
Cisco Reader Comment Card - документация - unix.org.ua
268
Cisco Reader Comment Card General Information 1 Years of networking experience: Years of experience with Cisco products: 2 I have these network types: LAN Backbone WAN Other: 3 I have these Cisco products: Switches Routers Other (specify models): 4 I perform these types of tasks: H/W installation and/or maintenance S/W configuration Network management Other: 5 I use these types of documentation: H/W installation H/W configuration S/W configuration Command reference Quick reference Release notes Online help Other: 6 I access this information through: Cisco.com (CCO) CD-ROM Printed docs Other: 7 I prefer this access method: 8 I use the following three product features the most: Document Information Document Title: Cisco Global Site Selector Configuration Guide Part Number: 78-14361-01 S/W Release (if applicable): 1.0 On a scale of 1–5 (5 being the best), please let us know how we rate in the following areas: Please comment on our lowest scores: Mailing Information Company Name Date Contact Name Job Title Mailing Address City State/Province ZIP/Postal Code Country Phone ( ) Extension Fax ( ) E-mail Can we contact you further concerning our documentation? Yes No You can also send us your comments by e-mail to [email protected], or by fax to 408-527-8089. The document is written at my technical level of understanding. The information is accurate. The document is complete. The information I wanted was easy to find. The information is well organized. The information I found was useful to my job. % % % %
-
Upload
khangminh22 -
Category
Documents
-
view
2 -
download
0
Transcript of Cisco Reader Comment Card - документация - unix.org.ua

Cisco Reader Comment CardGeneral Information
1 Years of networking experience: Years of experience with Cisco products:
2 I have these network types: LAN Backbone WANOther:
3 I have these Cisco products: Switches RoutersOther (specify models):
4 I perform these types of tasks: H/W installation and/or maintenance S/W configurationNetwork management Other:
5 I use these types of documentation: H/W installation H/W configuration S/W configurationCommand reference Quick reference Release notes Online helpOther:
6 I access this information through: Cisco.com (CCO) CD-ROMPrinted docs Other:
7 I prefer this access method:
8 I use the following three product features the most:
Document Information
Document Title: Cisco Global Site Selector Configuration Guide
Part Number: 78-14361-01 S/W Release (if applicable): 1.0
On a scale of 1–5 (5 being the best), please let us know how we rate in the following areas:
Please comment on our lowest scores:
Mailing Information
Company Name Date
Contact Name Job Title
Mailing Address
City State/Province ZIP/Postal Code
Country Phone ( ) Extension
Fax ( ) E-mail
Can we contact you further concerning our documentation? Yes No
You can also send us your comments by e-mail to [email protected], or by fax to 408-527-8089.
The document is written at mytechnical level of understanding.
The information is accurate.
The document is complete. The information I wanted was easy to find.The information is well organized. The information I found was useful to my job.
% %% %

BUSINESS REPLY MAILF I R S T - C L A S S M A I L P E R M I T N O . 4 6 3 1 S A N J O S E C A
POSTAGE WILL BE PAID BY ADDRESSEE
NO POSTAGENECESSARY
IF MAILEDIN THE
UNITED STATES
DOCUMENT RESOURCE CONNECTIONCISCO SYSTEMS INC170 WEST TASMAN DRSAN JOSE CA 95134-9916

Corporate HeadquartersCisco Systems, Inc.170 West Tasman DriveSan Jose, CA 95134-1706USAhttp://www.cisco.comTel: 408 526-4000
800 553-NETS (6387)Fax: 408 526-4100
Cisco Global Site Selector Configuration GuideRelease 1.0
Customer Order Number: DOC-7814361=Text Part Number: 78-14361-01

THE SPECIFICATIONS AND INFORMATION REGARDING THE PRODUCTS IN THIS MANUAL ARE SUBJECT TO CHANGE WITHOUT NOTICE. ALL STATEMENTS, INFORMATION, AND RECOMMENDATIONS IN THIS MANUAL ARE BELIEVED TO BE ACCURATE BUT ARE PRESENTED WITHOUT WARRANTY OF ANY KIND, EXPRESS OR IMPLIED. USERS MUST TAKE FULL RESPONSIBILITY FOR THEIR APPLICATION OF ANY PRODUCTS.
THE SOFTWARE LICENSE AND LIMITED WARRANTY FOR THE ACCOMPANYING PRODUCT ARE SET FORTH IN THE INFORMATION PACKET THAT SHIPPED WITH THE PRODUCT AND ARE INCORPORATED HEREIN BY THIS REFERENCE. IF YOU ARE UNABLE TO LOCATE THE SOFTWARE LICENSE OR LIMITED WARRANTY, CONTACT YOUR CISCO REPRESENTATIVE FOR A COPY.
The Cisco implementation of TCP header compression is an adaptation of a program developed by the University of California, Berkeley (UCB) as part of UCB’s public domain version of the UNIX operating system. All rights reserved. Copyright © 1981, Regents of the University of California.
NOTWITHSTANDING ANY OTHER WARRANTY HEREIN, ALL DOCUMENT FILES AND SOFTWARE OF THESE SUPPLIERS ARE PROVIDED “AS IS” WITH ALL FAULTS. CISCO AND THE ABOVE-NAMED SUPPLIERS DISCLAIM ALL WARRANTIES, EXPRESSED OR IMPLIED, INCLUDING, WITHOUT LIMITATION, THOSE OF MERCHANTABILITY, FITNESS FOR A PARTICULAR PURPOSE AND NONINFRINGEMENT OR ARISING FROM A COURSE OF DEALING, USAGE, OR TRADE PRACTICE.
IN NO EVENT SHALL CISCO OR ITS SUPPLIERS BE LIABLE FOR ANY INDIRECT, SPECIAL, CONSEQUENTIAL, OR INCIDENTAL DAMAGES, INCLUDING, WITHOUT LIMITATION, LOST PROFITS OR LOSS OR DAMAGE TO DATA ARISING OUT OF THE USE OR INABILITY TO USE THIS MANUAL, EVEN IF CISCO OR ITS SUPPLIERS HAVE BEEN ADVISED OF THE POSSIBILITY OF SUCH DAMAGES.
CCIP, the Cisco Arrow logo, the Cisco Powered Network mark, the Cisco Systems Verified logo, Cisco Unity, Follow Me Browsing, FormShare, iQ Breakthrough, iQ Expertise, iQ FastTrack, the iQ Logo, iQ Net Readiness Scorecard, Networking Academy, ScriptShare, SMARTnet, TransPath, and Voice LAN are trademarks of Cisco Systems, Inc.; Changing the Way We Work, Live, Play, and Learn, Discover All That’s Possible, The Fastest Way to Increase Your Internet Quotient, and iQuick Study are service marks of Cisco Systems, Inc.; and Aironet, ASIST, BPX, Catalyst, CCDA, CCDP, CCIE, CCNA, CCNP, Cisco, the Cisco Certified Internetwork Expert logo, Cisco IOS, the Cisco IOS logo, Cisco Press, Cisco Systems, Cisco Systems Capital, the Cisco Systems logo, Empowering the Internet Generation, Enterprise/Solver, EtherChannel, EtherSwitch, Fast Step, GigaStack, Internet Quotient, IOS, IP/TV, LightStream, MGX, MICA, the Networkers logo, Network Registrar, Packet, PIX, Post-Routing, Pre-Routing, RateMUX, Registrar, SlideCast, StrataView Plus, Stratm, SwitchProbe, TeleRouter, and VCO are registered trademarks of Cisco Systems, Inc. and/or its affiliates in the U.S. and certain other countries.
All other trademarks mentioned in this document or Web site are the property of their respective owners. The use of the word partner does not imply a partnership relationship between Cisco and any other company. (0208R)
Cisco Global Site Selector Configuration GuideCopyright © 2002, Cisco Systems, Inc.All rights reserved.
78-14361-01
C O N T E N T S
Preface xi
Document Objectives xi
Audience xii
Document Organization xii
Document Conventions xiii
Related Documentation xiv
Obtaining Documentation xiv
World Wide Web xv
Documentation CD-ROM xv
Ordering Documentation xv
Documentation Feedback xvi
Obtaining Technical Assistance xvi
Cisco.com xvi
Technical Assistance Center xvii
Cisco TAC Web Site xvii
Cisco TAC Escalation Center xviii
C H A P T E R 1 Introducing the Global Site Selector 1-1
GSS Overview 1-1
Key Features 1-2
Customer Profiles 1-3
Traditional DNS Routing 1-5
Determining Load and Availability When Routing 1-8
Server Load Balancing 1-8
Global Server Load Balancing 1-10
iiiCisco Global Site Selector Configuration Guide

Contents
Appliance-Based GSLB Using the GSS 1-12
Architecture 1-15
Global Site Selectors and Global Site Selector Managers 1-15
Primary GSSM 1-16
Standby GSSM 1-16
GSS 1-17
Hosted Domains 1-17
Domain Lists 1-18
Source Address and Source Address Lists 1-18
Answers and Answer Groups 1-19
VIP 1-19
Name Server 1-20
CRA 1-20
Keepalive Objects 1-21
ICMP 1-21
KAL-AP 1-21
HTTP-Head 1-22
CRA 1-22
Name Server 1-22
None 1-22
Balance Methods 1-23
Ordered List 1-23
Round-Robin 1-23
Weighted Round-Robin 1-24
Least Loaded 1-24
Source Address and Domain Hash 1-24
Boomerang 1-25
Balance Method Options 1-25
Regions and Locations 1-27
Owners 1-28
ivCisco Global Site Selector Configuration Guide
78-14361-01
Contents
Network Deployment 1-28
Overview 1-28
Locating GSS Devices 1-29
Locating GSS Devices Behind Firewalls 1-30
Communication Between Nodes 1-30
Redundancy 1-31
Deployment Within Data Centers 1-31
GSS Network Management 1-32
CLI-Based GSS Management 1-32
GUI-Based GSS Management 1-32
Understanding the GSSM GUI 1-33
List Windows 1-35
Details Windows 1-36
Navigation 1-37
C H A P T E R 2 Getting Started 2-1
Overview 2-1
Network Configuration 2-2
Configuring a GSSM 2-3
Starting the Cisco GSS Software and the GUI 2-5
Configuring a Global Site Selector 2-5
Enabling and Disabling SSH, Telnet, and FTP on a GSS Device 2-7
Logging On to the GSSM GUI 2-8
Global Server Load-Balancing Configuration 2-10
Overview 2-11
Preparing to Configure Request Routing 2-12
Organizing Your GSS Network 2-12
Creating and Modifying Locations and Regions 2-12
Creating and Modifying Owners 2-16
vCisco Global Site Selector Configuration Guide
78-14361-01
Contents
Grouping GSS Resources by Location, Region, and Owner 2-20
Creating and Modifying GSS Devices 2-21
Activating Your GSS Devices 2-21
Modifying GSS Device Configuration 2-23
Deleting GSS Devices 2-23
Creating and Modifying Source Address Lists 2-24
Creating Source Address Lists 2-24
Modifying Source Address Lists 2-27
Deleting Source Address Lists 2-28
Configuring and Modifying Domain Lists 2-28
Creating Domain Lists 2-29
Modifying Domain Lists 2-32
Deleting Domain Lists 2-33
Modifying Global Keepalive Properties 2-34
Configuring and Modifying Shared Keepalives 2-36
Creating a Shared Keepalive 2-37
Modifying a Shared Keepalive 2-38
Deleting a Shared Keepalive 2-39
Configuring and Modifying Answers 2-40
Creating a VIP Answer Type 2-40
Creating a CRA Answer Type 2-44
Creating a Name Server Answer Type 2-46
Modifying an Answer 2-47
Suspending or Reactivating an Answer 2-47
Suspending or Reactivating All Answers in a Location 2-48
Deleting an Answer 2-49
Configuring and Modifying Answer Groups 2-49
Creating an Answer Group 2-50
Modifying an Answer Group 2-53
Suspending or Reactivating an Answer Group 2-56
viCisco Global Site Selector Configuration Guide
78-14361-01
Contents
Suspending or Reactivating All Answers in an Answer Group Associated with an Owner 2-56
Deleting an Answer Group 2-57
Building and Modifying DNS Rules 2-58
DNS Rule Configuration Interface 2-58
Building DNS Rules Using the Wizard 2-61
Building DNS Rules Using the DNS Rule Builder 2-68
Suspending a DNS Rule 2-70
Suspending or Reactivating All DNS Rules Belonging to an Owner 2-71
Deleting a DNS Rule 2-72
Configuring DNS Rule Filters 2-72
Removing DNS Rule Filters 2-75
Upstream DNS Configuration 2-76
C H A P T E R 3 GSS Administration and Troubleshooting 3-1
Advanced Device Configuration 3-1
Changing the GSSM Role 3-2
Modifying Network Configuration 3-4
Changing the Startup and Running Configuration 3-5
Loading the Startup Configuration from an External File 3-6
GUI Configuration 3-7
Security Configuration 3-8
Creating and Managing GSSM Login Accounts 3-9
Creating a GSSM GUI User Account 3-9
Modifying a GSSM GUI User Account 3-11
Removing a GSSM GUI User Account 3-12
Changing Your GSSM GUI Password 3-12
Creating and Managing GSS Login Accounts 3-14
Creating a GSS User Account Using the CLI 3-14
Modifying a GSS User Account Using the CLI 3-15
viiCisco Global Site Selector Configuration Guide
78-14361-01
Contents
Deleting a GSS User Account Using the CLI 3-16
Resetting CLI Passwords 3-16
Segmenting GSS Traffic by Interface 3-18
Filtering GSS Traffic Using Access Lists 3-20
Creating an Access List 3-20
Associating an Access List with a GSS Interface 3-21
Disassociating an Access List from a GSS Interface 3-22
Adding Rules to an Access List 3-23
Removing Rules from an Access List 3-24
Viewing Access Lists 3-25
Deploying GSS Devices Behind Firewalls 3-25
Configuring SNMP on Your GSS Network 3-27
Enabling and Disabling SNMP 3-27
Viewing SNMP Status 3-28
Modifying the SNMP Port 3-29
Backing Up the GSSM 3-30
Determining When and What Type of Backup to Perform 3-31
When to Perform a Full Backup 3-31
When to Perform a Database Backup 3-31
Performing a Full GSSM Backup 3-31
Performing a GSSM Database Backup 3-32
Upgrading the Cisco GSS Software 3-33
Step 1—Determine the Current Software Version 3-34
Determining the Current Software Version from the CLI 3-34
Determining the Current Software Version from the GSSM GUI 3-35
Step 2—Backing Up the GSSM 3-35
Step 3—Obtaining the Software Upgrade 3-35
Step 4—Upgrading Your GSS Devices 3-37
Step 5—Verifying Your Upgrade 3-39
viiiCisco Global Site Selector Configuration Guide
78-14361-01
Contents
Downgrading and Restoring Your GSS Devices 3-40
Restoring an Earlier Software Version on Your GSS Devices 3-41
Restoring Your GSSM Database from a Backup 3-41
Restoring Your GSSM from a Full Backup 3-43
Viewing Third-Party Software Versions 3-45
GSS Error Messages 3-46
Answer Error Messages 3-47
Answer Group Error Messages 3-50
DNS Rule Error Messages 3-51
Domain List Error Messages 3-58
Shared Keepalive Error Messages 3-62
Keepalive Error Messages 3-64
Location Error Messages 3-66
Owner Error Messages 3-67
Region Error Messages 3-67
GSS Error Messages 3-68
Source Address List Error Messages 3-69
User Error Messages 3-71
C H A P T E R 4 Monitoring GSS Performance 4-1
Overview 4-1
Monitoring GSS Device Status 4-1
GSSs and GSSMs 4-2
Monitoring the Online Status of GSS Devices from the CLI 4-2
Monitoring the Status of Your GSS Network from the CLI 4-3
Monitoring GSS Device Status from the GUI 4-6
GSSM Database 4-6
Monitoring the Database Status 4-7
Validating Database Records 4-7
Creating a Database Validation Report 4-8
ixCisco Global Site Selector Configuration Guide
78-14361-01
Contents
Monitoring Global Load-Balancing Status 4-9
Answer Hit Counts 4-9
Answer Keepalive Statistics 4-11
Answer Status 4-13
DNS Rule Hit Count 4-14
Domain Hit Counts 4-16
Source Address Hit Counts 4-17
Global Statistics 4-19
Viewing Log Files 4-20
Understanding GSS Logging Levels 4-20
Viewing Device Logs from the CLI 4-22
Viewing the gss.log File from the CLI 4-22
Viewing Subsystem Log Files from the CLI 4-24
Viewing the System Log from the GUI 4-25
System Log Messages 4-27
Printing and Exporting GSSM Data 4-28
GL O S S A R Y
IN D E X
xCisco Global Site Selector Configuration Guide
78-14361-01
Preface
This preface discusses the objective, intended audience, and organization of the Cisco Global Site Selector Configuration Guide and defines the conventions used to convey instructions and information.
This preface contains the following sections:
• Document Objectives, page xi
• Audience, page xii
• Document Organization, page xii
• Document Conventions, page xiii
• Related Documentation, page xiv
• Obtaining Documentation, page xiv
• Obtaining Technical Assistance, page xvi
Document ObjectivesThis guide explains the basic features of the Cisco Global Site Selector (GSS) and provides instructions for the proper installation, configuration, and monitoring of the GSS product. Steps for troubleshooting many common problems are also provided.
xiCisco Global Site Selector Configuration Guide
78-14361-01
PrefaceAudience
AudienceTo use this configuration guide, you should be familiar with the Global Site Selector 4480 hardware. In addition, you should be familiar with basic TCP/IP and networking concepts, router configuration, Domain Name System (DNS), the Berkeley Internet Name Domain (BIND) software or similar DNS products, and your organization’s specific network configuration.
Document OrganizationThis guide includes the following chapters:
Chapter Title Description
Chapter 1 Introducing the Global Site Selector
Describes the basic concepts underlying the GSS product as well as important GSS-related terms.
Chapter 2 Getting Started Describes the process of configuring the Global Site Selector 4480 hardware to act as aGlobal Site Selector or Global Site Selector Manager device and then configuring request routing on your GSS network.
Chapter 3 GSS Administration and Troubleshooting
Provides step-by-step instructions on resolving common GSS-related problems.
Chapter 4 Monitoring GSS Performance
Describes techniques for monitoring the online status and performance of your GSS devices.
Glossary Glossary Defines key terms related to the GSS product.
xiiCisco Global Site Selector Configuration Guide
78-14361-01
PrefaceDocument Conventions
s
ts.
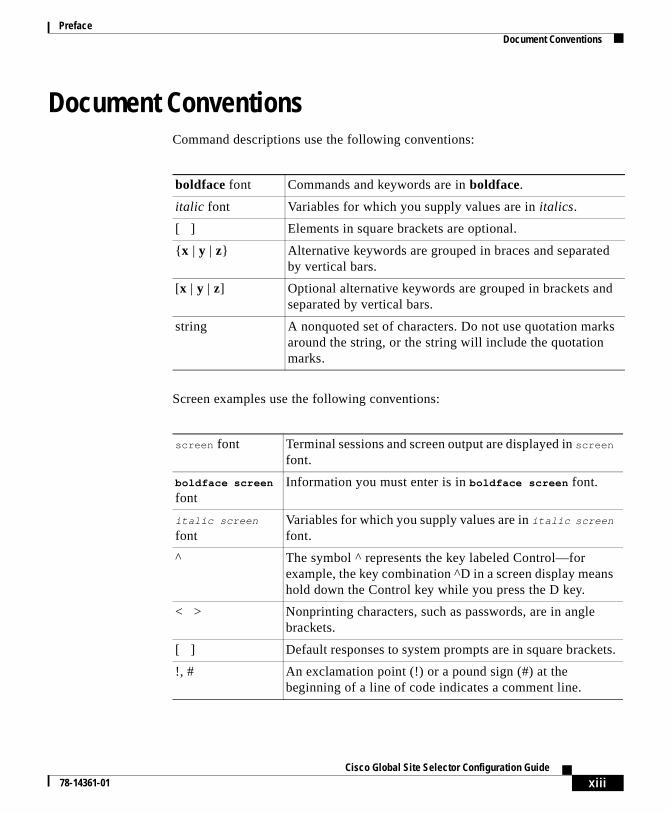
Document ConventionsCommand descriptions use the following conventions:
Screen examples use the following conventions:
boldface font Commands and keywords are in boldface.
italic font Variables for which you supply values are in italics.
[ ] Elements in square brackets are optional.
{x | y | z} Alternative keywords are grouped in braces and separated by vertical bars.
[x | y | z] Optional alternative keywords are grouped in brackets and separated by vertical bars.
string A nonquoted set of characters. Do not use quotation marks around the string, or the string will include the quotation marks.
screen font Terminal sessions and screen output are displayed in screen font.
boldface screen font
Information you must enter is in boldface screen font.
italic screen font
Variables for which you supply values are in italic screen font.
^ The symbol ^ represents the key labeled Control—for example, the key combination ^D in a screen display meanhold down the Control key while you press the D key.
< > Nonprinting characters, such as passwords, are in angle brackets.
[ ] Default responses to system prompts are in square bracke
!, # An exclamation point (!) or a pound sign (#) at the beginning of a line of code indicates a comment line.
xiiiCisco Global Site Selector Configuration Guide
78-14361-01
PrefaceRelated Documentation
Graphical user interface elements use the following conventions:
Notes and cautionary statements use these conventions:
Note Means reader take note. Notes contain helpful suggestions or references to materials not contained in this manual.
Caution Means reader be careful. You are capable of doing something that might result in equipment damage or loss of data.
Related DocumentationFor additional information, refer to the following documentation:
• Regulatory Compliance and Safety Information for the Cisco Content Networking Product Series
• Cisco Global Site Selector 4480 Hardware Installation Guide
• Cisco Global Site Selector Command Reference
• Release Notes for Cisco Global Site Selector Release 1.0
Obtaining DocumentationThese sections explain how to obtain documentation from Cisco Systems.
boldface font Button names are in boldface font.
italic font Directories and filenames are in italic font.
xivCisco Global Site Selector Configuration Guide
78-14361-01
PrefaceObtaining Documentation
World Wide WebYou can access the most current Cisco documentation on the World Wide Web at this URL:
http://www.cisco.com
Translated documentation is available at this URL:
http://www.cisco.com/public/countries_languages.shtml
Documentation CD-ROMCisco documentation and additional literature are available in a Cisco Documentation CD-ROM package, which is shipped with your product. The Documentation CD-ROM is updated monthly and may be more current than printed documentation. The CD-ROM package is available as a single unit or through an annual subscription.
Ordering DocumentationYou can order Cisco documentation in these ways:
• Registered Cisco.com users (Cisco direct customers) can order Cisco product documentation from the Networking Products MarketPlace:
http://www.cisco.com/cgi-bin/order/order_root.pl
• Registered Cisco.com users can order the Documentation CD-ROM through the online Subscription Store:
http://www.cisco.com/go/subscription
• Nonregistered Cisco.com users can order documentation through a local account representative by calling Cisco Systems Corporate Headquarters (California, U.S.A.) at 408 526-7208 or, elsewhere in North America, by calling 800 553-NETS (6387).
xvCisco Global Site Selector Configuration Guide
78-14361-01
PrefaceObtaining Technical Assistance
he
ips,
te
t
-use ese
Documentation FeedbackYou can submit comments electronically on Cisco.com. In the Cisco Documentation home page, click the Fax or Email option in the “Leave Feedback” section at the bottom of the page.
You can e-mail your comments to [email protected].
You can submit your comments by mail by using the response card behind tfront cover of your document or by writing to the following address:
Cisco SystemsAttn: Document Resource Connection170 West Tasman DriveSan Jose, CA 95134-9883
We appreciate your comments.
Obtaining Technical AssistanceCisco provides Cisco.com as a starting point for all technical assistance. Customers and partners can obtain online documentation, troubleshooting tand sample configurations from online tools by using the Cisco Technical Assistance Center (TAC) Web Site. Cisco.com registered users have compleaccess to the technical support resources on the Cisco TAC Web Site.
Cisco.comCisco.com is the foundation of a suite of interactive, networked services thaprovides immediate, open access to Cisco information, networking solutions, services, programs, and resources at any time, from anywhere in the world.
Cisco.com is a highly integrated Internet application and a powerful, easy-totool that provides a broad range of features and services to help you with thtasks:
• Streamline business processes and improve productivity
• Resolve technical issues with online support
• Download and test software packages
xviCisco Global Site Selector Configuration Guide
78-14361-01

PrefaceObtaining Technical Assistance
co
ue.
ct
lem
aving s, is
• Order Cisco learning materials and merchandise
• Register for online skill assessment, training, and certification programs
If you want to obtain customized information and service, you can self-register on Cisco.com. To access Cisco.com, go to this URL:
http://www.cisco.com
Technical Assistance CenterThe Cisco Technical Assistance Center (TAC) is available to all customers who need technical assistance with a Cisco product, technology, or solution. Two levels of support are available: the Cisco TAC Web Site and the Cisco TAC Escalation Center.
Cisco TAC inquiries are categorized according to the urgency of the issue:
• Priority level 4 (P4)—You need information or assistance concerning Cisproduct capabilities, product installation, or basic product configuration.
• Priority level 3 (P3)—Your network performance is degraded. Network functionality is noticeably impaired, but most business operations contin
• Priority level 2 (P2)—Your production network is severely degraded, affecting significant aspects of business operations. No workaround is available.
• Priority level 1 (P1)—Your production network is down, and a critical impato business operations will occur if service is not restored quickly. No workaround is available.
The Cisco TAC resource that you choose is based on the priority of the proband the conditions of service contracts, when applicable.
Cisco TAC Web Site
You can use the Cisco TAC Web Site to resolve P3 and P4 issues yourself, sboth cost and time. The site provides around-the-clock access to online toolknowledge bases, and software. To access the Cisco TAC Web Site, go to thURL:
http://www.cisco.com/tac
xviiCisco Global Site Selector Configuration Guide
78-14361-01
PrefaceObtaining Technical Assistance
All customers, partners, and resellers who have a valid Cisco service contract have complete access to the technical support resources on the Cisco TAC Web Site. The Cisco TAC Web Site requires a Cisco.com login ID and password. If you have a valid service contract but do not have a login ID or password, go to this URL to register:
http://www.cisco.com/register/
If you are a Cisco.com registered user, and you cannot resolve your technical issues by using the Cisco TAC Web Site, you can open a case online by using the TAC Case Open tool at this URL:
http://www.cisco.com/tac/caseopen
If you have Internet access, we recommend that you open P3 and P4 cases through the Cisco TAC Web Site.
Cisco TAC Escalation Center
The Cisco TAC Escalation Center addresses priority level 1 or priority level 2 issues. These classifications are assigned when severe network degradation significantly impacts business operations. When you contact the TAC Escalation Center with a P1 or P2 problem, a Cisco TAC engineer automatically opens a case.
To obtain a directory of toll-free Cisco TAC telephone numbers for your country, go to this URL:
http://www.cisco.com/warp/public/687/Directory/DirTAC.shtml
Before calling, please check with your network operations center to determine the level of Cisco support services to which your company is entitled: for example, SMARTnet, SMARTnet Onsite, or Network Supported Accounts (NSA). When you call the center, please have available your service agreement number and your product serial number.
xviiiCisco Global Site Selector Configuration Guide
78-14361-01
Cisco Gl78-14361-01
C H A P T E R 1
e can tent
Introducing the Global Site Selector
This chapter describes the Cisco Global Site Selector (GSS) and introduces the user to the terms and concepts necessary to properly understand and operate the GSS product.
This chapter contains the following sections:
• GSS Overview, page 1-1
• Architecture, page 1-15
• Network Deployment, page 1-28
• GSS Network Management, page 1-32
GSS Overview With the growth of the Internet and of Internet-based commerce, there is an increasing demand for high-end networking solutions that can handle sophisticated customer transactions and high traffic loads. Improved content routing is the core technology behind such networking solutions.
Based on a set of metrics such as network topology, server load, delay time, or established request routing “rules,” global load-balancing devices such as thCisco Content Services Switch (CSS) and Content Switching Module (CSM) balance content requests among two or more hosts containing the same conthat are connected to a corporate LAN or the Internet. SLBs ensure that thecontent consumer is directed to the host that is best suited to handle that consumer’s request.
1-1obal Site Selector Configuration Guide
Chapter 1 Introducing the Global Site SelectorGSS Overview
.
ct
ng
h e
g that ta
l of e it S
ests
SS rt
rate
Increasingly, organizations with a global reach or businesses that provide web and application hosting services require network devices that can perform such complex request routing to two or more redundant, geographically dispersed data centers, improving response times while also providing disaster recovery and failover protection through so-called “global server load balancing,” or GSLB
The Cisco Global Site Selector (GSS) is a next-generation networking produthat provides these services, allowing customers to leverage global content deployment across multiple distributed and mirrored data locations, optimizisite selection, improving Domain Name system (DNS) responsiveness, and ensuring data center availability.
Inserted into the traditional DNS routing hierarchy and closely integrated wityour Cisco or third-party server load balancers (SLBs), the GSS monitors thhealth and load of the SLBs in each of your data centers and then uses thatinformation along with customer-controlled routing algorithms to select the best-suited and least-loaded data center in real time.
Just as important, the GSS is capable of detecting site outages, thus ensurinweb-based applications are always on line and that customer requests to dacenters that suddenly go off line are quickly rerouted to available resources.
Finally, the GSS off-loads tasks from traditional DNS servers by taking controthe domain resolution process for parts of your domain name space. Becauscan transmit requests at a rate of thousands of requests per second, the GSgreatly improves DNS responsiveness to those subdomains.
Key FeaturesThe GSS offers the following key capabilities:
• Disaster recovery—The GSS can detect and instantaneously route requaround site outages.
• Improved site performance—In multiple data center deployments, the Gspeeds up the selection process through the application of state-of-the-aload-balancing algorithms that take the load and health of Cisco and third-party SLBs into account when routing requests.
• Scalability—The GSS is capable of scaling to support hundreds of sepadata centers and SLBs, while working seamlessly with a heterogeneousmixture of SLBs, including Cisco and third-party devices.
1-2Cisco Global Site Selector Configuration Guide
78-14361-01
Chapter 1 Introducing the Global Site SelectorGSS Overview
, NS
er ors
ork.
ster
that
ices om
ough ents and ore aster.
g o o equest ning
• Improved DNS performance—Inserted into the traditional DNS hierarchythe GSS off-loads traffic from DNS servers, becoming the authoritative Dserver for some (or all) of your domain name space.
• Centralized domain management—Through an easy-to-use graphical usinterface (GUI) on the Global Site Selector Manager (GSSM), administratcan manage quickly configure their GSS network as well as monitor the health and performance of request routing across their entire GSS netw
Customer ProfilesBecause of its critical role in providing global server load balancing and disarecovery capabilities for distributed data center deployments, the GSS is appropriate for organizations with a variety of network configurations and business needs. The following sections describe the types of organizations benefit the most from the deployment of a GSS.
Enterprise Customers with Externally Facing Websites and Web Applications
Enterprises that are deploying e-commerce solutions or other premium servusing the public Internet are among the organizations most likely to benefit frthe deployment of two or more GSSs.
Increasingly for such customers, data redundancy and disaster recovery thrthe deployment of multiple, mirrored data centers have become vital componin the continued success of their business; such websites must stay on line continue to serve customer requests even in the unlikely event that one or mentire data centers suddenly go off line because of a natural or man-made dis
For such customers, the GSS offers a robust and flexible request routing infrastructure. Up to eight GSSs can be deployed on a network, each workinindependently to process requests. Using load and device health statistics tmonitor the performance of SLBs under its control, the GSS is quickly able tselect the best data center from among many such centers on a request-by-rbasis. This way, the loss of any GSS on the network does not affect the functioof the other devices.
Enterprises with Internally Facing Websites and Web Applications
Increasingly, enterprises with a global reach are turning to the web to deploymission-critical and business-critical internal applications. From human resources to sales to support, business applications that were traditionally
1-3Cisco Global Site Selector Configuration Guide
78-14361-01
Chapter 1 Introducing the Global Site SelectorGSS Overview
managed within isolated departments are being moved to websites on corporate intranets, thus making them accessible to offices worldwide, as well as to employees connecting from remote locations.
Employee access to such sites is imperative for the smooth functioning of the organization. Site performance and optimization as well as disaster recovery are critical. However, the job of monitoring and maintaining one or more such internal sites across two or more data centers can put a strain on internal information technology (IT) resources.
With an easy-to-use GUI, the GSSM provides a convenient solution to such problems. The GSSM interface makes centralized management of all GSS network resources easy, enabling administrators to assess the health of their GSS devices, create request routing rules that respond to request traffic from within the organization, and ensure that employee access to business-critical data and applications is not hindered.
Application Service Providers Offering Hosting and Colocation Services
Application service providers (ASPs) manage and distribute software-based services and solutions from centralized data centers on behalf of their subscribers.
Purchasing and maintaining their own network and application infrastructure, ASPs enable their subscribers to outsource their information technology needs such as web-based application management or corporate website hosting.
For such organizations, the GSS offers scalability and simplified network management in addition to disaster recovery and site optimization.
An easy-to-understand command-line interface (CLI) provides fast and efficient control of network connectivity, device configuration, and access control. An intuitive GUI is used to configure request routing rules and manage request routing activity across all GSS devices on the network.
And with its support of more than 250 separate SLBs and over 4000 separate VIPs, the GSS makes it easy for ASPs to scale their operations, adding capacity to suit customer needs.
1-4Cisco Global Site Selector Configuration Guide
78-14361-01
Chapter 1 Introducing the Global Site SelectorGSS Overview
Traditional DNS RoutingBefore you can begin using the GSS product, you must first understand content routing as it currently exists, including DNS and how the introduction of GSS devices on your network will affect content routing and delivery to your customers.
This section explains some of the key concepts behind the GSS product.
Since the early 1980s, content routing on the Internet has been handled using the Domain Name System (DNS), a distributed database of host information that maps domain names to IP addresses. A radical departure from the largely manual system of maintaining lists of domain names that preceded it, DNS vastly improved the ability of those responsible for maintaining the Internet to manage network traffic and load, as well as maintain a consistent and unique list of valid Internet hosts.
Almost all transactions that occur across the Internet rely on DNS, including electronic mail, remote terminal access such as Telnet, file transfers using FTP, and web surfing. DNS makes possible the use of easy-to-remember alphanumeric host names instead of numeric IP addresses that bear no relationship to the content on the host.
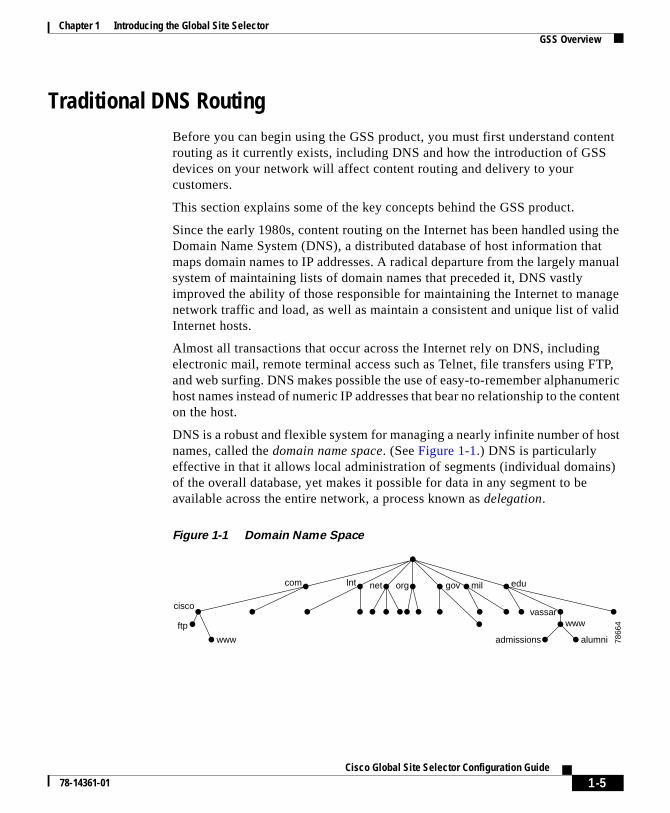
DNS is a robust and flexible system for managing a nearly infinite number of host names, called the domain name space. (See Figure 1-1.) DNS is particularly effective in that it allows local administration of segments (individual domains) of the overall database, yet makes it possible for data in any segment to be available across the entire network, a process known as delegation.
Figure 1-1 Domain Name Space
com
cisco
ftp
vassar
admissions alumni
www
www
lnt net org gov mil edu
7866
4
1-5Cisco Global Site Selector Configuration Guide
78-14361-01
Chapter 1 Introducing the Global Site SelectorGSS Overview
Name Servers
Information about the domain name space is stored on name servers that are distributed throughout the Internet, each server storing the complete information about its small part of the total domain name space, called a zone. End users requiring data from a particular domain or machine generate a recursive DNS request on their client that is sent first to the local name server (NS), sometimes called the D-proxy. The job of the D-proxy is to return the IP address of the requested domain to the end user.
Request Resolution
If the D-proxy does not have the information requested by the end user, it sends out iterative requests to the name servers that it knows are authoritative for domains close to the requested domain.
For example, a request for tac.support.cisco.com (see Figure 1-2) causes the D-proxy to check first for another name server that is authoritative for tac.support.cisco.com. If it fails to find that, it checks for name servers farther up the tree: support.cisco.com, then the cisco.com domain, the name server responsible for the com top-level domain, and finally the root server (’’’’ in Figure 1-2), the address of which every name server is required to have.
1-6Cisco Global Site Selector Configuration Guide
78-14361-01
Chapter 1 Introducing the Global Site SelectorGSS Overview
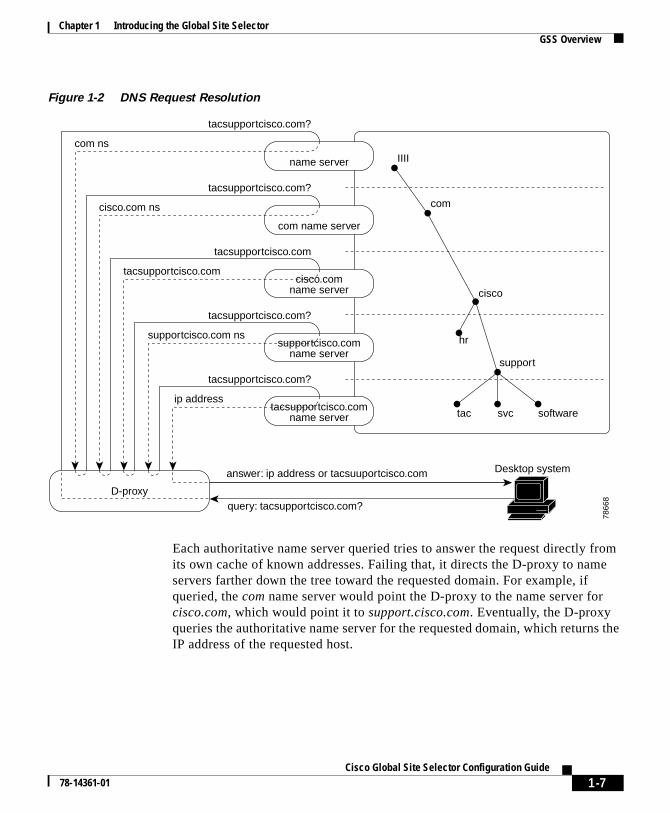
Figure 1-2 DNS Request Resolution
Each authoritative name server queried tries to answer the request directly from its own cache of known addresses. Failing that, it directs the D-proxy to name servers farther down the tree toward the requested domain. For example, if queried, the com name server would point the D-proxy to the name server for cisco.com, which would point it to support.cisco.com. Eventually, the D-proxy queries the authoritative name server for the requested domain, which returns the IP address of the requested host.
answer: ip address or tacsuuportcisco.com
query: tacsupportcisco.com?
tacsupportcisco.com?
com ns
tacsupportcisco.com?
cisco.com ns
tacsupportcisco.com
tacsupportcisco.com
tacsupportcisco.com?
supportcisco.com ns
IIII
com
cisco
support
hr
softwaresvctac
tacsupportcisco.com?
ip address
D-proxy
name server
com name server
cisco.comname server
supportcisco.comname server
tacsupportcisco.comname server
Desktop system
7866
8
1-7Cisco Global Site Selector Configuration Guide
78-14361-01

Chapter 1 Introducing the Global Site SelectorGSS Overview
ible
s of ret ices s this
based
Determining Load and Availability When RoutingAlthough traditional DNS provides an efficient and scalable system for users to be matched with the address of servers that contain the data they seek, the end user may not always be directed to the best site. For example, traditional DNS has no way of knowing whether the host whose address it receives is on line, in which case the data returned may be an error message stating that the server is down or “page not found.”
Also, if the requested content is mirrored on multiple servers with different addresses, DNS provides no way of determining which server out of all posschoices is the “best match” for the end user to serve that content.
Server Load Balancing
Because of the DNS limitations in routing decisions, more sophisticated kindcontent routing hardware and software have been developed that can interpinformation on load, availability, and even requested content type. These dev(often referred to as server load balancers, or SLBs) are designed to procesmore specific Layer 4 (L4) and Layer 7 (L7) information from both hosts andrequesting clients. SLBs can be deployed either singly or in concert with oneanother, and they help to connect clients to the best possible content server on such factors as:
• Network topology
• Server load
• Content availability
Examples of such devices include the Cisco Content Services Switch (CSS) and Cisco Content Switching Module (CSM). Figure 1-3 shows how server load balancing is accomplished using the Content Services Module.
1-8Cisco Global Site Selector Configuration Guide
78-14361-01
Chapter 1 Introducing the Global Site SelectorGSS Overview
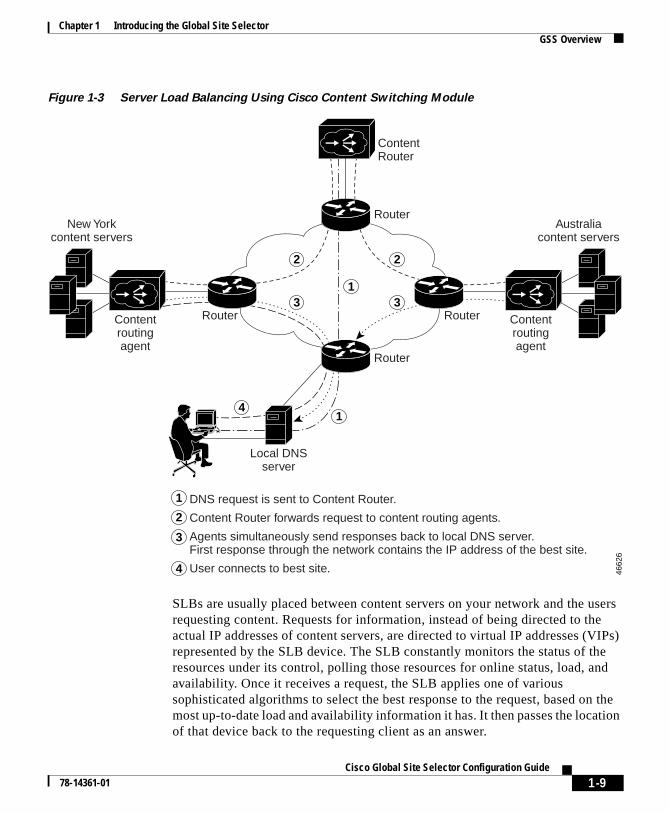
Figure 1-3 Server Load Balancing Using Cisco Content Switching Module
SLBs are usually placed between content servers on your network and the users requesting content. Requests for information, instead of being directed to the actual IP addresses of content servers, are directed to virtual IP addresses (VIPs) represented by the SLB device. The SLB constantly monitors the status of the resources under its control, polling those resources for online status, load, and availability. Once it receives a request, the SLB applies one of various sophisticated algorithms to select the best response to the request, based on the most up-to-date load and availability information it has. It then passes the location of that device back to the requesting client as an answer.
4662
6
New Yorkcontent servers
Router
Router
RouterRouter
Local DNSserver
Australiacontent servers
ContentRouter
Contentroutingagent
Contentroutingagent
2
1
13
4
2
3
1
2
3
4
DNS request is sent to Content Router.
Content Router forwards request to content routing agents.
Agents simultaneously send responses back to local DNS server.First response through the network contains the IP address of the best site.
User connects to best site.
1-9Cisco Global Site Selector Configuration Guide
78-14361-01
Chapter 1 Introducing the Global Site SelectorGSS Overview
nt’s LBs As). ntical first
the
he nt,
nce e or form o as
vices
he LB s
ing more g an
sts.
For example in Figure 1-3, a user request for content is directed to a Cisco Content Router 4430-B (Content Router). That device then redirects the clierequest to two redundant content sites that are both represented by Cisco S(for example, Content Service Switches) acting as content routing agents (CRUsing a resolution process called the DNS race, these devices then send ideand simultaneous requests back to the user’s D-proxy, which responds to therequest that reaches it through the network.
For details on the Cisco Content Router software and the DNS race, refer toCisco Content Routing Software Configuration Guide and Command Reference.
Global Server Load Balancing
Content Services Switches and Content Switching Modules greatly expand tability of an organization to serve user requests for content in a quick, efficieand reliable manner. What happens, however, when SLB devices must balarequests not just between a set number of host servers, but also between onmore geographically dispersed and redundant content sites? The effort to perserver load balancing between multiple, dispersed hosting sites is referred tglobal server load balancing, or GSLB.
GSLB offers some key advantages to large organizations or web hosting serthat need to manage content requests across a global network, including:
• Redundancy—Using real-time load and availability statistics, SLBs like tContent Services Switch and Content Switching Module deployed in a GSsetting can quickly shift traffic to standby devices should first-line devicesuddenly go off line or be overwhelmed with traffic.
• Load optimization—Using a variety of load-balancing methods, SLBs actas part of a GSLB solution can pass on requests to host servers in one orredundant host sites under their control so that all host servers are carryinappropriate request load and no one host is underused in serving reque
1-10Cisco Global Site Selector Configuration Guide
78-14361-01
Chapter 1 Introducing the Global Site SelectorGSS Overview
static y
en able
t
r
S
,
tent ation. ere
NS bility
B is ity e best t into
• Fast response time—Using balancing features such as the DNS race andproximity, SLBs in a GSLB solution can improve network performance bensuring that the host responding to a request is the one closest to the requesting client.
• Scalability—By quickly integrating new virtual IP addresses (VIPs) or eventire redundant data centers into the routing scheme, SLBs in a GSLB enyou to scale your entire Content Delivery Network (CDN) quickly to meeincreased demand.
GSLB Using the Content Services Switch
On its own, the Cisco Content Services Switch offers a number of options foconfiguring GSLB.
Content Rule-Based GSLB
In versions of the Content Services Switch earlier than Version 5.0, GSLB issupported through what is referred to as a rule-based method. Using this configuration, one or more Content Services Switches are configured as DNservers using the dns-server CLI command, forming a highly available, distributed, and load-sensitive website.
When groups of Content Services Switches are configured together for DNSthese devices form a content domain within which Content Services Switches—known as peers—can exchange content rules, load-balancing information, and data on service availability.
Each Content Services Switch becomes aware of all the locations for the conassociated with a domain name and the operational state and load of the locThe Content Services Switch can then intelligently direct clients to a site whthey can best obtain the desired content.
Access lists can be used on the Content Services Switch to filter incoming Drequests, and Content Services Switch content rules are applied to incomingrequests to match requests with the best available VIP based on server availaand load.
Zone-Based GSLB
Beginning with Version 5.0 of the Content Services Switch, zone-based GSLsupported in addition to content rule-based GSLB. As part of the new proximfeatures in the Cisco CSS 11000 Series Switch, zone-based GSLB ensures thsite and server selection for all content requests by dividing users and conten
1-11Cisco Global Site Selector Configuration Guide
78-14361-01
Chapter 1 Introducing the Global Site SelectorGSS Overview
Both
red ches
, obal S is The rver
e to t
in
ys the
zones and determining an optimum content zone based on a user’s location.the dns-server zone and dns-record CLI commands are used to configure the Content Services Switch to use zone-based GSLB, with internal keepalives (KALs) used to track the status of local VIPs, and external keepalives configuto monitor the status of VIPs associated with external Content Services Switor Content Switching Modules.
Appliance-Based GSLB Using the GSS
The GSS is designed to coordinate the efforts of Content Services SwitchesContent Switching Modules, and other geographically dispersed SLBs in a glnetwork deployment. Running on a Cisco Global Site Selector 4480, the GScapable of supporting up to 256 unique SLBs and over 4000 separate VIPs.GSS coordinates the activities of SLBs by acting as the authoritative DNS sefor those devices (SLBs as well as caches) under its control.
As the authoritative name server for a domain or subdomain, the GSS is ablconsider additional information about the resources under its control when ireceives requests from name servers farther upstream.
Among the additional factors that the GSS is capable of considering when responding to a request are:
• Availability—Which servers are on line and available to respond to the query?
• Proximity—Which server responded the fastest to a query?
• Load—What type of traffic load is each server handling in the domain?
• Source of the request—From which D-proxy did the content request originate?
• Preference—What is the first, second, or third choice of algorithm to useresponding to a query?
This type of load balancing helps to ensure not only that end users are alwadirected to resources that are online, but also that requests are forwarded tomost suitable device, resulting in reduced response time for users.
1-12Cisco Global Site Selector Configuration Guide
78-14361-01
Chapter 1 Introducing the Global Site SelectorGSS Overview
Request Resolution Using the GSS
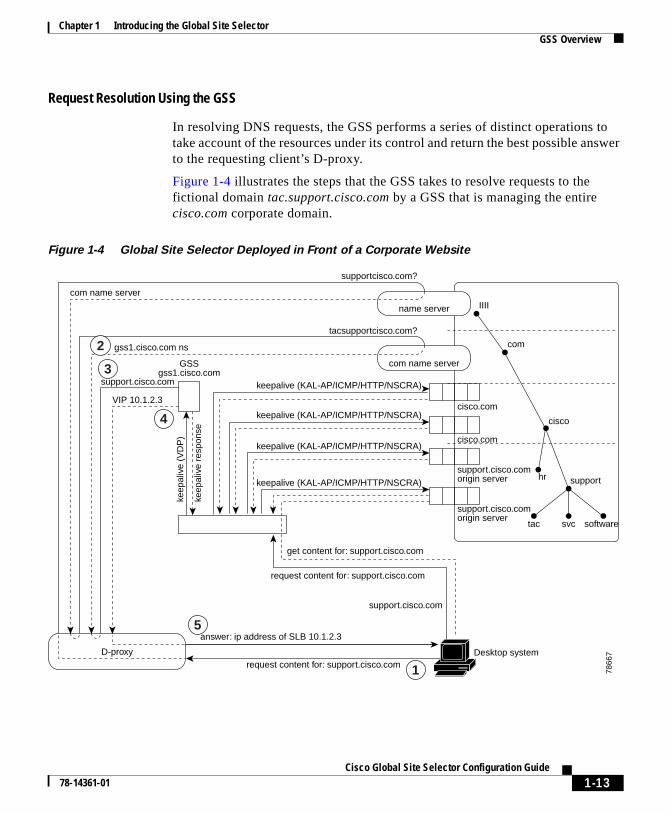
In resolving DNS requests, the GSS performs a series of distinct operations to take account of the resources under its control and return the best possible answer to the requesting client’s D-proxy.
Figure 1-4 illustrates the steps that the GSS takes to resolve requests to the fictional domain tac.support.cisco.com by a GSS that is managing the entire cisco.com corporate domain.
Figure 1-4 Global Site Selector Deployed in Front of a Corporate Website
answer: ip address of SLB 10.1.2.3
get content for: support.cisco.com
request content for: support.cisco.com
support.cisco.com
request content for: support.cisco.com
supportcisco.com?
com name server
tacsupportcisco.com?
gss1.cisco.com ns
support.cisco.com
keep
aliv
e (V
DP
)
keep
aliv
e re
spon
se
GSSgss1.cisco.com
VIP 10.1.2.3
IIII
com
cisco
supporthr
softwaresvctac
D-proxy
keepalive (KAL-AP/ICMP/HTTP/NSCRA)
keepalive (KAL-AP/ICMP/HTTP/NSCRA)
keepalive (KAL-AP/ICMP/HTTP/NSCRA)
keepalive (KAL-AP/ICMP/HTTP/NSCRA)
cisco.com
name server
com name server
Desktop system
7866
7
cisco.com
support.cisco.comorigin server
support.cisco.comorigin server
1
5
4
3
2
1-13Cisco Global Site Selector Configuration Guide
78-14361-01

Chapter 1 Introducing the Global Site SelectorGSS Overview
nect
r,
SM trol.
ating the s
The GSS takes the following steps to return the IP address of the requested content site:
1. The requesting web client sends a query for tac.support.cisco.com to its local D-proxy.
2. The local D-proxy sends a query to the root name server (’’’’ in Figure 1-4), which refers the D-proxy to the com name server.
3. The local D-proxy sends a query to the com name server, which refers the D-proxy to the GSS that is acting as the cisco name server.
4. The local D-proxy sends a query to the GSS name server, which determines which local SLB (in this case a Content Services Switch or a Content Switching Module) is the best one (based on availability and load) to fulfill the request for tac.support.cisco.com. The GSS name server sends the IP address of that SLB back to the local D-proxy.
5. The GSS returns the VIP address of the SLB to the requesting client’s D-proxy.
6. The client’s D-proxy returns that IP address back to the client.
7. The client’s browser uses the IP address provided by the D-proxy to conto the SLB.
8. The SLB locally load balances the request to the best-suited origin servewhich responds to the client request.
DNS Rule
The GSS uses DNS rules, as configured by the administrator through the GSGUI, to balance incoming DNS requests among the resources under its con
DNS rules determine how the GSS responds to each query it receives by creprotocols for matching requests received from a known source, or D-proxy, tomost suitable member of a collection of name servers or virtual IP addresse(VIPs).
Each DNS rule takes into account four variables:
• The source IP address of the requesting D-proxy.
• The requested hosted domain.
1-14Cisco Global Site Selector Configuration Guide
78-14361-01

Chapter 1 Introducing the Global Site SelectorArchitecture
ith
ring
uest nswer
key ur
• An answer group—A group of resources considered for the response, together with balance methods, makes up a clause (described in the paragraphs that follow).
• A balance method—An algorithm for selecting the best server, together wan answer group, makes up a clause.
In short, a DNS rule defines how a request is handled by the GSS by answethe following question:
When traffic arrives from a DNS proxy, querying a specific domain name, what resources should be considered for the response, and how should they be balanced?
In addition, for each DNS rule, up to three possible response “clauses” are possible. Each clause specifies that a particular answer group serve the reqand a specific balance method be used to select the best resource from that agroup. These clauses are evaluated in order, with parameters established todetermine when one clause should be skipped and the next answer used.
The sections that follow explain the architecture of the GSS product as well asGSS concepts that you need to understand before deploying the GSS on yonetwork.
ArchitectureThe following sections describe the key components of a GSS deployment, including hardware and software, as well as GSS networking concepts.
Global Site Selectors and Global Site Selector ManagersThe Global Site Selector solution relies on three distinct but closely related devices:
• Primary GSSM
• Standby GSSM
• GSS
1-15Cisco Global Site Selector Configuration Guide
78-14361-01
Chapter 1 Introducing the Global Site SelectorArchitecture
Primary GSSM
The primary GSSM is a Cisco Global Site Selector 4480 running Cisco GSS software and performing content routing as well as centralized management functions for the GSS network.
The primary GSSM serves as the organizing point of the GSS network, hosting the embedded GSS PostgreSQL database that contains configuration information for all your GSS resources, such as individual GSSs, and DNS rules. Other GSS devices report their status to the primary GSSM. Configuration changes initiated on the primary GSSM using the GSSM GUI are communicated to the devices that the GSSM manages.
Any GSS device can serve as a GSSM, and any GSS device can act as both a GSS and a GSSM simultaneously.
In addition to content routing configuration, a subset of device-monitoring and logging features is accessible from the GSSM GUI, though more extensive inquiries may require access to the GSS CLI for an individual device.
Communication between administrators and the GSSM GUI uses HTTPS, and access to the GSSM GUI is password-protected.
Standby GSSM
The standby GSSM is a Cisco Global Site Selector 4480 running Cisco GSS software and performing GSLB functions for the GSS network. In addition, the standby GSSM is configured to act as the GSSM should the primary GSSM suddenly go off line or become unavailable to communicate with other GSS devices.
As with the primary GSSM, the standby GSSM is configured to run the GSSM GUI and contains a duplicate copy of the embedded PostgreSQL GSS database that is currently installed on the primary GSSM. Any configuration or network changes affecting the GSS network are synchronized between the primary and the standby GSSM so that the two devices are never out of step.
Before it is enabled as the primary GSSM, the GSSM GUI is inaccessible on the standby GSSM.
1-16Cisco Global Site Selector Configuration Guide
78-14361-01

Chapter 1 Introducing the Global Site SelectorArchitecture
The standby GSSM can be quickly enabled as the primary GSSM using the gss CLI command, though you must make sure that your previous primary GSSM is off line before attempting to enable your standby as the new primary GSSM. Having two primary GSSMs active at the same time may result in the inadvertent loss of configuration changes for your GSS network.
GSS
The GSS is a Cisco Global Site Selector 4480 running Cisco GSS software and performing routing of DNS queries based on DNS rules and conditions configured using the GSSM.
Each GSS is known to and synchronized with the GSSM, but individual GSSs do not report their presence or status to one another.
Each GSS on your network must be configured on your upstream DNS server and can be managed separately using the Cisco CLI.
A device that is acting as a GSS may also be serving as the GSSM for a GSS network.
Hosted Domains
A hosted domain (HD) is any domain or subdomain that has been delegated to the GSS and configured (using the GSSM GUI) for DNS query responses.
All DNS queries must match a domain belonging to a configured domain list, or else they are denied by the GSS. Queries that do not match domains on any GSS domain lists can also be forwarded by the GSS to an external DNS name server for resolution.
Hosted domains may or may not correspond to standard third-level domain names but cannot exceed 128 characters in length. Domain names that use wildcards are supported by the GSS.
The following might be domain names configured on the GSS:
cisco.comwww.cisco.comwww.support.cisco.com.*\.cisco\.com
See the “Configuring and Modifying Domain Lists” section on page 2-28 for more information on configuring domains.
1-17Cisco Global Site Selector Configuration Guide
78-14361-01

Chapter 1 Introducing the Global Site SelectorArchitecture
S. enting
the
ich a
rder ate
rce
Domain ListsDomain lists are groupings of domains that have been delegated to the GSS. A domain list can contain between 1 and 1024 individual domains.
Using the DNS rules feature of the GSSM GUI, requests for any member of a domain list are matched to an answer—a resource hosting the content being requested—using one of a number of balance methods.
See the “Configuring and Modifying Domain Lists” section on page 2-28 for more information on configuring domain lists.
Source Address and Source Address ListsThe term source address refers to the source of DNS queries received by the GSSource addresses might point to an IP address or block of addresses represclient D-proxies from which queries will originate.
Using DNS rules, the GSS matches source addresses to domains hosted byGSS using one of a number of different balance methods.
Source addresses are taken from the D-proxy (the local name server) to whrequesting client issued a recursive request. The D-proxy iterates the client queries to multiple devices, eventually querying the GSS, which matches theD-proxy address against its list of configured source addresses.
DNS queries received by the GSS do not have to match a specific D-proxy in oto be routed; default routing can be performed on requests that do not emanfrom a known source address. A failsafe “Anywhere” source address list is provided by default. Incoming queries that do not match your configured souaddress lists are matched to this list.
In addition to specific IP addresses, source addresses can also be set up torepresent address blocks using variable-prefix-length classless interdomain routing (CIDR) block masking. For example, the following would all be acceptable GSS source addresses:
192.168.1.110192.168.1.110/32192.168.1.0/24192.168.0.0/16
1-18Cisco Global Site Selector Configuration Guide
78-14361-01
Chapter 1 Introducing the Global Site SelectorArchitecture
r
SSM
ods,
IP e h. A based
vices ore
Source addresses are grouped into lists, referred to as source address lists, for the purposes of routing requests. Source address lists can contain between 1 and 30 source addresses, or unique address blocks.
Answers and Answer GroupsIn a GSS network, the term answers refers to resources to which the GSS resolves DNS requests that it receives.
The three types of possible answers on a GSS network are:
• Virtual IPs (VIPs)—IP addresses associated with an SLB like the Cisco Content Services Switch, Content Switching Module, or other Cisco IOSsoftware-compliant SLB
• Name server—Configured DNS name server on your network to which queries that the GSS cannot resolve are forwarded
• CRA—Content routing agents associated with the GSS DNS race serve
As with domains and source addresses, answers are configured using the GGUI by identifying the IP address to which queries can be directed.
Once created, answers are grouped together as resource pools called answer groups, from which the GSS, using one of a number of available balance methcan choose the most appropriate resource to serve each user request.
Depending on the type of answer, further intelligence can be applied to DNSqueries to choose the best host. For example, a request that is routed to a Vassociated with a Content Services Switch will be routed to the best resourcbased on load and availability, as determined by the Content Services Switcrequest that is routed to a content routing agent is routed to the best resourceon proximity, as determined in a DNS race conducted by the GSS.
The following sections describe the various GSS answer types.
VIP
Virtual IP addresses (VIPs) are used by SLBs such as the Cisco Content SerSwitch and Content Switching Module to represent content hosted on one or mservers under their control. The use of VIPs allows for traffic to be balanced
1-19Cisco Global Site Selector Configuration Guide
78-14361-01
Chapter 1 Introducing the Global Site SelectorArchitecture
er that
he
ver to
rnal SS
erver uests
uests
se a ible
e is gents ously delay
ite.
among multiple origin servers, application servers, or transaction servers in a way that results in faster response times for users and less network congestion for the host.
When queried by a client’s D-proxy for a domain associated with a VIP answtype, the GSS responds with the VIP address of the SLB best suited to handlerequest. The requesting client then contacts the SLB, which load balances trequest to the server best suited to respond.
Name Server
A name server (NS) answer type specifies the IP address of a DNS name serwhich DNS queries will be forwarded from the GSS.
Using the name server forwarding feature, queries are forwarded to an exte(non-GSS) name server for resolution, with the answer passed back to the Gname server and from there to the requesting D-proxy. As such, the name sanswer type can act as a guaranteed fallback resource—a way to resolve reqthat the GSS cannot resolve itself—either because the requested content isunknown to the GSS, or because the resources that typically handle such reqare unavailable.
CRA
The CRA answer type relies on content routing agents and the GSS to choosuitable answer for a given query based on the proximity of two or more posshosts to the requesting D-proxy.
With the CRA answer type, requests received from a particular D-proxy are served by the content server that responds first to the request. Response timmeasured using a DNS race, coordinated by the GSS and content routing arunning on each content server. In the race, multiple hosts respond simultaneto a request. The server with the fastest response time (the shortest network between itself and the client’s D-proxy) is chosen to serve the content.
The boomerang balance method uses the DNS race to determine the best sSee the “Boomerang” section on page 1-25 for more information on this balance method.
1-20Cisco Global Site Selector Configuration Guide
78-14361-01

Chapter 1 Introducing the Global Site SelectorArchitecture
Keepalive ObjectsIn addition to specifying a resource, each answer also provides you with the option of specifying a keepalive for that resource, a method by which the GSS can periodically check to see if the resource is still active. All answers are validated by configured keepalives and are not returned if the keepalive indicates that the answer is not viable.
The GSS uses keepalives to collect and track information on everything from the simple online status of VIPs to services and applications running on a server. Depending on the type of answer being tracked, the GSS also monitors load and connection information on SLBs that can be used to perform load-based redirection.
Depending on the type of resource that you are configuring as a GSS answer (for example, a VIP associated with a Content Services Switch or Content Switching Module), you have the option of configuring a keepalive for that answer that will be used to monitor its liveness continually and report that information to the GSSM. Routing decisions involving that answer consider that liveness information.
The sections that follow explain the various keepalive object types.
ICMP
Used when the GSS answer that you are testing is a VIP or IP address, the Internet Control Message Protocol (ICMP) keepalive type monitors the health of resources by issuing queries containing ICMP packets to the configured VIP address (or a shared keepalive address) for the answer. Liveness is determined by a response from the targeted address, indicating simple connectivity to the network.
KAL-AP
Used when the GSS answer that you are testing is a VIP associated with a Cisco Content Services Switch or Content Switching Module, the KAL-AP keepalive type sends a detailed query to both a primary (master) and a secondary (backup) circuit address that you specify, returning the liveness status of each interface as well as information on load for whichever address is acting as the master VIP.
1-21Cisco Global Site Selector Configuration Guide
78-14361-01
Chapter 1 Introducing the Global Site SelectorArchitecture
Depending on your GSS network configuration, the KAL-AP keepalive can be used to either query a VIP address directly or query an address by way of an alphanumeric tag (KAL-AP By Tag), which can be particularly useful when you are attempting to determine the liveness status of a device that is located behind a firewall that is performing Network Address Translation (NAT).
HTTP-Head
Used when the GSS answer that you are testing is an HTTP web server acting as a standalone device or managed by an SLB device such as a Content Services Switch, Content Switching Module, Cisco IOS software SLB, or Cisco LocalDirector, the HTTP-Head keepalive type sends a TCP format HTTP HEAD request to a web server at an address that you specify, returning the liveness status of the device (in the form of a 200 response).
CRA
Used when the GSS answer that you are testing is a content routing agent (CRA) answer type that will be performing DNS races, the CRA keepalive type tracks the time required (in milliseconds) for a packet of information to reach the CRA and return to the GSS.
Name Server
Used when the GSS answer that you are testing is a name server answer type, the name server keepalive sends a query to the IP address of the name server or to a query domain that you specify (for example, www.cisco.com). Liveness for the name server answer is determined by the ability of the name server or D-proxy for the query domain to respond to the query and resolve the domain to an address.
None
With the keepalive set to None, the GSS assumes that the named answer is always on line. Setting the keepalive type to None prevents your GSS from taking online status or load into account when routing. However, it is useful under certain conditions when adding devices to your GSS network that are not suited to other keepalive types. In general, ICMP is a simple and flexible keepalive type that works with most devices. Using ICMP is preferable to using the None option.
1-22Cisco Global Site Selector Configuration Guide
78-14361-01
Chapter 1 Introducing the Global Site SelectorArchitecture
List used
tiple ed.
t
up is ext ts by
Balance MethodsThe GSS supports six unique balance methods that allow you to specify how a GSS answer should be selected to respond to a given DNS query.
• Ordered list
• Round-robin
• Weighted round-robin
• Least loaded (ACA load WebNS, connection count on the Content Switching Module)
• Hash based on source address or hosted domain
• Boomerang (DNS race)
See the following sections for more information on each of these balance options.
Ordered List
Using the ordered list balance method, each resource within an answer group (for example, an SLB VIP or a name server) is assigned a number that corresponds to the rank of that answer within the group. Devices with lower numbers rank above those with higher numbers.
Using the rankings, the GSS tries each resource in the order that has been prescribed, selecting the first available (“live”) answer to serve a user request.members are given precedence and tried in order, and a member will not beunless all previous members fail to provide a suitable result.
The ordered list method is typically useful in managing resources across mulcontent sites in which a deterministic method for selecting answers is requir
See the “Order” section on page 1-26 as well as the “Load Threshold” section on page 1-27 for information on how the GSS determines which answer to selecwhen using the ordered list balance method.
Round-Robin
Using the round-robin balance method, each resource within an answer grotried in turn, with the GSS cycling through the list of answers, selecting the nanswer in line for each request. In this way, the GSS is able to resolve requesevenly distributing the load among possible answers.
1-23Cisco Global Site Selector Configuration Guide
78-14361-01
Chapter 1 Introducing the Global Site SelectorArchitecture
sts.
hod.
swer h often.
t
hich
thod.
e ed hash S
ent
The round-robin balance method is useful when balancing requests among multiple, active data centers that are hosting identical content, for example between SLBs at a primary and at an “active standby” site that serves reque
See the “Load Threshold” section on page 1-27 for information on how the GSS determines which answer to select when using the round-robin balance met
Weighted Round-Robin
As with the round-robin balance method, the weighted round-robin (WRR) method cycles through a list of defined answers, choosing each available anin turn. However, with WRR, an additional “weight” factor is assigned to eacanswer, biasing the GSS toward certain servers, so that they are used more
See the “Weight” section on page 1-26 and the “Load Threshold” section on page 1-27 for information on how the GSS determines which answer to selecwhen using the weighted round-robin balance method.
Least Loaded
Using the least loaded balance method, the GSS resolves requests to the least-loaded of all resources, as reported by the KAL-AP keepalive process, wprovides the GSS with detailed information on the SLB load and availability.
See the “Load Threshold” section on page 1-27 for information on how the GSS determines which answer to select when using the least loaded balance me
Source Address and Domain Hash
Using the source address and domain hash balance method, elements of thclient’s DNS proxy IP address and the requesting client’s domain are extractand used to create a unique value, referred to as a “hash value.” The uniquevalue is attached to and used to identify a VIP that is chosen to serve the DNquery.
The use of hash values makes it possible to “stick” traffic from a particular requesting client to a specific VIP, ensuring that future requests from that cliare routed to the same VIP. This type of continuity can be used to facilitate features such as online “shopping baskets” in which client-specific data is expected to persist even when client connectivity to a site is terminated or interrupted.
1-24Cisco Global Site Selector Configuration Guide
78-14361-01
Chapter 1 Introducing the Global Site SelectorArchitecture
tion tent
of
rd
es at , is
As hen
sure
Boomerang
The GSS supports the boomerang (DNS race) method of proximity routing, a type of DNS resolution that is initiated by the GSS and is designed to load balance between 2 and 20 sites.
Based on the concept that instantaneous proximity can be found if a content routing agent (CRA) within each data center sends an A-record (IP address) at the exact same time to the client’s D-proxy, the DNS race method of DNS resolugives all possible CRAs (which can be either Cisco Content Engines or ConServices Switches) a fair chance at resolving a client request and allows forproximity to be determined without probing the client’s D-proxy. Whatever A-record is received first is by default the most proximate.
In order for the GSS to initiate a DNS race, it needs to establish two pieces information per CRA:
• The delay between the GSS and each of the CRAs in each data center. With this data, the GSS computes how long to delay the race from each data center, so that in each CRA starts the race simultaneously.
• The “aliveness” of the CRAs. With this data, the GSS knows not to forwarequests to any CRAs that are not responding.
The boomerang server gathers this information by sending keepalive messagpredetermined intervals. This data, along with the IP addresses of the CRAsused to request the exact start time of the DNS race.
Finally, in order for the CRA response to be accepted by the D-proxy, the CRmust spoof the IP address of the GSS to which the DNS request was sent wresponding.
Balance Method Options
For most balance methods supported by the GSS, there are additional configuration options that you must consider to make sure that your GSS is properly applying the balance method for your network resources, and to enthat you are getting the best possible results from your GSS device. Table 1-1 describes the available options.
1-25Cisco Global Site Selector Configuration Guide
78-14361-01
Chapter 1 Introducing the Global Site SelectorArchitecture
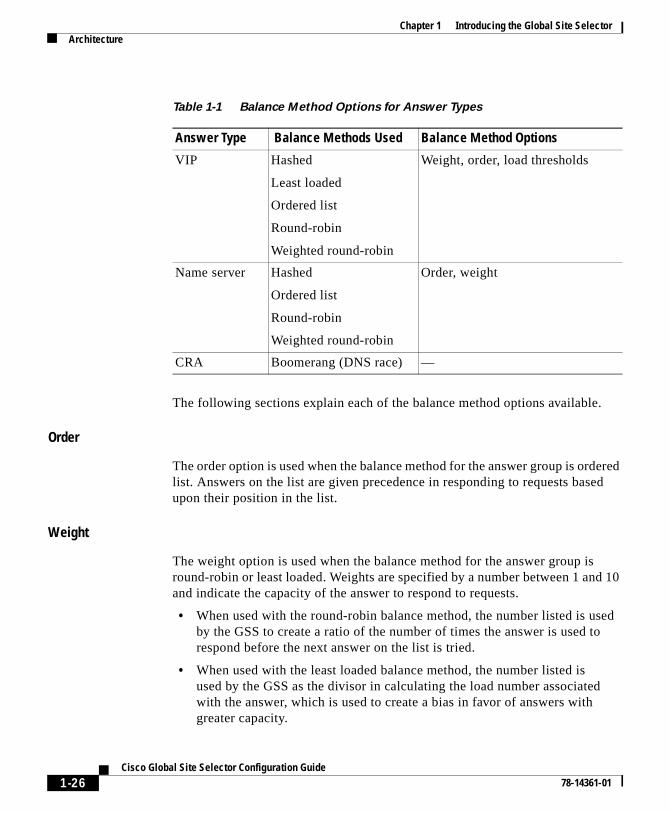
The following sections explain each of the balance method options available.
Order
The order option is used when the balance method for the answer group is ordered list. Answers on the list are given precedence in responding to requests based upon their position in the list.
Weight
The weight option is used when the balance method for the answer group is round-robin or least loaded. Weights are specified by a number between 1 and 10 and indicate the capacity of the answer to respond to requests.
• When used with the round-robin balance method, the number listed is used by the GSS to create a ratio of the number of times the answer is used to respond before the next answer on the list is tried.
• When used with the least loaded balance method, the number listed is used by the GSS as the divisor in calculating the load number associated with the answer, which is used to create a bias in favor of answers with greater capacity.
Table 1-1 Balance Method Options for Answer Types
Answer Type Balance Methods Used Balance Method Options
VIP Hashed
Least loaded
Ordered list
Round-robin
Weighted round-robin
Weight, order, load thresholds
Name server Hashed
Ordered list
Round-robin
Weighted round-robin
Order, weight
CRA Boomerang (DNS race) —
1-26Cisco Global Site Selector Configuration Guide
78-14361-01

Chapter 1 Introducing the Global Site SelectorArchitecture
erve
gned
SS mes ilable se
NS akes rs
Load Threshold
When the answer type is VIP and the keepalive method is KAL-AP, the load threshold is used regardless of the balance method used.
The load threshold specifies a number between 2 and 254 that is compared to the load being reported by the answer device. If the answer’s load is above the specified threshold, the answer is deemed to be off line and unavailable to sfurther requests.
The load threshold value can also be used in conjunction with the weight assito an answer, with the weight acting as a divisor for the load threshold in calculating capacity.
Regions and LocationsAs your GSS network grows, the job of organizing and administering your Gresources—answers and answer groups, domain lists, and DNS rules—becomore and more of a challenge. For that reason, the GSS makes features avato you that help you make sense of and organize your resources. Among theresources are:
• Locations—Logical groupings for GSS resources that correspond to geographical entities such as a city, data center, or content site
• Regions—Higher-level geographical groupings that contain one or morelocations
In addition to allowing you to easily sort and navigate long lists of answers, Drules, and so on, the use of logical groupings such as locations and regions mit easier to perform bulk administration of GSS resources. Using the locationfeature in the GSS GUI, for example, you can suspend or activate all answelinked to a particular GSS data center, shutting down a site for scheduled maintenance and then bringing it back on line with only a few mouse clicks.
1-27Cisco Global Site Selector Configuration Guide
78-14361-01
Chapter 1 Introducing the Global Site SelectorNetwork Deployment
nt as raffic ged
ources
can be
e of ess to
M l who wo.
GSS and
er
OwnersOwners serve a purpose similar to that of locations and regions in the GSS, providing a simple way to organize and identify groups of related GSS resources. However, whereas regions and locations are used to make geographical sense of your GSS network, owners are used to group resources according to other organizational schemes.
For example, a service provider using the GSS to manage multiple hosting sites might create an owner for each web or application hosting customer. With this organizational scheme, domain lists containing that customer’s hosted contewell as DNS rules, answer groups, and source address lists that specify how tto those domains should be processed, can all be associated with and manathrough the owner.
Deployed on a corporate intranet, owners can be used to segregate GSS reson a department-by-department basis, or to allocate specific resources to ITpersonnel. For example, you could create an owner for the finance, human resources, and sales departments so that resources corresponding to each viewed and managed together.
Note that designating an “owner” for a resource does not imply the existencspecial permissions to access the GSSM GUI or manage that resource. Accthe GSSM GUI and all its features is limited to those individuals with valid GSSlogins and passwords. Owners can be created to correspond to IT personnealso have GSSM logins, but there is no necessary connection between the t
Network DeploymentThe following sections detail a typical network deployment of the GSS.
OverviewA typical GSS deployment contains at least one and may contain up to eight devices deployed on a corporate intranet or the Internet. At least one GSS—no more than two GSSs—must be configured as GSSMs, which monitor othGSS devices on the network and offer features for managing and monitoring
1-28Cisco Global Site Selector Configuration Guide
78-14361-01
Chapter 1 Introducing the Global Site SelectorNetwork Deployment
by,”
n be
on ent
l be
ns, That have
to or to have of
request routing services using a GUI accessible through secure HTTP. Only one GSSM can be “active” at any time, with the second GSSM serving as a “standor backup device.
See the “GUI-Based GSS Management” section on page 1-32 for a list of the functions that can be controlled from the GSSM GUI.
The GSSM functionality is embedded on each GSS, and any GSS device caconfigured to act as a GSSM or a standby GSSM. See the “Configuring a GSSM” section on page 2-3 for details.
Additional GSSs beyond the primary and standby GSSM that are configuredthe GSS network route requests but do not perform GSS network managemtasks.
Locating GSS DevicesAlthough it is your organization that determines where your GSS devices wildeployed in your network, some general guidelines must be observed. The following sections discuss issues related to GSS network deployment.
Because they serve as the authoritative name server for one or more domaiGSSs must be publicly or privately addressable on your enterprise network. way, the D-proxy clients that are requesting content can find the GSSs that been charged with handling requests for that content.
Numerous options are available for delegating responsibility for your domainyour GSS devices, depending on traffic patterns to and from your domain. Fexample, given a network containing five GSS devices, you might choose tomodify your upstream name servers so that all traffic of all types that is sentyour domain is directed to each of your GSS devices. Or you might choose to a subset of your traffic (for example, all web traffic) delegated to one or moreyour GSSs, with other devices handling other segments of your traffic.
See the “Upstream DNS Configuration” section on page 2-76 for information on modifying your network’s DNS configuration to accommodate the addition ofGSSs to your network.
1-29Cisco Global Site Selector Configuration Guide
78-14361-01
Chapter 1 Introducing the Global Site SelectorNetwork Deployment
S to
ll
l.
Bs
they other
Locating GSS Devices Behind Firewalls
Deploying a firewall can be of immense benefit in preventing unauthorized access to your GSS network, as well as thwarting common denial of service (DoS) attacks on your GSS devices. In addition to the ability to be deployed behind your corporate firewall, the GSS comes with robust packet-filtering features that enable GSS administrators to permit and disallow traffic to any GSS device.
When positioning your GSS behind a firewall or enabling packet filtering on the GSS itself, you must properly configure each device (the firewall and the GSS) to allow valid network traffic to reach the GSS device on specific ports. In addition to requiring HTTPS traffic in order to access the GSS GUI, for example, you may want to configure your GSSs to allow FTP, Telnet, and SSH access through certain ports. In addition, GSSs must be able to communicate their status to and receive configuration information from the GSSM. Finally, primary and standby GSSMs must be able to communicate and synchronize with one another.
See the discussion of the access-list and access-group commands in the “Filtering GSS Traffic Using Access Lists” section on page 3-20 for instructions on limiting incoming traffic.
See the “Deploying GSS Devices Behind Firewalls” section on page 3-25 for information on which ports must be enabled and left open in order for the GSfunction properly.
Refer to the Cisco Global Site Selector Command Reference for detailed descriptions of the CLI commands required to create a firewall that blocks anon-GSS traffic to your GSS devices.
Communication Between NodesGSS devices communicate their status to the GSSM using the TCP protoco
In addition, GSSs monitor the status, including the load and availability, of SLunder their control using one of a series of keepalives discussed in the “Keepalive Objects” section on page 1-21.
GSS devices do not communicate directly with one another, however, nor do share keepalive statistics. Should a GSS unexpectedly go off line, therefore, GSSs on the network responsible for the same resources are not affected.
1-30Cisco Global Site Selector Configuration Guide
78-14361-01
Chapter 1 Introducing the Global Site SelectorNetwork Deployment
and e
VIPs
rigin
ata IPs most
nal sed
Redundancy
With both a primary and a standby GSSM deployed on your GSS network, device configuration information and DNS rules are automatically synchronized between the primary GSSM and a data store maintained on the standby GSSM.
Synchronization occurs automatically between the two devices whenever the GSS network configuration changes. Updates are packaged and sent to the standby GSSM using a secure connection between the two devices.
Should the primary GSSM suddenly become unavailable, the standby GSSM assumes the role of primary GSSM, and the GSS network continues to function. However, the standby GSSM must be manually enabled as the primary device using the CLI before its GUI can be accessed and configuration changes made. See the “Configuring a GSSM” section on page 2-3 for instructions on enabling the primary GSSM.
Deployment Within Data CentersA typical GSS network consists of multiple content sites, such as data centersserver farms, access to which is managed by one or more SLBs, such as thContent Services Switch.
Each SLB is represented by one or more virtual IP addresses, or VIPs. Theseact as the publicly addressable front-end of the data center.
Behind each SLB are transaction servers, database servers, and mirrored oservers offering a wide variety of content, from websites to applications.
The GSS communicates directly with the SLBs that are representing each dcenter, collecting statistics on availability and load for each of the SLBs and Vand using that data to direct requests to the best-suited data centers and theavailable resources within each data center.
In addition to SLBs, a typical data center deployment may also contain additioDNS name servers that are not being managed by the GSS. These can be uto resolve requests, through name server forwarding, that the GSS cannot resolve itself.
1-31Cisco Global Site Selector Configuration Guide
78-14361-01

Chapter 1 Introducing the Global Site SelectorGSS Network Management
GSS Network ManagementManagement of your GSS network is divided into two types:
• CLI-based management
• GUI-based management
CLI-Based GSS ManagementThe CLI is used to configure installation and management of your Cisco GSS software, including:
• Initial configuration of GSS and GSSM devices
• Software upgrades, downgrades, and restore operations on GSSs and GSSMs
• Configuration backups and restore operations
In addition, the CLI is used for network configuration of your GSS devices, including:
• Network address and host name configuration
• Network interface configuration
• Access control for your GSS devices, including IP filtering and traffic segmentation
• Database and configuration backups and restore operations
The CLI can also be used for status monitoring and logging on an individual GSS device.
GUI-Based GSS ManagementThe GSSM offers a single, centralized GUI for monitoring and administering your entire GSS network.
1-32Cisco Global Site Selector Configuration Guide
78-14361-01

Chapter 1 Introducing the Global Site SelectorGSS Network Management
web ape
SS ork ins the nce
ed
ork.
The GSSM GUI is used for:
• Configuring request routing and server load balancing through the creation of DNS rules
• Monitoring GSS network resources
• Monitoring request routing and GSS statistics
See the “Understanding the GSSM GUI” section that follows for more information on using the GSSM GUI.
Understanding the GSSM GUIThe GSSM GUI is a web-based tool that can be viewed using any standard browser such as Microsoft Internet Explorer Version 5.0 and later and NetscNavigator Version 4.7 or later.
The GSSM GUI serves as a centralized management point for your entire Gnetwork. Using the GSSM interface, you can add GSS devices to your netwand build DNS rules that match groups of source addresses to hosted domausing one of a number of possible load-balancing methods. In addition, usingGSSM monitoring feature, you can obtain real-time statistics on the performaof your GSS network or of individual devices on that network.
When you first log on to the GSSM GUI, you see a Welcome window. (See Figure 1-5.) Additional information appears in the footer area of the GUI, including the current login account information (centered) in the following format:
login (first name, last name)
The current GSS network time in Coordinated Universal Time (UTC) is displayin the lower right corner of the GUI.
The sections that follow describe the organization and workings of the GSSMGUI. Review them before attempting to use the GUI to create your GSS netw
1-33Cisco Global Site Selector Configuration Guide
78-14361-01
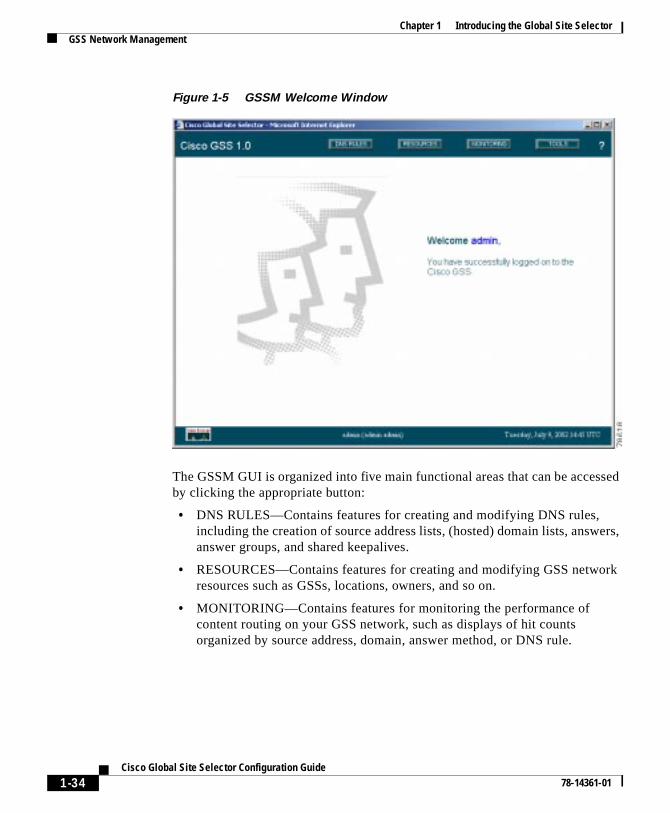
Chapter 1 Introducing the Global Site SelectorGSS Network Management
ers,
ork
Figure 1-5 GSSM Welcome Window
The GSSM GUI is organized into five main functional areas that can be accessed by clicking the appropriate button:
• DNS RULES—Contains features for creating and modifying DNS rules, including the creation of source address lists, (hosted) domain lists, answanswer groups, and shared keepalives.
• RESOURCES—Contains features for creating and modifying GSS netwresources such as GSSs, locations, owners, and so on.
• MONITORING—Contains features for monitoring the performance of content routing on your GSS network, such as displays of hit counts organized by source address, domain, answer method, or DNS rule.
1-34Cisco Global Site Selector Configuration Guide
78-14361-01
Chapter 1 Introducing the Global Site SelectorGSS Network Management
ion nu, )
es by er of
ature are
red the
NS re
list e by
e
DNS
• TOOLS—Contains administrative features for the GSS network, such ascreating login accounts, managing account passwords, and viewing system logs.
• HELP—Launches the GSSM online help system, which contains informaton using the many features of the GSSM GUI. In addition to the help metopic-specific help can also be obtained by clicking the question mark (?icons that appear in many GSSM windows.
Within each of these major feature areas, users can access particular featurchoosing them from a drop-down list that appears in the upper left-hand cornthe GSSM GUI. The options on this list change to reflect the feature area.
Once you have selected a feature, information on your GSS related to that feis further organized into two areas: list windows and details windows, which described in the sections that follow.
List Windows
List windows appear throughout the GSSM GUI and provide the user with a feature-specific overview, listing all resources of a certain type that are configuon the GSS network. For example, clicking the DNS RULES button displays DNS Rules list window, with all the rules currently configured on the GSS network listed.
List windows are also the location from which new resources (for example, Drules or domain lists) are added to the GSS network, or existing resources aremoved from the network.
In addition to providing a bird’s-eye look at resources on your GSS network, windows also enable you to sort those resources by any one of a number ofproperties that are listed on the screen, quickly locating a particular resourcan identifying characteristic such as name, owner, or type.
To sort information that is listed on the GSSM, click the column header for thcolumn containing the information by which you wish to sort the list. For example, to sort your DNS rules balance method, you would click the wordsBalance Methods at the top of that column. The screen refreshes, listing the rules sorted alphabetically by balance method type.
Figure 1-6 shows an example of a GSSM list window.
1-35Cisco Global Site Selector Configuration Guide
78-14361-01

Chapter 1 Introducing the Global Site SelectorGSS Network Management
Figure 1-6 GSSM List Window
Details Windows
Details windows appear throughout the GSS GUI and provide specific configuration information for a single resource, while also enabling administrators to modify those properties, create new resources, remove resources, and so on.
For example, in Figure 1-6, choosing Domain Lists from the drop-down menu displays the Domain Lists list window. Adjacent to each domain list is an icon depicting a pad and pencil, called the Edit icon. Clicking the Edit icon for the domain in the list window displays the details window for that domain list (see Figure 1-7), allowing the GSS administrator to modify the domain list by adding or removing domains.
1-36Cisco Global Site Selector Configuration Guide
78-14361-01
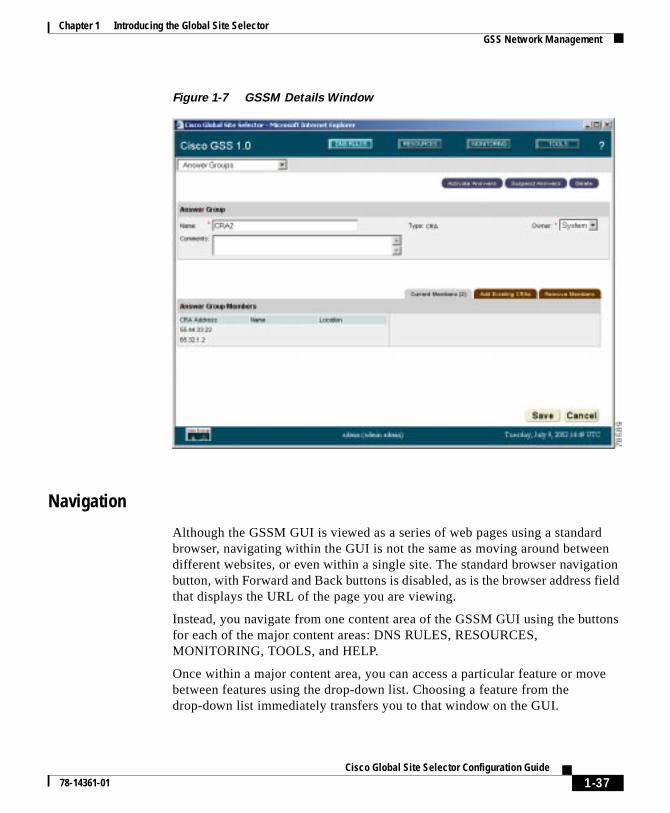
Chapter 1 Introducing the Global Site SelectorGSS Network Management
Figure 1-7 GSSM Details Window
Navigation
Although the GSSM GUI is viewed as a series of web pages using a standard browser, navigating within the GUI is not the same as moving around between different websites, or even within a single site. The standard browser navigation button, with Forward and Back buttons is disabled, as is the browser address field that displays the URL of the page you are viewing.
Instead, you navigate from one content area of the GSSM GUI using the buttons for each of the major content areas: DNS RULES, RESOURCES, MONITORING, TOOLS, and HELP.
Once within a major content area, you can access a particular feature or move between features using the drop-down list. Choosing a feature from the drop-down list immediately transfers you to that window on the GUI.
1-37Cisco Global Site Selector Configuration Guide
78-14361-01

Chapter 1 Introducing the Global Site SelectorGSS Network Management
SSM
the ve
ither
e ning
To move back from a details window for a resource to the corresponding list window, use the Save or Cancel buttons.
Note Using your web browser’s Back button cancels any unsaved changes in the GGUI.
For example, to return to the Global Site Selectors list window after viewing details for one of your GSSs, you would click the Cancel button. Or, if you hamade configuration changes to that GSS that you wish to retain, click Save. Eaction returns you to the Global Site Selectors list window.
GSSM Icons and Symbols
Table 1-2 lists and explains some common icons and graphical symbols in thGSSM interface. These icons are referenced throughout this guide in explaihow to use the features of the GSSM.
Table 1-2 GSSM GUI Icons and Symbols
Icon or Symbol Purpose Location
Edit icon. Opens the associated item for editing, displaying configuration settings in the details window.
List windows
Wizard icon. Opens the associated DNS rule for editing using the DNS Rule Wizard.
DNS Rule list window
Sort icon. Indicates that the items listed are sorted in ascending order according to the property listed in this column.
List windows
* Asterisk. Required field. Indicates that a value is required in the adjacent field before the item can be successfully saved.
Details windows
1-38Cisco Global Site Selector Configuration Guide
78-14361-01
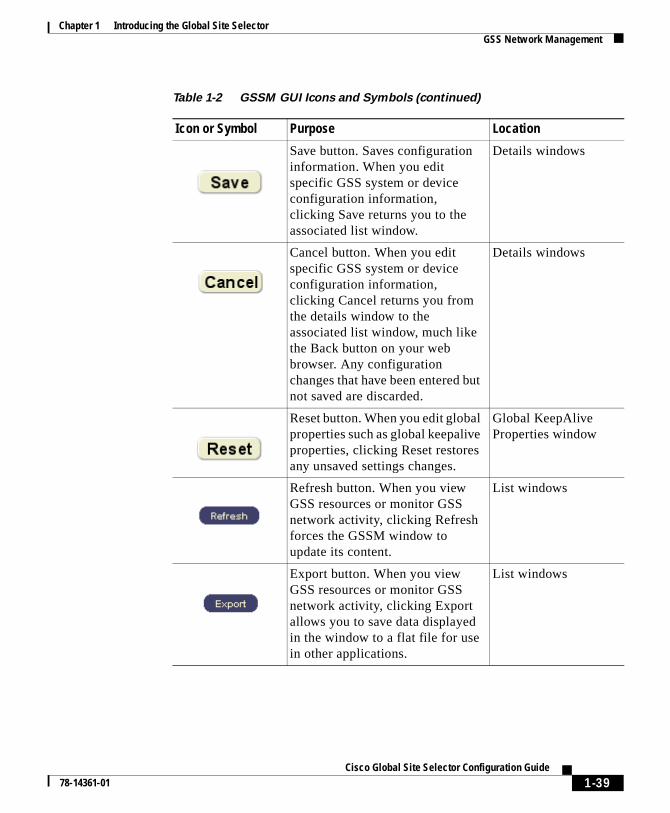
Chapter 1 Introducing the Global Site SelectorGSS Network Management
Save button. Saves configuration information. When you edit specific GSS system or device configuration information, clicking Save returns you to the associated list window.
Details windows
Cancel button. When you edit specific GSS system or device configuration information, clicking Cancel returns you from the details window to the associated list window, much like the Back button on your web browser. Any configuration changes that have been entered but not saved are discarded.
Details windows
Reset button. When you edit global properties such as global keepalive properties, clicking Reset restores any unsaved settings changes.
Global KeepAlive Properties window
Refresh button. When you view GSS resources or monitor GSS network activity, clicking Refresh forces the GSSM window to update its content.
List windows
Export button. When you view GSS resources or monitor GSS network activity, clicking Export allows you to save data displayed in the window to a flat file for use in other applications.
List windows
Table 1-2 GSSM GUI Icons and Symbols (continued)
Icon or Symbol Purpose Location
1-39Cisco Global Site Selector Configuration Guide
78-14361-01
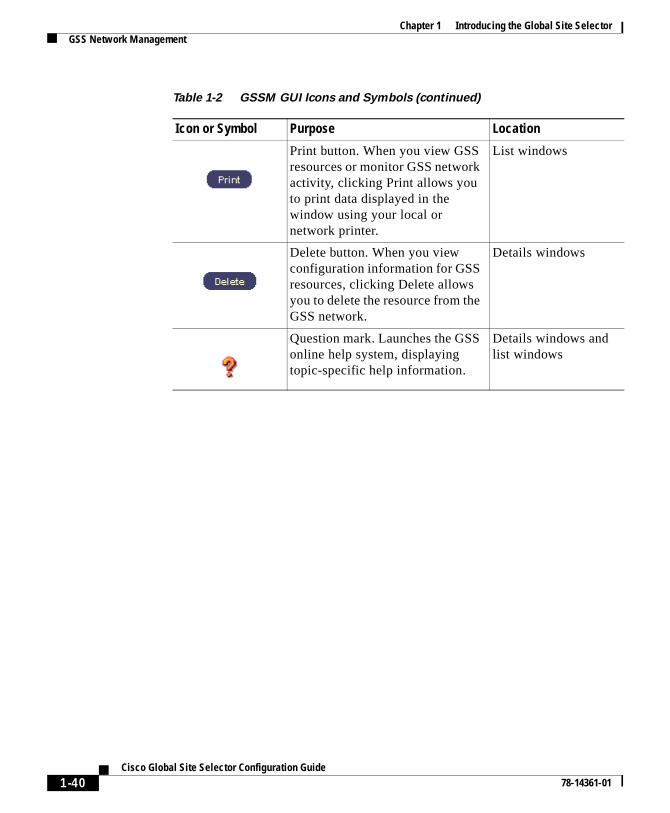
Chapter 1 Introducing the Global Site SelectorGSS Network Management
Print button. When you view GSS resources or monitor GSS network activity, clicking Print allows you to print data displayed in the window using your local or network printer.
List windows
Delete button. When you view configuration information for GSS resources, clicking Delete allows you to delete the resource from the GSS network.
Details windows
Question mark. Launches the GSS online help system, displaying topic-specific help information.
Details windows and list windows
Table 1-2 GSSM GUI Icons and Symbols (continued)
Icon or Symbol Purpose Location
1-40Cisco Global Site Selector Configuration Guide
78-14361-01
Cisco Gl78-14361-01
C H A P T E R 2
ion
SS ery be
Getting Started
This chapter is designed to provide you with all the information you need to configure your GSS devices to connect to your network, establish global server load-balancing resources and rules on the devices, and configure your existing DNS system to recognize and interact with your GSS devices.
This chapter contains the following sections:
• Overview, page 2-1
• Network Configuration, page 2-2
• Logging On to the GSSM GUI, page 2-8
• Global Server Load-Balancing Configuration, page 2-10
• Upstream DNS Configuration, page 2-76
OverviewGSSs need to be configured separately for:
• Network connectivity—Configuration of everything that is required to connect your GSS device to your IP network. This includes the configuratof network configuration information such as device IP addresses and gateways, FTP, Telnet and SSH access, and so on.
• Global server load balancing and DNS management—Configuration of Gcomponents related to global server load balancing within Content DelivNetworks. This includes the creation of DNS rules—the policies that will
2-1obal Site Selector Configuration Guide
Chapter 2 Getting StartedNetwork Configuration
—as ive
ver SSM
our SM.
ou
e
to
must
ou the
o de.
ate
used to process DNS queries and the methods used to respond to themwell as the configuration of GSS resources such as answers and keepalobjects that provide reliable responses to queries.
Network connectivity is configured for each device using the CLI. Global serload balancing and DNS management are configured using the centralized GGUI.
This chapter explains how to set up and configure network connectivity for yGSS devices, and how to configure global server load balancing using the GS
For instructions on monitoring the performance of your GSS network once yhave configured your GSS devices, see Chapter 4, “Monitoring GSS Performance.”
For detailed instructions on the syntax and use of GSS command, refer to thCisco Global Site Selector Command Reference.
Network ConfigurationWhen setting up your GSS or GSSM for the first time, you must log in directlythe CLI on the GSS device.
Note Because both SSH and Telnet are disabled by default on all GSS devices, youhave physical access to the GSS device. Refer to the Cisco Global Site Selector Hardware Installation Guide for instructions on connecting a console cable toyour Cisco Global Site Selector 4480 hardware.
Once you have configured your GSS device to connect to your IP network, ycan enable SSH and Telnet, which will make it possible for you to administerGSS device remotely in the future.
Note Network configuration requires that you enter into EXEC mode on the CLI, syour login must have adequate permissions to enable you to enter EXEC mo
After you have enabled your GSSMs and GSSs, use the GSSM GUI to activeach device on your network. See the “Creating and Modifying GSS Devices” section on page 2-21 for more information.
2-2Cisco Global Site Selector Configuration Guide
78-14361-01
Chapter 2 Getting StartedNetwork Configuration
r
IP
nges
pears,
Configuring a GSSMBefore you can begin configuring request routing or adding GSSs to your GSS network, you must first have configured a primary GSSM with which the GSSs will be associated.
When configuring a GSSM, you need to configure both the network connectivity of the GSSM as well as the embedded GSS database that resides on the GSSM and holds GSS device and network configuration information. You must also indicate whether the GSSM will serve as the primary or redundant (standby) manager.
After you have enabled your primary GSSM, see the “Starting the Cisco GSS Software and the GUI” section on page 2-5 to enable the device and the GSSMGUI.
Note Because both SSH and Telnet are disabled by default on all GSS devices, accessing the GSSM CLI requires that you have physical access to the GSSdevice. Refer to the Cisco Global Site Selector Hardware Installation Guide for instructions on connecting a console cable to your Cisco Global Site Selecto4480 hardware.
To configure a GSS device to act as a GSSM:
Step 1 See the “Configuring a Global Site Selector” section on page 2-5 and followStep 1 through Step 6 to enable your primary Ethernet interface and assign anaddress, gateway, and host name to your device.
By default, the host name for GSS devices is localhost.localdomain. This chaonce you configure the host name for the device.
Step 2 Exit global configuration mode and use the gssm command to create the embedded GSS database, for example:
gssm1.yourdomain.com(config)# exitgssm1.yourdomain.com# gssm database create
If a database has already been created on this device, an error message apfor example:
gssm1.yourdomain.com# gssm database createDatabase exists. Use [gssm database delete] to remove.
2-3Cisco Global Site Selector Configuration Guide
78-14361-01
Chapter 2 Getting StartedNetwork Configuration
r
Use the database delete command to delete the existing database and then repeat the gssm database create command to create a new GSS database. For example:
gssm1.yourdomain.com# gssm database deletegssm1.yourdomain.com# gssm database create
Step 3 Perform one of the following steps:
• If this GSSM is to be the primary (default) routing manager for your GSS network, use the gss enable gssm-primary command to enable your GSS device and make it the primary GSSM.
gssm1.yourdomain.com# gss enable gssm-primary
• If this GSSM is to be a backup (standby) GSSM for your GSS, use the gss enable gssm-standby command to place the GSSM in standby mode and associate it with the DNS name or IP address of the primary GSSM.
gssm1.yourdomain.com# gss enable gssm-standby 192.168.1.110
You must have a primary GSSM configured and enabled before you can enable a standby GSSM.
Step 4 Save your configuration changes to memory, for example:
gssm1.yourdomain.com# write memory
If you fail to save your configuration changes, the device reverts to its previous settings when it reboots.
Step 5 See the “Starting the Cisco GSS Software and the GUI” section on page 2-5 to enable the Cisco GSS software on your primary GSSM. Then see the “Logging On to the GSSM GUI” section on page 2-8 to access the GSSM GUI.
After enabling the GSSM GUI, you can use it to activate each device on younetwork. See the “Creating and Modifying GSS Devices” section on page 2-21 for more information.
2-4Cisco Global Site Selector Configuration Guide
78-14361-01
Chapter 2 Getting StartedNetwork Configuration
egin ave
nd
evice.
r
Starting the Cisco GSS Software and the GUIAfter you have enabled your GSS devices, you must start the Cisco GSS software. Starting the software is required before the device will begin acting as a GSSM or GSS, and before you can access the GSSM GUI.
To start the Cisco GSS software on your GSS devices:
Step 1 Log on to the CLI of the GSS device, following the instructions in the Cisco Global Site Selector Command Reference. The Cisco CLI prompt appears.
Step 2 Enable privileged EXEC mode. For example:
gss1.yourdomain.com> enable
Step 3 Use the gss start command to start the Cisco GSS software. For example:
gss1.yourdomain.com# gss start
You can now access the GSSM GUI using your preferred web browser by pointing that browser to the URL of the GSSM. See the “Logging On to the GSSM GUI” section on page 2-8 for information on logging on to and navigating the GSSMGUI.
Configuring a Global Site SelectorYou must have configured and enabled your primary GSSM before you can bconfiguring GSS devices that are neither primary nor standby GSSMs. If you hnot already done so, see the “Configuring a GSSM” section on page 2-3 for information on configuring and enabling your primary and standby GSSMs athe “Starting the Cisco GSS Software and the GUI” section on page 2-5 for information on starting the GSSM GUI.
Note Because both SSH and Telnet are disabled by default on all GSS devices, accessing the GSS CLI requires that you have physical access to the GSS dRefer to the Cisco Global Site Selector Hardware Installation Guide for instructions on connecting a console cable to your Cisco Global Site Selecto4480 hardware.
2-5Cisco Global Site Selector Configuration Guide
78-14361-01
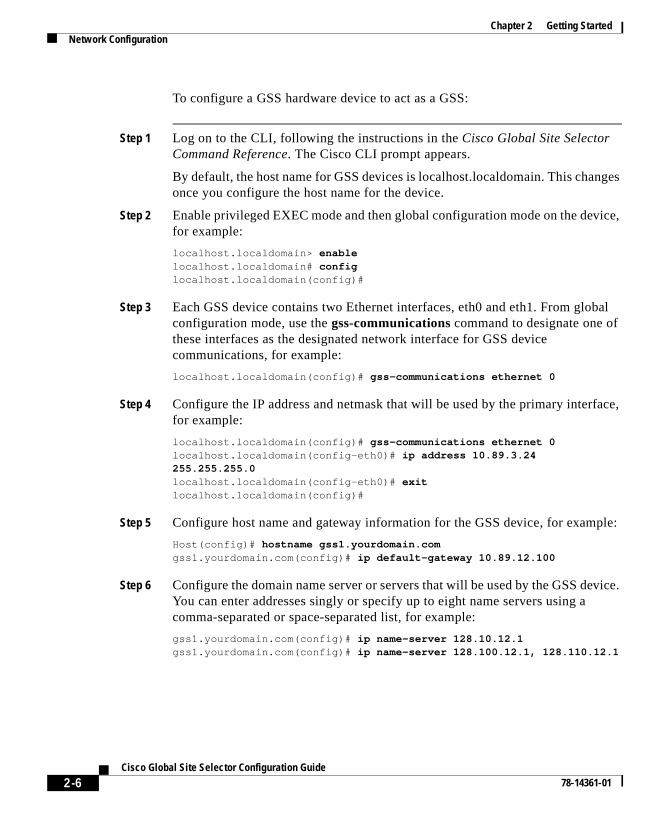
Chapter 2 Getting StartedNetwork Configuration
To configure a GSS hardware device to act as a GSS:
Step 1 Log on to the CLI, following the instructions in the Cisco Global Site Selector Command Reference. The Cisco CLI prompt appears.
By default, the host name for GSS devices is localhost.localdomain. This changes once you configure the host name for the device.
Step 2 Enable privileged EXEC mode and then global configuration mode on the device, for example:
localhost.localdomain> enablelocalhost.localdomain# configlocalhost.localdomain(config)#
Step 3 Each GSS device contains two Ethernet interfaces, eth0 and eth1. From global configuration mode, use the gss-communications command to designate one of these interfaces as the designated network interface for GSS device communications, for example:
localhost.localdomain(config)# gss-communications ethernet 0
Step 4 Configure the IP address and netmask that will be used by the primary interface, for example:
localhost.localdomain(config)# gss-communications ethernet 0localhost.localdomain(config-eth0)# ip address 10.89.3.24 255.255.255.0localhost.localdomain(config-eth0)# exitlocalhost.localdomain(config)#
Step 5 Configure host name and gateway information for the GSS device, for example:
Host(config)# hostname gss1.yourdomain.comgss1.yourdomain.com(config)# ip default-gateway 10.89.12.100
Step 6 Configure the domain name server or servers that will be used by the GSS device. You can enter addresses singly or specify up to eight name servers using a comma-separated or space-separated list, for example:
gss1.yourdomain.com(config)# ip name-server 128.10.12.1gss1.yourdomain.com(config)# ip name-server 128.100.12.1, 128.110.12.1
2-6Cisco Global Site Selector Configuration Guide
78-14361-01
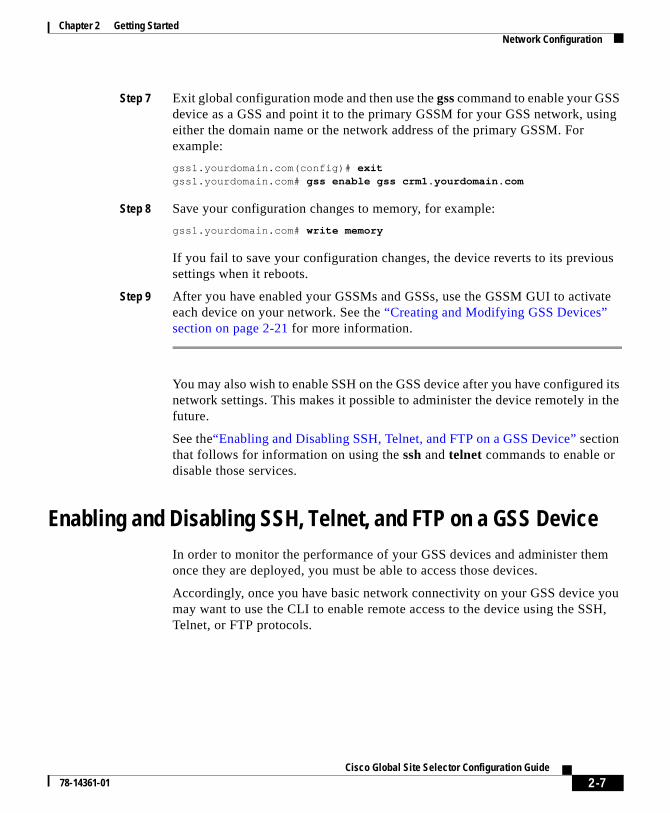
Chapter 2 Getting StartedNetwork Configuration
d its the
m
you H,
Step 7 Exit global configuration mode and then use the gss command to enable your GSS device as a GSS and point it to the primary GSSM for your GSS network, using either the domain name or the network address of the primary GSSM. For example:
gss1.yourdomain.com(config)# exitgss1.yourdomain.com# gss enable gss crm1.yourdomain.com
Step 8 Save your configuration changes to memory, for example:
gss1.yourdomain.com# write memory
If you fail to save your configuration changes, the device reverts to its previous settings when it reboots.
Step 9 After you have enabled your GSSMs and GSSs, use the GSSM GUI to activate each device on your network. See the “Creating and Modifying GSS Devices” section on page 2-21 for more information.
You may also wish to enable SSH on the GSS device after you have configurenetwork settings. This makes it possible to administer the device remotely infuture.
See the“Enabling and Disabling SSH, Telnet, and FTP on a GSS Device” section that follows for information on using the ssh and telnet commands to enable or disable those services.
Enabling and Disabling SSH, Telnet, and FTP on a GSS DeviceIn order to monitor the performance of your GSS devices and administer theonce they are deployed, you must be able to access those devices.
Accordingly, once you have basic network connectivity on your GSS device may want to use the CLI to enable remote access to the device using the SSTelnet, or FTP protocols.
2-7Cisco Global Site Selector Configuration Guide
78-14361-01
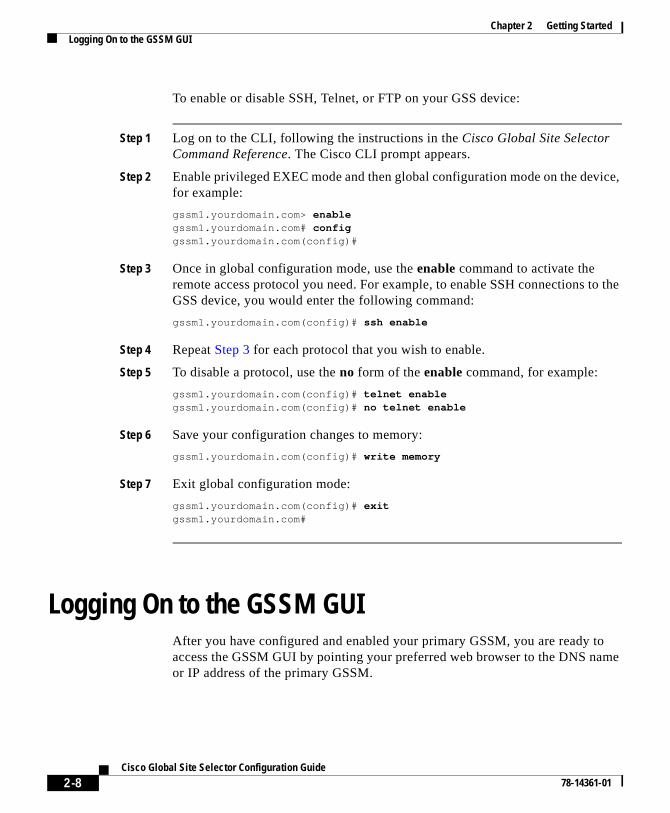
Chapter 2 Getting StartedLogging On to the GSSM GUI
To enable or disable SSH, Telnet, or FTP on your GSS device:
Step 1 Log on to the CLI, following the instructions in the Cisco Global Site Selector Command Reference. The Cisco CLI prompt appears.
Step 2 Enable privileged EXEC mode and then global configuration mode on the device, for example:
gssm1.yourdomain.com> enablegssm1.yourdomain.com# configgssm1.yourdomain.com(config)#
Step 3 Once in global configuration mode, use the enable command to activate the remote access protocol you need. For example, to enable SSH connections to the GSS device, you would enter the following command:
gssm1.yourdomain.com(config)# ssh enable
Step 4 Repeat Step 3 for each protocol that you wish to enable.
Step 5 To disable a protocol, use the no form of the enable command, for example:
gssm1.yourdomain.com(config)# telnet enablegssm1.yourdomain.com(config)# no telnet enable
Step 6 Save your configuration changes to memory:
gssm1.yourdomain.com(config)# write memory
Step 7 Exit global configuration mode:
gssm1.yourdomain.com(config)# exitgssm1.yourdomain.com#
Logging On to the GSSM GUIAfter you have configured and enabled your primary GSSM, you are ready to access the GSSM GUI by pointing your preferred web browser to the DNS name or IP address of the primary GSSM.
2-8Cisco Global Site Selector Configuration Guide
78-14361-01
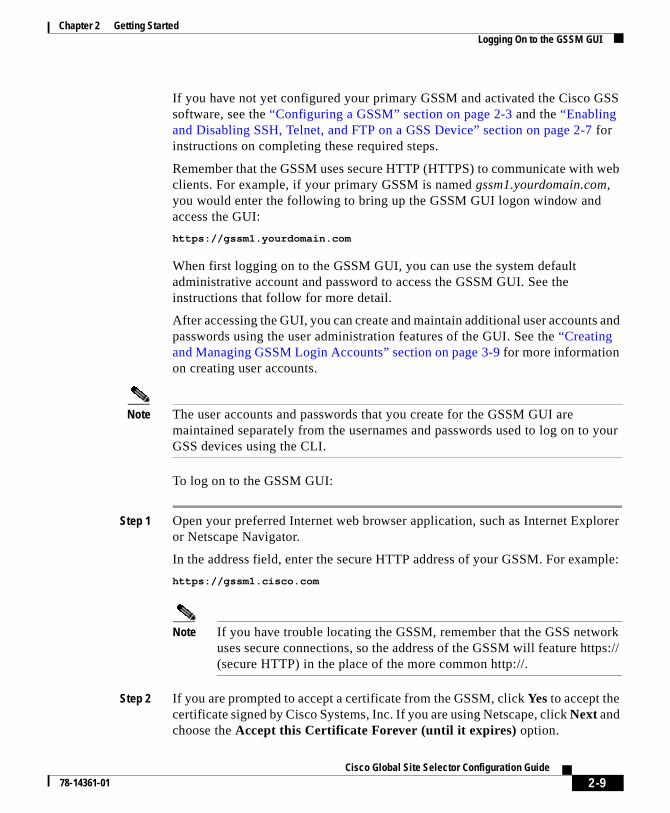
Chapter 2 Getting StartedLogging On to the GSSM GUI
web
s and
your
orer
ple:
ork ps://
If you have not yet configured your primary GSSM and activated the Cisco GSS software, see the “Configuring a GSSM” section on page 2-3 and the “Enabling and Disabling SSH, Telnet, and FTP on a GSS Device” section on page 2-7 for instructions on completing these required steps.
Remember that the GSSM uses secure HTTP (HTTPS) to communicate withclients. For example, if your primary GSSM is named gssm1.yourdomain.com, you would enter the following to bring up the GSSM GUI logon window and access the GUI:
https://gssm1.yourdomain.com
When first logging on to the GSSM GUI, you can use the system default administrative account and password to access the GSSM GUI. See the instructions that follow for more detail.
After accessing the GUI, you can create and maintain additional user accountpasswords using the user administration features of the GUI. See the “Creating and Managing GSSM Login Accounts” section on page 3-9 for more information on creating user accounts.
Note The user accounts and passwords that you create for the GSSM GUI are maintained separately from the usernames and passwords used to log on toGSS devices using the CLI.
To log on to the GSSM GUI:
Step 1 Open your preferred Internet web browser application, such as Internet Explor Netscape Navigator.
In the address field, enter the secure HTTP address of your GSSM. For exam
https://gssm1.cisco.com
Note If you have trouble locating the GSSM, remember that the GSS netwuses secure connections, so the address of the GSSM will feature htt(secure HTTP) in the place of the more common http://.
Step 2 If you are prompted to accept a certificate from the GSSM, click Yes to accept the certificate signed by Cisco Systems, Inc. If you are using Netscape, click Next and choose the Accept this Certificate Forever (until it expires) option.
2-9Cisco Global Site Selector Configuration Guide
78-14361-01

Chapter 2 Getting StartedGlobal Server Load-Balancing Configuration
r load
ork ming
Note Take the extra steps to trust certificates from Cisco Systems, Inc., which will prevent you from having to approve a certificate every time you log on to a GSSM. Refer to the online help for your browser for instructions on trusting certificates from a particular owner or website.
Step 3 When you are prompted to log on to the GSSM, enter your username and password in the fields provided and click OK. If this is your first time logging on to the GSSM, use the default account name and password to access the GSSM GUI as follows:
• Username—admin
• Password—default
The GSSM Welcome window appears. See the “Global Server Load-Balancing Configuration” section that follows for instructions on using the GSSM to configure content request routing on your GSS network.
Global Server Load-Balancing ConfigurationOnce you have created your GSS device and configured it to connect to younetwork, you are ready to begin configuring request routing and global server balancing on your GSS network.
Global server load balancing on your GSS network is managed through a centralized GUI on the GSSM. Using this interface, you can identify your netwresources (GSSs) and create the DNS rules that will be used to process incocontent requests.
See the “Understanding the GSSM GUI” section on page 1-33 for information on navigating the GSSM GUI.
2-10Cisco Global Site Selector Configuration Guide
78-14361-01
Chapter 2 Getting StartedGlobal Server Load-Balancing Configuration
o
ice to
ts to es
d by
rces y
to
that
ule
OverviewBecause you will be creating DNS rules that route incoming DNS requests to the most available data centers and resources on your network, you must configure the elements that will constitute your DNS rules before creating the rules themselves.
Use the following order in configuring your GSS devices and resources:
1. Create regions, locations, and owners—Optional. Use these groupings torganize your GSS network resources by customer account, physical location, or other organizing principle.
2. Activate and configure your GSS devices—Use the GSSM GUI to enableyour standby GSSM and any additional GSSs, and then assign each deva location.
3. Create one or more source address lists—Optional. Use these lists of addresses to identify the name servers (DNS proxies) that forward requesthe specified domains; the default source address list is “Any” and matchany incoming DNS request to the domains.
4. Create one or more domain lists—Establish lists of Internet domains, possibly using wildcards, that are being managed by the GSS and querieusers.
5. Create any shared keepalives—Optional. These are GSS network resouthat are regularly polled to monitor the online status of one or more GSSresources linked to the keepalive. Shared keepalives are required for ananswer that uses the KAL-AP keepalive type.
6. Create one or more answers—These are resources that match requestsdomains.
7. Create one or more answer groups—These are collections of resourcescan balance requests for content.
8. Build your DNS rules to process incoming DNS requests using the DNS RBuilder or DNS Rule Wizard.
2-11Cisco Global Site Selector Configuration Guide
78-14361-01
Chapter 2 Getting StartedGlobal Server Load-Balancing Configuration
ese hen
o
nnel
and
y
ork.
Preparing to Configure Request RoutingMake sure that you have configured your hardware devices. You must have a primary GSSM configured and enabled before you can configure request routing and server load balancing on the GSS network. Ideally, you have a standby GSSM configured as well.
See the “Network Configuration” section on page 2-2 for more information. If you will be deploying GSSs in addition to your primary and standby GSSM, thdevices will identify themselves to the GSSM and appear on the GSSM GUI wyou click the Resources button and choose Global Site Selectors from the drop-down menu.
Organizing Your GSS NetworkThe GSSM provides you with a number of tools that allow you to group and organize resources on your GSS network. The sections below explain how tcreate and manage these organizational tools on your GSS network. These include:
• Locations—Logical groupings for GSS resources that correspond to geographical entities such as a city, data center, or content site
• Regions—Higher-level geographical groupings that contain one or morelocations
• Owners—Groupings that correspond to business or organizational relationships; for example, customers, internal departments, and IT perso
The following sections explain how to create and manage locations, regions,owners on your GSS network.
Creating and Modifying Locations and Regions
The process for creating and maintaining locations and regions is essentiallidentical, except that in addition to their other configuration information, locations are associated with regions in a many-to-one relationship. Use thefollowing procedures to set up both regions and locations on your GSS netw
2-12Cisco Global Site Selector Configuration Guide
78-14361-01
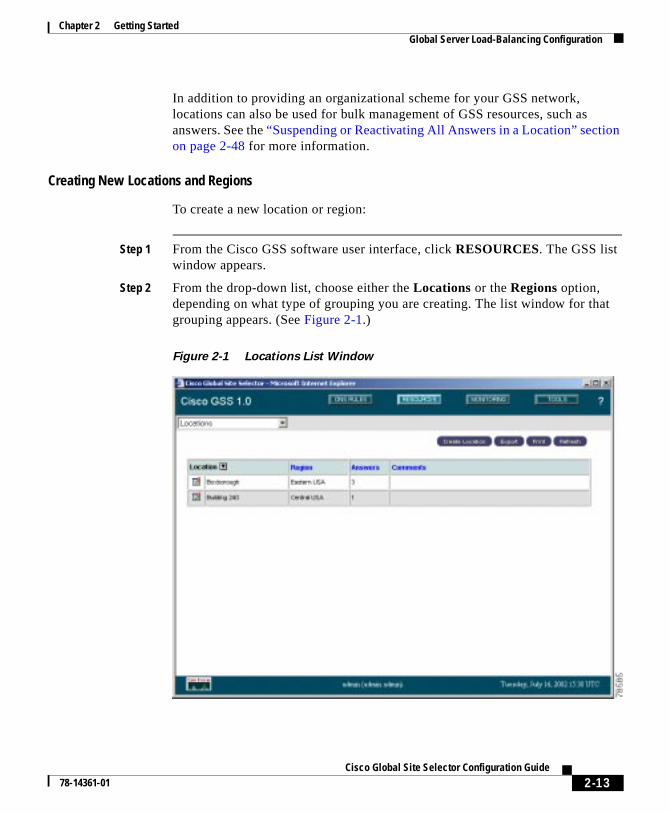
Chapter 2 Getting StartedGlobal Server Load-Balancing Configuration
n
at
In addition to providing an organizational scheme for your GSS network, locations can also be used for bulk management of GSS resources, such as answers. See the “Suspending or Reactivating All Answers in a Location” sectioon page 2-48 for more information.
Creating New Locations and Regions
To create a new location or region:
Step 1 From the Cisco GSS software user interface, click RESOURCES. The GSS list window appears.
Step 2 From the drop-down list, choose either the Locations or the Regions option, depending on what type of grouping you are creating. The list window for thgrouping appears. (See Figure 2-1.)
Figure 2-1 Locations List Window
2-13Cisco Global Site Selector Configuration Guide
78-14361-01
Chapter 2 Getting StartedGlobal Server Load-Balancing Configuration
Note We recommend creating regions before you create locations.
Step 3 Click the Create Region or Create Location button. The details window appears, allowing you to fill in the configuration information for the grouping that you are creating.
Step 4 In the Name field, enter the name for your new region or location.
Step 5 In the Comments field, enter descriptive information or important notes regarding the new region or location.
Step 6 If you are creating a location, click the Region drop-down list and choose a region with which the location will be associated. There should be a logical connection between region and location.
Step 7 Click Save to save your new region or location and return to the list window. Your new grouping will be listed and can now be used to help you organize other GSS resources.
Modifying Locations and Regions
You can modify your locations and regions at any point after you create them using the GSSM GUI.
To modify regions and locations:
Step 1 From the Cisco GSS software user interface, click RESOURCES. The GSS list window appears.
Step 2 From the drop-down list, choose either the Locations or Regions option, depending on what type of grouping you are modifying. (See Figure 2-2.) The list window for that grouping appears.
2-14Cisco Global Site Selector Configuration Guide
78-14361-01
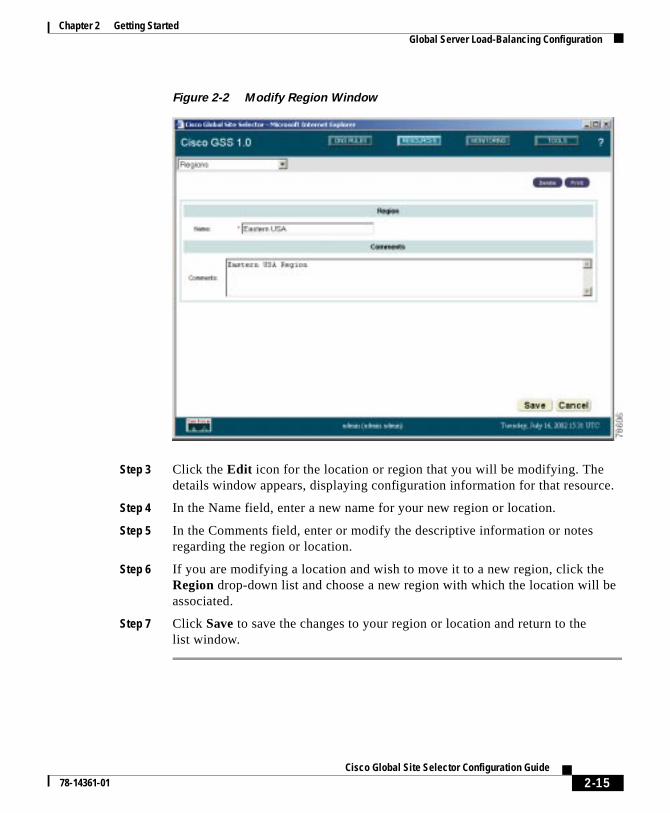
Chapter 2 Getting StartedGlobal Server Load-Balancing Configuration
Figure 2-2 Modify Region Window
Step 3 Click the Edit icon for the location or region that you will be modifying. The details window appears, displaying configuration information for that resource.
Step 4 In the Name field, enter a new name for your new region or location.
Step 5 In the Comments field, enter or modify the descriptive information or notes regarding the region or location.
Step 6 If you are modifying a location and wish to move it to a new region, click the Region drop-down list and choose a new region with which the location will be associated.
Step 7 Click Save to save the changes to your region or location and return to the list window.
2-15Cisco Global Site Selector Configuration Guide
78-14361-01

Chapter 2 Getting StartedGlobal Server Load-Balancing Configuration
ed”
t
ils
he
ing, uping
sting ource.
s, and
Deleting Locations and Regions
You can delete locations and regions from the GSS using the GSSM GUI. Before you attempt to delete a region or location, be sure that you know what dependencies that resource has. For example, regions that have locations associated with them cannot be deleted. In addition, answers associated with locations that are deleted will automatically be associated with the “Unspecifilocation.
To delete regions and locations:
Step 1 From the Cisco GSS software user interface, click RESOURCES. The GSS list window appears.
Step 2 From the drop-down list, choose either the Locations or Regions option, depending on what type of grouping you are deleting. The list window for thagrouping appears.
Step 3 Click the Edit icon for the location or region that you will be deleting. The detawindow appears, displaying configuration information for that resource.
Step 4 Click the Delete button. You are prompted to confirm your decision to delete tregion or location.
Step 5 Click OK. You are returned to the list window with the grouping removed.
If an error appears, telling you that a GSS resource is still linked to this groupuse the GSSM GUI to disassociate that resource and then try deleting the groagain.
Creating and Modifying Owners
Owners are logical groupings for GSS network resources that correspond tobusiness or organizational structures. For example, an owner might be a hocustomer, an internal department such as human resources, or an IT staff res
Owners are created and managed separately from either GSS or GSSM loginthere is no necessary connection between the two.
2-16Cisco Global Site Selector Configuration Guide
78-14361-01
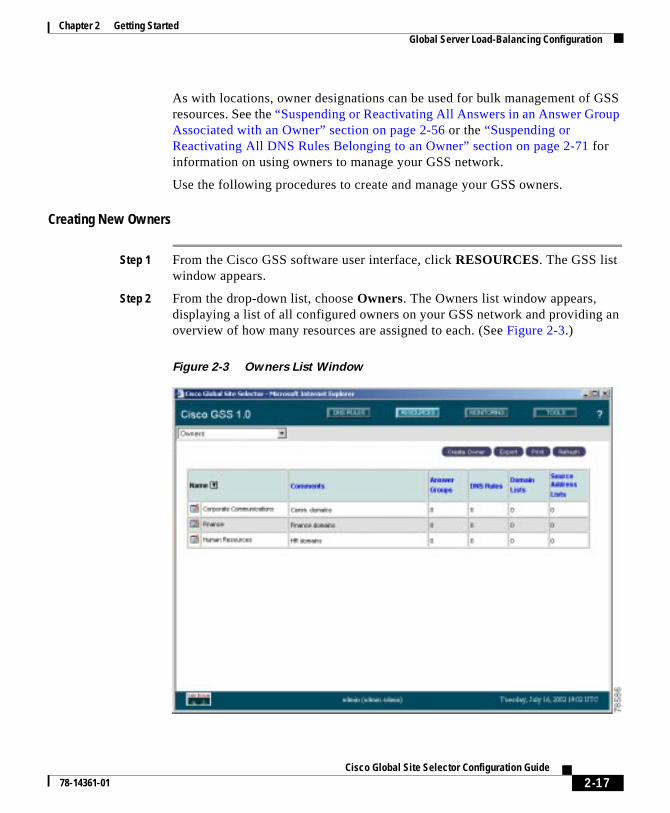
Chapter 2 Getting StartedGlobal Server Load-Balancing Configuration
p
an
As with locations, owner designations can be used for bulk management of GSS resources. See the “Suspending or Reactivating All Answers in an Answer GrouAssociated with an Owner” section on page 2-56 or the “Suspending or Reactivating All DNS Rules Belonging to an Owner” section on page 2-71 for information on using owners to manage your GSS network.
Use the following procedures to create and manage your GSS owners.
Creating New Owners
Step 1 From the Cisco GSS software user interface, click RESOURCES. The GSS list window appears.
Step 2 From the drop-down list, choose Owners. The Owners list window appears, displaying a list of all configured owners on your GSS network and providingoverview of how many resources are assigned to each. (See Figure 2-3.)
Figure 2-3 Owners List Window
2-17Cisco Global Site Selector Configuration Guide
78-14361-01
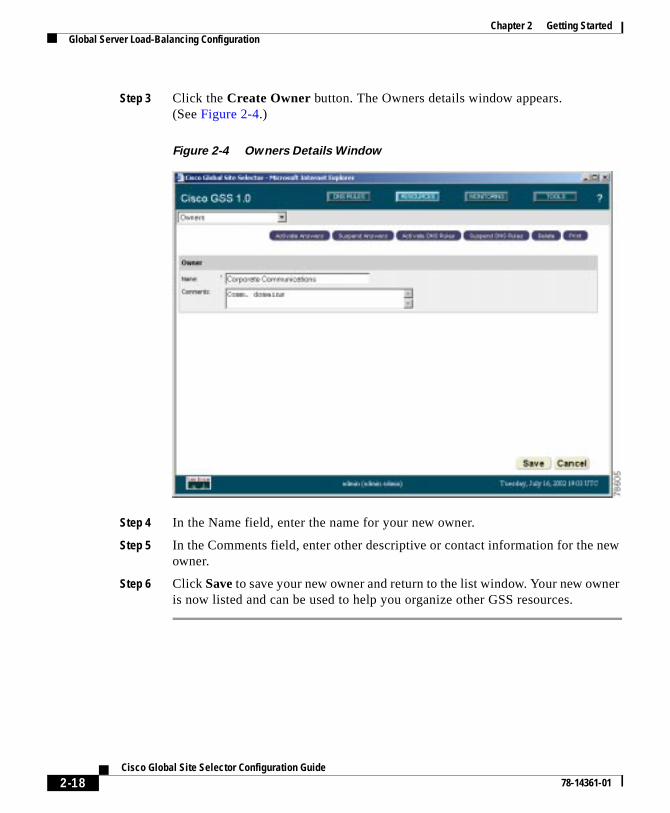
Chapter 2 Getting StartedGlobal Server Load-Balancing Configuration
Step 3 Click the Create Owner button. The Owners details window appears. (See Figure 2-4.)
Figure 2-4 Owners Details Window
Step 4 In the Name field, enter the name for your new owner.
Step 5 In the Comments field, enter other descriptive or contact information for the new owner.
Step 6 Click Save to save your new owner and return to the list window. Your new owner is now listed and can be used to help you organize other GSS resources.
2-18Cisco Global Site Selector Configuration Guide
78-14361-01

Chapter 2 Getting StartedGlobal Server Load-Balancing Configuration
Modifying Owners
You can modify your owners at any point after you create them using the GSSM GUI.
To modify an owner:
Step 1 From the Cisco GSS software user interface, click RESOURCES. The GSS list window appears.
Step 2 From the drop-down list, choose the Owners option. The Owners list window appears. (See Figure 2-3.)
Step 3 Click the Edit icon for the owner that you will be modifying. The Owners details window appears, displaying configuration information for that resource. (See Figure 2-4.)
Step 4 In the Name field, enter a new name for your new owner, if desired.
Step 5 In the Comments field, enter or modify the descriptive information or notes regarding the owner.
Step 6 Click Save to save the changes to your region or location and return to the list window.
Deleting Owners
You can delete an owner at any point after you create it using the GSSM GUI. Before you attempt to delete an owner, be sure that you know what dependencies that resource has. For example, answer groups, DNS rules, and domain lists associated with an owner will, if that owner is deleted, automatically be associated with the “System” owner account.
To delete an owner:
Step 1 From the Cisco GSS software user interface, click RESOURCES. The GSS list window appears.
Step 2 From the drop-down list, choose the Owners option. The Owners list window appears. (See Figure 2-3.)
2-19Cisco Global Site Selector Configuration Guide
78-14361-01
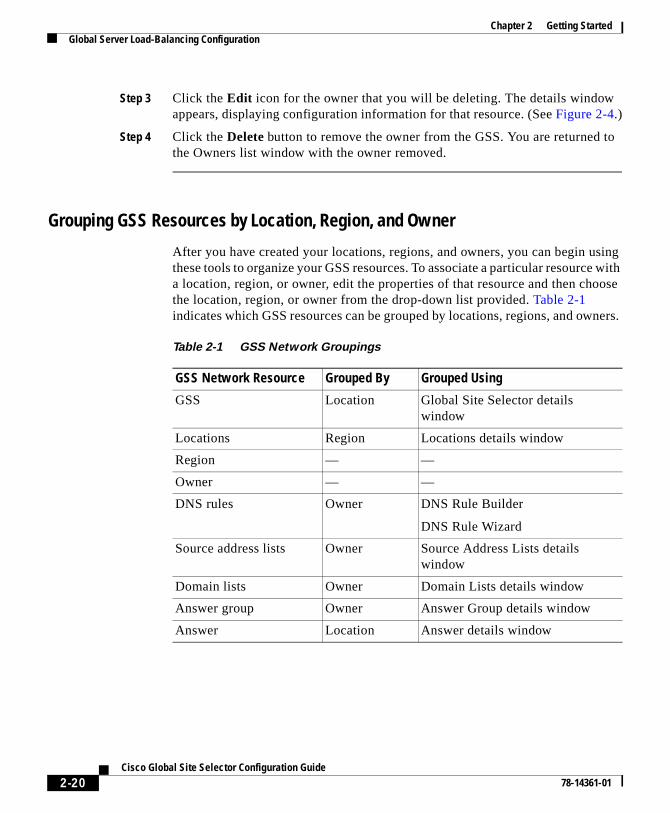
Chapter 2 Getting StartedGlobal Server Load-Balancing Configuration
Step 3 Click the Edit icon for the owner that you will be deleting. The details window appears, displaying configuration information for that resource. (See Figure 2-4.)
Step 4 Click the Delete button to remove the owner from the GSS. You are returned to the Owners list window with the owner removed.
Grouping GSS Resources by Location, Region, and Owner
After you have created your locations, regions, and owners, you can begin using these tools to organize your GSS resources. To associate a particular resource with a location, region, or owner, edit the properties of that resource and then choose the location, region, or owner from the drop-down list provided. Table 2-1 indicates which GSS resources can be grouped by locations, regions, and owners.
Table 2-1 GSS Network Groupings
GSS Network Resource Grouped By Grouped Using
GSS Location Global Site Selector details window
Locations Region Locations details window
Region — —
Owner — —
DNS rules Owner DNS Rule Builder
DNS Rule Wizard
Source address lists Owner Source Address Lists details window
Domain lists Owner Domain Lists details window
Answer group Owner Answer Group details window
Answer Location Answer details window
2-20Cisco Global Site Selector Configuration Guide
78-14361-01
Chapter 2 Getting StartedGlobal Server Load-Balancing Configuration
Creating and Modifying GSS DevicesThe first step in configuring global server load balancing on your GSS network is to activate and configure your GSS devices. Using the Global Site Selectors feature of the GSSM GUI, you can activate GSS devices (GSSs and standby GSSMs) that have been added to your GSS network, name GSS devices, and delete them from the GSS network.
Activating Your GSS Devices
After you have configured your GSS devices to act as GSSs or GSSMs, you must activate those devices from the GSSM GUI before they can begin receiving and processing user requests.
The one exception to this rule is the primary GSSM, which does not need to be activated after it is initially configured.
To activate a GSS or a standby GSSM from the primary GSSM GUI:
Step 1 From the primary GSSM, click the RESOURCES button.
Step 2 From the drop-down list, choose the Global Site Selectors option. The GSS list window appears. The device or devices that you need to activate are listed with an inactive status.
Step 3 Click the Edit icon for the first GSS that you wish to activate. The GSS details window appears. (See Figure 2-5.)
2-21Cisco Global Site Selector Configuration Guide
78-14361-01
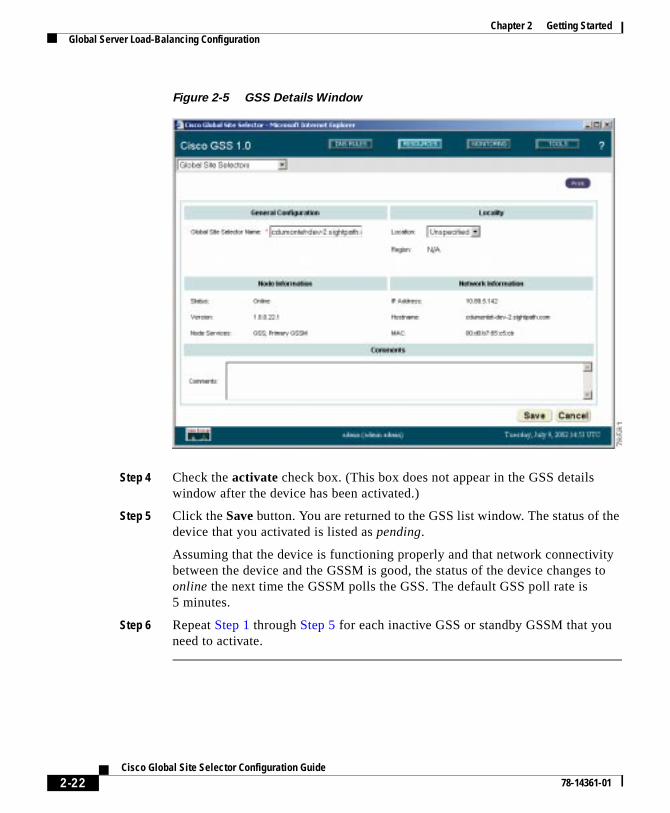
Chapter 2 Getting StartedGlobal Server Load-Balancing Configuration
Figure 2-5 GSS Details Window
Step 4 Check the activate check box. (This box does not appear in the GSS details window after the device has been activated.)
Step 5 Click the Save button. You are returned to the GSS list window. The status of the device that you activated is listed as pending.
Assuming that the device is functioning properly and that network connectivity between the device and the GSSM is good, the status of the device changes to online the next time the GSSM polls the GSS. The default GSS poll rate is 5 minutes.
Step 6 Repeat Step 1 through Step 5 for each inactive GSS or standby GSSM that you need to activate.
2-22Cisco Global Site Selector Configuration Guide
78-14361-01
Chapter 2 Getting StartedGlobal Server Load-Balancing Configuration
Modifying GSS Device Configuration
You can modify the name and location of any of your GSS devices using the GSSM GUI. To modify other network information such as the host name, IP address, or role, however, you must access the CLI on the device.
To modify the name and location of a GSS device:
Step 1 From the GSSM, click the RESOURCES button.
Step 2 From the drop-down list, choose the Global Site Selectors option. The GSS list window appears.
Step 3 Click the Edit icon for the GSS or GSSM that you wish to modify. The device type (GSS or GSS/GSSM) appears in the Node Services column.
Step 4 To modify the name of the device, enter a new name in the Global Site Selector Name field. This is not the same as the host name, which can only be changed using the CLI, but is used to easily distinguish one GSS device from another in the GSS GUI list windows, where many devices might be appear together.
Step 5 To modify the device location, choose a new location from the Location drop-down list.
Step 6 Click Save to save your changes and return to the GSS list window.
Deleting GSS Devices
With the exception of the primary GSSM, you can delete GSS devices from your network using the GSSM GUI. Deleting a GSS device such as a GSS or standby GSSM allows you to remove nonfunctioning GSS devices from your network, or to reconfigure and then reactivate a device should you encounter synchronization problems following a software upgrade or other configuration change.
To delete a GSS device:
Step 1 From the GSSM, click the RESOURCES button.
Step 2 From the drop-down list, choose the Global Site Selectors option. The GSS list window appears.
2-23Cisco Global Site Selector Configuration Guide
78-14361-01
Chapter 2 Getting StartedGlobal Server Load-Balancing Configuration
Step 3 Click the Edit icon for the GSS or standby GSSM that you wish to delete. The details window for the device appears.
Step 4 Click the Delete button. You are prompted to confirm your decision to delete the device.
Step 5 Click OK. You are returned to the GSS list window, with the device that you deleted removed.
Creating and Modifying Source Address ListsThe second step in configuring routing on your GSS network is to define the addresses from which requests will be sent. This is accomplished through the creation of source address lists, which are collections of IP addresses or address blocks for known client DNS proxies (or D-proxies).
Note The deployment of source address lists is optional. A default source address list, Anywhere, is supplied with the Cisco GSS software and matches any request for a domain.
Using the source address lists feature, you can enter one or more IP addresses, up to 30 addresses per list, representing DNS proxies from which requests will be originating.
In addition to adding individual addresses, the GSSM interface also allows you to enter IP address blocks conforming to the classless interdomain routing (CIDR) IP addressing scheme.
Creating Source Address Lists
To configure a source address list:
Step 1 From the GSSM, click the DNS RULES button.
Step 2 From the drop-down list, choose the Source Address Lists option. The Source Address Lists window appears. (See Figure 2-6.)
2-24Cisco Global Site Selector Configuration Guide
78-14361-01
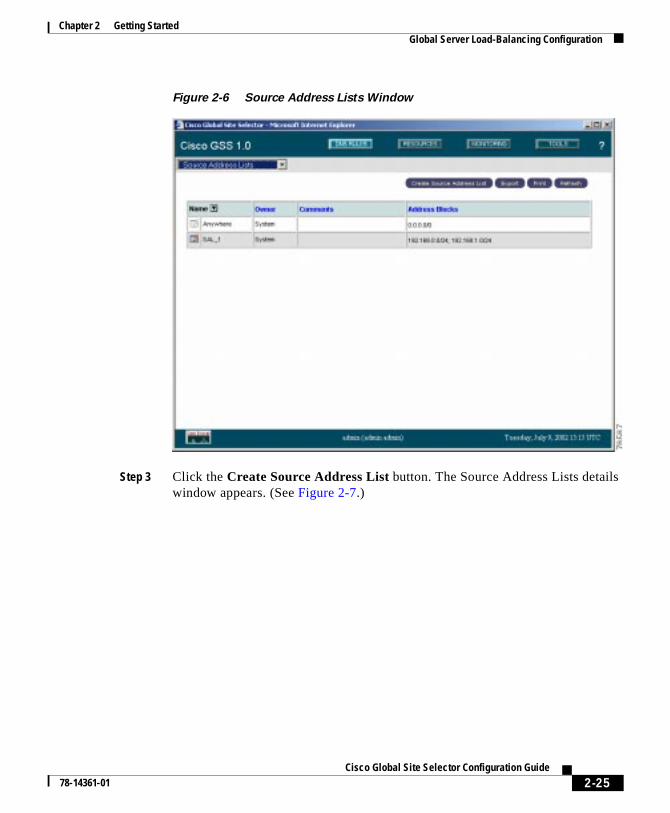
Chapter 2 Getting StartedGlobal Server Load-Balancing Configuration
Figure 2-6 Source Address Lists Window
Step 3 Click the Create Source Address List button. The Source Address Lists details window appears. (See Figure 2-7.)
2-25Cisco Global Site Selector Configuration Guide
78-14361-01
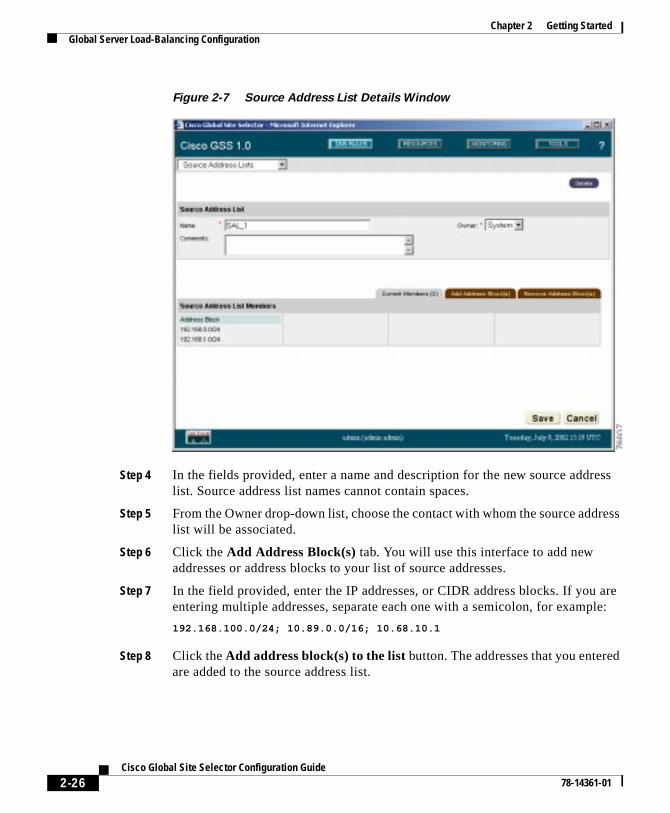
Chapter 2 Getting StartedGlobal Server Load-Balancing Configuration
Figure 2-7 Source Address List Details Window
Step 4 In the fields provided, enter a name and description for the new source address list. Source address list names cannot contain spaces.
Step 5 From the Owner drop-down list, choose the contact with whom the source address list will be associated.
Step 6 Click the Add Address Block(s) tab. You will use this interface to add new addresses or address blocks to your list of source addresses.
Step 7 In the field provided, enter the IP addresses, or CIDR address blocks. If you are entering multiple addresses, separate each one with a semicolon, for example:
192.168.100.0/24; 10.89.0.0/16; 10.68.10.1
Step 8 Click the Add address block(s) to the list button. The addresses that you entered are added to the source address list.
2-26Cisco Global Site Selector Configuration Guide
78-14361-01
Chapter 2 Getting StartedGlobal Server Load-Balancing Configuration
ke
rce
t you
you
w.
Step 9 To view the list, click the Current Members tab. The addresses in the source address list are expressed using the CIDR format.
Step 10 When you are satisfied with your source address list, click the Save button to save your changes.
You can add or remove addresses from the list at any time. See the “Modifying Source Address Lists” section that follows.
Modifying Source Address Lists
To modify an existing source address list:
Step 1 From the GSSM, click the DNS RULES button.
Step 2 From the drop-down list, choose the Source Address Lists option. The Source Address Lists window appears, listing existing source address lists. (See Figure 2-6.)
Step 3 Click the Edit icon corresponding to the source address list that you would lito edit. The Source Address Lists details window appears, displaying configuration information for that source address list. (See Figure 2-7.)
Step 4 Use the fields provided to modify the name, description, or owner for the souaddress list. Source address list names cannot contain spaces.
Step 5 To add more addresses to the list, click the Add Address Block(s) tab and then use the field provided to enter the IP addresses or CIDR address blocks thawish to add. Clicking the Add address block(s) to the list button appends the newaddresses to the existing source address list.
Step 6 To remove addresses from the source address list, click the Remove Address Block(s) tab. Check the check box accompanying each source address that wish to remove from the list and then click the Remove Selected button to remove the source addresses from the list.
Step 7 Once you have made your modifications, click the Current Members tab to review your updated source address list and then click the Save button. Your changes are saved, and you are returned to the Source Address Lists windo
2-27Cisco Global Site Selector Configuration Guide
78-14361-01
Chapter 2 Getting StartedGlobal Server Load-Balancing Configuration
ich use lists n that mple, nd nter
Deleting Source Address Lists
You cannot delete source address lists that are associated with an existing DNS rule. Before proceeding with the instructions below, first verify that none of your DNS rules reference the source address list that you will be deleting.
To delete a source address list from your GSS network:
Step 1 From the GSSM, click the DNS RULES button.
Step 2 From the drop-down list, choose the Source Address Lists option. The Source Address Lists window appears, listing existing source address lists. (See Figure 2-6.)
Step 3 Click the Edit icon corresponding to the source address list that you would like to delete. The Source Address Lists details window appears, displaying configuration information for that source address list. (See Figure 2-7.)
Step 4 Click the Delete button. You are prompted to confirm your decision to delete the source address list.
Step 5 Click OK. You are returned to the Source Address Lists window with the source address list that you deleted removed.
Configuring and Modifying Domain ListsDomain lists are collections of domain names for Internet or intranet resources, sometimes referred to as “hosted domains,” that are being requested by your users.
Domain lists contain one or more domain names that point to content for whthe GSS is acting as the authoritative DNS server and for which you wish tothe GSS technology to balance traffic and user requests. Using the domain feature, you can enter complete domain names or any valid regular expressiospecifies a pattern by which the GSS can match incoming addresses. For exaif you had only three hosted domains—www.cisco.com, support.cisco.com, acustomer.cisco.com—for which the GSS was responsible, you might want to eonly those domains in your domain list, as follows:
www.cisco.com; support.cisco.com; customer.cisco.com
2-28Cisco Global Site Selector Configuration Guide
78-14361-01
Chapter 2 Getting StartedGlobal Server Load-Balancing Configuration
ring
ing
However, if you had 20 or more possible domains for which the GSS was responsible—www1.cisco.com, www2.cisco.com, and so on—manually enteeach address is prohibitive. In such a situation, you could create a wildcard expression that would cover all those domains, as follows:
.*\.cisco\.com
Any request for a hosted domain that matches that pattern will be directed accordingly.
The Cisco GSS can support up to 1024 domains on any single server load-balancing device such as a Content Services Switch or Content SwitchModule.
Creating Domain Lists
To create a domain list:
Step 1 From the GSSM, click the DNS RULES button.
Step 2 From the drop-down list, choose the Domain Lists option. The Domain Lists window appears. (See Figure 2-8.)
2-29Cisco Global Site Selector Configuration Guide
78-14361-01
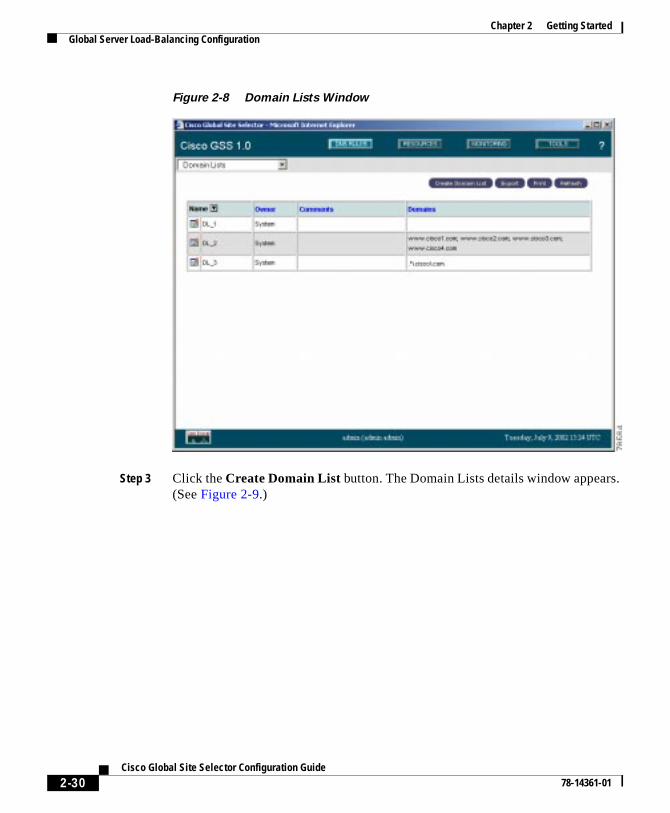
Chapter 2 Getting StartedGlobal Server Load-Balancing Configuration
Figure 2-8 Domain Lists Window
Step 3 Click the Create Domain List button. The Domain Lists details window appears. (See Figure 2-9.)
2-30Cisco Global Site Selector Configuration Guide
78-14361-01

Chapter 2 Getting StartedGlobal Server Load-Balancing Configuration
Figure 2-9 Domain List Details Window
Step 4 In the fields provided, enter a name and description for the new domain list. Domain list names cannot contain spaces.
Step 5 From the Owner drop-down list, choose the GSS with which the domain list will be associated.
Step 6 Click the Add Domain(s) tab. You will use this interface to add new hosted domains to your list.
Step 7 In the field provided, enter the names of any hosted domains that you want to add to the domain list. You can enter complete domain names or any regular expression that specifies a pattern by which the GSS can match incoming addresses, for example:
www.cisco.com; .*\.fidelity\.com
These should be addresses of resources for which the GSS is acting as the authoritative DNS server.
2-31Cisco Global Site Selector Configuration Guide
78-14361-01

Chapter 2 Getting StartedGlobal Server Load-Balancing Configuration
it. on
ain
Domain names that do not use wildcards cannot exceed 128 characters. For domain names with wildcards that are valid regular expressions, the GSS can match strings up to 256 characters long.
If you are entering multiple domain names, separate each one with a semicolon, for example:
www.cisco.com; support.cisco.com; cdn.cisco.com
Step 8 Click the Add Domains to Group button. The domain names that you entered are added to the domain list.
Step 9 To view the list, click the Current Members tab.
Step 10 When you are satisfied with your domain list, click the Save button to save your changes.
You can add domains to or remove them from the list at any time. See the “Modifying Domain Lists” section that follows.
Modifying Domain Lists
To modify an existing domain list:
Step 1 From the GSSM, click the DNS RULES button.
Step 2 From the drop-down list, choose the Domains Lists option. The Domain Lists window appears, listing existing domain lists. (See Figure 2-8.)
Step 3 Click the Edit icon corresponding to the domain list that you would like to edThe Domain Lists details window appears, displaying configuration informatifor that domain list. (See Figure 2-9.)
Step 4 Use the fields provided to modify the name, description, or owner for the domlist. Domain list names cannot contain spaces.
Step 5 To add more addresses to the list, click the Add Domain(s) tab and then use the field provided to enter the domain names that you wish to add. Clicking the Add Domains to Group button appends the new domains to the existing list.
2-32Cisco Global Site Selector Configuration Guide
78-14361-01
Chapter 2 Getting StartedGlobal Server Load-Balancing Configuration
Step 6 To remove domains from the domain list, click the Remove Domain(s) tab.
• Check the check box accompanying each domain that you wish to remove from the list.
• Click the Remove Selected button to remove the chosen domains.
Step 7 Once you have made your modifications, click the Current Members tab to review your updated domain list and then click the Save button. You changes are saved and you are returned to the Domain Lists window.
Deleting Domain Lists
You cannot delete domain lists that are associated with an existing DNS rule. Before proceeding with the instructions below, first verify that none of your DNS rules reference the domain list that you will be deleting.
To delete a domain list from your GSS network:
Step 1 From the GSSM, click the DNS RULES button.
Step 2 From the drop-down list, choose the Domain Lists option. The Domain Lists window appears, listing existing domain lists. (See Figure 2-8.)
Step 3 Click the Edit icon corresponding to the domain list that you would like to delete. The Domain Lists details window appears, displaying configuration information for that domain list. (See Figure 2-9.)
Step 4 Click the Delete button. You are prompted to confirm your decision to delete the domain list.
Step 5 Click OK. You are returned to the Domain Lists window with the list that you deleted removed.
2-33Cisco Global Site Selector Configuration Guide
78-14361-01
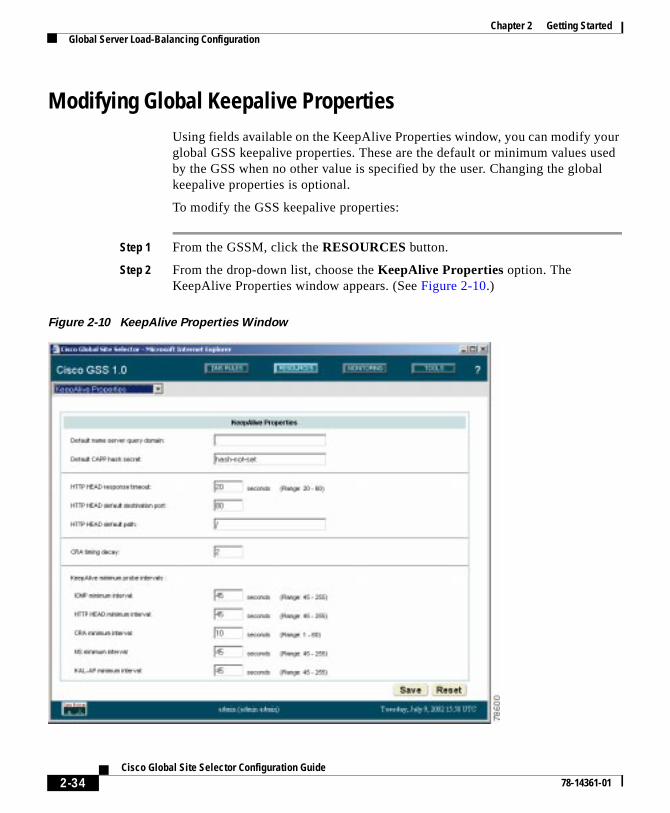
Chapter 2 Getting StartedGlobal Server Load-Balancing Configuration
Modifying Global Keepalive PropertiesUsing fields available on the KeepAlive Properties window, you can modify your global GSS keepalive properties. These are the default or minimum values used by the GSS when no other value is specified by the user. Changing the global keepalive properties is optional.
To modify the GSS keepalive properties:
Step 1 From the GSSM, click the RESOURCES button.
Step 2 From the drop-down list, choose the KeepAlive Properties option. The KeepAlive Properties window appears. (See Figure 2-10.)
Figure 2-10 KeepAlive Properties Window
2-34Cisco Global Site Selector Configuration Guide
78-14361-01
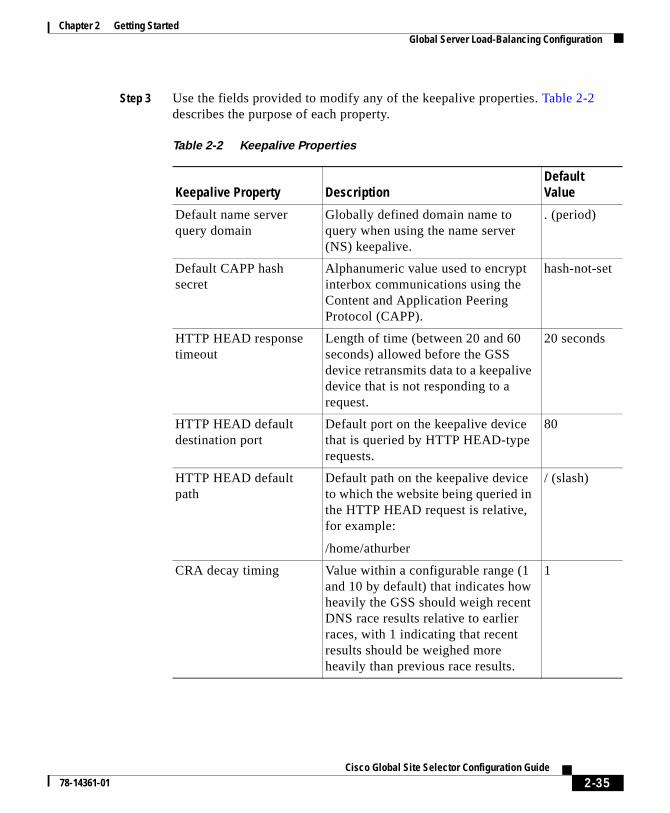
Chapter 2 Getting StartedGlobal Server Load-Balancing Configuration
Step 3 Use the fields provided to modify any of the keepalive properties. Table 2-2 describes the purpose of each property.
Table 2-2 Keepalive Properties
Keepalive Property DescriptionDefault Value
Default name server query domain
Globally defined domain name to query when using the name server (NS) keepalive.
. (period)
Default CAPP hash secret
Alphanumeric value used to encrypt interbox communications using the Content and Application Peering Protocol (CAPP).
hash-not-set
HTTP HEAD response timeout
Length of time (between 20 and 60 seconds) allowed before the GSS device retransmits data to a keepalive device that is not responding to a request.
20 seconds
HTTP HEAD default destination port
Default port on the keepalive device that is queried by HTTP HEAD-type requests.
80
HTTP HEAD default path
Default path on the keepalive device to which the website being queried in the HTTP HEAD request is relative, for example:
/home/athurber
/ (slash)
CRA decay timing Value within a configurable range (1 and 10 by default) that indicates how heavily the GSS should weigh recent DNS race results relative to earlier races, with 1 indicating that recent results should be weighed more heavily than previous race results.
1
2-35Cisco Global Site Selector Configuration Guide
78-14361-01
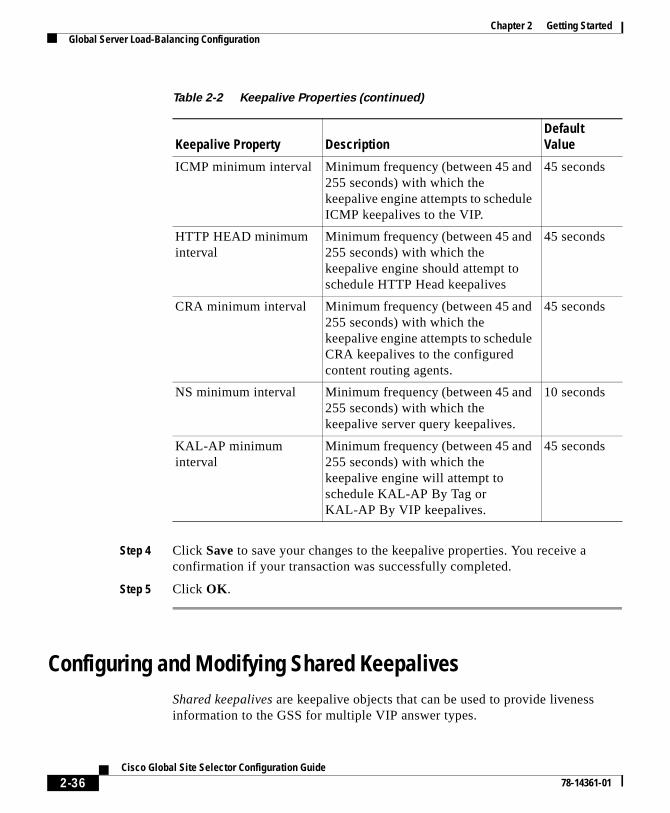
Chapter 2 Getting StartedGlobal Server Load-Balancing Configuration
Step 4 Click Save to save your changes to the keepalive properties. You receive a confirmation if your transaction was successfully completed.
Step 5 Click OK.
Configuring and Modifying Shared KeepalivesShared keepalives are keepalive objects that can be used to provide liveness information to the GSS for multiple VIP answer types.
ICMP minimum interval Minimum frequency (between 45 and 255 seconds) with which the keepalive engine attempts to schedule ICMP keepalives to the VIP.
45 seconds
HTTP HEAD minimum interval
Minimum frequency (between 45 and 255 seconds) with which the keepalive engine should attempt to schedule HTTP Head keepalives
45 seconds
CRA minimum interval Minimum frequency (between 45 and 255 seconds) with which the keepalive engine attempts to schedule CRA keepalives to the configured content routing agents.
45 seconds
NS minimum interval Minimum frequency (between 45 and 255 seconds) with which the keepalive server query keepalives.
10 seconds
KAL-AP minimum interval
Minimum frequency (between 45 and 255 seconds) with which the keepalive engine will attempt to schedule KAL-AP By Tag or KAL-AP By VIP keepalives.
45 seconds
Table 2-2 Keepalive Properties (continued)
Keepalive Property DescriptionDefault Value
2-36Cisco Global Site Selector Configuration Guide
78-14361-01
Chapter 2 Getting StartedGlobal Server Load-Balancing Configuration
y a .
r at he
Once created, shared keepalives are associated with VIPs when you create VIP answer types.
Should a shared keepalive fail to return a liveness status, all VIPs associated with that shared keepalive are assumed to be off line.
You must have a shared keepalive configured if you intend to use the KAL-AP keepalive method with a VIP answer; they are an option for both the ICMP and HTTP Head keepalive types.
Creating a Shared Keepalive
To create a shared keepalive:
Step 1 From the GSSM, click the DNS RULES button.
Step 2 From the drop-down list, choose the Shared KeepAlives option. The Shared KeepAlives list window appears, listing existing shared keepalives.
Step 3 Click the Create KeepAlive button. The Shared KeepAlives details window appears.
Step 4 Click the Type drop-down list at the top of the window and choose from one of the keepalive types for your shared keepalive:
• ICMP—Pings the specified keepalive address. Liveness is determined bresponse from the address, indicating simple connectivity to the network
• KAL-AP—Sends a detailed query to the keepalive address about the associated VIP, returning the liveness status of each interface as well asinformation on load for whichever VIP is acting as the master.
• HTTP Head—Sends a TCP format HTTP HEAD request to the web servean address you specified, returning the liveness status of the device in tform of a 200 response.
2-37Cisco Global Site Selector Configuration Guide
78-14361-01
Chapter 2 Getting StartedGlobal Server Load-Balancing Configuration
Step 5 Do one of the following:
• If you chose an ICMP shared keepalive type, enter the IP address that you will use to test liveness for the linked VIPs.
• If you chose a KAL-AP shared keepalive type:
– Enter the primary (master) IP address that will be tested for liveness in the field provided.
– If you wish, enter a secondary (standby) IP address in the field provided. This step is optional.
– If you will be using Content and Application Peering Protocol (CAPP) encryption, check the CAPP Secure check box and enter an alphanumeric encryption key value in the CAPP Hash Secret field.
• If you chose the HTTP Head shared keepalive type:
– Enter an optional domain name that is sent to the VIP as part of the HTTP HEAD query in the Host tag field. This tag allows an SLB to resolve the keepalive request to a particular website even when multiple sites are represented by the same VIP.
– Enter the port on the remote device that receives the HTTP request in the Destination port field. The default HTTP port is 80.
– Enter the default path used to locate the website in the Path field, for example:
home/athurber/
Step 6 Click Save to create the new shared keepalive and return to the Shared KeepAlives list window.
Modifying a Shared Keepalive
Once you have configured your shared keepalives, they can be modified at any time using the GSSM user interface.
2-38Cisco Global Site Selector Configuration Guide
78-14361-01
Chapter 2 Getting StartedGlobal Server Load-Balancing Configuration
VIP,
will
To modify an existing shared keepalive:
Step 1 From the Cisco GSS software user interface, click DNS RULES.
Step 2 From the drop-down list, choose Shared KeepAlives. The Shared KeepAlives list window appears.
Step 3 Locate the shared keepalive that you would like to modify and click the Edit icon adjacent to the keepalive name. The details window for that keepalive appears.
Step 4 Use the fields provided to modify the shared keepalive configuration.
Step 5 Click Save to save your configuration changes and return to the Shared KeepAlives list window.
Deleting a Shared Keepalive
To delete a shared keepalive from your GSS network, you must first disassociate any answers that are using the keepalive. Use the procedure that follows to disassociate your answers and remove a shared keepalive from your GSS network.
To delete a shared keepalive:
Step 1 From the GSSM, click the DNS RULES button.
Step 2 From the drop-down list, choose the Shared KeepAlives option. The Shared KeepAlives list window appears, listing existing shared keepalives.
Step 3 Click the Edit icon corresponding to the shared keepalive that you would like to delete. The Shared KeepAlive details window appears, displaying configuration information for that shared keepalive.
Step 4 Do one of the following:
• To disassociate all answers from the chosen shared keepalive and set the keepalive type of each of those answers to ICMP using the answer’s own click the Set Answers KAL ICMP button.
• To disassociate all answers from the chosen shared keepalive and set the keepalive type of each of those answers to None—meaning that the GSSassume they are always alive—click the Set Answers KAL None button.
2-39Cisco Global Site Selector Configuration Guide
78-14361-01
Chapter 2 Getting StartedGlobal Server Load-Balancing Configuration
s .
ith
SLB en it n A
f a ves, ring
n
You are prompted to confirm your decision to disassociate all the answers from the existing shared keepalive.
Step 5 Click OK.
Step 6 Click the Delete button. You are prompted to confirm your decision to delete the shared keepalive.
Step 7 Click OK. You are returned to the Shared KeepAlives list window with the shared keepalive that you deleted removed.
Configuring and Modifying AnswersUse the sections that follow to create and configure GSS answers to DNS queries. See the “Answers and Answer Groups” section on page 1-19 for information on each type of answer.
After you have configured your answers, see the “Configuring and Modifying Answer Groups” section on page 2-49 for instructions on collecting those answerinto groups from which individual answers will be chosen by your DNS rules
Remember that the method of keepalive monitoring available to you varies wthe resource type, as explained below.
Creating a VIP Answer Type
The VIP answer type refers to a virtual IP address (VIP) associated with an device such as a Content Services Switch or Content Switching Module. Whreceives requests for content that is managed by an SLB, the GSS returns arecord containing the VIP of the SLB that manages that content.
When configuring a VIP answer type you have the option of configuring one ovariety of different keepalive types to test for that answer. For certain keepalisuch as KAL-AP, it is necessary to configure shared keepalives before configuyour answer. See the “Configuring and Modifying Shared Keepalives” section opage 2-36 for more information on creating shared keepalives.
See the “Answers and Answer Groups” section on page 1-19 for more information on the VIP answer type.
2-40Cisco Global Site Selector Configuration Guide
78-14361-01
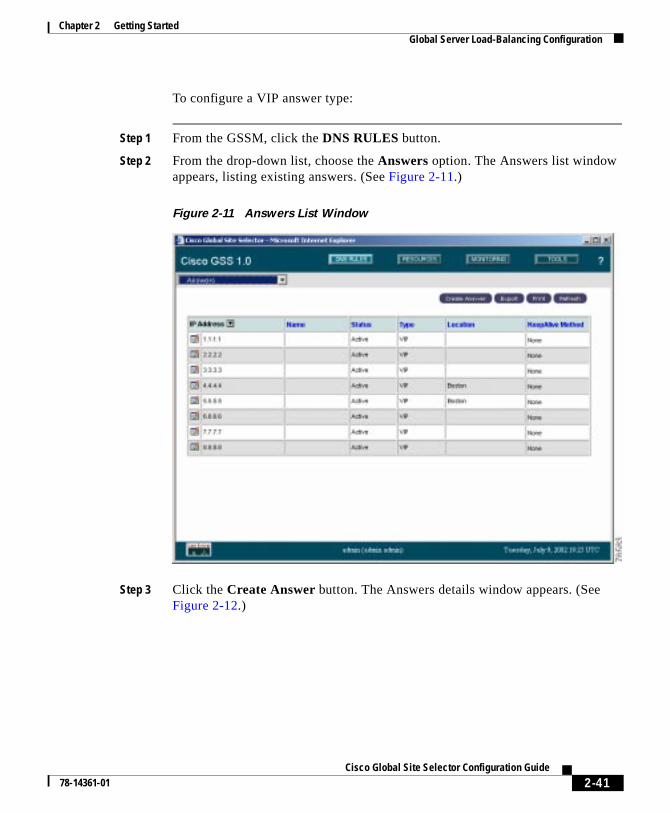
Chapter 2 Getting StartedGlobal Server Load-Balancing Configuration
To configure a VIP answer type:
Step 1 From the GSSM, click the DNS RULES button.
Step 2 From the drop-down list, choose the Answers option. The Answers list window appears, listing existing answers. (See Figure 2-11.)
Figure 2-11 Answers List Window
Step 3 Click the Create Answer button. The Answers details window appears. (See Figure 2-12.)
2-41Cisco Global Site Selector Configuration Guide
78-14361-01
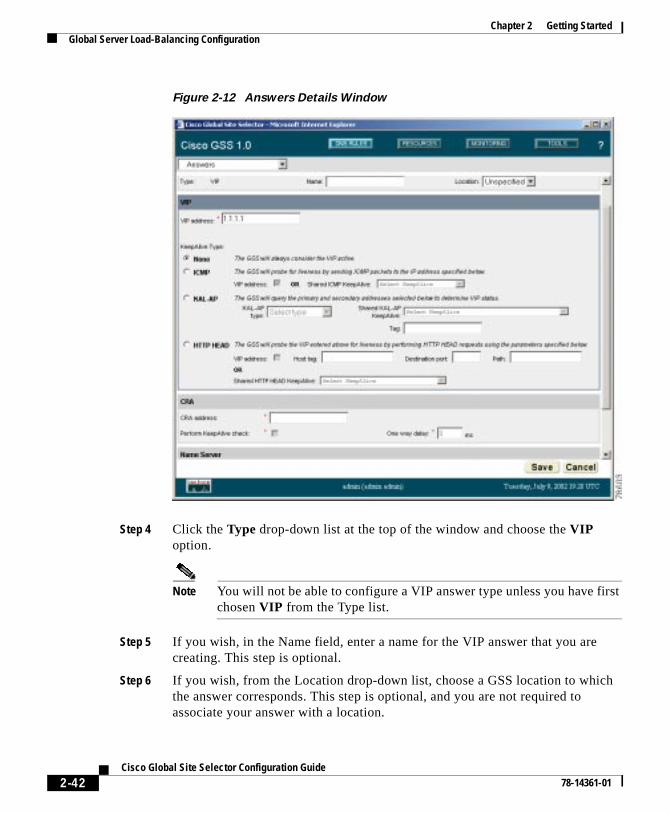
Chapter 2 Getting StartedGlobal Server Load-Balancing Configuration
Figure 2-12 Answers Details Window
Step 4 Click the Type drop-down list at the top of the window and choose the VIP option.
Note You will not be able to configure a VIP answer type unless you have first chosen VIP from the Type list.
Step 5 If you wish, in the Name field, enter a name for the VIP answer that you are creating. This step is optional.
Step 6 If you wish, from the Location drop-down list, choose a GSS location to which the answer corresponds. This step is optional, and you are not required to associate your answer with a location.
2-42Cisco Global Site Selector Configuration Guide
78-14361-01
Chapter 2 Getting StartedGlobal Server Load-Balancing Configuration
onse
ou 200
VIP
f a ss g
to
Step 7 Scroll down to the fields under the heading VIP.
Step 8 In the VIP address field, enter the publicly addressable or enterprise addressable VIP for the SLB that is managing the requested domain.
Step 9 Choose from one of the four keepalive types for your VIP answer:
• ICMP—Pings the VIP that you specified or an ICMP shared keepalive address type that you created. Liveness is determined by receiving a respto the ICMP packet sent.
• KAL-AP—Sends a detailed query to the VIPs associated with the sharedkeepalives, returning the liveness status of each interface as well as information on load for whichever VIP is acting as the master.
• HTTP Head—Sends a detailed HTTP HEAD query to the VIP address yspecified that probes for a web page header containing the page status. Amessage in the response from the server indicates liveness at the VIP.
• None—Sends no keepalive queries to the VIP. The GSS assumes that theis always alive.
Step 10 Do one of the following:
• If you chose an ICMP keepalive type, check the VIP address check box to have the GSS ping the VIP address to determine liveness. Otherwise, uncheck the VIP address check box and choose an ICMP shared keepalive type from the Shared ICMP keepalive drop-down list.
• If you chose a KAL-AP keepalive type, from the KAL Type drop-down list, choose the format of the KAL-AP keepalive query that you will be sending. The choices are:
– KAL-AP By Tag—Embeds a unique alphanumeric tag in the KAL-APrequest. The tag value is used to match the correct VIP on the SLB,avoiding confusion that can be caused when probing for the status oVIP on an SLB that is located behind a firewall using Network AddreTranslation (NAT) or that is applying multiple content rules to incominrequests.
– KAL-AP By VIP—Embeds the shared keepalive VIP address in the KAL-AP request. The KAL-AP queries the shared keepalive addressdetermine liveness.
2-43Cisco Global Site Selector Configuration Guide
78-14361-01
Chapter 2 Getting StartedGlobal Server Load-Balancing Configuration
le
SS
y the . The
ining
• If you chose an HTTP Head keepalive type, do one of the following:
– Check the VIP address check box if you wish to query the VIP address you specified for liveness and then proceed to Step 11.
– Uncheck the VIP address check box if you want to query a shared HTTP Head keepalive type for liveness, and then choose that keepalive from the Shared HTTP HEAD KeepAlive drop-down list. Proceed to Step 12.
Step 11 Do one of the following:
• If you chose KAL-AP By Tag from the KAL Type drop-down list:
– Choose the appropriate KAL-AP type keepalive from the Shared KAL-AP Type Keepalive drop-down list.
– Enter a unique alphanumeric value in the Tag field. This is used as a “key” by the Content Services Switch or the Content Switching Moduto match the KAL-AP request with the appropriate VIP.
• If you chose KAL-AP By VIP from the KAL Type drop-down list, choose the appropriate KAL-AP keepalive type from the Shared KAL-AP Type Keepalive drop-down list.
• If you chose the VIP address option under the heading HTTP Head, fill in the fields provided to configure your keepalive. See Step 5 of the “Creating a Shared Keepalive” section on page 2-37 for explanations of the HTTP Headconfiguration settings.
Step 12 Click Save to create the new VIP answer type and return to the Answers list window.
Creating a CRA Answer Type
The content routing agent (CRA) answer type is designed to work with the Gwhen the boomerang balance method has been selected.
Closeness is determined when multiple hosts reply to the requesting D-proxsimultaneously in what is referred to as a “DNS race.” The GSS coordinatesstart of the race so that all CRAs initiate their response at the exact same timefirst DNS reply to reach the D-proxy is chosen by the server as the host contathe answer.
2-44Cisco Global Site Selector Configuration Guide
78-14361-01
Chapter 2 Getting StartedGlobal Server Load-Balancing Configuration
To configure a CRA answer type:
Step 1 From the Cisco GSS software user interface, click DNS RULES.
Step 2 From the drop-down list, choose Answers. The Answers list window appears. (See Figure 2-11.)
Step 3 Click the Create Answer button. The Answers details window appears. (See Figure 2-12.)
Step 4 From the Type pull-down menu, choose CRA.
Step 5 From the Owner drop-down list, choose a defined GSS owner with which the answer will be associated.
Step 6 In the Name field, enter a name for the answer being created.
Step 7 If you wish, click the Location drop-down list and choose a location for the answer. Specifying a location for the answer is optional.
Step 8 In the CRA field of the window enter a CRA address, for example:
10.10.10.1
Step 9 If you wish the GSS to perform keepalive checks on the CRA answer, check the Perform KeepAlive check check box.
Step 10 If you wish, enter a one-way delay value (in milliseconds) in the field provided.
Note The Perform KeepAlive option can be disabled if a static one-way delay value is used.
When specified, this value is used to calculate a static round-trip time (RTT), with the one-way delay constituting one-half of the round-trip time that will be used for all DNS races involving this answer. Use the one-way delay value instead of the delay measured by the GSS keepalive engine.
Step 11 Click Save to create your new CRA answer type.
2-45Cisco Global Site Selector Configuration Guide
78-14361-01

Chapter 2 Getting StartedGlobal Server Load-Balancing Configuration
Creating a Name Server Answer Type
To configure a name server answer type:
Step 1 From the GSSM, click the DNS RULES button.
Step 2 From the drop-down list, choose the Answers option. The Answers list window appears, listing existing answers. (See Figure 2-11.)
Step 3 Click the Create Answer button. The Answers details window appears. (See Figure 2-12.)
Step 4 Click the Type drop-down list at the top of the window and choose the Name Server option.
Note You will not be able to configure a name server answer type unless you have first chosen Name Server from the Type list.
Step 5 If you wish, in the Name field, enter a name for the name server answer type that you are creating. This step is optional, and you are not required to enter a name for your answer.
Step 6 If you wish, from the Location drop-down list, choose a GSS location to which the answer corresponds. This step is optional, and you are not required to associate your answer type with a location.
Step 7 Scroll down to the fields under the heading Name Server.
Step 8 In the Name Server address field, enter the IP address of the name server to which the GSS will be forwarding requests.
Step 9 If you wish to have the GSS perform keepalive checks on the name server that you specified, verify that the Perform KeepAlive check box is checked (the default). The GSS will query the name server address you specified to determine liveness.
Step 10 If you wish to have the GSS query the name server for a specific domain in determining liveness, enter the domain name in the KeepAlive query domain field, for example:
cisco.com
2-46Cisco Global Site Selector Configuration Guide
78-14361-01
Chapter 2 Getting StartedGlobal Server Load-Balancing Configuration
sing
g it, nswer
ate
If no domain is specified, the GSS will query the default query domain. For instructions on configuring the default query domain, see the “Configuring and Modifying Shared Keepalives” section on page 2-36.
Step 11 Click Save to create the new answer and return to the Answers list window.
Modifying an Answer
Once you have configured your answers, they can be modified at any time uthe GSSM user interface.
To modify an existing answer:
Step 1 From the Cisco GSS software user interface, click DNS RULES.
Step 2 From the drop-down list, choose Answers. The Answers list window appears. (See Figure 2-11.)
Step 3 Locate the answer that you would like to modify and click the Edit icon adjacent to the answer name. The details window for that answer appears. (See Figure 2-12.)
Step 4 Use the fields provided to modify the answer configuration.
Note You cannot modify the type of an answer after it has been created.
Step 5 Click Save to save your configuration changes and return to the Answers listwindow.
Suspending or Reactivating an Answer
If you have created an answer but wish to temporarily stop the GSS from usinyou can use the suspend feature on the GSSM user interface to prevent that afrom being used by any of the currently configured DNS rules.
If you have already suspended an answer, use the activate feature to reactivthe answer.
2-47Cisco Global Site Selector Configuration Guide
78-14361-01
Chapter 2 Getting StartedGlobal Server Load-Balancing Configuration
been
le, es or
ers.
tion
To suspend or reactivate an answer:
Step 1 From the GSSM GUI, click DNS RULES.
Step 2 From the drop-down list, choose Answers. The Answers list window appears. (See Figure 2-11.)
Step 3 Locate the answer that you would like to suspend or reactivate and click the Edit icon adjacent to the answer name. The details window for that answer appears. (See Figure 2-12.)
Step 4 Click the Suspend button to suspend the answer.
If you are reactivating a suspended answer, click the Activate button.
Step 5 Click OK to confirm your decision to suspend or reactivate the answer. You are returned to the Answers list window. The answer that you modified will be listed with a status of “Suspended” or “Active.”
Suspending or Reactivating All Answers in a Location
Answers can be grouped and managed according to a GSS location that hasestablished and with which answers have been associated.
Using locations to manage your answers makes it easier for you to quickly suspend or activate answers in a particular area of your network, for exampshutting down one or more data centers for the purposes of software upgradregular maintenance.
The GSS automatically detects and routes requests around suspended answ
To suspend or reactivate answers based on their location:
Step 1 From the Cisco GSS software user interface, click RESOURCES. The GSS list window appears.
Step 2 From the drop-down list, choose the Locations option. The Locations list window appears. (See Figure 2-1.)
Step 3 Click the Edit icon for the location containing the answers that you will be suspending or reactivating. The details window appears, displaying configurainformation for that resource.
2-48Cisco Global Site Selector Configuration Guide
78-14361-01

Chapter 2 Getting StartedGlobal Server Load-Balancing Configuration
Step 4 Do one of the following:
• To suspend answers associated with this location, click the Suspend Answers button.
• To reactivate suspended answers associated with this location, click the Activate Answers button.
You are asked to confirm your decision to suspend or activate the answers.
Step 5 Click OK. You are returned to the Locations list window.
Deleting an Answer
If you have created an answer but wish to delete it from the GSS, you can use the delete feature on the GSSM GUI to remove that answer.
To delete an answer:
Step 1 From the Cisco GSS software user interface, click DNS RULES.
Step 2 From the drop-down list, choose Answers. The Answers list window appears. (See Figure 2-11.)
Step 3 Locate the answer that you would like to delete and click the Edit icon adjacent to the answer name. The details window for that answer appears.
Step 4 Click the Delete button to remove the answer. You are prompted to confirm your decision to delete the answer.
Step 5 Click OK to confirm your decision to delete the answer. You are returned to the Answers list window. The answer that you deleted will be removed.
Configuring and Modifying Answer GroupsAnswer groups are lists of GSS resources that are candidates to respond to DNS queries received from a user for a hosted domain. Using the DNS rules feature, these lists of network resources are associated with a particular balance method, which is used to resolve the request.
2-49Cisco Global Site Selector Configuration Guide
78-14361-01
Chapter 2 Getting StartedGlobal Server Load-Balancing Configuration
ss.
t type
• In the case of a VIP answer group type, the GSS chooses a single VIP using the balance method specified in the DNS rule.
• In the case of a CRA answer group type, all CRAs in the answer group are queried and then “race” to respond first to the D-proxy with their IP addre
• In the case of a name server answer group type, the GSS chooses a name server using the balance method specified in the DNS rule.
A DNS rule can have up to three balance clauses, each specifying a different answer group from which an answer can be chosen, after taking load threshold, order, and weight factors into account for each answer.
Before creating your answer groups, you must first have configured the answers that will make up those groups. See the “Configuring and Modifying Answers” section on page 2-40 for more information on creating GSS answers.
Creating an Answer Group
The procedure for creating an answer group is the same, regardless of whaof answer group you are creating.
To create an answer group:
Step 1 From the GSSM, click the DNS RULES button.
Step 2 From the drop-down list, choose the Answer Groups option. The Answer Group list window appears. (See Figure 2-13.)
2-50Cisco Global Site Selector Configuration Guide
78-14361-01
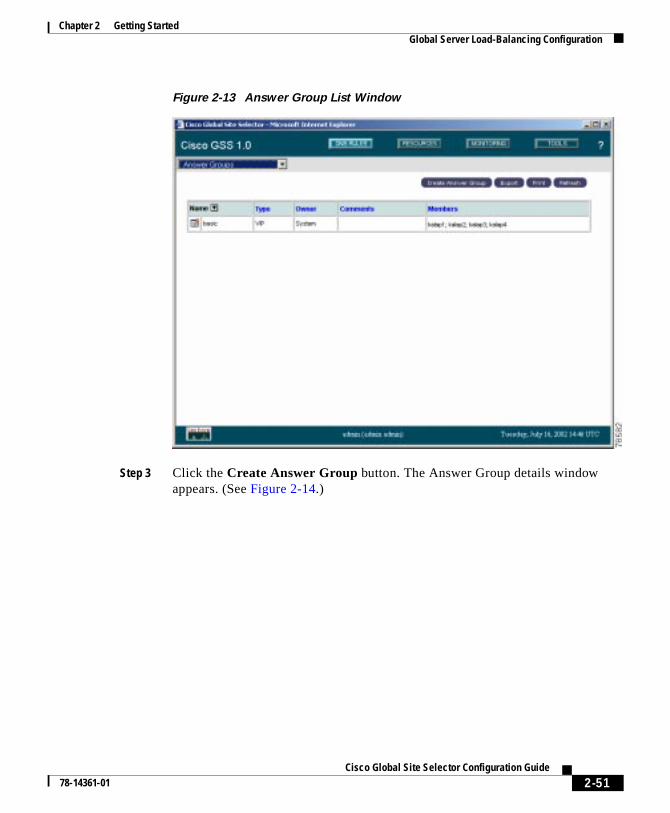
Chapter 2 Getting StartedGlobal Server Load-Balancing Configuration
Figure 2-13 Answer Group List Window
Step 3 Click the Create Answer Group button. The Answer Group details window appears. (See Figure 2-14.)
2-51Cisco Global Site Selector Configuration Guide
78-14361-01

Chapter 2 Getting StartedGlobal Server Load-Balancing Configuration
s.
Figure 2-14 Answer Group Details Window
Step 4 In the Name field, enter a name for the new answer group.
Note The answer group name cannot contain spaces.
Step 5 If you wish, in the Comments field, enter a description or other instructions regarding the new answer group. This step is not required.
Step 6 If you wish, from the Owner drop-down list, choose the GSS owner with which the answer group will be associated. You are not required to designate an owner for the answer group.
Step 7 From the Type drop-down list, choose one of the three options:
• Name server—The answer group will consist of configured name server
• CRA—The answer group will consist of CRAs for use with the GSS.
2-52Cisco Global Site Selector Configuration Guide
78-14361-01
Chapter 2 Getting StartedGlobal Server Load-Balancing Configuration
t type e
the
f type
me.
make the
• VIP—The answer group will consist of VIPs controlled by an SLB devicesuch as a Content Services Switch or a Content Switching Module.
Step 8 Click the Add Existing [answer]s tab. You will use this interface to add new answers to your answer group. The name of this tab varies depending on whaof answer group you are configuring. For example, if you are creating a namserver answer group type, it will be labeled Add Existing Name Servers.
Step 9 Check the check box corresponding to each answer that you wish to add to group.
Step 10 Click the Add Selected button. The answers that you chose are added to the answer group.
Step 11 Click the Current Members tab. You will use this interface to configure each othe answers in your group. The configuration options differ depending on the of answer group. See the “Balance Method Options” section on page 1-25 for explanations of the different balance method options available to you.
Step 12 Do one of the following:
• If you are configuring a name server answer group type, assign an order and weight to each answer in the answer group using the fields provided.
• If you are configuring a VIP answer group type, assign an order and load threshold to the answer using the fields provided, and then choose a weight for each answer in the answer group using the drop-down list provided.
• If you are configuring a CRA answer group type, proceed to the next step.
If you are unsure of the purpose of the order, weight, or load threshold settings, see the “Balance Method Options” section on page 1-25 for descriptions of each.
Step 13 When you are satisfied with your answer group, click the Save button to save your changes.
You can add answers to or remove answers from the answer group at any tiSee the “Modifying an Answer Group” section that follows for more information.
Modifying an Answer Group
Once you have created your answer groups, you can use the GSSM GUI to modifications to their configurations, adding and removing answers, changingorder, weight, and load thresholds of individual answers, and so on.
2-53Cisco Global Site Selector Configuration Guide
78-14361-01
Chapter 2 Getting StartedGlobal Server Load-Balancing Configuration
Answers can belong to more than one answer group. However, once you have added answers to an answer group, you cannot change the type of an answer group (for example, from VIP to CRA).
To modify an answer group:
Step 1 From the GSSM, click the DNS RULES button.
Step 2 From the drop-down list, choose the Answer Groups option. The Answer Group list window appears. (See Figure 2-13.)
Step 3 Click the Edit icon for the answer group you wish to modify. The Answer Group details window appears. (See Figure 2-14.)
Step 4 Use the fields provided to make changes to the name or comments attached to the answer group.
Note The answer group name cannot contain spaces.
Step 5 If you wish, from the Owner drop-down list, choose a new GSS owner with which the answer group will be associated. This step is optional, and you are not required to designate an owner for the answer group.
Step 6 Do one of the following:
• To add new answers to your answer group:
– Click the Add [answer]s tab. The name of this tab varies depending on what type of answer group you are configuring. For example, if you are creating a name server answer group type, it will be labeled Add Existing Name Servers. Answers can be added to more than one answer group.
– Check the check box corresponding to each answer that you wish to add to the answer group.
– Click the Add Selected button. The answers that you chose are added to the answer group.
2-54Cisco Global Site Selector Configuration Guide
78-14361-01
Chapter 2 Getting StartedGlobal Server Load-Balancing Configuration
• To remove answers from your answer group:
– Click the Remove Members tab.
– Check the check box corresponding to each answer that you wish to remove from the answer group.
– Click the Remove Selected button. The answers that you chose are removed from the answer group.
• To view the list, click the Current Members tab.
Step 7 Do one of the following:
• If your answer group is a VIP group type:
– Click the Current Members tab.
– In the Order field for each VIP listed, enter a number representing the order in which that answer will be used when the balance method is ordered list. Lower numbers take precedence over higher numbers.
– In the LT field, enter the load threshold for each VIP answer listed. The load threshold represents the maximum load allowable for each answer. If the answer reports a load greater than or equal to the specified threshold, that answer is ignored in favor of other answers.
– In the Weight field for each VIP listed, choose a weight (between 1 and 10) from the drop-down list that is to be used in determining how often the GSS should choose the selected answer when the balance method is weighted round-robin.
• If your answer group is a name server or VIP group type:
– Click the Current Members tab.
– In the Order field for each VIP listed, enter a number representing the order in which that answer will be used when the balance method is ordered list. Lower numbers take precedence over higher numbers.
– In the Weight field for each VIP listed, choose a weight (between 1 and 10) from the drop-down list that is to be used in determining how often the GSS should choose the selected answer when the balance method is weighted round-robin.
Step 8 When you are satisfied with your answer group, click the Save button to save your changes. You are returned to the Answer Group list window.
2-55Cisco Global Site Selector Configuration Guide
78-14361-01
Chapter 2 Getting StartedGlobal Server Load-Balancing Configuration
ged
Suspending or Reactivating an Answer Group
If you have created an answer group but wish to temporarily stop the GSS from directing requests to it, you can use the suspend answer feature on the GSSM user interface to temporarily suspend the answers that make up that group, thus preventing that answer group from being used by any of the currently configured DNS rules.
Note Suspending the answers in one answer group also affects any other answer groups to which those answers belong.
If you have already suspended the answers in an answer group, use the activate answers feature to reactivate the answer group.
To suspend or reactivate an answer group:
Step 1 From the Cisco GSS software user interface, click DNS RULES.
Step 2 From the drop-down list, choose Answer Groups. The Answer Group list window appears. (See Figure 2-13.)
Step 3 Locate the answer group that you would like to suspend and click the Edit icon adjacent to the answer group name. The details window for that answer group appears. (See Figure 2-14.)
Step 4 Click the Suspend Answers button to suspend the answer group.
If you are reactivating an answer group, click the Activate Answers button.
Step 5 Click OK to confirm your decision to suspend or reactivate the answers in the answer group. You are returned to the Answer Group list window.
Step 6 To view the status of the answers that you suspended or activated, see the “Configuring and Modifying Answers” section on page 2-40.
Suspending or Reactivating All Answers in an Answer Group Associated with an Owner
Answers that have been added to answer groups can be grouped and manaaccording to a GSS owner.
2-56Cisco Global Site Selector Configuration Guide
78-14361-01
Chapter 2 Getting StartedGlobal Server Load-Balancing Configuration
Using a GSS owner to manage your answer groups makes it easier for you to quickly suspend or activate related answers.
To suspend or reactivate all answers in answer groups associated with a GSS owner:
Step 1 From the Cisco GSS software user interface, click RESOURCES. The GSS list window appears.
Step 2 From the drop-down list, choose the Owners option. The Owners list window appears. (See Figure 2-3.)
Step 3 Click the Edit icon for the owner of the answers that you will be modifying. The Owners details window appears, displaying configuration information for that owner. (See Figure 2-4.)
Step 4 Do one of the following:
• To suspend answers associated with this owner, click the Suspend Answers button.
• To reactivate suspended answers associated with this owner, click the Activate Answers button.
You are asked to confirm your decision to suspend or activate the answers.
Step 5 Click OK. You are returned to the Owners list window.
Deleting an Answer Group
If you have created an answer group but wish to delete it from the GSS, you can use the delete feature on the GSSM user interface to remove that answer.
Note You cannot delete answer groups that are linked to DNS rules. Disassociate your answer groups from all DNS rules before attempting to delete them.
Deleting an answer group does not delete the answers contained in the group.
2-57Cisco Global Site Selector Configuration Guide
78-14361-01

Chapter 2 Getting StartedGlobal Server Load-Balancing Configuration
riety sed on
To delete an answer group:
Step 1 From the Cisco GSS software user interface, click DNS RULES.
Step 2 From the drop-down list, choose Answer Groups. The Answer Group list window appears. (See Figure 2-13.)
Step 3 Locate the answer group that you would like to delete and click the Edit icon adjacent to the answer name. The details window for that answer group appears. (See Figure 2-14.)
Step 4 Click the Delete button to remove the answer group. You are prompted to confirm your decision to delete the answer group.
Step 5 Click OK to confirm your decision to delete the answer group. You are returned to the Answer Group list window. The answer that you deleted has been removed.
Building and Modifying DNS RulesOnce you have configured your source address lists, domain lists, answers, and answer groups, you are ready to begin constructing the DNS rules that will govern all global server load balancing on your GSS network.
When building DNS rules, you specify actions for the GSS to take when it receives a request from a known source (a member of a source address list) for a known hosted domain (a member of a domain list).
The DNS rule specifies which response (answer) will be given to the requesting user’s local DNS host (D-proxy) and how that answer is chosen. One of a vaof balance methods is used to determine the best response to the request, bathe liveness and load of your GSS host devices.
Before creating your DNS rules, review the “Architecture” section on page 1-15.
DNS Rule Configuration Interface
The DNS rule area of the GSSM GUI does not correspond exactly to the listwindow and details window division described in the “Preparing to Configure Request Routing” section on page 2-12.
2-58Cisco Global Site Selector Configuration Guide
78-14361-01

Chapter 2 Getting StartedGlobal Server Load-Balancing Configuration
Because of the complexity of DNS rules, a slightly different interface scheme was adopted for the process of creating these rules. This scheme gives the user a choice of two interfaces for creating rules:
• DNS Rule Builder
• DNS Rule Wizard
DNS Rule Builder
If you are an experienced GSS user, you can use the DNS Rule Builder (see Figure 2-15) to quickly assemble DNS rules from source address lists, domain lists, and answers (balance methods) that you have already created. Using the fields and drop-down menus provided, you can assign a name for your rule and then configure the rule with up to three balance methods.
Figure 2-15 DNS Rule Builder Window
Because the DNS Rule Builder is launched in its own window, you can leave it open and return to the GSSM GUI to review or add answers, answer groups, domain lists, and more. Any changes made to your GSS network configuration while the DNS Rule Builder is open are immediately reflected in the
2-59Cisco Global Site Selector Configuration Guide
78-14361-01
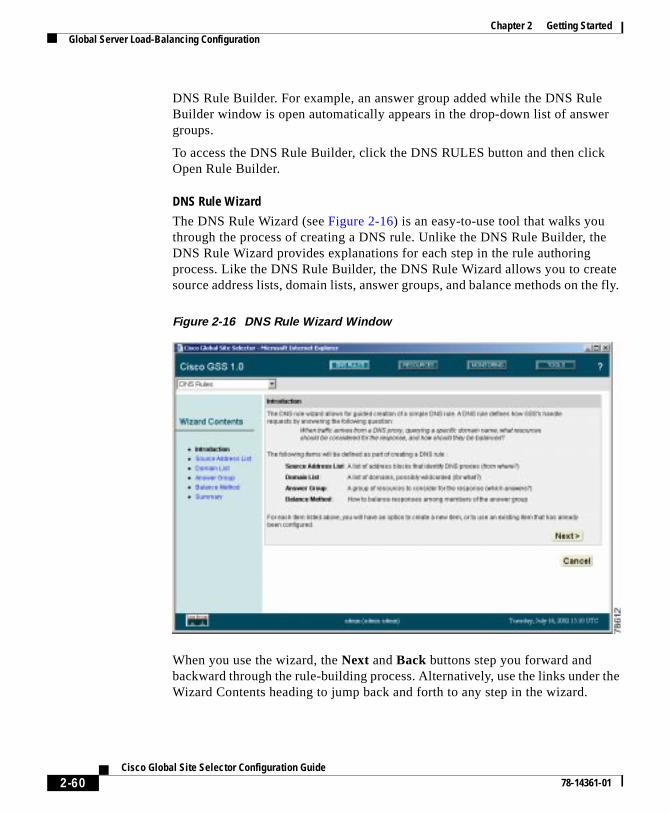
Chapter 2 Getting StartedGlobal Server Load-Balancing Configuration
DNS Rule Builder. For example, an answer group added while the DNS Rule Builder window is open automatically appears in the drop-down list of answer groups.
To access the DNS Rule Builder, click the DNS RULES button and then click Open Rule Builder.
DNS Rule Wizard
The DNS Rule Wizard (see Figure 2-16) is an easy-to-use tool that walks you through the process of creating a DNS rule. Unlike the DNS Rule Builder, the DNS Rule Wizard provides explanations for each step in the rule authoring process. Like the DNS Rule Builder, the DNS Rule Wizard allows you to create source address lists, domain lists, answer groups, and balance methods on the fly.
Figure 2-16 DNS Rule Wizard Window
When you use the wizard, the Next and Back buttons step you forward and backward through the rule-building process. Alternatively, use the links under the Wizard Contents heading to jump back and forth to any step in the wizard.
2-60Cisco Global Site Selector Configuration Guide
78-14361-01
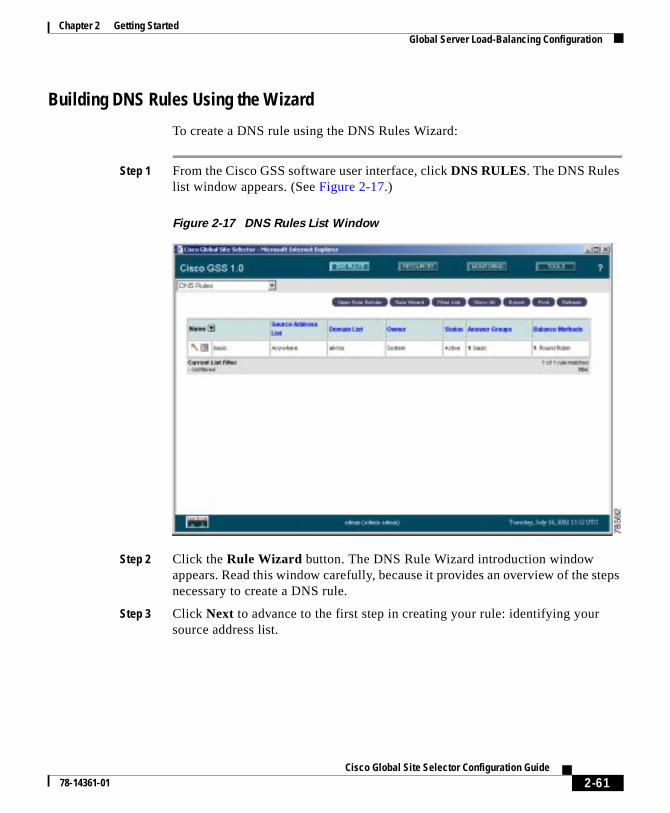
Chapter 2 Getting StartedGlobal Server Load-Balancing Configuration
Building DNS Rules Using the Wizard
To create a DNS rule using the DNS Rules Wizard:
Step 1 From the Cisco GSS software user interface, click DNS RULES. The DNS Rules list window appears. (See Figure 2-17.)
Figure 2-17 DNS Rules List Window
Step 2 Click the Rule Wizard button. The DNS Rule Wizard introduction window appears. Read this window carefully, because it provides an overview of the steps necessary to create a DNS rule.
Step 3 Click Next to advance to the first step in creating your rule: identifying your source address list.
2-61Cisco Global Site Selector Configuration Guide
78-14361-01
Chapter 2 Getting StartedGlobal Server Load-Balancing Configuration
Step 4 Do one of the following:
• To have this DNS rule apply to requests originating from any DNS proxy, click the Any Address button, click Next, and then proceed to Step 7.
• To have this DNS rule apply to requests originating from a list of DNS proxies that you have not yet configured and want to configure now, click the Manually entered source address list button and then click Next.
• To have this DNS rule apply to requests originating from a list of DNS proxies that you have already configured using the source address lists feature, click the Predefined source address list button and then click Next.
Step 5 Do one of the following:
• If you chose the Manually entered source address list option, use the following procedure to create your source address list. Once you have configured your source address list using the wizard, it is available for other DNS rules as well.
– Enter a name for your source address list in the List Name field.
– If you wish, choose an owner for the list by clicking the List Owner drop-down list and choosing a GSS username from the list. This step is optional.
– In the field provided, enter one or more source CIDR-format IP addresses that will make up the list. You can enter individual IP addresses or address blocks. Separate addresses using semicolons, for example:
192.168.1.110/32; 192.168.10.0/24; 192.161.0.0/16
• If you chose the Predefined source address list option, click the name of the source address list so that it is highlighted.
Step 6 Click Next to proceed to the domain list configuration stage of the DNS Rule Wizard.
Step 7 Do one of the following:
• To have this DNS rule apply to requests for a hosted domain that you have not yet configured and want to configure now, click the Manually entered domain list button and then click Next.
• To have this DNS rule apply to requests originating from a list of hosted domains that you have already configured using the domain lists feature, click the Predefined domain list button and then click Next.
2-62Cisco Global Site Selector Configuration Guide
78-14361-01
Chapter 2 Getting StartedGlobal Server Load-Balancing Configuration
Step 8 This step of the DNS Rule Wizard allows you to configure the domains that users will be requesting. The GSS can support up to 1024 domains managed by any single server load-balancing device such as a Cisco Content Services Switch or Content Switching Module.
Do one of the following:
• If you chose the Manually entered domain list option, use the following procedure to create your domain list. Once you have configured your domain list using the wizard, it is available for other DNS rules as well.
– Enter a name for your domain list in the List Name field.
– If you wish, choose an owner for the list by clicking the List Owner drop-down list and choosing a GSS owner from the list.
– In the field provided, enter one or more domain names that will make up the list. You can enter complete domain names or any regular expression that specifies a pattern by which the GSS can match incoming addresses, for example:
www.cisco.com; .*\.fidelity\.com
Any request for a hosted domain that matches that pattern is directed accordingly.
– When you have finished entering the domain names, click Next.
• If you chose the Predefined domain list option, click the name of the domain list so that it is highlighted and then click Next.
Step 9 This step of the DNS Rule Wizard enables you to configure answer groups, which are collections of resources that are used to respond to user requests.
Do one of the following:
• To have this DNS rule respond to the request for the hosted domain using resources (answers) that you have not yet configured, click the Enter addresses button and then click Next.
• To have this DNS rule respond to the request for the hosted domain using resources (answers) that you already configured using the answers and answer group features, click the Select an existing Answer Group button and then click Next.
2-63Cisco Global Site Selector Configuration Guide
78-14361-01
Chapter 2 Getting StartedGlobal Server Load-Balancing Configuration
Step 10 Do one of the following:
• If you chose the Enter addresses option, use the following procedure to create your answers and answer group. Once you have configured your answer group using the wizard, it is available for other DNS rules as well.
– Enter a name for your answer group in the Group Name field.
– If you wish, choose an owner for the answer group by clicking the List Owner drop-down list and choosing a GSS owner from the list. This step is optional.
– Choose an answer group type by clicking one of the three buttons provided. Once you choose an answer group type, only answers of that type (VIP, NS, or CRA) can be added to the group.
– Click Next to begin configuring answers for your answer group and then proceed to the next step.
• If you chose the Select an existing Answer Group option, click the name of the answer group so that it is highlighted and then click Next.
You will be asked to configure your answer group or choose an existing answer group to respond to requests.
If you will be creating your own answer group and need to enter more addresses than there are IP Address fields, click the Add Page button at the bottom of the window to create additional spaces in which to enter addresses.
Use the page number links in the upper right corner of the Answer Group Configuration window to navigate back and forth between windows.
Step 11 Do one of the following:
• If you are configuring a VIP answer group type, use the following procedure to identify the VIPs that will serve as the answers that make up the answer group. Then assign an order, load threshold, and weight to each answer in the answer group.
– Enter the address of each VIP that will belong to the answer group in the IP Address fields provided.
– If you wish, for each VIP IP address choose an optional location by clicking the Location drop-down list. This step is optional.
– If you will be using the ordered list balance method with this answer group, assign an order to each VIP listed in the answer group using the Order drop-down list provided. The number that you assign represents
2-64Cisco Global Site Selector Configuration Guide
78-14361-01
Chapter 2 Getting StartedGlobal Server Load-Balancing Configuration
the priority of the answer on the list, with lower-numbered answers having a higher priority. Subsequent VIPs on the list are used only if preceding VIPs on the list are unavailable.
– If you will be using the weighted round-robin balance method with this answer group, you can optionally assign a weight between 1 and 10 to each answer in the answer group using the Weight drop-down list provided.
– If you will be using the round-robin, ordered list, or least loaded balance methods, choose a threshold between 2 and 254 from the Load Threshold drop-down list. If the VIP answer reports a load above the threshold that you specify, the GSS considers the device unavailable to handle further requests.
• If you are configuring a CRA answer group type, use the following procedure to identify the CRAs that will serve as the answers that make up the answer group. If you wish, you can also assign a location for each answer in the answer group.
– Enter the address of each CRA that will belong to the answer group in the IP Address fields.
– For each CRA IP address, if you wish, you can choose an optional location by clicking the Location drop-down list.
• If you are configuring a name server answer group type, use the following procedure to identify the name servers that will serve as the answers that make up the answer group:
– Enter the address of each name server that will belong to the answer group in the IP Address fields.
– If you wish, for each name server IP address, you can choose an optional location by clicking the Location drop-down list.
– If you will be using the ordered list balance method with this answer group, assign an order to each name server listed in the answer group using the Order field. The number that you assign represents the priority of the answer on the list. Subsequent name servers on the list are used only if preceding name servers on the list are unavailable.
2-65Cisco Global Site Selector Configuration Guide
78-14361-01
Chapter 2 Getting StartedGlobal Server Load-Balancing Configuration
eated oth :
hash
the the
wers
– If you will be using the weighted round-robin balance method, assign a weight between 1 and 10 to each answer in the answer group, using the Weight drop-down list. The number that you provide is used to create a ratio that the GSS will use when directing requests to each answer.
For example, if answer A has a weight of 10 and answer B has a weight of 1, answer A will receive 10 requests for every 1 directed to answer B.
Step 12 Click Next to proceed to the balance method configuration stage of the DNS Rule Wizard.
Step 13 You will now choose a balance method to be used when an answer is chosen from your answer group that is best suited to respond to the DNS query. Your choice of balance methods is limited by the type of answer method (name server, VIP, or CRA) that you chose. See the “Balance Methods” section on page 1-23 for detailed explanations of each option.
Do one of the following:
• If you are configuring a VIP or name server answer group type to respond to requests, choose from the following balance methods for each of your DNS rule clauses:
– Hashed—The GSS chooses the answer based on a unique value crfrom information stored in the request. There are two hash options, bof which can be applied to a particular answer group simultaneously
• Hashed By Source Address—The GSS chooses the answer based on ahash value created from the source address of the request.
• Hashed By Domain Name—The GSS chooses the answer based on avalue created from the requested domain name.
– Least loaded—This balance method is available for the VIP answer group type only. The GSS chooses an answer from the list based onload reported by each VIP in the answer group; the answer reportinglightest load is chosen to respond to the request.
– Ordered list—The GSS chooses an answer from the list based on precedence; answers with a lower number are tried first, whereas ansfarther down the list are tried only if preceding name servers are unavailable to respond to the request.
– Round-robin—The GSS cycles through the list of answers that are available as requests are received.
2-66Cisco Global Site Selector Configuration Guide
78-14361-01

Chapter 2 Getting StartedGlobal Server Load-Balancing Configuration
hat
p e a
ds)
nswer
ress
as
om
– Weighted round-robin—The GSS cycles through the list of answers tare available as requests are received but sends requests to favoredanswers in a ratio determined by the weight value assigned to that resource.
– DNS TTL—This balance method is available for the VIP answer groutype only. It is the length of time in seconds that the requesting DNSproxy will cache the response sent from the GSS and consider it to bvalid answer.
– Return Record Count—This balance method is available for the VIPanswer group type only. It is the number of address records (A recorthat the GSS will return for requests that match the DNS rule.
• If you are configuring a CRA answer group type to respond to requests, enter a “last gasp” address in the Last Gasp field. This address serves as the aif no CRAs reply to the request.
Step 14 Click Next to proceed to the Summary stage of the DNS Rule Wizard. An overview of your rule is provided that supplies information on the source addlist, domain list, answer group, and balance method chosen.
Step 15 Using the fields provided in the Summary window, finish configuring your rulefollows:
a. Enter a name for your DNS rule in the Rule Name field.
b. If you wish, associate the rule with a GSS owner by choosing an owner frthe Rule Owner drop-down list.
c. Indicate what type of DNS queries that this rule will be applied to by choosing a query type from the Match DNS Query Type drop-down list:
– All—The DNS rule will be applied to all DNS queries originating froma host on the configured source address list.
– A record—The DNS rule will be applied only to answer record (A record) requests originating from a host on the configured sourceaddress list.
2-67Cisco Global Site Selector Configuration Guide
78-14361-01
Chapter 2 Getting StartedGlobal Server Load-Balancing Configuration
ist
ady
the es
that cified
nnot
h
t sts
d. Choose an operating status for the rule:
– Active—The DNS rule will immediately begin processing requests.
– Suspended—The DNS rule will be listed in your GSSM DNS Rules lwindow but will have a status of “suspended” and will not be used toprocess any incoming DNS queries.
Step 16 Click Save to save your DNS rule and return to the DNS Rules list page.
Building DNS Rules Using the DNS Rule Builder
If you are comfortable with the process of building a DNS rule and have alreconfigured your domain lists, answers, and answer groups, you can use theDNS Rule Builder to quickly assemble a DNS rule.
The DNS Rule Builder is a simplified interface that pulls together all the GSSelements needed to create new DNS rules. In addition to being simpler thanDNS Rule Wizard, the DNS Rule Builder allows you to configure multiple clausfor your DNS rule; that is, additional answer group and balance method pairscan be tried in the event that the first answer group and balance method spedoes not yield an answer.
To create a DNS rule using the DNS Rule Builder:
Step 1 From the Cisco GSS software user interface, click DNS RULES. The DNS Rules list window appears. (See Figure 2-17.)
Step 2 Click the Open Rule Builder button. The DNS Rule Builder window opens in aseparate window. (See Figure 2-15.)
Step 3 In the Rule Name field, enter a name for your new DNS rule. Rule names cacontain spaces.
Step 4 If you wish, click the Rule Owner drop-down list and choose a GSS owner witwhich the rule will be associated.
Step 5 Click the Source Address List drop-down list and choose a source address lisfrom which requests will originate. The DNS rule will be applied only to requecoming from one of the addresses in the source address list.
2-68Cisco Global Site Selector Configuration Guide
78-14361-01
Chapter 2 Getting StartedGlobal Server Load-Balancing Configuration
st
)
f his S
s:
xy valid
at e
xy lid
ore elp
A ency
Step 6 Click the Domain List drop-down list and choose a domain list to which DNS queries will be addressed. The DNS rule is applied only to requests for a domain on the specified domain list.
Step 7 From the Match DNS Query Type drop-down list, indicate what type of DNS queries this rule will be applied to:
• All—The DNS rule will be applied to all DNS queries originating from a hoon the configured source address list.
• A record—The DNS rule will be applied only to answer record (A recordrequests originating from a host on the configured source address list.
Step 8 Next to the heading Balance Clause 1, choose the answer group component oyour first answer group and balance method pairing from the drop-down list. Twill be the first method that the GSS will use to choose an answer for the DNquery.
Step 9 Fill in any additional configuration information for your answer group as follow
• If you chose a VIP answer group type, configure the following in the fields provided:
– DNS TTL—The length of time in seconds that the requesting DNS proshould cache the response sent from the GSS and consider it to be aanswer.
– Return record count—The number of address records (A records) thmatch the configured DNS rule clauses that the GSS will return to threquesting D-proxy.
• If you chose a CRA answer group type, configure the following in the fields provided:
– DNS TTL—The length of time in seconds that the requesting DNS prowill cache the response sent from the GSS and consider it to be a vaanswer.
– Fragment size—The maximum size of the reply packet that is sent toeach DNS server during a race. Lower packet sizes result in two or mpackets being sent to the D-proxy for a single DNS reply. This can hidentify network congestion and provide more reliable race results.
– Pad size—The amount of extra data (in bytes) included with each CRresponse packet and used to evaluate CRA bandwidth as well as latwhen making routing decisions.
2-69Cisco Global Site Selector Configuration Guide
78-14361-01
Chapter 2 Getting StartedGlobal Server Load-Balancing Configuration
ical each
lay S
er as
name ress
ame
d
t an
S, spend are
– IP TTL—The maximum number of network hops that should be usedwhen responding to the D-proxy.
– Secret—A text string of up to 64 characters that is used to encrypt critdata sent between the GSS and CRAs. This key must be the same forconfigured CRA.
– Max prop. delay—The maximum propagation delay, the maximum de(in milliseconds) that will be observed before the GSS forwards a DNrequest to a CRA.
– Server delay—The maximum delay (in milliseconds) that will be observed before the GSS forwards the address of its “last gasp” serva response to the requesting name server.
Step 10 Choose the balance method for the answer group from the drop-down list.
• If you chose a CRA answer group type, the balance method is automatically set to boomerang.
• If you chose hashed as the balance method, choose from the following options for the hash method (multiple options can be chosen in the same session):
– Hashed By Source Address—The GSS passes the request along to aserver forwarder based on a hash value created from the source addof the request.
– Hashed By Domain Name—The GSS passes the request along to a nserver forwarder based on a hash value created from the requested domain name.
Step 11 If you wish, repeat Step 8 through Step 10 to choose additional answer group anbalance method pairings for Balance Clause 2 and Balance Clause 3. Theseanswer pairs are only applied if the preceding clause was unable to arrive aanswer for the DNS query.
Step 12 Click Save to save your DNS rule and return to the DNS Rules list page.
Suspending a DNS Rule
If you want to stop requests from being processed by a DNS rule on your GSuse the suspend feature to temporarily deactivate the rule. You can use the sufeature to temporarily halt traffic to particular answers while those resourcesreceiving maintenance and so on.
2-70Cisco Global Site Selector Configuration Guide
78-14361-01
Chapter 2 Getting StartedGlobal Server Load-Balancing Configuration
been
our ch
e for
Once a rule has been suspended, you must reactivate it from the GSSM GUI before it can again be used to process incoming DNS queries.
To suspend a DNS rule:
Step 1 From the Cisco GSS software user interface, click DNS RULES. The DNS Rules list window appears. (See Figure 2-17.)
Step 2 Click the Edit icon for the DNS rule you wish to suspend. The DNS Rule Builder/Edit DNS Rule window appears in a separate browser window.
Step 3 Click the Suspend link in the upper right corner of the window. You are prompted to confirm your decision to suspend the DNS rule.
Step 4 Click OK to confirm your decision. You are returned to the DNS Rule list window. The status of the DNS rule is listed as “Suspended.”
Suspending or Reactivating All DNS Rules Belonging to an Owner
DNS rules can be grouped and managed according to a GSS owner that hasestablished and with which the DNS rules have been associated.
Using owners to manage your DNS rules makes it easier for you to quickly suspend or activate rules related to a particular group or department within yorganization (for example HR or sales) without needing to individually edit earule that serves that entity.
To suspend or reactivate DNS rules belonging to an owner:
Step 1 From the Cisco GSS software user interface, click RESOURCES. The GSS list window appears.
Step 2 From the drop-down list, choose the Owners option. The Owners list window appears. (See Figure 2-3.)
Step 3 Click the Edit icon for the owner responsible for the DNS rules that you will bmodifying. The details window appears, displaying configuration information that resource.
2-71Cisco Global Site Selector Configuration Guide
78-14361-01
Chapter 2 Getting StartedGlobal Server Load-Balancing Configuration
Step 4 Do one of the following:
• To suspend DNS rules associated with this owner, click the Suspend DNS Rules button.
• To reactivate suspended DNS rules associated with this owner, click the Activate DNS Rules button.
You are asked to confirm your decision to suspend or activate all the DNS rules associated with this owner.
Step 5 Click OK. You are returned to the DNS Rules list window.
Deleting a DNS Rule
To delete a DNS rule:
Step 1 From the Cisco GSS software user interface, click DNS RULES. The DNS Rules list window appears. (See Figure 2-17.)
Step 2 Click the Edit icon for the DNS rule that you wish to delete. The DNS Rule Builder/Edit DNS Rule window appears in a separate browser window.
Step 3 Click the Delete link in the upper right corner of the window. You are prompted to confirm your decision to delete the DNS rule.
Step 4 Click OK to confirm your decision. You are returned to the DNS Rule list window. The DNS rule is removed from the list.
Configuring DNS Rule FiltersAs your GSS network grows, so will your collection of DNS rules for handling traffic to and from your network. In time, it may become difficult to locate the rules that you need. For that reason, the GSS GUI provides filters that can be applied to your DNS rules, allowing you to view only those rules that have the properties you are interested in. For example, you can create a filter that will limit your view of the DNS rules to include only those that involve a certain source address list or domain list, use a certain balance method, are owned by a particular user, or have a status of “active.”
2-72Cisco Global Site Selector Configuration Guide
78-14361-01
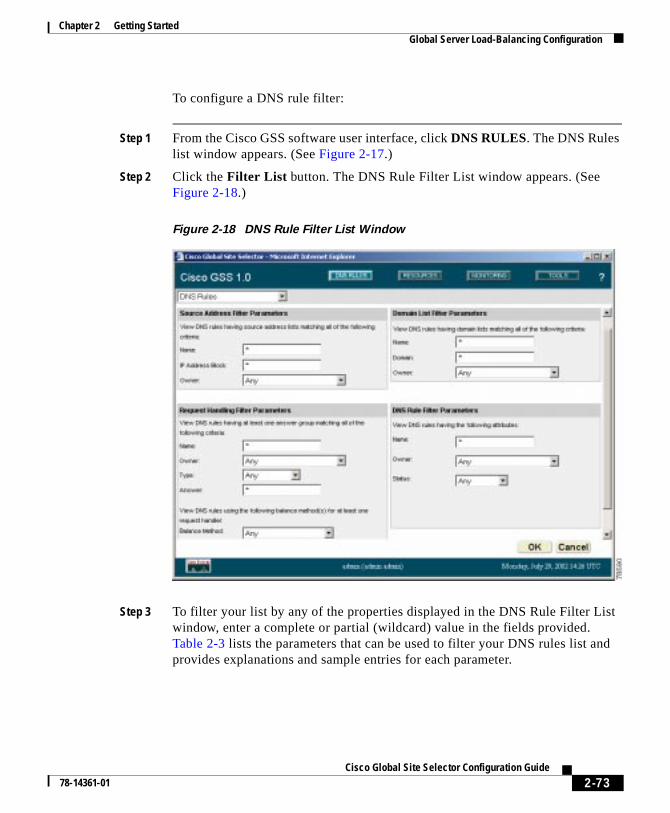
Chapter 2 Getting StartedGlobal Server Load-Balancing Configuration
To configure a DNS rule filter:
Step 1 From the Cisco GSS software user interface, click DNS RULES. The DNS Rules list window appears. (See Figure 2-17.)
Step 2 Click the Filter List button. The DNS Rule Filter List window appears. (See Figure 2-18.)
Figure 2-18 DNS Rule Filter List Window
Step 3 To filter your list by any of the properties displayed in the DNS Rule Filter List window, enter a complete or partial (wildcard) value in the fields provided. Table 2-3 lists the parameters that can be used to filter your DNS rules list and provides explanations and sample entries for each parameter.
2-73Cisco Global Site Selector Configuration Guide
78-14361-01
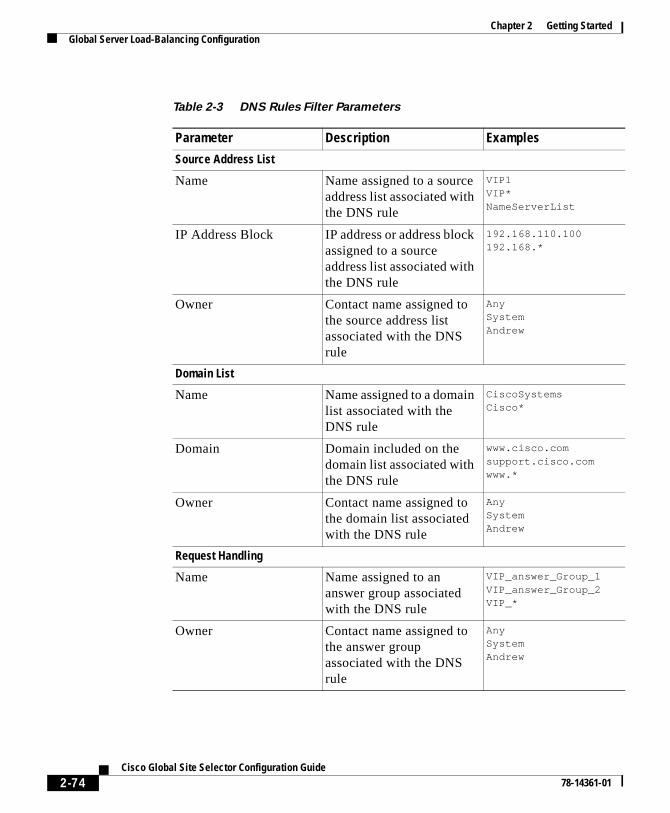
Chapter 2 Getting StartedGlobal Server Load-Balancing Configuration
Table 2-3 DNS Rules Filter Parameters
Parameter Description Examples
Source Address List
Name Name assigned to a source address list associated with the DNS rule
VIP1VIP*NameServerList
IP Address Block IP address or address block assigned to a source address list associated with the DNS rule
192.168.110.100192.168.*
Owner Contact name assigned to the source address list associated with the DNS rule
AnySystemAndrew
Domain List
Name Name assigned to a domain list associated with the DNS rule
CiscoSystemsCisco*
Domain Domain included on the domain list associated with the DNS rule
www.cisco.comsupport.cisco.comwww.*
Owner Contact name assigned to the domain list associated with the DNS rule
AnySystemAndrew
Request Handling
Name Name assigned to an answer group associated with the DNS rule
VIP_answer_Group_1VIP_answer_Group_2VIP_*
Owner Contact name assigned to the answer group associated with the DNS rule
AnySystemAndrew
2-74Cisco Global Site Selector Configuration Guide
78-14361-01
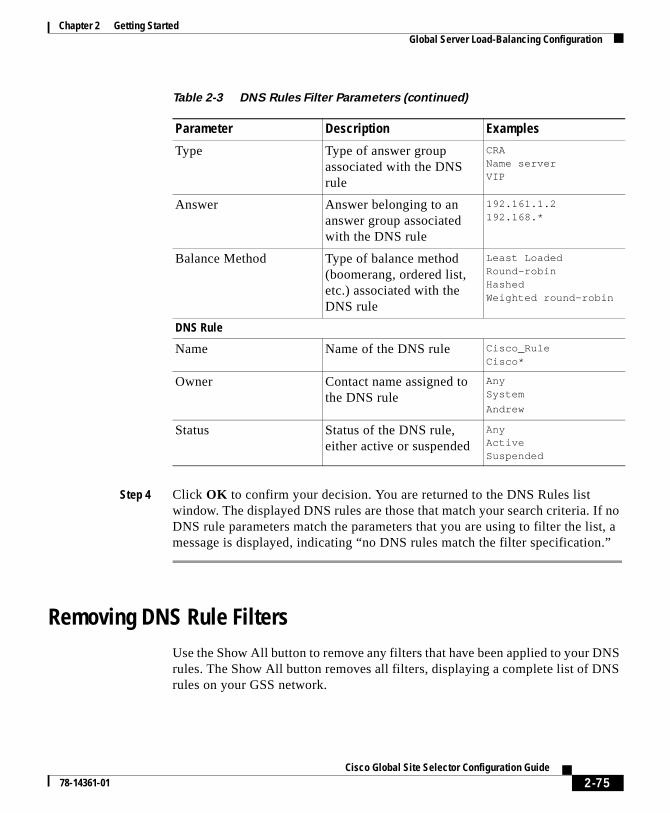
Chapter 2 Getting StartedGlobal Server Load-Balancing Configuration
.”
NS S
Step 4 Click OK to confirm your decision. You are returned to the DNS Rules list window. The displayed DNS rules are those that match your search criteria. If no DNS rule parameters match the parameters that you are using to filter the list, a message is displayed, indicating “no DNS rules match the filter specification
Removing DNS Rule FiltersUse the Show All button to remove any filters that have been applied to your Drules. The Show All button removes all filters, displaying a complete list of DNrules on your GSS network.
Type Type of answer group associated with the DNS rule
CRAName serverVIP
Answer Answer belonging to an answer group associated with the DNS rule
192.161.1.2192.168.*
Balance Method Type of balance method (boomerang, ordered list, etc.) associated with the DNS rule
Least LoadedRound-robinHashedWeighted round-robin
DNS Rule
Name Name of the DNS rule Cisco_RuleCisco*
Owner Contact name assigned to the DNS rule
AnySystem
Andrew
Status Status of the DNS rule, either active or suspended
AnyActiveSuspended
Table 2-3 DNS Rules Filter Parameters (continued)
Parameter Description Examples
2-75Cisco Global Site Selector Configuration Guide
78-14361-01
Chapter 2 Getting StartedUpstream DNS Configuration
ing parts
re or
at our
at
s for
To remove DNS rule filters:
Step 1 From the Cisco GSS software user interface, click DNS RULES. The DNS Rules list window appears. (See Figure 2-17.)
Step 2 Click the Show All button. The DNS Rule Filter List window refreshes (see Figure 2-18), displaying all configured DNS rules.
Upstream DNS ConfigurationOnce you have configured your GSS devices to connect to your network and have created the logical resources (source address lists, domain lists, answers and answer groups, and DNS rules) required for global server load balancing, you are ready to complete the final step that will integrate your new global server load-balancing device into your network’s DNS infrastructure and start deliveruser queries to your GSS: modifying your upstream DNS servers to delegate of your name space to your GSSs.
Note You should carefully review and perform a test of your GSS deployment befomaking changes to your DNS server configuration that will affect your publicenterprise network configuration.
Modifying your DNS servers to accommodate your GSS devices involves thefollowing steps:
1. Adding name server (NS) records to your DNS zone configuration file thdelegates your domain or subdomains of your domain to one or more of yGSSs
2. Adding “glue” address (A) records to your DNS zone configuration file thmap the DNS name of each of your GSS devices to an IP address
Example 2-1 provides an example of a DNS zone configuration file for a fictitioucisco.com domain that has been modified to delegate primary DNS authoritythree domains to two GSS devices. Relevant lines are shown in bold type.
2-76Cisco Global Site Selector Configuration Guide
78-14361-01
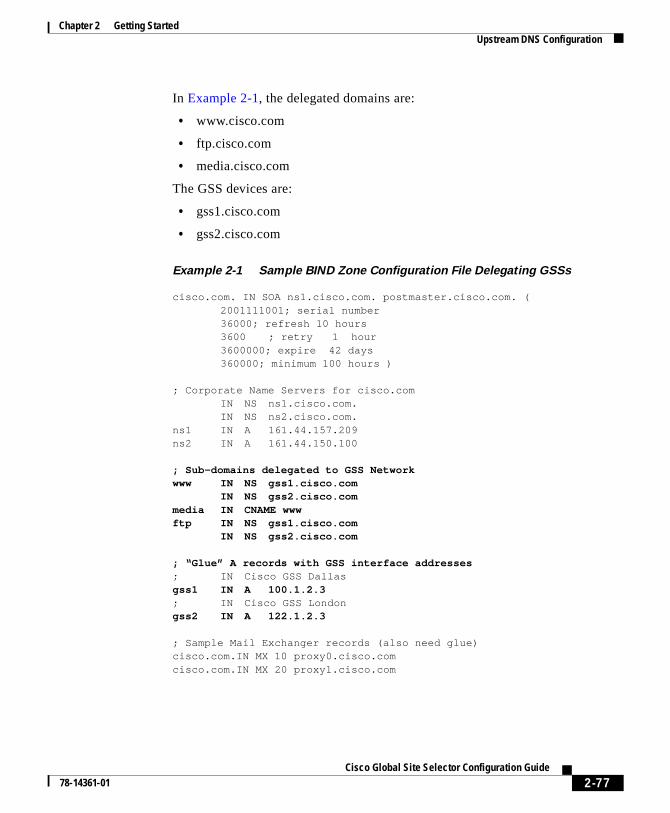
Chapter 2 Getting StartedUpstream DNS Configuration
In Example 2-1, the delegated domains are:
• www.cisco.com
• ftp.cisco.com
• media.cisco.com
The GSS devices are:
• gss1.cisco.com
• gss2.cisco.com
Example 2-1 Sample BIND Zone Configuration File Delegating GSSs
cisco.com. IN SOA ns1.cisco.com. postmaster.cisco.com. (2001111001; serial number36000; refresh 10 hours3600 ; retry 1 hour3600000; expire 42 days360000; minimum 100 hours )
; Corporate Name Servers for cisco.comIN NS ns1.cisco.com.IN NS ns2.cisco.com.
ns1 IN A 161.44.157.209ns2 IN A 161.44.150.100
; Sub-domains delegated to GSS Networkwww IN NS gss1.cisco.com
IN NS gss2.cisco.commedia IN CNAME wwwftp IN NS gss1.cisco.com
IN NS gss2.cisco.com
; “Glue” A records with GSS interface addresses; IN Cisco GSS Dallasgss1 IN A 100.1.2.3; IN Cisco GSS Londongss2 IN A 122.1.2.3
; Sample Mail Exchanger records (also need glue)cisco.com.IN MX 10 proxy0.cisco.comcisco.com.IN MX 20 proxy1.cisco.com
2-77Cisco Global Site Selector Configuration Guide
78-14361-01

Chapter 2 Getting StartedUpstream DNS Configuration
When reviewing this zone file, remember that there are any number of possible GSS deployments that you can use, some of which may suit your needs and your network better than the example listed. For example, instead of having all subdomains shared by all your GSS devices, you may want to allocate specific subdomains to specific GSSs.
2-78Cisco Global Site Selector Configuration Guide
78-14361-01
Cisco Gl78-14361-01
C H A P T E R 3
GSS Administration and TroubleshootingThis chapter covers the procedures necessary to properly manage and maintain your GSS devices, including login security, software upgrades, GSSM database administration, and GSSM error messages.
This chapter contains the following sections:
• Advanced Device Configuration, page 3-1
• GUI Configuration, page 3-7
• Security Configuration, page 3-8
• Configuring SNMP on Your GSS Network, page 3-27
• Backing Up the GSSM, page 3-30
• Upgrading the Cisco GSS Software, page 3-33
• Downgrading and Restoring Your GSS Devices, page 3-40
• Viewing Third-Party Software Versions, page 3-45
• GSS Error Messages, page 3-46
Advanced Device ConfigurationThe sections that follow describe advanced configuration tasks.
3-1obal Site Selector Configuration Guide
Chapter 3 GSS Administration and TroubleshootingAdvanced Device Configuration
ave
uch or
ur
y
ore
Changing the GSSM RoleThe Cisco GSS software supports the existence of multiple GSSMs on a single GSS network, with one GSSM acting as the active (or primary) GSSM and one acting as a backup (or standby) device that takes over the role of the primary GSSM if the primary device goes off line unexpectedly.
Using the CLI, you can manually switch the roles of your primary and standby GSSMs at any time.
Before switching GSSM roles, however, the conditions must be met:
• Both a primary and a standby GSSM have been configured on your GSS network.
• Both the primary and the standby GSSM must be enabled and have a status of “online.”
Do not attempt to switch roles before both a primary and a standby GSSM hbeen configured and enabled.
Note Make sure that you do not have two GSSMs designated as primary GSSMs operating at the same time. Although request routing continues to function in sa situation, configuration changes made on one or both devices may be lostoverwritten, and may not be communicated to your GSS devices.
We recommend observing the following order when changing the roles of yoprimary and standby GSSMs:
1. Perform a full backup of your primary GSSM.
2. Log on to the primary GSSM CLI.
3. Use the gssm primary-to-standby command to change the role of your primary GSSM.
4. Log on to the standby GSSM CLI.
5. Use the gssm standby-to-primary command to change the role of your standby GSSM.
Use the following procedure to change the roles of your primary and standbGSSMs. These instructions assume that your primary GSSM is online and functional at the time you are switching GSSM roles. If this is not the case, ignany steps that apply to the primary GSSM.
3-2Cisco Global Site Selector Configuration Guide
78-14361-01
Chapter 3 GSS Administration and TroubleshootingAdvanced Device Configuration
le by
ry
Step 1 If you have not already done so, perform a full backup of your primary GSSM to preserve your current network and configuration settings. See the “Performing a Full GSSM Backup” section on page 3-31 for detailed instructions on performinga full GSSM backup.
Step 2 Log on to the CLI of the primary GSSM by following the instructions in the Cisco Global Site Selector Command Reference. The Cisco CLI prompt appears.
Step 3 Enable privileged EXEC mode, for example:
gssm1.yourdomain.com> enable
Step 4 Once in privileged EXEC mode, use the gssm command to change the primary GSSM role, for example:
gssm1.yourdomain.com# gssm primary-to-standby
Step 5 Exit from the CLI and log on to your original standby GSSM. You will not be abto log in to the GUI of the old primary GSSM once it begins acting in a standcapacity.
Step 6 Enable privileged EXEC mode, for example:
gssm2.yourdomain.com> enable
Step 7 Use the gssm command to change the role of the standby GSSM to the primaGSSM, for example:
gssm2.yourdomain.com# gssm standby-to-primary
Your GSSM will immediately begin functioning in its new role.
Step 8 Exit privileged EXEC mode. You will now be able to access the GSSM GUI.
3-3Cisco Global Site Selector Configuration Guide
78-14361-01
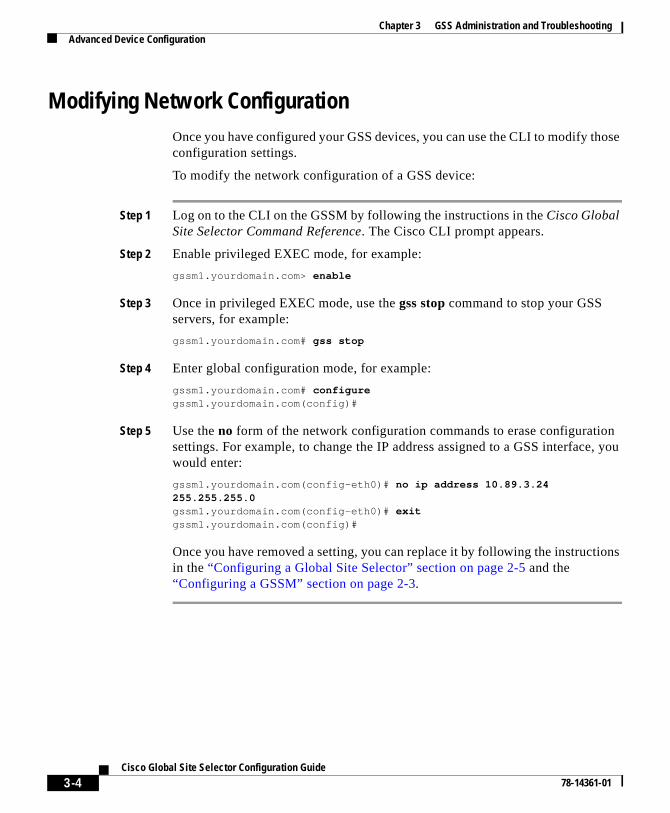
Chapter 3 GSS Administration and TroubleshootingAdvanced Device Configuration
Modifying Network ConfigurationOnce you have configured your GSS devices, you can use the CLI to modify those configuration settings.
To modify the network configuration of a GSS device:
Step 1 Log on to the CLI on the GSSM by following the instructions in the Cisco Global Site Selector Command Reference. The Cisco CLI prompt appears.
Step 2 Enable privileged EXEC mode, for example:
gssm1.yourdomain.com> enable
Step 3 Once in privileged EXEC mode, use the gss stop command to stop your GSS servers, for example:
gssm1.yourdomain.com# gss stop
Step 4 Enter global configuration mode, for example:
gssm1.yourdomain.com# configuregssm1.yourdomain.com(config)#
Step 5 Use the no form of the network configuration commands to erase configuration settings. For example, to change the IP address assigned to a GSS interface, you would enter:
gssm1.yourdomain.com(config-eth0)# no ip address 10.89.3.24 255.255.255.0gssm1.yourdomain.com(config-eth0)# exitgssm1.yourdomain.com(config)#
Once you have removed a setting, you can replace it by following the instructions in the “Configuring a Global Site Selector” section on page 2-5 and the “Configuring a GSSM” section on page 2-3.
3-4Cisco Global Site Selector Configuration Guide
78-14361-01

Chapter 3 GSS Administration and TroubleshootingAdvanced Device Configuration
n
e
. ust
Changing the Startup and Running ConfigurationThe network configuration for a GSS device includes:
• Interface—Ethernet interface being used
• IP address—Network address and netmask assigned to the interface
• GSS communications—Whether or not the interface is designated for handling GSS-related communications on the device
• Host name—Host name assigned to the interface
• IP default gateway—Network gateway used by the device
• IP name server—Network DNS server being used by the device
• SSH enable—Whether or not SSH is enabled on the device
• Telnet enable—Whether or not Telnet is enabled on the device
• FTP enable—Whether or not FTP is enabled on the device
Each GSS device tracks two such configurations:
• Startup configuration—Default network configuration. These configuratiosettings are loaded each time the device is booted.
• Running configuration—Network configuration currently being used by thGSS device.
Usually, the running configuration and the startup configuration are identicalHowever, once a configuration parameter is modified for any reason, the two mbe reconciled using the CLI in one of the following ways:
• Using the write memory command, the running configuration can be saved as the new startup configuration, meaning that any changes to the network configuration of the device are retained and used when the device is next rebooted.
• The startup configuration can be maintained. In this case, the running configuration is used up until the point at which the device is rebooted, at which time the running configuration is discarded and the startup configuration is restored.
3-5Cisco Global Site Selector Configuration Guide
78-14361-01

Chapter 3 GSS Administration and TroubleshootingAdvanced Device Configuration
To change the startup configuration for a GSS device:
Step 1 Log on to the CLI, following the instructions in the Cisco Global Site Selector Command Reference. The Cisco CLI prompt appears.
Step 2 Enable privileged EXEC mode and then global configuration mode on the device, for example:
gssm1.yourdomain.com> enablegssm1.yourdomain.com# configgssm1.yourdomain.com(config)#
Step 3 Make any desired changes to the network configuration of the device. For example, if you wanted to change the device host name, you would use the following command:
gssm1.yourdomain.com(config)# hostname new.yourdomain.comnew.yourdomain.com(config)#
Step 4 Once you have made all the desired changes to the running configuration of the device, use the write memory command to install the current running configuration as the new startup configuration for the device, for example:
new.yourdomain.com(config)# write memory
Alternatively, you can use the copy command to achieve the same result, copying the running configuration to the startup configuration, for example:
new.yourdomain.com(config)# copy running-config startup-config
Loading the Startup Configuration from an External FileIn addition to copying your running configuration as a new startup configuration, internally you can also upload or download GSS device configuration information from an external file using the copy command.
Before attempting to load the startup configuration from a file, make sure that the file has been moved to a local directory on the GSS device.
3-6Cisco Global Site Selector Configuration Guide
78-14361-01
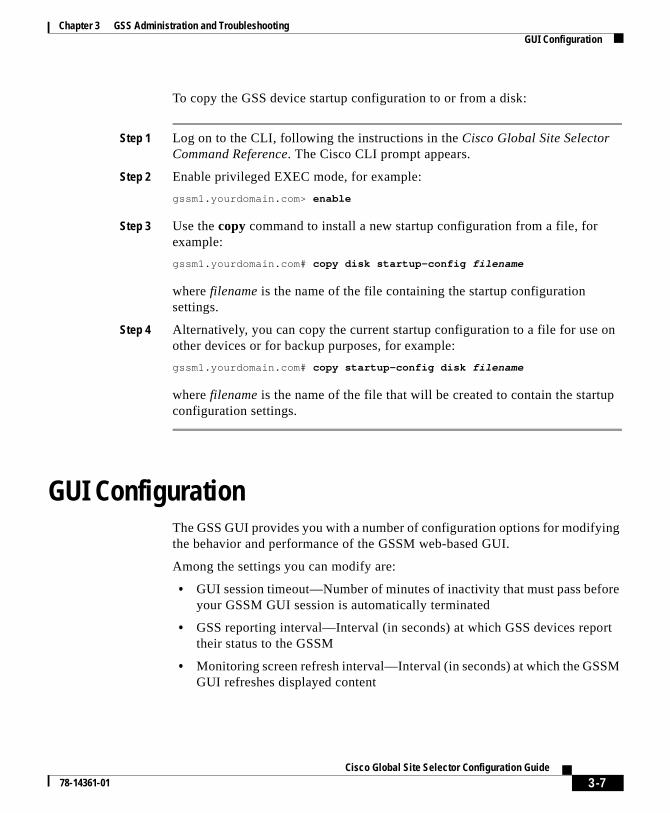
Chapter 3 GSS Administration and TroubleshootingGUI Configuration
ore
rt
SM
To copy the GSS device startup configuration to or from a disk:
Step 1 Log on to the CLI, following the instructions in the Cisco Global Site Selector Command Reference. The Cisco CLI prompt appears.
Step 2 Enable privileged EXEC mode, for example:
gssm1.yourdomain.com> enable
Step 3 Use the copy command to install a new startup configuration from a file, for example:
gssm1.yourdomain.com# copy disk startup-config filename
where filename is the name of the file containing the startup configuration settings.
Step 4 Alternatively, you can copy the current startup configuration to a file for use on other devices or for backup purposes, for example:
gssm1.yourdomain.com# copy startup-config disk filename
where filename is the name of the file that will be created to contain the startup configuration settings.
GUI ConfigurationThe GSS GUI provides you with a number of configuration options for modifying the behavior and performance of the GSSM web-based GUI.
Among the settings you can modify are:
• GUI session timeout—Number of minutes of inactivity that must pass befyour GSSM GUI session is automatically terminated
• GSS reporting interval—Interval (in seconds) at which GSS devices repotheir status to the GSSM
• Monitoring screen refresh interval—Interval (in seconds) at which the GSGUI refreshes displayed content
3-7Cisco Global Site Selector Configuration Guide
78-14361-01
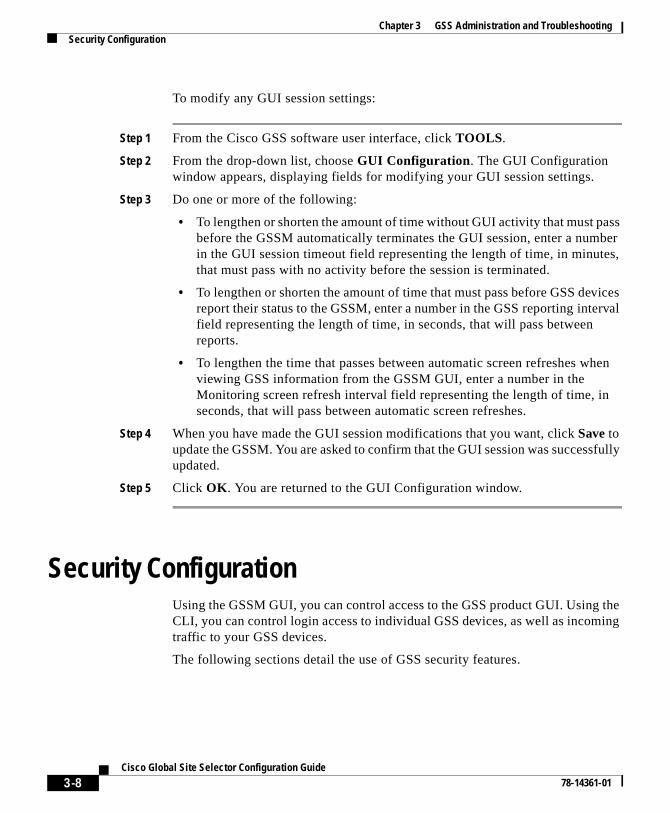
Chapter 3 GSS Administration and TroubleshootingSecurity Configuration
To modify any GUI session settings:
Step 1 From the Cisco GSS software user interface, click TOOLS.
Step 2 From the drop-down list, choose GUI Configuration. The GUI Configuration window appears, displaying fields for modifying your GUI session settings.
Step 3 Do one or more of the following:
• To lengthen or shorten the amount of time without GUI activity that must pass before the GSSM automatically terminates the GUI session, enter a number in the GUI session timeout field representing the length of time, in minutes, that must pass with no activity before the session is terminated.
• To lengthen or shorten the amount of time that must pass before GSS devices report their status to the GSSM, enter a number in the GSS reporting interval field representing the length of time, in seconds, that will pass between reports.
• To lengthen the time that passes between automatic screen refreshes when viewing GSS information from the GSSM GUI, enter a number in the Monitoring screen refresh interval field representing the length of time, in seconds, that will pass between automatic screen refreshes.
Step 4 When you have made the GUI session modifications that you want, click Save to update the GSSM. You are asked to confirm that the GUI session was successfully updated.
Step 5 Click OK. You are returned to the GUI Configuration window.
Security ConfigurationUsing the GSSM GUI, you can control access to the GSS product GUI. Using the CLI, you can control login access to individual GSS devices, as well as incoming traffic to your GSS devices.
The following sections detail the use of GSS security features.
3-8Cisco Global Site Selector Configuration Guide
78-14361-01
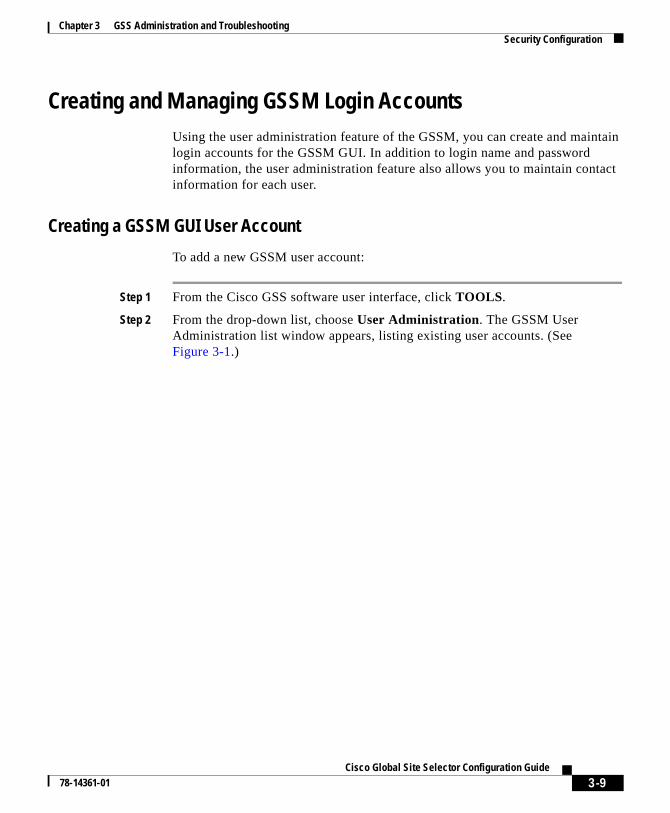
Chapter 3 GSS Administration and TroubleshootingSecurity Configuration
Creating and Managing GSSM Login AccountsUsing the user administration feature of the GSSM, you can create and maintain login accounts for the GSSM GUI. In addition to login name and password information, the user administration feature also allows you to maintain contact information for each user.
Creating a GSSM GUI User Account
To add a new GSSM user account:
Step 1 From the Cisco GSS software user interface, click TOOLS.
Step 2 From the drop-down list, choose User Administration. The GSSM User Administration list window appears, listing existing user accounts. (See Figure 3-1.)
3-9Cisco Global Site Selector Configuration Guide
78-14361-01
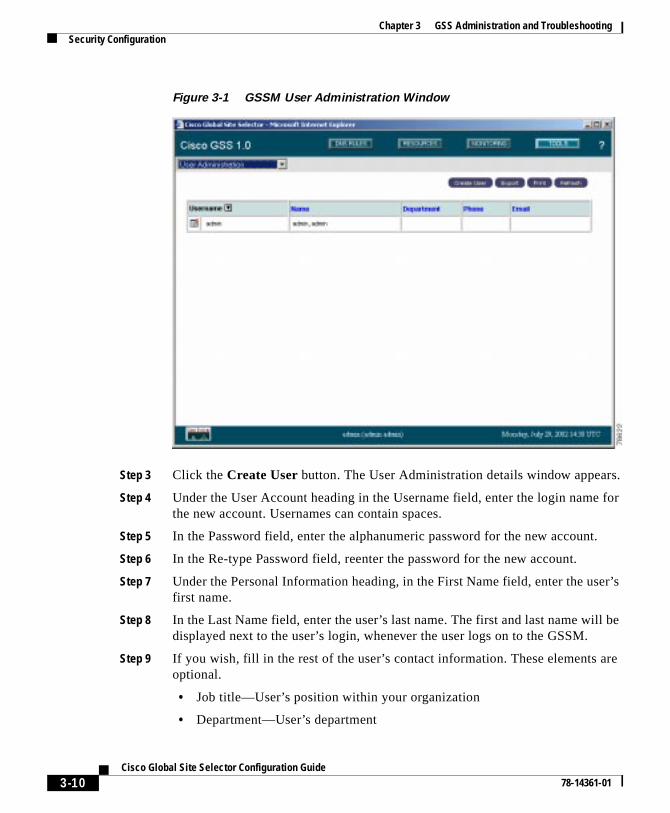
Chapter 3 GSS Administration and TroubleshootingSecurity Configuration
er’s
l be
are
Figure 3-1 GSSM User Administration Window
Step 3 Click the Create User button. The User Administration details window appears.
Step 4 Under the User Account heading in the Username field, enter the login name for the new account. Usernames can contain spaces.
Step 5 In the Password field, enter the alphanumeric password for the new account.
Step 6 In the Re-type Password field, reenter the password for the new account.
Step 7 Under the Personal Information heading, in the First Name field, enter the usfirst name.
Step 8 In the Last Name field, enter the user’s last name. The first and last name wildisplayed next to the user’s login, whenever the user logs on to the GSSM.
Step 9 If you wish, fill in the rest of the user’s contact information. These elements optional.
• Job title—User’s position within your organization
• Department—User’s department
3-10Cisco Global Site Selector Configuration Guide
78-14361-01
Chapter 3 GSS Administration and TroubleshootingSecurity Configuration
unt
new pted.
• Phone—User’s business telephone number
• E-mail—User’s e-mail address
• Comments—Any important information or comments about the user acco
Step 10 Click Save to create your new user account. You are returned to the User Administration list window.
Modifying a GSSM GUI User Account
To modify an existing GSSM user account:
Step 1 From the Cisco GSS software user interface, click TOOLS.
Step 2 From the drop-down list, choose User Administration. The GSSM User Administration list window appears, listing existing user accounts. (See Figure 3-1.)
Step 3 Click the Edit icon for the user account that you wish to modify. The User Administration details window appears, displaying that user’s account information.
Step 4 Use the fields provided to modify the user’s account, as follows:
• Username—Change the account’s login name.
• Password/Retype password—Modify the login password for the account; passwords must be entered identically in both fields before they are acce
• First name—Modify the user’s first name.
• Last name—Modify the user’s last name.
• Job title—Modify the user’s listed position within your organization.
• Department—Modify the user’s department.
• Phone—Modify the user’s business phone number.
3-11Cisco Global Site Selector Configuration Guide
78-14361-01

Chapter 3 GSS Administration and TroubleshootingSecurity Configuration
ser
h
word ting
• E-mail—Modify the user’s e-mail address.
• Comments—Modify comments on the user account.
Step 5 Click Save to save changes to the account. You are returned to the GSSM UAdministration list window.
Removing a GSSM GUI User Account
To delete an existing GSSM user account:
Step 1 From the Cisco GSS software user interface, click TOOLS.
Step 2 From the drop-down list, choose User Administration. The GSSM User Administration list window appears, listing existing user accounts. (See Figure 3-1.)
Step 3 Click the Edit icon for the user account that you wish to remove. The User Administration details window appears, displaying that user’s account information.
Note You cannot delete the admin account.
Step 4 Click the Delete button. You are prompted to confirm your decision to permanently delete the user.
Step 5 Click OK. You are returned to the GSSM User Administration list window witthe user account removed.
Changing Your GSSM GUI Password
Using the change password feature of the GSSM, you can change the passfor the account that you used to log on to the GSSM. You must know the exispassword for an account before you can change it to a new value.
3-12Cisco Global Site Selector Configuration Guide
78-14361-01
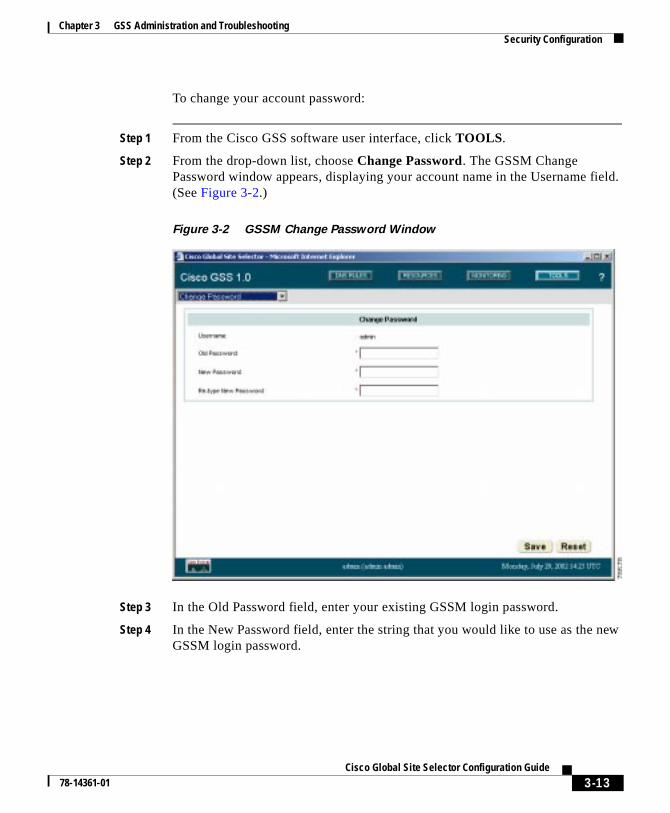
Chapter 3 GSS Administration and TroubleshootingSecurity Configuration
To change your account password:
Step 1 From the Cisco GSS software user interface, click TOOLS.
Step 2 From the drop-down list, choose Change Password. The GSSM Change Password window appears, displaying your account name in the Username field. (See Figure 3-2.)
Figure 3-2 GSSM Change Password Window
Step 3 In the Old Password field, enter your existing GSSM login password.
Step 4 In the New Password field, enter the string that you would like to use as the new GSSM login password.
3-13Cisco Global Site Selector Configuration Guide
78-14361-01
Chapter 3 GSS Administration and TroubleshootingSecurity Configuration
Step 5 In the Re-type New Password field, enter the new password string a second time. This will be used to verify that you have entered your password correctly.
Step 6 Click Save to update your login password.
Creating and Managing GSS Login AccountsUsing the CLI, you can set user access for each of your GSS devices, including the GSSM. User access to the CLI of your GSSs must be managed individually on each device.
Note Only the admin account can create and manage GSS logins.
To following sections explain the steps necessary to administer user accounts on your GSSs.
Creating a GSS User Account Using the CLI
When creating user accounts from the CLI, you must specify the new login, password, and privilege level using a single command. You cannot create a new account without designating a value for each of these configuration settings. Refer to the Cisco Global Site Selector Command Reference for detailed information on the username command syntax and use.
To create a user or administrative login account that can access the CLI of one of your GSS devices:
Step 1 Log on to the CLI of your GSS or GSSM, following the instructions in the Cisco Global Site Selector Command Reference. The Cisco CLI prompt appears.
Step 2 Enable privileged EXEC mode, for example:
gss1.yourdomain.com> enablegss1.yourdomain.com#
3-14Cisco Global Site Selector Configuration Guide
78-14361-01
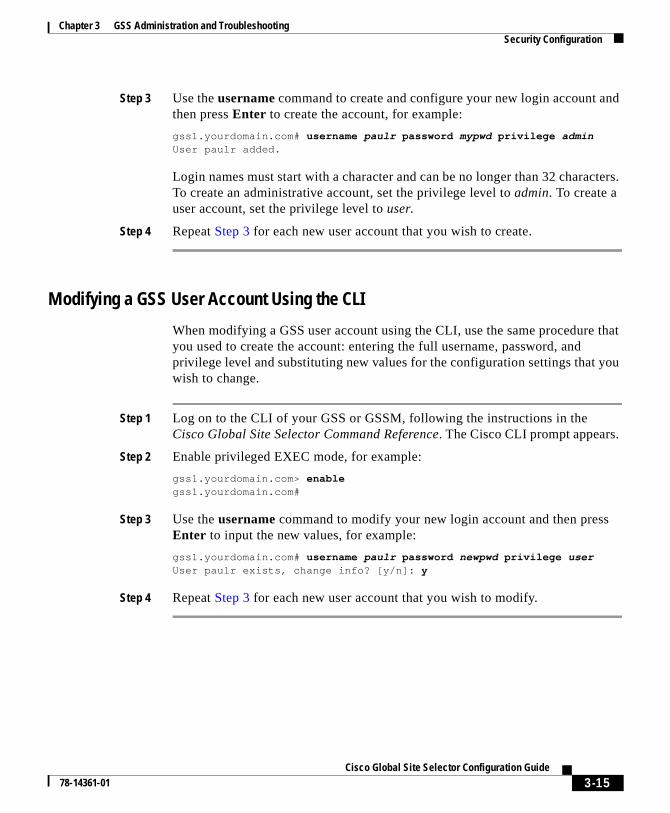
Chapter 3 GSS Administration and TroubleshootingSecurity Configuration
Step 3 Use the username command to create and configure your new login account and then press Enter to create the account, for example:
gss1.yourdomain.com# username paulr password mypwd privilege adminUser paulr added.
Login names must start with a character and can be no longer than 32 characters. To create an administrative account, set the privilege level to admin. To create a user account, set the privilege level to user.
Step 4 Repeat Step 3 for each new user account that you wish to create.
Modifying a GSS User Account Using the CLI
When modifying a GSS user account using the CLI, use the same procedure that you used to create the account: entering the full username, password, and privilege level and substituting new values for the configuration settings that you wish to change.
Step 1 Log on to the CLI of your GSS or GSSM, following the instructions in the Cisco Global Site Selector Command Reference. The Cisco CLI prompt appears.
Step 2 Enable privileged EXEC mode, for example:
gss1.yourdomain.com> enablegss1.yourdomain.com#
Step 3 Use the username command to modify your new login account and then press Enter to input the new values, for example:
gss1.yourdomain.com# username paulr password newpwd privilege userUser paulr exists, change info? [y/n]: y
Step 4 Repeat Step 3 for each new user account that you wish to modify.
3-15Cisco Global Site Selector Configuration Guide
78-14361-01
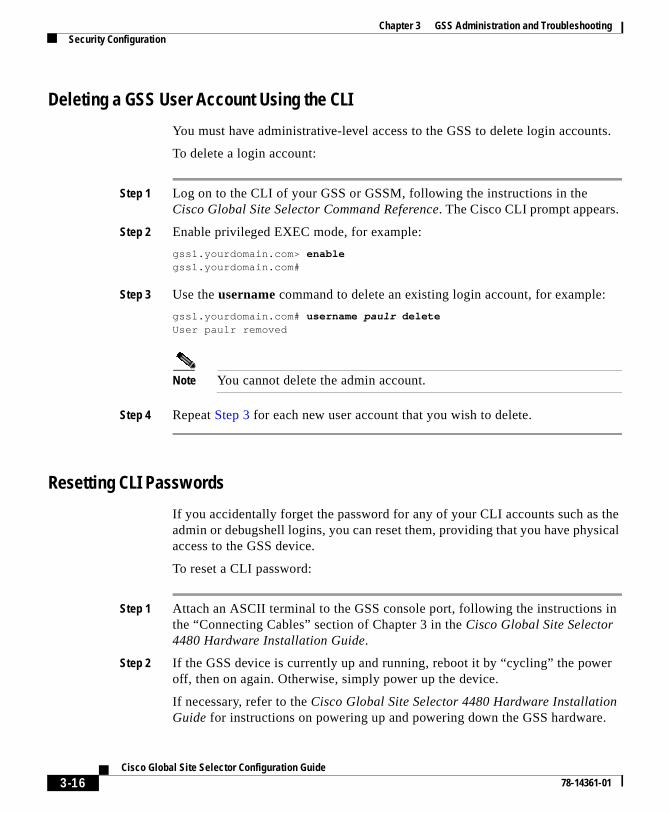
Chapter 3 GSS Administration and TroubleshootingSecurity Configuration
r
.
Deleting a GSS User Account Using the CLI
You must have administrative-level access to the GSS to delete login accounts.
To delete a login account:
Step 1 Log on to the CLI of your GSS or GSSM, following the instructions in the Cisco Global Site Selector Command Reference. The Cisco CLI prompt appears.
Step 2 Enable privileged EXEC mode, for example:
gss1.yourdomain.com> enablegss1.yourdomain.com#
Step 3 Use the username command to delete an existing login account, for example:
gss1.yourdomain.com# username paulr deleteUser paulr removed
Note You cannot delete the admin account.
Step 4 Repeat Step 3 for each new user account that you wish to delete.
Resetting CLI Passwords
If you accidentally forget the password for any of your CLI accounts such as the admin or debugshell logins, you can reset them, providing that you have physical access to the GSS device.
To reset a CLI password:
Step 1 Attach an ASCII terminal to the GSS console port, following the instructions in the “Connecting Cables” section of Chapter 3 in the Cisco Global Site Selector 4480 Hardware Installation Guide.
Step 2 If the GSS device is currently up and running, reboot it by “cycling” the poweoff, then on again. Otherwise, simply power up the device.
If necessary, refer to the Cisco Global Site Selector 4480 Hardware Installation Guide for instructions on powering up and powering down the GSS hardware
3-16Cisco Global Site Selector Configuration Guide
78-14361-01
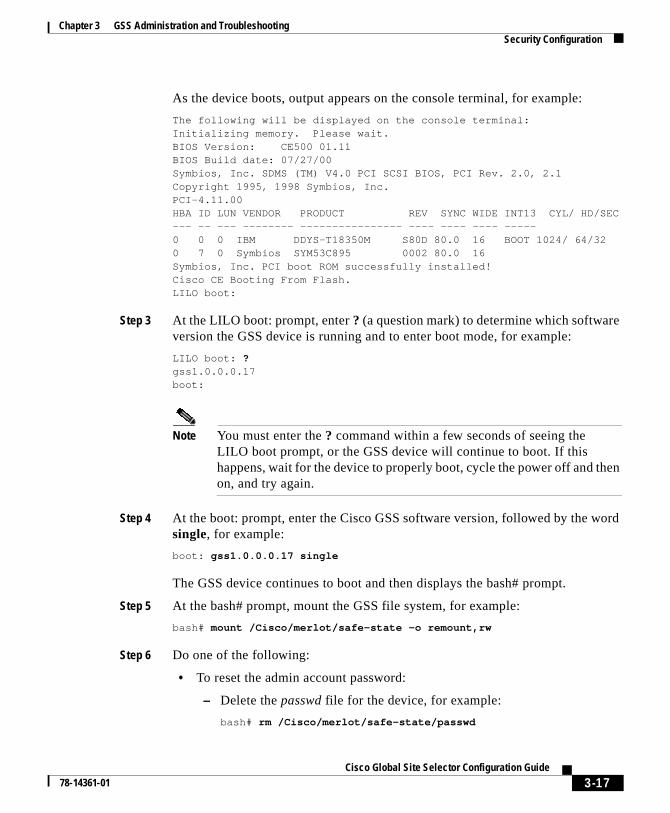
Chapter 3 GSS Administration and TroubleshootingSecurity Configuration
As the device boots, output appears on the console terminal, for example:
The following will be displayed on the console terminal:Initializing memory. Please wait. BIOS Version: CE500 01.11BIOS Build date: 07/27/00Symbios, Inc. SDMS (TM) V4.0 PCI SCSI BIOS, PCI Rev. 2.0, 2.1Copyright 1995, 1998 Symbios, Inc. PCI-4.11.00 HBA ID LUN VENDOR PRODUCT REV SYNC WIDE INT13 CYL/ HD/SEC--- -- --- -------- ---------------- ---- ---- ---- ----- 0 0 0 IBM DDYS-T18350M S80D 80.0 16 BOOT 1024/ 64/320 7 0 Symbios SYM53C895 0002 80.0 16 Symbios, Inc. PCI boot ROM successfully installed!Cisco CE Booting From Flash.LILO boot:
Step 3 At the LILO boot: prompt, enter ? (a question mark) to determine which software version the GSS device is running and to enter boot mode, for example:
LILO boot: ?gss1.0.0.0.17boot:
Note You must enter the ? command within a few seconds of seeing the LILO boot prompt, or the GSS device will continue to boot. If this happens, wait for the device to properly boot, cycle the power off and then on, and try again.
Step 4 At the boot: prompt, enter the Cisco GSS software version, followed by the word single, for example:
boot: gss1.0.0.0.17 single
The GSS device continues to boot and then displays the bash# prompt.
Step 5 At the bash# prompt, mount the GSS file system, for example:
bash# mount /Cisco/merlot/safe-state -o remount,rw
Step 6 Do one of the following:
• To reset the admin account password:
– Delete the passwd file for the device, for example:
bash# rm /Cisco/merlot/safe-state/passwd
3-17Cisco Global Site Selector Configuration Guide
78-14361-01

Chapter 3 GSS Administration and TroubleshootingSecurity Configuration
Note Resetting the admin account password deletes all other configured user accounts from the GSS.
– Reboot the GSS device:
bash# reboot
• To reset a nonadmin CLI account password:
– Navigate to the /safe-state directory, for example:
bash# cd /Cisco/merlot/safe-state
– Use the vi text editor to edit the passwd file, for example:
bash# vi passwd
– Remove the entry for the account for which you wish to reset the password. For example, to reset the password for the debugshell login, you would remove the ymerej entry.
– Reboot the GSS device.
bash# reboot
Segmenting GSS Traffic by InterfaceGSS devices come with two Ethernet interfaces. By default, GSS servers listen for traffic on both interfaces.
Note In the case of inter-GSS communications, GSS devices listen for configuration and status updates on one interface only, which is the first Ethernet interface by default. You can use the gss-communications command to configure which interface is used for interdevice communications on the GSS network. Refer to the Cisco Global Site Selector Command Reference for instructions on using the gss-communications command.
3-18Cisco Global Site Selector Configuration Guide
78-14361-01
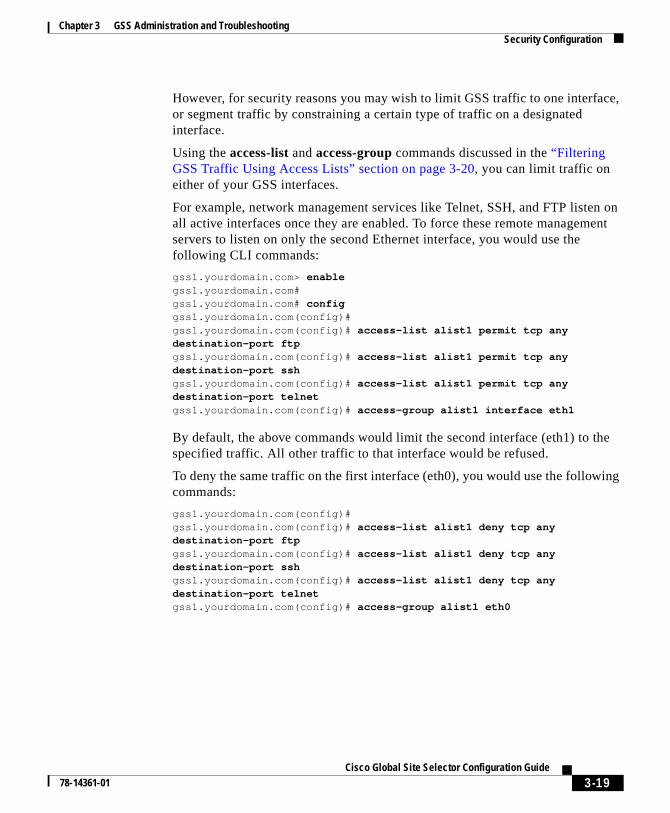
Chapter 3 GSS Administration and TroubleshootingSecurity Configuration
n on ent
he
ing
However, for security reasons you may wish to limit GSS traffic to one interface, or segment traffic by constraining a certain type of traffic on a designated interface.
Using the access-list and access-group commands discussed in the “Filtering GSS Traffic Using Access Lists” section on page 3-20, you can limit traffic on either of your GSS interfaces.
For example, network management services like Telnet, SSH, and FTP listeall active interfaces once they are enabled. To force these remote managemservers to listen on only the second Ethernet interface, you would use the following CLI commands:
gss1.yourdomain.com> enablegss1.yourdomain.com# gss1.yourdomain.com# configgss1.yourdomain.com(config)# gss1.yourdomain.com(config)# access-list alist1 permit tcp any destination-port ftpgss1.yourdomain.com(config)# access-list alist1 permit tcp any destination-port sshgss1.yourdomain.com(config)# access-list alist1 permit tcp any destination-port telnetgss1.yourdomain.com(config)# access-group alist1 interface eth1
By default, the above commands would limit the second interface (eth1) to tspecified traffic. All other traffic to that interface would be refused.
To deny the same traffic on the first interface (eth0), you would use the followcommands:
gss1.yourdomain.com(config)# gss1.yourdomain.com(config)# access-list alist1 deny tcp any destination-port ftpgss1.yourdomain.com(config)# access-list alist1 deny tcp any destination-port sshgss1.yourdomain.com(config)# access-list alist1 deny tcp any destination-port telnetgss1.yourdomain.com(config)# access-group alist1 eth0
3-19Cisco Global Site Selector Configuration Guide
78-14361-01
Chapter 3 GSS Administration and TroubleshootingSecurity Configuration
Filtering GSS Traffic Using Access ListsUsing built-in packet filtering features on the GSS, you can instruct your GSSs and GSSMs to permit or refuse specific packets that are received based on a combination of criteria that includes:
• Destination port of the packets
• Requesting host
• Protocol used (TCP, User Datagram Protocol [UDP], or ICMP)
These packet-filtering tools, called access lists, are created and maintained from the GSS CLI. Access lists are essentially collections of filtering rules that are created using the access-list CLI command and can be applied to one or both of your GSS interfaces using the access-group command.
For detailed information on access list syntax options, refer to the section on the access-list, access-group, and show access-list commands in the Cisco Global Site Selector Command Reference. See the sections that follow for instructions on creating and maintaining access lists.
Creating an Access List
The term access list simply refers to one or more filtering rules that are grouped together. You can create any number of access lists on a given GSS device.
After you have created an access list, rules can be appended to or removed from the list at any time.
Note You need to be able to access the CLI of your GSS devices in order to create access lists.
To create an access list:
Step 1 Log on to the CLI of your GSSM, following the instructions in the Cisco Global Site Selector Command Reference. The Cisco CLI prompt appears.
Step 2 Enable privileged EXEC mode, for example:
gss1.yourdomain.com> enablegss1.yourdomain.com#
3-20Cisco Global Site Selector Configuration Guide
78-14361-01

Chapter 3 GSS Administration and TroubleshootingSecurity Configuration
of
e of .
ciate
Step 3 Enable configuration mode, for example:
gss1.yourdomain.com# configgss1.yourdomain.com(config)#
Step 4 Use the access-list command to create your first access list.
For example, to configure an access list named alist1 containing a rule that allows any traffic using the TCP protocol on port 80 on the GSS device, you would enter the following:
gss1.yourdomain.com(config)# access-list alist1 permit tcp any destination-port eq 80
Refer to the Cisco Global Site Selector Command Reference for a detailed explanation of access-list command syntax.
Step 5 Repeat Step 4 for each access list that you wish to add to this device, or see the “Adding Rules to an Access List” section on page 3-23 for instructions on adding more rules to an access list that already exists.
Associating an Access List with a GSS Interface
After you have created an access list, you must associate it with one or bothyour GSS interfaces before it can be used to filter incoming traffic to that interface.
Note When no access lists are associated with an interface, all incoming traffic isallowed on that interface. After an access list has been applied, only the typtraffic explicitly permitted by that list is allowed. All other traffic is disallowed
The access-group command is used to associate an access list with a GSS interface.
Note You need to be able to access the CLI of your GSS devices in order to assoaccess lists with GSS interfaces.
3-21Cisco Global Site Selector Configuration Guide
78-14361-01
Chapter 3 GSS Administration and TroubleshootingSecurity Configuration
To associate access lists with an interface:
Step 1 Log on to the CLI of your GSSM, following the instructions in the Cisco Global Site Selector Command Reference. The Cisco CLI prompt appears.
Step 2 Enable privileged EXEC mode, for example:
gss1.yourdomain.com> enablegss1.yourdomain.com#
Step 3 Enable configuration mode, for example:
gss1.yourdomain.com# configgss1.yourdomain.com(config)#
Step 4 Use the access-group command to associate an access list with the GSS interface. For example, to associate the access list named alist1 with the first interface on your GSS device, you would enter the following:
gss1.yourdomain.com(config)# access-group alist1 interface eth0
Refer to the Cisco Global Site Selector Command Reference for a detailed explanation of access-group command syntax.
Step 5 Repeat Step 4 for each access list that you wish to associate with an interface.
Disassociating an Access List from a GSS Interface
After you have associated an access list with one or more of your GSS interfaces, you can dissociate it from that interface using the no form of the access-group command. Disassociating an access list from an interface removes any constraints that the list applied to traffic to that interface.
Note You need to be able to access the CLI of your GSS devices in order to disassociate access lists from GSS interfaces.
To disassociate an access list from an interface:
Step 1 Log on to the CLI of your GSSM, following the instructions in the Cisco Global Site Selector Command Reference. The Cisco CLI prompt appears.
3-22Cisco Global Site Selector Configuration Guide
78-14361-01

Chapter 3 GSS Administration and TroubleshootingSecurity Configuration
Step 2 Enable privileged EXEC mode, for example:
gss1.yourdomain.com> enablegss1.yourdomain.com#
Step 3 Enable configuration mode, for example:
gss1.yourdomain.com# configgss1.yourdomain.com(config)#
Step 4 Use the no access-group command to disassociate an access list from your GSS interface. For example, to disassociate the access list named alist1 from the first interface on your GSS device, you would enter the following:
gss1.yourdomain.com(config)# no access-group alist1 interface eth0
Refer to the Cisco Global Site Selector Command Reference for a detailed explanation of access-group and no access-group command syntax.
Step 5 Repeat Step 4 for each access list that you wish to disassociate from an interface.
Adding Rules to an Access List
Once you have created one or more access lists, you can append rules to them at any time.
To add a rule to an access list:
Step 1 Log on to the CLI of your GSSM, following the instructions in the Cisco Global Site Selector Command Reference. The Cisco CLI prompt appears.
Step 2 Enable privileged EXEC mode, for example:
gss1.yourdomain.com> enablegss1.yourdomain.com#
Step 3 Enable configuration mode, for example:
gss1.yourdomain.com# configgss1.yourdomain.com(config)#
3-23Cisco Global Site Selector Configuration Guide
78-14361-01
Chapter 3 GSS Administration and TroubleshootingSecurity Configuration
Step 4 Use the access-list command to add a new rule to an existing access list. For example, to add a new rule to the access list named alist1 that blocks all traffic from host 192.168.1.101, you would enter the following:
gss1.yourdomain.com(config)# access-list alist1 deny tcp host 192.168.1.101
Refer to the Cisco Global Site Selector Command Reference for a detailed explanation of access-list command syntax.
Step 5 Use the show access-list command to verify that the rule has been added to your access list, for example:
gss1.yourdomain.com(config)# show access-listaccess-list:alist1 access-list alist1 permit tcp any destination-port eq 80access-list alist1 deny tcp host 192.168.1.101
Step 6 Repeat Step 4 and Step 5 for each rule that you wish to add to this access list.
Removing Rules from an Access List
Once you have created one or more access lists, you can remove rules from them at any time. Access lists must contain at least one rule. Removing the last rule from an access list removes the list itself from the GSS.
To remove a rule from an access list:
Step 1 Log on to the CLI of your GSSM, following the instructions in the Cisco Global Site Selector Command Reference. The Cisco CLI prompt appears.
Step 2 Enable privileged EXEC mode, for example:
gss1.yourdomain.com> enablegss1.yourdomain.com#
Step 3 Enable configuration mode, for example:
gss1.yourdomain.com# configgss1.yourdomain.com(config)#
3-24Cisco Global Site Selector Configuration Guide
78-14361-01
Chapter 3 GSS Administration and TroubleshootingSecurity Configuration
S y an ed in
Step 4 Use the no form of the access-list command to remove a rule from an existing access list. For example, to remove the rule from the access list named alist1 that blocks all traffic from host 192.168.1.101, you would enter the following:
gss1.yourdomain.com(config)# no access-list alist1 deny tcp host 192.168.1.101
Refer to the Cisco Global Site Selector Command Reference for a detailed explanation of access-list command syntax.
Step 5 Use the show access-list command to verify that the rule has been removed from your access list, for example:
gss1.yourdomain.com(config)# show access-listaccess-list:alist1 access-list alist1 permit tcp any destination-port eq 80
Step 6 Repeat Step 4 and Step 5 for each rule that you wish to remove from this access list, or from others configured on your system.
Viewing Access Lists
Use the show access-list command to view configured access lists, for example:
gss1.yourdomain.com(config)# show access-listaccess-list:alist1 access-list alist1 permit tcp any destination-port eq 80
Deploying GSS Devices Behind FirewallsIn addition to the packet-filtering features of the access-list and access-group commands discussed in the “Filtering GSS Traffic Using Access Lists” section, you can also deploy your GSS devices behind an existing firewall on your enterprise network.
Note The GSS does not support deployment of devices behind a NAT for inter-GScommunication. The communication between the GSSs cannot be NAT’ed bintermediate device because the actual IP address of the devices is embeddthe payload of the packets.
3-25Cisco Global Site Selector Configuration Guide
78-14361-01
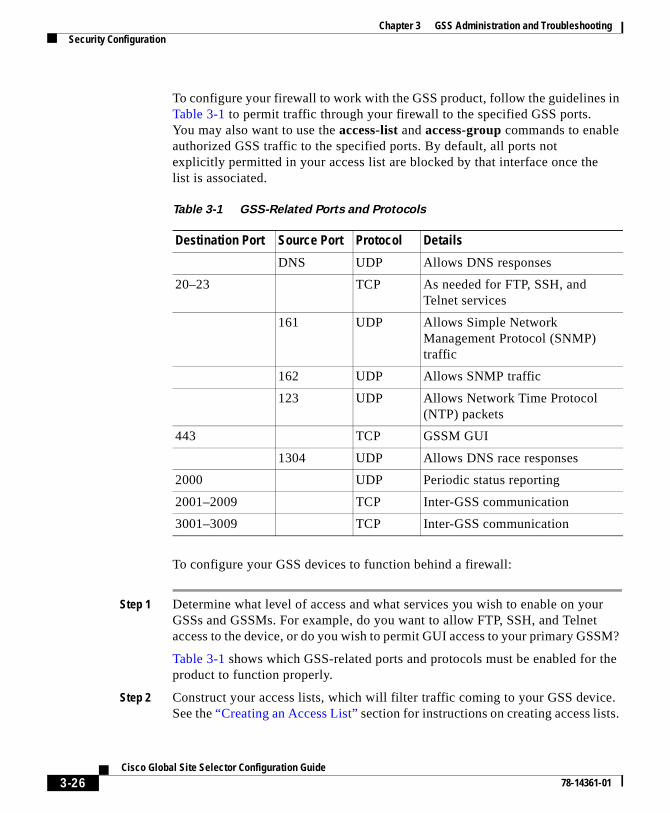
Chapter 3 GSS Administration and TroubleshootingSecurity Configuration
s.
To configure your firewall to work with the GSS product, follow the guidelines in Table 3-1 to permit traffic through your firewall to the specified GSS ports. You may also want to use the access-list and access-group commands to enable authorized GSS traffic to the specified ports. By default, all ports not explicitly permitted in your access list are blocked by that interface once the list is associated.
To configure your GSS devices to function behind a firewall:
Step 1 Determine what level of access and what services you wish to enable on your GSSs and GSSMs. For example, do you want to allow FTP, SSH, and Telnet access to the device, or do you wish to permit GUI access to your primary GSSM?
Table 3-1 shows which GSS-related ports and protocols must be enabled for the product to function properly.
Step 2 Construct your access lists, which will filter traffic coming to your GSS device. See the “Creating an Access List” section for instructions on creating access list
Table 3-1 GSS-Related Ports and Protocols
Destination Port Source Port Protocol Details
DNS UDP Allows DNS responses
20–23 TCP As needed for FTP, SSH, and Telnet services
161 UDP Allows Simple Network Management Protocol (SNMP) traffic
162 UDP Allows SNMP traffic
123 UDP Allows Network Time Protocol (NTP) packets
443 TCP GSSM GUI
1304 UDP Allows DNS race responses
2000 UDP Periodic status reporting
2001–2009 TCP Inter-GSS communication
3001–3009 TCP Inter-GSS communication
3-26Cisco Global Site Selector Configuration Guide
78-14361-01

Chapter 3 GSS Administration and TroubleshootingConfiguring SNMP on Your GSS Network
you
you
Step 3 Associate your access list with the GSS interface or interfaces to which your GSS servers will be listening. See the “Associating an Access List with a GSS Interface” section for instructions on using your access list to filter traffic on aspecific interface, and the “Segmenting GSS Traffic by Interface” section for instructions on limiting GSS traffic to a specific interface.
Configuring SNMP on Your GSS NetworkYour GSS or GSSM contains an SNMP agent, ucd-snmp v4.2.3, that enablesto query your GSS devices for standard MIB resources found in MIB-II (RFC-1213) and HOST-RESOURCE-MIB (RFC-1514). SNMP runs on GSS port 161 by default.
MIB-II and HOST-RESOURCE-MIB definitions can be obtained from the following Cisco FTP sites:
ftp://ftp.cisco.com/pub/mibs/v1
ftp://ftp.cisco.com/pub/mibs/v2
Before you can begin using SNMP to monitor your GSS or GSSM, however, must first enable the SNMP agent on your GSS device.
Enabling and Disabling SNMPTo enable the SNMP agent on your GSS device:
Step 1 Log on to the CLI of your GSSM, following the instructions in the Cisco Global Site Selector Command Reference. The Cisco CLI prompt appears.
Step 2 Enable privileged EXEC mode, for example:
gss1.yourdomain.com> enablegss1.yourdomain.com#
Step 3 Enable global configuration mode, for example:
gss1.yourdomain.com# configgss1.yourdomain.com(config)#
3-27Cisco Global Site Selector Configuration Guide
78-14361-01
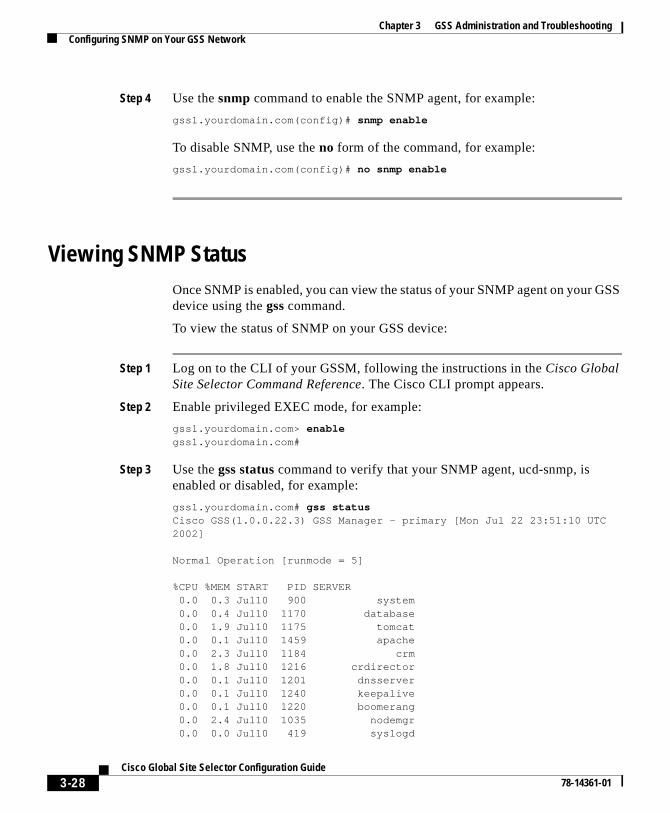
Chapter 3 GSS Administration and TroubleshootingConfiguring SNMP on Your GSS Network
Step 4 Use the snmp command to enable the SNMP agent, for example:
gss1.yourdomain.com(config)# snmp enable
To disable SNMP, use the no form of the command, for example:
gss1.yourdomain.com(config)# no snmp enable
Viewing SNMP StatusOnce SNMP is enabled, you can view the status of your SNMP agent on your GSS device using the gss command.
To view the status of SNMP on your GSS device:
Step 1 Log on to the CLI of your GSSM, following the instructions in the Cisco Global Site Selector Command Reference. The Cisco CLI prompt appears.
Step 2 Enable privileged EXEC mode, for example:
gss1.yourdomain.com> enablegss1.yourdomain.com#
Step 3 Use the gss status command to verify that your SNMP agent, ucd-snmp, is enabled or disabled, for example:
gss1.yourdomain.com# gss statusCisco GSS(1.0.0.22.3) GSS Manager - primary [Mon Jul 22 23:51:10 UTC 2002]
Normal Operation [runmode = 5]
%CPU %MEM START PID SERVER 0.0 0.3 Jul10 900 system 0.0 0.4 Jul10 1170 database 0.0 1.9 Jul10 1175 tomcat 0.0 0.1 Jul10 1459 apache 0.0 2.3 Jul10 1184 crm 0.0 1.8 Jul10 1216 crdirector 0.0 0.1 Jul10 1201 dnsserver 0.0 0.1 Jul10 1240 keepalive 0.0 0.1 Jul10 1220 boomerang 0.0 2.4 Jul10 1035 nodemgr 0.0 0.0 Jul10 419 syslogd
3-28Cisco Global Site Selector Configuration Guide
78-14361-01
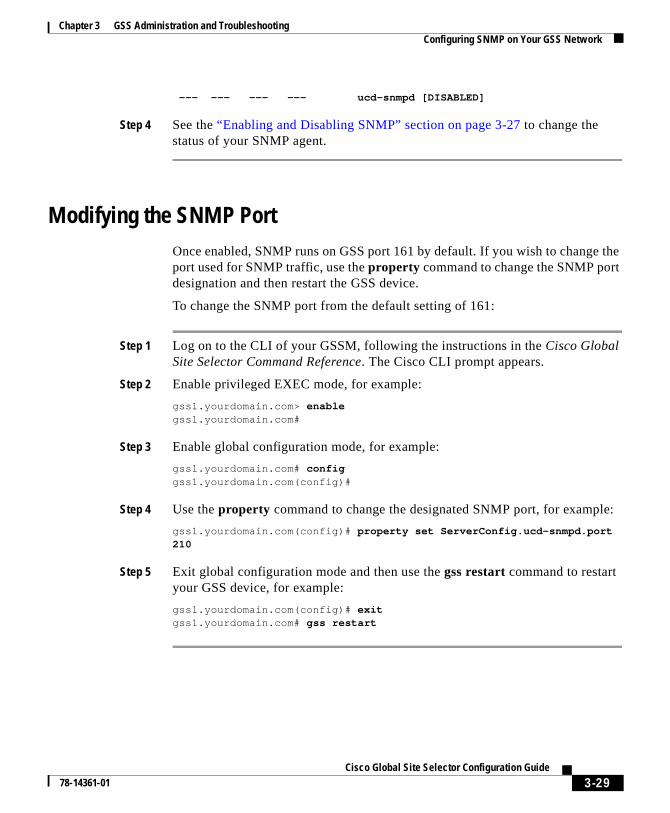
Chapter 3 GSS Administration and TroubleshootingConfiguring SNMP on Your GSS Network
the t
le:
--- --- --- --- ucd-snmpd [DISABLED]
Step 4 See the “Enabling and Disabling SNMP” section on page 3-27 to change the status of your SNMP agent.
Modifying the SNMP PortOnce enabled, SNMP runs on GSS port 161 by default. If you wish to changeport used for SNMP traffic, use the property command to change the SNMP pordesignation and then restart the GSS device.
To change the SNMP port from the default setting of 161:
Step 1 Log on to the CLI of your GSSM, following the instructions in the Cisco Global Site Selector Command Reference. The Cisco CLI prompt appears.
Step 2 Enable privileged EXEC mode, for example:
gss1.yourdomain.com> enablegss1.yourdomain.com#
Step 3 Enable global configuration mode, for example:
gss1.yourdomain.com# configgss1.yourdomain.com(config)#
Step 4 Use the property command to change the designated SNMP port, for examp
gss1.yourdomain.com(config)# property set ServerConfig.ucd-snmpd.port 210
Step 5 Exit global configuration mode and then use the gss restart command to restart your GSS device, for example:
gss1.yourdomain.com(config)# exitgss1.yourdomain.com# gss restart
3-29Cisco Global Site Selector Configuration Guide
78-14361-01
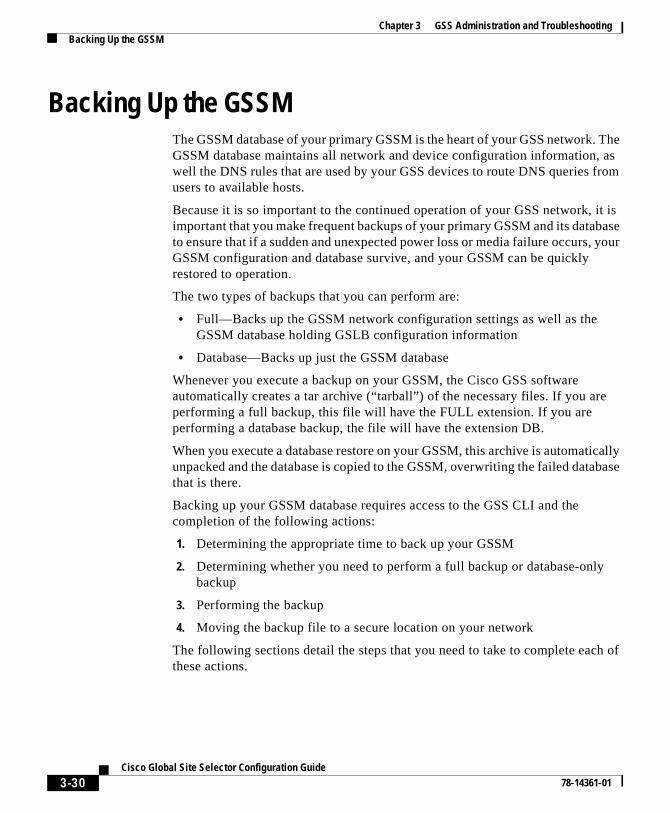
Chapter 3 GSS Administration and TroubleshootingBacking Up the GSSM
e
ically base
h of
Backing Up the GSSMThe GSSM database of your primary GSSM is the heart of your GSS network. The GSSM database maintains all network and device configuration information, as well the DNS rules that are used by your GSS devices to route DNS queries from users to available hosts.
Because it is so important to the continued operation of your GSS network, it is important that you make frequent backups of your primary GSSM and its database to ensure that if a sudden and unexpected power loss or media failure occurs, your GSSM configuration and database survive, and your GSSM can be quickly restored to operation.
The two types of backups that you can perform are:
• Full—Backs up the GSSM network configuration settings as well as the GSSM database holding GSLB configuration information
• Database—Backs up just the GSSM database
Whenever you execute a backup on your GSSM, the Cisco GSS software automatically creates a tar archive (“tarball”) of the necessary files. If you arperforming a full backup, this file will have the FULL extension. If you are performing a database backup, the file will have the extension DB.
When you execute a database restore on your GSSM, this archive is automatunpacked and the database is copied to the GSSM, overwriting the failed datathat is there.
Backing up your GSSM database requires access to the GSS CLI and the completion of the following actions:
1. Determining the appropriate time to back up your GSSM
2. Determining whether you need to perform a full backup or database-onlybackup
3. Performing the backup
4. Moving the backup file to a secure location on your network
The following sections detail the steps that you need to take to complete eacthese actions.
3-30Cisco Global Site Selector Configuration Guide
78-14361-01
Chapter 3 GSS Administration and TroubleshootingBacking Up the GSSM
Determining When and What Type of Backup to PerformSome general guidelines exist for when and how to back up your GSSM. If followed, they help ensure that you are never caught unprepared if you suffer a catastrophic loss of your GSSM.
When to Perform a Full Backup
You should perform a full backup of your GSSM in these situations:
• Before switching GSSM roles, making the standby GSSM your primary GSSM on your network
• Before you perform a Cisco GSS software upgrade
• After you make any changes in the device or network configuration of your GSSM
When to Perform a Database Backup
You should perform a database backup of your GSSM in these situations:
• After you make any changes in the device configuration of any of your GSS devices using the GSSM GUI
• After you make any changes to the GSLB configuration of your GSS network using the GSSM GUI, for example, adding or removing an answer, source address list, DNS rule, or user account
Performing a Full GSSM BackupYou can perform a full GSSM backup at any time. Doing so does not interfere with the functioning of the GSSM or any of your other GSS devices.
Note Performing a full backup of the GSSM requires access to the GSSM CLI.
3-31Cisco Global Site Selector Configuration Guide
78-14361-01
Chapter 3 GSS Administration and TroubleshootingBacking Up the GSSM
To perform a full backup of your GSSM:
Step 1 Log on to the CLI of your GSSM, following the instructions in the Cisco Global Site Selector Command Reference. The Cisco CLI prompt appears.
Step 2 Enable privileged EXEC mode, for example:
gss1.yourdomain.com> enablegss1.yourdomain.com#
Step 3 Use the gssm command to create a full backup of your GSSM. You need to supply a filename for your full backup. For example:
gss1.yourdomain.com# gssm backup full crmfullbk GSSM database backup succeeded [crmfullbk.full]
Step 4 After you have received confirmation that the GSSM has successfully created your full backup, copy or move the file off your GSSM to ensure that it is not also lost if a media failure or other catastrophic loss occurs on your GSSM.
Either the secure copy (scp) or ftp commands can be used to move your full backup to a remote host, for example:
gss1.yourdomain.com# scp crmfullbk.full server.yourdomain.com:home
Performing a GSSM Database BackupYou can perform a database backup at any time. Doing so does not interfere with the functioning of the GSSM or any of your other GSS devices.
Note Backing up the GSSM database requires access to the GSS CLI.
To perform a database backup of your GSSM:
Step 1 Log on to the CLI of your GSSM, following the instructions in the Cisco Global Site Selector Command Reference. The Cisco CLI prompt appears.
Step 2 Enable privileged EXEC mode, for example:
gss1.yourdomain.com> enable
3-32Cisco Global Site Selector Configuration Guide
78-14361-01
Chapter 3 GSS Administration and TroubleshootingUpgrading the Cisco GSS Software
d be the
s:
h of
gss1.yourdomain.com#
Step 3 Use the gssm command to create backup your GSSM database. You need to supply a filename for your database backup. For example:
gss1.yourdomain.com# gssm backup database crmdbbk GSSM database backup succeeded [crmdbbk.db]
Step 4 After you have received confirmation that the GSSM has successfully created your database backup, copy or move the file off your GSSM to ensure that it is not also lost if a media failure or other catastrophic loss occurs n your GSSM.
Either the secure copy (scp) or ftp commands can be used to move your database backup to a remote host, for example:
gss1.yourdomain.com# scp crmdbbk.db server.yourdomain.com:home
Upgrading the Cisco GSS SoftwarePeriodically, Cisco posts updated versions of the Cisco GSS software that offer new features or software patches for problems that have been identified in earlier versions. In order to upgrade to these new software versions, you must have access to the GSS download area of Cisco’s software download site, Cisco.com, anfamiliar with the proper procedure for updating your GSS devices, including CLI commands required to execute the backup.
Cisco GSS software upgrades require that you complete the following action
1. Verify the current software version.
2. Perform a full backup of your primary GSSM.
3. Obtain the software upgrade (.upg) file.
4. Upgrade your GSS devices.
5. Verify your upgrade.
The following sections detail the steps that you need to take to complete eacthese actions.
3-33Cisco Global Site Selector Configuration Guide
78-14361-01

Chapter 3 GSS Administration and TroubleshootingUpgrading the Cisco GSS Software
Step 1—Determine the Current Software VersionBefore attempting to upgrade to a new software version, first verify which version of the Cisco GSS software you are running. Confirming the current software version will help you determine:
• Whether an upgrade is necessary
• Whether there is a direct upgrade path between the software version you are running and the version to which you are upgrading
You can determine the software version running on any of your GSS devices either by logging on to those devices directly and using the CLI show version command, or by accessing the Global Site Selectors window on your GSSM GUI.
Determining the Current Software Version from the CLI
To determine the current software version using the CLI:
Step 1 Log on to the CLI of your GSSM, following the instructions in the Cisco Global Site Selector Command Reference. The Cisco CLI prompt appears.
Step 2 Enable privileged EXEC mode, for example:
gss1.yourdomain.com> enablegss1.yourdomain.com#
Step 3 Use the show version command to display the software version, for example:
gss1.yourdomain.com# show versionGlobal Site Selector (GSS)Copyright (c) 1999-2002 by Cisco Systems, Inc.Version 1.0(0.22.3)Compiled Tue Jul 9 16:56:08 2002 by atripath - changeset 25175uptime is 5 Days 2 Hours 31 Minutes and 18 secondsModel Number: GSS-3380-K9
3-34Cisco Global Site Selector Configuration Guide
78-14361-01

Chapter 3 GSS Administration and TroubleshootingUpgrading the Cisco GSS Software
Determining the Current Software Version from the GSSM GUI
Step 1 From the Cisco GSS software user interface, click the RESOURCES button.
Step 2 From the drop-down list, choose Global Site Selectors. The GSS list window appears.
Step 3 Click the Edit icon for the GSS device that you will be upgrading. The details window for the GSS device appears.
Step 4 Under the heading Node Information, look for the Version field. The number in this field is the software version being used by the device.
Step 5 Click Cancel to return to the GSS list window.
Step 2—Backing Up the GSSMBefore you attempt to upgrade your Cisco GSS software, first make sure that you have a full backup of your GSSM that is current. That way, should the upgrade fail for some reason, you can quickly restore your GSS network to its current state.
See the “Performing a Full GSSM Backup” section on page 3-31 for instructions on performing a full backup of your GSSM.
Step 3—Obtaining the Software Upgrade Before you can upgrade your Cisco GSS software, you must first acquire the appropriate software upgrade file from Cisco.
In order to acquire the software upgrade from Cisco, you must first:
• Access the Cisco.com website and locate the software upgrade files.
• Download the software upgrade files to a server within your own organization that is accessible through FTP or scp (secure copy) from your GSSs and GSSMs.
3-35Cisco Global Site Selector Configuration Guide
78-14361-01
Chapter 3 GSS Administration and TroubleshootingUpgrading the Cisco GSS Software
You must have a Cisco.com username and password before attempting to download a software upgrade from Cisco.com. In order to acquire a Cisco.com login, go to http://www.cisco.com and click the Register link.
Note You need a service contract number, Cisco.com registration number and verification key, Partner Initiated Customer Access (PICA) registration number and verification key, or packaged service registration number in order to obtain a Cisco.com username and password.
To add an upgrade file for the Cisco GSS:
Step 1 Launch your preferred web browser and point it to:
http://www.cisco.com/cgi-bin/tablebuild.pl/???
Step 2 When prompted, log on to Cisco.com using your designated Cisco.com username and password.
The Cisco GSS software download window appears, listing the available software upgrades for the Cisco GSS software product.
Note Each software upgrade consists of two files: a binary-format upgrade file (*.upg) and a smaller meta file (*.meta). Only the upgrade file must be downloaded in order to successfully complete a Cisco GSS software upgrade. The meta file contains the version number and the size of the upgrade file and can be used for verification of file integrity.
Step 3 Locate the files that you wish to download by referring to the Release column for the proper release version of the software.
Step 4 Click the link for the UPG (upgrade) file. The Software Download window appears.
Step 5 Click the Software License Agreement link. A new browser window opens, displaying the license agreement.
Step 6 After you have read the license agreement, close the browser window displaying the agreement and return to the Software Download window.
Step 7 Click the filename link labeled Download.
3-36Cisco Global Site Selector Configuration Guide
78-14361-01
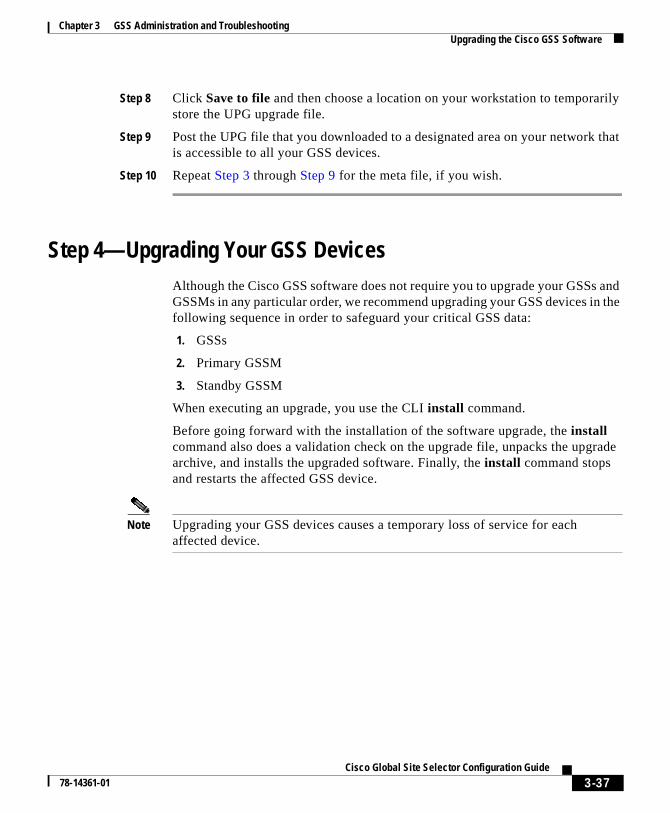
Chapter 3 GSS Administration and TroubleshootingUpgrading the Cisco GSS Software
Step 8 Click Save to file and then choose a location on your workstation to temporarily store the UPG upgrade file.
Step 9 Post the UPG file that you downloaded to a designated area on your network that is accessible to all your GSS devices.
Step 10 Repeat Step 3 through Step 9 for the meta file, if you wish.
Step 4—Upgrading Your GSS DevicesAlthough the Cisco GSS software does not require you to upgrade your GSSs and GSSMs in any particular order, we recommend upgrading your GSS devices in the following sequence in order to safeguard your critical GSS data:
1. GSSs
2. Primary GSSM
3. Standby GSSM
When executing an upgrade, you use the CLI install command.
Before going forward with the installation of the software upgrade, the install command also does a validation check on the upgrade file, unpacks the upgrade archive, and installs the upgraded software. Finally, the install command stops and restarts the affected GSS device.
Note Upgrading your GSS devices causes a temporary loss of service for each affected device.
3-37Cisco Global Site Selector Configuration Guide
78-14361-01

Chapter 3 GSS Administration and TroubleshootingUpgrading the Cisco GSS Software
To upgrade the Cisco GSS software on a GSS:
Step 1 Log on to the CLI of your GSS, following the instructions in the Cisco Global Site Selector Command Reference. The Cisco CLI prompt appears.
Step 2 If you have not already done so, use the ftp command to copy the Cisco GSS software upgrade file from the network location to which you downloaded it from Cisco.com to a directory on the current GSS. For example, to copy an upgrade file named gss.upg from a remote host, your FTP session might look like the following output:
gss1.yourdomain.com> ftp host.yourdomain.comConnected to host.yourdomain.com.220 host.yourdomain.com FTP server (Version wu-2.6.1-0.6x.21) ready.Name (host.yourdomain.com:root): admin331 Password required for admin.Password:230 User admin logged in. Access restrictions apply.Remote system type is UNIX.Using ascii mode to transfer files.ftp> binaryftp> get (remote-file) gss.upg(local-file) gss.upglocal: gss.upg remote: gss.upg200 PORT command successful....
Step 3 Enable privileged EXEC mode, for example:
gss1.yourdomain.com> enablegss1.yourdomain.com#
Step 4 Use the install command to install the upgrade. For example:
gss1.yourdomain.com# install gss.upgPerforming software install. This will take a few minutes.Device will reboot when the install is complete.
The GSS device reboots, causing you to lose any network CLI connections. Console connections remain active.
Step 5 Once the GSS device has rebooted, see the“Step 5—Verifying Your Upgrade” section to determine whether the upgrade was successfully completed.
3-38Cisco Global Site Selector Configuration Guide
78-14361-01

Chapter 3 GSS Administration and TroubleshootingUpgrading the Cisco GSS Software
Step 5—Verifying Your UpgradeUse the following procedure to log on to your upgraded GSS device and verify that the upgrade was successfully completed.
Step 1 Log on to the CLI of your GSS, following the instructions in the Cisco Global Site Selector Command Reference. The Cisco CLI prompt appears.
Step 2 Enable privileged EXEC mode, for example:
gss1.yourdomain.com> enablegss1.yourdomain.com#
Step 3 Use the show version command to verify that the intended software version has been successfully installed, for example:
gss1.cisco.com# show versionGlobal Site Selector (GSS)Copyright (c) 1999-2002 by Cisco Systems, Inc.
Version 1.0(0.22.3)
Compiled Tue Jul 9 16:56:08 2002 by atripath - changeset 25175uptime is 5 Days 2 Hours 31 Minutes and 18 secondsModel Number: GSS-3380-K9
Step 4 Use the gss status command to verify that the GSS device is running and confirm that the installed software version is correct, for example:
gss1.yourdomain.com> gss statusCisco GSS(1.0.0.22.3) GSS Manager - primary [Mon May 20 13:46:21 GMT 2002]
Normal Operation [runmode = 5]
%CPU %MEM START PID SERVER 0.0 0.3 May17 813 system 0.0 0.4 May17 1079 postgresql 0.0 1.6 May17 1083 tomcat 0.0 0.1 May17 1353 apache 0.0 2.2 May17 1092 controller 0.0 1.7 May17 1109 CrDirector 0.0 0.1 May17 1110 selector 0.0 0.1 May17 1122 kale 0.0 0.0 May17 1140 boomserv
3-39Cisco Global Site Selector Configuration Guide
78-14361-01

Chapter 3 GSS Administration and TroubleshootingDowngrading and Restoring Your GSS Devices
0.0 1.7 May17 937 nodemgr 0.0 0.0 May17 304 syslogd --- --- --- --- snmpd [DISABLED] --- --- --- --- ucd-snmpd [DISABLED]
Downgrading and Restoring Your GSS DevicesShould you encounter problems with a software upgrade, you can always restore an earlier version of the Cisco GSS software on your GSSs and GSSMs.
However, in order to restore an earlier version of your software, you must have backed up a version of your GSSM database that corresponds to that version. In other words, if you wish to downgrade from GSS Release 3 to GSS Release 1 software, there must be a GSS Release 1 database backup that you can restore; your GSS Release 3 database will not be able to run on the Release 1 platform because of changes in the database schema between releases.
When downgrading, use the following order of operations to safeguard your critical GSS data and properly restore your GSSM database:
1. Verify the current software version.
2. Perform a full backup of your primary GSSM.
3. Obtain the software downgrade (.upg) file.
4. Downgrade your GSS device.
5. Verify your downgrade.
In addition, do not attempt to restore an earlier version of the software than the earliest database backup you have available. For example, if the earliest version of the Cisco GSS software that you have run is Release 2.0 and your earliest database backup is for Release 2.0, do not attempt to downgrade to a release of the software earlier than 2.0.
3-40Cisco Global Site Selector Configuration Guide
78-14361-01

Chapter 3 GSS Administration and TroubleshootingDowngrading and Restoring Your GSS Devices
o are
r last
and riod.
a
the
Restoring an Earlier Software Version on Your GSS DevicesTo restore an earlier version of your Cisco GSS software, follow the instructions in the “Step 3—Obtaining the Software Upgrade” section on page 3-35, “Step 4—Upgrading Your GSS Devices” section on page 3-37, and “Step 5—Verifying Your Upgrade” section on page 3-39 to acquire and then install the earlier software upgrade and meta files.
After you have downgraded the software on your GSSM, see the “Restoring Your GSSM Database from a Backup” to restore your backed up GSSM database.
Restoring Your GSSM Database from a BackupYou must have a backup of an earlier version of your database file in order trestore it to run with your downgraded Cisco GSS software. You should be awthat the GSS database schema often changes between versions. When youdowngrade from a later to an earlier version of the GSSM database, any configuration changes that you entered through the GSSM subsequent to youupgrade are lost, including configuration changes, device configuration information, and DNS rules.
See the “Backing Up the GSSM” section on page 3-30 for details on performing a database backup of the GSSM.
Note Restoring your GSSM database requires that the GSSM device be stopped restarted, resulting in the device and the GUI being unavailable for a short pe
Use the following procedure to restore an earlier version of the GSSM from backup:
Step 1 Log on to the CLI of your GSS, following the instructions in the Cisco Global Site Selector Command Reference. The Cisco CLI prompt appears.
Step 2 Verify that the full backup of the GSSM is at a location that is accessible fromGSSM that you will be restoring. Full backups have a FULL file extension.
Step 3 Enable privileged EXEC mode, for example:
gss1.yourdomain.com> enablegss1.yourdomain.com#
3-41Cisco Global Site Selector Configuration Guide
78-14361-01
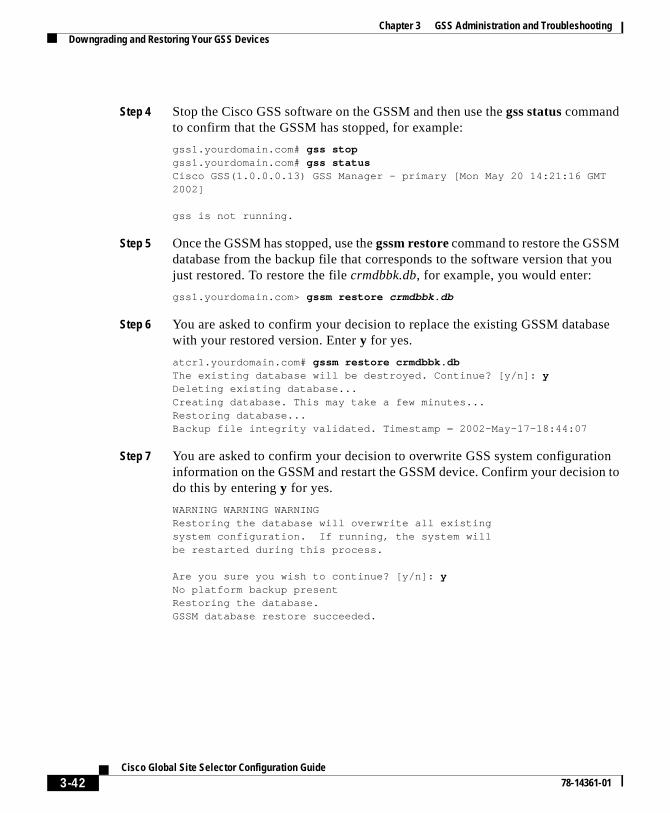
Chapter 3 GSS Administration and TroubleshootingDowngrading and Restoring Your GSS Devices
Step 4 Stop the Cisco GSS software on the GSSM and then use the gss status command to confirm that the GSSM has stopped, for example:
gss1.yourdomain.com# gss stopgss1.yourdomain.com# gss statusCisco GSS(1.0.0.0.13) GSS Manager - primary [Mon May 20 14:21:16 GMT 2002]
gss is not running.
Step 5 Once the GSSM has stopped, use the gssm restore command to restore the GSSM database from the backup file that corresponds to the software version that you just restored. To restore the file crmdbbk.db, for example, you would enter:
gss1.yourdomain.com> gssm restore crmdbbk.db
Step 6 You are asked to confirm your decision to replace the existing GSSM database with your restored version. Enter y for yes.
atcr1.yourdomain.com# gssm restore crmdbbk.dbThe existing database will be destroyed. Continue? [y/n]: yDeleting existing database...Creating database. This may take a few minutes...Restoring database...Backup file integrity validated. Timestamp = 2002-May-17-18:44:07
Step 7 You are asked to confirm your decision to overwrite GSS system configuration information on the GSSM and restart the GSSM device. Confirm your decision to do this by entering y for yes.
WARNING WARNING WARNINGRestoring the database will overwrite all existingsystem configuration. If running, the system willbe restarted during this process.
Are you sure you wish to continue? [y/n]: yNo platform backup presentRestoring the database.GSSM database restore succeeded.
3-42Cisco Global Site Selector Configuration Guide
78-14361-01
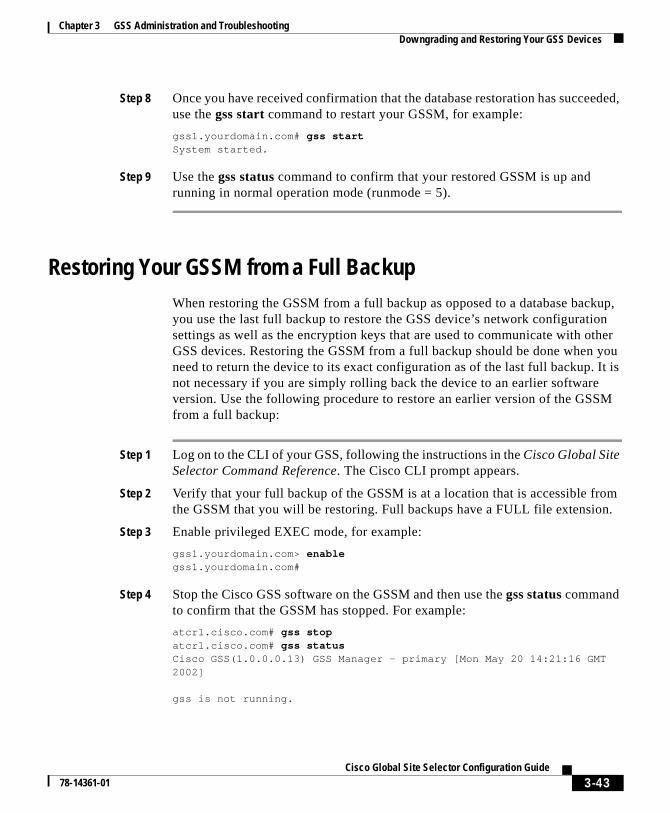
Chapter 3 GSS Administration and TroubleshootingDowngrading and Restoring Your GSS Devices
n ther you It is M
m n.
Step 8 Once you have received confirmation that the database restoration has succeeded, use the gss start command to restart your GSSM, for example:
gss1.yourdomain.com# gss startSystem started.
Step 9 Use the gss status command to confirm that your restored GSSM is up and running in normal operation mode (runmode = 5).
Restoring Your GSSM from a Full BackupWhen restoring the GSSM from a full backup as opposed to a database backup, you use the last full backup to restore the GSS device’s network configuratiosettings as well as the encryption keys that are used to communicate with oGSS devices. Restoring the GSSM from a full backup should be done whenneed to return the device to its exact configuration as of the last full backup. not necessary if you are simply rolling back the device to an earlier softwareversion. Use the following procedure to restore an earlier version of the GSSfrom a full backup:
Step 1 Log on to the CLI of your GSS, following the instructions in the Cisco Global Site Selector Command Reference. The Cisco CLI prompt appears.
Step 2 Verify that your full backup of the GSSM is at a location that is accessible frothe GSSM that you will be restoring. Full backups have a FULL file extensio
Step 3 Enable privileged EXEC mode, for example:
gss1.yourdomain.com> enablegss1.yourdomain.com#
Step 4 Stop the Cisco GSS software on the GSSM and then use the gss status command to confirm that the GSSM has stopped. For example:
atcr1.cisco.com# gss stopatcr1.cisco.com# gss statusCisco GSS(1.0.0.0.13) GSS Manager - primary [Mon May 20 14:21:16 GMT 2002]
gss is not running.
3-43Cisco Global Site Selector Configuration Guide
78-14361-01
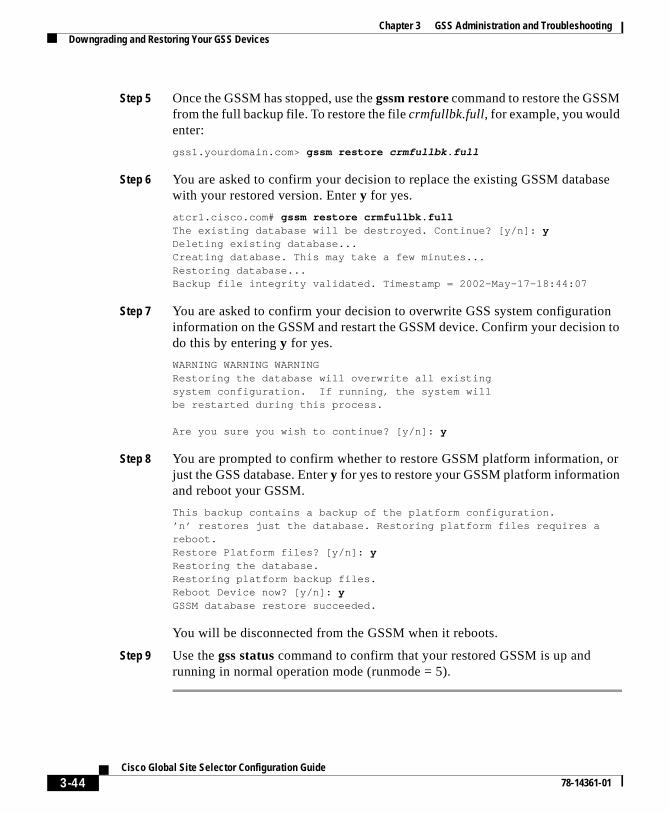
Chapter 3 GSS Administration and TroubleshootingDowngrading and Restoring Your GSS Devices
Step 5 Once the GSSM has stopped, use the gssm restore command to restore the GSSM from the full backup file. To restore the file crmfullbk.full, for example, you would enter:
gss1.yourdomain.com> gssm restore crmfullbk.full
Step 6 You are asked to confirm your decision to replace the existing GSSM database with your restored version. Enter y for yes.
atcr1.cisco.com# gssm restore crmfullbk.fullThe existing database will be destroyed. Continue? [y/n]: yDeleting existing database...Creating database. This may take a few minutes...Restoring database...Backup file integrity validated. Timestamp = 2002-May-17-18:44:07
Step 7 You are asked to confirm your decision to overwrite GSS system configuration information on the GSSM and restart the GSSM device. Confirm your decision to do this by entering y for yes.
WARNING WARNING WARNINGRestoring the database will overwrite all existingsystem configuration. If running, the system willbe restarted during this process.
Are you sure you wish to continue? [y/n]: y
Step 8 You are prompted to confirm whether to restore GSSM platform information, or just the GSS database. Enter y for yes to restore your GSSM platform information and reboot your GSSM.
This backup contains a backup of the platform configuration.’n’ restores just the database. Restoring platform files requires a reboot.Restore Platform files? [y/n]: yRestoring the database.Restoring platform backup files.Reboot Device now? [y/n]: yGSSM database restore succeeded.
You will be disconnected from the GSSM when it reboots.
Step 9 Use the gss status command to confirm that your restored GSSM is up and running in normal operation mode (runmode = 5).
3-44Cisco Global Site Selector Configuration Guide
78-14361-01
Chapter 3 GSS Administration and TroubleshootingViewing Third-Party Software Versions
S
Viewing Third-Party Software VersionsThe Cisco GSS software relies on a variety of third-party software products to operate properly. For that reason, the GSSM GUI provides a feature that easily allows you to track the third-party software used by the Cisco GSS software.
To view information on the third-party software currently running on your GSS:
Step 1 From the GSSM GUI, click the TOOLS button.
Step 2 From the drop-down list, choose the Third-Party Software option. The GSSM Third-Party Software window appears. (See Figure 3-3.) The window displays the following information:
• Product—Third-party software product, for example, RedHat Version 6.2
• Version—Version of the third-party software currently installed on the GSdevice
• URL—Web URL for the software product
3-45Cisco Global Site Selector Configuration Guide
78-14361-01
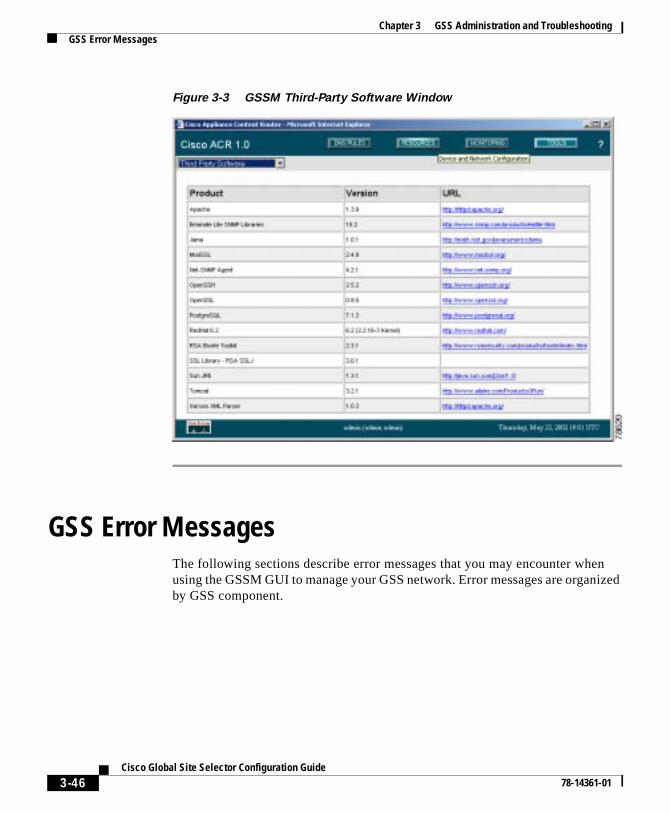
Chapter 3 GSS Administration and TroubleshootingGSS Error Messages
Figure 3-3 GSSM Third-Party Software Window
GSS Error MessagesThe following sections describe error messages that you may encounter when using the GSSM GUI to manage your GSS network. Error messages are organized by GSS component.
3-46Cisco Global Site Selector Configuration Guide
78-14361-01

Chapter 3 GSS Administration and TroubleshootingGSS Error Messages
Answer Error Messages
Error Message Invalid answer name. If entered, name must not be the empty string.
Explanation The name that you entered for the answer is not valid. Answer names cannot be blank or contain blank spaces.
Recommended Action Enter a valid alphanumeric answer name of a least 1 and no more than 80 characters in length that does not contain spaces.
Error Message Invalid answer name. Name length must not exceed 80 characters.
Explanation The answer name that you entered contains too many characters.
Recommended Action Enter a valid alphanumeric answer name of at least 1 and no more than 80 characters in length that does not contain spaces.
Error Message Invalid CRA timing decay. Timing decay must be between 1 and 10.
Explanation You entered an invalid number for the CRA timing decay.
Recommended Action Enter a number between 1 and 10. Lower timing decay values mean that more recent DNS races are weighted more heavily than older races. Higher decay values mean that the results of older races are weighted more heavily than more recent races.
Error Message Invalid CRA static RTT value. Static RTT must be between 0 and 1000.
Explanation You entered an invalid number for the static round-trip time (RTT). This is a manually entered value that is used by the GSS to represent the time it takes for traffic to reach and return from a host.
Recommended Action Enter a static RTT value between 0 and 1000.
3-47Cisco Global Site Selector Configuration Guide
78-14361-01
Chapter 3 GSS Administration and TroubleshootingGSS Error Messages
Error Message A VIP/Name Server/CRA-type answer named answer_name already exists. If specified, name and type must uniquely identify an answer.
Explanation You are trying to create an answer that already exists on the GSS. You cannot have two answers with the same name and answer type.
Recommended Action Assign a new name or answer type to your answer to make it unique.
Error Message An unnamed VIP/Name Server/CRA-type answer having address IP_address already exists. Name must be specified to configure an answer with the same address as another answer.
Explanation You are trying to create an answer that already exists on the GSS. You cannot have two answers with the same name and IP address.
Recommended Action Assign a new name to your answer in order to make it unique.
Error Message The maximum number of number VIP/Name Server/CRA-type answers has been met.
Explanation You are attempting to create an answer when the maximum number of that type of answer has already been created.
Recommended Action Remove an existing answer of the same type.
Error Message CRA decay value must be specified.
Explanation You are attempting to create a CRA answer type without specifying a decay value. The decay value is required to tell the GSS how to evaluate and weight DNS race results.
Recommended Action Enter a number between 1 and 10 for the CRA decay, with 1 causing the GSS to weigh recent DNS race results more heavily, and 10 telling it to weight them less heavily.
3-48Cisco Global Site Selector Configuration Guide
78-14361-01
Chapter 3 GSS Administration and TroubleshootingGSS Error Messages
Error Message CRA static RTT must be specified.
Explanation You are attempting to create a CRA answer type without specifying a static round-trip time (RTT) value. The RTT value is used to force the GSS to use a value that you supply as the round-trip time necessary to reach the requesting D-proxy.
Recommended Action Enter a number between 1 and 1000 for the CRA round-trip time in milliseconds.
Error Message Invalid keepalive tag. Tag must be at least one character in length.
Explanation You are attempting to create a VIP answer with a KAL-AP By Tag keepalive, but you have not specified a value for the tag in the field provided.
Recommended Action Enter an alphanumeric tag between 1 and 76 characters in the Tag field.
Error Message Invalid keepalive tag. Tag length must not exceed 76 characters.
Explanation You are attempting to create a VIP answer with a KAL-AP By Tag keepalive, but you have specified a value for the tag that contains too many characters.
Recommended Action Enter an alphanumeric tag between 1 and 76 characters in the Tag field.
Error Message NS-type answer IP Address has the same IP address as GSS GSS_name. GSS IP addresses must not equal any NS-type answers.
Explanation You are attempting to create a name server answer type with the same IP address as a GSS device on the same GSS network. Name server answers cannot use the same address as GSS devices belonging to the same GSS network.
Recommended Action Assign a valid IP address to your name server answer.
3-49Cisco Global Site Selector Configuration Guide
78-14361-01
Chapter 3 GSS Administration and TroubleshootingGSS Error Messages
Answer Group Error Messages
Error Message This answer group cannot be deleted because it is referenced by number DNS rule balance clause(s).
Explanation You are attempting to delete an answer group that is being referenced by one or more DNS rules.
Recommended Action Modify any DNS rules that are referencing the answer group so that those rules do not point to the group, and then try again to delete the group.
Error Message Invalid answer group name. Name must be entered.
Explanation You are attempting to create an answer group without assigning a name to that group. All answer groups must have names of at least one character.
Recommended Action Enter a name for the new answer group in the field provided, and then click Save.
Error Message Invalid answer group name. Name length must not exceed 80 characters.
Explanation You are attempting to assign the answer group an invalid name.
Recommended Action Enter an alphanumeric name for the answer group that is fewer than 80 characters and does not contain spaces.
Error Message Invalid answer group name. Name must not contain spaces.
Explanation You are attempting to assign the answer group an invalid name.
Recommended Action Enter an alphanumeric name for the answer group that is fewer than 80 characters and does not contain spaces.
3-50Cisco Global Site Selector Configuration Guide
78-14361-01
Chapter 3 GSS Administration and TroubleshootingGSS Error Messages
Error Message An answer group named name already exists. Name must uniquely identify an answer group.
Explanation You are attempting to assign the answer group a name that is already being used by a different GSS device.
Recommended Action Enter a unique alphanumeric name for the answer group that is fewer than 80 characters and does not contain spaces.
Error Message The maximum number of number answers per VIP/Name Server/CRA-type group has been met.
Explanation You are attempting to add an answer to an answer group to which the maximum number of answers has already been assigned.
Recommended Action Remove an answer from the group, or add the answer to a group to which the maximum number of answers has not already been added.
DNS Rule Error Messages
Error Message TTL must be specified for balance method associated with CRA- or VIP-type answer group.
Explanation You are attempting to create a balance clause without specifying a Time To Live (TTL) for answers returned by the clause.
Recommended Action Enter a TTL value between 0 and 604,800 seconds.
Error Message Invalid balance clause TTL. TTL must be between 0 and 604,800.
Explanation You are required to specify a Time To Live (TTL) value for answers provided by the balance clause that you are creating.
Recommended Action Enter a TTL value between 0 and 604,800 seconds.
3-51Cisco Global Site Selector Configuration Guide
78-14361-01
Chapter 3 GSS Administration and TroubleshootingGSS Error Messages
re)
this
rang Size race
d
Error Message Invalid balance clause position. Position must be between 0 and 2.
Explanation You are attempting to create a clause for your DNS rule that is out of sequence. The DNS Rule Builder provides options for three balance clauses, which must be created in order, with no gaps between clauses. For example, if you are using only one balance clause, it must appear in the first position. It cannot be listed in the second or third positions with the first position left blank.
Recommended Action Rearrange your balance clauses in the DNS Rule Builder so that they are listed in the proper order, with no gaps between them.
Error Message Hash type must be specified for answer group using hash balance method.
Explanation You are trying to create an answer group using the balance method “Hashed” with the selected answer, but you have not selected one (or mohash methods: By Domain Name and By Source Address.
Recommended Action Select one or more of the available hash methods by checking the box corresponding to the methods that you wish to use withbalance clause.
Error Message Balance clause Boomerang fragment size must be specified.
Explanation You are attempting to create a balance clause using the boomebalance method, but have not specified a fragment size in the Fragment field. The fragment size determines the preferred size of the boomerang response that is produced by a match to a DNS rule and is sent to the requesting client.
Recommended Action Enter a fragment size between 28 and 1980 in the fielprovided. The fragment size must be divisible by 4.
3-52Cisco Global Site Selector Configuration Guide
78-14361-01
Chapter 3 GSS Administration and TroubleshootingGSS Error Messages
Error Message Invalid balance clause Boomerang fragment size. Boomerang fragment size must be 0 or between 28 and 1980.
Explanation You are attempting to specify an unacceptable fragment size for this balance clause in the Fragment Size field.
Recommended Action Enter a valid fragment size. Fragment sizes must be between 28 and 1980, and must be divisible by 4.
Error Message Invalid balance clause Boomerang fragment size. Boomerang fragment size must be a multiple of 4.
Explanation You are attempting to specify a fragment for this boomerang balance clause that is within the acceptable range but not divisible by 4. Fragment sizes must be divisible by 4.
Recommended Action Enter a fragment size between 28 and 1980 that is also divisible by 4. Zero is also an acceptable fragment size.
Error Message Balance clause Boomerang IP TTL value must be specified.
Explanation You are attempting to create a balance clause the boomerang balance method, but have not specified an IP Time To Live (TTL) in the field provided. The IP TTL specifies the maximum number of network hops that can be used when returning a response to a CRA from a match on a DNS rule.
Recommended Action Enter an IP TTL between 1 and 255 in the field provided and then click Save.
Error Message Invalid balance clause Boomerang IP TTL. Boomerang IP TTL must be between 1 and 255.
Explanation You are attempting to create a balance clause using the boomerang balance method but have specified an invalid IP Time to Live (TTL).
Recommended Action Enter an IP TTL between 1 and 255 in the field provided and then click Save.
3-53Cisco Global Site Selector Configuration Guide
78-14361-01
Chapter 3 GSS Administration and TroubleshootingGSS Error Messages
Error Message Balance clause Boomerang maximum propagation delay must be specified.
Explanation You are attempting to create a balance clause using the boomerang balance method but have not specified a maximum propagation delay (Max Prop. Delay) in the field provided. The maximum propagation delay specifies the maximum length of time (in milliseconds) that will be observed before the GSS forwards a Domain Name System (DNS) request to a content routing agent (CRA).
Recommended Action Enter a maximum propagation delay between 1 and 1000 milliseconds in the Max Prop. Delay field.
Error Message Invalid balance clause Boomerang maximum propagation delay. Boomerang maximum propagation delay must be between 1 and 1000.
Explanation You are attempting to create a balance clause using the boomerang balance method but have not specified a valid maximum propagation delay (Max Prop. Delay) in the field provided.
Recommended Action Enter a maximum propagation delay between 1 and 1000 milliseconds in the Max Prop. Delay field.
Error Message Balance clause Boomerang padding size must be specified.
Explanation You are attempting to create a balance clause using the boomerang balance method but have not specified a pad size in the Pad Size field. The pad size is the amount of extra data (in bytes) included with each content routing agent (CRA) response packet and is used to evaluate CRA bandwidth as well as latency when routing decisions are made.
Recommended Action Enter a valid pad size between 0 and 2000 in the Pad Size field.
3-54Cisco Global Site Selector Configuration Guide
78-14361-01

Chapter 3 GSS Administration and TroubleshootingGSS Error Messages
he
Error Message Invalid balance clause Boomerang padding size. Boomerang padding size must be between 0 and 2000.
Explanation You are attempting to create a balance clause using the boomerang balance method, but have specified an invalid pad size in the Pad Size field.
Recommended Action Enter a valid pad size between 0 and 2000 in the Pad Size field.
Error Message Invalid balance clause Boomerang secret. If specified, Boomerang secret must be between 1 and 64 characters in length.
Explanation You are attempting to create a balance clause using the boomerang balance method but have specified an invalid secret in the Secret field. The boomerang secret is a text string consisting of between 1 and 64 characters that is used to encrypt critical data sent between the boomerang server and content routing agents (CRAs). This key must be the same for each configured CRA.
Recommended Action Enter a valid boomerang secret between 1 and 64 characters in the Secret field.
Error Message Balance clause Boomerang server delay must be specified.
Explanation You are attempting to create a balance clause using the boomerang balance method but have not specified a server delay in the Server Delay field. The boomerang server delay is the maximum delay (in milliseconds) that is observed before the boomerang server component of the GSS forwards the address of its “last gasp” server as a response to trequesting name server.
Recommended Action Enter a valid server delay between 32 and 999 milliseconds in the Server Delay field.
3-55Cisco Global Site Selector Configuration Guide
78-14361-01

Chapter 3 GSS Administration and TroubleshootingGSS Error Messages
Error Message Invalid balance clause Boomerang server delay. Boomerang server delay must be between 32 and 999.
Explanation You are attempting to create a balance clause using the boomerang balance method but have specified an invalid server delay in the Server Delay field.
Recommended Action Enter a valid server delay between 32 and 999 milliseconds in the Server Delay field.
Error Message Invalid DNS rule name. Name must be entered.
Explanation You are attempting to create a DNS rule without assigning a name to the rule. DNS rules must have names of between 1 and 100 characters.
Recommended Action Assign a name to your DNS rule using the Rule Name field and then try again to save the rule.
Error Message Invalid DNS rule name. Name length must not exceed 100 characters.
Explanation You are attempting to assign a name to your DNS rule that is too long. The maximum length for DNS rules is 100 characters.
Recommended Action Enter a name for your DNS rule that is between 1 and 100 characters and then attempt to save the rule again.
Error Message Invalid DNS rule name. Name must not contain spaces.
Explanation You are attempting to assign your DNS rule a name that contains spaces.
Recommended Action Enter a valid name for your DNS rule that is between 1 and 100 characters and does not contain spaces.
3-56Cisco Global Site Selector Configuration Guide
78-14361-01
Chapter 3 GSS Administration and TroubleshootingGSS Error Messages
Error Message A DNS rule using the specified source address list, domain list, and matching query type already exists. Source address list, domain list, and matching query type must uniquely identify a DNS rule.
Explanation You are attempting to create a DNS rule that already exists. DNS rules must specify a unique combination of source address list, domain list, and matching query type.
Recommended Action Reconfigure your DNS rule so that it does not exactly match the preexisting rule and then save the rule.
Error Message Duplicate answer group/balance method assignment detected. A DNS rule cannot use the same answer group and balance method in multiple balance clauses.
Explanation You are attempting to create two identical answer group and balance method clauses in your DNS rule. Each clause must use a unique combination of answer groups and balance methods.
Recommended Action Modify one of your answer group and balance method pairs so that it is no longer identical to the other and then save your DNS rule.
Error Message Balance clause gap detected at position {0,1,2}. Balance clauses must be specified sequentially without gaps.
Explanation You are attempting to create a clause for your DNS rule that is out of sequence. The DNS Rule Builder provides options for three balance clauses, which must be created in order, with no gaps between clauses. For example, if you are using only one balance clause, it must appear in the first position. It cannot be listed in the second or third positions with the first position left blank.
Recommended Action Rearrange your balance clauses in the DNS Rule Builder so that they are listed in the proper order, with no gaps between them.
3-57Cisco Global Site Selector Configuration Guide
78-14361-01
Chapter 3 GSS Administration and TroubleshootingGSS Error Messages
Error Message A DNS rule named DNS_Rule_name already exists. Name must uniquely identify a DNS rule.
Explanation You are attempting to assign a name to the DNS rule that is already assigned to another rule. DNS rule names must be unique.
Recommended Action Assign the rule a name that is not already being used and then save the rule.
Domain List Error Messages
Error Message <domain name> must contain at least one character.
Explanation You are attempting to add a domain to a domain list with an invalid name. Domains in domain lists must have names of at least one character.
Recommended Action Enter a name that is between 1 and 100 characters and then save your domain list.
Error Message <domain name> character limit exceeded.
Explanation You are attempting to add a domain to a domain list using a name that is too long. Domains in domain lists cannot have names of more than 100 characters.
Recommended Action Enter a new domain name of no more than 100 characters and then save your domain list.
Error Message Domain specification must not exceed 128 characters.
Explanation You are attempting to add a domain to your domain list with a name that is longer than 128 characters. Domain lists cannot contain domains with names longer than 128 characters.
Recommended Action Replace the domain with a domain name containing fewer than 128 characters and then save your domain list.
3-58Cisco Global Site Selector Configuration Guide
78-14361-01
Chapter 3 GSS Administration and TroubleshootingGSS Error Messages
Error Message <domain name> must not contain spaces.
Explanation You are attempting to add a domain to your domain list with a name that contains spaces. Domains in domain lists cannot have names that contain spaces.
Recommended Action Modify the domain name so that it does not contain spaces and then save your domain list.
Error Message <domain name> is not a valid regular expression: <regular expression syntax error message here>
Explanation You are attempting to add a domain name to a domain list with a name that contains invalid characters or formatting. Domain names in domain lists must be valid regular expressions.
Recommended Action Modify the domain name so that it is a valid regular expression and does not contain any invalid characters or formatting, for example, www.cisco.com or .*\.cisco\.com, and then save your domain list.
Error Message <domain name> must not begin or end with ’.’
Explanation You are attempting to add a domain to a domain list with a literal name that contains an invalid character at the beginning or end of the domain name.
Recommended Action Modify the domain name so that it does not contain a period at the beginning or end of the name and then save your domain list.
Error Message <domain name> component must not begin or end with ’-’
Explanation You are attempting to add a domain to a domain list with a literal name that contains an invalid character at the beginning or end of one component of the domain name, for example, www.cisco-.com.
Recommended Action Modify the domain name so that it does not contain a dash (-) at the beginning or end of any segment of the name and then save your domain list.
3-59Cisco Global Site Selector Configuration Guide
78-14361-01
Chapter 3 GSS Administration and TroubleshootingGSS Error Messages
Error Message <domain name> contains invalid character ’<character>’ (<ASCII value of the character>)
Explanation You are attempting to add a domain to a domain list with a name that contains an invalid text character. Domains belonging to domain lists must have names that are regular expressions.
Recommended Action Modify the domain name so that it does not contain an invalid text character and then save your domain list.
Error Message This domain list cannot be deleted because it is referenced by X DNS rule
Explanation You are attempting to delete a domain list that is being referenced by one or more DNS rules.
Recommended Action Modify any DNS rules that use the domain list so that they no longer reference it and then try again to delete the list.
Error Message Invalid domain list name. Name must be entered.
Explanation You are attempting to create a domain list without a name. Domain lists must have names of at least one character.
Recommended Action Assign a name of at least 1 and no more than 80 characters to your domain list and then save it.
Error Message Invalid domain list name. Name length must not exceed 80 characters.
Explanation You are attempting to create a domain list with a name that is too long.
Recommended Action Assign a name of at least 1 and no more than 80 characters to your domain list and then save it.
3-60Cisco Global Site Selector Configuration Guide
78-14361-01
Chapter 3 GSS Administration and TroubleshootingGSS Error Messages
Error Message Invalid domain list name. Name must not contain spaces.
Explanation You are attempting to create a domain list with a name that contains spaces. Domain list names cannot contain spaces.
Recommended Action Assign a name without spaces to your domain list. Names must consist of at least 1 and no more than 80 characters. Save your domain list when you have assigned it a valid name.
Error Message A domain list named ’<name>’ already exists. Name must uniquely identify a domain list.
Explanation You are attempting to assign a name to your domain list that has already been assigned to another domain list on the same GSS network.
Recommended Action Assign a unique name to your new domain list and then save the list.
Error Message The maximum number of <limit> domains per list has been met.
Explanation You are attempting to add a domain to your domain list when the maximum number of domains has already been added to that list.
Recommended Action Remove an existing domain from the domain list and then add the new domain. Alternatively, create a new domain list to hold the new domain and any subsequent domains that you wish to add.
3-61Cisco Global Site Selector Configuration Guide
78-14361-01
Chapter 3 GSS Administration and TroubleshootingGSS Error Messages
Shared Keepalive Error Messages
Error Message Invalid CAPP hash secret. Secret must be entered.
Explanation You are attempting to create a KAL-AP keepalive using a CAPP hash secret but have not specified a secret in the field provided.
Recommended Action Enter a CAPP hash secret of no more than 31 characters in the field provided.
Error Message Invalid CAPP hash secret. Secret length must not exceed 31 characters.
Explanation You are attempting to create a KAL-AP keepalive using a CAPP hash secret but have specified a secret that is too long.
Recommended Action Enter a CAPP hash secret of no more than 31 characters in the field provided.
Error Message Invalid HTTP HEAD response timeout.
Explanation You are attempting to specify an HTTP HEAD response timeout that is invalid.
Recommended Action Enter a response timeout between 20 and 60 seconds in the HTTP HEAD response timeout field in the KeepAlive Properties window.
Error Message Response timeout must be between 20 and 60 seconds.
Explanation You are attempting to specify an HTTP HEAD response timeout that is invalid.
Recommended Action Enter a response timeout between 20 and 60 seconds in the HTTP HEAD response timeout field in the KeepAlive Properties window.
3-62Cisco Global Site Selector Configuration Guide
78-14361-01
Chapter 3 GSS Administration and TroubleshootingGSS Error Messages
Error Message Invalid HTTP HEAD destination port. Destination port must be between 1 and 65,535.
Explanation You are attempting to specify a port number for HTTP HEAD traffic that is invalid.
Recommended Action In the HTTP HEAD destination port field in the KeepAlive Properties window, enter a port number between 1 and 65,535 through which HTTP Head keepalive traffic will pass. The default port is 80.
Error Message Invalid HTTP HEAD path. Path length must not exceed 256 characters.
Explanation You are attempting to specify an HTTP HEAD path that is not valid.
Recommended Action Enter a valid path shorter than 256 characters in the HTTP HEAD default path field in the KeepAlive Properties window.
Error Message Invalid <keepalive type> minimum probe frequency. Frequency must be between <min> and <max>.
Explanation You are attempting to specify a minimum probe interval for your keepalive type that is invalid.
Recommended Action Specify an interval (in seconds) within the range specified for that keepalive type in the KeepAlive Properties window. The interval range for the CRA keepalive type is between 1 and 60 seconds. For all other keepalive types, it is between 45 and 255 seconds.
3-63Cisco Global Site Selector Configuration Guide
78-14361-01
Chapter 3 GSS Administration and TroubleshootingGSS Error Messages
Keepalive Error Messages
Error Message Duplicate keepalive address detected. A keepalive must not be configured to use the same primary and secondary addresses.
Explanation You are trying to configure a KAL-AP keepalive that is identical to a keepalive of the same type that already exists.
Recommended Action Configure the KAL-AP keepalive to use a different primary and secondary address.
Error Message Duplicate keepalive primary address ’<primaryaddress>’ detected. An address can be used by at most one KAL-AP type keepalive.
Explanation You are trying to configure a KAL-AP keepalive that uses the same primary IP address as a keepalive of the same type that already exists.
Recommended Action Configure the KAL-AP keepalive to use a primary IP address that is not already being used by another keepalive.
Error Message Duplicate keepalive secondary address ’<secondary address>’ detected. An address can be used by at most one KAL-AP type keepalive.
Explanation You are trying to configure a KAL-AP keepalive that uses the same secondary IP address as a keepalive of the same type that already exists.
Recommended Action Configure the KAL-AP keepalive to use a secondary IP address that is not already being used by another keepalive.
3-64Cisco Global Site Selector Configuration Guide
78-14361-01
Chapter 3 GSS Administration and TroubleshootingGSS Error Messages
Error Message Duplicate keepalive detected. An HTTP HEAD keepalive must not use the same address, destination path, host tag, and port as another HTTP HEAD keepalive.
Explanation You are trying to configure an HTTP Head keepalive that features an identical configuration to that of another HTTP Head keepalive on your GSS network.
Recommended Action Configure the HTTP Head keepalive to use a unique configuration of address, destination path, host tag, and port.
Error Message Duplicate keepalive detected. An ICMP keepalive must not use the same address as another ICMP keepalive.
Explanation You are trying to configure an ICMP keepalive with an IP address that is identical to that of another ICMP keepalive on your GSS network.
Recommended Action Configure the ICMP to use a unique IP address.
Error Message Invalid CAPP hash secret. Secret length must not exceed 31 characters.
Explanation You are attempting to create a KAL-AP keepalive using a CAPP hash secret but have specified a secret that is too long.
Recommended Action Enter a CAPP hash secret of no more than 31 characters in the field provided.
Error Message Invalid HTTP HEAD destination port. If specified, destination port must be between 0 and 65,535.
Explanation You are attempting to specify a port number for HTTP HEAD traffic that is invalid.
Recommended Action In the HTTP HEAD destination port field in the KeepAlive Properties window, enter a port number between 1 and 65,535 through which HTTP Head keepalive traffic will pass. The default port is 80.
3-65Cisco Global Site Selector Configuration Guide
78-14361-01
Chapter 3 GSS Administration and TroubleshootingGSS Error Messages
Error Message Invalid HTTP HEAD host tag. Host tag length must not exceed 128 characters.
Explanation You are attempting to create an HTTP HEAD host tag that is too long.
Recommended Action Enter an HTTP HEAD host tag of no more than 128 characters.
Error Message Invalid HTTP HEAD path. If specified, path length must not exceed 256 characters.
Explanation You are attempting to specify an HTTP HEAD path that is not valid.
Recommended Action Enter a valid path shorter than 256 characters in the HTTP HEAD default path field in the KeepAlive Properties window.
Location Error Messages
Error Message The location is still being referenced by other objects and cannot be removed.
Explanation You are attempting to delete a location that has answers or GSSs associated with it.
Recommended Action Dissociate any answers or GSSs from the location and then try again to delete it.
Error Message There already exists a location named <name> in region <region> with the same name. Please specify a different location name.
Explanation You are attempting to create a location within this region when another location with the same name already exists.
Recommended Action Change the name of the location so that it is unique for the region.
3-66Cisco Global Site Selector Configuration Guide
78-14361-01
Chapter 3 GSS Administration and TroubleshootingGSS Error Messages
Owner Error Messages
Error Message Invalid owner name. Name must be entered.
Explanation You are attempting to create an owner without assigning the owner a name.
Recommended Action Owners must have a unique name. Enter a name for the owner in the field provided and then save the owner.
Error Message Invalid owner name. Name length must not exceed 80 characters.
Explanation You are attempting to assign a name to an owner that is too long.
Recommended Action Assign your owner a name that is no longer than 80 characters.
Error Message An owner named <owner name> already exists. Name must uniquely identify an owner.
Explanation You are attempting to assign your owner a name that is already assigned to another owner on your GSS network.
Recommended Action Assign a unique name to your owner.
Region Error Messages
Error Message The region is still being referenced by other objects and cannot be removed.
Explanation You are attempting to delete a region that is associated with GSSs on your GSS network.
Recommended Action Disassociate the GSSs from the region and then try again to delete the region.
3-67Cisco Global Site Selector Configuration Guide
78-14361-01
Chapter 3 GSS Administration and TroubleshootingGSS Error Messages
Error Message There already exists a region named <region name>. All region names have to be unique.
Explanation You are attempting assign a name to the region that is already being used by another region on your GSS network.
Recommended Action Assign a unique name to your region.
GSS Error Messages
Error Message Maximum number of GSSMs exceeded. A GSS network can contain at most 2 GSSMs.
Explanation You are attempting to enable a GSSM when there are already two GSSMs enabled on your GSS network.
Recommended Action If necessary, remove your standby GSSM from your GSS network and then try again to enable the GSSM.
Error Message The maximum number of <size> <className> has been met.
Explanation You are attempting to add a resource to your GSS network when the maximum number of that resource already exists.
Recommended Action Remove an existing resource of the same type and then try again to add the new resource.
3-68Cisco Global Site Selector Configuration Guide
78-14361-01
Chapter 3 GSS Administration and TroubleshootingGSS Error Messages
Source Address List Error Messages
Error Message Invalid source address block ’<block string>’. Address block must specify a host or a network.
Explanation You are attempting to specify an invalid source address range.
Recommended Action Enter a valid source address or block of source addresses. Source addresses cannot specify a multicast address list.
Error Message Invalid source address block ’<blockstring>’. Address block must specify a class A, B, or C host or network.
Explanation You are attempting to specify an invalid source address range.
Recommended Action Enter a valid source address or block of source addresses. Source addresses cannot specify a multicast address list.
Error Message Invalid source address list name. Name must be entered.
Explanation You are attempting to create a source address list without assigning the list a name.
Recommended Action Enter a name for the source address list in the Name field.
Error Message Invalid source address list name. Name length must not exceed 80 characters.
Explanation You are attempting to create a source address list with a name that is too long.
Recommended Action Enter a valid name for the source address list that has fewer than 80 characters and does not contain spaces.
3-69Cisco Global Site Selector Configuration Guide
78-14361-01
Chapter 3 GSS Administration and TroubleshootingGSS Error Messages
Error Message Invalid source address list name. Name must not contain spaces.
Explanation You are attempting to create a source address list with a name that contains spaces. Source address list names cannot contain spaces.
Recommended Action Enter a valid name for the source address list that has fewer than 80 characters and does not contain spaces.
Error Message This source address list cannot be deleted because it is referenced by <number> DNS rules.
Explanation You are attempting to delete a source address list that is referenced by one or more DNS rules.
Recommended Action Disassociate your DNS rules from the source address list using the DNS Rule Builder or DNS Rule Wizard and then attempt to delete the source address list again.
Error Message A source address list named ’<name>’ already exists. Name must uniquely identify a source address list.
Explanation You are attempting to create a new source address list using a name that is already being used by another source address list on your GSS network.
Recommended Action Assign a unique name to your source address list that is no more than 80 characters and does not contain spaces.
Error Message The maximum number of 30 source address blocks per list has been met.
Explanation You are attempting to add a source address block to the source address list, when the maximum of 30 source address blocks has already been added to the list.
Recommended Action Remove an existing source address block, or create a new source address list for the source address block that you wish to add.
3-70Cisco Global Site Selector Configuration Guide
78-14361-01
Chapter 3 GSS Administration and TroubleshootingGSS Error Messages
User Error Messages
Error Message There already exists a user account named <user name>. All user accounts must have a unique username.
Explanation You are attempting to create a user account with a name identical to that of an existing account.
Recommended Action Assign your new user account a unique name.
Error Message You cannot delete the account with username ’admin’. This account must exist.
Explanation You are attempting to delete the admin user account.
Recommended Action This account cannot be deleted from the GSSM.
Error Message Invalid answer load threshold. Load threshold must be between 2 and 254.
Explanation You are attempting to assign an invalid load threshold to your answer in the LT field.
Recommended Action Assign a load threshold for the answer that is between 2 and 254 in the LT field.
Error Message Invalid answer order. Order must not be negative.
Explanation You are attempting to assign a negative order number to your answer. The order must be a positive number.
Recommended Action Enter a nonnegative whole number for the order.
3-71Cisco Global Site Selector Configuration Guide
78-14361-01

Chapter 3 GSS Administration and TroubleshootingGSS Error Messages
3-72Cisco Global Site Selector Configuration Guide
78-14361-01
Cisco Gl78-14361-01
C H A P T E R 4
Monitoring GSS PerformanceOverviewThe Cisco GSS software features a number of tools for monitoring the status of your GSS devices and of global load balancing on your GSS network. These include CLI-based commands for determining the status of your GSSs, GSSMs, and the embedded GSS database. In addition, the GSSM GUI contains windows that display the status of global server load balancing activity, for example, tabulating answer and DNS rule hit counts.
This chapter contains the following sections:
• Monitoring GSS Device Status, page 4-1
• Monitoring Global Load-Balancing Status, page 4-9
• Viewing Log Files, page 4-20
• Printing and Exporting GSSM Data, page 4-28
Monitoring GSS Device StatusThe following sections address the various GSS features for monitoring the health of your GSS devices and components.
4-1obal Site Selector Configuration Guide
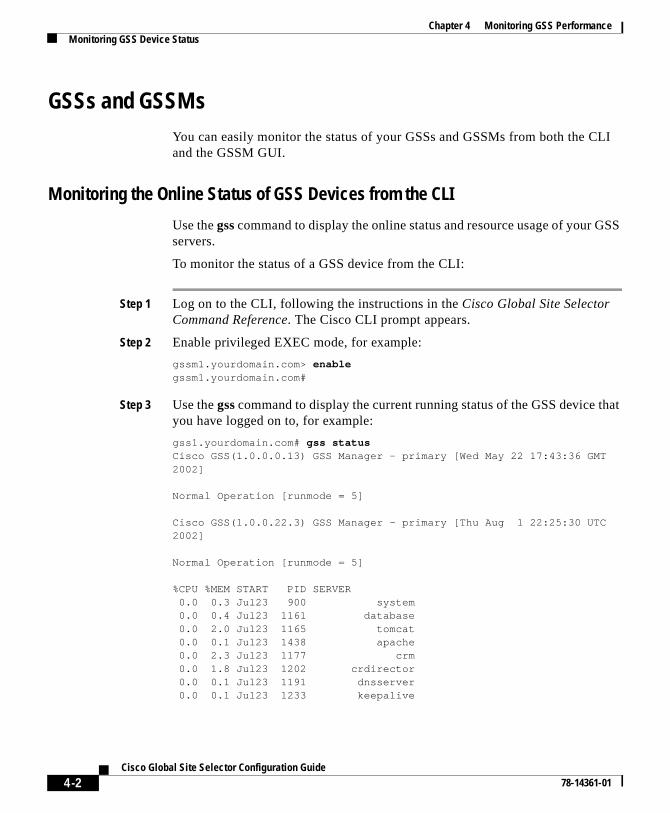
Chapter 4 Monitoring GSS PerformanceMonitoring GSS Device Status
GSSs and GSSMsYou can easily monitor the status of your GSSs and GSSMs from both the CLI and the GSSM GUI.
Monitoring the Online Status of GSS Devices from the CLI
Use the gss command to display the online status and resource usage of your GSS servers.
To monitor the status of a GSS device from the CLI:
Step 1 Log on to the CLI, following the instructions in the Cisco Global Site Selector Command Reference. The Cisco CLI prompt appears.
Step 2 Enable privileged EXEC mode, for example:
gssm1.yourdomain.com> enablegssm1.yourdomain.com#
Step 3 Use the gss command to display the current running status of the GSS device that you have logged on to, for example:
gss1.yourdomain.com# gss statusCisco GSS(1.0.0.0.13) GSS Manager - primary [Wed May 22 17:43:36 GMT 2002]
Normal Operation [runmode = 5]
Cisco GSS(1.0.0.22.3) GSS Manager - primary [Thu Aug 1 22:25:30 UTC 2002]
Normal Operation [runmode = 5]
%CPU %MEM START PID SERVER 0.0 0.3 Jul23 900 system 0.0 0.4 Jul23 1161 database 0.0 2.0 Jul23 1165 tomcat 0.0 0.1 Jul23 1438 apache 0.0 2.3 Jul23 1177 crm 0.0 1.8 Jul23 1202 crdirector 0.0 0.1 Jul23 1191 dnsserver 0.0 0.1 Jul23 1233 keepalive
4-2Cisco Global Site Selector Configuration Guide
78-14361-01
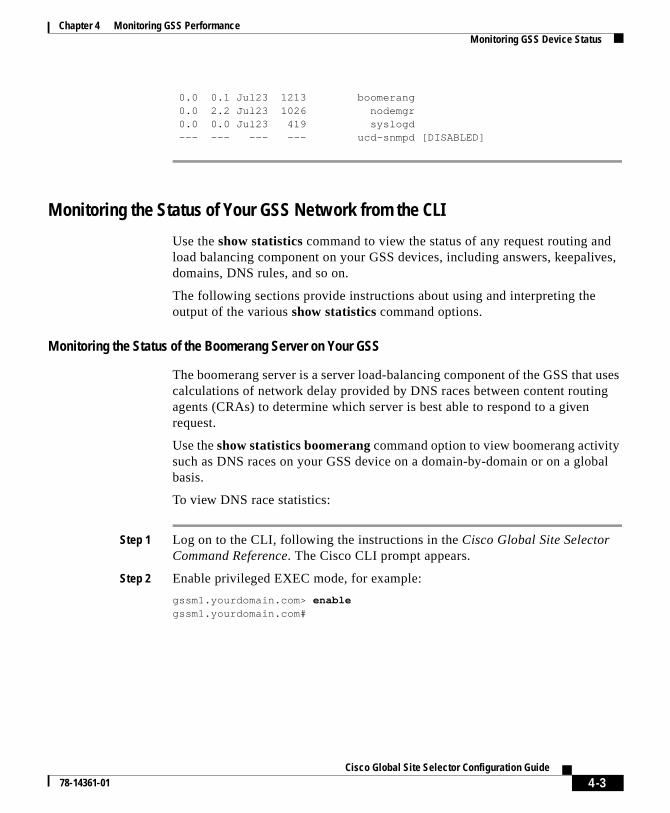
Chapter 4 Monitoring GSS PerformanceMonitoring GSS Device Status
0.0 0.1 Jul23 1213 boomerang 0.0 2.2 Jul23 1026 nodemgr 0.0 0.0 Jul23 419 syslogd --- --- --- --- ucd-snmpd [DISABLED]
Monitoring the Status of Your GSS Network from the CLI
Use the show statistics command to view the status of any request routing and load balancing component on your GSS devices, including answers, keepalives, domains, DNS rules, and so on.
The following sections provide instructions about using and interpreting the output of the various show statistics command options.
Monitoring the Status of the Boomerang Server on Your GSS
The boomerang server is a server load-balancing component of the GSS that uses calculations of network delay provided by DNS races between content routing agents (CRAs) to determine which server is best able to respond to a given request.
Use the show statistics boomerang command option to view boomerang activity such as DNS races on your GSS device on a domain-by-domain or on a global basis.
To view DNS race statistics:
Step 1 Log on to the CLI, following the instructions in the Cisco Global Site Selector Command Reference. The Cisco CLI prompt appears.
Step 2 Enable privileged EXEC mode, for example:
gssm1.yourdomain.com> enablegssm1.yourdomain.com#
4-3Cisco Global Site Selector Configuration Guide
78-14361-01
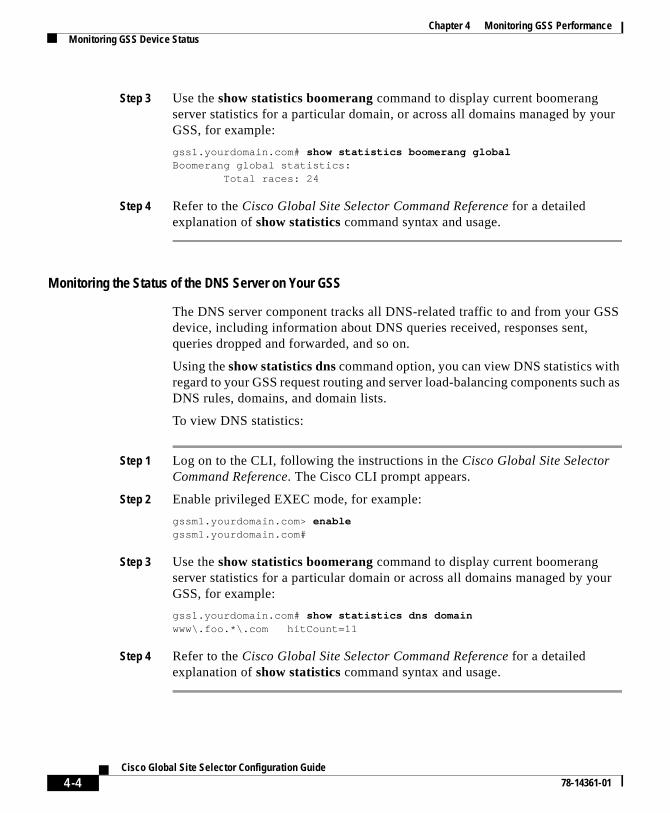
Chapter 4 Monitoring GSS PerformanceMonitoring GSS Device Status
Step 3 Use the show statistics boomerang command to display current boomerang server statistics for a particular domain, or across all domains managed by your GSS, for example:
gss1.yourdomain.com# show statistics boomerang globalBoomerang global statistics: Total races: 24
Step 4 Refer to the Cisco Global Site Selector Command Reference for a detailed explanation of show statistics command syntax and usage.
Monitoring the Status of the DNS Server on Your GSS
The DNS server component tracks all DNS-related traffic to and from your GSS device, including information about DNS queries received, responses sent, queries dropped and forwarded, and so on.
Using the show statistics dns command option, you can view DNS statistics with regard to your GSS request routing and server load-balancing components such as DNS rules, domains, and domain lists.
To view DNS statistics:
Step 1 Log on to the CLI, following the instructions in the Cisco Global Site Selector Command Reference. The Cisco CLI prompt appears.
Step 2 Enable privileged EXEC mode, for example:
gssm1.yourdomain.com> enablegssm1.yourdomain.com#
Step 3 Use the show statistics boomerang command to display current boomerang server statistics for a particular domain or across all domains managed by your GSS, for example:
gss1.yourdomain.com# show statistics dns domainwww\.foo.*\.com hitCount=11
Step 4 Refer to the Cisco Global Site Selector Command Reference for a detailed explanation of show statistics command syntax and usage.
4-4Cisco Global Site Selector Configuration Guide
78-14361-01
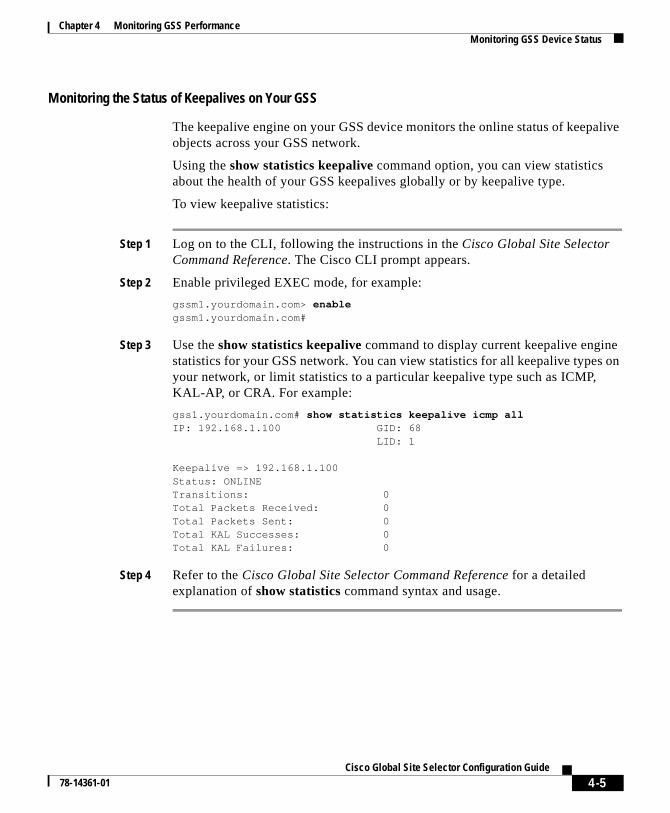
Chapter 4 Monitoring GSS PerformanceMonitoring GSS Device Status
Monitoring the Status of Keepalives on Your GSS
The keepalive engine on your GSS device monitors the online status of keepalive objects across your GSS network.
Using the show statistics keepalive command option, you can view statistics about the health of your GSS keepalives globally or by keepalive type.
To view keepalive statistics:
Step 1 Log on to the CLI, following the instructions in the Cisco Global Site Selector Command Reference. The Cisco CLI prompt appears.
Step 2 Enable privileged EXEC mode, for example:
gssm1.yourdomain.com> enablegssm1.yourdomain.com#
Step 3 Use the show statistics keepalive command to display current keepalive engine statistics for your GSS network. You can view statistics for all keepalive types on your network, or limit statistics to a particular keepalive type such as ICMP, KAL-AP, or CRA. For example:
gss1.yourdomain.com# show statistics keepalive icmp allIP: 192.168.1.100 GID: 68 LID: 1
Keepalive => 192.168.1.100Status: ONLINETransitions: 0Total Packets Received: 0Total Packets Sent: 0Total KAL Successes: 0Total KAL Failures: 0
Step 4 Refer to the Cisco Global Site Selector Command Reference for a detailed explanation of show statistics command syntax and usage.
4-5Cisco Global Site Selector Configuration Guide
78-14361-01
Chapter 4 Monitoring GSS PerformanceMonitoring GSS Device Status
M,
s
Monitoring GSS Device Status from the GUI
To monitor the status of your GSS devices from the GSSM GUI:
Step 1 From the GSSM, click the RESOURCES button.
Step 2 From the drop-down list, choose the Global Site Selectors option. The GSS list window appears.
Step 3 Click the Edit icon for the GSS or GSSM that you wish to monitor. The device type (GSS or GSSM) appears in the Node Services column.
The GSS details window appears, displaying configuration and status information about the device, including:
• Status—Online status
• Version—Software version currently loaded on the device
• Node services—Current role of the device (GSS, primary or standby GSSor both)
• IP address—Network address of the device
• Host name—Network host name of the device
• MAC—Machine address of the device
Step 4 Click Cancel to return to the GSS list window.
GSSM DatabaseA variety of features let you monitor the status of the GSSM database and itcontents.
4-6Cisco Global Site Selector Configuration Guide
78-14361-01
Chapter 4 Monitoring GSS PerformanceMonitoring GSS Device Status
Monitoring the Database Status
To verify that the GSS database on the GSSM is functioning properly:
Step 1 Log on to the CLI, following the instructions in the Cisco Global Site Selector Command Reference. The Cisco CLI prompt appears.
Step 2 Enable privileged EXEC mode, for example:
gssm1.yourdomain.com> enablegssm1.yourdomain.com#
Step 3 Use the gssm database status command to display the current running status of the GSS device that you have logged on to, for example:
gss1.yourdomain.com# gssm database statusGSSM database is running.
Validating Database Records
To validate the records in your GSSM database:
Step 1 Log on to the CLI, following the instructions in the Cisco Global Site Selector Command Reference. The Cisco CLI prompt appears.
Step 2 Enable privileged EXEC mode, for example:
gssm1.yourdomain.com> enablegssm1.yourdomain.com#
Step 3 Use the gssm database validate command to validate the content of your GSSM database, for example:
gss1.yourdomain.com# gssm database validateGSSM database passed validation.
4-7Cisco Global Site Selector Configuration Guide
78-14361-01
Chapter 4 Monitoring GSS PerformanceMonitoring GSS Device Status
Creating a Database Validation Report
Should you encounter problems while attempting to validate your GSSM database, you can generate a report, called validation.log, that details which database records failed validation.
To generate a database validation report:
Step 1 Log on to the CLI, following the instructions in the Cisco Global Site Selector Command Reference. The Cisco CLI prompt appears.
Step 2 Enable privileged EXEC mode, for example:
gssm1.yourdomain.com> enablegssm1.yourdomain.com#
Step 3 Use the gssm database report command to generate a validation report on the content of your GSSM database, for example:
gss1.yourdomain.com# gssm database reportGSSM database validation report written to validation.log.
Step 4 Once you have generated your validation report, use the type command to view its contents, for example:
gss1.yourdomain.com# type validation.logvalidation.log
Start logging at Wed May 22 22:39:34 GMT 2002
- storeAdmin Validating ... Wed May 22 22:39:36 GMT 2002 -- ObjectId Object_Name.Field_Name Description -Validating FactoryInfoValidating answerElementValidating answerGroup 70 answerGroup.OwnerId Many-To-One ListValidating CachingConfigValidating ClusterConfigValidating CmdControlValidating CmdPurgeRdValidating CmdUpdateValidating ConfigPropertyValidating CustomerValidating DistTreeValidating DnsRuleValidating DomainElementValidating DomainGroup
4-8Cisco Global Site Selector Configuration Guide
78-14361-01
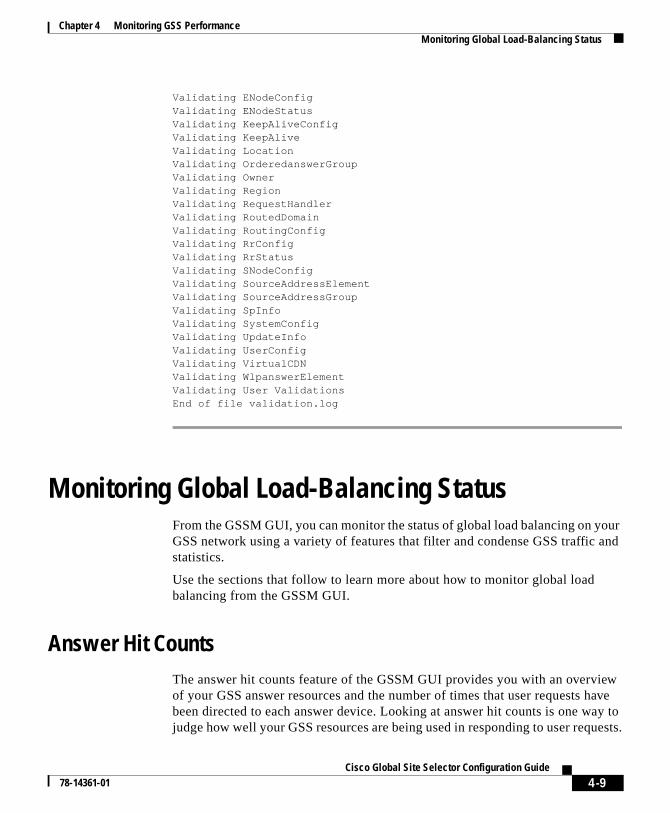
Chapter 4 Monitoring GSS PerformanceMonitoring Global Load-Balancing Status
Validating ENodeConfigValidating ENodeStatusValidating KeepAliveConfigValidating KeepAliveValidating LocationValidating OrderedanswerGroupValidating OwnerValidating RegionValidating RequestHandlerValidating RoutedDomainValidating RoutingConfigValidating RrConfigValidating RrStatusValidating SNodeConfigValidating SourceAddressElementValidating SourceAddressGroupValidating SpInfoValidating SystemConfigValidating UpdateInfoValidating UserConfigValidating VirtualCDNValidating WlpanswerElementValidating User ValidationsEnd of file validation.log
Monitoring Global Load-Balancing StatusFrom the GSSM GUI, you can monitor the status of global load balancing on your GSS network using a variety of features that filter and condense GSS traffic and statistics.
Use the sections that follow to learn more about how to monitor global load balancing from the GSSM GUI.
Answer Hit CountsThe answer hit counts feature of the GSSM GUI provides you with an overview of your GSS answer resources and the number of times that user requests have been directed to each answer device. Looking at answer hit counts is one way to judge how well your GSS resources are being used in responding to user requests.
4-9Cisco Global Site Selector Configuration Guide
78-14361-01
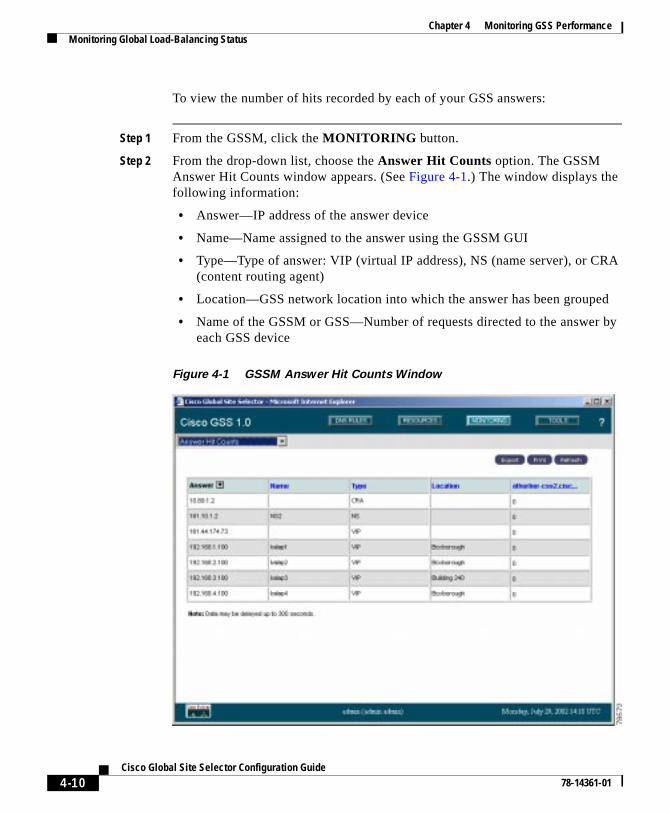
Chapter 4 Monitoring GSS PerformanceMonitoring Global Load-Balancing Status
RA
d
r by
To view the number of hits recorded by each of your GSS answers:
Step 1 From the GSSM, click the MONITORING button.
Step 2 From the drop-down list, choose the Answer Hit Counts option. The GSSM Answer Hit Counts window appears. (See Figure 4-1.) The window displays the following information:
• Answer—IP address of the answer device
• Name—Name assigned to the answer using the GSSM GUI
• Type—Type of answer: VIP (virtual IP address), NS (name server), or C(content routing agent)
• Location—GSS network location into which the answer has been groupe
• Name of the GSSM or GSS—Number of requests directed to the answeeach GSS device
Figure 4-1 GSSM Answer Hit Counts Window
4-10Cisco Global Site Selector Configuration Guide
78-14361-01
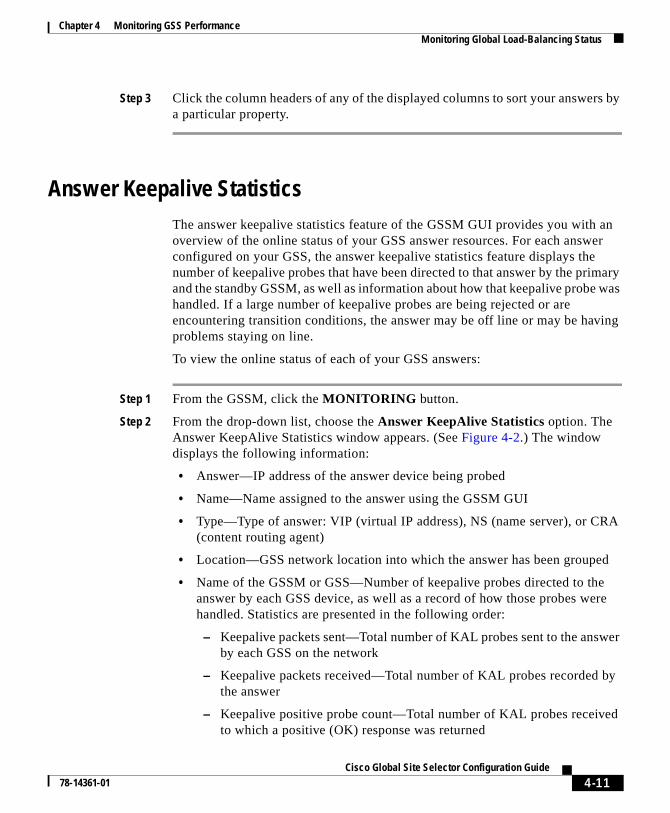
Chapter 4 Monitoring GSS PerformanceMonitoring Global Load-Balancing Status
RA
d
e ere
wer
by
d
Step 3 Click the column headers of any of the displayed columns to sort your answers by a particular property.
Answer Keepalive StatisticsThe answer keepalive statistics feature of the GSSM GUI provides you with an overview of the online status of your GSS answer resources. For each answer configured on your GSS, the answer keepalive statistics feature displays the number of keepalive probes that have been directed to that answer by the primary and the standby GSSM, as well as information about how that keepalive probe was handled. If a large number of keepalive probes are being rejected or are encountering transition conditions, the answer may be off line or may be having problems staying on line.
To view the online status of each of your GSS answers:
Step 1 From the GSSM, click the MONITORING button.
Step 2 From the drop-down list, choose the Answer KeepAlive Statistics option. The Answer KeepAlive Statistics window appears. (See Figure 4-2.) The window displays the following information:
• Answer—IP address of the answer device being probed
• Name—Name assigned to the answer using the GSSM GUI
• Type—Type of answer: VIP (virtual IP address), NS (name server), or C(content routing agent)
• Location—GSS network location into which the answer has been groupe
• Name of the GSSM or GSS—Number of keepalive probes directed to thanswer by each GSS device, as well as a record of how those probes whandled. Statistics are presented in the following order:
– Keepalive packets sent—Total number of KAL probes sent to the ansby each GSS on the network
– Keepalive packets received—Total number of KAL probes recorded the answer
– Keepalive positive probe count—Total number of KAL probes receiveto which a positive (OK) response was returned
4-11Cisco Global Site Selector Configuration Guide
78-14361-01
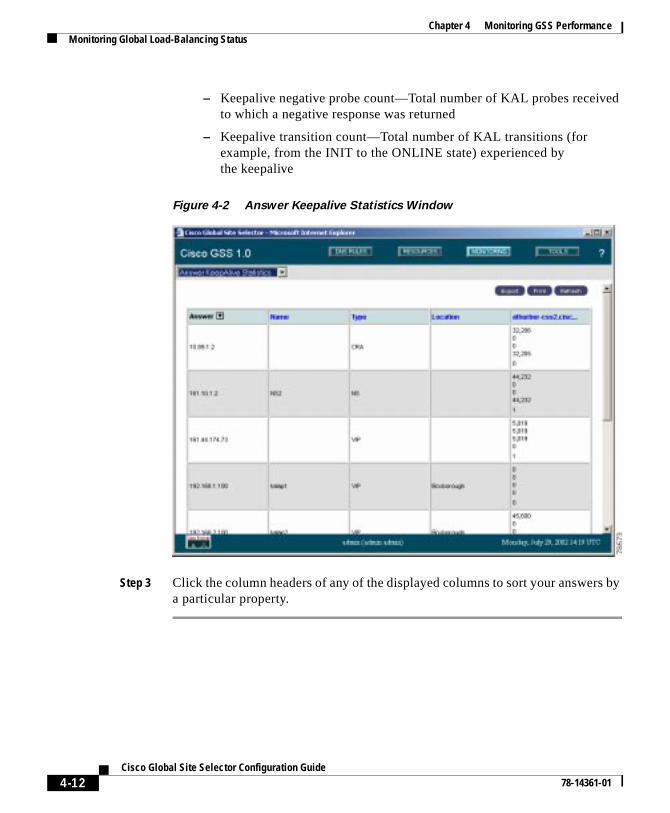
Chapter 4 Monitoring GSS PerformanceMonitoring Global Load-Balancing Status
ed
s by
– Keepalive negative probe count—Total number of KAL probes receivto which a negative response was returned
– Keepalive transition count—Total number of KAL transitions (for example, from the INIT to the ONLINE state) experienced by the keepalive
Figure 4-2 Answer Keepalive Statistics Window
Step 3 Click the column headers of any of the displayed columns to sort your answera particular property.
4-12Cisco Global Site Selector Configuration Guide
78-14361-01
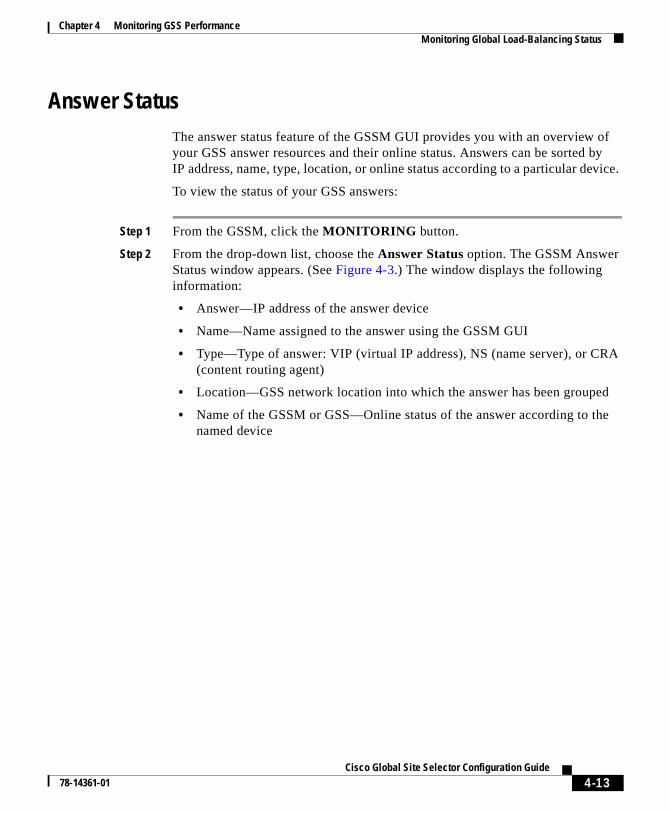
Chapter 4 Monitoring GSS PerformanceMonitoring Global Load-Balancing Status
RA
d
he
Answer StatusThe answer status feature of the GSSM GUI provides you with an overview of your GSS answer resources and their online status. Answers can be sorted by IP address, name, type, location, or online status according to a particular device.
To view the status of your GSS answers:
Step 1 From the GSSM, click the MONITORING button.
Step 2 From the drop-down list, choose the Answer Status option. The GSSM Answer Status window appears. (See Figure 4-3.) The window displays the following information:
• Answer—IP address of the answer device
• Name—Name assigned to the answer using the GSSM GUI
• Type—Type of answer: VIP (virtual IP address), NS (name server), or C(content routing agent)
• Location—GSS network location into which the answer has been groupe
• Name of the GSSM or GSS—Online status of the answer according to tnamed device
4-13Cisco Global Site Selector Configuration Guide
78-14361-01
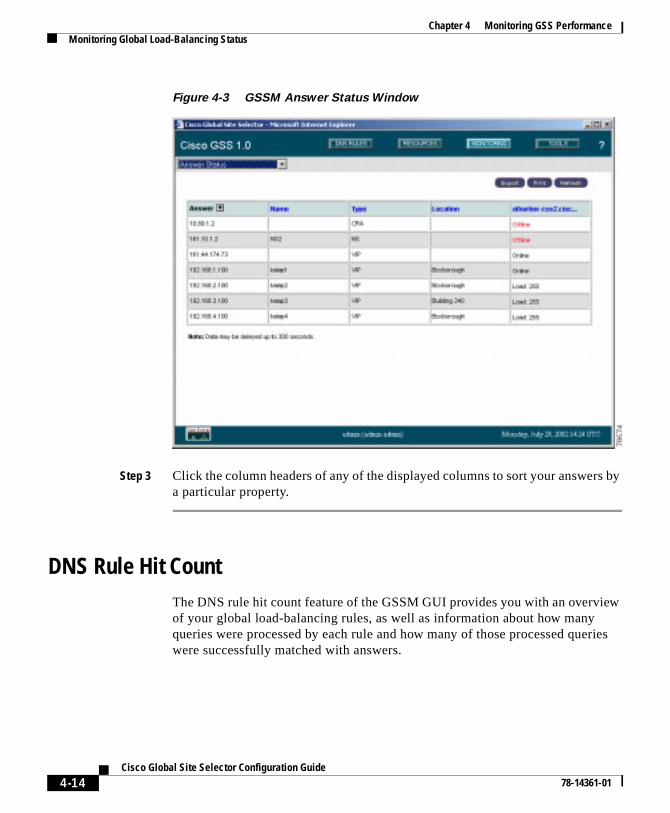
Chapter 4 Monitoring GSS PerformanceMonitoring Global Load-Balancing Status
Figure 4-3 GSSM Answer Status Window
Step 3 Click the column headers of any of the displayed columns to sort your answers by a particular property.
DNS Rule Hit CountThe DNS rule hit count feature of the GSSM GUI provides you with an overview of your global load-balancing rules, as well as information about how many queries were processed by each rule and how many of those processed queries were successfully matched with answers.
4-14Cisco Global Site Selector Configuration Guide
78-14361-01
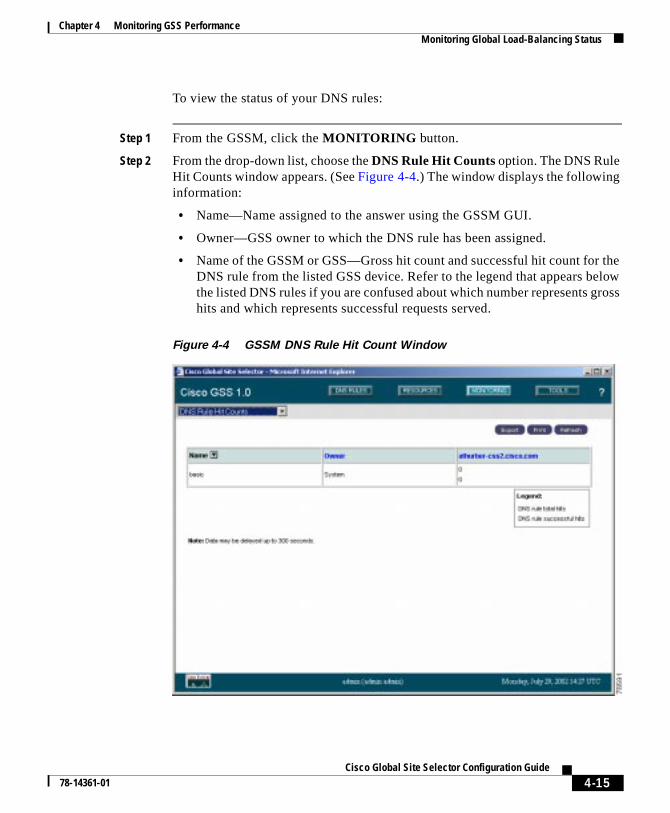
Chapter 4 Monitoring GSS PerformanceMonitoring Global Load-Balancing Status
the low ross
To view the status of your DNS rules:
Step 1 From the GSSM, click the MONITORING button.
Step 2 From the drop-down list, choose the DNS Rule Hit Counts option. The DNS Rule Hit Counts window appears. (See Figure 4-4.) The window displays the following information:
• Name—Name assigned to the answer using the GSSM GUI.
• Owner—GSS owner to which the DNS rule has been assigned.
• Name of the GSSM or GSS—Gross hit count and successful hit count forDNS rule from the listed GSS device. Refer to the legend that appears bethe listed DNS rules if you are confused about which number represents ghits and which represents successful requests served.
Figure 4-4 GSSM DNS Rule Hit Count Window
4-15Cisco Global Site Selector Configuration Guide
78-14361-01
Chapter 4 Monitoring GSS PerformanceMonitoring Global Load-Balancing Status
e
ain
Step 3 Click the column headers of any of the displayed columns to sort your DNS rules by a particular property.
Domain Hit CountsThe domain hit count feature of the GSSM GUI provides you with an overview of the hosted domains that your GSS is serving, as well as information about how many queries were directed to each domain by your DNS rules. The domain hit counts feature tracks the traffic directed to individual domains, not GSS domain lists, which may include one or more domains.
To view the status of your hosted domains:
Step 1 From the GSSM, click the MONITORING button.
Step 2 From the drop-down list, choose the Domain Hit Counts option. The GSSM Domain Hit Counts window appears. (See Figure 4-5.) The window displays the following information:
• Domain—DNS domains for which your GSS is responsible; these are thdomains contained in your domain lists
• Name of the GSSM or GSS—Gross number of requests for the listed domfrom each GSS device
4-16Cisco Global Site Selector Configuration Guide
78-14361-01
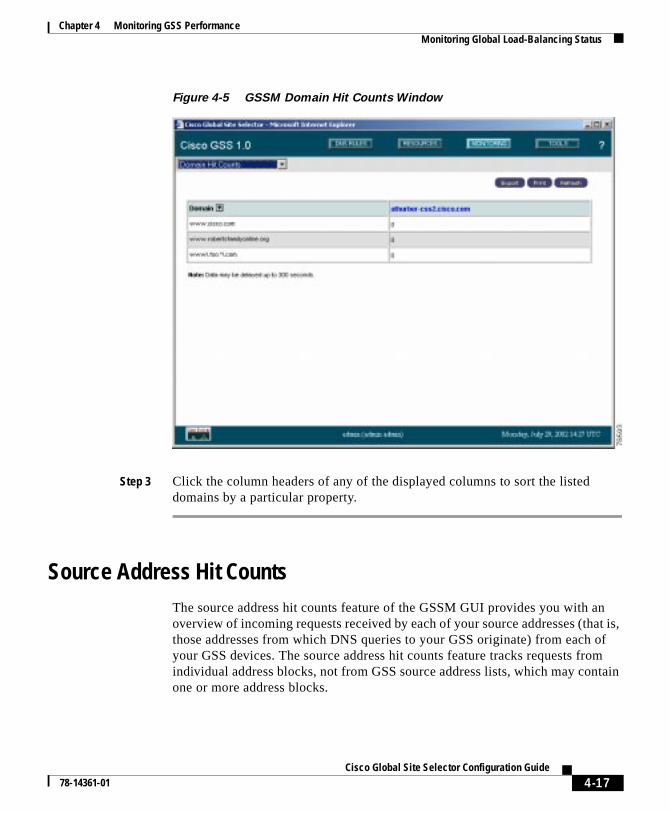
Chapter 4 Monitoring GSS PerformanceMonitoring Global Load-Balancing Status
Figure 4-5 GSSM Domain Hit Counts Window
Step 3 Click the column headers of any of the displayed columns to sort the listed domains by a particular property.
Source Address Hit CountsThe source address hit counts feature of the GSSM GUI provides you with an overview of incoming requests received by each of your source addresses (that is, those addresses from which DNS queries to your GSS originate) from each of your GSS devices. The source address hit counts feature tracks requests from individual address blocks, not from GSS source address lists, which may contain one or more address blocks.
4-17Cisco Global Site Selector Configuration Guide
78-14361-01
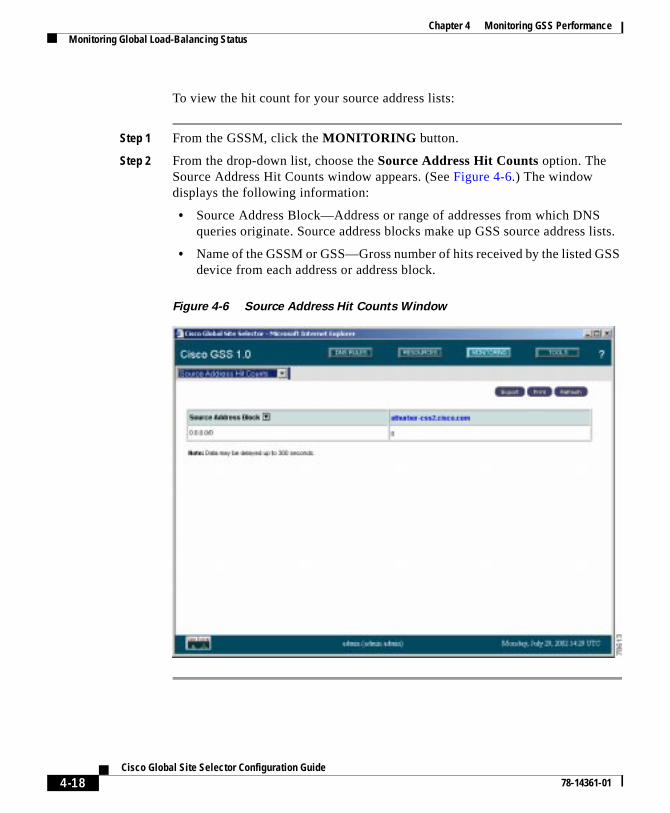
Chapter 4 Monitoring GSS PerformanceMonitoring Global Load-Balancing Status
lists.
SS
To view the hit count for your source address lists:
Step 1 From the GSSM, click the MONITORING button.
Step 2 From the drop-down list, choose the Source Address Hit Counts option. The Source Address Hit Counts window appears. (See Figure 4-6.) The window displays the following information:
• Source Address Block—Address or range of addresses from which DNSqueries originate. Source address blocks make up GSS source address
• Name of the GSSM or GSS—Gross number of hits received by the listed Gdevice from each address or address block.
Figure 4-6 Source Address Hit Counts Window
4-18Cisco Global Site Selector Configuration Guide
78-14361-01
Chapter 4 Monitoring GSS PerformanceMonitoring Global Load-Balancing Status
ch
d by
each
Global StatisticsThe global statistics feature of the GSSM GUI provides you with an overview of your GSS network, providing average statistics for DNS requests received by each GSS device and keepalive messages sent to your answers, as well as the online status of each GSS device.
To view the status of your GSS network:
Step 1 From the GSSM, click the MONITORING button.
Step 2 From the drop-down list, choose the Global Statistics option. The GSSM Global Statistics window appears. (See Figure 4-7.) The window displays the following information:
• GSS status—Online status of each GSS device
• Unmatched DNS queries—Gross number of DNS queries received by ealisted device for which no answer could be found
• DNS queries/sec—Average number of DNS queries received each seconeach listed GSS device
• Keepalive probes/sec—Average number of keepalive probes received by listed GSS device each second
4-19Cisco Global Site Selector Configuration Guide
78-14361-01
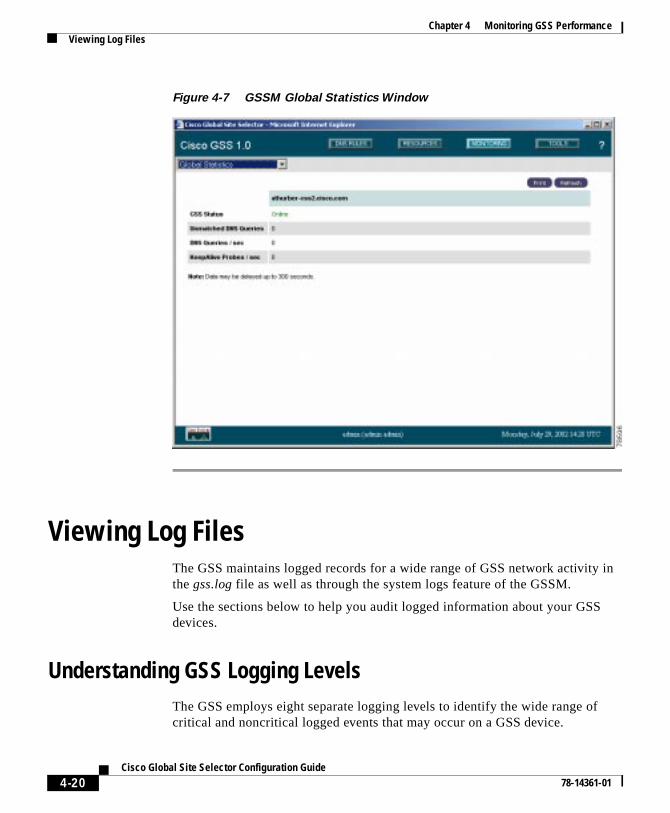
Chapter 4 Monitoring GSS PerformanceViewing Log Files
Figure 4-7 GSSM Global Statistics Window
Viewing Log FilesThe GSS maintains logged records for a wide range of GSS network activity in the gss.log file as well as through the system logs feature of the GSSM.
Use the sections below to help you audit logged information about your GSS devices.
Understanding GSS Logging LevelsThe GSS employs eight separate logging levels to identify the wide range of critical and noncritical logged events that may occur on a GSS device.
4-20Cisco Global Site Selector Configuration Guide
78-14361-01
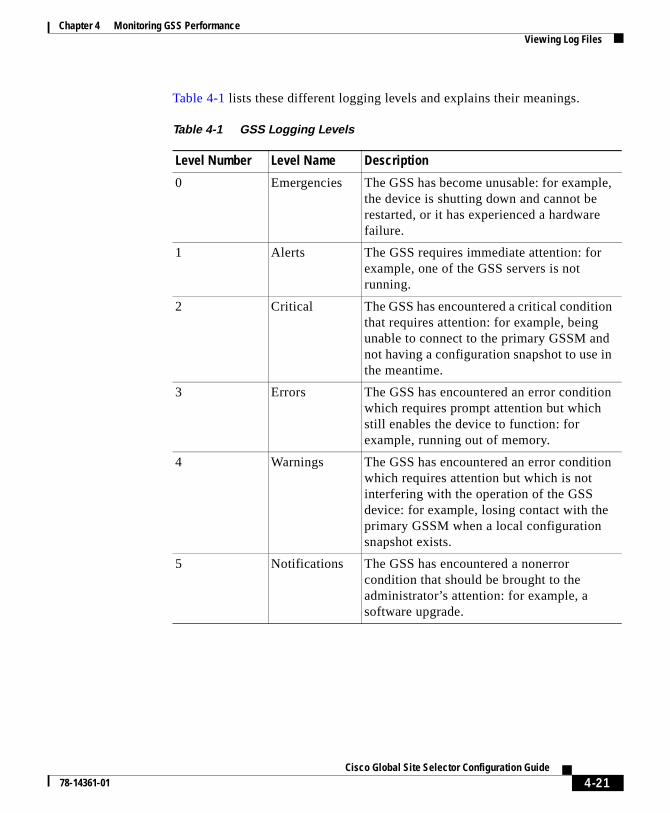
Chapter 4 Monitoring GSS PerformanceViewing Log Files
Table 4-1 lists these different logging levels and explains their meanings.
Table 4-1 GSS Logging Levels
Level Number Level Name Description
0 Emergencies The GSS has become unusable: for example, the device is shutting down and cannot be restarted, or it has experienced a hardware failure.
1 Alerts The GSS requires immediate attention: for example, one of the GSS servers is not running.
2 Critical The GSS has encountered a critical condition that requires attention: for example, being unable to connect to the primary GSSM and not having a configuration snapshot to use in the meantime.
3 Errors The GSS has encountered an error condition which requires prompt attention but which still enables the device to function: for example, running out of memory.
4 Warnings The GSS has encountered an error condition which requires attention but which is not interfering with the operation of the GSS device: for example, losing contact with the primary GSSM when a local configuration snapshot exists.
5 Notifications The GSS has encountered a nonerror condition that should be brought to the administrator’s attention: for example, a software upgrade.
4-21Cisco Global Site Selector Configuration Guide
78-14361-01
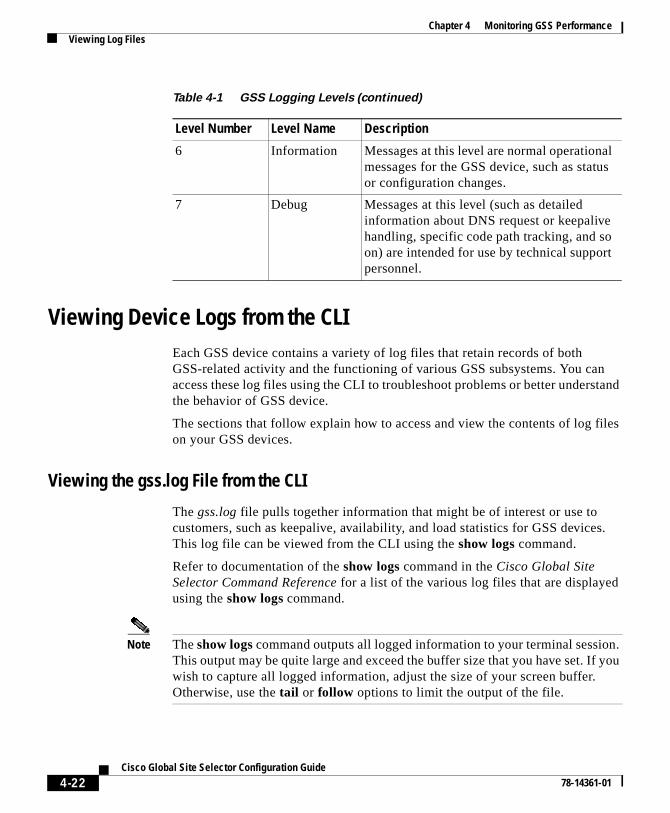
Chapter 4 Monitoring GSS PerformanceViewing Log Files
Viewing Device Logs from the CLIEach GSS device contains a variety of log files that retain records of both GSS-related activity and the functioning of various GSS subsystems. You can access these log files using the CLI to troubleshoot problems or better understand the behavior of GSS device.
The sections that follow explain how to access and view the contents of log files on your GSS devices.
Viewing the gss.log File from the CLI
The gss.log file pulls together information that might be of interest or use to customers, such as keepalive, availability, and load statistics for GSS devices. This log file can be viewed from the CLI using the show logs command.
Refer to documentation of the show logs command in the Cisco Global Site Selector Command Reference for a list of the various log files that are displayed using the show logs command.
Note The show logs command outputs all logged information to your terminal session. This output may be quite large and exceed the buffer size that you have set. If you wish to capture all logged information, adjust the size of your screen buffer. Otherwise, use the tail or follow options to limit the output of the file.
6 Information Messages at this level are normal operational messages for the GSS device, such as status or configuration changes.
7 Debug Messages at this level (such as detailed information about DNS request or keepalive handling, specific code path tracking, and so on) are intended for use by technical support personnel.
Table 4-1 GSS Logging Levels (continued)
Level Number Level Name Description
4-22Cisco Global Site Selector Configuration Guide
78-14361-01
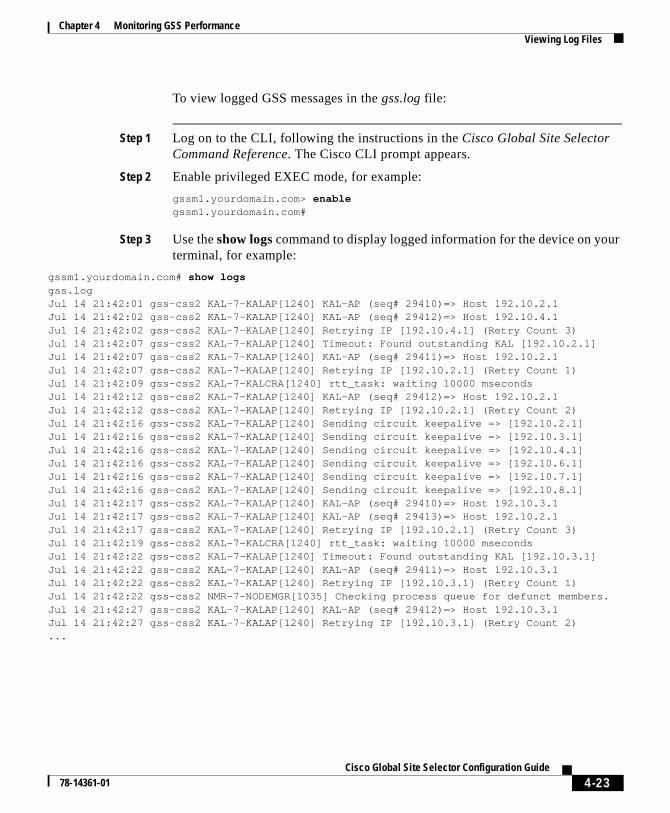
Chapter 4 Monitoring GSS PerformanceViewing Log Files
To view logged GSS messages in the gss.log file:
Step 1 Log on to the CLI, following the instructions in the Cisco Global Site Selector Command Reference. The Cisco CLI prompt appears.
Step 2 Enable privileged EXEC mode, for example:
gssm1.yourdomain.com> enablegssm1.yourdomain.com#
Step 3 Use the show logs command to display logged information for the device on your terminal, for example:
gssm1.yourdomain.com# show logsgss.logJul 14 21:42:01 gss-css2 KAL-7-KALAP[1240] KAL-AP (seq# 29410)=> Host 192.10.2.1Jul 14 21:42:02 gss-css2 KAL-7-KALAP[1240] KAL-AP (seq# 29412)=> Host 192.10.4.1Jul 14 21:42:02 gss-css2 KAL-7-KALAP[1240] Retrying IP [192.10.4.1] (Retry Count 3)Jul 14 21:42:07 gss-css2 KAL-7-KALAP[1240] Timeout: Found outstanding KAL [192.10.2.1]Jul 14 21:42:07 gss-css2 KAL-7-KALAP[1240] KAL-AP (seq# 29411)=> Host 192.10.2.1Jul 14 21:42:07 gss-css2 KAL-7-KALAP[1240] Retrying IP [192.10.2.1] (Retry Count 1)Jul 14 21:42:09 gss-css2 KAL-7-KALCRA[1240] rtt_task: waiting 10000 msecondsJul 14 21:42:12 gss-css2 KAL-7-KALAP[1240] KAL-AP (seq# 29412)=> Host 192.10.2.1Jul 14 21:42:12 gss-css2 KAL-7-KALAP[1240] Retrying IP [192.10.2.1] (Retry Count 2)Jul 14 21:42:16 gss-css2 KAL-7-KALAP[1240] Sending circuit keepalive => [192.10.2.1]Jul 14 21:42:16 gss-css2 KAL-7-KALAP[1240] Sending circuit keepalive => [192.10.3.1]Jul 14 21:42:16 gss-css2 KAL-7-KALAP[1240] Sending circuit keepalive => [192.10.4.1]Jul 14 21:42:16 gss-css2 KAL-7-KALAP[1240] Sending circuit keepalive => [192.10.6.1]Jul 14 21:42:16 gss-css2 KAL-7-KALAP[1240] Sending circuit keepalive => [192.10.7.1]Jul 14 21:42:16 gss-css2 KAL-7-KALAP[1240] Sending circuit keepalive => [192.10.8.1]Jul 14 21:42:17 gss-css2 KAL-7-KALAP[1240] KAL-AP (seq# 29410)=> Host 192.10.3.1Jul 14 21:42:17 gss-css2 KAL-7-KALAP[1240] KAL-AP (seq# 29413)=> Host 192.10.2.1Jul 14 21:42:17 gss-css2 KAL-7-KALAP[1240] Retrying IP [192.10.2.1] (Retry Count 3)Jul 14 21:42:19 gss-css2 KAL-7-KALCRA[1240] rtt_task: waiting 10000 msecondsJul 14 21:42:22 gss-css2 KAL-7-KALAP[1240] Timeout: Found outstanding KAL [192.10.3.1]Jul 14 21:42:22 gss-css2 KAL-7-KALAP[1240] KAL-AP (seq# 29411)=> Host 192.10.3.1Jul 14 21:42:22 gss-css2 KAL-7-KALAP[1240] Retrying IP [192.10.3.1] (Retry Count 1)Jul 14 21:42:22 gss-css2 NMR-7-NODEMGR[1035] Checking process queue for defunct members.Jul 14 21:42:27 gss-css2 KAL-7-KALAP[1240] KAL-AP (seq# 29412)=> Host 192.10.3.1Jul 14 21:42:27 gss-css2 KAL-7-KALAP[1240] Retrying IP [192.10.3.1] (Retry Count 2)...
4-23Cisco Global Site Selector Configuration Guide
78-14361-01
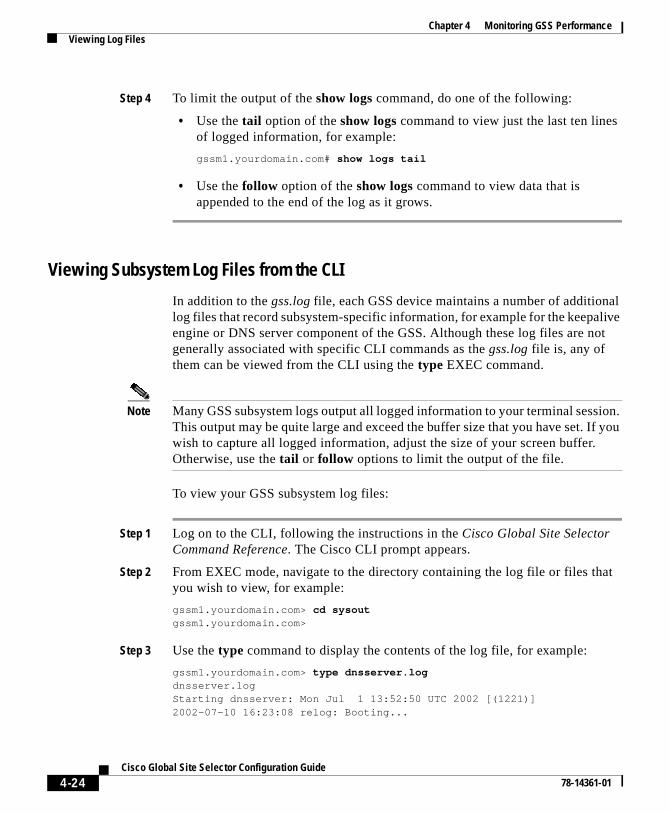
Chapter 4 Monitoring GSS PerformanceViewing Log Files
Step 4 To limit the output of the show logs command, do one of the following:
• Use the tail option of the show logs command to view just the last ten lines of logged information, for example:
gssm1.yourdomain.com# show logs tail
• Use the follow option of the show logs command to view data that is appended to the end of the log as it grows.
Viewing Subsystem Log Files from the CLI
In addition to the gss.log file, each GSS device maintains a number of additional log files that record subsystem-specific information, for example for the keepalive engine or DNS server component of the GSS. Although these log files are not generally associated with specific CLI commands as the gss.log file is, any of them can be viewed from the CLI using the type EXEC command.
Note Many GSS subsystem logs output all logged information to your terminal session. This output may be quite large and exceed the buffer size that you have set. If you wish to capture all logged information, adjust the size of your screen buffer. Otherwise, use the tail or follow options to limit the output of the file.
To view your GSS subsystem log files:
Step 1 Log on to the CLI, following the instructions in the Cisco Global Site Selector Command Reference. The Cisco CLI prompt appears.
Step 2 From EXEC mode, navigate to the directory containing the log file or files that you wish to view, for example:
gssm1.yourdomain.com> cd sysoutgssm1.yourdomain.com>
Step 3 Use the type command to display the contents of the log file, for example:
gssm1.yourdomain.com> type dnsserver.logdnsserver.logStarting dnsserver: Mon Jul 1 13:52:50 UTC 2002 [(1221)]2002-07-10 16:23:08 relog: Booting...
4-24Cisco Global Site Selector Configuration Guide
78-14361-01
Chapter 4 Monitoring GSS PerformanceViewing Log Files
nt
nt
ted
Starting dnsserver: Wed Jul 10 16:23:33 UTC 2002 [(1201)]End of file dnsserver.log]
Viewing the System Log from the GUIFrom the GSSM GUI, you can view messages logged in the GSS system.log file. This log presents the logged information that is most likely of interest to GSS administrators. However, the system.log file presents only a subset of all logged information. See the “Viewing Subsystem Log Files from the CLI” section on page 4-24 for information about viewing the entire contents of individual GSSlog files.
To view the GSS system logs:
Step 1 From the GSSM, click the TOOLS button.
Step 2 From the drop-down list, choose the System Logs option. The GSSM System Logs window appears. (See Figure 4-8.) The window displays the following information:
• Time—Time in Universal Coordinated Time (UTC) at which the logged eveoccurred on the GSS device
• Node type—Type of GSS node (GSS or GSSM) on which the logged eveoccurred
• Node name—Name assigned to the GSS device using the GSSM GUI
• Module—GSS component logging the message, for example, server or storeAdmin
• Severity— Severity of the logged message; system log messages are rausing one of four severity levels, as follows:
– Fatal—Indicates that the GSS or one of its components failed. Fatalerrors are rare and are usually caused by exceptions from which it isimpossible to recover, or by the failure of a GSS component to initialize properly.
– Warning—Indicates a noncritical error or unexpected condition.
4-25Cisco Global Site Selector Configuration Guide
78-14361-01
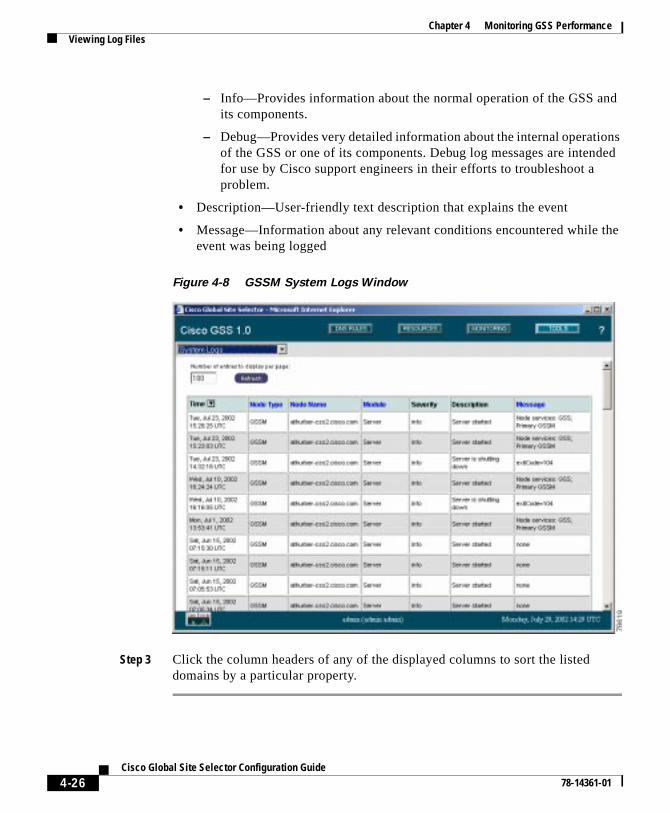
Chapter 4 Monitoring GSS PerformanceViewing Log Files
nd
ns ded
the
– Info—Provides information about the normal operation of the GSS aits components.
– Debug—Provides very detailed information about the internal operatioof the GSS or one of its components. Debug log messages are intenfor use by Cisco support engineers in their efforts to troubleshoot a problem.
• Description—User-friendly text description that explains the event
• Message—Information about any relevant conditions encountered whileevent was being logged
Figure 4-8 GSSM System Logs Window
Step 3 Click the column headers of any of the displayed columns to sort the listed domains by a particular property.
4-26Cisco Global Site Selector Configuration Guide
78-14361-01
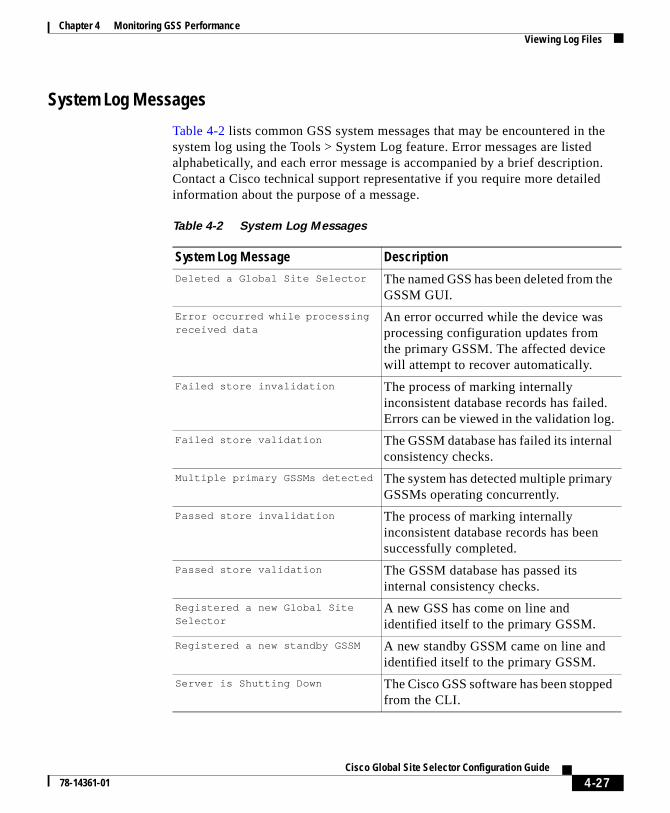
Chapter 4 Monitoring GSS PerformanceViewing Log Files
System Log Messages
Table 4-2 lists common GSS system messages that may be encountered in the system log using the Tools > System Log feature. Error messages are listed alphabetically, and each error message is accompanied by a brief description. Contact a Cisco technical support representative if you require more detailed information about the purpose of a message.
Table 4-2 System Log Messages
System Log Message Description
Deleted a Global Site Selector The named GSS has been deleted from the GSSM GUI.
Error occurred while processing received data
An error occurred while the device was processing configuration updates from the primary GSSM. The affected device will attempt to recover automatically.
Failed store invalidation The process of marking internally inconsistent database records has failed. Errors can be viewed in the validation log.
Failed store validation The GSSM database has failed its internal consistency checks.
Multiple primary GSSMs detected The system has detected multiple primary GSSMs operating concurrently.
Passed store invalidation The process of marking internally inconsistent database records has been successfully completed.
Passed store validation The GSSM database has passed its internal consistency checks.
Registered a new Global Site Selector
A new GSS has come on line and identified itself to the primary GSSM.
Registered a new standby GSSM A new standby GSSM came on line and identified itself to the primary GSSM.
Server is Shutting Down The Cisco GSS software has been stopped from the CLI.
4-27Cisco Global Site Selector Configuration Guide
78-14361-01

Chapter 4 Monitoring GSS PerformancePrinting and Exporting GSSM Data
Printing and Exporting GSSM DataYou can send any data displayed on the GSSM GUI to a local or network printer configured on your workstation, or export that data to a flat file for use with other office applications.
When printing or exporting data, all information displayed on the GSSM GUI window is dumped. You cannot select individual pieces of data to output.
Server Started The Cisco GSS software has been started from the CLI.
Standby GSSM database error An error has occurred on the standby GSSM embedded database.
Started store invalidation The process of marking internally inconsistent database records has begun.
Started store validation An internal consistency check has begun for the GSSM database.
Store is corrupted The GSS GSSM database has failed internal consistency checks.
x System Messages Dropped The GSS device has dropped (did not report) a certain number of messages in an effort to throttle message traffic to the GSSM.
Unexpected GSSM activation timestamp warning
The primary GSSM has received a report from a GSS device with a GSSM activation time stamp that was not consistent with the primary GSSM’s current time. The standby and primary GSSM may have clocks that are not synchronized.
User HTTP Password Change A user has changed his or her password using the Tools > Change Password feature.
Table 4-2 System Log Messages (continued)
System Log Message Description
4-28Cisco Global Site Selector Configuration Guide
78-14361-01
Chapter 4 Monitoring GSS PerformancePrinting and Exporting GSSM Data
To print or export GSSM data:
Step 1 From the GSSM, navigate to the list or details window containing the data that you wish to print or export.
Step 2 Do one of the following:
• To export the data, click the Export button. You are prompted to either save the exported data as a comma-separated value (CSV) file or open it using your designated CSV editor. Choose one or the other.
• To print the data, click the Print button. The print dialog appears, allowing you to choose a printer.
4-29Cisco Global Site Selector Configuration Guide
78-14361-01

Chapter 4 Monitoring GSS PerformancePrinting and Exporting GSSM Data
4-30Cisco Global Site Selector Configuration Guide
78-14361-01

Cisco Glob78-14361-01
G L O S S A R Y
t
t
A
answer Individual resource (virtual IP address [VIP], name server [NS], or content routing agent [CRA] that is used to reply to a content request.
answer group Customer-defined set of virtual IP address (VIP), name server (NS), or content routing agent (CRA) addresses from which an individual answer is selected and used to reply to a content request.
B
boomerang Server load-balancing component of the Global Site Selector (GSS) that uses calculations of network delay to select the site “closest” to the requesting D-proxy. Closeness is determined by conducting DNS races between contenrouting agents (CRAs) on each host server. The CRA that replies first to therequesting D-proxy is chosen to reply to the request.
C
client Content consumer, typically a web browser or multimedia stream player, thamakes Domain Name System (DNS) requests for domains managed by the Global Site Selector (GSS).
content provider Customer that deploys content on a Content Delivery Network (CDN), or purchases hosting services from a service provider or web hosting service.
content router Machine that routes requests for content through Domain Name System (DNS) records.
GL-1al Site Selector Configuration Guide
Glossary
he
content routing
agent (CRA)
Software running on a Content Delivery Network (CDN) or server load-balancing device that provides information to a Global Site Selector (GSS) for making content routing decisions, and handles content routing requests from the GSS.
Content Switching
Module (CSM)
Server load-balancing component for the Catalyst 6000 Switch product.
Content Services
Switch (CSS)
Cisco server load-balancing appliance for Layer 4 through Layer 7 content.
customer Cisco customer purchasing Global Site Selector (GSS) hardware, software, or services. Typically an Internet service provider (ISP), application service provider (ASP), or enterprise customer.
D
data center Collection of centrally located devices (content servers, transaction servers, or web caches).
DNS rule Central configuration and routing concept of the Global Site Selector (GSS), allowing specific request balance resources, methods, and options to be applied to source address and domain pairs.
domain list One or more hosted domains logically grouped for administrative and routing purposes.
D-proxy Client’s local name server, which makes iterative DNS queries on behalf of aclient. A single recursive query from a client may result in many iterative queries from a D-proxy. Also referred to as “local domain name server,” or LDNS.
F
fully qualified
domain name
(FQDN)
Domain name that specifies the named node’s absolute location relative to tDomain Name System (DNS) root in the DNS hierarchy.
GL-2Cisco Global Site Selector Configuration Guide
78-14361-01

Glossary
t.
or
e y.
G
Global Site Selector
(GSS)
Cisco content routing device that intelligently responds to Domain Name System (DNS) queries, selecting the “best” content locations to serve thosequeries based on DNS rules created by the customer.
GSS network Set of Global Site Selectors (GSSs) in a scaled, redundant GSS deploymen
Global Site Selector
Manager (GSSM)
Device that administers a Global Site Selector (GSS) network, storing configuration information and statistics for GSS devices and providing a graphical user interface that GSS administrators use to reconfigure or monitthe performance of their GSS network.
global server load
balancing (GSLB)
System based on the Content Services Switch that directs clients through thDomain Name System (DNS) to different sites based on load and availabilitTwo versions of GSLB currently exist:
• Rule-based GSLB
• Zone-based GSLB
H
hosted domain Any domain managed by the Global Site Selector (GSS). A minimum of two levels is required for delegation (for example, foo.com). Domain wildcards are supported.
GL-3Cisco Global Site Selector Configuration Guide
78-14361-01
Glossary
K
keepalive (KAL) Periodic testing of availability and status of a content service through the sending of intermittent queries to a specified address using one of a variety of methods.
The Global Site Selector product uses both primary keepalive and secondary keepalive IP addresses.
See keepalive method.
keepalive method Protocol or strategy used to determine whether a device is on line, for example, ICMP, KAL-AP, HTTP-Head, and CRA round-trip time.
L
location Grouping for devices with common geographical attributes, used for administrative purposes only, and similar to data center or content site.
See data center.
N
name server (NS) Publicly or privately addressable Domain Name System (DNS) server that resolves DNS names to IP addresses. Name servers are used by the Global Site Selector (GSS) for name server forwarding, in which queries that the GSS cannot resolve are forwarded to a designated name server that can resolve them.
O
ordered list List of possible answers that are used for routing. List members are ranked and tried in order. Answers lower on the list are not tried unless all previous members fail to provide a suitable result.
GL-4Cisco Global Site Selector Configuration Guide
78-14361-01
Glossary
origin server Machine that serves original or replicated content provider content.
owner Internal department or resource or external customer associated with a group of GSS resources such as domain lists, answer groups, and so on.
R
region Grouping of Global Site Selector (GSS) locations with common geographic attributes that is used to organize GSS resources.
S
Secure Socket Layer
(SSL)
Industry-standard method for protecting and encrypting web communication.
server load balancer
(SLB)
Network device that balances content requests to network resources based on content rules and real-time load and availability data collected from those devices. Server load balancers like the Cisco Content Services Switch (CSS), Content Switching Module (CSM), and LocalDirector provide publicly routable virtual IP addresses (VIPs) while front-ending content servers, firewalls, Secure Socket Layer (SSL) terminators, and caches. Third-party SLBs are supported in a GSS network through the use of Internet Message Control Protocol (ICMP) and HTTP-Head keepalives.
service provider Cisco customer that provides infrastructure for a Content Delivery Network (CDN). Also ISP (Internet service provider) and ASP (application service provider).
source address list List of source IPs or source IP blocks that are logically grouped by the system administrator.
GL-5Cisco Global Site Selector Configuration Guide
78-14361-01

Glossary
static proximity Type of request routing in which incoming requests from specified D-proxies are routed to statically defined resources that have been identified as being proximal to the source D-proxies.
subscriber Client or set of clients that is to receive a certain style of DNS routing. Subscribers often pay for application services from the Cisco GSS customer.
T
Time To Live (TTL) Length of time that a response is to be cached and considered valid by the requesting D-proxy.
W
Web Network
Services (WebNS)
VxWorks-based operating system and software that runs on the Content Services Switch (CSS).
GL-6Cisco Global Site Selector Configuration Guide
78-14361-01
Cisco Glob78-14361-01
I N D E X
Numerics
200 response 2-37
A
access
to GSSM GUI 1-16
access lists
adding rules to 3-23
associating with an interface 3-21
Content Services Switch 1-11
creating 3-20
definition 3-20
disassociating from an interface 3-22
for filtering traffic 3-20
removing rules from 3-24
viewing 3-25
activate
GSS 2-21
Add Existing tab 2-53
adding
rules to access list 3-23
addresses
name server 1-7
admin password
resetting 3-17
advanced device configuration 3-1
answer
about 1-9, 1-19
CRA
creating 2-44
definition 1-19
delete 2-49
error messages 3-47
hit count 4-11
keepalive 1-21
keepalive statistics 4-11
modify all in location 2-48
modifying 2-47
monitoring 4-11
name server
creating 2-46
definition 1-19, 1-20
DNS Rule Wizard 2-65
reactivating 2-47, 2-48
status 4-13
suspending 2-47, 2-48
VIP
creating 2-40
IN-1al Site Selector Configuration Guide

Index
definition 1-19
answer group
additional address space 2-64
balance methods 2-49
CRA 2-52
creating 2-50
definition 1-19
deleting 2-57
DNS rule 1-15, 2-63
error messages 3-50
modifying 2-53
name server 2-52
reactivating 2-56
suspending 2-56
suspending or reactivating all for an owner 2-56
VIP 2-53
answer hit counts 4-9
answer keepalive statistics 4-11
Anywhere source address 1-18, 2-24
appliance-based global server load balancing 1-12
application service provider 1-4
A record
match query type 2-67
associating
access list with interface 3-21
asterisk icon 1-38
IN-2Cisco Global Site Selector Configuration Guide
B
backup of GSSM
conditions for 3-31
overview 3-30
procedure 3-31
backup of GSSM database
conditions for 3-31
overview 3-30
procedure 3-32
balance clause 2-50
balance method
about 1-23
answer group pair 2-50
balance clauses 2-50
boomerang 1-25
clause 2-69
DNS rule 1-15
hashed
by domain name 2-70
by source address 2-70
definition 2-66
least loaded 1-24, 2-66
options 1-25
ordered list 1-23, 2-66
round-robin 1-23, 2-66
weighted round-robin 1-24, 2-67
Berkeley Internet Name Domain
See BIND
78-14361-01
Index
BIND
sample zone configuration file 2-77
boomerang
balance method 1-25
DNS race 1-25
server
function 1-25
monitoring status of 4-3
browsers
supported 1-33
C
Cancel button 1-39
CAPP Hash Secret 2-38
CAPP Secure 2-38
cautions
description of xiv
certificate
accepting 2-9
trusting 2-10
changing
GSSM role 3-2
startup and running configuration 3-5
CIDR block masking 1-18, 2-24
clause
balance clause 2-50
selecting 2-69
CLI
C78-14361-01
device management 1-32
device monitoring 4-2
monitoring GSS network 4-3
network configuration 2-2
resetting password 3-16
closeness
DNS race 2-44
communication
between nodes 1-30
interbox 1-16
configuration
advanced 3-1
DNS rule filters 2-72
GSLB 2-1, 2-11
GSS 2-6, 2-23
GUI 3-7
network 2-1
order of 2-11
primary GSSM 1-16
request routing 2-1
security 3-8
standby GSSM 1-16
console cable 2-2
content routing agent
See CRA
content rule
GSLB 1-11
Content Services Switch
11000 series 1-11
IN-3isco Global Site Selector Configuration Guide
Index
configured as DNS server 1-11
data center 1-31
definition GLO-2
for server load balancing 1-8
peers 1-11
VIPs 1-12, 1-19
zone-based GSLB 1-11
Content Switching Module
data center 1-31
definition GLO-2
for server load balancing 1-8
VIPs 1-12, 1-19
conventions
document xiii
copy command 3-6
copying
startup configuration to or from disk 3-7
CRA
about 1-20
answer
creating 2-44
DNS Rule Wizard 2-65
balance method 1-26, 2-50
definition GLO-2
keepalive
about 1-22
proximity determination 2-44
CRA decay timing
keepalive property 2-35
IN-4Cisco Global Site Selector Configuration Guide
CRA minimum interval
keepalive property 2-36
create
region 2-13
CSM
See Content Switching Module
CSS
See Content Services Switch
Current Members tab 2-53
current software version
determining 3-34
customer
as owner 1-28
ASP 1-4
definition GLO-2
profiles 1-3
D
database
about 1-16
backing up 3-32
creating 2-3
monitoring status of 4-7
synchronized with standby GSSM 1-31
validating records 4-7
validation report 4-8
data center
definition GLO-2
78-14361-01

Index
deployment 1-31
debug log message 4-26
default CAPP hash secret
keepalive property 2-35
default name server query domain
keepalive property 2-35
delay time 1-1
delegation
definition 1-5
of domains to GSS 1-29, 2-76
delete
GSS 2-23
Delete button 1-40
deployment
configuring name servers 2-76
data center 1-31
GSS devices behind firewall 3-25
locations and regions 2-12
overview 1-29
owners 2-12
details windows 1-36
determining
current software version 3-34
disassociating
access list from interface 3-22
DNS
about 1-5
configuring for GSS 2-76
creating DNS rules 2-61
C78-14361-01
iterative request 1-6
queries per second 4-19
query
hosted domain 1-17
match D-proxy 1-18
match type 2-67
race 1-20
recursive request 1-6
request resolution 1-7
server
Content Services Switch acting as 1-11
modifying 2-76
shortcomings 1-8
subdomain 1-17
traditional routing 1-5
unmatched queries 4-19
zone configuration file 2-76
DNS race
as balance method 1-25
coordinate start time 2-44
CRAs 1-20
statistics 4-3
dns-record command 1-12
DNS rule
about 1-14
active status 2-68
answer 1-15
balance clause 2-50
components 1-14
IN-5isco Global Site Selector Configuration Guide
Index
creating 2-58
definition GLO-2
deleting 2-72
error messages 3-51
filters
configuring 2-72
example 2-72
parameters 2-74
removing 2-75
hit count 4-14
reactivating all by owner 2-71
suspended status 2-68
suspending 2-71
suspending all by owner 2-71
DNS Rule Builder
about 2-59
creating DNS rules 2-68
DNS RULES button 1-34
DNS Rule Wizard
about 2-60
CRA answer 2-65
creating DNS rules 2-61
name server answer 2-65
VIP answer 2-64
DNS server
monitoring 4-4
dns-server command 1-11
DNS TTL 2-67, 2-69
documentation
IN-6Cisco Global Site Selector Configuration Guide
objectives xi
organization xii
related xiv
text conventions xiii
domain lists
about 1-18
adding domains to 2-28
creating 2-28, 2-29
defined 2-28
deleting 2-33
DNS rule 2-62
error messages 3-58
maximum domains 1-18
maximum nonwildcard domain length 2-32
modifying 2-32
wildcards in domains 2-29
domain name
hash 2-66
name space 1-5
Domain Name System
See DNS
domains
delegating to GSS 1-29, 2-76
hit count 4-16
hit counts 4-16
maximum length 2-32
maximum name length 1-17
maximum per domain list 1-18
maximum supported 2-29
78-14361-01

Index
pattern matching 2-29
wildcards
example 2-29, 2-63
maximum length 2-32
downgrading
order of operation 3-40
D-proxy
about 1-6
definition GLO-2
iterative requests 1-6
name server forwarding 1-20
query GSS 1-18
requesting 1-14
E
Edit icon 1-38
enable
GSS 2-21
error messages 3-46 to 3-71
Ethernet interface
segmenting traffic on 3-18
Export button 1-39
exporting GSSM data 4-28
F
fatal error log message 4-25
filtering GSS traffic
C78-14361-01
using access lists 3-20
filters
DNS rules 2-72
parameters 2-74
removing 2-75
firewall
deploying GSS devices behind 1-30, 3-25
permitting traffic to GSS 1-30
follow command option 4-22, 4-24
forwarding
to name server 1-20
FQDN
See fully qualified domain name
FTP
enabling 2-7
FTP enable
network configuration item 3-5
full GSSM backup 3-31
fully qualified domain name
definition GLO-2
G
global keepalive properties
modifying 2-34
table 2-35
global server load balancing
about 1-10
balance clauses 2-50, 2-69
IN-7isco Global Site Selector Configuration Guide
Index
configuration 2-1, 2-10
content rule-based 1-11
data centers 1-31
definition GLO-3
global statistics 4-19
monitoring 4-9
using Content Services Switch 1-11
using the GSS 1-12
zone-based 1-11
Global Site Selector
about 1-17
acting as GSSM 1-16, 1-29
activating 2-21
architecture 1-15
authoritative DNS server 1-12
balancing data centers 1-31
boomerang server 4-3
communication 1-30
configured as GSSM 2-3
configuring 2-1, 2-5
console cable 2-2
definition GLO-3
delete 2-23
deployment
behind firewall 1-30
data center 1-31
typical 1-28
DNS server 4-4
domain pattern matching 2-29
IN-8Cisco Global Site Selector Configuration Guide
enable remote connect 2-7
error messages 3-68
factors in responding to a request 1-12
hardware 1-12, 1-16, 1-17
interact with SLBs 1-12
keepalives
global properties 2-34
overview 1-21
key features 1-2
locating 1-29
login accounts 3-14
management
CLI-based 1-32
GUI-based 1-32
maximum supported domains 2-29
modifying 2-23
monitoring
through CLI 4-2
through GUI 4-6
network configuration 3-4
overview 1-2
packet filtering 1-30
publicly addressable 1-29
remote access 2-2
reporting interval 3-8
synchronized with GSSM 1-17
user account
creating 3-14
deleting 3-16
78-14361-01
Index
modifying 3-15
Global Site Selector Manager
acting as GSS 1-16
backing up 3-30
communication 1-30
configuring
primary 2-4
procedure 2-3
standby 2-4
database 1-16, 2-3
monitoring 4-7
restoring from backup 3-41
default username and password 2-10
definition GLO-3
deployment 1-29
DNS rule configuration interface 2-58
DNS rules 1-14, 1-34
enabling GUI 2-5
exporting data 4-28
GUI
changing the password 3-12
creating user account 3-9
modifying user account 3-11
monitoring 4-6
overview 1-33
removing user account 3-12
HELP button 1-35
icons 1-38
locating 1-29
C78-14361-01
login accounts 3-9
log on to 2-8
MONITORING button 1-34
password 3-12
primary 1-16
printing data 4-28
redundancy 1-31
RESOURCES button 1-34
restoring from full backup 3-43
role change 3-2
standby
act as primary 1-31
as backup 1-29
definition 1-17
switching primary and standby role 3-2
TOOLS button 1-35
two primary GSSMs (note) 3-2
upgrading software 3-33
global statistics 4-19
glue A records
adding to zone configuration file 2-76
group
resources by region, location, owner 2-20
GSLB
See global server load balancing
GSS
See Global Site Selector
gss.log file 4-22
gss command 4-2
IN-9isco Global Site Selector Configuration Guide
Index
GSS communications
network configuration item 3-5
GSSM
See Global Site Selector Manager
gssm primary-to-standby command 3-3
gssm standby-to-primary command 3-3
GSS network
configuration 1-16
definition GLO-3
deployment 1-28
global statistics 4-19
grouping (table) 2-20
GSLB configuration 2-10
GSLB status 4-9
management 1-32
monitoring
through CLI 4-3
through GUI 4-6
organizing 1-27, 2-12
primary GSSM 1-16
time 1-33
URL 2-9
GSS-related ports and protocols 3-26
GUI
browsers supported 1-33
configuration 3-7, 3-8
details windows 1-36
device management 1-32
enabling 2-5
IN-10Cisco Global Site Selector Configuration Guide
icons 1-38
list windows 1-35
logging on 1-33, 2-8
navigation 1-37
organization 1-34
password 3-12
refresh 3-8
security 3-8
timeout 3-8
understanding 1-33
user account
creating 3-9
modifying 3-11
removing 3-12
H
hash
by domain name 2-70
by source address 2-70
hashed balance method
by domain name 2-66
by source address 2-66
HELP button 1-35
hosted domain
about 1-17
definition 2-28, GLO-3
maximum name length 1-17
requested 1-14
78-14361-01
Index
host name
field 4-6
network configuration item 3-5
Host tag 2-38
HTTP
secure HTTP 2-9
HTTP HEAD default destination port
keepalive property 2-35
HTTP HEAD default path
keepalive property 2-35
HTTP-Head keepalive
about 1-22
type 2-37, 2-43
HTTP HEAD minimum interval
keepalive property 2-36
HTTP HEAD response timeout
keepalive property 2-35
I
ICMP keepalive type 1-21, 2-37, 2-43
ICMP minimum interval
keepalive property 2-36
icon
asterisk 1-38
Edit 1-38
question mark 1-40
sort 1-38
wizard 1-38
C78-14361-01
info log message 4-26
interface
GSS communications as network configuration item 3-5
network configuration item 3-5
Internet Explorer
supported versions 1-33
IP address
field 4-6
network configuration item 3-5
IP default gateway
network configuration item 3-5
IP name server
network configuration item 3-5
IP TTL 2-70
iterative requests 1-6
K
KAL
See keepalive
KAL-AP By Tag 2-43
KAL-AP By VIP 2-43
KAL-AP keepalive
about 1-21
KAL-AP By Tag 1-22, 2-43
KAL-AP By VIP 1-22, 2-43
type 2-37, 2-43
KAL-AP minimum interval
keepalive property 2-36
IN-11isco Global Site Selector Configuration Guide
Index
keepalive
about 1-21
and NAT 1-22
configuring for an answer 1-21
definition GLO-4
error messages 3-64
external 1-12
global properties
modifying 2-34
table 2-35
monitoring status of 4-5
probes per second 4-19
shared
about 2-36
creating 2-37
deleting 2-39
error messages 3-62
modifying 2-38
type
CRA 1-22
HTTP-Head 1-22
ICMP 1-21
KAL-AP 1-21
name server 1-22
None 1-22
keepalive negative probe count 4-12
keepalive packets received 4-11
keepalive packets sent 4-11
keepalive positive probe count 4-11
IN-12Cisco Global Site Selector Configuration Guide
keepalive probes per second 4-19
keepalive properties 2-35
KeepAlive query domain field
for determining liveness 2-46
keepalive transition count 4-12
L
L4
See Layer 4 information
L7
See Layer 7 information
Layer 4 information 1-8
Layer 7 information 1-8
least loaded
about 1-24
balance method 2-66
weight option 1-26
list windows 1-35
load 1-12
loading
startup configuration from external file 3-6
load optimization
and GSLB 1-10
load threshold
about 1-27
VIP answer 2-55
location
about 1-27
78-14361-01
Index
creating 2-13
definition 2-12, GLO-4
deleting 2-16
error messages 3-66
modify all answers in 2-48
modifying 2-14
log files
subsystem 4-24
viewing 4-20
logging levels 4-20
logging on
to GSSM GUI 2-8
login
default 2-10
GUI 1-33
login accounts
creating
GSS 3-14
GSSM 3-9
deleting GSS 3-16
GSS 3-14
GSSM 3-9
modifying
GSS 3-15
GSSM 3-11
login certificate 2-9
LT
See load threshold
C78-14361-01
M
MAC address 4-6
management
CLI-based 1-32
GUI-based 1-32
Manually entered domain list button 2-62
Manually entered source address list button 2-62
Match DNS Query Type drop-down list 2-67
messages
system log 4-27
monitoring
boomerang server status 4-3
database status 4-7
DNS server 4-4
global load-balancing status 4-9
keepalives 4-5
status of GSS devices
by CLI 4-2
from the GUI 4-6
MONITORING button 1-34
N
name server
about 1-6, 1-20
answer type
creating 2-46
authoritative 1-7
IN-13isco Global Site Selector Configuration Guide

Index
balance method 2-50
balance method options 1-26
configuring 2-76
definition GLO-4
forwarding 1-20
keepalive 1-22
known addresses 1-7
order 2-55
weight 2-55
name server records
adding to zone configuration file 2-76
navigation
GUI 1-37
Netscape Navigator
supported versions 1-33
network
configuration
erasing 3-4
for GSS devices 3-5
modifying 3-4
overview 2-2
running 3-5
startup 3-5
connectivity 2-2
deployment 1-29
GSSM connectivity 2-3
locating GSS on 1-29
Network Address Translation
keepalives 1-22
IN-14Cisco Global Site Selector Configuration Guide
network management 1-32
network topology 1-1
nodes
communication 1-30
nonadmin password
resetting 3-18
None keepalive type 2-43
NS
See name server
NS minimum interval
keepalive property 2-36
O
obtaining
software upgrade file 3-35
one-way delay 2-45
order
about 1-23, 1-26
assigning 2-64
name server 2-55
VIP answers 2-55
ordered list
definition GLO-4
ordered list balance method 1-23, 2-66
origin server
definition GLO-5
owner
about 1-28
78-14361-01

Index
creating 2-16, 2-17
deleting 2-19
deploying 2-12
error messages 3-67
modifying 2-19
reactivating all DNS rules 2-71
suspending all answer groups for 2-57
suspending all DNS rules 2-71
P
packet filtering 1-30
pad size 2-69
Partner Initiated Customer Access
See PICA
password
admin
resetting 3-17
CLI
resetting 3-16
default 2-10
GSSM GUI
changing 3-12
nonadmin
resetting 3-18
peers 1-11
PICA
registration number 3-36
ports and protocols
C78-14361-01
required for GSS devices 3-26
PostgreSQL database 1-16
Predefined source address list button 2-62
preference 1-12
primary GSSM
about 1-16
changing to standby 3-2
two enabled simultaneously (note) 3-2
Print button 1-40
printing GSSM data 4-28
profile
customer 1-3
properties
keepalive
modifying 2-34
protocols and ports
required for GSS devices 3-26
proximity
boomerang 1-25
DNS race 2-44
in Content Services Switch 1-11
Q
query
match DNS type 2-67
not matched to D-proxy 1-18
question mark icon 1-40
IN-15isco Global Site Selector Configuration Guide
Index
R
reactivate
all answer groups for an owner 2-57
all answers in location 2-48
all DNS rules by owner 2-71
answer group 2-56
records
validating database 4-7
recursive request 1-6
redundancy
and GSLB 1-10
and synchronization 1-31
Refresh button 1-39
refresh interval 3-8
region
about 1-27
creating 2-13
definition GLO-5
deleting 2-16
deploying 2-12
error messages 3-67
modifying 2-14
removing
rules from access list 3-24
report
answer hit counts 4-9
answer status 4-13
database validation 4-8
IN-16Cisco Global Site Selector Configuration Guide
DNS rule hit count 4-14
domain hit count 4-16
keepalive statistics 4-11
source address hit count 4-17
reporting interval 3-8
requests
handled by SLBs 1-9
iterative 1-6
resolution 1-6, 1-13
routing 2-11
source 1-12
Reset button 1-39
resetting
admin password 3-17
CLI password 3-16
nonadmin password 3-18
RESOURCES button 1-34
response
selected by SLB 1-9
response time
and GSLB 1-11
as component of proximity 1-12
restoring
earlier software version 3-41
GSSM database from a backup 3-41
GSSM from full backup 3-43
return record count 2-67, 2-69
round-robin
about 1-24
78-14361-01

Index
in balance clause 2-66
weight 1-26
round-trip time
versus one-way delay 2-45
running configuration
changing 3-5
S
Save button 1-39
scalability
and GSLB 1-11
secret
definition 2-70
Secure Socket Layer
definition GLO-5
security
configuration 3-8
GUI 3-8
segmenting
GSS traffic by interface 3-18
server delay 2-70
server load 1-1
server load balancer
definition GLO-5
maximum supported 1-12
placement on network 1-9
request handling 1-9
server load balancing
C78-14361-01
about 1-8
service and support xvi
service provider
definition GLO-5
Set Answers KAL ICMP button 2-39
Set Answers KAL None button 2-39
severity log message 4-25
shared HTTP-Head keepalive 2-44
shared ICMP keepalive 2-43
shared keepalive
about 2-37
creating 2-37
deleting 2-39
error messages 3-62
modifying 2-38
show access-list command 3-25
show logs command 4-22
show statistics command
boomerang 4-3
dns 4-4
SLB
See server load balancer
SNMP
enabling and disabling 3-27
viewing status 3-28
SNMP port
changing 3-29
software
starting 2-5
IN-17isco Global Site Selector Configuration Guide
Index
software update
new update file 3-35
obtaining file from Cisco 3-35
overall procedure 3-33
verifying 3-39
software version
determining 3-34
restoring earlier 3-41
sort
DNS rules 2-72
removing 2-76
sort icon 1-38
sorting 1-35
source address
about 1-18
blocks 1-18, 2-24
hash 2-66
hit counts 4-17
in DNS rule 2-62
maximum per source address list 2-24
source address and domain hash
about 1-24
source address list
about 1-18
anywhere 1-18
creating 2-24
default 2-24
definition 1-18, GLO-5
deleting 2-28
IN-18Cisco Global Site Selector Configuration Guide
error messages 3-69
maximum addresses 2-24
modifying 2-27
source of request 1-12
SSH
disabled 2-2
enabling 2-7
SSH enable
network configuration item 3-5
SSL
See Secure Socket Layer
standby GSSM
changing to primary 3-2
definition 1-16
enabling as primary 1-17
starting
Cisco GSS software 2-5
startup configuration
changing 3-5, 3-6
loading from external file 3-6
static proximity
definition GLO-6
statistics
global 4-19
stopping an answer 2-47
subdomain
delegate to GSS 1-29
subscriber
definition GLO-6
78-14361-01
Index
subsystem log files
viewing 4-24
suspend
all answer groups for an owner 2-56
all answers in a location 2-48
all DNS rules by owner 2-71
answer 2-47
answer group 2-56
DNS rule 2-68, 2-70
switching
primary and standby GSSM role 3-2
synchronization
primary and standby GSSM 1-31
system log
messages 4-27
severity 4-25
viewing 4-25
T
Tag field
used as key 2-44
tail command option 4-22, 4-24
TCP
to communicate status 1-30
technical support xvi
Telnet
disabled 2-2
enabling 2-7
C78-14361-01
Telnet enable
network configuration item 3-5
terminal session 2-2
third-party software
viewing information 3-45
time
GSS network 1-33
timeout, GUI
configuring 3-8
Time To Live
definition GLO-6
TOOLS button 1-35
traffic
segmenting
by interface 3-18
troubleshooting 3-46 to 3-71
TTL
See Time To Live
type command 4-24
U
unmatched DNS queries 4-19
upgrade file
adding 3-35
upgrading
GSS device software
order of operation 3-33
procedure 3-37
IN-19isco Global Site Selector Configuration Guide
Index
upstream DNS configuration 2-76
URL
secure HTTP 2-9
user account on GSS
creating 3-14
deleting 3-16
modifying 3-15
user account on GSSM
creating 3-9
modifying 3-11
removing 3-12
user error messages 3-71
user interface
details windows 1-36
enabling 2-5
icons 1-38
list windows 1-35
log on to 2-8
navigation 1-37
organization 1-34
understanding 1-33
username
default 2-10
UTC 1-33
V
validating
database records 4-7
IN-20Cisco Global Site Selector Configuration Guide
verifying
software upgrade 3-39
viewing
access lists 3-25
gss.log file 4-22
log files 4-20
SNMP status 3-28
subsystem log files 4-24
system log 4-25
third-party software information 3-45
VIP
about 1-9, 1-19
answer
DNS Rule Wizard 2-64
keepalive types 2-43
balance method 2-50
balance method options 1-26
creating answer 2-40
load threshold 2-55
order 2-55
weight 2-55
virtual IP address
See VIP
W
warning log message 4-25
web browser
access GSSM GUI 2-9
78-14361-01
Index
supported 1-33
WebNS
definition GLO-6
weight
about 1-26
assigning 2-65
least loaded 1-26
name server 2-55
round-robin 1-26
VIP 2-55
weighted round-robin
about 1-24
used in balance clause 2-67
weight option 1-26
wildcards
in domains 2-29
wizard
DNS Rule Wizard 2-60
icon 1-38
write memory command 3-5
Z
zone-based GSLB 1-11
zone configuration file
modifying 2-76
sample 2-77
C78-14361-01
IN-21isco Global Site Selector Configuration Guide

Index
IN-22Cisco Global Site Selector Configuration Guide
78-14361-01