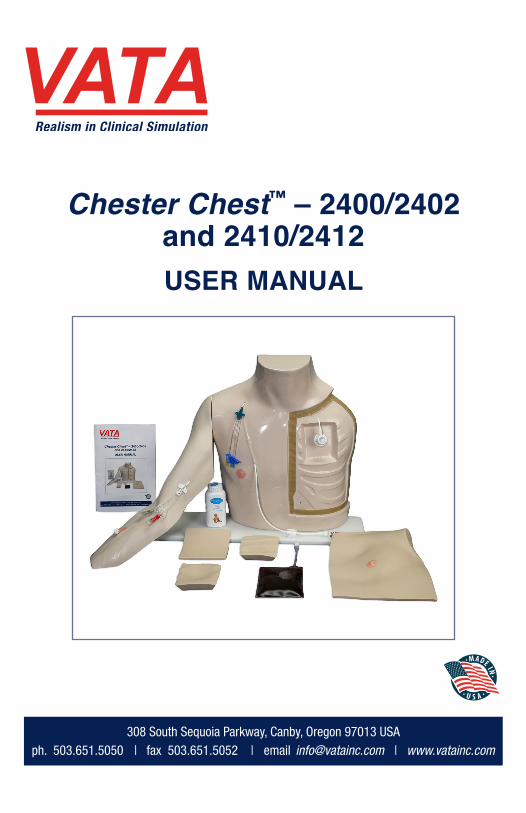
Chester Chest™ – 2400/2402 and 2410/2412
16
308 South Sequoia Parkway, Canby, Oregon 97013 USA ph. 503.651.5050 | fax 503.651.5052 | email [email protected] | www.vatainc.com Chester Chest ™ – 2400/2402 and 2410/2412 USER MANUAL
-
Upload
khangminh22 -
Category
Documents
-
view
0 -
download
0
Transcript of Chester Chest™ – 2400/2402 and 2410/2412
308 South Sequoia Parkway, Canby, Oregon 97013 USAph. 503.651.5050 | fax 503.651.5052 | email [email protected] | www.vatainc.com
Chester Chest™ – 2400/2402 and 2410/2412USER MANUAL
www.vatainc.com
Thank you for your purchase of VATA’s Chester Chest™ .
Chester Chest™, an industry standard since 1987, enables physicians, nurses, home health staff, patients and support persons to develop competence with the most common types of vascular access devices. Within one realistic and portable training aid, is a great tool for teaching, training, competency testing and skills assessment. This is the most realistic and complete model for central line care offered anywhere! The area around all catheter sites can be used to practice cleansing, application of dressings and securement devices, fluid infusion and withdrawal.
Please read the entire User’s Manual carefully before using the model to insure that you understand the proper care and use. This will also avoid situations that may not be covered by the warranty and help you enjoy the maximum benefit.
Thank You For Your Purchase!
2
Whatever your question, problem, or comment, VATA’s Customer Service is here to help. There are four quick, easy ways to contact us, so you can choose what works best for you. If there’s anything we can do, just let us know!
VATA Inc. 308 South Sequoia Parkway, Canby, Oregon 97013, USA Phone : 503.651-5050 Fax : 503.651-5052 E-Mail : [email protected] Web : www.vatainc.com
Contact Information
www.vatainc.com
Overview of Chester Chest™
3
The left chest area of Chester Chest™ features: • Outer Tissue Flap 0405/0404 – A specially formulated material duplicates the
feel of human tissue which, when placed over the chest port, provides a realistic practice of palpating and accessing, with proper access of the port being confirmed by a blood withdrawal – just like the real thing!
• A real implanted port under the Outer Tissue Flap• Difficult Accessing Inserts 0420/0421, 0430/0431 and 0440/0441 which are made
of a soft tissue like material and placed either under or over the port to simulate palpating and accessing a port with one of the following types of placements: normal, “tipping”, “wandering” or “deeply placed”.
• A rigid underlying surface with molded ribs and a recessed area for the interchangeable inserts
The right chest area of Chester Chest™ features: • A 9.6FR tunneled central catheter that is visible up to the clavicle. The Dacron cuff
is also discernable.• An external jugular vein is slightly raised with an opening for you to insert your
own catheter and there is also an opening in the clavical area for the placement of a subclavian catheter.
The arm of Chester Chest™ features: • A dual lumen 5FR PICC (Peripherally Inserted Central Catheter) exiting the basilic
vein from the inner bicep area, which is currently the preferred site for placement. The basilic vein is slightly raised for easy identification.
• A pre-positioned 20g IV catheter in the forearm.
*Note: There is also an option to purchase Chester Chest with an Advanced Arm (pictured on page 7), which includes features of the standard arm plus a recessed area for the placement of a peripheral arm port. (Port not included – see part 0417 in Models & Parts on page 15). The base of the recessed area is made of soft material that permits the port to “float” when accessed. This area is covered with a removable tissue-like flap which, when placed over the port, provides the realistic feel of palpating and accessing.
All central lines are attached to a simulated blood reservoir bag in either the torso or the arm to permit the practice of “blood” withdrawal and fluid infusion. Cleansing, application of dressings and securement devices can be demonstrated at all sites.
www.vatainc.com
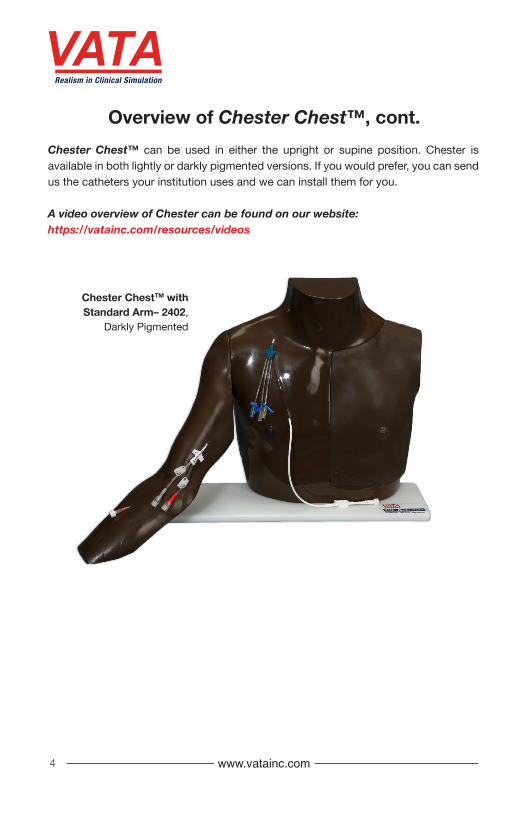
Chester ChestTM with Standard Arm– 2402,
Darkly Pigmented
4
Chester Chest™ can be used in either the upright or supine position. Chester is available in both lightly or darkly pigmented versions. If you would prefer, you can send us the catheters your institution uses and we can install them for you.
A video overview of Chester can be found on our website: https://vatainc.com/resources/videos
Overview of Chester Chest™, cont.
www.vatainc.com
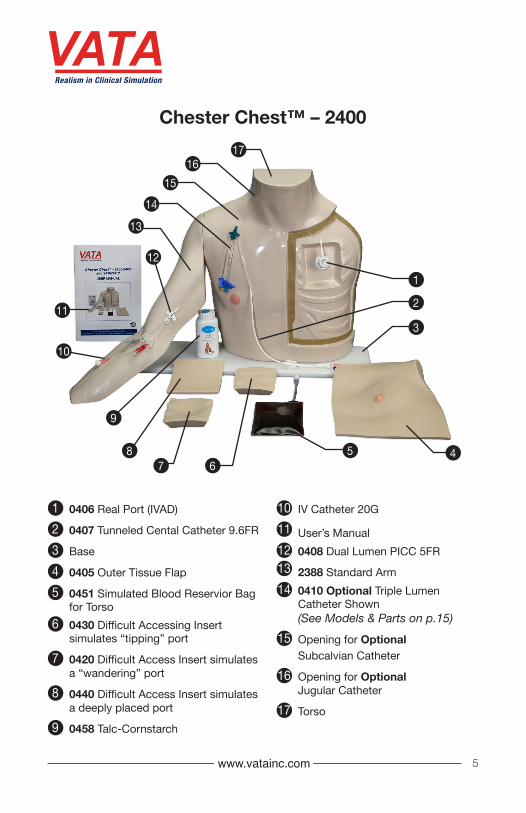
1 0406 Real Port (IVAD)
2 0407 Tunneled Cental Catheter 9.6FR
3 Base
4 0405 Outer Tissue Flap
5 0451 Simulated Blood Reservior Bag for Torso
6 0430 Difficult Accessing Insert simulates “tipping” port
7 0420 Difficult Access Insert simulates a “wandering” port
8 0440 Difficult Access Insert simulates a deeply placed port
9 0458 Talc-Cornstarch
3
10 IV Catheter 20G
11 User’s Manual12 0408 Dual Lumen PICC 5FR13 2388 Standard Arm14 0410 Optional Triple Lumen
Catheter Shown (See Models & Parts on p.15)
15 Opening for Optional Subcalvian Catheter
16 Opening for Optional Jugular Catheter
17 Torso
Chester Chest™ – 240017
1
457
86
1615
9
11
10
12
13
2
14
5
www.vatainc.com
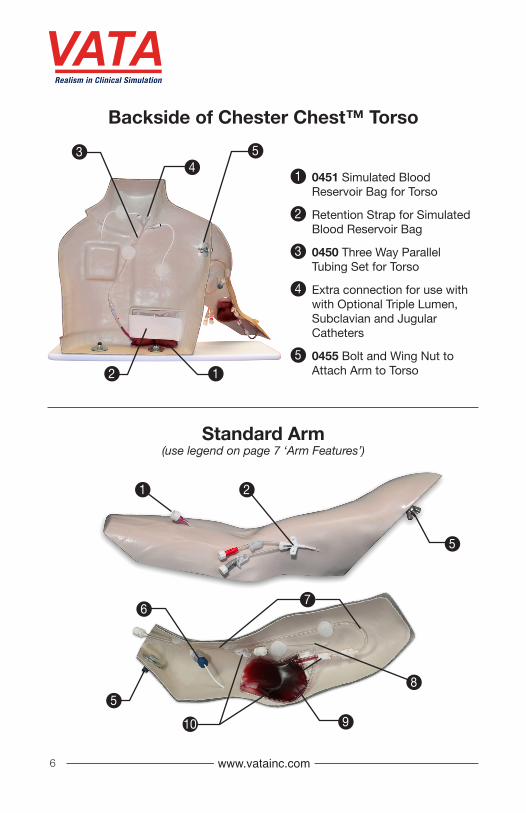
1 0451 Simulated Blood Reservoir Bag for Torso
2 Retention Strap for Simulated Blood Reservoir Bag
3 0450 Three Way Parallel Tubing Set for Torso
4 Extra connection for use with with Optional Triple Lumen, Subclavian and Jugular Catheters
5 0455 Bolt and Wing Nut to Attach Arm to Torso12
3 5
5
4
Backside of Chester Chest™ Torso
Standard Arm(use legend on page 7 ‘Arm Features’)
6
5
1 2
9
67
10
8

www.vatainc.com
1 IV Catheter 20G
2 0408 Dual Lumen PICC 5FR
3 0417 Optional Peripheral Port (See Models & Parts on p.15)
4 0442 skin flap covering recessed area for optional peripheral port 0417
5 0455 Bolt and Wing Nut to Attach Arm to Torso
9
6 Dual PICC Attachment to Tubing Set
7 0446 Tubing Set for Arm
8 20G IV Catheter Attachment to Tubing Set
9 0453 Simulated Blood Reservoir Bag for Arm
10 Snap Clamps
11 Back of Recessed Area
5
5
34
6
12
7
10
8
311
Advanced Arm
Arm Features
The Advanced Arm has the option to include an Optional Peripheral Port 0417 posterior to the PICC insertion site in the recessed area of the arm.
7
www.vatainc.com
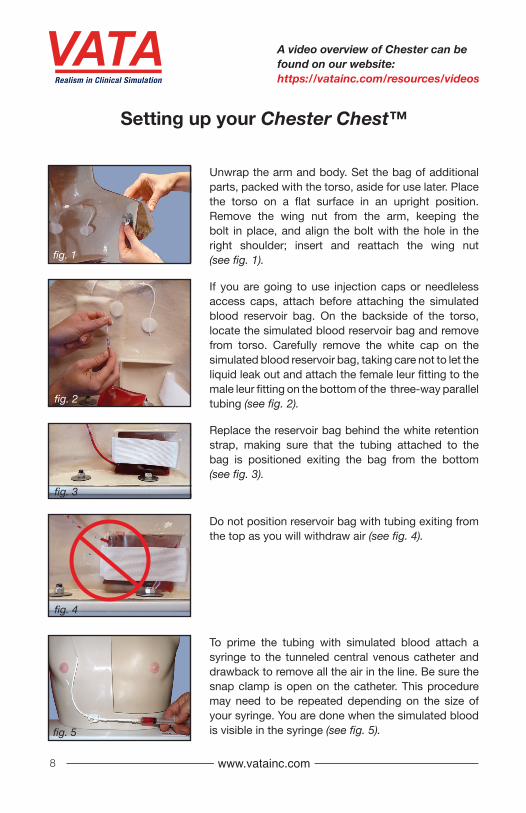
Unwrap the arm and body. Set the bag of additional parts, packed with the torso, aside for use later. Place the torso on a flat surface in an upright position. Remove the wing nut from the arm, keeping the bolt in place, and align the bolt with the hole in the right shoulder; insert and reattach the wing nut (see fig. 1).
If you are going to use injection caps or needleless access caps, attach before attaching the simulated blood reservoir bag. On the backside of the torso, locate the simulated blood reservoir bag and remove from torso. Carefully remove the white cap on the simulated blood reservoir bag, taking care not to let the liquid leak out and attach the female leur fitting to the male leur fitting on the bottom of the three-way parallel tubing (see fig. 2).
Replace the reservoir bag behind the white retention strap, making sure that the tubing attached to the bag is positioned exiting the bag from the bottom (see fig. 3).
Do not position reservoir bag with tubing exiting from the top as you will withdraw air (see fig. 4).
To prime the tubing with simulated blood attach a syringe to the tunneled central venous catheter and drawback to remove all the air in the line. Be sure the snap clamp is open on the catheter. This procedure may need to be repeated depending on the size of your syringe. You are done when the simulated blood is visible in the syringe (see fig. 5).
Setting up your Chester Chest™
A video overview of Chester can be found on our website: https://vatainc.com/resources/videos
fig. 1
fig. 2
fig. 3
fig. 4
fig. 5
8
www.vatainc.com
fig. 6
fig. 7
fig. 8A
fig. 9
fig. 8B
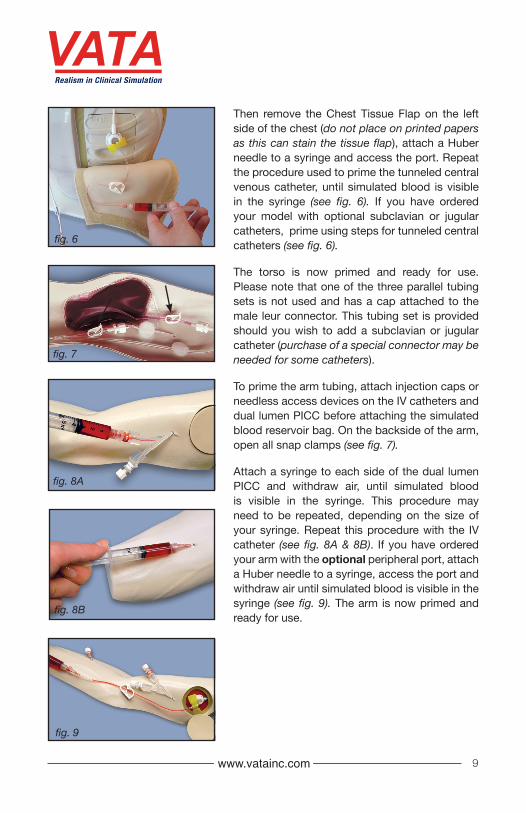
Then remove the Chest Tissue Flap on the left side of the chest (do not place on printed papers as this can stain the tissue flap), attach a Huber needle to a syringe and access the port. Repeat the procedure used to prime the tunneled central venous catheter, until simulated blood is visible in the syringe (see fig. 6). If you have ordered your model with optional subclavian or jugular catheters, prime using steps for tunneled central catheters (see fig. 6).
The torso is now primed and ready for use. Please note that one of the three parallel tubing sets is not used and has a cap attached to the male leur connector. This tubing set is provided should you wish to add a subclavian or jugular catheter (purchase of a special connector may be needed for some catheters).
To prime the arm tubing, attach injection caps or needless access devices on the IV catheters and dual lumen PICC before attaching the simulated blood reservoir bag. On the backside of the arm, open all snap clamps (see fig. 7).
Attach a syringe to each side of the dual lumen PICC and withdraw air, until simulated blood is visible in the syringe. This procedure may need to be repeated, depending on the size of your syringe. Repeat this procedure with the IV catheter (see fig. 8A & 8B). If you have ordered your arm with the optional peripheral port, attach a Huber needle to a syringe, access the port and withdraw air until simulated blood is visible in the syringe (see fig. 9). The arm is now primed and ready for use.
9
www.vatainc.com
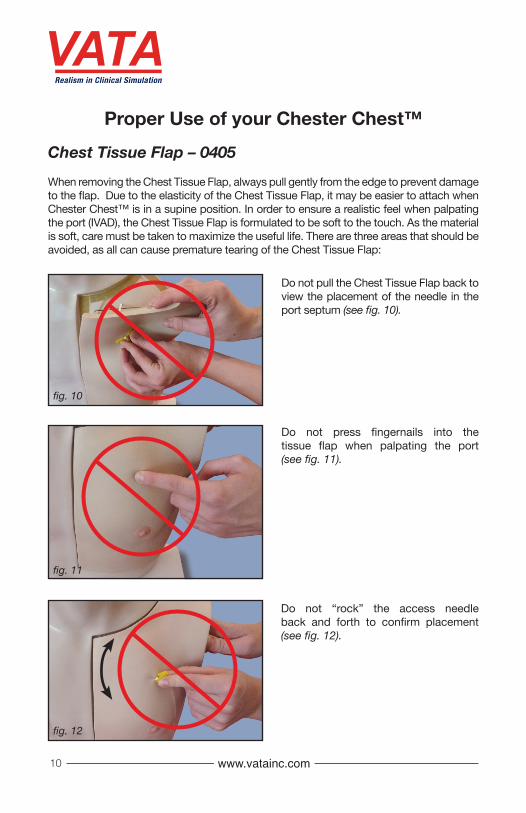
Chest Tissue Flap – 0405When removing the Chest Tissue Flap, always pull gently from the edge to prevent damage to the flap. Due to the elasticity of the Chest Tissue Flap, it may be easier to attach when Chester Chest™ is in a supine position. In order to ensure a realistic feel when palpating the port (IVAD), the Chest Tissue Flap is formulated to be soft to the touch. As the material is soft, care must be taken to maximize the useful life. There are three areas that should be avoided, as all can cause premature tearing of the Chest Tissue Flap:
Do not pull the Chest Tissue Flap back to view the placement of the needle in the port septum (see fig. 10).
Do not press fingernails into the tissue flap when palpating the port (see fig. 11).
Do not “rock” the access needle back and forth to confirm placement (see fig. 12).
Proper Use of your Chester Chest™
fig. 10
fig. 11
fig. 12
10
www.vatainc.com
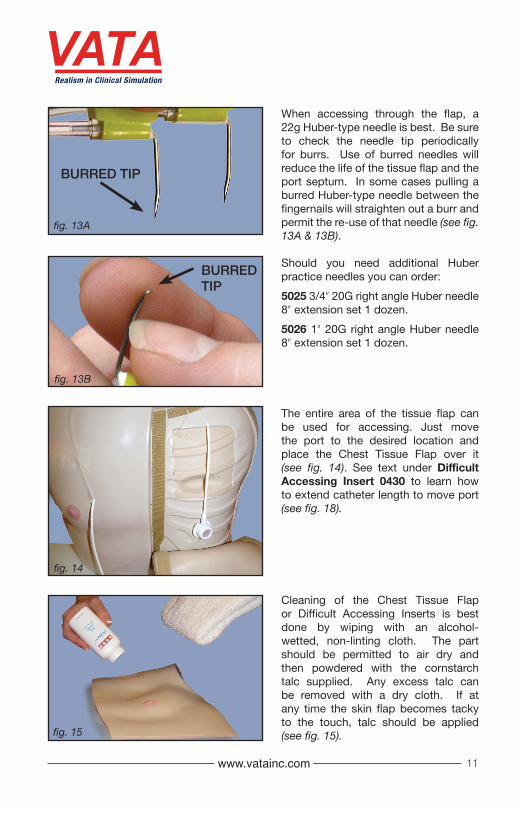
When accessing through the flap, a 22g Huber-type needle is best. Be sure to check the needle tip periodically for burrs. Use of burred needles will reduce the life of the tissue flap and the port septum. In some cases pulling a burred Huber-type needle between the fingernails will straighten out a burr and permit the re-use of that needle (see fig. 13A & 13B).
Should you need additional Huber practice needles you can order: 5025 3/4ʺ 20G right angle Huber needle 8ʺ extension set 1 dozen.5026 1ʺ 20G right angle Huber needle 8ʺ extension set 1 dozen.
The entire area of the tissue flap can be used for accessing. Just move the port to the desired location and place the Chest Tissue Flap over it (see fig. 14). See text under Difficult Accessing Insert 0430 to learn how to extend catheter length to move port (see fig. 18).
Cleaning of the Chest Tissue Flap or Difficult Accessing Inserts is best done by wiping with an alcohol-wetted, non-linting cloth. The part should be permitted to air dry and then powdered with the cornstarch talc supplied. Any excess talc can be removed with a dry cloth. If at any time the skin flap becomes tacky to the touch, talc should be applied (see fig. 15).
fig. 14
fig. 15
fig. 13A
fig. 13B
BURRED TIP
BURRED TIP
11
www.vatainc.com
fig. 16
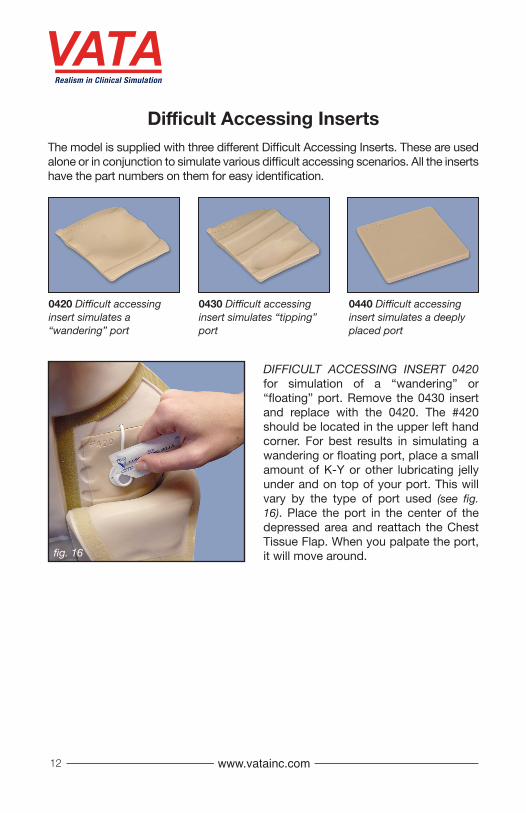
0420 Difficult accessing insert simulates a “wandering” port
0430 Difficult accessing insert simulates “tipping” port
0440 Difficult accessing insert simulates a deeply placed port
Difficult Accessing InsertsThe model is supplied with three different Difficult Accessing Inserts. These are used alone or in conjunction to simulate various difficult accessing scenarios. All the inserts have the part numbers on them for easy identification.
DIFFICULT ACCESSING INSERT 0420 for simulation of a “wandering” or “floating” port. Remove the 0430 insert and replace with the 0420. The #420 should be located in the upper left hand corner. For best results in simulating a wandering or floating port, place a small amount of K-Y or other lubricating jelly under and on top of your port. This will vary by the type of port used (see fig. 16). Place the port in the center of the depressed area and reattach the Chest Tissue Flap. When you palpate the port, it will move around.
12
www.vatainc.com
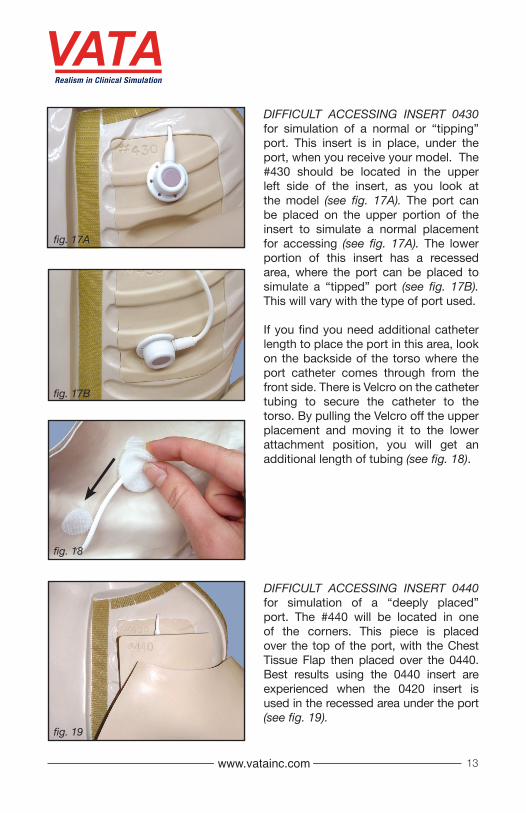
DIFFICULT ACCESSING INSERT 0430 for simulation of a normal or “tipping” port. This insert is in place, under the port, when you receive your model. The #430 should be located in the upper left side of the insert, as you look at the model (see fig. 17A). The port can be placed on the upper portion of the insert to simulate a normal placement for accessing (see fig. 17A). The lower portion of this insert has a recessed area, where the port can be placed to simulate a “tipped” port (see fig. 17B). This will vary with the type of port used.
If you find you need additional catheter length to place the port in this area, look on the backside of the torso where the port catheter comes through from the front side. There is Velcro on the catheter tubing to secure the catheter to the torso. By pulling the Velcro off the upper placement and moving it to the lower attachment position, you will get an additional length of tubing (see fig. 18).
DIFFICULT ACCESSING INSERT 0440 for simulation of a “deeply placed” port. The #440 will be located in one of the corners. This piece is placed over the top of the port, with the Chest Tissue Flap then placed over the 0440. Best results using the 0440 insert are experienced when the 0420 insert is used in the recessed area under the port (see fig. 19).
fig. 17A
fig. 17B
fig. 18
fig. 19
13
www.vatainc.com
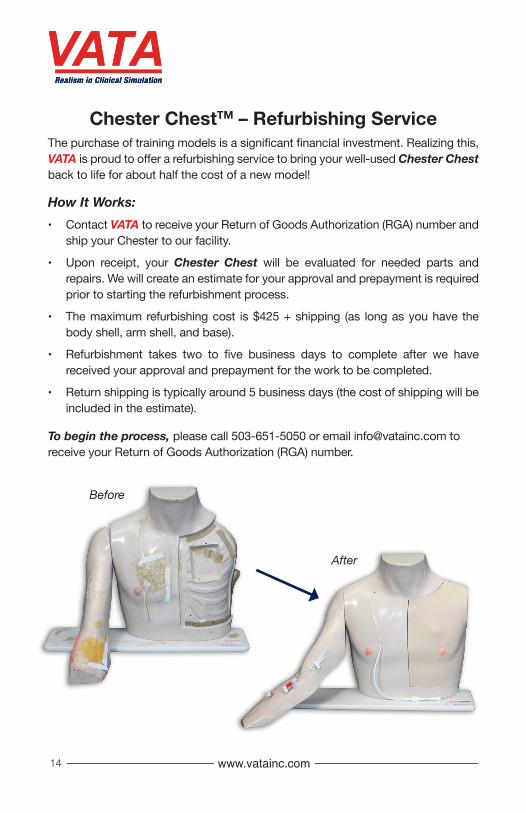
Chester ChestTM – Refurbishing Service The purchase of training models is a significant financial investment. Realizing this, VATA is proud to offer a refurbishing service to bring your well-used Chester Chest back to life for about half the cost of a new model!
How It Works:• Contact VATA to receive your Return of Goods Authorization (RGA) number and
ship your Chester to our facility.
• Upon receipt, your Chester Chest will be evaluated for needed parts and repairs. We will create an estimate for your approval and prepayment is required prior to starting the refurbishment process.
• The maximum refurbishing cost is $425 + shipping (as long as you have the body shell, arm shell, and base).
• Refurbishment takes two to five business days to complete after we have received your approval and prepayment for the work to be completed.
• Return shipping is typically around 5 business days (the cost of shipping will be included in the estimate).
To begin the process, please call 503-651-5050 or email [email protected] to receive your Return of Goods Authorization (RGA) number.
14
Before
After

www.vatainc.com
All parts on this model are available individually.
Chester ChestTM
2400 Chester Chest™ with Standard Arm, lightly pigmented2402 Chester Chest™ with Standard Arm, darkly pigmented2410 Chester Chest™ with Advanced Arm, lightly pigmented2412 Chester Chest™ with Advanced Arm, darkly pigmented
Accessories & Parts0401 Optional Carrying Case for Chester Chest™0404 Chest Tissue Flap Replacement, darkly pigmented for 2402/24120405 Chest Tissue Flap Replacement, lightly pigmented for 2400/24100406 Practice Port (IVAD)0407 Tunneled Central Venous Catheter 9FR (CVC)0408 Dual PICC Catheter 5 FR (requires part 0418 for attachment)0409 Optional Tunneled Dual Lumen Catheter 9.6FR 0410 Optional Triple Lumen Catheter (requires part 0454 for attachment)0417 Optional Peripheral Arm Port for Advanced Arm0418 6 FR Universal Catheter Connector0442 Replacement Skin Flap to cover peripheral arm port, lightly pigmented0443 Replacement Skin Flap to cover peripheral arm port, darkly pigmented0446 Clear Tubing for Chester Arm0450 Three-way Parallel Tubing Set0451 Simulated Blood Reservoir Bag for Chester torso0453 Simulated Blood Reservoir Bag for Chester arm0454 9.6 FR Universal Catheter Connector2386 Replacement Advanced Arm for Chester, lightly pigmented2387 Replacement Advanced Arm for Chester, darkly pigmented2388 Replacement Standard Arm for Chester, lightly pigmented2389 Replacement Standard Arm for Chester, darkly pigmented1491 Simulated Blood, One Quart – New, Stain Resistant1494 Simulated Blood, One Gallon – New, Stain Resistant5025 ¾ʺ 20G right angle Huber needle (set of 1 dozen)5026 1ʺ 20G right angle Huber needle (set of 1 dozen)
15
The following items are available for purchase at www.vatainc.com.
Chester ChestTM – Models & Parts
250323
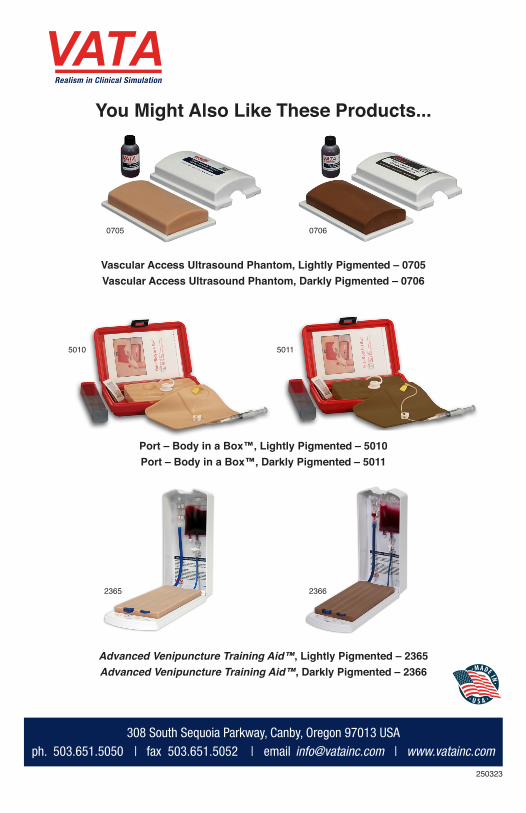
You Might Also Like These Products...
308 South Sequoia Parkway, Canby, Oregon 97013 USAph. 503.651.5050 | fax 503.651.5052 | email [email protected] | www.vatainc.com
Advanced Venipuncture Training Aid™, Lightly Pigmented – 2365 Advanced Venipuncture Training Aid™, Darkly Pigmented – 2366
2365 2366
Port – Body in a Box™, Lightly Pigmented – 5010 Port – Body in a Box™, Darkly Pigmented – 5011
Vascular Access Ultrasound Phantom, Lightly Pigmented – 0705 Vascular Access Ultrasound Phantom, Darkly Pigmented – 0706
0705 0706
50115010