Checkpoint Engage User Guide - Thomson Reuters
144
-
Upload
khangminh22 -
Category
Documents
-
view
8 -
download
0
Transcript of Checkpoint Engage User Guide - Thomson Reuters
Table of Contents
Table of Contents 2
Welcome to Checkpoint Engage 6
Creating an Engagement in Advance Flow or Onvio 7
Create Checkpoint Engage Engagement 9
Add Engagement 9
Single Audit and Yellow Book SetupQuestion 11
If your answer is Yes 12
If your answer is No 12
AdvanceFlow Engagement Properties 13
Add Project (Add Engagement) 14
Single Audit and Yellow Book SetupQuestion 17
If your answer is Yes 17
If your answer is No 17
Editing Checkpoint Engage Audit Area Selections and Set up Questions 19
Checkpoint Engage Properties 22
Import 23
Add Forms 40
Delete form 42
Delete form 45
Identify Risk 47
Planning Forms 47
Identified Risks 49
Planning Forms 51
Identified Risks 53
Assess Risks 54
Overall Financial Statement Risks 55
Design Audit Programs 56
Dynamic Data Flow Between Checkpoint Engage Workpapers 60
- 2 -

Linkage View 61
Complete Audit Programs 62
Diagnostics 70
Diagnostics Report 71
Diagnostics Report 72
About Internal Control 73
Enable Internal Control 75
Understand Controls Evaluating Design 77
ColumnHeading Questions 78
Public Company Audit of Internal Control 81
Complete the Form 82
Sources of Information 82
Significant Transaction Classes 82
Control Activities – Audit Areas and Financial Close and Reporting 86
Apply a Risk-Based Approach 88
Sources of Information 88
Identified Risks 89
Control Activities – General Computer Controls 90
Identified Risks 90
Summary of Design Effectiveness Evaluations 91
Add Objective 93
Add Control 96
Test Procedure Options 98
Assess Control Risk 101
Public Company Audit of Internal Control 101
About Multi User Controls 103
Edit a Form (Multi-users) 104
Option to Release Locks 104
Get the latest version of the engagement 105
- 3 -
Multi User Messages 106
Add Documents to your Engagement 107
Rollforward 124
General Planning Procedures 129
General Auditing and Completion Procedures 130
Add/Open Workpapers 131
Identified Risk 132
Add Document 133
Overall Financial Statement 134
Reset Procedure 135
Training Resources 136
Support Overview 137
Technical Support Numbers 137
Information Needed 137
Amount 138
Assessed Risk of Material Misstatement 138
Audit Approach 138
Benchmark 138
Control Risk 139
Factor 1 139
Factor 2 139
Inherent Risk 140
Linkage View 140
Lower Level of Planning Materiality 140
Method for Calculating Planning Materiality 140
Other Substantive Procedures Risk 140
Performance Materiality/Tolerable Misstatement 141
Planning Materiality 141
Practical Considerations 141
- 4 -

Relevant Assertion Level 141
Risk Factor 141
Significant Audit Area 142
Significant Risk 142
Stratification Multiplier 142
Stratified 142
Trivial Misstatements 143
Index 144
- 5 -

Welcome to Checkpoint EngageIntroducing Thomson Reuters Checkpoint Engage™, an online audit solution fully-integrated withThomson Reuters AdvanceFlow® andOnvio™. We’ve enhanced our trusted, risk-based engage-ment process while ensuring version control and staff access are issues of the past. Everything isstored in the cloud, updated in real time and accessible from anywhere. Keep up with changes onthe go, and share information while accessing and working on engagements simultaneously in thefield or anywhere else. Easily share information with your audit team while accessing and workingon engagements simultaneously, from anywhere, without version control issues, thanks to thecloud-based platform of Checkpoint Engage. We’ve enhanced our trusted SMART engagement pro-cess to achieve the efficiency, accuracy and consistency you need in your audit practice.
With our leading, risk-based audit program design, Checkpoint Engage delivers themost powerful,intuitive tools of its kind to help build your audit programs based on your documented risks andassertions for your unique client circumstances.
Welcome to the next generation of audit engagements.
l Real time collaboration
l Complete risk-based solution
l SMART audit process
Unmatched flexibility to design a risk-based audit approach for any size engagement—so you canstart your tailored audit programs with:
l Suggested audit procedures determined based on the auditor’s identified risks andrisk assessments
l Expert authored content pre-tailored for small, non-complex entities
l Blank audit programs, allowing procedures to be added step-by-step
- 6 -

Creating an Engagement in Advance Flow or OnvioAdvance Flow
Once an engagement is created, you can edit, delete, finalize and view properties of your engage-ment.
You can use the icons under engagements to perform engagement related actions.
Onvio
Upon logging into Onvio, click on theMenu icon that can be seen on the top left corner.
- 7 -
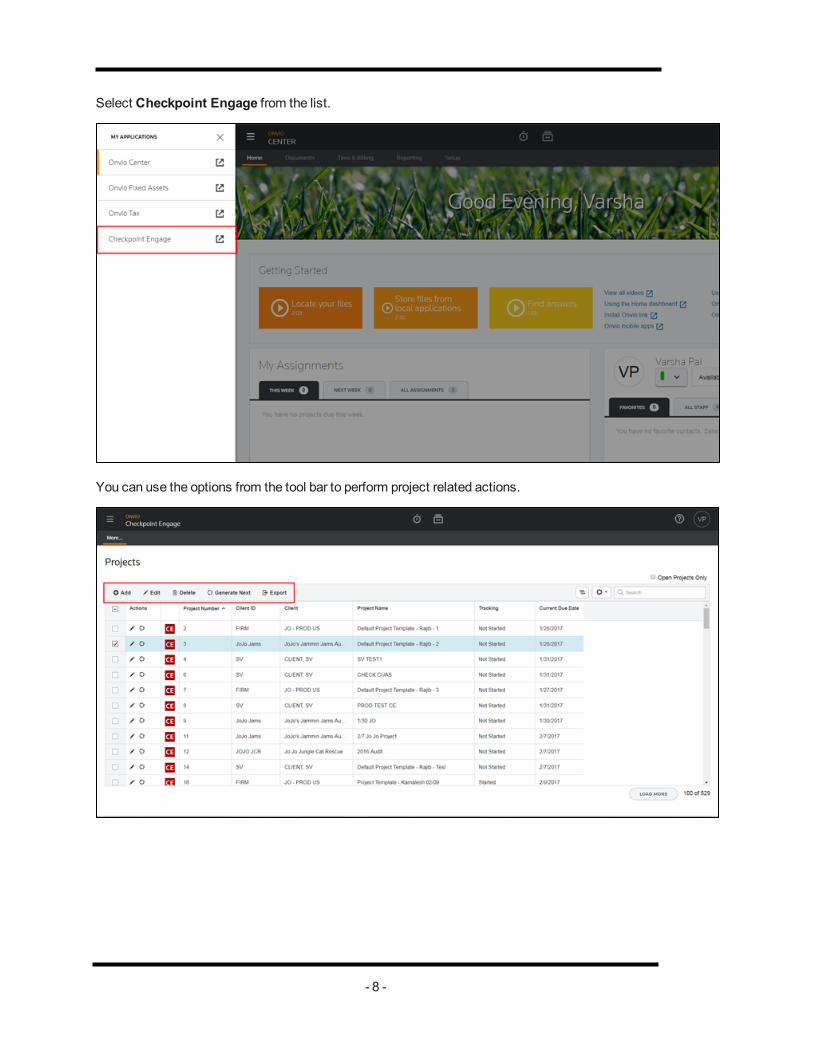
Select Checkpoint Engage from the list.
You can use the options from the tool bar to perform project related actions.
- 8 -
Create Checkpoint Engage EngagementAdvance Flow
Login to www.advanceflow.com with your AdvanceFlow username and password.
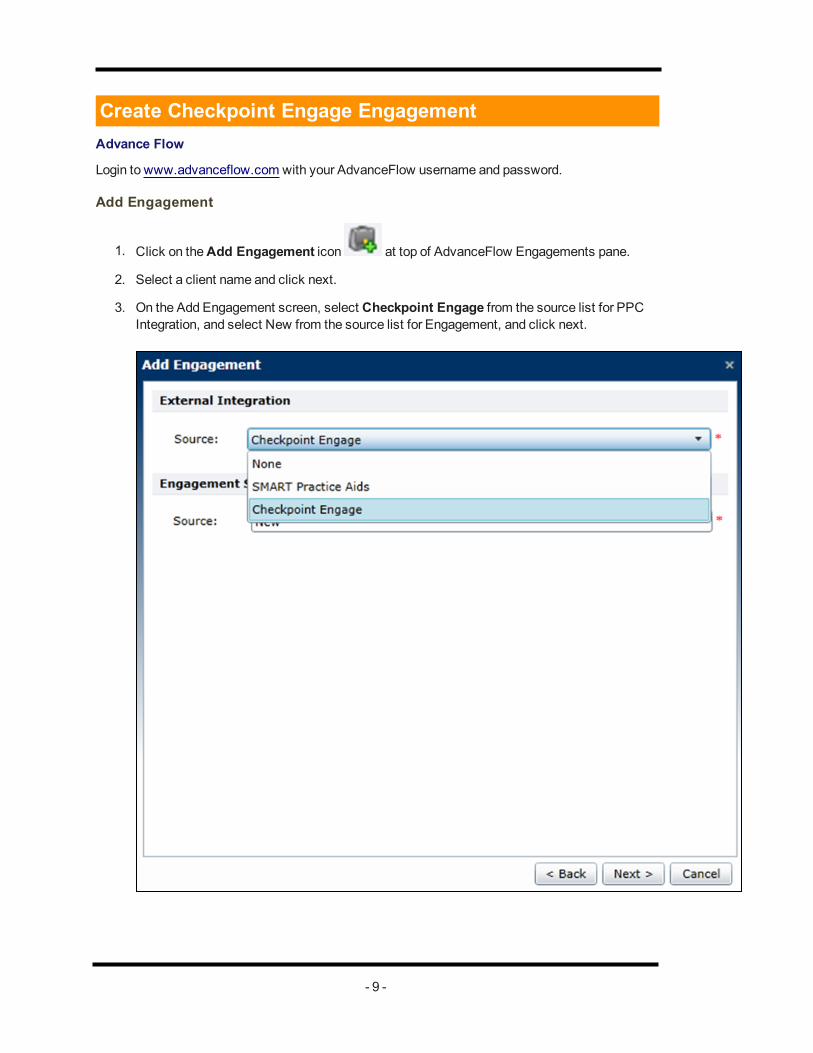
Add Engagement
1. Click on theAdd Engagement icon at top of AdvanceFlow Engagements pane.
2. Select a client name and click next.
3. On the Add Engagement screen, select Checkpoint Engage from the source list for PPCIntegration, and select New from the source list for Engagement, and click next.
- 9 -
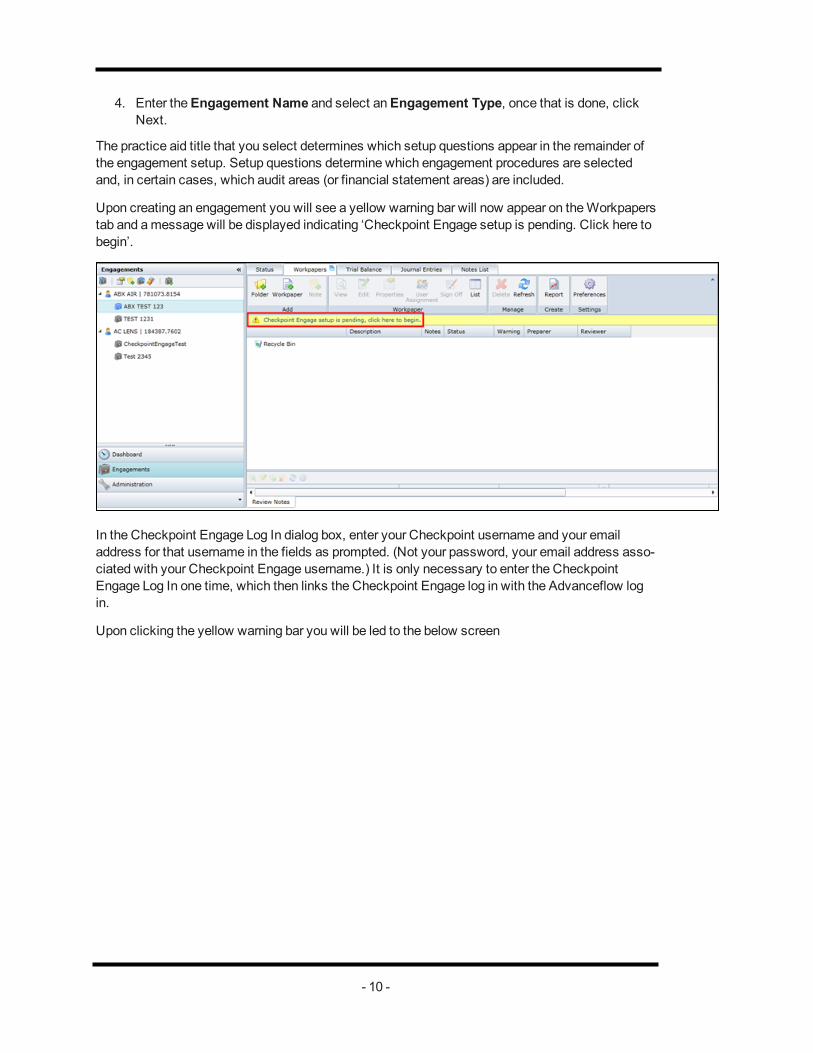
4. Enter theEngagement Name and select anEngagement Type, once that is done, clickNext.
The practice aid title that you select determines which setup questions appear in the remainder ofthe engagement setup. Setup questions determine which engagement procedures are selectedand, in certain cases, which audit areas (or financial statement areas) are included.
Upon creating an engagement you will see a yellow warning bar will now appear on theWorkpaperstab and amessage will be displayed indicating ‘Checkpoint Engage setup is pending. Click here tobegin’.
In the Checkpoint Engage Log In dialog box, enter your Checkpoint username and your emailaddress for that username in the fields as prompted. (Not your password, your email address asso-ciated with your Checkpoint Engage username.) It is only necessary to enter the CheckpointEngage Log In one time, which then links the Checkpoint Engage log in with the Advanceflow login.
Upon clicking the yellow warning bar you will be led to the below screen
- 10 -

The process is divided into 3 steps (which you can follow from the timeline on the top of the screen):
Under the Industry tab, you will be required tomake a selection of your choice in theSource,Engagement Type and Industry fields.
In theAudit Areas tab, you can select the audit areas you wish to include in your engagement.
TheSetup Questions tab has a series of questions that you will be required to answer by eitherselecting theYes orNo radio button.
The practice aid title that you select determines which setup questions appear in the remainder ofthe engagement setup. Setup questions determine which engagement procedures are selectedand, in certain cases, which audit areas (or financial statement areas) are included.
Upon creating an engagement you will see an option to begin your engagement set up. Click theoption to proceed to the next screen.
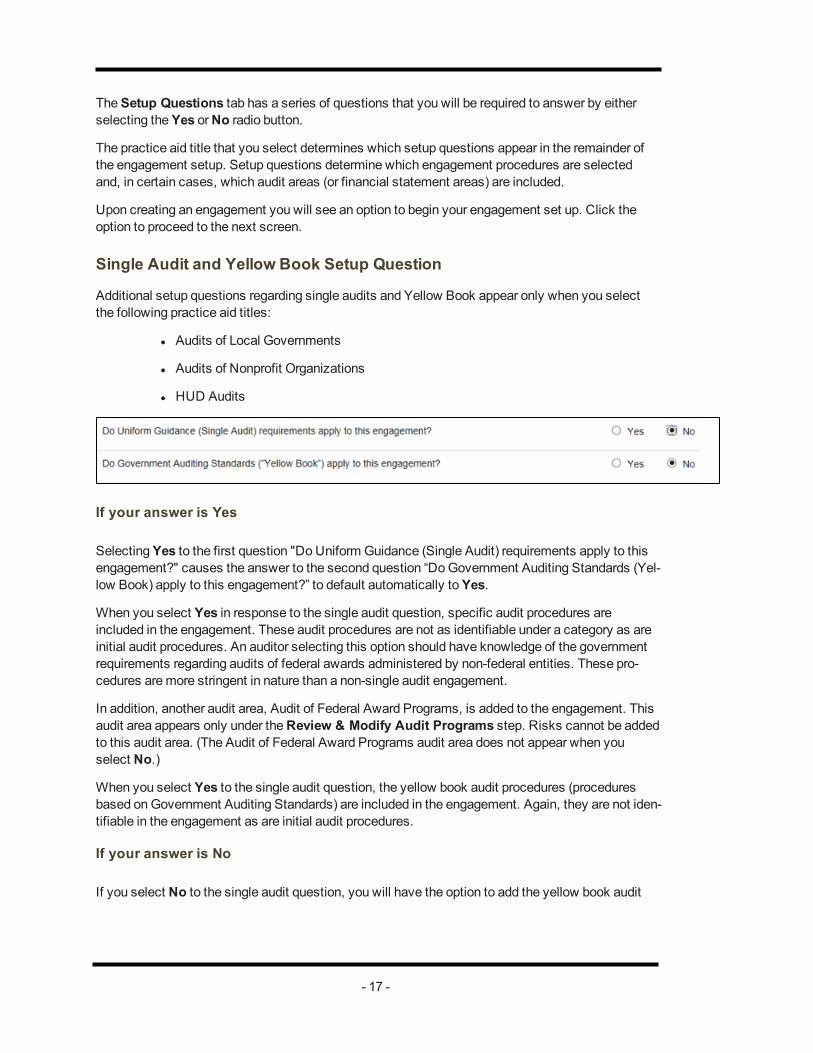
Single Audit and Yellow Book Setup Question
Additional setup questions regarding single audits and Yellow Book appear only when you selectthe following practice aid titles:
l Audits of Local Governments
l Audits of Nonprofit Organizations
l HUD Audits
- 11 -

If your answer is Yes
SelectingYes to the first question "Do Uniform Guidance (Single Audit) requirements apply to thisengagement?" causes the answer to the second question “DoGovernment Auditing Standards (Yel-low Book) apply to this engagement?” to default automatically toYes.
When you select Yes in response to the single audit question, specific audit procedures areincluded in the engagement. These audit procedures are not as identifiable under a category as areinitial audit procedures. An auditor selecting this option should have knowledge of the governmentrequirements regarding audits of federal awards administered by non-federal entities. These pro-cedures aremore stringent in nature than a non-single audit engagement.
In addition, another audit area, Audit of Federal Award Programs, is added to the engagement. Thisaudit area appears only under theReview & Modify Audit Programs step. Risks cannot be addedto this audit area. (The Audit of Federal Award Programs audit area does not appear when youselect No.)
When you select Yes to the single audit question, the yellow book audit procedures (proceduresbased onGovernment Auditing Standards) are included in the engagement. Again, they are not iden-tifiable in the engagement as are initial audit procedures.
If your answer is No
If you select No to the single audit question, you will have the option to add the yellow book auditprocedures manually.
Note: A HUD engagement shows only the single audit question. However, when you select Yesto this question, the yellow book procedures are automatically included along with single audit pro-cedures.
Once all the questions have been answered, click Done.
Your engagement has been created!
Checkpoint Engage documents are now included in the AdvanceFlow engagement, indicated withCheckpoint Engage icon.
- 12 -

AdvanceFlow Engagement Properties
Right click on the engagement and select Properties.
Choose the tab you wish tomake changes to, click OK once you are done themaking changes.
- 13 -

Onvio
Login to https://onvio.us/login/ with your Onvio username and password.
Add Project (Add Engagement)
1. Launch Checkpoint Engage from theOnvioMenu.
- 14 -

2. You will then see a tool bar to perform project related actions.
3. Click Add to create a Project.
4. Key in (or select an option from the drop-down) the information in all themandate fields andclick Save & Open.
- 15 -

5. On the next screen use the toggle to activate Checkpoint Engage.
6. To create a Checkpoint Engage engagement, click on theCheckpoint Engage Setup link.
7. You will then be led to the below screen. Click Continue.
The process is divided into 3 steps (which you can follow from the timeline on the top of the screen):
Under the Industry tab, you will be required tomake a selection of your choice in theSource,Engagement Type and Industry fields.
In theAudit Areas tab, you can select the audit areas you wish to include in your engagement.
- 16 -
TheSetup Questions tab has a series of questions that you will be required to answer by eitherselecting theYes orNo radio button.
The practice aid title that you select determines which setup questions appear in the remainder ofthe engagement setup. Setup questions determine which engagement procedures are selectedand, in certain cases, which audit areas (or financial statement areas) are included.
Upon creating an engagement you will see an option to begin your engagement set up. Click theoption to proceed to the next screen.
Single Audit and Yellow Book Setup Question
Additional setup questions regarding single audits and Yellow Book appear only when you selectthe following practice aid titles:
l Audits of Local Governments
l Audits of Nonprofit Organizations
l HUD Audits
If your answer is Yes
SelectingYes to the first question "Do Uniform Guidance (Single Audit) requirements apply to thisengagement?" causes the answer to the second question “DoGovernment Auditing Standards (Yel-low Book) apply to this engagement?” to default automatically toYes.
When you select Yes in response to the single audit question, specific audit procedures areincluded in the engagement. These audit procedures are not as identifiable under a category as areinitial audit procedures. An auditor selecting this option should have knowledge of the governmentrequirements regarding audits of federal awards administered by non-federal entities. These pro-cedures aremore stringent in nature than a non-single audit engagement.
In addition, another audit area, Audit of Federal Award Programs, is added to the engagement. Thisaudit area appears only under theReview & Modify Audit Programs step. Risks cannot be addedto this audit area. (The Audit of Federal Award Programs audit area does not appear when youselect No.)
When you select Yes to the single audit question, the yellow book audit procedures (proceduresbased onGovernment Auditing Standards) are included in the engagement. Again, they are not iden-tifiable in the engagement as are initial audit procedures.
If your answer is No
If you select No to the single audit question, you will have the option to add the yellow book audit
- 17 -

procedures manually.
Note: A HUD engagement shows only the single audit question. However, when you select Yesto this question, the yellow book procedures are automatically included along with single audit pro-cedures.
Once all the questions have been answered, click Done.
Your engagement has been created!
Checkpoint Engage documents are now included in Onvio, indicated with Checkpoint Engage icon,to see this navigate to the Binder tab.
- 18 -

Editing Checkpoint Engage Audit Area Selections and Setup QuestionsAdvance Flow
Tomake changes to Checkpoint Engage audit area selections and set up questions, select Check-point Engage Properties icon at top of AdvanceFlow Engagements pane.
Open a Checkpoint Engage document for editing in one of three ways:
1. Double click on the document.
2. Select the document and then click the Edit icon on theWorkpapers menu.
3. Select the document, right click and then select Edit on the right click menu.
The document opens in another window with Checkpoint Engage functionality. For better viewing,maximize the Checkpoint Engage window – AdvanceFlow will remain open in the previous window.
- 19 -
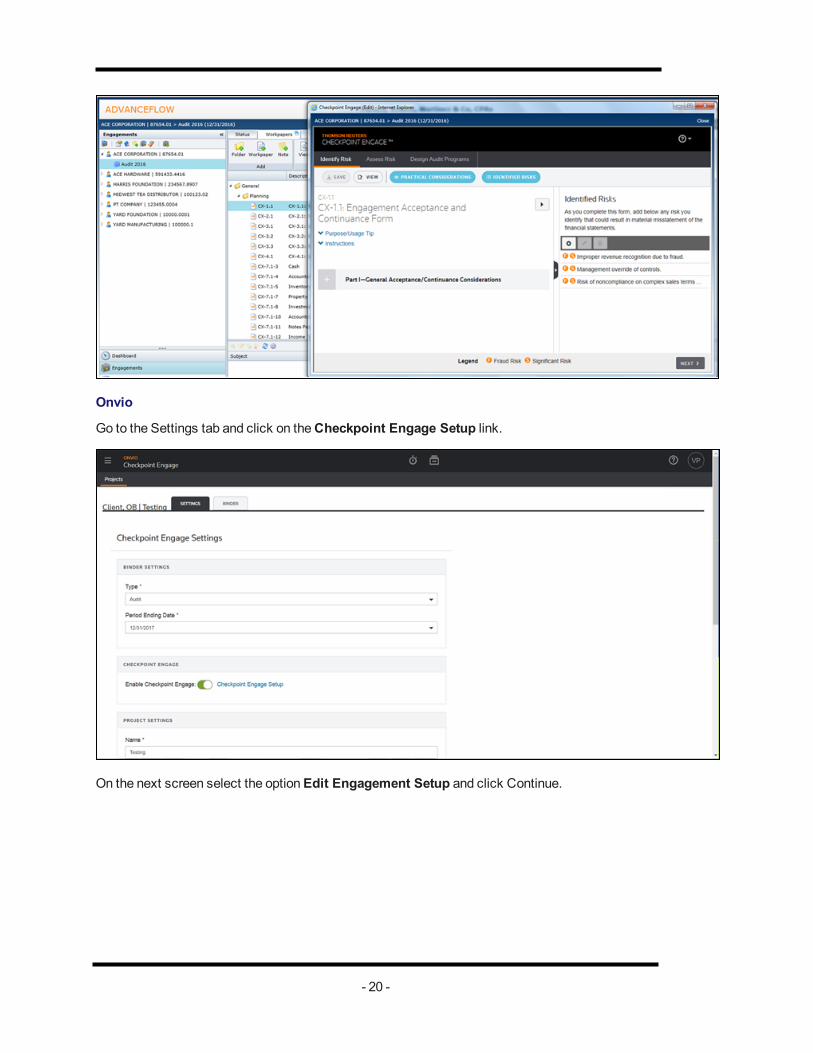
Onvio
Go to the Settings tab and click on theCheckpoint Engage Setup link.
On the next screen select the optionEdit Engagement Setup and click Continue.
- 20 -
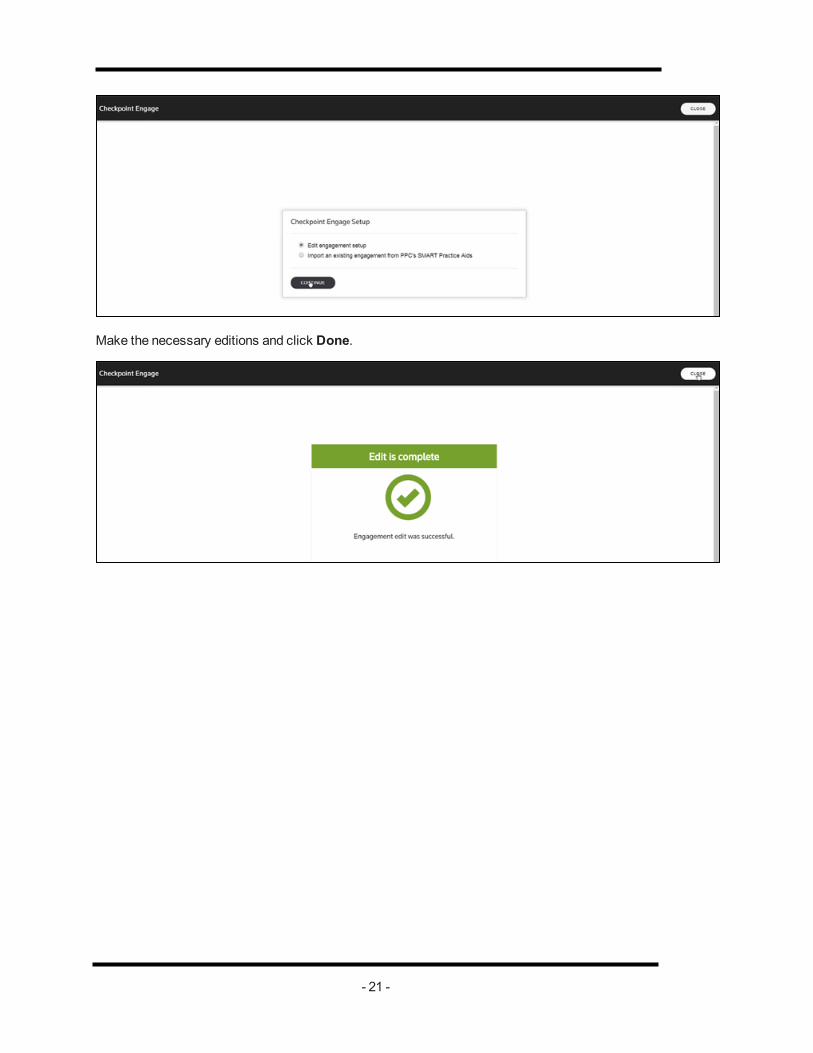
Make the necessary editions and click Done.
- 21 -

Checkpoint Engage Properties
Click on the Checkpoint Engage Properties icon tomake change to the properties.
You can choose to either Edit engagement setup or Rollforward Checkpoint Engage data or Importan existing engagement from PPC's SMART Practice Aids.
Once the changes have beenmade, you will notice that the changes will be displayed onAdvanceFlow as well.
- 22 -

ImportAdvance Flow
Add an engagement in Advance Flow.
Once that is done go onto Checkpoint Engage to create an engagement.
Upon the creation of the engagement, you will then be able to see the Import icon.
- 23 -

Click on the Import button and you will see the following pop-upmessage :
Upon clicking Yes, you will see a window that asks you to browse for the file that needs to beimported.
- 24 -
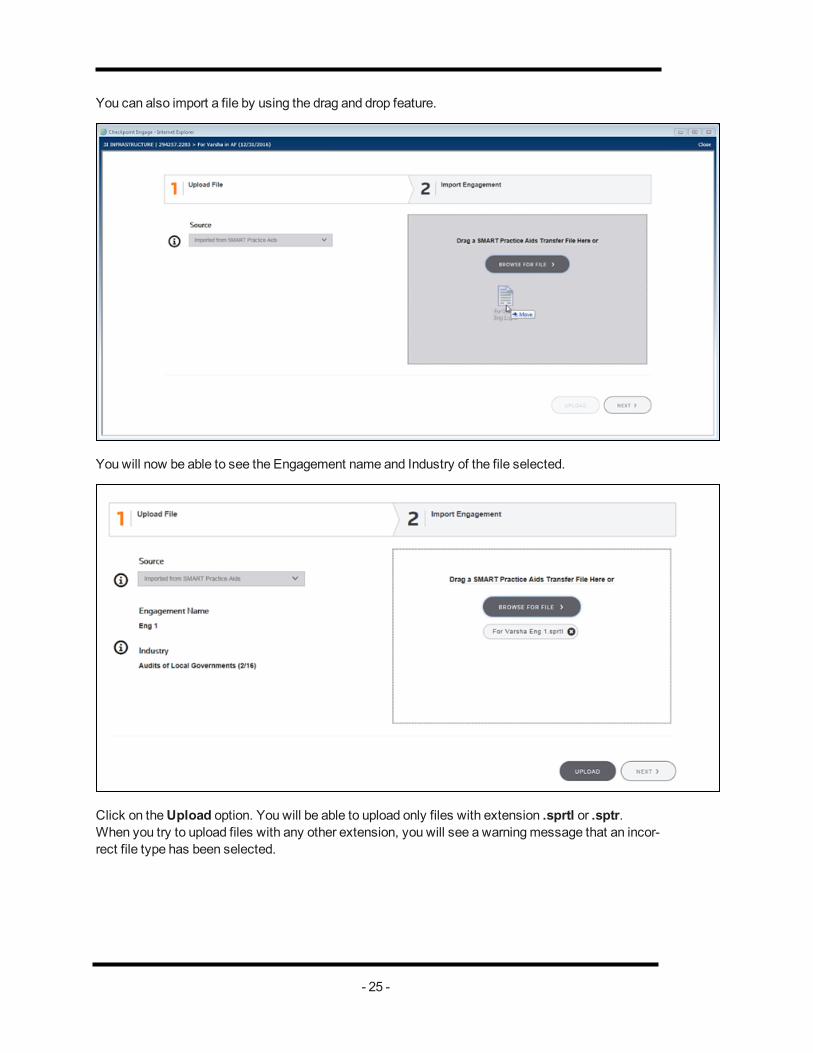
You can also import a file by using the drag and drop feature.
You will now be able to see the Engagement name and Industry of the file selected.
Click on theUpload option. You will be able to upload only files with extension .sprtl or .sptr.When you try to upload files with any other extension, you will see a warningmessage that an incor-rect file type has been selected.
- 25 -

You can track the status of the upload by looking at the progress bar.
Once the upload has been completed, theNext button will be enabled.
- 26 -

Click on Next to be led to the next screen. To get a status of the import as an email notification,enter your email address in the email address field.
The file might take a few minutes to import.
- 27 -

Once the import is completed, you will be able to see the below screen :
You will also receive an email notifying you the status of the import.
- 28 -
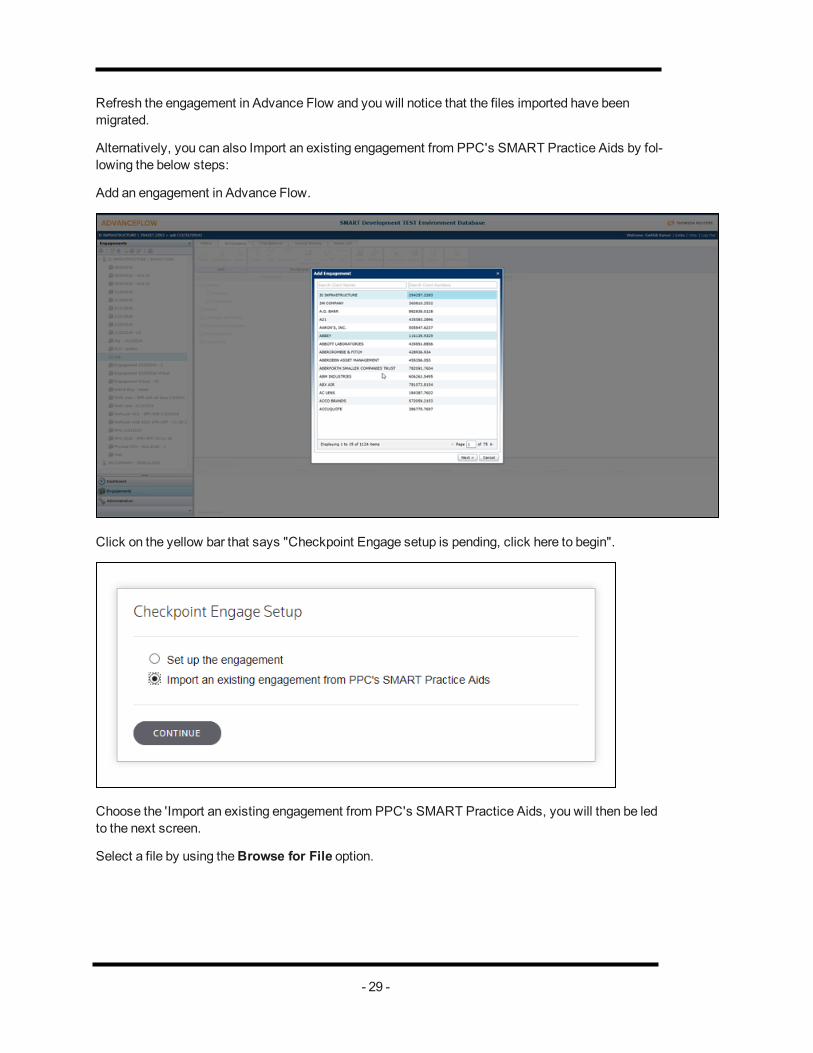
Refresh the engagement in Advance Flow and you will notice that the files imported have beenmigrated.
Alternatively, you can also Import an existing engagement from PPC's SMART Practice Aids by fol-lowing the below steps:
Add an engagement in Advance Flow.
Click on the yellow bar that says "Checkpoint Engage setup is pending, click here to begin".
Choose the 'Import an existing engagement from PPC's SMART Practice Aids, you will then be ledto the next screen.
Select a file by using theBrowse for File option.
- 29 -

You can also import a file by using the drag and drop feature.
You will now be able to see the Engagement name and Industry of the file selected.
- 30 -
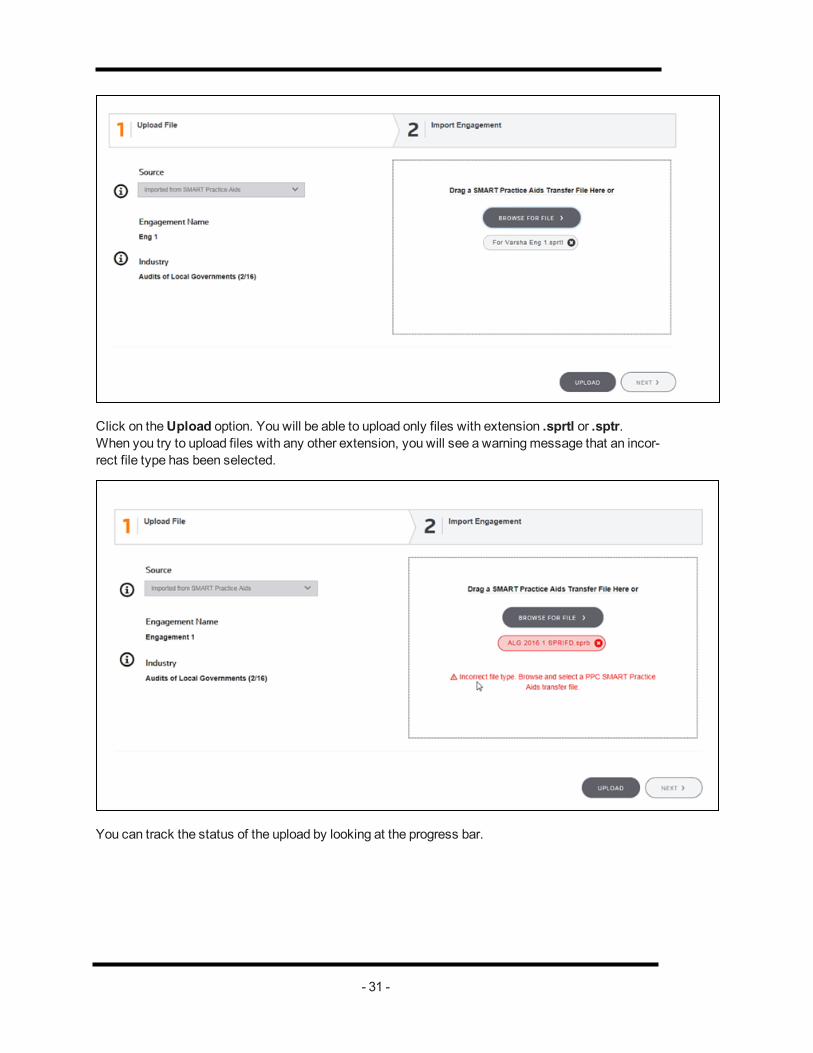
Click on theUpload option. You will be able to upload only files with extension .sprtl or .sptr.When you try to upload files with any other extension, you will see a warningmessage that an incor-rect file type has been selected.
You can track the status of the upload by looking at the progress bar.
- 31 -
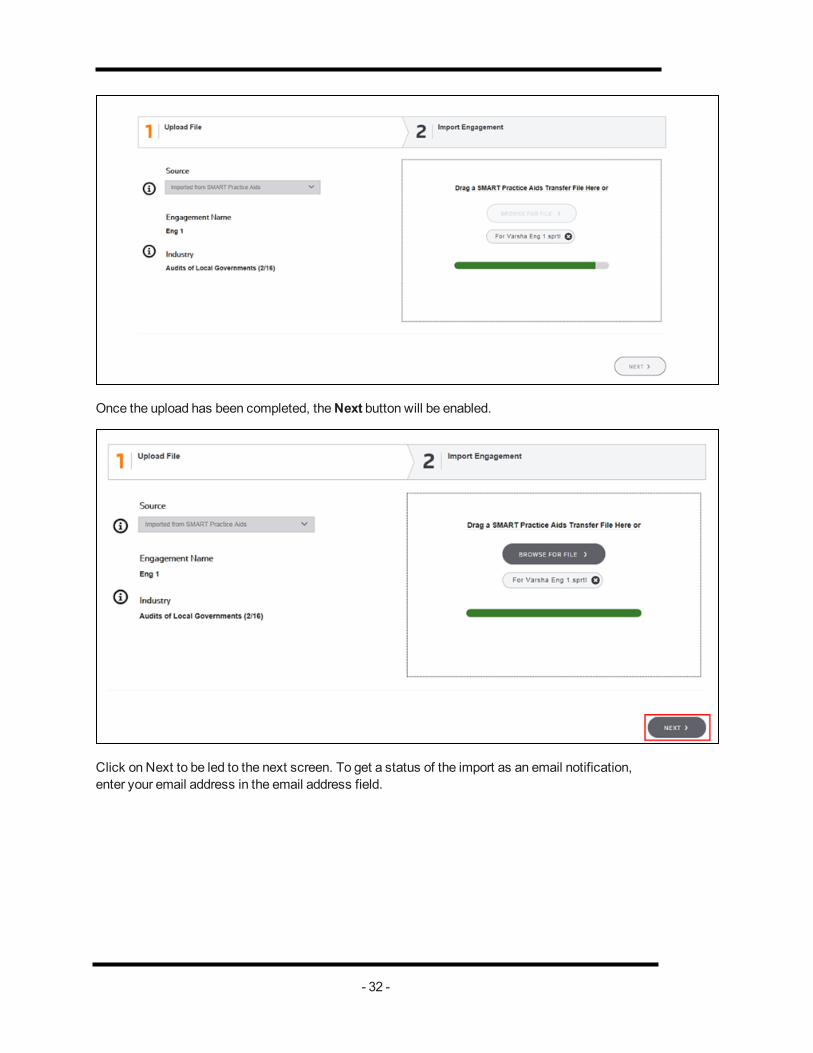
Once the upload has been completed, theNext button will be enabled.
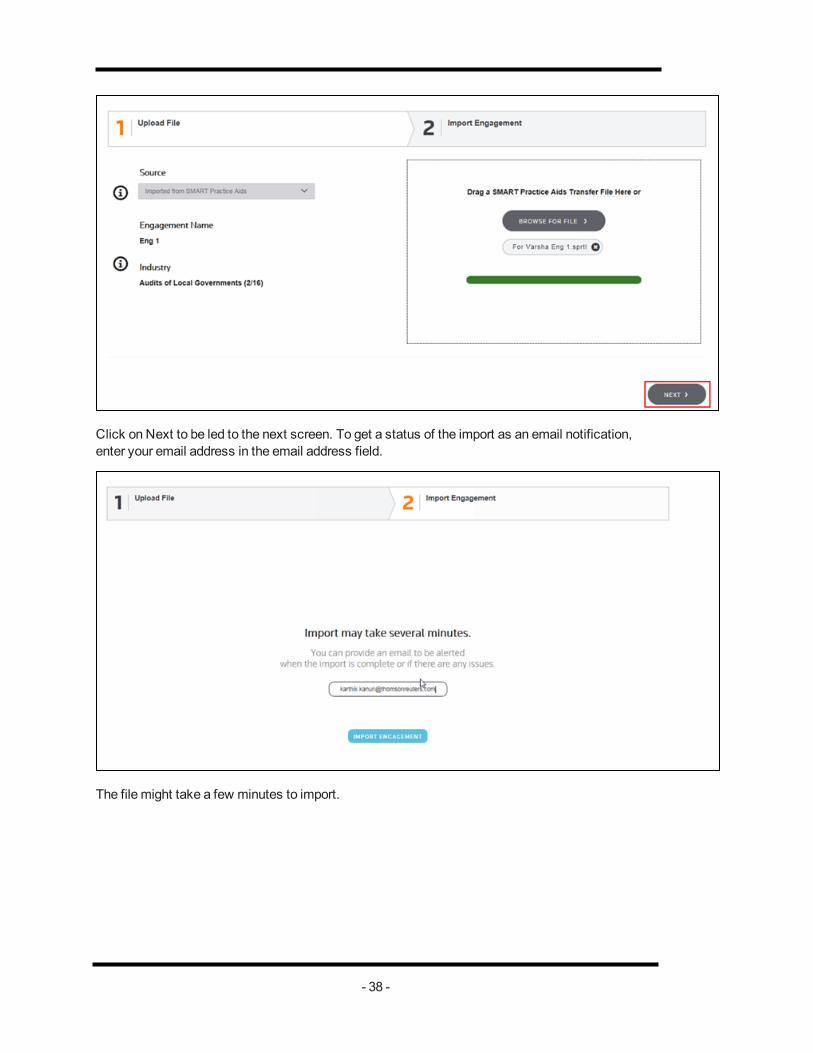
Click on Next to be led to the next screen. To get a status of the import as an email notification,enter your email address in the email address field.
- 32 -

The file might take a few minutes to import.
Once the import is completed, you will be able to see the below screen :
- 33 -

Youwill also receive an email notifying you the status of the import.
Refresh the engagement in Advance Flow and you will notice that the files imported have beenmigrated.
Onvio
Go to the Settings tab and click on theCheckpoint Engage Setup link.
- 34 -

On the next screen select the option Import an existing engagement from PPC's SMARTPractice Aids and click Continue.
Select a file by using theBrowse for File option.
- 35 -

You can also import a file by using the drag and drop feature.
You will now be able to see the Engagement name and Industry of the file selected.
Click on theUpload option. You will be able to upload only files with extension .sprtl or .sptr.When you try to upload files with any other extension, you will see a warningmessage that an incor-rect file type has been selected.
- 36 -

You can track the status of the upload by looking at the progress bar.
Once the upload has been completed, theNext button will be enabled.
- 37 -
Click on Next to be led to the next screen. To get a status of the import as an email notification,enter your email address in the email address field.
The file might take a few minutes to import.
- 38 -

Once the import is completed, you will be able to see the below screen :
You will also receive an email notifying you the status of the import.
Refresh the engagement in Onvio and you will notice that the files imported have beenmigrated.
- 39 -

Add FormsAdvance Flow
You can addmultiple copies of forms to an engagement as needed.
Click on theWorkpaper icon.
Select the source as Checkpoint Engage and click Next.
- 40 -

Then click OK to proceed to the next screen.
Select the type of document that you intent to choose.
Click on the arrow to indicate the number of forms required and click Next.
Note: You can select up to only 10 forms at a time.
Select a document that you require and enter a reference number for each document selected.
Click Done.
- 41 -

Your documents have been created!
Delete form
You can delete forms by either selecting the form and clicking the Delete button or you can simplyright click and select the Delete option.
Onvio
Click onBinder. Click the drop-down next to theNew option and select Checkpoint Engage.
- 42 -
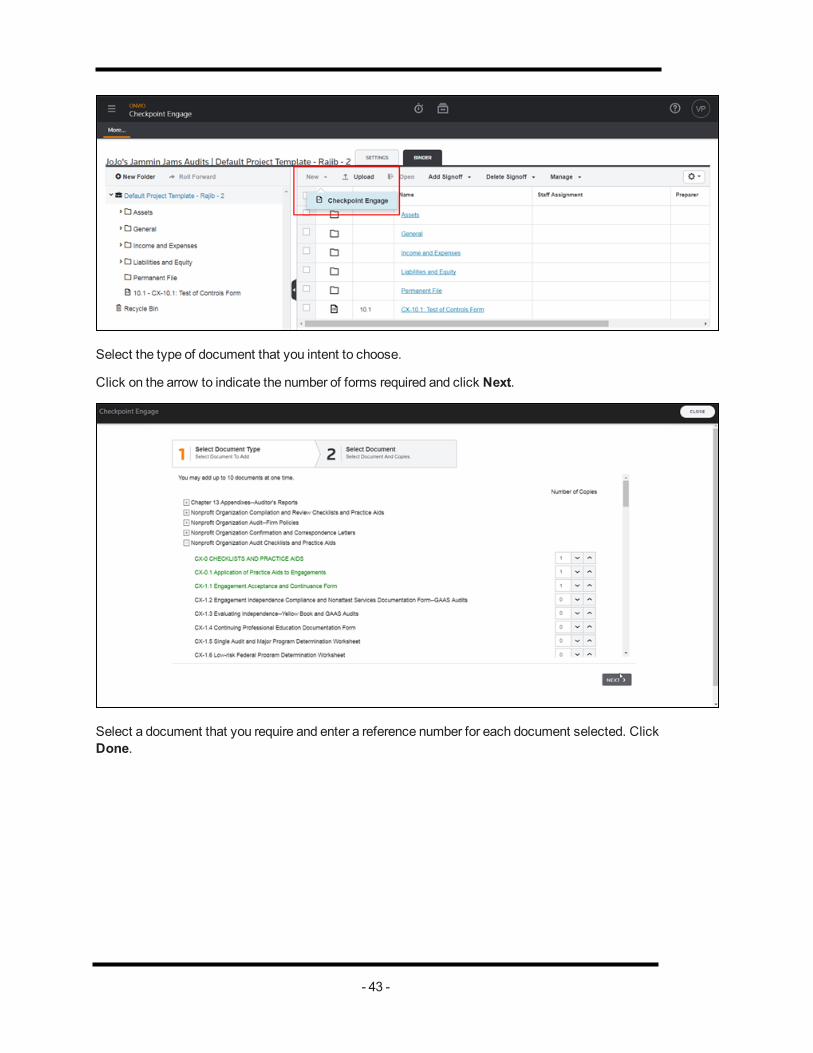
Select the type of document that you intent to choose.
Click on the arrow to indicate the number of forms required and click Next.
Select a document that you require and enter a reference number for each document selected. ClickDone.
- 43 -
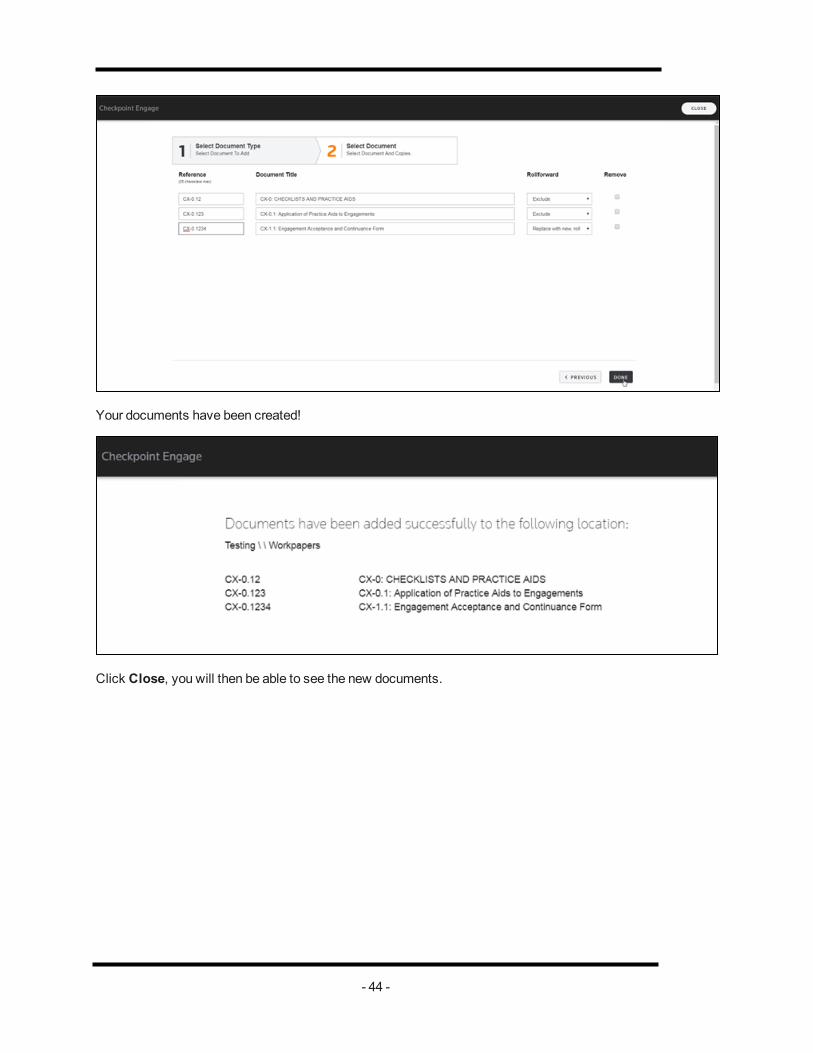
Your documents have been created!
Click Close, you will then be able to see the new documents.
- 44 -

Delete form
You can delete forms by selecting the form and clicking the Delete button.
- 45 -

- 46 -

Identify RiskAdvance Flow
OnAdvanceFlow double click on any of the forms to open them.
Alternatively, in Checkpoint Engage, after you create an engagement, the first step in completingthe engagement is identifying risks. Select a required form under the Identify Risk drop-downmenuand identify risks using the Identified Risks panel on the right.
Planning Forms
Click blue arrows to read Tips and Instructions.
- 47 -

Click to expand items and complete forms.
Link to paragraph guidance in Checkpoint.
Remember to use the save icon under the Identify Risk area to save information before proceedingto another form.
Click Identify Risk in topmenu area to select another planning form, or click Next button in bottomright.
Click + icon in Identified Risks pane on right to add risk.
Also, you have an option to use the formatting functionality for the comment boxes such as bold,italic, underline, using workpaper reference, etc.
- 48 -

As you complete the planning forms, you can add to the engagement any risks that could result inmaterial misstatement of the financial statements.
To complete the form:
Significant risks require a specific audit response and generally relate to non-routine transactionsand complex or judgmental matters. When you identify risks, your audit program will include exten-ded, substantive procedures for the assertions affected by the risk.
Click Nextwhen you are ready tomove to the next form, or you can select another form fromIdentify Risk.
When you have completed all planning forms, you are ready to continue to the next step, where youwill assess the effects of risk.
Identified Risks
To add identified risks:
- 49 -

1. Click theAdd Risk icon in the Identified Risks panel on the right.The Identified Riskswindow is displayed.
2. Enter information about the identified risk and check any audit areas affected by the risk.
3. Click Continue.
4. On theAssertions for Identified Riskswindow, select any assertions affected by the riskfor each audit area.
5. Click Done.
To edit or delete on existing risk:
You can edit or delete existing risks within each planning form using theEdit andDelete icons avail-able on the Identified Risks panel.
Onvio
In Onvio click on any of the form names to open them.
Alternatively, in Checkpoint Engage, after you create an engagement, the first step in completingthe engagement is identifying risks. Select a required form under the Identify Risk drop-downmenuand identify risks using the Identified Risks panel on the right.
- 50 -

Planning Forms
Click blue arrows to read Tips and Instructions.
Click to expand items and complete forms.
Link to paragraph guidance in Checkpoint.
Remember to use the save icon under the Identify Risk area to save information before proceedingto another form.
Click Identify Risk in topmenu area to select another planning form, or click Next button in bottomright.
Click + icon in Identified Risks pane on right to add risk.
- 51 -

Also, you have an option to use the formatting functionality for the comment boxes such as bold,italic, underline, using workpaper reference, etc.
As you complete the planning forms, you can add to the engagement any risks that could result inmaterial misstatement of the financial statements.
To complete the form:
Significant risks require a specific audit response and generally relate to non-routine transactionsand complex or judgmental matters. When you identify risks, your audit program will include exten-ded, substantive procedures for the assertions affected by the risk.
Click Nextwhen you are ready tomove to the next form, or you can select another form fromIdentify Risk.
When you have completed all planning forms, you are ready to continue to the next step, where youwill assess the effects of risk.
- 52 -

Identified Risks
To add identified risks:
1. Click theAdd Risk icon in the Identified Risks panel on the right.The Identified Riskswindow is displayed.
2. Enter information about the identified risk and check any audit areas affected by the risk.
3. Click Continue.
4. On theAssertions for Identified Riskswindow, select any assertions affected by the riskfor each audit area.
5. Click Done.
To edit or delete on existing risk:
You can edit or delete existing risks within each planning form using theEdit andDelete icons avail-able on the Identified Risks panel.
- 53 -
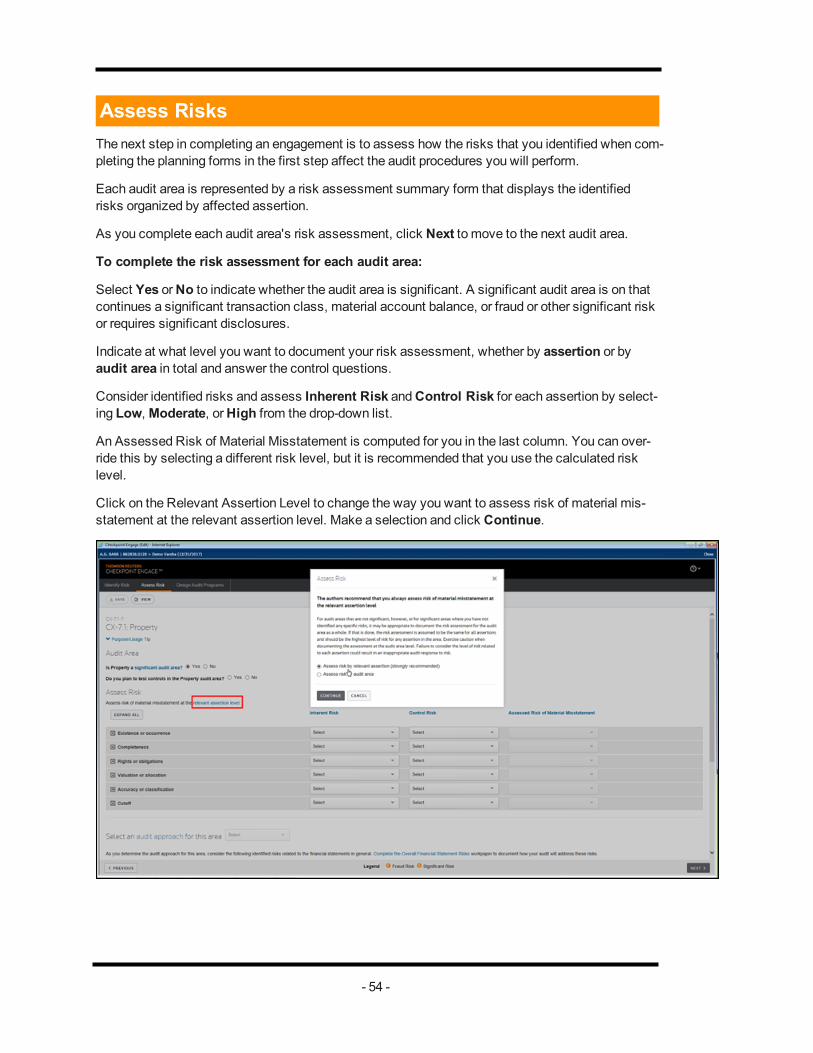
Assess RisksThe next step in completing an engagement is to assess how the risks that you identified when com-pleting the planning forms in the first step affect the audit procedures you will perform.
Each audit area is represented by a risk assessment summary form that displays the identifiedrisks organized by affected assertion.
As you complete each audit area's risk assessment, click Next to move to the next audit area.
To complete the risk assessment for each audit area:
Select Yes orNo to indicate whether the audit area is significant. A significant audit area is on thatcontinues a significant transaction class, material account balance, or fraud or other significant riskor requires significant disclosures.
Indicate at what level you want to document your risk assessment, whether by assertion or byaudit area in total and answer the control questions.
Consider identified risks and assess Inherent Risk andControl Risk for each assertion by select-ing Low,Moderate, orHigh from the drop-down list.
An Assessed Risk of Material Misstatement is computed for you in the last column. You can over-ride this by selecting a different risk level, but it is recommended that you use the calculated risklevel.
Click on the Relevant Assertion Level to change the way you want to assess risk of material mis-statement at the relevant assertion level. Make a selection and click Continue.
- 54 -

You can thenmake changes to the options under Inherent Risk, Control Risk andAssessedRisk of Material Misstatement by clicking on the drop-down next to each of the tabs.
Based in your answers to questions your risks assessments, an audit approach will be suggested.Accept the suggested approach or choose a different one based on your audit judgment.
After you finish the audit areas, click Next to go to theOverall Financial Statement form.
Overall Financial Statement Risks
In the Overall Financial Statement risks form, review the planned audit response to identified risksandmake changes if applicable.
All risks identified as affecting the financial statement in general are listed in the Identified Risksfield. For the risk management override of controls, a response is provided. You can edit theplanned audit response text, add comments, or make changes to the text as needed.
- 55 -

Design Audit ProgramsYou can perform this step in theDesign Audit Programs tab, here you access the suggestedaudit procedures for each audit area andmodify.
Youmay be able to respond to risks without performing all of the suggested procedures. Review thesuggested procedures and delete, modify, or add to them as necessary to ensure that, based onyour professional judgment, your audit adequately responds to audit risks.
Left Pane Contents
The left pane lists all audit procedures present in the audit area selected in theAvailable Pro-cedures drop-downmenu.
Use the icons to expand and collapse the different procedure sections.
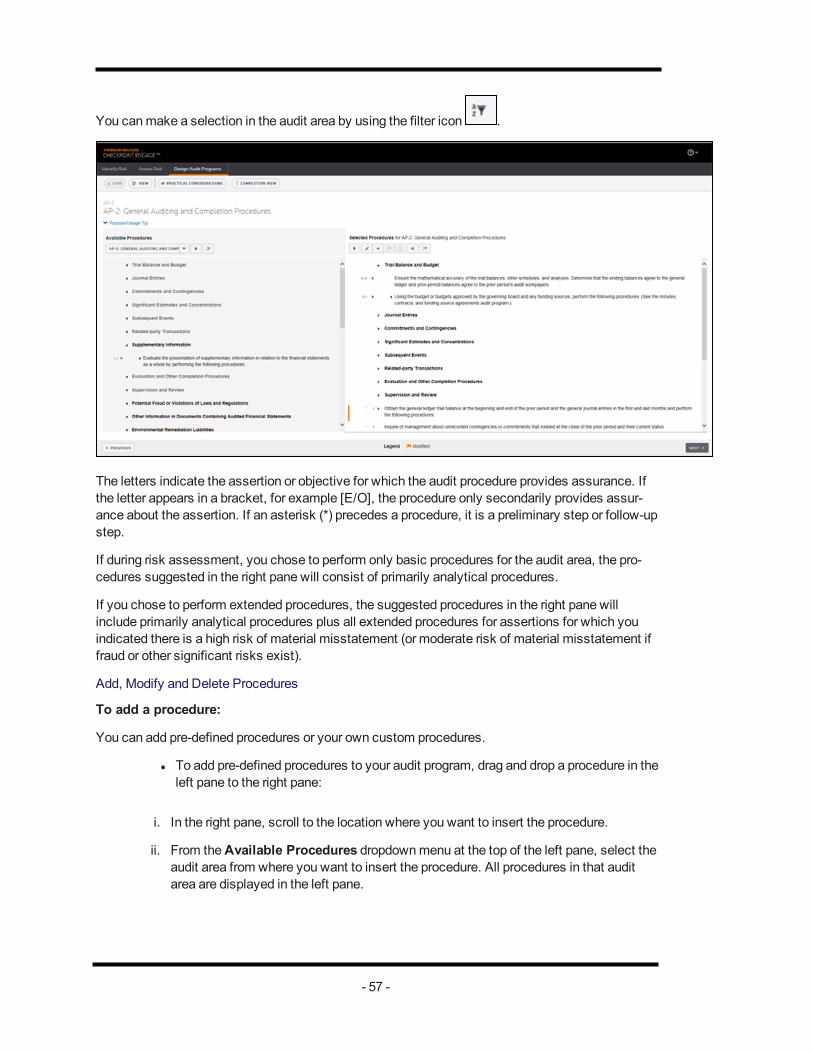
You canmake a selection in the audit area by using the filter icon .
Procedures currently included in your audit program appear in light gray text. Other procedures avail-able for selection appear in dark text.
Right Pane Contents
The right pane lists suggested audit procedures for the audit area based on your risk assessmentand selected audit approach. In the right pane, the letter codes indicate the procedure type:
A = Additional
B = Basic Step
E = Extended Step
I = Initial Step
O = Other Step
Use the icons to expand and collapse the different procedure sections. Upon clicking the
expand option, you will be able to enable theEdit andAdd options.
Once you edit a procedure, you will notice that a flag icon will appear next to it to indicate thatthe procedure has been edited.
Upon adding a procedure using the icon, you will also see that the Delete icon will beenabled.
You can also aDeselect a procedure by clicking on the particular procedure and then clicking on the
Deselect icon .
- 56 -
You canmake a selection in the audit area by using the filter icon .
The letters indicate the assertion or objective for which the audit procedure provides assurance. Ifthe letter appears in a bracket, for example [E/O], the procedure only secondarily provides assur-ance about the assertion. If an asterisk (*) precedes a procedure, it is a preliminary step or follow-upstep.
If during risk assessment, you chose to perform only basic procedures for the audit area, the pro-cedures suggested in the right pane will consist of primarily analytical procedures.
If you chose to perform extended procedures, the suggested procedures in the right pane willinclude primarily analytical procedures plus all extended procedures for assertions for which youindicated there is a high risk of material misstatement (or moderate risk of material misstatement iffraud or other significant risks exist).
Add, Modify and Delete Procedures
To add a procedure:
You can add pre-defined procedures or your own custom procedures.
l To add pre-defined procedures to your audit program, drag and drop a procedure in theleft pane to the right pane:
i. In the right pane, scroll to the location where you want to insert the procedure.
ii. From theAvailable Procedures dropdownmenu at the top of the left pane, select theaudit area from where you want to insert the procedure. All procedures in that auditarea are displayed in the left pane.
- 57 -

iii. Navigate within the left pane and click to select the procedure that you want to add tothe right pane.
iv. Drag and drop the selected procedure at the desired location.
Note: Procedures copied from another audit area will be treated like custom procedures.
l To add your own custom procedures, select Procedure Above orProcedure Below
(depending on where you want it to appear) click the add icon
Note: Custom procedures display hierarchically in the right plane.
To modify a procedure:
Double-click any procedure tomodify it. You can also selectModify by clicking theEdit iconto edit a selected procedure. To assist reviewers, your changes appear in red.
Steps that have beenmodified aremarked with amodified step flag. Use the flag icon to theResetProcedurewindow that shows the original PPC procedure and themodified version of the pro-cedure. If the engagement has been rolled forward from a prior period, the procedure as used in theprior period is also displayed. You can select which version you want to select. Themodified stepflag can be toggled between display and non-display by selectingShow Modified Step Flag fromtheViewmenu.
To delete a procedure:
To delete a procedure you have added, highlight the procedure in the right pane and click on the
Delete icon .
You can also drag and drop unwanted procedures from the right pane to the left pane using yourmouse to remove procedures from your audit program.
Add or Delete Categories
Procedural categories can be helpful to organize your audit plans into logical hierarchies.
To add a category:
1. Highlight the procedure or category in the right pane where you want your new category toappear.
2. Select Category Above orCategory Below (depending on where you want it to appear) by
clicking on the add icon .
3. In the Add Category window, enter the category name or description in theEnter CategoryText field.
4. Select the type of procedure for the new category.
- 58 -

5. Click OK.
The new category should be visible in the center pane.
To delete a category:
Highlight the category in the right pane and click on theDelete icon .
- 59 -

Dynamic Data Flow Between Checkpoint Engage Work-papersCheckpoint Engage brings the widely-used dynamic Checkpoint Engage functionality to allaspects of the audit, from beginning to end. This means that conclusions reached in one area flowthrough to others so that you don’t need tomanually input the same information in multiple doc-uments. Data and information are automatically shared between practice aids. For example, yourplanningmateriality, tolerable misstatement, and risk assessments are carried throughout youraudit engagement, and staff are alerted to any errors or inconsistencies. UsingMulti-user cap-ability, different auditors can work on different parts of the audit simultaneously.
Note: Tolerable misstatement is brought forward to areas throughout the engagement wheresampling or other scope decisions aremade.
- 60 -

Linkage ViewA critical and required step in audit planning is to ensure that you respond clearly and adequately toidentified risks at the relevant assertion level. To accomplish that, it is important that you reviewyour audit programs carefully, focusing on your audit response by assertion. Linkage View facil-itates that by allowing you to simultaneously view both your identified risks and your audit responseby assertion and tailor your audit program as needed.
Linkage View also displays and documents the linkage between your identified risks and yourselected audit steps, as required by auditing standards. An auditor’s response to an identified risktypically consists of a combination of audit procedures – there typically is not a one-to-one rela-tionship between an identified risk and a single audit step. Linkage View allows for easy viewing ofthis required linkage.
- 61 -
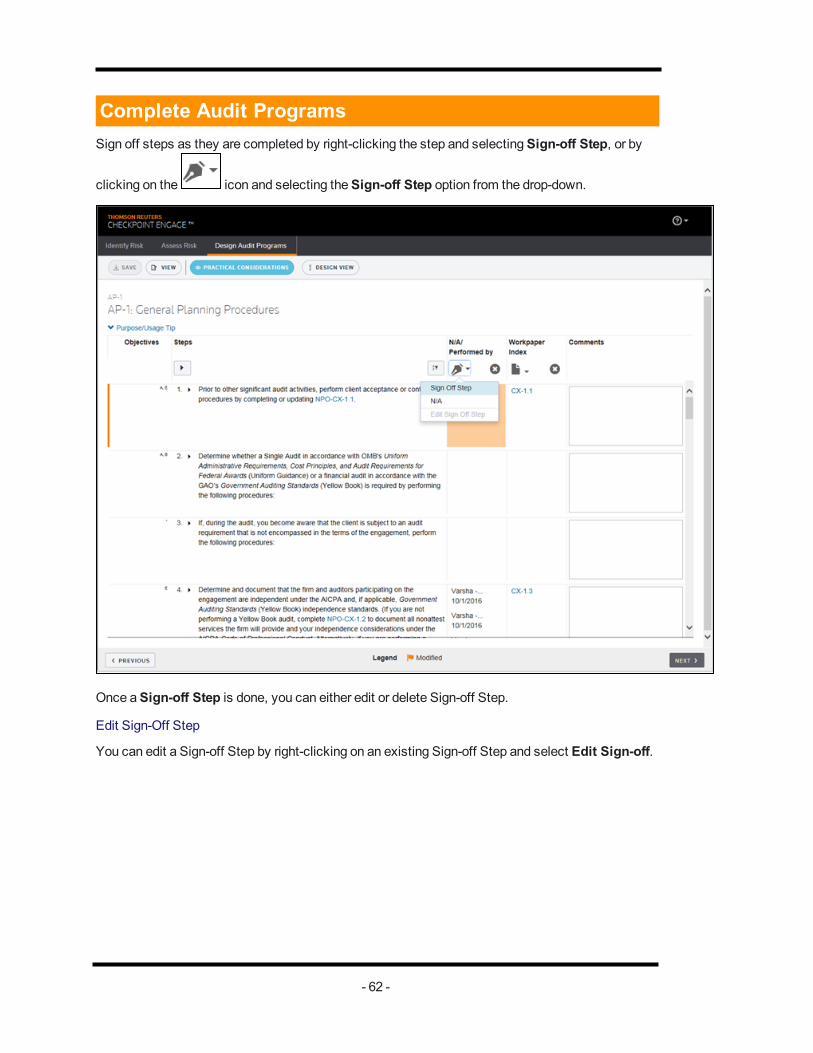
Complete Audit ProgramsSign off steps as they are completed by right-clicking the step and selectingSign-off Step, or by
clicking on the icon and selecting theSign-off Step option from the drop-down.
Once aSign-off Step is done, you can either edit or delete Sign-off Step.
Edit Sign-Off Step
You can edit a Sign-off Step by right-clicking on an existing Sign-off Step and select Edit Sign-off.
- 62 -
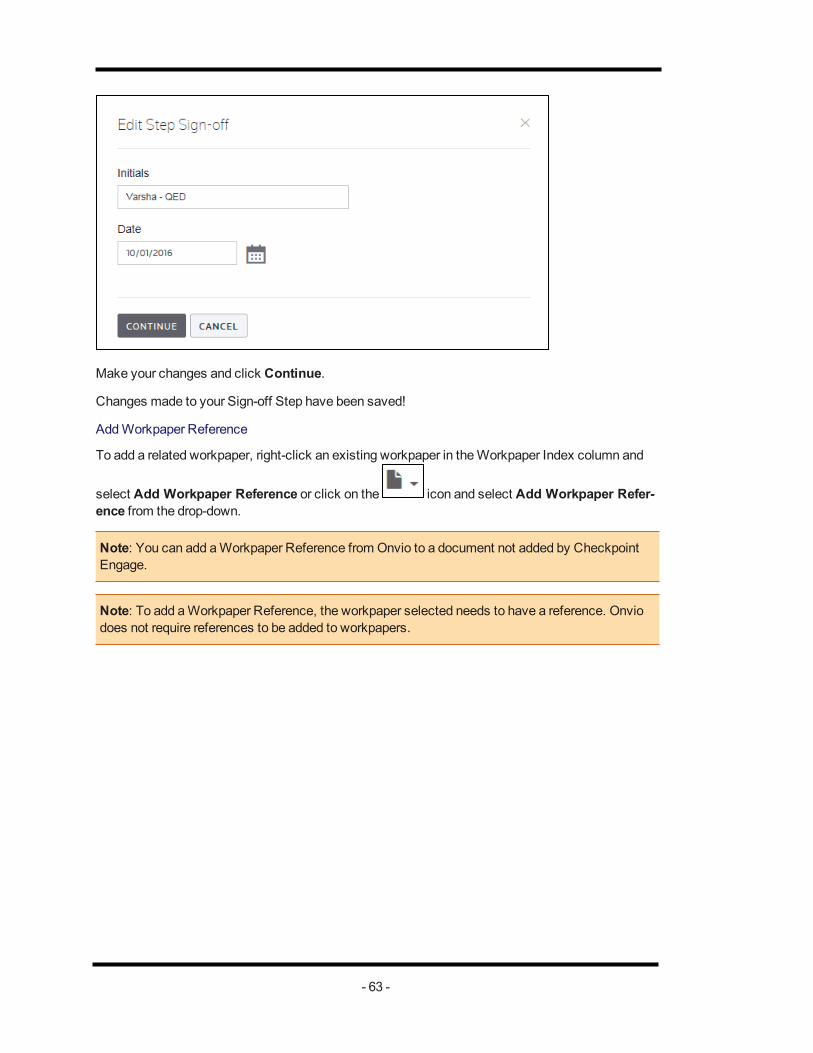
Make your changes and click Continue.
Changes made to your Sign-off Step have been saved!
AddWorkpaper Reference
To add a related workpaper, right-click an existing workpaper in theWorkpaper Index column and
select Add Workpaper Reference or click on the icon and select Add Workpaper Refer-ence from the drop-down.
Note: You can add aWorkpaper Reference from Onvio to a document not added by CheckpointEngage.
Note: To add aWorkpaper Reference, the workpaper selected needs to have a reference. Onviodoes not require references to be added to workpapers.
- 63 -

Select the workpaper and click Continue.
- 64 -
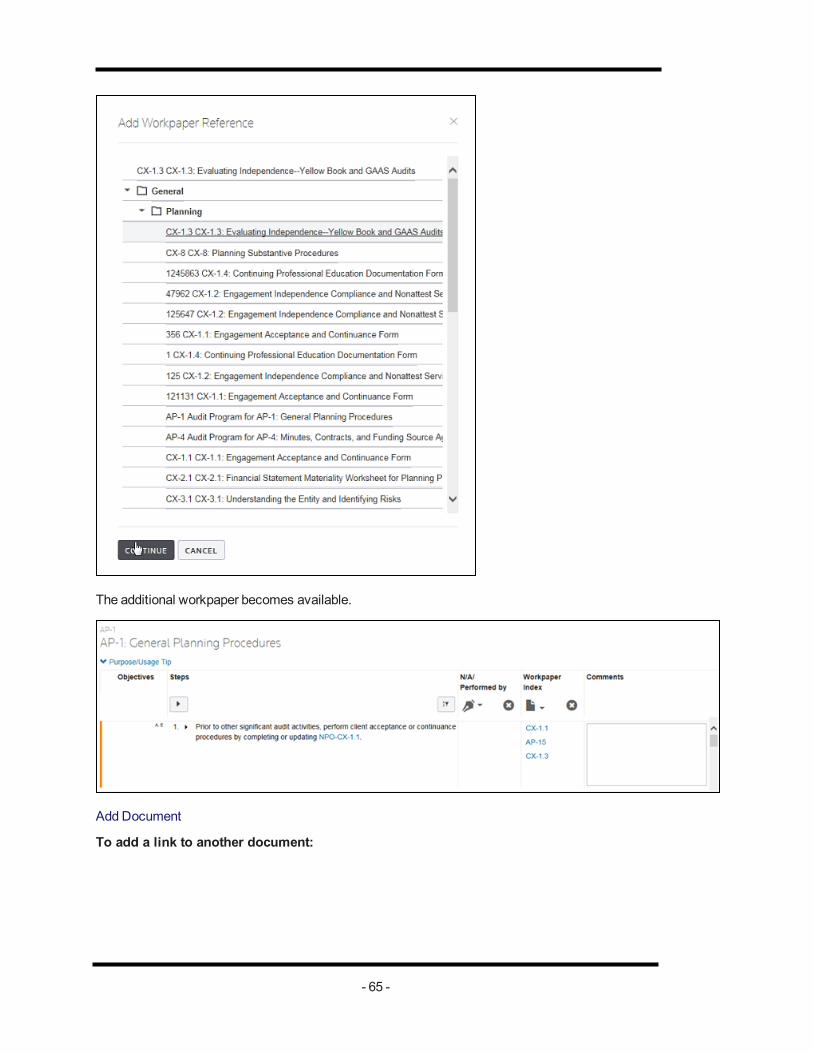
The additional workpaper becomes available.
Add Document
To add a link to another document:
- 65 -
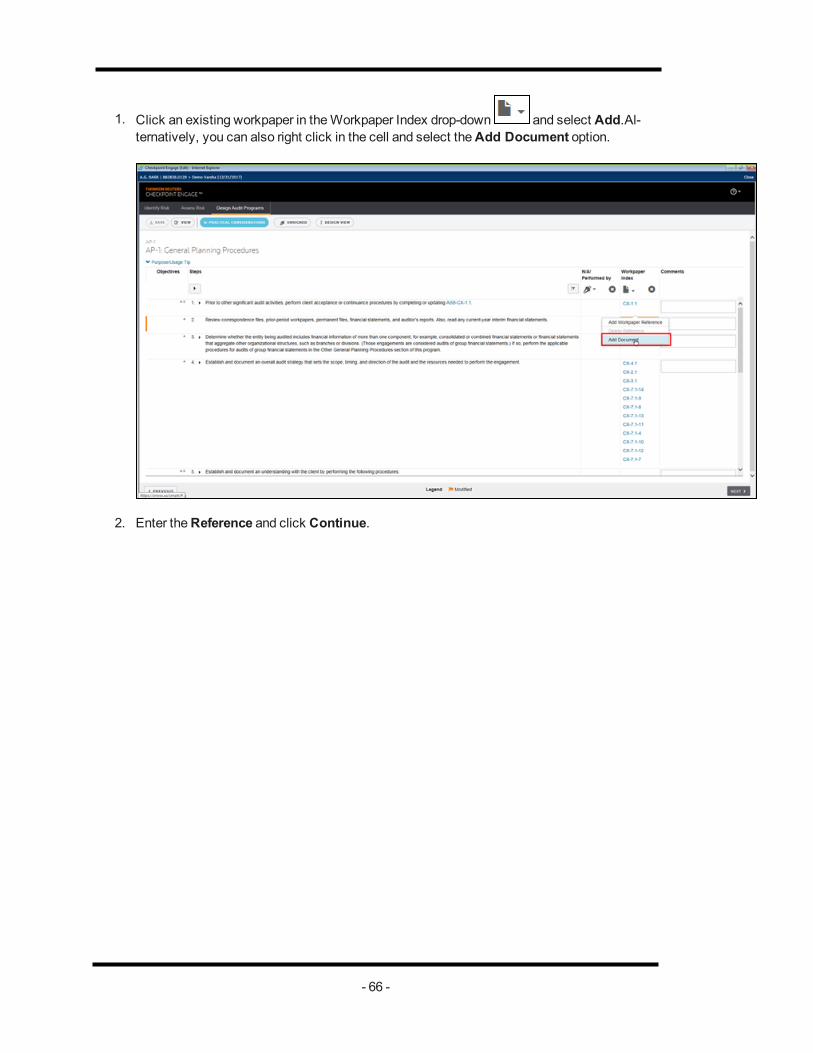
1. Click an existing workpaper in theWorkpaper Index drop-down and select Add.Al-ternatively, you can also right click in the cell and select theAdd Document option.
2. Enter theReference and click Continue.
- 66 -
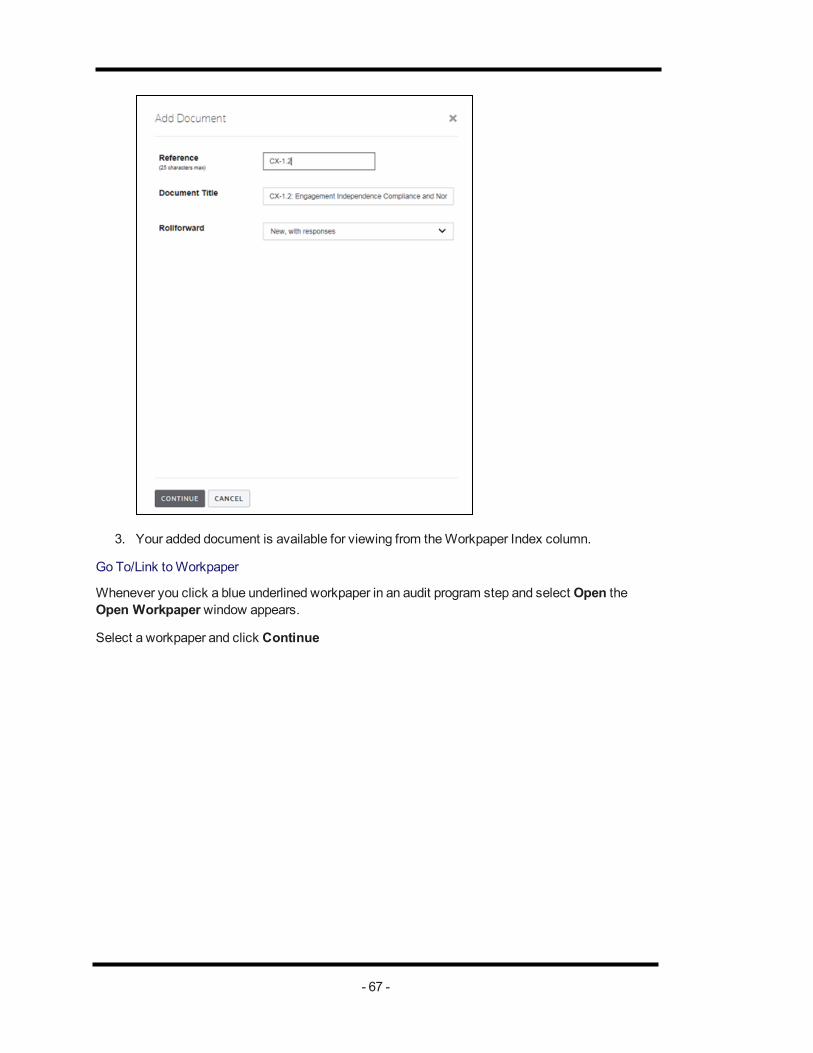
3. Your added document is available for viewing from theWorkpaper Index column.
Go To/Link toWorkpaper
Whenever you click a blue underlined workpaper in an audit program step and select Open theOpen Workpaperwindow appears.
Select a workpaper and click Continue
- 67 -

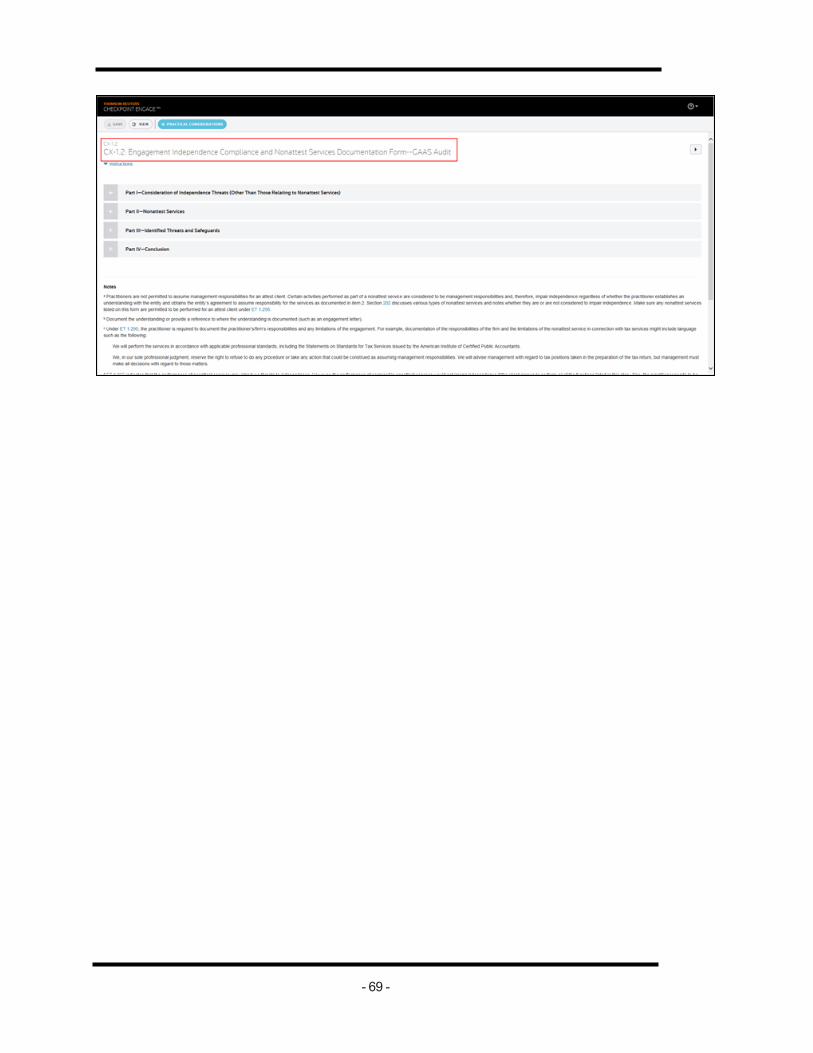
The selected workpaper will then appear.
- 68 -
- 69 -

DiagnosticsAdvance Flow
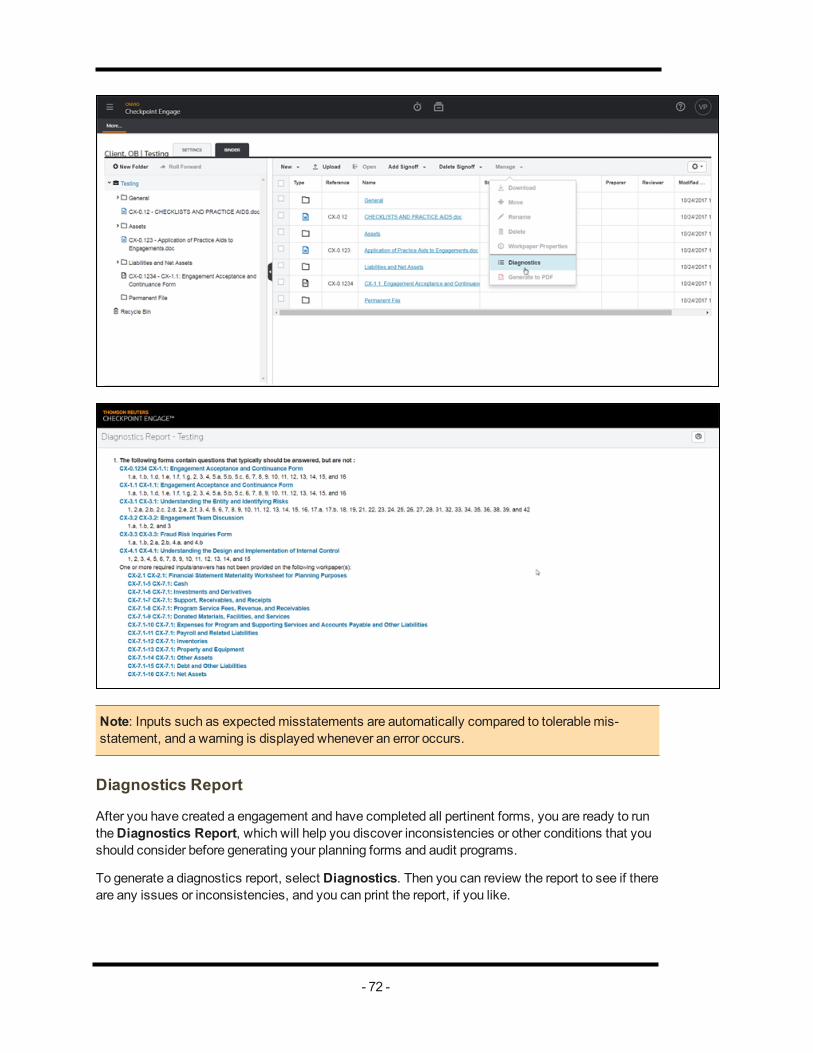
Engagement-wide diagnostics help you identify incomplete procedures, unanswered questions,inconsistent answers etc., throughout your engagement. As shown in the following example, on theplanning worksheet, to determine the extent of substantive tests, a warningmessage informs youthat sampling is normally not appropriate if an expectedmisstatement exceeds 1/3 of the tolerablemisstatement:
Click on the Diagnostics icon to launch this in Checkpoint Engage.
- 70 -

Note: Inputs such as expectedmisstatements are automatically compared to tolerable mis-statement, and a warning is displayed whenever an error occurs.
Diagnostics Report
After you have created a engagement and have completed all pertinent forms, you are ready to runtheDiagnostics Report, which will help you discover inconsistencies or other conditions that youshould consider before generating your planning forms and audit programs.
To generate a diagnostics report, select Diagnostics. Then you can review the report to see if thereare any issues or inconsistencies, and you can print the report, if you like.
Onvio
Engagement-wide diagnostics help you identify incomplete procedures, unanswered questions,inconsistent answers etc., throughout your engagement. As shown in the following example, on theplanning worksheet, to determine the extent of substantive tests, a warningmessage informs youthat sampling is normally not appropriate if an expectedmisstatement exceeds 1/3 of the tolerablemisstatement:
Click on the Diagnostics option under theManage drop-down.
- 71 -
Note: Inputs such as expectedmisstatements are automatically compared to tolerable mis-statement, and a warning is displayed whenever an error occurs.
Diagnostics Report
After you have created a engagement and have completed all pertinent forms, you are ready to runtheDiagnostics Report, which will help you discover inconsistencies or other conditions that youshould consider before generating your planning forms and audit programs.
To generate a diagnostics report, select Diagnostics. Then you can review the report to see if thereare any issues or inconsistencies, and you can print the report, if you like.
- 72 -

About Internal ControlIf Internal Control is licensed, while creating an engagement, you would have the option of selectingInternal Control to include related forms in the engagement.
When included in an engagement, the Internal Control forms are available under the Identify Riskstab.
- 73 -

Internal Control is a comprehensive, fully-integrated internal control evaluation and analysis toolthat you can use to:
l Obtain and document your understanding of internal control.
l Evaluate system design.
l Prepare internal control test plans (required if performing a public company audit ofinternal control).
l Conclude on control effectiveness (required if performing a public company audit ofinternal control).
l Assess control risk.
- 74 -

Enable Internal ControlIf Internal Control is licensed, you can enable it for any engagement for which you intend to usethe tool. You can enable Internal Control when you create a new engagement, and you can enable itfor an existing engagement.
To enable Internal Control for a new engagement:
1. Click theAdd Engagement icon.
2. Select a client and ensure that you select your source as Checkpoint Engage.
3. Enter the requisite fields in Advance Flow Engagement to navigate to Checkpoint Engageset up page and click Next.
4. You will then see the yellow banner which needs to be clicked to go into Checkpoint Engage.
- 75 -
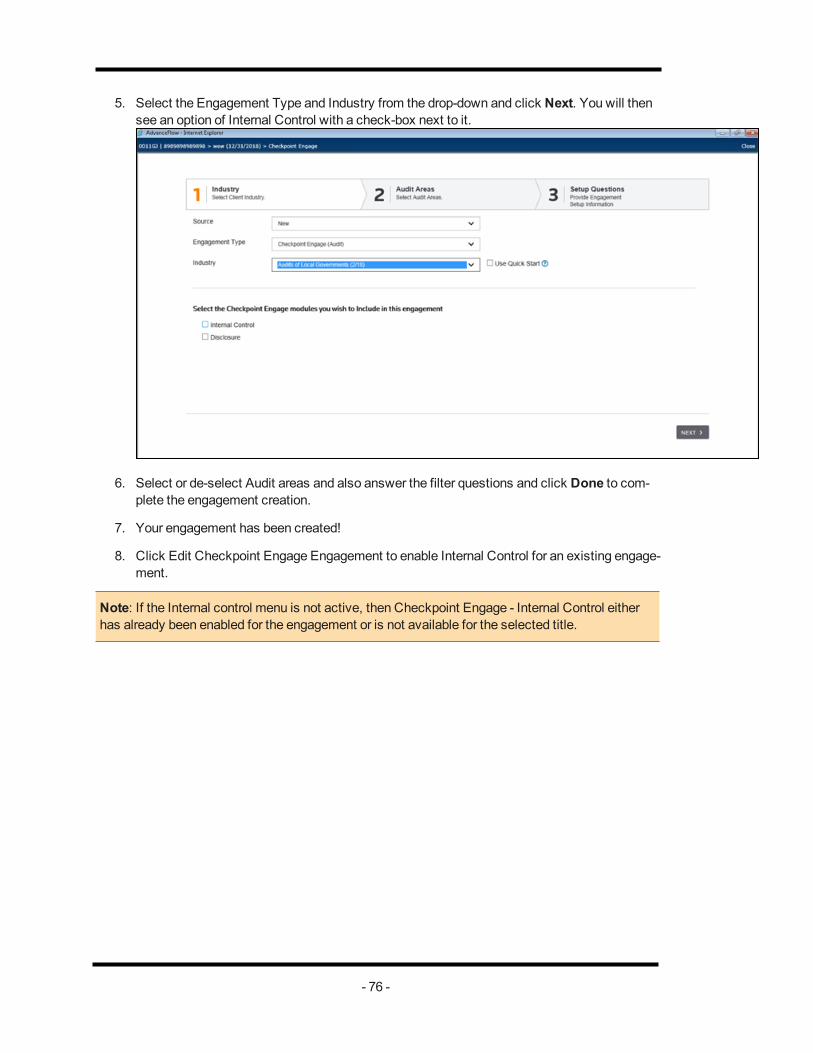
5. Select the Engagement Type and Industry from the drop-down and click Next. You will thensee an option of Internal Control with a check-box next to it.
6. Select or de-select Audit areas and also answer the filter questions and click Done to com-plete the engagement creation.
7. Your engagement has been created!
8. Click Edit Checkpoint Engage Engagement to enable Internal Control for an existing engage-ment.
Note: If the Internal control menu is not active, then Checkpoint Engage - Internal Control eitherhas already been enabled for the engagement or is not available for the selected title.
- 76 -

Understand Controls Evaluating DesignAfter you complete all of the Risk Assessment forms, click Next to move to the Internal Controlsection, beginning withUnderstand Controls and Evaluate Design.
Understand Controls and Evaluate Design includes each component of Internal Control as iden-tified by COSO:
l Control Environment
l Risk Assessment
l Information and Communication
l Monitoring
l Activity-level andOther Entity-level Controls
Control Environment, Risk Assessment, Information and Communication, Monitoring describeeach control objective to indicate how the applicable control principle has been achieved.
If you want to view a list of specific control activities related to the control principle, add theViewOptional Entity-Level Control Form link.
Use the Optional Entity-Level Control Form to view a list of specific control activities related to thecontrol principle. You can use this feature to further document your understanding of controls and toindicate controls that you plan to test. In general, you should focus on key controls. When neces-sary, you can document your comments.
When you expandControl Activities underUnderstand Controls and Evaluate Design, youneed tomark significant Transaction Class and click on a link to access the View Optional Activ-
- 77 -
ities Form which is similar to the Entity Level Control Form. The next section describes the columnheading questions in both forms.
Note: If performing a public company audit of internal control, youmust evaluate entity-level con-trols that are important to your conclusion about whether the company has effective internal con-trol, including Financial Close and Reporting process and theGeneral Computer Controlsprocess.
Column Heading Questions
In both the Entity-Level Control Form and the Control Activities Form, the column headings containquestions for each control principle/objective and control activity.
The sections below describe each heading.
Evaluate Objective
Indicate whether you want to evaluate the control objective. A control objective states the purposeof a control in relation to risks of material misstatements in the financial statements. By consideringcontrol objectives and how they relate to risks, youmay find it easier to identify relevant controls.Furthermore, youmay find it easier to evaluate whether existing controls, if operating effectively,would fully achieve the objective or if deficiencies exist either in design or through non-existent con-trols.
Generally, you should focus on control objectives related to the assertions you identified as poten-tially being higher risk. In other words, focus on those that relate to the risks that caused you toidentify the transaction class as significant. Then, identify the key controls for those objectives.
This question appears only on theControl Activities Form for Process Level Controls andGen-eral Computer Controls.
Addresses Significant Risk
Indicate whether the control addresses an identified fraud or other significant risk.
This question only appears on theControl Activities Form for Process Level Controls.
Key Control
You are not required to understand all controls and control activities that might exist in an entity.Rather, you should focus on key controls (those that aremost important in achieving the controlobjectives you intend to evaluate). When determining which controls are key, consider factors suchas:
l The nature of the risks being addressed
l The characteristics of related account balances or transaction classes
l Whether the control is preventive (prevents misstatements) or detective (detects mis-statements)
- 78 -

l Whether the control works in combination with or relies on the operation of other con-trols
l Whether the control is manual or automated
Certain controls that typically are key are selected by default; however, you should evaluate thembased on your individual client situations, considering the risks that caused you to identify the trans-action class as significant.
Implemented
Indicate whether the control has been implemented. Note that not all controls listedmust be imple-mented to achieve the control objective, but typically, those that you have identified as key controlsshould be appropriately designed and implemented. Generally, you can determine implementationusing procedures such as observation or inspection in combination with inquiries. Note that inquiryalone is not sufficient to evaluate the design of a control and determine if it has been implemented.
Select Yes, No, orN/A from the drop-down list in the Implemented? column.
Control Type
For each implemented control that you intend to evaluate, indicate whether the control is pre-ventative (prevents misstatements) or detective (detects misstatements).
Select Preventive orDetective from the drop-down list in theControl Type column.
IT Dependent
If you selectedYes for the control from theControl has been Implemented drop-down list, the ITDependent check box is enabled. Select the check box if the control is dependent upon informationtechnology (IT). Examples of IT dependent controls include automated system controls that pre-vent access to data by unauthorized users, manual reviews or reconciliation based on computer-generated reports or spreadsheets, and so forth. For IT dependent controls, you need to indicatewhether it is automated and identify the underlying software application.
Automated
If you selected the IT Dependent check box, theAutomated check box is enabled. Indicatewhether the control requires user intervention (manual control) or is performed by the systemwithout user intervention (automated control). Manual controls in an automated systemmay useinformation produced by the system ormay be limited tomonitoring the automated controls andhandling exceptions. Automated controls include processes such as edit and validation routinesembedded in computer programs.
The use of manual controls is oftenmore effective when judgment and discretion are needed. Forexample, manual controls are generally more appropriate in the following ways:
l For large, unusual, or nonrecurring transactions,
l Whenmonitoring the effectiveness of automated controls,
l In changing circumstances where a control responsemay be needed outside of the
- 79 -

scope of an automated control
l Whenmisstatements are difficult to anticipate, define, or predict
However, manual controls may be subject to override, misinterpretation, error, or bypass. As a res-ult, automated controls may bemore suitable in the following situations:
l Recurring or high-volume transactions
l Situations where errors can be anticipated, predicted, prevented, or detected by con-trol parameters subject to automation
l Control activities whose nature allows the use of properly designed automated con-trol processes
Software Application
When evaluating the effectiveness of IT dependent controls, it is important to also consider thedesign of general computer controls around the software applications upon which the IT dependentcontrols rely. Evaluating the effectiveness of IT general controls is required if performing a publiccompany audit of internal control. For example, to assess whether a control such as management’sreview of sales by product is effective, youmust also consider whether the general controls aroundthe computer application that produces the sales by product report are effective and result in a reli-able report.
For each IT dependent control that you intend to evaluate (for example, each IT dependent key con-trol), indicate the computer software application upon which the control depends. This value is car-ried forward to the general computer controls section, where you can evaluate general computercontrols over the software application.
1. Click 'select here' in theSoftware Application field for the control you are describing toopen theSoftware Applicationswindow.
- 80 -

2. Type the name of the application in the entry field and click theAdd Application button.
3. Select the check box tomark it as significant, if applicable.
4. Click Apply.
Effectively Designed
For those control principles/objectives that you intend to evaluate, conclude whether the control sys-tem is effectively designed to achieve the control objective.
Evaluation of design effectiveness considers whether an implemented control, individually or incombination with other implemented controls, is capable of effectively preventing or detecting andcorrecting errors that could result in material misstatements. That is, it considers the effectivenessof implemented controls in achieving the objective. If controls related to an objective are improperlydesigned, a control deficiency may exist that needs to be communicated tomanagement and thosecharged with governance.
Test
If you selectedYes underControl has been Implemented, the Test column is activated. Selectthe check box if you plan to test the control.
Financial Statement Audit
It is necessary to test controls only if you determine the following:
l Doing so allows you to assess control risk for an assertion at less than high and there-fore reduce the nature or extent of substantive procedures, resulting in amore effect-ive, efficient audit.
l Substantive procedures alone are not effective.
If you plan to test and rely on information technology (IT) dependent controls, you also should testgeneral computer controls around the software applications upon which the IT dependent controlsdepend.
Test only key controls that you have determined are suitably designed and have been implementedto prevent or detect material misstatements in specific assertions. SAS No. 110 recognizes thatcontrol test results may be relied upon for three years, subject to certain conditions, so that tests ofcontrols can be rotated using a three-year cycle. However, controls that have changed since theywere last tested or controls that mitigate fraud risks or other significant risks should be retestedeach year. Controls that have not changed should be retested at least every third year. In addition, ifa number of controls are being rotationally tested, some controls should be tested each year.
Public Company Audit of Internal Control
For all Understand Controls and Evaluate Design forms, when performing a public company audit ofinternal control to form a conclusion about the effectiveness of the company’s internal control, youmust perform sufficient tests of controls to address the assessed risk of misstatement to each rel-evant assertion of each significant account and disclosure.
Applying a top-down approach, focus first on entity-level controls. Evaluate entity-level controlsthat are important to your conclusion about whether the company has effective internal control
- 81 -

(including the financial close and reporting process; see Significant Transaction Classes). Thentest other controls that are important to your conclusion about whether the company’s controls suf-ficiently address the assessed risk of misstatement to each relevant assertion of each significantaccount and disclosure. Some entity-level controls might operate at a level of precision that,without the need for other controls, sufficiently addresses the risk of misstatement to a relevantassertion. If a control sufficiently addresses the risk, you do not need to test other controls relatedto that risk.
Only test the operating effectiveness of controls that are effectively designed. A control that has adesign flaw cannot be an effective control, nomatter how well it functions; there is no point in test-ing operating effectiveness.
Complete the Form
For all Understand Controls and Evaluate Design forms, as you complete the form, considerwhether any risks that could result in material misstatement of the financial statements exist. If so,enter the risk in the right-hand pane by clicking theAdd Risk button. (See Identify Risks topic forthe complete procedure.)
A question at the end of each form prompts you to conclude whether the applicable COSO topic isproperly designed and implemented (or effectively designed for public companies).
For a financial statement audit, the Control Deficiency Evaluation Form and AggregationWork-sheet can be used to evaluate whether control deficiencies are significant deficiencies or materialweaknesses.
For a public company audit of internal control, you can use the Control Deficiency Evaluation Formand AggregationWorksheet to summarize, accumulate, and evaluate deficiencies to determinewhether they (alone or in combination) represent amaterial weakness or significant deficiency; andto form an overall conclusion on the effectiveness of internal control.
Select theYes orNo option to the right of the question. Document your comments, if applicable.
Sources of Information
For all Understand Controls and Evaluate Design forms, in theSources of Information section ofeach of the COSO topics, describe your sources and procedures for gaining your understanding ofthe flow of information. Ensure that your description satisfies auditing standards regarding doc-umentation (seeSAS No. 103 orPCAOB Auditing Std. No. 3).
Significant Transaction Classes
Significant Transactions Classes is a subtopic of Control Activities. This form lets you selectthe transaction classes for which you want to obtain an understanding of internal control and
- 82 -
determine whether controls are properly designed and implemented (or effectively designed for pub-lic companies).
Significant Transactions Classes is a subtopic of Control Activities in the Navigation pane. It isthe form that follows theUnderstand Controls and Evaluate DesignCOSO components (Con-trol Environment, Risk Assessment, Information and Communication, andMonitoring).
This form lets you select the transaction classes for which you want to obtain an understanding ofinternal control and determine whether controls are properly designed and implemented (or effect-ively designed for public companies). Note that the Financial Close and Reporting andGeneralComputer Controls processes are included with significant transaction classes.
Note: In performing a public company audit of internal control, PCAOB Auditing Std. No. 5 doesnot require the identification of significant transaction classes and processes. However, you willneed to understand them to appropriately identify and select for testing the controls that addressthe assessed risk of misstatement to each relevant assertion.
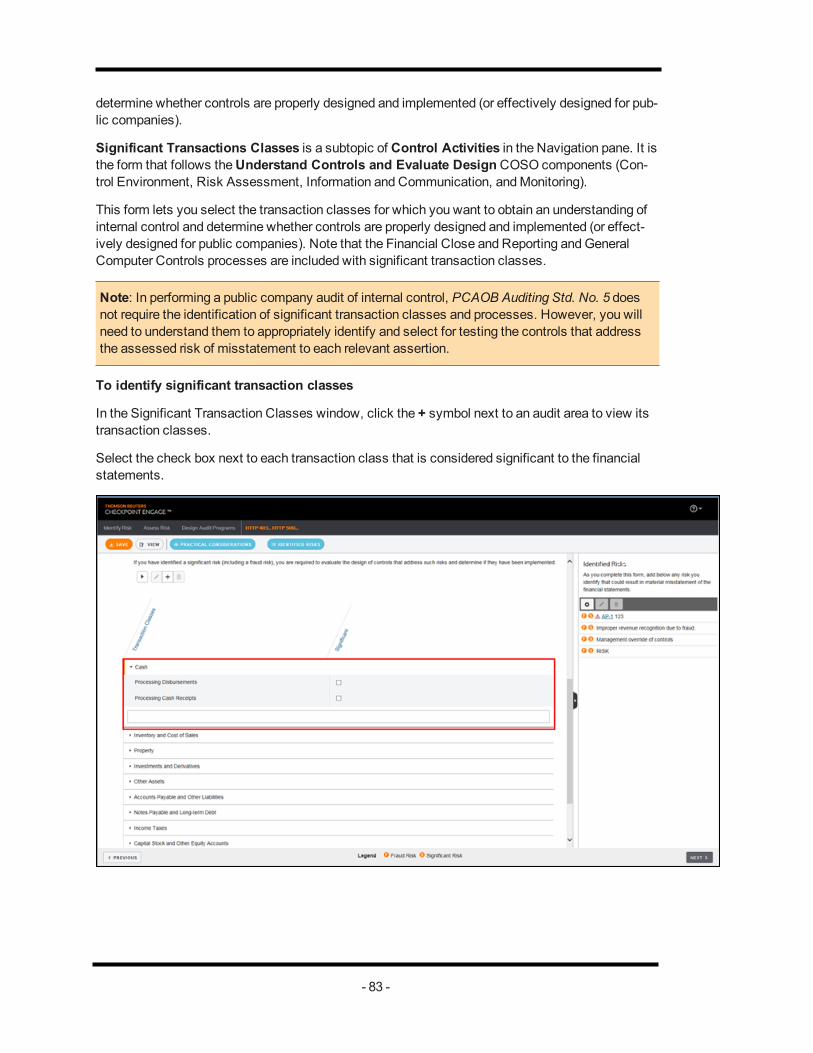
To identify significant transaction classes
In the Significant Transaction Classes window, click the + symbol next to an audit area to view itstransaction classes.
Select the check box next to each transaction class that is considered significant to the financialstatements.
- 83 -

Note: A red exclamation symbol (!) appearing before an audit area indicates that a significant orfraud risk is associated with the audit area. You can click the exclamationmark to view the risk.
Add Transaction Class
If you want to use a transaction class that is not listed, click theAdd Transaction Class button
from themini toolbar.
On the Add New Transaction Class window, enter the name of the new transaction class andselect the check boxes for the applicable audit areas.
You can also select to base the new transaction class on an existing transaction class by making aselection from the drop-down list.
If you base the new transaction class on an existing transaction class, objectives and their rela-tionships to controls and test procedures are copied to the new transaction class.
Edit or Delete Transaction Class
Once the new transaction class is added, you can edit or delete it by clicking the edit or delete
button.
Only transaction classes that you have created with theAdd Transaction Class feature can bedeleted. However, you can edit any transaction class, letting you add or omit audit areas to whichthe transaction class is assigned.
Apply a Risk-Based Approach
When selecting significant transaction classes, focus on those that present a reasonable possibilityof material misstatement to the financial statements or disclosures. Evaluate qualitative and quant-itative factors such as the following:
l Accounting and reporting complexities associated with the account or disclosure.
l Susceptibility to misstatement due to errors or fraud.
l Existence of related party transactions in the account.
l Volume of activity.
l Size and composition of the account.
l Nature of the account or disclosure.
l Exposure to losses in the account.
l Possibility of significant contingent liabilities arising from the activities reflected in theaccount or disclosure.
l Changes from the prior period in account or disclosure characteristics.
Control Activities - Financial Close and Reporting
- 84 -

In the Financial Close and Reporting subtopic underActivity-level and Other Entity-level Con-trols, you can describe the flow of information for each transaction class/process for each location.
In each location form, expand theDescribe Flow of Information section, and then expand any ofthe transactions. Under the transactions, click theView Control Activities Form link to view a listof specific control activities related to the transaction class/process.
The Control Activities Form can be used to further document your understanding of controls and toindicate controls that you plan to test.
For more information about the Control Activities Form, see the Understand Controls and EvaluateDesign topic.
A question following the transaction class/process input fields prompts you to conclude whether thecontrols are properly designed and implemented (or effectively designed for public companies).Select Yes orNo. If necessary, click the text box to enter a comment.
- 85 -

Control Activities – Audit Areas and Financial Close andReportingA series of input fields are provided to describe the flow of information for each transaction classyou previously selected as significant.
Previously, in the Significant Transaction Classes activity, the transaction classes you consider tobe significant to the financial statements. Each audit area containing significant transaction classesnow appears on theNavigation pane.
- 86 -

For each transaction class, you can describe the flow of information or referencememos and otherdocumentation about the flow of information.
- 87 -

The Control Activities Form can be used to further document your understanding of controls and toindicate controls that you plan to test.
For more information about the Control Activities Form, see the Understand Controls and EvaluateDesign topic.
A question following the transaction class input fields prompts you to conclude whether the controlsare properly designed and implemented (or effectively designed for public companies). Select YesorNo. You can document your comments if necessary.
Apply a Risk-Based Approach
Generally, you should focus on objectives related to the assertions you identified as potentiallybeing higher risk and the key controls for those objectives. Pay particular attention to controls thataddress risk of material misstatement due to fraud or management override. Controls that addressthese risks might include:
l Controls over significant, unusual transactions, particularly those that result in late orunusual journal entries
l Controls over journal entries and adjustments made in the period-end financial report-ing process
l Controls over related party transactions
l Controls related to significant management estimates
l Controls that mitigate incentives for, and pressures on, management to falsify or inap-propriately manage financial results
Also, consider the sources of potential misstatement that could occur within the transaction class,including the following:
l The points within the transaction class at which amisstatement (including amis-statement due to fraud) related to the relevant assertion could arise
l The controls implemented by management to address those identified points withinthe transaction class
l The controls implemented by management over the prevention or timely detection ofunauthorized acquisition, use, or disposition of entity assets that could result in amaterial misstatement of the financial statements.
Sources of Information
In the Document Sources of Information section of the Audit Area - Control Activities, describe yoursources and procedures for gaining your understanding of the flow of information. Ensure that yourdescription satisfies auditing standards regarding documentation (SAS No. 103 orPCAOB AuditingStd. No. 3).
- 88 -

Identified Risks
As you complete the form, consider whether any risks that could result in material misstatement ofthe financial statements exist. If so, enter the risk in the right-hand pane by clicking theAdd Riskbutton.
- 89 -
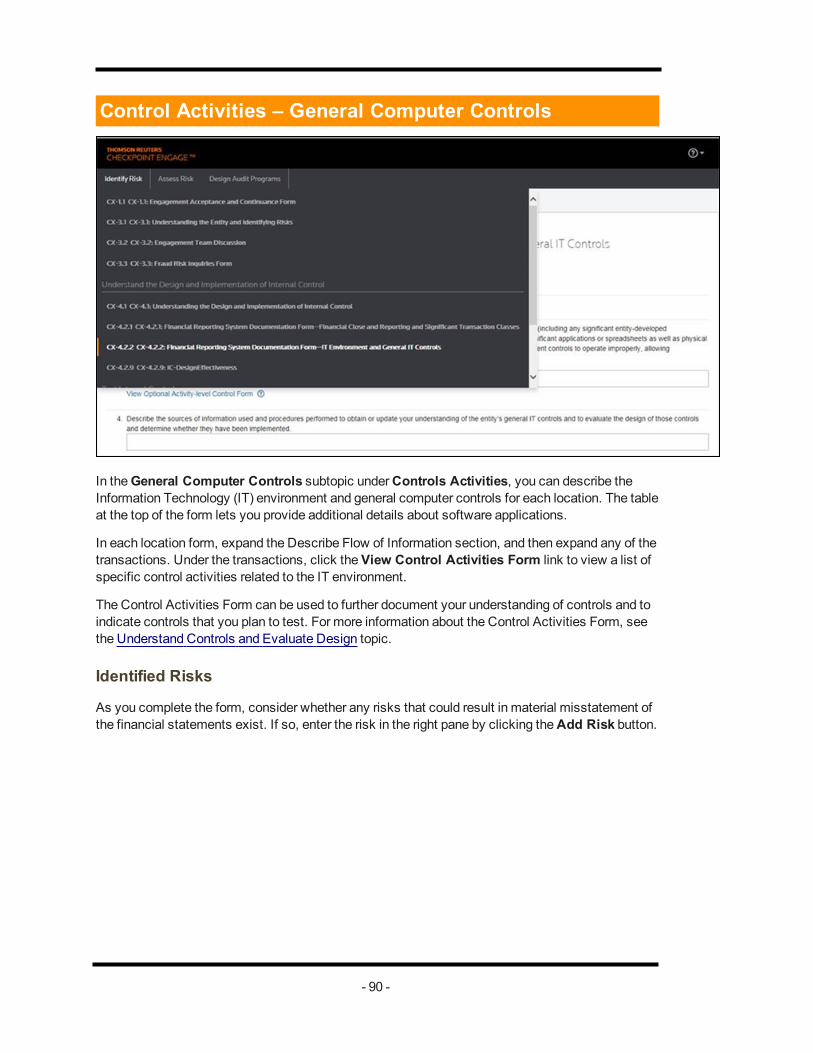
Control Activities – General Computer Controls
In theGeneral Computer Controls subtopic underControls Activities, you can describe theInformation Technology (IT) environment and general computer controls for each location. The tableat the top of the form lets you provide additional details about software applications.
In each location form, expand the Describe Flow of Information section, and then expand any of thetransactions. Under the transactions, click theView Control Activities Form link to view a list ofspecific control activities related to the IT environment.
The Control Activities Form can be used to further document your understanding of controls and toindicate controls that you plan to test. For more information about the Control Activities Form, seethe Understand Controls and Evaluate Design topic.
Identified Risks
As you complete the form, consider whether any risks that could result in material misstatement ofthe financial statements exist. If so, enter the risk in the right pane by clicking theAdd Risk button.
- 90 -

Summary of Design Effectiveness Evaluations
The Summary of Design Effectiveness Evaluations under Internal Control summarizes your pre-vious conclusions regarding design effectiveness. This summary can help you assess whether:
l Client communications regarding design deficiencies are necessary (for nonpublicentities)
l Design deficiencies indicate identified risks that should be listed in the right-handpane
l Your conclusions about design effectiveness should be re-evaluated
l For a public company audit of internal control, whether you have performed sufficienttests of design effectiveness to address the assessed risk of misstatement to eachrelevant assertion of each significant account and disclosure.
The summary also contains a link you can click to view the Control Deficiency Evaluation andAggregationWorksheet.
For a financial statement audit, you can use theControl Deficiency Evaluation and Aggreg-ation Worksheet to accumulate deficiencies and determine whether they represent significant defi-ciencies or material weaknesses that must be communicated to the client.
For a public company audit of internal control, you can use theControl Deficiency EvaluationForm and Aggregation Worksheet to summarize, accumulate, and evaluate deficiencies todetermine whether they (alone or in combination) represent amaterial weakness or significant defi-ciency; and to form an overall conclusion on the effectiveness of internal control.
The Summary of Design Effectiveness Evaluations also lets you view the transaction classes forwhich you plan to test controls. Consider whether those plans are appropriate given design con-clusions reached in each area. Generally, it is not effective to test controls over transaction classesthat contain design deficiencies.
- 91 -

It alsomay not be effective to test controls if design deficiencies exist in related transactionclasses for a given assertion or in any of the first four COSO components (Control Environment,Risk Assessment, Information and Communication, andMonitoring).
- 92 -

Add ObjectiveControl activities listed on a Control Activities Form are organized within objectives. When workingon a Control Activities Form, you can add a new objective to the list.
To add an objective:
1. Click theView Optional Activity-level Control Form link.
2. Click the icon and select Add Objective from the drop-downmenu.
The AddObjective window appears.
3. Complete the information by describing the objective, applying the objective to a transactionclass, and specifying assertions.
- 93 -
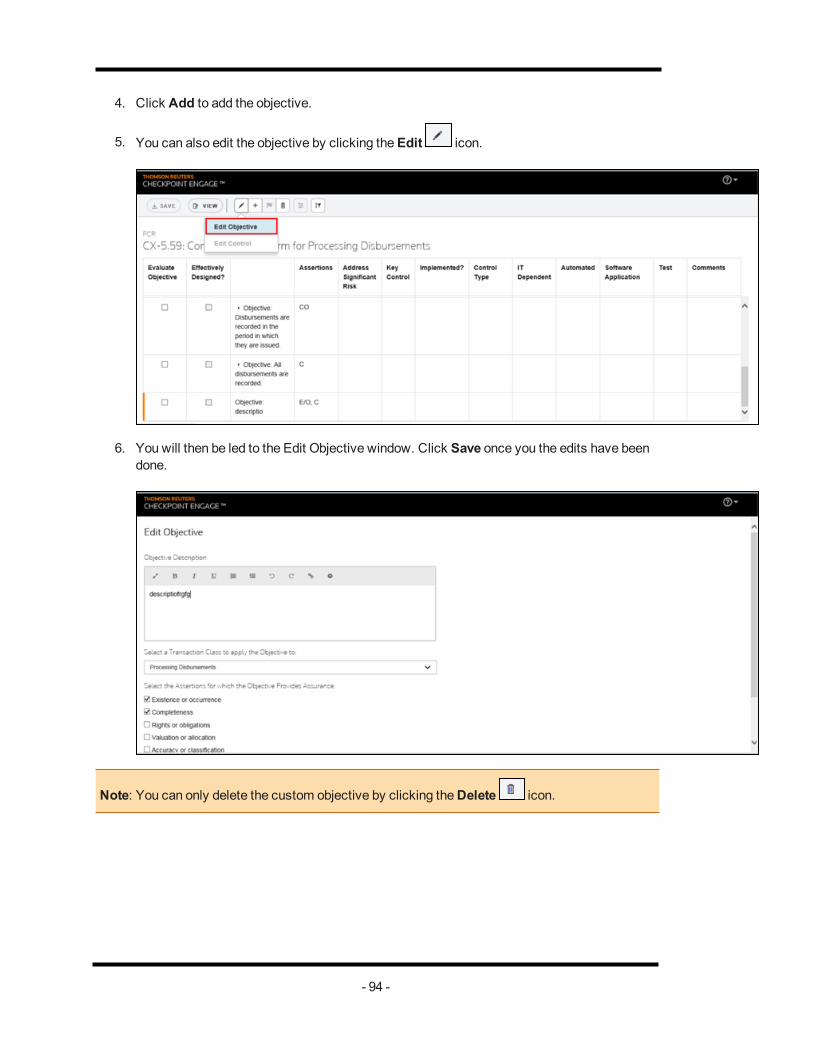
4. Click Add to add the objective.
5. You can also edit the objective by clicking theEdit icon.
6. You will then be led to the Edit Objective window. Click Save once you the edits have beendone.
Note: You can only delete the custom objective by clicking theDelete icon.
- 94 -
- 95 -

Add ControlObjectives listed on a Control Activities Form consist of controls. When working on a Control Activ-ities Form, you can add a new control to one or more objectives.
To add a control:
1. Click the button from the tool bar toAdd Control.
2. The Add Control window appears.
3. Complete the information by describing the control, assigning a control reference number,selecting the related objectives, and specifying assertions.
4. Make the necessary selections in theSelect the Related Principles field.
- 96 -

If you select Yes for assigning Test Procedures after adding control you will be led to theTest Procedure Options screen. See the Test Procedure Options topic for more inform-ation.
5. Select or clear check boxes to indicate your choices and click Assign.
6. Your control will be added to the bottom of the list.
7. You can always modify your control by clicking on theEdit icon.
8. Once themodifications have been done, a Flag icon appears next to the control indic-ating that changes have beenmade to the control. Should you need to switch back to the ori-ginal version of the control, click the Reset option .
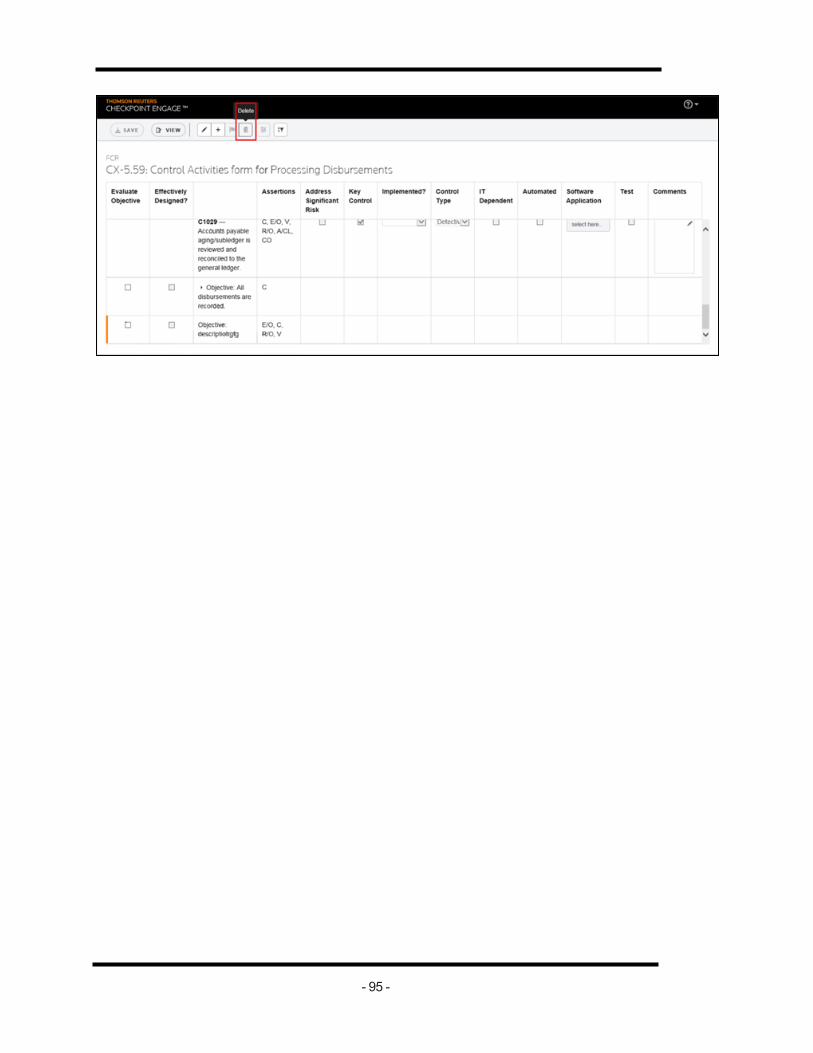
Note: You can only delete the custom control by clicking theDelete icon.
- 97 -

Test Procedure OptionsWhenworking on a Control Activities Form, you can add a new test procedure to a control.
1. While editing a control, you will see a question asking if you want to create a test procedureor not. Click Yes and thenSave to proceed to the next screen.
2. On the Test Procedure Options screen, click theAdd icon to add a Test Procedure.Enter the Test Procedure Description of your choice and click Add.
- 98 -
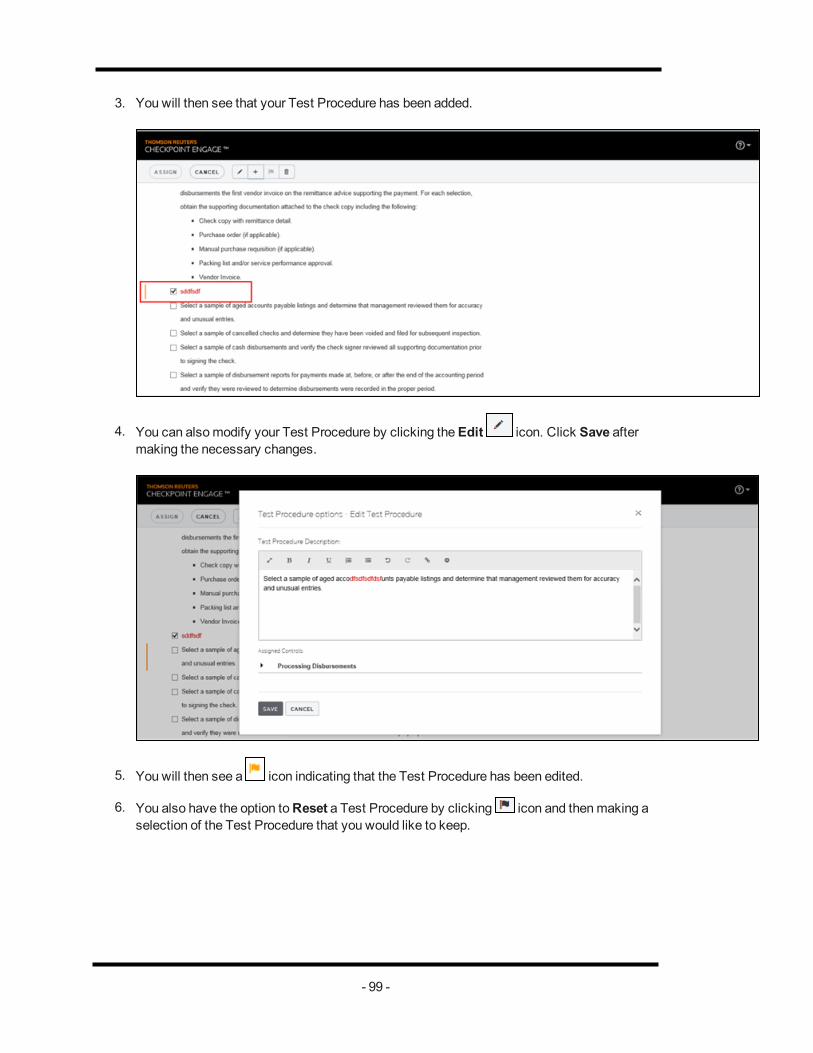
3. You will then see that your Test Procedure has been added.
4. You can alsomodify your Test Procedure by clicking theEdit icon. Click Save aftermaking the necessary changes.
5. You will then see a icon indicating that the Test Procedure has been edited.
6. You also have the option toReset a Test Procedure by clicking icon and thenmaking aselection of the Test Procedure that you would like to keep.
- 99 -

Note: You can only delete the custom Test Procedure by clicking theDelete icon.
- 100 -

Assess Control RiskIn the Internal Control Assess Control Risk form document your control risk assessments for eachCOSO component, audit area, and related assertions.
For those areas in which controls were tested, indicate your control risk assessment, consideringthe displayed test results. If sampling was applied using CX-10.2 - Tests of Controls Sampling Plan-ning and Evaluation Form, ensure that your risk assessments are appropriate given the sample sizeand number of deviations noted.
Public Company Audit of Internal Control
When performing a public company integrated audit of internal control and the financial statements,you should test controls to simultaneously accomplish the objectives of both audits. In performingthe audit of internal control, and you should obtain evidence that internal control has operated effect-ively for a sufficient period of time, whichmay be less than the financial statement period (ordinarilya year).
To assess control risk for specific assertions at less than themaximum for the financial statementaudit, you are required to obtain evidence that the relevant controls operated effectively during the
- 101 -

entire period upon which you plan to place reliance on those controls. (However, you are notrequired to assess control risk at less than themaximum for all relevant assertions andmay choosenot to do so.)
At this point, you will have completed your control testing and will assess control risk for each asser-tion for purposes of your financial statement audit. You will also be able to reach a tentative con-clusion regarding control effectiveness at CX-15 for purposes of your audit of internal control. (Yourfinal conclusion regarding internal control effectiveness will be reached once you complete your sub-stantive audit procedures.)
You should ensure that your control risk assessments (High, Moderate, Low) for your financial state-ment audit are consistent with your internal control audit conclusions, keeping in mind that your con-trol risk assessments are for the entire period under audit and your internal control effectivenessconclusion at CX-15 is as of a point in time. Ordinarily, effective internal control equates to a Lowcontrol risk assessment (assuming that controls were tested for a sufficient period), and ineffectiveinternal control equates to a High control risk assessment.
The control risk assessments that you enter in the Assess Control Risk section carry forward to theapplicable area.
- 102 -

About Multi User ControlsThe Checkpoint EngageMulti-User feature notifies you that another user is editing the form.
Unless you are notified that the form is locked, the form will be available for editing.
- 103 -

Edit a Form (Multi-users)In themulti-user feature, controls are in place to prevent conflicts between users.
You can begin to enter or edit information on the form selected by you.
While you aremaking changes to the form, it places a lock on the form. No other users are able toedit the form until you release the lock.
Option to Release Locks
When you navigate away from the form, the lock is automatically released.
However, if you navigate without saving, you will receive a validationmessage giving you theoption to stay on the current form.
When you elect to save the engagement the form will still be locked.
l Click Save and then click onView to allow other users to edit the form. If you want toperform edits on the form in the future, you will have to elect to edit the form again, asexplained at the beginning of this topic.
l Once you are in the form in edit mode, you will be able tomake the changes. Anyoneattempting to access this form will only be able to view the form and without the abil-ity to make changes.
- 104 -
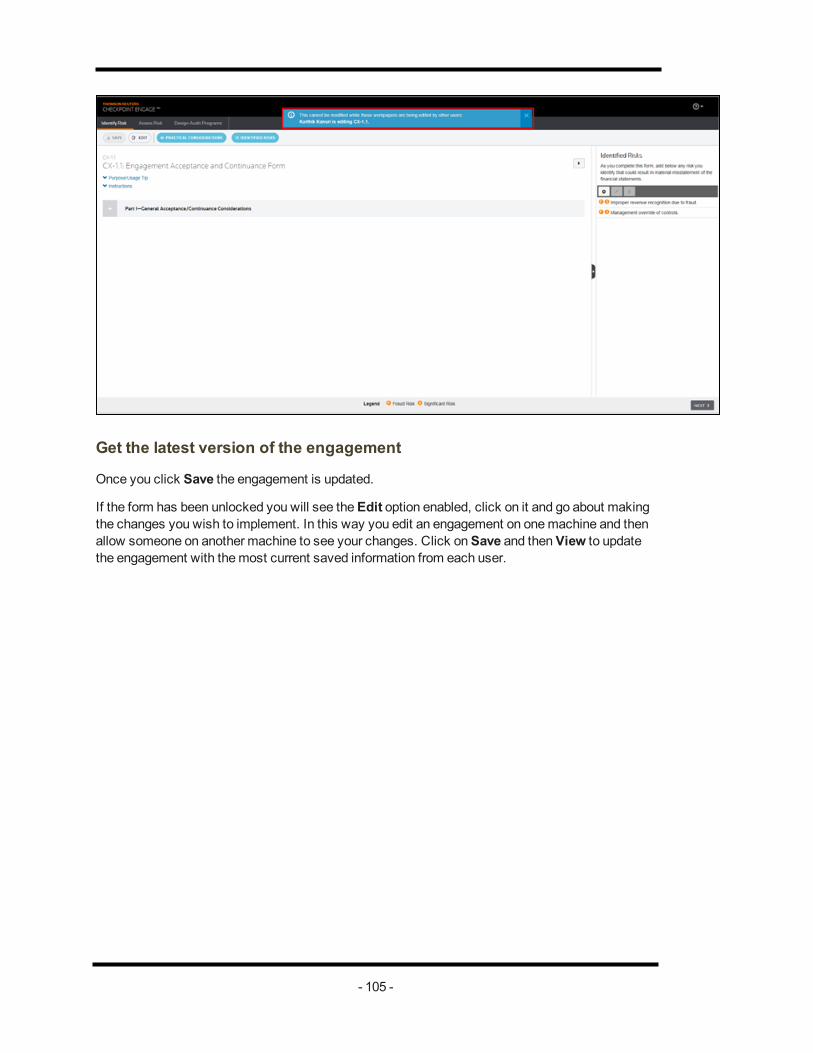
Get the latest version of the engagement
Once you click Save the engagement is updated.
If the form has been unlocked you will see theEdit option enabled, click on it and go about makingthe changes you wish to implement. In this way you edit an engagement on onemachine and thenallow someone on another machine to see your changes. Click onSave and thenView to updatethe engagement with themost current saved information from each user.
- 105 -
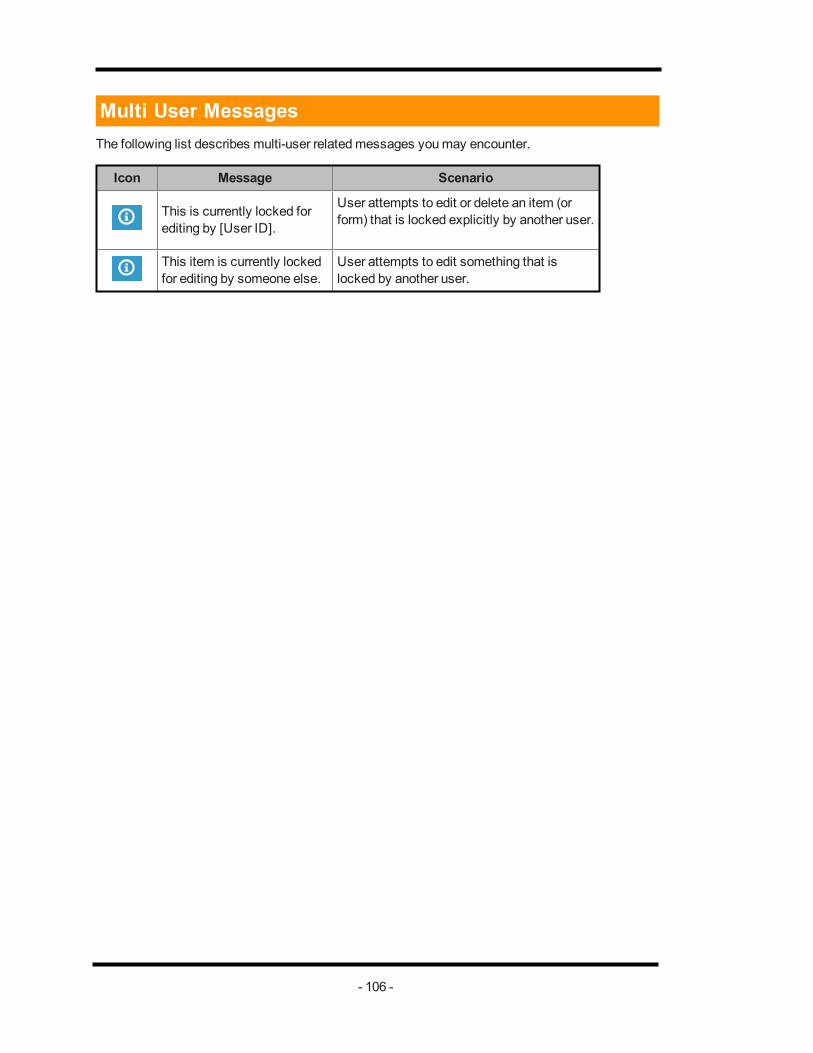
Multi User MessagesThe following list describes multi-user relatedmessages youmay encounter.
Icon Message Scenario
This is currently locked forediting by [User ID].
User attempts to edit or delete an item (orform) that is locked explicitly by another user.
This item is currently lockedfor editing by someone else.
User attempts to edit something that islocked by another user.
- 106 -

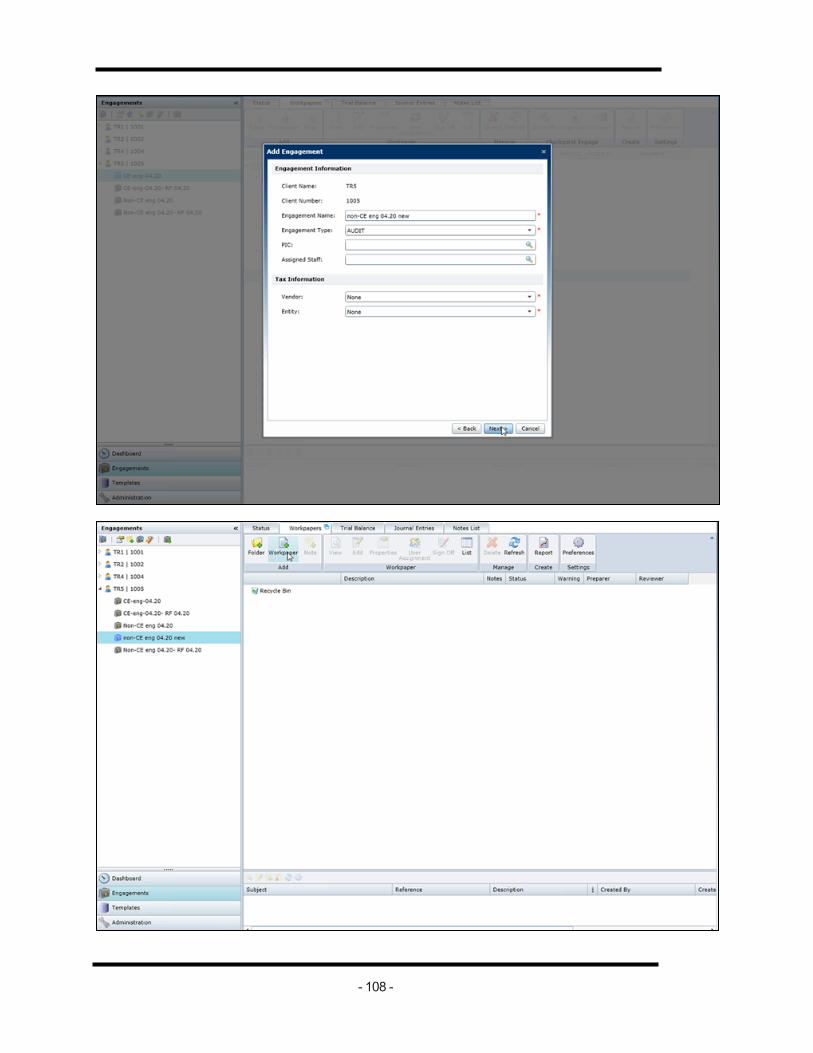
Add Documents to your EngagementYou can now add your Checkpoint Tools (CPT) documents to your engagement through the newweb interface. The prerequisite for adding CPT documents through the new web interface is to be aCheckpoint Engage enabled user.
For demonstrative purpose a non Checkpoint Engage engagement has been created.
- 107 -
- 108 -

Select the source as Checkpoint Tools and then click Next and thenOK to be led to the CheckpointTools screen.
The Checkpoint Tools screen has three panes: Left pane, Center pane and Right pane.
- 109 -

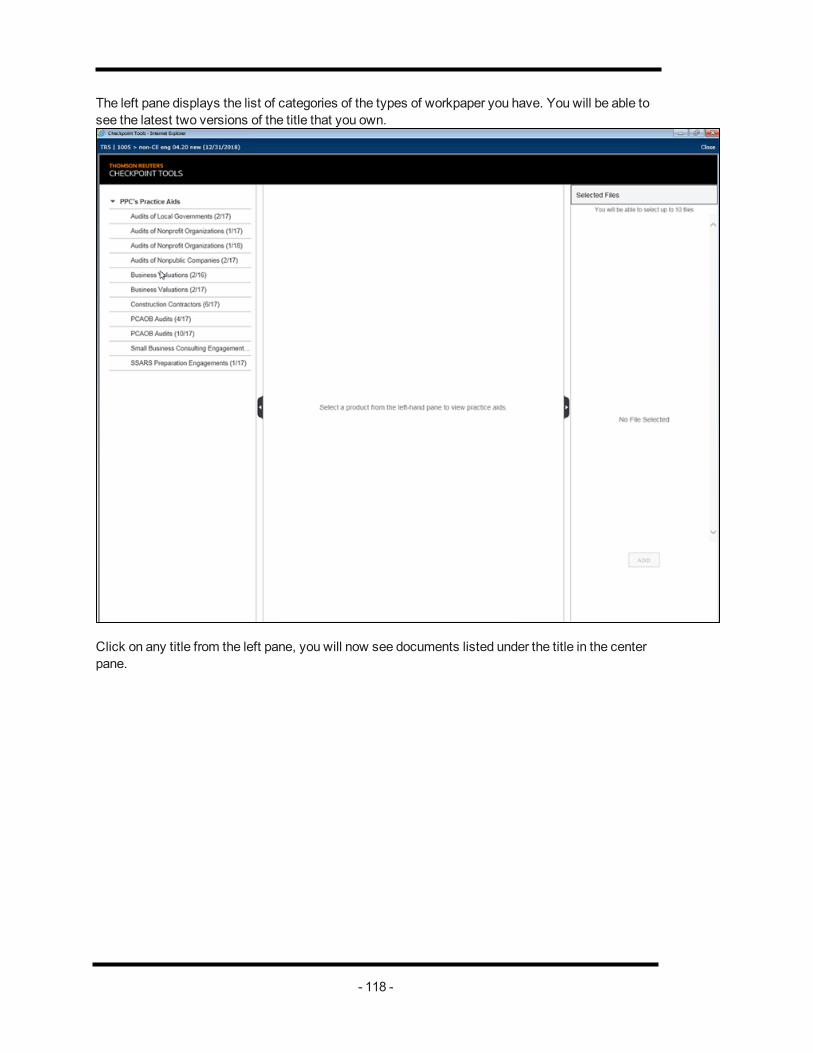
The left pane displays the list of categories of the types of workpaper you have. You will be able tosee the latest two versions of the title that you own (2017 and onwards).
Click on any title from the left pane, you will now see documents listed under the title in the centerpane.
- 110 -

You can further expand the category that you want to add the document from and to see the doc-ument if it is in a word format or an excel format (you will see either the word or excel icon next tothe document). Check mark the box next to the document you wish to add to the engagement. Youwill then see the document name reflect on the right pane as well. You can only add up to 10 doc-uments at a time to the engagement.
- 111 -

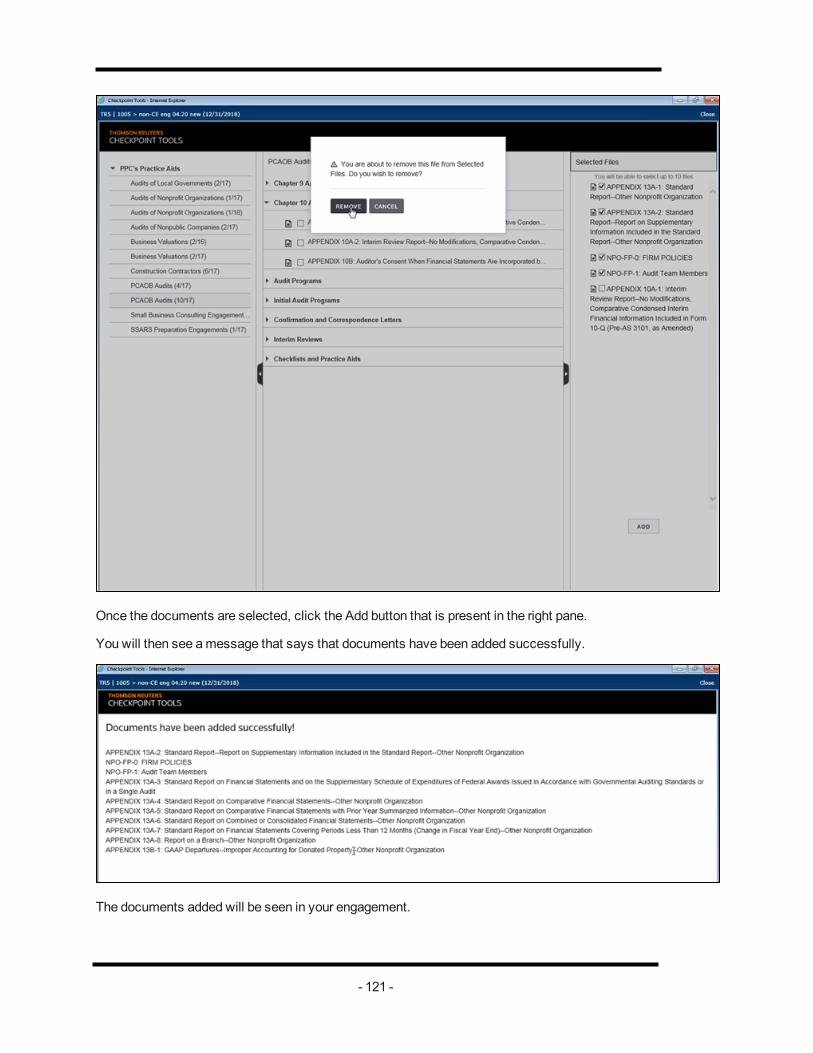
If you want to remove a document you can always uncheck the box next to the document eitherfrom the right pane or the center pane. You will then receive a pop-upmessage asking if you want toremove the document.
- 112 -

Once the documents are selected, click the Add button that is present in the right pane.
You will then see amessage that says that documents have been added successfully.
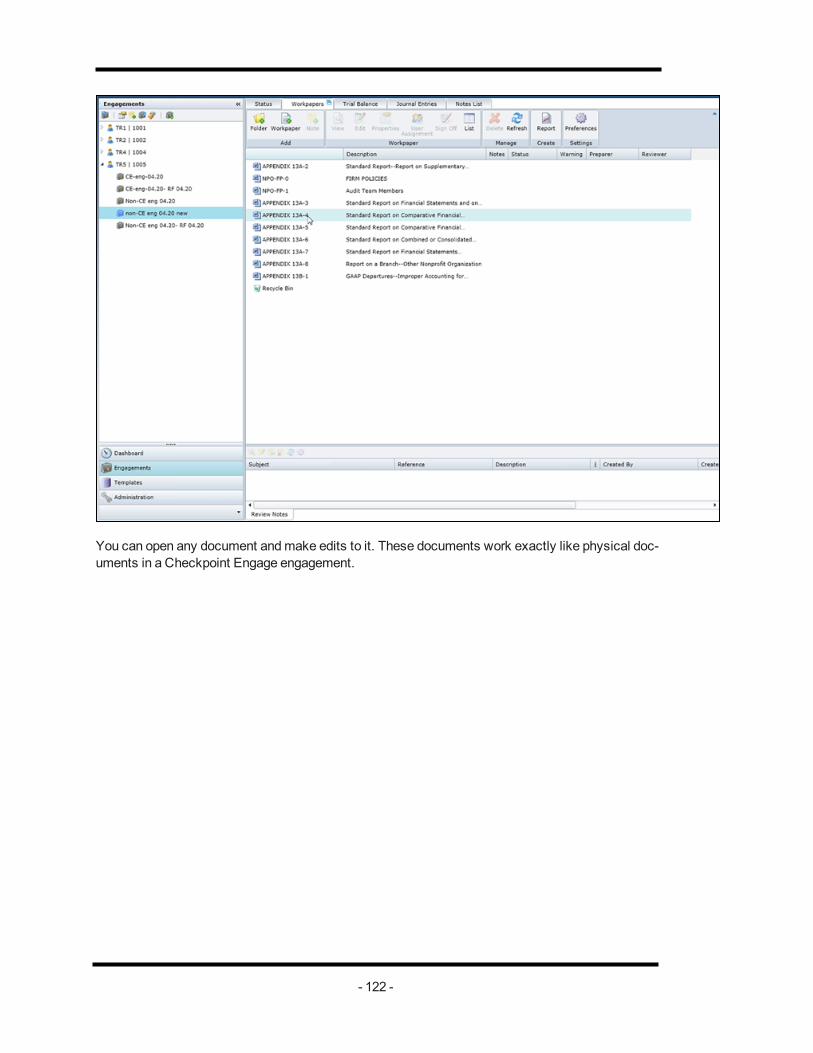
The documents added will be seen in your engagement.
- 113 -

You can open any document andmake edits to it. These documents work exactly like physical doc-uments in a Checkpoint Engage engagement.
- 114 -

For demonstrative purpose a Checkpoint Engage engagement has been created.
Once a Checkpoint Engage engagement has been created, you will see a folder structure withinwhich there will be documents existing in them.
- 115 -

Select the source as Checkpoint Tools and then click Next and thenOK to be led to the CheckpointTools screen.
- 116 -

The Checkpoint Tools screen has three panes: Left pane, Center pane and Right pane.
- 117 -
The left pane displays the list of categories of the types of workpaper you have. You will be able tosee the latest two versions of the title that you own.
Click on any title from the left pane, you will now see documents listed under the title in the centerpane.
- 118 -

You can further expand the category that you want to add the document from and to see the doc-ument if it is in a word format or an excel format (you will see either the word or excel icon next tothe document). Check mark the box next to the document you wish to add to the engagement. Youwill then see the document name reflect on the right pane as well. You can add up to 10 documentsto the engagement.
- 119 -

If you want to remove a document you can always uncheck the box next to the document eitherfrom the right pane or the center pane. You will then receive a pop-upmessage asking if you want toremove the document.
- 120 -
Once the documents are selected, click the Add button that is present in the right pane.
You will then see amessage that says that documents have been added successfully.
The documents added will be seen in your engagement.
- 121 -
You can open any document andmake edits to it. These documents work exactly like physical doc-uments in a Checkpoint Engage engagement.
- 122 -

- 123 -

RollforwardCheckpoint tools documents have 3 properties associated with them while doing the Roll forward.
The properties are Include, Exclude andReplace from Checkpoint Tools. The Replace fromCheckpoint Tools is the default option.
If you rollforward a Checkpoint Tools document with the default property, you will see a placeholderin the engagement that has been opted for a rollforward.
For demonstrative purpose one document each has been included and excluded, while the otherdocuments have the default property.
- 124 -

Then perform a rollforward.
- 125 -
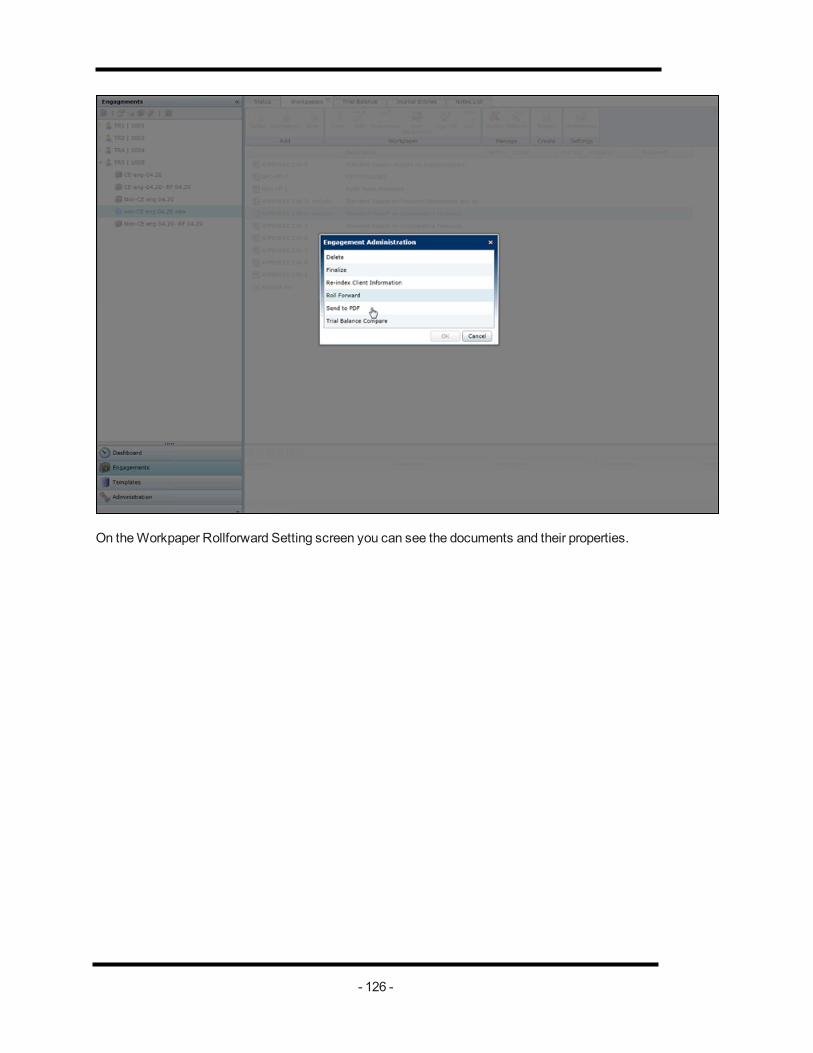
On theWorkpaper Rollforward Setting screen you can see the documents and their properties.
- 126 -

The Roll forwarded engagement include all the documents that has been set to roll forward. The doc-uments that have had the default property will appear to be placeholders. These will be populatedonly upon clicking the yellow banner.
- 127 -

Perform the necessary rollforward action and then upon clicking next you will see a screen that willsay rollforward has been completed.
You will then see the placeholders being replaced with the documents.
- 128 -
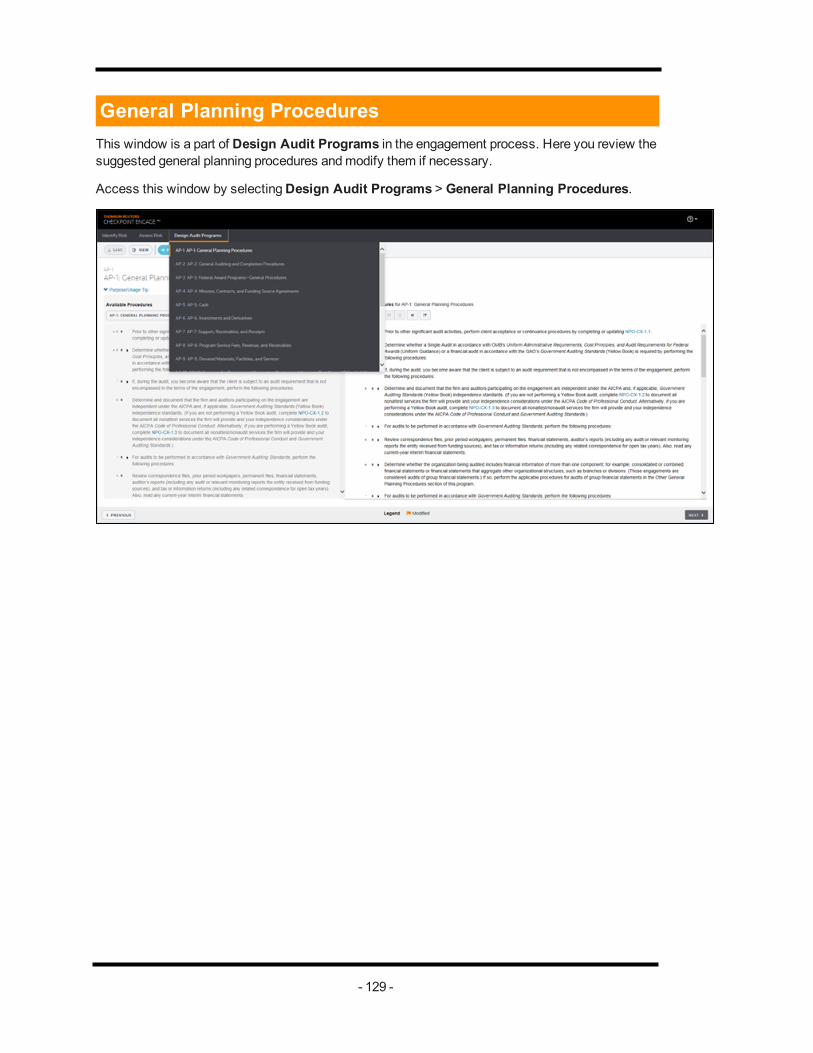
General Planning ProceduresThis window is a part of Design Audit Programs in the engagement process. Here you review thesuggested general planning procedures andmodify them if necessary.
Access this window by selectingDesign Audit Programs > General Planning Procedures.
- 129 -

General Auditing and Completion ProceduresThis window is part of Design Audit Programs tab in the engagement process. Here you reviewthe suggested audit procedures andmodify them if necessary.
Access this window by selectingDesign Audit Programs > General Auditing and CompletionProcedures.
- 130 -
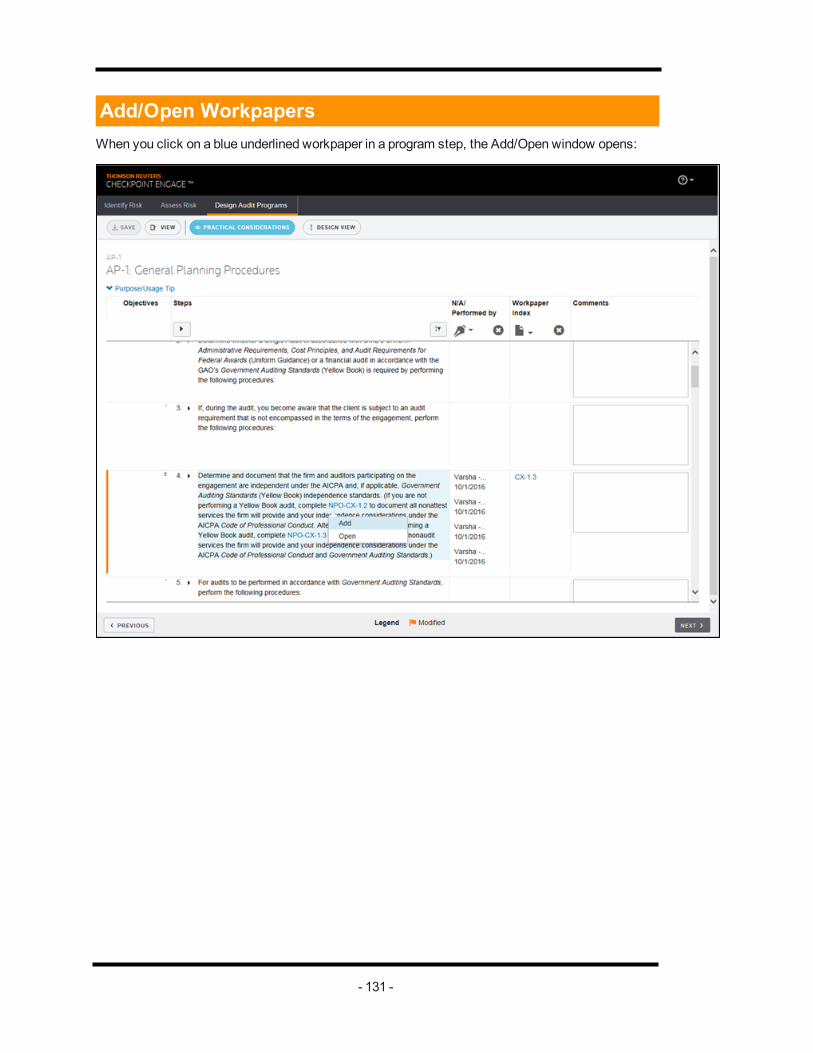
Add/Open WorkpapersWhen you click on a blue underlined workpaper in a program step, the Add/Open window opens:
- 131 -

Identified RiskAs you complete the planning forms in Identify Risk, you can add engagement any risks that couldresult in material misstatement of the financial statement.
To access this window, click theAdd Risk icon in the Identified Risks right pane.
- 132 -

Add DocumentTo add a document, select Add Document in the completion view of the audit program.
After selectingAdd Document, make a selection of theDocument Type and then aDocument.
- 133 -

Overall Financial StatementIn this window, you review the planned audit response to identified risks andmake changes if applic-able.
Access this form from theAssess Risk by selecting > Overall Financial Statements.
- 134 -
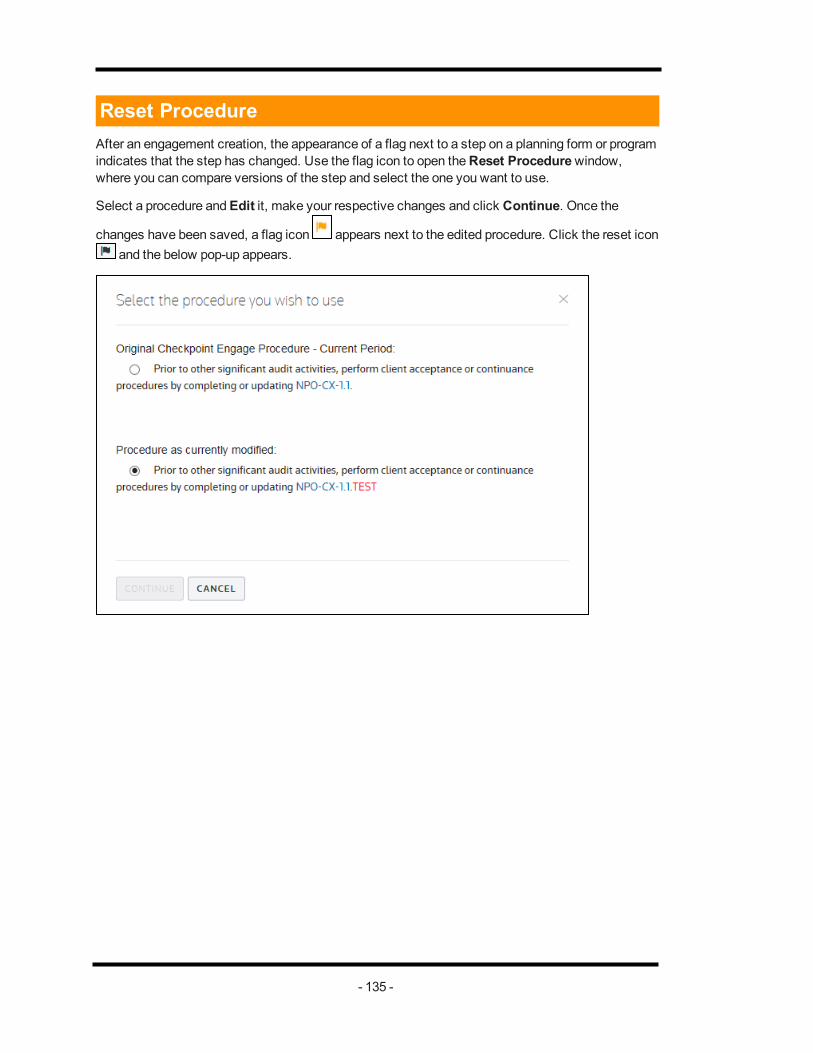
Reset ProcedureAfter an engagement creation, the appearance of a flag next to a step on a planning form or programindicates that the step has changed. Use the flag icon to open theReset Procedurewindow,where you can compare versions of the step and select the one you want to use.
Select a procedure andEdit it, make your respective changes and click Continue. Once the
changes have been saved, a flag icon appears next to the edited procedure. Click the reset iconand the below pop-up appears.
- 135 -

Training ResourcesThomson Reuters offers extensive training for many products including:
l On-site training classes
l Virtual training classes
l Self Study
Please visit support.checkpoint.tr.com/training for more details.
- 136 -

Support OverviewThomson Reuters maintains a staff of trained professionals to provide customers with solutions totechnical issues and information about our products.
Technical Support Numbers
Telephone (800) 431-9025
Internet support.checkpoint.tr.com
Information Needed
Please be at your computer when you call and be prepared to give the following information (whenapplicable):
l Application information
l The exact wording of any messages that appeared on your screen
l What happened and what you were doing when the problem occurred
l How you tried to solve the problem
l System information
l Windows Operating System andOffice versions
l Network Operating System
l The type of hardware that you are using, including network hardware
Note: When submitting requests via e-mail, please be sure that the above information is includedwith the inquiry.
- 137 -
AmountUse amounts from the financial statements to be audited or the trial balance from which those fin-ancial statements will be prepared. If not available, use annualized amounts from themost recentinterim financial statements. For revenue, use an annualized amount even if the audit period isshorter than a year.
When current amounts are unavailable, significant audit adjustments are expected, or significantchanges in the entity's circumstances indicate that current amounts are not representative of theentity's results of operations or financial position, use historical averages based on the past two orthree years.
Assessed Risk of Material MisstatementThe assessed risk of material misstatement (RMM) is the product of inherent risk (IR) and controlrisk (CR). RMM = IR x CR.
Audit ApproachWhen selecting an audit approach to respond to your risk assessment, consider the following:
l Limited Procedures - Preliminary analytical procedures, other risk assessment pro-cedures, and final analytical procedures are considered sufficient and no audit pro-gram will be created for the audit area. This approach is not appropriate for significantaudit areas.
l Basic Procedures - The audit program for the area will include primarily substantiveanalytical procedures and certain tests of details required by auditing standards or reg-ulations. This approach ordinarily is not appropriate to respond to a fraud risk or othersignificant risk.
l Extended Procedures - The audit program for the area will include the basic pro-cedures plus procedures for additional assurance related to assertions for which youindicated there is a high risk of material misstatement (or moderate risk of materialmisstatement if fraud or other significant risks exist).
BenchmarkAuditors generally determine planningmateriality by applying a percentage to a benchmark amountfrom the financial statements. When selecting a benchmark, consider the following:
l Elements of financial statements (for example, assets, liabilities, equity, income, andexpenses) andGAAP financial statement measures (for example, financial position,financial performance, and cash flows).
l Nature of the entity and the industry in which it operates.
l Size of the entity, nature of its ownership, and the way it is financed.
- 138 -

l Focus of users’ attention for the particular entity on particular financial statementitems (for example, for internet companies, users have tended to focus more on rev-enues than earnings).
Examples of benchmarks that might be appropriate depending on the nature and circumstances ofthe entity include total revenue, total assets, gross profit, income from continuing operations beforetax, other categories of reported income, and net assets. For many nonpublic companies, totalassets or revenue provides a sound benchmark. For public companies, income from continuingoperations before taxes may be appropriate (but not when earnings are volatile). Though ter-minology may differ, comparable items are used as benchmarks for nonprofit organizations, gov-ernmental entities, and entities in other types of industries.
Control RiskControl risk (C/R) is the risk that amisstatement that could occur in a relevant assertion and thatcould bematerial, either individually or when aggregated with other misstatements, will be not pre-vented or detected on a timely basis by the entity’s internal control.
Factor 1Factor (applied to the benchmark to arrive at planning materiality)
When planningmateriality is not determined based on PPC’s table, it is calculated by multiplyingthe chosen benchmark by a factor. Selection of the appropriate factor (or percentage) is basedsolely on your judgment about the client and its circumstances. The following are examples ofbenchmarks and factors that often produce realistic amounts for planningmateriality:
l Gross profit: 1% - 2%
l Income from continuing operations before taxes: 5%
l Pretax income: 5% - 10%
l Net income: 3% - 5%
l Equity: 1% - 2%
Though terminology may differ, comparable items are used as benchmarks and factors for nonprofitorganizations, governmental entities, and entities in other types of industries.
Factor 2Factor (applied to planning materiality to arrive at tolerable misstatement when “lowerlevel of planning materiality” is chosen).
Apply a factor necessary to achieve the desired level of PerformanceMateriality/Tolerable Mis-statement for the item. This is based on auditor judgment and is a combined factor to adjust Plan-ningMateriality at the financial statement level to PerformanceMateriality/Tolerable Misstatementfor the item. If desired, PlanningMateriality for the item can be documented in the Comment icon atthe end of the applicable row.
- 139 -

Inherent RiskInherent risk (I/R) is the susceptibility of a relevant assertion to amisstatement that could bemater-ial, either individually or when aggregated with other misstatements, assuming there are no relatedcontrols.
Linkage ViewAllows you to simultaneously view both your identified risks and your audit response by assertion,then tailor your audit program as needed.
Displays and documents the linkage between your identified risks and your selected audit steps, asrequired by auditing standards. An auditor’s response to an identified risk typically consists of acombination of audit procedures – there typically is not a one-to-one relationship between an iden-tified risk and a single audit step.
Delete this text and replace it with your own content.
Lower Level of Planning MaterialityIn addition to determiningmateriality at the financial statement level, determine whether there areany financial statement accounts, transaction classes or disclosures for which a lower planningmateriality amount is appropriate based on user perceptions of the particular items (for example,legal or regulatory matters, related party transactions, management compensation, key industry dis-closures, or subsidiaries or divisions that are separately disclosed). Whenmaking the determ-ination, consider:
l Whether accounting standards, laws, or regulations affect users’ expectations regard-ing themeasurement or disclosure of certain items.
l The key disclosures in relation to the industry and the environment in which the entityoperates (for example, research and development costs for a pharmaceutical com-pany).
l Whether attention is focused on the financial performance of a particular aspect of theentity's business (for example, a newly acquired business).
Method for Calculating Planning MaterialityThis worksheet computes planningmateriality based on a table that applies a sliding scale per-centage to total assets or total revenue, which the authors believe is suitable for the circumstancesof many nonpublic companies. If you want to base planningmateriality on an amount other thantotal assets or total revenue or apply a percentage other than those provided in the table, selectOther appropriate base.
Other Substantive Procedures RiskOther substantive procedures risk is the risk that related substantive procedures besides sampling,such as analytical procedures, will fail to detect amaterial misstatement. This risk assessment is
- 140 -

inversely related to the assurance provided by the other substantive procedures (that is, themoreeffectively the other procedures contribute to addressing the same assessed risks as the samplingprocedure, the lower the risk assessment). A lower risk assessment results in a lower sample size.
Performance Materiality/Tolerable MisstatementPerformancemateriality is an amount less thanmateriality for the financial statements as a whole(i.e., planningmateriality) to reduce to an appropriately low level the probability that the aggregate ofuncorrected and undetectedmisstatements exceeds materiality for the financial statements as awhole. Tolerable misstatement is the application of performancemateriality to a particular auditsampling procedure andmay be the same amount or an amount smaller than performancemater-iality. For purposes of this audit approach, which is based onMUS sampling, the same amount isused for performancemateriality and tolerable misstatement.
Professional standards do not discuss precisely how performancemateriality/tolerable mis-statement should be calculated. The approach used in this worksheet is to determine performancemateriality/tolerable misstatement as a percentage of planningmateriality. The percentage used isbased on your expectation of uncorrected and undetectedmisstatements. Using this approach, acommon rule of thumb is to calculate performancemateriality/tolerable misstatement as a fractionbetween 50% and 75% of planningmateriality, with the percentage being increased from 50% asthe likelihood of uncorrected detectedmisstatements decreases.
Planning MaterialityWhen establishing the overall strategy for the audit, you should determine amateriality level for thefinancial statements taken as a whole. The preliminary judgment about materiality, generallyreferred to as planningmateriality, is commonly determined by applying a percentage to a bench-mark amount from the financial statements.
Practical ConsiderationsDesigned to provide useful advice to consider when applying specific audit steps. It is not neces-sary to initial and date the practical considerations. For ease of review, practical considerationsmay be hidden or made visible by clicking the “Practical Considerations” button on the toolbar.
Relevant Assertion LevelFor audit areas that are not significant, however, or for significant areas where you have not iden-tified any specific risks, it may be appropriate to document the risk assessment for the audit area asa whole. If that is done, the risk assessment is assumed to be the same for all assertions andshould be the highest level of risk for any assertion in the area. Exercise caution when documentingthe assessment at the audit area level. Failure to consider the level of risk related to each assertioncould result in an inappropriate audit response to risk.
Risk FactorThe risk factor corresponds to levels for the risk of incorrect acceptance. By default, it is determ-ined from the table below based on your assessments of the risk of material misstatement for the
- 141 -

audit area and assertion being tested and other substantive procedures risk. Risk factors rangefrom 3.0 to 0.9, which is analogous to a range of 5% to 40% of the risk of incorrect acceptance.
Risk of Material MisstatementAssessment of Other Substantive ProceduresRisk
High Moderate Low
High 3.0 2.3 1.9
Moderate 2.3 1.6 1.2
Low 1.9 1.2 0.9
Use of the table permits you to hold audit risk to an appropriately low level while adjusting the levelof the risk of incorrect acceptance in response to the other assessed levels of risk, and permits youto adjust sample size to various combinations of assessed risk levels.
Significant Audit AreaA “significant audit area” is an audit area that contains a significant transaction class, amaterialaccount balance, requires significant disclosures, or contains a fraud risk or other significant risk.
Significant RiskA significant risk is one that requires special audit attention. An identified fraud risk is a significantrisk.
Stratification MultiplierIf it is impractical to stratify after identifying individually significant items, the sample size should beincreased. The AICPA Sampling Guide notes that sample sizes typically increase by 10% to 50%in such cases, but an adjustment of 100% ormoremay be needed when there is extreme variabilityin the characteristic of audit interest. The authors recommend the sample size be increased by 20%if stratification is not practical and there is not a significant variation in the items being sampled.Consequently, a factor of 1.2 is applied by default. Youmay change the factor to another value ifyou determine it is necessary to increase the sample size by a different percentage.
StratifiedThis sampling approach depends on dividing the items being tested into at least three groups: indi-vidually significant items, and an upper and a lower group of remaining items. A useful approach tostratification is to divide the remaining population after individually significant items into two groupsbased on the average item amount. Then, allocate the sample size two-thirds to the upper stratum(items above the average) and one-third to the lower stratum (items below the average).
If it is impractical to stratify after identifying individually significant items, the sample size isincreased by 20%. However, the AICPA Sampling Guide notes that while sample sizes typicallyincrease by 10% to 50% if the sample is not stratified, an adjustment of 100% ormoremay beneeded when there is extreme variability in the characteristic of audit interest. If desired, youmayapply a factor other than 20% by clicking the preview icon to view the sample size calculation.
- 142 -

Trivial MisstatementsSome auditors set an amount below which detectedmisstatements need not be accumulated onthe summary of audit differences (often referred to as adjustments passed at the workpaper level).This amount should be determined such that any misstatements either individually or when aggreg-ated with other misstatements, would be clearly immaterial to the financial statements, after thepossibility of further undetectedmisstatements is considered. A space has been provided for you todocument, if desired, the amount of misstatements that will be passed at the workpaper level.
- 143 -

Index
A
Assess the effects of risk 54
I
Identify Risk 47
O
Overall Financial Statement 55
R
Risk 47, 54
- 144 -