Chapter 5 Program Entry - Rainmaster
31
Rain Master Irrigation Systems DX2 User Manual Chapter 5:Program Entry Page 89 Chapter 5 Program Entry The Evolution DX2 controller allows the user to enter program data for up to 12 individual programs. A program provides a way of grouping stations with similar irrigation characteristics so that the start/stop of irrigation cycles can be automatically controlled. All programs must contain the following basic information: The station number(s) associated with the program The time(s) during the day when the program is executed (start time) The days of the week when the program is to be executed (water days) The amount of time each station remains on (station run time) Warning: Operation of a program may be altered depending upon the setup options selected. Refer to Chapter 4: Setup for additional details. Chapter 5: Program Entry
-
Upload
khangminh22 -
Category
Documents
-
view
1 -
download
0
Transcript of Chapter 5 Program Entry - Rainmaster

Rain Master Irrigation Systems DX2 User Manual
Chapter 5:Program Entry Page 89
Chapter 5 Program Entry The Evolution DX2 controller allows the user to enter program data for up to 12 individual programs. A program provides a way of grouping stations with similar irrigation characteristics so that the start/stop of irrigation cycles can be automatically controlled.
All programs must contain the following basic information:
The station number(s) associated with the program
The time(s) during the day when the program is executed (start time)
The days of the week when the program is to be executed (water days)
The amount of time each station remains on (station run time)
Warning: Operation of a program may be altered depending upon the setup options selected. Refer to Chapter 4: Setup for additional details.
Cha
pter
5:
Prog
ram
Ent
ry

Rain Master Irrigation Systems DX2 User Manual
Page 90 Chapter 5: Program Entry
Example of Program Execution
The following example demonstrates the actions which occur when a program runs. This program uses the factory default setup options defined in Chapter 4, Table 1 and a 14 day (two week) cycle.
Assume that Program 1 contains the following information:
Table 2: Program 1 Watering Schedule
WATER DAYS
SUN MON TUE WED THU FRI SAT Week 1 X X X Week 2 X X X X
START TIMES
Start Time 1 1:00 AM
Start Time 2 4:00 AM
RUN TIMES
Station 1 10 min
Station 2 15 min
Station 3 20 min

Rain Master Irrigation Systems DX2 User Manual
Chapter 5:Program Entry Page 91
Assume the current date/time is Monday 1:00 AM of Week 1. Execution of program 1 begins.
Figure 81: Program 1
The F1=MAIN MENU option allows the user to go to the main menu while the program continues to run. The F3=NEXT option advances the station number to the next station in the program.
Upon program completion for the 1:00 AM start time, the following events would have occurred:
1:00 AM Master Valve On Station 1 ON 1:10 AM Station 1 OFF Station 2 ON 1:25 AM Station 2 OFF Station 3 ON 1:45 AM Station 3 OFF Master Valve Off
At 4:00 AM the program would repeat itself in an identical fashion.
On Wednesday of Week 1, the irrigation cycle would repeat, same as Monday. Program execution would occur on the Week 1 and Week 2 specified days. The net effect of program 1 would be to irrigate every other day, and two times each scheduled water day, forever.
PGM 1 STATION 1 ON 00:01:30 MV=ON |F1|=MAIN MENU |F3|=NEXT
Rain Master Irrigation Systems DX2 User Manual
Page 92 Chapter 5: Program Entry
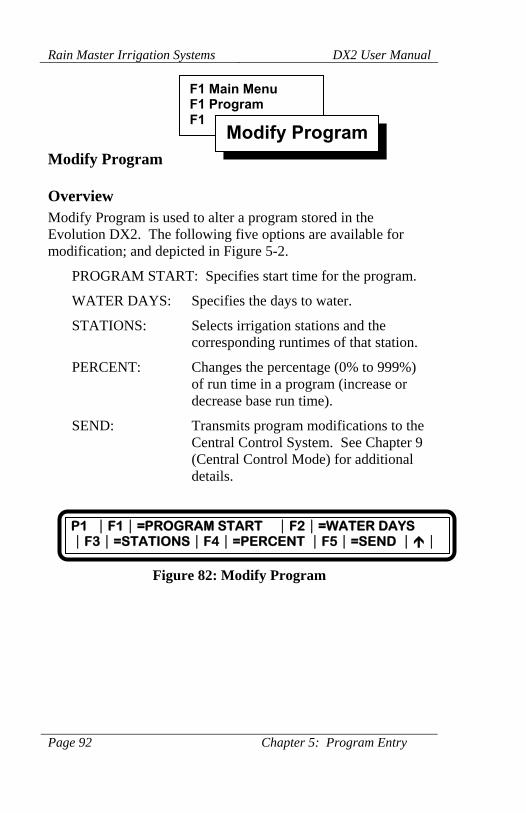
Modify Program
Overview Modify Program is used to alter a program stored in the Evolution DX2. The following five options are available for modification; and depicted in Figure 5-2.
PROGRAM START: Specifies start time for the program.
WATER DAYS: Specifies the days to water.
STATIONS: Selects irrigation stations and the corresponding runtimes of that station.
PERCENT: Changes the percentage (0% to 999%) of run time in a program (increase or decrease base run time).
SEND: Transmits program modifications to the Central Control System. See Chapter 9 (Central Control Mode) for additional details.
Figure 82: Modify Program
F1 Main Menu F1 Program F1
Modify Program
P1 |F1|=PROGRAM START |F2|=WATER DAYS |F3|=STATIONS|F4|=PERCENT |F5|=SEND | |
Rain Master Irrigation Systems DX2 User Manual
Chapter 5:Program Entry Page 93
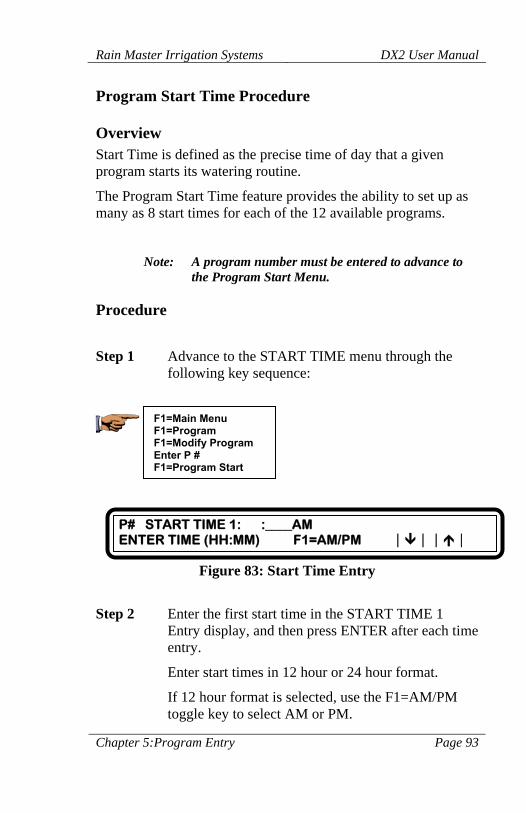
Program Start Time Procedure
Overview Start Time is defined as the precise time of day that a given program starts its watering routine.
The Program Start Time feature provides the ability to set up as many as 8 start times for each of the 12 available programs.
Note: A program number must be entered to advance to
the Program Start Menu.
Procedure
Step 1 Advance to the START TIME menu through the following key sequence:
Figure 83: Start Time Entry
Step 2 Enter the first start time in the START TIME 1
Entry display, and then press ENTER after each time entry.
Enter start times in 12 hour or 24 hour format.
If 12 hour format is selected, use the F1=AM/PM toggle key to select AM or PM.
F1=Main Menu F1=Program F1=Modify Program Enter P # F1=Program Start
P# START TIME 1: :____AM ENTER TIME (HH:MM) F1=AM/PM | || |

Rain Master Irrigation Systems DX2 User Manual
Page 94 Chapter 5: Program Entry
Note: To use Continuous Cycle rather than Start Times, go to Setup Programs, Cycle Mode. Refer to Chapter 4: Setup.
Step 3 With the first start time entered, the display will advance to the Start Time 2 display. Enter the second start time, if required.
Repeat as necessary to enter up to eight start times, or press the down arrow key to advance through the remaining start time menus.
Upon completion, the Modify Program Option menu will be displayed.
This completes the Program Start Time Procedure.

Rain Master Irrigation Systems DX2 User Manual
Chapter 5:Program Entry Page 95
Watering Day Options
The Water Day options screen offers three modes of watering routines to accommodate virtually any configuration of irrigation watering systems.
The three available options are:
14 DAY CYCLE - Creates a program utilizing a two week water cycle.
SKIP BY DAY - Selects a number of days between
watering.
31 DAY CYCLE - Creates a program utilizing a one month water cycle.
Water Days Procedure (14 Day Cycle)
Overview The F1=14 DAY CYCLE option provides the ability to select the watering days for a two week period. When programmed, the 14 Day Cycle will water as specified for two weeks and will continue to do so in the same manner in all subsequent 2 week periods. The water days will remain consistent indefinitely until the program is changed.

Rain Master Irrigation Systems DX2 User Manual
Page 96 Chapter 5: Program Entry
Procedure Step 1 Advance to the F1=14 DAY CYCLE selection menu
through the following key sequence:
Figure 84: Water Days Options
Note: NOW=F1 indicates the currently selected option.
Step 2 Select F1=14 DAY CYCLE to display the following Week 1 Entry screen, as depicted in Figure 5-5.
The first line of the display indicates: the program number (P#), the week 1 water days which have been programmed, the current day (TODAY:), and the current week (either WK1 or WK2).
The current week display located in the upper right corner indicates the status of the 14-DAY CYCLE. If WK1 is displayed, WK2 will not appear until week 2 starts. Each new week starts on Sunday 12:00 AM. This feature easily identifies the week in which the program is currently running at any given time.
Figure 85: Week 1 Entry
F1=Main Menu F1=Program F1=Modify Program Enter P # F2=Water Days
P1 |F1|=14 DAY CYCLE |F2|=SKIP BY DAY |F3|=31 DAY CYCLE NOW=F1 | |
P# : NONE TODAY: MO WK1 ENTER WEEK 1 WATER DAYS|SUN|- |SAT|| || |
Rain Master Irrigation Systems DX2 User Manual
Chapter 5:Program Entry Page 97
Use the Day Pad keys and the Enter key to select the days of the week.
Example: Select Sunday and Monday as water days, press the SUN key followed by the MON key and then press the Enter key. SU and MO appear in the display.
To delete a day, press the day key and verify that it blinks, and then press ENTER, the water day is removed.
Step 3 Enter the water days for Week one. The entries will blink on and off until the ENTER key is pressed.
Step 4 When complete: press the Down Arrow key to advance to Week 2.
Enter the desired water days for Week 2, and then press the Down Arrow key to return to the Modify Program option display menu.
This completes the 14 DAY WATER CYCLE Procedure.
Rain Master Irrigation Systems DX2 User Manual
Page 98 Chapter 5: Program Entry
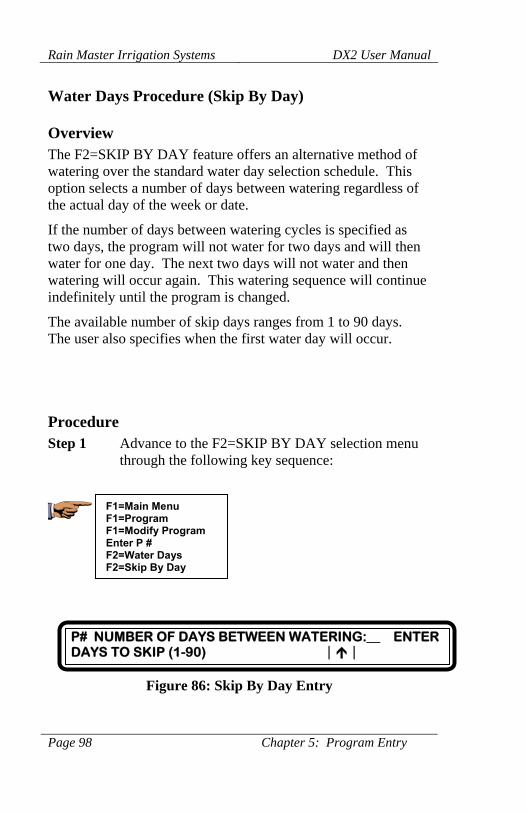
Water Days Procedure (Skip By Day)
Overview The F2=SKIP BY DAY feature offers an alternative method of watering over the standard water day selection schedule. This option selects a number of days between watering regardless of the actual day of the week or date.
If the number of days between watering cycles is specified as two days, the program will not water for two days and will then water for one day. The next two days will not water and then watering will occur again. This watering sequence will continue indefinitely until the program is changed.
The available number of skip days ranges from 1 to 90 days. The user also specifies when the first water day will occur.
Procedure Step 1 Advance to the F2=SKIP BY DAY selection menu
through the following key sequence:
Figure 86: Skip By Day Entry
F1=Main Menu F1=Program F1=Modify Program Enter P # F2=Water Days F2=Skip By Day
P# NUMBER OF DAYS BETWEEN WATERING:__ ENTER DAYS TO SKIP (1-90) | |

Rain Master Irrigation Systems DX2 User Manual
Chapter 5:Program Entry Page 99
Step 2 Enter the number of days between watering and then press ENTER. The number of days must be between 1 and 90.
Step 3 Enter the number of days until the first watering and then press ENTER. The number of days before watering must be between 0 and 90 days.
Figure 87: Start Water Day
To start watering today, enter 0 (zero) as the number of days until first watering, and then press ENTER.
The controller returns to the Modify Program Option display menu.
This completes the SKIP BY DAY procedure.
P# DAYS UNTIL FIRST WATER: __ ENTER DAYS (1-90), 0=START TODAY | |

Rain Master Irrigation Systems DX2 User Manual
Page 100 Chapter 5: Program Entry
Water Days Procedure (31 Day Cycle)
Overview The F3=31 DAY CYCLE option provides the ability to select the watering dates (from 1 - 31) for a monthly period. When programmed, the 31 Day Cycle will water on the dates specified for the month period and will continue to do so in the same manner in all subsequent months. The watering routine will remain indefinitely until the program is changed.
Procedure Step 1 Advance to the F3=31 DAY CYCLE selection menu
through the following key sequence:
Figure 88: 31 Days Cycle Entry
Step 2 Enter water dates 1 through 8 and then press
ENTER. To delete a date, press the corresponding number key and verify that it blinks, and then press ENTER.
Step 3 Press the Down Arrow key to advance to the next 8 dates of the month (9-16).
F1=Main Menu F1=Program F1=Modify Program Enter P # F2=Water Days F3=31 Day Cycle
P# : NONE ENTER DAYS 1 – 8 |1|- |8| | || |
Rain Master Irrigation Systems DX2 User Manual
Chapter 5:Program Entry Page 101
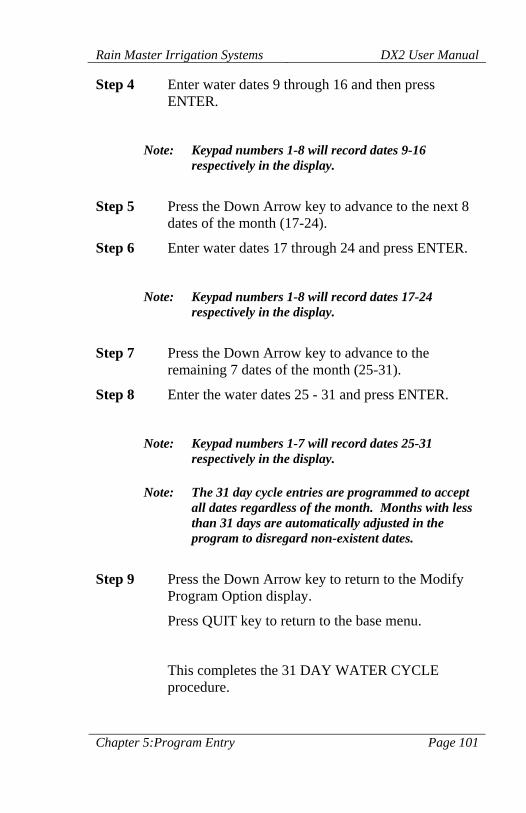
Step 4 Enter water dates 9 through 16 and then press ENTER.
Note: Keypad numbers 1-8 will record dates 9-16
respectively in the display.
Step 5 Press the Down Arrow key to advance to the next 8 dates of the month (17-24).
Step 6 Enter water dates 17 through 24 and press ENTER.
Note: Keypad numbers 1-8 will record dates 17-24
respectively in the display.
Step 7 Press the Down Arrow key to advance to the remaining 7 dates of the month (25-31).
Step 8 Enter the water dates 25 - 31 and press ENTER.
Note: Keypad numbers 1-7 will record dates 25-31
respectively in the display.
Note: The 31 day cycle entries are programmed to accept all dates regardless of the month. Months with less than 31 days are automatically adjusted in the program to disregard non-existent dates.
Step 9 Press the Down Arrow key to return to the Modify Program Option display.
Press QUIT key to return to the base menu.
This completes the 31 DAY WATER CYCLE procedure.

Rain Master Irrigation Systems DX2 User Manual
Page 102 Chapter 5: Program Entry
Stations
Overview Every valid program must have one or more stations assigned to it. Additionally, each station must have a programmed runtime (the amount of time that the station is active). The Evolution DX2 Controllers can be configured from 6 stations up to 48 stations in increments of 6 stations. The number of stations available will be displayed in the select station number screen, as depicted in Figure 5-10.
Stations are specified through the Run Time options menu, which selects the station number and its run time.
Procedure Step 1 Advance to the Run Time Options selection menu
through the following key sequence:
Figure 89: Stations
This screen lists which stations are active for the given program.
Step 2 Press the Down Arrow to advance to the Run Time options menu.
F1=Main Menu F1=Program F1=Modify Program Enter P # F3=Stations
P# STATIONS: NONE | || |

Rain Master Irrigation Systems DX2 User Manual
Chapter 5:Program Entry Page 103
Figure 90: Station Run Time Options
The Station Run Time Options are displayed.
There are two options:
Station Run Time - Programs individual station run times.
Quick Station Programming - Enter the same
run times for groups of stations.
Station Run Time Option
Programming Individual Stations with Different Run Times
Procedure Step 1 Advance to the Station Number Entry screen
through the following key sequence:
P # |F1|=STATION RUN TIME |F2|=QUICK STATION PROGRAMMING | || |
F1=Main Menu F1=Program F1=Modify Program Enter P # F3=Stations Down Arrow F1=Station Run Time

Rain Master Irrigation Systems DX2 User Manual
Page 104 Chapter 5: Program Entry
Figure 91: Select Station Number
Step 2 Enter the Station Number. The number must be
between 1 and 48. Press ENTER. Note: The maximum number of stations is determined by
the total stations installed in the associated controller. The maximum number will appear on the Station Number Entry Display screen.
Step 3 Enter the Run Time in the format indicated, then Press ENTER.
Figure 92: Station Run Time Entry
The formats are HH:MM (hours: minutes) and MM:SS (minutes: seconds).
Note: Time formats may be changed for each program. Go to Setup Programs, Time Format to change the format. (Refer to chapter 4, page 12)
Step 4 The next station number is displayed. Repeat the process entering the Run Time for each station, as necessary, press ENTER after each entry.
Step 5 Press the Up Arrow key to return to the Station Number Entry menu, enter a different station number. Repeat as required.
This completes the Station Run Time Entry procedure.
P# STATION NUMBER: ___ ENTER STATION NUMBER (1-48) | |
P# STATION# RUN TIME: : ___ ENTER TIME (HH:MM) | |
Rain Master Irrigation Systems DX2 User Manual
Chapter 5:Program Entry Page 105
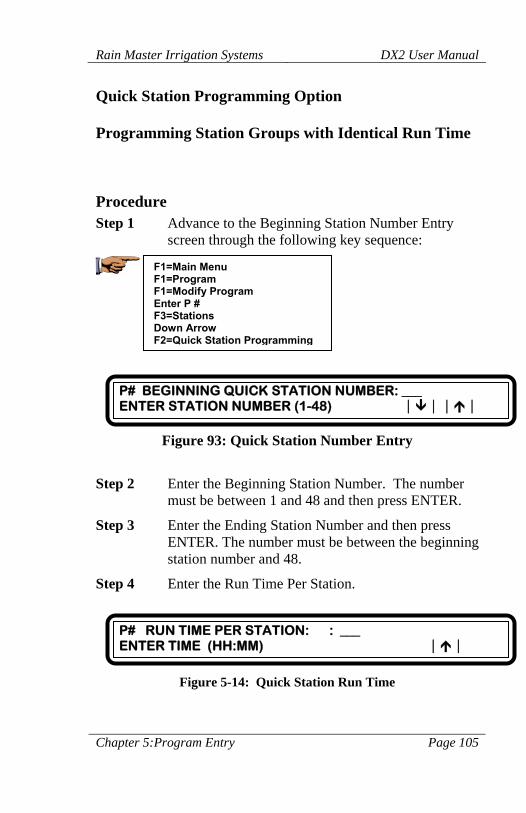
Quick Station Programming Option
Programming Station Groups with Identical Run Time
Procedure Step 1 Advance to the Beginning Station Number Entry
screen through the following key sequence:
Figure 93: Quick Station Number Entry
Step 2 Enter the Beginning Station Number. The number
must be between 1 and 48 and then press ENTER.
Step 3 Enter the Ending Station Number and then press ENTER. The number must be between the beginning station number and 48.
Step 4 Enter the Run Time Per Station.
Figure 5-14: Quick Station Run Time
F1=Main Menu F1=Program F1=Modify Program Enter P # F3=Stations Down Arrow F2=Quick Station Programming
P# BEGINNING QUICK STATION NUMBER: ___ ENTER STATION NUMBER (1-48) | || |
P# RUN TIME PER STATION: : ___ ENTER TIME (HH:MM) | |

Rain Master Irrigation Systems DX2 User Manual
Page 106 Chapter 5: Program Entry
Step 5 Press the Down Arrow to view the total run time for the entire program.
Figure 94: Quick Station Total Runtime
This completes the Quick Station Programming procedure.
Press QUIT to return to the base menu.
Px RUN TIME IS XX HOURS AND XX MINUTES | || |

Rain Master Irrigation Systems DX2 User Manual
Chapter 5:Program Entry Page 107
Percent
Overview The Percent feature provides the ability to alter the run times of all stations in a given program. Reducing the percentage factor will shorten all run times, i.e. a station run time programmed for 10 minutes would run for 5 minutes when the percentage is set to 50%. Conversely, the station would run for 20 minutes when the percentage is set to 200%.
The available percentage range is between 0 and 999%.
Procedure Step 1 Advance to the Percentage Run Time Entry screen
through the following sequence:
Figure 95: Percentage Run Time
Step 2 Enter the percentage of station run time and then
press ENTER. The percentage must be between 0 and 999.
F1=Main Menu F1=Program F1=Modify Program Enter P # F4=Percent
P# PERCENTAGE OF STATION RUN TIME: 100 ENTER PERCENTAGE (0-999) | |

Rain Master Irrigation Systems DX2 User Manual
Page 108 Chapter 5: Program Entry
Percentage Example: Assume station 1 has a runtime of 10 minutes, station 2 has a run time of 20 minutes and station 3 has a run time of 30 minutes.
Percent is used to change the run time of all three stations. For example, set the percent to 50%. The run time for station 1 becomes 5 minutes (50% of the original run time of 10 minutes), station 2 becomes 10 minutes and station 3 the run time is 15 minutes.
Change the percent to 200 percent and the run times for stations 1 through 3 become, 20, 40 and 60 minutes, respectively.
Note: Changing the percent does not change the displayed
run time station value as shown when stations are reviewed or modified. The controller automatically re-computes (adjusts for percent) when the program executes.
This completes the Percent procedure.
Press the QUIT key to return to the base menu.

Rain Master Irrigation Systems DX2 User Manual
Chapter 5:Program Entry Page 109
Send (Applies to Central Control Systems only)
Overview Send provides a warning only, to indicate that a program has been changed. When used with the Evolution Central Control System, the warning will automatically appear at the Central Computer. The Central Computer may then elect to "upload" the modified program. See Chapter 9 for additional details on Central Control operations.
Procedure Step 1 Advance to the Modify Program Option screen
through the following sequence:
Figure 96: Modify Program
Step 2 Select F5=SEND. The following message is
displayed:
Figure 97: Program Upload Request
F1=Main Menu F1=Program F1=Modify Program Enter P #
P# |F1|=PROGRAM START |F2|=WATER DAYS |F3|=STATIONS|F4|=PERCENT |F5|=SEND | |
P# PROGRAM UPLOAD REQUEST | |
Rain Master Irrigation Systems DX2 User Manual
Page 110 Chapter 5: Program Entry
When the Central Control System Computer contacts the Evolution DX2 controller, the program may be uploaded and the entry is cleared from the report list.
This completes the Send procedure.
Press the QUIT key to return to the base menu.

Rain Master Irrigation Systems DX2 User Manual
Chapter 5:Program Entry Page 111
New Program
Overview The F3=New Program feature is used to create a new controller program. The user is prompted for all necessary data required in order to create a valid program. A new program session will sequentially display the following settings:
Program Number
Day Cycle Watering Routine For Each Station (14 Day, Skip by Day, 31 Day)
Start Time For Each Station
Run Time For Each Station
All remaining parameters of the program are automatically set to the default settings. Refer to Chapter 4: Setup for a listing of all default settings.
To make any additional changes or modifications to the program, refer to the Modify Program section in this chapter.
Extensive program changes require the use of the Setup Menu as described in Chapter 4: Setup.
F1 Main Menu F1 Program F3
New Program
Rain Master Irrigation Systems DX2 User Manual
Page 112 Chapter 5: Program Entry
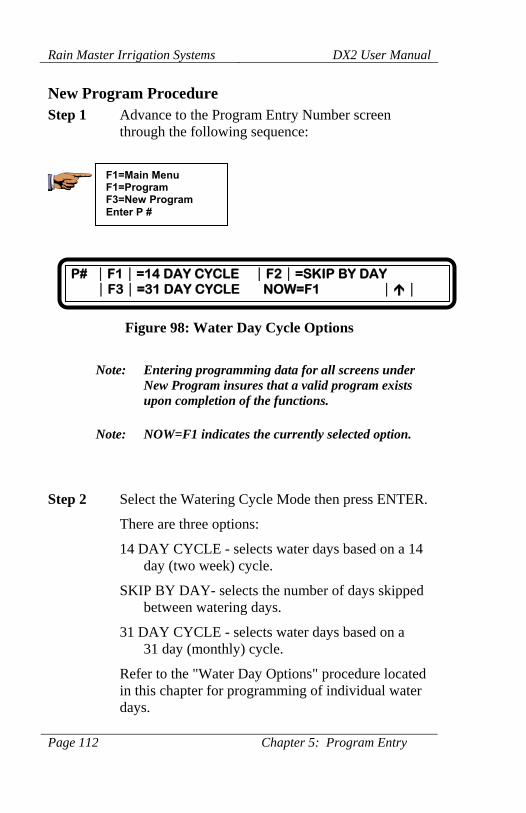
New Program Procedure Step 1 Advance to the Program Entry Number screen
through the following sequence:
Figure 98: Water Day Cycle Options
Note: Entering programming data for all screens under
New Program insures that a valid program exists upon completion of the functions.
Note: NOW=F1 indicates the currently selected option.
Step 2 Select the Watering Cycle Mode then press ENTER.
There are three options:
14 DAY CYCLE - selects water days based on a 14 day (two week) cycle.
SKIP BY DAY- selects the number of days skipped between watering days.
31 DAY CYCLE - selects water days based on a 31 day (monthly) cycle.
Refer to the "Water Day Options" procedure located in this chapter for programming of individual water days.
F1=Main Menu F1=Program F3=New Program Enter P #
P# |F1|=14 DAY CYCLE |F2|=SKIP BY DAY |F3|=31 DAY CYCLE NOW=F1 | |
Rain Master Irrigation Systems DX2 User Manual
Chapter 5:Program Entry Page 113
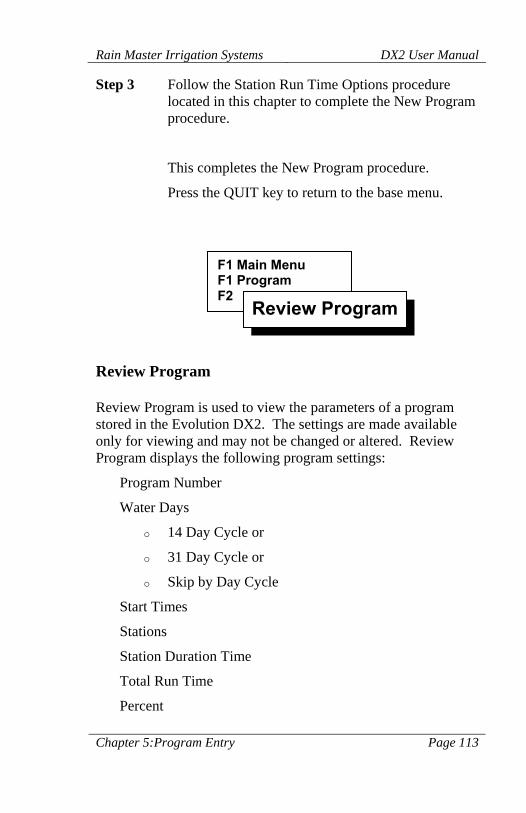
Step 3 Follow the Station Run Time Options procedure located in this chapter to complete the New Program procedure.
This completes the New Program procedure.
Press the QUIT key to return to the base menu.
Review Program
Review Program is used to view the parameters of a program stored in the Evolution DX2. The settings are made available only for viewing and may not be changed or altered. Review Program displays the following program settings:
Program Number
Water Days
o 14 Day Cycle or
o 31 Day Cycle or
o Skip by Day Cycle
Start Times
Stations
Station Duration Time
Total Run Time
Percent
F1 Main Menu F1 Program F2
Review Program

Rain Master Irrigation Systems DX2 User Manual
Page 114 Chapter 5: Program Entry
In addition to run times, many other parameters may be established on a per station basis. Use Setup Stations to establish these parameters, which include current limits, flow limits and station type.
Review Program Procedure Step 1 Advance to the Review Program View screen
through the following sequence:
Figure 99: Program Entry
Step 2 Enter the program number and then press ENTER.
The program number must be between 1 and 12.
Step 3 Review watering days.
Figure 100: Week 1 Water Days
The display shown is a 14 day cycle.
Note: It may be necessary to press the Down Arrow one or
more times to view the complete water day’s schedule.
F1=Main Menu F1=Program F2=Review Program
PROGRAM NUMBER: P # ___ ENTER PROGRAM TO BE REVIEWED (1-12) | |
P# : SU TU TH SA WATER DAYS FOR WEEK 1 | || |

Rain Master Irrigation Systems DX2 User Manual
Chapter 5:Program Entry Page 115
Step 4 Press the Down Arrow and review Start Time 1. Repeat as necessary to review additional start times.
Step 5 Press the Down Arrow and review stations for the program.
Step 6 Press the Down Arrow and review Station Duration times. Repeat as necessary to review additional run times.
Step 7 Press the Down Arrow and review total program Run Time.
Step 8 Press the Down Arrow and review program Percent.
Step 9 Press the Down Arrow to enter a new program number for review.
Step 10 Press the Up Arrow to return to the previous menu. Repeat as necessary.
This completes the Review Program procedure.
To make any changes, refer to the Modify Program section.
Press QUIT to return to the base menu.

Rain Master Irrigation Systems DX2 User Manual
Page 116 Chapter 5: Program Entry
Clear Program
Clear Program is used to remove an existing program that is no longer used or a program that is to be replaced by a new program. All program start, station run times, and water days are removed. Percentage is reset to 100%.
Note: Clear Program does not change the Setup
information for the program.
Clear Program Procedure Step 1 Advance to the Clear Program Number screen
through the following sequence:
Figure 101: Program Clear Number
Step 2 Enter the program number to be cleared.
Step 3 Press ENTER to clear the program.
Step 4 To clear additional programs, repeat entry of the program numbers.
This completes the Clear Program procedure.
Press QUIT to return to the base menu.
F1 Main Menu F1 Program F4
Clear Program
F1=Main Menu F1=Program F4=Clear Program
PROGRAM NUMBER: P ___ ENTER PROGRAM TO BE CLEARED (1-12) | |

Rain Master Irrigation Systems DX2 User Manual
Chapter 5:Program Entry Page 117
Program On/Off
The Program On/Off feature is an extremely useful tool for testing, running or stopping any given program. This front panel touch key is a toggle action switch, which when pressed the first time, acts upon the program accordingly (turns on or off) and when pressed again restores the program to its original state.
The following lists various situations when the Program On/Off features might be used:
Unexpected rainfall - When a program is watering during a sudden rainfall uses the Program On/Off to stop watering. The program will remain off until its next regularly scheduled water day and start time.
Excessive hot, dry weather conditions - When a program is set to water every other day, additional watering may be required. Activate the Program On/Off to water on the off day. The program will start immediately and run through its normal routine until complete. When complete, the program will resume its normal watering days.
Testing a program - A program that is set to water in upcoming days may be immediately tested to evaluate its performance. When complete, the program will start at its regular time.
Program On/Off
Rain Master Irrigation Systems DX2 User Manual
Page 118 Chapter 5: Program Entry
Program On/Off Procedure
Stopping a program
Note: The Program On/Off feature is only effective on
existing programs. If no programs exist, the Program On/Off is inoperative.
This procedure assumes that a program is currently running.
Step 1 A running program will be displayed on the base screen indicating the program number, station number, and the station runtime remaining.
Step 2 Press the Program On/Off key. Enter the program number and then press ENTER.
Note: Multiple programs may be simultaneously turned
off by entering 0 followed by ENTER.
Step 3 The program will stop and the base menu will be displayed.
Step 4 The program will resume operation on its next scheduled water day and start time.

Rain Master Irrigation Systems DX2 User Manual
Chapter 5:Program Entry Page 119
Starting a Program Step 1 Verify a valid program is available by observing the
base screen. All valid programs will be listed in the Valid Pgm: section.
Step 2 Press the Program On/Off key. Enter the program number and then press ENTER.
The program start time and water day will be disregarded and the program will immediately start running.
The complete program watering routine will be executed. When completed, the program will resume on its next regularly scheduled water day and start time.
This completes the Program On/Off procedure.
Press the QUIT key to return to the base menu.