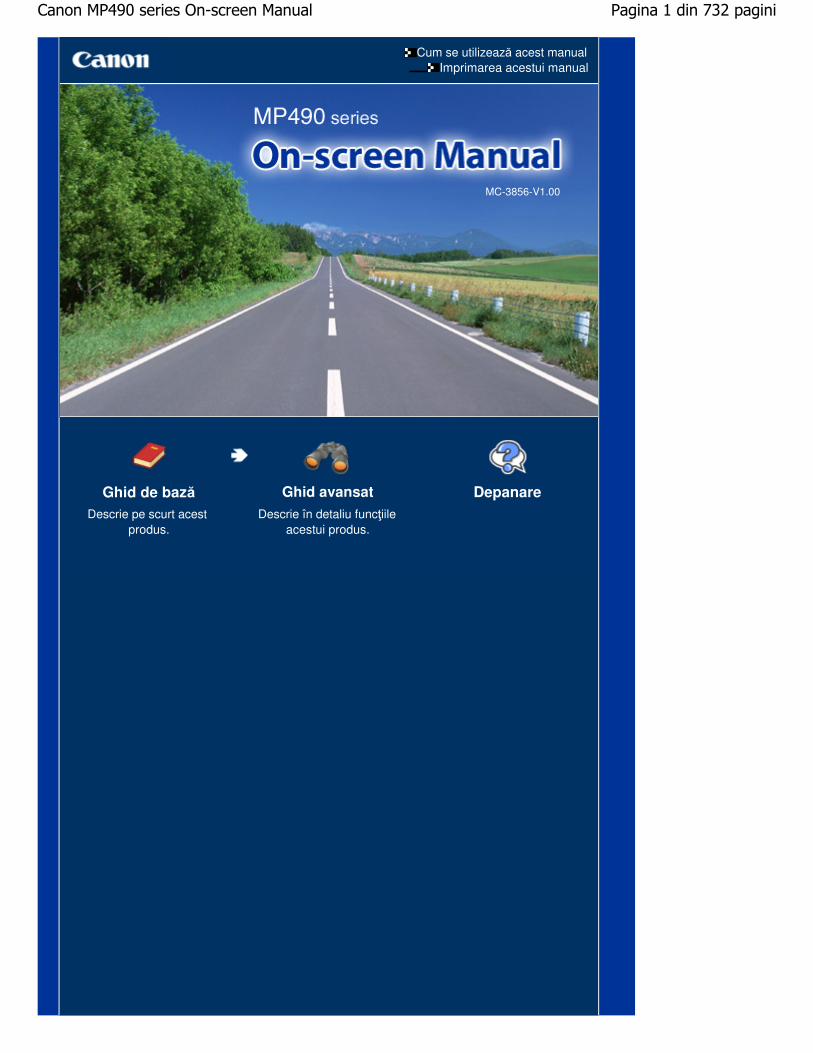
Canon MP490 series On-screen Manual
732
Cum se utilizează acest manual Imprimarea acestui manual MC-3856-V1.00 Ghid de bază Descrie pe scurt acest produs. Ghid avansat Descrie în detaliu funcţiile acestui produs. Depanare Pagina 1 din 732 pagini Canon MP490 series On-screen Manual
-
Upload
khangminh22 -
Category
Documents
-
view
0 -
download
0
Transcript of Canon MP490 series On-screen Manual
Cum se utilizează acest manualImprimarea acestui manual
MC-3856-V1.00
Ghid de bazăDescrie pe scurt acest
produs.
Ghid avansat
Descrie în detaliu funcţiileacestui produs.
Depanare
Pagina 1 din 732 paginiCanon MP490 series On-screen Manual

Cum se utilizează acest manualImprimarea acestui manual
MP-3377-V1.00
Ghid avansat
Cuprins
Privire de ansamblu asupra aparatului
Componentele principale
Cum să navigaţi prin meniuri pe LCD
Imprimarea de pe o cartelă de memorie
Imprimarea fotografiilor salvate pe o cartelă dememorie
Utilizarea diferitelor funcţii
Introducerea cartelei de memorie
Copierea
Realizarea de copii
Utilizarea diferitelor funcţii de copiere
Imprimarea formularelor şablon cum arfi hârtia de caiet
Imprimarea pe hârtie de caiet
Scanare
Salvarea datelor scanate pe computer
Imprimarea de pe computeruldumneavoastră
Imprimarea fotografiilor (Easy-PhotoPrint EX)
Imprimarea documentelor (Windows)
Imprimarea documentelor (Macintosh)
Alte utilizări
Setările aparatului
Aplicaţii software utile
Încărcarea hârtiei/documentelororiginale
Încărcarea hârtiei
Încărcarea documentelor originale
Întreţinere de rutină
Când imprimarea devine ştearsă sau culorilesunt incorecte
Înlocuirea unui cartuş FINE
Curăţarea rolei de alimentare cu hârtie
Anexă
Limitări legale privind utilizarea produsuluidumneavoastră şi utilizarea imaginilor
Sfaturi pentru utilizarea aparatuluidumneavoastră
Pagina 2 din 732 paginiMP490 series Ghid de bază

Ghid avansat Depanare
Cuprins > Privire de ansamblu asupra aparatului
Privire de ansamblu asupra aparatului Această secţiune prezintă denumirile componentelor aparatului şi descrie operaţiile de bază pe caretrebuie să le cunoaşteţi înainte de a-l utiliza.
Componentele principale
Vedere frontalăVizualizare din spateVizualizare din interiorPanoul de operare
Cum să navigaţi prin meniuri pe LCD
Selectarea meniurilor de pe ecranul meniului superior
În partea superioară a paginii
Pagina 3 din 732 paginiPrivire de ansamblu asupra aparatului

Ghid avansat Depanare
Cuprins > Privire de ansamblu asupra aparatului > Componentele principale
Componentele principale Vedere frontalăVedere din spateVedere din interiorPanoul de operare
Vedere frontală
(1) Capacul pentru documenteDeschideţi pentru a încărca un document original pe sticla plată.
(2) Suportul pentru hârtieRidicaţi-l şi înclinaţi-l pe spate pentru a încărca hârtia în tava din spate.
(3) Ghidajele hârtieiDeplasaţi-le prin glisare pentru a le alinia cu ambele părţi ale stivei de hârtie.
(4) Tava din spateÎncărcaţi hârtie de diferite dimensiuni şi de diferite tipuri ce pot fi utilizate de aparat. Două sau mai multe foide aceeaşi dimensiune şi de acelaşi tip de hârtie pot fi încărcate simultan şi preluate automat una câte una.
Consultaţi Încărcarea hârtiei simple/fotografice .
(5) LCD (Ecran cu cristale lichide)Afişează mesajele, selecţiile meniului şi starea de operare. De asemenea, puteţi să examinaţi fotografiile peLCD înaintea imprimării.
Notă Ecranul LCD se stinge dacă aparatul nu este utilizat timp de aproximativ cinci minute.Pentru a reporni ecranul, apăsaţi orice buton cu excepţia butonului ACTIVARE (ON) sauexecutaţi operaţia de imprimare.
(6) Panoul de operare
Pagina 4 din 732 paginiComponentele principale

Utilizaţi-l pentru a modifica setările sau pentru a manevra aparatul.
Consultaţi Panoul de operare.
(7) Tava de ieşire a hârtieiSe deschide automat la iniţierea imprimării sau copierii şi foaia de hârtie imprimată este evacuată.
(8) Extensia tăvii de ieşireDeschideţi extensia pentru a susţine foile imprimate. Deschideţi-o în timpul imprimării sau copierii.
(9) Sticla platăÎncărcaţi un original pentru copiere sau scanare.
(10) Capac de slot pentru cartelăDeschideţi-l pentru a introduce o cartelă de memorie.
Consultaţi Introducerea cartelei de memorie .
Vedere din spate
(11) Port USBIntroduceţi cablul USB pentru a conecta aparatul la un computer.
Important Nu atingeţi carcasa metalică. Nu conectaţi şi nici nu deconectaţi cablul USB în timp ce aparatul imprimă sau scaneazădocumente originale cu computerul.
(12) Conectorul cablului de alimentareConectaţi la priză cablul de alimentare furnizat.
Vedere din interior
Pagina 5 din 732 paginiComponentele principale

(13) Manetele de blocare ale cartuşului de cernealăFixează cartuşele FINE pe poziţie.
(14) Unitate de scanare (Capac)Scanează documente originale. Deschideţi-o pentru a înlocui cartuşele FINE sau pentru a îndepărta hârtiablocată în interiorul aparatului. Când deschideţi unitatea de scanare (capacul), ridicaţi-o cu capacul pentrudocumente închis.
(15) Lampa Acces (Access)Se aprinde sau clipeşte pentru a indica starea cartelei de memorie.
Consultaţi Introducerea cartelei de memorie .
(16) Slot pentru cartelăIntroduceţi o cartelă de memorie.
Consultaţi Introducerea cartelei de memorie .
(17) Suportul unităţii de scanareSusţine unitatea de scanare (capacul) în timp ce aceasta este deschisă.
(18) Suportul pentru cartuşe FINEInstalaţi cartuşele FINE.
Cartuşul FINE color trebuie instalat în slotul din stânga ( ), iar cartuşul FINE negru în slotul din dreapta (
).
(19) Cartuşele FINE (cartuşe de cerneală)Un cartuş de unică folosinţă, format dintr-un cap de imprimare cu un rezervor de cerneală încorporat.
Notă Pentru detalii privind instalarea cartuşelor FINE, consultaţi manualul imprimat: Ghid de
iniţiere.
Important Zona (A) indicată în figura de mai jos poate fi acoperită de stropi de cerneală. Acest lucru nuafectează funcţionalitatea aparatului.
Nu atingeţi zona (A). Este posibil ca aparatul să nu imprime corespunzător dacă o atingeţi.
Pagina 6 din 732 paginiComponentele principale

Panoul de operare
(1) butonul ACTIVARE (ON)Opreşte sau porneşte imprimanta. Înainte de a porni imprimanta, asiguraţi-vă că aţi închis capaculdocumentelor.
ImportantDeconectarea alimentării
Când deconectaţi fişa de alimentare după ce aţi oprit alimentarea, nu uitaţi să vă asiguraţică lampa Alimentare (Power) este stinsă. Dacă deconectaţi fişa de alimentare de lapriza de perete în timp ce lampa Alimentare (Power) este aprinsă sau clipeşte, esteposibil ca aparatul să nu mai poată imprima corect, deoarece capul de imprimare nu esteprotejat.
(2) Butonul MeniuAfişează ecranul Top menu.
Consultaţi Selectarea meniurilor de pe ecranul meniului superior .
(3) Butonul (Stânga) (Dreapta) (Sus) (Jos)Specifică numărul de copii sau de imprimate sau selectează un meniu sau un element de setare.
(4) Butonul OKSelectează un meniu sau un element de setare.
Consultaţi Selectarea meniurilor de pe ecranul meniului superior .
Soluţionează o eroare apărută în cursul imprimării sau reia funcţionarea normală a aparatului dupăîndepărtarea hârtiei blocate.
(5) Butonul Oprire
Pagina 7 din 732 paginiComponentele principale

Revocă operaţia de imprimare, copiere sau scanare în curs.
(6) Butonul CuloarePorneşte imprimarea, copierea sau scanarea color.
(7) Lampa AlarmăSe aprinde sau clipeşte portocaliu în cazul apariţiei unei erori, de tipul terminării hârtiei sau a cernelii.
(8) Lampa Alimentare (Power)Este aprinsă în verde după ce clipeşte la pornirea alimentării.
(9) Butonul NegruÎncepe copierea sau scanarea etc. în alb-negru.
(10) Butonul ÎnapoiRevine la ecranul anterior.
În partea superioară a paginii
Pagina 8 din 732 paginiComponentele principale

Ghid avansat Depanare
Cuprins > Privire de ansamblu asupra aparatului > Cum să navigaţi prin meniuri pe LCD
Cum să navigaţi prin meniuri pe LCD Puteţi utiliza aparatul pentru a copia sau imprima fără ajutorul unui computer. Ecranul pentru modul de copiere va apărea pe ecranul LCD la pornirea aparatului. Când introduceţi ocartelă de memorie în slotul pentru cartelă, ecranul LCD trece automat la ecranul pentru modul cartelă şivă permite imprimarea de fotografii.
Ecranul pentru modul de copiere.
Consultaţi Copierea .
Ecranul pentru modul cartelă.
Consultaţi Imprimarea de pe o cartelă de memorie .
(A) Introducerea unei cartele de memorie(B) Scoaterea cartelei de memorie
Selectarea meniurilor de pe ecranul meniului superior Ecranul Top menu va apărea când este apăsat butonul Meniu (Menu). Pentru a începe imprimarea,scanarea sau întreţinerea aparatului etc., selectaţi meniurile de pe ecranul Top menu.
1. Apăsaţi butonul Meniu (Menu) .Va apărea ecranul Top menu.
2. Utilizaţi butonul (Sus) sau (Jos) pentru a selecta meniul, apoi apăsaţi butonul OK.
Pagina 9 din 732 paginiCum să navigaţi prin meniuri pe LCD

Va apărea ecranul meniului selectat.
Notă Pentru a reveni la ecranul anterior, apăsaţi butonul Înapoi (Back) .
Meniurile următoare sunt disponibile în ecranul Top menu.
Copy: Afişează ecranul modului de copiere. Puteţi să realizaţi copii mărite saumicşorate la scara specificată de aparat pentru a se încadra automat înpagină sau la scara pe care aţi selectat-o sau puteţi să copiaţi cărţi fărăchenar negru în jurul imaginii sau să umbriţi partea de pe margine.Consultaţi Copierea .
Scan: Puteţi salva datele scanate pe computer sau pe o cartelă de memorieintrodusă în aparat, cu ajutorul panoului de operare.Consultaţi Scanarea.
Photo print: Afişează ecranul pentru modul cartelă. Puteţi imprima fotografii salvate pecartela de memorie a camerei digitale.Consultaţi Imprimarea de pe o cartelă de memorie .
Photo IndexSheet:
Puteţi imprima cu uşurinţă fotografii de pe o cartelă de memorie folosind foaiaindex foto.Consultaţi Utilizarea foilor index foto pentru imprimare .
Template print Puteţi să imprimaţi formulare şablon cum ar fi hârtie de caiet etc.Consultaţi Imprimarea formularelor şablon cum ar fi hârtia de caiet.
Remaining ink: Puteţi să confirmaţi starea cernelii.Consultaţi Verificarea nivelului de cerneală .
Maintenance: Puteţi să efectuaţi întreţinerea aparatului.Consultaţi Când imprimarea devine ştearsă sau culorile sunt incorecte sau Curăţarea rolei de alimentare cu hârtie .
Devicesettings:
Puteţi să modificaţi setările maşinii.Consultaţi Setările aparatului.
În partea superioară a paginii
Pagina 10 din 732 paginiCum să navigaţi prin meniuri pe LCD

Ghid avansat Depanare
Cuprins > Imprimarea de pe o cartelă de memorie
Imprimarea de pe o cartelă de memorie Puteţi examina fiecare fotografie de pe o cartelă de memorie pe ecranul LCD pentru a selecta şiimprima fotografia dorită.De asemenea, puteţi să imprimaţi pe hârtie de dimensiune A4 sau Letter miniaturi ale fotografiilorsalvate pe cartela de memorie şi le puteţi selecta pentru imprimare sau puteţi imprima cu aspectulselectat fotografiile dorite.
Imprimarea fotografiilor salvate pe o cartelă de memorie
Modificarea setărilor
Utilizarea diferitelor funcţii
Imprimarea fotografiilor cu aspecte diferiteCorectarea imaginilorImprimarea fotografiilor cu data realizării
Introducerea cartelei de memorie.
Înainte de introducerea cartelei de memorieIntroducerea cartelei de memorieScoaterea cartelei de memorie
În partea superioară a paginii
Pagina 11 din 732 paginiImprimarea de pe o cartelă de memorie

Ghid avansat Depanare
Cuprins > Imprimarea de pe o cartelă de memorie > Imprimarea fotografiilor salvate pe o cartelă de memorie
Imprimarea fotografiilor salvate pe o cartelă de memorie Examinaţi fiecare fotografie de pe cartela de memorie pe ecranul LCD pentru a selecta şi imprimafotografia dorită.Această secţiune descrie procedura de imprimare a fotografiilor fără chenar pe hârtie fotografică dedimensiuni 4" x 6" / 10 x 15 cm.Pentru această operaţie, consultaţi notele şi procedurile de operare descrise în pagina de referinţă.
Trebuie să pregătiţi:
O cartelă de memorie cu fotografii salvate. Consultaţi Înainte de introducerea cartelei de memorie .
Hârtie pentru imprimarea fotografiilor. Consultaţi Tipuri de suport pe care le puteţi utiliza .
1. Pregătiţi-vă pentru imprimare.
(1) Porniţi alimentarea.Pe ecranul LCD va apărea ecranul modului de copiere.
Dacă este introdusă cartela de memorie în aparat, va apărea ecranul pentru modul cartelă.
Consultaţi Panoul de operare.
(2) Încărcaţi hârtia.Consultaţi Încărcarea hârtiei .
Acum încărcaţi hârtie fotografică 4" x 6" / 10 x 15 în tava din spate.
(3) Deschideţi uşor tava de ieşire a hârtiei şi deschideţi extensia tăvii de ieşire.
Pagina 12 din 732 paginiImprimarea fotografiilor salvate pe o cartelă de memorie

2. Introduceţi o cartelă de memorie CU FAŢA CU ETICHETĂ ÎNSPRE STÂNGA înslotul pentru cartelă.Pentru tipurile de cartele de memorie compatibile cu aparatul şi locaţiile pentru a le introduce, consultaţi Introducerea cartelei de memorie .
Va apărea ecranul pentru modul cartelă.
Notă De asemenea, puteţi să afişaţi ecranul pentru modul cartelă selectând Photo print din ecranulmeniului superior care se afişează prin apăsarea butonului Meniu (Menu) .
Când Read/Write attribute s-a setat pe Writable from PC, nu puteţi imprima date de imagine depe cartela de memorie utilizând panoul de operare de la aparat. Selectaţi Device settings dinecranul meniului superior, apoi setaţi Read/write attribute pe Not writable from PC.Pentru detalii, consultaţi manualul on-screen: Ghid avansat .
3. Selectaţi fotografiile pe care doriţi să le imprimaţi.
(1) Utilizaţi butonul (Stânga) sau (Dreapta) pentru a afişa fotografia deimprimat.
Notă
poate apărea pe ecranul LCD în timpul citirii fotografiilor. Dacă utilizaţi butonul
(Stânga) sau (Dreapta) pentru a afişa fotografia în timp ce apare pe LCD, esteposibil ca fotografia dorită să nu fie selectată.
(2) Utilizaţi butonul (Sus) sau (Jos) pentru a specifica numărul de copii.
Pagina 13 din 732 paginiImprimarea fotografiilor salvate pe o cartelă de memorie

(3) Repetaţi procedurile de la (1) şi (2) pentru a specifica numărul de copii pentrufiecare fotografie.Pot fi specificate în total până la 2000 de fotografii.
(4) Apăsaţi butonul OK.Se va afişa ecranul de confirmare a imprimării.
4. Începeţi imprimarea.
(1) Apăsaţi butonul (Dreapta).Se va afişa ecranul cu setările de imprimare.
(2) Confirmaţi dimensiunea paginii, tipul de suport, calitatea de imprimare, aspectuletc.Aici confirmăm că pentru dimensiunea paginii s-a selectat 4"x6" (10x15cm), tipul hârtiei foto încărcatepentru tipul de suport şi că pentru aspect s-a selectat Borderless.
Pentru a modifica setările, utilizaţi butonul (Sus) sau (Jos) pentru a selecta elementul de modificat,apoi apăsaţi butonul (Stânga) sau (Dreapta). Pentru a comuta la cealaltă filă, utilizaţi butonul
(Sus) sau (Jos) pentru a selecta fila de setări, apoi apăsaţi butonul (Stânga) sau (Dreapta).
Consultaţi Modificarea setărilor .
Notă Dacă s-a selectat Auto photo fix ON, cu Prioritize Exif info selectat în AutoPhotoFix settingde sub Device settings din ecranul meniului superior, se pot ajusta în prealabil setărilespecificate la fotografiere. Este recomandat ca în mod obişnuit să selectaţi Do not prioritizeExif info. Pentru detalii, consultaţi manualul on-screen: Ghid avansat .
(3) Apăsaţi butonul OK.Ecranul va reveni la ecranul de confirmare a imprimării.
(4) Confirmaţi numărul total de coli care vor fi folosite pentru imprimarea fotografiilorselectate.
Pagina 14 din 732 paginiImprimarea fotografiilor salvate pe o cartelă de memorie

(5) Apăsaţi butonul Culoare (Color) sau butonul OK.Aparatul începe imprimarea fotografiilor.
Notă Apăsaţi butonul Oprire (Stop) pentru a revoca imprimarea. Imprimarea nu va fi iniţiată dacă apăsaţi butonul Negru (Black) . Pentru a scoate cartela de memorie, consultaţi Scoaterea cartelei de memorie .
Modificarea setărilor Puteţi utiliza butonul (Sus), (Jos), (Stânga) sau (Dreapta) pentru a modifica setări deimprimare precum dimensiunea hârtiei, tipul de suport sau calitatea imprimării.
Fila de setări 1:
(1) Page sizeSelectaţi dimensiunea paginii pentru hârtia de imprimat: 4"x6" (10x15cm), A4 etc.
(2) Media typeSelectaţi tipul de suport pentru hârtia de imprimat: Plus Glossy II, Plain paper etc.
Notă Dacă nu selectaţi corect tipul de suport, este posibil ca aparatul să nu imprime la calitateade imprimare corespunzătoare.
(3) Print qualityAjustaţi calitatea de imprimare: Print quality (calitate prioritară), Print quality (standard).
(4) LayoutSelectaţi aspectul pentru imprimarea fotografiei, precum Borderless, Borderless half side sau Bordered x2etc. Pentru un exemplu de imagine la utilizarea acestei funcţii, consultaţi Utilizarea diferitelor funcţii .
Notă Când pentru tipul de suport s-a selectat Plain paper, nu puteţi selecta Borderless sauBorderless half side.
Când raportul dintre înălţime şi lăţime diferă de cel al datelor de imagine atunci când s-aselectat Borderless sau Borderless half side, este posibil ca o parte din imagine să nu fieimprimată, în funcţie de dimensiunea suportului utilizat.
Pentru a activa automat sau manual funcţia de imprimare a datei sau de corectareautomată a fotografiei, selectaţi fila de setări 2. Pentru detalii, consultaţi manualul on-screen: Ghid avansat .
Notă Setările pentru dimensiunea paginii, tipul de suport, calitatea de imprimare, aspect, corecţia
Pagina 15 din 732 paginiImprimarea fotografiilor salvate pe o cartelă de memorie

imaginii sunt reţinute, apoi aceste setări vor apărea la următoarea selectare a unei fotografii înmodul cartelă, chiar dacă între timp se opreşte şi se porneşte din nou alimentarea.
Unele elemente nu pot fi precizate împreună, în funcţie de opţiune.
Utilizarea foilor index foto pentru imprimare
Miniaturile fotografiilor salvate pe cartela de memorie sunt imprimate pe o hârtie A4 sau de dimensiuneLetter (această foaie imprimată este numită Fişă index de fotografii). Puteţi selecta fotografii, numărul decopii, dimensiunea hârtiei, etc. pe această fişă şi le puteţi imprima.Selectaţi Photo Index Sheet în ecranul Top menu, apoi Photo Index Sheet print. Pentru detalii privindoperaţia, consultaţi manualul on-screen: Ghid avansat .
În partea superioară a paginii
Pagina 16 din 732 paginiImprimarea fotografiilor salvate pe o cartelă de memorie

Ghid avansat Depanare
Cuprins > Imprimarea de pe o cartelă de memorie > Utilizarea diferitelor funcţii
Utilizarea diferitelor funcţii Această secţiune prezintă funcţii utile ale modului cartelă.Pentru detalii, consultaţi manualul on-screen: Ghid avansat .
Imprimarea fotografiilor cu aspecte diferitePuteţi să selectaţi diverse aspecte, precum Borderless, Borderless half side sau Bordered x2 etc.atunci când selectaţi aspectul în ecranul cu setările de imprimare.
Corectarea imaginilorÎn fila de setări 2 din ecranul cu setările de imprimare puteţi să corectaţi imaginile automat saumanual, cum ar fi ajustarea luminozităţii, contrastului şi a nuanţelor de culoare sau puteţi săadăugaţi efecte la imagine.
Auto photo fix ON (Implicit)
Imprimarea fotografiilor cu data realizăriiÎn fila de setări 2 din ecranul cu setările de imprimare puteţi să imprimaţi fotografii cu data realizării.
Print date ON
În partea superioară a paginii
Pagina 17 din 732 paginiUtilizarea diferitelor funcţii

Ghid avansat Depanare
Cuprins > Imprimarea de pe o cartelă de memorie > Introducerea cartelei de memorie
Introducerea cartelei de memorie
Înainte de introducerea cartelei de memorie Următoarele tipuri de cartele de memorie şi imagini sunt compatibile cu echipamentul.
Important Dacă aţi făcut şi salvat fotografii pe un tip de cartelă de memorie care nu e garantat să funcţionezepe camera digitală, aparatul poate fi deteriorat sau imaginile nu pot fi citite. Pentru informaţii detaliatedespre cartelele de memorie cu care funcţionează camera digitală, consultaţi manualul deinstrucţiuni furnizat cu camera digitală.
Formataţi cartela de memorie cu o cameră digitală compatibilă cu sistemul Design rule for CameraFile (compatibilă Exif 2.2/2.21), TIFF (compatibilă Exif 2.2/2.21). Cartela de memorie nu poate ficompatibilă cu aparatul dacă este formatată pe un computer.
Cartele de memorie care nu necesită un adaptor de cartelă Cartelă de memorie digitală securizată SD
Cartelă de memorie SDHC
MultiMediaCard
MultiMediaCard Plus
Cartelă Compact Flash (CF)
Tip Suporturi I/II (3,3 V)
Microdrive
Stick de Memorie
Stick de Memorie PRO
Stick de Memorie Duo
Stick de Memorie PRO Duo
Cartele de memorie care necesită un adaptor de cartelă
Important Asiguraţi-vă că ataşaţi un adaptor de cartelă specială la următoarele cartele de memorie înaintede a le introduce în slotul de cartelă.Dacă una dintre următoarele cartele de memorie este introdusă fără un adaptor de cartele, osă fie imposibil să îndepărtaţi cartela de memorie. In acest caz, consultaţi „ Depanare” dinmanualul on-screen: Ghid avansat.
Cartelă miniSD *1
Cartelă miniSDHC *1
Cartelă microSD *1
Cartelă microSDHC *1
Cartelă xD-Picture *2
Cartelă xD-Picture Tip M *2
Pagina 18 din 732 paginiIntroducerea cartelei de memorie

Cartelă xD-Picture Tip H *2
RS-MMC *3
Memory Stick Micro *4
*1 Folosiţi „adaptor de cartelă SD” special.*2 Presupune achiziţionarea unui adaptor de cartelă compact flash separat pentru cartela xD-Picture.*3 Folosiţi adaptorul de cartelă special.*4 Utilizaţi adaptorul special Duo size sau de dimensiune maximă.
Date imagine care se pot imprima:Acest aparat acceptă imagini realizate cu o cameră digitală compatibilă cu sistemul Design rule forCamera File (compatibilă Exif 2.2/2.21), TIFF (compatibilă Exif 2.2/2.21). Alte tipuri de imagine saufilm, cum ar fi imagini RAW, nu pot fi imprimate.
Introducerea cartelei de memorie
Important Când se introduce o cartelă de memorie în fanta pentru cartelă, lampa Acces (Access) se aprinde.Atunci când lampa Acces (Access) clipeşte, aparatul accesează cartela de memorie. În acestcaz, nu atingeţi zona din jurul fantei de cartelă.
Notă Când Read/write attribute s-a setat pe Writable from PC, nu puteţi să imprimaţi date de imagine de pecartela de memorie sau să salvaţi date scanate pe cartela de memorie utilizând panoul de operare alaparatului. După utilizarea slotului pentru cartelă ca unitate de cartelă de memorie a unui computer,scoateţi cartela de memorie, selectaţi Device settings în ecranul Top menu, apoi setaţi Read/writeattribute pe Not writable from PC. Pentru detalii, consultaţi manualul on-screen: Ghid avansat .
Când folosiţi un computer pentru a edita sau îmbunătăţi fotografii salvate pe o cartelă de memorie,asiguraţi-vă să le imprimaţi de pe computer. Dacă folosiţi panoul de operare, există posibilitatea cafotografiile să nu fie imprimate corespunzător.
1. Pregătiţi cartela dvs. de memorie.Ataşaţi un adaptor de cartelă special în cazul în care cartela dvs. de memorie necesită una.
Consultaţi Cartele de memorie care necesită un adaptor de cartelă .
2. Porniţi alimentarea, apoi deschideţi capacul slotului pentru cartelă.
Pagina 19 din 732 paginiIntroducerea cartelei de memorie
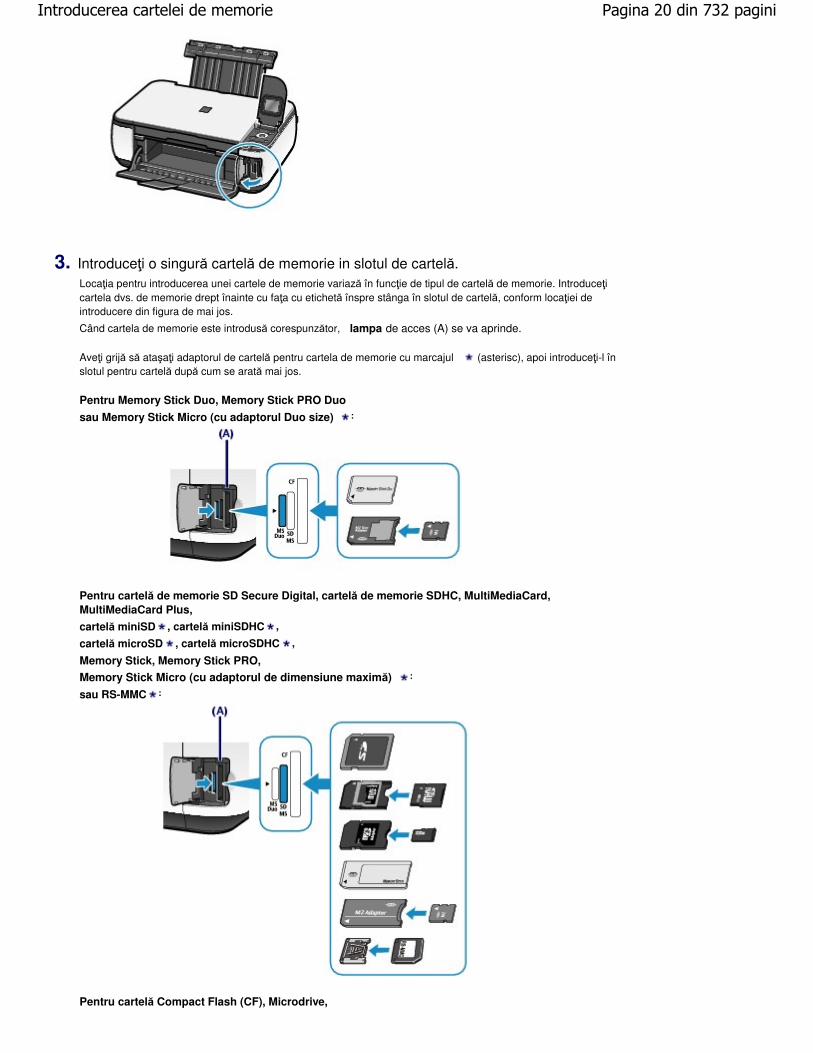
3. Introduceţi o singură cartelă de memorie in slotul de cartelă.Locaţia pentru introducerea unei cartele de memorie variază în funcţie de tipul de cartelă de memorie. Introduceţicartela dvs. de memorie drept înainte cu faţa cu etichetă înspre stânga în slotul de cartelă, conform locaţiei deintroducere din figura de mai jos.
Când cartela de memorie este introdusă corespunzător, lampa de acces (A) se va aprinde.
Aveţi grijă să ataşaţi adaptorul de cartelă pentru cartela de memorie cu marcajul (asterisc), apoi introduceţi-l înslotul pentru cartelă după cum se arată mai jos.
Pentru Memory Stick Duo, Memory Stick PRO Duo
sau Memory Stick Micro (cu adaptorul Duo size) :
Pentru cartelă de memorie SD Secure Digital, cartelă de memorie SDHC, MultiMediaCard,MultiMediaCard Plus,
cartelă miniSD , cartelă miniSDHC ,
cartelă microSD , cartelă microSDHC ,
Memory Stick, Memory Stick PRO,
Memory Stick Micro (cu adaptorul de dimensiune maximă) :
sau RS-MMC :
Pentru cartelă Compact Flash (CF), Microdrive,
Pagina 20 din 732 paginiIntroducerea cartelei de memorie

cartelă xD-Picture , cartelă xD-Picture Tip M sau cartelă xD-Picture Tip H :
Important O parte din cartela de memorie va ieşi din slotul de cartelă, dar nu o introduceţi forţat mai mult înslot. Acesta poate deteriora echipamentul sau cartela de memorie.
Asiguraţi-vă că este orientată corect cartela de memorie înainte de a o introduce în slotul decartelă. Dacă introduceţi forţat cartela de memorie în slotul de cartelă în poziţia greşită, cartelade memorie sau echipamentul pot fi deteriorate.
Nu introduceţi mai mult de o cartelă de memorie în acelaşi timp.
4. Închideţi capacul pentru slotul de cartelă.
Scoaterea cartelei de memorie
Important Dacă utilizaţi slotul de cartele ca unitate de stocare informaţii pentru un calculator, efectuaţi operaţia„îndepărtare în siguranţă” din computer înainte de a îndepărta fizic cartela de memorie dinechipament.- În Windows, faceţi clic dreapta pe pictograma de disc amovibil şi faceţi clic pe Scoatere suport
(Eject). Dacă Scoatere (Eject) nu apare pe ecran, asiguraţi-vă că lampa Acces (Access) esteaprinsă după care, îndepărtaţi cartela de memorie.
- În Macintosh, glisaţi (Mount drive) la Trash.
1. Deschideţi capacul pentru slotul de cartelă.
2. Asiguraţi-vă că lampa Acces (Access) este aprinsă şi, îndepărtaţi cartela dememorie.Apucaţi cartela de memorie de partea care rămâne afară şi îndepărtaţi-o din aparat drept înainte.
Important Nu scoateţi cartela de memorie în timp ce lampa Acces (Access) clipeşte. Lampa Acces(Access) clipeşte în timp ce aparatul citeşte sau scrie date din/pe cartela de memorie. Dacăîndepărtaţi cartela de memorie sau deconectaţi tensiunea în timp ce lampa Acces (Access)clipeşte, datele salvate pe cartela de memorie pot fi deteriorate.
3. Închideţi capacul pentru slotul de cartelă.
Pagina 21 din 732 paginiIntroducerea cartelei de memorie

În partea superioară a paginii
Pagina 22 din 732 paginiIntroducerea cartelei de memorie

Ghid avansat Depanare
Cuprins > Copierea
Copierea În afară de copiile standard, puteţi să realizaţi copii ale originalului mărite sau micşorate la scaraspecificată de aparat pentru a se încadra automat în pagină sau la scara pe care aţi selectat-o, copii fărăchenar ale fotografiilor şi copii ale cărţilor fără chenar negru în jurul imaginii sau cu umbrirea părţii de pemargine.
Efectuarea de copii
Modificarea setărilor
Utilizarea diferitelor funcţii de copiere
Mărire/micşorare
În partea superioară a paginii
Pagina 23 din 732 paginiCopierea

Ghid avansat Depanare
Cuprins > Copierea > Realizarea de copii
Realizarea de copii Această secţiune descrie procedura de copiere a documentelor format A4 pe hârtie simplă.Pentru această operaţie, consultaţi notele şi procedurile de operare descrise în pagina de referinţă.
Trebuie să pregătiţi:
Documentele originale pentru copiat. Consultaţi Documente originale pe care le puteţi încărca .
Hârtia pentru imprimat. Consultaţi Tipuri de suport pe care le puteţi utiliza .
1. Pregătirea pentru copiere.
(1) Porniţi alimentarea.Consultaţi Panoul de operare.
Pe monitor va apărea ecranul modului de copiere.
Când este introdusă cartela de memorie, va apărea ecranul pentru modul cartelă. Scoaterea cartelei dememorie.
Notă De asemenea, puteţi să afişaţi ecranul pentru modul de copiere selectând Copy din ecranulmeniului superior care se afişează prin apăsarea butonului Meniu (Menu) .
(2) Încărcaţi hârtia.Consultaţi Încărcarea hârtiei .
Aici încărcăm hârtie simplă format A4 în tava din spate.
(3) Deschideţi uşor tava de ieşire a hârtiei şi deschideţi extensia tăvii de ieşire.
Pagina 24 din 732 paginiRealizarea de copii

(4) Aşezaţi un document original pe suprafaţa de sticlă de scanare.Consultaţi Încărcarea documentelor originale .
Aşezaţi documentul original CU PARTEA DE COPIAT ORIENTATĂ ÎN JOS şi aliniaţi-l cu marcajul de aliniere,
după cum se arată mai jos.
Apoi închideţi uşor capacul pentru documente.
Notă Pentru detalii referitoare la tipurile şi stările documentului original pe care îl puteţi copia,consultaţi Documente originale pe care le puteţi încărca .
2. Începeţi copierea.
(1) Apăsaţi butonul (Sus) sau (Jos) pentru a specifica numărul de copii.
(2) Apăsaţi butonul (Dreapta).Se va afişa ecranul cu setările de imprimare.
Pagina 25 din 732 paginiRealizarea de copii

(3) Confirmaţi tipul de copiere, mărirea, dimensiunea paginii, tipul de suport etc.Aici se confirmă că sunt specificate Standard copy pentru tipul de copiere, 100% pentru mărire, A4 pentrudimensiunea paginii, Plain paper pentru tipul de suport şi Print quality (standard) pentru calitateaimprimării.
Pentru a modifica setările, utilizaţi butonul (Sus) sau (Jos) pentru a selecta elementul de modificat,apoi apăsaţi butonul (Stânga) sau (Dreapta).
Consultaţi Modificarea setărilor .
Notă Pentru a ajusta automat intensitatea în conformitate cu documentul original, setaţi Copyauto intensity pe Enable sub Device settings.
(4) Apăsaţi butonul OK.Ecranul LCD va reveni la ecranul modului de copiere.
(5) Apăsaţi butonul Culoare (Color) pentru copiere color sau butonul Negru(Black) pentru copiere alb-negru.Aparatul începe copierea.
Scoateţi documentul original de pe geamul plat după ce aţi terminat de copiat.
Important Nu deschideţi capacul pentru documente şi nu deplasaţi documentul original încărcat până laterminarea copierii.
Notă Pentru revocarea copierii, apăsaţi butonul Oprire (Stop).
Modificarea setărilor Puteţi utiliza butonul (Sus), (Jos), (Stânga) sau (Dreapta) pentru a modifica setări deimprimare precum dimensiunea paginii, tipul de suport sau calitatea imprimării.
(1) Tipul de copieSelectaţi tipul de copie: Borderless copy, Frame erase etc.
Consultaţi Utilizarea diferitelor funcţii de copiere .
(2) MagnificationSpecificaţi modalitatea de mărire/micşorare. Puteţi să selectaţi Fit to page pentru a mări sau reduce automatcopia pentru a se încadra în dimensiunea selectată a paginii. De asemenea, puteţi să specificaţi scara decopiere prin selectarea dimensiunii paginii: de la A4 la A5, de la A4 la B5 etc. Dacă nu doriţi să măriţi/micşoraţi dimensiunea paginii, selectaţi 100%. Pentru detalii, consultaţi manualul on-screen: Ghidavansat.
Consultaţi Utilizarea diferitelor funcţii de copiere .
Pagina 26 din 732 paginiRealizarea de copii

(3) Page sizeSelectaţi dimensiunea paginii pentru hârtia de imprimat: A4, 8.5"x11"(LTR) etc.
(4) Media typeSelectaţi tipul de suport pentru hârtia de imprimat: Plain paper, Plus Glossy II etc.
Notă Dacă nu selectaţi corect tipul de suport, este posibil ca aparatul să nu imprime la calitateade imprimare corespunzătoare.
(5) Print qualityAjustaţi calitatea de imprimare în funcţie de originalul de copiat: Print quality (calitate prioritară), Printquality (standard) sau Print quality (viteză prioritară). Valorile disponibile pentru calitatea imprimăriidepind de hârtia selectată pentru tipul de suport.
Notă Setările precum dimensiunea paginii, tipul de suport şi calitatea de imprimare sunt reţinute şi vorapărea la următoarea selectare a modului de copiere, chiar dacă se opreşte şi se reporneştealimentarea.
Unele elemente nu pot fi precizate împreună, în funcţie de opţiune. Puteţi specifica valoarea extinderii în Extension amount de sub Device settings, atunci cândeste selectat Borderless copy pentru tipul de copie.
Dacă este selectat Borderless copy, selectaţi A4, 4"x6"(10x15cm), 5"x7"(13x18cm) sau8.5"x11"(LTR) pentru dimensiunea paginii şi orice tip de hârtie exceptând Plain paper pentrutipul de suport.
Dacă este selectat Borderless copy, este posibil să apară o uşoară trunchiere la marginideoarece imaginea copiată este mărită pentru a acoperi întreaga pagină.
Chiar dacă s-a selectat Borderless copy sau Frame erase, puteţi să copiaţi cu raportulspecificat, selectând o dimensiune de hârtie. Totuşi, dacă s-a selectat Borderless copy,raportul de mărire/micşorare diferă de cel care se aplică atunci când s-a selectat Standardcopy.
Puteţi să setaţi calitatea de imprimare la Print quality (viteză-calitate) numai atunci cândpentru tipul de suport s-a selectat Plain paper.
Dacă selectaţi Print quality (viteză prioritară) cu tipul de suport setat pe Plain paper iarcalitatea nu este cea aşteptată, selectaţi Print quality (standard) sau Print quality
(calitate prioritară) şi reîncercaţi copierea. Puteţi să specificaţi Copy auto intensity. Această funcţie ajustează automat intensitatea pentrudocumentul original încărcat pe suprafaţa de sticlă de scanare.Consultaţi Setările aparatului.
În partea superioară a paginii
Pagina 27 din 732 paginiRealizarea de copii

Ghid avansat Depanare
Cuprins > Copierea > Utilizarea diferitelor funcţii de copiere
Utilizarea diferitelor funcţii de copiere Puteţi realiza următoarele copii dacă specificaţi tipul de copie sau mărirea pe ecranul de setări dinmodul de copiere.Pentru detalii, consultaţi manualul on-screen: Ghid avansat .
Borderless copy Frame erase
Mărire/micşorare Puteţi să copiaţi cu dimensiunea paginii mărită sau micşorată sau prin modificarea unui raport cudimensiunea de pagină selectată, cum ar fi 70% A4 A5 sau 115% B5 A4.
Fit-to-page copy Rată prestabilită
În partea superioară a paginii
Pagina 28 din 732 paginiUtilizarea diferitelor funcţii de copiere

Ghid avansat Depanare
Cuprins > Imprimarea formularelor şablon cum ar fi hârtia de caiet
Imprimarea formularelor şablon cum ar fihârtia de caiet Puteţi imprima linii sau grile pe hârtie pe care să o folosiţi pe post de hârtie de caiet etc.
Imprimarea pe hârtie de caiet
Imprimarea diverselor formulare şablon
În partea superioară a paginii
Pagina 29 din 732 paginiImprimarea formularelor şablon cum ar fi hârtia de caiet

Ghid avansat Depanare
Cuprins > Imprimarea formularelor şablon cum ar fi hârtia de caiet > Imprimarea pe hârtie de caiet
Imprimarea pe hârtie de caiet Această secţiune descrie procedura de selectare şi imprimare a formularelor şablon.
Trebuie să pregătiţi:
Hârtie simplă format A4, B5 sau Letter. Consultaţi Tipuri de suport pe care le puteţi utiliza .
1. Pregătiţi-vă pentru imprimare.
(1) Porniţi alimentarea.Consultaţi Panoul de operare.
(2) Încărcaţi hârtie simplă format A4, B5 sau Letter în tava din spate.Consultaţi Încărcarea hârtiei simple/fotografice .
(3) Deschideţi uşor tava de ieşire a hârtiei şi deschideţi extensia tăvii de ieşire.
2. Selectaţi un formular template.
(1) Apăsaţi butonul Meniu (Menu) .
(2) Utilizaţi butonul (Sus) sau (Jos) pentru a selecta Template print pe ecranulmeniului superior şi apăsaţi butonul OK.
(3) Utilizaţi butonul (Stânga) sau (Dreapta) pentru a selecta un formularşablon de imprimare, apoi apăsaţi butonul OK.
Pagina 30 din 732 paginiImprimarea pe hârtie de caiet

Notă Pentru informaţii referitoare la formularele şablon disponibile, consultaţi Imprimarea diverselorformulare şablon .
3. Începeţi imprimarea.
(1) Utilizaţi butonul (Sus) sau (Jos) pentru a specifica numărul de copii deimprimat.
(2) Utilizaţi butonul (Stânga) sau (Dreapta) pentru a specifica dimensiuneapaginii.
Notă Puteţi selecta A4, B5 sau 8.5"x11"(LTR) pentru Page size. B5 este posibil să nu fiedisponibil în funcţie de şablonul selectat.
(3) Apăsaţi butonul OK.Aparatul începe imprimarea.
Imprimarea diverselor formulare şablon Cu Template print puteţi să imprimaţi următoarele şabloane.
Notebook paper 1
8 mm spacing
Notebook paper 2
7 mm spacing
Notebook paper 3
6 mm spacing
Graph paper 1
Graph 5 mm
Graph paper 2
Graph 3 mm
Checklist
List with checkboxes
Pagina 31 din 732 paginiImprimarea pe hârtie de caiet

StaffPaper 1
StaffPaper 10 staves
StaffPaper 2
StaffPaper 12 staves
Handwriting paper
Rows of three lines
Weekly schedule
Vertical type
Monthly schedule
Calender type
În partea superioară a paginii
Pagina 32 din 732 paginiImprimarea pe hârtie de caiet

Ghid avansat Depanare
Cuprins > Scanarea
Scanarea Puteţi salva datele scanate pe computer şi le puteţi edita sau procesa cu aplicaţia software furnizată. Deasemenea, puteţi salva datele scanate pe o cartelă de memorie introdusă în aparat.
Salvarea datelor scanate pe computer
Pregătirea pentru scanare cu ajutorul panoului de operareSalvarea datelor scanate pe computer
În partea superioară a paginii
Pagina 33 din 732 paginiScanarea

Ghid avansat Depanare
Cuprins > Scanare > Salvarea datelor scanate pe computer
Salvarea datelor scanate pe computer Această secţiune descrie procedura de scanare a documentelor originale utilizând panoul de operarede la aparat şi de salvare a acestora pe computer, în conformitate cu setările specificate cu aplicaţia MPNavigator EX.Pentru alte operaţii de salvare a datelor scanate pe o cartelă de memorie şi de scanare a documentelororiginale de la computer, consultaţi manualul on-screen: Ghid avansat .
Important Reţineţi că firma Canon nu va fi răspunzătoare de nicio daună sau pierdere a datelor, indiferent demotiv, chiar şi în perioada de garanţie a aparatului.
Pregătirea pentru scanare cu ajutorul panoului de operare Înainte de a scana documentele originale, verificaţi următoarele:
Aplicaţiile software necesare (MP Drivers şi MP Navigator EX) sunt instalate?Instalaţi MP Drivers şi MP Navigator EX de pe CD-ROM-ul de instalare (Setup CD-ROM) când acesteaplicaţii nu au fost instalate sau au fost dezinstalate. Pentru a instala MP Drivers şi MP NavigatorEX, selectaţi MP Drivers şi MP Navigator EX în Custom Install. Sunt specificate setările necesare cu MP Navigator EX?Când scanaţi pentru a salva documente originale pe computer utilizând panoul de operare, puteţispecifica setările pentru salvarea datelor scanate în Preferences de la MP Navigator EX.Pentru detalii privind setările, consultaţi manualul on-screen: Ghid avansat . Documentul originalul de scanat întruneşte cerinţele pentru a putea fi încărcat pe suprafaţa desticlă de scanare? Pentru detalii, consultaţi Documente originale pe care le puteţi încărca .
Aparatul este conectat corect la computer cu un cablu USB?Asiguraţi-vă că între aparat şi computer există o conexiune prin cablu USB sigură din punct devedere fizic.
Important Nu conectaţi şi nici nu deconectaţi cablul USB în timp ce aparatul scanează documenteoriginale cu computerul.
Dacă utilizaţi Mac OS X v.10.3.9Trebuie să setaţi MP Navigator EX ca aplicaţie software de start în Image Capture din Applicationsdin Mac OS X.
(1) Selectaţi Applications din meniul Go, apoi faceţi dublu clic pe pictograma ImageCapture.
(2) Faceţi clic pe Options în partea din stânga jos a ferestrei scanerului, selectaţiMP Navigator EX 3 în Application to launch when scanner button is pressed,apoi faceţi clic pe OK.Pentru a părăsi Image Capture, selectaţi Quit Image Capture din meniul Image Capture.
Notă Dacă nu apare Options, selectaţi Preferences din meniul Image Capture, faceţi clic pe Scannerşi faceţi clic pe Use TWAIN software whenever possible pentru a şterge opţiunea. Apoipărăsiţi Image Capture şi reporniţi-l.
Salvarea datelor scanate pe computer
Pagina 34 din 732 paginiSalvarea datelor scanate pe computer

1. Pregătiţi-vă pentru scanare.
(1) Porniţi alimentarea.Consultaţi Panoul de operare.
(2) Apăsaţi butonul Meniu (Menu) .
(3) Utilizaţi butonul (Sus) sau (Jos) pentru a selecta Scan, apoi apăsaţi butonul OK. Va apărea ecranul de selectare a dispozitivului.
(4) Utilizaţi butonul (Sus) sau (Jos) pentru a selecta Save to PC, apoi apăsaţibutonul OK.
2. Iniţiere scanare.
(1) Confirmaţi mesajul şi încărcaţi un document original pe suprafaţa de sticlă de
scanare.Consultaţi Încărcarea documentelor originale .
(2) Apăsaţi butonul OK.Va fi pornit MP Navigator EX, documentul original va fi scanat în conformitate cu setările specificate cu MPNavigator EX, apoi datele scanate vor fi salvate pe computer.
Scanning... va apărea în timpul scanării originalului.
Dacă doriţi să scanaţi alt document original, încărcaţi-l pe suprafaţa de sticlă de scanare şi apăsaţi din noubutonul OK.
Luaţi documentul original de pe suprafaţa de sticlă de scanare după ce scanarea este finalizată.
Important Nu opriţi alimentarea în timp ce aparatul funcţionează. Nu deschideţi capacul pentru documente şi nu deplasaţi documentul original încărcat până laterminarea scanării.
Notă Pentru a efectua alte funcţii, selectaţi meniul dorit din ecranul meniului superior care seafişează prin apăsarea butonului Meniu (Menu) .
Notă Este posibil ca poziţia sau dimensiunea documentului original să nu fie scanată corect în funcţie detipul documentului original.În acest caz, consultaţi manualul on-screen: Ghid avansat pentru a modifica aceste setări înDocument Type şi Document Size de la MP Navigator EX astfel încât să corespundă cu documentuloriginal şi scanaţi-l din nou.
Când apare ecranul de selectare a programului:Ecranul de selectare a programului poate apărea după parcurgerea pasului 2.Dacă apare ecranul de selectare a programului, selectaţi MP Navigator EX Ver3.0, apoi faceţi clic peOK.Pentru a porni automat MP Navigator EX fără afişarea ecranului de selectare a programului, urmaţiprocedura de mai jos.
Pentru utilizatorii de Windows Vista, consultaţi „Pentru utilizatorii Windows” din „ Depanare” dinmanualul on-screen: Ghid avansat.
Pentru utilizatorii de Windows XP, în ecranul de selectare a programului selectaţi MP Navigator EXVer3.0 ca aplicaţia software de utilizat, selectaţi Always use this program for this action, apoifaceţi clic pe OK.
Pagina 35 din 732 paginiSalvarea datelor scanate pe computer

În partea superioară a paginii
Pagina 36 din 732 paginiSalvarea datelor scanate pe computer
Ghid avansat Depanare
Cuprins > Imprimarea de pe computerul dumneavoastră
Imprimarea de pe computeruldumneavoastră Această secţiune descrie procedura de imprimare a documentelor sau fotografiilor utilizând uncomputer.Puteţi imprima cu uşurinţă fotografii realizate cu camera dumneavoastră digitală utilizând aplicaţia Easy-PhotoPrint EX furnizată împreună cu aparatul.
Imprimarea fotografiilor (Easy-PhotoPrint EX)
Utilizarea diverselor funcţii ale Easy-PhotoPrint EX
Imprimarea documentelor (Windows)
Imprimarea documentelor (Macintosh)
Pentru Mac OS X v.10.5.xPentru Mac OS X v.10.4.x sau Mac OS X v.10.3.9
În partea superioară a paginii
Pagina 37 din 732 paginiImprimarea de pe computerul dumneavoastră

Ghid avansat Depanare
Cuprins > Imprimarea de pe computerul dumneavoastră > Imprimarea fotografiilor (Easy-PhotoPrint EX)
Imprimarea fotografiilor (Easy-PhotoPrint EX) Imprimaţi date imagine salvate pe computerul dumneavoastră utilizând aplicaţia Easy-PhotoPrint EXfurnizată împreună cu aparatul.Această secţiune descrie procedura de imprimare a fotografiilor fără chenar pe hârtie fotografică dedimensiuni 4" x 6" / 10 x 15 cm.Pentru detalii privind Easy-PhotoPrint EX, consultaţi manualul on-screen: Ghid avansat .
Notă Ecranele utilizate în această secţiune sunt pentru imprimarea din Windows. Operaţiile sunt aceleaşişi pentru imprimarea din Macintosh.
Instalaţi Easy-PhotoPrint EX de pe CD-ROM-ul de instalare (Setup CD-ROM) dacă nu a fostinstalat sau a dacă fost dezinstalat. Pentru a instala Easy-PhotoPrint EX, selectaţi Easy-PhotoPrintEX în Custom Install.
1. Pregătiţi-vă pentru imprimare.
(1) Asiguraţi-vă că aparatul este pus în funcţiune.Consultaţi Panoul de operare.
(2) Încărcaţi hârtia.Consultaţi Încărcarea hârtiei simple/fotografice .
Aici încărcăm hârtie fotografică de dimensiuni 4" x 6" / 10 x 15 cm.
(3) Deschideţi uşor tava de ieşire a hârtiei şi deschideţi extensia tăvii de ieşire.
2. Porniţi Easy-PhotoPrint EX şi selectaţi Photo Print.
(1) Porniţi Easy-PhotoPrint EX.
Faceţi dublu clic pe (Easy-PhotoPrint EX) de pe desktop.
Faceţi clic aici: Easy-PhotoPrint EX
Selectaţi meniul Go, Applications, Canon Utilities, Easy-PhotoPrint EX, apoi faceţi dublu clic peEasy-PhotoPrint EX.
Pagina 38 din 732 paginiImprimarea fotografiilor (Easy-PhotoPrint EX)

Notă
Pentru a porni Easy-PhotoPrint EX din Solution Menu, faceţi dublu clic pe (Solution
Menu) de pe desktop, apoi faceţi clic pe (Print photos or albums, etc.).Consultaţi Solution Menu .
Pentru a porni Easy-PhotoPrint EX din meniul Start, selectaţi Toate programele (AllPrograms) (sau Programe (Programs)), Canon Utilities, Easy-PhotoPrint EX, apoi Easy-PhotoPrint EX.
Pentru a porni Easy-PhotoPrint EX din Solution Menu, faceţi clic pe (Solution Menu) în
Dock şi faceţi clic pe (Print photos or albums, etc.).Consultaţi Solution Menu .
(2) Faceţi clic pe Photo Print.
Notă Puteţi selecta Album, Calendar, Stickers, etc., în plus faţă de Photo Print.Consultaţi Utilizarea diverselor funcţii ale Easy-PhotoPrint EX .
3. Selectaţi o fotografie de imprimat.
(1) Selectaţi folderul în care sunt salvate imaginile.
(2) Faceţi clic pe imaginea de imprimat.Numărul de copii apare ca „1”, iar imaginea selectată apare în zona de afişare a imaginilor selectate (A).Puteţi selecta două sau mai multe imagini simultan.
Notă Pentru a imprima două sau mai multe copii, faceţi clic pe (Săgeată sus) pentru amodifica numărul de copii.
Pentru a revoca selecţia, faceţi clic pe imaginea de revocat din zona imaginii selectate,
apoi faceţi clic pe (Delete Imported Image). De asemenea, puteţi utiliza (Săgeatăjos) pentru a modifica numărul de copii la zero.
Puteţi, de asemenea, corecta sau îmbunătăţi imaginea selectată. Consultaţi Utilizarea diverselor funcţii ale Easy-PhotoPrint EX .
(3) Faceţi clic pe Select Paper.
Pagina 39 din 732 paginiImprimarea fotografiilor (Easy-PhotoPrint EX)

4. Selectaţi hârtia încărcată.
(1) Asiguraţi-vă că denumirea aparatului este selectată în Printer.
(2) Selectaţi formatul şi tipul de hârtie încărcată în Paper Size şi Media Type.Aici se selectează 4"x6" 10x15cm în Paper Size şi tipul hârtiei fotografice încărcate în Media Type.
Notă Dacă selectaţi tipul de suport greşit, aparatul nu va putea imprima cu o calitate deimprimare corespunzătoare.
(3) Faceţi clic pe Layout/Print.
5. Selectaţi un aspect şi porniţi imprimarea.
(1) Selectaţi aspectul fotografiei.Aici selectaţi Borderless (full).
Previzualizarea apare în aspectul selectat pentru confirmarea rezultatului imprimării solicitat.
Notă Puteţi modifica orientarea fotografiei sau puteţi trunchia fotografii (ajustare) pentruimprimare.
Pentru detalii privind operaţia, consultaţi manualul on-screen: Ghid avansat .
(2) Faceţi clic pe Print.
Pagina 40 din 732 paginiImprimarea fotografiilor (Easy-PhotoPrint EX)

Notă
Pentru a revoca o operaţiune de imprimare în curs, apăsaţi butonul Oprire (Stop) de pe aparatsau faceţi clic pe Cancel Printing pe monitorul de stare a imprimantei. Pentru a afişa monitorul de stare al imprimantei, faceţi clic pe Canon XXX Printer (unde „ XXX”este denumirea aparatului) din bara de sarcini.
Faceţi clic pe pictograma imprimantei din Dock pentru a afişa lista lucrărilor de imprimare în cursde desfăşurare.
Pentru a revoca o activitate de imprimare în curs de desfăşurare, selectaţi activitatea dorită înlista Name şi faceţi clic pe Delete.Pentru a opri temporar o lucrare în curs, faceţi clic pe Hold. Pentru a opri temporar toatelucrările din listă, faceţi clic pe Pause Printer (sau pe Stop Jobs).
În partea superioară a paginii
Pagina 41 din 732 paginiImprimarea fotografiilor (Easy-PhotoPrint EX)

Ghid avansat Depanare
Cuprins > Imprimarea de pe computerul dumneavoastră > Imprimarea fotografiilor (Easy-PhotoPrint EX) > Utilizareadiverselor funcţii ale Easy-PhotoPrint EX
Utilizarea diverselor funcţii ale Easy-PhotoPrint EX Această secţiune prezintă câteva dintre funcţiile utile ale aplicaţiei Easy-PhotoPrint EX.Pentru detalii, consultaţi manualul on-screen: Ghid avansat .
Crearea propriilor imprimăriPuteţi crea un album sau un calendar utilizând fotografiile dumneavoastră.
Album Calendar
Stickers Layout Print
Corectarea imaginilorPuteţi utiliza Red-Eye Correction, Face Sharpener, Digital Face Smoothing, Brightness, Contrastetc. pentru a regla, corecta sau îmbunătăţi imaginile în mod automat sau manual.
Brightness
În partea superioară a paginii
Pagina 42 din 732 paginiUtilizarea diverselor funcţii ale Easy-PhotoPrint EX

Ghid avansat Depanare
Cuprins > Imprimarea de pe computerul dumneavoastră > Imprimarea documentelor (Windows)
Imprimarea documentelor (Windows) Această secţiune descrie procedura de imprimare a documentelor format A4 pe hârtie simplă.Pentru detalii, consultaţi manualul on-screen: Ghid avansat .
Notă Operaţiile pot diferi în funcţie de aplicaţiile dumneavoastră software. Pentru detalii privindfuncţionarea, consultaţi manualul de utilizare al aplicaţiei dumneavoastră.
Ecranele folosite în această secţiune sunt pentru imprimarea din sistemul de operare WindowsVista Ultimate Edition (denumit în continuare „Windows Vista”).
1. Asiguraţi-vă că aparatul este pus în funcţiune.Consultaţi Panoul de operare.
2. Încărcaţi hârtia.Consultaţi Încărcarea hârtiei .
Aici încărcaţi hârtie simplă format A4.
3. Deschideţi uşor tava de ieşire a hârtiei şi deschideţi extensia tăvii de ieşire.
4. Creaţi (sau deschideţi) un document de imprimat utilizând o aplicaţie softwarecorespunzătoare.
5. Deschideţi ferestrea de configurare a driverului de imprimantă
(1) Selectaţi Print din meniul File sau din bara de comenzi în aplicaţia software.Va apărea caseta de dialog Print.
(2) Asiguraţi-vă că numele aparatului dumneavoastră este selectat.
Notă Dacă este selectat numele unei alte imprimante, faceţi clic şi selectaţi numele aparatului.
(3) Faceţi clic pe Preferences (sau Properties).
Pagina 43 din 732 paginiImprimarea documentelor (Windows)

6. Specificaţi setările de imprimare necesare.
(1) Selectaţi Business Document în Commonly Used Settings.
Notă Când obiectul imprimat, cum ar fi Business Document sau Photo Printing este selectat înCommonly Used Settings, elementele din Additional Features vor fi selectate automat. Vorapărea, de asemenea, setările potrivite pentru obiectul imprimat, cum ar fi tipul de suportsau calitatea imprimării.
Când specificaţi două sau mai multe copii în Copies, caseta de bifare Collate va fiselectată.
(2) Asiguraţi-vă de setările afişate.Aici ne asigurăm că Plain Paper din Media Type, Standard din Print Quality şi A4 din Printer Paper Size suntselectate.
Notă Setările pot fi modificate.Totuşi, după modificarea de la Printer Paper Size, confirmaţi că setarea pentru Page Sizedin fila Page Setup se potriveşte cu setarea efectuată în aplicaţia software.Pentru detalii, consultaţi manualul on-screen: Ghid avansat .
Dacă selectaţi tipul de suport greşit, aparatul nu va putea imprima cu o calitate deimprimare corespunzătoare.
(3) Faceţi clic pe OK.
Notă Pentru detalii referitoare la funcţiile driverului de imprimantă, faceţi clic pe Help sau Instructionspentru a vizualiza ajutorul online sau manualul on-screen: Ghid avansat. Apare butonulInstructions în filele Quick Setup, Main şi Maintenance, dacă manualul pe ecran este instalat pecomputerul dumneavoastră.
Puteţi denumi setările modificate şi le puteţi adăuga la Commonly Used Settings. Pentru detalii, consultaţi manualul on-screen: Ghid avansat .
Dacă este selectată caseta Always Print with Current Settings, setarea curentă va fi aplicatăîncepând cu următoarea lucrare de imprimare. Este posibil ca anumite aplicaţii software să nuaibă această funcţie.
Pentru a afişa previzualizare care să confirme rezultatul de imprimare, selectaţi caseta debifare Preview before printing. Este posibil ca anumite aplicaţii software să nu aibă o funcţiede previzualizare.
Puteţi specifica setările detaliate pentru imprimare în foaia Main sau în foaia Page Setup.Pentru detalii, consultaţi manualul on-screen: Ghid avansat .
7. Începeţi imprimarea.Faceţi clic pe Print (sau pe OK) pentru a porni imprimarea.
Pagina 44 din 732 paginiImprimarea documentelor (Windows)

Notă Mesajul indicând cum să încărcaţi plicurile va apărea în timp ce le imprimaţi. Acest mesaj nu vamai apărea data viitoare, dacă bifaţi caseta de selectare Do not show this message again..Pentru detalii despre setările aferente imprimării plicurilor, consultaţi Încărcarea plicurilor .
Pentru a revoca o operaţiune de imprimare în curs, apăsaţi butonul Oprire de pe aparat saufaceţi clic pe Cancel Printing pe monitorul de stare a imprimantei.Pentru a afişa monitorul de stare al imprimantei, faceţi clic pe Canon XXX Printer (unde „ XXX”este denumirea aparatului) din bara de sarcini.
Dacă liniile ordonate imprimate sunt greşit aliniate sau dacă rezultatele imprimării suntnesatisfăcătoare, reglaţi poziţia capului de imprimare. Consultaţi Alinierea capului de imprimare.
În partea superioară a paginii
Pagina 45 din 732 paginiImprimarea documentelor (Windows)

Ghid avansat Depanare
Cuprins > Imprimarea de pe computerul dumneavoastră > Imprimarea documentelor (Macintosh)
Imprimarea documentelor (Macintosh) Această secţiune descrie procedura de imprimare a documentelor format A4 pe hârtie simplă.Pentru detalii, consultaţi manualul on-screen: Ghid avansat .
Notă Operaţiile pot diferi în funcţie de aplicaţiile dumneavoastră software. Pentru detalii privindfuncţionarea, consultaţi manualul de utilizare al aplicaţiei dumneavoastră.
Pentru Mac OS X v.10.5.x
1. Asiguraţi-vă că aparatul este pus în funcţiune.Consultaţi Panoul de operare.
2. Încărcaţi hârtia.Consultaţi Încărcarea hârtiei .
Aici încărcaţi hârtie simplă format A4.
3. Deschideţi uşor tava de ieşire a hârtiei şi deschideţi extensia tăvii de ieşire.
4. Creaţi (sau deschideţi) un document de imprimat utilizând o aplicaţie softwarecorespunzătoare.
5. Deschideţi caseta de dialog Print.Selectaţi Print din meniul File în aplicaţia dumneavoastră software.
Va apărea caseta de dialog Print.
Notă Dacă apare caseta de dialog de mai jos, faceţi clic pe (Săgeată jos).
6. Specificaţi setările de imprimare necesare.
(1) Asiguraţi-vă că denumirea aparatului este selectată în Printer.
(2) Selectaţi dimensiunea hârtiei încărcate în Paper Size.Aici selectăm A4.
(3) Selectaţi Quality & Media în meniul pop-up.
Pagina 46 din 732 paginiImprimarea documentelor (Macintosh)

(4) Selectaţi tipul de suport pentru hârtia încărcată din Media Type.Aici selectaţi Plain Paper.
Notă Dacă selectaţi tipul de suport greşit, aparatul nu va putea imprima cu o calitate deimprimare corespunzătoare.
(5) Selectaţi calitatea de imprimare în Print Quality.Aici selectaţi Standard.
Notă Pentru detalii privind calitatea imprimării, consultaţi manualul on-screen: Ghid avansat .
Notă Pentru detalii referitoare la funcţiile driverului de imprimantă, faceţi clic pe (Întrebare) înecranul Quality & Media, Color Options, Borderless Printing sau Margin.
Previzualizarea apare în stânga casetei de dialog pentru a confirma rezultatul imprimării. Esteposibil ca anumite aplicaţii software să nu aibă o funcţie de previzualizare.
7. Începeţi imprimarea.Faceţi clic pe Print pentru a porni imprimarea.
Notă Faceţi clic pe pictograma imprimantei din Dock pentru a afişa lista lucrărilor de imprimare în cursde desfăşurare.
Pentru a revoca o activitate de imprimare în curs de desfăşurare, selectaţi activitatea dorită înlista Name şi faceţi clic pe Delete. Pentru a opri temporar o lucrare în curs, faceţi clic pe Hold.Pentru a opri temporar toate lucrările din listă, faceţi clic pe Pause Printer.
Dacă liniile ordonate imprimate sunt greşit aliniate sau dacă rezultatele imprimării suntnesatisfăcătoare, reglaţi poziţia capului de imprimare. Consultaţi Alinierea capului de imprimare.
Pagina 47 din 732 paginiImprimarea documentelor (Macintosh)

Pentru Mac OS X v.10.4.x sau Mac OS X v.10.3.9
Notă Ecranele utilizate în această secţiune sunt pentru imprimarea din Mac OS X v.10.4.x.
1. Asiguraţi-vă că aparatul este pus în funcţiune.Consultaţi Panoul de operare.
2. Încărcaţi hârtia.Consultaţi Încărcarea hârtiei .
Aici încărcaţi hârtie simplă format A4.
3. Deschideţi uşor tava de ieşire a hârtiei şi deschideţi extensia tăvii de ieşire.
4. Creaţi (sau deschideţi) un document de imprimat utilizând o aplicaţie softwarecorespunzătoare.
5. Specificaţi dimensiunea paginii.
(1) Selectaţi Page Setup în meniul File din aplicaţia software.Va apărea caseta de dialog Page Setup.
(2) Asiguraţi-vă că numele aparatului dumneavoastră este selectat în Format for.
(3) Selectaţi dimensiunea hârtiei încărcate în Paper Size.Aici selectăm A4.
(4) Faceţi clic pe OK.
6. Specificaţi setările de imprimare necesare.
(1) Selectaţi Print din meniul File în aplicaţia dumneavoastră software.Va apărea caseta de dialog Print.
(2) Asiguraţi-vă că denumirea aparatului este selectată în Printer.
(3) Selectaţi Quality & Media în meniul pop-up.
(4) Selectaţi tipul de suport pentru hârtia încărcată din Media Type.
Pagina 48 din 732 paginiImprimarea documentelor (Macintosh)

Aici selectaţi Plain Paper.
Notă Dacă selectaţi tipul de suport greşit, aparatul nu va putea imprima cu o calitate deimprimare corespunzătoare.
(5) Selectaţi calitatea de imprimare în Print Quality.Aici selectaţi Standard.
Notă Pentru detalii privind calitatea imprimării, consultaţi manualul on-screen: Ghid avansat .
Notă Pentru detalii referitoare la funcţiile driverului de imprimantă, faceţi clic pe (Întrebare) înecranul Quality & Media, Color Options, Special Effects, Borderless Printing sau Margin.
Pentru a afişa previzualizarea în vederea confirmării rezultatului imprimării, faceţi clic pePreview. Este posibil ca anumite aplicaţii software să nu aibă o funcţie de previzualizare.
7. Începeţi imprimarea.Faceţi clic pe Print pentru a porni imprimarea.
Notă Faceţi clic pe pictograma imprimantei din Dock pentru a afişa lista lucrărilor de imprimare în cursde desfăşurare.
Pentru a revoca o activitate de imprimare în curs de desfăşurare, selectaţi activitatea dorită înlista Name şi faceţi clic pe Delete. Pentru a opri temporar o lucrare în curs, faceţi clic pe Hold.Pentru a întrerupe temporar toate comenzile din listă, faceţi clic pe Stop Jobs.
Dacă liniile ordonate imprimate sunt greşit aliniate sau dacă rezultatele imprimării suntnesatisfăcătoare, reglaţi poziţia capului de imprimare.Consultaţi Alinierea capului de imprimare.
În partea superioară a paginii
Pagina 49 din 732 paginiImprimarea documentelor (Macintosh)

Ghid avansat Depanare
Cuprins > Alte utilizări
Alte utilizări Această secţiune vă prezintă setările maşinii şi aplicaţii software utile pe care le puteţi utiliza cu aparatul.
Setările aparatului
Aplicaţii software utile
Solution MenuMy PrinterEasy-WebPrint EX
În partea superioară a paginii
Pagina 50 din 732 paginiAlte utilizări

Ghid avansat Depanare
Cuprins > Alte utilizări > Setările aparatului
Setările aparatului Această secţiune descrie elementele pe care le puteţi seta sau modifica din Device settings din ecranulTop menu. Pentru detalii referitoare la setare sau modificare, consultaţi manualul on-screen: Ghidavansat.
Copy auto intensityÎn timpul copierii, reglează automat intensitatea în funcţie de documentul original încărcat pesuprafaţa de sticlă de scanare.
Prevent abrasionUtilizaţi această setare doar atunci când se murdăreşte suprafaţa de imprimare.
Extension amountSelectează volumul de imagine care se extinde pe hârtie dacă realizaţi copii fără chenar.
AutoPhotoFix settingSelectează dacă se acordă sau nu prioritate imprimării informaţiilor Exif salvate pe o fotografie cândAuto photo fix ON este selectat în modul cartelă.
Date display Selectează formatul de dată care urmează a se imprima pe o fotografie când Print date On esteselectat în modul cartelă.
Read/write attributeSelectează dacă se va utiliza sau nu fanta pentru cartelă a aparatului pe post de unitate de cartelăde memorie a unui computer.
Quiet modeActivaţi această funcţie dacă doriţi să reduceţi zgomotul de funcţionare al aparatului, cum ar fi atuncicând utilizaţi aparatul pe timp de noapte (la copierea sau imprimarea de pe cartela de memorie).
Key repeatPermite mărirea sau reducerea numerelor rapid prin apăsarea lungă a butonului la introducerea devalori numerice. Când această setare este dezactivată, apăsarea lungă a butonului va avea acelaşiefect cu o apăsare scurtă.
Language selectionModifică limba pentru mesajele sau meniurile de pe LCD.
Reset settingRestabileşte setările aparatului la valorile implicite. (Totuşi, valorile setate pentru alinierea capuluide imprimare, setările pentru Read/write attribute şi limba setată în Language selection nu vor firesetate.)
Pagina 51 din 732 paginiSetările aparatului

În partea superioară a paginii
Pagina 52 din 732 paginiSetările aparatului

Ghid avansat Depanare
Cuprins > Alte utilizări > Aplicaţii software utile
Aplicaţii software utile Aparatul poate fi utilizat cu aplicaţii software utile precum Solution Menu, My Printer şi Easy-WebPrint EX.
Solution Menu Cu ajutorul Solution Menu puteţi porni aplicaţiile software furnizate împreună cu aparatul, sau puteţi afişainstrucţiunile de funcţionare.
Faceţi dublu clic pe (Solution Menu) de pe desktop.
Faceţi clic aici: Solution Menu
Faceţi clic pe (Solution Menu) din Dock.
* Ecranele de mai jos sunt pentru Windows Vista.
Faceţi clic pe butonul unei funcţii pe care doriţi să o utilizaţi.
După ce aţi pornit Solution Menu faceţi clic pe butonul de pe bara de titlu pentru a reducedimensiunea ferestrei.
Notă Instalaţi Solution Menu de pe CD-ROM-ul de instalare (Setup CD-ROM) dacă nu a fost instalat saudacă a fost dezinstalat. Pentru a instala Solution Menu, selectaţi Solution Menu din Custom Install.
Butoanele afişate pe ecran pot diferi în funcţie de ţara sau regiunea de cumpărare.
Pentru a porni Solution Menu din meniul Start, selectaţi Toate programele (All Programs) (sauPrograme (Programs)), Canon Utilities, Solution Menu, apoi Solution Menu.
Pentru a porni Solution Menu din bara de meniu, selectaţi meniul Go, Applications, Canon Utilities,Solution Menu, apoi faceţi dublu clic pe Solution Menu.
My Printer Cu My Printer, puteţi afişa fereastra de configurare a driverului de imprimantă. De asemenea, furnizeazăinformaţii referitoare la măsurile pe care le puteţi lua în cazul în care aveţi dificultăţi de operare.Opţiunea My Printer nu este disponibilă pentru Macintosh.
Pagina 53 din 732 paginiAplicaţii software utile

Faceţi dublu clic pe (My Printer) de pe desktop.
Notă De asemenea, puteţi porni My Printer din Solution Menu sau de la bara de activităţi. Instalaţi My Printer de pe CD-ROM-ul de instalare (Setup CD-ROM) dacă nu a fost instalat saudacă a fost dezinstalat. Pentru a instala My Printer, selectaţi My Printer în Custom Install.
Pentru a porni My Printer din meniul Start, selectaţi Toate programele (All Programs) (sau Programe(Programs)), Canon Utilities, My Printer, apoi My Printer.
Easy-WebPrint EX Easy-WebPrint EX asigură o imprimare rapidă şi simplă a paginilor Web pentru Internet Explorer. Puteţiimprima pagini Web redimensionate în mod automat pentru a se încadra în lăţimea hârtiei fără a tăiafeţele paginilor sau puteţi previzualiza şi selecta paginile Web pe care doriţi să le imprimaţi.Easy-WebPrint EX nu este disponibil în Windows 2000 şi Macintosh.
Important Este ilegală reproducerea sau editarea lucrărilor protejate prin copyright ale altor persoane fărăpermisiunea deţinătorului de copyright, cu excepţia celor pentru utilizare personală, utilizare ladomiciliu sau pentru alte utilizări în cadrul unei sfere limitate, aşa cum se defineşte prin copyright. Înplus, reproducerea sau editarea fotografiilor cu persoane poate încălca drepturile de imagine.
Când este instalat Easy-WebPrint EX, acesta adaugă o bară de instrumente la ecranul Internet Explorer.Bara de instrumente este disponibilă ori de câte ori se execută Internet Explorer.
Funcţia de decupare, de exemplu, vă permite să decupaţi părţile dorite din pagini Web şi să le editaţipentru imprimare.
Pagina 54 din 732 paginiAplicaţii software utile

Pentru detalii despre imprimarea paginilor Web, faceţi clic pe (Ajutor) pentru a vizualiza ajutorulonline.
NotăInstalarea Easy-WebPrint EX
Dacă aplicaţia Easy-WebPrint EX nu este instalată, instrucţiunile pentru instalarea acesteia potapărea din bara de activităţi de pe desktop.Pentru a instala Easy-WebPrint EX, faceţi clic pe ghidul afişat şi urmaţi instrucţiunile de pe ecran.
De asemenea, puteţi instala Easy-WebPrint EX de pe CD-ROM-ul de instalare (Setup CD-ROM).Pentru a instala Easy-WebPrint EX, selectaţi Easy-WebPrint EX în Custom Install.
Pentru a instala Easy-WebPrint EX pe computer, este necesar să aveţi Internet Explorer 7 sau ovariantă ulterioară şi computerul trebuie să fie conectat la Internet.
În partea superioară a paginii
Pagina 55 din 732 paginiAplicaţii software utile

Ghid avansat Depanare
Cuprins > Încărcarea hârtiei/documentelor originale
Încărcarea hârtiei/documentelor originaleAceastă secţiune descrie tipurile de hârtie sau documente originale pe care le puteţi încărca, cum săîncărcaţi hârtia de imprimare în tava din spate şi cum să încărcaţi documentele originale pentru a ficopiate sau scanate.
Încărcarea hârtiei
Încărcarea hârtiei simple/fotograficeÎncărcarea plicurilorTipuri de suport pe care le puteţi utilizaTipuri de suport pe care nu le puteţi utiliza.
Încărcarea documentelor originale
Încărcarea documentelor originaleDocumente originale pe care le puteţi încărca
În partea superioară a paginii
Pagina 56 din 732 paginiÎncărcarea hârtiei/documentelor originale

Ghid avansat Depanare
Cuprins > Încărcarea hârtiei/documentelor originale > Încărcarea hârtiei
Încărcarea hârtiei Încărcarea hârtiei simple/fotograficeÎncărcarea plicurilorTipuri de suport pe care le puteţi utilizaTipuri de suport pe care nu le puteţi utiliza
Încărcarea hârtiei simple/fotografice
Important Dacă tăiaţi hârtia simplă la dimensiuni mici precum 4" x 6" / 10 x 15 cm, 4" X 8" / 101,6 x 203,2 mm,5" x 7" / 13 x 18 cm sau 2,16" x 3,58" / 55,0 x 91,0 mm (dimensiuni carte de vizită) pentru imprimăriexperimentale, hârtia se poate bloca.
Notă Recomandăm utilizarea hârtiei fotografice originale Canon pentru a imprima fotografii.Pentru detalii despre hârtia originală Canon, consultaţi Tipuri de suport pe care le puteţi utiliza .
Puteţi folosi hârtie de imprimare obişnuită.Pentru detalii despre dimensiunile de pagină şi greutatea hârtiei pe care o puteţi utiliza pentru acestaparat, consultaţi Tipuri de suport pe care le puteţi utiliza .
1. Pregătiţi hârtia.Îndreptaţi marginile hârtiei. Îndreptaţi hârtia dacă este ondulată.
Notă Îndreptaţi marginile hârtiei înainte de încărcare. Încărcarea hârtiei fără îndreptarea marginilorpoate produce blocarea acesteia.
Dacă hârtia este încreţită, ţineţi colţurile încreţite opuse şi îndoiţi-le uşor în direcţia opusă pânăcând hârtia devine complet plată. Pentru detalii despre cum să îndreptaţi hârtia încreţită, consultaţi „ Depanare” în manualul on-screen: Ghid avansat.
2. Încărcaţi hârtia.
(1) Deschideţi suportul pentru hârtie, ridicaţi-l, apoi împingeţi-l înapoi.
(2) Deschideţi uşor tava de ieşire a hârtiei şi deschideţi extensia tăvii de ieşire.
Pagina 57 din 732 paginiÎncărcarea hârtiei

(3) Glisaţi ghidajele pentru hârtie (A) pentru a le deschide şi aşezaţi hârtia în centrultăvii din spate, cu FAŢA DE IMPRIMARE ORIENTATĂ CĂTREDUMNEAVOASTRĂ.
Important Întotdeauna încărcaţi hârtia cu orientarea tip portret (B). Încărcarea hârtiei cu orientarea tipvedere (C) poate cauza blocarea hârtiei.
(4) Glisaţi ghidajele de hârtie (A) pentru a le alinia cu ambele laturi ale stivei dehârtie.Nu culisaţi ghidajele de hârtie prea tare. Alimentarea cu hârtie nu se va realiza corect.
Pagina 58 din 732 paginiÎncărcarea hârtiei

Notă Nu încărcaţi mai sus de semnul pentru limita de încărcare (D).
Notă Aparatul poate emite un zgomot de funcţionare în timpul alimentării cu hârtie.
După încărcarea hârtiei Când utilizaţi aparatul pentru a copia sau imprima fără computer, selectaţi dimensiunea şi tipulhârtiei încărcate pentru dimensiunea paginii şi tipul de suport din ecranul de setări din fiecaremod.Consultaţi Modificarea setărilor din „Imprimarea fotografiilor salvate pe o cartelă de memorie”sau Modificarea setărilor din „Efectuarea de copii”.
La imprimarea cu ajutorul unui computer, selectaţi dimensiunile şi tipul hârtiei încărcate în PrinterPaper Size (sau Paper Size) şi Media Type din driverul imprimantei.Consultaţi Imprimarea documentelor (Windows) sau Imprimarea documentelor (Macintosh) .
În partea superioară a paginii
Pagina 59 din 732 paginiÎncărcarea hârtiei

Ghid avansat Depanare
Cuprins > Încărcarea hârtiei/documentelor originale > Încărcarea hârtiei > Încărcarea plicurilor
Încărcarea plicurilor Puteţi imprima pe plicuri European DL şi US Comm. plicuri dimensiunea #10Adresa este rotită şi imprimată automat conform direcţiei plicului prin specificarea corectă cu driverulpentru imprimantă.
Important Puteţi imprima pe plicuri numai utilizând un computer. Nu puteţi folosi următoarele plicuri.- Plicuri cu suprafaţa tratată sau gofrată- Plicuri cu clapete duble (sau clapete cu adeziv)- Plicuri ale căror clapete cauciucate sunt deja adezive şi umezite
Notă În Windows, mesajul care indică cum să încărcaţi plicurile va apărea în timp ce le imprimaţi. Acestmesaj nu va mai apărea data viitoare, dacă bifaţi caseta de selectare Do not show this messageagain..
1. Pregătirea plicurilor.
Apăsaţi cele patru colţuri şi margini ale plicurilor pentru a le îndrepta.
Dacă plicurile sunt încreţite, ţineţi colţurile opuse şi, încet, îndoiţi-le în direcţiaopusă.
Dacă colţul clapetei plicului este îndoit, îndreptaţi-l. Utilizaţi un creion pentru a îndrepta marginea în direcţia introducerii şi accentuaţipliul.
Figurile de mai sus arată o vedere laterală a marginii diriguitoare a plicului.
Important Plicurile se pot bloca în aparat dacă nu sunt întinse sau dacă marginile nu sunt aliniate.Asiguraţi-vă că ondulaţia sau umflătura nu depăşeşte 0,1 inchi / 3 mm.
2. Încărcarea plicurilor.
Pagina 60 din 732 paginiÎncărcarea plicurilor

(1) Deschideţi suportul pentru hârtie.Nu ridicaţi suportul pentru hârtie.
(2) Deschideţi uşor tava de ieşire a hârtiei şi deschideţi extensia tăvii de ieşire.Consultaţi Încărcaţi hârtia. în „Încărcarea hârtiei simple/fotografice” din „Încărcarea hârtiei”.
(3) Glisaţi ghidajele de hârtie (A) pentru a le deschide şi aşezaţi plicurile în centrultăvii din spate CU FAŢA DE IMPRIMARE ADRESĂ ORIENTATĂ CĂTREDUMNEAVOASTRĂ. Clapeta îndoită a plicului va fi orientată cu faţa în jos în partea stângă.
Pot fi încărcate până la 10 plicuri odată.
(4) Glisaţi ghidajele de hârtie (A) pentru a le alinia cu ambele părţi ale plicului.Nu culisaţi ghidajele de hârtie prea tare. Alimentarea cu plicuri nu se va realiza corect.
(B) Partea din spate
(C) Partea cu adresă
3. Specificaţi setările în driverul pentru imprimantă.
(1) Selectaţi Envelope în Commonly Used Settings din foaia Quick Setup.
(2) Selectaţi DL Env. sau Comm. Env. #10 în fereastra Envelope Size Setting .
(3) Selectaţi Landscape în Orientation.
Pagina 61 din 732 paginiÎncărcarea plicurilor

(1) Selectaţi Envelope în Media Type.
(2) Selectaţi DL Envelope sau #10 Envelope în Paper Size.
(3) Selectaţi orientarea Landscape în Orientation.
Important Dacă nu specificaţi corect dimensiunea sau orientarea pentru plic, adresa va fi imprimatăinvers sau întoarsă la 90 de grade.
Notă Aparatul poate emite un zgomot de funcţionare în timpul alimentării cu plicuri. În Windows, dacă rezultatul imprimării este răsturnat, deschideţi fereastra de configurare adriverului de imprimantă, selectaţi Envelope în Commonly Used Settings, apoi selectaţi casetade selectare Rotate 180 degrees din Additional Features.
Pentru detalii referitoare la setările pentru driverul de imprimantă, consultaţi Imprimarea
documentelor (Windows) sau Imprimarea documentelor (Macintosh) .
În partea superioară a paginii
Pagina 62 din 732 paginiÎncărcarea plicurilor
Ghid avansat Depanare
Cuprins > Încărcarea hârtiei/documentelor originale > Încărcarea hârtiei > Tipuri de suport pe care le puteţi utiliza
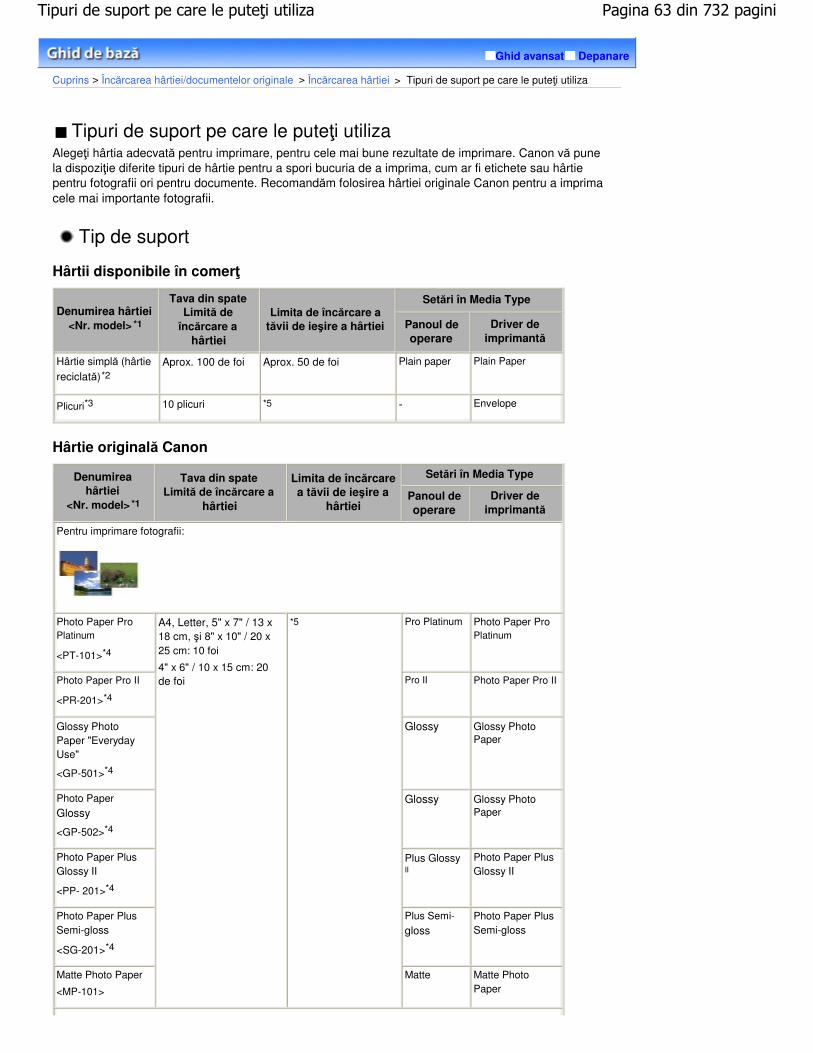
Tipuri de suport pe care le puteţi utiliza Alegeţi hârtia adecvată pentru imprimare, pentru cele mai bune rezultate de imprimare. Canon vă punela dispoziţie diferite tipuri de hârtie pentru a spori bucuria de a imprima, cum ar fi etichete sau hârtiepentru fotografii ori pentru documente. Recomandăm folosirea hârtiei originale Canon pentru a imprimacele mai importante fotografii.
Tip de suport
Hârtii disponibile în comerţ
Denumirea hârtiei<Nr. model> *1
Tava din spateLimită de
încărcare ahârtiei
Limita de încărcare atăvii de ieşire a hârtiei
Setări în Media Type
Panoul deoperare
Driver deimprimantă
Hârtie simplă (hârtie
reciclată)*2Aprox. 100 de foi Aprox. 50 de foi Plain paper Plain Paper
Plicuri*3 10 plicuri *5 - Envelope
Hârtie originală Canon
Denumireahârtiei
<Nr. model> *1
Tava din spateLimită de încărcare a
hârtiei
Limita de încărcarea tăvii de ieşire a
hârtiei
Setări în Media Type
Panoul deoperare
Driver deimprimantă
Pentru imprimare fotografii:
Photo Paper ProPlatinum
<PT-101>*4
A4, Letter, 5" x 7" / 13 x18 cm, şi 8" x 10" / 20 x25 cm: 10 foi
4" x 6" / 10 x 15 cm: 20de foi
*5 Pro Platinum Photo Paper ProPlatinum
Photo Paper Pro II
<PR-201>*4
Pro II Photo Paper Pro II
Glossy PhotoPaper "EverydayUse"
<GP-501>*4
Glossy Glossy PhotoPaper
Photo PaperGlossy
<GP-502>*4
Glossy Glossy PhotoPaper
Photo Paper PlusGlossy II
<PP- 201>*4
Plus GlossyII
Photo Paper PlusGlossy II
Photo Paper PlusSemi-gloss
<SG-201>*4
Plus Semi-
glossPhoto Paper PlusSemi-gloss
Matte Photo Paper
<MP-101>
Matte Matte PhotoPaper
Pagina 63 din 732 paginiTipuri de suport pe care le puteţi utiliza

Pentru imprimarea documentelor de afaceri:
High ResolutionPaper
<HR-101N>*3
80 foi 50 foi - High ResolutionPaper
Pentru creare imprimări proprii:
T-Shirt Transfers
<TR-301>*3
1 foaie *5 - T-Shirt Transfers
Autocolante foto
<PS-101>*3, *6
Glossy PhotoPaper
*1 Hârtia cu număr de model este hârtie originală Canon. Pentru informaţii detaliate despre parteaimprimabilă şi note despre manipularea hârtiei, consultaţi manualul de instrucţiuni furnizat împreună cuhârtia. Pentru informaţii despre dimensiunile de pagină disponibile pentru fiecare tip de hârtie originalăCanon, vizitaţi site-ul nostru Web. Există posibilitatea de a nu putea cumpăra hârtie originală Canon înfuncţie de ţara sau regiunea de cumpărare. În S.U.A., hârtia nu se vinde după număr de model.Cumpăraţi hârtie după nume.*2 Alimentarea corespunzătoare se poate să nu fie posibilă la capacitatea maximă în funcţie de tipul dehârtie sau condiţiile de mediu (condiţii de temperatură sau umiditate fie foarte ridicată, fie foartescăzută). În astfel de cazuri, reduceţi numărul foilor de hârtie pe care le încărcaţi la mai puţin de jumătate(poate fi utilizată hârtie reciclată 100%).*3 Disponibil numai când se imprimă de pe computer.*4 Când se încarcă hârtie în stive, latura de imprimare poate fi marcată pe măsură ce este introdusă sauhârtia poate să nu fie introdusă corespunzător. În acest caz, încărcaţi câte o coală pe rând.*5 Recomandăm să îndepărtaţi coala imprimată anterior din tava de ieşire a hârtiei înainte de a imprimaîn continuu pentru a evita neclarităţile şi decolorarea.*6 Puteţi să specificaţi cu uşurinţă setări de imprimare pentru hârtie autocolantă cu aplicaţia Easy-PhotoPrint EX furnizată pe CD-ROM-ul de instalare (Setup CD-ROM) . Instalaţi-o pe computerul dvs.
Dimensiuni paginăPuteţi folosi următoarele dimensiuni ale paginii.
Notă Pe Macintosh, Choukei 3 şi Choukei 4 nu sunt disponibile.
Dimensiuni standard:
Letter (8,50 x 11,00 inchi / 215,9 x 279,4 mm) Legal (8,50 x 14,00 inchi / 215,9 x 355,6 mm) A5 (5,83 x 8,27 inchi / 148,0 x 210,0 mm) A4 (8,27 x 11,69 inchi / 210,0 x 297,0 mm) B5 (7,17 x 10,12 inchi / 182,0 x 257,0 mm) 4" x 6" (4,00 x 6,00 inchi / 10 x 15 cm) 4" x 8" (4,00 x 8,00 inchi / 101,6 x 203,2 mm) 5" x 7" (5,00 x 7,00 inchi / 13 x 18 cm) 8" x 10" (8,00 x 10,00 inchi / 20 x 25 cm) L (3,50 x 5,00 inchi / 89,0 x 127,0 mm) 2L (5,00 x 7,01 inchi / 127,0 x 178,0 mm) Hagaki (3,94 x 5,83 inchi / 100,0 x 148,0 mm) Hagaki 2 (7,87 x 5,83 inchi / 200,0 x 148, mm)
Pagina 64 din 732 paginiTipuri de suport pe care le puteţi utiliza

Comm. Env. #10 (4,12 x 9,50 inchi / 104,6 x 241,3 mm) DL Env. (4,33 x 8,66 inchi / 110,0 x 220,0 mm) Choukei 3 (4,72 x 9,25 inchi / 120,0 x 235,0 mm) Choukei 4 (3,54 x 8,07 inchi / 90,0 x 205,0 mm) Youkei 4 (4,13 x 9,25 inchi / 105,0 x 235,0 mm) Youkei 6 (3,86 x 7,48 inchi / 98,0 x 190,0 mm) Card (2,16 x 3,58 inchi / 55,0 x 91,0 mm) Wide (4,00 x 7,10 inchi / 101,6 x 180,6 mm)
Dimensiuni non-standard:
Puteţi specifica o dimensiune particularizată din următorul interval:
Dimensiunea minimă: 2,17 x 3,58 inchi / 55,0 x 91,0 mm
Dimensiunea maximă: 8,50 x 26,61 inchi / 215,9 x 676,0 mm
Greutate hârtiede la 17 până la 28 lb / de la 64 până la 105 g/m 2 excepţie pentru hârtie originală CanonNu utilizaţi hârtie mai grea sau mai uşoară (cu excepţia hârtiei originale Canon), întrucât se poate blocaînăuntru.
Informaţii despre stocarea hârtiei Scoateţi din pachet numai numărul necesar de coli de hârtie, înainte de imprimare. Pentru a evita ondularea hârtiei când nu imprimaţi, aşezaţi hârtia nefolosită înapoi în pachet şipăstraţi-o pe o suprafaţă plană. De asemenea, depozitaţi ferit de căldură, umiditate şi luminadirectă a soarelui.
Note cu privire la hârtia pentru imprimare fără chenar pe întreagapagină Pentru imprimarea fără chenar pe întreaga pagină nu puteţi utiliza hârtie de dimensiuni A5, B5,Legal şi plicuri.
Puteţi utiliza hârtie simplă pentru imprimare fără chenar pe întreaga pagină doar atunci cândimprimaţi de pe computer. Totuşi, în acest caz calitatea imprimării va fi mai slabă. Vă recomandămsă utilizaţi hârtie simplă pentru o imprimare de probă.
În partea superioară a paginii
Pagina 65 din 732 paginiTipuri de suport pe care le puteţi utiliza

Ghid avansat Depanare
Cuprins > Încărcarea hârtiei/documentelor originale > Încărcarea hârtiei > Tipuri de suport pe care nu le puteţi utiliza
Tipuri de suport pe care nu le puteţi utiliza Nu utilizaţi următoarele tipuri de hârtie. Utilizarea acestor tipuri de hârtie nu numai că va cauza rezultatenesatisfăcătoare, dar va conduce la nefuncţionarea sau blocarea aparatului.
Hârtie îndoită, ondulată sau încreţită Hârtie umedă
Hârtie care este prea subţire (cântăreşte mai puţin de 17 lb / 64 g/m 2)
Hârtie care este prea groasă (cântăreşte mai mult de 28 lb / 105 g/m 2, excepţie pentru hârtieoriginală Canon)
Hârtie mai subţire decât o carte poştală, inclusiv hârtie simplă sau hârtie de bloc notes, tăiată la odimensiune mică (atunci când se imprimă pe hârtie mai mică decât cea de format A5)
Cărţi poştale cu imagine Cărţi poştale cu fotografii sau etichete Plicuri cu clapete duble (sau clapete cu adeziv) Plicuri cu suprafaţa tratată sau gofrată Plicuri ale căror clapete cauciucate sunt deja adezive şi umezite Orice tip de hârtie cu găuri Hârtie ce nu are forma rectangulară Hârtie prinsă cu capse sau lipici Hârtie cu adeziv Hârtie decorată cu sclipici, etc.
În partea superioară a paginii
Pagina 66 din 732 paginiTipuri de suport pe care nu le puteţi utiliza

Ghid avansat Depanare
Cuprins > Încărcarea hârtiei/documentelor originale > Încărcarea documentelor originale
Încărcarea documentelor originale Încărcarea documentelor originaleDocumente originale pe care le puteţi încărca
Încărcarea documentelor originale Puteţi să încărcaţi documentele originale, pentru a fi copiate sau scanate, pe suprafaţa de sticlă descanare.
Important După încărcarea documentului original pe suprafaţa de sticlă de scanare, asiguraţi-vă că închideţicapacul pentru documente înainte de a începe copierea sau scanarea.
Când se scanează de pe computer utilizând o aplicaţie software, trebuie să încărcaţi documentuloriginal în alt mod. Pentru detalii, consultaţi manualul on-screen: Ghid avansat .
1. Aşezaţi un document original pe suprafaţa de sticlă de scanare.
(1) Deschideţi capacul pentru documente.
Important Nu aşezaţi niciun obiect pe capacul pentru documente. Vor cădea în tava din spate atuncicând capacul pentru documente este deschis, cauzând funcţionarea defectuoasă aaparatului.
(2) Încărcaţi un document original cu faţa de copiat sau de scanat ORIENTATĂ ÎNJOS pe suprafaţa de sticlă de scanare.Aliniaţi colţul documentului original cu semnul de aliniere .
Important Nu aşezaţi niciun obiect cu greutatea mai mare de 4,4 lb / 2,0 kg pe suprafaţa de sticlă descanare.
Nu apăsaţi sau aşezaţi pe documentul original greutăţi mai mari de 4,4 lb / 2,0 kg. Procedândastfel puteţi produce disfuncţionalităţi scanerului sau suprafaţa de sticlă de scanare se poatesparge.
Aparatul nu poate scana zona întunecată (A) (0,04 inchi / 1 mm de la marginile suprafeţei desticlă de scanare).
Pagina 67 din 732 paginiÎncărcarea documentelor originale

2. Închideţi uşor capacul pentru documente.
În partea superioară a paginii
Pagina 68 din 732 paginiÎncărcarea documentelor originale

Ghid avansat Depanare
Cuprins > Încărcarea hârtiei/documentelor originale > Încărcarea documentelor originale > Documente originale pecare le puteţi încărca
Documente originale pe care le puteţi încărca Puteţi copia sau scana următoarele documente originale.
Tipuri de documenteoriginale:
Document text, revistă sau ziar
Fotografie imprimată, carte poştală sau carte de vizităsau DVD/CD
Dimensiune (l x L): Max. 8,5 x 11,7 inchi / 216,0 x 297,0 mm
Notă Când pe suprafaţa de sticlă de scanare încărcaţi un document original gros de tipul unei cărţi, aveţiposibilitatea să scoateţi capacul pentru documente de la aparat. Pentru detalii referitoare la modul în care puteţi scoate sau ataşa capacul pentru documente,consultaţi manualul on-screen: Ghid avansat .
În partea superioară a paginii
Pagina 69 din 732 paginiDocumente originale pe care le puteţi încărca

Ghid avansat Depanare
Cuprins > Întreţinere de rutină
Întreţinere de rutină Această secţiune descrie procedura de curăţare a aparatului când rezultatul imprimării este slab,procedura de înlocuire a cartuşelor FINE când acestea se golesc sau modul de acţionare cândalimentarea cu hârtie nu se face corespunzător.
Când imprimarea devine ştearsă sau culorile sunt incorecte
Imprimarea unui model de verificare a duzeiExaminarea unui model de verificare a duzeiCurăţarea capului de imprimareCurăţarea în profunzime a capului de imprimareAlinierea capului de imprimare
Înlocuirea unui cartuş FINE
Procedura de înlocuireVerificarea nivelului de cerneală
Curăţarea rolei de alimentare cu hârtie
În partea superioară a paginii
Pagina 70 din 732 paginiÎntreţinere de rutină

Ghid avansat Depanare
Cuprins > Întreţinere de rutină > Când imprimarea devine ştearsă sau culorile sunt incorecte
Când imprimarea devine ştearsă sau culorile sunt incorecte Dacă rezultatele imprimării sunt neclare sau culorile nu sunt imprimate corect, duzele capului deimprimare (cartuşele FINE) sunt, probabil, înfundate. Urmaţi procedura de mai jos pentru a imprimamodelul de verificare a duzei, verificaţi starea duzei capului de imprimare, apoi curăţaţi capul deimprimare.Dacă liniile regulate imprimate sunt aliniate greşit sau rezultatele imprimării sunt nesatisfăcătoare în altmod, calitatea imprimării poate fi îmbunătăţită prin alinierea capului de imprimare.
Important Nu clătiţi sau ştergeţi cartuşele Fine. Acest fapt poate crea probleme la cartuşele FINE.
NotăÎnaintea efectuării întreţinerii
Verificaţi dacă a mai rămas cerneală în cartuşul FINE.Consultaţi Verificarea nivelului de cerneală .
Verificaţi instalarea corectă a cartuşului FINE.Consultaţi Procedura de înlocuire .
Verificaţi dacă banda portocalie de protecţie din partea de jos a cartuşului FINE este îndepărtată.Consultaţi Procedura de înlocuire .
Dacă se afişează un mesaj de eroare pe LCD, consultaţi „ Depanare” în manualul on-screen: Ghidavansat.
Sporirea calităţii imprimării prin setările driverului imprimantei poate îmbunătăţi rezultatul imprimării.Pentru detalii, consultaţi manualul on-screen: Ghid avansat .
Când rezultatele imprimării sunt neclare sau inegale:
Etapa 1Consultaţi Imprimarea modelului de verificare a duzei .
Consultaţi Examinarea modelului de verificare a duzei .
După curăţarea capului deimprimare, imprimaţi modelul de
verificare a duzei şi analizaţi-l.
Dacă lipsesc linii sau există dungi albe orizontale în model:
Pasul 2Consultaţi Curăţarea capului de imprimare.
Dacă problema nu se rezolvă după curăţarea capului deimprimare de două ori:
Pasul 3Consultaţi Curăţarea în profunzime a capului de imprimare .
Dacă problema nu se rezolvă, opriţi alimentarea şi curăţaţicapul de imprimare în profunzime din nou după 24 de ore:
Dacă problema persistă:
Pasul 4Consultaţi Înlocuirea unui cartuş FINE .
Pagina 71 din 732 paginiCând imprimarea devine ştearsă sau culorile sunt incorecte

Notă Dacă problema persistă după înlocuirea cartuşului FINE, contactaţi centrul de service.
Când rezultatele imprimării sunt neuniforme, cum ar fi aliniereagreşită a liniilor:
Consultaţi Alinierea capului de imprimare.
Notă Puteţi, de asemenea, efectua operaţiunile de întreţinere de pe computerul dumneavoastră.Pentru detalii, consultaţi manualul on-screen: Ghid avansat .
În partea superioară a paginii
Pagina 72 din 732 paginiCând imprimarea devine ştearsă sau culorile sunt incorecte

Ghid avansat Depanare
Cuprins > Întreţinere de rutină > Când imprimarea devine ştearsă sau culorile sunt incorecte > Imprimarea modelului de
verificare a duzei
Imprimarea modelului de verificare a duzei Imprimaţi modelul de verificare a duzei pentru a stabili dacă cerneala iese corespunzător din duzelecapului de imprimare.
Notă Dacă nivelul cernelii rămase este scăzut, modelul de verificare a duzei nu va fi imprimat corect.Înlocuiţi cartuşul FINE cu nivel scăzut de cerneală.Consultaţi Înlocuirea unui cartuş FINE .
Trebuie să pregătiţi: o foaie de hârtie simplă de dimensiuni A4 sau Letter
1. Asiguraţi-vă că alimentarea este pornită.
2. Imprimaţi modelul de verificare a duzei.
(1) Apăsaţi butonul Meniu (Menu) .
(2) Selectaţi Maintenance, apoi apăsaţi butonul OK.
(3) Selectaţi Nozzle check şi apăsaţi butonul OK.
Va apărea ecranul de confirmare a imprimării modelului.
(4) Selectaţi Yes, apoi apăsaţi butonul OK.
(5) Confirmaţi mesajul afişat şi încărcaţi o foaie de hârtie simplă format A4 sauLetter.
(6) Deschideţi uşor tava de ieşire a hârtiei şi deschideţi extensia tăvii de ieşire.
(7) Apăsaţi butonul OK.Modelul de verificare a duzei va fi imprimat.
(8) Confirmaţi mesajul afişat şi apăsaţi butonul OK.Va apărea ecranul Check patterns.
3. Examinaţi modelul de verificare a duzei.Consultaţi Examinarea modelului de verificare a duzei .
În partea superioară a paginii
Pagina 73 din 732 paginiImprimarea modelului de verificare a duzei

Ghid avansat Depanare
Cuprins > Întreţinere de rutină > Când imprimarea devine ştearsă sau culorile sunt incorecte > Examinarea modeluluide verificare a duzei
Examinarea modelului de verificare a duzei Examinaţi modelul de verificare a duzei şi curăţaţi capul de imprimare, dacă este necesar.
1. Verificaţi dacă există linii lipsă în model (1) sau dacă modelul prezintă dungi albeorizontale (2).
(A) Nicio linie lipsă /nicio dungă albă orizontală
(B) Lipsesc linii /există dungi albe orizontale
2. Selectaţi modelul cel mai apropiat de modelul imprimat de verificare a duzelor înecranul Check patterns.
Pentru (A) (nu există nicio linie lipsă sau nicio dungă albă orizontală) atât în (1) cât şi în (2):
(1) Selectaţi All A, apoi apăsaţi butonul OK.Curăţarea nu este necesară.
(2) Confirmaţi mesajul şi apăsaţi butonul OK. Ecranul va reveni la ecranul Maintenance.
Notă Pentru a efectua alte funcţii, selectaţi meniul dorit din ecranul meniului superior care seafişează prin apăsarea butonului Înapoi (Back) sau Meniu (Menu) .
Pagina 74 din 732 paginiExaminarea modelului de verificare a duzei

Pentru (B) (lipsesc linii sau există dungi albe orizontale) în (1) sau (2) sau atât în (1) cât şi în (2):
(1) Selectaţi Also B, apoi apăsaţi butonul OK.Curăţaţi capul de imprimare. Va apărea ecranul de confirmare a curăţării.
(2) Selectaţi Yes, apoi apăsaţi butonul OK.Aparatul începe curăţarea capului de imprimare.
Consultaţi Curăţarea capului de imprimare.
În partea superioară a paginii
Pagina 75 din 732 paginiExaminarea modelului de verificare a duzei

Ghid avansat Depanare
Cuprins > Întreţinere de rutină > Când imprimarea devine ştearsă sau culorile sunt incorecte > Curăţarea capului deimprimare
Curăţarea capului de imprimare Curăţaţi capul de imprimare dacă există linii lipsă sau linii albe orizontale în modelul de verificare aduzelor imprimate. Prin curăţare, duzele sunt degajate şi starea capului de imprimare este restabilită.Curăţarea capului de imprimare consumă cerneală. Curăţaţi capul de imprimare doar dacă estenecesar.
Trebuie să pregătiţi: o foaie de hârtie simplă de dimensiuni A4 sau Letter
1. Asiguraţi-vă că alimentarea este pornită.
2. Curăţaţi capul de imprimare.
(1) Apăsaţi butonul Meniu (Menu) .
(2) Selectaţi Maintenance, apoi apăsaţi butonul OK.
(3) Selectaţi Cleaning, apoi apăsaţi butonul OK.
Se va afişa ecranul de confirmare.
(4) Selectaţi Yes, apoi apăsaţi butonul OK.Aparatul începe curăţarea capului de imprimare.
Nu efectuaţi alte operaţiuni până când imprimanta nu a finalizat curăţarea capului de imprimare. Aceastăoperaţie durează între 1 şi 2 minute.
Va apărea ecranul de confirmare a imprimării modelului.
3. Imprimaţi modelul de verificare a duzei.
(1) Selectaţi Yes, apoi apăsaţi butonul OK.
(2) Confirmaţi mesajul afişat şi încărcaţi o foaie de hârtie simplă format A4 sauLetter.
(3) Deschideţi uşor tava de ieşire a hârtiei şi deschideţi extensia tăvii de ieşire.
(4) Apăsaţi butonul OK.Modelul de verificare a duzei va fi imprimat.
(5) Confirmaţi mesajul afişat şi apăsaţi butonul OK.
4. Examinaţi modelul de verificare a duzei.Consultaţi Examinarea modelului de verificare a duzei .
Pagina 76 din 732 paginiCurăţarea capului de imprimare

Notă Dacă problema nu se rezolvă după curăţarea capului de imprimare de două ori, curăţaţi capulde imprimare în profunzime.Consultaţi Curăţarea în profunzime a capului de imprimare .
În partea superioară a paginii
Pagina 77 din 732 paginiCurăţarea capului de imprimare

Ghid avansat Depanare
Cuprins > Întreţinere de rutină > Când imprimarea devine ştearsă sau culorile sunt incorecte > Curăţarea în profunzimea capului de imprimare
Curăţarea în profunzime a capului de imprimare Dacă, după curăţarea standard a capului de imprimare, nu se îmbunătăţeşte calitatea imprimării,curăţaţi capul de imprimare în profunzime. Curăţarea în profunzime a capului de imprimare consumămai multă cerneală decât curăţarea standard, de aceea curăţaţi capul de imprimare în profunzimenumai atunci când este nevoie.
Trebuie să pregătiţi: o foaie de hârtie simplă de dimensiuni A4 sau Letter
1. Asiguraţi-vă că alimentarea este pornită.
2. Curăţaţi în profunzime capul de imprimare.
(1) Apăsaţi butonul Meniu (Menu) .
(2) Selectaţi Maintenance, apoi apăsaţi butonul OK.
(3) Selectaţi Deep cleaning, apoi apăsaţi butonul OK.
Se va afişa ecranul de confirmare.
(4) Selectaţi Yes, apoi apăsaţi butonul OK.Imprimanta începe curăţarea în profunzime a capului de imprimare.
Nu efectuaţi alte operaţiuni până când imprimanta nu a finalizat curăţarea în profunzime a capului deimprimare. Aceasta durează aproximativ 2 minute.
Va apărea ecranul de confirmare a imprimării modelului.
3. Imprimaţi modelul de verificare a duzei.
(1) Selectaţi Yes, apoi apăsaţi butonul OK.
(2) Confirmaţi mesajul afişat şi încărcaţi o foaie de hârtie simplă format A4 sauLetter.
(3) Deschideţi uşor tava de ieşire a hârtiei şi deschideţi extensia tăvii de ieşire.
(4) Apăsaţi butonul OK.Modelul de verificare a duzei va fi imprimat şi ecranul va reveni la ecranul Maintenance.
Notă Pentru a efectua alte funcţii, selectaţi meniul dorit din ecranul meniului superior care seafişează prin apăsarea butonului Înapoi (Back) sau Meniu (Menu) .
Pagina 78 din 732 paginiCurăţarea în profunzime a capului de imprimare

4. Examinaţi modelul de verificare a duzei.Consultaţi pasul 1 de la Examinarea modelului de verificare a duzei .
Dacă problema nu se rezolvă, opriţi alimentarea şi curăţaţi capul de imprimare în profunzime din nou după 24 deore.
Dacă problema tot nu este rezolvată, înlocuiţi cartuşul FINE cu unul nou.
Consultaţi Înlocuirea unui cartuş FINE .
Dacă problema persistă şi după înlocuirea cartuşului FINE, contactaţi centrul dumneavoastră de service.
În partea superioară a paginii
Pagina 79 din 732 paginiCurăţarea în profunzime a capului de imprimare

Ghid avansat Depanare
Cuprins > Întreţinere de rutină > Când imprimarea devine ştearsă sau culorile sunt incorecte > Alinierea capului deimprimare
Alinierea capului de imprimare Dacă liniile regulate imprimate nu sunt aliniate sau rezultatele imprimării sunt nesatisfăcătoare în altmod, reglaţi poziţia capului de imprimare.
Notă Dacă nivelul cernelii rămase este scăzut, foaia de aliniere a capului de imprimare nu va fi imprimatăcorect. Înlocuiţi cartuşul FINE cu nivel scăzut de cerneală.Consultaţi Înlocuirea unui cartuş FINE .
Trebuie să pregătiţi: o foaie de hârtie simplă de dimensiuni A4 sau Letter*
* Asiguraţi-vă că utilizaţi hârtie albă şi curată pe ambele feţe.
1. Asiguraţi-vă că alimentarea este pornită.
2. Imprimaţi foaia de aliniere a capului de imprimare.
(1) Apăsaţi butonul Meniu (Menu) .
(2) Selectaţi Maintenance, apoi apăsaţi butonul OK.
(3) Selectaţi Auto head align, apoi apăsaţi butonul OK.
Se va afişa ecranul de confirmare.
(4) Selectaţi Yes, apoi apăsaţi butonul OK.
(5) Confirmaţi mesajul afişat şi încărcaţi o foaie de hârtie simplă format A4.
(6) Deschideţi uşor tava de ieşire a hârtiei şi deschideţi extensia tăvii de ieşire.
(7) Apăsaţi butonul OK.Se va imprima foaia de aliniere a capului de imprimare.
Pagina 80 din 732 paginiAlinierea capului de imprimare

Important Nu atingeţi nicio parte imprimată de pe foaia de aliniere a capului de imprimare. Aveţi grijă să nu murdăriţi foaia de aliniere a capului de imprimare. Dacă foaia este pătatăsau încreţită, este posibil să nu poată fi scanată corect.
(8) Când apare mesajul „Did the patterns print correctly?”, verificaţi dacă modeluleste imprimat corect, selectaţi Yes, apoi apăsaţi butonul OK.
3. Scanaţi foaia de aliniere a capului de imprimare pentru a regla poziţia capului deimprimare.
(1) Confirmaţi mesajul afişat şi încărcaţi foaia de aliniere a capului de imprimare pesuprafaţa de sticlă de scanare.Aşezaţi foaia de aliniere a capului de imprimare CU PARTEA IMPRIMATĂ ÎN JOS şi aliniaţi marcajul de pe
colţul din stânga-sus al foii cu marcajul de aliniere .
(2) Închideţi uşor capacul pentru documente şi apăsaţi butonul OK.Aparatul începe să scaneze foaia de aliniere a capului de imprimare şi poziţia capului de imprimare va fireglată automat.
Pagina 81 din 732 paginiAlinierea capului de imprimare

După finalizarea reglării poziţiei capului de imprimare, îndepărtaţi foaia de aliniere a capului de imprimare depe suprafaţa de sticlă de scanare.
Important Nu deschideţi capacul pentru documente şi nu îndepărtaţi foaia de aliniere a capului deimprimare de pe suprafaţa de sticlă de scanare până când nu este finalizată reglareapoziţiei capului de imprimare.
Dacă se afişează mesajul „Failed to scan.”, apăsaţi butonul OK şi confirmaţi următoarele:- Suprafaţa de sticlă de scanare şi foaia de aliniere a capului de imprimare nu sunt
murdare.- Foaia de aliniere a capului de imprimare este aşezată în poziţia corectă cu faţa imprimată
în jos.Consultaţi „Depanare” în manualul on-screen: Ghid avansat.
Notă Pentru a efectua alte funcţii, selectaţi meniul dorit din ecranul meniului superior care seafişează prin apăsarea butonului Înapoi (Back) sau Meniu (Menu) .
Dacă rezultatele imprimării sunt tot nesatisfăcătoare după reglarea poziţiei capului deimprimare conform descrierii de mai sus, reglaţi manual poziţia capului de imprimare de laun computer.Pentru detalii, consultaţi manualul on-screen: Ghid avansat .
Pentru a imprima şi verifica valorile de reglare a poziţiei curente a capului, selectaţi Headalignment print din meniul Maintenance.
În partea superioară a paginii
Pagina 82 din 732 paginiAlinierea capului de imprimare

Ghid avansat Depanare
Cuprins > Întreţinere de rutină > Înlocuirea unui cartuş FINE
Înlocuirea unui cartuş FINE Dacă în timpul imprimării se epuizează cerneala, va apărea un mesaj de eroare pe LCD sau pe ecranulcomputerului. Verificaţi ce cartuş FINE a epuizat cerneala şi înlocuiţi-l cu unul nou.
Notă Dacă apare mesajul de eroare, confirmaţi mesajul afişat şi luaţi măsurile necesare.Pentru detalii, consultaţi „Pe LCD este afişat un mesaj de eroare” din „Depanare” din manualul on-screen: Ghid avansat.
Pentru informaţii despre cartuşele FINE compatibile, consultaţi manualul imprimat: Ghid de iniţiere .
Procedura de înlocuire Când cartuşele FINE se golesc, urmaţi procedura de mai jos pentru a le înlocui.
ImportantManipularea cartuşelor FINE
Nu atingeţi contactele electrice (A) sau duzele capului de imprimare (B) de pe cartuşul FINE. Esteposibil ca aparatul să nu imprime corespunzător dacă o atingeţi.
Pentru a menţine calitatea optimă a imprimării, se recomandă folosirea cartuşelor FINE specificeproduse de Canon.Nu se recomandă reumplerea cu cerneală.
Dacă îndepărtaţi un cartuş FINE, înlocuiţi-l imediat. Nu lăsaţi imprimanta fără cartuşe FINE. Pentru înlocuire folosiţi cartuşe FINE noi. Instalarea cartuşelor FINE uzate poate duce la înfundareaduzelor. Mai mult, cu astfel de cartuşe, imprimanta nu va putea să vă informeze corect când trebuie înlocuitecartuşele.
După instalarea unui cartuş FINE, nu-l scoateţi din aparat şi nu îl lăsaţi afară. Astfel, se va produceuscarea cartuşului FINE, iar aparatul nu mai poate funcţiona corespunzător când acesta estereinstalat. Pentru a păstra calitatea optimă de imprimare, utilizaţi un cartuş FINE maxim şase luni dela prima utilizare.
Notă Dacă un cartuş FINE se goleşte, puteţi imprima cu cartuşul FINE Color sau Negru în care a rămascerneală, dar numai pentru o scurtă perioadă de timp. Totuşi, calitatea imprimării poate fi redusăcomparativ cu imprimarea cu ambele cartuşe. Se recomandă folosirea de cartuşe FINE noi pentru aobţine calitatea optimă.Chiar şi când imprimaţi cu o singură cerneală, faceţi-o lăsând instalat cartuşul FINE gol. Dacă unuldintre cartuşele FINE, Color sau Negru, nu rămâne instalat, are loc o eroare şi aparatul nu poateimprima.
Pagina 83 din 732 paginiÎnlocuirea unui cartuş FINE
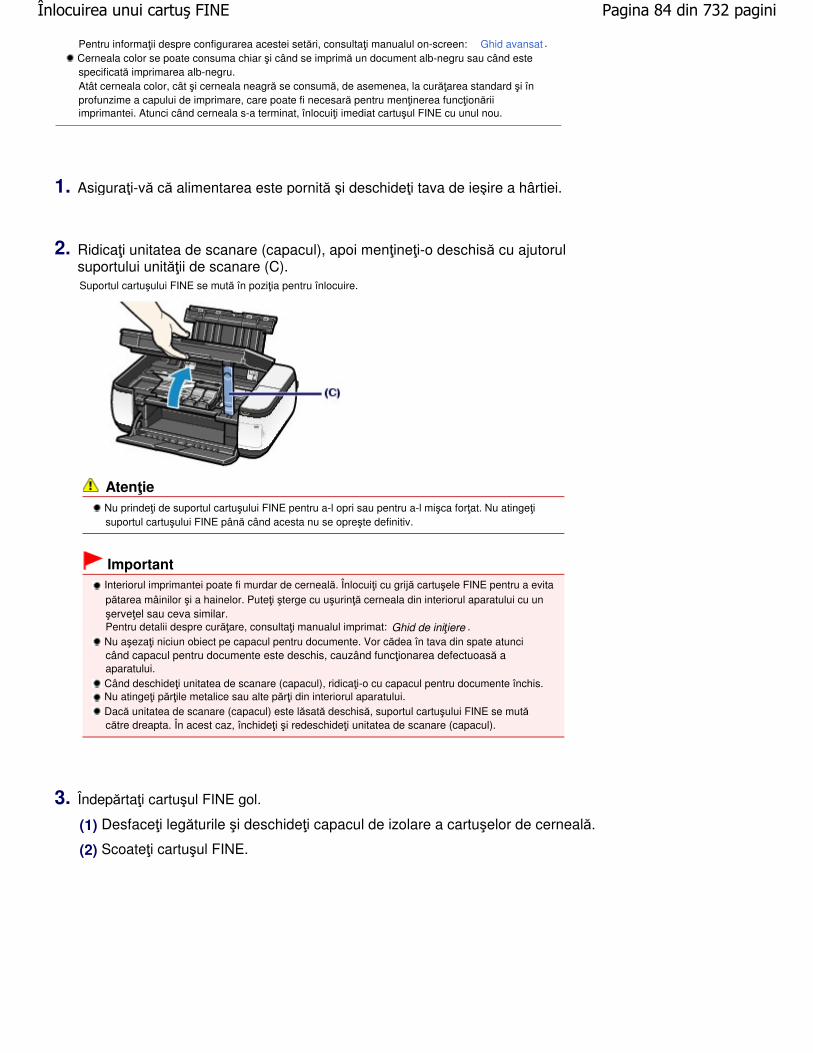
Pentru informaţii despre configurarea acestei setări, consultaţi manualul on-screen: Ghid avansat . Cerneala color se poate consuma chiar şi când se imprimă un document alb-negru sau când estespecificată imprimarea alb-negru.Atât cerneala color, cât şi cerneala neagră se consumă, de asemenea, la curăţarea standard şi înprofunzime a capului de imprimare, care poate fi necesară pentru menţinerea funcţionăriiimprimantei. Atunci când cerneala s-a terminat, înlocuiţi imediat cartuşul FINE cu unul nou.
1. Asiguraţi-vă că alimentarea este pornită şi deschideţi tava de ieşire a hârtiei.
2. Ridicaţi unitatea de scanare (capacul), apoi menţineţi-o deschisă cu ajutorulsuportului unităţii de scanare (C).Suportul cartuşului FINE se mută în poziţia pentru înlocuire.
Atenţie Nu prindeţi de suportul cartuşului FINE pentru a-l opri sau pentru a-l mişca forţat. Nu atingeţisuportul cartuşului FINE până când acesta nu se opreşte definitiv.
Important Interiorul imprimantei poate fi murdar de cerneală. Înlocuiţi cu grijă cartuşele FINE pentru a evitapătarea mâinilor şi a hainelor. Puteţi şterge cu uşurinţă cerneala din interiorul aparatului cu unşerveţel sau ceva similar.Pentru detalii despre curăţare, consultaţi manualul imprimat: Ghid de iniţiere .
Nu aşezaţi niciun obiect pe capacul pentru documente. Vor cădea în tava din spate atuncicând capacul pentru documente este deschis, cauzând funcţionarea defectuoasă aaparatului.
Când deschideţi unitatea de scanare (capacul), ridicaţi-o cu capacul pentru documente închis. Nu atingeţi părţile metalice sau alte părţi din interiorul aparatului. Dacă unitatea de scanare (capacul) este lăsată deschisă, suportul cartuşului FINE se mutăcătre dreapta. În acest caz, închideţi şi redeschideţi unitatea de scanare (capacul).
3. Îndepărtaţi cartuşul FINE gol.
(1) Desfaceţi legăturile şi deschideţi capacul de izolare a cartuşelor de cerneală.
(2) Scoateţi cartuşul FINE.
Pagina 84 din 732 paginiÎnlocuirea unui cartuş FINE

Important Manipulaţi cu grijă cartuşele FINE pentru a evita pătarea hainelor şi a zonelor înconjurătoare. Aruncaţi cartuşele FINE goale conform legilor şi normelor locale privind dezafectareaconsumabilelor.
4. Pregătiţi noul cartuş FINE.
(1) Scoateţi un nou cartuş FINE din ambalajul său şi îndepărtaţi uşor bandaprotectoare portocalie(D).
Important Dacă scuturaţi un cartuş FINE, cerneala se poate vărsa şi poate murdări mâinile şi zoneleînconjurătoare. Manipulaţi cu atenţie cartuşul FINE.
Manipulaţi cu atenţie pentru a nu vă păta mâinile şi zonele înconjurătoare cu cerneala de pebanda protectoare.
Nu lipiţi din nou banda protectoare după ce aţi îndepărtat-o. Aruncaţi-o conform legilor şinormelor locale privind dezafectarea consumabilelor.
Nu atingeţi contactele electrice sau duzele capului de imprimare de pe un cartuş FINE. Esteposibil ca aparatul să nu imprime corespunzător dacă o atingeţi.
5. Instalaţi cartuşul FINE.
(1) Aşezaţi un cartuş FINE nou în suportul pentru cartuşul FINE.Cartuşul FINE color trebuie instalat în slotul din stânga, iar cartuşul FINE negru în slotul din dreapta.
(2) Închideţi capacul de izolare a cartuşelor cu cerneală pentru a fixa cartuşul FINE.Împingeţi în jos capacul de izolare a cartuşelor de cerneală până când acesta se fixează în poziţie.
Pagina 85 din 732 paginiÎnlocuirea unui cartuş FINE

(3) Confirmaţi închiderea corectă a capacului de izolare a cartuşelor de cerneală.
Notă În cazul în care capacul de izolare a cartuşelor cu cerneală nu este închis corect, trageţi-lîn jos până când se fixează în poziţie.
(E) Închis corect
(F) Nu este închis corect (capacul este înclinat)
Important Dacă nu sunt instalate ambele cartuşe FINE, color şi negru, aparatul nu poate imprima.Asiguraţi-vă că aţi instalat ambele cartuşe FINE.
6. Ridicaţi unitatea de scanare (capacul) pentru a aşeza suportul unităţii de scanareînapoi în poziţia iniţială şi închideţi uşor unitatea de scanare (capacul).
Atenţie La aşezarea suportului unităţii de scanare înapoi în poziţia iniţială, ţineţi ferm unitatea descanare (capacul) şi aveţi grijă să nu vă prindeţi degetele.
Notă Dacă apare un mesaj de eroare pe LCD după ce aţi închis unitatea de scanare (capacul),consultaţi „Depanare” în manualul on-screen: Ghid avansat.
Când începeţi imprimarea după înlocuirea cartuşului FINE, aparatul începe automat curăţareacapului de imprimare. Nu efectuaţi alte operaţiuni până când imprimanta nu a finalizat curăţareacapului de imprimare. În timpul curăţării, lampa de alimentare clipeşte verde.
Dacă se imprimă linii neregulate sau poziţia capului de imprimare nu este aliniată, reglaţi poziţiacapului de imprimare.Consultaţi Alinierea capului de imprimare.
Pagina 86 din 732 paginiÎnlocuirea unui cartuş FINE

În partea superioară a paginii
Pagina 87 din 732 paginiÎnlocuirea unui cartuş FINE

Ghid avansat Depanare
Cuprins > Întreţinere de rutină > Înlocuirea unui cartuş FINE > Verificarea nivelului de cerneală
Verificarea nivelului de cerneală Puteţi verifica nivelul de cerneală pe LCD.
Notă Detectorul nivelului de cerneală este montat pe aparat pentru a detecta nivelul cernelii rămase.Aparatul consideră cartuşul plin atunci când un nou cartuş FINE este instalat şi începe să detectezenivelul de cerneală rămasă. Dacă instalaţi un cartuş FINE folosit, nivelul de cerneală indicat poate sănu fie corect. În acest caz, luaţi ca referinţă doar informaţiile legate de nivelul de cerneală.
(1) Asiguraţi-vă că alimentarea este pornită şi apăsaţi butonul Meniu (Menu).
(2) Apăsaţi butonul (Sus) sau (Jos) pentru a selecta Remaining ink, apoiapăsaţi butonul OK.Verificaţi dacă apare vreun simbol (A) pe ecranul pentru nivelul cernelii rămase.
Dacă nu apare niciun simbol, înseamnă că a rămas suficientă cerneală pentru imprimare.
Cerneala cu (Nivel scăzut cerneală) se apropie de epuizare. Puteţi continua să imprimaţi o vreme, darse recomandă să aveţi la îndemână un cartuş FINE nou.
Notă Puteţi verifica, de asemenea, nivelul cernelii pe ecranul LCD-ului afişat în timpul imprimării.
În partea superioară a paginii
Pagina 88 din 732 paginiVerificarea nivelului de cerneală

Ghid avansat Depanare
Cuprins > Întreţinere de rutină > Curăţarea rolei de alimentare cu hârtie
Curăţarea rolei de alimentare cu hârtie Dacă rola de alimentare cu hârtie este murdară sau prezintă depuneri de praf, hârtia nu este introdusăcorespunzător.În acest caz, curăţaţi rola de alimentare cu hârtie. Curăţarea va uza rola de alimentare cu hârtie, aşa căefectuaţi această operaţie doar dacă este necesară.
Trebuie să pregătiţi: trei foi de hârtie simplă de dimensiune A4 sau Letter.
1. Asiguraţi-vă că alimentarea este pornită.
2. Deschideţi uşor tava de ieşire a hârtiei şi deschideţi extensia tăvii de ieşire.
3. Selectaţi Roller cleaning.
(1) Apăsaţi butonul Meniu (Menu) .
(2) Selectaţi Maintenance, apoi apăsaţi butonul OK.
(3) Selectaţi Roller cleaning, apoi apăsaţi butonul OK.
Se va afişa ecranul de confirmare.
(4) Selectaţi Yes, apoi apăsaţi butonul OK.
4. Curăţaţi rola de alimentare cu hârtie în absenţa hârtiei.
(1) Urmaţi instrucţiunile mesajului pentru a scoate hârtia din tava din spate.
(2) Apăsaţi butonul OK.Rola de alimentare cu hârtie se va roti în timp ce este curăţată.
5. Curăţaţi cu hârtie rola de alimentare cu hârtie.
(1) Asiguraţi-vă că rola de alimentare cu hârtie nu se mai roteşte, apoi urmaţiinstrucţiunile mesajului pentru a încărca trei foi de hârtie simplă format A4 sauLetter în tava din spate.
(2) Apăsaţi butonul OK.Aparatul începe curăţarea.
Curăţarea va fi finalizată după ce hârtia este eliminată.
Notă
Pagina 89 din 732 paginiCurăţarea rolei de alimentare cu hârtie

Pentru a efectua alte funcţii, selectaţi meniul dorit din ecranul meniului superior care seafişează prin apăsarea butonului Înapoi (Back) sau Meniu (Menu) .
Dacă problema persistă după curăţarea rolei de alimentare cu hârtie, contactaţi centrul de service.
În partea superioară a paginii
Pagina 90 din 732 paginiCurăţarea rolei de alimentare cu hârtie

Ghid avansat Depanare
Cuprins > Anexă
Anexă Limitări legale privind utilizarea produsului şi utilizarea imaginilor
Sfaturi pentru utilizarea aparatului dumneavoastră
În partea superioară a paginii
Pagina 91 din 732 paginiAnexă

Ghid avansat Depanare
Cuprins > Anexă > Limitări legale privind utilizarea produsului şi utilizarea imaginilor
Limitări legale privind utilizarea produsului şi utilizareaimaginilor Copierea, scanarea, imprimarea sau folosirea reproducerilor după următoarele documente pot fiilegale.Lista furnizată nu este exhaustivă. În cazul în care aveţi îndoieli, consultaţi un reprezentant legal dinjurisdicţia dumneavoastră.
Bancnote Ordin de plată Certificate de depozit Timbre poştale (revocate saunerevocate)
Embleme sau insigne deidentificare
Documente de recrutare sau deserviciu militar
Verificări sau documente de lucruemise de agenţiile guvernamentale
Numere pentru vehicule cu motorsau certificate de proprietate
Cecuri de călătorie Bonuri de masă Paşapoarte Documente de imigrare Timbre fiscale (revocate sau nerevocate) Obligaţiuni sau alte certificate de îndatorare Certificate de acţiuni Lucrările protejate de copyright/lucrările deartă, fără permisiunea deţinătorului decopyright
În partea superioară a paginii
Pagina 92 din 732 paginiLimitări legale privind utilizarea produsului şi utilizarea imaginilor

Ghid avansat Depanare
Cuprins > Anexă > Sfaturi pentru utilizarea aparatului dumneavoastră
Sfaturi pentru utilizarea aparatului dumneavoastră Această secţiune vă prezintă sfaturi pentru folosirea aparatului dumneavoastră şi pentru imprimarea la ocalitate optimă.
Cerneala este folosită în scopuri diverse.
Cum se foloseşte cerneala şi la altceva în afară de imprimare?
Cerneala se poate folosi şi la altceva pe lângă imprimare. Cerneala nu se foloseşte doar laimprimare, ea poate fi folosită şi la curăţarea capului de imprimare pentru menţinerea unei calităţioptime de imprimare.Aparatul are funcţia de curăţare automată a duzelor prin care este aruncată cerneala pentru apreveni înfundarea lor. În timpul procesului de curăţare, cerneala este pompată afară din duze.Cerneala utilizată pentru curăţare este limitată la o cantitate mică.
Imprimarea alb-negru foloseşte cerneală colorată?
Imprimarea alb-negru poate utiliza cerneală color în funcţie de tipul hârtiei de imprimare sau desetările driverului de imprimantă. Prin urmare, cerneala colorată se consumă chiar la imprimareaalb-negru.
Imprimarea pe hârtie specială: Cum se imprimă la calitateaoptimă!?
Sfat!: Verificaţi starea aparatului înaintea imprimării!
Este în regulă capul de imprimare?Dacă duzele capului de imprimare sunt înfundate, rezultatele de imprimare vor fi neclare şi veţiirosi hârtia. Imprimaţi modelul de verificare a duzei pentru a verifica capul de imprimare.Consultaţi Când imprimarea devine ştearsă sau culorile sunt incorecte .
Interiorul imprimantei este pătat cu cerneală?După imprimarea unor cantităţi mari de hârtie sau imprimarea fără chenar, zona pe unde trechârtiile se poate păta cu cerneală. Curăţaţi interiorul aparatului cu ajutorul funcţiei de curăţare aplăcii de la bază.Consultaţi manualul on-screen: Ghid avansat .
Sfat!: Verificaţi dacă hârtia se încarcă corect!
Aţi încărcat hârtia în poziţia corectă?
Încărcaţi hârtia în tava din spate cu faţa de imprimare orientată spre dumneavoastră.
Pagina 93 din 732 paginiSfaturi pentru utilizarea aparatului dumneavoastră

Hârtia este ondulată?Hârtia ondulată provoacă blocarea acesteia. Îndreptaţi hârtia ondulată, apoi reîncărcaţi-o.Consultaţi „Depanare” în manualul on-screen: Ghid avansat .
Sfat!: După încărcarea hârtiei, asiguraţi-vă că aţi specificaţisetările hârtiei!
După încărcarea hârtiei, asiguraţi-vă că aţi selectat hârtia pentru tipul de suport cu panoul deoperare sau Media Type cu driverul imprimantei sau cu panoul de operare. Dacă tipul de hârtie nueste selectat, există posibilitatea să nu obţineţi rezultate satisfăcătoare la imprimare.Consultaţi Încărcarea hârtiei simple/fotografice .
Există diferite tipuri de hârtie: hârtie cu strat special pe suprafaţa sa pentru imprimarea fină afotografiilor şi hârtie potrivită pentru documente. Pentru Media type din Panoul de operare sauMedia Type din driverul de imprimantă au diferite setări prestabilite pentru fiecare tip de hârtie (cumar fi utilizarea cernelii, eliminarea cernelii sau distanţa faţă de duze), astfel încât puteţi imprima pefiecare hârtie la o calitate optimă a imaginii. Puteţi imprima cu diferite setări în tipul de suport (sauMedia Type) adecvat pentru fiecare tip de hârtie încărcată.
Folosiţi butonul Oprire pentru a revoca imprimarea!
Sfat!: Nu apăsaţi niciodată butonul ACTIVARE (ON)!
Dacă apăsaţi butonul ACTIVARE (ON) în timp ce imprimarea este în curs de desfăşurare, trimitereadatelor de imprimare de la un computer pune în aşteptare aparatul şi este posibil să nu mai puteţiimprima.Apăsaţi butonul Oprire (Stop) pentru a revoca imprimarea.
Notă Dacă nu puteţi revoca imprimarea apăsând butonul Oprire (Stop) în timpul imprimării de la un
computer, deschideţi fereastra de setare a driverului imprimantei pentru a şterge comenzile deimprimare care nu sunt necesare din programul de monitorizare a stării imprimantei (Windows).
Aparatul trebuie manipulat cu grijă la utilizare sau la transport?
Sfat!: Nu utilizaţi sau nu transportaţi aparatul în poziţie verticalăsau înclinată!
Dacă aparatul este utilizat sau transportat în poziţie verticală sau înclinată, acesta se poatedeteriora sau cerneala poate curge din aparat. Asiguraţi-vă că nu depozitaţi şi nu transportaţi aparatul pe verticală sau înclinat.
Sfat!: Nu aşezaţi niciun obiect pe capacul pentru documente!
Nu aşezaţi niciun obiect pe capacul pentru documente. Vor cădea în tava din spate atunci cândcapacul pentru documente este deschis, cauzând funcţionarea defectuoasă a aparatului.
Pagina 94 din 732 paginiSfaturi pentru utilizarea aparatului dumneavoastră

De asemenea, aşezaţi aparatul unde obiectele nu vor cădea pe acesta.
Sfat!: Alegeţi cu grijă suprafaţa pe care veţi aşeza aparatul!
Aşezaţi aparatul la o distanţă de cel puţin 5,91 inchi / 15 cm de alte echipamente electrice de tipulbecurilor fluorescente. Dacă aparatul este aşezat în apropierea acestora, este posibil să nufuncţioneze corespunzător datorită zgomotului emis de iluminatul fluorescent.
Cum se menţine calitatea optimă de imprimare?
Cheia pentru o imprimare la calitatea optimă este să preveniţi uscarea sau înfundarea capului deimprimare. Respectaţi întotdeauna paşii următori pentru a imprima la calitatea optimă.
La deconectarea fişei de alimentare, urmaţi procedura de mai jos. 1. Apăsaţi butonul ACTIVARE (ON) de pe aparat pentru a-l opri.
2. Asiguraţi-vă că lampa Alimentare (Power) este stinsă.
3. Deconectaţi fişa de alimentare de la priza de perete sau închideţi conectorul cablului deprelungire.
Dacă apăsaţi butonul ACTIVARE (ON) pentru a opri alimentarea, aparatul acoperă automatcapul de imprimare (duzele) pentru a preveni uscarea acestuia. Dacă scoateţi din priză fişa dealimentare sau închideţi conectorul cablului de prelungire înainte ca lampa Alimentare (Power) săse stingă, capul de imprimare nu va fi acoperit corespunzător, ceea ce va cauza uscarea sauînfundarea acestuia.
La deconectarea cablului de alimentare, trebuie să urmaţi această procedură.
Imprimaţi periodic!
La fel cum vârful unei carioci se usucă şi nu mai poate fi folosit, dacă nu a fost utilizat pe operioadă îndelungată, chiar dacă a avut capac, la fel capul de imprimare se poate usca şiînfunda dacă aparatul nu a mai fost folosit de multă vreme.Recomandăm folosirea aparatului cel puţin o dată pe lună.
Notă În funcţie de tipul de hârtie, cerneala poate fi neclară dacă marcaţi aria de imprimare cu un markersau o cariocă sau se poate scurge, dacă apa sau umezeala vine în contact cu aria de imprimare pepărţile imprimate.
Culorile sunt neuniforme, rezultatele imprimării sunt neclare.
Sfat!: Imprimaţi modelul de verificare a duzei pentru a verificadacă duzele sunt înfundate.
Dacă duzele capului de imprimare sunt înfundate, culorile pot deveni neuniforme sau rezultateleimprimării pot fi neclare.
Pagina 95 din 732 paginiSfaturi pentru utilizarea aparatului dumneavoastră

În acest caz
Imprimaţi modelul de verificare a duzei
Verificaţi modelul de verificare imprimat pentru a verifica dacă duzele sunt înfundate.Consultaţi Când imprimarea devine ştearsă sau culorile sunt incorecte .
În partea superioară a paginii
Pagina 96 din 732 paginiSfaturi pentru utilizarea aparatului dumneavoastră

MC-3896-V1.00
Ghid de bază
Imprimarea
Scanare
Copierea
Depanare
Cum se utilizează acest manual
Imprimarea acestui manual
Întreţinere
Modificarea setărilor aparatului
Anexă
Când se afişează acest On-screen
Manual în altă limbă decât
engleza, este posibil să apară
anumite descrieri în limbaengleză.
Imprimarea
Imprimare de pe un computer
Imprimarea cu pachetul software al aplicaţiei
Ce este Easy-PhotoPrint EX?
Imprimarea fotografiilor
Pornirea aplicaţiei Easy-PhotoPrint EX
Selectarea unei fotografii
Selectarea hârtiei
Imprimarea
Crearea unui album
Pornirea aplicaţiei Easy-PhotoPrint EX
Selectarea hârtiei şi a aspectului
Selectarea unei fotografii
Editarea
Imprimarea
Imprimarea calendarelor
Pornirea aplicaţiei Easy-PhotoPrint EX
Selectarea hârtiei şi a aspectului
Selectarea unei fotografii
Editarea
Imprimarea
Imprimarea autocolantelor
Pornirea aplicaţiei Easy-PhotoPrint EX
Selectarea hârtiei şi a aspectului
Selectarea unei fotografii
Editarea
Imprimarea
Aspectul imprimării
Pornirea aplicaţiei Easy-PhotoPrint EX
Selectarea hârtiei şi a aspectului
Selectarea unei fotografii
Editarea
Imprimarea
Corectarea şi îmbunătăţirea fotografiilor
Utilizarea funcţiei de corectare automată a fotografiei
Utilizarea funcţiei de corectare a ochilor roşii
Utilizarea funcţiei de luminare a feţei
Pagina 97 din 732 paginiMP490 series Ghid avansat

Utilizarea funcţiei de definire a conturului feţei
Utilizarea funcţiei de finisare digitală aimperfecţiunilor feţei
Utilizarea funcţiei de îndepărtare a petelor
Ajustarea imaginilor
Fereastra Corectare/Îmbunătăţire imagini
Întrebări şi răspunsuri
Cum pot muta (sau copia) fişierul salvat?
Din care parte a imaginii afişate începe imprimarea?
Cum imprim cu margini egale?
Ce este „C1” sau „C4”?
Setări pentru imprimarea fotografiilor
Imprimarea fotografiilor în culori vii
Reducerea perturbaţiilor din fotografii
Trunchierea fotografiilor (Imprimare fotografie)
Imprimarea datelor pe fotografii (Imprimarefotografie)
Imprimarea mai multor fotografii pe o singură pagină
Imprimarea unui index
Imprimarea fotografiilor ID (Imprimare fotografie ID)
Imprimarea informaţiilor fotografiei
Salvarea fotografiilor
Deschiderea fişierelor salvate
Alte setări
Schimbarea aspectului
Schimbarea fundalului
Adăugarea fotografiilor
Schimbarea poziţiilor fotografiilor
Înlocuirea fotografiilor
Schimbarea poziţiei, unghiului şi dimensiuniifotografiilor
Trunchierea fotografiilor
Încadrarea fotografiilor
Imprimarea datelor pe fotografii
Ataşarea comentariilor la fotografii
Adăugarea textului la fotografii
Salvarea
Setarea sărbătorilor
Setarea afişării calendarului
Deschiderea fişierelor salvate
Imprimarea cu alt software de aplicaţie
Diferite metode de imprimare
Imprimarea cu Configurare uşoară
Setarea dimensiunii şi orientării paginii
Setarea numărului de copii şi a ordinii de imprimare
Setarea marginii pentru capsare
Imprimarea fără chenar
Pagina 98 din 732 paginiMP490 series Ghid avansat

Imprimarea cu încadrare în pagină
Imprimarea cu scalare
Imprimarea aspectului paginii
Imprimarea posterelor
Imprimarea broşurilor
Imprimarea faţă-verso
Imprimarea marcajelor/fundalului
Înregistrarea unei ştampile
Înregistrarea datelor de imagine pentru utilizarea cafundal
Imprimarea unui plic
Afişarea rezultatelor imprimării înainte de imprimare
Setarea dimensiunilor hârtiei (dimensiuneparticularizată)
Modificarea calităţii imprimării şi corectarea datelor deimagine
Selectarea unei combinaţii între nivelul de calitate aimprimării şi metoda semitonurilor
Imprimarea monocromă a unui document color
Specificarea corectării culorii
Imprimarea optimă ca fotografie a datelor deimagine
Ajustarea culorilor folosind driverul de imprimantă
Imprimarea cu Profiluri ICC
Ajustarea echilibrului de culori
Ajustarea luminozităţii
Ajustarea intensităţii
Ajustarea contrastului
Simularea unei ilustraţii
Reprezentarea datelor de imagine cu o singurăculoare
Prezentarea datelor de imagine în culori vii
Îndreptarea contururilor în zigzag
Modificarea proprietăţilor culorilor pentruîmbunătăţirea colorării
Reducerea perturbaţiilor din fotografii
Privire de ansamblu asupra driverului de imprimantă
Operaţiile driverului de imprimantă
Driverul de imprimantă Canon IJ
Deschiderea ferestrei de configurare a driverului deimprimantă
Fila Întreţinere
Monitorul de stare Canon IJ
Examinarea Canon IJ
Imprimarea cu ajutorul panoului de operare al aparatului
Imprimarea hârtiei liniate sau a hârtiei grafice
Imprimarea formularelor tip şablon, cum ar fi hârtia liniatăsau hârtia grafică
Imprimarea de pe o cartelă de memorie
Pagina 99 din 732 paginiMP490 series Ghid avansat
Imprimarea fotografiilor salvate pe o cartelă de memorie
Elemente de configurare
Imprimarea cu ajutorul foii index foto
Configurarea slotului pentru cartelă ca unitate de cartelăde memorie a computerului
Scanarea
Scanarea
Scanarea imaginilor
Scanarea imaginilor
Înaintea scanării
Aşezarea documentelor
Salvarea datelor scanate pe cartela de memorie cu ajutorulpanoului de operare al aparatului
Salvarea datelor scanate pe cartela de memorie cuajutorul panoului de operare al aparatului
Salvarea datelor scanate pe computer cu ajutorul panoului deoperare al aparatului
Salvarea datelor scanate pe computer cu ajutorulpanoului de operare al aparatului
Anexă: Diferite setări de scanare
Selectarea unui răspuns la comenzile de la panoulde operare, utilizând MP Navigator EX
Scanarea cu pachetul software al aplicaţiei
Ce este MP Navigator EX (Software de scanare furnizat)?
Să încercăm să scanăm
Pornirea aplicaţiei MP Navigator EX
Scanarea fotografiilor şi a documentelor
Scanarea mai multor documente deodată
Scanarea imaginilor mai mari decât geamul plat(Asistare îmbinare)
Scanarea simplă printr-un clic
Funcţii utile din MP Navigator EX
Corectarea/îmbunătăţirea automată a imaginilor
Corectarea/Îmbunătăţirea manuală a imaginilor
Ajustarea imaginilor
Căutarea imaginilor
Clasificarea imaginilor pe categorii
Utilizarea imaginilor în MP Navigator EX
Salvarea
Salvarea ca fişiere PDF
Crearea/Editarea fişierelor PDF
Imprimarea documentelor
Imprimarea fotografiilor
Trimitere prin e-mail
Editarea fişierelor
Setarea parolelor pentru fişiere PDF
Deschiderea/editarea fişierelor PDF protejate cuparolă
Pagina 100 din 732 paginiMP490 series Ghid avansat

Ecranele aplicaţiei MP Navigator EX
Ecranul mod navigare
Fila Scanare/Import documente sau imagini
Fila Vizualizare şi utilizare imagini din computer
Fila Scanare personalizată cu un clic
Ecranul Fotografii/Documente (Geam plat)(Fereastra Scanare/Import)
Caseta de dialog Setări scanare (Fotografii/Documente)
Caseta de dialog Salvare
Caseta de dialog Salvare ca fişier PDF
Caseta de dialog Setări PDF
Ecran Cartelă de memorie (Fereastra Scan/Import)
Fereastra Vizualizare şi utilizare
Fereastra Creare/Editare fişiere PDF
Caseta de dialog Imprimare document
Caseta de dialog Imprimare fotografie
Caseta de dialog Trimitere prin e-mail
Fereastra Corectare/Îmbunătăţire imagini
Ecranul Mod Un clic
Caseta de dialog Scanare automată
Caseta de dialog Salvare (Ecranul Mod Un clic)
Caseta de dialog Setări scanare
Caseta de dialog Salvare
Caseta de dialog Setări Exif
Caseta de dialog PDF
Caseta de dialog Salvare ca fişier PDF
Caseta de dialog E-mail
Caseta de dialog OCR
Caseta de dialog Particularizat
Caseta de dialog Preferinţe
Fila General
Fila Setări buton scaner (Salvare)
Anexă: Deschiderea fişierelor diferite de imaginilescanate
Importarea imaginilor salvate pe o cartelă dememorie
Deschiderea imaginilor salvate pe un computer
Scanarea cu alt software de aplicaţie
Ce este ScanGear (driver de scaner)?
Scanarea cu Setări avansate, utilizând ScanGear (driverde scaner)
Pornirea aplicaţiei ScanGear (driver de scaner)
Scanarea în Modul de bază
Scanarea în Modul avansat
Scanarea în Modul scanare automată
Scanarea mai multor documente simultan cuScanGear (driver de scaner)
Pagina 101 din 732 paginiMP490 series Ghid avansat

Corectarea imaginilor şi ajustarea culorilor cu ScanGear(driver de scaner)
Corectarea imaginilor (Mască de uniformizare,Reducere praf şi zgârieturi, Corectare estompareetc.)
Ajustarea culorilor utilizând un model de culoare
Ajustarea saturaţiei şi echilibrului culorilor
Ajustarea luminozităţii şi a contrastului
Ajustarea histogramei
Ajustarea curbei de tonuri
Setarea pragului
Ecrane ScanGear (driver de scaner)
Fila Mod de bază
Fila Mod avansat
Setări de intrare
Setări de ieşire
Setări de imagine
Butoane de ajustare a culorilor
Fila Mod scanare automată
Caseta de dialog Preferinţe
Fila Scaner
Fila Examinare
Fila Scanare
Fila Setări culoare
Anexă: Informaţii utile referitoare la scanare
Ajustarea cadrelor de trunchiere
Rezoluţie
Formate de fişier
Potrivire culoare
Alte metode de scanare
Scanarea cu driverul WIA
Scanarea prin utilizarea panoului de control (numaipentru Windows XP)
Copierea
Imprimarea cu ajutorul panoului de operare al aparatului
Copierea
Realizarea de copii
Micşorarea sau mărirea unei copii
Utilizarea funcţiilor utile de copiere
Special Copy
Setări pentru copiere specială
Copierea fără chenar (Borderless Copy)
Copierea de documente originale groase cum ar ficărţile (Frame Erase)
Depanare
Depanare
Pagina 102 din 732 paginiMP490 series Ghid avansat

Dacă apare o eroare
Aparatul nu poate fi pornit
Pe LCD este afişat un mesaj de eroare
LCD-ul nu se poate vedea deloc
Pe LCD este afişată o limbă necorespunzătoare
Nu se poate face instalarea pentru MP Drivers
Conectarea la computer nu se realizează corespunzător
Viteza de imprimare sau de scanare este scăzută /Conexiunea USB de mare viteză nu funcţionează / Esteafişat mesajul „This device can perform faster”
Rezultatele imprimării nu sunt satisfăcătoare
Nu se efectuează imprimarea completă
Rezultate imprimare inexistente/Imprimarea este neclară/Culorile sunt greşite/Linii albe
Culorile nu sunt clare
Liniile sunt aliniate greşit
Hârtia imprimată se ondulează sau prezintă pete decerneală
Hârtia este pătată/Suprafaţa imprimată este zgâriată
Hârtia este pătată pe verso
Linii verticale sunt imprimate pe marginile paginiiimprimate
Culorile sunt neuniforme sau prezintă dungi
Imprimarea nu începe
Copierea/Imprimarea se opreşte înainte de a fi finalizată
Aparatul funcţionează, dar nu este eliminată cerneală
Viteza de imprimare este mai mică decât cea aşteptată
Suportul de cartuş FINE nu se mută în poziţia pentru înlocuire
Alimentarea cu hârtie nu se realizează corect
Blocaje de hârtie
Hârtia este blocată în fanta de ieşire a hârtiei sau în tavadin spate
În alte cazuri
Un mesaj apare pe ecranul computerului
Se afişează „Număr de eroare: B200 A intervenit o eroarede imprimantă. Opriţi imprimanta şi deconectaţi cablul dealimentare al imprimantei de la sursa de curent. Apoicontactaţi centrul de service.”
Se afişează „Număr de eroare: **** A intervenit o eroarede imprimantă. Închideţi imprimanta şi încercaţi din nou.Dacă problema nu este rezolvată, consultaţi ghidulutilizatorului pentru mai multe informaţii.”
Eroare de scriere/Eroare de ieşire/Eroare de comunicare
Numărul de eroare: 300 este afişat
Numărul de eroare: 1700 este afişat
Se afişează „Număr de informaţii referitoare la cerneală:1688”
Se afişează „Număr de informaţii referitoare la cerneală:1686”
Alte mesaje de eroare
Este afişat ecranul The Inkjet Printer/Scanner/Fax
Pagina 103 din 732 paginiMP490 series Ghid avansat

Extended Survey Program
Apare pictograma The Inkjet Printer/Scanner/FaxExtended Survey Program
Pentru utilizatorii Windows
Monitorul de stare a imprimantei nu este afişat
Lansarea MP Navigator EX oricând este apăsat butonulCuloare (Color) sau Negru (Black) de la aparat
Nu se imprimă corespunzător de pe o foaie index foto
Se afişează Failed to scan Photo Index Sheet
Se afişează Cannot print the selected photo./Se imprimăaltă fotografie sau nu se imprimă nimic/Alimentarea cuhârtie se face înainte de finalizarea imprimării
Nu se poate scoate o cartelă de memorie
Probleme cu scanarea
Scanerul nu funcţionează
ScanGear (driver de scaner) nu porneşte
Apare un mesaj de eroare şi ecranul ScanGear (driver descaner) nu apare
Calitatea scanării (imaginea afişată pe monitor) esteslabă
Imaginea scanată este înconjurată de zone albesuplimentare
Nu se pot scana mai multe documente deodată
Nu se poate scana corespunzător în Modul scanareautomată
Viteză redusă de scanare
Se afişează mesajul „There is not enough memory.”
Computerul se opreşte din funcţionare în timpul scanării
Scanerul nu mai funcţionează după ce s-a făcut upgradede Windows
Probleme de software
Programul software pentru e-mail pe care doriţi să îlutilizaţi nu apare pe ecranul pentru selectarea unuiprogram software pentru e-mail
Imaginea scanată este imprimată mărită (micşorată)
Imaginea scanată este mărită (micşorată) pe monitorulcomputerului
Imaginea scanată nu se deschide
Probleme cu MP Navigator EX
Nu se poate scana la dimensiunea corectă
Poziţia sau dimensiunea imaginii nu poate fi detectatăcorect atunci când se scanează utilizând panoul deoperare
Documentul este plasat corect, dar imaginea scanatăeste înclinată
Documentul este plasat corect, dar orientarea semodifică în imaginea scanată
Dacă nu puteţi rezolva problema
Întrebări frecvente
Instrucţiuni de utilizare (driver de imprimantă)
Note generale (driver de scaner)
Pagina 104 din 732 paginiMP490 series Ghid avansat

Utilizarea aplicaţiei Easy-PhotoPrint EX
Utilizarea aplicaţiei MP Navigator EX
Despre Solution Menu
Pagina 105 din 732 paginiMP490 series Ghid avansat

Ghid avansat > Cum se utilizează acest manual
Cum se utilizează acest manual
Utilizarea panoului Cuprins (Contents)
Utilizarea ferestrei Explanation
Imprimarea acestui manual
Utilizarea cuvintelor cheie pentru a găsi un document
Înregistrarea documentelor în Manualul meu (My Manual)
Simboluri utilizate în acest document
Mărci comerciale
În partea superioară a paginii
Pagina 106 din 732 paginiCum se utilizează acest manual

Ghid avansat > Cum se utilizează acest manual > Utilizarea panoului Cuprins (Contents)
Utilizarea panoului Cuprins (Contents)
Când faceţi clic pe un titlul unui document afişat în panoul de cuprins din partea stângă a On-screenManual, documentele acelui titlu sunt afişate în fereastra de explicaţii din partea dreaptă.
Când faceţi clic pe situat în partea stângă faţă de , sunt afişate titlurile documentelor găsite înierarhiile inferioare.
Notă
Faceţi clic pe pentru a închide sau pentru a afişa panoul de cuprins.
În partea superioară a paginii
Pagina 107 din 732 paginiUtilizarea panoului Cuprins (Contents)

Ghid avansat > Cum se utilizează acest manual > Utilizarea ferestrei Explanation
Utilizarea ferestrei Explanation
(1) Faceţi clic pe caracterele verzi pentru a sări la documentul corespunzător.
(2) Cursorul sare în partea superioară a acestui document.
În partea superioară a paginii
Pagina 108 din 732 paginiUtilizarea ferestrei Explanation

Ghid avansat > Cum se utilizează acest manual > Imprimarea acestui manual
Imprimarea acestui manual
Faceţi clic pe pentru a afişa panoul de imprimare în stânga faţă de On-screen Manual.
Notă
Faceţi clic pe pentru a închide sau pentru a afişa panoul de imprimare.
Când faceţi clic pe , apoi faceţi clic pe Iniţializare pagină (Page Setup), apare caseta de dialogIniţializare pagină (Page Setup). Apoi puteţi configura cu uşurinţă hârtia de utilizat pentru imprimare.
Click , and then click Setări imprimare (Print Settings) pentru a afişa caseta de dialog Imprimare(Print). Când este selectată caseta de dialog, selectaţi imprimanta de utilizat pentru imprimare. Deasemenea, fila Iniţ. imprimare (Print Setup) vă permite să selectaţi imprimanta de utilizat.După selectarea imprimantei de utilizat, faceţi clic pe Proprietăţi... (Properties...) pentru a specificasetările de imprimare.
Faceţi clic pe , apoi faceţi clic pe Setări opţiune (Option Settings) pentru a afişa caseta de dialogSetări opţiune (Option Settings). Apoi puteţi configura operaţiunea de imprimare.
Imprimare titlu document şi număr pagină (Print document title and page number)Când această casetă de selectare este bifată, numele manualului şi numărul paginii esteimprimat în antet (partea superioară a documentului).Imprimare culoare de fundal şi imagini (Print background color and images)Când această casetă de selectare este bifată, sunt imprimate culoarea de fundal şi imaginile.Unele imagini sunt imprimate indiferent dacă această casetă de selectare este bifată sau nu.Verificare număr de pagini de imprimat înainte de imprimare (Check number of pages to beprinted before printing)Când această casetă de selectare este bifată, înainte de începerea imprimării este afişatăcaseta de dialog Confirmare contor pagini de imprimat (Print Page Count Confirmation).Această casetă de dialog vă permite să verificaţi câte pagini vor fi imprimate.
În fila Selectare doc. (Document Selection), selectaţi metoda de imprimare a documentului. Suntdisponibile următoarele patru metode de imprimare:
Imprimarea documentului curent
Pagina 109 din 732 paginiImprimarea acestui manual

Imprimarea documentelor selectate
Imprimarea pentru Manualul meu (My Manual)
Imprimarea tuturor documentelor
Notă Puteţi să selectaţi tipul de imprimat, apoi să specificaţi cu uşurinţă setările de imprimare în fila Iniţ.imprimare (Print Setup).
Imprimarea documentului curent
Puteţi imprima documentul afişat.
1. Din Selectare ţintă (Select Target), selectaţi Doc. curent (Current Document)
Titlul documentului afişat este afişat în lista Documente de imprimat (Documents to Be Printed).
Notă Prin selectarea Imprimare documente legate (Print linked documents), puteţi imprima şidocumente care sunt legate de documentul curent. Documentele legate sunt adăugate la listaDocumente de imprimat (Documents to Be Printed).Faceţi clic pe Exam. înaintea imp (Print Preview) pentru a afişa şi verifica modul în care vorarăta rezultatele imprimării înainte de a imprima documentul.
2. Faceţi clic pe fila Iniţ. imprimare (Print Setup)
În fila Iniţializare pagină (Page Setup), selectaţi imprimanta de utilizat şi specificaţi setări simple deimprimare, după cum este necesar.
3. Faceţi clic pe Pornire imprimare (Start Printing)
Este afişat un mesaj care confirmă numărul de pagini de imprimat.
4. Executaţi imprimarea
Confirmaţi numărul de pagini care vor fi imprimate, apoi faceţi clic pe Da (Yes).
Sunt imprimate documentele afişate.
Imprimarea documentelor selectate
Puteţi selecta şi imprima documentele pe care le doriţi imprimate.
1. Din Selectare ţintă (Select Target), selectaţi Doc. selectate (Selected Documents)
Titlurile tuturor documentelor sunt afişate în lista Documente de imprimat (Documents to BePrinted).
2. Selectaţi documentele de imprimat
Din lista Documente de imprimat (Documents to Be Printed), selectaţi casetele de selectare aletitlurilor documentelor de imprimat.
Notă Când selectaţi caseta Selectare automată documente în ierarhii inferioare (Automaticallyselect documents in lower hierarchies), casetele de selectare ale tuturor documentelor găsiteîn ierarhiile inferioare sunt selectate.Faceţi clic pe Selectare toate (Select All) pentru a selecta casetele de selectare ale tuturordocumentelor.Faceţi clic pe Golire totală (Clear All) pentru a şterge casetele de selectare ale tuturordocumentelor.Faceţi clic pe Exam. înaintea imp (Print Preview) pentru a afişa şi verifica modul în care vorarăta rezultatele imprimării înainte de a imprima documentul.
Pagina 110 din 732 paginiImprimarea acestui manual

3. Faceţi clic pe fila Iniţ. imprimare (Print Setup)
În fila Iniţializare pagină (Page Setup), selectaţi imprimanta de utilizat şi specificaţi setări simple deimprimare, după cum este necesar.
4. Faceţi clic pe Pornire imprimare (Start Printing)
Este afişat un mesaj care confirmă numărul de pagini de imprimat.
5. Executaţi imprimarea
Confirmaţi numărul de pagini care vor fi imprimate, apoi faceţi clic pe Da (Yes).
Sunt imprimate toate documentele cu casete de selectare selectate.
Imprimarea pentru Manualul meu (My Manual)
Puteţi selecta şi imprima documente înregistrate în Manual meu (My Manual).
Pentru detalii despre Manual meu (My Manual), consultaţi „ Înregistrarea documentelor în Manualul meu(My Manual)”.
1. Din Selectare ţintă (Select Target), selectaţi Manualul meu (My Manual)
Titlurile documentelor care au fost înregistrate în Manualul meu (My Manual) sunt afişate în listaDocumente de imprimat (Documents to Be Printed).
2. Selectaţi documentele de imprimat
Din lista Documente de imprimat (Documents to Be Printed), selectaţi casetele de selectare aletitlurilor documentelor de imprimat.
Notă Faceţi clic pe Selectare toate (Select All) pentru a selecta casetele de selectare ale tuturordocumentelor.Faceţi clic pe Golire totală (Clear All) pentru a şterge casetele de selectare ale tuturordocumentelor.Faceţi clic pe Exam. înaintea imp (Print Preview) pentru a afişa şi verifica modul în care vorarăta rezultatele imprimării înainte de a imprima documentul.
3. Faceţi clic pe fila Iniţ. imprimare (Print Setup)
În fila Iniţializare pagină (Page Setup), selectaţi imprimanta de utilizat şi specificaţi setări simple deimprimare, după cum este necesar.
4. Faceţi clic pe Pornire imprimare (Start Printing)
Este afişat un mesaj care confirmă numărul de pagini de imprimat.
5. Executaţi imprimarea
Confirmaţi numărul de pagini care vor fi imprimate, apoi faceţi clic pe Da (Yes).
Sunt imprimate toate documentele cu casete de selectare selectate.
Imprimarea tuturor documentelor
Puteţi imprima toate documentele din On-screen Manual.
1. Din Selectare ţintă (Select Target), selectaţi Toate doc. (All Documents)
Titlurile tuturor documentelor sunt afişate în lista Documente de imprimat (Documents to BePrinted) şi casetele de selectare sunt selectate automat.
Notă Când debifaţi caseta de selectare a titlului unui document, acel document nu este imprimat.
Pagina 111 din 732 paginiImprimarea acestui manual

Faceţi clic pe Selectare toate (Select All) pentru a selecta casetele de selectare ale tuturordocumentelor.Faceţi clic pe Golire totală (Clear All) pentru a şterge casetele de selectare ale tuturordocumentelor.Faceţi clic pe Exam. înaintea imp (Print Preview) pentru a afişa şi verifica modul în care vorarăta rezultatele imprimării înainte de a imprima documentul.
2. Faceţi clic pe fila Iniţ. imprimare (Print Setup)
În fila Iniţializare pagină (Page Setup), selectaţi imprimanta de utilizat şi specificaţi setări simple deimprimare, după cum este necesar.
3. Faceţi clic pe Pornire imprimare (Start Printing)
Este afişat un mesaj care confirmă numărul de pagini de imprimat.
4. Executaţi imprimarea
Confirmaţi numărul de pagini care vor fi imprimate, apoi faceţi clic pe Da (Yes).
Sunt imprimate toate documentele.
Important
Pentru imprimarea tuturor documentelor este necesară o cantitate mare de hârtie. Înainte deimprimare, asiguraţi-vă că verificaţi numărul de pagini de imprimat care este afişat în casetade dialog Confirmare contor pagini de imprimat (Print Page Count Confirmation).Caseta de dialog Exam. înaintea imp (Print Preview) vă permite să adaptaţi imprimarea lalăţimea hârtiei sau să setaţi raportul de zoom. Cu toate acestea, dacă datele de imprimare iesdin foaia de hârtie datorită noului raport de zoom, porţiunea de document care depăşeştesuprafaţa hârtiei nu va fi imprimată.
În partea superioară a paginii
Pagina 112 din 732 paginiImprimarea acestui manual

Ghid avansat > Cum se utilizează acest manual > Utilizarea cuvintelor cheie pentru a găsi un document
Utilizarea cuvintelor cheie pentru a găsi un document
Puteţi introduce un cuvânt cheie pentru a căuta un document ţintă.
Sunt căutate toate documentele din manualul on-screen afişat.
1. Faceţi clic pe Panoul de căutare este afişat în stânga faţă de On-screen Manual.
Notă
Faceţi clic pe pentru a închide sau pentru a afişa panoul de căutare.
2. Introduceţi un cuvânt cheie
În Cuvânt cheie (Keyword), introduceţi un cuvânt cheie pentru elementul de verificat.
Când doriţi să introduceţi mai multe cuvinte cheie, introduceţi un spaţiu între cuvintele cheie.
Notă Puteţi introduce maximum 10 cuvinte cheie de căutare sau maximum 255 de caractere.Nu se face diferenţă între litere mari şi mici.Programul poate, de asemenea, căuta cuvinte cheie care conţin spaţii.O modalitate convenabilă pentru a găsi rapid un document de citit este aceea de a introducecuvinte cheie conform descrierii de mai jos.
Pentru a afla cum se lucrează cu o funcţie pe care o utilizaţi:Introduceţi numele meniului afişat pe panoul de operare al acestui aparat sau pe computer(de exemplu, cadru ştergere copiere).Pentru a găsi o explicaţie a operaţiei pentru un anumit scop:Introduceţi funcţia + elementul de imprimat (de exemplu, imprimare calendar).
3. Faceţi clic pe Pornire căutare (Start Searching)
Pagina 113 din 732 paginiUtilizarea cuvintelor cheie pentru a găsi un document

Începe căutarea şi titlurile documentelor ce conţin cuvântul cheie sunt afişate în lista rezultatelorcăutării.
Când efectuaţi o căutare prin introducerea mai multor cuvinte cheie, rezultatele căutării sunt afişatedupă cum se arată mai jos.
[Doc. care conţin potriv perfect] ([Documents Containing Perfect Match]) Documente care conţin întregul şir de caractere căutat (inclusiv spaţiile), exact aşa cum suntintroduse (potrivire perfectă)
[Doc. care conţin toate cuvintele cheie] ([Documents Containing All Keywords]) Documente care conţin toate cuvintele cheie introduse
[Doc. care conţin orice cuvânt cheie] ([Documents Containing Any Keyword]) Documente care conţin cel puţin unul dintre cuvintele cheie introduse
4. Afişaţi documentul pe care doriţi să îl citiţi
Din lista de rezultate ale căutării, faceţi dublu clic (sau selectaţi şi apăsaţi Enter) pe titluldocumentului pe care doriţi să îl citiţi.
Când documentele titlului respectiv sunt afişate, cuvintele cheie găsite în documentele respectivesunt evidenţiate.
Notă Dacă modificaţi intrarea cuvântului cheie şi efectuaţi mai multe căutări, rămâne un istoric alcăutărilor. Pentru a şterge istoricul căutărilor, faceţi clic pe situat în dreapta faţă de Cuvânt cheie(Keyword), apoi selectaţi Golire istoric (Clear History), care se afişează.
În partea superioară a paginii
Pagina 114 din 732 paginiUtilizarea cuvintelor cheie pentru a găsi un document

Ghid avansat > Cum se utilizează acest manual > Înregistrarea documentelor în Manualul meu (My Manual)
Înregistrarea documentelor în Manualul meu (My Manual)
Înregistraţi documentele citite frecvent ca documente pentru Manualul meu (My Manual), pentru a puteaîn orice moment să consultaţi mai uşor documentele respective.
1. Afişarea documentului
Afişarea documentului de adăugat la Manualul meu (My Manual).
2. Faceţi clic pe Panoul Manualul meu (My Manual) este afişat în stânga faţă de On-screen Manual.
Notă
Faceţi clic pe pentru a închide sau pentru a afişa panoul Manualul meu (My Manual).
3. Înregistrarea documentului în Manualul meu (My Manual)
Faceţi clic pe Adăugare (Add).
Titlul documentului afişat este adăugat la Lista Manualului meu (List of My Manual).
Notă De asemenea, puteţi adăuga documente la Manualul meu (My Manual) prin următoarelemetode. Dacă adăugaţi un document la Manualul meu (My Manual), în pictogrameledocumentelor din panoul de cuprins este afişat un marcaj .
În lista Documente afişate recent (Recently Displayed Documents), faceţi dublu clic pe titluldocumentului pe care doriţi să-l adăugaţi la Manualul meu (My Manual) (sau selectaţidocumentul şi apăsaţi tasta Enter) pentru a afişa titlul, apoi faceţi clic pe Adăugare (Add).Faceţi clic dreapta pe titlul documentului afişat în panoul de cuprins sau faceţi clic dreaptaîn fereastra de explicaţii, apoi selectaţi Adăugare la manualul meu (Add to My Manual) dinmeniul afişat.În panoul de cuprins, selectaţi titlul documentului pe care doriţi să-l adăugaţi la Manualul
Pagina 115 din 732 paginiÎnregistrarea documentelor în Manualul meu (My Manual)

meu (My Manual), apoi faceţi clic pe Adăugare la manualul meu (Add to My Manual) dinpartea din dreapta jos a panoului.
4. Afişare Manualul meu (My Manual)
Când faceţi dublu clic pe (sau selectaţi şi apăsaţi Enter) un titlu de document afişat în ListaManualului meu (List of My Manual), acel subiect este afişat în fereastra de explicaţii.
Notă Pentru a şterge un document din Lista Manualului meu (List of My Manual), selectaţi din listătitlul acelui document, apoi faceţi clic pe �tergere (Delete) (sau apăsaţi �tergere (Delete)).
În partea superioară a paginii
Pagina 116 din 732 paginiÎnregistrarea documentelor în Manualul meu (My Manual)

Ghid avansat > Cum se utilizează acest manual > Simboluri utilizate în acest document
Simboluri utilizate în acest document
Avertisment Instrucţiuni care, dacă nu sunt respectate, pot avea ca rezultat decesul sau vătămarea gravă, cauzate deoperarea necorespunzătoare a echipamentului. Acestea trebuie să fie respectate pentru o funcţionare însiguranţă.
Atenţie Instrucţiuni care, dacă nu sunt respectate, pot avea ca rezultat vătămare corporală sau daune materiale,cauzate de operarea necorespunzătoare a echipamentului. Acestea trebuie să fie respectate pentru ofuncţionare în siguranţă.
Important Instrucţiuni care includ informaţii importante.Aveţi grijă să citiţi aceste indicaţii.
Notă Instrucţiuni ca explicaţii pentru funcţionare sau explicaţii suplimentare.
Indică operaţii în Windows.
Indică operaţii în Macintosh.
În partea superioară a paginii
Pagina 117 din 732 paginiSimboluri utilizate în acest document

Ghid avansat > Cum se utilizează acest manual > Mărci comerciale
Mărci comerciale
Microsoft este marcă comercială înregistrată a Microsoft Corporation.
Windows este marcă comercială sau marcă comercială înregistrată a Microsoft Corporation înS.U.A. şi/sau alte ţări.
Windows Vista este marcă comercială sau marcă comercială înregistrată a Microsoft Corporation înS.U.A. şi/sau alte ţări.
Internet Explorer este marcă comercială sau marcă comercială înregistrată a Microsoft Corporationîn S.U.A. şi/sau alte ţări.
Macintosh şi Mac sunt mărci comerciale ale Apple Inc., înregistrate ín S.U.A. şi/sau alte ţări.
Bonjour este o marcă comercială a Apple Inc., înregistrată în S.U.A. şi/sau alte ţări.
Adobe, Adobe Photoshop, Adobe RGB şi Adobe RGB (1998) sunt mărci comerciale înregistrate saumărci comerciale ale Adobe Systems Incorporated în Statele Unite şi/sau în alte ţări.
Exif Print
Acest aparat suportă Exif Print.Exif Print este un standard pentru îmbunătăţirea comunicaţiilor între camerele digitale şi imprimante.Prin conectarea la o cameră compatibilă cu Exif Print, datele imaginii camerei de la data şi orafotografierii sunt utilizate şi optimizate, rezultând imprimate de calitate extrem de bună.
În partea superioară a paginii
Pagina 118 din 732 paginiMărci comerciale

Ghid avansat > Imprimare de pe un computer
Imprimare de pe un computer
Imprimarea cu pachetul software al aplicaţiei
Imprimarea cu alt software de aplicaţie
În partea superioară a paginii
Pagina 119 din 732 paginiImprimare de pe un computer

Ghid avansat > Imprimare de pe un computer > Imprimarea cu pachetul software al aplicaţiei
Imprimarea cu pachetul software al aplicaţiei
Ce este Easy-PhotoPrint EX?
Imprimarea fotografiilor
Crearea unui album
Imprimarea calendarelor
Imprimarea autocolantelor
Aspectul imprimării
Corectarea şi îmbunătăţirea fotografiilor
Întrebări şi răspunsuri
Setări pentru imprimarea fotografiilor
Alte setări
În partea superioară a paginii
Pagina 120 din 732 paginiImprimarea cu pachetul software al aplicaţiei

Advanced Guide > Printing from a Computer > Printing with the Bundled Application Software > What Is Easy-PhotoPrintEX?
What Is Easy-PhotoPrint EX?
Easy-PhotoPrint EX allows you to create albums, calendars and stickers easily using photos taken withdigital cameras.
You can also print borderless photos easily.
Important
Easy-PhotoPrint EX does not support Windows 95, Windows 98, Windows Me, or Windows NT4.Easy-PhotoPrint EX can only be used with Canon inkjet printers. It does not support some printers,including Canon compact printers (SELPHY CP series).If a printer that supports Easy-PhotoPrint EX is not installed, you cannot print items you create.If Easy-PhotoPrint EX is installed on a computer that already has Easy-LayoutPrint installed, Easy-LayoutPrint will be replaced by Easy-PhotoPrint EX.
NotePrinting on paper larger than A4 is available with supported printers only. See your printer manualfor details.See Help of Easy-PhotoPrint EX for descriptions of Easy-PhotoPrint EX screens.Click Help in a screen or dialog box, or select Easy-PhotoPrint EX Help... from the Help menu. Helpappears.
About Exif Print
Easy-PhotoPrint EX supports "Exif Print." Exif Print is a standard for enhancing the communicationbetween digital cameras and printers.
By connecting to an Exif Print-compliant digital camera, the image data at the time of shooting is usedand optimized, yielding extremely high quality prints.
Starting Easy-PhotoPrint EX from Other Applications
Pagina 121 din 732 paginiWhat Is Easy-PhotoPrint EX?

Easy-PhotoPrint EX can be started from other applications.
See the application's manual for details on the procedure for starting.
The Photo Print function is available with the following applications:
MP Navigator EX Ver.1.00 or later
ZoomBrowser EX Ver.6.0 or later
Digital Photo Professional Ver.3.2 or later
Important
Easy-PhotoPrint EX is subject to the following restrictions when started from Digital PhotoProfessional:- Menu does not appear in the step button area on the left side of the screen.- Images cannot be corrected/enhanced.- Image display order cannot be changed.- Edited images cannot be saved.- Options other than Enable ICC Profile cannot be selected for Color correction for printing onthe Advanced tab of the Preferences dialog box. Therefore, you cannot use the Vivid Photo andPhoto Noise Reduction functions.
The Album function is available with the following applications:
MP Navigator EX Ver.1.00 or later
ZoomBrowser EX Ver.5.8 or later
Supported Image File Formats (Extensions)
BMP (.bmp)
JPEG (.jpg, .jpeg)
TIFF (.tif, .tiff)
PICT (.pict, .pct)
Easy-PhotoPrint image files (.epp)
Important
When selecting an image, if there is a TIFF file in the selected folder, the image may not bedisplayed correctly or Easy-PhotoPrint EX may shut down depending on the TIFF format. In suchcases, move the TIFF file to another folder or recreate the file in a different file format, and thenselect the folder again.
Note
The thumbnails of files in unsupported formats are displayed as (Question Mark).When Easy-PhotoPrint EX is started from Digital Photo Professional, all image files supported byDigital Photo Professional will be displayed.
File Formats (Extensions) Supported by Easy-PhotoPrint EX
Easy-PhotoPrint EX Photo Print file (.el6)
Easy-PhotoPrint EX Album file (.el1)
Easy-PhotoPrint EX Stickers file (.el2)
Easy-PhotoPrint EX Calendar file (.el4)
Easy-PhotoPrint EX Layout file (.el5)
Page top
Pagina 122 din 732 paginiWhat Is Easy-PhotoPrint EX?

Advanced Guide > Printing from a Computer > Printing with the Bundled Application Software > Printing Photos
Printing Photos
Easy-PhotoPrint EX allows you to print your favorite photos in a variety of layouts.
You can also create borderless photos easily.
Corrections suitable for photos will be applied automatically when printing.
Steps
1. Starting Easy-PhotoPrint EX
2. Selecting a Photo
3. Selecting the Paper
4. Printing
Try This
Correcting and Enhancing Photos
Printing Vivid Photos
Reducing Photo Noise
Cropping Photos (Photo Print)
Printing Dates on Photos (Photo Print)
Printing Multiple Photos on One Page
Printing an Index
Printing ID Photos (ID Photo Print)
Printing Photo Information
Saving Photos
Opening Saved Files
Questions and Answers
How Can I Move (or Copy) the Saved File?
Which Side of the Displayed Image Does the Printing Start from?
How Do I Print with Even Margins?
Pagina 123 din 732 paginiPrinting Photos

Page top
Pagina 124 din 732 paginiPrinting Photos

Advanced Guide > Printing from a Computer > Printing with the Bundled Application Software > Printing Photos > StartingEasy-PhotoPrint EX
Starting Easy-PhotoPrint EX
1. From the Start menu, select (All) Programs > Canon Utilities > Easy-PhotoPrint EX> Easy-PhotoPrint EX.
Easy-PhotoPrint EX starts and Menu appears.
Page top
Pagina 125 din 732 paginiStarting Easy-PhotoPrint EX

Advanced Guide > Printing from a Computer > Printing with the Bundled Application Software > Printing Photos >Selecting a Photo
Selecting a Photo
1. Click Photo Print from Menu.
The Select Images screen appears.
Important
The thumbnails (reduced images) displayed in the screen may appear as follows:- A black line appears along an edge of the image.- An edge of the image appears cropped.However, such images will be displayed normally when enlarged or previewed, and printresults will not be affected.
2. Select the folder that contains the image you want to print from the folder tree area.
The images in the folder will be displayed as thumbnails (miniatures).
Important
If Easy-PhotoPrint EX is started from another application (MP Navigator EX, ZoomBrowser EXor Digital Photo Professional), the folder tree area will not be displayed.The images opened in the application will be displayed as thumbnails.
3. Click the image you want to print.
The number of copies appears as "1" below the clicked image, while the selected image itself willappear in the selected image area.
NoteTo delete an image in the selected image area, select the image you want to delete and click
Pagina 126 din 732 paginiSelecting a Photo

(Delete Imported Image).
To delete all images from the selected image area, click (Delete All Imported Images).
To print two or more copies of an image, click (Up arrow) until the number of copies you
want is reached. To reduce the number of copies shown in the box, click (Down arrow).You can change the order of photos using the list located at the top right corner of the screen.You can select the printing order from Sort by Date and Sort by Name.
NoteYou can correct or enhance the selected image before printing.
Correcting and Enhancing PhotosSee Help for details on the Select Images screen.
Page top
Pagina 127 din 732 paginiSelecting a Photo

Advanced Guide > Printing from a Computer > Printing with the Bundled Application Software > Printing Photos >Selecting the Paper
Selecting the Paper
1. Click Select Paper.The Select Paper screen appears.
2. Set the following items according to the printer and paper to be used:
Printer
Paper Source
Paper Size
Media Type
NoteThe paper sizes and media types may vary depending on the printer. See Help for details.The paper sources may vary depending on the printer and the media type.
NoteYou can print photos with more vivid colors or you can reduce the photo noise.
Printing Vivid PhotosReducing Photo Noise
See Help for details on the Select Paper screen.
Page top
Pagina 128 din 732 paginiSelecting the Paper

Advanced Guide > Printing from a Computer > Printing with the Bundled Application Software > Printing Photos > Printing
Printing
1. Click Layout/Print.
The Layout/Print screen appears.
Important
The thumbnails (reduced images) displayed in the screen may appear as follows:- A black line appears along an edge of the image.- An edge of the image appears cropped.However, such images will be displayed normally when enlarged or previewed, and printresults will not be affected.
2. Select a layout you want to use.
Click a borderless layout to print borderless photos.
NoteThe layouts that can be selected may vary depending on the printer, paper size, and mediatype.
3. Click Print.
Important
When you print on large size paper such as A3/A3+, some computers cannot print properly if youprint more than one page or copy at a time. It is recommended that you print page by page whenyou print on such paper.While printing on paper larger than A4 or printing high-resolution images, data may be printed onlyto the middle if many images are printed at one time. In such cases, select the Spool print job pageby page checkbox in the Preferences dialog box, and then print again.
Pagina 129 din 732 paginiPrinting

To display the Preferences dialog box, click (Settings) or select Preferences... from the Filemenu.The photo print settings will be discarded if you exit Easy-PhotoPrint EX without saving the settings.It is recommended that you save the printed image if you want to print it again.
Saving PhotosWhen you print on a bordered layout, the margins on the left and right or the top and bottom maybecome wider than the other.
How Do I Print with Even Margins?
NoteYou can crop images or print dates on photos.
Cropping Photos (Photo Print)Printing Dates on Photos (Photo Print)
You can correct or enhance the selected image before printing.Correcting and Enhancing Photos
You can specify advanced Photo Print settings (number of copies, print quality, etc.) in thePreferences dialog box.
To display the Preferences dialog box, click (Settings) or select Preferences... from the Filemenu.See Help for details on the Layout/Print screen.
Page top
Pagina 130 din 732 paginiPrinting

Advanced Guide > Printing from a Computer > Printing with the Bundled Application Software > Creating an Album
Creating an Album
Easy-PhotoPrint EX allows you to create your own personalized photo album.
Steps
1. Starting Easy-PhotoPrint EX
2. Selecting the Paper and Layout
3. Selecting a Photo
4. Editing
5. Printing
Try This
Correcting and Enhancing Photos
Changing Layout
Changing Background
Adding Photos
Swapping Positions of Photos
Replacing Photos
Changing Position, Angle and Size of Photos
Cropping Photos
Framing Photos
Printing Dates on Photos
Attaching Comments to Photos
Adding Text to Photos
Saving
Opening Saved Files
Questions and Answers
Pagina 131 din 732 paginiCreating an Album

How Can I Move (or Copy) the Saved File?
What Is "C1" or "C4"?
Page top
Pagina 132 din 732 paginiCreating an Album

Advanced Guide > Printing from a Computer > Printing with the Bundled Application Software > Creating an Album >Starting Easy-PhotoPrint EX
Starting Easy-PhotoPrint EX
1. From the Start menu, select (All) Programs > Canon Utilities > Easy-PhotoPrint EX> Easy-PhotoPrint EX.
Easy-PhotoPrint EX starts and Menu appears.
Page top
Pagina 133 din 732 paginiStarting Easy-PhotoPrint EX

Advanced Guide > Printing from a Computer > Printing with the Bundled Application Software > Creating an Album >Selecting the Paper and Layout
Selecting the Paper and Layout
1. Click Album from Menu.
The Page Setup screen appears.
2. Set the following items in the General Settings section:
Paper Size
Orientation
Cover
Double page album
Page number
NoteSee Help on the paper size that can be selected.You can select whether to display images on the inside of the front and back covers in theCover Options dialog box. To display the Cover Options dialog box, select Front or Front & Backfor Cover and click Options....Select the Double page album checkbox to enable the spread page layout (consisting of two-page master). In a double-page album, you can arrange an image across the left and rightpages.You can customize the page numbers (position, font size, etc.) in the Page Number Settingsdialog box. To display the Page Number Settings dialog box, select the Page number checkboxand click Settings....You can customize the margins of the front cover, inside pages and back cover in the MarginSettings dialog box. To display the Margin Settings dialog box, click Margins....
3. Select the theme you want to use from Theme in Sample Layout.
Pagina 134 din 732 paginiSelecting the Paper and Layout

4. If you want to change the layout, click Layout....
The Change Layout dialog box appears.
In the Change Layout dialog box, you can change the layout or select whether to print the date (onwhich the picture was taken) on the photo.
NoteThe layouts that can be selected may vary depending on the Paper Size, Orientation, Doublepage album, or the type of page selected (front cover, inside pages or back cover).You can customize the date (position, size, color, etc.) in the Date Settings dialog box. Todisplay the Date Settings dialog box, select the Print date checkbox in the Change Layoutdialog box and click Date Settings....
5. If you want to change the background, click Background....
The Change Background dialog box appears.
In the Change Background dialog box, you can paint the background in a single color or paste animage file to it.
NoteSee Help for details on the Page Setup screen.
Page top
Pagina 135 din 732 paginiSelecting the Paper and Layout

Advanced Guide > Printing from a Computer > Printing with the Bundled Application Software > Creating an Album >Selecting a Photo
Selecting a Photo
1. Click Select Images.
The Select Images screen appears.
2. Select the folder that contains the image you want to print from the folder tree area.
The images in the folder will be displayed as thumbnails (miniatures).
Important
If Easy-PhotoPrint EX is started from another application (MP Navigator EX or ZoomBrowserEX), the folder tree area will not be displayed.The images opened in the application will be displayed as thumbnails.
3. Select the image(s) you want to print, and click one of the buttons below.
To print on the front cover, click (Import to Front Cover).
To print on the inside pages, click (Import to Inside Pages).
To print on the back cover, click (Import to Back Cover).
The selected image(s) are displayed in the selected image area.
You can also select the image(s) you want to print by dragging them into the selected image area.
NoteTo delete an image in the selected image area, select the image you want to delete and click
(Delete Imported Image).
Pagina 136 din 732 paginiSelecting a Photo

To delete all images from the selected image area, click (Delete All Imported Images).
NoteSee Help for details on the Select Images screen.
Page top
Pagina 137 din 732 paginiSelecting a Photo

Advanced Guide > Printing from a Computer > Printing with the Bundled Application Software > Creating an Album >Editing
Editing
1. Click Edit.
The Edit screen appears.
2. Edit your album if necessary.
Changing Layout
Changing Background
Adding Photos
Swapping Positions of Photos
Replacing Photos
Changing Position, Angle and Size of Photos
Cropping Photos
Framing Photos
Printing Dates on Photos
Attaching Comments to Photos
Adding Text to Photos
Important
The edit information will be discarded if you exit Easy-PhotoPrint EX without saving the editedalbum. It is recommended that you save the item if you want to edit it again.The page numbers on the front and back covers of the album are displayed as follows:
C1: Front cover
C2: Inside the front cover
C3: Inside the back cover
Pagina 138 din 732 paginiEditing

C4: Back cover
Saving
NoteSee Help for details on the Edit screen.
Page top
Pagina 139 din 732 paginiEditing

Advanced Guide > Printing from a Computer > Printing with the Bundled Application Software > Creating an Album >Printing
Printing
1. Click Print Settings.
The Print Settings screen appears.
2. Set the following items according to the printer and paper to be used:
Printer
Media Type
Copies
Paper Source
Print Quality
Borderless Printing
NoteThe media types may vary depending on the printer and the paper size.Duplex Printing appears if the selected printer and media type support duplex printing. Selectthis checkbox to print on both sides of the paper.Automatic appears if you select the Duplex Printing checkbox after selecting a printer thatsupports automatic duplex printing and media type that supports duplex printing. Select thischeckbox to print on both sides of the paper automatically.The paper sources may vary depending on the printer and the media type.You can set a custom print quality level in the Print Quality Settings dialog box. To display thePrint Quality Settings dialog box, select Custom for Print Quality and click Quality Settings....Select the Borderless Printing checkbox to print borderless photos.You can specify the print range and the amount of extension for borderless printing in the PrintSettings dialog box. To display the Print Settings dialog box, click Advanced....
Pagina 140 din 732 paginiPrinting

3. Click Print.
NoteSee Help for details on the Print Settings screen.
Page top
Pagina 141 din 732 paginiPrinting

Advanced Guide > Printing from a Computer > Printing with the Bundled Application Software > Printing Calendars
Printing Calendars
Easy-PhotoPrint EX allows you to create your own calendar using your favorite photos.
Steps
1. Starting Easy-PhotoPrint EX
2. Selecting the Paper and Layout
3. Selecting a Photo
4. Editing
5. Printing
Try This
Correcting and Enhancing Photos
Changing Layout
Changing Background
Adding Photos
Swapping Positions of Photos
Replacing Photos
Changing Position, Angle and Size of Photos
Cropping Photos
Framing Photos
Printing Dates on Photos
Adding Text to Photos
Setting Calendar Display
Setting Holidays
Saving
Opening Saved Files
Pagina 142 din 732 paginiPrinting Calendars

Questions and Answers
How Can I Move (or Copy) the Saved File?
Page top
Pagina 143 din 732 paginiPrinting Calendars

Advanced Guide > Printing from a Computer > Printing with the Bundled Application Software > Printing Calendars >Starting Easy-PhotoPrint EX
Starting Easy-PhotoPrint EX
1. From the Start menu, select (All) Programs > Canon Utilities > Easy-PhotoPrint EX> Easy-PhotoPrint EX.
Easy-PhotoPrint EX starts and Menu appears.
Page top
Pagina 144 din 732 paginiStarting Easy-PhotoPrint EX

Advanced Guide > Printing from a Computer > Printing with the Bundled Application Software > Printing Calendars >Selecting the Paper and Layout
Selecting the Paper and Layout
1. Click Calendar from Menu.
The Page Setup screen appears.
2. Set the following items in the General Settings section:
Paper Size
Orientation
Start from
Period
NoteSee Help on the paper size that can be selected.You can add holidays to your calendar.
Setting Holidays
3. Select a layout for Design.
If necessary, make advanced settings on the calendar and set the background.
NoteYou can customize the calendar display (font colors of the dates and days of the week, positionand size of the calendar, etc.).
Setting Calendar DisplayYou can paint the background in a single color or paste an image file to it in the ChangeBackground dialog box. To display the Change Background dialog box, click Background....
Note
Pagina 145 din 732 paginiSelecting the Paper and Layout

See Help for details on the Page Setup screen.
Page top
Pagina 146 din 732 paginiSelecting the Paper and Layout

Advanced Guide > Printing from a Computer > Printing with the Bundled Application Software > Printing Calendars >Selecting a Photo
Selecting a Photo
1. Click Select Images.
The Select Images screen appears.
2. Select the folder that contains the image you want to print from the folder tree area.
The images in the folder will be displayed as thumbnails (miniatures).
3. Select the image(s) you want to print and click (Import to Inside Pages).
The selected image(s) are displayed in the selected image area.
You can also select the image(s) you want to print by dragging them into the selected image area.
NoteTo delete an image in the selected image area, select the image you want to delete and click
(Delete Imported Image).
To delete all images from the selected image area, click (Delete All Imported Images).
NoteSee Help for details on the Select Images screen.
Page top
Pagina 147 din 732 paginiSelecting a Photo

Advanced Guide > Printing from a Computer > Printing with the Bundled Application Software > Printing Calendars >Editing
Editing
1. Click Edit.
The Edit screen appears.
2. Edit the calendar if necessary.
Changing Layout
Changing Background
Adding Photos
Swapping Positions of Photos
Replacing Photos
Changing Position, Angle and Size of Photos
Cropping Photos
Framing Photos
Printing Dates on Photos
Adding Text to Photos
Setting Calendar Display
Setting Holidays
Important
The edit information will be discarded if you exit Easy-PhotoPrint EX without saving the editedcalendar. It is recommended that you save the item if you want to edit it again.
Saving
Note
Pagina 148 din 732 paginiEditing

See Help for details on the Edit screen.
Page top
Pagina 149 din 732 paginiEditing

Advanced Guide > Printing from a Computer > Printing with the Bundled Application Software > Printing Calendars >Printing
Printing
1. Click Print Settings.
The Print Settings screen appears.
2. Set the following items according to the printer and paper to be used:
Printer
Media Type
Copies
Paper Source
Print Quality
Borderless Printing
NoteThe media types may vary depending on the printer and the paper size.Duplex Printing appears if the selected printer and media type support duplex printing. Selectthis checkbox to print on both sides of the paper.Automatic appears if you select the Duplex Printing checkbox after selecting a printer thatsupports automatic duplex printing and media type that supports duplex printing. Select thischeckbox to print on both sides of the paper automatically.The paper sources may vary depending on the printer and the media type.You can set a custom print quality level in the Print Quality Settings dialog box. To display thePrint Quality Settings dialog box, select Custom for Print Quality and click Quality Settings....You can specify the print range and the amount of extension for borderless printing in the PrintSettings dialog box. To display the Print Settings dialog box, click Advanced....
3. Click Print.
Pagina 150 din 732 paginiPrinting

NoteSee Help for details on the Print Settings screen.
Page top
Pagina 151 din 732 paginiPrinting

Advanced Guide > Printing from a Computer > Printing with the Bundled Application Software > Printing Stickers
Printing Stickers
You can print your favorite photos on compatible sticker sheets.
Steps
1. Starting Easy-PhotoPrint EX
2. Selecting the Paper and Layout
3. Selecting a Photo
4. Editing
5. Printing
Try This
Correcting and Enhancing Photos
Adding Photos
Swapping Positions of Photos
Replacing Photos
Changing Position, Angle and Size of Photos
Cropping Photos
Framing Photos
Adding Text to Photos
Saving
Opening Saved Files
Questions and Answers
How Can I Move (or Copy) the Saved File?
Page top
Pagina 152 din 732 paginiPrinting Stickers

Advanced Guide > Printing from a Computer > Printing with the Bundled Application Software > Printing Stickers >Starting Easy-PhotoPrint EX
Starting Easy-PhotoPrint EX
1. From the Start menu, select (All) Programs > Canon Utilities > Easy-PhotoPrint EX> Easy-PhotoPrint EX.
Easy-PhotoPrint EX starts and Menu appears.
Page top
Pagina 153 din 732 paginiStarting Easy-PhotoPrint EX

Advanced Guide > Printing from a Computer > Printing with the Bundled Application Software > Printing Stickers >Selecting the Paper and Layout
Selecting the Paper and Layout
1. Click Stickers from Menu.The Page Setup screen appears.
2. Set the following items in the General Settings section:
Paper Size
Orientation
Print date
Use the same image in all frames
NotePaper sizes other than Photo Stickers cannot be selected.Select the Use the same image in all frames checkbox to use the same image in all theframes on the page.You can customize the date (position, size, color, etc.) in the Date Settings dialog box. Todisplay the Date Settings dialog box, select the Print date checkbox and click Date Settings....
NoteSee Help for details on the Page Setup screen.
Page top
Pagina 154 din 732 paginiSelecting the Paper and Layout

Advanced Guide > Printing from a Computer > Printing with the Bundled Application Software > Printing Stickers >Selecting a Photo
Selecting a Photo
1. Click Select Images.
The Select Images screen appears.
2. Select the folder that contains the image you want to print from the folder tree area.
The images in the folder will be displayed as thumbnails (miniatures).
3. Select the image(s) you want to print and click (Import to Inside Pages).
The selected image(s) are displayed in the selected image area.
You can also select the image(s) you want to print by dragging them into the selected image area.
NoteTo delete an image in the selected image area, select the image you want to delete and click
(Delete Imported Image).
To delete all images from the selected image area, click (Delete All Imported Images).
NoteSee Help for details on the Select Images screen.
Page top
Pagina 155 din 732 paginiSelecting a Photo

Advanced Guide > Printing from a Computer > Printing with the Bundled Application Software > Printing Stickers > Editing
Editing
1. Click Edit.
The Edit screen appears.
2. Edit the stickers if necessary.
Adding Photos
Swapping Positions of Photos
Replacing Photos
Changing Position, Angle and Size of Photos
Cropping Photos
Printing Dates on Photos
Adding Text to Photos
Important
The edit information will be discarded if you exit Easy-PhotoPrint EX without saving the editedstickers. It is recommended that you save the item if you want to edit it again.
Saving
NoteSee Help for details on the Edit screen.
Page top
Pagina 156 din 732 paginiEditing

Advanced Guide > Printing from a Computer > Printing with the Bundled Application Software > Printing Stickers >Printing
Printing
1. Click Print Settings.
The Print Settings screen appears.
2. Set the following items according to the printer and paper to be used:
Printer
Media Type
Copies
Paper Source
Print Quality
Borderless Printing
NoteThe media types may vary depending on the printer and the paper size.The paper sources may vary depending on the printer and the media type.You can set a custom print quality level in the Print Quality Settings dialog box. To display thePrint Quality Settings dialog box, select Custom for Print Quality and click Quality Settings....You can adjust the printing position in the Adjust Print Position dialog box. To display the AdjustPrint Position dialog box, click Print Position....You can specify the print range and the amount of extension for borderless printing in the PrintSettings dialog box. To display the Print Settings dialog box, click Advanced....
3. Click Print.
NoteSee Help for details on the Print Settings screen.
Pagina 157 din 732 paginiPrinting

Page top
Pagina 158 din 732 paginiPrinting

Advanced Guide > Printing from a Computer > Printing with the Bundled Application Software > Printing Layout
Printing Layout
You can add text to your favorite photos and print them in a variety of layouts.
Steps
1. Starting Easy-PhotoPrint EX
2. Selecting the Paper and Layout
3. Selecting a Photo
4. Editing
5. Printing
Try This
Correcting and Enhancing Photos
Changing Layout
Adding Photos
Swapping Positions of Photos
Replacing Photos
Changing Position, Angle and Size of Photos
Cropping Photos
Printing Dates on Photos
Adding Text to Photos
Saving
Opening Saved Files
Questions and Answers
How Can I Move (or Copy) the Saved File?
Page top
Pagina 159 din 732 paginiPrinting Layout
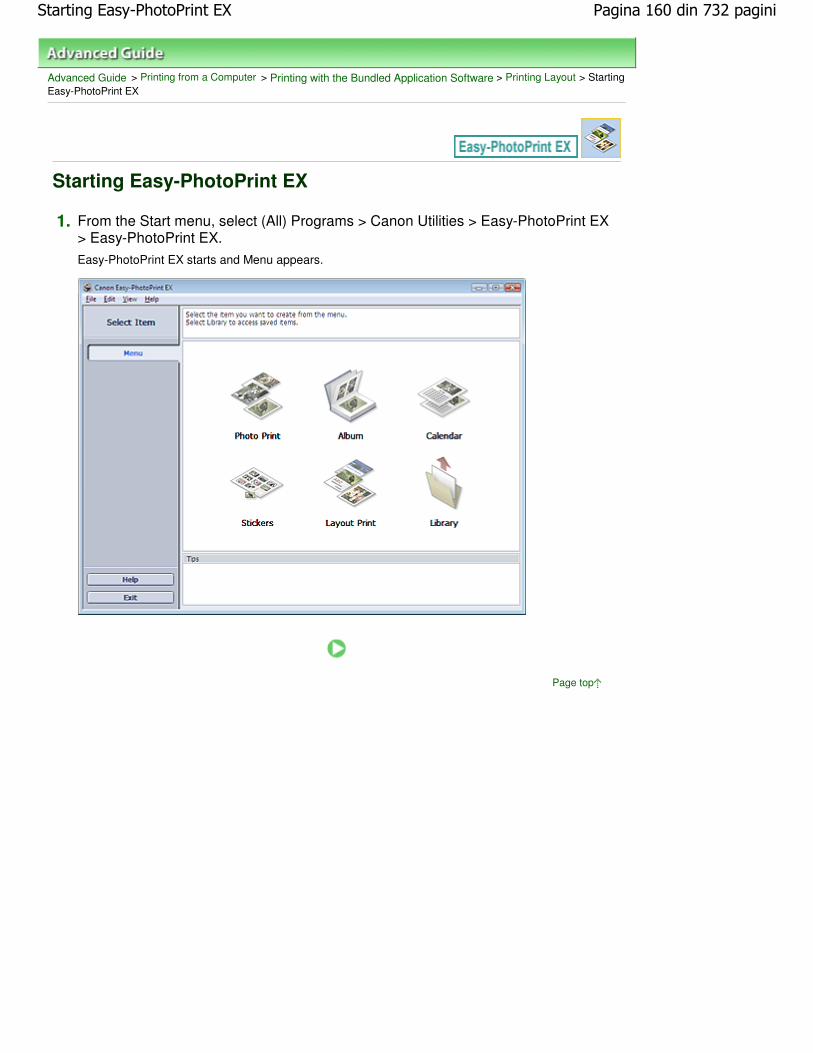
Advanced Guide > Printing from a Computer > Printing with the Bundled Application Software > Printing Layout > StartingEasy-PhotoPrint EX
Starting Easy-PhotoPrint EX
1. From the Start menu, select (All) Programs > Canon Utilities > Easy-PhotoPrint EX> Easy-PhotoPrint EX.
Easy-PhotoPrint EX starts and Menu appears.
Page top
Pagina 160 din 732 paginiStarting Easy-PhotoPrint EX

Advanced Guide > Printing from a Computer > Printing with the Bundled Application Software > Printing Layout >Selecting the Paper and Layout
Selecting the Paper and Layout
1. Click Layout Print from Menu.
The Page Setup screen appears.
2. Set the following items in the General Settings section:
Paper Size
Orientation
Print date
NoteSee Help on the paper size that can be selected.You can customize the date (position, size, color, etc.) in the Date Settings dialog box. Todisplay the Date Settings dialog box, select the Print date checkbox and click Date Settings....
3. Select a layout from Layouts.
NoteThe layouts may vary depending on the Orientation.
NoteSee Help for details on the Page Setup screen.
Page top
Pagina 161 din 732 paginiSelecting the Paper and Layout

Advanced Guide > Printing from a Computer > Printing with the Bundled Application Software > Printing Layout >Selecting a Photo
Selecting a Photo
1. Click Select Images.
The Select Images screen appears.
2. Select the folder that contains the image you want to print from the folder tree area.
The images in the folder will be displayed as thumbnails (miniatures).
3. Select the image(s) you want to print and click (Import to Inside Pages).
The selected image(s) are displayed in the selected image area.
You can also select the image(s) you want to print by dragging them into the selected image area.
NoteTo delete an image in the selected image area, select the image you want to delete and click
(Delete Imported Image).
To delete all images from the selected image area, click (Delete All Imported Images).
NoteSee Help for details on the Select Images screen.
Page top
Pagina 162 din 732 paginiSelecting a Photo

Advanced Guide > Printing from a Computer > Printing with the Bundled Application Software > Printing Layout > Editing
Editing
1. Click Edit.
The Edit screen appears.
2. Edit the layout if necessary.
Changing Layout
Adding Photos
Swapping Positions of Photos
Replacing Photos
Changing Position, Angle and Size of Photos
Cropping Photos
Printing Dates on Photos
Adding Text to Photos
Important
The edit information will be discarded if you exit Easy-PhotoPrint EX without saving the edited layout.It is recommended that you save the item if you want to edit it again.
Saving
NoteSee Help for details on the Edit screen.
Page top
Pagina 163 din 732 paginiEditing

Advanced Guide > Printing from a Computer > Printing with the Bundled Application Software > Printing Layout > Printing
Printing
1. Click Print Settings.
The Print Settings screen appears.
2. Set the following items according to the printer and paper to be used:
Printer
Media Type
Copies
Paper Source
Print Quality
Borderless Printing
NoteThe media types may vary depending on the printer and the paper size.Duplex Printing appears if the selected printer and media type support duplex printing. Selectthis checkbox to print on both sides of the paper.Automatic appears if you select the Duplex Printing checkbox after selecting a printer thatsupports automatic duplex printing and media type that supports duplex printing. Select thischeckbox to print on both sides of the paper automatically.The paper sources may vary depending on the printer and the media type.You can set a custom print quality level in the Print Quality Settings dialog box. To display thePrint Quality Settings dialog box, select Custom for Print Quality and click Quality Settings....Select the Borderless Printing checkbox to print borderless photos.You can specify the print range and the amount of extension for borderless printing in the PrintSettings dialog box. To display the Print Settings dialog box, click Advanced....
3. Click Print.
Pagina 164 din 732 paginiPrinting

NoteSee Help for details on the Print Settings screen.
Page top
Pagina 165 din 732 paginiPrinting

Advanced Guide > Printing from a Computer > Printing with the Bundled Application Software > Correcting andEnhancing Photos
Correcting and Enhancing Photos
You can correct and enhance images.
Click (Correct/Enhance Images) in the Select Images or Edit screen, or in the Layout/Print screen ofPhoto Print. You can make the following corrections and enhancements in the Correct/Enhance Imageswindow.
Important
For Photo Print, if you select Enable ICC Profile in the Advanced tab of the Preferences dialog box,you cannot correct/enhance images.
NoteSee "Correct/Enhance Images Window " for details on the Correct/Enhance Images window.
Auto Photo Fix
This function will automatically analyze the captured scene and apply suitable corrections.
Using the Auto Photo Fix Function
Red-Eye Correction Function
You can correct red eyes caused by a camera flash.
Using the Red-Eye Correction Function
Face Brightener Function
You can brighten dark faces caused by bright background.
Using the Face Brightener Function
Face Sharpener Function
You can sharpen out-of-focus faces in a photo.
Using the Face Sharpener Function
Digital Face Smoothing Function
You can enhance skin beautifully by removing blemishes and wrinkles.
Using the Digital Face Smoothing Function
Blemish Remover Function
You can remove moles.
Using the Blemish Remover Function
Image Adjustment
You can adjust brightness and contrast or sharpen the entire image.
You can also blur the outline of the subjects or remove the base color.
Pagina 166 din 732 paginiCorrecting and Enhancing Photos

Adjusting Images
Page top
Pagina 167 din 732 paginiCorrecting and Enhancing Photos

Advanced Guide > Printing from a Computer > Printing with the Bundled Application Software > Correcting andEnhancing Photos > Using the Auto Photo Fix Function
Using the Auto Photo Fix Function
Apply optimum corrections automatically to the photos used for an album, calendar, etc.
Important
The Auto Photo Fix function is not available for Photo Print. Photo Print allows you to automaticallyapply suitable corrections to all photos when printing, by selecting Auto Photo Fix in Color correctionfor printing on the Advanced tab of the Preferences dialog box. To display the Preferences dialog
box, click (Settings) in the Layout/Print screen or select Preferences... from the File menu.Once image is corrected with Auto Photo Fix and saved, it cannot be corrected again with AutoPhoto Fix.Also, Auto Photo Fix may not be available for images edited using an application, digital camera,etc. manufactured by other companies.
1. Select photos in the Select Images screen, then click (Correct/EnhanceImages).
The Correct/Enhance Images window appears.
Note
You can also display the Correct/Enhance Images window by clicking (Correct/EnhanceImages) in the Layout/Print or Edit screen. In that case, only the image displayed in Previewcan be corrected/enhanced.See "Correct/Enhance Images Window " for details on the Correct/Enhance Images window.
2. Select the image you want to correct from the list displayed in the lower part of theCorrect/Enhance Images window.The image appears in Preview.
Pagina 168 din 732 paginiUsing the Auto Photo Fix Function

NoteIf only one image is selected, the thumbnail does not appear below Preview.
3. Make sure that Auto is selected.
4. Click Auto Photo Fix, then click OK.
The entire photo is corrected automatically and the (Correction/Enhancement) mark appears onthe upper left of the image.
Note
Click (Compare) to display the images before and after the correction side by side so thatyou can compare and check the result.Click Reset Selected Image to undo the correction operation.If you want to apply the correction to all the selected images at once, select the Apply to allimages checkbox.Select the Prioritize Exif Info checkbox to apply corrections primarily based on the settingsmade at the time of shooting.Deselect this checkbox to apply corrections based on the image analysis results. It isrecommended that you normally select this setting.
5. Click Save Selected Image or Save All Corrected Images.
You can save corrected images as new files.
NoteTo save only the image you like, click Save Selected Image. To save all images, click Save AllCorrected Images.Only JPEG/Exif file format is available for corrected images.
6. Click Exit.
Important
The corrections will be lost if you exit before saving corrected images.
Page top
Pagina 169 din 732 paginiUsing the Auto Photo Fix Function

Advanced Guide > Printing from a Computer > Printing with the Bundled Application Software > Correcting andEnhancing Photos > Using the Red-Eye Correction Function
Using the Red-Eye Correction Function
You can correct red eyes caused by a camera flash.
You can perform the Red-Eye Correction function either automatically or manually.
NotePhoto Print allows you to automatically correct red eyes when printing. To correct automatically,select Enable Auto Photo Fix in Color correction for printing on the Advanced tab of the Preferencesdialog box and select the Enable Red-Eye Correction checkbox.
1. Select photos in the Select Images screen, then click (Correct/EnhanceImages).
The Correct/Enhance Images window appears.
Note
You can also display the Correct/Enhance Images window by clicking (Correct/EnhanceImages) in the Layout/Print or Edit screen. In that case, only the image displayed in Previewcan be corrected/enhanced.See "Correct/Enhance Images Window " for details on the Correct/Enhance Images window.
2. Select the image you want to correct from the list displayed in the lower part of theCorrect/Enhance Images window.The image appears in Preview.
NoteIf only one image is selected, the thumbnail does not appear below Preview.
Pagina 170 din 732 paginiUsing the Red-Eye Correction Function

Auto Correction
3. Make sure that Auto is selected.
4. Click Red-Eye Correction.
5. Click OK.
Red eyes are corrected and the (Correction/Enhancement) mark appears on the upper left ofthe image.
ImportantAreas other than the eyes may be corrected depending on the image.
Note
Click (Compare) to display the images before and after the correction side by side so thatyou can compare and check the result.Click Reset Selected Image to undo the correction operation.If you want to apply the correction to all the selected images at once, select the Apply to allimages checkbox.
Manual Correction
3. Click Manual, then click Correct/Enhance.
4. Click Red-Eye Correction.
NoteEffect levels can be changed using the slider below Red-Eye Correction.
Move the cursor over the image. The shape of the cursor changes to (Paintbrush).
5. Drag to select the red area you want to correct, then click OK that appears over theimage.
Pagina 171 din 732 paginiUsing the Red-Eye Correction Function

Red eye is corrected and the (Correction/Enhancement) mark appears on the upper left of theimage.
NoteClick Undo to undo the preceding correction operation.
6. Click Save Selected Image or Save All Corrected Images.
You can save corrected images as new files.
NoteTo save only the image you like, click Save Selected Image. To save all images, click Save AllCorrected Images.Only JPEG/Exif file format is available for corrected images.
7. Click Exit.
Important
The corrections will be lost if you exit before saving corrected images.
Page top
Pagina 172 din 732 paginiUsing the Red-Eye Correction Function

Advanced Guide > Printing from a Computer > Printing with the Bundled Application Software > Correcting andEnhancing Photos > Using the Face Brightener Function
Using the Face Brightener Function
You can brighten dark faces caused by bright background.
NoteYou can brighten dark photos caused by bright background automatically by selecting Auto PhotoFix.If the correction had not been made sufficiently, applying Face Brightener function is recommended.
Using the Auto Photo Fix Function
1. Select photos in the Select Images screen, then click (Correct/EnhanceImages).
The Correct/Enhance Images window appears.
Note
You can also display the Correct/Enhance Images window by clicking (Correct/EnhanceImages) in the Layout/Print or Edit screen. In that case, only the image displayed in Previewcan be corrected/enhanced.See "Correct/Enhance Images Window " for details on the Correct/Enhance Images window.
2. Select the image you want to correct from the list displayed in the lower part of theCorrect/Enhance Images window.The image appears in Preview.
NoteIf only one image is selected, the thumbnail does not appear below Preview.
3. Click Manual, then click Correct/Enhance.
Pagina 173 din 732 paginiUsing the Face Brightener Function

4. Click Face Brightener.
NoteEffect levels can be changed using the slider below Face Brightener.
Move the cursor over the image. The shape of the cursor changes to (Cross).
5. Drag to select the area you want to correct, then click OK that appears over theimage.
The entire image is corrected so that the selected area containing the face becomes brighter, and
the (Correction/Enhancement) mark appears on the upper left of the image.
NoteYou can also drag to rotate the selected area.Click Undo to undo the preceding correction operation.
6. Click Save Selected Image or Save All Corrected Images.
You can save corrected images as new files.
NoteTo save only the image you like, click Save Selected Image. To save all images, click Save AllCorrected Images.Only JPEG/Exif file format is available for corrected images.
7. Click Exit.
ImportantThe corrections will be lost if you exit before saving corrected images.
Page top
Pagina 174 din 732 paginiUsing the Face Brightener Function

Advanced Guide > Printing from a Computer > Printing with the Bundled Application Software > Correcting andEnhancing Photos > Using the Face Sharpener Function
Using the Face Sharpener Function
You can sharpen out-of-focus faces in a photo.
You can perform the Face Sharpener function either automatically or manually.
1. Select photos in the Select Images screen, then click (Correct/EnhanceImages).
The Correct/Enhance Images window appears.
Note
You can also display the Correct/Enhance Images window by clicking (Correct/EnhanceImages) in the Layout/Print or Edit screen. In that case, only the image displayed in Previewcan be corrected/enhanced.See "Correct/Enhance Images Window " for details on the Correct/Enhance Images window.
2. Select the image you want to correct from the list displayed in the lower part of theCorrect/Enhance Images window.The image appears in Preview.
NoteIf only one image is selected, the thumbnail does not appear below Preview.
Auto Correction
3. Make sure that Auto is selected.
Pagina 175 din 732 paginiUsing the Face Sharpener Function

4. Click Face Sharpener.
NoteEffect levels can be changed using the slider below Face Sharpener.
5. Click OK.
The face is sharpened and the (Correction/Enhancement) mark appears on the upper left of theimage.
Note
Click (Compare) to display the images before and after the correction side by side so thatyou can compare and check the result.Click Reset Selected Image to undo the correction operation.If you want to apply the correction to all the selected images at once, select the Apply to allimages checkbox.
Manual Correction
3. Click Manual, then click Correct/Enhance.
4. Click Face Sharpener.
NoteEffect levels can be changed using the slider below Face Sharpener.
Move the cursor over the image. The shape of the cursor changes to (Cross).
5. Drag to select the area you want to correct, then click OK that appears over theimage.
Pagina 176 din 732 paginiUsing the Face Sharpener Function

The facial area in and around the selected area is sharpened and the (Correction/Enhancement) mark appears on the upper left of the image.
NoteYou can also drag to rotate the selected area.Click Undo to undo the preceding correction operation.
6. Click Save Selected Image or Save All Corrected Images.
You can save corrected images as new files.
NoteTo save only the image you like, click Save Selected Image. To save all images, click Save AllCorrected Images.Only JPEG/Exif file format is available for corrected images.
7. Click Exit.
Important
The corrections will be lost if you exit before saving corrected images.
Page top
Pagina 177 din 732 paginiUsing the Face Sharpener Function

Advanced Guide > Printing from a Computer > Printing with the Bundled Application Software > Correcting andEnhancing Photos > Using the Digital Face Smoothing Function
Using the Digital Face Smoothing Function
You can enhance skin beautifully by removing blemishes and wrinkles.
You can perform the Digital Face Smoothing function either automatically or manually.
1. Select photos in the Select Images screen, then click (Correct/EnhanceImages).
The Correct/Enhance Images window appears.
Note
You can also display the Correct/Enhance Images window by clicking (Correct/EnhanceImages) in the Layout/Print or Edit screen. In that case, only the image displayed in Previewcan be corrected/enhanced.See "Correct/Enhance Images Window " for details on the Correct/Enhance Images window.
2. Select the image you want to enhance from the list displayed in the lower part of theCorrect/Enhance Images window.The image appears in Preview.
NoteIf only one image is selected, the thumbnail does not appear below Preview.
Auto Enhancement
3. Make sure that Auto is selected.
Pagina 178 din 732 paginiUsing the Digital Face Smoothing Function

4. Click Digital Face Smoothing.
NoteEffect levels can be changed using the slider below Digital Face Smoothing.
5. Click OK.
Skin is enhanced beautifully and the (Correction/Enhancement) mark appears on the upper leftof the image.
Note
Click (Compare) to display the images before and after the enhancement side by side sothat you can compare and check the result.Click Reset Selected Image to undo the enhancement operation.If you want to apply the enhancement to all the selected images at once, select the Apply to allimages checkbox.
Manual Enhancement
3. Click Manual, then click Correct/Enhance.
4. Click Digital Face Smoothing.
NoteEffect levels can be changed using the slider below Digital Face Smoothing.
Move the cursor over the image. The shape of the cursor changes to (Cross).
5. Drag to select the area you want to enhance, then click OK that appears over theimage.
Pagina 179 din 732 paginiUsing the Digital Face Smoothing Function

Skin in and around the selected area is enhanced beautifully and the (Correction/Enhancement)mark appears on the upper left of the image.
NoteYou can also drag to rotate the selected area.Click Undo to undo the preceding enhancement operation.
6. Click Save Selected Image or Save All Corrected Images.
You can save enhanced images as new files.
NoteTo save only the image you like, click Save Selected Image. To save all images, click Save AllCorrected Images.Only JPEG/Exif file format is available for enhanced images.
7. Click Exit.
Important
The enhancements will be lost if you exit before saving enhanced images.
Page top
Pagina 180 din 732 paginiUsing the Digital Face Smoothing Function

Advanced Guide > Printing from a Computer > Printing with the Bundled Application Software > Correcting andEnhancing Photos > Using the Blemish Remover Function
Using the Blemish Remover Function
You can remove moles.
1. Select photos in the Select Images screen, then click (Correct/EnhanceImages).
The Correct/Enhance Images window appears.
Note
You can also display the Correct/Enhance Images window by clicking (Correct/EnhanceImages) in the Layout/Print or Edit screen. In that case, only the image displayed in Previewcan be corrected/enhanced.See "Correct/Enhance Images Window " for details on the Correct/Enhance Images window.
2. Select the image you want to enhance from the list displayed in the lower part of theCorrect/Enhance Images window.The image appears in Preview.
NoteIf only one image is selected, the thumbnail does not appear below Preview.
3. Click Manual, then click Correct/Enhance.
4. Click Blemish Remover.
Pagina 181 din 732 paginiUsing the Blemish Remover Function

Note
Move the cursor over the image. The shape of the cursor changes to (Cross).
5. Drag to select the area you want to enhance, then click OK that appears over theimage.
Moles in and around the selected area are removed and the (Correction/Enhancement) markappears on the upper left of the image.
NoteClick Undo to undo the preceding enhancement operation.
6. Click Save Selected Image or Save All Corrected Images.
You can save enhanced images as new files.
NoteTo save only the image you like, click Save Selected Image. To save all images, click Save AllCorrected Images.Only JPEG/Exif file format is available for enhanced images.
7. Click Exit.
ImportantThe enhancements will be lost if you exit before saving enhanced images.
Page top
Pagina 182 din 732 paginiUsing the Blemish Remover Function

Advanced Guide > Printing from a Computer > Printing with the Bundled Application Software > Correcting andEnhancing Photos > Adjusting Images
Adjusting Images
You can make fine adjustments to the overall brightness, contrast, etc. of images.
1. Select photos in the Select Images screen, then click (Correct/EnhanceImages).
The Correct/Enhance Images window appears.
Note
You can also display the Correct/Enhance Images window by clicking (Correct/EnhanceImages) in the Layout/Print or Edit screen. In that case, only the image displayed in Previewcan be corrected/enhanced.See "Correct/Enhance Images Window " for details on the Correct/Enhance Images window.
2. Select the image you want to adjust from the list displayed in the lower part of theCorrect/Enhance Images window.The image appears in Preview.
NoteIf only one image is selected, the thumbnail does not appear below Preview.
3. Click Manual, then click Adjust.
4. Move the slider of the item you want to adjust and set the effect level.
The following adjustments are available:
Brightness
Contrast
Pagina 183 din 732 paginiAdjusting Images

Sharpness
Blur
Show-through Removal
NoteClick Defaults to reset all adjustments.
5. Click Save Selected Image or Save All Corrected Images.
You can save adjusted images as new files.
NoteTo save only the image you like, click Save Selected Image. To save all images, click Save AllCorrected Images.Only JPEG/Exif file format is available for adjusted images.
6. Click Exit.
Important
The adjustments will be lost if you exit before saving adjusted images.
Page top
Pagina 184 din 732 paginiAdjusting Images

Advanced Guide > Printing from a Computer > Printing with the Bundled Application Software > Correcting andEnhancing Photos > Correct/Enhance Images Window
Correct/Enhance Images Window
You can correct/enhance images in this window.
To display the Correct/Enhance Images window, click (Correct/Enhance Images) in the SelectImages or Edit screen, or in the Layout/Print screen of Photo Print.
(1)Toolbar
Toolbar
(Zoom In/Zoom Out)
Displays the enlarged or reduced preview of the page.
(Full Screen)
Displays the entire image in Preview.
(Compare)
Displays the Compare Images window. You can compare the images before and after the correction/enhancement side by side.The image before the correction/enhancement is displayed on the left, and the image after thecorrection/enhancement is displayed on the right.
Pagina 185 din 732 paginiCorrect/Enhance Images Window

(2)Task Area
Available tasks and settings may vary between the Auto and Manual tabs.
Click Auto or Manual to display the corresponding tab.
Auto Tab
Select to correct automatically.
Auto Photo Fix
Applies automatic corrections suitable for photos.
Important
The Auto Photo Fix function is not available for Photo Print. Photo Print allows you toautomatically apply suitable corrections to all photos when printing. Select this option in Colorcorrection for printing on the Advanced tab of the Preferences dialog box. To display the
Preferences dialog box, click (Settings) in the Layout/Print screen or select Preferences...from the File menu.
Prioritize Exif Info
Select this checkbox to apply corrections primarily based on the settings made at the time of
Pagina 186 din 732 paginiCorrect/Enhance Images Window

shooting.Deselect this checkbox to apply corrections based on the image analysis results. It isrecommended that you normally select this setting.
NoteExif is a standard format for embedding various shooting data in digital camera images(JPEG).For Photo Print, you can apply suitable corrections based on Exif information automaticallyby selecting Enable Auto Photo Fix in Color correction for printing on the Advanced tab of thePreferences dialog box and selecting the Prioritize Exif Info checkbox.
Red-Eye Correction
Corrects red eyes.
NoteFor Photo Print, you can also correct red eyes by selecting Enable Auto Photo Fix in Colorcorrection for printing on the Advanced tab of the Preferences dialog box and selecting theEnable Red-Eye Correction checkbox.
Face Sharpener
Sharpens out-of-focus faces.You can adjust the effect level using the slider.
Digital Face Smoothing
Enhances skin beautifully by removing blemishes and wrinkles.You can adjust the effect level using the slider.
Apply to all images
Automatically corrects all the images displayed in the list.
OK
Applies the selected effect to the selected image or all images.
Reset Selected Image
Cancels all corrections and enhancements applied to the selected image.
Save Selected Image
Saves the selected image in the list that applied corrections and enhancements.
Save All Corrected Images
Saves all the images that applied corrections and enhancements displayed in the list.
Exit
Click to close the Correct/Enhance Images window.
Manual Tab
Select to correct manually.
Use Adjust to adjust brightness and contrast, or to sharpen the entire image.
Use Correct/Enhance to correct/enhance specific areas.
Adjust
Pagina 187 din 732 paginiCorrect/Enhance Images Window

Brightness
Adjusts the overall image brightness.Move the slider to the left to darken and right to brighten the image.
Contrast
Adjusts the contrast of the image. Adjust the contrast when the image is flat due to lack of contrast.Move the slider to the left to decrease and right to increase the contrast of the image.
Sharpness
Emphasizes the outline of the subjects to sharpen the image. Adjust the sharpness when the photois out of focus or text is blurred.Move the slider to the right to sharpen the image.
Blur
Blurs the outline of the subjects to soften the image.Move the slider to the right to soften the image.
Show-through Removal
Removes show-through of text from the reverse side or removes the base color. Adjust the show-through level to prevent text on the reverse side of thin document or the base color of the documentfrom appearing on the image.Move the slider to the right to increase the show-through removal effect.
Defaults
Resets each adjustment (brightness, contrast, sharpness, blur, and show-through removal).
Reset Selected Image
Cancels all adjustments applied to the selected image.
Save Selected Image
Saves the selected image in the list that applied adjustments.
Save All Corrected Images
Saves all the images that applied adjustments displayed in the list.
Exit
Click to close the Correct/Enhance Images window.
Correct/Enhance
Pagina 188 din 732 paginiCorrect/Enhance Images Window

Red-Eye Correction
Corrects red eyes.You can specify the area you want to apply the effect to. You can adjust the effect level using theslider.
NoteFor Photo Print, red eyes are automatically corrected when Enable Auto Photo Fix is selected inColor correction for printing on the Advanced tab of the Preferences dialog box and the EnableRed-Eye Correction checkbox is selected. To disable the automatic correction, deselect thecheckbox.
Face Brightener
Corrects the entire image so that the selected facial area is brightened.You can adjust the effect level using the slider.
Face Sharpener
Sharpens out-of-focus faces.You can specify the area you want to apply the effect to. You can adjust the effect level using theslider.
Digital Face Smoothing
Enhances skin beautifully by removing blemishes and wrinkles.You can specify the area you want to apply the effect to. You can adjust the effect level using theslider.
Blemish Remover
Removes moles.You can specify the area you want to apply the effect to.
OK
Applies the selected effect to the specified area.
Undo
Cancels the latest correction/enhancement.
Reset Selected Image
Cancels all corrections and enhancements applied to the selected image.
Save Selected Image
Saves the selected image in the list that applied corrections and enhancements.
Save All Corrected Images
Saves all the images that applied corrections and enhancements displayed in the list.
Pagina 189 din 732 paginiCorrect/Enhance Images Window

Exit
Click to close the Correct/Enhance Images window.
Page top
Pagina 190 din 732 paginiCorrect/Enhance Images Window

Advanced Guide > Printing from a Computer > Printing with the Bundled Application Software > Questions and Answers
Questions and Answers
How Can I Move (or Copy) the Saved File?
Which Side of the Displayed Image Does the Printing Start from?
How Do I Print with Even Margins?
What Is "C1" or "C4"?
Page top
Pagina 191 din 732 paginiQuestions and Answers

Advanced Guide > Printing from a Computer > Printing with the Bundled Application Software > Questions and Answers> How Can I Move (or Copy) the Saved File?
How Can I Move (or Copy) the Saved File?
If you want to move (or copy) a file created and saved with Easy-PhotoPrint EX from one folder to another,you need to move (or copy) the folder that was automatically created when originally saving that file aswell.
For example, when you save a file named "MyAlbum.el1," a folder named "MyAlbum.el1.Data" isautomatically created in the same folder that contains the "MyAlbum.el1" file. If you want to move (or copy)the "MyAlbum.el1" file to another folder, move (or copy) the "MyAlbum.el1.Data" folder as well. The"MyAlbum.el1.Data" folder contains the photos used in the album.
NoteThe icons may vary depending on the items.
Important
Do not change the Data folder name; otherwise you will not be able to display the photos you editedwith Easy-PhotoPrint EX.
Page top
Pagina 192 din 732 paginiHow Can I Move (or Copy) the Saved File?

Advanced Guide > Printing from a Computer > Printing with the Bundled Application Software > Questions and Answers> Which Side of the Displayed Image Does the Printing Start from?
Which Side of the Displayed Image Does the Printing Startfrom?
As shown below, printing starts from the left side of the image displayed in the Layout/Print screen.
Outputs the paper in the direction as the arrow indicates.
See your printer manual for details on how to load paper (to print on the front/back, etc.).
Page top
Pagina 193 din 732 paginiWhich Side of the Displayed Image Does the Printing Start from?

Advanced Guide > Printing from a Computer > Printing with the Bundled Application Software > Questions and Answers> How Do I Print with Even Margins?
How Do I Print with Even Margins?
When you print on a bordered layout, the margins on the left and right or the top and bottom may becomewider than the other, depending on the image and printer.
To always print with even margins, select the Always crop images when selecting a layout with marginscheckbox on the Advanced tab of the Preferences dialog box.
To display the Preferences dialog box, click (Settings) in the Layout/Print screen or selectPreferences... from the File menu.
Crop the photo to apply even margins individually.
Cropping Photos (Photo Print)
NoteThis setting is available for Photo Print only.
Page top
Pagina 194 din 732 paginiHow Do I Print with Even Margins?

Advanced Guide > Printing from a Computer > Printing with the Bundled Application Software > Questions and Answers> What Is "C1" or "C4"?
What Is "C1" or "C4"?
When an album is printed, labels such as "C1" and "C4" are printed as page numbers.
The "C1" and "C4" represent the front cover and back cover, respectively.
C1: Front cover
C2: Inside the front cover
C3: Inside the back cover
C4: Back cover
Page top
Pagina 195 din 732 paginiWhat Is "C1" or "C4"?

Advanced Guide > Printing from a Computer > Printing with the Bundled Application Software > Photo Print Settings
Photo Print Settings
Printing Vivid Photos
Reducing Photo Noise
Cropping Photos (Photo Print)
Printing Dates on Photos (Photo Print)
Printing Multiple Photos on One Page
Printing an Index
Printing ID Photos (ID Photo Print)
Printing Photo Information
Saving Photos
Opening Saved Files
Page top
Pagina 196 din 732 paginiPhoto Print Settings

Advanced Guide > Printing from a Computer > Printing with the Bundled Application Software > Photo Print Settings >Printing Vivid Photos
Printing Vivid Photos
Select the Vivid Photo checkbox in the Select Paper screen to boost the colors in a photo before printing.
Important
This function is available only with a printer that supports Vivid Photo.This function is not available when Enable ICC Profile is selected on the Advanced tab of thePreferences dialog box.
NoteEven if you select the Vivid Photo checkbox, this effect applies only to the print result. The originalimage or preview image will not be affected.
Page top
Pagina 197 din 732 paginiPrinting Vivid Photos

Advanced Guide > Printing from a Computer > Printing with the Bundled Application Software > Photo Print Settings >Reducing Photo Noise
Reducing Photo Noise
When a photo is taken in a dark location such as night scene using digital camera, noise may appear inthe image.
Select the Photo Noise Reduction checkbox in the Select Paper screen to reduce noise in the image andmake the printed photos more vivid.
ImportantThis function is not available when Enable ICC Profile is selected on the Advanced tab of thePreferences dialog box.
NoteWhen the noise is severe, change Normal to Strong.The noise reduction effect applies only to the print result. The original image or preview image willnot be affected.
Page top
Pagina 198 din 732 paginiReducing Photo Noise
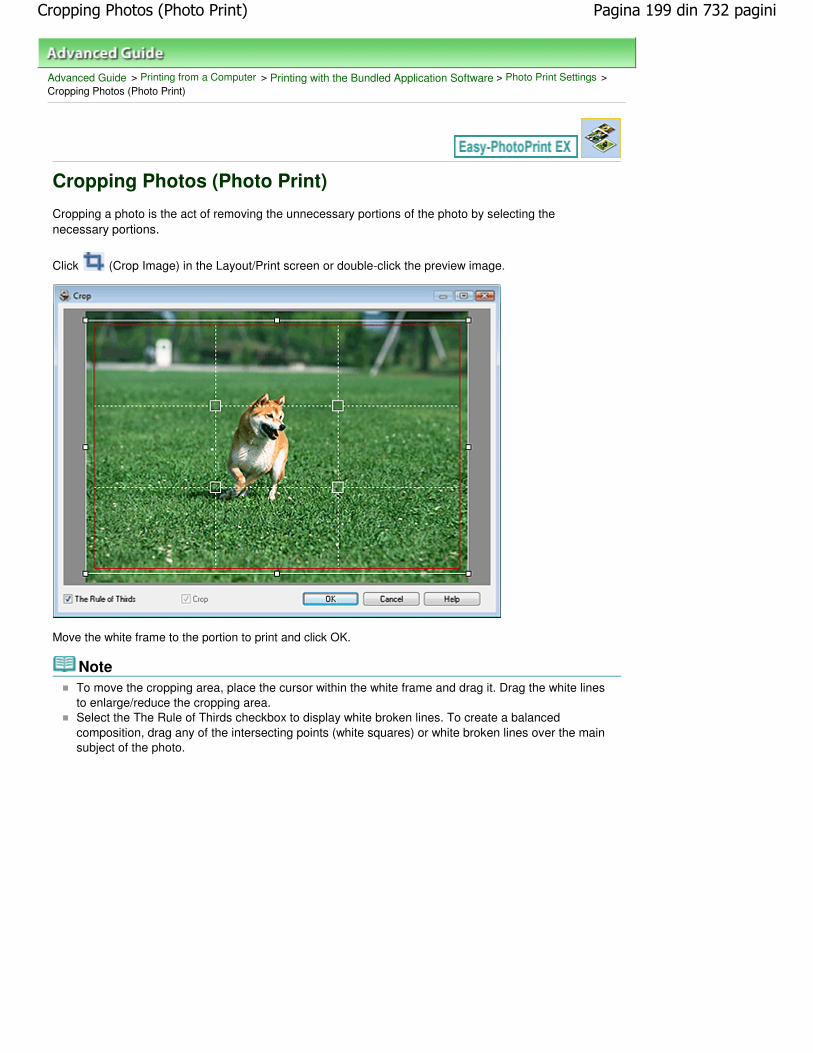
Advanced Guide > Printing from a Computer > Printing with the Bundled Application Software > Photo Print Settings >Cropping Photos (Photo Print)
Cropping Photos (Photo Print)
Cropping a photo is the act of removing the unnecessary portions of the photo by selecting thenecessary portions.
Click (Crop Image) in the Layout/Print screen or double-click the preview image.
Move the white frame to the portion to print and click OK.
NoteTo move the cropping area, place the cursor within the white frame and drag it. Drag the white linesto enlarge/reduce the cropping area.Select the The Rule of Thirds checkbox to display white broken lines. To create a balancedcomposition, drag any of the intersecting points (white squares) or white broken lines over the mainsubject of the photo.
Pagina 199 din 732 paginiCropping Photos (Photo Print)

The cropping effect applies only to the print result. The original image will not be cropped.See Help for details on the Crop window.
Page top
Pagina 200 din 732 paginiCropping Photos (Photo Print)

Advanced Guide > Printing from a Computer > Printing with the Bundled Application Software > Photo Print Settings >Printing Dates on Photos (Photo Print)
Printing Dates on Photos (Photo Print)
To print the date the photo was taken on the photo, click (Date Settings) in the Layout/Print screen,then select the Print date checkbox in the Date Settings dialog box.
NoteThe date is displayed in the short date format (mm/dd/yyyy, etc.) specified in your operating system.See Help for details on setting dates.
Page top
Pagina 201 din 732 paginiPrinting Dates on Photos (Photo Print)

Advanced Guide > Printing from a Computer > Printing with the Bundled Application Software > Photo Print Settings >Printing Multiple Photos on One Page
Printing Multiple Photos on One Page
You can print multiple photos on one page by selecting a multiple-photo layout in the Layout/Print screen.
NoteSee the following section for details on how to select photos.
Selecting a PhotoThe available number of photos and layout may vary depending on the media type.Photos are arranged in the following order.Example: Borderless (x4)
You can change the printing order in Printing Order on the Print tab of the Preferences dialog box.You can select the printing order from By Date, By Name and By Selection.
To display the Preferences dialog box, click (Settings) or select Preferences... from the Filemenu.
Page top
Pagina 202 din 732 paginiPrinting Multiple Photos on One Page

Advanced Guide > Printing from a Computer > Printing with the Bundled Application Software > Photo Print Settings >Printing an Index
Printing an Index
You can print an index of selected photos. An index print shows the thumbnails of the photos in onepage. It is convenient for managing your photos.
To print an index, select Index from the layouts in the Layout/Print screen.
Important
Index print will be disabled if you select any of the following paper sizes.- Credit CardYou can print up to 80 images on one page.
NoteSee the following section for details on how to select photos.
Selecting a PhotoPhotos are arranged in the following order.Example: Index (x20)
You can change the printing order in Printing Order on the Print tab of the Preferences dialog box.You can select the printing order from By Date, By Name, and By Selection.
To display the Preferences dialog box, click (Settings) or select Preferences... from the Filemenu.
Pagina 203 din 732 paginiPrinting an Index

Page top
Pagina 204 din 732 paginiPrinting an Index

Advanced Guide > Printing from a Computer > Printing with the Bundled Application Software > Photo Print Settings >Printing ID Photos (ID Photo Print)
Printing ID Photos (ID Photo Print)
You can print a variety of ID photos.
Important
The photo may not qualify as an official ID photo depending on its use.For details, contact the party to whom you will be submitting the photo.
To print ID photos, select 4"x6" 10x15cm for Paper Size in the Select Paper screen, and select a layout ofthe ID photo from the layouts in the Layout/Print screen.
NoteSee the following section for details on how to select photos.
Selecting a PhotoPhotos are arranged in the following order.Example: ID Photo 3.5x4.5cm
You can change the printing order in Printing Order on the Print tab of the Preferences dialog box.You can select the printing order from By Date, By Name, and By Selection.
To display the Preferences dialog box, click (Settings) or select Preferences... from the Filemenu.ID photos can only be printed on 4"x6" 10x15cm paper.
Pagina 205 din 732 paginiPrinting ID Photos (ID Photo Print)

Page top
Pagina 206 din 732 paginiPrinting ID Photos (ID Photo Print)

Advanced Guide > Printing from a Computer > Printing with the Bundled Application Software > Photo Print Settings >Printing Photo Information
Printing Photo Information
You can print the photo and the Exif information side by side.
To print them, select Letter 8.5"x11" or A4 for Paper Size in the Select Paper screen, and select CapturedInfo from the layouts in the Layout/Print screen.
NoteSee the following section for details on how to select photos.
Selecting a PhotoThis function is available only on paper sizes Letter 8.5"x11" and A4.
Page top
Pagina 207 din 732 paginiPrinting Photo Information

Advanced Guide > Printing from a Computer > Printing with the Bundled Application Software > Photo Print Settings >Saving Photos
Saving Photos
You can save edited photos. The information of cropping and layout can be saved.
Click Save in the Layout/Print screen.
When the Save As dialog box appears, specify the save location and file name, then click Save.
Important
If you edit a saved file and save it again, the file will be overwritten.To save a file again with a new name or to a different location, select Save As... from the File menuand save.
NoteSave will not be displayed in the Select Images or Select Paper screen.
Page top
Pagina 208 din 732 paginiSaving Photos

Advanced Guide > Printing from a Computer > Printing with the Bundled Application Software > Photo Print Settings >Opening Saved Files
Opening Saved Files
You can open files created with Easy-PhotoPrint EX.
1. Click Library from Menu.
The Open dialog box appears.You can check files created and saved with Easy-PhotoPrint EX by icon view (only for Windows Vista)or thumbnail view.
Important
When using 64bit Edition of Windows Vista or Windows XP, the contents of files cannot bedisplayed on Explorer.
2. Select the file you want to open and click Open.
The Layout/Print screen appears.
NoteEasy-PhotoPrint EX supports the following file format (extension).- Easy-PhotoPrint EX Photo Print file (.el6)
3. Edit the file if necessary.
NoteYou can open files created with Easy-PhotoPrint EX with the following methods, besides fromLibrary in Menu.- Double-click or click the file.- From the File menu, click Open..., then select the file you want to edit.
Pagina 209 din 732 paginiOpening Saved Files

You can also open a recently used file by clicking the file name shown in the File menu.
Page top
Pagina 210 din 732 paginiOpening Saved Files

Advanced Guide > Printing from a Computer > Printing with the Bundled Application Software > Other Settings
Other Settings
Changing Layout
Changing Background
Adding Photos
Swapping Positions of Photos
Replacing Photos
Changing Position, Angle and Size of Photos
Cropping Photos
Framing Photos
Printing Dates on Photos
Attaching Comments to Photos
Adding Text to Photos
Saving
Setting Holidays
Setting Calendar Display
Opening Saved Files
Page top
Pagina 211 din 732 paginiOther Settings

Advanced Guide > Printing from a Computer > Printing with the Bundled Application Software > Other Settings >Changing Layout
Changing Layout
You can change the layout of each page separately.
Select the page you want to change the layout of in the Edit screen, then click (Change Layout).
Select the layout you want to use in the Change Layout dialog box and click OK.
Album
ImportantIf the new layout has a different number of frames per page from the current layout, the following willhappen:If the number of layoutframes is increased
: Images will move from the subsequent pages to fill all the framesin the new layout.
If the number of layoutframes is decreased
: Pages with the new layout will be added until all the images on thepages with the current layout can be fitted.
If you change the current layout for the front or back cover to one that has fewer layout frames, anyimage that does not fit in the new layout will be deleted, starting with the last image that was addedto the former layout page.
NoteThe layouts that can be selected may vary depending on the Paper Size, Orientation, or the type ofpage selected (front cover, inside pages or back cover).Select the Apply to all pages checkbox to change the layouts of all pages to the one you newlyselected.
Calendar
Pagina 212 din 732 paginiChanging Layout

Important
The layouts of all pages are changed to the selected layout.All images that do not fit in the new layout will be collected on the last page.
NoteThe layouts that can be selected may vary depending on the Paper Size and Orientation.
Layout Print
Important
If the new layout has a different number of frames per page from the current layout, the following willhappen:If the number of layoutframes is increased
: Images will move from the subsequent pages to fill all the framesin the new layout.
If the number of layoutframes is decreased
: Pages with the new layout will be added until all the images on thepages with the current layout can be fitted.
NoteThe layouts that can be selected may vary depending on the Paper Size and Orientation.Select the Apply to all pages checkbox to change the layouts of all pages to the one you newlyselected.
Page top
Pagina 213 din 732 paginiChanging Layout

Advanced Guide > Printing from a Computer > Printing with the Bundled Application Software > Other Settings >Changing Background
Changing Background
You can change the background of each page.
Important
You cannot change the background of the Photo Print, Stickers, and Layout Print.
Click Background... in the Page Setup screen or select the page you want to change the background of in
the Edit screen, then click (Change Background).
NoteThe screens for Album printing are used as examples in the following descriptions. The screensmay vary depending on what you create.
Select the type of background you want to use in the Change Background dialog box.
When Select from samples is Selected
Select the image you want to use from Samples and click OK.
NoteSelect from samples will be displayed only if Album has been selected.Various backgrounds are available on our website besides those saved in the application.
Pagina 214 din 732 paginiChanging Background

Click Search backgrounds... to access the Canon website from which you can download additionalmaterials for free.
Internet connection is required to access the website. Internet connection fees apply.This function may not be available in some regions.Exit Easy-PhotoPrint EX before installing backgrounds.
When Single color is Selected
Select the color you want to use from Standard color or Custom color and click OK.
When Image file is Selected
Set Image File Path and Image Layout, then click OK.
Pagina 215 din 732 paginiChanging Background

NoteSee Help for details on how to set the background in the Change Background dialog box.
Page top
Pagina 216 din 732 paginiChanging Background

Advanced Guide > Printing from a Computer > Printing with the Bundled Application Software > Other Settings > AddingPhotos
Adding Photos
You can add images to pages.
Select the page you want to add photos in the Edit screen, then click (Add Image).
NoteThe screens for Album printing are used as examples in the following descriptions. The screensmay vary depending on what you create.
Select the folder containing the image you want to add from the folder tree area on the left of the AddImage dialog box, and select the image you want to add from the thumbnail window on the right.
NoteClick an image to select it (background turns blue) or deselect it (background turns white). You canalso select multiple images.
Select an option for Add to and click OK.
Important
You can add up to 20 images at one time to a single page.Up to 99 of the same images can be added to all pages combined.You cannot add two or more of the same image at one time. Add it one at a time.When the number of pages increases due to added images, you cannot add images beyond page400.
NoteIn the Add Image dialog box, you can select all images at one time or change the display size andorder of the thumbnails. See Help for details.
Page top
Pagina 217 din 732 paginiAdding Photos

Advanced Guide > Printing from a Computer > Printing with the Bundled Application Software > Other Settings >Swapping Positions of Photos
Swapping Positions of Photos
You can swap the positions of images.
Click (Swap Image Positions) in the Edit screen.
NoteThe screens for Album printing are used as examples in the following descriptions. The screensmay vary depending on what you create.
Select the target and source images you want to swap, then click Swap.
When you finish swapping all images you want to swap, click Back to Edit.
Page top
Pagina 218 din 732 paginiSwapping Positions of Photos
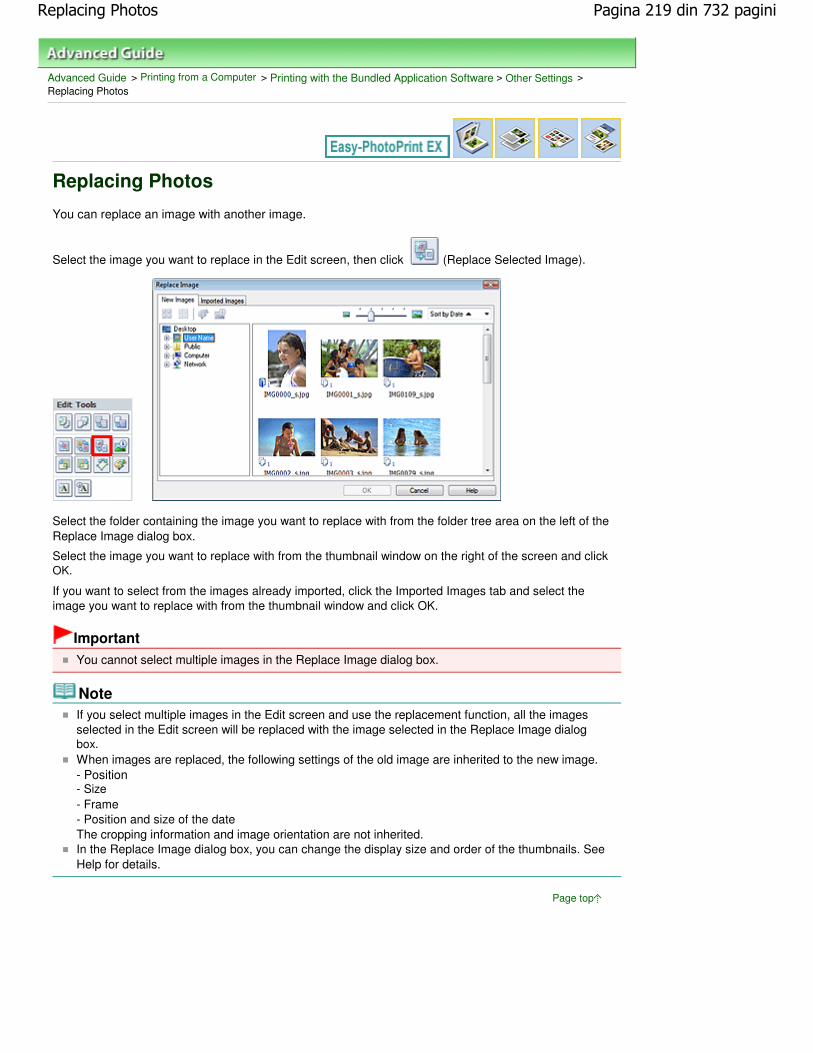
Advanced Guide > Printing from a Computer > Printing with the Bundled Application Software > Other Settings >Replacing Photos
Replacing Photos
You can replace an image with another image.
Select the image you want to replace in the Edit screen, then click (Replace Selected Image).
Select the folder containing the image you want to replace with from the folder tree area on the left of theReplace Image dialog box.
Select the image you want to replace with from the thumbnail window on the right of the screen and clickOK.
If you want to select from the images already imported, click the Imported Images tab and select theimage you want to replace with from the thumbnail window and click OK.
Important
You cannot select multiple images in the Replace Image dialog box.
NoteIf you select multiple images in the Edit screen and use the replacement function, all the imagesselected in the Edit screen will be replaced with the image selected in the Replace Image dialogbox.When images are replaced, the following settings of the old image are inherited to the new image.- Position- Size- Frame- Position and size of the dateThe cropping information and image orientation are not inherited.In the Replace Image dialog box, you can change the display size and order of the thumbnails. SeeHelp for details.
Page top
Pagina 219 din 732 paginiReplacing Photos

Advanced Guide > Printing from a Computer > Printing with the Bundled Application Software > Other Settings >Changing Position, Angle and Size of Photos
Changing Position, Angle and Size of Photos
You can adjust the position, angle and size of images.
Select the image of which you want to change the position or size in the Edit screen and click (EditImage) or double-click the image.
Set the Center Position, Rotation and Size, then click OK.
NoteYou can also change the position and size of an image by dragging it in the Edit screen.
Select an image in the Edit screen, then click (Free Rotate) and drag a corner of the image torotate it.See Help for details on the position and size of images.
Page top
Pagina 220 din 732 paginiChanging Position, Angle and Size of Photos

Advanced Guide > Printing from a Computer > Printing with the Bundled Application Software > Other Settings >Cropping Photos
Cropping Photos
Cropping an image is the act of removing the unnecessary portions of the image by selecting thenecessary portions.
Select the image you want to crop in the Edit screen and click (Edit Image) or double-click theimage.
Click the Crop tab in the Edit Image dialog box.
Drag the white squares on the image to change the area to be cropped and click OK.
NoteSee Help for details on cropping.
Page top
Pagina 221 din 732 paginiCropping Photos

Advanced Guide > Printing from a Computer > Printing with the Bundled Application Software > Other Settings > FramingPhotos
Framing Photos
You can add frames to images.
Important
You cannot add frames to images in Photo Print, Stickers, and Layout Print.
Select the image you want to frame in the Edit screen and click (Edit Image) or double-click theimage.
Click the Frame tab in the Edit Image dialog box.
Select the frame you want to use from Frames and click OK.
Important
You cannot print dates on framed photos.
NoteSelect the Apply to all images in the page checkbox to add the same frame to all the images on a
Pagina 222 din 732 paginiFraming Photos

selected page at one time.Various frames are available on our website besides those saved in the application.Click Search frames... to access the Canon website from which you can download additionalmaterials for free.
Internet connection is required to access the website. Internet connection fees apply.This function may not be available in some regions.Exit Easy-PhotoPrint EX before installing frames.
Search frames... will be displayed only if Album has been selected.See Help for details on frames.
Page top
Pagina 223 din 732 paginiFraming Photos

Advanced Guide > Printing from a Computer > Printing with the Bundled Application Software > Other Settings > PrintingDates on Photos
Printing Dates on Photos
You can print dates on images.
Select the image you want to print the date in the Edit screen and click (Edit Image) or double-clickthe image.
Click the Date tab in the Edit Image dialog box.
Select the Show date checkbox.
Set the Text Orientation, Position, Font Size and Color, then click OK.
Important
You cannot print dates on framed images.
NoteThe date is displayed in the short date format (mm/dd/yyyy, etc.) specified in your operating system.See Help for details on setting dates.
Pagina 224 din 732 paginiPrinting Dates on Photos

Page top
Pagina 225 din 732 paginiPrinting Dates on Photos

Advanced Guide > Printing from a Computer > Printing with the Bundled Application Software > Other Settings >Attaching Comments to Photos
Attaching Comments to Photos
You can attach comments to images and display them in your album. The photo name, shooting dateand comments are displayed (from top to bottom) in a comment box.
Important
You cannot attach comments to Photo Print, Calendar, Stickers, and Layout Print.
Select the image you want to attach comments to in the Edit screen and click (Edit Image) ordouble-click the image.
Click the Comments tab in the Edit Image dialog box.
Pagina 226 din 732 paginiAttaching Comments to Photos

Select the Show comment box checkbox.
Select the checkboxes of the items you want to display, and enter comments.
Set the size and color of font, and position of the comments, etc., then click OK.
NoteSee Help for details on comments.
Page top
Pagina 227 din 732 paginiAttaching Comments to Photos

Advanced Guide > Printing from a Computer > Printing with the Bundled Application Software > Other Settings > AddingText to Photos
Adding Text to Photos
You can add text to photos.
Click (Add Text) in the Edit screen and drag the mouse over the area in which you want to add text.
NoteThe screens for Album printing are used as examples in the following descriptions. The screensmay vary depending on what you create.
Select the Text tab in the Edit Text Box dialog box and enter text.
NoteIn the Edit Text Box dialog box, you can change the position, angle and size of the text. You can alsoset the color and line of the text box. See Help for details.
To change the entered text, select it and click (Edit Text Box). The Edit Text Box dialog boxappears. You can change the text.
Page top
Pagina 228 din 732 paginiAdding Text to Photos

Advanced Guide > Printing from a Computer > Printing with the Bundled Application Software > Other Settings > Saving
Saving
You can save edited items.
Click Save in the Edit or Print Settings screen.
NoteThe screens for Album printing are used as examples in the following descriptions. The screensmay vary depending on what you create.
When the Save As dialog box appears, specify the save location and file name, then click Save.
Important
If you edit a saved file and save it again, the file will be overwritten.To save a file again with a new name or to a different location, select Save As... from the File menuand save.
NoteSave will not be displayed in the Page Setup or Select Images screen.
Page top
Pagina 229 din 732 paginiSaving

Advanced Guide > Printing from a Computer > Printing with the Bundled Application Software > Other Settings > SettingHolidays
Setting Holidays
You can add holidays to your calendar.
Click Set Holidays... in the Page Setup screen of Calendar, or click (Setup Period/Holiday) in theEdit screen and click Set Holidays... in the Calendar General Settings dialog box to display the HolidaySettings dialog box.
To add a holiday, click Add.... The Add/Edit Holiday dialog box appears. To edit a saved holiday, select itand click Edit....
To delete a holiday, select it and click Delete. To delete all the saved holidays within your calendarperiod, click Clear.
Pagina 230 din 732 paginiSetting Holidays

Enter the name in Holiday Name and specify the date.
Select the Set as Holiday checkbox to display that day as a holiday in your calendar.
NoteSee Help for details on each dialog box.
Page top
Pagina 231 din 732 paginiSetting Holidays

Advanced Guide > Printing from a Computer > Printing with the Bundled Application Software > Other Settings > SettingCalendar Display
Setting Calendar Display
You can customize the calendar display (fonts, lines, colors, position, size, etc.).
Click Settings... in the Page Setup screen of Calendar, or select a calendar in the Edit screen and click
(Setup Calendar) to display the Calendar Settings dialog box.
Important
The Position & Size tab is displayed only when the Calendar Settings dialog box is displayed fromthe Edit screen.
NoteSee Help for details on the Calendar Settings dialog box.
Page top
Pagina 232 din 732 paginiSetting Calendar Display

Advanced Guide > Printing from a Computer > Printing with the Bundled Application Software > Other Settings > OpeningSaved Files
Opening Saved Files
You can open files created with Easy-PhotoPrint EX.
1. Click Library from Menu.
The Open dialog box appears.You can check files created and saved with Easy-PhotoPrint EX by icon view (only for Windows Vista)or thumbnail view.
Important
When using 64bit Edition of Windows Vista or Windows XP, the contents of files cannot bedisplayed on Explorer.
2. Select the file you want to open and click Open.
The Edit screen appears.
NoteEasy-PhotoPrint EX supports the following file formats (extensions).- Easy-PhotoPrint EX Album file (.el1)- Easy-PhotoPrint EX Stickers file (.el2)- Easy-PhotoPrint EX Calendar file (.el4)- Easy-PhotoPrint EX Layout file (.el5)
3. Edit the file if necessary.
NoteSee the following sections for details on the editing procedures.
Pagina 233 din 732 paginiOpening Saved Files

Editing AlbumEditing CalendarEditing StickersEditing Layout Print
NoteYou can open files created with Easy-PhotoPrint EX with the following methods, besides fromLibrary in Menu.- Double-click or click the file.- From the File menu, click Open..., then select the file you want to edit.You can also open a recently used file by clicking the file name shown in the File menu.
Page top
Pagina 234 din 732 paginiOpening Saved Files

Ghid avansat > Imprimare de pe un computer > Imprimarea cu alt software de aplicaţie
Imprimarea cu alt software de aplicaţie
Diferite metode de imprimare
Modificarea calităţii imprimării şi corectarea datelor de imagine
Privire de ansamblu asupra driverului de imprimantă
În partea superioară a paginii
Pagina 235 din 732 paginiImprimarea cu alt software de aplicaţie
Advanced Guide > Printing from a Computer > Printing with Other Application Software > Various Printing Methods
Various Printing Methods
Printing with Easy Setup
Setting a Page Size and Orientation
Setting the Number of Copies and Printing Order
Setting the Stapling Margin
Borderless Printing
Fit-to-Page Printing
Scaled Printing
Page Layout Printing
Poster Printing
Booklet Printing
Duplex Printing
Stamp/Background Printing
Registering a Stamp
Registering Image Data to be Used as a Background
Printing an Envelope
Displaying the Print Results before Printing
Setting Paper Dimensions (Custom Size)
Page top
Pagina 236 din 732 paginiVarious Printing Methods

Advanced Guide > Printing from a Computer > Printing with Other Application Software > Various Printing Methods >Printing with Easy Setup
Printing with Easy Setup
The simple setup procedure for carrying out appropriate printing on this machine, is as follows:
1. Open the printer driver setup window
2. Select a frequently used profile
In Commonly Used Settings on the Quick Setup tab, select a printing profile suited for the purpose.When you select a printing profile, the Additional Features, Media Type, and Printer Paper Sizesettings are automatically switched to the values that were preset.
3. Select the print quality
Select High, Standard, or Fast that matches your purpose for Print Quality.
4. Complete the setup Click OK.When you execute print, the document is printed with settings that matches your purpose.
Important
When you check the Always Print with Current Settings check box, all settings on the Quick Setup,Main, Page Setup, and Effects tabs are saved, and you can print with the same settings from thenext time as well. Click Save... to register the specified settings. For instructions on registering settings, see "Registering a Frequently Used Printing Profile."
Page top
Pagina 237 din 732 paginiPrinting with Easy Setup

Advanced Guide > Printing from a Computer > Printing with Other Application Software > Various Printing Methods >Setting a Page Size and Orientation
Setting a Page Size and Orientation
The paper size and orientation are essentially determined by the application. When the page size andorientation set for Page Size and Orientation on the Page Setup tab are same as those set with theapplication, you do not need to select them on the Page Setup tab.
When you are not able to specify them with the application, the procedure for selecting a page size andorientation is as follows:You can also set page size and Orientation on the Quick Setup tab.
1. Open the printer driver setup window
2. Select the paper size
Select a page size from the Page Size list on the Page Setup tab.
3. Set Orientation
Select Portrait or Landscape for Orientation. Check Rotate 180 degrees check box when you want toperform printing with the original being rotated 180 degrees.
4. Complete the setup Click OK.When you execute print, the document will be printed with the selected page size and the orientation.
Page top
Pagina 238 din 732 paginiSetting a Page Size and Orientation

Advanced Guide > Printing from a Computer > Printing with Other Application Software > Various Printing Methods >Setting the Number of Copies and Printing Order
Setting the Number of Copies and Printing Order
Default Setting Print from Last Page
Collate Print from Last Page + Collate
The procedure for specifying the number of copies and printing order is as follows:You can also set the number of copies on the Quick Setup tab.
1. Open the printer driver setup window
2. Specify the number of copies to be printed
For Copies on the Page Setup tab, specify the number of copies to be printed.
3. Specify the print order
Check the Print from Last Page check box when you want to print from the last page in order. Whenyou do this, you do not need to sort pages into their correct order after printing.
4. Set up collated printing when you specify multiple copies in the Copies box
Check the Collate check box when you are specifying multiple copy together.
Pagina 239 din 732 paginiSetting the Number of Copies and Printing Order

Uncheck this check box to print all pages with the same page number together.
5. Complete the setup Click OK.The specified number of copies will be printed with the specified printing order.
Important
When the application software that you used to create the document has the same function, givepriority to the printer driver settings. However, if the print results are not acceptable, specify thefunction settings on the application software. When you specify the number of copies and theprinting order with both the application and this printer driver, the number of copies may bemultiplied numbers of the two settings or the specified printing order may not be enabled. Print from Last Page and Collate appear grayed out and are unavailable when Booklet is selectedfor Page Layout. Print from Last Page appears grayed out and is unavailable when Poster is selected for PageLayout.
Note By setting both Print from Last Page and Collate, you can perform printing so that papers arecollated one by one starting from the last page.These settings can be used in combination with Borderless, Normal-size, Fit-to-Page, Scaled,Page Layout, and Duplex Printing.
Page top
Pagina 240 din 732 paginiSetting the Number of Copies and Printing Order

Advanced Guide > Printing from a Computer > Printing with Other Application Software > Various Printing Methods >Setting the Stapling Margin
Setting the Stapling Margin
The procedure for setting the staple side and the margin width is as follows:
1. Open the printer driver setup window
2. Specify the side to be stapled
Check the position of the stapling margin from Staple Side on the Page Setup tab.The printer analyzes the Orientation and Page Layout settings, and automatically selects the beststaple position. When you want to change the setting, select from the list.
3. Set the margin width
If necessary, click Specify Margin... and set the margin width, and then click OK.
Pagina 241 din 732 paginiSetting the Stapling Margin

4. Complete the setup
Click OK on the Page Setup tab.When you execute print, the data is printed with the specified staple side and margin width.
Important
Staple Side and Specify Margin... appear grayed out and are unavailable when: Borderless, Poster, or Booklet is selected for Page Layout. Scaled is selected for Page Layout (When Duplex Printing is also selected, only Staple Side canbe specified).
Page top
Pagina 242 din 732 paginiSetting the Stapling Margin

Advanced Guide > Printing from a Computer > Printing with Other Application Software > Various Printing Methods >Borderless Printing
Borderless Printing
The borderless printing function allows you to print data without any margin by enlarging the data so thatit extends slightly off the paper. Without the borderless printing function, a margin is provided around theprinted data. When you want to print data such as a photo without providing any margin around it, selectborderless printing.
The procedure for performing borderless printing is as follows:
You can also set borderless printing in Additional Features on the Quick Setup tab.
Setting Borderless Printing
1. Open the printer driver setup window
2. Set borderless printing
Select Borderless from the Page Layout list on the Page Setup tab.
Click OK when the confirmation message appears.When a message prompting you to change the media type appears, select a media type from thelist and click OK.
3. Check the paper size
Pagina 243 din 732 paginiBorderless Printing

Check the Page Size list. When you want to change, select another page size from the list. The listdisplays only sizes that can be used for borderless printing.
4. Adjust the amount of extension from the paper
If necessary, adjust the amount of extension using the Amount of Extension slider.Moving the slider to the right makes the amount larger and moving the slider to the left makes theamount smaller.It is recommended to set the slider at the second position from the right for most cases.
Important
When you set the slider at the rightmost position, the back side of the paper may becomesmudged.
5. Complete the setup Click OK.The data will be printed without any margins on the paper.
Important
When a page size that cannot be used for borderless printing is selected, the size is automaticallychanged to the valid page sizes for borderless printing. When High Resolution Paper, T-Shirt Transfers, or Envelope is selected from the Media Type list onthe Main tab, you cannot perform borderless printing. When Borderless is selected, the Printer Paper Size, Staple Side (when Duplex Printing is notselected) settings, and the Stamp/Background... button on the Page Setup tab appear grayed outand are unavailable. Print quality may deteriorate or the sheet may be stained at the top and bottom depending on thetype of the media used. When the ratio of the height to the width differs from the image data, a portion of the image may notbe printed depending on the size of the media used.In this case, crop the image data with an application software according to the paper size.
Note When Plain Paper is selected for Media Type on the Main tab, borderless printing is notrecommended, and therefore the dialog box for media selection appears.When you are using plain paper for test printing, select Plain Paper, and click OK.
Expanding the Range of the Document to Print
Specifying a large amount of extension allows you to perform borderless printing with no problems.However, the portion of the document that extends off the paper range will not be printed. Subjectsaround the perimeter of a photo may not be printed.
Try borderless printing once. When you are not satisfied with the result of borderless printing, reduce theamount of extension. The extension amount becomes shorter as the Amount of Extension slider ismoved to the left.
Important
When the amount of extension is shortened, an unexpected margin may be produced on the print,depending on the size of the paper.
Note When the Amount of Extension slider is set to the leftmost position, image data will be printed in thefull size. When Preview before printing is checked on the Main tab, you can confirm before printing whetherthere will be no border.
Pagina 244 din 732 paginiBorderless Printing

Page top
Pagina 245 din 732 paginiBorderless Printing
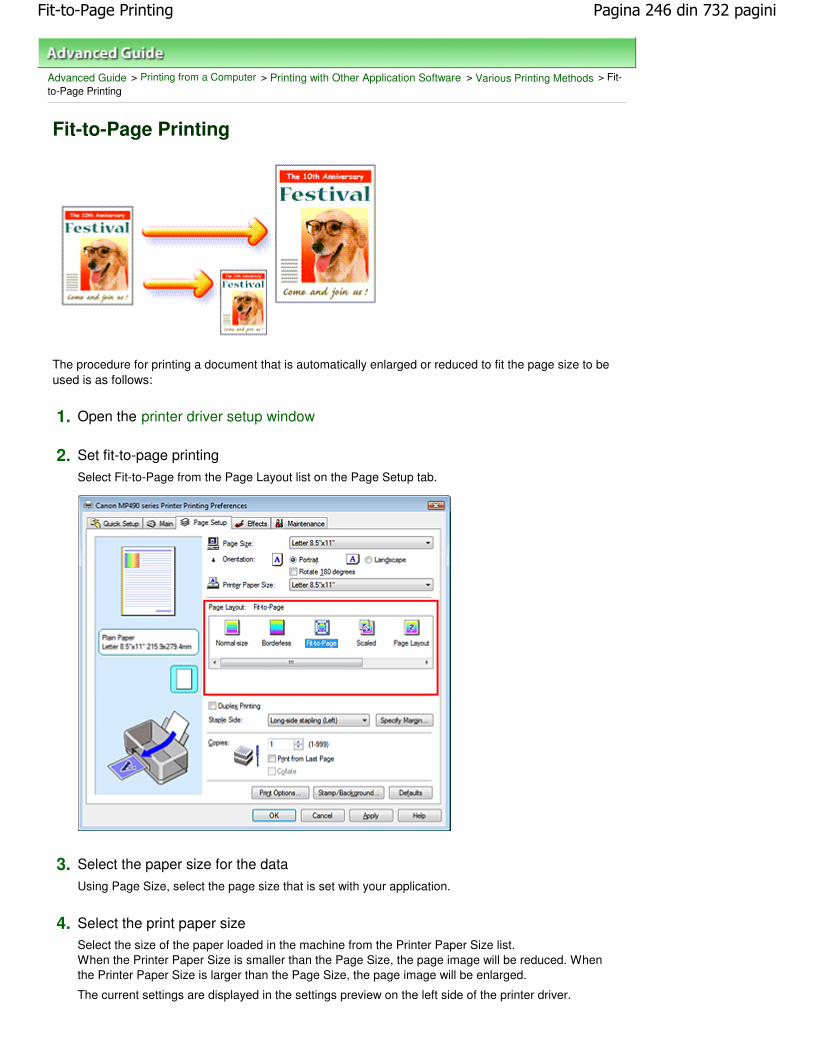
Advanced Guide > Printing from a Computer > Printing with Other Application Software > Various Printing Methods > Fit-to-Page Printing
Fit-to-Page Printing
The procedure for printing a document that is automatically enlarged or reduced to fit the page size to beused is as follows:
1. Open the printer driver setup window
2. Set fit-to-page printing
Select Fit-to-Page from the Page Layout list on the Page Setup tab.
3. Select the paper size for the data
Using Page Size, select the page size that is set with your application.
4. Select the print paper size Select the size of the paper loaded in the machine from the Printer Paper Size list.When the Printer Paper Size is smaller than the Page Size, the page image will be reduced. Whenthe Printer Paper Size is larger than the Page Size, the page image will be enlarged.
The current settings are displayed in the settings preview on the left side of the printer driver.
Pagina 246 din 732 paginiFit-to-Page Printing

5. Complete the setup Click OK.When you execute print, the document will be enlarged or reduced to fit to the page size.
Page top
Pagina 247 din 732 paginiFit-to-Page Printing

Advanced Guide > Printing from a Computer > Printing with Other Application Software > Various Printing Methods >Scaled Printing
Scaled Printing
The procedure for printing a document with pages enlarged or reduced is as follows:
1. Open the printer driver setup window
2. Set scaled printing
Select Scaled from the Page Layout list on the Page Setup tab.
3. Select the paper size for the data
Using Page Size, select the page size that is set with your application.
4. Set the scaling rate by using one of the following methods:
Select a Printer Paper Size
When the printer paper size is smaller than the Page Size, the page image will be reduced.When the printer paper size is larger than the Page Size, the page image will be enlarged.
Pagina 248 din 732 paginiScaled Printing

Specify a scaling factor
Directly type in a value into the Scaling box.
The current settings are displayed in the settings preview on the left side of the printer driver.
5. Complete the setup Click OK.When you execute print, the document will be printed with the specified scale.
Important
When the application software with which you created the original has the scaled printing function,configure the settings on your application software. You do not need to configure the same settingin the printer driver. When Scaled is selected, the Staple Side list box appears grayed out and is unavailable (whenDuplex Printing is not selected).
Note
Pagina 249 din 732 paginiScaled Printing

Selecting Scaled changes the printable area of the document.
Page top
Pagina 250 din 732 paginiScaled Printing

Advanced Guide > Printing from a Computer > Printing with Other Application Software > Various Printing Methods >Page Layout Printing
Page Layout Printing
The page layout printing function allows you to print more than one page image on a single sheet ofpaper.
The procedure for performing page layout printing is as follows:
1. Open the printer driver setup window
2. Set page layout printing
Select Page Layout from the Page Layout list on the Page Setup tab.The current settings are displayed in the settings preview on the left side of the printer driver.
3. Select the print paper size
Select the size of the paper loaded in the machine from the Printer Paper Size list.Setting the layout of two pages of the document from left to right is complete.
4. Set the number of pages to be printed on one sheet and the page order
If necessary, click Specify..., specify the following settings in the Page Layout Printing dialog box, andclick OK.
Pagina 251 din 732 paginiPage Layout Printing

Pages To increase the number of pages to be included on a single sheet of paper, select a desirednumber of pages from the list.
You can also set 2-Page Print or 4-Page Print on the Quick Setup tab.
Page Order To change the page arrangement order, select an icon from the list to change the page placementorder.
Page Border To print a page border around each document page, check this check box.
5. Complete the setup
Click OK on the Page Setup tab.When you execute print, the specified number of pages will be arranged on each sheet of paper inthe specified order.
Page top
Pagina 252 din 732 paginiPage Layout Printing

Advanced Guide > Printing from a Computer > Printing with Other Application Software > Various Printing Methods >Poster Printing
Poster Printing
The poster printing function allows you to enlarge image data, divide it into several pages, and printthese pages on separate sheets of paper. When the pages are pasted together, they form a large printlike a poster.
The procedure for performing poster printing is as follows:
Setting Poster Printing
1. Open the printer driver setup window
2. Set poster printing
Select Poster from the Page Layout list on the Page Setup tab.The current settings are displayed in the settings preview on the left side of the printer driver.
3. Select the print paper size
Select the size of the paper loaded in the machine from the Printer Paper Size list.Setting 2 by 2-page poster printing is complete.
Pagina 253 din 732 paginiPoster Printing

4. Set the number of image divisions and the pages to be printed
If necessary, click Specify..., specify the following settings in the Poster Printing dialog box, and thenclick OK.
Image Divisions Select the number of divisions (vertical x horizontal). As the number of divisions increases, thenumber of sheets used for printing increases, allowing you to create a larger poster.
Print "Cut/Paste" in margins To leave out words "Cut" and "Paste", uncheck this check box.
Important
This feature is unavailable when the 64-bit printer driver is used.
Print "Cut/Paste" lines in margins To leave out cut lines, uncheck this check box.
Pages To reprint only specific pages, enter the page number you want to print. To print multiple pages,specify by separating the pages with commas or entering a hyphen between the page numbers.
Note You can also specify the print range by clicking the pages in the settings preview.
5. Complete the setup
Click OK on the Page Setup tab.When you execute print, the document will be divided into several pages during printing.After all poster pages have been printed, paste the pages together to create a poster.
Printing Only Specific Pages
If ink becomes faint or runs out during printing, you can reprint specific pages by following the procedurebelow:
1. Set the print range
In the settings preview on the left of the Page Setup tab, click the pages that do not need to beprinted.The pages that were clicked are deleted, and only the pages to be printed are displayed.
Pagina 254 din 732 paginiPoster Printing
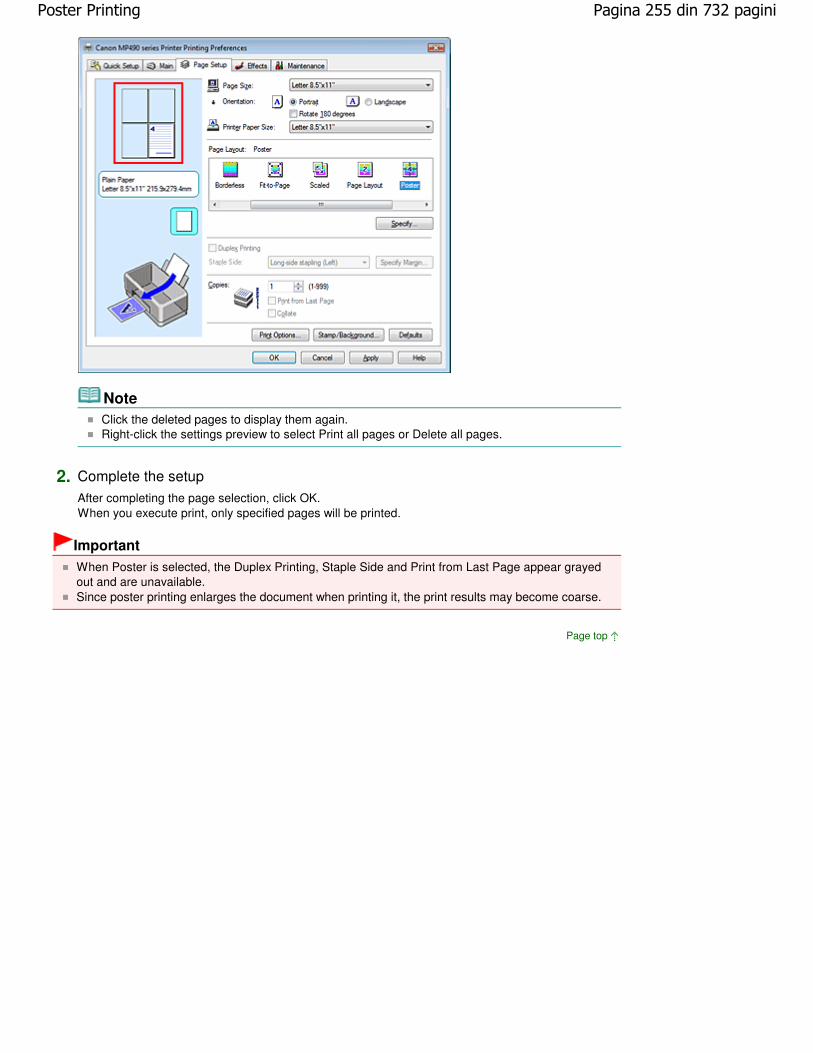
Note Click the deleted pages to display them again. Right-click the settings preview to select Print all pages or Delete all pages.
2. Complete the setup After completing the page selection, click OK.When you execute print, only specified pages will be printed.
Important
When Poster is selected, the Duplex Printing, Staple Side and Print from Last Page appear grayedout and are unavailable. Since poster printing enlarges the document when printing it, the print results may become coarse.
Page top
Pagina 255 din 732 paginiPoster Printing

Advanced Guide > Printing from a Computer > Printing with Other Application Software > Various Printing Methods >Booklet Printing
Booklet Printing
The booklet printing function allows you to print data for a booklet. Data is printed on both sides of thepaper. This type of printing ensures that pages can be collated properly, in page number order, when theprinted sheets are folded and stapled at the center.
The procedure for performing booklet printing is as follows:
1. Open the printer driver setup window
2. Set booklet printing
Select Booklet from the Page Layout list on the Page Setup tab.The current settings are displayed in the settings preview on the left side of the window.
3. Select the print paper size
Select the size of the paper loaded in the machine from the Printer Paper Size list.
4. Set the margin for stapling and the margin width
Click Specify... and specify the following settings in the Booklet Printing dialog box, and then clickOK.
Pagina 256 din 732 paginiBooklet Printing

Margin for stapling Select which side should the stapling margin be on when the booklet is completed.
Insert blank page To leave one side of a sheet blank, check the check box, and select the page to be left blank.
Margin Enter the margin width. The specified width from the center of the sheet becomes the margin widthfor one page.
Page Border To print a page border around each document page, check the check box.
5. Complete the setup Click OK on the Page Setup tab.
When you execute print, the document will be printed on one side of a sheet of paper. When theprinting of one side is complete, set the paper correctly by following the message and click OK.When the printing of the other side is complete, fold the paper at the center of the margin and makea booklet.
Important
Booklet cannot be selected when a media type other than Plain Paper is selected for Media Type. When Booklet is selected, Duplex Printing, Staple Side, Print from Last Page, and Collate appeargrayed out and are unavailable.
Note The stamp and background are not printed on blank sheets inserted with the Insert blank pagefunction of booklet printing.
Page top
Pagina 257 din 732 paginiBooklet Printing

Advanced Guide > Printing from a Computer > Printing with Other Application Software > Various Printing Methods >Duplex Printing
Duplex Printing
The procedure for printing data on both sides of a sheet of paper is as follows:You can also set duplex printing in Additional Features on the Quick Setup tab.
1. Open the printer driver setup window
2. Set duplex printing
Check the Duplex Printing check box on the Page Setup tab.
3. Select the layout
Select Normal-size (or Fit-to-Page, Scaled, or Page Layout) from the Page Layout list.
4. Specify the side to be stapled
The machine analyzes the Orientation and Page Layout settings, and automatically selects the bestStaple Side. When you want to change the setting, select another value from the list.
5. Set the margin width
If necessary, click Specify Margin... and set the margin width, and then click OK.
6. Complete the setup
Pagina 258 din 732 paginiDuplex Printing

Click OK on the Page Setup tab.
When you execute print, the document will be printed on one side of a sheet of paper. When theprinting of one side is complete, load the paper correctly by following the message and click OK.The document will be printed on the opposite side.
Important
Duplex Printing appears grayed out and is unavailable when: A media type other than Plain Paper is selected from the Media Type list. Poster is selected from the Page Layout list.
When Booklet is selected from the Page Layout list, Duplex Printing and Staple Side appear grayedout and are unavailable.
Note When you select borderless printing during duplex printing, a dialog box for media type selectionmay appear. If that happens, select Plain Paper. If the back side of the paper becomes smudged during duplex printing, perform Bottom PlateCleaning in the Maintenance tab.
Related Topic
Cleaning Inside the Machine
Page top
Pagina 259 din 732 paginiDuplex Printing

Advanced Guide > Printing from a Computer > Printing with Other Application Software > Various Printing Methods >Stamp/Background Printing
Stamp/Background Printing
This feature is unavailable when the 64-bit printer driver is used.
The Stamp function allows you to print a stamp text or a bitmap over or behind document data. It alsoallows you to print date, time and user name. The Background function allows you to print a lightillustration behind the document data.
The procedure for performing stamp/background printing is as follows:
Printing a Stamp
"CONFIDENTIAL," "IMPORTANT," and other stamps that are used often in companies are pre-registered.
1. Open the printer driver setup window
2. Click Stamp/Background... on the Page Setup tab
The Stamp/Background dialog box opens.
3. Select a stamp Check the Stamp check box, and select a desired stamp from the list.
Pagina 260 din 732 paginiStamp/Background Printing

The current settings are displayed in the settings preview on the left side of the Page Setup tab.
4. Set the stamp details If necessary, specify the following settings, and then click OK.
Place stamp over text To print the stamp on the front of the document, check this check box.
Note The stamp is given priority because the stamp is printed over the document data in thesections where the stamp and the document data overlap. When this check box is unchecked,the stamp is printed behind the document data and may be hidden in the overlapping sectionsdepending on the application used.
Stamp first page only To print the stamp only on the first page, check this check box.
Define Stamp... button To change the stamp text, bitmap, or position, click this (refer to " Registering a Stamp").
5. Complete the setup
Click OK on the Page Setup tab.When you execute print, the data is printed with the specified stamp.
Printing a Background
Two bitmap files are pre-registered as samples.
1. Open the printer driver setup window
2. Click Stamp/Background... on the Page Setup tab
The Stamp/Background dialog box opens.
3. Select the background
Check the Background check box, and select a desired background from the list.The current settings are displayed in the settings preview on the left side of the Page Setup tab.
4. Set the background details
If necessary, complete the following settings, and then click OK.
Background first page only To print the background only on the first page, check this check box.
Select Background... button To use another background or change the layout or density of a background, click this (refer to "Registering Image Data to be Used as a Background ").
5. Complete the setup
Click OK on the Page Setup tab.When you execute print, the data is printed with the specified background.
Important
When Borderless is selected, the Stamp/Background... button appears grayed out and isunavailable.
Note The stamp and background are not printed on blank sheets inserted with the Insert blank page
Pagina 261 din 732 paginiStamp/Background Printing

function of booklet printing.
Related Topics
Registering a Stamp
Registering Image Data to be Used as a Background
Page top
Pagina 262 din 732 paginiStamp/Background Printing

Advanced Guide > Printing from a Computer > Printing with Other Application Software > Various Printing Methods > Stamp/Background Printing > Registering a Stamp
Registering a Stamp
This feature is unavailable when the 64-bit printer driver is used.
You can create and register a new stamp. You can also change and register some of the settings of anexisting stamp. Unnecessary stamps can be deleted at any time.
The procedure for registering a new stamp is as follows:
Registering a New Stamp
1. Open the printer driver setup window
2. Click Stamp/Background... on the Page Setup tab
The Stamp/Background dialog box opens.
3. Click Define Stamp...
The Stamp Settings dialog box opens.
Pagina 263 din 732 paginiRegistering a Stamp

4. Configure the stamp while viewing the preview window
Stamp tab
Select Text, Bitmap, or Date/Time/User Name that matches your purpose for Stamp Type.
For Text registration, the characters must already be entered in Stamp Text. If necessary,change the TrueType Font, Style, Size, and Outline settings. You can select the color of thestamp by clicking Select Color....
For Bitmap, click Select File... and select the bitmap file (.bmp) to be used. If necessary,change the settings of the Size and Transparent white area.
For Date/Time/User Name, the creation date/time and user name of the printed object aredisplayed in Stamp Text. If necessary, change the settings of TrueType Font, Style, Size, andOutline. You can select the color of the stamp by clicking Select Color....
Important
Stamp Text appears grayed out and is unavailable when Date/Time/User Name is selected.
Placement tab
Select the stamp position from the Position list. You can also select Custom from the Positionlist and specify coordinates for X-Position and Y-Position.You can also change the stamp position by dragging the stamp in the preview window.To change the stamp position angle, type a value in the Orientation box directly.
5. Save the stamp
Click the Save settings tab and enter a title in the Title box, and then click Save.Click OK when the confirmation message appears.
6. Complete the setup
Click OK. The Stamp/Background dialog box opens again.The registered title appears in the Stamp list.
Changing and Registering Some of Stamp Settings
1. Select the stamp for which the settings are to be changed
Check the Stamp check box in the Stamp/Background dialog box, and then select the title of thestamp to be changed from the Stamp list.
Pagina 264 din 732 paginiRegistering a Stamp

2. Click Define Stamp...
The Stamp Settings dialog box opens.
3. Configure the stamp while viewing the preview window
4. Overwrite save the stamp Click Save overwrite on the Save settings tab.When you want to save the stamp with a different title, type a new title in the Title box and click Save.Click OK when the confirmation message appears.
5. Complete the setup
Click OK. The Stamp/Background dialog box opens again.The registered title appears in the Stamp list.
Deleting an Unnecessary Stamp
1. Click Define Stamp... in the Stamp/Background dialog box
The Stamp Settings dialog box opens.
2. Select the stamp to be deleted
Select the title of the stamp you want to delete from the Stamps list on the Save settings tab. Thenclick Delete.Click OK when the confirmation message appears.
3. Complete the setup
Click OK. The Stamp/Background dialog box opens again.
Page top
Pagina 265 din 732 paginiRegistering a Stamp

Advanced Guide > Printing from a Computer > Printing with Other Application Software > Various Printing Methods > Stamp/Background Printing > Registering Image Data to be Used as a Background
Registering Image Data to be Used as a Background
This feature is unavailable when the 64-bit printer driver is used.
You can select a bitmap file (.bmp) and register it as a new background. You can also change andregister some of the settings of an existing background. An unnecessary background can be deleted atany time.
The procedure for registering image data to be used as a background is as follows:
Registering New Background
1. Open the printer driver setup window
2. Click Stamp/Background... on the Page Setup tab
The Stamp/Background dialog box opens.
3. Click Select Background...
The Background Settings dialog box opens.
Pagina 266 din 732 paginiRegistering Image Data to be Used as a Background

4. Select the image data to be registered to the background
Click Select File.... Select the target bitmap file (.bmp), and then click Open.
5. Specify the following settings while viewing the preview window
Layout Method Select how the background image data is to be placed.When Custom is selected, you can set coordinates for X-Position and Y-Position.You can also change the background position by dragging the image in the preview window.
Intensity Set the intensity of the background image data with the Intensity slider. To lighten the background,move the slider to the left. To darken the background, move the slider to the right. To print thebackground at the original bitmap intensity, move the slider to the rightmost position.
6. Save the background
Click the Save settings tab and enter a title in the Title box, and then click Save.Click OK when the confirmation message appears.
7. Complete the setup
Click OK. The Stamp/Background dialog box opens again.The registered title appears in the Background list.
Changing and Registering Some Background Settings
1. Select the background for which the settings are to be changed
Check the Background check box in the Stamp/Background dialog box, and then select the title ofthe background you want to change from the Background list.
2. Click Select Background...
The Background Settings dialog box opens.
3. Specify the items on the Background tab while viewing the preview window.
4. Save the background
Click Save overwrite on the Save settings tab. When you want to save the background with a differenttitle, enter a new title in the Title box and click Save.Click OK when the confirmation message appears.
Pagina 267 din 732 paginiRegistering Image Data to be Used as a Background

5. Complete the setup
Click OK. The Stamp/Background dialog box opens again.The registered title appears in the Background list.
Deleting an Unnecessary Background
1. Click Select Background... in the Stamp/Background dialog box
The Background Settings dialog box opens.
2. Select the background to be deleted
Select the title of the background you want to delete from the Backgrounds list on the Save settingstab, and then click Delete.Click OK when the confirmation message appears.
3. Complete the setup
Click OK. The Stamp/Background dialog box opens again.
Page top
Pagina 268 din 732 paginiRegistering Image Data to be Used as a Background

Advanced Guide > Printing from a Computer > Printing with Other Application Software > Various Printing Methods >Printing an Envelope
Printing an Envelope
For details on how to load an envelope into the machine, refer to "Loading Paper" in the manual: BasicGuide.
The procedure for performing envelope printing is as follows:
1. Fold down the paper support
2. Load an envelope into the machine
Fold down the envelope flap.
Orient the envelope so that the flap is on the left and the folded surface is facing down, and load inthe rear tray.
3. Open the printer driver setup window
4. Select the media type
Select Envelope from Commonly Used Settings on the Quick Setup tab.
Pagina 269 din 732 paginiPrinting an Envelope

5. Select the paper size
Select Comm.Env. #10, DL Env., Youkei 4 105x235mm, or Youkei 6 98x190mm in the Envelope SizeSetting dialog box, and then click OK.
6. Set the orientation
To print the addressee horizontally, select Landscape for Orientation.
7. Select the print quality
Select High or Standard that matches your purpose for Print Quality.
8. Complete the setup Click OK.When you execute print, the information is printed on the envelope.
Important
When you execute envelope printing, guide messages are displayed.To hide the guide messages, check the Do not show this message again. check box.To show the guide again, click the View Printer Status... button on the Maintenance tab, and start theCanon IJ Status Monitor.Then click Envelope Printing from Display Guide Message of the Option menu, and change thesetting to on.
Page top
Pagina 270 din 732 paginiPrinting an Envelope

Advanced Guide > Printing from a Computer > Printing with Other Application Software > Various Printing Methods >Displaying the Print Results before Printing
Displaying the Print Results before Printing
You can display and check the print result before printing.
The procedure for displaying the print result before printing is as follows:
You can also set the print results display on the Quick Setup tab.
1. Open the printer driver setup window
2. Set the preview
Check the Preview before printing check box on the Main tab.
3. Complete the setup Click OK.The Canon IJ Preview will start and the print result will be displayed before printing.
Related Topic
Canon IJ Preview
Page top
Pagina 271 din 732 paginiDisplaying the Print Results before Printing

Advanced Guide > Printing from a Computer > Printing with Other Application Software > Various Printing Methods >Setting Paper Dimensions (Custom Size)
Setting Paper Dimensions (Custom Size)
You can specify the height and width of paper when its size cannot be selected from the Page Size. Sucha paper size is called a custom size.
The procedure for specifying a custom size is as follows:
You can also set a custom size in Printer Paper Size on the Quick Setup tab.
1. Set the custom size in the application software
On your application's paper size feature, specify the custom size.
Important
When the application software that created the document has a function for specifying theheight and width values, use the application software to set the values. When the applicationsoftware does not have such a function or if the document does not print correctly, use theprinter driver to set the values.
2. Open the printer driver setup window
3. Select the paper size
Select Custom... for Page Size on the Page Setup tab.
The Custom Paper Size dialog box opens.
Pagina 272 din 732 paginiSetting Paper Dimensions (Custom Size)

4. Set the custom paper size
Specify Units, and enter the Width and Height of the paper to be used. Then click OK.
5. Complete the setup
Click OK on the Page Setup tab.When you execute print, the data is printed with the specified paper size.
Page top
Pagina 273 din 732 paginiSetting Paper Dimensions (Custom Size)

Advanced Guide > Printing from a Computer > Printing with Other Application Software > Changing the Print Quality andCorrecting Image Data
Changing the Print Quality and Correcting Image Data
Selecting a Combination of the Print Quality Level and a Halftoning Method
Printing a Color Document in Monochrome
Specifying Color Correction
Optimal Photo Printing of Image Data
Adjusting Colors with the Printer Driver
Printing with ICC Profiles
Adjusting Color Balance
Adjusting Brightness
Adjusting Intensity
Adjusting Contrast
Simulating an Illustration
Representing Image Data with a Single Color
Presenting Image Data with Vivid Colors
Smoothing Jagged Outlines
Changing Color Properties to Improve Coloration
Reducing Photo Noise
Page top
Pagina 274 din 732 paginiChanging the Print Quality and Correcting Image Data

Advanced Guide > Printing from a Computer > Printing with Other Application Software > Changing the Print Quality andCorrecting Image Data > Selecting a Combination of the Print Quality Level and a Halftoning Method
Selecting a Combination of the Print Quality Level and aHalftoning Method
You can individually set the combined representation method for the print quality level and the halftoningmethod.
The procedure for setting the print quality level and the halftoning method is as follows:
1. Open the printer driver setup window
2. Select the print quality Select Custom for Print Quality on the Main tab, and click Set....
The Custom dialog box opens.
Pagina 275 din 732 paginiSelecting a Combination of the Print Quality Level and a Halftoning Method

3. Setting the print quality and halftone expression method Move the Quality slider to select the quality level.Select the expression method in Halftoning and click OK.
Note Halftones refer to color shades between the darkest color and the brightest color.The printer replaces the color shades with a collection of small dots to express the halftones.Dither arranges the dots according to fixed rules to express the halftones. Diffusion places thedots randomly to express the halftones. When you select Auto, the data is printed with theoptimal halftoning method for the selected print quality.
4. Complete the setup Click OK on the Main tab.When you execute print, the data is printed with the specified quality level and halftoning method.
Important
Certain print quality levels and halftoning methods cannot be selected depending on the settings ofMedia Type.
Note When the part of the object is not printed, selecting Diffusion for Halftoning may solve the problem.
Related Topics
Specifying Color Correction
Adjusting Color Balance
Adjusting Brightness
Adjusting Intensity
Adjusting Contrast
Page top
Pagina 276 din 732 paginiSelecting a Combination of the Print Quality Level and a Halftoning Method

Advanced Guide > Printing from a Computer > Printing with Other Application Software > Changing the Print Quality andCorrecting Image Data > Printing a Color Document in Monochrome
Printing a Color Document in Monochrome
The procedure for printing a color document in monochrome is as follows:
You can also set a grayscale printing in Additional Features on the Quick Setup tab.
1. Open the printer driver setup window
2. Set grayscale printing Check the Grayscale Printing check box on the Main tab.
3. Complete the setup Click OK.When you execute print, the document is converted to grayscale data. It allows you to print the colordocument in monochrome.
Important
When the Grayscale Printing check box is checked, the printer driver processes image data assRGB data. In this case, actual colors printed may differ from those in the original image data.When using the grayscale printing function to print Adobe RGB data, convert the data to sRGB datausing an application software.
Note
Pagina 277 din 732 paginiPrinting a Color Document in Monochrome

During Grayscale Printing, color inks may be used as well as black ink.
Page top
Pagina 278 din 732 paginiPrinting a Color Document in Monochrome

Advanced Guide > Printing from a Computer > Printing with Other Application Software > Changing the Print Quality andCorrecting Image Data > Specifying Color Correction
Specifying Color Correction
You can specify the color correction method suited to the type of document to be printed.Normally, the printer driver adjusts the colors by using Canon Digital Photo Color so that data is printedwith color tints that most people prefer. This method is suitable for printing sRGB data.
When you want to print by using the color space (Adobe RGB or sRGB) of the image data effectively,select ICM. When you want to use an application software to specify a printing ICC profile, select None.
The procedure for specifying color correction is as follows:
You can also set color correction on the Quick Setup tab by choosing Photo Printing under CommonlyUsed Settings, and then choosing Color/Intensity Manual Adjustment under Additional Features.
1. Open the printer driver setup window
2. Select the manual color adjustment On the Main tab, select Manual for Color/Intensity, and click Set....
The Manual Color Adjustment dialog box opens.
3. Select color correction Click Matching tab, select Color Correction setting that matches your purpose from the following,and click OK.
Pagina 279 din 732 paginiSpecifying Color Correction

Driver Matching By using Canon Digital Photo Color, you can print sRGB data with color tints that most people prefer.Driver Matching is the default setting for color correction.
ICM You can print by using the color space (Adobe RGB or sRGB) of the image data effectively.
None The printer driver does not perform color correction. Select this value when you are specifying anindividually created printing ICC profile or a printing ICC profile for special Canon paper in anapplication software to print data.
4. Complete the setup Click OK on the Main tab.When you execute print, the data is printed with the specified color correction method.
Important
When ICM is disabled in the application software, ICM is unavailable for Color Correction and theprinter may not be able to print the image data properly. When the Grayscale Printing check box on the Main tab is checked, Color Correction appearsgrayed out and is unavailable.
Related Topics
Optimal Photo Printing of Image Data
Adjusting Colors with the Printer Driver
Printing with ICC Profiles
Page top
Pagina 280 din 732 paginiSpecifying Color Correction

Advanced Guide > Printing from a Computer > Printing with Other Application Software > Changing the Print Quality andCorrecting Image Data > Specifying Color Correction > Optimal Photo Printing of Image Data
Optimal Photo Printing of Image Data
When people print images taken with digital cameras, they sometimes feel that the printed color tonesdiffer from those of actual image or those displayed on the monitor.To get the print results as close as possible to the desired color tones, you must select a printingmethod that is best suited to the application software used or to your purpose.
Color Management
Devices such as digital cameras, scanners, monitors, and printers handle color differently. Colormanagement (color matching) is a method that manages device-dependent "colors" as a common colorspace. For Windows, a color management system called "ICM" is built into the operating system.Adobe RGB and sRGB are popularly used as common color spaces. Adobe RGB has a wider colorspace than sRGB.
ICC profiles convert device-dependent "colors" into a common color space. By using an ICC profile andcarrying out color management, you can draw out the color space of the image data within the colorreproduction area that the printer can express.
Selecting a Printing Method Suited to the Image Data
The recommended printing method depends on the color space (Adobe RGB or sRGB) of the imagedata or the application software to be used. There are two typical printing methods. Check the colorspace (Adobe RGB or sRGB) of the image data and the application software to be used, and then selectthe printing method suited to your purpose.
Adjusting Colors with the Printer DriverDescribes the procedure for printing sRGB data by using the color correction function of the printer driver.
To print using Canon Digital Photo Color
The printer prints data with color tints that most people prefer, reproducing colors of the original imagedata and producing three-dimensional effects and high, sharp contrasts.
To print by directly applying editing and touch-up results of an application software
When printing the data, the printer brings out subtle color difference between dark and light areas,while leaving the darkest and lightest areas intact.When printing the data, the printer applies fine adjustment results, such as brightness adjustmentsmade with an application software.
Printing with ICC ProfilesDescribes the procedure for printing by using the color space of Adobe RGB or sRGB effectively.You can print with a common color space by setting up the application software and the printer driver sothat the color management matches the input ICC profile of the image data.The method for setting up the printer driver differs depending on the application software to be used.
Page top
Pagina 281 din 732 paginiOptimal Photo Printing of Image Data

Advanced Guide > Printing from a Computer > Printing with Other Application Software > Changing the Print Quality andCorrecting Image Data > Specifying Color Correction > Adjusting Colors with the Printer Driver
Adjusting Colors with the Printer Driver
You can specify the color correction function of the printer driver to print sRGB data with color tints thatmost people prefer through the use of Canon Digital Photo Color.When printing from an application software that can identify ICC profiles and allows you to specify them,use a printing ICC profile in the application software, and select settings for color management.
The procedure for adjusting colors with the printer driver is as follows:
1. Open the printer driver setup window
2. Select the media type Select the type of paper loaded in the machine from the Media Type list on the Main tab.
3. Select the print quality
Select High, Standard, or Fast that matches your purpose for Print Quality.
4. Select the manual color adjustment Select Manual for Color/Intensity, and click Set....The Manual Color Adjustment dialog box opens.
5. Select color correction
Click Matching tab, and select Driver Matching for Color Correction.
Pagina 282 din 732 paginiAdjusting Colors with the Printer Driver

6. Set the other items
If necessary, click Color Adjustment tab, and adjust the color balance of Cyan, Magenta, Yellow, andadjust Brightness, Intensity, and Contrast settings, and then click OK.
7. Complete the setup Click OK on the Main tab.When you execute print, the printer driver adjusts the colors when printing the data.
Related Topics
Selecting a Combination of the Print Quality Level and a Halftoning Method
Specifying Color Correction
Adjusting Color Balance
Adjusting Brightness
Adjusting Intensity
Adjusting Contrast
Page top
Pagina 283 din 732 paginiAdjusting Colors with the Printer Driver

Advanced Guide > Printing from a Computer > Printing with Other Application Software > Changing the Print Quality andCorrecting Image Data > Specifying Color Correction > Printing with ICC Profiles
Printing with ICC Profiles
When the image data has a specified input ICC profile, you can print by using the color space (AdobeRGB or sRGB) of the data effectively.
The printer driver setting procedure varies depending on the application software used to print.
Specify an ICC Profile from the Application Software and Print the Data
When you print the editing and touch-up results of Adobe Photoshop, Canon Digital Photo Professional,or any application software that allows you to specify input and printing ICC profiles, you print byeffectively using the color space of the input ICC profile specified in the image data.
To use this printing method, use your application software to select color management items andspecify an input ICC profile and a printing ICC profile in the image data.Even if you print using a printing ICC profile that you created yourself or one for special Canon paper fromyour application software, be sure to select color management items from your application software.For instructions, refer to the manual of the application software you are using.
1. Open the printer driver setup window
2. Select the media type
Select the type of paper loaded in the machine from the Media Type list on the Main tab.
3. Select the print quality
Select High, Standard, or Fast that matches your purpose for Print Quality.
4. Select the manual color adjustment Select Manual for Color/Intensity, and click Set....The Manual Color Adjustment dialog box opens.
5. Select color correction
Pagina 284 din 732 paginiPrinting with ICC Profiles

Click Matching tab, and select None for Color Correction.
6. Set the other items If necessary, click Color Adjustment tab, and adjust the color balance of Cyan, Magenta, Yellow, andadjust Brightness, Intensity, and Contrast settings, and then click OK.
7. Complete the setup Click OK on the Main tab.When you execute print, the printer uses the color space of the image data.
Specify an ICC Profile with the Printer Driver, and then Print
Print from a program that cannot identity input ICC profiles or does allow you to specify one by specifyinginput ICC profiles from printer profiles of the printer driver. When printing Adobe RGB data, you can printthe data with the Adobe RGB color space even if the application software does not support Adobe RGB.
1. Open the printer driver setup window
2. Select the media type
Select the type of paper loaded in the machine from the Media Type list on the Main tab.
Pagina 285 din 732 paginiPrinting with ICC Profiles

3. Select the print quality
Select High, Standard, or Fast that matches your purpose for Print Quality.
4. Select the manual color adjustment Select Manual for Color/Intensity, and click Set....Manual Color Adjustment dialog box opens.
5. Select color correction
Click Matching tab, and select ICM for Color Correction.
6. Select the input profile
Select an Input Profile that matches the color space of the image data.
For sRGB data or data without an input ICC profile:
Select Standard.
For Adobe RGB data:
Pagina 286 din 732 paginiPrinting with ICC Profiles

Select Adobe RGB (1998).
Important
When the application software specifies an input profile, the input profile setting of the printerdriver becomes invalid. When no input ICC profiles are installed on your computer, Adobe RGB (1998) is not displayed.You can install ICC profiles from the Setup CD-ROM that accompanies the machine.
7. Set the other items
If necessary, click Color Adjustment tab, and adjust the color balance of Cyan, Magenta, Yellow, andadjust Brightness, Intensity, and Contrast settings, and then click OK.
8. Complete the setup Click OK on the Main tab.When you execute print, the data is printed with the color space of the selected image data.
Related Topics
Selecting a Combination of the Print Quality Level and a Halftoning Method
Specifying Color Correction
Adjusting Color Balance
Adjusting Brightness
Adjusting Intensity
Adjusting Contrast
Page top
Pagina 287 din 732 paginiPrinting with ICC Profiles

Advanced Guide > Printing from a Computer > Printing with Other Application Software > Changing the Print Quality andCorrecting Image Data > Adjusting Color Balance
Adjusting Color Balance
You can adjust the color tints when printing.Since this function adjusts color balance of the output by changing the ink ratios of each color, it changesthe total color balance of the document. Use the application software if you want to change the colorbalance significantly. Use the printer driver only when you want to adjust the color balance slightly.The following sample shows the case when color balance is used to intensify cyan and to diminishyellow so that the overall colors are more uniform.
No adjustment Adjust Color Balance
The procedure for adjusting color balance is as follows:
You can also set color balance on the Quick Setup tab by choosing Photo Printing under CommonlyUsed Settings, and then choosing Color/Intensity Manual Adjustment under Additional Features.
1. Open the printer driver setup window
2. Select the manual color adjustment On the Main tab, select Manual for Color/Intensity, and click Set....
The Manual Color Adjustment dialog box opens.
3. Adjust color balance
There are individual sliders for Cyan, Magenta, and Yellow. Each color becomes stronger when thecorresponding slider is moved to the right, and becomes weaker when the corresponding slider is
Pagina 288 din 732 paginiAdjusting Color Balance

moved to the left. For example, when cyan becomes weaker, the color red becomes stronger.You can also directly enter a value linked to the slider. Enter a value in the range from -50 to 50.
After adjusting each color, click OK.
Important
Adjust the slider gradually.
4. Complete the setup Click OK on the Main tab.When you execute print, the document is printed with the adjusted color balance.
Important
When the Grayscale Printing check box on the Main tab is checked, Cyan, Magenta, and Yellowappear grayed out and are unavailable.
Related Topics
Selecting a Combination of the Print Quality Level and a Halftoning Method
Specifying Color Correction
Adjusting Brightness
Adjusting Intensity
Adjusting Contrast
Page top
Pagina 289 din 732 paginiAdjusting Color Balance

Advanced Guide > Printing from a Computer > Printing with Other Application Software > Changing the Print Quality andCorrecting Image Data > Adjusting Brightness
Adjusting Brightness
You can change the brightness of the overall image data during printing.This function does not change pure white or pure black but it changes the brightness of the intermediatecolors.The following sample shows the print result when the brightness specification is changed.
Light is selected Normal is selected Dark is selected
The procedure for adjusting brightness is as follows:
You can also set brightness on the Quick Setup tab by choosing Photo Printing under Commonly UsedSettings, and then choosing Color/Intensity Manual Adjustment under Additional Features.
1. Open the printer driver setup window
2. Select the manual color adjustment On the Main tab, select Manual for Color/Intensity, and click Set....
The Manual Color Adjustment dialog box opens.
3. Specify the brightness
Select Light, Normal, or Dark for Brightness, and click OK.
Pagina 290 din 732 paginiAdjusting Brightness

4. Complete the setup Click OK on the Main tab.When you execute print, the data is printed at the specified brightness.
Related Topics
Selecting a Combination of the Print Quality Level and a Halftoning Method
Specifying Color Correction
Adjusting Color Balance
Adjusting Intensity
Adjusting Contrast
Page top
Pagina 291 din 732 paginiAdjusting Brightness

Advanced Guide > Printing from a Computer > Printing with Other Application Software > Changing the Print Quality andCorrecting Image Data > Adjusting Intensity
Adjusting Intensity
You can dilute (brighten) or intensify (darken) the colors of the overall image data during printing.When you want to sharpen the print results, you should intensify the colors.The following sample shows the case when the intensity is increased so that all colors become moreintense when the image data is printed.
No adjustment Higher Intensity
The procedure for adjusting intensity is as follows:
You can also set intensity on the Quick Setup tab by choosing Photo Printing under Commonly UsedSettings, and then choosing Color/Intensity Manual Adjustment under Additional Features.
1. Open the printer driver setup window
2. Select the manual color adjustment Select Manual for Color/Intensity on the Main tab, and click Set....
The Manual Color Adjustment dialog box opens.
3. Adjust intensity
Moving the Intensity slider to the right intensifies (darkens) the colors. Moving the slider to the leftdilutes (brightens) the colors.You can also directly enter a value linked to the slider. Enter a value in the range from -50 to 50.
After adjusting each color, click OK.
Pagina 292 din 732 paginiAdjusting Intensity

Important
Adjust the slider gradually.
4. Complete the setup Click OK on the Main tab.When you execute print, the image data is printed with the adjusted intensity.
Related Topics
Selecting a Combination of the Print Quality Level and a Halftoning Method
Specifying Color Correction
Adjusting Color Balance
Adjusting Brightness
Adjusting Contrast
Page top
Pagina 293 din 732 paginiAdjusting Intensity

Advanced Guide > Printing from a Computer > Printing with Other Application Software > Changing the Print Quality andCorrecting Image Data > Adjusting Contrast
Adjusting Contrast
You can adjust the image contrast during printing.To make the differences between the light and dark portions of images greater and more distinct,increase the contrast. On the other hand, to make the differences between the light and dark portions ofimages smaller and less distinct, reduce the contrast.
No adjustment Adjust the contrast
The procedure for adjusting contrast is as follows:
You can also set contrast on the Quick Setup tab by choosing Photo Printing under Commonly UsedSettings, and then choosing Color/Intensity Manual Adjustment under Additional Features.
1. Open the printer driver setup window
2. Select the manual color adjustment On the Main tab, select Manual for Color/Intensity, and click Set....
The Manual Color Adjustment dialog box opens.
3. Adjust the contrast Moving the Contrast slider to the right increases the contrast, and moving it to the left decreases thecontrast.You can also directly enter a value linked to the slider. Enter a value in the range from -50 to 50.
After adjusting each color, click OK.
Pagina 294 din 732 paginiAdjusting Contrast

Important
Adjust the slider gradually.
4. Complete the setup Click OK on the Main tab.When you execute print, the image is printed with the adjusted contrast.
Related Topics
Selecting a Combination of the Print Quality Level and a Halftoning Method
Specifying Color Correction
Adjusting Color Balance
Adjusting Brightness
Adjusting Intensity
Page top
Pagina 295 din 732 paginiAdjusting Contrast

Advanced Guide > Printing from a Computer > Printing with Other Application Software > Changing the Print Quality andCorrecting Image Data > Simulating an Illustration
Simulating an Illustration
With the Simulate Illustration function, you can print full-color or 256-color image data so that it looks likea hand-drawn illustration. This function adds different effects to the original profile and colors.
The procedure for performing Simulate Illustration is as follows:
1. Open the printer driver setup window
2. Set the Simulate Illustration
If necessary, check the Simulate Illustration check box on the Effects tab, and adjust the Contrast.Moving the slider to the right lightens the image data and moving the slider to the left darkens theimage data.The current settings are displayed in the settings preview on the left side of the printer driver.
3. Complete the setup Click OK.When you execute print, the image will be printed so that it looks hand-drawn.
Page top
Pagina 296 din 732 paginiSimulating an Illustration

Advanced Guide > Printing from a Computer > Printing with Other Application Software > Changing the Print Quality andCorrecting Image Data > Representing Image Data with a Single Color
Representing Image Data with a Single Color
With the Monochrome Effects function, you can benefit from coloring effects such as changing aphotograph to a sepia tone image.
The procedure for performing Monochrome Effects is as follows:
1. Open the printer driver setup window
2. Set Monochrome Effects
Check the Monochrome Effects check box on the Effects tab and select your desired color.When you use Select Color, move the Color slider to specify the color you want.The current settings are displayed in the settings preview on the left side of the printer driver.
3. Complete the setup Click OK.When you execute print, the image will be printed with a single color.
Important
When the Grayscale Printing check box on the Main tab is checked, Monochrome Effects appears
Pagina 297 din 732 paginiRepresenting Image Data with a Single Color

grayed out and is unavailable.
Page top
Pagina 298 din 732 paginiRepresenting Image Data with a Single Color

Advanced Guide > Printing from a Computer > Printing with Other Application Software > Changing the Print Quality andCorrecting Image Data > Presenting Image Data with Vivid Colors
Presenting Image Data with Vivid Colors
The Vivid Photo function allows you to print image data with vivid colors.The vivid photo function emphasizes the colors in background sceneries while maintaining the humanskin color natural. By using this function, you can make vivid hues appear even more vivid.
The procedure for performing Vivid Photo is as follows:
You can also set vivid photos on the Quick Setup tab by choosing Photo Printing under Commonly UsedSettings, and then choosing Additional Features.
1. Open the printer driver setup window
2. Set Vivid Photo
Check the Vivid Photo check box on the Effects tab.
3. Complete the setup Click OK.When you execute print, the image will be printed with vivid colors.
Page top
Pagina 299 din 732 paginiPresenting Image Data with Vivid Colors

Advanced Guide > Printing from a Computer > Printing with Other Application Software > Changing the Print Quality andCorrecting Image Data > Smoothing Jagged Outlines
Smoothing Jagged Outlines
The Image Optimizer function allows you to smooth jagged outlines in photos and graphics that havebeen enlarged with your application. This feature is especially useful when printing low-resolutionimages from Web pages.
The procedure for performing Image Optimizer is as follows:
1. Open the printer driver setup window
2. Set image optimizer Check the Image Optimizer check box on the Effects tab.
3. Complete the setup Click OK.The photos and graphics will be printed with jagged outlines smoothed.
Note Depending on application software or resolution of image data, the image optimizer may have nodiscernible effects. It may take longer to complete printing when the image optimizer is used.
Pagina 300 din 732 paginiSmoothing Jagged Outlines

Page top
Pagina 301 din 732 paginiSmoothing Jagged Outlines

Advanced Guide > Printing from a Computer > Printing with Other Application Software > Changing the Print Quality andCorrecting Image Data > Changing Color Properties to Improve Coloration
Changing Color Properties to Improve Coloration
The Photo Optimizer PRO function corrects colors of digital camera images or scanned images. It isspecially designed to compensate for color shift, overexposure, and underexposure.
The procedure for performing Photo Optimizer PRO is as follows:
1. Open the printer driver setup window
2. Set Photo Optimizer PRO Check the Photo Optimizer PRO check box on the Effects tab.
Normally there is no need to check the Apply Throughout Page check box.Images within each page are optimized on an image-by-image basis.
Note Check the Apply Throughout Page check box when printing image data that has beenprocessed, such as being cropped or rotated. In this case the entire page will be treated as asingle image to be optimized.
3. Complete the setup Click OK.When you execute print, the images will be printed with color compensation.
Pagina 302 din 732 paginiChanging Color Properties to Improve Coloration

Important
Photo Optimizer PRO does not function when: Background is set in the Stamp/Background dialog box on the Page Setup tab. Define Stamp... is selected in the Stamp/Background dialog box on the Page Setup tab, and thebitmapped stamp is configured.
Note Depending on images, the Photo Optimizer PRO may have no discernible effect.
Page top
Pagina 303 din 732 paginiChanging Color Properties to Improve Coloration

Advanced Guide > Printing from a Computer > Printing with Other Application Software > Changing the Print Quality andCorrecting Image Data > Reducing Photo Noise
Reducing Photo Noise
With the Photo Noise Reduction function, you can reduce the digital camera noise and improve theimage quality of the digital print.
The procedure for performing Photo Noise Reduction is as follows:
1. Open the printer driver setup window
2. Set Photo Noise Reduction
Check the Photo Noise Reduction check box on the Effects tab and select Normal or Strong for thelevel.
3. Complete the setup Click OK.When you execute print, the image will be printed with the digital camera noise being reduced.
Note It is recommended to select Normal for most cases. Select Strong if you have selected Normal andthe noise still bothers you.
Pagina 304 din 732 paginiReducing Photo Noise

Depending on application software or resolution of image data, effects of digital camera noisereduction may not be obvious. When this function is used for other than photos taken by digital cameras, image may be distorted.
Page top
Pagina 305 din 732 paginiReducing Photo Noise

Advanced Guide > Printing from a Computer > Printing with Other Application Software > Overview of the Printer Driver
Overview of the Printer Driver
Printer Driver Operations
Canon IJ Printer Driver
How to Open the Printer Driver Setup Window
Maintenance Tab
Canon IJ Status Monitor
Canon IJ Preview
Page top
Pagina 306 din 732 paginiOverview of the Printer Driver

MA-5446-V1.00
| Instructions for Use (Printer Driver) | How to Use This Manual | Printing This Manual |
Various Printing Methods
Printing with Easy Setup
Setting a Page Size and Orientation
Setting the Number of Copies and PrintingOrder
Setting the Stapling Margin
Borderless Printing
Fit-to-Page Printing
Scaled Printing
Page Layout Printing
Poster Printing
Booklet Printing
Duplex Printing
Stamp/Background Printing
Printing an Envelope
Displaying the Print Results before Printing
Setting Paper Dimensions (Custom Size)
Changing the Print Quality and CorrectingImage Data
Selecting a Combination of the Print QualityLevel and a Halftoning Method
Printing a Color Document in Monochrome
Specifying Color Correction
Adjusting Color Balance
Adjusting Brightness
Adjusting Intensity
Adjusting Contrast
Simulating an Illustration
Representing Image Data with a Single Color
Presenting Image Data with Vivid Colors
Smoothing Jagged Outlines
Changing Color Properties to ImproveColoration
Reducing Photo Noise
Changing Machine Settings from YourComputer
Changing the Print Options
Registering a Frequently Used Printing Profile
Setting the Ink Cartridge
Managing the Machine Power
Reducing the Machine Noise
Changing the Machine Operation Mode
Performing Maintenance from a Computer
Cleaning the Print Heads
Cleaning the Paper Feed Rollers
Aligning the Print Head Position
Checking the Print Head Nozzles
Cleaning Inside the Machine
Overview of the Printer Driver
Canon IJ Printer Driver
How to Open the Printer Driver Setup Window
Maintenance Tab
Canon IJ Status Monitor
Canon IJ Preview
Updating the MP Drivers
Obtaining the Latest MP Drivers
Deleting the Unnecessary MP Drivers
Before Installing the MP Drivers
Installing the MP Drivers
Appendix
Deleting the Undesired Print Job
Sharing the Printer on a Network
Pagina 307 din 732 paginiPrinter Driver Operations

Advanced Guide > Printing from a Computer > Printing with Other Application Software > Overview of the Printer Driver> Canon IJ Printer Driver
Canon IJ Printer Driver
The Canon IJ printer driver is software that is installed on your computer for printing data on thismachine.
The Canon IJ printer driver converts the print data created by your Windows application into data that yourprinter can understand and sends the converted data to the printer.
Because different models support different print data formats, you need a Canon IJ printer driver for thespecific model you are using.
How to Use Printer Driver Help
You can display the Help describing the driver setting items through the printing preferences screen ofthe Canon IJ printer driver.
To view all descriptions of a tab...
Click the Help button on each tab. A dialog box opens, displaying a description of each item on thetab.You can also click the link found in the description of an item to display a description of the linkeddialog box.
To see a description for each item...
Right-click the item you want to learn about and then click What's This?.
Alternatively, when the Help button is found at the right end of the title bar, click that button, andthen click the item you want to learn about.A description of the item is displayed.
Related Topic
How to Open the Printer Driver Setup Window
Page top
Pagina 308 din 732 paginiCanon IJ Printer Driver

Advanced Guide > Printing from a Computer > Printing with Other Application Software > Overview of the Printer Driver> Canon IJ Printer Driver > How to Open the Printer Driver Setup Window
How to Open the Printer Driver Setup Window
The printer driver setup window can be displayed through the application software in use or the Startmenu of the Windows.
Note This guide mainly describes operations on the Windows Vista. Operations may differ depending onversions of the Windows.
Open the Printer Driver Setup Window through the Application Software
Follow the procedure below to configure printing profile when printing.
1. Select the command you perform printing on the application software in use
In general, select Print on the File menu to open the Print dialog box.
2. Select your model name and click Preferences (or Properties) The printer driver setup window appears.
Note Depending on application software you use, command names or menu names may vary andthere may be more steps. For details, refer to the user's manual of your application software.
Open the Printer Driver Setup Window through the Start Menu
Follow the procedure below to perform maintenance operations such as print head cleaning, or toconfigure printing profile that are common for all application software.
1. Select items from the Start menu as shown below: In Windows Vista, select the Start menu -> Control Panel -> Hardware and Sound -> Printers.
In Windows XP, select the start menu -> Control Panel -> Printers and Other Hardware ->Printers and Faxes.
In Windows 2000, select the Start menu -> Settings -> Printers.
2. Right-click your model name icon, and then select Printing Preferences... from thedisplayed menu
The printer driver setup window appears.
Important
Opening the printer driver setup window through Properties displays such tabs regarding theWindows functions as the Ports (or Advanced) tab. Those tabs do not appear when openingthrough Printing Preferences... or application software. For tabs regarding Windows functions,refer to the user's manual for the Windows.
Page top
Pagina 309 din 732 paginiHow to Open the Printer Driver Setup Window

Advanced Guide > Printing from a Computer > Printing with Other Application Software > Overview of the Printer Driver> Canon IJ Printer Driver > Maintenance Tab
Maintenance Tab
The Maintenance tab allows you to perform machine maintenance or change the settings of themachine.
Features
Cleaning the Print Heads
Cleaning the Paper Feed Rollers
Aligning the Print Head Position
Checking the Print Head Nozzles
Cleaning Inside the Machine
Setting the Ink Cartridge
Managing the Machine Power
Related Features
Reducing the Machine Noise
Changing the Machine Operation Mode
Page top
Pagina 310 din 732 paginiMaintenance Tab
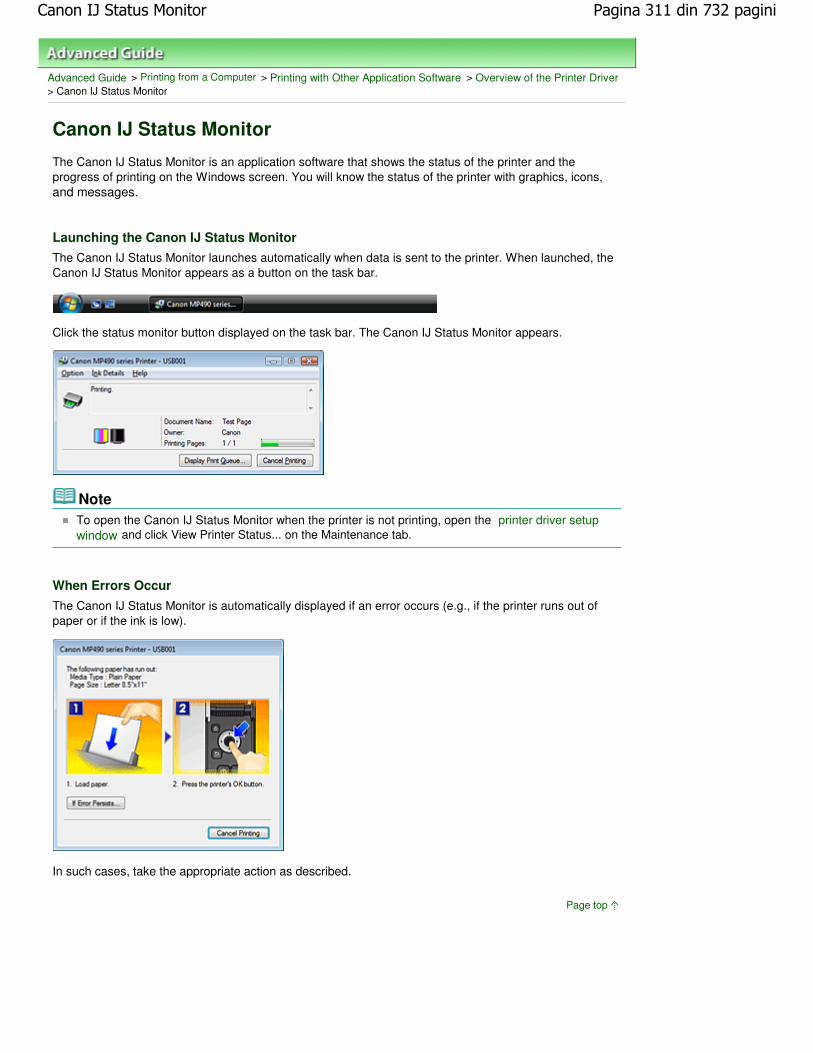
Advanced Guide > Printing from a Computer > Printing with Other Application Software > Overview of the Printer Driver> Canon IJ Status Monitor
Canon IJ Status Monitor
The Canon IJ Status Monitor is an application software that shows the status of the printer and theprogress of printing on the Windows screen. You will know the status of the printer with graphics, icons,and messages.
Launching the Canon IJ Status Monitor
The Canon IJ Status Monitor launches automatically when data is sent to the printer. When launched, theCanon IJ Status Monitor appears as a button on the task bar.
Click the status monitor button displayed on the task bar. The Canon IJ Status Monitor appears.
Note To open the Canon IJ Status Monitor when the printer is not printing, open the printer driver setupwindow and click View Printer Status... on the Maintenance tab.
When Errors Occur
The Canon IJ Status Monitor is automatically displayed if an error occurs (e.g., if the printer runs out ofpaper or if the ink is low).
In such cases, take the appropriate action as described.
Page top
Pagina 311 din 732 paginiCanon IJ Status Monitor

Advanced Guide > Printing from a Computer > Printing with Other Application Software > Overview of the Printer Driver> Canon IJ Preview
Canon IJ Preview
The Canon IJ Preview is an application software that displays what the print result will look like before adocument is actually printed.
The preview reflects the information that is set within the printer driver and allows you to check thedocument layout, print order, and number of pages. You can also change the media type settings.
When you want to display a preview before printing, open the printer driver setup window , click the QuickSetup tab or the Main tab, and check the Preview before printing check box.
When you do not want to display a preview before printing, uncheck the check box.
Related Topic
Displaying the Print Results before Printing
Page top
Pagina 312 din 732 paginiCanon IJ Preview

Ghid avansat > Imprimarea cu ajutorul panoului de operare al aparatului
Imprimarea cu ajutorul panoului de operare al aparatului
Imprimarea hârtiei liniate sau a hârtiei grafice
Copierea
Imprimarea de pe o cartelă de memorie
În partea superioară a paginii
Pagina 313 din 732 paginiImprimarea cu ajutorul panoului de operare al aparatului

Ghid avansat > Imprimarea cu ajutorul panoului de operare al aparatului > Imprimarea hârtiei liniate sau a hârtiei grafice
Imprimarea hârtiei liniate sau a hârtiei grafice
Imprimarea formularelor tip şablon, cum ar fi hârtia liniată sau hârtia grafică
În partea superioară a paginii
Pagina 314 din 732 paginiImprimarea hârtiei liniate sau a hârtiei grafice

Ghid avansat > Imprimarea cu ajutorul panoului de operare al aparatului > Imprimarea hârtiei liniate sau a hârtiei grafice >Imprimarea formularelor tip şablon, cum ar fi hârtia liniată sau hârtia grafică
Imprimarea formularelor tip şablon, cum ar fi hârtia liniată sauhârtia grafică
Puteţi imprima un formular şablon, cum ar hârtia liniată, hârtia grafică sau o listă de verificare etc. pehârtie simplă format A4, B5 sau Letter.
Imprimarea de formulare şablon
1. Asiguraţi-vă că aparatul este pus în funcţiune.
2. Încărcaţi hârtie simplă de dimensiune A4, B5 sau Letter.
3. Apăsaţi butonul Meniu (Menu) .
4. Utilizaţi butonul pentru a selecta Template print, apoi apăsaţi butonul OK.
5. Utilizaţi butonul pentru a selecta şablonul pe care doriţi să îl imprimaţi,apoi apăsaţi butonul OK.
Sunt disponibile următoarele formulare template:
Hârtie de caietPuteţi selecta formate cu spaţiere la trei rânduri.
Notebook paper 1: 8 mm spacingNotebook paper 2: 7 mm spacingNotebook paper 3: 6 mm spacing
Hârtie grafică
Puteţi selecta două dimensiuni de pătrat.
Graph paper 1: Graph 5 mm
Pagina 315 din 732 paginiImprimarea formularelor tip şablon, cum ar fi hârtia liniată sau hârtia grafică

Graph paper 2: Graph 3 mm
Listă cu bifePuteţi imprima un caiet cu casete de bifare.
Hârtie muzicalăPuteţi imprima hârtie muzicală cu 10 sau 12 portative.
Staff paper 1: Staff paper 10 stavesStaff paper 2: Staff paper 12 staves
Hârtie pentru scris de mânăPuteţi imprima hârtie pentru scris de mână.
Program săptămânal
Puteţi imprima un formular pentru program săptămânal.
Program lunarPuteţi imprima un formular pentru program lunar.
NotăNu puteţi imprima hârtie grafică pe hârtie de dimensiune B5.
6. Utilizaţi butonul pentru a specifica dimensiunea hârtiei şi numărul de copiişi butonul pentru a specifica dimensiunea hârtiei.
7. Apăsaţi butonul OK pentru a iniţia imprimarea.
Aparatul începe imprimarea formularului şablon.
În partea superioară a paginii
Pagina 316 din 732 paginiImprimarea formularelor tip şablon, cum ar fi hârtia liniată sau hârtia grafică

Ghid avansat > Imprimarea cu ajutorul panoului de operare al aparatului > Copierea
Copierea
Realizarea de copii
Utilizarea funcţiilor utile de copiere
În partea superioară a paginii
Pagina 317 din 732 paginiCopierea

Ghid avansat > Imprimarea cu ajutorul panoului de operare al aparatului > Copierea > Realizarea de copii
Realizarea de copii
Pentru procedura de bază de efectuare a copiilor, consultaţi Copierea.
Micşorarea sau mărirea unei copii
Utilizarea funcţiilor utile de copiere
În partea superioară a paginii
Pagina 318 din 732 paginiRealizarea de copii

Ghid avansat > Imprimarea cu ajutorul panoului de operare al aparatului > Copierea > Realizarea de copii > Micşorareasau mărirea unei copii
Micşorarea sau mărirea unei copii
1. Asiguraţi-vă că aparatul este pus în funcţiune.
2. Apăsaţi butonul Meniu (Menu) , apoi apăsaţi butonul OK pentru a selecta Copydacă a fost selectat un alt mod.
NotăPrin scoaterea cartelei de memorie din slotul pentru cartelă se revine la modul de copiere.
3. Încărcaţi hârtia.
4. Încărcaţi documentele originale pe suprafaţa de sticlă de scanare.
5. Apăsaţi butonul .Se afişează ecranul de setare a hârtiei.
6. Apăsaţi butonul pentru a selecta 100%.
7. Utilizaţi butonul pentru a selecta metoda de micşorare/mărire.
Puteţi să selectaţi următoarele metode de micşorare/mărire.Fit to page/115% B5-A4/141% A5-A4/400% MAX/25% MIN/70% A4-A5/86% A4-B5
NotăPuteţi selecta Fit to page când s-a selectat Standard copy sau Borderless copy.Când s-a selectat Fit to page, imaginile copiate sunt micşorate sau mărite automat pe lungime/lăţime pentru a se încadra în dimensiunea de pagină selectată.Selectaţi 100% dacă nu doriţi să reduceţi sau să măriţi o copie.
8. Apăsaţi butonul OK.Ecranul LCD va reveni la ecranul modului de copiere.
9. Utilizaţi butonul pentru a specifica numărul de copii.
NotăPrin apăsarea butonului Înapoi (Back) sau Oprire (Stop), numărul de copii revine la 1.
10. Apăsaţi butonul Culoare (Color) pentru copiere color, sau butonul Negru (Black)pentru copiere alb-negru.Aparatul începe copierea cu încadrare în pagină.După ce aţi terminat de copiat, luaţi documentul original de pe suprafaţa de sticlă de scanare.
Important
Nu ridicaţi capacul pentru documente şi nu îndepărtaţi documentul original de pe suprafaţa desticlă de scanare până la terminarea copierii.
NotăPentru a revoca operaţia de copiere, apăsaţi butonul Oprire.
Pagina 319 din 732 paginiMicşorarea sau mărirea unei copii

În partea superioară a paginii
Pagina 320 din 732 paginiMicşorarea sau mărirea unei copii

Ghid avansat > Imprimarea cu ajutorul panoului de operare al aparatului > Copierea > Utilizarea funcţiilor utile de copiere
Utilizarea funcţiilor utile de copiere
Special Copy
Selectaţi metoda de copiere în funcţie de scopul dumneavoastră.
Borderless copy
Puteţi copia imagini astfel încât să acopere întreaga pagină, fără chenar.
Copierea fără chenar (Borderless Copy)
Frame erase
Când copiaţi documente originale groase, cum ar fi cărţile, le puteţi copia fără margini negreîn jurul imaginii şi fără umbre de scurgere.
Copierea de documente originale groase cum ar fi cărţile (Frame Erase)
În partea superioară a paginii
Pagina 321 din 732 paginiUtilizarea funcţiilor utile de copiere

Ghid avansat > Imprimarea cu ajutorul panoului de operare al aparatului > Copierea > Utilizarea funcţiilor utile de copiere> Setări pentru copiere specială
Setări pentru copiere specială
1. Asiguraţi-vă că aparatul este pus în funcţiune.
2. Apăsaţi butonul Meniu (Menu) pentru a selecta Copy dacă a fost selectat un altmod.
3. Încărcaţi hârtia.
4. Încărcaţi documentele originale pe suprafaţa de sticlă de scanare.
NotăPentru detalii referitoare la tipurile şi stările documentelor originale pe care le puteţi copia,consultaţi Încărcarea hârtiei / documentelor originale .
5. Apăsaţi butonul .
Se afişează ecranul de setare a hârtiei.
În partea superioară a paginii
Pagina 322 din 732 paginiSetări pentru copiere specială

Ghid avansat > Imprimarea cu ajutorul panoului de operare al aparatului > Copierea > Utilizarea funcţiilor utile de copiere> Copierea fără chenar (Borderless Copy)
Copierea fără chenar (Borderless Copy)
Puteţi copia imagini astfel încât să acopere întreaga pagină, fără chenar.
Setări pentru copiere specială
1. Utilizaţi butonul pentru a selecta Borderless copy, apoi apăsaţi butonul OK.
2. Apăsaţi butonul Culoare (Color) pentru copiere color, sau butonul Negru (Black)pentru copiere alb-negru.
Important
Nu ridicaţi capacul pentru documente şi nu îndepărtaţi documentul original de pe suprafaţa desticlă de scanare până la terminarea copierii.
NotăEste posibil să apară o uşoară trunchiere la margini deoarece imaginea copiată este mărită pentrua acoperi întreaga pagină. Puteţi modifica lăţimea care trebuie trunchiată de pe marginile imaginiioriginale, în funcţie de necesităţi. Pentru detalii, consultaţi Valoare extindere.
Pentru detalii despre dimensiunea hârtiei şi tipul de suport disponibil pentru copierea fără margini,consultaţi Zonă de imprimare .
În partea superioară a paginii
Pagina 323 din 732 paginiCopierea fără chenar (Borderless Copy)

Ghid avansat > Imprimarea cu ajutorul panoului de operare al aparatului > Copierea > Utilizarea funcţiilor utile de copiere> Copierea de documente originale groase cum ar fi cărţile (Frame Erase)
Copierea de documente originale groase cum ar fi cărţile(Frame Erase)
Când copiaţi documente originale groase, cum ar fi cărţile, le puteţi copia fără margini negre în jurulimaginii şi fără umbre de scurgere. Dacă utilizaţi această funcţie, puteţi reduce consumul inutil decerneală.
Setări pentru copiere specială
1. Utilizaţi butonul pentru a selecta Frame erase, apoi apăsaţi butonul OK.
2. Apăsaţi butonul Culoare (Color) pentru copiere color, sau butonul Negru (Black)pentru copiere alb-negru.
NotăCând încărcaţi pe suprafaţa de sticlă de scanare un document original cum ar fi o carte groasă,demontaţi capacul pentru documente şi încărcaţi documentul original.
Cum se demontează/montează capacul pentru documenteEste posibil să apară o margine neagră îngustă în jurul imaginii. Această funcţie îndepărtează doarmarginile întunecate. Dacă o carte scanată este prea subţire sau dacă aparatul se utilizează înapropierea unei ferestre sau într-un mediu luminos, poate rămâne un cadru pal întunecat. Deasemenea, în cazul în care culoarea unui document original este întunecată, aparatul nu poatedistinge culoarea documentului de umbră şi astfel, imaginea poate fi uşor trunchiată sau poateprezenta umbre pe mijloc.
În partea superioară a paginii
Pagina 324 din 732 paginiCopierea de documente originale groase cum ar fi cărţile (Frame Erase)

Ghid avansat > Imprimarea cu ajutorul panoului de operare al aparatului > Imprimarea de pe o cartelă de memorie
Imprimarea de pe o cartelă de memorie
Imprimarea fotografiilor salvate pe o cartelă de memorie
Configurarea slotului pentru cartelă ca unitate de cartelă de memorie a computerului
În partea superioară a paginii
Pagina 325 din 732 paginiImprimarea de pe o cartelă de memorie

Ghid avansat > Imprimarea cu ajutorul panoului de operare al aparatului > Imprimarea de pe o cartelă de memorie >Imprimarea fotografiilor salvate pe o cartelă de memorie
Imprimarea fotografiilor salvate pe o cartelă de memorie
Pentru procedura de bază de imprimare de pe o cartelă de memorie, consultaţi Imprimarea de pe ocartelă de memorie .
Elemente de configurare
Imprimarea cu ajutorul foii index foto
NotăLa imprimarea de pe o cartelă de memorie, puteţi să specificaţi un număr de până la 2000 decopii.
În partea superioară a paginii
Pagina 326 din 732 paginiImprimarea fotografiilor salvate pe o cartelă de memorie

Ghid avansat > Imprimarea cu ajutorul panoului de operare al aparatului > Imprimarea de pe o cartelă de memorie > Imprimarea fotografiilor salvate pe o cartelă de memorie > Elemente de configurare
Elemente de configurare
La apăsarea butonului se vor afişa elementele de setare după specificarea fotografiei de imprimatşi a numărului de copii.
NotăÎn funcţie de opţiunea selectată, unele elemente de setare nu pot fi precizate împreună.
Fila de setări 1
1. Page size
Selectaţi dimensiunea paginii pentru hârtia încărcată.
2. Media type
Selectaţi tipul de suport pentru hârtia încărcată.
3. Print quality
Ajustaţi calitatea de imprimare în funcţie de documentul original.
4. Aspect
Selectaţi aspectul şi dacă se imprimă cu chenar sau fără chenar.Puteţi selecta următoarele aspecte.Borderless/Bordered/Borderless half side/Bordered half side/Bordered x2/Bordered x4/Bordered x8
NotăCând selectaţi Plain paper pentru tipul de suport, fotografia va fi imprimată cu chenar,chiar dacă selectaţi un aspect fără chenar.
Fila de setări 2
1. Print date
Activaţi/dezactivaţi opţiunea de imprimare pe o fotografie a datei fotografierii.
Pagina 327 din 732 paginiElemente de configurare

NotăData fotografierii este imprimată în conformitate cu Date display din Device settings.
2. Corectare automată a fotografiei
Dacă este selectată funcţia Auto photo fix ON, fundalul sau figura unei persoane dintr-ofotografie este recunoscută şi sunt aplicate automat cele mai adecvate corecţii pentru fiecarefotografie. Luminează o figură întunecată la imprimare cu ajutorul luminii din spate. Deasemenea, analizează imaginile, cum ar fi un decor, o scenă de seară, o persoană, etc. şicorectează automat fiecare scenă cu culoarea, luminozitatea sau contrastul cel mai adecvatpentru imprimare.
NotăÎn mod implicit se aplică Auto photo fix ON când se imprimă fotografii de pe o cartelă dememorie. Când s-a aplicat Auto photo fix ON, puteţi să specificaţi numai corecţia Red-Eye (3) de dedesubt.Dacă rezultatele imprimării cu funcţia Auto photo fix ON selectată nu sunt satisfăcătoare,selectaţi Auto photo fix OFF, apoi specificaţi mai jos elementele de setare avansată de la(4) până la (12).
3. Red-Eye correction
Corectează ochii roşii din portrete în cazul fotografiilor realizate cu bliţ.În funcţie de tipul fotografiei, este posibil ca efectul de ochi roşii să nu fie corectat sau să fiecorectată altă porţiune decât cea a ochilor.
NotăAceastă setare este disponibilă chiar dacă este selectată funcţia Auto photo fix ON.
4. Vivid photo
Face culorile verde şi albastru mai vii.
5. Photo optimizer pro
Optimizează automat luminozitatea şi nuanţele unei fotografii.
6. Noise reduction
Reduce zgomotul din zonele albastre, cum ar fi cerul, precum şi din zonele negre.
7. Face brightener
Luminează o figură întunecată din fotografiile realizate cu soarele în faţă.
8. Image optimizer
Corectează şi uniformizează contururile zimţate pentru imprimare.
9. Brightness
Reglaţi luminozitatea.
10. Contrast
Reglaţi contrastul.
11. Color hue
Reglaţi nuanţa de culoare.De exemplu, puteţi intensifica roşul sau galbenul pentru a regla nuanţele pielii.
12. Effects
Pagina 328 din 732 paginiElemente de configurare

Aplică efecte speciale fotografiei, cum ar fi imprimarea în tonuri sepia sau cu efect de schiţă.
În partea superioară a paginii
Pagina 329 din 732 paginiElemente de configurare

Ghid avansat > Imprimarea cu ajutorul panoului de operare al aparatului > Imprimarea de pe o cartelă de memorie > Imprimarea fotografiilor salvate pe o cartelă de memorie > Imprimarea cu ajutorul foii index foto
Imprimarea cu ajutorul foii index foto
Foaia index foto este o hârtie simplă format A4 sau Letter pe care se imprimă imaginile mici alefotografiilor salvate pe o cartelă de memorie. Imprimaţi o foaie index foto, marcaţi imaginile pe care doriţisă le imprimaţi, scanaţi foaia şi aparatul va imprima apoi imaginile selectate. De asemenea, puteţispecifica alte setări, cum ar fi dimensiunea hârtiei şi tipul de suport, utilizând această foaie; nu trebuiesă efectuaţi setări cu ajutorul Panoului de operare al aparatului.
1. Asiguraţi-vă că aparatul este pus în funcţiune.
2. Încărcaţi hârtie simplă de dimensiune A4 sau Letter.
3. Introduceţi o cartelă de memorie în slotul pentru cartelă.
Pagina 330 din 732 paginiImprimarea cu ajutorul foii index foto

NotăPentru informaţii despre modul în care se introduce o cartelă de memorie, consultaţi Imprimarea de pe o cartelă de memorie .
4. Apăsaţi butonul Meniu (Menu) .
5. Utilizaţi butonul pentru a selecta Photo Index Sheet, apoi apăsaţi butonul OK.
6. Confirmaţi să s-a selectat Photo Index Sheet print, apoi apăsaţi butonul OK.
7. Asiguraţi-vă că hârtia este încărcată, apoi apăsaţi butonul OK.
Foile index foto vor fi imprimate.
ImportantNu scoateţi cartela de memorie până când imprimarea foilor index foto nu s-a finalizat.
NotăDacă pe cartela de memorie sunt 31 de fotografii sau mai multe, vor fi imprimate două saumai multe foi index foto.
8. Umpleţi cercurile corespunzătoare din foaia index foto.
Umpleţi cercurile corespunzătoare ( ) cu un creion negru sau cu un stilou cu cerneală neagrăpentru a selecta fotografiile de imprimat şi setările lor de imprimare.
A. Selectaţi dimensiunea paginii şi alte formate de imprimare.
B. Dacă este necesar, selectaţi „Date”/„Auto Photo Fix OFF”.
C. Umpleţi cercul pentru a imprima toate fotografiile sau pentru a imprima conform setărilorDPOF.
* Dacă aţi umplut acest cerc, orice alt cerc umplut pentru numărul de copii de imprimat pentrufiecare fotografie va fi ignorat şi va fi imprimată o copie pentru fiecare fotografie.*Pentru detalii despre imprimarea DPOF, consultaţi Imprimarea DPOF utilizând foaia index foto .
Pagina 331 din 732 paginiImprimarea cu ajutorul foii index foto
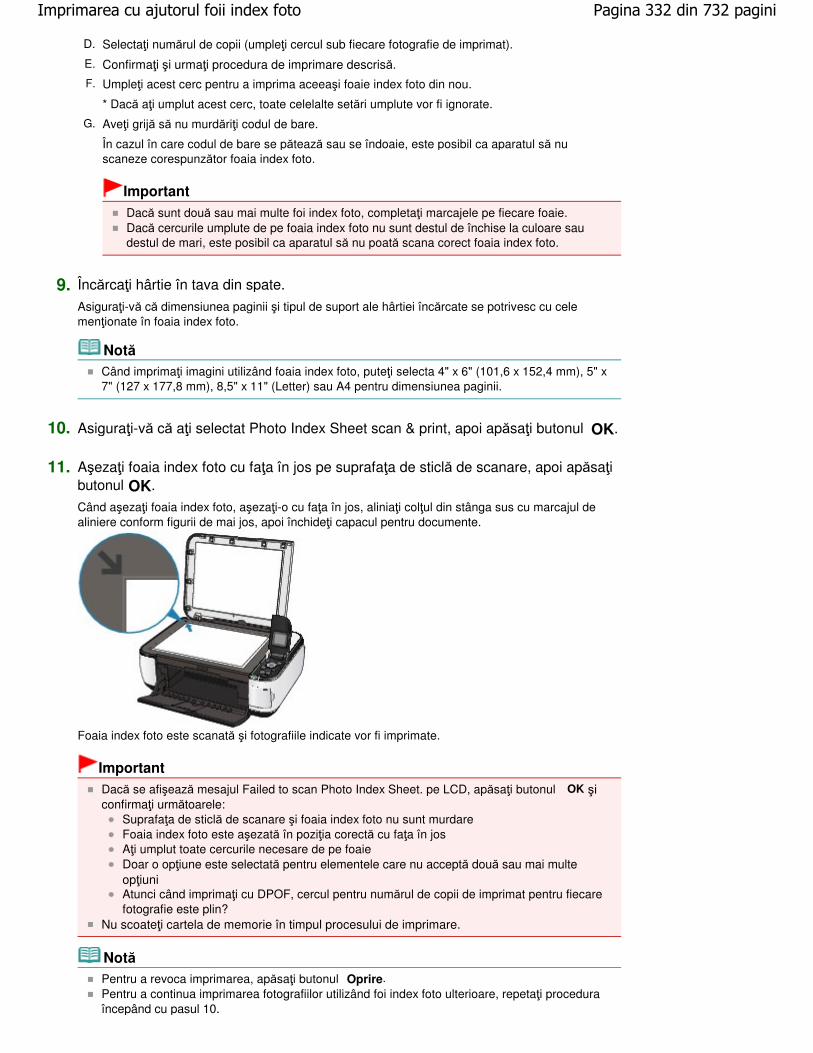
D. Selectaţi numărul de copii (umpleţi cercul sub fiecare fotografie de imprimat).
E. Confirmaţi şi urmaţi procedura de imprimare descrisă.
F. Umpleţi acest cerc pentru a imprima aceeaşi foaie index foto din nou.
* Dacă aţi umplut acest cerc, toate celelalte setări umplute vor fi ignorate.
G. Aveţi grijă să nu murdăriţi codul de bare.
În cazul în care codul de bare se pătează sau se îndoaie, este posibil ca aparatul să nuscaneze corespunzător foaia index foto.
Important
Dacă sunt două sau mai multe foi index foto, completaţi marcajele pe fiecare foaie.Dacă cercurile umplute de pe foaia index foto nu sunt destul de închise la culoare saudestul de mari, este posibil ca aparatul să nu poată scana corect foaia index foto.
9. Încărcaţi hârtie în tava din spate.
Asiguraţi-vă că dimensiunea paginii şi tipul de suport ale hârtiei încărcate se potrivesc cu celemenţionate în foaia index foto.
NotăCând imprimaţi imagini utilizând foaia index foto, puteţi selecta 4" x 6" (101,6 x 152,4 mm), 5" x7" (127 x 177,8 mm), 8,5" x 11" (Letter) sau A4 pentru dimensiunea paginii.
10. Asiguraţi-vă că aţi selectat Photo Index Sheet scan & print, apoi apăsaţi butonul OK.
11. Aşezaţi foaia index foto cu faţa în jos pe suprafaţa de sticlă de scanare, apoi apăsaţibutonul OK.
Când aşezaţi foaia index foto, aşezaţi-o cu faţa în jos, aliniaţi colţul din stânga sus cu marcajul dealiniere conform figurii de mai jos, apoi închideţi capacul pentru documente.
Foaia index foto este scanată şi fotografiile indicate vor fi imprimate.
ImportantDacă se afişează mesajul Failed to scan Photo Index Sheet. pe LCD, apăsaţi butonul OK şiconfirmaţi următoarele:
Suprafaţa de sticlă de scanare şi foaia index foto nu sunt murdareFoaia index foto este aşezată în poziţia corectă cu faţa în josAţi umplut toate cercurile necesare de pe foaieDoar o opţiune este selectată pentru elementele care nu acceptă două sau mai multeopţiuniAtunci când imprimaţi cu DPOF, cercul pentru numărul de copii de imprimat pentru fiecarefotografie este plin?
Nu scoateţi cartela de memorie în timpul procesului de imprimare.
NotăPentru a revoca imprimarea, apăsaţi butonul Oprire.Pentru a continua imprimarea fotografiilor utilizând foi index foto ulterioare, repetaţi proceduraîncepând cu pasul 10.
Pagina 332 din 732 paginiImprimarea cu ajutorul foii index foto

În cazul în care cartela de memorie a fost scoasă şi apoi reintrodusă înainte de imprimarea cuajutorul foii index foto, ar putea dura câteva momente până să înceapă imprimarea.
În partea superioară a paginii
Pagina 333 din 732 paginiImprimarea cu ajutorul foii index foto

Ghid avansat > Imprimarea cu ajutorul panoului de operare al aparatului > Imprimarea de pe o cartelă de memorie >Configurarea slotului pentru cartelă ca unitate de cartelă de memorie a computerului
Configurarea slotului pentru cartelă ca unitate de cartelă dememorie a computerului
Slotul pentru cartelă al aparatului poate fi utilizat, de asemenea, ca unitate de cartelă de memorie acomputerului.
Important
Când Read/write attribute de sub Device settings s-a setat pe Writable from PC utilizând panoul deoperare al aparatului, nu puteţi imprima fotografii de pe o cartelă de memorie utilizând panoul deoperare al aparatului. După utilizarea slotului pentru cartelă ca unitatea de cartelă de memorie acomputerului, scoateţi cartela de memorie, apoi asiguraţi-vă că setaţi opţiunea Read/write attributepe Not writable from PC. Atunci când opriţi aparatul, opţiunea Writable from PC va fi revocată, iarsetarea va reveni la Not writable from PC în momentul în care porniţi din nou aparatul.
1. Asiguraţi-vă că această cartelă de memorie nu este introdusă.
În cazul în care cartela de memorie este introdusă, scoateţi-o din slotul pentru cartelă. Pentru detalii,consultaţi Imprimarea de pe o cartelă de memorie .
2. Apăsaţi butonul Meniu (Menu) .
3. Utilizaţi butonul pentru a selecta Device settings, apoi apăsaţi butonul OK.
4. Utilizaţi butonul pentru a selecta Read/write attribute, apoi apăsaţi butonul OK.
5. Specificaţi atributul de citire/scriere.
Not writable from PC Slotul pentru cartelă este utilizat doar pentru citire. Asiguraţi-vă că selectaţi acest mod atunci cândimprimaţi fotografii de pe o cartelă de memorie.
Writable from PC Slotul pentru cartelă este utilizat ca unitate de cartelă de memorie a computerului. Datele foto pot fiscrise în cartela de memorie.
Important
Dacă utilizaţi slotul pentru cartelă ca unitate de cartelă de memorie a computerului, trebuie săefectuaţi o operaţie de „eliminare în siguranţă” de pe computer înainte de a îndepărta fizic cartelade memorie din aparat.
În Windows, faceţi clic dreapta pe pictograma Disc amovibil (Removable Disk) şi apoifaceţi clic pe Scoatere (Eject). Dacă pe ecran nu se afişează Scoatere (Eject), asiguraţi-vă căledul Access nu clipeşte şi scoateţi cartela de memorie.
Pe Macintosh, trageţi pictograma Mount drive în Trash.
În partea superioară a paginii
Pagina 334 din 732 paginiConfigurarea slotului pentru cartelă ca unitate de cartelă de memorie a co...

Ghid avansat > Scanarea
Scanarea
Scanarea imaginilor
Salvarea datelor scanate pe cartela de memorie utilizând panoul de operare al aparatului
Salvarea datelor scanate pe computer cu ajutorul panoului de operare al aparatului
Scanarea cu pachetul software al aplicaţiei
Scanarea cu alt software de aplicaţie
Alte metode de scanare
În partea superioară a paginii
Pagina 335 din 732 paginiScanarea

Ghid avansat > Scanarea > Scanarea imaginilor
Scanarea imaginilor
Scanarea imaginilor
Înaintea scanării
Aşezarea documentelor
În partea superioară a paginii
Pagina 336 din 732 paginiScanarea imaginilor

Ghid avansat > Scanarea > Scanarea imaginilor > Scanarea imaginilor
Scanarea imaginilor
Puteţi scana imagini de pe aparat pe un computer fără a le imprima şi le puteţi salva în formate de dateimagine cunoscute, precum JPEG, TIFF, bitmap sau PDF. De asemenea, puteţi să salvaţi imaginilescanate în format de date PDF sau JPEG pe cartela de memorie.
Selectaţi metoda de scanare în funcţie de scopul dumneavoastră.
Salvarea datelor scanate pe cartela de memorie cu ajutorul panoului de operare al aparatului
Salvarea datelor scanate pe computer cu ajutorul panoului de operare al aparatului
Scanarea cu pachetul software al aplicaţiei
Scanarea cu alt software de aplicaţie
În partea superioară a paginii
Pagina 337 din 732 paginiScanarea imaginilor

Ghid avansat > Scanarea > Scanarea imaginilor > Înaintea scanării
Înaintea scanării
Înainte de a scana imagini, verificaţi următoarele:
Documentul originalul de scanat întruneşte cerinţele pentru un original
care urmează să fie aşezat pe suprafaţa de sticlă de scanare?Dacă salvaţi datele pe computer, consultaţi Aşezarea documentelor pentru detalii.Dacă salvaţi datele pe cartela de memorie, consultaţi Încărcarea hârtiei / documentelor originalepentru detalii.
În partea superioară a paginii
Pagina 338 din 732 paginiÎnaintea scanării

Advanced Guide > Scanning > Scanning Images > Placing Documents
Placing Documents
Learn how to place documents on the machine's Platen. Place documents correctly according to the typeof document to be scanned. Otherwise, documents may not be scanned correctly.
Important
Do not place objects on the Document Cover. The objects may fall into the machine when theDocument Cover is opened. This may damage the machine.
Placing Documents
Place documents as described below to allow the machine to detect the document type or sizeautomatically.
Important
When scanning by specifying the document type or size in MP Navigator EX or ScanGear (scannerdriver), align an upper corner of the document with the corner at the arrow (alignment mark) of thePlaten.Photos that have been cut to various shapes and documents smaller than 1.18 inches (3 cm)square cannot be cropped accurately when scanning.Reflective CD/DVD labels may not be scanned properly.Close the Document Cover when scanning.
When Scanning Photos, Postcards, BusinessCards or CD/DVD
When Scanning Magazines, Newspapers or TextDocuments
Placing a Single Document
Place the document face-down on the Platen, with3/8 inches (1 cm) or more space between theedges of the Platen and the document. Portionsplaced on the diagonally striped area cannot bescanned.
Important
Large documents (such as A4 size photos)
Place the document face-down on the Platen andalign an upper corner of the document with thecorner at the arrow (alignment mark) of the Platen.Portions placed on the diagonally striped areacannot be scanned.
Pagina 339 din 732 paginiPlacing Documents

that cannot be placed away from the edges/arrow (alignment mark) of the Platen may besaved as PDF files. To save in a format otherthan PDF, scan by specifying the file format.
Placing Multiple Documents
Allow 3/8 inches (1 cm) or more space betweenthe edges of the Platen and documents, andbetween documents. Portions placed on thediagonally striped area cannot be scanned.
NoteYou can place up to 12 documents.Positions of slanted documents (10 degreesor less) are corrected automatically.
Page top
Pagina 340 din 732 paginiPlacing Documents

Ghid avansat > Scanarea > Salvarea datelor scanate pe cartela de memorie cu ajutorul panoului de operare al aparatului
Salvarea datelor scanate pe cartela de memorie cu ajutorulpanoului de operare al aparatului
Salvarea datelor scanate pe cartela de memorie cu ajutorul panoului de operare al aparatului
În partea superioară a paginii
Pagina 341 din 732 paginiSalvarea datelor scanate pe cartela de memorie cu ajutorul panoului de op...

Ghid avansat > Scanarea > Salvarea datelor scanate pe cartela de memorie cu ajutorul panoului de operare al aparatului> Salvarea datelor scanate pe cartela de memorie cu ajutorul panoului de operare al aparatului
Salvarea datelor scanate pe cartela de memorie cu ajutorulpanoului de operare al aparatului
Puteţi salva datele scanate pe o cartelă de memorie cu ajutorul panoului de operare.
Important
Nu scoateţi unitatea cartela de memorie din aparat în următoarele situaţii:În timpul scanăriiÎnainte de salvarea datelor scanate
Datele scanate salvate pe unitatea de cartelă de memorie nu pot fi imprimate în modul cartelă dememorie.Din motive de siguranţă, vă recomandăm să stocaţi periodic datele scanate salvate pe o cartelă dememorie pe un alt suport pentru a evita accidentele neprevăzute.Nu ne asumăm răspunderea pentru nicio daună sau pierdere a datelor indiferent de motiv, chiar şipe durata perioadei de garanţie.
1. Asiguraţi-vă că aparatul este pus în funcţiune.
2. Apăsaţi butonul Meniu (Menu) .
3. Utilizaţi butonul pentru a selecta Scan, apoi apăsaţi butonul OK.
Este afişat ecranul Scan & save to.
4. Utilizaţi butonul pentru a selecta Save to memory card, apoi apăsaţi butonul OK.
5. Introduceţi cartela de memorie în fanta pentru cartelă.
Pentru informaţii referitoare la introducerea cartelei de memorie în slotul pentru cartelă sau latipurile de cartele de memorie compatibile cu aparatul, consultaţi Imprimarea de pe o cartelă dememorie .
6. Selectaţi formatul de date, apoi apăsaţi butonul OK.
Selectaţi PDF sau JPEG.
7. Încărcaţi documentul original pe suprafaţa de sticlă de scanare conforminstrucţiunilor de pe ecranul LCD.
NotăConsultaţi Încărcarea hârtiei/documentelor originale pentru detalii cu privire la modul deîncărcare a documentelor originale pe suprafaţa de sticlă de scanare.Dimensiunea datelor scanate va fi A4, indiferent de dimensiunea documentului original.
Pagina 342 din 732 paginiSalvarea datelor scanate pe cartela de memorie cu ajutorul panoului de op...

8. Apăsaţi butonul OK.
Aparatul începe să scaneze şi datele scanate sunt salvate pe cartela de memorie.După finalizarea scanării, îndepărtaţi documentul original de pe suprafaţa de sticlă de scanare.Pentru a scoate cartela de memorie după finalizarea scanării, consultaţi Imprimarea de pe o cartelăde memorie .
NotăPuteţi scana imagini în mod continuu numai când selectaţi PDF. Continuaţi scanarea urmândecranul de confirmare. Puteţi salva până la 100 de pagini cu imagini într-un fişier PDF.În cazul în care cartela de memorie se umple în timpul scanării imaginilor, pot fi salvate doarimaginile deja scanate.Puteţi salva până la 2000 de fişiere de date scanate atât în format de date JPEG cât şi PDF.Denumirea directorului şi fişierului cu datele scanate salvate pe cartela de memorie esteurmătoarea:
Denumirea folderului: (extensie fişier: PDF): CANON_SC\DOCUMENT\0001Denumirea folderului: (extensie fişier: JPG): CANON_SC\IMAGE\0001Denumirea fişierului: Numere continue, pornind de la SCN_0001Data fişierului: 01/01/2009
În partea superioară a paginii
Pagina 343 din 732 paginiSalvarea datelor scanate pe cartela de memorie cu ajutorul panoului de op...

Ghid avansat > Scanarea > Salvarea datelor scanate pe computer cu ajutorul panoului de operare al aparatului
Salvarea datelor scanate pe computer cu ajutorul panoului deoperare al aparatului
Salvarea datelor scanate pe computer cu ajutorul panoului de operare al aparatului
Anexă: Diferite setări de scanare
În partea superioară a paginii
Pagina 344 din 732 paginiSalvarea datelor scanate pe computer cu ajutorul panoului de operare al a...
Ghid avansat > Scanarea > Salvarea datelor scanate pe computer cu ajutorul panoului de operare al aparatului >Salvarea datelor scanate pe computer cu ajutorul panoului de operare al aparatului
Salvarea datelor scanate pe computer cu ajutorul panoului deoperare al aparatului
Puteţi salva datele scanate pe computer utilizând panoul de operare al aparatului.
Înainte de a salva datele scanate pe computer, verificaţi următoarele:
Aplicaţiile software necesare (MP Drivers şi MP Navigator EX) sunt
instalate.Dacă aplicaţiile software (MP Drivers şi MP Navigator EX) nu sunt încă instalate, introduceţi CD-ROM
-ul de instalare (Setup CD-ROM) în unitatea de disc a computerului, apoi executaţi CustomInstall şi selectaţi MP Drivers şi MP Navigator EX.
Aparatul este conectat la computer în mod corespunzător.Asiguraţi-vă că aparatul este conectat corect la computer.
Nu conectaţi şi nu deconectaţi cablul USB în timp ce aparatul scanează imagini sau atunci cândcomputerul se află în modul inactivitate sau în modul standby.
Operaţia care se va realiza după scanarea documentului original este
specificată în MP Navigator EX.MP Navigator EX vă permite să specificaţi răspunsul rezultat în urma apăsării butonului Culoare(Color) sau Negru (Black) de pe aparat. Puteţi specifica răspunsul individual, pentru fiecareeveniment. Pentru detalii, consultaţi Selectarea unui răspuns pentru comenzile primite de la panoulde operare, utilizând MP Navigator EX .
1. Setaţi aplicaţia de pornire.
Dacă utilizaţi Mac OS X v.10.5.x sau Mac OS X v.10.4.x:Această operaţie nu este necesară.Dacă utilizaţi Mac OS X v.10.3.9:Trebuie să setaţi MP Navigator EX ca aplicaţia software de start în Captură imagine din Applicationsîn Mac OS X.Selectaţi Applications din meniul Go, apoi faceţi dublu clic pe pictograma Image Capture. Faceţi clicpe Options în partea din stânga jos a ferestrei scanerului, selectaţi MP Navigator EX 3 în Applicationto launch when the scanner button is pressed:, după care faceţi clic pe OK. Pentru a părăsi ImageCapture, selectaţi Quit Image Capture din meniul Image Capture.
ImportantDacă Options nu este afişat, selectaţi Preferences din meniul Image Capture, faceţi clic peScanner şi faceţi clic pe Use TWAIN software whenever possible pentru a şterge opţiunea.Apoi părăsiţi Image Capture şi reporniţi-l.
2. Asiguraţi-vă că aparatul este pus în funcţiune.
NotăConsultaţi Aşezarea documentelor pentru detalii cu privire la modul de încărcare adocumentelor originale pe suprafaţa de sticlă de scanare.
3. Apăsaţi butonul Meniu (Menu) .
4. Utilizaţi butonul pentru a selecta Scan, apoi apăsaţi butonul OK.
Pagina 345 din 732 paginiSalvarea datelor scanate pe computer cu ajutorul panoului de operare al a...

Se va afişa ecranul de selectare a locului de salvare a datelor.
5. Utilizaţi butonul pentru a selecta Save to PC, apoi apăsaţi butonul OK.
6. Încărcaţi documentul original pe suprafaţa de sticlă de scanare conforminstrucţiunilor de pe ecranul LCD.
NotăOpţiunile pentru operaţiile de scanare se pot specifica în MP Navigator EX. Pentru detalii,consultaţi Selectarea unui răspuns pentru comenzile primite de la panoul de operare, utilizândMP Navigator EX.
7. Apăsaţi butonul OK.
La scanare sunt aplicate setările configurate prin MP Navigator EX.
8. Pentru a specifica MP Navigator EX 3.0
Dacă utilizaţi Windows Vista:Este posibil să fie afişat ecranul de selectare a programului după apăsarea butonului Culoare(Color) sau Negru (Black). În acest caz, selectaţi MP Navigator EX Ver3.0 şi faceţi clic pe OK.Puteţi seta MP Navigator EX să se lanseze de câte ori este apăsat butonul Culoare (Color) sau Negru (Black). Pentru detalii, consultaţi Pentru utilizatorii Windows .Dacă utilizaţi Windows XP:Este posibil să fie afişat ecranul de selectare a programului după prima apăsare a butonului Culoare (Color) sau Negru (Black). În acest caz, specificaţi MP Navigator EX Ver3.0 ca aplicaţiesoftware de utilizat, selectaţi Always use this program for this action, apoi faceţi clic pe OK. Dataurmătoare, MP Navigator EX este pornit automat.
Important
Dacă poziţia sau dimensiunea unei imagini nu este scanată corect în funcţie de tipuldocumentului original, consultaţi Scanarea fotografiilor şi documentelor şi modificaţi setărileMP Navigator EX Document Type şi Document Size pentru a se potrivi cu cele ale originaluluicare este scanat.
Dacă doriţi să editaţi sau să imprimaţi imaginile scanateMP Navigator EX vă permite să editaţi imaginile scanate, precum optimizarea sau tăierea lor.
Puteţi, de asemenea, să porniţi aplicaţia software din MP Navigator EX pentru a edita sau imprimaimaginile scanate.
Să încercăm să scanăm
Dacă doriţi să scanaţi documente originale cu setări avansateScanGear vă permite să scanaţi documente originale cu setări avansate, precum rezoluţia.
Scanarea cu Setări avansate, utilizând ScanGear (driver de scaner)
NotăPuteţi utiliza o aplicaţie software compatibilă TWAIN sau WIA (doar Windows Vista şi WindowsXP) şi Panoul de control (doar Windows Vista şi Windows XP) pentru a scana documenteoriginale cu acest aparat.Pentru detalii, consultaţi Alte metode de scanare .
Pagina 346 din 732 paginiSalvarea datelor scanate pe computer cu ajutorul panoului de operare al a...

În partea superioară a paginii
Pagina 347 din 732 paginiSalvarea datelor scanate pe computer cu ajutorul panoului de operare al a...

Advanced Guide > Scanning > Saving Scanned Data to PC Using the Operation Panel of the Machine > Appendix:Various Scan Settings
Appendix: Various Scan Settings
Specifying how to respond when scanning using the Operation Panel of the machine
Selecting a Response to Commands from the Operation Panel Using MP Navigator EX
Page top
Pagina 348 din 732 paginiAppendix: Various Scan Settings

Advanced Guide > Scanning > Saving Scanned Data to PC Using the Operation Panel of the Machine > Appendix:Various Scan Settings > Selecting a Response to Commands from the Operation Panel Using MP Navigator EX
Selecting a Response to Commands from the Operation PanelUsing MP Navigator EX
MP Navigator EX enables you to specify the response resulting from pressing a button for scanning onthe Operation Panel of the machine. You can specify the response individually for each event.
1. Start MP Navigator EX.
Starting MP Navigator EX
2. Click Preferences.
The Preferences dialog box opens.
NoteThe Preferences dialog box can also be opened by clicking Preferences in the One-click Modescreen.
3. On the Scanner Button Settings tab, specify Actions.
Pagina 349 din 732 paginiSelecting a Response to Commands from the Operation Panel Using MP Na...

NoteSee the section below for details.
Scanner Button Settings Tab (Save)
4. Click OK.The operation will be performed according to the settings when you press the OK button on themachine.
Page top
Pagina 350 din 732 paginiSelecting a Response to Commands from the Operation Panel Using MP Na...

Ghid avansat > Scanarea > Scanarea cu pachetul software al aplicaţiei
Scanarea cu pachetul software al aplicaţiei
Ce este MP Navigator EX (Software de scanare furnizat)?
Să încercăm să scanăm
Funcţii utile din MP Navigator EX
Utilizarea imaginilor în MP Navigator EX
Ecranele aplicaţiei MP Navigator EX
Anexă: Deschiderea fişierelor diferite de imaginile scanate
În partea superioară a paginii
Pagina 351 din 732 paginiScanarea cu pachetul software al aplicaţiei

Advanced Guide > Scanning > Scanning with the Bundled Application Software > What Is MP Navigator EX (Supplied
Scanner Software)?
What Is MP Navigator EX (Supplied Scanner Software)?
MP Navigator EX is an application that enables you to easily scan photos and documents. It is suitableeven for beginners.
Important
MP Navigator EX may not start from the Operation Panel of the machine. In that case, restart thecomputer.Use the default display font size of the OS. Otherwise, software screens may not appear correctly.
What You Can Do with This Software
This software allows you to scan multiple documents at one time, or scan images larger than the Platen.You can also save scanned images, attach them to e-mail or print them using the supplied applications.
Screens
Main Menus
There are two types of MP Navigator EX Main Menu: Navigation Mode screen and One-click Mode screen.
Navigation Mode Screen
You can start various tasks from the Navigation Mode screen, including simple scanning, scanningusing ScanGear (scanner driver), and enhancing/correcting images.
One-click Mode Screen
You can complete from scanning to saving, etc. at one time by simply clicking the corresponding icon inthe One-click Mode screen.
Pagina 352 din 732 paginiWhat Is MP Navigator EX (Supplied Scanner Software)?

Scan/Import Window
Use the Scan/Import window to scan photos and documents, or import images saved on memory cards.
View & Use Window
Use the View & Use window to select what you want to do with the scanned images.
Page top
Pagina 353 din 732 paginiWhat Is MP Navigator EX (Supplied Scanner Software)?

Advanced Guide > Scanning > Scanning with the Bundled Application Software > Let's Try Scanning
Let's Try Scanning
Try scanning using MP Navigator EX.
Starting MP Navigator EX
Starting MP Navigator EX
Scanning documents, photos, magazines, etc. from the Platen
Scanning Photos and Documents
Scanning two or more photos (small documents) at one time
Scanning Multiple Documents at One Time
Scanning images larger than the Platen
Scanning Images Larger than the Platen (Stitch Assist)
Scanning easily according to purpose (scan and save, attach to e-mail, etc.)
Easy Scanning with One-click
Page top
Pagina 354 din 732 paginiLet's Try Scanning

Advanced Guide > Scanning > Scanning with the Bundled Application Software > Let's Try Scanning > Starting MPNavigator EX
Starting MP Navigator EX
Starting MP Navigator EX
1. Double-click Canon MP Navigator EX 3.0 icon on the desktop.MP Navigator EX starts.
NoteAlternatively, from the Start menu, select (All) Programs > Canon Utilities > MP Navigator EX 3.0> MP Navigator EX 3.0.
Starting One-click Mode
1. Click (Switch Mode) at the bottom left of the screen.
The One-click Mode screen appears.
Pagina 355 din 732 paginiStarting MP Navigator EX

NoteSelect the Show this window at startup checkbox in the Navigation Mode screen to always openthe Navigation Mode screen at startup. If this checkbox is not selected, the last used screenappears at startup.
Page top
Pagina 356 din 732 paginiStarting MP Navigator EX

Advanced Guide > Scanning > Scanning with the Bundled Application Software > Let's Try Scanning > Scanning Photosand Documents
Scanning Photos and Documents
Scan photos and documents placed on the Platen.
1. Start MP Navigator EX and open the Navigation Mode screen.
Starting MP Navigator EX
2. Point to Scan/Import and click Photos/Documents (Platen).
3. Place the document on the Platen, then select Document Type.
Placing Documents
NoteWhen you select Magazine(Color), the Descreen function will be enabled and scanning takeslonger than usual. To disable the Descreen function, deselect the Descreen checkbox in the
Pagina 357 din 732 paginiScanning Photos and Documents

Scan Settings dialog box.Select Text(OCR) to extract the text in the image and convert to editable text data using MPNavigator EX.Color scanning is not available for Text(OCR). To scan in color, use OCR in One-click and scanwith Color Mode set to Color.
4. Click Specify... to set the document size and scanning resolution as required.
When setting is completed, click OK.
Scan Settings Dialog Box (Photos/Documents)
Important
When scanning a large document (such as an A4 size photo), align its corner with the corner atthe arrow (alignment mark) of the platen and specify the document size in the Scan Settingsdialog box.
5. Click Scan.
Scanning starts.
When scanning is completed, the Scan Complete dialog box opens. Select Scan or Exit. SelectScan to scan the next document, or select Exit to end.
The scanned images appear in the Thumbnail window.
Pagina 358 din 732 paginiScanning Photos and Documents

6. Edit the scanned images as required.
Use Edit Tools to rotate images, select a part of an image, etc.
See the Edit Tools in "Photos/Documents (Platen) Screen (Scan/Import Window) " for details.
NoteFirst select images to edit. (Selected images are outlined in orange.) Drag the mouse or useShift + arrow keys to select multiple images.
7. Save the scanned images.
Saving
Saving as PDF Files
Page top
Pagina 359 din 732 paginiScanning Photos and Documents

Advanced Guide > Scanning > Scanning with the Bundled Application Software > Let's Try Scanning > ScanningMultiple Documents at One Time
Scanning Multiple Documents at One Time
You can scan two or more photos (small documents) at one time by setting Document Size to AutoDetect (Multiple Documents) in the Scan Settings dialog box of MP Navigator EX.
ImportantThe following types of documents may not be cropped correctly. In that case, start ScanGear(scanner driver), then adjust the cropping frames (scan areas) in whole image view and scanagain.- Photos that have a whitish border- Documents printed on white paper, hand-written text, business cards, etc.- Thin documents- Thick documents
Scanning Multiple Documents in Whole Image View
1. Place the document on the Platen.
Placing Documents
2. Start MP Navigator EX and open the Navigation Mode screen.
Starting MP Navigator EX
3. Point to Scan/Import and click Photos/Documents (Platen).
4. Select Document Type according to the document to be scanned.
Pagina 360 din 732 paginiScanning Multiple Documents at One Time

5. Click Specify....
Select Auto Detect (Multiple Documents) for Document Size.
When setting is completed, click OK.
Scan Settings Dialog Box (Photos/Documents)
6. Click Scan.
Pagina 361 din 732 paginiScanning Multiple Documents at One Time

Multiple documents are scanned at one time.
When scanning is completed, the Scan Complete dialog box opens. Select Scan or Exit. SelectScan to scan the next document, or select Exit to end.
The scanned images appear in the Thumbnail window.
7. Edit the scanned images as required.
Use Edit Tools to rotate images, select a part of an image, etc.
See the Edit Tools in "Photos/Documents (Platen) Screen (Scan/Import Window) " for details.
NoteFirst select images to edit. (Selected images are outlined in orange.) Drag the mouse or useShift + arrow keys to select multiple images.
8. Save the scanned images.
Saving
Saving as PDF Files
NoteIf you want to preview the images before scanning, use ScanGear (scanner driver).
Scanning Multiple Documents at One Time with ScanGear (Scanner Driver)
Page top
Pagina 362 din 732 paginiScanning Multiple Documents at One Time

Advanced Guide > Scanning > Scanning with the Bundled Application Software > Let's Try Scanning > Scanning ImagesLarger than the Platen (Stitch Assist)
Scanning Images Larger than the Platen (Stitch Assist)
Stitch Assist allows you to scan the left and right halves of a large document separately and combine thescanned images back into one image. You can scan documents that are up to twice as large as thePlaten.
1. Start MP Navigator EX and open the Navigation Mode screen.
Starting MP Navigator EX
NoteYou can complete from scanning to saving, etc. at one time by simply clicking thecorresponding icon in the One-click Mode screen. Stitch Assist is available from the One-clickMode screen as well, by changing the document size. Click the corresponding icon and selectStitch Assist for Document Size. Then skip ahead to Step 5.
2. Point to Scan/Import and click Photos/Documents (Platen).
3. Select Document Type according to the document to be scanned.
Pagina 363 din 732 paginiScanning Images Larger than the Platen (Stitch Assist)

4. Click Specify....
Select Stitch Assist for Document Size, then specify the scanning resolution as required.
When setting is completed, click OK.
Scan Settings Dialog Box (Photos/Documents)
5. Click Scan.
Pagina 364 din 732 paginiScanning Images Larger than the Platen (Stitch Assist)

The Stitch-assist window opens.
6. Place the left half of the document face-down on the Platen.
7. Click Scan.
The left half of the document is scanned and appears in the Stitch-assist window.
8. Place the right half of the document face-down on the Platen.
9. Click Scan.The right half of the document is scanned.
10. Adjust the scanned image as required.
Use the icons to swap the left and right halves, rotate the image 180 degrees or enlarge/reduce theimage.
Pagina 365 din 732 paginiScanning Images Larger than the Platen (Stitch Assist)

(Swap Left & Right)
Swaps the left and right halves.
Important
This function is not available while the image is enlarged/reduced.
Rotate 180°
Rotates right half of the image 180 degrees.
Important
This function is not available while the image is enlarged/reduced.
(Enlarge)
Enlarges the displayed image.
(Reduce)
Reduces the displayed image.
(Full-screen)
Enlarges/reduces the image to display it full-screen.
NoteEnlarge/Reduce does not affect the actual size of the scanned image.When the document is scanned upside down, the image displayed in the Stitch-assist windowwill also be upside down. Click Rotate 180° to rotate the image to the correct orientation.You can drag the right half of the image from right to left or up and down to adjust the position.If the left and right halves do not match due to a slanted document, place the documentcorrectly and click Back, then scan again.
11. Click Next.
12. Drag the mouse to specify the area to be saved, then click OK.
Pagina 366 din 732 paginiScanning Images Larger than the Platen (Stitch Assist)

The combined image appears in the Thumbnail window.
When scanning is completed, the Scan Complete dialog box opens. Select Scan or Exit. SelectScan to scan the next document, or select Exit to end.
13. Save the scanned images.
Saving
Saving as PDF Files
Page top
Pagina 367 din 732 paginiScanning Images Larger than the Platen (Stitch Assist)

Advanced Guide > Scanning > Scanning with the Bundled Application Software > Let's Try Scanning > Easy Scanningwith One-click
Easy Scanning with One-click
You can complete from scanning to saving, etc. at one time by simply clicking the corresponding icon.
1. Place the document on the Platen.
Placing Documents
2. Start MP Navigator EX.
Starting MP Navigator EX
The MP Navigator EX Navigation Mode screen or One-click Mode screen appears.
Navigation Mode Screen
One-click Mode Screen
NoteSkip ahead to Step 4 if One-click Mode screen is open.
3. Point to One-click.
Pagina 368 din 732 paginiEasy Scanning with One-click

4. Click the corresponding icon.
Custom Scan with One-click Tab
One-click Mode Screen
5. Select Document Type according to the document to be scanned.
6. Set the document size and scanning resolution as required.
7. Start scanning.
Scanning starts.
Page top
Pagina 369 din 732 paginiEasy Scanning with One-click

Advanced Guide > Scanning > Scanning with the Bundled Application Software > Useful MP Navigator EX Functions
Useful MP Navigator EX Functions
With MP Navigator EX, you can correct/enhance scanned images beautifully, and search saved imagesquickly.
Correcting/enhancing images automatically
Correcting/Enhancing Images Automatically
Correcting/enhancing images manually
Correcting/Enhancing Images Manually
Adjusting color characteristics such as brightness and contrast
Adjusting Images
Searching for lost images
Searching Images
Classifying and sorting images
Classifying Images into Categories
Page top
Pagina 370 din 732 paginiUseful MP Navigator EX Functions
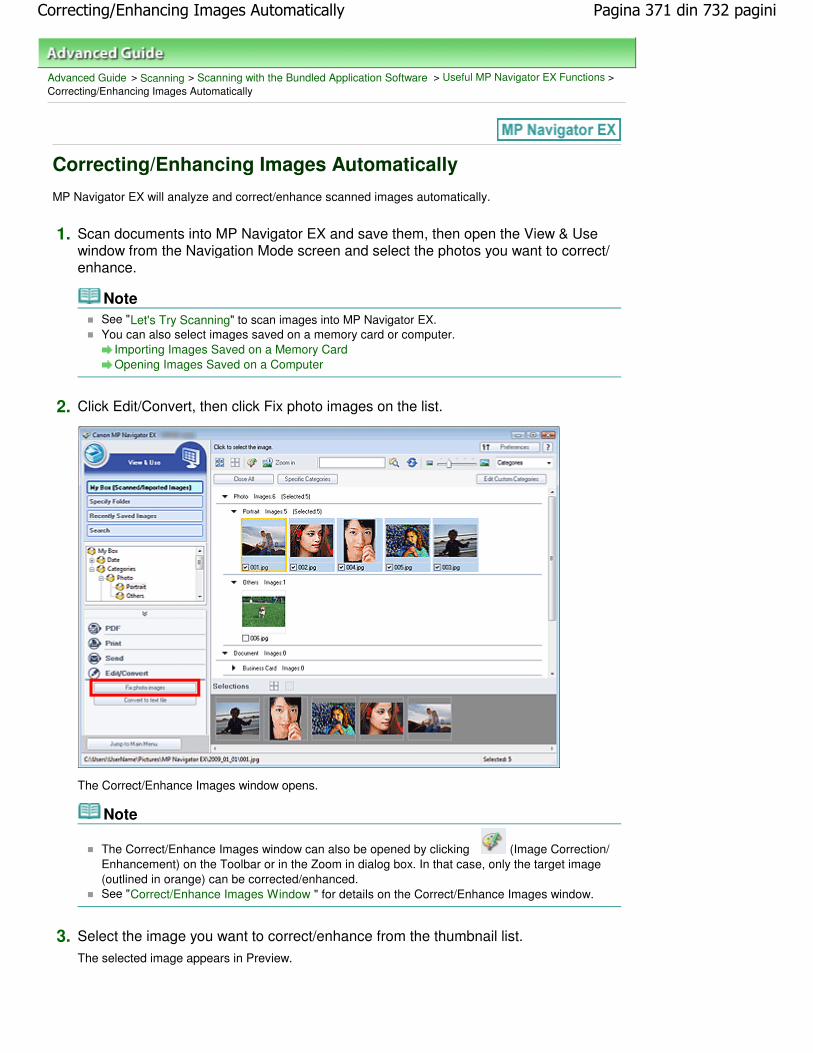
Advanced Guide > Scanning > Scanning with the Bundled Application Software > Useful MP Navigator EX Functions >Correcting/Enhancing Images Automatically
Correcting/Enhancing Images Automatically
MP Navigator EX will analyze and correct/enhance scanned images automatically.
1. Scan documents into MP Navigator EX and save them, then open the View & Usewindow from the Navigation Mode screen and select the photos you want to correct/enhance.
NoteSee "Let's Try Scanning" to scan images into MP Navigator EX.You can also select images saved on a memory card or computer.
Importing Images Saved on a Memory CardOpening Images Saved on a Computer
2. Click Edit/Convert, then click Fix photo images on the list.
The Correct/Enhance Images window opens.
Note
The Correct/Enhance Images window can also be opened by clicking (Image Correction/Enhancement) on the Toolbar or in the Zoom in dialog box. In that case, only the target image(outlined in orange) can be corrected/enhanced.See "Correct/Enhance Images Window " for details on the Correct/Enhance Images window.
3. Select the image you want to correct/enhance from the thumbnail list.
The selected image appears in Preview.
Pagina 371 din 732 paginiCorrecting/Enhancing Images Automatically

NoteIf you selected only one image in the View & Use window, the thumbnail list does not appearand only the preview image appears.
4. Make sure that Auto is selected.
5. Click Auto Photo Fix, Face Sharpener or Digital Face Smoothing.
Important
Once image is corrected with Auto Photo Fix and saved, it cannot be corrected again with AutoPhoto Fix. Auto Photo Fix may not be available for images edited using an application, digitalcamera, etc. manufactured by other companies.
NoteThe Face Sharpener and Digital Face Smoothing effect levels can be changed using the sliderthat appears by clicking the corresponding buttons.When you apply Auto Photo Fix, dark backlit photos will be corrected automatically. If the imageis not corrected enough using Auto Photo Fix, it is recommended that you apply FaceBrightener on the Manual tab.
Correcting/Enhancing Images Manually
Pagina 372 din 732 paginiCorrecting/Enhancing Images Automatically
6. Click OK.
The entire image is corrected/enhanced automatically and (Correct/Enhance) appears on theupper left of the thumbnail and preview image.
NoteClick Reset Selected Image to undo the correction/enhancement.Select the Apply to all images checkbox to correct/enhance all selected images.
7. Click Save Selected Image or Save All Corrected Images.
You can save corrected/enhanced images as new files.
NoteTo save only the images you like, select them and click Save Selected Image. To save allimages, click Save All Corrected Images.The file format of corrected/enhanced images is JPEG/Exif.Adobe RGB images are saved as sRGB images.
8. Click Exit.
Important
The corrections/enhancements will be lost if you exit before saving corrected/enhancedimages.
Page top
Pagina 373 din 732 paginiCorrecting/Enhancing Images Automatically

Advanced Guide > Scanning > Scanning with the Bundled Application Software > Useful MP Navigator EX Functions >Correcting/Enhancing Images Manually
Correcting/Enhancing Images Manually
You can correct/enhance scanned images manually.
1. Scan documents into MP Navigator EX and save them, then open the View & Usewindow from the Navigation Mode screen and select the photos you want to correct/enhance.
NoteSee "Let's Try Scanning" to scan images into MP Navigator EX.You can also select images saved on a memory card or computer.
Importing Images Saved on a Memory CardOpening Images Saved on a Computer
2. Click Edit/Convert, then click Fix photo images on the list.
The Correct/Enhance Images window opens.
Note
The Correct/Enhance Images window can also be opened by clicking (Image Correction/Enhancement) on the Toolbar or in the Zoom in dialog box. In that case, only the target image(outlined in orange) can be corrected/enhanced.See "Correct/Enhance Images Window " for details on the Correct/Enhance Images window.
3. Select the image you want to correct/enhance from the thumbnail list.
The selected image appears in Preview.
Pagina 374 din 732 paginiCorrecting/Enhancing Images Manually

NoteIf you selected only one image in the View & Use window, the thumbnail list does not appearand only the preview image appears.
4. Click Manual, then click Correct/Enhance.
5. Click Face Brightener, Face Sharpener, Digital Face Smoothing or BlemishRemover.
NoteThe Face Brightener, Face Sharpener and Digital Face Smoothing effect levels can bechanged using the slider that appears by clicking the corresponding buttons.
Move the cursor over the image. The shape of the cursor changes to (Cross).
6. Drag to select the area you want to correct/enhance, then click OK that appearsover the image.
Pagina 375 din 732 paginiCorrecting/Enhancing Images Manually

The portion in and around the selected area is corrected/enhanced and (Correct/Enhance)appears on the upper left of the thumbnail and preview image.
NoteYou can also drag to rotate the rectangle.Click Undo to undo the latest correction/enhancement.Click Reset Selected Image to cancel all corrections, enhancements and adjustments appliedto the selected image.
7. Click Save Selected Image or Save All Corrected Images.
You can save corrected/enhanced images as new files.
NoteTo save only the images you like, select them and click Save Selected Image. To save allimages, click Save All Corrected Images.The file format of corrected/enhanced images is JPEG/Exif.
8. Click Exit.
ImportantThe corrections/enhancements will be lost if you exit before saving corrected/enhancedimages.
Page top
Pagina 376 din 732 paginiCorrecting/Enhancing Images Manually

Advanced Guide > Scanning > Scanning with the Bundled Application Software > Useful MP Navigator EX Functions >Adjusting Images
Adjusting Images
You can make fine adjustments to the overall brightness, contrast, etc. of images.
1. Scan documents into MP Navigator EX and save them, then open the View & Usewindow from the Navigation Mode screen and select the photos you want to adjust.
NoteSee "Let's Try Scanning" to scan images into MP Navigator EX.You can also select images saved on a memory card or computer.
Importing Images Saved on a Memory CardOpening Images Saved on a Computer
2. Click Edit/Convert, then click Fix photo images on the list.
The Correct/Enhance Images window opens.
Note
The Correct/Enhance Images window can also be opened by clicking (Image Correction/Enhancement) on the Toolbar or in the Zoom in dialog box. In that case, only the target image(outlined in orange) can be corrected/enhanced.See "Correct/Enhance Images Window " for details on the Correct/Enhance Images window.
3. Select the image you want to adjust from the thumbnail list.
The selected image appears in Preview.
Pagina 377 din 732 paginiAdjusting Images

NoteIf you selected only one image in the View & Use window, the thumbnail list does not appearand only the preview image appears.
4. Click Manual, then click Adjust.
5. Move the slider of the item you want to adjust and set the effect level.
When you move a slider, (Correct/Enhance) appears on the upper left of the thumbnail andpreview image.
NoteClick Defaults to reset all adjustments.Click Reset Selected Image to cancel all corrections, enhancements and adjustments appliedto the selected image.
6. Click Save Selected Image or Save All Corrected Images.
You can save adjusted images as new files.
NoteTo save only the images you like, select them and click Save Selected Image. To save allimages, click Save All Corrected Images.
Pagina 378 din 732 paginiAdjusting Images

The file format of adjusted images is JPEG/Exif.
7. Click Exit.
Important
The adjustments will be lost if you exit before saving adjusted images.
Page top
Pagina 379 din 732 paginiAdjusting Images

Advanced Guide > Scanning > Scanning with the Bundled Application Software > Useful MP Navigator EX Functions >Searching Images
Searching Images
In the View & Use window of the Navigation Mode screen, you can search images saved on yourcomputer and open them in MP Navigator EX. Opened images can be printed, edited, etc.
NoteSearch images in My Box (Scanned/Imported Images), Recently Saved Images or a selected folderand its subfolders. You can also specify folder and search in Specify Folder.See "Starting MP Navigator EX" to start MP Navigator EX.
Quick Search
In (Text box) on the Toolbar, enter a word or phrase included in the file
name, Exif information or PDF text of the image you want to search for, then click (Search button).For Exif information, text in Maker, Model, Description and User Comment is searched.
Advanced Search
Click Search on the left of the screen to open search options. Enter information of the image you want tosearch for, then click Start Search.
Pagina 380 din 732 paginiSearching Images

Search in
If you know where to look for, select the drive, folder or network from Specify Folder.
File Name
If you know the file name, enter it.
A word or phrase in the file
Enter a word or phrase included in the items selected in More Advanced Options.
Important
For PDF files, you can only search for those created with MP Navigator EX. You cannot searchPDF files created or edited in other applications. Also, searching PDF files is available onlywhen keyword search is set.For details of creating PDF files that enables keyword search, see " PDF Settings Dialog Box ."Password-protected PDF files cannot be searched.
Category
You can search for images by category.
Modified Date
To search for images that have been updated in a specific time period, enter the first and last datesof the period.
Shooting Date
To search for images captured in a specific time period, enter the first and last dates of the period.
NoteCaptured date is the date and time of data creation, which are included in the document's Exifinformation.
More Advanced Options
A word or phrase in the file
In A word or phrase in the file, select the items to search. If you select the Exif information
Pagina 381 din 732 paginiSearching Images

checkbox, text in Maker, Model, Description and User Comment is searched. If you select thePDF text checkbox, text in PDF files is searched.
Important
Text in password-protected PDF files cannot be searched.
Search subfolders
Select this checkbox to search subfolders.
Case sensitive
Select this checkbox to match case.
Match all criteria
Searches for files that meet all the specified criteria.
Match any criteria
Searches for files that meet any of the specified criteria.
Start Search
Starts search.
Related Topic
View & Use Window
Page top
Pagina 382 din 732 paginiSearching Images

Advanced Guide > Scanning > Scanning with the Bundled Application Software > Useful MP Navigator EX Functions >Classifying Images into Categories
Classifying Images into Categories
Display images scanned with MP Navigator EX by category. You can classify unclassified imagesautomatically, and also create custom categories. You can drag and drop an image to move it from onecategory to another.
NoteIf you have classified the images in MP Navigator EX 2.0 or later and then upgrade MP Navigator EXto the latest version, the classification information on the second latest version is transferred uponinitial startup. After the initial startup, the classification information cannot be transferred.
1. Scan documents into MP Navigator EX and save them, then open the View & Usewindow from the Navigation Mode screen.
NoteSee "Let's Try Scanning" to scan images into MP Navigator EX.You can also select images saved on a memory card or computer.
Importing Images Saved on a Memory CardOpening Images Saved on a Computer
2. In (Sort by), select Categories.Images are automatically sorted by category and appear in the Thumbnail window.
Pagina 383 din 732 paginiClassifying Images into Categories

Images are sorted into the following categories.
Photos: Portrait, Others
Documents: Business Card, Postcard, Standard Size, PDF File, Others
Custom categories: Displays your custom categories.
To create custom categories, see " Creating Custom Categories ."
Unclassified: Displays images that have not yet been classified.
NoteClick Classify Images to classify images displayed in Unclassified automatically. Click Cancelto stop.Classification may take time if there are many images to classify.
Important
Even if you classify images saved in removable media such as USB flash drive and external harddisk, the classification information will be deleted once you remove the media. From the next time,the images are classified to Unclassified.Images cannot be classified when Recently Saved Images is selected in the View & Use window.
NoteSome images may not be detected correctly and thus may be classified into wrong categories. Inthat case, drag and drop the image to the correct category.Images saved in network folders may not be classified.You can search for images by category. See "Searching Images " for details.
Creating Custom Categories
1. In the View & Use window, sort images by category and click Edit Custom
Pagina 384 din 732 paginiClassifying Images into Categories

Categories.
The Edit Custom Categories dialog box opens.
2. Click Add to List.
The Add Category dialog box opens.
3. Enter Category name and click OK.
NoteYou can create up to 20 custom categories.Up to 50 single-byte characters can be used for a category name.Double-click a created category to open the Change Category Name dialog box in which youcan change the category name.Select a custom category and click Delete to delete it.
Related Topic
View & Use Window
Page top
Pagina 385 din 732 paginiClassifying Images into Categories

Advanced Guide > Scanning > Scanning with the Bundled Application Software > Utilizing Images in MP Navigator EX
Utilizing Images in MP Navigator EX
You can scan images using MP Navigator EX and edit or print the saved images.
See the corresponding sections below for details on saving scanned images.
Saving scanned images to computer
Saving
Saving scanned image as PDF Files
Saving as PDF Files
See the corresponding sections below for details on using images/files.
Creating/editing PDF files from scanned images
Creating/Editing PDF Files
Printing multiple scanned images at one time or printing at specific size, quality, etc.
Printing Documents
Printing scanned photos
Printing Photos
Sending scanned images via e-mail
Sending via E-mail
Correcting/enhancing scanned images or converting them to text
Editing Files
Setting passwords for created PDF files
Setting Passwords for PDF FilesOpening/Editing Password-protected PDF Files
Page top
Pagina 386 din 732 paginiUtilizing Images in MP Navigator EX

Advanced Guide > Scanning > Scanning with the Bundled Application Software > Utilizing Images in MP Navigator EX >Saving
Saving
Save images scanned with MP Navigator EX to a computer.
1. Select the checkboxes of the images you want to save, then click Save.
2. In the Save dialog box, specify the save settings.
Specify the destination folder, file name and file type.
Save Dialog Box
Important
You cannot select JPEG/Exif when Document Type is Text(OCR).
NoteBy default, the following folders are specified as the destination folders.Windows Vista: MP Navigator EX folder in Pictures folderWindows XP: MP Navigator EX folder in My Pictures folderWindows 2000: MP Navigator EX folder in My Pictures folder
Pagina 387 din 732 paginiSaving

3. Click Save.
Scanned images are saved according to the settings.
To further use/edit the scanned images on MP Navigator EX, click Open saved location in the SaveComplete dialog box.
Creating/Editing PDF Files
Printing Documents
Printing Photos
Sending via E-mail
Editing Files
Page top
Pagina 388 din 732 paginiSaving

Advanced Guide > Scanning > Scanning with the Bundled Application Software > Utilizing Images in MP Navigator EX >Saving as PDF Files
Saving as PDF Files
Save images scanned with MP Navigator EX as PDF files.
1. Select the checkboxes of the images you want to save, then click Save as PDF file.
2. In the Save as PDF file dialog box, specify the save settings.
Specify the file type, file name and destination folder.
Save as PDF file Dialog Box
Select from the following PDF file types:
Pagina 389 din 732 paginiSaving as PDF Files

Save each of the selected images as a separate PDF file.
PDF(Multiple Pages)
Save multiple images in one PDF file.
NotePDF(Multiple Pages) is displayed when multiple images are selected.
PDF(Add Page)
Add the scanned images to a PDF file. The images are added to the end of the PDF file. Youcannot rearrange the pages of the PDF file to which the images are added.
Important
Images can only be added to PDF files created with MP Navigator EX. You cannot specifyPDF files created with other applications. PDF files edited in other applications cannot bespecified as well.If a password-protected PDF file is edited, the passwords will be deleted. Reset thepasswords.
NoteBy default, the following folders are specified as the destination folders.Windows Vista: MP Navigator EX folder in Pictures folderWindows XP: MP Navigator EX folder in My Pictures folderWindows 2000: MP Navigator EX folder in My Pictures folderYou can set passwords for PDF files.
Setting Passwords for PDF Files
3. Click Save.
Scanned images are saved according to the settings.
To further use/edit the scanned images on MP Navigator EX, click Open saved location in the SaveComplete dialog box.
Creating/Editing PDF Files
Printing Documents
Printing Photos
Sending via E-mail
Editing Files
Page top
Pagina 390 din 732 paginiSaving as PDF Files
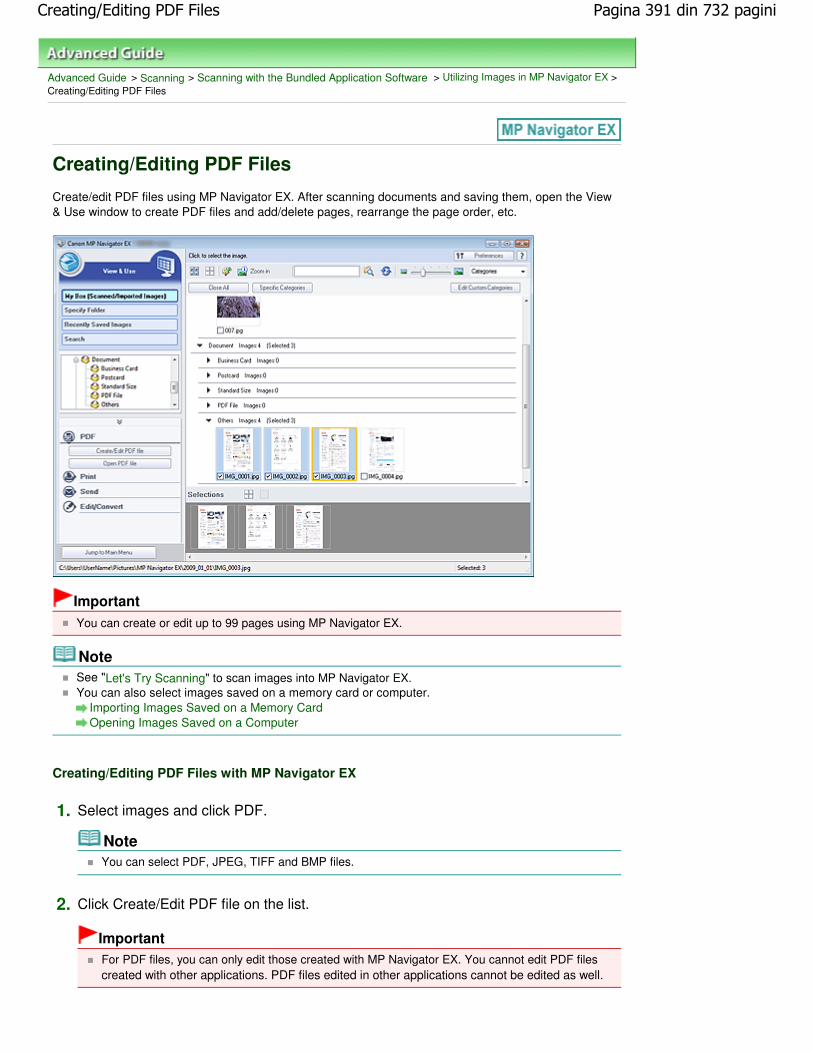
Advanced Guide > Scanning > Scanning with the Bundled Application Software > Utilizing Images in MP Navigator EX >Creating/Editing PDF Files
Creating/Editing PDF Files
Create/edit PDF files using MP Navigator EX. After scanning documents and saving them, open the View& Use window to create PDF files and add/delete pages, rearrange the page order, etc.
Important
You can create or edit up to 99 pages using MP Navigator EX.
NoteSee "Let's Try Scanning" to scan images into MP Navigator EX.You can also select images saved on a memory card or computer.
Importing Images Saved on a Memory CardOpening Images Saved on a Computer
Creating/Editing PDF Files with MP Navigator EX
1. Select images and click PDF.
NoteYou can select PDF, JPEG, TIFF and BMP files.
2. Click Create/Edit PDF file on the list.
ImportantFor PDF files, you can only edit those created with MP Navigator EX. You cannot edit PDF filescreated with other applications. PDF files edited in other applications cannot be edited as well.
Pagina 391 din 732 paginiCreating/Editing PDF Files
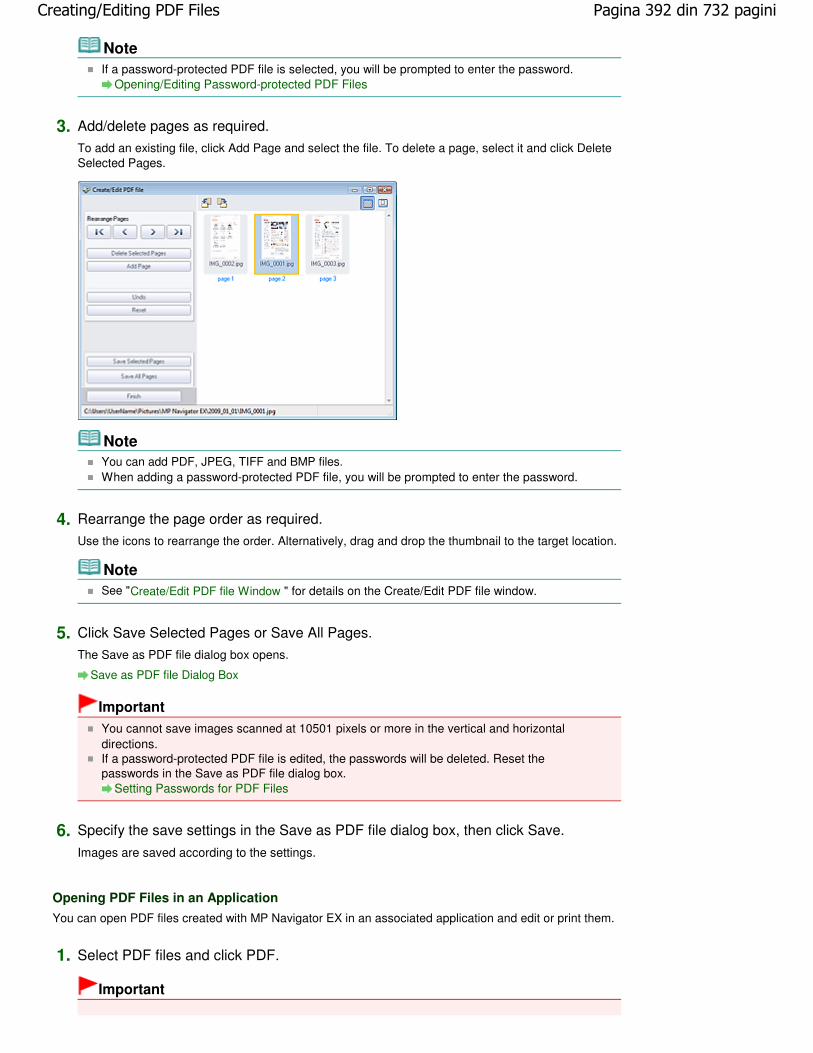
NoteIf a password-protected PDF file is selected, you will be prompted to enter the password.
Opening/Editing Password-protected PDF Files
3. Add/delete pages as required.
To add an existing file, click Add Page and select the file. To delete a page, select it and click DeleteSelected Pages.
NoteYou can add PDF, JPEG, TIFF and BMP files.When adding a password-protected PDF file, you will be prompted to enter the password.
4. Rearrange the page order as required.
Use the icons to rearrange the order. Alternatively, drag and drop the thumbnail to the target location.
NoteSee "Create/Edit PDF file Window " for details on the Create/Edit PDF file window.
5. Click Save Selected Pages or Save All Pages.
The Save as PDF file dialog box opens.
Save as PDF file Dialog Box
Important
You cannot save images scanned at 10501 pixels or more in the vertical and horizontaldirections.If a password-protected PDF file is edited, the passwords will be deleted. Reset thepasswords in the Save as PDF file dialog box.
Setting Passwords for PDF Files
6. Specify the save settings in the Save as PDF file dialog box, then click Save.
Images are saved according to the settings.
Opening PDF Files in an Application
You can open PDF files created with MP Navigator EX in an associated application and edit or print them.
1. Select PDF files and click PDF.
Important
Pagina 392 din 732 paginiCreating/Editing PDF Files

For PDF files, you can only select those created with MP Navigator EX. You cannot select PDFfiles created with other applications. PDF files edited in other applications cannot be selectedas well.
2. Click Open PDF file on the list.
The application associated with the .pdf file extension by the operating system starts.
Important
Password-protected PDF files cannot be opened in applications not supporting PDF security.Files may not open if an application that can be associated with PDF files is not installed.
3. Use the application to edit/print the file.
For details, refer to the application's manual.
Important
In some applications, the commands (print, edit, etc.) restricted by Permissions Passwordmay differ from those in MP Navigator EX.
Page top
Pagina 393 din 732 paginiCreating/Editing PDF Files

Advanced Guide > Scanning > Scanning with the Bundled Application Software > Utilizing Images in MP Navigator EX >Printing Documents
Printing Documents
You can print multiple scanned images at one time, print at specific quality, etc. using MP Navigator EX.
1. Scan documents into MP Navigator EX and save them, then open the View & Usewindow from the Navigation Mode screen and select images.
NoteSee "Let's Try Scanning" to scan images into MP Navigator EX.You can also select images saved on a memory card or computer.
Importing Images Saved on a Memory CardOpening Images Saved on a Computer
2. Click Print, then click Print Document on the list.
Important
If a password-protected PDF file is selected, you will be prompted to enter the password.Opening/Editing Password-protected PDF Files
3. Specify print settings as required.
In the displayed dialog box, specify print count, quality, scale, etc.
Print Document Dialog Box
Pagina 394 din 732 paginiPrinting Documents

Important
At normal-size (100%), some images may be printed small or with some portions cropped. Inthat case, select Auto to resize the print in proportion to the paper size.
4. Click Print.
Printing starts.
NoteWhen printing a multiple-page PDF file via Print Document, printing may take time dependingon your computer. In that case, follow these steps and change settings.1. From the Start menu, select Control Panel.2. Click Printers.3. Right-click the icon of your printer and click Properties.The printer properties dialog box opens.4. Click the Advanced tab.5. Select Spool print documents so program finishes printing faster.6. Select Start printing after last page is spooled.7. After printing, return the setting on the Advanced tab to Start printing immediately.To cancel while spooling, click Cancel. To cancel while printing, click Cancel Printing in theconfirmation window for the printer status. To open a confirmation window for the printer status,click printer icon on the taskbar.
Page top
Pagina 395 din 732 paginiPrinting Documents

Advanced Guide > Scanning > Scanning with the Bundled Application Software > Utilizing Images in MP Navigator EX >Printing Photos
Printing Photos
You can print photos using MP Navigator EX or an application that accompanies the machine. Afterscanning documents and saving them, open the View & Use window to select how you want to print thephotos.
NoteSee "Let's Try Scanning" to scan images into MP Navigator EX.You can also select images saved on a memory card or computer.
Importing Images Saved on a Memory CardOpening Images Saved on a Computer
When Printing Photos Using Easy-PhotoPrint EX
You can use Easy-PhotoPrint EX to print scanned photos at high quality or to layout and print images.
1. Select images and click Print.
2. Click Print Photo or Print Album on the list.Easy-PhotoPrint EX starts. See " Printing Photos " for details.
NoteIf Easy-PhotoPrint EX is not installed, print with MP Navigator EX.
When Printing Photos Using MP Navigator EX
1. Select images and click Print.
Pagina 396 din 732 paginiPrinting Photos

2. Click Print Photo on the list.
3. Specify print settings as required.
In the displayed dialog box, specify paper size, print count, etc.
Print Photo Dialog Box
4. Click Print.
Printing starts.
NoteTo cancel while spooling, click Cancel. To cancel while printing, click Cancel Printing in theconfirmation window for the printer status. To open a confirmation window for the printer status,click printer icon on the taskbar.
Page top
Pagina 397 din 732 paginiPrinting Photos

Advanced Guide > Scanning > Scanning with the Bundled Application Software > Utilizing Images in MP Navigator EX >Sending via E-mail
Sending via E-mail
Send scanned images via e-mail.
Important
MP Navigator EX is compatible with the following e-mail software programs:- Windows Mail (Windows Vista)- Outlook Express (Windows XP/Windows 2000)- Microsoft Outlook(If an e-mail software program does not operate properly, check that the program's MAPI is enabled.To enable MAPI, refer to the manual of the e-mail software program.)
1. Scan documents into MP Navigator EX and save them, then open the View & Usewindow from the Navigation Mode screen and select images.
NoteSee "Let's Try Scanning" to scan images into MP Navigator EX.You can also select images saved on a memory card or computer.
Importing Images Saved on a Memory CardOpening Images Saved on a Computer
2. Click Send, then click Attach to E-mail on the list.
3. Set save options as required.
Specify the destination folder and file name.
Send via E-mail Dialog Box
Pagina 398 din 732 paginiSending via E-mail

NoteYou can select a compression type when sending JPEG images via e-mail. Click Set... to opena dialog box and select a compression type from High(Low Compression), Standard orLow(High Compression).
4. Click OK.
Files are saved according to the settings, and the e-mail software program starts.
5. Specify the recipient, enter the subject and message, then send e-mail.For details, refer to the manual of the e-mail software program.
Page top
Pagina 399 din 732 paginiSending via E-mail

Advanced Guide > Scanning > Scanning with the Bundled Application Software > Utilizing Images in MP Navigator EX >Editing Files
Editing Files
You can edit images or convert them to text using MP Navigator EX or an application that accompaniesthe machine. After scanning documents and saving them, open the View & Use window to select whatyou want to do with the images.
NoteSee "Let's Try Scanning" to scan images into MP Navigator EX.You can also select images saved on a memory card or computer.
Importing Images Saved on a Memory CardOpening Images Saved on a Computer
Correcting Photo Images
You can correct/enhance images in the Correct/Enhance Images window.
1. Select images and click Edit/Convert.
2. Click Fix photo images on the list.
The Correct/Enhance Images window opens.
3. Correct/enhance images in the Correct/Enhance Images window.
NoteSee "Correct/Enhance Images Window " for details on the Correct/Enhance Images window.See the corresponding sections below for correcting/enhancing images.
Correcting/Enhancing Images AutomaticallyCorrecting/Enhancing Images Manually
Pagina 400 din 732 paginiEditing Files

Converting Documents to Text
Scan text in scanned magazines and newspapers and display it in Notepad (included with Windows).
ImportantPDF files cannot be converted to text.
1. Select images and click Edit/Convert.
2. Click Convert to text file on the list.
Notepad (included with Windows) starts and editable text appears.
NoteOnly text written in languages that can be selected on the General tab can be extracted toNotepad (included with Windows). Click Set... on the General tab and specify the languageaccording to the language of the document to be scanned.When scanning multiple documents, you can collect the extracted text into one file.
General TabText displayed in Notepad (included with Windows) is for guidance only. Text in the image ofthe following types of documents may not be detected correctly.- Documents containing text with font size outside the range of 8 points to 40 points (at 300 dpi)- Slanted documents- Documents placed upside down or documents with text in the wrong orientation (rotatedcharacters)- Documents containing special fonts, effects, italics, or hand-written text- Documents with narrow line spacing- Documents with colors in the background of text- Documents containing multiple languages
Page top
Pagina 401 din 732 paginiEditing Files

Advanced Guide > Scanning > Scanning with the Bundled Application Software > Utilizing Images in MP Navigator EX >Setting Passwords for PDF Files
Setting Passwords for PDF Files
Set passwords for opening, editing and printing PDF files.
You can set two passwords: one for opening the file and one for editing/printing it.
Important
In Windows 2000, Internet Explorer 5.5 Service Pack 2 or later is required to use this function.You will not be able to open/edit the file if you forget the password. Record your passwords in a safeplace for future reference.Password-protected PDF files cannot be opened in applications not supporting PDF security.In some applications, the commands (print, edit, etc.) restricted by Permissions Password maydiffer from those in MP Navigator EX.Password-protected PDF files cannot be searched by text from the View & Use Window .
1. Scan documents into MP Navigator EX, then click Save as PDF file.Alternatively, edit existing files in the Create/Edit PDF file window, then click SaveSelected Pages or Save All Pages.The Save as PDF file dialog box opens.
Important
Passwords cannot be set when images are automatically saved after scanning, such as whenscanning from the One-click Mode screen or scanning using the Operation Panel of themachine.
NoteSee "Let's Try Scanning" to scan images.See "Creating/Editing PDF Files " to create PDF files from existing images or to edit files.
2. Select the Password security settings checkbox.
Pagina 402 din 732 paginiSetting Passwords for PDF Files

The Password Security -Settings dialog box opens.
NoteYou can also open the Password Security -Settings dialog box by clicking Set..., then selectingPassword Security for Security in the PDF Settings dialog box.
3. Select the Require a password to open the document or Use a password to restrictprinting and editing of the document and its security settings checkbox, then enter apassword.
Important
Up to 32 single-byte alphanumeric characters can be used for the password. Passwords arecase sensitive.Select both checkboxes to set both Document Open Password and Permissions Password.You cannot use the same password for both.
4. Click OK.
The Confirm Document Open Password or Confirm Permissions Password dialog box opens.
Pagina 403 din 732 paginiSetting Passwords for PDF Files

Document Open Password
Permissions Password
5. Re-enter the password and click OK.The Save as PDF file dialog box returns.
ImportantIf you close the Save as PDF file dialog box without clicking Save, the settings in the PasswordSecurity -Settings dialog box will be deleted.Passwords are deleted once the file is edited. Reset the passwords when saving edited files.
NoteIf you set the passwords via the PDF Settings dialog box, the PDF Settings dialog box returns.Click OK. The Save as PDF file dialog box returns.
6. Click Save.Files are saved according to the settings.
Related Topic
Opening/Editing Password-protected PDF Files
Page top
Pagina 404 din 732 paginiSetting Passwords for PDF Files
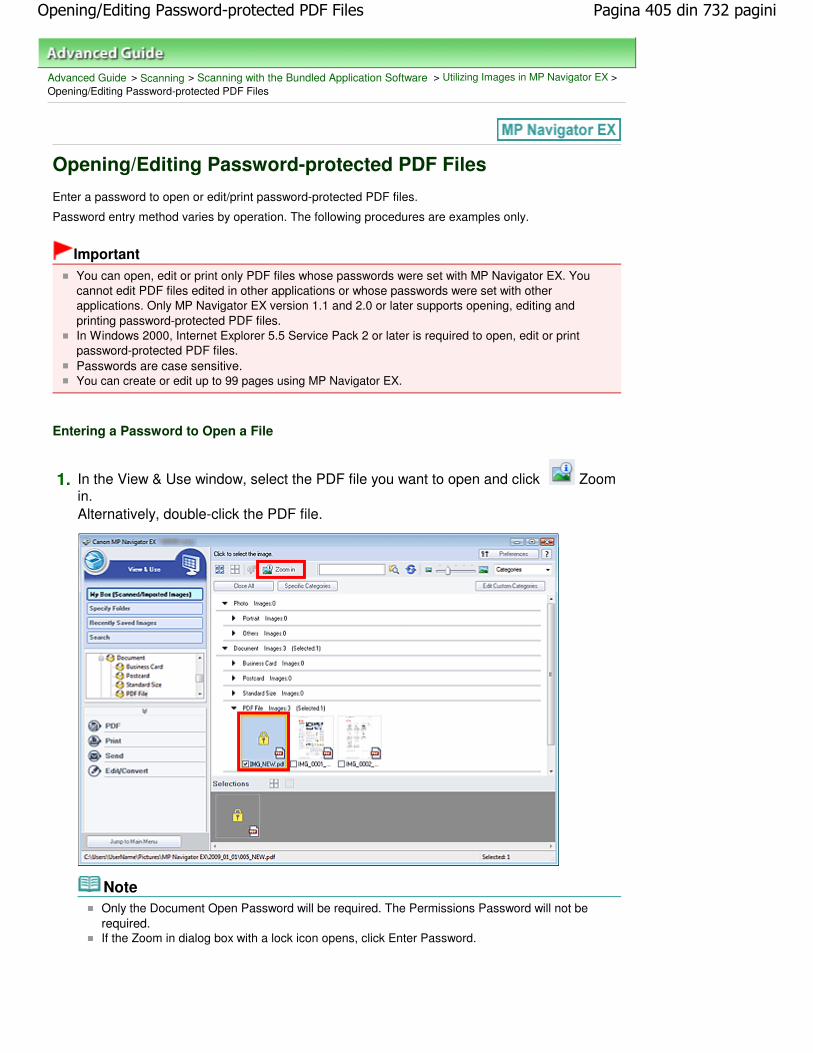
Advanced Guide > Scanning > Scanning with the Bundled Application Software > Utilizing Images in MP Navigator EX >Opening/Editing Password-protected PDF Files
Opening/Editing Password-protected PDF Files
Enter a password to open or edit/print password-protected PDF files.
Password entry method varies by operation. The following procedures are examples only.
Important
You can open, edit or print only PDF files whose passwords were set with MP Navigator EX. Youcannot edit PDF files edited in other applications or whose passwords were set with otherapplications. Only MP Navigator EX version 1.1 and 2.0 or later supports opening, editing andprinting password-protected PDF files.In Windows 2000, Internet Explorer 5.5 Service Pack 2 or later is required to open, edit or printpassword-protected PDF files.Passwords are case sensitive.You can create or edit up to 99 pages using MP Navigator EX.
Entering a Password to Open a File
1. In the View & Use window, select the PDF file you want to open and click Zoomin.Alternatively, double-click the PDF file.
NoteOnly the Document Open Password will be required. The Permissions Password will not berequired.If the Zoom in dialog box with a lock icon opens, click Enter Password.
Pagina 405 din 732 paginiOpening/Editing Password-protected PDF Files

2. The Password dialog box opens. Enter the password and click OK.
The PDF file opens in the Zoom in dialog box.
NoteTo reopen the file after closing the Zoom in dialog box, re-enter the password.
Entering a Password (Permissions Password) to Edit or Print a File
1. In the View & Use window, select PDF files and click PDF or Print.
Pagina 406 din 732 paginiOpening/Editing Password-protected PDF Files

2. To create a PDF file or edit the file, select Create/Edit PDF file on the list. To printthe file, click Print Document.
In the Password dialog box, you will be prompted to enter a password.
NoteIf the Document Open Password is set as well, the Document Open Password will berequired, then the Permissions Password will be required.
3. Enter the password and click OK.
The corresponding dialog box opens.
Important
If a password-protected PDF file is edited, the passwords will be deleted. Reset thepasswords.
Setting Passwords for PDF Files
Related Topic
Setting Passwords for PDF Files
Page top
Pagina 407 din 732 paginiOpening/Editing Password-protected PDF Files

Advanced Guide > Scanning > Scanning with the Bundled Application Software > MP Navigator EX Screens
MP Navigator EX Screens
Learn about the screens and functions of MP Navigator EX.
Scan/Import Documents or Images Tab
Photos/Documents (Platen) Screen (Scan/Import Window)
Scan Settings Dialog Box (Photos/Documents)Save Dialog BoxSave as PDF file Dialog Box
Memory Card Screen (Scan/Import Window)
View & Use Images on your Computer Tab
View & Use Window
Create/Edit PDF file WindowPrint Document Dialog BoxPrint Photo Dialog BoxSend via E-mail Dialog BoxCorrect/Enhance Images Window
Custom Scan with One-click Tab / One-click Mode Screen
Auto Scan Dialog Box
Save Dialog Box (One-click Mode Screen)
PDF Dialog Box
Mail Dialog Box
OCR Dialog Box
Custom Dialog Box
Preferences Dialog Box
General Tab
Scanner Button Settings Tab (Save)
Page top
Pagina 408 din 732 paginiMP Navigator EX Screens

Advanced Guide > Scanning > Scanning with the Bundled Application Software > MP Navigator EX Screens >Navigation Mode Screen
Navigation Mode Screen
This is one of the startup screens of MP Navigator EX.
Point to the icon at the top of the screen to display each tab. Use each tab depending on what you want todo.
Scan/Import
You can scan photos and documents, or import images saved on memory cards.Scan/Import Documents or Images Tab
View & Use
You can open images saved on a computer and print them or attach them to e-mail. You can also editthem using an application that accompanies the machine.
View & Use Images on your Computer Tab
One-click
You can complete from scanning to saving, etc. at one time by simply clicking the corresponding icon.Custom Scan with One-click Tab
(Switch Mode)
Switches to One-click Mode screen. In the One-click Mode screen, you can complete from scanning tosaving, etc. at one time by simply clicking the corresponding icon.
One-click Mode Screen
Show this window at startup
Select this checkbox to open the Main Menu at startup. If this checkbox is not selected, the last usedscreen appears.
Preferences
The Preferences dialog box opens. In the Preferences dialog box, you can make advanced settings toMP Navigator EX functions.
Preferences Dialog Box
(Guide)
Opens this guide.
Page top
Pagina 409 din 732 paginiNavigation Mode Screen

Advanced Guide > Scanning > Scanning with the Bundled Application Software > MP Navigator EX Screens > Scan/Import Documents or Images Tab
Scan/Import Documents or Images Tab
Point to Scan/Import in the Navigation Mode screen to display the Scan/Import Documents or Imagestab.
You can scan photos and documents, or import images saved on memory cards.
Photos/Documents (Platen)
Opens the Scan/Import window. Scan photos and documents placed on the Platen.Photos/Documents (Platen) Screen (Scan/Import Window)
Memory Card
Opens the Scan/Import window with Memory Card selected. Import images saved on memory cards.Memory Card Screen (Scan/Import Window)
(Switch Mode)
Switches to One-click Mode screen. In the One-click Mode screen, you can complete from scanning tosaving, etc. at one time by simply clicking the corresponding icon.
One-click Mode Screen
Show this window at startup
Select this checkbox to open the Main Menu at startup. If this checkbox is not selected, the last usedscreen appears.
Preferences
The Preferences dialog box opens. In the Preferences dialog box, you can make advanced settings toMP Navigator EX functions.
Preferences Dialog Box
(Guide)
Opens this guide.
Page top
Pagina 410 din 732 paginiScan/Import Documents or Images Tab

Advanced Guide > Scanning > Scanning with the Bundled Application Software > MP Navigator EX Screens > View &Use Images on your Computer Tab
View & Use Images on your Computer Tab
Point to View & Use in the Navigation Mode screen to display the View & Use Images on your Computertab.
You can open images saved on a computer and print them or attach them to e-mail. You can also editthem using an application that accompanies the machine.
My Box (Scanned/Imported Images)
Opens the View & Use window with My Box (Scanned/Imported Images) selected.You can open and use images saved in My Box.My Box is a specific folder for saving images scanned with MP Navigator EX.
NoteThe following folders are specified by default.Windows Vista: MP Navigator EX folder in Pictures folderWindows XP: MP Navigator EX folder in My Pictures folderWindows 2000: MP Navigator EX folder in My Pictures folder
Specify Folder
Opens the View & Use window with Specify Folder selected.You can open and use images saved in specific folders.
Recently Saved Images
Opens the View & Use window with Recently Saved Images selected.You can open and use "Scanned/Imported Images" and images that have been "Attached to E-mail" or"Sent to Application" recently.
View & Use Window
(Switch Mode)
Switches to One-click Mode screen. In the One-click Mode screen, you can complete from scanning tosaving, etc. at one time by simply clicking the corresponding icon.
One-click Mode Screen
Show this window at startup
Select this checkbox to open the Main Menu at startup. If this checkbox is not selected, the last usedscreen appears.
Preferences
Pagina 411 din 732 paginiView Use Images on your Computer Tab

The Preferences dialog box opens. In the Preferences dialog box, you can make advanced settings toMP Navigator EX functions.
Preferences Dialog Box
(Guide)
Opens this guide.
Related Topic
Opening Images Saved on a Computer
Page top
Pagina 412 din 732 paginiView Use Images on your Computer Tab

Advanced Guide > Scanning > Scanning with the Bundled Application Software > MP Navigator EX Screens > CustomScan with One-click Tab
Custom Scan with One-click Tab
Point to One-click in the Navigation Mode screen to display the Custom Scan with One-click tab.
You can complete from scanning to saving, etc. at one time by simply clicking the corresponding icon.
Auto Scan
Scan documents by automatically detecting the document type. File format is automatically set. Filesare saved to a computer. You can apply Auto Photo Fix as required.When you click this icon, the Auto Scan dialog box opens and you can specify the save settings.
Auto Scan Dialog Box
Save to PC
Scan documents or photos and save them to a computer. The document type can be detectedautomatically.When you click this icon, the Save dialog box opens and you can specify the scan/save settings.
Save Dialog Box (One-click Mode Screen)
Save as PDF file
Scan documents and save them as PDF files.When you click this icon, the PDF dialog box opens and you can specify the scan/save and applicationsettings.
PDF Dialog Box
Attach to E-mail
Scan documents or photos and attach them to e-mail.When you click this icon, the Mail dialog box opens and you can specify the scan/save and e-mailsoftware program settings.
Mail Dialog Box
OCR
Scan text documents then extract text in the image and display it in Notepad (included with Windows).When you click this icon, the OCR dialog box opens and you can specify the scan/save settings.
OCR Dialog Box
NoteFor further procedures, refer to the application's manual.
Custom
Scan documents and open them in a specified application. Document type is automatically detected.
Pagina 413 din 732 paginiCustom Scan with One-click Tab

When you click this icon, the Custom dialog box opens and you can specify the scan/save andapplication settings.
Custom Dialog Box
NoteFor further procedures, refer to the application's manual.
Start scanning by clicking the button
Select this checkbox and click an icon to start scanning immediately.
(Switch Mode)
Switches to One-click Mode. The One-click Mode screen appears.One-click Mode Screen
Show this window at startup
Select this checkbox to open the Main Menu at startup. If this checkbox is not selected, the last usedscreen appears.
Preferences
The Preferences dialog box opens. In the Preferences dialog box, you can make advanced settings toMP Navigator EX functions.
Preferences Dialog Box
(Guide)
Opens this guide.
Important
The following restrictions apply when you scan with Document Type set to Auto Mode in the Save orCustom dialog box.When you want to convert text in the scanned image to text data, specify Document Type (do notselect Auto Mode).
Related Topic
Easy Scanning with One-click
Page top
Pagina 414 din 732 paginiCustom Scan with One-click Tab

Advanced Guide > Scanning > Scanning with the Bundled Application Software > MP Navigator EX Screens > Photos/Documents (Platen) Screen (Scan/Import Window)
Photos/Documents (Platen) Screen (Scan/Import Window)
Point to Scan/Import in the Navigation Mode screen and click Photos/Documents (Platen) to open thePhotos/Documents (Platen) screen (Scan/Import window).
Open this window to scan documents from the Platen.
(1) Settings and Operation Buttons
(2) Toolbar
(3) Thumbnail Window
(4) Selected Images Area
Settings and Operation Buttons
(View & Use)
Click this when you want to open images and PDF files saved on your computer. The View & Usewindow opens.
View & Use Window
Photos/Documents (Platen)
Displays the screen for scanning photos, documents, magazines and other printed materials.
Memory Card
Click this when you want to import images saved on a memory card. The screen for importingimages from a memory card appears.
Memory Card Screen (Scan/Import Window)
Document Type
Select the type of document to be scanned.Scanning photos: Color Photo or Black and White PhotoScanning text documents: Color Document, Black and White Document or Text(OCR)Scanning magazines: Magazine(Color)
Important
Pagina 415 din 732 paginiPhotos/Documents (Platen) Screen (Scan/Import Window)

You cannot select Document Type if the Use the scanner driver checkbox is selected.
Specify...
Specify the document size, resolution, and other advanced scan settings.Scan Settings Dialog Box (Photos/Documents)
ImportantSpecify... is not available if the Use the scanner driver checkbox is selected.
Use the scanner driver
Select this checkbox when you want to scan with ScanGear (scanner driver). Use ScanGear(scanner driver) to correct images and adjust colors when scanning.
Scan
Scanning starts.
NoteThis button changes to Open Scanner Driver when you select the Use the scanner drivercheckbox.
Open Scanner Driver
ScanGear (scanner driver) starts.See "ScanGear (Scanner Driver) Screens " for details on ScanGear (scanner driver) screens.
NoteThis button changes to Scan when you deselect the Use the scanner driver checkbox.
Clear
Delete all images in the Thumbnail window.
NoteImages not saved on a computer will be deleted. To keep important images, use Save or othermethods to save them to a computer before clicking Clear.
Save
Save the selected images. Click to open the Save dialog box and specify the save settings.Save Dialog Box
Save as PDF file
Save the selected images as PDF files. Click to open the Save as PDF file dialog box and specify thesave settings.
Save as PDF file Dialog Box
Jump to Main Menu
Jumps to the Main Menu.
Toolbar
Preferences
The Preferences dialog box opens. In the Preferences dialog box, you can make advanced settingsto MP Navigator EX functions.
Preferences Dialog Box
(Guide)
Opens this guide.
Edit Tools
(Select All)
Pagina 416 din 732 paginiPhotos/Documents (Platen) Screen (Scan/Import Window)

Selects all images in the Thumbnail window.
(Cancel All)
Cancels all image selections in the Thumbnail window.
(Rotate Left)
Rotates the target image (outlined in orange) 90 degrees counter-clockwise.
(Rotate Right)
Rotates the target image (outlined in orange) 90 degrees clockwise.
(Invert)
Inverts the target image (outlined in orange) horizontally.
(Trimming)
Trims the target image (outlined in orange) in the Thumbnail window. Trimming is the act ofselecting the area you want to keep in a photo and discarding the rest. Click this button to openthe Crop window and specify the trimming frame.
Zoom in
Enlarges the target image (outlined in orange). You can also enlarge the image by double-clicking it.
(Display Size)
Changes the size of images in the Thumbnail window.
(Sort by)
Sorts the images in the Thumbnail window by category or by date (ascending or descending).
Thumbnail Window
Thumbnail Window
Scanned images are displayed.When you select the checkbox of an image, the image appears in the Selected Images area.
NoteThumbnails may appear as "?" when there is not enough memory to display the images.
When Images are Sorted by Categories
Close All / Open All
Close All
Hides all images.
Open All
Displays all images.
NoteClick Close All to change to Open All.
Selected Images Area
(Cancel All)
Cancels the selection of all images in the Selected Images area.
Pagina 417 din 732 paginiPhotos/Documents (Platen) Screen (Scan/Import Window)

(Cancel Selection)
Cancels the selection of the target image (outlined in orange) in the Selected Images area.
Selected Images Area
Images selected in the Thumbnail window are displayed.
Related Topic
Scanning Photos and Documents
Page top
Pagina 418 din 732 paginiPhotos/Documents (Platen) Screen (Scan/Import Window)

Advanced Guide > Scanning > Scanning with the Bundled Application Software > MP Navigator EX Screens > ScanSettings Dialog Box (Photos/Documents)
Scan Settings Dialog Box (Photos/Documents)
The Scan Settings dialog box opens when you click Specify... in the Scan/Import window.
In the Scan Settings dialog box, you can make advanced scan settings.
Document Type
Select the type of document to be scanned.Scanning photos: Color Photo or Black and White PhotoScanning text documents: Color Document, Black and White Document or Text(OCR)Scanning magazines: Magazine(Color)
Important
To scan correctly, select a document type that matches the document to be scanned.
Document Size
Select the size of the document to be scanned.When you select Custom, a screen in which you can specify the document size appears. Select aUnits, then enter the Width and Height and click OK.
Important
When you select Auto Detect, the image may not be scanned at the correct position and size. Inthat case, change the size to the actual document size (A4, Letter, etc.) and align a corner of thedocument with the corner at the arrow (alignment mark) of the Platen.You cannot select Auto Detect (Multiple Documents) or Auto Detect when Document Type isText(OCR).
Scanning Resolution
Select the resolution at which to scan documents.Resolution
Note
Pagina 419 din 732 paginiScan Settings Dialog Box (Photos/Documents)

The following scanning resolutions can be specified when Document Type is Text(OCR).300 dpi / 400 dpi
Descreen
Select this checkbox to reduce moire patterns.Printed photos and pictures are displayed as a collection of fine dots. "Moire" is a phenomenon whereuneven gradation or a stripe pattern appears when such photos or pictures printed with fine dots arescanned. Descreen is the function for reducing this moire effect.
Important
You cannot select this checkbox when Document Type is Color Photo, Black and White Photo orText(OCR).
NoteScanning takes longer than usual when you enable Descreen.
Reduce Show-through
Select this checkbox to sharpen text in a document or reduce show-through in newspapers.
Important
You cannot select this checkbox when Document Type is Color Photo, Black and White Photo orText(OCR).
NoteSelect this checkbox when Document Type is text document and show-through is apparent in thescanned image.
Unsharp Mask
Select this checkbox to emphasize the outline of the subjects and sharpen the image.
ImportantYou cannot select this checkbox when Document Type is Text(OCR).
Remove gutter shadow
Select this checkbox to correct shadows that appear between pages when scanning open booklets.
Important
You cannot select this checkbox when Document Size is Auto Detect, Auto Detect (MultipleDocuments) or Stitch Assist.Align the document correctly with the alignment mark on the Platen.
NoteUse ScanGear's Advanced Mode tab to correct gutter shadows when scanning non-standard sizedocuments or when custom cropping frames are set.For details, see Gutter Shadow Correction in " Image Settings " (ScanGear's Advanced Mode tab).
Correct slanted document
Select this checkbox to detect the scanned text and correct the angle (within -0.1 to -10 degrees or +0.1to +10 degrees) of the document.
Important
You cannot select this checkbox when Document Type is Color Photo or Black and White Photo.You cannot select this checkbox when Document Size is Stitch Assist.The inclination of the following types of documents may not be corrected, as the text cannot bedetected correctly.- Documents in which the text lines are inclined more than 10 degrees or the angles vary by line- Documents containing both vertical and horizontal text- Documents with extremely large or small fonts
Pagina 420 din 732 paginiScan Settings Dialog Box (Photos/Documents)
- Documents with small amount of text- Documents containing figures/images or hand-written text- Documents containing both vertical and horizontal lines (tables)
NoteScanning takes longer than usual when you enable Correct slanted document.
Detect the orientation of text documents and rotate images
Select this checkbox to detect the orientation of the document from the scanned text and rotate thescanned image to the correct orientation. Select the language of the document to be scanned inDocument Language.
ImportantYou cannot select this checkbox when Document Type is Color Photo or Black and White Photo.You cannot select this checkbox when Document Size is Stitch Assist.This function may not work properly depending on the document language. Only text documentswritten in languages that can be selected from Document Language are supported.The orientation of the following types of documents may not be corrected, as the text cannot bedetected correctly. In that case, select the scanned image in the Thumbnail window of the "Photos/Documents (Platen) Screen (Scan/Import Window) " and rotate it with Edit Tools.
- Resolution is outside the range of 300 dpi to 600 dpi- Font size is outside the range of 8 points to 48 points- Documents containing special fonts, effects, italics, or hand-written text- Documents with patterned backgrounds
NoteScanning takes longer than usual when you enable Detect the orientation of text documents androtate images.
Document Language
Select the language of the document to be scanned.
ImportantYou cannot select this checkbox when Document Type is Color Photo or Black and White Photo.You cannot select this checkbox when Document Size is Stitch Assist.
Defaults
Restores the default settings.
Page top
Pagina 421 din 732 paginiScan Settings Dialog Box (Photos/Documents)

Advanced Guide > Scanning > Scanning with the Bundled Application Software > MP Navigator EX Screens > SaveDialog Box
Save Dialog Box
The Save dialog box opens when you click Save in the Scan/Import window.
In the Save dialog box, you can make settings for saving images to a computer.
Save in
Displays the folder in which to save the scanned images. To change the folder, click Browse... tospecify another one.The following folders are specified by default.Windows Vista: MP Navigator EX folder in Pictures folderWindows XP: MP Navigator EX folder in My Pictures folderWindows 2000: MP Navigator EX folder in My Pictures folder
Important
When saving to a memory card, enable writing on the Card Slot of the machine. For details onhow to enable writing, refer to "Setting Up the Card Slot as the Memory Card Drive of theComputer."
File name
Enter the file name of the image to be saved (up to 64 characters). When saving multiple files, 4 digitsare appended to each file name.
Save as type
Select a file type to save the scanned images.Select JPEG/Exif, TIFF or BMP.
Important
You cannot select JPEG/Exif when Document Type is Text(OCR).
Set...
When Save as type is JPEG/Exif
You can specify a compression type for JPEG files. Select High(Low Compression), Standard orLow(High Compression).
Save to a Subfolder with Current Date
Select this checkbox to create a subfolder in the folder specified in Save in with the current date andsave scanned files in it. A subfolder with a name such as "2009_01_01" (Year_Month_Date) will becreated.If this checkbox is not selected, files are saved directly in the folder specified in Save in.
Page top
Pagina 422 din 732 paginiSave Dialog Box

Advanced Guide > Scanning > Scanning with the Bundled Application Software > MP Navigator EX Screens > Save asPDF file Dialog Box
Save as PDF file Dialog Box
In the Save as PDF file dialog box, you can make advanced settings for saving scanned images as PDFfiles. You can save multiple documents as one PDF file or add pages to a PDF file created with MPNavigator EX.
Important
You cannot save images scanned at 10501 pixels or more in the vertical and horizontal directions.
Dialog box that opens when Save as PDF file in the Scan/Import window is clicked
Dialog box that opens when Save Selected Pages or Save All Pages is clicked in theCreate/Edit PDF file window
Save as type
Select a PDF file type to save the scanned images.
Pagina 423 din 732 paginiSave as PDF file Dialog Box

Save each of the selected images as a separate PDF file.
PDF(Multiple Pages)
Save multiple images in one PDF file.
NotePDF(Multiple Pages) is displayed when multiple images are selected.
PDF(Add Page)
Add the scanned images to a PDF file. The images are added to the end of the PDF file. Youcannot rearrange the pages of the PDF file to which the images are added.
Important
Images can only be added to PDF files created with MP Navigator EX. You cannot specifyPDF files created with other applications. PDF files edited in other applications cannot bespecified as well.If a password-protected PDF file is edited, the passwords will be deleted. Reset thepasswords.
Setting Passwords for PDF Files
Set...
Make advanced settings for creating PDF files. See " PDF Settings Dialog Box" for details.
Password security settings
Select this checkbox to open the Password Security -Settings dialog box in which you can setpasswords for opening, editing and printing created PDF files.
Setting Passwords for PDF Files
Add to
This is displayed when you select PDF(Add Page) for Save as type and specify the PDF file to whichimages are added. To change the file, click Browse... to specify another one.
Important
Images can only be added to PDF files created with MP Navigator EX. You cannot specify PDFfiles created with other applications. PDF files edited in other applications cannot be specifiedas well.
File name
Enter the file name of the image to be saved (up to 64 characters). When saving multiple files, 4digits are appended to each file name.
Save in
Displays the folder in which to save the PDF files. To change the folder, click Browse... to specifyanother one.The following folders are specified by default.Windows Vista: MP Navigator EX folder in Pictures folderWindows XP: MP Navigator EX folder in My Pictures folderWindows 2000: MP Navigator EX folder in My Pictures folder
Save to a Subfolder with Current Date
Select this checkbox to create a subfolder in the folder specified in Save in with the current date andsave scanned files in it. A subfolder with a name such as "2009_01_01" (Year_Month_Date) will becreated.If this checkbox is not selected, files are saved directly in the folder specified in Save in.
Page top
Pagina 424 din 732 paginiSave as PDF file Dialog Box

Advanced Guide > Scanning > Scanning with the Bundled Application Software > MP Navigator EX Screens > PDF
Settings Dialog Box
PDF Settings Dialog Box
In the PDF Settings dialog box, you can specify the PDF compression type and other advanced settingsfor creating PDF files.
Enable keyword search
Select this checkbox to convert characters in a document to text data. This will enable an easy searchby keyword.
Document Language
Select the language of the document to be scanned.
Detect the orientation of text documents and rotate images
Select this checkbox to detect the orientation of the document from the scanned text and rotate thescanned image to the correct orientation.
Important
This function may not work properly depending on the document language. Only text documentswritten in languages that can be selected from Document Language are supported.The orientation of the following types of documents may not be corrected, as the text cannot bedetected correctly.- Resolution is outside the range of 300 dpi to 600 dpi- Font size is outside the range of 8 points to 48 points- Documents containing special fonts, effects, italics, or hand-written text- Documents with patterned backgrounds
Correct slanted document
Select this checkbox to detect the scanned text and correct the angle (within -0.1 to -10 degrees or +0.1to +10 degrees) of the document.
Important
The inclination of the following types of documents may not be corrected, as the text cannot bedetected correctly.- Documents in which the text lines are inclined more than 10 degrees or the angles vary by line- Documents containing both vertical and horizontal text- Documents with extremely large or small fonts- Documents with small amount of text- Documents containing figures/images or hand-written text- Documents containing both vertical and horizontal lines (tables)
PDF Compression
Select a compression type for saving.
Pagina 425 din 732 paginiPDF Settings Dialog Box

Standard
It is recommended that you normally select this setting.
High
Compresses the file size when saving, allowing you to reduce the load on your network/server.
ImportantHighly compressed PDF images may degrade if you repeatedly save them with highcompression.
NoteThe following images can be compressed with high efficiency.- Images with resolutions within the range of 75 dpi to 600 dpi.
Security
Set passwords for opening, editing and printing the created PDF files.
Important
In Windows 2000, Internet Explorer 5.5 Service Pack 2 or later is required to use this function.This function is not available when images are automatically saved after scanning, such as whenscanning from the One-click Mode screen or scanning using the Operation Panel of the machine.
NoteSelect Password Security and set passwords in the Password Security -Settings dialog box.
Setting Passwords for PDF Files
Page top
Pagina 426 din 732 paginiPDF Settings Dialog Box

Advanced Guide > Scanning > Scanning with the Bundled Application Software > MP Navigator EX Screens > MemoryCard Screen (Scan/Import Window)
Memory Card Screen (Scan/Import Window)
Point to Scan/Import in the Navigation Mode screen and click Memory Card, or click Memory Card in theScan/Import window to open the Memory Card screen (Scan/Import window).
Open this window to import images (including PDF files created via scanning using the Operation Panel)saved on a memory card.
(1) Settings and Operation Buttons
(2) Toolbar
(3) Thumbnail Window
(4) Selected Images Area
Settings and Operation Buttons
(View & Use)
Click this when you want to open images and PDF files saved on your computer. The View & Usewindow opens.
View & Use Window
Photos/Documents (Platen)
Click this when you want to scan photos, documents, magazines and other printed materials. Thescreen for scanning photos and documents appears.
Photos/Documents (Platen) Screen (Scan/Import Window)
Memory Card
Displays folders of images and PDF files (grouped by year, month/year and month/date/year) on amemory card in tree view. Select a folder to display its contents in the Thumbnail window to the right.File date is the captured or updated date.
Import
Imports the selected images and open them in the View & Use window.View & Use Window
Pagina 427 din 732 paginiMemory Card Screen (Scan/Import Window)

Jump to Main Menu
Jumps to the Main Menu.
Toolbar
Preferences
The Preferences dialog box opens. In the Preferences dialog box, you can make advanced settingsto MP Navigator EX functions.
Preferences Dialog Box
(Guide)
Opens this guide.
Edit Tools
(Select All)
Selects all images in the Thumbnail window.
(Cancel All)
Cancels all image selections in the Thumbnail window.
Zoom in
Enlarges the target image (outlined in orange). You can also enlarge the image by double-clicking it. You can check all pages when you select a PDF file.
(Refresh)
Refreshes the Thumbnail window contents.
(Display Size)
Changes the size of images in the Thumbnail window.
(Sort by)
Sorts the images in the Thumbnail window by date (ascending or descending).
Thumbnail Window
Thumbnail Window
Images saved on the memory card are displayed by year or month/year.When you select the checkbox of an image, the image appears in the Selected Images area.
Selected Images Area
(Cancel All)
Cancels the selection of all images in the Selected Images area.
(Cancel Selection)
Cancels the selection of the target image (outlined in orange) in the Selected Images area.
Selected Images Area
Images selected in the Thumbnail window are displayed.
Related Topic
Importing Images Saved on a Memory Card
Pagina 428 din 732 paginiMemory Card Screen (Scan/Import Window)

Page top
Pagina 429 din 732 paginiMemory Card Screen (Scan/Import Window)

Advanced Guide > Scanning > Scanning with the Bundled Application Software > MP Navigator EX Screens > View &Use Window
View & Use Window
Point to View & Use in the Navigation Mode screen and click My Box (Scanned/Imported Images), SpecifyFolder or Recently Saved Images to open the View & Use window.
Open this window to display or use scanned images or images saved on a computer.
ImportantFor PDF files, only those created with MP Navigator EX are displayed. You cannot display PDF filescreated with other applications. PDF files edited in other applications cannot be displayed as well.
(1) Display Setting Items
(2) Image Handling Buttons
(3) Toolbar
(4) Thumbnail Window
(5) Selected Images Area
Display Setting Items
(Scan/Import)
Click this when you want to scan photos, documents, magazines and other printed materials. The
Pagina 430 din 732 paginiView Use Window

Scan/Import window opens.Photos/Documents (Platen) Screen (Scan/Import Window)
My Box (Scanned/Imported Images)
Displays folders of images (grouped by year, year/month and year/month/date) in My Box in treeview. Select a folder to display its contents in the Thumbnail window to the right.Image date is the scanned, captured or updated date.
Specify Folder
Displays all hard disks and folders in tree view. Select a folder to display images in the Thumbnailwindow to the right.Selecting a folder and clicking it highlights the folder name, allowing you to rename it.
Recently Saved Images
"Scanned/Imported Images" and images that have been "Attached to E-mail" or "Sent to Application"recently are displayed in tree view by date. For "Scanned/Imported Images", "From Scanner" and"From Memory Card" are displayed separately. Select a Month/Date/Year folder to display images bydate in the Thumbnail window to the right.Image date is the scanned or sent date.
Search
The advanced search options opens.Searching Images
Jump to Main Menu
Jumps to the Main Menu.
Image Handling Buttons
Image Handling Buttons
Specify what to do with the selected images. See the corresponding sections below for details oneach button.
Creating/Editing PDF FilesPrinting DocumentsPrinting PhotosSending via E-mailEditing Files
NoteThe buttons in Image Handling Buttons are displayed when the corresponding applications areinstalled.
Toolbar
Preferences
The Preferences dialog box opens. In the Preferences dialog box, you can make advanced settingsto MP Navigator EX functions.
Preferences Dialog Box
(Guide)
Opens this guide.
Edit Tools
(Select All)
Selects all images in the Thumbnail window.
(Cancel All)
Cancels all image selections in the Thumbnail window.
Pagina 431 din 732 paginiView Use Window

(Image Correction/Enhancement)
Allows you to correct the target image (outlined in orange). Click this button to open the Correct/Enhance Images window in which you can correct/enhance images and also adjust thebrightness, contrast, etc.
Correct/Enhance Images Window
Important
Image correction/enhancement cannot be applied to PDF files or black and white binaryfiles.
Zoom in
Enlarges the target image (outlined in orange). You can also enlarge the image by double-clicking it. You can check all pages when you select a PDF file.You can also check file information such as file name, date, size and security setting. A lock iconappears for PDF files with Document Open Password set.
Opening/Editing Password-protected PDF Files
(Search)
Enter a word or phrase included in the file name, Exif information or PDF text of the image you
want to search for, then click (Search button). For Exif information, text in Maker, Model,Description and User Comment is searched.
NoteSearch images in My Box (Scanned/Imported Images), Recently Saved Images or aselected folder and its subfolders.
(Refresh)
Refreshes the Thumbnail window contents.
(Display Size)
Changes the size of images in the Thumbnail window.
(Sort by)
Sorts the images in the Thumbnail window by category, date (ascending or descending) orname (ascending or descending).Images can be sorted by category only when My Box (Scanned/Imported Images) or SpecifyFolder is displayed.
Thumbnail Window
Thumbnail Window
Scanned images are displayed.When you select the checkbox of an image, the image appears in the Selected Images area.Selecting an image and clicking the file name highlights the file name, allowing you to rename it.Drag and drop an image to do the following things.- Move from one category to another within the Thumbnail window- Move to a category folder displayed in My Box (Scanned/Imported Images)- Copy to a folder displayed in Specify Folder
ImportantIn Windows 2000, Internet Explorer 5.5 Service Pack 2 or later is required to open password-protected PDF files.You cannot change the extension (.jpg, .pdf, etc.) when renaming a file.You cannot move or copy images to the date folders displayed in tree view in My Box (Scanned/Imported Images) or Recently Saved Images.
Pagina 432 din 732 paginiView Use Window

NoteA lock icon appears for PDF files with Document Open Password set.Thumbnails may appear as "?" in the following cases.- Opening unsupported images- File size is too large and there is not enough memory to display the image- The file is corrupted
When Images are Sorted by Categories
Scanned images are displayed by category.
NoteSome images may not be detected correctly and thus may be classified into wrong categories.In that case, drag and drop an image and move it from one category to another.
Category name Images: N (Selected: n)
Category name
The following categories are provided.Photos: Portrait, OthersDocuments: Business Card, Postcard, Standard Size, PDF File, OthersCustom categories: Displays your custom categories.Unclassified: Displays images that have not yet been classified.
Images: N
The number of images classified into the category is displayed.
(Selected: n)
The number of images with the checkbox selected is displayed.
NoteThis portion is displayed only when one or more images are selected.
Close All / Open All
Close All
Hides all images.
Open All
Displays all images.
NoteImmediately after opening the View & Use window or sorting images, all images appearand Close All is displayed.Click Close All to change to Open All.
Specific Categories / All Categories
You can narrow down the categories to display only those containing images. If you narrowdown the categories, more images are displayed in the Thumbnail List area, allowing you tofind or move images easily.This button is displayed only when My Box (Scanned/Imported Images) or Specify Folder isdisplayed.
Specific Categories
Displays categories containing images, along with the contained images.
Pagina 433 din 732 paginiView Use Window

All Categories
Displays all categories and images.
NoteClick Specific Categories to change to All Categories.
Edit Custom Categories
When My Box (Scanned/Imported Images) or Specify Folder is displayed, the Edit CustomCategories dialog box opens.In the Edit Custom Categories dialog box, you can add/delete categories displayed in CustomCategories.See "Classifying Images into Categories " for details.
Classify Images
Images imported from hard disks or memory cards appear in Unclassified. Click ClassifyImages to classify them automatically.This button is displayed only when My Box (Scanned/Imported Images) or Specify Folder isdisplayed.
NoteClassification may take time if there are many images to classify.
Selected Images Area
(Cancel All)
Cancels the selection of all images in the Selected Images area.
(Cancel Selection)
Cancels the selection of the target image (outlined in orange) in the Selected Images area.
Selected Images Area
Images selected in the Thumbnail window are displayed.
Related Topic
Opening Images Saved on a Computer
Page top
Pagina 434 din 732 paginiView Use Window

Advanced Guide > Scanning > Scanning with the Bundled Application Software > MP Navigator EX Screens > Create/Edit PDF file Window
Create/Edit PDF file Window
Click PDF in the View & Use window, then click Create/Edit PDF file on the list to open the Create/EditPDF file window.
In the Create/Edit PDF file window, you can add/delete pages and rearrange the page order of PDF filescreated with MP Navigator EX.
Important
You cannot save images scanned at 10501 pixels or more in the vertical and horizontal directions.If a password-protected PDF file is edited, the passwords will be deleted. Reset the passwords.
Setting Passwords for PDF FilesYou can create or edit up to 99 pages using MP Navigator EX.
Rearrange Pages
You can move the selected image (outlined in orange).
Moves the selected image to the top.
Moves the selected image up one page.
Moves the selected image down one page.
Moves the selected image to the end.
NoteYou can also drag and drop the image to rearrange the order.
Delete Selected Pages
Deletes the selected image.
Pagina 435 din 732 paginiCreate/Edit PDF file Window

Add Page
Allows you to select and add an existing PDF file.
NoteA password will be required to add a password-protected PDF file.
Undo
Cancels the latest change made.
Reset
Cancels all the changes made.
Save Selected Pages
Opens the Save as PDF file dialog box. Specify the save settings. Only the selected page is saved.
NoteWhen multiple pages are selected, a multiple-page PDF file is created.See "Save as PDF file Dialog Box " for details on the Save as PDF file dialog box.
Save All Pages
Opens the Save as PDF file dialog box. Specify the save settings. All PDF files in the list will be savedas one PDF file.
Finish
Closes the Create/Edit PDF file window.
Toolbar
(Rotate Left)
Rotates the page 90 degrees counter-clockwise.
(Rotate Right)
Rotates the page 90 degrees clockwise.
(Preview Mode)
Switches to Preview Mode.The selected file appears in Preview.
(Enlarge)
Enlarges the image displayed in Preview.
(Reduce)
Reduces the image displayed in Preview.
Pagina 436 din 732 paginiCreate/Edit PDF file Window

(Full-screen)
Enlarges/reduces the image to display it fully in Preview.
(Thumbnail Mode)
Switches to Thumbnail Mode. Thumbnails of files are displayed.
Page top
Pagina 437 din 732 paginiCreate/Edit PDF file Window

Advanced Guide > Scanning > Scanning with the Bundled Application Software > MP Navigator EX Screens > PrintDocument Dialog Box
Print Document Dialog Box
Click Print in the View & Use window, then click Print Document on the list to open the Print Documentdialog box.
In the Print Document dialog box, you can make advanced settings for printing multiple scanned imagesat one time.
NoteThe setting items in the Print Document dialog box vary by printer.
Printer
Select the printer to use.
Paper Source
Select paper source.
Page Layout
Select a print type.
Normal-size Printing
Print one image per sheet.
Scaled Printing
Print images at the selected scale (enlarged or reduced).
Fit-to-Page Printing
Print an image at the paper size (enlarged or reduced).
Borderless Printing
Print the image on an entire sheet of paper without margins.
Page Layout Printing (2 on 1)
Layout and print two images on a sheet of paper.
Page Layout Printing (4 on 1)
Layout and print four images on a sheet of paper.
Enlarge/Reduce
Enlarge or reduce images to print.
Pagina 438 din 732 paginiPrint Document Dialog Box

(Enlarge/Reduce)
Print a reduced or enlarged image by specifying a scale in increments of 1%.
Auto
Scale is adjusted automatically according to the detected paper width and the selected paper size.Image may be printed rotated 90 degrees depending on its size.
Scale
Select a scale from the list.
Important
At normal-size (100%), some images may be printed small or with some portions cropped. Inthat case, select Auto to resize the print in proportion to the paper size.
Paper Size
Select the size of paper for printing. Match the size to the size of the paper set in the machine.
NoteSelectable paper sizes depend on the selected printer.
Media Type
Select the type of paper for printing. Print quality may be fixed depending on the paper type.
NoteSelectable paper types depend on the selected printer.
Print Quality
Select the print quality.
Density
Click (Density adjustment) to select the print density.
Copies
Click (Copy setting) to select the number of copies to be printed.
Grayscale Printing
Select this checkbox to print the document in black and white.
Preview before printing
Select this checkbox to display the print result before printing.
Defaults
Restores the default settings.
Start printing with the specified settings.
NoteTo cancel while spooling, click Cancel. To cancel while printing, click Cancel Printing in theconfirmation window for the printer status. To open a confirmation window for the printer status,click printer icon on the taskbar.
Page top
Pagina 439 din 732 paginiPrint Document Dialog Box

Advanced Guide > Scanning > Scanning with the Bundled Application Software > MP Navigator EX Screens > PrintPhoto Dialog Box
Print Photo Dialog Box
Click Print in the View & Use window, then click Print Photo on the list to open the Print Photo dialog box.
Important
The Print Photo dialog box will not open if Easy-PhotoPrint EX is installed. Easy-PhotoPrint EX startsinstead.PDF files cannot be printed.
NoteDouble-click an image to display it in a different window.
Printer
Select the printer to use.
Properties...
Displays the selected printer's advanced setting screen.
Paper Size
Select the size of paper for printing. Match the size to the size of the paper set in the machine.
Media Type
Select the type of paper for printing. Print quality may be fixed depending on the paper type.
Page Layout
Select a print type.
Normal-size Printing
Print one image per sheet.
Fit-to-Page Printing
Print an image at the paper size (enlarged or reduced).
Borderless Printing
Pagina 440 din 732 paginiPrint Photo Dialog Box

Select this checkbox to print the image on an entire sheet of paper without margins.
Important
Page Layout setting will be disabled when you select Borderless Printing.This setting is only available with printers that support borderless printing.
Orientation
Specify the print orientation.
Important
This setting is available only when Page Layout is Normal-size Printing. For others, the image isautomatically rotated according to the aspect ratio of the paper.
Copies
Specify the number of copies to print.
Vivid Photo
Select this checkbox to print the image in vivid colors.
Preview before printing
Select this checkbox to display the print result before printing.
Starts printing.
NoteOnly the images in the Thumbnail window with the checkbox selected are printed.
Close
Closes the dialog box without printing the photo.
Page top
Pagina 441 din 732 paginiPrint Photo Dialog Box

Advanced Guide > Scanning > Scanning with the Bundled Application Software > MP Navigator EX Screens > Send viaE-mail Dialog Box
Send via E-mail Dialog Box
Click Send in the View & Use window, then click Attach to E-mail on the list to open the Send via E-maildialog box.
In the Send via E-mail dialog box, you can make advanced settings for attaching images to e-mail.
ImportantMP Navigator EX is compatible with the following e-mail software programs:- Windows Mail (Windows Vista)- Outlook Express (Windows XP/Windows 2000)- Microsoft Outlook(If an e-mail software program does not operate properly, check that the program's MAPI is enabled.To enable MAPI, refer to the manual of the e-mail software program.)
Mail Program
The e-mail software program set up via Preferences in the Navigation Mode screen is displayed.Select the e-mail software program you want to use.
Adjust attachment file size
When Save as type is JPEG, selecting this checkbox allows you to resize the images. Select a sizefrom Size.
Save in
Displays the folder in which to save the images. To change the folder, click Browse... to specify anotherone. If resized, the resized images are saved.The following folders are specified by default.Windows Vista: MP Navigator EX folder in Pictures folderWindows XP: MP Navigator EX folder in My Pictures folderWindows 2000: MP Navigator EX folder in My Pictures folder
File name
Enter the file name of the image to be attached (up to 64 characters). When saving multiple files, 4digits are appended to each file name.
Set...
You can specify a compression type for JPEG files.Select High(Low Compression), Standard or Low(High Compression).
Page top
Pagina 442 din 732 paginiSend via E-mail Dialog Box

Advanced Guide > Scanning > Scanning with the Bundled Application Software > MP Navigator EX Screens > Correct/Enhance Images Window
Correct/Enhance Images Window
Click (Image Correction/Enhancement) in the View & Use window or click Fix photo images in theTask Button area to open the Correct/Enhance Images window.
In the Correct/Enhance Images window, you can make advanced settings including image correction/enhancement and brightness/contrast adjustment.
You can also display the source image and corrected image side by side for comparison.
Important
Image correction/enhancement cannot be applied to PDF files or black and white binary files.
Note
The Correct/Enhance Images window can also be opened by clicking (Image Correction/Enhancement) in the Zoom in dialog box.It may take a while to correct large images.See "View & Use Window" for details on the View & Use window.
(1) Task Area
(2) Toolbar
Task Area
Available tasks and settings vary between the Auto and Manual tabs.
Click Auto or Manual to open the corresponding tab.
Auto Tab
Use the functions in the Auto tab to apply corrections and enhancements to the entire image.
See "Correcting/Enhancing Images Automatically " for details.
Pagina 443 din 732 paginiCorrect/Enhance Images Window

Auto Photo Fix
Applies automatic corrections suitable for photos.
Prioritize Exif Info
Select this checkbox to apply corrections primarily based on the settings made at the time ofshooting.Deselect this checkbox to apply corrections based on the image analysis results. It isrecommended that you normally select this setting.
NoteExif is a standard format for embedding various shooting data in digital camera images(JPEG).
Face Sharpener
Sharpens out-of-focus faces.You can adjust the effect level using the slider.
Digital Face Smoothing
Enhances skin beautifully by removing blemishes and wrinkles.You can adjust the effect level using the slider.
Apply to all images
Applies the correction to all images displayed in the thumbnail list.
OK
Applies the selected effect to the selected image or all images.
Reset Selected Image
Cancels all corrections and enhancements applied to the selected image.
Save Selected Image
Saves the corrected images selected.
Save All Corrected Images
Saves all the corrected images displayed in the thumbnail list.
Exit
Closes the Correct/Enhance Images window.
Manual Tab
Use Adjust to adjust brightness and contrast, or to sharpen the entire image.
Use Correct/Enhance to correct/enhance specific areas.
See "Correcting/Enhancing Images Manually " for details.
Pagina 444 din 732 paginiCorrect/Enhance Images Window

Adjustment
Brightness
Adjusts the overall image brightness.Move the slider to the left to darken and right to brighten the image.
Contrast
Adjusts the contrast of the image. Adjust the contrast when the image is flat due to lack of contrast.Move the slider to the left to decrease and right to increase the contrast of the image.
Sharpness
Emphasizes the outline of the subjects to sharpen the image. Adjust the sharpness when thephoto is out of focus or text is blurred.Move the slider to the right to sharpen the image.
Blur
Blurs the outline of the subjects to soften the image.Move the slider to the right to soften the image.
Show-through Removal
Removes show-through of text from the reverse side or removes the base color. Adjust the show-through level to prevent text on the reverse side of thin document or the base color of the documentfrom appearing on the image.Move the slider to the right to increase the show-through removal effect.
Defaults
Resets all adjustments (brightness, contrast, sharpness, blur, and show-through removal).
Reset Selected Image
Cancels all corrections, enhancements and adjustments applied to the selected image.
Save Selected Image
Saves the corrected images selected.
Save All Corrected Images
Saves all the corrected images displayed in the thumbnail list.
Exit
Closes the Correct/Enhance Images window.
Correction/Enhancement
Pagina 445 din 732 paginiCorrect/Enhance Images Window

Face Brightener
Corrects the entire image so that the selected facial area is brightened.You can adjust the effect level using the slider.
Face Sharpener
Corrects the entire image to sharpen the face. You can specify the area you want to apply the effectto.You can adjust the effect level using the slider.
Digital Face Smoothing
Enhances skin beautifully by removing blemishes and wrinkles. You can specify the area you wantto apply the effect to.You can adjust the effect level using the slider.
Blemish Remover
Removes moles. You can specify the area you want to apply the effect to.
OK
Applies the selected effect to the specified area.
Undo
Cancels the latest correction.
Reset Selected Image
Cancels all corrections, enhancements and adjustments applied to the selected image.
Save Selected Image
Saves the corrected images selected.
Save All Corrected Images
Saves all the corrected images displayed in the thumbnail list.
Exit
Closes the Correct/Enhance Images window.
Toolbar
Toolbar
(Rotate Left)
Rotates the image 90 degrees counter-clockwise.
(Rotate Right)
Rotates the image 90 degrees clockwise.
Pagina 446 din 732 paginiCorrect/Enhance Images Window

(Invert)
Inverts the image horizontally.
(Trimming)
Trimming is the act of selecting the area you want to keep in a photo and discarding the rest. Inthe displayed window, drag the white frame to specify the trimming area. Move the cursor insidethe white frame and drag to move the trimming area.
NotePlace the main subjects along the broken white lines or at the intersections to create abalanced image.
(Enlarge)
Enlarges the displayed image.
(Reduce)
Reduces the displayed image.
(Full-screen)
Enlarges/reduces the image to display it full-screen.
(Compare)
Opens the source image for comparison.The source image appears on the left and the corrected image appears on the right.
Page top
Pagina 447 din 732 paginiCorrect/Enhance Images Window

Advanced Guide > Scanning > Scanning with the Bundled Application Software > MP Navigator EX Screens > One-clickMode Screen
One-click Mode Screen
Click (Switch Mode) at the bottom left of the Navigation Mode screen to display the One-clickMode screen.
You can complete from scanning to saving, etc. at one time by simply clicking the corresponding icon.
Auto
Scan documents by automatically detecting the document type. File format is automatically set. Filesare saved to a computer. You can apply Auto Photo Fix as required.When you click this icon, the Auto Scan dialog box opens and you can specify the save settings.
Auto Scan Dialog Box
Save
Scan documents or photos and save them to a computer. The document type can be detectedautomatically.When you click this icon, the Save dialog box opens and you can specify the scan/save settings.
Save Dialog Box (One-click Mode Screen)
Scan documents and save them as PDF files.When you click this icon, the PDF dialog box opens and you can specify the scan/save and applicationsettings.
PDF Dialog Box
Scan documents or photos and attach them to e-mail.When you click this icon, the Mail dialog box opens and you can specify the scan/save and e-mailsoftware program settings.
Mail Dialog Box
OCR
Scan text documents then extract text in the image and display it in Notepad (included with Windows).When you click this icon, the OCR dialog box opens and you can specify the scan/save settings.
OCR Dialog Box
NoteFor further procedures, refer to the application's manual.
Custom
Scan documents and open them in a specified application. Document type is automatically detected.When you click this icon, the Custom dialog box opens and you can specify the scan/save andapplication settings.
Custom Dialog Box
NoteFor further procedures, refer to the application's manual.
(Switch Mode)
Pagina 448 din 732 paginiOne-click Mode Screen

Switches to Navigation Mode. The Navigation Mode screen appears.Custom Scan with One-click Tab
Preferences
The Preferences dialog box opens. In the Preferences dialog box, you can make advanced settings toMP Navigator EX functions.
Preferences Dialog Box
(Guide)
Opens this guide.
Important
The following restrictions apply when you scan with Document Type set to Auto Mode in the Save orCustom dialog box.When you want to convert text in the scanned image to text data, specify Document Type (do notselect Auto Mode).
Related Topic
Easy Scanning with One-click
Page top
Pagina 449 din 732 paginiOne-click Mode Screen

Advanced Guide > Scanning > Scanning with the Bundled Application Software > MP Navigator EX Screens > AutoScan Dialog Box
Auto Scan Dialog Box
Click Auto Scan on the Custom Scan with One-click tab or click Auto in the One-click Mode screen toopen the Auto Scan dialog box.
Important
The following types of documents cannot be scanned correctly. In that case, click another icon inOne-click Mode or on the Custom Scan with One-click tab and specify the document type or size.- Documents other than photos, postcards, business cards, magazines, newspapers, textdocuments and CD/DVD- A4 size photos- Text documents smaller than 2L (5 inches x 7 inches) (127 mm x 178 mm), such as paperbackpages with the spine cut off- Documents printed on thin white paper- Long narrow documents such as panoramic photosReflective CD/DVD labels may not be scanned properly.Place documents correctly according to the type of document to be scanned. Otherwise, documentsmay not be scanned correctly.See "Placing Documents " for details on how to place documents.
NoteTo reduce moire, click another icon in One-click Mode or on the Custom Scan with One-click taband set Document Type to Magazine.
Scan Settings
Enable Auto Photo Fix
Select this checkbox to analyze the photo image and apply suitable corrections automatically.This function is available when Auto or JPEG/Exif is selected for Save as type in Save Settings.
Important
When Save as type is Auto, the base color tone of the following types of documents maychange from the source since they are corrected as photos. In that case, deselect the checkboxand scan.- Postcards and business cards
Pagina 450 din 732 paginiAuto Scan Dialog Box

Text documents may not be scanned correctly since they may be corrected as photosdepending on how you place the document. In that case, deselect the checkbox and scan.
NoteIf you select a format other than JPEG/Exif for Save as type and then select this checkbox, amessage appears and Save as type will be set to Auto.
Save Settings
File name
Enter the file name of the image to be saved (up to 64 characters). When saving multiple files, 4digits are appended to each file name.
Save as type
Select a file type to save the scanned images.Select Auto, JPEG/Exif, TIFF, BMP or PDF.
Important
When Save as type is Auto, the file format may differ depending on how you place thedocument.See "Placing Documents " for details on how to place documents.Large documents (such as A4 size photos) that cannot be placed away from the edges/arrow(alignment mark) of the Platen may not be saved in the correct file format when Save as type isAuto. In that case, select a file format suitable for the document to be scanned.Images cannot be added to password-protected PDF files.
NoteWhen Auto is selected, files are saved in the following formats according to the document type.Photos, postcards, CD/DVD and business cards: JPEGMagazines, newspapers and text documents: PDFYou can change the file format from Set....
Set...
When Save as type is Auto
You can specify the file format in which to save images. Select a file format for Document and Photoeach.
When Save as type is JPEG/Exif
You can specify a compression type for JPEG files. Select High(Low Compression), Standard orLow(High Compression).
When Save as type is PDF
Make advanced settings for creating PDF files. See " PDF Settings Dialog Box" for details.
Save in
Displays the folder in which to save the scanned images. To change the folder, click Browse... tospecify another one.The following folders are specified by default.Windows Vista: MP Navigator EX folder in Pictures folderWindows XP: MP Navigator EX folder in My Pictures folderWindows 2000: MP Navigator EX folder in My Pictures folder
Save to a Subfolder with Current Date
Select this checkbox to create a subfolder in the folder specified in Save in with the current date andsave scanned files in it. A subfolder with a name such as "2009_01_01" (Year_Month_Date) will becreated.If this checkbox is not selected, files are saved directly in the folder specified in Save in.
Start scanning by clicking the one-click button
Pagina 451 din 732 paginiAuto Scan Dialog Box

Select this checkbox to start scanning when you click an icon.
Apply
Saves and applies the specified settings.Click Cancel instead of Apply to cancel the specified settings.
Cancel
Cancels the specified settings. The current screen closes.
Defaults
Returns all settings in the screen to their defaults.
Scan
Scans and saves documents with the specified settings.When Save as type is Auto, a confirmation appears. Click Open Manual to open this guide (if it isinstalled).
Page top
Pagina 452 din 732 paginiAuto Scan Dialog Box
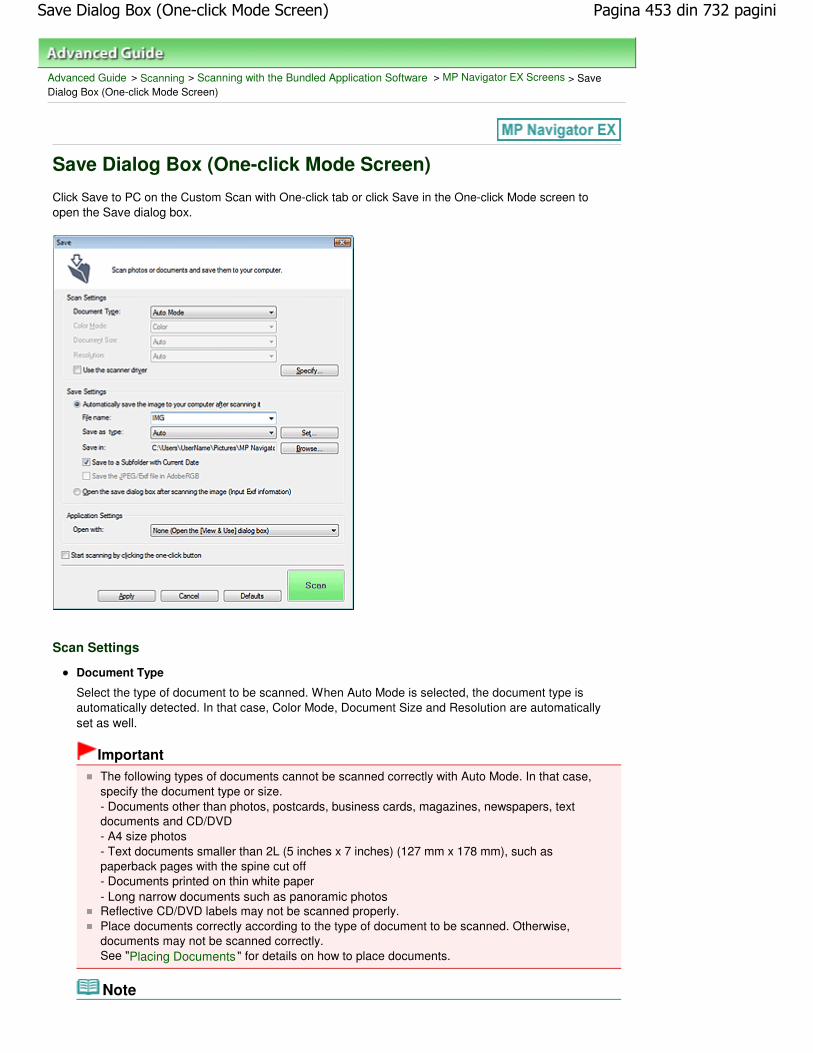
Advanced Guide > Scanning > Scanning with the Bundled Application Software > MP Navigator EX Screens > SaveDialog Box (One-click Mode Screen)
Save Dialog Box (One-click Mode Screen)
Click Save to PC on the Custom Scan with One-click tab or click Save in the One-click Mode screen toopen the Save dialog box.
Scan Settings
Document Type
Select the type of document to be scanned. When Auto Mode is selected, the document type isautomatically detected. In that case, Color Mode, Document Size and Resolution are automaticallyset as well.
Important
The following types of documents cannot be scanned correctly with Auto Mode. In that case,specify the document type or size.- Documents other than photos, postcards, business cards, magazines, newspapers, textdocuments and CD/DVD- A4 size photos- Text documents smaller than 2L (5 inches x 7 inches) (127 mm x 178 mm), such aspaperback pages with the spine cut off- Documents printed on thin white paper- Long narrow documents such as panoramic photosReflective CD/DVD labels may not be scanned properly.Place documents correctly according to the type of document to be scanned. Otherwise,documents may not be scanned correctly.See "Placing Documents " for details on how to place documents.
Note
Pagina 453 din 732 paginiSave Dialog Box (One-click Mode Screen)

To reduce moire, set Document Type to Magazine.
Color Mode
Select how to scan the document.
Document Size
Select the size of the document to be scanned.When you select Custom, a screen in which you can specify the document size appears. Select aUnits, then enter the Width and Height and click OK.
Important
When you select Auto Detect, the image may not be scanned at the correct position and size. Inthat case, change the size to the actual document size (A4, Letter, etc.) and align a corner of thedocument with the corner at the arrow (alignment mark) of the Platen.
Resolution
Select the resolution at which to scan documents.Resolution
Use the scanner driver
Select this checkbox to display the ScanGear (scanner driver) screen and make advanced scansettings.Color Mode, Document Size, Resolution and other settings in the Save dialog box will be disabled.Specify these settings in the ScanGear (scanner driver) screen.
Specify...
Click to open the Scan Settings dialog box in which you can make advanced scan settings.Scan Settings Dialog Box
Save Settings
Automatically save the image to your computer after scanning it
Select this to save the images to your computer as specified after scanning them.The File name, Save as type and Save in settings will be displayed.
Important
If you select this function, you will not be able to set passwords for PDF files.
File name
Enter the file name of the image to be saved (up to 64 characters). When saving multiple files, 4digits are appended to each file name.
Save as type
Select a file type to save the scanned images.Select Auto, JPEG/Exif, TIFF or BMP. Auto is displayed when Document Type is Auto Mode. Whensaving as PDF files, select PDF, PDF(Multiple Pages) or PDF(Add Page).
ImportantWhen Document Type is Auto Mode and Save as type is Auto, the file format may differdepending on how you place the document.See "Placing Documents " for details on how to place documents.Large documents (such as A4 size photos) that cannot be placed away from the edges/arrow(alignment mark) of the Platen may not be saved in the correct file format when Save as type is
Pagina 454 din 732 paginiSave Dialog Box (One-click Mode Screen)

Auto. In that case, select a file format suitable for the document to be scanned.Images cannot be added to password-protected PDF files.You cannot select JPEG/Exif when Color Mode is Black and White.
NoteWhen Auto is selected, files are saved in the following formats according to the document type.Photos, postcards, CD/DVD and business cards: JPEGMagazines, newspapers and text documents: PDFYou can change the file format from Set....Images saved as PDF files may not open depending on the application. In that case, select anoption other than Auto in Save as type.If you select JPEG/Exif when Document Type is not Auto Mode , the Save the JPEG/Exif file inAdobeRGB checkbox will be selectable.
Set...
When Save as type is Auto
You can specify the file format in which to save images. Select a file format for Document and Photoeach.
When Save as type is JPEG/Exif
You can specify a compression type for JPEG files. Select High(Low Compression), Standard orLow(High Compression).
When Save as type is PDF, PDF(Multiple Pages) or PDF(Add Page)
Make advanced settings for creating PDF files. See " PDF Settings Dialog Box" for details.
Save in
Displays the folder in which to save the scanned images. To change the folder, click Browse... tospecify another one.The following folders are specified by default.Windows Vista: MP Navigator EX folder in Pictures folderWindows XP: MP Navigator EX folder in My Pictures folderWindows 2000: MP Navigator EX folder in My Pictures folder
Save to a Subfolder with Current Date
Select this checkbox to create a subfolder in the folder specified in Save in with the current date andsave scanned files in it. A subfolder with a name such as "2009_01_01" (Year_Month_Date) will becreated.If this checkbox is not selected, files are saved directly in the folder specified in Save in.
Save the JPEG/Exif file in AdobeRGB
Select this checkbox to save the images in colors that correspond to Adobe RGB.
Important
This function is available only when Save as type is JPEG/Exif and Document Type is not AutoMode.This function is not available if the Adobe RGB profile is not installed.
NoteYou cannot select this setting if the Use the scanner driver checkbox is selected.When you save an image with the Save the JPEG/Exif file in AdobeRGB checkbox selected, anunderscore is added to the beginning of the file name. (Example: _Image0001.jpg)
Open the save dialog box after scanning the image (Input Exif information)
Select this to open the Save dialog box after scanning the images and specify the save settingssuch as destination folder, file name and Exif information.
Save Dialog Box
NoteTo set passwords for PDF files, select Open the save dialog box after scanning the image
Pagina 455 din 732 paginiSave Dialog Box (One-click Mode Screen)

(Input Exif information). After scanning, you can set the passwords in the Save dialog box.Setting Passwords for PDF Files
Application Settings
Open with
You can select whether to open the View & Use window or Explorer after saving the images.
Start scanning by clicking the one-click button
Select this checkbox to start scanning when you click an icon.
Apply
Saves and applies the specified settings.Click Cancel instead of Apply to cancel the specified settings.
Cancel
Cancels the specified settings. The current screen closes.
Defaults
Returns all settings in the screen to their defaults.
Scan
Scans and saves documents with the specified settings.When Save as type is Auto, a confirmation appears. Click Open Manual to open this guide (if it isinstalled).
Page top
Pagina 456 din 732 paginiSave Dialog Box (One-click Mode Screen)

Advanced Guide > Scanning > Scanning with the Bundled Application Software > MP Navigator EX Screens > ScanSettings Dialog Box
Scan Settings Dialog Box
Make advanced settings for scanning with one-click or scanning using the Operation Panel of themachine.
The Scan Settings dialog box opens when you click Specify... in a dialog box for making scan settings.
NoteThe displayed items vary by document type and how the screen was opened.
Document Type
Select the type of document to be scanned. When Auto Mode or Auto Scan is selected, the documenttype is automatically detected.In that case, Color Mode, Document Size, etc. are automatically set as well.
Important
To scan correctly, select a document type that matches the document to be scanned.When opened from the Scanner Button Settings tab in the Preferences dialog box, the DocumentType specified in the Scanner Button Settings tab is displayed and cannot be changed in thisdialog box.
Color Mode
Select how to scan the document.
Color
This mode renders the image in 256 levels (8 bit) of R(ed), G(reen), and B(lue).
Grayscale
This mode renders the image in 256 levels (8 bit) of black and white.
Black and White
This mode renders the image in black and white. The contrast in the image is divided at certainlevels (threshold level) into black and white and is rendered in two colors.
NoteColor Mode is not displayed in the Scan Settings dialog box opened from the Scanner ButtonSettings tab of the Preferences dialog box.
Document Size
Pagina 457 din 732 paginiScan Settings Dialog Box

Select the size of the document to be scanned.When you select Custom, a screen in which you can specify the document size appears. Select aUnits, then enter the Width and Height and click OK.
Important
When you select Auto Detect, the image may not be scanned at the correct position and size. Inthat case, change the size to the actual document size (A4, Letter, etc.) and align a corner of thedocument with the corner at the arrow (alignment mark) of the Platen.
Scanning Resolution
Select the resolution at which to scan documents.Resolution
Descreen
Select this checkbox to reduce moire patterns.Printed photos and pictures are displayed as a collection of fine dots. "Moire" is a phenomenon whereuneven gradation or a stripe pattern appears when such photos or pictures printed with fine dots arescanned. Descreen is the function for reducing this moire effect.
NoteScanning takes longer than usual when you enable Descreen.
Reduce Show-through
Select this checkbox to sharpen text in a document or reduce show-through in newspapers.
NoteSelect this checkbox when Document Type is text document and show-through is apparent in thescanned image.
Unsharp Mask
Select this checkbox to emphasize the outline of the subjects and sharpen the image.
Remove gutter shadow
Select this checkbox to correct shadows that appear between pages when scanning open booklets.
Important
You cannot select this checkbox when Document Size is Auto Detect, Auto Detect (MultipleDocuments) or Stitch Assist.Align the document correctly with the alignment mark on the Platen.
NoteUse ScanGear's Advanced Mode tab to correct gutter shadows when scanning non-standard sizedocuments or when custom cropping frames are set.For details, see Gutter Shadow Correction in " Image Settings " (ScanGear's Advanced Mode tab).
Correct slanted document
Select this checkbox to detect the scanned text and correct the angle (within -0.1 to -10 degrees or +0.1to +10 degrees) of the document.
Important
You cannot select this checkbox when Document Size is Stitch Assist.The inclination of the following types of documents may not be corrected, as the text cannot bedetected correctly.
Pagina 458 din 732 paginiScan Settings Dialog Box

- Documents in which the text lines are inclined more than 10 degrees or the angles vary by line- Documents containing both vertical and horizontal text- Documents with extremely large or small fonts- Documents with small amount of text- Documents containing figures/images or hand-written text- Documents containing both vertical and horizontal lines (tables)
NoteScanning takes longer than usual when you enable Correct slanted document.
Enable Auto Photo Fix (When scanning with Auto Scan using the Operation Panel)
Select this checkbox to analyze the photo image and apply suitable corrections automatically.This function is available when Auto or JPEG/Exif is selected for Save as type in Save Settings on theScanner Button Settings tab of the Preferences dialog box.
Important
When Save as type is Auto, the base color tone of the following types of documents may changefrom the source since they are corrected as photos. In that case, deselect the checkbox and scan.- Postcards and business cardsText documents may not be scanned correctly since they may be corrected as photos dependingon how you place the document. In that case, deselect the checkbox and scan.
NoteIf you select a format other than JPEG/Exif for Save as type and then select this checkbox, amessage appears and Save as type will be set to Auto.
Detect the orientation of text documents and rotate images
Select this checkbox to detect the orientation of the document from the scanned text and rotate thescanned image to the correct orientation. Select the language of the document to be scanned inDocument Language.
Important
You cannot select this checkbox when Document Size is Stitch Assist.This function may not work properly depending on the document language. Only text documentswritten in languages that can be selected from Document Language are supported.The orientation of the following types of documents may not be corrected, as the text cannot bedetected correctly.- Resolution is outside the range of 300 dpi to 600 dpi- Font size is outside the range of 8 points to 48 points- Documents containing special fonts, effects, italics, or hand-written text- Documents with patterned backgrounds
NoteScanning takes longer than usual when you enable Detect the orientation of text documents androtate images.
Document Language
Select the language of the document to be scanned.
Important
You cannot select this checkbox when Document Size is Stitch Assist.
Defaults
Restores the default settings.
Page top
Pagina 459 din 732 paginiScan Settings Dialog Box

Advanced Guide > Scanning > Scanning with the Bundled Application Software > MP Navigator EX Screens > SaveDialog Box
Save Dialog Box
The Save dialog box opens when you scan from Save to PC on the Custom Scan with One-click tab orfrom Save in the One-click Mode screen after selecting Open the save dialog box after scanning theimage (Input Exif information).
You can specify the file type and destination while viewing the thumbnails.
Save as type
Select a file type to save the scanned images.Select JPEG/Exif, TIFF, BMP, PDF, PDF(Multiple Pages) or PDF(Add Page).
Save each of the selected images as a separate PDF file.
PDF(Multiple Pages)
Save multiple images in one PDF file.
NotePDF(Multiple Pages) is displayed when multiple images are scanned.
PDF(Add Page)
Add the scanned images to a PDF file. The images are added to the end of the PDF file. Youcannot rearrange the pages of the PDF file to which the images are added.
Important
Images can only be added to PDF files created with MP Navigator EX. You cannot specifyPDF files created with other applications. PDF files edited in other applications cannot bespecified as well.If a password-protected PDF file is edited, the passwords will be deleted. Reset thepasswords.
Setting Passwords for PDF Files
Pagina 460 din 732 paginiSave Dialog Box
Important
PDF, PDF(Multiple Pages) and PDF(Add Page) cannot be selected for images scanned using theOperation Panel of the machine.You cannot select JPEG/Exif when Color Mode is Black and White.
Set...
When Save as type is JPEG/Exif
You can specify a compression type for JPEG files. Select High(Low Compression), Standard orLow(High Compression).
When Save as type is PDF, PDF(Multiple Pages) or PDF(Add Page)
Make advanced settings for creating PDF files. See " PDF Settings Dialog Box" for details.
Exif Settings...
When Save as type is JPEG/Exif, you can input Exif information into the file to be saved.Exif Settings Dialog Box
Password security settings
Select this checkbox to open the Password Security -Settings dialog box in which you can setpasswords for opening, editing and printing created PDF files.
Setting Passwords for PDF Files
NoteThis function is available only when Save as type is PDF, PDF(Multiple Pages) or PDF(Add Page).
Add to
This is displayed when you select PDF(Add Page) for Save as type and specify the PDF file to whichimages are added. To change the file, click Browse... to specify another one.
Important
Images can only be added to PDF files created with MP Navigator EX. You cannot specify PDFfiles created with other applications. PDF files edited in other applications cannot be specified aswell.
Rotate Left 90°/Rotate Right 90°
Rotates scanned images 90 degrees counter-clockwise or clockwise.Select the image you want to rotate and click Rotate Left 90° or Rotate Right 90°.
File name
Enter the file name of the image to be saved (up to 64 characters). When saving multiple files, 4 digitsare appended to each file name.
Save in
Displays the folder in which to save the scanned images. To change the folder, click Browse... tospecify another one.The following folders are specified by default.Windows Vista: MP Navigator EX folder in Pictures folderWindows XP: MP Navigator EX folder in My Pictures folderWindows 2000: MP Navigator EX folder in My Pictures folder
Save to a Subfolder with Current Date
Select this checkbox to create a subfolder in the folder specified in Save in with the current date andsave scanned files in it. A subfolder with a name such as "2009_01_01" (Year_Month_Date) will becreated.If this checkbox is not selected, files are saved directly in the folder specified in Save in.
Page top
Pagina 461 din 732 paginiSave Dialog Box

Advanced Guide > Scanning > Scanning with the Bundled Application Software > MP Navigator EX Screens > ExifSettings Dialog Box
Exif Settings Dialog Box
You can input Exif information into a file to be saved. Exif is a standard format for embedding variousshooting data in digital camera images (JPEG). Embedding Exif information into scanned imagesallows you to organize and print them along with digital camera images.
The Exif Settings dialog box can be opened when Save as type is JPEG/Exif.
Basic Information
Displays the information obtained automatically from the machine or software.
Advanced Information
Displays the information specified on the right side of the screen.
Advanced Information Settings Area
You can input Exif information such as the title and shooting data. Select the checkbox of the items youwant to specify, and select or enter information.
Apply the Same Setting of Input Items Automatically
Select this checkbox to automatically display the information you specified for the previous image.
Apply
After specifying all the information you need, click Apply to embed it into the image. The informationappears in Advanced Information.
OK
Embeds the specified information into the image and closes the screen. The specified information issaved.
Cancel
Cancels the settings and closes the screen.Information is embedded when Cancel is clicked after clicking Apply.
Page top
Pagina 462 din 732 paginiExif Settings Dialog Box

Advanced Guide > Scanning > Scanning with the Bundled Application Software > MP Navigator EX Screens > PDF
Dialog Box
PDF Dialog Box
Click Save as PDF file on the Custom Scan with One-click tab or click PDF in the One-click Mode screento open the PDF dialog box.
Scan Settings
Document Type
Select the type of document to be scanned.
Color Mode
Select how to scan the document.
Document Size
Select the size of the document to be scanned.When you select Custom, a screen in which you can specify the document size appears. Select aUnits, then enter the Width and Height and click OK.
Important
When you select Auto Detect, the image may not be scanned at the correct position and size. Inthat case, change the size to the actual document size (A4, Letter, etc.) and align a corner of the
Pagina 463 din 732 paginiPDF Dialog Box

document with the corner at the arrow (alignment mark) of the Platen.
Resolution
Select the resolution at which to scan documents.Resolution
Specify...
Click to open the Scan Settings dialog box in which you can make advanced scan settings.Scan Settings Dialog Box
Save Settings
Automatically save the image to your computer after scanning it
Select this to save the images to your computer as specified after scanning them.The File name, Save as type and Save in settings will be displayed.
Important
If you select this function, you will not be able to set passwords for PDF files.
File name
Enter the file name of the image to be saved (up to 64 characters). When saving multiple files, 4digits are appended to each file name.
Save as type
Select a file type to save the scanned images.Select PDF, PDF(Multiple Pages) or PDF(Add Page).
Save each of the selected images as a separate PDF file.
PDF(Multiple Pages)
Save multiple images in one PDF file.
PDF(Add Page)
Add the scanned images to a PDF file. The images are added to the end of the PDF file. Youcannot rearrange the pages of the PDF file to which the images are added.
Important
Images cannot be added to password-protected PDF files.
NoteClick Set... to open the PDF Settings dialog box in which you can specify the PDF compressiontype and other advanced settings for creating PDF files.
PDF Settings Dialog BoxSee "Creating/Editing PDF Files " to delete or rearrange the pages of saved PDF files.
Save in
Displays the folder in which to save the scanned images. To change the folder, click Browse... tospecify another one.The following folders are specified by default.Windows Vista: MP Navigator EX folder in Pictures folderWindows XP: MP Navigator EX folder in My Pictures folderWindows 2000: MP Navigator EX folder in My Pictures folder
Save to a Subfolder with Current Date
Select this checkbox to create a subfolder in the folder specified in Save in with the current date andsave scanned files in it. A subfolder with a name such as "2009_01_01" (Year_Month_Date) will becreated.If this checkbox is not selected, files are saved directly in the folder specified in Save in.
Open the save dialog box after scanning the image
Select this to open the Save as PDF file dialog box after scanning the images and specify the save
Pagina 464 din 732 paginiPDF Dialog Box

settings such as destination folder and file name.Save as PDF file Dialog Box
NoteTo set passwords for PDF files, select Open the save dialog box after scanning the image. Afterscanning, you can set the passwords in the Save as PDF file dialog box.
Setting Passwords for PDF Files
Application Settings
Open with
Specify an application with which to open scanned images. Drag and drop the icon of an applicationthat supports the file format displayed in Save as type. The specified application starts after imagesare scanned.
ImportantDepending on the specified application, the images may not appear correctly or the applicationmay not start.
Reset
Cancels the application setting.
Set...
Allows you to select an application to start.
Start scanning by clicking the one-click button
Select this checkbox to start scanning when you click an icon.
Apply
Saves and applies the specified settings.Click Cancel instead of Apply to cancel the specified settings.
Cancel
Cancels the specified settings. The current screen closes.
Defaults
Returns all settings in the screen to their defaults.
Scan
Scans and saves documents as PDF files with the specified settings.
Page top
Pagina 465 din 732 paginiPDF Dialog Box

Advanced Guide > Scanning > Scanning with the Bundled Application Software > MP Navigator EX Screens > Save asPDF file Dialog Box
Save as PDF file Dialog Box
The Save as PDF file dialog box opens when you scan from Save as PDF file on the Custom Scan withOne-click tab or from PDF in the One-click Mode screen after selecting Open the save dialog box afterscanning the image.
In the Save as PDF file dialog box, you can make settings for saving images to a computer.
Important
You cannot save images scanned at 10501 pixels or more in the vertical and horizontal directions.
Save as type
Select a PDF file type to save the scanned images.
Save each of the selected images as a separate PDF file.
PDF(Multiple Pages)
Save multiple images in one PDF file.
NotePDF(Multiple Pages) is displayed when multiple images are scanned.
PDF(Add Page)
Add the scanned images to a PDF file. The images are added to the end of the PDF file. Youcannot rearrange the pages of the PDF file to which the images are added.
Important
Images can only be added to PDF files created with MP Navigator EX. You cannot specifyPDF files created with other applications. PDF files edited in other applications cannot bespecified as well.
Pagina 466 din 732 paginiSave as PDF file Dialog Box

PDF(Add Page) cannot be selected for images scanned using the Operation Panel of themachine.If a password-protected PDF file is edited, the passwords will be deleted. Reset thepasswords.
Setting Passwords for PDF Files
Set...
Make advanced settings for creating PDF files. See " PDF Settings Dialog Box" for details.
Password security settings
Select this checkbox to open the Password Security -Settings dialog box in which you can setpasswords for opening, editing and printing created PDF files.
Setting Passwords for PDF Files
Rotate Left 90°/Rotate Right 90°
Rotates scanned images 90 degrees counter-clockwise or clockwise.Select the image you want to rotate and click Rotate Left 90° or Rotate Right 90°.
File name
Enter the file name of the image to be saved (up to 64 characters). When saving multiple files, 4 digitsare appended to each file name.
Save in
Displays the folder in which to save the PDF files. To change the folder, click Browse... to specifyanother one.The following folders are specified by default.Windows Vista: MP Navigator EX folder in Pictures folderWindows XP: MP Navigator EX folder in My Pictures folderWindows 2000: MP Navigator EX folder in My Pictures folder
Save to a Subfolder with Current Date
Select this checkbox to create a subfolder in the folder specified in Save in with the current date andsave scanned files in it. A subfolder with a name such as "2009_01_01" (Year_Month_Date) will becreated.If this checkbox is not selected, files are saved directly in the folder specified in Save in.
Page top
Pagina 467 din 732 paginiSave as PDF file Dialog Box

Advanced Guide > Scanning > Scanning with the Bundled Application Software > MP Navigator EX Screens > Mail
Dialog Box
Mail Dialog Box
Click Attach to E-mail on the Custom Scan with One-click tab or click Mail in the One-click Mode screen toopen the Mail dialog box.
Scan Settings
Document Type
Select the type of document to be scanned.
Color Mode
Select how to scan the document.
Document Size
Select the size of the document to be scanned.When you select Custom, a screen in which you can specify the document size appears. Select aUnits, then enter the Width and Height and click OK.
Important
When you select Auto Detect, the image may not be scanned at the correct position and size. Inthat case, change the size to the actual document size (A4, Letter, etc.) and align a corner of thedocument with the corner at the arrow (alignment mark) of the Platen.
Pagina 468 din 732 paginiMail Dialog Box

Resolution
Select the resolution at which to scan documents.Resolution
Use the scanner driver
Select this checkbox to display the ScanGear (scanner driver) screen and make advanced scansettings.Color Mode, Document Size, Resolution and other settings in the Mail dialog box will be disabled.Specify these settings in the ScanGear (scanner driver) screen.
Specify...
Click to open the Scan Settings dialog box in which you can make advanced scan settings.Scan Settings Dialog Box
Save Settings
File Size
Select a size from Small (fits in a 640 by 480 window), Medium (fits in a 800 by 600 window), Large(fits in a 1024 by 768 window) and Original.
File name
Enter the file name of the image to be saved (up to 64 characters). When saving multiple files, 4digits are appended to each file name.
Save as type
Select a file type to save the scanned images.Select JPEG/Exif, PDF or PDF(Multiple Pages).
Important
You cannot set passwords for PDF files.You cannot select JPEG/Exif when Color Mode is Black and White.
Set...
When Save as type is JPEG/Exif
You can specify a compression type for JPEG files. Select High(Low Compression), Standard orLow(High Compression).
When Save as type is PDF or PDF(Multiple Pages)
Make advanced settings for creating PDF files. See " PDF Settings Dialog Box" for details.
Save in
Displays the folder in which to save the scanned images. To change the folder, click Browse... tospecify another one.The following folders are specified by default.Windows Vista: MP Navigator EX folder in Pictures folderWindows XP: MP Navigator EX folder in My Pictures folderWindows 2000: MP Navigator EX folder in My Pictures folder
Save to a Subfolder with Current Date
Select this checkbox to create a subfolder in the folder specified in Save in with the current date andsave scanned files in it. A subfolder with a name such as "2009_01_01" (Year_Month_Date) will becreated.If this checkbox is not selected, files are saved directly in the folder specified in Save in.
Attachment Settings
Mail Program
Specify an e-mail software program.
Note
Pagina 469 din 732 paginiMail Dialog Box

Select Add... to open the Select Mail Program dialog box in which you can select an e-mailsoftware program. If the e-mail software program you want to use is not listed, click Add to Listand select it.
Start scanning by clicking the one-click button
Select this checkbox to start scanning when you click an icon.
Apply
Saves and applies the specified settings.Click Cancel instead of Apply to cancel the specified settings.
Cancel
Cancels the specified settings. The current screen closes.
Defaults
Returns all settings in the screen to their defaults.
Scan
Scans documents with the specified settings.When scanning is completed, the e-mail software program starts automatically and a new messagescreen appears with the image attached.
Page top
Pagina 470 din 732 paginiMail Dialog Box

Advanced Guide > Scanning > Scanning with the Bundled Application Software > MP Navigator EX Screens > OCRDialog Box
OCR Dialog Box
Click OCR on the Custom Scan with One-click tab or in the One-click Mode screen to open the OCRdialog box.
Scan Settings
Document Type
Select the type of document to be scanned.
Color Mode
Select how to scan the document.
Document Size
Select the size of the document to be scanned.When you select Custom, a screen in which you can specify the document size appears. Select aUnits, then enter the Width and Height and click OK.
Resolution
Select the resolution at which to scan documents.Resolution
Use the scanner driver
Select this checkbox to display the ScanGear (scanner driver) screen and make advanced scan
Pagina 471 din 732 paginiOCR Dialog Box

settings.Color Mode, Document Size, Resolution and other settings in the OCR dialog box will be disabled.Specify these settings in the ScanGear (scanner driver) screen.
Specify...
Click to open the Scan Settings dialog box in which you can make advanced scan settings.Scan Settings Dialog Box
NoteWhen scanning slanted documents, select the Correct slanted document checkbox to improvethe text recognition accuracy.
Save Settings
File name
Enter the file name of the image to be saved (up to 64 characters). When saving multiple files, 4digits are appended to each file name.
Save as type
Select a file type to save the scanned images.Select JPEG/Exif, TIFF or BMP.
Important
You cannot select JPEG/Exif when Color Mode is Black and White.
Set...
When Save as type is JPEG/Exif
You can specify a compression type for JPEG files. Select High(Low Compression), Standard orLow(High Compression).
Save in
Displays the folder in which to save the scanned images. To change the folder, click Browse... tospecify another one.The following folders are specified by default.Windows Vista: MP Navigator EX folder in Pictures folderWindows XP: MP Navigator EX folder in My Pictures folderWindows 2000: MP Navigator EX folder in My Pictures folder
Save to a Subfolder with Current Date
Select this checkbox to create a subfolder in the folder specified in Save in with the current date andsave scanned files in it. A subfolder with a name such as "2009_01_01" (Year_Month_Date) will becreated.If this checkbox is not selected, files are saved directly in the folder specified in Save in.
Application Settings
OCR with
Specify an OCR application.When MP Navigator EX is specified, after the image is scanned, the text in the image is extractedand appears in Notepad (included with Windows).
NoteOnly text written in languages that can be selected on the General tab can be extracted toNotepad (included with Windows). Click Set... on the General tab and specify the languageaccording to the language of the document to be scanned.When scanning multiple documents, you can collect the extracted text into one file.
General TabText displayed in Notepad (included with Windows) is for guidance only. Text in the image ofthe following types of documents may not be detected correctly.- Documents containing text with font size outside the range of 8 points to 40 points (at 300 dpi)
Pagina 472 din 732 paginiOCR Dialog Box

- Slanted documents- Documents placed upside down or documents with text in the wrong orientation (rotatedcharacters)- Documents containing special fonts, effects, italics, or hand-written text- Documents with narrow line spacing- Documents with colors in the background of text- Documents containing multiple languages
Reset
Cancels the application setting.
Set...
Allows you to select an application.
ImportantDepending on the specified application, the text may not be extracted correctly or the applicationmay not start.
Start scanning by clicking the one-click button
Select this checkbox to start scanning when you click an icon.
Apply
Saves and applies the specified settings.Click Cancel instead of Apply to cancel the specified settings.
Cancel
Cancels the specified settings. The current screen closes.
Defaults
Returns all settings in the screen to their defaults.
Scan
Scans documents with the specified settings.
Page top
Pagina 473 din 732 paginiOCR Dialog Box

Advanced Guide > Scanning > Scanning with the Bundled Application Software > MP Navigator EX Screens > CustomDialog Box
Custom Dialog Box
Click Custom on the Custom Scan with One-click tab or in the One-click Mode screen to open theCustom dialog box.
Scan Settings
Document Type
Select the type of document to be scanned. When Auto Mode is selected, the document type isautomatically detected. In that case, Color Mode, Document Size and Resolution are automaticallyset as well.
Important
The following types of documents cannot be scanned correctly with Auto Mode. In that case,specify the document type or size.- Documents other than photos, postcards, business cards, magazines, newspapers, textdocuments and CD/DVD- A4 size photos- Text documents smaller than 2L (5 inches x 7 inches) (127 mm x 178 mm), such aspaperback pages with the spine cut off- Documents printed on thin white paper- Long narrow documents such as panoramic photosReflective CD/DVD labels may not be scanned properly.Place documents correctly according to the type of document to be scanned. Otherwise,documents may not be scanned correctly.See "Placing Documents " for details on how to place documents.
Note
Pagina 474 din 732 paginiCustom Dialog Box

To reduce moire, set Document Type to Magazine.
Color Mode
Select how to scan the document.
Document Size
Select the size of the document to be scanned.When you select Custom, a screen in which you can specify the document size appears. Select aUnits, then enter the Width and Height and click OK.
Important
When you select Auto Detect, the image may not be scanned at the correct position and size. Inthat case, change the size to the actual document size (A4, Letter, etc.) and align a corner of thedocument with the corner at the arrow (alignment mark) of the Platen.
Resolution
Select the resolution at which to scan documents.Resolution
Use the scanner driver
Select this checkbox to display the ScanGear (scanner driver) screen and make advanced scansettings.Color Mode, Document Size, Resolution and other settings in the Custom dialog box will bedisabled. Specify these settings in the ScanGear (scanner driver) screen.
Specify...
Click to open the Scan Settings dialog box in which you can make advanced scan settings.Scan Settings Dialog Box
Save Settings
Automatically save the image to your computer after scanning it
Select this to save the images to your computer as specified after scanning them.The File name, Save as type and Save in settings will be displayed.
Important
If you select this function, you will not be able to set passwords for PDF files.
NoteIf an application to start is specified in Application Settings, the scanned image opens in thespecified application.
File name
Enter the file name of the image to be saved (up to 64 characters). When saving multiple files, 4digits are appended to each file name.
Save as type
Select a file type to save the scanned images.Select Auto, JPEG/Exif, TIFF or BMP. Auto is displayed and selected by default when Document Typeis Auto Mode.
ImportantWhen Document Type is Auto Mode and Save as type is Auto, the file format may differ
Pagina 475 din 732 paginiCustom Dialog Box

depending on how you place the document.See "Placing Documents " for details on how to place documents.Large documents (such as A4 size photos) that cannot be placed away from the edges/arrow(alignment mark) of the Platen may not be saved in the correct file format when Save as type isAuto. In that case, select a file format suitable for the document to be scanned.You cannot select JPEG/Exif when Color Mode is Black and White.
NoteWhen Auto is selected, files are saved in the following formats according to the document type.Photos, postcards, CD/DVD and business cards: JPEGMagazines, newspapers and text documents: PDFYou can change the file format from Set....Images saved as PDF files may not open depending on the application. In that case, select anoption other than Auto in Save as type.If you select JPEG/Exif when Document Type is not Auto Mode , the Save the JPEG/Exif file inAdobeRGB checkbox will be selectable.
Set...
When Save as type is Auto
You can specify the file format in which to save images. Select a file format for Document and Photoeach.
When Save as type is JPEG/Exif
You can specify a compression type for JPEG files. Select High(Low Compression), Standard orLow(High Compression).
Save in
Displays the folder in which to save the scanned images. To change the folder, click Browse... tospecify another one.The following folders are specified by default.Windows Vista: MP Navigator EX folder in Pictures folderWindows XP: MP Navigator EX folder in My Pictures folderWindows 2000: MP Navigator EX folder in My Pictures folder
Save to a Subfolder with Current Date
Select this checkbox to create a subfolder in the folder specified in Save in with the current date andsave scanned files in it. A subfolder with a name such as "2009_01_01" (Year_Month_Date) will becreated.If this checkbox is not selected, files are saved directly in the folder specified in Save in.
Save the JPEG/Exif file in AdobeRGB
Select this checkbox to save the images in colors that correspond to Adobe RGB.
Important
This function is available only when Save as type is JPEG/Exif and Document Type is not AutoMode.This function is not available if the Adobe RGB profile is not installed.
NoteYou cannot select this setting if the Use the scanner driver checkbox is selected.When you save an image with the Save the JPEG/Exif file in AdobeRGB checkbox selected, anunderscore is added to the beginning of the file name. (Example: _Image0001.jpg)
Open the save dialog box after scanning the image (Input Exif information)
Select this to open the Save dialog box after scanning the images and specify the save settingssuch as destination folder, file name and Exif information.
Save Dialog Box
Application Settings
Pagina 476 din 732 paginiCustom Dialog Box

Open with
Specify an application with which to open scanned images. Drag and drop the icon of an applicationthat supports the file format displayed in Save as type. The specified application starts after imagesare scanned.
Important
Depending on the specified application, the images may not appear correctly or the applicationmay not start.
Reset
Cancels the application setting.
Set...
Allows you to select an application to start.
Start scanning by clicking the one-click button
Select this checkbox to start scanning when you click an icon.
Apply
Saves and applies the specified settings.Click Cancel instead of Apply to cancel the specified settings.
Cancel
Cancels the specified settings. The current screen closes.
Defaults
Returns all settings in the screen to their defaults.
Scan
Scans and saves documents with the specified settings.When Save as type is Auto, a confirmation appears. Click Open Manual to open this guide (if it isinstalled).
Page top
Pagina 477 din 732 paginiCustom Dialog Box

Advanced Guide > Scanning > Scanning with the Bundled Application Software > MP Navigator EX Screens >Preferences Dialog Box
Preferences Dialog Box
Click Preferences to open the Preferences dialog box.
In the Preferences dialog box, you can make advanced settings to MP Navigator EX functions via theGeneral and Scanner Button Settings tabs.
NoteSee the corresponding sections below for details on each tab.
General TabScanner Button Settings Tab (Save)
Page top
Pagina 478 din 732 paginiPreferences Dialog Box

Advanced Guide > Scanning > Scanning with the Bundled Application Software > MP Navigator EX Screens > GeneralTab
General Tab
On the General tab, you can specify general MP Navigator EX settings.
Product Name
Displays the product name of the machine that MP Navigator EX is currently configured to use.If the displayed product is not the one you want to use, select the desired product from the list.
Save in (My Box)
Displays the folder in which to save scanned documents. To change the folder, click Browse... tospecify another one.The following folders are specified by default.Windows Vista: MP Navigator EX folder in Pictures folderWindows XP: MP Navigator EX folder in My Pictures folderWindows 2000: MP Navigator EX folder in My Pictures folder
Location of Temporary Files
Displays the folder in which to save images temporarily. To change the folder, click Browse... to specifyanother one.
ImportantAn error may occur if you set the destination to the root directory of the drive on which theoperating system is installed. Be sure to specify a folder.An error may occur if you set the destination to a network folder. Be sure to specify a local folder.
Application to run
Displays the applications that can be started via MP Navigator EX. Install the applications from the Setup CD-ROM that accompanies the machine.For Attach to E-mail, you can select an e-mail software program to start.For Open PDF file, the application associated with the .pdf file extension by the operating system isdisplayed.
Pagina 479 din 732 paginiGeneral Tab

Important
You can change which items are installed during installation from the Setup CD-ROM byselecting Custom Install. If you choose not to install some applications with Custom Install, thecorresponding MP Navigator EX functions will be unavailable. To use those functions, install thecorresponding applications.
NoteFor Convert to text file, Notepad (included with Windows) is displayed. Click Set... to open a dialogbox, then specify Document Language and how to scan multiple documents.
Document LanguageSpecify the language according to the language of the document to be scanned. Only textwritten in languages that can be selected in the Document Language can be extracted toNotepad.Combine multiple text conversion resultsWhen scanning multiple documents, select the checkbox to collect the conversion results (text)into one file. This checkbox is selected by default.When the checkbox is selected, you can scan up to 99 pages at one time.Deselect the checkbox to display each conversion result (text) in a separate file.When the checkbox is not selected, you can scan up to 10 pages at one time.
Page top
Pagina 480 din 732 paginiGeneral Tab

Advanced Guide > Scanning > Scanning with the Bundled Application Software > MP Navigator EX Screens > ScannerButton Settings Tab (Save)
Scanner Button Settings Tab (Save)
On the Scanner Button Settings tab, you can specify the following settings.
You can specify how to respond when scanning using the Operation Panel of the machine.
Event
Select Event
Save to PC is set.
Document Type
Auto Scan is set. The document type is automatically detected.
Important
The following types of documents cannot be scanned correctly with Auto Scan. In that case,specify the document type or size in MP Navigator EX.See "Scanning Photos and Documents " to scan images using MP Navigator EX.- Documents other than photos, postcards, business cards, magazines, newspapers, textdocuments and CD/DVD- A4 size photos- Text documents smaller than 2L (5 inches x 7 inches) (127 mm x 178 mm), such aspaperback pages with the spine cut off- Documents printed on thin white paper- Long narrow documents such as panoramic photosReflective CD/DVD labels may not be scanned properly.Place documents correctly according to the type of document to be scanned. Otherwise,documents may not be scanned correctly.See "Placing Documents " for details on how to place documents.
Pagina 481 din 732 paginiScanner Button Settings Tab (Save)

Actions
Scan Settings
Document Size
This setting is automatically set.
Resolution
This setting is automatically set.
Specify...
Click to open the Scan Settings dialog box in which you can make advanced scan settings.Scan Settings Dialog Box
Save Settings
Automatically save the image to your computer after scanning it
Select this to save the images to your computer as specified after scanning them.The File Name, Save as type and Save in settings will be displayed.
Important
If you select this function, you will not be able to set passwords for PDF files.
File Name
Enter the file name of the image to be saved (up to 64 characters).
Save as type
Select a file type to save the scanned images.Select Auto, JPEG/Exif, TIFF or BMP. Auto is displayed by default.
ImportantWhen Document Type is Auto Scan and Save as type is Auto, the file format may differdepending on how you place the document.See "Placing Documents " for details on how to place documents.Large documents (such as A4 size photos) that cannot be placed away from the edges/arrow (alignment mark) of the Platen may not be saved in the correct file format when Saveas type is Auto. In that case, select a file format suitable for the document to be scanned.
NoteIf you select the Enable Auto Photo Fix checkbox in the Scan Settings dialog box and thenselect a format other than JPEG/Exif for Save as type, a message appears and the EnableAuto Photo Fix checkbox will be deselected.When Auto is selected, files are saved in the following formats according to the documenttype.Photos, postcards, CD/DVD and business cards: JPEGMagazines, newspapers and text documents: PDFYou can change the file format from Set....
Set...
When Save as type is Auto
You can specify the file format in which to save images. Select a file format for saving Documentand Photo each.
When Save as type is JPEG/Exif
You can specify a compression type for JPEG files. Select High(Low Compression), Standard orLow(High Compression).
Save in
Displays the folder in which to save the scanned images. To change the folder, click Browse...
Pagina 482 din 732 paginiScanner Button Settings Tab (Save)

to specify another one.The following folders are specified by default.Windows Vista: MP Navigator EX folder in Pictures folderWindows XP: MP Navigator EX folder in My Pictures folderWindows 2000: MP Navigator EX folder in My Pictures folder
Save to a Subfolder with Current Date
Select this checkbox to create a subfolder in the folder specified in Save in with the current dateand save scanned files in it. A subfolder with a name such as "2009_01_01"(Year_Month_Date) will be created.If this checkbox is not selected, files are saved directly in the folder specified in Save in.
Open the save dialog box after scanning the image
Select this to open the save dialog box after scanning the images and specify the save settings suchas destination folder, file name and Exif information.
NoteSee "Save Dialog Box " for details.
Page top
Pagina 483 din 732 paginiScanner Button Settings Tab (Save)

Advanced Guide > Scanning > Scanning with the Bundled Application Software > Appendix: Opening Files Other thanScanned Images
Appendix: Opening Files Other than Scanned Images
You can save or print data other than scanned images using MP Navigator EX.
Using images saved on a memory card
Importing Images Saved on a Memory Card
Using images saved on a computer
Opening Images Saved on a Computer
Page top
Pagina 484 din 732 paginiAppendix: Opening Files Other than Scanned Images

Advanced Guide > Scanning > Scanning with the Bundled Application Software > Appendix: Opening Files Other thanScanned Images > Importing Images Saved on a Memory Card
Importing Images Saved on a Memory Card
You can import images (including PDF files created via scanning using the Operation Panel) saved on amemory card, and save them to a computer or print them using MP Navigator EX. You can also attachthem to e-mail, or edit them using an application that accompanies the machine.
When saving PDF files, you can select whether to enable keyword search, and also specify thecompression type and other advanced settings.
Important
Do not remove or insert memory cards while they are being accessed or the Access Lamp of themachine is flashing.The machine can only detect one memory card at a time. Do not simultaneously insert multiplememory cards.When switching to another memory card of the same type or inserting another memory card in adifferent Card Slot, make sure that the Access Lamp of the machine is not flashing, then remove thememory card. Then, insert another memory card.The machine's Card Slot (memory card) may become inaccessible. In that case, restart themachine or turn it off and reconnect the USB cable.
1. Insert a memory card containing images/PDF files into the machine's Card Slot.
For details on how to insert a memory card into the machine, refer to the on-screen manual: Basic
Guide.
2. Start MP Navigator EX as follows.
Windows Vista/Windows XP
Windows 2000
Windows Vista/Windows XP
The program selection screen appears. Click MP Navigator EX Ver3.0.
NoteIf you want to start MP Navigator EX every time a memory card is inserted into the machine,follow these steps.Windows Vista:Select the Always do this for pictures checkbox and click MP Navigator EX Ver3.0.
Pagina 485 din 732 paginiImporting Images Saved on a Memory Card

Windows XP:Select MP Navigator EX Ver3.0, then select the Always do the selected action. checkbox andclick OK.
The Memory Card screen of the Scan/Import window appears, and the images and PDF filessaved on the memory card appear in the Thumbnail window.
NoteSee "Memory Card Screen (Scan/Import Window) " for details on the Memory Card screen(Scan/Import window).
Windows 2000
Start MP Navigator EX and open the Navigation Mode screen.Starting MP Navigator EX
Point to Scan/Import and click Memory Card. The Memory Card screen of the Scan/Import windowappears, and the images and PDF files saved on the memory card appear in the Thumbnailwindow.
3. Select the checkboxes of the images and PDF files you want to import, then clickImport.
The Import dialog box opens. Specify the folder in which to save the imported files.
Pagina 486 din 732 paginiImporting Images Saved on a Memory Card
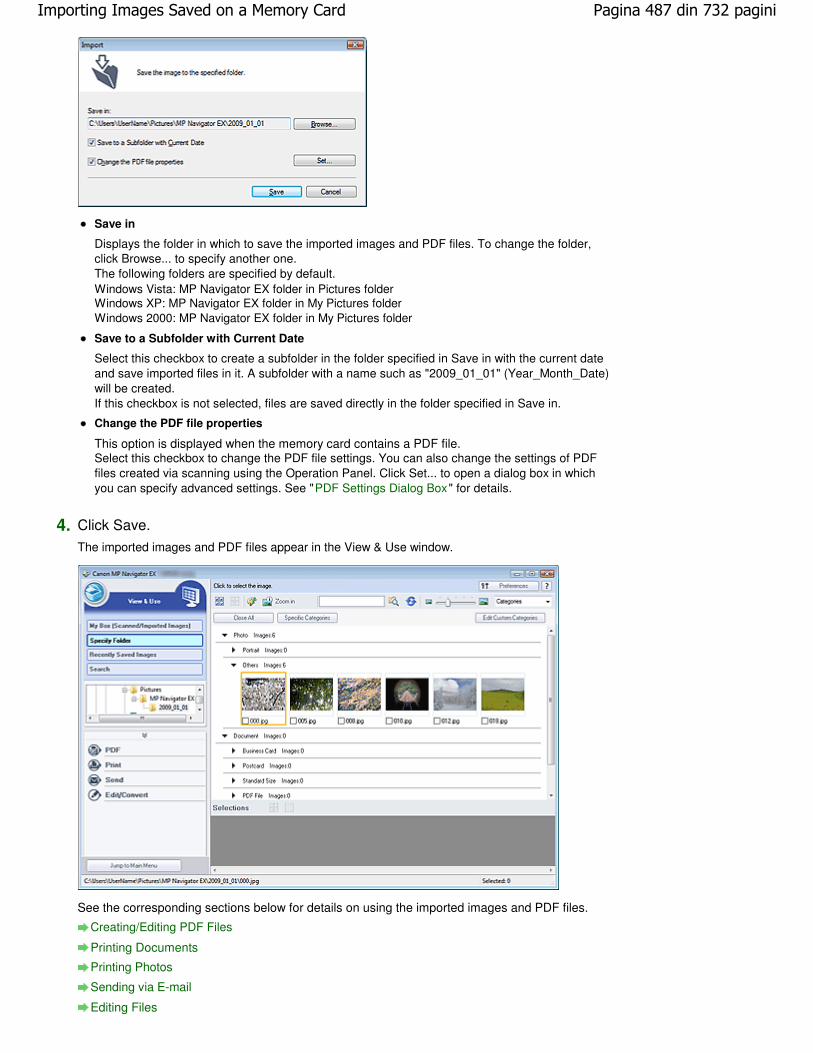
Save in
Displays the folder in which to save the imported images and PDF files. To change the folder,click Browse... to specify another one.The following folders are specified by default.Windows Vista: MP Navigator EX folder in Pictures folderWindows XP: MP Navigator EX folder in My Pictures folderWindows 2000: MP Navigator EX folder in My Pictures folder
Save to a Subfolder with Current Date
Select this checkbox to create a subfolder in the folder specified in Save in with the current dateand save imported files in it. A subfolder with a name such as "2009_01_01" (Year_Month_Date)will be created.If this checkbox is not selected, files are saved directly in the folder specified in Save in.
Change the PDF file properties
This option is displayed when the memory card contains a PDF file.Select this checkbox to change the PDF file settings. You can also change the settings of PDFfiles created via scanning using the Operation Panel. Click Set... to open a dialog box in whichyou can specify advanced settings. See "PDF Settings Dialog Box" for details.
4. Click Save.
The imported images and PDF files appear in the View & Use window.
See the corresponding sections below for details on using the imported images and PDF files.
Creating/Editing PDF Files
Printing Documents
Printing Photos
Sending via E-mail
Editing Files
Pagina 487 din 732 paginiImporting Images Saved on a Memory Card

Page top
Pagina 488 din 732 paginiImporting Images Saved on a Memory Card

Advanced Guide > Scanning > Scanning with the Bundled Application Software > Appendix: Opening Files Other thanScanned Images > Opening Images Saved on a Computer
Opening Images Saved on a Computer
You can open images saved on a computer and print them or attach them to e-mail using MP NavigatorEX. You can also edit them using an application that accompanies the machine.
1. Start MP Navigator EX and open the Navigation Mode screen.
Starting MP Navigator EX
2. In the Navigation Mode screen, point to View & Use and click My Box (Scanned/Imported Images), Specify Folder or Recently Saved Images.
Click My Box (Scanned/Imported Images) to open images saved in My Box (Scanned/ImportedImages), click Specify Folder to open images saved in a specific folder, or click Recently SavedImages to open recently saved images.
NoteIf the Show this window at startup checkbox is not selected, the last used screen appears. If
the Scan/Import window is displayed, click (View & Use) on the upper left of the screen.The View & Use window opens.See "View & Use Images on your Computer Tab " for details on the View & Use Images on yourComputer tab.
3. Click the folder containing the images you want to open.
Images saved in the folder appear in the Thumbnail window.
Pagina 489 din 732 paginiOpening Images Saved on a Computer

4. Select the images you want to use, then select what you want to do with them.
See the corresponding sections below for details on using images.
Creating/Editing PDF Files
Printing Documents
Printing Photos
Sending via E-mail
Editing Files
Page top
Pagina 490 din 732 paginiOpening Images Saved on a Computer

Ghid avansat > Scanarea > Scanarea cu alt software de aplicaţie
Scanarea cu alt software de aplicaţie
Ce este ScanGear (driver de scaner)?
Scanarea cu Setări avansate, utilizând ScanGear (driver de scaner)
Corectarea imaginilor şi ajustarea culorilor cu ScanGear (driver de scaner)
Ecrane ScanGear (driver de scaner)
Anexă: Informaţii utile referitoare la scanare
În partea superioară a paginii
Pagina 491 din 732 paginiScanarea cu alt software de aplicaţie

Advanced Guide > Scanning > Scanning with Other Application Software > What Is ScanGear (Scanner Driver)?
What Is ScanGear (Scanner Driver)?
ScanGear (scanner driver) is software required for scanning documents. It enables you to specify theoutput size and make image corrections when scanning.
ScanGear (scanner driver) can be started from MP Navigator EX or from other applications that arecompatible with a standard interface called TWAIN. (ScanGear (scanner driver) is a TWAIN-compatibledriver.)
What You Can Do with This Software
This software enables you to preview scan results or set document type and output size, etc. whenscanning documents. It is useful when you want to scan in a specific color tone, as it allows you to makevarious corrections and adjust brightness, contrast, etc.
Screens
There are three modes: Basic Mode, Advanced Mode and Auto Scan Mode.
Switch modes by clicking a tab on the upper right of the screen.
NoteScanGear (scanner driver) starts in the last used mode.Settings are not retained when you switch between modes.
Basic Mode
Use Basic Mode to scan easily by following three simple on-screen steps ( , and ).
Advanced Mode
Use Advanced Mode to specify color mode, output resolution, image brightness, color tone, etc. whenscanning.
Pagina 492 din 732 paginiWhat Is ScanGear (Scanner Driver)?

Auto Scan Mode
Use Auto Scan Mode to scan easily by simply placing the document on the Platen and clicking Scan.
Page top
Pagina 493 din 732 paginiWhat Is ScanGear (Scanner Driver)?

Advanced Guide > Scanning > Scanning with Other Application Software > Scanning with Advanced Settings UsingScanGear (Scanner Driver)
Scanning with Advanced Settings Using ScanGear (ScannerDriver)
Starting ScanGear (scanner driver)
Starting ScanGear (Scanner Driver)
Scanning documents after making simple image corrections
Scanning in Basic Mode
Scanning documents after making advanced image corrections and brightness/color adjustments
Scanning in Advanced Mode
Scanning with a simple operation
Scanning in Auto Scan Mode
Scanning multiple documents at one time after making image corrections and color adjustments
Scanning Multiple Documents at One Time with ScanGear (Scanner Driver)
Page top
Pagina 494 din 732 paginiScanning with Advanced Settings Using ScanGear (Scanner Driver)

Advanced Guide > Scanning > Scanning with Other Application Software > Scanning with Advanced Settings UsingScanGear (Scanner Driver) > Starting ScanGear (Scanner Driver)
Starting ScanGear (Scanner Driver)
Use ScanGear (scanner driver) to make image corrections and color adjustments when scanning.ScanGear (scanner driver) can be started from MP Navigator EX or an application.
Starting from MP Navigator EX
Navigation Mode Screen
Follow these steps to start ScanGear (scanner driver) from the Navigation Mode screen of MP NavigatorEX.
1. Start MP Navigator EX and open the Navigation Mode screen.Starting MP Navigator EX
2. Point to Scan/Import and click Photos/Documents (Platen).The Scan/Import window opens.
3. Select the Use the scanner driver checkbox, then click Open Scanner Driver.
The ScanGear (scanner driver) screen appears.
One-click Mode Screen
Follow these steps to start ScanGear (scanner driver) from the One-click Mode screen of MP NavigatorEX.
1. Start MP Navigator EX and open the One-click Mode screen.Starting MP Navigator EX
2. Click the corresponding icon.The corresponding dialog box opens.
Pagina 495 din 732 paginiStarting ScanGear (Scanner Driver)

3. Select the Use the scanner driver checkbox in Scan Settings, then click Scan.
The ScanGear (scanner driver) screen appears.
ImportantUse the scanner driver is not displayed in the PDF dialog box or Auto Scan dialog box.
Starting from an Application
Follow these steps (example) to start ScanGear (scanner driver) from an application.
The procedure varies depending on the application. For details, refer to the application's manual.
1. Start the application.
2. On the File menu of the application, select Select Source and select the machine.
3. Select the command to scan a document (Scan/Import, Acquire image, etc.).The ScanGear (scanner driver) screen appears.
Page top
Pagina 496 din 732 paginiStarting ScanGear (Scanner Driver)
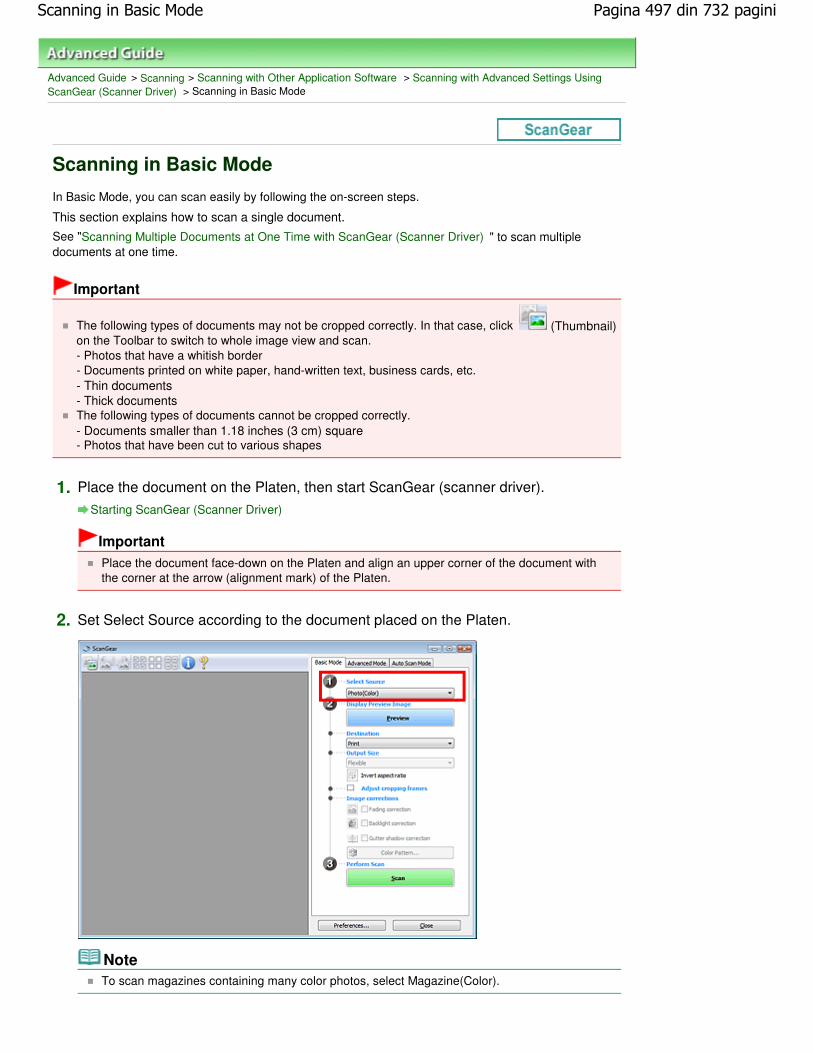
Advanced Guide > Scanning > Scanning with Other Application Software > Scanning with Advanced Settings UsingScanGear (Scanner Driver) > Scanning in Basic Mode
Scanning in Basic Mode
In Basic Mode, you can scan easily by following the on-screen steps.
This section explains how to scan a single document.
See "Scanning Multiple Documents at One Time with ScanGear (Scanner Driver) " to scan multipledocuments at one time.
Important
The following types of documents may not be cropped correctly. In that case, click (Thumbnail)on the Toolbar to switch to whole image view and scan.- Photos that have a whitish border- Documents printed on white paper, hand-written text, business cards, etc.- Thin documents- Thick documentsThe following types of documents cannot be cropped correctly.- Documents smaller than 1.18 inches (3 cm) square- Photos that have been cut to various shapes
1. Place the document on the Platen, then start ScanGear (scanner driver).
Starting ScanGear (Scanner Driver)
Important
Place the document face-down on the Platen and align an upper corner of the document withthe corner at the arrow (alignment mark) of the Platen.
2. Set Select Source according to the document placed on the Platen.
NoteTo scan magazines containing many color photos, select Magazine(Color).
Pagina 497 din 732 paginiScanning in Basic Mode

3. Click Preview.Preview image appears in the Preview area.
NoteColors are adjusted based on the document type selected in Select Source.
4. Set Destination.
5. Set Output Size.
Output size options vary by the items selected in Destination.
6. Adjust the scan area (cropping frame) as required.Adjust the size and position of the cropping frame (scan area) on the preview image.
Adjusting Cropping Frames
7. Set Image corrections as required.
8. Click Scan.
Scanning starts.
Note
Click (Information) to open a dialog box in which you can check the current scan settings(document type, etc.).ScanGear's response after scanning can be specified in Status of ScanGear dialog after scanningon the Scan tab of the Preferences dialog box.
Scan Tab
Related Topic
Basic Mode Tab
Page top
Pagina 498 din 732 paginiScanning in Basic Mode

Advanced Guide > Scanning > Scanning with Other Application Software > Scanning with Advanced Settings UsingScanGear (Scanner Driver) > Scanning in Advanced Mode
Scanning in Advanced Mode
In Advanced Mode, you can specify the color mode, output resolution, image brightness, color tone, etc.when scanning.
This section explains how to scan a single document.
See "Scanning Multiple Documents at One Time with ScanGear (Scanner Driver) " to scan multipledocuments at one time.
Important
The following types of documents may not be cropped correctly. In that case, click (Thumbnail)on the Toolbar to switch to whole image view and scan.- Photos that have a whitish border- Documents printed on white paper, hand-written text, business cards, etc.- Thin documents- Thick documentsThe following types of documents cannot be cropped correctly.- Documents smaller than 1.18 inches (3 cm) square- Photos that have been cut to various shapes
1. Place the document on the Platen, then start ScanGear (scanner driver).
Starting ScanGear (Scanner Driver)
ImportantPlace the document face-down on the Platen and align an upper corner of the document withthe corner at the arrow (alignment mark) of the Platen.
2. Click Advanced Mode.
The Advanced Mode tab appears.
Note
Pagina 499 din 732 paginiScanning in Advanced Mode

Settings are not retained when you switch between modes.
3. Set Color Mode.
Input Settings
4. Click Preview.Preview image appears in the Preview area.
NoteIf you scan without preview, the show-through reduction function will be active. This function isuseful when scanning magazines. However, when scanning photos, the color tone of thescanned image may differ from the source due to the show-through reduction function. In thatcase, use preview first.
5. Set Output Settings.
Output Settings
6. Adjust the cropping frame (scan area), correct image and adjust colors as required.
Adjusting Cropping Frames
Image Settings
Color Adjustment Buttons
7. Click Scan.
Scanning starts.
Note
Click (Information) to open a dialog box in which you can check the current scan settings(document type, etc.).ScanGear's response after scanning can be specified in Status of ScanGear dialog after scanningon the Scan tab of the Preferences dialog box.
Scan Tab
Related Topic
Advanced Mode Tab
Pagina 500 din 732 paginiScanning in Advanced Mode

Page top
Pagina 501 din 732 paginiScanning in Advanced Mode

Advanced Guide > Scanning > Scanning with Other Application Software > Scanning with Advanced Settings UsingScanGear (Scanner Driver) > Scanning in Auto Scan Mode
Scanning in Auto Scan Mode
You can scan easily in Auto Scan Mode of ScanGear (scanner driver) by letting it automatically determinethe type of document placed on the Platen.
NoteSupported document types are photos, postcards, business cards, magazines, newspapers, textdocuments and CD/DVD. To scan other documents, specify the document type on the Basic Modetab or the Advanced Mode tab.
Scanning in Basic ModeScanning in Advanced Mode
1. Place the document on the Platen, then start ScanGear (scanner driver).
Placing Documents
Starting ScanGear (Scanner Driver)
2. Click Auto Scan Mode.
The Auto Scan Mode tab appears.
3. Click Scan.Scanning starts.
NoteScanGear's response after scanning can be specified in Status of ScanGear dialog after scanningon the Scan tab of the Preferences dialog box.
Scan Tab
Related Topic
Auto Scan Mode Tab
Pagina 502 din 732 paginiScanning in Auto Scan Mode

Page top
Pagina 503 din 732 paginiScanning in Auto Scan Mode

Advanced Guide > Scanning > Scanning with Other Application Software > Scanning with Advanced Settings UsingScanGear (Scanner Driver) > Scanning Multiple Documents at One Time with ScanGear (Scanner Driver)
Scanning Multiple Documents at One Time with ScanGear(Scanner Driver)
You can scan two or more photos (small documents) on the Platen at one time in Basic Mode andAdvanced Mode of ScanGear (scanner driver).
This section explains how to scan multiple documents from the Basic Mode tab.
Important
To scan multiple documents as a single image, scan in whole image view.The following types of documents may not be cropped correctly. In that case, adjust the croppingframes (scan areas) in whole image view and scan.- Photos that have a whitish border- Documents printed on white paper, hand-written text, business cards, etc.- Thin documents- Thick documents
Scanning Multiple Documents in Whole Image ViewThe following types of documents cannot be cropped correctly.- Documents smaller than 1.18 inches (3 cm) square- Photos that have been cut to various shapes
NoteSee "Scanning in Auto Scan Mode " to scan easily by automatically detecting the document type.You can also scan multiple documents at one time from the Advanced Mode tab. Use the AdvancedMode tab to make advanced scan settings such as the color mode, output resolution, imagebrightness and color tone.See the corresponding sections below for details on the Basic Mode tab and Advanced Mode tab.
Basic Mode TabAdvanced Mode Tab
1. Place the document on the Platen, then start ScanGear (scanner driver).
Placing Documents
Starting ScanGear (Scanner Driver)
2. Set Select Source according to the document placed on the Platen.
Pagina 504 din 732 paginiScanning Multiple Documents at One Time with ScanGear (Scanner Driver)

3. Click Preview.Thumbnails of the preview images appear in the Preview area. Images are cropped (scan areas arespecified) automatically according to the document size.
4. Set Destination.
5. Set Output Size.
6. Adjust the scan areas (cropping frames) and set Image corrections as required.
NoteYou can correct each image separately. Select the frame you want to correct.In thumbnail view, you can only create one cropping frame (scan area) per image.To create multiple cropping frames in an image, scan in whole image view.
Scanning Multiple Documents in Whole Image View
7. Select the images you want to scan.
Select the checkboxes of the images you want to scan.
Pagina 505 din 732 paginiScanning Multiple Documents at One Time with ScanGear (Scanner Driver)

8. Click Scan.
Scanning Multiple Documents in Whole Image View
Follow these steps if thumbnails are not displayed correctly when previewed or if you want to scanmultiple documents as a single image.
NotePositions of slanted documents are not corrected in whole image view.
1. After previewing images, click (Thumbnail) on the Toolbar.
Switch to whole image view.
Note
When the whole image is displayed, the icon changes to (Whole Image).
2. Adjust the scan areas (cropping frames).Adjust the size and position of the cropping frame (scan area) on the preview image. You can alsocreate two or more cropping frames.
If an area is not specified, the document will be scanned at the document size (Auto Crop). If an areais specified, only the portion in the specified area will be scanned.
Adjusting Cropping Frames
3. Set Destination.
4. Set Output Size.
5. Set Image corrections as required.
6. Click Scan.Areas framed by broken lines are scanned.
Pagina 506 din 732 paginiScanning Multiple Documents at One Time with ScanGear (Scanner Driver)

NoteScanGear's response after scanning can be specified in Status of ScanGear dialog after scanningon the Scan tab of the Preferences dialog box.
Scan Tab
Page top
Pagina 507 din 732 paginiScanning Multiple Documents at One Time with ScanGear (Scanner Driver)

Advanced Guide > Scanning > Scanning with Other Application Software > Correcting Images and Adjusting Colors withScanGear (Scanner Driver)
Correcting Images and Adjusting Colors with ScanGear(Scanner Driver)
The following sections provide you with tips and know-how on advanced scanning techniques involvingcolor/brightness adjustment, etc.
Sharpening out-of-focus photos, reducing dust and scratches, and correcting faded colors
Correcting Images (Unsharp Mask, Reduce Dust and Scratches, Fading Correction, etc.)
Previewing and changing the color tone of the entire image to scan
Adjusting Colors Using a Color Pattern
Brightening colors that have faded with time or due to colorcast
Adjusting Saturation and Color Balance
Adjusting images that are too dark or bright, or too flat due to lack of contrast
Adjusting Brightness and Contrast
Adjusting the color tone using histogram (a graph showing brightness distribution)
Adjusting Histogram
Adjusting the image brightness using tone curve (a graph of brightness balance)
Adjusting Tone Curve
Sharpening characters in text documents or reducing show-through effects
Setting Threshold
Page top
Pagina 508 din 732 paginiCorrecting Images and Adjusting Colors with ScanGear (Scanner Driver)

Advanced Guide > Scanning > Scanning with Other Application Software > Correcting Images and Adjusting Colors withScanGear (Scanner Driver) > Correcting Images (Unsharp Mask, Reduce Dust and Scratches, Fading Correction, etc.)
Correcting Images (Unsharp Mask, Reduce Dust andScratches, Fading Correction, etc.)
The Image Settings functions in Advanced Mode tab of ScanGear (scanner driver) allow you to enhancethe outline of the subjects, reduce dust/scratches and correct faded colors when scanning images.
Setting Items
Click (Arrow) of a function and select an item from the pull-down menu.
Important
Do not apply these functions to images without moire, dust/scratches or faded colors. The colortone may be adversely affected.See "Image Settings " for details and precautions on each function.
NoteSee "Scanning in Advanced Mode " to start ScanGear (scanner driver) in Advanced Mode tab andscan.
Adjusting the image brightness and color tone
Set Image Adjustment to Auto, Photo, Magazine, Newspaper or Document according to the documenttype.
Pagina 509 din 732 paginiCorrecting Images (Unsharp Mask, Reduce Dust and Scratches, Fading Cor...

None Auto
Sharpening slightly out-of-focus images
Set Unsharp Mask to ON.
OFF ON
Reducing gradations and stripe patterns
Set Descreen to ON.
OFF ON
Note"Moire" is a phenomenon where uneven gradation or a stripe pattern appears when such photos orpictures printed with fine dots are scanned. Descreen is the function for reducing this moire effect.
Reducing dust and scratches
Set Reduce Dust and Scratches to Low, Medium or High according to the degree of dust and scratches.
None Medium
Correcting photos that have faded with time or due to colorcast
Set Fading Correction to Low, Medium or High according to the degree of fading or colorcast.
None Medium
Pagina 510 din 732 paginiCorrecting Images (Unsharp Mask, Reduce Dust and Scratches, Fading Cor...

Reducing graininess
Set Grain Correction to Low, Medium or High according to the degree of graininess.
None Medium
Correcting backlit images
Set Backlight Correction to Low, Medium or High according to the degree of backlight.
None Medium
Correcting shadows that appear between pages when scanning open booklets
Set Gutter Shadow Correction to Low, Medium or High according to the degree of shadows.
None Medium
Page top
Pagina 511 din 732 paginiCorrecting Images (Unsharp Mask, Reduce Dust and Scratches, Fading Cor...

Advanced Guide > Scanning > Scanning with Other Application Software > Correcting Images and Adjusting Colors withScanGear (Scanner Driver) > Adjusting Colors Using a Color Pattern
Adjusting Colors Using a Color Pattern
You can preview color changes and reproduce natural colors by using the Color Pattern function inScanGear's Basic Mode tab.
Color Adjustment
Correct colors that have faded with time or due to colorcast. Colorcast is a phenomenon where a specificcolor affects the entire picture due to the weather or ambient strong colors.
Click an arrow in Color Adjustment to emphasize the corresponding color.
Cyan & red, magenta & green and yellow & blue are complementary color pairs (each pair produces ashade of gray when mixed). You can reproduce the natural colors of the scene by reducing the cast colorand increasing the complementary color.
Pagina 512 din 732 paginiAdjusting Colors Using a Color Pattern

It is recommended that you find a portion in the image where it should be white, and adjust the colors sothat the portion turns white.
Preview image appears in the center. Preview image colors change as you adjust them.
Below is an example of correcting a bluish image.
Since Blue and Green are too strong, click the Yellow and Magenta arrows to correct.
Before After
NoteColor adjustments are applied only to the scan area (cropping frame) or the frame selected inthumbnail view.You can select multiple frames or cropping frames by clicking them while pressing the Ctrl key.You can also select a color tone from the color pattern displayed on the left of the Color Patternscreen.You can also use this function to add a specific tint to an image. Increase the magenta to add awarm tint, and increase the blue to add a cool tint.
Page top
Pagina 513 din 732 paginiAdjusting Colors Using a Color Pattern

Advanced Guide > Scanning > Scanning with Other Application Software > Correcting Images and Adjusting Colors withScanGear (Scanner Driver) > Adjusting Saturation and Color Balance
Adjusting Saturation and Color Balance
In ScanGear's Advanced Mode tab, click (Saturation/Color Balance).
NoteClick Defaults to reset all adjustments in the current window.
Saturation
Adjust the image's saturation (vividness). You can brighten colors that have faded with time, etc.
Move (slider) under Saturation to the left to decrease the saturation (darken the image), and to theright to increase the saturation (brighten the image). You can also enter a value (-127 to 127).
Saturation decreased Original image Saturation increased
NoteThe natural color tone of the original image may be lost if you increase saturation too much.
Color Balance
Adjust images that have a colorcast. Colorcast is a phenomenon where a specific color affects the entirepicture due to the weather or ambient strong colors.
Pagina 514 din 732 paginiAdjusting Saturation and Color Balance

Move (slider) under Color Balance to the left or right to emphasize the corresponding color.
Cyan & Red
Magenta & Green
Yellow & Blue
These are complementary color pairs (each pair produces a shade of gray when mixed). You canreproduce the natural colors of the scene by reducing the cast color and increasing the complementarycolor.
It is usually difficult to correct the image completely by adjusting only one color pair. It is recommendedthat you find a portion in the image where it should be white, and adjust all three color pairs so that theportion turns white.
You can also enter a value (-127 to 127).
Below is an example of an image in which the "Cyan & Red" pair has been adjusted.
Cyan is increased Red is increased
Page top
Pagina 515 din 732 paginiAdjusting Saturation and Color Balance

Advanced Guide > Scanning > Scanning with Other Application Software > Correcting Images and Adjusting Colors withScanGear (Scanner Driver) > Adjusting Brightness and Contrast
Adjusting Brightness and Contrast
In ScanGear's Advanced Mode tab, click (Brightness/Contrast).
Note
Click (Down arrow) to switch to detailed view. Click (Up arrow) to return to the previous view.Click Defaults to reset all adjustments in the current window.
Channel
Each dot of an image is a mixture of Red, Green and Blue in various proportions (gradation). Thesecolors can be adjusted individually as a "channel."
Master
Adjust the Red, Green and Blue combined.
Red
Adjust the Red channel.
Green
Adjust the Green channel.
Blue
Adjust the Blue channel.
Pagina 516 din 732 paginiAdjusting Brightness and Contrast

NoteOnly Grayscale will be displayed in Channel when Color Mode is Grayscale.
Brightness
Adjust the image brightness. Move (slider) under Brightness to the left to darken and right to brightenthe image. You can also enter a value (-127 to 127).
Darkened Original image Brightened
NoteHighlights may be lost if you brighten the image too much, and shadows may be lost if you darkenthe image too much.
Contrast
"Contrast" is the degree of difference between the brighter and darker parts of an image. Increasingcontrast will increase the difference, thus sharpening the image. Decreasing contrast will decrease thedifference, thus softening the image.
Move (slider) under Contrast to the left to decrease and right to increase the contrast of the image.You can also enter a value (-127 to 127).
Decreased contrast Original image Increased contrast
NoteIncreasing the contrast is effective in adding a three-dimensional feel to soft images. However,shadows and highlights may be lost if you increase the contrast too much.
Page top
Pagina 517 din 732 paginiAdjusting Brightness and Contrast

Advanced Guide > Scanning > Scanning with Other Application Software > Correcting Images and Adjusting Colors withScanGear (Scanner Driver) > Adjusting Histogram
Adjusting Histogram
In ScanGear's Advanced Mode tab, click (Histogram).
NoteClick Defaults to reset all adjustments in the current window.
Channel
Each dot of an image is a mixture of Red, Green and Blue in various proportions (gradation). Thesecolors can be adjusted individually as a "channel."
Master
Adjust the Red, Green and Blue combined.
Red
Adjust the Red channel.
Green
Adjust the Green channel.
Blue
Adjust the Blue channel.
NoteOnly Grayscale will be displayed in Channel when Color Mode is Grayscale.
Reading Histograms
You can open Histogram of a specified area for each Channel. The higher the Histogram peak, the moredata is distributed to that level.
Pagina 518 din 732 paginiAdjusting Histogram

(1) Bright area (2) Dark area (3) Whole image
More data is distributed to thehighlight side.
More data is distributed to theshadow side.
Data is widely distributed between thehighlight and shadow.
Adjusting Histograms (Using the Slider)
Select a Channel, then move (Black-point Slider) or (White-point Slider) to specify the level to beset as the shadow or highlight.
- All parts to the left of (Black-point Slider) will be black (level 0).
- The parts at (Mid-point Slider) will turn to the color exactly between the black-point and white-point.
- All parts to the right of (White-point Slider) will turn white (level 255).
Image Adjustment is Auto by default. Adjustments shown below are automatically performed.
Moving the Black-point and White-point Sliders
Move the Black-point Slider or White-point Slider to adjust brightness.
Images with more data distributed to the highlight side
Move the Black-point Slider toward the highlight side.
Images with more data distributed to the shadow side
Move the White-point Slider toward the shadow side.
Images with widely distributed data
Move the Black-point Slider toward the highlight side, and White-point Slider toward the shadow side.
Pagina 519 din 732 paginiAdjusting Histogram

Moving the Mid-point Slider
Move the Mid-point Slider to specify the level to be set as the middle of the tonal range.
Images with more data distributed to the highlight side
Move the Mid-point Slider toward the highlight side.
Images with more data distributed to the shadow side
Move the Mid-point Slider toward the shadow side.
Adjusting Histograms (Using the Droppers)
When you select a Channel and click the Black-point, Mid-point or White-point Dropper, the mousepointer on the preview image changes to a dropper. Click a Dropper displayed below the histogram tochange the setting.
- The point clicked with (Black-point Dropper) will be the darkest point. You can also enter a value (0to 245).
- The point clicked with (Mid-point Dropper) will be the middle of the tonal range. You can also entera value (5 to 250).
- The point clicked with (White-point Dropper) will be the brightest point. You can also enter a value(10 to 255).
- Click (Dropper) for Gray Balance and click the area you want to adjust the color in the previewimage.
The clicked point will be set as the achromatic color reference, and the rest of the image is adjustedaccordingly. For instance, if snow in a photo appears bluish, click the bluish part to adjust the wholeimage and reproduce natural colors.
Page top
Pagina 520 din 732 paginiAdjusting Histogram

Advanced Guide > Scanning > Scanning with Other Application Software > Correcting Images and Adjusting Colors withScanGear (Scanner Driver) > Adjusting Tone Curve
Adjusting Tone Curve
In ScanGear's Advanced Mode tab, click (Tone Curve Settings).
NoteClick Defaults to reset all adjustments in the current window.
Channel
Each dot of an image is a mixture of Red, Green and Blue in various proportions (gradation). Thesecolors can be adjusted individually as a "channel."
Master
Adjust the Red, Green and Blue combined.
Red
Adjust the Red channel.
Green
Adjust the Green channel.
Blue
Adjust the Blue channel.
NoteOnly Grayscale will be displayed in Channel when Color Mode is Grayscale.
Reading Tone Curves
With ScanGear (scanner driver), scanning images via a scanner is the input, and displaying to a monitoris the output. "Tone Curve" shows the balance of tone input and output for each Channel.
Pagina 521 din 732 paginiAdjusting Tone Curve

Adjusting Tone Curve
In Select Tone Curve, select a tone curve from No correction, Overexposure, Underexposure, Highcontrast, Reverse the negative/positive image and Edit custom curve.
No correction (No adjustment)
Overexposure (Convex curve)
The midtone data of the input side is stretched toward the highlight of the output side, resulting in abright-toned image when viewed on a monitor.
Underexposure (Concave curve)
The midtone data of the input side is stretched toward the shadow of the output side, resulting in a dark-toned image when viewed on a monitor.
High contrast (S curve)
The highlight and shadow of the input side are enhanced, resulting in a high-contrast image.
Reverse the negative/positive image (Downward-sloping line)
The input and output sides are reversed, resulting in a negative-positive inverted image.
Pagina 522 din 732 paginiAdjusting Tone Curve

Edit custom curve
You can drag specific points on the Tone Curve to freely adjust the brightness of the correspondingareas.
Page top
Pagina 523 din 732 paginiAdjusting Tone Curve

Advanced Guide > Scanning > Scanning with Other Application Software > Correcting Images and Adjusting Colors withScanGear (Scanner Driver) > Setting Threshold
Setting Threshold
The brightness of color and grayscale images is expressed in a value between 0 and 255. However, increating black and white images, all colors are mapped to either black (0) or white (255). "Threshold" isthe borderline value that determines a color as black or white. By adjusting the threshold level, you cansharpen text in a document or reduce show-through in newspapers.
This function is available when Color Mode is Black and White.
In ScanGear's Advanced Mode tab, click (Threshold).
NoteClick Defaults to reset all adjustments in the current window.
Adjusting Threshold
Move (slider) to the right to increase the threshold value and thus increase the black areas. Move theslider to the left to decrease the value and thus increase the white areas. You can also enter a value (0 to255).
Page top
Pagina 524 din 732 paginiSetting Threshold

Advanced Guide > Scanning > Scanning with Other Application Software > ScanGear (Scanner Driver) Screens
ScanGear (Scanner Driver) Screens
The following sections describe ScanGear's screens and functions, and how to use ScanGear (scannerdriver).
Basic Mode Tab
Advanced Mode Tab
Input SettingsOutput SettingsImage SettingsColor Adjustment Buttons
Auto Scan Mode Tab
Preferences Dialog Box
Scanner TabPreview TabScan TabColor Settings Tab
Page top
Pagina 525 din 732 paginiScanGear (Scanner Driver) Screens

Advanced Guide > Scanning > Scanning with Other Application Software > ScanGear (Scanner Driver) Screens >Basic Mode Tab
Basic Mode Tab
This mode allows you to scan easily by following the on-screen steps.
This section describes the settings and functions available in Basic Mode.
(1) Settings and Operation Buttons
(2) Toolbar
(3) Preview Area
NoteThe displayed items vary by document type and how the screen was opened.
Settings and Operation Buttons
Select Source
Photo(Color)
Scan color photos.
Magazine(Color)
Scan color magazines.
Newspaper(Grayscale)
Scan text and line drawings in black and white.
Document(Grayscale)
Scan documents and photos in black and white.Select this mode to create high-resolution black and white images.
NoteWhen you select a document type, colors are adjusted based on the Unsharp Mask function ordocument type.If you select Magazine(Color), the Descreen function will be active.
Display Preview Image
Pagina 526 din 732 paginiBasic Mode Tab
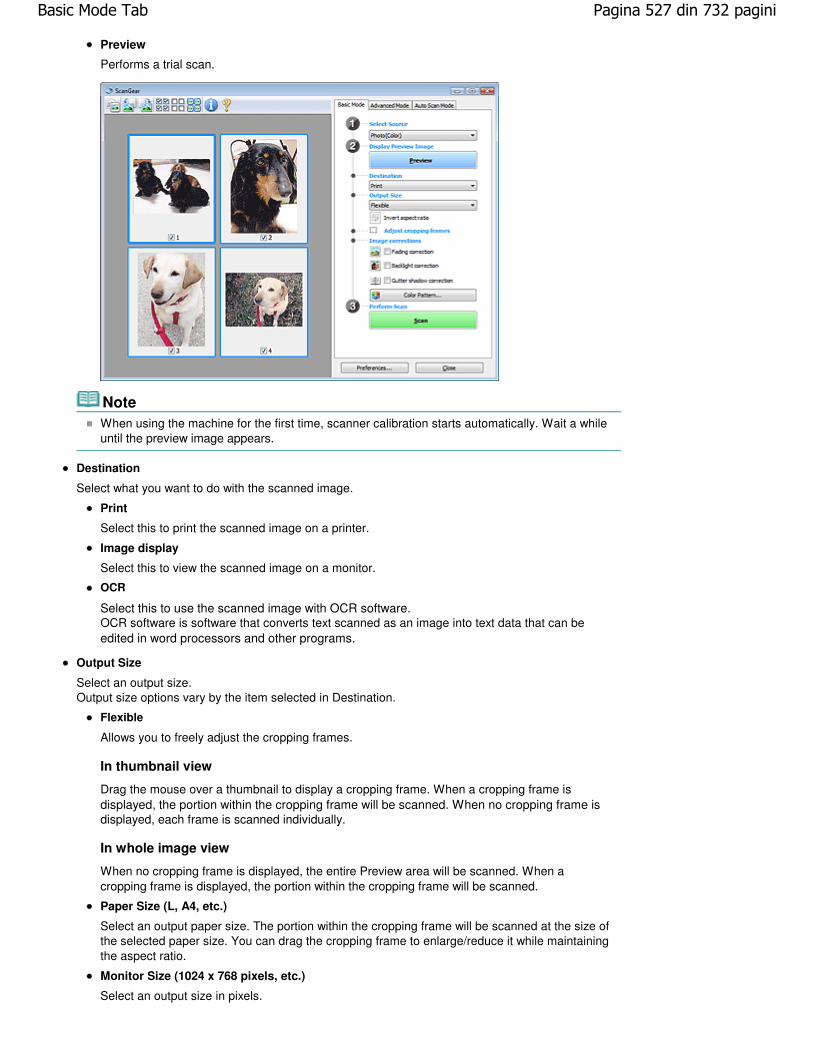
Preview
Performs a trial scan.
NoteWhen using the machine for the first time, scanner calibration starts automatically. Wait a whileuntil the preview image appears.
Destination
Select what you want to do with the scanned image.
Select this to print the scanned image on a printer.
Image display
Select this to view the scanned image on a monitor.
OCR
Select this to use the scanned image with OCR software.OCR software is software that converts text scanned as an image into text data that can beedited in word processors and other programs.
Output Size
Select an output size.Output size options vary by the item selected in Destination.
Flexible
Allows you to freely adjust the cropping frames.
In thumbnail view
Drag the mouse over a thumbnail to display a cropping frame. When a cropping frame isdisplayed, the portion within the cropping frame will be scanned. When no cropping frame isdisplayed, each frame is scanned individually.
In whole image view
When no cropping frame is displayed, the entire Preview area will be scanned. When acropping frame is displayed, the portion within the cropping frame will be scanned.
Paper Size (L, A4, etc.)
Select an output paper size. The portion within the cropping frame will be scanned at the size ofthe selected paper size. You can drag the cropping frame to enlarge/reduce it while maintainingthe aspect ratio.
Monitor Size (1024 x 768 pixels, etc.)
Select an output size in pixels.
Pagina 527 din 732 paginiBasic Mode Tab

A cropping frame of the selected monitor size will be displayed and the portion within thecropping frame will be scanned. You can drag the cropping frame to enlarge/reduce it whilemaintaining the aspect ratio.
Add/Delete...
Opens the Add/Delete the Output Size dialog box, in which you can specify custom output sizes.You can select this option when Destination is Print or Image display.
In the Add/Delete the Output Size dialog box, you can specify multiple output sizes and savethem at one time. Saved items will be registered to the Output Size list and can be selected,along with the predefined items.
Add
To add a size, enter Output Size Name, Width and Height, then click Add. For Unit, you canselect mm or inches when Destination is Print but you can only select pixels when Destinationis Image display. The name of the added size appears in Output Size List. Click Save to savethe items listed in Output Size List.
Delete
To delete an item, select it in Output Size List and click Delete. Click Save to save the itemslisted in Output Size List.
ImportantYou cannot delete predefined output sizes such as A4 and 1024 x 768 pixels.
NoteSave up to 10 items.An error message appears when you enter a value outside the setting range. Enter a valuewithin the setting range.
NoteWhether or how the cropping frame is initially displayed on a preview image can be specifiedon the Preview tab of the Preferences dialog box. See Cropping Frame on Previewed Images in"Preview Tab ."
Invert aspect ratio
This button is available when Output Size is set to anything but Flexible.Click this button to rotate the cropping frame. Click again to return it to the original orientation.
Adjust cropping frames
You can adjust the scan area within the Preview area.If an area is not specified, the document will be scanned at the document size (Auto Crop). If an areais specified, only the portion in the cropping frame will be scanned.
Adjusting Cropping Frames
Pagina 528 din 732 paginiBasic Mode Tab

Image corrections
Fading correction
Corrects and scans photos that have faded with time or have a colorcast.
Backlight correction
Corrects photos that have been shot against light.
Gutter shadow correction
Corrects shadows that appear between pages when scanning open booklets.
Important
For precautions on using this function, see Gutter Shadow Correction in " Image Settings" (Advanced Mode tab).
Color Pattern...
Allows you to adjust the image's overall color. You can correct colors that have faded due tocolorcast, etc. and reproduce natural colors while previewing color changes.
Adjusting Colors Using a Color Pattern
Perform Scan
Scan
Scanning starts.
NoteWhen scanning starts, the progress will be displayed. Click Cancel to cancel the scan.
Preferences...
The Preferences dialog box opens and you can make scan/preview settings.Preferences Dialog Box
Close
Closes ScanGear (scanner driver).
Toolbar
Toolbar
You can adjust or rotate preview images. The buttons displayed on the Toolbar vary by view.
In thumbnail view
In whole image view
Pagina 529 din 732 paginiBasic Mode Tab
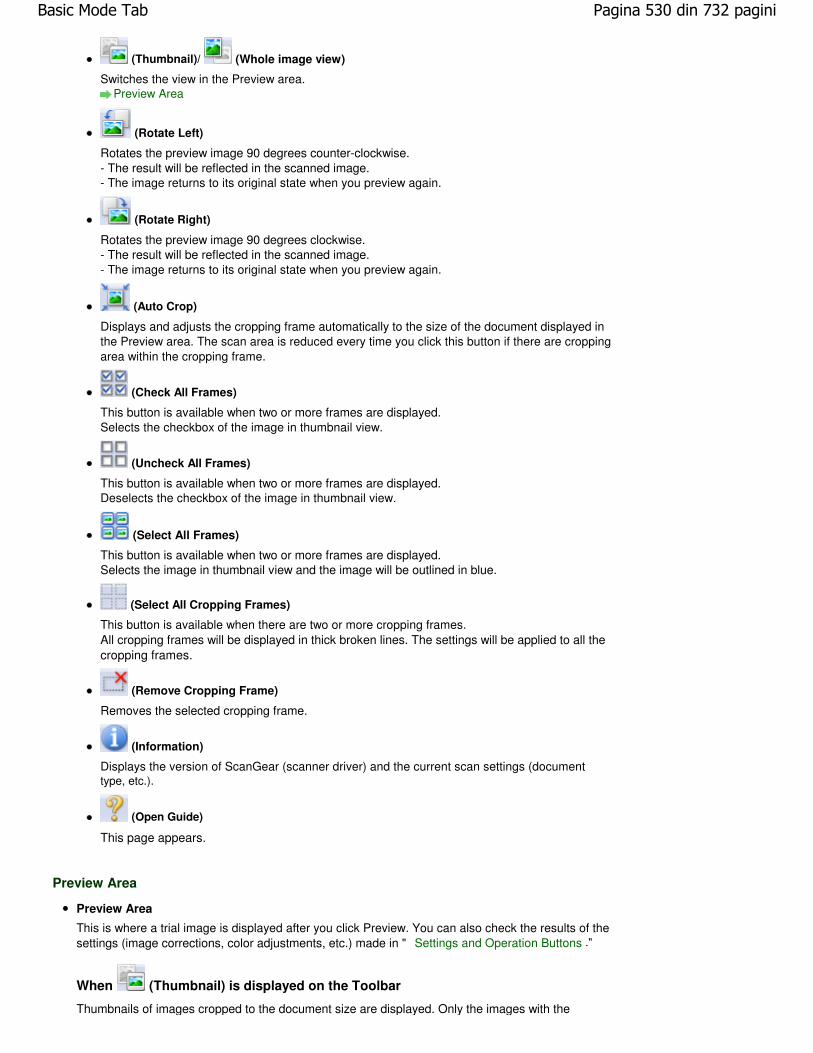
(Thumbnail)/ (Whole image view)
Switches the view in the Preview area.Preview Area
(Rotate Left)
Rotates the preview image 90 degrees counter-clockwise.- The result will be reflected in the scanned image.- The image returns to its original state when you preview again.
(Rotate Right)
Rotates the preview image 90 degrees clockwise.- The result will be reflected in the scanned image.- The image returns to its original state when you preview again.
(Auto Crop)
Displays and adjusts the cropping frame automatically to the size of the document displayed inthe Preview area. The scan area is reduced every time you click this button if there are croppingarea within the cropping frame.
(Check All Frames)
This button is available when two or more frames are displayed.Selects the checkbox of the image in thumbnail view.
(Uncheck All Frames)
This button is available when two or more frames are displayed.Deselects the checkbox of the image in thumbnail view.
(Select All Frames)
This button is available when two or more frames are displayed.Selects the image in thumbnail view and the image will be outlined in blue.
(Select All Cropping Frames)
This button is available when there are two or more cropping frames.All cropping frames will be displayed in thick broken lines. The settings will be applied to all thecropping frames.
(Remove Cropping Frame)
Removes the selected cropping frame.
(Information)
Displays the version of ScanGear (scanner driver) and the current scan settings (documenttype, etc.).
(Open Guide)
This page appears.
Preview Area
Preview Area
This is where a trial image is displayed after you click Preview. You can also check the results of thesettings (image corrections, color adjustments, etc.) made in " Settings and Operation Buttons ."
When (Thumbnail) is displayed on the Toolbar
Thumbnails of images cropped to the document size are displayed. Only the images with the
Pagina 530 din 732 paginiBasic Mode Tab

checkbox selected will be scanned.
NoteWhen multiple images are previewed, different outlines indicate different selection status.- Focus Frame (thick blue outline): The displayed settings will be applied.- Selected Frame (thin blue outline): The settings will be applied to the Focus Frame andSelected Frames simultaneously. You can select multiple images by clicking them whilepressing the Ctrl key.- Unselected (no outline): The settings will not be applied.
Double-click a frame to zoom in on the image. Click (Frame Advance) at the bottom ofthe screen to display the previous or next frame. Double-click the frame again to return thedisplay to its non-magnified state.
When (Whole Image) is displayed on the Toolbar
Items on the Platen are displayed as a single image. All portions in the cropping frames will bescanned.
NoteYou can specify the scan area (cropping frame) on the displayed image. In thumbnail view, you canonly create one cropping frame per image. In whole image view, you can create multiple croppingframes.
Adjusting Cropping Frames
Related Topic
Pagina 531 din 732 paginiBasic Mode Tab

Scanning in Basic Mode
Page top
Pagina 532 din 732 paginiBasic Mode Tab
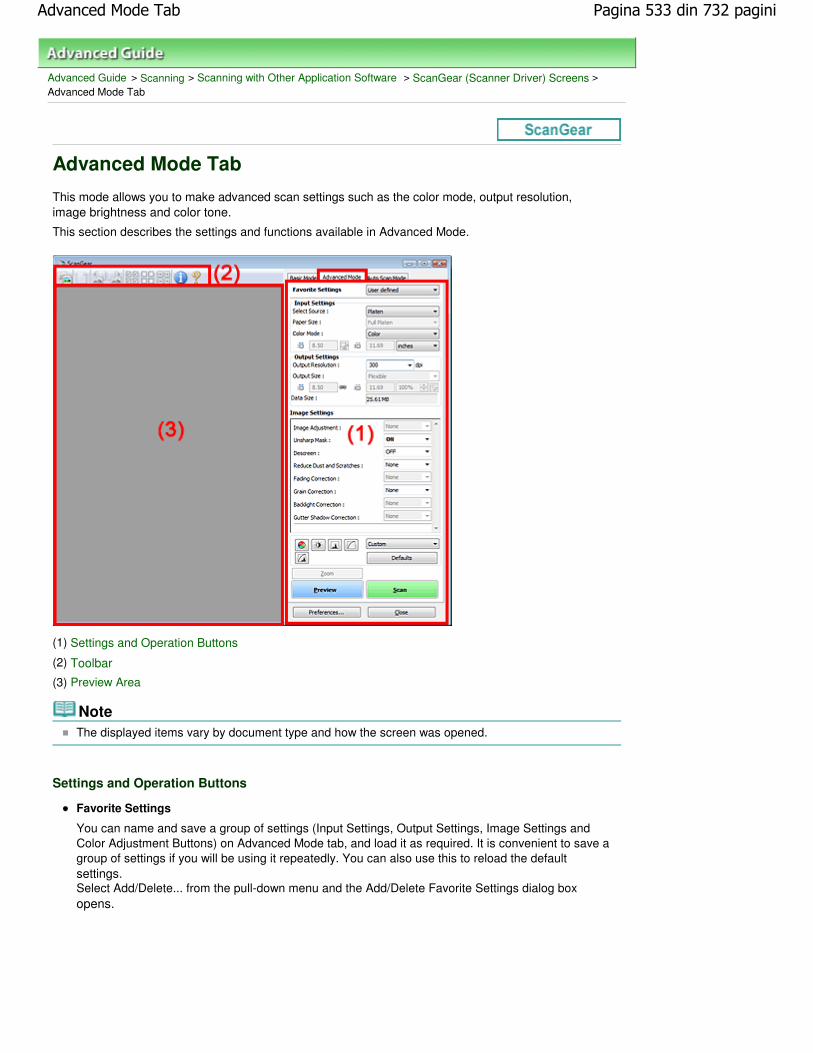
Advanced Guide > Scanning > Scanning with Other Application Software > ScanGear (Scanner Driver) Screens >Advanced Mode Tab
Advanced Mode Tab
This mode allows you to make advanced scan settings such as the color mode, output resolution,image brightness and color tone.
This section describes the settings and functions available in Advanced Mode.
(1) Settings and Operation Buttons
(2) Toolbar
(3) Preview Area
NoteThe displayed items vary by document type and how the screen was opened.
Settings and Operation Buttons
Favorite Settings
You can name and save a group of settings (Input Settings, Output Settings, Image Settings andColor Adjustment Buttons) on Advanced Mode tab, and load it as required. It is convenient to save agroup of settings if you will be using it repeatedly. You can also use this to reload the defaultsettings.Select Add/Delete... from the pull-down menu and the Add/Delete Favorite Settings dialog boxopens.
Pagina 533 din 732 paginiAdvanced Mode Tab
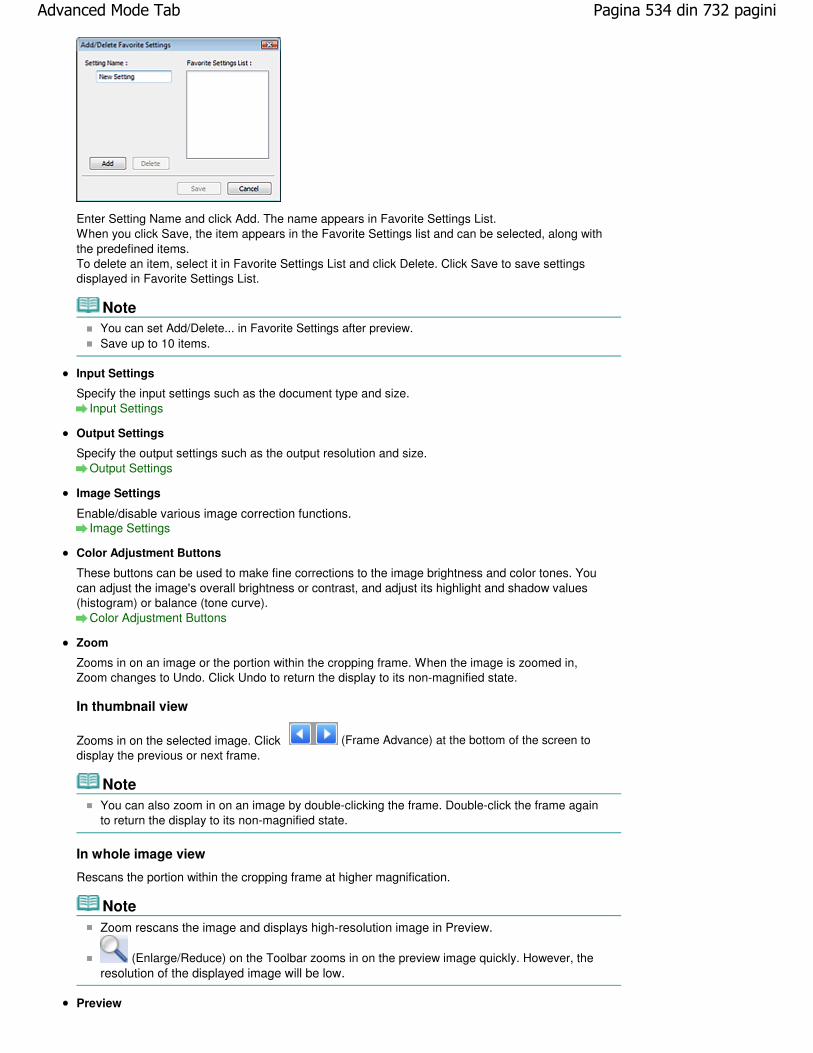
Enter Setting Name and click Add. The name appears in Favorite Settings List.When you click Save, the item appears in the Favorite Settings list and can be selected, along withthe predefined items.To delete an item, select it in Favorite Settings List and click Delete. Click Save to save settingsdisplayed in Favorite Settings List.
NoteYou can set Add/Delete... in Favorite Settings after preview.Save up to 10 items.
Input Settings
Specify the input settings such as the document type and size.Input Settings
Output Settings
Specify the output settings such as the output resolution and size.Output Settings
Image Settings
Enable/disable various image correction functions.Image Settings
Color Adjustment Buttons
These buttons can be used to make fine corrections to the image brightness and color tones. Youcan adjust the image's overall brightness or contrast, and adjust its highlight and shadow values(histogram) or balance (tone curve).
Color Adjustment Buttons
Zoom
Zooms in on an image or the portion within the cropping frame. When the image is zoomed in,Zoom changes to Undo. Click Undo to return the display to its non-magnified state.
In thumbnail view
Zooms in on the selected image. Click (Frame Advance) at the bottom of the screen todisplay the previous or next frame.
NoteYou can also zoom in on an image by double-clicking the frame. Double-click the frame againto return the display to its non-magnified state.
In whole image view
Rescans the portion within the cropping frame at higher magnification.
NoteZoom rescans the image and displays high-resolution image in Preview.
(Enlarge/Reduce) on the Toolbar zooms in on the preview image quickly. However, theresolution of the displayed image will be low.
Preview
Pagina 534 din 732 paginiAdvanced Mode Tab

Performs a trial scan.
Scan
Starts scanning.
NoteWhen scanning starts, the progress will be displayed. Click Cancel to cancel the scan.When scanning is completed, a dialog box prompting you to select the next action may open.Follow the prompt to complete. For details, see Status of ScanGear dialog after scanning in "Scan Tab" (Preferences dialog box).
It will take time to process the images if the total size of the scanned images exceeds a certainsize. In that case, a warning message appears. It is recommended that you reduce the totalsize. To continue, scan in whole image view.
Preferences...
The Preferences dialog box opens and you can make scan/preview settings.Preferences Dialog Box
Close
Closes ScanGear (scanner driver).
Toolbar
Toolbar
You can adjust or rotate preview images. The buttons displayed on the Toolbar vary by view.
In thumbnail view
In whole image view
(Thumbnail)/ (Whole image view)
Pagina 535 din 732 paginiAdvanced Mode Tab

Switches the view in the Preview area.Preview Area
(Clear)
Click this button to delete the preview image.It also resets the Toolbar and color adjustment settings.
(Crop)
Allows you to specify the scan area by dragging the mouse.
(Move Image)
If an enlarged image is too large to fit in the Preview area, you can click this button and drag theimage across the screen until the part you want to see is displayed. You can also move theimage using the scroll bars.
(Enlarge/Reduce)
Click this button then click on the image to enlarge it (zoom in). Right-click on the image toreduce it (zoom out).
(Rotate Left)
Rotates the preview image 90 degrees counter-clockwise.- The result will be reflected in the scanned image.- The image returns to its original state when you preview again.
(Rotate Right)
Rotates the preview image 90 degrees clockwise.- The result will be reflected in the scanned image.- The image returns to its original state when you preview again.
(Auto Crop)
Displays and adjusts the cropping frame automatically to the size of the document displayed inthe Preview area. The scan area is reduced every time you click this button if there are croppingarea within the cropping frame.
(Check All Frames)
This button is available when two or more frames are displayed.Selects the checkbox of the image in thumbnail view.
(Uncheck All Frames)
This button is available when two or more frames are displayed.Deselects the checkbox of the image in thumbnail view.
(Select All Frames)
This button is available when two or more frames are displayed.Selects the image in thumbnail view and the image will be outlined in blue.
(Select All Cropping Frames)
This button is available when there are two or more cropping frames.All cropping frames will be displayed in thick broken lines. The settings will be applied to all thecropping frames.
(Remove Cropping Frame)
Removes the selected cropping frame.
(Information)
Pagina 536 din 732 paginiAdvanced Mode Tab

Displays the version of ScanGear (scanner driver) and the current scan settings (documenttype, etc.).
(Open Guide)
This page appears.
Preview Area
Preview Area
This is where a trial image is displayed after you click Preview. You can also check the results of thesettings (image corrections, color adjustments, etc.) made in " Settings and Operation Buttons ."
When (Thumbnail) is displayed on the Toolbar
Thumbnails of images cropped to the document size are displayed. Only the images with thecheckbox selected will be scanned.
NoteWhen multiple images are previewed, different outlines indicate different selection status.- Focus Frame (thick blue outline): The displayed settings will be applied.- Selected Frame (thin blue outline): The settings will be applied to the Focus Frame andSelected Frames simultaneously. You can select multiple images by clicking them whilepressing the Ctrl key.- Unselected (no outline): The settings will not be applied.
When (Whole Image) is displayed on the Toolbar
Items on the Platen are displayed as a single image. All portions in the cropping frames will bescanned.
Pagina 537 din 732 paginiAdvanced Mode Tab

NoteYou can specify the scan area (cropping frame) on the displayed image. In thumbnail view, you canonly create one cropping frame per image. In whole image view, you can create multiple croppingframes.
Adjusting Cropping Frames
Related Topic
Scanning in Advanced Mode
Page top
Pagina 538 din 732 paginiAdvanced Mode Tab

Advanced Guide > Scanning > Scanning with Other Application Software > ScanGear (Scanner Driver) Screens > InputSettings
Input Settings
Input Settings allows you to set the following items:
Select Source
The type of document to be scanned is displayed.
Paper Size
Select the size of the document to be scanned. This setting is available in whole film image view only.When you select a size, the Preview area size changes accordingly.
Important
Some applications have a limit to the amount of scan data they can receive. ScanGear (scannerdriver) can scan data that is of:- 21000 pixels x 30000 pixels or lessIf you change Paper Size after previewing, the preview image will be deleted.
NoteIf you are not sure which size you should select for Paper Size, set Paper Size to Full Platen, then
measure the size of the document and enter the values into (Width) and (Height).
Color Mode
Select how to scan the document.
Color
Select this mode to scan color documents or to create color images. This mode renders theimage in 256 levels (8 bit) of R(ed), G(reen), and B(lue).
Grayscale
Select this mode to scan black and white photos, or to create black and white images. This mode
Pagina 539 din 732 paginiInput Settings

renders the image in 256 levels (8 bit) of black and white.
Black and White
Select this mode to scan photos and documents in black and white. This mode renders theimage in black and white. The contrast in the image is divided at certain levels (threshold level)
into black and white and is rendered in two colors. The threshold level can be set with (Threshold).
Input Size
In thumbnail view, the cropped document size is displayed after preview.In whole image view, the Paper Size is displayed before preview, and the cropping frame (scan area)size is displayed after preview.
You can adjust the cropping frame size by entering the values into (Width) and (Height).
Click (Keep Aspect Ratio) and change it to (Locked) to maintain the aspect ratio when youspecify the cropping frame size.
Important
Input size settings are available only when Output Size in Output Settings is Flexible. If you selecta size other than Flexible, a cropping frame calculated from Output Size and Output Resolution isdisplayed, and its aspect ratio is fixed.
NoteThe values you can enter will be within the range of the selected document size. The minimumsize is 96 pixels x 96 pixels when Output Resolution is 600 dpi, scaled at 100%.When Auto Crop is performed in whole image view, the aspect ratio will not be maintained sincethe size will be prioritized.See "Adjusting Cropping Frames" for details on cropping frames.
Page top
Pagina 540 din 732 paginiInput Settings

Advanced Guide > Scanning > Scanning with Other Application Software > ScanGear (Scanner Driver) Screens >Output Settings
Output Settings
Output Settings allows you to set the following items:
Output Resolution
Select the resolution to scan at.The higher the resolution (value), the more detail in your image.Select a resolution from the options displayed by clicking the button, or enter a value within the rangeof 25 dpi to 19200 dpi (in 1 dpi increments).
Resolution
Output Size
Select an output size.Select Flexible to set custom sizes or select a size for printing or displaying. Select Add/Delete... to setcustom size and save it as a new output size option.
Flexible
You can specify the output resolution and scale, and adjust the cropping frame.
In thumbnail view
Drag the mouse over a thumbnail to display a cropping frame. When a cropping frame isdisplayed, the portion within the cropping frame will be scanned. When no cropping frame isdisplayed, each frame is scanned individually.
In whole image view
When no cropping frame is displayed, the entire Preview area will be scanned. When a croppingframe is displayed, the portion within the cropping frame will be scanned.
Note
To enlarge/reduce the scanned image, enter values into (Width) and (Height) in
Pagina 541 din 732 paginiOutput Settings

Output Settings or specify a value (by 1%) for %. The maximum value available for %depends on the Output Resolution. % can be specified for up to 19200 dpi (the maximumavailable output resolution).
Paper Size (L, etc.) & Monitor Size (1024 x 768 pixels, etc.)
Width, height and scale cannot be specified. The preview image will be cropped according to theselected output size and resolution. The portion within the cropping frame will be scanned at thesize of the selected paper/monitor size. You can drag the cropping frame to enlarge, reduce ormove it while maintaining the aspect ratio.
Add/Delete...
Opens the Add/Delete the Output Size dialog box, in which you can specify custom output sizes.
In the Add/Delete the Output Size dialog box, you can specify multiple output sizes and save themat one time. Saved items will be registered to the Output Size list and can be selected, along withthe predefined items.
Add
To add a size, select Print or Image display for Destination, then enter Output Size Name, Width,and Height then click Add. The name of the added size appears in Output Size List.Click Save to save the items listed in Output Size List.
Delete
To delete an item, select it in Output Size List and click Delete. Click Save to save the items listedin Output Size List.
Important
You cannot delete predefined output sizes such as A4 and 1024 x 768 pixels.
NoteSave up to 10 items for each destination.An error message appears when you enter a value outside the setting range. Enter a valuewithin the range displayed in the message.Unit varies by Destination. For Print, select mm or inches. For Image display, the unit ispixels.
NoteSee "Adjusting Cropping Frames" for details on cropping frames.Whether or how the cropping frame is initially displayed on a preview image can be specified onthe Preview tab of the Preferences dialog box. See Cropping Frame on Previewed Images in "Preview Tab ."
(Switch Aspect Ratio)
Click this button to rotate the cropping frame. Click again to return it to the original orientation.
Data Size
An image file is created when the preview image is scanned. Its size when saved in BMP format isdisplayed.
NoteWhen the file size exceeds a certain size, the value appears in red. In that case, a warning
Pagina 542 din 732 paginiOutput Settings

message appears when you click Scan. It is recommended that you adjust the settings to reduceData Size. To continue, scan in whole image view.
Page top
Pagina 543 din 732 paginiOutput Settings

Advanced Guide > Scanning > Scanning with Other Application Software > ScanGear (Scanner Driver) Screens >Image Settings
Image Settings
Important
Do not apply these functions to images without moire, dust/scratches or faded colors. The colortone may be adversely affected.Image correction results may not be reflected in the preview image.
NoteSelectable settings depend on color mode settings.Scanning may take longer when you use Image Settings.
Image Settings allows you to set the following items:
Image Adjustment
When Image Adjustment is set, the brightness of the specified portion of the image is optimized.Images can be adjusted according to the automatically detected document type or the specifieddocument type. The result of the adjustment will be reflected in the entire image. This setting is Auto bydefault.
None
Image Adjustment will not be applied.
Auto
Applies Image Adjustment by automatically detecting the document type. It is recommended thatyou normally select this setting.
Photo
Select this to apply Image Adjustment to photos.
Magazine
Pagina 544 din 732 paginiImage Settings

Select this to apply Image Adjustment to magazines.
Newspaper
Select this to apply Image Adjustment to newspapers.
Document
Select this to apply Image Adjustment to text documents.
Important
You can set Image Adjustment after preview.You can set this setting when Recommended is selected on the Color Settings tab of thePreferences dialog box.
NoteIf the image is not adjusted properly with Auto, specify the document type.The color tone may change from the source image due to the Image Adjustment. In that case, setImage Adjustment to None.
Unsharp Mask
When this is set to ON, the outline of the subjects is emphasized to sharpen the image. This setting isON by default.
Descreen
Printed photos and pictures are displayed as a collection of fine dots. "Moire" is a phenomenon whereuneven gradation or a stripe pattern appears when such photos or pictures printed with fine dots arescanned. Descreen is the function for reducing this moire effect. This setting is OFF by default.
NoteEven if Descreen is set to ON, some moire effects may remain if Unsharp Mask is set to ON. Inthat case, set Unsharp Mask to OFF.Selecting Magazine(Color) in Select Source in Basic Mode tab has the same effect as settingDescreen to ON in Advanced Mode tab.
Reduce Dust and Scratches
Scanned photos may contain white dots caused by dust or scratches. Use this function to reduce suchnoise. This setting is None by default.
None
Dust and scratches will not be reduced.
Low
Select this to reduce small dust particles and scratches. Large ones may remain.
Medium
It is recommended that you normally select this setting.
High
Select this to reduce small/large dust particles and scratches. Evidence of the reduction processmay remain and may also remove delicate parts of the image.
ImportantThis function may not be effective for some types of photos.
NoteIt is recommended that you select None when scanning printed materials.
Fading Correction
Use this function to correct photos that have faded with time or have a colorcast. Colorcast is aphenomenon where a specific color affects the entire picture due to the weather or ambient strongcolors. This setting is None by default.
None
Pagina 545 din 732 paginiImage Settings

Fading correction will not be applied.
Low
Select this to correct a small amount of fading and colorcast.
Medium
It is recommended that you normally select this setting.
High
Select this to correct a large amount of fading and colorcast. This can affect the tone of the image.
Important
You can set Fading Correction after preview.Fading Correction may not be effective if the scan area is too small.You can set this setting when Recommended is selected on the Color Settings tab of thePreferences dialog box.
Grain Correction
Use this function to reduce graininess (roughness) in photos taken with high-speed or sensitized film.This setting is None by default.
None
Graininess will not be reduced.
Low
Select this when the photo is slightly grainy.
Medium
It is recommended that you normally select this setting.
High
Select this when the photo is very grainy. This can affect the gradation and sharpness of theimage.
Important
Grain Correction may not be effective if the scan area is too small.
Backlight Correction
Use this function to correct photos that have been shot against light.When you change the Backlight Correction setting, the result will be reflected in the preview image.This setting is None by default.
None
Backlight correction will not be applied.
Low
Select this to correct slightly backlit photos. This will not affect the image contrast.
Medium
It is recommended that you normally select this setting.
High
Select this to correct strongly backlit photos. This can affect the image contrast.
Important
You can set Backlight Correction after preview.You can set this setting when Recommended is selected on the Color Settings tab of thePreferences dialog box.Backlight Correction may not be effective if the scan area is too small.
NoteNoise patterns may appear when Backlight Correction is applied. Applying Grain Correction and
Pagina 546 din 732 paginiImage Settings

setting Unsharp Mask to OFF may reduce the noise patterns.
Gutter Shadow Correction
Use this function to correct shadows that appear between pages when scanning open booklets.When you set the Gutter Shadow Correction setting in the preview image, the result will be reflected.Preview the effects before scanning, as results vary depending on the type of document and how it ispressed.Unclear or blurred text/lines caused by curved pages are not corrected. This setting is None by default.
None
Gutter shadow will not be corrected.
Low
Select this when the effect level is too strong with the medium setting.
Medium
It is recommended that you normally select this setting.
High
Select this when the effect level is too weak with the medium setting.
Important
Do not place items that weigh 4.4 lbs (2.0 kg) or more on the Platen. Also, do not press on thedocument with a force exceeding 4.4 lbs (2.0 kg). If you press heavily, the scanner may not workcorrectly or you might break the glass.Align the document with the edge of the Platen. If not, the shadow will not be corrected properly.
Shadows may not be corrected properly depending on the document. If the page background isnot white, shadows may not be detected correctly or may not be detected at all.While scanning, press down on the spine with the same amount of pressure you used to previewthe scan. If the binding part is not even, the shadow will not be corrected properly.
How to place the document depends on your model and the document to be scanned.
NoteCover the document with black cloth if white spots, streaks, or colored patterns appear in scanresults due to ambient light entering between the document and the Platen.If the shadow is not corrected properly, adjust the cropping frame on the preview image.
Adjusting Cropping Frames
Page top
Pagina 547 din 732 paginiImage Settings

Advanced Guide > Scanning > Scanning with Other Application Software > ScanGear (Scanner Driver) Screens > ColorAdjustment Buttons
Color Adjustment Buttons
The Color Adjustment Buttons allow you to make fine corrections to the image brightness and colortones. You can adjust the image's overall brightness or contrast, and adjust its highlight and shadowvalues (histogram) or balance (tone curve).
Important
The Color Adjustment Buttons are not available when you select Color Matching on the ColorSettings tab of the Preferences dialog box.
NoteSelectable settings depend on color mode settings.When you adjust the image via the Color Adjustment Buttons, the results will be reflected in thepreview image.
Click a Color Adjustment Button to set the following items:
(Saturation/Color Balance)
Adjust the vividness and color tone of the image. Use this function to brighten colors that have fadedwith time or due to colorcast. Colorcast is a phenomenon where a specific color affects the entirepicture due to the weather or ambient strong colors.
Adjusting Saturation and Color Balance
(Brightness/Contrast)
Adjust the brightness and contrast of the image. If the image is too dark or too bright, or if the imagequality is flat due to lack of contrast, you can adjust the levels of brightness and contrast.
Adjusting Brightness and Contrast
Pagina 548 din 732 paginiColor Adjustment Buttons

(Histogram)
A histogram allows you to see the data concentration at each brightness level of an image. You canspecify the darkest level (shadow) and brightest level (highlight) within an image, cut the levels andexpand the middle of the tonal range of the image.
Adjusting Histogram
(Tone Curve Settings)
Adjust the brightness of an image by selecting the type of graph (tone curve) showing the balance oftone input and output. You can make fine adjustments to the brightness of a specific area.
Adjusting Tone Curve
(Final Review)
Make a final check of color adjustments. The final synthesized tone curve and the histogram derivedfrom the subsequent image processing will be displayed. There are no settings to make in thisscreen.
For a color image, select a color in Channel to check either Red, Green or Blue, or select Master tocheck three colors together.
If you place the cursor on the preview image, the portion will be enlarged and its RGB values (onlyL when Color Mode is Grayscale) before and after the adjustments will be displayed.
(Threshold)
Set the boundary (threshold) at which black and white are divided. By adjusting the threshold level, youcan sharpen text in a document or reduce show-through in newspapers.
Setting Threshold
Custom
You can name and save a set of tone curve and threshold settings of the Color Adjustment Buttons.Select Add/Delete... from the pull-down menu. When Color Mode is set to anything but Black andWhite, the Add/Delete Tone Curve Settings dialog box opens. When Color Mode is Black and White,the Add/Delete Threshold Settings dialog box opens.
Pagina 549 din 732 paginiColor Adjustment Buttons

Enter Setting Name and click Add. The name appears in Tone Curve Settings List or ThresholdSettings List.
Click Save to save.
You can load and apply the saved tone curve/threshold settings to a preview image. To load thesettings, select the saved item from the pull-down menu.
To delete an item, select it in Tone Curve Settings List or Threshold Settings List and click Delete.Click Save to save settings displayed in Tone Curve Settings List or Threshold Settings List.
NoteSave up to 20 items.
Defaults
Reset all adjustments (saturation/color balance, brightness/contrast, histogram and tone curve).
Page top
Pagina 550 din 732 paginiColor Adjustment Buttons

Advanced Guide > Scanning > Scanning with Other Application Software > ScanGear (Scanner Driver) Screens > AutoScan Mode Tab
Auto Scan Mode Tab
This mode allows you to scan easily by simply placing documents on the Platen and clicking a button.
In Auto Scan Mode, documents are automatically detected. You do not need to specify cropping framesor make image corrections.
Supported Documents
Photos, postcards, business cards, magazines, newspapers, text documents and CD/DVD.
Important
The following types of documents cannot be scanned correctly. In that case, specify the documenttype or size on the Basic Mode tab or the Advanced Mode tab and scan again.- Documents other than photos, postcards, business cards, magazines, newspapers, textdocuments and CD/DVD- Text documents smaller than 2L (5 inches x 7 inches) (127 mm x 178 mm), such as paperbackpages with the spine cut off- Documents printed on thin white paper- Long narrow documents such as panoramic photos
Scanning in Basic ModeScanning in Advanced Mode
Reflective CD/DVD labels may not be scanned properly.Place documents correctly according to the type of document to be scanned. Otherwise,documents may not be scanned correctly.See "Placing Documents " for details on how to place documents.
NoteScan from the "Basic Mode Tab" or "Advanced Mode Tab" to reduce moire.
Placing Documents
"Placing Documents " appears.
View scanned images
Select this checkbox to display the thumbnails of scanned images in a different window.
Pagina 551 din 732 paginiAuto Scan Mode Tab

Scan
Scanning starts.
NoteWhen scanning starts, the progress will be displayed. Click Cancel to cancel the scan.When scanning is completed, a dialog box prompting you to select the next action may open.Follow the prompt to complete. For details, see Status of ScanGear dialog after scanning in "Scan Tab" (Preferences dialog box).
Instructions
This page appears.
Preferences...
The Preferences dialog box opens and you can make scan/preview settings.Preferences Dialog Box
Close
Closes ScanGear (scanner driver).
Related Topic
Scanning in Auto Scan Mode
Page top
Pagina 552 din 732 paginiAuto Scan Mode Tab

Advanced Guide > Scanning > Scanning with Other Application Software > ScanGear (Scanner Driver) Screens >Preferences Dialog Box
Preferences Dialog Box
Click Preferences... in the ScanGear (scanner driver) screen to open Preferences dialog box.
In the Preferences dialog box, you can make advanced settings to ScanGear (scanner driver) functionsvia the Scanner, Preview, Scan and Color Settings tabs.
Scanner Tab
Allows you to specify a folder to save images temporarily and a music file to play during or at the end of ascan.
Scanner Tab
Preview Tab
Allows you to select what to do with Preview when ScanGear (scanner driver) is started and how todisplay cropping frames after previewing images. You can also select the cropping size for thumbnails ofscanned documents.
Preview Tab
Scan Tab
Allows you to select what to do with ScanGear (scanner driver) after scanning images.Scan Tab
Color Settings Tab
Allows you to select how to adjust color, and specify the monitor gamma value.Color Settings Tab
Page top
Pagina 553 din 732 paginiPreferences Dialog Box

Advanced Guide > Scanning > Scanning with Other Application Software > ScanGear (Scanner Driver) Screens >Scanner Tab
Scanner Tab
On the Scanner tab, you can specify the following settings.
Quiet Mode
Select this checkbox to reduce scanner sound by slowing down the scanner head when previewing orscanning documents. This checkbox is not selected by default.
NoteScanning takes longer than usual when you enable this function.
Select Folder Where Temporary Files are Saved
Displays the folder in which to save images temporarily. To change the folder, click Browse... to specifyanother one.
Sound Settings
You can set the machine to play music during/at the end of a scan.Select the Play Music During Scanning or Play Sound When Scanning is Completed checkbox, thenclick Browse... and specify a sound file.You can specify the following files.- MIDI file (*.mid, *.rmi, *.midi)- Audio file (*.wav, *.aif, *.aiff)- MP3 file (*.mp3)
Calibration Settings
When you set Execute at Every Scan to ON, the scanner will be calibrated every time before previewingand scanning, to reproduce correct color tones in scanned images.
NoteEven when Execute at Every Scan is set to OFF, the scanner may be calibrated automatically insome cases (such as immediately after you turn the machine on).Calibration may take time depending on your computer.
Pagina 554 din 732 paginiScanner Tab

Page top
Pagina 555 din 732 paginiScanner Tab

Advanced Guide > Scanning > Scanning with Other Application Software > ScanGear (Scanner Driver) Screens >Preview Tab
Preview Tab
On the Preview tab, you can specify the following settings.
Preview at Start of ScanGear
Select what to do with Preview when ScanGear (scanner driver) is started. Display Saved PreviewImage is selected by default.
Automatically Execute Preview
ScanGear (scanner driver) will automatically start previewing at startup.
Display Saved Preview Image
The previously previewed image will be displayed.The Color Adjustment Button settings, the Toolbar settings, and the Advanced Mode tab settingsare also saved.
None
No preview image will be displayed at startup.
NoteSelect None if you do not want to save the preview image.
Cropping Frame on Previewed Images
Select how to display cropping frames after previewing images. Execute Auto Cropping on PreviewedImages is selected by default.
Execute Auto Cropping on Previewed Images
The cropping frame will automatically be displayed in the document size after previewing.
Display the Last Frame on Previewed Images
A cropping frame of the same size as the last used cropping frame will be displayed afterpreviewing.
None
Pagina 556 din 732 paginiPreview Tab

No cropping frame will be displayed after previewing.
Cropping Size for Thumbnail View
Select the cropping size for thumbnails of scanned documents. Standard is selected by default.
Larger
Displays 105% (in width and height) of the area displayed for the standard size.
Standard
The standard size.
Smaller
Displays 95% (in width and height) of the area displayed for the standard size.
NoteWhen you change the Cropping Size for Thumbnail View setting, the preview images will berefreshed and cropped to the new size. As the preview images are refreshed, the coloradjustments and other settings applied to them are reset.
Page top
Pagina 557 din 732 paginiPreview Tab

Advanced Guide > Scanning > Scanning with Other Application Software > ScanGear (Scanner Driver) Screens > ScanTab
Scan Tab
On the Scan tab, you can specify the following settings.
Status of ScanGear dialog after scanning
Select what to do with ScanGear (scanner driver) after scanning images. Close ScanGearautomatically is selected by default.
Close ScanGear automatically
Select this to return to the original application when scanning is completed.
Do not close ScanGear automatically
Select this to return to the ScanGear (scanner driver) screen for another scan when scanning iscompleted.
Display the dialog to select next action
Select this to open a screen and select what to do when scanning is completed.
NoteEven if Do not close ScanGear automatically or Display the dialog to select next action is set,some applications may not support it.
Page top
Pagina 558 din 732 paginiScan Tab

Advanced Guide > Scanning > Scanning with Other Application Software > ScanGear (Scanner Driver) Screens > ColorSettings Tab
Color Settings Tab
On the Color Settings tab, you can specify the following settings.
Color Adjustment
Select either of the following. Recommended is selected by default.This function is available when Color Mode is Color or Grayscale.
Recommended
Select this to vividly reproduce the tone of a document on the screen. It is recommended that younormally select this setting.
Color Matching
Select this to automatically match the scanner, monitor and color printer colors, thus reducingtime and trouble to manually match the monitor and printer colors.Color Adjustment Buttons will be disabled.This function is available when Color Mode is Color.- Source(Scanner): Select scanner profile.- Target: Select target profile.- Monitor: Select this to display preview image with optimum correction for monitor.- Defaults: Returns to the default Color Matching settings.
None
Select this to disable color correction provided by ScanGear (scanner driver).
NoteColor Matching is available when ScanGear (scanner driver), monitor, color management-compliant application (such as Adobe Photoshop) and printer are set up correctly.Refer to the corresponding manual for the monitor, printer and application settings.
Monitor Gamma
By setting the gamma value of a monitor, you can adjust the input data to the brightnesscharacteristics of the monitor. Adjust the value if your monitor's gamma value does not match the
Pagina 559 din 732 paginiColor Settings Tab

default value set in ScanGear (scanner driver), and the colors of the original image are not accuratelyreflected in the monitor.Click Defaults to return to the default Monitor Gamma value (2.20).
NoteRefer to the manual of your monitor to check its gamma value. If it is not written in the manual,contact the manufacturer.
Page top
Pagina 560 din 732 paginiColor Settings Tab

Advanced Guide > Scanning > Scanning with Other Application Software > Appendix: Useful Information on Scanning
Appendix: Useful Information on Scanning
Adjusting the cropping frame (scan area)
Adjusting Cropping Frames
Selecting the best resolution
Resolution
Learning about file formats
File Formats
Learning about Color Matching
Color Matching
Matching the colors between the document and monitor
See Monitor Gamma in the following section.Color Settings Tab
Page top
Pagina 561 din 732 paginiAppendix: Useful Information on Scanning

Advanced Guide > Scanning > Scanning with Other Application Software > Appendix: Useful Information on Scanning >Adjusting Cropping Frames
Adjusting Cropping Frames
You can specify the scan area by creating a cropping frame on the image displayed in the Preview areaof the ScanGear (scanner driver) screen. When you click Scan, only the portion within the cropping framewill be scanned and passed to the application.
Cropping Frame Types
(1) Focus Cropping Frame (rotating thick broken lines)
The settings in Basic Mode or Advanced Mode will be applied.
(2) Selected Cropping Frame (stationary thick broken lines)
The settings will be applied to the Focus Cropping Frame and Selected Cropping Framessimultaneously. You can select multiple cropping frames by clicking them while pressing the Ctrl key.
(3) Unselected Cropping Frame (stationary thin broken lines)
The settings will not be applied.
NoteFocus Cropping Frame and Selected Cropping Frames are displayed in whole image view.
Initial Cropping Frame
In thumbnail view
Cropping frame is not displayed initially. Drag the mouse over a frame to create a cropping frame.
In whole image view
A cropping frame (Focus Cropping Frame) is displayed automatically around the preview imageaccording to the document size. You can also create a cropping frame by dragging the mouse in thePreview area.
NoteCropping frames are set according to the document size (Auto Crop) by default. For details, seeCropping Frame on Previewed Images in " Preview Tab " (Preferences dialog box).
Adjusting a Cropping Frame
The cursor will change into (Arrow) when it is positioned over a cropping frame. If youclick and drag the mouse in the direction of the arrow, the cropping frame will expand or contractaccordingly.
Pagina 562 din 732 paginiAdjusting Cropping Frames

The cursor will change into (Crosshair arrow) when it is positioned within a cropping frame. Clickand drag the mouse to move the entire cropping frame.
Note
In Advanced Mode, you can specify the cropping frame size by entering the values into (Width)
and (Height) in Input Settings.Input Settings
You can rotate a cropping frame 90 degrees by clicking (Switch Aspect Ratio). However, (Switch Aspect Ratio) is not available when Output Size is Flexible.
Creating Multiple Cropping Frames
In thumbnail view
You can only create one cropping frame per image.
In whole image view
Click and drag the mouse in a space outside the existing cropping frame to create a new cropping framein the Preview area. The new cropping frame will be the Focus Cropping Frame, and the old croppingframe will be the Unselected Cropping Frame.
Pagina 563 din 732 paginiAdjusting Cropping Frames

You can create multiple cropping frames and apply different scan settings to each cropping frame.
You can also select multiple cropping frames by clicking them while pressing the Ctrl key.
If you select multiple cropping frames and change the settings on a tab at the right of ScanGear (scannerdriver), the settings will be applied to all the selected cropping frames.
When you create a new cropping frame, it retains the settings of the latest cropping frame.
NoteCreate up to 12 cropping frames.Scanning takes longer than usual when multiple cropping frames are selected.
Deleting Cropping Frames
In thumbnail view
To delete a cropping frame, click an area outside the cropping frame on an image.
In whole image view
To delete a cropping frame, select it and click (Remove Cropping Frame) on the Toolbar.Alternatively, press the Delete key.
When there are multiple cropping frames, all the selected cropping frames (Focus Cropping Frame andSelected Cropping Frames) are deleted simultaneously.
Page top
Pagina 564 din 732 paginiAdjusting Cropping Frames

Advanced Guide > Scanning > Scanning with Other Application Software > Appendix: Useful Information on Scanning >Resolution
Resolution
What is Resolution?
The data in the image you have scanned is a collection of dots carrying information about brightness andcolor. The density of these dots is called "resolution", and resolution will determine the amount of detailyour image contains. The unit of resolution is dots per inch (dpi). Dpi is the number of dots per squareinch (2.54 cm square).
The higher the resolution (value), the more detail in your image; the lower the resolution (value), the lessdetail.
Setting the Resolution in MP Navigator EX
In MP Navigator EX, you can specify the resolution with Scanning Resolution in the Scan Settings dialogbox.
Images for Printing
Images to be printed should be scanned at a resolution that corresponds to the resolution of the printer.
For example, if you want to print using a 600 dpi black and white printer, you should set the resolution to600 dpi.
With a color printer, specifying the resolution at half the resolution of the printer should be fine. Forexample, if you want to print scanned paper/photos using a 600 dpi color printer, you should set theresolution to 300 dpi. However, with a high-resolution printer, printing takes longer than usual if you setthe resolution to half the resolution of the printer.
Example of Appropriate Resolution when Printing to Scale
If you print a document at twice the size both vertically and horizontally, the resolution of the document willbe reduced by half. If the resolution of the original document is 300 dpi, the resolution of the enlargeddocument will be 150 dpi. If you print the document with a 600 dpi color printer, the lack of detail in theimage may be obvious. In that case, if you scan at the Scanning Resolution of 600 dpi, the resolution willbe 300 dpi even if you double the size of document and you can print the document with sufficient quality.Conversely, if you print a document at half scale, it should be sufficient to scan at half the resolution.
When Printing Color Photos at Twice the Size
Document resolution: 300dpiScanning resolution: 600dpiScale: 200%
Print at twice the sizeScanning resolution/actual scanningresolution: 600 dpi
Printing resolution: 300dpi
Setting the Resolution in ScanGear (Scanner Driver)
In ScanGear (scanner driver), you can specify the resolution with Output Resolution in Output Settings on
Pagina 565 din 732 paginiResolution

the Advanced Mode tab.
Example of Appropriate Resolution when Printing to Scale
The scanning resolution is automatically set so that the value set in Output Resolution will be theresolution of the scanned image. If you set Output Resolution to 300 dpi and scan at twice the size, thedocument will be automatically scanned at 600 dpi, and the resolution of the scanned image will be 300dpi. You can print the document with sufficient quality using a 600 dpi color printer.
When Printing L Size (8.9 cm x 12.7 cm) Photos at Twice the Size
Document resolution: 300dpiOutput resolution: 300 dpiScale: 200%
Scan at twice the sizeActual scanning resolution: 600dpi
Image resolution/printing resolution:300 dpi
Appropriate Resolution Settings
Set the resolution according to the use of the scanned image.
For displaying on a monitor: 150 dpi
For printing: 300 dpi
When Output Size is set to Flexible in ScanGear's Advanced Mode tab (Select Source is Platen and thescale is 100%):
Document Use Color Mode OutputResolution
Color photo Copying(Printing)
Color 300 dpi
Creating a postcard Color 300 dpi
Saving to a computer Color 75 dpi - 300 dpi
Using on a website or attachingto e-mail
Color 75 dpi - 150 dpi
Black and whitephoto
Saving to a computer Grayscale 75 dpi - 300 dpi
Using on a website or attachingto e-mail
Grayscale 75 dpi - 300 dpi
Text document Copying Color, Grayscale or Blackand White
300 dpi
Attaching to e-mail Color, Grayscale or Blackand White
300 dpi
ImportantIf you double the resolution, the file size quadruples. If the file is too large, the processing speed willslow down significantly, and you will experience inconvenience such as lack of memory. Set theminimum required resolution according to the use of the image.
NoteAlthough you can change Output Resolution in ScanGear (scanner driver), it is recommended thatyou scan at the default value.
Page top
Pagina 566 din 732 paginiResolution

Advanced Guide > Scanning > Scanning with Other Application Software > Appendix: Useful Information on Scanning >File Formats
File Formats
You can select a file format when saving scanned images. You should specify the most suitable formataccording to how you want to use the image on which application.
Available file formats vary by application and computer (Windows or Macintosh).
See below for the characteristics of each image file format.
BMP (Standard File Extension: .bmp)
A standard file format for Windows.
BMP is often selected for images that are used only on Windows.
JPEG (Standard File Extension: .jpg)
A file format often used on websites and for digital camera images.
JPEG features high compression rates. JPEG images slightly degrade every time they are saved, andcannot be returned to their original state.
JPEG is not available for black and white images.
Exif (Standard File Extension: .jpg)
A file format supported by many digital cameras.
It adds information such as the date of image capture, camera model, shutter speed, shooting modeand comments to JPEG files.
The file format version must be Exif 2.2 or later in order to print on a Direct Print compatible printer.
TIFF (Standard File Extension: .tif)
A file format featuring a relatively high compatibility between various computers and applications. (SomeTIFF files are incompatible.) TIFF is suitable for editing saved images.
NoteMP Navigator EX supports the following TIFF file formats.- Uncompressed, black and white binary- Uncompressed, RGB (8 bits per channel)- Uncompressed, YCC (8 bits per component)- Uncompressed, RGB (16 bits per channel)- Uncompressed, YCC (16 bits per component)- Uncompressed, Grayscale
PDF (Standard File Extension: .pdf)
A file format developed by Adobe Systems. It can be used on various computers and operating systems.Therefore, PDF files can be exchanged between people who use different operating systems, fonts, etc.regardless of the differences.
Important
Only PDF files created with MP Navigator EX are supported. PDF files created or edited in otherapplications are not supported.
Page top
Pagina 567 din 732 paginiFile Formats

Advanced Guide > Scanning > Scanning with Other Application Software > Appendix: Useful Information on Scanning >Color Matching
Color Matching
Color Matching adjusts devices as shown below to match the colors of an image displayed on a monitoror a printed image with the colors of the original document.
Example: When sRGB is selected as the output profile (target)
Input Profile (Source)
Scanner
ScanGear (Scanner Driver)
Output Profile (Target)
sRGB
OSApplication
ApplicationPrinter Driver
Monitor Printer
ScanGear (scanner driver) converts the image's color space from the scanner's color space to sRGB.
When displaying on a monitor, the image's color space is converted from sRGB to the monitor's colorspace based on the operating system's monitor settings and the application's working space settings.
When printing, the image's color space is converted from sRGB to the printer's color space based on theapplication's print settings and the printer driver's settings.
Page top
Pagina 568 din 732 paginiColor Matching

Ghid avansat > Scanarea > Alte metode de scanare
Alte metode de scanare
Scanarea cu driverul WIA
Scanarea prin utilizarea panoului de control (numai pentru Windows XP)
În partea superioară a paginii
Pagina 569 din 732 paginiAlte metode de scanare

Advanced Guide > Scanning > Other Scanning Methods > Scanning with WIA Driver
Scanning with WIA Driver
You can scan an image from a WIA-compliant application and use the image in that application.
The procedure varies depending on the application. The following procedures are examples only.
For details, refer to the application's manual.
Important
In Windows 2000, you cannot scan using the WIA driver.
Scanning with WIA Driver 2.0
The following is an example of scanning using Windows Photo Gallery.
1. Place the document on the Platen.
Placing Documents
2. In File, click Import from Camera or Scanner..., then double-click WIA Canon (modelname).
The scan setting screen appears.
3. Specify the settings.
Scanner
The currently set product name is displayed. To change the scanner, click Change... and selectthe product you want to use.
Profile
Select Photo (Default) or Documents according to the document to be scanned. To save a newProfile, select Add profile.... You can specify the details in the Add New Profile dialog box.
Source
Select a scanner type.
Paper size
This setting is not available for this machine.
Color format
Select how to scan the document.
Pagina 570 din 732 paginiScanning with WIA Driver
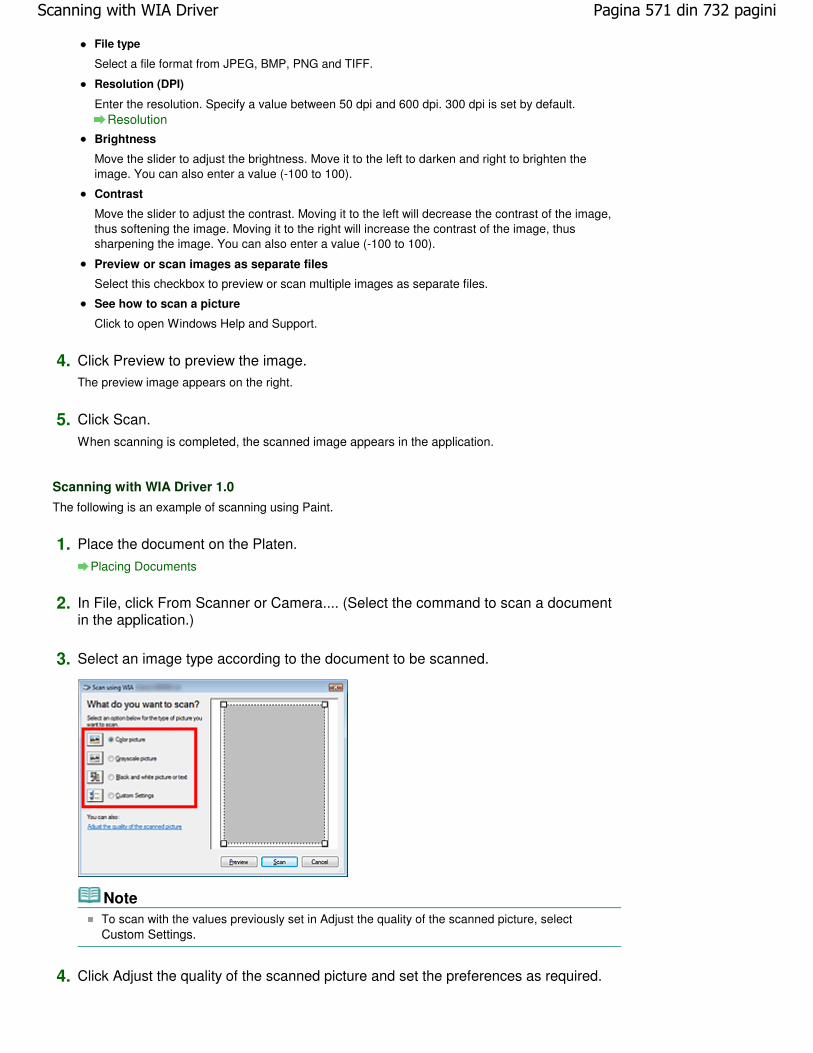
File type
Select a file format from JPEG, BMP, PNG and TIFF.
Resolution (DPI)
Enter the resolution. Specify a value between 50 dpi and 600 dpi. 300 dpi is set by default.Resolution
Brightness
Move the slider to adjust the brightness. Move it to the left to darken and right to brighten theimage. You can also enter a value (-100 to 100).
Contrast
Move the slider to adjust the contrast. Moving it to the left will decrease the contrast of the image,thus softening the image. Moving it to the right will increase the contrast of the image, thussharpening the image. You can also enter a value (-100 to 100).
Preview or scan images as separate files
Select this checkbox to preview or scan multiple images as separate files.
See how to scan a picture
Click to open Windows Help and Support.
4. Click Preview to preview the image.The preview image appears on the right.
5. Click Scan.
When scanning is completed, the scanned image appears in the application.
Scanning with WIA Driver 1.0
The following is an example of scanning using Paint.
1. Place the document on the Platen.
Placing Documents
2. In File, click From Scanner or Camera.... (Select the command to scan a documentin the application.)
3. Select an image type according to the document to be scanned.
NoteTo scan with the values previously set in Adjust the quality of the scanned picture, selectCustom Settings.
4. Click Adjust the quality of the scanned picture and set the preferences as required.
Pagina 571 din 732 paginiScanning with WIA Driver

Brightness
Move the slider to adjust the brightness. Move it to the left to darken and right to brighten theimage. You can also enter a value (-127 to 127).
Contrast
Move the slider to adjust the contrast. Moving it to the left will decrease the contrast of the image,thus softening the image. Moving it to the right will increase the contrast of the image, thussharpening the image. You can also enter a value (-127 to 127).
Resolution (DPI)
Enter the resolution. Specify a value between 50 dpi and 600 dpi.Resolution
Picture type
Select the type of scan you want for your document.
Reset
Click to restore the original settings.
5. Click Preview to preview the image.
The preview image appears on the right. Drag to specify the scan area.
6. Click Scan.
When scanning is completed, the scanned image appears in the application.
Page top
Pagina 572 din 732 paginiScanning with WIA Driver

Advanced Guide > Scanning > Other Scanning Methods > Scanning Using the Control Panel (Windows XP Only)
Scanning Using the Control Panel (Windows XP Only)
You can scan images via the Control Panel of Windows XP using the WIA driver.
Windows Image Acquisition (WIA) is a driver model implemented in Windows XP. It allows you to scandocuments without using an application. Scan documents from a TWAIN-compliant application to specifyadvanced settings for scanning.
1. From the Start menu, select Control Panel.
2. Click Printers and Other Hardware > Scanners and Cameras, then double-click WIACanon (model name).
The Scanner and Camera Wizard dialog box opens.
3. Click Next.
4. Select Picture type according to the document to be scanned.
NoteTo scan with the values previously set in Custom Settings, select Custom.
5. Click Custom Settings to set the preferences as required.
Brightness
Move the slider to adjust the brightness. Move it to the left to darken and right to brighten theimage. You can also enter a value (-127 to 127).
Pagina 573 din 732 paginiScanning Using the Control Panel (Windows XP Only)

Contrast
Move the slider to adjust the contrast. Moving it to the left will decrease the contrast of the image,thus softening the image. Moving it to the right will increase the contrast of the image, thussharpening the image. You can also enter a value (-127 to 127).
Resolution (DPI)
Enter the resolution. Specify a value between 50 dpi and 600 dpi.Resolution
Picture type
Select the type of scan you want for your document.
Reset
Click to restore the original settings.
6. Click Preview to preview the image.
The preview image appears on the right. Drag to specify the scan area.
7. Click Next and follow the instructions.
Page top
Pagina 574 din 732 paginiScanning Using the Control Panel (Windows XP Only)

Ghid avansat > Întreţinere
Întreţinere
Curăţarea aparatului
Alinierea capului de imprimare
Efectuarea întreţinerii de pe un computer
În partea superioară a paginii
Pagina 575 din 732 paginiÎntreţinere

Ghid avansat > Întreţinere > Curăţarea aparatului
Curăţarea aparatului
Curăţare
Curăţarea exteriorului aparatului
Curăţarea suprafeţei de sticlă de scanare şi a capacului pentru documente
Curăţarea interiorului aparatului (Curăţarea plăcii de la bază)
Curăţarea elementelor proeminente din interiorul aparatului
În partea superioară a paginii
Pagina 576 din 732 paginiCurăţarea aparatului
Ghid avansat > Întreţinere > Curăţarea aparatului > Curăţare
Curăţare
Această secţiune descrie procedura de curăţare necesară pentru întreţinerea aparatului.
Important
Nu utilizaţi şerveţele, prosoape de hârtie, cârpe aspre sau materiale similare la curăţare pentru anu zgâria exteriorul aparatului. Aveţi grijă să utilizaţi o cârpă moale.Nu utilizaţi niciodată lichide volatile cum ar fi diluanţii, benzenul, acetona sau orice altă substanţăchimică de curăţare pentru curăţarea aparatului, deoarece acest lucru poate cauza o defecţiunesau poate deteriora suprafaţa aparatului.
Curăţarea exteriorului aparatului
Curăţarea suprafeţei de sticlă de scanare şi a capacului pentru documente
Curăţarea interiorului aparatului (Curăţarea plăcii de la bază)
Curăţarea elementelor proeminente din interiorul aparatului
În partea superioară a paginii
Pagina 577 din 732 paginiCurăţare

Ghid avansat > Întreţinere > Curăţarea aparatului > Curăţarea exteriorului aparatului
Curăţarea exteriorului aparatului
Aveţi grijă să utilizaţi o cârpă moale ca şi cea pentru curăţarea ochelarilor şi îndepărtaţi uşor murdăria depe suprafaţă. Dacă este nevoie, neteziţi cutele cârpei înainte de curăţare.
Important
Asiguraţi-vă că aţi oprit aparatul şi că aţi întrerupt alimentarea înainte de a curăţa aparatul.Nu utilizaţi şerveţele, prosoape de hârtie, cârpe aspre sau materiale similare, deoarece acesteapot zgâria suprafaţa.
În partea superioară a paginii
Pagina 578 din 732 paginiCurăţarea exteriorului aparatului

Ghid avansat > Întreţinere > Curăţarea aparatului > Curăţarea suprafeţei de sticlă de scanare şi a capacului pentrudocumente
Curăţarea suprafeţei de sticlă de scanare şi a capacului pentrudocumente
Important
Asiguraţi-vă că aţi oprit aparatul şi că aţi întrerupt alimentarea înainte de a curăţa aparatul.
Cu o cârpă curată, moale, fără scame, ştergeţi uşor suprafaţa de sticlă de scanare (A) şi parteainterioară a capacului pentru documente (partea albă) (B). Asiguraţi-vă că nu lăsaţi niciun reziduu, înspecial pe suprafaţa de sticlă de scanare.
ImportantPartea interioară a capacului pentru documente (partea albă) (B) se deteriorează cu uşurinţă, aşacă ştergeţi-o uşor.
În partea superioară a paginii
Pagina 579 din 732 paginiCurăţarea suprafeţei de sticlă de scanare şi a capacului pentru documente

Ghid avansat > Întreţinere > Curăţarea aparatului > Curăţarea interiorului aparatului (Curăţarea plăcii de la bază)
Curăţarea interiorului aparatului (Curăţarea plăcii de la bază)
Această secţiune explică modul de curăţare a interiorului aparatului. Dacă imprimanta se murdăreşte îninterior, şi hârtia imprimată se poate murdări, de aceea se recomandă efectuarea curăţării în modregulat.
1. Asiguraţi-vă că aparatul este pus în funcţiune.
2. Deschideţi tava de ieşire a hârtiei.
Deschideţi cu grijă tava de ieşire a hârtiei.
3. Deschideţi extensia tăvii de ieşire.
4. Apăsaţi butonul Meniu (Menu) .
5. Utilizaţi butonul pentru a selecta Maintenance, apoi apăsaţi butonul OK button.
Se va afişa ecranul Maintenance.
6. Utilizaţi butonul pentru a selecta Bottom plate cleaning, apoi apăsaţi butonul OK.
Se afişează ecranul de confirmare.
7. Utilizaţi butonul pentru a selecta Yes, apoi apăsaţi butonul OK.
8. Îndepărtaţi orice hârtie din tava din spate şi urmaţi instrucţiunile de pe ecran.
9. Îndoiţi o foaie de hârtie simplă format A4 sau Letter în jumătate pe lăţime, apoidesfaceţi foaia de hârtie şi urmaţi instrucţiunile de pe ecran.
10. Încărcaţi doar această hârtie în tava din spate cu latura deschisă orientată în faţă şiurmaţi instrucţiunile de pe ecran.
(A) Încărcaţi hârtia după ce aţi desfăcut-o.Hârtia curăţă imprimanta în interior pe măsură ce o alimentează.
Pagina 580 din 732 paginiCurăţarea interiorului aparatului (Curăţarea plăcii de la bază)

Verificaţi partea îndoită a hârtiei eliminate. Efectuaţi din nou curăţarea plăcii de bază dacă hârtiaeste murdărită cu cerneală.Dacă problema nu se rezolvă după efectuarea curăţării de două ori, protuberanţele din interiorulimprimantei pot fi pătate. Curăţaţi-le conform instrucţiunilor.
Curăţarea elementelor proeminente din interiorul aparatului
NotăCând efectuaţi din nou curăţarea plăcii de la bază, nu uitaţi să folosiţi o coală de hârtie nouă.
În partea superioară a paginii
Pagina 581 din 732 paginiCurăţarea interiorului aparatului (Curăţarea plăcii de la bază)
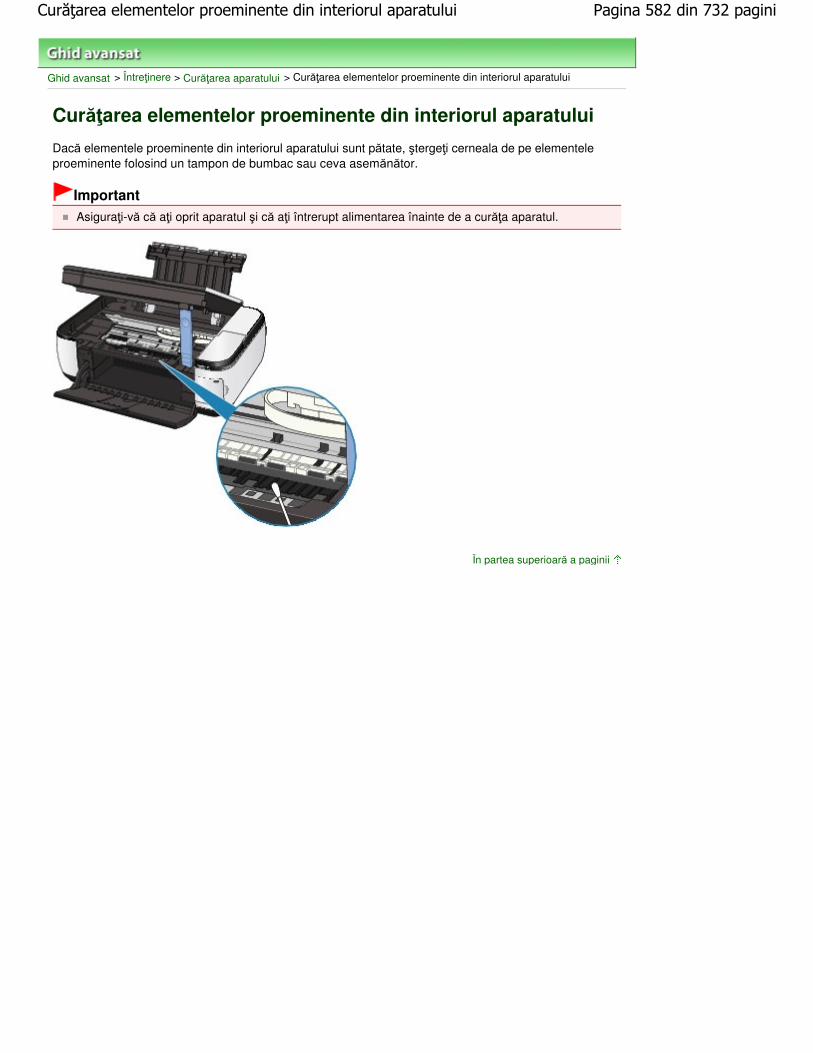
Ghid avansat > Întreţinere > Curăţarea aparatului > Curăţarea elementelor proeminente din interiorul aparatului
Curăţarea elementelor proeminente din interiorul aparatului
Dacă elementele proeminente din interiorul aparatului sunt pătate, ştergeţi cerneala de pe elementeleproeminente folosind un tampon de bumbac sau ceva asemănător.
Important
Asiguraţi-vă că aţi oprit aparatul şi că aţi întrerupt alimentarea înainte de a curăţa aparatul.
În partea superioară a paginii
Pagina 582 din 732 paginiCurăţarea elementelor proeminente din interiorul aparatului

Ghid avansat > Întreţinere > Alinierea capului de imprimare
Alinierea capului de imprimare
Alinierea capului de imprimare
În partea superioară a paginii
Pagina 583 din 732 paginiAlinierea capului de imprimare

Ghid avansat > Întreţinere > Alinierea capului de imprimare > Alinierea capului de imprimare
Alinierea capului de imprimare
Dacă liniile regulate imprimate nu sunt aliniate sau rezultatele imprimării sunt nesatisfăcătoare în altmod, reglaţi poziţia capului de imprimare.
NotăDacă nivelul cernelii rămase este scăzut, foaia de aliniere a capului de imprimare nu va fiimprimată corect. Înlocuiţi cartuşul FINE cu nivel scăzut de cerneală.
Întreţinere de rutină
1. Asiguraţi-vă că aparatul este pus în funcţiune.
2. Imprimaţi foaia de aliniere a capului de imprimare.1. Apăsaţi butonul Meniu (Menu).
2. Utilizaţi butonul pentru a selecta Maintenance, apoi apăsaţi butonul OK button.
Se va afişa ecranul Maintenance.
3. Utilizaţi butonul pentru a selecta Auto head align, apoi apăsaţi butonul OK.
Se afişează ecranul de confirmare.
4. Utilizaţi butonul pentru a selecta Yes, apoi apăsaţi butonul OK.
5. Încărcaţi o coală de hârtie simplă de dimensiune A4 sau Letter în tava din spate; urmaţiinstrucţiunile on-screen.
6. Deschideţi uşor tava de ieşire a hârtiei şi deschideţi extensia tăvii de ieşire.
7. Apăsaţi butonul OK.
Se va imprima foaia de aliniere a capului de imprimare.
Pagina 584 din 732 paginiAlinierea capului de imprimare

Important
Nu atingeţi nicio parte imprimată de pe foaia de aliniere a capului de imprimare.Nu murdăriţi foaia de aliniere a capului de imprimare. Dacă foaia este pătată sau încreţită,este posibil ca modelul să nu poată fi scanat corect.
8. Când se afişează Did the patterns print correctly? confirmaţi dacă modelul este imprimatcorect, utilizaţi butonul pentru a selecta Yes, apoi apăsaţi butonul OK.
3. Scanaţi foaia de aliniere a capului de imprimare pentru a regla poziţia capului deimprimare.
1. Plasaţi foaia de aliniere a capului de imprimare pe suprafaţa de sticlă de scanare, apoiînchideţi cu grijă capacul pentru documente.
Aşezaţi foaia de aliniere a capului de imprimare cu partea imprimată ORIENTATĂ ÎN JOS şi
aliniaţi marcajul din colţul din stânga-sus al foii cu marcajul de aliniere ( ).
2. Apăsaţi butonul OK.
Foaia de aliniere a capului de imprimare este scanată şi poziţia capului de imprimare estereglată automat.După finalizarea reglării, îndepărtaţi foaia de aliniere a capului de imprimare de pe suprafaţade sticlă de scanare.
Pagina 585 din 732 paginiAlinierea capului de imprimare

Important
Nu deschideţi capacul pentru documente şi nu deplasaţi foaia de aliniere a capului deimprimare încărcată până la finalizarea scanării.Dacă nu s-a reuşit reglarea automată a poziţiei capului de imprimare, pe LED apareFailed to scan..
Pe LCD este afişat un mesaj de eroare
NotăDacă rezultatele imprimării sunt tot nesatisfăcătoare după reglarea poziţiei capului deimprimare conform descrierii de mai sus, reglaţi manual poziţia capului de imprimare, dela computer.
Alinierea poziţiei capului de imprimareSelectaţi Head alignment print pentru a confirma valorile curente de ajustare a poziţieicapului.
În partea superioară a paginii
Pagina 586 din 732 paginiAlinierea capului de imprimare

Ghid avansat > Întreţinere > Efectuarea întreţinerii de pe un computer
Efectuarea întreţinerii de pe un computer
Curăţarea capetelor de imprimare
Curăţarea rolelor de alimentare a hârtiei
Alinierea poziţiei capului de imprimare
Verificarea duzelor capului de imprimare
Curăţarea interiorului aparatului
În partea superioară a paginii
Pagina 587 din 732 paginiEfectuarea întreţinerii de pe un computer

Advanced Guide > Maintenance > Performing Maintenance from a Computer > Cleaning the Print Heads
Cleaning the Print Heads
The print head cleaning function allows you to unclog clogged nozzles in the print head. Perform printhead cleaning if printing is faint or a specific color fails to print, even though there is enough ink.
The procedure for cleaning the print heads is as follows:
Cleaning
1. Open the printer driver setup window
2. Click Cleaning on the Maintenance tab
The Print Head Cleaning dialog box opens. Follow the instruction shown in the dialog box.Click Initial Check Items to display the items you need to check before performing Cleaning.
3. Execute cleaning
Make sure that the machine is on and then click Execute.
Print head cleaning starts.
4. Complete cleaning
The Nozzle Check dialog box opens after the confirmation message.
5. Check the results
To check whether the print quality has improved, click Print Check Pattern. To cancel the checkprocess, click Cancel.
If cleaning the head once does not resolve the print head problem, clean it once more.
Deep Cleaning
Deep Cleaning is more thorough than cleaning. Perform deep cleaning when two Cleaning attempts donot resolve the print head problem.
1. Open the printer driver setup window
2. Click Deep Cleaning on the Maintenance tab
The Deep Cleaning dialog box opens. Follow the instruction shown in the dialog box.Click Initial Check Items to display the items you need to check before performing Deep Cleaning.
3. Execute deep cleaning
Make sure that the machine is on and then click Execute.Click OK when the confirmation message appears.
Print head deep cleaning starts.
4. Complete deep cleaning
The Nozzle Check dialog box opens after the confirmation message.
Pagina 588 din 732 paginiCleaning the Print Heads

5. Check the results
To check whether the print quality has improved, click Print Check Pattern. To cancel the checkprocess, click Cancel.
Important
Cleaning consumes a small amount of ink. Deep Cleaning consumes a larger amount of ink thanCleaning.Cleaning the print heads frequently will rapidly deplete your printer's ink supply. Consequently,perform cleaning only when necessary.
Note If there is no sign of improvement after Deep Cleaning, switch off the machine, wait 24 hours, andthen perform Deep Cleaning again. If there is still no sign of improvement, see " Machine Moves ButInk Is Not Ejected ."
Related Topic
Checking the Print Head Nozzles
Page top
Pagina 589 din 732 paginiCleaning the Print Heads

Advanced Guide > Maintenance > Performing Maintenance from a Computer > Cleaning the Paper Feed Rollers
Cleaning the Paper Feed Rollers
Cleans the paper feed roller. Perform feed roller cleaning when there are paper particles sticking to thepaper feed roller and paper is not fed properly.
The procedure for performing the feed roller cleaning is as follows:
Roller Cleaning
1. Prepare the machine Remove all sheets of paper from the rear tray.
2. Open the printer driver setup window
3. Click Roller Cleaning on the Maintenance tab
The confirmation message appears.
4. Execute paper feed roller cleaning
Make sure that the machine is on and click OK.Paper feed roller cleaning starts.
5. Complete paper feed roller cleaning
After the rollers have stopped, follow the instruction in the message, load three sheets of plainpaper into the rear tray, and click OK.
Paper will be ejected and feed roller cleaning will be completed.
Page top
Pagina 590 din 732 paginiCleaning the Paper Feed Rollers

Advanced Guide > Maintenance > Performing Maintenance from a Computer > Aligning the Print Head Position
Aligning the Print Head Position
Print head alignment corrects the installation positions of the print head and improves deviated colorsand lines.
This machine supports two head alignment methods: automatic head alignment and manual headalignment.To perform automatic head alignment, refer to "Aligning the Print Head" in the manual: Basic Guide andthen execute the function from the operation panel of the machine.
The procedure for performing manual print head alignment is as follows:
Print Head Alignment
1. Open the printer driver setup window
2. Click Custom Settings on the Maintenance tab
The Custom Settings dialog box opens.
3. Switch head alignment to manual
Check the Align heads manually check box.
4. Transmit the settings
Click Send, and click OK when the confirmation message appears.
5. Click Print Head Alignment on the Maintenance tab
The Start Print Head Alignment dialog box opens.
6. Load paper in the machine
Load three sheets of A4 size or Letter size plain paper into the rear tray.
7. Execute head alignment
Make sure that the machine is on and click Align Print Head.Follow the instruction in the message.
8. Check the printed pattern
Enter the numbers of the patterns with the least amount of streaks in the associated boxes.Clicking the patterns with the least amount of streaks in the preview window, will automatically settheir numbers in the associated boxes.
Pagina 591 din 732 paginiAligning the Print Head Position

When you have entered all the necessary values, click OK.
Note If it is difficult to pick the best pattern, pick the setting that produces the least noticeable verticalwhite streaks.
(A) Less noticeable vertical white streaks (B) More noticeable vertical white streaks If it is difficult to pick the best pattern, pick the setting that produces the least noticeablehorizontal white streaks.
(A) Less noticeable horizontal white streaks (B) More noticeable horizontal white streaks
9. Confirm the displayed message and click OK The second pattern is printed.
Important
Do not open the Scanning Unit (Cover) while printing is in progress.
10. Check the printed pattern
Enter the numbers of the patterns with the least amount of streaks in the associated boxes.Clicking the patterns with the least amount of streaks in the preview window, will automatically settheir numbers in the associated boxes.
Pagina 592 din 732 paginiAligning the Print Head Position

When you have entered all the necessary values, click OK.
Note If it is difficult to pick the best pattern, pick the setting that produces the least noticeable verticalwhite streaks.
(A) Less noticeable vertical white streaks (B) More noticeable vertical white streaks
11. Confirm the displayed message and click OK
The third pattern is printed.
Important
Do not open the Scanning Unit (Cover) while printing is in progress.
12. Check the printed pattern
Enter the numbers of the patterns with the least noticeable horizontal stripes in the associatedboxes.Clicking the patterns with the least noticeable horizontal stripes in the preview window, willautomatically set their numbers in the associated boxes.
Pagina 593 din 732 paginiAligning the Print Head Position
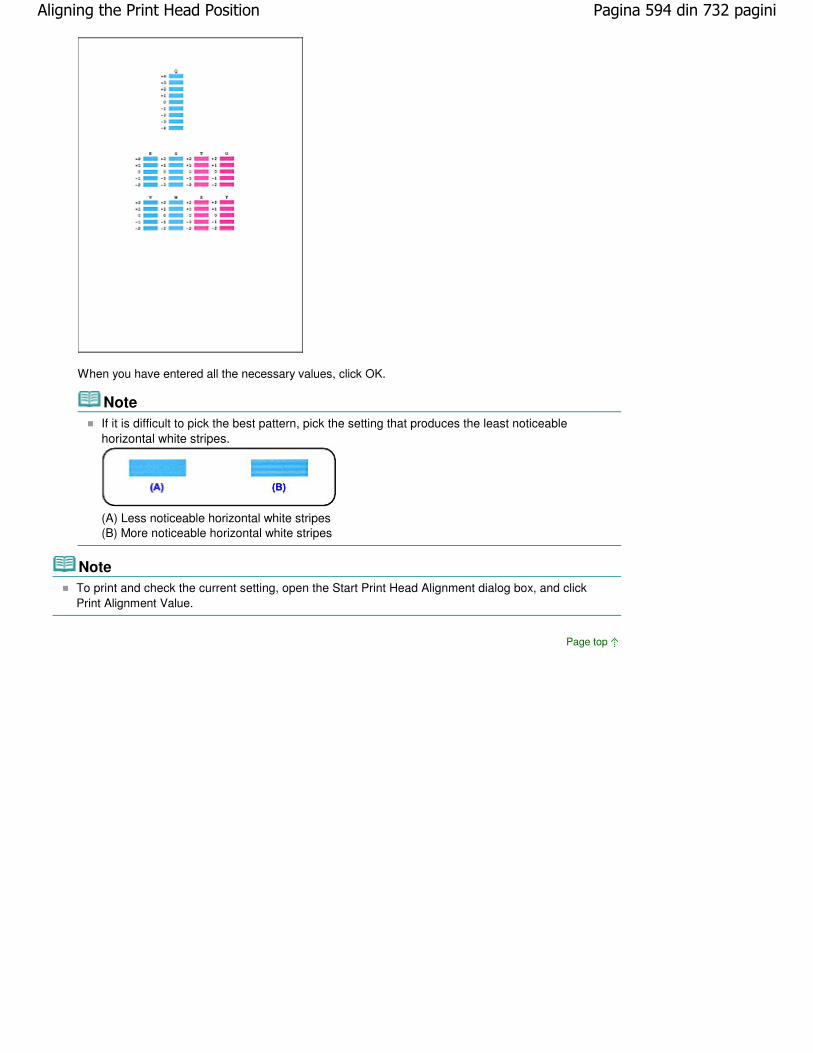
When you have entered all the necessary values, click OK.
Note If it is difficult to pick the best pattern, pick the setting that produces the least noticeablehorizontal white stripes.
(A) Less noticeable horizontal white stripes (B) More noticeable horizontal white stripes
Note To print and check the current setting, open the Start Print Head Alignment dialog box, and clickPrint Alignment Value.
Page top
Pagina 594 din 732 paginiAligning the Print Head Position

Advanced Guide > Maintenance > Performing Maintenance from a Computer > Checking the Print Head Nozzles
Checking the Print Head Nozzles
The nozzle check function allows you to check whether the print heads are working properly by printing anozzle check pattern. Print the pattern if printing becomes faint, or if a specific color fails to print.
The procedure for printing a nozzle check pattern is as follows:
Nozzle Check
1. Open the printer driver setup window
2. Click Nozzle Check on the Maintenance tab
The Nozzle Check dialog box opens.To display a list of items that you should check before printing the check pattern, click Initial CheckItems.
3. Load paper in the machine
Load a sheet of A4 size or Letter size plain paper into the rear tray.
4. Print a nozzle check pattern
Make sure that the machine is on and click Print Check Pattern.The nozzle check pattern is printed.
Click OK when the confirmation message appears.The Pattern Check dialog box opens.
5. Check the print result Check the print result. When the print result is normal, click Exit.If the print result is smudged or if there are any unprinted sections, click Cleaning to clean the printhead.
Related Topic
Cleaning the Print Heads
Page top
Pagina 595 din 732 paginiChecking the Print Head Nozzles

Advanced Guide > Maintenance > Performing Maintenance from a Computer > Cleaning Inside the Machine
Cleaning Inside the Machine
Perform bottom plate cleaning before you execute duplex printing to prevent smudges on the back sideof the paper.Also perform bottom plate cleaning if ink smudges caused by something other than print data appear onthe printed page.
For details on how to load paper into the machine, see " Cleaning the Inside of the Machine (Bottom PlateCleaning) ."
The procedure for performing bottom plate cleaning is as follows:
Bottom Plate Cleaning
1. Open the printer driver setup window
2. Click Bottom Plate Cleaning on the Maintenance tab
The Bottom Plate Cleaning dialog box opens.
3. Load paper in the machine
As instructed in the dialog box, fold the A4 size or Letter size plain paper in half horizontally, and thenunfold the sheet.Load the paper into the rear tray in the portrait orientation with the crest of the crease facing down.
4. Perform the bottom plate cleaning
Make sure that the machine is on and click Execute.Bottom plate cleaning starts.
Page top
Pagina 596 din 732 paginiCleaning Inside the Machine

Ghid avansat > Modificarea setărilor aparatului
Modificarea setărilor aparatului
Modificarea setărilor aparatului de pe LCD
Modificarea setărilor aparatului de la computer
În partea superioară a paginii
Pagina 597 din 732 paginiModificarea setărilor aparatului

Ghid avansat > Modificarea setărilor aparatului > Modificarea setărilor aparatului de pe LCD
Modificarea setărilor aparatului de pe LCD
Modificarea setărilor aparatului de pe LCD
Intensitate automată de copiere
Prevenirea abraziunii
Valoare extindere
Setare Autocorecţie foto
Afişaj dată
Atribut de citire/scriere
Mod silenţios
Repetare taste
Selectare limbă
Resetare setări
În partea superioară a paginii
Pagina 598 din 732 paginiModificarea setărilor aparatului de pe LCD

Ghid avansat > Modificarea setărilor aparatului > Modificarea setărilor aparatului de pe LCD > Modificarea setăriloraparatului de pe LCD
Modificarea setărilor aparatului de pe LCD
Această secţiune descrie procedura de modificare a setărilor din ecranul Device settings, efectuând caexemplu paşii pentru a specifica Extension amount.
1. Asiguraţi-vă că aparatul este pornit şi apăsaţi butonul Meniu (Menu).Se afişează ecranul meniului superior.
2. Utilizaţi butonul pentru a selecta Device settings, apoi apăsaţi butonul OK.
Se va afişa ecranul Device settings.
3. Utilizaţi butonul pentru a selecta un meniu, apoi apăsaţi butonul OK.
Se va afişa ecranul de setări pentru elementul selectat.
4. Utilizaţi butonul pentru a selecta un element de configurare, apoi apăsaţibutonul OK.
Intensitate automată de copiere
Prevenirea abraziunii
Valoare extindere
Setare Autocorecţie foto
Afişaj dată
Atribut de citire/scriere
Mod silenţios
Repetare taste
Selectare limbă
Pagina 599 din 732 paginiModificarea setărilor aparatului de pe LCD

Resetare setări
În partea superioară a paginii
Pagina 600 din 732 paginiModificarea setărilor aparatului de pe LCD

Ghid avansat > Modificarea setărilor aparatului > Modificarea setărilor aparatului de pe LCD > Intensitate automată decopiere
Intensitate automată de copiere
Ajustează automat intensitatea copiei.
În partea superioară a paginii
Pagina 601 din 732 paginiIntensitate automată de copiere

Ghid avansat > Modificarea setărilor aparatului > Modificarea setărilor aparatului de pe LCD > Prevenirea abraziunii
Prevenirea abraziunii
Utilizaţi această setare doar atunci când se murdăreşte suprafaţa de imprimare.
Important
Nu uitaţi să setaţi această opţiune înapoi pe Disable după imprimare deoarece poate determina oviteză scăzută sau o calitate scăzută a imprimării.
În partea superioară a paginii
Pagina 602 din 732 paginiPrevenirea abraziunii

Ghid avansat > Modificarea setărilor aparatului > Modificarea setărilor aparatului de pe LCD > Valoare extindere
Valoare extindere
Selectează volumul de imagine care se extinde pe hârtie dacă imprimaţi Borderless (full).
NotăDacă imaginile imprimate au chenar chiar dacă imprimaţi în modul Borderless, dacă specificaţiLarge, această setare poate soluţiona problema.
În partea superioară a paginii
Pagina 603 din 732 paginiValoare extindere
Ghid avansat > Modificarea setărilor aparatului > Modificarea setărilor aparatului de pe LCD > Setare Autocorecţie foto
Setare Autocorecţie foto
Când este selectat Prioritize Exif info, în următoarele cazuri puteţi să selectaţi dacă fotografiile seimprimă utilizând informaţiile Exif înregistrate în fişierele imagine.
Auto photo fix ON se selectează când imprimaţi fotografii de pe o cartelă de memorieCând se utilizează pentru imprimare o foaie index foto cu opţiunea „Auto Photo Fix OFF”necompletată
În partea superioară a paginii
Pagina 604 din 732 paginiSetare Autocorecţie foto
Ghid avansat > Modificarea setărilor aparatului > Modificarea setărilor aparatului de pe LCD > Afişaj dată
Afişaj dată
Modifică la imprimare formatul de afişare a datelor la care au fost realizate fotografiile.
NotăCând este selectat Print date ON în fila 2 de setări din ecranul setărilor de imprimare, datafotografierii este imprimată în formatul de afişare a datei selectat. Pentru setările de imprimare,consultaţi Elemente de configurare .Formatul datei la care au fost realizate fotografiile este cel specificat în setarea DPOF dinimprimare DPOF.
În partea superioară a paginii
Pagina 605 din 732 paginiAfişaj dată

Ghid avansat > Modificarea setărilor aparatului > Modificarea setărilor aparatului de pe LCD > Atribut de citire/scriere
Atribut de citire/scriere
Selectează dacă se va permite sau nu scrierea datelor pe cartele de memorie de pe un calculator.
Important
Scoateţi cartela de memorie înainte de modificarea acestei setări. Pentru detalii, consultaţi Configurarea slotului pentru cartelă ca unitate de cartelă de memorie a computerului .
Când stabiliţi această setare pe Writable from PC, nu puteţi să imprimaţi fotografii de pe o cartelăde memorie utilizând panoul de operare de la aparat. După ce finalizaţi operaţiile cu unitateadedicată cartelei de memorie, nu uitaţi să o setaţi înapoi la Not writable from PC.
În partea superioară a paginii
Pagina 606 din 732 paginiAtribut de citire/scriere

Ghid avansat > Modificarea setărilor aparatului > Modificarea setărilor aparatului de pe LCD > Mod silenţios
Mod silenţios
Activează această funcţie pe aparat dacă doriţi să reduceţi zgomotul de operare, cum ar fi de pildă atuncicând imprimaţi pe timp de noapte.
Activarea acestei funcţii reduce zgomotele generate când se efectuează:
CopiereaImprimarea de pe o cartelă de memorieImprimarea unui formular şablon
ImportantViteza de imprimare poate fi mai mică decât atunci când această setare este configurată peDisable.În funcţie de setarea de calitate a imprimării, este posibil ca această funcţie să fie mai puţineficientă. În plus, anumite zgomote, cum ar fi zgomotul produs atunci când aparatul se pregăteştede imprimare, nu sunt reduse.
NotăZgomotele generate în timpul scanării sau imprimării de pe calculator pot fi de asemenea reduse.Pentru a reduce aceste zgomote, trebuie să configuraţi setările pe computer.Pentru zgomote emise în timpul scanării, consultaţi Fila Scaner .
Pentru zgomotele generate în timpul imprimării de la computer consultaţi Reducerea zgomotuluidispozitivului.
În partea superioară a paginii
Pagina 607 din 732 paginiMod silenţios

Ghid avansat > Modificarea setărilor aparatului > Modificarea setărilor aparatului de pe LCD > Repetare taste
Repetare taste
Activează/dezactivează introducerea continuă prin apăsarea lungă a butonului , , sau lasetarea numărului de copii, la schimbarea fotografiei afişate pe LCD, la setarea raportului de zoom etc.
În partea superioară a paginii
Pagina 608 din 732 paginiRepetare taste

Ghid avansat > Modificarea setărilor aparatului > Modificarea setărilor aparatului de pe LCD > Selectare limbă
Selectare limbă
Modifică limba pentru mesajele sau meniurile de pe LCD.
În partea superioară a paginii
Pagina 609 din 732 paginiSelectare limbă

Ghid avansat > Modificarea setărilor aparatului > Modificarea setărilor aparatului de pe LCD > Resetare setări
Resetare setări
Setările pot fi restabilite la valorile implicite.
NotăUrmătoarele setări nu pot fi restabilite la valorile implicite:
Limba afişată pe LCDPoziţia curentă a capului de imprimareSetarea Read/write attribute
În partea superioară a paginii
Pagina 610 din 732 paginiResetare setări

Ghid avansat > Modificarea setărilor aparatului > Modificarea setărilor aparatului de la computer
Modificarea setărilor aparatului de la computer
Schimbarea opţiunilor de imprimare
Înregistrarea unui profil de imprimare utilizat frecvent
Setarea cartuşului cu cerneală
Gestionarea consumului de energie al aparatului
Reducerea zgomotului aparatului
Schimbarea modului de funcţionare a aparatului
În partea superioară a paginii
Pagina 611 din 732 paginiModificarea setărilor aparatului de la computer

Advanced Guide > Changing the Machine Settings > Changing Machine Settings from Your Computer > Changing thePrint Options
Changing the Print Options
You change the detailed print driver settings for print data that is sent from an application software.
Specify this option if you encounter print failures such as part of an image data being cut off.
The procedure for changing the print options is as follows:
1. Open the printer driver setup window
2. Click Print Options... on the Page Setup tab
The Print Options dialog box opens.
3. Change the individual settings
If necessary, change the setting of each item, and then click OK.
The Page Setup tab is displayed again.
Page top
Pagina 612 din 732 paginiChanging the Print Options

Advanced Guide > Changing the Machine Settings > Changing Machine Settings from Your Computer > Registering aFrequently Used Printing Profile
Registering a Frequently Used Printing Profile
You can register the frequently used printing profile to Commonly Used Settings on the Quick Setup tab.Unnecessary printing profiles can be deleted at any time.
The procedure for registering a printing profile is as follows:
Registering a Printing Profile
1. Open the printer driver setup window
2. Set the necessary items From Commonly Used Settings on the Quick Setup tab, select the printing profile to be used and ifnecessary, change the settings after Additional Features.You can also set necessary items on the Main, Page Setup, and Effects tab.
3. Click Save...
The Save Commonly Used Settings dialog box opens.
4. Save the settings Set Name, then click OK. If necessary, set the items in Options.... The printing profile is saved, andthe Quick Setup tab is displayed again.The name and icon are added to the Commonly Used Settings list.
Pagina 613 din 732 paginiRegistering a Frequently Used Printing Profile

Important
To save the page size, orientation, and number of copies that was set in each sheet, clickOptions..., and check each item.
Note When you install the printer driver again or upgrade the version of the printer driver, the print settingsyou registered will be deleted from Commonly Used Settings.Registered print settings cannot be saved and preserved. If a profile is deleted, register the printsettings again.
Deleting Unnecessary Printing Profile
1. Select the printing profile to be deleted
Select the printing profile you want to delete from the Commonly Used Settings list on the QuickSetup tab.
2. Delete the printing profile
Click Delete. When the confirmation message appears, click OK.The selected printing profile is deleted from the Commonly Used Settings list.
Note Printing profiles that are registered in the initial settings cannot be deleted.
Page top
Pagina 614 din 732 paginiRegistering a Frequently Used Printing Profile

Advanced Guide > Changing the Machine Settings > Changing Machine Settings from Your Computer > Setting the InkCartridge
Setting the Ink Cartridge
This feature enables you to specify the most appropriate ink cartridge among installed cartridgesaccording to an intended use.When one of the ink cartridges becomes empty and cannot be replaced immediately by a new one, youcan specify the other ink cartridge that still has ink and continue printing.
The procedure for specifying the ink cartridge is as follows:
Ink Cartridge Settings
1. Open the printer driver setup window
2. Click Ink Cartridge Settings on the Maintenance tab
The Ink Cartridge Settings dialog box appears.
3. Select the ink cartridge to be used
Select the ink cartridge to be used for printing and click OK.The specified ink cartridge will be used from the next printing.
Important
When the following settings are specified, Black Only does not function because the machine usesthe color ink cartridge to print documents.
Other than Plain Paper, Hagaki A, Hagaki, or Envelope is selected for Media Type on the Main tabBorderless is selected from the Page Layout list on the Page Setup tab
Do not detach an ink cartridge that is not in use. Printing cannot be performed while either inkcartridge is detached.
Page top
Pagina 615 din 732 paginiSetting the Ink Cartridge

Advanced Guide > Changing the Machine Settings > Changing Machine Settings from Your Computer > Managing theMachine Power
Managing the Machine Power
This function allows you to manage the machine power from the printer driver.
The procedure for managing the printer power is as follows:
Power Off
The Power Off function turns off the machine. When you use this function, you will not be able to turn themachine on from the printer driver.
1. Open the printer driver setup window
2. Execute power off
Click Power Off on the Maintenance tab. When the confirmation message appears, click OK.
The machine power switches off, and the Maintenance tab is displayed again.
Page top
Pagina 616 din 732 paginiManaging the Machine Power

Advanced Guide > Changing the Machine Settings > Changing Machine Settings from Your Computer > Reducing theMachine Noise
Reducing the Machine Noise
This function allows you to reduce the operating noise of the machine. Select when you wish to reducethe operating noise of the printer at night, etc.Using this function may lower the print speed.
The procedure for using the quiet mode is as follows:
Quiet Mode
1. Open the printer driver setup window
2. Click Quiet Mode on the Maintenance tab
The Quiet Mode dialog box opens.
3. Set the quiet mode
If necessary, specify one of the following items:
Do not use quiet mode The operating noise of the machine is at normal volume.
Always use quiet mode Select this option when you wish to reduce the operating noise of the machine.
Use quiet mode within specified time The operating noise of the machine can be reduced during a specified period of time.Set the Start time and End time when you wish the quiet mode to be activated.
Important The time specified in Start time and in End time must be different.
4. Transmit the settings Make sure that the machine is on and click Send.Click OK when the confirmation message appears.
The settings are enabled hereafter.
Note Depending on print quality settings, effects of the quiet mode may be less.
Page top
Pagina 617 din 732 paginiReducing the Machine Noise

Advanced Guide > Changing the Machine Settings > Changing Machine Settings from Your Computer > Changing theMachine Operation Mode
Changing the Machine Operation Mode
If necessary, switch between various modes of machine operation.
The procedure for configuring settings is as follows:
Custom Settings
1. Open the printer driver setup window
2. Make sure that the machine is on, and then click Custom Settings on theMaintenance tab
The Custom Settings dialog box opens.
Note If the machine is off or bi-directional communication is disabled, a message may appearbecause the computer cannot collect the machine status.If this happens, click OK to display the most recent settings specified on your computer.
3. If necessary, complete the following settings:
Prevent paper abrasion The machine can increase the gap between the print head and the paper during high-densityprinting to prevent paper abrasion.Check this check box to use this function.
Align heads manually The Print Head Alignment function on the Maintenance tab is normally set to automatic headalignment, but you can change it to manual head alignment. If the printing results are unsatisfactoryeven after you execute automatic head alignment, see " Aligning the Print Head Position ," andexecute manual head alignment.Check this check box to perform the manual head alignment.
Ink Drying Wait Time You can set the length of the machine rest time until printing of the next page begins. Moving theslider to the right increases the pause time and moving the slider to the left decreases the time.If the paper gets stained because the next page is ejected before the ink on the printed page dries,increase the ink drying wait time.Reducing the ink drying wait time speeds up printing.
4. Transmit the settings
Click Send, and click OK when the confirmation message appears.
The machine operates with the modified settings hereafter.
Page top
Pagina 618 din 732 paginiChanging the Machine Operation Mode

Ghid avansat > Depanare
Depanare
Dacă apare o eroare
Aparatul nu poate fi pornit
Pe LCD este afişat un mesaj de eroare
LCD-ul nu se poate vedea deloc
Pe LCD este afişată o limbă necorespunzătoare
Nu se poate face instalarea pentru MP Drivers
Conectarea la computer nu se realizează corespunzător
Rezultatele imprimării nu sunt satisfăcătoare
Imprimarea nu începe
Copierea/Imprimarea se opreşte înainte de a fi finalizată
Aparatul funcţionează, dar nu este eliminată cerneală
Viteza de imprimare este mai mică decât cea aşteptată
Suportul de cartuş FINE nu se mută în poziţia pentru înlocuire
Alimentarea cu hârtie nu se realizează corect
Blocaje de hârtie
Un mesaj apare pe ecranul computerului
Pentru utilizatorii Windows
Nu se imprimă corespunzător de pe o foaie index foto
Nu se poate scoate o cartelă de memorie
Probleme cu scanarea
Probleme de software
Probleme cu MP Navigator EX
Dacă nu puteţi rezolva problema
Întrebări frecvente
Instrucţiuni de utilizare (driver de imprimantă)
Note generale (driver de scaner)
În partea superioară a paginii
Pagina 619 din 732 paginiDepanare

Ghid avansat > Depanare > Dacă apare o eroare
Dacă apare o eroare
Când apare o eroare la imprimare, de exemplu dispozitivul nu mai are hârtie sau hârtia este blocată, seva afişa automat un mesaj de depanare. Efectuaţi acţiunea corespunzătoare, descrisă în mesaj. Mesajulpoate varia în funcţie de versiunea sistemului de operare.
În Mac OS X v.10.5.x:
În Mac OS X v.10.4.x sau Mac OS X v 10.3.9:
Pagina 620 din 732 paginiDacă apare o eroare

În partea superioară a paginii
Pagina 621 din 732 paginiDacă apare o eroare

Ghid avansat > Depanare > Aparatul nu poate fi pornit
Aparatul nu poate fi pornit
Verificarea 1: Apăsaţi butonul ACTIVARE (ON) .
Verificarea 2: Asiguraţi-vă că fişa de alimentare este bine introdusă în
conectorul cablului de alimentare al aparatului, apoi reporniţi aparatul.
Verificarea 3: Deconectaţi aparatul de la sursa de alimentare, apoi
reconectaţi şi reporniţi aparatul după cel puţin 2 minute.Dacă problema persistă, contactaţi centrul de service.
În partea superioară a paginii
Pagina 622 din 732 paginiAparatul nu poate fi pornit
Ghid avansat > Depanare > Pe LCD este afişat un mesaj de eroare
Pe LCD este afişat un mesaj de eroare
Dacă se afişează un mesaj de eroare pe LCD, luaţi măsurile corespunzătoare descrise mai jos.
Mesaj Acţiune
Print head is not installed.Install the print head.U051The type of print head is incorrect.Install the correct print head.U052The ink cartridge cannot be recognized.U053/U059
Cartuşul FINE nu este instalat corespunzător sau cartuşulnu este compatibil cu acest aparat.Deschideţi Unitatea de scanare (capacul) şi instalaţiCartuşul FINE corespunzător.Dacă eroarea persistă, contactaţi centrul de service.
One or more ink cartridges are notinstalled in place.U075
Asiguraţi-vă că fiecare cartuş FINE este instalat în poziţiacorectă.
Întreţinere de rutină
The ink cartridge cannot be recognized.U140
Cartuşul FINE nu este compatibil cu acest aparat.Instalaţi Cartuşul FINE compatibil cu acest aparat.
Întreţinere de rutină
The ink cartridge cannot be recognized.U150
Cartuşul FINE nu este instalat corespunzător.Deschideţi Unitatea de scanare (capacul) şi instalaţiCartuşul FINE corespunzător.Dacă eroarea persistă, contactaţi centrul de service.
Ink may have run out.Replacing the ink cartridge isrecommended.U162
Este posibil ca cerneala să se fi terminat.Funcţia pentru detectarea nivelului de cerneală rămasă va fidezactivată, având ín vedere că nivelul de cerneală nu poatefi detectat în mod corect.Dacă doriţi să continuaţi imprimarea fără această funcţieapăsaţi pe butonul [Stop] (Oprire) timp de cel puţin 5secunde.Canon recomandă utilizarea cartuşelor originale Canonpentru a obţine calităţi optime.Vă rugăm să reţineţi, Canon nu va răspunde pentru niciodefecţiune sau problemă cauzate de continuarea imprimăriifără cerneală.
NotăDacă funcţia pentru detectarea nivelului de cernealărămasă este dezactivată, se va afişa un cartuş decerneală cu gri pe ecranul pentru volumul rămas decerneală de pe LCD.
Întreţinere de rutină
Ink has run out.Replace the ink cartridge.U163
S-a terminat cerneala.Înlocuiţi cartuşul de cerneală şi ínchideţi unitatea de scanare(capacul).Dacă imprimarea este in curs de desfăşurare şi doriţi săcontinuaţi, apăsaţi butonul [Stop] (Oprire) pentru cel puţin 5secunde cu cartuşul de cerneală instalat. Apoi imprimareapoate continua fără cerneală.Funcţia de detectare a nivelului de cerneală rămasă va fidezactivată.Înlocuiţi cartuşul de cerneală gol imediat după imprimare.Calitatea imprimării rezultate nu este satisfăcătoare, dacă secontinuă imprimarea fără cerneală.
Pagina 623 din 732 paginiPe LCD este afişat un mesaj de eroare

NotăDacă funcţia pentru detectarea nivelului de cernealărămasă este dezactivată, se va afişa un cartuş decerneală cu gri pe ecranul pentru volumul rămas decerneală de pe LCD.
Întreţinere de rutină
There is no photo data on memory card. Nu există date foto salvate pe cartela de memorie caresă poată fi citite de acest aparat.Este posibil ca aparatul să nu poată recunoaşte fişieruldacă numele fişierului sau calea folderului conţineanumite caractere. Utilizaţi doar caractere alfanumerice.Datele foto editate sau procesate pe un computer trebuieimprimate de pe computer.
NotăCând este selectată o fotografie care a fost procesatăpe un computer, pe LCD se afişează „?”.
The ink absorber is almost full.Press OK to continue printing.Contact the service center.
Absorbantul de cerneală este aproape plin.Apăsaţi butonul OK al imprimantei pentru a continuaimprimarea. Contactaţi centrul de service.
Printer error has occurred.Contact the service center.
A intervenit o eroare de aparat.Contactaţi centrul de service.
Timeout error has occurred.OK
Au intervenit anumite erori în timpul copierii şi a trecut unanumit interval de timp.Apăsaţi butonul OK pentru a anula eroarea şi, încercaţi săcopiaţi din nou.
Failed to scan.Check orientation/position and checkthat platen/sheet is clean.<See manual>
Scanarea foii de aliniere a capului de imprimare a eşuat.Apăsaţi butonul OK pentru a anula eroarea, apoi efectuaţiacţiunile descrise mai jos.
Asiguraţi-vă că foaia de aliniere a capului de imprimareeste aşezată în poziţia şi orientarea corectă pe suprafaţade sticlă de scanare.Asiguraţi-vă că suprafaţa de sticlă de scanare şi foaia dealiniere a capului de imprimare nu sunt murdare.Asiguraţi-vă că tipul şi dimensiunea hârtiei încărcate suntadecvate pentru alinierea automată a capului deimprimare.Pentru alinierea automată a capului de imprimare,încărcaţi întotdeauna o coală de hârtie simplă de formatA4 sau Letter.Asiguraţi-vă că duzele capului de imprimare nu suntînfundate.Imprimaţi modelul de verificare a duzei pentru a verificastarea capului de imprimare.
Întreţinere de rutinăDacă eroarea persistă, conectaţi aparatul la computer şialiniaţi capul de imprimare folosind opţiunile driverului deimprimantă.
Alinierea poziţiei capului de imprimare
B200Printer error has occurred.Unplug the power cord and contact theservice center.
Opriţi aparatul şi scoateţi cablul de alimentare al aparatuluidin sursa de curent.Contactaţi centrul de service.
****Printer error has occurred.Turn off power then back on again.
"****" este afişat cu caractere alfanumerice şi depinde deeroarea care a intervenit.
5100 este afişat:
Pagina 624 din 732 paginiPe LCD este afişat un mesaj de eroare

If problem persists, see the manual. Revocaţi imprimarea, opriţi aparatul. Apoi îndepărtaţihârtia blocată sau materialul de protejare care împiedicăsuportul cartuşului FINE să se deplaseze şi porniţi dinnou aparatul.
ImportantAveţi grijă să nu atingeţi componentele din interiorulaparatului. Este posibil ca aparatul să nu imprimecorect dacă îl atingeţi.Dacă problema persistă, contactaţi centrul deservice.
6000 este afişat:Dacă în faţa aparatului se află un obiect, îndepărtaţi-l.Deschideţi cu grijă tava de ieşire a hârtiei, apoi opriţi şiporniţi din nou alimentarea.În alte cazuri:Opriţi aparatul şi scoateţi cablul de alimentare alaparatului din sursa de curent.Reconectaţi aparatul şi porniţi-l din nou.Dacă problema persistă, contactaţi centrul de service.
Writing from PC is enabled.Cannot access from the device.OK
Slotul pentru cartelă este setat pe Writable from PC.Nu puteţi să imprimaţi de pe cartela de memorie sau săsalvaţi datele scanate pe cartela de memorie dacă slotulpentru cartelă este setat pe Writable from PC. După ce aţiscris pe cartela de memorie, setaţi-o din nou la Not writablefrom PC.
În partea superioară a paginii
Pagina 625 din 732 paginiPe LCD este afişat un mesaj de eroare

Ghid avansat > Depanare > LCD-ul nu se poate vedea deloc
LCD-ul nu se poate vedea deloc
Dacă lampa Alimentare este stinsă:Aparatul nu este alimentat cu curent. Conectaţi cablul de alimentare şi apăsaţi butonul ACTIVARE(ON).
Dacă lampa Alimentare este aprinsă:Este posibil ca LCD-ul să se afle în modul economizor de ecran. Pe panoul de operare, apăsaţi unbuton diferit de ACTIVARE (ON).
În partea superioară a paginii
Pagina 626 din 732 paginiLCD-ul nu se poate vedea deloc

Ghid avansat > Depanare > Pe LCD este afişată o limbă necorespunzătoare
Pe LCD este afişată o limbă necorespunzătoare
Selectaţi limba preferată pentru afişare conform procedurii următoare.
1. Apăsaţi butonul Meniu (Menu) , apoi aşteptaţi aproximativ 5 secunde.
2. Apăsaţi butonul de şapte ori, apoi apăsaţi butonul OK.
3. Apăsaţi butonul de opt ori, apoi apăsaţi butonul OK.
4. Utilizaţi butonul pentru a selecta limba pentru LCD, apoi apăsaţi butonul OK.
În partea superioară a paginii
Pagina 627 din 732 paginiPe LCD este afişată o limbă necorespunzătoare

Ghid avansat > Depanare > Nu se poate face instalarea pentru MP Drivers
Nu se poate face instalarea pentru MP Drivers
Dacă instalarea nu porneşte nici după ce CD-ROM-ul de instalare (Setup
CD-ROM) este introdus în unitatea de disc a computerului:
Începeţi instalarea urmând procedura de mai jos.
1. Faceţi clic pe Start apoi pe Computer.
În Windows XP, faceţi clic pe Start apoi pe Computerul meu (My Computer).
În Windows 2000, faceţi dublu clic pe pictograma My Computer de pe desktop.
2. Faceţi dublu clic pe pictograma CD-ROM din fereastra afişată.
Dacă sunt afişate conţinuturile CD-ROM-ului, faceţi dublu clic pe MSETUP4.EXE.
Faceţi dublu clic pe pictograma CD-ROM de pe desktop pentru a începe instalarea.
NotăDacă pictograma CD-ROM nu este afişată, încercaţi următoarele:
Scoateţi CD-ROM-ul din computer, apoi introduceţi-l din nou.Reporniţi computerul.
Dacă pictograma nu este afişată nici acum, încercaţi diferite discuri şi vedeţi dacă acestea suntafişate. Dacă sunt afişate alte discuri, înseamnă că este o problemă cu CD-ROM-ul de
instalare (Setup CD-ROM). În acest caz, contactaţi centrul de service.
Dacă nu puteţi trece de ecranul Printer Connection:
Pagina 628 din 732 paginiNu se poate face instalarea pentru MP Drivers

Dacă nu puteţi trece de ecranul Printer Connection, asiguraţi-vă că aţi introdus bine cablul USB înportul USB al aparatului şi în computer, apoi urmaţi procedura de mai jos pentru a reinstaladriverele MP.
NotăÎn Windows Vista, mesajul The printer is not detected. Check the connection. poate fi afişat, înfuncţie de computerul pe care îl utilizaţi. În acest caz, aşteptaţi câteva momente. Dacă niciacum nu puteţi trece la pasul următor, urmaţi procedura de mai jos pentru a reinstala MPDrivers.
1. Faceţi clic pe Cancel pe ecranul Printer Connection.
2. Faceţi clic pe Start Over pe ecranul Installation Failure.
3. Faceţi clic pe Back pe următorul ecran care apare.
4. Faceţi clic pe Exit pe ecranul PIXMA XXX şi apoi scoateţi CD-ROM-ul.
5. Opriţi aparatul.
6. Reporniţi computerul.
7. Asiguraţi-vă că nu rulează nicio aplicaţie software.
8. Introduceţi din nou CD-ROM-ul, apoi efectuaţi Easy Instal pentru a instaladriverele MP Drivers.
În alte cazuri:Urmaţi procedura descrisă în manualul de instalare pentru a reinstala driverele MP.
Dacă driverele MP nu au fost instalate corect, dezinstalaţi driverele MP, reporniţi computerul şi apoireinstalaţi driverele MP.
Pagina 629 din 732 paginiNu se poate face instalarea pentru MP Drivers

�tergerea driverelor MP Drivers inutile
Dacă reinstalaţi driverele MP Drivers, executaţi Custom Install pentru CD-ROM-ul de instalare (Setup
CD-ROM), apoi selectaţi MP Drivers.
NotăDacă programul de instalare a fost forţat să se oprească din cauza unei erori Windows, esteposibil ca sistemul să fie într-o stare instabilă şi este posibil să nu puteţi instala driverele.Reporniţi computerul înainte de reinstalare.
În partea superioară a paginii
Pagina 630 din 732 paginiNu se poate face instalarea pentru MP Drivers

Ghid avansat > Depanare > Conectarea la computer nu se realizează corespunzător
Conectarea la computer nu se realizează corespunzător
Viteza de imprimare sau de scanare este scăzută/Conexiunea USB de viteză ridicată nu
funcţionează/ Este afişat mesajul „This device can perform faster”
Dacă mediul sistemului dumneavoastră nu este complet compatibil cu USB de viteză ridicată,aparatul va funcţiona la o viteză mai redusă prin USB 1.1. În acest caz, aparatul funcţioneazăcorespunzător, însă este posibil ca viteza de imprimare să se micşoreze datorită vitezei decomunicaţie.
Verificaţi: Verificaţi următoarele pentru a vă asigura că mediul sistemuluidumneavoastră acceptă conexiunea USB de viteză ridicată.
Portul USB de pe computer acceptă conexiunea USB de viteză ridicată?Cablul USB şi hub-ul USB, dacă le folosiţi, suportă o conexiune USB de vitezăridicată?Asiguraţi-vă că utilizaţi un cablu USB de viteză ridicată certificat. Recomandăm calungimea cablului să nu fie mai mare de aproximativ 3 metri / 10 picioare.Sistemul de operare al computerului suportă o conexiune USB de viteză ridicată?Obţineţi şi instalaţi cea mai recentă actualizare pentru computerul dumneavoastră.Driverul de USB de viteză ridicată funcţionează corespunzător?Obţineţi cea mai recentă versiune a driverului de USB de viteză ridicată compatibil cuechipamentele hardware de care dispuneţi şi instalaţi-l pe computer.
Important
Pentru detalii cu privire la USB de mare viteză în mediul sistemului dumneavoastră,contactaţi producătorul computerului, al cablului USB sau al hub-ului USB.
În partea superioară a paginii
Pagina 631 din 732 paginiConectarea la computer nu se realizează corespunzător

Ghid avansat > Depanare > Rezultatele imprimării nu sunt satisfăcătoare
Rezultatele imprimării nu sunt satisfăcătoare
Dacă rezultatul imprimării nu este satisfăcător din cauza liniilor albe, liniilor aliniate greşit sau a culorilorneuniforme, verificaţi mai întâi hârtia şi setările de calitate a imprimării.
Verificarea 1: Dimensiunea paginii şi setările tipului de suport se
potrivesc cu dimensiunea şi tipul hârtiei încărcate?Când aceste setări sunt incorecte, nu puteţi obţine un rezultat corect al imprimării.
La imprimarea unei fotografii sau a unei ilustraţii, setarea incorectă a tipului de hârtie poate reducecalitatea culorii imprimării.
De asemenea, imprimarea cu o setare incorectă a tipului de hârtie poate duce la zgâriereasuprafeţei imprimate.
La imprimarea fără chenar, culorile neuniforme pot apărea în funcţie de combinaţia setării tipului dehârtie şi hârtia încărcată.
Metoda de confirmare a setărilor pentru hârtie şi calitatea de imprimare diferă în funcţie de ceea cedoriţi să faceţi cu aparatul.
Pentru a copia operând aparatul Confirmaţi utilizând panoul de operare alaparatului.
Copierea
Pentru a imprima de pe cartela de memorieacţionând aparatul
Confirmaţi utilizând panoul de operare alaparatului.
Elemente de configurare
Pentru a imprima de pe un computer Confirmaţi utilizând driverul de imprimantă.Imprimarea cu Configurare uşoară
Verificarea 2: Asiguraţi-vă că este selectată calitatea de imprimare
corespunzătoare în funcţie de tipul de suport şi de datele de imprimare,
raportându-vă la tabelul de la Verificarea 1.Selectaţi o opţiune de calitate a imprimării potrivită pentru hârtia şi imaginea de imprimat. Dacăobservaţi zone neclare sau culori neuniforme, măriţi setarea calităţii imprimării şi încercaţi săimprimaţi din nou.
Verificarea 3: Dacă problema persistă, pot exista alte cauze.
Consultaţi şi secţiunile de mai jos:
Nu se efectuează imprimarea completă
Rezultate imprimare inexistente/Imprimarea este neclară/Culorile sunt greşite/Linii albe
Culorile nu sunt clare
Liniile sunt aliniate greşit
Hârtia imprimată se ondulează sau prezintă pete de cerneală
Hârtia este pătată/Suprafaţa imprimată este zgâriată
Hârtia este pătată pe verso
Linii verticale sunt imprimate pe marginile paginii imprimate
Culorile sunt neuniforme sau prezintă dungi
În partea superioară a paginii
Pagina 632 din 732 paginiRezultatele imprimării nu sunt satisfăcătoare

Ghid avansat > Depanare > Rezultatele imprimării nu sunt satisfăcătoare > Nu se efectuează imprimarea completă
Nu se efectuează imprimarea completă
Verificarea 1: Dimensiunea datelor imprimate este extrem de mare?
Faceţi clic pe Print Options în foaia Page Setup. Apoi, bifaţi caseta de selectare Prevent loss of printdata din caseta de dialog afişată.
Verificarea 2: Aveţi suficient spaţiu pe hard diskul computerului?�tergeţi fişierele inutile pentru a elibera spaţiu pe disc.
În partea superioară a paginii
Pagina 633 din 732 paginiNu se efectuează imprimarea completă

Ghid avansat > Depanare > Rezultatele imprimării nu sunt satisfăcătoare > Rezultate imprimare inexistente/Imprimareaeste neclară/Culorile sunt greşite/Linii albe
Rezultate imprimare inexistente/Imprimarea este neclară/Culorile sunt greşite/Linii albe
Pagina 634 din 732 paginiRezultate imprimare inexistente/Imprimarea este neclară/Culorile sunt gre...

Verificarea 1: Aţi confirmat setările de hârtie şi de calitate a imprimării?
Rezultatele imprimării nu sunt satisfăcătoare
Verificarea 2: Cartuşul FINE este instalat corect?În cazul în care capacul de blocare a cartuşelor cu cerneală nu este închis bine, este posibil cacerneala să nu fie eliberată corect.
Deschideţi unitatea de scanare (capacul), deschideţi capacul de blocare a cartuşelor cu cerneală,apoi închideţi capacul de blocare a cartuşelor cu cerneală.
Când închideţi capacul de blocare a cartuşelor cu cerneală, împingeţi capacul de blocare acartuşelor cu cerneală până când se fixează cu un clic.
Verificarea 3: Imprimaţi modelul de verificare a duzei şi realizaţi orice
operaţiune de întreţinere necesară, cum ar fi curăţarea capului de
imprimare.Imprimaţi modelul de verificare a duzei pentru a stabili dacă cerneala iese corespunzător din duzelecapului de imprimare.Consultaţi Întreţinere de rutină pentru imprimarea modelului de verificare a duzei, curăţarea capuluide imprimare şi curăţarea în profunzime a capului de imprimare.
Dacă modelul de verificare a duzei nu este imprimat corect:După curăţarea capului de imprimare, imprimaţi modelul de verificare a duzei şi analizaţimodelul.Dacă problema nu se rezolvă după curăţarea capului de imprimare de două ori:Curăţaţi capul de imprimare în profunzime.Dacă problema nu se rezolvă după curăţarea în profunzime a capului de imprimare, opriţiaparatul şi efectuaţi o altă curăţare în profunzime după 24 de ore.Dacă problema nu se rezolvă după curăţarea în profunzime a capului de imprimare de două ori:Este posibil ca cerneala să se fi terminat. Înlocuiţi cartuşul FINE.
Verificarea 4: Atunci când cartuşul FINE rămâne fără cerneală, înlocuiţi-l
cu unul nou.
Verificarea 5: La folosirea hârtiei cu o suprafaţă imprimabilă, asiguraţi-vă
că hârtia este încărcată cu suprafaţa imprimabilă orientată în sus.Imprimarea pe partea greşită a unei astfel de hârtii poate cauza imprimări neclare sau imprimări decalitate redusă.
Pentru informaţii detaliate despre partea imprimabilă, consultaţi manualul de instrucţiuni furnizatîmpreună cu hârtia.
Verificarea 6: Suprafaţa de sticlă de scanare este murdară?Curăţaţi suprafaţa de sticlă de scanare.
Curăţarea suprafeţei de sticlă de scanare şi a capacului pentru documente
Pentru copiere, consultaţi şi secţiunile de mai jos:
Pagina 635 din 732 paginiRezultate imprimare inexistente/Imprimarea este neclară/Culorile sunt gre...

Verificarea 7: Asiguraţi-vă că documentul original este încărcat corect
pe suprafaţa de sticlă de scanare.Încărcarea hârtiei/documentelor originale
Verificarea 8: Documentul original este încărcat pe suprafaţa de sticlă
de scanare cu partea de copiat orientată în jos?
Verificarea 9: Aţi copiat o imprimare realizată de acest aparat?
Imprimaţi direct de pe cartela de memorie sau imprimaţi din nou de pe computer.
În cazul în care copiaţi o imprimare realizată de acest aparat, este posibil să se reducă nivelul decalitate al imprimării.
În partea superioară a paginii
Pagina 636 din 732 paginiRezultate imprimare inexistente/Imprimarea este neclară/Culorile sunt gre...

Ghid avansat > Depanare > Rezultatele imprimării nu sunt satisfăcătoare > Culorile nu sunt clare
Culorile nu sunt clare
Verificarea 1: Activare corecţie culoare.La imprimarea fotografiilor sau a altor grafice, activarea corecţiei de culoare în driverul deimprimantă poate îmbunătăţi culoarea.
Selectaţi Vivid Photo în ecranul Effects din caseta de dialog Proprietăţi imprimantă.
Selectaţi Color Options în meniul pop-up din caseta de dialog Print şi apoi, selectaţi Vivid Photo înColor Mode.În Mac OS X v 10.4.x sau Mac OS X v 10.3.9, selectaţi Special Effects în caseta de dialog Print, apoiselectaţi Vivid Photo.
Verificarea 2: Cartuşul FINE este instalat corect?În cazul în care capacul de blocare a cartuşelor cu cerneală nu este închis bine, este posibil cacerneala să nu fie eliberată corect.
Deschideţi unitatea de scanare (capacul), deschideţi capacul de blocare a cartuşelor cu cerneală,apoi închideţi capacul de blocare a cartuşelor cu cerneală.
Când închideţi capacul de blocare a cartuşelor cu cerneală, împingeţi capacul de blocare acartuşelor cu cerneală până când se fixează cu un clic.
Verificarea 3: Atunci când cartuşul FINE rămâne fără cerneală, înlocuiţi-l
cu unul nou.
Verificarea 4: Modelul de verificare a duzei este imprimat corect?Imprimaţi modelul de verificare a duzei pentru a stabili dacă cerneala iese corespunzător din duzelecapului de imprimare.
Consultaţi Întreţinere de rutină pentru imprimarea modelului de verificare a duzei, curăţarea capuluide imprimare şi curăţarea în profunzime a capului de imprimare.
Dacă modelul de verificare a duzei nu este imprimat corect:După curăţarea capului de imprimare, imprimaţi modelul de verificare a duzei şi analizaţimodelul.Dacă problema nu se rezolvă după curăţarea capului de imprimare de două ori:Curăţaţi capul de imprimare în profunzime.Dacă problema nu se rezolvă după curăţarea în profunzime a capului de imprimare, opriţiaparatul şi efectuaţi o altă curăţare în profunzime după 24 de ore.Dacă problema nu se rezolvă după curăţarea în profunzime a capului de imprimare de două ori:Este posibil ca cerneala să se fi terminat. Înlocuiţi cartuşul FINE.
Notă
Pagina 637 din 732 paginiCulorile nu sunt clare

Culorile imprimate pot să nu corespundă culorilor de pe ecran din cauza diferenţelor de bază întremetodele utilizate pentru producerea culorilor. De asemenea, setările de control al culorii şidiferenţele de mediu pot afecta modul de afişare a culorilor pe ecran.
În partea superioară a paginii
Pagina 638 din 732 paginiCulorile nu sunt clare

Ghid avansat > Depanare > Rezultatele imprimării nu sunt satisfăcătoare > Liniile sunt aliniate greşit
Liniile sunt aliniate greşit
Verificarea 1: Aţi confirmat setările de hârtie şi de calitate a imprimării?
Rezultatele imprimării nu sunt satisfăcătoare
Verificarea 2: Efectuaţi alinierea capului de imprimare.Dacă nu aţi aliniat capul de imprimare după instalare, liniile drepte pot fi imprimate nealiniat.
Alinierea capului de imprimare
NotăDacă problema nu se rezolvă după alinierea capului de imprimare, aliniaţi capul de imprimaremanual conform indicaţiilor din Alinierea poziţiei capului de imprimare .
Verificarea 3: Dimensiunea datelor imprimate este extrem de mare?Faceţi clic pe Print Options în foaia Page Setup. Apoi, bifaţi caseta de selectare Prevent loss of printdata din caseta de dialog afişată.
Verificarea 4: Se foloseşte funcţia Page Layout Printing sau Binding
margin?Când se foloseşte funcţia Page Layout Printing sau Binding margin, există posibilitatea ca liniilesubţiri să nu fie imprimate. Încercaţi să îngroşaţi liniile din document.
În partea superioară a paginii
Pagina 639 din 732 paginiLiniile sunt aliniate greşit
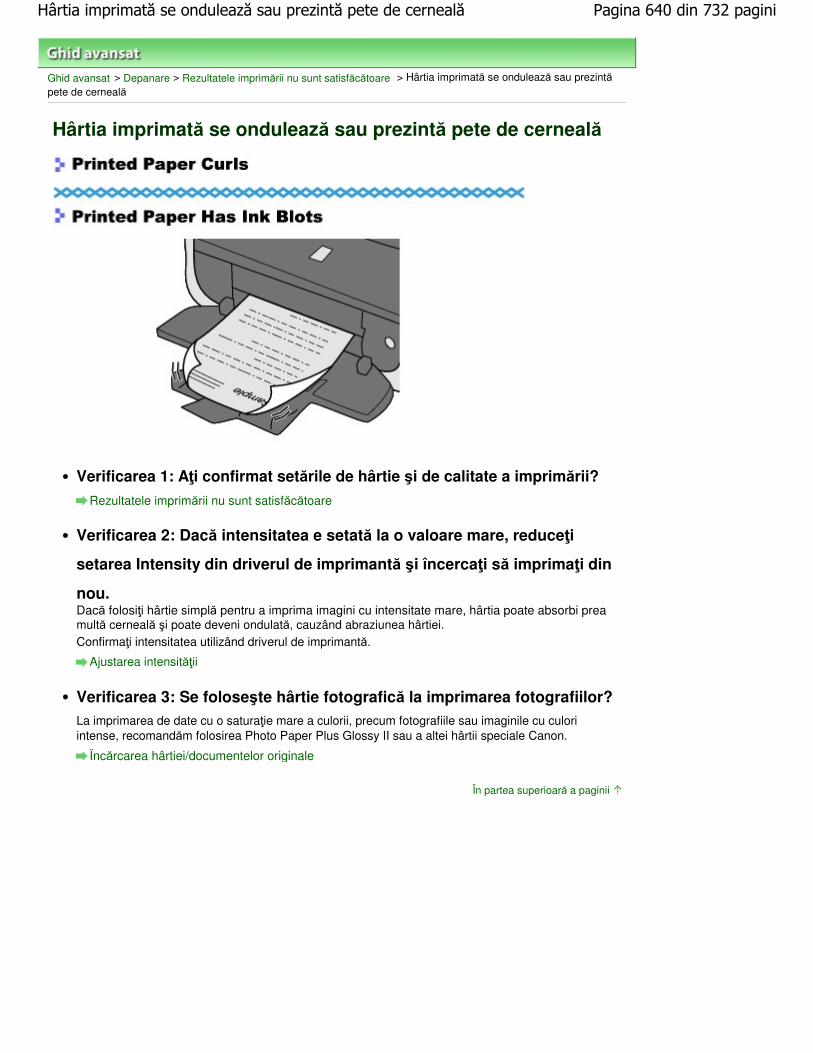
Ghid avansat > Depanare > Rezultatele imprimării nu sunt satisfăcătoare > Hârtia imprimată se ondulează sau prezintăpete de cerneală
Hârtia imprimată se ondulează sau prezintă pete de cerneală
Verificarea 1: Aţi confirmat setările de hârtie şi de calitate a imprimării?
Rezultatele imprimării nu sunt satisfăcătoare
Verificarea 2: Dacă intensitatea e setată la o valoare mare, reduceţi
setarea Intensity din driverul de imprimantă şi încercaţi să imprimaţi din
nou.Dacă folosiţi hârtie simplă pentru a imprima imagini cu intensitate mare, hârtia poate absorbi preamultă cerneală şi poate deveni ondulată, cauzând abraziunea hârtiei.Confirmaţi intensitatea utilizând driverul de imprimantă.
Ajustarea intensităţii
Verificarea 3: Se foloseşte hârtie fotografică la imprimarea fotografiilor?La imprimarea de date cu o saturaţie mare a culorii, precum fotografiile sau imaginile cu culoriintense, recomandăm folosirea Photo Paper Plus Glossy II sau a altei hârtii speciale Canon.
Încărcarea hârtiei/documentelor originale
În partea superioară a paginii
Pagina 640 din 732 paginiHârtia imprimată se ondulează sau prezintă pete de cerneală

Ghid avansat > Depanare > Rezultatele imprimării nu sunt satisfăcătoare > Hârtia este pătată/Suprafaţa imprimată estezgâriată
Hârtia este pătată/Suprafaţa imprimată este zgâriată
Verificarea 1: Aţi confirmat setările de hârtie şi de calitate a imprimării?
Rezultatele imprimării nu sunt satisfăcătoare
Verificarea 2: Se foloseşte tipul potrivit de hârtie? Verificaţi următoarele:Verificaţi dacă hârtia pe care imprimaţi este potrivită pentru scopul imprimării.
Încărcarea hârtiei/documentelor originaleCând efectuaţi Imprimare fără margini, asiguraţi-vă că hârtia folosită este potrivită pentruimprimare fără margini.Dacă hârtia folosită nu este potrivită pentru imprimarea fără margini, calitatea imprimării sepoate reduce la marginile de sus şi de jos ale hârtiei .
Zonă de imprimare
Verificarea 3: Încărcaţi hârtia după corectarea ondulaţiei.
Pentru hârtia simplă
Întoarceţi hârtia şi reîncărcaţi-o pentru a imprima pe cealaltă parte.
Dacă lăsaţi hârtia în tava din spate pentru un timp îndelungat, hârtia se poate ondula. În acestcaz, încărcaţi hârtia cu cealaltă parte orientată în sus. Astfel, problema ar putea fi rezolvată.
Recomandăm aşezarea hârtiei nefolosite înapoi în pachet şi păstrarea ei pe o suprafaţă plană.
Pentru altă hârtieDacă ondulaţia de la cele patru colţuri ale hârtiei are o înălţime mai mare de 0,1 inch/3 mm (A),hârtia poate fi pătată sau poate fi alimentată incorect. În astfel de cazuri, urmaţi proceduradescrisă mai jos pentru a corecta ondulaţia hârtiei.
1. Rulaţi hârtia în direcţia opusă ondulaţiei hârtiei, aşa cum este prezentat mai jos.
Pagina 641 din 732 paginiHârtia este pătată/Suprafaţa imprimată este zgâriată

2. Verificaţi dacă acum hârtia este întinsă.
Recomandăm imprimarea hârtiei cu ondulaţie corectată câte o coală pe rând.
NotăÎn funcţie de tipul suportului, hârtia poate fi pătată sau poate fi alimentată incorect chiar dacă nueste ondulată în interior. În astfel de cazuri, urmaţi procedura descrisă mai jos pentru a ondulahârtia în exterior pentru înălţimi mai mici de 0,1 inch/3 mm (B) înainte de imprimare. Astfel, esteposibilă o îmbunătăţire a rezultatului imprimării.
(C) Latura de imprimareRecomandăm imprimarea hârtiei care a fost ondulată în exterior câte o coală pe rând.
Verificarea 4: Dacă imprimaţi pe hârtie groasă, selectaţi setarea Prevent
paper abrasion.Selectând setarea Prevent paper abrasion se va mări spaţiul liber dintre capul de imprimare şihârtia încărcată. Dacă observaţi semne de abraziune chiar şi când tipul de suport este setat corectpentru a se potrivi hârtiei încărcate, setaţi aparatul pentru a preveni abraziunea hârtiei utilizândPanoul de operare sau driverul de imprimantă.
Viteza de imprimare se va reduce dacă selectaţi setarea Prevent paper abrasion.
* Dezactivaţi setarea Prevent paper abrasion după ce se finalizează imprimarea. În caz contrar,această setare rămâne activată pentru toate lucrările de imprimare ulterioare.
Pentru setare de pe panoul de operare
Apăsaţi butonul Meniu (Menu), selectaţi Device settings, apoi setaţi Prevent abrasion peEnable.
Modificarea setărilor aparatului de pe LCD
Pentru setare cu ajutorul driverului de imprimantă
Deschideţi caseta de dialog cu proprietăţile imprimantei şi, în Custom Settings din fişaMaintenance, selectaţi caseta Prevent paper abrasion şi apoi faceţi clic pe Send.Pentru a deschide caseta de dialog cu proprietăţile imprimantei, consultaţi Deschidereacasetei de dialog Proprietăţi imprimantă (Printer Properties) (Windows) .
În Utilitarul imprimantei Canon IJ, selectaţi Custom Settings din meniul pop-up, selectaţi casetaPrevent paper abrasion şi apoi faceţi clic pe Send.Pentru a deschide utilitarul Canon IJ Printer Utility, consultaţi Deschiderea utilitarului Canon IJPrinter Utility (Macintosh) .
Verificarea 5: Dacă intensitatea e setată la o valoare mare, reduceţi
setarea Intensity din driverul de imprimantă şi încercaţi să imprimaţi din
nou.Dacă folosiţi hârtie simplă pentru a imprima imagini cu intensitate mare, hârtia poate absorbi prea
Pagina 642 din 732 paginiHârtia este pătată/Suprafaţa imprimată este zgâriată

multă cerneală şi poate deveni ondulată, cauzând abraziunea hârtiei.Reduceţi setarea Intensity din driverul pentru imprimantă şi încercaţi să imprimaţi din nou.
1. Deschideţi caseta de dialog Proprietăţi imprimantă (Printer properties).
Deschiderea casetei de dialog Proprietăţi imprimantă (Printer properties) (Windows)
Faceţi clic aici: Driver de imprimantă* Înainte de a face clic aici pentru a deschide caseta de dialog Proprietăţi imprimantă (Printerproperties), părăsiţi software-ul de aplicaţie care rulează în prezent.
2. În foaia Main, selectaţi Manual pentru Color/Intensity, apoi faceţi clic pe Set.
3. Trageţi bara cursorului Intensity pe foaia Color Adjustment pentru ajustareaintensităţii.
1. Deschideţi caseta de dialog Print.
Deschiderea casetelor de dialog Page Setup şi Print (Macintosh)
2. Selectaţi Color Options din meniul pop-up.
3. Trageţi bara glisantă Intensity pentru a seta intensitatea.
Verificarea 6: Imprimarea se efectuează dincolo de zona de imprimare
recomandată?Dacă imprimarea se efectuează dincolo de zona de imprimare recomandată a hârtiei de imprimat,marginea de jos a hârtiei se poate păta cu cerneală.
Redimensionaţi documentul original în software-ul aplicaţiei.
Zonă de imprimare
Verificarea 7: Suprafaţa de sticlă de scanare este murdară?Curăţaţi suprafaţa de sticlă de scanare.
Curăţarea suprafeţei de sticlă de scanare şi a capacului pentru documente
Verificarea 8: Interiorul aparatului este murdar?Când imprimaţi faţă-verso, interiorul aparatului se poate păta cu cerneală, cauzând pătarea paginiiimprimate.
Curăţaţi placa de la bază pentru a curăţa interiorul aparatului.
Curăţarea interiorului aparatului (Curăţarea plăcii de la bază)
NotăPentru a preveni pătarea interiorului aparatului, setaţi corect dimensiunea hârtiei.
Verificarea 9: Setaţi Ink Drying Wait Time la o valoare mai mare.Astfel, suprafaţa imprimată are suficient timp să se usuce pentru a preveni pătarea şi zgâriereahârtiei.
1. Asiguraţi-vă că aparatul este pus în funcţiune.
Pagina 643 din 732 paginiHârtia este pătată/Suprafaţa imprimată este zgâriată

2. Deschideţi caseta de dialog Proprietăţi imprimantă (Printer properties).
Deschiderea casetei de dialog Proprietăţi imprimantă (Printer properties) (Windows)
3. Faceţi clic pe fila Maintenance, apoi pe Custom Settings.
4. Trageţi bara glisantă Ink Drying Wait Time pentru a seta timpul de aşteptare,apoi faceţi clic pe Send.
5. Confirmaţi mesajul şi faceţi clic pe OK.
1. Asiguraţi-vă că aparatul este pus în funcţiune.
2. Deschideţi Canon IJ Printer Utility.
Deschiderea utilitarului Canon IJ Printer Utility (Macintosh)
3. Selectaţi Custom Settings din meniul pop-up.
4. Trageţi bara glisantă Ink Drying Wait Time pentru a seta timpul de aşteptare,apoi faceţi clic pe Send.
5. Confirmaţi mesajul şi faceţi clic pe OK.
Verificarea 10: Este hârtia zgâriată de altă hârtie încărcată?În funcţie de tipul suportului, hârtia poate fi zgâriată de altă hârtie încărcată, atunci când sealimentează din tava din spate. În acest caz, încărcaţi câte o coală pe rând.
În partea superioară a paginii
Pagina 644 din 732 paginiHârtia este pătată/Suprafaţa imprimată este zgâriată

Ghid avansat > Depanare > Rezultatele imprimării nu sunt satisfăcătoare > Hârtia este pătată pe verso
Hârtia este pătată pe verso
Verificarea 1: Aţi confirmat setările de hârtie şi de calitate a imprimării?
Rezultatele imprimării nu sunt satisfăcătoare
Verificarea 2: Curăţaţi placa de la bază pentru a curăţa interiorul
aparatului.Curăţarea interiorului aparatului (Curăţarea plăcii de la bază)
NotăCând efectuaţi imprimare fără chenar, imprimare faţă-verso sau când imprimaţi prea mult,interiorul se poate păta cu cerneală.
În partea superioară a paginii
Pagina 645 din 732 paginiHârtia este pătată pe verso

Ghid avansat > Depanare > Rezultatele imprimării nu sunt satisfăcătoare > Linii verticale sunt imprimate pe marginilepaginii imprimate
Linii verticale sunt imprimate pe marginile paginii imprimate
Verificarea 1: Aţi confirmat setările tipului de hârtie şi de calitate a
imprimării?Rezultatele imprimării nu sunt satisfăcătoare
Verificarea 2: Dimensiunea hârtiei încărcate este corectă?
Este posibil ca liniile verticale să se imprime pe margine dacă dimensiunea hârtiei încărcate estemai mare decât cea specificată în driverul de imprimantă.
Setaţi corect dimensiunea hârtiei, în conformitate cu hârtia încărcată.
Rezultatele imprimării nu sunt satisfăcătoare
NotăDirecţia modelului liniilor verticale poate varia în funcţie de datele imagine sau de setarea deimprimare.Acest aparat efectuează o curăţare automată, atunci când este necesar, pentru a menţineimprimările curate. Pentru curăţare este eliberată o cantitate mică de cerneală.Deşi, de obicei, cerneala este eliberată pe absorbantul de cerneală, aceasta poate fi eliberatăşi pe hârtie dacă încărcaţi hârtie mai mare decât cea specificată în driverul de imprimantă.
În partea superioară a paginii
Pagina 646 din 732 paginiLinii verticale sunt imprimate pe marginile paginii imprimate

Ghid avansat > Depanare > Rezultatele imprimării nu sunt satisfăcătoare > Culorile sunt neuniforme sau prezintă dungi
Culorile sunt neuniforme sau prezintă dungi
Verificarea 1: Aţi confirmat setările de hârtie şi de calitate a imprimării?
Rezultatele imprimării nu sunt satisfăcătoare
Verificarea 2: Imprimaţi modelul de verificare a duzei şi realizaţi orice
operaţiune de întreţinere necesară, cum ar fi curăţarea capului de
imprimare.Imprimaţi modelul de verificare a duzei pentru a stabili dacă cerneala iese corespunzător din duzelecapului de imprimare.Consultaţi Întreţinere de rutină pentru imprimarea modelului de verificare a duzei, curăţarea capuluide imprimare şi curăţarea în profunzime a capului de imprimare.
Dacă modelul de verificare a duzei nu este imprimat corect:După curăţarea capului de imprimare, imprimaţi modelul de verificare a duzei şi analizaţimodelul.Dacă problema nu se rezolvă după curăţarea capului de imprimare de două ori:Curăţaţi capul de imprimare în profunzime.Dacă problema nu se rezolvă după curăţarea în profunzime a capului de imprimare, opriţiaparatul şi efectuaţi o altă curăţare în profunzime după 24 de ore.Dacă problema nu se rezolvă după curăţarea în profunzime a capului de imprimare de două ori:Este posibil ca cerneala să se fi terminat. Înlocuiţi cartuşul FINE.
Verificarea 3: Efectuaţi alinierea capului de imprimare.
Pagina 647 din 732 paginiCulorile sunt neuniforme sau prezintă dungi

Alinierea capului de imprimare
NotăDacă problema nu se rezolvă după alinierea capului de imprimare, aliniaţi capul de imprimaremanual conform indicaţiilor din Alinierea poziţiei capului de imprimare .
În partea superioară a paginii
Pagina 648 din 732 paginiCulorile sunt neuniforme sau prezintă dungi

Ghid avansat > Depanare > Imprimarea nu începe
Imprimarea nu începe
Verificarea 1: Asiguraţi-vă că fişa de alimentare este conectată bine,
apoi porniţi aparatul.În timp ce lampa Alimentare (Power) clipeşte verde, dispozitivul se iniţializează. Aşteptaţi până cândlampa Alimentare (Power) se opreşte din clipit şi rămâne aprinsă verde.
NotăCând se imprimă un volum mare de date, precum fotografii sau grafice, este posibil caînceperea imprimării să dureze mai mult. În timp ce lampa Alimentare (Power) clipeşte verde,computerul procesează datele şi le trimite către aparat. Aşteptaţi până începe imprimarea.
Verificarea 2: Asiguraţi-vă de conectarea corespunzătoare a cablului
USB la aparat şi la computer, apoi verificaţi următoarele:Dacă folosiţi un dispozitiv de retransmisie, precum un hub USB, deconectaţi-l, conectaţidispozitivul direct la computer şi încercaţi să imprimaţi din nou. Dacă imprimarea porneştenormal, există o problemă la dispozitivul de retransmisie. Consultaţi vânzătorul dispozitivului deretransmisie pentru detalii.Ar putea fi şi o problemă cu cablul USB. Înlocuiţi cablul USB şi încercaţi să imprimaţi din nou.
Verificarea 3: Reporniţi computerul dacă imprimaţi de la computer.Dacă există lucrări de imprimare inutile, ştergeţi-le.
�tergerea unei operaţiuni de imprimare nedorite
Verificarea 4: Asiguraţi-vă că numele aparatului este selectat în caseta
de dialog Imprimare (Print).Aparatul nu va imprima corect dacă folosiţi un driver pentru o altă imprimantă.
În Windows, asiguraţi-vă că numele aparatului este selectat în caseta de dialog Imprimare (Print).
În Macintosh, asiguraţi-vă că numele aparatului este selectat în Printer din caseta de dialog Print.
NotăPentru ca aparatul să fie cel selectat implicit, selectaţi Se stabileşte ca imprimantă implicită(Set as Default Printer) (Windows), Default Printer sau Make Default (Macintosh).
Verificarea 5: Configuraţi corespunzător portul imprimantei.Configuraţi „USBnnn” (unde „n” este un număr) ca port al imprimantei.
1. Autentificaţi-vă într-un cont de utilizator cu drepturi de administrator.
2. Faceţi clic pe Panou de control (Control Panel), apoi pe Imprimantă (Printer) înHardware şi sunet (Hardware and Sound).
In Windows XP, faceţi clic pe Panou de control (Control Panel), Imprimante şi alte echipamentehardware (Printers and Other Hardware), apoi pe Imprimante şi faxuri (Printers and Faxes).În Windows 2000, faceţi clic pe Control Panel, apoi pe Printers.
3. Faceţi clic dreapta pe pictograma Imprimantă Canon XXX (Canon XXX Printer),apoi selectaţi Proprietăţi (Properties).
Pagina 649 din 732 paginiImprimarea nu începe

4. Faceţi clic pe fila Porturi (Ports) pentru a confirma setările portului.
Asiguraţi-vă că un port denumit USBnnn (unde „n” este un număr) cu Canon XXX Printer încoloana Imprimantă (Printer) este selectat pentru Se imprimă la următoarele port-uri (Print tothe following port(s)).Dacă setarea este incorectă, reinstalaţi driverele MP sau schimbaţi portul de imprimantă cu celcorect.
Verificarea 6: Dimensiunea datelor imprimate este extrem de mare?Faceţi clic pe Print Options în foaia Page Setup. Apoi, bifaţi caseta de selectare Prevent loss of printdata din caseta de dialog afişată.
În partea superioară a paginii
Pagina 650 din 732 paginiImprimarea nu începe
Ghid avansat > Depanare > Copierea/Imprimarea se opreşte înainte de a fi finalizată
Copierea/Imprimarea se opreşte înainte de a fi finalizată
Verificarea 1: Aparatul a imprimat continuu pentru o perioadă
îndelungată?Dacă aparatul a imprimat în continuu pentru o perioadă îndelungată, capul de imprimare poate fisupraîncălzit. Pentru a proteja capul de imprimare, aparatul se poate opri din imprimat la un sfârşitde linie pentru o perioadă de timp şi apoi poate relua imprimarea.
În acest caz, întrerupeţi sesiunea de imprimare la un moment convenabil şi opriţi aparatul pentru celpuţin 15 minute.
În plus, dacă aparatul a imprimat grafice sau fotografii cu culori intense în continuu într-un intervalde timp, aparatul se poate opri din imprimare pentru a proteja capul de imprimare. În acest caz,imprimarea nu se va relua automat. Opriţi aparatul pentru cel puţin 15 minute.
AtenţieCapul de imprimare şi zona adiacentă pot deveni extrem de fierbinţi în interiorul aparatului. Nuatingeţi niciodată capul de imprimare sau componentele din apropiere.
Verificarea 2: Hârtia este încărcată?Asiguraţi-vă că hârtia este încărcată în tava din spate.
Dacă dispozitivul a rămas fără hârtie, încărcaţi hârtie.
Verificarea 3: Documentele imprimate conţin multe fotografii sau
ilustraţii?Imprimarea de fişiere mari, cum ar fi fotografii sau grafice, necesită un timp mai mare de procesarepentru aparat şi computer, în timpul căruia aparatul poate părea că s-a oprit din funcţionare.
În plus, la imprimarea de date în continuu pe hârtie simplă, pentru care se foloseşte o cantitatemare de cerneală, aparatul poate face o pauză temporară. Oricare ar fi situaţia, aşteptaţi până lafinalizarea procesului.
NotăDacă imprimaţi un document cu o zonă de imprimare mare sau imprimaţi mai multe copii aleunui document, imprimarea poate face o pauză pentru a permite cernelii să se usuce.
În partea superioară a paginii
Pagina 651 din 732 paginiCopierea/Imprimarea se opreşte înainte de a fi finalizată

Ghid avansat > Depanare > Aparatul funcţionează, dar nu este eliminată cerneală
Aparatul funcţionează, dar nu este eliminată cerneală
Verificarea 1: Sunt înfundate duzele capului de imprimare?Imprimaţi modelul de verificare a duzei pentru a stabili dacă cerneala iese corespunzător din duzelecapului de imprimare.
Consultaţi Întreţinere de rutină pentru imprimarea modelului de verificare a duzei, curăţarea capuluide imprimare şi curăţarea în profunzime a capului de imprimare.
Dacă modelul de verificare a duzei nu este imprimat corect:După curăţarea capului de imprimare, imprimaţi modelul de verificare a duzei şi analizaţimodelul.Dacă problema nu se rezolvă după curăţarea capului de imprimare de două ori:Curăţaţi capul de imprimare în profunzime.Dacă problema nu se rezolvă după curăţarea în profunzime a capului de imprimare, opriţiaparatul şi efectuaţi o altă curăţare în profunzime după 24 de ore.Dacă problema nu se rezolvă după curăţarea în profunzime a capului de imprimare de două ori:Este posibil ca cerneala să se fi terminat. Înlocuiţi cartuşul FINE.
Verificarea 2: Cartuşul FINE este instalat corect?În cazul în care capacul de blocare a cartuşelor cu cerneală nu este închis bine, este posibil cacerneala să nu fie eliberată corect.
Deschideţi unitatea de scanare (capacul), deschideţi capacul de blocare a cartuşelor cu cerneală,apoi închideţi capacul de blocare a cartuşelor cu cerneală.
Când închideţi capacul de blocare a cartuşelor cu cerneală, împingeţi capacul de blocare acartuşelor cu cerneală până când se fixează cu un clic.
Verificarea 3: Atunci când cartuşul FINE rămâne fără cerneală, înlocuiţi-l
cu unul nou.
În partea superioară a paginii
Pagina 652 din 732 paginiAparatul funcţionează, dar nu este eliminată cerneală

Ghid avansat > Depanare > Viteza de imprimare este mai mică decât cea aşteptată
Viteza de imprimare este mai mică decât cea aşteptată
Verificarea 1: Imprimarea se face în Quiet Mode?Viteza de imprimare se reduce dacă specificaţi să se imprime în Quiet Mode în driverul deimprimantă sau pe panoul de operare. Pentru o imprimare mai rapidă, nu imprimaţi în Quiet Mode.
Pentru informaţii referitoare la setările driverului de imprimantă, consultaţi Reducerea zgomotuluiemis de aparat .
Pentru informaţii referitoare la efectuarea setărilor la panoul de operare, consultaţi Modificareasetărilor aparatului de pe LCD .
Verificarea 2: Calitatea imprimării este setată la o valoare prea mare?Măriţi valoarea setării vitezei de imprimare în driverul de imprimantă. Setarea de prioritizare a vitezeiface imprimarea mai rapidă.
1. Deschideţi caseta de dialog Proprietăţi imprimantă (Printer properties).
Deschiderea casetei de dialog Proprietăţi imprimantă (Printer properties) (Windows)
Faceţi clic aici: Driver de imprimantă* Înainte de a face clic aici pentru a deschide caseta de dialog Proprietăţi imprimantă (Printerproperties), părăsiţi software-ul de aplicaţie care rulează în prezent.
2. În fila Main, selectaţi Fast pentru a seta Print Quality.
În funcţie de tipul de suport, este posibil ca opţiunea Fast să nu fie disponibilă.
1. Deschideţi caseta de dialog Print.
Deschiderea casetelor de dialog Page Setup şi Print (Macintosh)
2. Selectaţi Quality & Media în meniul pop-up după care selectaţi Fast pentrusetarea Print Quality.
În funcţie de tipul de suport, este posibil ca opţiunea Fast să nu fie disponibilă.
NotăEste posibil ca viteza de imprimare să nu se îmbunătăţească remarcabil urmând instrucţiunile demai sus, în funcţie de mediul sistemului.
În partea superioară a paginii
Pagina 653 din 732 paginiViteza de imprimare este mai mică decât cea aşteptată

Ghid avansat > Depanare > Suportul de cartuş FINE nu se mută în poziţia pentru înlocuire
Suportul de cartuş FINE nu se mută în poziţia pentru înlocuire
Verificarea 1: Este lampa Alimentare (Power) stinsă?Verificaţi dacă lampa Alimentare (Power) este aprinsă verde.
Suportul de cartuş FINE nu se va muta decât atunci când alimentarea funcţionează. Dacă lampa Alimentare (Power) este stinsă, închideţi unitatea de scanare (capacul) şi porniţi aparatul.
În timp ce lampa Alimentare (Power) clipeşte verde, dispozitivul se iniţializează. Aşteptaţi până cândlampa Alimentare (Power) nu mai clipeşte şi rămâne aprinsă verde şi apoi deschideţi din nouunitatea de scanare (capacul).
Verificarea 2: Pe LCD este afişat un mesaj de eroare?Închideţi unitatea de scanare (capacul), urmaţi indicaţiile afişate de mesajul de eroare pentru arezolva eroarea, apoi redeschideţi-o. Pentru detalii privind rezolvarea acestei erori, consultaţi PeLCD este afişat un mesaj de eroare .
Verificarea 3: Unitatea de scanare (capacul) a fost lăsat deschisă cel
puţin 10 minute?Dacă unitatea de scanare (capacul) este lăsată deschisă mai mult de 10 minute, suportul de cartuşFINE se mută către dreapta pentru a preveni uscarea capului de imprimare. Închideţi şi redeschideţiunitatea de scanare (capacul) pentru a întoarce suportul de cartuş FINE spre stânga.
Verificarea 4: Aparatul a imprimat în continuu pentru o perioadă
îndelungată?Închideţi unitatea de scanare (capacul), aşteptaţi un timp şi apoi deschideţi-o din nou.
Dacă aparatul a imprimat în continuu pentru un timp îndelungat, este posibil ca suportul cartuşuluiFINE să nu se deplaseze către mijloc deoarece capul de imprimare se poate supraîncălzi.
NotăDeschiderea unităţii de scanare (capacul) în timpul imprimării mută suportul de cartuş FINE spredreapta. Închideţi unitatea de scanare (capacul) şi redeschideţi-o după finalizarea imprimării.
În partea superioară a paginii
Pagina 654 din 732 paginiSuportul de cartuş FINE nu se mută în poziţia pentru înlocuire

Ghid avansat > Depanare > Alimentarea cu hârtie nu se realizează corect
Alimentarea cu hârtie nu se realizează corect
Verificarea 1: Asiguraţi-vă de următoarele când încărcaţi hârtia.Când încărcaţi două sau mai multe coli de hârtie, răsfoiţi-le înainte de încărcare.
Când încărcaţi două sau mai multe coli de hârtie, aliniaţi marginile colilor înainte de încărcare.Când încărcaţi două sau mai multe coli de hârtie, asiguraţi-vă că teancul de hârtie nudepăşeşte limita de încărcare a hârtiei.Totuşi, este posibil ca alimentarea corespunzătoare să nu fie posibilă la capacitatea maximă,în funcţie de tipul de hârtie sau de condiţiile de mediu (fie temperaturi foarte ridicate sau joaseşi umiditate). În astfel de cazuri, reduceţi numărul colilor de hârtie pe care le încărcaţi o dată lamai puţin de jumătate din limita de încărcare a hârtiei.Întotdeauna încărcaţi hârtia orientată tip portret, indiferent de orientarea imprimării.Atunci când încărcaţi hârtia în tava din spate, încărcaţi hârtia cu faţa de imprimare orientată înSUS şi glisaţi ghidajele de hârtie pentru a le alinia cu ambele laturi ale hârtiei.
Încărcarea hârtiei/documentelor originale
Verificarea 2: Verificaţi ca hârtia pe care imprimaţi să nu fie prea groasă
sau ondulată.Încărcarea hârtiei/documentelor originale
Verificarea 3: Asiguraţi-vă de următoarele când încărcaţi plicuri.
Când imprimaţi pe plicuri, consultaţi Încărcarea hârtiei/documentelor originale şi pregătiţi plicurileînainte de imprimare.După ce aţi pregătit plicurile, încărcaţi-le în orientare tip portret. Dacă plicurile sunt puse în orientaretip vedere, nu se vor alimenta corespunzător.
Verificarea 4: Asiguraţi-vă că nu există obiecte străine în tava din spate.
Pagina 655 din 732 paginiAlimentarea cu hârtie nu se realizează corect

Dacă hârtia se rupe în tava din spate, consultaţi Blocaje de hârtie pentru a o îndepărta.
Dacă există obiecte străine în tava din spate, asiguraţi-vă că opriţi aparatul, deconectaţi-l de la sursade alimentare, apoi îndepărtaţi obiectul străin.
În partea superioară a paginii
Pagina 656 din 732 paginiAlimentarea cu hârtie nu se realizează corect

Ghid avansat > Depanare > Blocaje de hârtie
Blocaje de hârtie
NotăDacă trebuie să opriţi aparatul pentru a înlătura hârtia blocată în timpul imprimării, apăsaţi butonul Oprire pentru a revoca lucrările de imprimare înainte de a opri aparatul.
Hârtia este blocată în fanta de ieşire a hârtiei sau în tava din spate
În alte cazuri
În partea superioară a paginii
Pagina 657 din 732 paginiBlocaje de hârtie

Ghid avansat > Depanare > Blocaje de hârtie > Hârtia este blocată în fanta de ieşire a hârtiei sau în tava din spate
Hârtia este blocată în fanta de ieşire a hârtiei sau în tava dinspate
Înlăturaţi hârtia urmând procedura de mai jos.
1. Trageţi uşor hârtia în afară, fie din tava din spate, fie din fanta de ieşire a hârtiei, deunde vă este mai uşor.
NotăDacă hârtia se rupe şi o bucată rămâne în interiorul aparatului, opriţi aparatul, deschideţiunitatea de scanare (capacul) şi înlăturaţi hârtia.Aveţi grijă să nu atingeţi componentele din interiorul aparatului.După înlăturarea în întregime a hârtiei, închideţi unitatea de scanare (capacul) şi reporniţiaparatul.Dacă nu puteţi trage hârtia, opriţi aparatul şi porniţi-l din nou. Este posibil ca hârtia să fiescoasă afară automat.
2. Încărcaţi din nou hârtia şi apăsaţi butonul OK de pe aparat.
Dacă aţi oprit aparatul la pasul 1, toate lucrările de imprimare în aşteptare sunt revocate.Reimprimaţi dacă este necesar.
NotăCând reîncărcaţi hârtia, confirmaţi că utilizaţi hârtia corectă şi că o încărcaţi în mod corect.
Încărcarea hârtiei/documentelor originaleHârtia de dimensiune A5 este potrivită pentru imprimarea documentelor care constau, înprincipal, din text. Nu recomandăm utilizarea unei astfel de hârtii pentru a imprima documentecu fotografii sau grafice, având în vedere că pagina imprimată se poate ondula şi poate cauzablocaje de hârtie la ieşire.
Dacă nu puteţi înlătura hârtia sau dacă hârtia se rupe în interiorul aparatului sau dacă eroarea de blocajcontinuă după înlăturarea hârtiei, contactaţi centrul de service.
În partea superioară a paginii
Pagina 658 din 732 paginiHârtia este blocată în fanta de ieşire a hârtiei sau în tava din spate

Ghid avansat > Depanare > Blocaje de hârtie > În alte cazuri
În alte cazuri
Asiguraţi-vă de următoarele:
Verificarea 1: Există vreun obiect străin în jurul fantei de ieşire a hârtiei?
Verificarea 2: Există vreun obiect străin în tava din spate?
Dacă există obiecte străine în tava din spate, asiguraţi-vă că opriţi aparatul, deconectaţi-l de la sursade alimentare, apoi îndepărtaţi obiectul străin.
Verificarea 3: Este hârtia ondulată?Verificarea 3: Încărcaţi hârtia după corectarea ondulaţiei.
În partea superioară a paginii
Pagina 659 din 732 paginiÎn alte cazuri

Ghid avansat > Depanare > Un mesaj apare pe ecranul computerului
Un mesaj apare pe ecranul computerului
Se afişează „Număr de eroare: B200 A intervenit o eroare de imprimantă. Opriţi imprimanta şideconectaţi cablul de alimentare al imprimantei de la sursa de curent. Apoi contactaţi centrul de service.”
Se afişează „Număr de eroare: **** A intervenit o eroare de imprimantă. Închideţi imprimanta şiîncercaţi din nou. Dacă problema nu este rezolvată, consultaţi ghidul utilizatorului pentru mai multeinformaţii.”
Eroare de scriere/Eroare de ieşire/Eroare de comunicare
Numărul de eroare: 300 este afişat
Numărul de eroare: 1700 este afişat
Numărul de informaţii cu privire la cerneală: 1688 este afişat
Numărul de informaţii referitoare la cerneală: 1686 este afişat
Alte mesaje de eroare
Este afişat ecranul The Inkjet Printer/Scanner/Fax Extended Survey Program
Apare pictograma The Inkjet Printer/Scanner/Fax Extended Survey Program
Se afişează „Număr de eroare: B200 A intervenit o eroare de imprimantă. Opriţiimprimanta şi deconectaţi cablul de alimentare al imprimantei de la sursa de curent.Apoi contactaţi centrul de service.”
Opriţi aparatul şi scoateţi cablul de alimentare al aparatului din sursa de curent.
Contactaţi centrul de service.
Se afişează „Număr de eroare: **** A intervenit o eroare de imprimantă. Închideţiimprimanta şi încercaţi din nou. Dacă problema nu este rezolvată, consultaţi ghidulutilizatorului pentru mai multe informaţii.”
"****" este afişat cu caractere alfanumerice şi depinde de eroarea care a intervenit.
5100 este afişat
Confirmaţi: Deplasarea suportului cartuşului FINE este blocată.
Revocaţi imprimarea de pe computer, opriţi dispozitivul. Apoi îndepărtaţi hârtia blocată saumaterialul de protejare care împiedică suportul cartuşului FINE să se deplaseze şi porniţi dinnou aparatul.
Important
Aveţi grijă să nu atingeţi componentele din interiorul aparatului. Este posibil ca aparatulsă nu imprime corect dacă îl atingeţi.Dacă problema persistă, contactaţi centrul de service.
6000 este afişat
Dacă în faţa aparatului se află un obiect, îndepărtaţi-l.
Deschideţi cu grijă tava de ieşire a hârtiei, apoi opriţi şi porniţi din nou alimentarea.
O valoare alfanumerică de patru cifre şi mesajul “A intervenit o eroare deimprimantă.” se afişează
Opriţi aparatul şi scoateţi cablul de alimentare al aparatului din sursa de curent.
Reconectaţi aparatul şi porniţi-l din nou.
Dacă problema persistă, contactaţi centrul de service.
Pagina 660 din 732 paginiUn mesaj apare pe ecranul computerului

Eroare de scriere/Eroare de ieşire/Eroare de comunicare
Verificarea 1: Dacă lampa Alimentare (Power) este stinsă, asiguraţi-vă că fişa dealimentare este conectată, apoi porniţi aparatul.
În timp ce lampa Alimentare (Power) clipeşte verde, dispozitivul se iniţializează. Aşteptaţipână când lampa Alimentare (Power) se opreşte din clipit şi rămâne aprinsă verde.
Verificarea 2: Asiguraţi-vă că portul de imprimantă este configuratcorespunzător în driverul de imprimantă.
* În următoarele instrucţiuni, „XXX” semnifică numele aparatului dumneavoastră.
1. Autentificaţi-vă într-un cont de utilizator cu drepturi de administrator.
2. Faceţi clic pe Panou de control (Control Panel), apoi pe Imprimantă (Printer) înHardware şi sunet (Hardware and Sound).
In Windows XP, faceţi clic pe Panou de control (Control Panel), Imprimante şi alteechipamente hardware (Printers and Other Hardware), apoi pe Imprimante şi faxuri(Printers and Faxes).În Windows 2000, faceţi clic pe Control Panel, apoi pe Printers.
3. Faceţi clic dreapta pe pictograma Imprimantă Canon XXX (Canon XXX Printer), apoiselectaţi Proprietăţi (Properties).
4. Faceţi clic pe fila Porturi (Ports) pentru a confirma setările portului.
Asiguraţi-vă că un port denumit USBnnn (unde „n” este un număr) cu Canon XXX Printerîn coloana Imprimantă (Printer) este selectat pentru Se imprimă la următoarele port-uri(Print to the following port(s)).Dacă setarea portului nu este corectă, reinstalaţi driverele MP sau schimbaţi setareaportului de imprimantă în funcţie de interfaţa pe care o folosiţi.
Verificarea 3: Asiguraţi-vă de conectarea corespunzătoare a cablului USB laaparat şi la computer.
Dacă folosiţi un dispozitiv de retransmisie, precum un hub USB, deconectaţi-l,conectaţi dispozitivul direct la computer şi încercaţi să imprimaţi din nou. Dacăimprimarea porneşte normal, există o problemă la dispozitivul de retransmisie.Consultaţi vânzătorul dispozitivului de retransmisie pentru detalii.Ar putea fi şi o problemă cu cablul USB. Înlocuiţi cablul USB şi încercaţi să imprimaţidin nou.
Verificarea 4: Asiguraţi-vă că driverele MP sunt instalate corect.
Dezinstalaţi driverele MP Drivers urmând procedura descrisă în �tergerea driverelor MPDrivers inutile , introduceţi CD-ROM-ul de instalare (Setup CD-ROM) în unitatea de disc acomputerului, apoi executaţi Custom Install şi selectaţi MP Drivers pentru reinstalare.
Verificarea 5: Verificaţi starea dispozitivului pe computer.
Urmaţi procedura de mai jos pentru a verifica starea dispozitivului.
1. Faceţi clic pe Panou de control (Control Panel), Hardware şi sunet (Hardware andSound), apoi Manager dispozitive (Device Manager).
Dacă ecranul Control cont utilizator (User Account Control) este afişat, urmaţiinstrucţiunile de pe ecran.În Windows XP, faceţi clic pe Panou de control (Control Panel), Performanţă şi întreţinere(Performance and Maintenance), Sistem (System), apoi pe Manager dispozitive (DeviceManager) pe fila Hardware.În Windows 2000, faceţi clic pe Panou de control (Control Panel), Sistem (System), apoipe Manager dispozitive (Device Manager) pe fila Hardware.
Pagina 661 din 732 paginiUn mesaj apare pe ecranul computerului

2. Faceţi dublu clic pe Controlere magistrală serială universală (Universal Serial Buscontrollers), apoi pe Asistenţă imprimare USB (USB Printing Support).
Dacă nu se afişează Asistenţă imprimare USB (USB Printing Support), asiguraţi-vă căaparatul este bine conectat la computer.
Verificarea 3: Asiguraţi-vă de conectarea corespunzătoare a cablului USB la aparat şila computer.
3. Faceţi clic pe fila General şi asiguraţi-vă că nu este niciun indiciu privind o problemăcu dispozitivul.
Dacă este afişată o eroare de dispozitiv, consultaţi ajutorul Windows pentru a rezolvaeroarea.
Numărul de eroare: 300 este afişat
Verificarea 1: Dacă lampa Alimentare (Power) este stinsă, asiguraţi-vă că fişa dealimentare este conectată, apoi porniţi aparatul.
În timp ce lampa Alimentare (Power) clipeşte verde, dispozitivul se iniţializează. Aşteptaţipână când lampa Alimentare (Power) se opreşte din clipit şi rămâne aprinsă verde.
Verificarea 2: Asiguraţi-vă de conectarea corespunzătoare a cablului USB laaparat şi la computer.
Dacă folosiţi un dispozitiv de retransmisie, precum un hub USB, deconectaţi-l,conectaţi dispozitivul direct la computer şi încercaţi să imprimaţi din nou. Dacăimprimarea porneşte normal, există o problemă la dispozitivul de retransmisie.Consultaţi vânzătorul dispozitivului de retransmisie pentru detalii.Ar putea fi şi o problemă cu cablul USB. Înlocuiţi cablul USB şi încercaţi să imprimaţidin nou.
Verificarea 3: Asiguraţi-vă că numele aparatului este selectat în caseta dedialog Print (Imprimare).
Deschiderea casetelor de dialog Page Setup şi Print (Macintosh)
Numărul de eroare: 1700 este afişat
Verificare: Consultaţi Absorbantul de cerneală este aproape plin. din Pe LCDeste afişat un mesaj de eroare şi luaţi măsurile adecvate.
Numărul de informaţii cu privire la cerneală: 1688 este afişat
Verificare: Consultaţi S-a terminat cerneala. din Pe LCD este afişat un mesaj deeroare şi luaţi măsurile necesare.
Numărul de informaţii referitoare la cerneală: 1686 este afişat
Verificare: Consultaţi Este posibil ca cerneala să se fi terminat. din Pe LCD esteafişat un mesaj de eroare şi luaţi măsurile necesare.
Alte mesaje de eroare
Verificaţi: Dacă este afişat un mesaj de eroare în afara monitorului de stare aimprimantei, verificaţi următoarele:
„Derularea nu s-a făcut cu succes din cauza unui spaţiu insuficient pe disc” ("Could
Pagina 662 din 732 paginiUn mesaj apare pe ecranul computerului

not spool successfully due to insufficient disk space")�tergeţi orice fişier inutil pentru a mări spaţiul liber de pe disc.„Derularea nu s-a făcut cu succes din cauza memoriei insuficiente” ("Could not spoolsuccessfully due to insufficient memory")Anulaţi alte aplicaţii în curs pentru a mări memoria disponibilă.Dacă tot nu puteţi imprima, reporniţi computerul şi încercaţi din nou să imprimaţi.„Driverul de imprimantă nu a putut fi găsit” ("Printer driver could not be found")Dezinstalaţi driverul de imprimantă conform procedurii descrise în �tergerea driverelorMP Drivers inutile , apoi reinstalaţi.„Nu s-a putut imprima numele aplicaţiei – numele fişierului” ("Could not printApplication name - File name")Încercaţi să imprimaţi din nou după ce lucrarea actuală este finalizată.
Este afişat ecranul The Inkjet Printer/Scanner/Fax Extended Survey Program
Dacă este instalat Inkjet Printer/Scanner/Fax Extended Survey Program, atunci un ecran deconfirmare care solicită permisiunea de trimitere de informaţii privind utilizarea imprimantei va fiafişat timp de trei luni şi apoi şase luni după instalare. Ulterior, va fi afişat la fiecare şase luni,timp de aproape patru ani.
Citiţi instrucţiunile de pe ecran şi urmaţi procedura de mai jos.
Dacă sunteţi de acord cu participarea la programul de studiu:
Faceţi clic pe Agree, apoi urmaţi instrucţiunile pe ecran. Informaţiile despre utilizareaimprimantei vor fi trimise prin Internet. Dacă aţi urmat instrucţiunile de pe ecran, informaţiilevor fi trimise automat în continuare, iar ecranul de confirmare nu va mai fi afişat.
NotăCând se trimit informaţiile, este posibil să apară un ecran de avertizare, precum unecran de securitate Internet. În acest caz, confirmaţi numele programului ca fiind"IJPLMUI.exe", apoi acceptaţi-l.Dacă debifaţi caseta de selectare Send automatically from the next time informaţiile nuvor fi trimise automat pe viitor şi un ecran de confirmare va fi afişat la următorul studiu.Pentru a trimite informaţiile automat, consultaţi Modificarea setării ecranului deconfirmare:.
Dacă nu sunteţi de acord cu participarea la programul de studiu:
Faceţi clic pe Do not agree. Ecranul de confirmare se va închide, iar studiul va fi ignorat dinacel moment. Ecranul de confirmare va fi afişat din nou, trei luni mai târziu.
Pagina 663 din 732 paginiUn mesaj apare pe ecranul computerului

Pentru a dezinstala Inkjet Printer/Scanner/Fax Extended Survey Program:
Pentru a dezinstala Inkjet Printer/Scanner/Fax Extended Survey Program, faceţi clic peDezinstalare (Uninstall) şi urmaţi instrucţiunile de pe ecran.
Modificarea setării ecranului de confirmare:
1. Selectaţi elemente din meniul Start după cum se arată mai jos.
În Windows Vista, selectaţi meniul Pornire (Start) > Panou de control (ControlPanel) > Dezinstalare program (Uninstall a program).În Windows XP, selectaţi meniul Start > Panou de control (Control Panel) >Adăugare sau eliminare programe (Add or Remove Programs).În Windows 2000, selectaţi meniul Start > Settings > Control Panel > Add/RemovePrograms.
NotăÎn Windows Vista, o casetă de confirmare/avertizare poate apărea în timpulinstalării, dezinstalării sau pornirii software.Această casetă de dialog apare atunci când se solicită drepturi de administratorpentru efectuarea unei operaţii.Dacă sunteţi conectat pe un cont de administrator, faceţi clic pe Continuare(Continue) sau Permisiune (Allow) pentru a continua.
2. Selectaţi Canon Inkjet Printer/Scanner/Fax Extended Survey Program.
3. Selectaţi Change.
Dacă selectaţi Yes după ce aţi urmat instrucţiunile de pe ecran, ecranul de confirmare vafi afişat la momentul următorului studiu.Dacă selectaţi No, informaţiile vor fi trimise automat.
NotăDacă selectaţi Dezinstalare (Uninstall) (sau Eliminare (Remove)), atunci InkjetPrinter/Scanner/Fax Extended Survey Program este dezinstalat. Urmaţi instrucţiunilede pe ecran.
Apare pictograma The Inkjet Printer/Scanner/Fax Extended Survey Program
Dacă este instalat Inkjet Printer/Scanner/Fax Extended Survey Program, informaţiile despreutilizarea imprimantei sunt programate să fie trimise la trei luni şi apoi la şase luni după instalare.După aceea, sunt programate să fie trimise la fiecare şase luni timp de aproximativ patru ani.Pictograma Inkjet Printer/Scanner/Fax Extended Survey Program apare în staţia de andocareatunci când este timpul să fie trimise informaţiile despre utilizarea imprimantei.
În Mac OS X v.10.3.9, Inkjet Printer/Scanner/Fax Extended Survey Program nu este instalat.
Citiţi instrucţiunile de pe ecran după ce faceţi clic pe pictogramă, apoi urmaţi procedura de maijos.
Pagina 664 din 732 paginiUn mesaj apare pe ecranul computerului

Dacă sunteţi de acord cu participarea la programul de studiu:
Faceţi clic pe Agree, apoi urmaţi instrucţiunile pe ecran. Informaţiile despre utilizareaimprimantei vor fi trimise prin Internet. Dacă aţi urmat instrucţiunile de pe ecran, informaţiilevor fi trimise automat în continuare, iar ecranul de confirmare nu va mai fi afişat.
NotăDacă debifaţi caseta de selectare Send automatically from the next time informaţiile nuvor fi trimise automat pe viitor şi pictograma Inkjet Printer/Scanner/Fax Extended SurveyProgram va apărea în staţia de andocare la momentul următorului studiu.
Dacă nu sunteţi de acord cu participarea la programul de studiu:
Faceţi clic pe Do not agree. Ecranul de confirmare se va închide, iar studiul va fi ignorat dinacel moment. Ecranul de confirmare va fi afişat din nou, trei luni mai târziu.
Pentru a opri trimiterea de informaţii:
Faceţi clic pe Turn off. Inkjet Printer/Scanner/Fax Extended Survey Program este oprit şiinformaţiile nu vor fi trimise. Pentru a reveni la studiu, consultaţi Modificarea setării: .
Pentru a dezinstala Inkjet Printer/Scanner/Fax Extended Survey Program:
1. Opriţi The Inkjet Printer/Scanner/Fax Extended Survey Program.
Modificarea setării:
2. Selectaţi Applications din meniul Go şi faceţi dublu clic pe folderul Canon Utilities, apoipe folderul Inkjet Extended Survey Program.
3. Puneţi fişierul Canon Inkjet Printer/Scanner/Fax Extended Survey Program.app la Trash.
4. Reporniţi computerul.
Goliţi Trash şi reporniţi computerul.
Modificarea setării:
Pagina 665 din 732 paginiUn mesaj apare pe ecranul computerului

Pentru a afişa ecranul de confirmare la fiecare trimitere de informaţii despre utilizareaimprimantei sau pentru a continua studiul, urmaţi procedura de mai jos.
1. Selectaţi Applications din meniul Go şi faceţi dublu clic pe folderul Canon Utilities, apoipe folderul Inkjet Extended Survey Program.
2. Faceţi dublu clic pe pictograma Canon Inkjet Printer/Scanner/Fax Extended SurveyProgram.
Do not display the confirmation screen when information is sent:Dacă bifaţi caseta de selectare, informaţiile vor fi trimise automat.Dacă nu este bifată caseta de selectare, pictograma Inkjet Printer/Scanner/FaxExtended Survey Program va apărea în staţia de andocare la momentulurmătorului studiu. Faceţi clic pe pictogramă, apoi urmaţi instrucţiunile de peecran.Buton Turn off/Turn on:Faceţi clic pe butonul Turn off pentru a opri Inkjet Printer/Scanner/Fax ExtendedSurvey Program.Faceţi clic pe butonul Turn on pentru a reporni Inkjet Printer/Scanner/Fax ExtendedSurvey Program.
În partea superioară a paginii
Pagina 666 din 732 paginiUn mesaj apare pe ecranul computerului

Ghid avansat > Depanare > Pentru utilizatorii Windows
Pentru utilizatorii Windows
Monitorul de stare a imprimantei nu este afişat
Verificaţi: Este activat programul de monitorizare a stării imprimantei?
Asiguraţi-vă că Enable Status Monitor este selectat în meniul Option din monitorul de stare aimprimantei.
1. Deschideţi caseta de dialog Proprietăţi imprimantă (Printer properties).
Deschiderea casetei de dialog Proprietăţi imprimantă (Printer properties) (Windows)
2. Pe foaia Maintenance, faceţi clic pe View Printer Status.
3. Selectaţi Enable Status Monitor în meniul Option dacă nu este selectat.
Dacă utilizaţi Windows Vista:
Lansarea MP Navigator EX oricând este apăsat butonul Culoare (Color) sau Negru (Black)dela aparat
Verificare: Specificaţi răspunsul rezultat în urma apăsării butonului Culoare(Color) sau Negru (Black) de la aparat.
Urmaţi procedura de mai jos pentru a specifica răspunsul de la computer.
1. Autentificaţi-vă într-un cont de utilizator cu drepturi de administrator.
2. Faceţi clic pe Panou de control (Control Panel), Hardware şi sunet (Hardware andSound), apoi Scanere şi aparate foto (Scanners and Cameras).
3. Selectaţi WIA Canon XXX ser, apoi faceţi clic pe butonul Properties.
Dacă apare ecranul Control cont utilizator (User Account Control), faceţi clic peContinuare (Continue).
4. Faceţi clic pe fila Events din ecranul WIA Canon XXX ser Properties.
5. Selectaţi Start this program pentru Actions, apoi selectaţi MP Navigator EX Ver3.0 dinmeniul derulant.
Alegeţi un eveniment din meniul derulant Select an event, apoi selectaţi MP Navigator EXVer3.0 pentru lansare la fiecare eveniment. Dacă MP Navigator EX Ver3.0 este dejaselectat pentru fiecare eveniment, faceţi clic pe Cancel.
6. Faceţi clic pe OK.
În partea superioară a paginii
Pagina 667 din 732 paginiPentru utilizatorii Windows

Ghid avansat > Depanare > Nu se imprimă corespunzător de pe o foaie index foto
Nu se imprimă corespunzător de pe o foaie index foto
Se afişează Failed to scan Photo Index Sheet.
Verificaţi următoarele, apăsaţi butonul OK, apoi executaţi din nou meniul PhotoIndex Sheet scan & print.
Aţi aşezat foaia index foto pe poziţia şi cu orientarea corecte pe suprafaţa de sticlă descanare?Suprafaţa de sticlă de scanare şi foaia index foto sunt murdare?Sunt toate cercurile necesare de pe foaia index foto umplute?Atunci când imprimaţi cu DPOF, cercul pentru numărul de copii de imprimat pentrufiecare fotografie este plin?
NotăDacă cercurile umplute de pe foaia index foto nu sunt destul de închise la culoare saudestul de mari, este posibil ca aparatul să nu poată scana corect foaia index foto.
Se afişează Cannot print the selected photo./Se imprimă altă fotografie sau nu seimprimă nimic/Alimentarea cu hârtie se face înainte de finalizarea imprimării
Verificarea 1: Asiguraţi-vă că fotografia pe care doriţi să o imprimaţi este afişatăpe LCD.
Apăsaţi butonul Meniu (Menu), selectaţi Photo print, apoi selectaţi fotografia pe care doriţi săo imprimaţi pentru a vă asigura că este salvată pe cartela de memorie.
Verificarea 2: Reimprimaţi foaia index foto.
NotăEste posibil ca aparatul să nu scaneze corespunzător foaia index foto chiar dacă cerculPrint a blank Photo Index Sheet este umplut. Apăsaţi butonul Meniu (Menu), selectaţiPhoto index sheet, urmaţi instrucţiunile on-screen pentru a reimprima foaia de indexfoto.
Verificarea 3: Asiguraţi-vă că fotografia salvată pe cartela de memorie poate ficitită de acest aparat.
Imprimarea de pe o cartelă de memorie
Verificarea 4: Fotografia salvată pe cartela de memorie a fost prelucrată pe uncomputer?
O fotografie prelucrată pe un computer este posibil să nu fie imprimată.
NotăCând este selectată o fotografie care a fost procesată pe un computer, pe LCD seafişează „?”.
Verificarea 5: Aţi făcut modificări la cartela de memorie după imprimarea foiiindex foto?
Dacă aţi adăugat/şters fotografii pe/de pe cartela de memorie, reimprimaţi foaia index foto.
Important
Nu rescrieţi conţinutul cartelei de memorie până când imprimarea şi scanarea foii indexfoto nu s-a finalizat.
Pagina 668 din 732 paginiNu se imprimă corespunzător de pe o foaie index foto

Verificarea 6: Aţi scos cartela de memorie în timpul imprimării?
Nu scoateţi cartela de memorie înainte de finalizarea imprimării.
Important
În cazul în care cartela de memorie este scoasă în timpul imprimării, datele stocate sepot deteriora sau este posibil ca fotografia selectată să nu fie imprimată deoarece citireafotografiei de pe cartela de memorie şi imprimarea fotografiei sunt efectuate simultan.
În partea superioară a paginii
Pagina 669 din 732 paginiNu se imprimă corespunzător de pe o foaie index foto

Ghid avansat > Depanare > Nu se poate scoate o cartelă de memorie
Nu se poate scoate o cartelă de memorie
Contactaţi centrul de service.
Important
Nu încercaţi niciodată să scoateţi o cartelă de memorie cu un băţ subţire sau cu o pensetă. Acestlucru poate duce la avarierea aparatului.
NotăPentru următoarele cartele de memorie sunt necesare adaptoare exclusive. Introduceţi acestecartele în aparat cu adaptoarele ataşate.Cartelă miniSD /Cartelă miniSDHC /Cartelă microSD /Cartelă microSDHC /Cartelă xD-Picture /Cartelă xD-Picture Tip M /Cartelă xD-Picture Tip H /Memory Stick Micro /RS-MMC
În partea superioară a paginii
Pagina 670 din 732 paginiNu se poate scoate o cartelă de memorie

Advanced Guide > Troubleshooting > Problems with Scanning
Problems with Scanning
Scanner Does Not Work
ScanGear (Scanner Driver) Does Not Start
Error Message Appears and the ScanGear (Scanner Driver) Screen Does Not Appear
Scan Quality (Image Displayed on the Monitor) Is Poor
Scanned Image Is Surrounded by Extra White Areas
Cannot Scan Multiple Documents at One Time
Cannot Scan Properly in Auto Scan Mode
Slow Scanning Speed
"There is not enough memory." Message Is Displayed
Computer Stops Operating during Scanning
Scanner Does Not Work After Upgrading Windows
Page top
Pagina 671 din 732 paginiProblems with Scanning

Advanced Guide > Troubleshooting > Problems with Scanning > Scanner Does Not Work
Scanner Does Not Work
Check 1: Make sure that the machine is turned on.
Check 2: Connect the USB cable to a different USB port on the computer.
Check 3: If the USB cable is connected to a hub, remove it from the huband connect it to a USB port on the computer.
Check 4: Restart the computer.
Page top
Pagina 672 din 732 paginiScanner Does Not Work
Advanced Guide > Troubleshooting > Problems with Scanning > ScanGear (Scanner Driver) Does Not Start
ScanGear (Scanner Driver) Does Not Start
Check 1: Make sure that the MP Drivers is installed.If it is not installed, insert the Setup CD-ROM into the computer's disc drive, then select Custom Installand install MP Drivers.
Check 2: On the File menu of the application, select Select Source andselect the machine.
Important
Do not select the model name that includes WIA in it.
NoteThe operation may differ depending on the application.
Check 3: Start from a TWAIN-compliant application.
Page top
Pagina 673 din 732 paginiScanGear (Scanner Driver) Does Not Start

Advanced Guide > Troubleshooting > Problems with Scanning > Error Message Appears and the ScanGear (ScannerDriver) Screen Does Not Appear
Error Message Appears and the ScanGear (Scanner Driver)Screen Does Not Appear
Check 1: Make sure that the machine is turned on.
Check 2: Connect the USB cable to a different USB port on the computer.
Check 3: If the USB cable is connected to a hub, remove it from the huband connect it to a USB port on the computer.
Check 4: Make sure that the MP Drivers is installed.If it is not installed, insert the Setup CD-ROM into the computer's disc drive, then select Custom Installand install MP Drivers.
Check 5: On the File menu of the application, select Select Source andselect the machine.
NoteThe operation may differ depending on the application.
Check 6: Make sure that the application is TWAIN-compliant.You cannot open ScanGear (scanner driver) from applications not supporting TWAIN.
Check 7: Exit ScanGear (scanner driver) if it is running on anotherapplication.
Page top
Pagina 674 din 732 paginiError Message Appears and the ScanGear (Scanner Driver) Screen Does N...

Advanced Guide > Troubleshooting > Problems with Scanning > Scan Quality (Image Displayed on the Monitor) Is Poor
Scan Quality (Image Displayed on the Monitor) Is Poor
Check 1: Increase the scanning resolution.Resolution
Check 2: Set the scale to 100%.Some applications do not display images clearly if the image is too small.
Check 3: If moire (stripe pattern) appears, take the following measures andscan again.
On the Basic Mode tab of ScanGear (scanner driver), select Magazine(Color) in Select Source.Basic Mode Tab
On the Advanced Mode tab of ScanGear (scanner driver), set Descreen in Image Settings to ON.Image Settings
NoteIf moire appears when you scan a digital print photo, take the above measures and scan again.
If you use MP Navigator EX, set Document Type to Magazine(Color) or enable Descreen in the ScanSettings dialog box and scan again.
Scan Settings Dialog Box (Photos/Documents)
Check 4: Check the monitor's color depth.From the Start menu, select Control Panel > Appearance and Personalization > Adjust screen resolutionto open the Display Settings dialog box. Set the color depth to Medium (16 bit) or Highest (32 bit).
Windows XP:
From the Start menu, select Control Panel > Display to open the Display Properties dialog box. Onthe Settings tab, set Colors to Medium (16 bit) or Highest (32 bit).
Windows 2000:
From the Start menu, select Settings > Control Panel > Display to open the Display Properties dialogbox. On the Settings tab, set Colors to High Color (16 bit) or True Color (32 bit).
Check 5: Clean the Platen and Document Cover.Cleaning the Platen Glass and Document Cover
Check 6: If the document is in poor condition (dirty, faded, etc.), useReduce Dust and Scratches, Fading Correction, Grain Correction, etc. inImage Settings on the Advanced Mode tab of ScanGear (scanner driver).
Image Settings
Check 7: If the color tone of images is different from the original document,take the following measures and scan again.
On the Advanced Mode tab of ScanGear (scanner driver), set Image Adjustment in Image Settings toNone.
Image Settings
Open the Preferences dialog box from the Advanced Mode tab of ScanGear (scanner driver) and setColor Matching on the Color Settings tab.
Color Settings Tab
Page top
Pagina 675 din 732 paginiScan Quality (Image Displayed on the Monitor) Is Poor

Advanced Guide > Troubleshooting > Problems with Scanning > Scanned Image Is Surrounded by Extra White Areas
Scanned Image Is Surrounded by Extra White Areas
Check: Specify the scan area.
Click (Auto Crop) in ScanGear (scanner driver) to automatically display the cropping frame (scanarea) according to the document size. You can also manually specify the scan area, for example whenthere are white margins along the document or when you want to create custom cropping frames.
Adjusting Cropping Frames
Page top
Pagina 676 din 732 paginiScanned Image Is Surrounded by Extra White Areas

Advanced Guide > Troubleshooting > Problems with Scanning > Cannot Scan Multiple Documents at One Time
Cannot Scan Multiple Documents at One Time
Check 1: Make sure that the documents are placed correctly on the Platen.Placing Documents
Check 2: Scan each item individually.Some applications do not support multiple image scanning.
Page top
Pagina 677 din 732 paginiCannot Scan Multiple Documents at One Time

Advanced Guide > Troubleshooting > Problems with Scanning > Cannot Scan Properly in Auto Scan Mode
Cannot Scan Properly in Auto Scan Mode
Check 1: Make sure that the documents are placed correctly on the Platen.Placing Documents
Check 2: Multiple image scanning may not be supported.Some applications do not support multiple image scanning. In that case, scan each item individually.
Page top
Pagina 678 din 732 paginiCannot Scan Properly in Auto Scan Mode

Advanced Guide > Troubleshooting > Problems with Scanning > Slow Scanning Speed
Slow Scanning Speed
Check 1: To view the image on a monitor, set the output resolution toaround 150 dpi. To print, set it to around 300 dpi.
Resolution
Check 2: Set Fading Correction, Grain Correction, etc. to None.Image Settings
Check 3: In MP Navigator EX, deselect the Correct slanted documentcheckbox and scan again.
Scan Settings Dialog Box
Check 4: In MP Navigator EX, deselect the Detect the orientation of textdocuments and rotate images checkbox and scan again.
Scan Settings Dialog Box
Page top
Pagina 679 din 732 paginiSlow Scanning Speed

Advanced Guide > Troubleshooting > Problems with Scanning > "There is not enough memory." Message Is Displayed
"There is not enough memory." Message Is Displayed
Check 1: Exit other applications and try again.
Check 2: Reduce the resolution or output size and scan again.Resolution
Page top
Pagina 680 din 732 pagini"There is not enough memory." Message Is Displayed

Advanced Guide > Troubleshooting > Problems with Scanning > Computer Stops Operating during Scanning
Computer Stops Operating during Scanning
Check 1: Restart the computer, reduce the output resolution in ScanGear(scanner driver) and scan again.
Check 2: Delete unnecessary files to obtain sufficient free hard disk space,then scan again.Error message may appear if there is not enough hard disk space to scan and save, when the imagesize is too large (such as when scanning a large document at high resolution.)
Check 3: For Location of Temporary Files in MP Navigator EX, specify afolder on a drive with sufficient free space.
General Tab
Check 4: Multiple devices may be connected to USB ports.Disconnect other devices.
Page top
Pagina 681 din 732 paginiComputer Stops Operating during Scanning

Advanced Guide > Troubleshooting > Problems with Scanning > Scanner Does Not Work After Upgrading Windows
Scanner Does Not Work After Upgrading Windows
Check: Disconnect the machine from the computer, then uninstall andreinstall the MP Drivers and MP Navigator EX.
Step 1: Uninstall the MP Drivers.
See "Deleting the Unnecessary MP Drivers " for details.
Step 2: Uninstall MP Navigator EX.
1. From the Start menu, select (All) Programs > Canon Utilities > MP Navigator EX 3.0 > MPNavigator EX Uninstall.
2. When a confirmation appears, click Yes.
3. When uninstallation is complete, click OK.
MP Navigator EX is uninstalled.
Step 3: Reinstall the MP Drivers and MP Navigator EX.
Insert the Setup CD-ROM into the computer's disc drive, then select Custom Install and reinstall theMP Drivers and MP Navigator EX.
Page top
Pagina 682 din 732 paginiScanner Does Not Work After Upgrading Windows

Advanced Guide > Troubleshooting > Software Problems
Software Problems
E-mail Software Program You Want to Use Does Not Appear in the Screen for Selecting an E-mailSoftware Program
Scanned Image Is Printed Enlarged (Reduced)
Scanned Image Is Enlarged (Reduced) on the Computer Monitor
Scanned Image Does Not Open
Page top
Pagina 683 din 732 paginiSoftware Problems

Advanced Guide > Troubleshooting > Software Problems > E-mail Software Program You Want to Use Does Not Appearin the Screen for Selecting an E-mail Software Program
E-mail Software Program You Want to Use Does Not Appear inthe Screen for Selecting an E-mail Software Program
Check 1: MP Navigator EX may not support the e-mail software program.The following e-mail software programs are supported. (Image are attached to the mail messageautomatically.)
- Windows Mail (Windows Vista)
- Outlook Express (Windows XP/Windows 2000)
- Microsoft Outlook
Check 2: If an e-mail software program does not operate properly, checkthat the program's MAPI is enabled.To enable MAPI, refer to the manual of the e-mail software program.
Check 3: If using an e-mail software program other than the ones listedabove, select None (Attach Manually) when prompted to select a programand attach the scanned image manually.
Page top
Pagina 684 din 732 paginiE-mail Software Program You Want to Use Does Not Appear in the Screen ...

Advanced Guide > Troubleshooting > Software Problems > Scanned Image Is Printed Enlarged (Reduced)
Scanned Image Is Printed Enlarged (Reduced)
Check: Set the printing size in the application.
Page top
Pagina 685 din 732 paginiScanned Image Is Printed Enlarged (Reduced)

Advanced Guide > Troubleshooting > Software Problems > Scanned Image Is Enlarged (Reduced) on the ComputerMonitor
Scanned Image Is Enlarged (Reduced) on the ComputerMonitor
Check 1: Change the display setting in the application.You cannot reduce the display size in "Paint." To reduce the display size, open the images in anapplication.
For details, refer to the application's manual. If you have any questions, contact the manufacturer of theapplication.
Check 2: Change the resolution setting in ScanGear (scanner driver) andscan again.The higher the resolution, the larger the resulting image will be.
Resolution
Page top
Pagina 686 din 732 paginiScanned Image Is Enlarged (Reduced) on the Computer Monitor

Advanced Guide > Troubleshooting > Software Problems > Scanned Image Does Not Open
Scanned Image Does Not Open
Check: If the file format is not supported by the application, scan the imageagain and save it in a popular file format such as JPEG.For details, refer to the application's manual. If you have any questions, contact the manufacturer of theapplication.
Page top
Pagina 687 din 732 paginiScanned Image Does Not Open

Advanced Guide > Troubleshooting > MP Navigator EX Problems
MP Navigator EX Problems
Cannot Scan at the Correct Size
Position or Size of the Image Cannot be Detected Correctly When Scanning Using the Operation Panel
Document Is Placed Correctly, but the Scanned Image Is Slanted
Document Is Placed Correctly, but the Orientation Changes in the Scanned Image
Page top
Pagina 688 din 732 paginiMP Navigator EX Problems

Advanced Guide > Troubleshooting > MP Navigator EX Problems > Cannot Scan at the Correct Size
Cannot Scan at the Correct Size
Check 1: Make sure that the documents are placed correctly on the Platen.Placing Documents
Check 2: Set Document Size to the actual document size and scan again.If the matching size is not found, scan at a larger size and trim the image.
See the Toolbar (Trimming) in " Correct/Enhance Images Window " for details.
Page top
Pagina 689 din 732 paginiCannot Scan at the Correct Size

Advanced Guide > Troubleshooting > MP Navigator EX Problems > Position or Size of the Image Cannot be DetectedCorrectly When Scanning Using the Operation Panel
Position or Size of the Image Cannot be Detected CorrectlyWhen Scanning Using the Operation Panel
Check 1: Make sure that the documents are placed correctly on the Platen.Placing Documents
Check 2: Check that the MP Navigator EX settings are correctly setaccording to the document.If you cannot scan properly with Auto Scan using the Operation Panel, specify the document type or sizein MP Navigator EX.
Scanning Photos and Documents
Page top
Pagina 690 din 732 paginiPosition or Size of the Image Cannot be Detected Correctly When Scannin...

Advanced Guide > Troubleshooting > MP Navigator EX Problems > Document Is Placed Correctly, but the Scanned ImageIs Slanted
Document Is Placed Correctly, but the Scanned Image IsSlanted
Check: In MP Navigator EX, deselect the Correct slanted documentcheckbox and scan again.
Scan Settings Dialog Box (Photos/Documents)
Page top
Pagina 691 din 732 paginiDocument Is Placed Correctly, but the Scanned Image Is Slanted

Advanced Guide > Troubleshooting > MP Navigator EX Problems > Document Is Placed Correctly, but the OrientationChanges in the Scanned Image
Document Is Placed Correctly, but the Orientation Changes inthe Scanned Image
Check: In MP Navigator EX, deselect the Detect the orientation of textdocuments and rotate images checkbox and scan again.
Scan Settings Dialog Box (Photos/Documents)
Page top
Pagina 692 din 732 paginiDocument Is Placed Correctly, but the Orientation Changes in the Scanned...

Ghid avansat > Depanare > Dacă nu puteţi rezolva problema
Dacă nu puteţi rezolva problema
Dacă nu puteţi rezolva problema cu niciuna dintre soluţiile din acest capitol, vă rugăm să contactaţivânzătorul aparatului sau centrul de service.
Personalul de asistenţă al Canon este instruit pentru a putea oferi asistenţă tehnică pentru satisfacereaclienţilor.
AtenţieDacă aparatul scoate vreun zgomot neobişnuit, fum sau miros, opriţi-l imediat. Deconectaţi cablulde alimentare din borna de ieşire şi contactaţi vânzătorul sau centrul de service. Nu încercaţiniciodată să reparaţi sau să demontaţi singuri aparatul.Încercările din partea clienţilor de a repara sau demonta aparatul vor duce la pierderea valabilităţiioricărei garanţii, indiferent dacă garanţia a expirat sau nu.
Înainte de contactarea centrului de service, verificaţi următoarele:
Denumirea produsului:* Denumirea aparatului se află pe prima copertă a manualului de configurare.Număr de serie: consultaţi manualul de configurareDetalii ale problemeiCe aţi încercat pentru a soluţiona problema şi ce s-a întâmplat
În partea superioară a paginii
Pagina 693 din 732 paginiDacă nu puteţi rezolva problema

Ghid avansat > Depanare > Întrebări frecvente
Întrebări frecvente
Rezultate imprimare inexistente/Imprimarea este neclară/Culorile sunt greşite/Linii albe
Aparatul funcţionează, dar nu este eliminată cerneală
Nu se poate face instalarea pentru MP Drivers
Imprimarea nu începe
Copierea/Imprimarea se opreşte înainte de a fi finalizată
Eroare de scriere/Eroare de ieşire/Eroare de comunicare
Rezultatele imprimării nu sunt satisfăcătoare
Blocaje de hârtie
Alimentarea cu hârtie nu se realizează corect
În partea superioară a paginii
Pagina 694 din 732 paginiÎntrebări frecvente

Advanced Guide > Troubleshooting > Instructions for Use (Printer Driver)
Instructions for Use (Printer Driver)
This printer driver is subject to the following restrictions. Keep the following points in mind when usingthe printer driver.
Restrictions on the Printer Driver
With some applications, the Copies setting in the Page Setup tab of the printer driver may not beenabled.In this case, use the copies setting in the Print dialog box of the application software.
If the selected Language in the About dialog box does not match the operating system interfacelanguage, the driver screen may not be displayed properly.
Do not change the Advanced tab items of the printer properties. If you change any of the items, youwill not be able to use the following functions correctly.Also, if Print to file is selected in the Print dialog box of the application software and with applicationsthat prohibit EMF spooling, such as Adobe Photoshop LE and MS Photo Editor, the followingfunctions will not operate.
Preview before printing on the Main tab
Prevent loss of print data in the Print Options dialog box
Page Layout, Poster, Booklet, Duplex Printing, Specify Margin..., Print from Last Page, Collate, andStamp/Background... on the Page Setup tab
Since the resolution in the preview display differs from the printing resolution, text and lines in thepreview display may appear different from the actual print result.
With some applications, the printing is divided into multiple print jobs.To cancel printing, delete all divided print jobs.
If image data is not printed correctly, display the Print Options dialog box from the Page Setup taband change the setting of Disable ICM required from the application software. This may solve theproblem.
Software windows may not appear correctly on Windows Vista when fonts are set to Larger scale.When you want to display the windows with Larger scale fonts, set the desktop theme to WindowsClassic as follows:
1. Select Control Panel from the Start menu.
2. Select Appearance and Personalization -> Personalization -> Theme.The Theme Settings dialog box opens.
3. At the Theme Settings dialog box, click the Themes tab, and select Windows Classic fromTheme.
4. Click OK.Desktop changes to Windows Classic display.
The card slot (memory card) of the machine may become inaccessible. In such cases, restart themachine or turn it off and reconnect the USB cable.
Points to Note with Applications
There are following restrictions in Microsoft Word (Microsoft Corporation).
When Microsoft Word has the same printing functions as the printer driver, use Word to specifythem.
Pagina 695 din 732 paginiInstructions for Use (Printer Driver)

When selecting Scaled, Fit-to-Page, or Page Layout from the Page Layout list on the Page Setuptab, the selected printing function may not be effective, depending on the version of Word.If this happens, follow the procedure below.
1. Open Word's Print dialog box.
2. Open the printer driver setup window, specify Page Layout on the Page Setup tab, and clickOK.
3. Without starting printing, close the Print dialog box.
4. Open Word's Print dialog box again.
5. Open the printer driver setup window again and click OK.
6. Start printing.
Illustrator/Adobe Systems Inc.If bitmap printing takes effect, printing may take time or some data may not be printed. Print afterunchecking the Bitmap Printing check box in the Print dialog box.
Page top
Pagina 696 din 732 paginiInstructions for Use (Printer Driver)

Advanced Guide > Troubleshooting > General Notes (Scanner Driver)
General Notes (Scanner Driver)
ScanGear (scanner driver) is subject to the following restrictions. Keep these points in mind when usingit.
Scanner Driver Restrictions
When using the NTFS file system, the TWAIN data source may not be invoked. This is because theTWAIN module cannot be written to the winnt folder for security reasons. Contact the computer'sadministrator for help.
Some computers (including laptops) connected to the machine may not resume correctly fromstandby mode. In that case, restart the computer.
Do not connect two or more machines or multifunction printers with scanner function to the samecomputer simultaneously. If multiple scanning devices are connected, you cannot scan from theOperation Panel of the machine and also may experience errors while accessing the devices.
Software screens may not appear correctly on Windows Vista when font size is set to Larger scale. Ifyou want to display the screens with Larger scale fonts, change the theme in Appearance andPersonalization to Windows Classic as follows:1. From the Start menu, select Control Panel.2. Select Appearance and Personalization > Personalization > Theme.The Theme Settings dialog box opens.3. On the Themes tab of the Theme Settings dialog box, select Windows Classic under Theme.4. Click OK.Desktop changes to Windows Classic view.
Use the default display font size of the OS. Otherwise, software screens may not appear correctly.
Scanning may fail if the computer has resumed from sleep or standby mode. In that case, followthese steps and scan again.1. Turn off the machine.2. Exit ScanGear (scanner driver), then disconnect the USB cable from the computer and reconnectit.3. Turn on the machine.
ScanGear (scanner driver) cannot be opened in multiple applications at the same time. Within anapplication, ScanGear (scanner driver) cannot be opened for the second time when it is alreadyopen.
Be sure to close the ScanGear (scanner driver) window before closing the application.
Make sure that you have adequate disk space available when scanning large images at highresolutions. For example, at least 300 MB of free space is required to scan an A4 document at 600dpi in full-color.
ScanGear (scanner driver) and WIA driver cannot be used at the same time.
Do not enter the computer into sleep or hibernate state during scanning.
Calibration may take time if the machine is connected via USB 1.1.
Applications with Restrictions on Use
If you start Media Center included in Windows XP Media Center Edition 2005, you may not be able toscan using the Operation Panel of the machine. In that case, restart the computer.
You cannot scan images with Media Center included in Windows Vista and Windows XP MediaCenter Edition 2005. Scan with other applications such as MP Navigator EX.
In some applications, you may encounter a problem when you switch to thumbnail view in theAdvanced Mode tab of ScanGear (scanner driver). In that case, scan each document individually,
Pagina 697 din 732 paginiGeneral Notes (Scanner Driver)
changing Paper Size according to the document.
In some applications, if you select the View scanned images checkbox in the Auto Scan Mode tab ofScanGear (scanner driver), the window displaying the thumbnails of the scanned images may closeautomatically.
Some applications may not display the TWAIN user interface. In that case, refer to the application'smanual and change the settings accordingly.
Some applications do not support continuous scanning of multiple documents. In some cases, onlythe first scanned image is accepted, or multiple images are scanned as one image.
When scanning platen size images into a Microsoft Office application (such as Word, Excel orPowerPoint), click Custom Insert in the Insert Picture from Scanner or Camera screen. Otherwise,images may not be scanned correctly.
Images may not be scanned correctly in some applications. In that case, increase the operatingsystem's virtual memory and retry.
When image size is too large (such as when scanning large images at high resolution), yourcomputer may not respond or the progress bar may remain at 0% depending on the application. Inthat case, cancel the action (for example by clicking Cancel on the progress bar), then increase theoperating system's virtual memory or reduce the image size/resolution and retry. Alternatively, scanthe image via MP Navigator EX first, then save and import it into the application.
Page top
Pagina 698 din 732 paginiGeneral Notes (Scanner Driver)

Ghid avansat > Anexă
Anexă
Zonă de imprimare
Cum se demontează/montează capacul pentru documente
Imprimarea DPOF utilizând foaia index foto
�tergerea unei operaţiuni de imprimare nedorite
Actualizare MP Drivers
Dezinstalarea manualelor On-Screen Manual
Transportul aparatului
Deschiderea casetei de dialog Proprietăţi imprimantă (Printer properties) (Windows)
Deschiderea casetelor de dialog Page Setup şi Print (Macintosh)
Deschiderea utilitarului Canon IJ Printer Utility (Macintosh)
Partajarea imprimantei íntr-o reţea
În partea superioară a paginii
Pagina 699 din 732 paginiAnexă

Ghid avansat > Anexă > Zonă de imprimare
Zonă de imprimare
Pentru a asigura cea mai bună calitate de imprimare, aparatul alocă o margine de-a lungul fiecărei laturia suportului. Zona efectivă de imprimare va fi zona din interiorul acestor margini.
Zonă de imprimare recomandată : Canon recomandă imprimarea în interiorul acestei zone.
Zonă de imprimare : Zona unde este posibilă imprimarea.
Totuşi, imprimarea în această zonă poate afecta calitatea de imprimare sau precizia alimentării cuhârtie.
NotăImprimare fără chenar
Selectând opţiunea Imprimare fără chenar, puteţi imprima fără margini.Atunci când efectuaţi o Imprimare fără chenar, este posibil să apară o uşoară trunchiere lamargini, deoarece imaginea imprimată este mărită pentru a acoperi întreaga pagină.Pentru Imprimare fără chenar, folosiţi următoarea hârtie:
Glossy Photo Paper „Everyday Use” GP-501Photo Paper Glossy GP-502Photo Paper Plus Semi-Gloss SG-201Photo Paper Pro Platinum PT-101Photo Paper Plus Glossy II PP-201Photo Paper Pro II PR-201Matte Photo Paper MP-101
Efectuarea unei Imprimări fără chenar pe orice alt tip de hârtie poate reduce substanţialcalitatea imprimării şi/sau poate avea ca rezultat imprimări cu nuanţe de culoare modificate.Imprimarea fără chenar pe hârtie simplă poate avea ca rezultat imprimări de calitate redusă.Folosiţi-le doar pentru imprimarea de test. Puteţi imprima fără chenar pe hârtie simplă doaratunci când se imprimă de pe computer.Imprimarea fără chenar nu este disponibilă pentru hârtie de dimensiune Legal, A5, B5 saupentru plicuri.În funcţie de tipul hârtiei, Imprimarea fără chenar poate reduce calitatea imprimării la marginilede sus şi de jos ale hârtiei sau poate face ca aceste părţi să se păteze.
În modul de copiere fără chenar, puteţi preciza valoarea extinderii în Extension amount din Devicesettings.
Modificarea setărilor aparatului de pe LCD
Letter, Legal
Plicuri
Alte dimensiuni pe lângă Letter, Legal, Plicuri
În partea superioară a paginii
Pagina 700 din 732 paginiZonă de imprimare

Ghid avansat > Anexă > Zonă de imprimare > Alte dimensiuni pe lângă Letter, Legal, Plicuri
Alte dimensiuni pe lângă Letter, Legal, Plicuri
Dimensiune Zonă de imprimare (lăţime x înălţime)
A5* 5,56 x 7,95 inchi / 141,2 x 202,0 mm
A4 8,00 x 11,38 inchi / 203,2 x 289,0 mm
B5* 6,90 x 9,80 inchi / 175,2 x 249,0 mm
4" x 6" / 10 x 15 cm 3,73 x 5,69 inchi / 94,8 x 144,4 mm
4" x 8" / 10 x 20 cm* 3,73 x 7,69 inchi / 94,8 x 195,2 mm
5" x 7" / 13 x 18 cm 4,73 x 6,69 inchi / 120,2 x 169,8 mm
8" x 10" / 20 x 25 cm 7,73 x 9,69 inchi / 196,4 x 246,0 mm
Wide 3,73 x 6,80 inchi / 94,8 x 172,6 mm
* Această dimensiune de pagină poate fi utilizată doar atunci când se imprimă de la computer.
Zonă de imprimare recomandată
Zonă de imprimare
În partea superioară a paginii
Pagina 701 din 732 paginiAlte dimensiuni pe lângă Letter, Legal, Plicuri

Ghid avansat > Anexă > Zonă de imprimare > Letter, Legal
Letter, Legal
Dimensiune Zonă de imprimare (lăţime x înălţime)
Letter 8,00 x 10,69 inchi / 203,2 x 271,4 mm
Legal* 8,00 x 13,69 inchi / 203,2 x 347,6 mm
* Această dimensiune de pagină poate fi utilizată doar atunci când se imprimă de la computer.
Zonă de imprimare recomandată
Zonă de imprimare
În partea superioară a paginii
Pagina 702 din 732 paginiLetter, Legal

Ghid avansat > Anexă > Zonă de imprimare > Plicuri
Plicuri
Dimensiune Zonă de imprimare recomandată (lăţime x înălţime)
European DL* 4,06 x 7,07 inchi / 103,2 x 179,5 mm
US Comm. Env. #10* 3,86 x 7,91 inchi / 98,0 x 200,8 mm
* Această dimensiune de pagină poate fi utilizată doar atunci când se imprimă de la computer.
Zonă de imprimare recomandată
În partea superioară a paginii
Pagina 703 din 732 paginiPlicuri

Ghid avansat > Anexă > Cum se demontează/montează capacul pentru documente
Cum se demontează/montează capacul pentru documente
Demontarea capacului pentru documente:Ţineţi capacul pentru documente în poziţie verticală.
Montarea capacului pentru documente:Introduceţi ambele balamale (A) ale capacului pentru documente vertical în suport (B) pentru amonta capacul pentru documente conform imaginii de mai jos.
În partea superioară a paginii
Pagina 704 din 732 paginiCum se demontează/montează capacul pentru documente

Ghid avansat > Anexă > Imprimarea DPOF utilizând foaia index foto
Imprimarea DPOF utilizând foaia index foto
Imprimaţi o foaie index foto, selectaţi imprimare DPOF, introduceţi şi scanaţi foaia şi puteţi imprimautilizând setările DPOF stocate pe cartela de memorie.
Această secţiune descrie funcţia de imprimare DPOF şi elementele de setare pentru foaia index foto.
Imprimare DPOF
Dacă aţi specificat setările Digital Print Order Format (Format ordine imprimare digitală) (DPOF) lacamera digitală, puteţi imprima utilizând aceste setări. Aparatul acceptă următoarele funcţii DPOF.
NotăDPOF este un format standard pentru a înregistra informaţiile specificate referitoare laimagini, cum ar fi ce imagine sau ce număr de copii să se imprime.Dacă scanaţi foaia index foto cu DPOF, deşi fotografia salvată pe cartela de memorie nu areinformaţii DPOF, pe LED se va afişa mesajul de eroare.
Versiune: Pe baza versiunii 1.00
Tipuri de imagine acceptate: CIFF, Exif (TIFF) şi JFIF
Stil de imprimare - Imprimare standard: Imprimă fotografiile care au fost specificate ca fiind „Imprimare standard” cu DPOF
Stil de imprimare - Imprimare index: Imprimă un index al fotografiilor care au fost specificate ca fiind „Imprimare index” cu DPOF,utilizând aspectul de imprimare index al aparatului
Stil de imprimare - Imprimare mai multe imagini: Imprimă o fotografie care a fost specificată ca fiind „Imprimare imagini multiple” cu DPOF (cunumărul de copii şi cu aspectul specificate)
Selectare fotografii de imprimat: Imprimă doar fotografiile specificate cu DPOF
Număr de copii: Imprimă numărul de copii specificate cu DPOF
Setări ale foii index foto
Puteţi selecta următoarele setări pentru foaia index foto.
Important
Atunci când imprimaţi cu DPOF, nu umpleţi cercul pentru a specifica numărul de copii saupentru a imprima o copie a tuturor fotografiilor pe fişa index de fotografii.Dacă cercul este umplut, mesajul de eroare este afişat pe LCD.
Pagina 705 din 732 paginiImprimarea DPOF utilizând foaia index foto

1. Selectaţi dimensiunea paginii şi alte formate de imprimare.
Când selectaţi un alt tip de hârtie decât cea simplă, fotografia specificată ca imprimarestandard sau imprimare a mai multor imagini cu DPOF este imprimată fără chenar. Cândselectaţi hârtie simplă, fotografia este imprimată cu chenar.
2. Chiar dacă umpleţi acest cerc, setarea aspectului este ignorată.
Fotografia este imprimată în aspectul specificat cu DPOF.
3. Specificaţi fiecare setare avansată.
Setarea de imprimare a datei este specificată cu DPOF. Dacă imprimaţi indexul fotografiilorcare sunt specificate ca fiind imprimare index cu DPOF, toate setările avansate sunt ignorate.
4. Umpleţi acest cerc pentru imprimare DPOF.
5. Dacă cercul este umplut atunci când imprimaţi cu DPOF, mesajul de eroare este afişat peLCD.
6. Dacă cercul este umplut atunci când imprimaţi cu DPOF, mesajul de eroare este afişat peLCD.
NotăImprimările sunt mărite sau micşorate automat pentru a se potrivi cu dimensiuneapaginii. Marginile fotografiei pot fi trunchiate în funcţie de dimensiunea paginii.Setarea ordinii datei fotografiilor după care sunt sortate fotografiile care o urmează pecea a DPOF.
În partea superioară a paginii
Pagina 706 din 732 paginiImprimarea DPOF utilizând foaia index foto

Advanced Guide > Appendix > Deleting the Undesired Print Job
Deleting the Undesired Print Job
If the printer does not start printing, the print job data cancelled or failed may be remaining.Delete the undesired print job by using the Canon IJ Status Monitor.
1. Display the Canon IJ Status Monitor
Click the status monitor button displayed on the task bar.The Canon IJ Status Monitor appears.
2. Display the print jobs
Click Display Print Queue....The print queue window opens.
3. Delete the print jobs
Select Cancel All Documents from the Printer menu.When the confirmation message appears, click Yes.
The deletion of the print job is complete.
Important
Users who have not been granted access permission for printer management cannot delete theprint job of another user.
Note When you perform this operation, all print jobs are deleted. If the print queue list contained anecessary print job, start the printing process over from the beginning.
Page top
Pagina 707 din 732 paginiDeleting the Undesired Print Job

Ghid avansat > Anexă > Actualizare MP Drivers
Actualizare MP Drivers
Obţinerea celor mai recente drivere MP Drivers
�tergerea driverelor MP Drivers inutile
Înainte de instalarea driverelor MP Drivers
Instalarea driverelor MP Drivers
În partea superioară a paginii
Pagina 708 din 732 paginiActualizare MP Drivers

Advanced Guide > Appendix > Updating the MP Drivers > Obtaining the Latest MP Drivers
Obtaining the Latest MP Drivers
The MP Drivers include a printer driver and scanner driver (ScanGear).
By updating the MP Drivers to the latest version of the MP Drivers, unresolved problems may be solved.
Access our web site through the Internet and download the latest MP Drivers for your model.
Important
You can download the MP Drivers for free, but any Internet access charges incurred are yourresponsibility. Before installing the latest MP Drivers, delete the previously installed version.For information on how to delete the MP Drivers, see " Deleting the Unnecessary MP Drivers ."
Related Topics
Before Installing the MP Drivers
Installing the MP Drivers
Page top
Pagina 709 din 732 paginiObtaining the Latest MP Drivers

Advanced Guide > Appendix > Updating the MP Drivers > Deleting the Unnecessary MP Drivers
Deleting the Unnecessary MP Drivers
The MP Drivers you no longer use can be deleted.When deleting the MP Drivers, first exit all programs that are running.
The procedure to delete the unnecessary MP Drivers is as follows:
When There is an Uninstaller
1. Start the uninstaller
In Windows Vista, select the Start menu -> All Programs -> "Your model name" -> MP DriversUninstaller.
In Windows XP, select the start menu -> All Programs -> "Your model name" -> MP DriversUninstaller.
In Windows 2000, select the Start menu -> Programs -> "Your model name" -> MP DriversUninstaller.
The MP Drivers Uninstaller dialog box is displayed.
Important
In Windows Vista, a confirmation/warning dialog box may appear when installing, uninstallingor starting software.This dialog box appears when administrative rights are required to perform a task.When you are logged on to an administrator account, click Continue or Allow to continue.Some applications require an administrator account to continue. When you are logged on to astandard account, switch to an administrator account, and restart the operation from thebeginning.
2. Execute the uninstaller
Click Execute. When the confirmation message appears, click Yes.When all the files have been deleted, click Complete.
The deletion of the MP Drivers is complete.
Important
Printer driver and scanner driver (ScanGear) will be deleted when you uninstall the MP Drivers.
When There is No Uninstaller
When there is no uninstaller in the Start menu of Windows Vista, follow these steps:
1. Select the printer to be deleted
Select the Start menu -> Control Panel -> Hardware and Sound -> Printers.Click the model to delete, then press the Alt key on your keyboard. On the File menu, click Delete.
2. Delete the printer
When the User Account Control dialog box appears, click Continue. Then when the confirmationmessage appears, click Yes.The icon is deleted.
3. Select the printer driver to be deleted
Pagina 710 din 732 paginiDeleting the Unnecessary MP Drivers

Press the Alt key. On the File menu, select Run as administrator, and then click Server Properties....When the User Account Control dialog box appears, click Continue.
Click the Drivers tab. In the Installed printer drivers list, click the printer to delete.
4. Delete the printer driver
When you click Remove..., Remove Driver And Package dialog box is displayed.Select Remove driver and driver package, and then click OK.In the confirmation dialog box, click Yes.
When data collection is completed in the Remove Driver Package dialog box, click Delete.
5. Click OK The deletion of the printer driver is complete.
Important
You may not be able to delete the printer driver properly from the Installed printer drivers list.If this happens, restart your computer, and try again.
Page top
Pagina 711 din 732 paginiDeleting the Unnecessary MP Drivers

Advanced Guide > Appendix > Updating the MP Drivers > Before Installing the MP Drivers
Before Installing the MP Drivers
This section describes the items that you should check before installing the MP Drivers. You should alsorefer to this section if the MP Drivers cannot be installed.
Checking the Machine Status
Properly connect the personal computer and the machine. For details on connection instructions,refer to the "Install the Software" in the manual: Getting Started.
Turn off the machine.
Checking the Personal Computer Settings
Terminate all running applications.
In Windows Vista, log on as a user who has the administrator rights.In Windows XP, log on as the computer administrator.In Windows 2000, log on as a member of the Administrators group.
Note When an old version of the MP Drivers is already installed, first delete (uninstall) that version. Forinstructions on deleting the MP Drivers, see " Deleting the Unnecessary MP Drivers ."
Related Topics
Obtaining the Latest MP Drivers
Installing the MP Drivers
Page top
Pagina 712 din 732 paginiBefore Installing the MP Drivers

Advanced Guide > Appendix > Updating the MP Drivers > Installing the MP Drivers
Installing the MP Drivers
You can access our web site through the Internet and download the latest MP Drivers for your model.
The procedure for installing the downloaded MP Drivers is as follows:
1. Turn off the machine
Important When you turn on the computer while the machine is on, the Windows Plug and Play function isexecuted automatically, and the Found New Hardware window (Windows Vista) or Found NewHardware Wizard window (Windows XP, Windows 2000) is displayed. In this case, clickCancel.
2. Start the installer
Double-click the icon of the downloaded file.The installation program starts.
Important
In Windows Vista, a confirmation/warning dialog box may appear when installing, uninstallingor starting software.This dialog box appears when administrative rights are required to perform a task.When you are logged on to an administrator account, click Continue or Allow to continue.Some applications require an administrator account to continue. When you are logged on to astandard account, switch to an administrator account, and restart the operation from thebeginning.
3. Install the driver
At the Welcome window, click Next.Read the contents of the License Agreement window. After checking the contents, click Yes.Installation of the MP Drivers begins.
After the Installation Complete window is displayed, check that the machine and the computer areconnected through a cable.
To select the connection port for your machine manually, check the Select printer port check box, andclick Manual Selection. At the Select Port window, select the connection destination, and then clickOK.
4. Complete the installation
Click Complete.Turn on the machine, and wait awhile until the connection is recognized.
This procedure installs the MP Drivers is complete.
Depending on the environment you are using, a message prompting you to restart the computer may bedisplayed. To complete the installation properly, restart the computer.
Important
You can download the MP Drivers for free, but any Internet access charges incurred are yourresponsibility.
Related Topics
Obtaining the Latest MP Drivers
Before Installing the MP Drivers
Pagina 713 din 732 paginiInstalling the MP Drivers

Page top
Pagina 714 din 732 paginiInstalling the MP Drivers

Ghid avansat > Anexă > Dezinstalarea manualelor On-Screen Manual
Dezinstalarea manualelor On-Screen Manual
Urmaţi procedura de mai jos pentru a dezinstala toate manualele on-screen instalate de pe computeruldumneavoastră.
Înainte de a dezinstala manualele on-screen, părăsiţi toate manualele on-screen care sunt în curs dedeschidere.
Toate manualele on-screen instalate vor fi şterse simultan.
1. Faceţi clic pe Start > Toate programele (All Programs) (Programs în Windows2000) > Canon XXX Manual (unde „XXX” reprezintă denumirea aparatului) >Dezinstalare (Uninstall).
2. Faceţi clic pe OK la afişarea mesajului de confirmare.
NotăCând apare mesajul care vă solicită repornirea computerului, faceţi clic pe OK pentru a repornicomputerul.
Manualele on-screen în afara ajutorului driverului de imprimantă şi a ajutorului driverului de scaner suntdezinstalate simultan.
1. Selectaţi Applications din meniul Go.
2. Faceţi dublu clic pe folderul Canon Utilities, apoi pe folderul IJ Manual.
3. Trageţi folderul cu numele aparatului în coşul de gunoi.
4. Trageţi pictograma Canon XXX On-screen Manual (unde „XXX” reprezintădenumirea aparatului) de pe desktop în coş.
În partea superioară a paginii
Pagina 715 din 732 paginiDezinstalarea manualelor On-Screen Manual

Ghid avansat > Anexă > Transportul aparatului
Transportul aparatului
Când schimbaţi locul aparatului, împachetaţi-l în ambalajul original.
Dacă nu aveţi ambalajul original, împachetaţi aparatul cu atenţie, folosind materiale de protecţie şiaşezaţi-l într-o cutie solidă.
Important
Nu transportaţi şi nu depozitaţi aparatul în poziţie înclinată, verticală sau inversă, deoarece poate săcurgă cerneala şi să deterioreze aparatul.
1. Opriţi aparatul.
2. Asiguraţi-vă că lampa Alimentare este stinsă şi deconectaţi aparatul.
Important
Nu deconectaţi aparatul în timp ce lampa Alimentare este aprinsă sau clipeşte de culoareverde, deoarece poate cauza o defecţiune sau o deteriorare a dispozitivului, aducânddispozitivul în imposibilitatea de a imprima.
3. Retrageţi suportul pentru hârtie, apoi închideţi tava de ieşire a hârtiei.
4. Deconectaţi cablul imprimantei de la computer şi de la aparat şi apoi deconectaţialimentarea de la aparat.
5. Prindeţi cu bandă adezivă toate capacele aparatului pentru a le împiedica să sedeschidă în timpul transportului. Apoi împachetaţi aparatul într-o pungă de plastic.
6. Ataşaţi materialul de protecţie de aparat atunci când îl împachetaţi.
Important
Împachetaţi dispozitivul cu cartuşele FINE rămase instalate în aparat.
NotăPuneţi etichete clare pe cutie cu „FRAGIL” sau „A SE MANIPULA CU GRIJĂ”.
În partea superioară a paginii
Pagina 716 din 732 paginiTransportul aparatului

Ghid avansat > Anexă > Deschiderea casetei de dialog Proprietăţi imprimantă (Printer Properties) (Windows)
Deschiderea casetei de dialog Proprietăţi imprimantă (PrinterProperties) (Windows)
Fereastra de configurare a driverului de imprimantă poate fi afişată din software-ul aplicaţiei în uz saudin meniul Start din Windows.
Deschideţi caseta de dialog Proprietăţi imprimantă (Printer Properties) cu ajutorulaplicaţiei software
Urmaţi procedura de mai jos pentru a configura setările de imprimare atunci când se imprimă.
1. Selectaţi comanda de imprimare din software-ul aplicaţiei în uz.
În general, selectaţi Imprimare (Print) din meniul Fişier (File) pentru a deschide caseta dedialog Imprimare (Print).
2. Selectaţi numele modelului dumneavoastră şi faceţi clic pe Preferinţe (Preferences) (sauProprietăţi (Properties)).
Se deschide caseta de dialog Proprietăţi imprimantă (Printer Properties).
NotăÎn funcţie de software-ul aplicaţiei utilizate, numele comenzilor sau numele meniurilorpot diferi şi pot exista mai mulţi paşi. Pentru detalii, consultaţi manualul de utilizare alaplicaţiei dumneavoastră software.
Deschideţi caseta de dialog Proprietăţi imprimantă (Printer Properties) din meniul Start
Urmaţi procedura de mai jos pentru a efectua operaţii de întreţinere, precum curăţarea capului deimprimare sau pentru a configura setările de imprimare comune tuturor aplicaţiilor software.
1. Selectaţi elemente din meniul Start după cum se arată mai jos.
În Windows Vista, selectaţi meniul Start > Panou de control (Control Panel) > Hardware şisunet (Hardware and Sound) > Imprimante (Printers).În Windows XP, selectaţi meniul Start > Panou de control (Control Panel) > Imprimante şi altedispozitive hardware (Printers and Other Hardware) > Imprimante şi faxuri (Printers andFaxes).În Windows 2000, selectaţi meniul Start > Settings > Printers.
2. Faceţi clic dreapta pe pictograma numelui modelului dumneavoastră şi selectaţi PrintingPreferences din meniul afişat.
Se deschide caseta de dialog Proprietăţi imprimantă (Printer Properties).
Important
Deschiderea casetei de dialog Proprietăţi imprimantă (Printer Properties) din Proprietăţi(Properties) afişează file ce se referă la funcţii Windows, precum fila Porturi (Ports) (sauComplex (Advanced)). Aceste file nu apar la deschiderea cu ajutorul Preferinţeimprimare (Printing Preferences) sau cu software-ul de aplicaţie. Cu privire la filele cese referă la funcţiile Windows, consultaţi manualul de utilizare pentru Windows.
În partea superioară a paginii
Pagina 717 din 732 paginiDeschiderea casetei de dialog Proprietăţi imprimantă (Printer Properties) (...

Ghid avansat > Anexă > Deschiderea casetelor de dialog Page Setup şi Print (Macintosh)
Deschiderea casetelor de dialog Page Setup şi Print(Macintosh)
Puteţi deschide casetele de dialog Page Setup şi Print din programul de aplicaţie pe care îl folosiţi.
Deschiderea casetei de dialog Page Setup
Deschideţi caseta de dialog Page Setup pentru a specifica setările pentru pagină (hârtie) înaintede imprimare.
1. Selectaţi Page Setup... din meniul File din programul dvs. de aplicaţie.
Se va deschide caseta de dialog Page Setup.
Deschiderea casetei de dialog Print
Deschideţi caseta de dialog Print pentru a specifica setările de imprimare înainte de operaţia deimprimare.
1. Selectaţi Print... din meniul File din programul dvs. de aplicaţie.
Se deschide caseta de dialog Print.
În partea superioară a paginii
Pagina 718 din 732 paginiDeschiderea casetelor de dialog Page Setup şi Print (Macintosh)

Ghid avansat > Anexă > Deschiderea utilitarului Canon IJ Printer Utility (Macintosh)
Deschiderea utilitarului Canon IJ Printer Utility (Macintosh)
Pentru a deschide Canon IJ Printer Utility, urmaţi procedura de mai jos.
În Mac OS X v.10.5.x
1. Selectaţi System Preferences din meniul Apple.
2. Faceţi clic pe Print & Fax.
3. Selectaţi denumirea aparatului din Printers şi faceţi clic pe Open Print Queue....
Este afişată lista de lucrări ale aparatului.
4. Faceţi clic pe Utility.
Se deschide Printer List.
5. Selectaţi denumirea aparatului din lista Product şi faceţi clic pe Maintenance.
Porneşte Canon IJ Printer Utility.
Pagina 719 din 732 paginiDeschiderea utilitarului Canon IJ Printer Utility (Macintosh)

În Mac OS X v.10.4.x sau Mac OS X v 10.3.9
1. Selectaţi Applications din meniul Go.
2. Faceţi dublu clic pe folderul Utilities, iar apoi faceţi dublu clic pe pictograma Printer SetupUtility.
Se deschide Printer List.
3. Selectaţi denumirea aparatului din lista Name şi faceţi clic pe Utility.
4. Selectaţi denumirea aparatului din lista Product şi faceţi clic pe Maintenance.
Porneşte Canon IJ Printer Utility.
În partea superioară a paginii
Pagina 720 din 732 paginiDeschiderea utilitarului Canon IJ Printer Utility (Macintosh)
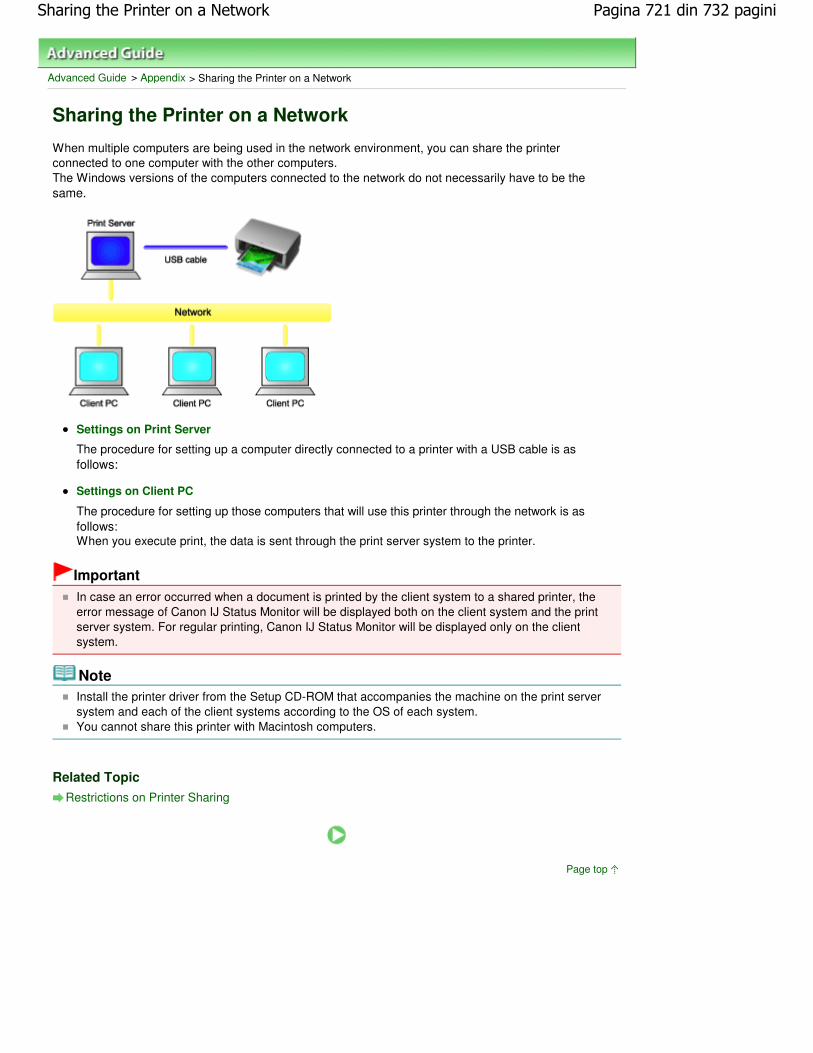
Advanced Guide > Appendix > Sharing the Printer on a Network
Sharing the Printer on a Network
When multiple computers are being used in the network environment, you can share the printerconnected to one computer with the other computers.The Windows versions of the computers connected to the network do not necessarily have to be thesame.
Settings on Print Server
The procedure for setting up a computer directly connected to a printer with a USB cable is asfollows:
Settings on Client PC
The procedure for setting up those computers that will use this printer through the network is asfollows:When you execute print, the data is sent through the print server system to the printer.
Important
In case an error occurred when a document is printed by the client system to a shared printer, theerror message of Canon IJ Status Monitor will be displayed both on the client system and the printserver system. For regular printing, Canon IJ Status Monitor will be displayed only on the clientsystem.
Note Install the printer driver from the Setup CD-ROM that accompanies the machine on the print serversystem and each of the client systems according to the OS of each system. You cannot share this printer with Macintosh computers.
Related Topic
Restrictions on Printer Sharing
Page top
Pagina 721 din 732 paginiSharing the Printer on a Network

Advanced Guide > Appendix > Sharing the Printer on a Network > Settings on Print Server
Settings on Print Server
When you use the printer on a network, set up the printer driver for sharing on the server system.
The procedure for setting up the print server systems is as follows:
1. Install the printer driver on the print server system
For details on installation instructions, refer to the "Install the Software" in the manual: GettingStarted.
2. Select items from the Start menu as shown below: In Windows Vista, select the Start menu -> Control Panel -> Hardware and Sound -> Printers.
In Windows XP, select the start menu -> Control Panel -> Printers and Other Hardware ->Printers and Faxes.
In Windows 2000, select the Start menu -> Settings -> Printers.
The Printers window (Windows Vista, Windows 2000) or Printers and Faxes window (Windows XP)is displayed.
3. Click the icon for the model name of printer to be shared
In Windows Vista, press the Alt key on your keyboard and then select Run as administrator ->Sharing... from the displayed File menu.
In Windows XP or Windows 2000, select Sharing... from the File menu.
Important
In Windows Vista, a confirmation/warning dialog box may appear when installing, uninstalling,or starting software.This dialog box appears when administrative rights are required to perform a task.When you are logged on to an administrator account, click Continue or Allow to continue. Some applications require an administrator account to continue. When you are logged on to astandard account, switch to an administrator account, and restart the operation from thebeginning.
Note Windows XP may display a message recommending the user to use the Network SetupWizard to set up sharing.When this message appears, choose not to use the wizard and then set up sharing.
4. Set sharing
Select Share this printer (Windows Vista, Windows XP) or Shared as (Windows 2000) on theSharing tab to set a shared name if necessary, and click OK.
The setup on the print server system is complete. Next, set up the client systems.
Page top
Pagina 722 din 732 paginiSettings on Print Server

Advanced Guide > Appendix > Sharing the Printer on a Network > Settings on Client PC
Settings on Client PC
After setting up the print server system, set up the client system.
The procedure for setting up the client systems is as follows:
In Windows Vista
1. Install the printer driver on the client systems To install the driver, load the Setup CD-ROM that comes with the machine, and select CustomInstall.For details on connection instructions, refer to the "Install the Software" in the manual: GettingStarted.
Note During the installation, a screen prompting you to turn the printer on appears. Click ManualSelection and then select an appropriate port to complete your installation.
2. Start the wizard Select the Start menu -> Network -> Add Printer.The Add Printer window appears.
3. Add a printer
Select Add a network, wireless or Bluetooth printer, and click the icon for the printer that you haveconfigured on the print server system to be shared, and then click Next.
Note If the icon for the printer is not displayed, check that the printer is actually connected to the printserver. It may take some time for the icon for the printer to appear.
4. Complete the setup
Take the appropriate action as described on the screen and then click Finish.The icon for the shared printer will be created in the Printers window.
The setup on the client systems is complete. You can now share the printer in the network.
In Windows XP/Windows 2000
1. Install the printer driver on the client systems
To install the driver, load the Setup CD-ROM that comes with the machine, and select CustomInstall.For details on connection instructions, refer to the "Install the Software" in the manual: GettingStarted.
Note During the installation, a screen prompting you to turn the printer on appears. Click ManualSelection and then select an appropriate port to complete your installation.
2. Start the wizard
In Windows XP, select the start menu -> Control Panel -> Printers and Other Hardware ->
Pagina 723 din 732 paginiSettings on Client PC

Printers and Faxes -> Add a printer.
In Windows 2000, select the Start menu -> Settings -> Printers -> Add Printer.
When Welcome to the Add Printer Wizard screen appears, click Next.
3. Add a printer
Select A network printer, or a printer attached to another computer (Windows XP) or Network printer(Windows 2000), then click Next.
On the Specify a Printer window (Windows XP) or Locate Your Printer window (Windows 2000), clickNext and then search for the print server system.
Click the icon for the printer that you have configured on the print server system to be shared, andthen click Next.
Note If the icon for the printer is not displayed, check that the printer is actually connected to the printserver.
4. Complete the setup Take the appropriate action as described on the screen and then click Finish.The icon for the shared printer will be created in the Printers and Faxes window (Windows XP) orPrinters window (Windows 2000).
The setup on the client systems is complete. You can now share the printer in the network.
Page top
Pagina 724 din 732 paginiSettings on Client PC
Advanced Guide > Appendix > Sharing the Printer on a Network > Restrictions on Printer Sharing
Restrictions on Printer Sharing
These are restrictions that apply when you are using a printer in a network environment. Check therestrictions for the environment you are using.
When You Are Sharing a Printer in a Network
A print completion message may be displayed. To disable the message display, follow theprocedure below.
In Windows Vista:
Press the Alt key from the Printers window on the client system. Open Run as administrator ->Server Properties... from the displayed File menu.
Uncheck Show informational notifications for network printers on the Advanced tab, and thenrestart the computer.
In Windows XP or Windows 2000:
Open Server Properties from the File menu of the Printer and Faxes window (Windows XP) or thePrinters window (Windows 2000) on the print server system.
Uncheck Notify when remote documents are printed on the Advanced tab, and then restart thecomputer.
The bi-directional communication function is disabled and the correct printer status may not berecognized.
When a client user opens the printer driver properties and then clicks OK with the Enablebidirectional support check box on the Ports tab unchecked, the bi-directional function of the printerserver system may also be disabled.In this case, check Enable bidirectional support check box on both the print server system and theclient system.
When you print from a client system, you cannot use Canon IJ Preview.
When the functions on the Maintenance tab cannot be set properly from a client system, they may begrayed out. In this case, change the settings from the print server.
When you change the settings of the print server, you should delete the icon of the shared printerfrom the client system, and then specify the shared settings again in the client system.
When the Same Printer Driver is Installed in the Print Server System and the ClientSystem as the Local Printer
The net crawl function may automatically create a network printer icon on the client system.
Page top
Pagina 725 din 732 paginiRestrictions on Printer Sharing

Advanced Guide > Using Easy-PhotoPrint EX
Using Easy-PhotoPrint EX
--- Transforming Your Photos into Creative Works of Art ---
Easy-PhotoPrint EX allows you to create albums, calendars and stickers easily using photos taken withdigital cameras.
You can also print borderless photos easily.
Start Easy-PhotoPrint EX
Click Here: Easy-PhotoPrint EX
NoteSee the section below for details on how to use Easy-PhotoPrint EX.
Printing with the Bundled Application Software
Create a Personalized Photo Album
Creating a personalized photo album is an easy task if you use Easy-PhotoPrint EX!
All you need to do is select which photos to use, select a layout, then load paper into your printer andprint. After you bind the printed sheets, you'll have the one and only album of your memories!
You can change the layout and background, and attachcomments to photos.
You can also select the size and orientation.You can arrange a photo across the left and right
pages.
CHECK!
Select a theme (background design) to create a single-themed album.
Decorate Items with Text and Frames
You can add text and frames to photos. Attach a description of the photo in an album, and add a frame toenhance the photo's atmosphere.
Pagina 726 din 732 paginiUsing Easy-PhotoPrint EX

CHECK!
Select Album to add text and frames. You cannot decorate photos with Photo Print.
Create a Calendar Using Your Favorite Photos
Create calendars easily with Easy-PhotoPrint EX. Create your own calendar using your favorite photos!It'll be exciting to turn the calendar pages.
You can use all kinds of photos.You can also create 2-month, 6-month and 12-month
calendars.
Create Stickers
Create stickers easily with Easy-PhotoPrint EX!
Create stickers of your favorite photos and share them with your friends!
CHECK!
You can add text to photos.
Pagina 727 din 732 paginiUsing Easy-PhotoPrint EX

Page top
Pagina 728 din 732 paginiUsing Easy-PhotoPrint EX

Advanced Guide > Using MP Navigator EX
Using MP Navigator EX
MP Navigator EX is an application that enables you to easily scan photos and documents. It is suitableeven for beginners.
Start MP Navigator EX
Click Here: MP Navigator EX
NoteSee "Let's Try Scanning" for details on how to scan images using MP Navigator EX.
Scan Photos and Documents
You can scan easily by navigating through MP Navigator EX screens. You can also save/print scannedimages using MP Navigator EX.
Scan Small Documents at One Time
You can scan multiple small documents (photos, cards, etc.) at one time. It is useful as you do not needto scan multiple times.
Scan Large Documents
You can easily scan documents that are larger than the Platen using MP Navigator EX. It allows you toscan the left and right halves of a document separately and combine them back into one image.
Pagina 729 din 732 paginiUsing MP Navigator EX

Scan with One-click
In One-click Mode, MP Navigator EX completes from scanning to saving, with a click of an icon. One-clickMode also allows you to scan and save images as PDF files or attach them to e-mail automatically.
Scan and Correct/Enhance Photos
You can easily correct/enhance scanned photos using MP Navigator EX. You do not need to use otherapplications.
For details on how to use MP Navigator EX, refer to " Scanning with the Bundled Application Software ."
Page top
Pagina 730 din 732 paginiUsing MP Navigator EX

Advanced Guide > About Solution Menu
About Solution Menu
Quick Shortcut!! Solution Menu
Solution Menu is a menu window that provides quick access from your desktop to Canon applications,manuals, and online product information.
Important
The number and types of buttons displayed in the window may vary depending on your printer andregion.
Starting Solution Menu
Click Here: Solution Menu
To start from desktop, see below.
Double-click the Canon Solution Menu icon on the desktop. Alternatively, from the Start menu, select (All)Programs > Canon Utilities > Solution Menu > Solution Menu.
From the next time, Solution Menu starts when Windows starts.
If the Start Solution Menu when Windows starts checkbox at the bottom left of the window is not selected,Solution Menu does not start when Windows starts.
NoteSolution Menu will start automatically when you install it using the Setup CD-ROM thataccompanies the printer.
Changing the Window Size
Click (window size: large) or (window size: small) on the title bar to change the window size
Pagina 731 din 732 paginiAbout Solution Menu

(large or small).
Solution Menu opens with the last used window size next time it is started.
When screen size is small
Starting an Application
1. Point to a button on the window to display the description of each application.
2. By clicking each button, the introduced application starts.
Follow the same steps to view the manuals or online product information.
Important
Internet connection is required to access the online information. Internet connection fees apply.
Exiting Solution Menu
Click (Close) on the title bar.
Restriction on Use of Solution Menu
This software is subject to the following restriction. Keep this point in mind when using it.
All icons of the installed applications that support Solution Menu are displayed in the window. Afterthe installation, you cannot rearrange the icons or delete only the icons.
Page top
Pagina 732 din 732 paginiAbout Solution Menu