Call Logging Procedure - DWS
10
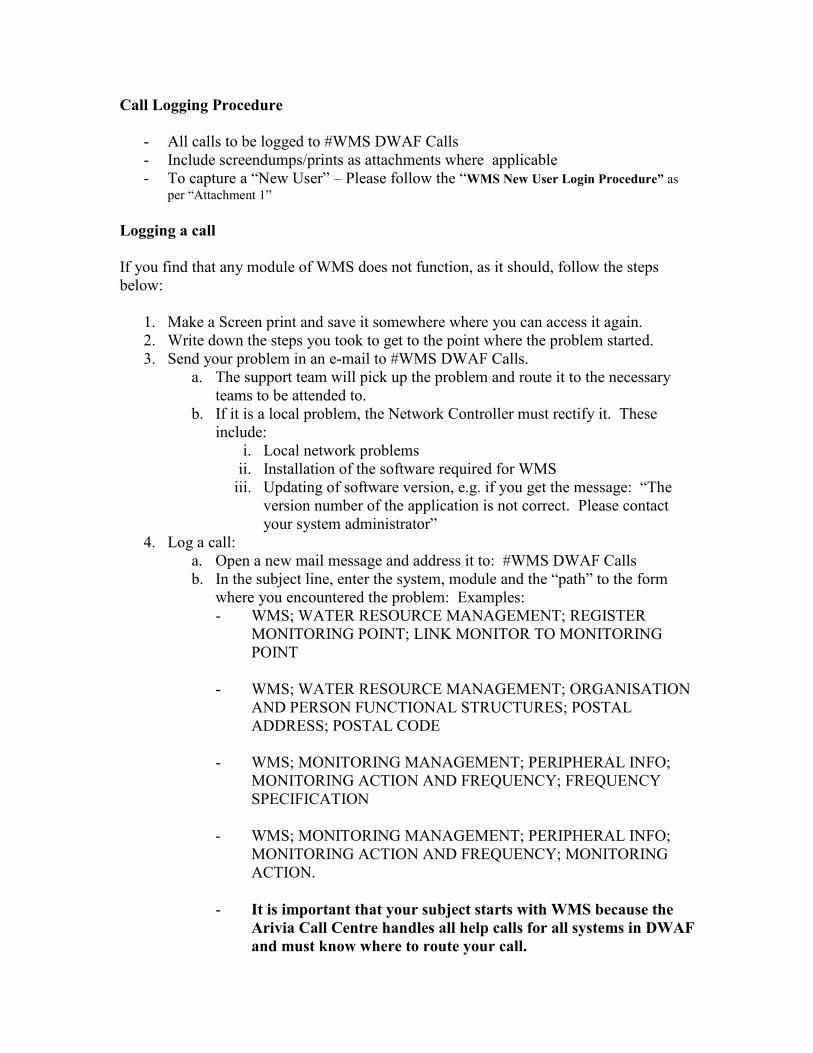
Call Logging Procedure - All calls to be logged to #WMS DWAF Calls - Include screendumps/prints as attachments where applicable - To capture a “New User” – Please follow the “WMS New User Login Procedure” as per “Attachment 1” Logging a call If you find that any module of WMS does not function, as it should, follow the steps below: 1. Make a Screen print and save it somewhere where you can access it again. 2. Write down the steps you took to get to the point where the problem started. 3. Send your problem in an e-mail to #WMS DWAF Calls. a. The support team will pick up the problem and route it to the necessary teams to be attended to. b. If it is a local problem, the Network Controller must rectify it. These include: i. Local network problems ii. Installation of the software required for WMS iii. Updating of software version, e.g. if you get the message: “The version number of the application is not correct. Please contact your system administrator” 4. Log a call: a. Open a new mail message and address it to: #WMS DWAF Calls b. In the subject line, enter the system, module and the “path” to the form where you encountered the problem: Examples: - WMS; WATER RESOURCE MANAGEMENT; REGISTER MONITORING POINT; LINK MONITOR TO MONITORING POINT - WMS; WATER RESOURCE MANAGEMENT; ORGANISATION AND PERSON FUNCTIONAL STRUCTURES; POSTAL ADDRESS; POSTAL CODE - WMS; MONITORING MANAGEMENT; PERIPHERAL INFO; MONITORING ACTION AND FREQUENCY; FREQUENCY SPECIFICATION - WMS; MONITORING MANAGEMENT; PERIPHERAL INFO; MONITORING ACTION AND FREQUENCY; MONITORING ACTION. - It is important that your subject starts with WMS because the Arivia Call Centre handles all help calls for all systems in DWAF and must know where to route your call.
-
Upload
khangminh22 -
Category
Documents
-
view
0 -
download
0
Transcript of Call Logging Procedure - DWS
Call Logging Procedure
- All calls to be logged to #WMS DWAF Calls - Include screendumps/prints as attachments where applicable - To capture a “New User” – Please follow the “WMS New User Login Procedure” as
per “Attachment 1” Logging a call If you find that any module of WMS does not function, as it should, follow the steps below:
1. Make a Screen print and save it somewhere where you can access it again. 2. Write down the steps you took to get to the point where the problem started. 3. Send your problem in an e-mail to #WMS DWAF Calls.
a. The support team will pick up the problem and route it to the necessary teams to be attended to.
b. If it is a local problem, the Network Controller must rectify it. These include:
i. Local network problems ii. Installation of the software required for WMS
iii. Updating of software version, e.g. if you get the message: “The version number of the application is not correct. Please contact your system administrator”
4. Log a call: a. Open a new mail message and address it to: #WMS DWAF Calls b. In the subject line, enter the system, module and the “path” to the form
where you encountered the problem: Examples: - WMS; WATER RESOURCE MANAGEMENT; REGISTER
MONITORING POINT; LINK MONITOR TO MONITORING POINT
- WMS; WATER RESOURCE MANAGEMENT; ORGANISATION
AND PERSON FUNCTIONAL STRUCTURES; POSTAL ADDRESS; POSTAL CODE
- WMS; MONITORING MANAGEMENT; PERIPHERAL INFO;
MONITORING ACTION AND FREQUENCY; FREQUENCY SPECIFICATION
- WMS; MONITORING MANAGEMENT; PERIPHERAL INFO;
MONITORING ACTION AND FREQUENCY; MONITORING ACTION.
- It is important that your subject starts with WMS because the
Arivia Call Centre handles all help calls for all systems in DWAF and must know where to route your call.

c. Supply the following information:
DWAF Asset Number: Persal Number: Directorate: Programme: Contact Details: e-mail address: Telephone: Region: Building: Office Number: Priority of Call:
d. Copy the subject line after this. e. Skip one line, then describe your problem in as much detail as possible to enable
the person that will attend to your problem to recreate it. f. Skip a line and describe the possible solution (if known) or the alteration that is
required. g. SCREENPRINTS OR FILES CAN BE ATTACHED (supply as far as possible) h. Send your message.
5. You will receive an answer from Arivia Call Centre. The answer will have a reference number for your call in the “Subject line”, either an “I” number or a “R” number. An “I” number is an incident while a “R” is a request for service. The difference between the calls is that an “I” is basically a bug while a “RFS” is a change to the system, or even data extraction.
6. You will also be provided with a “URS” number. This is the number for your problem as registered in the Requirement System (of WMS). You can access the Requirement System at http://wmstest:8080/urs/URSHomeFrame and follow the process for solving and the status of your problem else you can simply send a mail to “Therese Peddie” who will advise you or follow up with the Arivia call centre.
7. Priorities (Indicate the priority of your call) URS Priorities
ID Priority 1 Job Stopper 2 Critical 3 High 4 Medium 5 Low 6 None
Arivia Priorities (Application Support Calls) Priority Code
Description
1 Mission Critical 2 Critical 3 Medium 4 Low
- Priority 1 – Jobstopper / Mission Critical – This is a bug or error in the system
that prevents you from doing your work. Impacts the entire directorate and both the head office and regional operations. These requests get immediate attention.
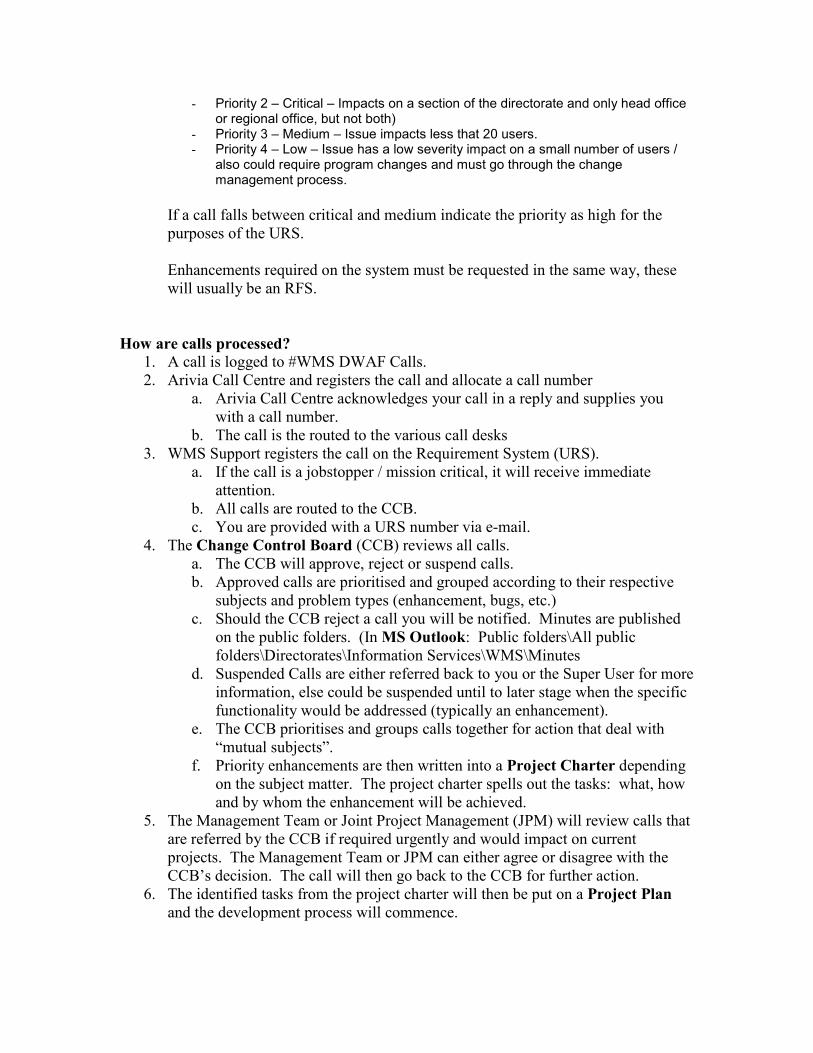
- Priority 2 – Critical – Impacts on a section of the directorate and only head office or regional office, but not both)
- Priority 3 – Medium – Issue impacts less that 20 users. - Priority 4 – Low – Issue has a low severity impact on a small number of users /
also could require program changes and must go through the change management process.
If a call falls between critical and medium indicate the priority as high for the purposes of the URS. Enhancements required on the system must be requested in the same way, these will usually be an RFS.
How are calls processed?
1. A call is logged to #WMS DWAF Calls. 2. Arivia Call Centre and registers the call and allocate a call number
a. Arivia Call Centre acknowledges your call in a reply and supplies you with a call number.
b. The call is the routed to the various call desks 3. WMS Support registers the call on the Requirement System (URS).
a. If the call is a jobstopper / mission critical, it will receive immediate attention.
b. All calls are routed to the CCB. c. You are provided with a URS number via e-mail.
4. The Change Control Board (CCB) reviews all calls. a. The CCB will approve, reject or suspend calls. b. Approved calls are prioritised and grouped according to their respective
subjects and problem types (enhancement, bugs, etc.) c. Should the CCB reject a call you will be notified. Minutes are published
on the public folders. (In MS Outlook: Public folders\All public folders\Directorates\Information Services\WMS\Minutes
d. Suspended Calls are either referred back to you or the Super User for more information, else could be suspended until to later stage when the specific functionality would be addressed (typically an enhancement).
e. The CCB prioritises and groups calls together for action that deal with “mutual subjects”.
f. Priority enhancements are then written into a Project Charter depending on the subject matter. The project charter spells out the tasks: what, how and by whom the enhancement will be achieved.
5. The Management Team or Joint Project Management (JPM) will review calls that are referred by the CCB if required urgently and would impact on current projects. The Management Team or JPM can either agree or disagree with the CCB’s decision. The call will then go back to the CCB for further action.
6. The identified tasks from the project charter will then be put on a Project Plan and the development process will commence.

7. Approved enhancements that are not identified, as a high priority will only be done when resources are allocated.
8. The problem, bug or enhancement is rectified or the programme is adapted. 9. A bug fix or new programme version is sent to all Network Controllers. 10. The Network Controllers update the version on your PC or Local server. 11. You will receive a mail from the WMS Support team once your fix has been
released, requesting confirmation. 12. Check that your problem is resolved and send a mail confirming that fixed or not. 13. If your problem is not resolved, the process starts over.
Example of a logged call:
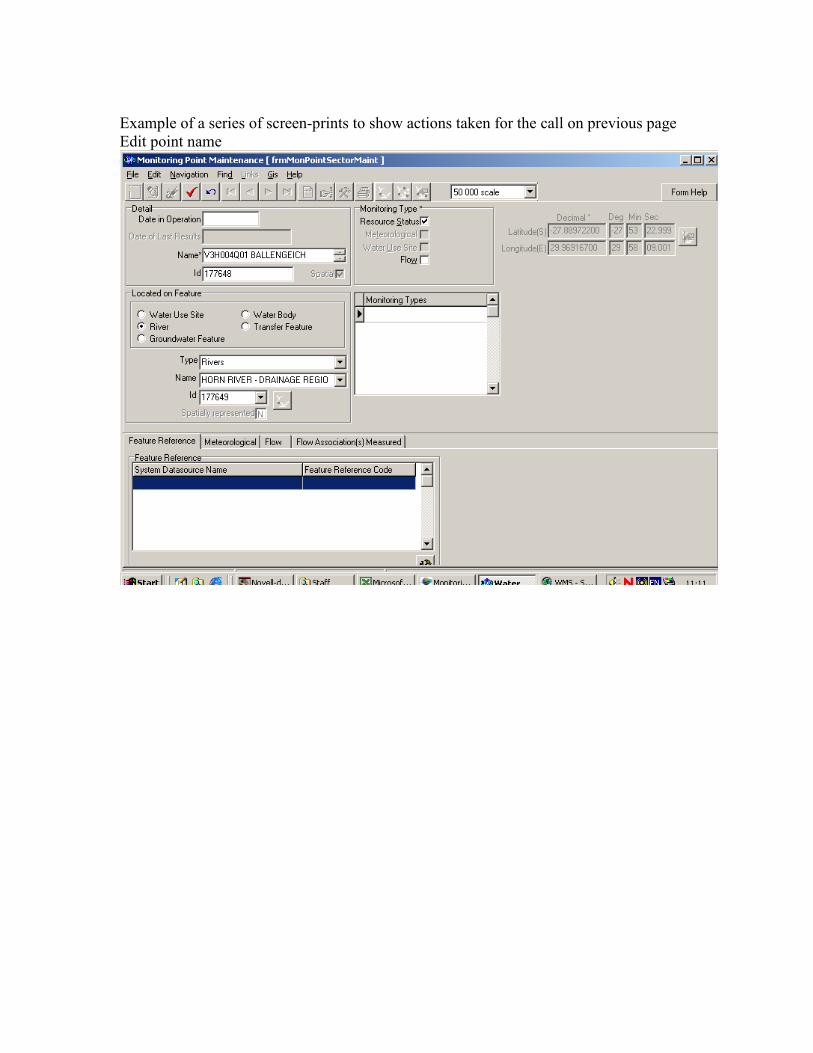
Example of a series of screen-prints to show actions taken for the call on previous page Edit point name
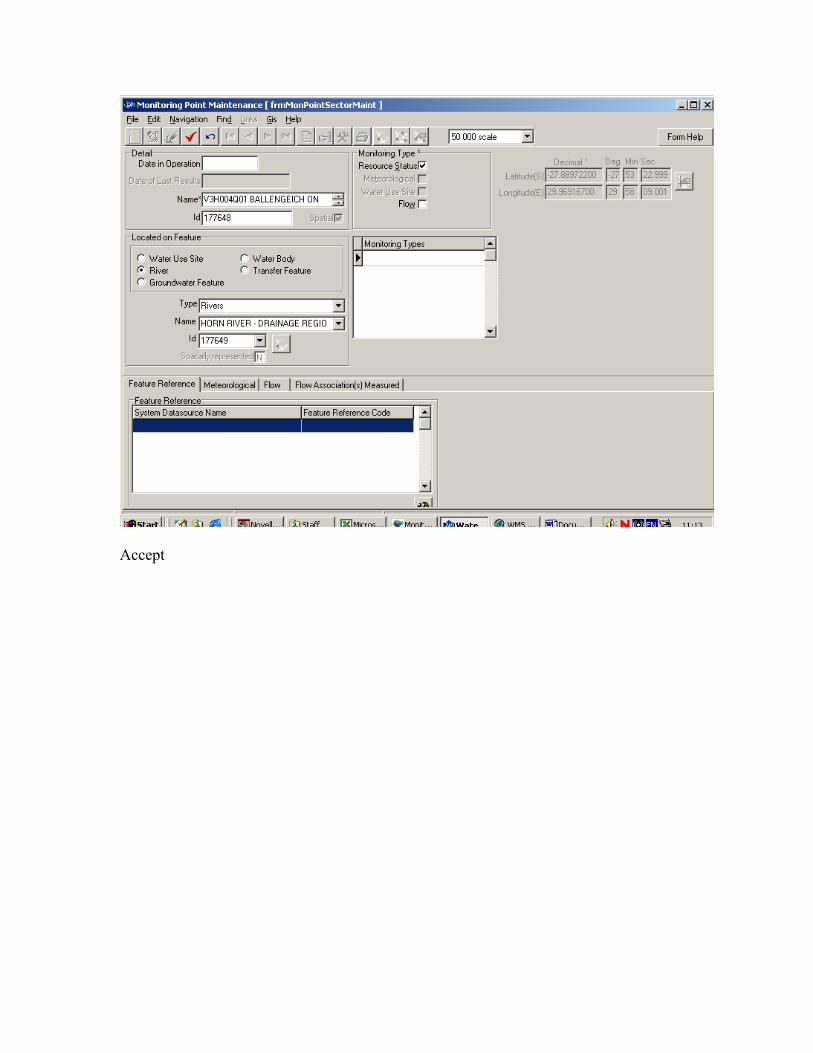
Accept
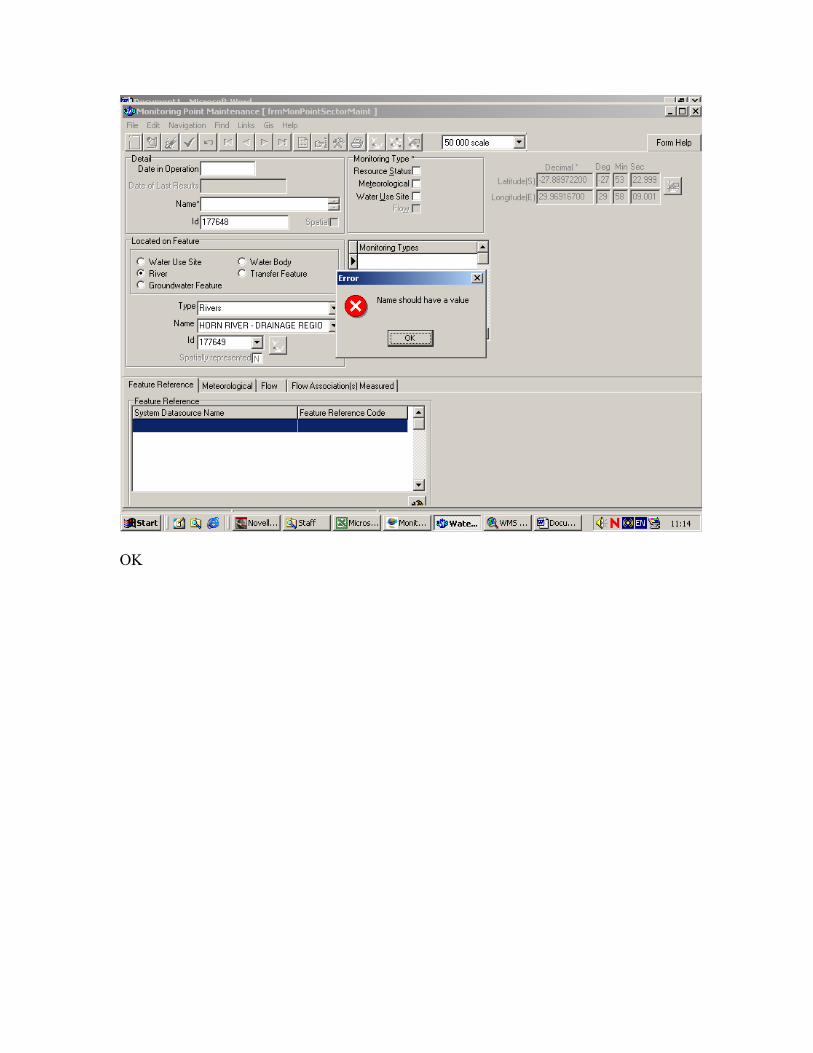
OK
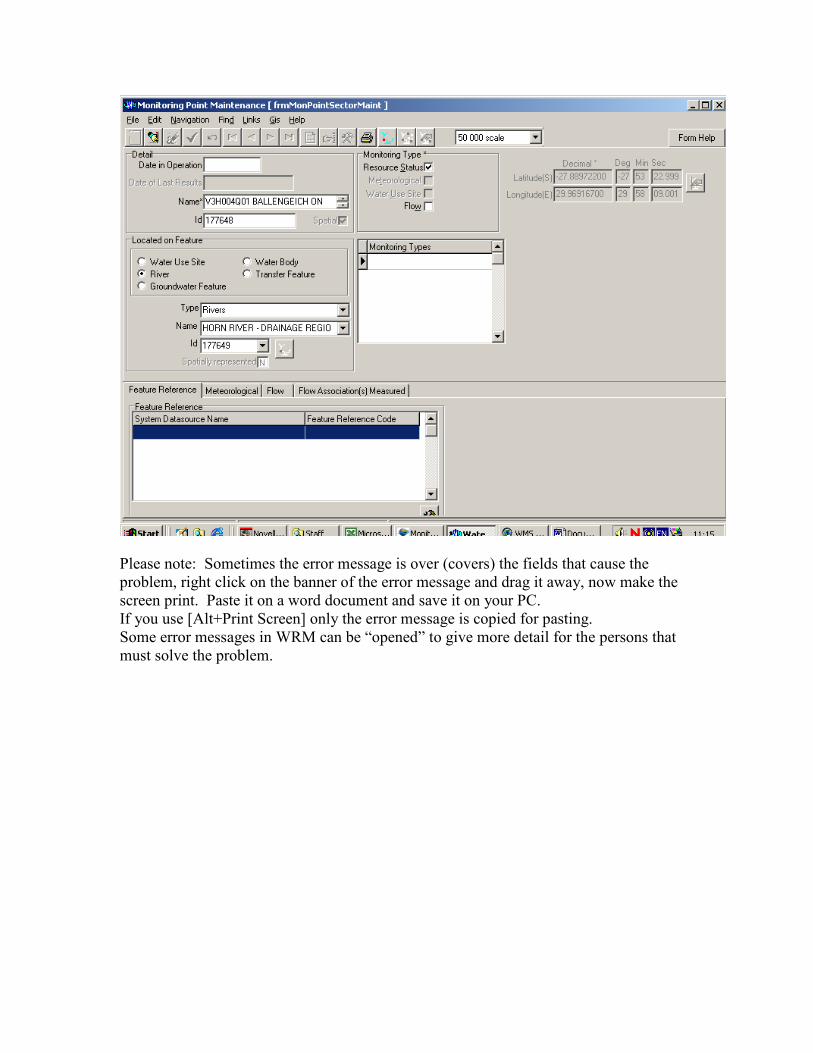
Please note: Sometimes the error message is over (covers) the fields that cause the problem, right click on the banner of the error message and drag it away, now make the screen print. Paste it on a word document and save it on your PC. If you use [Alt+Print Screen] only the error message is copied for pasting. Some error messages in WRM can be “opened” to give more detail for the persons that must solve the problem.
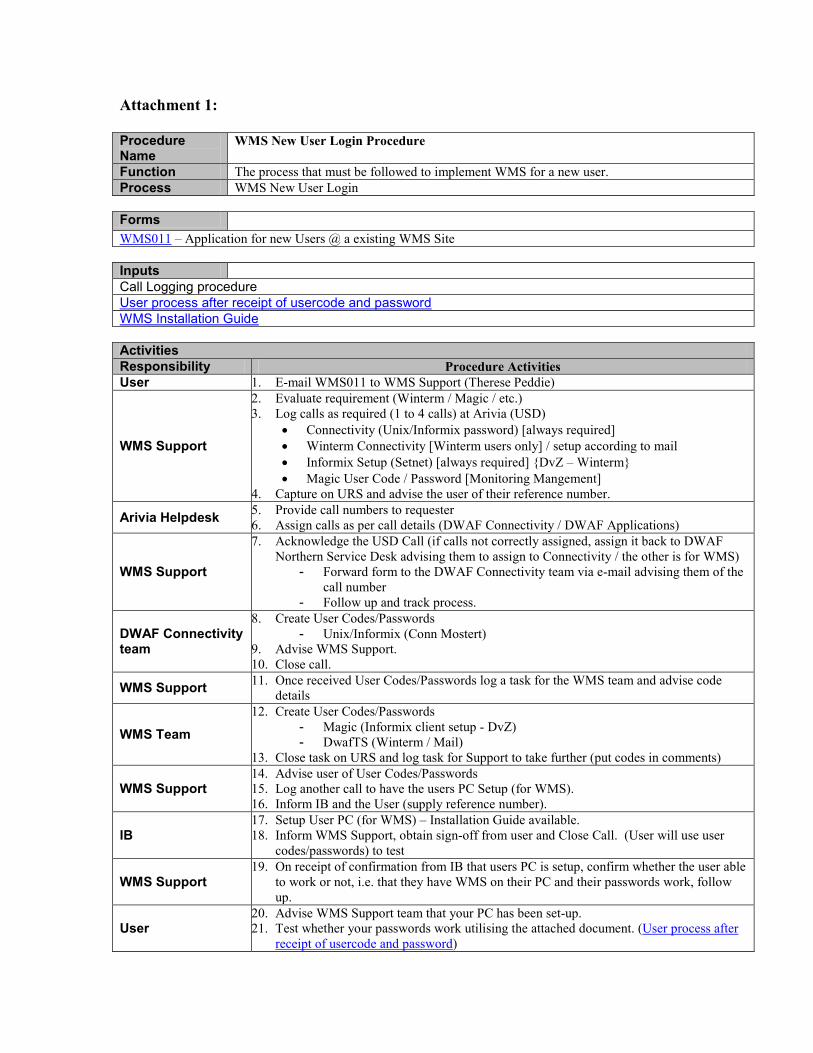
Attachment 1: Procedure Name
WMS New User Login Procedure
Function The process that must be followed to implement WMS for a new user. Process WMS New User Login Forms WMS011 – Application for new Users @ a existing WMS Site Inputs Call Logging procedure User process after receipt of usercode and password WMS Installation Guide Activities Responsibility Procedure Activities User 1. E-mail WMS011 to WMS Support (Therese Peddie)
WMS Support
2. Evaluate requirement (Winterm / Magic / etc.) 3. Log calls as required (1 to 4 calls) at Arivia (USD)
• Connectivity (Unix/Informix password) [always required] • Winterm Connectivity [Winterm users only] / setup according to mail • Informix Setup (Setnet) [always required] {DvZ – Winterm} • Magic User Code / Password [Monitoring Mangement]
4. Capture on URS and advise the user of their reference number.
Arivia Helpdesk 5. Provide call numbers to requester 6. Assign calls as per call details (DWAF Connectivity / DWAF Applications)
WMS Support
7. Acknowledge the USD Call (if calls not correctly assigned, assign it back to DWAF Northern Service Desk advising them to assign to Connectivity / the other is for WMS)
- Forward form to the DWAF Connectivity team via e-mail advising them of the call number
- Follow up and track process.
DWAF Connectivity team
8. Create User Codes/Passwords - Unix/Informix (Conn Mostert)
9. Advise WMS Support. 10. Close call.
WMS Support 11. Once received User Codes/Passwords log a task for the WMS team and advise code details
WMS Team
12. Create User Codes/Passwords - Magic (Informix client setup - DvZ) - DwafTS (Winterm / Mail)
13. Close task on URS and log task for Support to take further (put codes in comments)
WMS Support 14. Advise user of User Codes/Passwords 15. Log another call to have the users PC Setup (for WMS). 16. Inform IB and the User (supply reference number).
IB 17. Setup User PC (for WMS) – Installation Guide available. 18. Inform WMS Support, obtain sign-off from user and Close Call. (User will use user
codes/passwords) to test
WMS Support 19. On receipt of confirmation from IB that users PC is setup, confirm whether the user able
to work or not, i.e. that they have WMS on their PC and their passwords work, follow up.
User 20. Advise WMS Support team that your PC has been set-up. 21. Test whether your passwords work utilising the attached document. (User process after
receipt of usercode and password)
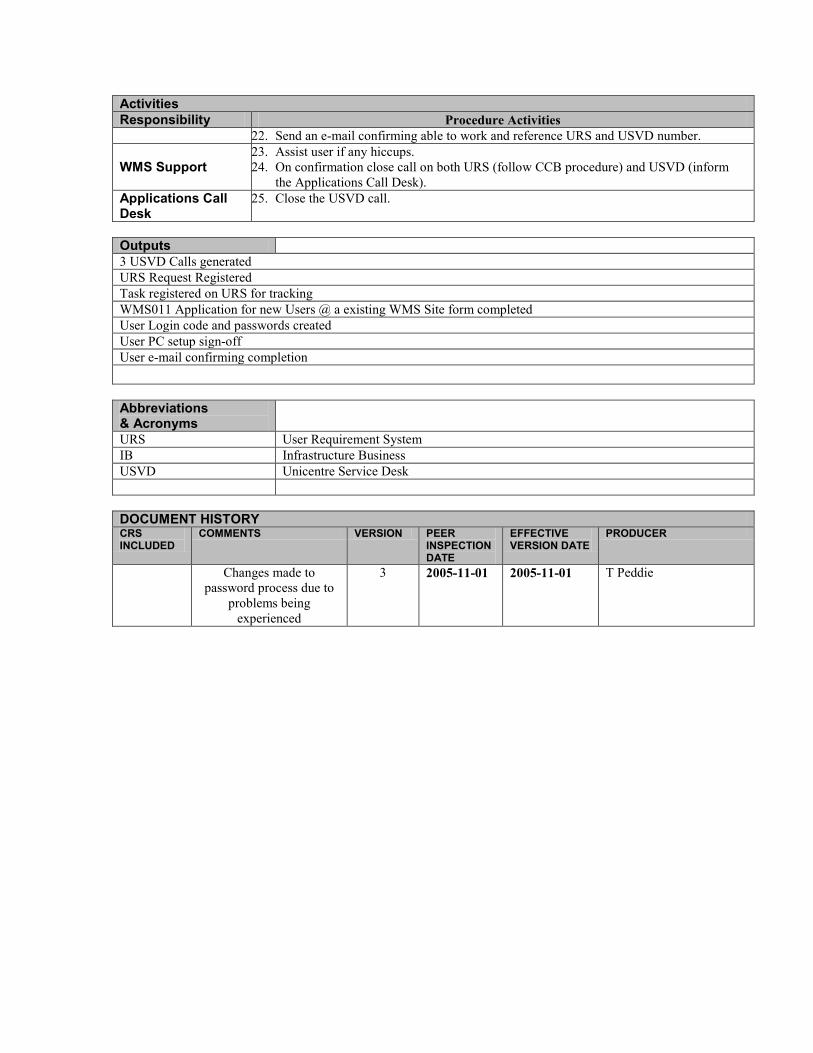
Activities Responsibility Procedure Activities
22. Send an e-mail confirming able to work and reference URS and USVD number.
WMS Support 23. Assist user if any hiccups. 24. On confirmation close call on both URS (follow CCB procedure) and USVD (inform
the Applications Call Desk). Applications Call Desk
25. Close the USVD call.
Outputs 3 USVD Calls generated URS Request Registered Task registered on URS for tracking WMS011 Application for new Users @ a existing WMS Site form completed User Login code and passwords created User PC setup sign-off User e-mail confirming completion Abbreviations & Acronyms
URS User Requirement System IB Infrastructure Business USVD Unicentre Service Desk DOCUMENT HISTORY CRS INCLUDED
COMMENTS VERSION PEER INSPECTION DATE
EFFECTIVE VERSION DATE
PRODUCER
Changes made to password process due to
problems being experienced
3 2005-11-01 2005-11-01 T Peddie