C# .NET Illuminated
367
C# .NET Illuminated Art Gittleman JONES AND BARTLETT PUBLISHERS
-
Upload
independent -
Category
Documents
-
view
3 -
download
0
Transcript of C# .NET Illuminated

C# .NET Illuminated
Art Gittleman
JONES AND BARTLETT PUBLISHERS

Art GittlemanCalifornia State University, Long Beach
World HeadquartersJones and Bartlett Publishers 40 Tall Pine DriveSudbury, MA [email protected]
Jones and Bartlett PublishersCanada2406 Nikanna RoadMississauga, ON L5C 2W6CANADA
Jones and Bartlett PublishersInternational Barb House, Barb MewsLondon W6 7PAUK
Copyright © 2005 by Art Gittleman
Cover Image © Photodisc
Library of Congress Cataloging-in-Publication DataGittleman, Art.C# .Net illuminated / Art Gittleman.
p. cm.Includes bibliographical references and index.ISBN 0-7637-2593-5 (pbk.)
1. C# (Computer program language) 2. Microsoft .NET. I. Title.QA76.73.C154G52 2004005.13’3—dc22
2004004572
9257
All rights reserved. No part of the material protected by this copyright notice may be reproducedor utilized in any form, electronic or mechanical, including photocopying, recording, or anyinformation storage or retrieval system, without written permission from the copyright owner.
Microsoft® and Windows® are registered trademarks of the Microsoft Corporation in the USA andother countries. Screen shots and icons reprinted with permission of Microsoft Corporation. Thisbook is not sponsored or endorsed by or affiliated with the Microsoft Corporation.
Acquisitions Editor: Stephen SolomonProduction Manager: Amy RoseEditorial Assistant: Caroline SenayMarketing Manager: Matthew BennettSales Manager: Jennifer CorrManufacturing Buyer: Therese BräuerComposition: Northeast CompositorsTechnical Artist: George NicholsText and Cover Design: Kristin E. OhlinPrinting and Binding: Courier WestfordCover Printing: John Pow Company
Printed in the United States of America08 07 06 05 04 10 9 8 7 6 5 4 3 2 1

In memory of my Uncle Julius who always volunteered his help

This page intentionally left blank
PREFACEI designed this text to teach programmers and aspiring programmers howto build applications using the C# language and Visual Studio .NET. Thesetools facilitate building applications for desktop computers, the Internet,and mobile devices. The text provides a thorough introduction to C#, andcarefully shows how to exploit the power of the Visual Studio .NET envi-ronment to minimize the coding a developer needs to do “by hand.”
The text starts by introducing the event-driven programming style, inwhich we write code to respond to users interacting with the forms we cre-ate. The second chapter goes through the steps of building an applicationusing Visual Studio .NET, while the third presents user interface controls.Chapters 4, 5, and 6 cover the basics of C#.
In Chapter 7 we access a database, and in Chapters 8 and 9 we build Webapplications, which are an ever-increasing part of the computing land-scape. Chapters 10 and 11 cover XML and Web services, the technologiesthat allow applications to communicate and integrate functions and data.The concluding chapters, 12 and 13, treat mobile applications for hand-held computers and other devices and the Crystal Reports report writingtool included with Visual Studio .NET.
The Visual Studio .NET platform makes rapid application developmentpossible for those with a wide range of interests. This text will be useful tothose preparing to become developers, as well as to those who use comput-ers as a tool to enhance their productivity in their major areas of interest.
Visual Studio .NET incorporates all of the capabilities of the .NET classframework library. It generates much of the code we need, leaving only theevent-handling code to be written by the developer. For those who want tolook behind the scenes and do all the programming without the aid ofapplication building tools, the author’s book Computing with C# and the.NET Framework (Jones and Bartlett, 2003) uses the .NET class frameworkdirectly, covering many of the same topics as in this text.
Software
Microsoft Visual Studio .NET 2003 or later will handle all the examples inthis text. Visual C# .NET, which can be bundled with this text, will handlethe examples in the first 11 chapters.
In the text, we deploy Web applications (Chapter 8 and later) locally usingMicrosoft Internet Information Server. If IIS is not installed, Web Matrix isavailable at no cost from Microsoft and will run Web applications locallywhile not permitting connections from other sites. Once Web Matrix isinstalled, its readme file will show how to use it.
The database examples use the Microsoft Access database. If Access is notinstalled, the SQL Server Desktop Engine is available at no cost fromMicrosoft.
Resources
All of the applications are included on the publisher’s website athttp://computerscience.jbpub.com, so readers have the complete code foreach example. Answers to the odd-numbered Test Your Understandingexercises appear at the end of the book.
Acknowledgments
I thank the following reviewers for their helpful comments and suggestionson an earlier draft. I found their feedback to be extremely valuable.
Corinne Hoisington, Northern Virginia Community College
Sheila Sicilia, Onondaga Community College
Ron Greenwald, Saint Petersburg Community College
Gerald Baumgartner, The Ohio State University
Ayad Boudiab, Georgia Perimeter College
I am thankful for the dedicated assistance and support from the Jones andBartlett staff, including Stephen Solomon, Caroline Senay, Amy Rose,Matthew Bennett, Kristin Ohlin, Anne Spencer, and Tracey Chapman, andMike Wile of Northeast Compositors.
Errata
Please e-mail any errors or typos to me at [email protected]. I will post themon my website at http://www.cecs.csulb.edu/~artg/csharp/errata1.txt
vi Preface

CONTENTSChapter 1 Introduction 1
Event-Driven Programming 1Windows Applications 2Using a Database 4Web Applications 5Web Services 6Mobile Applications 6Crystal Reports 7
Computing with C# 8Hardware 8Software 9History 10Features 12
Visual Studio .NET 12
Summary 14
Chapter 2 Creating an Application 15
Creating a Windows Application 15The Start Page 15Creating a Project 16The Properties Window 17Changing Properties 18
Adding Controls 19The Toolbox 19TextBox 20Label 21Code for an Event 22IntelliSense 23Running an Application 24Closing the Project 25Test Your Understanding 25
Positioning and Sizing Controls 25Anchoring 27Aligning Text 28

Docking 31Moving and Sizing Controls 33
Using a Button 34Setting Properties 35Handling the Click Event 37Context-Sensitive Help 37
Summary 38
Programming Exercises 39
Chapter 3 Controls for Windows Forms 41
Using Radio Buttons and Link Labels 41Radio Buttons 41Adding a Link 45Grouping Radio Buttons 47Adding Another Group 51
More Boxes 52Picture Boxes 52Check Boxes 53List Boxes 58Combo Boxes 61
Keeping Track 62DateTimePicker 63NumericUpDown 65Enabling the Display 65StatusBar 66Timer 66
Menus and Dialogs 68MainMenu 68RichTextBox 70File Dialogs 72A Print Dialog 75A Color Dialog 75A Font Dialog 77
Summary 78
Programming Exercises 79
Chapter 4 Variables and Types 81
Variables and the Assignment Operator 81Identifiers 81
viii Contents

Keywords 82The Character Set 82Variables 82The Assignment Operator 83Illustrating Variables 84Constants 87
Types 87Formatting 89Format Specifiers 90Field Width 92
Operators and Expressions 96Precedence of Arithmetic Operators 97Increment and Decrement Operators 99Relational Operators and Expressions 100The AND, OR, and NOT Operators 101Conditional AND 101Conditional OR 102Logical Complement 102Operator Precedence 103Combining AND with OR 103
Summary 106
Programming Exercises 107
Chapter 5 Selection and Repetition 109
The if and if-else Statements 110The if Statement 110The if-else Statement 111Blocks 112
Nested ifs and the switch Statement 116Nested if Statements 117Pairing else with if 119The switch Statement 122
Repetition 126The while Statement 126Loop Termination 127The for Statement 128The do Statement 133
Summary 136
Programming Exercises 137
Contents ix

Chapter 6 Reference Types 140
Arrays 140Multiple ListBox Selections 141Using the Documentation 142A CheckBox Array 143A Search Game 144Random Numbers 145Array Variables and Values 148
Strings 150Visualizing a String 150Creating a String 151A String Property 152A String Indexer 152String Methods 152Overloaded Methods 154Class Methods 156Using StringBuilder 158
Library Classes 162Namespaces 162Control Objects 163
Summary 164
Programming Exercises 165
Chapter 7 Using a Database 170
The Northwind Database 170Relational Databases 170Queries 171
The Connected Model 173Connecting to a Database 173Building a Command 175Reading and Displaying the Data 176
The Disconnected Model 179The Data Adapter Configuration Wizard 180A Query Builder 181A Data Set 182Using the Data Form Wizard 183
Using Multiple Tables 187Building the Query 188Displaying the Query Results 190
x Contents

Summary 192
Programming Exercises 191
Chapter 8 Web Applications 195
HTML 196Some HTML Tags 196
Web Server Controls and Code Behind 200Hosting a Web page 200Server Controls 202Code Behind 202More Web Controls 204
Accessing a Database 208Adding a Connection 209Configuring a Command 209Displaying in a DataGrid 209Writing the Event Handler 210Choosing Data to Display 211
Using Multiple Web Forms 216Redirecting a Response 216The AutoPostBack Property 217Adding a Web Form to a Project 218Initializing the Page 219Hidden State 220Initializing the Page 223
Summary 224
Programming Exercises 225
Chapter 9 Validation Controls 227
Checking Required Fields 227
Range Checking 231String Values 232Integer Values 233Dates 233Currency 234
Comparing Values 235Client-Side Versus Server-Side Validation 237
Validating Expressions and Summarizing 239Validating Expressions 239
Contents xi

Summarizing Validation Errors 243
Summary 244
Programming Exercises 244
Chapter 10 XML 247
XML and Its Syntax 247The Limitations of HTML 247XML Syntax 248
Schemas 251Building a Schema in Visual Studio .NET 252Valid Documents 255Using a Schema to Create an XML Document 256
From Data to XML 258Northwind Data to XML 258The Document Object Mode (DOM) 260Processing an XML Document 261
Transforming XML 263XSLT (Extensible Stylesheet Language for
Transformations) 263
Summary 272
Programming Exercises 273
Chapter 11 Web Services 276
Web Service Clients 276Adding a Web Reference 276Asynchronous Calls 279The Event Handler and the Callback Methods 280
Creating a Web Service 282Testing the Web Service 284A Client for the Reverse Service 285
Accessing Data 286Creating the Web Service 286Creating a Client 290
Summary 292
Programming Exercises 292
xii Contents

Chapter 12 Mobile Applications 295
Introduction 295Mobile Devices 295Operating Systems 296The .NET Compact Framework 297Mobile Web Applications 298
A Simple Mobile Web Application 301Creating a Web Application 301The Windows CE .NET Emulator 302The Pocket PC 2002 Emulator 304
A Smart Device Application: Appointment List 306Using Tabs 307Saving the Appointment List 309Initializing the Appointment List 310
Accessing Web Services 311Adding Web References 313
Summary 315
Programming Exercises 316
Chapter 13 Crystal Reports 317
Creating a Simple Report 317Adding and Creating a Report 317Viewing the Report 320Filtering 321
Adding Features to a Report 323The Data Tab 323The Fields Tab 324The Group Tab 325The Total Tab 325The Remaining Tabs 326Viewing the Report 326
Reports via the Web 327Viewing a Report in a Web Form 327A Web Service Report 328Accessing the Web Service 329
Summary 330
Programming Exercises 330
Contents xiii
Appendix A C# Keywords 331
Appendix B Operator Precedence Table 332
Appendix C The ASCII Character Set 333
Answers to Odd-Numbered Test Your Understanding Exercises 337
Index 343
xiv Contents
1CHAPTERIntroductionSending e-mail, playing games, and buying books are just a few of the many
uses for our computer. With powerful tools we can learn to create computer
applications ourselves. The C# language and Visual Studio .NET are two such
powerful tools, both of which are introduced in this chapter. C# is a general-pur-
pose programming language that lends itself to many programming styles.
Visual Studio .NET is a development environment that makes it easy to develop
applications for desktop computers, mobile devices, and the Web. The style of
these applications frequently is event-driven, presenting an interface with
which the user interacts.
Chapter Objectives:■ Explain event-driven programming
■ Introduce the C# language
■ Introduce Visual Studio .NET
1.1 Event-Driven Programming
User-generated events control an event-driven program. A simple exampleappears in Figure 1.1.
The application shown in Figure 1.1 waits for the user to enter a name inthe text box. As the user enters a name, the name replaces the initial mes-sage in the label. If the user does not enter a name or even goes away, thenno code is executed. The system executes code when the user enters text.
Using Visual Studio .NET means that we have very little C# code to writeourselves. For an event-driven application, the code we need to write consistsof event handlers. Event handlers respond to an event generated by the user.
In the application shown in Figure 1.1 we need to handle the event thatoccurs when the user enters text in the text box. Our code will consist of

2 CHAPTER 1 Introduction
Figure 1.1 A simple form.
only one line used to copy the text from the text box to the label. Visual Stu-dio .NET writes the code to create the text box and label, position them inthe form, and make the label color red. It provides the code structureneeded to run the application.
In this text we will create several types of event-driven applications. Theyinclude Windows applications, ASP.NET Web applications, ASP.NET Webservices, and mobile Web applications.
1.1.1 Windows Applications
A Windows application runs on a computer using the Windows operatingsystem. Currently, Windows XP is the latest version. The application startsby displaying a user interface, such as the simple one shown in Figure 1.1. Itwaits for the user’s actions and responds to them. In Chapter 2 we carefullygo through the steps necessary to create a Windows application.
A form represents a window for a user interface. Controls are componentswith a visual representation that we can add to a form to build a user inter-face. Chapter 3 presents a wide variety of Windows application controls.

1.1 Event-Driven Programming 3
Figure 1.2 Using list box and combo box controls.
Figure 1.3 A form to calculate the change from a dollar.
For example, Figure 1.2 shows a screen that contains a list box, a combobox, and a label. When the user selects a drink from the combo box, theevent handler that we wrote displays the food and drink that the userselected in the label.
Because we have not really begun to explore the C# language, we only dosimple things in the event-handling code that we write. We only allow theuser to select one food and one drink because we need to cover more C#concepts to allow multiple selections.
Chapters 4, 5, and 6 introduce the C# language, presenting the features weneed to write various types of event-driven applications. Chapter 4 uses C#for simple computations, introducing arithmetic expressions and basicdata types. Figure 1.3 shows the screen for an application that finds the

Figure 1.4Change from a dollar.
4 CHAPTER 1 Introduction
Figure 1.5 Assigning a letter grade.
coins needed to make change from a dollar given the purchase amount theuser enters in a text box. We respond to the event the user generates bypressing a button. We use the button to allow the user to complete the entryin the text box before calculating the change. Had we responded to the userentering text in the text box, we would have responded after each digit wasentered, which is not what we want.
Figure 1.4 shows the result of the calculation display in a message box. It iscorrect mathematically, but not grammatically. The display shows “1dimes”, but would be better as “1 dime”. Similarly, “1 nickels” should be “1nickel”. To correct the grammar we need to learn how to make choices,which is the subject of Chapter 5.
In Chapter 5 we cover the C# statements needed to select from amongalternatives and to repeat steps. Figure 1.5 shows a form in which the userenters a test score in a text box and presses a button to find out the lettergrade assigned to that score. The event-handling code selects the gradebased on the range of values in which the grade lies. It makes choicesdepending on the results of comparisons.
Chapter 6 covers arrays and strings. Array notation lets us use collections ofdata conveniently. We use character strings in each chapter, and then wetake the time in Chapter 6 to cover important details about them that wewill use in later examples. Applications can handle multiple selections in alist box and can produce the grammatically correct response shown in thetext box of Figure 1.6.
1.1.2 Using a Database
Chapter 7 continues Windows applications, adding the use of a database.Many applications use and create data that needs to be saved. A database

8
1.1 Event-Driven Programming 5
Figure 1.6 Choosing animals and a thing.
system uses efficient methods to save possibly large sets of data. Figure 1.7shows a screen that displays the products from the Northwind databaseincluded with the Microsoft Access database program.
1.1.3 Web Applications
The World Wide Web is becoming the platform of choice for many applica-tions. Users can browse sites all over the world with Internet Explorer orother similar software. Web pages are written in HTML, the hypertextmarkup language. Chapter 8 introduces HTML, but in our applicationVisual Studio .NET writes the HTML we need.
Visual Studio .NET provides Web forms and Web controls to enable us tobuild Web applications. We host these applications on our Web site. Usersbrowse our site and download our application to their own computers.They may submit information that they enter on forms to our server. Webserver controls, covered in Chapter 8, execute on our server and sendresponses back to the users who submitted requests. Figure 1.8 shows a Webform that confirms the user’s choices for ordering an ice cream sundae.
Chapter 9 continues discussion of building Web applications. It illustratesvalidation controls that make sure the user does not leave a field blank.These controls can also check that a value is in a correct range or that itcompares correctly with another value such as a password. They can also

6 CHAPTER 1 Introduction
Figure 1.7 Displaying database data.
check for valid formats of common data items such as telephone numbersand zip codes. Checking correct data entry is an important part of buildinga robust application. Figure 1.9 shows a screen indicating that the user hasfailed to enter a name or an address in the Web form.
1.1.4 Web Services
The Web applications covered in Chapters 8 and 9 let a user access andinteract with forms downloaded from a remote site. More generally, Webservices allow programs to access other sites without depending on ahuman user with a browser. Web services use XML, a general notation forexpressing information, which we cover in Chapter 10. In Chapter 11 weaccess and build Web services.
Figure 1.10 shows an interface to a weather-temperature Web service. Inthis case we provided a user interface. The user enters a zip code, and thenthe Web service returns the temperature in that zip code.
1.1.5 Mobile Applications
Mobile devices, including handheld computers, personal digital assistants,and cell phones, have installed applications and may access Web applica-tions hosted on servers. Visual Studio .NET, starting with the 2003 version,

1.1 Event-Driven Programming 7
Figure 1.8 A Web application.
allows us to develop applications for these devices. We introduce applica-tion development for mobile devices in Chapter 12.
1.1.6 Crystal Reports
Visual Studio .NET includes the Crystal Reports package that enables us tocreate a variety of reports to present the data and results of .NET applications.In Chapter 13 we show how to create reports and to access them on the Web.

8 CHAPTER 1 Introduction
Figure 1.9 Validating entries in a Web form.
Figure 1.10 Using a Web Service.
1.2 Computing with C#
Microsoft created the C# language along with the .NET platform. We startwith some basic computing concepts and then trace the evolution of C#and highlight its features.
1.2.1 Hardware
A computer has several basic components. The processor executes pro-grams stored in memory, using the memory to store data needed in the

1.2 Computing with C# 9
Figure 1.11 A computer system.
computation. External storage, including disk drives, holds programs anddata. Input devices such as a keyboard and a mouse allow user interaction.Output devices display results. Figure 1.11 illustrates this system. Changingtechnology continually improves the performance of these componentsand provides new types, but current commercial computers are structuredin this manner.
1.2.2 Software
Software consists of the programs that the computer executes. The oper-ating system software makes it much easier for us to use the computer. Itprovides an interface to the hardware so that we do not have to writeprograms to read input from the keyboard, write output to the screen, orcreate files on the hard disk. An operating system can be relatively sim-ple, providing few services, or it can be a huge program with many bellsand whistles.
Programmers appreciate utility programs such as editors that allow us tocreate or modify programs, and compilers that translate programs fromone language to another to facilitate their execution. End users run wordprocessors, spreadsheets, games, and browsers, among many other applica-tions. Businesses rely on computer software to serve customers and fortheir own accounting, payroll, and other management needs.
The processor executes software using its specially designed instruction set.Each instruction is simple, so it may take hundreds, thousands, or millionsof instructions to implement the tasks we want our software to perform.Each instruction has several parts. These parts specify the operation—addi-
tion, for example—that the instruction performs and any operands that ituses, such as the numbers to add. Each memory location has a numericaladdress. High-level languages such as C# provide instructions that performthe equivalent of many low-level machine instructions.
Processor
Memory
Storage OutputInput

10 CHAPTER 1 Introduction
High-Level Languages
Each processor has its own instruction set that uses numerical codes for theoperators and numerical addresses for the operations. Each instructionperforms one basic step such as an addition, a load, or a store. Program-ming using a processor’s instruction set would make it difficult to accom-plish anything more than the simplest tasks. Moreover, we would have towrite such a program all over again for the instruction set of a differentprocessor. A program using processor ABC’s instruction set will not run onprocessor XYZ, and vice versa.
A high-level language allows us to express the computation in a moreunderstandable form, combining several steps into one expression, and towrite a program that we can implement on many different types of proces-sors. For example, we can express an addition as
totalSalary = baseSalary + bonus;
and write more complicated statements such as
totalScore =(judge1Score + judge2Score + judge3Score) * difficulty;
which represents the total score obtained by first adding the scores of threejudges and then multiplying that sum by a difficulty factor. We use the star,*, to denote multiplication.
1.2.3 History
FORTRAN and COBOL were among the first high-level languages, introducedin the late 1950s. Both are still used today, FORTRAN for scientific applicationsand COBOL for business. Smalltalk, released around 1980, is a fully object-ori-ented language that influenced its successors, including Java and C#.
Systems programmers who needed access to the machine hardware usedassembly languages, which are very low-level and specific to the hardware.The C language, developed in the early 1970s, is sometimes described as aportable assembly language. It is a high-level language, like FORTRAN andCOBOL, but provides access to machine hardware. The UNIX operatingsystem, developed for the then new minicomputers, was mostly written inC, and both C and UNIX rapidly grew in popularity.
1.2 Computing with C# 11
Although good for systems programming, C is a small language that doesnot facilitate the development of large software systems. Introduced in thelate 1960s, object-oriented programming started to become popular in themid 1980s. Languages that support object-oriented programming do facili-tate the development of large software systems. C++ extends C to includeconstructs that support object-oriented programming, while still includingthose that access machine hardware. Consequently, C++ grew in popularity.
Meeting a different need, BASIC was developed in the 1960s as an easierway for students to learn to program. It used an interpreter so that studentscould immediately see the results of execution. Originally, personal com-puters had very limited memory chips in which to hold programs, soBASIC, which did not require compilation to a larger low-level representa-tion, became the main language used on early PCs. As memory becamecheaper and graphics capabilities grew, BASIC morphed to Visual Basic, anextremely popular language for the rapid development of user applications.
With the introduction of the .NET Framework, Visual Basic has evolved toVisual Basic .NET, a cousin of C#. One way we might describe C# is as alanguage that tries to combine the rapid application development of VisualBasic with much of the power of C++.
With the rise of desktop computers and the rapid growth of the Internet inthe mid 1990s came the need for a language to support programming byallowing users on vastly different systems to interact in a secure way. Java,introduced in 1995, uses a Java Virtual Machine to provide security andenable programs developed on different systems to interact. A large libraryextends its capabilities for Internet programming. Because it suited the newdemands placed on developers, Java has become very popular.
The goals of C# are similar to those of Java. Those versed in one of theselanguages can rapidly convert to using the other. C# had the advantage ofseeing the Java approach and how it might enhance it. C# adds features forthe easy development of components to make it simpler for developers tocombine programs from different sources. One can annotate a C# programwith attributes that are available when the application is running. Thismetadata describes the program so that other programs can use it. C#,newly developed in the 21st century, promises to become very popular asthe primary .NET programming language.

12 CHAPTER 1 Introduction
1.2.4 C# Features
Microsoft identifies C# as a modern, object-oriented language that allows pro-grammers to quickly build .NET components from high-level business objectsto system-level applications. These components can easily be converted toWeb services to be used over the Internet. Important characteristics are:
■ Productivity and Safety
— C# uses the .NET platform supporting Web technologies. C#works well with XML, the emerging standard way to pass struc-tured data over the Internet.
— The C# design eliminates many costly programming errors. Itincludes automatic memory management and initialization ofvariables. It checks types to avoid run-time errors.
— C# reduces updating costs by supporting versioning in the lan-guage, making it easier and less costly to introduce a new ver-sion of a product.
■ Power, Expressiveness, and Flexibility
— C# allows a close connection between the abstract businessprocess and its software implementation. The developer canassociate metadata with a program that will allow tools todetermine whether a component is correctly identified as partof a business object or to create reports.
— To avoid the need to use C++ to access basic machine func-tions, C# permits carefully identified low-level access tomachine resources.
1.3 Visual Studio .NET
Visual Studio .NET is a complete set of development tools for buildingdesktop applications, ASP Web applications, XML Web services, andmobile applications. In Chapter 2 we carefully detail the steps needed tocreate a Windows application. In this section we illustrate some of the fea-tures of Visual Studio .NET.
Figure 1.12 shows Visual Studio .NET opened to the design view with aform. The Toolbox on the left show the controls that we can drag onto theform. The form currently contains a TextBox and a Label. The selected tab at

1.3 Visual Studio .NET 13
Figure 1.12 Using Visual Studio .NET.
the top of the left side has the label Form1.cs [design]. Visual Studio .NETcreates the default name Form1. The extension .cs denotes a C# application.
The form contains the user interface design that we create by dragging con-trols from the Toolbox. The rightmost tab, Form1.cs, is not selected. It con-tains the C# code that Visual Studio .NET has written to implement ourdesign. We never need to select it. The only C# code we will need to write tomake this application work will be one line to copy the text that the userenters in the text box to the label below it. To write event-handling code, wedouble click on the control in which the event occurs. In the design shownin Figure 1.12, we will double click the TextBox and add that one line ofcode inside the template that appears.
Similarly, we use Visual Studio .NET forms and a Toolbox to design Webapplications and mobile applications. We use a similar process to writeevent-handling code for these types of applications. Visual Studio .NET isa powerful tool that minimizes the amount of C# code the developerneeds to write.
14 CHAPTER 1 Introduction
1.4 Summary■ With powerful tools we can learn to create computer applications
ourselves. The C# language and Visual Studio .NET are two suchpowerful tools.
■ User-generated events control an event-driven program. Typesof event-driven applications include Windows applications,ASP.NET Web applications, ASP.NET Web services, and mobileWeb applications.
■ Using Visual Studio .NET means that we have very little C# code towrite ourselves. For an event-driven application, the code we needto write consists of event handlers.
2CHAPTERCreating an ApplicationWe start by building a simple application illustrating the use of Visual Studio
.NET. Controls are components with visual representations that we add to a
form to make a user interface.We discuss placing controls in a form, configuring
controls by setting properties, and writing code to make a control respond to
the user’s actions.
Chapter Objectives:■ Create a simple Windows application
■ Add controls using the Toolbox
■ Configure controls using Properties
■ Write code to respond to user actions
■ Use context-sensitive help
2.1 Creating a Windows Application
We show how to use Visual Studio .NET to begin creating a simple Win-dows application.
2.1.1 The Start Page
Visual Studio .NET opens by default with a Start Page, as shown in Figure2.1.
We can change the default by choosing the Tools, Options menu item. In theupper-right corner, we can pop up the following choices:
Show Start Page
Load last loaded solution
Show Open Project dialog box

16 CHAPTER 2 Creating an Application
Figure 2.1 The Start Page.
Show New Project dialog box
Show empty environment
2.1.2 Creating a Project
To create a new project we click the New Project button, choosing Visual C#Projects as the project type and the Windows Application template. Templatesprovide the correct starting environment for the type of project we arebuilding. The various project types with their accompanying descriptionsare:
Windows Application A project for creating an application with aWindows user interface
Class Library A project for creating classes to use in otherapplications
Windows Control Library A project for creating controls to use in Win-dows applications
Mobile Web Application A project for creating an application viewableon PDAs, cell phones, and other mobile devices

2.1 Creating a Windows Application 17
ASP.NET Web Application A project for creating an application with a Webuser interface
ASP.NET Web Service A project for creating XML Web services to usefrom other applications
Web Control Library A project for creating controls to use in Webapplications
Console Application A project for creating a command-line application
Windows Service A project for creating services for Windows
Empty Project An empty project for creating a local application
Empty Web Project An empty project for creating a Web Application
New Project in An empty project created in an existing folderExisting Folder
We will use some of these templates later in the text. Later versions ofVisual Studio .NET include a few additional choices. The Mobile Web Appli-cation template requires a separate download to install in earlier versions.For the Windows application we are creating, we choose the name Exam-ple2-1 and the location c:\booknet\ch2, and click OK. The location is thefolder in which all the files for this project will be stored.
2.1.3 The Properties Window
Figure 2.2 shows the form on the left with the Properties window on theright. If the Properties window does not appear, we can view it by clickingthe View, Properties Window menu item.
The form in Figure 2.2 has a grid of dots that we can use to align controlsthat we add to the form. Using the scroll bar in the Properties window, wecan explore the various properties that we can use to configure the form. Themain Properties categories for a Form are Accessibility, Appearance, Behavior,Configurations, Data, Design, Focus, Layout, Misc, and Window Style. If they showwith a plus sign (+) at the left, clicking on the plus sign will open a list ofproperties in that category. Figure 2.2 shows the Appearance properties. Thehighlighted property, Text, has its description below the Properties window.
In the Properties windows, the row just below the name, Form1, contains fivebuttons. The leftmost two, separated by a vertical bar from the rest, allow usto choose to arrange the properties by category or alphabetically. The leftbutton of these two, for categories, is the default. The second group of twobuttons lets us choose this window to display property values or event

18 CHAPTER 2 Creating an Application
Figure 2.2 A Windows application.
methods. The default is property values. We will discuss event methods laterand use another approach to define them. We stick with the default choiceof property values. The rightmost button, for Property Pages, is disabled.
2.1.4 Changing Properties
The Text property contains the title of the application. It appears in theframe of the form. We can replace the default text, Form1, with our own title.We type A Simple Form, and after pressing the Enter key this text appears asthe new title in the form.
We use the BackColor property to change the background color of the form.The current color is a gray, which is the default for a Control. If we click onthis current BackColor value we get a combo box with an arrow to allow usto pop up a window with three tabs, Custom, Web, and System. The System tabis on top and shows the default color for various system elements. We couldselect ControlLight or ControlLightLight to get a lighter color for the formbackground, but we select the Custom tab to get a grid of custom color selec-tions. We choose the fourth color in the top row, which is a light pinkishyellow. The numbers 255, 255, and 192 associated with this color represent

Visual Studio .NET openswith a Start page that wecan configure in variousstyles. We begin by creat-ing a project of which thereare several types. A Win-dows application providesa Form for creating a userinterface. A Propertieswindow lists properties ofthe form, such as its background color, that wecan customize with ourchoices.
The BIG Picture
2.2 Adding Controls 19
its red, green, and blue components on a scale from 0 to 255, with 255being the most intense.
We can use properties to specify the size and the location of the form. Weuse pixels to indicate size and location. A pixel is a picture element, a singledot on the screen. The screen resolution determines the number of pixelsfor the full screen. Some usual configurations are 800 by 600 or 1024 by768, where the first measurement is the number of pixels making up thewidth and the second is the height.
Test Your Understanding
1. Using Visual Studio .NET, find the property to set the size of aform. What is the default size?
2. Using Visual Studio .NET, in what property group is the Location
property? At which corner of the form does it specify the position?
2.2 Adding Controls
Controls are components that we can add to a form. They enable us to cre-ate rich user interfaces.
2.2.1 The Toolbox
The Visual Studio .NET Toolbox contains controls that we can add to aform. To view the Toolbox, we click on the View, Toolbox menu item. Themain window is getting crowded with the form, the Properties window,and the Toolbox. The Properties window in Figure 2.2 shows a pushpin inthe vertical position just to the left of the X that allows the user to close thatwindow. Clicking on the pushpin turns it to the horizontal position andhides the Properties window in a bar on the right side. It reappears whenwe move the mouse over the bar. By auto-hiding the Properties window wecan have it readily available without cluttering the screen. We could auto-hide the Toolbox but leave it showing as in Figure 2.3, so that we can refer toit. Figure 2.3 shows the form with its new title and background color.
The Toolbox groups controls into the following categories:
Data Controls to represent database data
Components Nonvisual components such as a timer or report document
Windows Forms Controls that make up the visual interface

20 CHAPTER 2 Creating an Application
Figure 2.3 The Toolbox.
Clipboard Ring Used to copy text
General Used to add additional controls
In Figure 2.3, the opened Windows Forms tab shows the first of the user inter-face controls. Notice that the controls are not in alphabetical order, butrather are in order of expected frequency of use. The commonly used Label,LinkLabel, Button, and TextBox controls appear first. Clicking once on a con-trol will enable it, so that clicking the mouse in the form will place that con-trol on the form in the position of the mouse click. The Pointer optionappears in every category. Clicking on it releases the mouse to functionnormally. We could click Pointer if we had clicked Button but changed ourmind about adding a button to the form.
For our application, we will use two of most frequently used controls,TextBox and Label. A TextBox allows the user to enter text and displays it,while a Label is just for display.
2.2.2 TextBox
The TextBox control allows the user to enter text in an application. We clickthe mouse on the TextBox entry under the Windows Forms tab in the Toolbox,

2.2 Adding Controls 21
and click the mouse again at the location in the form where we want to addthe text box. We can also drag the TextBox from the Toolbox to the form.
When we add the TextBox to the form or later select it by clicking on it, theProperties window shows its properties. The Properties window alwaysshows the values of the properties for the selected control. The categoriesfor a TextBox are Accessibility, Appearance, Behavior, Configurations, Data,Design, Focus, and Layout.
Properties may be relevant for one control and not another. For example,the Appearance category for a TextBox includes a Lines property that containsthe lines of text in the text box. The Form control does not have a Lines prop-erty. The default text, textBox1, appears in the text box initially. It is thedefault value of the Text property. To allow the user to enter text withouthaving to erase, we could delete the value textBox1 from the Text propertyfield in the Properties window.
Visual Studio .NET generates default names for each control that it uses inthe code it generates. It generates the name textBox1 for the TextBox that weinclude in Example2-1. We prefer to change the names of our controls to bemore meaningful. This makes the programs easier to understand. Tochange the variable name, we look for the (Name) property in the Design sec-tion of the Properties window for the text box. We change the defaultname, textBox1, to nameEntry because the user should enter his or her name.
Note that properties refer to the control when the application is running,not while using Visual Studio .NET to design the application. For example,the Cursor property indicates the style of cursor that will appear when theuser passes the mouse over the control when the application is running.The TextBox is initially configured with the IBeam cursor that looks like theletter I. This IBeam cursor will appear when the user passes the mouse overit in the running application. During the design, the cursor is either thedefault Arrow or the SizeAll cursor pointing in all four directions.
2.2.3 Label
Labels are often used to provide descriptive text for controls. We add aLabel to the form by clicking Label in the Toolbox and then clicking at thelocation where we wish to place the label. Using the grid of dots, we canalign the label in the same column below the text box already on the form.The default text in the label is label1, but we use the Text property in the
22 CHAPTER 2 Creating an Application
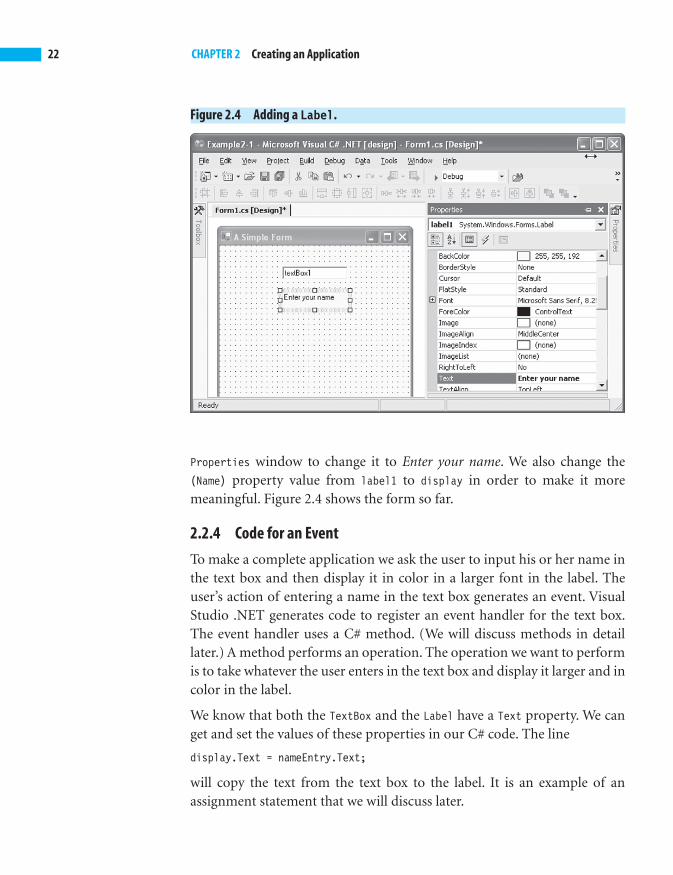
Figure 2.4 Adding a Label.
Properties window to change it to Enter your name. We also change the(Name) property value from label1 to display in order to make it moremeaningful. Figure 2.4 shows the form so far.
2.2.4 Code for an Event
To make a complete application we ask the user to input his or her name inthe text box and then display it in color in a larger font in the label. Theuser’s action of entering a name in the text box generates an event. VisualStudio .NET generates code to register an event handler for the text box.The event handler uses a C# method. (We will discuss methods in detaillater.) A method performs an operation. The operation we want to performis to take whatever the user enters in the text box and display it larger and incolor in the label.
We know that both the TextBox and the Label have a Text property. We canget and set the values of these properties in our C# code. The line
display.Text = nameEntry.Text;
will copy the text from the text box to the label. It is an example of anassignment statement that we will discuss later.
2.2 Adding Controls 23
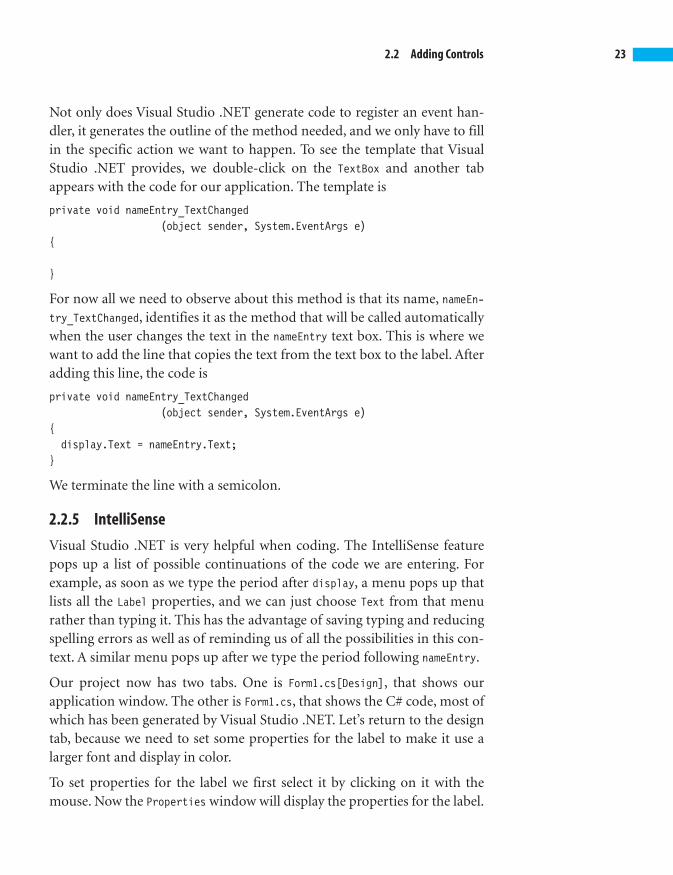
Not only does Visual Studio .NET generate code to register an event han-dler, it generates the outline of the method needed, and we only have to fillin the specific action we want to happen. To see the template that VisualStudio .NET provides, we double-click on the TextBox and another tabappears with the code for our application. The template is
private void nameEntry_TextChanged(object sender, System.EventArgs e)
{
}
For now all we need to observe about this method is that its name, nameEn-try_TextChanged, identifies it as the method that will be called automaticallywhen the user changes the text in the nameEntry text box. This is where wewant to add the line that copies the text from the text box to the label. Afteradding this line, the code is
private void nameEntry_TextChanged(object sender, System.EventArgs e)
{display.Text = nameEntry.Text;
}
We terminate the line with a semicolon.
2.2.5 IntelliSense
Visual Studio .NET is very helpful when coding. The IntelliSense featurepops up a list of possible continuations of the code we are entering. Forexample, as soon as we type the period after display, a menu pops up thatlists all the Label properties, and we can just choose Text from that menurather than typing it. This has the advantage of saving typing and reducingspelling errors as well as of reminding us of all the possibilities in this con-text. A similar menu pops up after we type the period following nameEntry.
Our project now has two tabs. One is Form1.cs[Design], that shows ourapplication window. The other is Form1.cs, that shows the C# code, most ofwhich has been generated by Visual Studio .NET. Let’s return to the designtab, because we need to set some properties for the label to make it use alarger font and display in color.
To set properties for the label we first select it by clicking on it with themouse. Now the Properties window will display the properties for the label.

24 CHAPTER 2 Creating an Application
Figure 2.5 Executing the application.
Clicking on the ForeColor property whose default is black, normally usedfor ControlText, pops up a color editor. We choose the Custom tab and selectthe second color in the third row, which is Red. Doing that changes the colorof the text in the label to red.
A FontDialog window pops up when we click on the Font value in the Prop-erties window. We change the size from 8 to 16. Making the font size largerchanges the display in the label from Enter your name to Enter you becausethe label is not large enough to hold the original text. To fix this, we find theAutoSize property under the Behavior category in the Properties window forthe label and change its value to True. This will allow the label to change itssize automatically to accommodate the text we place in it.
2.2.6 Running an Application
Our application is very simple, but before going any further we want toexecute it. The easiest way to execute an application is to click the Debug,Start menu item. This will compile the code and execute it. We could com-pile the code first by clicking Build, Build Solution and then run it by click-ing Debug, Start. Figure 2.5 shows the application window. Notice that thelabel has the same indentation as the text box, because we use the grid inVisual Studio .NET to align them.
The name that the user enters appears in the label in a larger size and in red.Each character appears in the label as soon as the user enters it in the textbox because the event handler responds to each entry. Another approach,

The Toolbox containscontrols that we can dragonto a form.It groups con-trols by categories. TheTextBox control allowsthe user to enter text in anapplication. Labels areoften used to providedescriptive text for con-trols. Double-clicking on aTextBox displays thetemplate for an eventhandler that will be calledto respond when the userchanges the text in thebox. We enter the C# codeto perform the desiredaction to respond to thisevent. We can execute theapplication from VisualStudio .NET.
The BIG Picture
2.3 Positioning and Sizing Controls 25
which we explore later, would add a button and copy the text from the textbox to the label when the user clicks the button. This alternative wouldallow the user to finish the entry and make any necessary corrections beforethe result appears in the label.
Notice that the application window in Figure 2.5 has three buttons in theupper-right corner. Clicking on the leftmost button, the minus sign, mini-mizes the application as an icon on the taskbar. Clicking on the middle but-ton, the screen, maximizes the window to fill the screen. When wemaximize the window, the text field and the label remain in their originallocations with respect to the upper-left corner. Thus they appear in theupper-left corner of the maximized window. We will see later how to allowthese positions to change when the window is maximized. Clicking on therightmost button, the X, closes the window and terminates the execution ofthe application.
2.2.7 Closing the Project
We want to save this project as it stands to compare it with later extensions.We click File, Close Solution. A window pops up asking us whether we wantto save those parts of the project that have changed. We click Yes. All the filespertaining to this project are located in the folder c:\booknet\ch2\Example2-1.
Test Your Understanding
3. Using Visual Studio .NET, find the properties in the Appearancecategory for each of the three controls, Form, TextBox, and Label.Which appear in one Control and not in one of the others?
4. What happens if you click Label in the Toolbox and then clickPointer before clicking in the Form?
5. Describe how the running Example2-1 application looks when youmaximize it by clicking the middle button in the upper-right corner.
2.3 Positioning and Sizing Controls
We will use anchoring to position a control appropriately when the userresizes the form containing it. We will dock a control to an edge of theform. We can use the mouse to drag a control to a new location or to resizeit. The keyboard can also be used to resize a control.

26 CHAPTER 2 Creating an Application
Figure 2.6 Creating a new project.
To illustrate, we start a new Visual Studio .NET project. After Visual Studio.NET opens, we click the New, Project menu item to pop up the New Project
window. We choose Visual C# Projects on the left and Windows Application onthe right. Then we enter Example2-2 as the project name, as Figure 2.6 shows.
Clicking OK opens the design for Example2-2 with a blank form. We add aTextBox to the form. Under it we add a Label, and under the Label we addanother TextBox. We align all three the same distance from the left of theform and roughly centered horizontally.
First we want to choose more meaningful names for each control and changethe default display messages. (Figure 2.11 shows how the running applicationwill look.) Because this example illustrates the different anchoring positions,we name the upper text box topText, name the label middleDisplay, and namethe lower text box bottomText. To assign these names we select each control byclicking on it and changing the value of its (Name) property from the defaultname to the desired name. The default Text property of the form itself isForm1. This text appears in the title of the form at the top. We change the Textproperty of the form to Anchor and Align.
The default display message for a TextBox or a Label just displays itsname. To prompt the user, we change the Text properties of topText andbottomText to Enter a message. We change the Text property of the middle-Display label to Display here.

2.3 Positioning and Sizing Controls 27
Figure 2.7 Selecting a control in the Properties window.
2.3.1 Anchoring
The default anchor for a control is top and left. This means that the controlwill maintain the same distance from the top and the left of the form as theuser resizes the form. The Anchor property allows us to change this default.To balance the appearance of the form, we can anchor some controls to thetop and some to the bottom, or some to the right and some to the left.
Because the default anchor is Top, Left, if we run this application and max-imize the form by clicking the middle button on the upper left of the form,all three controls will appear in the top left part of the form, not centered aswe originally placed them. To change the Anchor property, we find it in theProperties window toward the bottom in the Layout category.
The Properties window has a combo box at the top that allows us to selectthe control whose properties we wish to view. Pressing the arrow button atthe right pops up all the choices, as shown in Figure 2.7. Choosing topTextand clicking its Anchor value pops up a diagram with rectangles pointing up,right, down, and left, and a larger rectangle in the center, as shown in Figure2.8. We can choose from 0 to 4 of the four outer rectangles for the Anchor

28 CHAPTER 2 Creating an Application
Figure 2.8 Choices for the Anchor property.
value. For topText, we select the rectangle pointing up to set its Anchor toTop. We do not use the center rectangle for a TextBox.
We set the Anchor property for middleDisplay to Left, Right by selecting boththe left and right rectangles in the window similar to Figure 2.8, but for mid-dleDisplay. This will force middleDisplay to keep the same distance from theleft and right edges of the form when the form is resized. If the user maxi-mizes the form, middleDisplay will have to expand horizontally because itsdistance from either edge cannot increase and the form gets much wider.Finally, we set the Anchor property of bottomText to Bottom.
2.3.2 Aligning Text
If we click Debug, Start to execute this application and click the middle but-ton on the upper right to maximize the window, we see that upperText andlowerText remain in the center of the form because they are no longeranchored to the left edge. But the text Display here still appears near the leftedge, which at first glance looks inconsistent with the new anchoring ofLeft, Right for middleDisplay. But we cannot see the boundaries of mid-
dleDisplay because its default color is the same as the color of the form. Tosee the extent of middleDisplay, we change its BackColor to pink using thecolor dialog that pops up in the Properties window, as shown in Figure 2.9.
Rerunning the application now shows that middleDisplay remains centeredin the form, but expanded in width so that its left and right edges remain

2.3 Positioning and Sizing Controls 29
Figure 2.9 Setting the BackColor property.
Figure 2.10 TextAlign choices.
the same distance from the left and right edges of the form. The text, Dis-play here, appears at the upper-left edge of middleDisplay because its align-ment is TopLeft. To change the alignment we click on the value of theTextAlign property in the Appearance category in the Properties window,bringing up the choices shown in Figure 2.10. Selecting the center rectanglewill change TextAlign to MiddleCenter. Rerunning the application again willshow the text in the center of the label.
30 CHAPTER 2 Creating an Application
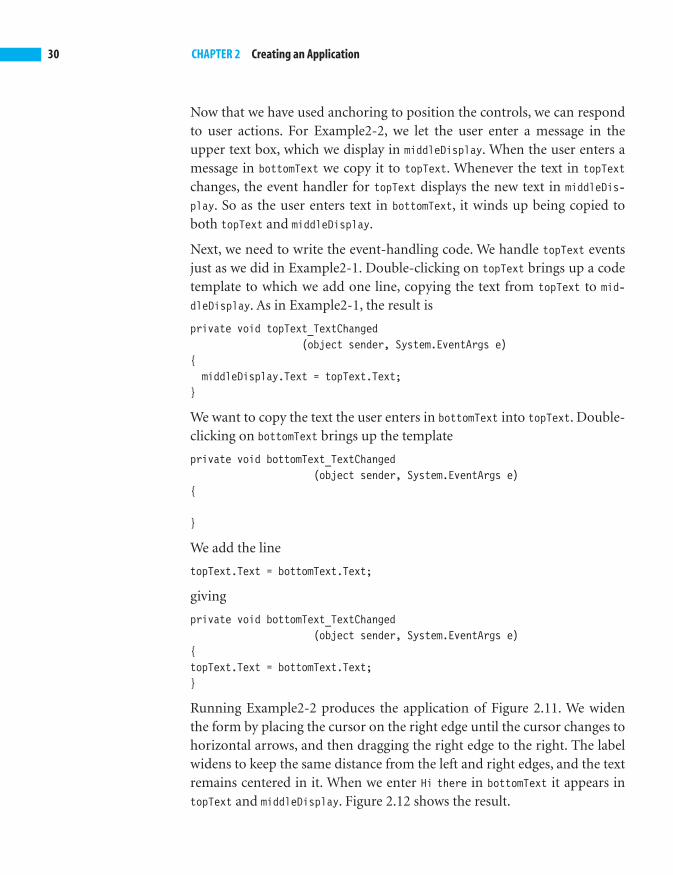
Now that we have used anchoring to position the controls, we can respondto user actions. For Example2-2, we let the user enter a message in theupper text box, which we display in middleDisplay. When the user enters amessage in bottomText we copy it to topText. Whenever the text in topTextchanges, the event handler for topText displays the new text in middleDis-play. So as the user enters text in bottomText, it winds up being copied toboth topText and middleDisplay.
Next, we need to write the event-handling code. We handle topText eventsjust as we did in Example2-1. Double-clicking on topText brings up a codetemplate to which we add one line, copying the text from topText to mid-dleDisplay. As in Example2-1, the result is
private void topText_TextChanged(object sender, System.EventArgs e)
{middleDisplay.Text = topText.Text;
}
We want to copy the text the user enters in bottomText into topText. Double-clicking on bottomText brings up the template
private void bottomText_TextChanged(object sender, System.EventArgs e)
{
}
We add the line
topText.Text = bottomText.Text;
giving
private void bottomText_TextChanged(object sender, System.EventArgs e)
{topText.Text = bottomText.Text;}
Running Example2-2 produces the application of Figure 2.11. We widenthe form by placing the cursor on the right edge until the cursor changes tohorizontal arrows, and then dragging the right edge to the right. The labelwidens to keep the same distance from the left and right edges, and the textremains centered in it. When we enter Hi there in bottomText it appears intopText and middleDisplay. Figure 2.12 shows the result.

2.3 Positioning and Sizing Controls 31
Figure 2.11 Executing Example2-2.
Figure 2.12 Widening the form of Example2-2.
2.3.3 Docking
Docking a control attaches it to an edge of the form, or to all edges. To illus-trate, in Example2-3 we will dock a TextBox to the top of the form and allowa Label to fill the rest. The width of the text box must expand to match theedge of the form. The text box will remain docked to the top edge of theform when the form is resized.
32 CHAPTER 2 Creating an Application
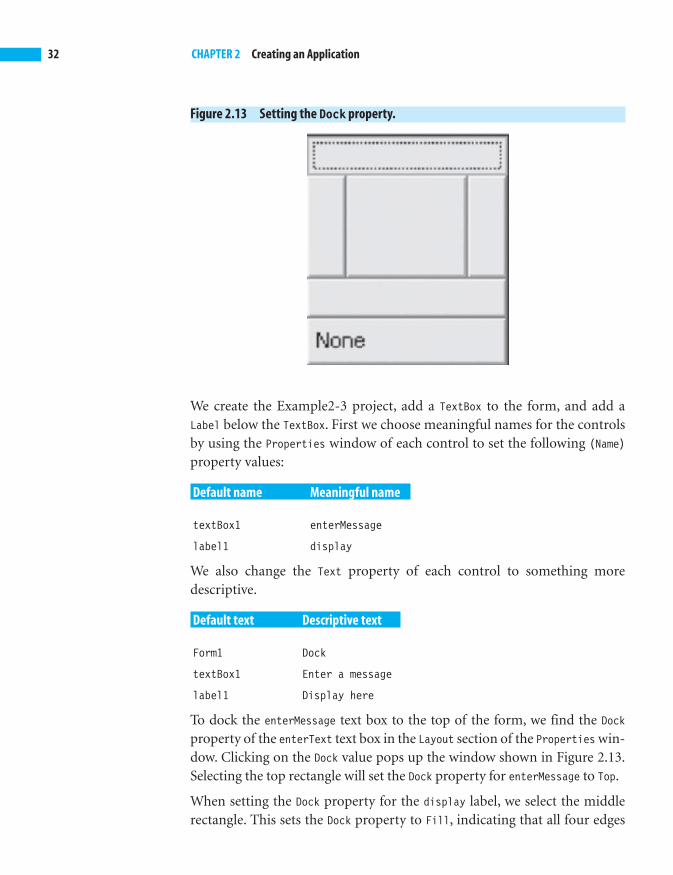
Figure 2.13 Setting the Dock property.
We create the Example2-3 project, add a TextBox to the form, and add aLabel below the TextBox. First we choose meaningful names for the controlsby using the Properties window of each control to set the following (Name)property values:
Default name Meaningful name
textBox1 enterMessage
label1 display
We also change the Text property of each control to something moredescriptive.
Default text Descriptive text
Form1 Dock
textBox1 Enter a message
label1 Display here
To dock the enterMessage text box to the top of the form, we find the Dock
property of the enterText text box in the Layout section of the Properties win-dow. Clicking on the Dock value pops up the window shown in Figure 2.13.Selecting the top rectangle will set the Dock property for enterMessage to Top.
When setting the Dock property for the display label, we select the middlerectangle. This sets the Dock property to Fill, indicating that all four edges
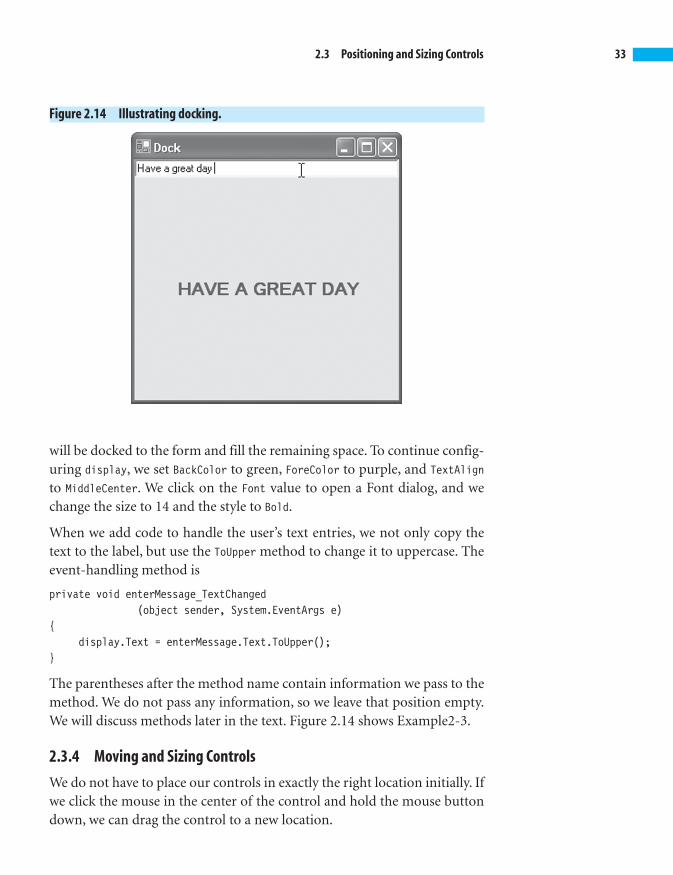
2.3 Positioning and Sizing Controls 33
Figure 2.14 Illustrating docking.
will be docked to the form and fill the remaining space. To continue config-uring display, we set BackColor to green, ForeColor to purple, and TextAlignto MiddleCenter. We click on the Font value to open a Font dialog, and wechange the size to 14 and the style to Bold.
When we add code to handle the user’s text entries, we not only copy thetext to the label, but use the ToUpper method to change it to uppercase. Theevent-handling method is
private void enterMessage_TextChanged(object sender, System.EventArgs e)
{display.Text = enterMessage.Text.ToUpper();
}
The parentheses after the method name contain information we pass to themethod. We do not pass any information, so we leave that position empty.We will discuss methods later in the text. Figure 2.14 shows Example2-3.
2.3.4 Moving and Sizing Controls
We do not have to place our controls in exactly the right location initially. Ifwe click the mouse in the center of the control and hold the mouse buttondown, we can drag the control to a new location.

The Anchor propertydetermines which edgesof a control are anchoredto the edges of its con-tainer. The TextAlignproperty of a Labelpositions its text. TheDock property specifiesan edge on which toattach the control.We usethe mouse to move a con-trol or resize it.
The BIG Picture
34 CHAPTER 2 Creating an Application
We can make the control larger or smaller using the mouse. When we selecta TextBox or a Label in the form that we are designing in Visual Studio .NET,eight small squares appear around the boundary, as we saw earlier in Figure2.4. For a TextBox, when we point the mouse over the middle square on theleft or right edge, the cursor changes to a horizontal line with arrows point-ing left and right. This signifies that if we press the mouse and drag thecontrol, we can expand or contract it horizontally. None of the othersquares on the selected TextBox box provide resizing starting points.
By contrast, each of the eight squares around a selected label provides aresizing starting point. Placing the cursor on the squares in the middle ofthe left and right sides of the label allows horizontal resizing. When we putthe cursor on one of the middle squares on the top or bottom side of thelabel, the cursor changes to a vertical bar with an arrow pointing up ordown. This signifies that we can resize the label vertically. Placing the cur-sor on one of the four corners changes the cursor to a diagonal bar witharrows pointing in both diagonal directions. This indicates that we canresize diagonally, changing both the vertical and horizontal dimensions ofthe label as we drag the mouse.
Test Your Understanding
6. If the Anchor property of a control has the value Top, Right, whatcan we conclude about the distances of the control to the edgesof the form?
7. What value does the Dock property have when the control attachesto all four edges of the form?
8. The Multiline property of a TextBox is False by default. How doyou think changing its value to True would affect the resizingcapability of that text box?
2.4 Using a Button
The applications so far have copied the text from the text box to the labelcharacter by character as the user types it. We might prefer to wait until theuser has completed the entry, making any necessary corrections, before copy-ing that text. We can do that by using a button. Only when the user clicks thebutton will the application copy the text from the text box to the label.
2.4 Using a Button 35
Figure 2.15 Some form properties.
We create an Example2-4 project with a text box, a label, and a button.After opening Visual Studio .NET, we click on the File, New, Project menuitem to display the New Project window. We choose Visual C# Projects andWindows Application and then enter Example2-4 in the Name text box. Click-ing OK displays an empty form.
If the Toolbox is not visible we click on the View, Toolbox menu item to dis-play it. We drag a TextBox, a Label, and a Button from the Toolbox to the form.
2.4.1 Setting Properties
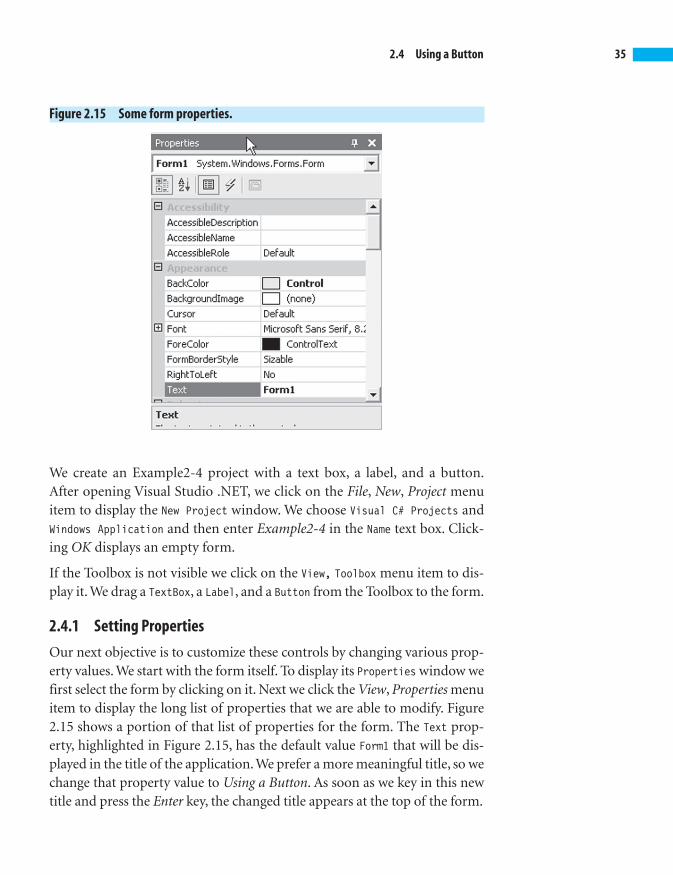
Our next objective is to customize these controls by changing various prop-erty values. We start with the form itself. To display its Properties window wefirst select the form by clicking on it. Next we click the View, Properties menuitem to display the long list of properties that we are able to modify. Figure2.15 shows a portion of that list of properties for the form. The Text prop-erty, highlighted in Figure 2.15, has the default value Form1 that will be dis-played in the title of the application. We prefer a more meaningful title, so wechange that property value to Using a Button. As soon as we key in this newtitle and press the Enter key, the changed title appears at the top of the form.
36 CHAPTER 2 Creating an Application
Figure 2.16 Changing the background color.
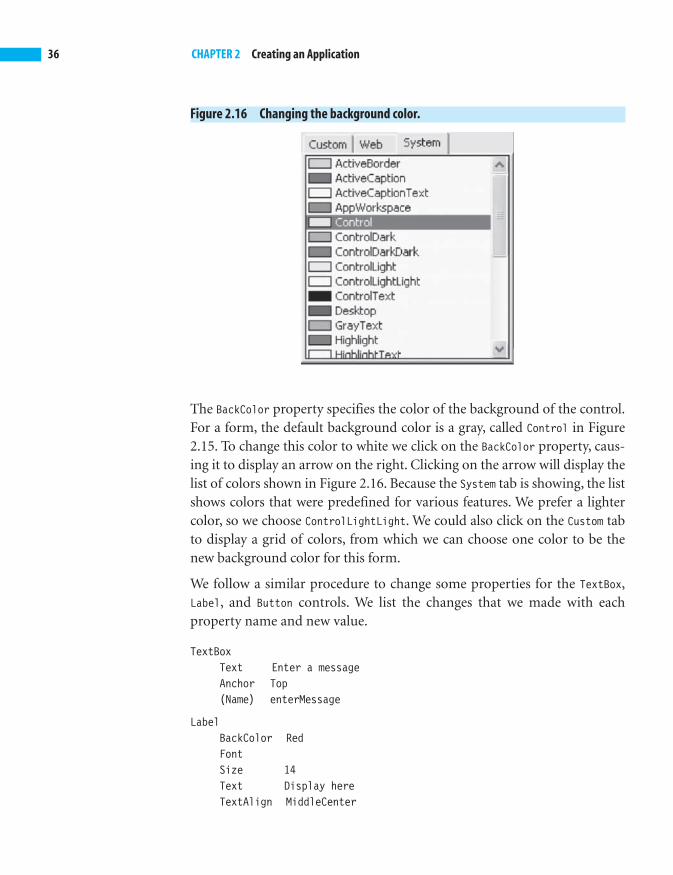
The BackColor property specifies the color of the background of the control.For a form, the default background color is a gray, called Control in Figure2.15. To change this color to white we click on the BackColor property, caus-ing it to display an arrow on the right. Clicking on the arrow will display thelist of colors shown in Figure 2.16. Because the System tab is showing, the listshows colors that were predefined for various features. We prefer a lightercolor, so we choose ControlLightLight. We could also click on the Custom tabto display a grid of colors, from which we can choose one color to be thenew background color for this form.
We follow a similar procedure to change some properties for the TextBox,Label, and Button controls. We list the changes that we made with eachproperty name and new value.
TextBoxText Enter a messageAnchor Top(Name) enterMessage
LabelBackColor RedFontSize 14Text Display hereTextAlign MiddleCenter

2.5 Context-Sensitive Help 37
Anchor Left, Right(Name) displayLabel
ButtonBackColor YellowText CopyAnchor Bottom(Name) copyButton
2.4.2 Handling the Click Event
For Example2-4, we write code to handle the event generated when the userclicks the button. Double-clicking the button brings up the following template:
private void copyButton_Click(object sender, System.EventArgs e)
{
}
We add our usual line to copy the text giving the completed method
private void copyButton_Click(object sender, System.EventArgs e)
{displayLabel.Text = enterMessage.Text;
}
Notice that the name of this method is copyButton_Click, while the meth-od name for the TextBox event handler of Example2-3 was enter-
Message_TextChanged. These names chosen by Visual Studio .NET reflect thedifference between entering text in a text box, which generates a TextChangedevent, and clicking a button, which generates a Click event.
Running Example2-4 produces the form of Figure 2.17. If we enter a mes-sage in the text box and click the Copy button, this application will displaythe message in a larger font in the center label.
2.4.3 Context-Sensitive Help
We conclude this chapter by describing a useful Visual Studio .NET featurethat we can use to get information about buttons or about any part of thedesign or code we are creating. Pressing the F1 function key at the top ofthe keyboard brings up help information about the currently selected item.For example, selecting button1 in Example2-4 in the Visual Studio .NET

38 CHAPTER 2 Creating an Application
Rather than responding toan event each time theuser makes a change in aTextBox, we can add aButton and only re-spond when the user fin-ishes entering text andclicks the button. Pressingthe F1 key provides con-text-sensitive help on theselected control.
The BIG Picture
Figure 2.17 Using a button.
design and clicking the F1 key brings up a full description of button mem-bers from the .NET Framework Class Library. A link near the top of thatscreen directs us to a button overview. We can get the same information bypressing the F1 key when selecting Button in the Toolbox. We will studymany other controls in later chapters. Selecting any of them and pressingthe F1 key will bring up descriptive information about that control.
Test Your Understanding
9. How would the form of Example2-4 appear if we change the Auto-Size property of labe11 to True?
10. Is Button resizing behavior more like a TextBox or a Label? Explain.
2.5 Summary■ Visual Studio .NET opens with a Start page that we can configure
in various styles. We begin by creating a Project of which there areseveral types. A Windows Application provides a Form in which we cancreate a user interface. A Properties window lists properties of theform, such as its background color, that we can customize with ourchoices.

2.6 Programming Exercises 39
■ The Toolbox contains controls that we can drag onto a form. Itgroups controls by categories. The TextBox control allows the userto enter text in an application. Labels are often used to providedescriptive text for controls. Double-clicking on a TextBox displaysthe template for an event handler that will be called to respondwhen the user changes the text in the box. We enter the C# code toperform the desired action to respond to this event. We can executethe application from Visual Studio .NET.
■ The Anchor property determines which edges of a control areanchored to the edges of its container. The TextAlign property of aLabel positions its text. The Dock property specifies an edge onwhich we can attach the control. We use the mouse to move a con-trol or resize it.
■ Rather than responding to an event each time the user makes achange in a TextBox, we can add a Button and only respond whenthe user finishes entering text and clicks the button. Pressing the F1key provides context-sensitive help on the selected control.
2.6 Programming Exercises
2.1 Modify Example2-1 to make the background color of the form white.
2.2 Reset the Anchor of each control in Example2-2 to the default ofTop, Left. Rerun the example and maximize the form that appears.Compare the positioning of the controls here with that of the orig-inal when the form is maximized.
2.3 Restore the TextAlign property of the label in Example2-2 to thedefault of TopLeft. Rerun the example and indicate how its appear-ance changes.
2.4 Change the Dock property of the Label in Example2-3 to Bottom.Rerun the example and describe how its appearance changes.
2.5 Create a Windows application that includes a TextBox, two Labelcontrols, and two Button controls. Clicking one button will displaythe text in the text box in a small size in the first label. Clicking theother button will display it in a large size in the other label.
2.6 Redo Exercise 2.5 to anchor each control to a different edge of theform.

40 CHAPTER 2 Creating an Application
2.7 Create a Windows application that includes a TextBox, Label, andtwo Button controls. Clicking one button will display the textbox'scontents as red in the label field. Clicking the other button will dis-play it in blue.
2.8 Redo Exercise 2.7 so that the controls stay in the center of the formwhen it is maximized.

3CHAPTERControls for Windows FormsVisual Studio .NET provides many controls to build user interfaces for Windows
applications. We have already used TextBox, Label, and Button in Chapter 2. In
this chapter, we introduce radio buttons, more boxes, bars, dates, timers, menus,
and dialogs.
Chapter Objectives:
Add controls to
■ make selections
■ add links
■ add images
■ choose a date or number
■ time events
■ make menu choices
■ respond to dialogs
3.1 Using Radio Buttons and Link Labels
Several controls allow the user to make selections. Radio buttons require anexclusive choice, while check boxes allow multiple selections. We can add alarger number of selections to a list box, or, to save space, to a combo box thatshows one choice and pops up others.We use a link label to display a hyperlink.
3.1.1 Radio Buttons
A RadioButton may display text, an image, or both. By default the radio but-tons on a form comprise a group, and the user must select exactly one. Thisexplains the name RadioButton. Older radios used to have buttons set to dif-ferent stations. Pushing in a button would tune the radio to the preset sta-tion, releasing the previously pushed button. The selected button would

42 CHAPTER 3 Controls for Windows Forms
remain depressed until another button was pushed. Car radio buttonswork similarly, but they do not remain depressed. By using a GroupBox or aPanel we can create groups of radio buttons where exactly one button ineach group must be selected.
Example3-1 contains three radio buttons, each representing a color, and alabel. When the user selects a color, the text in the label changes to theselected color. The text of the label also changes to reflect the selection. Weopen Visual Studio .NET and click on the File, New, Project menu to displaythe New Project window. We select Visual C# Projects as the project type,select the Windows Application template, enter Example3-1 in the Name field,and click OK.
The design will show a blank form with the default title, Form1, showing atits top. We change this default to the more meaningful Select a Color. Tomake this change we select the form by clicking on it. Then we click theView, Properties menu item to display the Properties window. Now we canchange the Text property.
We use the Toolbox to add controls to the form. To display the Toolbox weclick the View, Toolbox menu item. To add the controls to the form, weselect each from the Toolbox and drag it to the form. Figure 3.1 shows theToolbox with the RadioButton control selected.
We use the Properties window to configure each of the three radio buttonsand the label that we added to the form. Our three radio buttons will repre-sent the colors red, green, and blue, so we will set their background colorsand their text to show the user the color in two ways. To make the text morevisible we will change the font style to Bold. As usual, we give each control amore meaningful name. Finally, we change the anchor of each radio buttonto Top to allow them to remain centered should the user maximize the form.
The list below shows the properties we configure for each radio button. Itshows the values for the topmost button.
BackColor Red
Font
Bold True
Text Red
Anchor Top
(Name) redButton

3.1 Using Radio Buttons and Link Labels 43
Figure 3.1 Selecting RadioButton.
Figure 3.2a Before expanding the Font properties. Figure 3.2b After expanding the Font properties.
To see the Font.Bold property in the Properties window we click on the plussign to the left of the Font property. Figure 3.2a shows part of the Propertieswindow before we click on the plus sign, and Figure 3.2b shows that win-dow after the click.
Figure 3.3 shows the form of Example3-1 after we have configured theremaining controls. The application is running and the user has selectedthe color red.
The list that follows shows the properties we configure for the Label con-trol. The BorderStyle can be the default of None, or FixedSingle that frames it
44 CHAPTER 3 Controls for Windows Forms
Figure 3.3 Using radio buttons.
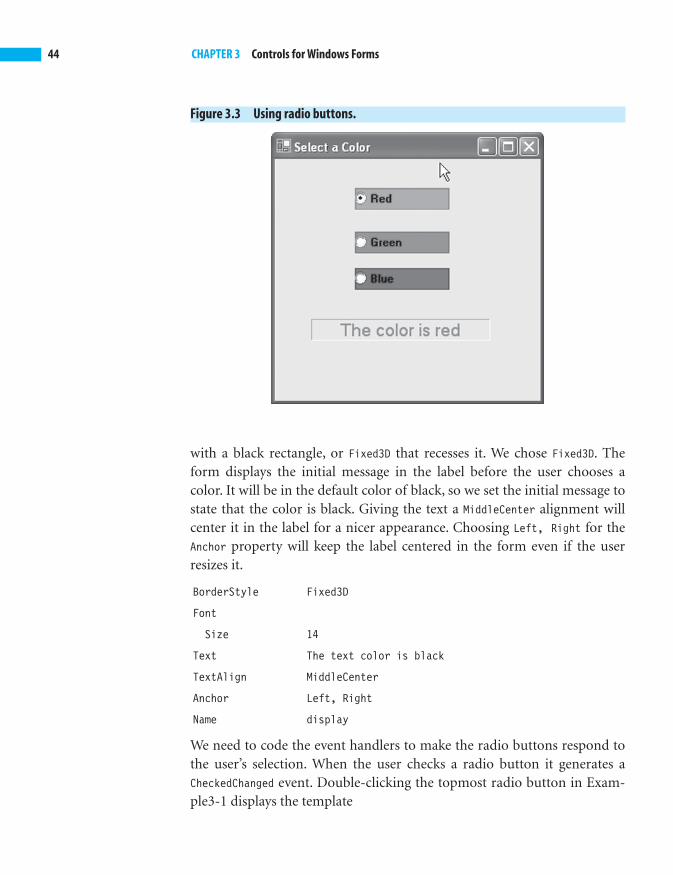
with a black rectangle, or Fixed3D that recesses it. We chose Fixed3D. Theform displays the initial message in the label before the user chooses acolor. It will be in the default color of black, so we set the initial message tostate that the color is black. Giving the text a MiddleCenter alignment willcenter it in the label for a nicer appearance. Choosing Left, Right for theAnchor property will keep the label centered in the form even if the userresizes it.
BorderStyle Fixed3D
Font
Size 14
Text The text color is black
TextAlign MiddleCenter
Anchor Left, Right
Name display
We need to code the event handlers to make the radio buttons respond tothe user’s selection. When the user checks a radio button it generates aCheckedChanged event. Double-clicking the topmost radio button in Exam-ple3-1 displays the template

3.1 Using Radio Buttons and Link Labels 45
private void redRadio_CheckedChanged(object sender, System.EventArgs e)
{
}
We add code to change the label’s foreground color to the one shown in theradio button. We also change the label’s text to describe the chosen color.The completed event handlers for all three radio buttons are
private void redRadio_CheckedChanged(object sender, System.EventArgs e)
{display.ForeColor = Color.Red;display.Text = "The color is red";
}private void greenRadio_CheckedChanged
(object sender, System.EventArgs e){
display.ForeColor = Color.Green;display.Text = "The color is green";
}private void blueRadio_CheckedChanged
(object sender, System.EventArgs e){
display.ForeColor = Color.Blue;display.Text = "The color is blue";
}
3.1.2 Adding a Link
The LinkLabel control lets us add links to Web sites to our form. In Exam-ple3-2, we start by adding a link to a White House site giving a short biog-raphy of George Washington. Then we will enhance this application toinclude three radio buttons to allow the user to choose a president. Whenthe user chooses a president, the link changes to point to the site for thatpresident’s biographical information. Clicking on the link will open anInternet Explorer window displaying the selected president’s biography.
By default, radio buttons form a group. The user can only choose one radiobutton from the group. The final enhancement to Example3-2 will include asecond group of two radio buttons to choose the border style for the LinkLa-
bel control. Figure 3-4 shows how the application appears when running.

46 CHAPTER 3 Controls for Windows Forms
Figure 3.4 A form with two radio button groups and a link label.
To start building Example3-2, we create a new project named Example3-2and drag a LinkLabel control from the Toolbox to the design form. Beforeadding any radio buttons, we will configure the link to access a Web site forGeorge Washington. Building an application one step at a time and testingit is much more effective than trying to build it in one big step.
We use the Text property to change the default link text, linkLabel1, toGeorge Washington. We also change the (Name) property of the LinkLabel fromlinkLabel1 to presidentLink. When the user clicks on this link, we want tohave Internet Explorer appear showing George Washington’s biography.The user click generates a LinkClicked event. Our job as developers is towrite the code to open Internet Explorer.
To start Internet Explorer, we use the Process class of the System.Diagnosticsnamespace. The Process class is useful for starting, stopping, controlling,and monitoring applications. We use its Start method to start the InternetExplorer browser, passing it the address of the site we seek, which is
http://www.whitehouse.gov/history/presidents/gw1.html
The code to open Internet Explorer displaying George Washington’sbiography is
System.Diagnostics.Process.Start("IEExplore","http://www.whitehouse.gov/history/presidents/gw1.html");

3.1 Using Radio Buttons and Link Labels 47
Figure 3.5 Adding a link.
We need to place this code inside the event handler that will be called whenthe user clicks the presidentLink link label. Double-clicking the link in theVisual Studio .NET design displays the template for the event handler.
private void presidentLink_LinkClicked(object sender,System.Windows.Forms.LinkLabelLinkClickedEventArgs e)
{
}
We add code to open Internet Explorer, so the completed event handlerbecomes
private void presidentLink_LinkClicked(object sender,System.Windows.Forms.LinkLabelLinkClickedEventArgs e)
{System.Diagnostics.Process.Start("IEExplore","http://www.whitehouse.gov/history/presidents/gw1.html");
}
Figure 3.5 shows the link in Example3-2. We changed the Text property ofthe form to show Example3-2 rather than Form1.
3.1.3 Grouping Radio Buttons
By default, all radio buttons on a form are in one group, and the user selectsone of them. We can use GroupBox controls to let the user choose one radiobutton from each group.
We add a GroupBox to Example3-2 to hold radio buttons that allow us tochoose the president whose biography we wish to view. A GroupBox displaysa border with the default title groupBox1. To make this title more meaning-ful, we change the Text property of this GroupBox to Choose a President,which describes the function of the radio buttons that we will add to it.
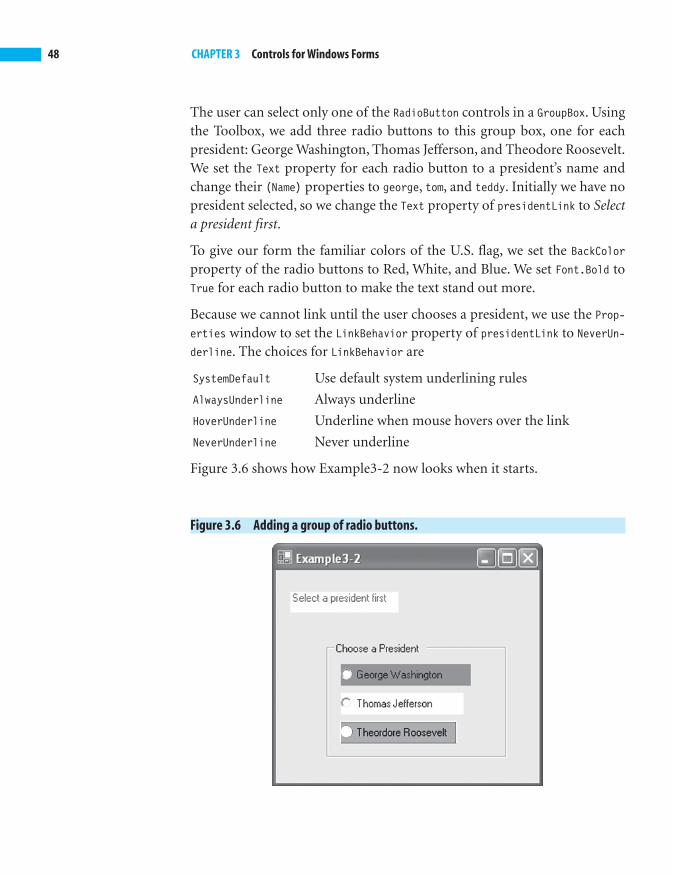
48 CHAPTER 3 Controls for Windows Forms
Figure 3.6 Adding a group of radio buttons.
The user can select only one of the RadioButton controls in a GroupBox. Usingthe Toolbox, we add three radio buttons to this group box, one for eachpresident: George Washington, Thomas Jefferson, and Theodore Roosevelt.We set the Text property for each radio button to a president’s name andchange their (Name) properties to george, tom, and teddy. Initially we have nopresident selected, so we change the Text property of presidentLink to Selecta president first.
To give our form the familiar colors of the U.S. flag, we set the BackColorproperty of the radio buttons to Red, White, and Blue. We set Font.Bold toTrue for each radio button to make the text stand out more.
Because we cannot link until the user chooses a president, we use the Prop-erties window to set the LinkBehavior property of presidentLink to NeverUn-derline. The choices for LinkBehavior are
SystemDefault Use default system underlining rules
AlwaysUnderline Always underline
HoverUnderline Underline when mouse hovers over the link
NeverUnderline Never underline
Figure 3.6 shows how Example3-2 now looks when it starts.

3.1 Using Radio Buttons and Link Labels 49
To make the links function, we need to change the approach we used whenwe had only one radio button. When the user selects a radio button, wewant to do three things:
1. Show the president’s name in the link.
2. Underline the link.
3. Associate the link with the site containing the president’s biography.
Double-clicking on the George Washington radio button in the Visual Studio.NET design displays the template for the CheckedChanged event handler. Weadd three lines to it, resulting in the following code:
private void george_CheckedChanged(object sender, System.EventArgs e)
{presidentLink.Text = "George Washington";presidentLink.LinkBehavior =
LinkBehavior.AlwaysUnderline;presidentLink.Links[0].LinkData =
"http://www.whitehouse.gov/history/presidents/gw1.html";}
The first line
presidentLink.Text = "George Washington";
sets the text of the link. The second statement
presidentLink.LinkBehavior = LinkBehavior.AlwaysUnderline;
sets the LinkBehavior property. Note that in the code we need to prefix thevalue AlwaysUnderline with its type, LinkBehavior. When we set LinkBehaviorduring design, Visual Studio .NET remembered this detail for us.
The third statement
presidentLink.Links[0].LinkData ="http://www.whitehouse.gov/history/presidents/gw1.html";
associates the site for George Washington’s biography with the link. A Link-Label has a Links property that holds a collection of the links that the LinkLabelcontains. A LinkLabel may contain more than one link, although we only useone in Example3-2.
50 CHAPTER 3 Controls for Windows Forms
The collection of links is indexed by integers starting with index 0 for thefirst link. To access an element of a collection using an index, we place theindex in square brackets so that the Link in the presidentLink is
presidentLink.Links[0]
Each link has a LinkData property that we set to associate the George Wash-ington site with the link.
Writing the event handlers for the other two radio buttons is just a matterof changing the president’s name and the biography site. The other twoevent-handling methods are
private void tom_CheckedChanged(object sender, System.EventArgs e)
{presidentLink.Text = "Thomas Jefferson";presidentLink.LinkBehavior =
LinkBehavior.AlwaysUnderline;presidentLink.Links[0].LinkData =
"http://www.whitehouse.gov/history/presidents/tj3.html";}
private void teddy_CheckedChanged(object sender, System.EventArgs e)
{presidentLink.Text = "Theodore Roosevelt";presidentLink.LinkBehavior =
LinkBehavior.AlwaysUnderline;presidentLink.Links[0].LinkData =
"http://www.whitehouse.gov/history/presidents/tr26.html";}
To make the link work, we use the event-handling code
private void presidentLink _LinkClicked(object sender,System.Windows.Forms.LinkLabelLinkClickedEventArgs e)
{System.Diagnostics.Process.Start
(e.Link.LinkData.ToString());}
Because the link site depends on which radio button the user clicks, we donot want to hard code the link in this event-handling method. When .NETcalls an event handler, it passes information to it about the event. For theLinkClicked event it uses an object with type LinkLabelLinkClickedEventArgs,

Exactly one RadioBut-ton of a group can beselected. By default, allRadioButton controlsbelong to one group. Wecan use a GroupBox tocreate another group. TheBorderStyle propertyspecifies the type of bor-der for a Label.
The LinkLabel con-trol lets us add links to ourform. A LinkLabel maycontain more than onelink. The Links propertyholds the collection oflinks. The first link is atindex 0. The LinkBe-havior property speci-fies the underline rule forthe link. To start InternetExplorer we use theProcess class of theSystem.Diagnos-tics namespace.
The BIG Picture
3.1 Using Radio Buttons and Link Labels 51
which we refer to as e in the code. This long name identifies itself as theEventArgs of the LinkClicked event of the LinkLabel.
The object e has a Link property describing the link. The Link has a LinkDataproperty, which in general is an object, so we use the ToString method to getthe string representing the link to pass to the Start method. Because thestring has the .html extension, the Start method will start Internet Explorer.
3.1.4 Adding Another Group
We add another group box, this time including two radio buttons. Theradio buttons will give the user a choice of border styles for presidentLink.We set the group box Text property to Border Style, the Text of one radiobutton to FixedSingle, and the Text of the other to Fixed3D. We change thenames of these two radio buttons to singleBorder and threeDBorder.
To make the form balance the controls when the user resizes it, we set theAnchor property of the upper GroupBox for choosing a president to Top andthe Anchor of the lower GroupBox for choosing a border style to Right. Figure3.4 shows the final version of Example3-2.
To make the added radio buttons implement the user’s choice, we double-click each to display its event-handling template and add code to set theborder style of linkLabel1. The event-handling code is
private void singleBorder_CheckedChanged(object sender, System.EventArgs e)
{presidentLink.BorderStyle = BorderStyle.FixedSingle;
}
private void threeDBorder_CheckedChanged(object sender, System.EventArgs e)
{presidentLink.BorderStyle = BorderStyle.Fixed3D;
}
Test Your Understanding
1. Name the event that occurs when the user checks a RadioButton.
2. Name the event that occurs when the user clicks a LinkLabel.
3. Which property of a LinkLabel do we set to specify how the link isunderlined?

52 CHAPTER 3 Controls for Windows Forms
Figure 3.7 Using PictureBox controls.
4. Which property of a LinkLabel holds the collection of links it con-tains?
5. How would the application of Example3-2 work if we just addedthe five radio buttons but omitted the two group boxes?
3.2 More Boxes
A PictureBox displays an image. We use CheckBox controls when the user canselect zero or more items, in contrast to RadioButton controls that are mutu-ally exclusive. A ListBox conveniently holds a list of choices. A ComboBoxholds a list of choices but saves space by showing only one. It also allows theuser to enter additional choices.
3.2.1 Picture Boxes
We can display graphics in a PictureBox. Example3-3, shown in Figure 3.7,includes four picture boxes. To create this application we dragged four Pic-tureBox controls to the form. The user does not interact with this applica-tion. It simply illustrates the use of the PictureBox control.
To place an image in a PictureBox, we click on the PictureBox and display itsProperties window. Clicking on the Image property lets us search for animage file to display. Three of the PictureBox controls use a picture,amanda.jpg, of the author’s daughter. The other PictureBox uses an image ofthe author, gittleman.gif.

3.2 More Boxes 53
Figure 3.8 Illustrating check boxes.
The SizeMode property specifies how the image will be displayed. It has fourmodes of type PictureBoxSizeMode. They are:
Normal Places the image in the upper-left corner, clipped if too large
StretchImage Stretches or shrinks the image to fit
AutoSize Resizes the PictureBox to the size of the image
CenterImage Displays the image in the center if the PictureBox is largerthan the image. Centers and clips the image if it is larger.
In Example3-3, the large picture on the left, of the author’s daughterAmanda, uses AutoSize mode to adjust the size of the PictureBox. Theupper-right PictureBox uses the Normal mode to show the same imageplaced in the upper-left corner and clipped to fit. The middle-right imageuses the CenterImage mode to clip the center of the image to fit. The lower-left image uses the StretchImage mode that distorts the image to fit. Theauthor felt it prudent to use his own image rather than his daughter’s inthis case.
The BorderStyle property lets us choose one of the three styles: None, Fixed-Single, or Fixed3D. The upper-right image has the Fixed3D border, the middle-right image has None, while the lower-right uses the FixedSingle border style.
3.2.2 Check Boxes
Using CheckBox controls, we can make multiple selections or select nothing.In Example3-4 we add four CheckBox controls and a Label. Each CheckBox
names a type of food. The Label displays the result of the last change theuser made. Figure 3.8 shows Example3-4 running when the user has

54 CHAPTER 3 Controls for Windows Forms
checked the upper two CheckBox controls. The user’s last change was to checkthe Salad box, so the label contains the message Salad true. If the user nextremoves the Strawberry box check, the message will read Strawberry false.
Each CheckBox in Figure 3.8 has a different appearance. The Appearanceproperty determines the form of the check box. A Normal value displays aCheckBox with a small square for the user to check or uncheck. A Buttonvalue makes the check box appear like a button. Checking it in this modedepresses it. In Example3-4 we set the Appearance property for the Pizzacheck box to Button. The other three check boxes have a Normal appearancewith a square box for the user to check or uncheck.
The BackColor property lets us specify a background color for a CheckBox. Aswe see from Figure 3.8, we changed the BackColor property of the Saladcheck box to green and that of the Pizza check box to yellow.
We can set the Image property to add an image or set the BackgroundImageproperty to have an image cover the background. In Example3-4 we addedan image of a strawberry to the Strawberry check box. The steps needed toadd an image are:
1. Click on the View, Properties menu item to show the list ofproperties.
2. Click on the Image property to display a small button at the right.
3. Click on the small button to pop up a window to open a file.
4. Browse to locate the desired image, and click the Open button.
Setting the BackgroundImage property follows similar steps. We set the samestrawberry image, a file named straw.jpg, as the Image property for theStrawberry check box and as the BackgroundImage for the Strawberries check-box. As a background image it repeats to cover the check box. As an imageit appears only once.
The ImageAlign property lets us place the image at different positions within aCheckBox. The CheckAlign property functions in the same way for the positionof the box that the user checks. The TextAlign property determines the place-ment of the text. The steps to set any of these three alignment properties are
1. Click on the View, Properties menu item to show the list of properties.
2. Click on the ImageAlign, CheckAlign, or TextAlign property to dis-play a small button at the right.

3.2 More Boxes 55
3. Click on the small button to pop up a grid of three rows and threecolumns that allows us to choose the alignment position.
4. Click to choose one of the nine positions. The three vertical posi-tions, Top, Middle, and Bottom, combine with the three horizon-tal positions, Left, Center, and Right, to give the nine choices.
In the Salad check box we changed the TextAlign property value from itsdefault of MiddleLeft to MiddleRight. We changed the ImageAlign property toMiddleRight in the Strawberry check box so the image would not cover the text.
The FlatStyle property determines the flat style appearance of the squarebox holding the check. Its possible values are
Flat The box appears flat.
Popup The box appears flat until the mouse passing over makes itappear three-dimensional.
Standard The box appears three-dimensional.
System The appearance of the box is determined by the user’s operat-ing system.
In Example3-4 we set the FlatStyle property of the Strawberries check boxto Popup. The others are Standard.
Figure 3.8 shows the form of Example3-4. Each time the user selects a Check-
Box, the name of the food appears in the label followed by the word True.When the user deselects a CheckBox, the name of the food appears followedby False. Only the last change appears in the label. We set the Anchor propertyof each control to Top to allow the controls to adjust during resizing.
Selecting or deselecting a CheckBox generates a CheckChanged event. If wewant an immediate response to a selection or deselection, we write an eventhandler for the CheckChanged event. Another approach would be to use abutton to generate an event and get the state of each check box in the but-ton’s event handler. We can determine whether the user checked the box bygetting the Checked property.
In Example3-4 we handle each CheckedChanged event. Double-clicking on acheck box in the Visual Studio .NET design displays the template shown inFigure 3.9.
We add a line to the event handler to set the text of the label to show thecurrent status of the check box after it has just been checked. In that line of

56 CHAPTER 3 Controls for Windows Forms
Figure 3.9 The CheckedChanged event-handling template.
code, we concatenate the status of the check box to the food name using the+ operator. Similarly, we click on each of the other three check boxes to dis-play the event-handling template and add a line of code to each. The codefor the event handlers is
private void berryBox_CheckedChanged(object sender, System.EventArgs e)
{display.Text = "Strawberry " + berryBox.Checked;
}
private void pizzaBox_CheckedChanged(object sender, System.EventArgs e)
{display.Text = "Pizza " + pizzaBox.Checked;
}
private void saladBox_CheckedChanged(object sender, System.EventArgs e)
{display.Text = "Salad " + saladBox.Checked;
}
private void berriesBox_CheckedChanged(object sender, System.EventArgs e)
{

3.2 More Boxes 57
display.Text = "Strawberries " + berriesBox.Checked;}
To summarize, we set the following properties for the controls in Example3-4.
berry
Image straw.jpg
ImageAlign MiddleRight
Text Strawberry
Anchor Top
Font
Bold True
(Name) berry
pizza
Appearance Button
BackColor Yellow
Text Pizza
TextAlign MiddleCenter
Anchor Top
Font
Bold True
(Name) pizza
salad
BackColor 0, 192, 0
CheckAlign MiddleRight
Text Salad
Anchor Top
Font
Bold True
(Name) salad
berries
BackgroundImage straw.jpg
FlatStyle Popup

58 CHAPTER 3 Controls for Windows Forms
Figure 3.10 Selecting an item in a list box.
Text Strawberries
Anchor Top
Font
Bold True
(Name) berries
display
Text Choose some food
AutoSize True
Anchor Top
(Name) display
3.2.3 List Boxes
The ListBox control lets us display items that the user can select by clicking.Until we cover more C#, we will select just a single item, leaving the se-lection of multiple items until later. Figure 3.10 shows the form of Exam-ple3-5 containing a ListBox on the left with a Label below it and a ComboBoxon the right. The list box lists foods. When the user selects a food, the labeldisplays the number of letters in the word selected.
We change the (Name) property for these controls to choose the more mean-ingful names foodList, drinksCombo, and display.
We use the Properties window of Visual Studio .NET to enter the list items.Selecting the Items property in the Display section displays a button. Click-

3.2 More Boxes 59
Figure 3.11 Inserting items in a list box.
ing the button pops up the window shown in Figure 3.11 that allows us toadd the list items. We add five food names. We set the Anchor property to Topto allow the list box to adjust its position during resizing. The default valueof the Sorted property is False. By changing it to True we could display thelist items in alphabetical order.
The default setting of BorderStyle is Fixed3D. Figure 3.10 shows the recessedimplementation of the list box. The default SelectionMode value is One,meaning that the user can select only one item at a time. The SelectionModeproperty has four possible values:
None No items can be selected.
One One item can be selected.
MultiSimple Multiple items can be selected.
MultiExtended Multiple items can be selected, and the user can use theshift, control, and arrow keys to make the selection.
Selecting a list item generates a SelectedIndexChanged event. The index is thevalue by which we refer to a list item. We number the items starting with 0 atthe top, so the items in listBox1 have indices 0 through 4. When the userselects an item, it changes the selected index to the index of the new selection.
To respond to the SelectedIndexChanged event, we need to write an eventhandler for it. Double-clicking on foodList in the Visual Studio .NETdesign displays the template
private void foodList_SelectedIndexChanged(object sender, System.EventArgs e)
{}

60 CHAPTER 3 Controls for Windows Forms
for the event-handling method.
The SelectedItem property of a ListBox refers to the selected item. To repre-sent the item as a string we call the ToString method. Thus the expression
foodList.SelectedItem.ToString()
is a string representing the selected food. The Length property of this stringrepresents the number of characters in the string as an integer. Again wecall the ToString method to represent this length as a string. The expression
foodList.SelectedItem.ToString().Length.ToString()
is long, but it simply displays the number of characters in the selectedword. For example, if the user selects spaghetti, the above expression willdisplay 9.
Figure 3.10 displays the message hamburger has 9 letters. We build thisexpression in four parts:
hamburger the selected item
has
9 the length of the selected word
letters
No matter which word the user selects, the second and fourth parts of themessage will be the same. But parts one and three depend on what the userselects. We use C# expressions to represent the parts that change, so in C#the four parts are
foodList.SelectedItem.ToString()" has "foodList.SelectedItem.ToString().Length.ToString()" letters "
Notice that we surround the words that do not change with blanks; otherwisethe message would appear as hamburgerhas9letters, which is not what we want.
To complete the code for the event handler, we concatenate the four partstogether to form the message and set the Text of the display label to thismessage. The + operator concatenates strings one after the other. The com-pleted code is
private void foodList_SelectedIndexChanged(object sender, System.EventArgs e)
{
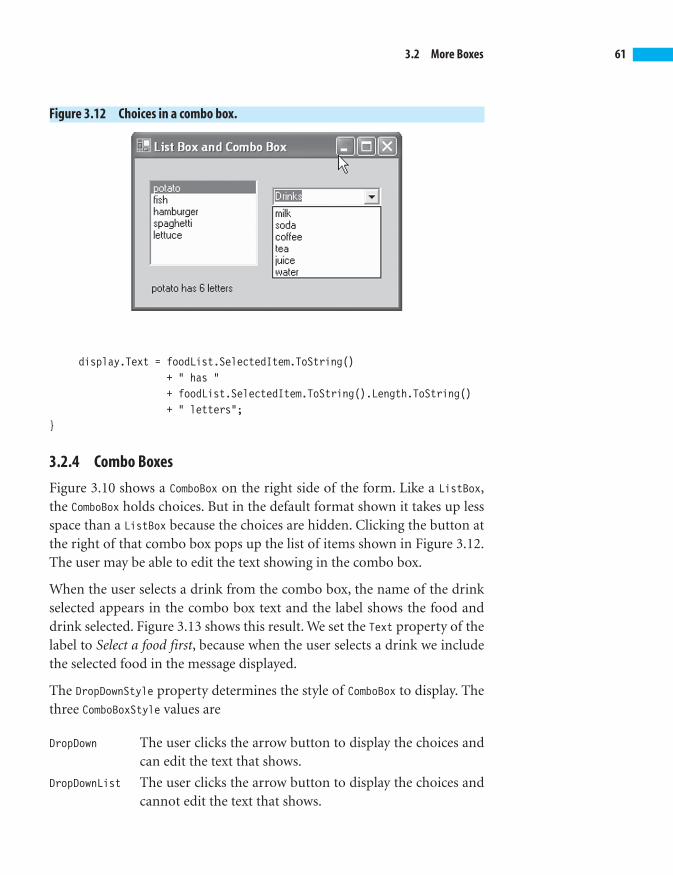
3.2 More Boxes 61
Figure 3.12 Choices in a combo box.
display.Text = foodList.SelectedItem.ToString()+ " has "+ foodList.SelectedItem.ToString().Length.ToString()+ " letters";
}
3.2.4 Combo Boxes
Figure 3.10 shows a ComboBox on the right side of the form. Like a ListBox,the ComboBox holds choices. But in the default format shown it takes up lessspace than a ListBox because the choices are hidden. Clicking the button atthe right of that combo box pops up the list of items shown in Figure 3.12.The user may be able to edit the text showing in the combo box.
When the user selects a drink from the combo box, the name of the drinkselected appears in the combo box text and the label shows the food anddrink selected. Figure 3.13 shows this result. We set the Text property of thelabel to Select a food first, because when the user selects a drink we includethe selected food in the message displayed.
The DropDownStyle property determines the style of ComboBox to display. Thethree ComboBoxStyle values are
DropDown The user clicks the arrow button to display the choices andcan edit the text that shows.
DropDownList The user clicks the arrow button to display the choices andcannot edit the text that shows.

A PictureBox displaysan image in one of fourmodes. Using CheckBoxcontrols, we can makemultiple selections orselect nothing. We set theAppearance, Back-Color, Background-Image, CheckAlign,FlatStyle, Image,ImageAlign,and Text-Align properties to con-figure a CheckBox.
A ListBox conve-niently holds a list ofchoices. A ComboBoxholds a list of choices butsaves space by showingonly one. We use theItems,Anchor,Selec-tionMode, and Sortedproperties to configure aListBox. The Drop-DownStyle propertydetermines the style of aComboBox.
The BIG Picture
62 CHAPTER 3 Controls for Windows Forms
Figure 3.13 Selecting milk.
Simple The choices are always visible, and the user can edit thetext portion.
As with the ListBox, we entered the choices by clicking on the Items prop-erty in the Data section of the Properties window in Visual Studio .NET. Weset the Text property to Drinks and the Anchor property to Top.
Test Your Understanding
6. Which PictureBoxSizeMode value changes the size of the PictureBox?
7. Explain the effect of each of the different values for the Appearanceproperty of a CheckBox.
8. Explain the difference between the Image and the BackgroundImageproperties for a CheckBox.
9. Which event will the user generate when making a selection ina ListBox?
10. Which ComboBoxStyle displays all the choices?
3.3 Keeping Track
Various controls help us keep track of dates, time, and numbers. We createa simple example to illustrate the DateTimePicker, NumericUpDown, StatusBar,and Timer controls. After covering more C# constructs in later chapters, wewill be able to complete more substantial projects. Figure 3.14 shows theform of Example3-6. When the user presses the Show button, the application

3.3 Keeping Track 63
Figure 3.14 The application of Example3-6.
displays the date selected in one label and the number selected in anotherlabel. The current date and time appear in the status bar in the lower-leftcorner. Watching the application run will show that the time in the statusbar updates every second. The background colors of the middle controlsswitch every second, giving a flashing effect.
To create Example3-6, we drag several controls from the Toolbox to theform. From the top down in Figure 3.14, these controls are: DateTimePicker,Label, NumericUpDown, Label, Button, and StatusBar. We also drag a Timer con-trol that does not appear on the form.
3.3.1 DateTimePicker
The topmost control in Figure 3.14 is a DateTimePicker. It allows the user toselect a date and time and to display it in a specific format. We choose theformat by setting the Format property to one of the following four values:
Custom Displays using a custom format.
Long Uses the long date format set by the user’s operating system.
Short Uses the short date format set by the user’s operating system.
Time Uses the time format set by the user’s operating system.
For the author’s Windows XP system configured for the United States, Eng-lish-speaking locale, the displays are

64 CHAPTER 3 Controls for Windows Forms
Figure 3.15 Popping up a monthly calendar.
Long Tuesday, January 28, 2003
Short 1/28/03
Time 10:32:56 AM
To use a custom format, we could set the CustomFormat property using a pat-tern for a custom DateTime string. We do not cover custom formats in this text.
By default the MinDate property has the value 1/1/1753 and MaxDate has thevalue 12/31/9998. Great Britain and the embryonic United States adoptedthe Gregorian calendar in 1752, so its first full year was 1753. The maxi-mum date seems to allow a year to solve the Y10K problem of changing toallow five digits for a year instead of four.
The ShowUpDown property controls whether up-down buttons are used tomodify dates rather than a drop-down calendar. In Figure 3.14, ShowUpDownis True. Clicking on January and pressing the up arrow will change themonth to February. Clicking on day 28 and then the down arrow willchange the day to 27. The user can similarly change the year. When onevalue changes, the others adjust in accordance.
When the ShowUpDown value is False, a single button shows at the right, andclicking on it pops up a calendar for that month as shown in Figure 3.15.There is also a MonthCalendar control that displays a calendar for the month,like the one shown in Figure 3.15.We do not use MonthCalendar in Example3-6.

3.3 Keeping Track 65
3.3.2 NumericUpDown
We can use a NumericUpDown control to specify a number. The user canchange the value of the number in a NumericUpDown control by clicking theup or down buttons it contains. The Minimum value by default is 0 and theMaximum is 100. The default Increment on each button click is 1, representingthe amount to increment when clicking the up button or decrement whenclicking the down button.
The DecimalPlaces property starts with a default value of 0, representing thenumber of places to show following the decimal. If the ThousandsSeparatorproperty is False, the digits will not be grouped in threes. The Value dis-played in a NumericUpDown is a Decimal type that we will discuss later.
3.3.3 Enabling the Display
We use a DateTimePicker to allow the user to select a date, and a NumericUp-Down to allow the user to select a number. For now we just display each ofthe selected values in a label when the user clicks the Show button. We needto write the event handler for the button’s Click event. Clicking on the but-ton in the design form displays the code template
private void showButton_Click(object sender, System.EventArgs e)
{}
The event-handling code should copy the value from the DateTimePickernamed date to the Label control under it named dateDisplay. The Valueproperty of a DateTimePicker holds the date that the user selected. TheToLongDateString method will convert this value to a date in the Long formatdescribed above. The line of code we need to add is
dateDisplay.Text ="Date selected: " + date.Value.ToLongDateString();
The event-handling code for the Show button should also copy the numberselected using the NumericUpDown control named number to the Label below itnamed numberDisplay. The Value property of the NumericUpDown control holdsthe number the user selected. The ToString method will convert that num-ber to a string for display. Thus, the line of code we need to add to the eventhandler is

66 CHAPTER 3 Controls for Windows Forms
Figure 3.16 Adding a Timer to the form.
numberDisplay.Text ="Number selected " + number.Value.ToString();
The completed event-handling code for the Show button is
private void showButton_Click(object sender, System.EventArgs e)
{dateDisplay.Text =
"Date selected: " + date.Value.ToLongDateString();numberDisplay.Text =
"Number selected " + number.Value.ToString();}
3.3.4 StatusBar
A StatusBar displays text. By default, it is docked to the bottom of the formso that it remains there during resizing. We set the initial value of the Textproperty to the empty string, but the timer introduced next will copy thecurrent time every second. Thus the status bar functions like a digital clockshowing both the date and the time.
3.3.5 Timer
A Timer generates a Tick event at a set interval, say, every second. It does nothave a visual representation in the form of Example3-6 shown in Figure3.14. The Visual Studio .NET design shows it below the form as shown inFigure 3.16.
We set the Interval property to 1000 milliseconds, or one second, to specifythe frequency of the Tick event. When the tick event occurs we want toshow the current time in a StatusBar at the bottom of the form. We alsowant to change the background colors of the two Label controls and the
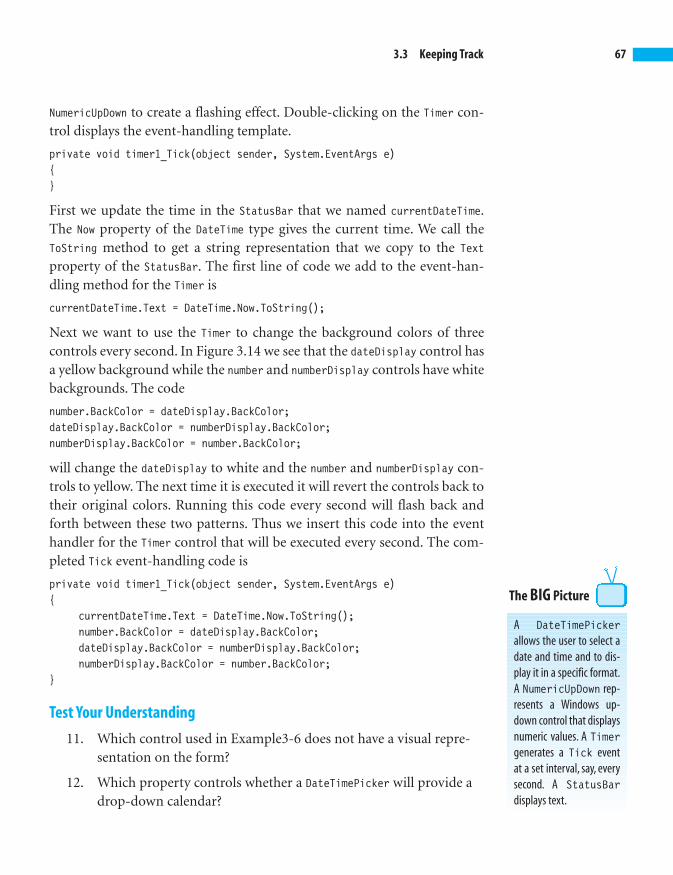
A DateTimePickerallows the user to select adate and time and to dis-play it in a specific format.A NumericUpDown rep-resents a Windows up-down control that displaysnumeric values. A Timergenerates a Tick eventat a set interval, say, everysecond. A StatusBardisplays text.
The BIG Picture
3.3 Keeping Track 67
NumericUpDown to create a flashing effect. Double-clicking on the Timer con-trol displays the event-handling template.
private void timer1_Tick(object sender, System.EventArgs e){}
First we update the time in the StatusBar that we named currentDateTime.The Now property of the DateTime type gives the current time. We call theToString method to get a string representation that we copy to the Textproperty of the StatusBar. The first line of code we add to the event-han-dling method for the Timer is
currentDateTime.Text = DateTime.Now.ToString();
Next we want to use the Timer to change the background colors of threecontrols every second. In Figure 3.14 we see that the dateDisplay control hasa yellow background while the number and numberDisplay controls have whitebackgrounds. The code
number.BackColor = dateDisplay.BackColor;dateDisplay.BackColor = numberDisplay.BackColor;numberDisplay.BackColor = number.BackColor;
will change the dateDisplay to white and the number and numberDisplay con-trols to yellow. The next time it is executed it will revert the controls back totheir original colors. Running this code every second will flash back andforth between these two patterns. Thus we insert this code into the eventhandler for the Timer control that will be executed every second. The com-pleted Tick event-handling code is
private void timer1_Tick(object sender, System.EventArgs e){
currentDateTime.Text = DateTime.Now.ToString();number.BackColor = dateDisplay.BackColor;dateDisplay.BackColor = numberDisplay.BackColor;numberDisplay.BackColor = number.BackColor;
}
Test Your Understanding
11. Which control used in Example3-6 does not have a visual repre-sentation on the form?
12. Which property controls whether a DateTimePicker will provide adrop-down calendar?

68 CHAPTER 3 Controls for Windows Forms
Figure 3.17 Adding a main menu.
13. How would you configure a NumericUpDown to allow values such asprices, which have two places after the decimal point?
14. What Interval should a Timer use to generate a Tick event fourtimes per second?
3.4 Menus and Dialogs
Menus are a standard feature of useful software. Fortunately, the MainMenucontrol makes it easy to add menus to our applications. Dialogs are anotherfriendly way to allow the user to make selections that are more involvedthan checking a box or clicking a list item. We illustrate the OpenFileDialog,SaveFileDialog, PrintDialog, ColorDialog, and FontDialog in this section. TheRichTextBox and PrintDocument controls help us to implement Example3-7.
3.4.1 MainMenu
The MainMenu control contains the menu structure for the form. Figure 3.17shows the start of Example3-7. Using the Toolbox, we added a MainMenu con-trol to the form. The MainMenu does not itself appear on the form, so it isshown underneath it. A box appears in the upper-left corner of the formwith the caption Type Here, indicating the place for us to enter our desiredmenu choices.
The menu structure we want will have two menus showing at the top of theform, a File menu and a Format menu. These two menus are at the upper

3.4 Menus and Dialogs 69
Figure 3.18 Inserting menu items.
left, as shown later in Figure 3.19. When the user clicks on the File menuwe want to pop up the menu items
Open Ctrl+OSave Ctrl+SPrint
The Ctrl+O indicates a keyboard shortcut. Typing the O key while holdingdown the Ctrl key will also activate the open file dialog. When the userclicks the Format menu, we want to pop up the choices
FontColor
The arrow indicates that Clicking on the Color menu will display additionalchoices, in this case,
ForegroundBackground
To create this menu structure, we start by entering File as the first menuname. This brings up a box to the right of it to start a second menu on themain menu bar, and a box below to add a menu item for the File menu.Figure 3.18 shows the design at this stage.
We add Open, Save, and Print as the menu items under the File menu. To theright of the File menu item we add a Format menu. Under the Format menuwe add Font and Color menu items. To the right of the Color menu we addthe Foreground menu item, under which we add Background.
The Shortcut property allows us to associate a keyboard shortcut with eachmenu item. Clicking on Shortcut in the Properties window for the Open
▲

70 CHAPTER 3 Controls for Windows Forms
menu item and then clicking on the button in the field for the Shortcutvalue displays a list of choices for the keystrokes to operate the menu. Weselect CtrlO for the Open menu item and CtrlS for the Save menu item. Tobegin to open a file, we can either click the Open menu item or press the Okey while pressing the Ctrl key. When we click on File to see its menuitems, we see that the Open menu item appears as
Open Ctrl+O
to remind the user of the shortcut.
Clicking on a menu item generates a Click event. We need to handle thisClick event to make the menu item perform its intended function. Double-clicking on a menu item in the Visual Studio .NET design will display atemplate for the Click event handler. We will implement event handlers forthe following menu items listed with their intended behavior. We willimplement each event handler after describing the controls that it uses.
Open Select a file and copy it to a rich text box.
Save Select a file path and save the contents of the rich text box tothat location.
Print Choose print options and display a message that theprinter is busy.
Font Select a font and change the rich text box to use it for its text.
Foreground Choose a color and make it the foreground color of therich text box.
Background Choose a color and make it the background color of therich text box.
3.4.2 RichTextBox
The RichTextBox control allows the user to enter and edit text and providesadvanced formatting capabilities. We use the Toolbox to select a RichTextBoxcontrol and add it to our form, stretching it to be as wide as possible andreducing the height of the form to fit. We will not add any other visiblecontrols to the form, so we do not need any extra space. The File and For-
mat menu items appear at the upper left of the form of Example3-7 shownin Figure 3.19.

3.4 Menus and Dialogs 71
Figure 3.19 The form of Example3-7.
To allow richTextBox1 to expand as the user resizes the form, we set thevalue of the Anchor property to Top, Bottom, Left, Right. We change thevalue of the WordWrap property to False to avoid clumsy line breaks.
Vertical and horizontal scroll bars will automatically be added to a rich textbox when necessary to view the text. The ScrollBars property enables thisbehavior with the default setting of Both. The choices for the Rich-TextBoxScrollBars value of the ScrollBars property are
None No scroll bars
Horizontal Horizontal when needed, but no vertical
Vertical Vertical when needed, but no horizontal
Both Both when needed
ForcedHorizontal Always horizontal but no vertical
ForcedVertical Always vertical but no horizontal
ForcedBoth Always both
The RichTextBox control has a LoadFile method to load text from a file and aSaveFile method to save its text to a file. We will activate these methodsfrom a menu via dialogs that we will introduce next. To use these methodswe need to know the file name to load or save. The dialogs will allow us tochoose these file names. We need to know the type of file, too. For ourapplication we will use the PlainText type that includes simple text fileswithout special formatting.

72 CHAPTER 3 Controls for Windows Forms
Figure 3.20 Selecting a file to open.
3.4.3 File Dialogs
The OpenFileDialog and SaveFileDialog controls do not visually appear inthe form, so when we add them to the design they appear below it as we sawwith the MainMenu control. Each has a ShowDialog method that pops up awindow allowing the user to select a file to open or save to. Figure 3.20shows that the user selected rich.txt as the file to open. Pressing the Openbutton will set the FileName property to the name that the user selected.
We want the event handler for the Click event, generated when the userclicks the Open menu item, to show the open file dialog and then load theselected file into richTextBox1. To write the event handler for the Clickevent, we first double-click the Open menu item in the Visual Studio .NETdesign to display the template. The code uses the meaningful names wegave the controls, openMenu for the Open menu item, openDialog for the Open-FileDialog, and displayBox for the RichTextBox. The completed event-han-dling template is
private void openMenu_Click(object sender, System.EventArgs e)
{openDialog.ShowDialog();displayBox.LoadFile(openDialog.FileName,

3.4 Menus and Dialogs 73
Figure 3.21 Displaying a file.
RichTextBoxStreamType.PlainText);}
The first line of code we wrote shows the dialog of Figure 3.20. The secondline loads the file whose name the dialog saves in the FileName property. Fol-lowing the LoadFile method name are the two pieces of information Load-File needs. These are called arguments. We will discuss methods and theirarguments more fully later. We enclose method arguments in parenthesesand separate them with commas. The first argument
openDialog.FileName
is the name of the file to load, and the second
RichTextBoxStreamType.PlainText
is the type of data it contains.
To illustrate loading a file, we use the simple rich.txt file shown beingselected in Figure 3.20. Figure 3.21 shows how the form looks after the userclicks the Open button in Figure 3.20.
We can edit the text in displayBox. Figure 3.22 shows the form of Example3-7after the user added a line and resized the form to make it wider.
When the user clicks on File and then on Save, it will generate a Click event,which we can handle to show a SaveFileDialog and save the edited text tothe file name indicated by the user. The event handler for this Click eventwhose template we filled in using Visual Studio .NET is
private void saveMenu_Click(object sender, System.EventArgs e)
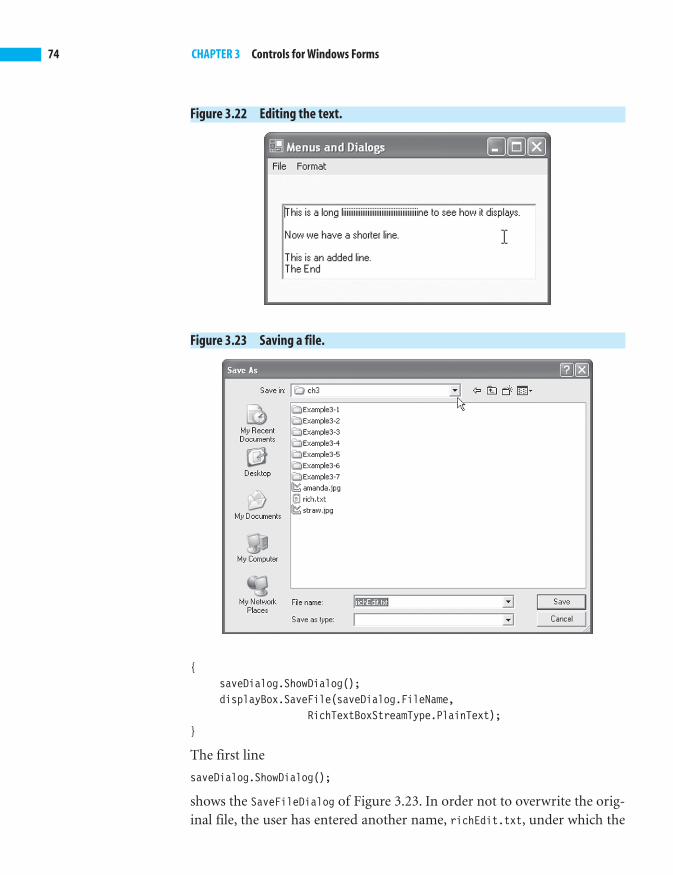
74 CHAPTER 3 Controls for Windows Forms
Figure 3.23 Saving a file.
Figure 3.22 Editing the text.
{saveDialog.ShowDialog();displayBox.SaveFile(saveDialog.FileName,
RichTextBoxStreamType.PlainText);}
The first line
saveDialog.ShowDialog();
shows the SaveFileDialog of Figure 3.23. In order not to overwrite the orig-inal file, the user has entered another name, richEdit.txt, under which the

3.4 Menus and Dialogs 75
edited file can be saved. When the user clicks the Save button, this name willbe set as the FileName property of saveDialog.
The second line
displayBox.SaveFile(saveDialog.FileName,RichTextBoxStreamType.PlainText);
saves the text in displayBox using the name just chosen by the user. The firstargument to the SaveFile method is the file name, and the second argumentis its type, PlainText.
3.4.4 A Print Dialog
The PrintDialog control allows a user to configure a print job by selectingthe printer, the number of copies, and the pages to print. Clicking on thePrint menu item generates a Click event. To print, we would need to writeC# code to write each line of text. We defer implementing printing until wecover more C# constructs. Even though we will defer printing, we need toadd a PrintDocument control to allow for configuration of the print job later.The PrintDocument control does not appear on the form, but shows below itin the design along with the menu and dialog controls. In Example3-7,when the user clicks the Print menu item we simply display a message thatthe printer is busy. The event-handling method is
private void printMenu_Click(object sender, System.EventArgs e)
{printDialog.Document = printDocument;printDialog.ShowDialog();displayBox.Text = "Printer busy \n Try later";
}
The first line of the event handler sets the Document property of printDialog
to the PrintDocument, printDocument, that we will use later to configure thejob. The second line shows the dialog to the user. We are not ready to usethe printer selection that the user makes, so the third line will just display amessage in displayBox.
3.4.5 A Color Dialog
A ColorDialog control lets the user choose a color from a palette. Figure 3.24shows the color dialog that appears when the user clicks the Format menu,then the Color menu item, and finally the Foreground menu item. We will

76 CHAPTER 3 Controls for Windows Forms
Figure 3.24 A color dialog.
write the event handler so that when the user selects a color in the dialog,the foreground color of the text in displayBox displays in that color.
During the design we added the ColorDialog by dragging it from the Tool-box to the form. It appears below the form in the design window becausethis control has no visual representation on the form. Double-clicking onthe Foreground menu item displays the template for the event-handlingmethod that we complete to give
private void foregroundMenu_Click(object sender, System.EventArgs e)
{colorDialog.ShowDialog();displayBox.ForeColor =colorDialog.Color;
}
The first line shows the color dialog, and the second sets the ForeColorproperty of displayBox to the Color selected by the user.
Similarly, we can handle a click of the Background menu item to change thebackground color of displayBox to the color selected by the user. The event-handling code is
private void backgroundMenu_Click(object sender, System.EventArgs e)

3.4 Menus and Dialogs 77
Figure 3.25 A font dialog.
{colorDialog.ShowDialog();displayBox.BackColor = colorDialog.Color;
}
3.4.6 A Font Dialog
When the user clicks the Font menu item, we will show a font dialog toenable the user to select a font and change the font used in displayBox tothat selected by the user. When building Example3-7 using Visual Studio.NET, we drag a FontDialog control from the Toolbox to the form. It appearsbelow the form. Double-clicking on the Font menu item displays the tem-plate for the event-handling code that we complete to give the code
private void fontMenu_Click(object sender, System.EventArgs e)
{fontDialog.ShowDialog();displayBox.Font = fontDialog.Font;
}
Figure 3.25 shows the font dialog, and Figure 3.26 shows the result of theuser’s selection.

78 CHAPTER 3 Control for Windows Forms
Figure 3.26 Changing the font and colors.
Test Your Understanding
15. Explain how to use the keyboard instead of a menu to begin sav-ing the text in the RichTextField control of Example3-7 to a file.
16. Which controls do we use in Example3-7 that do not have a visualrepresentation on the form?
17. Which OpenFileDialog property holds the file name selected by theuser in the dialog?
18. What event does a user generate by clicking on a menu item?
19. What is the name of the C# method that pops up a dialog?
3.5 Summary■ Exactly one RadioButton of a group can be selected. By default, all
RadioButton controls belong to one group. We can use a GroupBox tocreate another group. The BorderStyle property specifies the typeof border for a Label.
■ The LinkLabel control lets us add links to our form. A LinkLabel maycontain more than one link. The Links property holds the collec-tion of links. The first link is at index 0. The LinkBehavior propertyspecifies the underline rule for the link. To start Internet Explorer,we use the Process class of the System.Diagnostics namespace.
The MainMenu controlrepresents the menustructure for the form. Wecan easily add menus withmenu items in the VisualStudio .NET design. TheRichTextBox controlallows the user to enterand edit text and providesadvanced formattingcapabilities. An Open-FileDialog allows theuser to choose a file toopen, and SaveFile-Dialog lets the user savea file. Each has a Show-Dialog method. APrintDialog allowsthe user to select a printerand choose which por-tions of the document toprint. A ColorDialogcontrol lets the userchoose a color from apalette. A FontDialoglets the user choose afont.
The BIG Picture
3.6 Programming Exercises 79
■ A PictureBox displays an image in one of four modes. Using Check-Box controls, we can make multiple selections or select nothing. Weset the Appearance, BackColor, BackgroundImage, CheckAlign, FlatStyle,Image, ImageAlign, and TextAlign properties to configure a CheckBox.
■ A ListBox conveniently holds a list of choices. A ComboBox holds a listof choices but saves space by showing only one. We use the Items,Anchor, SelectionMode, and Sorted properties to configure a ListBox.The DropDownStyle property determines the style of a ComboBox.
■ A DateTimePicker allows the user to select a date and time and to dis-play it in a specific format.A NumericUpDown represents a Windows up-down control that displays numeric values. A Timer generates a Tick
event at a set interval, say, every second. A StatusBar displays text.
■ The MainMenu control represents the menu structure for the form. Wecan easily add menus with menu items in the Visual Studio .NETdesign. The RichTextBox control allows the user to enter and edit textand provides advanced formatting capabilities. An OpenFileDialog
allows the user to choose a file to open, and SaveFileDialog lets theuser save a file. Each has a ShowDialog method. A PrintDialog allowsthe user to select a printer and choose which portions of the docu-ment to print. A ColorDialog control lets the user choose a colorfrom a palette. A FontDialog lets the user choose a font.
3.6 Programming Exercises
3.1 Modify Example3-1 so the Label is surrounded by a black rectangleand the text is in italics.
3.2 Modify Example3-2 to choose a college. Pick three colleges toinclude in the choices.
3.3 Modify Example3-4 so that all four CheckBox controls look like but-tons.
3.4 Modify Example3-5 so that the ComboBox shows all choices.
3.5 Modify Example3-6 so that the DateTimePicker works as shown inFigure 3.15.
3.6 Create a Windows application that includes two CheckBox and twoPictureBox controls. Checking one box will display a photo of the

80 CHAPTER 3 Control for Windows Forms
author’s daughter in a PictureBox on the left of the form. Checkingthe other will display a photo of the author on the right of the form.
3.7 Create a Windows application that includes radio buttons for theuser to select either a small or a large size. Include a text box for theuser to enter a message and two labels to display the message. Dis-play the message in the first label if the selected size is small and inthe second if it is large.
3.8 Create a Windows application that includes a RichTextBox and aStatusBar. Display the length of the text in the status bar.
3.9 Create a Windows application that includes a DateTimePicker, aLabel, and a MainMenu including Color and Font menu items. Displaythe date that the user selects in the label. Display the label text inthe color and font that the user selects.
3.10 Create a Windows application that includes a Timer and a Label. Dis-play the current time in the label each second. Make the size large.
3.11 Create a Windows application that includes an Open button, a Savebutton, and a RichTextBox. When the user clicks the Open button,pop up an OpenFileDialog and display the file that the user selects inthe RichTextBox. When the user clicks the Save button, pop up aSaveFileDialog, and save the file in the RichTextBox using the filename that the user selects.

4CHAPTERVariables and TypesWe have introduced a variety of forms using Visual Studio .NET. In the next few
chapters we cover some essential C# that will enable us to develop more inter-
esting applications. In this chapter we discuss variables, types, and expressions.
Chapter Objectives:■ Learn how to construct names and expressions
■ Work with useful types of data, including formatting
■ Use variables and assignments
4.1 Variables and the Assignment Operator
Variables help us store data for later use in a program. The assignmentoperator gives a variable a value. First we need to learn the rules for namingvariables and other entities.
4.1.1 Identifiers
An identifier names program elements. The identifier age names an integervariable. These identifiers can include both uppercase and lowercase char-acters. C# is case-sensitive, so identifiers age, Age, and AGE are all differenteven though they each use the same three letters of the alphabet in the sameorder. Good C# style starts variables with a lowercase letter.
Digits occur in identifiers but cannot be the first character. Starting anidentifier with a digit would confuse it with numbers. Identifiers may alsouse the underscore character and even start with it. For example, _hat,hat_box, and My_____my are all valid identifiers.
We use underscores or uppercase letters to make identifiers easier to read.For example, use a_big_car or aBigCar rather than abigcar. Preferred styleuses meaningful names such as age rather than arbitrary names such as xyz.

82 CHAPTER 4 Variables and Types
4.1.2 Keywords
Keywords are identifiers that are reserved for special uses. The event-han-dling templates we used in Chapter 3 started with the two keywords privateand void. Because these are keywords, they cannot be user-defined names.We include the complete list of C# keywords in Appendix A.
Some valid C# identifiers are:
savingstextLabelrest_stop_12B3_testMy____my
Some invalid identifiers are:
4you // Starts with a number
x<y // Includes an illegal character, <
top-gun // Includes an illegal character, -
int // Reserved keyword
4.1.3 The Character Set
The character set defines the characters that we can use in a program. TheASCII (pronounced as′-key) character set contains 128 printing and non-printing characters shown in Appendix C. The ASCII characters includeuppercase and lowercase letters, digits, and punctuation. For worldwideuse, a programming language must have a much bigger character set toinclude the many characters of the various major languages. C# uses theUnicode character set that contains thousands of characters, including allof the ASCII characters. For example, Unicode includes the Greek lettergamma, �. We will use only the ASCII characters in this book.
4.1.4 Variables
A variable represents a storage location. Every variable has a name and atype that determines what kind of data it holds. We must declare everyvariable before we use it. A variable declaration states its name and type,and may provide an initial value. For example,
int age;

Figure 4.2 A variable holding the value 19.
19age
Figure 4.1 Memory location for the agevariable.
???age
4.1 Variables and the Assignment Operator 83
declares a variable whose name is age and whose type is int. We will dis-cuss types in the next section, where we will see that the type int denotesinteger values.
The variable age represents a memory location. Figure 4.1 shows the effect ofthis declaration. The box signifies a location in the computer’s memory. Thequestion marks signify that we do not know the contents of that memorylocation. The C# compiler checks that a variable has a value before it is used.
We can initialize a variable with a value in a declaration. For example, thedeclaration
int age = 19;
declares the variable age and initializes it to hold 19, as Figure 4.2 shows.
4.1.5 The Assignment Operator
We initialize a variable only once, in its declaration. To change the value ofa variable after we have declared it, we can use the assignment operator.This, as its name suggests, assigns a value to a variable. C# uses the equalsign, =, for the assignment operator. An example of a simple assignmentstatement is
age = 10;
in which we assign the value 10 to the variable age. This assignment state-ment assumes that we have already declared the variable age. The compilerwould report an error if we did not declare age.
We declare and initialize a variable only once, but we can assign it a valuemany times in a program. Later in the program we may wish to change thevalue of age, say, to 20, using the assignment statement
age = 20;
Remember that the variable, age, has one location. Each assignmentreplaces the old value with the newly assigned value. Figure 4.3 shows thechanges taking place resulting from the above assignments to age.
Figure 4.3 Declaring and assigning values to a variable.
19age 10age 20
a. int age = 19; b. int age = 10; c. int age = 20;
age

84 CHAPTER 4 Variables and Types
Figure 4.4 The result of an assignment.
9
int mySize = 9;
10
int yourSize = 10;
mySize yourSize
10
mySize = yourSize
10
So far we have only assigned constant values to variables, but we can alsoassign the value of one variable to another, as in
int mySize = 9;int yourSize = 10;mySize = yourSize;
The assignment takes the value of yourSize, which we initialized to 10, andassigns it to mySize. Figure 4.4 shows the locations for yourSize and mySize
before and after the assignment.
We can write an arithmetic expression, such as y + 2, on the righthand sideof an assignment. The computer will then evaluate the expression andassign that value to the variable on the lefthand side of the assignment. Wewill learn about arithmetic expressions later in this chapter. The assignment
mySize = yourSize + 2;
would give mySize a value of 12, given that yourSize still has the value of 10that it was initialized with above.
Notice that when a variable occurs on the righthand side of an assignment,we use the value that we find in its storage location. When a variable occurson the lefthand side of an assignment, we store a value in its memory loca-tion. Variables perform this very important function—storing values forlater use—in our program.
4.1.6 Illustrating Variables
Example4-1 includes a TextBox for the user to enter a price of an item. A Label
informs the user to enter a price in cents. We assume that the user will bepaying with a dollar bill worth 100 cents. Pressing the Make Change button
a. Initialize
b. Assign

4.1 Variables and the Assignment Operator 85
Figure 4.5 Making change.
1If the Properties window is not showing, we click the View, Properties menu item.
will pop up a MessageBox describing the correct amount of change in quar-ters, dimes, nickels, and pennies. Figure 4.5 shows the form of Example4-1.
To build Example4-1, we create the Example4-1 project and drag TextBox,Label, and Button controls from the Toolbox to the form. We click on eachcontrol to display its Properties window.1 The properties, with their newvalues, that we configure are
FormText Change from a Dollar
TextBox(Name) centsBoxText " "Anchor Top
LabelText Enter a price in centsAnchor Top
Button(Name) changeButtonText Make ChangeAnchor Top
The only code we need to write is the body of the event handler to respondwhen the user presses the Make Change button. We double-click on the but-ton in the design to display the code template for the event handler, which is
private void changeButton_Click(object sender, System.EventArgs e)
{}

Figure 4.6A MessageBox.
86 CHAPTER 4 Variables and Types
The event-handling method for the button uses local variables to hold theamount of change necessary, and the numbers of quarters, dimes, nickels,and pennies. Later in the chapter we discuss arithmetic expressions thatwill explain the operations used in this example. We declare local variablesinside a method, and they can be used only inside the method in whichthey are declared. Figure 4.6 shows the pop-up MessageBox in which theevent handler displays the change that results. When we learn to use controlstructures in the next chapter, we will be able to improve the grammar inthe resulting message.
The completed event-handling code for the button is
private void changeButton_Click(Object sender, System.EventArgs e)
{int price = int.Parse(centsBox.Text); // convert stringint change = 100 - price; // $1 depositedint quarters = change / 25; // 25 cents per quarterint remainder = change % 25; // after quarters givenint dimes = remainder / 10; // 10 cents per dimeremainder = remainder % 10; // after dimes givenint nickels = remainder / 5; // five cents per nickelint pennies = remainder % 5; // after nickels givenMessageBox.Show("Change is \n"
+ quarters + " quarters \n"+ dimes + " dimes \n"+ nickels + " nickels \n"+ pennies + " pennies");
}
The event-handling method declares seven local variables. The first, price,contains the price of the item that the user entered in the TextBox. Becausethe TextBox entry is a String, we need to convert it to an integer value usingthe int.Parse method. The second variable, change, represents the totalamount of change we need to dispense. The user deposited one dollar,equal to 100 cents, so we subtract the price from 100 to get the amount ofchange. Later in the chapter we explain the C# arithmetic operator symbolsused to compute the quarters, dimes, nickels, and pennies.
A MessageBox is a simple way to display a message to the user. Later we willlook in more detail at String formatting techniques. Here we use the Stringconcatenation operator, +, to join strings together. To go to the next line of
Variables help us storedata for later use in a pro-gram. The assignmentoperator gives a variable avalue. An identifier namesprogram elements. Key-words are identifiers thatare reserved for specialuses. C# uses the Unicodecharacter set that containsthousands of characters.We can define constants,which we cannot change.
The BIG Picture
4.2 Types 87
the message we add the newline character that we represent using two key-strokes, a backslash followed by a lowercase n, \n.
4.1.7 Constants
We changed the value of variable quarters in Example4-1. We can defineconstants, which we cannot change. For example, the declaration
const int FIXED = 25;
declares a constant named FIXED. Trying to assign a value to FIXED wouldgenerate a compilation error.
Test Your Understanding
1. Which of the following are valid identifiers? For each nonvalidexample, explain why it is not valid.
a. Baby b. _chip_eater c. any.time d. #noteThis
e. &car f. GROUP g. A103 h. 76trombones
i. float j. intNumber k. $$help
2. A variable represents a ___________________ location.
3. We refer to a variable by its ______________. The _____________of a variable determines what type of data it holds.
4. How can we improve the following declaration?
int number;
4.2 Types
C# provides a number of simple data types. We discuss int, double, decimal,char, and bool in this section. Figure 4.7 describes these types briefly.
The int type holds values ranging from �2,147,483,648 through2,147,483,647. We can declare and initialize variables of type double. Forexample,
double small = 0.000345;double large = 12345.6;
The type decimal uses a special format that allows exact representations ofdecimal numbers of up to 28 places. Such a representation is essential for
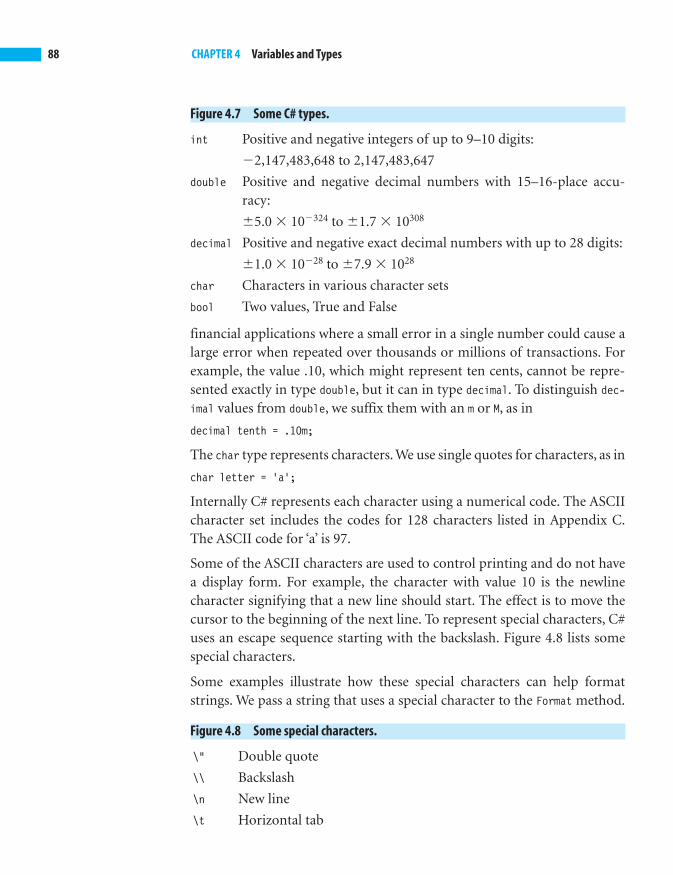
88 CHAPTER 4 Variables and Types
Figure 4.7 Some C# types.
int Positive and negative integers of up to 9–10 digits:
�2,147,483,648 to 2,147,483,647
double Positive and negative decimal numbers with 15–16-place accu-racy:
�5.0 � 10�324 to �1.7 � 10308
decimal Positive and negative exact decimal numbers with up to 28 digits:
�1.0 � 10�28 to �7.9 � 1028
char Characters in various character sets
bool Two values, True and False
Figure 4.8 Some special characters.
\" Double quote
\\ Backslash
\n New line
\t Horizontal tab
financial applications where a small error in a single number could cause alarge error when repeated over thousands or millions of transactions. Forexample, the value .10, which might represent ten cents, cannot be repre-sented exactly in type double, but it can in type decimal. To distinguish dec-imal values from double, we suffix them with an m or M, as in
decimal tenth = .10m;
The char type represents characters. We use single quotes for characters, as in
char letter = 'a';
Internally C# represents each character using a numerical code. The ASCIIcharacter set includes the codes for 128 characters listed in Appendix C.The ASCII code for ‘a’ is 97.
Some of the ASCII characters are used to control printing and do not havea display form. For example, the character with value 10 is the newlinecharacter signifying that a new line should start. The effect is to move thecursor to the beginning of the next line. To represent special characters, C#uses an escape sequence starting with the backslash. Figure 4.8 lists somespecial characters.
Some examples illustrate how these special characters can help formatstrings. We pass a string that uses a special character to the Format method.
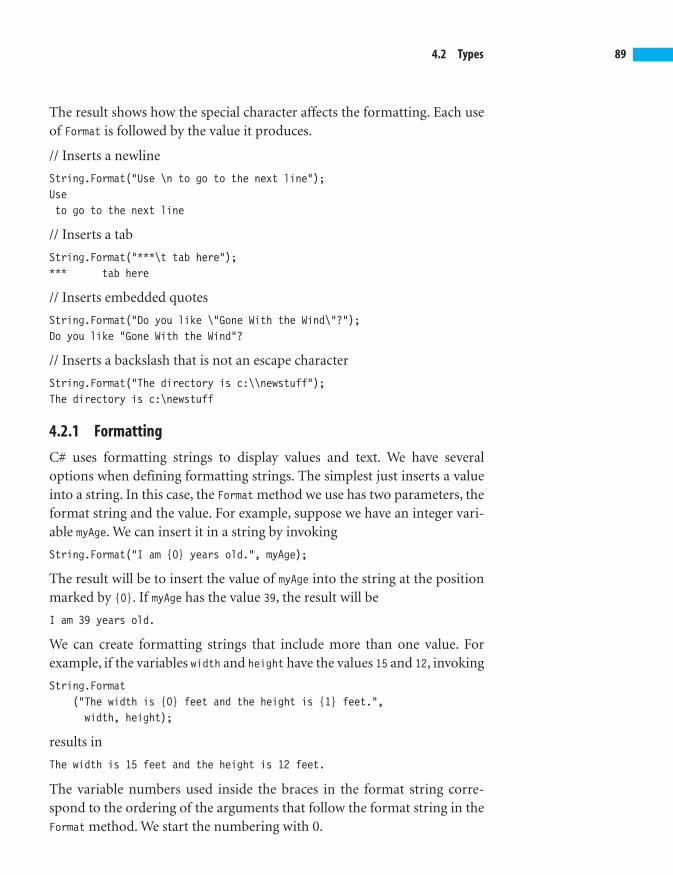
4.2 Types 89
The result shows how the special character affects the formatting. Each useof Format is followed by the value it produces.
// Inserts a newline
String.Format("Use \n to go to the next line");Useto go to the next line
// Inserts a tab
String.Format("***\t tab here");*** tab here
// Inserts embedded quotes
String.Format("Do you like \"Gone With the Wind\"?");Do you like "Gone With the Wind"?
// Inserts a backslash that is not an escape character
String.Format("The directory is c:\\newstuff");The directory is c:\newstuff
4.2.1 Formatting
C# uses formatting strings to display values and text. We have severaloptions when defining formatting strings. The simplest just inserts a valueinto a string. In this case, the Format method we use has two parameters, theformat string and the value. For example, suppose we have an integer vari-able myAge. We can insert it in a string by invoking
String.Format("I am {0} years old.", myAge);
The result will be to insert the value of myAge into the string at the positionmarked by {0}. If myAge has the value 39, the result will be
I am 39 years old.
We can create formatting strings that include more than one value. Forexample, if the variables width and height have the values 15 and 12, invoking
String.Format("The width is {0} feet and the height is {1} feet.",width, height);
results in
The width is 15 feet and the height is 12 feet.
The variable numbers used inside the braces in the format string corre-spond to the ordering of the arguments that follow the format string in theFormat method. We start the numbering with 0.

90 CHAPTER 4 Variables and Types
We do not have to use the variables in the order they appear as arguments.For example, calling
String.Format("The width is {1} feet and the height is {0} feet.",height, width);
would produce the same result
The width is 15 feet and the height is 12 feet.
Here the height variable, which appears as the second argument, occurslater in the formatting string than the variable width, which is the thirdargument to the Format method.
If we just want to display a value by itself as a string, we could use theToString method. For example
myAge.ToString();
produces 39, and
String.Format("{0}", myAge);
gives the same result.
4.2.2 Format Specifiers
To allow more control over the format, we can use format specifiers. Forexample, to express a value in the local currency, dollars and cents in theUnited States, we would add the C specifier. If the price variable has thevalue 17.227, the statement
String.Format("I paid {0 : C} for that shirt including tax", price);
would produce the string
I paid $17.23 for that shirt including tax
We could express the price itself as a currency string using
price.ToString({C});
to produce the string $17.23.
Figure 4.9 shows some of the format types.
The Number format inserts commas to separate each three-digit group foreasier reading. It uses a number to specify the number of places after thedecimal point, so N0 would show zero places after the point and N2 wouldshow two. For example,

4.2 Types 91
Figure 4.9 Formatting specifiers.
Format Specifier Name
C or c Currency
N or n Number
P or p Percent
F or f Fixed-point
G or g General
123456789.ToString("N0");
produces 123,456,789. Using the N specifier without a number will display adefault number of places after the decimal point.
The Percent format converts a number of a percent by multiplying by 100.We can add a number to indicate the number of places after the decimalpoint, as in
.0253456.ToString("P1");
that produces the string 2.5 %.
The Fixed-point format displays a number using a decimal point. We canspecify the number of places after the decimal, as in
1234.56789.ToString("F3");
that produces the string 1234.568, obtained by rounding up because1234.56789 is closer to 1234.568 than to 1234.567.
The General format, which is the default when we omit a format specifier,displays in fixed-point but uses scientific notation when it would be morecompact. The precision specifier indicates the number of significant digitsin the resulting string. Some examples are:
1234.56789.ToString("G"); Produces 1234.56789
.00000123456.ToString("G"); Produces 1.23456E-06. The number follow-ing the E indicates the number of places tomove the decimal point, left if negative, rightif positive.
.00000123456.ToString("G2"); Produces 1.2E-06

Figure 4.11Displaying a formatted value.
92 CHAPTER 4 Variables and Types
Figure 4.10 Choosing formatting parameters.
4.2.3 Field Width
We can use format specifiers to indicate the size of the field that the num-ber will occupy. The format specifier {0, 10} indicates that the variable withindex 0 should appear in a field of size 10. The field will increase in size ifnecessary to display the formatted value properly. A positive value for thesize means that the value will be right-justified in the field, while a negativevalue provides for left-justification. For example,
String.Format("{0,10}{1,10}", 123, 45678);String.Format("{0,-10}{1,-10}", "Jack", "Jill");
produces
123 45678Jack Jill
We can include formatting codes when specifying the field width. For example,
String.Format("{0,12:C}{1,12:C}", 123, 45678);
produces
$123.00 $45,678.00
Example4-2 displays 9876.543 using the user’s choice of formatting param-eters. Pressing the Display button in Figure 4.10 shows the MessageBox ofFigure 4.11 showing the string produced by
String.Format("{0,10:N2}", 9876.543);
To build Example4-2, we create a new project and drag two NumericUpDowncontrols, three Label controls, a Button, and a ComboBox from the Toolbox to
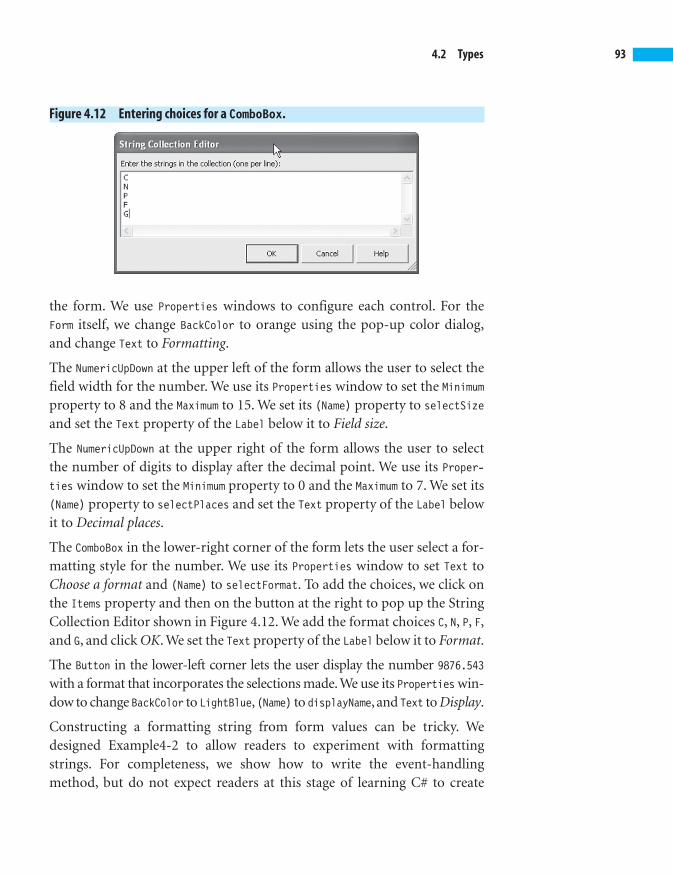
4.2 Types 93
Figure 4.12 Entering choices for a ComboBox.
the form. We use Properties windows to configure each control. For theForm itself, we change BackColor to orange using the pop-up color dialog,and change Text to Formatting.
The NumericUpDown at the upper left of the form allows the user to select thefield width for the number. We use its Properties window to set the Minimumproperty to 8 and the Maximum to 15. We set its (Name) property to selectSizeand set the Text property of the Label below it to Field size.
The NumericUpDown at the upper right of the form allows the user to selectthe number of digits to display after the decimal point. We use its Proper-ties window to set the Minimum property to 0 and the Maximum to 7. We set its(Name) property to selectPlaces and set the Text property of the Label belowit to Decimal places.
The ComboBox in the lower-right corner of the form lets the user select a for-matting style for the number. We use its Properties window to set Text toChoose a format and (Name) to selectFormat. To add the choices, we click onthe Items property and then on the button at the right to pop up the StringCollection Editor shown in Figure 4.12. We add the format choices C, N, P, F,and G, and click OK. We set the Text property of the Label below it to Format.
The Button in the lower-left corner lets the user display the number 9876.543
with a format that incorporates the selections made. We use its Properties win-dow to change BackColor to LightBlue,(Name) to displayName, and Text to Display.
Constructing a formatting string from form values can be tricky. Wedesigned Example4-2 to allow readers to experiment with formattingstrings. For completeness, we show how to write the event-handlingmethod, but do not expect readers at this stage of learning C# to create

94 CHAPTER 4 Variables and Types
such expressions. For the example shown in Figure 4.10 and Figure 4.11, wehave the form values
numericUpDown1.Value field size 10
numericUpDown2.Value number of digits 2
comboBox1.Text format code N
Using these values, the code we need to create the MessageBox of Figure 4.11 is
MessageBox.Show(String.Format("Start {0, 10:N2}", 9876.543));
We prefix the number with the word Start to show the space that the fieldof size 10 spans. Had the number had fewer digits, there would have beenmore spaces after the word Start in Figure 4.11 which illustrates the N for-mat for a number using commas to group by threes and with the selectedtwo places after the decimal point.
We need to build the string “Start {0, 10:N2}" using the property valuesdetermined by the user’s selections. We use the Format method to build theformatting string. We need to distinguish between braces used to build theformatting string and those that will be part of the formatting string. Weuse {{ to embed a left brace, {, in the formatting string and }} to embed aright brace, }. Using this approach, we execute
String fString = String.Format("Start {{0,{0}:{1}{2}}}",numericUpDown1.Value, comboBox1.Text,numericUpDown2.Value);
to build the formatting string "Start {0, 10:N2}" that we then use to for-mat 9876.543.
To get the template for the button’s event-handling method, we double-click on the Display button in the Visual Studio .NET design to show
private void displayNumber_Click(object sender, System.EventArgs e)
{}
Entering the code that we just devised produces the completed event-han-dling method for the Display button as
private void displayNumber_Click(object sender, System.EventArgs e)

C# provides a number ofsimple data types, includ-ing int, double, dec-imal, char, and bool.C# uses formatting stringsto display values and text.To allow more control overthe format, we can useformat specifiers.
The BIG Picture
4.2 Types 95
{String fString = String.Format
("Start {{0,{0}:{1}{2}}}",selectSize.Value, selectFormat.Text,selectPlaces.Value);
MessageBox.Show(String.Format(fString, 9876.543));}
Test Your Understanding
5. The largest value that the ______ type can hold is 2,147,483,647.
6. Show the string produced from each of the following statements.
a. String.Format(“Descartes said, \“I think\ntherefore\nI am\””);
b. String.Format(“set path=c:\\C#\\bin”);
c. String.Format(“12345\t678”);
7. Show the string produced from each of the following statements.
a. String.Format(“I like \n\nto write C# programs.”);
b. String.Format(“Ali Baba said, \“Open, Sesame!\””);
c. String.Format(“Find 3\\4 of 24”);
8. Suppose that the double variable, x, has the indicated value. Showthe result of x.ToString("C").
a. 3456.789 b. .0000023456 c. .09876543
d. 1234567890.987 e. –234567.765432
9. Suppose that the double variable, x, has the indicated value. Showthe result of x.ToString("F2").
a. 3456.789 b. .0000023456 c. .09876543
d. 1234567890.987 e. –234567.765432
10. Suppose that the double variable, x, has the indicated value. Showthe result of x.ToString("N2").
a. 3456.789 b. .0000023456 c. .09876543
d. 1234567890.987 e. –234567.765432
11. Suppose that the double variable, x, has the indicated value. Showthe result of x.ToString("P1").

96 CHAPTER 4 Variables and Types
a. 3456.789 b. .0000023456 c. .09876543
d. 1234567890.987 e. –234567.765432
12. Show the string produced by
String.Format("{0,10}{0,-10}", "George", 24);
13. Show the string produced by
String.Format("{0,-10}{0,10}", "George", 24);
4.3 Operators and Expressions
In the process of solving problems, we perform operations on the data.Each type of data has suitable operations associated with it. Integer anddecimal data have familiar arithmetic operations—addition, subtraction,multiplication, division, and negation—and a remainder operation.
A binary operator, such as ‘+,’ takes two operands, as in the expression 3 + 4,where the numbers 3 and 4 are the operands. C# supports these binaryarithmetic operators:
+ addition- subtraction* multiplication/ division% remainder
A unary operator takes one operand, as in the expression -3. C# supportsthese unary arithmetic operators:
- negation+ (no effect)
If the operands are integers, then the result of an arithmetic operation willbe an integer. Addition, subtraction, and multiplication behave as weexpect from ordinary arithmetic. Some examples are:
Operation Result
32 + 273 305
63 - 19 44
42 * 12 504
2.31 * 6.2 14.322

4.3 Operators and Expressions 97
Figure 4.13 C# arithmetic operations.
Operation Math notation C# (constants) C# (variables)
Addition a + b 3 + 4 score1 + score2
Subtraction a - b 3 - 4 bats - gloves
Multiplication ab 12 * 17 twelve * dozens
Division a/b 7 / 3 total / quantity
Remainder r in a=qb+r 43 % 5 cookies % people
Negation -a -6 -amount
Integer division produces an integer result, truncating toward zero if neces-sary, meaning that it discards the fractional part, if any.
Operation Result
12 / 3 4 Exact.
17 / 5 3 Discards the 2/5.
-17 / 5 -3 Discards the �2/5.
17.0 / 5.0 2.4 Exact.
The operation x%y computes the remainder when x is divided by y.
Operation Result
17 % 5 2 // 3*5 + 2 = 17
14.56 % 2.21 1.3 // 6*2.21 + 1.3 = 14.56
Examples of the unary operations are -7, which negates the seven, and +3.In summary, Figure 4.13 shows the C# arithmetic operations for integers.
4.3.1 Precedence of Arithmetic Operators
In mathematics, we apply some common rules to decide how each opera-tion gets its operands. For example, in the expression 3 + 4*5, we wouldmultiply 4*5 giving 20, and then add 3+20 to get the result of 23. We say themultiplication has higher precedence than the addition, meaning that itgets its operands first. In Figure 4.14 we show that * gets its operands firstby drawing a box around the expression 4*5.

98 CHAPTER 4 Variables and Types
Figure 4.14 Multiplication gets its operands first.
3 + * is first4 * 5
Figure 4.15 Compute within parentheses first.
+ is first (3 + 4) * 5
If we want to do the addition first, we would need to use parentheses, as in(3+4)*5, shown in Figure 4.15. We compute everything inside parenthesesfirst, so we would add 3+4 giving 7, and then multiply 7*5 giving 35. Byremembering the rules of precedence, we can often avoid using parenthe-ses. We could have written parentheses in the original expression, whichwould then be 3+(4*5), but these parentheses are not needed because weknow that multiplication goes first.
Higher precedence
-, + Unary Negation and Plus
*, /, % Multiplication, Division, and Remainder
+, - Binary Addition and Subtraction
= Assignment
Lower Precedence
We evaluate x-3/y as x-(3/y) because ‘/’ has higher precedence than ‘-’. Weevaluate -7+10 as (-7)+10 or 3, because negation has higher precedence thanaddition. In the case of arithmetic operators of equal precedence, we evalu-ate from left to right. Thus, we compute 3+x+7 as (3+x)+7 and 10-7-5 as(10-7)-5, which is -2. We say that the associativity of the binary arithmeticoperators is from left to right.

4.3 Operators and Expressions 99
2Although these operators provide no new functionality, they do make it easier for the com-piler to generate efficient code.
4.3.2 Combining Assignment and Arithmetic
Suppose we want to add 5 to a variable x. We could do that with the assign-ment statement
x = x + 5;
C# has an operator that combines2 the assignment and the addition intoone operator, +=. We can write the above statement more simply as
x += 5;
C# also has operators that combine assignment with the other arithmeticoperators, -=, *=, /=, and %=. We must enter these two-character operatorswithout any space between the two symbols. Some examples are:
Combined Form Equivalent Form
y -= 7; y = y - 7;
a *= x; a = a * x
x /= y; x = x / y;
w %= z; w = w % z;
b *= z + 3; b = b*(z + 3);
Note in the last example that we put parentheses around the entire right-hand side expression, z + 3, and multiplied that entire expression by thelefthand side variable, b.
4.3.3 Increment and Decrement Operators
C# has simple forms for the frequent operations of adding one to a variable(incrementing) or subtracting one from a variable (decrementing). Toincrement the variable x using the postfix form of the increment operator,we write x++. If x had a value of 5, executing x++ would give it a value of 6.The prefix form of the increment operator, ++x, also increments the variableby one. We only use the increment operator to increment a variable that isnot part of a larger expression. In this case it makes no difference whetherwe use the prefix or the postfix form of this operator.

100 CHAPTER 4 Variables and Types
Figure 4.16 C# relational and equality operators.
The operators <=,>=,==, and != are two-character operators that must be together, withoutany spaces between the two characters.The expression 3 <= 4 is fine, but 3 < = 4 will givean error. (The compiler thinks we want the ‘<’ operator and cannot figure out why we did notgive a correct righthand operand.)
TIP
C# has prefix and postfix forms of the decrement operator, --x and x--.Each decrements the value of the variable by 1.
4.3.4 Relational Operators and Expressions
Arithmetic operators take numeric operands and give numeric results. Forexample, the value of 3+4 is an integer, 7. By contrast, an expression such as3 < 4, stating that 3 is less than 4, gives the value true, and the expression7 < 2 gives the bool value, false. C# provides relational and equality opera-tors, listed in Figure 4.16, which take two operands of a primitive type andproduce a bool result.
We can use variables in relational expressions. For example, if x is an inte-ger variable, the expression
x < 3
is true if the value of x is less than 3 and false otherwise. The expression
x == 3
evaluates to true if x equals 3, and to false otherwise.
< less than 31 < 25 false
<= less than or equal 464 <= 7213 true
> greater than -98 > -12 false
>= greater than or equal 9 >= 99 false
== equal 9 == 12 + 12 false
!= not equal 292 != 377 true
Symbol Meaning Example

4.3 Operators and Expressions 101
Be careful not to confuse the equality operator,==, with the assignment operator,=. If x hasthe value 12, then x == 3 evaluates to false, but x = 3 assigns the value 3 to x, changing itfrom 12.
TIP
Figure 4.17 Conditional operators.
The && and || operators use two-character symbols that must be typed without any spacebetween them. Using & & instead of && would give an error.
TIP
4.3.5 The AND, OR, and NOT Operators
The C# conditional operators express the familiar AND and OR opera-tions, which we can use to write conditions such as
John’s age is greater than 20 AND John’s age is less than 35.
John’s height is greater than 78.5 OR John’s weight is greater than 300.
Figure 4.17 shows the C# symbols for the conditional operators.
Note that the operands of the conditional operators have type bool. Theexpression age > 20 is either true or false, and so is age < 35.
4.3.6 Conditional AND
The conditional AND expression (age > 20) && (age < 35) will be true onlywhen both of its operands are true, and false otherwise. If the variable agehas the value 25, both operands are true, and the whole && expression istrue. If age has the value 17, the first operand, age > 20 is false, and thewhole && expression is false. Figure 4.18 shows some sample evaluations ofa conditional AND expression, illustrating how the value of an && expres-sion depends upon the values of its arguments.
Symbol Meaning Example
&& conditional AND (age > 20) && 35)
| | conditional OR (height > 78.5) | | (weight > 300)

Figure 4.20Evaluating a logical complementexpression.
A !A
true false
false true
102 CHAPTER 4 Variables and Types
Figure 4.19 Evaluating an example of a conditional OR expression.
height weight height > 78.5 weight > 300 (height > 78.5) || (weight > 300)
62 125 false false false
80 250 true false true
72 310 false true true
80 325 true true true
Figure 4.18 Evaluating an example of a conditional AND expression.
Note that when the first operand is false, as it is when age is 17, we knowthat the conditional AND is false without even checking the value of thesecond operand.
4.3.7 Conditional OR
The conditional OR expression (height > 78.5) || (weight > 300) is true ifeither one of its operands is true, or if both are true. If height has the value72 and weight has the value 310, then the first operand is false and the sec-ond operand is true, so the || expression is true. Figure 4.19 shows somesample evaluations of a conditional OR expression, illustrating how thevalue of an || expression depends upon the values of its arguments.
4.3.8 Logical Complement
C# uses the symbol ! for the logical complement, or NOT, operator, whichhas only one operand. The logical complement negates the value of itsoperand, as Figure 4.20 shows. If the bool variable, on, has the value true,then !on is false, but if on is false, then !on is true.
age age > 20 age < 35 age > 20 && age < 35
10 false true false
25 true true true
40 true false false

4.3 Operators and Expressions 103
Figure 4.21 Operator precedence.
3See Appendix B for the complete operator precedence table.
4.3.9 Operator Precedence
The conditional AND and conditional OR operators have lower precedencethan the relational and equality operators, as shown in Figure 4.21 wherewe show operators of equal precedence on the same line.3
Remember that C# follows precedence rules in evaluating expressions, withthe higher precedence operators getting their arguments first. In theexpression
age > 20 && age < 35
the < and > operators have higher precedence than the && operator, so C#will evaluate it as if it had been written as
(age > 20) && (age < 35)
4.3.10 Combining AND with OR
We can use both the && and || operators in the same expression, as in:
age > 50 && (height > 78.5 || height < 60)
Highest
NOT !
multiplicative * / %
additive + –
relational < > <= >=
equality == !=
conditional AND &&
conditional OR | |
assignment = += –= /= %=
Lowest

Figure 4.23Checking a temperature.
104 CHAPTER 4 Variables and Types
Figure 4.22 Converting a temperature.
where we need the parentheses because the AND operator has higherprecedence than the OR operator. Without parentheses, as in:
age > 50 && height > 78.5 || height < 60
C# will evaluate the expression as if we had written it as:
(age > 50 && height > 78.5) || height < 60
which is not what we intended.
Example4-3 allows the user to enter a temperature in degrees centigrade inthe form shown in Figure 4.22. The user enters a centigrade temperature inthe TextBox. Clicking the Hot? button pops up a MessageBox that indicateswhether that temperature is hot, as shown in Figure 4.23. Clicking theFahrenheit button pops up a MessageBox that shows the Fahrenheit equiva-lent of the Centigrade temperature that the user entered.
To create Example4-3, we open an Example4-3 project and drag a TextBox, aLabel, and two Button controls from the Toolbox to the form. We use the Prop-
erties windows to configure the controls. To change the background color ofthe form itself, we click on the BackColor property and then on the button thatappears at the right. We selected a light green color from the grid on the Cus-
tom tab. The Text property of the Form becomes Convert Temperature.
We set the Text property of the TextBox to 25, so the user will have a defaultvalue entered and can try the Hot? or Fahrenheit buttons before entering avalue. We set its (Name) property to enterCentigrade, and set the Text prop-erty of the Label below it to Centigrade temperature.
We set the BackColor property of each Button control to a medium green.The Text property of the upper Button becomes Hot? and its (Name) becomesisHot. The Text of the lower Button becomes Fahrenheit and its (Name)becomes convert.

Each type of data has suit-able operations associ-ated with it. By remem-bering the rules ofprecedence, we can oftenavoid using parentheses.C# includes arithmetic,relational, equality, logi-cal, and assignment oper-ators.
The BIG Picture
4.3 Operators and Expressions 105
Figure 4.24 The conversion result.
Double clicking on the Hot? button in the Visual Studio .NET design dis-plays the event-handling method for this button. We add code to evaluate anexpression stating that the temperature is greater than thirty degrees Centi-grade. If so, we conclude that it is hot. We use the Parse method to convertthe user’s entry from a string to a double value. The event-handling code is
private void isHot_Click(object sender, System.EventArgs e)
{double temp = double.Parse(enterCentigrade.Text);bool hot = temp > 30;MessageBox.Show(String.Format
("It is {0} that {1:F1} is hot", hot, temp));}
Figure 4.24 shows the result of converting to Fahrenheit. To do the conver-sion we use the formula F = 9/5C + 32. The event-handling code is
private void convert_Click(object sender, System.EventArgs e)
{double cent = double.Parse(enterCentigrade.Text);double fahr = 9.0*cent/5.0 + 32.0;MessageBox.Show(String.Format
("{0:F1} Centigrade is {1:F1} Fahrenheit",cent, fahr));
}
Test Your Understanding
14. If a=4, b=23, c=-5, and d=61, evaluate
a. b/a b. b%a c. a%b d. b/c e. c*d f. d%b g. c/a h. c%a

106 CHAPTER 4 Variables and Types
15. Evaluate the following C# expressions, where x=2, y=3, z=-4, and w=5.
a. x + w / 2 b. z * 4 - y c. y + w % 2
d. x + y - z e. x * z / y
f. x + z * y / w g. y * x - z / x
h. w * x % y - 4 i. 14 % w % y
16. What value would C# assign each variable if, for each expression,j=7, k=11, and n=-4?
a. j += 31; b. k *= n; c. k -= n + 7;
d. k %= j e. k /= n - 1
17. Write a relational expression in C# for each of the following:
a. 234 less than 52
b. 435 not equal to 87
c. �12 equal to �12
d. 76 greater than or equal to 54
18. Evaluate the following relational expressions:
a. 23 < 45 b. 49 >= 4 + 9 c. 95 != 100 - 5
19. Explain the difference between x = 5 and x == 5.
20. Explain why the expression x > = 3 is not a correct C# expression tostate that x is greater than or equal to 3.
21. For each expression, find values for x and y that make it true.
a. (x == 2) && (y > 4) b. (x <= 5) || (y >= 5)
c. x > 10 || y != 5 d. x > 10 && y < x + 4
4.4 Summary■ Variables help us store data for later use in a program. The assign-
ment operator gives a variable a value. An identifier names pro-gram elements. Keywords are identifiers that are reserved forspecial uses. C# uses the Unicode character set that containsthousands of characters. We can define constants, which we can-not change.

4.5 Programming Exercises 107
■ C# provides a number of simple data types, including int, double,decimal, char, and bool. C# uses formatting strings to display valuesand text. To allow more control over the format, we can use formatspecifiers.
■ Each type of data has suitable operations associated with it. Byremembering the rules of precedence, we can often avoid usingparentheses. C# includes arithmetic, relational, equality, logical,and assignment operators.
4.5 Programming Exercises
4.1 Modify Example4-1 to make change without using any dimes.
4.2 Modify Example4-2 to use a TextBox to enter the field size ratherthan a NumericUpDown.
4.3 Modify Example4-2 to use a ComboBox to select the number of digitsafter the decimal point.
4.4 Modify Example4-3 to add a Cold? button that displays a MessageBoxindicating whether the entered temperature is cold. Assume that atemperature is cold if it is below zero centigrade.
4.5 Create a Windows application that includes a ComboBox listingnames, a NumericUpDown to select an age, and a Button to display theselected name and age in a Label with the name left justified andthe name right justified, each in fields of size 15.
4.6 Create a Windows application that includes a ComboBox listing prod-ucts, a NumericUpDown to select a price, and a Button to display theselected product and price in a Label with the name product nameleft justified and the price right justified, each in fields of size 15.
4.7 Create a Windows application that includes a TextBox to enter anumerator and another TextBox to enter a denominator. Allow val-ues of type double. Include a Button to display the quotient in a Mes-sageBox using each of the format specifiers N, F, C, P, and G. (Usethe double.Parse method to convert the string in the TextBox to adouble value.)
4.8 Create a Windows application that includes a NumericUpDown toselect an x value and a Button to display the value of the polynomial3x2 – 7x + 2 in a Label.

108 CHAPTER 4 Variables and Types
4.9 Create a Windows application that includes a TextBox to enter aninteger number of miles. Allow the user to click a Button to convertto an equivalent number of feet and display the result in a Message-Box. (There are 5280 feet in a mile.)
4.10 Create a Windows application to convert an integer number of sec-onds to an equivalent number of hours, minutes, and seconds. Forexample, an input of 52,400 should give 14 hours, 33 minutes, and20 seconds. (Dividing 52,400 by 3600 gives a quotient of 14 hourswith a remainder of 2000 seconds. Dividing the remainder of 2000by 60 gives a quotient of 33 minutes with a remainder of 20.)Include a TextBox for the user to enter the number of seconds, anda Button to convert and display the result in a MessageBox.
5CHAPTERSelection and RepetitionOur C# event-handling methods so far have been simple. All we have learned to
do so far is to execute one statement after another in order. We have not had
any choices. If we lived life like that, then, no matter how we felt, we would get
up, get dressed, and have breakfast. In reality, we make decisions among alter-
natives. If we are very sick we might stay in bed and not get dressed. (If we are
very lucky, someone might bring us breakfast in bed.) We might not be hungry
one morning, so we would get up, get dressed, but skip breakfast. Here is a
description of our morning, with decisions:
if (I feel ill)stay in bed;
else {get up;get dressed;if (I feel hungry)
eat breakfast;}
In this “program,” what I do depends upon whether “I feel ill” is true or false. We
will see in this chapter how to write C# expressions that are either true or false,
and how to write C# statements that allow us to choose among alternatives
based on the truth or falsity of a test expression.
Making choices gives us more flexibility, but we need even more control. For
example, if I am thirsty, I might drink a glass of water,but one glass of water might
not be enough.What I really want to do is to keep drinking water as long as I am
still thirsty. I need to be able to repeat an action.The kind of program I want is:
while (I feel thirsty)drink a glass of water;
We will see in this chapter how to write C# statements that allow us to repeat
steps in our program.

110 CHAPTER 5 Selection and Repetition
We think of the processor as flowing from one statement to the next as it executes
our program. In this chapter we introduce C# selection statements that allow us
to make choices among alternatives and repetition statements that enable us to
repeat sections of code.These statements will allow us to specify how the proces-
sor should flow through our program as it executes its statements.
Chapter Objectives:■ Choose using if, if-else, and switch statements
■ Repeat code using while, for, and do statements
■ Use selection and repetition statements to write more powerful event-han-
dling methods
5.1 The if and if-else Statements
We are now ready to make choices about which statements to execute. Theif statement allows us to choose whether to execute a statement. With theif-else statement we can choose between two alternatives.
5.1.1 The if Statement
The if statement is essential because it allows us to make choices, and itallows us to solve more complex problems.
The if statement has the pattern
if (condition)if_true_statement
as in the example
if (checkBox1.Checked)pictureBox1.Visible = True;
The condition is an expression, such as checkBox1.Checked, that evaluatesto true or false. The if_true_statement is a C# statement such as picture-Box1.Visible = True. If the condition is true, then execute the if_true_state-ment; but if the condition is false, skip the if_true_statement and go on tothe next line of the program. In this example, if the user has checked check-Box1, we set the Visible property of pictureBox1 to true; but if Checked isfalse, we would skip the statement pictureBox1.Visible = True.
The if statement allows us to make a choice about the control flow. A flowdiagram represents the logic of an if statement graphically. We use a dia-

5.1 The if and if-else Statements 111
Indent all lines after the first to show that these lines are part of the if statementand to make it easier to read.
Doif (checkBox1.Checked)
pictureBox1.Visible = True;
Don’tif (checkBox1.Checked)
pictureBox1.Visible = True; STYLE
Figure 5.1 Control flow for the if statement.
mond shape to represent a decision based on the truth or falsity of a condi-tion. One arrow, called the true branch, shows what comes next if the condi-tion is true. Another arrow, called the false branch, shows what comes next ifthe condition is false. Figure 5.1 shows the control flow for an if statement.When the condition is true, C# will execute an additional statement.
5.1.2 The if-else Statement
The if statement allows us to choose to execute a statement or not to exe-cute it depending on the value of a test expression. With the if-else state-ment we can choose between two alternatives, executing one when the testcondition is true and the other when the test condition is false.
Conditiontrue
if_true_statementfalse
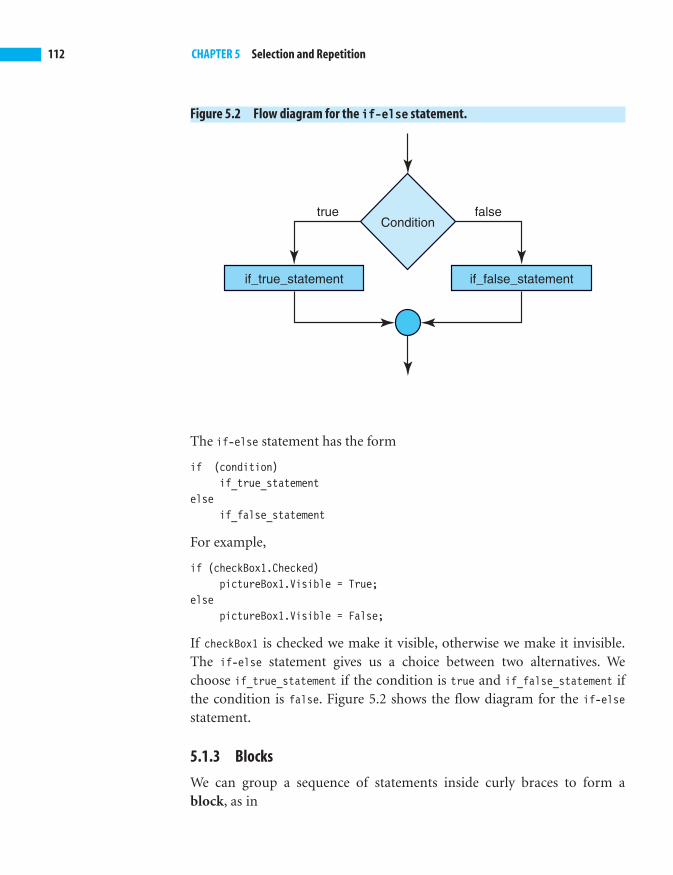
112 CHAPTER 5 Selection and Repetition
Figure 5.2 Flow diagram for the if-else statement.
Conditionfalse
if_false_statement
true
if_true_statement
The if-else statement has the form
if (condition)if_true_statement
elseif_false_statement
For example,
if (checkBox1.Checked)pictureBox1.Visible = True;
elsepictureBox1.Visible = False;
If checkBox1 is checked we make it visible, otherwise we make it invisible.The if-else statement gives us a choice between two alternatives. Wechoose if_true_statement if the condition is true and if_false_statement ifthe condition is false. Figure 5.2 shows the flow diagram for the if-elsestatement.
5.1.3 Blocks
We can group a sequence of statements inside curly braces to form ablock, as in

5.1 The if and if-else Statements 113
Do not forget to enclose the statements that you want to execute if a condition is true withincurly braces. Just indenting them, as in
if (y > 5)x = 5;y = -8;z = x * y;
will not group the three statements together.We indent to make the program easier to read;indenting does not affect the meaning of the program.Without the braces, C# will interpretthe code as
if (y > 5)x = 5;
y = -8;z = x * y;
If y is greater than five, then C# will set x to five.Whether or not y is greater than 5, C# willalways set y to �8, and z to x*y.This is quite a different result than we would get if wegrouped the three statements in a block, and changed the values of x,y, and z only if the con-dition is true.
TIP
{x = 5;y = -8;z = x * y;}
We can use a block as a statement in an if or an if-else statement, as in:
if (y > 5) {x = 5;y = -8;z = x * y;
}
By using a block, we can perform more than one action if the test conditionis true. In this example, if y is greater than 5, we want to set x, y, and z tonew values.
Example5-1 includes two check boxes, each of which affects a picture box.Checking a box makes the picture it affects visible. Unchecking a box makesthe picture it affects invisible. Figure 5.3 shows the form.
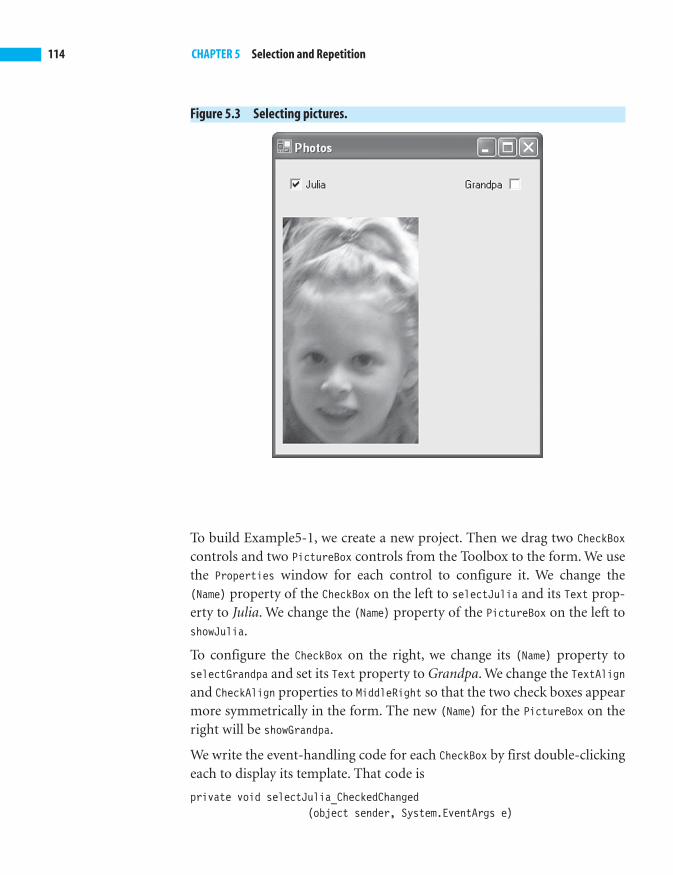
114 CHAPTER 5 Selection and Repetition
Figure 5.3 Selecting pictures.
To build Example5-1, we create a new project. Then we drag two CheckBoxcontrols and two PictureBox controls from the Toolbox to the form. We usethe Properties window for each control to configure it. We change the(Name) property of the CheckBox on the left to selectJulia and its Text prop-erty to Julia. We change the (Name) property of the PictureBox on the left toshowJulia.
To configure the CheckBox on the right, we change its (Name) property toselectGrandpa and set its Text property to Grandpa. We change the TextAlignand CheckAlign properties to MiddleRight so that the two check boxes appearmore symmetrically in the form. The new (Name) for the PictureBox on theright will be showGrandpa.
We write the event-handling code for each CheckBox by first double-clickingeach to display its template. That code is
private void selectJulia_CheckedChanged(object sender, System.EventArgs e)

5.1 The if and if-else Statements 115
Use a consistent style for blocks so that it is easy to match the opening brace,{, withthe closing brace,}. One choice is to put the left brace on the same line as the if orelse, and to align the right brace with the if or else, as in
if (x < 10){
y = 5;
z = 8;
} else {
y = 9;
z = -2;
}
Using this style, we can match the keyword if with the closing brace,}, to keep ourcode neatly organized. Another choice is to align the left brace with the if or else,as in
if (x < 10)
{
y = 5;
z = 8;
}
else
{
y = 9;
z = -2;
}
Either of these styles allows us to add or delete lines within a block without having tochange the braces.The latter style makes it easier to match opening with closingbraces, but uses an extra line to separate the opening brace from the code.We couldmake the code more compact by putting the braces on the same line as the code,but this is harder to read and modify, and not recommended.
STYLE
{if (selectJulia.Checked)
showJulia.Visible = true;else
showJulia.Visible = false;}private void selectGrandpa_CheckedChanged
(object sender, System.EventArgs e){

The if statement allowsus to choose whether toexecute a statement. Withthe if-else statementwe can choose betweentwo alternatives.
The BIG Picture
116 CHAPTER 5 Selection and Repetition
if (selectGrandpa.Checked)showGrandpa.Visible = true;
elseshowGrandpa.Visible = false;
}
In each PictureBox we set the SizeMode property to CenterImage. Using full-sizepictures with the AutoSize value might cause the pictures to overlap. Usingthe default Normal mode might only show the upper-left corner of the image.
Test Your Understanding
1. Correct the error in each of the following:
a. if {x == 12} y += 7;
b. if (x=12) y += 7;
c. if (x == 12) then y += 7;
2. Correct the error in each of the following:
a. if (y > 5) b. if y > 5 c. if (y > 5)
z = 7; z = 3; z = 3;
x = 5; else else (
else x = y + 2; s = y + 7;
w = 4; z = s - 2;
);
3. How would you improve the style in each of the following?
a. if (y <= 6) b. if (x != 0)
z += 5; y+=5;
else
z = y + 9;
5.2 Nested ifs and the switch Statement
With the if-else statement, we can choose between two alternatives. In thissection we show two ways to choose between multiple alternatives, nestedif statements and the switch statement.

5.2 Nested ifs and the switch Statement 117
Figure 5.4 Nested if-else statement to choose among three alternatives.
if (score >= 60 && score < 80)label1.Text = “C”;
else if (score >= 80 && score < 90)label1.Text = “B”;
elselabel1.Text = “A”;
5.2.1 Nested if Statements
Suppose we grade test scores as 60–79 C, 80–89 B, and 90–100 A. Given a testscore between 60 and 100, we can determine the grade by first checkingwhether the score is between 60 and 79 or higher, using the if-else statement
if (score >= 60 && score < 80)label1.Text = “C”;
elselabel1.Text = “B or A”;
This if-else statement only chooses between the two alternatives, grades Cand B or better. To choose between the three alternatives, grades A, B, or C,we nest another if-else statement as the body of the else-part of our orig-inal if-else statement.
The code in Figure 5.4 has a problem. If we assume that a score is alwaysbetween 60 and 100, then the code does what we expect; but let us tracethe code if the score has a value of 40. Then the first test, score >=60 &&
score < 80, fails, so we execute the else-part, which is a nested if-else
statement. Its condition, score >= 80 && score < 90, also fails, so we executethe else-part, which indicates that a score of 40 receives an A grade, notwhat we expect.
We can improve the code of Figure 5.4 by nesting an if statement in the lastelse-part to check that the score is really between 90 and 100, as shown inFigure 5.5.
We see that using nested if-else statements allows us, in this example, tochoose among three alternatives:
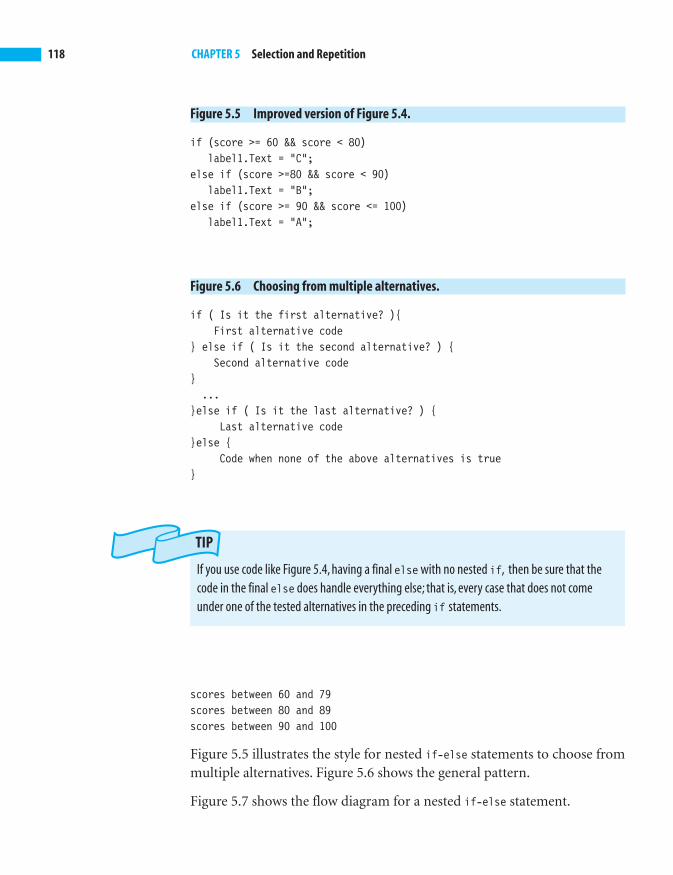
118 CHAPTER 5 Selection and Repetition
Figure 5.6 Choosing from multiple alternatives.
if ( Is it the first alternative? ){First alternative code
} else if ( Is it the second alternative? ) {Second alternative code
}...
}else if ( Is it the last alternative? ) {Last alternative code
}else {Code when none of the above alternatives is true
}
If you use code like Figure 5.4, having a final else with no nested if, then be sure that thecode in the final else does handle everything else; that is, every case that does not comeunder one of the tested alternatives in the preceding if statements.
TIP
Figure 5.5 Improved version of Figure 5.4.
if (score >= 60 && score < 80)label1.Text = “C”;
else if (score >=80 && score < 90)label1.Text = “B”;
else if (score >= 90 && score <= 100)label1.Text = “A”;
scores between 60 and 79scores between 80 and 89scores between 90 and 100
Figure 5.5 illustrates the style for nested if-else statements to choose frommultiple alternatives. Figure 5.6 shows the general pattern.
Figure 5.7 shows the flow diagram for a nested if-else statement.
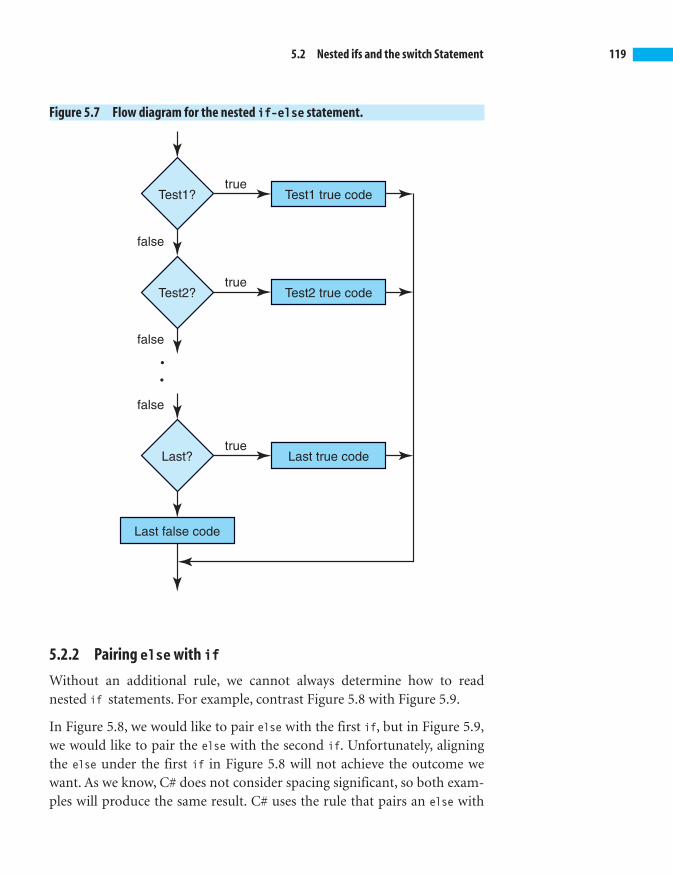
5.2 Nested ifs and the switch Statement 119
Figure 5.7 Flow diagram for the nested if-else statement.
Test1?
false
false
false
Test1 true codetrue
Test2? Test2 true codetrue
Last? Last true code
Last false code
true
5.2.2 Pairing else with if
Without an additional rule, we cannot always determine how to readnested if statements. For example, contrast Figure 5.8 with Figure 5.9.
In Figure 5.8, we would like to pair else with the first if, but in Figure 5.9,we would like to pair the else with the second if. Unfortunately, aligningthe else under the first if in Figure 5.8 will not achieve the outcome wewant. As we know, C# does not consider spacing significant, so both exam-ples will produce the same result. C# uses the rule that pairs an else with

120 CHAPTER 5 Selection and Repetition
Figure 5.9 Corrected pairing of an else and an if.
if (score >= 60)if (score >= 80)label1.Text = “B or A”;
elselabel1.Text = “C”; // Correct pairing
Figure 5.10 Figure 5.8 rewritten as an if-else with nested if.
if (score >= 60) {if (score >= 80)label1.Text = “B or A”;
}else // Paired to first ‘if’label1.Text = “D or F”;
Remember the rule:
Pair an else with the nearest preceding if.
Trace each branch of nested if statements, checking carefully which values of the data willcause execution to flow to that branch.
TIP
Figure 5.8 Incorrect attempt to pair an else with an if.
if (score >= 60)if (score >= 80)label1.Text = “B or A”;
elselabel1.Text = “D or F”; // Wrong pairing
the nearest if. Figure 5.9 is the correct version, and it would be correct evenif we type the else under the first if, as in Figure 5.8.
Both Figures 5.8 and 5.9 are if statements with nested if-else statements.What we tried to do in Figure 5.8 was write an if-else statement whose if-part contained a nested if statement. To do that, we need to enclose thenested if statement in braces, as in Figure 5.10.
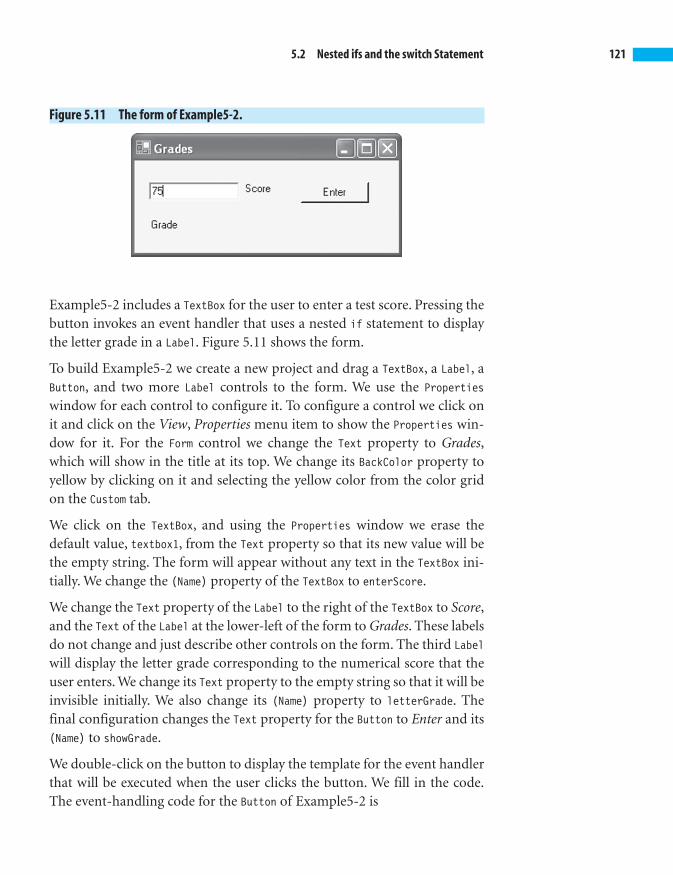
5.2 Nested ifs and the switch Statement 121
Figure 5.11 The form of Example5-2.
Example5-2 includes a TextBox for the user to enter a test score. Pressing thebutton invokes an event handler that uses a nested if statement to displaythe letter grade in a Label. Figure 5.11 shows the form.
To build Example5-2 we create a new project and drag a TextBox, a Label, aButton, and two more Label controls to the form. We use the Propertieswindow for each control to configure it. To configure a control we click onit and click on the View, Properties menu item to show the Properties win-dow for it. For the Form control we change the Text property to Grades,which will show in the title at its top. We change its BackColor property toyellow by clicking on it and selecting the yellow color from the color gridon the Custom tab.
We click on the TextBox, and using the Properties window we erase thedefault value, textbox1, from the Text property so that its new value will bethe empty string. The form will appear without any text in the TextBox ini-tially. We change the (Name) property of the TextBox to enterScore.
We change the Text property of the Label to the right of the TextBox to Score,and the Text of the Label at the lower-left of the form to Grades. These labelsdo not change and just describe other controls on the form. The third Labelwill display the letter grade corresponding to the numerical score that theuser enters. We change its Text property to the empty string so that it will beinvisible initially. We also change its (Name) property to letterGrade. Thefinal configuration changes the Text property for the Button to Enter and its(Name) to showGrade.
We double-click on the button to display the template for the event handlerthat will be executed when the user clicks the button. We fill in the code.The event-handling code for the Button of Example5-2 is

122 CHAPTER 5 Selection and Repetition
private void showGrade_Click(object sender, System.EventArgs e)
{int score = int.Parse(textBox1.Text);if (score < 50)
letterGrade.Text = “F”;else if (score < 60)
letterGrade.Text = “D”;else if (score < 80)
letterGrade.Text = “C”;else if (score < 90)
letterGrade.Text = “B”;else
letterGrade.Text = “A”;}
We first convert the number that the user enters to an integer, and then usenested if statements to determine the letter grade. Later we will cover inputvalidation, which will allow us to correct for invalid user input.
5.2.3 The switch Statement
Choosing among six alternatives is stretching the use of nested if state-ments. The efficiency of this construction declines as we add more alterna-tives. For example, to interpret a score of 98, Example5-2 tests fiveconditions, the first four of which fail. The switch statement allows us tocheck a large number of alternatives more efficiently.
A switch statement chooses alternatives based upon the value of a variable. Inthis section, we use an int variable in our switch statement. We may also usethe char type, String type, or other integer types to indicate switch choices.
The switch statement has the form
switch (test_expression) {case expression1:
statement1;case expression2:
statement2;.....default:
default_statement;}

5.2 Nested ifs and the switch Statement 123
Figure 5.12 An example of a switch statement.
switch(mark) {case 0:case 1:case 2:case 3:case 4: label3.Text = “F”;
break;case 5: label3.Text = “D”;
break;case 6:case 7: label3.Text = “C”;
break;case 8: label3.Text = “B”;
break;case 9:case 10: label3.Text = “A”;
break;default: label3.Text = “Incorrect score”;
break;}
We can use a switch statement to replace the nested if statements of Exam-ple5-2. Computing score/10 will give a number from zero to ten becauseeach score is between 0 and 100. For example, 87/10 is 8, and 35/10 is 3. Wecan assign score/10 to a variable mark as in:
int mark = score/10;
and use mark in the switch statement of Figure 5.12 to determine the gradefor that score.
In Figure 5.12, C# evaluates the variable mark, jumping directly to one oftwelve cases depending upon the value of mark. We specify each case with acase label such as case 5:, which is made up of the word case followed bythe number 5, followed by a colon. The label marks the place in the code tojump to when the switch variable value matches that case label. If mark is 5,C# executes the code following the label, case 5:, which displays the gradeof D; the break statement then causes a jump out of the switch statement tothe code following the closing brace, }.

Nested if statements andthe switch statementallow us to choose betweenmultiple alternatives. Pairan else with the nearestpreceding if. A switchstatement chooses alterna-tives based upon the valueof a variable.
The BIG Picture
124 CHAPTER 5 Selection and Repetition
If mark is 10, then C# jumps to the code at the label, case 10:, which displaysan A and breaks to the end of the switch. If mark is any integer other than 0through 10, then C# jumps to the default case and displays an error mes-sage. The default case is optional. Had we omitted the default case in Fig-ure 5.12, then C# would simply do nothing if the variable mark had anyvalue other than 0 through 10. Note that several labels can refer to the samecode, as, for example, case 6 and case 7, which both label the statement thatdisplays a C.
We must include the break statement after each case. C# does not allowcode to “fall through” to the code for the next case. However, as in Figure5.12, several case labels may mark the same location.
Test Your Understanding
4. A charity designates donors who give $1,000 or more as Benefac-tors, those who give $500–$999 as Patrons, and those who give$100–$499 as Supporters. Write a nested if-else statement that,given the amount of a contribution, assigns the correct designa-tion for that contributor to a string variable.
5. Write a nested if-else statement that includes the categories fromQuestion 4 and identifies donors of $1–$99 as Contributors.
6. What value will the variable x have after executing
x = 6;
if (k < 10)
if (k < 5)
x = 7;
else
x = 8;
if k has the value
a. 9 b. 3 c. 11 d. �2
7. What value will the variable x have after executing
x = 6;
if (k < 10)
if (k < 5)
x = 7;
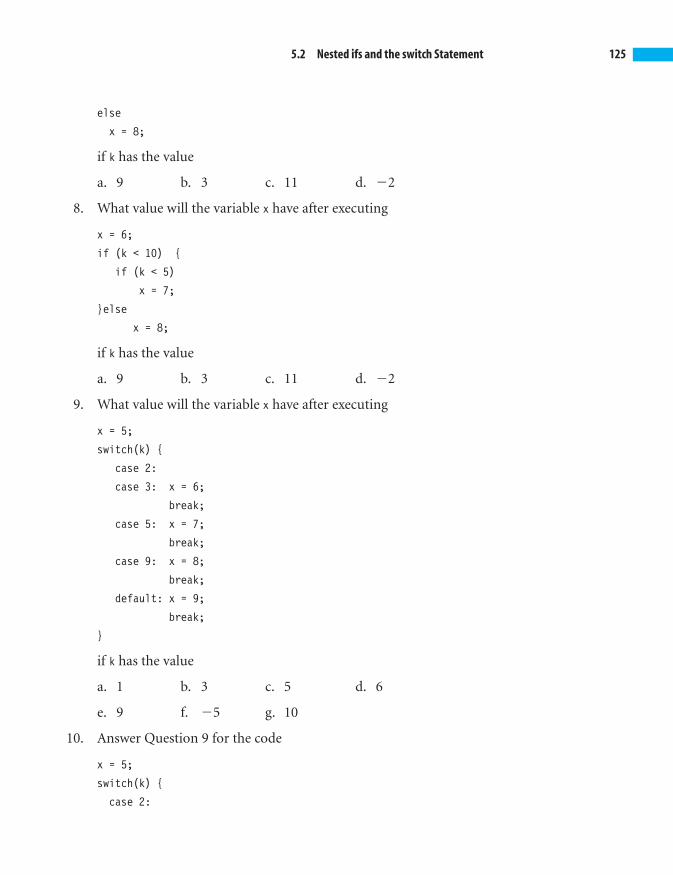
5.2 Nested ifs and the switch Statement 125
else
x = 8;
if k has the value
a. 9 b. 3 c. 11 d. �2
8. What value will the variable x have after executing
x = 6;
if (k < 10) {
if (k < 5)
x = 7;
}else
x = 8;
if k has the value
a. 9 b. 3 c. 11 d. �2
9. What value will the variable x have after executing
x = 5;
switch(k) {
case 2:
case 3: x = 6;
break;
case 5: x = 7;
break;
case 9: x = 8;
break;
default: x = 9;
break;
}
if k has the value
a. 1 b. 3 c. 5 d. 6
e. 9 f. �5 g. 10
10. Answer Question 9 for the code
x = 5;
switch(k) {
case 2:

126 CHAPTER 5 Selection and Repetition
Figure 5.13 Flow diagram for the while loop.
case 3: x = 6;
break;
case 5: x = 7;
break;
case 9: x = 8;
break;
}
5.3 Repetition
The if, if-else, and switch statements give us the ability to make choices.In this section we will see how the while, for, and do statements enable us torepeat steps.
5.3.1 The while Statement
The while statement follows the pattern
while (condition)while_true_statement
where the condition evaluates to true or false, and the while_true_statementcan be any C# statement including a code block. If the condition is true, C#executes the while_true_statement and goes back to check the conditionagain. If the condition is still true, C# executes the while_true_statement andgoes back to check the condition again, and so on. This process repeatsuntil the condition is false. Figure 5.13 shows the flow diagram for the whilestatement.
Conditiontrue
while_true_statementfalse

5.3 Repetition 127
For example, suppose that the variable x has the value 7 just before C#starts to execute the while statement
while (x < 10)x += 2;
Because 7 < 10 is true, C# executes the statement x += 2, which changes thevalue of x to 9. Remember, this is a while statement, so C# again checks thecondition, x < 10. Because 9 < 10 is still true, C# again executes x += 2, giv-ing x the value 11. Now checking the condition x < 10, C# finds that 11 < 10is false, so the execution of the while statement is finished.
The while statement is a type of loop, so-called because execution keepslooping back to check the condition after every execution of thewhile_true_statement, which we call the body of the loop. The body of theloop could be a block, in which case C# executes every statement in theblock while the condition is true.
The condition in a while statement may evaluate to false on the first entryto the loop, in which case C# never executes the body of the loop. Forexample, if x has the value 3 before executing the loop
while (x >= 5)x -= 4;
then the condition, 3 >= 5, is false, and the loop body, x -= 4, is never executed.
5.3.2 Loop Termination
Each time the loop condition is true, C# executes the loop body. In orderfor the loop to terminate, something must change that causes the conditionto fail. In the loop
while ( x < 10)x += 2;
we add 2 to x each time we execute the body. If x has the value 5 before theloop starts executing, eventually x will become greater than or equal to 10,so the condition x < 10 will fail and the loop will terminate.
Possibly the loop may never stop. For example, if x has the value 5, the loop
while (x < 10)x -= 2;

128 CHAPTER 5 Selection and Repetition
Beware of loops that never terminate.We use loops because we want repetition, but we mustmake sure that the repetition stops. Check each loop that you write to make sure that it willterminate.
TIP
will continue executing until the user aborts the program. (Holding theControl key down and pressing the C key will interrupt the program onWindows systems.) The value of x is 5, 3, 1, -1, -3, -5, . . ., and so on. Thecondition, x < 10, is always true, so the loop keeps on executing. Rememberthat when writing a while statement, something must eventually cause thecondition to be false.
5.3.3 The for Statement
The for statement provides a powerful iteration capability. It works wellwhen we know the number of repetitions. Technically we could use a whilestatement instead of a for statement in these cases, but it is much moreconvenient to say
Do this calculation 10 times.
than it is to write
Declare and initialize a count variable to zero.while (count < 10) {
doSomething;count ++;
}
The for statement performs the same steps but packages them more conve-niently, following the pattern
for (initialize; test; update)for_body_statement
where for_body_statement can be a simple statement or a block. Figure 5.14shows the flow diagram for the for statement. The code in Figure 5.15 usesa for statement to add the numbers from one to four. The initialize partdeclares and initializes a variable, i, called the index or counter, which willcount the repetitions.
The test expression, i <= 4, checks whether we need more repetitions. C#will execute the statement sum += i, of the for loop body, if the test condition

5.3 Repetition 129
Figure 5.14 Flow diagram for the for statement.
true
falseTest?
Initialize
for_statement
Update
Figure 5.15 A for statement for the sum 1+2+3+4.
int sum = 0;for (int i = 1; i <= 4; i++)sum += i;
is true, in this case if the count, i, is less than or equal to four. The loop ter-minates when the test condition becomes false, in this case when i is greaterthan four. The update expression, i++ in this example, increments thecount, i, by one. C# executes the update expression, after executing the for
loop body. Figure 5.16 traces the execution of the for loop of Figure 5.15.
The update expression can be more general than the increment in Figure5.15. In Figure 5.17, we find the sum of the positive odd numbers less than 10.In each iteration, we add two to the index variable, i, which gets the values1, 3, 5, 7, and 9, each of which is added to sum, whose final value is 25.
Normally the index variable increases at each iteration, as in the code ofFigures 5.15 and 5.17. However, we can initialize the index to its highestvalue and decrement it at each iteration, as in Figure 5.18, which also com-putes the sum of the first four positive integers.

130 CHAPTER 5 Selection and Repetition
Figure 5.18 A for statement for the sum 4+3+2+1.
int sum = 0;for (int i = 4; i >= 1; i--)
sum += i;
Figure 5.16 Trace of execution of the for loop of Figure 5.15.
initialize i = 1test 1 <= 4 is trueexecute body sum += 1 (result: sum = 0 + 1 = 1)update i++ (result: i = 2)test 2 <= 4 is trueexecute body sum += 2 (result: sum = 1 + 2 = 3)update i++ (result: i = 3)test 3 <= 4 is trueexecute body sum += 3 (result: sum = 3 + 3 = 6)update i++ (result: i = 4)test 4 <= 4 is trueexecute body sum += 4 (result: sum = 6 + 4 = 10)update i++ (result: i = 5)test 5 <= 4 is false
Figure 5.17 A for statement for the sum 1+3+5+7+9.
int sum = 0;for (int i = 1; i < 10; i += 2)sum += i;
Now that we have seen how to write a for statement, we will use it in Exam-ple5-3 to find how much our money will grow in a bank account. Theaccount earns interest at a certain rate over a specified time, assuming thatinterest is compounded yearly. (At the end of the year, the interest due forthat year is added to the principal.) Example5-3 uses a ComboBox for the userto select an interest rate, a TextBox to enter the initial account balance, aNumericUpDown to select the number of years, and a Button to find the accu-mulated amount. Three Label controls describe the purpose of the othercontrols. Figure 5.19 shows the form of Example5-3.
We use Properties windows to configure each control. We click on the Formin the design view and click on the View, Properties menu item to show the

5.3 Repetition 131
Figure 5.19 The form of Example5-3.
Figure 5.20 Choosing a background color.
Properties window for the Form. We change the Text property to Findgrowth, which will display in the title at the top of the form. We change theBackColor to orange by choosing a color from the grid in the Custom tab thatpops up when we click the button that appears at the right of the BackColorproperty entry. Figure 5.20 shows the color grid that appears.
We configure the ComboBox with a list of interest rates. Clicking the Itemsproperty shows a button that we click to pop up the String Collection Edi-tor window shown in Figure 5.21, in which we enter four interest rates, 2.0,3.2, 4.5, and 5.1. We change the (Name) of this ComboBox to selectRate and itsText property to the empty string. The Label below it will have its Textproperty set to Interest rate.

Figure 5.22Displaying the accumulated amount.
132 CHAPTER 5 Selection and Repetition
Figure 5.21 Entering the interest rate choices.
We change the Text property of the TextBox to the empty string so it will beblank initially. We change its (Name) property to enterAmount. The Labelbelow will have its Text property set to Deposit amount.
We set the Text of the Button to Growth and change its (Name) to showResult.We change the (Name) of the NumericUpDown to selectYears, and change theText of the Label below it to Years.
To develop a solution, let us start with a simple case, $1000 at 5% for threeyears. For each year, we have to find the interest earned and add it to theaccount balance, as the following table shows.
Year Interest New Balance
1 1000 * .05 = 50 1000 + 50 = 1050
2 1050 * .05 = 52.50 1050 + 52.50 = 1102.50
3 1102.50 * .05 = 55.13 1102.50 + 55.13 = 1157.63
From this example, we see that each year we find the interest and add it tothe balance to get the new balance. We will put these two steps in the bodyof our for statement.
The user chooses an interest rate from a ComboBox, enters an amount todeposit in a TextBox, and scrolls a NumericUpDown to specify the duration ofthe account. When the user clicks the Growth button, its event handlercomputes the amount of money in the account when it matures and dis-plays it in a MessageBox as shown in Figure 5.22.

5.3 Repetition 133
Figure 5.23 Syntax for the do statement.
dostatement
while (condition) ;
To display the template for the event handler for the Button, we double-click on it in the design view. The event-handling code is
private void showResult_Click(object sender, System.EventArgs e)
{double rate = double.Parse
(selectRate.SelectedItem.ToString())/100;decimal years = selectYears.Value;double deposit = double.Parse(enterAmount.Text);double result = deposit;for (int i = 1; i <= years; i++){
double interest = rate*result;result += interest;
}MessageBox.Show(result.ToString(“C”));
}
In the event handler we first place the user entries in variables. We con-vert the interest rate to a double and divide by 100 so that 3.2% becomes0.032. The Value for the years in the NumericUpDown has type decimal. Weconvert the deposit amount to type double and initialize a result variablewith this value.
The for loop computes the interest for each year and adds it to the result. AMessageBox displays the result in currency format.
5.3.4 The do Statement
The while statement lets us repeat a block of code; it checks the conditionbefore executing the loop body. In some problems, when we know we willexecute the body at least once, it is more natural to check the conditionafter executing the body. The do statement, having the syntax shown in Fig-ure 5.23, lets us do that. C# executes the statement and then checks the
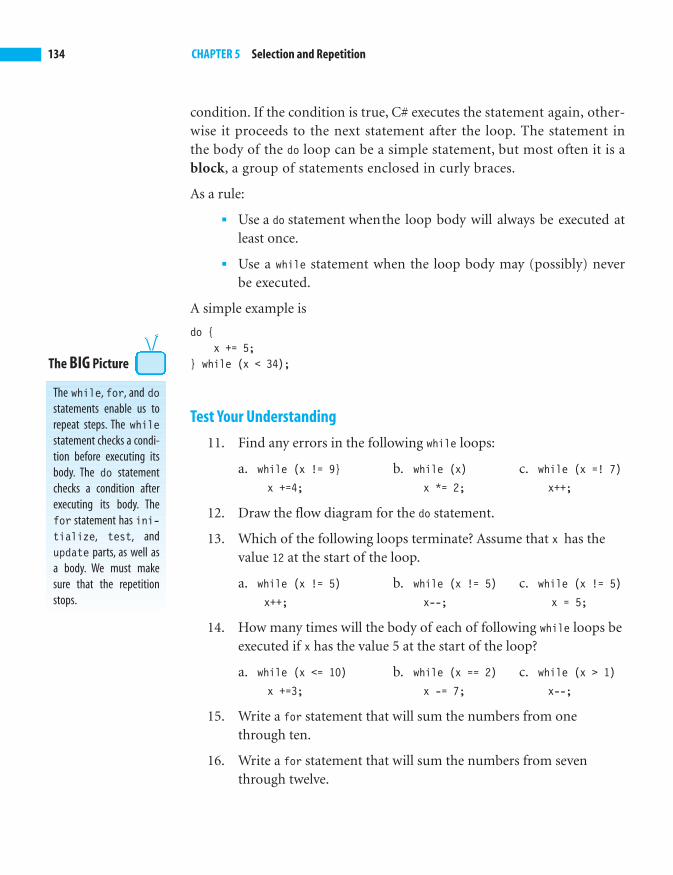
The while, for, and dostatements enable us torepeat steps. The whilestatement checks a condi-tion before executing itsbody. The do statementchecks a condition afterexecuting its body. Thefor statement has ini-tialize, test, andupdate parts, as well asa body. We must makesure that the repetitionstops.
The BIG Picture
134 CHAPTER 5 Selection and Repetition
condition. If the condition is true, C# executes the statement again, other-wise it proceeds to the next statement after the loop. The statement inthe body of the do loop can be a simple statement, but most often it is ablock, a group of statements enclosed in curly braces.
As a rule:
■ Use a do statement whenthe loop body will always be executed atleast once.
■ Use a while statement when the loop body may (possibly) neverbe executed.
A simple example is
do {x += 5;
} while (x < 34);
Test Your Understanding
11. Find any errors in the following while loops:
a. while (x != 9} b. while (x) c. while (x =! 7)
x +=4; x *= 2; x++;
12. Draw the flow diagram for the do statement.
13. Which of the following loops terminate? Assume that x has thevalue 12 at the start of the loop.
a. while (x != 5) b. while (x != 5) c. while (x != 5)
x++; x--; x = 5;
14. How many times will the body of each of following while loops beexecuted if x has the value 5 at the start of the loop?
a. while (x <= 10) b. while (x == 2) c. while (x > 1)
x +=3; x -= 7; x--;
15. Write a for statement that will sum the numbers from onethrough ten.
16. Write a for statement that will sum the numbers from seventhrough twelve.

5.3 Repetition 135
17. Write a for statement that will sum the numbers from ninethrough three, in that order.
18. Write a for statement that will sum the even numbers from fourthrough twenty.
19. What value will the variable sum have after the execution of the fol-lowing code?
int sum = 0;
for (int i = 0; i < 8; i++)
sum += i;
20. What value will the variable sum have after the execution of the fol-lowing code?
int sum = 100;
for (int i = 2; i < 6; i++)
sum -= i;
21. What value will the variable sum have after the execution of the fol-lowing code?
int sum = 100;
for (int i = 20; i > 16 ; i--)
sum -= i;
22. What value will the variable sum have after the execution of the fol-lowing code?
int sum = 0;
for (int i = 1; i <= 20 ; i += 3)
sum -= i;
23. What value will the variable sum have after the execution of the fol-lowing code?
int sum = 100;
for (int i = 20; i > 6 ; i -= 5)
sum -= i;
24. Find the value of the variable i after the execution of the fol-lowing code.
int i = 1;
int total = 0;

136 CHAPTER 5 Selection and Repetition
do {
total += i;
i++ ;
} while (total < 25);
25. Find the value of the variable i after the execution of the fol-lowing code.
int i = 10;
int total =100;
do {
total -= i;
i += 5;
} while (total > 25);
26. Find the value of the variable total after the execution of the fol-lowing code.
int i = 1;
int total = 10;
do {
total += i;
i++ ;
} while (i < 5);
27. Find the value of the variable total after the execution of the fol-lowing code.
int i = 1;
int total = 100;
do {
total -= i;
i++ ;
} while (i <= 7);
5.4 Summary■ The if statement allows us to choose whether to execute a state-
ment. With the if-else statement we can choose between twoalternatives. Nested if statements and the switch statement allowus to choose between multiple alternatives. Pair an else with the

5.5 Programming Exercises 137
nearest preceding if. A switch statement chooses alternatives basedupon the value of a variable.
■ The while, for, and do statements enable us to repeat steps. Thewhile statement checks a condition before executing its body. Thedo statement checks a condition after executing its body. The forstatement has initialize, test, and update parts, as well as a body.We must make sure that the repetition stops.
5.5 Programming Exercises
5.1 Modify Example5-1 to use radio buttons instead of check boxes.
5.2 Modify Example5-2 to display the grade in a MessageBox ratherthan a Label.
5.3 Modify Example5-3 to use a ListBox instead of a ComboBox for theinterest rate.
5.4 Create a Windows application that checks a grade-point averagethat the user inputs, and displays Congratulations, You made thehonor roll if the average is 3.5 and above, but displays Sorry, Youare on probation if the average is below 2.0.
5.5 Create a Windows application to convert meters to feet or inches.There are 39.37 inches in one meter and 12 inches in a foot. If thelength is less than one foot, just display the number of inches.Show two digits after the decimal point. Thus 3.4 meters convertsto 11.15 feet, while .2 meter converts to 7.87 inches.
5.6 Create a Windows application to determine how many months itwill take to pay off a loan. The user will enter the loan amount, theannual interest rate, and the monthly payment. For example, sup-pose the loan amount is $1000 at 12% annual interest with monthlypayments of $100. Each month you pay interest on the remainingbalance. The interest rate is 1% per month, so the first month youpay $10 interest and $90 goes to reduce the balance to $910. Thenext month’s interest is $9.10, and $90.90 is applied to reduce thebalance, and so on. The last month’s payment may be less than $100.
5.7 Create a Windows application that inputs the prices of a box ofcereal and a quart of milk at store A and the prices of the same items

138 CHAPTER 5 Selection and Repetition
at store B. The application should display the total cost of threeboxes of cereal and two quarts of milk at whichever store has thelower cost. Either store is acceptable if the cost is the same at both.
5.8 Create a Windows application that includes three labels, A, B, andC, a text box, a button, and a numeric up-down. Let A, B, and Ceach represent a hidden number between 1 and 25. The user triesto guess the three numbers by entering a number from 1 to 25 inthe text box and clicking the button to submit the guess. If thenumber matches one of the hidden numbers, the label represent-ing it changes to show the number. The numeric up-down countsthe number of guesses the user makes until all three numbers havebeen guessed. (Using random numbers, covered in the next chap-ter, can make this game more interesting.)
5.9 Create a Windows application that includes four groups of tworadio buttons each. One radio button of each group has a Textshowing the number 0, and the other shows the number 1. Create asequence of four digits, each 0 or 1. For example 1, 0, 1, 0 is such asequence. The user is to select one radio button from each group,either 0 or 1, and click a button to submit the four selections. Theapplication responds by stating the number of correct selections ina label. For example, if the user chooses the sequence 0, 1, 1, 0, theresponse would be two correct, because the last two values, 1 and 0,match the last two positions of the 1, 0, 1, 0 sequence chosen ini-tially. The user plays until a response of four correct is obtained. Anumeric up-down displays the number of submissions that theuser has made. (Using random numbers, covered in the next chap-ter, can make this game more interesting.)

6CHAPTERReference TypesReference types contrast with value types such as int. A variable of type int
holds an integer value. A reference type such as a String holds a reference to a
String object. Reference types are convenient when the values are large and of
variable size.We can have several references to the same object without making
unnecessary copies. In this chapter we first consider arrays and strings and then
look at objects more generally.
We have written C# code for event handlers to enable controls to perform their
desired functions. Arrays will enable us to be more effective. For example, if the
user checks multiple check boxes, we can use an array to iterate through them
to respond to the user’s selections.We look more carefully at the String objects
we have already been using to learn more about this fundamental type and
compare it to StringBuilder for use in building strings. It will be interesting to
explore some of the object types we use in the .NET Framework Class Library.
Chapter Objectives:■ Use arrays
■ Study the String type
■ Use StringBuilder
■ Introduce objects from the .NET Framework Class Library
6.1 Arrays
An array contains a number of variables that we access through indices. Forexample, if a class has 30 students and each takes a test, we need 30 vari-ables to save these scores. It would be very inconvenient to declare variablesscore1, score2, score3, and so on up to score30. With 300 students it wouldbe much too much trouble.

140 CHAPTER 6 Reference Types
The array declaration
int[] score = {65, 87, 34, 56, 98, 67, 58};
creates an array of seven variables, score[0], score[1], score[2], score[3],score[4], score[5], and score[6], and gives each variable an initial value.Declaring one array of seven variables is easier than declaring seven vari-ables separately, and the advantage increases if the number of variables islarger. The type int[] denotes an array of integers. We can declare an arrayof any type.
The array declaration for score assigns 65 to score[0], 87 to score[1], and soon. We can use these values in expressions. For example,
int x = score[3] + score[4];
assigns the variable x a value of 154 because score[3] is 56 and score[4] is 98.
We can change array variables by assignment. For example,
score[6] = 85;
would change the value of score[6] from 58 to 85.
Often we access arrays using loops. We can use a for loop to sum the ele-ments of the score array. Each array stores its length in the Length property,which we can use as the upper bound of the loop index. The following codecomputes the sum of the test scores in the score array.
int sum = 0;for (int i = 0; i < score.Length; i++)
sum += score[i];
This loop will sum our score array of seven scores, but it would also workwithout modification if the array had 300 scores. Using individual variablesscore1, score2, . . ., score300 would not be feasible.
In Example6-1 we use array notation in two ways, once to process multipleselections in a ListBox and again to process CheckBox selections. Figure 6.1shows Example6-1.
On the left, a ListBox contains choices of food with three choices selected. ALabel below the ListBox displays the choices the user made. This displayupdates immediately when the user selects or deselects a food from the list.
The four CheckBox controls on the right list subjects. The user checks orunchecks subjects and clicks the Choose Favorites button to show the cur-rently selected favorite subjects in the Label at the lower left of the form.

6.1 Arrays 141
Figure 6.1 Making multiple selections in a ListBox.
To build Example6-1, we create a new project and drag the controls we usefrom the Toolbox to the Form. To make the control names more meaningful,we change the default (Name) property of the following controls.
Control New name
ListBox foodList
Label (lower-left) display
Button showFavorites
CheckBox (top to bottom) Spanish
Computing
History
Sociology
6.1.1 Multiple ListBox Selections
The SelectionMode property determines the number of selections to allow ina ListBox. Its values are MultiExtended, MultiSimple, None, or One. In the Multi-Simple mode, clicking on an item with the mouse selects it, highlighting itin blue; clicking on it again deselects it. In the MultiExtended mode, the usercan select a range of values. To do this, the user first clicks on an item toselect it. Then, if the user holds the SHIFT key down and selects anotheritem, the entire range between the two selections will be selected. In thismode, pressing Ctrl and clicking on an item selects or deselects it whilekeeping intact the remaining selections.

142 CHAPTER 6 Reference Types
To enter these items into the list, we clicked on the Items entry in the Prop-erties window of the Visual Studio .NET design. A String Collection win-dow pops up, into which we enter the food items.
We used the Properties window in the Visual Studio .NET design to set theSelectionMode for the ListBox to MultiSimple. The user’s selections appear ina Label. We would prefer to separate the selection by commas, and use“and” before the last selection. In the next section we will see how to buildsuch strings.
To write the event handler for the ListBox selections, we first double-clickon the ListBox in the Visual Studio .NET design to display the template
private void foodList_SelectedIndexChanged(object sender, System.EventArgs e)
{}
The .NET run time will call the foodList_SelectedIndexChanged methodwhenever the user changes a selection, either by selecting another item ordeselecting one.
The SelectedItems property holds the collection of selected items. It is notan array, but it is set up to allow us to use array notation to index it. Thiscollection has a Count property whose value is the number of selected items.Thus we can use
foodList.SelectedItems.Count
to find the number of items selected, which in Figure 6.1 is three. Becausewe can use array indexing, we can refer to the three items as Selecte-dItems[0], SelectedItems[1], and SelectedItems[2]. We write the event-han-dling code using a loop to add each selection item to the Text for the displaylabel. The completed code is
private void foodList_SelectedIndexChanged(object sender, System.EventArgs e)
{display.Text = "You selected ";for (int i = 0; i < foodList.SelectedItems.Count; i++)
display.Text += foodList.SelectedItems[i] + " ";}
6.1.2 Using the Documentation
The SelectedItems property does not appear in the Properties window in theVisual Studio .NET design because it is set at run time by the user who makes

6.1 Arrays 143
Figure 6.2 CheckBox selections.
selections from the items in the ListBox. When writing the event-handlingcode, we can use the documentation to discover the properties of a control.
In Example6-1, while in the design mode, pressing the F1 key when theListBox is selected displays the documentation for the ListBox members.This documentation shows many ListBox properties. The description forthe SelectedItems property states that it gets a collection of the itemsselected by the user. Because it gets a collection, we can assume that we canuse array notation to index its elements.
6.1.3 A CheckBox Array
The right section of Figure 6-2 shows four CheckBox controls. When the userselects favorite subjects and clicks the Choose Favorites button, the user’sfavorite subjects appear in the label below. Again, we will improve the dis-play in the label after we consider strings more carefully in the next section.
The four CheckBox variables are spanish, computing, history, and sociology.We could use these names directly, but it is easier to declare an array to referto these controls. We declare
CheckBox[] subject ={spanish, computing, history, sociology};
so we can refer to the controls using the subject array. For example, sub-ject[1] refers to computing because the array indices are 0, 1, 2, and 3. Thevariable subject[3] refers to sociology.
When the user presses the button, we want the label to display the selectedfavorite subjects. In the event-handling code, we use the Checked property of
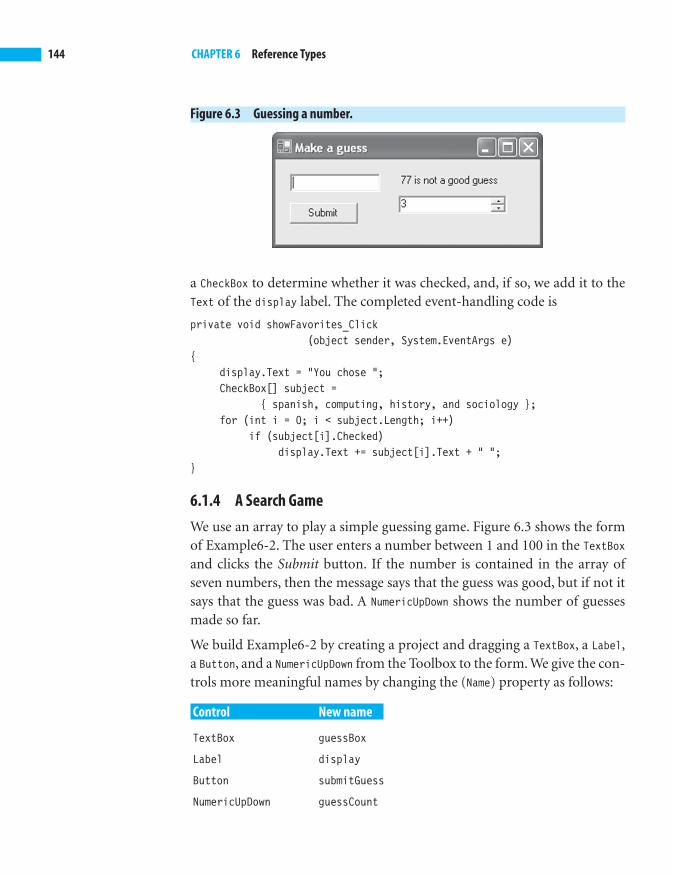
144 CHAPTER 6 Reference Types
Figure 6.3 Guessing a number.
a CheckBox to determine whether it was checked, and, if so, we add it to theText of the display label. The completed event-handling code is
private void showFavorites_Click(object sender, System.EventArgs e)
{display.Text = "You chose ";CheckBox[] subject =
{ spanish, computing, history, and sociology };for (int i = 0; i < subject.Length; i++)
if (subject[i].Checked)display.Text += subject[i].Text + " ";
}
6.1.4 A Search Game
We use an array to play a simple guessing game. Figure 6.3 shows the formof Example6-2. The user enters a number between 1 and 100 in the TextBoxand clicks the Submit button. If the number is contained in the array ofseven numbers, then the message says that the guess was good, but if not itsays that the guess was bad. A NumericUpDown shows the number of guessesmade so far.
We build Example6-2 by creating a project and dragging a TextBox, a Label,a Button, and a NumericUpDown from the Toolbox to the form. We give the con-trols more meaningful names by changing the (Name) property as follows:
Control New name
TextBox guessBox
Label display
Button submitGuess
NumericUpDown guessCount

6.1 Arrays 145
The event-handling code for the Submit button is
private void submitGuess_Click(object sender, System.EventArgs e)
{int[]score = {65, 87, 34, 56, 98, 67, 58};int number = int.Parse(guessBox.Text);int i = 0;
// search for test in score arraywhile (i < score.Length && number != score[i])
i++;if (i < score.Length) // number found
display.Text = number + " is a good guess";else // number not found
display.Text = number + " is not a good guess";guessBox.Text = ""; // remove previous entryguessBox.Focus(); // send key presses hereguessCount.Value++; // increment guesses
}}
We create the array with seven scores, and then convert the user’s entry inguessBox to an integer. The while statement searches for the number in thescore array. If the number is in the array at index i, the condition number !=
score[i] will fail and the loop will terminate. For example, if the user guesses34, the condition 34 != score[2] is false and the loop will stop when i is 2.
If the user’s guess is not one of the score elements, then i will continue tobe incremented until it becomes 7 and the condition i < score.Length willfail, causing the loop to terminate. After the while loop terminates, we usean if-else statement to determine what caused the termination, finding theuser’s number or incrementing the index past the end of the array. We indi-cate the result in the label.
To make it easier for the user to enter the next number, we reset the Text inguessBox to the empty string. We call the Focus method of guessBox to directthe keystrokes to guessBox. This is helpful because when the user presses thebutton, it gets the focus; otherwise the user would have to click the mouseinside guessBox to direct key presses to it for the next entry.
6.1.5 Random Numbers
The guessing game of Example6-2 will not be interesting to replay becausethe user will soon figure out the numbers in the score array. To make it

146 CHAPTER 6 Reference Types
more interesting, we can generate random numbers that will change eachtime the program is run.
The Random class has a Next method that returns a number that appears to berandomly chosen from the integers 0 through 99. The following C# codewill create an array of scores and fill it with randomly chosen numbersfrom 1 through 100.
int[] score = new score[7];Random r = new Random();for (int i = 0; i < score.Length; i++)
score[i] = r.Next(100) + 1;
In this code, we did not initialize the array, but instead used the new opera-tor to create seven variables, score[0], . . . , score[6]. We use the new operatoragain to create a Random object r that we can use to generate the randomnumbers. In the for loop, we assign each variable a value randomly chosenfrom 1 through 100. The Next method returns values from 0 through 99, sowe add 1 to each.
Example6-2a revises Example6-2 to fill the score array with random num-bers. The easiest approach would be to modify the event-handling methodfor the button to fill the score array with random numbers. However, doingthis would mean that each time the user made a guess the array would berecreated. We want to fill the array once and let the user keep makingguesses until successfully finding a value. Thus we need to fill the scorearray outside of the event-handling method.
To fill the array in one place and use it in another, we need to create it sothat it will be visible throughout the application. Similarly, the controls weadd in the Visual Studio .NET design need to be visible throughout theapplication. Visual Studio initializes them inside the InitializeComponentmethod, and we use and change their properties inside our event-handlingmethods. We will declare the score array in the same location that VisualStudio .NET declares the controls. Figure 6.4 shows these declarations fromExample6-2a. The private modifier indicates that only this application canuse these variables directly.
Visual Studio .NET initializes the controls in the InitializeComponentmethod. We cannot change this method because Visual Studio automati-cally regenerates it when we make changes in the design and does notinclude any added code. Visual Studio places a comment in the code telling

6.1 Arrays 147
Figure 6.4 Declarations of Example6-2a.
public class Form1 : System.Windows.Forms.Form{
private int[] score = new int[7];private System.Windows.Forms.TextBox guessBox;private System.Windows.Forms.Label display;private System.Windows.Forms.Button submitGuess;private
System.Windows.Forms.NumericUpDown guessCount;// rest of code here
}
Figure 6.5 The Form1 constructor.
public Form1(){
//// Required for Windows Form Designer support//InitializeComponent();
//// TODO: Add any constructor code after// InitializeComponent call//Random r = new Random();for (int i = 0; i < score.Length; i++)
score[i] = r.Next(100) + 1;}
us where to add our initialization. Figure 6.5 shows the Form1 constructor. Aconstructor has the same name as the application class. Notice that in Fig-ure 6.4 the class name is Form1. The constructor in Figure 6.5 has the samename, Form1, and no return value.
The .NET system calls the constructor when the application starts. TheForm1 constructor calls the InitializeComponent method to initialize the con-trols. The TODO comment tells us to add any constructor code we need toinitialize our variables, so we add the code to fill the score array with ran-dom numbers.

148 CHAPTER 6 Reference Types
Figure 6.6 Primitive types hold values.
The event-handling method for the Submit button, submitGuess_Click, isthe same as the event-handling method used in Example6-2 except that weomit the first line to initialize the score array because we have already ini-tialized it with random numbers. Running Example6-2a will produce aform like Figure 6.3, but each time the user runs this application the scorearray will be different, making the game more interesting. We will elaborateon the concepts introduced in this example later in the chapter.
6.1.6 Array Variables and Values
Data, like many things, comes in different sizes. Many people have a cat thatruns around their house, which they even pick up and hold from time totime. If the cat is sitting on your lap, and your sister wants to hold it, youcan pass it to her. Some people have horses, but they do not give them freerein in the house, nor do they hold them on their laps—horses are too big.Both you and your sister know where to find the horses, in the stable.
Values of primitive types, such as 10, 'e', or 3.14, have fixed small sizes.Variables hold values of primitive types, and assignment copies the valuefrom one variable to another, as Figure 6.6 shows.
Values of array types, such as {10,20,30,40,50,60,70}, can often be quitelarge. Variables do not hold array values, but hold references to them. A ref-erence is a memory address: it tells where to find the item, in this case, anarray. We indicate a reference by an arrow pointing to the location of thearray. Figure 6.7 shows the memory usage for the array given by
int[] score = {26, 73, 92};
Figure 6.7 Memory usage for score.
score26 73 92
score
80
temp
0
80 80
int score = 80, temp = 0;
score = temp

6.1 Arrays 149
Figure 6.8 Memory usage for an array assignment.
x 1 2 3 4 5
y null
int [ ] x = {1, 2, 3, 4, 5};
int [ ] y;
a. Before the assignment
x 1 2 3 4 5
y
y = x;
b. After the assignment, y = x
Figure 6.9 Memory usage after the assignment y[2] = 7.
x
y
1 2 7 4 5
The variable score holds a reference to the array of three int elements.
Assigning one array to another copies the reference, not the array value. Forexample, Figure 6.8a diagrams the memory that C# uses for an array vari-able x initialized to refer to an array of five integers, and an uninitializedarray variable y. Figure 6.8b shows the memory usage after we assign x to y.
We see that the assignment copies the reference from the variable x into thevariable y. After the assignment, both variables refer to the same array. Copyinga reference is more efficient than copying the whole array, which can be quitelarge. It takes time to copy the array values, and to create the space to hold them.
Because the variables x and y in Figure 6.8b refer to the same array, anychanges made using x will affect y, and vice versa. For example, if we execute
y[2] = 7;
we will see that x[2] also has the value 7; x and y refer to the same array, sotheir elements must be the same. Figure 6.9 shows the effect of the assign-ment to y[2].

150 CHAPTER 6 Reference Types
Test Your Understanding
1. In the array
int[] x = {7, 8, 9};
evaluate
a. x[2]
b. x.Length
2. Explain the difference between the MultiSimple and MultiExtended
modes for a ListBox.
3. Which property holds the number of items in the SelectedItemscollection for a ListBox?
6.2 Strings
We have used String objects often in our previous examples. For example,many controls have a Text property to display text associated with the con-trol. For a Label, that Text is its main content.
Instances of the class String represent sequences of characters. The Stringclass is part of the core .NET Framework library in the System namespace.Inside a String object is a sequence of characters, such as "C# is fun". Thestate (internal configuration) of a String object is private. Users of String
objects do not need to know how the characters are represented.
6.2.1 Visualizing a String
We visualize a String as an object, such as a vending machine with a button foreach service it provides. Strings have many public operations to provide theirservices. We show only a few in Figure 6.10, Length, IndexOf('i'), and ToUp-
per(). The String object, "C# is fun" in Figure 6.10 does not have a window tosee inside, because strings do not show any of their state; it is all private.
When we press the Length button in Figure 6.10, we get the result of 9because "C# is fun" has 9 characters. The result of an operation depends onthe state of the object.
The IndexOf('i') button returns the first position in which the character 'i'occurs in the string, or �1 if 'i' does not occur in it. For this object the
An array contains a num-ber of variables that weaccess through indices.Wecan change array variablesby assignment. Often weaccess arrays using loops.Each array stores itslength in the Lengthproperty, which we canuse as the upper bound ofthe loop index.
The Random class aNext method thatreturns a number thatappears to be randomlychosen.
The BIG Picture

6.2 Strings 151
Figure 6.10 A String object for ”C# is fun”.
Figure 6.11 A String object for “C# IS FUN”.
IndexOf('i') operation returns 3. The first 'i' occurs as the fourth character,but for technical reasons we start the numbering with 0, so 'i' is at index 3.
Strings objects in C# never change. The String object in Figure 6.10 willalways represent "C# is fun". When we execute the ToUpper() operation, wedo not change the object, but rather we get a new String object representing"C# IS FUN" shown in Figure 6.11.
Because the state is hidden, Figure 6.11 looks just like Figure 6.10, but itoperates differently. Executing the IndexOf('i') operation will return �1,signifying the character 'i' does not appear in "C# IS FUN". C# is case-sen-sitive; a lowercase 'i' differs from an uppercase 'I'.
Visualizing a String object as a vending machine in Figures 6.10 and 6.11really helps us to keep in mind that to use strings in C# programs, we needto create a string and ask it to execute one of its operations.
6.2.2 Creating a String
C# makes a special form of declaration available for String objects, becausewe use them so frequently. C# treats a literal such as "C# lets us use
objects." as an instance of the String class. The declaration
String s = "C# lets us use objects. ";
IndexOf('i')Length
ToUpper() other services
IndexOf('i')Length
ToUpper() other services

152 CHAPTER 6 Reference Types
Figure 6.12 A String variable referring to a String object.
s "C# lets us use objects. "
creates and initializes a String, which we refer to as s. The variable s refersto the String object, as shown schematically in Figure 6.12.
6.2.3 A String Property
A property is like a data field, but it does not directly represent a storagelocation. For example, the value of a property may be computed from othervalues. A property provides information about an object. For example,
s.Length;
will return the number of characters in s, 25 in this example. This string hastwo trailing blanks. All characters between the beginning and endingquotes are significant. We use a property like an instance variable, but inter-nally it uses an accessor method to retrieve the length; thus we return thelength using s.Length rather than s.Length(). In this text we have often usedpredefined properties of objects.
6.2.4 A String Indexer
An indexer is like a property, but it provides access by an index, like arrays.In C#, the Chars property in the String class is an indexer for the string. Itreturns the character at the specified index in the string. For example,
s[4]
returns 'e' because the character at index 4 is an 'e'. We use square brack-ets, [], to enclose an index, rather than the round parentheses, (), which weuse for method arguments.
6.2.5 String Methods
The String class has both instance and class methods. An instance methodrefers to a specific String object. A class method is shared by all instances ofthe class. Most of the methods of the String class are instance methods.

6.2 Strings 153
Figure 6.13 s.ToLower() returns a new String.
The ToLower() method returns a new String with the characters convertedto lowercase. For example,
s.ToLower();
returns "c# lets us use objects. ". To use this new String, we need toassign it to a variable, as in
String sLower = s.ToLower();
Figure 6.13 shows that we now have two String objects referred to by s
and sLower.
The Trim and Substring methods also return new String objects. The Trimmethod removes leading and trailing whitespace, where whitespaceincludes blank spaces, newlines, and tabs. For example,
s.Trim();
returns "C# lets us use objects."
The Substring method has two parameters. The first gives the index atwhich the substring starts. The second indicates the number of charactersin the substring. Thus
s.Substring(11,11);
returns "use objects", composed of the characters starting at position 11 ins, and including 11 characters.
s "C# lets us use objects. "
sLower
"c# lets us use objects. "

154 CHAPTER 6 Reference Types
6.2.6 Overloaded Methods
The String class contains overloaded methods. For example, the IndexOfmethod has six versions, which C# differentiates by the different parame-ters for each. The six methods are:
1. public int IndexOf(char ch)—returns the index of first occur-rence of ch
2. public int IndexOf(char ch, int from)—returns the index of firstoccurrence of ch starting at index from
3. public int IndexOf(char ch, int from, int len)—returns theindex of first occurrence of ch starting at index from—within thenext len positions
4. public int IndexOf(String str)—returns the index of first occur-rence of str
5. public int IndexOf(String str, int from)—returns the index offirst occurrence of str starting at index from
6. public int IndexOf(String str, int from, int len)—returns theindex of first occurrence of str starting at index from within thenext len positions
To illustrate,
s.IndexOf('e');
returns 4, because the leftmost 'e' in the string occurs at index 4. Themethod call
s.IndexOf('e',8);
returns 13, because the first occurrence of 'e', starting from index 8, is atindex 13. The method call
s.IndexOf('e',8,3);
returns �1, because there is no 'e' in the next three positions starting atindex 8. The method call
s.IndexOf("us");
returns 8, because the leftmost occurrence of "us" starts at index 8. Similarly,
s.IndexOf("us",11);

6.2 Strings 155
returns 11 as the first occurrence of "us", starting from index 11, begins atindex 11. When we try
s.IndexOf("us",15);
the result is �1, because there is no occurrence of "us" in s startingfrom index 15.
Programmers find it less cumbersome to use overloaded methods. Forexample, if the IndexOf method were not overloaded, we would have to usesomething like IndexOfChar, IndexOfCharFrom, IndexOfCharFromLen, IndexOf-
String, IndexOfStringFrom, and IndexOfStringFromLen as the names for thesesix methods. Method overloading helps when we have methods that aresimilar except that they operate with different arguments.
When we use an overloaded method in a program, C# can determinewhich method to call by looking at the type of argument we pass to it. Forexample, in
String food = "potato";int a = food.IndexOf('a'); // passing a charint to = food.IndexOf("to"); // passing a String
C# will call the IndexOf(char c) method to find the index of the first 'a' in"potato", because the argument 'a' passed in the call IndexOf('a') has typechar. However, C# will call IndexOf(String s) to find the index of the firstoccurrence of "to", because the argument "to" has type String.
Replace is another overloaded method. One version replaces all occurrences ofone character with another. The second version replaces all occurrences of aString with another. For example, in s = "C# lets us use objects. ",
s.Replace('e', 'o')
returns the String
"C# lots us uso objocts. "
and
s.Replace("us", "them")
returns
"C# lets them theme objects. "

156 CHAPTER 6 Reference Types
Figure 6.14 The form of Example6-3.
1The documentation for the .NET Framework Class Library is available for viewing ordownload from http://msdn.microsoft.com/library/default.asp?url=/library/en-us/cpref/html/cpref_start.asp. It is also available from the Help menu in Visual Studio .NET.
6.2.7 Class Methods
The String class has many other instance methods.1 It also contains someclass methods. Unlike an instance method, a class method does not refer toa specific object. For example,
double d = 3.14159265;String w = String.Format("The price is {0:C}", d);
produces the String
"The price is $3.14"
Note that we prefix the Format method with the class name, String, ratherthan an object instance name. The Format method does not apply to aString object, in contrast to the IndexOf method and other instance meth-ods that only make sense when applied to a String instance. Format is a classmethod rather than an instance method.
To illustrate the use of String methods, Example6-3 allows the user toreplace every occurrence of one string with another in the string
"the three did feed the deer and then they were full"
Figure 6.14 shows the form of Example6-3. The user enters the string tofind and the string to substitute for each occurrence. When the user clicksthe Replace All button, the changed string appears in a label above the text

6.2 Strings 157
boxes. Notice that the replacement is case sensitive and does not replace theinitial “The”, which begins with an uppercase character.
We change the (Name) properties to give the controls the following moremeaningful names:
Control New name
Label (top) display
TextBox (left) find
TextBox (right) substitute
Button replace
We double-click on the button in the design view to display the templatefor its event handler. The code for the event handler for the button is
private void replace_Click(object sender, System.EventArgs e)
{String oldWord = find.Text; // word to replaceString newWord = substitute.Text; // replacementString temp = display.Text;int position = temp.IndexOf(oldWord);
// first occurrencewhile(position != -1)
// -1 indicates no match{
temp = temp.Substring(0,position)// before match
+ newWord // replacement+ temp.Substring(position + oldWord.Length);
// after matchposition = // next occurrence
temp.IndexOf(oldWord,position + newWord.Length);}display.Text = temp;
}
Each iteration of the while loop replaces one occurrence. We construct thenew string by concatenating three parts: the substring before the occur-rence, the replacement string, and the substring after the occurrence. Tocontinue, we look for another occurrence further on in the string.

158 CHAPTER 6 Reference Types
Figure 6.15 Concatenating strings.
6.2.8 Using StringBuilder
The StringBuilder class represents a string-like object whose value is a sequenceof characters that we can change. We can modify a StringBuilder object after ithas been created by appending, removing, replacing, or inserting characters.
A C# String is immutable. It cannot be changed. The concatenation opera-tor causes new temporary strings to be created. Creating a simple message,
String message = "The cow jumped over the moon";
presents no problem, but suppose the animal names and the thing theyjump over are stored in variables. For example, suppose we have two vari-ables, animal1 and animal2, that hold the names of animals, and a variable,thing, that holds the name of a thing. To construct a similar String, wecould use the statements
String message = "The ";message += animal1;message += " and ";message += animal2;message += " jumped over the ";message += thing;
Each concatenation would create a temporary String and change the mes-sage variable to refer to it. Figure 6.15 shows how the first step would work.
a. Before
b. After
animal1
message
animal1
message
"cow"
"The"
"cow"
"The"
"The cow"

6.2 Strings 159
Figure 6.16 The form of Example6-4.
By contrast, we can change a StringBuilder. The Append method adds astring to the existing StringBuilder and does not need to create a newobject. Using a StringBuilder we could create the message with the code
StringBuilder mess = new StringBuilder("The ");mess.Append(animal1);mess.Append(" and ");mess.Append(animal2);mess.Append(" jumped over the ");mess.Append(thing);String message = mess.ToString();
We use a StringBuilder in Example6-4, where we need to make choices con-cerning the punctuation of the message. We leave the modification ofExample6-1 to use a StringBuilder to improve the display to the exercises.
Figure 6.16 shows the form of Example6-4. The user can select multipleanimals from a ListBox whose SelectionMode is MultiSimple, but mustselect one thing from a ListBox whose SelectionMode is One. When theuser selects a thing, a message appears in the TextBox describing thatchoice. When the user selects animals and a thing, and then clicks theChoose Animals button, a message states that the animals jumped overthe thing. The event handler for the button uses a StringBuilder to cre-ate the message. Two check boxes allow the user to display images inpicture boxes.
We set the (Name) property to assign the following names to the indi-cated controls.

160 CHAPTER 6 Reference Types
Control New Name
Button showChoices
ListBox (animals) selectAnimals
ListBox (things) selectThing
CheckBox (moon) showMoon
CheckBox (author) showAuthor
TextBox display
PictureBox (author) author
PictureBox (moon) moon
We use the Visible property of a PictureBox to make the desired image visi-ble when the corresponding CheckBox is checked, and not visible otherwise.The event-handling code for each CheckBox follows.
private void showMoon_CheckedChanged(object sender, System.EventArgs e)
{if (showMoon.Checked)
moon.Visible = true;else
moon.Visible = false;}
private void showAuthor_CheckedChanged(object sender, System.EventArgs e)
{if (showAuthor.Checked)
author.Visible = true;else
author.Visible = false;}
The event-handling method for selectThing, the list box containing things,just displays a message naming the selected thing. The code is
private void selectThing_SelectedIndexChanged(object sender, System.EventArgs e)
{display.Text =
"You selected " + selectThing.SelectedItem;}

6.2 Strings 161
The event handler for the Button uses a StringBuilder to build the mes-sage combining constants such as "The " with the animals and thing,which change depending on the user’s selections. When the user has notchosen a thing, we use "??" in its place. We separate the user’s twochoices with " and ", and use commas when the user chooses more thantwo animals.
private void showChoices_Click(object sender, System.EventArgs e)
{ // prefix with namespaceSystem.Text.StringBuilder message =
new System.Text.StringBuilder("The ");int length = selectAnimals.SelectedItems.Count;switch(length){case 0: message.Append("??");
break;case 1: message.Append
(selectAnimals.SelectedItems[0].ToString());break;
case 2: message.Append(selectAnimals.SelectedItems[0].ToString());message.Append(" and ");message.Append(selectAnimals.SelectedItems[1].ToString());break;
default:for(int i = 0; i < length-1; i++){ // comma after all but lastmessage.Append
(selectAnimals.SelectedItems[i].ToString());message.Append(", ");} // "and" before lastmessage.Append("and ");message.Append(selectAnimals.
SelectedItems[length-1].ToString());break;
}message.Append(" jumped over the ");message.Append(selectThing.SelectedItem);display.Text = message.ToString();
}

Instances of the class Stringrepresent sequences of charac-ters. The String class is partof the core .NET Frameworklibrary in the System name-space.C# makes a special formof declaration available forString objects, because weuse them so frequently.
A property is like a data field,but it does not directly repre-sent a storage location. TheLength property of aString is an example. Anindexer is like a property,but itprovides access by an index,like arrays.For a Strings,weuse s[2] to represent thecharacter at index 2 in thestring.
The String class containsoverloaded methods. Forexample, the IndexOfmethod has six versions,whichC# differentiates by the differ-ent parameters for each.
The Format method doesnot apply to a String object,in contrast to the IndexOfmethod and other instancemethods that only make sensewhen applied to a Stringinstance. Format is a classmethod rather than aninstance method.
A C# String is immutable.It cannot be changed. By con-trast, we can change aStringBuilder object.
The BIG Picture
162 CHAPTER 6 Reference Types
Test Your Understanding
4. Given the String object
String s = "The three did feed the deer";
find
a. s.Length b. s[5] c. s.IndexOf('e')
d. s.IndexOf("did") e. s.Substring(4,5) f. s.ToUpper()
5. Given the String object
String r = "Mississippi";
find
a. r.IndexOf('i') b. r.IndexOf('i',4)
c. r.IndexOf("is",4) d. r.IndexOf("is",9)
e. r.IndexOf("sip") f. r.IndexOf("sissy")
6. If String s = "Happy days are here again", find
a. s.Replace('a', 'i') b. s.Replace("e ", "xkd");
6.3 Library Classes
The .NET Framework Class Library provides a large number of classes,some of which we have used in our applications. These classes are groupedinto namespaces.
6.3.1 Namespaces
A namespace lets us organize code and create globally unique type names.Using a name within one namespace would not preclude its being used inanother, because each will have a different prefix. The namespaces we use inthis text include
System Fundamental classes
System.Data Components that manage data
System.Data.OleDb Database access
System.Drawing Graphics functionality
System.Web.Services Web services
System.Web.UI User interfaces on a web page

6.3 Library Classes 163
System.Web.UI.WebControls Web server controls
System.Windows.Forms Windows user interfaces
System.Xml XML processing
System.Xml.Schema XML schemas
System.Xml.Xsl Stylesheet transformations
We prefix a class with its namespace. The full declaration for a String s pre-fixes the System namespace that contains the String class. For example,
System.String s = "a big car";
To avoid prefixing a class with its namespace, we can add a using declara-tion at the top of the code file. For example, adding
using System;
allows the String to be declared as
String s = "a big car";
6.3.2 Control Objects
The classes in the .NET Framework Class Library define objects that we usein our applications. An object is an instance of a class. For example, the But-ton class defines the features of a button. We can create many Buttoninstances to use in our applications. The fragment from Example6-2ashown here (see also Figure 6.4) declares five objects: a TextBox, a Label, aButton, a NumericUpDown, and an array.
private System.Windows.Forms.TextBox guessBox;private System.Windows.Forms.Label display;private System.Windows.Forms.Button submitGuess;private
System.Windows.Forms.NumericUpDown guessCount;private int[] score = new int[7];
The declaration for the TextBox is
private System.Windows.Forms.TextBox guessBox;
The private modifier signifies that the guessBox variable is only accessiblewithin Example6-2a in which it is defined. The prefix System.Windows.Formsrepresents the namespace containing the TextBox class. We chose the vari-able name guessBox instead of the default name textBox1. To change thevariable name, we set the (Name) property of the TextBox.

164 CHAPTER 6 Reference Types
The .NET Framework ClassLibrary provides a largenumber of classes, someof which we have used inour applications. Theseclasses are grouped intonamespaces. A name-space lets us organizecode and create globallyunique type names. Theclasses in the .NET Frame-work Class Library defineobjects that we use in ourapplications. An object isan instance of a class. Thenew operator allocatesmemory for objects.
The BIG Picture
The variable guessBox has a reference type, meaning that its memory loca-tion holds a reference to a TextBox, not the TextBox itself. In fact, so far thereis no TextBox object. Until we assign it a TextBox, the variable guessBox hasthe value null, signifying an invalid reference.
Visual Studio .NET hides the creation of the user interface controls. Look-ing at the code for Example6-2a shows the line
+
Clicking on the plus sign in the margin will show the code generated byVisual Studio .NET to create and position the user interface controls thatwe added to the form. It is hidden because we are not to modify it.
This hidden code contains the line
guessBox = new System.Windows.Forms.TextBox();
that creates a TextBox and assigns the reference to it to guessBox. The newoperator allocates memory for the TextBox instance and calls the TextBoxconstructor, which is like an initialization method. As in Example6-2a,Visual Studio .NET creates most of the objects we need when building ourapplications.
Test Your Understanding
7. In what namespace is the String class?
8. In what namespace is the TextBox class?
6.4 Summary■ An array contains a number of variables that we access through
indices. We can change array variables by assignment. Often weaccess arrays using loops. Each array stores its length in the Lengthproperty, which we can use as the upper bound of the loop index.
■ The Random class has a Next method that returns an integer.
■ Instances of the class String represent sequences of characters. TheString class is part of the core .NET Framework library in the Sys-tem namespace. C# makes a special form of declaration availablefor String objects because we use them so frequently.
Windows Form Designer generated code

6.5 Programming Exercises 165
■ A property is like a data field, but it does not directly represent astorage location. The Length property of a String is an example. Anindexer is like a property, but it provides access by an index, likearrays. For a String s, we use s[2] to represent the character atindex 2 in the string.
■ The String class contains overloaded methods. For example, theIndexOf method has six versions, which C# differentiates by the dif-ferent parameters for each.
■ The Format method does not apply to a String object, in contrast tothe IndexOf method and other instance methods that only makesense when applied to a String instance. Format is a class methodrather than an instance method.
■ A C# String is immutable. It cannot be changed. By contrast, wecan change a StringBuilder object.
■ The .NET Framework Class Library provides a large number ofclasses, some of which we have used in our applications. Theseclasses are grouped into namespaces. A namespace lets us organizecode and create globally unique type names. The classes in the.NET Framework Class Library define objects that we use in ourapplications. An object is an instance of a class. The new operatorallocates memory for objects.
6.5 Programming Exercises
6.1 Modify Example6-1 to use a CheckedListBox instead of four separateCheckBox controls.
6.2 Modify Example6-2 to use a Label instead of NumericUpDown to dis-play the number of attempts.
6.3 Modify Example6-3 to give the user a choice of three source stringsthat appear in a ComboBox.
6.4 Modify Example6-1 to separate items in the display label withcommas and to put an “and” before the last element. With twoitems, do not use a comma.
6.5 Modify Example6-4 to allow the selection of more than one thing.
6.6 Create a Windows application that changes every ‘p’ to a ‘q’ in aString entered by the user.

166 CHAPTER 6 Reference Types
6.7 Create a Windows application to simulate the roll of two dice, anddisplay the sum of the numbers on each. A die has six faces num-bered 1 through 6. Each face is equally likely to occur, so we simu-late a roll by generating a random number from 1 through 6.
6.8 Create a Windows application with one ListBox showing foods andanother for drinks. Allow the user to make multiple selectionsfrom each, and display the user’s selections in a MessageBox.
6.9 Create a Windows application that includes three labels, A, B, andC; a text box; a button; and a numeric-up-down. Let A, B, and Ceach represent a hidden number between 1 and 25, chosen ran-domly. The user tries to guess the three numbers by entering anumber from 1 to 25 in the text box and clicking the button to sub-mit the guess. If the number matches one of the hidden numbers,the label representing it changes to show the number. Thenumeric-up-down counts the number of guesses that the usermakes until all three numbers have been guessed. You may wish touse the Tag property of a label to store the hidden number.
6.10 Create a Windows application that includes four groups of two radiobuttons each. One radio button of each group has a Text showing thenumber 0, and the other shows the number 1. Use random numbersto create a sequence of four digits, each 0 or 1. For example, 1, 0, 1, 0 issuch a sequence. The user is to select one radio button from eachgroup, either 0 or 1, and click a button to submit the four selections.The application responds by stating the number of correct selectionsin a label. For example, if the user chooses the sequence 0, 1, 1, 0, theresponse would be two correct, because the last two values, 1 and 0,match the last two positions of the 1, 0, 1, 0 sequence chosen initially.The user plays until a response of four correct is obtained. A numeric-up-down displays the numbers of submissions that the user has made.
6.11 Create a Windows application that includes four labels, A, B, C,and D, with a ComboBox under each label. Each combo box will listthe six colors: Red, Green, Blue, Yellow, White, and Orange. Choosea color for each label randomly, but do not show those colors in theform. The user will try to guess the color of each label by selectingthe color for each in the combo box below it. When the user makesa selection, the label will change to the color selected. When theuser presses a Button, the application will respond with a message

6.5 Programming Exercises 167
stating how many colors are correct and how many are in the cor-rect position. For example, if the user guesses Red, Red, Blue, Yel-low, and the correct choices are Red, Blue, Yellow, and Green, theresponse will be 1, 2, meaning that one color matches exactly andtwo other colors are correct but in the wrong positions. A Numer-icUpDown will count the number of tries until the user guesses allfour colors correctly. You may wish to use the Tag property of alabel to store its color to be guessed.
6.12 Create a Windows application to play a game. The game uses sixletters: a, b, c, d, e, and f. The computer chooses four letters at ran-dom, and they may be repeated, so they might be abcc or aadd, andso forth. The player enters a string of letters, say, ddec, in a TextBoxand clicks the Submit button. The application displays two num-bers, the number of letters that exactly match the pattern chosen inadvance, and the number of letters that are in the pattern but thatthe user put in the wrong position. For example, if the pattern isabcc, some guesses and scores are:
adef 1, 0
deaf 0, 1
cabb 0, 3
cccc 2, 0
acbc 2, 2
The game continues until the user guesses all letters in the correctposition (4, 0). The score is the number of guesses it takes. Natu-rally, lower scores are better.

This page intentionally left blank

7CHAPTERUsing a DatabaseVisual Studio .NET tools make it easy to connect to a database to retrieve or
update data. We can process data while connected to the database or we can
process the data locally in our application. By processing data locally using a
DataSet, we can free the connection to the database for others to use. Later we
will develop Web applications in which the client and the server by default do
not maintain a connection.
We use a .NET data provider for connecting to a database, executing com-
mands, and retrieving results. Connection, Command, and DataReader objects pro-
vide these three functions. A DataAdapter populates a DataSet to process data
without maintaining a connection.
The simplest and most efficient database access uses a DataReader to process
data while connected to the database. When using multiple tiers, the user does
not directly connect to the database but rather to a middle tier that provides
database access. Using multiple tiers allows applications to handle many users
while maintaining performance. For simplicity, we do not use multiple tiers in
this chapter but do show both methods of data access: using a DataReader while
connected and populating a DataSet for offline processing.
Chapter Objectives:■ Use the Northwind example database
■ Use a DataReader while connected to a database
■ Use a DataAdapter to load data from a data source to a DataSet
■ Build a query to retrieve data
■ Generate a DataSet
■ Display data in a DataGrid
■ Generate a data Form
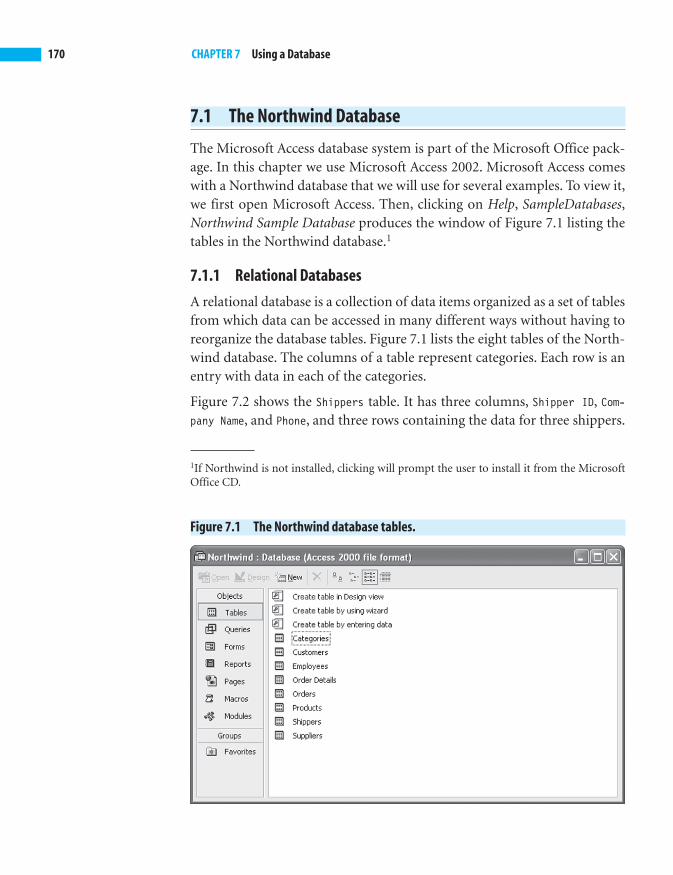
170 CHAPTER 7 Using a Database
Figure 7.1 The Northwind database tables.
1If Northwind is not installed, clicking will prompt the user to install it from the MicrosoftOffice CD.
7.1 The Northwind Database
The Microsoft Access database system is part of the Microsoft Office pack-age. In this chapter we use Microsoft Access 2002. Microsoft Access comeswith a Northwind database that we will use for several examples. To view it,we first open Microsoft Access. Then, clicking on Help, SampleDatabases,Northwind Sample Database produces the window of Figure 7.1 listing thetables in the Northwind database.1
7.1.1 Relational Databases
A relational database is a collection of data items organized as a set of tablesfrom which data can be accessed in many different ways without having toreorganize the database tables. Figure 7.1 lists the eight tables of the North-wind database. The columns of a table represent categories. Each row is anentry with data in each of the categories.
Figure 7.2 shows the Shippers table. It has three columns, Shipper ID, Com-pany Name, and Phone, and three rows containing the data for three shippers.

7.1 The Northwind Database 171
Figure 7.2 The Shippers table.
2For display purposes, the Orders table shows the Company Name rather than CustomerID.
The first column, Shipper ID, is the key. It uniquely identifies the shipper.Even if two shippers had the same name, they would have a unique ShipperID to identify them. For display purposes, the column headers have spaces,but the names in the design view are ShipperID, CompanyName, and Phone.
A well-designed relational database avoids duplication of information. Forexample, in Northwind each entry in the Orders table specifies the Customerwho placed it. The Orders table just includes the CustomerID2 and not theAddress. If the Orders table included the address for each customer, thenwhen the address changed all the entries in the Orders table containing thatcustomer’s address would have to change. In Northwind, the Customerstable contains the customer’s address, which only occurs once and can beupdated in one place. Figure 7.3 lists the column categories for each of theNorthwind tables.
The Order Details table has a compound key. We need both the OrderID andthe ProductID to uniquely identify an Order Details entry. The Order Detailstable helps to avoid redundancy. Each order may include several products.Making multiple entries for each order in the Orders table would force rep-etition of the Customer, Employee, Order Date, and so on, which are the samefor all items of the order. All the information that is the same for an entireorder occurs in the Orders table. The information that depends on the itemordered occurs in the Order Details table.
7.1.2 Queries
A query retrieves information from a database. The Structured Query Lan-guage (SQL) is the standard for expressing queries, but we will not need to

A relational database is acollection of data itemsorganized as a set oftables from which datacan be accessed in manydifferent ways withouthaving to reorganize thedatabase tables. A queryretrieves information froma database.
The BIG Picture
172 CHAPTER 7 Using a Database
Figure 7.3 Columns of the Northwind tables.
CategoriesCategoryID (key), CategoryName, Description, Picture
CustomersCustomerID (key), CompanyName, ContactName, ContactTitle, Address, City, Region, PostalCode, Country, Phone, Fax
EmployeesEmployeeID (key), LastName, FirstName, Title, TitleOfCourtesy,BirthDate, HireDate, Address, City, Region, PostalCode, Country,HomePhone, Extension, Photo, Notes, ReportsTo
Order DetailsOrderID (key), ProductID (key), UnitPrice, Quantity, Discount
OrdersOrderID (key), CustomerID, EmployeeID, OrderDate, RequiredDate,ShippedDate, ShippedVia, Freight, ShipName, ShipAddress, ShipCity,ShipRegion, ShipPostalCode, ShipCountry
ProductsProductID (key), ProductName, SupplierID, CategoryID, QuantityPerUnit,UnitPrice, UnitsInStock, UnitsOnOrder, ReorderLevel, Discontinued
ShippersShipperID (key), CompanyName, Phone
SuppliersSupplierID (key), CompanyName, ContactName, ContactTitle, Address,City, Region, PostalCode, Country, Phone, Fax, HomePage
use it explicitly because Visual Studio .NET provides the Query Buildertool to construct queries. We will use it in the next section.
A simple query might ask for a list of all company names. We can find thecompany names from the Customers table. A more involved query might askfor the total sales in August 1996. This would require checking the dates inthe Orders table, finding those rows of the Order Details table with Order IDcorresponding to an August 1996 date, computing the sales from that item,and updating the total.
Test Your Understanding
1. Why is ProductID a better choice than ProductName as the key for theProducts table in the Northwind database?

7.2 The Connected Model 173
7.2 The Connected Model
In the connected model, we process data while maintaining a connection tothe database. We use a data reader to read from a database for more effi-cient processing when we do not need a middle tier or are not sharing thedataset with many users. In Example7-1, we connect to the Northwinddatabase. We will query Northwind to find the price for each product, andthen display the products and prices in a ListBox control.
7.2.1 Connecting to a Database
We start by opening Visual Studio .NET and creating a new Windows Appli-cation project for Example7-1. In the Toolbox, we click the Data tab to opena list of controls useful for accessing data. A .NET data provider links ourapplication with a data source. In this book, we use the OLE DB .NET DataProvider to communicate with the Microsoft Access Northwind database.
We drag an OleDbConnection control from the Toolbox to the form. Thiscontrol represents a connection to a database. Note that in Figure 7.4 itappears below the form because it has no visible representation on the
Figure 7.4 Adding an OleDbConnection.

174 CHAPTER 7 Using a Database
Figure 7.5 Selecting a provider.
form. Its Properties window at the right allows us to configure the connec-tion. We change the (Name) property to northwind.
To connect to the Northwind database, we need to set the ConnectionStringproperty for the OleDbConnection. Clicking on the button at the right of theConnectionString entry in the Properties window displays a list of connec-tion strings previously set and a <New Connection...> choice that we select.Figure 7.5 shows the Data Link Properties window that pops up, in whichwe have selected the Provider tab and selected the Microsoft Jet 4.0 OLE DBProvider used to connect to a Microsoft Access database.
Clicking Next displays the Connection tab shown in Figure 7.6. We browse toselect a database name. On the author’s system, Northwind has the path
H:\Program Files\Microsoft Office\Office10\Samples\Northwind.mdb
We enter Admin as the password and check Blank Password. Clicking the TestConnection button should display a message saying that the test connection

7.2 The Connected Model 175
Figure 7.6 Configuring a database connection.
succeeded. We click OK to close the message box and click OK to close theData Link Properties window.
7.2.2 Building a Command
We want to find the price of each Northwind product. With an OleDbCommandcontrol, we can configure a query to the Northwind database to retrieveproduct information. We drag an OleDbCommand from the Toolbox to theform. It also appears below the form in the design. We change its (Name)property to productPrices.
To associate a database with the command, we set the Connection property.Clicking the button at its right displays the choices shown in Figure 7.7.Clicking the + sign to the left of Existing shows the existing connections. Weselect the northwind connection that we configured above.
The CommandText property will specify the query that we build to find theprices of Northwind products. We click on it and on the button that appears

176 CHAPTER 7 Using a Database
Figure 7.7 Associating a connection with a command.
Figure 7.8 Selecting the Products table.
at the right. Figure 7.8 shows the Add Table window that appears. We will beusing the Products table, so we select Products and click Add and Close. TheQuery Builder form appears showing the columns of the Products table. Wecheck ProductName and UnitPrice, as shown in Figure 7.9, and click OK.
7.2.3 Reading and Displaying the Data
We use a data reader to read the product names and prices from the North-wind database. To display the data that we retrieve from the Northwind

7.2 The Connected Model 177
Figure 7.9 Building a query.
database, we need to enter it in a user interface control. We use a ListBoxcontrol to display the list of Northwind products with their prices. Clickingthe Windows Forms tab in the Toolbox displays the user interface controlsavailable. We drag a ListBox control to the form and change its (Name) prop-erty to display. We change the Font.Name property to Courier New so that thedisplay will be evenly spaced. In the Courier New font, each character has thesame width.
We retrieve the data from the database when the application begins execu-tion. Double-clicking on the form displays the template
private void Form1_Load(object sender, System.EventArgs e){
}
for the Form1_Load method that executes when the application starts. Weneed to add the C# code to query the database and to enter the data into theListBox. The completed Form1_Load method is
private void Form1_Load(object sender, System.EventArgs e){
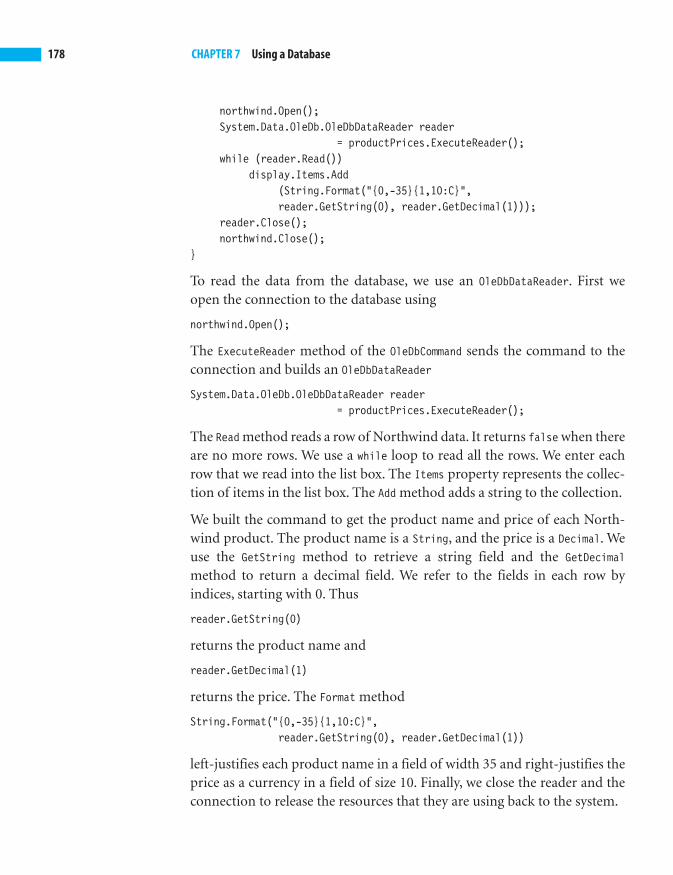
178 CHAPTER 7 Using a Database
northwind.Open();System.Data.OleDb.OleDbDataReader reader
= productPrices.ExecuteReader();while (reader.Read())
display.Items.Add(String.Format("{0,-35}{1,10:C}",reader.GetString(0), reader.GetDecimal(1)));
reader.Close();northwind.Close();
}
To read the data from the database, we use an OleDbDataReader. First weopen the connection to the database using
northwind.Open();
The ExecuteReader method of the OleDbCommand sends the command to theconnection and builds an OleDbDataReader
System.Data.OleDb.OleDbDataReader reader= productPrices.ExecuteReader();
The Read method reads a row of Northwind data. It returns false when thereare no more rows. We use a while loop to read all the rows. We enter eachrow that we read into the list box. The Items property represents the collec-tion of items in the list box. The Add method adds a string to the collection.
We built the command to get the product name and price of each North-wind product. The product name is a String, and the price is a Decimal. Weuse the GetString method to retrieve a string field and the GetDecimalmethod to return a decimal field. We refer to the fields in each row byindices, starting with 0. Thus
reader.GetString(0)
returns the product name and
reader.GetDecimal(1)
returns the price. The Format method
String.Format("{0,-35}{1,10:C}",reader.GetString(0), reader.GetDecimal(1))
left-justifies each product name in a field of width 35 and right-justifies theprice as a currency in a field of size 10. Finally, we close the reader and theconnection to release the resources that they are using back to the system.
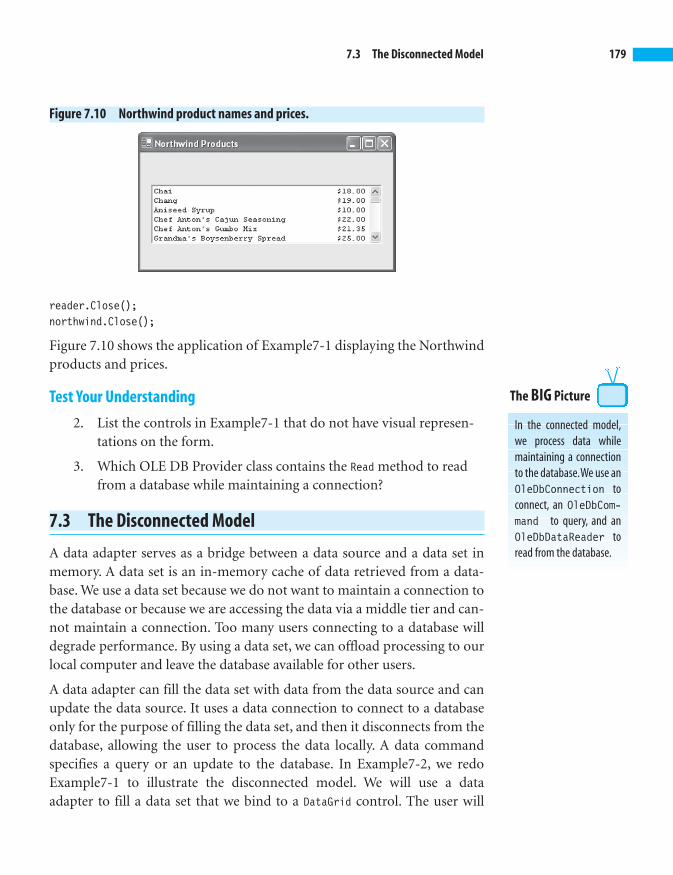
In the connected model,we process data whilemaintaining a connectionto the database.We use anOleDbConnection toconnect, an OleDbCom-mand to query, and anOleDbDataReader toread from the database.
The BIG Picture
7.3 The Disconnected Model 179
Figure 7.10 Northwind product names and prices.
reader.Close();northwind.Close();
Figure 7.10 shows the application of Example7-1 displaying the Northwindproducts and prices.
Test Your Understanding
2. List the controls in Example7-1 that do not have visual represen-tations on the form.
3. Which OLE DB Provider class contains the Read method to readfrom a database while maintaining a connection?
7.3 The Disconnected Model
A data adapter serves as a bridge between a data source and a data set inmemory. A data set is an in-memory cache of data retrieved from a data-base. We use a data set because we do not want to maintain a connection tothe database or because we are accessing the data via a middle tier and can-not maintain a connection. Too many users connecting to a database willdegrade performance. By using a data set, we can offload processing to ourlocal computer and leave the database available for other users.
A data adapter can fill the data set with data from the data source and canupdate the data source. It uses a data connection to connect to a databaseonly for the purpose of filling the data set, and then it disconnects from thedatabase, allowing the user to process the data locally. A data commandspecifies a query or an update to the database. In Example7-2, we redoExample7-1 to illustrate the disconnected model. We will use a dataadapter to fill a data set that we bind to a DataGrid control. The user will

180 CHAPTER 7 Using a Database
Figure 7.11 Selecting a data connection.
work with the data grid. We will not make any changes, but if we did, thedata adapter could update the database to reflect the changes made whileprocessing locally.
7.3.1 The Data Adapter Configuration Wizard
We start by opening Visual Studio .NET and creating a new WindowsApplication project for Example7-2. In the Toolbox, we click the Data tabto open a list of controls useful for accessing data. There are two dataadapters in the first .NET version, SqlDataAdapter and OleDbDataAdapter, andadditional adapters in later versions. The SqlDataAdapter can be applied tothe Microsoft SQL Server database. We use the OleDbDataAdapter to connectto the Microsoft Access database. Dragging an OleDbDataAdapter from theToolbox to the form of Example7-2 displays the Data Adapter Configura-tion Wizard. Clicking Next on the welcome screen displays the Choose YourData Connection window shown in Figure 7.11. We select the connection weconfigured in Example7-1. Clicking Next displays the Choose a Query Typescreen shown in Figure 7.12. We check the Use SQL statements radio buttonand click Next.

7.3 The Disconnected Model 181
Figure 7.12 Choosing a query type.
7.3.2 A Query Builder
In the Generate the SQL statements window, click the Query Builder buttonat the lower right. The Query Builder tool builds a query to extract infor-mation from the database. Figure 7.8 shows the Add Table window thatappears. We will be using the Products table, so we select Products and clickAdd and Close. The Query Builder form appears showing the columns of theProducts table. We check ProductName and UnitPrice as shown in Figure 7.9and click OK.
We are only going to read the data and do not need the capability to insert,delete, or update data. By default, the data adapter configuration wizardwill generate commands to insert, delete, and update. To change thedefault, we click the Advanced Options. . . button in the Generate the SQLstatements screen shown in Figure 7.13. We remove the check from theGenerate Insert, Update, and Delete statements box and click OK.
We click Next in the Generate the SQL statements screen and then click Fin-ish. We have configured the data adapter with a data connection and aquery to extract information. As in Example7-1, these controls appear

182 CHAPTER 7 Using a Database
Figure 7.13 Generating SQL statements.
below the form in the design. We change the (Name) property of the Ole-DbAdapter to northwindAdapter and that of the OleDbConnection to northwind-Connection. Now that we have built the query, we need to generate a DataSetto hold the data in our application.
7.3.3 A Data Set
A DataSet holds data in memory that has been received from a database. Weuse a DataSet in our program to receive the Northwind data. We start byclicking the Data, Generate Dataset menu item that displays the GenerateDataset form of Figure 7.14. We click OK to accept the default setting show-ing that the Products table will be part of the data set. The data set controlalso appears below the form in the design. We change its (Name) property toproductPrices.
To display the data, we can use a DataGrid control. We drag a DataGrid controlfrom the Windows Forms tab of the Toolbox to the form in the Visual Studio.NET design. We click on the DataSource property in the Properties windowand choose productPrices.Products. This will enter the ProductName, Unit-

7.3 The Disconnected Model 183
Figure 7.14 Generating a data set.
Price, and ProductID in the DataGrid control. Notice that the ProductID key wasautomatically added. We need to widen the DataGrid to show all the fields.
To fill the DataGrid with the desired information, we use the Fill method ofthe OleDbDataAdapter. We double-click on the form (not the DataGrid con-trol) in the Visual Studio .NET design to display the Form1_Load templateand enter the code to fill the data set, giving
private void Form1_Load(object sender, System.EventArgs e){
northwindAdapter.Fill(productPrices);}
Figure 7.15 shows the resulting data from the Products table.
7.3.4 Using the Data Form Wizard
With the Data Form Wizard, we can display information from a datasetusing a Windows Form, either in a DataGrid or in individual controls. Exam-ple7-3 uses the Data Form Wizard to create a Form to present the Productstable from the Northwind database.
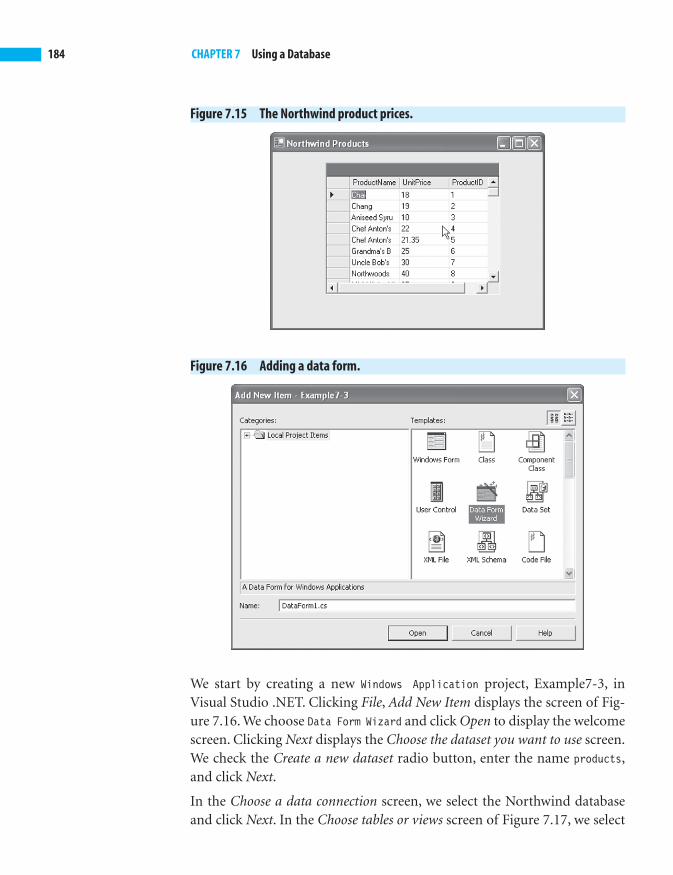
184 CHAPTER 7 Using a Database
Figure 7.15 The Northwind product prices.
Figure 7.16 Adding a data form.
We start by creating a new Windows Application project, Example7-3, inVisual Studio .NET. Clicking File, Add New Item displays the screen of Fig-ure 7.16. We choose Data Form Wizard and click Open to display the welcomescreen. Clicking Next displays the Choose the dataset you want to use screen.We check the Create a new dataset radio button, enter the name products,and click Next.
In the Choose a data connection screen, we select the Northwind databaseand click Next. In the Choose tables or views screen of Figure 7.17, we select

7.3 The Disconnected Model 185
Figure 7.17 Selecting the Products table.
the Products table, click the right arrow to transfer it to the Selected itemsarea, and click Next.
By default, the Choose tables and columns to display on the form screenshown in Figure 7.18 has all columns of the Products table selected. ClickingNext displays the Choose the display style screen of Figure 7.19. We select theSingle record in individual controls radio button to display each field in itsown control. We uncheck the Add, Delete, and Cancel check boxes becausewe do not want to make any changes to the Northwind database, but wecheck the Navigation controls check box to inspect the data from the Prod-ucts table.
Clicking the Finish button produces the DataForm1 form, which we need tomake the start-up form so that it will appear when we execute this applica-tion. We right-click on Form1 in the Visual Studio .NET design and clickView Code. We scroll down to the Main method and change Form1 toDataForm1 so that the Main method reads
static void Main(){
Application.Run(new DataForm1());}

186 CHAPTER 7 Using a Database
Figure 7.19 Choose the display style.
Figure 7.18 Choose tables and columns to display on the form.

In the disconnectedmodel, we use a data setto process data locally. Adata adapter serves as abridge between a datasource and a data set forretrieving and storingdata. The Data AdapterConfiguration Wizard addsa data connection config-ured to a particular data-base. Its query builder toolconstructs a query to getthe desired informationfrom the database.
A DataSet holds datain memory that has beenreceived from a database.It allows us to processdata without maintaininga connection to the data-base.The DataGrid con-trol displays data on aform. We fill the Data-Grid when the formloads.
With the Data FormWizard, we can displayinformation from a dataset using a WindowsForm, either in a Data-Grid or in individual con-trols. It adds another formto the project, which canbe started by modifyingthe Main method of theoriginal form.
The BIG Picture
7.4 Using Multiple Tables 187
Figure 7.20 The data form showing Northwind products.
We execute Example7-3 and press the Load button to fill the form with thedata from the Northwind Products table as shown in Figure 7.20.
Test Your Understanding
4. Which control represents data from the database in memory?
5. Which control displays data in a scrollable grid?
6. What does SQL stand for?
7.4 Using Multiple Tables
The most interesting uses of databases require data to be gathered frommultiple tables. When using a relational database, the database systemprocesses the query to make it access the data efficiently. In Example7-4, wewill display the names of all the products from the Seafood category. TheProducts table does not directly show the category name for each product. Itlists the CategoryID.
If we use the Categories table, we can match the CategoryID for a productwith the CategoryID in the Categories table and find the corresponding Cat-egoryName for that CategoryID. For example, the first product, Chai, has a Cat-egoryID of 1. Looking at entry 1 in the Categories table shows that itsCategoryName is Beverages, so Chai is not part of the result. However, thetenth product, Ikura, has a CategoryID of 8. From the Categories table wefind that the corresponding CategoryName is Seafood, so it is one of theresults. This is the kind of processing performed by the database system,

188 CHAPTER 7 Using a Database
Figure 7.21 Selecting multiple tables.
Microsoft Access in our example. We use Visual Studio .NET tools to set upour query.
7.4.1 Building the Query
We start by creating Example7-4 as a new Windows Application. Dragging anOleDbDataAdapter onto the form brings up the Data Adapter ConfigurationWizard. Clicking Next displays the Choose Your Data Connection screen. Weselect the Northwind database and click Next. In the Choose a Query Typescreen, we select Use SQL statements and click Next. In the Generate the SQLstatements screen, we click the Query Builder button. In the Add Tablescreen shown in Figure 7.21, we select the Categories table and hold the Ctrlkey down while selecting the Products table. Holding the Ctrl key downallows us to make multiple selections.
Clicking Add and Close shows the Query Builder form with the columns ofthe Categories and Products tables displayed. We check ProductName in theProducts table because that is the result we want to show in our application.Figure 7.22 shows the Query Builder form.
The Query Builder shown in Figure 7.22 has four panes. From top to bottomthey are the Diagram, Grid, SQL, and Results panes. The Diagram pane displaysthe tables we are using. A bar joins the CategoryID field in the Categoriestable with the CategoryID field in the Products table. This identifies thesearch process described above where we matched the CategoryID of a prod-

7.4 Using Multiple Tables 189
Figure 7.22 Selecting ProductName in the Query Builder.
uct in the Products table with the same CategoryID in the Categories table tofind the corresponding CategoryName for that product. The boldface type inthe Categories table indicates that CategoryID is the primary key of thattable. The CategoryID field appears as a foreign key in the Products table.
The Grid pane allows us to specify options about the data to be selected.Checking the ProductName column in the Products table in the Diagram panemakes an entry in the Grid pane showing, by default, that ProductName willbe part of the output. We want to include a condition restricting the outputto products in the Seafood category. The restriction we want is that the Cat-egoryName in the Categories table be Seafood.
To add this restriction, we first check the CategoryName column in the Cate-gories table in the Diagram pane. This will add it to the Grid pane. We thenuncheck the Output column in the Grid pane for the CategoryName row. Thiswill also uncheck the CategoryName box in the Categories table in the Diagrampane. In the Criteria column for the CategoryName row in the Grid pane, weadd the constraint " = 'Seafood' ". Figure 7.23 shows the Query Builder win-dow after these steps.
The SQL pane shows the SQL statement for this query that was constructedusing the Query Builder tool. We click OK to return to the Generate the SQL

190 CHAPTER 7 Using a Database
Figure 7.23 The configured query.
statements screen. We click Advanced Options and uncheck the GenerateInsert, Update, and Delete statements box, because we will not be using thesestatements. We click OK to return to the Generate the SQL statements screenand then click Next. Finally, we click Finish in the View Wizard Results screen.
7.4.2 Displaying the Query Results
We first add a DataSet to hold the results of the query. Clicking on the Data,Generate dataset menu item displays the Generate Dataset form of Figure7.24. We enter seafoodProducts as the name of the new data set and click OK.
To display the results, we drag a DataGrid control from the Toolbox to theform. We choose seafoodProducts1.Products as the DataSource in the Proper-
ties window for the DataGrid. We expand the DataGrid to show the fields fully.
To fill the DataGrid with the desired information, we double-click on theform (not the DataGrid control) in the Visual Studio .NET design and fill inthe Form1_Load template as shown:
private void Form1_Load(object sender, System.EventArgs e){
oleDbDataAdapter1.Fill(seafoodProducts1);}

The most interesting usesof databases require datato be gathered from mul-tiple tables. We useQuery Builder toconstruct a query thatuses multiple tables.
The BIG Picture
7.4 Using Multiple Tables 191
Figure 7.24 Generating a data set.
Figure 7.25 The seafood products from the Northwind database.
Figure 7.25 shows the seafood products in the DataGrid on the form ofExample7-4.
Test Your Understanding
7. Name the four sections of the Query Builder screen.

192 CHAPTER 7 Using a Database
7.5 Summary■ A relational database is a collection of data items organized as a set
of tables from which data can be accessed in many different wayswithout having to reorganize the database tables. A query retrievesinformation from a database.
■ In the connected model, we process data while maintaining a connec-tion to the database. We use an OleDbConnection to connect, an OleDb-
Command to query, and an OleDbDataReader to read from the database.
■ In the disconnected model, we use a data set to process data locally.A data adapter serves as a bridge between a data source and a dataset for retrieving and storing data. The Data Adapter ConfigurationWizard adds a data connection configured to a particular database.Its query builder tool constructs a query to get the desired informa-tion from the database. A DataSet holds data in memory that hasbeen received from a database. The DataGrid control displays dataon a form. We fill the DataGrid when the form loads.
■ With the Data Form Wizard, we can display information from adata set using a Windows Form, either in a DataGrid or in individualcontrols. It adds another form to the project, which can be startedby modifying the Main method of the original form.
■ The most interesting uses of databases require data to be gatheredfrom multiple tables. We use Query Builder to construct a querythat uses multiple tables.
7.6 Programming Exercises
7.1 Modify Example7-1 to add the quantity of each product in stock tothe display.
7.2 Modify Example7-3 to use a DataGrid rather than individual con-trols. Continue to use the Data Form Wizard.
7.3 Modify Example7-4 to show the beverages rather than theseafood products.
7.4 Create a Windows application to display the names and titles of allNorthwind employees.
7.5 Create a Windows application to display the order date of eachorder from the Orders table.
7.6 Programming Exercises 193
7.6 Use the Data Form Wizard to display the CompanyName, ContactName,Address, and City from the Northwind Customers table in individ-ual controls.
7.7 Create a Windows application to display the CompanyName of allNorthwind customers who ordered beverages.
7.8 Create a Windows application to list the CompanyName of all North-wind customers whose orders were shipped by Speedy Express.

This page intentionally left blank

8CHAPTERWeb ApplicationsThe browser provides access to Web sites all over the world. It is the primary
mode of computing for many users. Static World Wide Web pages return the
same content to every user, but very often users submit information and
receive responses based on that information. The Web server uses programs
running on the server to provide a response tailored to the client. Microsoft
includes ASP.NET in the .NET Framework to support dynamic Web pages. ASP
(Active Server Pages), the previous Web technology from Microsoft, in its new
form uses the .NET Framework Class Library.
Browsers display HTML documents. HTML (Hypertext Markup Language) is the
language used to write Web pages, adding markup tags to indicate how the
browser should present the document. A Web form can pass information to a
C# program running on the server, called the code behind, which processes it
and sends results back to the client.This approach separates the presentation in
the Web form seen by the client using the browser from the content in the code
behind run on the server. A Web page designer can focus on the presentation
while a C# developer prepares the code behind.
With a three-tiered architecture, the client communicates with the code behind
on the middle-tier, which in turn connects with a database server on the third
tier. In this way, clients do not have to connect directly to a database.
HTTP connections are stateless, meaning that when a client connects again
there is no record of previous connections. Session-tracking allows servers to
maintain client information from one connection to the next, an essential fea-
ture needed for many Web applications including Web commerce.
Chapter Objectives:■ Introduce HTML
■ Use Web forms and code behind to provide dynamic Web pages
■ Add database connectivity in a three-tiered architecture
■ Use multiple Web forms in a single application

196 CHAPTER 8 Web Applications
8.1 HTML
The Internet includes many applications, of which the most used is e-mail.The rapidly growing World Wide Web (WWW) allows computers all overthe world to explore the enormous web of links from one site to another foreducational, commercial, and recreational purposes. We introduce theHTML notation used to write Web pages.
8.1.1 Some HTML Tags
Web page files often have the .html extension. We use HTML to create thehypertext files found on the Web. This mark-up language adds tags to spec-ify the formatting of the text. For example, the tag <br> causes a break to anew line. A browser, such as Internet Explorer, interprets these tags, for-matting the page for the client. Using tags allows browsers of differentcapabilities to interpret the tags differently. For example, the tag <em>,requesting emphasis for the text that follows, might cause one browser todisplay the text in italics, but another browser, without the capability to useitalics, might underline that text for emphasis.
The World Wide Web must adapt itself to many computers with differingcapabilities. By using HTML tags, Web documents can be displayed by a vari-ety of browsers including those on terminals without graphics capabilities.
Although HTML is not hard to learn to use, we need only an introduction toexperiment with Web forms. To get the flavor of HTML, we list a few tags inFigure 8.1 and use them to write a rudimentary Web page.
We can insert an empty tag such as <br> anywhere to cause a line break.Non-empty tags such as <em> have a closing form using the forward slashthat marks the end of the text covered by that tag. Thus
<em> .NET is fun. </em>
would emphasize the text, .NET is fun. The six levels of header tags specifythe importance of the header, with <h1> being the most important, and <h6>the least. Browsers will try to make the more important headers larger andmore impressive. An unordered list <ul> includes, between its starting andending tags, various list elements with tags <li>.
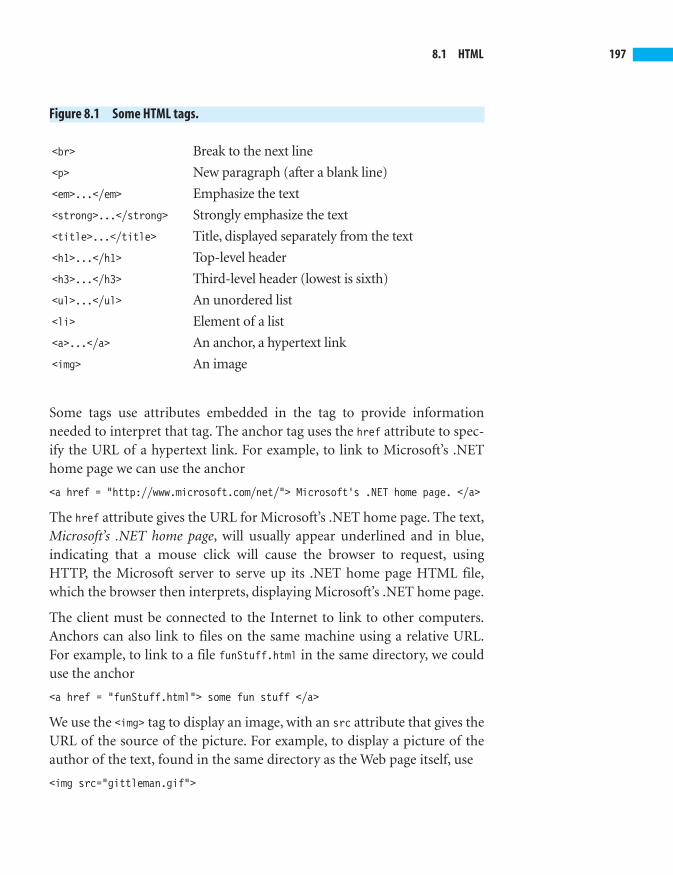
8.1 HTML 197
Figure 8.1 Some HTML tags.
<br> Break to the next line
<p> New paragraph (after a blank line)
<em>...</em> Emphasize the text
<strong>...</strong> Strongly emphasize the text
<title>...</title> Title, displayed separately from the text
<h1>...</h1> Top-level header
<h3>...</h3> Third-level header (lowest is sixth)
<ul>...</ul> An unordered list
<li> Element of a list
<a>...</a> An anchor, a hypertext link
<img> An image
Some tags use attributes embedded in the tag to provide informationneeded to interpret that tag. The anchor tag uses the href attribute to spec-ify the URL of a hypertext link. For example, to link to Microsoft’s .NEThome page we can use the anchor
<a href = "http://www.microsoft.com/net/"> Microsoft's .NET home page. </a>
The href attribute gives the URL for Microsoft’s .NET home page. The text,Microsoft’s .NET home page, will usually appear underlined and in blue,indicating that a mouse click will cause the browser to request, usingHTTP, the Microsoft server to serve up its .NET home page HTML file,which the browser then interprets, displaying Microsoft’s .NET home page.
The client must be connected to the Internet to link to other computers.Anchors can also link to files on the same machine using a relative URL.For example, to link to a file funStuff.html in the same directory, we coulduse the anchor
<a href = "funStuff.html"> some fun stuff </a>
We use the <img> tag to display an image, with an src attribute that gives theURL of the source of the picture. For example, to display a picture of theauthor of the text, found in the same directory as the Web page itself, use
<img src="gittleman.gif">
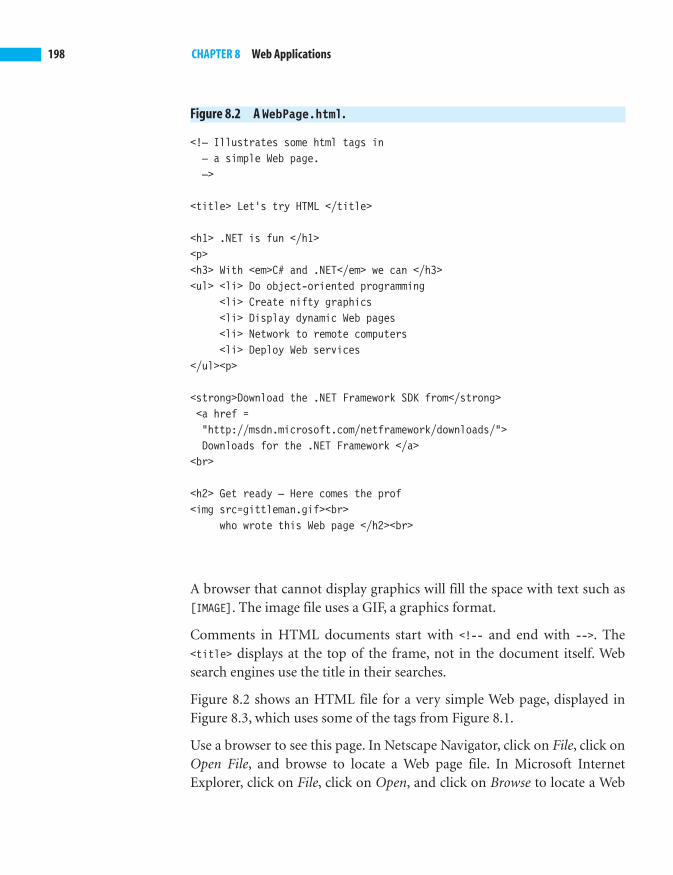
198 CHAPTER 8 Web Applications
Figure 8.2 A WebPage.html.
<!— Illustrates some html tags in— a simple Web page.—>
<title> Let’s try HTML </title>
<h1> .NET is fun </h1><p><h3> With <em>C# and .NET</em> we can </h3><ul> <li> Do object-oriented programming
<li> Create nifty graphics<li> Display dynamic Web pages<li> Network to remote computers<li> Deploy Web services
</ul><p>
<strong>Download the .NET Framework SDK from</strong><a href =“http://msdn.microsoft.com/netframework/downloads/”>Downloads for the .NET Framework </a>
<br>
<h2> Get ready — Here comes the prof<img src=gittleman.gif><br>
who wrote this Web page </h2><br>
A browser that cannot display graphics will fill the space with text such as[IMAGE]. The image file uses a GIF, a graphics format.
Comments in HTML documents start with <!-- and end with -->. The<title> displays at the top of the frame, not in the document itself. Websearch engines use the title in their searches.
Figure 8.2 shows an HTML file for a very simple Web page, displayed inFigure 8.3, which uses some of the tags from Figure 8.1.
Use a browser to see this page. In Netscape Navigator, click on File, click onOpen File, and browse to locate a Web page file. In Microsoft InternetExplorer, click on File, click on Open, and click on Browse to locate a Web

8.1 HTML 199
Figure 8.3 Displaying WebPage.html in a browser.
page. The URL is a file URL, using the file protocol. The domain name ofthe server is just the local host, which can be omitted, so the URL looks like
file:///path/AWebPage.html
where path is the path on the local machine to the AWebPage.html file.
Figure 8.3 shows us browsing a local file, but this is just for testing purposesduring development. We deploy Web pages on a Web site, making themavailable to anyone who has a browser and is connected to the Internet.Browsing the author’s Web site at
http://www.cecs.csulb.edu/~artg/AWebPage.html
will download this Web page.
The Web site runs a Web server that expects Web pages to be in a defaultdirectory, often named htdocs. On the author’s Web site, the files A Web-Page.html and gittleman.gif are in the htdocs folder.
Using a browser, we canconnect to sites anywherein the World Wide Web todisplay Web pages, writ-ten using HTML, theHypertext Markup Lan-guage. HTML uses tagsenclosed in angle bracketsto indicate formatting.
The BIG Picture
200 CHAPTER 8 Web Applications
Test Your Understanding
1. Which protocol does the browser use to download Web pages?
2. Given the URL
http://www.cecs.csulb.edu/~artg/AWebPage.html
a. What is the protocol?
b. What is the domain name of the server?
c. What is the path to the resource?
3. What language do we use to write Web pages?
4. Which header tag, h2 or h5, will most likely cause a more promi-nent display of the text to which it applies?
5. For what purpose is an HTML anchor tag used?
8.2 Web Server Controls and Code Behind
Web server controls provide much richer Web pages. Using Visual Studio.NET, we can drag these controls from the Toolbox to a Web form, creatingthe desired user interface. Visual Studio .NET creates an HTML file withspecial tags for these controls that the server translates into HTML for theparticular client. When the user interacts with the control, our event-han-dling code will be called. We put the event-handling code in a separatecode-behind file to separate the C# code from the HTML.
8.2.1 Hosting a Web Page
We need a .NET Web server to host our Web pages. With Microsoft Win-dows 2000 or XP Professional operating systems, we can install IIS (Inter-net Information Server) to host our Web pages. If IIS is not available in thisway, another option is to download Web Matrix from http://www.asp.net/webmatrix. Web Matrix provides a free web server that runs locally. TheREADME file available after installation shows how to use it.
To create a Web application, we open a new project in Visual Studio .NETchoosing Visual C# Projects and the ASP .NET Web Application templates. Inthe Location field, we change the default name WebApplication1 to a name ofour choice. In this case we use Example8-1. This will create an Example8-1folder in a special folder in which IIS keeps the Web pages it hosts. On theauthor’s machine that folder is C:\Inetpub\wwwroot, so this is where the

8.2 Web Server Controls and Code Behind 201
Figure 8.4 An ASP.NET Web Application project.
1Rather than placing our code in the special directory used by IIS, we can create a virtual direc-tory to refer to another folder containing our Web page and code. To create a virtual directory,we click on Start, Control Panel, Administrative Tools, Internet Information Services to open theMicrosoft Management Console. Right-clicking on Default Web Site, New, Virtual Directoryopens the Virtual Directory Creation Wizard. We click Next, enter ch8 as the alias for our vir-tual directory, and click Next. We browse to find the directory that contains the Web pages wewant to host in this virtual directory. We click Next, and Next again in the Permissions screen,and then click Finish. The name of the virtual directory appears in the URL referring to theWeb page.
Example8-1 folder will be created.1 Figure 8.4 shows the Visual Studio.NET New Project screen.
Web forms use the .aspx extension. The Example8-1 project opens with aWeb form whose default name is WebForm1.aspx. We have a choice of twolayout styles for our Web forms, GridLayout or FlowLayout. These layoutmodes determine how we can position elements in a Web page. Using Grid-Layout, the default, positions elements at fixed coordinate values that do notchange. FlowLayout positions elements from top to bottom, allowing resiz-ing by different browsers. It is the more flexible layout. To change toFlowLayout, we would set the pageLayout property in the Properties windowto FlowLayout.

Figure 8.5Some Web Forms controls.
202 CHAPTER 8 Web Applications
Example8-1 is a simple Web application with a Label, a TextBox, a Button,and another Label. We enter an item in the TextBox. Pressing the buttonsends that item name to the server. In a fully developed application, theserver might check that item for availability or provide more information.To illustrate how a Web application works, we simply have the server tellthe user that the submission was received.
8.2.2 Server Controls
When creating a Web application, we could use various HTML input tagsto enable the user to submit data to the server, but the .NET Frameworkprovides server controls that handle the details of the HTML. They executeon the server using a code-behind file that we will introduce soon. VisualStudio .NET shows both the Design and the HTML views. Unless we want toadd HTML code to that generated by Visual Studio .NET, we can concen-trate on the Design view.
To set up Example8-1, we drag a Label, a TextBox, a Button, and anotherLabel from the Web Forms tab in the Toolbox onto the Web form in theVisual Studio .NET design. Figure 8.5 shows some of the Web Forms con-trols in the Toolbox.
We select the first Label in the Design view and change its Text property toEnter an item name. We change the Text property of the button to Submitand the Text property of the second Label to the empty string. We changethe (ID) property of a control to give it a more meaningful name. In Exam-ple8-1 we set the following new names. Visual Studio .NET uses uppercaseletters to start names in Web applications.
TextBox EnterItemButton SubmitItemLabel (lower) DisplayItem
Figure 8.6 shows the Visual Studio .NET design for Example8-1.
8.2.3 Code Behind
The code-behind file contains the C# code that initializes the page and theevent-handler methods. We double-click on the Button to create the event-handler template that will be called when the user clicks the button. VisualStudio .NET displays a C# file, WebForm1.aspx.cs, which contains theevent-handling template.
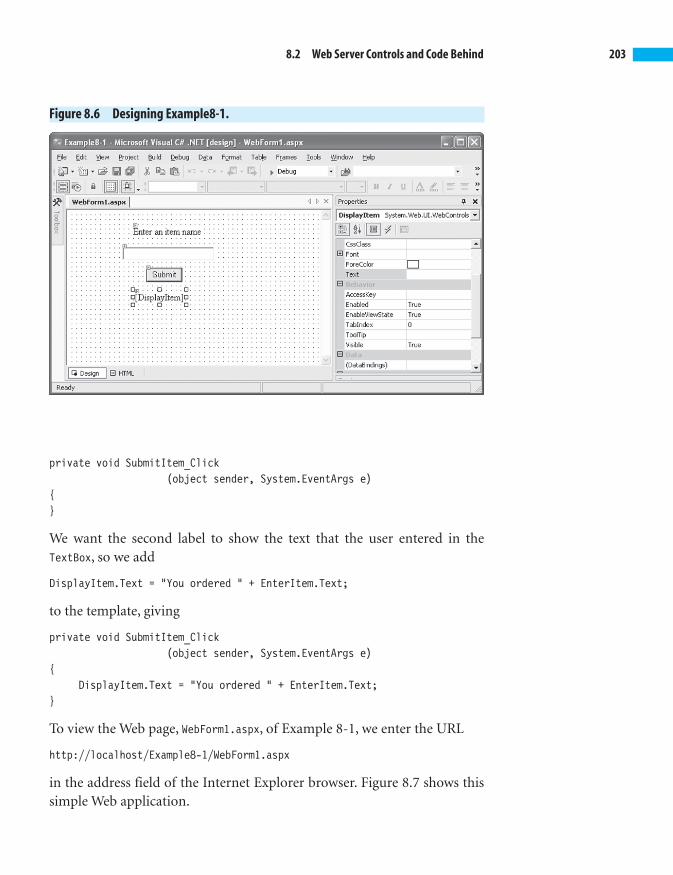
8.2 Web Server Controls and Code Behind 203
Figure 8.6 Designing Example8-1.
private void SubmitItem_Click(object sender, System.EventArgs e)
{}
We want the second label to show the text that the user entered in theTextBox, so we add
DisplayItem.Text = "You ordered " + EnterItem.Text;
to the template, giving
private void SubmitItem_Click(object sender, System.EventArgs e)
{DisplayItem.Text = "You ordered " + EnterItem.Text;
}
To view the Web page, WebForm1.aspx, of Example 8-1, we enter the URL
http://localhost/Example8-1/WebForm1.aspx
in the address field of the Internet Explorer browser. Figure 8.7 shows thissimple Web application.

204 CHAPTER 8 Web Applications
Figure 8.7 The Web application of Example8-1.
8.2.4 More Web Controls
In Example8-2 we illustrate the TextBox, ListBox, CheckBoxList, RadioButton-List, Button, and Label Web server controls. The user creates an order for anice cream sundae. The server sends a message acknowledging receipt of theorder. After opening a new ASP .NET Web Application project, we dragWeb controls in six rows to create the application of Figure 8.8. The firstrow contains a Label and a TextBox to enter the user’s name, while the sec-ond row contains a Label and a TextBox to enter the user’s password. TheTextMode property of a TextBox has three possible values: SingleLine, Multi-Line, and Password. We accept the SingleLine default for the first TextBox, butset the TextMode of the second to Password.
Next, we add a ListBox to the Web form to hold the ice cream flavors. Weaccept the default SelectionMode of Single rather than change it to Multiplebecause we only allow one flavor of ice cream to be selected. To add the fla-vors, we click on the value of the Items property of the ListBox to display aListItem Collection Editor. We add the flavors Vanilla, Chocolate, and Straw-berry. To add a flavor, we click the Add button and fill in the Text propertyof the item we want to add, as shown in Figure 8.9 for Vanilla.
We will allow several choices of toppings and will use a CheckBoxList con-trol to display the choices. We click on the value of the Items property todisplay the ListItem Collection Editor and add the toppings, Hot Fudge, But-terscotch, Nuts, and Whipped Cream.

8.2 Web Server Controls and Code Behind 205
Figure 8.8 The Web form of Example8-2.
Figure 8.9 Adding an item to the ListBox.

206 CHAPTER 8 Web Applications
We add a RadioButtonList to allow the user to select whether to eat at thefacility or to take it out. The choices, again added using the ListItem Col-lection Editor, are Eat here and Take out. We next add a Label under each ofthe three list controls to label the lists Flavor, Toppings, and Location.
We add two buttons, one to submit the user’s entries and another to resetthem. We set the Text property of the first to Submit and the second toReset. To finish the form, we add a TextBox to hold the message that theserver returns, set its Text property to the empty string, and set its TextModeproperty to MultiLine.
We use the Properties window to set the (ID) property of the following con-trols to give them more meaningful names.
TextBox (at top) Name
TextBox Password
ListBox Flavor
CheckBoxList Toppings
RadioButtonList Location
Button (left) Submit
Button (right) Reset
TextBox (bottom) Display
The Submit button should send the data to the server and place the server’sresponse in the bottom TextBox. We double-click on the Submit button todisplay the template for its event-handling method in the code-behind file.We first check the password that the user entered. In a fully developedapplication, we would check the password in a database. Here we just checkthat it is “1234” using the code
if (Password.Text == "1234") {// respond to user's selections
}
When the server responds to the user’s selections, it first sends a greetingincluding the user’s name, taken from the first TextBox, and adds a newlineat the end so that the next part of the message will start on the second line.
Display.Text = "Hi " + Name.Text + "\n";
Next, the event-handling code will add the user’s choice of flavor to themessage.
Display.Text += "You ordered "+ Flavor.SelectedItem.Text + " ice cream";

8.2 Web Server Controls and Code Behind 207
The next addition to the code concatenates the location to the message.
if (Location.SelectedItem.Value == "Eat here")Display.Text += " to eat here.";
elseDisplay.Text += " to go.";
The event-handling code needs a loop to add each of the selected toppingsto the response message.
// If checkbox selected, add its item to the toppingsDisplay.Text += "\nYou selected toppings";
// The Count property gives the number of checkboxesfor (int i = 0; i < Toppings.Items.Count; i++)
if (Toppings.Items[i].Selected)Display.Text
+= "\n\t" + Toppings.Items[i].Text;
Figure 8.10 shows the complete event-handling code for the Submit button.
To handle the click of the Reset button, we set the Text in the three TextBoxcontrols to the empty string, and set the SelectedIndex of the ListBox, Check-BoxList, and RadioButtonList controls to �1. Setting the SelectedIndex to�1 causes all items to be unchecked. Figure 8.11 shows this event handler.
Figure 8.10 The Submit button click event handler.
private void Submit_Click(object sender, System.EventArgs e)
{if (Password.Text == “1234”){
Display.Text = “Hi “ + Name.Text + “\n”;Display.Text += “You ordered ”
+ Flavor.SelectedItem.Text + “ ice cream”;if (Location.SelectedItem.Value == “Eat here”)
Display.Text += “ to eat here.”;else
Display.Text += “ to go.”;// If checkbox selected, add its item to the toppings
Display.Text += “\nYou selected toppings”;// The Count property gives the number of checkboxes
for (int i = 0; i < Toppings.Items.Count; i++)if (Toppings.Items[i].Selected)Display.Text += “\n\t” + Toppings.Items[i].Text;
}}

Web server controls pro-vide much richer Webpages. Using Visual Studio.NET, we can drag thesecontrols from the Toolboxto a Web form, creatingthe desired user interface.Visual Studio .NET createsan HTML file with specialtags for these controlsthat the server translatesinto HTML for the particu-lar client. When the userinteracts with the control,our event-handling codewill be called. We put theevent-handling code in aseparate code-behind fileto separate the C# codefrom the HTML. Webserver controls includeTextBox, ListBox,C h e c k B o x L i s t ,RadioButtonList ,Button, and Label.
The BIG Picture
208 CHAPTER 8 Web Applications
Figure 8.11 The Reset button click event handler.
private void Reset_Click(object sender, System.EventArgs e){
Name.Text = “”;Password.Text = “”;Display.Text = “”;Flavor.SelectedIndex = -1;Toppings.SelectedIndex = -1;Location.SelectedIndex = -1;
}
Test Your Understanding
6. Name the two layout styles for a Web form and describe howeach works.
7. What does a code-behind file include?
8. Which property of a ListBox determines whether the user canselect more than one item?
9. Which property of a TextBox determines whether it can hold morethan one line?
10. Which property of a CheckBoxList contains the collection of checkbox choices?
11. What value should the SelectedIndex property of a RadioButtonListbe assigned to uncheck all of its radio buttons?
8.3 Accessing a Database
Using a browser, we can get information from a database using the Web. Wedevelop a Web application that displays the names and addresses of thesuppliers in the Northwind database. The client Web application connectsto the Web server, which in turn connects to the Northwind database toexecute a query and presents the results in a DataGrid control.
In this example, we do not use a DataSet to save the data locally. This meansthat we do not need a data adapter to fill the dataset from the database.Because we only execute one query, we use a data reader to obtain the datawhile connected and bind it directly to the DataGrid. The data reader is a

8.3 Accessing a Database 209
read-only forward-only reader optimized for fast access. We do not want toupdate the database, so we will not have to make another connection.
8.3.1 Adding a Connection
We create Example8-3 in Visual Studio .NET as a C# ASP .NET Web Appli-cation project. We set the title property of the document to Display North-wind Suppliers. From the Data tab on the Toolbox, we add an OleDbConnectionto the design. We click on the value of its ConnectionString property in theProperties window and select the path to the Northwind database. Itshould be already available from creating the Chapter 7 examples, but ifnot, we can repeat the steps we used there. We set the (Name) property tonorthwind.
8.3.2 Configuring a Command
We add an OleDbCommand from the Toolbox. This command will express thequery that we want to make of the Northwind database. We need to associ-ate it with the connection to Northwind that we just configured. Clickingon its Connection property pops up a choice of Existing or New. ClickingExisting displays the northwind connection that we added to the form. Weselect this connection. We set the (Name) property to suppliers.
We need to create the specific command that we wish to execute. Clickingon the value of the CommandText property of the OleDbCommand that we addeddisplays a small button at the right. Clicking it displays the Query Builderwith the Add Table window open and showing the list of the Northwindtables. We select Suppliers and click the Add button and then the Close but-ton. The Query Builder shows a list of all the pieces of information availablefor each supplier listed in the Northwind database. We do not want to showall this information, so we select the Address, City, and CompanyName fieldsand click OK.
8.3.3 Displaying in a DataGrid
We will display the supplier data in a DataGrid control. We open the Web Forms
tab in the Toolbox, drag a DataGrid control onto the form, and set its (ID)
property to Display. We click on the AutoFormat link at the bottom of the Prop-
erties window for the DataGrid to choose a format for the data. We chooseColorful1 from the Auto Format screen shown in Figure 8.12 and click OK.

210 CHAPTER 8 Web Applications
Figure 8.12 The AutoFormat screen.
8.3.4 Writing the Event Handler
The Page_Load method executes when the page that we are creating is loaded.Double-clicking on the form will display the template for it in the code-behind file. We will put the code here that will read the data from the data-base and bind it to the DataGrid for viewing. To read the data from thedatabase we use an OleDbDataReader. First, we open the connection to the data-base using
northwind.Open();
The ExecuteReader method of the OleDbCommand sends the command to theconnection and builds an OleDbDataReader
System.Data.OleDb.OleDbDataReader Reader= suppliers.ExecuteReader();
We set this Reader as the DataSource property of the DataGrid and execute theDataBind method of the DataGrid so that as the reader reads from the data-base it will display the data in the data grid.
Display.DataSource = Reader;Display.DataBind();
Finally, we close the reader and the connection to release the resources theyare using back to the system.

8.3 Accessing a Database 211
Figure 8.13 Initializing a Web form with data.
private void Page_Load(object sender, System.EventArgs e){
northwind.Open();System.Data.OleDb.OleDbDataReader Reader
= suppliers.ExecuteReader();Display.DataSource = Reader;Display.DataBind();Reader.Close();northwind.Close();
}
2The default ConnectionString for northwind may cause a database access error. In thiscase, click on the value of the ConnectionString property and remove everything afterNorthwind.mdb.
Reader.Close();northwind.Close();
Figure 8.13 shows the complete Page_Load method.
Running the application produces Figure 8.14.2
8.3.5 Choosing Data to Display
Example8-4 creates a simple Web form, shown in Figure 8.15, that gives theuser a choice of displaying the Northwind supplier data as we did in Exam-ple8-3 or displaying information about Northwind products. For thisform, we set the pageLayout property in the Properties window to FlowLay-out. The FlowLayout lets us type on the form. We can use the space bar toposition Web controls. We set the title property of the Web form to Sup-pliers or Products.
We start by adding two RadioButton controls to the Web page. They appearat the upper left of the page with empty Text property values. We set theText property of the first RadioButton to Suppliers and that of the second toProducts. We change the (ID) properties to selectSuppliers and selectProp-
erties. Figure 8.16 shows the page so far.

212 CHAPTER 8 Web Applications
Figure 8.15 The initial Web page of Example8-4.
Figure 8.14 Displaying Northwind suppliers.
To enter a message in the Web page, we position the cursor in the VisualStudio .NET design just before the first RadioButton and press the Enter keyto open a blank line above. We enter the message Choose Northwind sup-plier or product data to display. To display each RadioButton on a separateline, we position the cursor between the two RadioButton controls and hitthe Enter key.

8.3 Accessing a Database 213
Figure 8.16 Adding RadioButton controls using FlowLayout.
3The AutoPostBack property is false by default for a RadioButton because we often use a But-ton to submit data to the server. The AutoPostBack property for a Button has a default oftrue.
We need to change the AutoPostBack property of each RadioButton fromFalse to True.3 Remember that the user checks a RadioButton on the client.We use the AutoPostBack property to indicate whether the state of the checkbox for the radio button is posted back to the server when an event such aschecking or unchecking a RadioButton occurs. We want to post back to theserver so that it will respond by getting and displaying the data correspon-ding to the RadioButton checked.
The RadioButton controls need to be part of a group, so exactly one of thegroup will be checked. We will display the Supplier data or the Product data,but not both, so the user should only be able to select one or the otherRadioButton. To put both radio buttons in the same group, we set the Group-Name property of each to Group1.
We position the cursor below the second RadioButton and drag a DataGrid tothe Web page. It does not show in the initial page of Figure 8.15 because wehave not entered any data yet. We set its (ID) property to Display. We selectthe DataGrid and click the AutoFormat link at the bottom of the Propertieswindow. After choosing Colorful1 in the AutoFormat screen, we click OK.
From the Data tab in the Toolbox we add an OleDbConnection and two OleDb-Command controls. We set the (Name) property of the OleDbConnection to north-wind and the (Name) property of the OleDbCommand controls to suppliers andproducts. We will use a command to acquire the data requested by aRadioButton.

214 CHAPTER 8 Web Applications
Figure 8.17 Configuring the products command.
To set the ConnectionString property of the northwind connection, we clickon it in the Properties window and select the connection string that weconfigured in earlier examples. On the author’s system, this string is
Provider=Microsoft.Jet.OLEDB.4.0;Password="";User ID=Admin; Data Source="C:\Program Files\Microsoft Office\Office10\Samples\Northwind.mdb"
The Data Source file may differ somewhat on other systems.
For each OleDbCommand, we set the Connection property by choosing northwindfrom the Existing connections shown in the Connection property box. Bothcommands will use the same connection. For the suppliers command, weuse the QueryBuilder as in Example8-3 to set the CommandText property, againincluding the Address, City, and CompanyName fields of the Suppliers table inthe display.
For the products command, we click on the value of the CommandText prop-erty to display the Add Table screen, click Products, and then Add and Close.
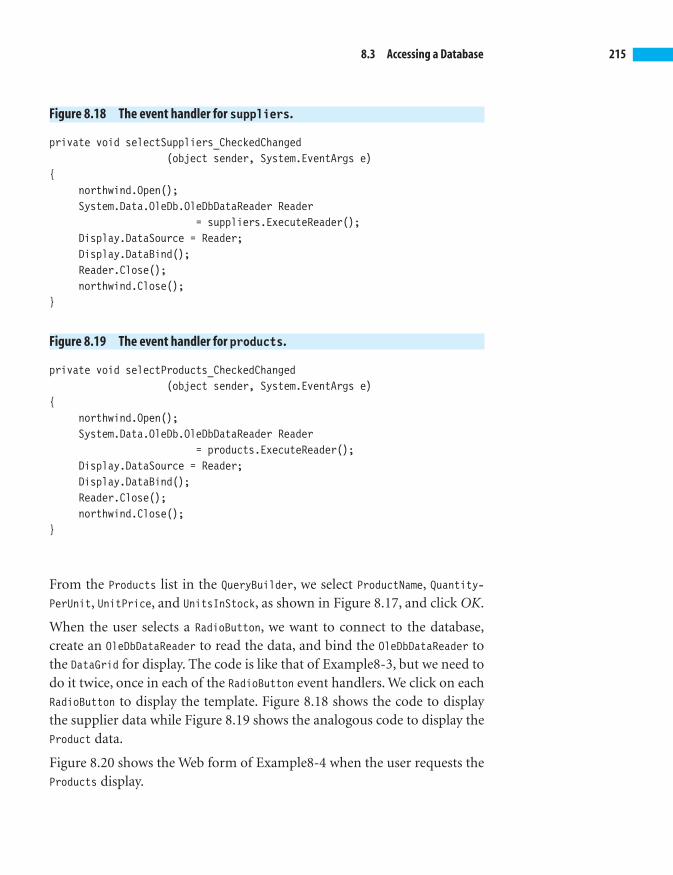
8.3 Accessing a Database 215
Figure 8.18 The event handler for suppliers.
private void selectSuppliers_CheckedChanged(object sender, System.EventArgs e)
{northwind.Open();System.Data.OleDb.OleDbDataReader Reader
= suppliers.ExecuteReader();Display.DataSource = Reader;Display.DataBind();Reader.Close();northwind.Close();
}
Figure 8.19 The event handler for products.
private void selectProducts_CheckedChanged(object sender, System.EventArgs e)
{northwind.Open();System.Data.OleDb.OleDbDataReader Reader
= products.ExecuteReader();Display.DataSource = Reader;Display.DataBind();Reader.Close();northwind.Close();
}
From the Products list in the QueryBuilder, we select ProductName, Quantity-PerUnit, UnitPrice, and UnitsInStock, as shown in Figure 8.17, and click OK.
When the user selects a RadioButton, we want to connect to the database,create an OleDbDataReader to read the data, and bind the OleDbDataReader tothe DataGrid for display. The code is like that of Example8-3, but we need todo it twice, once in each of the RadioButton event handlers. We click on eachRadioButton to display the template. Figure 8.18 shows the code to displaythe supplier data while Figure 8.19 shows the analogous code to display theProduct data.
Figure 8.20 shows the Web form of Example8-4 when the user requests theProducts display.

Using a browser, we canget information from adatabase using the Web.The client Web applicationconnects to the Webserver, which in turn con-nects to the database toexecute a query and pres-ents the results in a Webform control. We use adata reader to obtain thedata while connected tothe database. When usinga data reader, we need toadd a data connection toconnect to the databaseand a data command tospecify a query.
The BIG Picture
216 CHAPTER 8 Web Applications
Figure 8.20 Displaying the Northwind Product data.
Test Your Understanding
12. Which control can we use to read data from a database while con-nected to it?
13. Which control can we use to express the query that we want toexecute?
14. Which C# method executes when a Web page is loaded and ini-tialized?
15. Which property of a control determines whether its state is sent tothe server when an event occurs?
8.4 Using Multiple Web Forms
Often a Web application uses several forms. Our example will use three forms.
8.4.1 Redirecting a Response
The Response property of a Page allows us to access the HttpResponse that theserver sends to the client’s request. We will use it to redirect the response to
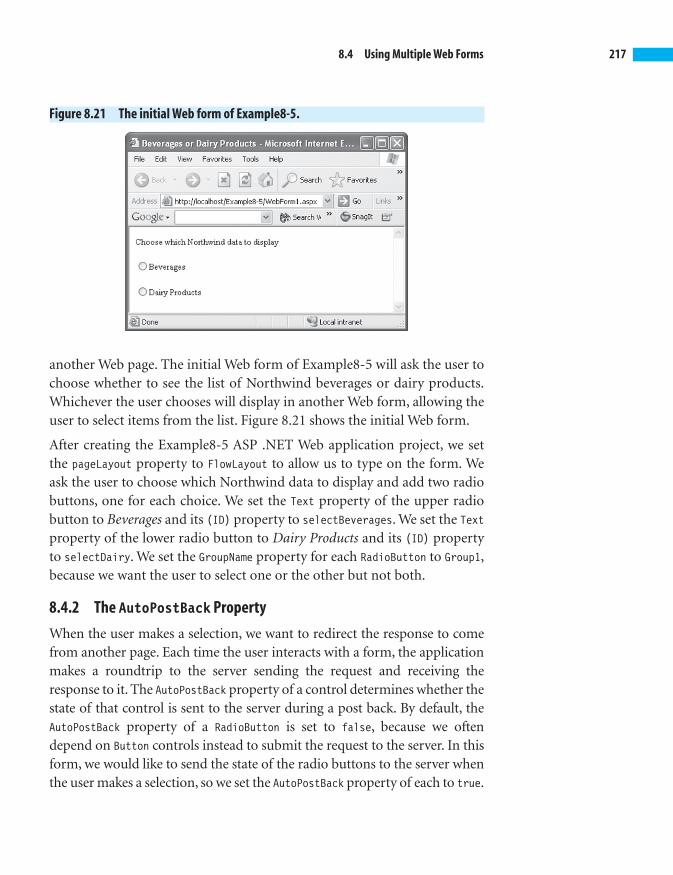
8.4 Using Multiple Web Forms 217
Figure 8.21 The initial Web form of Example8-5.
another Web page. The initial Web form of Example8-5 will ask the user tochoose whether to see the list of Northwind beverages or dairy products.Whichever the user chooses will display in another Web form, allowing theuser to select items from the list. Figure 8.21 shows the initial Web form.
After creating the Example8-5 ASP .NET Web application project, we setthe pageLayout property to FlowLayout to allow us to type on the form. Weask the user to choose which Northwind data to display and add two radiobuttons, one for each choice. We set the Text property of the upper radiobutton to Beverages and its (ID) property to selectBeverages. We set the Textproperty of the lower radio button to Dairy Products and its (ID) propertyto selectDairy. We set the GroupName property for each RadioButton to Group1,because we want the user to select one or the other but not both.
8.4.2 The AutoPostBack Property
When the user makes a selection, we want to redirect the response to comefrom another page. Each time the user interacts with a form, the applicationmakes a roundtrip to the server sending the request and receiving theresponse to it. The AutoPostBack property of a control determines whether thestate of that control is sent to the server during a post back. By default, theAutoPostBack property of a RadioButton is set to false, because we oftendepend on Button controls instead to submit the request to the server. In thisform, we would like to send the state of the radio buttons to the server whenthe user makes a selection, so we set the AutoPostBack property of each to true.

218 CHAPTER 8 Web Applications
When the user checks a RadioButton, we want to redirect the response toanother Web form. We click on each RadioButton in the Visual Studio .NETdesign to display the event-handling templates and fill in the code to give
private void selectBeverages_CheckedChanged(object sender, System.EventArgs e)
{Response.Redirect("WebForm2.aspx");
}
private void selectDairy_CheckedChanged(object sender, System.EventArgs e)
{Response.Redirect("WebForm3.aspx");
}
8.4.3 Adding a Web Form to a Project
To add the second Web form, we click Project, Add Web Form, and clickOpen in the Add New Item screen that appears. The form’s default name willbe WebForm2.aspx. We want this form to display Northwind data, so we addan OleDbDataConnection and an OleDbDataCommand. We set the (Name) propertyof the data connection to northwind and the ConnectionString property to
Provider=Microsoft.Jet.OLEDB.4.0;Password="";User ID= Admin;DataSource="C:\Program Files\Microsoft Office \Office10\Samples\Northwind.mdb"
The Data Source path may vary on other systems.
For the OleDbCommand, we select northwind as the Connection property and setits (Name) property to beverages. We use Query Builder to set the CommandTextproperty to show Northwind beverages. In the Add Tables screen, we addCategories and Products, clicking Add twice and then Close. In the QueryBuilder, we select ProductName from Products and CategoryName from Cate-gories. In the CategoryName row, we add
= 'Beverages'
in the Criteria column, uncheck the box in the Output column as shown inFigure 8.22, and click OK.
We add a CheckBoxList to the form to hold the data and allow the user toselect beverages. By default, when the user checks a box it is not posted tothe server. The AutoPostBack property of a CheckBoxList is false. This reflectsthe common usage that lets a user complete making selections and then

8.4 Using Multiple Web Forms 219
Figure 8.22 Building a query for beverages.
submit them using a button. We set the (ID) property to BeveragesList. Weset the DataTextField property to ProductName to display the product namefor each beverage.
We add a Button Web server control to submit the selections, and change its(ID) property to SubmitChoices and its Text property to Select. We add a sec-ond button to restart the selection process, changing its (ID) property toBack and its Text property to Restart. We add a Label to display the user’sselections and change its (ID) property to Display.
8.4.4 Initializing the Page
When the user makes a selection of beverages in the original Web forms, thePage_Load method of the second Web page will be called. To display the tem-plate for this event handler, we double-click on the second Web form. Weinsert the code to connect to the database, create a data reader for the com-mand that we configured, and bind the data reader to the check box so thateach box will represent a beverage from the Northwind database. The code is
private void Page_Load(object sender, System.EventArgs e){
if (!IsPostBack)

220 CHAPTER 8 Web Applications
{northwind.Open();System.Data.OleDb.OleDbDataReader Reader
= beverages.ExecuteReader();BeveragesList.DataSource = Reader;BeveragesList.DataBind();Reader.Close();northwind.Close();
}}
Whenever the user interacts with the form, it generates a post back to theserver, which recreates the form to submit the response back to the user.The server will execute the Page_Load method once to create the form thefirst time, and then again every time that the user generates an event byinteracting with a control. Because we only need to connect to the databaseonce, we only do it when IsPostBack is false, which occurs once when theform is first created before the user interacts with any controls.
Each Button has its AutoPostBack property set to true by default, so pressinga button will submit the request to the server. In the event handler for theSelect button, we add the text of each selected checkbox to the label.
private void SubmitChoices_Click(object sender, System.EventArgs e)
{Display.Text = "Selections: ";for (int i = 0; i < BeveragesList.Items.Count; i++)
// Add each selected item to the labelif (BeveragesList.Items[i].Selected)
Display.Text +=BeveragesList.Items[i].Text + ", ";
// Remove the trailing comma and spaceDisplay.Text =Display.Text.Substring(0, Display.Text.Length -2);
}
8.4.5 Hidden State
Each time the user makes a selection or clicks a button, it generates a roundtrip to the server. When using standard HTML controls, the informationsent in one trip is not preserved in the next unless special effort is made tosave the state between posts. Web server controls hide action by the server

8.4 Using Multiple Web Forms 221
Figure 8.23 Selecting beverages.
to save the state between round trips automatically. Thus, when the usersubmits a selection of beverages to the server, the response comes back withthe selections still checked, ready for the user to make changes if desired.
The Restart button sends the user back to the original form to choose againbetween beverages and dairy products. The beverage data selected will nowbe lost. The code for this event handler is
private void Back_Click(object sender, System.EventArgs e
{Response.Redirect("WebForm1.aspx");
}
Figure 8.23 shows the Web form for selecting beverages.
Creating the Web form for selecting dairy products is very similar. The dif-ference is that in the Query Builder, we add the criteria
= 'Dairy Products'
To add the third Web form, we click Project, Add Web Form, and click Openin the Add New Item screen that appears. The form’s default name will be Web-Form3.aspx. We want this form to display Northwind data, so we add anOleDbDataConnection and an OleDbDataCommand. We set the (Name) property ofthe data connection to northwind and the ConnectionString property to

222 CHAPTER 8 Web Applications
Figure 8.24 Building a query for dairy products.
Provider=Microsoft.Jet.OLEDB.4.0;Password="";User ID= Admin;DataSource="C:\Program Files\Microsoft Office \Office10\Samples\Northwind.mdb"
The Data Source path may vary on other systems.
For the OleDbCommand, we select northwind as the Connection property and setits (Name) property to dairy. We use Query Builder to set the CommandTextproperty to show Northwind dairy products. In the Add Tables screen, weadd Categories and Products, clicking Add twice and then Close. In theQuery Builder, we select ProductName from Products and CategoryName fromCategories. In the CategoryName row, we add
= 'Dairy Products'
in the Criteria column, uncheck the box in the Output column as shown inFigure 8.24, and click OK.
We add a CheckBoxList to the form to hold the data and allow the user to selectdairy products. We set the (ID) property to DairyList. We set the DataTextField
property to ProductName to display the product name for each beverage.
We add a Button Web server control to submit the selections, and change its(ID) property to SubmitChoices and its Text property to Select. We add a sec-ond button to restart the selection process, changing its (ID) property to

8.4 Using Multiple Web Forms 223
Back and its Text property to Restart. We add a Label to display the user’sselections and change its (ID) property to Display.
8.4.6 Initializing the Page
When the user makes a selection of dairy products in the original Webforms, the Page_Load method of the third Web page will be called. To displaythe template for this event handler, we double-click on the third Web form.We insert the code to connect to the database, create a data reader for thecommand we configured, and bind the data reader to the check box so thateach box will represent a beverage from the Northwind database. The code is
private void Page_Load(object sender, System.EventArgs e){
if (!IsPostBack){
northwind.Open();System.Data.OleDb.OleDbDataReader Reader
= beverages.ExecuteReader();DairyList.DataSource = Reader;DairyList.DataBind();Reader.Close();northwind.Close();
}}
Each Button has its AutoPostBack property set to true by default, so pressinga button will submit the request to the server. In the event handler for theSelect button, we add the text of each selected checkbox to the label.
private void SubmitChoices_Click(object sender, System.EventArgs e)
{Display.Text = "Selections: ";for (int i = 0; i < DairyList.Items.Count; i++)
// Add each selected item to the labelif (DairyList.Items[i].Selected)
Display.Text +=DairyList.Items[i].Text + ", ";
// Remove the trailing comma and spaceDisplay.Text =Display.Text.Substring(0, Display.Text.Length -2);
}
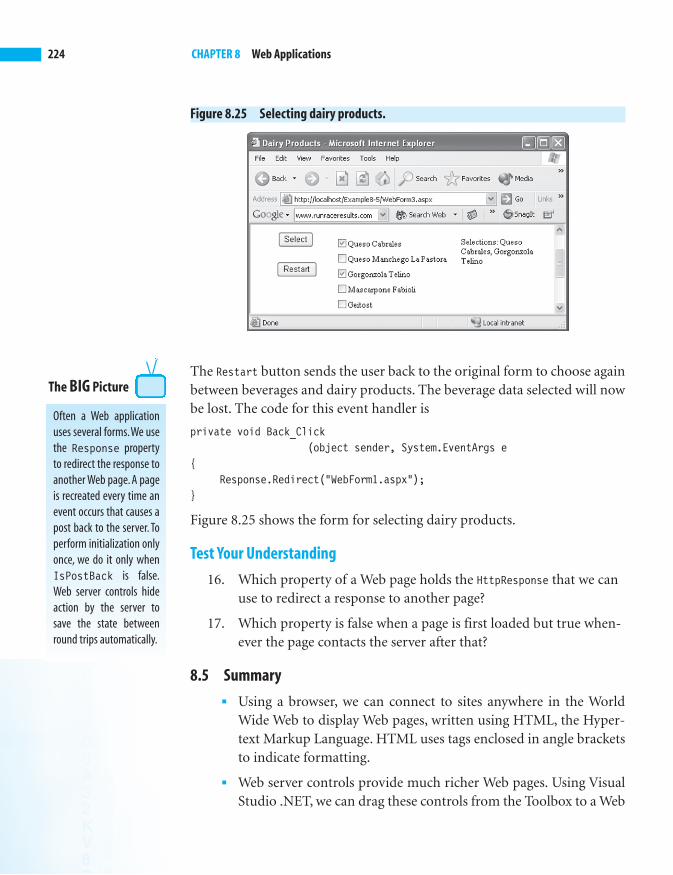
224 CHAPTER 8 Web Applications
Often a Web applicationuses several forms.We usethe Response propertyto redirect the response toanother Web page. A pageis recreated every time anevent occurs that causes apost back to the server. Toperform initialization onlyonce, we do it only whenIsPostBack is false.Web server controls hideaction by the server tosave the state betweenround trips automatically.
The BIG Picture
Figure 8.25 Selecting dairy products.
The Restart button sends the user back to the original form to choose againbetween beverages and dairy products. The beverage data selected will nowbe lost. The code for this event handler is
private void Back_Click(object sender, System.EventArgs e
{Response.Redirect("WebForm1.aspx");
}
Figure 8.25 shows the form for selecting dairy products.
Test Your Understanding
16. Which property of a Web page holds the HttpResponse that we canuse to redirect a response to another page?
17. Which property is false when a page is first loaded but true when-ever the page contacts the server after that?
8.5 Summary■ Using a browser, we can connect to sites anywhere in the World
Wide Web to display Web pages, written using HTML, the Hyper-text Markup Language. HTML uses tags enclosed in angle bracketsto indicate formatting.
■ Web server controls provide much richer Web pages. Using VisualStudio .NET, we can drag these controls from the Toolbox to a Web
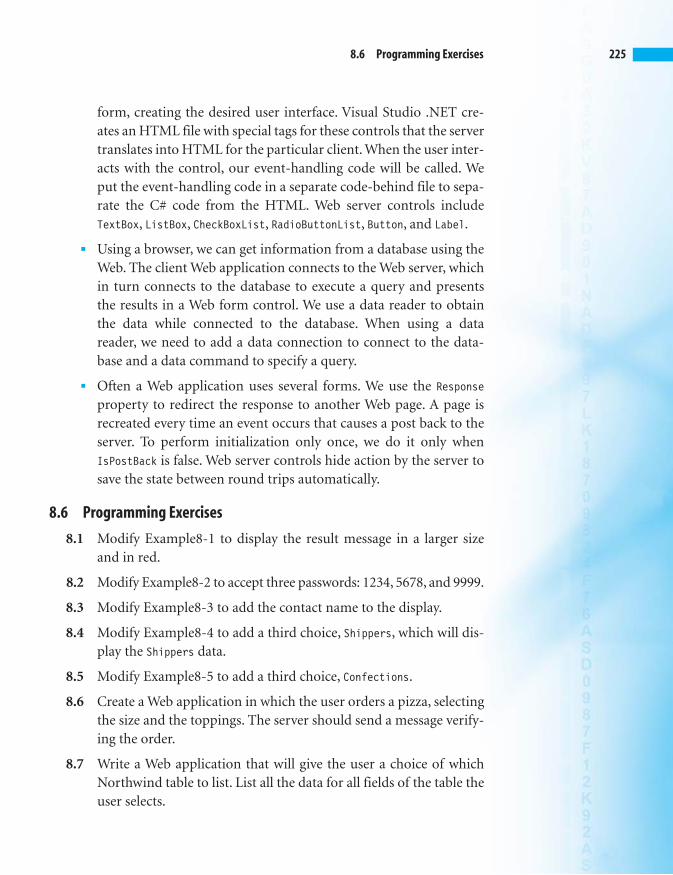
8.6 Programming Exercises 225
form, creating the desired user interface. Visual Studio .NET cre-ates an HTML file with special tags for these controls that the servertranslates into HTML for the particular client. When the user inter-acts with the control, our event-handling code will be called. Weput the event-handling code in a separate code-behind file to sepa-rate the C# code from the HTML. Web server controls includeTextBox, ListBox, CheckBoxList, RadioButtonList, Button, and Label.
■ Using a browser, we can get information from a database using theWeb. The client Web application connects to the Web server, whichin turn connects to the database to execute a query and presentsthe results in a Web form control. We use a data reader to obtainthe data while connected to the database. When using a datareader, we need to add a data connection to connect to the data-base and a data command to specify a query.
■ Often a Web application uses several forms. We use the Responseproperty to redirect the response to another Web page. A page isrecreated every time an event occurs that causes a post back to theserver. To perform initialization only once, we do it only whenIsPostBack is false. Web server controls hide action by the server tosave the state between round trips automatically.
8.6 Programming Exercises
8.1 Modify Example8-1 to display the result message in a larger sizeand in red.
8.2 Modify Example8-2 to accept three passwords: 1234, 5678, and 9999.
8.3 Modify Example8-3 to add the contact name to the display.
8.4 Modify Example8-4 to add a third choice, Shippers, which will dis-play the Shippers data.
8.5 Modify Example8-5 to add a third choice, Confections.
8.6 Create a Web application in which the user orders a pizza, selectingthe size and the toppings. The server should send a message verify-ing the order.
8.7 Write a Web application that will give the user a choice of whichNorthwind table to list. List all the data for all fields of the table theuser selects.

226 CHAPTER 8 Web Applications
8.8 Create a Web application that lets the user choose whether to orderpizza or ice cream. If the user chooses pizza, another form willappear that allows the user to choose the size and the toppings. Ifthe user chooses ice cream, a form will appear that allows the userto choose the flavor and the toppings. In each case the applicationdisplays the user’s choices.
8.9 Create a Web application that allows the user to choose variousitems of clothing. The choices will show the items with the price foreach. When the user makes a selection, a RadioButtonList will dis-play a list of available sizes. When the user clicks the Submit button,the application will describe the order, including the total price.
8.10 Create a Web application that provides a list of Northwindemployees. When the user chooses an employee, the applicationwill list orders by that employee, the cost of each order, and thetotal cost of all the orders by that employee.

9CHAPTERValidation ControlsUsers may forget to enter data in a field or may enter it in an incorrect format.
Before the .NET Framework became available, validation often involved writing
extra client-side code, usually in a separate scripting language. Validation con-
trols enable the server to check the user’s entry and return the form for correc-
tions before processing.
Chapter Objectives:■ Check that required fields are not empty
■ Check that values are entered in the correct range
■ Compare field values
■ Validate an expression
■ Summarize validation messages
9.1 Checking Required Fields
Forms often have many entries, and users may try to submit a form withinsufficient information. To make sure that the user completes a field, wecan associate a RequiredFieldValidator Web control with the original con-trol. It will display a message if the user leaves that field empty. In Exam-ple9-1, we ask the user to enter a name and an address and validate that theuser does in fact change the default entry.
We create a new ASP .NET Web Application project named Example9-1.Figure 9.1 shows the validation controls available in the Toolbox.
We drag a TextBox to the form, and to the right of it we drag a Required-FieldValidator control. To the left we drag a Label. We change the (ID) prop-erty of the TextBox to EnterName, and the Text property of the Label to Last

228 CHAPTER 9 Validation Controls
Figure 9.1 Validation controls.
Figure 9.2 Adding a RequiredFieldValidator control.
Name. Figure 9.2 shows the Visual Studio .NET design. The Properties win-dow at the right, for the RequiredFieldValidator control, contains the Ini-tialValue property with a default value of the empty string. After weassociate the RequiredFieldValidator with the TextBox, the InitialValueproperty will determine what the user must enter in that text box to avoid avalidation error.
We want to make sure that the user makes an entry. To associate aRequiredFieldValidator with the EnterName text box, we click the Required-FieldValidator control in the Visual Studio .NET design and set itsControlToValidate property to EnterName in the Properties window. We setits ErrorMessage property to A last name is required. This error message willdisplay if the user does not make any entry in the EnterName text box. Fig-ure 9.3 shows these property entries.

9.1 Checking Required Fields 229
Figure 9.3 Configuring a RequiredFieldValidator control.
The InitialValue property of the RequiredFieldValidator determines whatthe user must enter to make the entry valid. The user must make an entrythat differs from the InitialValue. The RequiredFieldValidator control usedto validate the EnterName entry has its InitialValue property set to the emptystring by default, so the user must enter a non-empty string in TextBox1 toavoid receiving an error message from the validator.
To show another way to use a RequiredFieldValidator, we add another Label,TextBox, and RequiredFieldValidator in a second row below the first threecontrols that we already added. We set the Text property of the Label toAddress and the (ID) property of the second TextBox to EnterAddress. We leftthe EnterName text box blank initially, but we set the Text property of theEnterAddress text box to Enter your address. The easiest response from theuser would be to leave this message and not replace it with an address. Tocheck that this does not happen, we use the second RequiredFieldValidator,setting the following properties:
ControlToValidate EnterAddress
ErrorMessage An address is required
InitialValue Enter your address
The InitialValue property is the same as the initial Text in the EnterAddresstext box. Its associated RequiredFieldValidator will display an error messageunless the user changes the initial entry in the EnterAddress text box, inwhich case it will differ from InitialValue.

230 CHAPTER 9 Validation Controls
Figure 9.4 Validation errors.
The Web form of Example9-1 includes a Button to submit the user’s entries.We change the Text property of the Button to Submit and the (ID) propertyto SubmitInfo. Figure 9.4 shows the response when the user does not makeany changes to the initial form and receives two error messages.
Had we left the InitialValue property as the empty string, the second errormessage would not be displayed because the default entry in the EnterAd-dress text box would differ from the InitialValue property of the associatedRequiredFieldValidator control.
The Web form of Example9-1 has a third Label used to display the lastname and address that the user enters. We change its (ID) property to Dis-play. We set the Text of this Label in the event-handling method for the Sub-mit button. Clicking on this button in the Visual Studio .NET designdisplays the event-handling template to which we add code to display thelast name with the address below it. We are making an entry on a Web page,so we use the <br> tag to go to the next line. The event-handling method is
private void SubmitInfo_Click(object sender, System.EventArgs e)
{Display.Text = "Name: " + EnterName.Text + "<br>"
+ "Address: " + EnterAddress.Text;}

Forms often have manyentries, and users may tryto submit a form withinsufficient information.To make sure that the usercompletes a field, we canassociate a Required-FieldValidator Webcontrol with the originalcontrol. It will display amessage if the user doesnot change the field entryfrom the Initial-Value specified in thevalidator.
The BIG Picture
9.2 Range Checking 231
Figure 9.5 Valid entries.
The Display label does not show in Figure 9.4 because when validation failsthe server sends the error messages to display rather than responding as itwould to valid input. Figure 9.5 shows the response to valid user entries.
Test Your Understanding
1. Which RequiredFieldValidator property specifies the control that itis validating?
2. How does the RequiredFieldValidator indicate the string that theuser must change in order to make an entry valid?
9.2 Range Checking
Using a RangeValidator Web control, we can require that the user enter valuesin a specified range. Figure 9.6 shows the data types for which we can validateranges.
Example9-2 illustrates validating String, Integer, Date, and Currency values.We add four TextBox Web server controls and pair each with a RangeValida-tor control. We precede each TextBox with a label describing its contents. AButton at the bottom submits the data to the server. Figure 9.7 shows thedesign view of Example9-2.
From top to bottom, we change the (ID) properties of the four text boxes toEnterString, EnterInt, EnterDate, and EnterPrice. We also change the (ID) prop-erty of the Button to SubmitInfo and that of the Label to its right to Display.

232 CHAPTER 9 Validation Controls
Figure 9.6 Validation data types.
Type Description
String A character string, compared alphabetically
Integer An integer value
Double A double value
Date A date expressed numerically
Currency A value in dollars and cents (in the US)
Figure 9.7 Adding the controls for Example9-2.
9.2.1 String Values
In the topmost text box, we ask the user to enter a word between “bed” and“red”, and add a RangeValidator to validate the entry. We set the followingproperties for the topmost RangeValidator:
ControlToValidate EnterString
ErrorMessage Enter a word alphabetically from “bed” to “red”
MaximumValue red
MinimumValue bed

9.2 Range Checking 233
The default Type is String, so we do not need to set it. A valid entry, such aspotato, will be submitted to the server. An entry that is out of the specifiedrange, such as trip, will cause the display of the error message. Entries are casesensitive, so Potato will generate an error because the ASCII value of ‘P’ is lessthan the value of ‘b’, the smallest possible start of a valid word in this example.
9.2.2 Integer Values
The second EnterInt text box will hold a test score, which we require to bebetween 0 and 100. The properties we set for the RangeValidator to its right are:
ControlToValidate EnterInt
ErrorMessage Enter a score from 0 to 100
MaximumValue 100
MinimumValue 0
Type Integer
Entering anything except an integer between 0 and 100 will cause display ofthe error message. The value 64 will be valid, but 102 will cause an error, aswill 59.5 or “red”. An empty string will not cause an error. To rule this out,we could add a RequiredFieldValidator as we did in Example9-1.
9.2.3 Dates
The third text box, EnterDate, holds a date that we require to be within theyears 2003, 2004, and 2005. The properties we set for the RangeValidator toits right are:
ControlToValidate EnterDate
ErrorMessage Enter a 2003 to 2005 date
MaximumValue 12/31/2005
MinimumValue 1/1/2003
Type Date
Dates must be formatted numerically. We can use four-digit or two-digityears, as in 5/28/2003 or 5/28/03. We can use one- or two-digit days ormonths, as in 5/28/03 or 05/28/03. The forward slash or the dash can sepa-rate the month, day, and year, as in 5/28/03 or 5-28-03. However, we cannotwrite out the months, as in May 28, 2003.

234 CHAPTER 9 Validation Controls
Figure 9.8 Entries in the specified range.
9.2.4 Currency
We can restrict entries to a range of currency values. In the United States,we use the period as a decimal point and the comma to separate groups ofthree digits. We can use these symbols in our currency values. In Example9-2,we will restrict the entries in the EnterPrice text box to the range of zero toone hundred thousand dollars. The property settings for the RangeValidatorto its right are:
ControlToValidate EnterPrice
ErrorMessage Enter the price in dollars and cents
MaximumValue 100,000
MinimumValue 0
Type Currency
Values 32.35, 12,567.22, and 12 are valid, but the value 1,000,000 is invalidbecause it is too large, and the value 123.456 is invalid because it has threedecimal places rather than two. Unfortunately, a value such as 12,34.56 isdeemed valid, because the validator does not require grouping by threeswhen using the comma separator. Figure 9.8 shows the Web form of Exam-ple 9-2 with all values valid, while Figure 9.9 shows invalid entries.
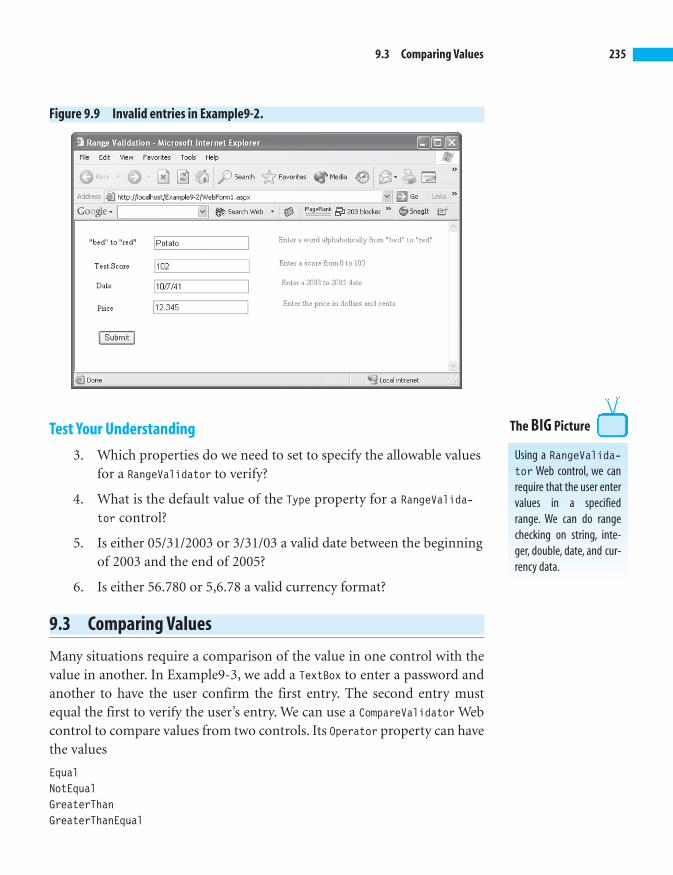
Using a RangeValida-tor Web control, we canrequire that the user entervalues in a specifiedrange. We can do rangechecking on string, inte-ger, double, date, and cur-rency data.
The BIG Picture
9.3 Comparing Values 235
Figure 9.9 Invalid entries in Example9-2.
Test Your Understanding
3. Which properties do we need to set to specify the allowable valuesfor a RangeValidator to verify?
4. What is the default value of the Type property for a RangeValida-
tor control?
5. Is either 05/31/2003 or 3/31/03 a valid date between the beginningof 2003 and the end of 2005?
6. Is either 56.780 or 5,6.78 a valid currency format?
9.3 Comparing Values
Many situations require a comparison of the value in one control with thevalue in another. In Example9-3, we add a TextBox to enter a password andanother to have the user confirm the first entry. The second entry mustequal the first to verify the user’s entry. We can use a CompareValidator Webcontrol to compare values from two controls. Its Operator property can havethe values
EqualNotEqualGreaterThanGreaterThanEqual

236 CHAPTER 9 Validation Controls
LessThanLessThanEqualDataTypeCheck
The GreaterThanEqual value requires that the value in the ControlToVali-
date be greater than or equal to the value in the ControlToCompare. TheDataTypeCheck operator does not compare the value to the value in anothercontrol. It requires that the value of the ControlToValidate be of a typespecified by the Type property. Type choices are String, Integer, Double,Date, and Currency.
In Example9-3, we add a TextBox for the user to enter a password, setting its(ID) property to EnterPassword. We set its TextMode property to Password, sothe password will not show when the user enters it. A Label added at its lefthas its Text property set to Password to indicate the desired entry in theEnterPassword text box.
We add another TextBox for the user to confirm the password, setting its(ID) property to ConfirmPassword and its TextMode property to Password. Tothe left of this text box we add a Label with the Text property changed toConfirm. On the right of this text box we add a CompareValidator. The prop-erties we set are:
ErrorMessage Entry does not match password field
ControlToCompare EnterPassword
ControlToValidate ConfirmPassword
If the EnterPassword text box entry does not match the ConfirmPasswordentry, this CompareValidator will display the error message.
To illustrate type checking, we add a third TextBox labeled Code, and set the(ID) of this text box to EnterCode. We want to require that the user enters aninteger value for the code, so we add another CompareValidator and set thefollowing properties for it:
ErrorMessage Code must be an integer
ControlToValidate EnterCode
Operator DataTypeCheck
Type Integer

9.3 Comparing Values 237
Figure 9.10 Valid entries in Example9-3.
Figure 9.11 Comparison errors.
Figure 9.10 shows all valid entries and no error messages, before clickingthe Submit button. Figure 9.11 shows the failure to confirm a password andthe failure to enter an integer value.
9.3.1 Client-Side Versus Server-Side Validation
Notice that when entering values using Internet Explorer, the messagesappear before the click of the Submit button. This indicates that the

238 CHAPTER 9 Validation Controls
browser client is performing validation before submitting the data to theserver. Validating on the client side improves efficiency, saving round tripsto the server of bad data with error messages coming back. With client-sidevalidation, the user corrects the data before sending it to the server. Before.NET, one had to write JavaScript or other client-side code to perform suchvalidation. The .NET validation controls generate this JavaScript automati-cally. We can view it by clicking View, Source in Internet Explorer whenrunning the application.
When the user confirms the password correctly and enters a valid integercode, clicking the Submit button sends the data to the server for processing.In Example9-3 we display the message “No data entry errors” in anotherlabel. We need to write the event-handling code for the Submit button. Inthe design, we double-click on the button to display the template for theevent handler and fill it in, to give
private void SubmitInfo_Click(object sender, System.EventArgs e)
{Display.Text = "No data entry errors";
}
where Display is the (ID) property of the label to the right of the button.Figure 9.12 shows the form after the user has confirmed a valid password
Figure 9.12 Submitting valid entries.

Many situations require acomparison of the value inone control with the valuein another. We can use aCompareValidatorWeb control to comparevalues from two controls.It uses an operator tocompare the two values.The DataTypeCheckoperator does not com-pare the value to the valuein another control. Itrequires that the value ofthe ControlToVali-date be of a type speci-fied by the Typeproperty.
The BIG Picture
9.4 Validating Expressions and Summarizing 239
and entered a valid integer code. The application displays the message andempties the password fields after they have been submitted to the server.
Test Your Understanding
7. Which CompareValidator properties do we set to specify the twocontrols whose values it will compare?
8. What is the advantage of validating controls on the client insteadof on the server?
9. How can we configure a CompareValidator to check that a value hastype double?
9.4 Validating Expressions and Summarizing
Often, a field requires that data fit a certain pattern. For example, a U.S.phone number has 10 digits including the area code. One common formatis (ddd)ddd-dddd, where d stands for some digit. A format such asddd*ddd*dddd is not used. A phone number pattern such as (dd)dd-ddd wouldnot match U.S. phone numbers.
9.4.1 Validating Expressions
The RegularExpressionValidator Web control lets us validate that userentries match a particular pattern. The regular expression syntax is a way ofexpressing patterns. Writing regular expressions is beyond the scope of thistext, but we do not need to, as the RegularExpressionValidator control pro-vides patterns for the following expression types:
French Phone NumberFrench Postal CodeGerman Phone NumberGerman Postal CodeJapanese Phone NumberJapanese Postal CodeP.R.C. Phone NumberP.R.C. Postal CodeP.R.C. Social Security Number (ID Number)U.S. Phone NumberU.S. Zip Code

240 CHAPTER 9 Validation Controls
Figure 9.13 Validating expressions.
Internet E-mail AddressInternet URLU.S. Social Security Number
In Example9-4, we illustrate the validation of a URL, an e-mail address, aphone number, a social security number, and a zip code. For each field weadd a Label to identify the data, a TextBox for the user to enter it, and aRegularExpressionValidator to validate it. There will be five rows of thesethree controls, one for each type of field. Below these five rows weinclude a Button to submit the validated data and a Label to indicate thatthe user entered all the fields correctly. Figure 9.13 shows the design.From top to bottom, we set the (ID) properties of the five TextBox controlsto EnterURL, EnterEmail, EnterPhone, EnterSSN, and EnterZip. We set the (ID)
property of the Button to SubmitInfo and that of the Label to its right toDisplay.
The EnterURL text box will hold a URL, so we configure the RegularExpres-sionValidator to its right by setting the following properties:
ErrorMessage Format: http://www.cecs.csulb.edu/index.htmlControlToValidate EnterURLValidationExpression Internet URL

9.4 Validating Expressions and Summarizing 241
The regular expression pattern for an Internet URL requires starting withhttp:// and requires at least one period in the address part. Thushttp://localhost would not fit the default pattern, although one couldwrite a custom regular expression that would include it.
The EnterEmail text box requires a correctly formatted e-mail address. Itrequires at least two words separated by a period after the @ character. Thusit accepts [email protected] but not artg@csulb. It also accepts [email protected],[email protected], and [email protected]. We set the properties for the Regular-ExpressionValidator to its right as follows:
ErrorMessage Format: [email protected] EnterEmailValidationExpression Internet E-mail Address
The regular expression for validating a phone number that we use to vali-date the EnterPhone text box accepts two formats, (ddd)ddd-dddd or ddd-ddd-
dddd, where d stands for a digit from 0 through 9. Thus it would accept(123)456-7890 and 123-456-7890 but not 123 456 7890. We set the followingproperties for the RegularExpressionValidator to its right:
ErrorMessage (ddd)ddd-dddd or ddd-ddd-ddddControlToValidate EnterPhoneValidationExpression U.S. Phone Number
The social security number format requires the pattern ddd-dd-dddd. Thus222-22-2222 is valid but 222222222 is not. The properties we set for the Regu-larExpressionValidator to the right of the EnterSSN text box that validatesthe social security number field are
ErrorMessage ddd-dd-ddddControlToValidate EnterSSNValidationExpression U.S. Social Security Number
A zip code may either have five or nine digits. Acceptable formats are dddddor ddddd-dddd. For RegularExpressionValidator, to the right of the EnterZiptext box we set the following properties:
ErrorMessage ddddd or ddddd-ddddControlToValidate EnterZipValidationExpression U.S. Zip code
Figure 9.14 shows valid data entry for every field, while Figure 9.15 showsinvalid values.

242 CHAPTER 9 Validation Controls
Figure 9.14 Valid entries.
Figure 9.15 Invalid entries.

Often a field requires thatdata fit a certain pattern.The RegularExpres-sionValidator Webcontrol lets us validatethat user entries match aparticular pattern. Thiscontrol comes with prede-fined patterns for the vali-dation of a URL, an e-mailaddress, a phone number,a social security number,and a zip code. Instead ofdisplaying error messagesnext to each control, wecan summarize all theerror messages at the bot-tom of the form.
The BIG Picture
9.4 Validating Expressions and Summarizing 243
Figure 9.16 Using a validation summary.
9.4.2 Summarizing Validation Errors
Instead of displaying error messages next to each control, we can summa-rize all of the error messages at the bottom of the form. This might allow animproved layout of controls. With this approach, we add a ValidationSum-mary at the bottom of the form. It does not need any configuration. We doneed to specify the Text property for each of the other validation controls tobe the text we want to display next to the control that it validates.
We can use a ValidationSummary with any of the validation controls. Weillustrate by modifying Example9-4, adding a ValidationSummary controland setting the Text property of each of the five RegularExpressionValidatorcontrols to *, so that a * will display to the right of the invalid entry with thesummary of all error messages at the bottom, as shown in Figure 9.16.
Test Your Understanding
10. Which of the following would a RegularExpressionValidator recog-nize as a valid e-mail format: [email protected] or g.art@csulb?
244 CHAPTER 9 Validation Controls
11. Show two U.S. phone number formats that a RegularExpressionVa-lidator would accept using the digits 1, 2, 3, 4, 5, 6, 7, 8, 9, and 0,in that order.
12. Using a ValidationSummary, where do the error messages appear?
9.5 Summary■ Validation controls enable the server to check the user’s entry and
return the form for corrections before processing. Forms oftenhave many entries, and users may try to submit a form with insuf-ficient information. To make sure that the user completes a field,we can associate a RequiredFieldValidator Web control with theoriginal control. It will display a message if the user leaves thatfield empty.
■ Using a RangeValidator Web control, we can require that the userenter values in a specified range. We can do range checking onstring, integer, double, date, and currency data.
■ Many situations require a comparison of the value in one controlwith the value in another. We can use a CompareValidator Web con-trol to compare values from two controls. It uses an operator tocompare the two values. The DataTypeCheck operator does notcompare the value to the value in another control. It requires thatthe value of the ControlToValidate be of a type specified by theType property.
■ Often a field requires that data fit a certain pattern. The RegularEx-pressionValidator Web control lets us validate that user entriesmatch a particular pattern. This control comes with predefinedpatterns for the validation of a URL, an e-mail address, a phonenumber, a social security number, and a zip code. Instead of dis-playing error messages next to each control, we can summarize allthe error messages at the bottom of the form.
9.6 Programming Exercises
9.1 Modify Example9-1 to include an initial message in the First Namebox.
9.2 Modify Example9-2 to include a TextBox that checks that a doublevalue is between �4.5 and 4.5.

9.6 Programming Exercises 245
9.3 Modify Example9-2 to use a ValidationSummary control.
9.4 Modify Example9-2 to add RequiredFieldValidator controls foreach field.
9.5 Modify Example9-3 to include a TextBox that requires a value oftype double.
9.6 Modify Example8-2 to use a RadioButtonList for the radio but-tons, and validate that the user has selected one by using aRequiredFieldValidator.
9.7 Modify Example8-2 to use a RequiredFieldValidator to check thatthe user has selected a flavor from the ListBox.
9.8 Create a Web application in which the user orders a pizza, selectingthe size and the toppings. The user enters a phone number. Use aRegularExpressionValidator to check that it has the correct format.If the phone number has a valid format, the server should send amessage verifying the order.
9.9 Write a Web application that will give the user a choice of whichNorthwind table to list. Use a RequiredFieldValidator to require theuser to enter a password, so the password field may not be leftblank. If the user enters “1234”, list all the data for all fields of thetable that the user selects.
9.10 Create a Web application that lets the user sign up to receive a freemagazine. The user must enter a name, address, city, state, zipcode, and phone number. Require that each field has an entry andthat the zip code and phone numbers have correct formats. If so,display a message that the magazine will be sent.
9.11 Create a Web application that allows the user to choose variousitems of clothing. The choices show the items with the price foreach. Include a TextBox for each item in which the user enters thequantity to order. Add a validation control to check that the valueis correctly formatted as an integer and that its value is within rea-sonable bounds. When the user clicks the Submit button, the appli-cation describes the order, including the total price.

This page intentionally left blank

10CHAPTERXMLWeb pages use HTML to indicate formatting to a browser.The Web has become
very popular in part because HTML is relatively simple and easy to use. But
HTML focuses on presentation, making it hard to determine the information on
a page. XML (Extensible Mark-up Language) lets us devise our own tags to
reflect the information content. We can pass these standard XML files among
various applications to transfer information from one program to another. Web
services, which we cover in the next chapter, use XML to allow programs to
communicate even though they may be written in different languages and may
run on different hardware.
Chapter Objectives:■ Learn XML syntax
■ Use a schema to specify a valid XML type
■ Try DOM (Document Object Model) for processing XML files
■ Use XSLT to transform XML to other representations
10.1 XML and Its Syntax
We first touch upon the limitations of HTML for representing contentbefore introducing XML.
10.1.1 The Limitations of HTML
With HTML we can easily format data for display, but the content is noteasy to retrieve. Figure 10.1 shows the Web page displayed by the InternetExplorer browser given the HTML file of Figure 10.2.

248 CHAPTER 10 XML
Figure 10.1 Listing an author’s books.
Figure 10.2 The anAuthor.html file for the Web page of Figure 10.1.
<html><title>Art's Page</title><ul>I have written<li> <em>Computing with C# and the .NET Framework</em><li> <em>History of Mathematics</em><li> <em>Advanced Java</em>
</html>
1See http://www.w3.org/XML for the XML specification.
Most of the tags in Figure 10.2 refer to the display of the file. <ul> indicatesan unordered list, while <li> specifies a list item. A human reader mightdeduce quickly that a person named Art is listing books he has written, butthe word “books” is never used. A program processing this file would find itvery difficult to determine its content.
Moreover browsers accept many variations in HTML syntax. In Figure10.2, the end tag </ul> for the unordered list does not appear, and none ofthe list items have end tags </li>. We could have omitted the <html> and</html> tags. Permitting such variations in syntax makes it hard for pro-grams to extract information from HTML files.
10.1.2 XML Syntax
We can define our own XML tags to indicate the content.1 For example, wemight rewrite (and expand) the HTML file of Figure 10.2 as the XML file ofFigure 10.3.

10.1 XML and Its Syntax 249
Figure 10.3 The anAuthor.xml file.
<?xml version="1.0" encoding="utf-8" ?><author xmlns="http://tempuri.org/XSDSchema1.xsd"><name><first>Art</first><last>Gittleman</last>
</name><age>39+</age><books><book kind="text"><title>Computing with C# and the .NET Framework
</title><edition> first </edition><copyright> 2003 </copyright><isbn> 0-7637-2339-8 </isbn>
</book><book kind="text"><title>History of Mathematics</title><edition> first </edition><copyright> 1975 </copyright><isbn> 0-675-08784-8 </isbn>
</book><book kind="text"><title>Advanced Java</title><edition> second </edition><copyright> 2002 </copyright><isbn> 1-57676-096-0 </isbn>
</book></books>
</author>
Notice that the anAuthor.xml file of Figure 10.3 has content tags such as<author> and <book>, rather than formatting tags such as <li> and <em>. Thehuman reader finds it easy to read, and understandable. More importantly,programs can easily find relevant information such as the copyright date orthe ISBN number.
Each XML file starts with an optional prolog, which in Figure 10.3 is
<?xml version="1.0"?>

XML allows us to define alanguage to represent data.We define tags and theirstructure.Well-formed XMLfollows precise rules tomake it easier to transferXML documents betweenprograms.
The BIG Picture
250 CHAPTER 10 XML
XML comments use the same HTML syntax, as in
<!-- Comments go here. -->
Tags may have attributes. For example the <book> tag in Figure 10.3 has thekind attribute with value “text”. Attributes may be optional. For example,the <title> tag has a full attribute that appears in one title, but not in others.
For programs to easily process XML, the syntax rules are precise. They are:
■ Each tag must have an end tag.
For example, the <book> tag must have a </book> tag to mark the endof the <book> element. We place the content between the start andthe end tags. A tag may be empty, meaning it has no content. Forexample, in Figure 10.3 we might have used a <softcover> tag toindicate that a book has a soft cover. The correct form would be
<softcover></softcover>
which may be abbreviated as
<softcover/>
■ Tags must be nested.
For example, if the start tag <title> occurs between <book> and</book>, then its end tag </title> must occur before </book>.
Correct: <book> ... <title> ... </title> ... </book>
Incorrect: <book> ... <title> ... </book> ... </title>
■ Attribute values must be enclosed in quotes.
Correct: kind = "text"
Incorrect: kind = text
An XML document is well-formed if it follows all the rules of XML syntax,but we still need a way to define the intended usage of the tags we have cre-ated. For example, is it OK to omit the <age> tag? Can a <first> tag appearmore than once? We introduce schemas in the next section that allow us todefine the intended structure of an XML document.
Test Your Understanding
1. Which of the following are well-formed XML documents?
a. <author>

10.2 Schemas 251
<name>
<first> Art </first>
<last> Gittleman </last>
</name>
</author>
b. <author>
<name/>
<first> Art </first>
<last> Gittleman </last>
</author>
c. <author/>
2. Write an XML document for a record collection.
10.2 Schemas
A well-formed XML document uses correct XML syntax. A documentthat had an <author> tag without an </author> tag would not be well-formed. However, a well-formed document may not make sense. Forexample, the fragment
<name><first> George </first><first> John </first><first> Mary </first>
</name>
uses correct syntax, but does not look appropriate. A name has three firstentries and no last entry.
We can use an XML schema to specify the form of a valid type of XML doc-ument. Before we create a schema, we show the tree structure of the authortype in Figure 10.4. Because XML tags must nest, we can always diagramXML document structure in tree form.
The schema for the <author> XML document type will specify the structureshown in Figure 10.4. It will specify the types of each tag. For example, the<first> and <last> tags have no nested tags. They just contain the stringdata for the first and last names of the author. By contrast, the <name> tag isnot simple. It contains two nested tags, a <first> tag followed by a <last>tag. We want the schema to show this structure for the <author> type.

252 CHAPTER 10 XML
Figure 10.4 The tree structure of the author document type.
author
age booksname
first last book ... book
title edition copyright isbn
We can also specify how many times a tag may occur. By default, a tagoccurs exactly once, but we can specify its minOccurs and maxOccurs proper-ties to allow it to be optional or to have multiple occurrences. For example,in the schema for the <author> type we will want to specify that the <age> tagis optional and that the <book> tag must occur at least once but may occurmore than once. After all, an author may not want to reveal his age and hemay have written more than one book.
10.2.1 Building a Schema in Visual Studio .NET
We can create a schema in Visual Studio .NET. If we create the schema first,we can use it as guide when creating XML documents that follow thatschema. The schema will define the structure of the author document typeas shown in Figure 10.4. It will include the type of data present in each tag.It will indicate optional tags or tags that may occur more than once.
We start by creating Example10-1 as an ASP .NET Web Application. Click-ing on File, Add New Item, we choose the XML Schema template and clickOpen in the Add New Item window. This will create a tab for XSDSchema1.xsdon which we can develop a schema for the XML document for the <author>tag. The Toolbox in Figure 10.5 now shows an XML Schema tab containing thevarious components we use to define an XML document type.
We can drag Toolbox entries to create the schema. First, we drag an elementtag onto the form and enter author as its name. The box in Figure 10.6 hasan E in the upper-left corner signifying that it represents an XML element.The <author> tag, as we see from the structure of Figure 10.4, has nested<name>, <age>, and <books> tags. We want the schema to specify this struc-

10.2 Schemas 253
Figure 10.5 The XML Schema tab.
Figure 10.6 Starting to create a schema.
ture, so we enter each of these tags in three rows of the <author> tag box.Figure 10.6 initially shows one empty row. As we enter each row, anotherblank row appears below it for the next entry.
We add name in the first row and hit the Enter key. This will enter the defaulttype of string. We see from Figure 10.4 that <name> is not a simple type. It iscomposed of a <first> tag and a <last> tag. If we click on the string entry,we get a choice of types. Choosing Unnamed complex type will replace stringby the placeholder (name) for the type and add a child box to enter the fields

254 CHAPTER 10 XML
Figure 10.7 Describing the <author> tag.
for the <name> element. In this way, we can continue to create the structureshown in Figure 10.4.
In the second row, we add age and accept the default string type. We wantthe <age> tag to be optional, so we click on the age entry and open the Prop-erties window. We set the minOccurs property to 0 and the maxOccurs to 1. Inthe third row, we add books and again choose Unnamed complex type from thepop-up box. Figure 10.7 shows the schema so far.
Notice that there are two tabs, Schema and XML, at the bottom of the screen.We are using the graphical view on the Schema tab. The schema is an XMLdocument using various schema tags. We can see the XML version of theschema on the XML tab, but do not need to write XML ourselves becauseVisual Studio .NET is creating the XML schema as we add to the diagram.
In the name box, we enter the rows first and last and accept the defaultstring type for each because the <first> and <last> tags contain the firstand last name strings rather than any nested XML tags. In the books box, weenter book and choose Unnamed complex type to add a book box to define thebook entries.

Figure 10.8Adding an attribute.
10.2 Schemas 255
The book entry has some interesting features. An author may have writ-ten several books, so we allow the <book> tag to appear one or moretimes. To specify this, we click on the book box, open the Properties win-dow, and set the minOccurs property to 1 and the maxOccurs property tounbounded.
The <book> tag contains <title>, <edition>, <copyright>, and <isbn> tags, anda kind attribute indicating if the book is a textbook primarily for studentuse or a trade book for the general reader. We add entries for title, edition,copyright, and isbn in the book box. We want the <edition>, <copyright>, and<isbn> tags to be optional, so we set the minOccurs property for each to 0,and the maxOccurs property to 1.
We see the kind attribute used in the XML document of Figure 10.3. Each ofthe <book kind="text"> tags includes the kind attribute with the value "text".The other choice of attribute would be "trade", but this author has not writ-ten any trade books. To add the kind attribute, we click the small box at theleft of the bottom row in the book box and choose attribute from the boxthat pops up, as shown in Figure 10.8. This will place an A at the left of thisrow, indicating that it represents an attribute. We enter kind as its name.
To define the type for the kind attribute, we drag a simpleType from theToolbox and name it bookType. We want this type to have two values, textand trade. Clicking on the left of the first row allows us to choose facet, aconstraint on a type, which places an F at the left of the row. The facets willconstrain the string type to have two values. We choose enumeration as thekind of facet and text as its value. We do the same in the next row to createa trade facet for this type.
Once we define bookType we can use it in the rest of the schema. If we clickon the type entry for the kind attribute in the book box, bookType will show asone of the entries and we select it. Figure 10.8 shows the kind attribute withthe bookType type. We want to require that this attribute always be includedin the <book> tag, so we select it and set its use property in the Propertieswindow to required. Figure 10.9 shows additions to the schema descendingfrom the author box of Figure 10.7.
10.2.2 Valid Documents
A valid XML document follows the rules given in its schema. A documentcan be well-formed without being valid. For example, the fragment

256 CHAPTER 10 XML
Figure 10.9 Completing a schema for the <author> type.
<name><first> George </first><first> John </first><first> Mary </first>
</name>
is not valid. The rule for <name> specifies a single <first> followed by a sin-gle <last>.
10.2.3 Using a Schema to Create an XML Document
The schema we created defines a pattern that a valid XML document has tofollow. If we add an XML file to our project and associate this schema withit, the IntelliSense feature of Visual Studio .NET will prompt us for the cor-rect tags to enter as we create the XML document.
We click File, Add New Item and choose XML File. In its Properties windowwe select http://tempuri/XSDSchema1 as the targetSource. This is the URL cre-ated for the schema we just developed. Each schema is associated with aURL. Because we did not define our own name, Visual Studio .NET uses thename tempuri. The XMLFile1.xml tab that we added to our project now shows
<?xml version="1.0" encoding="utf-8" ?><author xmlns="http://tempuri.org/XSDSchema1.xsd">
</author>

We can use an XMLschema to specify theform of a valid type ofXML document. We cancreate a schema in VisualStudio .NET. If we createthe schema first, we canuse it as a guide when cre-ating XML documentsthat follow that schema. Avalid XML document fol-lows the rules given in itsschema. A document canbe well-formed withoutbeing valid.
The schema we createddefines a pattern that avalid XML document hasto follow. If we add anXML file to our project andassociate this schemawith it, the IntelliSensefeature of Visual Studio.NET will prompt us forthe correct tags to enter aswe create the XML docu-ment.
The BIG Picture
10.2 Schemas 257
This template allows space for us to fill in the tags nested inside the author tag.Typing the left bracket, <, to start a nested tag brings up the IntelliSense choiceof age, books, or name. We select name and add the right bracket, >. IntelliSenseadds the closing tag </name> and we start another tag and select <first>.
At any time we can click the XML, Validate XML Data menu item to checkthat the document we are creating is following the schema pattern. Any devi-ation will be reported in a window below the XML file. For example, the file
<?xml version="1.0" encoding="utf-8" ?><author xmlns="http://tempuri.org/XSDSchema1.xsd"><stuff></stuff>
</author>
would generate a validation error even though it is well-formed. There isno <stuff> tag in the schema associated with this file.
As we continue to create an XML document, we get to the book tag that hasan attribute. The document so far is
<?xml version="1.0" encoding="utf-8" ?><author xmlns="http://tempuri.org/XSDSchema1.xsd">
<name><first>Art</first><last>Gittleman</last>
</name><age>39+</age><books><book
</author>
If we space after we enter <book, IntelliSense will provide the attributename, kind, so we choose it to add that attribute. Continuing to use theIntelliSense guide, we create the XML file shown in Figure 10.3.
Now that we can use XML Designer to create a schema and can create anXML document that we validate with respect to the schema, we will seesome XML applications in the next sections.
Test Your Understanding
3. Which of the following are valid XML documents with respect tothe schema of Figures 10.7 and 10.9?
a. <author>
<name>

258 CHAPTER 10 XML
<first> Art </first>
<last> Gittleman </last>
</name>
<books>
<book>
<title>Objects to Components with the C#
Platform
</title>
</book>
</books>
</author>
b. <author>
<name>
<last> Gittleman </last>
</name>
<age> 39+ </age>
<books>
<book>
<title>Objects to Components with the
C# Platform</title>
</book>
</books>
</author>
4. When creating a schema, how can we designate that a tag is optional?
10.3 From Data to XML
Each database vendor uses special formats and methods for storing data.With the connectivity of the Internet, it becomes increasingly important tobe able to share data among diverse applications. XML provides a standardformat for data. If we take data from the database and put it in an XML file,we can transmit that file to other applications, which can then transformthe XML to whatever internal formats they need.
10.3.1 Northwind Data to XML
Example10-2 will put the data from the Customers table into an XML file.We create a Windows Application project and drag an OleDbDataAdapter from

10.3 From Data to XML 259
the Toolbox to the form. We set its (Name) property to northwind. When theData Adapter Configuration Wizard appears, we select the Northwind data-base that we used in examples in previous chapters.
In the Generate the SQL statements screen, we click the Query Builder but-ton, choose Customers from the Add Tables window, and click Add and thenClose. In the Customers box in Query Builder, we check the All Columns boxand click OK. We click Next when the Generate the SQL statements windowreturns, and click Finish in the View SQL Results screen.
We begin creating a data set to hold the Northwind customer data by click-ing the Data, Generate Dataset menu item. We accept the default selectionof a New data set with the Customers table added, enter customerTable as thedata set name, and click OK.
To display the data, we drag a DataGrid control from the Windows Forms tab ofthe Toolbox. We open the Properties window for the DataGrid and selectcustomerTable. Customers as its DataSource property. We expand the size ofthe DataGrid control in the Visual Studio .NET design so that it will be eas-ier to view the data.
In Example10-2, we will display the Customer data in a DataGrid and save itas an XML file that we can send to other applications. To perform theseoperations we add code to the Form1_Load method, which we display bydouble-clicking on the form itself, not the data grid control. We fill in thecode in the Form1_Load method as follows:
private void Form1_Load(object sender, System.EventArgs e){
// fill the data set from the databasenorthwind.Fill(customerTable, "Customers");
// make an XML document from the dataSystem.Xml.XmlDocument customers
= new System.Xml.XmlDataDocument(customerTable);
// store the XML documentcustomers.Save("customers.xml");
}
The Fill method fills the data set with the Northwind data. We create anXmlDocument from the data set and use its Save method to save the XML doc-ument containing the Northwind customer data. Figure 10.10 shows the

260 CHAPTER 10 XML
Figure 10.10 Displaying the Northwind customers.
Figure 10.11 The customers.xml file.
windows form displaying the customers, and Figure 10.11 shows the XMLfile we created.
10.3.2 The Document Object Mode (DOM)
The DOM (Document Object Model) API supports the reading of theentire document to make a tree model of it in memory. We can accessnodes of the tree to locate information contained in the XML document.We use the following classes from the System.XML namespace.

10.3 From Data to XML 261
Figure 10.12 Extracting titles from an XML document.
2We also change the URL so that the author tag becomes <author xmlns = "http://tempuri.org/anAuthor.xsd">.
Class Description
XmlDocument Represents the entire XML document
XmlDataDocument Allows data to be manipulated through a DataSet
XmlElement Represents an element in an XML document
XmlNode Represents a single node in an XML document
XmlNodeList A collection of nodes
XmlText The text of an element or attribute
10.3.3 Processing an XML Document
If we receive an XML document, we can create an XmlDocument object anduse its features to extract information from the document. In Example10-3,we process the anAuthor.xml file that we created in Example10-1. We alsouse the schema that we developed, but rename it anAuthor.xsd.2 We willbuild an XmlDocument and find all the <title> tags so that we can display thebook titles in a ListBox as shown in Figure 10.12. We leave for the exercisesthe making of a user interface to allow users to choose what informationfrom the XML file to display.
We create Example10-3 as a Windows Application project. We click on File,Add Existing Item to add anAuthor.xml and anAuthor.xsd to the project. Tocreate a DataSet for the schema, we click on the anAuthor.xsd tab to show theschema, and then click Schema, Generate Dataset. This creates a DataSetnamed anAuthor. We drag a DataSet control from the Toolbox to the formand click OK in the Add Dataset dialog that appears. We change the name ofthe data set to anAuthor.

262 CHAPTER 10 XML
We will create the XMLDocument and process it when the form loads. We dou-ble-click on the form to display the template for the Form1_Load method andcomplete the code as follows:
private void Form1_Load(object sender, System.EventArgs e){
// read XML file into data setanAuthor.ReadXml
("c:\\booknet\\ch10\\anAuthor.xml");
// represent XML document in memorySystem.Xml.XmlDocument author
= new System.Xml.XmlDataDocument(anAuthor);
// get the root elementSystem.Xml.XmlElement root = author.DocumentElement;
// get all the <title> tagsSystem.Xml.XmlNodeList titles
= root.GetElementsByTagName("title");
// process each <title>for (int i=0; i < titles.Count; i++){
// get the text from each <title>System.Xml.XmlNode text = titles[i].FirstChild;
// add title to the list boxlistBox1.Items.Add(text.Value);
}}
The ReadXml method reads the XML file into the DataSet. The XmlDataDocu-ment constructor takes the DataSet and builds the XmlDocument representing itin memory using the Document Object Model. Its DocumentElement prop-erty holds the XmlElement that is the root tag of the document. All other tagsare nested in this root. We use its GetElementsByTag method to find all<title> tags. These are an XmlNodeList.
The Count property tells us the number of <title> tags. We use a for loop toprocess each <title> tag. The FirstChild property of the <title> tag holdsan XmlNode containing the text of the <title> tag. The Value of this node isthe book title. We add each title to the ListBox.

XML provides a standardformat for data. If we takedata from the databaseand put it in an XML file,we can transmit that fileto other applications,which can then transformthe XML to whateverinternal formats theyneed.
If we receive an XMLdocument, we can createan XmlDocument objectand use its features toextract information fromthe document. The DOM(Document Object Model)API supports the readingof the entire document tomake a tree model inmemory. We can accessnodes of the tree to locateinformation contained inthe XML document.
The BIG Picture
10.4 Transforming XML 263
Test Your Understanding
5. What type of argument did we pass to the XmlDataDocument con-structor in Example10-2?
6. In Example10-3, we start with an XML file and a schema. Howdid we use Visual Studio .NET to get a DataSet to represent theschema? What method did we use to add data from the XML fileto the data set?
7. Which property of an XmlDocument represents the root element ofthe document?
10.4 Transforming XML
XML provides a platform-independent representation for data. We canpass XML data from system to system. Often, receivers of XML data willneed to transform it to a format suited to their needs. Moreover, XMLfocuses on content rather than presentation. We can transform an XMLdocument to HTML for presentation.
10.4.1 XSLT (Extensible Stylesheet Language for Transformations)
XSL (Extensible Stylesheet Language) has two parts, one for formatting andthe other for transformations. The transformation part, XSLT (ExtensibleStylesheet Language for Transformations), has been developed first. Itallows us to transform one document to another. We can transform an XMLdocument to another XML document or to HTML for display in a browser.
Stylesheets
We specify the transformations in a stylesheet. The stylesheet follows XMLsyntax. The transformations use templates that a processor matches againstthe tags in an XML file. Example10-4 applies a stylesheet to an XML docu-ment to produce an HTML file. Figure 10.13 shows the Web page producedusing the stylesheet of Figure 10.14 for the anAuthorStyle.xml, a slight mod-ification of the XML file of Figure 10.3, which changes the first two lines to
<?xml version="1.0" encoding="utf-8" ?><?xml:stylesheet type="text/xsl" href="author.xslt" ?><author>

264 CHAPTER 10 XML
Figure 10.13 Transforming an XML document to HTML.
The new second line indicates that we wish to apply an XML stylesheetfound in the file author.xslt. The third line, the <author> tag, omits the ref-erence to the schema. To view the transformed XML document locally, weenter the path to the document in the browser address fields. Figure 10.13shows that on the author’s system that path is
H:\booknet\ch10\Example10-4\anAuthorStyle.xml
As with other XML files, we start the stylesheet with the processing instruction
<?xml version="1.0"?>
Processing instructions occur between <? and ?>. XSLT stylesheets use theXSLT namespace to provide a context for the XSLT commands. Eachcommand uses a tag with the xsl prefix, as in xsl:template. Thexsl:stylesheet tag

10.4 Transforming XML 265
<xsl:stylesheet version="1.0"xmlns:xsl="http://www.w3.org/1999/XSL/Transform">
indicates the version, 1.0. The xmlns:xsl attribute states that the namespacename is xsl and gives the URL where that namespace is defined. As with allXML tags, the xsl:stylesheet tag has a closing tag at the end of thestylesheet.
The top-level structure of the stylesheet of Figure 10.14 uses five xsl:tem-plate tags:
<xsl:template match="author"><xsl:template match="name"><xsl:template match="age"><xsl:template match="books"><xsl:template match="book">
Each template applies to tags whose names match the value of the matchattribute. The first template applies to <author> tags, the second to <name>tags, and so on. When transforming an XML document using a stylesheet,the processor outputs the body of the template when it finds a match.
When the XSLT processor applies the first template to anAuthorStyle.xml, itfinds a match with the author template from Figure 10.14, copied here as
<xsl:template match="author"><html><head><title> Books written by an author </title>
</head><body><xsl:apply-templates />
</body></html>
</xsl:template>
and the <author> tag, and outputs the template body
<html><head><title> Books written by an author </title>
</head><body><xsl:apply-templates />
</body></html>

266 CHAPTER 10 XML
Figure 10.14 An XSLT stylesheet,author.xslt.
<?xml version="1.0"?><xsl:stylesheet version="1.0"
xmlns:xsl="http://www.w3.org/1999/XSL/Transform">
<xsl:template match="author"><html><head><title> Books written by an author </title>
</head><body><xsl:apply-templates />
</body></html>
</xsl:template>
<xsl:template match="name"><h3>
Author: <xsl:value-of select="first"/><xsl:text> </xsl:text><xsl:value-of select="last"/><br/>
</h3></xsl:template><xsl:template match="age">
<h4>Age: <xsl:value-of select="." />
</h4><hr/>
</xsl:template><xsl:template match="books">
<xsl:apply-templates /></xsl:template><xsl:template match="book">
<h4><strong><xsl:value-of select="title"/></strong></h4><table><th>Edition</th><th>Copyright</th><th>ISBN</th><tr><td><xsl:value-of select="edition"/></td><td><xsl:value-of select="copyright"/></td><td><xsl:value-of select="isbn"/></td>
</tr></table><hr/>
</xsl:template></xsl:stylesheet>
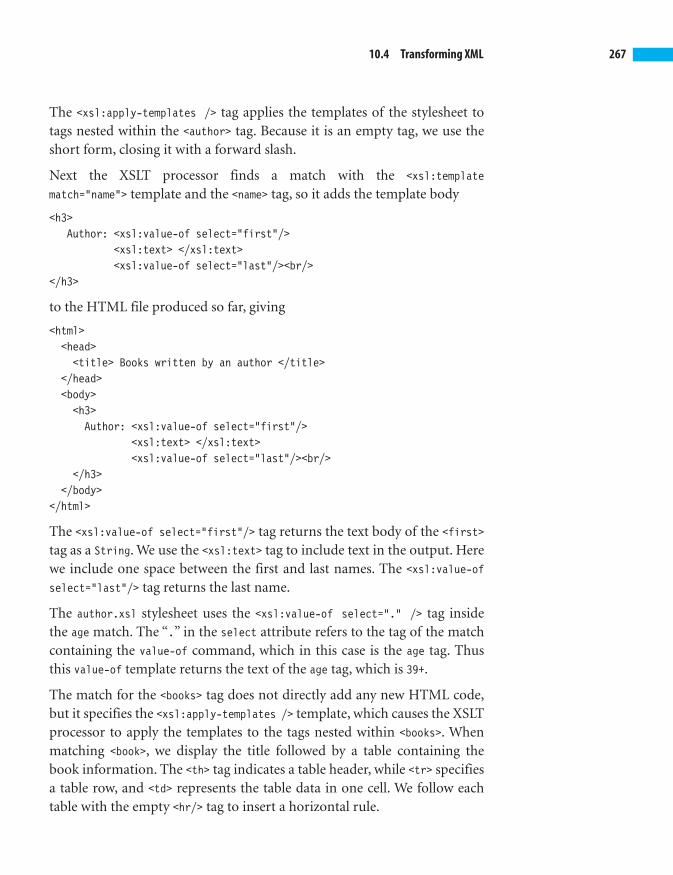
10.4 Transforming XML 267
The <xsl:apply-templates /> tag applies the templates of the stylesheet totags nested within the <author> tag. Because it is an empty tag, we use theshort form, closing it with a forward slash.
Next the XSLT processor finds a match with the <xsl:template
match="name"> template and the <name> tag, so it adds the template body
<h3>Author: <xsl:value-of select="first"/>
<xsl:text> </xsl:text><xsl:value-of select="last"/><br/>
</h3>
to the HTML file produced so far, giving
<html><head><title> Books written by an author </title>
</head><body><h3>Author: <xsl:value-of select="first"/>
<xsl:text> </xsl:text><xsl:value-of select="last"/><br/>
</h3></body>
</html>
The <xsl:value-of select="first"/> tag returns the text body of the <first>tag as a String. We use the <xsl:text> tag to include text in the output. Herewe include one space between the first and last names. The <xsl:value-ofselect="last"/> tag returns the last name.
The author.xsl stylesheet uses the <xsl:value-of select="." /> tag insidethe age match. The “.” in the select attribute refers to the tag of the matchcontaining the value-of command, which in this case is the age tag. Thusthis value-of template returns the text of the age tag, which is 39+.
The match for the <books> tag does not directly add any new HTML code,but it specifies the <xsl:apply-templates /> template, which causes the XSLTprocessor to apply the templates to the tags nested within <books>. Whenmatching <book>, we display the title followed by a table containing thebook information. The <th> tag indicates a table header, while <tr> specifiesa table row, and <td> represents the table data in one cell. We follow eachtable with the empty <hr/> tag to insert a horizontal rule.

268 CHAPTER 10 XML
Figure 10.15 The transformed file of anAuthorStyle.xml using author.xslt.
<html><head> <title>Book written by an author</title> </head><body><h3> Author: Art Gittleman <br /> </h3><h4> Age: 39+ </h4><hr /><h4><strong> Computing with C# and the .NET Framework</strong></h4><table><th>Edition</th><th>Copyright</th><th>ISBN</th><tr><td> first </td><td> 2003 </td><td> xxxxxxxxxx </td>
</tr></table><hr /><h4><strong> History of Mathematics </strong></h4><table><th>Edition</th><th>Copyright</th><th>ISBN</th><tr><td>first</td><td>1975</td><td> 0-675-08784-8 </td></tr></table><hr /><h4><strong> Advanced Java </strong></h4><table><th>Edition</th><th>Copyright</th><th>ISBN</th><tr><td>second</td><td>2002</td><td>1-57676-096-0</td></tr></table><hr /></body></html>
Figure 10.15 shows the HTML file produced by applying the stylesheet ofFigure 10.14 to anAuthorStyle.xml. Internet Explorer applies the stylesheetand displays the transformed file in Figure 10.13.
Using a Stylesheet
Example10-3 created a DOM tree from an XML file and then processed itto find the book titles. Example10-5 uses a stylesheet to transform the XMLfile anAuthorTitles.xml to an HTML file to display the book titles on a Webpage. The anAuthorTitles.xml document changes the line
<author xmlns="http://tempuri.org/XSDSchema1.xsd">
of anAuthor.xml to
<?xml:stylesheet type="text/xsl" href="titles.xslt" ?><author>
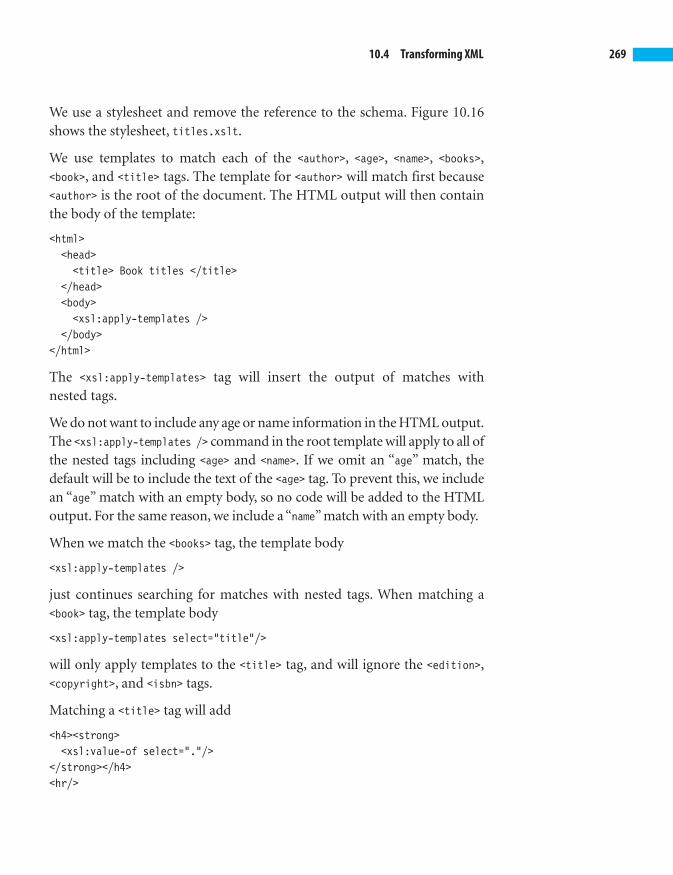
10.4 Transforming XML 269
We use a stylesheet and remove the reference to the schema. Figure 10.16shows the stylesheet, titles.xslt.
We use templates to match each of the <author>, <age>, <name>, <books>,<book>, and <title> tags. The template for <author> will match first because<author> is the root of the document. The HTML output will then containthe body of the template:
<html><head><title> Book titles </title>
</head><body><xsl:apply-templates />
</body></html>
The <xsl:apply-templates> tag will insert the output of matches withnested tags.
We do not want to include any age or name information in the HTML output.The <xsl:apply-templates /> command in the root template will apply to all ofthe nested tags including <age> and <name>. If we omit an “age” match, thedefault will be to include the text of the <age> tag. To prevent this, we includean “age” match with an empty body, so no code will be added to the HTMLoutput. For the same reason, we include a “name” match with an empty body.
When we match the <books> tag, the template body
<xsl:apply-templates />
just continues searching for matches with nested tags. When matching a<book> tag, the template body
<xsl:apply-templates select="title"/>
will only apply templates to the <title> tag, and will ignore the <edition>,<copyright>, and <isbn> tags.
Matching a <title> tag will add
<h4><strong><xsl:value-of select="."/>
</strong></h4><hr/>

270 CHAPTER 10 XML
Figure 10.16 The titles.xsl stylesheet.
<?xml version="1.0"?><xsl:stylesheet version="1.0"
xmlns:xsl="http://www.w3.org/1999/XSL/Transform">
<xsl:template match="author"><html><head><title> Book titles </title>
</head><body><xsl:apply-templates />
</body></html>
</xsl:template>
<xsl:template match="age"></xsl:template>
<xsl:template match="name"></xsl:template>
<xsl:template match="books"><xsl:apply-templates />
</xsl:template>
<xsl:template match="book"><xsl:apply-templates select="title"/>
</xsl:template>
<xsl:template match="title"><h4><strong><xsl:value-of select="."/>
</strong></h4><hr/>
</xsl:template>
</xsl:stylesheet>

Often,receivers of XML datawill need to transform it toa format suited to theirneeds. Moreover, XMLfocuses on content ratherthan presentation. We cantransform an XML docu-ment to HTML for presenta-tion. XSLT (ExtensibleStylesheet Language forTransformations) allows usto transform one documentto another. We specify thetransformations in astylesheet. The stylesheetfollows XML syntax. Thetransformations use tem-plates that a processormatches against the tags inan XML file.
The BIG Picture
10.4 Transforming XML 271
Figure 10.17 Result of applying titles.xslt to anAuthorTitles.xml.
<html><head><title> Book titles </title></head><body><h4> <strong>
Computing with C# and the .NET Framework</strong></h4><h4><strong>
History of Mathematics</strong></h4><h4><strong>
Advanced Java</strong></h4>
</body></html>
Figure 10.18 Using a stylesheet to find book titles.
to the HTML output. Figure 10.17 shows the resulting HTML file, and Fig-ure 10.18 shows the Web page resulting from entering the path to anAuthor-Titles.xml in the browser address field.
Test Your Understanding
8. List the XSLT tags from the xsl namespace that we use in Fig-ure 10.14.

272 CHAPTER 10 XML
9. Write the unabbreviated equivalent of the <xsl:apply-templates />tag.
10. Figure 10.16 includes the
<xsl:apply-templates select="title"/>
tag. Explain the difference between this tag and the tag
<xsl:apply-templates />
10.5 Summary■ HTML focuses on presentation, making it hard to determine the
information on a page. XML (Extensible Mark-up Language) letsus devise our own tags to reflect the information content. We canpass these standard XML files among various applications to trans-fer information from one program to another.
■ We can use an XML schema to specify the form of a valid type ofXML document. We can create a schema in Visual Studio .NET. Ifwe create the schema first, we can use it as a guide when creatingXML documents that follow that schema. A valid XML documentfollows the rules given in its schema. A document can be well-formed without being valid.
■ The schema we created defines a pattern that a valid XML docu-ment has to follow. If we add an XML file to our project and asso-ciate this schema with it, the IntelliSense feature of Visual Studio.NET will prompt us for the correct tags to enter as we create theXML document.
■ XML provides a standard format for data. If we take data from thedatabase and put it in an XML file, we can transmit that file toother applications, which can then transform the XML to whateverinternal formats they need.
■ If we receive an XML document, we can create an XmlDocumentobject and use its features to extract information from the docu-ment. The DOM (Document Object Model) API supports thereading of the entire document to make a tree model in memory.We can access nodes of the tree to locate information contained inthe XML document.

10.6 Programming Exercises 273
10.6 Programming Exercises
10.1 Modify Example10-1 to create a schema that requires the <age> tag.
10.2 Modify Example10-2 to include only those customers who placedorders for beverages.
10.3 Modify Example10-3 to add the copyright date to the output.
10.4 Modify Example10-4 to omit the age from the resulting HTML.
10.5 Modify Example10-5 to add the copyright date to the output.
10.6 Write a stylesheet to produce an HTML file fromanAuthorTitles.xml that displays the title and ISBN of each book.
10.7 Write a stylesheet to produce an HTML file fromanAuthorTitles.xml that displays the author’s name and the copy-right date of each book.
10.8 Write a Windows application to make a user interface to allowusers to choose what information from the anAuthorStyle.xml XMLdocument to display. Write a stylesheet to create an HTML file thatdisplays that information.
10.9 Using data from the Northwind database, write a Windows appli-cation that lists the company name and contact name for each cus-tomer.
10.10 Write a Windows application to create an XML document from theProducts data in the Northwind database.

This page intentionally left blank

11CHAPTERWeb ServicesWeb services use a simple protocol with XML to allow programs to communi-
cate. In this way, an application developed on one platform can use methods of
another application running on a different platform at a remote site and per-
haps written in a different language. Companies have many applications that
need to communicate. A manufacturer might contact parts suppliers to deter-
mine availability of needed parts. Using Web services, the search for parts could
be done automatically with the manufacturer’s program using Web services of
the suppliers.
Chapter Objectives:■ Create a client for existing Web services
■ Create new Web services
■ Create Web services that use data
11.1 Web Service Clients
With Visual Studio .NET, we can easily write a client program to access Webservices available on the Internet. We do not need to know the details of theprotocol used to communicate with the service. The XMethods site,http://www.xmethods.net, contains many Web services that we can try. TheXMethods Demo Services listed at the bottom of their page are likely toremain available for some time. We try the Weather-Temperature servicethat gives the temperature for any zip code area.
We create Example11-1 as a Windows Application. We add a TextBox for theuser to enter a zip code and a Button to submit it to the Web service. We usetwo Label controls, one to label the text box and the other to display thetemperature. We set the (Name) property of the text box to enterZip, the(Name) property of the button to getTemperature, and that of the label to its

276 CHAPTER 11 Web Services
Figure 11.1 Using a Web service to find the temperature.
Figure 11.2 Selecting the Weather-Temperature Web service.
right to display. Figure 11.1 shows the temperature at California State Uni-versity Long Beach.
11.1.1 Adding a Web Reference
We need to be connected to the Internet to use an external Web service. Torefer to the Weather-Temperature Web service in our project, we click theProject, Add Web Reference menu item. This displays an Add Web Referencewindow that includes a text box to enter the address of the Web service. Weenter www.xmethods.net and hit the Enter key. The frame on the left sideshows the XMethods site. We scroll to the bottom where we find the listingof the XMethods Demo Services shown in Figure 11.2. Selecting the

11.1 Web Service Clients 277
Figure 11.3 The XMethods Weather-Temperature Web service.
Weather-Temperature Web service displays its Web page on the XMethodssite, as shown in Figure 11.3.
The Web Service Definition Language (WSDL) uses XML to describe Webservices. We look for the WSDL link on the Weather-Temperature page. Itshows the link
http://www.xmethods.net/sd/2001/TemperatureService.wsdl
which we click. Figure 11.4 shows the Add Web Referencewindow in our project.
We click the Add Reference button to add a reference to this Web serviceto our project. The Example11-1 folder contains the files for this proj-ect. Adding a Web reference creates a Web References folder inside Exam-ple11-1. This folder contains a folder called net.xmethods.www, which inturn contains the WSDL file TemperatureService.wsdl, and a C# program,Reference.cs, that exposes the methods of the Weather-TemperatureWeb service.
We click Project, Add Existing Item, Browse, as shown in Figure 11.5, to findthe Reference.cs file, and click Open to add it to our project.

278 CHAPTER 11 Web Services
Figure 11.4 The WSDL file for the Weather-Temperature Web service.
Figure 11.5 Locating the Weather-Temperature code.
The code for Reference.cs shows that it
■ is contained in the Example11_1.net.xmethods.www namespace
■ defines a TemperatureService class
■ defines a getTemp method that has a String zip code parameter andreturns a System.Single, which is another name for a float number

11.1 Web Service Clients 279
When the user clicks the Temperature button, we want to pass the zip codethat the user entered to the getTemp method and display the return value.Because we are using a Web service, the getTemp method will actually exe-cute on the site of the Weather-Temperature service.
We double-click the button in the Visual Studio .NET design to display itsevent-handling template and fill in the code as follows:
private void getTemperature_Click(object sender, System.EventArgs e)
{Example11_1.net.xmethods.www.TemperatureService t= new Example11_1.net.xmethods.www.TemperatureService();display.Text = "The temperature is "
+ t.getTemp(enterZip.Text).ToString();}
We first create a TemperatureService object, and then call its getTemp method,passing it the zip code that the user entered. We invoke the ToString methodto convert the float to a string to display in the label.
11.1.2 Asynchronous Calls
The getTemp method we used in Example11-1 calls the Weather-Tempera-ture Web service, passes the zip code, and waits for the Web service toreturn the temperature. We call this synchronous access, because the callingmethod is synchronized with the Web service. Weather-Temperature is avery simple service, not requiring extensive computation, but one can eas-ily imagine services that might take time to prepare an appropriateresponse. They may need to contact other Web services, which would pro-long the wait. Any network communication is subject to unforeseen delays.
Web services provide asynchronous access to allow the calling program tocontact the Web service and then continue further local processing withoutwaiting for the response. The client provides a callback method that theWeb service will invoke when it is ready to respond.
The Weather-Temperature Web service has two methods, BegingetTemp andEndgetTemp, which provide asynchronous access. The client calls Beginget-Temp when it makes the request. It passes the zip code and the callbackmethod. When the Web service responds, it invokes the callback method.The callback method calls the EndgetTemp method to get the result.
Example11-2 accesses the Weather-Temperature Web service asynchro-nously. We create this Windows Application project in the same way we

Figure 11.7The response to the client.
280 CHAPTER 11 Web Services
Figure 11.6 Making an asynchronous request.
created Example11-1. When the user clicks the Temperature button, theevent handler calls the BegingetTemp method and displays a message in alabel telling the user to wait for a message box giving the temperature. Theevent handler finishes execution.
Meanwhile, the Web service finds the temperature for the submitted zipcode and calls the callback method, which calls the EndgetTemp method toget the result and displays it in a MessageBox. This Web service does not takelong to respond, so the message box appears soon after the request, butother services will not always be so quick. We use a MessageBox here, but thecallback method could write the result to a file or a log, which the usercould inspect to get the result. Figure 11.6 shows making an asynchronousrequest, and Figure 11.7 shows the response to the user.
11.1.3 The Event Handler and the Callback Methods
When the user clicks the Temperature button, we want to send the zip codethat the user entered to the Weather-Temperature Web service. Because weare not waiting for the Web service to find the temperature, we also send ita callback method that the Web service will call when it is ready to send thereply with the temperature at the requested zip code. Double-clicking onthe Temperature button in the Visual Studio .NET design displays its event-handling template, which we complete to give
private void getTemperature_Click(object sender, System.EventArgs e)
{Example11_2.net.xmethods.www.TemperatureService t= newExample11_2.net.xmethods.www.TemperatureService();
AsyncCallback callback= new AsyncCallback(Zip_Callback);

11.1 Web Service Clients 281
t.BegingetTemp(enterZip.Text, callback, t);display.Text = "Wait for message";
}
The four statements of the getTemperature_Click method
■ create an instance of the TemperatureService class
■ create an AsyncCallback callback, passing it the name of the call-back method
■ call BegingetTemp
■ place a temporary message in a label
We explain each of these in turn. The first statement creates an instance ofthe TemperatureService class provided in the Reference.cs file when weadded the Web reference to the Weather-Temperature service to our proj-ect. The TemperatureService class contains the three methods that we use inExample11-1 and Example11-2: getTemp, BegingetTemp, and EndgetTemp.
The second statement creates the callback we need to pass to the Web serv-ice for the callback. The AsyncCallback callback is defined in the Systemnamespace. It specifies the pattern that an asynchronous callback shouldhave. We pass it Zip_Callback, a method that follows that pattern and whosecode we discuss later in this section.
The third statement requests a temperature from the Web service by callingBegingetTemp, passing it three arguments. The first argument is the zip code.The second argument is the callback that the Web service will use torespond when it is ready. The third argument is the service object that willbe returned with the result during the callback.
The fourth statement displays a message in a label, so the user is promptedto expect a delayed response. We need to write the callback method in thecode-behind file that also contains getTemperature_Click. Its code is
private void Zip_Callback(IAsyncResult result){
Example11_2.net.xmethods.www.TemperatureService t= (Example11_2.net.xmethods.www.TemperatureService)
result.AsyncState;float temperature = t.EndgetTemp(result);MessageBox.Show("The temperature is " + temperature);
}

With Visual Studio .NET wecan easily write a clientprogram to access Webservices available on theInternet.We do not need toknow the details of theprotocol used to communi-cate with the service. TheXMethods site, http://www.xmethods.net,contains many Web servicesthat we can try.
The Web Service Defini-tion Language (WSDL) usesXML to describe Web serv-ices. When we add a Webreference,Visual Studio .NETcreates a C# file thatexposes the Web servicemethods for us to call in ourapplication.
In addition to synchro-nous access, Web servicesprovide asynchronousaccess to allow the callingprogram to contact the Webservice and then continuefurther local processingwithout waiting for theresponse. The client pro-vides a callback methodthat the Web service willinvoke when it is ready torespond.
The BIG Picture
282 CHAPTER 11 Web Services
The Zip_Callback method follows the pattern required by the AsyncCallbacktype. It has a parameter, result, of type IAsyncResult, which represents theresult of an asynchronous operation, and a void return type. When theWeather-Temperature Web service calls the Zip_Callback method, it willpass a result of this type. The AsyncState property of result provides theresponse containing the information about the asynchronous operation. Inthis case, that includes the temperature. The first statement of the Zip_Call-back method casts the AsyncState value to the TemperatureService type weare using, so we can call the EndgetTemp method to get the temperature.
The second line calls the EndgetTemp method that gets the temperature fromthe result parameter. The third line displays the temperature in a MessageBox.
Test Your Understanding
1. What does WSDL stand for?
2. Explain the difference between a synchronous and an asynchro-nous call to a Web service.
11.2 Creating a Web Service
Visual Studio .NET makes it easy to create a Web service. In Example11-3,we create a Web service that provides a Reverse method. The client submitsa string, and the Example11-3 service returns the reversed string to theuser. We open Example11-3 as an ASP.NET Web Service template. Visual Stu-dio .NET provides a design page, but we do not use it in this example. Webservices operate behind the scenes and do not need a user interface, but ina later example we will add nonvisual components to the design page. Fig-ure 11.8 shows the design page with a link at the bottom to switch to thecode view.
We click this link to change to the code page with the default file name ofService1.asmx.cs. Visual Studio .NET creates the code template to include asample Web service method that is totally commented out. It is there toshow what needs to be done. That code is
// WEB SERVICE EXAMPLE// The HelloWorld() example service returns// the string Hello World// To build, uncomment the following lines then// save and build the project

11.2 Creating a Web Service 283
Figure 11.8 The Web service design page.
// To test this web service, press F5
// [WebMethod]// public string HelloWorld()// {// return "Hello World";// }
The key feature to note is the Web service attribute, [WebMethod], includedbefore the method. Adding this attribute enables the method we write to beavailable as a Web service.
The code for the Reverse method we add is
[WebMethod]public String Reverse(String s){
int size = s.Length;char[] c = new char[size];for (int i=0; i<size; i++)
c[i] = s[size-1-i];return new String(c);
}
To reverse a string, we first find its length. We then create an array of char-acters of that same size and copy the characters starting from the end of thestring to the beginning of the array, so that the array will hold the reverse ofthe original string. Figure 11.9 shows this process for the string s, where s =“tomato”. The loop starts with i=0, so the first copy is
c[0] = s[size-1];

284 CHAPTER 11 Web Services
Figure 11.9 Reversing a string.
String s = "tomato"
char [ ] c = o t a m o t
Figure 11.10 Testing the Reverse service.
Because size is 6, that becomes
c[0] = s[5]
which copies the ending 'o' of the string s to the first position of the array c.
11.2.1 Testing the Web Service
We can test by pressing the F5 key or by clicking the Debug, Start menuitem in Visual Studio .NET, or we can enter http://localhost/Example11-3/Service1.asmx in the address field of Internet Explorer. Any of these meth-ods brings up a page with a link at the top labeled Reverse. Clicking this linkdisplays the text box shown in Figure 11.10 in which we can enter a stringto reverse. Entering tomato and clicking the invoke button produces theresponse of Figure 11.11.

11.2 Creating a Web Service 285
Figure 11.11 The response from the Reverse service.
Figure 11.12 A Client for Reverse service.
The response in Figure 11.11 is an XML file. Inside the <string> tag we seethe reserved string, otamot. Next, we will write a client for this service thatwill allow users to access it.
11.2.2 A Client for the Reverse Service
Example11-4 will provide a form, shown in Figure 11.12, in which theclient can enter a string. Pressing a button will contact the Reverse service ofExample11-3 and display the reversed string in a label.
We create Example11-4 as a Windows Application project and add a button,two labels, and a text box to the form. We set a few properties, including theBackColor and Text of Form1. We set the (Name) property of the TextBox toenterString and its Text property to the empty string. We change the (Name)of the Button to reverse and its Text to Reverse. The Label to its right gets a(Name) of display and an empty string Text.
Example11-4 needs to refer to the Web service of Example11-3. To add thisreference, we click Project, Add Web Reference and enter
http://localhost/Example11-3/Service1.asmx
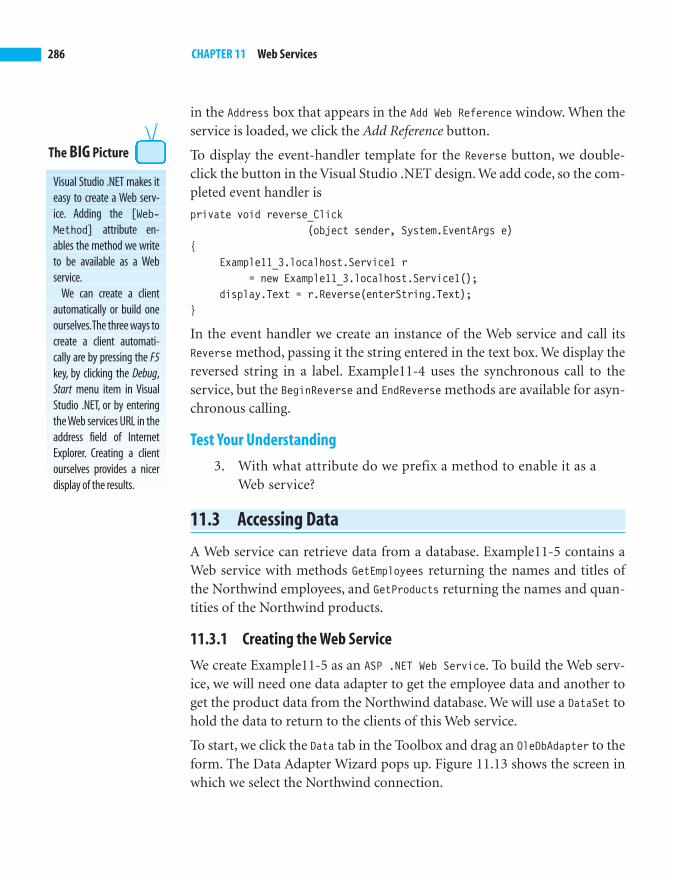
Visual Studio .NET makes iteasy to create a Web serv-ice. Adding the [Web-Method] attribute en-ables the method we writeto be available as a Webservice.
We can create a clientautomatically or build oneourselves.The three ways tocreate a client automati-cally are by pressing the F5key, by clicking the Debug,Start menu item in VisualStudio .NET, or by enteringthe Web services URL in theaddress field of InternetExplorer. Creating a clientourselves provides a nicerdisplay of the results.
The BIG Picture
286 CHAPTER 11 Web Services
in the Address box that appears in the Add Web Reference window. When theservice is loaded, we click the Add Reference button.
To display the event-handler template for the Reverse button, we double-click the button in the Visual Studio .NET design. We add code, so the com-pleted event handler is
private void reverse_Click(object sender, System.EventArgs e)
{Example11_3.localhost.Service1 r
= new Example11_3.localhost.Service1();display.Text = r.Reverse(enterString.Text);
}
In the event handler we create an instance of the Web service and call itsReverse method, passing it the string entered in the text box. We display thereversed string in a label. Example11-4 uses the synchronous call to theservice, but the BeginReverse and EndReverse methods are available for asyn-chronous calling.
Test Your Understanding
3. With what attribute do we prefix a method to enable it as aWeb service?
11.3 Accessing Data
A Web service can retrieve data from a database. Example11-5 contains aWeb service with methods GetEmployees returning the names and titles ofthe Northwind employees, and GetProducts returning the names and quan-tities of the Northwind products.
11.3.1 Creating the Web Service
We create Example11-5 as an ASP .NET Web Service. To build the Web serv-ice, we will need one data adapter to get the employee data and another toget the product data from the Northwind database. We will use a DataSet tohold the data to return to the clients of this Web service.
To start, we click the Data tab in the Toolbox and drag an OleDbAdapter to theform. The Data Adapter Wizard pops up. Figure 11.13 shows the screen inwhich we select the Northwind connection.

11.3 Accessing Data 287
Figure 11.13 Choosing a data connection.
We click Next and accept the default Use SQL statements in the Choose aQuery Type screen that appears next. In the Generate the SQL statements
screen we click the Query Builder button. Figure 11.14 shows the Add Tablesscreen in which we select Employees and click Add and Close. From theEmployees box we select FirstName, LastName, and Title and click OK.
The Query Builder screen of Figure 11.15 shows the Employees table. Weneed to select the fields with which we wish to fill the data set that the Webservice will return to the client. From the Employees box we select FirstName,LastName, and Title and click OK. This finishes building the query andreturns to the Generate the SQL statements screen.
We could immediately accept the work of the query builder and click theNext button. Optionally, by clicking the Advanced Options button we candisable the generation of commands we will not be using. In Example11-5,we click Advanced Options, uncheck the Generate Insert, Update, and Deletestatements box, and click OK before clicking the Next button in the Generatethe SQL statements screen. To complete the configuration of the dataadapter, we click Finish in the View Wizard Results screen.

288 CHAPTER 11 Web Services
Figure 11.14 Selecting the Employees table.
Figure 11.15 Selecting Employees fields.

11.3 Accessing Data 289
Figure 11.16 Adding a data set.
We change the (Name) property of the data adapter that appears in thedesign to employees and the (Name) of the data connection that appears tonorthwind.
Similarly, we add a second OleDbDataAdapter and use the Data Adapter Wiz-ard to configure it to use the northwind connection. In that process, we buildthe query to use the Products table and its ProductName and UnitsInStock
fields. We change the (Name) property of this data adapter to products.
We adjust the ConnectionString property value for the northwind connection,if necessary, to
Provider=Microsoft.Jet.OLEDB.4.0;Password=";User ID=Admin; DataSource="C:\Program Files\Microsoft Office \Office10\Samples\Northwind.mdb"
The Data Source path may vary on other systems.
We need to add the code for the GetEmployees and GetProducts methods thatwe will expose as Web services for clients to use. Each method will return aDataSet containing the data that the client can display. When we drag aDataSet control from the Toolbox to the design, the Add Dataset window ofFigure 11.16 appears. We select Untyped dataset and click OK. In the designview, we change the (Name) property of this data set to northwindData.
We click on the View, Code menu item and add the code for the GetEmploy-ees and GetProducts methods.

290 CHAPTER 11 Web Services
[WebMethod]public DataSet GetEmployees(){
employees.Fill(northwindData);return nortwindData;
}
[WebMethod]public DataSet GetProducts(){
products.Fill(northwindData);return northwindData;
}
The [Web Method] attribute identifies each method as a Web service. Eachmethod has a DataSet return type. The GetEmployees code uses the Fillmethod of the employees data adapter to fill the northwindData data set withemployee data. The GetProducts code uses the Fill method of the productsdata adapter to fill the northwindData data adapter with products data.
Next, we need to create a client to use these Web services.
11.3.2 Creating a Client
In Example11-6, we create a client that allows the user to find either North-wind employees or products. We create Example11-6 as a Windows Applica-tion project and add two Button controls and a DataGrid. We set the Textproperty of the first button to Employees and set the Text of the second toProducts. We change the (Name) property of the Employees button toemployees, the (Name) property of the Products button to products, and thatof the data grid to display.
We click the Project, Add Web Reference menu item to add a reference to theWeb service we just created, entering http://localhost/Example11-5/Ser-vice1.asmx in the Address box in the window that appears. We click the AddReference button to add this reference to the project.
To access the Web service of Example11-5 from this project, we implementthe event handlers for the buttons. Clicking on the Employees button in theVisual Studio .NET design, we complete the code in the template thatappears, to give
private void employees_Click(object sender, System.EventArgs e)

A Web service can retrievedata from a database. Theclient adds a Web refer-ence to a Web service andis able to call its methods.
The BIG Picture
11.3 Accessing Data 291
Figure 11.17 Using a Web service to get Northwind data.
{Example11_6.localhost.Service1 service =
new Example11_6.localhost.Service1();display.DataSource = service.getEmployees();
}
We create an instance of the Web service and call the GetEmployees methodto return a DataSet that we assign as the DataSource property of the DataGrid.In the event handler for the second button, we call the GetProducts methodof the Web service. The code is
private void products_Click(object sender, System.EventArgs e)
{Example11_6.localhost.Service1 service =
new Example11_6.localhost.Service1();display.DataSource = service.GetProducts();
}
Figure 11.17 shows the user obtaining the names and titles of Northwindemployees.
Test Your Understanding
4. What does a Web service client need to add to its project to link tothe Web service?

292 CHAPTER 11 Web Services
11.4 Summary■ Web services use a simple protocol with XML to allow programs to
communicate. In this way, an application developed on one plat-form can use methods of another application running on a differentplatform at a remote site and perhaps written in a different language.
■ With Visual Studio .NET, we can easily write a client program toaccess Web services available on the Internet. We do not need toknow the details of the protocol used to communicate with theservice. The XMethods site, http://www.xmethods.net, containsmany Web services that we can try.
■ The Web Service Definition Language (WSDL) uses XML todescribe Web services. When we add a Web reference, Visual Studio.NET creates a C# file that exposes the Web service methods for usto call in our application.
■ In addition to synchronous access, Web services provide asynchro-nous access to allow the calling program to contact the Web serviceand then continue further local processing without waiting for theresponse. The client provides a callback method that the Web serv-ice will invoke when it is ready to respond.
■ Visual Studio .NET makes it easy to create a Web service. Addingthe [WebMethod] attribute enables the method we write to be avail-able as a Web service.
■ We can create a client automatically or build one ourselves. Thethree ways to create a client automatically are by pressing the F5key, by clicking the Debug, Start menu item in Visual Studio .NET,or by entering the Web services URL in the address field of Inter-net Explorer. Creating a client ourselves provides a nicer display ofthe results.
■ A Web service can retrieve data from a database. The client adds aWeb reference to a Web service and is able to call its methods.
11.5 Programming Exercises
11.1 Modify Example11-1 to display the date and time when the tem-perature is displayed.
11.5 Programming Exercises 293
11.2 Modify Example11-2 to display the date and time when the tem-perature is displayed.
11.3 Modify Example11-4 to display the reversed string in a MessageBox.
11.4 Modify Example11-5 to add a GetShippers method that returns aDataSet containing the Northwind Shippers data.
11.5 Modify Example11-6 to add a Button to display the Shippers dataadded in Exercise 4.
11.6 Create a Web service that returns the amount that will result if agiven initial amount is deposited at a specified interest rate for aspecified number of years, if the interest is compounded yearly.
11.7 Create a Web service that returns a random lucky numberbetween 1 and 47.
11.8 Pick a service from the www.xmethods.com site and write a client toaccess that service.
11.9 Create a client that uses the Web service of Exercise 7. The clientselects the number of lucky numbers desired from a ComboBox andpresses a Button to display the numbers in a Label.
11.10 Write a client to access the Web service of Exercise 6. The cliententers the initial amount in a TextBox and displays the resultingamount in a Label.
11.11 Write a client that accesses the Web service of Exercise 6 asynchro-nously. The client enters the initial amount in a TextBox and dis-plays the resulting amount in a MessageBox.
11.12 Write a client that accesses the Reverse service of Example11-3asynchronously.
11.13 Write a Web service to display the Northwind Orders data. Includethe Order ID, the Customer, and the Shipped Date.
11.14 Write a client to use the Web service of Exercise 13. Display thedata in a DataGrid control.

This page intentionally left blank
12CHAPTERMobile ApplicationsDevices such as cellular phones and personal digital assistants (PDAs) are
becoming an ever larger part of the computing landscape.These devices vary in
capabilities, most importantly in the size of the display and the amount of
memory available. Devices with limited capabilities can execute Web applica-
tions in which the code for the application resides on the server and a micro
browser executes the client on the small device. Devices with more capabilities
can run stand-alone applications using the .NET Compact Framework, a version
of .NET design for mobile devices.
Visual Studio .NET 2003 includes the ASP .NET mobile controls. We use Visual
Studio .NET 2003 in this chapter.
Chapter Objectives:■ Build simple mobile applications
■ Store data on the device
■ Access Web services from mobile applications
12.1 Introduction
In this section we give an overview of .NET development for mobile devices.
12.1.1 Mobile Devices
Many types of devices have computing capability and run .NET applica-tions. These devices vary greatly in computing power and features. A hand-held computer may have about the same capability as a desktop machine.Typically, however, its capabilities are more limited, necessitating somechanges in application development. Mobile phones usually have lessmemory and a smaller screen than handheld computers. Personal digital

296 CHAPTER 12 Mobile Applications
assistants come in various sizes with differing capabilities. Pagers and otherdevices may also be programmable.
12.1.2 Operating Systems
Each device runs operating system software that manages the lower-levelinteractions with it. Desktop computers may use the Windows XP operat-ing system, but this system is too large for the handheld and pocket mobiledevices. Microsoft provides the Windows CE operating system for con-strained environments.
Devices vary greatly in the features they support. For example, the screensize differs among devices, and a device may not have a screen at all. Adevice may have a keyboard similar to the larger desktop keyboards, it mayhave a limited phone keypad, it may have a keyboard simulated in software,or it may have no keyboard of any kind. And devices vary greatly in theamount of memory available to host applications.
Consequently, the Windows CE operating system must be very flexible.Manufacturers may use those Windows CE modules needed to support thefeatures present on their devices and may omit other unneeded modules. Adeveloper must test applications developed for the Windows CE system onan emulator for the target device to make sure that it runs well on that par-ticular device and does not require any Windows CE capabilities not pres-ent on the target device.
To make it easier to develop mobile applications that run on many devices,Microsoft has specified versions of Windows CE for particular classes ofdevices. The Pocket PC operating system is a variant of Windows CE,including specific modules that must be present on conforming devices.Thus a developer for the Pocket PC system can assume that a Pocket PCwill have the specified capabilities. For example, every Pocket PC device hasa screen size of 240 � 320.
Because the Pocket PC screen size is small, it cannot display more than oneapplication at a time. It would be inconvenient for the user to close oneapplication before starting another, because that application would have tobe started again to continue running later. Thus on the Pocket PC, applica-tions run indefinitely. When the user minimizes an application, it does notterminate but stays alive in the background.

12.1 Introduction 297
Figure 12.1 Creating a Smart Device Application project.
Every Pocket PC device will have these common features, so developers canwrite one application and expect it to run in a similar manner on all PocketPC devices. The Pocket PC must have at least 32 megabytes of memory tohost data and applications, and 16 megabytes for the system software. Thusdevelopers may provide rich clients that will be installed on the device andrun as stand-alone applications without any requirements for networkconnectivity. Windows CE devices have varying amounts of memory.Devices may use the Web to access applications too large to be installed onthe device. Microsoft provides smaller versions of its desktop .NET Frame-work to develop applications for mobile devices.
12.1.3 The .NET Compact Framework
The .NET Compact Framework is a smaller version of the .NET Frame-work designed for Windows CE systems. Its class library contains versionsof about 25 to 30 percent of the full framework. It includes many familiarWindows user interface controls, which we have used earlier in the book todevelop desktop applications. Starting with Visual Studio .NET 2003, the.NET Compact Framework classes are included.
To illustrate, we open a new project by clicking the File, New, Project menuitem. Figure 12.1 shows the selection of a Smart Device Application project.Figure 12.2 indicates that we can target either the more specific Pocket PCplatform, whose devices all must have at least a common set of resources,

298 CHAPTER 12 Mobile Applications
Figure 12.2 Choosing a platform.
or the more generic Windows CE platform that allows a great variety ofdevice capabilities.
In Figure 12.2, we selected the Pocket PC platform. Figure 12.3 shows thedesign view that opens when we click OK. The Toolbox on the left listssome of the device controls that we can add to the form. The form is theshape of a Pocket PC device. We will see later in the chapter that when wetest a Pocket PC application on the Pocket PC emulator, the emulator lookslike a typical Pocket PC device.
The other platform choice in Figure 12.2 is the Windows CE platform. Butnotice on the right of Figure 12.2 that only the Pocket PC emulator is installedfor testing Pocket PC applications. No one emulator could model the varietyof devices that run Windows CE. Thus to test a Windows CE application, wewould need to download an emulator for a specific device from the manufac-turer’s site. We do not develop stand-alone Windows CE applications in thisbook, but do develop mobile Web applications for that platform.
12.1.4 Mobile Web Applications
A server hosts a Web application. Typically, the device makes a wirelessInternet connection to a Web site. Just as with desktop Web applications,

12.1 Introduction 299
Figure 12.3 Designing a Pocket PC application.
the ASP .NET mobile server controls run on the server sending a Web pageto a small browser on the device.
When the device connects to the server it identifies itself, and, based on thatidentification, the server can vary the page it sends back to the device. Theserver may take into account the screen size, the availability of color, andother device characteristics in preparing its response. Using .NET, mobileWeb applications can adapt to a variety of devices.
To create a mobile Web application, we create a Visual Studio .NET project.In Figure 12.4, we have selected an ASP .NET Mobile Web Application. Fig-ure 12.5 shows the Toolbox that lists a few of the available Mobile WebForm controls that we can drag onto the form at its right.
The Microsoft Smartphone is another specification based on Windows CE.Newer versions of the .NET Compact Framework have the capability todevelop applications for Smartphone devices. Because these are currentlyless common than Pocket PC devices, we concentrate on Pocket PC andgeneric Windows CE applications in this chapter.
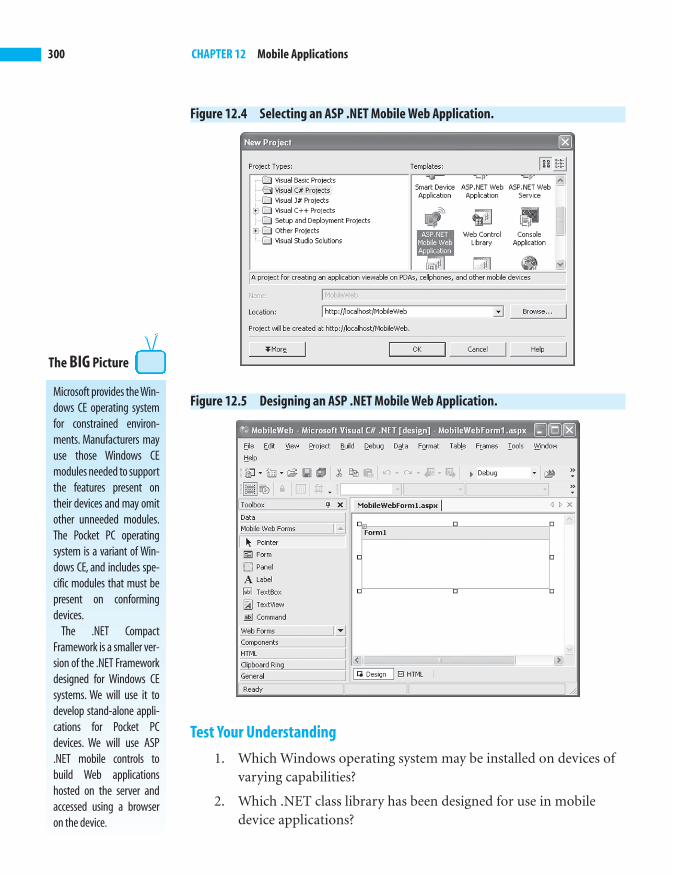
Microsoft provides the Win-dows CE operating systemfor constrained environ-ments. Manufacturers mayuse those Windows CEmodules needed to supportthe features present ontheir devices and may omitother unneeded modules.The Pocket PC operatingsystem is a variant of Win-dows CE, and includes spe-cific modules that must bepresent on conformingdevices.
The .NET CompactFramework is a smaller ver-sion of the .NET Frameworkdesigned for Windows CEsystems. We will use it todevelop stand-alone appli-cations for Pocket PCdevices. We will use ASP.NET mobile controls tobuild Web applicationshosted on the server andaccessed using a browseron the device.
The BIG Picture
300 CHAPTER 12 Mobile Applications
Figure 12.4 Selecting an ASP .NET Mobile Web Application.
Figure 12.5 Designing an ASP .NET Mobile Web Application.
Test Your Understanding
1. Which Windows operating system may be installed on devices ofvarying capabilities?
2. Which .NET class library has been designed for use in mobiledevice applications?

12.2 A Simple Mobile Web Application 301
12.2 A Simple Mobile Web Application
Many of the mobile controls are similar to controls we have used in build-ing .NET Windows and Web applications for personal computers.
12.2.1 Creating a Web Application
Using Visual Studio .NET, we create Example12-1 as an ASP.NET MobileWeb Application project. A simple form appears in the Visual Studio .NETdesign. The screen area of mobile devices is limited, so we cannot add toomany controls. If necessary, we can use additional forms.
The Toolbox, partially shown in Figure 12.5, contains a list of Mobile WebForm controls that we can drag onto a form. For this example, we add aLabel and two Command controls. Command controls are like buttons.
We change the Text property of the label to Have a great day and its Align-ment property to Center. By clicking the plus to the left of the Font propertyin the Properties window, we display other properties of the current font.We set the Bold property to True. We change its (ID) property to Display.
We also set the Bold property for the Font of each Command to True. The Text ofone button is Red and that of the other is Blue. We set their (ID) properties toMakeRed and MakeBlue.We change the BackColor of each Command to reflect its text.
When the user clicks a command, we want to change the color of the label’stext to the color indicated by the command. We need to write code to han-dle the event generated when the user clicks a Command. Double-clicking thecommand in the Visual Studio .NET design displays the event-handlingmethod for that command. We add a line to each to change the ForeColorproperty of the label. The code is
private void MakeRed_Click(object sender, System.EventArgs e)
{Display.ForeColor = Color.Red;
}private void MakeBlue_Click
(object sender, System.EventArgs e){
Display.ForeColor = Color.Blue;}
Clicking the Debug, Start menu will test the Web page in the desktop Inter-net Explorer browser. Starting with the 2003 edition, Visual Studio .NET

302 CHAPTER 12 Mobile Applications
Figure 12.6 Choosing a device or device emulator.
includes an emulator for a Pocket PC, which serves as a test model for theactual device. Clicking the Tools, Connect to Device menu item displays aConnect to Device window that permits a choice of two platforms, Pocket PCor Windows CE.
The Pocket PC option represents a specific version of the Windows CEplatform that is designed primarily for personal information managementdevices with more memory and screen area than some of the smallermobile devices. Windows CE .NET is a more general platform targeting awide array of devices.
12.2.2 The Windows CE .NET Emulator
Choosing the Windows CE platform displays the screen of Figure 12.6. Wechose the Windows CE .NET Emulator.
Pressing the Connect button displays the generic screen of Figure 12.7. Wewould need to download specific device emulators from manufacturers toget device screens that refer to specific hardware devices running WindowsCE. Clicking the Internet Explorer icon displays the generic device browser.We enter the address, on our system, of Example12-1,
http://192.168.1.100/Example12-1/MobileWebForm1.aspx
to display the Web application of Example12-1, shown in Figure 12.8. Inthe URL, we use the address of the local machine we are using,192.168.1.100. To find this address, we could execute the ipconfig commandin a command window.

12.2 A Simple Mobile Web Application 303
Figure 12.7 The Windows CE .NET Emulator.
Figure 12.8 The generic Windows CE browser.

304 CHAPTER 12 Mobile Applications
Figure 12.9 The Pocket PC emulator.
When we shut down the emulator, we get a dialog that gives us a choice ofsaving the emulator state or turning off the emulator. We choose to turn offthe emulator.
12.2.3 The Pocket PC 2002 Emulator
To use the Pocket PC emulator instead, we choose it in the Connect to
Device screen. Because the Pocket PC refers to a specific type of device, theemulator is able to represent it more closely. Figure 12.9 shows its start-upappearance.
To configure the Pocket PC emulator to connect to the Internet, we click onthe Start, Settings menu item, then on the Connections tab, and finally on theConnection icon. Settings will vary depending on the configuration of thehost computer. The uppermost combo box gives a choice of Internet Set-
tings or Work Settings to connect to the Internet. The author selected WorkSettings to use a broadband connection that is always on. The Internet Set-

12.2 A Simple Mobile Web Application 305
tings choice permits the entry of a dial-up number. After completing theconfiguration, we click the circular ok in the upper-right corner of the emu-lator, and the X at the upper right of the Settings screen. We only need toconfigure once.
To run Example12-1, we click the Start menu shown in the upper-left cor-ner of Figure 12.9. Because Example12-1 is a Web application, in the listthat appears we click the Internet Explorer item to use the local browser.Figure 12.10 shows the emulator running Pocket Internet Explorer.
We click the View, Address Bar menu item in the lower-left corner and thenenter the address of Example12-1. A keyboard appears, provided to modeldata entry with a stylus. We can use the mouse with the emulator keyboard.To browse the site, we click the button with the green arrow at the right ofthe address, as shown in Figure 12.11. Figure 12.12 shows Example12-1running on the Pocket PC emulator.
Figure 12.10 The Pocket PC emulator running Internet Explorer.

We can add variousMobile Web Controls to aWeb application. We cantest Web applications inthe Windows CE .NETemulator, which providesa generic browser, or inthe Pocket PC emulator,which resembles a PocketPC device.
The BIG Picture
306 CHAPTER 12 Mobile Applications
Figure 12.11 Browsing a Web application. Figure 12.12 Example12-1 in the Pocket PC emulator.
Test Your Understanding
3. Which device type, Windows CE or Pocket PC, includes deviceswith more limited resources?
12.3 A Smart Device Application: Appointment List
In this section we create an application that resides on a Pocket PC device.Example12-2 will allow the user to update a schedule of appointments. Thedevice will store the appointments and allow the user to view the list and toadd or delete appointments. The simple user interface could be enhancedwith additional effort. The Pocket PC simulator includes an appointmentscheduler, so Example12-2 is meant only to introduce Pocket PC applica-tion building.
We create Example12-2 as a Smart Device Application. In the Smart DeviceWizard that appears, we target the Pocket PC platform and create a Windows

12.3 A Smart Device Application: Appointment List 307
Application project. The Toolbox in the Visual Studio .NET design containsa list of device controls that includes Label, TextBox, MainMenu, CheckBox,RadioButton, PictureBox, Panel, DataGrid, ListBox, ComboBox, ListView, TreeView,TabControl, HScrollBar, VScrollBar, Timer, DomainUpDown, NumericUpDown, Track-Bar, ProgressBar, ImageList, ContextMenu, ToolBar, StatusBar, OpenFileDialog,SaveFileDialog, and InputPanel.
12.3.1 Using Tabs
Example12-2 uses a TabControl with two tabs. The first tab lets the user adda new appointment, and the second tab shows the appointment list. Wedrag a TabControl from the Toolbox to the form. Right-clicking the mouseon it displays a menu in which we click the Add Tab item. Repeating thisstep, we add the second tab. We use the Properties window to set the Textproperty of the first tab to Add and the text of the second to View.
To permit the user to select an appointment time, we drag a combo box,two radio buttons, and a label onto the Add tab. The user selects the hourfrom the combo box and AM or PM from the radio buttons. We set the (Name)property of the combo box to time, that of the AM radio button to am, andthat of the PM button to pm. We also drag a text box and a label to this tab sothat the user can describe the appointment briefly, and we set the (Name)property of the text box to description.
We click Debug, Start to run the application. Figure 12.13 shows the Add tabthat appears when this application starts running. Notice that the controlsappear above the keyboard that the user has displayed by clicking the key-board icon in the lower-left corner. A button allows the user to add anappointment. We set its Text property to Add Appointment and its (Name)property to add.
We add a ListBox to the View tab to display the list of appointments and aSave button to allow the user to save the updated list of appointments in anXML file. We set the (Name) property of the list box to appointments and thatof the Save button to save. The application will initialize the list box withthe current list of appointments when it loads. In Example12-2, we do notkeep the list in chronological order or include dates. These features are leftas exercises for the reader.
When the user clicks the Add Appointment button, the event handler addsthe appointment to the list box. Double-clicking on the button in the

308 CHAPTER 12 Mobile Applications
Figure 12.13 Adding an appointment.
Visual Studio .NET design displays the template for the event handler. Withour added code it is
private void add_Click(object sender, System.EventArgs e)
{String amOrPm = "";if(am.Checked)
amOrPm = " AM -- ";else
amOrPm = " PM -- ";appointments.Items.Add(time.SelectedItem
+ amOrPm + description.Text);}
The event-handling code for the button sets the amOrPm string to either AM orPM depending upon which radio button the user checked. Then it adds tothe list box a string composed of the time followed by the description theuser entered in the text box.
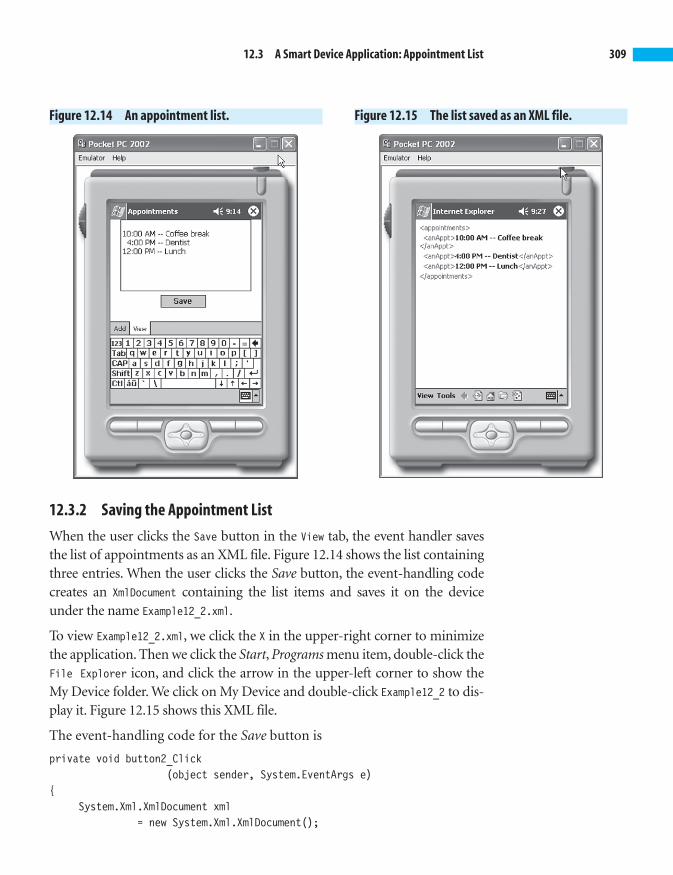
12.3 A Smart Device Application: Appointment List 309
12.3.2 Saving the Appointment List
When the user clicks the Save button in the View tab, the event handler savesthe list of appointments as an XML file. Figure 12.14 shows the list containingthree entries. When the user clicks the Save button, the event-handling codecreates an XmlDocument containing the list items and saves it on the deviceunder the name Example12_2.xml.
To view Example12_2.xml, we click the X in the upper-right corner to minimizethe application. Then we click the Start, Programs menu item, double-click theFile Explorer icon, and click the arrow in the upper-left corner to show theMy Device folder. We click on My Device and double-click Example12_2 to dis-play it. Figure 12.15 shows this XML file.
The event-handling code for the Save button is
private void button2_Click(object sender, System.EventArgs e)
{System.Xml.XmlDocument xml
= new System.Xml.XmlDocument();
Figure 12.14 An appointment list. Figure 12.15 The list saved as an XML file.

310 CHAPTER 12 Mobile Applications
System.Xml.XmlElement top= xml.CreateElement("appointments");
xml.AppendChild(top);foreach (String s in listBox1.Items){if (s != "){
System.Xml.XmlElement appt= xml.CreateElement("anAppt");
appt.InnerText = s;top.AppendChild(appt);
}}xml.Save("Example12_2.xml");
}
The first line of the event-handling code creates the XML document. Thenext two lines add the root tag <appointments> to the XML document. Theforeach loop takes each string from the list box, adds it as the text of an<anAppt> tag, and makes that tag a child of the root. The last line saves thecompleted document on the device.
12.3.3 Initializing the Appointment List
When the user starts the application we want to load the Example12-2.xmlfile and add each appointment it contains to the ListBox in the View tab.Double-clicking on the form displays the template for the Form1_Loadmethod. We add our code to the template, so the completed method is
private void Form1_Load(object sender, System.EventArgs e){
if (System.IO.File.Exists("Example12_2.xml")){System.Xml.XmlDocument doc
= new System.Xml.XmlDocument();doc.Load("Example12_2.xml");System.Xml.XmlElement root = doc.DocumentElement;System.Xml.XmlNodeList item
= root.GetElementsByTagName("anAppt");for (int i = 0; i < item.Count; i++)
appointments.Items.Add(item[i].FirstChild.OuterXml);
}}

The Toolbox in the VisualStudio .NET design con-tains a list of device con-trols that we can use tobuild smart device appli-cations. Using a TabCon-trol lets us break theuser interface into multi-ple screens to best use thelimited size of mobiledevices. We can save datain an XML file stored onthe device.
The BIG Picture
12.4 Accessing Web Services 311
The code starts by checking that the file exists. Until the user saves anappointment list, this file probably will not be available. When it is, we cre-ate a new XmlDocument and load the file into it. The DocumentElement propertyholds the root element of the document. That would be the <appointments>tag in our example.
Next we get a list of all <anAppt> tags that are nested in this root. These forman XmlNodeList. The Count property contains the size of that list. We use a forloop to get each item from the list of <anAppt> tags. The FirstChild propertyof each holds an XmlText node that contains the text inside the <anAppt> tag,which is the appointment we want to add to the list box. The OuterXml prop-erty gets the content of the tag, which is the text we want to add to the listbox. The Items property contains the collection of items in the list box. TheAdd method adds an item to this collection.
Test Your Understanding
4. In designing a smart device application, why might we choose notto add controls to the lower part of the screen?
5. Which method can we use to find all the <anAppt> tags in anXML document?
12.4 Accessing Web Services
If we have configured our Pocket PC to connect to the Internet, we canaccess Web services from it. Example12-3 lets the user choose whether toaccess the Temperature Web service hosted on www.xmethods.com and dis-cussed in Chapter 11, or the Reverse Web service hosted locally and devel-oped in Chapter 11. Figure 12.16 shows the initial screen in which the userhas selected the Temperature Web service and entered a zip code.
We create Example12-3 as a Smart Device Application. From top to bottom,the device controls we add to the form and the properties we set for each are
Label
Text Choose a web service
Radio Button
Text Temperature
(Name) temperature
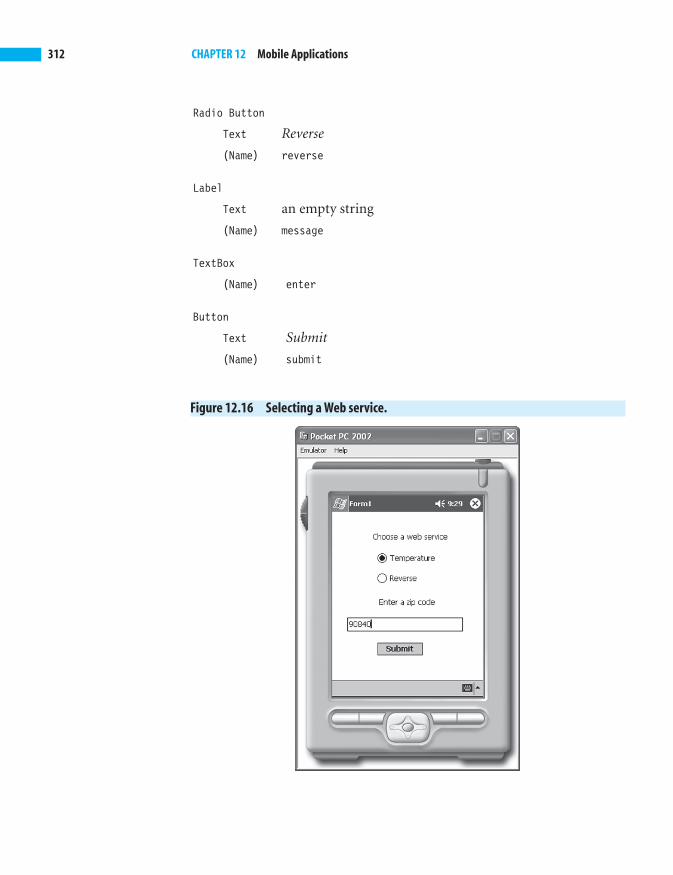
312 CHAPTER 12 Mobile Applications
Radio Button
Text Reverse
(Name) reverse
Label
Text an empty string
(Name) message
TextBox
(Name) enter
Button
Text Submit
(Name) submit
Figure 12.16 Selecting a Web service.
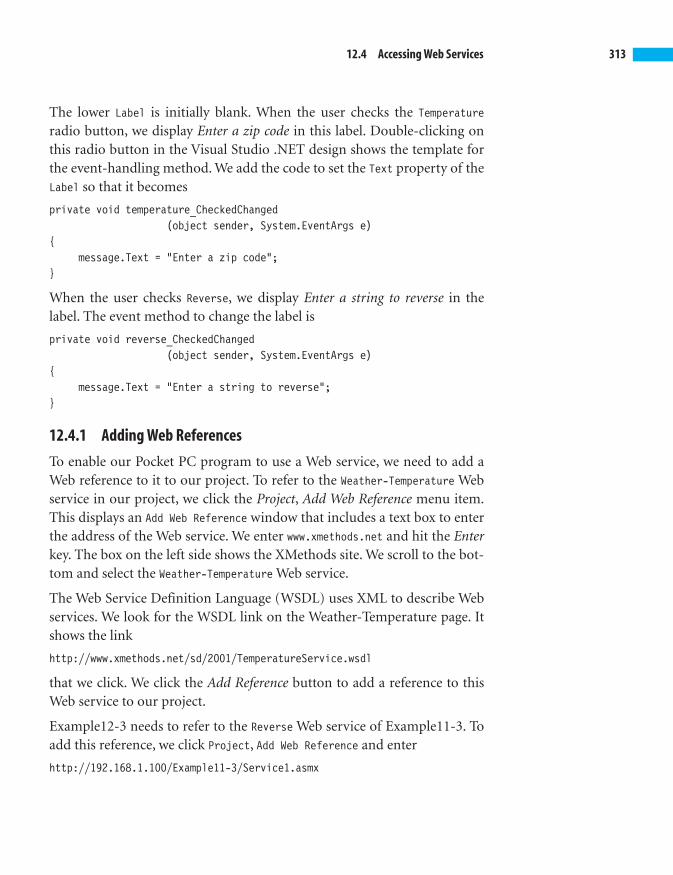
12.4 Accessing Web Services 313
The lower Label is initially blank. When the user checks the Temperatureradio button, we display Enter a zip code in this label. Double-clicking onthis radio button in the Visual Studio .NET design shows the template forthe event-handling method. We add the code to set the Text property of theLabel so that it becomes
private void temperature_CheckedChanged(object sender, System.EventArgs e)
{message.Text = "Enter a zip code";
}
When the user checks Reverse, we display Enter a string to reverse in thelabel. The event method to change the label is
private void reverse_CheckedChanged(object sender, System.EventArgs e)
{message.Text = "Enter a string to reverse";
}
12.4.1 Adding Web References
To enable our Pocket PC program to use a Web service, we need to add aWeb reference to it to our project. To refer to the Weather-Temperature Webservice in our project, we click the Project, Add Web Reference menu item.This displays an Add Web Reference window that includes a text box to enterthe address of the Web service. We enter www.xmethods.net and hit the Enterkey. The box on the left side shows the XMethods site. We scroll to the bot-tom and select the Weather-Temperature Web service.
The Web Service Definition Language (WSDL) uses XML to describe Webservices. We look for the WSDL link on the Weather-Temperature page. Itshows the link
http://www.xmethods.net/sd/2001/TemperatureService.wsdl
that we click. We click the Add Reference button to add a reference to thisWeb service to our project.
Example12-3 needs to refer to the Reverse Web service of Example11-3. Toadd this reference, we click Project, Add Web Reference and enter
http://192.168.1.100/Example11-3/Service1.asmx

If we have configured ourPocket PC to connect tothe Internet, we canaccess Web services fromit.To enable our Pocket PCprogram to use a Webservice, we need to add aWeb reference to it to ourproject.
The BIG Picture
314 CHAPTER 12 Mobile Applications
in the Address box that appears in the Add Web Reference window. When theservice is loaded we click the Add Reference button. When developing usingthe .NET Compact Framework, we need to use a numerical address,192.169.1.100 on the author’s machine, instead of localhost.
The Submit button will submit the data to either Web service. In its eventhandler we determine which radio button the user checked and call thecorresponding Web service. The code is
private void submit_Click(object sender, System.EventArgs e)
{if (temperature.Checked){Example12_3.net.xmethods.www.TemperatureService t= newExample12_3.net.xmethods.www.TemperatureService();
message.Text = "The temperature is "+ t.getTemp(enter.Text).ToString();
}else if (reverse.Checked){Example12_3.WebReference.Service1 r
= new Example12_3.WebReference.Service1();message.Text = r.Reverse(enter.Text);
}}
If the user checks the temperature radio button, we create an object to accessthe Temperature Web service and display the result of the call of the getTempmethod that returns the temperature in the zip code entered.
If the user checks the reverse radio button, we create an object to access theReverse Web service and display the reverse of the string entered. Figure12.17 shows a successful use of the Reverse service.
Test Your Understanding
6. What do we need to add to a project to enable a Pocket PC pro-gram to use a Web service?

12.5 Summary 315
Figure 12.17 Using the ReverseWeb service.
12.5 Summary■ Devices with limited capabilities can execute Web applications in
which the code for the application resides on the server and a microbrowser executes the client on the small device. Devices with morecapabilities can run stand-alone applications using the .NET Com-pact Framework, a version of .NET design for mobile devices. Manyof the mobile controls are similar to controls we have used in build-ing .NET Windows and Web applications for personal computers.
■ Starting with the 2003 edition,Visual Studio .NET includes an emula-tor for a Pocket PC, which serves as a test model for the actual device.The Pocket PC option represents a specific version of the WindowsCE platform that is designed primarily for personal informationmanagement devices that have more memory and screen area than

316 CHAPTER 12 Mobile Applications
some of the smaller mobile devices.Windows CE .NET is a more gen-eral platform targeting a wide array of devices, including cell phones.
■ If we have configured our Pocket PC to connect to the Internet, wecan access Web services from it. To enable our Pocket PC program touse a Web service, we need to add a Web reference to it to our project.
12.6 Programming Exercises
12.1 Modify Example12-1 to allow the user to choose either the Red,Green, or Blue colors for the text.
12.2 Modify Example12-2 to keep the appointments with the earlierones listed first.
12.3 Modify Example12-2 to include dates for the appointments.
12.4 Modify Example12-3 to include a list of zip codes for the user tochoose from.
12.5 Write a Web application that will allow the user to get a list of luckynumbers from 1 through 49. The user should select how manynumbers are desired. The numbers should be randomly chosen.
12.6 Write a smart device application in which the user can enter aname and phone number and store them on the device. The usercan choose from a list of names to retrieve the associated phonenumber from stored memory.
12.7 Write a smart device application that will allow the user to choosefrom two Web services at the www.xmethods.com site and to usewhichever service was selected.
12.8 Write a Web application that allows the user to choose a zip codeand returns a list of three restaurants located in that zip code.

13CHAPTERCrystal ReportsCrystal Reports for Visual Studio .NET is the standard reporting tool for Visual
Studio .NET. We can host reports on Web and Windows platforms and publish
Crystal reports as Report Web Services on a Web server. Visual Studio .NET
includes Crystal Reports for Visual Studio .NET.
Chapter Objectives:■ Create a simple report
■ Add features to a report
■ Use data sets as a report source
■ Expose reports as Web services
■ Enable users to interact with a report
13.1 Creating a Simple Report
Example13-1 builds a Windows application to display Northwind productdata. We start by clicking New, Project, selecting the Visual C# Projects
project type and then the Windows Application template. Choosing the Loca-tion and entering Example13-1 in the Name field, we click OK. Before addingcontrols to the form, we will create a report.
13.1.1 Adding and Creating a Report
To add a report to the project, we click on File, Add New Item, select theCrystal Report template, and click Open, which displays the Crystal Report

318 CHAPTER 13 Crystal Reports
Figure 13.1 Crystal Report Gallery.
Gallery screen shown in Figure 13.1. The three choices for creating a Crys-tal Report document are:
Using the Report Expert Guides report creation. Adds choices toReport Designer
As a Blank Report Opens the Report Designer
From an Existing Report Uses the same design as another report
The choices for the report expert are:
Standard Typical report
Form Letter Letter combining text and data
Form Includes a letterhead or logo; used for invoices
Cross-Tab Contains a summarized grid
Subreport Contains a second report
Mail Label Contains multiple columns for address labels
Drill Down Displays summary and reveals details by drilling down

13.1 Creating a Simple Report 319
Figure 13.2 The Standard Report Expert.
Example13-1 accepts the defaults using the report expert with the standardreport. Figure13-2 shows the Standard Report Expert screen that appears. Ithas eight tabs that allow many report building options.
Because we want to use Northwind data, we select the OLE DB (ADO) datasource. Clicking on the plus sign, +, at its left displays the OLE DB Providerscreen. We select Microsoft Jet 4.0 OLE DB Provider and click Next. In theConnection Information screen in the Database Name field, we browse to findthe path to Northwind.mdb and click Next. We click Finish in the AdvancedInformation screen.
The display returns to the Standard Report Expert screen that now shows theNorthwind database as an OLE DB (ADO) data source. Clicking on the plussign, +, to the left of its Tables item shows a list of the tables in the North-wind database. We select the Products table and click the Insert Table buttonto add Products to the Tables in report list on the right side of the screen.
Clicking Next displays the Fields tab of the Standard Report Expert shown inFigure 13.3, in which we have selected the ProductId, ProductName, UnitPrice,and UnitsInStock fields. We held the Ctrl key down while making selectionsto allow multiple selections. Clicking the Add button moves the four
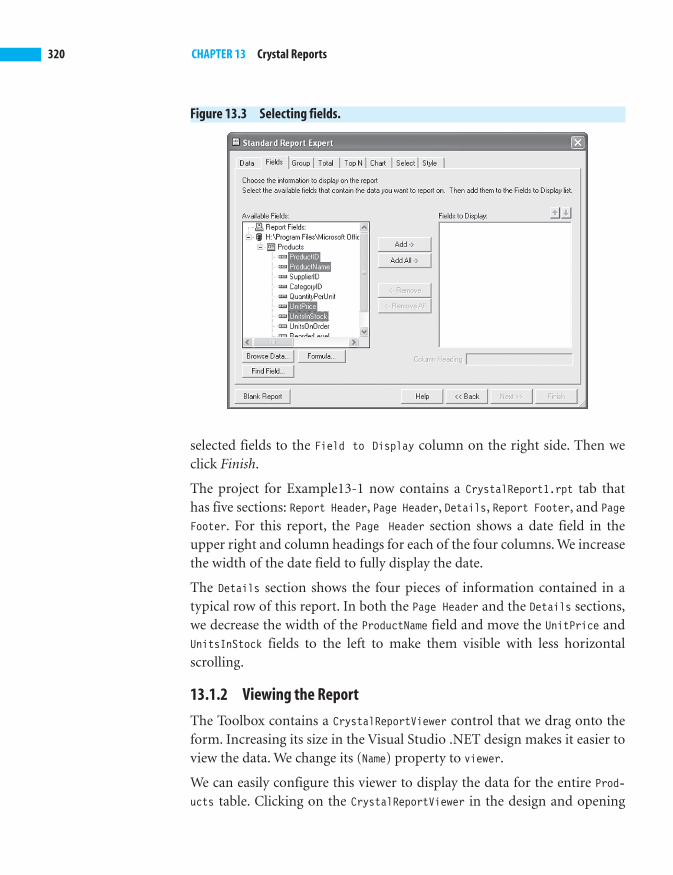
320 CHAPTER 13 Crystal Reports
Figure 13.3 Selecting fields.
selected fields to the Field to Display column on the right side. Then weclick Finish.
The project for Example13-1 now contains a CrystalReport1.rpt tab thathas five sections: Report Header, Page Header, Details, Report Footer, and PageFooter. For this report, the Page Header section shows a date field in theupper right and column headings for each of the four columns. We increasethe width of the date field to fully display the date.
The Details section shows the four pieces of information contained in atypical row of this report. In both the Page Header and the Details sections,we decrease the width of the ProductName field and move the UnitPrice andUnitsInStock fields to the left to make them visible with less horizontalscrolling.
13.1.2 Viewing the Report
The Toolbox contains a CrystalReportViewer control that we drag onto theform. Increasing its size in the Visual Studio .NET design makes it easier toview the data. We change its (Name) property to viewer.
We can easily configure this viewer to display the data for the entire Prod-ucts table. Clicking on the CrystalReportViewer in the design and opening

13.1 Creating a Simple Report 321
Figure 13.4 Display information for all products.
the Properties window, we browse to set the ReportSource property to thepath to the CrystalReport1.rpt report contained in the current project. Weset the DisplayGroupTree property to False because we are not grouping datain this report. Figure 13.4 shows how the report looks so far. To allow theviewer to resize when the user resizes the form, we change its Anchor prop-erty to anchor it to all four edges of the form.
13.1.3 Filtering
To make the report more useful, we can allow the user to choose a Company-Name from the list of Suppliers and filter the data to only report Northwindproducts from that supplier. We add a ComboBox to allow the user to select aCompanyName and change the report to only display Northwind productsfrom the chosen company.
We drag a Label and a ComboBox onto the form, set the Text property of theLabel to Select a Supplier:, set the Text property of the ComboBox to theempty string, and set its (Name) property to supplier. We anchor each ofthese controls to Top only rather than Top, Left.
To display the current list of Suppliers, we will connect to the Northwinddatabase. We add an OleDbDataAdapter to the form and set its (Name) prop-erty to northwindAdapter. We use the Data Adapter Configuration Wizard asin earlier chapters. In the Add Table screen of the Query Builder, we choosethe Suppliers table. In the CheckBoxList of Suppliers, we select CompanyName

We used the Report Expertwith the Standard format.We use a Crystal-
ReportViewer control toview a report. We can filterdata by setting the Selec-tionFormulaproperty.
The BIG Picture
322 CHAPTER 13 Crystal Reports
and SupplierID as the fields to include in the query. We click the Data, Gen-erate Dataset menu item to generate a data set to hold the query results andchange its (Name) property to suppliersData.
We will fill the data set when the form is initialized. Double-clicking on theform itself displays the Form1_Load template. We add C# code, so it becomes
private void Form1_Load(object sender, System.EventArgs e){
oleDbDataAdapter1.Fill(suppliersData);}
We need to display this data set in the combo box. We do this by setting theDataSource property for comboBox1 to suppliersData.Suppliers. We would liketo display the company name in the combo box but use the correspondingsupplier id to find the products from that supplier. To do this, we select theComboBox and in the Properties window set the DisplayMember property toCompanyName and the ValueMember property to SupplierID.
When the user selects a company name, we want to alter the report to dis-play only products from the selected supplier. We double-click on the Com-boBox to display the event-handler template and fill in the code, to give
private void supplier_SelectedIndexChanged(object sender, System.EventArgs e)
{viewer.SelectionFormula
= "{Products.SupplierID} = "+ supplier.SelectedValue;
viewer.RefreshReport();}
The first line of code sets the SelectionFormula property of the CrystalRe-portViewer. The selection formula determines which records are selected forthe report. We require that the SupplierID of the product be the same as theSupplierID corresponding to the CompanyName that the user selected in theComboBox. To write the condition we enclose Products.Suppliers in braces.Figure 13.5 shows the form with the report. The second line of coderefreshes the report to reflect the new selection formula.
Test Your Understanding
1. What choices of report type do we have when using the ReportExpert?

13.2 Adding Features to a Report 323
Figure 13.5 Selecting products from one supplier.
2. Which property of a CrystalReportViewer control holds the pathto the report it displays?
3. Which property of a CrystalReportViewer control can we set toenable the report to choose which rows of data to display?
13.2 Adding Features to a Report
We can arrange the report by groups, add column subtotals, and add com-puted fields. Special formatting can highlight or distinguish selected rows.The report of Example13-2 illustrates these features using the OrderDetailstable from the Northwind database.
Following the steps used in creating the report of Example13-1, we create aWindows Application project. To add a report to the project we click onFile, Add New Item, select the Crystal Report template and click Open,which displays the Crystal Report Gallery screen. Example13-2 accepts thedefaults using the report expert with the standard report.
13.2.1 The Data Tab
Because we want to use Northwind data we select the OLE DB (ADO) datasource in the Standard Report Expert screen that appears. Clicking on theplus sign, + , at its left displays the OLE DB Provider screen. We select MicrosoftJet 4.0 OLE DB Provider and click Next. In the Connection Information screenin the Database Name field, we browse to find the path to Northwind.mdb,
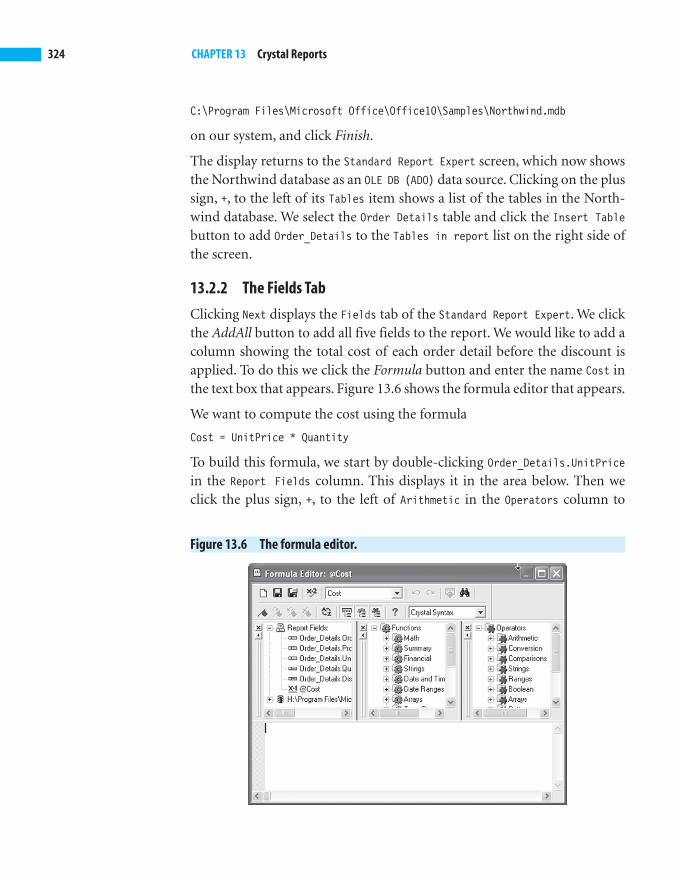
324 CHAPTER 13 Crystal Reports
Figure 13.6 The formula editor.
C:\Program Files\Microsoft Office\Office10\Samples\Northwind.mdb
on our system, and click Finish.
The display returns to the Standard Report Expert screen, which now showsthe Northwind database as an OLE DB (ADO) data source. Clicking on the plussign, +, to the left of its Tables item shows a list of the tables in the North-wind database. We select the Order Details table and click the Insert Tablebutton to add Order_Details to the Tables in report list on the right side ofthe screen.
13.2.2 The Fields Tab
Clicking Next displays the Fields tab of the Standard Report Expert. We clickthe AddAll button to add all five fields to the report. We would like to add acolumn showing the total cost of each order detail before the discount isapplied. To do this we click the Formula button and enter the name Cost inthe text box that appears. Figure 13.6 shows the formula editor that appears.
We want to compute the cost using the formula
Cost = UnitPrice * Quantity
To build this formula, we start by double-clicking Order_Details.UnitPricein the Report Fields column. This displays it in the area below. Then weclick the plus sign, +, to the left of Arithmetic in the Operators column to

13.2 Adding Features to a Report 325
Figure 13.7 A formula for the cost.
show the arithmetic operators. Double-clicking Multiply adds the multipli-cation operator to the formula. To complete the formula, we double-clickOrder_Details.Quantity. Figure 13.7 shows the completed formula.
We click the third button from the left in the Formula Editor to save the for-mula and close the editor. In the Standard Report Expert, we select the Cost fieldand click the Add button to add it to the Fields to Display list on the right.
13.2.3 The Group Tab
Clicking Next displays the Group tab. We will group by the amount of dis-count, so we select Order_Details.Discount and click Add and then Next. Acombo box allows four choices for the sort order: in ascending order, indescending order, in specified order, and in original order. We select indescending order and click Next.
13.2.4 The Total Tab
The Total tab displays a screen that enables us to choose one or more fieldsto summarize. We choose to summarize the Cost field, making sure that it isthe only field in the Summarized Fields list on the right. The Summary Typecombo box contains a large number of choices for the type of summary.These include sum, average, maximum, minimum, and count among many others.We choose sum for this example.
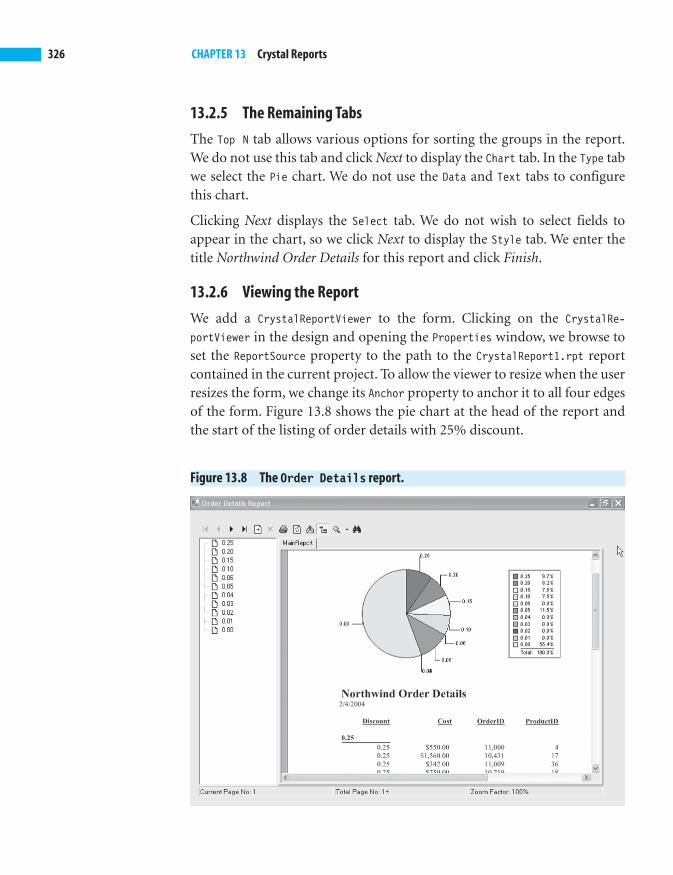
326 CHAPTER 13 Crystal Reports
Figure 13.8 The Order Details report.
13.2.5 The Remaining Tabs
The Top N tab allows various options for sorting the groups in the report.We do not use this tab and click Next to display the Chart tab. In the Type tabwe select the Pie chart. We do not use the Data and Text tabs to configurethis chart.
Clicking Next displays the Select tab. We do not wish to select fields toappear in the chart, so we click Next to display the Style tab. We enter thetitle Northwind Order Details for this report and click Finish.
13.2.6 Viewing the Report
We add a CrystalReportViewer to the form. Clicking on the CrystalRe-portViewer in the design and opening the Properties window, we browse toset the ReportSource property to the path to the CrystalReport1.rpt reportcontained in the current project. To allow the viewer to resize when the userresizes the form, we change its Anchor property to anchor it to all four edgesof the form. Figure 13.8 shows the pie chart at the head of the report andthe start of the listing of order details with 25% discount.
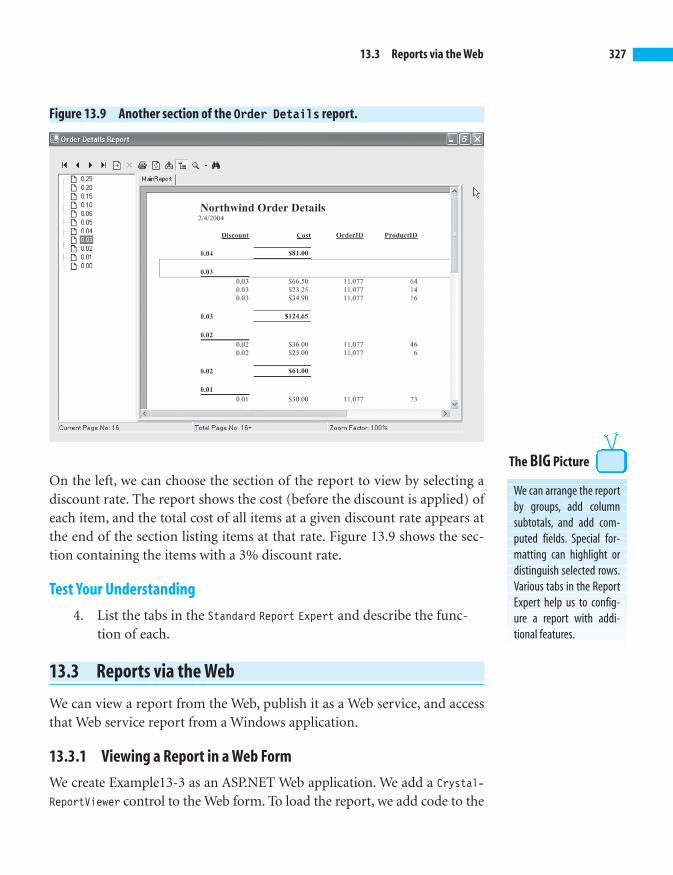
We can arrange the reportby groups, add columnsubtotals, and add com-puted fields. Special for-matting can highlight ordistinguish selected rows.Various tabs in the ReportExpert help us to config-ure a report with addi-tional features.
The BIG Picture
13.3 Reports via the Web 327
Figure 13.9 Another section of the Order Details report.
On the left, we can choose the section of the report to view by selecting adiscount rate. The report shows the cost (before the discount is applied) ofeach item, and the total cost of all items at a given discount rate appears atthe end of the section listing items at that rate. Figure 13.9 shows the sec-tion containing the items with a 3% discount rate.
Test Your Understanding
4. List the tabs in the Standard Report Expert and describe the func-tion of each.
13.3 Reports via the Web
We can view a report from the Web, publish it as a Web service, and accessthat Web service report from a Windows application.
13.3.1 Viewing a Report in a Web Form
We create Example13-3 as an ASP.NET Web application. We add a Crystal-
ReportViewer control to the Web form. To load the report, we add code to the

328 CHAPTER 13 Crystal Reports
Figure 13.10 Viewing a report on the Web.
Page_Load method, which we can access by clicking the WebForm1.aspx.cs tab. Ifthat tab is not showing, we show it by clicking the View, Code menu item. Inthe Page_Load method, we need to set the ReportSource property for the viewer.We will view the report of Example13-2. The Page_Load method code is
private void Page_Load(object sender, System.EventArgs e){CrystalReportViewer1.ReportSource= "c:\\booknet\\ch13\\Example13-2\\CrystalReport1.rpt";
}
Entering http://localhost/Example13-3/WebForm1.aspx in the browser dis-plays the report shown in Figure 13.10.
13.3.2 A Web Service Report
We create Example13-4 as an ASP.NET Web Service. We will publish the OrderDetails report of Example13-2 as a Web service. In the Visual Studio .NETdesign, we click the File, Add Existing Item menu item and browse to findthe report of Example13-2.

13.3 Reports via the Web 329
To enable this report as a Web service, we first click the View, SolutionExplorer menu item. Then in the Solution Explorer we right-click on thereport entry, CrystalReport1.rpt in this example, and click Publish as webservice. Visual Studio .NET adds a CrystalReport1Service.asmx file to theSolution Explorer, which provides the report as a Web service.
13.3.3 Accessing the Web Service
To access the Web service we created in Example13-4, we create Exam-ple13-5 as a Windows Application. We click the Project, Add Web Referencemenu item to add a reference to the Web service of Example13-4. We enter
http://localhost/Example13-4/CrystalReport1Service.asmx
in the Address field of the Add Web Reference screen, and click the Add Refer-ence button when it appears.
To view the Web service report, we add a CrystalReportViewer control to theform. Double-clicking on the form displays the Form1_Load method inwhich we set the ReportSource property of the viewer to an instance of theWeb service. The code is
private void Form1_Load(object sender, System.EventArgs e){
crystalReportViewer1.ReportSource= new Example13_5.localhost.CrystalReport1Service();
}
Figure 13.11 shows the Windows application of Example13-5 displayingthe report obtained from the Web service of Example13-4.
Figure 13.11 An Order DetailsWeb service client.

330 CHAPTER 13 Crystal Reports
We can view a report fromthe Web,publish it as a Webservice,and access that Webservice report from a Win-dows application.
The BIG Picture Test Your Understanding
5. Which C# method do we use to initialize a Web application?
6. Describe the steps used to publish a report as a Web service.
13.4 Summary
Crystal Reports for Visual Studio .NET is the standard reporting tool forVisual Studio .NET. We can host reports on Web and Windows platformsand publish Crystal reports as Report Web Services on a Web server. VisualStudio .NET includes Crystal Reports for Visual Studio .NET.
The Report Expert displays a set of tabs that we use to configure reports.The CrystalReportViewer control enables us to view a report from a Win-dows application or a Web form. By using the Data Adapter ConfigurationWizard, we can incorporate information from a database in a report.
13.5 Programming Exercises
13.1 Modify Example13-1 to filter the data by the category of the prod-uct rather than the supplier.
13.2 Modify Example13-2 to show the discounted total cost rather thanthe gross total cost.
13.3 Modify Example13-2 to group by the quantity rather than the dis-count rate.
13.4 Write an application that displays a Crystal Report showing theNorthwind customers. It will list the company name, address, andcountry. Group by country.
13.5 Write a Web application that will view the report of Exercise 1.
13.6 Allow the user to filter the report of Exercise 4 by Contact Title.The user will select a contact title from a ComboBox and the reportwill display only those customers with the selected title.
13.7 Enable the report of Exercise 3 as a Web service and write a Webapplication that accesses that Web service.
13.8 Add a pie chart to the report of Exercise 4.

AAPPENDIXC# Keywords
abstract as base bool break
byte case catch char checked
class const continue decimal default
delegate do double else enum
event explicit extern false finally
fixed float for foreach goto
if implicit in int interface
internal is lock long namespace
new null object operator out
override params private protected public
readonly ref return sbyte sealed
short sizeof stackalloc static string
struct switch this throw true
try typeof uint ulong unchecked
unsafe ushort using virtual void
volatile while

This page intentionally left blank

BAPPENDIXOperator Precedence Table
Highest
Primary [ ] . () ++ -- new
Unary ++(prefix) --(prefix) + - ~ ! (T)x
Multiplicative * / %
Additive + -
Shift << >>
Relational < > <= >= is
Equality == !=
Bitwise, Logical AND &
Bitwise, Logical XOR ^
Bitwise, Logical OR |
Conditional AND &&
Conditional OR ||
Conditional ?:
Assignment = += -= *= /= %= >>= <<= &= ^= |=
Lowest

This page intentionally left blank

CAPPENDIXThe ASCII Character SetThe first 32 characters and the last one are control characters. We labelthose control characters that we use in the text.
0 32 blank 64 @ 96 `1 33 ! 65 A 97 a2 34 " 66 B 98 b3 35 # 67 C 99 c4 36 $ 68 D 100 d5 37 % 69 E 101 e6 38 & 70 F 102 f7 39 ’ 71 G 103 g8 \b 40 ( 72 H 104 h9 \t 41 ) 73 I 105 i10 \n 42 * 74 J 106 j11 43 + 75 K 107 k12 44 , 76 L 108 l13 \r 45 - 77 M 109 m14 46 . 78 N 110 n15 47 / 79 O 111 o16 48 0 80 P 112 p17 49 1 81 Q 113 q18 50 2 82 R 114 r19 51 3 83 S 115 s20 52 4 84 T 116 t21 53 5 85 U 117 u22 54 6 86 V 118 v23 55 7 87 W 119 w24 56 8 88 X 120 x25 57 9 89 Y 121 y26 58 : 90 Z 122 z27 59 ; 91 [ 123 {28 60 < 92 \ 124 |29 61 = 93 ] 125 }30 62 > 94 ^ 126 ~31 63 ? 95 _ 127

This page intentionally left blank

ANSWERSAnswers to Odd-Numbered Test Your Understanding Exercises
Chapter 2
1. Size, 300 � 300
3. BackColor, Cursor, Font, ForeColor, RightToLeft, and Text occurin all three.
BackgroundImage and FormBorderStyle are Form propertiesonly.
BorderStyle and TextAlign occur in TextBox and Label.
Lines and ScrollBars occur only in TextBox.
Image, ImageAlign, ImageIndex, ImageList, and UseMnemonicoccur only in Label.
5. The Form fills the entire screen.
7. Fill
9. It remains at the left end of the screen.
Chapter 3
1. CheckedChanged
3. LinkBehavior
5. The user would only be able to select one of the five radio but-tons, and not one from each group.
7. The Normal value provides a square box for the user to check. TheButton value omits the square box and requires the user to clickthe check box like a button.
9. SelectedIndexChanged
11. Timer
13. Set the DecimalPlaces property to 2.
15. Hold the Ctrl key down and press the S key.
17. FileName
19. ShowDialog

Chapter 4
1. a, b, f, g, and j are valid. c, d, e, and k use invalid characters.h starts with a digit, i is a keyword.
3. name, type
5. int
7. a. I like
to write C# programs.
b. Ali Baba said, “Open, Sesame!”
c. Find 3\4 of 24
9. a. 3456.79
b. 0.00
c. 0.10
d. 1234567890.99
e. �234567.77
11. a. 345,678.9%
b. 0.0%
c. 9.9%
d. 123,456,789,098.7%
e. �23,456,776.5%
13. George George
where there are eight spaces in between
15. a. 4
b. �19
c. 4
d. 9
e. �2
f. 0
g. 8
h. �3
i. 1
17. a. 234 < 52
b. 435 != 87
c. �12 == �12
d. 76 >= 54
338 Answers

19. x=5 assigns 5 to x. x==5 tests whether x is equal to 5.
21. Many correct answers are possible, for example
a. x=2, y=7
b. x=0, y = any integer
c. x = 20, y = any integer
d. x=11, y =0
Chapter 5
1. a, b, and c. if (x == 12) y += 7;
3. a. if (y <= 6)
z += 5;
b. if (x != 0)
y+=5;
else
z = y + 9;
5. String category = “”;
if (amount >= 1 && amount <= 99)
category = “Contributor”;
else if (amount >+ 100 && amount < 499)
category = “Supporter”;
else if (amount >= 500 && amount <= 999)
category = “Patron”;
else if (amount >= 1000)
category = “Benefactor”;
7. a. 8
b. 7
c. 6
d. 7
9. a. 9
b. 6
c. 7
d. 9
e. 8
f. 9
g. 9
Answers 339

11. a. } should be )
b. test condition must be bool valued
c. =! should be !=
13. a. does not terminate
b. terminates
c. does not terminate
15. int sum = 0;
for(int i = 1; i <= 10; i++)
sum += 1;
17. int sum = 0;
for(int i = 9; i >= 3; i--)
sum += i;
19. 28
21. 26
23. 55
25. 0
27. 72
Chapter 6
1. a. 9
b. 3
3. Count
5. a. 1
b. 4
c. 4
d. �1
e. 6
f. �1
7. System
Chapter 7
1. ProductID is unique for each product, whereas two or more prod-ucts may have the same ProductName.
340 Answers

3. System.Data.OleDb.OleDbDataReader
5. DataGrid
7. Diagram, Grid, SQL, and Results
Chapter 8
1. Hypertext Transfer Protocol (HTTP)
3. Hypertext Markup Language (HTML)
5. To link to another document.
7. The code behind the file contains the C# code that initializes thepage and the event-handler methods.
9. MultiLine
11. �1
13. OleDbCommand
15. AutoPostBack
17. IsPostBack
Chapter 9
1. ControlToValidate
3. MaximumValue, MinimumValue, and Type
5. Both are valid
7. ControlToCompare and ControlToValidate
9. Set the Type property to Double
11. (123)456-7890 or 123-456-7890
Chapter 10
1. They are all well-formed
3. The schema of part (a) is valid.
5. DataSet
7. DocumentElement
9. <xsl:apply-templates></xsl:apply-templates>
Answers 341

Chapter 11
1. Web Service Definition Language
3. [WebMethod]
Chapter 12
1. Windows CE
3. Windows CE
5. GetElementsByTagName
Chapter 13
1. Standard, Form Letter, Form, Subreport, Mail, Label, and Drill Down
3. SelectionFormula
5. Form1_Load, where Form1 is the name of the form.
342 Answers

INDEXSYMBOLS! 102 != 100 % 96%= 99 && 101 * 96*= 99+
addition 96concatenation 60
++ 99+= 99 - 96— 100-= 99 / 96/* 99 < 100<= 100 == 100> 100 >= 100_ 81|| 101
Aanchoring, 25, 27-28, 39AND, 101-102arguments, 73arithmetic expressions, 84, 96-100arrays, 139-149
Length property, 140variables, 148
ASCII, 82, 88, 335ASP .NET, 195assignment, 81, 83-84, 87, 99associativity, 98attributes, 11
BBASIC, 11binary operator, 96block, 112-113, 134bool, 88BorderStyle, 43-44
FixedSingle, 43Fixed3D, 44
break statement, 124browser, 198, 200, 216Button, 34-38
BackColor, 36Click event, 37Text, 35
CC, 10, 11C#, 1, 11
case-sensitive, 81 expressiveness, 12features, 12flexibility, 12power, 12productivity, 12safety, 12
C++, 11case, 123char, 88-89character set, 82characters
escape, 88special, 88-89
CheckBox, 53-58, 62Appearance, 54BackgroundImage, 54CheckAlign, 54CheckChanged event, 55-56Checked, 143-144FlatStyle, 55

344 Index
Image, 54ImageAlign, 54TextAlign, 54
class method, 152client, 195, 216
client-side validation, 237COBOL, 10code, 22-23code behind, 195, 202-203collection
of links, 49-50ColorDialog, 75-77
Click event, 76-77Color, 76
ComboBox, 61-62DropDownStyle, 61Items, 62
commanddatabase, 169, 175-176, 179
CompareValidator, 235ControlToCompare, 236Operator, 235
compilers, 9components, 11, 12concatenation, 60condition, 110conditional operators, 101-102connection
database, 169, 173-174, 179constants, 87constructor, 147, 164context-sensitive help, 37-38, 39controls, 2
adding, 19-25moving, 33-34positioning, 25-33sizing, 33-34
Crystal Reports, 7, 317-330adding features, 323-327as a Web service, 328-330creating, 317-320CrystalReportViewer, 320-321filtering, 321-322reports via the Web, 327-330
SelectionFormula, 322viewing, 320-321, 326-328
Ddata adapter, 169, 179
Configuration Wizard, 180-182,187
Data Form Wizard, 183-187data link properties, 174data provider 173data reader, 169, 176 data set, 169, 179, 182-183data source, 179database, 169-192
connected model, 173-179 disconnected model, 179-187introductory example, 4-5, 6multiple tables, 187-191Web access, 208-216
DataGrid, 179, 182-183, 187AutoFormat, 209DataBind method, 210DataSource, 182
DataSet, 182-183, 187ReadXml method, 262
DateTimeNow, 67
DateTimePicker, 63-64, 67Format, 63-64MaxDate, 64MinDate, 64ShowUpDown, 64
decimal, 87-88decrement operator, 99, 100do statement, 133-134docking, 25, 31-33, 39Document Object Model (DOM),
260-263double, 87, 88
Eeditors, 9emulator
for Pocket PC, 302, 304-306for Windows CE, 302-303

Index 345
event-driven programming, 1-8, 14event handlers, 1
CheckChanged, 44-45, 55-56Click, 37, 70, 75, 76-77code, 22-23LinkClicked, 46-47, 50 SelectedIndexChanged, 59-61TextChanged, 23Tick, 66-67
execution, 24-25Extensible Markup Language
See XMLExtensible Stylesheet Language
(XSL), 263Extensible Stylesheet Language for
Transformations See XSLT
FF1 key, 38, 39, 143Field width, 92file dialogs, 72-75flow diagram
for, 129if, 111if-else, 112nested if-else, 119while, 126
Focus method, 145FontDialog, 24, 77-78
Click event, 77for statement, 128-130form, 2
BackColor, 18Text, 18
Format method, 89, 90, 92, 156format specifiers, 90-92formatting, 89-92formatting strings, 89, 95FORTRAN, 10
GGroupBox, 42, 47
Hhardware, 8-9help, 37-38hidden code, 164high-level languages, 9-10history
of programming languages, 10-11HTML, 5, 195, 196-200
anchor, 197attributes, 197image, 197limitations, 247-248tags, 196-198
HttpResponse, 216 Hypertext Markup Language
See HTML
Iidentifiers, 81, 87if statement, 110-111, 116
nested, 117, 124if-else statement, 111-112, 116
nested, 117pairing, 119
increment operator, 99indexer, 152, 162InitializeComponent method, 146instance, 163instance method,152instruction set, 9int, 83, 87, 88IntelliSense, 23-24, 256Internet Explorer, 46Internet Information Server (IIS), 200
JJava, 10, 11JavaScript, 238
Kkey
database, 171keyboard shortcut, 69keywords, 82, 87, 331
346 Index
LLabel, 21-22, 39
AutoSize, 24BorderStyle, 43Dock, 32Font, 24ForeColor, 24Name, 21Text, 21TextAlign, 29
Length, 60library classes, 162-164LinkLabel, 45-47
LinkBehavior, 48LinkClicked event, 46-47, 50LinkLabel.Link.LinkData, 50 Links, 49
LinkLabelLinkClickedEventArgs, 50Link, 51Link.LinkData, 51
ListBox, 58-61, 62, 141-142Items, 58-59Item.Add method, 178multiple selections, 141-142SelectedIndexChanged event, 59-61SelectedItem, 60SelectedItems, 142SelectionMode, 59Sorted, 59
ListItem Collection Editor, 204Load method, 177, 183logical complement, 102loop termination, 127-128
MMainMenu, 68-70, 78meaningful names, 21, 32MenuItem
Click event, 70Shortcut, 69
menus, 68-70MessageBox, 86metadata, 11, 12Microsoft Access, 170middle tier, 169, 195
mobile applications, 6, 295-316mobile devices, 295-296mobile operating systems
Pocket PC, 296, 300Windows CE, 296, 300
mobile Web applications, 298-306creating, 301-302
mobile Web form controlsCommand, 301Label, 301
MonthCalendar, 64
Nnamespace, 162-163.NET
Compact Framework, 295, 297-298, 300
components, 12class library, 162-164
new, 164newline, 87Northwind, 170-172NOT, 102null, 164NumericUpDown, 65, 67
DecimalPlaces, 65Maximum, 65Minimum, 65ThousandsSeparator, 65Value, 65
Oobject, 163, 164OleDbCommand, 175-176
CommandText, 175-176Connection, 175ExecuteReader method, 178
OleDbConnection, 173ConnectionString, 174Open method, 178Close method, 178
OleDbDataAdapter, 180Fill method, 183
OleDbDataReader, 170Close method, 178

Index 347
GetDecimal method, 178GetString method, 178Read method, 178
OpenFileDialog, 72-73, 77FileName, 72ShowDialog method, 72
operating system, 9operator precedence, 103OR, 101, 102overloading, 154
PPanel, 41Parse method
double, 105int, 86
PictureBox, 52-53, 62BorderStyle, 53SizeMode, 53Visible, 160
pixel, 19Pointer option, 20precedence, 97-98, 103, 333PrintDialog, 75, 77
Click event, 75PrintDocument, 75private, 146, 163Process, 46
Start method, 46processor, 8, 9project, 16-17
closing, 25code, 23creating, 26design, 23tabs, 23
Properties autohiding 19buttons, 17-18categories, 17changing, 18-19window, 17-18, 27, 38
property, 152, 162
Qquery, 171-172Query Builder tool, 172, 176, 181-182
RRadioButton, 41-45
CheckChanged event, 44-45Font.Bold, 43group, 41, 47-48
Random, 146Next method, 146
random numbers, 145-146RangeValidator, 231, 235
ControlToValidate, 232ErrorMessage, 232MaximumValue, 232MinimumValue, 232Type, 233
reference, 148, 164reference types, 139RegularExpressionValidator, 239
expression types, 239ValidationExpression, 240
relational databases, 170-172relational operators, 100-101RequiredFieldValidator, 227
InitialValue, 228ControlToValidate, 228
Response, 216, 224Redirect, 218redirecting, 216-217
RichTextBox, 70-71, 77LoadFile method, 71, 72RichTextScrollBars, 71SaveFile method, 71, 74ScrollBars, 71WordWrap, 71
RichTextBoxStreamType, 73
SSaveFileDialog, 72, 73-75, 77
FileName, 75 ShowDialog method, 72
schemas, 251-257creating, 252

348 Index
tag types, 251search, 144server, 195, 216session tracking, 195Smalltalk, 10smart device application, 306-311
accessing Web services, 311-315saving data, 309using tabs, 307-309
software, 9-10SqlDataAdapter, 180Start page, 15-16StatusBar, 66, 67String, 150-162
Chars, 152declaration, 151Format method, 89, 90, 92, 156immutable, 158IndexOf, 150, 154-155Length, 150 methods, 152-157Replace, 155Substring, 153ToLower, 153ToUpper, 33, 151Trim, 153
StringBuilder, 158-159Append, 159
Structured Query Language (SQL), 171switch statement, 122-124System.Diagnostics namespace, 46
TTextBox, 20-21, 39
Anchor, 27Cursor, 21Dock, 32event-handling code, 22-23, 30Name, 21Property categories, 21Text, 21
three-tiered architecture, 195Timer, 66-67
Interval, 66Tick event, 66-67
Toolbox, 12-13, 19-20, 39autohiding, 19categories, 19-20
ToLongDateString, 65ToString, 51, 60, 90, 91ToUpper, 33types, 87-95, 139-164
validation data types, 232
Uunary operator, 96Unicode, 82Uniform Resource Locator (URL), 199UNIX, 10using, 163utility programs, 9
Vvalidation controls, 5, 8, 227-244ValidationSummary, 243variables, 81, 82-83, 87
declaration, 82initialization, 83local, 86name, 82type, 82
Visual Basic, 11Visual Studio .NET, 12-13
code generation, 23 design, 12documentation, 142-143
WWeb applications, 5-6, 195-225
creation, 200-201execution, 24-25multiple forms, 216-224virtual directory, 201
Web formsadding, 218DataTextField, 219FlowLayout, 201, 211GridLayout, 201hidden state, 220-221initializing, 219-220, 223
Index 349
IsPostBack, 220, 224Page, 216pageLayout, 201, 211PageLoad method, 210
Web Matrix, 200Web reference, 276-279Web server
hosting, 200-201Web server controls, 5, 7, 200-208
AutoPostBack property, 213, 217Button, 202CheckBoxList, 204checking required fields, 227-231code behind, 202-203comparing values, 235-239Label, 202ListBox, 204RadioButtonList, 206range checking, 221Response property, 216, 218summarizing validation errors, 243TextBox, 202, 204validating expressions, 239-242
Web Service Definition Language(WSDL), 277, 282
Web services, 6, 8, 275-292accessing data, 286-291AsyncCallback, 281AsyncState, 282asynchronous calls, 279-282callback method, 279 clients, 275-282, 285, 286creating, 282-285IAsyncResult, 282synchronous call, 286testing, 284-285WebMethod attribute, 283, 286
while statement, 126-127
Windows applications, 2-4closing, 25creating, 15-19, 26maximizing, 25minimizing, 25
XXML, 12, 247-272
attributes, 250comment, 250document creation, 256-257from data, 258-262prolog, 249syntax, 248-250tags, 250transforming, 263-271validate, 257using schema, 256-257valid, 255-256well-formed, 250
XmlDataDocument, 259, 261XmlDocument, 261
DocumentElement, 262Save method, 259
XmlElement, 261GetElementsByTagName, 262
XmlNode, 261FirstChild, 262
XmlNodeList, 261Count, 262
XmlText, 261XSLT, 263-271
apply-templates, 265, 267processing instruction, 264 stylesheet, 263template, match 265text, 267value-of, 267

This page intentionally left blank

Computer Science Illuminated, Second EditionNell Dale and John LewisISBN: 0-7637-0799-6©2004
Programming and Problem Solving with JavaNell Dale, Chip Weems, and Mark R. HeadingtonISBN: 0-7637-0490-3©2003
Databases IlluminatedCatherine RicardoISBN: 0-7637-3314-8©2004
Foundations of Algorithms Using JavaPseudocodeRichard Neapolitan and Kumarss NaimipourISBN: 0-7637-2129-8©2004
Artificial Intelligence IlluminatedBen CoppinISBN: 0-7637-3230-3©2004
The Essentials of Computer Organization andArchitectureLinda Null and Julia LoburISBN: 0-7637-0444-X©2003
A Complete Guide to C#David BishopISBN: 0-7637-2249-9©2004
A First Course in Complex Analysis with ApplicationsDennis G. Zill and Patrick ShanahanISBN: 0-7637-1437-2©2003
Programming and Problem Solving with C++,Fourth EditionNell Dale and Chip WeemsISBN: 0-7637-0798-8©2004
C++ Plus Data Structures, Third EditionNell DaleISBN: 0-7637-0481-4©2003
Applied Data Structures with C++Peter SmithISBN: 0-7637-2562-5©2004
Foundations of Algorithms Using C++Pseudocode, Third EditionRichard Neapolitan and Kumarss NaimipourISBN: 0-7637-2387-8©2004
Managing Software ProjectsFrank TsuiISBN: 0-7637-2546-3©2004
Readings in CyberEthics, Second EditionRichard Spinello and Herman TavaniISBN: 0-7637-2410-6©2004
C#.NET IlluminatedArt GittlemanISBN: 0-7637-2593-5©2004
Discrete Mathematics, Second EditionJames L. HeinISBN: 0-7637-2210-3©2003
Outstanding New Titles:
http://www.jbpub.com/ 1.800.832.0034

Take Your Courses to the Next LevelTurn the page to preview new and forthcoming titles
in Computer Science and Math from Jones and Bartlett…
Providing solutions for students and educators in the following disciplines:
Please visit http://computerscience.jbpub.com/ andhttp://math.jbpub.com/ to learn more about our exciting publishing
programs in these disciplines.
• Introductory Computer Science
• Java
• C++
• Databases
• C#
• Data Structures
• Algorithms
• Network Security
• Software Engineering
• Discrete Mathematics
• Engineering Mathematics
• Complex Analysis
http://www.jbpub.com/ 1.800.832.0034