Box Office for Windows - Sensible Cinema Software
224
Installation and User Guide Software Version 3.7x Box Office for Windows
-
Upload
khangminh22 -
Category
Documents
-
view
4 -
download
0
Transcript of Box Office for Windows - Sensible Cinema Software
Installation and User GuideSoftware Version 3.7x
Box Office for Windows

Sensible Cinema Box Of1ice for Windows Printed Manual -‐ Revision 10
September 2014
Copyright ©2014 Sensible Cinema Software All Rights Reserved
Print Shops:
You may allow our customer to reprint this user guide as needed for manager and staff.
Program Speci2ications are Subject to Change:
Illustrations or descriptions of program features, functions and options may from time to time change without notice to the user. Consult your online help documentation for late breaking program changes and consult the Version History 1ile on our updates web page. For the latest software and documentation updates visit our web site at:
http://www.sensiblecinema.com
2
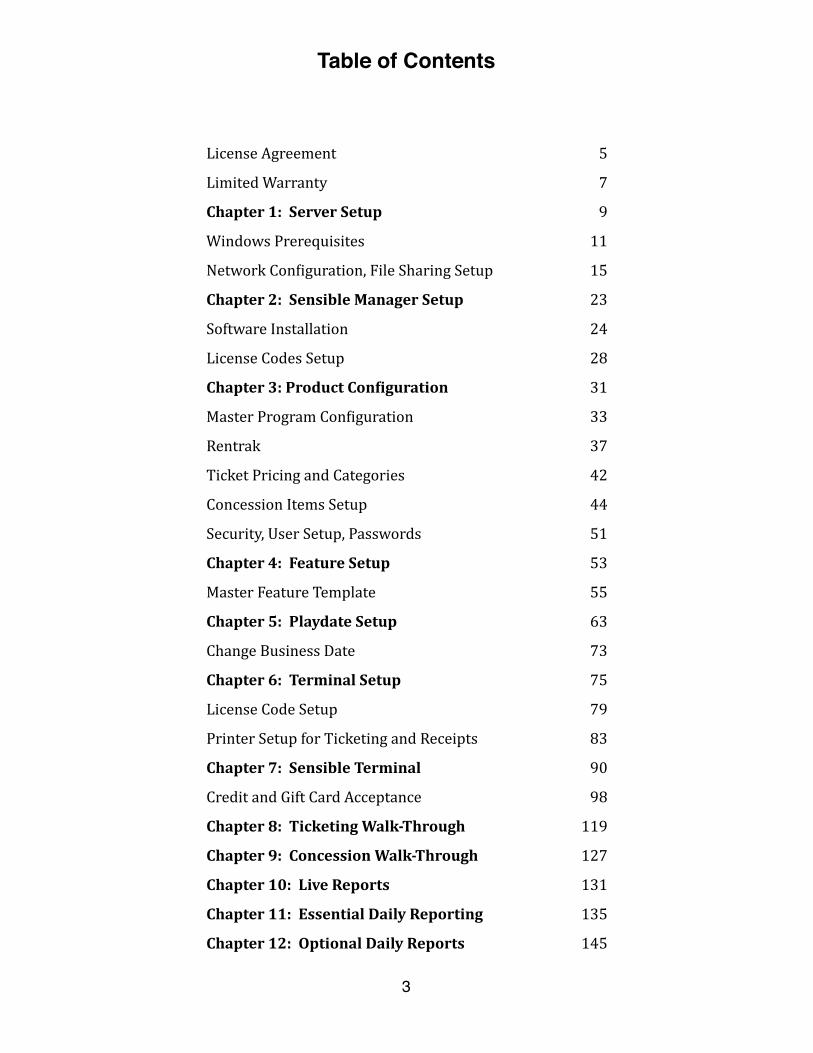
License Agreement 5
Limited Warranty 7
Chapter 1: Server Setup 9
Windows Prerequisites 11
Network Con1iguration, File Sharing Setup 15
Chapter 2: Sensible Manager Setup 23
Software Installation 24
License Codes Setup 28
Chapter 3: Product Con2iguration 31
Master Program Con1iguration 33
Rentrak 37
Ticket Pricing and Categories 42
Concession Items Setup 44
Security, User Setup, Passwords 51
Chapter 4: Feature Setup 53
Master Feature Template 55
Chapter 5: Playdate Setup 63
Change Business Date 73
Chapter 6: Terminal Setup 75
License Code Setup 79
Printer Setup for Ticketing and Receipts 83
Chapter 7: Sensible Terminal 90
Credit and Gift Card Acceptance 98
Chapter 8: Ticketing Walk-‐Through 119
Chapter 9: Concession Walk-‐Through 127
Chapter 10: Live Reports 131
Chapter 11: Essential Daily Reporting 135
Chapter 12: Optional Daily Reports 145
Table of Contents
3
Chapter 13: Weekly Box Of2ice Reports 157
Chapter 14: Weekly Summary 171
Chapter 15: Weekly Concession Reports 175
Chapter 16: Historic Summary Report 179
Chapter 17: Concession Inventory 183
Chapter 18: Internet Ticketing 203
Chapter 19: Utility Programs 207
Sensible Signage 208
Database Repair 213
Dolby Schedule Export 214
TCC Schedule Export for Cinedigm and GDC 216
Sensible Home Of1ice 219
Chapter 20: Product Support 223
Table of Contents
�4

IMPORTANT -‐ READ CAREFULLY: This End-‐User License Agreement (“EULA”) is a legal agreement between you (either an individual or a single entity) and Sensible Cinema Software for the software product identi1ied above, which includes computer software and may include associated media, printed materials, and “online” or electronic documentation (“SOFTWARE PRODUCT”). The SOFTWARE PRODUCT also includes any updates and supplements to the original SOFTWARE PRODUCT provided to you by Sensible Cinema Software. Any software provided along with the SOFTWARE PRODUCT that is associated with a separate end-‐user license agreement is licensed to you under the terms of that license agreement. You agree to be bound by the terms of this EULA by installing, copying, downloading, accessing or otherwise using the SOFTWARE PRODUCT. If you do not agree, do not install or use the SOFTWARE PRODUCT and return it to your place of purchase for a full refund.
Software PRODUCT LICENSE
The SOFTWARE PRODUCT is protected by copyright laws and international copyright treaties, as well as other intellectual property laws and treaties. The SOFTWARE PRODUCT is licensed, not sold.
1. GRANT OF LICENSE: Sensible Cinema Software grants you the following rights provided that you comply with all the terms and conditions of this EULA. (Installation and use. You may install and use two copies of the SOFTWARE PRODUCT. One on a desktop computer, including a workstation, terminal or other digital electronic device (“COMPUTER”) and another on a portable computer such as a laptop. At no time may the software installed as described above be used by more than one per-‐ son simultaneously.
2. OTHER RIGHTS AND LIMITATIONS: Limitations on Reverse Engineering, Decompilation, and Disassembly: You may not reverse engineer, decompile, or disassemble the SOFTWARE PRODUCT, except and only to the extent that such activity is expressly permitted by applicable law notwithstanding this limitation. Separation of Components: The SOFTWARE PRODUCT is licensed as a single product. Its component parts may not be separated for use on more than one computer. Rental: You may not rent, lease or lend the SOFTWARE PRODUCT. Trademarks: This EULA does not grant you any rights in connection with any trademarks or service marks of Sensible Cinema Software. Termination: Without prejudice to any other rights, Sensible Cinema Software may cancel this EULA if you do not abide by the terms and conditions of this EULA, in which case, you must destroy all copies of the SOFTWARE PRODUCT and all of its component parts.
3. UPGRADES: To use a SOFTWARE PRODUCT identi1ied as an upgrade, you must 1irst be licensed for the product identi1ied by Sensible Cinema Software as eligible for the upgrade. After upgrading, you may no longer use the product that formed the basis for your upgrade eligibility.
License Agreement
5
4. COPYRIGHT: All title and intellectual property rights in and to the SOFTWARE PRODUCT (including but not limited to any images, photographs, animations, video, audio, music, text, and “applets” incorporated into the SOFTWARE PRODUCT), the accompanying printed materials, and any copies of the SOFTWARE PRODUCT are owned by Sensible Cinema Software or its suppliers. All title and intellectual property rights in and to the content which may be accessed through use of the SOFTWARE PRODUCT is the property of the respective content owner and may be protected by applicable copyright or other intellectual property laws and treaties. This EULA grants you no rights to use such content. All rights not expressly granted are reserved by Sensible Cinema Software.
5. DUAL-‐MEDIA SOFTWARE: You may receive the SOFTWARE PRODUCT in more than one medium. Regardless of the type or size of medium you receive, you may use only one medium that is appropriate for your single computer. You may not use or install the other medium on another computer. You may not loan, rent, lease, lend or otherwise transfer the other medium to another user, except as part of the permanent transfer (as provided above) of the SOFTWARE PRODUCT.
6. BACKUP COPY: After installation of one copy of the SOFTWARE PRODUCT pursuant to this EULA, you may keep the original media on which the SOFTWARE PRODUCT was provided by Sensible Cinema Software solely for backup or archival purposes. If the original media is required to use the SOFTWARE PRODUCT on the COMPUTER, you may make one copy of the SOFTWARE PRODUCT solely for backup or archival purposes. Except as expressly provided in this EULA, you may not otherwise make copies of the SOFTWARE PRODUCT or the printed materials accompany-‐ ing the SOFTWARE PRODUCT.
7. U.S. GOVERNMENT RESTRICTED RIGHTS: All SOFTWARE PRODUCT provided to the U.S. Government pursuant to solicitations issued on or after December 1, 1995 is provided with the commercial license rights and restrictions described elsewhere herein. All SOFTWARE PRODUCT provided to the U. S. Government pursuant to solicitations issued prior to December 1, 1995 is provided with “Restricted Rights” as provided for in FAR, 48 CFR 52.227-‐14 (JUNE 1987) or DFAR, 48 CFR 252.227-‐7013 (OCT 1988), as applicable.
8. EXPORT RESTRICTIONS: You acknowledge that the SOFTWARE PRODUCT is of U.S.-‐origin. You agree to comply with all applicable international and national laws that apply to these products, including the U.S. Export Administration Regulations, as well as end-‐user, end-‐use and country destination restrictions issued by U.S. and other governments. For additional information on exporting Sensible Cinema Software products, contact us at 615-‐799-‐6366.
License Agreement
6
LIMITED WARRANTY:
LIMITED WARRANTY. Sensible Cinema Software warrants that the SOFTWARE PRODUCT will perform substantially in accordance with the accompanying written materials for a period of ninety (90) days from the date of receipt.
If an implied warranty or condition is created by your state/jurisdiction and federal or state/provincial law prohibits disclaimer of it, you also have an implied warranty or condition, BUT ONLY AS TO DEFECTS DISCOVERED DURING THE PERIOD OF THIS LIMITED WARRANTY (NINETY (90) DAYS). AS TO ANY DEFECTS DISCOVERED AFTER THE NINETY (90) DAY PERIOD, THERE IS NO WARRANTY OR CONDITION OF ANY KIND. Some states/jurisdictions do not allow limitations on duration of an implied warranty, so the above limitation may not apply to you.
Any supplements or updates to the SOFTWARE PRODUCT, including without limitation, any (if any) service packs or hot 1ixes provided to you after the expiration of the ninety (90) day Limited Warranty period are not covered by any warranty or condition, express or implied, or statutory.
LIMITATION ON REMEDIES; NO CONSEQUENTIAL OR OTHER DAMAGES:
Your exclusive remedy for any breach of this Limited Warranty is as set forth below. Except for any refund elected by Sensible Cinema Software, YOU ARE NOT ENTITLED TO ANY DAMAGES, INCLUDING BUT NOT LIMITED TO CONSEQUENTIAL DAMAGES, if the SOFTWARE PRODUCT does not meet Sensible Cinema Software’s Limited Warranty, and, to the maximum extent allowed by applicable law, even if any remedy fails of its essential purpose. The terms “Exclusion of Incidental, Consequential and Certain Other Damages” below are also incorporated into this Limited Warranty. Some states/jurisdictions do not allow the exclusion or limitation of incidental or consequential damages, so the above limitation or exclusion may not apply to you. This Limited Warranty gives you speci1ic legal rights. You may have others which vary from state/jurisdiction to state/ jurisdiction.
YOUR EXCLUSIVE REMEDY:
Sensible Cinema Software and its suppliers’ entire liability and your exclusive remedy shall be, at Sensible Cinema Software’s option from time to time, (a) return of the price paid (if any) for the SOFTWARE PRODUCT, or (b) repair or replacement of, the SOFTWARE PRODUCT that does not meet this Limited Warranty and that is returned to Sensible Cinema Software with a copy of your receipt. You will receive the remedy elected by Sensible Cinema Soft-‐ ware without charge, except that you are responsible for any expenses you may incur (e.g. cost of shipping the SOFTWARE PRODUCT to Sensible Cinema Software). This Limited Warranty is void if failure of the SOFTWARE PRODUCT has resulted from accident, abuse, misapplication, abnormal use or a virus. Any replacement SOFTWARE PRODUCT will be warranted for the remainder of the original warranty period or thirty (30) days, whichever is longer. Outside the United States or Canada, neither these remedies nor any product support services offered by Sensible Cinema Software are available without an authorized
Limited Warranty
7

international source. To exercise your remedy, contact: Sensible Cinema Software, 7216 Sutton Place, Fairview, TN 37062.
DISCLAIMER OF WARRANTIES:
The limited warranty that appears above is the only express warranty made to you and is provided in lieu of any other express warranties (if any) created by any documentation or packaging. Except for the limited warranty and to the maximum extent permitted by applicable law, Sensible Cinema Software and its suppliers provide the SOFTWARE PRODUCT and Support Services (if any) AS IS AND WITH ALL FAULTS, and hereby disclaim all other warranties and conditions, either express, implied or statutory, including, but not limited to, any (if any) implied warranties or conditions of merchantability, of 1itness for a particular purpose, of lack of viruses, of accuracy or completeness of responses, of results, and of lack of negligence or lack of workmanlike effort, all with regard to the SOFTWARE PRODUCT, and the provision of or failure to provide Support Services. ALSO, THERE IS NO WARRANTY OR CONDITION OF TITLE, QUIET ENJOYMENT, QUIET POSSESSION, CORRESPONDENCE TO DESCRIPTION OR NON-‐INFRINGEMENT WITH REGARD TO THE SOFTWARE PRODUCT.
EXCLUSION OF INCIDENTAL, CONSEQUENTIAL AND CERTAIN OTHER DAMAGES:
To the maximum extent permitted by applicable law, in no event shall Sensible Cinema Soft-‐ ware or its suppliers be liable for any special, incidental, indirect, or consequential damages whatsoever (including, but not limited to, damages for loss of pro1its or con1idential or other information, for business interruption, for personal injury, for loss of privacy, for failure to meet any duty including of good faith or of reasonable care, for negligence, and for any other pecuniary or other loss whatsoever) arising out of or in any way related to the use of or inability to use the SOFTWARE PRODUCT, the provision of or failure to provide Support Services, or otherwise under or in connection with any provision of this EULA, even in the event of the fault, tort (including negligence), strict liability, breach of contract or breach of warranty of Sensible Cinema Software or any supplier, and even if Sensible Cinema Software or any supplier has been advised of the possibility of such damages.
LIMITATION OF LIABILITY AND REMEDIES:
Notwithstanding any damages that you might incur for any reason whatsoever (including, without limitation, all damages referenced above and all direct or general damages), the entire liability of Sensible Cinema Software and any of its suppliers under any provision of this EULA and your exclusive remedy for all of the foregoing (except for any remedy of repair or replacement elected by Sensible Cinema Software with respect to any breach of the Limited Warranty) shall be limited to the greater of the amount actually paid by you for the SOFTWARE PRODUCT or U.S. $5.00. The foregoing limitations, exclusions and disclaimers described above shall apply to the maximum extent permitted by applicable law, even if any remedy fails its essential purpose.
Limited Warranty
8
Chapter 1
Server Setup
9

The Sensible Cinema Box Of2ice for Windows product can be con1igured four different ways depending on your budget and needs. Prerequisites and best practices for running our software are in this server setup chapter. Sensible Cinema Software recommends Microsoft Windows 7, however other supported versions of Windows include Windows Server 2003, 2008, 2012 and later, Windows 8 and 8.1. Windows Embedded for POS, POSReady 7 and other Embedded systems are also supported for use on terminals. Here are four possible con1iguration scenarios:
Standalone System: recommended for very small venues; usually only ticketing The standalone system consists of a single computer CPU with the Sensible Manager (server and reporting software) and the Sensible Terminal (point-‐of-‐sale ticketing or ticketing and concession). All work is done from the single workstation. A touch screen is recommended for the selling interface. No network required.
Manager Server + Client/Client System: lower cost multi-‐terminal con7iguration The Manager Server + Client/Client system consists of a computer CPU to be used for con1iguring features, showtimes, concession items, etc. and completing nightly and weekly reports with the Sensible Manager (server and reporting software) plus the Sensible Terminal software (point-‐of-‐sale ticketing or ticketing and concession). A touch screen is recommended for the selling interface. This computer can also act as the server for up to three other Sensible Terminal client computers (depending on the speci1ications of this PC). A fast computer is recommended for the terminal doubling as a server. 100Mbps wired Ethernet Required. 1Gbps wired Ethernet Recommended.
Manager Server/Client System: most typical con7iguration The Manager Server/Client system consists of a computer CPU for the manager of1ice to be used for con1iguring features, showtimes, concession items, etc. and completing nightly and weekly reports with the Sensible Manager (server and reporting software) and up to eighteen Sensible Terminal computers with software for point-‐of-‐sale ticketing, concession or ticketing and concession. A touch screen is recommended for the selling interface though not necessary for use on the manager/server PC. 100Mbps wired Ethernet Required. 1Gbps wired Ethernet Recommended. Dedicated Server/Manager/Client System: higher volume operations; most secure The Dedicated Server/Manager/Client system consists of a computer CPU for the server that is not used except to serve 1iles for the POS, a manager PC to be used for con1iguring features, showtimes, concession items, etc. and completing nightly and weekly reports with the Sensible Manager (server and reporting software) and up to eighteen Sensible Terminal computers with software for point-‐of-‐sale ticketing, concession or ticketing and concession. A touch screen is recommended for the selling interface though not necessary for use on the manager or server PC. The Sensible Manager software is present on both the Dedicated Server and Manager computer but only runs on the Manager computer. Each must be updated when Sensible Cinema issues an update or upgrade. 100Mbps wired Ethernet Required. 1Gbps wired Ethernet Recommended.
Server Setup
10

Server Preparation Follow these steps to prepare a new Windows 7 or 8.1 computer to be used as your server.
POWER SETTINGS: In order for Sensible Cinema Box Of1ice for Windows terminal clients to successfully interact with your server, certain power saving options on the server must be disabled.
In the Control Panel, select Power Options. First, click Create a Power Plan and give it a name. Base it on the “High Performance” power plan.
Server Setup
11
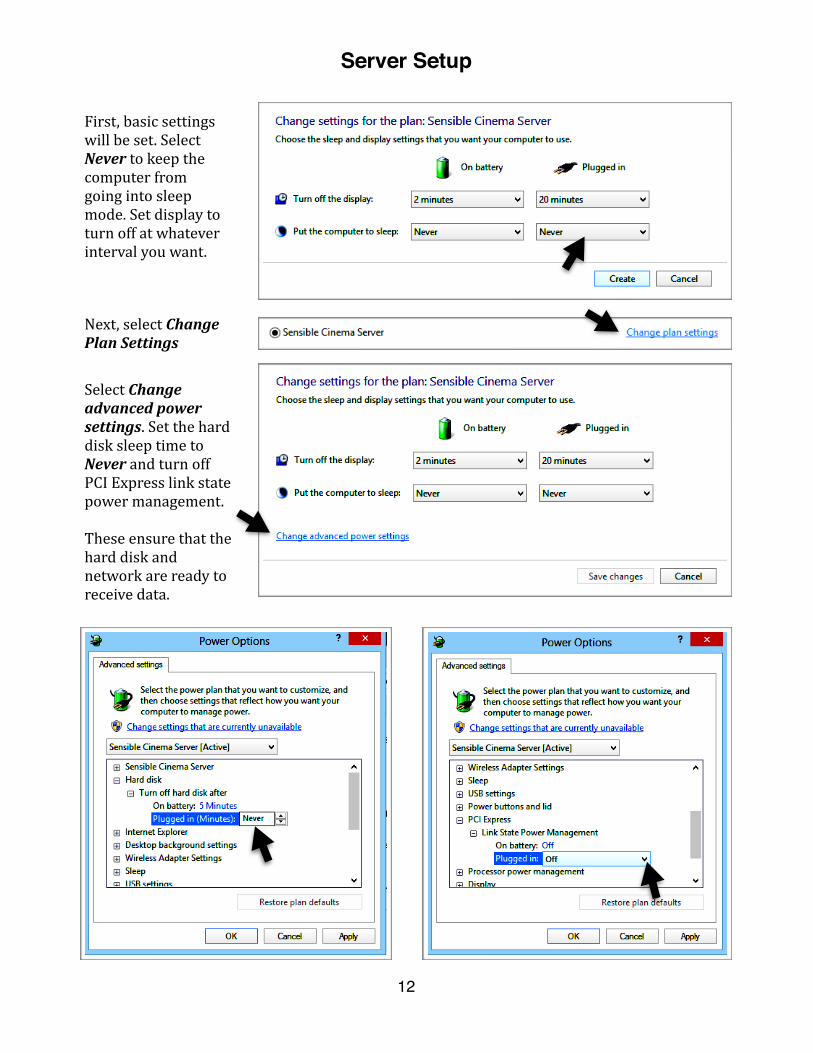
First, basic settings will be set. Select Never to keep the computer from going into sleep mode. Set display to turn off at whatever interval you want.
Next, select Change Plan Settings
Select Change advanced power settings. Set the hard disk sleep time to Never and turn off PCI Express link state power management.
These ensure that the hard disk and network are ready to receive data.
Server Setup
12
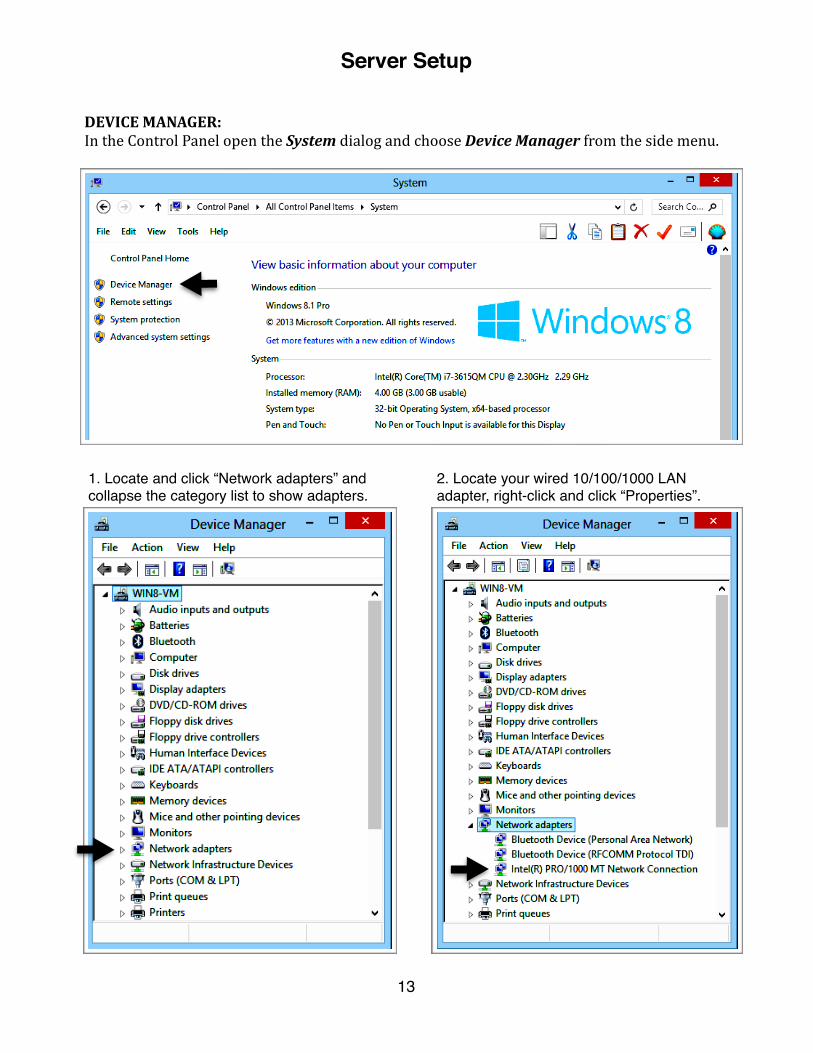
1. Locate and click “Network adapters” and collapse the category list to show adapters.
2. Locate your wired 10/100/1000 LAN adapter, right-click and click “Properties”.
DEVICE MANAGER: In the Control Panel open the System dialog and choose Device Manager from the side menu.
Server Setup
13
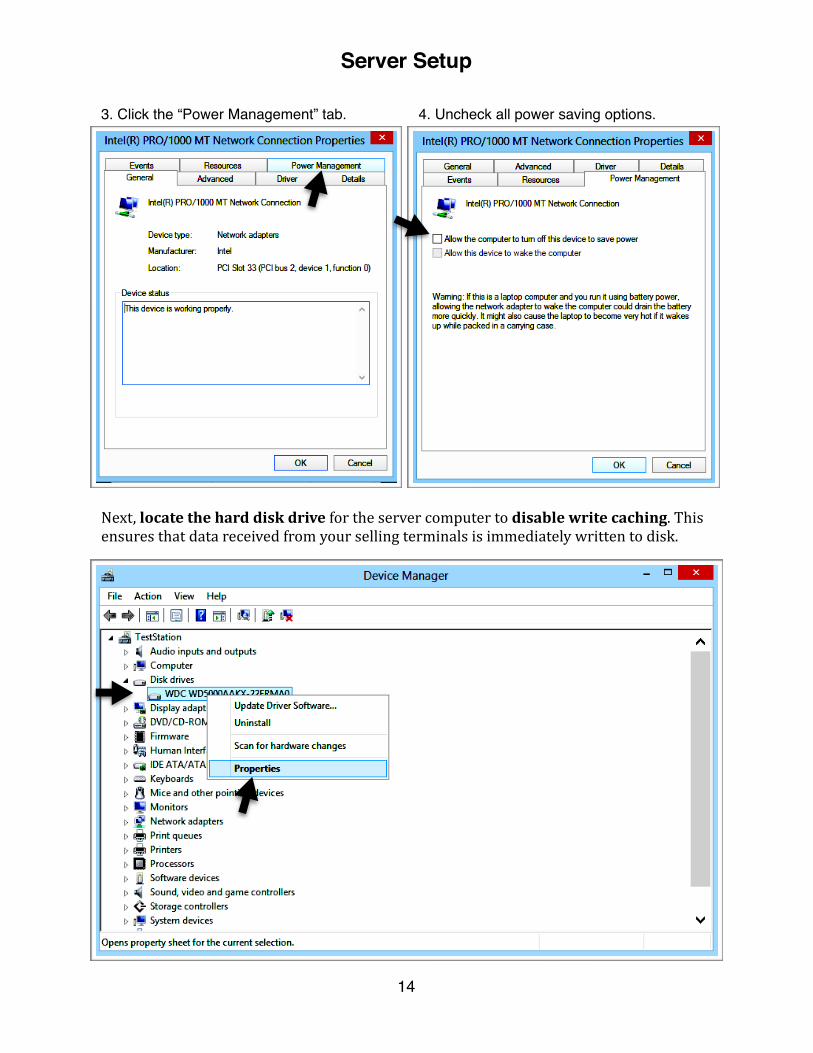
3. Click the “Power Management” tab. 4. Uncheck all power saving options.
Next, locate the hard disk drive for the server computer to disable write caching. This ensures that data received from your selling terminals is immediately written to disk.
Server Setup
14
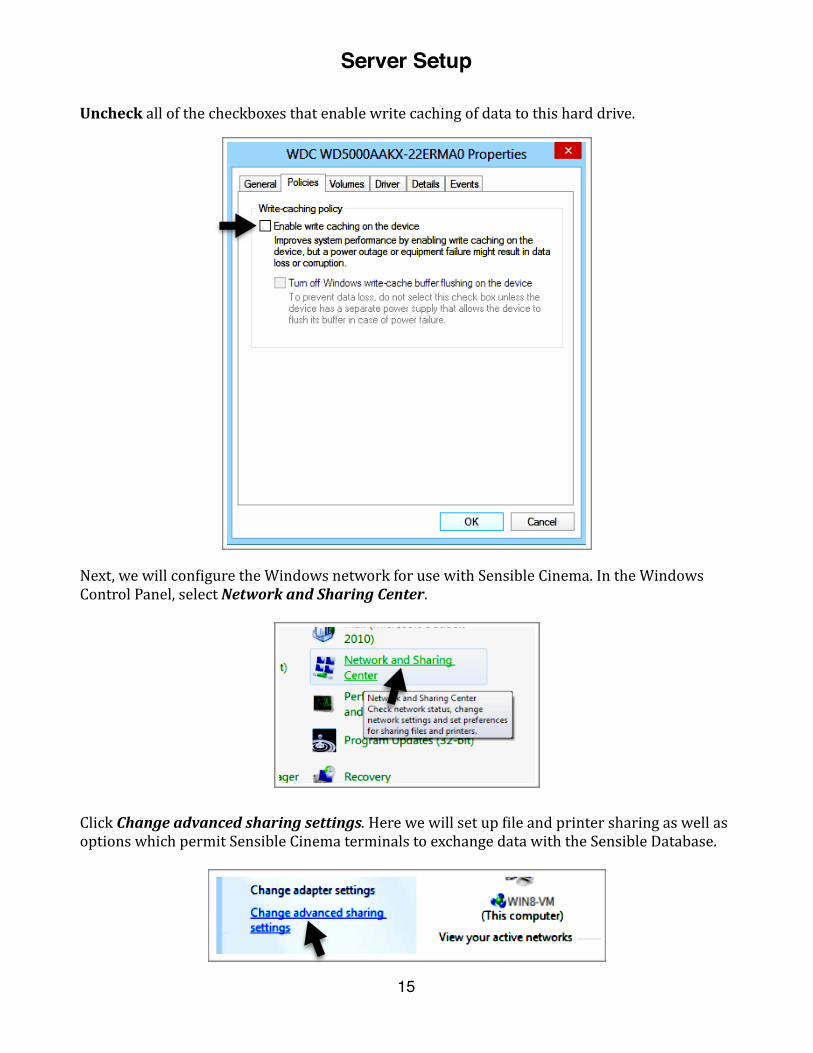
Uncheck all of the checkboxes that enable write caching of data to this hard drive.
Next, we will con1igure the Windows network for use with Sensible Cinema. In the Windows Control Panel, select Network and Sharing Center.
Click Change advanced sharing settings. Here we will set up 1ile and printer sharing as well as options which permit Sensible Cinema terminals to exchange data with the Sensible Database.
Server Setup
15

In Advanced Sharing Settings, turn on Network discovery and File and Printer Sharing. Turn off Password Protected Sharing unless you have an IT professional to help you coordinate user IDs and passwords to connect every terminal to password protected shares.
FIREWALL AND ANTIVIRUS: Sensible Cinema Software recommends Microsoft Defender (Windows 8) and Microsoft Security Essentials (other Windows Versions) coupled with the Windows Firewall set to all its defaults. This is the only 1irewall that we can help you with during support sessions. The Microsoft Security Essentials anti-‐virus software is available without cost from microsoft.com.
Server Setup
16

Select those with whom the Sensible Database will be shared. Typically this will be “Everyone” unless your speci1ic needs require password protected sharing.
At this point, the remainder of the Server Setup requires that Sensible Cinema Management Software has been installed on your server computer. Skip ahead,
install the Sensible Cinema Management Software and then come back.
SHARING THE SENSIBLE DATABASE: After installing the Sensible Cinema Management Software , open your Windows File Explorer and 1ind the Local Disk C:. Click and 1ind the Sensible Database folder. Right-‐Click and choose Properties then choose Sharing tab and press the Share button.
Server Setup
17

Network Path: Last, press Share and you should return to the main Sensible Database properties window on its Sharing tab. Under the heading for Network Path, circled on the image at the right, will be your own network path that will be used in Sensible Local Settings Software at each individual selling terminal.
Note that the format is \\YourServerName\Sensible Database where YourServerName is the name of your computer you will be calling your Server.
In the next step you will enter your Network Path into the Sensible Local Settings program on each individual selling station (and manager station if you have a dedicated server CPU).
Select Everyone from the drop-‐down menu and press Add.
Select Everyone and change permissions to allow Read/Write access. You must provide read and write access or your selling stations will be unable to save sales data.
Server Setup
18
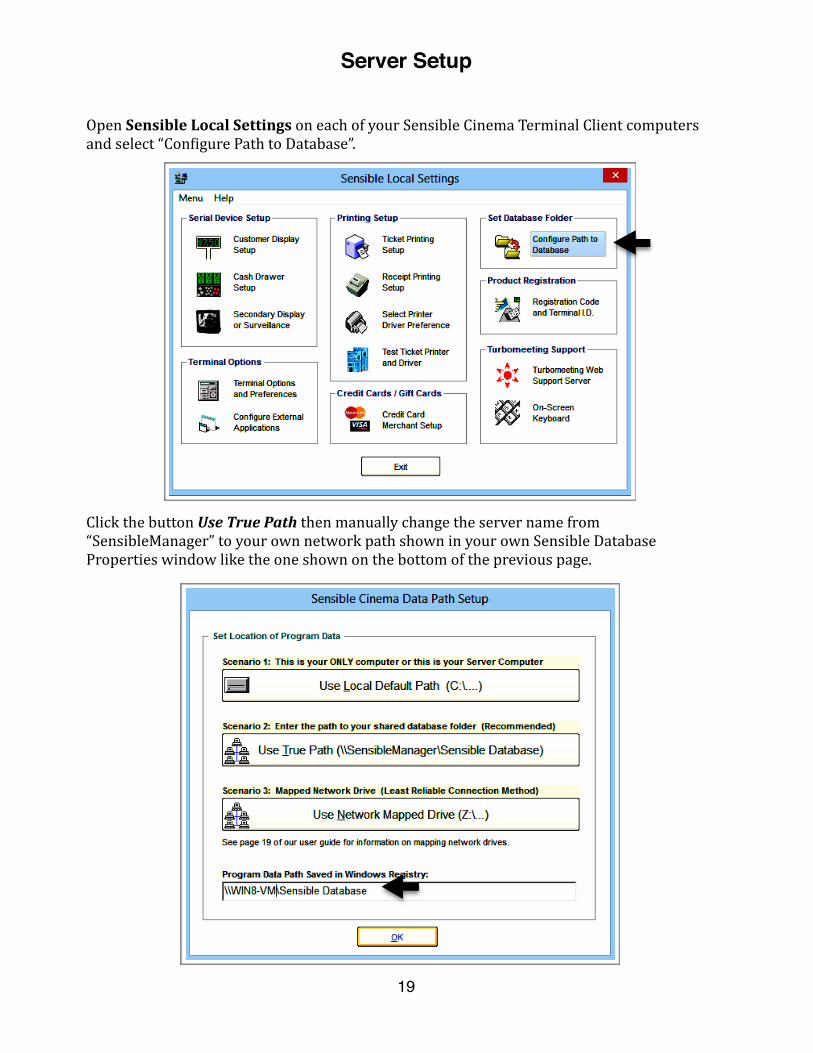
Open Sensible Local Settings on each of your Sensible Cinema Terminal Client computers and select “Con1igure Path to Database”.
Click the button Use True Path then manually change the server name from “SensibleManager” to your own network path shown in your own Sensible Database Properties window like the one shown on the bottom of the previous page.
Server Setup
19
Troubleshooting
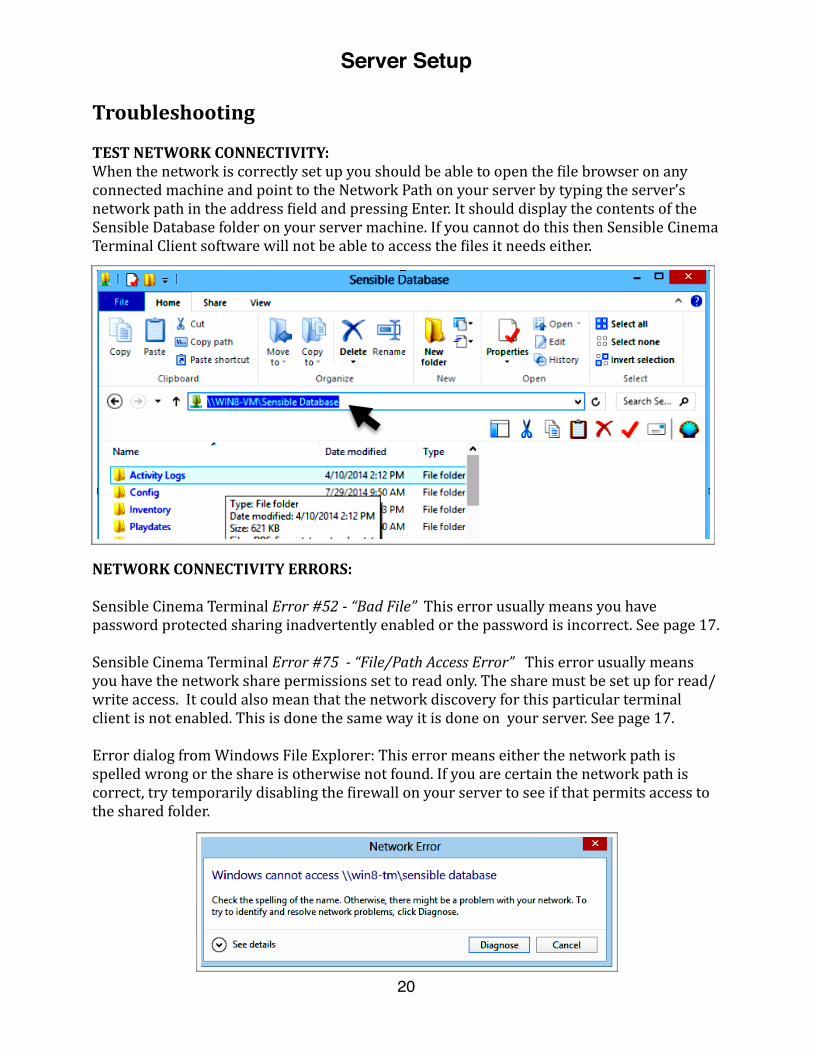
TEST NETWORK CONNECTIVITY: When the network is correctly set up you should be able to open the 1ile browser on any connected machine and point to the Network Path on your server by typing the server’s network path in the address 1ield and pressing Enter. It should display the contents of the Sensible Database folder on your server machine. If you cannot do this then Sensible Cinema Terminal Client software will not be able to access the 1iles it needs either.
NETWORK CONNECTIVITY ERRORS:
Sensible Cinema Terminal Error #52 -‐ “Bad File” This error usually means you have password protected sharing inadvertently enabled or the password is incorrect. See page 17.
Sensible Cinema Terminal Error #75 -‐ “File/Path Access Error” This error usually means you have the network share permissions set to read only. The share must be set up for read/write access. It could also mean that the network discovery for this particular terminal client is not enabled. This is done the same way it is done on your server. See page 17.
Error dialog from Windows File Explorer: This error means either the network path is spelled wrong or the share is otherwise not found. If you are certain the network path is correct, try temporarily disabling the 1irewall on your server to see if that permits access to the shared folder.
Server Setup
20

Use this form to write down important information about your system setup.
SERVER WINDOWS SETUP:
Administrator Account User : _________________________________________________________
Administrator Account Password: _________________________________________________________
NETWORK SETUP:
Router Physical Location: _________________________________________________________
Router Setup IP Address: _________________________________________________________
Router Setup User Name: _________________________________________________________
Router Setup Password: _________________________________________________________
Network Switch #1 Location: _________________________________________________________
Network Switch #2 Location: _________________________________________________________
Network Switch #3 Location: _________________________________________________________
SENSIBLE CINEMA SERVER SETUP:
Manager User Name: _________________________________________________________
Manager Password: _________________________________________________________
IT PERSON TO CALL:
Software Support: Rusty Gordon, Sensible Cinema Software (615) 799-‐6366, [email protected]
Network Support Name: _________________________________________________________
Network Support Phone: _________________________________________________________
Network Support E-‐Mail: _________________________________________________________
Server Setup
21

22
Chapter 2
Sensible Manager Setup
23

Minimum System Requirements: Our Recommendation:
Single or Dual Core CPU at 1.0 GHz Dual or Quad Core CPU at 2.0 GHz 512 MB System RAM 2 GB System RAM Windows XP, 7, 8, 8.1 Server 2003 or Later Windows 7, 8, 8.1 Server 2008 or Later 160 GB HDD 320 GB HDD or Larger 100 Mbps Fast Wired Ethernet Gigabit Wired Ethernet Broadband Internet High Speed Broadband Internet Screen Resolution 1024x768 or Larger Screen Resolution 1280x768 Anti-‐virus, and anti-‐malware Software Anti-‐virus, and anti-‐malware Software USB Port USB 2.0 Port
This software works with both 32-‐bit and 64-‐bit versions of Windows operating systems.
Manager/Server Software Installation
SYSTEM REQUIREMENTS: In order for Sensible Cinema Box Of1ice for Windows terminal clients to work as designed and with the speed you would expect, certain minimum system requirements must be met. For best results, follow our recommendations when designing your system.
MANAGER PC TEN BEST PRACTICES: 1. Keep the Sensible Cinema Programs up to date. Check for updates twice per month. 2. Keep Windows updated by enabling Automatic Updates in the Control Panel. 3. Reboot your manager PC every other day to refresh system resources. 4. Install anti-‐virus and anti-‐malware programs and keep virus de1initions up to date. 5. Fully scan for viruses and spyware once per week. 6. Use a laser printer for crisp and clean reports with a low total cost of ownership. 7. Avoid “sur1ing” the internet on the POS Server Computer. 8. Avoid heavy CPU usage—particularly games, videos and disk intensive applications. 9. Try to avoid using the server PC during periods of high volume sales. 10. Keep staff off of the management PC.
NETWORK BEST PRACTICES: Sensible Cinema Box Of2ice for Windows should only be used on a wired Fast Ethernet or Gigabit Ethernet network with a minimum speed of 100 Mbps with full duplex.
Wireless networks are not recommended because network connection speed and bandwidth will vary from terminal to terminal as wireless networks lower connection speeds based on signal strength. When speeds fall below the 100 Mbps threshold the possibility for damage to the database increases.
Older network “Hubs” operate in “Half-‐Duplex” mode and should not be used.
Sensible Manager Setup
24
More info
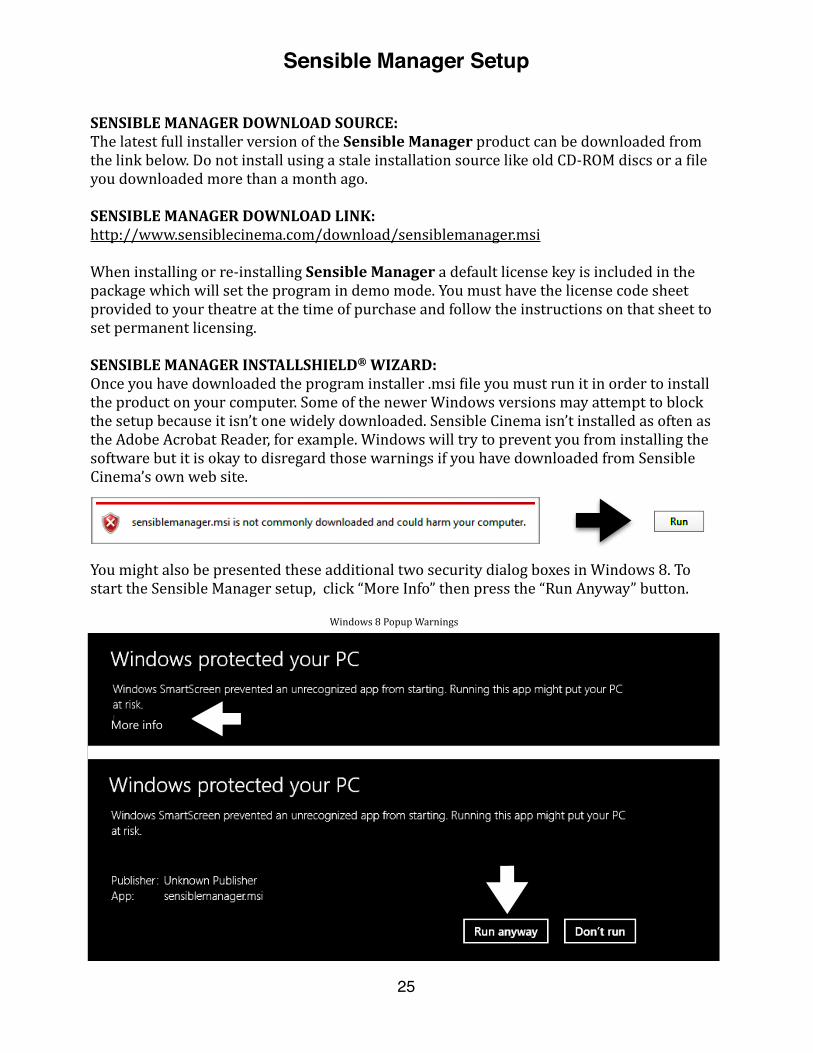
SENSIBLE MANAGER DOWNLOAD SOURCE: The latest full installer version of the Sensible Manager product can be downloaded from the link below. Do not install using a stale installation source like old CD-‐ROM discs or a 1ile you downloaded more than a month ago.
SENSIBLE MANAGER DOWNLOAD LINK: http://www.sensiblecinema.com/download/sensiblemanager.msi
When installing or re-‐installing Sensible Manager a default license key is included in the package which will set the program in demo mode. You must have the license code sheet provided to your theatre at the time of purchase and follow the instructions on that sheet to set permanent licensing.
SENSIBLE MANAGER INSTALLSHIELD® WIZARD: Once you have downloaded the program installer .msi 1ile you must run it in order to install the product on your computer. Some of the newer Windows versions may attempt to block the setup because it isn’t one widely downloaded. Sensible Cinema isn’t installed as often as the Adobe Acrobat Reader, for example. Windows will try to prevent you from installing the software but it is okay to disregard those warnings if you have downloaded from Sensible Cinema’s own web site.
You might also be presented these additional two security dialog boxes in Windows 8. To start the Sensible Manager setup, click “More Info” then press the “Run Anyway” button.
Windows 8 Popup Warnings
Sensible Manager Setup
25
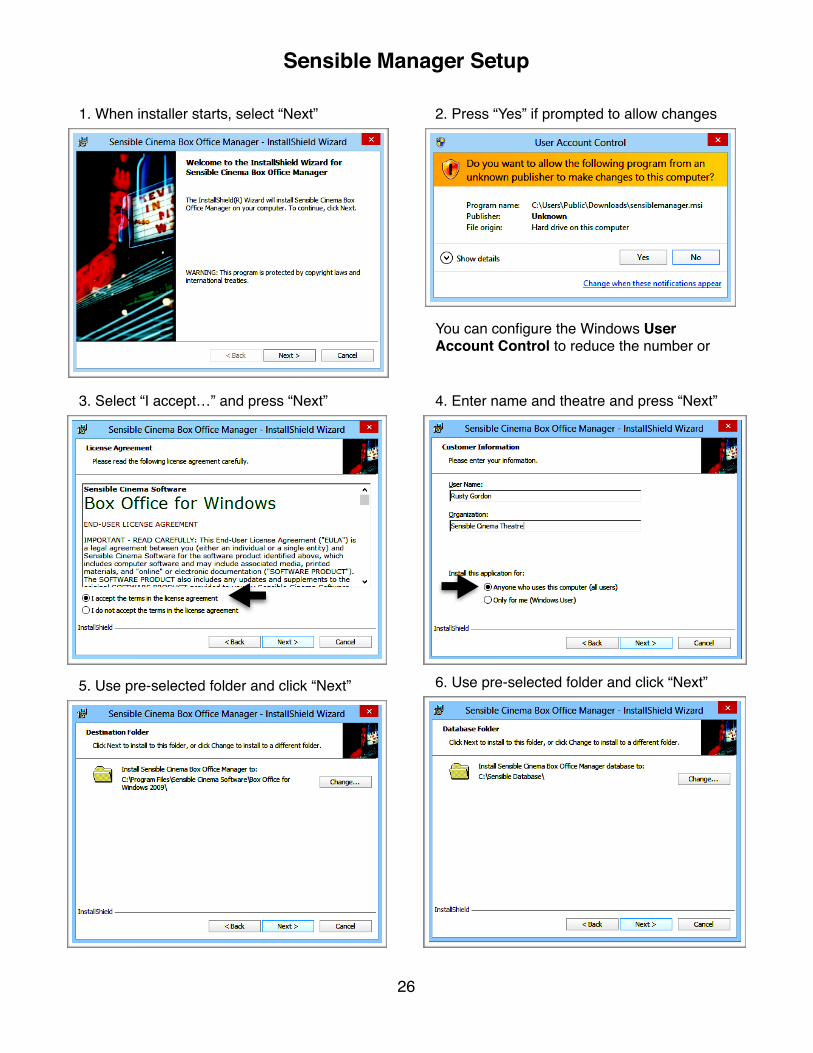
1. When installer starts, select “Next” 2. Press “Yes” if prompted to allow changes
You can configure the Windows User Account Control to reduce the number or
3. Select “I accept…” and press “Next” 4. Enter name and theatre and press “Next”
5. Use pre-selected folder and click “Next” 6. Use pre-selected folder and click “Next”
Sensible Manager Setup
26
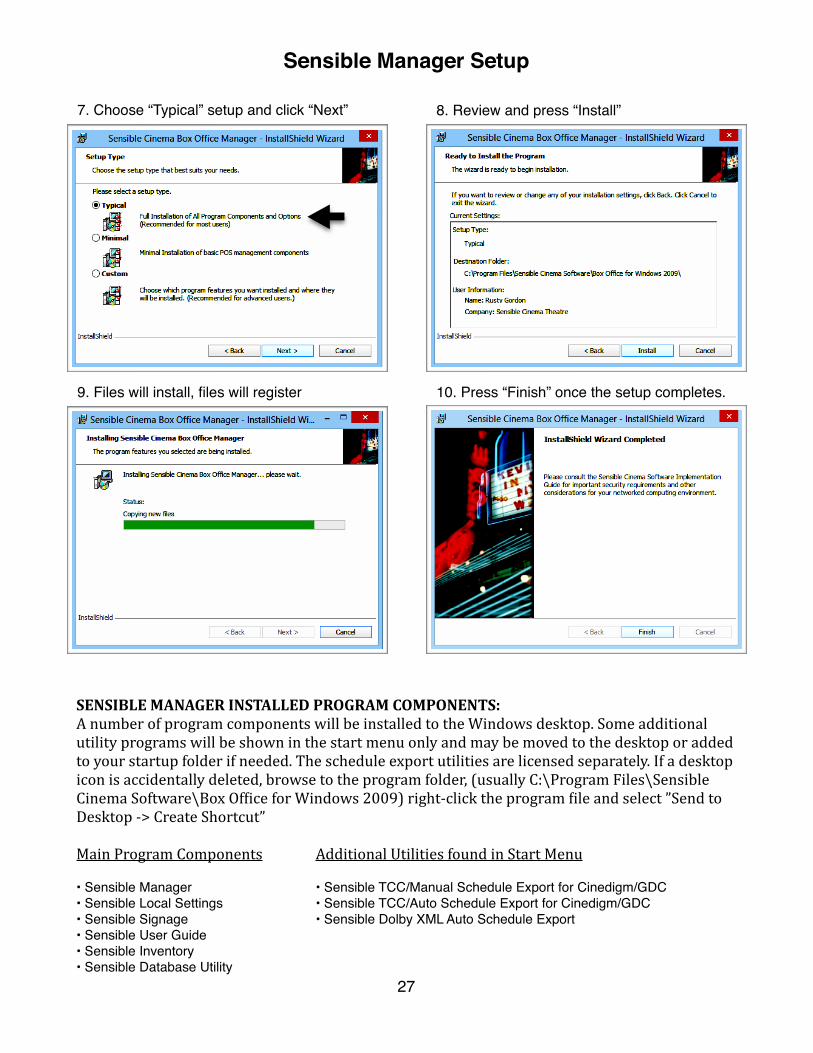
7. Choose “Typical” setup and click “Next” 8. Review and press “Install”
9. Files will install, files will register 10. Press “Finish” once the setup completes.
SENSIBLE MANAGER INSTALLED PROGRAM COMPONENTS: A number of program components will be installed to the Windows desktop. Some additional utility programs will be shown in the start menu only and may be moved to the desktop or added to your startup folder if needed. The schedule export utilities are licensed separately. If a desktop icon is accidentally deleted, browse to the program folder, (usually C:\Program Files\Sensible Cinema Software\Box Of1ice for Windows 2009) right-‐click the program 1ile and select ”Send to Desktop -‐> Create Shortcut”
Main Program Components Additional Utilities found in Start Menu
• Sensible Manager • Sensible TCC/Manual Schedule Export for Cinedigm/GDC• Sensible Local Settings • Sensible TCC/Auto Schedule Export for Cinedigm/GDC• Sensible Signage • Sensible Dolby XML Auto Schedule Export • Sensible User Guide• Sensible Inventory• Sensible Database Utility
Sensible Manager Setup
27

SENSIBLE MANAGER LICENSE CODE SETUP: Have the license code sheet for your theatre available in hand as you start up the desktop application called Sensible Local Settings.
Click Registration Code and Terminal I.D.
Sensible Manager Setup
28

If you have entered everything correctly, a dialog showing a successful registration will appear. This will show the terminal number and the licensed capabilities of this particular terminal.
You can now exit Sensible Local Settings application and open the Sensible Manager application using the desktop icon. If you are using the software for the 1irst time, use the following default administrative login. Be sure to change the password or better yet, create your own user name and password set for level 99 administrator access once you have successfully logged it for the 1irst time.
Default Administrator User: admin Default Administrator Password: cinema Default Administrator Level: 99
Select Manager’s Station on systems which will not have a selling terminal client installed or Selling Station in cases where the manager station will double as a selling terminal. Enter the registration Circuit Name and Theatre Name precisely as shown on the license code sheet provided. Then enter the registration code and any other required codes. Press “OK”.
Sensible Manager Setup
29

Sensible Manager Setup
30

Chapter 3
Product Configuration
31
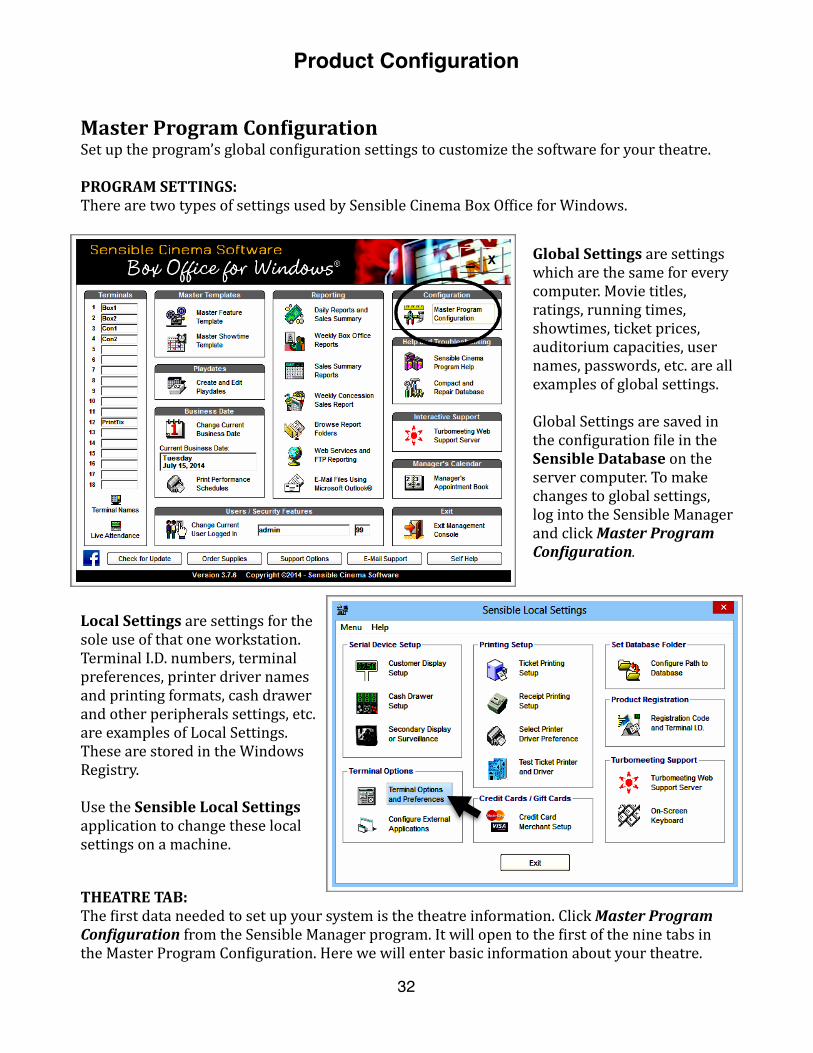
Master Program Con2iguration Set up the program’s global con1iguration settings to customize the software for your theatre.
PROGRAM SETTINGS: There are two types of settings used by Sensible Cinema Box Of1ice for Windows.
Local Settings are settings for the sole use of that one workstation. Terminal I.D. numbers, terminal preferences, printer driver names and printing formats, cash drawer and other peripherals settings, etc. are examples of Local Settings. These are stored in the Windows Registry.
Use the Sensible Local Settings application to change these local settings on a machine.
Global Settings are settings which are the same for every computer. Movie titles, ratings, running times, showtimes, ticket prices, auditorium capacities, user names, passwords, etc. are all examples of global settings.
Global Settings are saved in the con1iguration 1ile in the Sensible Database on the server computer. To make changes to global settings, log into the Sensible Manager and click Master Program ConFiguration.
THEATRE TAB: The 1irst data needed to set up your system is the theatre information. Click Master Program ConFiguration from the Sensible Manager program. It will open to the 1irst of the nine tabs in the Master Program Con1iguration. Here we will enter basic information about your theatre.
Product Configuration
32
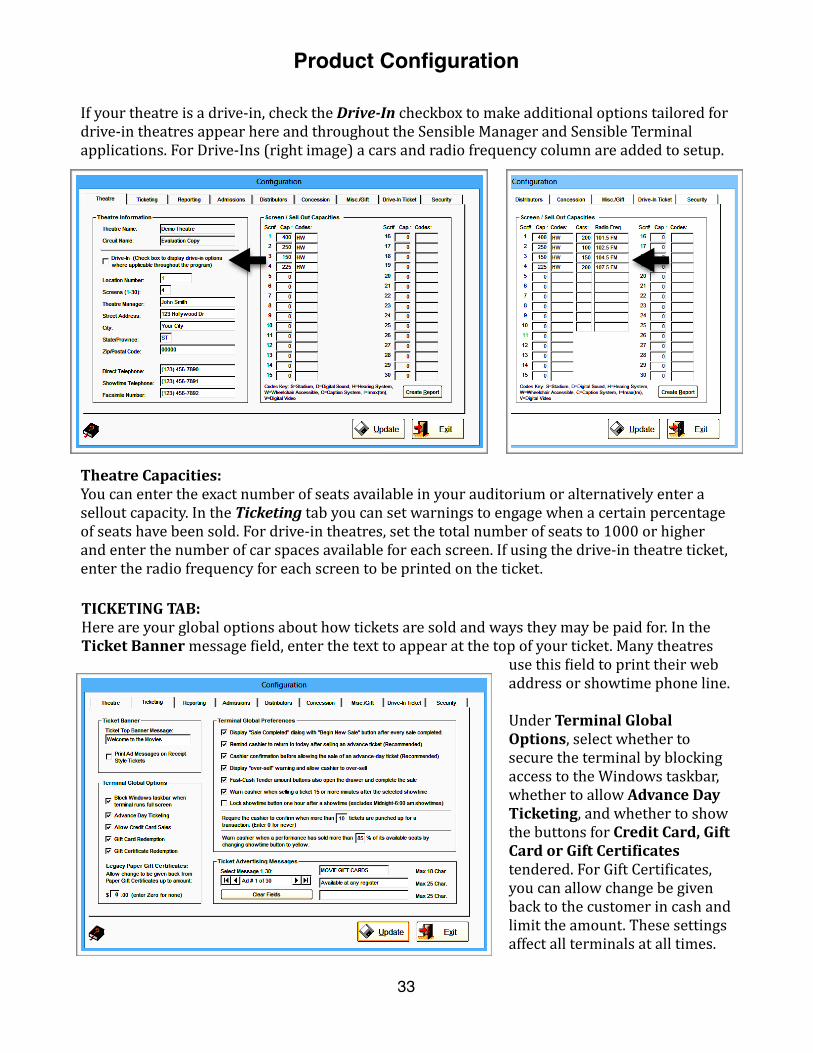
TICKETING TAB: Here are your global options about how tickets are sold and ways they may be paid for. In the Ticket Banner message 1ield, enter the text to appear at the top of your ticket. Many theatres
use this 1ield to print their web address or showtime phone line.
Under Terminal Global Options, select whether to secure the terminal by blocking access to the Windows taskbar, whether to allow Advance Day Ticketing, and whether to show the buttons for Credit Card, Gift Card or Gift Certi2icates tendered. For Gift Certi1icates, you can allow change be given back to the customer in cash and limit the amount. These settings affect all terminals at all times.
If your theatre is a drive-‐in, check the Drive-‐In checkbox to make additional options tailored for drive-‐in theatres appear here and throughout the Sensible Manager and Sensible Terminal applications. For Drive-‐Ins (right image) a cars and radio frequency column are added to setup.
Theatre Capacities: You can enter the exact number of seats available in your auditorium or alternatively enter a sellout capacity. In the Ticketing tab you can set warnings to engage when a certain percentage of seats have been sold. For drive-‐in theatres, set the total number of seats to 1000 or higher and enter the number of car spaces available for each screen. If using the drive-‐in theatre ticket, enter the radio frequency for each screen to be printed on the ticket.
Product Configuration
33

Under Terminal Global Preferences, select the checkbox for each of the features you want to use. We call these preferences because these are all used based on the personal preference of the theatre owner about how they want the system to behave. Many are features which were at one time requested by our customers. Here is a detailed description of each preference:
☑ Display “Sale Completed” Dialog with “Begin New Sale” button after every sale completed.
When checked, the “Sale Completed” dialog box (left) will be shown after each sale is completed. Using the Sale Completed dialog ensures your employees know when they have successfully 1inished a sale prior to moving on to the next. This is especially helpful to prevent running sales together resulting in the wrong amount being charged to a customer credit card. That said, this adds an extra step to the start of each new sale. If you can train your employees to pay attention to the colored line around the amount tender area, you can eliminate this step. The line around the sale window (shown in the screen capture on the right) is GREEN for “GO” when ready for a new sale and turns RED for “STOP” when a sale is in progress. In the bottom middle of the sales terminal screen are the completed sale totals from the last sale and change due are displayed. There is even a button which allows printing a receipt for the last sale.
☑ Remind cashier to return to today after selling an advance ticket. (Recommended)
This preference causes the cashier to be reminded to return to the current day after selling an advance ticket. This prevents the sale of additional tickets for the wrong day.
☑ Cashier confirmation before allowing the sale of an advance-day ticket. (Recommended)
This preference prompts the cashier that the ticket being sold is for (speci1ic date and time) instead of for the current day. This is to prevent mistakingly printing an unneeded ticket.
☑ Display “oversell” warning and allow the cashier to over-sell
This preference prompts the cashier that the maximum number of seats has been reached. It allows the cashier to knowingly over-‐sell in the event that seats are found for the patron since some theatres hold back a number of seats from the point-‐of-‐sale system.
Product Configuration
34
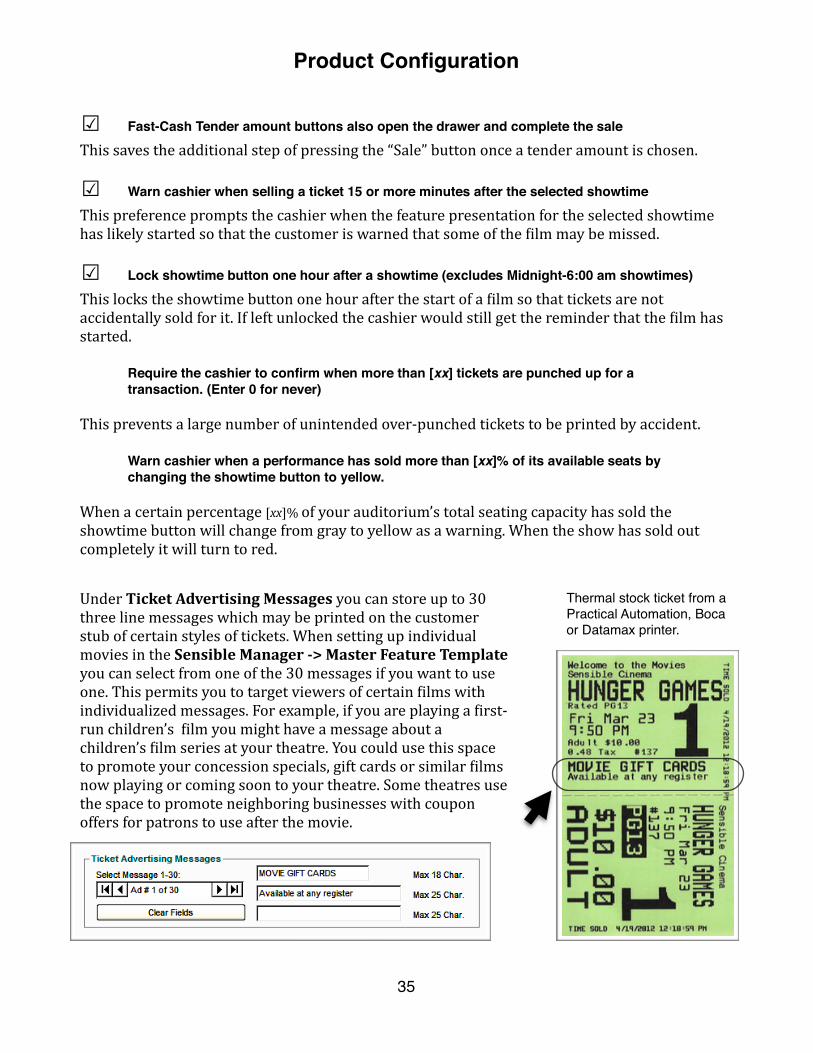
Thermal stock ticket from a Practical Automation, Boca or Datamax printer.
Under Ticket Advertising Messages you can store up to 30 three line messages which may be printed on the customer stub of certain styles of tickets. When setting up individual movies in the Sensible Manager -‐> Master Feature Template you can select from one of the 30 messages if you want to use one. This permits you to target viewers of certain 1ilms with individualized messages. For example, if you are playing a 1irst-‐run children’s 1ilm you might have a message about a children’s 1ilm series at your theatre. You could use this space to promote your concession specials, gift cards or similar 1ilms now playing or coming soon to your theatre. Some theatres use the space to promote neighboring businesses with coupon offers for patrons to use after the movie.
☑ Fast-Cash Tender amount buttons also open the drawer and complete the sale
This saves the additional step of pressing the “Sale” button once a tender amount is chosen.
☑ Warn cashier when selling a ticket 15 or more minutes after the selected showtime
This preference prompts the cashier when the feature presentation for the selected showtime has likely started so that the customer is warned that some of the 1ilm may be missed.
☑ Lock showtime button one hour after a showtime (excludes Midnight-6:00 am showtimes)
This locks the showtime button one hour after the start of a 1ilm so that tickets are not accidentally sold for it. If left unlocked the cashier would still get the reminder that the 1ilm has started.
Require the cashier to confirm when more than [xx] tickets are punched up for a transaction. (Enter 0 for never)
This prevents a large number of unintended over-‐punched tickets to be printed by accident.
Warn cashier when a performance has sold more than [xx]% of its available seats bychanging the showtime button to yellow.
When a certain percentage [xx]% of your auditorium’s total seating capacity has sold the showtime button will change from gray to yellow as a warning. When the show has sold out completely it will turn to red.
Product Configuration
35
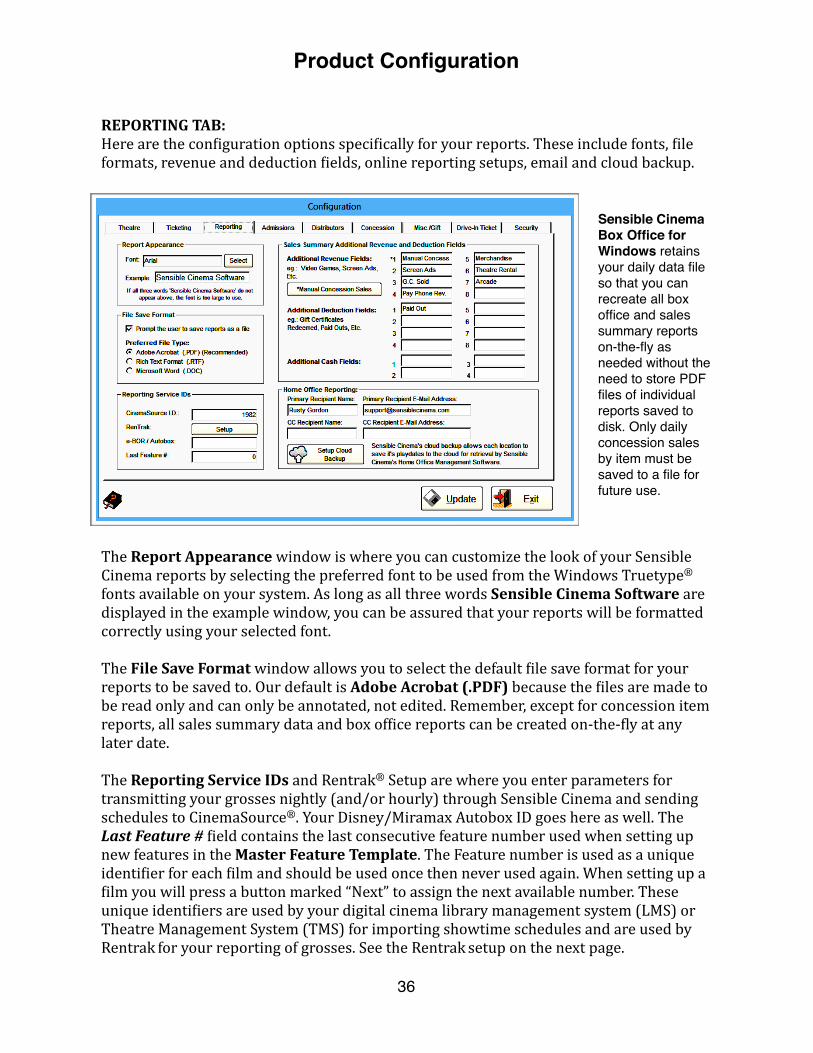
The Report Appearance window is where you can customize the look of your Sensible Cinema reports by selecting the preferred font to be used from the Windows Truetype® fonts available on your system. As long as all three words Sensible Cinema Software are displayed in the example window, you can be assured that your reports will be formatted correctly using your selected font.
The File Save Format window allows you to select the default 1ile save format for your reports to be saved to. Our default is Adobe Acrobat (.PDF) because the 1iles are made to be read only and can only be annotated, not edited. Remember, except for concession item reports, all sales summary data and box of1ice reports can be created on-‐the-‐1ly at any later date.
The Reporting Service IDs and Rentrak® Setup are where you enter parameters for transmitting your grosses nightly (and/or hourly) through Sensible Cinema and sending schedules to CinemaSource®. Your Disney/Miramax Autobox ID goes here as well. The Last Feature # 1ield contains the last consecutive feature number used when setting up new features in the Master Feature Template. The Feature number is used as a unique identi1ier for each 1ilm and should be used once then never used again. When setting up a 1ilm you will press a button marked “Next” to assign the next available number. These unique identi1iers are used by your digital cinema library management system (LMS) or Theatre Management System (TMS) for importing showtime schedules and are used by Rentrak for your reporting of grosses. See the Rentrak setup on the next page.
REPORTING TAB: Here are the con1iguration options speci1ically for your reports. These include fonts, 1ile formats, revenue and deduction 1ields, online reporting setups, email and cloud backup.
Sensible Cinema Box Office for Windows retains your daily data file so that you can recreate all box office and sales summary reports on-the-fly as needed without the need to store PDF files of individual reports saved to disk. Only daily concession sales by item must be saved to a file for future use.
Product Configuration
36

RENTRAK® SETUP: Press the Rentrak® Setup button to con1igure the Sensible Cinema Box Of1ice for Windows software for electronic gross reporting via our own internal 1ile transfer protocol (FTP) client. Grosses may be reported on the hour or once nightly. You should also report each new 1ilm opening using the button for doing so in your Master Feature Template.
To use the FTP reporting, you must 1irst request a user ID, password, FTP address and theatre ID from Rentrak. See the setup dialog window for details or contact your 1ilm buyer.
Hourly Rentrak Reporting is an option that a studio or Rentrak itself may ask you to use. This lets them monitor key sites to evaluate how a particular film or holiday weekend is doing. If not specifically requested, you may leave this unchecked and use only the nightly reporting of your final gross for the day. When enabled, an hourly Rentrak feed button is shown in the main menu.
The hourly feed On and Off buttons allow you to start and stop the hourly grosses feed. Clicking the status bar allows viewing of the .XML format 1ile sent with the hour’s feed. The feed is automatically stopped when you have transmitted the 1inal box of1ice grosses for the night from the Daily Box OfFice Reports tab under Daily Reports and Sales Summary as part of your closing procedure. A reminder to reactivate the Rentrak hourly grosses feed is shown on the screen immediately after changing the business date.
For information about transmitting your nightly grosses to Rentrak, refer to the chapter on Daily Reporting. For information about sending your new movie openings each week, refer to the chapter on Master Templates.
Sensible Manager Main Menu Bottom Taskbar
Product Configuration
37
HOME OFFICE REPORTING: Reports can be sent to an individual or home of1ice either by email (using Microsoft Outlook) or more ef1iciently by using the Sensible Cinema Home Of2ice application, a subscription service and program available from Sensible Cinema Software.
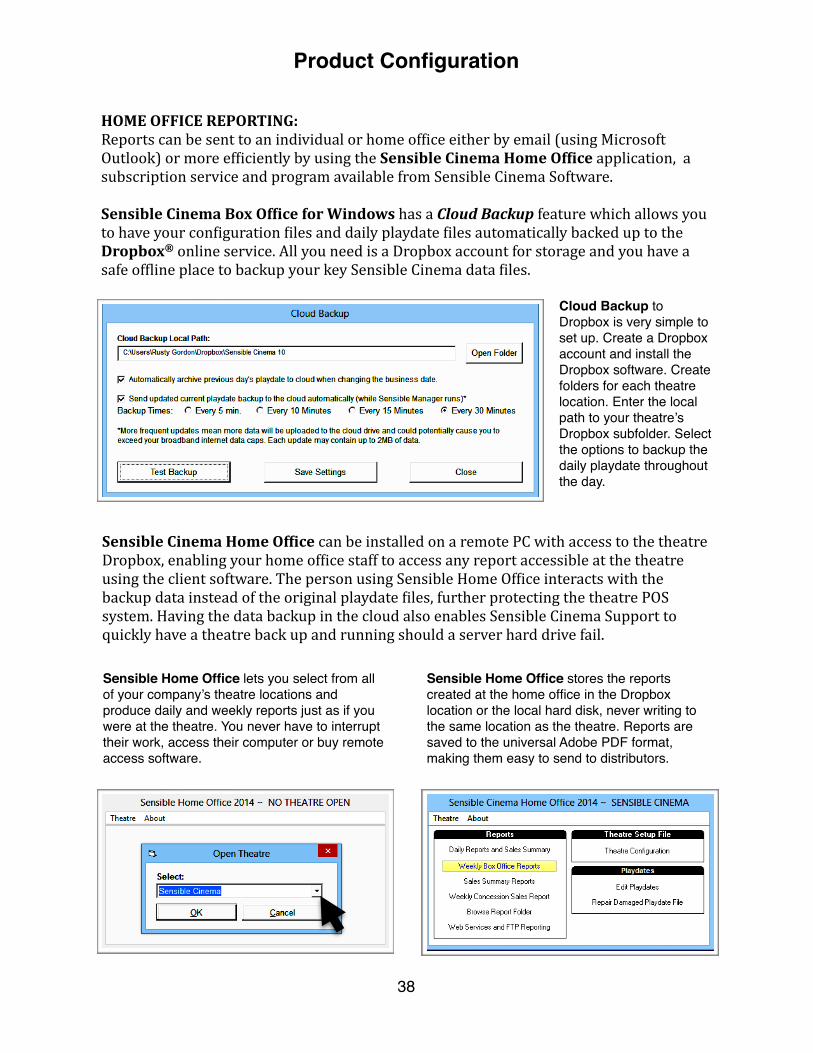
Sensible Cinema Box Of2ice for Windows has a Cloud Backup feature which allows you to have your con1iguration 1iles and daily playdate 1iles automatically backed up to the Dropbox® online service. All you need is a Dropbox account for storage and you have a safe of1line place to backup your key Sensible Cinema data 1iles.
Sensible Home Office lets you select from all of your company’s theatre locations and produce daily and weekly reports just as if you were at the theatre. You never have to interrupt their work, access their computer or buy remote access software.
Sensible Home Office stores the reports created at the home office in the Dropbox location or the local hard disk, never writing to the same location as the theatre. Reports are saved to the universal Adobe PDF format, making them easy to send to distributors.
Cloud Backup to Dropbox is very simple to set up. Create a Dropbox account and install the Dropbox software. Create folders for each theatre location. Enter the local path to your theatre’s Dropbox subfolder. Select the options to backup the daily playdate throughout the day.
Sensible Cinema Home Of2ice can be installed on a remote PC with access to the theatre Dropbox, enabling your home of1ice staff to access any report accessible at the theatre using the client software. The person using Sensible Home Of1ice interacts with the backup data instead of the original playdate 1iles, further protecting the theatre POS system. Having the data backup in the cloud also enables Sensible Cinema Support to quickly have a theatre back up and running should a server hard drive fail.
Product Configuration
38
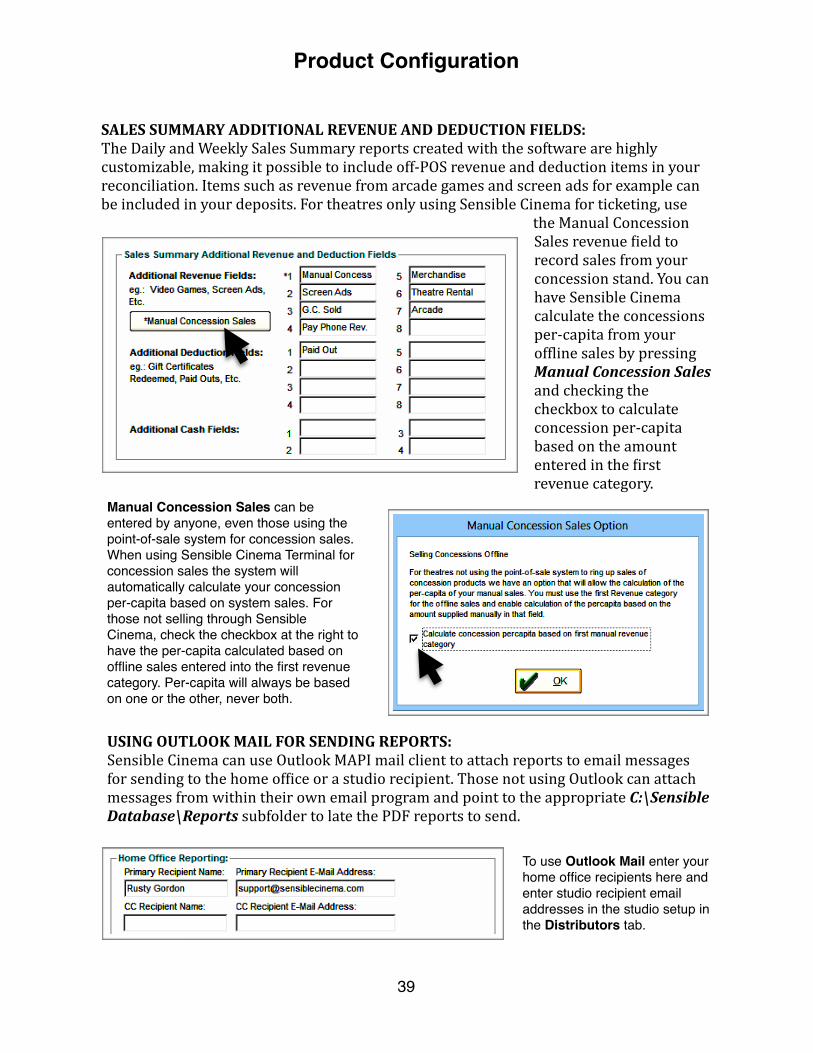
SALES SUMMARY ADDITIONAL REVENUE AND DEDUCTION FIELDS: The Daily and Weekly Sales Summary reports created with the software are highly customizable, making it possible to include off-‐POS revenue and deduction items in your reconciliation. Items such as revenue from arcade games and screen ads for example can be included in your deposits. For theatres only using Sensible Cinema for ticketing, use
the Manual Concession Sales revenue 1ield to record sales from your concession stand. You can have Sensible Cinema calculate the concessions per-‐capita from your of1line sales by pressing Manual Concession Sales and checking the checkbox to calculate concession per-‐capita based on the amount entered in the 1irst revenue category.
Manual Concession Sales can be entered by anyone, even those using the point-of-sale system for concession sales. When using Sensible Cinema Terminal for concession sales the system will automatically calculate your concession per-capita based on system sales. For those not selling through Sensible Cinema, check the checkbox at the right to have the per-capita calculated based on offline sales entered into the first revenue category. Per-capita will always be based on one or the other, never both.
USING OUTLOOK MAIL FOR SENDING REPORTS: Sensible Cinema can use Outlook MAPI mail client to attach reports to email messages for sending to the home of1ice or a studio recipient. Those not using Outlook can attach messages from within their own email program and point to the appropriate C:\Sensible Database\Reports subfolder to late the PDF reports to send.
To use Outlook Mail enter your home office recipients here and enter studio recipient email addresses in the studio setup in the Distributors tab.
Product Configuration
39

Enter or select your recipient by pressing Home OfFice, Studio or CinemaSource to choose. Once you have selected or entered a recipient, select up to six 1iles you wish to attach, enter a message body if any then press Compose and Send Email to open a new outgoing message and add your 1ile attachments.
E-‐mail message with attachment ready to send in Microsoft Outlook®.
Product Configuration
40

ADMISSIONS TAB: The Admissions tab is where you will maintain your ticket prices and categories. Sensible Cinema Box Of1ice for Windows has two ten-‐category admission pro1iles, “A” and “B”, with each pro1ile independent of one another. For each 1ilm you show you will select one pro1ile or the other. Generally speaking, pro1ile “A” is used for 2D movies and pro1ile “B” is used for 3D movies.
Important Information about Admission Price Setup: Your admission categories, prices and taxes are copied from the Master Con1iguration to each playdate as it is created. This means you must have your pricing set and correct in the Master Con1iguration -‐> Admissions Tab before you create a playdate. You cannot change pricing, taxes or category names for a particular day after a playdate has been created. This is to prevent selling tickets for the same ticket category for more than one price. You can switch between admissions pro1ile “A” and “B” only if no seats have been sold. If you have discovered your prices in a particular playdate are incorrect and no seats have been sold, you can delete the playdate, 1ix your admission price pro1ile in the Master Con1iguration and then re-‐create the playdate. If you have sold tickets you will have to wait and change the prices another day or lose the sales you have made by deleting the playdate and creating it again. Remember, changes made to the Admission Price setup in the Master Con1iguration will not affect any existing playdates in any way. If you want to disable a certain category from sales on a certain day that you have already created, you can go to the showtimes for the particular playdate in Create and Edit Playdates and uncheck that category from all of your showtimes.
Admission Price Changes: When planning an admission price change, you must 1irst create the playdates which will be sold for at the old prices, change the admission prices in the Master Con1iguration, then create your new playdates to be at your new admission prices. This makes it possible to sell tickets for the old playdates at the old price and immediately begin selling advance tickets for the future playdates which will be at the new prices. Here is a diagram:
Create all playdates for Monday-‐Thursday before changing prices in the Master Con1iguration. Next, change prices in Master Con2iguration -‐> Admissions Tab. Create the new playdates for the weekend starting Friday.
MON TUE WED THUR FRI SAT SUNOld Old Old Old New New NewPrice Price Price Price Price Price Price
Advance tickets sold on Monday for a Saturday night show in this scenario would be at the new prices, regardless of what the price for seeing a movie on Monday was. So, if I came to see a movie Monday and decided to buy a ticket for Saturday while I happened to be at the theatre, the price to see the movie would be different for each night.
PrintTix® Internet Ticketing Customers: If you have added, deleted or changed the name of a ticket category in Sensible Cinema you must also log into the PrintTix TVS software con1iguration and re-‐select the categories of tickets to be sold online.
Product Configuration
41

Setting Up Ticket Prices and Taxes: For each individual ticket category, you must enter the breakdown of the ticket price. This is the total face value of the ticket broken down into the admission price and admission tax components. If your tax authority does not charge tax on tickets, leave the amount for the tax as 0.00 and enter the tax rate at the bottom right as 0%.
We enter the tax breakdown because the 1ilm distributors want the tax applied to each individual ticket reported on your box of1ice report. We enter the percentage because the tax authority of your state, county, and municipality wants a percentage of your total ticket sales reported as your sales tax liability. These two different ways of calculating the sales tax are at odds with one another, but both must be done to satisfy the requirements of each of these entities. As a result, these two 1igures may differ slightly from one another. Sensible Cinema makes sure each of these entities get the reported the tax they expect. Take for example the scenario below:
Distributor Calculation Method for 5% Tax on AdmissionsExample: 1000 tickets sold at $12.00 each {$11.43 and $0.57 tax} (formula 12.00 ÷ 1.05)You Report $11,430.00 in admissions and the Tax= $570.00 in tax = $12,000.00 Total Sales
Tax Authority (State/County/Municipal Govt.) Calculation Method for 5% Tax on AdmissionsExample: 1000 tickets sold at $12.00 each = Total $12,000Back Out Sales Tax of 5% (formula $12,000 ÷ 1.05 = $11,428.57), Subtract $11,428.57 from $12,000 and the Tax = $571.43
Product Configuration
42
Movie Ratings: The movie ratings table is updatable and editable.
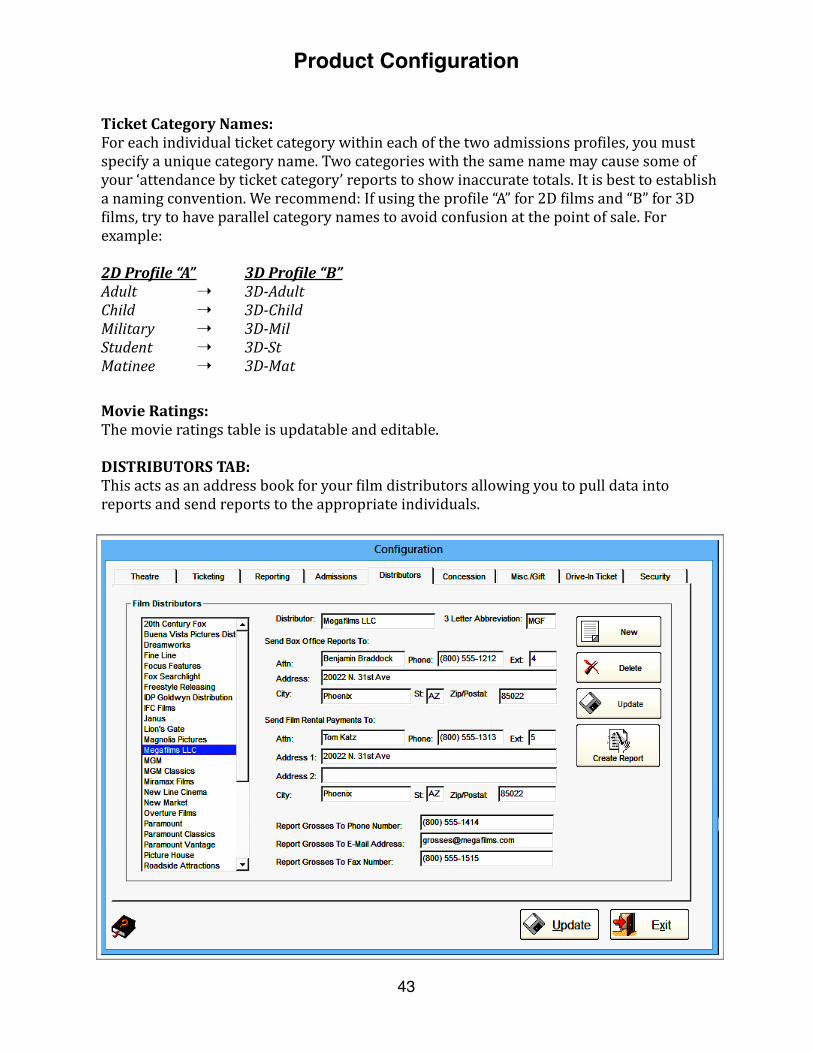
DISTRIBUTORS TAB: This acts as an address book for your 1ilm distributors allowing you to pull data into reports and send reports to the appropriate individuals.
Ticket Category Names: For each individual ticket category within each of the two admissions pro1iles, you must specify a unique category name. Two categories with the same name may cause some of your ‘attendance by ticket category’ reports to show inaccurate totals. It is best to establish a naming convention. We recommend: If using the pro1ile “A” for 2D 1ilms and “B” for 3D 1ilms, try to have parallel category names to avoid confusion at the point of sale. For example:
2D ProFile “A” 3D ProFile “B” Adult ➝ 3D-‐Adult Child ➝ 3D-‐Child Military ➝ 3D-‐Mil Student ➝ 3D-‐St Matinee ➝ 3D-‐Mat
Product Configuration
43
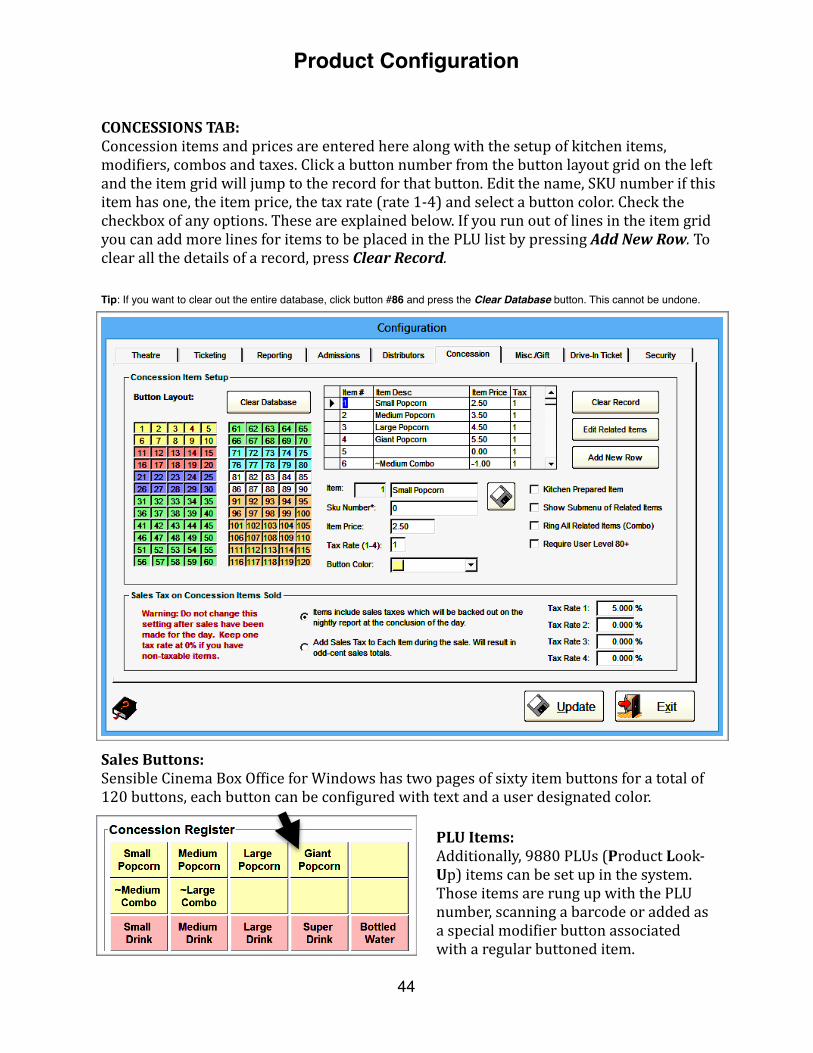
Tip: If you want to clear out the entire database, click button #86 and press the Clear Database button. This cannot be undone.
CONCESSIONS TAB: Concession items and prices are entered here along with the setup of kitchen items, modi1iers, combos and taxes. Click a button number from the button layout grid on the left and the item grid will jump to the record for that button. Edit the name, SKU number if this item has one, the item price, the tax rate (rate 1-‐4) and select a button color. Check the checkbox of any options. These are explained below. If you run out of lines in the item grid you can add more lines for items to be placed in the PLU list by pressing Add New Row. To clear all the details of a record, press Clear Record.
PLU Items: Additionally, 9880 PLUs (Product Look-‐Up) items can be set up in the system. Those items are rung up with the PLU number, scanning a barcode or added as a special modi1ier button associated with a regular buttoned item.
Sales Buttons: Sensible Cinema Box Of1ice for Windows has two pages of sixty item buttons for a total of 120 buttons, each button can be con1igured with text and a user designated color.
Product Configuration
44

The Kitchen Ticket can be printed to a receipt printer in the prep kitchen. The printer can be connected to a computer by USB, a print server or if you order an Ethernet interface printer, by CAT5 cable.
☑ Kitchen Prepared Item:Items marked as kitchen items will automatically print to a receipt printer in the kitchen when so con1igured or a duplicate receipt may be printed to the same printer as the customer receipt then handed to someone preparing the order. The customer copy and kitchen copy have a large order number at the top making matching customers with their orders easy. Items to be made in the kitchen are underlined and have a “kitchen” note.
An optional external bell is available for your kitchen ticket printer for use in noisy environments.
☑ Show Sub Menu of Related Items + Edit Related Items button Modi1iers for your main menu button items can include order preparation information including options, add-‐ons and suggestive sales of similar or complimentary items. Up to 20 modi1iers may be con1igured to come up in a special menu every time a primary menu item is rung up at the point-‐of-‐sale. In this example, building on the kitchen item setup for Hotdog, we have con1igured a menu of several options which we would like presented the cashier whenever she presses “Hotdog” at her register:
Modifiers can be items on other main menu keys or items pulled from the PLU List. Modifier items can have a price or be zero price items.
Product Configuration
45
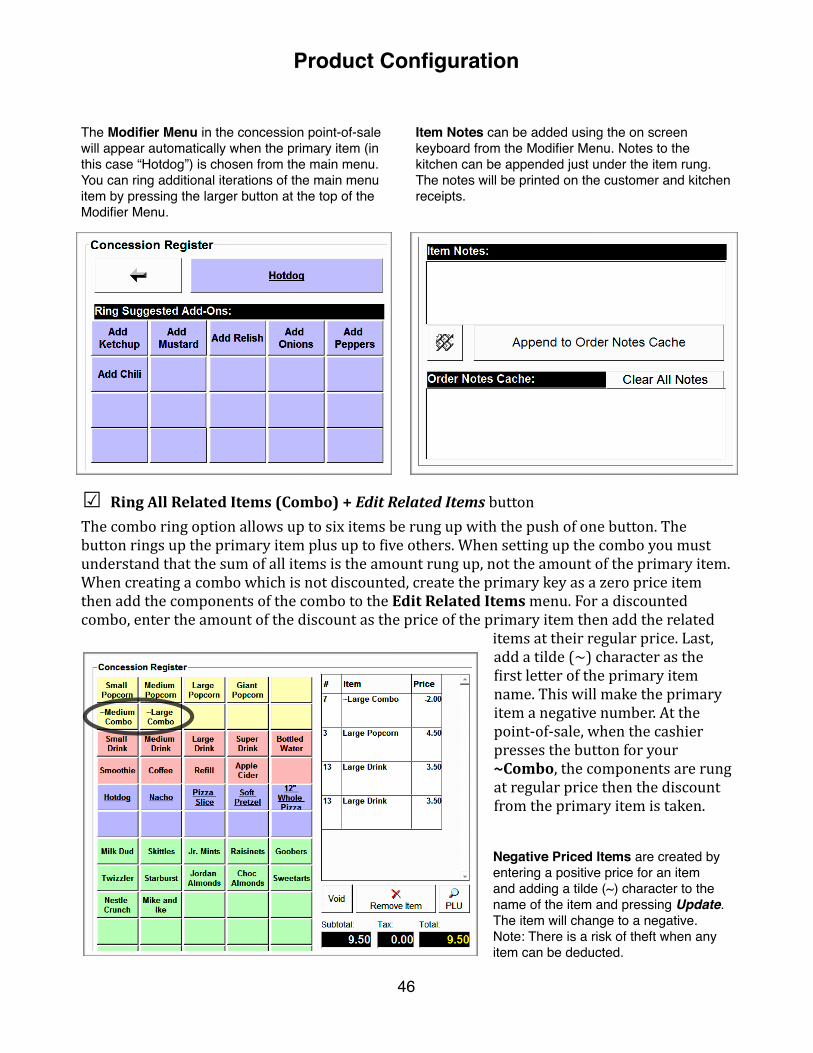
The Modifier Menu in the concession point-of-sale will appear automatically when the primary item (in this case “Hotdog”) is chosen from the main menu. You can ring additional iterations of the main menu item by pressing the larger button at the top of the Modifier Menu.
Item Notes can be added using the on screen keyboard from the Modifier Menu. Notes to the kitchen can be appended just under the item rung. The notes will be printed on the customer and kitchen receipts.
☑ Ring All Related Items (Combo) + Edit Related Items button The combo ring option allows up to six items be rung up with the push of one button. The button rings up the primary item plus up to 1ive others. When setting up the combo you must understand that the sum of all items is the amount rung up, not the amount of the primary item. When creating a combo which is not discounted, create the primary key as a zero price item then add the components of the combo to the Edit Related Items menu. For a discounted combo, enter the amount of the discount as the price of the primary item then add the related
items at their regular price. Last, add a tilde (~) character as the 1irst letter of the primary item name. This will make the primary item a negative number. At the point-‐of-‐sale, when the cashier presses the button for your ~Combo, the components are rung at regular price then the discount from the primary item is taken.
Negative Priced Items are created by entering a positive price for an item and adding a tilde (~) character to the name of the item and pressing Update. The item will change to a negative. Note: There is a risk of theft when any item can be deducted.
Product Configuration
46

☑ Require User Level 80+:Items checked may not be run up by persons with a user access level under 80. This option makes it possible for certain item keys or PLU items to work only when rung by a manager or supervisor.
Sales Tax on Concession Items Sold: Sensible Cinema Box Of1ice for Windows allows users to handle sales tax in one of two ways:
Include tax in cases where you want rounded prices. All prices on your menu board and POS will include tax and the tax will be backed out at the end of the day on the Daily Summary Report. This is the most popular method. Rounding prices to the nearest quarter saves time and reduces overages and shortages. It also cuts down on the amount of change needed on hand and counting all of that change.
Add Tax in cases where you want to post the item price on your menu board then add tax separately. This results in a higher likelihood that the sale amounts will be odd cent totals. Totals will be shown separately on your Daily Sales Summary.
Tax Rates 1-‐4: Each individual item you sell can be assigned one of four tax rates. Some localities allow certain food and drink items to be taxed at different percentages or to be tax exempt altogether. Enter up to four tax rates to be assigned to your item setup.
Product Configuration
47
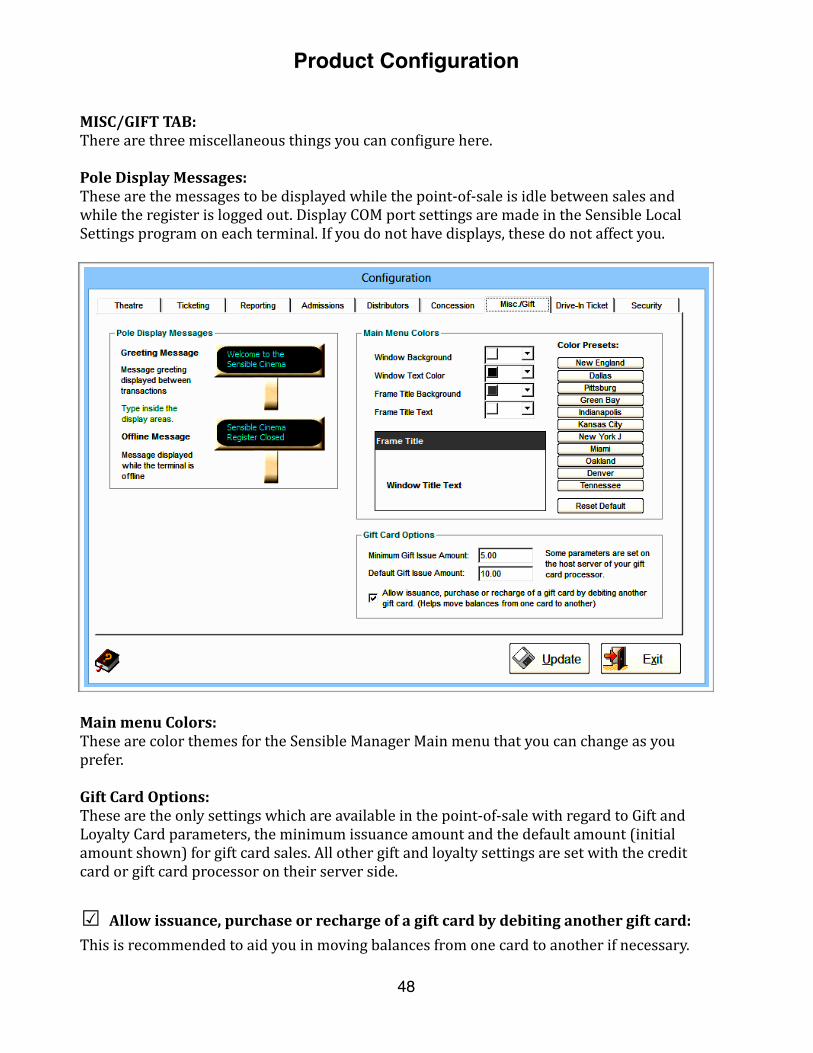
MISC/GIFT TAB: There are three miscellaneous things you can con1igure here.
Pole Display Messages: These are the messages to be displayed while the point-‐of-‐sale is idle between sales and while the register is logged out. Display COM port settings are made in the Sensible Local Settings program on each terminal. If you do not have displays, these do not affect you.
Main menu Colors: These are color themes for the Sensible Manager Main menu that you can change as you prefer.
Gift Card Options: These are the only settings which are available in the point-‐of-‐sale with regard to Gift and Loyalty Card parameters, the minimum issuance amount and the default amount (initial amount shown) for gift card sales. All other gift and loyalty settings are set with the credit card or gift card processor on their server side.
☑ Allow issuance, purchase or recharge of a gift card by debiting another gift card:This is recommended to aid you in moving balances from one card to another if necessary.
Product Configuration
48
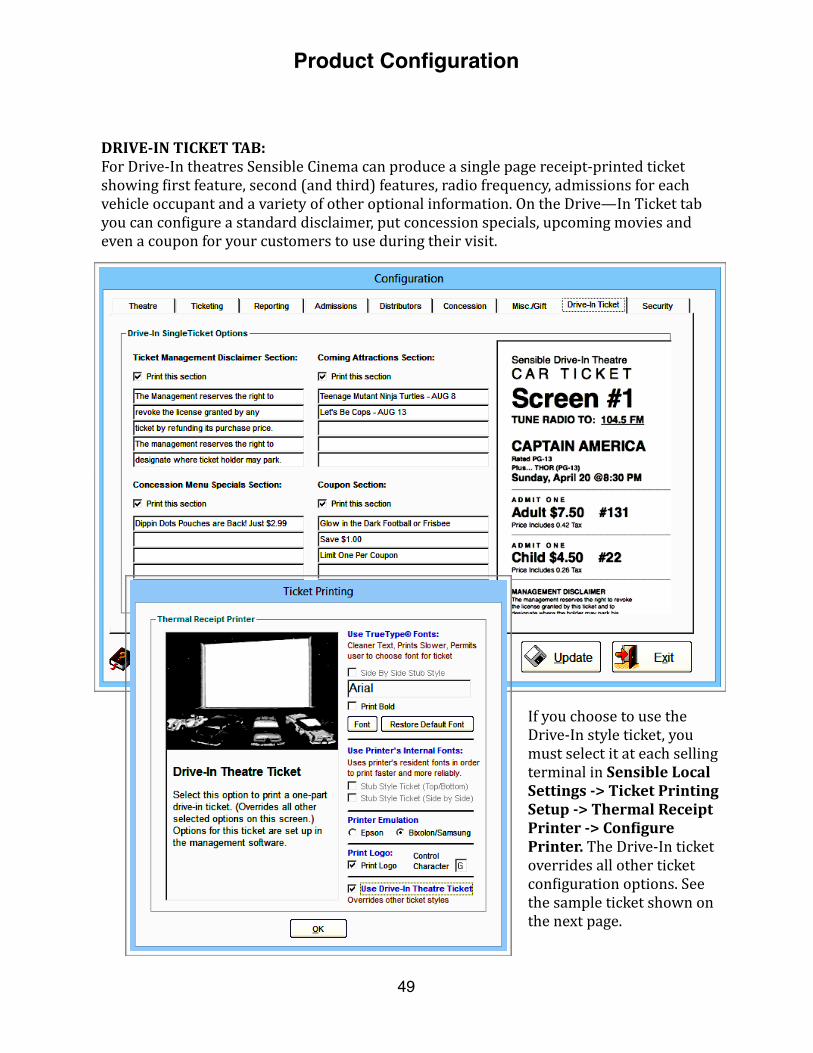
If you choose to use the Drive-‐In style ticket, you must select it at each selling terminal in Sensible Local Settings -‐> Ticket Printing Setup -‐> Thermal Receipt Printer -‐> Con2igure Printer. The Drive-‐In ticket overrides all other ticket con1iguration options. See the sample ticket shown on the next page.
DRIVE-‐IN TICKET TAB: For Drive-‐In theatres Sensible Cinema can produce a single page receipt-‐printed ticket showing 1irst feature, second (and third) features, radio frequency, admissions for each vehicle occupant and a variety of other optional information. On the Drive—In Ticket tab you can con1igure a standard disclaimer, put concession specials, upcoming movies and even a coupon for your customers to use during their visit.
Product Configuration
49

Drive-InWindow TicketHighlights
Screen Number:The screen number is printed in giant print making it easy to audit the field for people who have crossed over for other screens.
Logo Graphic:An optional logo can be saved to the nonvolatile RAM in your receipt printer, saving time sending the graphic for each print job. Tools to do this are available at the printer manufacturer web site.
Radio Frequency:Tells the patron where to tune for program audio.
Patron Tickets:Individual patrons shown on the ticket but grouped together.
Standard Disclaimer:Rules, refund policy and other matters. Set up in Master Program Configuration -> Drive-Ins tab.
Coming Attractions, Concession Specials, and Coupons:Optionally list upcoming features, concession specials and a coupon. Configured in Master Program Configuration -> Drive-Ins Tab
Feature Title(s):Shows the first feature in large type plus up to two secondary features. Day, Date and Approximate show time for the first feature.
Product Configuration
50
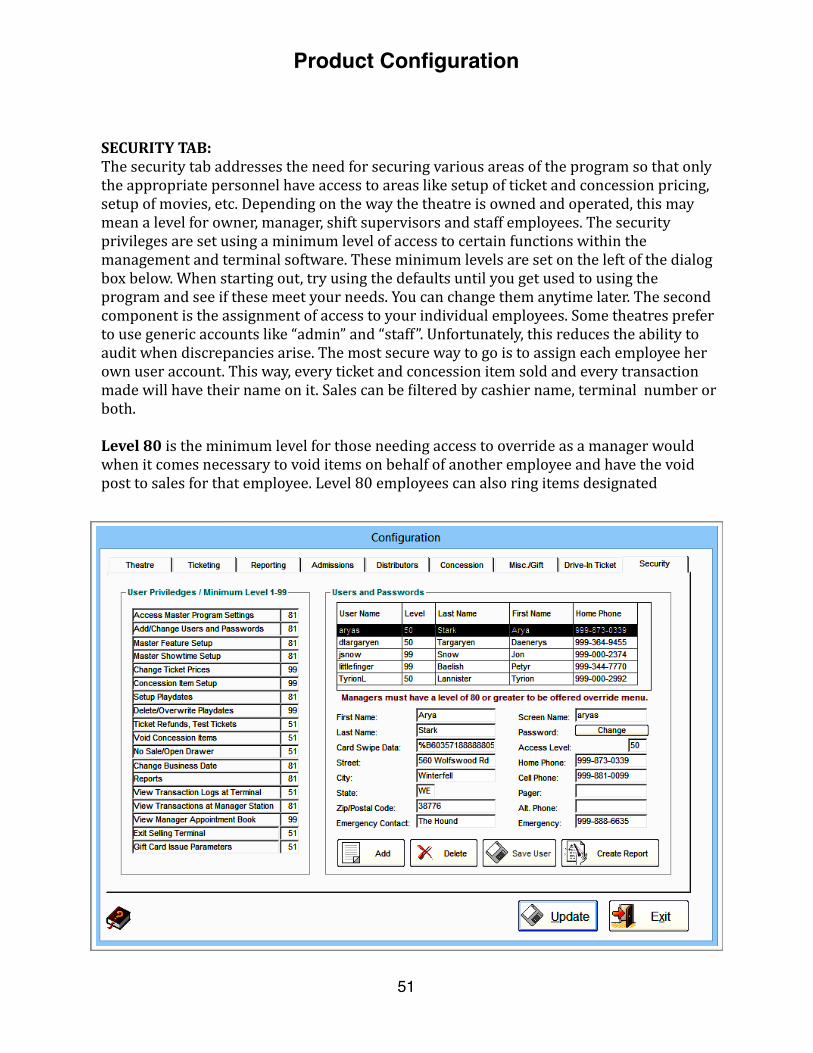
SECURITY TAB: The security tab addresses the need for securing various areas of the program so that only the appropriate personnel have access to areas like setup of ticket and concession pricing, setup of movies, etc. Depending on the way the theatre is owned and operated, this may mean a level for owner, manager, shift supervisors and staff employees. The security privileges are set using a minimum level of access to certain functions within the management and terminal software. These minimum levels are set on the left of the dialog box below. When starting out, try using the defaults until you get used to using the program and see if these meet your needs. You can change them anytime later. The second component is the assignment of access to your individual employees. Some theatres prefer to use generic accounts like “admin” and “staff”. Unfortunately, this reduces the ability to audit when discrepancies arise. The most secure way to go is to assign each employee her own user account. This way, every ticket and concession item sold and every transaction made will have their name on it. Sales can be 1iltered by cashier name, terminal number or both.
Level 80 is the minimum level for those needing access to override as a manager would when it comes necessary to void items on behalf of another employee and have the void post to sales for that employee. Level 80 employees can also ring items designated
Product Configuration
51

Card Swipe Data can be entered or swiped into the employee’s record so that the employee can log into the selling terminal using a gift card or another card with a magnetic stripe. If the employee is not in possession of the card, she would then need to use her user name and password. If you are going to use swipe cards, it is recommended that you use them for all employees and that you purchase a portable USB swipe reader for the back of1ice, programmed similarly to your point-‐of-‐sale computer. Sensible Cinema has these in its web store. Using swipe cards for some and not others can create confusion at the log in screen because the system remembers how the previous user logged in.
To use the Swipe Login, select the Swipe Card Login button and swipe your card through the MSR.
To use the Regular User Login, deselect the Swipe Card Login button and enter your user name and password.
To Change Password, press the User button from the main menu of the selling terminal. Next, check the Change Password After Login checkbox then log in.
Last, change your password.
Product Configuration
52

Chapter 4
Feature Setup
53

Master Feature Template Set up movies and showtimes for your theatre. Below explain key elements of setting up 1ilms and creating playdates for selling tickets. These are grouped together in the Main Menu.
MASTER TEMPLATES: The Master Feature Template and Master Showtime Templates are where you will set up each 1ilm for your theatre, select the auditorium, set the showtimes and ticket categories available for each showtime and manage details of each engagement. These will be the building blocks used to create the Playdate 1iles which will be used on each business date to record your sales.
PLAYDATES: Creating a playdate is the step after setting up the templates the way you want them to be for a speci1ic date or period of dates. The playdate 1ile is made from the Master Feature Template or another playdate or can be created blank for the purpose of importing features later. More on this in the next few pages.
BUSINESS DATE: This makes the playdate for a particular day be the current business date. For each business day, a playdate 1ile must be created. It is used in advance of being the business date in cases where you want to make available advance tickets, storing pre-‐sale ticket sales data. When its business date rolls around it will store concession sales and other store sales data for that business date.
Sensible Cinema Feature Templates give you a lot of flexibility, including these benefits:
Future playdates can be created as far in advance as you like, allowing the sale for upcoming blockbusters before knowing what else will be playing that week.
Movies aren’t tied to a specific screen. Screens for performances are selected for each individual showtime.
Feature Setup
54
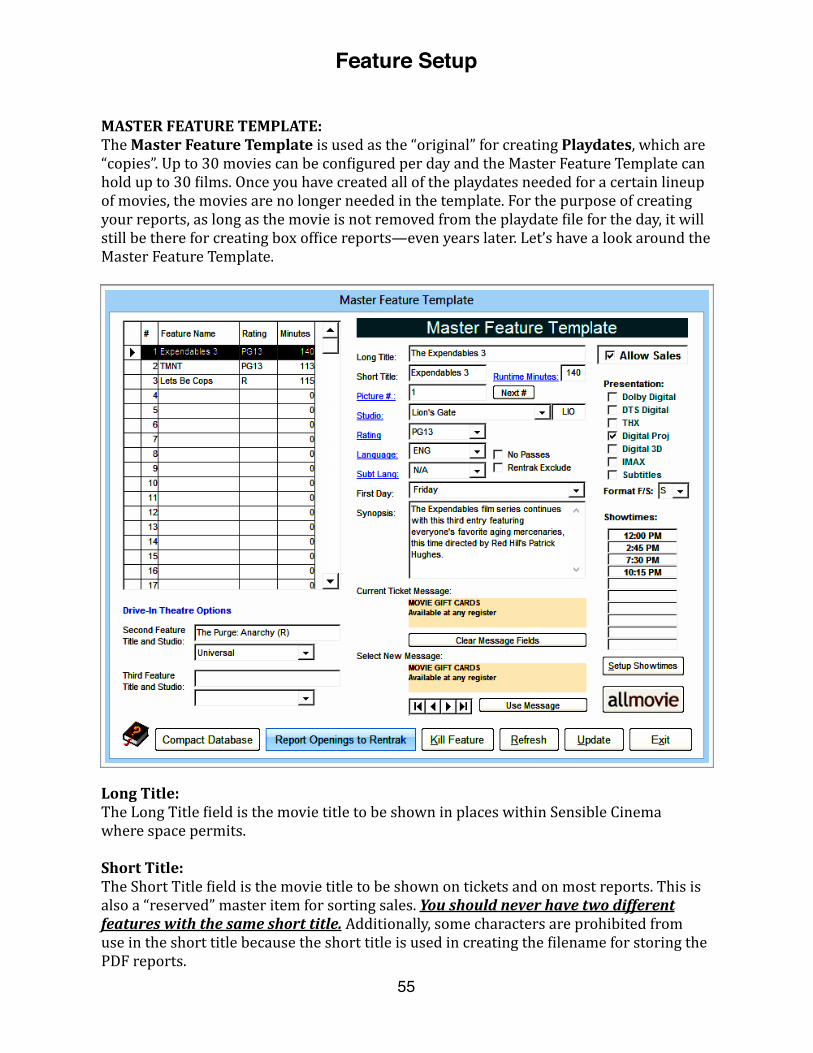
Long Title:The Long Title 1ield is the movie title to be shown in places within Sensible Cinema where space permits.
Short Title: The Short Title 1ield is the movie title to be shown on tickets and on most reports. This is also a “reserved” master item for sorting sales. You should never have two different features with the same short title. Additionally, some characters are prohibited from use in the short title because the short title is used in creating the 1ilename for storing the PDF reports.
MASTER FEATURE TEMPLATE: The Master Feature Template is used as the “original” for creating Playdates, which are “copies”. Up to 30 movies can be con1igured per day and the Master Feature Template can hold up to 30 1ilms. Once you have created all of the playdates needed for a certain lineup of movies, the movies are no longer needed in the template. For the purpose of creating your reports, as long as the movie is not removed from the playdate 1ile for the day, it will still be there for creating box of1ice reports—even years later. Let’s have a look around the Master Feature Template.
Feature Setup
55

Runtime Minutes: The running time for the feature presentation plus your pre-‐show material should be entered here. The running time should be entered accurately and include previews, advertisements and theatre daters to ensure that showtimes exported to an LMS or TMS are correct. Additionally, incorrect running times will yield incorrect ending times, creating confusion for your ushers, as their reports will be incorrect.
Picture #/Next # Button: The picture number is a number you generate which will be used as a numerical representation for this movie. It should never have been used before for another movie and it should never be used again after this 1ilm leaves. To ensure you don’t cause a duplicate to be used, you can press the Next button to retrieve the next unused number from the system. The picture number is used by our integrated Rentrak® reporting and for synchronizing your showtimes to a Library Management Server (LMS) like Cinedigm or Theatre Management System (TMS) from Dolby or GDC. Schedule sync software is available from Sensible Cinema for an additional license fee.
Studio: The studio name and abbreviation are selected from the drop-‐down list. If the studio you want isn’t there, click the Studio hyperlink to add it to the database. This uses studios you have stored in the Distributor Database in the Master Program Con1iguration -‐> Distributors Tab. This is shown on page 43.
Rating: Select the movie rating from the drop-‐down list. If the one you need isn’t there you can add it to the database by clicking the Rating hyperlink. This adds the rating to the database shown in the Master Program Con1iguration -‐> Admissions tab. This database is shown on page 42.
Language: This is the language for the dialog in this 1ilm. This information is exported to the LMS/TMS and should be selected accurately to prevent the projector from presenting the movie with the wrong language.
Subtitle Language: This is the subtitle language for the dialog in this 1ilm. This information is exported to the LMS/TMS and should be selected accurately to prevent the projector from presenting the movie with the wrong subtitle language.
First Day: This is the 1irst day of the week for each reporting period. More often it will be Friday, but this can be any day. This acts as a reminder should you be doing a weekly box of1ice report starting from the wrong day of the week. For example, if a 1ilm opened on Wednesday and you mistakingly create the box of1ice report as if the 1ilm opened on a Friday.
Feature Setup
56
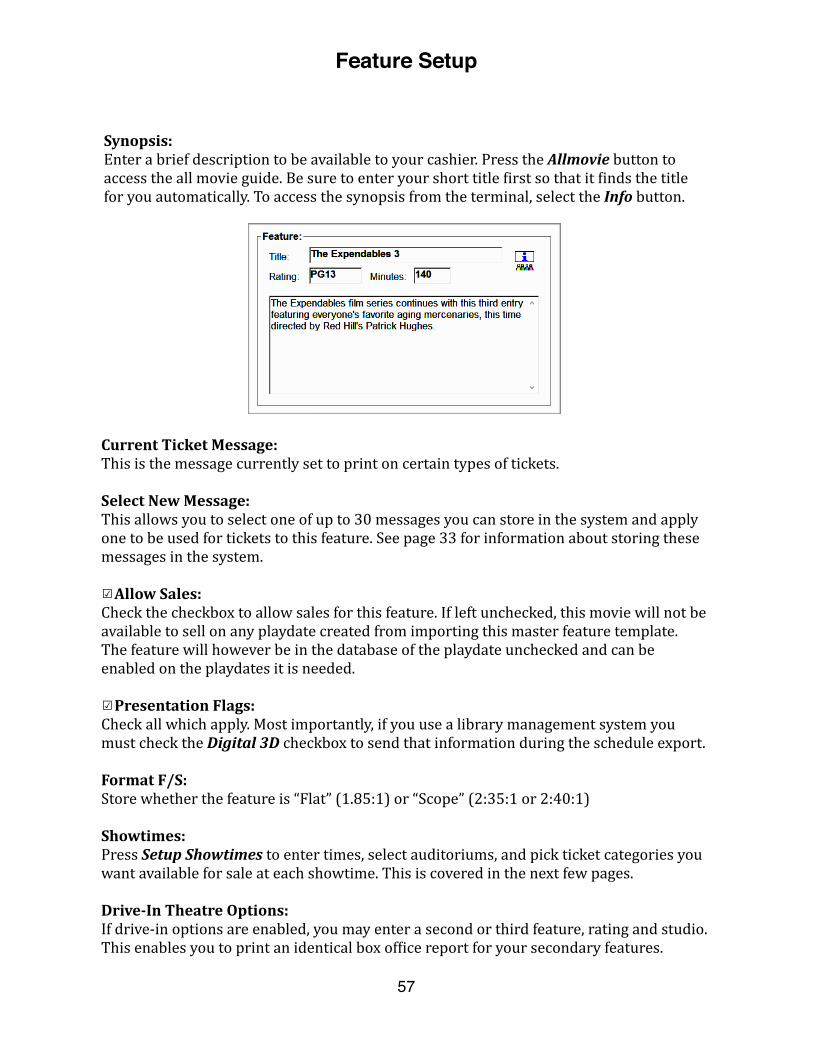
Synopsis: Enter a brief description to be available to your cashier. Press the Allmovie button to access the all movie guide. Be sure to enter your short title 1irst so that it 1inds the title for you automatically. To access the synopsis from the terminal, select the Info button.
Current Ticket Message: This is the message currently set to print on certain types of tickets.
Select New Message: This allows you to select one of up to 30 messages you can store in the system and apply one to be used for tickets to this feature. See page 33 for information about storing these messages in the system.
☑Allow Sales: Check the checkbox to allow sales for this feature. If left unchecked, this movie will not be available to sell on any playdate created from importing this master feature template. The feature will however be in the database of the playdate unchecked and can be enabled on the playdates it is needed.
☑Presentation Flags: Check all which apply. Most importantly, if you use a library management system you must check the Digital 3D checkbox to send that information during the schedule export.
Format F/S: Store whether the feature is “Flat” (1.85:1) or “Scope” (2:35:1 or 2:40:1)
Showtimes: Press Setup Showtimes to enter times, select auditoriums, and pick ticket categories you want available for sale at each showtime. This is covered in the next few pages.
Drive-‐In Theatre Options: If drive-‐in options are enabled, you may enter a second or third feature, rating and studio. This enables you to print an identical box of1ice report for your secondary features.
Feature Setup
57

Steps to Transmitting Your Openings:1) Select the opening date on the calendar. 2) Check the checkbox under “New”3) Send report to Rentrak.
Compact Database Button: Opens the compact and repair utility so that you can reduce the size of or repair the features database.
Report Openings to Rentrak Button: Opens a utility so that you can announce your new features opening each week to Rentrak. This readies their system to expect your grosses in the new week.
Kill Feature Button: Deletes all content of the currently selected feature slot. Always KILL a feature which is leaving. DO NOT simply enter data over it unless you wish to retain all of the showtimes, auditoriums and selected categories to sell from.
Refresh Button: Re-‐queries the database and refreshes the data grid containing your features.
Update Button: Saves any new information entered since the last time you pressed Update.
Exit Button: Saves any new information entered since the last time you pressed Update and exits the Master Feature Template.
Allmovie Button: Searches the All Movie Guide online database for the title entered in the short title 1ield. This will supply you with the synopsis, distributor, running time, actors, directors, etc.
Feature Setup
58

MASTER SHOWTIME TEMPLATE: The Master Showtime Template is an extension of the Master Feature Template using data from the same database table, allowing a simple, clean interface for con1iguring showtimes. Showtimes con1igured here only affect the template, not playdates you have already created. If you need to correct something on a particular day, select the Create and Edit Playdates button in the Main Menu and Edit Showtimes for… that Playdate.
Feature, Rating and Running Time: The movie you have selected to edit. If you have pressed Setup Showtimes in the Master Feature Template, this will display that 1ilm. If you went to Master Showtime Template from the Main menu, a dropdown list control will let you select any feature in the Master Feature Template.
☑Allow Sales: Check the checkbox to allow sales for this feature. If left unchecked, this movie will not be available to sell on any playdate created from importing this master feature template. The feature will however be in the database of the playdate unchecked and can be enabled on the playdates it is needed.
Select Pricing Pro2ile: Select the pricing pro1ile. ⦿A ❍B Usually select “A” price pro1ile for 2D Movies, “B” price pro1ile for 3D 1ilms.
Feature Setup
59

Choosing Showtimes: You can select the drop down list and search for the time you want or drop open the list and press a number (other than one) to jump to a PM time like 7:00.
Once you have selected your showtime, the End Time box will populate with the ending time based on the running time you have entered in
Choosing Auditorium: Movies aren’t tied to a specific screen. Screens for performances are selected for each individual showtime.
Setting Up Auditoriums:See page 33 for an explanation of how to set up auditorium capacities in the Master Program Configuration.
Showtime (Drop-‐down lists): Each 1ilm may have up to ten (10) showtimes con1igured per day. If you have a movie on more than one screen and more than ten showtimes are needed, create separate setups for this movie and remember to make each one have a slightly different short title… (eg. “Expendables A”, “Expendables B” and “Expendables C”.
Screen Selector/Seats: Select the screen where each performance will be shown. The seats 1ield will populate with the capacity of the auditorium.
Select Ticket Categories: Click the checkbox for each of the ticket categories you want available for your cashier to sell at each showtime. Click All/None to enable or deselect all categories. Clicking the big red X in the Clear column removes the showtime, the auditorium selection and all selected categories of tickets.
Feature Setup
60
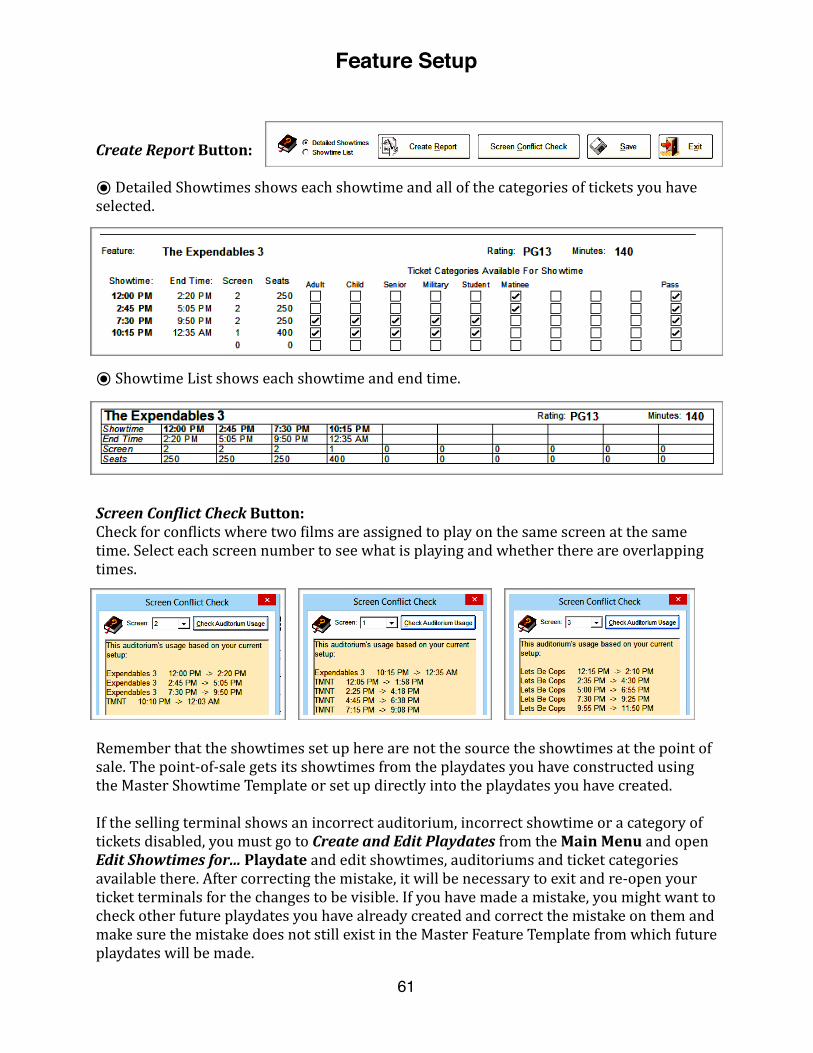
Create Report Button:
⦿ Detailed Showtimes shows each showtime and all of the categories of tickets you have selected.
⦿ Showtime List shows each showtime and end time.
Screen ConFlict Check Button: Check for con1licts where two 1ilms are assigned to play on the same screen at the same time. Select each screen number to see what is playing and whether there are overlapping times.
Remember that the showtimes set up here are not the source the showtimes at the point of sale. The point-‐of-‐sale gets its showtimes from the playdates you have constructed using the Master Showtime Template or set up directly into the playdates you have created.
If the selling terminal shows an incorrect auditorium, incorrect showtime or a category of tickets disabled, you must go to Create and Edit Playdates from the Main Menu and open Edit Showtimes for… Playdate and edit showtimes, auditoriums and ticket categories available there. After correcting the mistake, it will be necessary to exit and re-‐open your ticket terminals for the changes to be visible. If you have made a mistake, you might want to check other future playdates you have already created and correct the mistake on them and make sure the mistake does not still exist in the Master Feature Template from which future playdates will be made.
Feature Setup
61

Feature Setup
62

Chapter 5
Playdate Setup
63

Create and Edit Playdates The Playdate 1ile is a data 1ile containing all of the data for a single day of business, including the movies, showtimes, tickets sold, concessions sold, individual transactions, ticket prices and audit trail. The playdate 1ile is created by using something as a template. The most common practice is to create it as a duplicate of the Master Feature Template.
CREATE A NEW PLAYDATE: Select the date on the calendar for your new playdate. If it doesn’t already exist, this dialog will ask if you want to create a new one.
The Playdate File is created for a specific business date in the future, days or weeks before using it on the current Business Date it is made for. This permits you to sell advance tickets both on site and online.
When the date for this playdate file finally rolls around, it will be used to store sales data for the specific business date, from ticket sales to concession sales and have the stored pre-sale tickets you have been selling in advance.
Method 1: ⦿ Import All Features (Recommended) Create the playdate as a carbon-‐copy of the Master Feature Template. This uses your current ticket prices and categories stored in the Master Program Con2iguration and locks them into the playdate. No changes to prices or ticket categories can occur after creating a playdate.
Method 2: ⦿ Create empty playdate Create an empty playdate and import the features and showtimes individually at a later time. This enables you to begin selling advance tickets for a movie well in advance to knowing what other movies you will have that day. This uses your current ticket prices and categories stored in the Master Program Con2iguration and locks them into the playdate. No changes to prices or ticket categories can occur after creating a playdate.
Method 3: ⦿ Copy Playdate with Current Ticket Prices Create a playdate by copying another existing past or future playdate. This uses your current ticket prices and categories stored in the Master Program Con2iguration and locks them into the playdate. No changes to prices or ticket categories can occur after creating a playdate.
Playdate Setup
64

Method 4: ⦿ Copy Playdate with Original Ticket Prices Create a playdate by copying another existing past or future playdate. This uses the ticket prices and categories stored in the Playdate File you select and locks them into the playdate. No changes to prices or ticket categories can occur after creating a playdate.
Descriptions of these methods are contained in the dialog box when creating playdates.
EDIT AN EXISTING PLAYDATE: Click the calendar to select the desired date. The buttons in the Playdate setup will change and show the selected date. Edit Features… brings up a Feature Setup dialog similar to the Master Feature Template, except this one is only for the selected playdate. Edit Showtimes… brings up a Showtime Setup dialog similar to the Master Showtime Template, except that this one is speci1ic to the selected playdate.
Playdate Setup lets you make specific changes to playdates you have created without affecting other business days.
Playdate Setup
65

PLAYDATE FEATURE TEMPLATE: The Playdate Feature Template is the database of 1ilms con1igured for a speci1ic business day. Up to 30 movies can be con1igured per day and the Playdate Feature Template can hold up to 30 1ilms. Let’s have a look around the Playdate Feature Template.
Click the Unlock Setup Fields for Editing Button to allow you the ability to edit 1ields in the Playdate Feature Database. Editing is protected by this step since generally the imported data is exactly as it was intended to be. A disclaimer will be displayed.
Long Title:The Long Title 1ield is the movie title to be shown in places within Sensible Cinema where space permits. The short title is used on tickets and Weekly Box Of1ice Reports.
Short Title: The Short Title 1ield is the movie title to be shown on tickets and on most reports. This is also a “reserved” master item for sorting sales. You should never have two different features with the same short title. Additionally, some characters are prohibited from use in the short title because the short title is used in creating the 1ilename for storing the PDF reports.
Playdate Setup
66
Runtime Minutes: The running time for the feature presentation plus your pre-‐show material should be entered here. The running time should be entered accurately and include previews, advertisements and theatre daters to ensure that showtimes exported to an LMS or TMS are correct. Additionally, incorrect running times will yield incorrect ending times, creating confusion for your ushers, as their reports will be incorrect.
Picture #/Info Button: The picture number is a number you generate which will be used as a numerical representation for this movie. It should never have been used before for another movie and it should never be used again after this 1ilm leaves. The picture number is used by our integrated Rentrak® reporting and for synchronizing your showtimes to a Library Management Server (LMS) like Cinedigm or Theatre Management System (TMS) from Dolby or GDC. Schedule sync software is available from Sensible Cinema for an additional license fee.
Studio: The studio name and abbreviation are selected from the drop-‐down list. If the studio you want isn’t there, click the Studio hyperlink to add it to the database. This uses studios you have stored in the Distributor Database in the Master Program Con1iguration -‐> Distributors Tab. This is shown on page 43.
Rating: Select the movie rating from the drop-‐down list. If the one you need isn’t there you can add it to the database by clicking the Rating hyperlink. This adds the rating to the database shown in the Master Program Con1iguration -‐> Admissions tab. This database is shown on page 42.
Language: This is the language for the dialog in this 1ilm. This information is exported to the LMS/TMS and should be selected accurately to prevent the projector from presenting the movie with the wrong language.
Subtitle Language: This is the subtitle language for the dialog in this 1ilm. This information is exported to the LMS/TMS and should be selected accurately to prevent the projector from presenting the movie with the wrong subtitle language.
Synopsis: Enter a brief description to be available to your cashier. Be sure to enter your short title 1irst so that it 1inds the title for you automatically. To access the synopsis from the terminal, select the Info button in the terminal.
Playdate Setup
67
Ticket Ad Message: This is the message currently set to print on certain types of tickets. Press Select to change the message to another of the up to 30 stored messages. See page 33 for information about storing these messages in the system.
☑Allow Sales: Check the checkbox to allow sales for this feature. If left unchecked, this movie will not be available for sales.
☑Presentation Flags: Check all which apply. Most importantly, if you use a library management system you must check the Digital 3D checkbox to send that information during the schedule export.
Format F/S: Store whether the feature is “Flat” (1.85:1) or “Scope” (2:35:1 or 2:40:1)
Import Features: Select a movie and press Import Selected Feature (or double-‐click the title) to import a movie from the Master Feature Template and add it to the current movie lineup for this playdate. The imported feature will include showtimes and categories selected in the Master Showtimes Template.
Edit Showtimes for Today: Press Edit Showtimes for Today to enter times, select auditoriums, and pick ticket categories you want available for sale at each showtime. This is covered in the next few pages.
Drive-‐In Theatre Options: If drive-‐in options are enabled, you may enter a second or third feature, rating and studio. This enables you to print an identical box of1ice report for your secondary features.
Kill Feature Button: Deletes all content of the currently selected feature slot.
Refresh Button: Re-‐queries the database and refreshes the data grid containing your features.
Update Button: Saves any new information entered since the last time you pressed Update.
Exit Button: Saves any new information entered since the last time you pressed Update and exits the Playdate Feature Template.
Playdate Setup
68
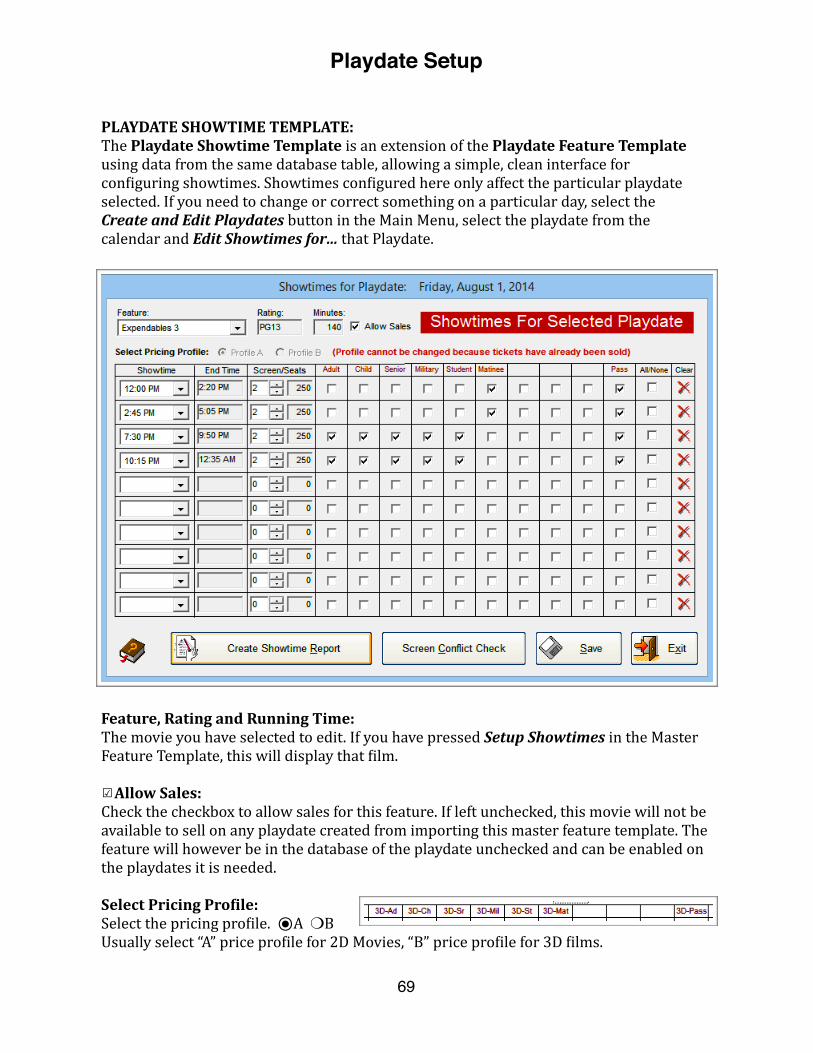
PLAYDATE SHOWTIME TEMPLATE: The Playdate Showtime Template is an extension of the Playdate Feature Template using data from the same database table, allowing a simple, clean interface for con1iguring showtimes. Showtimes con1igured here only affect the particular playdate selected. If you need to change or correct something on a particular day, select the Create and Edit Playdates button in the Main Menu, select the playdate from the calendar and Edit Showtimes for… that Playdate.
Feature, Rating and Running Time: The movie you have selected to edit. If you have pressed Setup Showtimes in the Master Feature Template, this will display that 1ilm.
☑Allow Sales: Check the checkbox to allow sales for this feature. If left unchecked, this movie will not be available to sell on any playdate created from importing this master feature template. The feature will however be in the database of the playdate unchecked and can be enabled on the playdates it is needed.
Select Pricing Pro2ile: Select the pricing pro1ile. ⦿A ❍B Usually select “A” price pro1ile for 2D Movies, “B” price pro1ile for 3D 1ilms.
Playdate Setup
69

Choosing Showtimes: You can select the drop down list and search for the time you want or drop open the list and press a number (other than one) to jump to a PM time like 7:00.
Once you have selected your showtime, the End Time box will populate with the ending time based on the running time you have entered in
Choosing Auditorium: Movies aren’t tied to a specific screen. Screens for performances are selected for each individual showtime.
Setting Up Auditoriums:See page 33 for an explanation of how to set up auditorium capacities in the Master Program Configuration.
Showtime (Drop-‐down lists): Each 1ilm may have up to ten (10) showtimes con1igured per day. If you have a movie on more than one screen and more than ten showtimes are needed, create separate setups for this movie and remember to make each one have a slightly different short title… (eg. “Expendables A”, “Expendables B” and “Expendables C”.
Screen Selector/Seats: Select the screen where each performance will be shown. The seats 1ield will populate with the capacity of the auditorium.
Select Ticket Categories: Click the checkbox for each of the ticket categories you want available for your cashier to sell at each showtime. Click All/None to enable or deselect all categories. Clicking the big red X in the Clear column removes the showtime, the auditorium selection and all selected categories of tickets.
Playdate Setup
70

Create Showtime Report Button: A variety of showtime reports are available for each playdate. Choose the date from the calendar and select the desired report. This menu is also available from the Main Menu where you change the Business Date.
Schedule for Web Publishing: A basic .html schedule file.
Sensible Cinema customers who use integrated online ticketing will have their showtimes submitted to CinemaSource on your behalf.
Chronological Show Start Schedule: A start-by-start list of the day’s shows. See pg. 72.
Chronological Show End Schedule: A end-by-end list of the day’s shows’ ending times, ideal for usher staff. See pg. 72.
Selected Ticket Categories: A feature list showing selected ticket categories.
Sorted by Feature Name: Alphabetical feature and showtime list.
CinemaSource: Data file for submission to CinemaSource. CinemaSource submits your movie schedule to dozens of websites, from local media to MSN, Yahoo, Google, Moviefone, MovieTickets, et al.
Playdate Setup
71

Screen ConFlict Check Button: Check for con1licts where two 1ilms are assigned to play on the same screen at the same time. Select each screen number to see what is playing and whether there are overlapping times.
Chronological Showtime Reports: These reports help organize staff around each show start and show end.
Playdate Setup
72

Click Change Current Business Date and select the date from the calendar. A playdate file must exist for the selected date. If it does, it will ask you whether to set it as the current business date.
Terminals must be logged out in order to change the business date. If someone has turned a machine off without logging out of the software, it will still appear to be logged in. Go to the offending terminal and log into the terminal all the way to the selling screen, press “Menu, then log out of the terminal.
CHANGE BUSINESS DATE: For each business day you will need to have created a playdate 1ile as described in this chapter. Each day, you will manually change the business day to the current date, making the playdate 1ile the storage vessel for the day’s sales data.
The process of changing the business date should be done immediately after completing the day’s sales and can be done even before doing the night’s reports for the end of this day. This is especially a good idea if selling tickets online because online sales are posted to the current business date. If you leave the 1inished day as the current business date after you close, online customers may cause additional sales to be added to the concluded playdate, causing those sales to not appear on the report you are working on. In this example, opening this day’s sales tomorrow may show different totals because of the additional sales made.
Changing the business date is a manual process and not one that can or should be automated because: 1) business date cannot be changed if there are terminals logged in, 2) it cannot be changed if no playdate 1ile exists for the next business date and 3) keeping this a manual process gives the manager more 1lexibility— for example, to include midnight show sales on the before midnight sales date. Online sales transactions will be applied to the current chosen business date. Tickets are applied to box of1ice reports for the day of the show.
Playdate Setup
73

Playdate Setup
74
Chapter 6
Terminal Setup
75

Minimum System Requirements: Our Recommendation:
Single or Dual Core CPU at 733 MHz Dual Core CPU at 1 GHz or Faster 256 MB System RAM 2 GB System RAM WinXP, Embedded POS-‐Ready 2009/7/8 Embedded POS-‐Ready 2009/7/8 40 GB HDD 80 GB HDD or Larger 100 Mbps Fast Wired Ethernet Gigabit Wired Ethernet Broadband Internet High Speed Broadband Internet Screen Resolution 1024x768 or Larger Screen Resolution 1024x768 or Larger Anti-‐virus, and anti-‐malware Software Anti-‐virus, and anti-‐malware Software USB Port USB 2.0 Port
This software works with both 32-‐bit and 64-‐bit versions of Windows operating systems.
Sensible Terminal Software Installation
SYSTEM REQUIREMENTS: In order for Sensible Cinema Box Of1ice for Windows terminal clients to work as designed and with the speed you would expect, certain minimum system requirements must be met. For best results, follow our recommendations when designing your system.
BEST PRACTICES: 1. Keep the Sensible Cinema Programs up to date. Check for updates twice per month. 2. Keep Windows updated by enabling Automatic Updates in the Control Panel. 3. Reboot your manager PC every other day to refresh system resources. 4. Install anti-‐virus and anti-‐malware programs and keep virus de1initions up to date. 5. Fully scan for viruses and spyware once per week. 6. Use a laser printer for crisp and clean reports with a low total cost of ownership 7. Avoid “sur1ing” the internet on the POS Server Computer. 8. Try to avoid using the server PC during periods of high volume sales. 9. Keep staff off of the management PC.
NETWORK BEST PRACTICES: Sensible Cinema Box Of2ice for Windows should only be used on a wired Fast Ethernet or Gigabit Ethernet network with a minimum speed of 100 Mbps with full duplex.
Wireless networks are not recommended because network connection speed and bandwidth will vary from terminal to terminal as wireless networks lower connection speeds based on signal strength. When speeds fall below the 100 Mbps threshold the possibility for damage to the database increases. Accepting credit cards over a wireless connection will require you to pay for a 1ield audit assessment of your wireless network and require additional layers of security for which we offer no support.
Terminal Setup
76
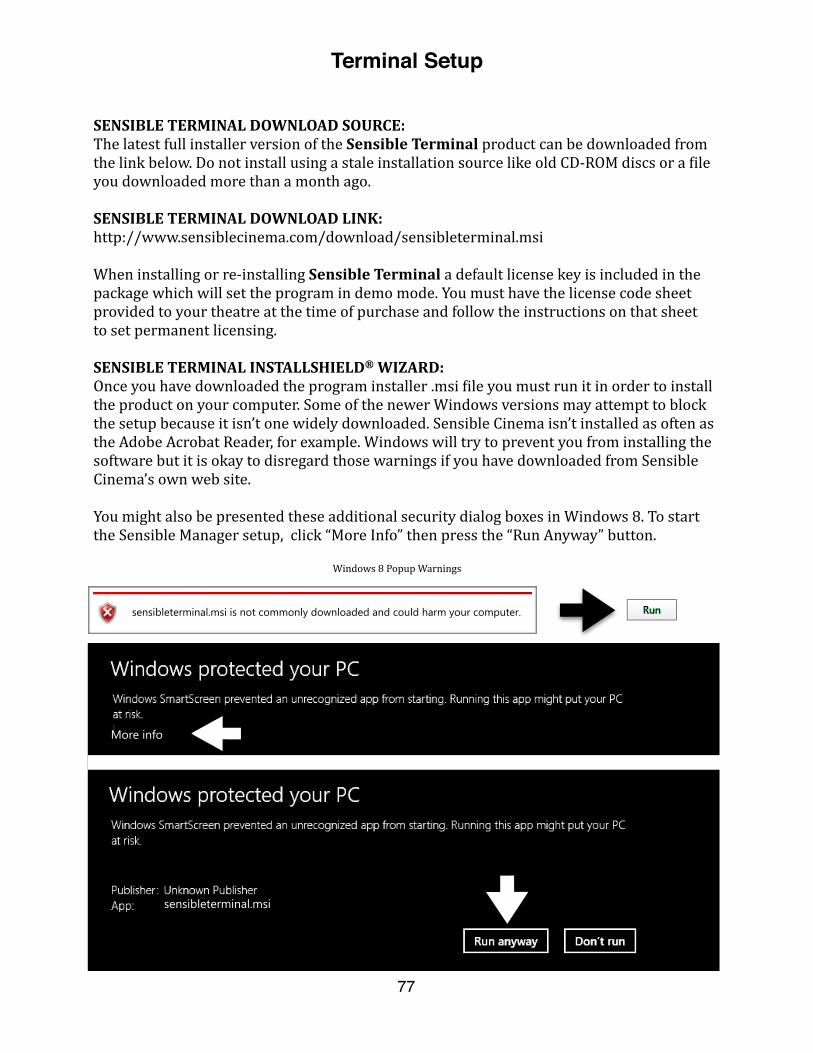
More info
sensibleterminal.msi
sensibleterminal.msi is not commonly downloaded and could harm your computer.
SENSIBLE TERMINAL DOWNLOAD SOURCE: The latest full installer version of the Sensible Terminal product can be downloaded from the link below. Do not install using a stale installation source like old CD-‐ROM discs or a 1ile you downloaded more than a month ago.
SENSIBLE TERMINAL DOWNLOAD LINK: http://www.sensiblecinema.com/download/sensibleterminal.msi
When installing or re-‐installing Sensible Terminal a default license key is included in the package which will set the program in demo mode. You must have the license code sheet provided to your theatre at the time of purchase and follow the instructions on that sheet to set permanent licensing.
SENSIBLE TERMINAL INSTALLSHIELD® WIZARD: Once you have downloaded the program installer .msi 1ile you must run it in order to install the product on your computer. Some of the newer Windows versions may attempt to block the setup because it isn’t one widely downloaded. Sensible Cinema isn’t installed as often as the Adobe Acrobat Reader, for example. Windows will try to prevent you from installing the software but it is okay to disregard those warnings if you have downloaded from Sensible Cinema’s own web site.
You might also be presented these additional security dialog boxes in Windows 8. To start the Sensible Manager setup, click “More Info” then press the “Run Anyway” button.
Windows 8 Popup Warnings
Terminal Setup
77

1. When installer starts, click “Next” 2. Select “Accept…” and click “Next”
3. Enter Name and Theatre and click “Next” 4. Use default path and click “Next”
5. Use default path and click “Next” 6. Allow Changes by pressing “Yes”
Terminal Setup
78

5. Program will install… 5. Press “Finish” when completed.
SENSIBLE TERMINAL INSTALLED PROGRAM COMPONENTS: A number of program components will be installed to the Windows desktop. Some additional utility programs may be shown in the start menu only and may be moved to the desktop or added to your startup folder if needed.
Main Program Components • Sensible Terminal• Sensible Local Settings
SENSIBLE TERMINAL LICENSE CODE SETUP: Have the license code sheet for your theatre available in hand as you start up the desktop application called Sensible Local Settings.
Terminal Setup
79

Terminal ID Numbers tell the terminal client software whether it is licensed for tickets, concessions or both. The number also assigns the terminal number on your POS system. You cannot have two terminals with the same terminal ID because it will result in file-locking errors and will mean
multiple terminals selling to the same cash drawer total.You can purchase license upgrades to add combo terminals.
Click Registration Code and Terminal I.D.
Select Selling Station. Enter the registration Circuit Name and Theatre Name precisely as shown on the license code sheet provided. Then enter the registration code and your terminal ID number for this terminal. Press “OK”.
Terminal Setup
80

SENSIBLE LOCAL SETTINGS is a utility program for con1iguring options to use each Sensible Cinema program component. In this case we will set up speci1ic options for your Sensible terminal client software. Local settings are those which will only apply to this particular computer, like terminal ID numbers and settings for your printer. See a picture of the Sensible Local Settings Main Menu on page 80.
Customer Display Setup lets you con1igure the serial port and display emulation for a connected customer facing or “pole” display, showing each individual item as it is being sold from the Sensible Terminal.
The customer display can be powered by the terminal serial port or by using an A/C adapter plugged into the wall. If you use a terminal you purchased from Sensible Cinema, you can power the serial port to be used by the customer display by setting it up in the terminal’s CMOS setup. This is accessed by pressing DEL at boot up. In integrated peripheral (Super I/O) setup, select 12V power to the selected serial port. Pole Display Setup allows you to test the display.
Cash Drawer Setup lets you add a cash drawer to your system, programmed to open when a sale has completed. A cash drawer can be connected to the terminal using a cash drawer cable (RJ-‐11 to RJ45), serial cable or USB cable.
☑ PartnerTech Cash Drawer Check the supported terminal number checkbox and plug in your cable.
☑ Use Serial Cash Drawer The serial cash drawer can be powered by the terminal, serial port or by using an A/C adapter plugged into the wall. If you use a terminal you purchased from Sensible Cinema, you can power the serial port to be used by the cash drawer by setting it up in the terminal’s CMOS. This is accessed by pressing DEL at boot up. To con1igure, check “Use Serial Port Cash Drawer” then choose serial port and open string. To send a NULL string, select Custom Open String and enter ten “@“ characters.
Terminal Setup
81
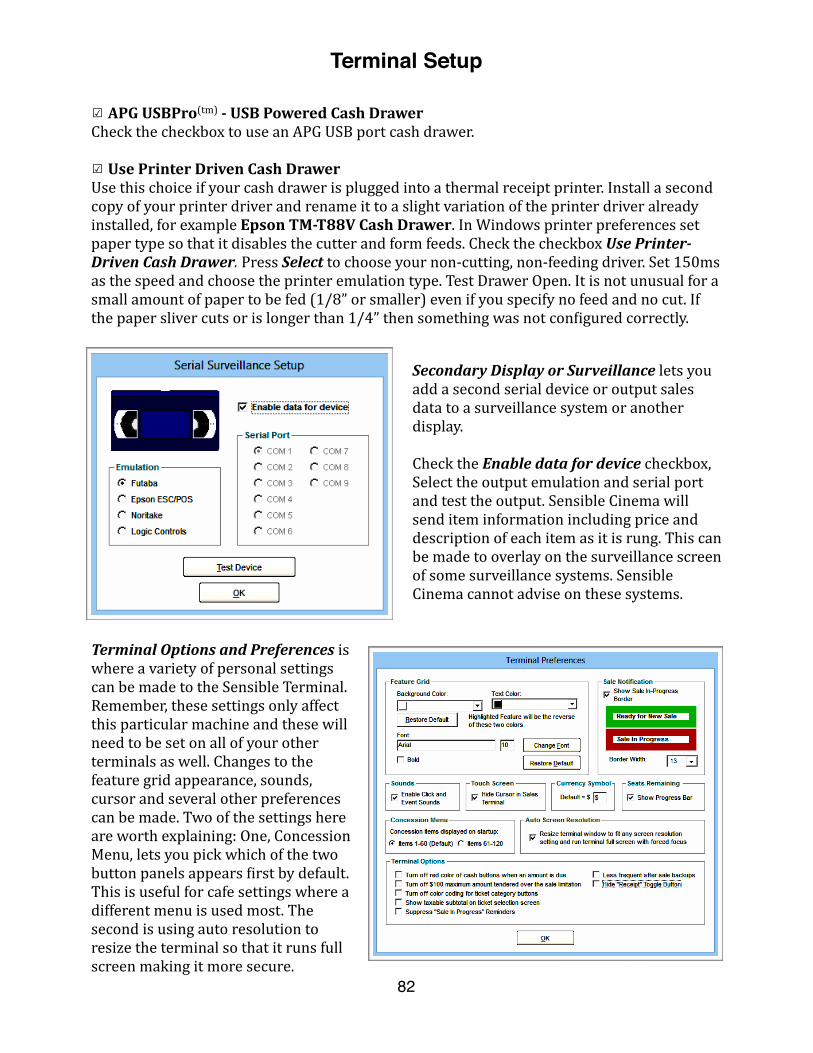
☑ APG USBPro(tm) -‐ USB Powered Cash Drawer Check the checkbox to use an APG USB port cash drawer.
☑ Use Printer Driven Cash Drawer Use this choice if your cash drawer is plugged into a thermal receipt printer. Install a second copy of your printer driver and rename it to a slight variation of the printer driver already installed, for example Epson TM-‐T88V Cash Drawer. In Windows printer preferences set paper type so that it disables the cutter and form feeds. Check the checkbox Use Printer-‐Driven Cash Drawer. Press Select to choose your non-‐cutting, non-‐feeding driver. Set 150ms as the speed and choose the printer emulation type. Test Drawer Open. It is not unusual for a small amount of paper to be fed (1/8” or smaller) even if you specify no feed and no cut. If the paper sliver cuts or is longer than 1/4” then something was not con1igured correctly.
Secondary Display or Surveillance lets you add a second serial device or output sales data to a surveillance system or another display.
Check the Enable data for device checkbox, Select the output emulation and serial port and test the output. Sensible Cinema will send item information including price and description of each item as it is rung. This can be made to overlay on the surveillance screen of some surveillance systems. Sensible Cinema cannot advise on these systems.
Terminal Options and Preferences is where a variety of personal settings can be made to the Sensible Terminal. Remember, these settings only affect this particular machine and these will need to be set on all of your other terminals as well. Changes to the feature grid appearance, sounds, cursor and several other preferences can be made. Two of the settings here are worth explaining: One, Concession Menu, lets you pick which of the two button panels appears 1irst by default. This is useful for cafe settings where a different menu is used most. The second is using auto resolution to resize the terminal so that it runs full screen making it more secure.
Terminal Setup
82
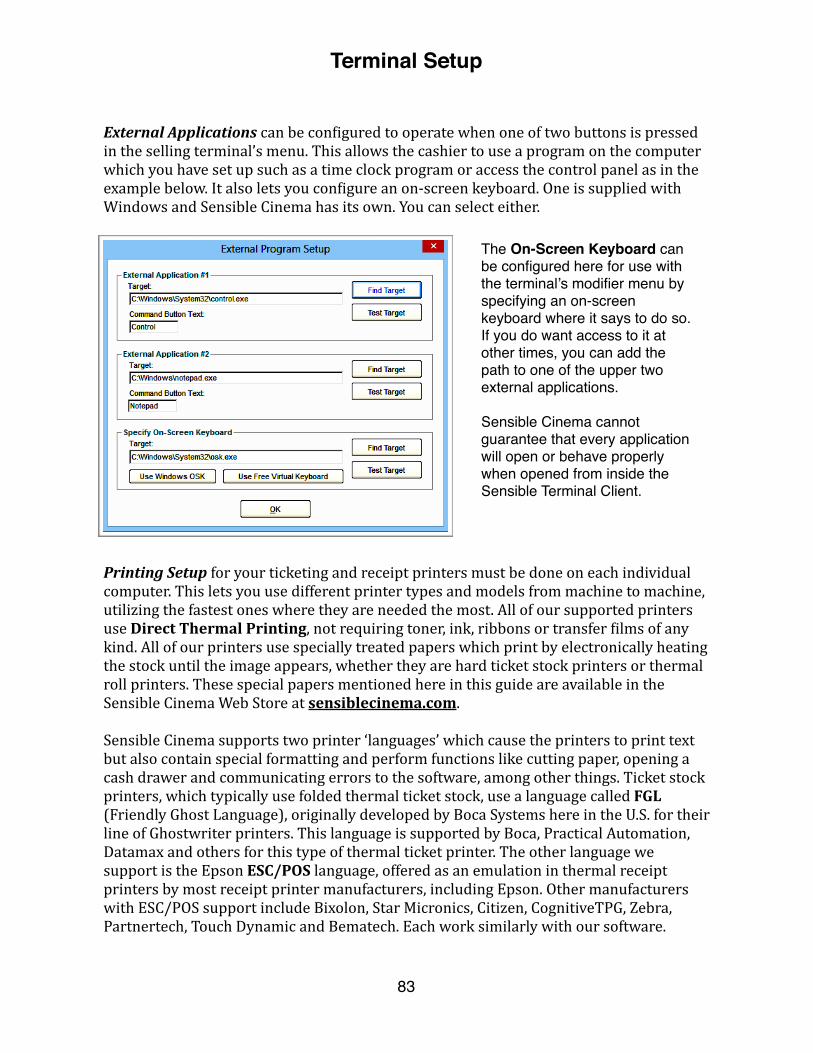
External Applications can be con1igured to operate when one of two buttons is pressed in the selling terminal’s menu. This allows the cashier to use a program on the computer which you have set up such as a time clock program or access the control panel as in the example below. It also lets you con1igure an on-‐screen keyboard. One is supplied with Windows and Sensible Cinema has its own. You can select either.
The On-Screen Keyboard can be configured here for use with the terminal’s modifier menu by specifying an on-screen keyboard where it says to do so. If you do want access to it at other times, you can add the path to one of the upper two external applications.
Sensible Cinema cannot guarantee that every application will open or behave properly when opened from inside the Sensible Terminal Client.
Printing Setup for your ticketing and receipt printers must be done on each individual computer. This lets you use different printer types and models from machine to machine, utilizing the fastest ones where they are needed the most. All of our supported printers use Direct Thermal Printing, not requiring toner, ink, ribbons or transfer 1ilms of any kind. All of our printers use specially treated papers which print by electronically heating the stock until the image appears, whether they are hard ticket stock printers or thermal roll printers. These special papers mentioned here in this guide are available in the Sensible Cinema Web Store at sensiblecinema.com.
Sensible Cinema supports two printer ‘languages’ which cause the printers to print text but also contain special formatting and perform functions like cutting paper, opening a cash drawer and communicating errors to the software, among other things. Ticket stock printers, which typically use folded thermal ticket stock, use a language called FGL (Friendly Ghost Language), originally developed by Boca Systems here in the U.S. for their line of Ghostwriter printers. This language is supported by Boca, Practical Automation, Datamax and others for this type of thermal ticket printer. The other language we support is the Epson ESC/POS language, offered as an emulation in thermal receipt printers by most receipt printer manufacturers, including Epson. Other manufacturers with ESC/POS support include Bixolon, Star Micronics, Citizen, CognitiveTPG, Zebra, Partnertech, Touch Dynamic and Bematech. Each work similarly with our software.
Terminal Setup
83

3. Click the checkbox next to the desired style. A sample will appear in the window on the left.
Set Up Thermal Receipt Printer for Ticketing The 1irst step, before setting up a printer for use in Sensible Cinema, is to install the driver for your printer in Windows. If you do not have a disk or disk drive, you can download drivers for most printers from its manufacturer’s web site. Sensible Cinema has drivers for all of the printers it sells at sensiblecinema.com. Once the driver has been installed and you can print a Windows print test, you are ready to set up your printer for use with Sensible Terminal.
Select Printer Type
Check if you want to print a stored logo.
Check Use Drive-In Theatre Ticket to use the ticket pictured on page 50.
2. Click Thermal Receipt Printerand press Configure Printer
1. Click Ticket Printing Setup
Sensible Cinema sells this extra heavy-weight pre-perforated, green striped thermal roll paper in its web store at sensiblecinema.com
Thermal Receipt Printers can be used to print several styles of tickets. You can view samples of them on the next screen by selecting different options.
Terminal Setup
84
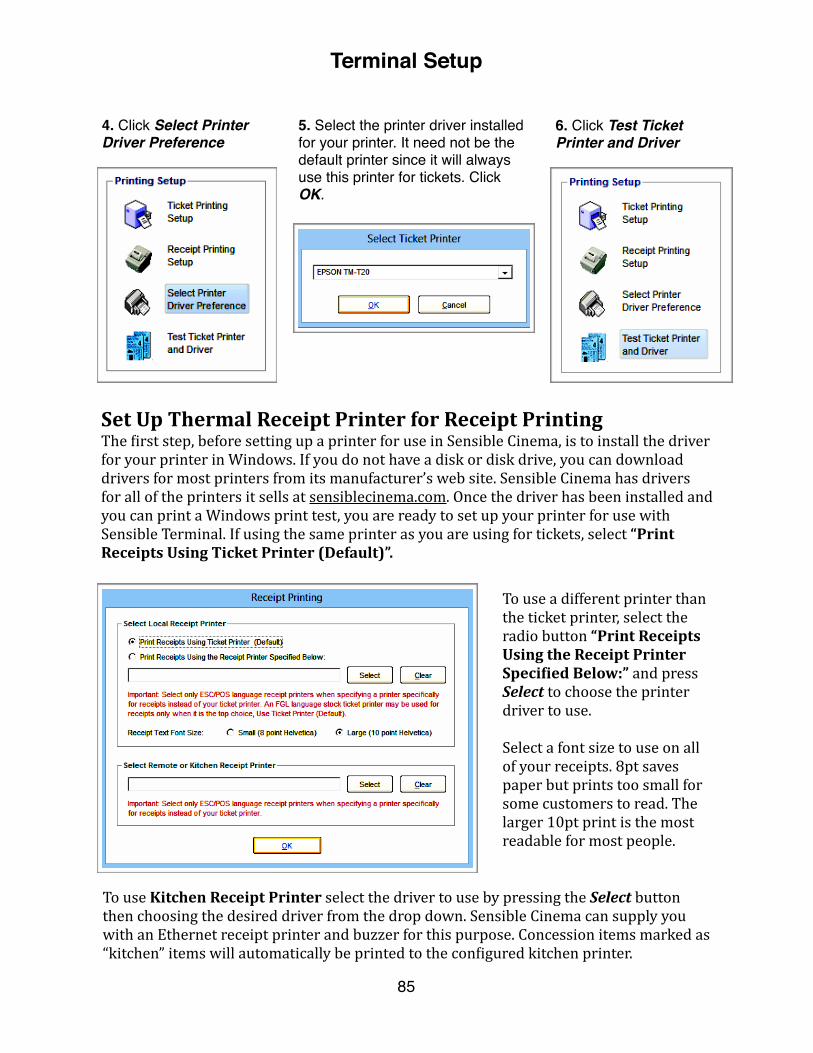
4. Click Select Printer Driver Preference
5. Select the printer driver installed for your printer. It need not be the default printer since it will always use this printer for tickets. Click OK.
6. Click Test Ticket Printer and Driver
Set Up Thermal Receipt Printer for Receipt Printing The 1irst step, before setting up a printer for use in Sensible Cinema, is to install the driver for your printer in Windows. If you do not have a disk or disk drive, you can download drivers for most printers from its manufacturer’s web site. Sensible Cinema has drivers for all of the printers it sells at sensiblecinema.com. Once the driver has been installed and you can print a Windows print test, you are ready to set up your printer for use with Sensible Terminal. If using the same printer as you are using for tickets, select “Print Receipts Using Ticket Printer (Default)”.
To use a different printer than the ticket printer, select the radio button “Print Receipts Using the Receipt Printer Speci2ied Below:” and press Select to choose the printer driver to use.
Select a font size to use on all of your receipts. 8pt saves paper but prints too small for some customers to read. The larger 10pt print is the most readable for most people.
To use Kitchen Receipt Printer select the driver to use by pressing the Select button then choosing the desired driver from the drop down. Sensible Cinema can supply you with an Ethernet receipt printer and buzzer for this purpose. Concession items marked as “kitchen” items will automatically be printed to the con1igured kitchen printer.
Terminal Setup
85
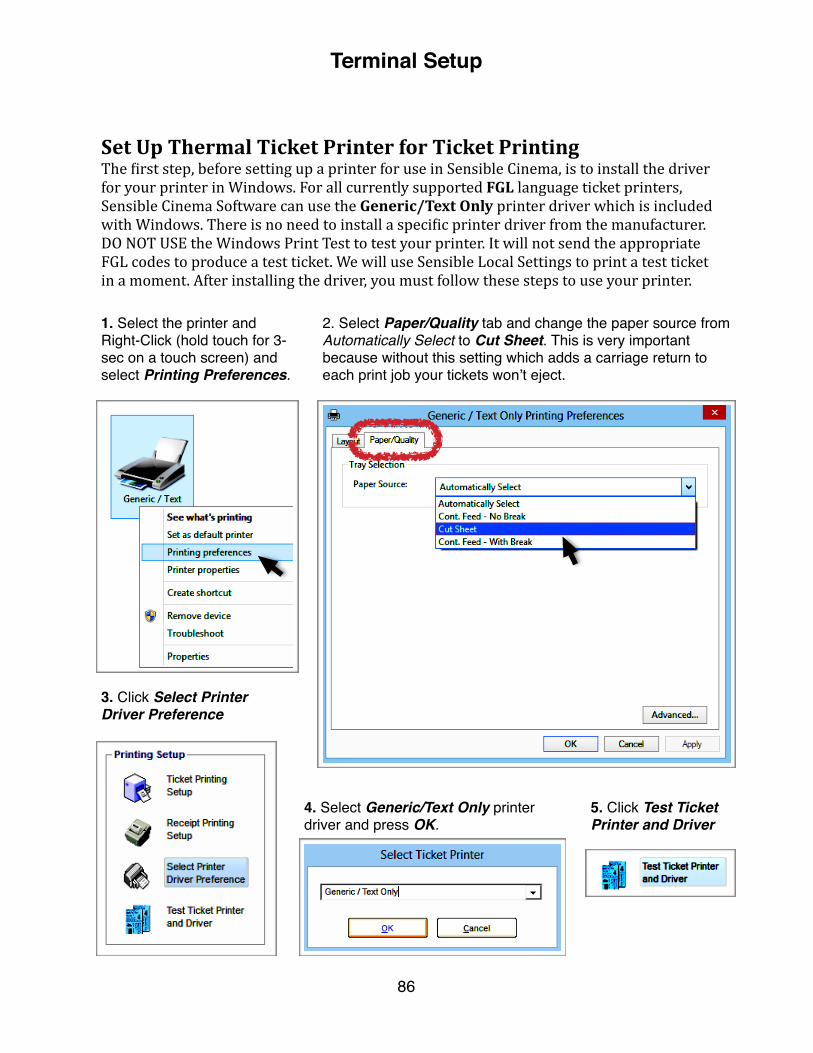
Set Up Thermal Ticket Printer for Ticket Printing The 1irst step, before setting up a printer for use in Sensible Cinema, is to install the driver for your printer in Windows. For all currently supported FGL language ticket printers, Sensible Cinema Software can use the Generic/Text Only printer driver which is included with Windows. There is no need to install a speci1ic printer driver from the manufacturer. DO NOT USE the Windows Print Test to test your printer. It will not send the appropriate FGL codes to produce a test ticket. We will use Sensible Local Settings to print a test ticket in a moment. After installing the driver, you must follow these steps to use your printer.
1. Select the printer and Right-Click (hold touch for 3-sec on a touch screen) and select Printing Preferences.
2. Select Paper/Quality tab and change the paper source from Automatically Select to Cut Sheet. This is very important because without this setting which adds a carriage return to each print job your tickets won’t eject.
3. Click Select Printer Driver Preference
4. Select Generic/Text Only printer driver and press OK.
5. Click Test Ticket Printer and Driver
Terminal Setup
86
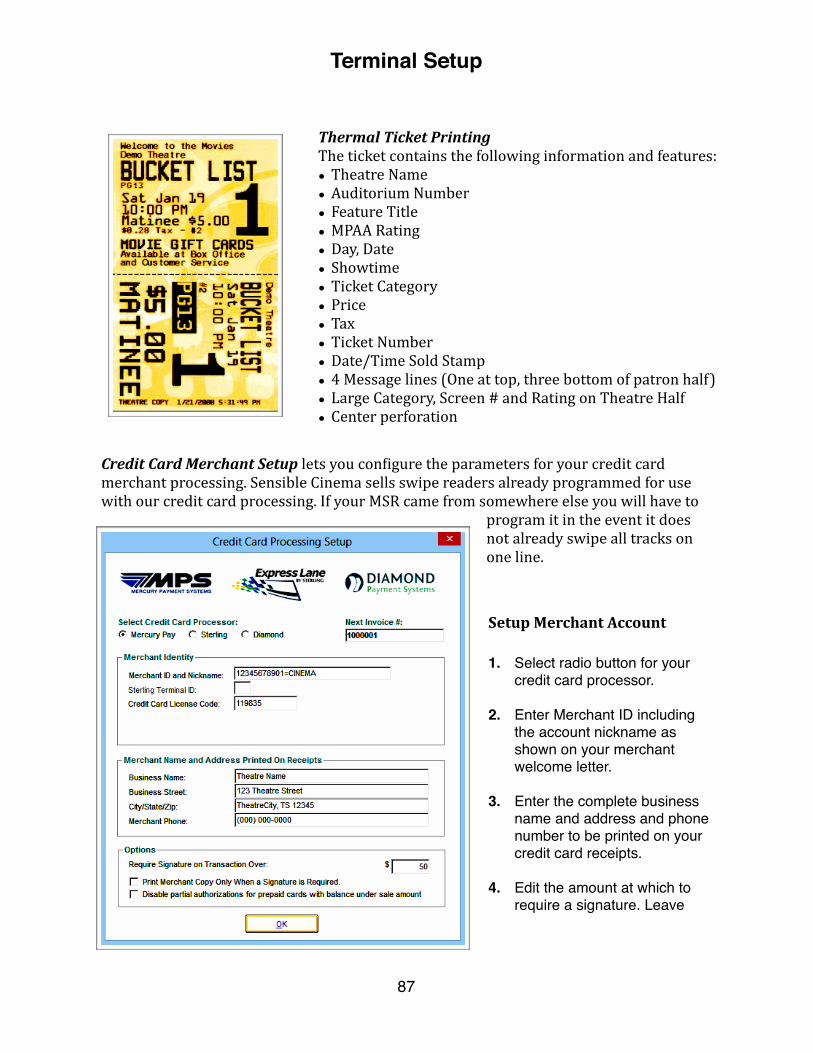
Thermal Ticket Printing The ticket contains the following information and features: • Theatre Name • Auditorium Number • Feature Title • MPAA Rating • Day, Date • Showtime • Ticket Category • Price • Tax • Ticket Number • Date/Time Sold Stamp • 4 Message lines (One at top, three bottom of patron half) • Large Category, Screen # and Rating on Theatre Half • Center perforation
Credit Card Merchant Setup lets you con1igure the parameters for your credit card merchant processing. Sensible Cinema sells swipe readers already programmed for use with our credit card processing. If your MSR came from somewhere else you will have to
program it in the event it does not already swipe all tracks on one line.
1. Select radio button for your credit card processor.
2. Enter Merchant ID including the account nickname as shown on your merchant welcome letter.
3. Enter the complete business name and address and phone number to be printed on your credit card receipts.
4. Edit the amount at which to require a signature. Leave
Setup Merchant Account
Terminal Setup
87
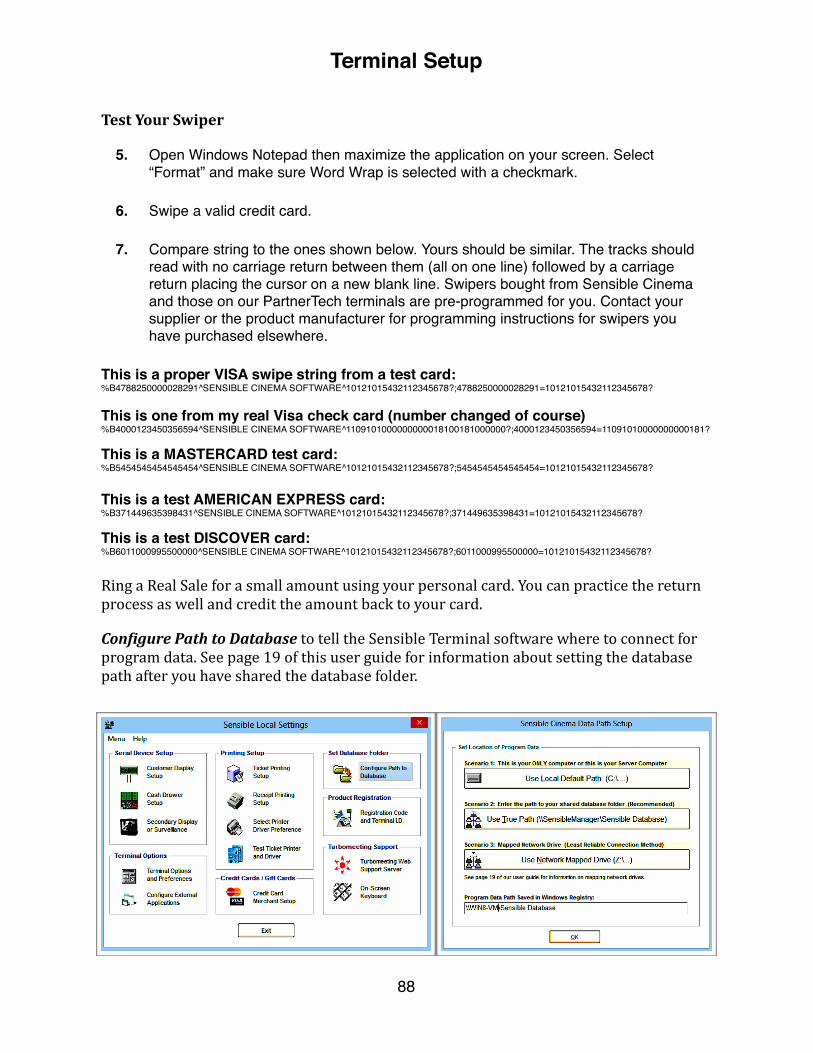
Test Your Swiper
5. Open Windows Notepad then maximize the application on your screen. Select “Format” and make sure Word Wrap is selected with a checkmark.
6. Swipe a valid credit card.
7. Compare string to the ones shown below. Yours should be similar. The tracks should read with no carriage return between them (all on one line) followed by a carriage return placing the cursor on a new blank line. Swipers bought from Sensible Cinema and those on our PartnerTech terminals are pre-programmed for you. Contact your supplier or the product manufacturer for programming instructions for swipers you have purchased elsewhere.
This is a proper VISA swipe string from a test card: %B4788250000028291^SENSIBLE CINEMA SOFTWARE^10121015432112345678?;4788250000028291=10121015432112345678?
This is one from my real Visa check card (number changed of course) %B4000123450356594^SENSIBLE CINEMA SOFTWARE^1109101000000000018100181000000?;4000123450356594=11091010000000000181?
This is a MASTERCARD test card: %B5454545454545454^SENSIBLE CINEMA SOFTWARE^10121015432112345678?;5454545454545454=10121015432112345678?
This is a test AMERICAN EXPRESS card: %B371449635398431^SENSIBLE CINEMA SOFTWARE^10121015432112345678?;371449635398431=10121015432112345678?
This is a test DISCOVER card: %B6011000995500000^SENSIBLE CINEMA SOFTWARE^10121015432112345678?;6011000995500000=10121015432112345678?
Ring a Real Sale for a small amount using your personal card. You can practice the return process as well and credit the amount back to your card.
ConFigure Path to Database to tell the Sensible Terminal software where to connect for program data. See page 19 of this user guide for information about setting the database path after you have shared the database folder.
Terminal Setup
88

Chapter 7
Sensible Terminal
89
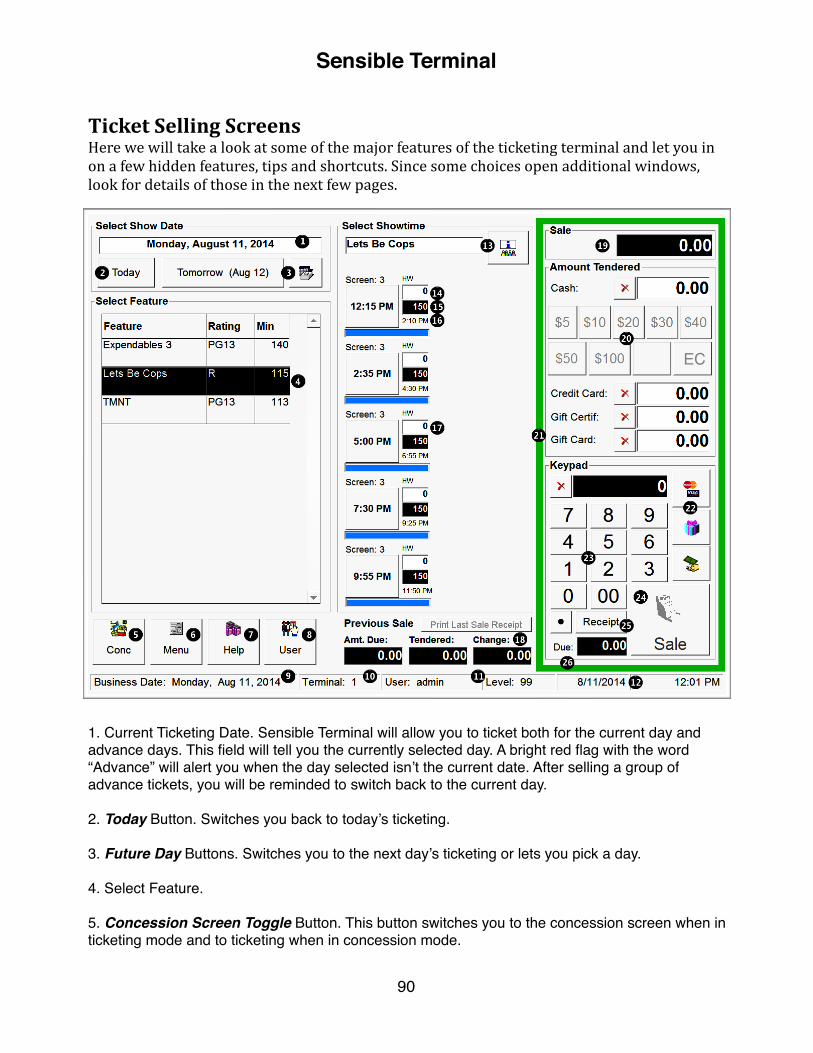
Ticket Selling Screens Here we will take a look at some of the major features of the ticketing terminal and let you in on a few hidden features, tips and shortcuts. Since some choices open additional windows, look for details of those in the next few pages.
1. Current Ticketing Date. Sensible Terminal will allow you to ticket both for the current day and advance days. This field will tell you the currently selected day. A bright red flag with the word “Advance” will alert you when the day selected isn’t the current date. After selling a group of advance tickets, you will be reminded to switch back to the current day.
2. Today Button. Switches you back to today’s ticketing.
3. Future Day Buttons. Switches you to the next day’s ticketing or lets you pick a day.
4. Select Feature.
5. Concession Screen Toggle Button. This button switches you to the concession screen when in ticketing mode and to ticketing when in concession mode.
EC
Sensible Terminal
90
6. Menu Button. Switch to the menu screen containing many options accessible from the terminal. See page 94 for a breakdown of this screen.
7. Help Button.
8. User Button. Switch user or secure the terminal.
Bottom Status Bar
Hidden feature: Click the status bar to view the database path.
9. Current Business Date.
10. Terminal Number.
11. User and Access Level of the current user. To switch user or perform a management override to exit terminal or perform a void, click the User button.
12. Date and Time Display
Select Showtime Window Panel
13. Feature Information Button. Click to view the synopsis, print a schedule for the customer
14. Seats Sold Display. Applies to the showtime at the left of this window.
15. Seats Remaining Display. Applies to the showtime at the left of this window.
16. Show Ending Time Display. Applies to the showtime at the left of this window.
17. Showtime Display. Clicking the showtime reveals the Select Tickets window. See page 93.
Sales and Amount Tendered
18. Last Sale Display. Shows the last sale total and change. Has a Print Last Sale Receipt button for printing a receipt after the previous sale has completed.
19. This Sale Running Total Display. If this amount is something other than zero, the sale in progress border is red. See #21.
20. Amount Tendered Buttons. These buttons, when pressed, use the amount displayed on the button as the amount tendered for the sale. The EC Button (Exact Change) uses the sale amount as the amount tendered.
Hidden Feature: The amount tendered button just to the left of the EC button (shown on page 93) will dynamically change based on the sale amount. It is designed to round up to the next dollar.
Sensible Terminal
91

21. Sale In Progress Border. The colored border of the Amount Tender display is green when you are between customers and red when you have a sale in progress.
22. Credit Card and Gift Card Buttons. When you have a sale in progress and press the credit card button, it will bring up the credit card swipe dialog box to charge the entire amount of the sale to the customer’s card. If first you type a specific amount with the numeric keypad and press the credit card button, it will charge that amount and allow another amount to be paid by cash or gift card. Just enter that amount and press either cash or gift. If you have a sale in progress and press the gift card button, a dialog will come up asking if you want to redeem a gift card (electronic) or a gift certificate (paper), assuming the entire amount of the sale. If you enter a particular amount on the numeric keypad then press the gift button and the gift type, it will charge the specific amount and allow you to use a second payment means. If you press the gift card button when no sale is in progress, you can sell a gift card or check the balance on one. The Cash button below these two buttons is for doing split tender sales in much the same way.
23. Numeric Keypad. The numeric keypad is used for a variety of functions, including entering credit card numbers manually and to expedite making ticket and concession sales for larger quantities.
Hidden Feature: When ticketing, you can press a number on the numeric keypad then the ticket category name to ring up multiples of a ticket type, for instance press “8” then “Child” and 8 child tickets will be registered.
Hidden Feature: When selling concessions, you can press a number on the numeric keypad and then an item key to ring up multiples of that item, for instance press “4” then “Small Drink” and 4 small drinks will be registered.
Hidden Feature: When selling concessions, you can press the item number then the PLU key to ring up a specific item or PLU without looking it up or bringing up the PLU menu.
Hidden Feature/Easter Egg: Press 911 on the numeric keyboard and press “Help”. This brings up the mayday screen with our phone number.
24. Sale Button. Press the Sale Button when necessary to complete the sale, for instance when using multiple payment tender types (split tender) or doing a gift redemption.
25. Receipt Toggle Button. Press the Receipt Toggle Button on (green) when you want the system to print a receipt for every sale. Leave it off (gray) when you plan to print a receipt only when asked (on demand) by pressing the Print Last Sale Receipt button.
26. Amount Due Display. Shows the balance remaining for this sale. For example, if you have a $16.00 sale and have entered $10.00 on the gift card redeemed line, this balance due would read $6.00)
Tip: If the border around the Amount Tender area is RED, stop and make sure to complete the current sale in progress before moving to a new customer.
Sensible Terminal
92
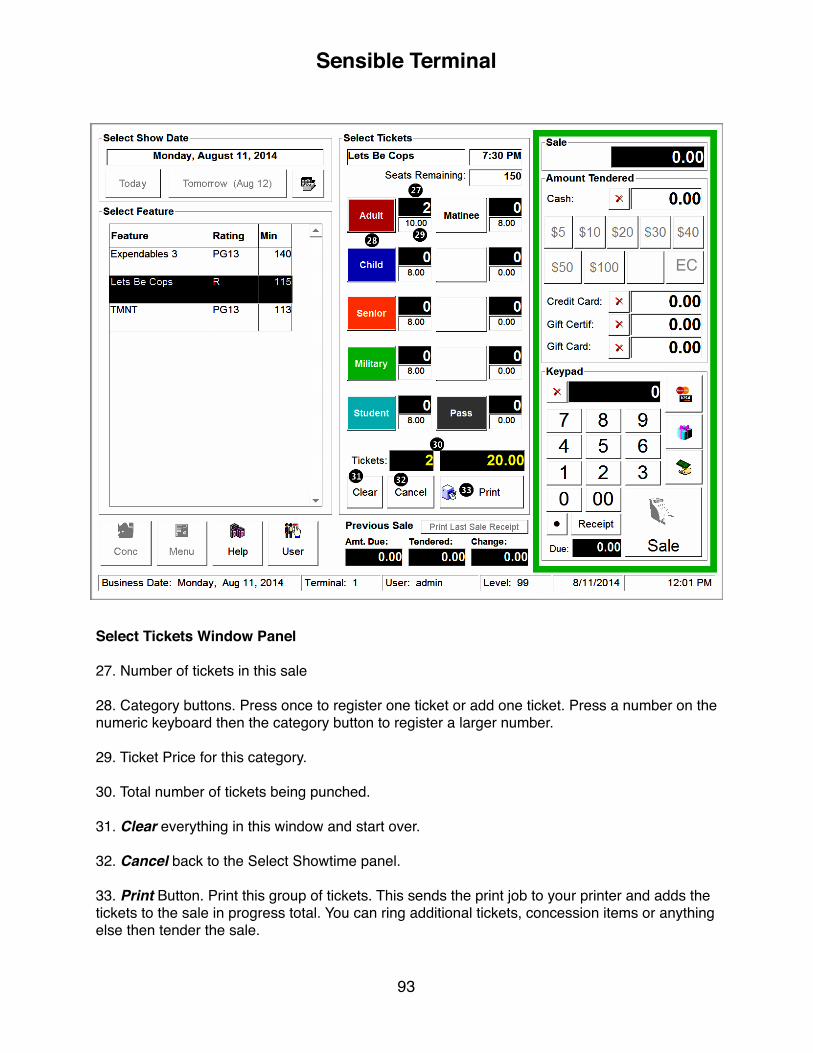
EC
Select Tickets Window Panel
27. Number of tickets in this sale
28. Category buttons. Press once to register one ticket or add one ticket. Press a number on the numeric keyboard then the category button to register a larger number.
29. Ticket Price for this category.
30. Total number of tickets being punched.
31. Clear everything in this window and start over.
32. Cancel back to the Select Showtime panel.
33. Print Button. Print this group of tickets. This sends the print job to your printer and adds the tickets to the sale in progress total. You can ring additional tickets, concession items or anything else then tender the sale.
Sensible Terminal
93
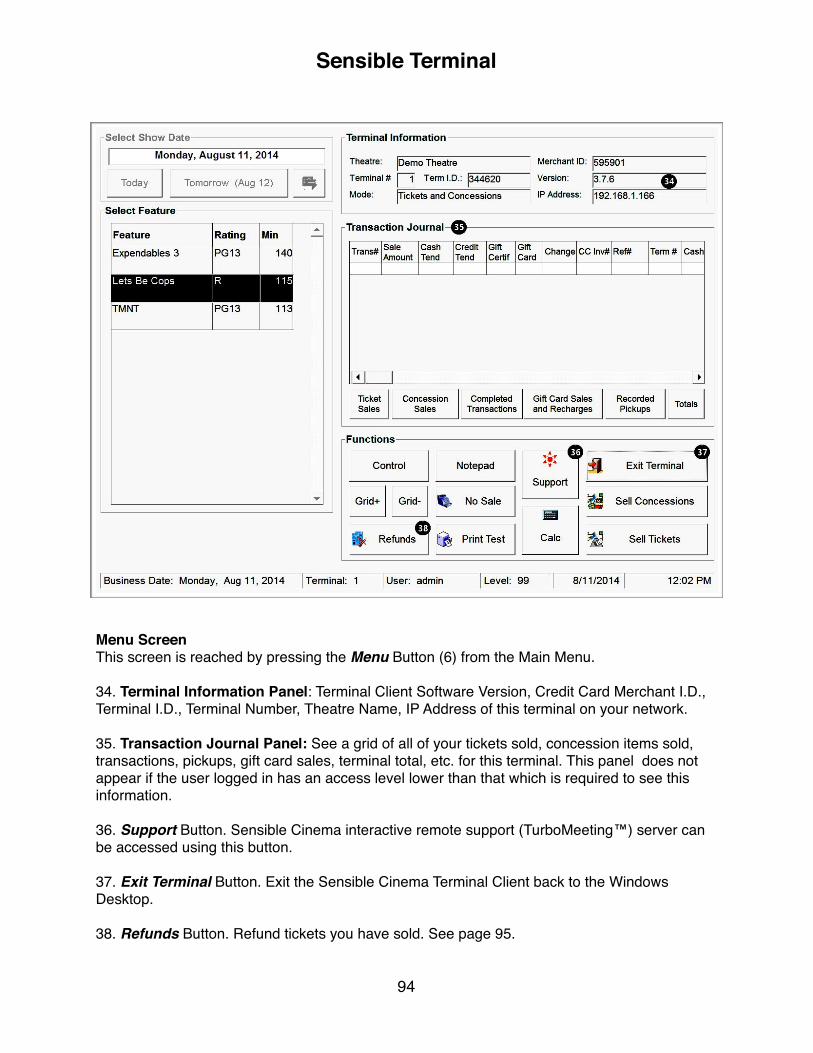
Menu ScreenThis screen is reached by pressing the Menu Button (6) from the Main Menu.
34. Terminal Information Panel: Terminal Client Software Version, Credit Card Merchant I.D., Terminal I.D., Terminal Number, Theatre Name, IP Address of this terminal on your network.
35. Transaction Journal Panel: See a grid of all of your tickets sold, concession items sold, transactions, pickups, gift card sales, terminal total, etc. for this terminal. This panel does not appear if the user logged in has an access level lower than that which is required to see this information.
36. Support Button. Sensible Cinema interactive remote support (TurboMeeting™) server can be accessed using this button.
37. Exit Terminal Button. Exit the Sensible Cinema Terminal Client back to the Windows Desktop.
38. Refunds Button. Refund tickets you have sold. See page 95.
Sensible Terminal
94

Ticket Refund ScreenThis screen is reached by pressing the Menu Button (6) from the Main Menu, Selecting the desired feature title and pressing the Refunds Button.
39. The top of the window shows the playdate and feature selected. When you have selected a showtime (40) the time and show number are also displayed.
40. Showtime Button. Select the showtime for which you intend to refund tickets. This will retrieve the number of seats sold for each ticket category and allow you to refund the tickets you want to refund. Note, only tickets actually sold can be refunded.
41. Ticket Category Button. Press once for each ticket you want to refund.
42. Refund Tickets Now Button. Press to refund the tickets and reduce the amount shown as Total Due or show total due as a negative number. To complete a negative sale refunding tickets as cash, press EC button. If returning the money to a customer’s credit card, press the Credit Card button. To put the
Sensible Terminal
95

Concession Sales Screen
43. Concession Item Buttons. Press a button to register an item. To register a larger number of items, enter a number on the numerical keypad then press the item key.
44. Kitchen Item Buttons are those with the item names underlined.
45. Ticket Button takes you to the ticket sales screen. When ticketing, this button takes you to the concession screen. See (5).
46. Items you have rung. To remove one, click that item in the grid and press Remove Item Button (48).
47. Void Button. This is available to users with access high enough to use this feature. While this toggle is depressed in the on condition, items may be voided.
Concession Selling Screens Here we will take a look at some of the major features of the concession terminal and let you in on a few hidden features, tips and shortcuts. Since some choices open additional windows, look for details of those in the next few pages.
Sensible Terminal
96
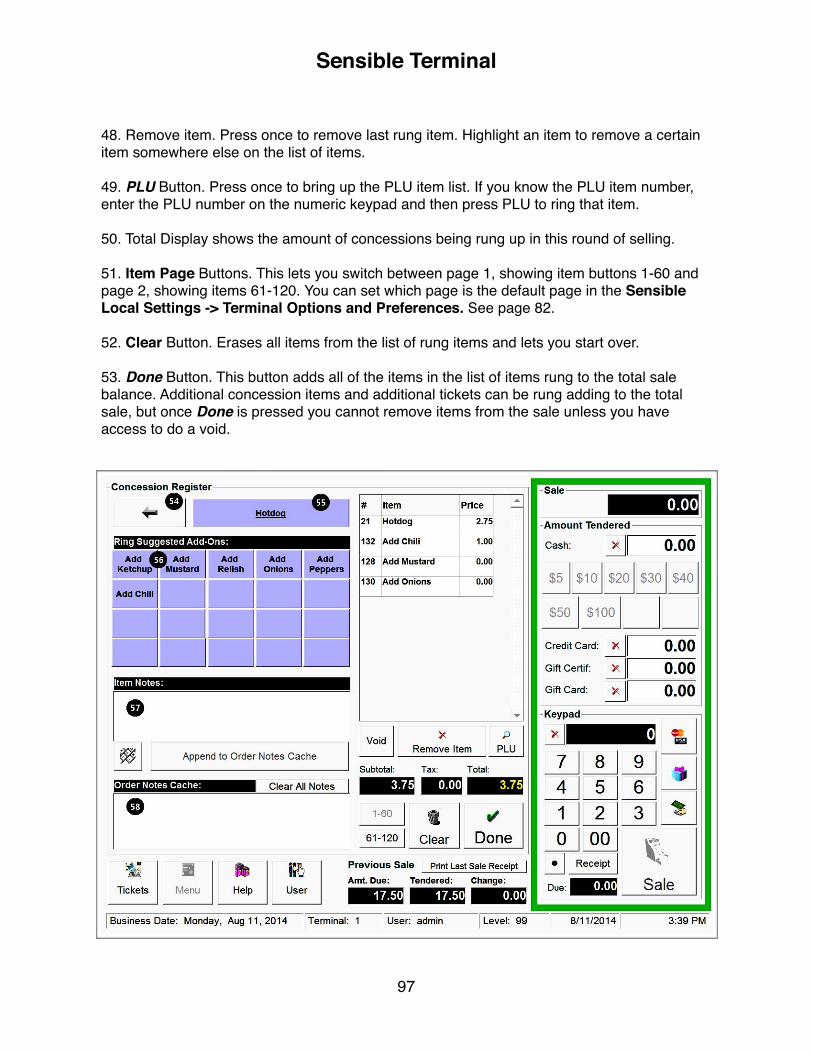
48. Remove item. Press once to remove last rung item. Highlight an item to remove a certain item somewhere else on the list of items.
49. PLU Button. Press once to bring up the PLU item list. If you know the PLU item number, enter the PLU number on the numeric keypad and then press PLU to ring that item.
50. Total Display shows the amount of concessions being rung up in this round of selling.
51. Item Page Buttons. This lets you switch between page 1, showing item buttons 1-60 and page 2, showing items 61-120. You can set which page is the default page in the Sensible Local Settings -> Terminal Options and Preferences. See page 82.
52. Clear Button. Erases all items from the list of rung items and lets you start over.
53. Done Button. This button adds all of the items in the list of items rung to the total sale balance. Additional concession items and additional tickets can be rung adding to the total sale, but once Done is pressed you cannot remove items from the sale unless you have access to do a void.
Sensible Terminal
97

Modifier Menu
54. Back Button. Returns you to the concession sales screen and out of the Modifier menu.
55. Primary Item rung that brought up the modifier options. This button lets you add additional units of the original item.
56. Modifier Buttons. These are options for the primary item which can be additional cost or not. Kitchen instructions can be typed in using an on screen keyboard. (57) and (58).
Completing the Sale When you have rung up all of the tickets and concession items you need to ring for your sale, tell the customer what the total amount due is.
CASH TENDERED Press the red cash button corresponding to the tender amount or press EC for Exact Change. To manually enter a cash tendered you type it into the numerical keypad window, press the Cash Button and then the Sale Button.
CREDIT CARD TENDERED: Press the Credit Card Button and then follow the directions on the credit card swipe dialog box screen.
GIFT CARD TENDERED: Press the Gift Button, Press Redeem Gift Card (Electronic) Button followed by Sale and then follow the directions on the swipe dialog box screen.
GIFT CERTIFICATE TENDERED: Press the Gift Card Button, Select Redeem Gift CertiFicate (PAPER)
Credit Card Tendered as Payment for a Sale The screens shown when processing a credit card sale may differ depending on the processor. We will cover two possible ways this will look and how you interact with them in the next few pages. Sales may be entered either by swiping the customer card at the point-‐of-‐sale or by entering the card number and expiration date manually. Sales which are entered manually are processed at a higher rate than cards which are swiped. Therefore, if you frequently have trouble reading cards when you swipe them, it may be to your advantage to clean or replace the device sooner than later.
Sensible Terminal
98

Card Acceptance (Swiped) Do not swipe until “Swipe Card” appears.)
1. Wait for a payment server connection. 2. Swipe the Card 3. Wait for Approval (3-‐15 seconds) 4. Receipt is Printed
Card Acceptance (Manual) Press Key in Manually from Swipe Dialog Box.
1. Enter card Number and Expiration Date 2. Press Process Button 3. Wait for Approval (3-‐15 seconds) 4. Receipt is Printed
DIAMOND PAYMENT SYSTEMS SWIPE SCREEN MERCURY PAYMENT SYSTEMS SWIPE SCREEN
DIAMOND PAYMENT SYSTEMS MANUAL ENTRY SCREEN MERCURY PAYMENT SYSTEMS MANUAL ENTRY SCREEN
Sensible Terminal
99
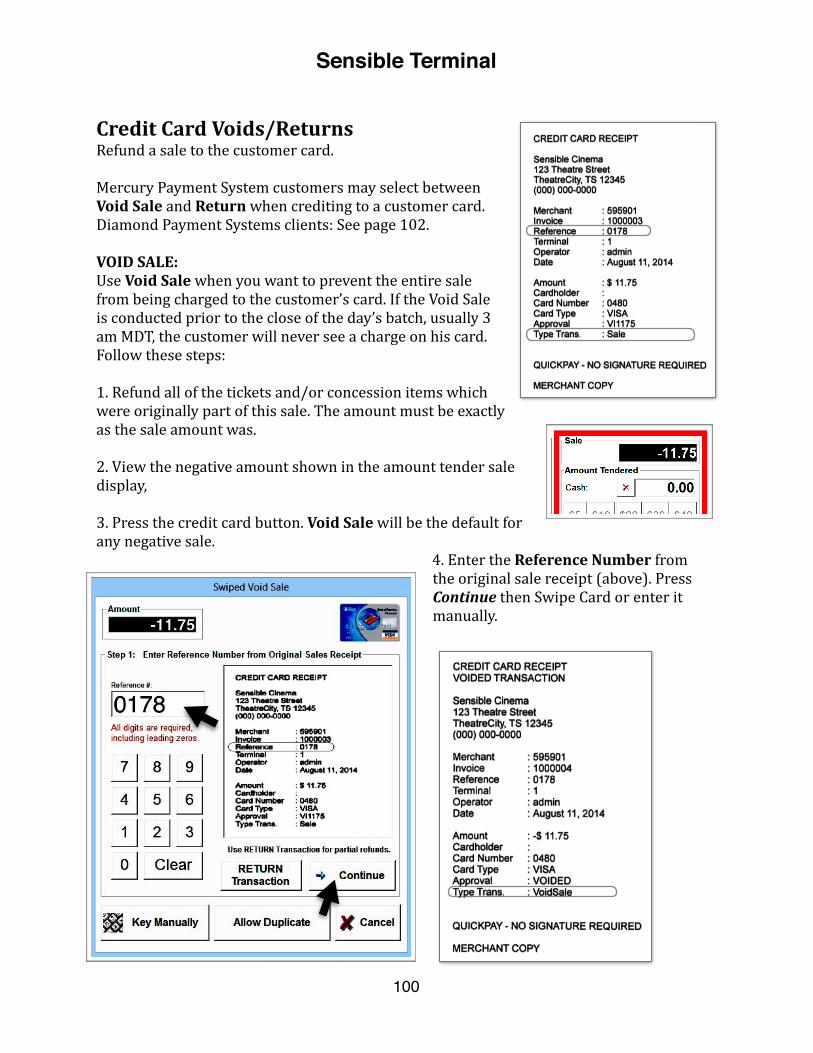
Credit Card Voids/Returns Refund a sale to the customer card.
Mercury Payment System customers may select between Void Sale and Return when crediting to a customer card. Diamond Payment Systems clients: See page 102.
VOID SALE: Use Void Sale when you want to prevent the entire sale from being charged to the customer’s card. If the Void Sale is conducted prior to the close of the day’s batch, usually 3 am MDT, the customer will never see a charge on his card. Follow these steps: 1. Refund all of the tickets and/or concession items which were originally part of this sale. The amount must be exactly as the sale amount was.
2. View the negative amount shown in the amount tender sale display,
3. Press the credit card button. Void Sale will be the default for any negative sale.
4. Enter the Reference Number from the original sale receipt (above). Press Continue then Swipe Card or enter it manually.
Sensible Terminal
100
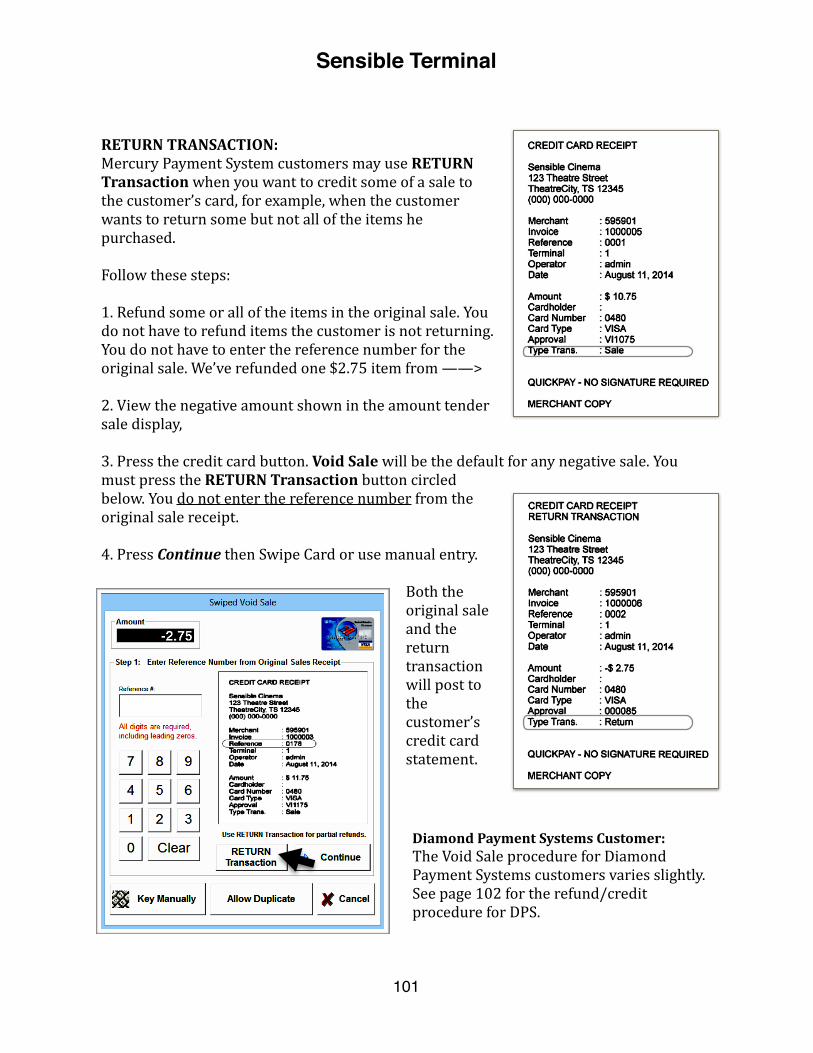
RETURN TRANSACTION: Mercury Payment System customers may use RETURN Transaction when you want to credit some of a sale to the customer’s card, for example, when the customer wants to return some but not all of the items he purchased.
Follow these steps: 1. Refund some or all of the items in the original sale. You do not have to refund items the customer is not returning. You do not have to enter the reference number for the original sale. We’ve refunded one $2.75 item from ——>
2. View the negative amount shown in the amount tender sale display,
3. Press the credit card button. Void Sale will be the default for any negative sale. You must press the RETURN Transaction button circled below. You do not enter the reference number from the original sale receipt.
4. Press Continue then Swipe Card or use manual entry.
Both the original sale and the return transaction will post to the customer’s credit card statement.
Diamond Payment Systems Customer: The Void Sale procedure for Diamond Payment Systems customers varies slightly. See page 102 for the refund/credit procedure for DPS.
Sensible Terminal
101

Diamond Payment Systems -‐ Void Sale Variation: Ring the necessary ticket refunds and/or concession voids to equal the amount of the original sale. When the amount due sale total equals negative of the sale amount, press the Credit Card Button on the main sales screen. In the credit card sale dialog, enter the Transaction ID from the original sales receipt and press Process.
Gift Card Tendered as Payment This section will deal with a customer who is presenting a gift card as payment for tickets and concessions. Often with gift cards the amount of the sale will exceed the available balance on the card. First, we will show an example sale where the available balance covers the sale completely, then we will make a second purchase where the amount due exceeds the available card balance. When the card lacks the funds to complete the purchase, a second form of payment will be required to pay the difference owed. This can be paid with a credit card, another gift card or cash. Completing a sale with more than one payment form is called a split tender.
This section will explain how a split tender may be used to complete a sale. You do not need to know the customer’s card’s balance in advance, however you can check the balance of a card from the gift card administration screen. To reach the administration screen, click the Gift Button then click the Gift Issue/Gift Reload/Balance Inquiry Button.
In our example sale, three concession items are rung which total $8.75. See the following pages for step-‐by-‐step instructions for accepting a Mercury StoreCard™.
The customer’s card is not needed to process a Void Sale through Diamond, however, you need the transaction ID from the original sale receipt.
Sensible Terminal
102
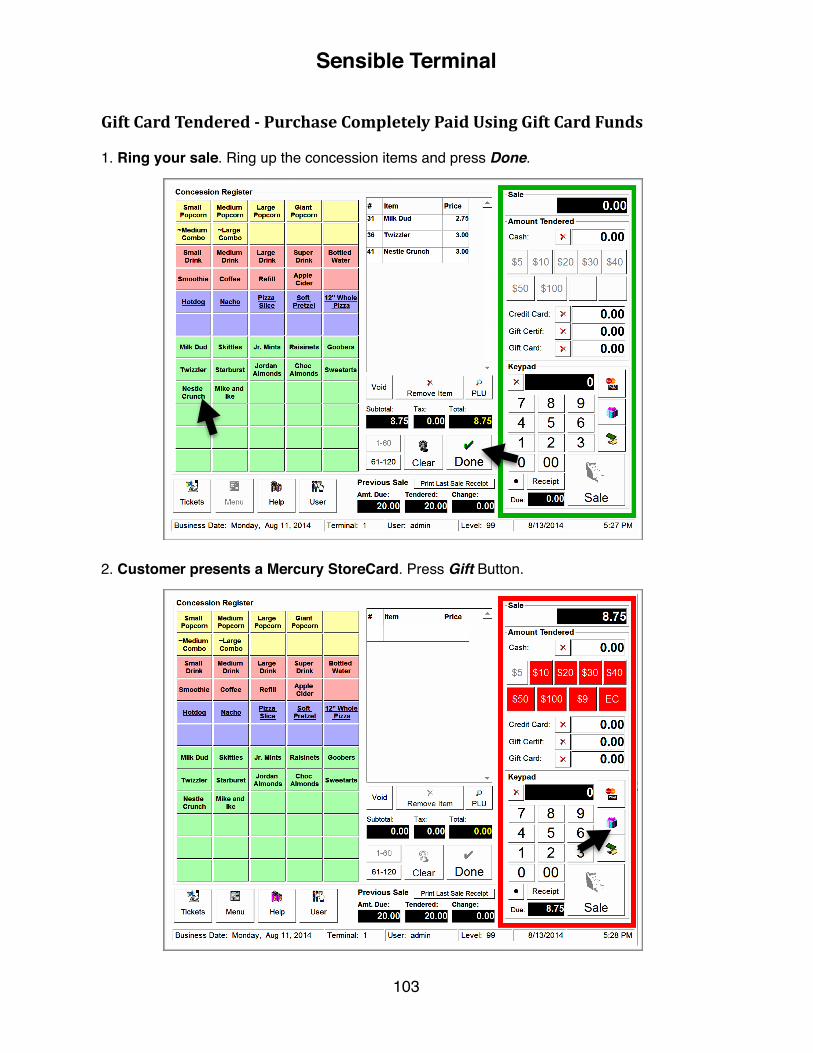
Gift Card Tendered -‐ Purchase Completely Paid Using Gift Card Funds
1. Ring your sale. Ring up the concession items and press Done.
2. Customer presents a Mercury StoreCard. Press Gift Button.
Sensible Terminal
103
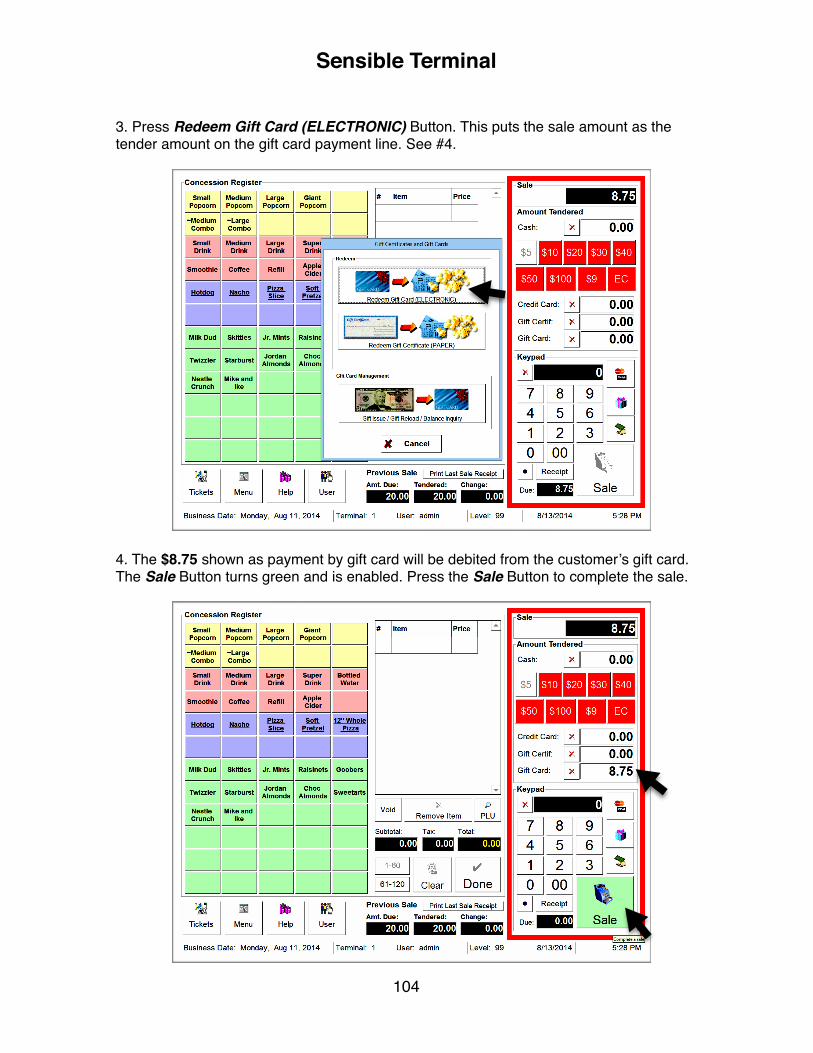
3. Press Redeem Gift Card (ELECTRONIC) Button. This puts the sale amount as the tender amount on the gift card payment line. See #4.
4. The $8.75 shown as payment by gift card will be debited from the customer’s gift card. The Sale Button turns green and is enabled. Press the Sale Button to complete the sale.
Sensible Terminal
104
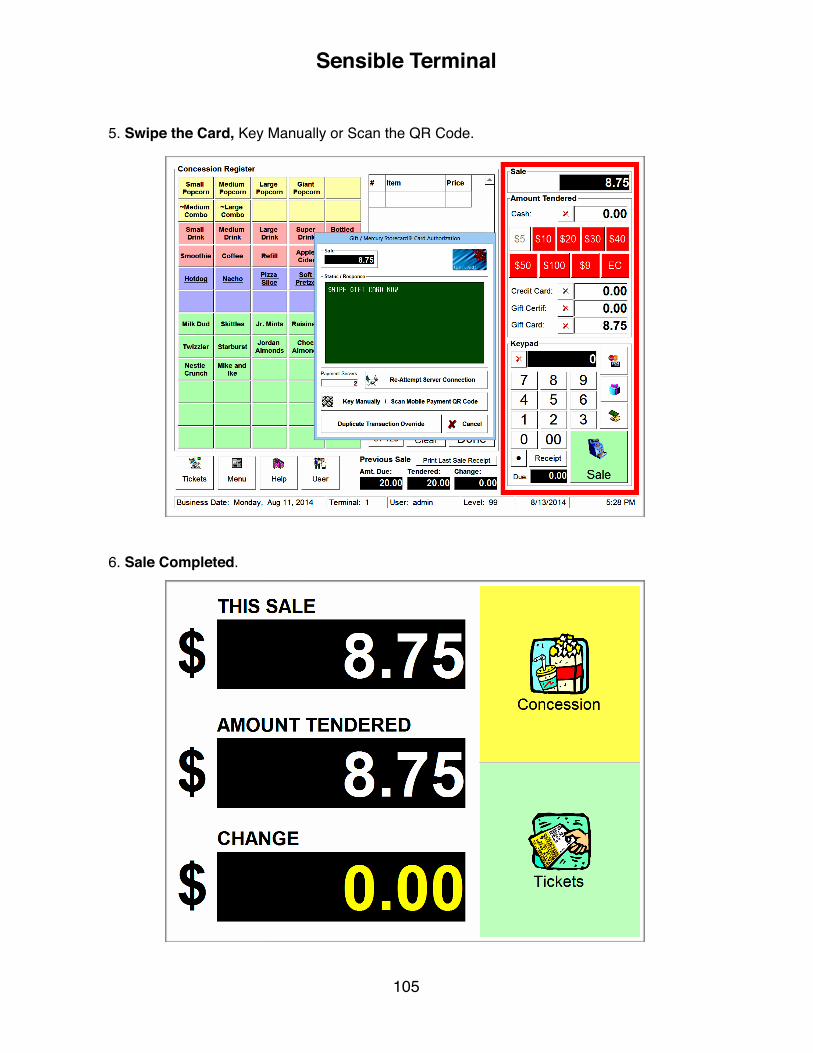
5. Swipe the Card, Key Manually or Scan the QR Code.
6. Sale Completed.
Sensible Terminal
105
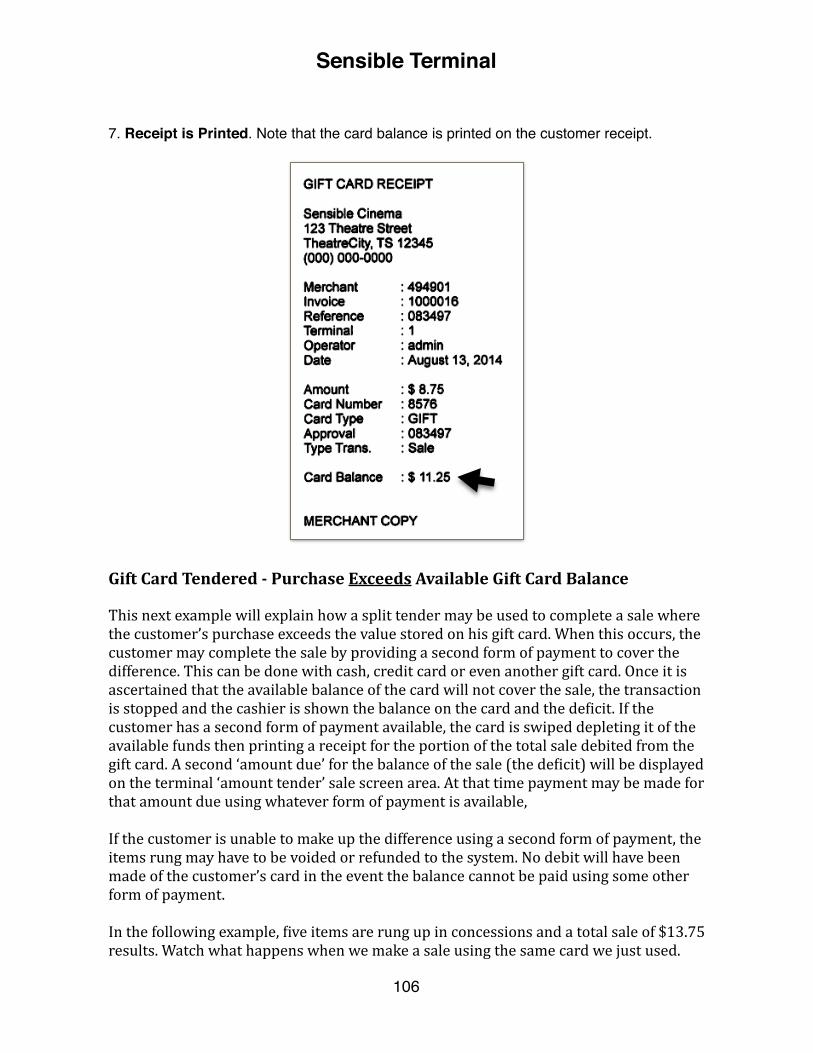
Gift Card Tendered -‐ Purchase Exceeds Available Gift Card Balance
This next example will explain how a split tender may be used to complete a sale where the customer’s purchase exceeds the value stored on his gift card. When this occurs, the customer may complete the sale by providing a second form of payment to cover the difference. This can be done with cash, credit card or even another gift card. Once it is ascertained that the available balance of the card will not cover the sale, the transaction is stopped and the cashier is shown the balance on the card and the de1icit. If the customer has a second form of payment available, the card is swiped depleting it of the available funds then printing a receipt for the portion of the total sale debited from the gift card. A second ‘amount due’ for the balance of the sale (the de1icit) will be displayed on the terminal ‘amount tender’ sale screen area. At that time payment may be made for that amount due using whatever form of payment is available,
If the customer is unable to make up the difference using a second form of payment, the items rung may have to be voided or refunded to the system. No debit will have been made of the customer’s card in the event the balance cannot be paid using some other form of payment.
In the following example, 1ive items are rung up in concessions and a total sale of $13.75 results. Watch what happens when we make a sale using the same card we just used.
7. Receipt is Printed. Note that the card balance is printed on the customer receipt.
Sensible Terminal
106
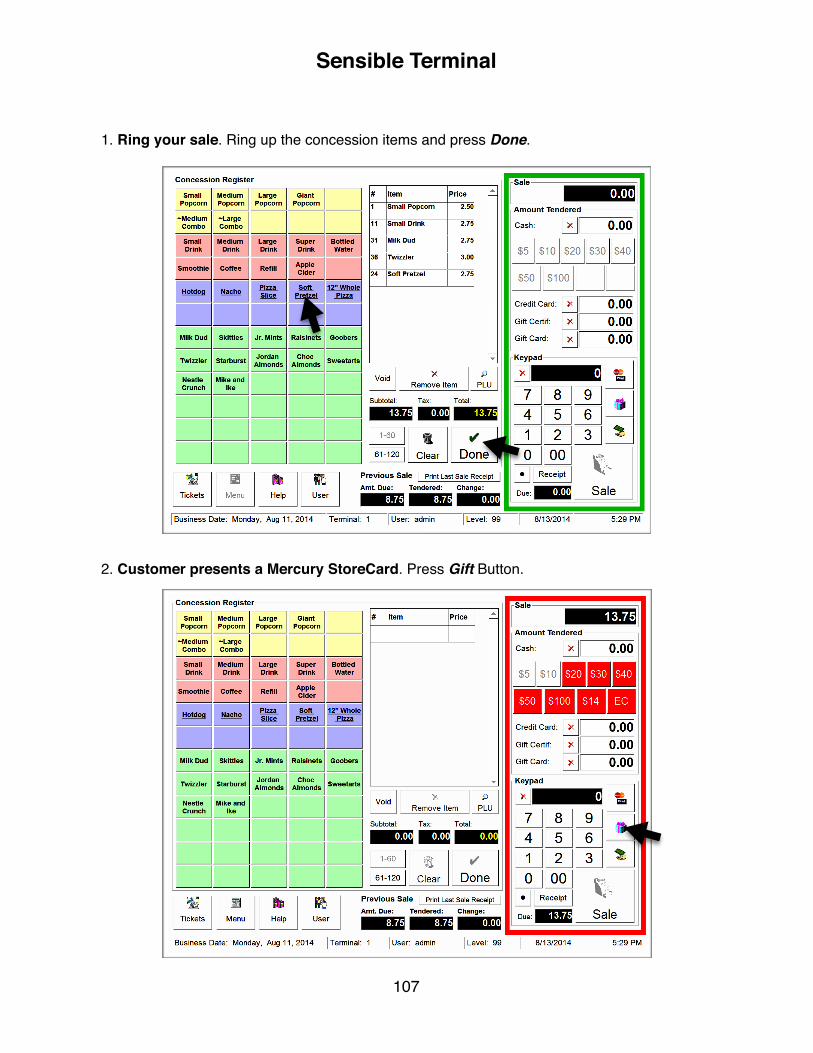
1. Ring your sale. Ring up the concession items and press Done.
2. Customer presents a Mercury StoreCard. Press Gift Button.
Sensible Terminal
107

3. Press Redeem Gift Card (ELECTRONIC) Button. This puts the sale amount as the tender amount on the gift card payment line. See #4.
4. The $13.75 shown as payment by gift card will be debited from the customer’s gift card. The Sale Button turns green and is enabled. Press the Sale Button to complete the sale.
Sensible Terminal
108
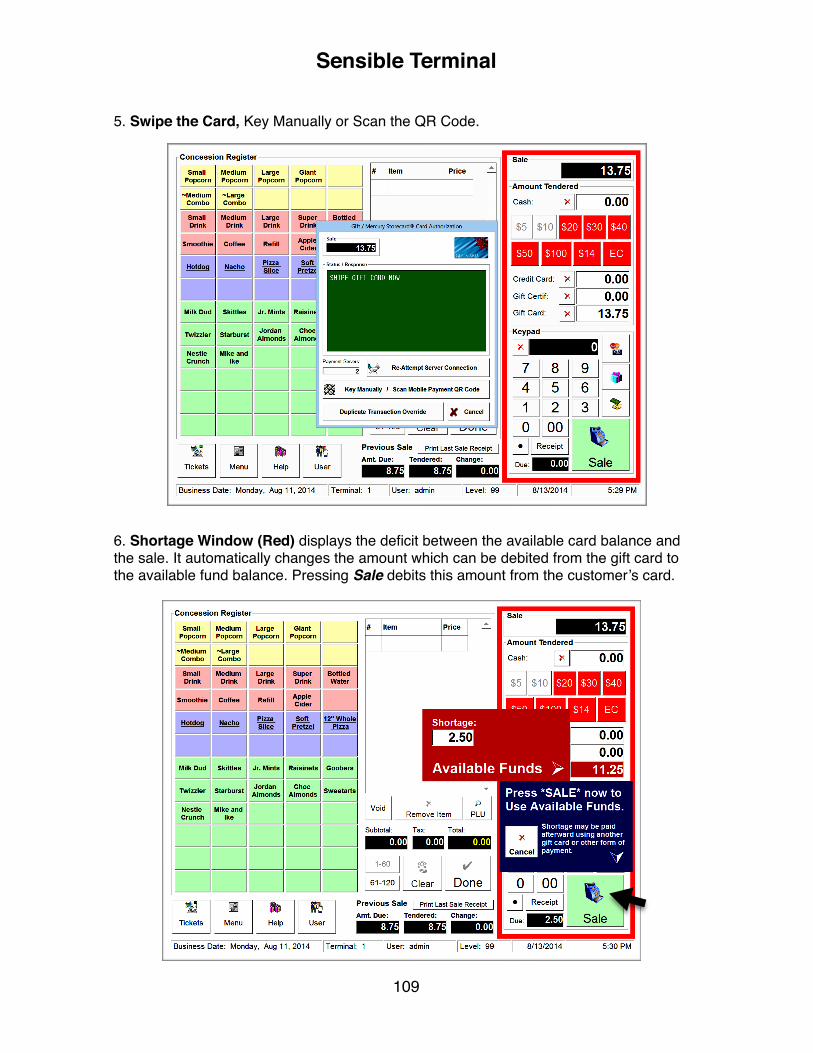
5. Swipe the Card, Key Manually or Scan the QR Code.
6. Shortage Window (Red) displays the deficit between the available card balance and the sale. It automatically changes the amount which can be debited from the gift card to the available fund balance. Pressing Sale debits this amount from the customer’s card.
Sensible Terminal
109
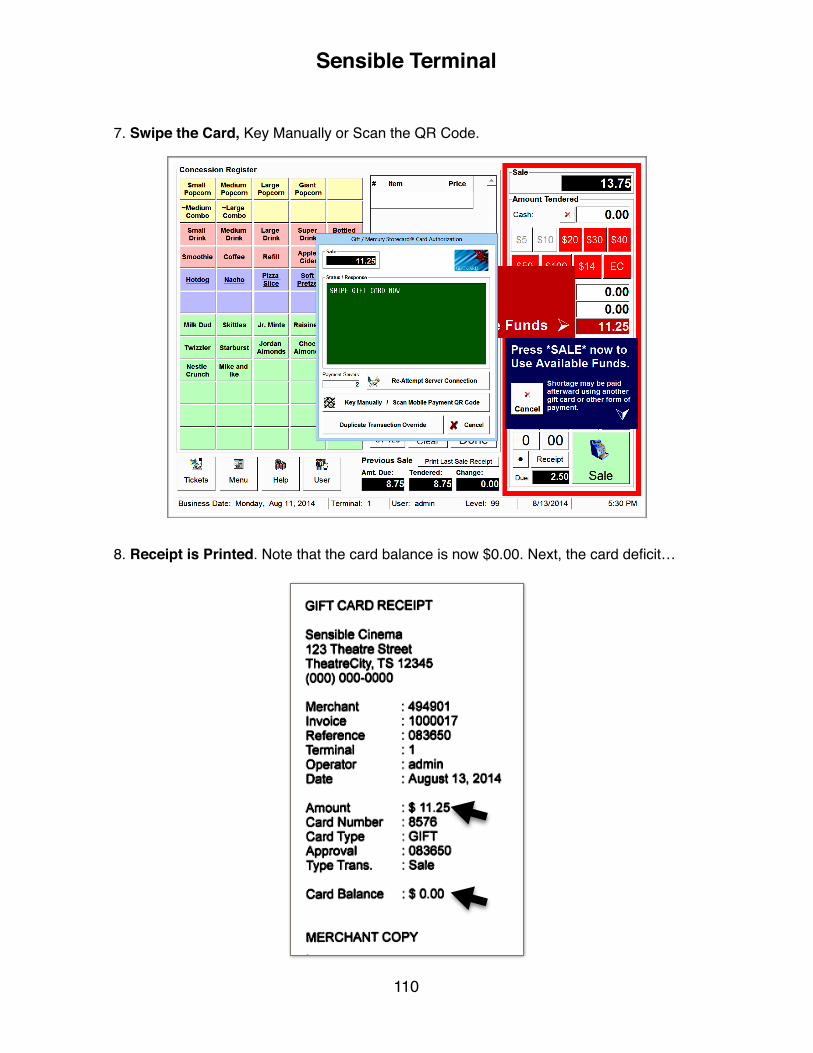
7. Swipe the Card, Key Manually or Scan the QR Code.
8. Receipt is Printed. Note that the card balance is now $0.00. Next, the card deficit…
Sensible Terminal
110
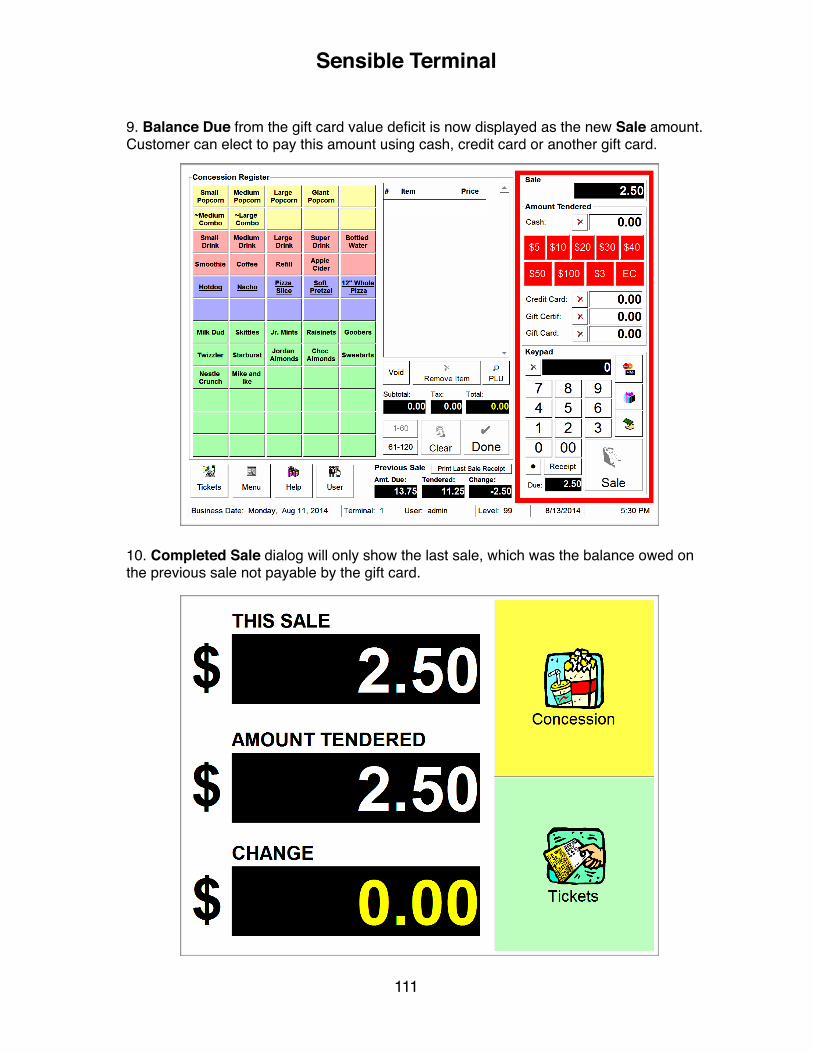
9. Balance Due from the gift card value deficit is now displayed as the new Sale amount. Customer can elect to pay this amount using cash, credit card or another gift card.
10. Completed Sale dialog will only show the last sale, which was the balance owed on the previous sale not payable by the gift card.
Sensible Terminal
111
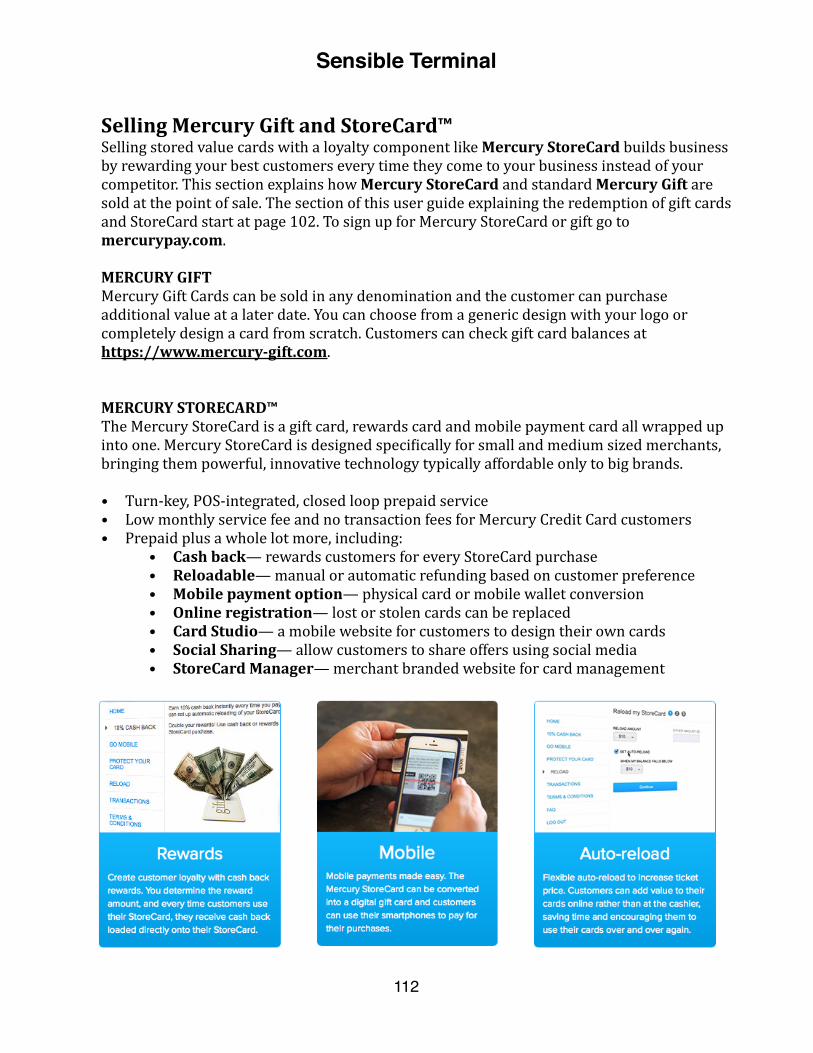
Selling Mercury Gift and StoreCard™ Selling stored value cards with a loyalty component like Mercury StoreCard builds business by rewarding your best customers every time they come to your business instead of your competitor. This section explains how Mercury StoreCard and standard Mercury Gift are sold at the point of sale. The section of this user guide explaining the redemption of gift cards and StoreCard start at page 102. To sign up for Mercury StoreCard or gift go to mercurypay.com.
MERCURY GIFT Mercury Gift Cards can be sold in any denomination and the customer can purchase additional value at a later date. You can choose from a generic design with your logo or completely design a card from scratch. Customers can check gift card balances at https://www.mercury-‐gift.com.
MERCURY STORECARD™ The Mercury StoreCard is a gift card, rewards card and mobile payment card all wrapped up into one. Mercury StoreCard is designed speci1ically for small and medium sized merchants, bringing them powerful, innovative technology typically affordable only to big brands.
• Turn-‐key, POS-‐integrated, closed loop prepaid service • Low monthly service fee and no transaction fees for Mercury Credit Card customers • Prepaid plus a whole lot more, including:
• Cash back— rewards customers for every StoreCard purchase • Reloadable— manual or automatic refunding based on customer preference • Mobile payment option— physical card or mobile wallet conversion • Online registration— lost or stolen cards can be replaced • Card Studio— a mobile website for customers to design their own cards • Social Sharing— allow customers to share offers using social media • StoreCard Manager— merchant branded website for card management
Sensible Terminal
112
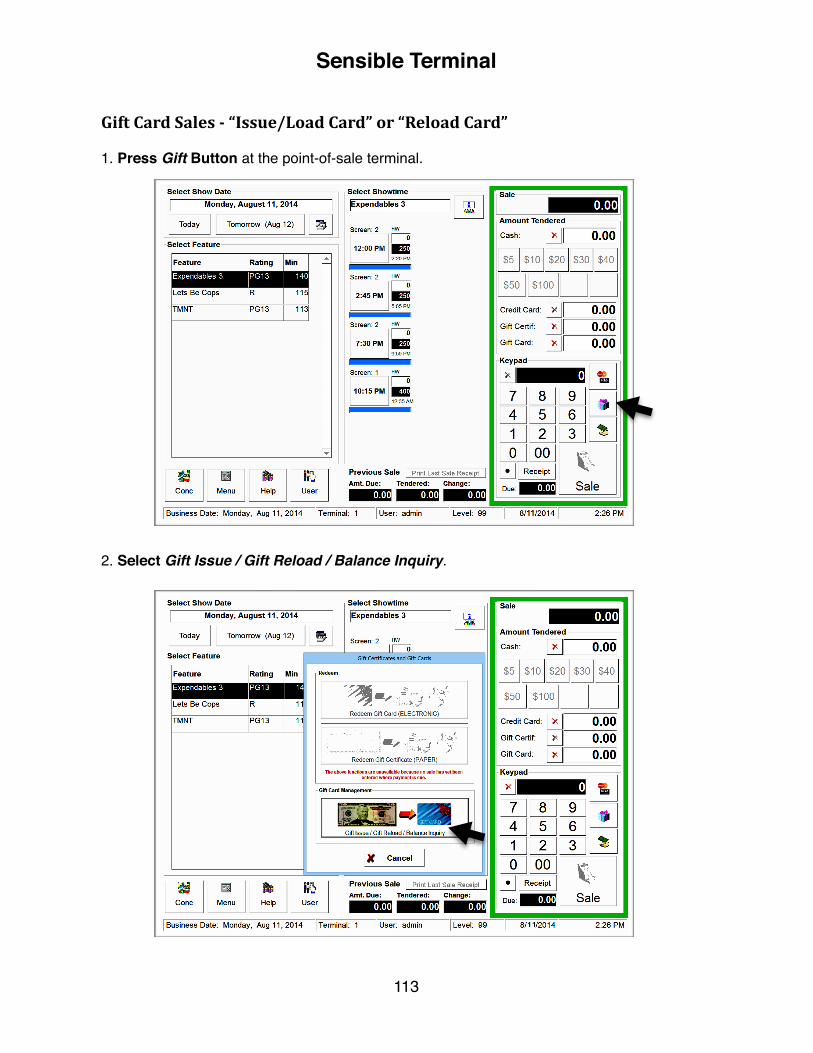
Gift Card Sales -‐ “Issue/Load Card” or “Reload Card”
1. Press Gift Button at the point-of-sale terminal.
2. Select Gift Issue / Gift Reload / Balance Inquiry.
Sensible Terminal
113

3. Select Issue/Load Card for a new card or Reload for a card which has already been issued. Enter an amount to be loaded onto the card and press Continue.
4. Swipe the Card to load the value onto the card. The value stored on the card is stored on the payment server at Mercury Pay. The customer can check balance online at mercury-gift.com.
Sensible Terminal
114

5. Receipt is Printed showing the new card balance at the bottom of the card. You’ll want to remind the customer to register a Mercury StoreCard to ensure it can be replaced should it everbe lost or stolen.
6. Sale is Complete after the customer pays for the new card or card reload. Remind the customer that she can add value to the Mercury StoreCard on your custom website or manage the card features like auto-reload by going online and registering the card.
Sensible Terminal
115
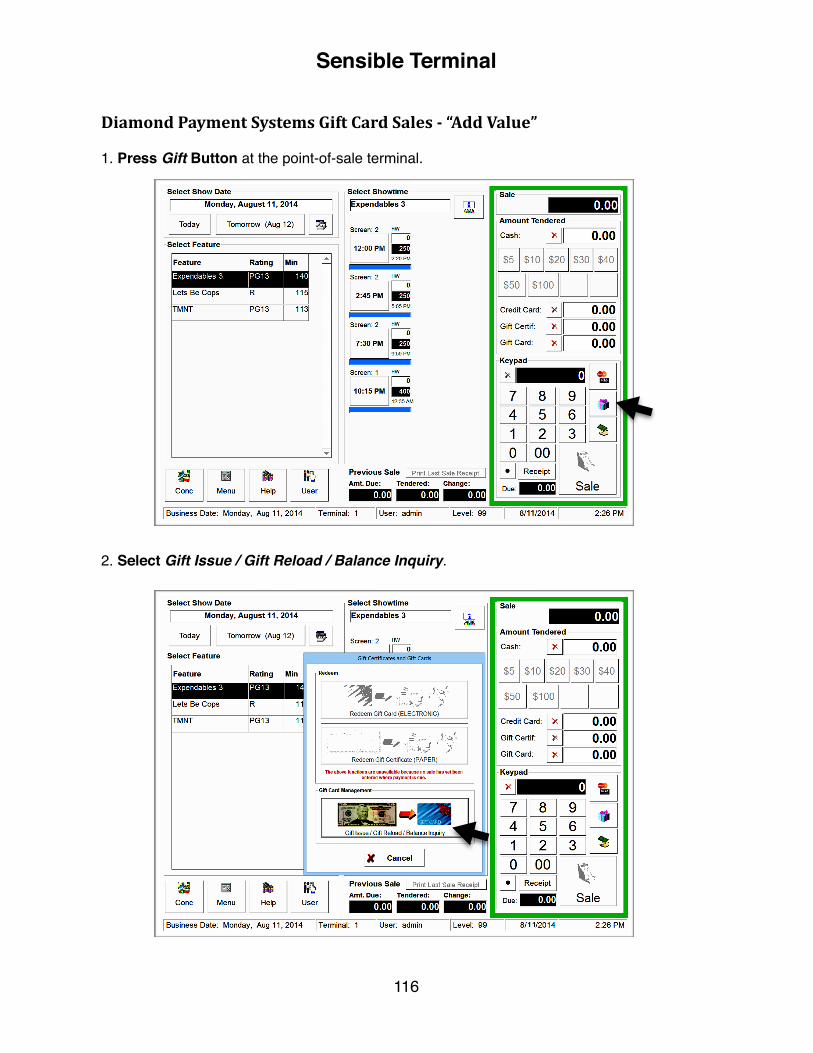
Diamond Payment Systems Gift Card Sales -‐ “Add Value”
1. Press Gift Button at the point-of-sale terminal.
2. Select Gift Issue / Gift Reload / Balance Inquiry.
Sensible Terminal
116
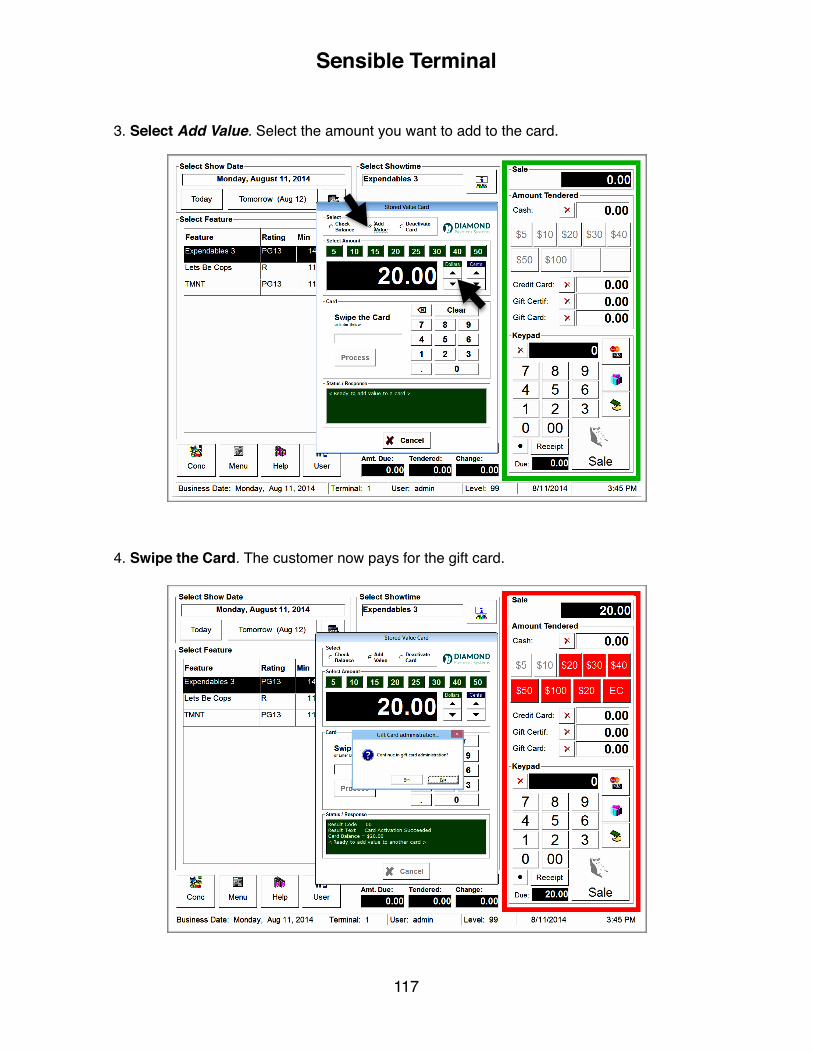
3. Select Add Value. Select the amount you want to add to the card.
4. Swipe the Card. The customer now pays for the gift card.
Sensible Terminal
117
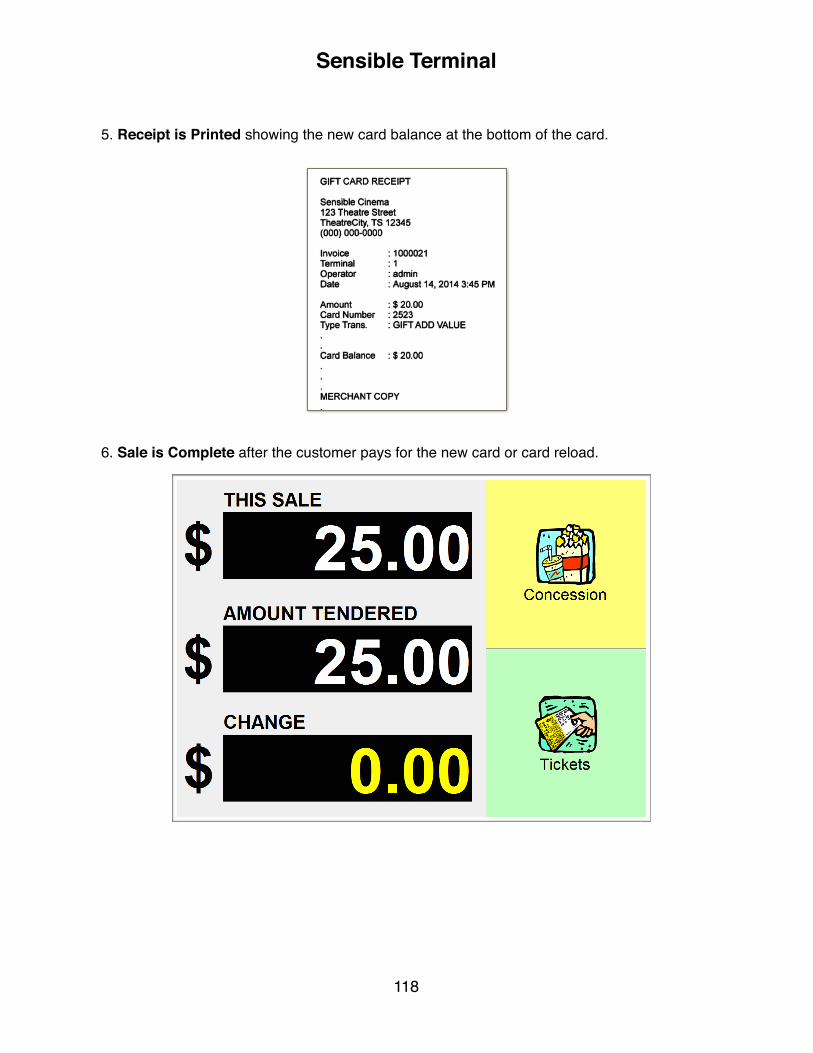
5. Receipt is Printed showing the new card balance at the bottom of the card.
6. Sale is Complete after the customer pays for the new card or card reload.
Sensible Terminal
118

Chapter 8
Ticketing Walk-Through
119

Step-‐By-‐Step -‐ Making a Ticket Sale for the Current Day
1. Press [Feature Name] at the point-of-sale terminal. Showtimes for the feature are shown in the middle panel. Press [Showtime] in the center panel of your terminal.
2. Press [Ticket Category]. Ticket category availabilities are shown in the middle panel. Select the tickets by pressing category names and press Print.
Ticketing Walk-Through
120

3. Total Sale in top of the right-most panel changes to the amount of the purchase. Select the payment type. For cash, press the [Amount] button to tender sale. For credit cards and gift, press the appropriate tender key.
4. Complete Sale and make change for the customer.
Ticketing Walk-Through
121
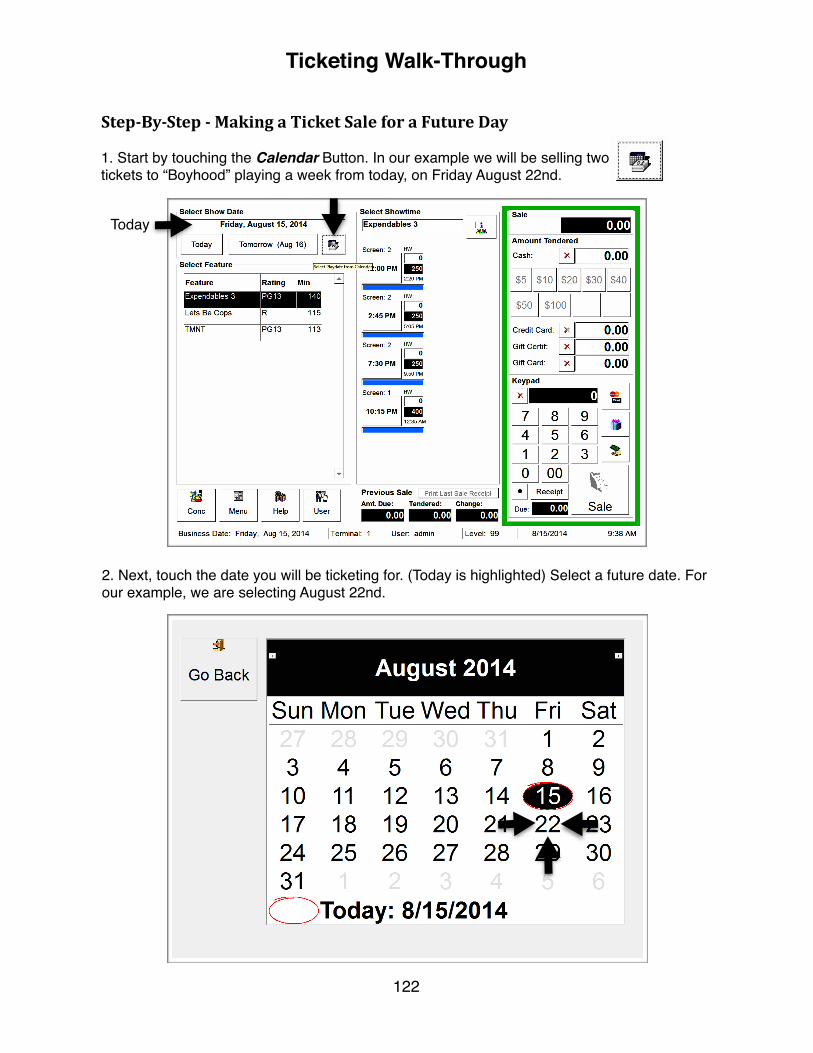
Today
Step-‐By-‐Step -‐ Making a Ticket Sale for a Future Day
1. Start by touching the Calendar Button. In our example we will be selling two tickets to “Boyhood” playing a week from today, on Friday August 22nd.
2. Next, touch the date you will be ticketing for. (Today is highlighted) Select a future date. For our example, we are selecting August 22nd.
Ticketing Walk-Through
122
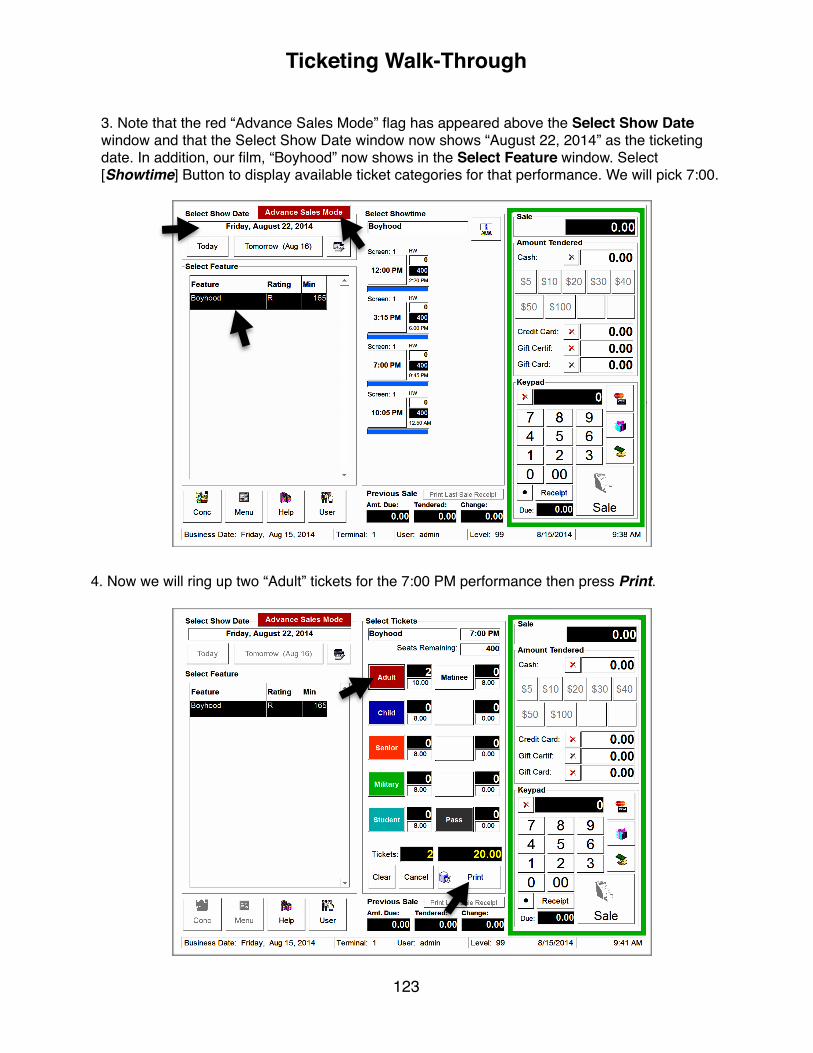
4. Now we will ring up two “Adult” tickets for the 7:00 PM performance then press Print.
3. Note that the red “Advance Sales Mode” flag has appeared above the Select Show Date window and that the Select Show Date window now shows “August 22, 2014” as the ticketing date. In addition, our film, “Boyhood” now shows in the Select Feature window. Select [Showtime] Button to display available ticket categories for that performance. We will pick 7:00.
Ticketing Walk-Through
123

5. Press Yes to confirm that you wish to print advance tickets or No to abort.
6. Now, accept payment for the advance tickets you have sold or sell additional tickets (or concessions) to the customer. Pressing Today Button returns you to sales for today’s tickets. If you do not switch back to today’s tickets, you will be reminded after the sale is completed.
Ticketing Walk-Through
124
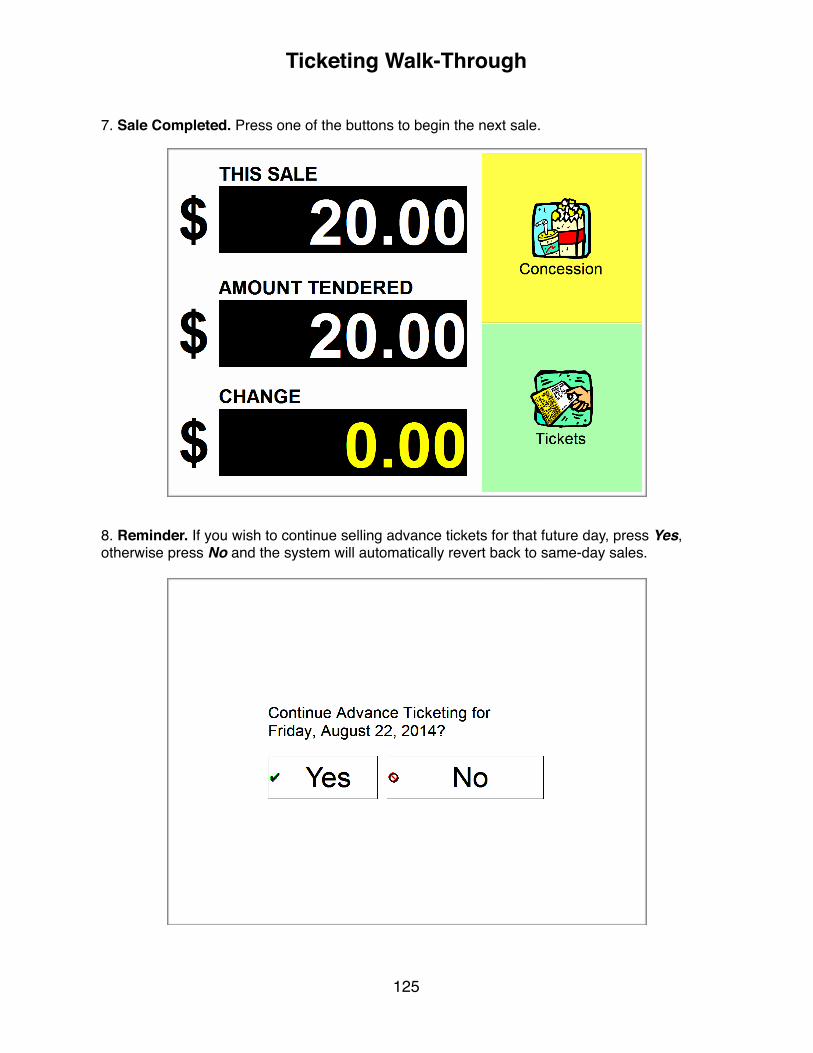
7. Sale Completed. Press one of the buttons to begin the next sale.
8. Reminder. If you wish to continue selling advance tickets for that future day, press Yes, otherwise press No and the system will automatically revert back to same-day sales.
Ticketing Walk-Through
125
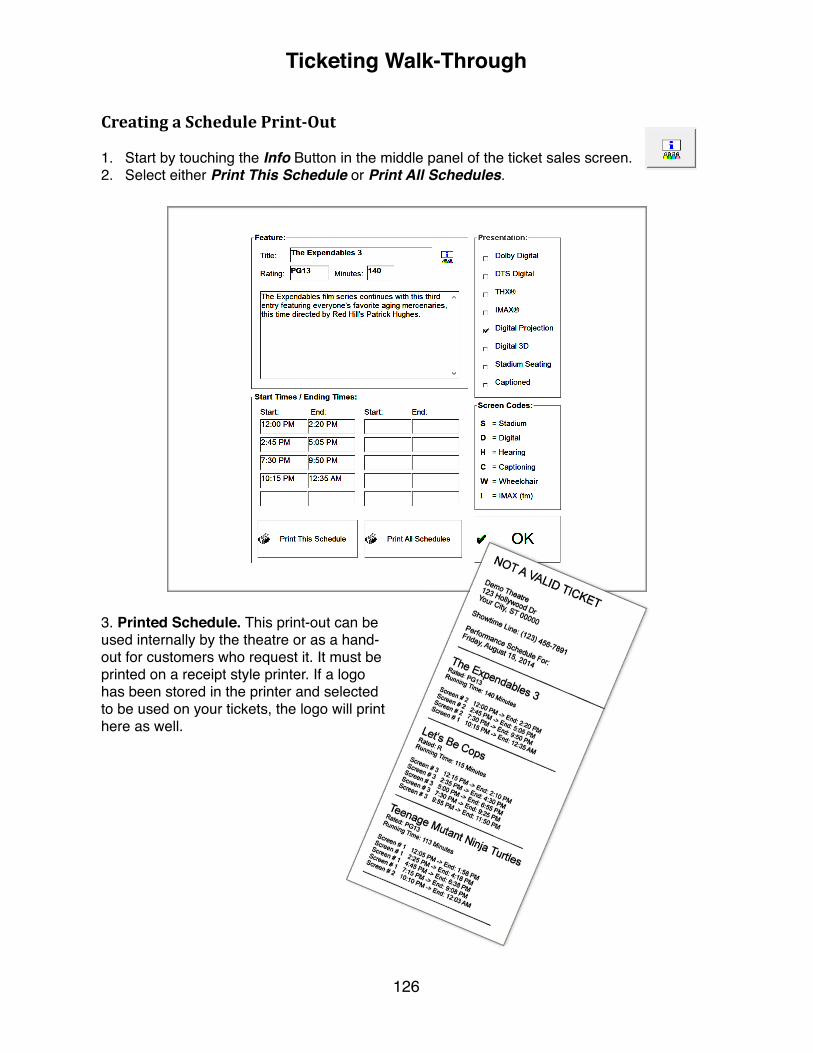
Creating a Schedule Print-‐Out
1. Start by touching the Info Button in the middle panel of the ticket sales screen.2. Select either Print This Schedule or Print All Schedules.
3. Printed Schedule. This print-out can be used internally by the theatre or as a hand-out for customers who request it. It must be printed on a receipt style printer. If a logo has been stored in the printer and selected to be used on your tickets, the logo will print here as well.
Ticketing Walk-Through
126
Chapter 9
Concession Walk-Through
127

Step-‐By-‐Step -‐ Making a Concession Sale
1. Press [Item Name] from the leftmost panel to register one of that item. For more iterations of the item, press the button subsequent times as needed. You could also type a number in the numerical keypad then press the item key to register that quantity of the item.
2. Items show as they are rung in the middle panel. Press Done when finished ringing items.
Concession Walk-Through
128

3. Now accept payment for the concession items. You can press a cash [Amount Tendered] button for a cash payment or accept payment by credit or gift card. See page 98 for credit card acceptance procedures. We will assume a $20 cash payment in this example.
4. Sale Completed.
Concession Walk-Through
129

Concession Walk-Through
130

Chapter 10
Live Reports
131
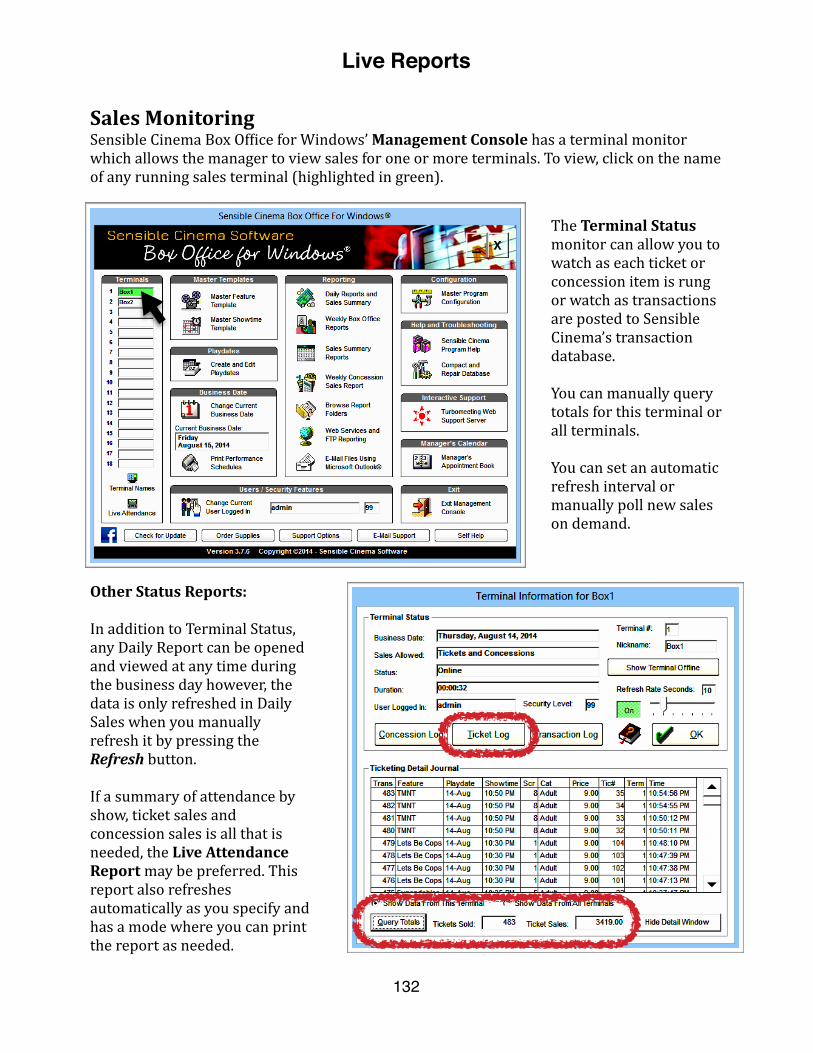
Sales Monitoring Sensible Cinema Box Of1ice for Windows’ Management Console has a terminal monitor which allows the manager to view sales for one or more terminals. To view, click on the name of any running sales terminal (highlighted in green).
The Terminal Status monitor can allow you to watch as each ticket or concession item is rung or watch as transactions are posted to Sensible Cinema’s transaction database.
You can manually query totals for this terminal or all terminals.
You can set an automatic refresh interval or manually poll new sales on demand.
Other Status Reports:
In addition to Terminal Status, any Daily Report can be opened and viewed at any time during the business day however, the data is only refreshed in Daily Sales when you manually refresh it by pressing the Refresh button.
If a summary of attendance by show, ticket sales and concession sales is all that is needed, the Live Attendance Report may be preferred. This report also refreshes automatically as you specify and has a mode where you can print the report as needed.
Live Reports
132
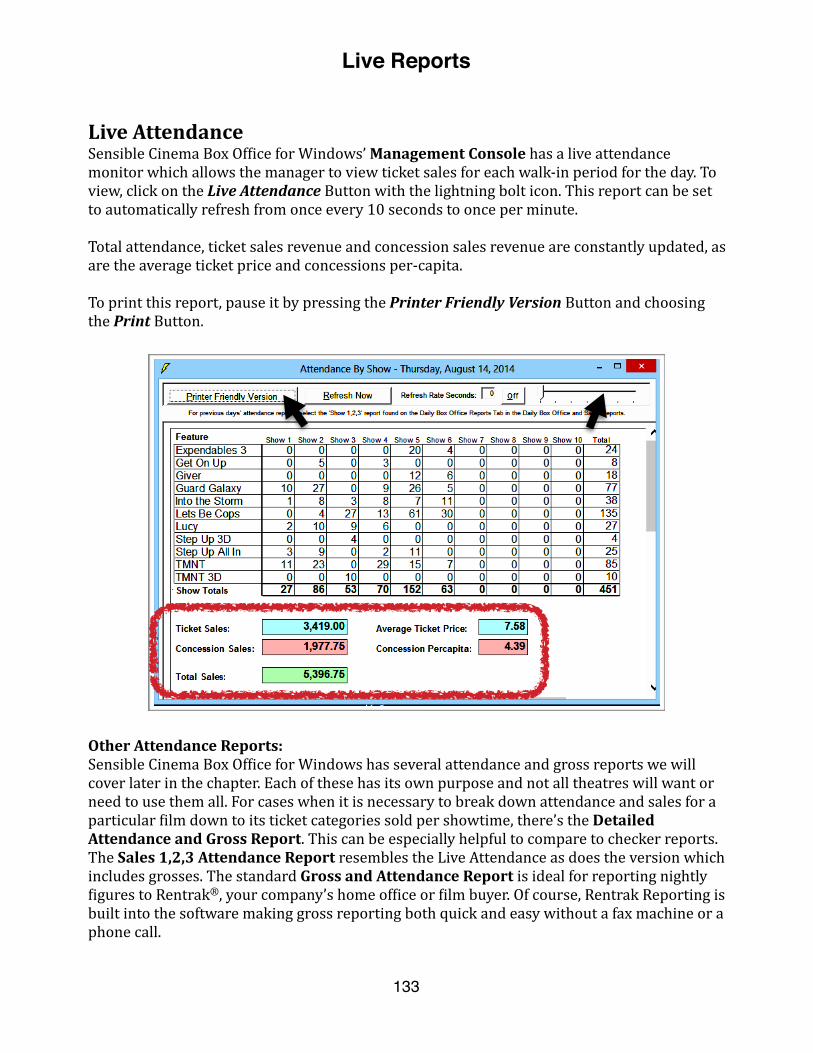
Live Attendance Sensible Cinema Box Of1ice for Windows’ Management Console has a live attendance monitor which allows the manager to view ticket sales for each walk-‐in period for the day. To view, click on the Live Attendance Button with the lightning bolt icon. This report can be set to automatically refresh from once every 10 seconds to once per minute.
Total attendance, ticket sales revenue and concession sales revenue are constantly updated, as are the average ticket price and concessions per-‐capita.
To print this report, pause it by pressing the Printer Friendly Version Button and choosing the Print Button.
Other Attendance Reports: Sensible Cinema Box Of1ice for Windows has several attendance and gross reports we will cover later in the chapter. Each of these has its own purpose and not all theatres will want or need to use them all. For cases when it is necessary to break down attendance and sales for a particular 1ilm down to its ticket categories sold per showtime, there’s the Detailed Attendance and Gross Report. This can be especially helpful to compare to checker reports. The Sales 1,2,3 Attendance Report resembles the Live Attendance as does the version which includes grosses. The standard Gross and Attendance Report is ideal for reporting nightly 1igures to Rentrak®, your company’s home of1ice or 1ilm buyer. Of course, Rentrak Reporting is built into the software making gross reporting both quick and easy without a fax machine or a phone call.
Live Reports
133

Live Reports
134

Chapter 11
Essential Daily Reporting
135
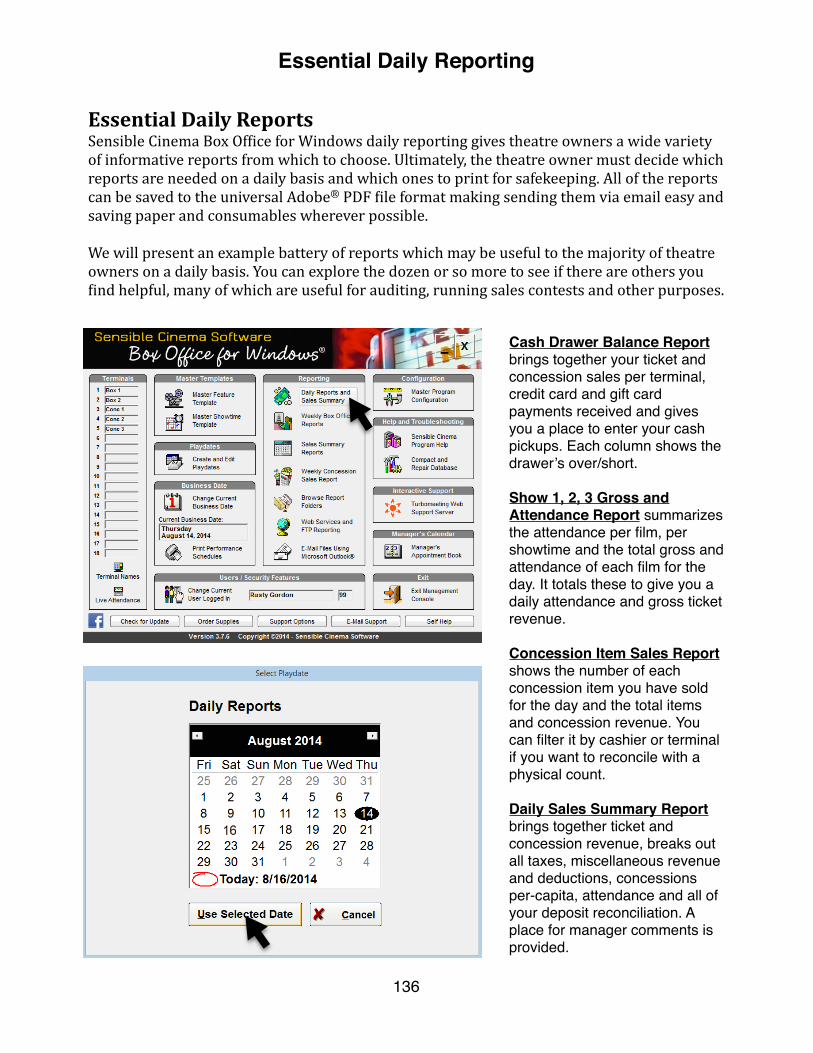
Essential Daily Reports Sensible Cinema Box Of1ice for Windows daily reporting gives theatre owners a wide variety of informative reports from which to choose. Ultimately, the theatre owner must decide which reports are needed on a daily basis and which ones to print for safekeeping. All of the reports can be saved to the universal Adobe® PDF 1ile format making sending them via email easy and saving paper and consumables wherever possible.
We will present an example battery of reports which may be useful to the majority of theatre owners on a daily basis. You can explore the dozen or so more to see if there are others you 1ind helpful, many of which are useful for auditing, running sales contests and other purposes.
Cash Drawer Balance Reportbrings together your ticket and concession sales per terminal, credit card and gift card payments received and gives you a place to enter your cash pickups. Each column shows the drawer’s over/short.
Show 1, 2, 3 Gross and Attendance Report summarizes the attendance per film, per showtime and the total gross and attendance of each film for the day. It totals these to give you a daily attendance and gross ticket revenue.
Concession Item Sales Report shows the number of each concession item you have sold for the day and the total items and concession revenue. You can filter it by cashier or terminal if you want to reconcile with a physical count.
Daily Sales Summary Report brings together ticket and concession revenue, breaks out all taxes, miscellaneous revenue and deductions, concessions per-capita, attendance and all of your deposit reconciliation. A place for manager comments is provided.
Essential Daily Reporting
136
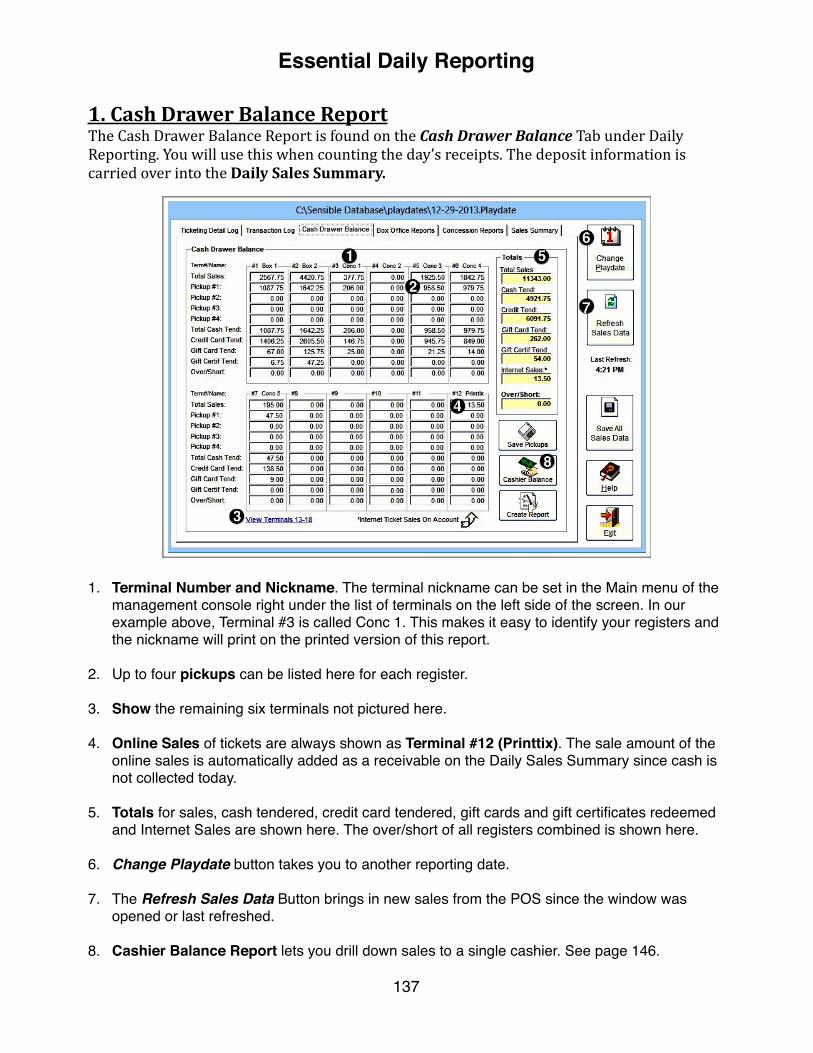
1. Cash Drawer Balance Report The Cash Drawer Balance Report is found on the Cash Drawer Balance Tab under Daily Reporting. You will use this when counting the day’s receipts. The deposit information is carried over into the Daily Sales Summary.
1. Terminal Number and Nickname. The terminal nickname can be set in the Main menu of the management console right under the list of terminals on the left side of the screen. In our example above, Terminal #3 is called Conc 1. This makes it easy to identify your registers and the nickname will print on the printed version of this report.
2. Up to four pickups can be listed here for each register.
3. Show the remaining six terminals not pictured here.
4. Online Sales of tickets are always shown as Terminal #12 (Printtix). The sale amount of the online sales is automatically added as a receivable on the Daily Sales Summary since cash is not collected today.
5. Totals for sales, cash tendered, credit card tendered, gift cards and gift certificates redeemed and Internet Sales are shown here. The over/short of all registers combined is shown here.
6. Change Playdate button takes you to another reporting date.
7. The Refresh Sales Data Button brings in new sales from the POS since the window was opened or last refreshed.
8. Cashier Balance Report lets you drill down sales to a single cashier. See page 146.
Essential Daily Reporting
137

Essential Daily Reporting
138

2. Show 1,2,3 Gross and Attendance Report The Show 1,2,3 Gross and Attendance Report summarizes the attendance per 1ilm at each show period. It totals these to give you a daily attendance and gross ticket revenue.
Essential Daily Reporting
139
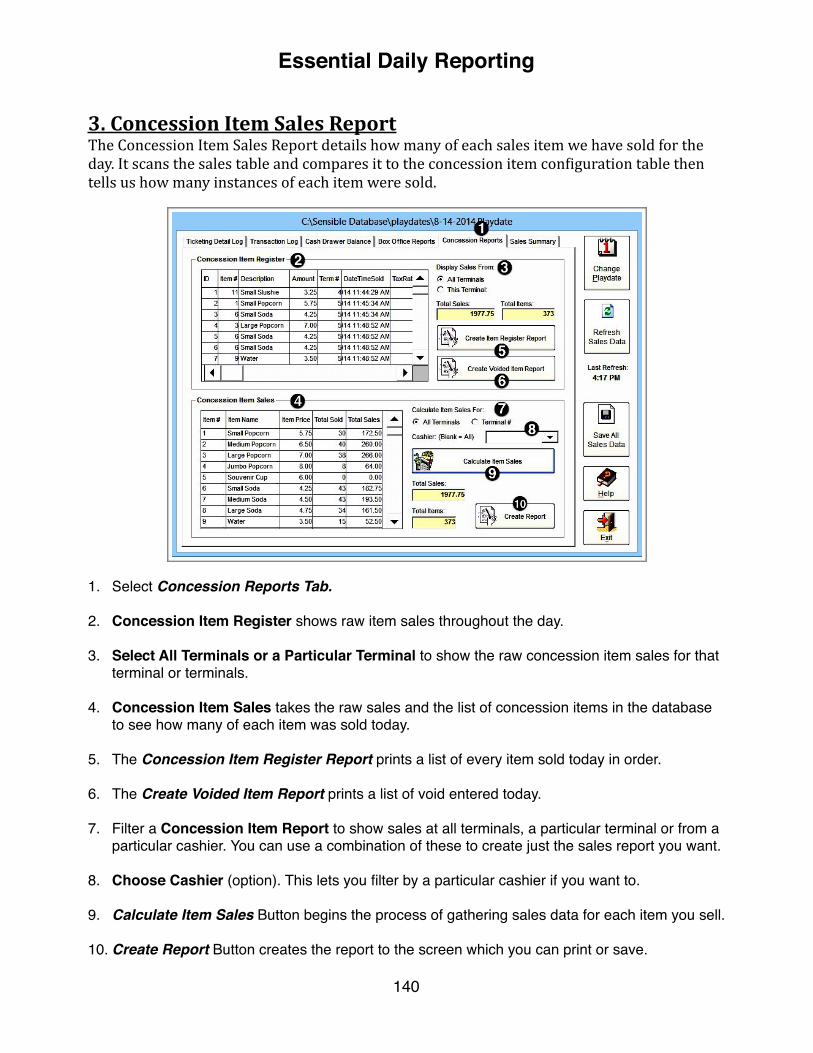
3. Concession Item Sales Report The Concession Item Sales Report details how many of each sales item we have sold for the day. It scans the sales table and compares it to the concession item con1iguration table then tells us how many instances of each item were sold.
1. Select Concession Reports Tab.
2. Concession Item Register shows raw item sales throughout the day.
3. Select All Terminals or a Particular Terminal to show the raw concession item sales for that terminal or terminals.
4. Concession Item Sales takes the raw sales and the list of concession items in the database to see how many of each item was sold today.
5. The Concession Item Register Report prints a list of every item sold today in order.
6. The Create Voided Item Report prints a list of void entered today.
7. Filter a Concession Item Report to show sales at all terminals, a particular terminal or from a particular cashier. You can use a combination of these to create just the sales report you want.
8. Choose Cashier (option). This lets you filter by a particular cashier if you want to.
9. Calculate Item Sales Button begins the process of gathering sales data for each item you sell.
10. Create Report Button creates the report to the screen which you can print or save.
Essential Daily Reporting
140

Essential Daily Reporting
141

4. Daily Sales Summary Report The Daily Sales Summary Report should be your cover sheet for today’s report, detailing the ticketing and concession revenue, miscellaneous revenue and deductions, a breakdown of admission and sales taxes and your deposit reconciliation.
1. Select Sales Summary Tab.
2. Revenue Items show monies coming in today for sales.
3. Arrow Buttons give you the ability to see components of this item broken down.
4. Deduction Items show monies going out.
5. Manager’s Remarks provides room to explain the report or mention opposition activities.
6. Cash Tendered shows the total cash collected in pickups from the Cash Balance Report.
7. Credit, Gift Card and Gift Certificate Tendered. These are your deposit components.
8. Additional Deposit Items can be added to offset additional revenue.
9. Reconciliation compares your total due to your total receipts showing an over or short.
10. Create Report Button creates the report to the screen which you can print or save.
11. Cloud Backup lets you save this report to the theatre’s Dropbox Folder.
Essential Daily Reporting
142
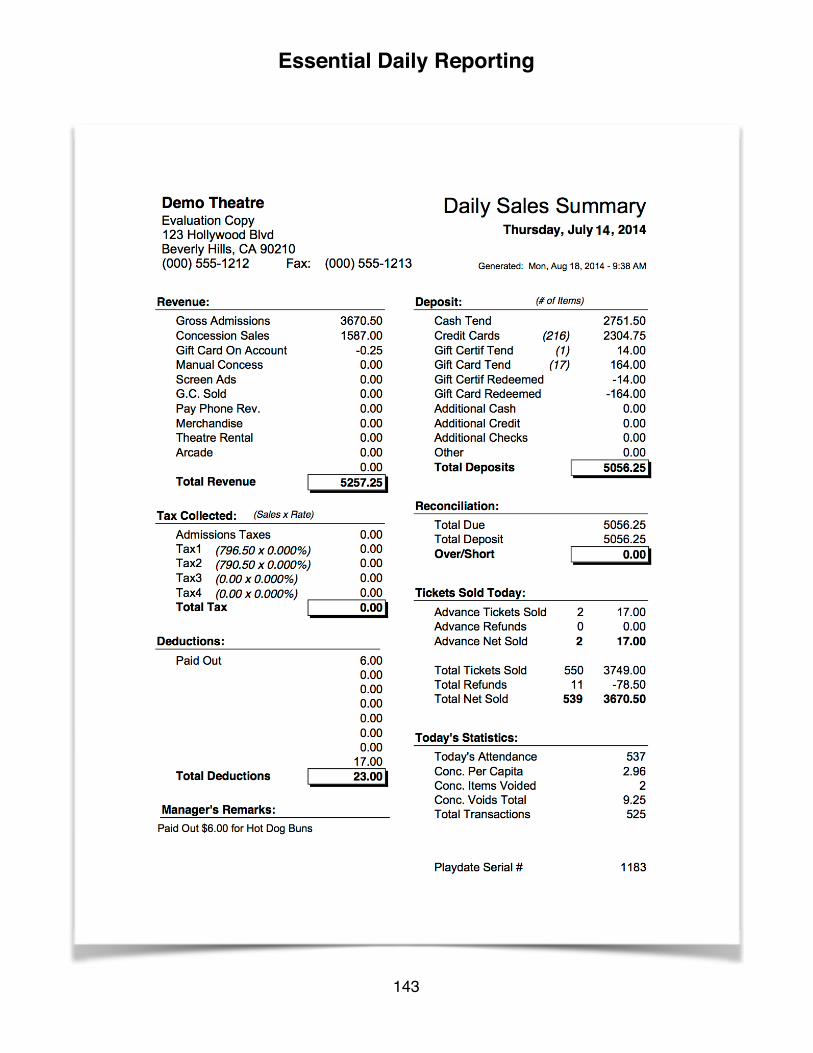
Essential Daily Reporting
143

Essential Daily Reporting
144

Chapter 12
Optional Daily Reports
145

1. Select a Workstation this cashier used and all of the transactions for the day made on that terminal will be totaled.
2. Select a cashier name and sales for that terminal are drilled down to just the ones made by this particular cashier.
3. Select Shift to show the day part this cashier worked on the cashier balance report.
4. Total Cash is entered here. Once other forms of payment are taken into account, the cashier’s over/short is determined.
5. Press Save Cashier Data to Terminal Grid. This puts the sales and deposit for this cashier towards the total sales for this terminal shown on #6.
6. Terminal Receipts shows the total sales for the selected terminal and all of the saved cashier checkouts towards that total sales amount.
7. Press Send Total Cash Receipts of_____ to Cash Pickups and Exit. This adds this cashier’s cash to the next available pickup slot for this terminal number on the Cash Balance Report.
Cashier Balance Report (Option) The Cashier Balance Report is found on the Cash Drawer Balance Tab under Daily Reporting by pressing the Cashier Balance Button on the Cash Drawer Balance screen. The cashier balance screen is an extension of the cash drawer balance report for managers who want to drill down sales by cashier as well as till number. This is handy when more than one individual will use the drawer in different day parts. It enables you to 1ilter sales by a particular login and record pickups individually by cashier to obtain an over/short for each employee handling cash.
Optional Daily Reports
146
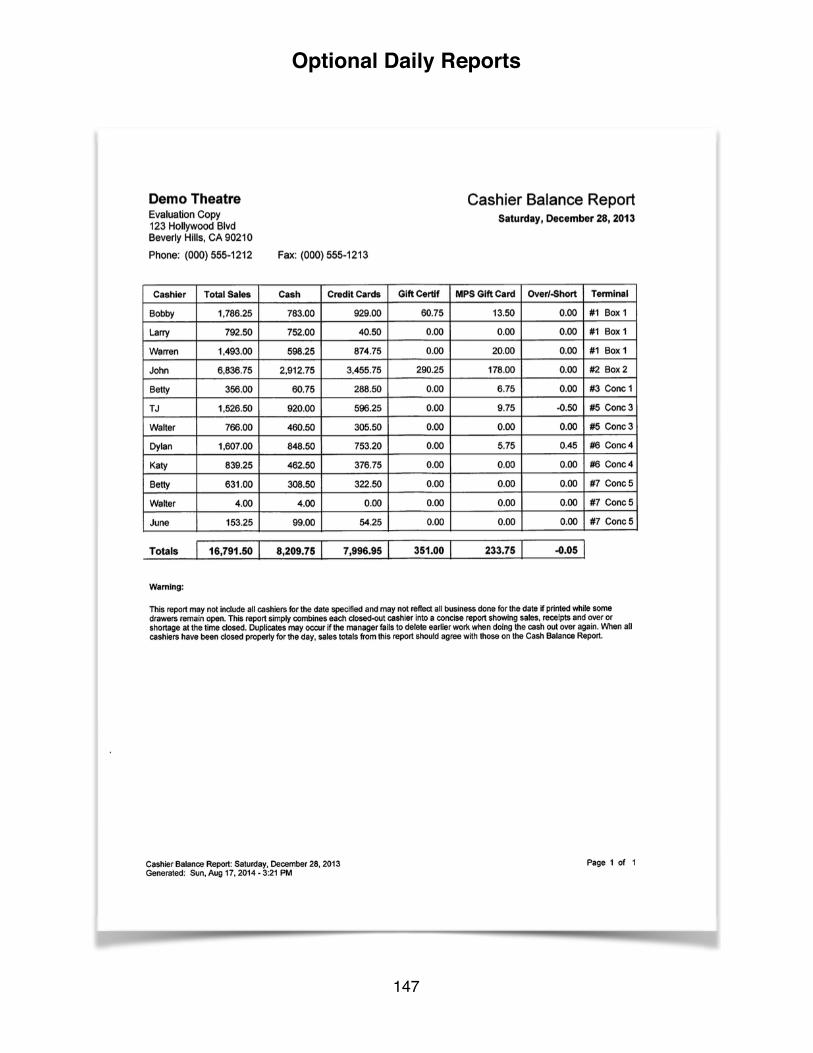
Optional Daily Reports
147

Advance Tickets Sold Report (Option) This report shows tickets sold today for today, tickets sold on previous days for today’s shows and tickets sold today for shows on future days. The summary report is all most theatres will need to account for advance sales, however a complete ticket register is available.
Optional Daily Reports
148
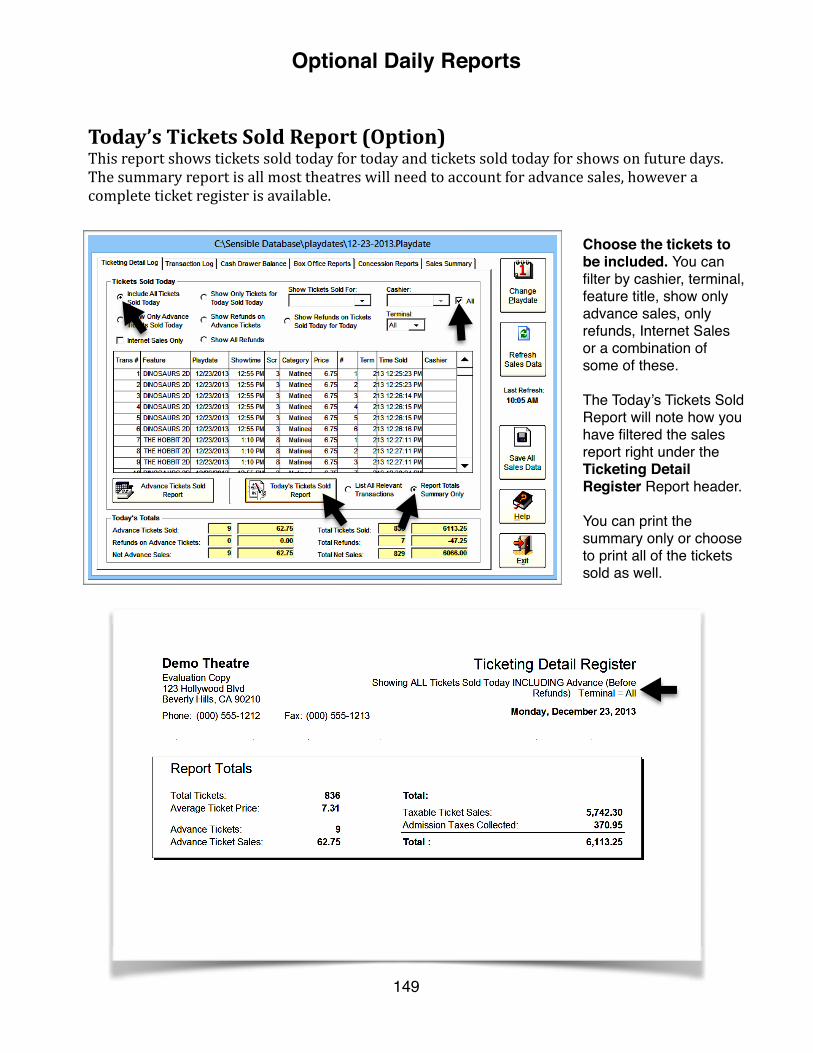
Today’s Tickets Sold Report (Option) This report shows tickets sold today for today and tickets sold today for shows on future days. The summary report is all most theatres will need to account for advance sales, however a complete ticket register is available.
Choose the tickets to be included. You can filter by cashier, terminal, feature title, show only advance sales, only refunds, Internet Sales or a combination of some of these.
The Today’s Tickets Sold Report will note how you have filtered the sales report right under the Ticketing Detail Register Report header.
You can print the summary only or choose to print all of the tickets sold as well.
Optional Daily Reports
149
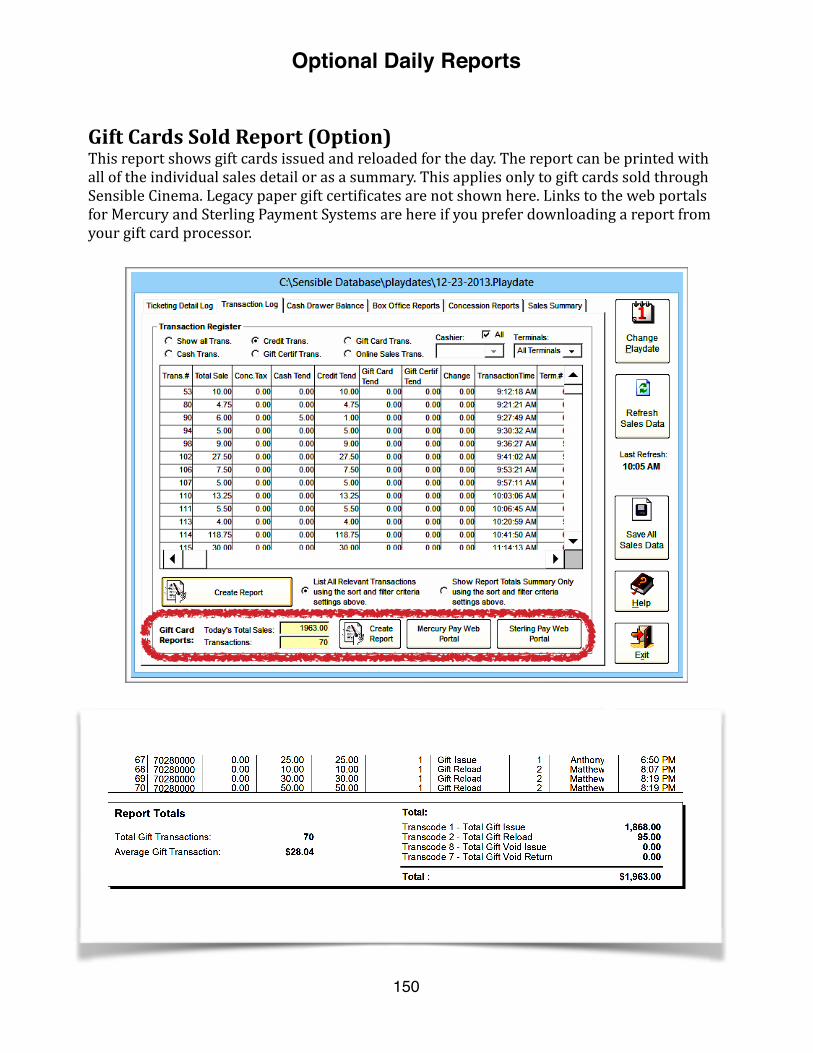
Gift Cards Sold Report (Option) This report shows gift cards issued and reloaded for the day. The report can be printed with all of the individual sales detail or as a summary. This applies only to gift cards sold through Sensible Cinema. Legacy paper gift certi1icates are not shown here. Links to the web portals for Mercury and Sterling Payment Systems are here if you prefer downloading a report from your gift card processor.
Optional Daily Reports
150
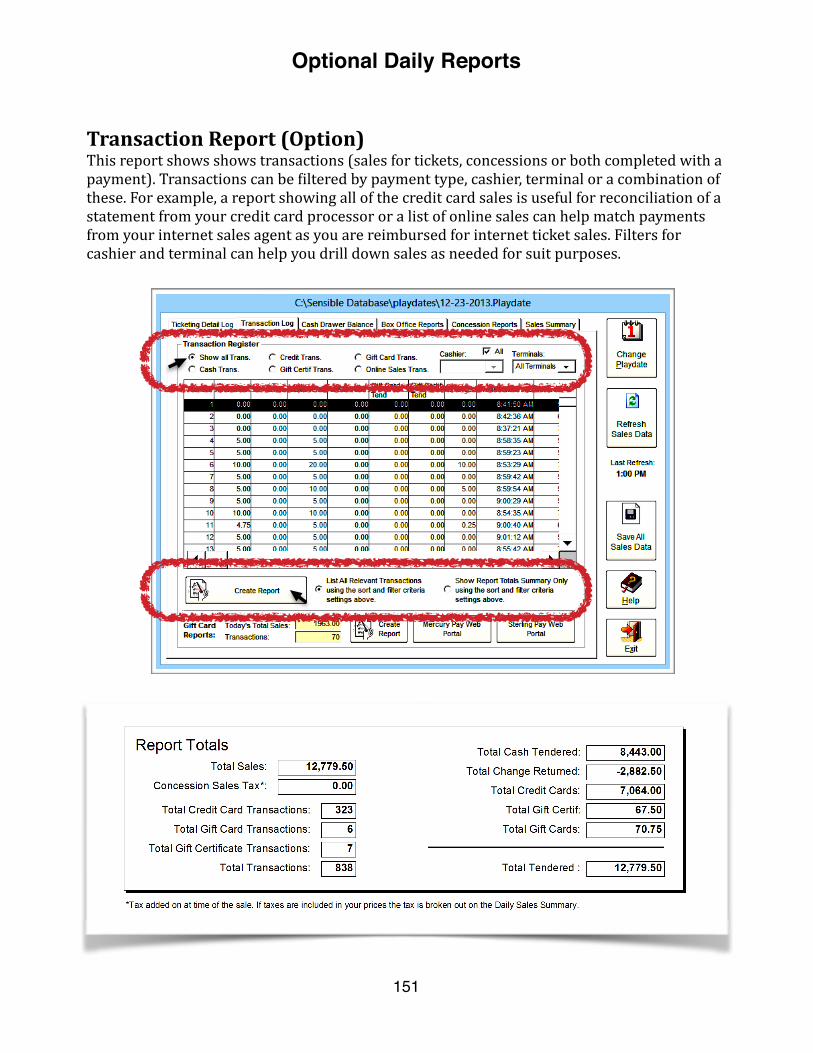
Transaction Report (Option) This report shows shows transactions (sales for tickets, concessions or both completed with a payment). Transactions can be 1iltered by payment type, cashier, terminal or a combination of these. For example, a report showing all of the credit card sales is useful for reconciliation of a statement from your credit card processor or a list of online sales can help match payments from your internet sales agent as you are reimbursed for internet ticket sales. Filters for cashier and terminal can help you drill down sales as needed for suit purposes.
Optional Daily Reports
151
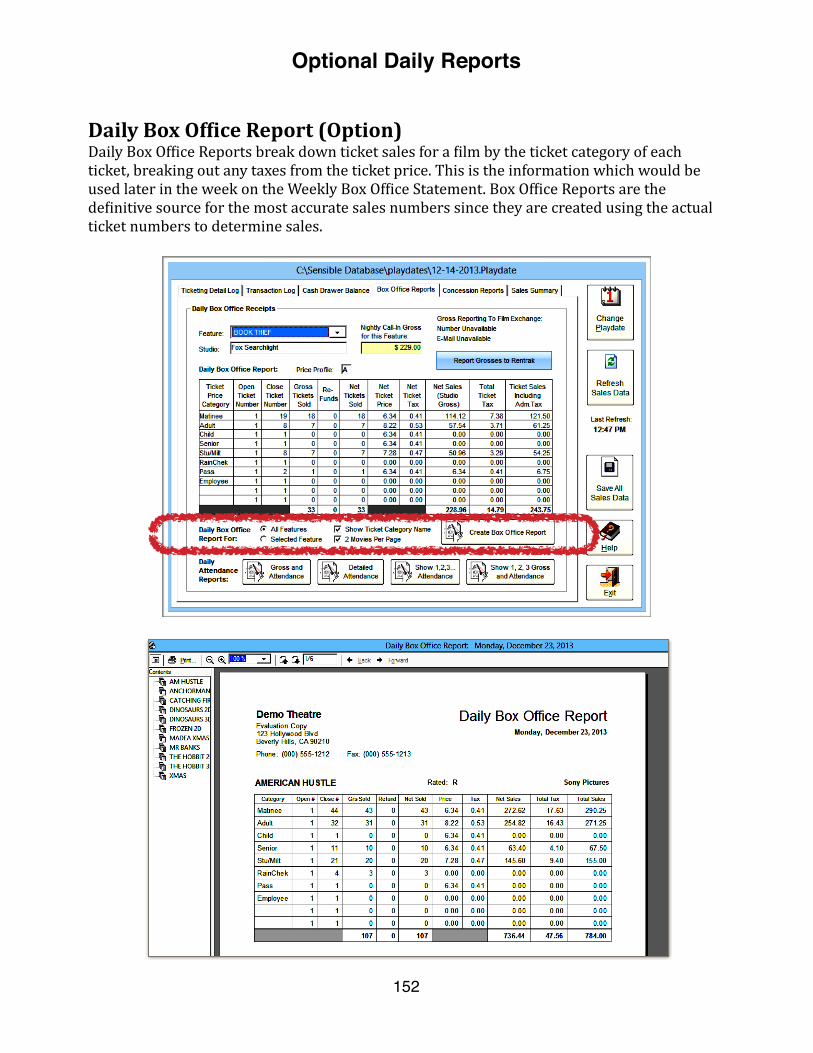
Daily Box Of2ice Report (Option) Daily Box Of1ice Reports break down ticket sales for a 1ilm by the ticket category of each ticket, breaking out any taxes from the ticket price. This is the information which would be used later in the week on the Weekly Box Of1ice Statement. Box Of1ice Reports are the de1initive source for the most accurate sales numbers since they are created using the actual ticket numbers to determine sales.
Optional Daily Reports
152

Gross And Attendance Report (Option) The Gross and Attendance Report summarizes grosses and attendance for each 1ilm as a total. This is great for faxing or emailing to a 1ilm booker or Rentrak. For a show by show account of attendance, try the Show 1,2,3 Gross and Attendance Report.
Optional Daily Reports
153
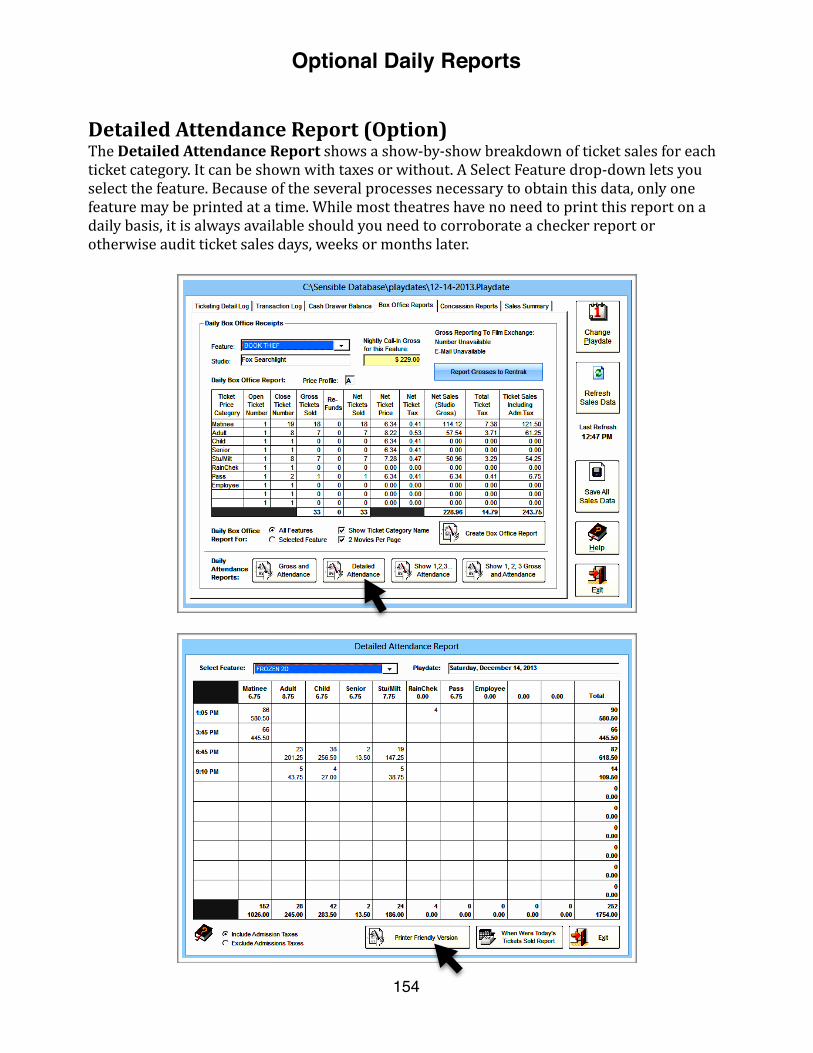
Detailed Attendance Report (Option) The Detailed Attendance Report shows a show-‐by-‐show breakdown of ticket sales for each ticket category. It can be shown with taxes or without. A Select Feature drop-‐down lets you select the feature. Because of the several processes necessary to obtain this data, only one feature may be printed at a time. While most theatres have no need to print this report on a daily basis, it is always available should you need to corroborate a checker report or otherwise audit ticket sales days, weeks or months later.
Optional Daily Reports
154
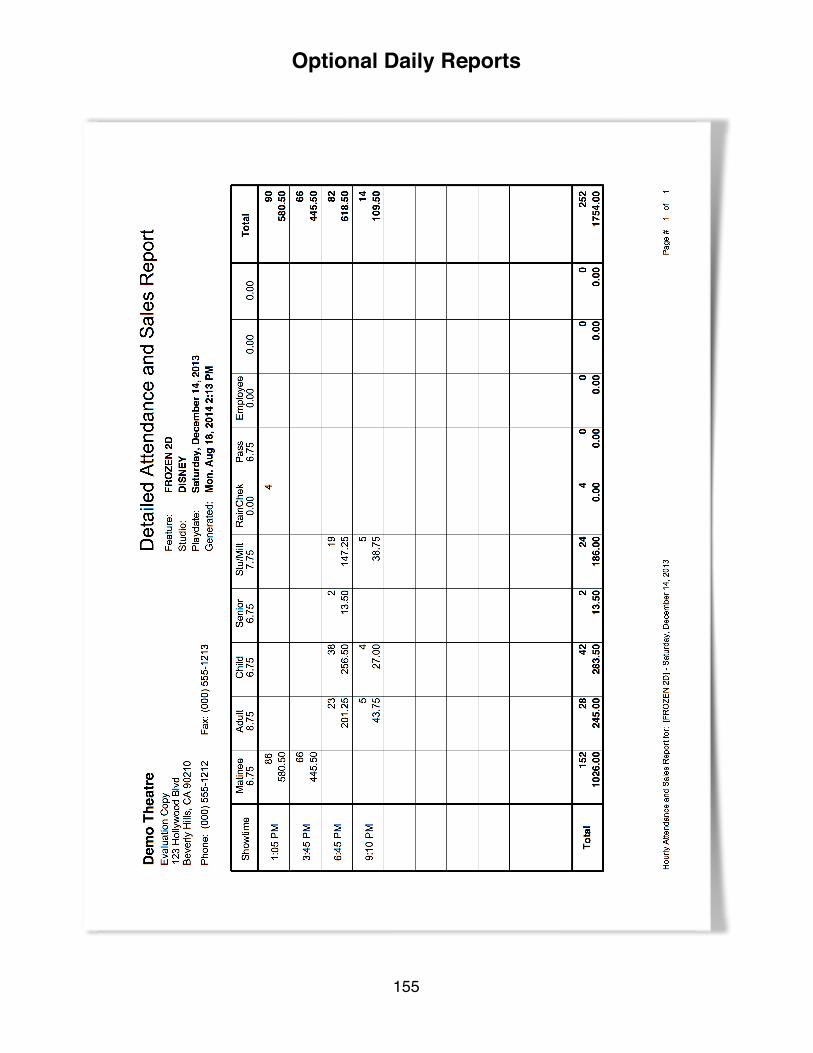
Optional Daily Reports
155
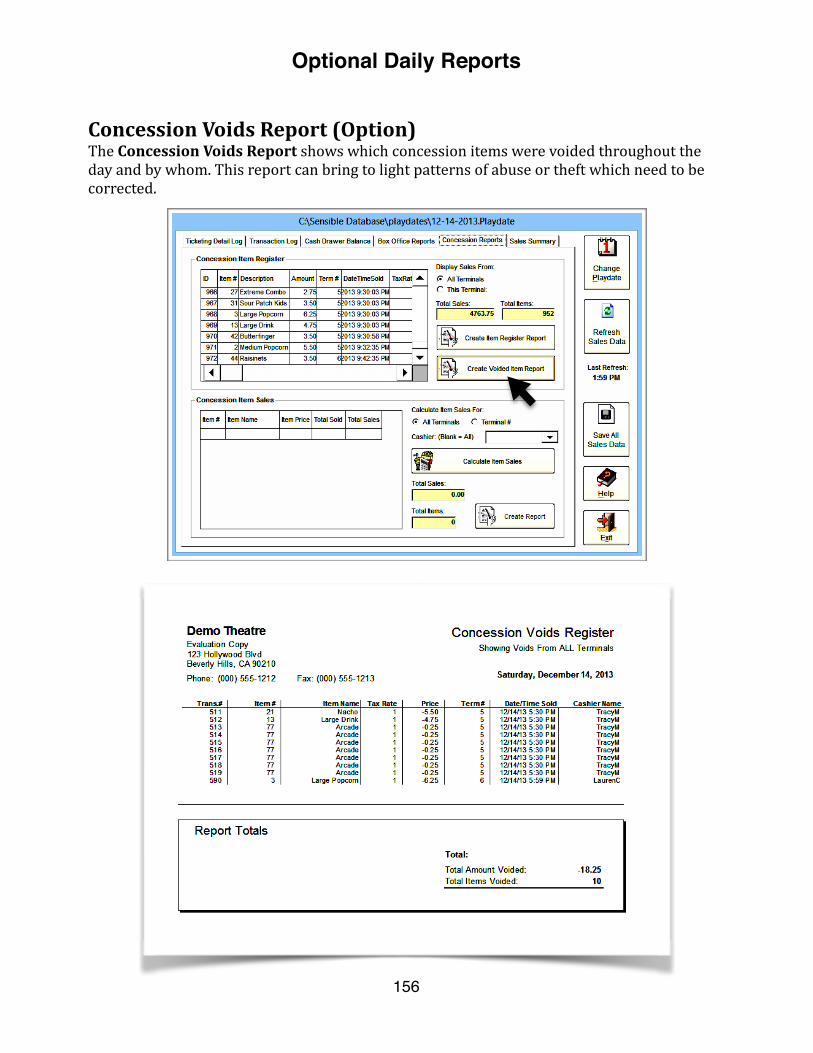
Concession Voids Report (Option) The Concession Voids Report shows which concession items were voided throughout the day and by whom. This report can bring to light patterns of abuse or theft which need to be corrected.
Optional Daily Reports
156
Chapter 13
Weekly Box Office Reports
157
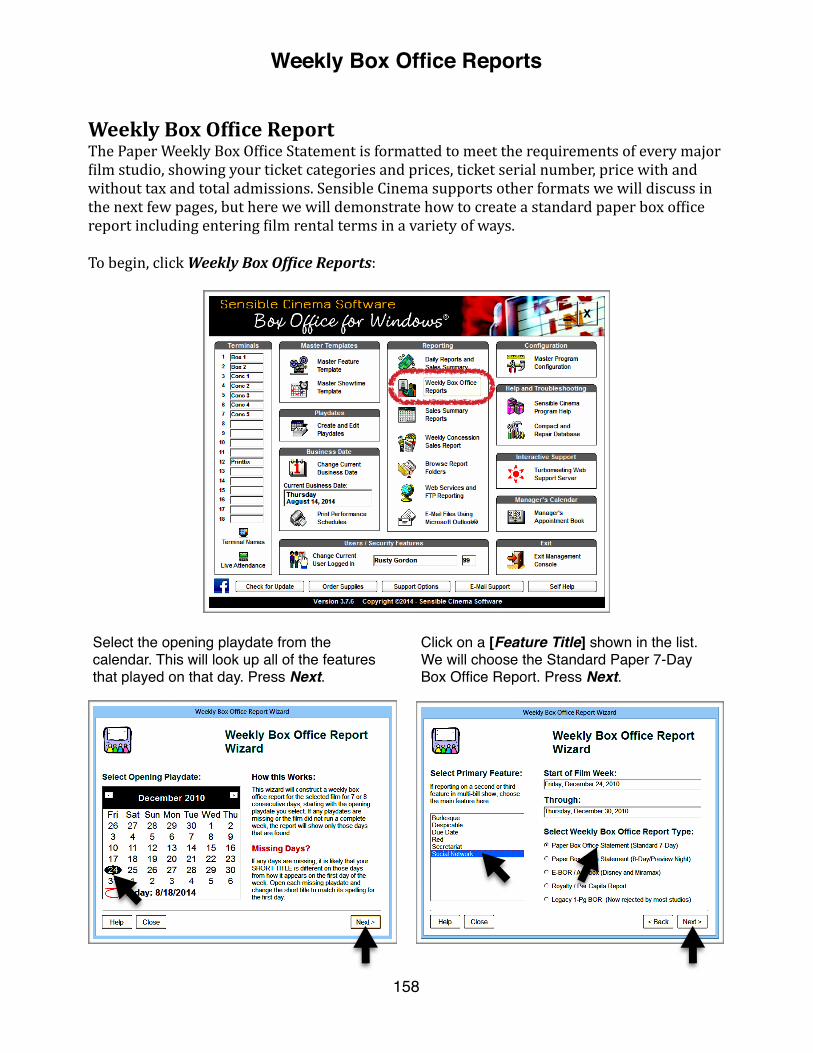
Select the opening playdate from the calendar. This will look up all of the features that played on that day. Press Next.
Click on a [Feature Title] shown in the list. We will choose the Standard Paper 7-Day Box Office Report. Press Next.
Weekly Box Of2ice Report The Paper Weekly Box Of1ice Statement is formatted to meet the requirements of every major 1ilm studio, showing your ticket categories and prices, ticket serial number, price with and without tax and total admissions. Sensible Cinema supports other formats we will discuss in the next few pages, but here we will demonstrate how to create a standard paper box of1ice report including entering 1ilm rental terms in a variety of ways.
To begin, click Weekly Box OfFice Reports:
Weekly Box Office Reports
158

Set film rental terms and enter additional credits and deductions.
1. Select Feature. In cases where there is a Second Feature or Third Feature associated with this film’s run, select the drop-down list to reveal those movie titles. This enables the printing of the same box office statement for the second feature(s). The distributor drop-down list works the same way.
2. Show Film Rental on the Box Office Report. Choose a radio button setting.
3. Set the Minimum Film Rental Percentage. Select a rounded amount or enter another amount.
4. Enter a Minimum Guarantee and House Allowance. Leave these fields blank unless your booker states otherwise.
5. The Split comes into play only if you are entering a House Allowance.
6. Use a blended per-capita method and enter that minimum amount on the Blended Per-capita Amount line.
7. Enter a Credit Amount from another engagement to deduct from film rental owed.
8. Enter the Previous Film’s Name from which the credit being applied comes.
9. Enter the deduction allowed for sharing Co-Op Advertising Expenses.
10. Enter the Second Feature Deduction for cases where a double-bill is shown, usually at drive-in theatres.
Weekly Box Office Reports
159

Weekly Box Office Reports
160
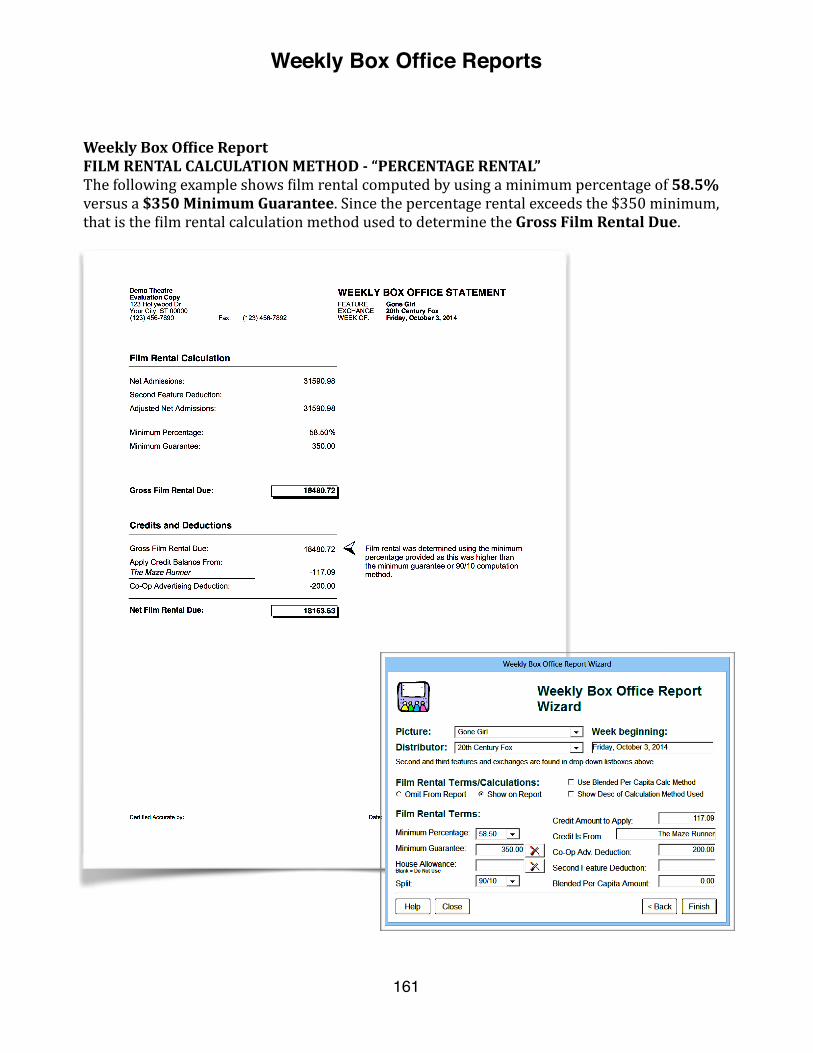
Weekly Box Of2ice Report FILM RENTAL CALCULATION METHOD -‐ “PERCENTAGE RENTAL” The following example shows 1ilm rental computed by using a minimum percentage of 58.5% versus a $350 Minimum Guarantee. Since the percentage rental exceeds the $350 minimum, that is the 1ilm rental calculation method used to determine the Gross Film Rental Due.
Weekly Box Office Reports
161

Weekly Box Of2ice Report FILM RENTAL CALCULATION METHOD -‐ “HOUSE ALLOWANCE AND 90/10” The following example shows 1ilm rental computed by using a minimum percentage of 58.5% versus a 90% Film Rental after a House Deduction of $2000. Since the percentage rental exceeds the $350 minimum, that is the 1ilm rental calculation method used to determine the Gross Film Rental Due.
Weekly Box Office Reports
162

Weekly Box Of2ice Report FILM RENTAL CALCULATION METHOD -‐ “BLENDED PER-‐CAPITA” The following example shows 1ilm rental computed by using a minimum percentage of 58.5% versus a Per-‐Capita of $9.00 per ticket. Since the blended per-‐capita calculation exceeds both the percentage rental and the $350 minimum, that is the 1ilm rental calculation method used to determine the Gross Film Rental Due. The Blended Per-‐Capita method of 1ilm rental computation is an alternate way your 1ilm rental may be decided, particularly if your theatre has an unusually low admission price policy. The distributor assigns each theatre a “per-‐capita” based on your market’s average ticket prices. In the example below, $9.00. You multiply the
per-‐capita by the total number of admissions, giving you a ‘theoretical’ gross. Then you subtract the actual admission taxes
your theatre collected in actual sales from the theoretical gross to get your adjusted gross admissions. This is subjected to the same terms as your actual gross. Whichever amount is higher is the 1ilm rental you owe.
Weekly Box Office Reports
163

Weekly Box Of2ice Report PREVIEW NIGHT -‐ 8 DAY BOX OFFICE REPORT The following example shows a Weekly Box Of1ice Report that adds a Preview Night from the day before an of1icial opening of a movie. By showing the Preview Night (in this case a special showing on a Thursday night) to the box of1ice report, it will be included in the 1irst week gross and calculation of 1ilm rental terms. If the studio wishes to have the theatre include the Preview Night showing with the next day’s gross, the studio will simply add the preview night and the opening night grosses together. Otherwise, if they want the Preview Reported separately, they have that already in this report.
1. Select the opening playdate from the calendar. This will look up all of the features that played on that day. Press Next.
2. Select the film. Select the radio button for Paper Box Office Report (8-Day/Preview Night). Press Next.
3. You might be reminded that the feature starts on a different day than you chose. Press Yes to Continue Anyway.
4. Enter your Film Rental Terms or change the radio button to “Omit From Report” and press Finish.
Weekly Box Office Reports
164
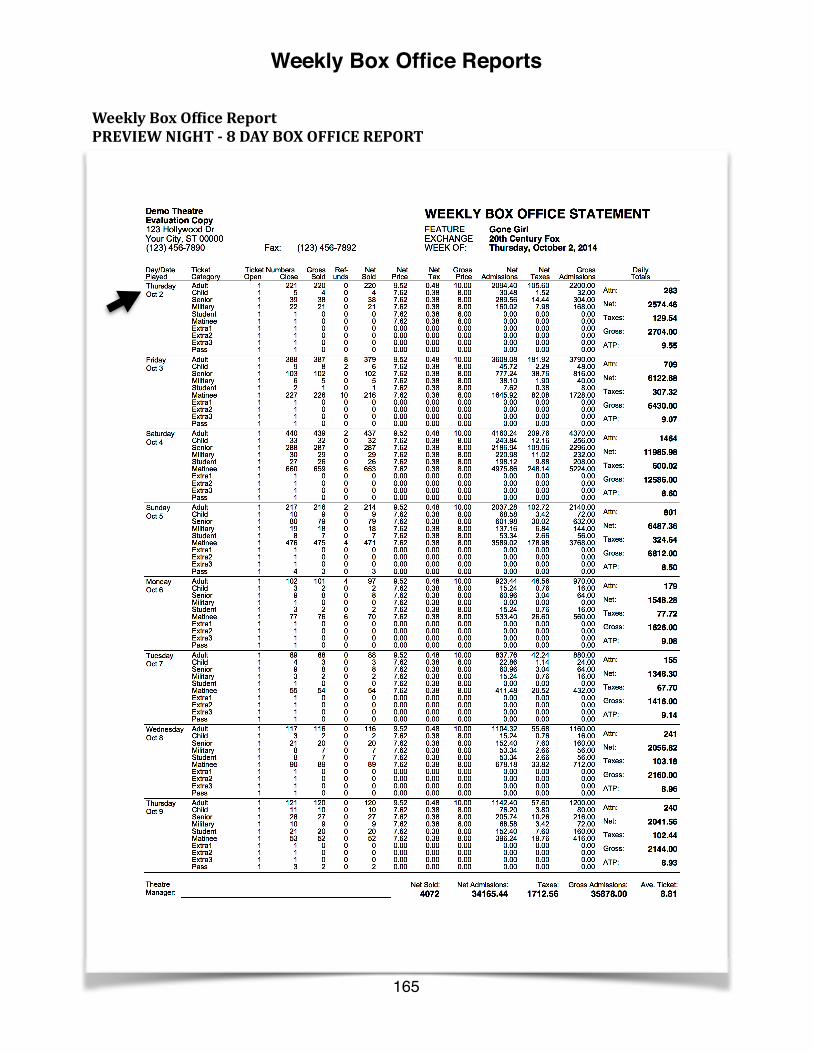
Weekly Box Of2ice Report PREVIEW NIGHT -‐ 8 DAY BOX OFFICE REPORT
Weekly Box Office Reports
165

Weekly Box Of2ice Report DISNEY/MIRAMAX E-‐BOR The following example shows how you create a Weekly Box Of1ice Report E-‐BOR 1ile for Disney and Miramax. The E-‐BOR 1ile for the week should contain data for all 1ilms from these studios combined into a single 1ile using the append capability explained below. The 1ile is sent via e-‐mail or FTP according to studio requirements.
1. Select the opening playdate from the calendar. This will look up all of the features that played on that day. Press Next.
2. Select the film. Select the radio button for E-BOR/Autobox (Disney and Miramax). Press Next.
3. Select radio button marked Create a new e-BOR file for BVD for the week beginning… and press Finish.
4. Save the file. The default path will be the C:\Sensible Database\Reports\Autobox E-BOR folder. Press Save.
Weekly Box Office Reports
166

5. View your file then close Windows Notepad. If this is the only film from Buena Vista Pictures you played this week, you are finished and you are ready to send the file to the distributor either by email or via FTP. This specially formatted e-BOR file is imported into the Buena Vista Pictures accounting system. In this example below we will be appending this file with another box office report for another Buena Vista Pictures Distribution film we played this week. Resume below at number 6 to append another film.
6. Select the opening playdate from the calendar. This will look up all of the features that played on that day. Press Next.
7. Select the next film. Leave the radio button on E-BOR/Autobox (Disney and Miramax). Press Next.
Weekly Box Office Reports
167

8. Select the radio button Open and append existing e-BOR file… Press Finish.
9. Locate and select the file created for the first eBOR you created then Press Save.
10. View your file. Note how box office reports for the films have been combined. Close Windows Notepad. If this is the last film from Buena Vista Pictures or Miramax you played this week, you are finished and you are ready to send the file to the distributor either by email or via FTP.
Weekly Box Office Reports
168

Weekly Box Of2ice Report ROYALTY/PER-‐CAPITA REPORT This box of1ice report is commonly used to compute a royalty to be paid to Real-‐D® for 3D 1ilm payments but can also be used to produce a per-‐capita based Weekly Box Of1ice Report for a studio. It simply creates a report like all the others but with a settlement page showing your total attendance multiplied by the agreed upon royalty payment or per-‐capita 1ilm rental amount.
1. Select the opening playdate from the calendar. This will look up all of the features that played on that day. Press Next.
2. Select the film you want to compute royalties for. Select the radio button for Royalty/Per Capita Report. Press Next.
3. Enter the terms for the royalty payment. Usually this will be a minimum per-capita royalty, a standard flat percentage and a maximum per-capita. Press Finish.
4. A standard Weekly Box Office Report is printed with this footer explaining the royalty breakdown on the film rental reconciliation page.
The total gross for the film (less taxes) is multiplied by the royalty percentage. The total attendance is multiplied by the minimum per ticket royalty. The larger number is the royalty, not to exceed the maximum per ticket royalty.
Weekly Box Office Reports
169

Weekly Box Office Reports
170

Chapter 14
Weekly Summary
171

Weekly Summary Report The Weekly Summary Report brings data from all of your Daily Sales Summary Reports into a concise, columned report totaling sales from a seven-‐day period. The two-‐step wizard is all it takes to create the report, formatted for two landscape oriented pages. This report is probably the most useful report to provide to your accountant so she does not have to wade through all of your individual daily reports. It can be saved as an Adobe .PDF 1ile or Microsoft Excel .XLS Spreadsheet.
1. Select the Sales Summary Reports Button from the Main Menu.
2. Select the Weekly Sales Summary Radio Button from the dialog box.
3. Confirm the reporting period is correct and press Finish.
4. After printing your report (see page 173), close the report and save to a .PDF file or .XLS Spreadsheet file if desired.
Weekly Summary
172
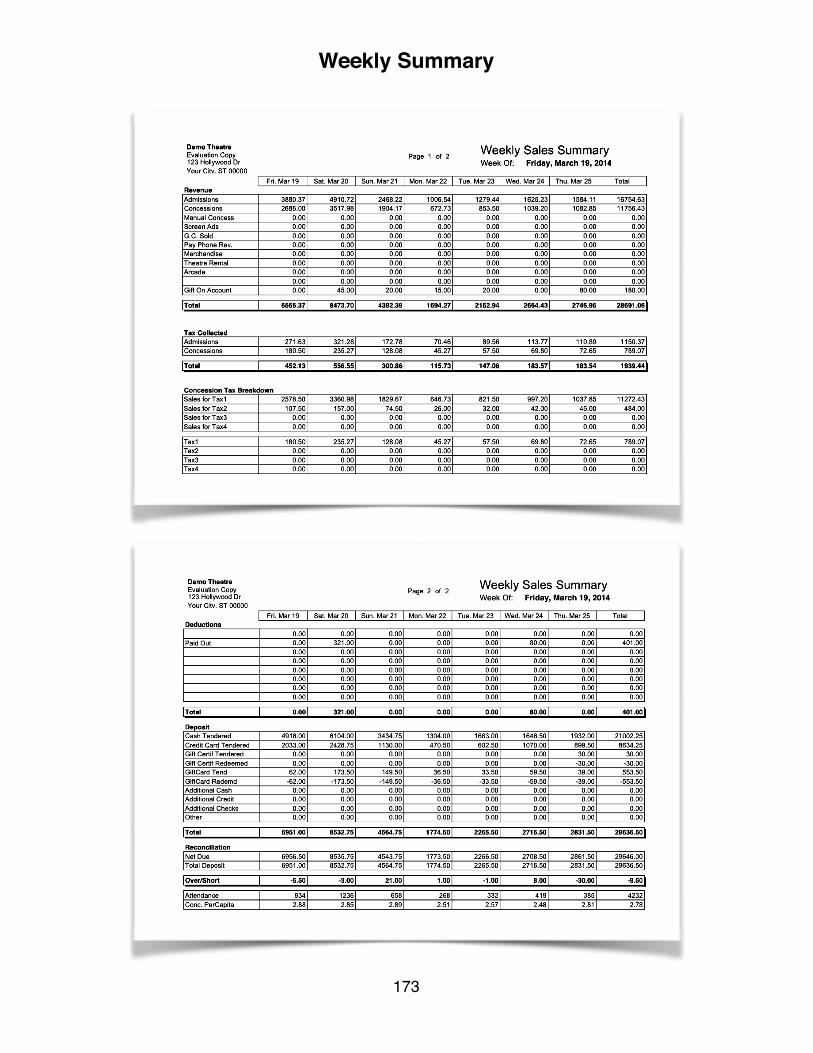
Weekly Summary
173

Weekly Summary
174

Chapter 15
Weekly Concession Report
175
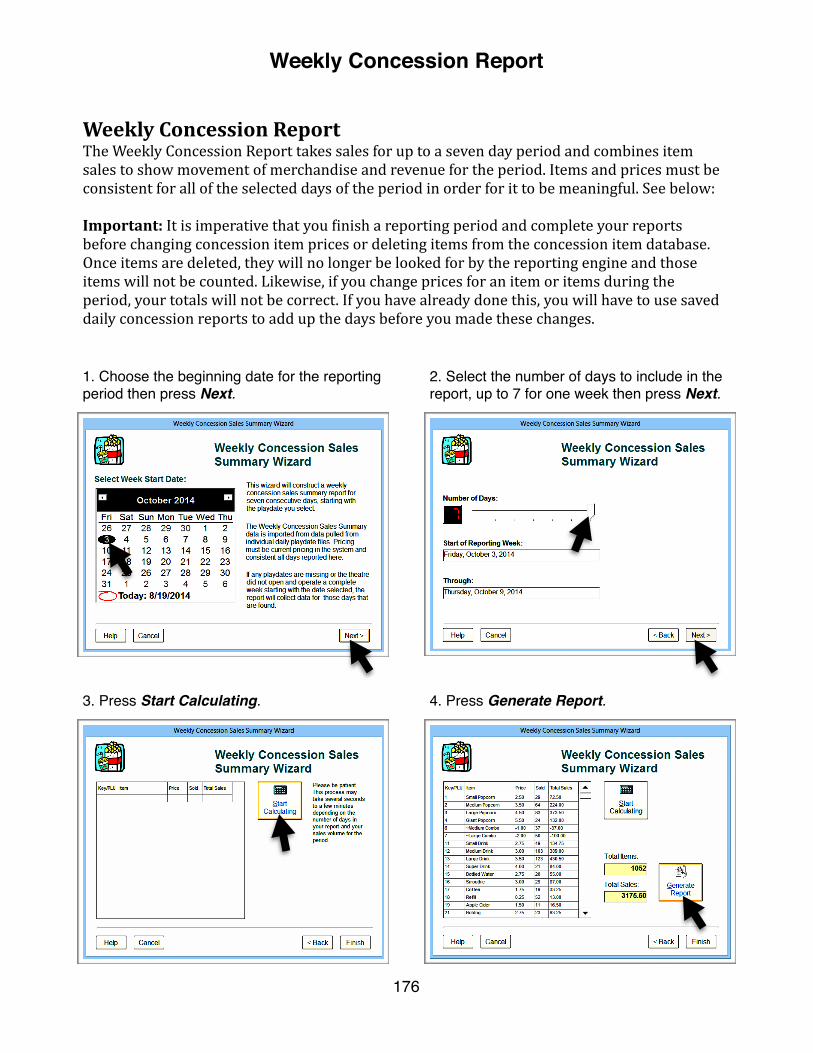
Weekly Concession Report The Weekly Concession Report takes sales for up to a seven day period and combines item sales to show movement of merchandise and revenue for the period. Items and prices must be consistent for all of the selected days of the period in order for it to be meaningful. See below:
Important: It is imperative that you 1inish a reporting period and complete your reports before changing concession item prices or deleting items from the concession item database. Once items are deleted, they will no longer be looked for by the reporting engine and those items will not be counted. Likewise, if you change prices for an item or items during the period, your totals will not be correct. If you have already done this, you will have to use saved daily concession reports to add up the days before you made these changes.
1. Choose the beginning date for the reporting period then press Next.
2. Select the number of days to include in the report, up to 7 for one week then press Next.
3. Press Start Calculating. 4. Press Generate Report.
Weekly Concession Report
176

Weekly Concession Report
177

Weekly Concession Report
178

Chapter 16
Historic Summary Report
179

Historic Summary Report The Historic Summary Report takes sales data stored in individual Daily Sales Summary Reports and lets you build your own sales summary report for either a date range or a month, quarter or year. It will notify you if there are any missing playdates and create a list. The report created is portrait oriented and is a summary of all of the sales for the period, including revenue and deduction items numbered 1-‐8. This is because totals for these 1ields are based on the numbered position, not the category name since the name or position may have changed at some time during the period.
1. Select the Historical Sales Summary (Month/Quarter/Year) and press the OK Button.
2. Select the Reporting Period from the automated choices under Date Shortcuts or manually enter a date, then press Next.
Historic Summary Report
180
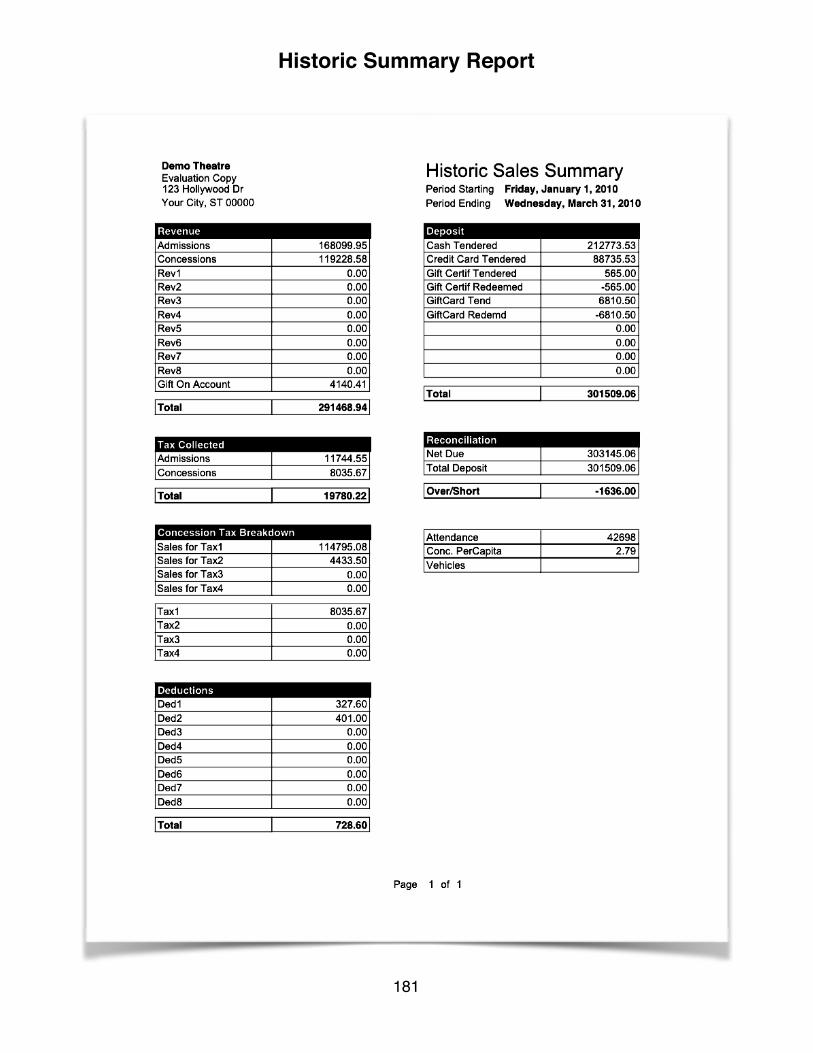
Historic Summary Report
181

Historic Summary Report
182

Chapter 17
Concession Inventory
183
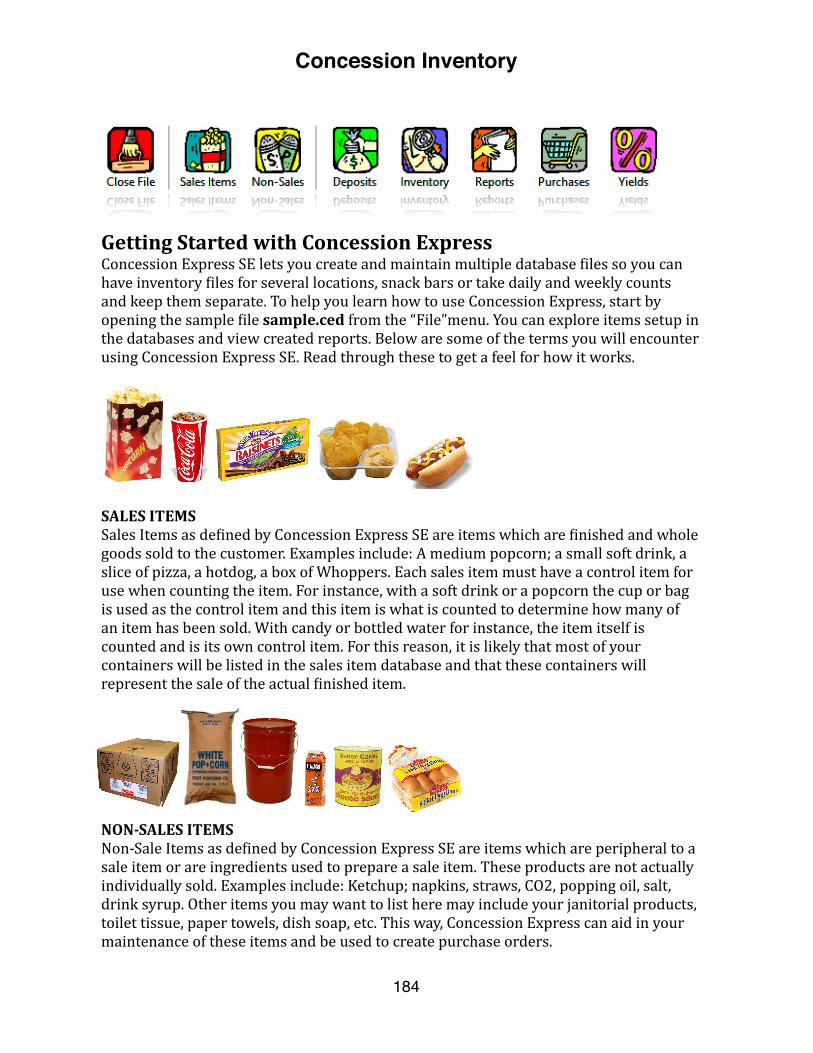
Getting Started with Concession Express Concession Express SE lets you create and maintain multiple database 1iles so you can have inventory 1iles for several locations, snack bars or take daily and weekly counts and keep them separate. To help you learn how to use Concession Express, start by opening the sample 1ile sample.ced from the “File”menu. You can explore items setup in the databases and view created reports. Below are some of the terms you will encounter using Concession Express SE. Read through these to get a feel for how it works.
SALES ITEMS Sales Items as de1ined by Concession Express SE are items which are 1inished and whole goods sold to the customer. Examples include: A medium popcorn; a small soft drink, a slice of pizza, a hotdog, a box of Whoppers. Each sales item must have a control item for use when counting the item. For instance, with a soft drink or a popcorn the cup or bag is used as the control item and this item is what is counted to determine how many of an item has been sold. With candy or bottled water for instance, the item itself is counted and is its own control item. For this reason, it is likely that most of your containers will be listed in the sales item database and that these containers will represent the sale of the actual 1inished item.
NON-‐SALES ITEMS Non-‐Sale Items as de1ined by Concession Express SE are items which are peripheral to a sale item or are ingredients used to prepare a sale item. These products are not actually individually sold. Examples include: Ketchup; napkins, straws, CO2, popping oil, salt, drink syrup. Other items you may want to list here may include your janitorial products, toilet tissue, paper towels, dish soap, etc. This way, Concession Express can aid in your maintenance of these items and be used to create purchase orders. Concession In
Concession Inventory
184

YIELDS DEFINED Yields as de1ined by Concession Express SE are values which represent the average number of servings you are getting from 1inite quantity of an ingredient (for example a gallon of post mix drink syrup). Each item that you sell is assigned a yield multiplier based on the smallest serving of the item. Assume you have three drink sizes, 16 oz., 24 oz. and 32 oz. If the smallest size (16 oz.) is considered to be one (1) serving then the 24 oz. drink would be 1.31 servings and the 32 oz. size would be 2.0 servings. Next, we determine the total servings sold during the period. If we sold 100 small, 100 medium and 100 large drinks, our total servings sold would equal 431 servings. This is how we mea-‐ sure apples vs. apples. Finally, we look at each ingredient and divide the number of servings sold by the amount of the ingredient used. If we used four gallons of drink syrup to sell 431 servings then our yield would be 108, or 108 servings per gallon. Concession express automatically determines the number of servings sold for an item’s category (see below about categories) by using the yield multi-‐ plier you set up in the sales item database to determine the yield units sold for each size.
ITEM CATEGORIES DEFINED As de1ined by Concession Express SE item categories are individual groups of items that are related. Members of these categories may be sales items and non-‐sale items. In fact, in order to compute yields, both the sales item and its ingredients must be listed within the same category. For a movie theatre, categories may include: soft drinks, popcorn, candy, beer and wine, etc. During the yields computation process, the number of servings (see Yields above) sold is divided by the amount of ingredients used to create the item.
CONTROL ITEM As de1ined by Concession Express SE, a control item is the container or item that is used in your concession count to determine how many units of a sales item have been sold. For example, a medium popcorn bag would be the control item to determine how many medium popcorns were sold. This makes much more sense than counting the corn, salt, butter to get an accurate number of units sold. In the case of a box of candy or a bottled drink, the control item would be the item itself. Items such as nachos, hotdogs, pretzels etc. must have a control item as well. This could be a nacho tray, a hotdog frank or the pretzel itself, respectively.
÷
Concession Inventory
185

Database Setup Open or create a new Sensible Cinema Concession Express data 1ile or open the sample.ced 1ile which shipped with the software.
STORAGE LOCATIONS Enter the names of the storage locations where your concession stock is stored. These headings will appear on your printed inventory count sheets.
STORAGE LOCATIONS Enter the names of the storage locations where your concession stock is stored. These headings will appear on your printed inventory count sheets.
ITEM CATEGORIES For each category of items you sell, enter the name in this database. If the category is one for which yields will be computed on ingredients, check the “compute yields” checkbox. In the example below, the category soft drinks is a category for which yields will be computed. Soft drink sales items are compared to the ingredient syrup total gallonage, a non-‐sale item. You will also note that another category called “Soft Drink Flavors” is shown in the example. Under the “Soft Drink” category, syrup is considered and counted as total gallonage so that your yield shows the number of servings sold per gallon— under “Soft Drink Flavors” each individual 1lavor is separate for determining which 1lavors to order and include on purchase orders. If you’re lost after reading the above, follow this: When computing yields for soft drinks, put each 1lavor of syrup in the 1lavors category and create a single inventory non-‐sales item called “Total Syrup Gallonage.” After you have counted the number of gallons for each syrup 1lavor, total up the total gallons and enter this number on the inventory as total syrup gallonage. Be sure no value is entered under unit cost for total syrup gallonage because the inventory value is already getting the unit cost from where you have entered the number of gallons for individual 1lavors. This way, the yields are accurate and you can clearly see which 1lavors need to be replenished.
Concession Inventory
186
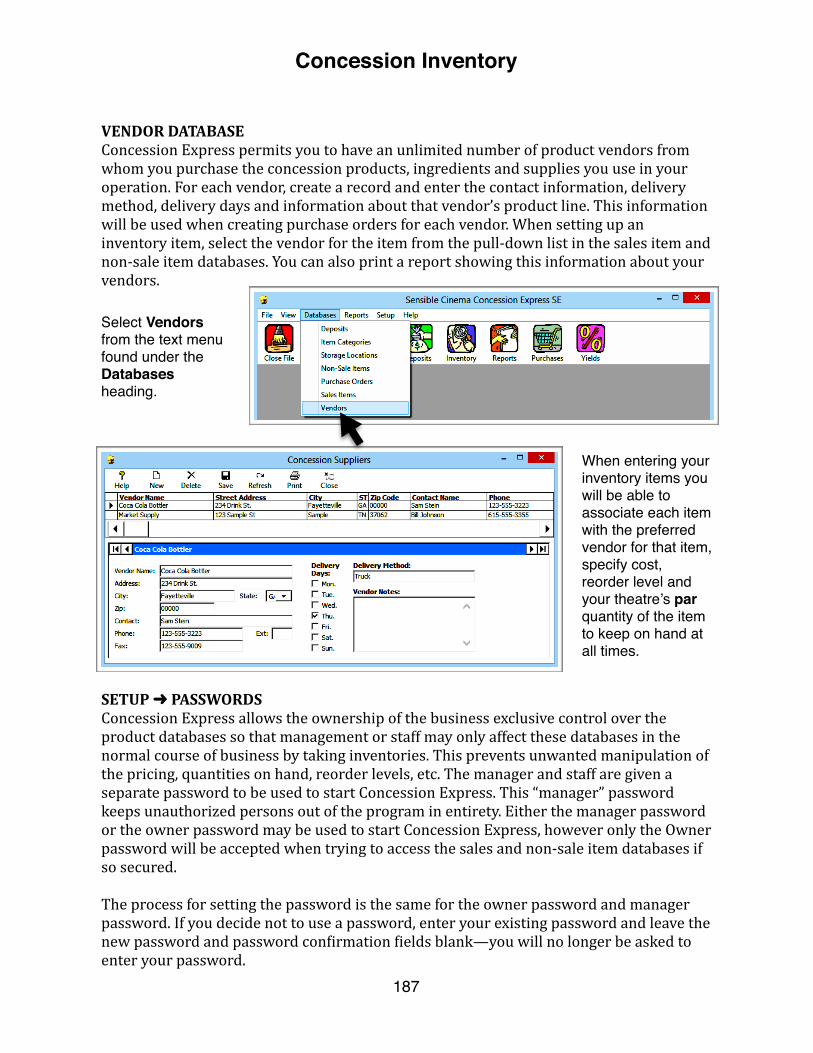
VENDOR DATABASE Concession Express permits you to have an unlimited number of product vendors from whom you purchase the concession products, ingredients and supplies you use in your operation. For each vendor, create a record and enter the contact information, delivery method, delivery days and information about that vendor’s product line. This information will be used when creating purchase orders for each vendor. When setting up an inventory item, select the vendor for the item from the pull-‐down list in the sales item and non-‐sale item databases. You can also print a report showing this information about your vendors.
SETUP ➜ PASSWORDS Concession Express allows the ownership of the business exclusive control over the product databases so that management or staff may only affect these databases in the normal course of business by taking inventories. This prevents unwanted manipulation of the pricing, quantities on hand, reorder levels, etc. The manager and staff are given a separate password to be used to start Concession Express. This “manager” password keeps unauthorized persons out of the program in entirety. Either the manager password or the owner password may be used to start Concession Express, however only the Owner password will be accepted when trying to access the sales and non-‐sale item databases if so secured.
The process for setting the password is the same for the owner password and manager password. If you decide not to use a password, enter your existing password and leave the new password and password con1irmation 1ields blank—you will no longer be asked to enter your password.
Select Vendors from the text menu found under the Databases heading.
When entering your inventory items you will be able to associate each item with the preferred vendor for that item, specify cost, reorder level and your theatre’s par quantity of the item to keep on hand at all times.
Concession Inventory
187

Once you see the password change successful dialog you must begin using any new password you have set up. Select “Passwords” from the Setup Menu and press “Change Password.”
The Owner Password is used to secure areas like master product databases where the product prices, cost amounts and inventory levels cannot be changed even by management.
The Manager Password is used to secure other areas. The Owner Password supersedes the Manager password.
If you currently have a password enter it now, otherwise you will be asked to enter your new password.
Once you have entered the new password, press the OK button to the right of the new password field.
Last, you will be required to confirm the entry of the new password since its entry is masked. This prevents errors made if the password is entered incorrectly.
From this point forward, a password will be required to access the program or specific secured areas.
Concession Inventory
188
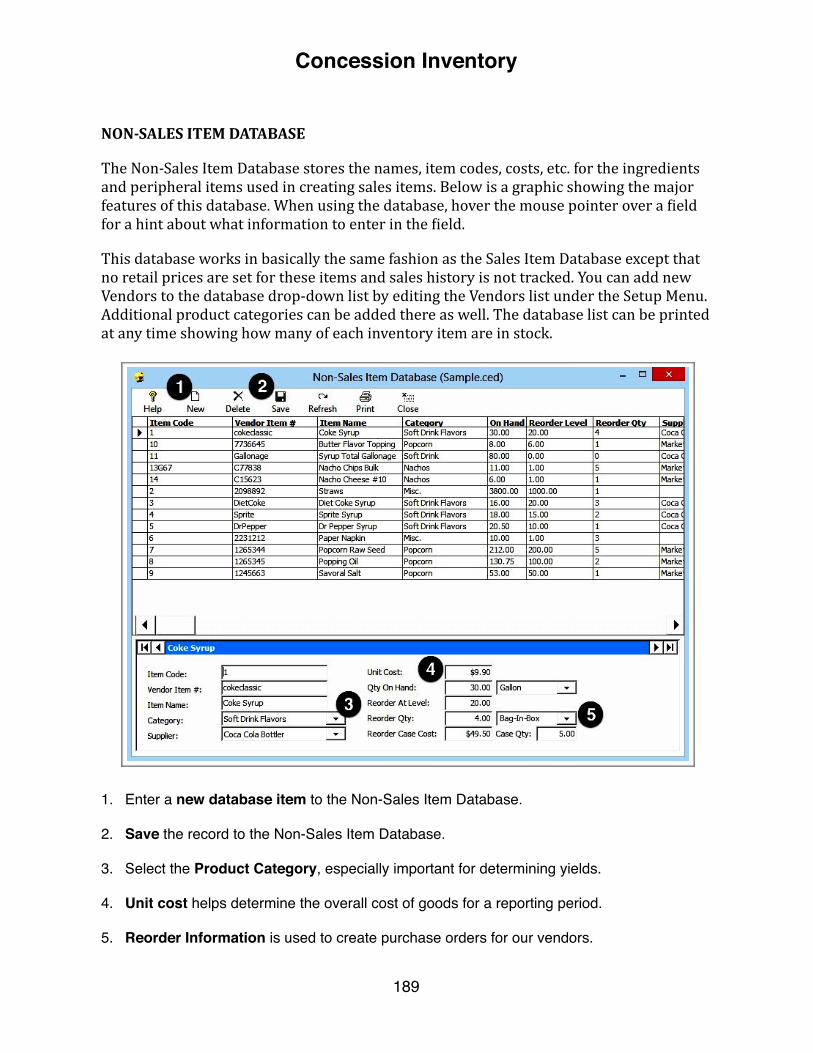
NON-‐SALES ITEM DATABASE
The Non-‐Sales Item Database stores the names, item codes, costs, etc. for the ingredients and peripheral items used in creating sales items. Below is a graphic showing the major features of this database. When using the database, hover the mouse pointer over a 1ield for a hint about what information to enter in the 1ield.
This database works in basically the same fashion as the Sales Item Database except that no retail prices are set for these items and sales history is not tracked. You can add new Vendors to the database drop-‐down list by editing the Vendors list under the Setup Menu. Additional product categories can be added there as well. The database list can be printed at any time showing how many of each inventory item are in stock.
1. Enter a new database item to the Non-Sales Item Database.
2. Save the record to the Non-Sales Item Database.
3. Select the Product Category, especially important for determining yields.
4. Unit cost helps determine the overall cost of goods for a reporting period.
5. Reorder Information is used to create purchase orders for our vendors.
Concession Inventory
189

SALES ITEM DATABASE
The sales item database stores the names, item codes, prices, costs, etc. for the 1inished items you sell. Below is a graphic showing the major features of this database. When using this database, hover the mouse pointer over a 1ield if you need a hint about what information to enter.
This database allows you to track sales histories for all of your sales items by month and year to date. It is editable in case you make a mistake and have to modify it.
To expand the grid for a larger view, maximize the window to increase the number of records displayed on the grid.
1. Enter a new database item to the Sales Item Database.
2. Save the record to the Sales Item Database.
3. Import sales items from Sensible Cinema Box Office for Windows to create a new table.
4. Select the Product Category, especially important for determining yields.
Concession Inventory
190

5. Enter your retail price.
6. Quantity on Hand and Reorder Levels help determine when new product should be ordered.
7. Reorder Quantity and Pack Type.
8. Yield Multiplier for this size of the item. For example, if a 16 oz. drink is a 1.00 multiplier for 1 unit, a 32 oz. drink would be 2.00 and a 48 oz. would be a 3.00.
9. Edit the history number of items sold and cash for the period.
UPDATING THE DATABASE The databases will rarely need to be edited manually. The inventory process entails adding new stock to the database as well as accounting for damages and entering the 1inal count for a period. At the end of the ‘take inventory’ process, the 1inalization of the report will transfer the closing stock numbers over to the databases.
WHY COUNT YOUR NON-‐SALES ITEM STOCK? The inventory of non-‐sale items is supposed to help you control your ingredient stock so that you know when inordinately high quantities of product are being used (or disappearing) from your place of business and so you can order appropriate amounts of new stock when needed. The calculation of yields will vary from place to place, but once you put in place portion control standards, you should establish a baseline from which any variance will be noticeable and something you can investigate and correct. At 1irst these numbers may not mean much, but once you have been using the methodology for a while, you will notice patterns emerge. For example, by using a yield multiplier based on a percentage of the smallest size drink you sell, with that smallest size measured as one serving we can 1igure out exactly how many servings we can get from a 1ive gallon bag-‐in-‐box of soda syrup.
TIME FOR INVENTORY A sales period can be a day, a week, a fortnight, a month, or anything in between as long as you know your starting count. Once you have an accurate physical count, use the program to crunch the numbers. The 1irst time you do inventory will be simply to get the numbers input into the database. For measuring yields, you must take both a sales item and a non-‐sales item inventory for the same period.
Concession Express can create a count sheet for your use when counting your stock. You can sort this information in the same order as the numbers are entered into the inventory wizard. Select Reports from the menu and select Count Sheet from the dropdown list.
Concession Inventory
191
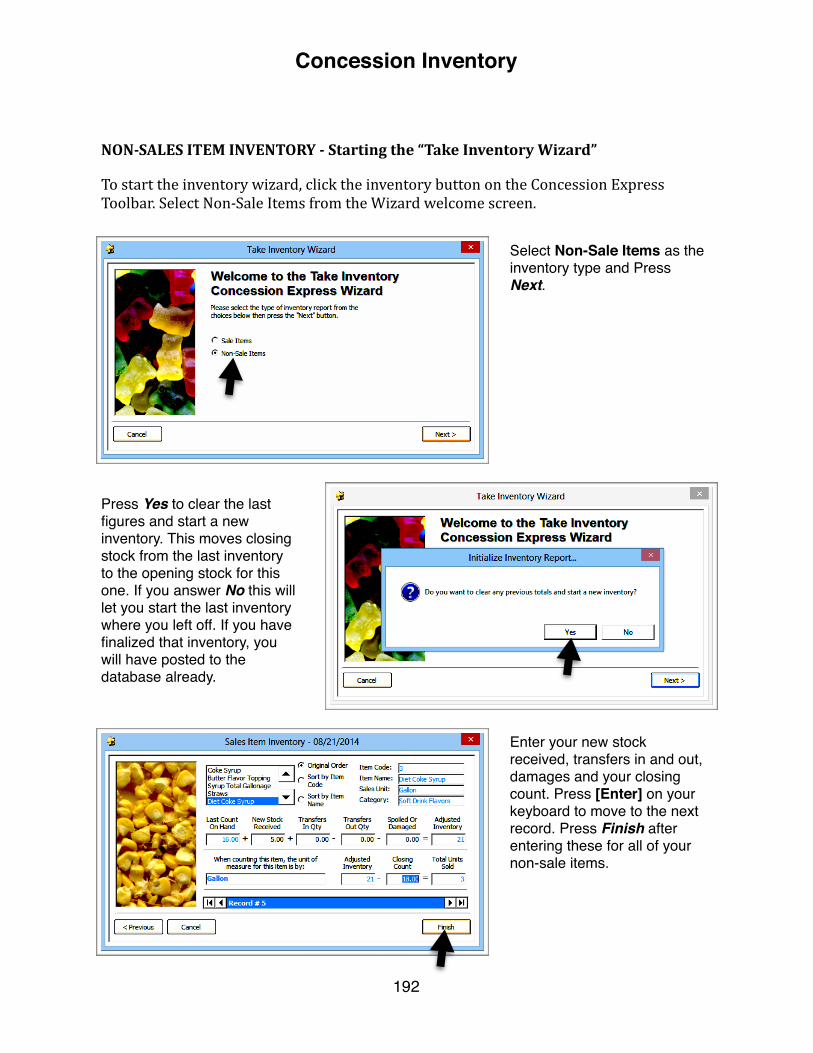
Select Non-Sale Items as the inventory type and Press Next.
Press Yes to clear the last figures and start a new inventory. This moves closing stock from the last inventory to the opening stock for this one. If you answer No this will let you start the last inventory where you left off. If you have finalized that inventory, you will have posted to the database already.
Enter your new stock received, transfers in and out, damages and your closing count. Press [Enter] on your keyboard to move to the next record. Press Finish after entering these for all of your non-sale items.
NON-‐SALES ITEM INVENTORY -‐ Starting the “Take Inventory Wizard”
To start the inventory wizard, click the inventory button on the Concession Express Toolbar. Select Non-‐Sale Items from the Wizard welcome screen.
Concession Inventory
192

Your cost of goods is computed and shown.
Press Print to create the report.
You can select the sort order of the printed report: original sort order (how you originally entered items), by your item code or alphabetically.
Concession Inventory
193
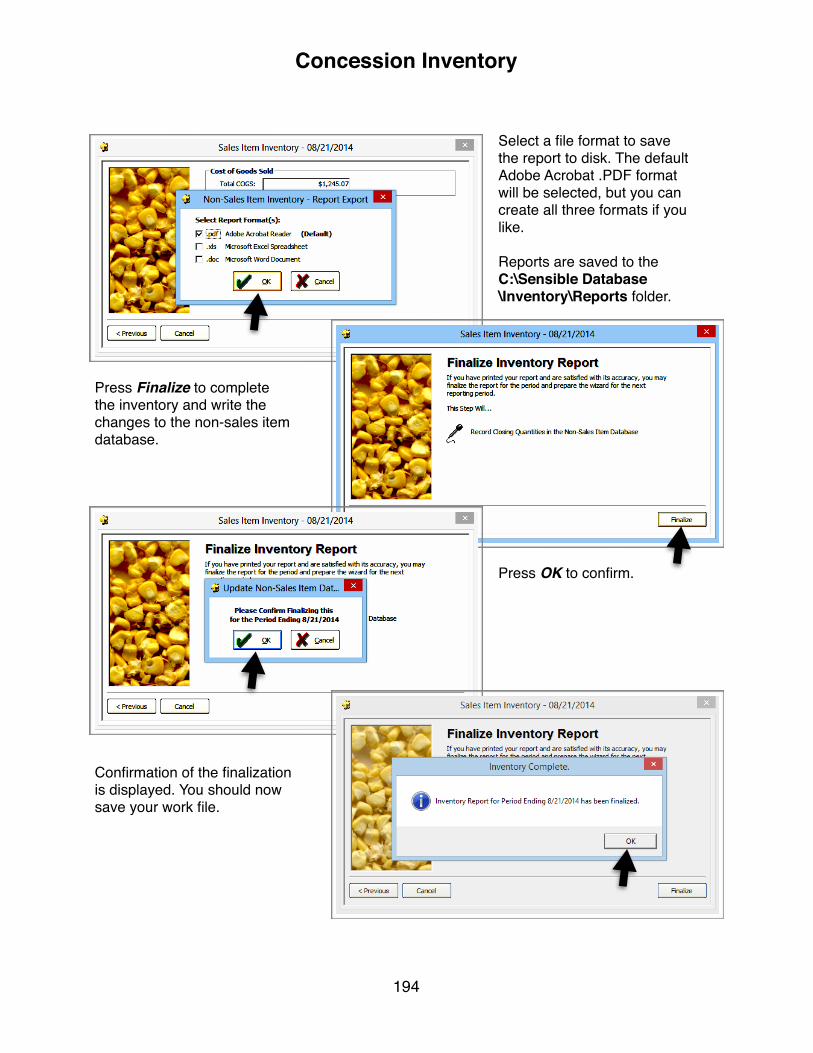
Select a file format to save the report to disk. The default Adobe Acrobat .PDF format will be selected, but you can create all three formats if you like.
Reports are saved to the C:\Sensible Database\Inventory\Reports folder.
Press Finalize to complete the inventory and write the changes to the non-sales item database.
Press OK to confirm.
Confirmation of the finalization is displayed. You should now save your work file.
Concession Inventory
194
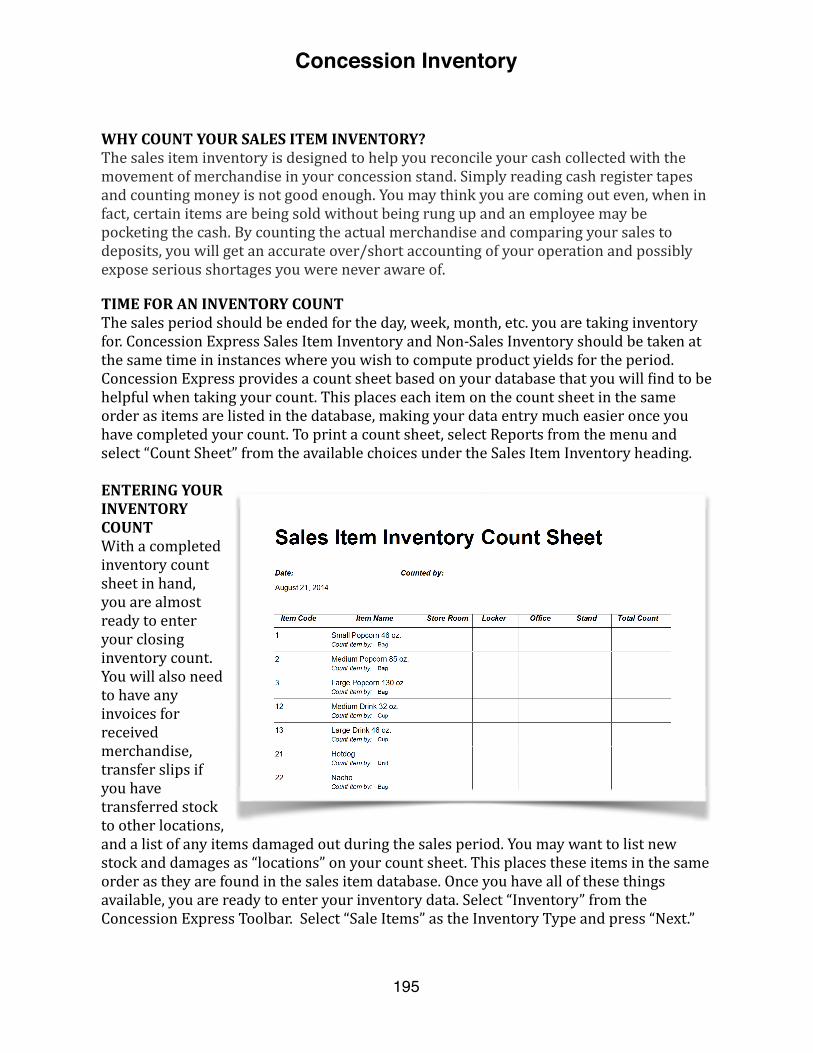
WHY COUNT YOUR SALES ITEM INVENTORY? The sales item inventory is designed to help you reconcile your cash collected with the movement of merchandise in your concession stand. Simply reading cash register tapes and counting money is not good enough. You may think you are coming out even, when in fact, certain items are being sold without being rung up and an employee may be pocketing the cash. By counting the actual merchandise and comparing your sales to deposits, you will get an accurate over/short accounting of your operation and possibly expose serious shortages you were never aware of.
TIME FOR AN INVENTORY COUNT The sales period should be ended for the day, week, month, etc. you are taking inventory for. Concession Express Sales Item Inventory and Non-‐Sales Inventory should be taken at the same time in instances where you wish to compute product yields for the period. Concession Express provides a count sheet based on your database that you will 1ind to be helpful when taking your count. This places each item on the count sheet in the same order as items are listed in the database, making your data entry much easier once you have completed your count. To print a count sheet, select Reports from the menu and select “Count Sheet” from the available choices under the Sales Item Inventory heading.
ENTERING YOUR INVENTORY COUNT With a completed inventory count sheet in hand, you are almost ready to enter your closing inventory count. You will also need to have any invoices for received merchandise, transfer slips if you have transferred stock to other locations, and a list of any items damaged out during the sales period. You may want to list new stock and damages as “locations” on your count sheet. This places these items in the same order as they are found in the sales item database. Once you have all of these things available, you are ready to enter your inventory data. Select “Inventory” from the Concession Express Toolbar. Select “Sale Items” as the Inventory Type and press “Next.”
Concession Inventory
195
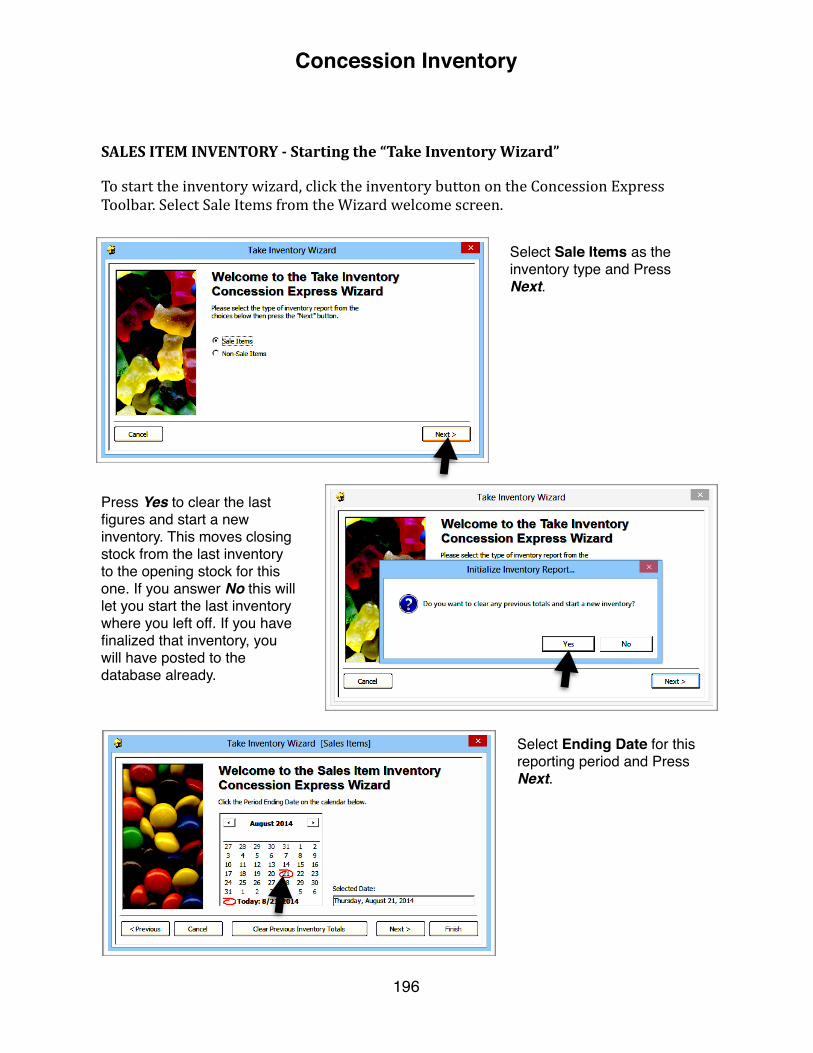
Select Sale Items as the inventory type and Press Next.
SALES ITEM INVENTORY -‐ Starting the “Take Inventory Wizard”
To start the inventory wizard, click the inventory button on the Concession Express Toolbar. Select Sale Items from the Wizard welcome screen.
Press Yes to clear the last figures and start a new inventory. This moves closing stock from the last inventory to the opening stock for this one. If you answer No this will let you start the last inventory where you left off. If you have finalized that inventory, you will have posted to the database already.
Select Ending Date for this reporting period and Press Next.
Concession Inventory
196

Enter your new stock received, transfers in and out, damages and your closing count. Press [Enter] on your keyboard to move to the next record. Press Finish after entering these for all of your sale items.
Enter the total cash for the period and press Calculate Over/Short.
Enter your total attendance for the period and press Calculate Per-Capita.
Choose how to sort the data for your report.
Press OK to print the report.
Concession Inventory
197
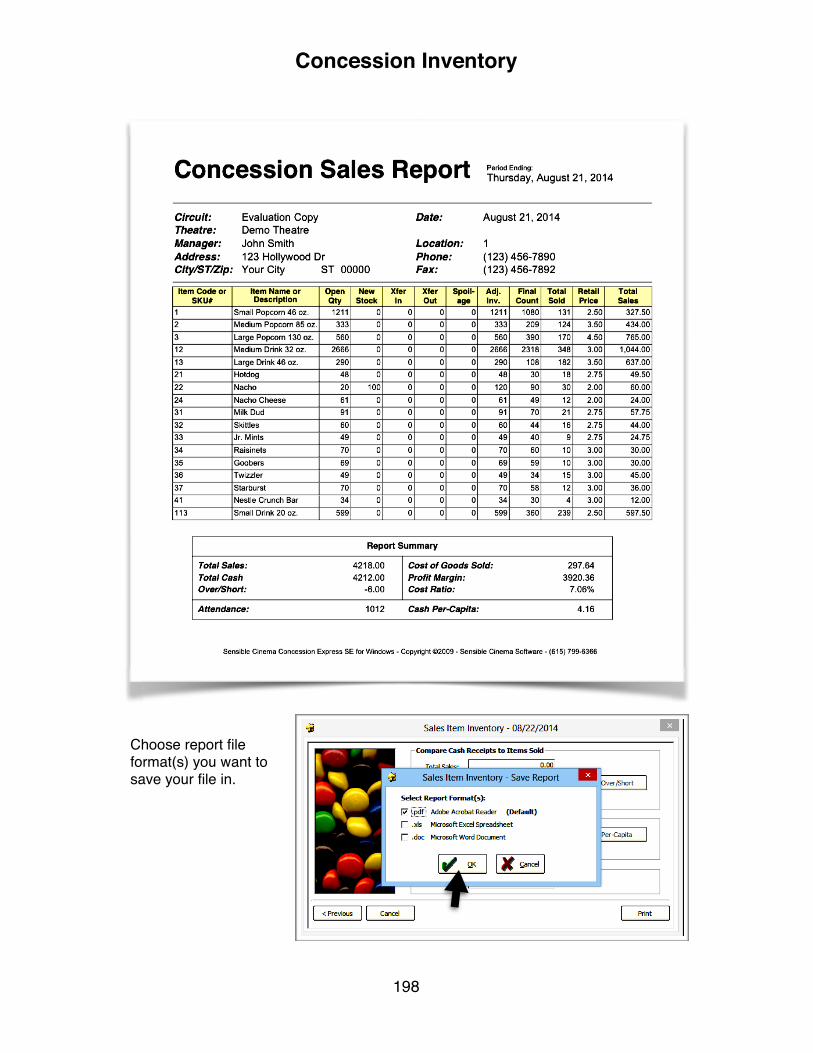
Choose report file format(s) you want to save your file in.
Concession Inventory
198

Finalizing the report sends the closing numbers to the database, records your deposit and updates the product history for each item. Press Finalize.
Press OK to confirm.
Press OK to complete.
Concession Inventory
199
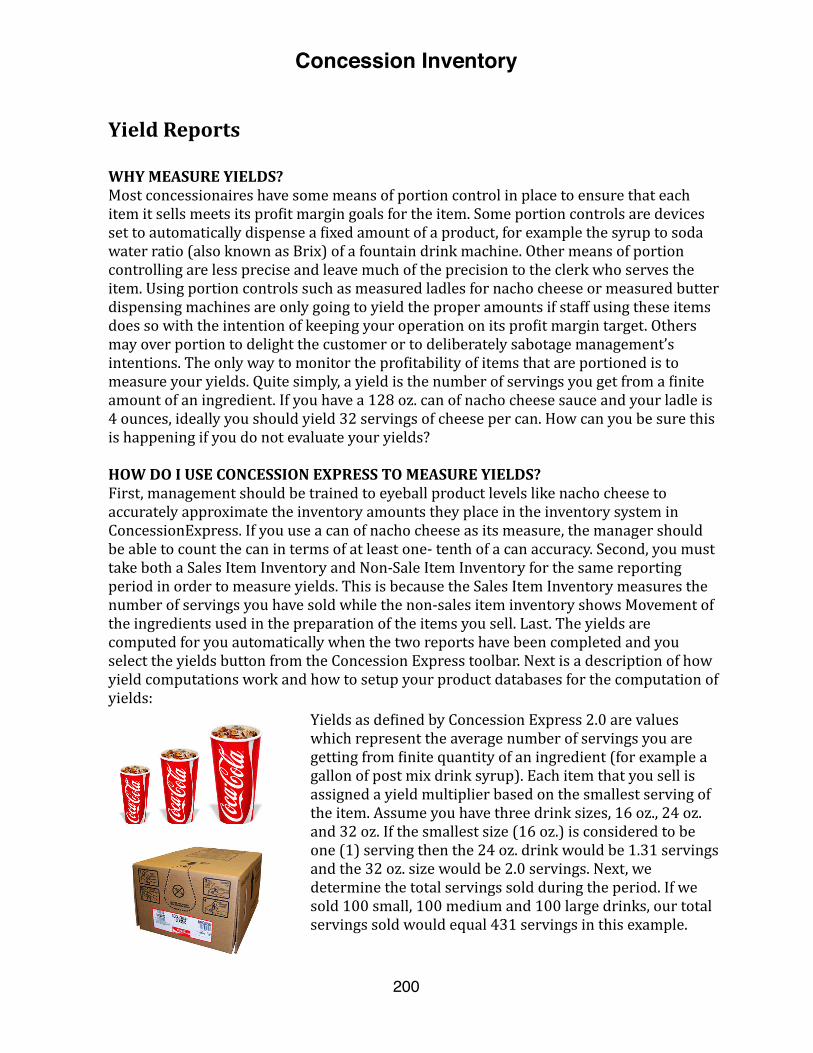
Yield Reports
WHY MEASURE YIELDS? Most concessionaires have some means of portion control in place to ensure that each item it sells meets its pro1it margin goals for the item. Some portion controls are devices set to automatically dispense a 1ixed amount of a product, for example the syrup to soda water ratio (also known as Brix) of a fountain drink machine. Other means of portion controlling are less precise and leave much of the precision to the clerk who serves the item. Using portion controls such as measured ladles for nacho cheese or measured butter dispensing machines are only going to yield the proper amounts if staff using these items does so with the intention of keeping your operation on its pro1it margin target. Others may over portion to delight the customer or to deliberately sabotage management’s intentions. The only way to monitor the pro1itability of items that are portioned is to measure your yields. Quite simply, a yield is the number of servings you get from a 1inite amount of an ingredient. If you have a 128 oz. can of nacho cheese sauce and your ladle is 4 ounces, ideally you should yield 32 servings of cheese per can. How can you be sure this is happening if you do not evaluate your yields?
HOW DO I USE CONCESSION EXPRESS TO MEASURE YIELDS? First, management should be trained to eyeball product levels like nacho cheese to accurately approximate the inventory amounts they place in the inventory system in ConcessionExpress. If you use a can of nacho cheese as its measure, the manager should be able to count the can in terms of at least one-‐ tenth of a can accuracy. Second, you must take both a Sales Item Inventory and Non-‐Sale Item Inventory for the same reporting period in order to measure yields. This is because the Sales Item Inventory measures the number of servings you have sold while the non-‐sales item inventory shows Movement of the ingredients used in the preparation of the items you sell. Last. The yields are computed for you automatically when the two reports have been completed and you select the yields button from the Concession Express toolbar. Next is a description of how yield computations work and how to setup your product databases for the computation of yields:
Yields as de1ined by Concession Express 2.0 are values which represent the average number of servings you are getting from 1inite quantity of an ingredient (for example a gallon of post mix drink syrup). Each item that you sell is assigned a yield multiplier based on the smallest serving of the item. Assume you have three drink sizes, 16 oz., 24 oz. and 32 oz. If the smallest size (16 oz.) is considered to be one (1) serving then the 24 oz. drink would be 1.31 servings and the 32 oz. size would be 2.0 servings. Next, we determine the total servings sold during the period. If we sold 100 small, 100 medium and 100 large drinks, our total servings sold would equal 431 servings in this example.
Concession Inventory
200
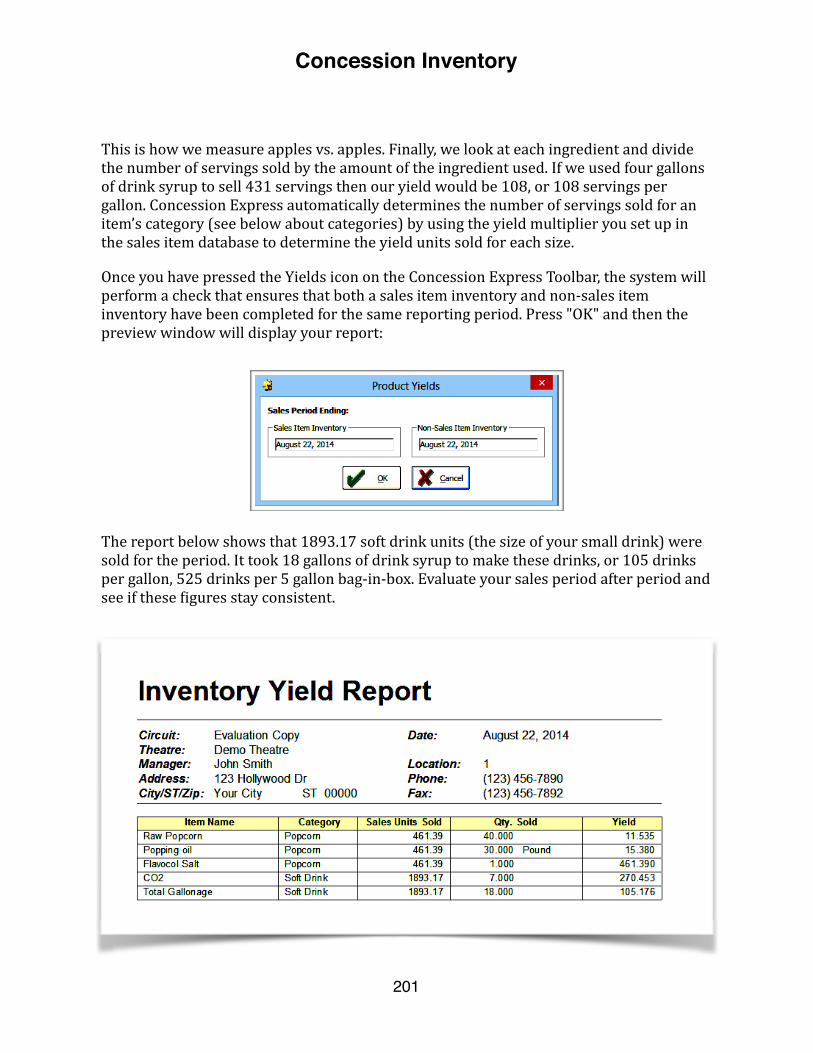
This is how we measure apples vs. apples. Finally, we look at each ingredient and divide the number of servings sold by the amount of the ingredient used. If we used four gallons of drink syrup to sell 431 servings then our yield would be 108, or 108 servings per gallon. Concession Express automatically determines the number of servings sold for an item’s category (see below about categories) by using the yield multiplier you set up in the sales item database to determine the yield units sold for each size.
Once you have pressed the Yields icon on the Concession Express Toolbar, the system will perform a check that ensures that both a sales item inventory and non-‐sales item inventory have been completed for the same reporting period. Press "OK" and then the preview window will display your report:
The report below shows that 1893.17 soft drink units (the size of your small drink) were sold for the period. It took 18 gallons of drink syrup to make these drinks, or 105 drinks per gallon, 525 drinks per 5 gallon bag-‐in-‐box. Evaluate your sales period after period and see if these 1igures stay consistent.
Concession Inventory
201

Concession Inventory
202

Chapter 18
Internet Ticketing
203
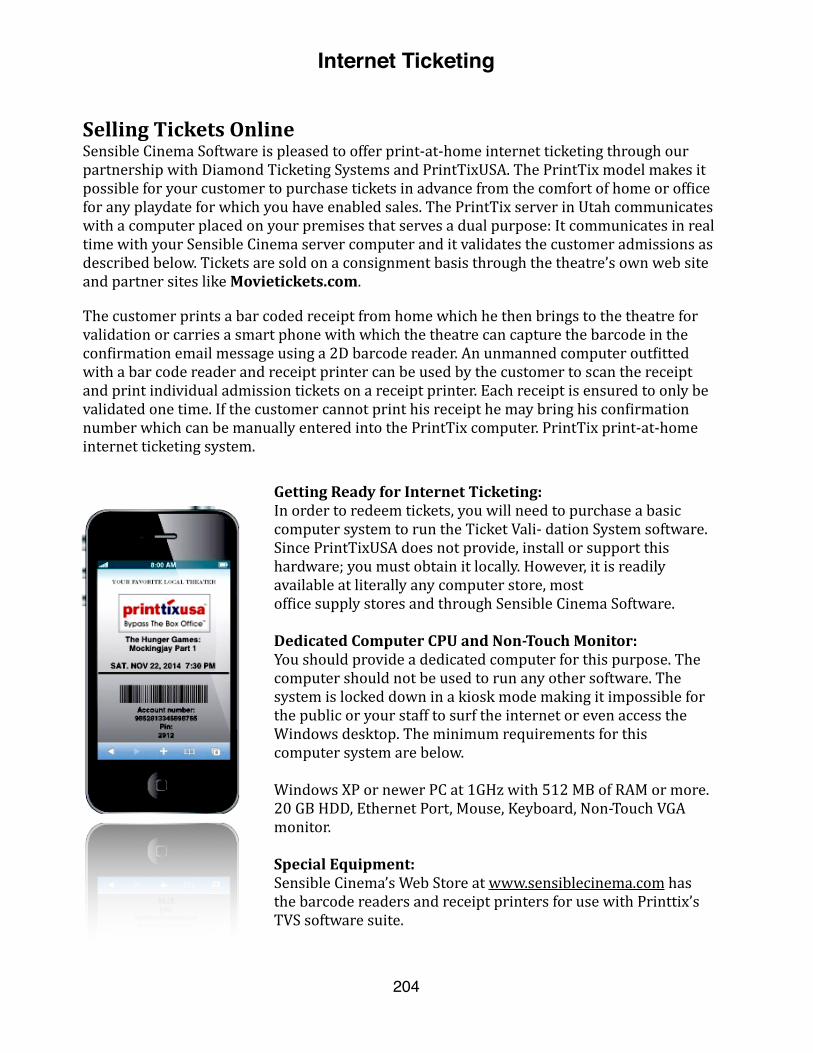
Selling Tickets Online Sensible Cinema Software is pleased to offer print-‐at-‐home internet ticketing through our partnership with Diamond Ticketing Systems and PrintTixUSA. The PrintTix model makes it possible for your customer to purchase tickets in advance from the comfort of home or of1ice for any playdate for which you have enabled sales. The PrintTix server in Utah communicates with a computer placed on your premises that serves a dual purpose: It communicates in real time with your Sensible Cinema server computer and it validates the customer admissions as described below. Tickets are sold on a consignment basis through the theatre’s own web site and partner sites like Movietickets.com.
The customer prints a bar coded receipt from home which he then brings to the theatre for validation or carries a smart phone with which the theatre can capture the barcode in the con1irmation email message using a 2D barcode reader. An unmanned computer out1itted with a bar code reader and receipt printer can be used by the customer to scan the receipt and print individual admission tickets on a receipt printer. Each receipt is ensured to only be validated one time. If the customer cannot print his receipt he may bring his con1irmation number which can be manually entered into the PrintTix computer. PrintTix print-‐at-‐home internet ticketing system.
Getting Ready for Internet Ticketing: In order to redeem tickets, you will need to purchase a basic computer system to run the Ticket Vali-‐ dation System software. Since PrintTixUSA does not provide, install or support this hardware; you must obtain it locally. However, it is readily available at literally any computer store, most of1ice supply stores and through Sensible Cinema Software.
Dedicated Computer CPU and Non-‐Touch Monitor: You should provide a dedicated computer for this purpose. The computer should not be used to run any other software. The system is locked down in a kiosk mode making it impossible for the public or your staff to surf the internet or even access the Windows desktop. The minimum requirements for this computer system are below.
Windows XP or newer PC at 1GHz with 512 MB of RAM or more. 20 GB HDD, Ethernet Port, Mouse, Keyboard, Non-‐Touch VGA monitor.
Special Equipment: Sensible Cinema’s Web Store at www.sensiblecinema.com has the barcode readers and receipt printers for use with Printtix’s TVS software suite.
Internet Ticketing
204

Private Label Ticketing The Printtix private label ticketing solution means theatres can sell tickets directly from their own web site without sending a customer to a site where other theatres compete for their business. For those customers who happen to already be online at a major site or do a theatre search using the location tool on a smartphone, sites using movietickets.com and 1lixter.com can sell your tickets as well through the Printtix product.
Customers select any available showtime then make their purchase online using their credit card. A service charge is paid by the customer out of which a credit card processing fees are paid. The theatre is reimbursed for the face value of the ticket.
How It Works:
As tickets are sold online, they are immediately deducted from the available seats shown on the cashier’s sales screen in the ticketing system.
The customer makes his selection in his web browser and has five minutes to complete his purchase. Tickets not purchased in that time frame are returned to the POS system for sale to another customer.
Online tickets are sold from the same series of tickets as those online. They can be sold as far in advance as you like.
You can presell concession items as well.
Internet Ticketing
205

Internet Ticketing
206

Chapter 19
Utility Programs
207
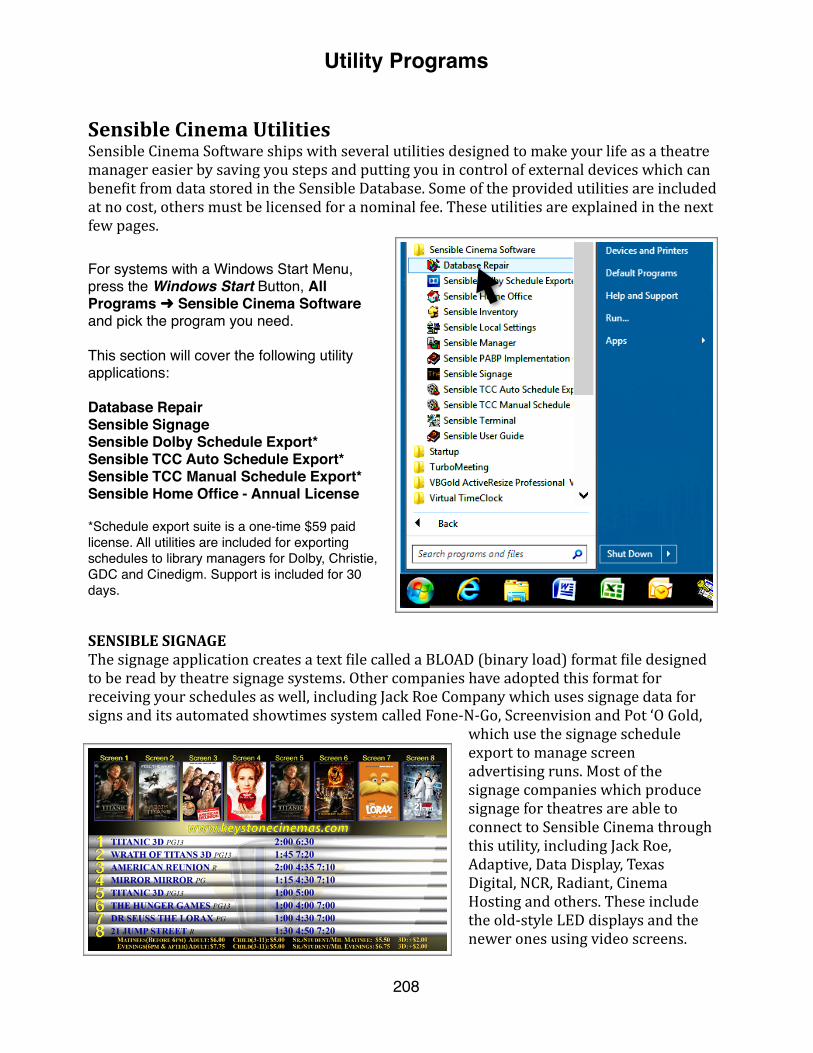
Sensible Cinema Utilities Sensible Cinema Software ships with several utilities designed to make your life as a theatre manager easier by saving you steps and putting you in control of external devices which can bene1it from data stored in the Sensible Database. Some of the provided utilities are included at no cost, others must be licensed for a nominal fee. These utilities are explained in the next few pages.
For systems with a Windows Start Menu, press the Windows Start Button, All Programs ➜ Sensible Cinema Software and pick the program you need.
This section will cover the following utility applications:
Database RepairSensible SignageSensible Dolby Schedule Export*Sensible TCC Auto Schedule Export*Sensible TCC Manual Schedule Export*Sensible Home Office - Annual License
*Schedule export suite is a one-time $59 paid license. All utilities are included for exporting schedules to library managers for Dolby, Christie, GDC and Cinedigm. Support is included for 30 days.
SENSIBLE SIGNAGE The signage application creates a text 1ile called a BLOAD (binary load) format 1ile designed to be read by theatre signage systems. Other companies have adopted this format for receiving your schedules as well, including Jack Roe Company which uses signage data for signs and its automated showtimes system called Fone-‐N-‐Go, Screenvision and Pot ‘O Gold,
which use the signage schedule export to manage screen advertising runs. Most of the signage companies which produce signage for theatres are able to connect to Sensible Cinema through this utility, including Jack Roe, Adaptive, Data Display, Texas Digital, NCR, Radiant, Cinema Hosting and others. These include the old-‐style LED displays and the newer ones using video screens.
Utility Programs
208
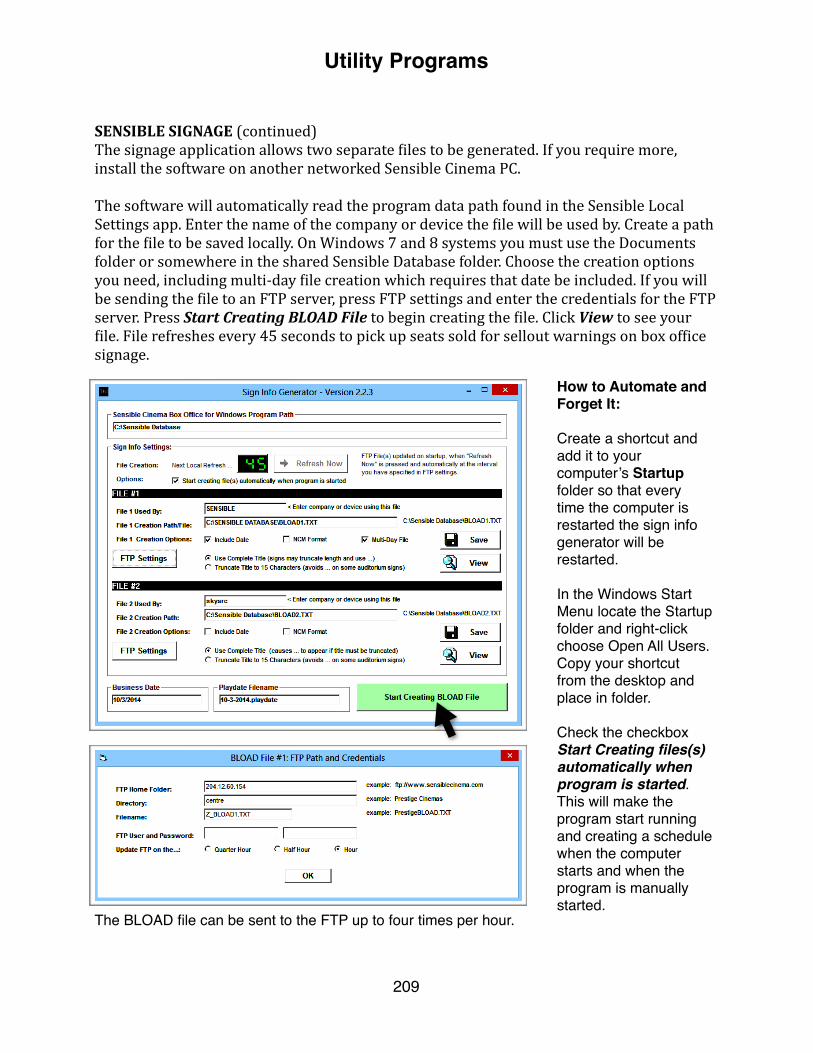
SENSIBLE SIGNAGE (continued) The signage application allows two separate 1iles to be generated. If you require more, install the software on another networked Sensible Cinema PC.
The software will automatically read the program data path found in the Sensible Local Settings app. Enter the name of the company or device the 1ile will be used by. Create a path for the 1ile to be saved locally. On Windows 7 and 8 systems you must use the Documents folder or somewhere in the shared Sensible Database folder. Choose the creation options you need, including multi-‐day 1ile creation which requires that date be included. If you will be sending the 1ile to an FTP server, press FTP settings and enter the credentials for the FTP server. Press Start Creating BLOAD File to begin creating the 1ile. Click View to see your 1ile. File refreshes every 45 seconds to pick up seats sold for sellout warnings on box of1ice signage.
How to Automate and Forget It:
Create a shortcut and add it to your computer’s Startup folder so that every time the computer is restarted the sign info generator will be restarted.
In the Windows Start Menu locate the Startup folder and right-click choose Open All Users. Copy your shortcut from the desktop and place in folder.
Check the checkbox Start Creating files(s) automatically when program is started. This will make the program start running and creating a schedule when the computer starts and when the program is manually started.
The BLOAD file can be sent to the FTP up to four times per hour.
Utility Programs
209
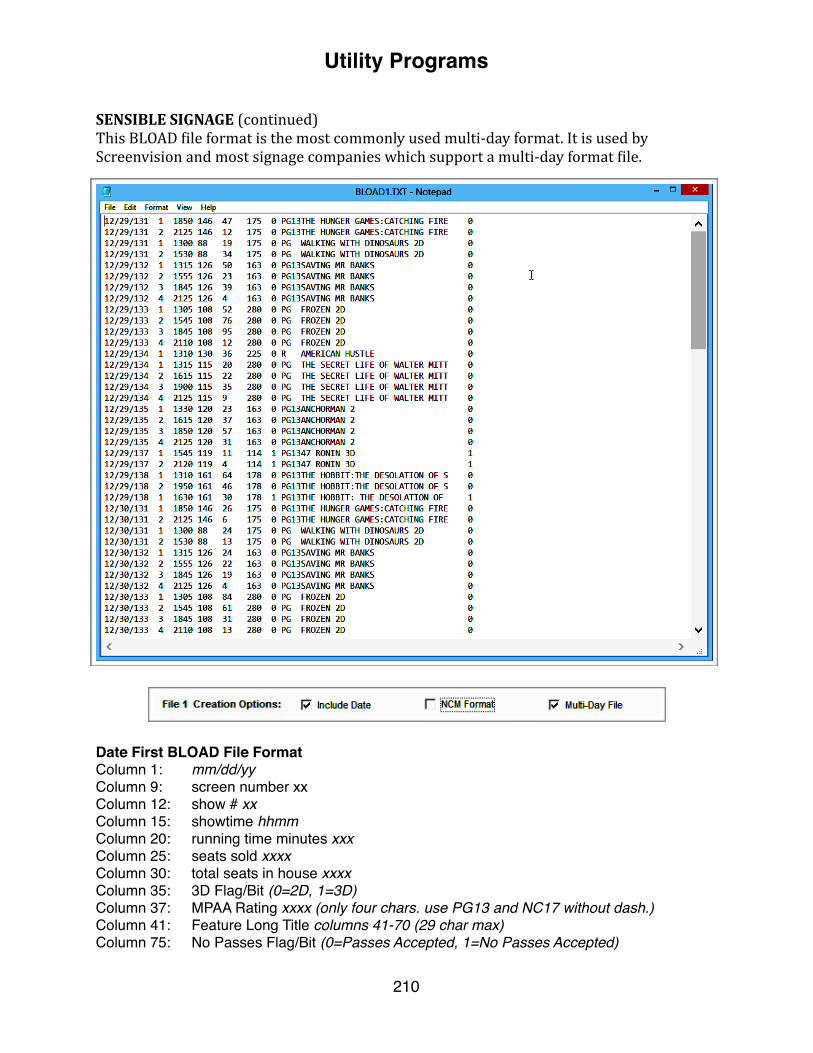
SENSIBLE SIGNAGE (continued) This BLOAD 1ile format is the most commonly used multi-‐day format. It is used by Screenvision and most signage companies which support a multi-‐day format 1ile.
Date First BLOAD File FormatColumn 1: mm/dd/yyColumn 9: screen number xxColumn 12: show # xxColumn 15: showtime hhmmColumn 20: running time minutes xxxColumn 25: seats sold xxxxColumn 30: total seats in house xxxxColumn 35: 3D Flag/Bit (0=2D, 1=3D)Column 37: MPAA Rating xxxx (only four chars. use PG13 and NC17 without dash.)Column 41: Feature Long Title columns 41-70 (29 char max)Column 75: No Passes Flag/Bit (0=Passes Accepted, 1=No Passes Accepted)
Utility Programs
210
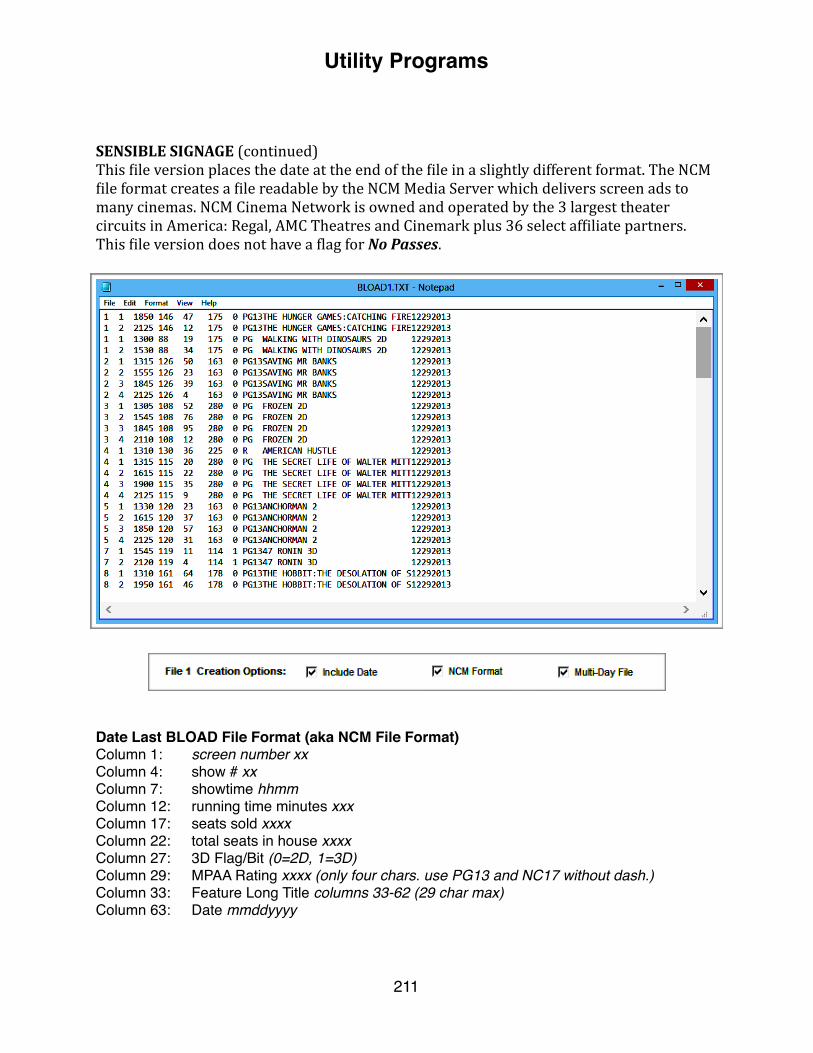
Date Last BLOAD File Format (aka NCM File Format)Column 1: screen number xxColumn 4: show # xxColumn 7: showtime hhmmColumn 12: running time minutes xxxColumn 17: seats sold xxxx Column 22: total seats in house xxxx Column 27: 3D Flag/Bit (0=2D, 1=3D)Column 29: MPAA Rating xxxx (only four chars. use PG13 and NC17 without dash.)Column 33: Feature Long Title columns 33-62 (29 char max)Column 63: Date mmddyyyy
SENSIBLE SIGNAGE (continued) This 1ile version places the date at the end of the 1ile in a slightly different format. The NCM 1ile format creates a 1ile readable by the NCM Media Server which delivers screen ads to many cinemas. NCM Cinema Network is owned and operated by the 3 largest theater circuits in America: Regal, AMC Theatres and Cinemark plus 36 select af1iliate partners. This 1ile version does not have a 1lag for No Passes.
Utility Programs
211
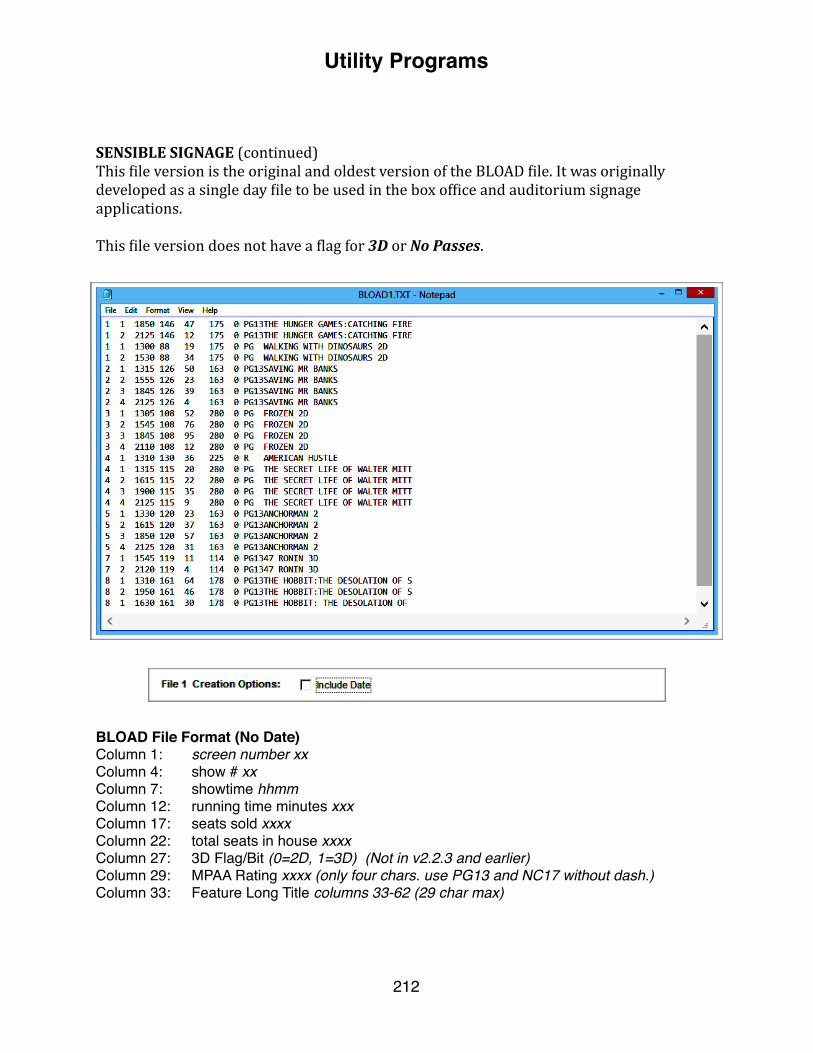
SENSIBLE SIGNAGE (continued) This 1ile version is the original and oldest version of the BLOAD 1ile. It was originally developed as a single day 1ile to be used in the box of1ice and auditorium signage applications.
This 1ile version does not have a 1lag for 3D or No Passes.
BLOAD File Format (No Date)Column 1: screen number xxColumn 4: show # xxColumn 7: showtime hhmmColumn 12: running time minutes xxxColumn 17: seats sold xxxx Column 22: total seats in house xxxx Column 27: 3D Flag/Bit (0=2D, 1=3D) (Not in v2.2.3 and earlier)Column 29: MPAA Rating xxxx (only four chars. use PG13 and NC17 without dash.)Column 33: Feature Long Title columns 33-62 (29 char max)
Utility Programs
212
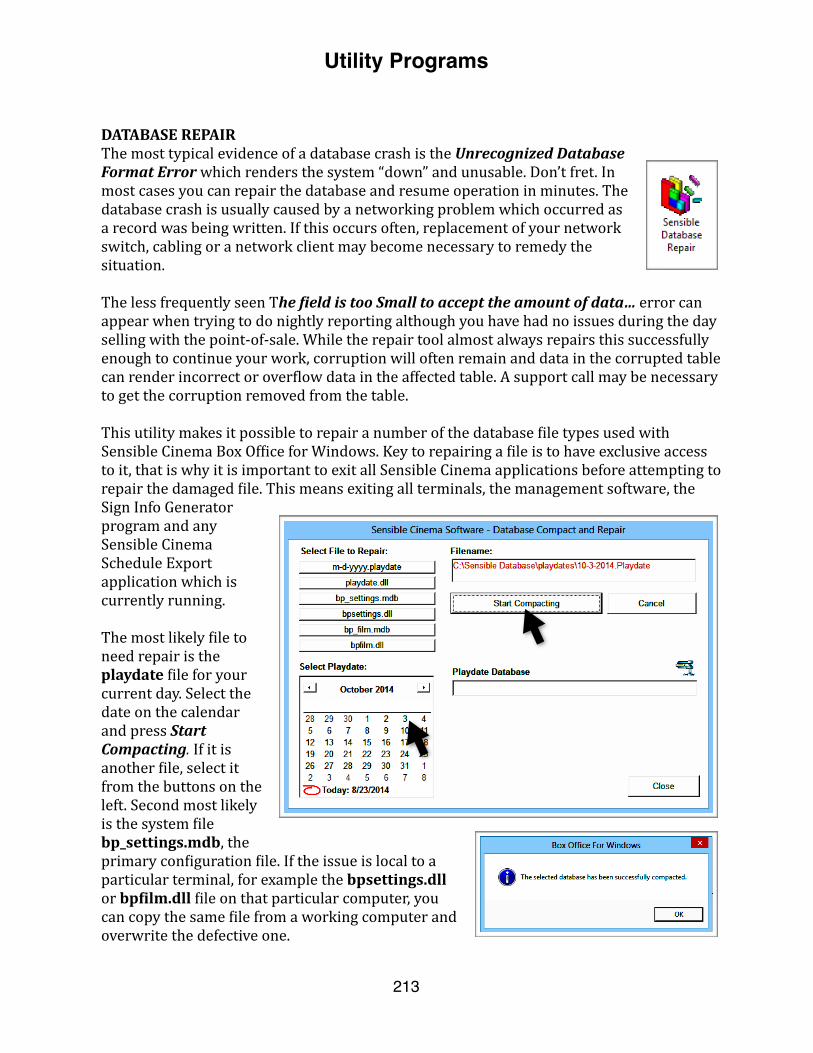
DATABASE REPAIR The most typical evidence of a database crash is the Unrecognized Database Format Error which renders the system “down” and unusable. Don’t fret. In most cases you can repair the database and resume operation in minutes. The database crash is usually caused by a networking problem which occurred as a record was being written. If this occurs often, replacement of your network switch, cabling or a network client may become necessary to remedy the situation.
The less frequently seen The Field is too Small to accept the amount of data… error can appear when trying to do nightly reporting although you have had no issues during the day selling with the point-‐of-‐sale. While the repair tool almost always repairs this successfully enough to continue your work, corruption will often remain and data in the corrupted table can render incorrect or over1low data in the affected table. A support call may be necessary to get the corruption removed from the table.
This utility makes it possible to repair a number of the database 1ile types used with Sensible Cinema Box Of1ice for Windows. Key to repairing a 1ile is to have exclusive access to it, that is why it is important to exit all Sensible Cinema applications before attempting to repair the damaged 1ile. This means exiting all terminals, the management software, the Sign Info Generator program and any Sensible Cinema Schedule Export application which is currently running.
The most likely 1ile to need repair is the playdate 1ile for your current day. Select the date on the calendar and press Start Compacting. If it is another 1ile, select it from the buttons on the left. Second most likely is the system 1ile bp_settings.mdb, the primary con1iguration 1ile. If the issue is local to a particular terminal, for example the bpsettings.dll or bp2ilm.dll 1ile on that particular computer, you can copy the same 1ile from a working computer and overwrite the defective one.
Utility Programs
213

FTP Schedule Push Protocol
The following FTP parameters must be used with the schedule push protocol.
FTP port: 7778user name: dolbyschedule password: dolbyftp
DOLBY SCHEDULE EXPORT The Dolby Schedule Export utility creates an XML 1ile for importing to the Dolby Theatre Management System.
The Dolby TMS (pictured left) is free and ideal for small theatre sites. It uses a proprietary XML file format for importing schedules from theatre point-of-sale systems.
Sensible Cinema Software’s Dolby Schedule Export runs on the desktop supplying up to the minute schedule changes to the Dolby TMS via an FTP connection.
Settings: Your IP address or home folder will be different but the settings for FTP user, pass and port will remain the same as pictured. Consult with your TMS installer for creating the connection from the point-of-sale to the TMS server. The upload interval is configurable from every minute to once an hour.
Utility Programs
214
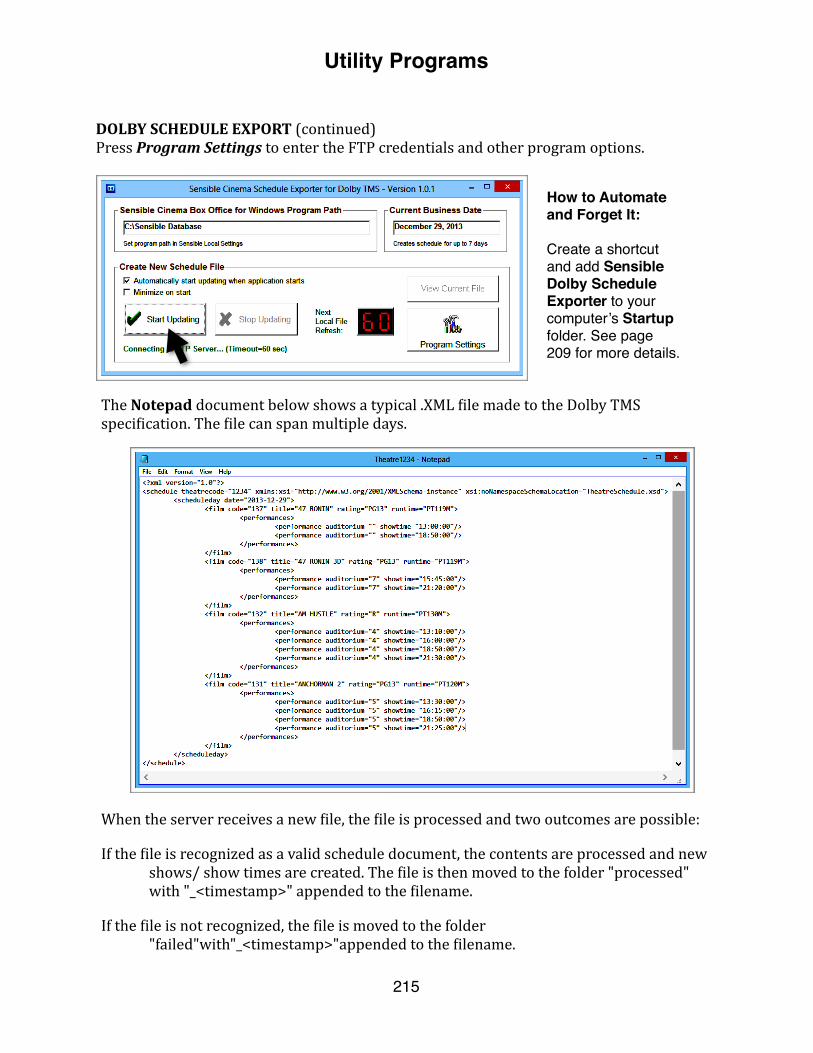
DOLBY SCHEDULE EXPORT (continued) Press Program Settings to enter the FTP credentials and other program options.
How to Automate and Forget It:
Create a shortcut and add Sensible Dolby Schedule Exporter to your computer’s Startup folder. See page 209 for more details.
The Notepad document below shows a typical .XML 1ile made to the Dolby TMS speci1ication. The 1ile can span multiple days.
When the server receives a new 1ile, the 1ile is processed and two outcomes are possible:
If the 1ile is recognized as a valid schedule document, the contents are processed and new shows/ show times are created. The 1ile is then moved to the folder "processed" with "_<timestamp>" appended to the 1ilename.
If the 1ile is not recognized, the 1ile is moved to the folder "failed"with"_<timestamp>"appended to the 1ilename.
Utility Programs
215
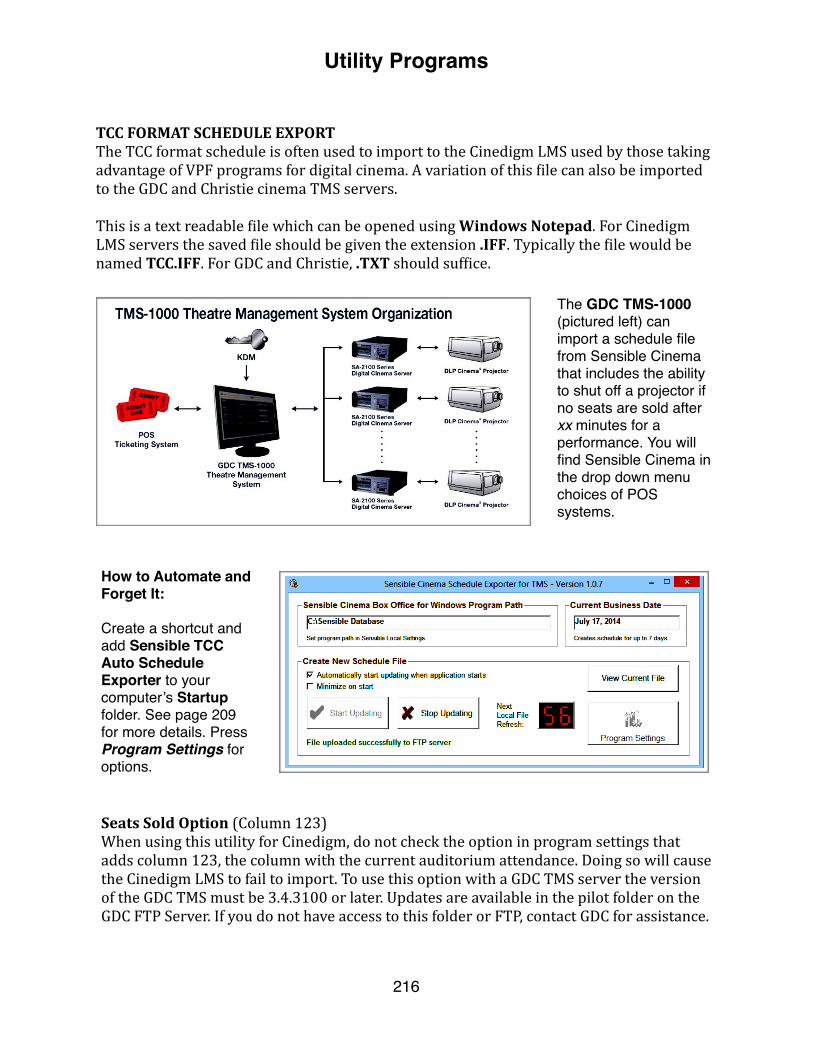
TCC FORMAT SCHEDULE EXPORT The TCC format schedule is often used to import to the Cinedigm LMS used by those taking advantage of VPF programs for digital cinema. A variation of this 1ile can also be imported to the GDC and Christie cinema TMS servers.
This is a text readable 1ile which can be opened using Windows Notepad. For Cinedigm LMS servers the saved 1ile should be given the extension .IFF. Typically the 1ile would be named TCC.IFF. For GDC and Christie, .TXT should suf1ice.
The GDC TMS-1000 (pictured left) can import a schedule file from Sensible Cinema that includes the ability to shut off a projector if no seats are sold after xx minutes for a performance. You will find Sensible Cinema in the drop down menu choices of POS systems.
How to Automate and Forget It:
Create a shortcut and add Sensible TCC Auto Schedule Exporter to your computer’s Startup folder. See page 209 for more details. Press Program Settings for options.
Seats Sold Option (Column 123) When using this utility for Cinedigm, do not check the option in program settings that adds column 123, the column with the current auditorium attendance. Doing so will cause the Cinedigm LMS to fail to import. To use this option with a GDC TMS server the version of the GDC TMS must be 3.4.3100 or later. Updates are available in the pilot folder on the GDC FTP Server. If you do not have access to this folder or FTP, contact GDC for assistance.
Utility Programs
216
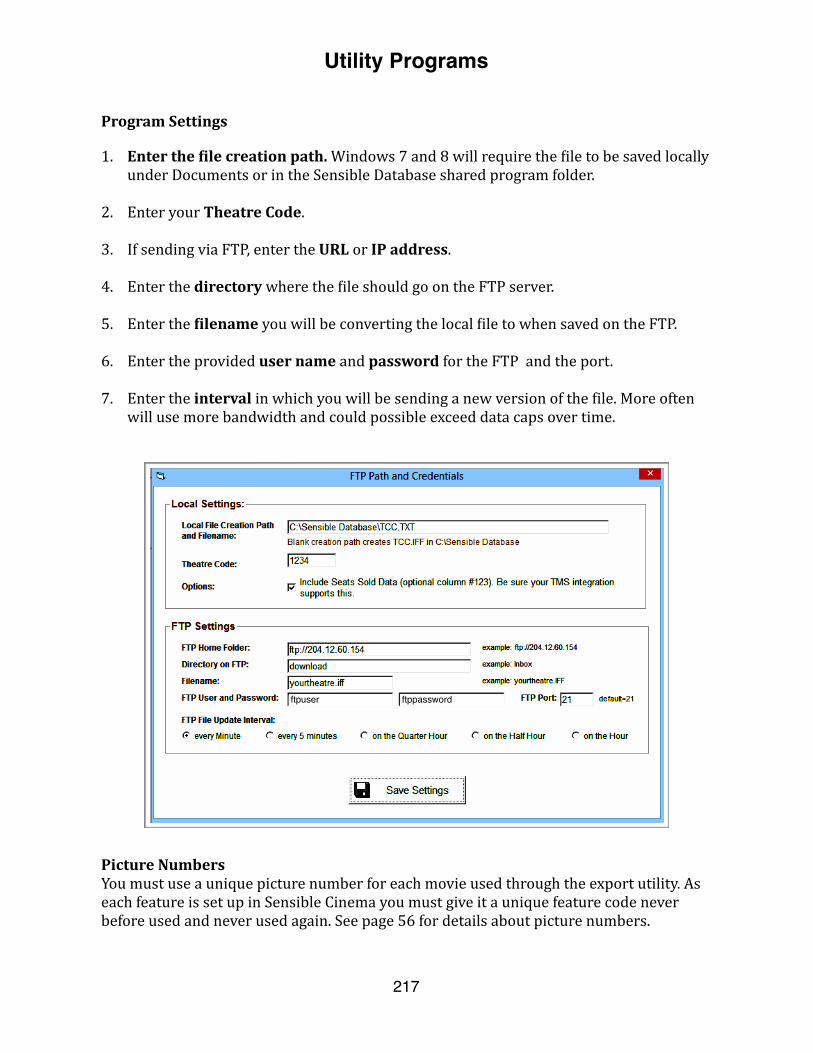
ftpuser ftppassword
1. Enter the 2ile creation path. Windows 7 and 8 will require the 1ile to be saved locally under Documents or in the Sensible Database shared program folder.
2. Enter your Theatre Code.
3. If sending via FTP, enter the URL or IP address.
4. Enter the directory where the 1ile should go on the FTP server.
5. Enter the 2ilename you will be converting the local 1ile to when saved on the FTP.
6. Enter the provided user name and password for the FTP and the port.
7. Enter the interval in which you will be sending a new version of the 1ile. More often will use more bandwidth and could possible exceed data caps over time.
Program Settings
Picture Numbers You must use a unique picture number for each movie used through the export utility. As each feature is set up in Sensible Cinema you must give it a unique feature code never before used and never used again. See page 56 for details about picture numbers.
Utility Programs
217
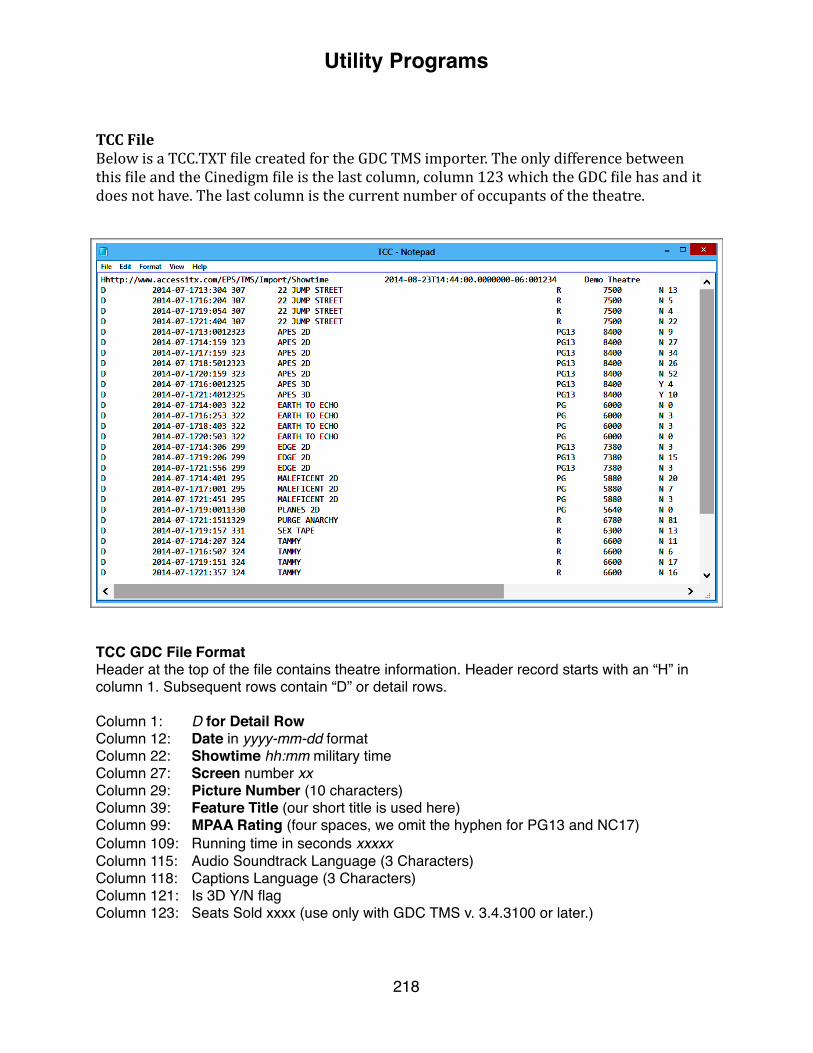
TCC File Below is a TCC.TXT 1ile created for the GDC TMS importer. The only difference between this 1ile and the Cinedigm 1ile is the last column, column 123 which the GDC 1ile has and it does not have. The last column is the current number of occupants of the theatre.
TCC GDC File FormatHeader at the top of the file contains theatre information. Header record starts with an “H” in column 1. Subsequent rows contain “D” or detail rows.
Column 1: D for Detail RowColumn 12: Date in yyyy-mm-dd formatColumn 22: Showtime hh:mm military timeColumn 27: Screen number xxColumn 29: Picture Number (10 characters)Column 39: Feature Title (our short title is used here)Column 99: MPAA Rating (four spaces, we omit the hyphen for PG13 and NC17)Column 109: Running time in seconds xxxxxColumn 115: Audio Soundtrack Language (3 Characters)Column 118: Captions Language (3 Characters)Column 121: Is 3D Y/N flagColumn 123: Seats Sold xxxx (use only with GDC TMS v. 3.4.3100 or later.)
Utility Programs
218

SENSIBLE HOME OFFICE 2014 and later Sensible Home Of1ice enables the theatre operator to manage reporting for one or more locations remotely using any Windows computer. The Sensible Home Of1ice software is a desktop application which runs on PCs running Windows XP and later, with 1GB RAM or more and a page oriented printer. It is similar to the Sensible Manager software only it allows you to open 1iles and create reports for multiple locations. Theatres are set up to automatically send their playdate 1iles to the Dropbox™ service. The Sensible Home Of1ice client software connects to Dropbox, not the theatre, to utilize the 1iles for reporting purposes. So, in addition to remote reporting capability, theatres also have a means to inexpensively back up 1iles to the cloud. Even theatres not using Sensible Home Of1ice can use the online backup capability.
Sensible Home Of1ice is licensed for a cost of $100 per year for each theatre location connected, prorated for the balance of each calendar year. Each new version becomes available by mid-‐December for the next year. Licenses not renewed will cease to operate on January 15th. The annual renewal cost includes the updated software, installation support, and three free support sessions per calendar year. In the initial year, Sensible Cinema installs the software on your home of1ice or laptop computer, sets up Dropbox backups for each theatre and teaches you how to use it. Installation on additional Sensible Home Of1ice client computers is $100.
Sensible Home Of1ice lets you work with data sent periodically from the theatre automatically, so during business hours you can view and interact with report data refreshed every quarter hour. At the end of the day the theatre can push out its 1inal data from the Daily Sales Summary screen or by changing to the next playdate. Most daily, weekly and historic reports can be done for each theatre going back as far as playdates are available. Tell us when ordering how far back you want data available.
Utility Programs
219

Utility Programs
220

Chapter 20
Product Support
221

Sensible Cinema Product Support
See current support fees and options are available at www.sensiblecinema.com.
Support Phone Number: Support E-‐Mail: (615) 799-‐6366 [email protected] Of2ice Hours: Monday through Friday 9:00 am -‐ 5:00 pm Central Time After Hours Emergency Support: Monday through Friday 5:00 pm -‐ 12:00 am Central Time Saturday and Sunday 9:00 am -‐ 12:00 am Central Time Other times by appointment The following are required at the problem computer when calling for support: • Internet access • Telephone • Physical Keyboard Software Version: Check to ensure you are using the most recent version of Sensible Cinema. The problem you are calling about may have been addressed in a software update.
Virus and Spyware Infestations: Sensible Cinema will not provide assistance for systems which have active virus and/or spyware infestations. You should seek local help for restoring operating systems to normal after an attack. Due to Payment Card Industry (PCI) compliance regulations, compromised systems should not be used to accept credit and debit cards. All systems used for processing credit cards are required to have anti-‐virus and anti-‐malware software installed with an active subscription and set to automatically download updated virus de1initions and Windows updates.
Supporting Documents: Send supporting 1iles to: [email protected] Playdate 1iles can be found in C:\Sensible Database\Playdates on your server computer. System log 1ile can be found in C:\Sensible Database\Activity Logs on your server computer.
Product Support
222
Other Vendors Product Support
Diamond Ticketing Systems/PrinttixUSA (866) 323-‐5411, option 1 [email protected]
PartnerTech (949) 598-‐1888Support regarding the operation of Partner Tech Sales Terminals Have the product serial number ready when calling. Be sure to request a support incident ID if the product will need warranty replacement. http://www.partnertechcorp .com/support.shtml Monday-‐Friday 8 am-‐6 pm PST
Practical Automation (203) 882-‐5640Support regarding the operation of Practical Automation printers. Monday-‐Friday 8 am-‐6 pm EST
Boca Systems (561) 998-‐9600 Support regarding the operation of Boca Systems printers. Monday-‐Friday 8 am-‐6 pm EST
Product Support
223

Product Support
224