
Blueprint and Server Automated Configuration for Windows
88
IBM Spectrum Protect Blueprint and Server Automated Configuration for Windows IBM Release 4 Version 1
-
Upload
khangminh22 -
Category
Documents
-
view
2 -
download
0
Transcript of Blueprint and Server Automated Configuration for Windows

IBM Spectrum Protect
Blueprint and Server AutomatedConfiguration for Windows
IBM
Release 4 Version 1

Note:
Before you use this information and the product it supports, read the information in “Notices” on page73.
First edition (May 2019)
This edition applies to Version 8.1.1 and later of the IBM Spectrum Protect server, and to all subsequent releases andmodifications until otherwise indicated in new editions or technical newsletters.© Copyright International Business Machines Corporation 2014, 2019.US Government Users Restricted Rights – Use, duplication or disclosure restricted by GSA ADP Schedule Contract withIBM Corp.

Contents
About this document..............................................................................................vSupport for IBM Spectrum Protect blueprint and server automated configuration...................................v
What's new in Version 4.1.................................................................................... vii
Chapter 1. Introduction......................................................................................... 1
Chapter 2. Implementation requirements...............................................................3Hardware and software prerequisites......................................................................................................... 5
Hardware requirements......................................................................................................................... 5Software requirements........................................................................................................................ 10
Planning worksheets..................................................................................................................................10
Chapter 3. Storage configuration blueprints......................................................... 13Small system..............................................................................................................................................14Medium system..........................................................................................................................................16Large system.............................................................................................................................................. 18
Chapter 4. Setting up the system..........................................................................21Step 1: Set up and configure hardware.....................................................................................................21Step 2: Install the operating system......................................................................................................... 22Step 3: Configure multipath I/O................................................................................................................ 23Step 4: Configure file systems for IBM Spectrum Protect........................................................................ 24
Configure a file system by using the script.......................................................................................... 24Configure by using the manual procedure...........................................................................................25
Step 5: Test system performance..............................................................................................................26Step 6: Install the IBM Spectrum Protect backup-archive client............................................................ 29Step 7: Install the IBM Spectrum Protect server......................................................................................29
Obtain the installation package........................................................................................................... 30Install IBM Spectrum Protect Version 8.1.1 or later...........................................................................30
Chapter 5. Configuring the IBM Spectrum Protect server...................................... 33Removing an IBM Spectrum Protect blueprint configuration...................................................................39
Chapter 6. Completing the system configuration...................................................41Changing default passwords..................................................................................................................... 41Registering nodes and associating them with predefined client schedules............................................42Reorganizing database tables and indexes...............................................................................................43
Chapter 7. Next steps.......................................................................................... 45Optional: Set up node replication and storage pool protection............................................................... 45
Appendix A. Performance results......................................................................... 49Small system performance measurements.............................................................................................. 49Medium system performance measurements.......................................................................................... 50Workload simulation tool results...............................................................................................................51
Appendix B. Configuring the disk system by using commands............................... 53
iii

Appendix C. Using a response file with the Blueprint configuration script.............. 61
Appendix D. Using predefined client schedules.....................................................63
Appendix E. Modification of blueprint configurations............................................ 67
Appendix F. Troubleshooting................................................................................69
Appendix G. Accessibility.................................................................................... 71
Notices................................................................................................................73
Index.................................................................................................................. 77
iv

About this document
This information is intended to facilitate the deployment of an IBM Spectrum Protect server by usingdetailed hardware specifications to build a system and automated scripts to configure the software. Tocomplete the tasks, you must have an understanding of IBM Spectrum Protect and scripting.
Tip: Beginning with V7.1.3, IBM® Tivoli® Storage Manager is now IBM Spectrum Protect. To learn moreabout the rebranding transition, see technote 1963634.
Support for IBM Spectrum Protect blueprint and server automatedconfiguration
The information in this document is distributed on an "as is" basis without any warranty that is eitherexpressed or implied. Support assistance for the use of this material is limited to situations where IBMSpectrum Protect support is entitled and where the issues are not specific to a blueprint implementation.
© Copyright IBM Corp. 2014, 2019 v

vi IBM Spectrum Protect: Blueprint and Server Automated Configuration for Windows

What's new in Version 4.1
The IBM Spectrum Protect Blueprint configuration script, hardware and software requirements, anddocumentation are updated.
Implement IBM POWER9™ technology for data-intensive computing
You can now take advantage of POWER9 processor technology, which supports data-intensivecomputing and is designed to provide enhanced performance. POWER9 technology is available on theIBM AIX® and Linux on Power Systems operating systems.
Take advantage of newer server generations
Take advantage of newer server generations when you install IBM Spectrum Protect on a Linuxx86_64 or a Microsoft Windows operating system in a medium or large configuration. Theseconfigurations incorporate the Lenovo ThinkSystem SR650 server, which uses Intel Xeon Scalableprocessors to help optimize performance.
Handle larger workloads with Storwize® V5020
The medium Blueprint is now based on IBM Storwize V5020 hardware, which supports larger storagepool and database capacities to process larger workloads.
Increase the IBM Spectrum Protect database to 8 TB
In the large configuration, you can now increase database capacity up to 8 TB. Previously, themaximum size of the IBM Spectrum Protect database was 6 TB.
Technical and other updates were made throughout the book. Look for the vertical bar ( | ) in the margin.
© Copyright IBM Corp. 2014, 2019 vii

viii IBM Spectrum Protect: Blueprint and Server Automated Configuration for Windows

Chapter 1. IntroductionThis document provides detailed steps to build a small, medium, or large IBM Spectrum Protect serverwith disk-only storage that uses data deduplication on Microsoft Windows on an x86 system.
By following prerequisite steps precisely, you can set up hardware and prepare your system to run theIBM Spectrum Protect Blueprint configuration script, TSMserverconfig.pl, for a successfuldeployment. The settings and options that are defined by the script are designed to ensure optimalperformance, based on the size of your system.
Overview
The following roadmap lists the main tasks that you must complete to deploy a server:
1. Determine the size of the configuration that you want to implement.2. Review the requirements and prerequisites for the server system.3. Set up the hardware by using detailed blueprint specifications for system layout.4. Configure the hardware and install the Windows operating system.5. Prepare file systems for IBM Spectrum Protect.6. Run the IBM Spectrum Protect workload simulation tool to verify that your configuration is
functioning properly.7. Install the IBM Spectrum Protect backup-archive client.8. Install a licensed version of the IBM Spectrum Protect server.9. Run the Blueprint configuration script to validate your hardware configuration, and then configure the
server.10. Complete post-configuration steps to begin managing and monitoring your server environment.
© Copyright IBM Corp. 2014, 2019 1

2 IBM Spectrum Protect: Blueprint and Server Automated Configuration for Windows

Chapter 2. Implementation requirementsSelect the appropriate size for your IBM Spectrum Protect environment and then review requirements forhardware and software.
Use Table 1 on page 3 to select the server size, based on the amount of data that you manage. Both thetotal managed data and daily amount of new data are measured before data deduplication.
Data amounts in the table are based on the use of directory-container storage pools with inline datadeduplication, a feature that was introduced in IBM Spectrum Protect Version 7.1.3. The blueprints arealso designed to use inline storage pool compression, a feature that was introduced in IBM SpectrumProtect V7.1.5.
Tip: Before you configure a solution, learn about container storage pools. See Directory-container storagepools FAQs.
Table 1. Selecting the size of the IBM Spectrum Protect server
If your total managed datais in this range
And the amount of new data thatyou back up is in this range Build a server of this size
60 TB - 240 TB Up to 10 TB per day Small
360 TB - 1440 TB 10 - 30 TB per day Medium
1000 TB - 4000 TB 20 - 100 TB per day Large
The daily ingestion rate is the amount of data that you back up each day. The daily ingestion amounts inTable 1 on page 3 are based on test results with 128 MB sized objects, which are used by IBM SpectrumProtect for Virtual Environments. The daily ingestion amount is stated as a range because backupthroughput, and the time that is required to complete maintenance tasks, vary based on workload.
If a server is used to both accept backup data, and receive replicated data from other servers, moreplanning is needed. Any data that is received through replication must be considered as part of the dailybackup amount. For example, a server that receives 25 TB of new backup data and 15 TB of newreplication data daily has a total ingestion rate of 40 TB per day.
Not every workload can achieve the maximum amount in the range for daily backups. The range is acontinuum, and placement within the range depends on several factors:Major factors
• Average object size. Workloads with smaller average object sizes, such as those that are commonwith file server backups, typically have smaller backup throughputs. If the average object size is lessthan 128 KB, daily backup amounts are likely to fall in the lower 25% of the range. If the averageobject size is larger, for example, 512 KB or more, backup throughputs are greater.
• Daily data reduction. When data is reduced by using data deduplication and compression, less datamust be written to storage pools. As a result, the server can handle larger amounts of daily dataingestion.
Additional factors
• Data deduplication location. By using client-side data deduplication, you reduce the processingworkload on the server. As a result, you can increase the total amount of data that is deduplicateddaily.
• Network performance. By using efficient networks, you can back up and replicate more data daily.
To better understand the factors that affect the maximum amount of daily data ingestion, review thefollowing figure:
© Copyright IBM Corp. 2014, 2019 3

Figure 1. Range for daily data ingestion in a large system
Total managed data is the amount of data that is protected. This amount includes all versions. A range isprovided because data processing responds differently to data deduplication and compression,depending on the type of data that is backed up. The smaller number in the range represents the physicalcapacity of the IBM Spectrum Protect storage pool. Although the use of inline compression does notresult in additional growth of the IBM Spectrum Protect database, compression might result in the abilityto store more data in the same amount of storage pool space. In this way, the amount of total manageddata can increase causing more database space to be used.
To estimate the total managed data for your environment, you must have the following information:
• The amount of client data (the front-end data amount) that will be protected• The number of days that backup data must be retained• An estimate of the daily change percentage• The backup model that is used for a client type, for example, incremental-forever, full daily, or full
periodic
If you are unsure of your workload characteristics, use the middle of the range for planning purposes.
You can calculate the total managed data for different types of clients in groups and then add the groupresults.Client types with incremental-forever backup operations
Use the following formula to estimate the total managed data:
Frontend + (Frontend * changerate * (retention - 1))
For example, if you back up 100 TB of front-end data, use a 30-day retention period, and have a 5%change rate, calculate your total managed data as shown:
100 TB + (100TB * 0.05 * (30-1)) = 245 TB total managed data
Client types with full daily backup operationsUse the following formula to estimate the total managed data:
Frontend * retention * (1 + changerate)
For example, if you back up 10 TB of front-end data, use a 30-day retention period, and have a 3%change rate, calculate your total managed data as shown:
10 TB * 30 * (1 + .03) = 309 TB total managed data
4 IBM Spectrum Protect: Blueprint and Server Automated Configuration for Windows

Hardware and software prerequisitesBefore you set up your system and configure IBM Spectrum Protect, you must meet hardware andsoftware prerequisites.
Hardware requirementsYou must acquire hardware that is based on scale size requirements. You can choose equivalent or bettercomponents than what are listed.
The following topics list the hardware requirements for a small, medium, or large configuration. Thetables contain detailed descriptions, including part numbers and quantities for IBM components that areused in the storage configuration blueprints.
The system memory sizes that are provided are recommendations for optimal performance. They are notminimum requirements. Memory recommendations account for using both data deduplication and nodereplication with a database that is near maximum capacity. Some workloads can tolerate smaller amountsof memory. When node replication is not used, the memory recommendations can be reduced by 25%.
The hardware specifications that are provided are current at the time of publishing. Part substitutionsmight be required, depending on hardware availability over time. Be cautious if you plan to substitute asmaller quantity of larger drives, particularly for the database. A smaller quantity of drives might notprovide comparable performance.
The tables in the following topics have abbreviated part lists, which include only major components. Workwith your hardware supplier to ensure that your configuration is complete.
Hardware requirements for small systemsYou must acquire hardware that is based on scale size requirements. You can choose equivalent or bettercomponents than what are listed.
IBM Storwize disks are designed to provide a simple, high-performance solution for managing block-based storage. For this reason, Storwize systems are suited for use by the IBM Spectrum Protect serverfor both the database and storage pool. For more information about Storwize features, see IBM Storwizefamily.
You can use a Lenovo ThinkSystem SR650 server or a Supermicro SuperServer 2029U-E1CRT:
• For Lenovo product information, see Lenovo ThinkSystem SR650 Rack Server. For hardwarerequirements, see Table 2 on page 6.
• For Supermicro product information, see Supermicro SuperServer 2029U-E1CRT. For hardwarerequirements, see Table 3 on page 6.
Implementation requirements 5

Table 2. Hardware requirements for a small system that uses a Lenovo server.
Hardware Requirements Blueprint component Detailed description Quantity Part number
Server and network • 16 processor cores, 1.7GHz or faster
• 64 GB RAM• 10 Gb Ethernet• 8 Gb or 16 Gb Fibre
Channel adapter
Lenovo ThinkSystemSR650
Lenovo ThinkSystem SR650 1 7X06CT01W
8-core Intel Xeon Bronze 31061.7 GHz processor
2 AWEH
8 GB TruDDR4 2666 MHzmemory
8 AUU1
Emulex VFA5.2 2x10 GbE SFP+PCIe adapter
1 AT7S
Emulex 16 Gb Gen6 FC dual-port HBA
1 ATZV
RAID 530-8i PCIe 12 Gbadapter
1 AUNG
300 GB 10K SAS 12 Gb HotSwap 512n HDD
2 AULY
Disks for storage • 16 Gb host interface• Database and active log
disks: 800 GB SSD flashdrives
• Storage pool disks: 4 TBNL-SAS
IBM Storwize V5010 IBM Storwize V5010 SFFControl
1 2078-124
16 Gb Fibre Channel adapterpair
1 AC0B
800 GB 3DWPD 2.5 flash drive 4 AC9J
IBM Storwize V5010 Largeform-factor (LFF) ExpansionEnclosure
2 2078-12F
0.6 m 12 Gb SAS Cable (mSASHD)
4 ACUA
4 TB 7.2 K 3.5-inch NL HDD 24 AC39
Table 3. Hardware requirements for a small system that uses Supermicro SuperServer technology.
Hardware Requirements Blueprint component Detailed description Quantity Part number
Server and network • At least 16 processorcores, 1.7 GHz
• 64 GB RAM• 10-Gigabit Ethernet• 8-Gigabit Fibre Channel
SupermicroSuperServer
Supermicro SuperServer2029U-E1CRT
1 SYS-2029U-E1CRT
Intel Xeon Scalable 3106 8C1.7 GHz processor
2 P4X-SKL3106-SR3GL
8 GB TruDDR4 MemoryDDR4-2666 1RX8 ECC RDIMM
8 MEM-DR480L-CL02-ER26
Emulex LPe16002B-M6 16 GbFibre Channel HBA
1 AOC-LPE16002B-M6-O
4-port 10G SFP+, Intel XL710 1 AOC-STG-I4S
300 GB 10K 12 Gbps SAS 2.5-inch G3HS HDD
2 HDD-2A500-ST9500620SS
6 IBM Spectrum Protect: Blueprint and Server Automated Configuration for Windows

Table 3. Hardware requirements for a small system that uses Supermicro SuperServer technology. (continued)
Hardware Requirements Blueprint component Detailed description Quantity Part number
Disks for storage • 16 Gb host interface• Database and active log
disks: 800 GB SSD flashdrives
• Storage pool disks: 4 TBNL-SAS
IBM Storwize V5010 IBM Storwize V5010 SFFControl
1 2078-124
16 Gb Fibre Channel adapterpair
1 AC0B
800 GB 3DWPD 2.5 flash drive 4 AC9J
IBM Storwize V5010 Largeform-factor (LFF) ExpansionEnclosure
2 2078-12F
0.6 m 12 Gb SAS Cable (mSASHD)
4 ACUA
4 TB 7.2 K 3.5-inch NL HDD 24 AC39
Hardware requirements for medium systemsYou must acquire hardware that is based on scale size requirements. You can choose equivalent or bettercomponents than what are listed.
IBM Storwize disks are designed to provide a simple, high-performance solution for managing block-based storage. For this reason, Storwize systems are suited for use by the IBM Spectrum Protect serverfor both the database and storage pool. For more information about Storwize features, see IBM Storwizefamily.
You can use a Lenovo ThinkSystem SR650 server or a Supermicro SuperServer 2029U-E1CRT:
• For Lenovo product information, see Lenovo ThinkSystem SR650 Rack Server. For hardwarerequirements, see Table 4 on page 7.
• For Supermicro product information, see Supermicro SuperServer 2029U-E1CRT. For hardwarerequirements, see Table 5 on page 8.
Table 4. Hardware requirements for a medium system that uses a Lenovo server.
Hardware RequirementsBlueprintcomponent Detailed description Quantity Part number
Server andnetwork
• 20 processor cores,2.2 GHz or faster
• 192 GB RAM• 10 Gb Ethernet• 8 Gb or 16 Gb Fibre
Channel adapter
Lenovo ThinkSystemSR650
Lenovo ThinkSystem SR650 1 7X06CTO1W
10-core Intel Xeon Silver 41142.2 GHz processor
2 AWEC
16 GB TruDDR4 2666 MHzmemory
12 AUNC
Emulex VFA5.2 2x10 GbE SFP+PCIe adapter
1 AT7S
Emulex 16 Gb Gen6 FC dual-portHBA
1 ATZV
RAID 530-8i PCIe 12 Gb adapter 1 AUNG
300 GB 10K SAS 12 Gb Hot Swap512n HDD
2 AULY
Disks forstorage
• 16 Gb host interface• Database and active
log disks: 1.9 TB SSD• Storage pool, archive
log, and databasebackup disks: 6 TBNL-SAS
IBM Storwize V5020 IBM Storwize V5020 SFF Control 1 2078-224
16 GB Fibre Channel adapter pair 1 AC0B
1.92 TB 2.5-inch flash drive 6 ACN0
V5000 HD large form-factor (LFF)expansion
1 2078-92F
6 TB 7.2 K 3.5-inch NL HDD 92 ACP7
3 m 12 GB SAS cable (mSAS HD) 2 ACUC
Implementation requirements 7

Table 5. Hardware requirements for a medium system that uses Supermicro SuperServer technology.
Hardware RequirementsBlueprintcomponent Detailed description Quantity Part number
Server andnetwork
• At least 20 processorcores, 2.2 GHz
• 192 GB RAM• 10 Gb Ethernet• 8 Gb Fibre Channel
SupermicroSuperServer
Supermicro SuperServer 2029U-E1CRT
1 SYS-2029U-E1CRT
Intel Xeon Scalable 4114 10C 2.2GHz processor
2 P4X-SKL4114-SR3GK
16GB TruDDR4 MemoryDDR4-2666 2RX8 ECC RDIMM
12 MEM-DR416L-HL03-ER26
Emulex LPe16002B-M6 16GFibre Channel HBA
1 AOC-LPE16002B-M6-O
4-port 10G SFP+, Intel XL710 1 AOC-STG-I4S
300 GB 10 K 12 Gbps SAS 2.5-inch G3HS HDD
2 HDD-2A500-ST9500620SS
Disks forstorage
• 16 Gb host interface• Database and active
log disks: 1.9 TB SSD• Storage pool, archive
log, and databasebackup disks: 6 TBNL-SAS
IBM Storwize V5020 IBM Storwize V5020 SFF Control 1 2078-224
16 GB Fibre Channel adapter pair 1 AC0B
1.92 TB 2.5-inch flash drive 6 ACN0
V5000 HD large form-factor (LFF)expansion
1 2078-92F
6 TB 7.2 K 3.5-inch NL HDD 92 ACP7
3 m 12 GB SAS cable (mSAS HD) 2 ACUC
Hardware requirements for large systemsYou must acquire hardware that is based on scale size requirements. You can choose equivalent or bettercomponents than what are listed.
IBM Storwize disks are designed to provide a simple, high-performance solution for managing block-based storage. For this reason, Storwize systems are suited for use by the IBM Spectrum Protect serverfor both the database and storage pool. For more information about Storwize features, see IBM Storwizefamily.
You can use a Lenovo ThinkSystem SR650 server or a Supermicro SuperServer 2029U-E1CRT:
• For Lenovo product information, see Lenovo ThinkSystem SR650. For hardware requirements, see Table6 on page 9.
• For Supermicro product information, see Supermicro SuperServer 2029U-E1CRT. For hardwarerequirements, see Table 7 on page 9.
8 IBM Spectrum Protect: Blueprint and Server Automated Configuration for Windows

Table 6. Hardware requirements for a large system that uses a Lenovo server.
Hardware Requirements Blueprintcomponent
Detailed description Quantity Part number
Server andnetwork
• 44 processor cores,2.1 GHz or faster
• 384 GB RAM• 10 Gb Ethernet• 8 Gb or 16 Gb Fibre
Channel adapter
LenovoThinkSystem SR650
Lenovo ThinkSystem SR650 1 7X06CTO1W
22-core Intel Xeon Gold 6152 2.1 GHzprocessor
2 AWDV
32 GB TruDDR4 2666 MHz Memory 12 AUND
Emulex VFA5.2 2x10 GbE SFP+ PCIeadapter
2 AT7S
Emulex 16 Gb Gen6 FC dual-port HBA 1 ATZV
RAID 530-8i PCIe 12 Gb adapter 1 AUNG
300 GB 10K SAS 12 Gb Hot Swap512n HDD
3 1 AULY
Disks forstorage
• Database and activelog disks: 1.9 TB SSD
• Storage pool, archivelog, and databasebackup disks: 8 TBNL-SAS drives
IBM StorwizeV5030
IBM Storwize V5030 SFF Control 1 2078-324
16 Gb Fibre Channel adapter pair 1 AC0B
IBM Storwize V5030 Cache Upgrade 1 ACHD
1.92 TB 2.5-inch flash drive 8 ACN0
IBM Storwize V5000 LFF Expansion 15 2078-92F 2
8 TB 7.2 K 3.5-inch NL HDD 180 AC3B
0.6 m 12 Gb SAS Cable (mSAS HD) 30 ACUA
1. Two of the three 300 GB internal hard disks are configured in a RAID 1 pair, and the third drive is assigned as a spare. If a spare is notneeded based on business requirements, the system can be configured with only two drives.
2. Alternatively, you can use two units of the IBM Storwize V5000 High Density Expansion, part number 2077-92F, to reduce the number ofrack units and save space.
Table 7. Hardware requirements for a large system that uses Supermicro SuperServer technology.
Hardware Requirements Blueprintcomponent
Detailed description Quantity Part number
Server andnetwork
• At least 44 processorcores, 2.1 GHz
• 384 GB RAM• 10-Gigabit Ethernet• 8-Gigabit Fibre
Channel
SupermicroSuperServer
Supermicro SuperServer 2029U-E1CRT
1 SYS-2029U-E1CRT
Intel Xeon Scalable 6152 22C 2.1 GHzprocessor
2 P4X-SKL6152-SR3B4
32GB TruDDR4 Memory DDR4-26662RX4 ECC RDIMM
12 MEM-DR432L-CL01-ER26
Emulex LPe16002B-M6 16G FibreChannel HBA
2 AOC-LPE16002B-M6-O
4-port 10G SFP+, Intel XL710 2 AOC-STG-I4S
IBM 300 GB 10K 12 Gbps SAS 2.5-inch G3HS HDD
3 1 HDD-2A500-ST9500620SS
Implementation requirements 9
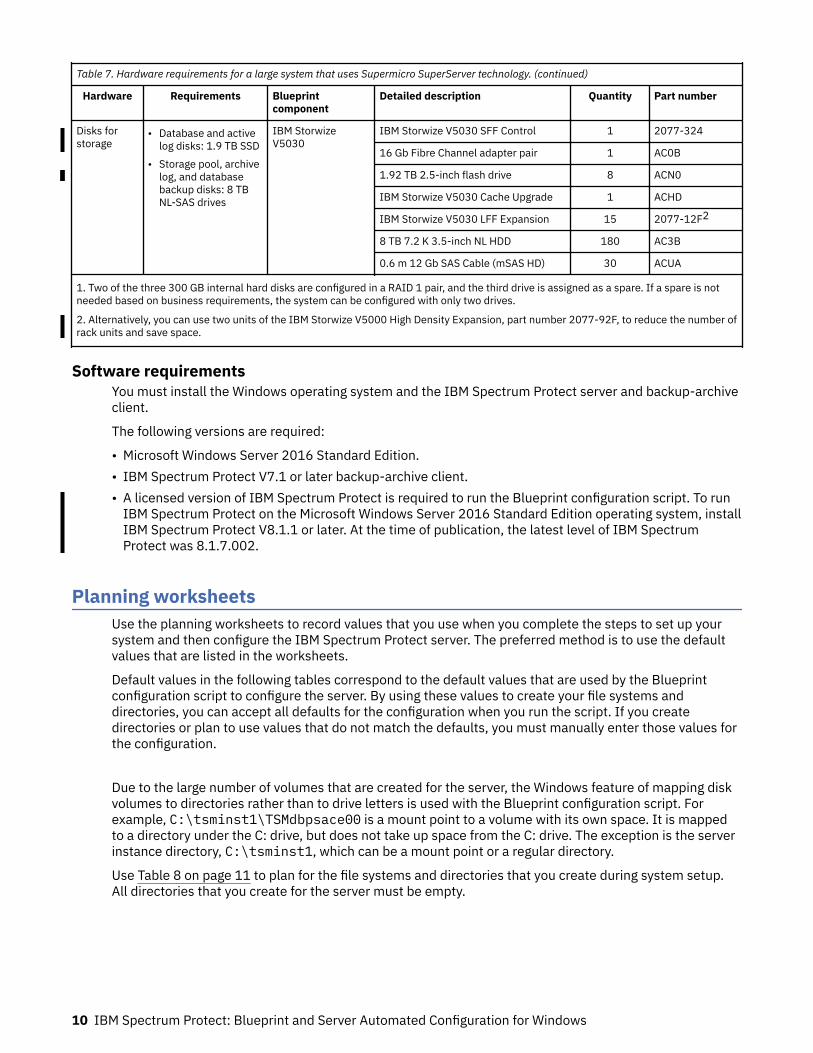
Table 7. Hardware requirements for a large system that uses Supermicro SuperServer technology. (continued)
Hardware Requirements Blueprintcomponent
Detailed description Quantity Part number
Disks forstorage
• Database and activelog disks: 1.9 TB SSD
• Storage pool, archivelog, and databasebackup disks: 8 TBNL-SAS drives
IBM StorwizeV5030
IBM Storwize V5030 SFF Control 1 2077-324
16 Gb Fibre Channel adapter pair 1 AC0B
1.92 TB 2.5-inch flash drive 8 ACN0
IBM Storwize V5030 Cache Upgrade 1 ACHD
IBM Storwize V5030 LFF Expansion 15 2077-12F2
8 TB 7.2 K 3.5-inch NL HDD 180 AC3B
0.6 m 12 Gb SAS Cable (mSAS HD) 30 ACUA
1. Two of the three 300 GB internal hard disks are configured in a RAID 1 pair, and the third drive is assigned as a spare. If a spare is notneeded based on business requirements, the system can be configured with only two drives.
2. Alternatively, you can use two units of the IBM Storwize V5000 High Density Expansion, part number 2077-92F, to reduce the number ofrack units and save space.
Software requirementsYou must install the Windows operating system and the IBM Spectrum Protect server and backup-archiveclient.
The following versions are required:
• Microsoft Windows Server 2016 Standard Edition.• IBM Spectrum Protect V7.1 or later backup-archive client.• A licensed version of IBM Spectrum Protect is required to run the Blueprint configuration script. To run
IBM Spectrum Protect on the Microsoft Windows Server 2016 Standard Edition operating system, installIBM Spectrum Protect V8.1.1 or later. At the time of publication, the latest level of IBM SpectrumProtect was 8.1.7.002.
Planning worksheetsUse the planning worksheets to record values that you use when you complete the steps to set up yoursystem and then configure the IBM Spectrum Protect server. The preferred method is to use the defaultvalues that are listed in the worksheets.
Default values in the following tables correspond to the default values that are used by the Blueprintconfiguration script to configure the server. By using these values to create your file systems anddirectories, you can accept all defaults for the configuration when you run the script. If you createdirectories or plan to use values that do not match the defaults, you must manually enter those values forthe configuration.
Due to the large number of volumes that are created for the server, the Windows feature of mapping diskvolumes to directories rather than to drive letters is used with the Blueprint configuration script. Forexample, C:\tsminst1\TSMdbpsace00 is a mount point to a volume with its own space. It is mappedto a directory under the C: drive, but does not take up space from the C: drive. The exception is the serverinstance directory, C:\tsminst1, which can be a mount point or a regular directory.
Use Table 8 on page 11 to plan for the file systems and directories that you create during system setup.All directories that you create for the server must be empty.
10 IBM Spectrum Protect: Blueprint and Server Automated Configuration for Windows

Table 8. Values needed for preconfiguration.
Item Default value Your value Directory size Notes
TCP/IP portaddress forcommunicationswith the server
1500 Not applicable This value is used when youinstall and configure theoperating system and is assignedby the Blueprint configurationscript during configuration of theserver.
If you want to use a value otherthan the default, you can specifya number in the range 1024 -32767.
Directory for theserver instance
C:\tsminst1 50 GB If you change the value for theserver instance directory from thedefault, modify the IBM Db2®
instance owner ID in Table 9 onpage 12 as well.
Drive for serverinstallation
C: 30 GB The directory size value is theminimum available space that youmust have.
For information about systemrequirements on Windowsoperating systems, see technote1064234.
Directory for theactive log
C:\tsminst1\TSMalog • Small and medium:140 GB
• Large: 300 GB
Directory for thearchive log
C:\tsminst1\TSMarchlog • Small: 1 TB• Medium: 2 TB• Large: 4 TB
Directories for thedatabase
C:\tsminst1\TSMdbspace00C:\tsminst1\TSMdbspace01C:\tsminst1\TSMdbspace02and so on.
Minimum total space forall directories:
• Small: At least 1 TB• Medium: At least 2 TB• Large: At least 4 TB
Create a minimum number of filesystems for the database,depending on the size of yoursystem:
• Small: At least 4 file systems• Medium: At least 4 file systems• Large: At least 8 file systems
Directories forstorage
C:\tsminst1\TSMfile00C:\tsminst1\TSMfile01C:\tsminst1\TSMfile02C:\tsminst1\TSMfile03and so on.
Minimum total space forall directories:
• Small: At least 38 TB• Medium: At least 180
TB• Large: At least 500 TB
Create a minimum number of filesystems for storage, dependingon the size of your system:
• Small: At least 10 file systems• Medium: At least 20 file
systems• Large: At least 40 file systems
Implementation requirements 11

Table 8. Values needed for preconfiguration. (continued)
Item Default value Your value Directory size Notes
Directories fordatabase backup
C:\tsminst1\TSMbkup00C:\tsminst1\TSMbkup01C:\tsminst1\TSMbkup02C:\tsminst1\TSMbkup03and so on.
Minimum total space forall directories:
• Small: At least 3 TB• Medium: At least 10
TB• Large: At least 16 TB
Create a minimum number of filesystems for backing up thedatabase, depending on the sizeof your system:
• Small: At least 2 file systems• Medium: At least 4 file systems• Large: At least 4 file systems,
but preferably 6 to 8
The first database backupdirectory is also used for thearchive log failover directory anda second copy of the volumehistory and device configurationfiles.
Use Table 9 on page 12 when you run the Blueprint configuration script to configure the server. Thepreferred method is to use the default values, except where noted.
Table 9. Values needed for the server configuration
Item Default value Your value Notes
Db2 instance owner ID tsminst1 If you changed the value for the server instancedirectory in Table 8 on page 11 from the default,modify the value for the Db2 instance owner IDas well.
Db2 instance ownerpassword
pAssW0rd The preferred method is to select a differentvalue for the instance owner password than thedefault. Ensure that you record this value in asecure location.
Server name The default value forthe server name isthe system hostname.
Server password passw0rd The preferred method is to select a differentvalue for the server password than the default.Ensure that you record this value in a securelocation.
Administrator ID (user IDfor the server instance)
admin
Administrator ID password passw0rd The preferred method is to select a differentvalue for the administrator password than thedefault. Ensure that you record this value in asecure location.
Schedule start time 22:00 The default schedule start time begins the clientworkload phase, which is predominantly theclient backup and archive activities. During theclient workload phase, server resources supportclient operations. These operations are usuallycompleted during the nightly schedule window.
Schedules for server maintenance operations aredefined to begin 10 hours after the start of theclient backup window.
12 IBM Spectrum Protect: Blueprint and Server Automated Configuration for Windows

Chapter 3. Storage configuration blueprintsAfter you acquire hardware for the scale of server that you want to build, you must prepare your storage tobe used with IBM Spectrum Protect. Configuration blueprints provide detailed specifications for storagelayout. Use them as a map when you set up and configure your hardware.
Specifications in “Hardware requirements” on page 5 and the default values in the “Planning worksheets”on page 10 were used to construct the blueprints for small, medium, and large systems. If you deviatefrom those specifications, you must account for any changes when you configure your storage.
Distributed arrays
You can use the distributed arrays feature with NL-SAS drives to achieve faster drive rebuild times in caseof a disk failure. Storwize distributed arrays, which contain 4 - 128 drives, also contain rebuild areas thatare used to maintain redundancy after a drive fails. The distributed configuration can reduce rebuild timesand decrease the exposure of volumes to the extra workload of recovering redundancy. If you plan to usethe 92-drive Storwize expansions, the preferred method is to create two 46-drive distributed RAID 6arrays per expansion.
If you are using a disk system that does not support distributed arrays, you must use traditional storagearrays. For instructions about configuring traditional storage arrays, see the Blueprint and ServerAutomated Configuration, Version 2 Release 3 guide for your operating system at the IBM SpectrumProtect Blueprints website.
Tip: To see earlier versions of the blueprint books, go to the bottom of the web page and select theAttachments tab.
Storwize layout requirements
A managed disk, or MDisk, is a logical unit of physical storage. In the blueprint configurations, MDisks areinternal-storage RAID arrays and consist of multiple physical disks that are presented as logical volumesto the system. When you configure the disk system, you will create MDisk groups, or data storage pools,and then create MDisk arrays in the groups. In the blueprint configurations, a one-to-one mapping existsbetween MDisks and MDisk groups.
Volumes, or LUNs, belong to one MDisk group and one I/O group. The MDisk group defines which MDisksprovide the storage that makes up the volume. The I/O group defines which nodes provide I/O access tothe volume. When you create volumes, make them fully allocated. For IBM Storwize hardware, select thegeneric volume type when you create volumes.
Table 10 on page 13 and Table 11 on page 14 describe the layout requirements for MDisk and volumeconfiguration in the storage blueprints.
Table 10. Components of MDisk configuration
Component Details
Server storage requirement How the storage is used by the IBM Spectrum Protect server.
Disk type Size and speed for the disk type that is used for the storage requirement.
Disk quantity Number of each disk type that is needed for the storage requirement.
Hot spare coverage Number of disks that are reserved as spares to take over in case of diskfailure.
RAID type Type of RAID array that is used for logical storage.
RAID array quantity andDDM per array
Number of RAID arrays to be created, and how many disk drive modules(DDMs) are to be used in each of the arrays.
© Copyright IBM Corp. 2014, 2019 13

Table 10. Components of MDisk configuration (continued)
Component Details
Usable size Size that is available for data storage after accounting for space that is lostto RAID array redundancy.
Suggested MDisk names Preferred name to use for MDisks and MDisk groups.
Usage IBM Spectrum Protect server component that uses part of the physicaldisk.
Table 11. Components of volume (LUN) configuration
Component Details
Server storage requirement Requirement for which the physical disk is used.
Volume name Unique name that is given to a specific volume.
Quantity Number of volumes to create for a specific requirement. Use the samenaming standard for each volume that is created for the same requirement.
Uses MDisk group The name of the MDisk group from which the space is obtained to createthe volume.
Size The size of each volume.
Intended server mountpoint
The directory on the IBM Spectrum Protect server system where thevolume is mounted.
If you plan to use directories other than the defaults that are configured bythe Blueprint configuration script, you must also use those directory valueswhen you configure your hardware. In this case, do not use the values thatare specified in the blueprints.
Usage IBM Spectrum Protect server component that uses part of the physicaldisk.
Small systemA small-scale system is based on IBM Storwize V5010 storage. One dual control enclosure and twoexpansion enclosures contain IBM Spectrum Protect data.
Logical layout
Figure 2 on page 15 shows the small system layout and how server and storage hardware is connectedto clients. A single cluster and I/O group are used in this configuration. The small system configurationwas tested with 8 Gb Fibre Channel connections made directly from the host to the Storwize V5010system without a SAN switch.
14 IBM Spectrum Protect: Blueprint and Server Automated Configuration for Windows

Figure 2. Logical layout for a small system
Storage configurationTable 12 on page 15 and Table 13 on page 15 show the detailed layout for each IBM Spectrum Protectstorage requirement on a small system.
Table 12. MDisk configuration
Server storagerequirement
Disktype
Diskquantity
Hot sparecoverage RAID type
RAID arrayquantity
Usablesize
Suggested MDiskgroup and array
names Usage
Database 800 GBSSD
4 1rebuild
areas=1
RAID 5 1 1
4 DDM
1.45 TB db_grp0db_array0
Database container
Storage pool 4 TB 7.2krpm NL-SAS HDD
24 rebuildareas=1
RAID 6 2 1
24 DDM
67 TB stgpool_grp0stgpool_array0
Storage pool
1. Distributed RAID 5, stripewidth=3, rebuild areas=1.2. Distributed RAID 6, stripewidth=12, rebuild areas=1.
Table 13. Fully allocated volume configuration
Serverstorage
requirementVolumename Quantity Uses MDisk group Size Intended server mount point Usage
Database db_00 -db_03
4 db_grp0 335.25GB each
C:\tsminst1\TSMdbspace00C:\tsminst1\TSMdbspace01C:\tsminst1\TSMdbspace02C:\tsminst1\TSMdbspace03
Databasecontainer
alog 1 db_grp0 145.25GB
C:\tsminst1\TSMalog Active log
archlog 1 stgpool_grp0 1.19 TB C:\tsminst1\TSMarchlog Archive log
backup_0 -backup_3
4 stgpool_grp0 1.58 TBeach C:\tsminst1\TSMbkup00
C:\tsminst1\TSMbkup01C:\tsminst1\TSMbkup02C:\tsminst1\TSMbkup03
Databasebackup
Storage configuration blueprints 15

Table 13. Fully allocated volume configuration (continued)
Serverstorage
requirementVolumename Quantity Uses MDisk group Size Intended server mount point Usage
Storage pool filepool_00 -filepool_09
10 stgpool_grp0 6.05 TBeach
C:\tsminst1\TSMfile00C:\tsminst1\TSMfile01C:\tsminst1 TSMfile02
...C:\tsminst1\TSMfile09
IBMSpectrum
Protect filesystems fora directory-containerstorage
pool
Medium systemA medium-scale system is based on IBM Storwize V5020 hardware. One dual control enclosure and onelarge capacity expansion enclosure contain IBM Spectrum Protect data.
Logical layout
Figure 3 on page 16 shows the medium system layout and how server and storage hardware isconnected to clients. A single cluster and I/O group are used. The medium system configuration wastested by using a SAN switch with 8 Gb Fibre Channel connections and two bonded 10 Gb Ethernetconnections.
The tables show multiple storage pool distributed arrays that are members of different Storwize storagepools. Alternatively, you can consolidate multiple storage pool arrays into a single storage pool. Thealternative configuration was tested and is supported.
Figure 3. Logical layout for a medium system
Storage configuration
Table 14 on page 17 and Table 15 on page 17 show the detailed layouts for MDisk and volumeconfigurations on a medium system. The following array configuration requires the default Storwizememory allocation for RAID to be increased, as described in Step “2” on page 57.
16 IBM Spectrum Protect: Blueprint and Server Automated Configuration for Windows

Table 14. MDisk configuration
Server storagerequirement
Disktype
Diskquantity
Hot sparecoverage RAID type
RAID arrayquantity
Usablesize
Suggested MDiskgroup and array
names Usage
Database 1.92 TBSSD
6 1
rebuild-areas = 1
DRAID61 1
6 DDM
5.16 TB db_grp0db_array0
Database andactive log
Storage pool 6 TB NL-SAS
46 2 DRAID62 1
46 DDM
197.91TB
stgpool_grp0stgpool_array0
Storage pool,archive log, and
database backups46 2 DRAID62 1
46 DDM
197.91TB
stgpool_grp1stgpool_array1
1. Distributed RAID 6, stripe width=5, rebuild areas=1.2. Distributed RAID 6, stripe width=12, rebuild areas=2.
Table 15. Fully allocated volume configuration
Serverstorage
requirementVolumename Quantity Uses MDisk group Size Intended server mount point Usage
Database db_00db_01db_02db_03db_04db_05db_06db_07
8 db_grp0 642.1GB each
c:\tsminst1\TSMdbspace00c:\tsminst1\TSMdbspace01c:\tsminst1\TSMdbspace02c:\tsminst1\TSMdbspace03c:\tsminst1\TSMdbspace04c:\tsminst1\TSMdbspace05c:\tsminst1\TSMdbspace06c:\tsminst1\TSMdbspace07
Database
alog 1 db_grp0 147 GB c:\tsminst1\TSMalog Active log
archlog_00 1 stgpool_grp0 1 TB c:\tsminst1\TSMarchlog Archive log
archlog_01 1 stgpool_grp1 1 TB
backup_00backup_01backup_02
3 stgpool_grp0 5 TBeach
c:\tsminst1\TSMbkup00c:\tsminst1\TSMbkup01c:\tsminst1\TSMbkup02
Databasebackup
backup_03backup_04backup_05
3 stgpool_grp1 5 TBeach c:\tsminst1\TSMbkup03
c:\tsminst1\TSMbkup04c:\tsminst1\TSMbkup05
Storage pool filepool00 -filepool19
20 stgpool_grp0 9.09 TBeach
Even numberedc:\tsminst1\TSMfile00c:\tsminst1\TSMfile02
...c:\tsminst1\TSMfile38
IBMSpectrum
Protect filesystems fora directory-containerstorage
poolfilepool20 -filepool39
20 stgpool_grp1 9.09 TBeach
Odd numberedc:\tsminst1\TSMfile01c:\tsminst1\TSMfile03
...c:\tsminst1\TSMfile39
Storage configuration blueprints 17

Large systemA large-scale system is based on IBM Storwize V5030 hardware. One controller with 15 expansionscontains the data.
Logical layout
Figure 4 on page 18 shows the large system layout and how server and storage hardware is connected toclients. Testing for the large system configuration was completed by using a SAN switch with four 8 GbFibre Channel connections and four bonded 10 Gb Ethernet connections.
The tables show multiple storage pool distributed arrays that are members of different Storwize storagepools. Alternatively, you can consolidate multiple storage pool arrays into a single storage pool. Thealternative configuration was tested and is supported.
Figure 4. Logical layout for a large system
Storage configuration
Table 16 on page 19 and Table 17 on page 19 show the detailed layouts for MDisk and volumeconfigurations on a large system. To allocate arrays across 15 expansions, the memory that is availablefor RAIDs must be increased to 125 MB, as described in Step “2” on page 57.
18 IBM Spectrum Protect: Blueprint and Server Automated Configuration for Windows

Table 16. MDisk configuration.
Server storagerequirement Disk type
Diskquantity
Hot sparecoverage RAID type
RAID arrayquantity
Usablesize
Suggested MDisk group andarray names Usage
Database 1.92 TB SSD 8 1
rebuildareas = 1
DRAID 6 1 1
8 DDM
8.64 TB db_grp0db_array0
Databasecontainer and
active log
Storage pool,archive log, and
database backup
8 TB NL-SAS 180 rebuildareas = 2
DRAID 6 2 3 3
60 DDMeach
349.89 TBeach stgpool_grp0
stgpool_grp1stgpool_grp2
stgpool_array0stgpool_array1stgpool_array2
Storage pool
1. Distributed RAID 6, stripe width=7, rebuild areas=1.
2. Distributed RAID 6, stripe width=12, rebuild areas=2.
3. Instead of three 60-drive RAID 6 arrays, you can use four 45-drive RAID 6 arrays. This is a supported alternative configuration.
Table 17. Fully allocated volume configuration.
Server storagerequirement Volume name Quantity Uses MDisk group Size
Intended servermount point Usage
Databasedb_00 -db_11
12 db_grp0 712 GBeach
C:\tsminst1\TSMdbspace00 -C:\tsminst1\TSMdbspace11
Database
alog 1 db_grp0 300 GB C:\tsminst1\TSMalog Active log
archlog_00 1 stgpool_grp0 1.3 TB C:\tsminst1\TSMarchlog Archive log
archlog_011 stgpool_grp1 1.3 TB
archlog_02 1 stgpool_grp2 1.3 TB
backup_00backup_01
2 stgpool_grp0 8 TB each C:\tsminst1\TSMbkup00C:\tsminst1\TSMbkup01
Databasebackup
backup_02backup_03
2 stgpool_grp1 8 TB eachC:\tsminst1\TSMbkup02C:\tsminst1\TSMbkup03
backup_04backup_05
2 stgpool_grp2 8 TB eachC:\tsminst1\TSMbkup04C:\tsminst1\TSMbkup05
Storage configuration blueprints 19

Table 17. Fully allocated volume configuration. (continued)
Server storagerequirement Volume name Quantity Uses MDisk group Size
Intended servermount point Usage
Storage pool filepool_00 -filepool 24
25 stgpool_grp0
(Twenty-five volumesper array)
13.2 TBeach
Mount points skip 2
stgpool_grp0:C:\tsminst1\TSMfile00C:\tsminst1\TSMfile03
...C:\tsminst1\TSMfile72
IBM SpectrumProtect file
systems for adirectory-container
storage pool
filepool_25 -filepool_49
25 stgpool_grp1
(Twenty-five volumesper array)
13.2 TBeach
Mount points skip 2
stgpool_grp1:C:\tsminst1\TSMfile01C:\tsminst1\TSMfile04
...C:\tsminst1\TSMfile73
filepool_50 -filepool_74
25 stgpool_grp2
(Twenty-five volumesper array)
13.2 TBeach
Mount points skip 2
stgpool_grp2:C:\tsminst1\TSMfile02C:\tsminst1\TSMfile05
...C:\tsminst1\TSMfile74
20 IBM Spectrum Protect: Blueprint and Server Automated Configuration for Windows

Chapter 4. Setting up the systemYou must set up hardware and preconfigure the system before you run the IBM Spectrum ProtectBlueprint configuration script.
Procedure
1. Configure your storage hardware according to the blueprint specifications and manufacturerinstructions. Follow the instructions in “Step 1: Set up and configure hardware” on page 21.
2. Install the Windows operating system on the server. Follow the instructions in “Step 2: Install theoperating system” on page 22.
3. Configure multipath I/O for disk storage devices. Follow the instructions in “Step 3: Configuremultipath I/O” on page 23.
4. Prepare file systems for IBM Spectrum Protect. Follow the instructions in “Step 4: Configure filesystems for IBM Spectrum Protect” on page 24.
5. Test system performance with the IBM Spectrum Protect workload simulation tool, tsmdiskperf.pl.Follow the instructions in “Step 5: Test system performance” on page 26.
6. Install the IBM Spectrum Protect backup-archive client. Follow the instructions in “Step 6: Install theIBM Spectrum Protect backup-archive client” on page 29.
7. Install the IBM Spectrum Protect license and server. Follow the instructions in “Step 7: Install the IBMSpectrum Protect server” on page 29.
Step 1: Set up and configure hardwareSet up and configure storage hardware by using the blueprint specifications and hardwaredocumentation.
Procedure
1. Connect your hardware according to manufacturer instructions. For optimal system performance, useat least 8 Gb SAN fabric for connections. If you are using a SAN switch, ensure that it is capable of 8 or16 Gb connection speeds.
• For server SAN cabling, use both Fibre Channel connection ports in the dual-port adapter on smalland medium systems for optimal throughput. Use all four ports in the two dual-port adapters onlarge systems. All configurations should support a Fibre Channel connection directly to storage or toa SAN switch.
• For storage subsystem SAN cabling, connect at least four cables to each storage device.2. Check for system BIOS updates from the server vendor and apply any suggested changes.3. Configure the disk system.
To configure a Storwize system, complete the following steps.
Tips:
• For information about using the command line to complete Steps c - e, see Appendix B, “Configuringthe disk system by using commands,” on page 53.
• Small, medium, and large systems were tested by using Storwize software level 8.2.1.2.
a) Configure licensed functions by following the instructions in your hardware documentation.b) Set up disks in enclosures according to the manufacturer instructions for the size of system that
you are building.c) Create RAIDs and LUNs, or volumes. For information about storage configuration layout, see the
storage blueprints:
© Copyright IBM Corp. 2014, 2019 21

• “Small system” on page 14• “Medium system” on page 16• “Large system” on page 18
d) Define the IBM Spectrum Protect server as a host to the disk system.e) Assign or map all of the volumes that were created in Step 2c to the new host.
To obtain the Fibre Channel worldwide port name (WWPN) to use for the Storwize host mapping,open a Microsoft Windows PowerShell command prompt and issue the following command:
Get-InitiatorPort
4. If you attach Storwize and IBM Spectrum Protect servers to a SAN fabric, create zones to ensure thatspecific Fibre Channel ports on the IBM Spectrum Protect server can communicate with specificStorwize host ports. During testing, the following guidelines were followed:
a. A separate zone was created for each Fibre Channel port on the IBM Spectrum Protect server sothat each zone contained no more than one server port.
b. Each zone contained one Storwize host port from each node canister.
Before you create zones, review the following examples for medium and large systems. The examplesare appropriate for a single fabric environment in which the host and disk subsystems are attached toa single switch.Medium system
a. On the IBM Spectrum Protect server, both Fibre Channel ports on the dual port Fibre Channeladapter are cabled and are referred to as ha1p1 and ha1p2.
b. Two of the host ports on the Storwize server are cabled (one from each node canister) and arereferred to as n1p1 and n2p1.
c. Two zones are created with the following members:
zone1: ha1p1, n1p1, n2p1zone2: ha1p2, n1p1, n2p1
Large system
a. On the IBM Spectrum Protect server, all four Fibre Channel ports across the two dual portadapters are cabled. The ports are referred to as ha1p1, ha1p2, ha2p1, and ha2p2.
b. Four of the host ports on the Storwize server are cabled (two from each node canister) and arereferred to as n1p1, n1p2, n2p1, and n2p2.
c. Four zones are created with the following members:
zone1: ha1p1, n1p1, n2p1zone2: ha1p2, n1p2, n2p2zone3: ha2p1, n1p1, n2p1zone4: ha2p2, n1p2, n2p2
For additional guidelines about achieving optimal performance and redundancy, see the SANconfiguration and zoning rules summary in IBM Knowledge Center.
Step 2: Install the operating systemInstall Microsoft Windows Server 2016 Standard Edition on the server system and prepare the system forinstallation and configuration of the IBM Spectrum Protect server.
Before you beginThe operating system is installed on internal hard disk drives. Configure the drives by using a hardwareRAID 1 schema. For example, if you are configuring a large system, configure the three 300 GB internal
22 IBM Spectrum Protect: Blueprint and Server Automated Configuration for Windows

drives by assigning two drives to a RAID 1 pair and the third drive as a spare. If a spare is not needed tomeet business requirements, you can configure the system with only two drives.
Procedure
1. Install Windows Server 2016 Standard Edition, according to the manufacturer instructions.2. Change the Windows account control policies by completing the following steps.
a) Open the Local Security Policy editor by running secpol.msc.b) Click Local Policies > Security Options and ensure that the following User Account Control policies
are disabled:
• Admin Approval Mode for the Built-in Administrator account• Run all administrators in Admin Approval Mode
3. Configure your TCP/IP settings according to installation instructions for the operating system.4. Apply Windows updates and enable optional features by completing the following steps:
a) Apply the latest Windows Server 2016 updates.
b) Install and enable the Windows 2012 R2 feature Microsoft .NET Framework 3.5 from the WindowsServer Manager.
c) If required, update the FC and Ethernet HBA device drivers to newer levels.d) Install the multipath I/O driver that is appropriate for the disk system that you are using.
The IBM Subsystem Device Driver (SDD) version SDDDSM_x64_2530_121418 was used fortesting.
e) Install a 64-bit Perl interpreter, which is required for the disk performance and IBM SpectrumProtect blueprint configuration.For example, you can install ActivePerl from ActiveState.
5. Open a TCP/IP port for communications with the IBM Spectrum Protect server.
• To use the default port address, open port 1500 in the Windows firewall. For example, issue thefollowing command:
netsh advfirewall firewall add rule name="TSM server port 1500"dir=in action=allow protocol=TCP localport=1500
• If you want to use a port other than the default, you can specify a number in the range 1024 -32767. If you open a port other than the default, you must specify that port when you run theconfiguration script.
6. Optional: If you plan to use this system as an IBM Spectrum Protect Operations Center hub, open thedefault port for secure (https) communications. The port number is 11090.For example, issue the following command:
netsh advfirewall firewall add rule name="TSM Operations Center port 11090"dir=in action=allow protocol=TCP localport=11090
Step 3: Configure multipath I/OEnable and configure multipathing for disk storage.
Procedure
1. Ensure that the Multipath I/O feature is installed. If needed, install additional vendor-specificmultipath drivers.
Setting up the system 23
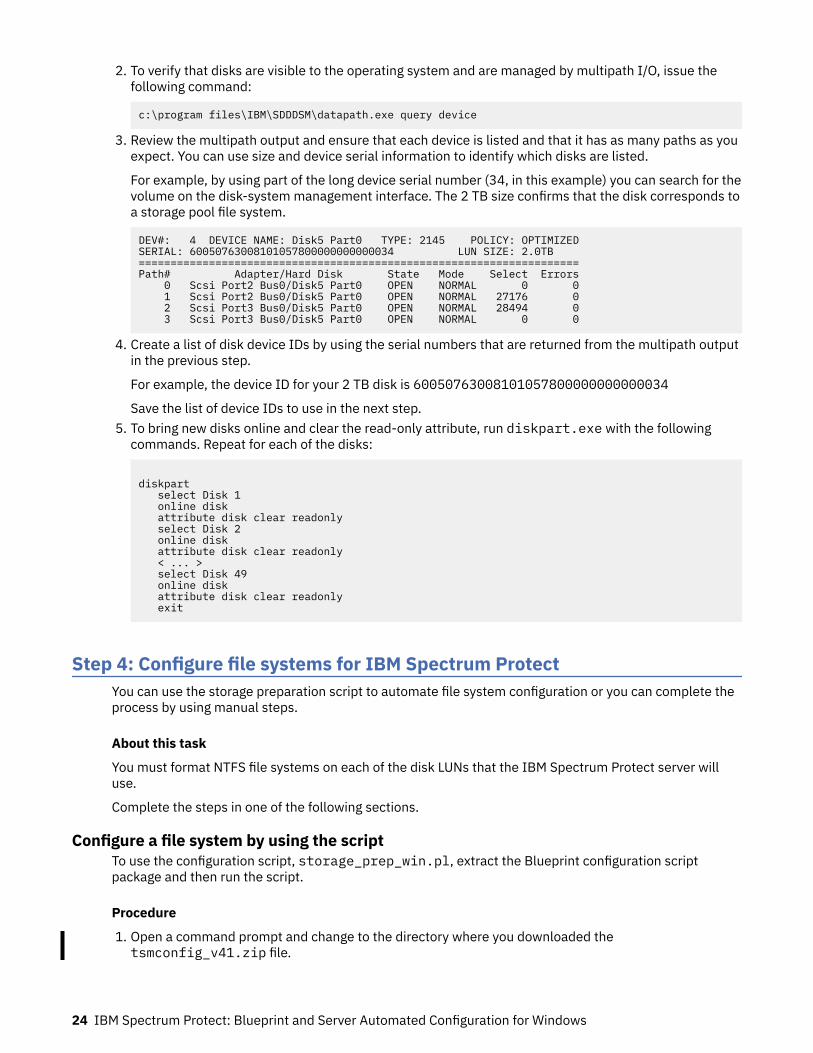
2. To verify that disks are visible to the operating system and are managed by multipath I/O, issue thefollowing command:
c:\program files\IBM\SDDDSM\datapath.exe query device
3. Review the multipath output and ensure that each device is listed and that it has as many paths as youexpect. You can use size and device serial information to identify which disks are listed.
For example, by using part of the long device serial number (34, in this example) you can search for thevolume on the disk-system management interface. The 2 TB size confirms that the disk corresponds toa storage pool file system.
DEV#: 4 DEVICE NAME: Disk5 Part0 TYPE: 2145 POLICY: OPTIMIZEDSERIAL: 60050763008101057800000000000034 LUN SIZE: 2.0TB=====================================================================Path# Adapter/Hard Disk State Mode Select Errors 0 Scsi Port2 Bus0/Disk5 Part0 OPEN NORMAL 0 0 1 Scsi Port2 Bus0/Disk5 Part0 OPEN NORMAL 27176 0 2 Scsi Port3 Bus0/Disk5 Part0 OPEN NORMAL 28494 0 3 Scsi Port3 Bus0/Disk5 Part0 OPEN NORMAL 0 0
4. Create a list of disk device IDs by using the serial numbers that are returned from the multipath outputin the previous step.
For example, the device ID for your 2 TB disk is 60050763008101057800000000000034
Save the list of device IDs to use in the next step.5. To bring new disks online and clear the read-only attribute, run diskpart.exe with the following
commands. Repeat for each of the disks:
diskpart select Disk 1 online disk attribute disk clear readonly select Disk 2 online disk attribute disk clear readonly < ... > select Disk 49 online disk attribute disk clear readonly exit
Step 4: Configure file systems for IBM Spectrum ProtectYou can use the storage preparation script to automate file system configuration or you can complete theprocess by using manual steps.
About this task
You must format NTFS file systems on each of the disk LUNs that the IBM Spectrum Protect server willuse.
Complete the steps in one of the following sections.
Configure a file system by using the scriptTo use the configuration script, storage_prep_win.pl, extract the Blueprint configuration scriptpackage and then run the script.
Procedure
1. Open a command prompt and change to the directory where you downloaded thetsmconfig_v41.zip file.
24 IBM Spectrum Protect: Blueprint and Server Automated Configuration for Windows

2. From the Windows Explorer, right-click the tsmconfig_v41.zip file and select Extract All to extractall folders.The process creates a directory that is called tsmconfig. This directory contains the storagepreparation script, the workload simulation tool, and the Blueprint configuration script.
3. Change to the tsmconfig directory by issuing the following command:
cd tsmconfig
4. Run the Perl script and specify the size of system that you are configuring.For example, for a medium system, issue the following command:
perl storage_prep_win.pl medium
If you did not map the disks to the host according to the specifications in “Step 3: Configure multipathI/O” on page 23, the script requires customization.
5. After the script finishes, verify that file systems are mounted at the correct LUN and mount point. Listall file systems by issuing the mountvol command and then review the output.For example:
\\?\Volume{8ffb9678-3216-474c-a021-20e420816a92}\ C:\tsminst1\TSMdbspace00\
You can confirm the amount of free space for each volume by using Windows Explorer.6. After the disk configuration is complete, restart the system.
Configure by using the manual procedureYou can prepare file systems manually by using commands.
Procedure
1. Create mount point directories for IBM Spectrum Protect file systems.Issue the md command for each directory that you must create. Use the directory values that yourecorded in the “Planning worksheets” on page 10.For example, to create the server instance directory by using the default value, issue the followingcommand:
md c:\tsminst1
Repeat the md command for each file system.If you do not use the default paths for your directories, you must manually list directory paths duringconfiguration of the IBM Spectrum Protect server.
2. Create a volume for every disk LUN that is mapped to a directory under the server instance directory.To use the Windows volume manager, click Server Manager > File and Storage Services. You can alsouse a command interface with the diskpart.exe command for this task.
Complete the following steps for each disk that corresponds to the LUN mapping that was created inthe previous step:
a) Bring the disk online.b) Initialize the disk to the GPT basic type, which is the default.c) Create a simple volume that occupies all of the space on the disk. Format the file system by using
NTFS, and assign a label that matches the purpose of the volume, such as TSMfile00. Do notassign the new volume to a drive letter. Instead, map the volume to a directory under the instancedirectory, such as C:\tsminst1\TSMfile00.
Tip: Determine the volume label and directory mapping labels based on the size of the disk that isreported.
Setting up the system 25
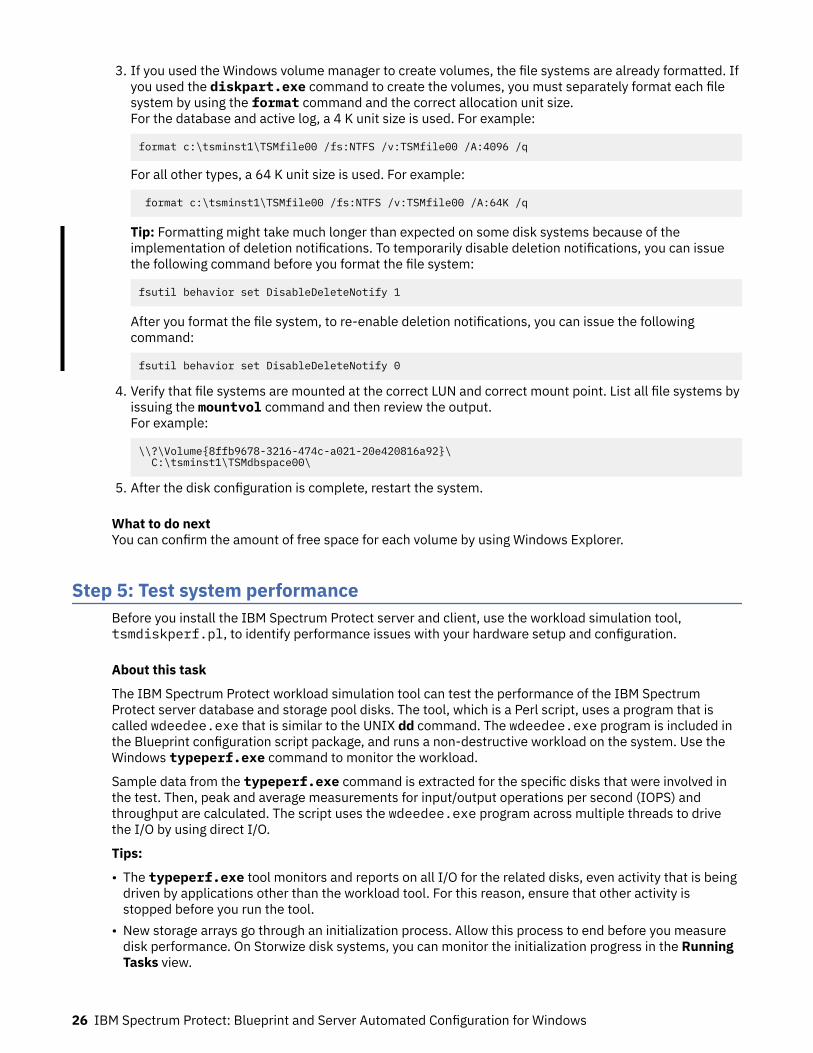
3. If you used the Windows volume manager to create volumes, the file systems are already formatted. Ifyou used the diskpart.exe command to create the volumes, you must separately format each filesystem by using the format command and the correct allocation unit size.For the database and active log, a 4 K unit size is used. For example:
format c:\tsminst1\TSMfile00 /fs:NTFS /v:TSMfile00 /A:4096 /q
For all other types, a 64 K unit size is used. For example:
format c:\tsminst1\TSMfile00 /fs:NTFS /v:TSMfile00 /A:64K /q
Tip: Formatting might take much longer than expected on some disk systems because of theimplementation of deletion notifications. To temporarily disable deletion notifications, you can issuethe following command before you format the file system:
fsutil behavior set DisableDeleteNotify 1
After you format the file system, to re-enable deletion notifications, you can issue the followingcommand:
fsutil behavior set DisableDeleteNotify 0
4. Verify that file systems are mounted at the correct LUN and correct mount point. List all file systems byissuing the mountvol command and then review the output.For example:
\\?\Volume{8ffb9678-3216-474c-a021-20e420816a92}\ C:\tsminst1\TSMdbspace00\
5. After the disk configuration is complete, restart the system.
What to do nextYou can confirm the amount of free space for each volume by using Windows Explorer.
Step 5: Test system performanceBefore you install the IBM Spectrum Protect server and client, use the workload simulation tool,tsmdiskperf.pl, to identify performance issues with your hardware setup and configuration.
About this task
The IBM Spectrum Protect workload simulation tool can test the performance of the IBM SpectrumProtect server database and storage pool disks. The tool, which is a Perl script, uses a program that iscalled wdeedee.exe that is similar to the UNIX dd command. The wdeedee.exe program is included inthe Blueprint configuration script package, and runs a non-destructive workload on the system. Use theWindows typeperf.exe command to monitor the workload.
Sample data from the typeperf.exe command is extracted for the specific disks that were involved inthe test. Then, peak and average measurements for input/output operations per second (IOPS) andthroughput are calculated. The script uses the wdeedee.exe program across multiple threads to drivethe I/O by using direct I/O.
Tips:
• The typeperf.exe tool monitors and reports on all I/O for the related disks, even activity that is beingdriven by applications other than the workload tool. For this reason, ensure that other activity isstopped before you run the tool.
• New storage arrays go through an initialization process. Allow this process to end before you measuredisk performance. On Storwize disk systems, you can monitor the initialization progress in the RunningTasks view.
26 IBM Spectrum Protect: Blueprint and Server Automated Configuration for Windows

The workload simulation tool can run the following types of workloads:Storage pool workload
The storage pool workload simulates IBM Spectrum Protect server-side data deduplication, in whichlarge, 256 KB block-size sequential read and write operations are overlapped. The write processsimulates incoming backups while the read operation simulates identification of duplicate data. Thetool creates a read and write thread for every file system that is included in the test, allowing multiplesessions and processes to be striped across more than one file system.
You can also simulate a storage pool workload that conducts only read I/O or only write I/Ooperations:
• Simulate restore operations by specifying the mode=readonly option.• Simulate backup operations by specifying the mode=writeonly option.
Database workloadThe database workload simulates IBM Spectrum Protect database disk access in which small, 8 KBread and write operations are performed randomly across the disk. For this workload, 10 GB files arepre-created on each of the specified file systems and then read and write operations are run torandom ranges within these files. Multiple threads are issued against each file system, sending I/Orequests simultaneously.
For the database workload, configurations typically have one file system for each pool on the storagearray. Include all database file systems when you are testing the database workload.
To use the tool effectively, experiment with test runs by including different quantities of file systems in thesimulation until the performance of the system diminishes.
Depending on disk speed and the number of file systems that you are testing, the time that is required torun the script can be 3 - 10 minutes.
Procedure
To use the workload simulation tool, complete the following steps:1. Plan to test either the storage pool file systems or the database file systems.2. Collect a list of the file systems that are associated with your chosen type of storage. Break the file
systems into groups according to which pool they belong to on the disk system.Grouping is used to ensure that physical disks from all volumes on all arrays for the storage type areengaged in the test. To review groupings for file systems, see the volume configuration tables inChapter 3, “Storage configuration blueprints,” on page 13.
3. To run the tool, change to the tsmconfig directory by issuing the following command:
cd tsmconfig
If you did not extract the Blueprint configuration script compressed file to prepare file systems for IBMSpectrum Protect, follow the instructions in “Configure a file system by using the script” on page 24.
4. Run an initial test of the workload that includes one file system of the storage type from each pool onthe storage array.For example, to simulate the IBM Spectrum Protect storage pool workload on a medium-scale system,issue the following command:
perl tsmdiskperf.pl workload=stgpoolfslist=c:\tsminst1\TSMfile00,c:\tsminst1\TSMfile01,c:\tsminst1\TSMfile02,c:\tsminst1\TSMfile03,c:\tsminst1\TSMfile04,c:\tsminst1\TSMfile05,c:\tsminst1\TSMfile06,c:\tsminst1\TSMfile07
For example, to simulate backup operations (by using only write I/O) for an IBM Spectrum Protectstorage pool workload on a medium-scale system, issue the following command:
perl tsmdiskperf.pl workload=stgpoolfslist=c:\tsminst1\TSMfile00,c:\tsminst1\TSMfile01,c:\tsminst1\TSMfile02,c:\tsminst1\TSMfile03,c:\tsminst1\TSMfile04,c:\tsminst1\TSMfile05,c:\tsminst1\TSMf
Setting up the system 27

ile06,c:\tsminst1\TSMfile07 mode=writeonly
To simulate the database workload on a small-scale system and include all four of the database filesystems, issue the following command:
perl tsmdiskperf.pl workload=db fslist=c:\tsminst1\TSMdbspace00,c:\tsminst1\TSMdbspace01,c:\tsminst1\TSMdbspace02,c:\tsminst1\TSMdbspace03
Record the reported results for each test run.5. Rerun the previous test, but modify it to include one additional file system from each pool.
For example, if you have two pools on the array that is dedicated to the storage pool, your testsequence will include a count of file systems at 2, 4, 6, 8, 10, and so on.
6. Continue repeating these tests while the reported performance measurements improve. Whenperformance diminishes, capture the results of the last test that indicated improvement. Use theseresults as the measurements for comparison.
Results
The performance results that are provided when you run the workload simulation tool might not representthe maximum capabilities of the disk subsystem that is being tested. The intent is to providemeasurements that can be compared against the lab results that are reported for medium and largesystems.
The workload simulation tool is not intended to be a replacement for disk performance analysis tools.Instead, you can use it to spot configuration problems that affect performance before you run IBMSpectrum Protect workloads in a production environment. Problems will be evident if the measurementsfrom test runs are significantly lower than what is reported for test lab systems. If you are using hardwareother than the Storwize components that are included in this document, use your test results as a roughestimate of how other disk types compare with the tested configurations.
Example
This example shows the output from a storage pool workload test on a small system. Four file systems areincluded. The following command is issued:
perl tsmdiskperf.pl workload=stgpool fslist=c:\tsminst1\TSMfile00,c:\tsminst1\TSMfile01,c:\tsminst1\TSMfile02,c:\tsminst1\TSMfile03
The output shows the following results:
===================================================================: IBM Spectrum Protect disk performance test (Program version 4.1):: Workload type: stgpool: Number of filesystems: 8: Mode: readwrite: Files to write per fs: 5: File size: 2 GB:===================================================================:: Beginning I/O test.: The test can take upwards of ten minutes, please be patient ...: Starting write thread ID: 1 on filesystem c:\tsminst1\TSMfile00: Starting read thread ID: 2 on filesystem c:\tsminst1\TSMfile00: Starting write thread ID: 3 on filesystem c:\tsminst1\TSMfile01: Starting read thread ID: 4 on filesystem c:\tsminst1\TSMfile01: Starting write thread ID: 5 on filesystem c:\tsminst1\TSMfile02: Starting read thread ID: 6 on filesystem c:\tsminst1\TSMfile02: Starting write thread ID: 7 on filesystem c:\tsminst1\TSMfile03: Starting read thread ID: 8 on filesystem c:\tsminst1\TSMfile03: All threads are finished. Stopping typeperf process with id 1452
28 IBM Spectrum Protect: Blueprint and Server Automated Configuration for Windows

SUCCESS: The process with PID 1452 has been terminated.===================================================================: RESULTS:: Devices reported on from output:: \LogicalDisk(C:\tsminst1\TSMfile00)\*: \LogicalDisk(C:\tsminst1\TSMfile01)\*: \LogicalDisk(C:\tsminst1\TSMfile02)\*: \LogicalDisk(C:\tsminst1\TSMfile03)\*:: Average R Throughput (KB/sec): 176579.84: Average W Throughput (KB/sec): 168082.13: Avg Combined Throughput (MB/sec): 336.58: Max Combined Throughput (MB/sec): 445.55:: Average IOPS: 2025.07: Peak IOPS: 2800.32 at 08/05/2015 14:23:59:: Total elapsed time (seconds): 100
What to do next
Compare your performance results against test lab results by reviewing sample outputs for storage pooland database workloads on both medium and large systems:
• For the storage pool workload, the measurement for average combined throughput in MB per secondcombines the read and write throughput. This is the most useful value when you compare results.
• For the database workload, the peak IOPS measurements add the peak read and write operations persecond for a specific time interval. This is the most useful value when you compare results for thedatabase workload.
To review the sample outputs, see Appendix A, “Performance results,” on page 49.
Step 6: Install the IBM Spectrum Protect backup-archive clientInstall the IBM Spectrum Protect for Windows backup-archive client so that the administrative command-line client is available.
About this taskInstall the backup-archive client and API on the server system.
Procedure
• Install the backup-archive client by following the instructions in Installing the backup-archive clientsin IBM Knowledge Center.
Tip: If available, you can display different versions of the same topic by using the versions menu at thetop of the page.
Step 7: Install the IBM Spectrum Protect serverBefore you can run the Blueprint configuration script, you must install the IBM Spectrum Protect serverand license.
About this task
To ensure that the server can run on the Microsoft Windows Server 2016 Standard Edition operatingsystem, you must install IBM Spectrum Protect Version 8.1.1 or later. To take advantage of the latestproduct updates, install the latest product level. At the time of publication, the latest available level was8.1.7.002.
Setting up the system 29

Before you install IBM Spectrum Protect, review the list of new features, including any securityenhancements, for your selected release. For an overview, see What's new in V7 releases and What's newin V8 releases.
For information about security updates, see technote 2004844.
Obtain the installation packageYou can obtain the IBM Spectrum Protect Version 8.1.1 or later installation package from an IBMdownload site such as Passport Advantage® or IBM Fix Central.
Procedure
1. Download the server installation package from Passport Advantage or Fix Central.2. For the latest information, updates, and maintenance fixes, go to the IBM Support Portal for IBM
Spectrum Protect.3. Complete the following steps:
a) Verify that you have enough space to store the installation files when they are extracted from theproduct package. See the download document for the space requirements:
• IBM Spectrum Protect: Techdoc 4042944• IBM Spectrum Protect Extended Edition: Techdoc 4042945
b) Change to the directory where you placed the executable file.
In the next step, the files are extracted to the current directory. The path must contain no morethan 128 characters. Be sure to extract the installation files to an empty directory. Do not extractthe files to a directory that contains previously extracted files, or any other files.
c) To extract the files, double-click the executable file, or enter the following command at thecommand prompt:
package_name
where package_name is like this example: 8.1.1.000-IBM-SPSRV-WindowsX64.exe
Install IBM Spectrum Protect Version 8.1.1 or laterInstall IBM Spectrum Protect Version 8.1.1 or later by using the command line in console mode.
Before you begin
Complete the following steps:
1. Verify that the operating system is set to the language that you require. By default, the language of theoperating system is the language of the installation wizard.
2. Verify that the user ID that will be used for the installation has local Administrator authority.
Procedure
1. Change to the directory where you downloaded the package.2. Start the installation wizard in console mode by issuing the following command:
install.bat -c
Optional: Generate a response file as part of a console mode installation. Complete the console modeinstallation options, and in the Summary window, specify G to generate the responses.
30 IBM Spectrum Protect: Blueprint and Server Automated Configuration for Windows

ResultsIf errors occur during the installation process, the errors are recorded in log files that are stored in theIBM Installation Manager logs directory, for example:
C:\ProgramData\IBM\Installation Manager\logs
What to do next
After you install IBM Spectrum Protect, and before you customize it for your use, go to the IBM SupportPortal for IBM Spectrum Protect. Click Download drivers, firmware and PTFs (Fix Central) and apply anyapplicable fixes.
Tip: For more information about installation, see Installing the server components in IBM KnowledgeCenter.
Setting up the system 31

32 IBM Spectrum Protect: Blueprint and Server Automated Configuration for Windows

Chapter 5. Configuring the IBM Spectrum Protectserver
Run the Blueprint configuration script, TSMserverconfig.pl, to configure the IBM Spectrum Protectserver.
Before you begin
You can run the Blueprint configuration script in interactive or non-interactive mode. In interactive mode,you provide responses for each step in the script and accept defaults or enter values for the configuration.In non-interactive mode, the script uses a response file that contains answers to the script prompts.
To run the script in non-interactive mode, use one of the response files that are included in the blueprintconfiguration compressed file. For instructions about how to use a response file, see Appendix C, “Using aresponse file with the Blueprint configuration script,” on page 61.
As part of the system setup and software installation steps, updates to system environment variables aremade. In order for these changes to take effect, you must log out and log back in to Windows before yourun the Blueprint configuration script to configure the server.
About this taskWhen you start the script and select the size of server that you want to configure, the script verifies thefollowing hardware and system configuration prerequisites:
• Sufficient memory is available for server operations.• Processor core count meets blueprint specifications.• All required file systems are created.• The minimum number of file system types exist and the minimum level of free space is available in eachfile system.
If all prerequisites checks are passed, the script begins server configuration. The following tasks arecompleted to configure the server for optimal performance, based on the scale size that you select:
• A Db2 database instance is created.• The dsmserv.opt options file with optimum values is created.• The server database is formatted.• A Windows service is created so that the server starts automatically on system start.• Definitions that are required for database backup operations are created.• A directory-container storage pool with optimal performance settings for data deduplication is defined.
You can use the -legacy option with the blueprint configuration script to force the creation of adeduplicated storage pool, which uses a FILE device class.
• Policy domains for each type of client workload are defined.• Schedules for client backup are created.• Server maintenance schedules that are sequenced for optimal data deduplication scalability are
created.• The client options file is created.
The blueprint configuration script includes a compression option that enables compression for both thearchive log and database backups. You can save significant storage space by using this option, but theamount of time that is needed to complete database backups increases. The preferred method is toenable the option if you are configuring a small blueprint system because limited space is configured forthe archive log and database backups.
© Copyright IBM Corp. 2014, 2019 33

The default setting for the compression option is disabled.
Tip: Do not confuse the blueprint configuration script compression option with inline compression of datain container storage pools, which is enabled by default with IBM Spectrum Protect V7.1.5 and later.
Complete the following steps as the Administrator to run the Blueprint configuration script.
After you complete the system setup, you must log out and then log back in to Windows before youconfigure the server.
Procedure
1. Open a command prompt.2. If you did not extract the Blueprint configuration script compressed file to prepare file systems for IBM
Spectrum Protect, follow the instructions in “Configure a file system by using the script” on page 24.3. Change to the tsmconfig directory by issuing the following command:
cd tsmconfig
4. Run the configuration script in one of the following modes:
• To run the configuration script in interactive mode and enter your responses at the script prompts,issue the following command:
perl TSMserverconfig.pl
If you want to enable compression for the archive log and database backups on a small system,issue the following command:
perl TSMserverconfig.pl -compression
Depending on how you preconfigured the system, you can accept the default values that arepresented by the script. Use the information that you recorded in the “Planning worksheets” onpage 10 as a guide. If you changed any of the default values during the preconfiguration step,manually enter your values at the script prompts.
• To run the configuration script in non-interactive mode by using a response file to set configurationvalues, specify the response file when you run the script. For example:
– To use the default response file for a medium system, issue the following command:
perl TSMserverconfig.pl responsefilemed_win.txt
– To use the default response file for a small system and enable compression for the archive logand database backups, issue the following command:
perl TSMserverconfig.pl responsefilesmall_win.txt -compression
If you encounter a problem during the configuration and want to pause temporarily, use the quitoption. When you run the script again, it resumes at the point that you stopped. You can also openother terminal windows to correct any issues, and then return to and continue the script. When thescript finishes successfully, a log file is created in the current directory.
5. Save the log file for future reference.
The log file is named setupLog_datestamp.log where datestamp is the date that you ran theconfiguration script. If you run the script more than once on the same day, a version number isappended to the end of the name for each additional version that is saved.
For example, if you ran the script three times on July 27, 2013, the following logs are created:
• setupLog_130727.log• setupLog_130727_1.log• setupLog_130727_2.log
34 IBM Spectrum Protect: Blueprint and Server Automated Configuration for Windows

ResultsAfter the script finishes, the server is ready to use. Review Table 18 on page 35 and the setup log file fordetails about your system configuration.
Table 18. Summary of configured elements
Item Details
Db2 database instance
• The Db2 instance is created by using the instance user ID and instance home directory.• Db2 instance variables that are required by the server are set.• The Db2 -locklist parameter remains at the default setting of Automatic (for automatic
management), which is preferred for container storage pools. If you are defining a non-container storage pool, you can use the -locklist parameter with the IBM Spectrum Protectblueprint configuration script, TSMserverconfig.pl, to revert to manually setting -locklistvalues.
IBM Spectrum Protect API • An API tsmdbmgr.opt file is created with required parameters.• The API password is set.
Server settings
• The server is configured to start automatically when the system is started.• An initial system level administrator is registered.• The server name and password are set.• The following values are specified for SET commands:
– SET ACTLOGRETENTION is set to 90.– SET EVENTRETENTION is set to 180.– SET SUMMARYRETENTION is set to 180.
Configuring the IBM Spectrum Protect server 35

Table 18. Summary of configured elements (continued)
Item Details
IBM Spectrum Protect server optionsfile
The dsmserv.opt file is set with optimal parameter values for server scale. The following serveroptions are specified:
• ACTIVELOGSIZE is set according to scale size:
– Small system: 131072– Medium system: 131072– Large system: 262144
• If you enabled compression for the blueprint configuration, ARCHLOGCOMPRESS is set to Yes.• COMMTIMEOUT is set to 3600 seconds.• If you are using the -legacy option for data deduplication, DEDUPDELETIONTHREADS is set
according to scale size:
– Small system: 8– Medium system: 8– Large system: 12
• DEDUPREQUIRESBACKUP is set to NO.• DEVCONFIG is specified as devconf.dat, which is where a backup copy of device configuration
information will be stored.• EXPINTERVAL is set to 0, so that expiration processing runs according to schedule.• IDLETIMEOUT is set to 60 minutes.• MAXSESSIONS is set according to scale size:
– Small system: 250 maximum simultaneous client sessions– Medium system: 500 maximum simultaneous client sessions– Large system: 1000 maximum simultaneous client sessions
The effective value for the SET MAXSCHEDSESSIONS option is 80% of the value that wasspecified for the MAXSESSIONS option:
– Small system: 200 sessions– Medium system: 400® sessions– Large system: 800 sessions
• NUMOPENVOLSALLOWED is set to 20 open volumes.• VOLUMEHISTORY is specified as volhist.dat, which is where the server will store a backup copy
of volume history information. In addition to volhist.dat, which will be stored in the serverinstance directory, a second volume history option is specified to be stored in the first databasebackup directory for redundancy.
IBM Spectrum Protect server optionsfile: database reorganization options
Server options that are related to database reorganization are specified in the following sections.
Servers at V7.1.1 or later:
• ALLOWREORGINDEX is set to YES.• ALLOWREORGTABLE is set to YES.• DISABLEREORGINDEX is not set.• DISABLEREORGTABLE is set to
BF_AGGREGATED_BITFILES,BF_BITFILE_EXTENTS,ARCHIVE_OBJECTS,BACKUP_OBJECTS
• REORGBEGINTIME is set to 12:00.• REORGDURATION is set to 6.
Directory-container storage pool A directory-container storage pool is created, and all of the storage pool file systems are definedas container directories for this storage pool. The following parameters are set in the DEFINESTGPOOL command:
• STGTYPE is set to DIRECTORY.• MAXWRITERS is set to NOLIMIT.
For servers at V7.1.5 or later, compression is automatically enabled for the storage pool.
36 IBM Spectrum Protect: Blueprint and Server Automated Configuration for Windows

Table 18. Summary of configured elements (continued)
Item Details
Storage pool if the -legacy option isspecified
• A FILE device class is created and tuned for configuration size:
– All storage pool file systems are listed with the DIRECTORY parameter in the DEFINEDEVCLASS command.
– The MOUNTLIMIT parameter is set to 4000 for all size systems.– The MAXCAP parameter is set to 50 GB for all size systems.
• The storage pool is created with settings that are tuned for configuration size:
– Data deduplication is enabled.– The value of the IDENTIFYPROCESS parameter is set to 0 so that duplicate identification
can be scheduled.– Threshold reclamation is disabled so that it can be scheduled.– The MAXSCRATCH parameter value is tuned based on the amount of storage that is
available in the FILE storage pool.
Configuring the IBM Spectrum Protect server 37

Table 18. Summary of configured elements (continued)
Item Details
Server schedules The following server maintenance schedules are defined:
• A replication schedule is defined to run 10 hours after the start of the backup window. Thisschedule is inactive unless replication is enabled. Then, you must activate the schedule.Sessions are based on system size:
– Small system: 20– Medium system: 40– Large system: 60
• Database backup is scheduled to run until it is complete. The schedule starts 14 hours after thebeginning of the client backup window.
A device class that is named DBBACK_FILEDEV is created for the database backup. If theconfiguration script is started with the compression option, the BACKUP DB command runs withcompress=yes.
The device class is created to allow a mount limit of 32. The file volume size is set to 50 GB. Thedevice class directories include all of the database backup directories. The number of databasebackup sessions is based on system size:
– Small system: 2– Medium system: 4– Large system: 12
In addition, the SET DBRECOVERY command is issued. It specifies the device class, thenumber of streams, and the password for database backup operations. After a successfuldatabase backup operation, the DELETE VOLHISTORY command is used to delete backupsthat were created more than 4 days prior.
• Expiration processing is scheduled to run until it is complete. The schedule starts 17 hours afterthe beginning of the client backup window. The RESOURCE parameter is set according to scalesize and type of data deduplication storage pool:
Directory-container storage pools:
– Small system: 10– Medium system: 30– Large system: 40
Non-container storage pools:
– Small system: 6– Medium system: 8– Large system: 10
If you are using the -legacy option for data deduplication, the following schedules are alsodefined:
• Duplicate identification is set for a duration of 12 hours. The schedule starts at the beginning ofthe client backup window. The NUMPROCESS parameter is set according to scale size:
– Small system: 12– Medium system: 16– Large system: 32
• Reclamation processing is set for a duration of 8 hours. The reclamation threshold is 25%.
The schedule starts 14 hours after the beginning of the client backup window. TheRECLAIMPROCESS parameter is set as part of the storage pool definition, according to scalesize:
– Small system: 10– Medium system: 20– Large system: 32
38 IBM Spectrum Protect: Blueprint and Server Automated Configuration for Windows

Table 18. Summary of configured elements (continued)
Item Details
Policy domains The following policy domains are created:
• STANDARD – The default policy domain• server name_DATABASE – Policy domain for database backups• server name_DB2 – Policy domain for Db2 database backups• server name_FILE – Policy domain for file backups that use the backup-archive client• server name_MAIL – Policy domain for mail application backups• server name_ORACLE – Policy domain for Oracle database backups• server name_VIRTUAL – Policy domain for virtual machine backups• server name_HANA – Policy domain for SAP HANA backups• server name_OBJECT - Policy domain for Amazon Simple Storage Service (S3) object data from
IBM Spectrum Protect Plus offload operations
Policy domains other than the STANDARD policy are named by using a default value with theserver name. For example, if your server name is TSMSERVER1, the policy domain for databasebackups is TSMSERVER1_DATABASE.
Management classes Management classes are created within the policy domains that are listed in the previous row.Retention periods are defined for 7, 30, 90, and 365 days.
The default management class uses the 30-day retention period.
Client schedules Client schedules are created in each policy domain with the start time that is specified duringconfiguration.
The type of backup schedule that is created is based on the type of client:
• File server schedules are set as incremental forever.• Data protection schedules are set as full daily.
Some data protection schedules include command file names that are appropriate for the dataprotection client.
For more information about the schedules that are predefined during configuration, see AppendixD, “Using predefined client schedules,” on page 63.
Removing an IBM Spectrum Protect blueprint configurationIf your blueprint configuration fails, you can use a cleanup script to remove the IBM Spectrum Protectserver and stored data.
Before you begin
Attention: The automated script cleanupserversetup.pl is destructive and will completelyremove an IBM Spectrum Protect server and all stored data.
About this taskThe script can be used to clean up your system during initial testing and troubleshooting for blueprintconfigurations. If a configuration attempt fails, running the script removes the server and all associatedIBM Spectrum Protect data. The script uses the file, serversetupstatefileforcleanup.txt, whichis generated when you run the Blueprint configuration script, TSMserverconfig.pl.
The cleanup script is available in the diag folder of the blueprint tsmconfig directory.
Procedure
To clean up your system by using the script, complete the following steps:1. Edit the cleanupserversetup.pl script by commenting out the exit on the first line.
Configuring the IBM Spectrum Protect server 39

For example:
#exit; # This script is destructive, so by default it exits. Comment-out this line to proceed.
2. Copy the cleanupserversetup.pl script into the folder where the TSMserverconfig.pl script islocated.
3. Issue the following command:
perl TSMserverconfig.pl
4. Issue the following command:
perl cleanupserversetup.pl
40 IBM Spectrum Protect: Blueprint and Server Automated Configuration for Windows

Chapter 6. Completing the system configurationComplete the following tasks after your IBM Spectrum Protect server is configured and running.
About this taskFor more information about the configuration tasks, see the documentation for your IBM SpectrumProtect server version in IBM Knowledge Center.
Tip: To display a different version of the same topic in IBM Knowledge Center, you can use the versionsmenu, if available, at the top of the page.
Changing default passwordsIf you accepted the default value for any of the passwords that are configured by the Blueprintconfiguration script, you must change those passwords to more secure values.
About this taskBy default, the script sets a value of passw0rd for the following passwords:
• Initial IBM Spectrum Protect administrator• IBM Spectrum Protect server• Db2 instance owner
Procedure
• To update password information for the server and administrator, use server commands.For more information, see the SET SERVERPASSWORD, UPDATE ADMIN, and UPDATE SERVER servercommands.
• To update the Windows user and Db2 instance owner passwords, use the Windows operating systemnet user command. Complete the following steps:
1. Update the Windows user password by issuing the net user command. For example, update thepassword to new!PA$$:
net user tsminst1 new!PA$$
2. To update the Db2 instance owner password, at the Db2 command prompt, issue a command thatis similar to the following example. Ensure that you specify a unique password:
db2iupdt tsminst1 /u:tsminst1,new!PA$$
• Create a system-level administrator. Then, remove or lock the administrator that is named ADMIN byusing the REMOVE ADMIN or LOCK ADMIN command.
• Change the password that is used to protect the server encryption key for database backup operations.Issue the following command:
set dbrecovery dbback_filedev password=newpassword
where newpassword is the password that you set.
Attention: You must remember the password, or you will be unable to restore databasebackups.
© Copyright IBM Corp. 2014, 2019 41

Registering nodes and associating them with predefined client schedulesWhen you are ready to register nodes to the IBM Spectrum Protect server, use the REGISTER NODEcommand. Then, you can associate nodes with a predefined client schedule.
Before you beginWhen you register nodes, the host name of the protected system is typically used for the node name. Inthe following example, assume that you want to register a node named newnode1 to theTSMSERVER1_FILE domain for backup-archive client backups, and associate the node with a predefinedclient schedule. You can use the administrative command line to issue server commands for theoperation.
When you issue the REGISTER NODE server command, increase the default value for the maximumnumber of mount points that a node is allowed to use on the server. Specify a value of 99 for theMAXNUMMP parameter instead of using the default.
Complete the following example steps to register newnode1, associate it with a schedule, and then verifythat the schedule is ready to use for backups.
Procedure
1. Register newnode1 to the TSMSERVER1_FILE domain. Specify a value for the client node password, forexample, pw4node1. Set the MAXNUMMP parameter to 99:
register node newnode1 pw4node1 dom=TSMSERVER1_FILE maxnummp=99
2. To use a predefined client schedule, determine which schedule to associate newnode1 with byquerying the list of available schedules. Issue the QUERY SCHEDULE command.The output lists all defined schedules. For example, the following output shows the details for the FILE_INCRFOREVER_10PM schedule:
Domain * Schedule Name Action Start Date/Time Duration Period Day--------------- - ---------------- ------ --------------- -------- ------ ---TSMSERVER1_FILE FILE_INCRFOREVER_10PM Inc Bk 07/24/2013 22:00:00 60 M 1 D Any
3. Define an association between newnode1 and the FILE _INCRFOREVER_10PM schedule. You mustspecify the domain for the node and schedule.For example:
define association TSMSERVER1_FILE FILE_INCRFOREVER_10PM newnode1
4. Verify that newnode1 is associated with the correct schedule by issuing the QUERY ASSOCIATIONcommand.For example, issue the following command, specifying the schedule domain and the schedule name:
query association TSMSERVER1_FILE FILE_INCRFOREVER_10PM
The output shows that newnode1 is associated with the queried domain and schedule name.
Policy Domain Name: TSMSERVER1_FILE Schedule Name: FILE_INCRFOREVER_10PM Associated Nodes: NEWNODE1
5. Display details about the client schedule by issuing the QUERY EVENT command. Specify the domainand name of the schedule for which you want to display events.For example, issue the following command:
query event TSMSERVER1_FILE FILE_INCRFOREVER_10PM
42 IBM Spectrum Protect: Blueprint and Server Automated Configuration for Windows

The output shows that the backup for newnode1 is scheduled, but has not yet occurred.
Scheduled Start Actual Start Schedule Name Node Name Status------------------- ------------- ------------- --------- ------08/23/2013 22:00:00 FILE_INCRFOREVER_10PM NEWNODE1 Future
6. After you register a node and assign it to a schedule, configure the client and client schedule on theclient system and then start the scheduler daemon on the client system so that the backup operationstarts at the scheduled time.
To configure the client schedules that are predefined by the Blueprint configuration script, seeAppendix D, “Using predefined client schedules,” on page 63.
For more information about starting the client scheduler, see the IBM Spectrum Protect clientdocumentation in IBM Knowledge Center.
Reorganizing database tables and indexesSchedule database table and index reorganization to ensure that the server is running efficiently.
About this task
If tables or the indexes that are associated with tables are not reorganized, unexpected database and loggrowth and reduced server performance can occur over time. For servers at V7.1.7 or later, the Blueprintconfiguration script enables online database table and index reorganization for most tables by setting theALLOWREORGTABLE and ALLOWREORGINDEX server options to YES. Table reorganization is disabled forsome larger tables by specifying the DISABLEREORGTABLE server option. For the tables in the followinglist, you can run offline reorganization by using the Procedure:
• BF_AGGREGATED_BITFILES• BF_BITFILE_EXTENTS• ARCHIVE_OBJECTS• BACKUP_OBJECTS
Restriction: Run offline reorganization for the BF_BITFILE_EXTENTS table only if your system includesone or more primary storage pools that were converted to directory-container storage pools.
To run offline reorganization, you must have a file system with enough temporary space to hold an entiretable during reorganization. Space within the file systems that are used for database backups can be freedfor this purpose.
Because the IBM Spectrum Protect server database grows over time, there might be insufficient space inthe database backup file systems to use as free space for the reorganization process. To release space indatabase backup file systems, you can remove old backup versions.
Complete the following steps to prepare temporary space in the database file systems, and then runoffline reorganization.
Procedure
1. Remove the oldest database backups.For example, to remove the two oldest database backups, issue the following command:
delete volhistory type=dbb todate=today-4
2. Back up the current version of the database with the BACKUP DB command:
backup db devc=DBBACK_FILEDEV type=full numstreams=3
3. Locate the database backup file system with the most free space to use for the reorganization.
Completing the system configuration 43

4. Complete the procedure for offline table reorganization. During this step, you might be prompted toback up the database but it is unnecessary for you to do so. Follow the instructions in technote1683633.
44 IBM Spectrum Protect: Blueprint and Server Automated Configuration for Windows

Chapter 7. Next stepsAfter you complete the setup and configuration for your IBM Spectrum Protect implementation, you canmonitor your system and plan for maintenance.
Monitor your system with the IBM Spectrum Protect Operations CenterFor more information about the Operations Center, see the following topics.Getting started with the Operations Center
Installing and upgrading the Operations CenterMonitoring with the Operations Center
Monitoring storage solutions
Access the administrative command-line clientThe administrative command-line client is installed when you set up your system to run the IBMSpectrum Protect Blueprint configuration script. You can use the administrative client to issue servercommands.
For more information about using the DSMADMC command to start and stop the administrative client, seeIssuing commands from the administrative client.
Review documentationFor documentation in IBM Knowledge Center, see the following links.
Tip: If available, you can display different versions of the same topic in IBM Knowledge Center by usingthe versions menu at the top of the page.
IBM Spectrum Protect server and client software
• V7.1.8 documentation• V8.1.7 documentation
Storwize V5000 second-generation disk storage systemsStorwize V5000 second-generation welcome page
Additional documentation is available at other locations:IBM Redbooks® for Lenovo System x
Lenovo PressIBM Spectrum Protect wiki
Welcome to the wiki
Optional: Set up node replication and storage pool protectionTwo IBM Spectrum Protect servers that are configured by using the blueprint configuration script can beupdated to run the REPLICATE NODE and PROTECT STGPOOL commands. If you enable a replicationschedule, it enables both node replication and storage pool protection.
Before you begin
1. If you are not familiar with the concepts of node replication and storage pool protection, review thefollowing information:Node replication
You can use node replication to create additional copies of data on another server. To learn thebasic concepts of node replication, see Replicating client data to another server in IBM KnowledgeCenter.
© Copyright IBM Corp. 2014, 2019 45

Storage pool protectionYou can use storage pool protection to protect data in a directory-container storage pool by storingthe data in another directory-container storage pool on the target server. To learn the basicconcepts of storage pool protection, see Protecting data in directory-container storage pools inIBM Knowledge Center.
2. Consider whether replication will run in one direction from a source to target server, or if each serverwill replicate to the other server (acting as both a source and a target). The Blueprint configurationscript creates an inactive replication schedule on all servers. Activate the replication schedule only onsource replication servers.
3. To optimize node replication operations, ensure that the source and target replication servers have thesame hardware configuration, for example:
• Allocate the same amount of storage capacity on both servers for the database, logs, and storagepools.
• Use the same type of disks for the database and active log. For example, use solid-state disks forboth the database and active log on both servers.
• Ensure that both servers have the same number of processor cores and a similar amount of read-only memory (RAM). If both servers are used for client backup operations, allocate the same numberof processor cores to both servers. However, if the target server is used only for replication, but notfor client backup operations, you can allocate half as many processor cores (but no fewer than six) tothe target server.
About this taskYou can set up node replication and storage pool protection by using the Add Server Pair wizard in theOperations Center or by following the Procedure.
Procedure
The following manual example assumes that two servers, TAPSRV01 and TAPSRV02, were configured byusing the blueprint specifications. The procedure sets up node replication and storage pool protection sothat client nodes back up data to TAPSRV01 and this data is replicated to TAPSRV02.1. Set up server-to-server communication.
On TAPSRV01, issue the following command:
define server tapsrv02 serverpassword=passw0rd hla=tapsrv02.yourdomain.com lla=1500
On TAPSRV02, issue the following command:
define server tapsrv01 serverpassword=passw0rd hla=tapsrv01.yourdomain.com lla=1500
2. Test the communication path.
On TAPSRV01, issue the following command:
ping server tapsrv02
On TAPSRV02, issue the following command:
ping server tapsrv01
If the test is successful, you see results similar to the following example:
ANR1706I Ping for server 'TAPSRV02' was able to establish a connection.
3. Export policy definitions from TAPSRV01 to TAPSRV02. Issue the following command on TAPSRV01:
export policy * toserver=tapsrv02
46 IBM Spectrum Protect: Blueprint and Server Automated Configuration for Windows

4. Define TAPSRV02 as the replication target of TAPSRV01. Issue the following command on TAPSRV01:
set replserver tapsrv02
5. Enable replication for certain nodes or all nodes. To enable replication for all nodes, issue the followingcommand on TAPSRV01:
update node * replstate=enabled
6. Enable storage pool protection for your directory-container storage pool.For example, issue the following command:
update stgpool sourcestgpool protectstgpool=targetstgpool
7. On each source replication server, activate the administrative schedule that the Blueprint configurationscript created to run replication every day. Issue the following command:
update schedule REPLICATE type=admin active=yes
Restriction: Ensure that you complete this step only on source replication servers. However, if you arereplicating nodes in both directions, and each server is a source and a target, activate the schedule onboth servers.
What to do nextTo recover data after a disaster, follow the instructions in Repairing and recovering data in directory-container storage pools.
Next steps 47

48 IBM Spectrum Protect: Blueprint and Server Automated Configuration for Windows

Appendix A. Performance resultsYou can compare IBM system performance results against your IBM Spectrum Protect storageconfiguration as a reference for expected performance.
Observed results are based on measurements that were taken in a test lab environment. Test systemswere configured according to the Blueprints in this document. Backup-archive clients communicatedacross a 10 Gb Ethernet connection to the IBM Spectrum Protect server, and deduplicated data wasstored in directory-container storage pools. Because many variables can influence throughput in a systemconfiguration, do not expect to see exact matches with the results. Storage pool compression wasincluded in the test configuration on which these performance results are based.
The following typical factors can cause variations in actual performance:
• Average object size of your workload• Number of client sessions that are used in your environment• Amount of duplicate data
This information is provided to serve only as a reference.
For approximate performance results on large Blueprint systems, see the Blueprint and Server AutomatedConfiguration for Linux x86, Version 4 Release 1 at IBM Spectrum Protect Blueprints.
Small system performance measurementsData was recorded for a small system in the IBM test lab environment.
Table 19. Data intake processes.
Metric Limit or range Notes
Maximum supported client sessions 250
Daily amount of new data (before datadeduplication)
Up to 10 TB per day1 The daily amount of datais how much new data isbacked up each day.
Backup ingestion rate
Server-side inline datadeduplication
2.2 TB per hour
Client-side datadeduplication
3.0 TB per hour
1 The daily amount of new data is a range. For more information, see the guidance in Chapter 2,“Implementation requirements,” on page 3.
Table 20. Protected data
Metric Range Notes
Total managed data (size before datadeduplication)
60 TB - 240 TB Total managed data is thevolume of data that theserver manages, includingall versions.
© Copyright IBM Corp. 2014, 2019 49

Table 21. Data restore processes.
MetricNumber of restoreprocesses Limit
Throughput of restore processes
1 316.8 GB per hour
2 537.3 GB per hour
4 840.2 GB per hour
6 1188.8 GB per hour
8 1814.1 GB per hour
Medium system performance measurementsData was recorded for a medium system in the IBM test lab environment.
Table 22. Data intake processes.
Metric Limit or range Notes®
Maximum supported client sessions 500
Daily amount of new data (before datadeduplication)
10 - 30 TB per day 1 The daily amount of datais how much new data isbacked up each day.
Backup ingestion rate
Server-side inline datadeduplication
4.9 TB per hour
Client-side datadeduplication
6.2 TB per hour
1 The daily amount of new data is a range. For more information, see Chapter 2, “Implementationrequirements,” on page 3.
Table 23. Protected data
Metric Range Notes
Total managed data (size before datadeduplication)
360 TB - 1440 TB Total managed data is thevolume of data that theserver manages, includingall versions.
50 IBM Spectrum Protect: Blueprint and Server Automated Configuration for Windows

Table 24. Data restore processes.
MetricNumber of restoreprocesses Limit
Throughput of restore processes
1 439.1 GB per hour
2 732.4 GB per hour
4 1032.2 GB per hour
6 1611.7 GB per hour
8 2160.9 GB per hour
10 2511.2 GB per hour
12 2757.7 GB per hour
Workload simulation tool resultsSample data from the workload simulation tool is provided for blueprint test lab systems. Both a storagepool workload and a database workload were tested on each system.
For workload simulation results on large blueprint systems, see the Blueprint and Server AutomatedConfiguration for Linux x86, Version 4 Release 1 at IBM Spectrum Protect Blueprints.
Small system - storage pool workload
The storage pool workload test included eight file systems. The following command was issued:
perl tsmdiskperf.pl workload=stgpool fslist=c:\tsminst1\TSMfile00, c:\tsminst1\TSMfile01,c:\tsminst1\TSMfile02,c:\tsminst1\TSMfile03, c:\tsminst1\TSMfile04,c:\tsminst1\TSMfile05,c:\tsminst1\TSMfile06, c:\tsminst1\TSMfile07
These results were included in the output:
: Average R Throughput (KB/sec): 197150.91 : Average W Throughput (KB/sec): 201662.67 : Avg Combined Throughput (MB/sec): 389.47 : Max Combined Throughput (MB/sec): 631.88 : : Average IOPS: 2373.00 : Peak IOPS: 3090.72 at 04/29/2019 14:21:57 : : Total elapsed time (seconds): 396
Small system - database workload
The database workload test included four file systems. The following command was issued:
perl tsmdiskperf.pl workload=db fslist=c:\tsminst1\TSMdbspace00, c:\tsminst1\TSMdbspace01,c:\tsminst1\TSMdbspace02,c:\tsminst1\TSMdbspace03
These results were included in the output:
: Average R Throughput (KB/sec): 19178.03 : Average W Throughput (KB/sec): 18900.63 : Avg Combined Throughput (MB/sec): 37.19 : Max Combined Throughput (MB/sec): 48.20 : : Average IOPS: 4760.30
Performance results 51

: Peak IOPS: 6169.49 at 04/29/2019 12:34:50 : : Total elapsed time (seconds): 842
Medium system - storage pool workload
The storage pool workload test included 16 file systems. The following command was issued:
perl tsmdiskperf.pl workload=stgpool fslist=c:\tsminst1\TSMfile00,c:\tsminst1\TSMfile01,c:\tsminst1\TSMfile02,c:\tsminst1\TSMfile03,c:\tsminst1\TSMfile04,c:\tsminst1\TSMfile05,c:\tsminst1\TSMfile06,c:\tsminst1\TSMfile07,c:\tsminst1\TSMfile08,c:\tsminst1\TSMfile09,c:\tsminst1\TSMfile10,c:\tsminst1\TSMfile11,c:\tsminst1\TSMfile12,c:\tsminst1\TSMfile13,c:\tsminst1\TSMfile14,c:\tsminst1\TSMfile15
These results were included in the output:
: Average R Throughput (KB/sec): 742055.20: Average W Throughput (KB/sec): 770712.96: Avg Combined Throughput (MB/sec): 1477.31: Max Combined Throughput (MB/sec): 1876.90:: Average IOPS: 8998.50: Peak IOPS: 10834.15 at 05/03/2019 15:24:42:: Total elapsed time (seconds): 233
Medium system - database workload
At the time of publication, database workload results for a medium system were not available, but work isunder way to obtain the results.
52 IBM Spectrum Protect: Blueprint and Server Automated Configuration for Windows

Appendix B. Configuring the disk system by usingcommands
You can use the IBM Storwize command line to configure storage arrays and volumes on the disk system.Example procedures are provided for the V5010 (small), V5010 (medium), and V5030 (large) systems.
Refer to Chapter 3, “Storage configuration blueprints,” on page 13 for layout specifications.
Small system
1. Connect to and log in to the disk system by issuing the ssh command. For example:
ssh superuser@your5010hostname
2. List drive IDs for each type of disk so that you can create the managed disk (MDisk) arrays in Step “4”on page 53. Issue the lsdrive command. The output can vary, based on slot placement for thedifferent disks. The output is similar to the following example:
id status use tech_type capacity ... enclosure_id slot_id ... 0 online candidate tier0_flash 372.1GB 1 3 1 online candidate tier0_flash 372.1GB 1 4 2 online candidate tier0_flash 372.1GB 1 1 3 online candidate tier0_flash 372.1GB 1 2 4 online candidate tier0_flash 372.1GB 1 55 online candidate tier_nearline 3.6TB 2 66 online candidate tier_nearline 3.6TB 2 17 online candidate tier_nearline 3.6TB 2 78 online candidate tier_nearline 3.6TB 2 109 online candidate tier_nearline 3.6TB 2 510 online candidate tier_nearline 3.6TB 2 411 online candidate tier_nearline 3.6TB 2 212 online candidate tier_nearline 3.6TB 2 913 online candidate tier_nearline 3.6TB 2 1114 online candidate tier_nearline 3.6TB 2 315 online candidate tier_nearline 3.6TB 2 1216 online candidate tier_nearline 3.6TB 2 817 online candidate tier_nearline 3.6TB 3 618 online candidate tier_nearline 3.6TB 3 1219 online candidate tier_nearline 3.6TB 3 920 online candidate tier_nearline 3.6TB 3 421 online candidate tier_nearline 3.6TB 3 1122 online candidate tier_nearline 3.6TB 3 523 online candidate tier_nearline 3.6TB 3 224 online candidate tier_nearline 3.6TB 3 1025 online candidate tier_nearline 3.6TB 3 826 online candidate tier_nearline 3.6TB 3 127 online candidate tier_nearline 3.6TB 3 728 online candidate tier_nearline 3.6TB 3 3
3. Create the MDisk groups for the IBM Spectrum Protect database and storage pool. Issue themkmdiskgroup command for each pool, specifying 256 for the extent size:
mkmdiskgrp -name db_grp0 -ext 256mkmdiskgrp -name stgpool_grp0 -ext 256
4. Create MDisk arrays by using mkdistributedarray commands. Specify the commands to add theMDisk arrays to the data pools that you created in the previous step. For example:
mkdistributedarray -name db_array0 -level raid5 -driveclass 2 -drivecount 4 -stripewidth 3 -rebuildareas 1 -strip 256 db_grp0mkdistributedarray -name stgpool_array0 -level raid6 -driveclass 1 -drivecount 24-stripewidth 12 -rebuildareas 1 -strip 256 stgpool_grp0
5. Create the storage volumes for the system. Issue the mkvdisk command for each volume, specifyingthe volume sizes in MB. For example:
mkvdisk -mdiskgrp db_grp0 -size 343296 -name db_00 -iogrp 0 -nofmtdiskmkvdisk -mdiskgrp db_grp0 -size 343296 -name db_01 -iogrp 0 -nofmtdisk
© Copyright IBM Corp. 2014, 2019 53

mkvdisk -mdiskgrp db_grp0 -size 343296 -name db_02 -iogrp 0 -nofmtdiskmkvdisk -mdiskgrp db_grp0 -size 343296 -name db_03 -iogrp 0 -nofmtdisk
mkvdisk -mdiskgrp db_grp0 -size 148736 -name alog -iogrp 0 -nofmtdisk
mkvdisk -mdiskgrp stgpool_grp0 -size 1244928 -name archlog -iogrp 0 -nofmtdisk
mkvdisk -mdiskgrp stgpool_grp0 -size 1651699 -name backup_0 -iogrp 0 -nofmtdiskmkvdisk -mdiskgrp stgpool_grp0 -size 1651699 -name backup_1 -iogrp 0 -nofmtdiskmkvdisk -mdiskgrp stgpool_grp0 -size 1651699 -name backup_2 -iogrp 0 -nofmtdiskmkvdisk -mdiskgrp stgpool_grp0 -size 1651699 -name backup_3 -iogrp 0 -nofmtdisk
mkvdisk -mdiskgrp stgpool_grp0 -size 6343884 -name filepool_00 -iogrp 0 -nofmtdiskmkvdisk -mdiskgrp stgpool_grp0 -size 6343884 -name filepool_01 -iogrp 0 -nofmtdiskmkvdisk -mdiskgrp stgpool_grp0 -size 6343884 -name filepool_02 -iogrp 0 -nofmtdiskmkvdisk -mdiskgrp stgpool_grp0 -size 6343884 -name filepool_03 -iogrp 0 -nofmtdiskmkvdisk -mdiskgrp stgpool_grp0 -size 6343884 -name filepool_04 -iogrp 0 -nofmtdiskmkvdisk -mdiskgrp stgpool_grp0 -size 6343884 -name filepool_05 -iogrp 0 -nofmtdiskmkvdisk -mdiskgrp stgpool_grp0 -size 6343884 -name filepool_06 -iogrp 0 -nofmtdiskmkvdisk -mdiskgrp stgpool_grp0 -size 6343884 -name filepool_07 -iogrp 0 -nofmtdiskmkvdisk -mdiskgrp stgpool_grp0 -size 6343884 -name filepool_08 -iogrp 0 -nofmtdiskmkvdisk -mdiskgrp stgpool_grp0 -size 6343884 -name filepool_09 -iogrp 0 -nofmtdisk
6. Create a logical host object by using the mkhost command. Specify the Fibre Channel WWPNs fromyour operating system and specify the name of your host. To obtain the WWPNs from your system,follow the instructions in “Step 1: Set up and configure hardware” on page 21.
For example, to create a host that is named hostone with a list that contains FC WWPNs10000090FA3D8F12 and 10000090FA49009E, issue the following command:
mkhost -name hostone -fcwwpn 10000090FA3D8F12:10000090FA49009E -iogrp 0 -type=generic -force
7. Map the volumes that you created in Step “5” on page 53 to the new host. Issue themkvdiskhostmap command for each volume. For example, issue the following commands wherehostname is the name of your host:
mkvdiskhostmap -host hostname -scsi 0 db_00mkvdiskhostmap -host hostname -scsi 1 db_01mkvdiskhostmap -host hostname -scsi 2 db_02mkvdiskhostmap -host hostname -scsi 3 db_03
mkvdiskhostmap -host hostname -scsi 4 alog
mkvdiskhostmap -host hostname -scsi 5 archlog
mkvdiskhostmap -host hostname -scsi 6 backup_0mkvdiskhostmap -host hostname -scsi 7 backup_1mkvdiskhostmap -host hostname -scsi 8 backup_2mkvdiskhostmap -host hostname -scsi 9 backup_3
mkvdiskhostmap -host hostname -scsi 10 filepool_00mkvdiskhostmap -host hostname -scsi 11 filepool_01mkvdiskhostmap -host hostname -scsi 12 filepool_02mkvdiskhostmap -host hostname -scsi 13 filepool_03mkvdiskhostmap -host hostname -scsi 14 filepool_04mkvdiskhostmap -host hostname -scsi 15 filepool_05mkvdiskhostmap -host hostname -scsi 16 filepool_06mkvdiskhostmap -host hostname -scsi 17 filepool_07mkvdiskhostmap -host hostname -scsi 18 filepool_08mkvdiskhostmap -host hostname -scsi 19 filepool_09
Medium system
1. Connect to and log in to the disk system by issuing the ssh command. For example:
ssh superuser@your5010hostname
2. Increase the memory that is available for the RAIDs to 125 MB by issuing the chiogrp command:
chiogrp -feature raid -size 125 io_grp0
54 IBM Spectrum Protect: Blueprint and Server Automated Configuration for Windows

3. List drive IDs for each type of disk so that you can create the MDisk arrays in Step “5” on page 55.Issue the lsdrive command. The output can vary, based on slot placement for the different disks.The output is similar to the following example:
IBM_Storwize:tapv5kg:superuser>lsdriveid status use tech_type capacity enclosure_id slot_id drive_class_id0 online member tier_nearline 5.5TB 1 26 01 online member tier_nearline 5.5TB 1 44 02 online member tier_nearline 5.5TB 1 1 03 online member tier_nearline 5.5TB 1 34 04 online member tier_nearline 5.5TB 1 20 05 online member tier_nearline 5.5TB 1 25 0< ... >91 online member tier_nearline 5.5TB 1 2 092 online member tier1_flash 1.7TB 2 4 193 online member tier1_flash 1.7TB 2 1 194 online member tier1_flash 1.7TB 2 3 195 online member tier1_flash 1.7TB 2 6 196 online member tier1_flash 1.7TB 2 5 197 online member tier1_flash 1.7TB 2 2 1
4. Create the MDisk groups for the IBM Spectrum Protect database and storage pool. Issue themkmdiskgroup command for each pool, specifying 512 for the extent size:
mkmdiskgrp -name db_grp0 -ext 256mkmdiskgrp -name stgpool_grp0 -ext 256mkmdiskgrp -name stgpool_grp1 -ext 256
5. Create MDisk arrays by using mkdistributedarray commands. Specify the commands to add theMDisk arrays to the data pools that you created in the previous step.
For example:
mkdistributedarray -name db_array0 -level raid6 -driveclass 1 -drivecount 6 -stripewidth 5 -rebuildareas 1 -strip 256 db_grp0mkdistributedarray -name stgpool_array0 -level raid6 -driveclass 0 -drivecount 46 -stripewidth 12 -rebuildareas 2 -strip 256 stgpool_grp0mkdistributedarray -name stgpool_array1 -level raid6 -driveclass 0 -drivecount 46 -stripewidth 12 -rebuildareas 2 -strip 256 stgpool_grp1
6. Create the storage volumes for the system. Issue the mkvdisk command for each volume, specifyingthe volume sizes in MB. For example:
mkvdisk -mdiskgrp db_grp0 -size 657599 -name db_00 -iogrp 0 -nofmtdiskmkvdisk -mdiskgrp db_grp0 -size 657599 -name db_01 -iogrp 0 -nofmtdiskmkvdisk -mdiskgrp db_grp0 -size 657599 -name db_02 -iogrp 0 -nofmtdiskmkvdisk -mdiskgrp db_grp0 -size 657599 -name db_03 -iogrp 0 -nofmtdiskmkvdisk -mdiskgrp db_grp0 -size 657599 -name db_04 -iogrp 0 -nofmtdiskmkvdisk -mdiskgrp db_grp0 -size 657599 -name db_05 -iogrp 0 -nofmtdiskmkvdisk -mdiskgrp db_grp0 -size 657599 -name db_06 -iogrp 0 -nofmtdiskmkvdisk -mdiskgrp db_grp0 -size 657599 -name db_07 -iogrp 0 -nofmtdisk
mkvdisk -mdiskgrp db_grp0 -size 150528 -name alog -iogrp 0 -nofmtdisk
mkvdisk -mdiskgrp stgpool_grp0 -size 1048576 -name archlog_00 -iogrp 0 -nofmtdiskmkvdisk -mdiskgrp stgpool_grp1 -size 1048576 -name archlog_01 -iogrp 0 -nofmtdisk
mkvdisk -mdiskgrp stgpool_grp0 -size 5242880 -name backup_00 -iogrp 0 -nofmtdiskmkvdisk -mdiskgrp stgpool_grp0 -size 5242880 -name backup_01 -iogrp 0 -nofmtdiskmkvdisk -mdiskgrp stgpool_grp0 -size 5242880 -name backup_02 -iogrp 0 -nofmtdiskmkvdisk -mdiskgrp stgpool_grp1 -size 5242880 -name backup_03 -iogrp 0 -nofmtdiskmkvdisk -mdiskgrp stgpool_grp1 -size 5242880 -name backup_04 -iogrp 0 -nofmtdiskmkvdisk -mdiskgrp stgpool_grp1 -size 5242880 -name backup_05 -iogrp 0 -nofmtdisk
mkvdisk -mdiskgrp stgpool_grp0 -size 9536999 -name filepool_00 -iogrp 0 -nofmtdiskmkvdisk -mdiskgrp stgpool_grp0 -size 9536999 -name filepool_01 -iogrp 0 -nofmtdiskmkvdisk -mdiskgrp stgpool_grp0 -size 9536999 -name filepool_02 -iogrp 0 -nofmtdiskmkvdisk -mdiskgrp stgpool_grp0 -size 9536999 -name filepool_03 -iogrp 0 -nofmtdiskmkvdisk -mdiskgrp stgpool_grp0 -size 9536999 -name filepool_04 -iogrp 0 -nofmtdiskmkvdisk -mdiskgrp stgpool_grp0 -size 9536999 -name filepool_05 -iogrp 0 -nofmtdiskmkvdisk -mdiskgrp stgpool_grp0 -size 9536999 -name filepool_06 -iogrp 0 -nofmtdiskmkvdisk -mdiskgrp stgpool_grp0 -size 9536999 -name filepool_07 -iogrp 0 -nofmtdiskmkvdisk -mdiskgrp stgpool_grp0 -size 9536999 -name filepool_08 -iogrp 0 -nofmtdiskmkvdisk -mdiskgrp stgpool_grp0 -size 9536999 -name filepool_09 -iogrp 0 -nofmtdiskmkvdisk -mdiskgrp stgpool_grp0 -size 9536999 -name filepool_10 -iogrp 0 -nofmtdiskmkvdisk -mdiskgrp stgpool_grp0 -size 9536999 -name filepool_11 -iogrp 0 -nofmtdisk
Configuring the disk system by using commands 55

mkvdisk -mdiskgrp stgpool_grp0 -size 9536999 -name filepool_12 -iogrp 0 -nofmtdiskmkvdisk -mdiskgrp stgpool_grp0 -size 9536999 -name filepool_13 -iogrp 0 -nofmtdiskmkvdisk -mdiskgrp stgpool_grp0 -size 9536999 -name filepool_14 -iogrp 0 -nofmtdiskmkvdisk -mdiskgrp stgpool_grp0 -size 9536999 -name filepool_15 -iogrp 0 -nofmtdiskmkvdisk -mdiskgrp stgpool_grp0 -size 9536999 -name filepool_16 -iogrp 0 -nofmtdiskmkvdisk -mdiskgrp stgpool_grp0 -size 9536999 -name filepool_17 -iogrp 0 -nofmtdiskmkvdisk -mdiskgrp stgpool_grp0 -size 9536999 -name filepool_18 -iogrp 0 -nofmtdiskmkvdisk -mdiskgrp stgpool_grp0 -size 9536999 -name filepool_19 -iogrp 0 -nofmtdisk
mkvdisk -mdiskgrp stgpool_grp1 -size 9536999 -name filepool_20 -iogrp 0 -nofmtdiskmkvdisk -mdiskgrp stgpool_grp1 -size 9536999 -name filepool_21 -iogrp 0 -nofmtdiskmkvdisk -mdiskgrp stgpool_grp1 -size 9536999 -name filepool_22 -iogrp 0 -nofmtdiskmkvdisk -mdiskgrp stgpool_grp1 -size 9536999 -name filepool_23 -iogrp 0 -nofmtdiskmkvdisk -mdiskgrp stgpool_grp1 -size 9536999 -name filepool_24 -iogrp 0 -nofmtdiskmkvdisk -mdiskgrp stgpool_grp1 -size 9536999 -name filepool_25 -iogrp 0 -nofmtdiskmkvdisk -mdiskgrp stgpool_grp1 -size 9536999 -name filepool_26 -iogrp 0 -nofmtdiskmkvdisk -mdiskgrp stgpool_grp1 -size 9536999 -name filepool_27 -iogrp 0 -nofmtdiskmkvdisk -mdiskgrp stgpool_grp1 -size 9536999 -name filepool_28 -iogrp 0 -nofmtdiskmkvdisk -mdiskgrp stgpool_grp1 -size 9536999 -name filepool_29 -iogrp 0 -nofmtdiskmkvdisk -mdiskgrp stgpool_grp1 -size 9536999 -name filepool_30 -iogrp 0 -nofmtdiskmkvdisk -mdiskgrp stgpool_grp1 -size 9536999 -name filepool_31 -iogrp 0 -nofmtdiskmkvdisk -mdiskgrp stgpool_grp1 -size 9536999 -name filepool_32 -iogrp 0 -nofmtdiskmkvdisk -mdiskgrp stgpool_grp1 -size 9536999 -name filepool_33 -iogrp 0 -nofmtdiskmkvdisk -mdiskgrp stgpool_grp1 -size 9536999 -name filepool_34 -iogrp 0 -nofmtdiskmkvdisk -mdiskgrp stgpool_grp1 -size 9536999 -name filepool_35 -iogrp 0 -nofmtdiskmkvdisk -mdiskgrp stgpool_grp1 -size 9536999 -name filepool_36 -iogrp 0 -nofmtdiskmkvdisk -mdiskgrp stgpool_grp1 -size 9536999 -name filepool_37 -iogrp 0 -nofmtdiskmkvdisk -mdiskgrp stgpool_grp1 -size 9536999 -name filepool_38 -iogrp 0 -nofmtdiskmkvdisk -mdiskgrp stgpool_grp1 -size 9536999 -name filepool_39 -iogrp 0 -nofmtdisk
7. Create a logical host object by using the mkhost command. Specify the Fibre Channel WWPNs fromyour operating system and specify the name of your host. To obtain the WWPNs from your system,follow the instructions in “Step 1: Set up and configure hardware” on page 21.
For example, to create a host that is named hostone with a list that contains FC WWPNs10000090FA3D8F12 and 10000090FA49009E, issue the following command:
mkhost -name hostone -fcwwpn 10000090FA3D8F12:10000090FA49009E -iogrp 0 -type=generic -force
8. Map the volumes that you created in Step “6” on page 55 to the new host. Issue themkvdiskhostmap command for each volume. For example, issue the following commands wherehostname is the name of your host:
mkvdiskhostmap -host hostname -scsi 0 db_00mkvdiskhostmap -host hostname -scsi 1 db_01mkvdiskhostmap -host hostname -scsi 2 db_02mkvdiskhostmap -host hostname -scsi 3 db_03mkvdiskhostmap -host hostname -scsi 4 db_04mkvdiskhostmap -host hostname -scsi 5 db_05mkvdiskhostmap -host hostname -scsi 6 db_06mkvdiskhostmap -host hostname -scsi 7 db_07
mkvdiskhostmap -host hostname -scsi 8 alog
mkvdiskhostmap -host hostname -scsi 9 archlog_00mkvdiskhostmap -host hostname -scsi 10 archlog_01
mkvdiskhostmap -host hostname -scsi 11 backup_00mkvdiskhostmap -host hostname -scsi 12 backup_01mkvdiskhostmap -host hostname -scsi 13 backup_02mkvdiskhostmap -host hostname -scsi 14 backup_03mkvdiskhostmap -host hostname -scsi 15 backup_04mkvdiskhostmap -host hostname -scsi 16 backup_05
mkvdiskhostmap -host hostname -scsi 17 filepool_00mkvdiskhostmap -host hostname -scsi 18 filepool_01mkvdiskhostmap -host hostname -scsi 19 filepool_02mkvdiskhostmap -host hostname -scsi 20 filepool_03mkvdiskhostmap -host hostname -scsi 21 filepool_04mkvdiskhostmap -host hostname -scsi 22 filepool_05mkvdiskhostmap -host hostname -scsi 23 filepool_06mkvdiskhostmap -host hostname -scsi 24 filepool_07mkvdiskhostmap -host hostname -scsi 25 filepool_08mkvdiskhostmap -host hostname -scsi 26 filepool_09mkvdiskhostmap -host hostname -scsi 27 filepool_10mkvdiskhostmap -host hostname -scsi 28 filepool_11mkvdiskhostmap -host hostname -scsi 29 filepool_12
56 IBM Spectrum Protect: Blueprint and Server Automated Configuration for Windows

mkvdiskhostmap -host hostname -scsi 30 filepool_13mkvdiskhostmap -host hostname -scsi 31 filepool_14mkvdiskhostmap -host hostname -scsi 32 filepool_15mkvdiskhostmap -host hostname -scsi 33 filepool_16mkvdiskhostmap -host hostname -scsi 34 filepool_17mkvdiskhostmap -host hostname -scsi 35 filepool_18mkvdiskhostmap -host hostname -scsi 36 filepool_19mkvdiskhostmap -host hostname -scsi 37 filepool_20mkvdiskhostmap -host hostname -scsi 38 filepool_21mkvdiskhostmap -host hostname -scsi 39 filepool_22mkvdiskhostmap -host hostname -scsi 40 filepool_23mkvdiskhostmap -host hostname -scsi 41 filepool_24mkvdiskhostmap -host hostname -scsi 42 filepool_25mkvdiskhostmap -host hostname -scsi 43 filepool_26mkvdiskhostmap -host hostname -scsi 44 filepool_27mkvdiskhostmap -host hostname -scsi 45 filepool_28mkvdiskhostmap -host hostname -scsi 46 filepool_29mkvdiskhostmap -host hostname -scsi 47 filepool_30mkvdiskhostmap -host hostname -scsi 48 filepool_31mkvdiskhostmap -host hostname -scsi 49 filepool_32mkvdiskhostmap -host hostname -scsi 50 filepool_33mkvdiskhostmap -host hostname -scsi 51 filepool_34mkvdiskhostmap -host hostname -scsi 52 filepool_35mkvdiskhostmap -host hostname -scsi 53 filepool_36mkvdiskhostmap -host hostname -scsi 54 filepool_37mkvdiskhostmap -host hostname -scsi 55 filepool_38mkvdiskhostmap -host hostname -scsi 56 filepool_39
Large system
1. Connect to and log in to the disk system by issuing the ssh command. For example:
ssh superuser@your5030hostname
2. Increase the memory that is available for the RAIDs to 125 MB by issuing the chiogrp command:
chiogrp -feature raid -size 125 io_grp0
3. List drive IDs for each type of disk so that you can create the MDisk arrays in Step “5” on page 57.Issue the lsdrive command. The output can vary, based on slot placement for the different disks.The output is similar to what is returned for small and medium systems.
4. Create the MDisk groups for the IBM Spectrum Protect database and storage pool. Issue themkmdiskgroup command for each pool, specifying 1024 for the extent size:
mkmdiskgrp -name db_grp0 -ext 1024mkmdiskgrp -name stgpool_grp0 -ext 1024mkmdiskgrp -name stgpool_grp1 -ext 1024mkmdiskgrp -name stgpool_grp2 -ext 1024
5. Create arrays by using the mkdistributedarray command. Specify the commands to add the MDiskarrays to the data pools that you created in the previous step.
For example:
mkdistributedarray -name db_array0 -level raid6 -driveclass 1 -drivecount 8 -stripewidth 7 -rebuildareas 1 -strip 256 db_grp0mkdistributedarray -name stgpool_array0 -level raid6 -driveclass 0 -drivecount 60 -stripewidth 12 -rebuildareas 2 -strip 256 stgpool_grp0mkdistributedarray -name stgpool_array1 -level raid6 -driveclass 0 -drivecount 60 -stripewidth 12 -rebuildareas 2 -strip 256 stgpool_grp1mkdistributedarray -name stgpool_array2 -level raid6 -driveclass 0 -drivecount 60 -stripewidth 12 -rebuildareas 2 -strip 256 stgpool_grp2
6. Create the storage volumes for the system. Issue the mkvdisk command for each volume, specifyingthe volume sizes in MB.
For example:
mkvdisk -mdiskgrp db_grp0 -size 729088 -unit mb -name db_00 -iogrp 0 -nofmtdiskmkvdisk -mdiskgrp db_grp0 -size 729088 -unit mb -name db_01 -iogrp 0 -nofmtdiskmkvdisk -mdiskgrp db_grp0 -size 729088 -unit mb -name db_02 -iogrp 0 -nofmtdiskmkvdisk -mdiskgrp db_grp0 -size 729088 -unit mb -name db_03 -iogrp 0 -nofmtdiskmkvdisk -mdiskgrp db_grp0 -size 729088 -unit mb -name db_04 -iogrp 0 -nofmtdisk
Configuring the disk system by using commands 57

mkvdisk -mdiskgrp db_grp0 -size 729088 -unit mb -name db_05 -iogrp 0 -nofmtdiskmkvdisk -mdiskgrp db_grp0 -size 729088 -unit mb -name db_06 -iogrp 0 -nofmtdiskmkvdisk -mdiskgrp db_grp0 -size 729088 -unit mb -name db_07 -iogrp 0 -nofmtdiskmkvdisk -mdiskgrp db_grp0 -size 729088 -unit mb -name db_08 -iogrp 0 -nofmtdiskmkvdisk -mdiskgrp db_grp0 -size 729088 -unit mb -name db_09 -iogrp 0 -nofmtdiskmkvdisk -mdiskgrp db_grp0 -size 729088 -unit mb -name db_10 -iogrp 0 -nofmtdiskmkvdisk -mdiskgrp db_grp0 -size 729088 -unit mb -name db_11 -iogrp 0 -nofmtdisk
mkvdisk -mdiskgrp db_grp0 -size 307200 -unit mb -name alog -iogrp 0 -nofmtdisk
mkvdisk -mdiskgrp stgpool_grp0 -size 1400000 -unit mb -name archlog_00 -iogrp 0 -nofmtdiskmkvdisk -mdiskgrp stgpool_grp1 -size 1400000 -unit mb -name archlog_01 -iogrp 0 -nofmtdiskmkvdisk -mdiskgrp stgpool_grp2 -size 1400000 -unit mb -name archlog_02 -iogrp 0 -nofmtdisk
mkvdisk -mdiskgrp stgpool_grp0 -size 8388608 -unit mb -name backup_00 -iogrp 0 -nofmtdiskmkvdisk -mdiskgrp stgpool_grp0 -size 8388608 -unit mb -name backup_01 -iogrp 0 -nofmtdiskmkvdisk -mdiskgrp stgpool_grp1 -size 8388608 -unit mb -name backup_02 -iogrp 0 -nofmtdiskmkvdisk -mdiskgrp stgpool_grp1 -size 8388608 -unit mb -name backup_03 -iogrp 0 -nofmtdiskmkvdisk -mdiskgrp stgpool_grp2 -size 8388608 -unit mb -name backup_04 -iogrp 0 -nofmtdiskmkvdisk -mdiskgrp stgpool_grp2 -size 8388608 -unit mb -name backup_05 -iogrp 0 -nofmtdisk
mkvdisk -mdiskgrp stgpool_grp0 -size 13933568 -unit mb -name filepool_00 -iogrp 0 -nofmtdiskmkvdisk -mdiskgrp stgpool_grp0 -size 13933568 -unit mb -name filepool_01 -iogrp 0 -nofmtdiskmkvdisk -mdiskgrp stgpool_grp0 -size 13933568 -unit mb -name filepool_02 -iogrp 0 -nofmtdiskmkvdisk -mdiskgrp stgpool_grp0 -size 13933568 -unit mb -name filepool_03 -iogrp 0 -nofmtdiskmkvdisk -mdiskgrp stgpool_grp0 -size 13933568 -unit mb -name filepool_04 -iogrp 0 -nofmtdiskmkvdisk -mdiskgrp stgpool_grp0 -size 13933568 -unit mb -name filepool_05 -iogrp 0 -nofmtdiskmkvdisk -mdiskgrp stgpool_grp0 -size 13933568 -unit mb -name filepool_06 -iogrp 0 -nofmtdiskmkvdisk -mdiskgrp stgpool_grp0 -size 13933568 -unit mb -name filepool_07 -iogrp 0 -nofmtdiskmkvdisk -mdiskgrp stgpool_grp0 -size 13933568 -unit mb -name filepool_08 -iogrp 0 -nofmtdiskmkvdisk -mdiskgrp stgpool_grp0 -size 13933568 -unit mb -name filepool_09 -iogrp 0 -nofmtdiskmkvdisk -mdiskgrp stgpool_grp0 -size 13933568 -unit mb -name filepool_10 -iogrp 0 -nofmtdiskmkvdisk -mdiskgrp stgpool_grp0 -size 13933568 -unit mb -name filepool_11 -iogrp 0 -nofmtdiskmkvdisk -mdiskgrp stgpool_grp0 -size 13933568 -unit mb -name filepool_12 -iogrp 0 -nofmtdiskmkvdisk -mdiskgrp stgpool_grp0 -size 13933568 -unit mb -name filepool_13 -iogrp 0 -nofmtdiskmkvdisk -mdiskgrp stgpool_grp0 -size 13933568 -unit mb -name filepool_14 -iogrp 0 -nofmtdiskmkvdisk -mdiskgrp stgpool_grp0 -size 13933568 -unit mb -name filepool_15 -iogrp 0 -nofmtdiskmkvdisk -mdiskgrp stgpool_grp0 -size 13933568 -unit mb -name filepool_16 -iogrp 0 -nofmtdiskmkvdisk -mdiskgrp stgpool_grp0 -size 13933568 -unit mb -name filepool_17 -iogrp 0 -nofmtdiskmkvdisk -mdiskgrp stgpool_grp0 -size 13933568 -unit mb -name filepool_18 -iogrp 0 -nofmtdiskmkvdisk -mdiskgrp stgpool_grp0 -size 13933568 -unit mb -name filepool_19 -iogrp 0 -nofmtdiskmkvdisk -mdiskgrp stgpool_grp0 -size 13933568 -unit mb -name filepool_20 -iogrp 0 -nofmtdiskmkvdisk -mdiskgrp stgpool_grp0 -size 13933568 -unit mb -name filepool_21 -iogrp 0 -nofmtdiskmkvdisk -mdiskgrp stgpool_grp0 -size 13933568 -unit mb -name filepool_22 -iogrp 0 -nofmtdiskmkvdisk -mdiskgrp stgpool_grp0 -size 13933568 -unit mb -name filepool_23 -iogrp 0 -nofmtdiskmkvdisk -mdiskgrp stgpool_grp0 -size 13933568 -unit mb -name filepool_24 -iogrp 0 -nofmtdisk
mkvdisk -mdiskgrp stgpool_grp1 -size 13933568 -unit mb -name filepool_25 -iogrp 0 -nofmtdiskmkvdisk -mdiskgrp stgpool_grp1 -size 13933568 -unit mb -name filepool_26 -iogrp 0 -nofmtdiskmkvdisk -mdiskgrp stgpool_grp1 -size 13933568 -unit mb -name filepool_27 -iogrp 0 -nofmtdiskmkvdisk -mdiskgrp stgpool_grp1 -size 13933568 -unit mb -name filepool_28 -iogrp 0 -nofmtdiskmkvdisk -mdiskgrp stgpool_grp1 -size 13933568 -unit mb -name filepool_29 -iogrp 0 -nofmtdiskmkvdisk -mdiskgrp stgpool_grp1 -size 13933568 -unit mb -name filepool_30 -iogrp 0 -nofmtdiskmkvdisk -mdiskgrp stgpool_grp1 -size 13933568 -unit mb -name filepool_31 -iogrp 0 -nofmtdiskmkvdisk -mdiskgrp stgpool_grp1 -size 13933568 -unit mb -name filepool_32 -iogrp 0 -nofmtdiskmkvdisk -mdiskgrp stgpool_grp1 -size 13933568 -unit mb -name filepool_33 -iogrp 0 -nofmtdiskmkvdisk -mdiskgrp stgpool_grp1 -size 13933568 -unit mb -name filepool_34 -iogrp 0 -nofmtdiskmkvdisk -mdiskgrp stgpool_grp1 -size 13933568 -unit mb -name filepool_35 -iogrp 0 -nofmtdiskmkvdisk -mdiskgrp stgpool_grp1 -size 13933568 -unit mb -name filepool_36 -iogrp 0 -nofmtdiskmkvdisk -mdiskgrp stgpool_grp1 -size 13933568 -unit mb -name filepool_37 -iogrp 0 -nofmtdiskmkvdisk -mdiskgrp stgpool_grp1 -size 13933568 -unit mb -name filepool_38 -iogrp 0 -nofmtdiskmkvdisk -mdiskgrp stgpool_grp1 -size 13933568 -unit mb -name filepool_39 -iogrp 0 -nofmtdiskmkvdisk -mdiskgrp stgpool_grp1 -size 13933568 -unit mb -name filepool_40 -iogrp 0 -nofmtdiskmkvdisk -mdiskgrp stgpool_grp1 -size 13933568 -unit mb -name filepool_41 -iogrp 0 -nofmtdiskmkvdisk -mdiskgrp stgpool_grp1 -size 13933568 -unit mb -name filepool_42 -iogrp 0 -nofmtdiskmkvdisk -mdiskgrp stgpool_grp1 -size 13933568 -unit mb -name filepool_43 -iogrp 0 -nofmtdiskmkvdisk -mdiskgrp stgpool_grp1 -size 13933568 -unit mb -name filepool_44 -iogrp 0 -nofmtdiskmkvdisk -mdiskgrp stgpool_grp1 -size 13933568 -unit mb -name filepool_45 -iogrp 0 -nofmtdiskmkvdisk -mdiskgrp stgpool_grp1 -size 13933568 -unit mb -name filepool_46 -iogrp 0 -nofmtdiskmkvdisk -mdiskgrp stgpool_grp1 -size 13933568 -unit mb -name filepool_47 -iogrp 0 -nofmtdiskmkvdisk -mdiskgrp stgpool_grp1 -size 13933568 -unit mb -name filepool_48 -iogrp 0 -nofmtdiskmkvdisk -mdiskgrp stgpool_grp1 -size 13933568 -unit mb -name filepool_49 -iogrp 0 -nofmtdisk
mkvdisk -mdiskgrp stgpool_grp2 -size 13933568 -unit mb -name filepool_50 -iogrp 0 -nofmtdiskmkvdisk -mdiskgrp stgpool_grp2 -size 13933568 -unit mb -name filepool_51 -iogrp 0 -nofmtdiskmkvdisk -mdiskgrp stgpool_grp2 -size 13933568 -unit mb -name filepool_52 -iogrp 0 -nofmtdiskmkvdisk -mdiskgrp stgpool_grp2 -size 13933568 -unit mb -name filepool_53 -iogrp 0 -nofmtdiskmkvdisk -mdiskgrp stgpool_grp2 -size 13933568 -unit mb -name filepool_54 -iogrp 0 -nofmtdiskmkvdisk -mdiskgrp stgpool_grp2 -size 13933568 -unit mb -name filepool_55 -iogrp 0 -nofmtdiskmkvdisk -mdiskgrp stgpool_grp2 -size 13933568 -unit mb -name filepool_56 -iogrp 0 -nofmtdiskmkvdisk -mdiskgrp stgpool_grp2 -size 13933568 -unit mb -name filepool_57 -iogrp 0 -nofmtdiskmkvdisk -mdiskgrp stgpool_grp2 -size 13933568 -unit mb -name filepool_58 -iogrp 0 -nofmtdisk
58 IBM Spectrum Protect: Blueprint and Server Automated Configuration for Windows

mkvdisk -mdiskgrp stgpool_grp2 -size 13933568 -unit mb -name filepool_59 -iogrp 0 -nofmtdiskmkvdisk -mdiskgrp stgpool_grp2 -size 13933568 -unit mb -name filepool_60 -iogrp 0 -nofmtdiskmkvdisk -mdiskgrp stgpool_grp2 -size 13933568 -unit mb -name filepool_61 -iogrp 0 -nofmtdiskmkvdisk -mdiskgrp stgpool_grp2 -size 13933568 -unit mb -name filepool_62 -iogrp 0 -nofmtdiskmkvdisk -mdiskgrp stgpool_grp2 -size 13933568 -unit mb -name filepool_63 -iogrp 0 -nofmtdiskmkvdisk -mdiskgrp stgpool_grp2 -size 13933568 -unit mb -name filepool_64 -iogrp 0 -nofmtdiskmkvdisk -mdiskgrp stgpool_grp2 -size 13933568 -unit mb -name filepool_65 -iogrp 0 -nofmtdiskmkvdisk -mdiskgrp stgpool_grp2 -size 13933568 -unit mb -name filepool_66 -iogrp 0 -nofmtdiskmkvdisk -mdiskgrp stgpool_grp2 -size 13933568 -unit mb -name filepool_67 -iogrp 0 -nofmtdiskmkvdisk -mdiskgrp stgpool_grp2 -size 13933568 -unit mb -name filepool_68 -iogrp 0 -nofmtdiskmkvdisk -mdiskgrp stgpool_grp2 -size 13933568 -unit mb -name filepool_69 -iogrp 0 -nofmtdiskmkvdisk -mdiskgrp stgpool_grp2 -size 13933568 -unit mb -name filepool_70 -iogrp 0 -nofmtdiskmkvdisk -mdiskgrp stgpool_grp2 -size 13933568 -unit mb -name filepool_71 -iogrp 0 -nofmtdiskmkvdisk -mdiskgrp stgpool_grp2 -size 13933568 -unit mb -name filepool_72 -iogrp 0 -nofmtdiskmkvdisk -mdiskgrp stgpool_grp2 -size 13933568 -unit mb -name filepool_73 -iogrp 0 -nofmtdiskmkvdisk -mdiskgrp stgpool_grp2 -size 13933568 -unit mb -name filepool_74 -iogrp 0 -nofmtdisk
7. Create a logical host object by using the mkhost command. Specify the Fibre Channel WWPNs fromyour operating system and specify the name of your host. For instructions about obtaining the WWPNsfrom your system, see “Step 1: Set up and configure hardware” on page 21.
For example, to create a host that is named hostone with a list that contains FC WWPNs10000090FA3D8F12 and 10000090FA49009E, issue the following command:
mkhost -name hostone -fcwwpn 10000090FA3D8F12:10000090FA49009E -iogrp 0 -type=generic -force
8. Map the volumes that you created in Step “6” on page 57 to the new host. Issue themkvdiskhostmap command for each volume. For example, issue the following commands wherehostname is the name of your host:
mkvdiskhostmap -host hostname -scsi 0 db_00mkvdiskhostmap -host hostname -scsi 1 db_01mkvdiskhostmap -host hostname -scsi 2 db_02mkvdiskhostmap -host hostname -scsi 3 db_03mkvdiskhostmap -host hostname -scsi 4 db_04mkvdiskhostmap -host hostname -scsi 5 db_05mkvdiskhostmap -host hostname -scsi 6 db_06mkvdiskhostmap -host hostname -scsi 7 db_07mkvdiskhostmap -host hostname -scsi 8 db_08mkvdiskhostmap -host hostname -scsi 9 db_09mkvdiskhostmap -host hostname -scsi 10 db_10mkvdiskhostmap -host hostname -scsi 11 db_11
mkvdiskhostmap -host hostname -scsi 12 alog
mkvdiskhostmap -host hostname -scsi 13 archlog_00mkvdiskhostmap -host hostname -scsi 14 archlog_01mkvdiskhostmap -host hostname -scsi 15 archlog_02
mkvdiskhostmap -host hostname -scsi 16 backup_00mkvdiskhostmap -host hostname -scsi 17 backup_01mkvdiskhostmap -host hostname -scsi 18 backup_02mkvdiskhostmap -host hostname -scsi 19 backup_03mkvdiskhostmap -host hostname -scsi 20 backup_04mkvdiskhostmap -host hostname -scsi 21 backup_05
mkvdiskhostmap -host hostname -scsi 22 filepool_00mkvdiskhostmap -host hostname -scsi 23 filepool_01mkvdiskhostmap -host hostname -scsi 24 filepool_02mkvdiskhostmap -host hostname -scsi 25 filepool_03mkvdiskhostmap -host hostname -scsi 26 filepool_04mkvdiskhostmap -host hostname -scsi 27 filepool_05mkvdiskhostmap -host hostname -scsi 28 filepool_06mkvdiskhostmap -host hostname -scsi 29 filepool_07mkvdiskhostmap -host hostname -scsi 30 filepool_08mkvdiskhostmap -host hostname -scsi 31 filepool_09mkvdiskhostmap -host hostname -scsi 32 filepool_10mkvdiskhostmap -host hostname -scsi 33 filepool_11mkvdiskhostmap -host hostname -scsi 34 filepool_12mkvdiskhostmap -host hostname -scsi 35 filepool_13mkvdiskhostmap -host hostname -scsi 36 filepool_14mkvdiskhostmap -host hostname -scsi 37 filepool_15mkvdiskhostmap -host hostname -scsi 38 filepool_16mkvdiskhostmap -host hostname -scsi 39 filepool_17mkvdiskhostmap -host hostname -scsi 40 filepool_18mkvdiskhostmap -host hostname -scsi 41 filepool_19mkvdiskhostmap -host hostname -scsi 42 filepool_20
Configuring the disk system by using commands 59

mkvdiskhostmap -host hostname -scsi 43 filepool_21mkvdiskhostmap -host hostname -scsi 44 filepool_22mkvdiskhostmap -host hostname -scsi 45 filepool_23mkvdiskhostmap -host hostname -scsi 46 filepool_24
mkvdiskhostmap -host hostname -scsi 47 filepool_25mkvdiskhostmap -host hostname -scsi 48 filepool_26mkvdiskhostmap -host hostname -scsi 49 filepool_27mkvdiskhostmap -host hostname -scsi 50 filepool_28mkvdiskhostmap -host hostname -scsi 51 filepool_29mkvdiskhostmap -host hostname -scsi 52 filepool_30mkvdiskhostmap -host hostname -scsi 53 filepool_31mkvdiskhostmap -host hostname -scsi 54 filepool_32mkvdiskhostmap -host hostname -scsi 55 filepool_33mkvdiskhostmap -host hostname -scsi 56 filepool_34mkvdiskhostmap -host hostname -scsi 57 filepool_35mkvdiskhostmap -host hostname -scsi 58 filepool_36mkvdiskhostmap -host hostname -scsi 59 filepool_37mkvdiskhostmap -host hostname -scsi 60 filepool_38mkvdiskhostmap -host hostname -scsi 61 filepool_39mkvdiskhostmap -host hostname -scsi 62 filepool_40mkvdiskhostmap -host hostname -scsi 63 filepool_41mkvdiskhostmap -host hostname -scsi 64 filepool_42mkvdiskhostmap -host hostname -scsi 65 filepool_43mkvdiskhostmap -host hostname -scsi 66 filepool_44mkvdiskhostmap -host hostname -scsi 67 filepool_45mkvdiskhostmap -host hostname -scsi 68 filepool_46mkvdiskhostmap -host hostname -scsi 69 filepool_47mkvdiskhostmap -host hostname -scsi 70 filepool_48mkvdiskhostmap -host hostname -scsi 71 filepool_49
mkvdiskhostmap -host hostname -scsi 72 filepool_50mkvdiskhostmap -host hostname -scsi 73 filepool_51mkvdiskhostmap -host hostname -scsi 74 filepool_52mkvdiskhostmap -host hostname -scsi 75 filepool_53mkvdiskhostmap -host hostname -scsi 76 filepool_54mkvdiskhostmap -host hostname -scsi 77 filepool_55mkvdiskhostmap -host hostname -scsi 78 filepool_56mkvdiskhostmap -host hostname -scsi 79 filepool_57mkvdiskhostmap -host hostname -scsi 80 filepool_58mkvdiskhostmap -host hostname -scsi 81 filepool_59mkvdiskhostmap -host hostname -scsi 82 filepool_60mkvdiskhostmap -host hostname -scsi 83 filepool_61mkvdiskhostmap -host hostname -scsi 84 filepool_62mkvdiskhostmap -host hostname -scsi 85 filepool_63mkvdiskhostmap -host hostname -scsi 86 filepool_64mkvdiskhostmap -host hostname -scsi 87 filepool_65mkvdiskhostmap -host hostname -scsi 88 filepool_66mkvdiskhostmap -host hostname -scsi 89 filepool_67mkvdiskhostmap -host hostname -scsi 90 filepool_68mkvdiskhostmap -host hostname -scsi 91 filepool_69mkvdiskhostmap -host hostname -scsi 92 filepool_70mkvdiskhostmap -host hostname -scsi 93 filepool_71mkvdiskhostmap -host hostname -scsi 94 filepool_72mkvdiskhostmap -host hostname -scsi 95 filepool_73mkvdiskhostmap -host hostname -scsi 96 filepool_74
60 IBM Spectrum Protect: Blueprint and Server Automated Configuration for Windows

Appendix C. Using a response file with the Blueprintconfiguration script
You can run the Blueprint configuration script in non-interactive mode by using a response file to set yourconfiguration choices.
Three response files are provided with the Blueprint configuration script. If you plan to set up a system byusing all default values, you can run the configuration script in non-interactive mode by using one of thefollowing response files:Small system
responsefilesmall_win.txtMedium system
responsefilemed_win.txtLarge system
responsefilelarge_win.txtThe files are pre-filled with default configuration values for the small, medium, and large systems and donot require updates.
If you want to customize your responses for a system, use the following table with your “Planningworksheets” on page 10 to update one of the default response files. The values that are used in theresponse file correspond to values that you recorded in the Your value column of the worksheet.
Response file value Corresponding value from the planning worksheet
serverscale Not recorded in the planning worksheet. Enter a value of S for a smallsystem, M for a medium system, or L for a large system.
db2user Db2 instance owner ID
db2userpw Db2 instance owner password
instdirmountpoint Directory for the server instance
db2dirpaths Directories for the database
tsmstgpaths Directories for storage
actlogpath Directory for the active log
archlogpath Directory for the archive log
dbbackdirpaths Directories for database backup
backupstarttime Schedule start time
tsmsysadminid IBM Spectrum Protect administrator ID
tsmsysadminidpw IBM Spectrum Protect administrator ID password
tcpport TCP/IP port address for communications with the IBM Spectrum Protectserver.
Enter the value that you specified for Step “5” on page 23.
servername Server name
serverpassword Server password
© Copyright IBM Corp. 2014, 2019 61

62 IBM Spectrum Protect: Blueprint and Server Automated Configuration for Windows

Appendix D. Using predefined client schedulesThe Blueprint configuration script creates several client schedules during server configuration. To usethese schedules, you must complete configuration steps on the client system.
Table 25 on page 63 lists the predefined schedules that are created on the server. The schedule namesand descriptions are based on the default backup schedule start time of 10 PM. If you changed this starttime during server configuration, the predefined client schedules on your system are named according tothat start time. Information about updating client schedules to use with the IBM Spectrum Protect serveris provided in the sections that follow the table.
For complete information about scheduling client backup operations, see your client documentation.
Table 25. Predefined client schedules
Client Schedule name Schedule description
IBM Spectrum Protect forDatabases: Data Protection forOracle
ORACLE_DAILYFULL_10PM Oracle Daily FULL backupthat starts at 10 PM
IBM Spectrum Protect forDatabases: Data Protection forMicrosoft SQL Server
SQL_DAILYFULL_10PM Microsoft SQL Daily FULLbackup that starts at 10 PM
IBM Spectrum Protect backup-archive client
FILE_INCRFOREVER_10PM File incremental-foreverbackup that starts at 10 PM
IBM Spectrum Protect for Mail:Data Protection for IBMDomino®
DOMINO_DAILYFULL_10PM Daily FULL backup thatstarts at 10 PM
IBM Spectrum Protect for Mail:Data Protection for MicrosoftExchange Server
EXCHANGE_DAILYFULL_10PM FULL backup that starts at10 PM
IBM Spectrum Protect forVirtual Environments: DataProtection for Microsoft Hyper-V
HYPERV_FULL_10PM Hyper-V full backup thatstarts at 10 PM
Data Protection for Oracle
Data Protection for Oracle does not include a sample backup file. You can create a script or .bat commandfile and update the OBJECTS parameter for the predefined schedule by using the UPDATE SCHEDULEserver command. Specify the full path to the command file on the client system unless you save thecommand file in the client installation directory. Then, you must provide only the file name.
For example, to update the ORACLE_DAILYFULL_10PM schedule that is in the DATABASE domain, issuethe following command. Specify the name of the command file that you want to use in the clientinstallation directory. In this example, the command file is named schedcmdfile.bat.
update schedule database oracle_dailyfull_10pm obj=schedcmdfile.bat
Data Protection for Microsoft SQL ServerThe sample schedule file that is included with Data Protection for Microsoft SQL Server is namedsqlfull.cmd. This file can be customized for use with IBM Spectrum Protect server. If you save the fileto the client installation directory on the client system, you do not have to update the predefined scheduleto include the full path to the file.
© Copyright IBM Corp. 2014, 2019 63

Backup-archive clientWhen you use the predefined schedule for backup-archive clients, the server processes objects as theyare defined in the client options file, unless you specify a file to run a command or macro. For informationabout setting the domain, include, and exclude options for backup operations, see the online productdocumentation:
• Client options reference (V6.4)• Client options reference (V7.1)• Client options reference (V8.1)
Data Protection for IBM DominoThe sample schedule file that is included with Data Protection for IBM Domino is named domsel.cmd.This file can be customized for use with IBM Spectrum Protect server. If you save the file to the clientinstallation directory on the client system, you do not have to update the predefined schedule to includethe full path to the file.
Data Protection for Microsoft Exchange ServerThe sample schedule file that is included with Data Protection for Microsoft Exchange Server is namedexcfull.cmd. This file can be customized for use with IBM Spectrum Protect server. If you save the fileto the client installation directory on the client system, you do not have to update the predefined scheduleto include the full path to the file.
Data Protection for Microsoft Hyper-VNo sample schedule file is provided with Data Protection for Microsoft Hyper-V. To create a .cmd file thatcan back up multiple virtual machines, complete the following steps:
1. Update the client options file to include the following settings:
commmethod tcpiptcpport 1500TCPServeraddress <IBM Spectrum Protect server name>nodename <node name>passwordaccess generatevmbackuptype hypervfull
2. For each virtual machine that you want to back up, create a separate script file. A unique file is neededto ensure that a log is saved for each backup. For example, create a file that is namedhvvm1.cmd. Include the backup command, the name of the virtual machine, the client options file,and the log file that you want to create on the first line. On the second line, include the word exit.
For example:
dsmc backup vm "tsmhyp1vm3" -optfile=dsm-hv.opt >> hv_backup_3.logexit
Repeat this step for each virtual machine that you want to back up.3. Create a backup schedule file, for example, hv_backup.cmd.4. Add an entry to hv_backup.cmd for each virtual machine script file that you created. For example:
start hvvm1.cmdchoice /T 10 /C X /D X /N > NULstart hvvm2.cmdchoice /T 10 /C X /D X /N > NULstart hvvm3.cmdchoice /T 10 /C X /D X /N > NULhvvm4.cmd
5. Issue the UPDATE SCHEDULE server command to update the predefined HYPERV_FULL_10PMschedule. Specify the full path for the Hyper-V backup schedule file location in the OBJECTSparameter.
64 IBM Spectrum Protect: Blueprint and Server Automated Configuration for Windows

IBM Spectrum Protect for Virtual EnvironmentsTo create new schedules, use the Data Protection for VMware vCenter plug-in GUI.
Using predefined client schedules 65

66 IBM Spectrum Protect: Blueprint and Server Automated Configuration for Windows

Appendix E. Modification of blueprint configurationsIf you want to customize the configurations that are detailed in this document, plan carefully.
Consider the following before you deviate from the blueprint specifications:
• If you want to extend the usable storage for your system by adding storage enclosures, you must alsoadd storage for the IBM Spectrum Protect database. Increase the database storage by approximately1% of the additional total amount of managed data that will be protected (size before datadeduplication).
• You can use Windows operating systems other than Microsoft Windows Server 2016 Standard Edition,but the following caveats apply:
– The version and operating system must be supported for use with the IBM Spectrum Protect server.– Additional configuration steps or modifications to steps for installation and configuration might be
needed.• If you use other storage systems, performance measurements that are reported for the blueprintconfigurations are not guaranteed to match your customization.
• In general, no guarantees can be made for a customized environment. Test the environment to ensurethat it meets your business requirements.
© Copyright IBM Corp. 2014, 2019 67

68 IBM Spectrum Protect: Blueprint and Server Automated Configuration for Windows

Appendix F. TroubleshootingAt the time of publication, the following issue was known.
Slow throughput after server installationIn some cases, following a new installation of IBM Spectrum Protect, the server might experienceslow throughput. This condition can be caused by a delay in the Db2 runstats operation, whichoptimizes how queries are performed. An indication of this issue is that the Db2 process db2sysc isusing a large amount of CPU processing as compared to the amount of processing that is used by theserver.
To resolve this problem, you can start runstats processing manually. Issue the following commandfrom the administrative command-line interface:
dsmadmc > runstats all
© Copyright IBM Corp. 2014, 2019 69

70 IBM Spectrum Protect: Blueprint and Server Automated Configuration for Windows

Appendix G. Accessibility features for the IBMSpectrum Protect product family
Accessibility features assist users who have a disability, such as restricted mobility or limited vision, touse information technology content successfully.
Overview
The IBM Spectrum Protect family of products includes the following major accessibility features:
• Keyboard-only operation• Operations that use a screen reader
The IBM Spectrum Protect family of products uses the latest W3C Standard, WAI-ARIA 1.0(www.w3.org/TR/wai-aria/), to ensure compliance with US Section 508 (www.access-board.gov/guidelines-and-standards/communications-and-it/about-the-section-508-standards/section-508-standards) and Web Content Accessibility Guidelines (WCAG) 2.0 (www.w3.org/TR/WCAG20/). To takeadvantage of accessibility features, use the latest release of your screen reader and the latest webbrowser that is supported by the product.
The product documentation in IBM Knowledge Center is enabled for accessibility. The accessibilityfeatures of IBM Knowledge Center are described in the Accessibility section of the IBM Knowledge Centerhelp (www.ibm.com/support/knowledgecenter/about/releasenotes.html?view=kc#accessibility).
Keyboard navigation
This product uses standard navigation keys.
Interface information
User interfaces do not have content that flashes 2 - 55 times per second.
Web user interfaces rely on cascading style sheets to render content properly and to provide a usableexperience. The application provides an equivalent way for low-vision users to use system displaysettings, including high-contrast mode. You can control font size by using the device or web browsersettings.
Web user interfaces include WAI-ARIA navigational landmarks that you can use to quickly navigate tofunctional areas in the application.
Vendor software
The IBM Spectrum Protect product family includes certain vendor software that is not covered under theIBM license agreement. IBM makes no representation about the accessibility features of these products.Contact the vendor for accessibility information about its products.
Related accessibility information
In addition to standard IBM help desk and support websites, IBM has a TTY telephone service for use bydeaf or hard of hearing customers to access sales and support services:
TTY service800-IBM-3383 (800-426-3383)(within North America)
For more information about the commitment that IBM has to accessibility, see IBM Accessibility(www.ibm.com/able).
© Copyright IBM Corp. 2014, 2019 71

72 IBM Spectrum Protect: Blueprint and Server Automated Configuration for Windows

Notices
This information was developed for products and services offered in the US. This material might beavailable from IBM in other languages. However, you may be required to own a copy of the product orproduct version in that language in order to access it.
IBM may not offer the products, services, or features discussed in this document in other countries.Consult your local IBM representative for information on the products and services currently available inyour area. Any reference to an IBM product, program, or service is not intended to state or imply that onlythat IBM product, program, or service may be used. Any functionally equivalent product, program, orservice that does not infringe any IBM intellectual property right may be used instead. However, it is theuser's responsibility to evaluate and verify the operation of any non-IBM product, program, or service.
IBM may have patents or pending patent applications covering subject matter described in this document.The furnishing of this document does not grant you any license to these patents. You can send licenseinquiries, in writing, to:
IBM Director of LicensingIBM CorporationNorth Castle Drive, MD-NC119Armonk, NY 10504-1785US
For license inquiries regarding double-byte character set (DBCS) information, contact the IBM IntellectualProperty Department in your country or send inquiries, in writing, to:
Intellectual Property LicensingLegal and Intellectual Property LawIBM Japan Ltd.19-21, Nihonbashi-Hakozakicho, Chuo-kuTokyo 103-8510, Japan
INTERNATIONAL BUSINESS MACHINES CORPORATION PROVIDES THIS PUBLICATION "AS IS"WITHOUT WARRANTY OF ANY KIND, EITHER EXPRESS OR IMPLIED, INCLUDING, BUT NOT LIMITED TO,THE IMPLIED WARRANTIES OF NON-INFRINGEMENT, MERCHANTABILITY OR FITNESS FOR APARTICULAR PURPOSE. Some jurisdictions do not allow disclaimer of express or implied warranties incertain transactions, therefore, this statement may not apply to you.
This information could include technical inaccuracies or typographical errors. Changes are periodicallymade to the information herein; these changes will be incorporated in new editions of the publication.IBM may make improvements and/or changes in the product(s) and/or the program(s) described in thispublication at any time without notice.
Any references in this information to non-IBM websites are provided for convenience only and do not inany manner serve as an endorsement of those websites. The materials at those websites are not part ofthe materials for this IBM product and use of those websites is at your own risk.
IBM may use or distribute any of the information you supply in any way it believes appropriate withoutincurring any obligation to you.
Licensees of this program who wish to have information about it for the purpose of enabling: (i) theexchange of information between independently created programs and other programs (including thisone) and (ii) the mutual use of the information which has been exchanged, should contact:
IBM Director of LicensingIBM CorporationNorth Castle Drive, MD-NC119Armonk, NY 10504-1785US
© Copyright IBM Corp. 2014, 2019 73

Such information may be available, subject to appropriate terms and conditions, including in some cases,payment of a fee.
The licensed program described in this document and all licensed material available for it are provided byIBM under terms of the IBM Customer Agreement, IBM International Program License Agreement or anyequivalent agreement between us.
The performance data discussed herein is presented as derived under specific operating conditions.Actual results may vary.
Information concerning non-IBM products was obtained from the suppliers of those products, theirpublished announcements or other publicly available sources. IBM has not tested those products andcannot confirm the accuracy of performance, compatibility or any other claims related to non-IBMproducts. Questions on the capabilities of non-IBM products should be addressed to the suppliers ofthose products.
This information contains examples of data and reports used in daily business operations. To illustratethem as completely as possible, the examples include the names of individuals, companies, brands, andproducts. All of these names are fictitious and any similarity to the names and addresses used by anactual business enterprise is entirely coincidental.
COPYRIGHT LICENSE:
This information contains sample application programs in source language, which illustrate programmingtechniques on various operating platforms. You may copy, modify, and distribute these sample programsin any form without payment to IBM, for the purposes of developing, using, marketing or distributingapplication programs conforming to the application programming interface for the operating platform forwhich the sample programs are written. These examples have not been thoroughly tested under allconditions. IBM, therefore, cannot guarantee or imply reliability, serviceability, or function of theseprograms. The sample programs are provided "AS IS", without warranty of any kind. IBM shall not beliable for any damages arising out of your use of the sample programs.
Each copy or any portion of these sample programs or any derivative work must include a copyright noticeas follows: © (your company name) (year). Portions of this code are derived from IBM Corp. SamplePrograms. © Copyright IBM Corp. _enter the year or years_.
Trademarks
IBM, the IBM logo, and ibm.com® are trademarks or registered trademarks of International BusinessMachines Corp., registered in many jurisdictions worldwide. Other product and service names might betrademarks of IBM or other companies. A current list of IBM trademarks is available on the Web at"Copyright and trademark information" at www.ibm.com/legal/copytrade.shtml.
Adobe is a registered trademark of Adobe Systems Incorporated in the United States, and/or othercountries.
Linear Tape-Open, LTO, and Ultrium are trademarks of HP, IBM Corp. and Quantum in the U.S. and othercountries.
Intel and Itanium are trademarks or registered trademarks of Intel Corporation or its subsidiaries in theUnited States and other countries.
Linux is a registered trademark of Linus Torvalds in the United States, other countries, or both.
Microsoft, Windows, and Windows NT are trademarks of Microsoft Corporation in the United States, othercountries, or both.
Java™ and all Java-based trademarks and logos are trademarks or registered trademarks of Oracle and/orits affiliates.
UNIX is a registered trademark of The Open Group in the United States and other countries.
74 Notices

VMware, VMware vCenter Server, and VMware vSphere are registered trademarks or trademarks ofVMware, Inc. or its subsidiaries in the United States and/or other jurisdictions.
Terms and conditions for product documentation
Permissions for the use of these publications are granted subject to the following terms and conditions.
ApplicabilityThese terms and conditions are in addition to any terms of use for the IBM website.
Personal useYou may reproduce these publications for your personal, noncommercial use provided that allproprietary notices are preserved. You may not distribute, display or make derivative work of thesepublications, or any portion thereof, without the express consent of IBM.
Commercial useYou may reproduce, distribute and display these publications solely within your enterprise providedthat all proprietary notices are preserved. You may not make derivative works of these publications, orreproduce, distribute or display these publications or any portion thereof outside your enterprise,without the express consent of IBM.
RightsExcept as expressly granted in this permission, no other permissions, licenses or rights are granted,either express or implied, to the publications or any information, data, software or other intellectualproperty contained therein.
IBM reserves the right to withdraw the permissions granted herein whenever, in its discretion, the useof the publications is detrimental to its interest or, as determined by IBM, the above instructions arenot being properly followed.
You may not download, export or re-export this information except in full compliance with allapplicable laws and regulations, including all United States export laws and regulations.
IBM MAKES NO GUARANTEE ABOUT THE CONTENT OF THESE PUBLICATIONS. THE PUBLICATIONSARE PROVIDED "AS-IS" AND WITHOUT WARRANTY OF ANY KIND, EITHER EXPRESSED OR IMPLIED,INCLUDING BUT NOT LIMITED TO IMPLIED WARRANTIES OF MERCHANTABILITY, NON-INFRINGEMENT, AND FITNESS FOR A PARTICULAR PURPOSE.
Privacy policy considerations
IBM Software products, including software as a service solutions, (“Software Offerings”) may use cookiesor other technologies to collect product usage information, to help improve the end user experience, totailor interactions with the end user, or for other purposes. In many cases no personally identifiableinformation is collected by the Software Offerings. Some of our Software Offerings can help enable you tocollect personally identifiable information. If this Software Offering uses cookies to collect personallyidentifiable information, specific information about this offering’s use of cookies is set forth below.
This Software Offering does not use cookies or other technologies to collect personally identifiableinformation.
If the configurations deployed for this Software Offering provide you as customer the ability to collectpersonally identifiable information from end users via cookies and other technologies, you should seekyour own legal advice about any laws applicable to such data collection, including any requirements fornotice and consent.
For more information about the use of various technologies, including cookies, for these purposes, seeIBM’s Privacy Policy at http://www.ibm.com/privacy and IBM’s Online Privacy Statement at http://www.ibm.com/privacy/details in the section entitled “Cookies, Web Beacons and Other Technologies,”and the “IBM Software Products and Software-as-a-Service Privacy Statement” at http://www.ibm.com/software/info/product-privacy.
Notices 75

76 IBM Spectrum Protect: Blueprint and Server Automated Configuration for Windows

Index
Aaccessibility features 71ACTIVELOGSIZE server option 36ALLOWREORGINDEX server option 43ALLOWREORGTABLE server option 43ARCHLOGCOMPRESS server option 36
BBIOS settings 21blueprint
customization 67large system 18medium system 16small system 14
blueprint configuration scriptcompression option 33configuring with 33planning for 10response file 61testing 39troubleshooting 39
CCOMMTIMEOUT server option 36compression 33configuration
clean up script 39customizing 67prerequisites 5
configuringDb2 database 33disk systems 21file systems 24, 25hardware 21IBM Spectrum Protect server 33RAID arrays 13, 21Storwize V5010 system 53Storwize V5030 system 53TCP/IP settings 22volumes 13, 21
Ddatabase
configuration of 33reorganizing tables and indexes 43
Db2 -locklist parameter 35DEDUPDELETIONTHREADS server option 36DEDUPREQUIRESBACKUP server option 36DEFINE ASSOCIATION server command 42DEVCONFIG server option 36directories
creating 24, 25
disability 71DISABLEREORGTABLE server option 43disk
configuring with command line 53diskpart.exe command 25documentation 45dsmserv.opt file 36
EEXPINTERVAL server option 36
Ffile systems
creating 24, 25planning for 10
Hhardware requirements 5, 7, 8
IIBM Knowledge Center 45IBM Spectrum Protect directories
planning for 10IBM Spectrum Protect server
cleaning up after a failed configuration attempt 39configuring 33schedules 33
IDLETIMEOUT server option 36installing
IBM Spectrum Protect backup-archive client 29IBM Spectrum Protect server 29, 30Microsoft Windows Server 2016 Standard Edition 22obtaining IBM Spectrum Protectserver installationpackages 30operating system 22
Kkeyboard 71
LLenovo ThinkSystem SR650
hardware requirements 5, 7, 8
MMAXSESSIONS server option 36md command 25MDisk 13Microsoft Windows Server 2016 Standard Edition 10
77

mountvol command 25multipath I/O for disk storage 23
Nnet user command 41node replication 45NUMOPENVOLSALLOWED server option 36
OOperations Center 45, 69
Ppasswords
default 41updating 41
performanceevaluating 49medium system 50small system 49testing 26workload simulation tool 51
performance results 49planning worksheet 10
QQUERY EVENT server command 42
RRAID arrays 13REGISTER NODE server command 42registering nodes to the server 42
Sschedules
client 33predefined client 63server 33
scriptblueprint configuration script 33configuration clean up 39storage preparation 24workload simulation tool 26
serverdetermining the size of 3installing 29, 30obtaining installation packages 30
server commandsDEFINE ASSOCIATION 42QUERY EVENT 42REGISTER NODE 42SET ACTLOGRETENTION 35SET EVENTRETENTION 35SET MAXSCHEDSESSIONS 35
server optionsACTIVELOGSIZE 36ALLOWREORGINDEX 36
server options (continued)ALLOWREORGTABLE 36ARCHLOGCOMPRESS 36COMMTIMEOUT 36DEDUPDELETIONTHREADS 36DEDUPREQUIRESBACKUP 36DEVCONFIG 36DISABLEREORGINDEX 36DISABLEREORGTABLE 36EXPINTERVAL 36IDLETIMEOUT 36MAXSESSIONS 36NUMOPENVOLSALLOWED 36REORGBEGINTIME 36REORGDURATION 36VOLUMEHISTORY 36
SET ACTLOGRETENTION server command 35SET EVENTRETENTION server command 35SET MAXSCHEDSESSIONS server command 35software prerequisites 10storage configuration
planning for 10storage layout
large system 18medium system 16small system 14
storage preparation 24Storwize V5010 systems
hardware requirements 5, 7storage configuration for small systems 14
Storwize V5020 systemsstorage configuration for medium systems 16
Storwize V5030 systemshardware requirements 8storage configuration for large systems 18
Supermicro SuperServer 2029U-E1CRThardware requirements 5, 7, 8
system setup 21
Ttasks for configuration 21testing system performance 26total managed data 3troubleshooting 69
VVOLUMEHISTORY server option 36
Wweedee.exe program 26What's new viiWindows commands
diskpart.exe 25md 25mountvol 25net user 41typeperf.exe 26
workload simulation tool 26, 51
78


IBM®