BIG-IP Application Security Manager - F5 Networks
348
BIG-IP ® Application Security Manager ™ : Implementations Version 13.0
-
Upload
khangminh22 -
Category
Documents
-
view
1 -
download
0
Transcript of BIG-IP Application Security Manager - F5 Networks

BIG-IP® Application Security Manager™:Implementations
Version 13.0


Table of Contents
Preventing DoS Attacks on Applications............................................................................... 13What is a DoS attack?......................................................................................................13
About recognizing DoS attacks............................................................................. 13When to use different DoS protections..................................................................13About proactive bot defense..................................................................................14About configuring TPS-based DoS protection...................................................... 15About configuring stress-based DoS protection....................................................15About Behavioral DoS protection.......................................................................... 16About DoS mitigation methods..............................................................................16About geolocation mitigation................................................................................. 17About heavy URL protection................................................................................. 17About cross-domain requests................................................................................17About site-wide DoS mitigation............................................................................. 18About CAPTCHA challenges in DoS detection..................................................... 18About DoS protection and HTTP caching............................................................. 18
Overview: Preventing DoS attacks on applications..........................................................19Configuring DoS protection for applications.......................................................... 19Creating a whitelist for DoS protection.................................................................. 20Using proactive bot defense..................................................................................21Configuring bot defense logging............................................................................23Configuring bot signature checking.......................................................................23Configuring TPS-based DoS detection................................................................. 24Configuring behavioral & stress-based DDoS protection...................................... 26Configuring heavy URL protection........................................................................ 29Recording traffic during DoS attacks.....................................................................30Configuring CAPTCHA for DoS protection............................................................31Associating a DoS profile with a virtual server...................................................... 32
Implementation Result..................................................................................................... 32
Viewing DoS Reports, Statistics, and Logs............................................................................35Overview: Viewing DoS reports and logs.........................................................................35
Investigating DoS attacks and mitigation...............................................................35Displaying DoS Application Event logs..................................................................37Viewing URL Latencies reports.............................................................................38Creating customized DoS reports......................................................................... 39Logging bot defense requests............................................................................... 40
Configuring DoS Policy Switching..........................................................................................43Overview: Configuring DoS policy switching....................................................................43
About DoS protection and local traffic policies...................................................... 43Creating a DoS profile for Layer 7 traffic............................................................... 44Modifying the default DoS profile.......................................................................... 45Creating a local traffic policy for DoS policy switching.......................................... 45Creating policy rules for DoS policy switching.......................................................45Associating a DoS profile with a virtual server...................................................... 46Associating a published local traffic policy with a virtual server............................ 47
Implementation results.....................................................................................................47
Table of Contents
3

Using Shun with Layer 7 DoS.................................................................................................. 49Overview: Using Shun with Layer 7 DoS......................................................................... 49
About the DoS shun list.........................................................................................49Shun List system variables....................................................................................50Configuring DoS protection for applications.......................................................... 50Using an IP Intelligence policy with L7 DoS..........................................................51Associating a DoS profile and IP intelligence policy with a virtual server............. 51Result of using shun list with Layer 7 DoS............................................................ 52
Creating Login Pages for Secure Application Access.......................................................... 53About login pages............................................................................................................ 53About creating login and logout pages.............................................................................53
Creating login pages automatically....................................................................... 53Creating login pages manually..............................................................................54Enforcing login pages............................................................................................56Creating logout pages .......................................................................................... 57
Mitigating Brute Force Attacks................................................................................................59About brute force attacks................................................................................................. 59About configuring brute force protection.......................................................................... 59Overview: Mitigating brute force attacks.......................................................................... 59
Creating login pages automatically....................................................................... 60Creating login pages manually..............................................................................60Configuring automatic brute force protection........................................................ 62Creating a custom brute force protection.............................................................. 62Viewing brute force attack reports.........................................................................65Displaying brute force event logs.......................................................................... 66
Detecting and Preventing Web Scraping................................................................................67Overview: Detecting and preventing web scraping.......................................................... 67
Prerequisites for configuring web scraping........................................................... 67Adding allowed search engines.............................................................................68Detecting web scraping based on bot detection....................................................69Detecting web scraping based on session opening.............................................. 70Detecting web scraping based on session transactions........................................72Using fingerprinting to detect web scraping.......................................................... 73Displaying web scraping event logs...................................................................... 74Viewing web scraping statistics.............................................................................77
Implementation Result..................................................................................................... 78
Setting Up IP Address Intelligence Blocking......................................................................... 81Overview: Setting up IP address intelligence blocking.....................................................81
Downloading the IP address intelligence database...............................................81Blocking IP addresses with bad reputations..........................................................82Reviewing IP address intelligence statistics..........................................................83Creating an iRule to log IP address intelligence information.................................83Creating an iRule to reject requests with questionable IP addresses................... 84
IP address intelligence categories................................................................................... 84
Managing IP Address Exceptions........................................................................................... 87Overview: Managing IP address exceptions.................................................................... 87
Table of Contents
4

Creating IP address exceptions............................................................................ 87Deleting IP address exceptions.............................................................................88Updating IP address exceptions............................................................................89
Disallowing Application Use at Specific Geolocations......................................................... 91Overview: Disallowing application use in certain geolocations........................................ 91Disallowing application use in certain geolocations......................................................... 91Setting up geolocation enforcement from a request ....................................................... 92
Protecting Sensitive Data with Data Guard............................................................................ 93About protecting sensitive data with Data Guard............................................................. 93Response headers that Data Guard inspects.................................................................. 93Protecting sensitive data.................................................................................................. 93
Masking Credit Card Numbers in Logs...................................................................................95Overview: Masking credit card numbers in logs...............................................................95
Masking credit card numbers in request logs........................................................95
Displaying Reports and Monitoring ASM............................................................................... 97ASM Reporting Tools....................................................................................................... 97Displaying an application security overview report.......................................................... 97Analyzing requests with violations................................................................................... 98
How to view a request .......................................................................................... 99Generating PCI Compliance reports.............................................................................. 100
Sample PCI Compliance report...........................................................................101
Logging Application Security Events................................................................................... 103About logging profiles.................................................................................................... 103How to use multiple logging profiles...............................................................................103Creating a logging profile for local storage.....................................................................104Setting up remote logging.............................................................................................. 105Associating a logging profile with a security policy........................................................ 106
About logging responses.....................................................................................106About ArcSight log message format....................................................................107About syslog request format................................................................................107
Filtering logging information...........................................................................................108Viewing application security logs................................................................................... 109
Preventing Session Hijacking and Tracking User Sessions...............................................111Overview: Preventing session hijacking......................................................................... 111
Preventing session hijacking............................................................................... 111Configuring the response to cookie hijacking......................................................112
Overview: Tracking user sessions using login pages.....................................................112Creating login pages automatically..................................................................... 113Creating login pages manually............................................................................113Setting up session tracking................................................................................. 115Monitoring user and session information............................................................ 117Tracking specific user and session information................................................... 117
Overview: Tracking application security sessions using APM........................................118Creating a VLAN................................................................................................. 119Creating a self IP address for a VLAN................................................................ 120Creating a local traffic pool for application security ............................................ 120
Table of Contents
5

Creating a virtual server to manage HTTPS traffic............................................. 121Creating a simple security policy.........................................................................121Creating an access profile...................................................................................122Configuring an access policy.............................................................................. 124Adding the access profile to the virtual server.................................................... 125Setting up ASM session tracking with APM........................................................ 125Monitoring user and session information............................................................ 127
Mitigating Open Redirects..................................................................................................... 129Overview: Mitigating open redirects............................................................................... 129
Mitigating open redirects..................................................................................... 129Adjusting how open redirects are learned...........................................................130Enforcing redirection domains.............................................................................131
Implementation results...................................................................................................131
Setting Up Cross-Domain Request Enforcement................................................................ 133About cross-domain request enforcement..................................................................... 133
Setting up cross-domain request enforcement....................................................133Replacing CORS headers in requests................................................................ 134How cross-domain request enforcement works.................................................. 136
Implementing Web Services Security................................................................................... 139Overview: Implementing web services security............................................................. 139
About client and server certificates..................................................................... 139Adding client and server certificates................................................................... 139Enabling encryption, decryption, signing, and verification of SOAP messages.. 140Writing XPath queries..........................................................................................142Configuring blocking actions for web services security....................................... 143
Fine-tuning Advanced XML Security Policy Settings..........................................................145Fine-tuning XML defense configuration......................................................................... 145Advanced XML defense configuration settings ............................................................. 145Masking sensitive XML data.......................................................................................... 147Overriding meta characters based on content............................................................... 148Managing SOAP methods..............................................................................................148
Adding JSON Support to an Existing Security Policy.........................................................151Overview: Adding JSON support to existing security policies........................................151
Creating a JSON profile...................................................................................... 151Associating a JSON profile with a URL...............................................................152Associating a JSON profile with a parameter......................................................153
Implementation result.....................................................................................................154
Creating Security Policies for AJAX Applications...............................................................155Application security for applications that use AJAX....................................................... 155Overview: Creating a security policy for applications that use AJAX............................. 155
Creating a simple security policy.........................................................................155Implementation result..........................................................................................156
Overview: Adding AJAX blocking and login response behavior.....................................156Configuring the blocking response for AJAX applications................................... 157
Table of Contents
6

Securing Web Applications Created with Google Web Toolkit.......................................... 159Overview: Securing Java web applications created with Google Web Toolkit
elements................................................................................................................... 159Creating a Google Web Toolkit profile.................................................................159Associating a Google Web Toolkit profile with a URL......................................... 160
Implementation result.....................................................................................................161
Adding Server Technologies to a Policy...............................................................................163Overview: Adding server technologies to a policy..........................................................163Automatically adding server technologies......................................................................163
Refining Security Policies with Learning............................................................................. 165About learning................................................................................................................165About learning suggestions............................................................................................165
What suggestions look like..................................................................................166What violations are unlearnable?...................................................................................166Configuring how entities are learned............................................................................. 167Learning from responses............................................................................................... 168Learning based on response codes...............................................................................169Reviewing learning suggestions.....................................................................................169Viewing requests that caused learning suggestions...................................................... 171Viewing and allowing ignored suggestions.................................................................... 172About enforcement readiness........................................................................................ 172Enforcing entities............................................................................................................172Exploring security policy action items............................................................................ 173
Changing How a Security Policy is Built.............................................................................. 175Overview: Changing how a security policy is built......................................................... 175
Changing how to build a security policy.............................................................. 175Adding trusted IP addresses to a security policy................................................ 177Learning host names automatically.....................................................................177Classifying the content of learned parameters....................................................178Specifying whether to learn integer parameters..................................................178Specifying when to learn dynamic parameters................................................... 179Collapsing entities in a security policy.................................................................180Changing how cookies are enforced................................................................... 180Limiting the maximum number of policy elements.............................................. 181Classifying the content of requests to URLs....................................................... 182Specifying the file types for wildcard URLs......................................................... 183Disabling full policy inspection.............................................................................183Stopping and starting automatic policy building.................................................. 184
Configuring Security Policy Blocking...................................................................................185About security policy blocking........................................................................................ 185
Changing security policy enforcement................................................................ 185Configuring blocking actions for violations.......................................................... 186Configuring HTTP protocol compliance validation.............................................. 187Configuring blocking actions for evasion techniques...........................................187Configuring blocking actions for web services security....................................... 188
Configuring What Happens if a Request is Blocked........................................................... 191
Table of Contents
7

Overview: Configuring what happens if a request is blocked.........................................191Configuring responses to blocked requests........................................................ 191Configuring responses to blocked logins.............................................................192Customizing responses to blocked XML requests...............................................193Configuring the blocking response for AJAX applications................................... 194
Adding Entities to a Security Policy......................................................................................197Adding File Types to a Security Policy........................................................................... 197
About adding file types........................................................................................197Adding allowed file types.....................................................................................197Adding disallowed file types................................................................................ 198
Adding Parameters to a Security Policy......................................................................... 199About adding parameters to a security policy..................................................... 199Overview: Securing Base64-Encoded Parameters............................................. 210
Adding URLs to a Security Policy.................................................................................. 211About adding URLs............................................................................................. 211About referrer URLs............................................................................................ 211Adding allowed HTTP URLs................................................................................211Adding disallowed HTTP URLs........................................................................... 217Creating allowed WebSocket URLs.................................................................... 217Adding disallowed WebSocket URLs.................................................................. 219Enforcing requests for HTTP URLs based on header content............................ 219Specifying characters legal in URLs....................................................................220Overriding methods on URLs.............................................................................. 221Configuring flows to URLs...................................................................................222Creating flow parameters.................................................................................... 223Configuring dynamic flows to URLs.................................................................... 224Configuring dynamic session IDs in URLs.......................................................... 224
Adding Cookies..............................................................................................................225About cookies......................................................................................................225About adding cookies..........................................................................................227Overview: Configuring advanced cookie protection............................................ 231
Adding Allowed Methods to a Security Policy................................................................ 233Adding allowed methods..................................................................................... 233
Securing Applications That Use WebSocket........................................................................235Overview: Securing applications that use WebSocket connections...............................235
About WebSocket security.................................................................................. 235About WebSocket and login enforcement........................................................... 236About WebSocket and cross-domain request enforcement................................ 236Securing WebSocket applications: The easy way...............................................236Creating a WebSocket profile..............................................................................237Recognizing WebSocket traffic ...........................................................................238Creating a JSON profile...................................................................................... 238Creating a plain text content profile.....................................................................239Creating allowed WebSocket URLs.................................................................... 240Adjusting learning settings for WebSocket URLs................................................ 242Classifying the content of requests to WebSocket URLs.................................... 243Adding disallowed WebSocket URLs.................................................................. 243Associating a profile with a WebSocket URL...................................................... 244WebSocket violations.......................................................................................... 244
Configuring HTTP Headers that Require Special Treatment.............................................. 247About mandatory headers..............................................................................................247
Table of Contents
8

About header normalization........................................................................................... 247About default HTTP headers..........................................................................................247Overview: Configuring HTTP headers........................................................................... 248
Configuring HTTP headers................................................................................. 248Configuring the maximum HTTP header length..................................................249
Implementation Result................................................................................................... 250
Changing Security Policy Settings....................................................................................... 251About security policy settings.........................................................................................251
Editing an existing security policy........................................................................251Changing security policy enforcement................................................................ 251Adjusting the enforcement readiness period....................................................... 252Viewing whether a security policy is case-sensitive............................................ 252Differentiating between HTTP and HTTPS URLs............................................... 252Specifying the response codes that are allowed................................................. 253Activating ASM iRule events............................................................................... 253Allowing XFF headers in requests.......................................................................254Adding host names..............................................................................................255Protecting against cross-site request forgery (CSRF).........................................256
Configuring General ASM System Options..........................................................................259Changing your system preferences............................................................................... 259Adjusting system variables.............................................................................................259Incorporating external antivirus protection..................................................................... 260Creating user accounts for application security............................................................. 261Validating regular expressions....................................................................................... 262
Working with Violations......................................................................................................... 263About violations..............................................................................................................263
Viewing descriptions of violations........................................................................263Changing severity levels of violations..................................................................263Types of violations...............................................................................................264
About violation rating......................................................................................................264Investigating potential attacks........................................................................................ 265Overview: Creating user-defined violations....................................................................265
Creating user-defined violations..........................................................................266Enabling user-defined violations......................................................................... 267Sample iRules for user-defined violations........................................................... 267Deleting user-defined violations.......................................................................... 271Exporting and importing user-defined violations................................................. 272
Maintaining Security Policies................................................................................................ 273Overview: Importing and exporting security policies .....................................................273
About security policy export formats................................................................... 273Exporting security policies...................................................................................273Importing security policies...................................................................................274
Overview: Comparing security policies.......................................................................... 274Comparing security policies................................................................................ 275
Configuring ASM with Local Traffic Policies........................................................................277Overview: Configuring ASM with local traffic policies.................................................... 277
About application security and local traffic policies............................................. 277About application security and manually adding local traffic policies.................. 277
Table of Contents
9
Creating a simple security policy.........................................................................278Creating local traffic policy rules for ASM............................................................279
Implementation results...................................................................................................280
Automatically Synchronizing Application Security Configurations.................................. 281Overview: Automatically synchronizing ASM systems...................................................281
About device management and synchronizing application securityconfigurations.................................................................................................281
Considerations for application security synchronization......................................282Performing basic network configuration for synchronization............................... 282Specifying an IP address for config sync............................................................ 283Establishing device trust......................................................................................283Creating a Sync-Failover device group................................................................284Syncing the BIG-IP configuration to the device group.........................................285Specifying IP addresses for failover communication........................................... 286Creating a Sync-Only device group.....................................................................287Enabling ASM synchronization on a device group.............................................. 288Synchronizing an ASM-enabled device group.....................................................288
Implementation result.....................................................................................................289
Manually Synchronizing Application Security Configurations...........................................291Overview: Manually synchronizing ASM systems..........................................................291
About device management and synchronizing application securityconfigurations.................................................................................................291
Considerations for application security synchronization......................................292Performing basic network configuration for synchronization............................... 292Specifying an IP address for config sync............................................................ 293Establishing device trust......................................................................................293Creating a Sync-Failover device group................................................................294Syncing the BIG-IP configuration to the device group.........................................295Specifying IP addresses for failover communication........................................... 296Enabling ASM synchronization on a device group.............................................. 297Synchronizing an ASM-enabled device group.....................................................297
Implementation result.....................................................................................................298
Synchronizing Application Security Configurations Across LANs................................... 299Overview: Synchronizing ASM systems across LANs................................................... 299
About device management and synchronizing application securityconfigurations.................................................................................................300
Considerations for application security synchronization......................................300Performing basic network configuration for synchronization............................... 300Specifying an IP address for config sync............................................................ 301Establishing device trust......................................................................................301Creating a Sync-Failover device group................................................................302Syncing the BIG-IP configuration to the device group.........................................303Specifying IP addresses for failover communication........................................... 304Creating a Sync-Only device group.....................................................................305Enabling ASM synchronization on a Sync-Only device group.............................306Synchronizing an ASM-enabled device group.....................................................306
Implementation result.....................................................................................................307
Integrating ASM with Database Security Products............................................................. 309Overview: Integrating ASM with database security products......................................... 309
Table of Contents
10

Creating a simple security policy.........................................................................310Creating login pages manually............................................................................311Enforcing login pages..........................................................................................312Configuring a database security server...............................................................313Enabling database security integration in a security policy................................. 314
Implementation result.....................................................................................................314
Integrating ASM and APM with Database Security Products............................................. 315Overview: Integrating ASM and APM with database security products......................... 315Prerequisites for integrating ASM and APM with database security.............................. 315
Creating a VLAN................................................................................................. 316Creating a self IP address for a VLAN................................................................ 317Creating a local traffic pool for application security ............................................ 317Creating a virtual server to manage HTTPS traffic............................................. 318Creating a simple security policy.........................................................................318Creating an access profile...................................................................................319Configuring an access policy.............................................................................. 321Adding the access profile to the virtual server.................................................... 322Configuring a database security server...............................................................322Enabling database security integration with ASM and APM............................... 323
Implementation result.....................................................................................................324
Securing FTP Traffic............................................................................................................... 325Overview: Securing FTP traffic using default values......................................................325
Creating an FTP service profile with security enabled........................................ 325Enabling protocol security for an FTP virtual server........................................... 325Reviewing violation statistics for security profiles................................................326
Overview: Securing FTP traffic using a custom configuration........................................326Creating a custom FTP profile for protocol security............................................ 327Creating a security profile for FTP traffic.............................................................327Modifying associations between service profiles and security profiles............... 328Configuring an FTP virtual server with a server pool.......................................... 328Reviewing violation statistics for security profiles................................................329
Securing SMTP Traffic............................................................................................................331Overview: Securing SMTP traffic using system defaults................................................331
Creating an SMTP service profile with security enabled.....................................331Creating an SMTP virtual server with protocol security...................................... 331Reviewing violation statistics for security profiles................................................332
Overview: Creating a custom SMTP security profile......................................................332Creating a custom SMTP service profile.............................................................333Creating a security profile for SMTP traffic..........................................................333Enabling anti-virus protection for email............................................................... 334Modifying associations between service profiles and security profiles............... 335Creating and securing an SMTP virtual server and pool.....................................335Reviewing violation statistics for security profiles................................................336
Legal Notices.......................................................................................................................... 337Legal notices..................................................................................................................337
Table of Contents
11

Table of Contents
12
Preventing DoS Attacks on Applications
What is a DoS attack?A denial-of-service attack (DoS attack) or distributed denial-of-service attack (DDoS attack) makes avictim's resource unavailable to its intended users, or obstructs the communication media between theintended users and the victimized site so that they can no longer communicate adequately. Perpetrators ofDoS attacks typically target sites or services, such as banks, credit card payment gateways, and e-commerce web sites.
Application Security Manager™ (ASM) helps protect web applications from DoS attacks aimed at theresources that are used for serving the application: the web server, web framework, and the applicationlogic. Advanced Firewall Manager™ (AFM) helps prevent network, SIP, and DNS DoS and DDoSattacks.
HTTP-GET attacks and page flood attacks are typical examples of application DoS attacks. These attacksare initiated either from a single user (single IP address) or from thousands of computers (distributed DoSattack), which overwhelms the target system. In page flood attacks, the attacker downloads all theresources on the page (images, scripts, and so on) while an HTTP-GET flood repeatedly requests specificURLs regardless of their place in the application.
About recognizing DoS attacks
Application Security Manager™ determines that traffic is a DoS attack based on calculations fortransaction rates on the client side (TPS-based) or latency on the server side (stress-based). You canspecify the thresholds that you want the system to use, or let the system automatically detect reasonablethresholds based on examining traffic patterns.
Note: You can set up both methods of detection to work independently or you can set them up to workconcurrently to detect attacks on both the client side and server side. Whichever method detects theattack handles DoS protection.
You can also have the system proactively identify and prevent automated attacks by web robots. Inaddition, the system can protect web applications against DoS attacks on heavy URLs. Heavy URLprotection implies that during a DoS attack, the system protects the heavy URLs that might cause stresson the server.
You can view details about DoS attacks that the system detected and logged in the event logs and DoSreports. You can also configure remote logging support for DoS attacks when creating a logging profile.
When to use different DoS protectionsApplication Security Manager™ provides several different types of DoS protections that you can set toprotect applications. This table describes when it is most advantageous to use the different protections.You can use any combination of the protections.
DoS Protection When to Use
Proactive bot defense To stop DoS attacks before they compromise the system. Affords greatprotection and stops non-human traffic before it gets to ASM.

DoS Protection When to Use
Bot signatures To allow requests from legitimate (benign) bots, and instruct the systemhow to handle malicious bots (you can ignore, log, or block them).Logging malicious bots gives them visibility in the reports.
TPS-based detection To focus protection on the client side to detect an attack right away, mostlyby looking at the requests per seconds thresholds.
Stress-based detection To focus protection on the server side where attacks are detected when aserver slowdown occurs. This protection provides more accurate DoSdetection based on latency and requests per second thresholds.
Behavioral detection To use behavioral analysis and machine learning of traffic flows toautomatically discover and mitigate DoS attacks.
Heavy URL protection If application users can query a database or submit complex queries thatmay slow the system down.
CAPTCHA challenge To stop non-human attackers by presenting a character recognitionchallenge to suspicious users.
About proactive bot defense
Application Security Manager™ (ASM) can proactively defend your applications against automatedattacks by web robots, called bots for short. This defense method, called proactive bot defense, canprevent layer 7 DoS attacks, web scraping, and brute force attacks from starting. By preventing bots fromaccessing the web site, proactive bot defense protects against these attacks as well.
Working together with other DoS protections, proactive bot defense helps identify and mitigate attacksbefore they cause damage to the site. This feature inspects most traffic, but requires fewer resources thantraditional web scraping and brute force protections. You can use proactive bot defense in addition to theweb scraping and brute force protections that are available in ASM security policies. Proactive botdefense is enforced through a DoS profile, and does not require a security policy.
When clients access a protected web site for the first time, the system sends a JavaScript challenge to thebrowser. Therefore, if you plan to use this feature, it is important that clients use browsers that allowJavaScript.
If the client successfully evaluates the challenge and resends the request with a valid cookie, the systemallows the client to reach the server. Requests that do not answer the challenge remain unanswered andare not sent to the server. Requests sent to non-HTML URLs without the cookie are dropped andconsidered to be bots.
You can configure lists of URLs to consider safe so that the system does not need to validate them. Thisspeeds up access time to the web site. If your application accesses many cross-domain resources and youhave a list of those domains, you may want to select an option that validates cross-domain requests tothose domains.
Proactive bot defense and CORS
Cross-Origin Resource Sharing (CORS) is a way that web sites can allow resources from another originaccess to your site (that is, domain + protocol + port) such as when using AJAX, @font-face, and a fewother cases. Proactive Bot Defense blocks CORS requests even for legitimate users. CORS requests areblocked because browsers typically do not include the required cookies when allowing cross-domainrequests to prevent session riding by attackers trying to access live sessions and sensitive data from otherdomains.
Therefore, if you enable Proactive Bot Defense and your web site uses CORS, we recommend that youadd the CORS URLs to the proactive bot URL whitelist. Those URLs will not be defended from bots
Preventing DoS Attacks on Applications
14

proactively, but they will not be blocked, and will still be protected by other enabled DoS detections andmitigations.
A common type of cross-domain request is when an HTML page references resources from otherdomains, such as embedded images, style sheets (CSS), and JavaScript. Proactive Bot Defense supportsthis type of cross-domain request, and you can configure specific domains from which to allow resourcesin the Cross-Domain Requests setting.
About configuring TPS-based DoS protection
When setting up DoS protection, you can configure the system to prevent DoS attacks based ontransaction rates (TPS-based anomaly detection). If you use TPS-based anomaly protection, the systemdetects DoS attacks from the client side using the following calculations:
Transaction rate detection intervalA short-term average of recent requests per second (for a specific URL or from an IP address) that isupdated every 10 seconds.
Note: The averages for IP address and URL counts are done for each site, that is, for each virtual serverand associated DoS profile. If one virtual server has multiple DoS profiles (implemented using a localtraffic policy), then each DoS profile has its own statistics within the context of the virtual server.
Transaction rate history intervalA longer-term average of requests per second (for a specific URL or from an IP address) calculatedfor the past hour that is updated every 10 seconds.
If the ratio of the transaction rate detection interval to the transaction rate during the history interval isgreater than the percentage indicated in the TPS increased by setting, the system considers the web siteto be under attack, or the URL, IP address, or geolocation to be suspicious. In addition, if the transactionrate detection interval is greater than the TPS reached setting (regardless of the history interval), thenagain, the respective URL, IP address, or geolocation is suspicious or the site is being attacked.
Note that TPS-based protection might detect a DoS attack simply because many users are trying to accessthe server all at once, such as during a busy time or when a new product comes out. In this case, theattack might be a false positive because the users are legitimate. But the advantage of TPS-based DoSprotection is that attacks can be detected earlier than when using stress-based protection. So it isimportant to understand the typical maximum peak loads on your system when setting up DoS protection,and to use the methods that are best for your application.
About configuring stress-based DoS protection
When setting up DoS protection, you can configure the system to prevent DoS attacks based on theserver side (stress-based detection). In stress-based detection, it takes a latency increase and at least onesuspicious IP address, URL, heavy URL, site-wide entry, or geolocation for the activity to be consideredan attack.
Note: The average latency is measured for each site, that is, for each virtual server and associated DoSprofile. If one virtual server has multiple DoS profiles (implemented using a local traffic policy), theneach DoS profile has its own statistics within the context of the virtual server.
Stress-based DoS protection also includes Behavioral DoS. When enabled, the system examines trafficbehavior to automatically detect DoS attacks. Behavioral DoS reviews the offending traffic, and mitigatesthe attack with minimal user intervention required.
Stress-based protection is less prone to false positives than TPS-based protection because in a DoSattack, the server is reaching capacity and service/response time is slow: this is impacting all users.Increased latency can be used as a trigger step for detecting an L7 attack. Following the detection of a
BIG-IP Application Security Manager: Implementations
15

significant latency increase, it is important to determine whether you need further action. Afterexamining the increase in the requests per second and by comparing these numbers with past activity, youcan identify suspicious versus normal latency increases.
About Behavioral DoS protection
Behavioral DoS (BADoS) provides automatic protection against DDoS attacks by analyzing trafficbehavior using machine learning and data analysis. Working together with other BIG-IP® DoSprotections, Behavioral DoS examines traffic flowing between clients and application servers in datacenters, and automatically establishes the baseline traffic/flow profiles for Layer 7 (HTTP) and Layers 3and 4.
For example, in the case of a DDoS attack from a botnet, each request may be completely legal but manyrequests all at once can slow down or crash the server. Behavioral DoS can mitigate the attack by slowingdown the traffic no more than necessary to keep the server in good health.
Behavioral DoS continuously monitors server health and loading, by means of a customer feedback loop,to ensure the real-time correlations, and validate server conditions, attacks, and mitigations. Anysubsequent anomalies are put on watch, and the system applies mitigations (slowdowns or blocks) asneeded.
This is how Behavioral DoS works:
• Learns typical behavior of normal traffic• Detects an attack based on current conditions (server health)• Finds behavior anomaly (what and who changed to cause congestion?)• Mitigates by slowing down suspicious clients• Improves with experience
You enable Behavioral DoS, which requires minimal configuration, in a DoS profile in the Stress-baseddetection settings. Because the system is tracking the traffic data, it adapts to changing conditions sothere are no thresholds to specify. You set the level of mitigation that you want to occur, ranging from nomitigation (learning only) to aggressive protection (proactive DoS protection). The system can quicklydetect Layer 7 DoS attacks, characterize the offending traffic, and mitigate the attack.
You can use a DoS profile that has Behavioral DoS enabled to protect one or, at most, two virtual servers.
About DoS mitigation methods
When setting up either transaction-based or stress-based DoS protection, you can specify mitigationmethods that determine how the system recognizes and handles DoS attacks. You can use the followingmethods:
• JavaScript challenges (also called Client-Side Integrity Defense)• CAPTCHA challenges• Request blocking (including Rate Limit or Block All)
You can configure the system to issue a JavaScript challenge to analyze whether the client is using a legalbrowser (that can respond to the challenge) when the system encounters a suspicious IP address, URL,geolocation, or site-wide criteria. If the client does execute JavaScript in response to the challenge, thesystem purposely slows down the interaction. The Client Side Integrity Defense mitigations are enactedonly when the Operation Mode is set to blocking.
Based on the same suspicious criteria, the system can also issue a CAPTCHA (character recognition)challenge to determine whether the client is human or an illegal script. Depending on how strict you wantto enforce DoS protection, you can limit the number of requests that are allowed through to the server orblock requests that are deemed suspicious.
You can also use can use request blocking in the DoS profile to specify conditions for when the systemblocks requests. Note that the system only blocks requests during a DoS attack when the Operation Mode
Preventing DoS Attacks on Applications
16

for TPS-based or stress-based detection is set to Blocking. You can use request blocking to rate limit orblock all requests from suspicious IP addresses, suspicious countries, or URLs suspected of being underattack. Site-wide rate limiting also blocks requests to web sites suspected of being under attack. If youblock all requests, the system blocks suspicious IP addresses and geolocations except those on thewhitelist. If you are using rate limiting, the system blocks some requests depending on the thresholddetection criteria set in the DoS profile.
The mitigation methods that you select are used in the order they appear on the screen. The systemenforces the methods only as needed if the previous method was not able to stem the attack.
About geolocation mitigation
You can mitigate DoS attacks based on geolocation by detecting traffic from countries sending suspicioustraffic. This is part of the mitigation methods in the DoS profile for stress-based and TPS-basedanomalies, and this method helps protect against unusual activity as follows:
• Geolocation-based Client Side integrity: If traffic from countries matches the thresholds configured inthe DoS profile, the system considers those countries suspicious, and sends a JavaScript challenge toeach suspicious country.
• Geolocation-based CAPTCHA challenge: If traffic from countries matches the thresholds configuredin the DoS profile, the system considers those countries suspicious, and issues a CAPTCHA challengeto each suspicious country.
• Geolocation-based request blocking: The system blocks all, or some, requests from suspiciouscountries.
In addition, you can add countries to a geolocation whitelist (traffic from these countries is neverblocked) and a blacklist (traffic from these countries is always blocked when a DoS attack is detected).
About heavy URL protection
Heavy URLs are URLs that may consume considerable server resources per request. Heavy URLsrespond with low latency most of the time, but can easily reach high latency under specific conditions(such as DoS attacks). Heavy URLs are not necessarily heavy all the time, but tend to get heavyespecially during attacks. Therefore, low rate requests to those URLs can cause significant DoS attacksand be hard to distinguish from legitimate clients.
Typically, heavy URLs involve complex database queries; for example, retrieving historical stock quotes.In most cases, users request recent quotes with weekly resolution, and those queries quickly yieldresponses. However, an attack might involve requesting five years of quotes with day-by-day resolution,which requires retrieval of large amounts of data, and consumes considerably more resources.
Application Security Manager™ (ASM) allows you to configure protection from heavy URLs in a DoSprofile. You can specify a latency threshold for automatically detecting heavy URLs. If some of the website's URLs could potentially become heavy URLs, you can manually add them so the system will keepan eye on them, and you can add URLs that should be ignored and not considered heavy.
ASM™ measures the tail latency of each URL and of the whole site for 24 hours to get a good sample ofrequest behavior. A URL is considered heavy if its average tail latency is more than twice that of the sitelatency for the 24-hour period.
About cross-domain requests
Proactive bot defense in a DoS profile allows you to specify which cross-domain requests are legal.Cross-domain requests are HTTP requests for resources from a different domain than the domain of theresource making the request.
If your application accesses many cross-domain resources and you have a list of those domains, you canvalidate cross-domain requests to those domains.
BIG-IP Application Security Manager: Implementations
17

For example, your web site uses two domains, site1.com (the main site) and site2.com (whereresources are stored). You can configure this in the DoS profile by enabling proactive bot defense,choosing one of the Allowed configured domains options for the Cross-Domain Requests setting, andspecifying both of the web sites in the list of related site domains. When the browser makes a request tosite1.com, it gets cookies for both site1.com and site2.com independently and simultaneously, andcross domain requests from site1.com to site2.com are allowed.
If only site1.com is configured as a related site domain, when the browser makes a request tosite1.com, it gets a cookie for site1.com only. If the browser makes a cross-domain request to get animage from site2.com, it gets a cookie and is allowed only if it already has a valid site1.com cookie.
About site-wide DoS mitigation
In order to mitigate highly distributed DoS attacks, such as those instigated using large scale botnetsattacking multiple URLs, you can specify when to use site-wide mitigation in a DoS profile. You canconfigure site-wide mitigation for either TPS-based or stress-based DoS protection. In this case, thewhole site can be considered suspicious as opposed to a particular URL or IP address. Site-widemitigation goes into effect when the system determines that the whole site is experiencing high-volumetraffic but is not able to pinpoint and handle the problem.
The system implements site-wide mitigation method only as a last resort because it may cause the systemto drop legitimate requests. However, it maintains, at least partially, the availability of the web site, evenwhen it is under attack. When the system applies site-wide mitigation, it is because all other activedetection methods were unable to stop the attack.
The whole site is considered suspicious when configured thresholds are crossed, and in parallel, specificIP addresses and URLs could also be found to be suspicious. The mitigation continues until themaximum duration elapses or when the whole site stops being suspicious. That is, there are no suspiciousURLs, no suspicious IP addresses, and the whole site is no longer suspicious.
About CAPTCHA challenges in DoS detection
A CAPTCHA (or visual character recognition) challenge displays characters for a client to identifybefore they can access a web site or application. Whether the client can correctly identify the charactersdetermines whether the client is human or is likely an illegal script. You can configure a CAPTCHAchallenge as part of the mitigation policy for TPS-based DoS detection, stress-based DoS detection, or aspart of proactive bot defense. If you have configured it, the system a CAPTCHA challenge to suspicioustraffic.
The system provides a standard CAPTCHA response that clients will see. You can customize theresponse if you want.
About DoS protection and HTTP caching
HTTP caching enables the BIG-IP® system to store frequently requested web objects (or static content) inmemory to save bandwidth and reduce traffic load on web servers. The Web Acceleration profile has thesettings to configure caching.
If you are using HTTP caching along with DoS protection, you need to understand how DoS protectionfor cached content works. In this case, URLs serving cached content are considered a DoS attack if theyexceed the relative TPS increased by percentage (and not the explicit TPS reached number). Requeststo static or cacheable URLs are always mitigated by rate limiting. This is true even during periods ofmitigation using client-side integrity or CAPTCHA, and when those mitigations are not only URL-based.
Preventing DoS Attacks on Applications
18

Overview: Preventing DoS attacks on applicationsYou can configure the Application Security Manager™ to protect against DoS attacks on webapplications. Depending on your configuration, the system detects DoS attacks based on transactions persecond (TPS) on the client side, stress-based server latency, heavy URLs, geolocation, suspiciousbrowsers, and failed CAPTCHA responses. Behavioral DoS (BADoS), part of stress-based detection,automatically discovers and mitigates DoS attacks using behavioral data.
You configure DoS protection for Layer 7 by creating a DoS profile with Application Security enabled.You then associate the DoS profile with one or more virtual servers representing applications that youwant to protect. DoS protection is a system protection that is not part of a security policy.
The main factors in establishing the prevention policy are:
• Attackers: The clients that initiate the actual attacks. They are represented by their IP addresses andthe geolocations they come from.
• Servers: The web application servers that are under attack. You can view them site-wide as the pairingof the virtual server and the DoS profile, by the URL, or as a pool member.
• BIG-IP system: The middle tier that detects attacks and associated suspicious entities, then mitigatesthe attacks, or blocks or drops requests depending on the options you configure in the DoS profile.
Task SummaryConfiguring DoS protection for applicationsCreating a whitelist for DoS protectionUsing proactive bot defenseConfiguring bot defense loggingConfiguring bot signature checkingConfiguring TPS-based DoS detectionConfiguring behavioral & stress-based DDoS protectionConfiguring heavy URL protectionRecording traffic during DoS attacksConfiguring CAPTCHA for DoS protectionAssociating a DoS profile with a virtual server
Configuring DoS protection for applications
You can configure Application Security Manager™ to protect against and mitigate DoS attacks, andincrease system security.
1. On the Main tab, click Security > DoS Protection > DoS Profiles.The DoS Profiles list screen opens.
2. Click Create.The Create New DoS Profile screen opens.
3. In the Name field, type the name for the profile, then click Finished.4. In the list of DoS profiles, click the name of the profile you just created, and click the Application
Security tab.This is where you set up application-level DoS protection.
5. In the General Settings, for Application Security, click Edit and select the Enabled check box.General settings that you can configure are displayed.
6. To configure Heavy URL Protection, edit the setting for which URLs to include or exclude, or useautomatic detection.
BIG-IP Application Security Manager: Implementations
19

Another task describes heavy URL protection in more detail.7. To set up DoS protection based on the country where a request originates, edit the Geolocations
setting, selecting countries to allow or disallow.a) Click Edit.b) Move the countries for which you want the system to block traffic during a DoS attack into the
Geolocation Blacklist.c) Move the countries that you want the system to allow (unless the requests have other problems)
into the Geolocation Whitelist.d) Use the Stress-based or TPS-based Detection settings to select appropriate mitigations by
geolocation in the How to detect attackers and which mitigation to use settings.e) When done, click Close.
8. If you have written an iRule to specify how the system handles a DoS attack and recovers afterwards,enable the Trigger iRule setting.
9. To better protect an applications consisting of one page that dynamically loads new content, enableSingle Page Application.
10. If your application uses many URLs, in URL Patterns, you can create logical sets of similar URLswith the varying part of the URL acting like a parameter. Click Not Configured and type one or moreURL patterns, for example, /product/*.php.The system then looks at the URL patterns that combine several URLs into one and can more easilyrecognize DoS attacks, for example, on URLs that might be less frequently accessed by aggregatingthe statistics from other similar URLs.
11. Click Update to save the DoS profile.
You have created a DoS profile that provides basic DoS protection including TPS-based detection andheavy URL detection (automatically enabled).
Next, consider configuring additional levels of DoS protection such as stress-based protection, proactivebot defense, and behavioral DoS. Look at the other options available under Application Security andadjust as needed. For example, if using geolocation, use the stress-based or TPS-based detection settingsto select appropriate mitigations. Also, you need to associate the DoS profile with a virtual server beforeit protects against DoS attacks.
Creating a whitelist for DoS protection
You can create a whitelist which is a list of IP addresses that the system does not examine whenperforming DoS protection.
1. On the Main tab, click Security > DoS Protection > DoS Profiles.The DoS Profiles list screen opens.
2. In the list of DoS profiles, click the name of the profile for which you want to specify a whitelist.The DoS profile properties tab opens.
3. To omit checking for DoS attacks on certain trusted addresses, edit the Default Whitelist setting:a) In the Shared Objects frame on the the right side of the screen, next to Address Lists, click +.b) In the Properties panel below, type a name, then one at a time, type trusted IP addresses or subnets
that do not need to be examined for DoS attacks, and click Add.
Note: You can add up to 20 IP addresses.
c) When you are done, click Update.The new whitelist is added to the Address Lists.
d) To use the new whitelist, after Default Whitelist, type the name of the whitelist you added.
4. If you want to create a separate whitelist for HTTP traffic instead of the default whitelist, for HTTPWhitelist, select Override Default and create a whitelist as you would for the default whitelist.
Preventing DoS Attacks on Applications
20

5. When you are done, click Update.
The whitelist you created either for the default or for HTTP is created as a shared object that can be usedfor all DoS protection. You can use it in any DoS profile including those that contain DoS protection forapplications, networks, SIP, and/or DNS.
Using proactive bot defense
For you to use proactive bot defense, client browsers accessing your web site must be able to acceptJavaScript. Because this defense mechanism uses reverse lookup, you need to configure a DNS Server(System > Configuration > Device > DNS) and a DNS Resolver (Network > DNS Resolvers > DNSResolver List) for it to work.
You can configure Application Security Manager™ (ASM) to protect your web site against attacks by webrobots (called bots, for short) before the attacks occur. Proactive bot defense checks all traffic (exceptwhitelisted URLs) coming to the web site, not simply suspicious traffic. This DoS protection uses a set ofJavaScript evaluations and bot signatures to make sure that browsers visiting your web site are legitimate.
Important: Proactive bot defense has limitations if your web site uses Cross-Origin Resource Sharing(CORS), for example, with AJAX requests.
1. On the Main tab, click Security > DoS Protection > DoS Profiles.The DoS Profiles list screen opens.
2. Click the name of an existing DoS profile (or create a new one, then open it), and click theApplication Security tab.
3. On the left, under Application Security, click General Settings, and ensure that Application Securityis enabled.The screen displays additional settings.
4. On the left, click Proactive Bot Defense.5. Set the Operation Mode to specify when to implement proactive bot defense.
Option Description
During Attacks Checks all traffic during a DoS attack, and prevents detected attacks fromescalating.
Always Checks all traffic at all times, and prevents DoS attacks from starting.
Important: If you enable Proactive Bot Defense and your web site uses CORS (Cross-OriginResource Sharing), we recommend that you add the CORS URLs to the proactive bot URL whitelist.
The system enables Bot Signatures to enforce Proactive Bot Defense. By default, the system blocksrequests from highly suspicious browsers and displays a default CAPTCHA (or visual characterrecognition) challenge to browsers that are suspicious.
6. By default, the Block requests from suspicious browsers setting and check boxes are enabled. Ifyou do not want to block suspicious browsers or send a CAPTCHA challenge, you can clear theBlock Suspicious Browsers or CAPTCHA Challenge check boxes.You can also change the CAPTCHA response by clicking CAPTCHA Settings. (Another taskexplains how to configure CAPCHA when setting up DoS protection.)
7. In the Grace Period field, type the number of seconds to wait before the system blocks suspectedbots.The default value is 300 seconds.The grace period allows web pages (including complex pages such as those which include images, JS,and CSS) the time to be recognized as non-bots, receive validation, and completely load withoutunnecessarily dropping requests.
BIG-IP Application Security Manager: Implementations
21

The grace period begins after the client is validated, a configuration change occurs, or when proactivebot defense starts as a result of a detected DoS attack or high latency.
8. Using the Cross-Domain Requests setting, specify how the system validates cross-domain requests(such as requests for non-HTML resources like embedded images, CSS style sheets, XML,JavaScript, or Flash).Cross-domain requests are requests with different domains in the Host and Referrer headers.
Option Description
Allow all requests Allows requests arriving to a non-HTML URL referred by a differentdomain and without a valid cookie if they pass a simple challenge. Thesystem sends a challenge that tests basic browser capabilities, such asHTTP redirects and cookies.
Allow configureddomains; validate inbulk
Allows requests to other related internal or external domains that areconfigured in this section, and validates the related domains in advance.The requests to related site domains must include a valid cookie fromone of the site domains; the external domains are allowed if they pass asimple challenge. Choose this option if your web site does not use manydomains, and then include them all in the lists below.
Also, if your website uses CORs, select this option and then specify theWebSocket domain in the Related Site Domains list.
Allow configureddomains; validate uponrequest
Allows requests to other related internal or external domains that areconfigured in this section. The requests to related site domains mustinclude a valid cookie from the main domain; the external domains areallowed if they pass a simple challenge. Choose this option if your website uses many domains, and include the main domain in the list below.
9. If you selected one of the Allow configured domains options in the last step, you need to addRelated Site Domains that are part of your web site, and Related External Domains that areallowed to link to resources in your web site.
10. In the URL Whitelist setting, add the resource URLs for which the web site expects to receiverequests and that you want the system to consider safe.Type URLs in the form /index.html, then click Add.. Wildcards are supported.
Tip: If your web site uses CORS, add the CORS URLs to the whitelist, otherwise, they will be blocked.
The system does not perform proactive bot defense on requests to the URLs in this list.11. Click Update to save the DoS profile.
You have now configured proactive bot defense which protects against DDoS, web scraping, and bruteforce attacks (on the virtual servers that use this DoS profile). By creating a bot defense logging profile,you can view a Bot Defense event log at Security > Event Logs > Bot Defense.
The system sends a JavaScript challenge to traffic accessing the site for the first time. Legitimate trafficanswers the challenge correctly, and resends the request with a valid cookie; then it is allowed to accessthe server. The system drops requests sent by browsers that do not answer the system’s initial JavaScriptchallenge (considering those requests to be bots). The system also automatically enables bot signaturesand blocks bots known to be malicious.
If proactive bot detection is always running, ASM™ filters out bots before they manage to build up anattack on the system and cause damage. If using proactive bot defense only during attacks, once ASMdetects a DoS attack, the system uses proactive bot defense for the duration of the attack.
Proactive bot defense is used together with the active mitigation methods specified in TPS- and stress-based detection. Any request that is not blocked by the active mitigation method still has to pass theproactive bot defense mechanism to be able to reach the server (unless it is on the URL whitelist).
Preventing DoS Attacks on Applications
22

Proactive bot defense blocks requests to CORS (Cross-Origin Resource Sharing) URLs not on the URLwhitelist.
Configuring bot defense logging
Before beginning to configure bot defense logging, ensure that you have configured remote logging toSplunk for your system. Both the F5 DevCentral and Splunk websites have information on how toconfigure BIG-IP to send logs to a Splunk platform. Local logging is not recommended.
1. On the Main tab, click Security > Event Logs > Logging Profiles.The Logging Profile screen opens.
2. Click the name of an existing logging profile (or create a new one, then open it).The Logging Profile Properties screen opens.
3. Enable Bot Defense.The Bot Defense tab opens.
4. From the Bot Defense tab, select your preconfigured Remote Publisher from the drop down list.5. Enable the log details you want to capture.6. Click Update to save the logging profile.7. On the Main tab, click Local Traffic > Virtual Servers > Virtual Server List.8. Select the virtual server to associate the bot defense logging profile to.
The Properties tab opens.9. Click the Security > Policies tab.10. Enable DoS Protection Profile.11. In the Log Profile section, select the bot defense profile from the uiAvailable list and move it to the
Selected list.12. Click Update to save the Policy Settings.
You can view the bot defense logs by navigating to Security > Event Logs > Bot Defense > Requests.Overview: Preventing DoS attacks on applicationsUsing proactive bot defenseConfiguring bot signature checking
Configuring bot signature checking
If you need to create custom bot signatures and categories for your application, you should do this beforeconfiguring bot signature checking. Navigate to Security > Options > DoS Protection > Bot SignaturesList. Otherwise, you can use the system-supplied bot signatures and categories listed in the same place.
Because this defense mechanism uses reverse lookup, you need to configure a DNS Server (System >Configuration > Device > DNS) and a DNS Resolver (Network > DNS Resolvers > DNS ResolverList) for it to work.
Bot signature checking is typically used with proactive bot defense (and is enabled by default when youuse proactive bot defense). The system performs bot signature checking, which identifies known bots aslegitimate or malicious based on their HTTP characteristics. You can specify whether to ignore, report, orblock certain categories of malicious or benign bots. You can also disable specific bot signatures, ifneeded.
1. On the Main tab, click Security > DoS Protection > DoS Profiles.The DoS Profiles list screen opens.
2. Click the name of an existing DoS profile (or create a new one, then open it), and click theApplication Security tab.
BIG-IP Application Security Manager: Implementations
23

3. On the left, under Application Security, click General Settings, and ensure that Application Securityis enabled.The screen displays additional settings.
4. On the left, click Bot Signatures to display the settings.5. For the Bot Signature Check setting, select Enabled if it is not already selected.6. In the Bot Signature Categories field, for each category of bots, both malicious and benign, select
the action to take when a request matches a signature in that category.Option Action
None Ignore requests in this category.
Report Log requests in this category.
Block Block and report requests in this category.
You can select one action for all malicious or all benign categories, or have different actions forseparate categories.
Note:
These settings override the Proactive Bot Defense settings. For example, requests from bots in anycategory, if set to Block, are always blocked.
7. If certain signatures need to be disabled, in the Bot Signatures List, move the signatures to theDisabled Signatures list.
8. Click Update to save the DoS profile.
You have specified how to perform bot signature checking on your system. By comparing the botsignatures with requests, the system can identify those made by different categories of bots and willignore, report, or block requests from bots it discovers.
If using bot signature checking, you will want to keep the signatures up to date. You can configure botsignatures (and all other signatures) to be updated automatically or update them manually using theSecurity Updates feature. A security update downloads the latest new and updated bot signatures andattack signatures.
Configuring TPS-based DoS detection
You can configure Application Security Manager™ to mitigate DoS attacks based on transaction ratesusing TPS-based DoS protection.
1. On the Main tab, click Security > DoS Protection > DoS Profiles.The DoS Profiles list screen opens.
2. Click the name of an existing DoS profile (or create a new one, then open it), and click theApplication Security tab.
3. On the left, under Application Security, click General Settings, and ensure that Application Securityis enabled.If Application Security is disabled, click Enabled.The screen displays additional settings.
4. On the left, under Application Security, click TPS-based Detection.The screen displays TPS-based DoS Detection settings.
5. Click Edit All.You can also edit each setting separately instead of editing them all at once.The screen opens the settings for editing.
Preventing DoS Attacks on Applications
24

6. For Operation Mode, select the option to determine how the system reacts when it detects a DoSattack.Option Description
Transparent Displays data about DoS attacks on the DoS reporting screens, but does notblock requests, or perform any of the mitigations.
Blocking Applies the necessary mitigation steps to suspicious IP addresses, geolocations,URLs, or the entire site. Also displays information about DoS attacks on the DoSreporting screens.
Select Off to turn this type of DoS Detection off.The screen displays additional configuration settings when you select an operation mode.
7. For Thresholds Mode, select whether to let the system automatically determine thresholds(Automatic) or to set the threshold values manually (Manual) for the DoS profile.If you choose to set the values manually, more fields are shown in the How to detect attackers andwhich mitigation to use setting, and you can adjust the threshold values. The default values arereasonable for most installations. If using automatic thresholds, the system sets the values using awide range to begin with, then calculates the values using 7 days of historical data and sets thresholdvalues to the highest levels during normal activity (to minimize false positives). The system updatesthresholds every 12 hours.
8. For How to detect attackers and which mitigation to use, specify how to identify and stop DoSattacks. By default, source IP addresses and URLs are used to detect DoS attacks. You can specifyother detection methods, and, if setting thresholds manually, adjust the thresholds for each of thesettings as needed.Option Description
By Source IP Specifies conditions for when to treat an IP address as an attacker. Forautomatic thresholds, one threshold is used for all source IP addresses.
By Device ID Specifies conditions for when to treat a device as an attacker. For automaticthresholds, one threshold is used for all device IDs.
By Geolocation Specifies when to treat a particular country as an attacker. If using automaticthresholds, the system calculates thresholds for the top 20 geolocations,setting different thresholds for every hour of the day. Thus, thresholdscalculated at 9:00AM are based on data from 8:00-9:00AM, and are used at8:00AM next day.
By URL Specifies when the system treats a URL as under attack. For automaticthresholds, one threshold is used for all URLs. (Heavy URLs are notincluded in the calculations.)
Site Wide Specifies conditions for how to determine when the entire web site is underattack. For automatic thresholds, one threshold value is used for the entiresite.
At least one mitigation method must be selected before you can edit the detection settings. If thespecified thresholds in the settings are reached, the system limits the number of requests per second tothe history interval and uses the selected mitigation methods described here.
Option Description
Client Side IntegrityDefense
Sends a JavaScript challenge to determine whether the client is a legalbrowser or an illegal script. Only used when the Operation Mode is setto Blocking.
BIG-IP Application Security Manager: Implementations
25

Option Description
CAPTCHA Challenge Issues a CAPTCHA challenge to the traffic identified as suspicious bysource IP address, geolocation, URL, or site wide.
Request Blocking Specifies how and when to block (if the operation mode is set toBlocking) or report (if the operation mode is set to Transparent)suspicious requests. Select Block All to block all suspicious requests orRate Limit to reduce the number of suspicious requests.
9. For the Prevention Duration setting, specify the time spent in each mitigation step until deciding tomove to the next mitigation step.Option Description
Escalation Period Specifies the minimum time spent in each mitigation step before the systemmoves to the next step when preventing attacks against an attacker IP address orattacked URL. During a DoS attack, the system performs attack prevention forthe amount of time configured here for the mitigation methods that are enabled.If after this period the attack is not stopped, the system enforces the nextenabled prevention step. Type a number between 1 and 3600. The default is120 seconds.
De-escalationPeriod
Specifies the time spent in the final escalation step until retrying the steps usingthe mitigation methods that are enabled. Type a number (greater than theescalation period) between 0 (meaning the steps are never retried) and 86400seconds. The default value is 7200 seconds (2 hours).
DoS mitigation is reset after 2 hours, even if the detection criteria still hold, regardless of the value setfor the De-escalation Period. If the attack is still taking place, a new attack occurs and mitigationstarts over, retrying all the mitigation methods. If you set the De-escalation Period to less than 2hours, the reset occurs more frequently.
10. Click Update to save the DoS profile.
You have now configured a DoS profile to prevent DoS attacks based on the client side (TPS-baseddetection). When the system receives too many requests per second for a source IP address, device ID,URL, or site wide, it is considered suspicious. The attack starts if the system detects at least onesuspicious entity. The attack ends when there are no suspicious entities for a period of two minutes.
Next, you need to associate the DoS profile with the application’s virtual server. You also have the optionof configuring stress-based detection, heavy URL protection, or proactive bot defense in your DoSprofile.
Configuring behavioral & stress-based DDoS protection
You can configure Application Security Manager™ to mitigate Layer 7 DDoS attacks based on serverlatency and traffic behavior. Behavioral DDoS protection is based on continuous machine learning oftraffic and flow characteristics, and detects attacks very quickly.
1. On the Main tab, click Security > DoS Protection > DoS Profiles.The DoS Profiles list screen opens.
2. Click the name of an existing DoS profile (or create a new one, then open it), and click theApplication Security tab.
3. On the left, under Application Security, click General Settings, and ensure that Application Securityis enabled.The screen displays additional settings.
4. On the left, under Application Security, click Behavioral & Stress-based Detection.The screen displays Behavioral & Stress-based DoS Detection settings.
Preventing DoS Attacks on Applications
26
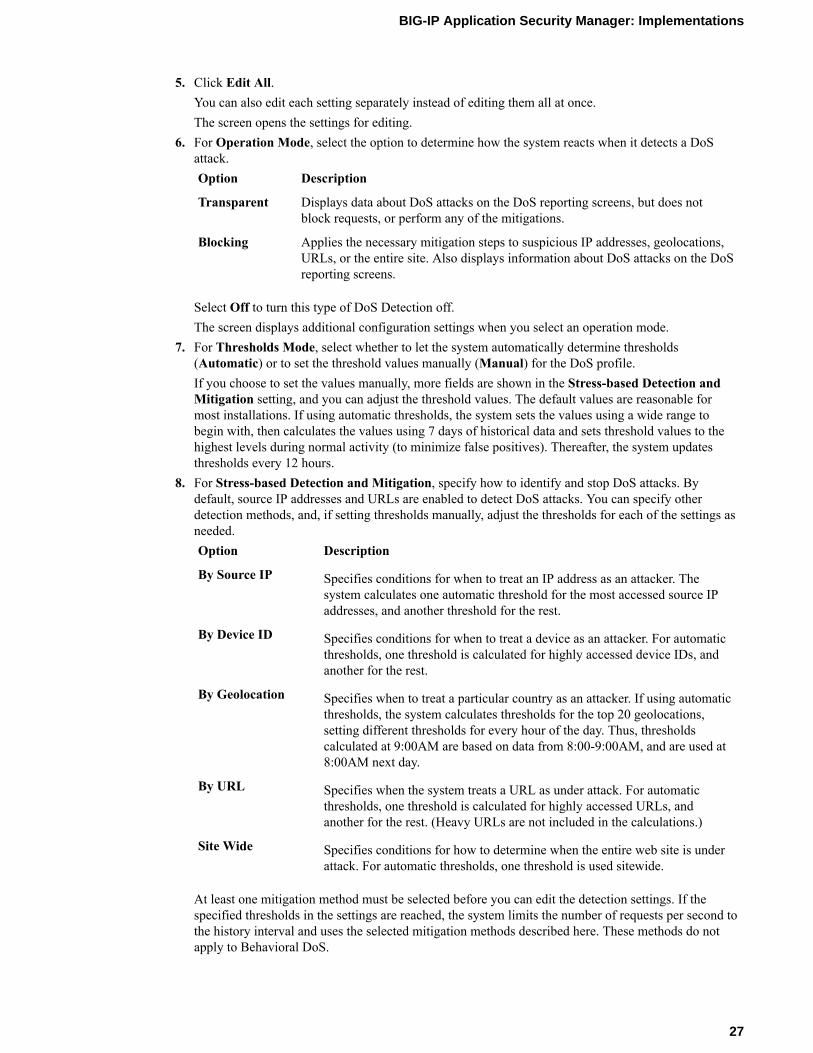
5. Click Edit All.You can also edit each setting separately instead of editing them all at once.The screen opens the settings for editing.
6. For Operation Mode, select the option to determine how the system reacts when it detects a DoSattack.Option Description
Transparent Displays data about DoS attacks on the DoS reporting screens, but does notblock requests, or perform any of the mitigations.
Blocking Applies the necessary mitigation steps to suspicious IP addresses, geolocations,URLs, or the entire site. Also displays information about DoS attacks on the DoSreporting screens.
Select Off to turn this type of DoS Detection off.The screen displays additional configuration settings when you select an operation mode.
7. For Thresholds Mode, select whether to let the system automatically determine thresholds(Automatic) or to set the threshold values manually (Manual) for the DoS profile.If you choose to set the values manually, more fields are shown in the Stress-based Detection andMitigation setting, and you can adjust the threshold values. The default values are reasonable formost installations. If using automatic thresholds, the system sets the values using a wide range tobegin with, then calculates the values using 7 days of historical data and sets threshold values to thehighest levels during normal activity (to minimize false positives). Thereafter, the system updatesthresholds every 12 hours.
8. For Stress-based Detection and Mitigation, specify how to identify and stop DoS attacks. Bydefault, source IP addresses and URLs are enabled to detect DoS attacks. You can specify otherdetection methods, and, if setting thresholds manually, adjust the thresholds for each of the settings asneeded.Option Description
By Source IP Specifies conditions for when to treat an IP address as an attacker. Thesystem calculates one automatic threshold for the most accessed source IPaddresses, and another threshold for the rest.
By Device ID Specifies conditions for when to treat a device as an attacker. For automaticthresholds, one threshold is calculated for highly accessed device IDs, andanother for the rest.
By Geolocation Specifies when to treat a particular country as an attacker. If using automaticthresholds, the system calculates thresholds for the top 20 geolocations,setting different thresholds for every hour of the day. Thus, thresholdscalculated at 9:00AM are based on data from 8:00-9:00AM, and are used at8:00AM next day.
By URL Specifies when the system treats a URL as under attack. For automaticthresholds, one threshold is calculated for highly accessed URLs, andanother for the rest. (Heavy URLs are not included in the calculations.)
Site Wide Specifies conditions for how to determine when the entire web site is underattack. For automatic thresholds, one threshold is used sitewide.
At least one mitigation method must be selected before you can edit the detection settings. If thespecified thresholds in the settings are reached, the system limits the number of requests per second tothe history interval and uses the selected mitigation methods described here. These methods do notapply to Behavioral DoS.
BIG-IP Application Security Manager: Implementations
27

Option Description
Client Side IntegrityDefense
Sends a JavaScript challenge to determine whether the client is a legalbrowser or an illegal script. Only used when the Operation Mode is setto Blocking.
CAPTCHA Challenge Issues a CAPTCHA challenge to the traffic identified as suspicious bysource IP address, geolocation, URL, or site wide.
Request Blocking Specifies how and when to block (if the operation mode is set toBlocking) or report (if the operation mode is set to Transparent)suspicious requests. Select Block All to block all suspicious requests orRate Limit to reduce the number of suspicious requests.
9. For the Behavioral Detection and Mitigation settings, specify how to mitigate DDoS attacksdiscovered based on behavior.Option Description
Bad actors behaviordetection
Lets the system identify IP addresses of bad actors by examining trafficbehavior and anomaly detection.
Request signaturesdetection
Examines requests and creates behavioral signatures describe patternsfound in attacks the system has identified. Select Use approvedsignatures only if you want to verify that the system-generatedsignatures are valid before letting the system use them.
Mitigation Specifies the level of mitigation to perform for attacks discovered usingbehavioral DoS.
• Conservative Protection: If Bad actors behavior detection isenabled, slows down and rate limits requests from anomalous IPaddresses based on anomaly detection confidence and server health.If Request signatures detection is enabled, blocks requests thatmatch behavioral signatures.
• Standard Protection: If Bad actors behavior detection is enabled,slows down requests from anomalous IP addresses based on itsanomaly detection confidence and server health. Rate limits requestsfrom anomalous IP addresses and, if necessary, rate limits allrequests based on server health. Limits the number of concurrentconnections from anomalous IP addresses and, if necessary, limitsthe number of all concurrent connections based on server health. IfRequest signatures detection is enabled, blocks requests that matchbehavioral signatures.
• Aggressive Protection: If Bad actors behavior detection isenabled, does all that standard protection does plus it proactivelyperforms all protection actions (even before an attack). Increases theimpact of the protection techniques. If Request signaturesdetection is enabled, blocks requests that match behavioralsignatures. Increases the impact of blocked requests.
• No Mitigation: Learns and monitors traffic behavior, but takes noaction.
10. For the Prevention Duration setting, specify the time spent in each mitigation step until deciding tomove to the next mitigation step.Option Description
Escalation Period Specifies the minimum time spent in each mitigation step before the systemmoves to the next step when preventing attacks against an attacker IP address orattacked URL. During a DoS attack, the system performs attack prevention for
Preventing DoS Attacks on Applications
28

Option Description
the amount of time configured here for the mitigation methods that are enabled.If after this period the attack is not stopped, the system enforces the nextenabled prevention step. Type a number between 1 and 3600. The default is120 seconds.
De-escalationPeriod
Specifies the time spent in the final escalation step until retrying the steps usingthe mitigation methods that are enabled. Type a number (greater than theescalation period) between 0 (meaning the steps are never retried) and 86400seconds. The default value is 7200 seconds (2 hours).
DoS mitigation is reset after 2 hours, even if the detection criteria still hold, regardless of the value setfor the De-escalation Period. If the attack is still taking place, a new attack occurs and mitigationstarts over, retrying all the mitigation methods. If you set the De-escalation Period to less than 2hours, the reset occurs more frequently.
11. Click Update to save the DoS profile.
You have now configured a DoS profile to prevent DoS attacks automatically based on server healthand/or Behavioral DoS. The BIG-IP® system monitors server health and estimates the server load basedon Layer 7 statistics including TPS, pending transactions, request drop rate, and so on. If the systemdetects potential attack conditions, the mitigation starts working (depending on the level of behavioralprotection you selected) seconds after an attack begins.
Note: If using stress-based or behavioral DoS protection, the system may falsely detect an attack in theevent of a runtime failure (such as a backend server being down) or a configuration issue (such as thesystem having no pool or the pool having no pool members).
The mitigation process starts with the list of suspicious IP addresses and slows down suspicious clients.The system may also perform ingress rate shaping. The suspicious clients are tagged as a result of theLayer 7 behavioral analysis.
Next, associate the DoS profile with the application’s virtual server. You also have the option ofconfiguring TPS-based detection, proactive bot defense, or heavy URL protection in your DoS profile.
Configuring heavy URL protection
To use heavy URL protection, F5 recommends that you configure stress-based anomaly settings in theDoS profile. That way the system can detect low-volume attacks on heavy URLs when no other high-volume attacks are underway. Also, you must enable at least one of the URL-based prevention policymethods in the TPS-based Anomaly or stress-based Anomaly settings in the DoS profile.
You can configure Application Security Manager™ (ASM) to prevent DoS attacks on heavy URLs.Heavy URLs are URLs on your application web site that may consume considerable resources undercertain conditions. By tracking URLs that are potentially heavy, you can mitigate DoS attacks on theseURLs before response latency exceeds a specific threshold.
1. On the Main tab, click Security > DoS Protection > DoS Profiles.The DoS Profiles list screen opens.
2. Click the name of an existing DoS profile (or create a new one, then open it), and click theApplication Security tab.
3. On the left, under Application Security, click General Settings, and ensure that Application Securityis enabled.The screen displays additional settings.
4. In the General Settings, next to Heavy URL Protection, click Edit.
BIG-IP Application Security Manager: Implementations
29

5. To have the system automatically detect heavy URLs, select A URL is considered heavy if itsportion of transactions with latency above this threshold is higher than usual for this site, andadjust the latency threshold if necessary.The default value is 1000 milliseconds.The system detects heavy URLs by measuring the latency tail ratio, which is the number oftransactions whose latency is consistently greater than the threshold.
6. If you expect certain URLs to be heavy (have high latency) at times, add them to the Configures alist of Heavy URLs setting:a) Type each URL in the form /query.html. The URLs in this list may include wildcards, such
as /product/*.b) Type the threshold in milliseconds at which point you want the URL to be considered heavy.c) Click Add, adding as many URLs as you need to.
If you are not sure which URLs to add to the Heavy URLs list, leave this setting unconfigured and letthe system automatically detect heavy URLs.
7. In the Configures a list of URLs which are excluded from being automatically detected as HeavyURLs setting, type the URLs not to consider heavy, and click Add.The URLs in this list may include wildcards, such as /product/*.
8. Click Update to save the DoS profile.
You have now configured a DoS profile that includes heavy URL protection. Heavy URLs are detectedbased on reaching higher latency under certain conditions. ASM tracks the probability distribution ofserver latency, which is called heavy tailed.
To validate automatic detection, you can view the URL Latencies report (Security > Reporting > DoS >URL Latencies) periodically to check that the latency threshold that you used is close to the value in thelatency histogram column for all traffic. You should set the latency threshold so that approximately 95%of the requests for the virtual server have lower latency.
By reviewing the URL Latencies report and sorting the URLs listed by latency, you can make sure thatthe URLs that you expect to be heavy are listed in the DoS profile. Also, if the system detects too many(or too few) heavy URLs, you can increase (or decrease) the latency threshold.
Recording traffic during DoS attacks
If you have DoS protection enabled, you can configure the system to record traffic during DoS attacks.By reviewing the recorded traffic in the form of a TCP dump, you can diagnose the attack vectors andattackers, observe whether and how the attack was mitigated, and determine whether you need to changethe DoS protection configuration.
1. On the Main tab, click Security > DoS Protection > DoS Profiles.The DoS Profiles list screen opens.
2. Click the name of an existing DoS profile (or create a new one, then open it), and click theApplication Security tab.
3. On the left, under Application Security, click General Settings, and ensure that Application Securityis enabled.The screen displays additional settings.
4. On the left, under Application Security, click Record Traffic.5. For Record Traffic During Attacks, click Edit, then select the Enabled check box.
The screen displays additional configuration settings.6. For Maximum TCP Dump Duration, click Edit, then type the maximum number of seconds (from
1 - 300) for the system to record traffic during a DoS attack.The default value is 30 seconds.
7. For Maximum TCP Dump Size, type the maximum size (from 1 - 50) allowed for the TCP dump.
Preventing DoS Attacks on Applications
30

When the maximum size is reached, the dump is complete. The default value is 10 MB.8. For TCP Dump Repetition, specify how often to perform TCP dumps during a DoS attack:
• To record traffic once during an attack, select Dump once per attack.• To record traffic periodically during an attack, select Repeat dump after and type the number of
seconds (between 1 - 3600) for how long to wait after completing a TCP dump before starting thenext one.
9. Click Update to save the DoS profile.
When the system detects a DoS attack, it performs a TCP dump to record the traffic on the virtual serverwhere the attack occurred. The files are located on the system in /shared/dosl7/tcpdumps. The nameof the file has the format: <yyyy_mm_dd_hh:mm:ss>-<attack_ID>-<seq_num>.pcap, including thetime the dump started, the ID of the attack in logs and reports, and the number of the TCP dump since theattack started. If traffic being recorded is SSL traffic, it is recorded encrypted.
If working with F5 support, you can collect the TCP dump files into a QuickView file so that supportpersonnel can help determine the cause of the DoS attack, and recommend ways of preventing futureattacks.
Configuring CAPTCHA for DoS protection
You can configure a CAPTCHA challenge as part of the mitigation policy for TPS-based DoS detection,behavioral & stress-based DoS detection, or as part of proactive bot defense. A CAPTCHA (or visualcharacter recognition) challenge determines whether the client is human or an illegal script.
1. On the Main tab, click Security > DoS Protection > DoS Profiles.The DoS Profiles list screen opens.
2. Click the name of an existing DoS profile (or create a new one, then open it), and click theApplication Security tab.
3. On the left, under Application Security, click General Settings, and ensure that Application Securityis enabled.The screen displays additional settings.
4. On the left, under Application Security, select an option to configure TPS-based, behavioral & stress-based, or proactive bot defense, and select CAPTCHA as one of the mitigation methods.a) For TPS-based Detection, in the How to detect attackers and which mitigation to use setting,
edit the source IP, device ID, geolocation, URL, or site-wide mitigation, and select CAPTCHAChallenge.
b) For Behavioral & Stress-based Detection, in the Stress-based Detection and Mitigationsetting, edit the source IP, device ID, geolocation, URL, or site-wide mitigation, and selectCAPTCHA Challenge.
c) For Proactive Bot Defense, in the Block requests from suspicious browsers setting, selectCAPTCHA Challenge to challenge a suspected bot.
5. To customize the CAPTCHA response that the system sends as a challenge to suspicious users, clickCAPTCHA Settings.The CAPTCHA Settings link is only available after you select a CAPTCHA challenge.The Application Security General Settings area opens and displays the CAPTCHA Response.
6. In the CAPTCHA Response setting, specify the text the system sends as a challenge to users.
Note: This setting appears only if one or more of the CAPTCHA Challenge options is selected.
a) From the First Response Type list, select Custom.b) Edit the text (HTML) in the First Response Body field.
You can use the following variables within the challenge or response.
BIG-IP Application Security Manager: Implementations
31

Variable Use
%DOSL7.captcha.image% Displays the CAPTCHA image in data URIformat.
%DOSL7.captcha.change% Displays the change CAPTCHA challenge icon.
%DOSL7.captcha.solution% Displays the solution text box.
%DOSL7.captcha.submit% Displays the Submit button.
c) Click Show to see what it looks like.7. In the CAPTCHA Response setting, specify the text the system sends to users if they fail to respond
correctly to the CAPTCHA challenge.a) From the Failure Response Type list, select Custom if you want to change the text.b) If customizing the text, edit the text in the Failure Response Body field.
You can use the same variables in the text to send a second challenge.c) Click Show to see what it looks like.
8. Click Update to save the DoS profile.
You have now configured a CAPTCHA challenge for potential DoS attackers that helps with filtering outbots. The system sends a character recognition challenge only on the first request of a client session. If itis solved correctly, the request is sent to the server. Subsequent requests in the session do not include thechallenge. If the client fails the first challenge, the CAPTCHA response is sent. If that also fails, theclient is handled according to the mitigation methods selected in the DoS profile.
Associating a DoS profile with a virtual server
You must first create a DoS profile separately, to configure denial-of-service protection for applications,the DNS protocol, or the SIP protocol. For application-level DoS protection, the virtual server requires anHTTP profile (such as the default http).
You add denial-of-service protection to a virtual server to provide enhanced protection from DoS attacks,and track anomalous activity on the BIG-IP® system.
1. On the Main tab, click Local Traffic > Virtual Servers.The Virtual Server List screen opens.
2. Click the name of the virtual server you want to modify.3. In the Destination Address field, type the IP address in CIDR format.
The supported format is address/prefix, where the prefix length is in bits. For example, an IPv4address/prefix is 10.0.0.1 or 10.0.0.0/24, and an IPv6 address/prefix is ffe1::0020/64 or2001:ed8:77b5:2:10:10:100:42/64. When you use an IPv4 address without specifying a prefix,the BIG-IP® system automatically uses a /32 prefix.
4. On the menu bar, from the Security menu, choose Policies.5. To enable denial-of-service protection, from the DoS Protection Profile list, select Enabled, and
then, from the Profile list, select the DoS profile to associate with the virtual server.6. Click Update to save the changes.
DoS protection is now enabled, and the DoS Protection profile is associated with the virtual server.
Implementation ResultWhen you have completed the steps in this implementation, you have configured the ApplicationSecurity Manager™ (ASM) to protect against L7 DoS attacks. If using proactive bot defense, ASM™
protects against DDoS, web scraping, and brute force attacks (on the virtual servers that use this DoS
Preventing DoS Attacks on Applications
32

profile) before the attacks can harm the system. Depending on the configuration, the system may alsodetect DoS attacks based on transactions per second (TPS) on the client side, server latency, or both.
In TPS-based detection mode, if the ratio of the transaction rate during the history interval is greater thanthe TPS increased by percentage, the system considers the URL to be under attack, the IP address orcountry to be suspicious, or possibly the whole site to be suspicious.
In stress-based detection mode, if there is a latency increase and at least one suspicious IP address,country, URL, or heavy URL, the system considers the URL to be under attack, the IP address or countryto be suspicious, or possibly the whole site to be suspicious.
If you enabled heavy URL protection, the system tracks URLs that consume higher than averageresources and mitigates traffic that is going to those URLs.
If you chose the blocking operation mode, the system applies the necessary mitigation steps to suspiciousIP addresses, URLs, or geolocations, or applies them site-wide. If using the transparent operation mode,the system reports DoS attacks but does not block them.
If you are using iRules® to customize reaction to DoS attacks, when the system detects a DoS attackbased on the configured conditions, it triggers an iRule and responds to the attack as specified in theiRule code.
After traffic is flowing to the system, you can check whether DoS attacks are being prevented, andinvestigate them by viewing DoS event logs and reports.
BIG-IP Application Security Manager: Implementations
33

Preventing DoS Attacks on Applications
34

Viewing DoS Reports, Statistics, and Logs
Overview: Viewing DoS reports and logsOnce you have configured DoS protection on the BIG-IP® system, you can view charts, reports, statisticsand event logs that show information about DoS attacks and mitigations in place on the system(Security > Reporting > DoS). For example, you can view the DoS Dashboard screen, which shows at-a-glance whether or not the system is under attack, the type of attack and IP addresses of the source anddestination of monitored traffic. The DoS Dashboard screen also indicates the impact of DoS attacks onyour virtual servers, in addition to overall system health.
The DoS Analysis screen you can view reports of transaction outcomes, and correlate the impact ofsystem detection and the mitigation of DoS attacks to system health and performance indicators. Thereports and event logs on the DoS Analysis screen help you to understand whether the DoS protectionyou have implemented is protecting your application's performance, or whether you need to fine-tune theconfiguration. In addition, you can adjust the time line to view historical attacks and their trends, whichcan provide insight into the DoS threats your application commonly faces.
Investigating DoS attacks and mitigation
Before you can investigate DoS attacks, you need to have created a DoS profile so that the system iscapturing the analytics on the system. You must associate the DoS profile with one or more virtualservers.
You can display the DoS Dashboard to see whether or not a DoS attack is taking place, and displayinformation about DoS attacks.
1. On the Main tab, click Security > Reporting > DoS > Dashboard.The DoS Dashboard opens and displays real-time information about all DoS attacks on the system.The system displays information about attacks that either started or ended during the last hour, bydefault.
2. Review the charts to see if there have been any recent DoS attacks.3. At the top of the screen, you can adjust the time frame and refresh details for the statistics.
Option Description
Time frame Specifies the time frame for which you want to display HTTP statistics (Lasthour, Last day, Last week, and so on, or All to display all data).
Auto-refreshinterval
Controls how often the statistics are refreshed on the screen (1 min., 5 min.,10min., or turns refresh Off.
Refresh button Updates the statistics on the screen immediately.
Timelineadjuster
Shows the actual time frame for which statistics are currently displayedaccording to the time focus that is selected. On the graphic, drag the handles oneither end to change the focus of the statistics.
As you adjust the time settings, the statistics are updated on the screen.4. Initially, the data is unfiltered, and it displays all statistics it has for the time frame selected (Last
hour, by default). To filter the data, select one or more dimensions in the right column.

For example, you can filter by dimensions such as Attack IDs, Applications, Vectors, Countries,and so on. You can select more than one dimension, and one or more instances in a dimension. Butnote that some combinations are restricted.As you select dimensions or instances, the filtered statistics are displayed on the screen.
5. To view the statistics in table form, expand the dimension, then drag the handle on the dimensionscolumn to the left.
Tip: To see the full column names, hover over the headings. To expand the table to the full width ofthe screen to see all of the columns, click the handle.
Tables containing detailed statistics for the items in the dimensions are displayed.6. You can clear all filter selections or those for a dimension.
• To clear all selections, click the gear icon at the top of the column and select Clear All.• To clear selections for a dimension, click the options icon (three horizontal lines to the left of the
title), and select Clear Selection.7. To view an analysis of your DoS activity, click Security > Reporting > DoS > Analysis.
You can review the details about DoS attacks on the DoS Dashboard and Analysis screens to quickly seewhether or not you are under attack and view an analysis of DoS activity.
Sample DoS Dashboards
This figure shows a sample DoS Dashboard on a system that is having a low-level DoS attack now.
Figure 1: Sample DoS Dashboard
This figure shows a sample DoS Dashboard showing DoS attacks that occurred during the last week.Three of the attacks were critical but all were mitigated within minutes.
Viewing DoS Reports, Statistics, and Logs
36

Figure 2: Sample DoS Dashboard showing attacks
Displaying DoS Application Event logs
You can display DoS Application Event logs to see whether L7 DoS attacks have occurred, and viewinformation about the attacks. The logs show details about the DoS events.
1. On the Main tab, click Security > Event Logs > DoS > Application Events.The DoS Application Events screen opens, and if Layer 7 DoS attacks were detected, it lists thedetails about the DoS attack such as the start and end times, how it was detected and mitigated, theattack ID, and so on.
2. If DoS attacks are listed, review the list of attacks to see what has occurred, when it occurred, themitigation, and the severity of the attack.
3. From the event log, click the Attack ID link for an attack or event to display information about theattack in a graphical chart.
BIG-IP Application Security Manager: Implementations
37

Viewing URL Latencies reports
For the URL Latencies report to include useful information, you need to have created a DoS profile andassociated it with the application's virtual server for the system to capture the latency statistics for theapplication.
You can display a report that shows information about the latency of traffic to specific web pages in yourapplication. The report lists the latency for each URL separately, and one row lists the latency for allURLs combined. You can use this report to check that the latency threshold that you used is close to thevalue in the latency histogram column for all traffic.
1. On the Main tab, click Security > Reporting > DoS > URL Latencies.The URL Latencies reporting screen opens.
2. From the Time Period list, select the time period for which you want to view URL latency, or specifya custom time range.
3. If you want to filter the information by virtual server, DoS profile, URL, or detection criteria, specifythe ones for which you want to view the URL latency, and click Filter.By default, the report displays information for all items.
4. Adjust the chart display options as you want.Display Option Description
Display Mode Select whether to display the information as Cumulative or as related to therespective latency range, Per Interval.
Unified Scale Select this check box to display all histograms using a single scale for all URLs,rather than a separate scale for each one.
Order by Select the order in which to display the statistics: by the average server latency, thenumber of transactions, the histogram latency ranges (in milliseconds), or by howheavy URLs were detected (automatically detected or manually set).
5. Review the latency statistics.
• The report shows the latency for the most active URLs.• The Aggregated row summarizes the statistics for the URLs not included in the report.• The Overall Summary shows the latency of all traffic.
6. To focus in on the specific latency details for one row, click the latency histogram.A magnified view of the histogram is displayed in a separate window. The latency histogram showsthe percentage of transactions for each range of latency (0-2 ms, 2-4 ms, and so on up to 10000 ms or10 seconds).
The URL Latencies report shows how fast your web application returns web pages and can show typicallatency for applications (meaning virtual servers associated with a DoS profile) on your system. It canhelp you to identify slow pages with latency problems that may require additional troubleshooting byapplication developers.
You can also use the URL Latencies report for the following purposes:
• To determine the threshold latencies, especially the heaviness threshold.
Tip: Set the heaviness threshold to approximately 90-95% of the latency distribution for the site.Filter the data by site (that is, by virtual server and DoS profile), and check the latency distribution inthe histogram of the Total row.
• To track the current heavy URLs. You can add or remove manually configured heavy URLsdepending on the information in the report.
• To monitor the latency distribution.
Viewing DoS Reports, Statistics, and Logs
38

Sample URL Latencies report
This figure shows a sample URL Latencies report for a system that has two DoS profiles and two virtualservers. It shows the latency for several web pages ranging from 10.97 ms to 2006.07 ms. One page(/DOS/latency2.php) has very high latency and might require some troubleshooting. In this case, thesystem determined that URL to be "heavy" based on traffic. While investigating the latency of URLs thattake longer to display, if it is acceptable, you may decide to add them to the list of heavy URLs in theDoS profile so they do not trigger DoS mitigation.
Figure 3: Sample URL Latencies report
Creating customized DoS reports
You can create a customized DoS reporting screen so that it shows the specific data you are interested in,such as the top DoS attacks and server latency.
1. On the Main tab, click Security > Reporting > DoS > Custom Page.The DoS Custom Page screen opens, and shows default widgets (sections) you may find useful.
2. Review the charts and tables provided, and click the configuration icon to adjust or delete them, asneeded.
• To modify the widget and change what it displays, click the gear icon and select Settings. On thepopup screen, adjust the values that control what is displayed.
• To remove the widget from the custom page, click the gear icon and select Delete.3. To create a new widget to your specifications, click Add Widget.
The Add New Widget popup screen opens where you can select custom options for what to include,the time frame, and how to display the information.
BIG-IP Application Security Manager: Implementations
39

4. Continue adjusting the custom page so that it shows the information you want.You can drag and drop the widgets to change the order in which they are displayed. You can set thetime range for all widgets or for each one separately.
5. To save the information shown in the custom report to a file or email attachment, click Export andchoose your options.You can also export the data from a single widget by selecting Export from the configuration icon.
You have created a custom page that includes the information you need to monitor your system. As youuse the reports to investigate DoS attacks, you can adjust the custom page to include additional data thatyou need. You can save the reports or send them to others who want to review the data.
Logging bot defense requests
You can create a logging profile to log bot defense requests on systems set up to do proactive bot defense.
1. On the Main tab, click Security > Event Logs > Logging Profiles.The Logging Profiles list screen opens.
2. Click Create.The New Logging Profile screen opens.
3. In the Profile Name field, type a unique name for the profile.4. Select Bot Defense.5. To log bot defense attacks locally, select Local Publisher.6. To send the log to a remote reporting server (such as Splunk, Arcsight, or syslog), from Remote
Publisher, select the name of the publisher.7. Select which requests to include in the log:
• Log Illegal Requests: Requests that failed the proactive bot defense tests, such as suspiciousbrowser or wrong CAPTCHA responses. Note that JS challenges that are never responded to arenot included here.
• Log Captcha Challenged Requests: Requests that are responded to a Captcha challenge as part ofthe suspicious browser tests.
• Log Challenged Requests: Requests that are responded to with a JS challenge for new clients orclients renewing their cookies.
• Log Bot Signature Matched Requests: Requests that matched any of the Bot signatures with theaction block or report.
• Log Legal Requests: Requests that passed through.8. Click Finished.9. Associate this logging profile with the virtual server being protected with bot defense:
a) Go to Local Traffic > Virtual Servers, then click the virtual server.b) Under Security, select Policies.c) In the Log Profile setting, move the log profile from Available to Selected.d) Click Update.
10. After passing traffic, you can view the bot defense event log: Click Security > Event Logs > BotDefense.Use the arrow keys to scroll to see the full details for each bot defense request.
Viewing DoS Reports, Statistics, and Logs
40

BIG-IP Application Security Manager: Implementations
41

Viewing DoS Reports, Statistics, and Logs
42

Configuring DoS Policy Switching
Overview: Configuring DoS policy switchingYou can configure the BIG-IP® system to protect against Layer 7 DoS attacks applying unique profiles indifferent situations, or on different types of traffic.
In this example, you configure DoS protection for Layer 7 by creating two DoS profiles with ApplicationSecurity enabled. You associate the DoS profiles with virtual servers representing the applications thatyou want to protect. You also create a local traffic policy with rules that assign different DoS protectionsdepending on the traffic. Then you associate the local traffic policy with the virtual servers.
This example divides traffic into three categories:
• Employees: A unique DoS profile, assigned to employees, reports DoS attacks but does not dropconnections when there is an attack.
• Internal users: No DoS protection is applied to internal users.• Others: The strictest DoS protection is applied using the default DoS profile for all other users; the
system blocks DoS attacks that occur on other traffic.
Many other options are available for configuring DoS policy switching. This is simply one way toillustrate how you can configure multiple DoS protections using a local traffic policy to determinedifferent conditions and actions. By following the steps in this example, you can see the other optionsthat are available on the screens, and can adjust the example for your needs.
Task SummaryCreating a DoS profile for Layer 7 trafficModifying the default DoS profileCreating a local traffic policy for DoS policy switchingCreating policy rules for DoS policy switchingAssociating a DoS profile with a virtual serverAssociating a published local traffic policy with a virtual server
About DoS protection and local traffic policies
To provide additional flexibility for configuring DoS protection, you can use local traffic policiestogether with DoS protection. The advantage of creating local traffic policies is that you can applymultiple DoS protection policies to different types of traffic, using distinct DoS profiles. However, youneed to be aware of certain considerations when using this method.
Local traffic policies can include multiple rules. Each rule consists of a condition and a set of actions tobe performed if the respective condition holds. So you can create a local traffic policy that controls Layer7 DoS protection and includes multiple rules. If you do, every rule must include one of the followingLayer 7 DoS actions:
• Enable DoS protection using the default DoS profile (/Common/dos)• Enable DoS protection from a specific DoS profile• Disable DoS protection

Important: Make sure that the local traffic policy with DoS protection includes a default rule with nocondition that applies to traffic that does not match any other rule. In addition, be sure that each rule(including the default one), has an L7 DoS action in it, possibly in addition to other actions.
A default rule is required because the local traffic policy action applies not only to the request thatmatched the condition, but also to the following requests in the same TCP connection, even if they do notmatch the condition that triggered the action unless subsequent requests on the same connection match adifferent rule with a different L7 DoS action.
This requirement ensures that every request will match some rule (even the default one), and will triggera reasonable Layer 7 DoS action. This way a request will not automatically enforce the action of theprevious request on the same connection, which can yield unexpected results.
A typical action for the default rule in case of Layer 7 DoS is to create a rule with no condition andsimply enable DoS protection. In this case, the action the rule takes is to use the DoS policy attached tothe virtual server. In the example of configuring DoS policy switching, the third rule, others, is thedefault rule.
Creating a DoS profile for Layer 7 traffic
To define the circumstances under which the system considers traffic to be a Denial of Service (DoSattack), you create a DoS profile. For the DoS policy switching example, you can create a special DoSprofile, for employees, that does not block traffic. It only reports the DoS attack.
1. On the Main tab, click Security > DoS Protection > DoS Profiles.The DoS Profiles list screen opens.
2. Click Create.The Create New DoS Profile screen opens.
3. In the Name field, typeemployee_l7dos_profile for the profile, then click Finished.4. In the list of DoS profiles, click the name of the profile you just created, and click the Application
Security tab.5. On the left, under Application Security, click General Settings, and ensure that Application Security
is enabled.The screen displays additional settings.
6. On the left, under Application Security, click TPS-based Detection.The screen displays TPS-based DoS Detection settings.
7. For Operation Mode, select the option to determine how the system reacts when it detects a DoSattack.Option Description
Transparent Displays data about DoS attacks on the DoS reporting screens, but does notblock requests, or perform any of the mitigations.
Blocking Applies the necessary mitigation steps to suspicious IP addresses, geolocations,URLs, or the entire site. Also displays information about DoS attacks on the DoSreporting screens.
Select Off to turn this type of DoS Detection off.The screen displays additional configuration settings when you select an operation mode.
8. Use the default values for the other settings.9. Click Update to save the DoS profile.
You have now created a simple DoS profile to report DoS attacks based on transaction rates using TPS-based DoS protection.
Configuring DoS Policy Switching
44

Modifying the default DoS profile
The BIG-IP® system includes a default DoS profile that you can modify to specify when to use DoSprotection. For the DoS policy switching example, you can modify the default DoS profile and use it forpeople other than employees or internal users who are accessing applications. This example creates astrict default DoS profile that drops requests considered to be an attack.
1. On the Main tab, click Security > DoS Protection > DoS Profiles.The DoS Profiles list screen opens.
2. Click the profile called dos, and click the Application Security tab.The DoS Profile Properties screen opens.
3. On the left, under Application Security, click General Settings, and ensure that Application Securityis enabled.The screen displays additional settings.
4. On the left, under Application Security, click TPS-based Detection.The screen displays TPS-based DoS Detection settings.
5. In the TPS-based DoS Detection settings, ensure that the Operation Mode is set to Blocking.6. On the left, under Application Security, click Behavioral & Stress-based Detection.
The screen displays Behavioral & Stress-based DoS Detection settings.7. In the Behavioral & Stress-based Detection settings, edit the Operation Mode, and select Blocking.8. Use the default values for the other settings.9. Click Update to save the DoS profile.
You have now modified the default DoS profile that will be used for people other than employees orinternal users. For these users, the system drops connections from attacking IP addresses, and for requestsdirected to attacked URLs.
Creating a local traffic policy for DoS policy switching
You can create a local traffic policy to impose different levels of DoS protection on distinct types ofLayer 7 traffic.
1. On the Main tab, click Local Traffic > Policies.2. Click Create.
The New Policy screen opens.3. In the Policy Name field, type a name for the local traffic policy.4. From the Strategy list, select first.
The system applies the first rule that matches the criteria specified.5. If you see a Type setting, leave it set to Traffic Policy.6. Click Create Policy to create the local traffic policy.7. Click Save Draft to save the local traffic policy.
You have now created a draft local traffic policy, but it does not direct traffic yet.
Next, you need to add rules to the local traffic policy to specify the DoS protection that should occur fordifferent types of Layer 7 traffic.
Creating policy rules for DoS policy switching
Before you can add rules to the local traffic policy, you need to have created the policy, and it must be indraft form. For this example, you need two DoS profiles that enable Application Security and performDoS protection: one for employees, employee_l7dos_profile, and another for other people accessingthe system not internally (enable Application Security on the default dos profile).
BIG-IP Application Security Manager: Implementations
45

You can add rules to define conditions and perform specific actions for different types of Layer 7 traffic.This example creates three rules to implement different DoS protection for employees, for internalpersonnel, and for others.
1. On the Main tab, click Local Traffic > Policies.2. Click the name of the draft local traffic policy that you want to control Layer 7 DoS.3. In the Rules area, click Create.
The New Rule screen opens.4. Create a rule to define DoS protection for employees:
a) In the Name field, type the name employees.b) In the Match all of the following conditions area, click +.c) In the same area, from the lists, select HTTP Host, host, and ends with; then, after any of, in the
lower field, type employee.my_host.com, and click Add.d) To specify a unique DoS profile for employees, in the Do the following when the traffic is
matched area, select Enable, l7dos, then after from profile, select employee_l7dos_profile (or apreviously created custom DoS profile).
e) Click Save to add the rule to the policy.5. Create a rule to define DoS protection for internal personnel:
a) In the Name field, type the name internal.b) In the Match all of the following conditions area, click +.c) In the same area, from the lists select HTTP Host, host, and ends with; then, after any of, in the
lower field, type internal.my_host.com, and click Add.d) To turn off DoS protection for employees working internally, in the Do the following when the
traffic is matched area, select Disable and l7dos.e) Click Save to add the rule to the policy.
6. Create a rule to define DoS protection for anyone else not handled by the first two rules:a) In the Name field, type the name others.b) Leave Match all of the following conditions set to All traffic.c) To specify DoS protection for all others, in the Do the following when the traffic is matched area,
select Enable, l7dos, then after from profile, select dos (or a previously created custom DoSprofile).
d) Click Save to add the rule to the policy.
This last rule is the default rule, which applies if the other two rules do not apply. If you do notinclude a rule like this, and traffic does not match any other rule, the previous rule that was applied isused again.
7. Click Save Draft to save the draft local traffic policy with the rules.The Policy List Page opens.
8. Select the check box next to the draft policy you edited, and click Publish.
You have now created and published a local traffic policy that defines DoS protection for employees, forinternal traffic, and for others.
Next, you need to associate the DoS profiles and the local traffic policy with the virtual server thatconnects to the application server you are protecting.
Associating a DoS profile with a virtual server
You must first create a DoS profile separately, to configure denial-of-service protection for applications,the DNS protocol, or the SIP protocol. For application-level DoS protection, the virtual server requires anHTTP profile (such as the default http).
You add denial-of-service protection to a virtual server to provide enhanced protection from DoS attacks,and track anomalous activity on the BIG-IP® system.
Configuring DoS Policy Switching
46

1. On the Main tab, click Local Traffic > Virtual Servers.The Virtual Server List screen opens.
2. Click the name of the virtual server you want to modify.3. In the Destination Address field, type the IP address in CIDR format.
The supported format is address/prefix, where the prefix length is in bits. For example, an IPv4address/prefix is 10.0.0.1 or 10.0.0.0/24, and an IPv6 address/prefix is ffe1::0020/64 or2001:ed8:77b5:2:10:10:100:42/64. When you use an IPv4 address without specifying a prefix,the BIG-IP® system automatically uses a /32 prefix.
4. On the menu bar, from the Security menu, choose Policies.5. To enable denial-of-service protection, from the DoS Protection Profile list, select Enabled, and
then, from the Profile list, select the DoS profile to associate with the virtual server.6. Click Update to save the changes.
DoS protection is now enabled, and the DoS Protection profile is associated with the virtual server.
Associating a published local traffic policy with a virtual server
After you publish a local traffic policy, you associate that published policy with the virtual server createdto handle application traffic.
1. On the Main tab, click Local Traffic > Virtual Servers.The Virtual Server List screen opens.
2. Click the name of the virtual server you want to modify.3. On the menu bar, click Resources.4. In the Policies area, click the Manage button.5. For the Policies setting, select the local traffic policy you created from the Available list and move it
to the Enabled list.6. Click Finished.
The published policy is associated with the virtual server.
Implementation resultsWhen you have completed the steps in this implementation, you have configured the ApplicationSecurity Manager™ to protect against Layer 7 DoS attacks. By using a local traffic policy, youdistinguished between three types of traffic: employees, internal users, and others.
The first rule in the local traffic policy identifies employees by the last line of the host header in therequest, which says employee.my_host.com. You created a special DoS profile for employees thatreports transaction-based DoS attacks but does not drop connections.
The second rule in the local traffic policy identifies internal users by the last line of the host header in therequest, which says internal.my_host.com. In the policy, you specified that there should be no DoSprotection for internal users.
A third rule acts as the default rule and applies to any traffic that was not identified by the first two rules.All other traffic uses the default DoS profile (dos) assigned on the Security tab of the virtual serverwhere traffic is directed to the application. You modified the default DoS profile to block transaction-based and server stress-based DoS attacks that the system detects.
After creating the local traffic policy with Layer 7 DoS rules, you also associated it with the virtualserver. Different types of traffic directed to the virtual server now have distinct DoS protections assignedto them.
BIG-IP Application Security Manager: Implementations
47

Configuring DoS Policy Switching
48

Using Shun with Layer 7 DoS
Overview: Using Shun with Layer 7 DoSLayer 7 DoS in Application Security Manager™ (ASM) is set up to automatically add IP addresses to ashun list (also called auto-blacklisting). The BIG-IP® system stops traffic that is thought to be causing aDoS attack, by adding it to a shun list for a limited time. L7 DoS maintains the shun list and auto-blacklisting works at Layer 7 when you configure an L7 DoS profile and attach it to a virtual server.
Furthermore, by integrating L7 DoS shun with an IP intelligence policy, the auto-blacklisting stops trafficat Layer 3 saving system resources. The auto-blacklisting works at Layer 3 when:
• You configure an L7 DoS profile and an IP intelligence policy, and then associate both with a virtualserver, and
• You are using mitigations other than device ID or URL in the DoS profile.
The DoS profile you create should include all of the DoS mitigations you want to use for the application.For example, you could enable these protections:
• Proactive Bot Defense with CAPTCHA challenge• Stress-based Detection with Request Blocking and Rate Limiting• Heavy URL Protection set to automatic detection
Source IP addresses that are thought to be causing a DoS attack based on the mitigations you configuredfall into the category of application denial of service blacklist, for which the IP intelligence policy isconfigured to drop. Together, and using fewer resources, the DoS profile and IP intelligence policyprotect the web application from DoS attacks.
Task SummaryConfiguring DoS protection for applicationsUsing an IP Intelligence policy with L7 DoSAssociating a DoS profile and IP intelligence policy with a virtual server
About the DoS shun list
A shun list is a temporary list of IP addresses that have been sending lots of traffic that is failing 90%, ormore, of the time. The failures occur as a result of any of the mitigation methods in use in the DoSprofile, including CAPTCHA, request blocking, client-side integrity defense, proactive bot defense, andso on. The system creates a shun list of clients that repeatedly fail to respond to DoS JavaScriptchallenges, undergo high block ratios in rate limiting, or have been repeatedly handled by any of theother DoS mitigations. While these clients are on the shun list, all traffic they send is blocked.
Shun list features are set up using system variables. By default, the shun list is enabled, and clientsremain on the list and are blocked for 120 seconds. The default value for the minimum ratio of successfulresponses to JavaScript challenges is 10% (to keep clients off the shun list). A client being considered forthe shun list must be sending a minimum of 10 requests per second. Advanced users can change thedefault values, if necessary, by adjusting the system variables from the command line.

Shun List system variablesThe shun list is automatically managed with predefined conditions and thresholds set using systemvariables. These system variables are set to reasonable values by default. Do not change these variablesunless you are an advanced BIG-IP® system user.
Variable DefaultValue
What It Specifies
dosl7d.shun_list enable Whether to use the shun list to block IP addresses.
dosl7d.min_challenge_success_ratio
10% The minimum percentage of good transactions per IPaddress (or else the system adds it to the shun list).
dosl7d.min_challenge_rps 10 The minimum requests per second before the systemcan apply shun mitigation.
dosl7d.shun_prevention_time 120 The time in seconds (from 1-1000) to keep the IPaddress on the shun list.
For example, to disable the shun list, on the command line, type:
(tmos)# modify sys db dosl7d.shun_list value disable
Configuring DoS protection for applications
You can configure Application Security Manager™ to protect against and mitigate DoS attacks, andincrease system security.
1. On the Main tab, click Security > DoS Protection > DoS Profiles.The DoS Profiles list screen opens.
2. Click Create.The Create New DoS Profile screen opens.
3. In the Name field, type the name for the profile, then click Finished.4. In the list of DoS profiles, click the name of the profile you just created, and click the Application
Security tab.This is where you set up application-level DoS protection.
5. In the General Settings, for Application Security, click Edit and select the Enabled check box.General settings that you can configure are displayed.
6. To configure Heavy URL Protection, edit the setting for which URLs to include or exclude, or useautomatic detection.Another task describes heavy URL protection in more detail.
7. To set up DoS protection based on the country where a request originates, edit the Geolocationssetting, selecting countries to allow or disallow.a) Click Edit.b) Move the countries for which you want the system to block traffic during a DoS attack into the
Geolocation Blacklist.c) Move the countries that you want the system to allow (unless the requests have other problems)
into the Geolocation Whitelist.d) Use the Stress-based or TPS-based Detection settings to select appropriate mitigations by
geolocation in the How to detect attackers and which mitigation to use settings.e) When done, click Close.
8. If you have written an iRule to specify how the system handles a DoS attack and recovers afterwards,enable the Trigger iRule setting.
Using Shun with Layer 7 DoS
50

9. To better protect an applications consisting of one page that dynamically loads new content, enableSingle Page Application.
10. If your application uses many URLs, in URL Patterns, you can create logical sets of similar URLswith the varying part of the URL acting like a parameter. Click Not Configured and type one or moreURL patterns, for example, /product/*.php.The system then looks at the URL patterns that combine several URLs into one and can more easilyrecognize DoS attacks, for example, on URLs that might be less frequently accessed by aggregatingthe statistics from other similar URLs.
11. Click Update to save the DoS profile.
You have created a DoS profile that provides basic DoS protection including TPS-based detection andheavy URL detection (automatically enabled).
Next, consider configuring additional levels of DoS protection such as stress-based protection, proactivebot defense, and behavioral DoS. Look at the other options available under Application Security andadjust as needed. For example, if using geolocation, use the stress-based or TPS-based detection settingsto select appropriate mitigations. Also, you need to associate the DoS profile with a virtual server beforeit protects against DoS attacks.
Using an IP Intelligence policy with L7 DoS
You can create an IP intelligence policy that blocks traffic from IP addresses that are on the shun listbecause they are in a specific blacklist category. For IP addresses that were blocked originally as a resultof DoS Layer 7 protections, this IP intelligence policy causes traffic from those IP addresses to bedropped temporarily.
1. On the Main tab, click Security > Network Firewall > IP Intelligence > Policies.The IP Intelligence Policies screen opens.
2. Click Create to create a new IP Intelligence policy.3. In the Name field, type a name for the IP intelligence profile, such as ip-intell-l7.4. Leave the Default Action list set to Drop.5. For Blacklist Matching Policy, specify the action for the application DoS category.
a) For Blacklist Category, select application_denial_of_service.L7 DoS classifies bad IP addresses in the shun list as application_denial_of_service by default.Other categories are for use if you purchased an IPI subscription (or IP intelligence database).Refer to information on IP intelligence blocking.
b) For Action, select Drop.c) For Log Blacklist Category Matches, select Yes.d) Click Add.
6. Click Finished.
The IP intelligence policy now connects using the shun list at the IP level to problems discoveredoriginally at the application level. This allows the system to slow down DoS attacks using fewer systemresources.
The IP intelligence policy needs to be associated with a virtual server, or you can assign a global IPintelligence policy to all virtual servers.
Associating a DoS profile and IP intelligence policy with a virtual server
Before you can accomplish this task, you must first create a DoS profile in Application SecurityManager™ (ASM) to protect your application. You also need an IP intelligence policy that tells the shunlist to temporarily drop traffic from IP addresses that have been sending suspicious traffic.
BIG-IP Application Security Manager: Implementations
51

You can add DoS protection and an IP intelligence policy to a virtual server to provide enhancedprotection from DoS attacks, and use the shun list to recognize attackers.
1. On the Main tab, click Local Traffic > Virtual Servers.The Virtual Server List screen opens.
2. Click the virtual server that you want to have DoS protection and use the shun list.3. On the menu bar, from the Security menu, choose Policies.4. To specify the shun list action for Layer 7 DoS, from the IP Intelligence list, select Enabled, and
then, from the Policy list, select the IP intelligence policy (for example, ip-intelligence) to associatewith the virtual server.You can also apply one IP intelligence policy at the global level that applies to all virtual servers onthe system (Security > Network Firewall > IP Intelligence).
5. To enable denial-of-service protection, from the DoS Protection Profile list, select Enabled, andthen, from the Profile list, select the DoS profile to associate with the virtual server.
6. Click Update to save the changes.
The application represented by the virtual server now has DoS protection, and uses the shun list. If ASMdiscovers lots of malicious traffic coming from one IP address, that IP address is added to the shun list.Traffic from that IP address is blocked immediately for two minutes (using the default value). After that,traffic from the IP address is allowed through to ASM and, if necessary, is handled by other DoSmitigations specified in the DoS profile. If problems still exist, the IP address is added back onto the shunlist.
Result of using shun list with Layer 7 DoS
Now you have associated both a DoS profile and an IP intelligence policy with the virtual serverrepresenting the application. Here's a general idea of what happens next:
• A client is sending lots of traffic from one IP address to the web application.• Layer 7 DoS first inspects the traffic even before it gets to Application Security Manager™.• If the client is blocked more than 90% of the time and it is sending at least 10 requests per second, the
client IP address is put on the shun list.• Traffic from the IP address on the shun list is blocked at the IP level (Layer 3) for two minutes.• After that, the IP address is removed from the shun list.• Traffic from the IP address is allowed through to L7 DoS where it is inspected according to the
protections in the DoS profile.• If the traffic is successful more than 10% of the time, it is allowed and handled by L7 DoS.
Otherwise, that IP address is added back onto the shun list.
If DoS mitigation is performed by URL or device ID, the IP addresses are not shunned at the IP level, butare shunned at Layer 7.
Using Shun with Layer 7 DoS
52

Creating Login Pages for Secure Application Access
About login pagesMost web applications use login pages as a way to secure the application and authenticate applicationusers. A login page specifies the login URL in a web application that users must pass through to get tothe authenticated URLs at the heart of the application.
Authenticated URLs are URLs that become accessible to users only after they successfully log in to thelogin URL. A logout URL is a URL that, if accessed, forces users to return to the login URL before re-accessing authenticated URLs. System administrators use these special URLs to prevent forcefulbrowsing by causing users to pass through the login URL before viewing the restricted authenticatedURLs. In addition to specifying the login URL, login pages in the security policy can also enforce accessvalidation by defining access permissions for users.
In Application Security Manager™ (ASM), security policies use login pages for several features:
• Login enforcement for secure application access• Session awareness• Brute force attack prevention• Integration with database security
Login enforcement specifies the authenticated URLs and logout URLs for the application. Sessionawareness provides tracking information of user sessions so that you can investigate suspicious activityand the attacker. Brute force protection prevents hackers from staging multiple attempts to guess usernames and passwords so that they can log on to the application. Database security integration can uselogin pages to provide event notification and user data to a third-party database monitoring system.
About creating login and logout pagesYour web application might contain URLs that should be accessed only through other URLs. Forexample, in an online banking application, account holders should be able to access their accountinformation only by logging on through a login screen first. You can create login pages manually, or havethe system create them automatically.
Application Security Manager™ (ASM) adds login pages for you automatically if you use certain options.The options are Detect Login Pages and Learn from Responses in the Learning and Blocking Settings.If you create the security policy automatically using the Comprehensive policy template, the system setsthese options by default. If you are using Fundamental, you can explicitly set these options. Theseoptions cause ASM to detect login pages in the web application and add them to the security policy whensufficient legitimate traffic has accessed the application.
You can also create login or logout pages manually by specifying the login or logout URLs used by theapplication. The same URL can be used as both a login URL and a logout URL.
Creating login pages automatically
Login pages specify a login URL that presents a site that users must pass through to gain access to theweb application. Your existing security policy can detect and create login pages automatically if you usecertain options.

Note: If you are creating a security policy automatically and selected Comprehensive as the policytemplate, the default options are already set to create login pages automatically. If you are using theFundamental policy template, the steps here explain the options to configure ASM™ to automaticallydetect and create login pages for your application.
1. On the Main tab, click Security > Application Security > Policy Building > Learning andBlocking Settings.The Learning and Blocking Settings screen opens.
2. Ensure that the Learning Mode is set to Automatic.The system examines the traffic to the web application, and after processing sufficient legitimatetraffic, the system builds the security policy automatically by adding and enforcing elements withminimal manual intervention. A few learning suggestions require your review before they are added.
3. In the Policy Building Settings area, expand Sessions and Logins and ensure that Detect login pagesis selected.This setting must be selected if you want to automatically detect login pages.
4. In the Policy Building Process area, expand Options and ensure that Learn from responses isselected.
5. Click Save to save your settings.6. In the editing context area, click Apply Policy to put the changes into effect.
The security policy looks for login pages by examining traffic to the web application. When a login pageis found, the Policy Builder suggests adding the login form to the security policy. Because the suggestionis learned from responses and responses are considered trusted, if the Learning Mode is Automatic, thelogin page is typically added to the policy right away.
If the Learning Mode is Manual, the login page is added to the learning suggestions on the TrafficLearning screen where you can add it to the policy. The login pages in the security policy are included inthe Login Pages List.
You can use the login pages for login enforcement, brute force protection, or session awareness.
Creating login pages manually
Before you can create a login page manually, you need to be familiar with the login URL or URLs theapplication the security policy is protecting.
In your security policy, you can create a login page manually to specify a login URL that presents a sitethat users must pass through to gain access to the web application. The login URL commonly leads to thelogin page of the web application.
Note: You can also have the system create login pages automatically by selecting Detect login pages onthe Learning and Blocking Settings screen.
1. On the Main tab, click Security > Application Security > Sessions and Logins.The Login Pages List screen opens.
2. In the Current edited security policy list near the top of the screen, verify that the security policyshown is the one you want to work on.
3. Click Create.The New Login Page screen opens.
4. For the Login URL setting, specify a URL that users must pass through to get to the application.a) From the list, select the type of URL: Explicit or Wildcard.b) Select either HTTP or HTTPS based on the type of traffic the web application accepts.c) Type an explicit URL or wildcard expression in the field.
Creating Login Pages for Secure Application Access
54
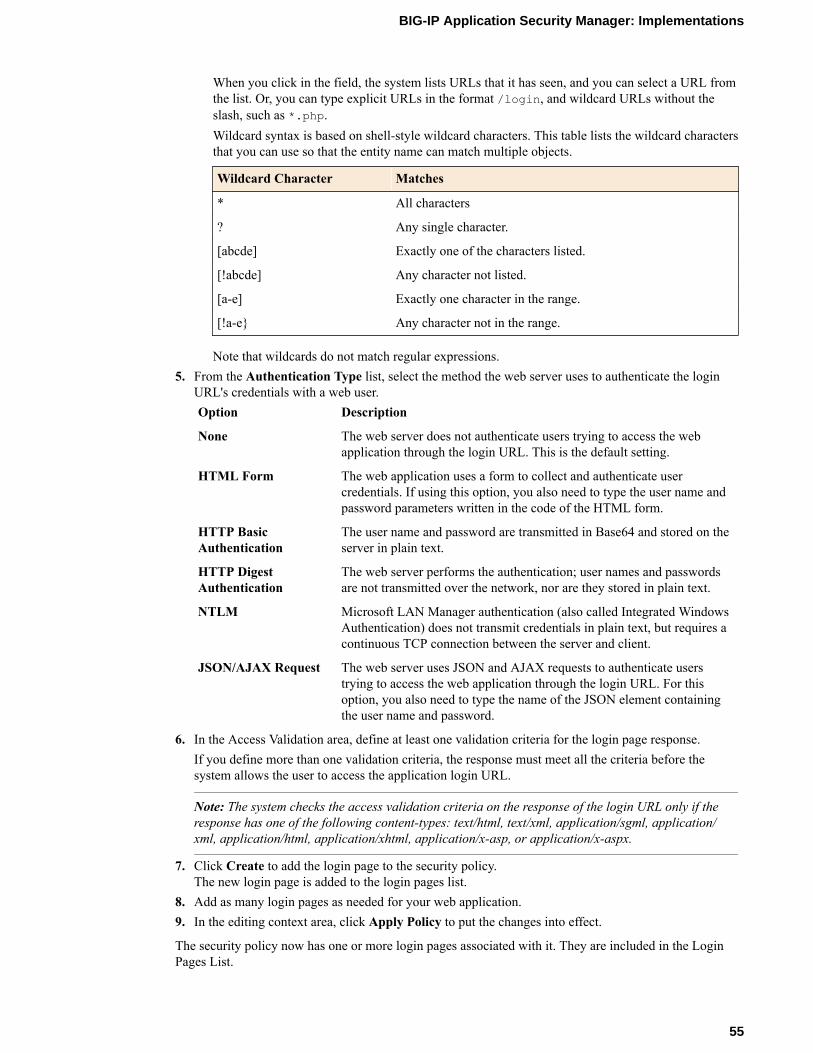
When you click in the field, the system lists URLs that it has seen, and you can select a URL fromthe list. Or, you can type explicit URLs in the format /login, and wildcard URLs without theslash, such as *.php.Wildcard syntax is based on shell-style wildcard characters. This table lists the wildcard charactersthat you can use so that the entity name can match multiple objects.
Wildcard Character Matches
* All characters
? Any single character.
[abcde] Exactly one of the characters listed.
[!abcde] Any character not listed.
[a-e] Exactly one character in the range.
[!a-e} Any character not in the range.
Note that wildcards do not match regular expressions.5. From the Authentication Type list, select the method the web server uses to authenticate the login
URL's credentials with a web user.Option Description
None The web server does not authenticate users trying to access the webapplication through the login URL. This is the default setting.
HTML Form The web application uses a form to collect and authenticate usercredentials. If using this option, you also need to type the user name andpassword parameters written in the code of the HTML form.
HTTP BasicAuthentication
The user name and password are transmitted in Base64 and stored on theserver in plain text.
HTTP DigestAuthentication
The web server performs the authentication; user names and passwordsare not transmitted over the network, nor are they stored in plain text.
NTLM Microsoft LAN Manager authentication (also called Integrated WindowsAuthentication) does not transmit credentials in plain text, but requires acontinuous TCP connection between the server and client.
JSON/AJAX Request The web server uses JSON and AJAX requests to authenticate userstrying to access the web application through the login URL. For thisoption, you also need to type the name of the JSON element containingthe user name and password.
6. In the Access Validation area, define at least one validation criteria for the login page response.If you define more than one validation criteria, the response must meet all the criteria before thesystem allows the user to access the application login URL.
Note: The system checks the access validation criteria on the response of the login URL only if theresponse has one of the following content-types: text/html, text/xml, application/sgml, application/xml, application/html, application/xhtml, application/x-asp, or application/x-aspx.
7. Click Create to add the login page to the security policy.The new login page is added to the login pages list.
8. Add as many login pages as needed for your web application.9. In the editing context area, click Apply Policy to put the changes into effect.
The security policy now has one or more login pages associated with it. They are included in the LoginPages List.
BIG-IP Application Security Manager: Implementations
55

You can use the login pages you created for login enforcement, brute force protection, or sessionawareness.
Login page access validation criteria
Following are descriptions of the access validation criteria for the response to the login URL. Youconfigure one or more of these validations when defining a login page manually. A login attempt is onlysuccessful if all of the specified validation criteria are satisfied.
Access validation Define in login page as
A string that should appear in the response A string that must appear in the response for thesystem to allow the user to access the authenticatedURL; for example, Successful Login.
A string that should NOT appear in theresponse
A string that indicates a failed login attempt andprohibits user access to the authenticated URL; forexample, Authentication failed.
Expected HTTP response status code An HTTP response code that the server mustreturn to the user to allow access to theauthenticated URL; for example, 200.
Expected validation header name and value (forexample, Location header)
A header name and value that the response to thelogin URL must match to permit user access to theauthenticated URL.
Expected validation domain cookie name A defined domain cookie name that the response tothe login URL must match to permit user access tothe authenticated URL.
Expected parameter name (added to URI linksin the response)
A parameter that must exist in the login URL’sHTML body to allow access to the authenticatedURL.
Enforcing login pages
Login enforcement settings prevent forceful browsing attacks where attackers gain access to restrictedparts of the web application by supplying a URL directly. You can use login enforcement to force users topass through one URL (known as the login URL) before being allowed to display a different URL(known as the target URL) where they can access restricted pages and resources.
Login enforcement indicates how the security policy implements login pages including an optionalexpiration time, a list of URLs that require authentication to get to, and a list of URLs used to log out ofthe application. You can also use authenticated URLs to enforce idle time-outs on applications that aremissing this functionality.
1. On the Main tab, click Security > Application Security > Sessions and Logins > LoginEnforcement.The Login Enforcement screen opens.
2. If you want the login URL to be valid for a limited time, set Expiration Time to Enabled, and type avalue, in seconds (1-99999) that indicates how long the session will last.If enabled, the login session ends after the number of seconds has passed.
3. For the Authenticated URLs setting, specify the target URLs that users can access only by way ofthe login URL:a) In the Authenticated URLs (Wildcards supported) field, type the target URL name in the
format /private.php (wildcards are allowed).b) Click Add to add the URL to the list of authenticated URLs.
Creating Login Pages for Secure Application Access
56

c) Repeat to add as many authenticated URLs as needed.4. Click Save to save your settings.5. To put the security policy changes into effect immediately, click Apply Policy.
If you specify authenticated URLs and a user tries to access them, bypassing the login URL (specified ina Login Page), the system issues the Login URL bypassed violation. If a user session is idle andexceeds the expiration time, the system issues the Login URL expired violation, logs the user out,and as a result, the user can no longer reach the authenticated URLs. For both login violations, if theenforcement mode is blocking, the system now sends the Login Page Response to the client (seeApplication Security > Policy > Response Pages).
Creating logout pages
Before you can create a logout page, you need to be familiar with the logout URL the application uses.
In your security policy, you can create a logout page to specify a logout URL that users go to when theylog out of the web application. The logout URL can be the same as the login URL.
1. On the Main tab, click Security > Application Security > Sessions and Logins > Logout PagesList.
2. In the Current edited security policy list near the top of the screen, verify that the security policyshown is the one you want to work on.
3. Click Create.4. For the Logout URL (Explicit only) setting, specify a URL that users go to when they log out of the
application.a) Select either HTTP or HTTPS based on the type of traffic the web application accepts.b) Type an explicit URL in the format /logout.html.
5. Optionally, type strings that should or should not appear in the request.6. Click Create.7. In the editing context area, click Apply Policy to put the changes into effect.
The security policy now has a logout page associated with it included in the Logout Pages List. LogoutURLs are automatically added to the list of allowed URLs.
BIG-IP Application Security Manager: Implementations
57

Creating Login Pages for Secure Application Access
58

Mitigating Brute Force Attacks
About brute force attacksBrute force attacks are attempts to break in to secured areas of a web application by trying exhaustive,systematic, user name/password combinations to discover legitimate authentication credentials.
To prevent brute force attacks, the Application Security Manager™ tracks the number of failed attempts toreach the configured login URLs. The system considers it to be an attack if the failed logon rate increasedat a very high rate or if failed logins reached a certain number.
About configuring brute force protectionYou can add default brute force protection when creating a security policy. If you do, the policy simplyneeds to know for which login pages to enforce brute force protection. The system creates a default bruteforce configuration that applies to all defined login URLs that are not associated with any other bruteforce configuration.
You can have the system detect and create login pages automatically, or you can create them manually.But at least one login URL must be defined in the security policy to protect against brute force attacks.Then you can either use the default brute force configuration or create a new configuration.
Brute force security includes both session-based and dynamic brute force protection.
Session-based mitigationCounts the number of failed login attempts that occur during one session, based on a session cookie.When the number of login attempts during a session exceeds the number specified, the systemtriggers the Brute Force: Maximum login attempts are exceeded violation, andapplies the blocking policy. If the violation is set to block and too many login attempts are made, theclient is blocked for a number of seconds.
Dynamic mitigationDetects and mitigates brute force attacks based on statistical analysis of the traffic. You configuredynamic mitigation to determine when the system should consider the login URL to be under attack,and how to react to an attack. The system mitigates attacks when the volume of unsuccessful loginattempts is significantly greater than the typical number of failed logins. You activate this method bysetting the operation mode to either alarm or alarm and block.
Overview: Mitigating brute force attacksYou can configure Application Security Manager™ (ASM) to protect against brute force attacks. Thesystem detects brute force attacks based on failed login rates. Therefore, the security policy needs to havelogin pages for the web applications you want to protect. ASM can create login pages automatically byobserving traffic, or you can create them yourself.
Task summaryCreating login pages automaticallyCreating login pages manuallyConfiguring automatic brute force protection

Creating a custom brute force protectionViewing brute force attack reportsDisplaying brute force event logs
Creating login pages automatically
Login pages specify a login URL that presents a site that users must pass through to gain access to theweb application. Your existing security policy can detect and create login pages automatically if you usecertain options.
Note: If you are creating a security policy automatically and selected Comprehensive as the policytemplate, the default options are already set to create login pages automatically. If you are using theFundamental policy template, the steps here explain the options to configure ASM™ to automaticallydetect and create login pages for your application.
1. On the Main tab, click Security > Application Security > Policy Building > Learning andBlocking Settings.The Learning and Blocking Settings screen opens.
2. Ensure that the Learning Mode is set to Automatic.The system examines the traffic to the web application, and after processing sufficient legitimatetraffic, the system builds the security policy automatically by adding and enforcing elements withminimal manual intervention. A few learning suggestions require your review before they are added.
3. In the Policy Building Settings area, expand Sessions and Logins and ensure that Detect login pagesis selected.This setting must be selected if you want to automatically detect login pages.
4. In the Policy Building Process area, expand Options and ensure that Learn from responses isselected.
5. Click Save to save your settings.6. In the editing context area, click Apply Policy to put the changes into effect.
The security policy looks for login pages by examining traffic to the web application. When a login pageis found, the Policy Builder suggests adding the login form to the security policy. Because the suggestionis learned from responses and responses are considered trusted, if the Learning Mode is Automatic, thelogin page is typically added to the policy right away.
If the Learning Mode is Manual, the login page is added to the learning suggestions on the TrafficLearning screen where you can add it to the policy. The login pages in the security policy are included inthe Login Pages List.
You can use the login pages for login enforcement, brute force protection, or session awareness.
Creating login pages manually
Before you can create a login page manually, you need to be familiar with the login URL or URLs theapplication the security policy is protecting.
In your security policy, you can create a login page manually to specify a login URL that presents a sitethat users must pass through to gain access to the web application. The login URL commonly leads to thelogin page of the web application.
Note: You can also have the system create login pages automatically by selecting Detect login pages onthe Learning and Blocking Settings screen.
1. On the Main tab, click Security > Application Security > Sessions and Logins.The Login Pages List screen opens.
Mitigating Brute Force Attacks
60

2. In the Current edited security policy list near the top of the screen, verify that the security policyshown is the one you want to work on.
3. Click Create.The New Login Page screen opens.
4. For the Login URL setting, specify a URL that users must pass through to get to the application.a) From the list, select the type of URL: Explicit or Wildcard.b) Select either HTTP or HTTPS based on the type of traffic the web application accepts.c) Type an explicit URL or wildcard expression in the field.
When you click in the field, the system lists URLs that it has seen, and you can select a URL fromthe list. Or, you can type explicit URLs in the format /login, and wildcard URLs without theslash, such as *.php.Wildcard syntax is based on shell-style wildcard characters. This table lists the wildcard charactersthat you can use so that the entity name can match multiple objects.
Wildcard Character Matches
* All characters
? Any single character.
[abcde] Exactly one of the characters listed.
[!abcde] Any character not listed.
[a-e] Exactly one character in the range.
[!a-e} Any character not in the range.
Note that wildcards do not match regular expressions.5. From the Authentication Type list, select the method the web server uses to authenticate the login
URL's credentials with a web user.Option Description
None The web server does not authenticate users trying to access the webapplication through the login URL. This is the default setting.
HTML Form The web application uses a form to collect and authenticate usercredentials. If using this option, you also need to type the user name andpassword parameters written in the code of the HTML form.
HTTP BasicAuthentication
The user name and password are transmitted in Base64 and stored on theserver in plain text.
HTTP DigestAuthentication
The web server performs the authentication; user names and passwordsare not transmitted over the network, nor are they stored in plain text.
NTLM Microsoft LAN Manager authentication (also called Integrated WindowsAuthentication) does not transmit credentials in plain text, but requires acontinuous TCP connection between the server and client.
JSON/AJAX Request The web server uses JSON and AJAX requests to authenticate userstrying to access the web application through the login URL. For thisoption, you also need to type the name of the JSON element containingthe user name and password.
6. In the Access Validation area, define at least one validation criteria for the login page response.If you define more than one validation criteria, the response must meet all the criteria before thesystem allows the user to access the application login URL.
BIG-IP Application Security Manager: Implementations
61

Note: The system checks the access validation criteria on the response of the login URL only if theresponse has one of the following content-types: text/html, text/xml, application/sgml, application/xml, application/html, application/xhtml, application/x-asp, or application/x-aspx.
7. Click Create to add the login page to the security policy.The new login page is added to the login pages list.
8. Add as many login pages as needed for your web application.9. In the editing context area, click Apply Policy to put the changes into effect.
The security policy now has one or more login pages associated with it. They are included in the LoginPages List.
You can use the login pages you created for login enforcement, brute force protection, or sessionawareness.
Configuring automatic brute force protection
For brute force attack prevention to work, at least one login URL has to be defined. You can define loginURLs, or you can let the system detect them automatically (see the sections on creating login pages).
To prevent hackers from gaining access to a web application by performing multiple login attempts, youcan add brute force protection to a security policy. You can use a default configuration that is easy to setup, as explained here, or create a custom configuration. The Default brute force configuration implementsautomatic brute force protection.
1. On the Main tab, click Security > Application Security > Anomaly Detection > Brute ForceAttack Prevention.The Brute Force Attack Prevention screen opens where you can view a list of the login URLs that areprotected against brute force attacks. The system includes a default configuration that protects alllogin pages except those which have custom configurations.
2. In the Current edited security policy list near the top of the screen, verify that the security policyshown is the one you want to work on.
3. To protect all login pages that are included in your security policy, you can use the Default brute forceconfiguration provided. Click the Login URL to enable the login URL named Default.
4. To verify the configuration, click the Default login page.The default Brute Force Protection Configuration screen opens.
5. Select the Brute Force Protection check box.6. Review the remaining settings. However, using the default values is recommended.7. If you made changes, click Save to save them.8. To put the security policy changes into effect immediately, click Apply Policy.
The system detects and mitigates brute force attacks based on statistical analysis of failed login attempts.The system protects all defined login pages in the security policy. If you create a custom configuration,the system protects that particular login URL as specified in the configuration. All other login URLs usethe default configuration unless you disable it.
Creating a custom brute force protection
Before brute force attack prevention can work, at least one login URL must be defined. You can definelogin URLs, or you can let the system detect them automatically (see the sections on creating loginpages). To use session-based protection settings, the Brute Force: Maximum login attemptsare exceeded violation must be set to block on the Learning and Blocking Settings screen.
To prevent hackers from gaining access to a web application by performing multiple login attempts, youcan add brute force protection to a security policy. You can create a custom configuration for specificURLs and use the system-provided default configuration for the rest.
Mitigating Brute Force Attacks
62

1. On the Main tab, click Security > Application Security > Anomaly Detection > Brute ForceAttack Prevention.The Brute Force Attack Prevention screen opens where you can view a list of the login URLs that areprotected against brute force attacks. The system includes a default configuration that protects alllogin pages except those which have custom configurations.
2. In the Current edited security policy list near the top of the screen, verify that the security policyshown is the one you want to work on.
3. To create a custom configuration for a particular login URL, click the Create button.
Note: Custom configuration of explicit logins for brute force protection is recommended only in caseswhere your application requires different thresholds for each login URL.
The New Brute Force Protection Configuration screen opens.4. For the Login Page setting, select a previously created login page from the list (or create a new one).
If you need to manually create a login page in the security policy, click the Create button.The login page specifies the URL that you want to protect against brute force attacks using aconfiguration different from the default.
5. For the IP Address Whitelist setting, click the arrow to go to a screen where you can add the IPaddresses and subnets from which traffic is known to be safe.
Important: The system adds any whitelist IP addresses to the centralized IP address exceptions list.The exceptions list is common to both brute force prevention and web scraping detectionconfigurations.
6. In the Session-based Brute Force Protection area, for the Login Attempts From The Same Clientsetting, type the number of times a user can attempt to log in before the system blocks the request.The default value is 5.
7. For Re-enable Login After, type the number of seconds the user must wait to attempt to log in afterthey have been blocked.The default value is 600 seconds.
8. If you want to track failed login attempts by device ID, select the Use Device ID check box.
Note: To use device ID for tracking, client browsers accessing your web site must be able to acceptJavaScript.
9. In the Dynamic Brute Force Protection area, for Operation Mode, select how the system handlesdynamic brute force attacks.Option Description
Off The system does not check for brute force attacks.
Alarm The system logs brute force attack data.
Alarm and Block In addition to logging the attack data, the system drops requests from theoffending IP address, or requests to attacked URLs, depending on how theattack was detected.
10. If the security policy is in transparent mode, the system displays a note under the Operation Modesetting. If you want the system to block brute force attacks, in the note, click the Learning andBlocking Settings link to go to that screen.a) In the General Settings, set the Enforcement Mode to Blocking.
This setting blocks all requests that cause violations, which are set to block.b) In the Policy Building Settings, under Sessions and Logins, verify that the Brute Force:
Maximum login attempts are exceeded violation is set to Learn, Alarm, and Block.
BIG-IP Application Security Manager: Implementations
63

c) If you changed the learning and blocking settings, click Save.d) Click the browser back button to return to the Brute Force Protection Configuration screen.
11. For the Measurement Period, type the number of seconds (from 1-60) within which to measurefailed login attempts.For example, define a brute force attack as 8 login attempts in 5 seconds, type 5 as the MeasurementPeriod and in the Detection Criteria, for Failed Login Attempts Rate reached, type 8.
Important: If the Measurement Period is greater than 1, the system uses only the Failed LoginAttempts Rate reached value to detect an attack, and not the Failed Login Attempts increased bypercentage. Also, all traffic from suspicious IP addresses is blocked.
12. For the Detection Criteria setting, specify when to consider login attempts to be an attack.Option Description
Minimum Failed LoginAttempts
Indicates an attack if, for all IP addresses tracked, the number of loginattempts is equal to, or greater than, this number. This setting preventsfalse positive attack detection. The default value is 20 login attemptsper second.
Failed Logins Attemptsincreased by
Indicates an attack if, for all IP addresses tracked, the ratio between thedetection interval and the history interval is greater than this number.The default value is 500 %.
Failed Login AttemptsRate reached
The system considers unsuccessful login attempts to be an attack if, forall IP addresses tracked, the login attempt rate reaches this number. Thedefault value is 100 login attempts per second.
Here's how it works:
• First, the Minimum Failed Login Attempts has to be reached.• Then either the Failed Logins Attempts increased by percent or the Failed Login Attempts
Rate reached number must be reached.• When both conditions are met, ASM™ considers the attempts to be a brute force attack.
13. For Suspicious Criteria (per IP address), specify how to identify a potential attacker’s IP address. Ifat least one of the criteria is met, the system treats the IP address as an attacker, and prevents theattacker from trying to guess the password. The system also limits the number of login attempts to thenormal level.a) Type a number for Failed Login Attempts increased by criteria. An individual IP address is
suspicious if the number of login attempts has increased by this percentage over the normalnumber of failed logins. The default setting is 500 percent.
b) Type a number for Failed Login Attempts Rate reached. An individual IP address is suspiciousif the number of login attempts per second from that IP address is equal to or greater than thisnumber. The default setting is 20 login attempts per second.
If either of these numbers is reached, the system limits the number of login attempts to the historyinterval.
14. For the Prevention Policy setting, select one or more options to determine how you want the systemto handle a brute force attack.
Note: If you enable more than one option, the system uses the options in the order in which they arelisted.
Mitigating Brute Force Attacks
64

Option Description
Source IP-BasedClient-SideIntegrity Defense
Determines whether a client is a legal browser or an illegal script by injectingJavaScript into responses when suspicious IP addresses are requested. Legalbrowsers can process JavaScript and respond properly, whereas illegal scriptscannot. The default is disabled.
URL-BasedClient-SideIntegrity Defense
Determines whether a client is a legal browser or an illegal script by injectingJavaScript into responses when suspicious URLs are requested. Legalbrowsers can process JavaScript and respond properly, whereas illegal scriptscannot. The default is disabled.
Source IP-BasedRate Limiting
Drops requests from suspicious IP addresses. The system limits the rate ofrequests to the average rate prior to the attack, or lower than the absolutethreshold specified by the IP detection TPS reached setting. The default isenabled.
URL-Based RateLimiting
Indicates that when the system detects a URL under attack, ApplicationSecurity Manager™ drops connections to limit the rate of requests to the URLto the average rate prior to the attack. The default is enabled.
15. For Prevention Duration, specify how long the system should mitigate brute force attacks.
• To perform attack prevention until the end of the attack, select Unlimited .• To limit attack prevention to the amount of time configured here (even if the attack continues) or
until the system detects the end of the attack, select Maximum and type the number of seconds toperform attack prevention.
16. To add the custom brute force configuration to the security policy, click Create.The screen refreshes, and you see the protected login URL in the list.
17. To put the security policy changes into effect immediately, click Apply Policy.
The system detects and mitigates brute force attacks based on statistical analysis of failed login attemptsto the specified login URL. The system protects that particular login URL as specified in the customconfiguration. All other login URLs associated with the security policy are protected using the defaultconfiguration unless you disable it.
Viewing brute force attack reports
Before you can look at the brute force attack statistics, you need to have configured session-based ordynamic brute force protection.
You can display charts that show information about brute force attacks. The charts provide visibility intowhat applications are being attacked, the login URL, and start and end times of an attack.
1. On the Main tab, click Security > Reporting > Application > Brute Force Attacks.The Brute Force Attacks reporting screen opens.
2. From the Time Period list, select the time period for which you want to view information about bruteforce attacks.
3. To focus in on the specific details you want more information about, point to the chart or click it.The system displays information about the item.
4. If you want to export the report to a file or send it by email, click Export and select the options.To send reports by email, you need to specify an SMTP configuration (System > Configuration >Device > SMTP).
You can continue to review the details about brute force attacks on the report screen. As a result, youbecome more familiar with what caused the attacks and what applications are most vulnerable, and yousee the mitigation methods that are in place.
BIG-IP Application Security Manager: Implementations
65
Displaying brute force event logs
You can display event logs to see whether brute force attacks have occurred, and view information aboutthe attacks.
1. On the Main tab, click Security > Event Logs > Application > Brute Force Attacks.The Brute Force Attacks event log opens.
2. If the log is long, use the Security Policy and/or Time Period settings to filter the list and show morespecific entries.
3. Review the list of brute force attacks to see which security policy detected the attack, which loginURLs were attacked, and the start and end times of the attack.
Mitigating Brute Force Attacks
66

Detecting and Preventing Web Scraping
Overview: Detecting and preventing web scrapingWeb scraping is a technique for extracting information from web sites that often uses automatedprograms, or bots (short for web robots), opening many sessions, or initiating many transactions. You canconfigure Application Security Manager™ (ASM) to detect and prevent various web scraping activities onthe web sites that it is protecting.
Note: The BIG-IP® system can accurately detect web scraping anomalies only when response caching isturned off.
ASM™ provides the following methods to address web scraping attacks. These methods can workindependently of each other, or they can work together to detect and prevent web scraping attacks.
• Bot detection investigates whether a web client source is human by detecting human interactionevents such as mouse movements and keyboard strokes, by detecting irregular sequences of thoseevents, and by detecting rapid surfing.
• Session opening detects an anomaly when either too many sessions are opened from an IP address orwhen the number of sessions exceeds a threshold from an IP address. Also, session opening can detectan attack when the number of inconsistencies or session resets exceeds the configured thresholdwithin the defined time period. This method also identifies as an attack an open session that sendsrequests that do not include an ASM cookie.
• Session transactions anomaly captures sessions that request too much traffic, compared to the averageamount observed in the web application. This is based on counting the transactions per session andcomparing that to the average amount observed in the web application.
• Fingerprinting captures information about browser attributes in order to identify a client. It is usedwhen the system fails to detect web scraping anomalies by examining IP addresses, ASM cookies, orpersistent device identification.
• Suspicious clients used together with fingerprinting, specifies how the system identifies and protectsagainst potentially malicious clients; for example, by detecting scraper extensions installed in abrowser.
• Persistent client identification prevents attackers from circumventing web scraping protection byresetting sessions and sending requests.
Task SummaryAdding allowed search enginesDetecting web scraping based on bot detectionDetecting web scraping based on session openingDetecting web scraping based on session transactionsUsing fingerprinting to detect web scrapingDisplaying web scraping event logsViewing web scraping statistics
Prerequisites for configuring web scraping
For web scraping detection to work properly, you should understand the following prerequisites:

• The web scraping mitigation feature requires that the DNS server is on the DNS lookup server list sothe system can verify the IP addresses of legitimate bots. Go to System > Configuration > Device >DNS to see if the DNS lookup server is on the list. If not, add it and restart the system.
• Client browsers need to have JavaScript enabled, and support cookies for anomaly detection to work.• Consider disabling response caching. If response caching is enabled, the system does not protect
cached content against web scraping.• The Application Security Manager™ does not perform web scraping detection on legitimate search
engine traffic. If your web application has its own search engine, we recommend that you add it to thesystem. Go to Security > Options > Application Security > Advanced Configuration > SearchEngines, and add it to the list.
Adding allowed search engines
The Application Security Manager™ does not perform web scraping detection on traffic from searchengines that the system recognizes as being legitimate. You can optionally add other legitimate searchengines to the search engines list.
1. On the Main tab, click Security > Options > Application Security > Advanced Configuration >Search Engines.The Search Engines screen opens, and displays a list of the search engines that are consideredlegitimate.
2. Click Create.The New Search Engine screen opens.
3. In the Search Engine field, type the name.4. In the Bot Name field, type the search engine bot name, such as googlebot.
Tip: You can get this name from the user-agent header of a request that the search engine sends.
5. In the Domain Name field, type the search engine crawler’s domain name; for example, yahoo.net.6. Click Create.
Note: For this feature to work, the DNS server must be on the DNS lookup server list on the BIG-IP®
system (System > Configuration > Device > DNS). The system uses reverse DNS lookup to verifysearch engine requests.
The system adds the search engine to the list.
The system does not perform web scraping detection on traffic originating from the search engines on thesearch engines list.
Allowed search engines
By default, Application Security Manager™ (ASM) allows requests from these well-known searchengines and legitimate web robots:
• Ask (.ask.com)• Baidu (.baidu.com, .baidu.jp)• Bing (.msn.com)• Google (.googlebot.com)• Yahoo (.yahoo.net)• Yandex (.yandex.com .yandex.net, .yandex.ru,)
You can add other search engines to the allowed search engine list; for example, if your web applicationuses an additional search engine. The list applies globally to all security policies on the system. ASMdoes not perform web scraping detection on traffic from any search engine listed.
Detecting and Preventing Web Scraping
68

Detecting web scraping based on bot detection
Application Security Manager™ can mitigate web scraping on application web sites by investigatingwhether a client is human or a web robot. This is called bot detection. The bot detection method protectsweb applications against rapid surfing by measuring how frequently URLs are accessed and whetherpages are refreshed too often. The system can also detect non-human clients by detecting bad sequencesin human interaction events.
1. On the Main tab, click Security > Application Security > Anomaly Detection > Web Scraping.The Web Scraping screen opens.
2. In the Current edited security policy list near the top of the screen, verify that the security policyshown is the one you want to work on.
3. For the Bot Detection setting, select either Alarm or Alarm and Block to indicate how you want thesystem to react when it detects that a bot is sending requests to the web application.If you choose Alarm and Block, the security policy enforcement mode needs to be set to Blockingbefore the system blocks web scraping attacks.
Note: The system can accurately detect a human user only if clients have JavaScript enabled andsupport cookies in their browsers.
The screen displays the Bot Detection tab and more settings related to bot detection. Detecting webscraping based on session opening and session transactions is discussed in other sections
4. For the IP Address Whitelist setting, click the arrow to go to a screen where you can add the IPaddresses and subnets from which traffic is known to be safe.
Important: The system adds any whitelist IP addresses to the centralized IP address exceptions list.The exceptions list is common to both brute force prevention and web scraping detectionconfigurations.
5. If you plan to use fingerprinting to monitor behavior by browser (and collect its attributes) rather thanby session, select the Fingerprinting Usage check box.The screen displays additional settings; a separate task explains how to use fingerprinting to detectweb scraping.
6. If you want to protect client identification data (when using Bot Detection or Session Openingdetection), specify the persistence settings.a) Select the Persistent Client Identification check box.b) For Persistent Data Validity Period, type how long you want the client data to persist in minutes.
The default value is 120 minutes.
Note: This setting enforces persistent storage on the client and prevents easy removal of client data.Be sure that this behavior is compatible with the application privacy policy.
The system maintains client data and prevents removal of this data from persistent storage for thevalidity period specified.
7. On the Bot Detection tab, for the Rapid Surfing setting, specify the maximum number of pagerefreshes or different pages that can be loaded within a specified number of seconds before the systemsuspects a bot.The default value is Maximum 120 page refreshes, or 30 different pages loaded within 30seconds.
8. For Grace Interval, type the number of requests to allow while determining whether a client ishuman.The default value is 100.
BIG-IP Application Security Manager: Implementations
69

9. For Blocking Period, type the number of requests that cause the Web Scraping Detectedviolation if no human activity was detected during the grace period.The default value is 500.Reaching this interval causes the system to reactivate the grace period.
10. For Safe Interval, type the number of requests to allow after human activity is detected, and beforereactivating the grace threshold to check again for non-human clients.The default value is 2000.
11. To track event sequences in the browser and detect irregular sequences, for Event SequenceEnforcement, select Enabled.
12. Click Save to save your settings.13. On the Main tab, click Security > Application Security > Policy Building > Learning and
Blocking Settings.The Learning and Blocking Settings screen opens.
14. To ensure that web scraping violations are learned, in the Policy Building Settings area, expand BotDetection and select Web scraping detected, if it is not already selected.
15. Click Save to save your settings.16. To put the security policy changes into effect immediately, click Apply Policy.
The system checks for rapid surfing, and if too many pages are loaded too quickly, it logs Web Scrapingdetected violations in the event log, and specifies the attack type of bot detection. If you enforced eventsequencing, the system tracks the sequence of events in the browser, thus preventing bots that can imitatehuman mouse, keyboard, or touch events. If an irregular sequence of events is detected during the graceperiod, the client continues to receive the JavaScript challenge that tries to detect a human. When thegrace period is over, if the sequences were irregular, the system starts to block requests from the client.
After setting up bot detection, you can also set up fingerprinting, session opening, and sessiontransactions anomaly detection for the same security policy. If you want to implement proactive botdefense for additional protection against web robots, you can set that up by configuring DoS protection.
Detecting web scraping based on session opening
You can configure how the system protects your web application against session opening web scrapingviolations that result from too many sessions originating from a specific IP address, inconsistenciesdetected in persistent storage, and when the number of session resets exceeds the threshold.
1. On the Main tab, click Security > Application Security > Anomaly Detection > Web Scraping.The Web Scraping screen opens.
2. In the Current edited security policy list near the top of the screen, verify that the security policyshown is the one you want to work on.
3. For the Session Opening setting, select either Alarm or Alarm and Block to indicate how you wantthe system to react when it detects a large increase in the number of sessions opened from a. specificIP address, or when the number of session resets or inconsistencies exceeds the set threshold.If you choose Alarm and Block, the security policy enforcement mode needs to be set to Blockingbefore the system blocks web scraping attacks.The screen displays the Session Opening tab and more settings.
4. For the IP Address Whitelist setting, click the arrow to go to a screen where you can add the IPaddresses and subnets from which traffic is known to be safe.
Important: The system adds any whitelist IP addresses to the centralized IP address exceptions list.The exceptions list is common to both brute force prevention and web scraping detectionconfigurations.
Detecting and Preventing Web Scraping
70

5. If you plan to use fingerprinting to monitor behavior by browser (and collect its attributes) rather thanby session, select the Fingerprinting Usage check box.The screen displays additional settings; a separate task explains how to use fingerprinting to detectweb scraping.
6. If you want to protect client identification data (when using Bot Detection or Session Openingdetection), specify the persistence settings.a) Select the Persistent Client Identification check box.b) For Persistent Data Validity Period, type how long you want the client data to persist in minutes.
The default value is 120 minutes.
Note: This setting enforces persistent storage on the client and prevents easy removal of client data.Be sure that this behavior is compatible with the application privacy policy.
The system maintains client data and prevents removal of this data from persistent storage for thevalidity period specified.
7. To detect session opening anomalies by IP address, on the Session Opening tab, select the SessionOpening Anomaly check box.
8. For the Prevention Policy setting, select one or more options to direct how the system should handlea session opening anomaly attack.Option Description
Client SideIntegrity Defense
When enabled, the system determines whether a client is a legitimate browseror an illegal script by sending a JavaScript challenge to each new sessionrequest. Legitimate browsers can respond to the challenge; scripts cannot.
Rate Limiting When enabled, the system drops random sessions exhibiting suspiciousbehavior until the session opening rate is the same as the historical legitimatevalue. If you select this option, the screen displays an option for droppingrequests from IP addresses with a bad reputation.
Drop IPAddresses withbad reputation
This option is available only if you have enabled rate limiting. When enabled,the system drops requests originating from IP addresses that are in the system’sIP address intelligence database when the attack is detected; no rate limitingwill occur. (Attacking IP addresses that do not have a bad reputation undergorate limiting, as usual.) You also need to set up IP address intelligence, and atleast one of the IP intelligence categories must have its Alarm or Block flagenabled.
9. For the Detection Criteria setting, specify the criteria under which the system considers traffic to bea session opening anomaly attack.Option Description
Sessions opened persecond increased by
The system considers traffic to be an attack if the number of sessionsopened per second increased by this percentage. The default value is500%.
Sessions opened persecond reached
The system considers traffic to be an attack if the number of sessionsopened per second is equal to or greater than this number. The defaultvalue is 50 sessions opened per second.
Minimum sessionsopened per secondthreshold for detection
The system only considers traffic to be an attack if this value plus one ofthe sessions opened values is exceeded. The default value is 25 sessionsopened per second.
Note: The Detection Criteria values all work together. The minimum sessions value and one of thesessions opened values must be met for traffic to be considered an attack. However, if the minimum
BIG-IP Application Security Manager: Implementations
71

sessions value is not reached, traffic is never considered an attack even if the Sessions opened persecond increased by value is met.
10. For Prevention Duration, type a number that indicates how long the system prevents an anomalyattack by logging or blocking requests. The default is 1800 seconds.If the attack ends before this number of seconds, the system also stops attack prevention.
11. If you enabled Persistent Client Identification and you want to detect session opening anomaliesbased on inconsistencies, select the Device Identification Integrity check box, and set the maximumnumber of integrity faulty events to allow within a specified number of seconds.The system tracks the number of inconsistent device integrity events within the time specified, and iftoo many events occurred within the time, a Web scraping detection violation occurs.
12. If you enabled Persistent Client Identification and you want to track cookie deletion events, in theCookie Deletion Detection setting, specify how to detect cookie deletion. You can use either one orboth options.a) To use persistent device identification to detect cookie deletion events, select the Enabled by
Persistent Device Identification check box, and set the maximum number of cookie deletions toallow within a specified number of seconds.
b) If you enabled Fingerprinting Usage, to use fingerprinting to detect cookie deletion events, selectthe Enabled by Fingerprinting check box, and set the maximum number of cookie deletions toallow within a specified number of seconds.
The system tracks the number of cookie deletion events that occur within the time specified, and iftoo many cookies were deleted within the time, a Web scraping detection violation occurs.
13. For Prevention Duration, type a number that indicates how long the system prevents an anomalyattack by logging or blocking requests. The default is 1800 seconds.If the attack ends before this number of seconds, the system also stops attack prevention.
14. Click Save to save your settings.15. To put the security policy changes into effect immediately, click Apply Policy.
The system checks for too many sessions being opened from one IP address, too many cookie deletions,and persistent storage inconsistencies depending on the options you selected. The system logs violationsin the web scraping event log along with information about the attack including whether it is a SessionOpening Anomaly by IP Address or Session Resets by Persistent Client Identification attack type andwhen it began and ended. The log also includes the type of violation (Device Identification Integrity orCookie Deletion Detection) and the violation numbers.
After setting up web scraping detection by session opening, you can also set up bot detection,fingerprinting, and session transactions anomaly detection for the same security policy.
Detecting web scraping based on session transactions
You can configure how the system protects your web application against harvesting, which is detected bycounting the number of transactions per session and comparing that number to a total average oftransactions from all sessions. Harvesting may cause session transaction anomalies.
1. On the Main tab, click Security > Application Security > Anomaly Detection > Web Scraping.The Web Scraping screen opens.
2. In the Current edited security policy list near the top of the screen, verify that the security policyshown is the one you want to work on.
3. For the Session Transactions Anomaly setting, select either Alarm or Alarm and Block to indicatehow you want the system to react when it detects a large increase in the number of transactions persession.If you choose Alarm and Block, the security policy enforcement mode needs to be set to Blockingbefore the system blocks web scraping attacks.
Detecting and Preventing Web Scraping
72

The screen displays the Session Transactions Anomaly tab and more settings.4. For the IP Address Whitelist setting, click the arrow to go to a screen where you can add the IP
addresses and subnets from which traffic is known to be safe.
Important: The system adds any whitelist IP addresses to the centralized IP address exceptions list.The exceptions list is common to both brute force prevention and web scraping detectionconfigurations.
5. On the Session Transactions Anomaly tab, for the Detection Criteria setting, specify the criteriaunder which the system considers traffic to be a session transactions anomaly attack.Option Description
Sessiontransactions abovenormal by
The system considers traffic in a session to be an attack if the number oftransactions in the session is more than normal by this percentage (andminimum session value is met). Normal refers to the average number oftransactions per session for the whole site during the last hour. The defaultvalue is 500%.
Sessionstransactionsreached
The system considers traffic to be an attack if the number of transactions persessions is equal to or greater than this number (and minimum session valueis met). The default value is 400 transactions.
Minimum sessiontransactionsthreshold fordetection
The system considers traffic to be an attack only if the number of transactionsper session is equal to or greater than this number, and at least one of thesessions transactions numbers was exceeded. The default value is 200transactions.
Important: The Detection Criteria values all work together. The minimum sessions value and one ofthe sessions transactions values must be met for traffic to be considered an attack. However, if theMinimum session transactions threshold is not reached, traffic is never considered an attack even ifthe Sessions transactions above normal by value is met.
6. For Prevention Duration, type a number that indicates how long the system prevents an anomalyattack by logging or blocking requests. The default is 1800 seconds.If the attack ends before this number of seconds, the system also stops attack prevention.
7. Click Save to save your settings.8. To put the security policy changes into effect immediately, click Apply Policy.
When the system detects a session that requests too many transactions (as compared to normal), alltransactions from the attacking session cause the Web Scraping detected violation to occur until theend of attack or until the prevention duration expires.
After setting up web scraping detection based on session transactions, you can also set up bot detection,fingerprinting, and session opening anomaly detection for the same security policy.
Using fingerprinting to detect web scraping
Application Security Manager™ (ASM) can identify web scraping attacks on web sites that ASM™
protects by using information gathered about clients through fingerprinting or persistent identification.Fingerprinting is collecting browser attributes and associating the detected behavior with the browserusing those attributes. The system can use the collected information to identify suspicious clients(potential bots) and recognize web scraping attacks more quickly.
1. On the Main tab, click Security > Application Security > Anomaly Detection > Web Scraping.The Web Scraping screen opens.
2. In the Current edited security policy list near the top of the screen, verify that the security policyshown is the one you want to work on.
BIG-IP Application Security Manager: Implementations
73

3. To have the system detect browsers and bots by collecting browser attributes, select theFingerprinting Usage check box.The screen enables fingerprinting and displays the Suspicious Clients setting, which works togetherwith the fingerprinting feature.
4. If you want the system to detect suspicious clients using fingerprinting data, for the SuspiciousClients setting, select Alarm and Block.The system displays a new Suspicious Clients tab.
5. To configure how the system determines which clients are suspicious, adjust the setting on theSuspicious Clients tab:a) For the Scraping Plugins setting, select the Detect browsers with Scraping Extensions check
box, and move the browser extensions you do not want to allow to the Disallowed Extensionslist.If ASM detects a browser with a disallowed extension, the client is considered suspicious, andASM logs and blocks requests from this client to the web application.
b) In the Prevention Duration field, type the number of seconds for which the system preventsrequests from a client after ASM determines it to be suspicious.
6. Click Save to save your settings.7. To put the security policy changes into effect immediately, click Apply Policy.
The system now collects browser attributes to help with web scraping detection, and tracks behavior bybrowser rather than session. This way a bot cannot stay undetected by opening a new session. If you alsoenabled the Suspicious Clients setting, when the system detects suspicious clients using informationobtained by fingerprinting, the system records the attack data, and blocks the suspicious requests.
In addition to using fingerprinting, you can also set up bot detection, session opening, and sessiontransactions anomaly detection for the same security policy.
Displaying web scraping event logs
You can display event logs to see whether web scraping attacks have occurred, and view informationabout the attacks.
1. On the Main tab, click Security > Event Logs > Application > Web Scraping Statistics.The Web Scraping Statistics event log opens.
2. If the log is long, you can filter the list by security policy and time period to show more specificentries.
3. Review the list of web scraping attacks to see the web scraping attack type that occurred, the IPaddress of the client that caused the attack, which security policy detected the attack, and the start andend times of the attack.
4. Examine the web scraping statistics shown, and click the attack type links to see what caused theattack.
5. To learn more about the requests that caused the web scraping attack, click the number of violatingrequests.The Requests screen opens where you can investigate the requests that caused the web scrapingattacks.
Web scraping attack examples
This figure shows a Web Scraping Statistics event log on an Application Security Manager™ (ASM)system where several web scraping attacks, with different attack types, have occurred.
Detecting and Preventing Web Scraping
74
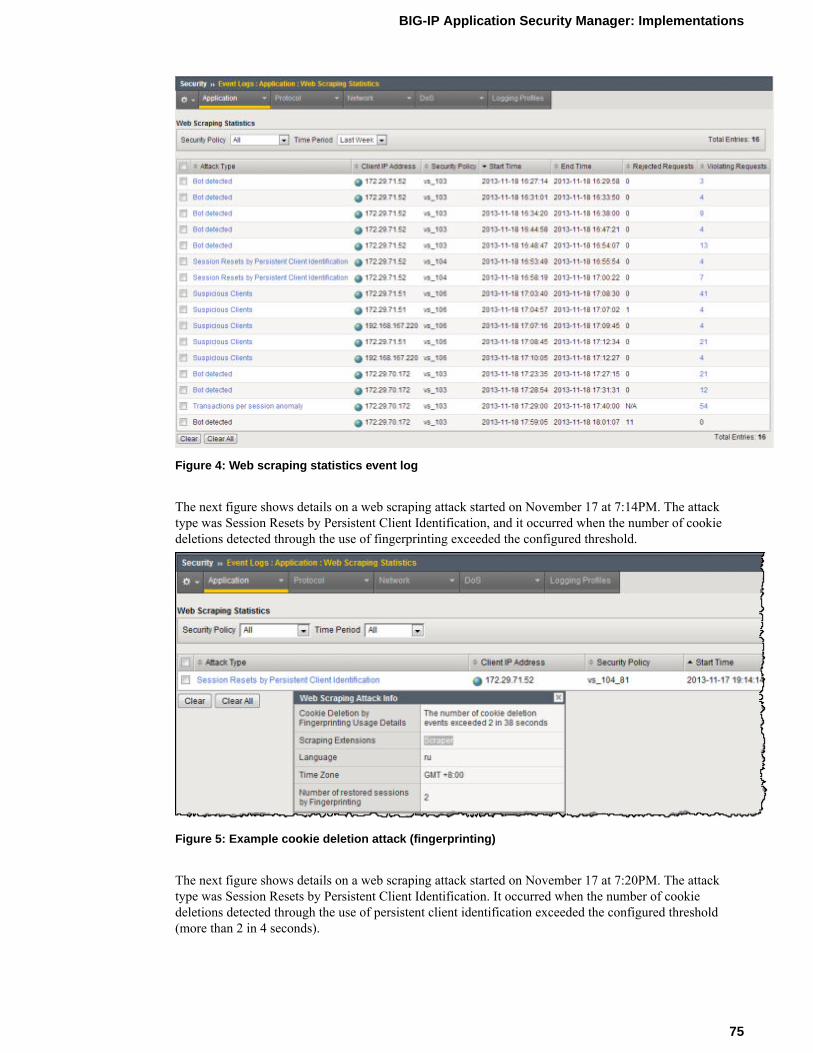
Figure 4: Web scraping statistics event log
The next figure shows details on a web scraping attack started on November 17 at 7:14PM. The attacktype was Session Resets by Persistent Client Identification, and it occurred when the number of cookiedeletions detected through the use of fingerprinting exceeded the configured threshold.
Figure 5: Example cookie deletion attack (fingerprinting)
The next figure shows details on a web scraping attack started on November 17 at 7:20PM. The attacktype was Session Resets by Persistent Client Identification. It occurred when the number of cookiedeletions detected through the use of persistent client identification exceeded the configured threshold(more than 2 in 4 seconds).
BIG-IP Application Security Manager: Implementations
75

Figure 6: Example cookie deletion attack (persistent client ID)
The next figure shows details on a web scraping attack started on November 17 at 7:24PM. The attacktype was Session Resets by Persistent Client Identification. It occurred when the number of integrity faultevents detected through the use of persistent client identification exceeded the configured threshold(more than 3 in 25 seconds).
Figure 7: Example device ID integrity attack
The next figure shows details on a suspicious clients attack that occurred when a client installed thedisallowed Scraper browser plug-in.
Figure 8: Example disallowed plug-in attack
Detecting and Preventing Web Scraping
76

Web scraping attack types
Web scraping statistics specify the attack type so you have more information about why the attackoccurred. This shows the web scraping attack types that can display in the web scraping event log.
Attack Type Description
Bot activity detected Indicates that there are more JavaScript injections than JavaScriptreplies. Click the attack type link to display the detected injectionratio and the injection ratio threshold.
Note: You cannot configure the Bot activity detected ratio values. Thisattack type can occur only when the security policy is in Transparentmode.
Bot Detected Indicates that the system suspects that the web scraping attack wascaused by a web robot.
Session Opening Anomaly byIP
Indicates that the web scraping attack was caused by too manysessions being opened from one IP address. Click the attack type linkto display the number of sessions opened per second from the IPaddress, the number of legitimate sessions, and the attack preventionstate.
Session Resets by PersistentClient Identification
Indicates that the web scraping attack was caused by too manysession resets or inconsistencies occurring within a specified time.Click the attack type link to display the number of resets orinconsistencies that occurred within a number of seconds.
Suspicious Clients Indicates that the web scraping attack was caused by web scrapingextensions on the browser. Click the attack type link to display thescraping extensions found in the browser.
Transactions per sessionanomaly
Indicates that the web scraping attack was caused by too manytransactions being opened during one session. Click the attack typelink to display the number of transactions detected on the session.
Viewing web scraping statistics
Before you can look at the web scraping attack statistics, you need to have configured web scrapingprotection.
You can display charts that show information about web scraping attacks that have occurred againstprotected applications.
1. On the Main tab, click Security > Reporting > Application > Web Scraping Statistics.The Web Scraping Statistics screen opens.
2. From the Time Period list, select the time period for which you want to view information about webscraping attacks.
3. If you want to export the report to a file or send it by email, click Export and select the options.To send reports by email, you need to specify an SMTP configuration (System > Configuration >Device > SMTP).
The statistics show the total number of web scraping attacks, violations, and rejected requests thatoccurred. You can review the details about the attacks and see that mitigation is in place.
BIG-IP Application Security Manager: Implementations
77

Web scraping statistics chart
This figure shows a Web Scraping Statistics chart on an Application Security Manager™ (ASM) testsystem where many web scraping attacks occurred during a short period of time.
Figure 9: Web scraping statistics chart
You can use this chart to see the number of rejected requests, web scraping attacks, and total violationsthat occurred on the web applications protected using the five security policies listed at the bottom.
Implementation ResultWhen you have completed the steps in this implementation, you have configured the ApplicationSecurity Manager™ to protect against web scraping. The system examines mouse and keyboard activityfor non-human actions. Depending on your configuration, the system detects web scraping attacks basedon bot detection, session opening violations, session transaction violations, and fingerprinting.
After traffic is flowing to the system, you can check whether web scraping attacks are being logged orprevented, and investigate them by viewing web scraping event logs and statistics.
If fingerprinting is enabled, the system uses browser attributes to help with detecting web scraping. Ifusing fingerprinting with suspicious clients set to alarm and block, the system collects browser attributes
Detecting and Preventing Web Scraping
78

and blocks suspicious requests using information obtained by fingerprinting. If you enabled eventsequencing, the system looks for irregular event sequences to detect bots.
If you chose alarm and block for the web scraping configuration and the security policy is in the blockingoperation mode, the system drops requests that cause the Web scraping detected violation. If you chosealarm only (or the policy is in the transparent mode), web scraping attacks are logged only but notblocked.
BIG-IP Application Security Manager: Implementations
79
Detecting and Preventing Web Scraping
80
Setting Up IP Address Intelligence Blocking
Overview: Setting up IP address intelligence blockingIn Application Security Manager™, you can use IP address intelligence blocking in a security policy toblock requests from IP addresses that have questionable reputations. IP addresses from which attacks orspam have originated are included in an IP intelligence database, along with the category describing theproblem. The BIG-IP® system must connect to the IP intelligence database before you can use IP addressintelligence blocking.
You can configure a security policy to log (alarm) or block requests from IP addresses of questionablereputation, and to perform different actions depending on the categories of problems. For example, youcan block requests from IP addresses associated with Windows exploits and log requests from scanners.
You can create a whitelist of IP addresses that might be in the database, and allow them to access the webapplication regardless of their IP reputation. This is a way to ensure that traffic from known sources is notblocked because of IP address intelligence data.
You can also use iRules to instruct the system how to use IP address intelligence information.
Task summaryDownloading the IP address intelligence databaseBlocking IP addresses with bad reputationsReviewing IP address intelligence statisticsCreating an iRule to log IP address intelligence informationCreating an iRule to reject requests with questionable IP addresses
Downloading the IP address intelligence database
The requirements for using IP address intelligence are:
• The system must have an IP Intelligence license.• The system must have an Internet connection either directly or through an HTTP proxy server.• The system must have DNS configured (go to System > Configuration > Device > DNS).
Important: IP address intelligence is enabled by default if you have a license for it. You only need toenable it if it was previously disabled.
To enable IP address intelligence on the BIG-IP® system, you enable auto-update to download the IPintelligence database to the system.
1. Log in to the command line for the BIG-IP® system.2. To determine whether IP intelligence auto-update is enabled, type the following command: tmsh
list sys db iprep.autoupdateIf the value of the iprep.autoupdate variable is disable, IP intelligence is not enabled. If it isenable, your task is complete. No further steps are necessary.
3. If disabled, at the prompt, type tmsh modify sys db iprep.autoupdate value enableThe system downloads the IP intelligence database and stores it in the binary file, /var/IpRep/F5IpRep.dat. It is updated every 5 minutes.

4. If the BIG-IP system is behind a firewall, make sure that the BIG-IP system has external access tovector.brightcloud.com using port 443.That is the IP Intelligence server from which the system gets IP Intelligence information.
5. (Optional) If the BIG-IP system connects to the Internet using a forward proxy server, set thesesystem database variables.a) Type tmsh modify sys db proxy.host value hostname to specify the host name of the
proxy server.b) Type tmsh modify sys db proxy.port value port_number to specify the port number of
the proxy server.c) Type tmsh modify sys db proxy.username value username to specify the user name to
log in to the proxy server.d) Type tmsh modify sys db proxy.password value password to specify the password to
log in to the proxy server.
The IP address intelligence feature remains enabled unless you disable it with the command tmshmodify sys db iprep.autoupdate value disable.
You can create iRules® to instruct the system how to handle traffic from IP addresses with questionablereputations, or use Application Security Manager™ to configure IP address intelligence blocking.
Blocking IP addresses with bad reputations
You can configure a security policy to log and block requests from source IP addresses that, according toan IP intelligence database, have a bad reputation and could cause a potential attack.
1. On the Main tab, click Security > Application Security > IP Addresses > IP Address Intelligence.The IP Address Intelligence screen opens.
2. In the Current edited policy list near the top of the screen, verify that the edited security policy is theone you want to work on.
3. Select the IP Address Intelligence check box.The screen refreshes, and displays additional configuration options.
4. For the IP Address Whitelist setting, click the arrow to go to a screen where you can specify any IPaddresses you want to allow, even if they are found in the IP intelligence database.
Important: The system adds any whitelist IP addresses to the centralized IP address exceptions list.The exceptions list is common to both brute force prevention and web scraping detectionconfigurations.
The system updates the whitelist with the allowed IP addresses.5. In the IP Address Intelligence Categories area, select Alarm or Block, or both, for the categories of
IP addresses you are interested in.
• Select Alarm to cause the system to log the IP address intelligence data (IP address intelligencecategory and status) on the Requests screen whenever a request is from a source IP address in thatcategory.
• Select Block to stop requests sent from a source IP address that matches that category
Tip: To select all categories at once, click the Alarm or Block column name check boxes.
6. Click Save.
The system matches source IP addresses to those in the IP address intelligence database. When a match isfound, the violation Access from malicious IP address occurs. The system determines whatcategory of reputation the IP address has, then logs or blocks the IP address according to how the IPAddress Intelligence categories are set.
Setting Up IP Address Intelligence Blocking
82

Reviewing IP address intelligence statistics
After you set up IP intelligence blocking on the Application Security Manager™, you can review statisticsconcerning how many requests were received from IP addresses with questionable reputations. You canalso view the requests from those IP addresses.
1. On the Main tab, click Security > Reporting > Application.The Charts screen opens.
2. In the Charts area, next to View by, click IP Address Intelligence.The chart shows details about IP addresses that were used to send the illegal requests, groupedaccording to their reputation in the IP intelligence database.
3. Hover over the pie chart or look at the Details table below it to see the categories of IP addresses withquestionable reputations.
4. Under Chart Path on the left, click View Requests to see the requests from IP addresses in the IPintelligence database.The Requests list opens.
5. Click any request to view details about the request.The screen expands to show more information about the request. IP address intelligence informationis shown in the Source IP Address field in the request details. The details include the category of themalicious IP address and information about when the IP intelligence database was last updated.
6. If you have set up remote logging, you can also review IP intelligence data on the remote logger.
Based on the statistics and IP address intelligence categories that the IP addresses fall into, you can adjustwhat happens (alarm or block) when the system receives requests from IP addresses in differentcategories.
Creating an iRule to log IP address intelligence information
Before you can create an iRule to log IP address intelligence information, your system must have IPaddress intelligence enabled.
You use iRules® to log IP address intelligence categories to the file /var/log/ltm. This is an exampleof the type of iRule you can write.
1. On the Main tab, click Local Traffic > iRules.The iRule List screen opens, displaying any existing iRules.
2. Click Create.The New iRule screen opens.
3. In the Name field, type a name, such as my_irule.The full path name of the iRule cannot exceed 255 characters.
4. In the Definition field, type the iRule using Tool Command Language (Tcl) syntax.For example, to log all IP addresses and any associated IP address intelligence categories, type thefollowing iRule:
when CLIENT_ACCEPTED { log local0. "IP Address Intelligence for IP address [IP::client_addr]: [IP::reputation [IP::client_addr]]" }
Tip: For complete and detailed information iRules syntax, see the F5 Networks DevCentral web site(http://devcentral.f5.com).
5. Click Finished.The new iRule appears in the list of iRules on the system.
BIG-IP Application Security Manager: Implementations
83

When traffic is received from an IP address with a questionable reputation and that is included in the IPintelligence database, the system prints the IP address intelligence information in the /var/log/ltmlog.
For complete and detailed information about iRules syntax, see the F5 Networks DevCentral web site,http://devcentral.f5.com.
Creating an iRule to reject requests with questionable IP addresses
Before you can create an iRule to reject requests based on an IP address reputation, your system musthave IP address intelligence enabled.
You can use iRules® to reject requests from IP addresses that have questionable reputations and are listedin the IP intelligence database. This is an example of the type of iRule you can write.
1. On the Main tab, click Local Traffic > iRules.The iRule List screen opens, displaying any existing iRules.
2. Click Create.The New iRule screen opens.
3. In the Name field, type a name, such as my_irule.The full path name of the iRule cannot exceed 255 characters.
4. In the Definition field, type the iRule using Tool Command Language (Tcl) syntax.For example, to reject requests from IP addresses listed in the IP intelligence database because theycould be Windows Exploits or Web Attacks, type the following iRule:
when HTTP_REQUEST { set ip_reputation_categories [IP::reputation [IP::client_addr]] set is_reject 0 if {($ip_reputation_categories contains "Windows Exploits")} { set is_reject 1 } if {($ip_reputation_categories contains "Web Attacks")} { set is_reject 1 } if {($is_reject)} { log local0. "Attempted access from malicious IP address [IP::client_addr] ($ip_reputation_categories), request was rejected" HTTP::respond 200 content "<HTML><HEAD><TITLE>Rejected Request</TITLE> </HEAD><BODY>The request was rejected. <BR> Attempted access from malicious IP address</BODY></HTML>" }}
Tip: For complete and detailed information about iRules syntax, see the F5 Networks DevCentralweb site (http://devcentral.f5.com).
5. Click Finished.The new iRule appears in the list of iRules on the system.
When the system receives traffic from an IP address that is included in the IP intelligence database, thesystem prints the IP address intelligence information in the /var/log/ltm log.
IP address intelligence categoriesAlong with the IP address, the IP intelligence database stores the category that explains the reason thatthe IP address is considered untrustworthy.
Setting Up IP Address Intelligence Blocking
84

Category Name Description
Anonymous Proxy IP addresses that are associated with web proxies that shield the originator's IPaddress (such as proxy and anonymization services). This category also includesTOR anonymizer addresses.
Botnets IP addresses of computers that are infected with malicious software (BotnetCommand and Control channels, and infected zombie machines) and arecontrolled as a group by a Bot master, and are now part of a botnet. Hackers canexploit botnets to send spam messages, launch various attacks, or cause targetsystems to behave in other unpredictable ways.
Cloud ProviderNetworks
IP addresses and networks that belong to cloud providers, which offer serviceshosted on their servers via the Internet.
Denial-of-Service IP addresses that have launched denial-of-service (DoS) attacks, distributeddenial-of-service (DDoS) attacks, anomalous SYN flood attacks, or anomaloustraffic detection. These attacks are usually requests for legitimate services, butoccur at such a fast rate that targeted systems cannot respond quickly enough andbecome bogged down or unable to service legitimate clients.
Illegal Websites IP addresses that contain criminally obscene or potentially criminal internetcopyright and intellectual property violations.
Note: This category has been deprecated by Webroot BrightCloud.
Infected Sources Active IP addresses that issue HTTP requests with a low reputation index score, orthat are known malicious web sites offering or distributing malware, shell code,rootkits, worms, or viruses.
Phishing Proxies IP addresses that host phishing sites, and other kinds of fraud activities, such as adclick fraud or gaming fraud.
Scanners IP addresses that are involved in reconnaissance, such as probes, host scan,domain scan, and password brute force, typically to identify vulnerabilities forlater exploits.
Web Attacks IP addresses involved in cross site scripting, iFrame injection, SQL injection, crossdomain injection, or domain password brute force.
Windows Exploits Active IP addresses that have exercised various exploits against Windowsresources by offering or distributing malware, shell code, rootkits, worms, orviruses using browsers, programs, downloaded files, scripts, or operating systemvulnerabilities.
BIG-IP Application Security Manager: Implementations
85

Setting Up IP Address Intelligence Blocking
86

Managing IP Address Exceptions
Overview: Managing IP address exceptionsAn IP address exception is an IP address that you want the system to treat in a specific way for a securitypolicy. For example, you can specify IP addresses from which the system should always trust traffic, IPaddresses for which you do not want the system to generate learning suggestions for the traffic, and IPaddresses for which you want to exclude information from the logs. You can use the IP address exceptionfeature to create exceptions for IP addresses of internal tools that your company uses, such as penetrationtools, manual or automatic scanners, or web scraping tools. You can add an IP address exception, andinstruct the system how to handle traffic coming from that address.
You can view a centralized list of IP address exceptions, and you can add new IP address exceptions tothe list. The list of IP address exceptions shows exceptions that you add directly to the list, or those whichyou add from other locations, as shown by the following examples:
• When creating a security policy, you can specify IP addresses that you want the Policy Builder toalways trust.
• When creating a security policy that is integrated with a vulnerability assessment tool, you canconfigure the scanner IP address as an IP address exception.
• When setting up anomaly detection (such as for DoS, brute force, and web scraping protections), youcan specify IP addresses that the system should consider legitimate (called whitelists).
• When setting up IP address intelligence, you can add IP addresses that the system should allow evenif the IP address is in the IP intelligence database.
The IP Address Exceptions list shows in one location all of the IP exceptions configured for this securitypolicy. You can view or modify IP exceptions both from the centralized IP exception list and from thespecific feature screens.
This implementation describes how to create, delete, and update the list of IP address exceptions.
Creating IP address exceptions
For each security policy, you can create a list of IP address exceptions, and indicate how you want thesystem to handle the traffic from these IP addresses. From the centralized IP Address Exceptions list, youcan configure whitelists or blacklists to allow or block traffic from an IP address or subnet.
1. On the Main tab, click Security > Application Security > IP Addresses > IP Address Exceptions.The IP Address Exceptions screen opens, and displays a centralized list of configured IP addressexceptions.
2. Click Create.The New IP Address Exception screen opens.
3. In the IP Address field, type the IP address that you want the system to trust.
Note: To add a route domain, type %n after the IP address where n is the route domain identificationnumber.
4. In the Netmask field, type the netmask of the IP address exception.If you omit the netmask value, the system uses a default value of 255.255.255.255. So to block the10.10.0.0 subnet, specify 10.10.0.0 as the IP address and 255.255.0.0 as the Netmask.

5. To consider traffic from this IP address as being safe, for the Policy Builder trusted IP setting, selectEnabled.The system adds this IP address to the Trusted IP Addresses list on the Learning and BlockingSettings screen.
6. To ignore this IP address when performing brute force and web scraping detection, for the Ignore inAnomaly Detection and do not collect Device ID setting, select Enabled.The system adds this IP address to the IP Address Whitelist setting on the anomaly detection screensfor configuring brute force and web scraping.
7. If you do not want the system to generate learning suggestions for traffic sent from this IP address, forthe Ignore in Learning Suggestions setting, select Enabled.
Note: Application Security Manager does not generate learning suggestions for requests that result inthe web server returning HTTP responses with 400 or 404 status codes unless the security policy isconfigured to learn and block traffic (the Ignore in Learning Suggestions check box cannot beselected and the Block this IP Address cannot be set to Never Block this IP).
8. For Block this IP Address:
• To never block traffic from this IP address, select Never block this IP Address.• To always block traffic from this IP address, select Always block this IP.• To block according to policy rules, select Policy Default.
9. To disable logging for this address, enable Never log traffic from this IP Address.The system does not log requests or responses sent from this IP address, even if the traffic is illegal,and even if your security policy is configured to log all traffic.
10. To consider traffic from this IP address to be legitimate even if it is found in the IP Intelligencedatabase, for the Ignore IP Address Intelligence setting, select Enabled.The system adds this IP address to the IP Address Whitelist setting on the IP Address Intelligencescreen.
11. Click Create.The IP Address Exceptions screen opens and shows all of the exceptions configured for the securitypolicy including the one you created.
You can view and manage all of your IP address exceptions from the centralized IP Address Exceptionsscreen.
Deleting IP address exceptions
If you no longer want an IP address on the exceptions list, you can delete the IP address exceptions.
1. On the Main tab, click Security > Application Security > IP Addresses > IP Address Exceptions.The IP Address Exceptions screen opens, and displays a centralized list of configured IP addressexceptions.
2. Select the IP address exception you want to delete and click Delete.The IP address exception is deleted from the list.
3. You can also delete IP address exceptions from the anomaly detection whitelists, the IP addressintelligence whitelist, and the policy building configuration. On any of these screens, select the IPaddress, and click Delete.The system removes the IP address from the whitelist on the screen. However, the IP address remainson the IP Address Exceptions screen with the related setting changed. For example, if you deleted theIP address from an anomaly detection whitelist, the Anomaly Detection column for that IP address inthe exceptions list changes from Ignore IP to say Include IP.
4. In the editing context area, click Apply Policy to put the changes into effect.
Managing IP Address Exceptions
88

Updating IP address exceptions
You can update IP address exceptions from the centralized list of IP address exceptions.
1. On the Main tab, click Security > Application Security > IP Addresses > IP Address Exceptions.The IP Address Exceptions screen opens, and displays a centralized list of configured IP addressexceptions.
2. Click the IP address of the IP address exception you want to modify.The IP Address Exception Properties screen opens.
3. Change the settings as needed.4. Click Update.5. In the editing context area, click Apply Policy to put the changes into effect.
BIG-IP Application Security Manager: Implementations
89

Managing IP Address Exceptions
90

Disallowing Application Use at Specific Geolocations
Overview: Disallowing application use in certain geolocationsGeolocation software can identify the geographic location of a client or web application user.Geolocation refers either to the process of assessing the location, or to the actual assessed location.
For applications protected by Application Security Manager™, you can use geolocation enforcement torestrict or allow application use in specific countries. You adjust the lists of which countries or locationsare allowed or disallowed in a security policy. If an application user tries to access the web applicationfrom a location that is not allowed, the Access from disallowed GeoLocation violationoccurs. By default, all locations are allowed, and the violation learn, alarm, and block flags are enabled.
Requests from certain locations, such as RFC-1918 addresses or unassigned global addresses, do notinclude a valid country code. The geolocation is shown as N/A in both the request, and the list ofgeolocations. You have the option to disallow N/A requests whose country of origination is unknown.
Disallowing application use in certain geolocationsBefore you can set up geolocation enforcement, you need to create a security policy. If the BIG-IP®system is deployed behind a proxy, you might need to set the Trust XFF Header option in thesecurity policy properties. Then the system identifies the location using the address from the XFF headerinstead of the source IP address.
You can set up a security policy to allow or disallow access to the web application by users in specificcountries, areas, or from anonymous proxies.
1. On the Main tab, click Security > Application Security > Geolocation Enforcement.2. In the Current edited security policy list near the top of the screen, verify that the security policy
shown is the one you want to work on.3. In the Geolocation List setting, use the move buttons to adjust the lists of allowed and disallowed
geolocations. To restrict traffic from anonymous proxies, move Anonymous Proxy to the disallowedgeolocations list.If no geolocations are disallowed, the list displays the word None. The screen shows the value N/A inthe list of geolocations for cases where a user is in a location that cannot be identified, for example, ifusing RFC-1918 addresses or unassigned global addresses.
Tip: You can approach geolocation enforcement by specifying either which locations you want todisallow or which locations you want to allow.
4. Click Save to save your settings.5. In the editing context area, click Apply Policy to put the changes into effect.
If a user in a disallowed location attempts to access the web application, the security policy (if inblocking mode) blocks the user and displays the violation Access from disallowedGeolocation.

Setting up geolocation enforcement from a requestYou can restrict application use in certain geolocations by using the Requests list. This is an easy way torestrict users in a certain country from accessing the web application. By examining illegal requestdetails, you can disallow the locations from which frequent problems are originating.
1. On the Main tab, click Security > Event Logs > Application > Requests.The Requests screen opens and shows all illegal requests that have occurred for all security policies.
2. Filter the Requests List to show the illegal requests for the security policy for which you want todisallow the geolocation causing the problem.
3. In the Requests List, click anywhere on a request.The screen displays details about the request including any violations associated with the request, andother details, such as the geolocation.
4. In the Request Details area, the Geolocation setting displays the country, and if the country is not onthe disallowed geolocation list, you see Disallow this Geolocation. If you want to disallow thatlocation, click it.The system asks you to verify that you want to disallow this geolocation. When you verify that youdo, the system adds the country to the Disallowed Geolocations list for that policy.
5. Apply the change to the security policy: on the Main tab, click Security > Application Security >Policy, make sure it is the correct current edited policy, and then click Apply Policy.
If a user in a disallowed location attempts to access the web application, the security policy (if inblocking mode) blocks the user and displays the violation Access from disallowedGeolocation.
Disallowing Application Use at Specific Geolocations
92

Protecting Sensitive Data with Data Guard
About protecting sensitive data with Data GuardIn some web applications, a response may contain sensitive user information, such as credit card numbersor social security numbers (U.S. only). The Data Guard feature can prevent responses from exposingsensitive information by masking the data (this is also known as response scrubbing). Data Guard scanstext in responses looking for the types of sensitive information that you specify.
Note: When you mask the data, the system replaces the sensitive data with asterisks (****). F5 Networksrecommends that you enable this setting especially when the security policy enforcement mode istransparent. Otherwise, when the system returns a response, sensitive data could be exposed to the client.
Using Data Guard, you can configure custom patterns using PCRE regular expressions to protect otherforms of sensitive information, and indicate exception patterns not to consider sensitive. You can alsospecify which URLs you want the system to examine for sensitive data.
The system can also examine the content of responses for specific types of files that you do not want tobe returned to users, such as Microsoft Office documents, PDFs, ELF binary files, Mach object files, orWindows portable executables. File content checking causes the system to examine responses for the filecontent types you select. You can configure the system to block sensitive file content (according to theblocking setting of the DataGuard: Information Leakage Detected violation).
Response headers that Data Guard inspectsData Guard examines responses that have the following content-type headers:
• "text/..."• "application/x-shockwave-flash"• "application/sgml"• "application/x-javascript"• "application/xml"• "application/x-asp"• "application/x-aspx"• "application/xhtml+xml"
You can configure one additional user-defined response content-type using the system variableuser_defined_accum_type. If response logging is enabled, these responses can also be logged.
Protecting sensitive dataYou can configure the system to protect sensitive data. If a web server response contains a credit cardnumber, U.S. Social Security number, or pattern that matches a pattern, then the system responds basedon the enforcement mode setting.
1. On the Main tab, click Security > Application Security > Data Guard.The Data Guard screen opens.

2. In the Current edited security policy list near the top of the screen, verify that the security policyshown is the one you want to work on.
3. Select the Data Guard check box.4. If you want the system to consider credit card numbers as sensitive data, select the Credit Card
Numbers check box.5. If you want the system to consider U.S. social security numbers (in the form nnn-nn-nnnn, where n
is an integer) as sensitive data, select the U.S. Social Security Numbers check box.6. To specify additional sensitive data patterns that occur in the application:
a) Select the Custom Patterns check box.b) In the New Pattern field, type a PCRE regular expression to specify the sensitive data pattern,
then click Add. For example, 999-[/d][/d]-[/d][/d][/d][/d].
Tip: You can validate the regular expression using the tool at Security > Options > ApplicationSecurity > RegExp Validator.
c) Add as many custom patterns as needed for the application.7. To specify data patterns not to consider sensitive:
a) Select the Exception Patterns check box.b) In the New Pattern field, type a PCRE regular expression to specify the sensitive data pattern,
then click Add.c) Add as many custom patterns as needed for the application.
8. If, in responses (when not blocked), you want the system to replace the sensitive data with asterisks(****), select the Mask Data check box.This setting is not relevant if blocking is enabled for the violation, because the system blocksresponses containing sensitive data.
9. To review responses for specific file content (for example, to determine whether someone is trying todownload a sensitive type of document):a) For the File Content Detection setting, select the Check File Content check box.
The screen displays a list of available file types.b) Move the file types you want the system to consider sensitive from the Available list into the
Members list.10. To specify which URLs to examine for sensitive data, use the Enforcement Mode setting:
• To inspect all URLs, use the default value of Ignore URLs in list, and do not add any URLs to thelist.
• To inspect all but a few specific URLs, use the default value of Ignore URLs in list, and add theexceptions to the list.
• To inspect only specific URLs, select Enforce URLs in list, and add the URLs to check to the list.
When adding URLs, you can type either explicit (/index.html) or wildcard (*xyz.html) URLs.11. Click Save to save your settings.
When the system detects sensitive information in a response, it generates the Data Guard:Information leakage detected violation (if the violation is set to alarm or block). If the securitypolicy enforcement mode is set to blocking and the violation is set to block, the system does not send theresponse to the client.
Protecting Sensitive Data with Data Guard
94

Masking Credit Card Numbers in Logs
Overview: Masking credit card numbers in logsApplication Security Manager™ (ASM) can mask credit card numbers in request logs. By default, whenyou create a security policy, the option to mask credit card numbers is enabled. Wherever credit cardnumbers appear in logs and violation details, they will be replaced by asterisks.
Keeping the Mask Credit Card Numbers in Request Log option enabled is required for PCIcompliance. You must use this option in addition to Data Guard and masking sensitive parameters tocomply with the Protect Stored Cardholder Data requirement. Data Guard masks sensitive information,such as credit card numbers and social security numbers, in responses.
Sensitive parameters can conceal sensitive information that is passed as parameters, such as credit cardnumbers. Making a parameter sensitive guarantees that its values are always masked in logs. Usingsensitive parameters is good for form fields that are designated to contain sensitive data (like credit cardnumbers). But since a user can include credit card numbers in other places, enabling the Mask CreditCard Numbers in Request Log option looks for them anywhere in the request and masks them,providing an additional layer of security.
Masking credit card numbers in request logs
You can make sure that a security policy is set up to mask credit card numbers in logs and violations.This protects sensitive information, specifically credit card numbers, more securely.
1. On the Main tab, click Security > Application Security > Policy > Policy Properties.The Policy Properties screen for the current edited policy opens.
2. Select the Mask Credit Card Numbers in Request Log check box if it is not already enabled.3. Click Save to save your settings.
The system now looks for occurrences of credit card numbers in request logs, violations, suggestions, andreports and replaces them with asterisks.

Masking Credit Card Numbers in Logs
96

Displaying Reports and Monitoring ASM
ASM Reporting ToolsYou can use several reporting tools in Application Security Manager ™(ASM) to analyze incomingrequests, track trends in violations, generate security reports, and evaluate possible attacks. The statisticsand monitoring reporting tools are described in this table.
Reporting Tool Description
Application securityoverview
Displays a summary of all configured security policies showing the activesecurity policies, attacks that have occurred, anomaly statistics, and networkingand traffic statistics. You can save the information or send it as an emailattachment.
Requests summary Summarizes the requested URLs for security policies.
Event correlation Displays a list of incidents (suspected attacks on the web application).Requests become incidents when at least two illegal requests are sent to theweb application within 15 minutes, and the system groups them according tocriteria. The criteria concern illegal requests for a specific URL, a specificparameter, or a specific source IP address.
Charts Displays graphical reports about security policy violations and provides toolsthat let you view the data by different criteria, drill down for more data, createcustomized reports, and send or export reports.
Charts scheduler Allows you to periodically generate specific reports and distribute them usingemail.
DoS Attacks report Displays graphic charts about DoS attacks, viewed by selected category, andincludes the attack start and end times.
Brute Force Attacksreport
Displays graphic charts about brute-force attacks, viewed by selected category,and includes the attack start and end times.
Web Scrapingstatistics
Displays graphic charts about web scraping attacks, viewed by selectedcategory, and includes the attack start and end times.
Session Trackingstatus
Displays the users, sessions, and IP addresses that the system is currentlytracking, and for which the system is taking action as a result of havingtriggered one of the violation detection thresholds.
PCI Compliancereport
Displays a printable Payment Card Industry (PCI) compliance report for eachsecurity policy showing each security measure required for PCI-DSS 1.2, andcompliance details.
CPU Utilization report Displays the amount of the available CPU that the Application SecurityManager uses over a period of time.
Displaying an application security overview reportTo view data in the security overview, the system must be logging data internally. Some default loggingprofiles are already set up on the system but you may want to customize them.

The Application Security Manager™ (ASM) can display a security overview where you can quickly seewhat is happening on your system. The overview is configurable and can include statistics concerningattack types, violations, and anomalies, traffic summaries, transactions per second, throughput, and toprequested URLs, IP addresses, and request types. You can also export the statistics into a PDF, and emailthem as an attachment.
1. On the Main tab, click Security > Overview > Application > Traffic.The Overview Traffic screen opens and summarizes ASM system activity at a glance.
2. If using device groups, from the Device Group list, select a device group to narrow down thestatistics.
3. To change the default time frame for all widgets, select a time period from the Override time rangeto list.
4. From the Security Policy list, select a security policy to narrow down the statistics.By default, statistics for all active security policies are shown.
5. Review the summary statistics (organized into areas called widgets) to determine what is happeningon the system.
6. If you want to create a new area of information customized to your specifications, at the bottom of thescreen, click Add Widget.The Add New Widget popup screen opens.
7. Optionally, for each widget, you can adjust the time range, data measurements, and format of data todisplay from the Time Period list (Last Hour, Last Day, Last Week, Last Month, or Last Year) or theconfiguration gear settings.You can also delete any widget that you do not need on the screen.
8. To save the summary as a PDF file on your computer:a) Click the Export link.b) In the popup screen that opens, click Export again to save the file on your computer.
9. To send the report as an email attachment, click the Export link.
Note: To send email, you need to configure an SMTP server. If one is not configured, on the Main tab,click System > Configuration > Device > SMTP, and then click Create to configure one first.
a) Click Send the report file via E-Mail as an attachment.b) In the Target E-Mail Address(es) field, type the one or more email addresses (separated by
commas or semi-colons).c) From the SMTP Server list, select the SMTP server.d) Click Export.
The systems sends an email with the PDF to the specified addresses.
You can adjust the overview and create widgets for the information you are interested in.
Analyzing requests with violationsTo review requests with violations, you need to have a security policy that is already handling traffic thatis causing violations. If no violations have occurred, you will not see illegal requests listed in theRequests List.
In the Requests List event log, you can view details about a request, including viewing the violationrating, the full request itself, and any violations associated with it. You can also drill down to viewdetailed descriptions of the violations and potential attacks. When viewing details about an illegalrequest, if you decide that the request is trusted and you want to allow it, you can accept the violationsshown for this specific request.
Displaying Reports and Monitoring ASM
98

1. On the Main tab, click Security > Event Logs > Application > Requests.The Requests screen opens, where, by default, you view an event log displaying illegal requests forall security policies.
2. In the Requests List, click a request to view information about the request and any violationsassociated with it.The screen refreshes, showing the Request Details area, where you see any violations associated withthe request and other details, such as the security policy it relates to, the support ID, the violationrating, and potential attacks that it could cause.
3. Use the Violation area elements to view details about a violation associated with an illegal request:
• To view details about this specific violation such as the file type, the expected and actual length ofthe query, or similar relevant information, click the violation name.
• To display a general description of that type of violation, click the info icon to the left of theviolation name.
4. For violations that you want to allow (false positives), click the Learn button.Some violations cannot be learned; the Learn button is unavailable in this case.If there are learning suggestions, the violation’s learning screen opens, and you can accept or clear thesuggestions one at a time.
5. To view the actual contents of the request, click HTTP Request or HTTP Response.6. When you are done looking at the request details, click Close.
The Requests List provides information about a request such as: the request category, the time of therequest, its violation rating, the source IP address of the request, the server response code, and therequested URL itself. Icons on each request line provide additional status information such as whetherthe request is legal or illegal, blocked, truncated, or has a response. By reviewing the request details, youcan investigate whether it was an attack or a false positive.
How to view a request
To see if any violations have recently occurred, you can examine the Requests event log. It is a good ideato look for spikes and irregular behavior in the Requests log because these usually indicate suspiciousactivity. As shown in the following figure, you may see several illegal requests. The violation ratings(numbers from 1-5) indicate how likely a request is to be an attack (typically 4 or 5) or a false positive(often 1 or 2). In the figure, the first request has been selected and details appear on the right.
BIG-IP Application Security Manager: Implementations
99

Figure 10: Sample Requests event log
Generating PCI Compliance reportsA PCI Compliance report displays details on how closely the security policy of a web application meetsPayment Card Industry (PCI) security standards, PCI-DSS 3.0. You can create printable versions of PCIcompliance reports for each web application to assure auditors that the BIG-IP® system and your webapplications are secure.
1. On the Main tab, click Security > Reporting > Application > PCI Compliance.The PCI Compliance screen opens showing a compliance report for the current security policy.
2. To learn more about items that are PCI compliant (items with a green check mark), those which arepartially compliant, or those which are not PCI compliant (items with a red X), click the item link inthe Requirement column.The screen shows information about how to make an item PCI-compliant.
3. Optionally, in the Details list, you can click a hyperlink (blue text) to go directly to the screen whereyou can adjust the non-compliant settings.
4. To create a PDF version of the report that you can save, open, or print, click Printable Version.5. To display a PCI compliance report for a different security policy, in the PCI Compliance Report area,
from the Security Policy list, select a different policy name.A PCI compliance report for the selected policy opens.
The PCI Compliance report lists the security measures that are required to comply with PCI standards.The report indicates which requirements Application Security Manager™ can help enforce, and allowsyou to view details about what to configure differently to meet compliance standards.
Displaying Reports and Monitoring ASM
100

Sample PCI Compliance report
This sample PCI Compliance report examines the security policy called phpauction_2. It shows fiverequirements that do not comply with PCI-DSS 3.0 (marked with red Xs). Application SecurityManager™ has settings that support bringing these requirements into compliance.
Figure 11: Sample PCI Compliance report
BIG-IP Application Security Manager: Implementations
101

Displaying Reports and Monitoring ASM
102

Logging Application Security Events
About logging profilesLogging profiles determine where events are logged, and which items (such as which parts of requests, orwhich type of errors) are logged. Events can be logged either locally on the system and viewed in theEvent Logs, or remotely by the client’s server. The system forwards the log messages to the client’sserver using the Syslog service. Each logging profile can specify local or remote logging, but not both.
You can use one logging profile for Application Security, Protocol Security, Network Firewall, DoSProtection and Bot Defense. The system includes two logging profiles that log data locally forApplication Security: one to log all requests and another to log illegal requests. Other logging profiles areincluded for global-network and local-dos. You can use the system-supplied logging profiles, or you cancreate a custom logging profile. The system-supplied logging profiles cannot be edited.
The logging profile records requests to the virtual server. By default, when you create a security policy,the system associates the log illegal requests profile to the virtual server associated with the policy. Youcan change which logging profile is associated with the security policy by editing the virtual server.
Note: If running Application Security Manager™ on a BIG-IP® system using Virtualized ClusteredMultiprocessing (vCMP), for best performance, F5 recommends configuring remote logging to storeApplication Security Manager logs remotely rather than locally.
A logging profile has two parts: the storage configuration and the storage filter. The storage configurationspecifies where to store the logs, either locally or remotely. The storage filter determines whatinformation is stored. For remote logging, you can send logging files for storage on a remote system (inCSV format), on a reporting server (as key/value pairs), or on an ArcSight server (in CEF format). Notethat configuring external logging servers is not handled by F5 Networks.
How to use multiple logging profilesYou can assign multiple logging profiles to one virtual server. Here are some examples of how to usemultiple logging profiles:
Log Illegal Requests locally, All requests remotely
You can log all requests locally using just one logging profile. But you can save resources by loggingillegal requests locally and logging all requests remotely. You would create two logging profiles:
• Local storage with illegal requests• Remote storage of all requests
Multiple SIEM Systems
If your company uses multiple security information and event management (SIEM) systems to collectlogs and other security related information (for example, Splunk and ArcSight), you could set up threelogging profiles.
• Local storage with illegal requests• Remote filter in Splunk format (user-defined format with Splunk field names).• Remote filter in Arcsight format (user-defined format with ArcSight field names)

Creating a logging profile for local storageYou can create a custom logging profile to log application security events locally on the BIG-IP® system.
1. On the Main tab, click Security > Event Logs > Logging Profiles.The Logging Profiles list screen opens.
2. Click Create.The New Logging Profile screen opens.
3. In the Profile Name field, type a unique name for the profile.4. Select the Application Security check box.
The screen displays additional fields.5. On the Application Security tab, for Configuration, select Advanced.6. In the Storage Destination list, be sure that Local Storage is selected.7. Optional: To ensure that the system logs requests for the security policy, even when the logging utility
is competing for system resources, select the Guarantee Local Logging check box.8. From the Response Logging list, select one of the following options.
Option Description
Off Do not log responses.
For Illegal RequestsOnly
Log responses for illegal requests.
For All Requests Log responses for all requests. Used when the Storage Filter RequestType is set to All Requests. (Otherwise, logs only illegal requests.)
By default, the system logs the first 10000 bytes of responses, up to 10 responses per second. You canchange the limits by using the response logging system variables.
9. To further specify the types of requests that the system or server logs, set up the Storage Filter. Fromthe Request Type list, select one of the following options.Option Description
Illegal requests only Log illegal requests only.
Illegal requests, andrequests that includestaged attacksignatures
Log illegal requests and requests that trigger attack signatures in staging(even though those requests are allowed).
All requests Log all requests.
To further filter what gets logged, use the Advanced storage filter options.10. Click Finished.
When you store the logs locally, the logging utility may compete for system resources. Using theGuarantee Local Logging setting ensures that the system logs the requests in this situation, but mayresult in a performance reduction in high-volume traffic applications.
After creating the logging profile, you need to associate it with the virtual server used by the securitypolicy. You can associate only one local logging profile with the virtual server.
Logging Application Security Events
104

Setting up remote loggingTo set up remote logging for Application Security Manager™, you need to have created a logging profilewith Application Security enabled.
You can configure a custom logging profile to log application security events remotely on syslog or otherreporting servers.
1. On the Main tab, click Security > Event Logs > Logging Profiles.The Logging Profiles list screen opens.
2. Click Create.The New Logging Profile screen opens.
3. In the Profile Name field, type a unique name for the profile.4. Select the Application Security check box.
The screen displays additional fields.5. On the Application Security tab, for Configuration, select Advanced.6. From the Storage Destination list, select Remote Storage.
Additional fields related to remote logging are displayed.7. From the Logging Format list, select the appropriate type:
• To store traffic on a remote logging server in CSV format, select Comma Separated Values.• To store traffic on a reporting server (such as Splunk) using a preconfigured storage format with
key-value pairs in the log messages, select Key-Value Pairs.• If your network uses ArcSight logs, select Common Event Format (ArcSight). Log messages
are in Common Event Format (CEF).• To store logs on the BIG-IQ system, select BIG-IQ.
8. For the Protocol setting, select the protocol that the remote storage server uses: TCP (the defaultsetting), TCP-RFC3195, or UDP.
9. For Server Addresses, specify one or more remote servers, reporting servers, or ArcSight servers onwhich to log traffic. Type the IP Address, Port (default is 514), and click Add.
10. If using the Comma-Separated Values logging format, for Facility, you can optionally select thefacility category of the logged traffic. The possible values are LOG_LOCAL0 throughLOG_LOCAL7.
Tip: If you have more than one security policy you can use the same remote logging server for bothapplications, and use the facility filter to sort the data for each.
11. If you are using the Comma-Separated Values logging format, in the Storage Format setting, youcan specify how the log displays information, which traffic items the server logs, and what order itlogs them:a) To determine how the log appears, select Field-List to display the items in the Selected Items list
in CSV format with a delimiter you specify; select User-Defined to display the items in theSelected Items list in addition to any free text you type in the Selected Items list.
b) To specify which items appear in the log, move items from the Available Items list into theSelected Items list.
c) To control the order in which predefined items appear in the server logs, select an item in theSelected Items list, and click the Up or Down button.
12. If you want the system to send a report string to the remote system log when a brute force attack orweb scraping attack starts and ends, select Report Detected Anomalies.
13. To further specify the types of requests that the system or server logs, set up the Storage Filter. Fromthe Request Type list, select one of the following options.
BIG-IP Application Security Manager: Implementations
105

Option Description
Illegal requests only Log illegal requests only.
Illegal requests, andrequests that includestaged attacksignatures
Log illegal requests and requests that trigger attack signatures in staging(even though those requests are allowed).
All requests Log all requests.
To further filter what gets logged, use the Advanced storage filter options.14. Click Finished.
When you create a logging profile for remote storage, the system stores the data for the associatedsecurity policy on one or more remote systems.
Next, you need to associate the logging profile with the virtual server used by the security policy.
Associating a logging profile with a security policyA logging profile determines where events are logged and what details are included. By default, whenyou create a security policy, the system associates the Log Illegal Requests profile with the virtual serverused by the policy. You can change which logging profile is associated with the security policy or assigna new one to the virtual server.
1. Click Local Traffic > Virtual Servers2. Click the name of the virtual server used by the security policy.
The system displays the general properties of the virtual server.3. From the Security menu, choose Policies.
The system displays the policy settings for the virtual server.4. Ensure that the Application Security Policy setting is Enabled, and that Policy is set to the security
policy you want.5. For the Log Profile setting:
a) Check that it is set to Enabled.b) From the Available list, select the profile to use for the security policy, and move it into the
Selected list.
You can assign only one local logging profile to a virtual server, but it can have multiple remotelogging profiles.
6. Click Update.
Information related to traffic controlled by the security policy is logged using the logging profile orprofiles specified in the virtual server.
About logging responses
If you enable response logging in the logging profile, the system can log only responses that include thefollowing content headers:
• "text/..."• "application/x-shockwave-flash"• "application/sgml"• "application/x-javascript"• "application/xml"• "application/x-asp"
Logging Application Security Events
106

• "application/x-aspx"• "application/xhtml+xml"• "application/soap+xml"• "application/json"
The system cannot log other responses.
About ArcSight log message format
If your network uses ArcSight logs, you can create a logging profile so that the log information is savedusing the appropriate format. Application Security Manager stores all logs on a remote logging serverusing the predefined ArcSight settings for the logs. The log messages are in Common Event Format(CEF).
The basic format is:
CEF:Version|Device Vendor|Device Product|Device Version |Device Event Class ID|Name|Severity|Extension
About syslog request format
Application Security Manager™ can log security events to the /var/log/asm file on the system if youneed to. Logging to this file is off by default. You can turn the logging on using thesend_content_events system variable from the command line, or on the System Variables screen:Security > Options > Application Security > Advanced Configuration > System Variables.
Note: F5 recommends enabling the send_content_events parameter only for troubleshootingpurposes due to a potential decrease in performance.
Here is the format of the syslog request followed by descriptions of the fields:
<Rejection Description> <Request Violation> <Support ID> <Source IP> <XFF IP> <Source Port> <Destination IP> <Destination Port> <Route Domain> <HTTP Classifier> <Scheme> <Geographic Location> <Request> <Username> <Session ID> <Violation Rating>
Field What it contains
Rejection Description Empty unless the request is blocked by the security policy.
Request Violations A comma separated list of the violations that occurred during enforcement ofthe request or response.
Support ID An ID number assigned to the request by the system to allow the systemadministrator to track it.
Source IP The IP address from which the request originated.
XFF IP The X-Forwarded-For (XFF) IP address located in the XFF header and whichrepresents the end client's IP address.
Source Port The port from which the request originated.
Destination IP The IP address to which the request is sent, generally, the virtual server IPaddress.
Destination Port The port to which the request is sent.
Route Domain The route domain (network traffic segment) where the request originated.
BIG-IP Application Security Manager: Implementations
107

Field What it contains
HTTP Classifier The name of the ASM security policy.
Scheme Whether the request was made using HTTP or HTTPS.
Geographic Location The two-letter country code of origin based on the source IP address.
Request The actual request made including headers (up to 128 bytes).
Username Name of the user associated with the request.
Session ID ID number assigned to the request to allow the system administrator to trackrequests by session.
Violation Rating Rating between 1 and 5 that ranks the severity of any violations associatedwith the request. 1 is most likely a false positive and 5 is most likely anattack.
Filtering logging informationThe storage filter of an application security logging profile determines the type of requests the system orserver logs. You can create a custom storage filter for a logging profile so that the event logs include theexact information you want to see.
1. On the Main tab, click Security > Event Logs > Logging Profiles.The Logging Profiles list screen opens.
2. In the Profile Name column, click the logging profile name for which you want to set up the filter.
Note: This profile must be one that you created and not one of the system-supplied profiles, whichcannot be edited.
The Edit Logging Profile screen opens.3. From the Storage Filter list, select Advanced.
The screen displays additional settings.4. For the Logic Operation setting, specify the filter criteria to use.
Option Description
OR Select this operator to log the data that meets one or more of the criteria.
AND Select this operator to log the data that meets all of the criteria.
5. For the Request Type setting, select the requests that you want the system to store in the log, AllRequests or Illegal Requests Only.
6. For the Protocols setting, select whether logging occurs for both HTTP and HTTPS protocols or aspecific protocol.
7. For the Response Status Codes setting, select whether logging occurs for all response status codes oronly for specific ones.
8. For the HTTP Methods setting, select whether logging occurs for all methods or only for specificones.
9. For the Request Containing String setting, select whether the request logging is for any string ordependent on a specific string that you specify.
10. Click Update.
The system logs application security data that meets the criteria specified in the storage filter.
Logging Application Security Events
108

Viewing application security logsYou can view locally stored system logs for the Application Security Manager™ on the BIG-IP® system.These are the logs that include general system events and user activity.
Tip: If you prefer to review the log data from the command line, you can find the application security logdata in the /var/log/asm file.
1. Click System > Logs2. Click Application Security.
The system displays application security data that meets the criteria specified in the logging profile.
BIG-IP Application Security Manager: Implementations
109

Logging Application Security Events
110

Preventing Session Hijacking and Tracking User Sessions
Overview: Preventing session hijackingSession hijacking, also called cookie hijacking, is the exploitation of a valid computer session to gainunauthorized access to an application. The attacker steals (or hijacks) the cookies from a valid user andattempts to use them for authentication. Application Security Manager™ (ASM™) can prevent sessionhijacking by tracking clients with a device ID. The device ID is a unique identifier that ASM creates bysending JavaScript to get information about the client device. If the client browser does not acceptJavaScript, the client receives a message saying to enable JavaScript to view the page content. Clientsthat do not accept JavaScript are stopped even when the security policy is in transparent mode.
ASM stores the device ID along with other client data (including the message key or session ID) in acookie that remains with the client for the length of the HTTP session. The system periodically checksthat the device ID of the client is the same one that was assigned when the session started.
If the device ID or message key changes during the session or the session timed out, the system considersthat to be an attack and issues an ASM cookie hijacking violation. It looks like an attacker has stolencookies from a legitimate user and is trying to gain illegal access. Note that the ASM cookie hijackingviolation only occurs if you enabled the Learn, Alarm, or Block settings for the violation.
You set up session hijacking along with session tracking. However, you do not have to track user sessionsto set up hijacking prevention.
Task SummaryPreventing session hijackingConfiguring the response to cookie hijacking
Preventing session hijacking
You can use Application Security Manager™ to prevent session hijacking by tracking the device ID andsession ID of each user.
Note: To use device ID for tracking, client browsers accessing your web site must be able to acceptJavaScript, or they will be blocked even when working in transparent mode.
1. On the Main tab, click Security > Application Security > Sessions and Logins > Session Tracking.The Session Tracking screen opens.
2. In the Session Hijacking area, for Detect Session Hijacking by Device ID Tracking, select theEnabled check box.
Note: When you are using device ID to track traffic, make sure that the Accept XFF setting is enabledin the HTTP profile that is assigned to the virtual server.
3. Click Save to save your settings.4. To set the blocking modes for the hijacking violation, click Security > Application Security > Policy
Building > Learning and Blocking Settings.a) In the General Settings, set the Enforcement Mode to Blocking.
This setting blocks all requests that cause violations, and which are set to block.

b) In the Policy Building Settings, expand Cookies, and for the ASM Cookie Hijackingviolation, select Learn, Alarm, and Block.
c) Click Save.5. To put the security policy changes into effect immediately, click Apply Policy.
Any client that does not accept JavaScript is now prevented from reaching the web site. If the systemdetects session hijacking, it issues the ASM Cookie Hijacking violation. The event log includes adescription of why it happened:
• Message key mismatch between cookies• Device ID mismatch• Device ID mismatch and message key mismatch between cookiesBecause the security policy enforcement mode is set to blocking, the request is blocked and the clientreceives the cookie hijacking response page. By default, ASM erases the cookies for the session, andredirects the client to the login page. If the client is legitimate, the login should be successful. Attackersthat had attempted to hijack the session are blocked.
Configuring the response to cookie hijacking
You can configure the blocking response that the system sends in response to a session (or cookie)hijacking attempt.
1. On the Main tab, click Security > Application Security > Policy > Response Pages.The Response Pages screen opens.
2. In the Current edited security policy list near the top of the screen, verify that the security policyshown is the one you want to work on.
3. Click Cookie Hijacking Response Page.4. For the Response Type setting, select Erase Cookies.
You can use other options such as the Default Response page, Custom Response page, or SOAPFault. But Erase Cookies is the recommended and default response to cookie hijacking.
The system deletes client side domain cookies to block the application user.5. Click Save to save your settings.6. To put the security policy changes into effect immediately, click Apply Policy.
If the enforcement mode is blocking and a session hijacking attempt is blocked, the system erases thebrowser cookies, and displays the cookie hijacking response page.
Overview: Tracking user sessions using login pagesYou can track user sessions using login pages configured from within Application Security Manager™
(ASM™), or have the policy retrieve the user names from Access Policy Manager®(APM®). Thisimplementation describes how to set up session tracking for a security policy using login pages. Theadvantage of using session tracking is that you are able to identify the user, session, device ID, or IPaddress an attack.
Login pages, created manually or automatically, define the URLs, parameters, and validation criteriarequired for users to log in to the application. User and session information is included in the system logsso you can track a particular session or user. The system can log activity, or block a user or session ifeither generates too many violations.
If you configure session awareness, you can view the user and session information in the applicationsecurity charts.
Preventing Session Hijacking and Tracking User Sessions
112

Task SummaryCreating login pages automaticallyCreating login pages manuallySetting up session trackingMonitoring user and session informationTracking specific user and session information
Creating login pages automatically
Login pages specify a login URL that presents a site that users must pass through to gain access to theweb application. Your existing security policy can detect and create login pages automatically if you usecertain options.
Note: If you are creating a security policy automatically and selected Comprehensive as the policytemplate, the default options are already set to create login pages automatically. If you are using theFundamental policy template, the steps here explain the options to configure ASM™ to automaticallydetect and create login pages for your application.
1. On the Main tab, click Security > Application Security > Policy Building > Learning andBlocking Settings.The Learning and Blocking Settings screen opens.
2. Ensure that the Learning Mode is set to Automatic.The system examines the traffic to the web application, and after processing sufficient legitimatetraffic, the system builds the security policy automatically by adding and enforcing elements withminimal manual intervention. A few learning suggestions require your review before they are added.
3. In the Policy Building Settings area, expand Sessions and Logins and ensure that Detect login pagesis selected.This setting must be selected if you want to automatically detect login pages.
4. In the Policy Building Process area, expand Options and ensure that Learn from responses isselected.
5. Click Save to save your settings.6. In the editing context area, click Apply Policy to put the changes into effect.
The security policy looks for login pages by examining traffic to the web application. When a login pageis found, the Policy Builder suggests adding the login form to the security policy. Because the suggestionis learned from responses and responses are considered trusted, if the Learning Mode is Automatic, thelogin page is typically added to the policy right away.
If the Learning Mode is Manual, the login page is added to the learning suggestions on the TrafficLearning screen where you can add it to the policy. The login pages in the security policy are included inthe Login Pages List.
You can use the login pages for login enforcement, brute force protection, or session awareness.
Creating login pages manually
Before you can create a login page manually, you need to be familiar with the login URL or URLs theapplication the security policy is protecting.
In your security policy, you can create a login page manually to specify a login URL that presents a sitethat users must pass through to gain access to the web application. The login URL commonly leads to thelogin page of the web application.
Note: You can also have the system create login pages automatically by selecting Detect login pages onthe Learning and Blocking Settings screen.
BIG-IP Application Security Manager: Implementations
113

1. On the Main tab, click Security > Application Security > Sessions and Logins.The Login Pages List screen opens.
2. In the Current edited security policy list near the top of the screen, verify that the security policyshown is the one you want to work on.
3. Click Create.The New Login Page screen opens.
4. For the Login URL setting, specify a URL that users must pass through to get to the application.a) From the list, select the type of URL: Explicit or Wildcard.b) Select either HTTP or HTTPS based on the type of traffic the web application accepts.c) Type an explicit URL or wildcard expression in the field.
When you click in the field, the system lists URLs that it has seen, and you can select a URL fromthe list. Or, you can type explicit URLs in the format /login, and wildcard URLs without theslash, such as *.php.Wildcard syntax is based on shell-style wildcard characters. This table lists the wildcard charactersthat you can use so that the entity name can match multiple objects.
Wildcard Character Matches
* All characters
? Any single character.
[abcde] Exactly one of the characters listed.
[!abcde] Any character not listed.
[a-e] Exactly one character in the range.
[!a-e} Any character not in the range.
Note that wildcards do not match regular expressions.5. From the Authentication Type list, select the method the web server uses to authenticate the login
URL's credentials with a web user.Option Description
None The web server does not authenticate users trying to access the webapplication through the login URL. This is the default setting.
HTML Form The web application uses a form to collect and authenticate usercredentials. If using this option, you also need to type the user name andpassword parameters written in the code of the HTML form.
HTTP BasicAuthentication
The user name and password are transmitted in Base64 and stored on theserver in plain text.
HTTP DigestAuthentication
The web server performs the authentication; user names and passwordsare not transmitted over the network, nor are they stored in plain text.
NTLM Microsoft LAN Manager authentication (also called Integrated WindowsAuthentication) does not transmit credentials in plain text, but requires acontinuous TCP connection between the server and client.
JSON/AJAX Request The web server uses JSON and AJAX requests to authenticate userstrying to access the web application through the login URL. For thisoption, you also need to type the name of the JSON element containingthe user name and password.
6. In the Access Validation area, define at least one validation criteria for the login page response.
Preventing Session Hijacking and Tracking User Sessions
114

If you define more than one validation criteria, the response must meet all the criteria before thesystem allows the user to access the application login URL.
Note: The system checks the access validation criteria on the response of the login URL only if theresponse has one of the following content-types: text/html, text/xml, application/sgml, application/xml, application/html, application/xhtml, application/x-asp, or application/x-aspx.
7. Click Create to add the login page to the security policy.The new login page is added to the login pages list.
8. Add as many login pages as needed for your web application.9. In the editing context area, click Apply Policy to put the changes into effect.
The security policy now has one or more login pages associated with it. They are included in the LoginPages List.
You can use the login pages you created for login enforcement, brute force protection, or sessionawareness.
Setting up session tracking
You can use session tracking to track, enforce, and report on user sessions, device IDs, and IP addresses.To perform tracking, you enable session awareness and indicate how to associate the application username with the session. You can also determine whether to track violations and perform logging orblocking actions based on the number of violations per user, session, and IP address.
1. On the Main tab, click Security > Application Security > Sessions and Logins > Session Tracking.The Session Tracking screen opens.
2. In the Session Tracking Configuration area, select the Session Awareness check box.3. From the Application Username list, select Use All Login Pages to track login sessions for all of the
login pages in the security policy.4. In the Violation Detection Actions area, select the Track Violations and Perform Actions check
box.5. In the Violation Detection Period field, type the number of seconds that indicates the sliding time
period to count violations for violation thresholds.The default is 900 seconds.
6. If you want the system to block all activity for a user, session, device ID, or IP address when thenumber of violations exceeds the threshold within the violation detection period, specify one or moreof the following settings on the Block All tab.Option Description
Blocked URLs Specify which URLs to block after the number of violations exceeds the enabledthresholds. To block all URLs, select Block all URLs. To block authenticatedURLs protected by login pages, select Block Authenticated URLs.
UsernameThreshold
Select Enable and specify the number of violations allowed before the systemstarts to block this user's activity.
SessionThreshold
Select Enable and specify the number of violations allowed before the systemstarts to block activity for this HTTP session.
Device IDThreshold
Select Enable and specify the number of violations allowed per device IDbefore the system starts to block activity for this device.
IP AddressThreshold
Select Enable and specify the number of violations allowed before the systemstarts to block the activity for this IP address.
BIG-IP Application Security Manager: Implementations
115

Option Description
Block All Period Specify how long to block users, sessions, or IP addresses if the number ofviolations exceeds the threshold. To block the user, session, or IP addressindefinitely, click Infinite. Otherwise, click User-defined and type the numberof seconds to block the traffic. The default is 600 seconds.
Note: For the system to block requests, the security policy Enforcement Mode must be set to blockingand some violations must be set to block.
7. If you want the system to log activity when the number of violations for user, session, device ID, orIP address, exceeds the threshold during the violation detection period, specify one or more of thefollowing settings on the Log All Requests tab.Option Description
UsernameThreshold
Select Enable and specify the number of violations allowed before the systemstarts logging this user's activity for the log all requests period.
Session Threshold Select Enable and specify the number of violations allowed before the systemstarts logging activity for this HTTP session for the log all requests period.
Device IDThreshold
Select Enable and specify the number of violations allowed before the systemstarts to log requests for this device.
IP AddressThreshold
Select Enable and specify the number of violations allowed before the systemstarts logging the activity of this IP address for the log all requests period.
Log All RequestsPeriod
Specify how long the system should log all requests when any of the enabledthresholds is reached. Type the number of seconds in the field.
8. If you want more tolerant blocking for selected violations, such as those prone to false positives,specify one or more of the following settings on the Delay Blocking tab.Option Description
UsernameThreshold
Select Enable and specify the number of violations a user must cause before thesystem begins blocking this user for the delay blocking period.
SessionThreshold
Select Enable and specify the number of violations users must cause (during theviolation detection period) before the system begins blocking this HTTP sessionfor the delay blocking period.
Device IDThreshold
Select Enable and specify the number of violations allowed per device IDbefore the system starts to block illegal requests from the device.
IP AddressThreshold
Select Enable and specify the number of violations allowed before the systembegins blocking this IP address for the delay blocking period.
Delay BlockingPeriod
Type the number of seconds that the system should block the user, session, or IPaddress when any of the enabled thresholds is reached.
AssociatedViolations
Move the violations for which you want delay blocking from the Available listinto the Selected list. If the selected violations occur, the system does not blocktraffic until one of the enabled thresholds is reached. At that point, the systemblocks traffic causing those violations for the user, session, or IP address, butallows other transactions to pass.
Note: For the system to block requests, the security policy Enforcement Mode must be set to blockingand some violations must be set to block.
9. Click Save to save your settings.
Preventing Session Hijacking and Tracking User Sessions
116

After you set up session tracking, if any enabled threshold exceeds the number of violations during thedetection period, the system starts the configured actions (block all, log all requests, or delay blocking).
Monitoring user and session information
To monitor user and session information, you first need to set up session tracking for the security policy.
You can use the reporting tools in Application Security Manager™ to monitor user and session details,especially when you need to investigate suspicious activity that is occurring with certain users, sessions,or IP addresses.
1. On the Main tab, click SecurityReporting ApplicationSession Tracking Status.The Session Tracking Status screen opens and shows the users, sessions, and IP addresses that thesystem is currently tracking for this security policy.
2. From the Action list, select the action by which to filter the data.Action Description
All Specifies that the screen displays all entries. This is the default value.
Block All Specifies that the system displays sessions whose requests the system blocksafter the configured threshold was reached.
Log All Requests Specifies that the system displays sessions whose requests the system logs afterthe configured threshold was reached.
Delay Blocking Specifies that the system displays sessions whose requests the system delayedblocking until the configured threshold was reached.
3. From the Scope list, specify the scope (username, session, or IP address) by which to filter the data.Option Description
Alt Specifies that the screen displays all entries. This is the default value.
Username Specifies that the system displays usernames whose illegal requests exceeded thesecurity policy’s threshold values.
Session Specifies that the system displays identification numbers of illegal sessions thatexceeded the security policy’s threshold values.
IP Address Specifies that the system displays IP addresses where illegal requests from these IPaddresses exceeded the security policy’s threshold values.
Device ID Specifies that the system displays device IDs where illegal requests from these devicesexceeded the security policy’s threshold values.
4. If you want to filter the information by value, in the Value field, type the username, sessionidentification number, IP address, device ID, or string. If empty, the screen displays all entries.
5. When you finish specifying the filter details, click Go.The Session Tracking Status list now shows the information specified in the Filter setting.
After you set up session tracking, you can monitor the specific requests that cause violations byexamining each request and reviewing graphical charts.
Tracking specific user and session information
To monitor user and session information, you first need to set up session tracking for the security policy.
You can configure Application Security Manager™ to log, block, or delay blocking requests from aspecific username, session, or source IP address.
1. On the Main tab, click Security > Reporting > Application > Session Tracking Status.
BIG-IP Application Security Manager: Implementations
117
The Session Tracking Status screen opens and shows the users, sessions, and IP addresses that thesystem is currently tracking for this security policy.
2. Next to the Session Tracking Status list, click Add.The Add Session to Tracking screen opens.
3. From the Action list, select the action that the system will take if it detects the specified username,session, or IP address.Action Description
Block All Specifies that the system blocks all requests from a specific username, sessionID, IP address, or device ID for the configured period of time.
Log AllRequests
Specifies that the system blocks all requests from a specific username, sessionID, IP address, or device ID for the configured period of time.
Delay Blocking Specifies that the system will delay blocking the associated violations from aspecific username, session ID, IP address, or device ID until the threshold isreached; then they will be blocked for the configured period of time.
4. From the Scope list, specify whether the system is tracking a specific Username (the default value),Session, IP Address, or device ID.
5. In the Value field, type the unique username, session identification number, or IP address that youwant to track, based on what you selected in the Scope option.
6. Click Add.The system adds the entry to the Session Tracking list and immediately begins to enforce it.
If the system detects the specific username, session, or IP address, it takes that action you configured forit.
Overview: Tracking application security sessions using APMYou can track sessions using login pages configured from within Application Security Manager™
(ASM™), or have the policy retrieve the user names from Access Policy Manager® (APM®). Thisimplementation describes how to set up session tracking for a security policy using APM to verify usercredentials. Then, you can set up session awareness from within ASM to identify the user, session, or IPaddress that instigated an attack.
If you configure session tracking, you can view the user and session information in the applicationsecurity charts.
Prerequisites for setting up session tracking with APM
In order to set up session tracking from within Application Security Manager™ (ASM™) so that thesecurity policy retrieves the user names from Access Policy Manager ® (APM®), you need to performbasic these system configuration tasks according to the needs of your networking configuration:
• Run the setup utility and create a management IP address.• License and provision ASM, APM, and Local Traffic Manager™ (LTM®).• Configure a DNS address (System > Configuration > Device > DNS).• Configure an NTP server (System > Configuration > Device > NTP).• Restart ASM (at the command line, type tmsh restart /sys service asm).
Task summary
Use the following tasks to set up application security session tracking with APM authenticationintegrated.Creating a VLAN
Preventing Session Hijacking and Tracking User Sessions
118

Creating a self IP address for a VLANCreating a local traffic pool for application securityCreating a virtual server to manage HTTPS trafficCreating a simple security policyCreating an access profileConfiguring an access policyAdding the access profile to the virtual serverSetting up ASM session tracking with APMMonitoring user and session information
Creating a VLAN
VLANs represent a logical collection of hosts that can share network resources, regardless of theirphysical location on the network. You create a VLAN to associate physical interfaces with that VLAN.
1. On the Main tab, click Network > VLANs.The VLAN List screen opens.
2. Click Create.The New VLAN screen opens.
3. In the Name field, type a unique name for the VLAN.4. In the Tag field, type a numeric tag, between 1-4094, for the VLAN, or leave the field blank if you
want the BIG-IP system to automatically assign a VLAN tag.The VLAN tag identifies the traffic from hosts in the associated VLAN.
5. If you want to use Q-in-Q (double) tagging, use the Customer Tag setting to perform the followingtwo steps. If you do not see the Customer Tag setting, your hardware platform does not support Q-in-Q tagging and you can skip this step.a) From the Customer Tag list, select Specify.b) Type a numeric tag, from 1-4094, for the VLAN.
The customer tag specifies the inner tag of any frame passing through the VLAN.6. For the Interfaces setting,
a) From the Interface list, select an interface number.b) From the Tagging list, select Untagged.c) Click Add.
7. For the Hardware SYN Cookie setting, select or clear the check box.When you enable this setting, the BIG-IP system triggers hardware SYN cookie protection for thisVLAN.Enabling this setting causes additional settings to appear. These settings appear on specific BIG-IPplatforms only.
8. For the Syncache Threshold setting, retain the default value or change it to suit your needs.The Syncache Threshold value represents the number of outstanding SYN flood packets on theVLAN that will trigger the hardware SYN cookie protection feature.
When the Hardware SYN Cookie setting is enabled, the BIG-IP system triggers SYN cookieprotection in either of these cases, whichever occurs first:
• The number of TCP half-open connections defined in the LTM® setting Global SYN CheckThreshold is reached.
• The number of SYN flood packets defined in this Syncache Threshold setting is reached.9. For the SYN Flood Rate Limit setting, retain the default value or change it to suit your needs.
BIG-IP Application Security Manager: Implementations
119

The SYN Flood Rate Limit value represents the maximum number of SYN flood packets per secondreceived on this VLAN before the BIG-IP system triggers hardware SYN cookie protection for theVLAN.
10. Click Finished.The screen refreshes, and displays the new VLAN in the list.
Creating a self IP address for a VLAN
Ensure that you have at least one VLAN configured before you create a self IP address.
Self IP addresses enable the BIG-IP® system, and other devices on the network, to route applicationtraffic through the associated VLAN.
1. On the Main tab, click Network > Self IPs.2. Click Create.
The New Self IP screen opens.3. In the Name field, type a unique name for the self IP address.4. In the IP Address field, type an IPv4 or IPv6 address.
This IP address should represent the address space of the VLAN that you specify with the VLAN/Tunnel setting.
5. In the Netmask field, type the network mask for the specified IP address.
For example, you can type 255.255.255.0.6. From the VLAN/Tunnel list, select the VLAN to associate with this self IP address.
• On the internal network, select the internal or high availability VLAN that is associated with aninternal interface or trunk.
• On the external network, select the external VLAN that is associated with an external interface ortrunk.
7. Use the default values for all remaining settings.8. Click Finished.
The screen refreshes, and displays the new self IP address.
The BIG-IP system can now send and receive TCP/IP traffic through the specified VLAN.
Creating a local traffic pool for application security
You can use a local traffic pool with Application Security Manager™ system to forward traffic to theappropriate resources.
Note: Instead of doing it now, you can optionally create a pool if creating a virtual server during securitypolicy creation.
1. On the Main tab, click Local Traffic > Pools.The Pool List screen opens.
2. Click Create.The New Pool screen opens.
3. In the Name field, type a unique name for the pool.4. In the Resources area, for the New Members setting, add to the pool the application servers that host
the web application:a) Type an IP address in the Address field.b) In the Service Port field, type a port number (for example, type 80 for the HTTP service), or
select a service name from the list.c) Click Add.
Preventing Session Hijacking and Tracking User Sessions
120

5. Click Finished.
The BIG-IP® system configuration now includes a local traffic pool containing the resources that youwant to protect using Application Security Manager™.
Creating a virtual server to manage HTTPS traffic
You can create a virtual server to manage HTTPS traffic.
1. On the Main tab, click Local Traffic > Virtual Servers.The Virtual Server List screen opens.
2. Click the Create button.The New Virtual Server screen opens.
3. In the Name field, type a unique name for the virtual server.4. In the Service Port field, type 443 or select HTTPS from the list.5. From the Configuration list, select Advanced.6. From the HTTP Profile list, select http.7. For the SSL Profile (Client) setting, from the Available list, select clientssl, and using the Move
button, move the name to the Selected list.8. (Optional) From the SSL Profile (Server) list, select serverssl.
Note: This setting ensures that there is an SSL connection between the HTTP virtual server and theexternal HTTPS server.
9. From the Source Address Translation list, select Auto Map.10. From the Default Pool list, select the pool that is configured for application security.11. Click Finished.
The HTTPS virtual server appears in the Virtual Server List screen.
Creating a simple security policy
Before you can create a security policy, you must perform the minimal system configuration tasksrequired according to the needs of your networking environment.
You can use Application Security Manager™ to create a robust, yet simple, security policy that is tailoredto protect your web application. This is the easiest way to create a security policy.
1. On the Main tab, click Security > Application Security > Security Policies > Policies List.The Policies List screen opens.
2. Click Create New Policy.You only see this button when no policy is selected.
3. In the Policy Name field, type a name for the policy.4. Leave Policy Type, set to Security.5. For Policy Template, select Fundamental.6. For Virtual Server, click Configure new virtual server to specify where to direct application
requests.a) For What type of protocol does your application use?, select HTTP, HTTPS, or both.b) In the Virtual Server Name field, type a unique name.c) In the HTTP Virtual Server Destination field, type the address in IPv4 (10.0.0.1) or IPv6
(2001:ed8:77b5:2:10:10:100:42/64) format, and specify the service port.
BIG-IP Application Security Manager: Implementations
121

Tip: If you want multiple IP addresses to be directed here, use the Network setting.
d) In the HTTP Pool Member setting, specify the addresses of the back-end application servers.e) From the Logging Profile list, select a profile such as Log illegal requests to determine which
events are logged on the system.7. In the upper right corner, click Advanced.
You can use default values for the Advanced settings but it's a good idea to take a look at them.
• If you selected Fundamental or Comprehensive for the Policy Template, Learning Mode is setto Automatic and Enforcement Mode is set to Blocking.
Tip: If you need to change these values, set application language to a value other than Autodetect.
• If you know the Application Language, select it or use Unicode (utf-8).• To add specific protections (enforcing additional attack signatures) to the policy, for Server
Technologies, select the technologies that apply to the back-end application servers.• You can configure trusted IP addresses that you want the security policy to consider safe.
8. Click Create Policy to create the security policy.
ASM™ creates a security policy that immediately starts protecting your application. The enforcementmode of the security policy is set to Blocking. Traffic that is considered to be an attack such as traffic thatis not compliant with HTTP protocol, has malformed payloads, uses evasion techniques, performs webscraping, contains sensitive information or illegal values is blocked. Other potential violations arereported but not blocked.
The system examines the traffic to the web application making suggestions for more specifically buildingthe security policy. The Policy Builder selectively learns new entities like file types, parameters, andcookies used in requests to the application. When ASM processes sufficient traffic, it automatically addsthe entities to the security policy, and enforces them.
The system applies a basic set of attack signatures to the security policy and puts them in staging (bydefault, for 7 days). If you specified server technologies, additional attack signatures are included. ASMreports common attacks discovered by comparison to the signatures but does not block these attacks untilthe staging period is over and they are enforced. That gives you a chance to be sure that these are actualattacks and not legitimate requests.
Tip: This is a good point at which send some traffic to test that you can access the application beingprotected by the security policy and check that traffic is being processed correctly by the BIG-IP® system.Send the traffic to the virtual server destination address.
Creating an access profile
You create an access profile to provide the access policy configuration for a virtual server that establishesa secured session.
1. On the Main tab, click Access > Profiles / Policies.The Access Profiles (Per-Session Policies) screen opens.
2. Click Create.The New Profile screen opens.
3. In the Name field, type a name for the access profile.
Note: An access profile name must be unique among all access profile and any per-request policynames.
4. From the Profile Type list, select SSL-VPN.
Preventing Session Hijacking and Tracking User Sessions
122

Additional settings display.5. From the Profile Scope list, retain the default value or select another.
• Profile: Gives a user access only to resources that are behind the same access profile. This is thedefault value.
• Virtual Server: Gives a user access only to resources that are behind the same virtual server.• Global: Gives a user access to resources behind any access profile that has global scope.
6. To configure timeout and session settings, select the Custom check box.7. In the Inactivity Timeout field, type the number of seconds that should pass before the access policy
times out. Type 0 to set no timeout.If there is no activity (defined by the Session Update Threshold and Session Update Windowsettings in the Network Access configuration) between the client and server within the specifiedthreshold time, the system closes the current session.
8. In the Access Policy Timeout field, type the number of seconds that should pass before the accessprofile times out because of inactivity.Type 0 to set no timeout.
9. In the Maximum Session Timeout field, type the maximum number of seconds the session can exist.Type 0 to set no timeout.
10. In the Max Concurrent Users field, type the maximum number of users that can use this accessprofile at the same time.Type 0 to set no maximum.
11. In the Max Sessions Per User field, type the maximum number of concurrent sessions that one usercan start.Type 0 to set no maximum.
Note: Only a user in the administrator, application editor, manager, or resource administrator rolehas access to this field.
12. In the Max In Progress Sessions Per Client IP field, type the maximum number of concurrentsessions that can be in progress for a client IP address.When setting this value, take into account whether users will come from a NAT-ed or proxied clientaddress and, if so, consider increasing the value accordingly. The default value is 128.
Note: Only a user in the administrator, application editor, manager, or resource administrator rolehas access to this field.
Note: F5 does not recommend setting this value to 0 (unlimited).
13. Select the Restrict to Single Client IP check box to restrict the current session to a single IP address.This setting associates the session ID with the IP address.
Note: Only a user in the administrator, application editor, manager, or resource administrator rolehas access to this field.
Upon a request to the session, if the IP address has changed the request is redirected to a logout page,the session ID is deleted, and a log entry is written to indicate that a session hijacking attempt wasdetected. If such a redirect is not possible, the request is denied and the same events occur.
14. To configure logout URIs, in the Configurations area, type each logout URI in the URI field, and thenclick Add.
15. In the Logout URI Timeout field, type the delay in seconds before logout occurs for the customizedlogout URIs defined in the Logout URI Include list.
BIG-IP Application Security Manager: Implementations
123
16. To configure SSO:
• For users to log in to multiple domains using one SSO configuration, skip the settings in the SSOAcross Authentication Domains (Single Domain mode) area. You can configure SSO for multipledomains only after you finish the initial access profile configuration.
• For users to log in to a single domain using an SSO configuration, configure settings in the SSOAcross Authentication Domains (Single Domain mode) area, or you can configure SSO settingsafter you finish the initial access profile configuration.
17. In the Domain Cookie field, specify a domain cookie, if the application access control connectionuses a cookie.
18. In the Cookie Options setting, specify whether to use a secure cookie.
• If the policy requires a secure cookie, select the Secure check box to add the secure keyword tothe session cookie.
• If you are configuring an LTM access scenario that uses an HTTPS virtual server to authenticatethe user and then sends the user to an existing HTTP virtual server to use applications, clear thischeck box.
19. If the access policy requires a persistent cookie, in the Cookie Options setting, select the Persistentcheck box.This sets cookies if the session does not have a webtop. When the session is first established, sessioncookies are not marked as persistent; but when the first response is sent to the client after the accesspolicy completes successfully, the cookies are marked persistent. Persistent cookies are updated forthe expiration timeout every 60 seconds. The timeout is equal to session inactivity timeout. If thesession inactivity timeout is overwritten in the access policy, the overwritten value will be used to setthe persistent cookie expiration.
20. From the SSO Configurations list, select an SSO configuration.21. In the Language Settings area, add and remove accepted languages, and set the default language.
A browser uses the highest priority accepted language. If no browser language matches the acceptedlanguages list, the browser uses the default language.
22. Click Finished.
The access profile displays in the Access Profiles List. Default-log-setting is assigned to the accessprofile.
To add an SSO configuration for multiple domains, click SSO / Auth Domains on the menu bar. Toprovide functionality with an access profile, you must configure the access policy. The default accesspolicy for a profile denies all traffic and contains no actions. Click Edit in the Access Policy column toedit the access policy.
Configuring an access policy
You configure an access policy to provide authentication, endpoint checks, and resources for an accessprofile. This procedure configures a simple access policy that adds a logon page, gets user credentials,submits them to an authentication type of your choice, then allows authenticated users, and denies others.
1. On the Main tab, click Access > Profiles / Policies.The Access Profiles (Per-Session Policies) screen opens.
2. Click the name of the access profile you want to edit.3. On the menu bar, click Access Policy.4. For the Visual Policy Editor setting, click the Edit access policy for Profile policy_name link.
The visual policy editor opens the access policy in a separate window or tab.5. Click the (+) icon anywhere in the access policy to add a new item.
Preventing Session Hijacking and Tracking User Sessions
124

Note: Only an applicable subset of access policy items is available for selection in the visual policyeditor for any access profile type.
A popup screen opens, listing predefined actions on tabs such as General Purpose, Authentication,and so on.
6. On the Logon tab, select Logon Page and click the Add Item button.The Logon Page Agent properties screen opens.
7. Click Save.The Access Policy screen reopens.
8. On the rule branch, click the plus sign (+) between Logon Page and Deny.9. Set up the appropriate authentication and client-side checks required for application access at your
company, and click Add Item.10. Change the Successful rule branch from Deny to Allow and click the Save button.11. If needed, configure further actions on the successful and fallback rule branches of this access policy
item, and save the changes.12. At the top of the screen, click the Apply Access Policy link to apply and activate your changes to this
access policy.13. Click the Close button to close the visual policy editor.
To apply this access policy to network traffic, add the access profile to a virtual server.
Note: To ensure that logging is configured to meet your requirements, verify the log settings for theaccess profile.
Adding the access profile to the virtual server
Before you can perform this task, you need to create an access profile using Access Policy Manager®.
You associate the access profile with the virtual server created for the web application that ApplicationSecurity Manager™ is protecting.
1. On the Main tab, click Local Traffic > Virtual Servers.The Virtual Server List screen opens.
2. Click the name of the virtual server that manages the network resources for the web application youare securing.
3. In the Access Policy area, from the Access Profile list, select the access profile that you configuredearlier.
4. Click Update.
Your access policy is now associated with the virtual server.
Setting up ASM session tracking with APM
You can use session tracking to track, enforce, and report on user sessions and IP addresses. To performtracking, you enable session awareness and indicate how to associate the application user name with thesession.
1. On the Main tab, click Security > Application Security > Sessions and Logins > Session Tracking.The Session Tracking screen opens.
2. In the Session Tracking Configuration area, select the Session Awareness check box.3. From the Application Username list, select Use APM Usernames and Session ID.4. In the Violation Detection Actions area, select the Track Violations and Perform Actions check
box.
BIG-IP Application Security Manager: Implementations
125

5. In the Violation Detection Period field, type the number of seconds that indicates the sliding timeperiod to count violations for violation thresholds.The default is 900 seconds.
6. If you want the system to block all activity for a user, session, device ID, or IP address when thenumber of violations exceeds the threshold within the violation detection period, specify one or moreof the following settings on the Block All tab.Option Description
Blocked URLs Specify which URLs to block after the number of violations exceeds the enabledthresholds. To block all URLs, select Block all URLs. To block authenticatedURLs protected by login pages, select Block Authenticated URLs.
UsernameThreshold
Select Enable and specify the number of violations allowed before the systemstarts to block this user's activity.
SessionThreshold
Select Enable and specify the number of violations allowed before the systemstarts to block activity for this HTTP session.
Device IDThreshold
Select Enable and specify the number of violations allowed per device IDbefore the system starts to block activity for this device.
IP AddressThreshold
Select Enable and specify the number of violations allowed before the systemstarts to block the activity for this IP address.
Block All Period Specify how long to block users, sessions, or IP addresses if the number ofviolations exceeds the threshold. To block the user, session, or IP addressindefinitely, click Infinite. Otherwise, click User-defined and type the numberof seconds to block the traffic. The default is 600 seconds.
Note: For the system to block requests, the security policy Enforcement Mode must be set to blockingand some violations must be set to block.
7. If you want the system to log activity when the number of violations for user, session, device ID, orIP address, exceeds the threshold during the violation detection period, specify one or more of thefollowing settings on the Log All Requests tab.Option Description
UsernameThreshold
Select Enable and specify the number of violations allowed before the systemstarts logging this user's activity for the log all requests period.
Session Threshold Select Enable and specify the number of violations allowed before the systemstarts logging activity for this HTTP session for the log all requests period.
Device IDThreshold
Select Enable and specify the number of violations allowed before the systemstarts to log requests for this device.
IP AddressThreshold
Select Enable and specify the number of violations allowed before the systemstarts logging the activity of this IP address for the log all requests period.
Log All RequestsPeriod
Specify how long the system should log all requests when any of the enabledthresholds is reached. Type the number of seconds in the field.
8. If you want more tolerant blocking for selected violations, such as those prone to false positives,specify one or more of the following settings on the Delay Blocking tab.Option Description
UsernameThreshold
Select Enable and specify the number of violations a user must cause before thesystem begins blocking this user for the delay blocking period.
Preventing Session Hijacking and Tracking User Sessions
126

Option Description
SessionThreshold
Select Enable and specify the number of violations users must cause (during theviolation detection period) before the system begins blocking this HTTP sessionfor the delay blocking period.
Device IDThreshold
Select Enable and specify the number of violations allowed per device IDbefore the system starts to block illegal requests from the device.
IP AddressThreshold
Select Enable and specify the number of violations allowed before the systembegins blocking this IP address for the delay blocking period.
Delay BlockingPeriod
Type the number of seconds that the system should block the user, session, or IPaddress when any of the enabled thresholds is reached.
AssociatedViolations
Move the violations for which you want delay blocking from the Available listinto the Selected list. If the selected violations occur, the system does not blocktraffic until one of the enabled thresholds is reached. At that point, the systemblocks traffic causing those violations for the user, session, or IP address, butallows other transactions to pass.
Note: For the system to block requests, the security policy Enforcement Mode must be set to blockingand some violations must be set to block.
9. Click Save to save your settings.
After you set up session tracking, if any enabled threshold exceeds the number of violations during thedetection period, the system starts the configured actions for block all, log all requests, and delayblocking.
Test that you can log in to the web application through the Access Policy Manager™ logon page. You canalso test that the security policy works by generating violations and reviewing the application securitylogs.
Monitoring user and session information
To monitor user and session information, you first need to set up session tracking for the security policy.
You can use the reporting tools in Application Security Manager™ to monitor user and session details,especially when you need to investigate suspicious activity that is occurring with certain users, sessions,or IP addresses.
1. On the Main tab, click SecurityReporting ApplicationSession Tracking Status.The Session Tracking Status screen opens and shows the users, sessions, and IP addresses that thesystem is currently tracking for this security policy.
2. From the Action list, select the action by which to filter the data.Action Description
All Specifies that the screen displays all entries. This is the default value.
Block All Specifies that the system displays sessions whose requests the system blocksafter the configured threshold was reached.
Log All Requests Specifies that the system displays sessions whose requests the system logs afterthe configured threshold was reached.
Delay Blocking Specifies that the system displays sessions whose requests the system delayedblocking until the configured threshold was reached.
3. From the Scope list, specify the scope (username, session, or IP address) by which to filter the data.
BIG-IP Application Security Manager: Implementations
127

Option Description
Alt Specifies that the screen displays all entries. This is the default value.
Username Specifies that the system displays usernames whose illegal requests exceeded thesecurity policy’s threshold values.
Session Specifies that the system displays identification numbers of illegal sessions thatexceeded the security policy’s threshold values.
IP Address Specifies that the system displays IP addresses where illegal requests from these IPaddresses exceeded the security policy’s threshold values.
Device ID Specifies that the system displays device IDs where illegal requests from these devicesexceeded the security policy’s threshold values.
4. If you want to filter the information by value, in the Value field, type the username, sessionidentification number, IP address, device ID, or string. If empty, the screen displays all entries.
5. When you finish specifying the filter details, click Go.The Session Tracking Status list now shows the information specified in the Filter setting.
After you set up session tracking, you can monitor the specific requests that cause violations byexamining each request and reviewing graphical charts.
Preventing Session Hijacking and Tracking User Sessions
128

Mitigating Open Redirects
Overview: Mitigating open redirectsApplication Security Manager™ (ASM) can protect users from open redirects. An open redirect is avulnerability where the server tries to redirect the user to a target domain that is not defined in thesecurity policy. This vulnerability is one of the OWASP top ten application security risks.
Spammers use open redirects in phishing attacks to get users to visit malicious sites without knowing it.Often, the request includes a parameter, which contains a URL that redirects a user to an external webapplication without any validation. An example of this vulnerability is a request such as: https://www.good.com/redirect.php?url=http://www.evil.com.
This type of request may result in a response containing a Location header that points to a new target. Forexample:
HTTP/1.1 200 OK Location: http://www.evil.com
You can configure redirection protection and the domains where users are permitted to be redirected on aresponse header in an existing security policy. By default, redirection protection is enabled in ASM witha pure wildcard configured as an allowed domain (effectively providing no enforcement). You can adjustthe settings so that the security policy allows redirect to specific domains, and protects againstunvalidated redirects.
This feature does not affect internal redirection, which is always allowed. For example, the followingexample would be allowed even if redirection protection is enabled on the system.
Location: /<anotherpage>/<thisserver>/internal_redirect.php
Task SummaryMitigating open redirectsAdjusting how open redirects are learnedEnforcing redirection domains
Mitigating open redirects
You can configure an existing security policy in Application Security Manager™ (ASM) to protect usersfrom being redirected by unvalidated redirects. By enabling redirection protection, you can help preventusers from being redirected to questionable phishing or malware web sites.
1. On the Main tab, click Security > Application Security > Headers > Redirection Protection.The Redirection Protection screen opens.
2. In the Current edited security policy list near the top of the screen, verify that the security policyshown is the one you want to work on.
3. Make sure that the Redirection Protection check box is selected.4. In the Allowed Redirection Domains setting, configure the domains where users can be redirected.

a) In the Domain Name field, type the name of the domain (in English-only, such as yahoo.com),or its IP address.
If protection is enabled and no domains are configured, then only relative URIs are allowed (forexample, /login.php).
b) If you want users to be able to be redirected to sub-domains of the specified domain, selectInclude Sub-domains.If this check box is selected for f5.com, for example, then redirects to www.f5.com,mail.f5.com, and websupport.f5.com are also allowed. If it is not selected, redirection tosub-domains, such as www.f5.com, is not allowed. You need to add all allowed domains and sub-domains explicitly in that case.
c) Click Add.The system adds the domain to the security policy’s list of allowed redirection domains.
You can add up to 100 redirection domains. If you are using the Policy Builder for automatic policybuilding, you can leave the * wildcard configured to Add All Entities in the policy. When thetightening period is over and the policy is stable, the system will have added the redirection domainsoccurring within the traffic that it saw (if any), and then the system deletes the wildcard. If not usingthe Policy Builder, consider removing the * wildcard.
5. In the Allowed Redirection Domains setting, select the * wildcard and click the Enforce button todelete it.
6. Click Save to save your settings.
If ASM™ receives a request that attempts to redirect the user to a domain other than one that is listed inthe redirection protection, the system issues an Illegal redirection attempt violation, which isan attack type of Open/Unvalidated Redirects. The violation is set to Learn, Alarm, and Block, bydefault. If the policy is in transparent mode, responses are always forwarded to the client. If the policy isin blocking mode, illegal redirection attempts are blocked.
Adjusting how open redirects are learned
You can adjust the explicit entities learning settings for redirection domains. Explicit learning settingsspecify when the system adds, or suggests you add, redirection domains to the security policy.
1. On the Main tab, click Security > Application Security > Policy Building > Learning andBlocking Settings.The Learning and Blocking Settings screen opens.
2. In the Current edited security policy list near the top of the screen, verify that the security policyshown is the one you want to work on.
3. In the Policy Building Settings area, expand Redirection Protection.4. For the Learn New Redirection Domains setting, select the option for when to make Learning
suggestions (based on real traffic).Option Description
Never(wildcardonly)
Specifies that when false positives occur, the system suggests relaxing the settingsof the wildcard. The system does not add domains to the list of allowed redirectiondomains, and does not remove the wildcard (regardless of the Learning Mode).
Always Creates a comprehensive whitelist policy that includes all observed domains to thelist of allowed redirection domains. If Learning Mode is set to Automatic, it addsexplicit domains to the security policy. When the security policy is stable, the *wildcard is removed. If Learning Mode is set to Manual, the system suggestsadding explicit domains. This is the default value.
5. If adding redirection domains, adjust the number in Maximum Learned Redirection Domains ifnecessary.
Mitigating Open Redirects
130

6. Click Save to save your settings.7. To put the security policy changes into effect immediately, click Apply Policy.
The security policy now learns new redirection domains according to the Redirection Protection settingsyou specified.
Enforcing redirection domains
After you create a security policy and traffic is sent to the web application, the system adds domainswhere users are redirected. Redirection protection is enabled by default with a pure wildcard. You canreview the redirection domains that are ready to be enforced, and add them to the security policy if theyare valid places users should be going.
1. On the Main tab, click Security > Application Security > Policy Building > Traffic Learning.The Enforcement Readiness summary is on the bottom right.
2. In the Current edited security policy list near the top of the screen, verify that the security policyshown is the one you want to work on.
3. To enforce all entities that are ready to be enforced, click Enforce Ready Entities.If you click this button, you are done. Continue only if you want to review learning suggestions forredirection domains.
4. In the Enforcement Readiness Summary, check to see if a number appears in the Have Suggestionscolumn next to redirection domains.A number greater than zero indicates that an Illegal Redirection Attempt occurred, and the systemmade a learning suggestion.
5. Click the number in the Have Suggestions column.6. Select the domains to which you want the security policy to allow users to be redirected, and click
Accept.7. Click Learning and Blocking Settings, expand Redirection Protection, and check to be sure that
the Learn, Alarm, and Block settings for the Illegal Redirection Attempt violation areselected.
The system adds selected redirection domains to the security policy and allows users to be redirected tothem. Attempts at redirection to other domains will be blocked when the system is in blocking mode.
On the Policy Building Status (Automatic) screen, you can review the status of the security policy, seethe policy elements that were added including the redirection domains, and view details about them.
Implementation resultsWhen you configure redirection protection, Application Security Manager™ (ASM) protects users frombeing redirected to a web site that is not listed in the allowed redirection domains. If the pure wildcard islisted as an allowed domain, ASM™ allows redirection to all domains. If you want to check whether usersare redirected by the application, you can leave the wildcard as an allowed domain and let the systemlearn the redirect domains.
For the allowed domains, the system does not enforce protocol differences: HTTPS and HTTP are treatedthe same.
ASM sets the explicit entities learning for redirection domains in the general policy building settings. Thesecurity policy learns, by default, all domains (Add All Entities) where users are redirected. If you areusing automatic learning, the system adds to the security policy the redirect domains that match the purewildcard. When the security policy is stable, the system removes the wildcard redirect domain from thesecurity policy, and allows users to be redirected only to the redirect domains that were added to thepolicy.
BIG-IP Application Security Manager: Implementations
131

If you are building the security policy manually, the system learns and suggests that you add the redirectdomains that it detects. You can determine whether there are redirection domains with learningsuggestions by looking at the Enforcement Readiness Summary. After you add the legitimate redirectdomains to the security policy, you can consider removing the wildcard redirect domain from the securitypolicy. As a result, the policy on redirects becomes more strictly enforced.
Mitigating Open Redirects
132

Setting Up Cross-Domain Request Enforcement
About cross-domain request enforcementCross-Origin Resource Sharing (CORS) is an HTML5 feature that enables one website to access theresources of another website using JavaScript within the browser. On occasion, your web applicationmight need to share resources with another external website that is hosted on a different domain. UsingApplication Security Manager™, you can safely allow CORS by specifying the conditions that state whena foreign web application is allowed to access your web application, after making a cross-domain request.This feature is called cross-domain request enforcement.
You enable cross-domain request enforcement as part of the Allowed HTTP or WebSocket URLproperties within a security policy. Then you can specify which domains can access the responsegenerated by requesting this URL (the “resource”). For HTTP URLs, you can also configure how tooverwrite CORS response headers that are returned by the web server.
This feature does not affect internal redirection, which is always allowed. For example, Location: /anotherpage/onthisserver/internal_redirect.php would be allowed even if cross-domainrequest enforcement is enabled on the system.
Setting up cross-domain request enforcement
For this task, the security policy needs to have an allowed HTTP or WebSocket URL.
If you want to allow your application website to access the resources of another website, you can addcross-domain request enforcement to an existing HTTP or WebSocket URL. This procedure shows howto enable Cross-Origin Resource Sharing (CORS) support on your application server for either type ofURL.
1. On the Main tab, click Security > Application Security > URLs.The Allowed HTTP URLs screen opens.
2. In the Current edited security policy list near the top of the screen, verify that the security policyshown is the one you want to work on.
3. Locate the HTTP or WebSocket URL that needs CORs support:a) From the Allowed URLs menu, choose either Allowed HTTP URLs or Allowed WebSocket
URLs.b) In either the Allowed URLs List or the Allowed WebSocket URLs List, click the URL you want
to modify.
The Allowed HTTP URL Properties screen or WebSocket URL Properties screen for the URL opens.4. From either URL Properties list, select Advanced.5. Click the HTML5 Cross-Domain Request Enforcement tab.6. For Enforcement Mode, specify the option to determine how to handle CORS requests.
Select this option To do this
Disabled Do nothing related to cross-domain requests. Pass CORS requestsexactly as set by the server.
Remove all CORS headers Remove all CORS headers from the response. The response is sentto the browser, and the browser does not allow cross-origin requests.

Select this option To do this
Replace CORS headers(HTTP URLs only)
Replace the CORS header in the response with another headerspecified on the tab, including allowed origins, allowed methods,allowed headers, and so on. The browser enforces the policy. Thenafter Replace with specify the protocol, origin, and port forreplacing CORS headers.
Enforce on ASM Allow cross-origin resource sharing as configured in the AllowedOrigins setting. CORS requests are allowed from the domainsspecified as allowed origins. ASM enforces the policy. Specify theprotocol, origin, and port of allowed origins
For maximum security, F5 recommends that you select Enforce on ASM.The tab now includes additional settings determined by the option you selected.
7. For the Allowed Origins setting, add the origins that are allowed to share data returned by this URL.a) For Protocol, select the appropriate protocol for the allowed origin.b) For Origin Name, type the domain name or IP address with which the URL can share data.
Wildcards are allowed in the names. For example: *.f5.com will match b.f5.com; however itwill not match a.b.f5.com.
c) For Port, select the port that other web applications can use to request data from your webapplication, or use the * wildcard for all ports.
d) If you want to allow sub-domains to receive data, select the Include Sub-Domains check box.e) Click Add to add the origins.
The origins that can share data with the URL are included in the list.8. Click Update.9. To put the security policy changes into effect immediately, click Apply Policy.
The security policy allows requests for the HTTP or WebSocket URL to access the resources of otherwebsites hosted in a different domain according to the enforcement conditions that you configured.
ASM extracts the Origin (domain) of the request from the Origin header. If the Origin header is missingor has more than one occurrence, ASM issues an Illegal cross-origin request violation if it isset to alarm or block. If the violation is set to block in the URL section of the Learning and BlockingSettings (and the Enforcement Mode of the security policy is set to blocking), the system blocks therequest.
If a request comes from a domain that does not belong to the application and is not specified in the list ofallowed origins, the system also issues an Illegal cross-origin request violation. If the violationis set to block (and the Enforcement Mode is set to blocking), the request is blocked.
Replacing CORS headers in requests
For this task, the security policy needs to have an allowed HTTP URL. Also, the OPTIONS method mustbe on the Allowed Methods list.
CORS headers are enforced by all popular browsers. The browser reads the allowed origins from theAccess-Control-Allowed-Origin headers in the response. If the subsequent request from that page doesnot match any of the allowed origins, the browser will not place the request. In many situations, theservers do not populate those headers properly, so you can have ASM™ replace the CORS headers.If you want ASM to replace CORS headers when enforcing HTML5 cross-domain requests, you canupdate an existing HTTP URL. This task does not apply to WebSocket URLs, only HTTP URLs.
1. On the Main tab, click Security > Application Security > URLs.The Allowed HTTP URLs screen opens.
Setting Up Cross-Domain Request Enforcement
134

2. In the Current edited security policy list near the top of the screen, verify that the security policyshown is the one you want to work on.
3. From the Allowed HTTP URLs List, click the name of the URL you want to modify.The Allowed HTTP URL Properties screen opens.
4. From the Allowed URL Properties list, select Advanced.5. On the HTML5 Cross-Domain Request Enforcement tab, for Enforcement Mode, select Replace
CORS headers.The tab now includes additional settings where you define how to overwrite CORS response headersreturned by the web server.
6. In the Allowed Origins setting, add the origins that are allowed to share data returned by this URL.Select Replace with, then specify the origin names:a) For Protocol, select the appropriate protocol for the allowed origin.b) For Origin Name, type the domain name or IP address that you want to allow to share your data
with.Wildcards are allowed in the names. For example: *.f5.com will match b.f5.com, but it willnot match a.b.f5.com.
c) For Port, select the port that other web applications can use to request data from your webapplication, or use the * wildcard for all ports.
d) If you want to allow sub-domains to receive data, select the Include Sub-Domains check box.e) Click Add to add the origins.
The origins that can share data with the URL are included in the list.7. Optionally, for Allowed Methods, specify which methods other applications may use when
requesting this URL from another domain. Select Replace with, then move the methods to allowfrom the Available Methods to the Allowed Methods list.
Important: Any method you allow here must also be in the Allowed Methods list in the security policy(Security > Application Security > Headers > Methods).
8. Optionally, for Allowed Headers, select Replace with, then type the headers that other applicationscan use when requesting this URL from another domain.Allowed headers are request headers sent by clients. For example, to allow clients to send Ajaxrequests, type X-Requested-With, and to allow XML requests, type Content-Type.
9. Optionally, for Exposed Headers, select Replace with, then specify the headers that JavaScript canexpose and share with other applications when requesting this URL from another domain.Exposed headers are the headers the server returns in the response. For example, to discover serverside web application technology, type X-Powered-By.
10. Optionally, for Allow Credentials, select Replace with, then specify whether requests fromapplications in another domain can include user credentials.
11. Optionally, for Maximum Age, select Replace with, then specify the number of seconds that theresults of a preflight request can be cached or use the default.
12. Click Update.13. To add methods, such as OPTIONS, required to replace headers:
a) Click Security > Application Security > Headers > Methods.b) Click Create.c) In the Method setting, select OPTIONS.d) Click Create.
14. To put the security policy changes into effect immediately, click Apply Policy.
The security policy passes the CORS request to the application server. ASM replaces the header of theresponse with the header you specified, and returns the response.
BIG-IP Application Security Manager: Implementations
135

If this request is authorized by the web server, the browser allows the foreign domain to send its originalrequest. If the request from that page does not match any of the allowed origins, the browser declines therequest.
How cross-domain request enforcement works
If you enable cross-domain request enforcement, the system must authorize requests (typically AJAXrequests) made from one domain to another. When a client makes a request to another origin, the browsersends a preflight request to determine whether JavaScript from another domain may access your resource.
When processing a modification request, the browser sends a preflight request if it has no previouslycached allowed origins (that is, this is the first time the browser goes to the foreign domain for suchrequests). The preflight request uses an OPTIONS HTTP method and CORS-related headers to checkwhether the server authorizes that origin.
The CORS-related headers that are included in a preflight request are:
Header Description
Origin Determines requesting origin.
Access-Control-Request-Method Indicates which methods are used in the actual request (other thansimple methods).
Access-Control-Request-Headers Indicates which headers are used in the actual request (other thansimple headers).
In response to the preflight request, the system uses these CORS response headers:
Header Description
Access-Control-Allow-Origin List of origins the resource may be shared among (supportwildcard).
Access-Control-Allow-Credentials
Indicates whether actual request may include user credentials (true/false).
Access-Control-Allow-Methods Indicates which methods can be used during the actual request.
Access-Control-Allow-Headers Indicates which request headers can be used during the actualrequest.
Access-Control-Max-Age Indicates how long (in seconds) to cache the results of a preflightrequest in the browser.
Access-Control-Expose-Headers Indicates which response headers are safe to expose to JavaScript.
The browser uses the response to determine whether to allow the JavaScript to make the actual request. Ifthe cross-domain request is authorized, the server processes the actual requests by rechecking the originand including another response header:
Header Description
Access-Control-Expose-Headers Indicates which response headers are safe to expose to JavaScript.
The browser then allows the foreign domain to send its original requests.
If you do not enable cross-domain request enforcement, the system removes all cross-origin requestheaders and CORS is not allowed for the URL.
If you select Enforce on ASM as the CORS Enforcement Mode, ASM™ permits access according to theallowed origins. So, when using this option, there is no need for a preflight request because ASM itself
Setting Up Cross-Domain Request Enforcement
136

checks the origin. Unlike using the Replace CORS headers setting, ASM, not the browser, does theenforcement.
BIG-IP Application Security Manager: Implementations
137

Setting Up Cross-Domain Request Enforcement
138
Implementing Web Services Security
Overview: Implementing web services securityWeb services security adds another level of protection to XML-based web applications by embeddingsecurity-related data within SOAP messages. For web services that Application Security Manager™
protects, you can use web services security to do the following:
• Encrypt and decrypt parts of SOAP messages• Digitally sign parts of SOAP messages• Verify parts of SOAP messages using digital signatures
If you want to use features such as encryption, you can add web services security to an existing securitypolicy that has an associated XML profile. You can enforce web services security only for URLs.
Task SummaryAdding client and server certificatesEnabling encryption, decryption, signing, and verification of SOAP messagesWriting XPath queriesConfiguring blocking actions for web services security
About client and server certificates
Client and server certificates are XML digital signatures that ensure the integrity of the message data, andcan authenticate the identity of the document signer. By importing client and server certificates, thesystem can perform encryption and decryption of SOAP messages.
The system uses client and server certificates differently:
Server CertificatesDecrypt SOAP messages from a web client to a web service, or sign SOAP messages from a webservice back to a web client.
Client CertificatesEncrypt SOAP messages from a web service to a web client, or verify SOAP messages from a webclient to a web service.
Adding client and server certificates
To use web services security for encryption, decryption, and digital signature signing and verification,you must upload client and server certificates onto the Application Security Manager™. The system usesthese certificates to process Web Services Security markup in SOAP messages within requests andresponses to and from web services.
You must import both client and server certificates to perform encryption and decryption on theApplication Security Manager.
1. On the Main tab, click Security > Options > Application Security > Advanced Configuration >Certificates Pool.The Certificates Pool screen opens.

2. Add one server certificate, and a client certificate for each client that you want to access the XMLapplication. For each certificate you want to add, perform these steps:
Note: The server and client certificates must be PEM files in x509v3 format. Also, the servercertificate should contain the server’s private key.
a) Click Add.The Create New Certificate screen opens.
b) For Name, type a name for the certificate.c) For Type, select Client or Server, as appropriate.d) For the .PEM File setting, either select Upload File from the list, then browse to and upload a
certificate, or select Paste text to paste a copy of the certificate in the field.e) To store the certificate even if it is expired or untrusted, enable the Save Expired/Untrusted
Certificate setting.f) Click Add.
The system adds the certificate to the certificates pool.
You have added client or server certificates to the system’s database. You can configure a security policyto use these certificates in an associated XML profile. The certificates in the pool can be used for anyweb applications.
Enabling encryption, decryption, signing, and verification of SOAP messages
Before you can complete this task, you first must have created a security policy, created and associated anXML profile with the policy, and uploaded security certificates onto the system.
You can use the web services security features of Application Security Manager™ to off load encryptionand decryption of SOAP messages from the application server. Web services security can also handleverification of digital signatures and digital signing of SOAP messages.
1. On the Main tab, click Security > Application Security > Content Profiles > XML Profiles.The XML Profiles screen opens.
2. Click the name of the XML profile for which you want to configure web services security, or create anew profile.The XML Profile Properties screen opens.
3. For the Web Services Security setting, select Enabled.4. Click Web Services Security Configuration.
The XML Profile Properties screen displays Web Services Security Configuration options.5. For Server Certificate, select one server certificate from the list, or click Create to add a new
certificate to the configuration.A Request area appears after you specify the certificate.The system uses the server certificate to decrypt SOAP messages from a web client to a web service,or sign SOAP messages from a web service back to a web client.
6. For Client Certificates, select names from the Available list and then move them into the Memberslist.The system uses the client certificates to encrypt SOAP messages from a web service to a web client,or to verify SOAP messages from a web client to a web service.
7. In the Request area, for Action, select the action you want the system to perform in SOAP messagerequests.
• Select Verify and Decrypt to decrypt and verify digitally signed SOAP messages. F5recommends that you use this value.
• Select Decrypt to decode encrypted SOAP messages.
Implementing Web Services Security
140

• Select Verify to validate digitally signed SOAP messages. This option is available only if youimported client certificates, but no server certificate.
8. For Role/Actor, select a role to determine which security headers you want the system to process inSOAP message requests.Role Description
Do not check role/actor Process all security headers regardless of the role. This is the defaultsetting.
Custom role/actor Process security headers that contain the role you type in the adjacentbox.
next Process security headers that contain the role next or http://www.w3.org/2003/05/soap-envelope/role/next.
none Process security headers that contain the role none or http://www.w3.org/2003/05/soap-envelope/role/none.
ultimateReceiver Process security headers that contain the role ultimateReceiver orhttp://www.w3.org/2003/05 /soap-envelope/role/ultimateReceiver.
9. Select the Enforce And Verify Defined Elements check box to confirm that elements defined in theNamespaces and Elements area of the screen and contained in the request are signed and verified.This setting also enforces the options SOAP Body in Request Must Be Signed and Verified andEnforce Timestamp In Request.
10. In the Response area, for Action, select the action you want the system to perform on the elementsdefined in the Namespaces and Elements area of the screen for SOAP message responses.
• Select Encrypt to encrypt the elements.• Select Sign to digitally sign the elements.• Select Sign, Then Encrypt to first digitally sign and then encrypt the elements. F5 recommends
that you use this value.• Select Encrypt, Then Sign to first encrypt, then digitally sign the elements.
Note: For the action to occur, you must also select Apply Action To Defined Elements.
11. To limit how long a security header is valid:a) Enable the Add Timestamp setting.b) Type the length of time (in seconds) the timestamp should be valid. The default is 300 seconds.
If you want the timestamp to be valid for an unlimited amount of time, enter 0. The maximumvalue is 134217728 seconds.
12. For Role/Actor, select a role to insert into the security header of SOAP messages.Role Description
Do not assign role/actor
If the document contains a security header without a role, the systeminserts the cryptographic information into the security header. This is thedefault setting.
Assign custom role/actor
If the document contains a security header with a custom role, the systeminserts the cryptographic information into the existing security header. Inthe field, type the custom role/actor attribute.
next If the document contains a security header with the next role, the systeminserts the cryptographic information into that security header.
none If the document contains a security header with the none role, the systeminserts the cryptographic information into that security header.
BIG-IP Application Security Manager: Implementations
141

Role Description
ultimateReceiver If the document contains a security header with the ultimateReceiverrole, the system inserts the cryptographic information into that securityheader.
13. If the response action includes signing, for Signature Algorithm, select the type of signaturealgorithm used to sign parts of SOAP messages in responses that match the response elements thatyou configure in the Namespaces and Elements area of the screen.
• Select RSA-SHA-1 (the default value) to use the RSA public cryptosystem for encryption andauthentication.
• Select HMAC-SHA-1 to use secret-key hashing.
Tip: Be sure your clients support this type of encryption.
14. If the response action includes encryption, for Encryption Algorithm and Key TransportAlgorithm, select the types of encryption to use for the elements and keys.
15. Select the Apply Action To Defined Elements check box to perform the action you selected.16. In the Namespaces and Elements area of the Web Services Security Configuration, configure these
settings to specify how to process the XML document:a) For Namespace Mappings, add the namespace mappings (prefix and URLs) the system uses for
XPath queries:b) Select the SOAP Body In Request Must Be Signed And Verified check box to verify that
requests contain a SOAP body that is digitally signed and verified.If not, the system issues a Verification Error violation.
c) Select the Enforce Timestamp In Request check box to verify that the SOAP request contains avalid timestamp.If the request has no timestamp, the Missing Timestamp violation occurs. If the timestamp isexpired, the system issues the Expired Timestamp violation.
17. Specify which parts of the XML document you want the system to process:
• If you want the response action to apply to the whole SOAP message (/soapenv:Envelope/soapenv:Body), select the Apply Action to Entire Response Body Value check box.
• To specify which parts of requests and responses you want the system to process, use theElements setting to add XPath expressions to define the parts of the SOAP message to encrypt.
18. If you are updating an existing profile, click Update. If you are creating a new profile, click Create.
The security policy that is associated with the XML profile now includes web services security for theXML application.
Writing XPath queries
You can write up to three XPath queries to define the content that you are looking for in XMLdocuments. When writing XPath queries, you use a subset of the XPath syntax described in the XMLPath Language (XPath) standard at http://www.w3.org/TR/xpath.
These are the rules for writing XPath queries for XML content-based routing.
1. Express the queries in abbreviated form.2. Map all prefixes to namespaces.3. Use only ASCII characters in queries.4. Write queries to match elements and attributes.5. Use wildcards as needed for elements and namespaces; for example, //emp:employee/*.6. Do not use predicates in queries.
Implementing Web Services Security
142

Syntax for XPath expressions
This table shows the syntax to use for XPath expressions.
Expression Description
Nodename Selects all child nodes of the named node.
@Attname Selects all attribute nodes of the named node.
/ Indicates XPath step.
// Selects nodes that match the selection no matter where they are in the document.
XPath query examples
This table shows examples of XPath queries.
Query Description
/a Selects the root element a.
//b Selects all b elements wherever they appear in the document.
/a/b:* Selects any element in a namespace bound to prefix b, which is a child of the rootelement a.
//a/b:c Selects elements in the namespace of element c, which is bound to prefix b, and is achild of element a.
Configuring blocking actions for web services security
It only makes sense to select learning and blocking settings for web services security errors if youpreviously created a security policy to protect a web application that uses XML formatting or employsweb services. The security policy must have an XML profile (with web services security enabled)associated with it.
You can select which web services security errors must occur for the system to learn, log, or blockrequests that trigger the errors. These errors are subviolations of the parent violation, Web ServicesSecurity failure.
1. On the Main tab, click Security > Application Security > Policy Building > Learning andBlocking Settings.The Learning and Blocking Settings screen opens.
2. In the Current edited security policy list near the top of the screen, verify that the security policyshown is the one you want to work on.
3. Adjust the Enforcement Mode setting if needed.
• To block traffic that causes violations, select Blocking.• To allow traffic even if it causes violations (allowing you to make sure that legitimate traffic
would not be blocked), select Transparent.
You can only configure the Block flag on violations if the enforcement mode is set to Blocking.4. From the list, select Advanced.5. Expand the Content Profiles setting.
The content profile violations and Web Services Security failure subviolations are displayed.6. Review the Web Services Security failure setting and adjust the Learn, Alarm, and Block flags as
required.
BIG-IP Application Security Manager: Implementations
143

7. For Web Services Security failure subviolations, enable or disable the web services subviolations, asrequired for your application.
Tip: For an explanation of any individual subviolation, click it.
The selected subviolations are the ones that will cause the Web Services Security failureviolation to occur.
8. Click Save to save your settings.9. To put the security policy changes into effect immediately, click Apply Policy.
If a request causes one of the enabled errors to occur, web services security stops parsing the document.How the system reacts depends on how you configured the blocking settings for the Web ServicesSecurity failure violation:
• If configured to Learn or Alarm when the violation occurs, the system does not encrypt or decrypt theSOAP message, and sends the original document to the web service.
• If configured to Block when the violation occurs, the system blocks the traffic and prevents thedocument from reaching its intended destination. The system sends a blocking response page. If theXML profile associated with the policy is configured to use an XML blocking response page, it usesthe XML response. Otherwise, it uses the default response page.
• If a web services security violation occurs on an entity in staging, for example, a URL in stagingassociated with an XML profile, the violation (set to alarm or block) is not enforced.
Implementing Web Services Security
144

Fine-tuning Advanced XML Security Policy Settings
Fine-tuning XML defense configurationBefore you can perform this task, you must have created a security policy for an application that usesweb services or XML, and created and associated an XML profile with the policy.
The defense configuration in an XML profile provides formatting and attack pattern checks for the XMLdata. The defense configuration complements the validation configuration to provide comprehensivesecurity for XML data and web services applications. If your XML application has special requirements,you can adjust the defense configuration settings. This is an advanced task that is not required whencreating a security policy for an XML application.
1. On the Main tab, click Security > Application Security > Content Profiles > XML Profiles.The XML Profiles screen opens.
2. Click the name of the XML profile for which you want to modify the advanced defense configurationsettings.The XML Profile Properties screen opens.
3. On the XML Firewall Configuration tab, from the Defense Configuration list, select Advanced.The screen displays additional defense configuration settings.
4. For the Defense Level setting, select the protection level you want for the application.The defense level determines the granularity of the security inspection for the XML application. Youcan choose High, Medium, or Low and let the system determine the defense level settings. Or youcan set the level, then adjust any of the settings to create a Custom defense level.
5. Adjust the defense configuration settings as required by your application and traffic.6. Optionally, modify the attack signatures, meta characters, or sensitive data for this XML profile on
the appropriate tabs.7. Click Update to update the XML profile.8. To put the security policy changes into effect immediately, click Apply Policy.
A trade-off occurs between ease of configuration and defense level. The higher the defense level, themore you may need to refine the security policy. For example, if you use the default defense level ofHigh, the XML security is optimal; however, when you initially apply the security policy, the systemmay generate false-positives for some XML violations. However, a Low defense level may not protectthe application as strictly but may cause fewer false positives.
The system checks requests that contain XML data to be sure that the data complies with the variousdocument limits defined in the defense configuration of the security policy's XML profile. The systemgenerally examines the message for compliance to boundaries such as the message's size, maximumdepth, and maximum number of children. When the system detects a problem in an XML document, itcauses the XML data does not comply with format settings violation, if the violation is set toAlarm or Block.
Advanced XML defense configuration settingsThis table describes the defense configuration settings. The Defense Level setting in an XML profiledetermines the default values for the setting, or you can adjust them. A value of Any indicates unlimited;that is, up to the boundaries of an integer type.

Setting Description Default Values
Defense Level Specifies the level of protectionthat the system applies to XMLdocuments, applications, andservices. If you change any of thedefault settings, the systemautomatically changes thedefense level to Custom.
High, Medium, Low
Allow DTDs Specifies, when enabled, that theXML document can containDocument Type Definitions(DTDs).
High: Disabled, Medium:Enabled, Low: Enabled
Allow External References Specifies, when enabled, that theXML document is allowed to listexternal references usingoperators, such asschemaLocation and SYSTEM.
High: Disabled, Medium:Disabled, Low: Enabled
Tolerate Leading White Space Specifies, when enabled, thatleading white spaces at thebeginning of an XML documentare acceptable.
High: Disabled, Medium:Disabled, Low: Enabled
Tolerate Close Tag Shorthand Specifies, when enabled, that theclose tag format </>, which isused in the XML encoding forMicrosoft Office Outlook WebAccess, is acceptable.
High: Disabled, Medium:Disabled, Low: Enabled
Tolerate Numeric Names Specifies, when enabled, that theentity and namespace names canstart with an integer (0-9). Notethat this is a compatibility optionfor use with Microsoft OfficeOutlook Web Access.
High: Disabled, Medium:Disabled, Low: Enabled
Allow Processing Instructions Specifies, when enabled, that thesystem allows processinginstructions in the XML request.If you upload a WSDL file thatreferences valid SOAP methods,this setting is inactive.
High: Enabled, Medium:Enabled, Low: Enabled
Allow CDATA Specifies, when enabled, that thesystem permits the existence ofcharacter data (CDATA) sectionsin the XML document part of arequest.
High: Disabled, Medium:Enabled, Low: Enabled
Maximum Document Size Specifies, in bytes, the largestacceptable document size.
High: 1024000, Medium:10240000, Low: Any
Maximum Elements Specifies the maximum numberof elements that can be in asingle document.
High: 65536, Medium: 512000,Low: Any
Fine-tuning Advanced XML Security Policy Settings
146

Setting Description Default Values
Maximum Name Length Specifies, in bytes, the maximumacceptable length for element andattribute names.
High: 256, Medium: 1024, Low:Any
Maximum Attribute ValueLength
Specifies, in bytes, the maximumacceptable length for attributevalues.
High: 1024, Medium: 4096,Low: Any
Maximum Document Depth Specifies the maximum depth ofnested elements.
High: 32, Medium: 128, Low:Any
Maximum Children PerElement
Specifies the maximumacceptable number of childelements for each parent element.
High: 1024, Medium: 4096,Low: Any
Maximum Attributes PerElement
Specifies the maximum numberof attributes for each element.
High: 16, Medium: 64, Low:Any
Maximum NS Declarations Specifies the maximum numberof namespace declarationsallowed in a single document.
High: 64, Medium: 256, Low:Any
Maximum Namespace Length Specifies the largest allowed size,in bytes, for a namespace prefixin the XML part of a request.
High: 256, Medium: 1024, Low:Any
Masking sensitive XML dataBefore you can perform this task, you must have created a security policy, and created and associated anXML profile with the policy.
You can mask sensitive XML data so that it does not appear in the interface or logs. You set this up in theXML profile of a security policy.
1. On the Main tab, click Security > Application Security > Content Profiles > XML Profiles.The XML Profiles screen opens.
2. Click the name of the XML profile for which you want to mask sensitive data.The XML Profile Properties screen opens.
3. Click the Sensitive Data Configuration tab.The screen displays Sensitive Data Configuration settings.
4. For Namespace, select one of the options:Option Use
Any Namespace When the sensitive data can appear in an element or attribute in any namespace.
Custom When the sensitive data appears in an element or attribute in a particularnamespace. Type the namespace prefix that can contain sensitive data.
No Namespace When no namespace in the XML document has an element or attribute with avalue that contains sensitive data.
5. For Name:a) Select Element or Attribute to indicate whether the sensitive data appears as a value of either an
XML element or an attribute.b) In the field, type the XML element or attribute whose value can contain sensitive data. Entries in
this field are case-sensitive.
BIG-IP Application Security Manager: Implementations
147

6. Click Add to add the information you entered in the Namespace and Name fields to the SensitiveData table and the XML profile.
7. Click Update to update the XML profile.8. To put the security policy changes into effect immediately, click Apply Policy.
The system checks requests that contain XML data and if they contain sensitive data, that data is maskedin logs and in request content shown in the Application Security Manager™.
Overriding meta characters based on contentBefore you can perform this task, you must have previously created a JSON, XML, Google Web Toolkit(GWT), or Plain Text content profile.
You can have the system check for allowed or disallowed meta characters based on the content of arequest as defined in content profiles (XML, JSON, GWT, or Plain Text). In addition, you can overridethe security policy settings so that the system avoids checking for meta characters in particular content.
1. On the Main tab, point toSecurity > Application Security > Content Profiles and click a contentprofile type (XML, JSON, GWT, or Plain Text).
2. In the profiles list, click the name of the content profile for which you want to override meta characterchecks.The profile properties screen opens.
3. Click the Meta Characters tab (for XML) or Value Meta Characters (for JSON, plain text, or GWT).4. Select the appropriate check box:
• For JSON, plain text, or GWT profiles, select the Check characters check box to have the systemcheck for meta characters in JSON data.
• For XML profiles, select Check element value characters to check meta characters in XMLelements, and select Check attribute value characters to check meta characters in XMLattributes.
5. In the Global Security Policy Settings list, review the meta characters that are assigned to thesecurity policy, and which are allowed or disallowed in the content profile.
6. From the Global Security Policy Settings list, move any meta characters that you want to overridefor this content profile into the Overridden Security Policy Settings list.
7. Set the meta character to Allow or Disallow in the overridden settings list (the opposite from theglobal setting).
8. Click Update to update the content profile.9. To put the security policy changes into effect immediately, click Apply Policy.
If the content matches that defined in the content profile, meta characters are allowed or disallowedaccording to the overriden meta character settings in the content profile.
Managing SOAP methodsBefore you can perform this task, you must have created a security policy, and created and associated anXML profile with the policy.You must have already uploaded a WSDL document in the XML profile.
When using a WSDL document in the XML profile, the system includes the relevant SOAP methods inthe validation configuration. You can enable or disable the SOAP methods, as needed.
1. On the Main tab, click Security > Application Security > Content Profiles > XML Profiles.The XML Profiles screen opens.
Fine-tuning Advanced XML Security Policy Settings
148

2. Click the name of the XML profile for which you want to enable or disable one or more SOAPmethods.The XML Profile Properties screen opens.
3. On the XML Fireweall Configuration tab, in the Validation Configuration area, the Valid SOAPMethods table lists the SOAP methods used by the WSDL file you uploaded previously. Select orclear the Enabled check box for each method that you want to enable (allow) or disable (not allow).
4. Click Update to update the XML profile.5. To put the security policy changes into effect immediately, click Apply Policy.
The XML profile is updated if you changed which SOAP methods are allowed by the security policy. Ifyou disable a SOAP method, and a request contains that method, the system issues the SOAP methodnot allowed violation, and blocks the request if the enforcement mode is set to blocking.
BIG-IP Application Security Manager: Implementations
149

Fine-tuning Advanced XML Security Policy Settings
150

Adding JSON Support to an Existing Security Policy
Overview: Adding JSON support to existing security policiesJSON (JavaScript® Object Notation) is a data-interchange format often used to pass data back and forthbetween an application and a server. This implementation describes how to add JSON support to anexisting security policy for an application that uses JSON for data transfer. You create a JSON profile todefine what the security policy enforces and considers legal when it detects traffic that contains JSONdata.
You add JSON support to a security policy by completing these tasks.
Task SummaryCreating a JSON profileAssociating a JSON profile with a URLAssociating a JSON profile with a parameter
Creating a JSON profile
Before you can complete this task, you need to have already created a security policy for yourapplication.
This task describes how to create a JSON profile that defines the properties that the security policyenforces for an application sending JSON payloads or WebSocket payloads in JSON format.
Note: The system supports JSON in UTF-8 and UTF-16 encoding. WebSocket allows only UTF-8.
1. On the Main tab, click Security > Application Security > Content Profiles > JSON Profiles.2. Click Create to create a new JSON profile, or edit the Default JSON profile (by clicking it).
The Create New JSON Profile screen opens.3. Type a name for the profile.4. Adjust the maximum values that define the JSON data for the AJAX application, or use the default
values.5. If you want the system to tolerate and not report warnings about JSON content, select the Tolerate
JSON Parsing Warnings check box.If the system cannot parse JSON content, it generates the violation Malformed JSON data,regardless of whether this setting is enabled or disabled.
6. To parse parameters in a JSON payload as parameters (recommended), ensure that Parse Parametersis enabled.The system extracts parameters from JSON content whenever the JSON profile is used; for example,with URLs, WebSocket URLs, or parameters that use a JSON profile.The security policy parses parameters extracted from the JSON payload the same as other parameters.Also, the Attack Signatures, Value Metacharacters, and Sensitive Data Configuration tabs areremoved from the screen, so you can skip to the last step.
7. If the signatures included in the security policy are not sufficient for this JSON profile, you canchange them.

a) On the Attack Signatures tab, in the Global Security Policy Settings list, select any specificattack signatures that you want to enable or disable for this profile, and then move them into theOverridden Security Policy Settings list.
Tip: If no attack signatures are listed in the Global Security Policy Settings list, create the profile,update the attack signatures, then edit the profile.
b) After you have moved any applicable attack signatures to the Overridden Security PolicySettings list, enable or disable each of them as needed:
• Enabled - Enforces the attack signature for this JSON profile, although the signature might bedisabled in general. The system reports the violation Attack Signature Detectedwhen the JSON in a request matches the attack signature.
• Disabled - Disables the attack signature for this JSON profile, although the signature might beenabled in general.
8. To allow or disallow specific meta characters in JSON data (and thus override the global metacharacter settings), click the Value Meta Characters tab.
• Select the Check characters check box, if it is not already selected.• Move any meta characters that you want allow or disallow from the Global Security Policy
Settings list into the Overridden Security Policy Settings list.• In the Overridden Security Policy Settings list, change the meta character state to Allow or
Disallow.9. To mask sensitive JSON data (replacing it with asterisks), click the Sensitive Data Configuration tab.
• In the Element Name field, type the JSON element whose values you want the system to considersensitive.
• Click Add.
Important: If the JSON data causes violations and the system stops parsing the data part waythrough a transaction, the system masks only the sensitive data that was fully parsed.
Add any other elements that could contain sensitive data that you want to mask.10. Click Create (or Update if editing the Default profile).
The system creates the profile and displays it in the JSON Profiles list.
This creates a JSON profile that affects the security policy when you associate the profile with a URL,WebSocket URL, or parameter.
Next, you need to associate the JSON profile with any URLs, WebSocket URLs, or parameters that mightinclude JSON data.
Associating a JSON profile with a URL
Before you can associate a JSON profile with a URL, you need to have created a security policy withpolicy elements including application URLs, and the JSON profile.
You can associate a JSON profile with one or more explicit or wildcard URLs.
1. On the Main tab, click Security > Application Security > URLs.2. In the Current edited security policy list near the top of the screen, verify that the security policy
shown is the one you want to work on.3. From the Allowed URLs List, click the name of a URL that might contain JSON data.
The Allowed URL Properties screen opens.4. Next to Allowed URL Properties, select Advanced.
The screen refreshes to display additional configuration options.
Adding JSON Support to an Existing Security Policy
152
5. Click the Header-Based Content Profiles tab, and in the Request Header Name field, type theexplicit string or header name that defines when the request is treated as the Parsed As type; forexample, content-type.This field is not case sensitive.
Note: If the URL always contains JSON data, for Request Body Handling select JSON.
6. In the Request Header Value field, type the wildcard (including *, ?, or [chars]) for the header valuethat must be matched in the Request Header Name field; for example, *json*.This field is case sensitive.
7. From the Request Body Handling list, select JSON.The system automatically creates a Default JSON profile, and assigns it as the profile when youselect JSON in this field.
8. From the Profile Name list, either leave the default, select a JSON profile appropriate for this URL,or click Create to quickly create a new JSON profile.
9. Click Add.Add as many header types as you need to secure this URL, clicking Add after specifying each one.
10. To override the global meta character settings for this URL, adjust the meta character policy settings:
• In the Meta Characters tab, select the Check characters on this URL check box, if it is notalready selected.
• Move any meta characters that you want allow or disallow from the Global Security PolicySettings list into the Overridden Security Policy Settings list.
• In the Overridden Security Policy Settings list, change the meta character state to Allow orDisallow.
11. Click Update.12. To put the security policy changes into effect immediately, click Apply Policy.
The JSON profile is associated with the URL.
Continue to associate JSON profiles with any URLs in the application that might contain JSON data.
Associating a JSON profile with a parameter
You need to have created a security policy with policy elements including parameters and a JSON profilebefore starting this procedure.
You can associate a JSON profile with a parameter.
1. On the Main tab, click Security > Application Security > Parameters.2. In the Current edited security policy list near the top of the screen, verify that the security policy
shown is the one you want to work on.3. In the Parameters List area, click the name of a parameter to which to assign a JSON profile.
The Parameter Properties screen opens.4. For the Parameter Value Type setting, select JSON value.
The system automatically creates a Default JSON profile, and assigns it as the profile when youselect JSON value in this field.
5. From the JSON Profile list, either leave the default, select a JSON profile appropriate for thisparameter, or click Create to quickly create a new JSON profile for this parameter.
6. Click Update.The system associates the JSON profile with the parameter.
7. To put the security policy changes into effect immediately, click Apply Policy.
Continue to associate JSON profiles with any parameters in the application that might contain JSONdata.
BIG-IP Application Security Manager: Implementations
153

Implementation resultYou have manually added JSON support to the active security policy. The policy can now secureapplications that use JSON for data transfer between the client and the server. If web application trafficincludes JSON data, the system checks that it meets the requirements that you specified in the JSONprofile.
Adding JSON Support to an Existing Security Policy
154

Creating Security Policies for AJAX Applications
Application security for applications that use AJAXApplication Security Manager™ can protect AJAX applications including those that use JSON or XMLfor data transfer between the client and the server. If the AJAX application uses XML for data transfer,the security policy requires that an XML profile be associated with a URL or parameter. If the AJAXapplication uses JSON for data transfer, the security policy requires that a JSON profile be associatedwith a URL or parameter. If the AJAX application uses HTTP for data transfer, no profile is needed.
Some web applications use AJAX authentications that submit the login form as an AJAX POST request,with the login details and response in JSON format. If so, you can create a login page with anauthentication type of JSON/AJAX Request to protect against brute force attacks. You can use this loginURL when configuring session awareness or login enforcement.
You can also set up AJAX blocking response behavior for applications so that if a violation occurs duringAJAX-generated traffic, the system displays a message or redirects the application user to anotherlocation.
Overview: Creating a security policy for applications that use AJAXAJAX (Asynchronous JavaScript and XML) applications make requests to the server and send responsesto the client formatted using XML or JavaScript Object Notation (JSON). You can create a securitypolicy automatically for applications that use AJAX.
Creating a simple security policy
Before you can create a security policy, you must perform the minimal system configuration tasksrequired according to the needs of your networking environment.
You can use Application Security Manager™ to create a robust, yet simple, security policy that is tailoredto protect your web application. This is the easiest way to create a security policy.
1. On the Main tab, click Security > Application Security > Security Policies > Policies List.The Policies List screen opens.
2. Click Create New Policy.You only see this button when no policy is selected.
3. In the Policy Name field, type a name for the policy.4. Leave Policy Type, set to Security.5. For Policy Template, select Fundamental.6. For Virtual Server, click Configure new virtual server to specify where to direct application
requests.a) For What type of protocol does your application use?, select HTTP, HTTPS, or both.b) In the Virtual Server Name field, type a unique name.c) In the HTTP Virtual Server Destination field, type the address in IPv4 (10.0.0.1) or IPv6
(2001:ed8:77b5:2:10:10:100:42/64) format, and specify the service port.

Tip: If you want multiple IP addresses to be directed here, use the Network setting.
d) In the HTTP Pool Member setting, specify the addresses of the back-end application servers.e) From the Logging Profile list, select a profile such as Log illegal requests to determine which
events are logged on the system.7. In the upper right corner, click Advanced.
You can use default values for the Advanced settings but it's a good idea to take a look at them.
• If you selected Fundamental or Comprehensive for the Policy Template, Learning Mode is setto Automatic and Enforcement Mode is set to Blocking.
Tip: If you need to change these values, set application language to a value other than Autodetect.
• If you know the Application Language, select it or use Unicode (utf-8).• To add specific protections (enforcing additional attack signatures) to the policy, for Server
Technologies, select the technologies that apply to the back-end application servers.• You can configure trusted IP addresses that you want the security policy to consider safe.
8. Click Create Policy to create the security policy.
ASM™ creates a security policy that immediately starts protecting your application. The enforcementmode of the security policy is set to Blocking. Traffic that is considered to be an attack such as traffic thatis not compliant with HTTP protocol, has malformed payloads, uses evasion techniques, performs webscraping, contains sensitive information or illegal values is blocked. Other potential violations arereported but not blocked.
The system examines the traffic to the web application making suggestions for more specifically buildingthe security policy. The Policy Builder selectively learns new entities like file types, parameters, andcookies used in requests to the application. When ASM processes sufficient traffic, it automatically addsthe entities to the security policy, and enforces them.
The system applies a basic set of attack signatures to the security policy and puts them in staging (bydefault, for 7 days). If you specified server technologies, additional attack signatures are included. ASMreports common attacks discovered by comparison to the signatures but does not block these attacks untilthe staging period is over and they are enforced. That gives you a chance to be sure that these are actualattacks and not legitimate requests.
Tip: This is a good point at which send some traffic to test that you can access the application beingprotected by the security policy and check that traffic is being processed correctly by the BIG-IP® system.Send the traffic to the virtual server destination address.
Implementation result
The Real Traffic Policy Builder® creates a security policy that can protect applications that use AJAXwith JSON or XML for data transfer between the client and the server. The system examines the trafficand creates an appropriate profile. If the application uses XML, the security policy includes one or moreXML profiles associated with URLs or parameters. If the application uses JSON, the security policyincludes one or more JSON profiles associated with URLs or parameters.
Overview: Adding AJAX blocking and login response behaviorNormal policy blocking and login response behavior could interfere with applications that use AJAX. Ifyou want to display a message or redirect traffic without interfering with the user experience whilebrowsing to an AJAX-featured web application, you need to enable AJAX blocking behavior (JavaScript
Creating Security Policies for AJAX Applications
156

injection). You can implement blocking and login response behavior for applications that use AJAX withJSON or XML for data transfer.
Important: You can implement AJAX blocking behavior only for applications developed using one of thefollowing frameworks:
• Microsoft® ASP.NET• jQuery• Prototype®
• MooTools
By default, if you enable AJAX blocking behavior, when an AJAX request results in a violation that isset to Block, Application Security Manager performs the default AJAX response page action. The systempresents a login response if the application user sends an AJAX request that attempts to directly access aURL that should only be accessed after logging in.
Note: Enabling AJAX blocking behavior has performance implications.
Configuring the blocking response for AJAX applications
Before you can complete this task, you need to have already created a security policy for your webapplication. The application needs to have been developed using ASP.NET, jQuery, Prototype®, orMooTools to use AJAX blocking behavior.
When the enforcement mode of the security policy is set to blocking and a request triggers a violation(that is set to block), the system displays the AJAX blocking response according to the action set that youdefine. If a login violation occurs when requesting the login URL, the system sends a login responsepage, or redirects the user.
1. On the Main tab, click Security > Application Security > Policy > Response Pages.2. In the Current edited security policy list near the top of the screen, verify that the security policy
shown is the one you want to work on.3. Click the AJAX Response Page tab.4. Select the Enable AJAX blocking behavior (JavaScript injection)? check box.
The system displays the default blocking response and login response actions for AJAX.5. For the Default Response Page action setting, select the type of response you want the application
user to receive when they are blocked from the application:
• Custom Response lets you specify HTML text or upload a file to use as a replacement for theframe or browser page that generated the AJAX request. Include the text, then click Show topreview the response.
• Popup message displays text in a popup window (default text is included).• Redirect URL redirects the user to the URL you specify. You can also include the support ID. For
example: http://www.example.com/blocking_page.php?support_id=<%TS.request.ID()%>.
6. For the Login Page Response action, select the type of response (types are the same as for defaultresponse page in Step 5).
7. Click Save.8. To put the security policy changes into effect immediately, click Apply Policy.
BIG-IP Application Security Manager: Implementations
157

Creating Security Policies for AJAX Applications
158

Securing Web Applications Created with Google WebToolkit
Overview: Securing Java web applications created with Google WebToolkit elements
Google Web Toolkit (GWT) is a Java framework that is used to create AJAX applications. When you addGWT enforcement to a security policy, the Security Enforcer can detect malformed GWT data, requestpayloads and parameter values that exceed length limits, attack signatures, and illegal meta characters inparameter values. This implementation describes how to add GWT support to an existing security policyfor a Java web application created with GWT elements.
Task summaryCreating a Google Web Toolkit profileAssociating a Google Web Toolkit profile with a URL
Creating a Google Web Toolkit profile
Before you can begin this task, you need to create a security policy for the web application that you arecreating using Google Web Toolkit (GWT).
A GWT profile defines what the security policy enforces and considers legal when it detects traffic thatcontains GWT data.
Note: The system supports GWT in UTF-8 and UTF-16 encoding.
1. On the Main tab, click Security > Application Security > Content Profiles > GWT Profiles.2. In the Current edited security policy list near the top of the screen, verify that the security policy
shown is the one you want to work on.3. Click Create.
The Create New GWT Profile screen opens.4. Type a name and optional description for the profile.5. For the Maximum Total Length of GWT Data setting, specify the maximum byte length for the
request payload or parameter value that contains GWT data.The default is 10000 bytes.
Option Description
Any Specifies that there are no length restrictions.
Length Specifies, in bytes, the maximum data length that is acceptable.
6. For the Maximum Value Length setting, specify the longest acceptable value for a GWT elementthat occurs in a document that the security policy allows.The default is 100 bytes.
Option Description
Any Specifies that there are no length restrictions.
Length Specifies, in bytes, the maximum acceptable length.

7. Clear the Tolerate GWT Parsing Warnings check box if you want the system to report warningsabout parsing errors in GWT content.
8. To change the security policy settings for specific attack signatures for this GWT profile, from theGlobal Security Policy Settings list, select the attack signatures and then move them into theOverridden Security Policy Settings list.
Note: If no attack signatures are listed in the Global Security Policy Settings list, create the profile,update the attack signatures, then edit the profile.
9. In the Overridden Security Policy Settings list, enable or disable each attack signature as needed:Option Description
Enabled Enforces the attack signature for this GWT profile, although the signature might bedisabled in general. The system reports the Attack Signature Detected violation when theGWT data in a request matches the attack signature.
Disabled Deactivates the attack signature for this GWT profile, although the signature might beenabled in general.
10. To allow or disallow specific meta characters in GWT data (and thus override the global metacharacter settings), click the Value Meta Characters tab.a) Select the Check characters check box, if it is not already selected.b) Move any meta characters that you want allow or disallow from the Global Security Policy
Settings list into the Overridden Security Policy Settings list.c) In the Overridden Security Policy Settings list, change the meta character state to Allow or
Disallow.11. Click Create.
The system creates the profile and displays it in the GWT Profiles list.
The security policy does not enforce the GWT profile settings until you associate the GWT profile withany URLs that might include GWT data.
Associating a Google Web Toolkit profile with a URL
Before you can associate a Google Web Toolkit (GWT) profile with a URL, you need to create a securitypolicy with policy elements, including application URLs and the GWT profile.
When you associate a GWT profile with a URL in a security policy, the Security Enforcer can applyspecific GWT checks to the associated requests.
1. On the Main tab, click Security > Application Security > URLs.2. In the Current edited security policy list near the top of the screen, verify that the security policy
shown is the one you want to work on.3. In the Allowed URLs List area, click the name of a URL that might contain GWT data.
The Allowed URL Properties screen opens.4. From the Allowed URL Properties list, select Advanced.5. For the Header-Based Content Profiles setting, specify the characteristics of the traffic to which the
GWT profile applies.a) In the Request Header Name field, type the explicit string or header name that defines when the
request is treated as the Parsed As type; for example, Content-Type.This field is not case-sensitive.
b) In the Request Header Value field, type a wildcard character (including *, ?, or [chars]) for theheader value; for example, *gwt*.This field is case-sensitive.
Securing Web Applications Created with Google Web Toolkit
160

c) For the Parsed As setting, select GWT.d) For the Profile Name setting, select the GWT profile that you created from the list.e) Click Add.
The system adds the header and profile information to the list.6. (Optional) If you have multiple headers and profiles defined, you can adjust the order of processing.7. Click Update.8. To put the security policy changes into effect immediately, click Apply Policy.
When the system receives traffic that contains the specified URLs, the Security Enforcer applies thechecks you established in the GWT profile, and takes action according to the corresponding blockingpolicy.
Implementation resultYou have now added Google Web Toolkit (GWT) support to a security policy. When the SecurityEnforcer detects GWT traffic that matches the URLs defined in the security policy, the selectedparameters are enforced as you have indicated.
BIG-IP Application Security Manager: Implementations
161

Securing Web Applications Created with Google Web Toolkit
162

Adding Server Technologies to a Policy
Overview: Adding server technologies to a policyIt is not always easy to determine which server technologies apply to the applications for which you arecreating security policies. Server technologies can be server-side applications, frameworks, programs,web servers, operating systems, and so on, and they are associated with one or more sets of attacksignatures that can be added to the policy. This allows you to assign a more selective set of attacksignatures to the policy, that is, signatures that specifically apply to the technologies used in theapplication being protected.
When you first create a security policy, you have the opportunity to select server technologies that youknow about. Once the policy is created, you can have it automatically detect server technologies. In thiscase, the policy can detect appropriate server technologies, and can continue to detect new servertechnologies if the back-end server infrastructure changes, if new systems are added, or if an attacksignature update adds a new server technology that is appropriate for the policy.
The system can automatically detect the server technology on Request headers and payloads only when asuccessful response code is received (1xx/2xx/3xx). For Responses, server technology can be detectedonly if "Content-Type" header is in the response. The system also learns technologies from errorresponses, such as 4xx and 5xx status codes (even if they are not listed in the HTTP Response StatusCodes used to learn traffic in the Learning and Blocking Settings).
You can also manually add server technologies to the policy if you determine that certain ones areappropriate for the applications being protected and want to apply them right away.
Automatically adding server technologiesA security policy can automatically detect the server technologies that the applications it protects areusing. You can also view a list of server technologies and add them manually.
1. On the Main tab, click Security > Application Security > Policy Building > Learning andBlocking Settings.The Learning and Blocking Settings screen opens.
2. In the Policy Building Settings area, expand Server Technologies and select Enable ServerTechnology Detection.
3. Click Save to save your settings.4. Click the arrow next to Enable Server Technology Detection.
The Policy: Server Technologies screen opens where you can see which server technologies areapplied to the current security policy.
5. Click Add Server Technology to see the server technologies that are discoverable, and select any thatyou know apply to the applications being protected, and click Save.If manually adding a server technology that has implied technologies, you see a notification that liststhe additional server technologies that will be added. For example, if you add ASP.NET, IIS andMicrosoft Windows are also included.
6. In the editing context area, click Apply Policy to put the changes into effect.
The security policy is set up to automatically detect server technologies and make suggestions to addthem to the policy. If using automatic learning, the system adds the detected technologies when sufficienttime and traffic has passed. If the Learning Mode is Manual, you need to specifically accept thelearning suggestions to add the sever technologies on the Traffic Learning screen.

When server technologies are included in the policy, the system creates a user-defined signature set foreach server technology. If the technology has related or implied server technologies, they are added aswell. The signature sets are added to the security policy with the Learn, Alarm, Block flags set, and newsignatures are put into staging. The system learns server technologies from responses regardless of theLearn from response flag setting in the Learning and Blocking Settings .
If you later delete server technologies and want to delete the associated user-defined signature sets, youcan go to Options > Application Security > Attack Signatures > Attack Signature Sets and delete thesets there. Deleting the user-defined signature sets alone, however, does not remove the server technologyfrom the list.
Adding Server Technologies to a Policy
164

Refining Security Policies with Learning
About learningYou can use learning resources to help build a security policy, particularly if you are building a securitypolicy manually. When building a security policy manually, the learning mode is set to Manual, and whenbuilding a policy automatically, the learning mode is Automatic.
When you send client traffic through the Application Security Manager™ (ASM), the learning dataprovides information on requests or responses that do not comply with the current security policy andhave triggered a violation. The reason for triggering a violation can be either an actual attack on the site,or a false positive (typically seen during the process of building a policy).
ASM™ generates learning suggestions for requests that cause violations and do not pass the securitypolicy checks. The system also suggests adding legitimate entities such as URLs, file types, orparameters that often appear in requests. You can examine the requests that cause learning suggestions,and then use the suggestions to refine the security policy. In some cases, learning suggestions maycontain recommendations to relax the security policy. When dealing with learning suggestions, make sureto relax the policy only where false positives occurred, and not in cases where a real attack caused aviolation. You can use the violation ratings to help determine how likely a request was caused by anattack.
If you are generating a security policy automatically, ASM handles much of the learning for you,adjusting the security policy based on traffic characteristics. In that case, the learning screens show onlythe elements that the security policy is in the process of learning, or those which require manualintervention to be resolved.
About learning suggestionsApplication Security Manager™ (ASM) generates learning suggestions for violations if the Learn flag isenabled for the violations on the Learning and Blocking Settings screen. When the system receives arequest that triggers a violation, the system updates the Traffic Learning screen with learning suggestionsusing information from the violating request. From this screen, you can review the learning suggestionsto determine whether the request triggered a legitimate security policy violation, or if the violationrepresents a need to update the security policy.
The system can also generate suggestions based on legitimate activity, such as adding a valid URL orhost name to the security policy.
Next to each suggestion, ASM assigns a learning score that measures the strength of the suggestion byshowing a percentage that indicates how close the system is to recommending that you accept thesuggestion. The learning score is also influenced by the violation rating: the lower the rating of theviolations, the higher the score.
If the system is working in automatic learning mode, when the learning score reaches 100%, the systemaccepts and enforces most of the suggestions, or you can accept suggestions manually at any time. If youare using manual learning, when the learning score reaches 100% (or before that if you know thesuggestions are valid), you need to accept the suggestions manually.
Making decisions about which learning suggestions to accept requires a general understanding ofapplication security, and specific knowledge of the protected application (for example, recognizing validtraffic). For example, you should consider accepting a learning suggestion when you see that it is

associated with many requests from many different source IP addresses. As long as they are valid,repeated requests may indicate legitimate traffic behavior that warrants relaxing the security policy.
You can also review the violation rating for requests by selecting the suggestion. Learning suggestionsassociated with requests having a low average violation rating are more likely to be false positives andcan be accepted. But if a request has a high violation rating, the learning suggestion should not beaccepted. Instead, it should be cleared because it is most likely indicative of an attack.
The Traffic Learning screen also displays violations for which the system does not generate learningsuggestions. Typically, these violations are related to RFC compliance and system resources; theresolution for these violations may be to disable the violation rather than to change the configuration. Thesystem displays these violations along with the learning suggestions to ease the security policymanagement tasks.
What suggestions look like
This figure shows the Traffic Learning screen with several suggestions on it. As an example, on the left,the suggestion to enforce a cookie is highlighted; the information on the right shows what caused thesuggestion. The HTTP violations are listed, and one is selected showing details about the request. Thecookie PHPAUCTION_SESSION matched the * wildcard in the Allowed Cookies list in several requests sothe suggestion is to add and enforce the cookie. If you accept the suggestion, the cookie is added to theEnforced Cookies list.
Figure 12: Traffic Learning screen with suggestions
What violations are unlearnable?Some violations that occur indicate a real problem with a request that cannot be learned. These are calledunlearnable violations. For example, requests for access from disallowed users, disallowed sessions, and
Refining Security Policies with Learning
166

disallowed IP addresses are unlearnable. In addition, the system considers requests that trigger thefollowing HTTP protocol compliance violations to be unlearnable:
• Bad HTTP version• Unparsable request content• Null in request
They are considered unlearnable because these violations indicate behavior that is never acceptable, sothe security policy will never be changed to allow them. Consequently, the violating requests are not usedfor automatic or manual learning (even if they include additional violations that could be learned). Nolearning suggestions are created for requests containing these violations. Also, the violation rating forthese transactions is always set to 5 (the highest severity).
Configuring how entities are learnedYou can adjust the learning settings for file types, URLs, parameters, cookies, and redirection domains.Learning settings specify when Real Traffic Policy Builder® adds, or suggests you add, explicit entities tothe security policy.
1. On the Main tab, click Security > Application Security > Policy Building > Learning andBlocking Settings.The Learning and Blocking Settings screen opens.
2. In the Current edited security policy list near the top of the screen, verify that the security policyshown is the one you want to work on.
3. On the right side of the Learning and Blocking Settings screen, select Advanced.The screen displays the advanced configuration details for policy building.
4. In the Policy Building Settings area, click the entity (File Types, URLs, Parameters, Cookies, andRedirection Protection) to show the settings. Then from the Learn New entity setting, select theoption that determines which Learning suggestions the system provides (based on real traffic).Option Description
Never (wildcardonly)
Specifies that when false positives occur, the system suggests relaxing thesettings of the wildcard. This option results in a security policy that is easy tomanage, but is not as strict. If it is running in automatic learning mode, thePolicy Builder does not add explicit entities that match a wildcard to thesecurity policy. The wildcard entity remains in the security policy. The PolicyBuilder changes the attributes of any matched wildcard. If it is running inmanual learning mode, Policy Builder suggests changing the attributes ofmatched wildcard entities, but does not suggest that you add explicit entitiesthat match the wildcard entity.
Selective Applies only to * wildcard entity. When false positives occur, adds an explicitentity with relaxed settings. This option serves as a good balance betweensecurity, policy size, and ease of maintenance. If using automatic learning, thepolicy includes explicit entities that do not match the attributes of the *wildcard, and does not remove the * wildcard. If usingmanuial learning, thesystem suggests adding explicit entities that match the * wildcard. (Thisoption is not available for redirection protection.)
Compact Applies only to the * wildcard. Specifies that the policy includes the mostcommonly used entities (while enforcing all others types with a wildcardrule), also provides a pre-populated list of known disallowed file types, andincludes top-level URLs such as /abc/*. This option serves as a good balancebetween Selective and Always making a smaller, more compact policy, withfewer suggestions.
BIG-IP Application Security Manager: Implementations
167

Option Description
When using Automatic learning, the system adds explicit entities that do notexist in the policy but which match the attributes of the * wildcard. ThePolicy Builder does not remove the * wildcard file type from the securitypolicy. For Manual learning, the system suggests adding explicit entities thatmatch the * wildcard file type. (This option is not available for cookies orredirection protection.)
Always Creates a comprehensive whitelist policy that includes all web site entities.This option results in a large, more granular configuration with strictersecurity. If Policy Builder is running, it adds explicit entities that match awildcard to the security policy. When the security policy is stable, the *wildcard is removed. If Policy Builder is not running, the system suggestsadding explicit entities that match the wildcard. (This option is not availablefor cookies.)
5. Click Save to save your settings.6. To put the security policy changes into effect immediately, click Apply Policy.
The security policy now learns new file types, parameters, URLs, cookies, and redirection domainsaccording to the learning settings you specified.
Learning from responsesIf you are using automatic learning to build a policy, you can have the system examine responses as wellas requests for entities to include in the security policy. This is called learning from responses, and thesystem does this by default. You may want to learn from responses because a response might includemore information about the web application than is found in the request, or if you want to have thesystem learn login pages automatically.
You can disable this setting if your application does not need to examine responses for entities to add tothe security policy, or if the application does not use dynamic parameters.
Note: This setting applies only to what entities can be learned from the response content, such as URLsand parameters. The system does not learn from violations that occur in responses, such as Data Guardleakage. Learning from violations is enabled by selecting the Learn flag of the respective violation.
1. On the Main tab, click Security > Application Security > Policy Building > Learning andBlocking Settings.The Learning and Blocking Settings screen opens.
2. In the Current edited security policy list near the top of the screen, verify that the security policyshown is the one you want to work on.
3. On the right side of the Learning and Blocking Settings screen, select Advanced.The screen displays the advanced configuration details for policy building.
4. Ensure that the Learning Mode is set to Automatic.5. If you do not want the security policy to include elements found in responses when building the
security policy, in the Policy Building Process area, expand Options and clear the Learn fromresponses check box.
Tip: You can also have the system learn only from requests that return specific response codes.
If the setting is not enabled, the Policy Builder never learns from responses.6. Click Save to save your settings.
Refining Security Policies with Learning
168

7. To put the security policy changes into effect immediately, click Apply Policy.
If you disabled the Learn from responses check box, the Policy Builder never adds to the security policyelements found in responses. If the check box is enabled, the Policy Builder adds elements found in validresponses to the security policy (meaning those that do not generate violations).
Learning based on response codesWhen using automatic or manual learning, the system learns from legitimate traffic including transactionsthat return response codes of 1xx, 2xx, and 3xx. These classes of codes are added by default to the policybuilding settings. You can change which response codes are listed, or add specific response codes, suchas those used by the web application you are protecting.
1. On the Main tab, click Security > Application Security > Policy Building > Learning andBlocking Settings.The Learning and Blocking Settings screen opens.
2. In the Current edited security policy list near the top of the screen, verify that the security policyshown is the one you want to work on.
3. On the right side of the Learning and Blocking Settings screen, select Advanced.The screen displays the advanced configuration details for policy building.
4. In the Policy Building Process area, expand Options.5. In the Add field following HTTP Response Status Codes used to learn traffic, type the response
code you want to add (for example, add specific codes like 304 or a class of codes like 4xx), thenclick Add. Use these formats.Response code Description
1xx All informational responses (the request was received; continuing toprocess it). Included by default.
2xx All successful responses (the request was received, understood, accepted,and processed successfully). Included by default.
3xx All redirection (the client needs to take additional action on the request).Included by default.
4xx Server failed to fulfill the response as a result of client syntax or inputerrors.
5xx All server error responses (the server failed to fulfill a request).
Specific codes such as100, 306, 400, or 404
Refer to your web application or the Hypertext Transfer Protocol --HTTP/1.1 specification (RFC-2616).
6. Click Save to save your settings.7. To put the security policy changes into effect immediately, click Apply Policy.
The Policy Builder extracts information for the security policy from traffic transactions that return thespecified HTTP response status codes.
Reviewing learning suggestionsBefore you can see learning suggestions on the system, it needs to have had some traffic sent to it.
After you create a security policy and begin sending traffic to the application, the system provideslearning suggestions concerning additions to the security policy based on the traffic it sees. For example,you can have users or testers browse the web application. By analyzing the traffic to and from the
BIG-IP Application Security Manager: Implementations
169

application, Application Security Manager™ generates learning suggestions or ways to fine-tune thesecurity policy to better suit the traffic and secure the application.
Note: This task is primarily for building a security policy manually. If you are using the automaticlearning mode, this task applies to resolving suggestions that require manual intervention, or forspeeding up the enforcement of policy elements.
1. On the Main tab, click Security > Application Security > Policy Building > Traffic Learning.The Traffic Learning screen opens, and lists suggestions based on traffic patterns and violations thatthe system has detected.
2. Take a look at the Traffic Learning screen to get familiar with it.With no suggestions selected, graphical charts summarize policy activity and you see an enforcementreadiness summary on the bottom right.
3. To change the order in which the suggestions are listed, or refine what is included in the list, use thefilters at the top of the column. Click the search icon to see basic and advanced filters.
4. Review the learning suggestions as follows.a) Select a learning suggestion.
Information is displayed about the action the system will take if you accept the suggestion, andwhat caused the suggestion.
b) Select a suggestion to learn more about what caused it by looking at the action, the number ofsamples it is based on, the violations caused and their violation ratings, and if available, byexamining samples of the requests that caused the suggestion.
c) Select a request to view data about the request on the right, including any violations it generated,the contents of the request itself, and the response (if any).By examining the requests that caused a suggestion, you can determine whether it should beaccepted.
d)To add comments about the suggestion and the cause, click the Add Comment icon to theright of the suggestion commands, and type the comments.
5. Decide how to respond to the suggestion. You can start with the suggestions that have the highestlearning scores, or those which you know to be valid for the application. These are the options.Option What happens
AcceptSuggestion
The system modifies the policy by taking the suggested action, such as addingan entity that is legitimate. If the entity that triggered the suggestion can beplaced in staging (file types, URLs, parameters, cookies, or redirectiondomains), clicking Accept Suggestion displays a second option, Acceptsuggestion and enable staging on Matched <<entity>>. Click this option toaccept the suggestion and place the matched entity in staging.
DeleteSuggestion
The system removes the learning suggestion, but the suggestion reoccurs if newrequests cause it. The learning score of the suggestion starts over from zero inthat case.
IgnoreSuggestion
The system does not change the policy and stops showing this suggestion on theTraffic Learning screen now and in the future. You can view ignored suggestionsby filtering by status ignored.
Note: If you are working in automatic learning mode, when the learning score reaches 100%, thesystem accepts most of the suggestions, or you can accept suggestions manually at any time. If youare using manual learning, when the learning score reaches 100% (or before that if you know thesuggestions are valid), you need to accept the suggestions manually.
Refining Security Policies with Learning
170

If you know that a suggestion is valid, you can accept it at any time even before the learning scorereaches 100%. The ones that reach 100% have met all the conditions so that they are probablylegitimate entities.
6. To put the security policy changes into effect immediately, click Apply Policy.
By default, a security policy is put into an enforcement readiness period for seven days. During that time,you can examine learning suggestions and adjust the security policy making sure that users can access theapplication. The security policy then includes elements unique to your web application.
It is a good idea to periodically review the learning suggestions on the Traffic Learning screen todetermine whether the violations are legitimate and caused by an attack, or if they are false positives thatindicate a need to update the security policy. Typically, a wide recurrence of violations at some place inthe policy (with a low violation rating and a high learning score) indicates that they might be falsepositives, and hence the policy should be changed so that they will not be triggered anymore. If theviolations seem to indicate true attacks (for example, they have a high violation rating), the policy shouldstay as is, and you can review the violations that it triggered.
Viewing requests that caused learning suggestionsTo review requests that are related to learning suggestions, you need to have a security policy that isalready handling traffic. If the Learn flag is disabled for a violation, you will not see learningsuggestions for that violation. If no violations have occurred, you will only see learning suggestions foradding legitimate entities to the security policy.
Before you process a learning suggestion, it is very helpful to examine the details of sample requests thatcaused the learning suggestion. By viewing the requests, you can determine whether to accept each one,or not. If the suggestion is based on a violation, you can see whether the violation was caused by anattack, or if it is a false positive.
1. On the Main tab, click Security > Application Security > Policy Building > Traffic Learning.The Traffic Learning screen opens, and lists suggestions based on traffic patterns and violations thatthe system has detected.
2. In the Current edited security policy list near the top of the screen, verify that the security policyshown is the one you want to work on.
3. In the left column, select the learning suggestion that you want to learn more about.Sample requests associated with the suggestions show on the right, with the average violation rating.(Legal requests have no violation rating.)
4. Select the request that you want to review more closely.The request details are displayed on the right, including any violations the request generated, thecontents of the request itself, and the response (if any).
5. Review the information about the request on the General Data tab.
Tip: If the request caused violations, they are listed at the top. Click the down arrow to examine theviolation occurrences and description.
The Request Status and a flag highlight requests considered to be illegal. These are the ones you needto examine most closely.
6. To examine the request or response itself, click Request or Response.The actual content of the request or response is displayed in the tab.
7. On the Traffic Learning screen, continue to review the learning suggestions and associated requests.
When you finish reviewing the requests associated with learning suggestions, you can accept, delete, orignore the suggestions.
BIG-IP Application Security Manager: Implementations
171

Viewing and allowing ignored suggestionsIf the system is not generating learning suggestions that you would expect to see, or when suggestions donot appear consistently, you can view learning suggestions that were previously ignored. You can alsochange the status of those suggestions so that if the situation reoccurs, the suggestion will be included onthe Traffic Learning screen.
1. On the Main tab, click Security > Application Security > Policy Building > Traffic Learning.The Traffic Learning screen opens, and lists suggestions based on traffic patterns and violations thatthe system has detected.
2. In the Current edited security policy list near the top of the screen, verify that the security policyshown is the one you want to work on.
3. Above the list of suggestions, click the Open Filter icon.The filter popup screen opens.
4. In the filter popup screen, click Advanced Filter.5. From the Status list, select Ignored.6. Click Apply Filter.
Suggestions that were previously ignored are displayed in the list.7. Review the ignored suggestions and decide how to handle them:
• If the suggestion should continue to be ignored, do nothing. Click the Reset Filter (X) above thelist to return to the current suggestions.
• If you do not want this suggestion to be ignored in the future, click Delete Suggestion.• If you want to implement this previously ignored suggestion, click Accept Suggestion.
If you delete the suggestion, it is removed from the ignored suggestions list, and it will not be ignoredif the conditions that caused it occur again. If you accept the suggestion, the suggested change ismade to the security policy, and it is removed from the list of ignored suggestions.
About enforcement readinessWhen you are creating a security policy, you specify an enforcement readiness period that indicates astaging period for entities and attack signatures (typically 7 days). When entities or attack signatures arein staging, the system does not enforce them. Instead, the system posts learning suggestions for stagedentities.
When the enforcement readiness period is over and no learning suggestions are added for the stagingperiod duration (the default is 7 days), the file type, URL, parameter, cookie, signature, or redirectiondomain is considered ready to be enforced. Particularly if you are using manual learning, you can delveinto the details to see if you want to enforce these entities in the security policy. From the EnforcementReadiness summary on the Traffic Learning screen, you can enforce selected entities to the securitypolicy, or you can enforce all of the entities and signatures that are ready to be enforced. If you are usingautomatic learning, you can still enforce entities manually, but the Policy Builder enforces entitiesaccording to the learning and blocking settings. So you do not need to enforce entities in the securitypolicy.
Enforcing entitiesWhen you create a security policy and traffic is sent to the web application, the system makes learningsuggestions about files types, URLs, parameters, cookies, and redirection domains to add to the security
Refining Security Policies with Learning
172
policy. You can review the entities and signatures that are ready to be enforced, and enforce them in thesecurity policy.
Note: This task is primarily for building a security policy using manual learning. If you are using theautomatic learning mode, the system automatically enforces entities in the security policy when it hasprocessed sufficient traffic and sessions over enough time, from different IP addresses, to determine thelegitimacy of the file types, URLs, parameters, cookies, methods, and so on. .
1. On the Main tab, click Security > Application Security > Policy Building > Traffic Learning.The Enforcement Readiness summary is on the bottom right.
2. In the Current edited security policy list near the top of the screen, verify that the security policyshown is the one you want to work on.
3. Below the charts on the right, review the Enforcement Readiness Summary to see if there are entitiesthat are ready to be enforced. If there are, select the entities you want the security policy to enforce,and click Enforce Ready Entities.If you select this option, you are done with this task. Continue only if you want to enforce selectedentities or signatures instead of enforcing all entities ready to be enforced.
4. In the Enforcement Readiness Summary, check to see if a number appears in the Not Enforcedcolumn.A number greater than zero indicates that entities of that type are in staging, or have wildcard entitiesconfigured so that the security policy learns all explicit entities that match them.
5. Click the number in the Not Enforced column.The allowed file types, URLs, parameters, cookies, signatures, or redirection protection list opensshowing the entities that you can enforce.
6. Select the entities you want the security policy to enforce, and click Enforce.
The system removes the selected entities or signatures from staging, and enforces them in the securitypolicy. If any of the entities are wildcards that are learning explicit entities, the system deletes thewildcards.
Exploring security policy action itemsEven though you are done creating a security policy, Application Security Manager™ (ASM) might haveadditional action items it recommends for you to do based on your current system configuration andcurrent security policies.
1. On the Main tab, click Security > Overview > Application > Action Items.The Action Items screen opens.
2. Examine the Action Items screen for information about recommended actions that you need tocomplete.
3. Review the Suggested Action Items area, which lists system tasks and security policy tasks that thesystem recommends.Examples of system-wide action items include updating attack signatures, restarting the system, andsetting up synchronization so that all configuration data from this system is duplicated on anothersystem in a device group. Action items related to the security policy include enforcing entities that areready to be enforced and applying changes previously made to the security policy.
4. Click the links in the Suggested Action Items area to go to the screen where you can perform therecommended actions.
5. In the Quick Links area, click any of the links to gain access to common configuration and reportingscreens.
6. If you are using the Automatic Learning Mode, you can see a summary of the policy elements learnedin automatic mode for each security policy on the system.
BIG-IP Application Security Manager: Implementations
173

By looking at the recommended Action Items and system reports, you can find out what additional stepsyou can take to tighten your security policy.
Refining Security Policies with Learning
174

Changing How a Security Policy is Built
Overview: Changing how a security policy is builtApplication Security Manager™ (ASM) completely configures the policy building settings according tothe selections you make when you create a security policy. These settings are used for both automatic andmanual policy building. You can review the settings, and change them later if needed.
The policy building settings control:
• Whether traffic is blocked if a violation occurs• Whether ASM automatically builds the security policy• How inclusive the security policy is• How new entities (file types, URLs, parameters, and so on) are learned: never learn new entities, learn
if there are violations on an entity (selective mode), learn all entities that are discovered in the traffic.• Which violations to enforce and how to enforce them• Which IP addresses to trust traffic and data from• Whether learning is available for every particular attribute
There are two levels of policy building settings: basic and advanced. The basic settings are sufficient formost installations, and require less work. Selecting the policy template causes ASM to choose reasonablevalues for the advanced settings.
The advanced level allows you to view and change all of the configuration settings if you want furthercontrol over security policy details. However, in most cases, you do not need to change the default valuesof these settings. F5 recommends that you use the default settings unless you are technically familiar withthe web application being protected, and with ASM.
Task summaryChanging how to build a security policyAdding trusted IP addresses to a security policyLearning host names automaticallyClassifying the content of learned parametersSpecifying whether to learn integer parametersSpecifying when to learn dynamic parametersCollapsing entities in a security policyChanging how cookies are enforcedLimiting the maximum number of policy elementsClassifying the content of requests to URLsSpecifying the file types for wildcard URLsDisabling full policy inspectionStopping and starting automatic policy building
Changing how to build a security policy
If you are an advanced user, you can review or adjust the settings that the system uses to build or fine-tune a security policy. In most cases, you do not need to change the values of these settings.

1. On the Main tab, click Security > Application Security > Policy Building > Learning andBlocking Settings.The Learning and Blocking Settings screen opens.
2. In the Current edited security policy list near the top of the screen, verify that the security policyshown is the one you want to work on.
3. Adjust the Enforcement Mode setting if needed.
• To block traffic that causes violations, select Blocking.• To allow traffic even if it causes violations (allowing you to make sure that legitimate traffic
would not be blocked), select Transparent.
You can only configure the Block flag on violations if the enforcement mode is set to Blocking.4. For Learning Mode, select how you want the Policy Builder to build the security policy.
• If you want the Policy Builder to automatically build the security policy, select Automatic.• If you want the Policy Builder to make suggestions and manually decide what to include, select
Manual.• If you do not want the system to suggest policy changes, select Disabled.
If you selected Automatic or Manual, the system examines traffic and makes suggestions about howto tighten the security policy. If you are using automatic learning, the system enforces the suggestionswhen it is reasonable to do so. If you are using manual learning, you need to examine the changes andaccept, delete, or ignore them on the Traffic Learning screen. If you disabled this option, the systemdoes not do any learning for this policy, it makes no suggestions, and the Learn flag for all violationsbecomes inactive.
5. For Learning Speed, select how fast to build the security policy:Option Description
Fast Builds a security policy using lower threshold values for the rules so they are likely tomeet the thresholds more quickly; for example, this setting is useful for smaller web siteswith less traffic. Selecting this value may create a less accurate security policy.
Medium Builds a security policy based on greater threshold values for the rules. This is the defaultsetting and is recommended for most sites.
Slow Builds a security policy using even higher thresholds for the rules and takes longer tomeet them; for example, this value is useful for large web sites with lots of traffic.Selecting this value may result in fewer false positives and create a more accurate securitypolicy.
A faster learning speed causes the system to make more learning suggestions for changes to the policyin a shorter time. A slower learning speed causes the system to examine more traffic before makinglearning suggestions.If you are using automatic learning and a faster learning speed, the system enforces the learningsuggestions more quickly. If you are using automatic and slower learning, it takes longer to build andenforce the security policy. If you are using manual learning at any learning speed, you have tomanually enforce the learning suggestions.
6. On the right side of the Learning and Blocking Settings screen, select Advanced.The screen displays the advanced configuration details for policy building.
7. Expand any setting by clicking it.The Policy Building Settings provide blocking settings for violations, learning settings for entities(file types, URLs, parameters, cookies, and redirection domains).The Policy Building Process settings let you adjust details about how the security policy is built, suchas minimizing false positives, allowing trusted IP addresses, whether to learn from responses, and theadvanced settings let you adjust rules for when to relax or tighten the security policy.
Changing How a Security Policy is Built
176

8. Review the settings and modify them as needed. Refer to the online help for details on each of thesettings.
9. Click Save to save your settings.10. To put the security policy changes into effect immediately, click Apply Policy.
By adjusting the policy building settings, you change the way that Application Security Manager™
creates the security policy.
Adding trusted IP addresses to a security policy
In a security policy, you can include a list of IP addresses that you want the system to consider safe ortrusted. Take care when specifying trusted IP addresses. Trusted IP addresses are typically internal IPaddresses to which only trusted users have access. You configure all trusted IP addresses as IP addressexceptions.
1. On the Main tab, click Security > Application Security > Policy Building > Learning andBlocking Settings.The Learning and Blocking Settings screen opens.
2. In the Current edited security policy list near the top of the screen, verify that the security policyshown is the one you want to work on.
3. On the right side of the Learning and Blocking Settings screen, select Advanced.The screen displays the advanced configuration details for policy building.
4. To use a global list of trusted IP addresses, in the Policy Building Process area, select Advanced (onthe right), then expand Trusted IP Addresses.a) Select Address List and click Save.b) If the list is empty or you want to add trusted IP addresses, click the arrow next to Trusted IP
Addresses to jump to the IP Address Exceptions list where you can specify which IP addresses toconsider safe.
5. To trust all IP addresses (for internal or test environments), in the Policy Building Process area,expand Trusted IP Addresses, and select All IP Addresses.
Warning: Use this option only in test environments where all clients are known to be legitimate, andthe goal is to quickly build a security policy for the production environment. If you are not using it inthe proper environment, the policy could be compromised as each request will be consideredlegitimate, and all violations will be considered false positives and disabled in the policy.
6. Click Save to save your settings.7. To put the security policy changes into effect immediately, click Apply Policy.
Application Security Manager™ (ASM) processes traffic from trusted clients differently than traffic fromuntrusted clients. For clients with trusted IP addresses, the rules are configured so that ASM™ requiresless traffic (by default, only 1 user session) to update the security policy or make suggestions aboutadding an entity or making other changes. It takes more traffic from untrusted clients to change orsuggest changes to the security policy (for example, if using the default values).
Learning host names automatically
The security policy maintains a list of the host names that can access the web application. Your securitypolicy can automatically learn host names from requests if you use certain options.
Note: If you are creating a security policy with automatic learning, the default option for all policytemplates is already set to learn host names automatically. The steps here explain the options to configureASM™ to automatically detect and learn host names for your application if the option has been disabled.
BIG-IP Application Security Manager: Implementations
177

1. On the Main tab, click Security > Application Security > Policy Building > Learning andBlocking Settings.The Learning and Blocking Settings screen opens.
2. Ensure that the Learning Mode is set to Automatic.The system examines the traffic to the web application, and after processing sufficient legitimatetraffic, the system builds the security policy automatically by adding and enforcing elements withminimal manual intervention. A few learning suggestions require your review before they are added.
3. On the right side of the Learning and Blocking Settings screen, select Advanced.The screen displays the advanced configuration details for policy building.
4. In the Policy Building Settings area, expand Headers and ensure that Learn Host Names is selected.
Tip: Click the arrow next to the setting to jump to the list of host names already recognized by thesecurity policy.
5. Click Save to save your settings.6. In the editing context area, click Apply Policy to put the changes into effect.
The security policy searches headers for valid host names. When a host name is found, ASM creates asuggestion to add the host name to the policy. When the learning score reaches 100%, the suggestion isautomatically accepted, or you can accept the suggestion manually on the Traffic Learning screen. Thehost names in the security policy (also called the host headers) are included in the Host Names list.
Classifying the content of learned parameters
When using automatic learning, you can instruct the system to examine and classify the content oflearned parameters. If the system detects legitimate XML or JSON data in parameters, the system adds(or suggests adding) XML or JSON content profiles to the security policy and configures them using thedata found.
1. On the Main tab, click Security > Application Security > Policy Building > Learning andBlocking Settings.The Learning and Blocking Settings screen opens.
2. In the Current edited security policy list near the top of the screen, verify that the security policyshown is the one you want to work on.
3. In the General Settings, for Learning Mode, ensure that it is set to Automatic.4. On the right side of the Learning and Blocking Settings screen, select Advanced.
The screen displays the advanced configuration details for policy building.5. In the Policy Building Settings area, expand Parameters.6. Select Classify Value Content of Learned Parameters.7. Click Save to save your settings.8. To put the security policy changes into effect immediately, click Apply Policy.
If XML or JSON data is discovered in parameters, the system creates the appropriate content profile andadd it (or suggests adding it) to the security policy.
Specifying whether to learn integer parameters
Integer parameters are parameters with a data type that is numeric and can include only whole numbers.If a security policy is learning parameters (when Learn New Parameters is set to Selective or Add AllEntities), you can specify whether the Policy Builder suggests adding integer parameters to the securitypolicy. This option is available only when the learning mode is set to automatic.
1. On the Main tab, click Security > Application Security > Policy Building > Learning andBlocking Settings.
Changing How a Security Policy is Built
178

The Learning and Blocking Settings screen opens.2. In the Current edited security policy list near the top of the screen, verify that the security policy
shown is the one you want to work on.3. On the right side of the Learning and Blocking Settings screen, select Advanced.
The screen displays the advanced configuration details for policy building.4. In the Policy Building Settings area, expand Parameters.5. Set Learn New Parameters to either Always or Selective.6. Select Learn Integer Parameters.7. Click Save to save your settings.8. To put the security policy changes into effect immediately, click Apply Policy.
When the Application Security Manager™ receives a request that includes an entity (for example, a URL)containing an integer parameter, the system collects the parameter value from the web application’sresponse to the request and suggests adding it to the security policy.
Specifying when to learn dynamic parameters
Dynamic parameters are those whose values are regenerated when the user accesses an application. Forexample, a session ID is a dynamic parameter, and it is linked to a user session. The system can extractdynamic parameters from parameters, URLs, and file types. You can specify the conditions under whichthe Policy Builder suggests adding dynamic parameters to the security policy. This option is availableonly when the learning mode is set to automatic.
1. On the Main tab, click Security > Application Security > Policy Building > Learning andBlocking Settings.The Learning and Blocking Settings screen opens.
2. In the Current edited security policy list near the top of the screen, verify that the security policyshown is the one you want to work on.
3. Ensure that the Learning Mode is set to Automatic.4. On the right side of the Learning and Blocking Settings screen, select Advanced.
The screen displays the advanced configuration details for policy building.5. In the Policy Building Settings area, expand Parameters.6. Set Learn New Parameters to either Always or Selective.7. For Learn Dynamic Parameters, select one or more of the check boxes to specify the conditions
under which the Policy Builder adds dynamic parameters to the security policy.Option Description
All HIDDEN Fields Adds to the security policy all hidden form input parameters, seenin responses, as dynamic content value parameters.
Using statistics - FORMparameters
Adds parameters from forms as dynamic content value parameters.
Using statistics - linkparameters
Adds parameters from links as dynamic content value parameters.
Statistics: Configureparameters as dynamic if<num>...
Specifies the number (<num>) of unique value sets that must beseen for a parameter before the system considers it a dynamiccontent value. The default value is 10.
8. In the Policy Building Process area, expand Options and ensure that Learn from responses isselected.
9. Click Save to save your settings.10. To put the security policy changes into effect immediately, click Apply Policy.
BIG-IP Application Security Manager: Implementations
179

When the Application Security Manager™ receives a request that includes an entity (for example, a fileextension or URL) containing a dynamic parameter, the system collects the parameter value or namefrom web application’s response to the request and suggests adding it to the security policy.
Collapsing entities in a security policy
When using automatic policy building, the system automatically simplifies your security policy bycombining several similarly named explicit entities into wildcard entities. For example, multipleparameters beginning with param are combined into param*. You can specify which entities should becollapsed and after how many occurrences.
1. On the Main tab, click Security > Application Security > Policy Building > Learning andBlocking Settings.The Learning and Blocking Settings screen opens.
2. In the Current edited security policy list near the top of the screen, verify that the security policyshown is the one you want to work on.
3. On the right side of the Learning and Blocking Settings screen, select Advanced.The screen displays the advanced configuration details for policy building.
4. To collapse URLs, in the Policy Building Settings area, expand URLs.a) Select Collapse many common URLs into one wildcard URL.
The system collapses URLs only in the same directory (with the same prefix path), and if theyhave the same file extension. For example, the system collapses the URLs /aaa/x.php, /aaa/y.php, and /aaa/z.php into /aaa/*.php.
b) In the adjacent occurrences field, type the number of occurrences (2 or more) the system mustdetect before collapsing URLs into one entity. The default value is 500.
c) In the following depth field, type the minimum depth for collapsing path segments (forexample, /aa/bb/x.php has a depth of 3). The default value is 2.
5. To collapse parameters, in the Policy Building Settings area, expand Parameters.a) Select Collapse many common Parameters into one wildcard Parameter.b) In the adjacent occurrences field, type the number of occurrences (2 or more) the system must
detect before collapsing them to one entity. The default value is 10.6. To collapse cookies, in the Policy Building Settings area, expand Cookies.
a) Select Collapse many common Cookies into one wildcard Cookie.b) In the adjacent occurrences field, type the number of occurrences (2 or more) the system must
detect before collapsing them to one entity. The default value is 10.7. Click Save to save your settings.8. To put the security policy changes into effect immediately, click Apply Policy.
When the traffic includes sufficient occurrences of the URLs, parameters, cookies, and/or contentprofiles, the system collapses multiple similar entities into a wildcard entity in the appropriate list unlessthe collapse would lead to a loss of security policy information.
Changing how cookies are enforced
You can change the way cookies are enforced in the security policy. To make these changes, you need tounderstand how your application uses cookies. Does the application server set most or all of the cookies,and are they not modified on the client? Or does your application allow cookies to be modified?
1. On the Main tab, click Security > Application Security > Policy Building > Learning andBlocking Settings.The Learning and Blocking Settings screen opens.
2. On the right side of the Learning and Blocking Settings screen, select Advanced.The screen displays the advanced configuration details for policy building.
Changing How a Security Policy is Built
180

3. In the Policy Building Settings area, expand Cookies and ensure that Learn New Cookies is set toSelective.
4. In the cookies settings, consider how to set the Learn and enforce new unmodified cookies checkbox. Are cookies set by the application server and not modified on the client side?
• If yes, clear this check box and make sure the * cookie wildcard is an enforced cookie. Only thecookies that are modified or created on the client side are learned as allowed cookies.
• If no, select this check box and make sure the * cookie wildcard is an allowed cookie.
Check the * cookie wildcard by viewing Security > Application Security > Headers > CookiesList.
Note: Security policies created using the comprehensive template are set to learn and enforce newunmodified cookies by default.
5. Click Save to save your settings.6. In the editing context area, click Apply Policy to put the changes into effect.
If Learn and enforce new unmodified cookies is selected, the system creates new enforced cookies ifthese two conditions are met:
• The * cookie wildcard is an allowed cookie• Learn New Cookies is set to Selective
If you clear the Learn and enforce new unmodified cookies check box, the system learns the modifiedcookies when:
• The * cookie wildcard is an enforced cookie• Learn New Cookies is set to Selective• The Learn flag of the Modified domain cookie(s) violation is selected
If a request causes the Modified domain cookie(s) violation, the system changes their type from“enforced” to “allowed” (in the GUI they are moved between the tabs).
In cases where you want all cookies to be enforced, the * cookie wildcard must be an allowed cookie. Ifyou do not want all cookies to be enforced, the * cookie wildcard must be an enforced cookie. In eithercase, set Learn New Cookies to Never (wildcard only) and clear the Learn and enforce newunmodified cookies check box.
Limiting the maximum number of policy elements
When building a security policy using automatic or manual learning, the system has reasonable limits forthe maximum number of file types, URLs, parameters, cookies, and redirection domains that the systemcan learn and add to the security policy. These limits work fine for most situations. You can adjust thelimits, if needed. Note that you can always add an entity manually even after the limits are reached.
1. On the Main tab, click Security > Application Security > Policy Building > Learning andBlocking Settings.The Learning and Blocking Settings screen opens.
2. In the Current edited security policy list near the top of the screen, verify that the security policyshown is the one you want to work on.
3. On the right side of the Learning and Blocking Settings screen, select Advanced.The screen displays the advanced configuration details for policy building.
4. In the Policy Building Settings area, expand the type of entity for which you want to adjust the limit(File Types, URLs, Parameters, Cookies, or Redirection Protection), and in the appropriateMaximum Learned setting, adjust the maximum number of elements that the Policy Builder can addto the security policy.
BIG-IP Application Security Manager: Implementations
181

• Maximum Learned File Types• Maximum Learned HTTP URLs• Maximum Learned WebSocket URLs• Maximum Learned Parameters• Maximum Learned Cookies• Maximum Learned Redirection Domains
Default values differ depending on the Learn New setting.5. Click Save to save your settings.6. To put the security policy changes into effect immediately, click Apply Policy.
If the Policy Builder reaches the specified limit, it stops adding that type of security policy element. Ifthis happens, you may need to intervene.
• If the web site requires more than the maximum number of elements, you can increase the limits, orreconsider the type of the policy (you may not need to include all the elements explicitly).
• If the site includes a dynamic element that the Policy Builder cannot learn (such as dynamic sessionsin URL or dynamically generated parameter names), either configure the security policy to includethe element (for example, dynamic sessions in URL), or clear the element type. The Policy Buildershould not be configured to learn that element type in such an environment.
• If you want to maintain the limits, you can add the required entities manually.
Classifying the content of requests to URLs
When using automatic learning, you can instruct the system to examine and classify the content ofrequests to URLs. If the system detects legitimate XML, JSON, or Google Web Toolkit (GWT) data inrequests to URLs configured in the security policy, the system adds XML, JSON, or GWT contentprofiles to the security policy and configures them using the data found.
1. On the Main tab, click Security > Application Security > Policy Building > Learning andBlocking Settings.The Learning and Blocking Settings screen opens.
2. In the Current edited security policy list near the top of the screen, verify that the security policyshown is the one you want to work on.
3. In the General Settings, for Learning Mode, ensure that it is set to Automatic.4. On the right side of the Learning and Blocking Settings screen, select Advanced.
The screen displays the advanced configuration details for policy building.5. In the Policy Building Settings area, expand URLs.6. For Learn New HTTP URLs or Learn New WebSocket URLs, specify Selective or Always to
determine when to add explicit URLs to the security policy.
• Choose Selective to add explicit URLs that do not match the * wildcard.• Choose Always to create a comprehensive whitelist of all the website URLs.
Using these options activates the Classify Request Content of Learned URLs check box.7. Select Classify Request Content of Learned URLs.8. Click Save to save your settings.9. To put the security policy changes into effect immediately, click Apply Policy.
If XML, JSON, or GWT data is discovered in requests to URLs in the security policy, the system createsthe appropriate content profiles and adds them to the policy.
Changing How a Security Policy is Built
182

Specifying the file types for wildcard URLs
For security policies that are tracking URLs (policies that use the comprehensive template), the systemadds a wildcard URL instead of explicit URLs for commonly used file types. You can adjust the list offile types that are changed to wildcard URLs.
1. On the Main tab, click Security > Application Security > Policy Building > Learning andBlocking Settings.The Learning and Blocking Settings screen opens.
2. In the Current edited security policy list near the top of the screen, verify that the security policyshown is the one you want to work on.
3. On the right side of the Learning and Blocking Settings screen, select Advanced.The screen displays the advanced configuration details for policy building.
4. In the Policy Building Settings area, expand URLs.5. In the File types for which wildcard HTTP URLs will be configured setting, add or delete the file
types for which the Policy Builder creates a wildcard URL instead of adding an explicit URL.Common file types are included by default. Note that the setting is unavailable in policies that do notinclude URLs (such as if Learn New HTTP URLs is set to Never).
• To add file types, in the File types field adjacent to the Add button, type the file extension andclick Add.
• To remove file types, select the file type and click Delete.6. Click Save to save your settings.7. To put the security policy changes into effect immediately, click Apply Policy.
For the file types listed, the Policy Builder adds wildcards instead of explicit URLs when encounteringthem in web application traffic. Also, the wildcards are added to the policy as non-case sensitive; forexample, .jpg URLs are added as *.[Jj][Pp][Gg] instead of image1.jpg, IMAGE2.JPG, andimage3.jpg.
Disabling full policy inspection
Application Security Manager™ provides full functionality, and performs full policy inspection, and holdsin memory information about the configuration of entities that are included in a security policy. In rarecases, such as on systems with limited memory or when instructed to do so by F5 Support, you mightneed to disable full policy inspection.
Note: F5 does not recommend disabling full policy inspection.
1. On the Main tab, click Security > Application Security > Policy Building > Learning andBlocking Settings.The Learning and Blocking Settings screen opens.
2. In the Current edited security policy list near the top of the screen, verify that the security policyshown is the one you want to work on.
3. On the right side of the Learning and Blocking Settings screen, select Advanced.The screen displays the advanced configuration details for policy building.
4. To turn on memory optimization and limit the elements that the security policy stores in memory, inthe Policy Building Process area, expand Options and clear the Full Policy Inspection check box.
5. Click Save to save your settings.6. To put the security policy changes into effect immediately, click Apply Policy.
If you disable the Full Policy Inspection check box, the system does not store all the information aboutthe policy elements in memory, thus it enables memory optimization. However, you lose some
BIG-IP Application Security Manager: Implementations
183

functionality. When the setting is disabled, the system cannot collapse URLs, WebSocket URLs,parameters, or content profiles (the collapse settings are cleared, become unavailable, and cannot bechanged). The system no longer performs classification for parameters, URLs, or WebSocket URLs.
Disabling full policy inspection causes pabnagd (policy building daemon) to restart in 5 minutes. Thedelay allows time to disable the check box on more than one policy. The restart does not affect trafficthroughput.
Stopping and starting automatic policy building
You can use the Real Traffic Policy Builder® to automatically build a security policy in two ways: withautomatic learning or manual learning. When you set Learning Mode to automatic, the Policy Buildermakes suggestions on how to update the security policy and updates the security policy when the policybuilding rules are met. It does this by automatically enforcing the suggested changes, adding file types,URLs, parameters, and so on for the web application. The Policy Builder also operates when you setLearning Mode to manual. In this case, the Policy Builder examines traffic, and makes suggestions onwhat to add to the security policy or what to change in the policy settings but you have to implementthem.
1. On the Main tab, click Security > Application Security > Policy Building > Learning andBlocking Settings.The Learning and Blocking Settings screen opens.
2. In the Current edited security policy list near the top of the screen, verify that the security policyshown is the one you want to work on.
3. In the General Settings, for Learning Mode, select how you want to build the security policy:Option Who builds the security policy?
Automatic The Policy Builder. It examines traffic, makes suggestions, and enforces mostsuggestions after sufficient traffic over a period of time from various users makes itreasonable to add them. You may have to enforce a few suggestions manually, and youhave the option of enhancing the policy manually.
Manual The Policy Builder and you together. The Policy Builder examines traffic and makessuggestions on what to add to the security policy. You need to manually handle thesuggestions on the Traffic Learning screen, and optionally adjust the security policy.
Disabled You. The Policy Builder does not do any learning for the security policy, and makes nosuggestions. Based on your knowledge of the web application, you can manually addentities to the security policy and adjust the policy building settings.
4. Click Save to save your settings.5. To put the security policy changes into effect immediately, click Apply Policy.
If you set learning mode to automatic, the Policy Builder automatically discovers and populates thesecurity policy with the policy elements (such as file types, URLs, parameters, and cookies). If you areusing manual learning, the Policy Builder examines traffic and makes suggestions on ways to adjust thesecurity policy; changes are implemented only when you approve them. You can manually accept, delete,or ignore the suggestions on the Traffic Learning screen.
If you disable the learning mode, all learning suggestions are deleted and no more learning takes place;the security policy remains the same unless you manually change it. If you enable manual or automaticlearning later, the learning process starts over. Regardless of the learning mode, you can always monitorthe policy and manually change it.
Changing How a Security Policy is Built
184

Configuring Security Policy Blocking
About security policy blockingYou can configure how Application Security Manager™ handles requests that violate the security policyin several ways.
Method Description
Blocking actions Blocking actions for each of the security policy violations, along with theenforcement mode, determine the action that will be taken when theviolation occurs. If a violation set to alarm or block occurs on an entitythat is in staging, it is not enforced.
Evasion techniques Sophisticated hackers have figured out coding methods that normal attacksignatures do not detect. These methods are known as evasion techniques.You can choose which evasion techniques you want Application SecurityManager to identify, and configure blocking actions that occur if any ofthe selected techniques is detected.
HTTP Protocol Compliance The system performs validation checks on HTTP requests to ensure thatthe requests are formatted properly. You can configure which validationchecks are enforced by the security policy.
Web Services Security You can configure which web services security errors must occur for thesystem to learn, log, or block requests that trigger the errors.
Response pages When the enforcement mode of the security policy is blocking, and arequest (or response) triggers a violation for which the Block action isenabled, the system returns the response page to the client. If youconfigure login pages, you can also configure a response page for blockedaccess.
Changing security policy enforcement
Security policies can be in one of two enforcement modes: transparent or blocking. The enforcementmode specifies whether the system simply logs or blocks a request that triggers a security policyviolation. You can manually change the enforcement mode for a security policy depending on how youwant the system to handle traffic that causes violations.
1. On the Main tab, click Security > Application Security > Policy Building > Learning andBlocking Settings.The Learning and Blocking Settings screen opens.
2. In the Current edited security policy list near the top of the screen, verify that the security policyshown is the one you want to work on.
3. For the Enforcement Mode setting, specify how to treat traffic that causes violations.
• To block traffic that causes violations (that are set to block), select Blocking.• To stop allow traffic even if it causes violations so you can review the violations, select
Transparent.4. Click Save to save your settings.5. To put the security policy changes into effect immediately, click Apply Policy.
When the enforcement mode is set to transparent, traffic is not blocked even if a violation is triggered.The system typically logs the violation event (if the Learn flag is set on the violation). You can use this

mode along with an enforcement readiness period when you first put a security policy into effect to makesure that no false positives occur that would stop legitimate traffic.
When the enforcement mode is set to blocking, traffic is blocked if it causes a violation (that isconfigured for blocking), and the enforcement readiness period is over. You can use this mode when youare ready to enforce a security policy.
Configuring blocking actions for violations
You can configure the Learn, Alarm, and Block flags, or blocking actions, for each violation. Theblocking actions (along with the enforcement mode) determine how the system processes requests thattrigger the corresponding violation.
1. On the Main tab, click Security > Application Security > Policy Building > Learning andBlocking Settings.The Learning and Blocking Settings screen opens.
2. In the Current edited security policy list near the top of the screen, verify that the security policyshown is the one you want to work on.
3. Adjust the Enforcement Mode setting if needed.
• To block traffic that causes violations, select Blocking.• To allow traffic even if it causes violations (allowing you to make sure that legitimate traffic
would not be blocked), select Transparent.
You can only configure the Block flag on violations if the enforcement mode is set to Blocking.4. From the list, select Advanced.5. Review each of the Policy Building Settings so you understand how the security policy handles
requests that cause the associated violations, and adjust if necessary. You need to expand most of thesettings to see the violations.
Tip: To the right of Policy Building Settings, click Blocking Settings to see and adjust all of theviolations at once.
Option What happens when selected
Learn The system generates learning suggestions for requests that trigger the violation(except learning suggestions are not generated for requests that return HTTP responseswith 400 or 404 status codes).
Alarm When selected, the system marks requests that trigger the violation as illegal. Thesystem also records illegal requests in the Charts screen, the system log (/var/log/asm), and possibly in local or remote logs (depending on the settings of the loggingprofile).
Block The system blocks requests that trigger the violation when (1) the security policy is inthe blocking enforcement mode, (2) a violation occurs, and (3) the entity is enforced.The system sends the blocking response page (containing a Support ID to identify therequest) to the client.
6. Expand the violations that are links to display more granular details or subviolations for which youcan enable blocking properties.You can enable or disable blocking subviolations for HTTP protocol compliance, evasion techniques,and web services security.
7. Click Save to save your settings.8. To put the security policy changes into effect immediately, click Apply Policy.
Entities in staging, attack signatures in staging, and wildcards set to add all entities do not causeviolations, and consequently are not blocked. But if the enforcement mode is blocking and violations are
Configuring Security Policy Blocking
186

set to Block, traffic causing those violations is blocked. If violations are set to Alarm, the system logs theviolations. For violations set to Learn, the system generates learning suggestions if the violation occurs.
You can now configure the response that the system sends when a request is blocked.
Configuring HTTP protocol compliance validation
The first security checks that Application Security Manager™ performs are those for RFC compliancewith the HTTP protocol. The system validates HTTP requests to ensure that the requests are formattedproperly. For each security policy, you can configure which HTTP protocol checks the system performs,and specify what happens if requests are not compliant.
1. On the Main tab, click Security > Application Security > Policy Building > Learning andBlocking Settings.The Learning and Blocking Settings screen opens.
2. In the Policy Building Settings area, for the HTTP protocol compliance failed violation, set theblocking settings as needed.Select thisOption
When You Want to
Learn Generate learning suggestions for requests that trigger the violation.
Alarm Record requests that trigger the violation in ASM Charts, the system log(/var/log/asm), and possibly in local or remote logs (depending on the loggingprofile settings).
Block Block requests that trigger the violation (the enforcement mode must be set toBlocking).
3. Expand the HTTP protocol compliance failed setting.The HTTP subviolations are displayed.
4. Select or clear the HTTP protocol checks, as required.
Tip: For an explanation of any individual HTTP validation, click it.
5. Click Save to save your settings.6. To put the security policy changes into effect immediately, click Apply Policy.
If the HTTP protocol compliance failed violation is set to Learn, Alarm, or Block, thesystem performs the protocol compliance checks. If the Enforcement Mode is set to Blocking and theviolation is set to block, the system blocks requests that are not compliant with the selected HTTPprotocol validations.
If a request is too long and causes the Request length exceeds defined buffer sizeviolation, the system stops validating protocol compliance for that request.
Configuring blocking actions for evasion techniques
For every HTTP request, Application Security Manager™ examines the request for evasion techniques,which are coding methods that attackers use to avoid detection by attack signatures and intrusionprevention systems. You can enable or disable the blocking properties of specific evasion techniques inthe Evasion technique detected violation.
1. On the Main tab, click Security > Application Security > Policy Building > Learning andBlocking Settings.The Learning and Blocking Settings screen opens.
2. In the Current edited security policy list near the top of the screen, verify that the security policyshown is the one you want to work on.
BIG-IP Application Security Manager: Implementations
187

3. Adjust the Enforcement Mode setting if needed.
• To block traffic that causes violations, select Blocking.• To allow traffic even if it causes violations (allowing you to make sure that legitimate traffic
would not be blocked), select Transparent.
You can only configure the Block flag on violations if the enforcement mode is set to Blocking.4. Review the Evasion technique detected violation and adjust the Learn, Alarm, and Block flags as
required.5. Expand the Evasion technique detected setting.
The evasion technique subviolations are displayed.6. Enable or disable the evasion technique subviolations, as required.
Tip: For an explanation of an individual subviolation, click it.
7. Click Save to save your settings.8. To put the security policy changes into effect immediately, click Apply Policy.
If a request uses any of the selected evasion techniques, the system reacts according to how youconfigured the blocking settings for the Evasion technique detected violation. If theEnforcement Mode is set to Blocking and the violation is set to block, the system blocks requests thatuse selected evasion techniques.
Configuring blocking actions for web services security
It only makes sense to select learning and blocking settings for web services security errors if youpreviously created a security policy to protect a web application that uses XML formatting or employsweb services. The security policy must have an XML profile (with web services security enabled)associated with it.
You can select which web services security errors must occur for the system to learn, log, or blockrequests that trigger the errors. These errors are subviolations of the parent violation, Web ServicesSecurity failure.
1. On the Main tab, click Security > Application Security > Policy Building > Learning andBlocking Settings.The Learning and Blocking Settings screen opens.
2. In the Current edited security policy list near the top of the screen, verify that the security policyshown is the one you want to work on.
3. Adjust the Enforcement Mode setting if needed.
• To block traffic that causes violations, select Blocking.• To allow traffic even if it causes violations (allowing you to make sure that legitimate traffic
would not be blocked), select Transparent.
You can only configure the Block flag on violations if the enforcement mode is set to Blocking.4. From the list, select Advanced.5. Expand the Content Profiles setting.
The content profile violations and Web Services Security failure subviolations are displayed.6. Review the Web Services Security failure setting and adjust the Learn, Alarm, and Block flags as
required.7. For Web Services Security failure subviolations, enable or disable the web services subviolations, as
required for your application.
Tip: For an explanation of any individual subviolation, click it.
Configuring Security Policy Blocking
188

The selected subviolations are the ones that will cause the Web Services Security failureviolation to occur.
8. Click Save to save your settings.9. To put the security policy changes into effect immediately, click Apply Policy.
If a request causes one of the enabled errors to occur, web services security stops parsing the document.How the system reacts depends on how you configured the blocking settings for the Web ServicesSecurity failure violation:
• If configured to Learn or Alarm when the violation occurs, the system does not encrypt or decrypt theSOAP message, and sends the original document to the web service.
• If configured to Block when the violation occurs, the system blocks the traffic and prevents thedocument from reaching its intended destination. The system sends a blocking response page. If theXML profile associated with the policy is configured to use an XML blocking response page, it usesthe XML response. Otherwise, it uses the default response page.
• If a web services security violation occurs on an entity in staging, for example, a URL in stagingassociated with an XML profile, the violation (set to alarm or block) is not enforced.
BIG-IP Application Security Manager: Implementations
189

Configuring Security Policy Blocking
190

Configuring What Happens if a Request is Blocked
Overview: Configuring what happens if a request is blockedThe Application Security Manager™ has a default blocking response page that it returns to the clientwhen the client request, or the web server response, is blocked by the security policy. The system also hasa login response page for login violations. You can change the way the system responds to blocked loginsor blocked requests.
Note: The system issues response pages only when the enforcement mode is set to Blocking.
A security policy can respond to blocked requests in these ways:
• Default response• Custom response• Redirect URL• SOAP fault• Erase Cookies
The system uses default pages in response to a blocked request or blocked login. If the default pages areacceptable, you do not need to change them and they work automatically. However, if you want tocustomize the response, or include XML or AJAX formatting in the blocking responses, you need toenable the blocking behavior first. You enable XML blocking on the XML profile, AJAX blocking on theAJAX response page, and Cookie Hijacking on the Session Tracking screen.
All default response pages contain a variable, <%TS.request.ID()%>, that the system replaces with asupport ID number when it issues the page. Customers can use the support ID to identify the requestwhen making inquiries.
Configuring responses to blocked requests
You can configure the blocking response that the system sends to the user when the security policyblocks a client request.
1. On the Main tab, click Security > Application Security > Policy > Response Pages.The Response Pages screen opens.
2. In the Current edited security policy list near the top of the screen, verify that the security policyshown is the one you want to work on.
3. On the Default Response Page tab, for the Response Type setting, select one of the followingoptions.Option System Response to Blocked Request
DefaultResponse
The system returns the system-supplied response page in HTML. No furtherconfiguration is needed.
CustomResponse
The system returns a response page with HTML code that you define.
Redirect URL The system redirects the user to a specified web page.
SOAP Fault The system returns the system-supplied blocking response page in XML format.You cannot edit the text, but you need to select Use XML Blocking ResponsePage on the XML profile.

Option System Response to Blocked Request
Erase Cookies The system deletes all client side domain cookies. As a result, the system blocksweb application users once, and redirects them to the login page. Legitimateusers can login and get new cookies. This feature is primarily for sessionhijacking.
The settings on the screen change depending on the selection that you make for the Response Typesetting.
4. If you selected the Custom Response option, you can either modify the default text or upload anHTML file.To modify the default text:a) For the Response Headers setting, type the response header you want the system to send.b) For the Response Body setting, type or paste the text you want to send to a client in response to
an illegal blocked request. Use standard HTTP syntax.c) Click Show to see what the response will look like.
To upload a file containing the response:a) In the Response Body, for the Upload File setting,click Choose File to specify an HTML file that
contains the response you want to send to blocked requests.b) Click Upload to upload the file into the response body.
5. If you selected the Redirect URL option, then in the Redirect URL field, type the URL to which thesystem redirects the user, for example, http://www.myredirectpage.com.The URL should be for a page that is not within the web application itself.For example, to redirect the blocking page to a URL with a support ID in the query string, type theURL and the support ID in the following format:http://www.myredirectpage.com/block_pg.php?support_id= <%TS.request.ID()%>The system replaces <%TS.request.ID%> with the relevant support ID so that the blocked request isredirected to the URL with the relevant support ID.
6. Click Save to save your settings.7. To put the security policy changes into effect immediately, click Apply Policy.
If the enforcement mode is blocking and a request is blocked, the system displays the selected responsepage, erases session cookies, or redirects the user to another URL depending on the option you selected.If a request causes multiple violations and results in more than one type of blocking page, only one willappear in this order:
• AJAX Response Page• Cookie Hijacking Response Page• XML Response Page• Login Response Page• Default Response Page
Configuring responses to blocked logins
You can configure the blocking response that the system sends to the user when the security policyblocks a client attempt to log in to the application. This occurs when Application Security Manager™
mitigates brute force login attacks.
1. On the Main tab, click Security > Application Security > Policy > Response Pages.The Response Pages screen opens.
2. In the Current edited security policy list near the top of the screen, verify that the security policyshown is the one you want to work on.
Configuring What Happens if a Request is Blocked
192

3. On the Default Response Page tab, for the Response Type setting, select one of the followingoptions.Option System Response to Blocked Request
DefaultResponse
The system returns the system-supplied response page in HTML. No furtherconfiguration is needed.
CustomResponse
The system returns a response page with HTML code that you define.
Redirect URL The system redirects the user to a specified web page.
SOAP Fault The system returns the system-supplied blocking response page in XML format.You cannot edit the text, but you need to select Use XML Blocking ResponsePage on the XML profile.
Erase Cookies The system deletes all client side domain cookies. As a result, the system blocksweb application users once, and redirects them to the login page. Legitimateusers can login and get new cookies. This feature is primarily for sessionhijacking.
The settings on the screen change depending on the selection that you make for the Response Typesetting.
4. If you selected the Custom Response option, you can either modify the default text or upload anHTML file.To modify the default text:a) For the Response Headers setting, type the response header you want the system to send.b) For the Response Body setting, type or paste the text you want to send to a client in response to
an illegal blocked request. Use standard HTTP syntax.c) Click Show to see what the response will look like.
To upload a file containing the response:a) In the Response Body, for the Upload File setting,click Choose File to specify an HTML file that
contains the response you want to send to blocked requests.b) Click Upload to upload the file into the response body.
5. If you selected the Redirect URL option, then in the Redirect URL field, type the URL to which thesystem redirects the user, for example, http://www.myredirectpage.com.The URL should be for a page that is not within the web application itself.For example, to redirect the blocking page to a URL with a support ID in the query string, type theURL and the support ID in the following format:http://www.myredirectpage.com/block_pg.php?support_id= <%TS.request.ID()%>The system replaces <%TS.request.ID%> with the relevant support ID so that the blocked request isredirected to the URL with the relevant support ID.
6. Click Save to save your settings.7. To put the security policy changes into effect immediately, click Apply Policy.
If a user violates one of the preconditions when requesting the target URL of a configured login page, thesystem displays the selected response page or redirect URL depending on the option you selected.
Customizing responses to blocked XML requests
You can configure the blocking response that the system sends to the user when the security policyblocks a client request that contains XML content, which does not comply with the settings of an XMLprofile in the security policy.
BIG-IP Application Security Manager: Implementations
193

Note: If you want to use the default SOAP response (SOAP Fault), you only need to enable XML blockingon the profile.
1. On the Main tab, click Security > Application Security > Policy > Response Pages.The Response Pages screen opens.
2. In the Current edited security policy list near the top of the screen, verify that the security policyshown is the one you want to work on.
3. Click the XML Response Page tab.4. For the Response Type setting, select Custom Response.5. In the Response Headers field, type the response header you want the system to send.
Tip: Paste the default response header to use the system response that you can then edit.
6. In the Response Body field:
• If you want to specify the content to send the client in response to an illegal blocked request, typethe text using XML syntax.
• To upload a file containing the XML response, specify an XML file and click Upload to uploadthe file into the response body.
Click Show to see what the response will look like.7. Click Save to save your settings.8. Make sure that the XML profile the application is using has blocking enabled:
a) On the Main tab, click Security > Application Security > Content Profiles > XML Profiles.b) Click name of the XML profile used by the application.c) Make sure that the Use XML Blocking Response Page check box is selected.d) Click Update.
9. To put the security policy changes into effect immediately, click Apply Policy.
Configuring the blocking response for AJAX applications
Before you can complete this task, you need to have already created a security policy for your webapplication. The application needs to have been developed using ASP.NET, jQuery, Prototype®, orMooTools to use AJAX blocking behavior.
When the enforcement mode of the security policy is set to blocking and a request triggers a violation(that is set to block), the system displays the AJAX blocking response according to the action set that youdefine. If a login violation occurs when requesting the login URL, the system sends a login responsepage, or redirects the user.
1. On the Main tab, click Security > Application Security > Policy > Response Pages.2. In the Current edited security policy list near the top of the screen, verify that the security policy
shown is the one you want to work on.3. Click the AJAX Response Page tab.4. Select the Enable AJAX blocking behavior (JavaScript injection)? check box.
The system displays the default blocking response and login response actions for AJAX.5. For the Default Response Page action setting, select the type of response you want the application
user to receive when they are blocked from the application:
• Custom Response lets you specify HTML text or upload a file to use as a replacement for theframe or browser page that generated the AJAX request. Include the text, then click Show topreview the response.
• Popup message displays text in a popup window (default text is included).
Configuring What Happens if a Request is Blocked
194

• Redirect URL redirects the user to the URL you specify. You can also include the support ID. Forexample: http://www.example.com/blocking_page.php?support_id=<%TS.request.ID()%>.
6. For the Login Page Response action, select the type of response (types are the same as for defaultresponse page in Step 5).
7. Click Save.8. To put the security policy changes into effect immediately, click Apply Policy.
BIG-IP Application Security Manager: Implementations
195

Configuring What Happens if a Request is Blocked
196

Adding Entities to a Security Policy
Adding File Types to a Security Policy
About adding file types
In a security policy, you can manually specify the file types that are allowed (or disallowed) in traffic tothe web application being protected. This is only if you are not using the recommended automatic policybuilding. When you are using automatic policy building, Application Security Manager™ determineswhich file types to add, based on legitimate traffic.
When you create a security policy, a wildcard file type of *, representing all file types, is added to the filetype list. During the enforcement readiness period, the system examines the file types in the traffic andmakes learning suggestions that you can review and add the file types to the policy as needed. This way,the security policy includes the file types that are typically used. When you think all the file types areincluded in the security policy, you can remove the * wildcard from the allowed file types list.
Adding allowed file types
You can manually add allowed file types, which are file types that the security policy accepts in traffic tothe web application being protected.
1. On the Main tab, click Security > Application Security > File Types.The Allowed File Types screen opens.
2. In the Current edited security policy list near the top of the screen, verify that the security policyshown is the one you want to work on.
3. Click Create.The Add Allowed File Type screen opens.
4. For File Type, choose a type:Option Description
Explicit Specifies a unique file type, such as JPG or HTML. Type the file type (from 1 to 255characters) in the adjacent box.
No Extension Specifies that the web application has a URL with no file type. The systemautomatically assigns this file type the name no_ext. The slash character (/) is anexample of a no_ext file type.
Wildcard Specifies that the file type is a wildcard expression. Any file type that matches thewildcard expression is considered legal. The pure wildcard (*) is automaticallyadded to the security policy so you do not need to add it. But you can add otherwildcards such as htm*. Type a wildcard expression in the adjacent box.
5. For the length settings, adjust the values as needed. This is optional.Option Specifies
URL Length The maximum acceptable length, in bytes, for a URL in the context of an HTTPrequest containing this file type. The default is 100 bytes.
Request Length The maximum acceptable length, in bytes, for the whole HTTP request thatapplies to this file type. The default is 5000 bytes.

Option Specifies
Query StringLength
The maximum acceptable length, in bytes, for the query string portion of a URLthat contains the file type. The default is 1000 bytes.
POST DataLength
The maximum acceptable length, in bytes, for the POST data of an HTTPrequest that contains the file type. The default is 1000 bytes
6. By default, the Perform Staging check box is selected. We recommend that you keep it selected.7. If you want the system to validate responses for this file type, select the Apply Response Signatures
check box.Selecting this option enables attack signatures (that are designed to inspect server responses) to filterresponses.
8. Click Create.The Allowed File Types screen opens and lists the new file type.
9. To put the security policy changes into effect immediately, click Apply Policy.
The security policy allows the file type that you added. If the file type is in staging, the system informsyou when learning suggestions are available or when it is ready to be enforced.
Wildcard syntax
The syntax for wildcard entities is based on shell-style wildcard characters. This table lists the wildcardcharacters that you can use in the names of file types, URLs, parameters, or cookies so that the entityname can match multiple objects.
Wildcard Character Matches
* All characters
? Any single character
[abcde] Exactly one of the characters listed
[!abcde] Any character not listed
[a-e] Exactly one character in the range
[!a-e] Any character not in the range
Adding disallowed file types
For some web applications, you may want to deny requests for certain file types. In this case, you cancreate a set of disallowed file types. Adding disallowed file types is useful for file types that you knowshould never appear on your site (such as .exefiles), or for files on your site that you never want usersfrom the outside to reach (such as .bak files).
Note that in the Learning and Blocking Settings, when Learn New File Types is set to Compact, thesystem automatically adds the following disallowed file types:
• Server side technologies or source code: php, aspx, ashx, jsp, lua, cgi, do, java, py, pl• Certificate files: pem, crt, cer, key, der, p7b, p7c, pfx, p12• Backup files: bak, bkp, bck, old, tmp, temp, sav, save• Configuration files: ini, conf, reg, cfg, config,• Data files: dat, eml, log, exe1, hta, htr, htw, ida, idc, idq, nws, pol, printer, shtm, shtml, stm, wmz• Executable files: exe, msi, bin, cmd, com, bat, dll, sys
1. On the Main tab, click Security > Application Security > File Types > Disallowed File Types.The Disallowed File Types screen opens.
Adding Entities to a Security Policy
198

2. In the Current edited security policy list near the top of the screen, verify that the security policyshown is the one you want to work on.
3. Click Create.The New Disallowed File Type screen opens.
4. In the File Type (Explicit only) field, type the file type that the security policy does not allow (forexample, jpg or exe).
Note: File types are case-sensitive unless you cleared Security Policy is case sensitive when youcreated the policy.
5. Click Create.The Disallowed File Types screen opens and lists the new file type.
6. To put the security policy changes into effect immediately, click Apply Policy.
The system categorizes both disallowed file types, and requested file types not configured in the securitypolicy as illegal file types. When the Application Security Manager™ receives a request with a disallowedfile type, the system ignores, learns, logs, or blocks the request depending on the settings you configurefor the Illegal File Type violation on the Learning and Blocking Settings screen.
Adding Parameters to a Security Policy
About adding parameters to a security policy
Parameters are an integral part of any web application, and they need to be protected so clients cannotaccess them, modify them, or view sensitive data. When you define parameters in a security policy, youincrease the security of the web application and prevent web parameter tampering.
Application Security Manager™ evaluates parameters, meta characters, query string lengths, and POSTdata lengths as part of a positive security logic check. When the security policy includes knownparameters, you are creating a whitelist of acceptable parameters. The system allows traffic that includesthe parameters that you configure in a security policy.
Security policies can include parameters defined as global parameters, URL parameters, and flowparameters. You can further specify parameters as being particular value types: static content, dynamiccontent, dynamic parameter name, user-input, JSON, or XML. You can also create parameters for whichthe system does not check or verify the value.
Creating global parameters
Global parameters are parameters that are not associated with specific URLs or application flows. Theadvantage of using global parameters is that you can configure a global parameter once, and the systemenforces the parameter wherever it occurs. You create a global parameter to address these conditions:
• The web application has a parameter that appears in several URLs or flows.• You want the Application Security Manager™ to enforce the same parameter attributes on all
parameters.
1. On the Main tab, click Security > Application Security > Parameters.2. In the Current edited security policy list near the top of the screen, verify that the security policy
shown is the one you want to work on.3. Click Create.
The Add Parameter screen opens.4. In the Create New Parameter area, for the Parameter Name setting, specify the type of parameter
you want to create.
BIG-IP Application Security Manager: Implementations
199

• To create a named parameter, select Explicit, then type the name.• To use pattern matching, select Wildcard, then type a wildcard expression. Any parameter name
that matches the wildcard expression is permitted by the security policy.• To create an unnamed parameter, select No Name. The system creates a parameter with the label,
UNNAMED.5. For the Parameter Level setting, select Global.
The parameter can occur anywhere and is not associated with a specific URL or flow.6. Leave the Perform Staging check box selected if you want the system to evaluate traffic before
enforcing this parameter.Staging helps reduce the occurrence of false positives.
7. Specify whether the parameter requires a value:
• If the parameter is acceptable without a value, leave the Allow Empty Value setting enabled.• If the parameter must always include a value, clear the Allow Empty Value check box.
8. To allow users to send a request that contains multiple parameters with the same name, select theAllow Repeated Occurrences check box.
Important: Before enabling this check box, consider that requests containing multiple parameters ofthe same name could indicate an attack on the web application (HTTP Parameter Pollution).
9. If you want to treat the parameter you are creating as a sensitive parameter (data not visible in logs orthe user interface), enable the Sensitive Parameter setting.
10. For the Parameter Value Type setting, select the format of the parameter value.Depending on the value type you select, the screen refreshes to display additional configurationoptions.
11. Click Create to add the new parameter to the security policy.12. To put the security policy changes into effect immediately, click Apply Policy.
When you first create a global parameter, the system places the parameter in staging by default and doesnot block requests even if a violation occurs and the system is configured to block the violation. Thesystem makes learning suggestions that you can accept or clear.
Creating URL parameters
URL parameters are parameters that are defined in the context of a URL. You can use a URL parameterwhen it does not matter where users were before they accessed this URL, or whether the parameter wasin a GET or POST request. You can create a parameter that goes with a URL that already exists in thesecurity policy.
1. On the Main tab, click Security > Application Security > Parameters.2. In the Current edited security policy list near the top of the screen, verify that the security policy
shown is the one you want to work on.3. Click Create.
The Add Parameter screen opens.4. In the Create New Parameter area, for the Parameter Name setting, specify the type of parameter
you want to create.
• To create a named parameter, select Explicit, then type the name.• To use pattern matching, select Wildcard, then type a wildcard expression. Any parameter name
that matches the wildcard expression is permitted by the security policy.• To create an unnamed parameter, select No Name. The system creates a parameter with the label,
UNNAMED.5. For the Parameter Level setting, select URL, then for the URL Path setting, select a protocol from
the list, and then type the URL in this format: /url_name.ext.
Adding Entities to a Security Policy
200

When you begin to type the URL, the system lists all URLs that include the character you typed, andyou can select the URL from the list.
6. Leave the Perform Staging check box selected if you want the system to evaluate traffic beforeenforcing this parameter.Staging helps reduce the occurrence of false positives.
7. Specify whether the parameter requires a value:
• If the parameter is acceptable without a value, leave the Allow Empty Value setting enabled.• If the parameter must always include a value, clear the Allow Empty Value check box.
8. To allow users to send a request that contains multiple parameters with the same name, select theAllow Repeated Occurrences check box.
Important: Before enabling this check box, consider that requests containing multiple parameters ofthe same name could indicate an attack on the web application (HTTP Parameter Pollution).
9. If you want to treat the parameter you are creating as a sensitive parameter (data not visible in logs orthe user interface), enable the Sensitive Parameter setting.
10. For the Parameter Value Type setting, select the format of the parameter value.Depending on the value type you select, the screen refreshes to display additional configurationoptions.
11. Click Create to add the new parameter to the security policy.12. To put the security policy changes into effect immediately, click Apply Policy.
When you define a URL parameter, the system applies the security policy to the parameter attributes inthe context of the associated URL, and ignores the flow information. When you first create a URLparameter, the system places the parameter in staging by default and does not block requests even if aviolation occurs and the system is configured to block the violation. The system makes learningsuggestions that you can accept or clear.
Creating flow parameters
Before you can create a flow parameter, you need to first have created the flow to which the parameterapplies. If the source URL is a referrer URL, that HTTP URL must already be defined in the securitypolicy as well.
You define parameters in the context of a flow when it is important to enforce that the target HTTP URLreceives a parameter only from a specific referrer URL. Flow parameters provide very tight, flow-specific security for web applications. With this increased protection comes an increase in maintenanceand configuration time. Note that if your application uses dynamic parameters, you need to manually addthose to the security policy.
1. On the Main tab, click Security > Application Security > Parameters.2. In the Current edited security policy list near the top of the screen, verify that the security policy
shown is the one you want to work on.3. Click Create.
The Add Parameter screen opens.4. In the Create New Parameter area, for the Parameter Name setting, specify the type of parameter
you want to create.
• To create a named parameter, select Explicit, then type the name.• To use pattern matching, select Wildcard, then type a wildcard expression. Any parameter name
that matches the wildcard expression is permitted by the security policy.• To create an unnamed parameter, select No Name. The system creates a parameter with the label,
UNNAMED.
BIG-IP Application Security Manager: Implementations
201

5. In the Parameter Level setting, select Flow, and then for From URL define where the flow mustcome from:
• If the source URL is an entry point, click Entry Point.• If the source URL is a referrer URL (already defined in the policy), click URL Path, select the
protocol used for the URL, then type the referrer URL associated with the flow.
When you begin to type the URL, the system lists all referrer URLs that include the character youtyped, and you can select the URL from the list.
6. In the Parameter Level setting, for Method, select the HTTP method (GET or POST) that applies tothe target referrer URL (already defined in the policy).
7. In the Parameter Level setting, for To URL, select the protocol used for the URL, then type thetarget URL.
8. Leave the Perform Staging check box selected if you want the system to evaluate traffic beforeenforcing this parameter.Staging helps reduce the occurrence of false positives.
9. If the parameter is required in the context of the flow, select the Is Mandatory Parameter check box.Note that only flows can have mandatory parameters.
10. Specify whether the parameter requires a value:
• If the parameter is acceptable without a value, leave the Allow Empty Value setting enabled.• If the parameter must always include a value, clear the Allow Empty Value check box.
11. To allow users to send a request that contains multiple parameters with the same name, select theAllow Repeated Occurrences check box.
Important: Before enabling this check box, consider that requests containing multiple parameters ofthe same name could indicate an attack on the web application (HTTP Parameter Pollution).
12. If you want to treat the parameter you are creating as a sensitive parameter (data not visible in logs orthe user interface), enable the Sensitive Parameter setting.
13. For the Parameter Value Type setting, select the format of the parameter value.Depending on the value type you select, the screen refreshes to display additional configurationoptions.
14. Click Create to add the new parameter to the security policy.15. To put the security policy changes into effect immediately, click Apply Policy.
When you create a parameter that is associated with a flow, the system verifies the parameter in thecontext of the flow. For example, if you define a parameter in the context of a GET request, and a clientsends a POST request that contains the parameter, the system generates an Illegal Parameterviolation.
Creating sensitive parameters
The Application Security Manager™ stores incoming requests in plain text format. Some requests includesensitive data in parameters, such as an account number, that you want to hide from system users. Youcan create sensitive parameters as described in the procedure, following, or by enabling the SensitiveParameter setting when creating or editing any parameter. All parameters defined as sensitive,regardless of how you configured them, appear in the Sensitive Parameters list.
1. On the Main tab, click Security > Application Security > Parameters > Sensitive Parameters.2. In the Current edited security policy list near the top of the screen, verify that the security policy
shown is the one you want to work on.3. Click Create.
The New Sensitive Parameter screen opens.
Adding Entities to a Security Policy
202

4. In the Parameter Name field, type the name of the user-input parameter, exactly as it occurs in theHTTP request, for which you do not want the system to store the actual value.In this example, account is the sensitive parameter:http://www.siterequest.com/bank.php?account=12345
Tip: If a parameter of this name already exists in the security policy, click it in the parameter list, andenable the Sensitive Parameter setting instead of creating a new sensitive parameter.
5. Click Create to add the new parameter to the security policy.6. To put the security policy changes into effect immediately, click Apply Policy.
When you create sensitive parameters, the system replaces the sensitive data, in the stored request and inlogs, with asterisks (***).
Disallowing file uploads in parameters
Because most web applications do not legitimately allow users to upload executable code, you candisallow parameters containing binary executable content. To do this, you add a user-input parameterwith the file upload data type to a security policy, and use the option to prevent uploading of executablefiles. You can also specify a maximum length for the parameter.
1. On the Main tab, click Security > Application Security > Parameters.2. Click Create.
The Add Parameter screen opens.3. Type the name for the new explicit parameter.4. For the Parameter Level setting, select where in a request the parameter is located.
Option Description
Global The parameter can occur anywhere and is not associated with a specific URL orflow.
URL The parameter occurs in the specific URL that you provide.
Flow The parameter occurs in the specific entry point URL or referrer URL that youprovide.
5. Leave the Perform Staging check box selected if you want the system to evaluate traffic beforeenforcing this parameter.Staging helps reduce the occurrence of false positives.
6. Specify whether the parameter requires a value:
• If the parameter is acceptable without a value, leave the Allow Empty Value setting enabled.• If the parameter must always include a value, clear the Allow Empty Value check box.
7. To allow users to send a request that contains multiple parameters with the same name, select theAllow Repeated Occurrences check box.
Important: Before enabling this check box, consider that requests containing multiple parameters ofthe same name could indicate an attack on the web application (HTTP Parameter Pollution).
8. For the Parameter Value Type setting, select User-input value.9. On the Data Type tab, for the Data Type setting, select File Upload.10. To enforce limits on the size of the parameter, in the Maximum Length setting, select Value and type
the maximum number of bytes for a parameter value.11. Ensure that Disallow File Upload of Executables is selected.12. Click Create.
The screen refreshes, and the new parameter appears in the parameters list.
BIG-IP Application Security Manager: Implementations
203

13. To put the security policy changes into effect immediately, click Apply Policy.
If a client sends an HTTP request that includes a user-input parameter containing a binary executable file,the system issues the Disallowed file upload content detected violation. This is consideredparameter tampering. If the violation is set to block (it is, by default) and the enforcement mode is set toblocking, the request is blocked.
If a parameter in a request exceeds the maximum length specified, the system presents an Illegalparameter value length violation. By default it is set to alarm; that means if a request triggersthis violation, the system records the request in the Charts screen, the Syslog (/var/log/asm), and mayrecord the request in the local log (the Requests screen) and/or in a remote log, according to the loggingprofile.
Creating navigation parameters
If you want the security policy to differentiate between pages in the web application that are generated byrequests with the same URL name but with different parameter and value pairs, and to build theappropriate flows, you must specify the exact names of the parameters that trigger the creation of thepages in the web application. These parameters are called navigation parameters. A navigation parametercannot be a wildcard.
1. On the Main tab, click Security > Application Security > Parameters > Navigation Parameters.2. In the Current edited security policy list near the top of the screen, verify that the security policy
shown is the one you want to work on.3. Click Create.
The New Navigation Parameter screen opens.4.5. In the Navigation Parameter field, type the name of the parameter passed to the web server for
dynamic page-building purposes.6. Click Create to add the new parameter to the security policy.7. To put the security policy changes into effect immediately, click Apply Policy.
Creating parameters with dynamic content
Dynamic content value (DCV) parameters are parameters where the web application sets the value on theserver side (so, for example, the content can change depending on who the user is). When you create aDCV parameter, you also specify where and how to get the dynamic information. For example, in anauction application, you can configure the price parameter as a DCV parameter to keep users fromtampering with the price.
You can also use DCV parameters for user identities in web applications that use sessions. As anexample, user identity is often passed between pages as a hidden parameter, which could be exploited bymalicious users, unless protected.
1. On the Main tab, click Security > Application Security > Parameters.2. In the Current edited security policy list near the top of the screen, verify that the security policy
shown is the one you want to work on.3. Click Create.
The Add Parameter screen opens.4. In the Create New Parameter area, for the Parameter Name setting, specify the type of parameter
you want to create.
• To create a named parameter, select Explicit, then type the name.• To use pattern matching, select Wildcard, then type a wildcard expression. Any parameter name
that matches the wildcard expression is permitted by the security policy.
Adding Entities to a Security Policy
204

• To create an unnamed parameter, select No Name. The system creates a parameter with the label,UNNAMED.
5. For the Parameter Level setting, select the appropriate type, typically Global or URL.6. For the Parameter Value Type setting, select Dynamic content value.7. Click Create.
Note: You should define the extractions for a DCV parameter before you apply the security policy thatincludes the parameters. Otherwise, the system warns you that the security policy contains dynamicparameters with no extractions defined.
A popup screen opens asking if you want to define extractions.8. Click OK.
The Create New Extraction screen opens. The Name field shows the name of the parameter youcreated.
9. From the Extracted Items Configuration list, select Advanced.10. Use the Extract From setting to specify which items the system searches for dynamic parameter
values.Use This Option When
File Types You want the system to extract dynamic parameters from responses to requestsfor certain file types that exist in the security policy. Select the file type and clickAdd.
URLs You want the system to extract dynamic parameters from responses to requestsfor the listed URLs. To add the URLs, select the protocol, type the URL and clickAdd. If the URL is not in the security policy, it is added.
RegExp You want the system to extract dynamic parameters from responses to requeststhat match a regular expression pattern.
Extract FromAll Items
You want the system to extract dynamic parameters from all text-based URLs andfile types.
11. From the Extracted Methods Configuration list, select Advanced.12. Select the appropriate check boxes to specify how to get the dynamic parameter values.
Select This Option When
Search in Links You want the system to extract dynamic parameter values from links (hreftags) within the server response to a URL.
Search EntireForm
You want the system to extract dynamic parameter values from all parametersin a form in the HTML response to a requested URL.
Search WithinForm
You want the system to extract dynamic parameter values from a specificparameter within in a form. Also specify the Form Index and the ParameterIndex.
Search in XML You want the system to extract dynamic parameter values from within XMLentities. Type the XPath specification in the XPath field.
Search in ResponseBody
You want to the system to search for dynamic parameter values in the body ofthe response. You can also specify how many incidents the system shouldfind, a prefix, a RegExp value, or a prefix to search for.
13. Click Create to add the extraction properties to the parameter.14. Click Update to save the changes.15. To put the security policy changes into effect immediately, click Apply Policy.
BIG-IP Application Security Manager: Implementations
205

When the Application Security Manager receives a request that contains an entity (for example, a fileextension or URL) with a dynamic content value parameter, the system extracts the parameter value fromthe web application response and stores it away. The next time the system receives a request containingthat parameter, it uses the stored value to validate the dynamic content value parameter. The systemverifies that the client is not changing the parameter value that the server sets from one request to thenext, or using the values from a different user.
By default, the system saves up to 950 values that it finds for a dynamic content value parameter. If thenumber of values exceeds 950, the system replaces the first-extracted values with the new values.
Creating parameters with dynamic names
Before you can make a parameter with a dynamic name, you must have created a flow parameter.
In some web applications, flow parameters have dynamic names. When you create a parameter with adynamic name, you also specify the manner in which Application Security Manager™ discovers theparameter names.
1. On the Main tab, click Security > Application Security > Parameters.2. In the Parameters List, click the name of the flow parameter that you want to have a dynamic name.
The Parameter Properties screen opens where you can edit the flow parameter.3. For the Parameter Value Type setting, select Dynamic parameter name.4. On the Dynamic Parameter Properties tab, for the Extract Parameter from URL setting, select the
protocol to use and type the URL from which you want the system to extract the dynamic parameter.5. Specify whether the system searches for the parameter name in a form or the response body:
• To search in forms, select Search Within Form, and specify values for Form Index andParameter Index.
• To search in the response body, select Search parameters in response body (in form elementsnames only). In the By Pattern field, type a regular expression to search for parameter names ininput elements in the forms. Select Check parameter value to verify the parameter value inaddition to the name matched in the By Pattern field.
6. Click Update to save the changes.7. To put the security policy changes into effect immediately, click Apply Policy.
The system extracts the parameters from the web server responses and then uses the extracted parametersto enforce the dynamic parameter associated with the flow.
Changing character sets for parameter values
The character sets for parameter values are the characters and meta characters that the security policyaccepts in a parameter value. You can view and modify the character set that is allowed in a parametervalue.
1. On the Main tab, click Security > Application Security > Parameters > Character Sets >Parameter Value.
2. In the Current edited security policy list near the top of the screen, verify that the security policyshown is the one you want to work on.
3. Use the View option to filter the character set.4. For each character or meta character, change the state, as required.
State Description
Allow The security policy permits this character or meta character in parameter values.
Disallow The security policy does not permit this character or meta character in parameter values.
5. Click Save to save the changes.6. To put the security policy changes into effect immediately, click Apply Policy.
Adding Entities to a Security Policy
206

If a request includes a parameter with a disallowed character, the system generates an Illegalparameter violation (if that violation is set to Alarm or Block).
Changing character sets for parameter names
The character sets for parameter names are the characters and meta characters that the security policyaccepts in a parameter name. You can view and modify the character set that is allowed in a parametername.
1. On the Main tab, click Security > Application Security > Parameters > Character Sets >Parameter Name.
2. In the Current edited security policy list near the top of the screen, verify that the security policyshown is the one you want to work on.
3. Use the View option to filter the character set.4. For each character or meta character, change the state, as required.
State Description
Allow The security policy permits this character or meta character in parameter names.
Disallow The security policy does not permit this character or meta character in parameter names.
5. Click Save to save the changes.6. To put the security policy changes into effect immediately, click Apply Policy.
If a request includes a parameter name with a disallowed character, the system generates an Illegalparameter violation (if that violation is set to Alarm or Block).
Adjusting the parameter level
You can adjust how the system determines what parameters it adds (automatic policy building) orsuggests you add (manual learning) to the security policy. In most cases, you do not need to change thedefault values of these settings.
1. On the Main tab, click Security > Application Security > Policy Building > Learning andBlocking Settings.The Learning and Blocking Settings screen opens.
2. In the Current edited security policy list near the top of the screen, verify that the security policyshown is the one you want to work on.
3. Expand Parameters and for the Parameter Level setting, select the level of parameter to add.Option Description
Global Add parameters at the global level for all URLs in the security policy. Make learningsuggestions based on the properties of entities that already exist in the security policy.Default value for Fundamental policy template.
URL Add parameters at the URL level, only for specific URLs. Make learning suggestions basedon real traffic. Default value for Comprehensive policy template.
Note: This option applies only to the attack signature and illegal meta character violations.
4. Click Save to save your settings.5. To put the security policy changes into effect immediately, click Apply Policy.
The security policy now adds parameters according to the level you specified.
Parameter Value Types
When you add a parameter to the security policy, you specify its parameter value type. The parametervalue type indicates the format of the parameter. You can configure global, URL, and flow parameters as
BIG-IP Application Security Manager: Implementations
207

any value type, except the dynamic parameter name type. You can configure only flow parameters asdynamic parameter names.
Parameter Value Type Description
Dynamic content value Dynamic parameters are parameters whose values can change, and areoften linked to a user session. When you create a new parameter of thistype, you must also define dynamic parameter extraction properties. Theserver sets the value for dynamic content value (DCV) parameters. DCVparameters are often associated with applications that use session IDs forclient sessions.
Dynamic parameter name If using flow parameters with names that change dynamically, you canuse this parameter type. If you select this type, you also need to specifythe URL from which the system can extract dynamic parameter nameparameters.
Ignore value If you do not want the system to perform validity checks on theparameter value, select this value type. Regarding signatures, this valuetype prevents the system from performing parameter-based signaturechecks on the parameter value, but it does perform other relevantsignature checks.
JSON value The JSON value type is for parameters that contain JSON data that isvalidated according to a JSON profile that defines the format of the data.Select an existing JSON profile or create a new one.
Static content value Static parameters are those that have a known set of values. A list ofcountry names or a yes/no form field are both examples of staticparameters. If you select this type, you also need to specify the staticvalues for the parameter in the Parameter Static Values list. For example,a credit card payment parameter in a shopping application may be staticand have the static values MasterCard®, Visa®, and American Express®.
User-input value User-input parameters are those that require users to enter or providesome sort of data. This is the most commonly used parameter value type.Comment, name, and phone number fields on an online form are allexamples of user-input parameters. You can also configure user-inputparameters even if the parameter is not really user input. For example, ifa parameter has a wide range of values or many static values, you maywant to configure the parameter as a user-input parameter instead of as astatic content parameter. By default, the system looks for attack patternswithin all alpha-numeric user-input parameters. For each parameter, youcan enable or disable a specific attack signature.
XML value XML parameters are those whose parameter value contains XML datathat is validated according to an XML profile that defines the format ofthe data. Select an existing XML profile or create a new one.
How the system processes parameters
When you create any type of parameter, the system automatically places the parameter in staging anddoes not block requests even if a violation occurs and the system is configured to block that violation.Based on examining traffic, the system makes learning suggestions that you can accept or clear. If youcreate wildcard parameters, you also have the option of enabling learning for explicit entities.
The system enforces parameters in the following order:
• Flow parameters• URL parameters• Global parameters
Adding Entities to a Security Policy
208

If a parameter is defined more than once in the request context, the system applies only the more specificdefinition. For example, parameter param_1 is defined as a static content global parameter, and alsodefined as a user-input URL parameter. When the Application Security Manager™ receives a request forthe parameter in a URL that matches a URL defined in the security policy, and the parameter is definedon both the global and URL level, the system generates any violations based on the URL parameterdefinition.
About path parameters
Path parameters are parameters that are attached to path segments in the URI. You can configureApplication Security Manager™ (ASM) to enforce path parameters as needed in your organization. Pathparameters can be ignored, or treated as parameters, or as an integral part of URLs.
Although path parameters are not widely used, they could serve as covert back doors to potential attackseven for server applications that do not use path parameters. For example, an application could copy aURI with path parameters containing attack signatures to the body of the response.
Path parameters can have multiple parameters in the same path segment separated by semicolons. Asemicolon also separates the path segment from the parameters; for example, /path/name;param1;p2;p3. Each parameter can optionally equal a value; for example, param=value;p2. Ifa path parameter has more than one value, the values are separated by commas, such asparam=val1,val2,val3.
Path parameters are extracted from requests, but not from responses.
Enforcing path parameter security
A URI path parameter is the part of a path segment that occurs after its name. You can configure how asecurity policy handles path parameters that are attached to path segments in URIs. You can enforcedifferent levels of security based on your needs.
1. On the Main tab, click Security > Application Security > Security Policies.The Policies List screen opens.
2. Click the name of the security policy you want to work on.The Policy Summary opens.
3. From the list, select Advanced.4. Scroll down to Handle Path Parameters, and select how you want to treat path parameters in URIs.
Option Description
As Parameter The system normalizes and enforces path parameters. For each path parameter, thesystem removes it from the URL as part of the normalization process, finds acorresponding parameter in the security policy (first at the matching URL level, andif not found, then at the Global level), and enforces it according to its attributes likeany other parameter.
As URL The system does not normalize or enforce path parameters, and treats them as anintegral part of the URL.
Ignore The system removes path parameters from URLs as part of the normalizationprocess, but does not enforce them.
5. Click Save.6. In the editing context area, click Apply Policy to put the changes into effect.
Path parameters in URIs are handled as specified in the security policy properties
Note: The maximum number of path parameters collected in one URI path is 10. All the rest of theparameters (from the eleventh on, counting from left to right) are ignored as parameters, but are stillstripped from the URI as part of the normalization process.
BIG-IP Application Security Manager: Implementations
209

.
Overview: Securing Base64-Encoded Parameters
Base64 encoding is a convenient encoding method that uses a compact presentation, and is relativelyunreadable to the casual observer. Many applications apply base64 encoding to binary data, for inclusionin URLs or in hidden web form fields. Unfortunately, it is also possible to mask application attacks inbase64-encoded data. To provide better security for applications that use base64 encoding, ApplicationSecurity Manager™ can decode user-input parameter values that are base64-encoded.
Adding base64 decoding to a new user-input parameter
If your application uses base64 encoding, the system can apply base64 decoding to a user-inputparameter. When the decoding is successful, the system applies the parameter checks specified in thesecurity policy. When the decoding is not successful, the system issues the Illegal base64encoded value violation and responds to the offending request according the associated blockingpolicy.
1. On the Main tab, click Security > Application Security > Parameters.2. In the Current edited security policy list near the top of the screen, verify that the security policy
shown is the one you want to work on.3. Click Create.
The Add Parameter screen opens.4. Type the name for the new explicit parameter.5. For the Parameter Level setting, select where in a request the parameter is located.
Option Description
Global The parameter can occur anywhere and is not associated with a specific URL or flow.
URL The parameter occurs in the specific URL that you provide.
Flow The parameter occurs in the specific entry point URL or referrer URL that you provide.
6. Leave the Perform Staging check box selected if you want the system to evaluate traffic beforeenforcing this parameter.Staging helps reduce the occurrence of false positives.
7. For the Parameter Value Type setting, select User-input value.8. On the Data Type tab, for the Data Type setting, select either Alpha-Numeric or File Upload.9. Select the Base64 Decoding check box if you want the system to apply base64 decoding to values for
this parameter.10. Configure any other properties that apply to this new parameter.11. Click Create.
The screen refreshes, and the new parameter appears in the parameters list.12. To put the security policy changes into effect immediately, click Apply Policy.
Adding base64 decoding to an existing user-input parameter
When enabled, the system can decode base64 encoding in a user-input parameter. If the decoding issuccessful, the system applies the parameter checks specified in the security policy. If the decoding is notsuccessful, the system issues the Illegal base64 encoded value violation and responds to theoffending request according to the associated blocking policy.
1. On the Main tab, click Security > Application Security > Parameters > Parameters List.2. In the Parameters List filter, select Parameter Value Type in the left list, User-input value in right
list, and click Go.
Adding Entities to a Security Policy
210

The screen refreshes and lists only user-input parameters.3. In the Parameter Name column, click the name of the parameter to which you want to add base64
decoding.The Parameter Properties screen opens.
4. On the Data Type tab, select the Base64 Decoding check box so the system applies base64 decodingto values for this parameter.
Note: The base64 decoding setting is available only for user-input parameters of the alpha-numericor file upload data type.
5. Click Update.The screen refreshes, and displays the parameters list.
6. To put the security policy changes into effect immediately, click Apply Policy.
Adding URLs to a Security Policy
About adding URLs
In a security policy, you can manually specify the HTTP or WebSocket URLs that are allowed (ordisallowed) in traffic to the web application being protected. If you are using automatic policy building(and the policy includes learning URLs), Application Security Manager™ (ASM) can determine whichURLs to add, based on legitimate traffic. If a WebSocket profile is associated with the security policyvirtual server, ASM can also add WebSocket URLs to the policy.
When you create a security policy, wildcard URLs of * (representing all HTTP or WebSocket URLs) areadded to the Allowed HTTP and WebSocket URLs lists. During the enforcement readiness period, thesystem examines the URLs in the traffic and makes learning suggestions that you can review and add theURLs to the policy as needed. This way, the security policy includes the HTTP and WebSocket URLsthat are typically used. When you think all the URLs are included in the security policy, you can removethe * wildcards from the allowed URLs lists.
About referrer URLs
Referrer URLs are web pages that request other URLs within a web application. For example, an HTMLpage can request a GIF, JPG, or PNG image file. The HTML page is the referrer, and the GIF, JPG, andPNG files are non-referrers. In lists of URLs, non-referrer URLs appear in blue and referrer URLs appearin gold.
A referrer in Application Security Manager™ is similar to the HTTP Referer header. Use referrers forcomplex objects, such as HTML pages, but not for embedded objects, such as GIF files.
Adding allowed HTTP URLs
You can manually add allowed HTTP URLs, which are URLs from which the security policy acceptstraffic en route to the web application being protected.
1. On the Main tab, click Security > Application Security > URLs.The Allowed HTTP URLs screen opens.
2. In the Current edited security policy list near the top of the screen, verify that the security policyshown is the one you want to work on.
3. Click Create.The New Allowed HTTP URL screen opens.
BIG-IP Application Security Manager: Implementations
211

4. For URL, choose a type and protocol, and then type the URL name or wildcard.Option Description
Explicit Specifies a unique URL, such as /index.html. Choose HTTP or HTTPS, and type theURL in the adjacent field.
Wildcard Specifies that the URL is a wildcard expression. Any URL that matches the wildcardexpression is considered legal. The pure wildcard (*) is automatically added to thesecurity policy so you do not need to add it. But you can add other wildcards such as /main/*. Select HTTP or HTTPS, and type a wildcard expression in the adjacent field.
5. By default, the Perform Staging check box is selected. F5 recommends that you keep it selected.6. If you want to view more options, next to Create New Allowed URL, select Advanced.7. If the attack signatures included in the security policy apply differently to this allowed URL, you can
adjust them on the Attack Signatures tab.a) Ensure that Check attack signatures on this URL is selected.b) From the Global Security Policy Settings list, move any attack signatures whose global settings
you want to override into the Overridden Security Policy Settings and adjust the state as needed(from Enabled to Disabled or vice versa).
Tip: The most common action you perform here is to disable an attack signature for a specific URL.
Overridden attack signatures are preceded with a yellow alert triangle in the attack signature list, andyou can filter the list to view them.
8. To process requests for this URL according to the header content, create header-based contentprofiles.The task, Enforcing requests for HTTP URLs based on header content, provides details on how to dothis.
9. To protect the application from being able to harbor illegitimate frames and iframes (inline frames)with malicious code in the application, set up protection from clickjacking:a) For Clickjacking Protection, select the Enabled check box.b) From the Allow Rendering in Frames list, select an option to determine whether to allow this
URL to be rendered in a frame or iframe.10. For wildcard URLs, leave Wildcard Match Includes Slashes selected.
When this option is selected, an asterisk in a wildcard matches any number of path segments(separated by slashes); when cleared, an asterisk matches at most one segment.
11. For wildcard URLs, in the Meta Characters tab, you can specify whether to check for meta charactersin the URL, and which ones to allow or disallow.a) The Check characters on this URL setting is enabled by default so that the system verifies meta
characters in the URL. (If you do not want to check for meta characters, clear the check box andskip to the next step.)
b) To specify which meta characters to allow or disallow, from the Global Security Policy Settingslist, select any meta characters that you want to specifically allow or disallow, and move them tothe Overridden Security Policy Settings list.
c) For each meta character that you moved, set the state to Allow or Disallow.
Note: The Overridden Security Policy Settings take precedence over the global settings for the webapplication character set.
12. Click Create.The Allowed URLs screen opens and lists the new URL.
13. To put the security policy changes into effect immediately, click Apply Policy.
Adding Entities to a Security Policy
212

The security policy allows requests for the URL or URLs matching the wildcard that you added. If theURL is in staging, the system informs you when learning suggestions are available or when it is ready tobe enforced.
Wildcard syntax
The syntax for wildcard entities is based on shell-style wildcard characters. This table lists the wildcardcharacters that you can use in the names of file types, URLs, parameters, or cookies so that the entityname can match multiple objects.
Wildcard Character Matches
* All characters
? Any single character
[abcde] Exactly one of the characters listed
[!abcde] Any character not listed
[a-e] Exactly one character in the range
[!a-e] Any character not in the range
Allowed HTTP URL properties
These tables describe the properties (both Basic and Advanced settings) that define HTTP URLs that thesecurity policy will allow.
New allowed HTTP URL properties
Property Description
URL Specifies an HTTP URL that the security policy allows. The available typesare:
• Explicit: Specifies that the URL is a unique HTTP URL. Type the URL inthe adjacent field using the format /index.html.
• Wildcard: Specifies a wildcard expression. Any HTTP URL that matchesis considered legal. For example, typing * specifies that any HTTP URL isallowed by the security policy. Type a wildcard expression in the adjacentfield.
Protocol Specifies whether the protocol for the URL is HTTP or HTTPS.
Perform Staging Specifies that the system places this URL in staging. Learning suggestionsproduced by requesting staged URLs are logged in the Learning screens.Review staging status on the Allowed HTTP URLs screen. If a URL is instaging, point to the icon to display staging information. When you are nolonger getting learning suggestions, you can disable this setting. If you enforcea URL, this setting is cleared.
Check Flows to thisURL
Specifies that the security policy validates flows to the URL (if configured). Ifthis setting is disabled, the system ignores the flows to the URL. When youselect this check box, additional settings appear.
URL is Entry Point (Visible when Check Flows to this URL is selected.) Specifies that this URLis a page through which a visitor can enter the web application.
URL is Referrer (Visible when Check Flows to this URL is selected.) Specifies that the URLis a URL from which a user can access other URLs in the web application.
BIG-IP Application Security Manager: Implementations
213

Property Description
URL can changeDomain Cookie
Specifies that the security policy does not block an HTTP request where thedomain cookie was modified on the client side. Note that this setting isapplicable only if the URL is a referrer.
URL with NavigationParameter
Specifies that you want to associate a navigation parameter with this URL. Youmust have a navigation parameter defined in the security policy to view thisoption.
Select NavigationParameter
Specifies a list of navigation parameters that you can associate with this URL.
NavigationParameter Value
Indicates the value of the navigation parameter.
ClickjackingProtection
Specifies that the system adds the X-Frame-Options header to the domaincookie’s response header. This is done to protect the web application againstclickjacking. Clickjacking occurs when attacker lures a user to clickillegitimate frames and iframes because the attacker hid them on legitimatevisible website buttons. Therefore, enabling this option protects the webapplication from other web sites hiding malicious code behind them. Thedefault is disabled. After you enable this option, you can select whether, andunder what conditions, the browser should allow this URL to be rendered in aframe or iframe.
Allow Rendering inFrames
Specifies the conditions for when the browser should allow this URL to berendered in a frame or iframe.
• Never: Specifies that this URL must never be rendered in a frame oriframe. The web application instructs browsers to hide, or disable, frameand iframe parts of this URL.
• Same Origin Only: Specifies that the browser may load the frame oriframe if the referring page is from the same protocol, port, and domain asthis URL. This limits the user to navigate only within the same webapplication.
• Only From URL: Specifies that the browser may load the frame or iframefrom a specified domain. Type the protocol and domain in URL formatforexample, http://www.mywebsite.com. Do not enter a sub-URL, suchas http://www.mywebsite.com/index.
Wildcard MatchIncludes Slashes
Specifies that an asterisk in a wildcard URL matches any number of pathsegments (separated by slashes); when cleared, specifies that an asteriskmatches at most one segment. For example: the wildcard /art/*matches /art/abc/index.html if the wildcard match includes slashes(default value), but does not match it if the check box is cleared. In that case, itmatches /art/go.html (only one segment below /art).
HTML5 Cross-Domain RequestEnforcement
CORS (Cross-Origin Resource Sharing) lets one website access the resourcesof another website using JavaScript (within the browser). Web applicationsmay share resources with other websites hosted on a different domain. Whenthe option is selected, the system protects a specific URL in your webapplication from cross-origin resource sharing. You can configure whichdomains can access the response generated by requesting this URL (theresource), and how to overwrite CORS response headers returned by the webserver.
URL Description Describes the URL (optional).
Adding Entities to a Security Policy
214

Header-Based Content Profiles
Property Description
Request HeaderName
Specifies an explicit header name that must appear in requests for this URL.This field is not case-sensitive.
Request HeaderValue
Specifies a simple pattern string (glob pattern matching) for the header valuethat must appear in legal requests for this URL; for example, *json*,xml_method?, or method[0-9]. If the header includes this pattern, thesystem assumes the request contains the type of data you select in the RequestBody Handling setting. This field is case-sensitive.
Request BodyHandling
Indicates how the system parses the content of requests for the allowed URL:
• Apply Content Signatures: Do not parse the content; scan the entirepayload with full-content attack signatures.
• Apply Value and Content Signatures: Do not parse the content or extractparameters; process the entire payload with value and full-content attacksignatures.
• Disallow: Block requests for an URL containing this header content. Logthe Illegal Request Content Type violation.
• Do Nothing: Do not inspect or parse the content. Handle the header of therequest as specified by the security policy.
• Form Data: Parse content as posted form data in either URL-encoded ormulti-part formats. Enforce the form parameters according to the policy.
• GWT: Perform checks for data in requests, based on the configuration ofthe GWT (Google Web Toolkit) profile associated with this URL.
• JSON: Review JSON data using an associated JSON profile, and use valueattack signatures to scan the element values.
• XML: Review XML data using an associated XML profile.
Profile Name Specifies the XML, JSON, or GWT profile the security policy uses whenexamining requests for this URL if the header content is parsed as XML,JSON, or GWT. You can also create or view the XML, JSON, or GWT profilefrom this option.
HTML5 Cross-Domain Request Enforcement
Property Description
Allow HTML5 Cross-Origin Requests
Allows all CORS requests to this URL, and displays additional settings.
Allowed Origins Allows you to specify a list of origins allowed to share data returned bythis URL.
Allowed Methods Allows you to specify a list of methods that other web applications hostedin different domains can use when requesting this URL.
Allowed Headers Allows you to specify a list of request headers that other web applicationshosted in different domains can use when requesting this URL. Or you candelete non-simple headers returned in response to requests.
Exposed Headers Allows you to specify a list of response headers that are safe to expose toJavaScript, and can be shared with web applications hosted in differentdomains. Or you can allow only simple headers to be exposed.
Allow Credentials Specifies whether requests from other web applications hosted in differentdomains may include user credentials.
BIG-IP Application Security Manager: Implementations
215

Property Description
Maximum Age Specifies how long (in seconds) to cache in the browser the results of apreflight request (a special request that the browser sends to your webapplication to determine if JavaScript from another domain may accessyour resource).
Meta Characters
Property Description
Check characters onthis URL
Specifies that the system verifies meta characters on this wildcard URL. Youcan change which meta characters are allowed or disallowed.
Methods Enforcement
Property Description
Override policyallowed methods
Specifies that the system allows you to override allowed methods for this URL.When selected, global policy settings for methods are listed, and you canchange what is allowed or disallowed for this URL.
Learning Settings for HTTP URLs
These settings are on the Learning and Blocking Settings screen.
Setting Description
Learn New HTTPURLs
Specifies how to add, or suggests that you add URLs to the security policy ifyou are creating a wildcard URL.
• Add All Entities: The system suggests you add explicit URLs that matchthe wildcard to the security policy creating a comprehensive whitelist of allthe URLs on the web site. You can review suggestions on the TrafficLearning screen.
• Selective: When false positives occur, the system adds or suggests addingan explicit URL with relaxed settings that avoid the false positive. Thisoption is a good balance between security, policy size, and ease ofmaintenance.
• Never (wildcard only): The system does not add URLs that match thewildcard to the security policy, and suggests changing the attributes ofmatched wildcard entities.
Maximum LearnedHTTP URLs
Limits the number of URLs that the security policy allows. The default is10000.
Learn AllowedMethods on URLs
If selected, when the system learns a new URL with a method, it selects theoverride methods enforcement setting. If using automatic learning, suggestionsare made for the new URL only. For manual learning, suggestions are made toadd the method to the URL and to the policy as well.
Classify RequestContent of LearnedHTTP URLs
If the system detects legitimate XML or JSON data for URLs in the securitypolicy, the system adds or suggests you add XML or JSON profiles to thesecurity policy and configures their attributes according to the data it detects.
Collapse manycommon URLs intoone wildcard URL
Collapses many common explicit URLs into one wildcard URL with acommon prefix and suffix. The system collapses URLs only in the samedirectory (with the same prefix path) and the same file extension. The systemcreates a wildcard with no slash.
Adding Entities to a Security Policy
216

Setting Description
File types for whichwildcard URLs willbe configured (e.g.*.jpg)
Specifies the file types for which to create a wildcard URL instead of addingexplicit URLs. The system includes several by default.
Adding disallowed HTTP URLs
For some web applications, you may want to deny requests for certain URLs. In this case, you can createa set of disallowed URLs. Adding disallowed URLs is useful, for example, to prevent access to anadministrative interface to the web application such as /admin/config.php.
1. On the Main tab, click Security > Application Security > URLs > Disallowed URLs > DisallowedHTTP URLs.The Disallowed HTTP URLs screen opens.
2. In the Current edited security policy list near the top of the screen, verify that the security policyshown is the one you want to work on.
3. Click Create.The New Disallowed HTTP URL screen opens.
4. For the URL (Explicit only) setting, select HTTP or HTTPS as the protocol for the URL, and typethe URL that the security policy considers illegal; for example, /index.html.
Note: URLs are case-sensitive unless you cleared the Security Policy is case sensitive option whenyou created the policy.
5. Click Create.The Disallowed HTTP URLs screen opens and lists the URL.
6. To put the security policy changes into effect immediately, click Apply Policy.
If a requested URL is on the disallowed HTTP URLs list, the system ignores, learns, logs, or blocks therequest depending on the settings you configure for the Illegal URL violation on the Learning andBlocking Settings screen. You can view learning suggestions for disallowed HTTP URLs on the TrafficLearning screen.
Creating allowed WebSocket URLs
You can manually create allowed WebSocket URLs, which are URLs from which the security policyaccepts messages over WebSocket connections. You do this if you have a short list of WebSocket URLsto protect and you know their paths.
Note: If you are using automatic learning, the security policy protects WebSocket URLs automatically,and you do not have to add them. Learning settings for WebSocket URLs are on the Learning andBlocking Settings screen.
1. On the Main tab, click Security > Application Security > URLs > Allowed URLs > AllowedWebSocket URLs.The Allowed WebSocket URLs screen opens.
2. Click Create.The New Allowed WebSocket URL screen opens.
3. In the Current edited security policy list near the top of the screen, verify that the security policyshown is the one you want to work on.
4. Next to Create New Allowed WebSocket URL, select Advanced.5. For WebSocket URL, choose a type and protocol, and then type the URL name or wildcard.
BIG-IP Application Security Manager: Implementations
217

Type Description
Explicit Specifies a specific WebSocket URL, such as /chat.room.com/websocket. SelectWS (for unencrypted text) or WSS (for encrypted text), and type the URL in theadjacent field.
Wildcard Specifies a wildcard expression to represent a number of URLs. Any URL that matchesthe wildcard expression is considered legal. The pure wildcard (*) is automatically addedto the security policy so you do not need to add it. But you can add other wildcards suchas /main/*. Select WS (for unencrypted text) or WSS (for encrypted text), and type awildcard expression in the adjacent field.
6. Retain the default selected Perform Staging check box.Keep it selected so you can check for false positives before enforcing the new URL.
7. For wildcard WebSocket URLs, leave Wildcard Match Includes Slashes selected.When this option is selected, an asterisk in a wildcard matches any number of path segments(separated by slashes); when cleared, an asterisk matches at most one segment.
8. On the Message Handling tab, leave Check Message Payload enabled.Based on the traffic and the selections in the Payload Enforcement setting, the Check MessagePayload setting causes the system to validate the format of WebSocket messages.
9. For the WebSocket Extensions list, leave the default value Remove Headers to select what happensto messages that have WebSocket extensions.Other options to ignore extensions (Dangerous! Not recommended.) or block messages withextensions are available, but F5 recommends using the default.The system removes the Sec-WebSocket-Extensions header from the message and allows theWebSocket to be established so messages can be exchanged.
10. For Allowed Message Payload Formats, select the format or formats that you want to enforce forWebSocket messages: click JSON or Binary.At least one format must be selected. (Initially, Plain Text is always selected.) If you are using adifferent format and not verifying plain text in messages, you can clear Plain Text.
11. For Payload Enforcement, choose how to validate the message content.
• To verify plain text or JSON formatting, select the previously created content profile, or create anew one.
• To enforce binary messages, for Maximum Binary Message Size, click Length and type thelargest binary message (in bytes) to allow. The default value is 10000 bytes.
12. For Maximum Frame Size, adjust the frame size, if necessary.The default value is 10000 bytes.
13. For Maximum Frames per Fragmented Message, adjust the number, if necessary.The default value is 100 frames.
14. For wildcard WebSocket URLs, on the Meta Characters tab, you can overwrite the global URLcharacter set, and allow or disallow specific meta characters in the WebSocket URL if you need to.a) The Check characters on this URL setting is enabled by default so that the system verifies meta
characters in the URL. (If you do not want to check for meta characters, clear the check box andskip to the next step.)
b) To specify which meta characters to allow or disallow, from the Global Security Policy Settingslist, select any meta characters that you want to specifically allow or disallow, and move them tothe Overridden Security Policy Settings list.
c) For each meta character that you moved, set the state to Allow or Disallow.
Note: The Overridden Security Policy Settings take precedence over the global settings for the webapplication character set.
Adding Entities to a Security Policy
218

15. If your web site uses CORS (Cross-Origin Resource Sharing), click the HTML5 Cross-DomainRequest Enforcement tab.a) For Enforcement Mode, select Enforce on ASM.b) On the HTML5 Cross-Domain Request Enforcement tab, specify how to enforce CORS on this
WebSocket URL. For details, see Setting Up Cross-Domain Request Enforcement.16. Click Create.
The Allowed WebSockets URLs screen opens and lists the new WebSocket URL.17. To put the security policy changes into effect immediately, click Apply Policy.
The security policy allows requests for the WebSocket URLs that you added. If the WebSocket URL is instaging, the system informs you when learning suggestions are available or when it is ready to beenforced.
Adding disallowed WebSocket URLs
For some web applications, you might want to deny requests for certain WebSocket URLs. In this case,you can create a set of disallowed WebSocket URLs.
1. On the Main tab, click Security > Application Security > URLs > Disallowed URLs > DisallowedWebSocket URLs.The Disallowed WebSocket URLs screen opens.
2. In the Current edited security policy list near the top of the screen, verify that the security policyshown is the one you want to work on.
3. Click Create.The New Disallowed WebSocket URL screen opens.
4. For the WebSocket URL (Explicit only) setting, select WS or WSS as the protocol for the URL, andtype the WebSocket URL that the security policy considers illegal; for example, /index.html.
Note: URLs are case-sensitive unless you cleared the Security Policy is case sensitive option whenyou created the policy.
5. Click Create.The Disallowed WebSocket URLs screen opens and lists the URL.
6. To put the security policy changes into effect immediately, click Apply Policy.
If a requested URL is on the disallowed WebSocket URLs list, the system ignores, learns, logs, or blocksthe request depending on the settings you configure for the Illegal URL violation on the Learningand Blocking Settings screen. You can view learning suggestions for disallowed WebSocket URLs on theTraffic Learning screen.
Enforcing requests for HTTP URLs based on header content
Before you can enforce requests for URLs using header content, you need to have added an allowedHTTP URL.
When you manually create a new allowed HTTP URL, the system reviews requests for the URL usingHTTP parsing. The system automatically creates a default header-based content profile for HTTP, andyou cannot delete it. However, requests for an URL may contain other types of content, such as JSON,XML, or other proprietary formats.
You can use header-based content profiles to configure how the system recognizes and enforces requestsfor this URL according to the header content in the request. You can also use header-based contentprofiles to block traffic based on the type of header and header value in requests for a URL.
1. On the Main tab, click Security > Application Security > URLs.The Allowed HTTP URLs screen opens.
BIG-IP Application Security Manager: Implementations
219

2. In the Current edited security policy list near the top of the screen, verify that the security policyshown is the one you want to work on.
3. In the Allowed URLs List, click the name of the URL for which you want to specify legal headercontent.The Allowed HTTP URL Properties screen opens where you can modify the properties of the URL.
4. From the Allowed URL Properties list, select Advanced.5. On the Header-Based Content Profiles tab, specify the header and value as follows:
a) In the Request Header Name field, type the explicit header name that must appear in requests forthis URL. This field is not case-sensitive.
b) In the Request Header Value field, type the pattern string for the header value to find in legalrequests for this URL, for example, *json*, xml_method?, or method[0-9]. This field is case-sensitive.If a header value includes this pattern, the system assumes that the request contains the type ofdata you select in the Request Body Handling setting.
c) From the Request Body Handling list, specify how the system recognizes and enforces requestsfor this URL according to the requests’ header content:
Option Result
Apply Content Signatures Do not parse the content; scan the entire payload with full-contentattack signatures.
Apply Value and ContentSignatures
Do not parse the content or extract parameters; process the entirepayload with value and full-content attack signatures. This optionprovides basic security for protocols other than HTTP, XML,JSON, and GWT; for example, use *amf* as the header value for acontent-type of Action Message Format.
Disallow Block requests for an URL containing this header content. Thesystem logs the Illegal Request Content Type violation.
Do Nothing Do not inspect or parse the content. Handle the header of therequest as specified by the security policy.
Form Data Parse content as posted form data in either URL-encoded or multi-part formats. Enforce the form parameters according to the policy.
GWT Examine data in requests, based on the configuration of a GWT(Google Web Toolkit) profile associated with this URL.
JSON Examine JSON data using an associated JSON profile, and usevalue attack signatures to scan the element values.
XML Examine XML data using an associated XML profile.d) If the content is GWT, JSON, or XML, for Profile Name, select an existing profile or click the
Create (+) button to create one. (The other options do not require special profiles.)e) Click Add.
6. Click Update.7. To put the security policy changes into effect immediately, click Apply Policy.
If the system detects a request for a URL that contains header content that is disallowed in the URL'sHeader-Based Content Profile, the Illegal request content type violation occurs.
Specifying characters legal in URLs
When you create a security policy, you select a language encoding (or let the system determine itautomatically) that determines the characters that can be used in URLs. You can view or modify whichcharacters the security policy allows or disallows in URLs.
Adding Entities to a Security Policy
220

1. On the Main tab, click Security > Application Security > URLs > Character Set.The URLs Character Set screen opens, where you can view the character set, and state of eachcharacter.
2. In the Current edited security policy list near the top of the screen, verify that the security policyshown is the one you want to work on.
3. Use the View filter to display the set of characters that you want to see.
Tip: To restore the default character set definitions, you can click the Restore Defaults button at anytime.
4. To modify which characters the system should permit or prohibit in the name of a wildcard URL,click Allow or Disallow next to the character.
5. Click Save to save the changes.6. To put the security policy changes into effect immediately, click Apply Policy.
The security policy checks that URLs in requests do not include any disallowed characters. For example,by disallowing the characters <, >, ', and |, a security policy protects against many cross-site scriptingattacks and injection attacks.
Overriding methods on URLs
You can define a list of methods that are allowed or disallowed for a specific URL. The list overrides thelist of methods allowed or disallowed globally at the policy level.
If you are using automatic learning, on the Learning and Blocking Settings screen, under URLs, you canselect Learn Methods on URLs; the system automatically learns overridden methods at the URL level.In that case, you do not need to perform this task.
1. On the Main tab, click Security > Application Security > URLs.The Allowed HTTP URLs screen opens.
2. In the Current edited security policy list near the top of the screen, verify that the security policyshown is the one you want to work on.
3. From the Allowed HTTP URLs List, click the name of the URL you want to modify.The Allowed HTTP URL Properties screen opens.
4. From the Allowed URL Properties list, select Advanced.5. Toward the bottom of the screen, click the Methods Enforcement tab.6. Select the Override policy allowed methods check box.7. In the Method Enforcement tab, from the Global Security Policy Settings list, select any specific
methods that you want to enable or disable for this URL, and then move them into the OverriddenSecurity Policy Settings list.The screen lists the methods in the state opposite from the global setting.
8. If the method you want to override is not listed, click Create Custom Method to add a new methodto the security policy. Type the method name, and select whether the new method should act as GETor POST.
9. Click Update.10. To put the security policy changes into effect immediately, click Apply Policy.
The methods you selected are treated differently for this URL than for the rest of the security policy. Ifthe method causes an Illegal method violation due to URL level enforcement, the description readsIllegal method for URL. (If the violation is caused at the policy level, the description readsIllegal method for policy.) If the URL is in staging, and the violation is due to override, theviolation does not block even if it is in blocking mode.
BIG-IP Application Security Manager: Implementations
221

Configuring flows to URLs
Before you can configure a flow, you should have created the explicit HTTP URL for which you want toadd the flow.
A flow defines the access path leading from one explicit HTTP URL to another, between a referrer URLand a target URL in a web application. For example, a basic web page may include a graphic andhyperlinks to other pages in the application. The calls from the basic page to the other pages make up theflow. You can configure flows to a URL.
Note: Configuring flows is an optional task. Unless you need the enhanced security of configured flows,F5 Networks recommends that you do not configure flow-based security policies due to their complexity.
1. On the Main tab, click Security > Application Security > URLs.The Allowed HTTP URLs screen opens.
2. In the Current edited security policy list near the top of the screen, verify that the security policyshown is the one you want to work on.
3. From the Allowed HTTP URLs List, click the name of the URL you want to modify.The Allowed HTTP URL Properties screen opens.
4. From the Allowed URL Properties list, select Advanced.5. If you want the system to verify flows to this URL, select the Check Flows To URL check box.6. On the menu bar, click Flows to URL.
The Flows to URL screen opens and shows the flows to that specific URL.7. Above the Flows to URL area, click Create.
The Create a New Flow popup screen opens.8. For the Referrer URL setting, specify how the client enters the application.
• If you want the client to enter the application from this URL, select Entry Point.• To specify the path of a referrer URL that refers to other URLs in the application, select URL
Path; for example, type /index.html.9. From the Protocol list, select the appropriate protocol, HTTP or HTTPS.10. From the Method list, select the HTTP method that the URL expects a visitor to use to access the
authenticated URL, for example, GET or POST.11. In the Frame Target field, type the index (0-29, or 99) of the HTML frame in which the URL
belongs, if the web application uses frames.
Tip: If your web application does not use frames, type the value 1.
12. If this flow can contain a query strings or POST data, select the Allow QS/PD check box.13. If you want the system to verify query strings or POST data for this flow, select the Check QS/PD
check box.14. Click OK.
The popup screen closes, and on the Flows to URL screen, you see the HTTP URLs from which theURL can be accessed.
15. To view the entire application flow, click Security > Application Security > URLs > Flows List.16. To view the flow or modify the flow properties, click the URL in the Flows list.17. To put the security policy changes into effect immediately, click Apply Policy.
You now have the option of creating parameters that are associated with the flow.
Adding Entities to a Security Policy
222

Creating flow parameters
Before you can create a flow parameter, you need to first have created the flow to which the parameterapplies. If the source URL is a referrer URL, that HTTP URL must already be defined in the securitypolicy as well.
You define parameters in the context of a flow when it is important to enforce that the target HTTP URLreceives a parameter only from a specific referrer URL. Flow parameters provide very tight, flow-specific security for web applications. With this increased protection comes an increase in maintenanceand configuration time. Note that if your application uses dynamic parameters, you need to manually addthose to the security policy.
1. On the Main tab, click Security > Application Security > Parameters.2. In the Current edited security policy list near the top of the screen, verify that the security policy
shown is the one you want to work on.3. Click Create.
The Add Parameter screen opens.4. In the Create New Parameter area, for the Parameter Name setting, specify the type of parameter
you want to create.
• To create a named parameter, select Explicit, then type the name.• To use pattern matching, select Wildcard, then type a wildcard expression. Any parameter name
that matches the wildcard expression is permitted by the security policy.• To create an unnamed parameter, select No Name. The system creates a parameter with the label,
UNNAMED.5. In the Parameter Level setting, select Flow, and then for From URL define where the flow must
come from:
• If the source URL is an entry point, click Entry Point.• If the source URL is a referrer URL (already defined in the policy), click URL Path, select the
protocol used for the URL, then type the referrer URL associated with the flow.
When you begin to type the URL, the system lists all referrer URLs that include the character youtyped, and you can select the URL from the list.
6. In the Parameter Level setting, for Method, select the HTTP method (GET or POST) that applies tothe target referrer URL (already defined in the policy).
7. In the Parameter Level setting, for To URL, select the protocol used for the URL, then type thetarget URL.
8. Leave the Perform Staging check box selected if you want the system to evaluate traffic beforeenforcing this parameter.Staging helps reduce the occurrence of false positives.
9. If the parameter is required in the context of the flow, select the Is Mandatory Parameter check box.Note that only flows can have mandatory parameters.
10. Specify whether the parameter requires a value:
• If the parameter is acceptable without a value, leave the Allow Empty Value setting enabled.• If the parameter must always include a value, clear the Allow Empty Value check box.
11. To allow users to send a request that contains multiple parameters with the same name, select theAllow Repeated Occurrences check box.
Important: Before enabling this check box, consider that requests containing multiple parameters ofthe same name could indicate an attack on the web application (HTTP Parameter Pollution).
BIG-IP Application Security Manager: Implementations
223

12. If you want to treat the parameter you are creating as a sensitive parameter (data not visible in logs orthe user interface), enable the Sensitive Parameter setting.
13. For the Parameter Value Type setting, select the format of the parameter value.Depending on the value type you select, the screen refreshes to display additional configurationoptions.
14. Click Create to add the new parameter to the security policy.15. To put the security policy changes into effect immediately, click Apply Policy.
When you create a parameter that is associated with a flow, the system verifies the parameter in thecontext of the flow. For example, if you define a parameter in the context of a GET request, and a clientsends a POST request that contains the parameter, the system generates an Illegal Parameterviolation.
Configuring dynamic flows to URLs
Before you can configure a dynamic flow, you must have created the explicit HTTP URL for which youwant to add the dynamic flow.
Some web applications contain HTTP URLs with dynamic names, for example, the links to a serverlocation for file downloads, where the file name may be unique to each user. You can configure thesystem to detect these URLs by creating a dynamic flow. For the dynamic flow, you specify a regularexpression that describes the dynamic name, and associate the flow with the URL.
1. On the Main tab, click Security > Application Security > URLs.The Allowed HTTP URLs screen opens.
2. In the Current edited security policy list near the top of the screen, verify that the security policyshown is the one you want to work on.
3. From the Allowed HTTP URLs List, click the name of the URL you want to modify.The Allowed HTTP URL Properties screen opens.
4. On the menu bar, click Dynamic Flows from URL.The Flows to URL screen opens and shows the flows to that specific URL.
5. Above the Dynamic Flows to URL area, click Create.The Create a New Dynamic Flow popup screen opens.
6. In the Prefix field, type a fixed substring that appears near the top of the HTML source page beforethe dynamic URL.The prefix may be the name of a section in combination with HTML tags, for example,<title>Online Banking</title>.
7. For the RegExpValue setting, type a regular expression that specifies the set of URLs that make upthe dynamic flow, for example, a set of archive files.
8. For the Suffix setting, type a fixed string that occurs in the referring URL’s source code, and isphysically located after the reference to the dynamic name URL.
9. Click OK.The popup screen closes, and on the Dynamic Flows from URL screen, you see the dynamic flowextraction properties.
10. To put the security policy changes into effect immediately, click Apply Policy.
The regular expression describes the dynamic URL name. The Application Security Manager extractsdynamic URL names from the URL responses associated with the dynamic flow.
Configuring dynamic session IDs in URLs
If an application uses dynamic information in URLs (for example, user names), the Application SecurityManager™ cannot use its normal functions to extract and enforce HTTP URLs or flows because the URIcontains a dynamic element. If the web application that you are securing could contain dynamic
Adding Entities to a Security Policy
224
information in a URL, you can allow dynamic session IDs in URLs. (You only need to configure thissetting if you know that your application works this way.)
1. On the Main tab, click Security > Application Security > Security Policies.The Policies List screen opens.
2. Click the name of the security policy you want to work on.The Policy Summary opens.
3. From the list, select Advanced.4. For the Dynamic Session ID in URL setting, specify how the security policy should process URLs
that use dynamic sessions.Use this option When
Custom pattern The security policy uses a user-defined regular expression to recognize a dynamicsession ID in URLs. Type a regular expression in the Value field, and adescription in the Description field.
Default pattern The security policy uses the default regular expression (\/sap\([^)]+\)) forrecognizing dynamic session IDs in URLs.
Disabled The security policy does not enforce dynamic session IDs in URLs. This is thedefault value.
5. Click Save to save your settings.6. To put the security policy changes into effect immediately, click Apply Policy.
Normally, if the system receives a request in which the dynamic session information does not match thesettings in the security policy, the system issues the Illegal session ID in URL violation.When you allow dynamic session IDs in URLs, ASM extracts the dynamic session information fromrequests or responses, based on the pattern that you configure. For requests, the system applies the patternto the URI up to, but not including, the question mark (?) character in a query string.
Note: The system can extract dynamic information only from illegal URLs.
Adding Cookies
About cookies
Many web-based applications use cookies to help users navigate the web site efficiently and performcertain functions. For example, web servers may use cookies to authenticate users logging in to secureapplications, or an application can use cookies to store user preferences. Whether using automatic policybuilding or manually creating a security policy, you may want to add cookies that the web applicationuses.
You may want a security policy to ignore certain known and recognized cookie headers that are includedin HTTP requests. For example, if cookies can change on the client side legitimately, you can createallowed cookies.
You may also want a security policy to prevent changes to specific cookies, such as session-relatedcookies that are set by the application. If so, you can create enforced cookies. The cookie in the requestmust not be modified, or it generates the Modified Domain Cookie violation.
In addition, some PHP applications treat cookies as parameters and use the value of the cookie as input tothe application. For that reason, you can have the system check attack signatures on the cookie (as youcan for parameters). You can apply attack signatures only to allowed cookies, because enforced cookiesare set by the server, and therefore, are considered to be secure.
BIG-IP Application Security Manager: Implementations
225

Both allowed and enforced cookies can be put in staging when they are created so that you can make surethat they do not cause false positives during the staging period.
If you are using automatic policy building, the security policy adds cookies automatically. If manuallybuilding a security policy, the manual traffic learning screens suggest cookies to add.
About pure wildcard cookies
When you create a security policy, it includes a pure wildcard (*) and it is created as an allowed cookie inthe Allowed Cookies list. You cannot delete the pure wildcard from the security policy but you canchange its type from allowed to enforced. The allowed cookie wildcard allows all cookies, and you canspecify which cookies the users cannot change in the enforced cookies list .This is considered a negativesecurity model, because you allow all cookies except the ones you specify.
However, new cookies are added to the security policy (or not) based on the Learn New Cookies valueof the matched wildcard in the Learning and Blocking settings. The value can be Never (wildcard only)or Selective. The default value differs depending on the deployment scenario you use to create the policy.
The following deployments create pure wildcard cookies using the value Never (wildcard only), thusthey do not add (or suggest to add) explicit cookies to the security policy:
• All templates (including Rapid Deployment policy)• Automatic policy building with Fundamental policy template• Vulnerability assessment
All other policy templates create the pure wildcard cookie with Learn New Cookies set to Selective. Soit adds (if building the policy automatically) or suggests to add (if building the policy manually) explicitcookies encountered in the traffic to the security policy.
In Selective mode, the system learns cookies that violate the settings of the wildcard. In particular,cookies that do not change are learned as enforced cookies. Most cookies are added to the security policyas allowed cookies, and are checked for the configured signature set. These are captured by the * purewildcard. The exceptions are the enforced cookies and cookies that need to be exempted from some ofthe signature checks. These are whitelisted.
Wildcard syntax
The syntax for wildcard entities is based on shell-style wildcard characters. This table lists the wildcardcharacters that you can use in the names of file types, URLs, parameters, or cookies so that the entityname can match multiple objects.
Wildcard Character Matches
* All characters
? Any single character
[abcde] Exactly one of the characters listed
[!abcde] Any character not listed
[a-e] Exactly one character in the range
[!a-e] Any character not in the range
About cookies and learning
When you create a security policy that includes cookies, the system adds new cookies (or suggests thatyou add them) to the security policy (or not) based on the Learn New Cookies value. The value can beNever (do not add cookies) or Selective (add cookies that match the wildcard). The default value differsdepending on the policy template you use to create the policy.
Adding Entities to a Security Policy
226

The following deployments create pure wildcard cookies using the value Never, thus they do not add (orsuggest to add) explicit cookies to the security policy by default:
• Rapid Deployment policy• Automatic policy building with Fundamental policy type• Vulnerability assessment
All other templatex create the pure wildcard cookie with Learn New Cookies set to Selective. So thesystem adds (if building the policy automatically) or suggests to add (if building the policy manually)explicit cookies encountered in the traffic to the security policy.
You could start by having the wildcard set to selective in the allowed cookies, get a list of all the cookiesthat your web application uses, then move them to the enforced list. This would make it easier to add thecookies that your web application uses and that you want to enforce to the security policy.
About adding cookies
Application Security Manager™ (ASM) allows you to add cookies with different characteristics tosecurity policies.
You can specify the cookies that you want to allow, and the ones you want to enforce in a security policy:
• Allowed cookies: The system allows these cookies and clients can change them.• Enforced cookies: The system enforces the cookies in the list (not allowing clients to change them)
and allows clients to change all others.
If the cookies in the web application change, you can edit or delete the cookies.
Adding allowed cookies
You manually add allowed cookies to a security policy when you want a security policy to ignore thosecookies. You may want to add allowed cookies for certain known and recognized cookie headers that areoften included in HTTP requests. For example, if clients can change certain cookies legitimately and theyare not session-related (like cookies assigned by single sign-on servers), you can specify these cookies asallowed in the security policy.
1. On the Main tab, click Security > Application Security > Headers.The Cookies List screen opens.
2. In the Current edited security policy list near the top of the screen, verify that the security policyshown is the one you want to work on.
3. Click Create.The New Cookie screen opens.
4. For Cookie Name identify the cookie.a) From the list, select whether the system identifies the cookie by a specific name (Explicit), or by a
regular expression (Wildcard).The pure wildcard (*) is automatically added to the security policy so you do not need to add it.But you can add other wildcards such as *site.com.
b) In the field, type either the name of the cookie, or the pattern string for the wildcard to matchcookie names.
5. For Cookie Type, select Allowed.6. Leave the Perform Staging check box selected if you want the security policy to evaluate traffic
before enforcing this entity.Staging helps reduce the occurrence of false positives.
7. If you want the system to add the HttpOnly attribute to the response header of the domain cookie,select the Insert HttpOnly attribute check box.
BIG-IP Application Security Manager: Implementations
227

This attribute prevents the cookie from being modified or intercepted on the client side, by unwantedthird parties that run scripts on the web page. The client's browser allows only pure HTTP or HTTPStraffic to access the protected cookie.
8. If you want the system to add the Secure attribute to the response header of the domain cookie, selectthe Insert Secure attribute check box.This attribute ensures that cookies are returned to the server only over SSL, which prevents the cookiefrom being intercepted. It does not, however, guarantee the integrity of the returned cookie.
9. If this is a custom cookie that may include base64 encoding, select the Base64 Decoding check box.If the cookie contains a Base64 encoded string, the system decodes the string and continues with itssecurity checks.
10. To adjust the attack signature settings for this cookie, use the Attack Signatures tab. Tip: The mostcommon action you perform here is to disable a specific attack signature for a specific cookie.a) If you want to override the attack signature settings for this cookie, select the Check attack
signatures on this cookie check box.When this option is selected, the system displays a list of attack signatures.
b) From the Global Security Policy Settings list, move any attack signatures whose global settingsyou want to override into the Overridden Security Policy Settings and adjust the state as needed.
11. Click Create.The new cookie is created and added to the list.
12. To put the security policy changes into effect immediately, click Apply Policy.
The system ignores allowed cookies in requests, and allows clients to change allowed cookies in the list.
Adding enforced cookies
You manually add enforced cookies to a security policy when you want a security policy to preventclients from changing those cookies.
1. On the Main tab, click Security > Application Security > Headers.The Cookies List screen opens.
2. In the Current edited security policy list near the top of the screen, verify that the security policyshown is the one you want to work on.
3. Click Create.The New Cookie screen opens.
4. For Cookie Name identify the cookie.a) From the list, select whether the system identifies the cookie by a specific name (Explicit), or by a
regular expression (Wildcard).The pure wildcard (*) is automatically added to the security policy so you do not need to add it.But you can add other wildcards such as *site.com.
b) In the field, type either the name of the cookie, or the pattern string for the wildcard to matchcookie names.
5. For Cookie Type, select Enforced.6. Leave the Perform Staging check box selected if you want the security policy to evaluate traffic
before enforcing this entity.Staging helps reduce the occurrence of false positives.
7. If you want the system to add the HttpOnly attribute to the response header of the domain cookie,select the Insert HttpOnly attribute check box.This attribute prevents the cookie from being modified or intercepted on the client side, by unwantedthird parties that run scripts on the web page. The client's browser allows only pure HTTP or HTTPStraffic to access the protected cookie.
8. If you want the system to add the Secure attribute to the response header of the domain cookie, selectthe Insert Secure attribute check box.
Adding Entities to a Security Policy
228

This attribute ensures that cookies are returned to the server only over SSL, which prevents the cookiefrom being intercepted. It does not, however, guarantee the integrity of the returned cookie.
9. Click Create.The new cookie is created and added to the list.
10. To put the security policy changes into effect immediately, click Apply Policy.
If a request contains a modified or unsigned enforced cookie header and the Modified domain cookie(s)violation is set to alarm or block, the system logs and/or blocks the request (when the system is inblocking mode). Note that the request is not blocked if the enforced cookie is in staging, or if the securitypolicy is in transparent mode.
Changing the order in which wildcard cookies are enforced
If you create several wildcard cookies, the security policy adds each new one to the top of the wildcardcookies list. The cookie wildcards are enforced from the top of the list down. You can change the order inwhich a security policy enforces wildcard cookies.
1. On the Main tab, click Security > Application Security > Headers > Cookie Wildcards Order.The Cookie Wildcards Order screen opens.
2. In the Current edited security policy list near the top of the screen, verify that the security policyshown is the one you want to work on.
3. In the Wildcard Cookies list, adjust the order of the cookie wildcards by using the Up and Downbuttons putting the cookies you want to enforce first at the top of the list.
4. Click Save to save the changes.5. To put the security policy changes into effect immediately, click Apply Policy.
The system enforces the cookie wildcards from the top down.
Editing cookies
You can edit cookies as required by changes in the web application that the security policy is protecting.
1. On the Main tab, click Security > Application Security > Headers.The Cookies List screen opens.
2. In the Current edited security policy list near the top of the screen, verify that the security policyshown is the one you want to work on.
3. Select either the Enforced Cookies or Allowed Cookies tab to locate the cookie you want to edit.4. In the Cookie Name column, click the cookie name.
The Edit Cookie screen opens.5. In the Cookie Properties area, make the required changes to the cookie.6. Click Update to save the changes.7. To put the security policy changes into effect immediately, click Apply Policy.
Deleting cookies
You can delete cookies that are no longer needed in your security policy. If a cookie changes in yourapplication, you may want to delete the old cookie and let Application Security Manager™ add the newcookie (or suggest adding it).
1. On the Main tab, click Security > Application Security > Headers.The Cookies List screen opens.
2. In the Current edited security policy list near the top of the screen, verify that the security policyshown is the one you want to work on.
3. Select either the Enforced Cookies or Allowed Cookies tab to locate the cookie you want to edit.
BIG-IP Application Security Manager: Implementations
229

4. In the Enforced Cookies or Allowed Cookies list, select the check box next to the cookie you want todelete.
5. Click Delete to delete the entity, and click OK when asked to confirm.6. To put the security policy changes into effect immediately, click Apply Policy.
Specifying when to add explicit cookies
You can specify the circumstances under which Application Security Manager™ adds, or suggests youadd, explicit cookies to the security policy.
1. On the Main tab, click Security > Application Security > Policy Building > Learning andBlocking Settings.The Learning and Blocking Settings screen opens.
2. In the Current edited security policy list near the top of the screen, verify that the security policyshown is the one you want to work on.
3. Expand Cookies, in the Learn New Cookies setting, select the option you want.Option Description
Never(wildcardonly)
The system does not add or suggest that you add cookies that match the wildcard tothe policy. When false positives occur, the system suggests relaxing the settings ofthe wildcard entity. This option results in a security policy that is easy to manage butmay not be as strict.
Selective The system adds or suggests that you add cookies that match the wildcard to thepolicy. When false positives occur, the system adds or suggests that you add anexplicit entity with relaxed settings that avoid the false positive. This optionprovides a good balance between security, policy size, and ease of maintenance.
4. Click Save to save the changes.5. To put the security policy changes into effect immediately, click Apply Policy.
Configuring the maximum cookie header length
You specify a maximum cookie header length so that the system knows the acceptable maximum lengthfor the cookie header in an incoming request. This setting is useful primarily in preventing bufferoverflow attacks.
1. On the Main tab, click Security > Application Security > Security Policies.The Policies List screen opens.
2. Click the name of the security policy you want to work on.The Policy Summary opens.
3. From the list, select Advanced.4. For the Maximum Cookie Header Length setting, select one of the options.
Option Description
Any Specifies that the system accepts requests with cookie headers of anylength.
Length with a value inbytes
Specifies that the system accepts cookie headers up to that length. Thedefault maximum length is 8192 bytes.
5. Click Save to save your settings.6. To put the security policy changes into effect immediately, click Apply Policy.
The system calculates and enforces the cookie header length based on the sum of the length of the cookieheader name and value. Requests with headers that are longer than the maximum length cause an Illegalheader length violation.
Adding Entities to a Security Policy
230

Overview: Configuring advanced cookie protection
Many of the Application Security Manager™ (ASM) security features store ASM™ cookies on clients aspart of the traffic security enforcement. Examples of security features that use cookies for validation arecookie enforcement, parameter enforcement, CSRF protection, login enforcement, session tracking, andanomaly detection. Cookie enforcement is also called domain cookies; cookies for the other features arecalled other ASM cookies.
The system applies a random security key unique to each deployment and uses it in conjunction with anencryption algorithm. The combination of the randomly generated key and the selected algorithms iscalled the security context. Normally, you do not have to change the cookie protection settings. However,in cases where you suspect a security breach has occurred, or if you want a different balance betweenspeed and security, you can reconfigure cookie protection.
By default, when you initially start the system, it automatically generates a security key and sets thecookie security level to secure. You can change the encryption schema to provide faster cookie protectionby reconfiguring cookie protection.
If you want to use the same security context on other systems, you can set up advanced cookieconfiguration settings on one BIG-IP® system and export them. You can then import the settings on theother systems. You can configure all your systems to use the same cookie protection, or apply differentsettings to the systems. However, if you have multiple ASM-enabled devices that share traffic (and arenot synchronized using device groups), it is recommended that those systems should all use the samecookie protection settings.
If synchronizing multiple ASM systems using device groups, you can configure the settings you want touse for all systems on one and then synchronize the systems.
Reconfiguring cookie protection
Application Security Manager™ (ASM) automatically configures cookie protection. If you need to adjustcookie protection due to a security breach or because you want to change the current protection level, youcan reconfigure cookie protection.
Note: This is an advanced configuration task that is required only in special circumstances.
1. On the Main tab, click Security > Options > Application Security > Advanced Configuration >Cookie Protection.The Cookie Protection screen opens.
2. Review the data and time specified in the Latest Generation/Import Configuration Time setting tosee when cookie protection was last configured.
3. To review the details of the cookie protection, click View Algorithms Configuration.The screen shows the specific algorithms the system uses to protect domain and other ASM cookies.
4. If you decide that you want to change the cookie configuration, click Reconfigure CookieProtection.The Reconfigure Cookie Protection screen opens.
5. For Grace Period Until signing with new Security Context, type the amount of time in minutes thatmust pass before the system begins signing ASM cookies with the new key and algorithm that you areconfiguring.The default value is 30 minutes. Initially when you start the system, this is the period the systemwaits to apply the new security context for the new release.
6. For Grace Period To Accept Old Cookies, type the amount of time in minutes that must pass beforethe system stops accepting traffic with ASM cookies that use the old key and algorithm.The default value is 2880 minutes (48 hours).
BIG-IP Application Security Manager: Implementations
231

7. For Algorithm Selection, select the overall cookie security level to apply: Secure or Fast.
Tip: The Secure setting uses more system resources.
Changing this setting changes the Scramble and Mac algorithms used for cookie protection.8. If you want to review the actual algorithms used for the cookies, you can do this:
a) For the Cookie Protection Configuration setting, select Advanced.The screen shows additional settings.
b) Review the scramble and Mac algorithms used for the domain cookies and other ASM cookies,and adjust them if needed.If you use settings other than the defaults, the Algorithm Selection changes to Custom.
9. Click Reconfigure.The system regenerates a new security context but waits to start using it until it surpasses the graceperiod until signing value.
10. If you need to extend either of the grace periods, click Extend and type the number of minutes to addand click Save.
Importing cookie protection configuration
If you want to use the same cookie configuration settings on more than one Application SecurityManager™ (ASM) system (especially systems that share traffic), you can export the settings from onesystem and import them onto another one. This task explains how to import the settings.
1. On the Main tab, click Security > Options > Application Security > Advanced Configuration >Cookie Protection.The Cookie Protection screen opens.
2. Click Import.The Import Cookie Protection Configuration screen opens.
3. From the Import Method list, select Upload file and locate the previously exported configurationfile.The exported file has a name such asASM_Cookie_Protection_Configuration_2013-08-15_08-22.txt.
4. To review the details of the cookie protection, click View Algorithms Configuration.The screen shows the specific algorithms the system uses to protect domain and other ASM cookies.
5. For Grace Period Until signing with new Security Context, type the amount of time in minutes thatmust pass before the system begins signing ASM cookies with the new key and algorithm that you areconfiguring.The default value is 30 minutes. Initially when you start the system, this is the period the systemwaits to apply the new security context for the new release.
6. For Grace Period To Accept Old Cookies, type the amount of time in minutes that must pass beforethe system stops accepting traffic with ASM cookies that use the old key and algorithm.The default value is 2880 minutes (48 hours).
7. Click Import.The system imports the security context but waits to start using it until the grace period until signingis up.
8. If you need to extend either of the grace periods, click Extend and type the number of minutes to addand click Save.
Exporting cookie protection configuration
If you want to use the same cookie configuration settings on more than one Application SecurityManager™ system, you can export the settings from one system and import them onto another one. Thistask explains how to export the settings to a file.
Adding Entities to a Security Policy
232

1. On the Main tab, click Security > Options > Application Security > Advanced Configuration >Cookie Protection.The Cookie Protection screen opens.
2. Click Export.The system exports the cookie protection configuration to a file with a name such asASM_Cookie_Protection_Configuration_2013-08-15_08-22.txt.
Adding Allowed Methods to a Security Policy
Adding allowed methods
All security policies accept standard HTTP methods by default. If your web application uses HTTPmethods other than the default allowed methods (GET, HEAD, and POST), you can add them to thesecurity policy.
1. On the Main tab, click Security > Application Security > Headers > Methods.The Methods screen opens.
2. In the Current edited security policy list near the top of the screen, verify that the security policyshown is the one you want to work on.
3. Click Create.4. For the Method setting, select the type of method to allow:
• To use an existing HTTP method to act as a GET or POST action, select Predefined then selectthe system-supplied method to add to the allowed methods list.
• To add an option that is not predefined, select Custom, and then in the Custom Method field,type the name of a method.
5. If using flows in the security policy, from the Allowed Method Properties list, select Advanced,then from the Act as Method list, select an option:
• If you do not expect requests to contain HTTP data following the HTTP header section, selectGET.
• If you expect requests to contain HTTP data following the HTTP header section, select POST.6. Click Create.7. To put the security policy changes into effect immediately, click Apply Policy.
The method is added to the allowed methods list. The system treats any incoming HTTP request that usesan HTTP method other than an allowed method as an invalid request. The system ignores, learns, logs, orblocks the request depending on the settings configured for the Illegal Method violation underHeaders on the Learning and Blocking Settings screen.
BIG-IP Application Security Manager: Implementations
233

Adding Entities to a Security Policy
234

Securing Applications That Use WebSocket
Overview: Securing applications that use WebSocket connectionsWebSocket is an HTML5 protocol that simplifies and speeds up communication between clients andservers. Once a connection is established through a handshake, messages can be passed back and forthwhile keeping the connection open.
For example, WebSocket connections are used for bi-directional, real-time applications such as supportchats, news feeds, immediate quotes, or collaborative work. It is important to secure the content that isexchanged, otherwise an attacker could potentially gain access to the application server.
If your application uses WebSocket protocol, your security policy can protect WebSocket connectionsfrom exploits related to the protocol. If the policy uses automatic learning, the system handles much ofthe work for you. If you are using manual learning, you can add content profiles and WebSocket URLs tothe security policy to protect WebSocket traffic.
This use case presumes that you have already created the security policy for the web application. It tellsyou what you need to do so that the system can recognize and secure WebSocket traffic.
Task SummarySecuring WebSocket applications: The easy wayCreating a WebSocket profileRecognizing WebSocket trafficCreating a JSON profileCreating a plain text content profileCreating allowed WebSocket URLsAdjusting learning settings for WebSocket URLsClassifying the content of requests to WebSocket URLsAdding disallowed WebSocket URLsAssociating a profile with a WebSocket URL
About WebSocket security
Many web applications use two-way communication channels between the client and the server. TheWebSocket Protocol, specified in RFC 6455, defines a way to speed up and simplify the communication.
Application Security Manager™ (ASM) provides security for WebSocket connections in security policiesby adding WebSocket URLs (ws:// and wss://) and defining defense measures in a WebSocketprofile. The WebSocket protocol allows extensions to add features to the basic framing protocol. TheWebSocket URL informs ASM how to handle the extensions. The WebSocket URL also defines theallowed message format, size, and whether it is enforced.
You cannot associate parameters with WebSocket URLs. Therefore, any parameters in the request arehandled at the global level.
WebSocket security can protect against many threats, including those listed in this table.
Threat How WebSocket Security Prevents It
Server stack abuse Enforces mandatory headers in the request.

Threat How WebSocket Security Prevents It
Session riding or CSRF Denies access to requests coming from origins not in theconfigured whitelist.
Information leakage Enforces login sessions for ws:// and wss:// URLs.
XSS, SQL injection, command shellinjection, and other threats that attacksignatures prevent
Uses attack signatures to examine parameter content in eachWebSocket text message. If it finds them, closes theWebSocket connection and logs it in the Request log.
Server exploits Examines text messages for RFC compliance, illegal metacharacters, and null characters.
Cache poisoning Enforces message masking for client text messages to avoidcaching false content.
Buffer overflow Limits message size, frame size, and enforces correct frameformat. If messages are in JSON format, validates content.
Exhausted server socket resources Limits the time for sending a message and time betweenmessages.
About WebSocket and login enforcement
If your application uses login enforcement, you can specify authenticated WebSocket URLs that can onlybe accessed after login. To do this, the security policy needs to include at least one login page. Youspecify the WebSocket and WebSocket Secure (ws:// and wss://) URLs that must be authenticated onthe login enforcement screen.
See Creating Login Pages for Secure Application Access for how to set up login enforcement forWebSocket URLs.
About WebSocket and cross-domain request enforcement
To prevent access to a WebSocket from an unauthorized origin, you can add more security to it. You canenable cross-domain request enforcement as part of the Allowed WebSocket URL properties within asecurity policy.
See Setting Up Cross-Domain Request Enforcement for how to set up cross-domain request enforcementfor WebSocket URLs.
Securing WebSocket applications: The easy way
You can use Application Security Manager™ to secure applications that use WebSocket connections. Theeasiest way to do this is to create a security policy that uses automatic learning. That way, the systembuilds the policy for you when you tell it how to recognize WebSocket traffic.
1. On the Main tab, click Security > Application Security > Security Policies > Policies List.The Policies List screen opens.
2. With no policy selected, click Create New Policy.a) Type a name for the policy.b) For Policy Template, select Comprehensive.c) For Virtual Server, configure the local traffic settings for the virtual server.d) Click Create policy.
The system creates a security policy, but the policy does not yet support WebSocket.
Securing Applications That Use WebSocket
236

3. Click Local Traffic > Virtual Servers, open the virtual server you created, select the Advancedconfiguration settings, and from the WebSocket Profile list, select websocket, and when done, clickUpdate to save your changes.For details, see Recognizing WebSocket Traffic.The system uses the default WebSocket profile for the application.
4. Start sending traffic to the web application that uses WebSocket connections.
The system starts examining the application traffic, and builds the security policy as usual. The systemadds Allowed WebSocket URLs to the security policy along with other policy elements when ASM seesenough traffic from various users.
In Comprehensive policies, the system examines and classifies request content of learned WebSocketURLs, and creates a JSON profile if needed. The system stabilizes the security policy when sufficientsessions over a period of time include the same elements.
In Fundamental policies, the system learns URLs selectively, and classification is turned off, by default.Most WebSocket traffic is treated as plain text, and URLs with binary messages are learned (assumingthey are the exception). The system does not learn JSON automatically because JSON is seen as plaintext, and no violation is issued.
Creating a WebSocket profile
If you want the BIG-IP® system to recognize WebSocket traffic, you need a WebSocket profile. For mostpurposes, you can use the default websocket profile included with the system and skip this task. If youneed to adjust the masking options, you can create a new WebSocket profile.
1. On the Main tab, click Local Traffic > Profiles > Services > WebSocket.2. Click Create.
The New WebSocket Profile screen opens.3. In the Name field, type a name for the WebSocket profile.4. Select the Custom check box at the right so you can edit the screen.5. From the Masking list, select an option:
Option When you want to do this
Preserve Preserve the mask of the packet received, and make no change. ASM and other modulesreceive masked frames.
Unmask Remove the mask from the packet and remask it using the same mask when sending thetraffic to the server. (Default value.)
Selective Preserve the mask of the packet received, and make no changes unless an ApplicationSecurity Policy is associated with the virtual server. In that case, unmask the packet,allow ASM™ to examine the WebSocket payload, and remask it when sending the trafficto the server.
Remask Remove the mask received from the client. The system generates a new, random maskwhen sending the traffic to the server.
6. Click Finished.
Next, you can associate the WebSocket profile with the virtual server that handles applications withWebSocket connections. For example, this could be the virtual server associated with an ApplicationSecurity Policy created for WebSocket applications.
BIG-IP Application Security Manager: Implementations
237

Recognizing WebSocket traffic
If you want the system to recognize and handle WebSocket traffic, you need to associate a WebSocketprofile with the virtual server that handles the traffic. For example, this could be the virtual serverassociated with a security policy that you want to secure an application with WebSocket connections.
1. On the Main tab, click Local Traffic > Virtual Servers.The Virtual Server List screen opens.
2. Click the name of the virtual server associated with the security policy that you want to secureWebSocket traffic.
3. From the Configuration list, select Advanced.4. Make sure that HTTP Profile is set to http.5. From the WebSocket Profile list, select websocket, or the name of the profile you created.
The websocket profile is a default profile included with the system.6. Click Update to save the changes.
The WebSocket profile is associated with the virtual server. The system can now recognize WebSockettraffic.
Creating a JSON profile
Before you can complete this task, you need to have already created a security policy for yourapplication.
This task describes how to create a JSON profile that defines the properties that the security policyenforces for an application sending JSON payloads or WebSocket payloads in JSON format.
Note: The system supports JSON in UTF-8 and UTF-16 encoding. WebSocket allows only UTF-8.
1. On the Main tab, click Security > Application Security > Content Profiles > JSON Profiles.2. Click Create to create a new JSON profile, or edit the Default JSON profile (by clicking it).
The Create New JSON Profile screen opens.3. Type a name for the profile.4. Adjust the maximum values that define the JSON data for the AJAX application, or use the default
values.5. If you want the system to tolerate and not report warnings about JSON content, select the Tolerate
JSON Parsing Warnings check box.If the system cannot parse JSON content, it generates the violation Malformed JSON data,regardless of whether this setting is enabled or disabled.
6. To parse parameters in a JSON payload as parameters (recommended), ensure that Parse Parametersis enabled.The system extracts parameters from JSON content whenever the JSON profile is used; for example,with URLs, WebSocket URLs, or parameters that use a JSON profile.The security policy parses parameters extracted from the JSON payload the same as other parameters.Also, the Attack Signatures, Value Metacharacters, and Sensitive Data Configuration tabs areremoved from the screen, so you can skip to the last step.
7. If the signatures included in the security policy are not sufficient for this JSON profile, you canchange them.
Securing Applications That Use WebSocket
238
a) On the Attack Signatures tab, in the Global Security Policy Settings list, select any specificattack signatures that you want to enable or disable for this profile, and then move them into theOverridden Security Policy Settings list.
Tip: If no attack signatures are listed in the Global Security Policy Settings list, create the profile,update the attack signatures, then edit the profile.
b) After you have moved any applicable attack signatures to the Overridden Security PolicySettings list, enable or disable each of them as needed:
• Enabled - Enforces the attack signature for this JSON profile, although the signature might bedisabled in general. The system reports the violation Attack Signature Detectedwhen the JSON in a request matches the attack signature.
• Disabled - Disables the attack signature for this JSON profile, although the signature might beenabled in general.
8. To allow or disallow specific meta characters in JSON data (and thus override the global metacharacter settings), click the Value Meta Characters tab.
• Select the Check characters check box, if it is not already selected.• Move any meta characters that you want allow or disallow from the Global Security Policy
Settings list into the Overridden Security Policy Settings list.• In the Overridden Security Policy Settings list, change the meta character state to Allow or
Disallow.9. To mask sensitive JSON data (replacing it with asterisks), click the Sensitive Data Configuration tab.
• In the Element Name field, type the JSON element whose values you want the system to considersensitive.
• Click Add.
Important: If the JSON data causes violations and the system stops parsing the data part waythrough a transaction, the system masks only the sensitive data that was fully parsed.
Add any other elements that could contain sensitive data that you want to mask.10. Click Create (or Update if editing the Default profile).
The system creates the profile and displays it in the JSON Profiles list.
This creates a JSON profile that affects the security policy when you associate the profile with a URL,WebSocket URL, or parameter.
Next, you need to associate the JSON profile with any URLs, WebSocket URLs, or parameters that mightinclude JSON data.
Creating a plain text content profile
Before you can complete this task, you need to have already created a security policy for yourapplication.
You can create a plain text content profile that defines the properties that a security policy enforces forunstructured text content, such as those used in WebSocket messages. Note that the system creates adefault plain text profile in advance for * wildcard URLs (unless this was an upgrade from a previousversion). You can use the default profile for other URLs, and also edit it if it applies to multiple URLsincluding the *, instead of creating new ones.
1. On the Main tab, click Security > Application Security > Content Profiles > Plain Text Profiles.2. In the Current edited security policy list near the top of the screen, verify that the security policy
shown is the one you want to work on.3. Click Create.
BIG-IP Application Security Manager: Implementations
239

The Create New Plain Text Profile screen opens.4. For Profile Name, type the name of the profile.5. Adjust the maximum values that define the length of the text messages, or use the default values.6. In the Attack Signatures tab, determine which patterns to look for in the text:
a) If the text content does not need to be reviewed for potential threats, clear the Check attacksignatures check box. Otherwise, leave it selected and the system will use the attack signatures tolook for threats.
b) If checking signatures, in the Global Security Policy Settings list, select any specific attacksignatures that you want to enable or disable for this profile, and then move them into theOverridden Security Policy Settings list.
c) Once you have moved any applicable attack signatures to the Overridden Security PolicySettings list, enable or disable each of them as needed.
Option Description
Enabled Enforces the attack signature for this text profile, although the signature might bedisabled for the policy in general. The system reports the violation AttackSignature Detected when the text in a request matches the attack signature.
Disabled Disables the attack signature for this text profile, although the signature might beenabled in general.
Tip: If no attack signatures are listed in the Global Security Policy Settings list, create the profile,update the attack signatures, then edit the profile.
7. To allow or disallow specific meta characters in the text (and thus override the global meta charactersettings), click the Value Meta Characters tab.a) Select the Check characters check box, if it is not already selected.b) Move any meta characters that you want allow or disallow from the Global Security Policy
Settings list into the Overridden Security Policy Settings list.c) In the Overridden Security Policy Settings list, change the meta character state to Allow or
Disallow.8. Click Create.
The system creates the profile and displays it in the Plain Text Profiles list.
This creates a plain text content profile that affects the security policy when you associate the profile witha URL, such as a WebSocket URL. Once associated, the security policy checks the content of text beingsent to the WebSocket URL.
Next, you need to associate the plain text content profile with the WebSocket URLs so the system canverify the content of the messages being sent over the WebSocket connection. You can create theWebSocket URLs manually if not using automatic learning.
Creating allowed WebSocket URLs
You can manually create allowed WebSocket URLs, which are URLs from which the security policyaccepts messages over WebSocket connections. You do this if you have a short list of WebSocket URLsto protect and you know their paths.
Note: If you are using automatic learning, the security policy protects WebSocket URLs automatically,and you do not have to add them. Learning settings for WebSocket URLs are on the Learning andBlocking Settings screen.
1. On the Main tab, click Security > Application Security > URLs > Allowed URLs > AllowedWebSocket URLs.
Securing Applications That Use WebSocket
240

The Allowed WebSocket URLs screen opens.2. Click Create.
The New Allowed WebSocket URL screen opens.3. In the Current edited security policy list near the top of the screen, verify that the security policy
shown is the one you want to work on.4. Next to Create New Allowed WebSocket URL, select Advanced.5. For WebSocket URL, choose a type and protocol, and then type the URL name or wildcard.
Type Description
Explicit Specifies a specific WebSocket URL, such as /chat.room.com/websocket. SelectWS (for unencrypted text) or WSS (for encrypted text), and type the URL in theadjacent field.
Wildcard Specifies a wildcard expression to represent a number of URLs. Any URL that matchesthe wildcard expression is considered legal. The pure wildcard (*) is automatically addedto the security policy so you do not need to add it. But you can add other wildcards suchas /main/*. Select WS (for unencrypted text) or WSS (for encrypted text), and type awildcard expression in the adjacent field.
6. Retain the default selected Perform Staging check box.Keep it selected so you can check for false positives before enforcing the new URL.
7. For wildcard WebSocket URLs, leave Wildcard Match Includes Slashes selected.When this option is selected, an asterisk in a wildcard matches any number of path segments(separated by slashes); when cleared, an asterisk matches at most one segment.
8. On the Message Handling tab, leave Check Message Payload enabled.Based on the traffic and the selections in the Payload Enforcement setting, the Check MessagePayload setting causes the system to validate the format of WebSocket messages.
9. For the WebSocket Extensions list, leave the default value Remove Headers to select what happensto messages that have WebSocket extensions.Other options to ignore extensions (Dangerous! Not recommended.) or block messages withextensions are available, but F5 recommends using the default.The system removes the Sec-WebSocket-Extensions header from the message and allows theWebSocket to be established so messages can be exchanged.
10. For Allowed Message Payload Formats, select the format or formats that you want to enforce forWebSocket messages: click JSON or Binary.At least one format must be selected. (Initially, Plain Text is always selected.) If you are using adifferent format and not verifying plain text in messages, you can clear Plain Text.
11. For Payload Enforcement, choose how to validate the message content.
• To verify plain text or JSON formatting, select the previously created content profile, or create anew one.
• To enforce binary messages, for Maximum Binary Message Size, click Length and type thelargest binary message (in bytes) to allow. The default value is 10000 bytes.
12. For Maximum Frame Size, adjust the frame size, if necessary.The default value is 10000 bytes.
13. For Maximum Frames per Fragmented Message, adjust the number, if necessary.The default value is 100 frames.
14. For wildcard WebSocket URLs, on the Meta Characters tab, you can overwrite the global URLcharacter set, and allow or disallow specific meta characters in the WebSocket URL if you need to.
BIG-IP Application Security Manager: Implementations
241

a) The Check characters on this URL setting is enabled by default so that the system verifies metacharacters in the URL. (If you do not want to check for meta characters, clear the check box andskip to the next step.)
b) To specify which meta characters to allow or disallow, from the Global Security Policy Settingslist, select any meta characters that you want to specifically allow or disallow, and move them tothe Overridden Security Policy Settings list.
c) For each meta character that you moved, set the state to Allow or Disallow.
Note: The Overridden Security Policy Settings take precedence over the global settings for the webapplication character set.
15. If your web site uses CORS (Cross-Origin Resource Sharing), click the HTML5 Cross-DomainRequest Enforcement tab.a) For Enforcement Mode, select Enforce on ASM.b) On the HTML5 Cross-Domain Request Enforcement tab, specify how to enforce CORS on this
WebSocket URL. For details, see Setting Up Cross-Domain Request Enforcement.16. Click Create.
The Allowed WebSockets URLs screen opens and lists the new WebSocket URL.17. To put the security policy changes into effect immediately, click Apply Policy.
The security policy allows requests for the WebSocket URLs that you added. If the WebSocket URL is instaging, the system informs you when learning suggestions are available or when it is ready to beenforced.
Adjusting learning settings for WebSocket URLs
You can adjust the policy building settings for WebSocket URLs if you need to change how WebSocketURLs are learned, or how WebSocket violations are handled.
1. On the Main tab, click Security > Application Security > Policy Building > Learning andBlocking Settings.The Learning and Blocking Settings screen opens.
2. In the Current edited security policy list near the top of the screen, verify that the security policyshown is the one you want to work on.
3. In the Policy Building Settings, expand URLs to view the settings.4. Specify how WebSocket URLs are added to the security policy in Learn New WebSocket URLs.
Option Description
Never (wildcardonly)
Do not add explicit WebSocket URLs; just use a wildcard and relax thesettings if it causes false positives.
Selective Add explicit WebSocket URLs that do not match the attributes of the *wildcard.
Add All Entities Add all WebSocket URLs used on the website.
5. Review the Learn, Alarm, Block (if in blocking enforcement mode) settings of the WebSocket-related violations to see if they are set as you want them to be.
6. For Maximum Learned WebSocket URLs, use the default value of 10000.This option is available only if you are using Selective or Add All Entities for learning.
7. Click Save to save your settings.8. To put the security policy changes into effect immediately, click Apply Policy.
The WebSocket URL learning settings are changed.
Securing Applications That Use WebSocket
242

Classifying the content of requests to WebSocket URLs
You can instruct the system to automatically examine and classify the content of requests to WebSocketURLs. If the system detects legitimate JSON, plain text, or binary data in requests to URLs allowed inthe security policy, the system adds the content profiles to the security policy, and configures them usingthe data found.
1. On the Main tab, click Security > Application Security > Policy Building > Learning andBlocking Settings.The Learning and Blocking Settings screen opens.
2. In the Current edited security policy list near the top of the screen, verify that the security policyshown is the one you want to work on.
3. In the General Settings, for Learning Mode, ensure that it is set to Automatic.4. On the right side of the Learning and Blocking Settings screen, select Advanced.
The screen displays the advanced configuration details for policy building.5. In the Policy Building Settings area, expand URLs.6. For Learn New HTTP URLs, specify when the system should add explicit URLs to the security
policy.
• Choose Selective to add explicit URLs that do not match the * wildcard.• Choose Add All Entries to create a comprehensive whitelist of all the website URLs.
Using these options activates the Classify Client Message Payload Format of Learned WebSocketURLs check box.
7. Select Classify Client Message Payload Format of Learned WebSocket URLs.8. Click Save to save your settings.9. To put the security policy changes into effect immediately, click Apply Policy.
If JSON, binary, or plain text data is discovered in requests to WebSocket URLs, the system classifies thedata and makes learning suggestions regarding each format of data (binary, JSON, and plain text). Thepolicy suggests adding, then after examining sufficient traffic, creates the appropriate content profiles,and adds them to the policy.
It is useful to view the learning suggestions regarding classification. The benefit of seeing the suggestionsis being able to see sample requests that lead the system to choose the respective payload formats.
Adding disallowed WebSocket URLs
For some web applications, you might want to deny requests for certain WebSocket URLs. In this case,you can create a set of disallowed WebSocket URLs.
1. On the Main tab, click Security > Application Security > URLs > Disallowed URLs > DisallowedWebSocket URLs.The Disallowed WebSocket URLs screen opens.
2. In the Current edited security policy list near the top of the screen, verify that the security policyshown is the one you want to work on.
3. Click Create.The New Disallowed WebSocket URL screen opens.
4. For the WebSocket URL (Explicit only) setting, select WS or WSS as the protocol for the URL, andtype the WebSocket URL that the security policy considers illegal; for example, /index.html.
Note: URLs are case-sensitive unless you cleared the Security Policy is case sensitive option whenyou created the policy.
BIG-IP Application Security Manager: Implementations
243

5. Click Create.The Disallowed WebSocket URLs screen opens and lists the URL.
6. To put the security policy changes into effect immediately, click Apply Policy.
If a requested URL is on the disallowed WebSocket URLs list, the system ignores, learns, logs, or blocksthe request depending on the settings you configure for the Illegal URL violation on the Learningand Blocking Settings screen. You can view learning suggestions for disallowed WebSocket URLs on theTraffic Learning screen.
Associating a profile with a WebSocket URL
Before you can associate a text or JSON content profile with a WebSocket URL, you need to havecreated a security policy with policy elements including WebSocket URLs, and a text or JSON contentprofile.
You can associate a text or JSON content profile, or both, with one or more existing explicit or wildcardWebSocket URLs. The associated profiles specify the format you want to enforce for WebSocketpayloads.
1. On the Main tab, click Security > Application Security > URLs > Allowed URLs > AllowedWebSocket URLs.The Allowed WebSocket URLs screen opens.
2. In the Current edited security policy list near the top of the screen, verify that the security policyshown is the one you want to work on.
3. From the Allowed WebSocket URLs List, click the name of a WebSocket URL that can containunstructured text or JSON data.The Allowed WebSocket URL Properties screen opens.
4. In the Allowed Message Payload Formats setting, select Plain Text or JSON or both.5. For the Payload Enforcement setting, from the Plain Text Profile or JSON Profile lists, select the
content profiles to enforce.6. Click Update.7. To put the security policy changes into effect immediately, click Apply Policy.
The Plain Text and JSON profiles are associated with the WebSocket URL, and ASM™ verifies thecontent of the messages being sent over the WebSocket connection.
Continue to associate Plain Text or JSON profiles with any WebSocket URLs in the application thatmight contain unstructured text or JSON data.
WebSocket violationsThis table lists the violations that Application Security Manager™ can detect in WebSocket traffic.
Violation Cause
Bad WebSocket handshakerequest
A problem occurred while establishing a WebSocketconnection. The request did not comply with protocol.
Failure in WebSocket framingprotocol
A framing protocol error occurred while parsing themessage.
Illegal cross-origin request The request did not come from the same origin as thetraffic, and is not on the list of allowed origins in theHTTP or WebSocket URL.
Illegal number of frames permessage
The request contains more frames than the WebSocketURL allows.
Securing Applications That Use WebSocket
244

Violation Cause
Illegal WebSocket binarymessage length
The binary message is longer than the WebSocket URLallows.
Illegal WebSocket extension The message has an extension that the WebSocket URLdoes not allow.
Illegal WebSocket framelength
The message exceeds the maximum frame size permittedby the WebSocket URL.
Mask not found in clientframe
The mask bit in the client frame is not set, and it needs tobe.
Null character found inWebSocket text message
The system found a null character in a text messagehaving has a content profile.
Text content found in binaryonly WebSocket
The WebSocket URL allows only binary content, but themessage includes plain text.
BIG-IP Application Security Manager: Implementations
245

Securing Applications That Use WebSocket
246

Configuring HTTP Headers that Require Special Treatment
About mandatory headersA mandatory header is a header that must appear in a request for the request to be considered legal by thesystem. If a request does not contain the mandatory header and the Mandatory HTTP header ismissing violation is set to alarm or block, the system logs or blocks the request. This violation is notset to alarm or block by default, so you have to set the blocking policy if you want to alarm or blockrequests that do not include a mandatory header.
You can use mandatory headers to make sure, for example, that requests are passing a proxy (whichintroduces such a header) before they reach the Application Security Manager™.
You configure mandatory headers on the HTTP Headers screen.
About header normalizationHeader normalization is a process whereby the Application Security Manager™ buffers the contents ofrequest headers to change them into a standard format that can be more easily checked for discrepancies.Normalizing deals with special characters (such as percent encoding), non-ASCII text, URL paths andparameters, Base64 encoded binary content, non-printable characters, HTML codes, and many otherformats that may be used in headers that could potentially hide malicious code.
Not all headers need to be normalized. You should normalize referer headers, and custom headerscontaining binary data, URLs, or other encoded information. But there is a performance trade-off whenusing normalization, so you should implement it only when needed.
You configure header normalization on the HTTP Headers screen when you select the option to checksignatures for the header.
About default HTTP headersApplication Security Manager™ (ASM) includes the default HTTP headers listed in the table.
Header Name Description
* (wildcard) This wildcard HTTP header checks signatures against all requests unless theymatch another HTTP header. No normalization settings are selected by default,but you can edit them. Realize that enabling normalization on the wildcardheader may impact performance. The Base64 Decoding and Mandatory checkboxes are unavailable for this header.
referer When requests have referer headers, they include URLs. The system checkssignatures against them, performs URL normalization, and validates the URLsyntax. Violations are issued if problems are encountered during normalization.The other settings are not typically relevant for this header.
cookie Cookies have their own process for normalization and attack signature checkand so the cookie as a header is always excluded from the normalization andattack signature check. You cannot change the settings, but you can configurethe settings of a specific cookie by clicking the Cookie configuration link.

Header Name Description
authorization Although the user name may be encoded as Base64, the Base64 decoding isalways off for this header; the reason for this is that the user name (andpassword) are only part of the Authorization header value. ASM™ detects whatand when to decode, so the generic Base64 setting should always be off.Therefore, the Base64 Decoding check box is unavailable for this header.Realize that enabling normalization on the authorization header may impactperformance.
You cannot delete any of the default HTTP headers.
Overview: Configuring HTTP headersThis is an advanced task not required in all environments.
Application Security Manager™ (ASM) lets you configure custom headers that deserve special treatmentin your security policy. You can add these types of headers:
• Mandatory headers• Headers that require Base64 decoding• Headers to exclude from signature checks• Headers that need to be normalized
The security policy can recognize requests with these headers and handles them with specialconsideration. For example, if your application uses custom headers that must occur in every request, youcan configure mandatory headers in the security policy. Or, if some request headers include binarycontent encoded in Base64, you can instruct ASM™ to decode the data and examine it for discrepancies.
You can also specify many different options to normalize an HTTP header for which you want to checksignatures.
Configuring HTTP headers
You add HTTP headers to a security policy when you need to define certain headers that require specialtreatment when found in requests. For example, if you are receiving false positives for a certain type ofheader, you can create the header and exclude it from signature checks.
1. On the Main tab, click Security > Application Security > Headers > HTTP Headers.The HTTP Headers screen opens.
2. In the Current edited security policy list near the top of the screen, verify that the security policyshown is the one you want to work on.
3. Click Create.The New Header screen opens.
4. From the Name list, select a standard HTTP header name type or select Custom and type the customheader name that appears in requests.
5. If you want this to be a header that is required in every request, select the Mandatory check box.If a request does not include this header, the Mandatory HTTP header is missing violationoccurs (if set to alarm or block).
6. If you want the security policy to check this header against attack signatures, select the Check AttackSignatures check box. Otherwise, this header is excluded from signature checks.If the check box is selected, the screen displays additional settings for header normalization and theAttack Signatures tab.
7. If this is a custom header that may include base64 encoding, select the Base64 Decoding check box.
Configuring HTTP Headers that Require Special Treatment
248

Note: When this check box is selected, the options Percent Decoding, Url Normalization, andNormalization Violations are unavailable because they are not compatible with Base64 decoding.
The system performs decoding on the header and if decoding fails, the Illegal Base64 Value violationoccurs (if set to alarm or block).
8. If you want to normalize this header, select the options you need.Option Description
Percent Decoding This option normalizes referer headers or custom headers that may includestrings with encoded percent codes (%xx) that replace certain characters,perform unescaping, and require other checks. This is included in URLnormalization and thus is not available when checking the URLNormalization option.
Url Normalization This option normalizes URLs in referer headers or custom headers that mayinclude URLs with multiple slashes, directory traversal, or which requirebackslash replacement or path parameter removal. Includes percent decodingalso.
HTMLNormalization
This option removes non-printable characters, comment delimiters, HTML,hex, and decimal codes, and other HTML extras.
9. If you want evasion violations to be issued in case of problems while normalizing the header, selectthe Evasion Techniques Violations check box.This check box is only available if using Percent Decoding or Url Normalization.
10. If the attack signatures included in the security policy apply differently to this HTTP header, you canadjust them on the Attack Signatures tab.a) Ensure that Check Attack Signatures is selected.b) From the Global Security Policy Settings list, move any attack signatures whose global settings
you want to override into the Overridden Security Policy Settings and adjust the state as needed(from Enabled to Disabled or vice versa).
Tip: The most common action you perform here is to disable an attack signature for a specific URL.
Overridden attack signatures are preceded with a yellow alert triangle in the attack signature list, andyou can filter the list to view them.
11. Click Create.The HTTP Headers screen opens and lists the new header.
When ASM™ receives a request with the type of header you created, the system performs the specialconsiderations indicated in the HTTP header.
Configuring the maximum HTTP header length
You specify a maximum HTTP header length so that the system knows the acceptable maximum lengthfor the HTTP header in an incoming request. This setting is useful primarily in preventing bufferoverflow attacks.
1. On the Main tab, click Security > Application Security > Security Policies.The Policies List screen opens.
2. Click the name of the security policy you want to work on.The Policy Summary opens.
3. From the list, select Advanced.4. For the Maximum HTTP Header Length setting, select one of the options.
BIG-IP Application Security Manager: Implementations
249

Option Description
Any Specifies that the system accepts requests with HTTP headers of anylength.
Length with a value inbytes
Specifies that the system accepts HTTP headers up to that length. Thedefault maximum length is 8192 bytes.
5. Click Save to save your settings.6. To put the security policy changes into effect immediately, click Apply Policy.
The system calculates and enforces the HTTP header length based on the sum of the length of the HTTPheader name and value. Requests with headers that are longer than the maximum length cause an Illegalheader length violation.
Implementation ResultWhen Application Security Manager™ receives requests, the system checks the header to see if it matchesany of the HTTP headers other than the wildcard header. If the request header matches one of theheaders, the system performs the configured options for that header.
You can review suggestions related to violations that occur on the Traffic Learning screen. HTTP headerviolations are listed under Evasion Techniques in the section Evasion Techniques Detected in Headers.You can examine the requests to see if they are legitimate or false positives. If they are false positives,you can consider turning off evasion violations or normalization for the header. You can drill down andview the headers causing violations. If a header violation is a false positive, you can also disablenormalization from the Evasion Techniques Detected in Headers screen.
If signature violations occur in the header, the system suggests disabling the signature that cause theviolation, or disabling the signature check for that header. If a header declared mandatory is missing, thesystem suggests disabling the violation or making the missing header non-mandatory.
If the Base64 violation occurs in the header, the system suggests disabling the violation or disabling theBase64 decoding for that header.
Configuring HTTP Headers that Require Special Treatment
250

Changing Security Policy Settings
About security policy settingsThe security policy settings determine how the security policy is built. You initially specify the values ofthese settings when you create the policy. You can change the values, but understand that the securitypolicy will have different characteristics than it originally did.
Editing an existing security policy
When you create a security policy, the system uses default values for some of the settings. You can accessa security policy for editing either from the Policies List or from the Current edited security policysetting. (For parent policies, it is the Current edited parent policy.) The Current edited security policysetting appears at the top of almost every security policy screen throughout Application SecurityManager™.
1. On the Main tab, click Security > Application Security > Policy Building > Learning andBlocking Settings.The Learning and Blocking Settings screen opens.
2. Make any changes that are required for that security policy, such as to general settings, URLs,parameters, and so on.
3. Click Save to save your settings.4. To put the security policy changes into effect immediately, click Apply Policy.5. To edit other security policies, from the Current edited policy list, select the security policy you
want to edit.
Changing security policy enforcement
Security policies can be in one of two enforcement modes: transparent or blocking. The enforcementmode specifies whether the system simply logs or blocks a request that triggers a security policyviolation. You can manually change the enforcement mode for a security policy depending on how youwant the system to handle traffic that causes violations.
1. On the Main tab, click Security > Application Security > Policy Building > Learning andBlocking Settings.The Learning and Blocking Settings screen opens.
2. In the Current edited security policy list near the top of the screen, verify that the security policyshown is the one you want to work on.
3. For the Enforcement Mode setting, specify how to treat traffic that causes violations.
• To block traffic that causes violations (that are set to block), select Blocking.• To stop allow traffic even if it causes violations so you can review the violations, select
Transparent.4. Click Save to save your settings.5. To put the security policy changes into effect immediately, click Apply Policy.
When the enforcement mode is set to transparent, traffic is not blocked even if a violation is triggered.The system typically logs the violation event (if the Learn flag is set on the violation). You can use thismode along with an enforcement readiness period when you first put a security policy into effect to makesure that no false positives occur that would stop legitimate traffic.

When the enforcement mode is set to blocking, traffic is blocked if it causes a violation (that isconfigured for blocking), and the enforcement readiness period is over. You can use this mode when youare ready to enforce a security policy.
Adjusting the enforcement readiness period
For each security policy, you can configure the number of days used as the enforcement readiness period,also called staging. Security policy entities and attack signatures remain in staging for this period of timebefore the system suggests that you enforce them. Staging allows you to test security policy entities andattack signatures for false positives without enforcing them. The default value of 7 days works well formost situations so you typically do not need to change it.
1. On the Main tab, click Security > Application Security > Policy > Policy Properties.The Policy Properties screen for the current edited policy opens.
2. For the Enforcement Readiness Period, type the number of days you want the entities or signaturesto be in staging.The default value is 7 days.
3. Click Save to save your settings.4. To put the security policy changes into effect immediately, click Apply Policy.
During the enforcement readiness period, the system does not block traffic, even if requests triggerviolations against the security policy and the violations are set to Block. The security policy providessuggestions when requests match the attack signatures or do not adhere to the security policy entity'ssettings.
If you are using automatic policy building and the system has processed sufficient traffic, after theenforcement readiness period is over, the Policy Builder automatically enforces the security policyentities and the attack signatures that did not cause violations during the period.
Viewing whether a security policy is case-sensitive
When you first create a security policy, you have the advanced option of making a security policy case-sensitive or not. By default, the option Security Policy is case sensitive is selected, and the securitypolicy treats file types, URLs, and parameters as case-sensitive. You cannot change this setting after thesecurity policy is created, but you can view how it is set.
1. On the Main tab, click Security > Application Security > Policy > Policy Properties.The Policy Properties screen for the current edited policy opens.
2. Review the Policy is case sensitive setting.If the value is Yes, the security policy is case-sensitive; if the value is No, the policy is not case-sensitive.
3. Click Cancel when you are done.
Differentiating between HTTP and HTTPS URLs
When creating a security policy, you can determine whether a security policy differentiates betweenHTTP and HTTPS URLs. Later, you can view the setting, but you can change it only if the securitypolicy contains no URLs that have the same name and use different protocols.
1. On the Main tab, click Security > Application Security > Security Policies.The Policies List screen opens.
2. Click the name of the security policy you want to work on.The Policy Summary opens.
3. Review the Differentiate between HTTP and HTTPS URLs setting.
Changing Security Policy Settings
252

If the Enabled check box is selected, the security policy differentiates between HTTP and HTTPSURLs. Otherwise, it does not, and creates protocol-independent URLs.
4. Click Cancel when you are done.
If the Differentiate between HTTP and HTTPS URLs setting is disabled, the security policyconfigures URLs without specifying a specific protocol. This is useful for applications that behave thesame for HTTP and HTTPS, and it keeps the security policy from including the same URL twice.
Specifying the response codes that are allowed
You can specify which responses a security policy permits. By default, the Application SecurityManager™ accepts all response codes from 100 to 399 as valid responses. Response codes from 400 to599 are considered invalid unless added to the Allowed Response Status Codes list. By default, 400, 401,404, 407, 417, and 503 are on the list as allowed HTTP response status codes.
1. On the Main tab, click Security > Application Security > Policy > Policy Properties.The Policy Properties screen for the current edited policy opens.
2. From the list, select Advanced.3. If you want to allow additional responses for the Allowed Response Status Codes setting, in the
New Allowed Response Status Code field, type the HTTP response status code, between 400 and599, that the security policy should consider a legal response, and click Add.
4. If you do not want to allow any response codes between 400 and 599, click Remove All.5. Click Save to save your settings.6. To put the security policy changes into effect immediately, click Apply Policy.
The security policy considers legal responses that return response codes that are listed as allowedresponse codes. If a response contains a response status code from 400 to 599 that is not on the list, thesystem issues the violation, Illegal HTTP status in response. If you configured the securitypolicy to block this violation, the system blocks the response.
Activating ASM iRule events
An iRule is a script that lets you customize how you manage traffic on the BIG-IP® system. You canwrite iRules® to modify a request or response, or to cause an action to occur. For detailed information oniRules, see the F5 Networks DevCentral web site, http://devcentral.f5.com. If you are usingiRules to perform actions based on Application Security Manager™ iRule events, you must instructASM™ to trigger iRule events. By default, the trigger iRule event setting is disabled.
1. On the Main tab, click Security > Application Security > Policy > Policy Properties.The Policy Properties screen for the current edited policy opens.
2. From the list, select Advanced.3. If you have written iRules to process application security events, for the Trigger ASM iRule Events
setting, select the Enabled check box.Leave this option disabled if you have not written any ASM iRules, or you have written iRules not forASM (triggered by the Local Traffic Manager™).
4. For the ASM iRules Event Mode setting, select the mode to use.
• Recommended: If you are writing new iRules, such as those that perform a specific action afterhandling requests, select Normal Mode. Whenever ASM processes a request, it triggers anASM_REQUEST_DONE event.
• Not recommended: If you are using iRules that use ASM_REQUEST_VIOLATION, selectCompatibility Mode. Whenever ASM processes a request with a violation, it triggers anASM_REQUEST_VIOLATION event. F5 recommends that you rewrite the iRules usingASM_REQUEST_DONE in the Normal Mode.
BIG-IP Application Security Manager: Implementations
253

5. Click Save to save your settings.6. To put the security policy changes into effect immediately, click Apply Policy.
If you write iRules that process ASM iRule events and assign them to a specific virtual server, when thetrigger iRules setting is enabled, ASM triggers iRule events for requests. If the trigger iRules setting isnot enabled, no iRule events occur for ASM iRule events.
Application security iRule events
These are the events that iRules® can subscribe to in Application Security Manager™.
Application Security iRuleEvent
Description
ASM_REQUEST_DONE Occurs when Application Security Manager finishes processing arequest in Normal mode (regardless of whether a violation occurredor not). The system triggers this event after deciding what to dowith the request, block it or forward it, but before actuallyexecuting that action, so you can specify a change to that action.
ASM_REQUEST_BLOCKING Occurs when Application Security Manager is generating an errorresponse to the request that caused a violation, and gives the iRule achance to modify the response before it is sent. Allows you tomodify the blocking page.
ASM_RESPONSE_VIOLATION Occurs when Application Security Manager detects a response thatviolates a security policy.
ASM_REQUEST_VIOLATION Deprecated. Use ASM_REQUEST_DONE instead. Occurs whenApplication Security Manager detects a request that violates asecurity policy when using Compatibility mode only.
Notes
From any of these events, you can use the ASM::fingerprint command to get fingerprintinginformation from a request. For example:
when ASM_REQUEST_DONE { log local0.[ASM::fingerprint]}
If fingerprinting information is available, this example returns the fingerprint ID. If it is not available, theexample returns 0.
The fingerprint ID is a number representing the client's browser. If requests coming from a particularfingerprint ID contain violations, you could mark that ID as suspicious and treat future requests from thatID differently.
Allowing XFF headers in requests
You can configure Application Security Manager™ (ASM) to trust XFF (X-Forwarded-For) headers orcustomized XFF headers in requests. For example, you could do this if ASM is deployed behind aninternal or other trusted proxy. Then, the system uses the IP address that initiated the connection to theproxy instead of the internal proxy’s IP address. This option is useful for logging, web scraping, anomalydetection, and the geolocation feature.
You should not configure trusted XFF headers if you think the HTTP header may be spoofed, or crafted,by a malicious client.
Changing Security Policy Settings
254

1. On the Main tab, click Security > Application Security > Policy > Policy Properties.The Policy Properties screen for the current edited policy opens.
2. From the list, select Advanced.3. For the Trust XFF Header setting, select the Enabled check box.
The screen displays the Custom XFF Headers configuration option.4. If your web application uses custom XFF headers, in the Custom XFF Headers setting, add them as
follows:a) In the New Custom XFF Header field, type the XFF header that the system should trust.b) Click Add.
You can add up to five custom XFF headers.5. Click Save to save your settings.6. To put the security policy changes into effect immediately, click Apply Policy.
When you trust XFF headers, the system has confidence in XFF headers in the request. If you addedcustom XFF headers, the system recognizes and trusts them. If deployed behind a proxy, ASM uses theinitiating IP address rather than the address of the proxy.
Adding host names
You can manually add legitimate host names to a security policy, for example, if users can access theapplication from multiple host names. If you are using automatic policy building, the systemautomatically adds domain names to the security policy so adding them in that case is optional.
1. On the Main tab, click Security > Application Security > Headers > Host Names.The Host Names screen opens.
2. In the Current edited security policy list near the top of the screen, verify that the security policyshown is the one you want to work on.
3. Above the list of host names, click the Create button.The New Host Name screen opens.
4. In the Host Name field, type the host name that is used to access the web application (either a domainname or an IP address).
5. If you also want to use all sub-domains of the specified host name to access the web application,select the Include Sub-domains check box.
6. If you want to make sure all the traffic to the host is not blocked even if it has blocking violations,select Policy is always transparent for this host.This is useful when deploying the policy on a new application that needs to be tested before movingto blocking mode while still securing other applications protected by the same policy.This setting causes the policy to operate in transparent mode only for the application identified withthis host name, while still working in blocking mode on other applications protected by the policy.For a host name with different enforcement, the event log shows the blocking override reason as Hostname is configured as transparent.
7. Click Create.8. To put the security policy changes into effect immediately, click Apply Policy.
The host name is added to the list of host names that can legitimately be used to access the webapplication that the security policy is protecting. The list shows the enforcement mode of the host name(transparent or blocking).
About adding multiple host names
If users can access a web application using multiple host names or IP addresses, you can add the multiplehost names or IP addresses to the security policy that protects the application. The system uses this list ofhost names as follows:
BIG-IP Application Security Manager: Implementations
255

• The Policy Builder considers the host names in the list to be legitimate internal links and forms, andlearns security policy entities from them, and also from relative URLs that do not contain a domainname.
• The CSRF feature uses the list to distinguish between internal and external links and forms, and thesystem inserts the CSRF token only into internal links and forms.
The Application Security Manager™ (ASM) identifies web application-related host names as fullyqualified domain names (FQDNs) in requests or responses. If you include sub-domains with the hostname, the system matches all sub-domains when evaluating FQDNs, and inserts ASM™ cookies intoresponses from the sub-domains of the host name. When an application uses several sub-domains, ASMcookie-based features (like CSRF protection, Login Pages, and Dynamic Sessions ID in URL) requireASM cookies to be inserted from the correct domain.
Protecting against cross-site request forgery (CSRF)
Cross-site request forgery (CSRF) is an attack where a user is forced to execute unauthorized actions(such as a bank transfer) within a web application where the user is currently authenticated. You canconfigure a security policy to protect against CSRF attacks, including specifying which URLS you wantthe system to examine.
1. On the Main tab, click Security > Application Security > CSRF Protection.The CSRF Protection screen opens.
2. In the Current edited security policy list near the top of the screen, verify that the security policyshown is the one you want to work on.
3. Select the CSRF Protection check box.4. Specify which part of the application you want to protect against CSRF attacks:
• To protect SSL requests only in the secured part of the application, select the SSL Only checkbox.
• To protect the entire web application, leave the SSL Only check box cleared.5. If you want the CSRF token (which is injected into responses) to expire:
a) For Expiration Time, select Enabled.b) In the field, type the amount of time, in seconds (1 to 99999), after which the token should expire.
The default is 600 seconds.6. In the URLs List (Wildcards supported) setting, specify the URLs you want the system to examine.
You need to add at least one URL to the list. The system considers all URLs not on the list safe unlessanother problem is discovered.a) Type the URL in the format /index.html.
You can also use wildcards for URLs; for example /myaccount/*.html, /*/index.php, or /index.?html.
b) Click Add.c) Add all of the potentially unsafe URLs that you want the system to examine.
7. Click Save to save your settings.8. On the Main tab, click Security > Application Security > Policy Building > Learning and
Blocking Settings.The Learning and Blocking Settings screen opens.
9. In the Policy Building Settings (in the Advanced settings), expand CSRF Protection, and click theappropriate Learn, Alarm, and Block settings in the two CSRF violations.
Tip: If you want to block CSRF attacks, click Block for CSRF attack detected. Also in theGeneral Settings, check that Enforcement Mode is set to Blocking.
10. Click Save to save your settings.
Changing Security Policy Settings
256

11. To put the security policy changes into effect immediately, click Apply Policy.
The system inserts an Application Security Manager™ token to prevent CSRF attacks. If the systemdetects a CSRF attack, it issues a CSRF attack detected violation. To prevent token hijacking, thesystem reviews the token expiration date. If the token is expired, the system issues the CSRFauthentication expired violation.
BIG-IP Application Security Manager: Implementations
257

Changing Security Policy Settings
258

Configuring General ASM System Options
Changing your system preferencesYou can change the default user interface and system preferences for the Application Security Manager™
(ASM), and configure which fields are displayed in the Request List of the Reporting screen.
1. On the Main tab, click Security > Options > Application Security > Preferences.2. In the GUI Preferences area, for Records Per Screen, type the number of entries to display (between
1-100). (The default value is 20.)This setting determines the maximum number of security policies, file types, URLs, parameters,flows, headers, and XML and JSON profiles to display in lists throughout ASM™.
3. For Titles Tooltip Settings, select an option for how to display tooltips.Option Description
Do not show tooltips Never display tooltips or icons.
Show tooltip icons Display an icon if a tooltip is available for a setting, show the tooltipwhen you move the cursor over the icon.
Show tooltips on titlemouseover
Do not display an icon, but show the tooltip when you move the cursorover the setting name. This is the default setting.
4. For Default Configuration Level, select Advanced to display all possible settings, or Basic todisplay only the essential settings, on screens with that option.The default is Basic.
5. For Apply Policy Confirmation Message, you can specify whether to display a popup messageasking if you want to perform the Apply Policy operation each time you change a security policy.
6. If you are using a high-availability configuration, for the Sync setting, select the Recommend Syncwhen Policy is not applied check box to display the Sync Recommended message at the top of thescreen when you change a security policy, to remind you to perform a ConfigSync with the peerdevice.
7. For the Logging setting, select the Write all changes to Syslog check box to record all changes madeto security policies in the Syslog (/var/log/asm).
Note: The system continues to log system data regardless of whether you enable policy changelogging.
8. Click Save to save your settings.
The adjusted settings are used throughout the ASM system.
Adjusting system variablesSystem variables control how Application Security Manager™ (ASM) works. They apply system-wide.You can review and adjust the values of the system variables if the default values are not appropriate foryour installation.
Important: You generally do not need to change the default values of the system variables. F5 Networksrecommends that you consult with technical support before adjusting them.

1. On the Main tab, click Security > Options > Application Security > Advanced Configuration >System Variables.The System Variables screen opens.
2. Locate the system variable you want to change and view the description.3. In the Parameter Value field, type the new value for the variable.4. Click Save.
If the value you typed is not valid, the system displays a message indicating the valid range or values.
5. On the Main tab, click System > Configuration > Device > General, and click Reboot to restart thesystem using the new value.If using device management to synchronize ASM systems, you must restart ASM on all of thesystems in the device group for the change to take effect on all of them.
Tip: If the parameter name is shown in boldface text, the value has been changed from the default.The default value is displayed below the parameter value.
The system uses the adjusted value for the system variable. On the System Variables screen, you canclick Restore Defaults to change the values back to their original values.
Incorporating external antivirus protectionBefore you can incorporate antivirus protection, you need to have an ICAP server setup in your network.
You can configure the Application Security Manager™ (ASM) to connect with an Internet ContentAdaptation Protocol (ICAP) server to check requests for viruses. (ASM was tested with McAfeeVirusScan, Trend Micro InterScan, Symantec Protection Engine, and Kaspersky Antivirus products, andmay work with others.) You can also set up antivirus checking for HTTP file uploads and SOAP webservice requests.
1. On the Main tab, click Security > Options > Application Security > Integrated Services > Anti-Virus Protection.The Anti-Virus Protection screen opens.
2. For the Server Host Name/IP Address setting, type the fully qualified domain name of the ICAPserver, or its IP address.
Note: If you specify the host name, you must first configure a DNS server by selecting System >Configuration > Device > DNS.
3. For Server Port Number, type the port number of the ICAP server.The default value is 1344.
4. If you want to perform virus checking even if it may slow down the web application, select theGuarantee Enforcement check box.
5. Click Save to save your settings.6. On the Main tab, click Security > Application Security > Policy Building > Learning and
Blocking Settings.The Learning and Blocking Settings screen opens.
7. For each security policy, configure, as needed, the blocking policy for antivirus protection.a) Ensure that the Current edited policy is the one for which you want antivirus protection.b) Expand Policy General Features and for the Virus Detected violation, select either or both of
the Alarm and Block check boxes.To set the violation to Block, the Enforcement Mode must be set to Blocking.
c) Click Save to save the settings.
Configuring General ASM System Options
260

8. For each security policy, configure, as needed, antivirus scanning for file uploads or SOAPattachments.
Note: Performing antivirus checks on file uploads may slow down file transfers.
a) On the Main tab, click Security > Application Security > Integrated Services > Anti-VirusProtection.
b) Ensure that the Current edited policy is the one that may include HTTP file uploads or SOAPrequests.
c) To have the external ICAP server inspect file uploads for viruses before releasing the content tothe web server, select the Inspect file uploads within HTTP requests check box.
d) To perform anti-virus scanning on SOAP attachments, if the security policy includes one or moreXML profiles, in the XML Profiles setting, move the profiles from the Antivirus ProtectionDisabled list to the Antivirus Protection Enabled list. Alternately, click Create to quickly add anew XML profile, with default settings, to the configuration. You can then add the new profile tothe Antivirus Protection Enabled list.
e) Click Save to save the settings.9. To put the security policy changes into effect immediately, click Apply Policy.
If the Virus Detected violation is set to Alarm or Block in the security policy, the system sendsrequests with file uploads to an external ICAP server for inspection. The ICAP server examines therequests for viruses and, if the ICAP server detects a virus, it notifies ASM, which then issues the VirusDetected violation.
If antivirus checking for HTTP file uploads and SOAP web service requests is configured, the systemchecks the file uploads and SOAP requests before releasing content to the web server.
Creating user accounts for application securityUser accounts on the BIG-IP® system are assigned a user role that specifies the authorization level forthat account. While an account with the user role of Administrator can access and configure everythingon the system, you can further specialize administrative accounts for application security.
1. On the Main tab, click System > Users.2. Click Create.
The New User properties screen opens.3. From the Role list, select a user role for security policy editing.
• To limit security policy editing to a specific administrative partition, select Application SecurityEditor.
• To allow security policy editing on all partitions, select Application Security Administrator.4. If you selected Application Security Editor, then from the Partition Access list, select the partition
in which to allow the account to create security policies.You can select a single partition name or All.
5. From the Terminal Access list, select whether to allow console access using tmsh commands.6. Click Finished.
The BIG-IP system now contains a new user account for administering application security.
• Application Security Editors have permission to view and configure most parts of the ApplicationSecurity Manager™ on specified partitions.
• Application Security Administrators have permission to view and configure all parts of theApplication Security Manager, on all partitions. With respect to application security objects, this roleis equivalent to the Administrator role.
BIG-IP Application Security Manager: Implementations
261

Validating regular expressionsThe RegExp Validator is a system tool designed to help you validate your regular expression syntax. Youcan type a regular expression in the RegExp Validator, provide a test string pattern, and let the toolanalyze the data. The tool is included with Application Security Manager™.
1. Click Security > Options > Application Security > RegExp Validator2. From the RegExp Type list, select either PCRE or RE2 (recommended) as the RegExp engine.
Tip: As of BIG-IP® version 11.2, the system’s regular expression library and signatures changed fromPCRE to RE2 to increase performance and lower false positives. The system still supports the PCRElibrary for systems that have user-defined signatures configured in PCRE.
3. Specify how you want the validator to work:
• In the RegExp field, type the regular expression you want to validate.• Or in the RegExp field, type the regular expression to use to verify a test string, and then in the
Test String field, type the string.4. Click the Validate button.
The screen shows the results of the validation.
The validation result indicates whether the regular expression is valid or not. The first RegExp matchdisplays the result of the verification check (if specified) including if there are matches or not.
Configuring General ASM System Options
262

Working with Violations
About violationsApplication Security Manager™ can detect violations that occur in requests. Violations occur when someaspect of a request or response does not comply with the security policy. You can configure the blockingsettings for any violation in a security policy to determine how the system will treat requests withviolations. When a violation occurs in a request, the system can learn, alarm, or block the request(blocking is only available when the enforcement mode is set to blocking).
In the Violations List you can view a list of all of the violations that are supplied on the system, alongwith the violation type and severity. The severity level is adjustable, as needed.
You can also create user-defined or custom violations with unique specifications that you want the systemto detect.
Viewing descriptions of violations
You can view detailed descriptions of each violation to learn what causes that type of violation, and thetype of security risks it could be related to.
1. On the Main tab, click Security > Options > Application Security > Advanced Configuration >Violations List.The Violations List screen opens.
2. Click the violation you are interested in learning about.A popup screen shows the violation description, risks, and examples, if available.
3. To view violations that have occurred for the current edited security policy, on the Main tab, clickSecurity > Application Security > Policy Building > Traffic Learning.The Traffic Learning screen opens and lists learning suggestions many of which are related toviolations that the system found against the security policy.
You can view descriptions for all the violations that can occur and see how the blocking settings areconfigured for the security policy currently being edited.
Changing severity levels of violations
You can change the severity levels of security policy violations for all application security events thatoccur system-wide. If violations occur, the system displays the events and severity level on the SecurityAlerts screen and logs the message in the Syslog. This is an optional task that you need to do only if youwant to change the default severity levels of violations.
1. On the Main tab, click Security > Options > Application Security > Advanced Configuration >Violations List.
2. Review the list of built-in violations and severities.3. To change the severity of a violation, click the violation name.
The Built-In Violation Details popup screen opens where you can view information about theviolation and the current severity level.
4. From the Severity list, select the severity level you want to use for the violation.The available severities are: Emergency, Alert, CriticalError, Warning, Notice, andInformational.
5. Click Update.

The new severity level is shown in the violations list. If the changed violation occurs, the system uses thenew severity level. Changes made to the event severity levels for security policy violations apply globallyto all security policies on the Application Security Manager™.
Types of violationsThis table describes the types of violations that can occur. On the Security > Options > ApplicationSecurity > Advanced Configuration > Violations List, you can get details about the violations (andchange the severity) by clicking the violation. You also can view descriptions of each violation byclicking the violation on the Learning and Blocking Settings screen.
Violation Type Description
RFC violations Occur when the format of an HTTP request violates the HTTP RFCs. RFCdocuments are general specifications that summarize Internet and networkingstandards. RFCs, as they are commonly known, are published by the InternationalEngineering Task Force (IETF). For more information on RFCs, see http://www.ietf.org/rfc.
Access violations Occur when an HTTP request tries to gain access to an area of a web application,and the system detects a reference to one or more entities that are not allowed (orare specifically disallowed) in the security policy.
Length violations Occur when an HTTP request contains an entity that exceeds the length settingthat is defined in the security policy.
Input violations Occur when an HTTP request includes a parameter or header that contains data orinformation that does not match, or comply with, the security policy. Inputviolations most often occur when the security policy contains defined user-inputparameters.
Cookie violations Occur when the cookie values in the HTTP request do not comply with thesecurity policy. Cookie violations may indicate malicious attempts to hijackprivate information.
Negative securityviolations
Occur when an incoming request contains a string pattern that matches an attacksignature in one of the security policy’s attack signature sets, or when a responsecontains exposed user data, for example, a credit card number.
Other violations Refers to user-defined violations. If your system includes user-defined violations,they occur when instructed by the iRules® that were developed to activate them.
About violation ratingYou or the security manager can examine requests that cause violations to determine whether the requestsare real attacks or false positives. To simplify the task of identifying false positives, each transaction withone or more violations has a violation rating associated with it. The violation rating ranks the transactionfrom 1 to 5, where 5 indicates the highest probability of a real attack with high severity. This tableexplains how to interpret the violation ratings.
Rating Description
5 Request is most likely a threat so consider clearing any learning suggestions associated withit.
4 Request looks like a threat but requires examination before clearing the suggestion.
3 Request needs further examination.
2 Request looks like a false positive but requires examination.
Working with Violations
264

Rating Description
1 Request is most likely a false positive. If it is, then consider accepting learning suggestions toadd this to the security policy.
The violation rating is included with information on screens in Application Security Manager™, such as:
• Requests lists• Manual learning suggestions• Application Security reports and charts
The system assigns the violation rating by assessing the combination of violations occurring in atransaction. The violation rating is assigned to the transaction as a whole rather than the individualviolations in the request. This is because real attacks often include multiple violations within onetransaction. The violation rating takes into consideration the impact of the violations on the business.
Requests with high violation ratings are likely to be real attacks, and you can review them to analyzethreats to your web applications. You can filter the requests in the Requests list to focus on the high-ratedillegal requests with ratings of 4 or 5.
You can review requests with low violation ratings and if they are false positives you can accept therequest to adopt the learning suggestions for the security policy.
Investigating potential attacksYou can investigate potential attacks by reviewing violation ratings of illegal requests. Requests with ahigh violation rating are more likely to be attacks that you may want to investigate.
1. On the Main tab, click Security > Event Logs > Application > Requests.The Requests screen opens, where, by default, you view an event log displaying illegal requests forall security policies.
2. From the Requests List filter, adjust the Violation Rating slider to 4-5, and click Apply Filter.The Requests List displays illegal requests with a violation rating of 4 or 5.
3. In the Requests List, click a request to view information about the request and any violationsassociated with it.The screen refreshes, showing the Request Details area, where you see any violations associated withthe request and other details, such as the security policy it relates to, the support ID, the violationrating, and potential attacks that it could cause.
4. Use the Violation area elements to view details about a violation associated with an illegal request:
• To view details about this specific violation such as the file type, the expected and actual length ofthe query, or similar relevant information, click the violation name.
• To display a general description of that type of violation, click the info icon to the left of theviolation name.
By reviewing the high-rated illegal requests, you can determine whether your application is beingattacked and get an idea of where the attacks are coming from and what the attackers are doing. As aresult, you may decide to modify the security policy or take other steps that do not involve ApplicationSecurity Manager™ such as modifying firewall settings or changing the application.
Overview: Creating user-defined violationsYou can create user-defined violations so that Application Security Manager™ (ASM) can detect newthreats or protect against application-specific vulnerabilities. After creating the violation, you can thenconfigure the system to alert or block requests that cause it. You need to write iRules®to detect the
BIG-IP Application Security Manager: Implementations
265

customized attack conditions and issue the violation. In the security policy properties, you then need toactivate iRule events.
The iRules are written using application security events and commands. For detailed information oniRules, see the F5 Networks DevCentral web site, http://devcentral.f5.com.
Creating user-defined violations
You can create up to 28 user-defined violations for situations not covered by the built-in violations. User-defined violations are helpful for mitigating zero-day attacks, and to protect your web application againstspecific vulnerabilities not yet protected by Application Security Manager™ (ASM). You can writeiRules® to detect new attack conditions and issue the violation.
1. On the Main tab, click Security > Options > Application Security > Advanced Configuration >Violations List.
2. Click User-Defined Violations.3. Click Create.
The Create New User-Defined Violation popup screen opens.4. In the Violation Name field, type a name for the violation using alphanumeric characters and
underscores only.The recommended format is an uppercase alphanumeric string starting with VIOLATION, havingwords separated by underscores; for example, VIOLATION_SLOW_POST.The name is used as reference in the ASM::custom_violation and ASM::violation name iRulecommands, and in APIs, iControl®, and TMAPI.
5. In the Violation Title field, type descriptive text for the violation. It is typically similar to the namebut in a more friendly format.This text appears wherever the violation is referred to, including configuration of blocking settings,the proxy log, and reports.
6. From the Type list, select the category of the violation, or leave it set to Unspecified.7. From the Severity list, select the severity level of the violation.
The available severities are: Informational, Notice, Warning, Error, Critical, Alert, andEmergency.
8. From the Attack Type list, select one of the existing attack types.If none of the specific attack types is appropriate, select Other Application Attacks or OtherApplication Activity.The attack type is shown when you click the Info icon next to the violation name on the Learning andBlocking Settings screen.
9. In the Description field, type a description of the violation.The description is shown when you click the Info icon next to the violation name on the Learning andBlocking Settings screen.
10. Click Create.
The custom violation is added to the list of user-defined violations. You can edit all attributes of a user-defined violation except the name.
You should now set up the blocking settings (Alarm and Block only) for the user-defined violationenabling the violation for specific security policies. You also need to write iRules that issue the customviolations based on the conditions available using the ASM::raise violation_name[violation_details] command. ASM™ blocks requests according to the violation’s blocking settingsand operation mode, and logs details in the Requests log. For detailed information on iRules, see the F5Networks DevCentral web site, http://devcentral.f5.com.
Working with Violations
266

Enabling user-defined violations
Application security iRule events must be activated in the security policy to enable user-definedviolations.
You enable user-defined violations by configuring the Alarm and Block flags, or blocking actions, foruser-defined violations. The blocking actions (along with the enforcement mode) determine how thesystem processes requests that trigger the violation.
1. On the Main tab, click Security > Application Security > Policy Building > Learning andBlocking Settings.The Learning and Blocking Settings screen opens.
2. In the Current edited security policy list near the top of the screen, verify that the security policyshown is the one you want to work on.
3. Adjust the Enforcement Mode setting if needed.
• To block traffic that causes violations, select Blocking.• To allow traffic even if it causes violations (allowing you to make sure that legitimate traffic
would not be blocked), select Transparent.
You can only configure the Block flag on violations if the enforcement mode is set to Blocking.4. For each user-defined violation (listed in Other Violations), set the Alarm and Block settings.
Option Description
Alarm If selected, the system records requests that trigger the violation in the Charts screen, thesystem log (/var/log/asm), and possibly in local or remote logs (depending on thesettings of the logging profile).
Block If selected (and the enforcement mode is set to Blocking), the system blocks requests thattrigger the violation.
5. Click Save to save your settings.6. To put the security policy changes into effect immediately, click Apply Policy.
Once you have an iRule that determines when to issue the user-defined violation (and the enforcementmode is set to blocking), the specified alarm or block action occurs when the system detects the violation.
Sample iRules for user-defined violations
You can write iRules® to activate user-defined violations that you created and enabled in a securitypolicy.
Note: The examples in this topic may not work depending on your configuration. Some examples includemultiple ways of setting them up, or may require additional code. For more information about iRules,refer to devcentral.f5.com.
The following application security iRule issues a user-defined violation calledVIOLATION_NOT_BROWSER if the request was not sent using Internet Explorer, Mozilla Firefox, Safari,Chrome, or Opera.
when ASM_REQUEST_DONE { if { {not [HTTP::header "User Agent"]match_regexp "(IE|Mozilla|Safari|Chrome|Opera)" } and {[llength [IP::reputation [ASM::client_ip]]] > 0} } { ASM::raise VIOLATION_NOT_BROWSER } }
BIG-IP Application Security Manager: Implementations
267

The following application security iRule issues a user-defined violation when there are too many ASM™
violations.
when ASM_REQUEST_DONE { if {[ASM::violation count] > 3 and [ASM::severity] eq "Error"} { ASM::raise VIOLATION_TOO_MANY_VIOLATIONS } }
This iRule uses an ASM event to log in /var/log/ltm all available information about the request thatwas enforced by ASM.
when ASM_REQUEST_DONE { #Get and log info as it was done before v11.5. log local0. "==============Previous style: Start===========" set x [ASM::violation_data] for {set i 0} {$i<7} {incr i} { log local0. [lindex $x $i] } log local0. "==============Previous style: Done===========" #Using the new command (V11.5 or later) log all available information about #the enforced request. log local0. "==============New style Start===========" #display ASM policy which enforced request log local0. "ASM Policy: [ASM::policy];" #log some part of request using iRule commands Method, URI, log local0. "Request string: [HTTP::method] [HTTP::uri];" #log payload from request using ASM::payload command and HTTP::payload or #log Query string. log local0. "Payload ASM payload [ASM::payload];" log local0. "Payload HTTP payload [HTTP::payload];" log local0. "Query String [HTTP::query];" # log information about request processed by ASM policy #support ID log local0. "SupportID: [ASM::support_id];" #request status for current moment log local0. "Request Status: [ASM::status];" #Severity of attack detected in request log local0. "Severity: [ASM::severity];" #client IP log local0. "ClientIP: [ASM::client_ip];" # number of violations ASM detected in the request log local0. "Number Violations: [ASM::violation count]" # log all ASM violation iControl names detected in the request log local0. "Violations Names: [ASM::violation names];" # log all Attack types detected in request log local0. "Attack Types: [ASM::violation attack_types];" # log all violation details detected in the request. set details [ASM::violation details] if { [llength $details]>0 } { set i 0 foreach pair $details { if { [lindex $pair 0] contains "viol_name"} { #Log violation Name log local0. "Violation Number: $i; $pair" incr i } else { #log other details for violation set key [lindex $pair 0] set value [lindex $pair 1] log local0. "----------$pair----------" if {$key contains "parameter_data.name" || $key contains "parameter_data.value"} {
Working with Violations
268

#decode parameter name from base64. if {[catch {b64decode $value} decoded_value] == 0}{ log local0. "$key ---- $decoded_value" } else { log local0. "$key ---- $value" } } else { #log other details log local0. "$key ---- $value" } } } } #Log all violation details as one string. Could be cut. log local0. "Violation details: [ASM::violation details];" log local0. "==============New style Done===========" }
When raising user-defined violations within an ASM iRule, you can specify additional violation details toinclude in the log as shown in the following example. You need to create the violations in ASM.
#Raise with lappend
when ASM_REQUEST_DONE { # log support id for enforced request log local0. "SupportID: [ASM::support_id];" #log request status log local0. "Request Status: [ASM::status];" #log severity of request log local0. "Severity: [ASM::severity];" #log Client IP log local0. "ClientIP: [ASM::client_ip];" #log number of different violations detected in request log local0. "Number Violations: [ASM::violation count]" #log iControl violation names log local0. "Violations Names: [ASM::violation names];"
# Raise 3 user-defined violations without any details ASM::raise violation1 ASM::raise violation2 ASM::raise violation3 # Raise a user-defined violation with custom details set x [] set y1 [] set y2 [] lappend y1 "key1" "value_field1" lappend y2 "key2" "value_field2" lappend x $y1 lappend x $y2 log local0. "Raise Violation4 [ASM::raise violation4 $x]" #Log the number and names of detected violations. #ASM logs detected and raised violations. #Log the number of different violations detected in the request log local0. "Number of Violations: [ASM::violation count]" #log iControl violation names log local0. "Violations Names: [ASM::violation names];"
The following iRule shows how to use request blocking with a blocking response page.
#RequestBlockingWithBRP
#Use new ASM iRule commands in old ASM iRule event.
when ASM_REQUEST_BLOCKING {
BIG-IP Application Security Manager: Implementations
269

log local0. "==============OLD style start===========" set x [ASM::violation_data] for {set i 0} {$i<7} {incr i} { log local0. [lindex $x $i] } log local0. "==============OLD style Done==========="
log local0. "==============New style Start===========" log local0. "SupportID: [ASM::support_id];" log local0. "Request Status: [ASM::status];" log local0. "Severity: [ASM::severity];" log local0. "ClientIP: [ASM::client_ip];" log local0. "Number Violations: [ASM::violation count]" log local0. "Violations Names: [ASM::violation names];" log local0. "Attack Types: [ASM::violation attack_types];" log local0. "Violation details: [ASM::violation details];"
#check if illegal parameter violation was detected #then change Blocking response page. if {([ASM::violation names] contains "VIOLATION_PARAM")} { log local0. "VIOLATION_PARAM detected, let's customize reject page" HTTP::header remove Content-Length HTTP::header insert header_1 value_1 set response "<html><head></body><html>" ASM::payload replace 0 [ASM::payload length] "" ASM::payload replace 0 0 $response } }
The following example iRule shows how to use all ASM iRule events and commands.
#alliRulesforUDV
#Example with all ASM iRule events and commands when HTTP_REQUEST { # get LTM policy matched rule and chosen ASM security policy set policy [POLICY::names matched] log local0. "Matched policy [POLICY::names matched]" log local0. "Matched rule in policy [POLICY::rules matched]" log local0. "ASM policy [ASM::policy] enforcing"} #New ASM iRule event introduced in 11.5 when ASM_REQUEST_DONE { log local0. "=========Old iRule Data======" log local0. "Compatibility Mode is triggered" set x [ASM::violation_data] for {set i 0} {$i<7} {incr i} { log local0. [lindex $x $i] } log local0. "=========Old iRule Data Done======"
log local0. "=========New iRule Data======" log local0. "SupportID: [ASM::support_id];" log local0. "Request Status: [ASM::status];" log local0. "Severity: [ASM::severity];" log local0. "ClientIP: [ASM::client_ip];" log local0. "Number Violations: [ASM::violation count]" log local0. "Violations Names: [ASM::violation names];" log local0. "Attack Types: [ASM::violation attack_types];" log local0. "Violation details: [ASM::violation details];" log local0. "=========New iRule Data Done======"} # Old ASM iRule events which were before 11.5.0
Working with Violations
270

when ASM_REQUEST_VIOLATION { log local0. "=========Old iRule Data======" log local0. "Compatibility Mode is triggered" set x [ASM::violation_data] for {set i 0} {$i<7} {incr i} { log local0. [lindex $x $i] } log local0. "=========Old iRule Data Done======" log local0. "=========New iRule Data======" log local0. "SupportID: [ASM::support_id];" log local0. "Request Status: [ASM::status];" log local0. "Severity: [ASM::severity];" log local0. "ClientIP: [ASM::client_ip];" log local0. "Number Violations: [ASM::violation count]" log local0. "Violations Names: [ASM::violation names];" log local0. "Attack Types: [ASM::violation attack_types];" log local0. "Violation details: [ASM::violation details];" log local0. "=========New iRule Data Done======"}
when ASM_RESPONSE_VIOLATION { log local0. "=========Old iRule Data======" log local0. "Compatibility Mode is triggered" set x [ASM::violation_data] for {set i 0} {$i<7} {incr i} { log local0. [lindex $x $i] } log local0. "=========Old iRule Data Done======" log local0. "=========New iRule Data======" log local0. "SupportID: [ASM::support_id];" log local0. "Request Status: [ASM::status];" log local0. "Severity: [ASM::severity];" log local0. "ClientIP: [ASM::client_ip];" log local0. "Number Violations: [ASM::violation count]" log local0. "Violations Names: [ASM::violation names];" log local0. "Attack Types: [ASM::violation attack_types];" log local0. "Violation details: [ASM::violation details];" log local0. "=========New iRule Data Done======"}
when ASM_REQUEST_BLOCKING { log local0. "=========Old iRule Data======" log local0. "Compatibility Mode is triggered" set x [ASM::violation_data] for {set i 0} {$i<7} {incr i} { log local0. [lindex $x $i] } log local0. "=========Old iRule Data Done======" log local0. "=========New iRule Data======" log local0. "SupportID: [ASM::support_id];" log local0. "Request Status: [ASM::status];" log local0. "Severity: [ASM::severity];" log local0. "ClientIP: [ASM::client_ip];" log local0. "Number Violations: [ASM::violation count]" log local0. "Violations Names: [ASM::violation names];" log local0. "Attack Types: [ASM::violation attack_types];" log local0. "Violation details: [ASM::violation details];" log local0. "=========New iRule Data Done======"}
Deleting user-defined violations
You can delete user-defined violations if you no longer need them.
1. On the Main tab, click Security > Options > Application Security > Advanced Configuration >Violations List.
BIG-IP Application Security Manager: Implementations
271

2. Click User-Defined Violations.3. Select the user-defined violation that you want to delete.4. Click Delete.
The deleted violation is moved to the list of Historical Violations.
The deleted user-defined violation and details about it remain on the system in the Historical Violationslist. From there, you can restore previously removed user-defined violations if you need to.
Exporting and importing user-defined violations
You can export user-defined violations to back them up, or for importing onto another ApplicationSecurity Manager™ system.
1. On the Main tab, click Security > Options > Application Security > Advanced Configuration >Violations List.
2. Click User-Defined Violations.3. Select the user-defined violations to export.4. Click Export.
The violations are saved in an XML file with the name, date, and time stamp:user_defined_violations_yyyy-mm-dd_hh-mm.xml.
5. To import the user-defined violations onto another system, navigate to the User-Defined ViolationsList on the other system, click Import, and specify the exported file.
Working with Violations
272

Maintaining Security Policies
Overview: Importing and exporting security policiesYou can export or import security policies from one Application Security Manager™ (ASM) system toanother.
You can export a security policy as a binary archive file or as a readable XML file. For example, youmight want to export a security policy protecting one web application to use it as a baseline policy foranother similar web application. You might want to export a security policy to archive it on a remotesystem before upgrading the system software, to create a backup copy, to replace an existing policy, or tomerge with another security policy.
You can import a security policy that was previously exported from another ASM™ system. When youimport a security policy, you can import it as an inactive security policy or so that it replaces an existingsecurity policy. If you replace an existing policy, the replaced policy is automatically archived with theinactive security policies.
About security policy export formats
Application Security Manager™ can export security policies in binary or XML format. The XML orarchive file includes the partition name, the name of the security policy, and the date and time it wasexported. For example, a policy called finance in the Common partition is exported to a file calledCommon_finance__2014-04-28_12-10-00__source.device with either a .plc (binary) or .xmlextension. The time used in the file name is the policy version timestamp (which includes the sourcehostname where the policy was last modified, the time modified, and the policy name).
An exported security policy includes any user-defined attack signature sets that are in use by the policy,but not the actual signatures. Therefore, it is a good idea to make sure that the attack signatures and user-defined signatures are the same on the two systems.
If you save the policy as an XML file, you can open it to view the configured settings of the securitypolicy in a human readable format.
In addition when exporting to XML, you can save the security policy in a compact format, which resultsin a smaller XML file. The compact XML format does not include information about the staging state ofattack signatures. Also, information about the following items is only included if it was changed from thedefault values:
• Meta-character sets• Learn, Alarm, and Block settings for violations• Response pages• IP address intelligence Alarm and Block settings
Exporting security policies
You can export a security policy and save it in a file. The exported security policy can be used as backup,or you can import it onto another system.
1. On the Main tab, click Security > Application Security > Security Policies.The Policies List screen opens.
2. From the Policies list, select the security policy that you want to export, then click Export.The Export policy popup screen opens.

3. For Export policy format, select an export method.
• To save the security policy as an XML file, select XML format.• To save the security policy as a policy archive file (.plc file), select Binary format.
4. For Compact format , if you want to reduce the size of the XML file, click Enabled.5. Click Export Policy.
The system exports the security policy in the format you specified.
The exported security policy includes all of the policy details, including entities that use default values,unless you selected the compact format option. If using the compact format, values unchanged from thedefault values are not exported.
The exported security policy includes any user-defined signature sets that are in the policy, but not theuser-defined signatures themselves. Optionally, you can export user-defined signatures from the AttackSignature List (to see the list, go to Security > Options > Application Security > Attack Signatures >Attack Signatures List).
Importing security policies
Before you import a security policy from another system, make sure that the attack signatures and user-defined signatures are the same on both systems. You also need access to the exported policy file.
You can import a security policy that was previously exported from another Application SecurityManager™system.
1. On the Main tab, click Security > Application Security > Security Policies.The Policies List screen opens.
2. Click Import Policy.The Import Security Policy screen opens.
3. For Imported Policy File, click Select File to navigate to a previously exported security policy.The exported security policy can be in XML (regular or compact) or binary (.plc) format.The system shows the name of the policy you plan to import and the policy encoding.
4. For the Import Target setting, select how to import the security policy.
• To place the uploaded policy into the list of inactive policies for later use, select Inactive SecurityPolicies List.
• To replace the currently active policy with the security policy you are importing, select ReplacedPolicy and select the policy to replace from the list.
5. For Import Target, select how to import the policy:
• To treat the imported policy as a new security policy, select New Policy.• To replace an existing policy with the imported policy, select Replace Policy.
The system imports the security policy and displays a success status message when the operation iscomplete.
If you replaced an existing policy, the imported security policy completely overwrites the existingsecurity policy. Also, the imported policy is then associated with the virtual server and local traffic policythat was previously associated with the policy you replaced. The replaced policy is automaticallyarchived with the inactive security policies.
Overview: Comparing security policiesApplication Security Manager™ has a Policy Diff feature that lets you compare two security policies,view the differences between them, and copy the settings from one policy to the other. You can use thecomparison for auditing purposes, to make two policies act similarly, or to simply view the differences
Maintaining Security Policies
274

between two security policies. The Policy Diff feature is particularly useful for comparing a securitypolicy in staging and a production version. You can compare active security policies (with or withoutPolicy Builder running), inactive security policies, and exported security policies. When you importsecurity policies that were exported from another system, they are placed in the inactive policies list.
You need to have a user role on the BIG-IP® system of Administrator or Web Application Security Editorto use Policy Diff to compare security policies.
Comparing security policies
Before you can compare security policies, the two policies must be on the same BIG-IP system, oraccessible from the system you are using (such as imported policies). They must also have the samelanguage encoding, the same protocol independence (Differentiate between HTTP and HTTPS URLs)configuration, and the same case sensitivity configuration. You can compare policies even if they arerunning Policy Builder, but because they are constantly changing, the comparison is done on copies ofthe policies to avoid corrupting them.
Note: Only users with a role of Administrator, Application Security Administrator, or ApplicationSecurity Editor can use Policy Diff to compare security policies.
You can compare two security policies to review the differences between them. While the two securitypolicies are being compared, the system prevents other users from saving changes to them.
1. On the Main tab, click Security > Application Security > Security Policies > Policy Diff.2. From the First Policy and Second Policy lists, select the security policies you want to compare or
merge, or browse to search your computer for an exported security policy.The two security policies you are comparing can be active, inactive, policies imported in binary orXML format, or a combination of both.
3. If you plan to merge security policy attributes, it is a good idea to safeguard the original securitypolicy. In the Working Mode field, select how you want to work.Option Description
Work onOriginal
Incorporate changes to one (or both) of the original security policies dependingon the merge options you select without making a copy of it.
Make a Copy Make a copy of the security policy into which you are incorporating changes.
Work on Copy Work on a copy of the original security policy. First, a copy is made, thenincorporate possible changes on the original policies. If comparing one or morepolicies with Policy Builder enabled, this option is automatically selected (andthe other options become unavailable).
4. Click the Calculate Differences button to compare the two security policies.
Note: The system does not compare navigation parameters. They are ignored and do not appear inthe results.
The Policy Differences Summary lists the number of differences for each entity type.5. Click any row in the Policy Differences Summary to view the differing entities with details about the
conflicting attributes.The system displays a list of the differing entities and shows details about each entity's conflictingattributes.
6. Review the differences between the two policies and determine whether or not you want to mergeattributes from one policy to the other.
BIG-IP Application Security Manager: Implementations
275

Maintaining Security Policies
276

Configuring ASM with Local Traffic Policies
Overview: Configuring ASM with local traffic policiesApplication Security Manager™ applies security policy rules to traffic that is controlled and defined usinga local traffic policy. To provide more flexibility in selecting the traffic, you can edit the local trafficpolicy and add rules to it.
This implementation shows how to create a security policy and edit at the local traffic policy that iscreated. The example provided describes how to add rules to the local traffic policy so that the securitypolicy applies only to administrative traffic beginning with /admin. No security policy applies to theother traffic.
Many other options are available for configuring local traffic policies with ASM. By following throughthe steps in this example, you can see the other options that are available on the screens, and can adjustthe example for your needs.
Task SummaryCreating a simple security policyCreating local traffic policy rules for ASM
About application security and local traffic policies
When you use Application Security Manager™ (ASM) to create a security policy attached to a virtualserver, the BIG-IP® system automatically creates a local traffic policy. The local traffic policy forms alogical link between the local traffic components and the application security policy.
By default, the system automatically creates a simple local traffic policy directs all HTTP traffic comingto the virtual server to the ASM™ security policy that you created. ASM examines the traffic to ensurethat it meets the requirements of the security policy. If that is all you need to do, your task is done. If,however, you want more flexibility, such as applying different security policies depending on the type oftraffic or disabling ASM for certain types of traffic, you can use the local traffic policy to do that.
Local traffic policies can include multiple rules. Each rule consists of a condition and one or more actionsto be performed if the condition holds. So you can create a local traffic policy that works with ASM andincludes multiple rules that do different things depending on the conditions you set up. In this type oftraffic policy, the rules perform these actions:
• Enable ASM enforcing a specific security policy• Disable ASM
For example, you may want a local traffic policy directed to a specific URL to enforce a security policy.As a default rule, all other traffic could disable ASM. You can also direct people using different aspectsof an application (or different applications) to various security policies. Many other options are availablefor directing ASM traffic using local traffic policies.
About application security and manually adding local traffic policies
If you create a security policy not attached to a virtual server, the system creates the security policy butdoes not create a local traffic policy. However, you will need to have a virtual server and local trafficpolicy to select the traffic for the security policy to enforce.
In that case, you can develop the security policy, adding the features that you want to use. Without avirtual server, the system cannot build the security policy automatically until you have traffic goingthrough. But you can manually develop the security policy by adding entities such as file types, URLs,assigning server technologies, and so on.
When you are ready to enforce the security policy and start sending traffic through the system, create avirtual server with an http profile, and enable the security policy you created in the virtual serverresources. When you save the virtual server, the system automatically creates a default local traffic policythat enforces the security policy on all traffic. You can edit the local traffic policy rules if you want moreflexibility concerning how the security policies are implemented.
Creating a simple security policy
Before you can create a security policy, you must perform the minimal system configuration tasksrequired according to the needs of your networking environment.
You can use Application Security Manager™ to create a robust, yet simple, security policy that is tailoredto protect your web application. This is the easiest way to create a security policy.
1. On the Main tab, click Security > Application Security > Security Policies > Policies List.The Policies List screen opens.
2. Click Create New Policy.You only see this button when no policy is selected.
3. In the Policy Name field, type a name for the policy.4. Leave Policy Type, set to Security.5. For Policy Template, select Fundamental.6. For Virtual Server, click Configure new virtual server to specify where to direct application
requests.a) For What type of protocol does your application use?, select HTTP, HTTPS, or both.b) In the Virtual Server Name field, type a unique name.c) In the HTTP Virtual Server Destination field, type the address in IPv4 (10.0.0.1) or IPv6
(2001:ed8:77b5:2:10:10:100:42/64) format, and specify the service port.
Tip: If you want multiple IP addresses to be directed here, use the Network setting.
d) In the HTTP Pool Member setting, specify the addresses of the back-end application servers.e) From the Logging Profile list, select a profile such as Log illegal requests to determine which
events are logged on the system.7. In the upper right corner, click Advanced.
You can use default values for the Advanced settings but it's a good idea to take a look at them.
• If you selected Fundamental or Comprehensive for the Policy Template, Learning Mode is setto Automatic and Enforcement Mode is set to Blocking.
Tip: If you need to change these values, set application language to a value other than Autodetect.
• If you know the Application Language, select it or use Unicode (utf-8).• To add specific protections (enforcing additional attack signatures) to the policy, for Server
Technologies, select the technologies that apply to the back-end application servers.• You can configure trusted IP addresses that you want the security policy to consider safe.
8. Click Create Policy to create the security policy.
ASM™ creates a security policy that immediately starts protecting your application. The enforcementmode of the security policy is set to Blocking. Traffic that is considered to be an attack such as traffic thatis not compliant with HTTP protocol, has malformed payloads, uses evasion techniques, performs web
Configuring ASM with Local Traffic Policies
278
scraping, contains sensitive information or illegal values is blocked. Other potential violations arereported but not blocked.
The system examines the traffic to the web application making suggestions for more specifically buildingthe security policy. The Policy Builder selectively learns new entities like file types, parameters, andcookies used in requests to the application. When ASM processes sufficient traffic, it automatically addsthe entities to the security policy, and enforces them.
The system applies a basic set of attack signatures to the security policy and puts them in staging (bydefault, for 7 days). If you specified server technologies, additional attack signatures are included. ASMreports common attacks discovered by comparison to the signatures but does not block these attacks untilthe staging period is over and they are enforced. That gives you a chance to be sure that these are actualattacks and not legitimate requests.
Tip: This is a good point at which send some traffic to test that you can access the application beingprotected by the security policy and check that traffic is being processed correctly by the BIG-IP® system.Send the traffic to the virtual server destination address.
Creating local traffic policy rules for ASM
Before you can use the local traffic policy with ASM™, you need a security policy associated with avirtual server.
You can add rules to define conditions and perform specific actions for different types of applicationtraffic in a local traffic policy. This example creates two rules to implement different security protectionfor different traffic.
1. On the Main tab, click Local Traffic > Policies.2. Click the name of the local traffic policy associated with the security policy.3. To edit the policy, click Create Draft.4. In the Draft Policies list, click the name of the draft policy.5. In the Rules area, click Create to create a rule that defines when traffic is handled by the security
policy.6. In the Name field, type the name admin.7. In the Match all of the following conditions area, click + and specify these conditions:
a) For the first condition, select HTTP URI.b) For the second condition, select path.c) For the third condition, select begins with.d) For the fourth condition, by the field below any of, type /admin and click Add.
This rule looks for requests with a URI that begins with /admin.8. In Do the following when the traffic is matched, click + and specify the actions:
a) For the first action, select Enable.For the second action, select asm.
b) Next to for policy, select the security policy you created.9. Click Save to add the rule to the local traffic policy.
The admin rule is added to the list.10. In the Rules area, click the rule called default.
The default rule was added to the local traffic policy when the system created it.The screen displays the General Properties of the rule.
11. To change the default action for all other traffic, in the Do the following when the traffic is matchedarea, edit the action that is shown there.
BIG-IP Application Security Manager: Implementations
279

a) For the first action, select Disable.b) For the second action, select asm.c) To save the rule, click Save.
The default rule now disables ASM protection for other traffic.12. To save the updated policy, click Save Draft.
The Policy List Page opens.13. Select the check box next to the draft policy you edited, and click Publish.
You have edited and published the local traffic policy so that administrative traffic must meet the securitypolicy you assigned to it. But other traffic is not subject to that security policy.
Implementation resultsWhen you have completed the steps in this implementation, you have configured the ApplicationSecurity Manager™ (ASM) to enforce security policy rules only on traffic with a URI beginning with /admin. All other traffic bypasses ASM™.
This is simply one way to illustrate how you can use a local traffic policy to determine differentconditions and specify multiple actions instead of having all traffic treated the same way. We encourageyou to explore the local traffic policy options and documentation to learn how to use this flexible featureto best suit your needs.
Configuring ASM with Local Traffic Policies
280

Automatically Synchronizing Application SecurityConfigurations
Overview: Automatically synchronizing ASM systemsThis implementation describes how to set up multiple BIG-IP® systems running Application SecurityManager™ (ASM) so that they automatically synchronize their security policies and ASM™
configurations. In addition, the ASM devices can fail over to one another if any of the devices goesoffline. For synchronizing local traffic configuration data, you can manually synchronize that data asneeded.
Figure 13: Automatically synchronizing ASM configuration data
In this case, multiple BIG-IP systems are all processing similar traffic for one or more web applicationsbehind a router (or load balancer). All systems are running BIG-IP ASM™ and are in the local trustdomain. You organize the systems into two device groups: one Sync-Failover device group for allsystems (not ASM-enabled) and one Sync-Only device group with ASM-enabled for all of the systems.The ASM configurations and web applications are automatically duplicated on all of the systems. Youcan manually synchronize the BIG-IP configuration of the systems in the Sync-Failover device group.
Task summaryPerforming basic network configuration for synchronizationSpecifying an IP address for config syncEstablishing device trustCreating a Sync-Failover device groupSyncing the BIG-IP configuration to the device groupSpecifying IP addresses for failover communicationCreating a Sync-Only device groupEnabling ASM synchronization on a device groupSynchronizing an ASM-enabled device group
About device management and synchronizing application security configurations
You can use device management to set up several BIG-IP® systems running Application SecurityManager™ (ASM) so that the systems synchronize their security policies and configurations, and fail overto one another if a system goes offline for any reason. By using application security synchronization, youcan set up application security and create security policies on one system, and can propagate them to

other systems in an application security device group. In BIG-IP ASM™, a device group is two or moreBIG-IP devices using the same configuration and providing consistent security policy enforcement.
You can set up application security synchronization, for example, behind an Application DeliveryController where multiple BIG-IP systems running Application Security Manager are deployed asmembers of a pool. The options and security policies on all of the systems stay in sync regardless ofwhere you update them.
When you set up ASM™ synchronization, in addition to security policies, other settings such as customattack signatures, logging profiles, SMTP configuration, anti-virus protection, system variables, andpolicy templates, are synchronized with all devices in the ASM-enabled device group.
Considerations for application security synchronization
When using device management with Application Security Manager™ (ASM™), you need to be aware ofthe following considerations that apply specifically to application security synchronization.
• A BIG-IP® system with Application Security Manager can be a member of only one ASM-enableddevice group.
• All BIG-IP systems in a device group must be running the same version (including hot fix updates) ofApplication Security Manager (version 11.0 or later).
• The BIG-IP systems in the ASM-enabled device group synchronize application security configurationdata and security policies, providing consistent enforcement on all the devices.
• Real Traffic Policy Builder® can run on only one system per security policy. For example, you can setup automatic security policy building on one system that is a member of an ASM-enabled devicegroup, the policy is built on that system and then automatically updated on all of the systems in thedevice group.
• If using a VIPRION® platform (with multiple blades), it is considered one device, and you need toadd only the master blade to the device trust and group.
Performing basic network configuration for synchronization
You need to perform basic networking configuration for each of the BIG-IP® systems whose ApplicationSecurity Manager™ (ASM) configurations you want to synchronize.
1. Install the same BIG-IP system version (including any hot fixes) on each device.2. Provision LTM® and ASM™ on each device (System > Resource Provisioning).3. On each device, create one or more VLANs, depending on your networking configuration
(Network > VLANs).4. On each device, create a self IP (Network > Self IPs).
When creating the self IP, set Traffic Group to traffic-group-local-only (non-floating).5. On each device, create a default gateway, if needed (Network > Routes).6. On each device, configure DNS (System > Configuration > Device > DNS) and NTP (System >
Configuration > Device > NTP) so they are set to the same time.7. Verify connectivity between the devices (self IP address to self IP address). For example, use this
command to ensure communications: ping -I vlan_interface device_self_IP8. If your company requires special device certificates, install them on each device (System > Device
Certificates and click Import).
The basic networking setup is complete for the BIG-IP ASM systems for which you want to sharesecurity policies and configurations.
Next, on each device, specify the IP address to use when synchronizing configuration objects to the localdevice:
Automatically Synchronizing Application Security Configurations
282

Specifying an IP address for config sync
Before configuring the config sync address, verify that all devices in the device group are running thesame version of BIG-IP® system software.
You perform this task to specify the IP address on the local device that other devices in the device groupwill use to synchronize their configuration objects to the local device.
Note: You must perform this task locally on each device in the device group.
1. Confirm that you are logged in to the device you want to configure.2. On the Main tab, click Device Management > Devices.
This displays a list of device objects discovered by the local device.3. In the Name column, click the name of the device to which you are currently logged in.4. Near the top of the screen, click ConfigSync.5. From the Local Address list, retain the displayed IP address or select another address from the list.
F5 Networks recommends that you use the default value, which is the self IP address for the internalVLAN. This address must be a non-floating (static) self IP address and not a management IP address.
Important: If the BIG-IP device you are configuring is accessed using Amazon Web Services, then theinternal self IP address that you select must be an internal private IP address that you configured forthis EC2 instance as the Local Address.
6. Click Update.
After performing this task, the other devices in the device group can synchronize their configurations tothe local device whenever a sync operation is initiated.
Establishing device trust
Before you begin this task, verify that:
• Each BIG-IP® device that is to be part of the local trust domain has a device certificate installed on it.• The local device is designated as a certificate signing authority.
You perform this task to establish trust among devices on one or more network segments. Devices thattrust each other constitute the local trust domain. A device must be a member of the local trust domainprior to joining a device group.
By default, the BIG-IP software includes a local trust domain with one member, which is the localdevice. You can choose any one of the BIG-IP devices slated for a device group and log into that deviceto add other devices to the local trust domain. For example, devices Bigip_1, Bigip_2, and Bigip_3each initially shows only itself as a member of the local trust domain. To configure the local trust domainto include all three devices, you can simply log into device Bigip_1 and add devices Bigip_2 andBigip_3 to the local trust domain; there is no need to repeat this process on devices Bigip_2 andBigip_3.
1. On the Main tab, click Device Management > Device Trust > Device Trust Members.2. Click Add.3. From the Device Type list, select Peer or Subordinate.4. Type a device IP address, administrator user name, and administrator password for the remote BIG-
IP® device with which you want to establish trust. The IP address you specify depends on the type ofBIG-IP device:
• If the BIG-IP device is an appliance, type the management IP address for the device.
BIG-IP Application Security Manager: Implementations
283

• If the BIG-IP device is a VIPRION® device that is not licensed and provisioned for vCMP®, typethe primary cluster management IP address for the cluster.
• If the BIG-IP device is a VIPRION device that is licensed and provisioned for vCMP, type thecluster management IP address for the guest.
• If the BIG-IP device is an Amazon Web Services EC2 device, type one of the Private IP addressescreated for this EC2 instance.
5. Click Retrieve Device Information.6. Verify that the certificate of the remote device is correct, and then click Device Certificate Matches.7. In the Name field, verify that the name of the remote device is correct.8. Click Add Device.
After you perform this task, the local device is now a member of the local trust domain. Also, the BIG-IPsystem automatically creates a special Sync-Only device group for the purpose of synchronizing trustinformation among the devices in the local trust domain, on an ongoing basis.
Repeat this task to specify each device that you want to add to the local trust domain.
Creating a Sync-Failover device group
This task establishes failover capability between two or more BIG-IP® devices. If an active device in aSync-Failover device group becomes unavailable, the configuration objects fail over to another memberof the device group and traffic processing is unaffected. You perform this task on any one of the authoritydevices within the local trust domain.
Repeat this task for each Sync-Failover device group that you want to create for your networkconfiguration.
1. On the Main tab, click Device Management > Device Groups.2. On the Device Groups list screen, click Create.
The New Device Group screen opens.3. In the Name field, type a name for the device group.4. From the Group Type list, select Sync-Failover.5. In the Description field, type a description of the device group.
This setting is optional.6. From the Configuration list, select Advanced.7. For the Members setting, select a host name from the Available list for each BIG-IP device that you
want to include in the device group, including the local device. Use the Move button to move the hostname to the Includes list.The Available list shows any devices that are members of the device's local trust domain but notcurrently members of a Sync-Failover device group. A device can be a member of one Sync-Failovergroup only. Also, for vCMP-provisioned systems on platforms that contain a hardware securitymodule (HSM) supporting FIPS multi-tenancy, the FIPS partitions on the guests in the device groupmust be identical with respect to the number of SSL cores allocated to the guest's FIPS partition andthe maximum number of private SSL keys that the guest can store on the HSM.
8. From the Sync Type list:
• Select Automatic with Incremental Sync when you want the BIG-IP system to automaticallysync the most recent BIG-IP configuration changes from a device to the other members of thedevice group. In this case, the BIG-IP system syncs the configuration data whenever the datachanges on any device in the device group.
• Select Manual with Incremental Sync when you want to manually initiate a config syncoperation. In this case, the BIG-IP system syncs the latest BIG-IP configuration changes from thedevice you choose to the other members of the device group. We strongly recommend that you
Automatically Synchronizing Application Security Configurations
284

perform a config sync operation whenever configuration data changes on one of the devices in thedevice group.
• Select Manual with Full Sync when you want to manually initiate a config sync operation. In thiscase, the BIG-IP system syncs the full set of BIG-IP configuration data from the device youchoose to the other members of the device group. We strongly recommend that you perform aconfig sync operation whenever configuration data changes on one of the devices in the devicegroup.
9. In the Maximum Incremental Sync Size (KB) field, retain the default value of 1024, or type adifferent value.This value specifies the total size of configuration changes that can reside in the incremental synccache. If the total size of the configuration changes in the cache exceeds the specified value, the BIG-IP system performs a full sync whenever the next config sync operation occurs.
10. For the Network Failover setting, select or clear the check box:
• Select the check box if you want device group members to handle failover communications byway of network connectivity. This is the default value and is required for active-activeconfigurations.
• Clear the check box if you want device group members to handle failover communications by wayof serial cable (hard-wired) connectivity.
For active-active configurations, you must select network failover, as opposed to serial-cable (hard-wired) connectivity.
11. In the Link Down Time on Failover field, use the default value of 0.0, or specify a new value.This setting specifies the amount of time, in seconds, that interfaces for any external VLANs aredown when a traffic group fails over and goes to the standby state. Specifying a value other than 0.0for this setting causes other vendor switches to use the specified time to learn the MAC address of thenewly-active device.
Important: This setting is a system-wide setting, and does not apply to this device group only.Specifying a value in this field causes the BIG-IP system to assign this value to the global bigdbvariable failover.standby.linkdowntime.
12. Click Finished.
You now have a Sync-Failover type of device group containing BIG-IP devices as members.
Syncing the BIG-IP configuration to the device group
Before you sync the configuration, verify that the devices targeted for config sync are members of adevice group and that device trust is established.
This task synchronizes the BIG-IP® configuration data from the local device to the devices in the devicegroup. This synchronization ensures that devices in the device group operate properly. Whensynchronizing self IP addresses, the BIG-IP system synchronizes floating self IP addresses only.
Important: You perform this task on either of the two devices, but not both.
1. On the Main tab, click Device Management > Overview.2. In the Device Groups area of the screen, click the arrow next to the name of the relevant device
group.The screen expands to show a summary and details of the sync status of the selected device group, aswell as a list of the individual devices within the device group.
3. In the Devices area of the screen, choose the device that shows a sync status of Changes Pending.4. In the Sync Options area of the screen, select Push the selected device configuration to the group.5. Click Sync.
BIG-IP Application Security Manager: Implementations
285
The BIG-IP system syncs the configuration data of the selected device to the other members of thedevice group.
After performing this task, all BIG-IP configuration data that is eligible for synchronization to otherdevices is replicated on each device in the device group.
Specifying IP addresses for failover communication
You perform this task to specify the local IP addresses that you want other devices in the device group touse for continuous health-assessment communication with the local device. You must perform this tasklocally on each device in the device group.
Note: The IP addresses that you specify must belong to route domain 0.
1. Confirm that you are logged in to the device you want to configure.2. On the Main tab, click Device Management > Devices.
This displays a list of device objects discovered by the local device.3. In the Name column, click the name of the device to which you are currently logged in.4. Near the top of the screen, click Failover Network.5. Click Add.6. From the Address list, select an IP address.
The unicast IP address you select depends on the type of device:
Platform Action
Appliancewithout vCMP
Select a static self IP address associated with an internal VLAN (preferablyVLAN HA) and the static management IP address currently assigned to thedevice.
Appliance withvCMP
Select a static self IP address associated with an internal VLAN (preferablyVLAN HA) and the unique management IP address currently assigned to theguest.
VIPRIONwithout vCMP®
Select a static self IP address associated with an internal VLAN (preferablyVLAN HA). If you choose to select unicast addresses only (and not a multicastaddress), you must also specify the existing, static management IP addressesthat you previously configured for all slots in the cluster. If you choose to selectone or more unicast addresses and a multicast address, then you do not need toselect the existing, per-slot static management IP addresses when configuringaddresses for failover communication.
VIPRION withvCMP
Select a self IP address that is defined on the guest and associated with aninternal VLAN on the host (preferably VLAN HA). If you choose to selectunicast failover addresses only (and not a multicast address), you must alsoselect the existing, virtual static management IP addresses that you previouslyconfigured for all slots in the guest's virtual cluster. If you choose to select oneor more unicast addresses and a multicast address, you do not need to select theexisting, per-slot static and virtual management IP addresses when configuringaddresses for failover communication.
Important: Failover addresses should always be static, not floating, IP addresses.
7. From the Port list, select a port number.We recommend using port 1026 for failover communication.
8. To enable the use of a failover multicast address on a VIPRION® platform (recommended), then forthe Use Failover Multicast Address setting, select the Enabled check box.
Automatically Synchronizing Application Security Configurations
286

9. If you enabled Use Failover Multicast Address, either accept the default Address and Port values,or specify values appropriate for the device.If you revise the default Address and Port values, but then decide to revert to the default values, clickReset Defaults.
10. Click Finished.
After you perform this task, other devices in the device group can send failover messages to the localdevice using the specified IP addresses.
Creating a Sync-Only device group
You perform this task to create a Sync-Only type of device group. When you create a Sync-Only devicegroup, the BIG-IP® system can then automatically synchronize configuration data in folders attached tothe device group (such as security policies and acceleration applications) with the other devices in thegroup, even when some of those devices reside in another network.
Note: You perform this task on any one BIG-IP device within the local trust domain; there is no need torepeat this process on the other devices in the device group.
1. On the Main tab, click Device Management > Device Groups.2. Find the Partition list in the upper right corner of the BIG-IP Configuration utility screen, to the left
of the Log out button.3. From the Partition list, pick partition Common.4. On the Device Groups list screen, click Create.
The New Device Group screen opens.5. From the Configuration list, select Advanced.6. For the Members setting, select a host name from the Available list for each BIG-IP device that you
want to include in the device group. Use the Move button to move the host name to the Includes list.The list shows any devices that are members of the device's local trust domain.
7. For the Full Sync setting, specify whether the system synchronizes the entire configuration duringsynchronization operations:
• Select the check box when you want all sync operations to be full syncs. In this case, every time aconfig sync operation occurs, the BIG-IP system synchronizes all configuration data associatedwith the device group. This setting has a performance impact and is not recommended for mostcustomers.
• Clear the check box when you want all sync operations to be incremental (the default setting). Inthis case, the BIG-IP system syncs only the changes that are more recent than those on the targetdevice. When you select this option, the BIG-IP system compares the configuration data on eachtarget device with the configuration data on the source device and then syncs the delta of eachtarget-source pair.
If you enable incremental synchronization, the BIG-IP system might occasionally perform a full syncfor internal reasons. This is a rare occurrence and no user intervention is required.
8. In the Maximum Incremental Sync Size (KB) field, retain the default value of 1024, or type adifferent value.This value specifies the total size of configuration changes that can reside in the incremental synccache. If the total size of the configuration changes in the cache exceeds the specified value, the BIG-IP system performs a full sync whenever the next config sync operation occurs.
9. Click Finished.
You now have a Sync-Only type of device group containing BIG-IP devices as members.
BIG-IP Application Security Manager: Implementations
287

Enabling ASM synchronization on a device group
You need to have already set up the BIG-IP®systems you want to synchronize in a device trust and adevice group. Application Security Manager™ (ASM) must be provisioned on all the systems in thedevice group.
You can enable ASM™ synchronization on a device group to synchronize security policies andconfigurations on all devices in the device group. You do this task on one system; for example, the activesystem in an active-standby pair.
1. On the Main tab, click Security > Options > Application Security > Synchronization.The system displays a list of device groups of which this device is a member.
2. For Device Group, select the device group whose members you want to synchronize.3. Click Save.
The BIG-IP ASM systems that you want to share security policies and configurations are part of a devicegroup with ASM synchronization.
Synchronizing an ASM-enabled device group
You need to have set up the BIG-IP® Application Security Manager™ (ASM) systems you want tosynchronize in a Sync-Failover device group that is ASM™-enabled.
You can manually synchronize security policies and configuration of systems in an ASM-enabled devicegroup.
1. On one system in the ASM-enabled failover device group, create an application security policy.Because the two systems are not in sync, you see a Changes Pending status message on the screen.
2. Click the Changes Pending message.
Tip: You can also click Device Management > Overview.
The Overview screen opens.3. In the Device Groups area of the screen, click the arrow next to the name of the relevant device
group.The screen expands to show a summary and details of the sync status of the selected device group, aswell as a list of the individual devices within the device group.
4. In the Devices area of the screen, choose the device that shows a sync status of Changes Pending.5. In the Sync Options area of the screen, select Push the selected device configuration to the group.6. Click Sync.
The BIG-IP system syncs the configuration data of the selected device to the other members of thedevice group.
7. Verify that the devices are synchronized.For example, log in to another device in the device group and verify that the security policy youcreated also resides on that system. Click Security > Application Security > Security Policies andsee if the policy is listed.
Except for static self IP addresses, the entire set of BIG-IP configuration data including ASM™ securitypolicies and configuration is replicated on one or more devices in the ASM-enabled device group. If theactive device is not available, the standby device becomes active and handles traffic.
You can create new security policies or update existing ones on any of the devices in the group, or updatethe ASM configuration options. You can manually synchronize changes you make on one device with theother devices in the ASM-enabled device group.
Automatically Synchronizing Application Security Configurations
288

Implementation resultYou have set up multiple BIG-IP® systems running Application Security Manager™ (ASM) so that theyautomatically synchronize their ASM security policies and ASM configuration data. In addition, with thisimplementation, you can manually synchronize the local traffic configuration, as needed.
You can create new security policies or update existing ones on any of the devices in the group, or updatethe ASM™ configuration options. Any ASM changes you make on one device are automaticallysynchronized with the other devices in the ASM-enabled Sync-Only device group.
If Attack Signatures Update Mode is scheduled for automatic update, the attack signature update settingsare synchronized. Each device in the device group updates itself independently according to theconfigured schedule. If you manually upload attack signatures or click Update Signatures to updatefrom the server, the update is propagated to all of the devices in the device group.
BIG-IP Application Security Manager: Implementations
289

Automatically Synchronizing Application Security Configurations
290

Manually Synchronizing Application SecurityConfigurations
Overview: Manually synchronizing ASM systemsThis implementation describes how to set up two BIG-IP® systems running Application SecurityManager™ (ASM) so that you can synchronize their security policies and configurations. With thisimplementation, the BIG-IP systems can fail over to one another, and you can manually sync all of theBIG-IP configuration data, including ASM policy data.
Figure 14: Manually synchronizing ASM configuration data
The two BIG-IP systems are set up for redundancy: one active and the other standby. Both systems are inthe local trust domain and in the same Sync-Failover device group. If one system is unavailable, the othersystem begins to process application traffic. You can manually synchronize the systems. The ASM™
configurations and security policies are duplicated on both systems.
You can use this implementation as the basis for more complex configurations. For example, if you havemultiple redundant pairs each supporting a different web application, you can use this implementation toset up each pair. You could create a Sync-Failover device group for each pair and then synchronize thedata within each pair only. In this configuration, you all devices reside in the local trust domain.
Task summaryPerforming basic network configuration for synchronizationSpecifying an IP address for config syncEstablishing device trustCreating a Sync-Failover device groupSyncing the BIG-IP configuration to the device groupSpecifying IP addresses for failover communicationEnabling ASM synchronization on a device groupSynchronizing an ASM-enabled device group
About device management and synchronizing application security configurations
You can use device management to set up several BIG-IP® systems running Application SecurityManager™ (ASM) so that the systems synchronize their security policies and configurations, and fail overto one another if a system goes offline for any reason. By using application security synchronization, youcan set up application security and create security policies on one system, and can propagate them toother systems in an application security device group. In BIG-IP ASM™, a device group is two or moreBIG-IP devices using the same configuration and providing consistent security policy enforcement.

You can set up application security synchronization, for example, behind an Application DeliveryController where multiple BIG-IP systems running Application Security Manager are deployed asmembers of a pool. The options and security policies on all of the systems stay in sync regardless ofwhere you update them.
When you set up ASM™ synchronization, in addition to security policies, other settings such as customattack signatures, logging profiles, SMTP configuration, anti-virus protection, system variables, andpolicy templates, are synchronized with all devices in the ASM-enabled device group.
Considerations for application security synchronization
When using device management with Application Security Manager™ (ASM™), you need to be aware ofthe following considerations that apply specifically to application security synchronization.
• A BIG-IP® system with Application Security Manager can be a member of only one ASM-enableddevice group.
• All BIG-IP systems in a device group must be running the same version (including hot fix updates) ofApplication Security Manager (version 11.0 or later).
• The BIG-IP systems in the ASM-enabled device group synchronize application security configurationdata and security policies, providing consistent enforcement on all the devices.
• Real Traffic Policy Builder® can run on only one system per security policy. For example, you can setup automatic security policy building on one system that is a member of an ASM-enabled devicegroup, the policy is built on that system and then automatically updated on all of the systems in thedevice group.
• If using a VIPRION® platform (with multiple blades), it is considered one device, and you need toadd only the master blade to the device trust and group.
Performing basic network configuration for synchronization
You need to perform basic networking configuration for each of the BIG-IP® systems whose ApplicationSecurity Manager™ (ASM) configurations you want to synchronize.
1. Install the same BIG-IP system version (including any hot fixes) on each device.2. Provision LTM® and ASM™ on each device (System > Resource Provisioning).3. On each device, create one or more VLANs, depending on your networking configuration
(Network > VLANs).4. On each device, create a self IP (Network > Self IPs).
When creating the self IP, set Traffic Group to traffic-group-local-only (non-floating).5. On each device, create a default gateway, if needed (Network > Routes).6. On each device, configure DNS (System > Configuration > Device > DNS) and NTP (System >
Configuration > Device > NTP) so they are set to the same time.7. Verify connectivity between the devices (self IP address to self IP address). For example, use this
command to ensure communications: ping -I vlan_interface device_self_IP8. If your company requires special device certificates, install them on each device (System > Device
Certificates and click Import).
The basic networking setup is complete for the BIG-IP ASM systems for which you want to sharesecurity policies and configurations.
Next, on each device, specify the IP address to use when synchronizing configuration objects to the localdevice:
Manually Synchronizing Application Security Configurations
292

Specifying an IP address for config sync
Before configuring the config sync address, verify that all devices in the device group are running thesame version of BIG-IP® system software.
You perform this task to specify the IP address on the local device that other devices in the device groupwill use to synchronize their configuration objects to the local device.
Note: You must perform this task locally on each device in the device group.
1. Confirm that you are logged in to the device you want to configure.2. On the Main tab, click Device Management > Devices.
This displays a list of device objects discovered by the local device.3. In the Name column, click the name of the device to which you are currently logged in.4. Near the top of the screen, click ConfigSync.5. From the Local Address list, retain the displayed IP address or select another address from the list.
F5 Networks recommends that you use the default value, which is the self IP address for the internalVLAN. This address must be a non-floating (static) self IP address and not a management IP address.
Important: If the BIG-IP device you are configuring is accessed using Amazon Web Services, then theinternal self IP address that you select must be an internal private IP address that you configured forthis EC2 instance as the Local Address.
6. Click Update.
After performing this task, the other devices in the device group can synchronize their configurations tothe local device whenever a sync operation is initiated.
Establishing device trust
Before you begin this task, verify that:
• Each BIG-IP® device that is to be part of the local trust domain has a device certificate installed on it.• The local device is designated as a certificate signing authority.
You perform this task to establish trust among devices on one or more network segments. Devices thattrust each other constitute the local trust domain. A device must be a member of the local trust domainprior to joining a device group.
By default, the BIG-IP software includes a local trust domain with one member, which is the localdevice. You can choose any one of the BIG-IP devices slated for a device group and log into that deviceto add other devices to the local trust domain. For example, devices Bigip_1, Bigip_2, and Bigip_3each initially shows only itself as a member of the local trust domain. To configure the local trust domainto include all three devices, you can simply log into device Bigip_1 and add devices Bigip_2 andBigip_3 to the local trust domain; there is no need to repeat this process on devices Bigip_2 andBigip_3.
1. On the Main tab, click Device Management > Device Trust > Device Trust Members.2. Click Add.3. From the Device Type list, select Peer or Subordinate.4. Type a device IP address, administrator user name, and administrator password for the remote BIG-
IP® device with which you want to establish trust. The IP address you specify depends on the type ofBIG-IP device:
• If the BIG-IP device is an appliance, type the management IP address for the device.
BIG-IP Application Security Manager: Implementations
293

• If the BIG-IP device is a VIPRION® device that is not licensed and provisioned for vCMP®, typethe primary cluster management IP address for the cluster.
• If the BIG-IP device is a VIPRION device that is licensed and provisioned for vCMP, type thecluster management IP address for the guest.
• If the BIG-IP device is an Amazon Web Services EC2 device, type one of the Private IP addressescreated for this EC2 instance.
5. Click Retrieve Device Information.6. Verify that the certificate of the remote device is correct, and then click Device Certificate Matches.7. In the Name field, verify that the name of the remote device is correct.8. Click Add Device.
After you perform this task, the local device is now a member of the local trust domain. Also, the BIG-IPsystem automatically creates a special Sync-Only device group for the purpose of synchronizing trustinformation among the devices in the local trust domain, on an ongoing basis.
Repeat this task to specify each device that you want to add to the local trust domain.
Creating a Sync-Failover device group
This task establishes failover capability between two or more BIG-IP® devices. If an active device in aSync-Failover device group becomes unavailable, the configuration objects fail over to another memberof the device group and traffic processing is unaffected. You perform this task on any one of the authoritydevices within the local trust domain.
Repeat this task for each Sync-Failover device group that you want to create for your networkconfiguration.
1. On the Main tab, click Device Management > Device Groups.2. On the Device Groups list screen, click Create.
The New Device Group screen opens.3. In the Name field, type a name for the device group.4. From the Group Type list, select Sync-Failover.5. In the Description field, type a description of the device group.
This setting is optional.6. From the Configuration list, select Advanced.7. For the Members setting, select a host name from the Available list for each BIG-IP device that you
want to include in the device group, including the local device. Use the Move button to move the hostname to the Includes list.The Available list shows any devices that are members of the device's local trust domain but notcurrently members of a Sync-Failover device group. A device can be a member of one Sync-Failovergroup only. Also, for vCMP-provisioned systems on platforms that contain a hardware securitymodule (HSM) supporting FIPS multi-tenancy, the FIPS partitions on the guests in the device groupmust be identical with respect to the number of SSL cores allocated to the guest's FIPS partition andthe maximum number of private SSL keys that the guest can store on the HSM.
8. From the Sync Type list:
• Select Automatic with Incremental Sync when you want the BIG-IP system to automaticallysync the most recent BIG-IP configuration changes from a device to the other members of thedevice group. In this case, the BIG-IP system syncs the configuration data whenever the datachanges on any device in the device group.
• Select Manual with Incremental Sync when you want to manually initiate a config syncoperation. In this case, the BIG-IP system syncs the latest BIG-IP configuration changes from thedevice you choose to the other members of the device group. We strongly recommend that you
Manually Synchronizing Application Security Configurations
294

perform a config sync operation whenever configuration data changes on one of the devices in thedevice group.
• Select Manual with Full Sync when you want to manually initiate a config sync operation. In thiscase, the BIG-IP system syncs the full set of BIG-IP configuration data from the device youchoose to the other members of the device group. We strongly recommend that you perform aconfig sync operation whenever configuration data changes on one of the devices in the devicegroup.
9. In the Maximum Incremental Sync Size (KB) field, retain the default value of 1024, or type adifferent value.This value specifies the total size of configuration changes that can reside in the incremental synccache. If the total size of the configuration changes in the cache exceeds the specified value, the BIG-IP system performs a full sync whenever the next config sync operation occurs.
10. For the Network Failover setting, select or clear the check box:
• Select the check box if you want device group members to handle failover communications byway of network connectivity. This is the default value and is required for active-activeconfigurations.
• Clear the check box if you want device group members to handle failover communications by wayof serial cable (hard-wired) connectivity.
For active-active configurations, you must select network failover, as opposed to serial-cable (hard-wired) connectivity.
11. In the Link Down Time on Failover field, use the default value of 0.0, or specify a new value.This setting specifies the amount of time, in seconds, that interfaces for any external VLANs aredown when a traffic group fails over and goes to the standby state. Specifying a value other than 0.0for this setting causes other vendor switches to use the specified time to learn the MAC address of thenewly-active device.
Important: This setting is a system-wide setting, and does not apply to this device group only.Specifying a value in this field causes the BIG-IP system to assign this value to the global bigdbvariable failover.standby.linkdowntime.
12. Click Finished.
You now have a Sync-Failover type of device group containing BIG-IP devices as members.
Syncing the BIG-IP configuration to the device group
Before you sync the configuration, verify that the devices targeted for config sync are members of adevice group and that device trust is established.
This task synchronizes the BIG-IP® configuration data from the local device to the devices in the devicegroup. This synchronization ensures that devices in the device group operate properly. Whensynchronizing self IP addresses, the BIG-IP system synchronizes floating self IP addresses only.
Important: You perform this task on either of the two devices, but not both.
1. On the Main tab, click Device Management > Overview.2. In the Device Groups area of the screen, click the arrow next to the name of the relevant device
group.The screen expands to show a summary and details of the sync status of the selected device group, aswell as a list of the individual devices within the device group.
3. In the Devices area of the screen, choose the device that shows a sync status of Changes Pending.4. In the Sync Options area of the screen, select Push the selected device configuration to the group.5. Click Sync.
BIG-IP Application Security Manager: Implementations
295

The BIG-IP system syncs the configuration data of the selected device to the other members of thedevice group.
After performing this task, all BIG-IP configuration data that is eligible for synchronization to otherdevices is replicated on each device in the device group.
Specifying IP addresses for failover communication
You perform this task to specify the local IP addresses that you want other devices in the device group touse for continuous health-assessment communication with the local device. You must perform this tasklocally on each device in the device group.
Note: The IP addresses that you specify must belong to route domain 0.
1. Confirm that you are logged in to the device you want to configure.2. On the Main tab, click Device Management > Devices.
This displays a list of device objects discovered by the local device.3. In the Name column, click the name of the device to which you are currently logged in.4. Near the top of the screen, click Failover Network.5. Click Add.6. From the Address list, select an IP address.
The unicast IP address you select depends on the type of device:
Platform Action
Appliancewithout vCMP
Select a static self IP address associated with an internal VLAN (preferablyVLAN HA) and the static management IP address currently assigned to thedevice.
Appliance withvCMP
Select a static self IP address associated with an internal VLAN (preferablyVLAN HA) and the unique management IP address currently assigned to theguest.
VIPRIONwithout vCMP®
Select a static self IP address associated with an internal VLAN (preferablyVLAN HA). If you choose to select unicast addresses only (and not a multicastaddress), you must also specify the existing, static management IP addressesthat you previously configured for all slots in the cluster. If you choose to selectone or more unicast addresses and a multicast address, then you do not need toselect the existing, per-slot static management IP addresses when configuringaddresses for failover communication.
VIPRION withvCMP
Select a self IP address that is defined on the guest and associated with aninternal VLAN on the host (preferably VLAN HA). If you choose to selectunicast failover addresses only (and not a multicast address), you must alsoselect the existing, virtual static management IP addresses that you previouslyconfigured for all slots in the guest's virtual cluster. If you choose to select oneor more unicast addresses and a multicast address, you do not need to select theexisting, per-slot static and virtual management IP addresses when configuringaddresses for failover communication.
Important: Failover addresses should always be static, not floating, IP addresses.
7. From the Port list, select a port number.We recommend using port 1026 for failover communication.
8. To enable the use of a failover multicast address on a VIPRION® platform (recommended), then forthe Use Failover Multicast Address setting, select the Enabled check box.
Manually Synchronizing Application Security Configurations
296

9. If you enabled Use Failover Multicast Address, either accept the default Address and Port values,or specify values appropriate for the device.If you revise the default Address and Port values, but then decide to revert to the default values, clickReset Defaults.
10. Click Finished.
After you perform this task, other devices in the device group can send failover messages to the localdevice using the specified IP addresses.
Enabling ASM synchronization on a device group
You need to have already set up the BIG-IP®systems you want to synchronize in a device trust and adevice group. Application Security Manager™ (ASM) must be provisioned on all the systems in thedevice group.
You can enable ASM™ synchronization on a device group to synchronize security policies andconfigurations on all devices in the device group. You do this task on one system; for example, the activesystem in an active-standby pair.
1. On the Main tab, click Security > Options > Application Security > Synchronization.The system displays a list of device groups of which this device is a member.
2. For Device Group, select the device group whose members you want to synchronize.3. Click Save.
The BIG-IP ASM systems that you want to share security policies and configurations are part of a devicegroup with ASM synchronization.
Synchronizing an ASM-enabled device group
You need to have set up the BIG-IP® Application Security Manager™ (ASM) systems you want tosynchronize in a Sync-Failover device group that is ASM™-enabled.
You can manually synchronize security policies and configuration of systems in an ASM-enabled devicegroup.
1. On one system in the ASM-enabled failover device group, create an application security policy.Because the two systems are not in sync, you see a Changes Pending status message on the screen.
2. Click the Changes Pending message.
Tip: You can also click Device Management > Overview.
The Overview screen opens.3. In the Device Groups area of the screen, click the arrow next to the name of the relevant device
group.The screen expands to show a summary and details of the sync status of the selected device group, aswell as a list of the individual devices within the device group.
4. In the Devices area of the screen, choose the device that shows a sync status of Changes Pending.5. In the Sync Options area of the screen, select Push the selected device configuration to the group.6. Click Sync.
The BIG-IP system syncs the configuration data of the selected device to the other members of thedevice group.
7. Verify that the devices are synchronized.For example, log in to another device in the device group and verify that the security policy youcreated also resides on that system. Click Security > Application Security > Security Policies andsee if the policy is listed.
BIG-IP Application Security Manager: Implementations
297

Except for static self IP addresses, the entire set of BIG-IP configuration data including ASM™ securitypolicies and configuration is replicated on one or more devices in the ASM-enabled device group. If theactive device is not available, the standby device becomes active and handles traffic.
You can create new security policies or update existing ones on any of the devices in the group, or updatethe ASM configuration options. You can manually synchronize changes you make on one device with theother devices in the ASM-enabled device group.
Implementation resultYou have now set up two BIG-IP® systems running Application Security Manager™ (ASM) so that youcan synchronize their security policies and configurations. With this implementation, you manuallysynchronize the ASM and BIG-IP configurations.
The two BIG-IP systems are in the same Sync-Failover device group. If one system becomes unavailable,the other system begins processing application traffic.
Manually Synchronizing Application Security Configurations
298

Synchronizing Application Security ConfigurationsAcross LANs
Overview: Synchronizing ASM systems across LANsThis implementation describes how to set up multiple BIG-IP® systems running Application SecurityManager™ (ASM) so that you can synchronize their security policies and configurations for disasterrecovery. You can use this implementation to synchronize BIG-IP ASM™ security policies andconfigurations on systems that reside in different network segments or LANs, such as those in separateoffices or data centers. Note that traffic must be routable between the network segments. If a disasteroccurs at one of the offices and both devices are disabled, the latest security policies are still available onthe systems in the other location.
This implementation also configures failover between systems in a redundant pair on a particular networksegment. If one of the devices in a pair goes offline for any reason, the other device in the pair beginsprocessing the application traffic.
Figure 15: Automatically synchronizing ASM configuration data across LANs
In the figure, two sets of BIG-IP systems are set up for redundancy: one active and the other standby.Each pair is in a different network segment (LAN), and there can be additional pairs, as needed. EachLAN has one pair of devices, where both have the same default routing, but routing is not the same forthe devices in the other LAN.
All of the systems are running ASM and are in the trust domain. Three device groups are set up: oneSync-Failover device group for each pair (not ASM-enabled), and one Sync-Only device group withASM enabled using automatic synchronization for all of the systems. The systems automaticallyduplicate the ASM configurations and security policies on all of the systems. You can manuallysynchronize the BIG-IP configurations of each pair of systems when needed.
Task summaryPerforming basic network configuration for synchronizationSpecifying an IP address for config syncEstablishing device trustCreating a Sync-Failover device groupSyncing the BIG-IP configuration to the device groupSpecifying IP addresses for failover communicationCreating a Sync-Only device groupEnabling ASM synchronization on a Sync-Only device group
Synchronizing an ASM-enabled device group
About device management and synchronizing application security configurations
You can use device management to set up several BIG-IP® systems running Application SecurityManager™ (ASM) so that the systems synchronize their security policies and configurations, and fail overto one another if a system goes offline for any reason. By using application security synchronization, youcan set up application security and create security policies on one system, and can propagate them toother systems in an application security device group. In BIG-IP ASM™, a device group is two or moreBIG-IP devices using the same configuration and providing consistent security policy enforcement.
You can set up application security synchronization, for example, behind an Application DeliveryController where multiple BIG-IP systems running Application Security Manager are deployed asmembers of a pool. The options and security policies on all of the systems stay in sync regardless ofwhere you update them.
When you set up ASM™ synchronization, in addition to security policies, other settings such as customattack signatures, logging profiles, SMTP configuration, anti-virus protection, system variables, andpolicy templates, are synchronized with all devices in the ASM-enabled device group.
Considerations for application security synchronization
When using device management with Application Security Manager™ (ASM™), you need to be aware ofthe following considerations that apply specifically to application security synchronization.
• A BIG-IP® system with Application Security Manager can be a member of only one ASM-enableddevice group.
• All BIG-IP systems in a device group must be running the same version (including hot fix updates) ofApplication Security Manager (version 11.0 or later).
• The BIG-IP systems in the ASM-enabled device group synchronize application security configurationdata and security policies, providing consistent enforcement on all the devices.
• Real Traffic Policy Builder® can run on only one system per security policy. For example, you can setup automatic security policy building on one system that is a member of an ASM-enabled devicegroup, the policy is built on that system and then automatically updated on all of the systems in thedevice group.
• If using a VIPRION® platform (with multiple blades), it is considered one device, and you need toadd only the master blade to the device trust and group.
Performing basic network configuration for synchronization
You need to perform basic networking configuration for each of the BIG-IP® systems whose ApplicationSecurity Manager™ (ASM) configurations you want to synchronize.
1. Install the same BIG-IP system version (including any hot fixes) on each device.2. Provision LTM® and ASM™ on each device (System > Resource Provisioning).3. On each device, create one or more VLANs, depending on your networking configuration
(Network > VLANs).4. On each device, create a self IP (Network > Self IPs).
When creating the self IP, set Traffic Group to traffic-group-local-only (non-floating).5. On each device, create a default gateway, if needed (Network > Routes).6. On each device, configure DNS (System > Configuration > Device > DNS) and NTP (System >
Configuration > Device > NTP) so they are set to the same time.7. Verify connectivity between the devices (self IP address to self IP address). For example, use this
command to ensure communications: ping -I vlan_interface device_self_IP
Synchronizing Application Security Configurations Across LANs
300

8. If your company requires special device certificates, install them on each device (System > DeviceCertificates and click Import).
The basic networking setup is complete for the BIG-IP ASM systems for which you want to sharesecurity policies and configurations.
Next, on each device, specify the IP address to use when synchronizing configuration objects to the localdevice:
Specifying an IP address for config sync
Before configuring the config sync address, verify that all devices in the device group are running thesame version of BIG-IP® system software.
You perform this task to specify the IP address on the local device that other devices in the device groupwill use to synchronize their configuration objects to the local device.
Note: You must perform this task locally on each device in the device group.
1. Confirm that you are logged in to the device you want to configure.2. On the Main tab, click Device Management > Devices.
This displays a list of device objects discovered by the local device.3. In the Name column, click the name of the device to which you are currently logged in.4. Near the top of the screen, click ConfigSync.5. From the Local Address list, retain the displayed IP address or select another address from the list.
F5 Networks recommends that you use the default value, which is the self IP address for the internalVLAN. This address must be a non-floating (static) self IP address and not a management IP address.
Important: If the BIG-IP device you are configuring is accessed using Amazon Web Services, then theinternal self IP address that you select must be an internal private IP address that you configured forthis EC2 instance as the Local Address.
6. Click Update.
After performing this task, the other devices in the device group can synchronize their configurations tothe local device whenever a sync operation is initiated.
Establishing device trust
Before you begin this task, verify that:
• Each BIG-IP® device that is to be part of the local trust domain has a device certificate installed on it.• The local device is designated as a certificate signing authority.
You perform this task to establish trust among devices on one or more network segments. Devices thattrust each other constitute the local trust domain. A device must be a member of the local trust domainprior to joining a device group.
By default, the BIG-IP software includes a local trust domain with one member, which is the localdevice. You can choose any one of the BIG-IP devices slated for a device group and log into that deviceto add other devices to the local trust domain. For example, devices Bigip_1, Bigip_2, and Bigip_3each initially shows only itself as a member of the local trust domain. To configure the local trust domainto include all three devices, you can simply log into device Bigip_1 and add devices Bigip_2 andBigip_3 to the local trust domain; there is no need to repeat this process on devices Bigip_2 andBigip_3.
1. On the Main tab, click Device Management > Device Trust > Device Trust Members.
BIG-IP Application Security Manager: Implementations
301

2. Click Add.3. From the Device Type list, select Peer or Subordinate.4. Type a device IP address, administrator user name, and administrator password for the remote BIG-
IP® device with which you want to establish trust. The IP address you specify depends on the type ofBIG-IP device:
• If the BIG-IP device is an appliance, type the management IP address for the device.• If the BIG-IP device is a VIPRION® device that is not licensed and provisioned for vCMP®, type
the primary cluster management IP address for the cluster.• If the BIG-IP device is a VIPRION device that is licensed and provisioned for vCMP, type the
cluster management IP address for the guest.• If the BIG-IP device is an Amazon Web Services EC2 device, type one of the Private IP addresses
created for this EC2 instance.5. Click Retrieve Device Information.6. Verify that the certificate of the remote device is correct, and then click Device Certificate Matches.7. In the Name field, verify that the name of the remote device is correct.8. Click Add Device.
After you perform this task, the local device is now a member of the local trust domain. Also, the BIG-IPsystem automatically creates a special Sync-Only device group for the purpose of synchronizing trustinformation among the devices in the local trust domain, on an ongoing basis.
Repeat this task to specify each device that you want to add to the local trust domain.
Creating a Sync-Failover device group
This task establishes failover capability between two or more BIG-IP® devices. If an active device in aSync-Failover device group becomes unavailable, the configuration objects fail over to another memberof the device group and traffic processing is unaffected. You perform this task on any one of the authoritydevices within the local trust domain.
Repeat this task for each Sync-Failover device group that you want to create for your networkconfiguration.
1. On the Main tab, click Device Management > Device Groups.2. On the Device Groups list screen, click Create.
The New Device Group screen opens.3. In the Name field, type a name for the device group.4. From the Group Type list, select Sync-Failover.5. In the Description field, type a description of the device group.
This setting is optional.6. From the Configuration list, select Advanced.7. For the Members setting, select a host name from the Available list for each BIG-IP device that you
want to include in the device group, including the local device. Use the Move button to move the hostname to the Includes list.The Available list shows any devices that are members of the device's local trust domain but notcurrently members of a Sync-Failover device group. A device can be a member of one Sync-Failovergroup only. Also, for vCMP-provisioned systems on platforms that contain a hardware securitymodule (HSM) supporting FIPS multi-tenancy, the FIPS partitions on the guests in the device groupmust be identical with respect to the number of SSL cores allocated to the guest's FIPS partition andthe maximum number of private SSL keys that the guest can store on the HSM.
8. From the Sync Type list:
Synchronizing Application Security Configurations Across LANs
302

• Select Automatic with Incremental Sync when you want the BIG-IP system to automaticallysync the most recent BIG-IP configuration changes from a device to the other members of thedevice group. In this case, the BIG-IP system syncs the configuration data whenever the datachanges on any device in the device group.
• Select Manual with Incremental Sync when you want to manually initiate a config syncoperation. In this case, the BIG-IP system syncs the latest BIG-IP configuration changes from thedevice you choose to the other members of the device group. We strongly recommend that youperform a config sync operation whenever configuration data changes on one of the devices in thedevice group.
• Select Manual with Full Sync when you want to manually initiate a config sync operation. In thiscase, the BIG-IP system syncs the full set of BIG-IP configuration data from the device youchoose to the other members of the device group. We strongly recommend that you perform aconfig sync operation whenever configuration data changes on one of the devices in the devicegroup.
9. In the Maximum Incremental Sync Size (KB) field, retain the default value of 1024, or type adifferent value.This value specifies the total size of configuration changes that can reside in the incremental synccache. If the total size of the configuration changes in the cache exceeds the specified value, the BIG-IP system performs a full sync whenever the next config sync operation occurs.
10. For the Network Failover setting, select or clear the check box:
• Select the check box if you want device group members to handle failover communications byway of network connectivity. This is the default value and is required for active-activeconfigurations.
• Clear the check box if you want device group members to handle failover communications by wayof serial cable (hard-wired) connectivity.
For active-active configurations, you must select network failover, as opposed to serial-cable (hard-wired) connectivity.
11. In the Link Down Time on Failover field, use the default value of 0.0, or specify a new value.This setting specifies the amount of time, in seconds, that interfaces for any external VLANs aredown when a traffic group fails over and goes to the standby state. Specifying a value other than 0.0for this setting causes other vendor switches to use the specified time to learn the MAC address of thenewly-active device.
Important: This setting is a system-wide setting, and does not apply to this device group only.Specifying a value in this field causes the BIG-IP system to assign this value to the global bigdbvariable failover.standby.linkdowntime.
12. Click Finished.
You now have a Sync-Failover type of device group containing BIG-IP devices as members.
Syncing the BIG-IP configuration to the device group
Before you sync the configuration, verify that the devices targeted for config sync are members of adevice group and that device trust is established.
This task synchronizes the BIG-IP® configuration data from the local device to the devices in the devicegroup. This synchronization ensures that devices in the device group operate properly. Whensynchronizing self IP addresses, the BIG-IP system synchronizes floating self IP addresses only.
Important: You perform this task on either of the two devices, but not both.
1. On the Main tab, click Device Management > Overview.
BIG-IP Application Security Manager: Implementations
303

2. In the Device Groups area of the screen, click the arrow next to the name of the relevant devicegroup.The screen expands to show a summary and details of the sync status of the selected device group, aswell as a list of the individual devices within the device group.
3. In the Devices area of the screen, choose the device that shows a sync status of Changes Pending.4. In the Sync Options area of the screen, select Push the selected device configuration to the group.5. Click Sync.
The BIG-IP system syncs the configuration data of the selected device to the other members of thedevice group.
After performing this task, all BIG-IP configuration data that is eligible for synchronization to otherdevices is replicated on each device in the device group.
Specifying IP addresses for failover communication
You perform this task to specify the local IP addresses that you want other devices in the device group touse for continuous health-assessment communication with the local device. You must perform this tasklocally on each device in the device group.
Note: The IP addresses that you specify must belong to route domain 0.
1. Confirm that you are logged in to the device you want to configure.2. On the Main tab, click Device Management > Devices.
This displays a list of device objects discovered by the local device.3. In the Name column, click the name of the device to which you are currently logged in.4. Near the top of the screen, click Failover Network.5. Click Add.6. From the Address list, select an IP address.
The unicast IP address you select depends on the type of device:
Platform Action
Appliancewithout vCMP
Select a static self IP address associated with an internal VLAN (preferablyVLAN HA) and the static management IP address currently assigned to thedevice.
Appliance withvCMP
Select a static self IP address associated with an internal VLAN (preferablyVLAN HA) and the unique management IP address currently assigned to theguest.
VIPRIONwithout vCMP®
Select a static self IP address associated with an internal VLAN (preferablyVLAN HA). If you choose to select unicast addresses only (and not a multicastaddress), you must also specify the existing, static management IP addressesthat you previously configured for all slots in the cluster. If you choose to selectone or more unicast addresses and a multicast address, then you do not need toselect the existing, per-slot static management IP addresses when configuringaddresses for failover communication.
VIPRION withvCMP
Select a self IP address that is defined on the guest and associated with aninternal VLAN on the host (preferably VLAN HA). If you choose to selectunicast failover addresses only (and not a multicast address), you must alsoselect the existing, virtual static management IP addresses that you previouslyconfigured for all slots in the guest's virtual cluster. If you choose to select oneor more unicast addresses and a multicast address, you do not need to select the
Synchronizing Application Security Configurations Across LANs
304

Platform Action
existing, per-slot static and virtual management IP addresses when configuringaddresses for failover communication.
Important: Failover addresses should always be static, not floating, IP addresses.
7. From the Port list, select a port number.We recommend using port 1026 for failover communication.
8. To enable the use of a failover multicast address on a VIPRION® platform (recommended), then forthe Use Failover Multicast Address setting, select the Enabled check box.
9. If you enabled Use Failover Multicast Address, either accept the default Address and Port values,or specify values appropriate for the device.If you revise the default Address and Port values, but then decide to revert to the default values, clickReset Defaults.
10. Click Finished.
After you perform this task, other devices in the device group can send failover messages to the localdevice using the specified IP addresses.
Creating a Sync-Only device group
You perform this task to create a Sync-Only type of device group. When you create a Sync-Only devicegroup, the BIG-IP® system can then automatically synchronize configuration data in folders attached tothe device group (such as security policies and acceleration applications) with the other devices in thegroup, even when some of those devices reside in another network.
Note: You perform this task on any one BIG-IP device within the local trust domain; there is no need torepeat this process on the other devices in the device group.
1. On the Main tab, click Device Management > Device Groups.2. Find the Partition list in the upper right corner of the BIG-IP Configuration utility screen, to the left
of the Log out button.3. From the Partition list, pick partition Common.4. On the Device Groups list screen, click Create.
The New Device Group screen opens.5. From the Configuration list, select Advanced.6. For the Members setting, select a host name from the Available list for each BIG-IP device that you
want to include in the device group. Use the Move button to move the host name to the Includes list.The list shows any devices that are members of the device's local trust domain.
7. For the Full Sync setting, specify whether the system synchronizes the entire configuration duringsynchronization operations:
• Select the check box when you want all sync operations to be full syncs. In this case, every time aconfig sync operation occurs, the BIG-IP system synchronizes all configuration data associatedwith the device group. This setting has a performance impact and is not recommended for mostcustomers.
• Clear the check box when you want all sync operations to be incremental (the default setting). Inthis case, the BIG-IP system syncs only the changes that are more recent than those on the targetdevice. When you select this option, the BIG-IP system compares the configuration data on eachtarget device with the configuration data on the source device and then syncs the delta of eachtarget-source pair.
BIG-IP Application Security Manager: Implementations
305

If you enable incremental synchronization, the BIG-IP system might occasionally perform a full syncfor internal reasons. This is a rare occurrence and no user intervention is required.
8. In the Maximum Incremental Sync Size (KB) field, retain the default value of 1024, or type adifferent value.This value specifies the total size of configuration changes that can reside in the incremental synccache. If the total size of the configuration changes in the cache exceeds the specified value, the BIG-IP system performs a full sync whenever the next config sync operation occurs.
9. Click Finished.
You now have a Sync-Only type of device group containing BIG-IP devices as members.
Enabling ASM synchronization on a Sync-Only device group
You need to have set up the BIG-IP®systems you want to synchronize in a device trust and a devicegroup. Application Security Manager™ (ASM) must be provisioned on all the systems in the devicegroup.
You can enable ASM™ synchronization on a device group to synchronize security policies andconfigurations on all devices in the device group. You do this task on one system, for example, the activesystem in an active-standby pair.
1. On the Main tab, click Security > Options > Application Security > Synchronization.The system displays a list of device groups of which this device is a member.
2. For Device Group, select the Sync-Only device group you created.3. Click Save.
The BIG-IP ASM™ systems that you want to share security policies and configurations are part of aSync-Only device group with ASM synchronization.
Synchronizing an ASM-enabled device group
You need to have set up the BIG-IP® Application Security Manager™ (ASM) systems you want tosynchronize in a Sync-Failover device group that is ASM™-enabled.
You can manually synchronize security policies and configuration of systems in an ASM-enabled devicegroup.
1. On one system in the ASM-enabled failover device group, create an application security policy.Because the two systems are not in sync, you see a Changes Pending status message on the screen.
2. Click the Changes Pending message.
Tip: You can also click Device Management > Overview.
The Overview screen opens.3. In the Device Groups area of the screen, click the arrow next to the name of the relevant device
group.The screen expands to show a summary and details of the sync status of the selected device group, aswell as a list of the individual devices within the device group.
4. In the Devices area of the screen, choose the device that shows a sync status of Changes Pending.5. In the Sync Options area of the screen, select Push the selected device configuration to the group.6. Click Sync.
The BIG-IP system syncs the configuration data of the selected device to the other members of thedevice group.
7. Verify that the devices are synchronized.
Synchronizing Application Security Configurations Across LANs
306

For example, log in to another device in the device group and verify that the security policy youcreated also resides on that system. Click Security > Application Security > Security Policies andsee if the policy is listed.
Except for static self IP addresses, the entire set of BIG-IP configuration data including ASM™ securitypolicies and configuration is replicated on one or more devices in the ASM-enabled device group. If theactive device is not available, the standby device becomes active and handles traffic.
You can create new security policies or update existing ones on any of the devices in the group, or updatethe ASM configuration options. You can manually synchronize changes you make on one device with theother devices in the ASM-enabled device group.
Implementation resultYou have set up disaster recovery for multiple BIG-IP® systems running Application Security Manager™
(ASM). Each office or data center has an active system and a standby that takes over if the active systemshould fail. You must manually synchronize the BIG-IP configuration from one system to the other if youchange the configuration.
You can create new security policies or update existing ones on any of the devices in the group, or updatethe ASM™ configuration options (Application Security>Options). Any changes you make on onedevice are automatically synchronized with the other devices in the ASM-enabled Sync-Only devicegroup.
If Attack Signatures Update Mode is scheduled for automatic update, the attack signature update settingsare synchronized. Each device in the device group updates itself independently according to theconfigured schedule. If you manually upload attack signatures or click Upload Signatures to updatefrom the server, the update is propagated to all of the devices in the device group.
BIG-IP Application Security Manager: Implementations
307

Synchronizing Application Security Configurations Across LANs
308
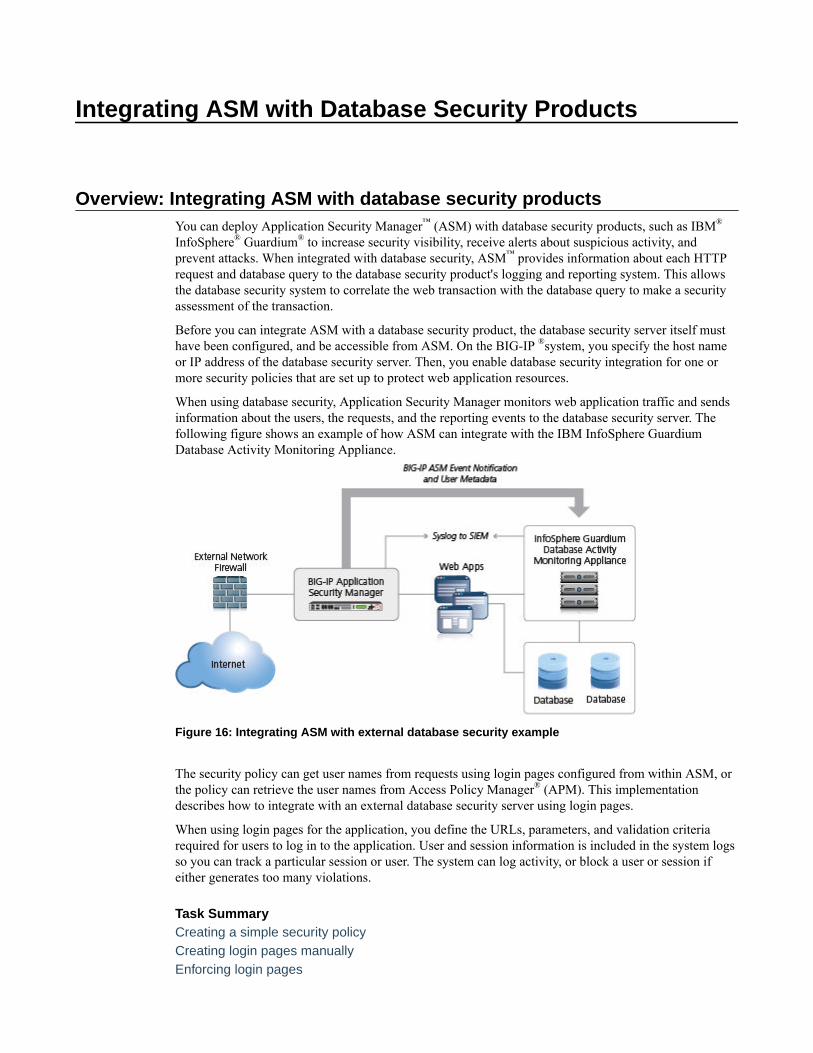
Integrating ASM with Database Security Products
Overview: Integrating ASM with database security productsYou can deploy Application Security Manager™ (ASM) with database security products, such as IBM®
InfoSphere® Guardium® to increase security visibility, receive alerts about suspicious activity, andprevent attacks. When integrated with database security, ASM™ provides information about each HTTPrequest and database query to the database security product's logging and reporting system. This allowsthe database security system to correlate the web transaction with the database query to make a securityassessment of the transaction.
Before you can integrate ASM with a database security product, the database security server itself musthave been configured, and be accessible from ASM. On the BIG-IP ®system, you specify the host nameor IP address of the database security server. Then, you enable database security integration for one ormore security policies that are set up to protect web application resources.
When using database security, Application Security Manager monitors web application traffic and sendsinformation about the users, the requests, and the reporting events to the database security server. Thefollowing figure shows an example of how ASM can integrate with the IBM InfoSphere GuardiumDatabase Activity Monitoring Appliance.
Figure 16: Integrating ASM with external database security example
The security policy can get user names from requests using login pages configured from within ASM, orthe policy can retrieve the user names from Access Policy Manager® (APM). This implementationdescribes how to integrate with an external database security server using login pages.
When using login pages for the application, you define the URLs, parameters, and validation criteriarequired for users to log in to the application. User and session information is included in the system logsso you can track a particular session or user. The system can log activity, or block a user or session ifeither generates too many violations.
Task SummaryCreating a simple security policyCreating login pages manuallyEnforcing login pages
Configuring a database security serverEnabling database security integration in a security policy
Creating a simple security policy
Before you can create a security policy, you must perform the minimal system configuration tasksrequired according to the needs of your networking environment.
You can use Application Security Manager™ to create a robust, yet simple, security policy that is tailoredto protect your web application. This is the easiest way to create a security policy.
1. On the Main tab, click Security > Application Security > Security Policies > Policies List.The Policies List screen opens.
2. Click Create New Policy.You only see this button when no policy is selected.
3. In the Policy Name field, type a name for the policy.4. Leave Policy Type, set to Security.5. For Policy Template, select Fundamental.6. For Virtual Server, click Configure new virtual server to specify where to direct application
requests.a) For What type of protocol does your application use?, select HTTP, HTTPS, or both.b) In the Virtual Server Name field, type a unique name.c) In the HTTP Virtual Server Destination field, type the address in IPv4 (10.0.0.1) or IPv6
(2001:ed8:77b5:2:10:10:100:42/64) format, and specify the service port.
Tip: If you want multiple IP addresses to be directed here, use the Network setting.
d) In the HTTP Pool Member setting, specify the addresses of the back-end application servers.e) From the Logging Profile list, select a profile such as Log illegal requests to determine which
events are logged on the system.7. In the upper right corner, click Advanced.
You can use default values for the Advanced settings but it's a good idea to take a look at them.
• If you selected Fundamental or Comprehensive for the Policy Template, Learning Mode is setto Automatic and Enforcement Mode is set to Blocking.
Tip: If you need to change these values, set application language to a value other than Autodetect.
• If you know the Application Language, select it or use Unicode (utf-8).• To add specific protections (enforcing additional attack signatures) to the policy, for Server
Technologies, select the technologies that apply to the back-end application servers.• You can configure trusted IP addresses that you want the security policy to consider safe.
8. Click Create Policy to create the security policy.
ASM™ creates a security policy that immediately starts protecting your application. The enforcementmode of the security policy is set to Blocking. Traffic that is considered to be an attack such as traffic thatis not compliant with HTTP protocol, has malformed payloads, uses evasion techniques, performs webscraping, contains sensitive information or illegal values is blocked. Other potential violations arereported but not blocked.
The system examines the traffic to the web application making suggestions for more specifically buildingthe security policy. The Policy Builder selectively learns new entities like file types, parameters, andcookies used in requests to the application. When ASM processes sufficient traffic, it automatically addsthe entities to the security policy, and enforces them.
Integrating ASM with Database Security Products
310

The system applies a basic set of attack signatures to the security policy and puts them in staging (bydefault, for 7 days). If you specified server technologies, additional attack signatures are included. ASMreports common attacks discovered by comparison to the signatures but does not block these attacks untilthe staging period is over and they are enforced. That gives you a chance to be sure that these are actualattacks and not legitimate requests.
Tip: This is a good point at which send some traffic to test that you can access the application beingprotected by the security policy and check that traffic is being processed correctly by the BIG-IP® system.Send the traffic to the virtual server destination address.
Creating login pages manually
Before you can create a login page manually, you need to be familiar with the login URL or URLs theapplication the security policy is protecting.
In your security policy, you can create a login page manually to specify a login URL that presents a sitethat users must pass through to gain access to the web application. The login URL commonly leads to thelogin page of the web application.
Note: You can also have the system create login pages automatically by selecting Detect login pages onthe Learning and Blocking Settings screen.
1. On the Main tab, click Security > Application Security > Sessions and Logins.The Login Pages List screen opens.
2. In the Current edited security policy list near the top of the screen, verify that the security policyshown is the one you want to work on.
3. Click Create.The New Login Page screen opens.
4. For the Login URL setting, specify a URL that users must pass through to get to the application.a) From the list, select the type of URL: Explicit or Wildcard.b) Select either HTTP or HTTPS based on the type of traffic the web application accepts.c) Type an explicit URL or wildcard expression in the field.
When you click in the field, the system lists URLs that it has seen, and you can select a URL fromthe list. Or, you can type explicit URLs in the format /login, and wildcard URLs without theslash, such as *.php.Wildcard syntax is based on shell-style wildcard characters. This table lists the wildcard charactersthat you can use so that the entity name can match multiple objects.
Wildcard Character Matches
* All characters
? Any single character.
[abcde] Exactly one of the characters listed.
[!abcde] Any character not listed.
[a-e] Exactly one character in the range.
[!a-e} Any character not in the range.
Note that wildcards do not match regular expressions.5. From the Authentication Type list, select the method the web server uses to authenticate the login
URL's credentials with a web user.
BIG-IP Application Security Manager: Implementations
311

Option Description
None The web server does not authenticate users trying to access the webapplication through the login URL. This is the default setting.
HTML Form The web application uses a form to collect and authenticate usercredentials. If using this option, you also need to type the user name andpassword parameters written in the code of the HTML form.
HTTP BasicAuthentication
The user name and password are transmitted in Base64 and stored on theserver in plain text.
HTTP DigestAuthentication
The web server performs the authentication; user names and passwordsare not transmitted over the network, nor are they stored in plain text.
NTLM Microsoft LAN Manager authentication (also called Integrated WindowsAuthentication) does not transmit credentials in plain text, but requires acontinuous TCP connection between the server and client.
JSON/AJAX Request The web server uses JSON and AJAX requests to authenticate userstrying to access the web application through the login URL. For thisoption, you also need to type the name of the JSON element containingthe user name and password.
6. In the Access Validation area, define at least one validation criteria for the login page response.If you define more than one validation criteria, the response must meet all the criteria before thesystem allows the user to access the application login URL.
Note: The system checks the access validation criteria on the response of the login URL only if theresponse has one of the following content-types: text/html, text/xml, application/sgml, application/xml, application/html, application/xhtml, application/x-asp, or application/x-aspx.
7. Click Create to add the login page to the security policy.The new login page is added to the login pages list.
8. Add as many login pages as needed for your web application.9. In the editing context area, click Apply Policy to put the changes into effect.
The security policy now has one or more login pages associated with it. They are included in the LoginPages List.
You can use the login pages you created for login enforcement, brute force protection, or sessionawareness.
Enforcing login pages
Login enforcement settings prevent forceful browsing attacks where attackers gain access to restrictedparts of the web application by supplying a URL directly. You can use login enforcement to force users topass through one URL (known as the login URL) before being allowed to display a different URL(known as the target URL) where they can access restricted pages and resources.
Login enforcement indicates how the security policy implements login pages including an optionalexpiration time, a list of URLs that require authentication to get to, and a list of URLs used to log out ofthe application. You can also use authenticated URLs to enforce idle time-outs on applications that aremissing this functionality.
1. On the Main tab, click Security > Application Security > Sessions and Logins > LoginEnforcement.The Login Enforcement screen opens.
2. If you want the login URL to be valid for a limited time, set Expiration Time to Enabled, and type avalue, in seconds (1-99999) that indicates how long the session will last.
Integrating ASM with Database Security Products
312
If enabled, the login session ends after the number of seconds has passed.3. For the Authenticated URLs setting, specify the target URLs that users can access only by way of
the login URL:a) In the Authenticated URLs (Wildcards supported) field, type the target URL name in the
format /private.php (wildcards are allowed).b) Click Add to add the URL to the list of authenticated URLs.c) Repeat to add as many authenticated URLs as needed.
4. Click Save to save your settings.5. To put the security policy changes into effect immediately, click Apply Policy.
If you specify authenticated URLs and a user tries to access them, bypassing the login URL (specified ina Login Page), the system issues the Login URL bypassed violation. If a user session is idle andexceeds the expiration time, the system issues the Login URL expired violation, logs the user out,and as a result, the user can no longer reach the authenticated URLs. For both login violations, if theenforcement mode is blocking, the system now sends the Login Page Response to the client (seeApplication Security > Policy > Response Pages).
Configuring a database security server
To integrate Application Security Manager™ (ASM) with a third-party database security product, youneed to configure the database security server on ASM™. You can configure one database security serverper system.
1. On the Main tab, click Security > Options > Application Security > Integrated Services >Database Security.The Database Security Configuration screen opens.
2. In the Server Host Name/IP Address field, type the host name or IP address of the database securityserver.
Note: If using SSL to establish a secured session between the BIG-IP ®system and the databasesecurity server, type the IP address of a virtual server configured for the secure connection. Thevirtual server uses any open IP address for the destination, the IBM Guardium port (16016, bydefault) for the service port, serverssl or a customized profile for the SSL Profile (Server) setting,and specifies a default pool (containing one member, the database security server, using its IP addressand service port, typically, 16016).
3. For Server Port Number, type the port number of the database server.The default value is 16016, the port used by IBM® InfoSphere® Guardium.®
4. If you want the system to wait for an ACK response from the database security server before sendingthe request to the application server, from the Request Hold Timeout list, select Enabled and typethe number of milliseconds to wait for the response.The default value is 5 milliseconds.When this setting is enabled, the system forwards the request to the application server as soon as thedatabase security server sends an ACK, or when the timeout has passed. If you leave this settingdisabled, the system forwards the request to the application server immediately.
5. Click Save.The system saves the configuration settings.
The Application Security Manager is now configured to connect to the database security server.
For ASM to forward request data to the database security server, you next need to enable databasesecurity integration in one or more security policies.
BIG-IP Application Security Manager: Implementations
313
Enabling database security integration in a security policy
Before you can enable database security integration, you need to have created a security policy to protectyour web application. For the policy to retrieve the user names of those making requests, you need tocreate login pages in Application Security Manager™ (ASM).
You enable database security integration in a security policy so that ASM™ forwards request informationto a third-party database server.
1. On the Main tab, click Security > Application Security > Integrated Services > DatabaseSecurity.The Database Security screen opens.
2. In the Current edited security policy list near the top of the screen, verify that the security policyshown is the one you want to work on.
3. If you haven't configured your database security server, click the link in the message and do that now.4. Select the Database Security Integration check box.5. For User Source, select Use Login Pages to have the system use an ASM login page to determine the
user source.If there is no login page configured in the security policy, click the login pages link to open a popupscreen where you can add one.
6. Click Save.The system saves the configuration settings.
The Application Security Manager connects to the database security server and can forward request dataabout traffic to it.
Implementation resultYou have set up a BIG-IP® system to use Application Security Manager™ (ASM) to secure applicationtraffic and use login pages to check user credentials.
Client traffic is routed to the virtual server for the web application. ASM™ analyzes the request andchecks for security violations. ASM also verifies user credentials on the login page and sends thedatabase security server a request notification. When ASM receives an acknowledgment from thedatabase security server or the request hold timeout is over, ASM forwards traffic that meets the securitypolicy requirements to the application.
The database security server includes the application and user information provided by ASM, so it can beviewed in logs and reports on that system. The database security server can perform a more in-depthsecurity assessment of the web request.
If you want to review reports and event logs that associate the user name with the session information onthe BIG-IP system, you can set up session tracking (by enabling session awareness). When sessionawareness is enabled, you can see the user names on the Event Logs: Application: Requests screen in theGeneral Details section of specific requests. In addition, the Reporting: Application: Charts screendisplays the users who sent the illegal requests.
Integrating ASM with Database Security Products
314

Integrating ASM and APM with Database SecurityProducts
Overview: Integrating ASM and APM with database security productsYou can deploy Application Security Manager™ (ASM) and Access Policy Manager®(APM®) withdatabase security products, such as IBM® InfoSphere® Guardium® to increase security visibility, receivealerts about suspicious activity, and prevent attacks. When integrated with database security, ASM™ canprovide information about each HTTP request and database query. This allows the database securitysystem to correlate the web transaction with the database query to make a security assessment of thetransaction. ASM also provides application level details to improve the database security system'slogging and reporting.
For you to integrate ASM with a database security product, the database security server itself must havebeen configured and accessible on the network. On the BIG-IP® system, you specify the host name or IPaddress of the database security server. Then, you enable database security integration for one or moresecurity policies that are set up to protect web application resources.
When using database security, Application Security Manager monitors web application traffic and sendsinformation about the users, the requests, and reporting events to the database security server. Thefollowing figure shows an example of how ASM can integrate with the IBM InfoSphere GuardiumDatabase Activity Monitoring Appliance.
Figure 17: Integrating ASM and APM with external database security example
The security policy can get user names from requests using login pages configured from within ASM, orthe policy can retrieve the user names from Access Policy Manager®(APM). This implementationdescribes how to integrate ASM and APM™ with an external database security server. APM handles userauthentication in this case and provides the information that is sent to the database security server.
Prerequisites for integrating ASM and APM with database securityIn order to integrate a database security server from within Application Security Manager™ (ASM™) sothat the security policy retrieves the user names from Access Policy Manager ®(APM®), you need toperform basic these system configuration tasks according to the needs of your networking configuration:

• Run the setup utility and create a management IP address.• License and provision ASM, APM, and Local Traffic Manager™ (LTM®).• Configure a DNS address (System > Configuration > Device > DNS).• Configure an NTP server (System > Configuration > Device > NTP).• Restart ASM (at the command line, type tmsh restart /sys service asm).
Task SummaryCreating a VLANCreating a self IP address for a VLANCreating a local traffic pool for application securityCreating a virtual server to manage HTTPS trafficCreating a simple security policyCreating an access profileConfiguring an access policyAdding the access profile to the virtual serverConfiguring a database security serverEnabling database security integration with ASM and APM
Creating a VLAN
VLANs represent a logical collection of hosts that can share network resources, regardless of theirphysical location on the network. You create a VLAN to associate physical interfaces with that VLAN.
1. On the Main tab, click Network > VLANs.The VLAN List screen opens.
2. Click Create.The New VLAN screen opens.
3. In the Name field, type a unique name for the VLAN.4. In the Tag field, type a numeric tag, between 1-4094, for the VLAN, or leave the field blank if you
want the BIG-IP system to automatically assign a VLAN tag.The VLAN tag identifies the traffic from hosts in the associated VLAN.
5. If you want to use Q-in-Q (double) tagging, use the Customer Tag setting to perform the followingtwo steps. If you do not see the Customer Tag setting, your hardware platform does not support Q-in-Q tagging and you can skip this step.a) From the Customer Tag list, select Specify.b) Type a numeric tag, from 1-4094, for the VLAN.
The customer tag specifies the inner tag of any frame passing through the VLAN.6. For the Interfaces setting,
a) From the Interface list, select an interface number.b) From the Tagging list, select Untagged.c) Click Add.
7. For the Hardware SYN Cookie setting, select or clear the check box.When you enable this setting, the BIG-IP system triggers hardware SYN cookie protection for thisVLAN.Enabling this setting causes additional settings to appear. These settings appear on specific BIG-IPplatforms only.
8. For the Syncache Threshold setting, retain the default value or change it to suit your needs.The Syncache Threshold value represents the number of outstanding SYN flood packets on theVLAN that will trigger the hardware SYN cookie protection feature.
Integrating ASM and APM with Database Security Products
316

When the Hardware SYN Cookie setting is enabled, the BIG-IP system triggers SYN cookieprotection in either of these cases, whichever occurs first:
• The number of TCP half-open connections defined in the LTM® setting Global SYN CheckThreshold is reached.
• The number of SYN flood packets defined in this Syncache Threshold setting is reached.9. For the SYN Flood Rate Limit setting, retain the default value or change it to suit your needs.
The SYN Flood Rate Limit value represents the maximum number of SYN flood packets per secondreceived on this VLAN before the BIG-IP system triggers hardware SYN cookie protection for theVLAN.
10. Click Finished.The screen refreshes, and displays the new VLAN in the list.
Creating a self IP address for a VLAN
Ensure that you have at least one VLAN configured before you create a self IP address.
Self IP addresses enable the BIG-IP® system, and other devices on the network, to route applicationtraffic through the associated VLAN.
1. On the Main tab, click Network > Self IPs.2. Click Create.
The New Self IP screen opens.3. In the Name field, type a unique name for the self IP address.4. In the IP Address field, type an IPv4 or IPv6 address.
This IP address should represent the address space of the VLAN that you specify with the VLAN/Tunnel setting.
5. In the Netmask field, type the network mask for the specified IP address.
For example, you can type 255.255.255.0.6. From the VLAN/Tunnel list, select the VLAN to associate with this self IP address.
• On the internal network, select the internal or high availability VLAN that is associated with aninternal interface or trunk.
• On the external network, select the external VLAN that is associated with an external interface ortrunk.
7. Use the default values for all remaining settings.8. Click Finished.
The screen refreshes, and displays the new self IP address.
The BIG-IP system can now send and receive TCP/IP traffic through the specified VLAN.
Creating a local traffic pool for application security
You can use a local traffic pool with Application Security Manager™ system to forward traffic to theappropriate resources.
Note: Instead of doing it now, you can optionally create a pool if creating a virtual server during securitypolicy creation.
1. On the Main tab, click Local Traffic > Pools.The Pool List screen opens.
2. Click Create.The New Pool screen opens.
BIG-IP Application Security Manager: Implementations
317

3. In the Name field, type a unique name for the pool.4. In the Resources area, for the New Members setting, add to the pool the application servers that host
the web application:a) Type an IP address in the Address field.b) In the Service Port field, type a port number (for example, type 80 for the HTTP service), or
select a service name from the list.c) Click Add.
5. Click Finished.
The BIG-IP® system configuration now includes a local traffic pool containing the resources that youwant to protect using Application Security Manager™.
Creating a virtual server to manage HTTPS traffic
You can create a virtual server to manage HTTPS traffic.
1. On the Main tab, click Local Traffic > Virtual Servers.The Virtual Server List screen opens.
2. Click the Create button.The New Virtual Server screen opens.
3. In the Name field, type a unique name for the virtual server.4. In the Service Port field, type 443 or select HTTPS from the list.5. From the Configuration list, select Advanced.6. From the HTTP Profile list, select http.7. For the SSL Profile (Client) setting, from the Available list, select clientssl, and using the Move
button, move the name to the Selected list.8. (Optional) From the SSL Profile (Server) list, select serverssl.
Note: This setting ensures that there is an SSL connection between the HTTP virtual server and theexternal HTTPS server.
9. From the Source Address Translation list, select Auto Map.10. From the Default Pool list, select the pool that is configured for application security.11. Click Finished.
The HTTPS virtual server appears in the Virtual Server List screen.
Creating a simple security policy
Before you can create a security policy, you must perform the minimal system configuration tasksrequired according to the needs of your networking environment.
You can use Application Security Manager™ to create a robust, yet simple, security policy that is tailoredto protect your web application. This is the easiest way to create a security policy.
1. On the Main tab, click Security > Application Security > Security Policies > Policies List.The Policies List screen opens.
2. Click Create New Policy.You only see this button when no policy is selected.
3. In the Policy Name field, type a name for the policy.4. Leave Policy Type, set to Security.5. For Policy Template, select Fundamental.
Integrating ASM and APM with Database Security Products
318

6. For Virtual Server, click Configure new virtual server to specify where to direct applicationrequests.a) For What type of protocol does your application use?, select HTTP, HTTPS, or both.b) In the Virtual Server Name field, type a unique name.c) In the HTTP Virtual Server Destination field, type the address in IPv4 (10.0.0.1) or IPv6
(2001:ed8:77b5:2:10:10:100:42/64) format, and specify the service port.
Tip: If you want multiple IP addresses to be directed here, use the Network setting.
d) In the HTTP Pool Member setting, specify the addresses of the back-end application servers.e) From the Logging Profile list, select a profile such as Log illegal requests to determine which
events are logged on the system.7. In the upper right corner, click Advanced.
You can use default values for the Advanced settings but it's a good idea to take a look at them.
• If you selected Fundamental or Comprehensive for the Policy Template, Learning Mode is setto Automatic and Enforcement Mode is set to Blocking.
Tip: If you need to change these values, set application language to a value other than Autodetect.
• If you know the Application Language, select it or use Unicode (utf-8).• To add specific protections (enforcing additional attack signatures) to the policy, for Server
Technologies, select the technologies that apply to the back-end application servers.• You can configure trusted IP addresses that you want the security policy to consider safe.
8. Click Create Policy to create the security policy.
ASM™ creates a security policy that immediately starts protecting your application. The enforcementmode of the security policy is set to Blocking. Traffic that is considered to be an attack such as traffic thatis not compliant with HTTP protocol, has malformed payloads, uses evasion techniques, performs webscraping, contains sensitive information or illegal values is blocked. Other potential violations arereported but not blocked.
The system examines the traffic to the web application making suggestions for more specifically buildingthe security policy. The Policy Builder selectively learns new entities like file types, parameters, andcookies used in requests to the application. When ASM processes sufficient traffic, it automatically addsthe entities to the security policy, and enforces them.
The system applies a basic set of attack signatures to the security policy and puts them in staging (bydefault, for 7 days). If you specified server technologies, additional attack signatures are included. ASMreports common attacks discovered by comparison to the signatures but does not block these attacks untilthe staging period is over and they are enforced. That gives you a chance to be sure that these are actualattacks and not legitimate requests.
Tip: This is a good point at which send some traffic to test that you can access the application beingprotected by the security policy and check that traffic is being processed correctly by the BIG-IP® system.Send the traffic to the virtual server destination address.
Creating an access profile
You create an access profile to provide the access policy configuration for a virtual server that establishesa secured session.
1. On the Main tab, click Access > Profiles / Policies.The Access Profiles (Per-Session Policies) screen opens.
2. Click Create.
BIG-IP Application Security Manager: Implementations
319

The New Profile screen opens.3. In the Name field, type a name for the access profile.
Note: An access profile name must be unique among all access profile and any per-request policynames.
4. From the Profile Type list, select SSL-VPN.Additional settings display.
5. From the Profile Scope list, retain the default value or select another.
• Profile: Gives a user access only to resources that are behind the same access profile. This is thedefault value.
• Virtual Server: Gives a user access only to resources that are behind the same virtual server.• Global: Gives a user access to resources behind any access profile that has global scope.
6. To configure timeout and session settings, select the Custom check box.7. In the Inactivity Timeout field, type the number of seconds that should pass before the access policy
times out. Type 0 to set no timeout.If there is no activity (defined by the Session Update Threshold and Session Update Windowsettings in the Network Access configuration) between the client and server within the specifiedthreshold time, the system closes the current session.
8. In the Access Policy Timeout field, type the number of seconds that should pass before the accessprofile times out because of inactivity.Type 0 to set no timeout.
9. In the Maximum Session Timeout field, type the maximum number of seconds the session can exist.Type 0 to set no timeout.
10. In the Max Concurrent Users field, type the maximum number of users that can use this accessprofile at the same time.Type 0 to set no maximum.
11. In the Max Sessions Per User field, type the maximum number of concurrent sessions that one usercan start.Type 0 to set no maximum.
Note: Only a user in the administrator, application editor, manager, or resource administrator rolehas access to this field.
12. In the Max In Progress Sessions Per Client IP field, type the maximum number of concurrentsessions that can be in progress for a client IP address.When setting this value, take into account whether users will come from a NAT-ed or proxied clientaddress and, if so, consider increasing the value accordingly. The default value is 128.
Note: Only a user in the administrator, application editor, manager, or resource administrator rolehas access to this field.
Note: F5 does not recommend setting this value to 0 (unlimited).
13. Select the Restrict to Single Client IP check box to restrict the current session to a single IP address.This setting associates the session ID with the IP address.
Note: Only a user in the administrator, application editor, manager, or resource administrator rolehas access to this field.
Integrating ASM and APM with Database Security Products
320

Upon a request to the session, if the IP address has changed the request is redirected to a logout page,the session ID is deleted, and a log entry is written to indicate that a session hijacking attempt wasdetected. If such a redirect is not possible, the request is denied and the same events occur.
14. To configure logout URIs, in the Configurations area, type each logout URI in the URI field, and thenclick Add.
15. In the Logout URI Timeout field, type the delay in seconds before logout occurs for the customizedlogout URIs defined in the Logout URI Include list.
16. To configure SSO:
• For users to log in to multiple domains using one SSO configuration, skip the settings in the SSOAcross Authentication Domains (Single Domain mode) area. You can configure SSO for multipledomains only after you finish the initial access profile configuration.
• For users to log in to a single domain using an SSO configuration, configure settings in the SSOAcross Authentication Domains (Single Domain mode) area, or you can configure SSO settingsafter you finish the initial access profile configuration.
17. In the Domain Cookie field, specify a domain cookie, if the application access control connectionuses a cookie.
18. In the Cookie Options setting, specify whether to use a secure cookie.
• If the policy requires a secure cookie, select the Secure check box to add the secure keyword tothe session cookie.
• If you are configuring an LTM access scenario that uses an HTTPS virtual server to authenticatethe user and then sends the user to an existing HTTP virtual server to use applications, clear thischeck box.
19. If the access policy requires a persistent cookie, in the Cookie Options setting, select the Persistentcheck box.This sets cookies if the session does not have a webtop. When the session is first established, sessioncookies are not marked as persistent; but when the first response is sent to the client after the accesspolicy completes successfully, the cookies are marked persistent. Persistent cookies are updated forthe expiration timeout every 60 seconds. The timeout is equal to session inactivity timeout. If thesession inactivity timeout is overwritten in the access policy, the overwritten value will be used to setthe persistent cookie expiration.
20. From the SSO Configurations list, select an SSO configuration.21. In the Language Settings area, add and remove accepted languages, and set the default language.
A browser uses the highest priority accepted language. If no browser language matches the acceptedlanguages list, the browser uses the default language.
22. Click Finished.
The access profile displays in the Access Profiles List. Default-log-setting is assigned to the accessprofile.
To add an SSO configuration for multiple domains, click SSO / Auth Domains on the menu bar. Toprovide functionality with an access profile, you must configure the access policy. The default accesspolicy for a profile denies all traffic and contains no actions. Click Edit in the Access Policy column toedit the access policy.
Configuring an access policy
You configure an access policy to provide authentication, endpoint checks, and resources for an accessprofile. This procedure configures a simple access policy that adds a logon page, gets user credentials,submits them to an authentication type of your choice, then allows authenticated users, and denies others.
1. On the Main tab, click Access > Profiles / Policies.The Access Profiles (Per-Session Policies) screen opens.
BIG-IP Application Security Manager: Implementations
321
2. Click the name of the access profile you want to edit.3. On the menu bar, click Access Policy.4. For the Visual Policy Editor setting, click the Edit access policy for Profile policy_name link.
The visual policy editor opens the access policy in a separate window or tab.5. Click the (+) icon anywhere in the access policy to add a new item.
Note: Only an applicable subset of access policy items is available for selection in the visual policyeditor for any access profile type.
A popup screen opens, listing predefined actions on tabs such as General Purpose, Authentication,and so on.
6. On the Logon tab, select Logon Page and click the Add Item button.The Logon Page Agent properties screen opens.
7. Click Save.The Access Policy screen reopens.
8. On the rule branch, click the plus sign (+) between Logon Page and Deny.9. Set up the appropriate authentication and client-side checks required for application access at your
company, and click Add Item.10. Change the Successful rule branch from Deny to Allow and click the Save button.11. If needed, configure further actions on the successful and fallback rule branches of this access policy
item, and save the changes.12. At the top of the screen, click the Apply Access Policy link to apply and activate your changes to this
access policy.13. Click the Close button to close the visual policy editor.
To apply this access policy to network traffic, add the access profile to a virtual server.
Note: To ensure that logging is configured to meet your requirements, verify the log settings for theaccess profile.
Adding the access profile to the virtual server
Before you can perform this task, you need to create an access profile using Access Policy Manager®.
You associate the access profile with the virtual server created for the web application that ApplicationSecurity Manager™ is protecting.
1. On the Main tab, click Local Traffic > Virtual Servers.The Virtual Server List screen opens.
2. Click the name of the virtual server that manages the network resources for the web application youare securing.
3. In the Access Policy area, from the Access Profile list, select the access profile that you configuredearlier.
4. Click Update.
Your access policy is now associated with the virtual server.
Configuring a database security server
To integrate Application Security Manager™ (ASM) with a third-party database security product, youneed to configure the database security server on ASM™. You can configure one database security serverper system.
Integrating ASM and APM with Database Security Products
322

1. On the Main tab, click Security > Options > Application Security > Integrated Services >Database Security.The Database Security Configuration screen opens.
2. In the Server Host Name/IP Address field, type the host name or IP address of the database securityserver.
Note: If using SSL to establish a secured session between the BIG-IP ®system and the databasesecurity server, type the IP address of a virtual server configured for the secure connection. Thevirtual server uses any open IP address for the destination, the IBM Guardium port (16016, bydefault) for the service port, serverssl or a customized profile for the SSL Profile (Server) setting,and specifies a default pool (containing one member, the database security server, using its IP addressand service port, typically, 16016).
3. For Server Port Number, type the port number of the database server.The default value is 16016, the port used by IBM® InfoSphere® Guardium.®
4. If you want the system to wait for an ACK response from the database security server before sendingthe request to the application server, from the Request Hold Timeout list, select Enabled and typethe number of milliseconds to wait for the response.The default value is 5 milliseconds.When this setting is enabled, the system forwards the request to the application server as soon as thedatabase security server sends an ACK, or when the timeout has passed. If you leave this settingdisabled, the system forwards the request to the application server immediately.
5. Click Save.The system saves the configuration settings.
The Application Security Manager is now configured to connect to the database security server.
For ASM to forward request data to the database security server, you next need to enable databasesecurity integration in one or more security policies.
Enabling database security integration with ASM and APM
Before you can enable database security integration, you need to have created a security policy to protectyour web application. For the policy to retrieve the user names of those making requests, you need tohave set up Access Policy Manager®(APM®) on the BIG-IP® system.
You enable database security integration in a security policy so that Application Security Manager™
(ASM) forwards request information to a third-party database server.
1. On the Main tab, click Security > Application Security > Integrated Services > DatabaseSecurity.The Database Security screen opens.
2. In the Current edited security policy list near the top of the screen, verify that the security policyshown is the one you want to work on.
3. Select the Database Security Integration check box.4. For User Source, select Use APM Usernames and Session ID.
The system uses Access Policy Manager (APM) user names and session ID to determine the usersource. You can choose this option only if you have APM licensed and provisioned.
5. Click Save.The system saves the configuration settings.
The Application Security Manager connects to the database security server and can forward request datato it.
BIG-IP Application Security Manager: Implementations
323

Implementation resultYou have set up a BIG-IP® system to use Application Security Manager™ (ASM) to secure applicationtraffic, and Access Policy Manager™ (APM) to check user credentials.
Client traffic is routed to the virtual server for the web application. At first, traffic is handled by the APMmodule. APM® verifies user credentials and allows those with valid credentials to use web application.APM also sends user names and session IDs of valid users to ASM™. After that, ASM checks for securityviolations and forwards traffic that meets the security policy requirements to the backend server.
The database security server includes the application and user information provided by ASM and APM,so it can be viewed in logs and reports on that system. The database security server can perform a more indepth security assessment of the web request.
If you want to review reports and event logs that associate the user name with the session information onthe BIG-IP system, you can set up session tracking (by enabling session awareness). When sessionawareness is enabled, you can see the user names on the Event Logs: Application: Requests screen in theGeneral Details section of specific requests. IN addition, the Reporting: Application: Charts screendisplays the users who sent the illegal requests.
Integrating ASM and APM with Database Security Products
324

Securing FTP Traffic
Overview: Securing FTP traffic using default valuesThis implementation describes how to secure FTP traffic the easy way--by using default values. Whenyou use an FTP security profile, the BIG-IP® system inspects FTP traffic for network vulnerabilities. Adefault FTP security profile is included in the system that you can use. To activate security checks forFTP traffic, you enable protocol security in an FTP service profile, and associate the service profile witha virtual server.
You can use the default configuration to protect against the following FTP security risks:
• Port scanning exploits• Anonymous FTP requests• Command line length exceeds the defined length• Potentially dangerous FTP commands• Traffic that fails FTP protocol compliance checks• Brute force attacks (due to excessive FTP login attempts)• File stealing exploits
Task summaryCreating an FTP service profile with security enabledEnabling protocol security for an FTP virtual serverReviewing violation statistics for security profiles
Creating an FTP service profile with security enabled
The easiest method for initiating FTP protocol security for your FTP virtual server traffic is to use thesystem default settings. You do this by enabling protocol security for the system-supplied FTP serviceprofile, and then associating that service profile with a virtual server.
1. On the Main tab, click Local Traffic > Profiles > Services > FTP.The FTP profile list screen opens.
2. In the Name column, click ftp.The Properties screen for the system-supplied FTP profile opens.
3. In the Settings area, clear the Translate Extended check box if you want to disable IPv6 translation.4. Retain the Data Port setting default value of 20.5. Select the Protocol Security check box to enable FTP security checks.6. Click Update.
You now have a security-enabled service profile that you can associate with a virtual server so that FTPprotocol checks are performed on the traffic that the FTP virtual server receives.
Enabling protocol security for an FTP virtual server
When you enable protocol security for an FTP virtual server, the system scans any incoming FTP trafficfor vulnerabilities before the traffic reaches the FTP servers.
1. On the Main tab, click Local Traffic > Virtual Servers.The Virtual Server List screen opens.

2. Click the Create button.The New Virtual Server screen opens.
3. In the Name field, type a unique name for the virtual server.4. In the Destination Address field, type the IP address in CIDR format.
The supported format is address/prefix, where the prefix length is in bits. For example, an IPv4address/prefix is 10.0.0.1 or 10.0.0.0/24, and an IPv6 address/prefix is ffe1::0020/64 or2001:ed8:77b5:2:10:10:100:42/64. When you use an IPv4 address without specifying a prefix,the BIG-IP® system automatically uses a /32 prefix.
Note: The IP address you type must be available and not in the loopback network.
5. In the Service Port field, type 21 or select FTP from the list.6. In the Configuration area, for the FTP Profile setting, select the default profile, ftp.7. From the Source Address Translation list, select Auto Map.8. For the Default Pool setting, either select an existing pool from the list, or click the Create (+) button
and create a new pool.9. Click Finished.
The custom FTP virtual server appears in the Virtual Servers list.
Reviewing violation statistics for security profiles
You can view statistics and transaction information for each security profile that triggers securityviolations.
1. On the Main tab, click Security > Event Logs > Protocol and click HTTP, FTP, SMTP, or DNS.The appropriate statistics screen opens listing all violations for that protocol, with the number ofoccurrences.
2. Type a Support ID, if you have one, to filter the violations and view one in particular.3. Click a violation's hyperlink to see details about the requests causing the violation.
On the Statistics screen, in the left column, you can review information regarding the traffic volumefor each security profile configured.
Overview: Securing FTP traffic using a custom configurationThis implementation describes how to secure FTP traffic using a custom configuration. When you use anFTP security profile, the BIG-IP® system inspects FTP traffic for network vulnerabilities. A default FTPsecurity profile is included in the system that you can modify, or you can create a new one as described inthe tasks included here. To activate security checks for FTP traffic, you enable protocol security in anFTP service profile, and associate the service profile with a virtual server.
You can customize an FTP security profile to generate alarms or block requests for the following FTPsecurity risks:
• Port scanning exploits• Anonymous FTP requests• Command line length exceeds the defined length• Specific FTP commands• Traffic that fails FTP protocol compliance checks• Brute force attacks (excessive FTP login attempts)• File stealing exploits
Securing FTP Traffic
326

Task summaryCreating a custom FTP profile for protocol securityCreating a security profile for FTP trafficModifying associations between service profiles and security profilesConfiguring an FTP virtual server with a server poolReviewing violation statistics for security profiles
Creating a custom FTP profile for protocol security
You create a custom FTP profile when you want to fine-tune the way that the BIG-IP®system managesFTP traffic. This procedure creates an FTP service profile that optimizes FTP traffic in the LAN, andenables Protocol Security in the profile so it can scan for vulnerabilities specific to the protocol.
1. On the Main tab, click Local Traffic > Profiles > Services > FTP.The FTP profile list screen opens.
2. Click Create.The New FTP Profile screen opens.
3. In the Name field, type a unique name for the profile.4. From the Parent Profile list, select the default ftp profile.5. Select the Custom check box.6. In the Settings area, clear the Translate Extended check box if you want to disable IPv6 translation.7. For the Inherit Parent Profile setting, select the check box.
This optimizes data channel traffic.8. Retain the Data Port setting default value of 20.9. Select the Protocol Security check box to enable FTP security checks.10. Click Finished.
The custom FTP profile now appears in the FTP profile list screen.
Creating a security profile for FTP traffic
An FTP security profile provides security checks that are applicable to the FTP protocol. You can createan FTP profile that specifies whether the system allows, logs, or blocks commands and requests fromservers that use the FTP protocol.
1. On the Main tab, click Security > Protocol Security > Security Profiles > FTP.The Security Profiles: FTP screen opens.
2. Click the Create button.The New FTP Security Profile screen opens.
3. In the Profile Name field, type a unique name for the profile.4. In the Defense Configuration area, select Alarm or Block for the defenses you want to activate.
FTP Defense Description when set to Block
Active Mode Prevents port scanning and other active mode exploits.
Anonymous FTPRequests
Prevents unauthorized access by prohibiting anonymous users
Command LengthRestriction
Prevents buffer overflow attacks by limiting command line length.Specify the maximum number of characters allowed in a command.
FTP Commands Protects against unwanted FTP commands. Move the commands youdo not want to allow into the Disallowed list.
BIG-IP Application Security Manager: Implementations
327

FTP Defense Description when set to Block
FTP ProtocolCompliance Failed
Protects against non-RFC compliant commands and also disallowssyntax errors.
Maximum Login Retries Prevents brute force attacks by limiting login retries. Specify themaximum attempts a user can try to log on, the maximum number oflogin attempts allowed from a specific client IP address, and how longto block users before they can try again.
Passive Mode Prevents passive mode exploits such as file stealing.
Option Description
Alarm The system logs any requests that trigger the violation.
Block The system blocks any requests that trigger the violation.
Alarm and Block The system both logs and blocks any requests that trigger the violation.
If you do not enable either Alarm or Block for a violation, the system does not perform thecorresponding security check.
5. Click Create.The screen refreshes, and you see the new security profile in the list.
The BIG-IP® system automatically assigns this service profile to FTP traffic that a designated virtualserver receives.
Modifying associations between service profiles and security profiles
Before you can modify associations between service profiles and security profiles, you must have createdat least one security profile.
When you enable the Protocol Security setting on an FTP, HTTP, or SMTP service profile, the systemautomatically assigns the first-listed security profile to the service profile you configured for that profile.You can review and modify the current associations between the service profiles and the security profilesfor each protocol.
1. On the Main tab, click Security > Protocol Security > Profiles Assignment.The Profiles Assignment screen opens.
2. From the Profiles Assignment menu, select the service profile type.3. For each traffic profile, select the protocol security profile to use from the list in the Assigned
Security Profile column.4. Click Save.
Configuring an FTP virtual server with a server pool
You can configure a local traffic virtual server and a default pool for your network's FTP servers.
1. On the Main tab, click Local Traffic > Virtual Servers.The Virtual Server List screen opens.
2. Click the Create button.The New Virtual Server screen opens.
3. In the Name field, type a unique name for the virtual server.4. In the Destination Address/Mask field, type an address, as appropriate for your network.
Securing FTP Traffic
328

The supported format is address/prefix, where the prefix length is in bits. For example, an IPv4address/prefix is 10.0.0.1 or 10.0.0.0/24, and an IPv6 address/prefix is ffe1::0020/64 or2001:ed8:77b5:2:10:10:100:42/64. When you use an IPv4 address without specifying a prefix,the BIG-IP® system automatically uses a /32 prefix.
5. In the Service Port field, type 21 or select FTP from the list.6. From the FTP Profile list, select either ftp or a custom profile.7. From the Source Address Translation list, select Auto Map.8. In the Resources area of the screen, for the Default Pool setting, click the Create (+) button.
The New Pool screen opens.9. In the Name field, type a unique name for the pool.10. In the Resources area, for the New Members setting, select the type of new member you are adding,
then type the information in the appropriate fields, and click Add to add as many pool members asyou need.
11. Click Finished to create the pool.The screen refreshes, and reopens the New Virtual Server screen. The new pool name appears in theDefault Pool list.
12. Click Finished to create the virtual server.The screen refreshes, and you see the new virtual server in the list.
The custom FTP virtual server appears in the Virtual Servers list.
Reviewing violation statistics for security profiles
You can view statistics and transaction information for each security profile that triggers securityviolations.
1. On the Main tab, click Security > Event Logs > Protocol and click HTTP, FTP, SMTP, or DNS.The appropriate statistics screen opens listing all violations for that protocol, with the number ofoccurrences.
2. Type a Support ID, if you have one, to filter the violations and view one in particular.3. Click a violation's hyperlink to see details about the requests causing the violation.
On the Statistics screen, in the left column, you can review information regarding the traffic volumefor each security profile configured.
BIG-IP Application Security Manager: Implementations
329

Securing FTP Traffic
330

Securing SMTP Traffic
Overview: Securing SMTP traffic using system defaultsThis implementation describes how to secure SMTP traffic using system defaults. When you create anSMTP security profile, the BIG-IP® Advanced Firewall Manager™ (AFM) provides several securitychecks for requests sent to a protected SMTP server. When you enable a security check, the system eithergenerates an alarm for, or blocks, any requests that trigger the security check.
You can configure the SMTP security profile to include the following checks:
• Verify SMTP protocol compliance, as defined in RFC 2821.• Validate incoming mail using several criteria.• Inspect email and attachments for viruses.• Apply rate limits to the number of messages.• Validate DNS SPF records.• Prevent directory harvesting attacks.• Disallow or allow some of the SMTP methods, such as VRFY, EXPN, and ETRN, that spam senders
typically use to attack mail servers.• Reject the first message from a sender, because legitimate senders retry sending the message, and
spam senders typically do not. This process is known as greylisting. The system does not rejectsubsequent messages from the same sender to the same recipient.
Task SummaryCreating an SMTP service profile with security enabledCreating an SMTP virtual server with protocol securityReviewing violation statistics for security profiles
Creating an SMTP service profile with security enabled
The easiest method for initiating SMTP protocol security for your SMTP virtual server traffic is to usethe system default settings. You do this by enabling protocol security for the system-supplied SMTPservice profile, and then associating that service profile with a virtual server.
1. On the Main tab, click Local Traffic > Profiles > Services > SMTP.The SMTP profile list screen opens.
2. In the Name column, click smtp.The Properties screen for the system-supplied SMTP profile opens.
3. Select the Protocol Security check box to enable SMTP security checks.4. Click Update.
You now have a security-enabled service profile that you can associate with a virtual server so that SMTPprotocol checks are performed on the traffic that the SMTP virtual server receives.
Creating an SMTP virtual server with protocol security
When you enable protocol security for an SMTP virtual server, the system scans any incoming SMTPtraffic for vulnerabilities before the traffic reaches the SMTP servers.
1. On the Main tab, click Local Traffic > Virtual Servers.

The Virtual Server List screen opens.2. Click the Create button.
The New Virtual Server screen opens.3. In the Name field, type a unique name for the virtual server.4. In the Destination Address field, type the IP address in CIDR format.
The supported format is address/prefix, where the prefix length is in bits. For example, an IPv4address/prefix is 10.0.0.1 or 10.0.0.0/24, and an IPv6 address/prefix is ffe1::0020/64 or2001:ed8:77b5:2:10:10:100:42/64. When you use an IPv4 address without specifying a prefix,the BIG-IP® system automatically uses a /32 prefix.
Note: The IP address you type must be available and not in the loopback network.
5. In the Service Port field, type 25 or select SMTP from the list.6. In the Configuration area, for the SMTP Profile setting, select the default profile, smtp.7. From the Source Address Translation list, select Auto Map.8. For the Default Pool setting, either select an existing pool from the list, or click the Create (+) button
and create a new pool.9. Click Finished.
The custom SMTP virtual server appears in the Virtual Servers list.
Reviewing violation statistics for security profiles
You can view statistics and transaction information for each security profile that triggers securityviolations.
1. On the Main tab, click Security > Event Logs > Protocol and click HTTP, FTP, SMTP, or DNS.The appropriate statistics screen opens listing all violations for that protocol, with the number ofoccurrences.
2. Type a Support ID, if you have one, to filter the violations and view one in particular.3. Click a violation's hyperlink to see details about the requests causing the violation.
On the Statistics screen, in the left column, you can review information regarding the traffic volumefor each security profile configured.
Overview: Creating a custom SMTP security profileThis implementation describes how to secure SMTP traffic. When you create an SMTP security profile,the system provides several security checks for requests sent to a protected SMTP server. When youenable a security check, the system either generates an alarm for, or blocks, any requests that trigger thesecurity check.
You can configure the SMTP security profile to include the following checks:
• Verify SMTP protocol compliance as defined in RFC 2821.• Validate incoming mail using several criteria.• Inspect email and attachments for viruses.• Apply rate limits to the number of messages.• Validate DNS SPF records.• Prevent directory harvesting attacks.• Disallow or allow some of the SMTP methods, such as VRFY, EXPN, and ETRN, that spam senders
typically use to attack mail servers.
Securing SMTP Traffic
332

• Reject the first message from a sender, because legitimate senders retry sending the message, andspam senders typically do not. This process is known as greylisting. The system does not rejectsubsequent messages from the same sender to the same recipient.
Task summaryCreating a custom SMTP service profileCreating a security profile for SMTP trafficEnabling anti-virus protection for emailModifying associations between service profiles and security profilesCreating and securing an SMTP virtual server and poolReviewing violation statistics for security profiles
Creating a custom SMTP service profile
You create an SMTP service profile optimized for security when you want to fine-tune the way that theBIG-IP®system scans SMTP traffic for vulnerabilities.
1. On the Main tab, click Local Traffic > Profiles > Services > SMTP.The SMTP profile list screen opens.
2. Click Create.The New SMTP Profile screen opens.
3. In the Name field, type a unique name for the profile.4. From the Parent Profile list, select the existing SMTP profile from which you want the new profile
to inherit settings. The default is smtp.5. Select the Custom check box.6. Select the Protocol Security check box to enable SMTP security checks.7. Click Finished.
The custom SMTP service profile now appears in the SMTP list screen.
Creating a security profile for SMTP traffic
The SMTP security profile provides security checks that are applicable to the SMTP protocol.
1. On the Main tab, click Security > Protocol Security > Security Profiles > SMTP.The Security Profiles: SMTP screen opens.
2. Click the Create button.The New SMTP Security Profile screen opens.
3. In the Profile Name field, type a unique name for the profile.4.5. In the Defense Configuration area, select Alarm or Block for the SMTP defenses you want to
activate.Option Description
Alarm The system logs any requests that trigger the violation.
Block The system blocks any requests that trigger the violation.
Alarm and Block The system both logs and blocks any requests that trigger the violation.
6. Click Create.The screen refreshes, and you see the new security profile in the list.
The BIG-IP® system automatically assigns this service profile to SMTP traffic that a designated virtualserver receives.
BIG-IP Application Security Manager: Implementations
333
Enabling anti-virus protection for email
You can warn or block against email attachments containing a suspected virus. To do this, you configurethe Application Security Manager™ to act as an ICAP client, and make sure that the SMTP profile hasanti-virus options selected. This prompts an external ICAP server to inspect email and email attachmentsfor viruses before releasing the content to the SMTP server.
1. On the Main tab, click Security > Options > Application Security > Integrated Services > Anti-Virus Protection.The Anti-Virus Protection screen opens.
2. For the Server Host Name/IP Address setting, type the fully qualified domain name of the ICAPserver, or its IP address.
Note: If you specify the host name, you must first configure a DNS server by selecting System >Configuration > Device > DNS.
3. For Server Port Number, type the port number of the ICAP server.The default value is 1344.
4. If you want to perform virus checking even if it may slow down the web application, select theGuarantee Enforcement check box.
5. Click Save.6. On the Main tab, click Security > Options > Protocol Security > Advanced Configuration.
The Advanced Configuration screen opens.7. In the System Variables area, ensure that the values for the icap_uri (URI for the ICAP service), and
virus_header_name (header name used) internal parameters correspond to your ICAP server'ssettings.By default, the system supports an ICAP server with McAfee anti-virus protection. If yourorganization uses a different ICAP server, update the parameters and save your changes.
ICAP Server icap_uri Value
McAfee VirusScan /REQMOD
Trend Micro InterScan Web Security /reqmod
Kaspersky /av/reqmod
Symantec /symcscanreq-av-url
ICAP Server virus_header_name Value
McAfee VirusScan X-Infection-Found,X-Virus-Name
Trend Micro InterScan Web Security X-Virus-ID
Kaspersky X-Virus-ID
Symantec X-Violations-Found
8. On the Main tab, click Security > Protocol Security > Security Profiles > SMTP.The Security Profiles: SMTP screen opens.
9. Click an existing SMTP security profile name or create a new one.The (New) SMTP Profile Properties screen opens.
10. For the Virus Detection setting, select the Alarm or Block options as required.
Securing SMTP Traffic
334

Option Description
Alarm The system logs any requests that trigger the virus detected violation, anddisplays them on the Protocol Security statistics screen.
Block The system blocks any email requests that trigger the virus detected violation.
Alarm and Block The system both logs and blocks any requests that trigger the virus detectedviolation.
11. Click Create to create a new profile, or Update to update an existing one.
All incoming email attachments will be inspected for viruses.
Modifying associations between service profiles and security profiles
Before you can modify associations between service profiles and security profiles, you must have createdat least one security profile.
When you enable the Protocol Security setting on an FTP, HTTP, or SMTP service profile, the systemautomatically assigns the first-listed security profile to the service profile you configured for that profile.You can review and modify the current associations between the service profiles and the security profilesfor each protocol.
1. On the Main tab, click Security > Protocol Security > Profiles Assignment.The Profiles Assignment screen opens.
2. From the Profiles Assignment menu, select the service profile type.3. For each traffic profile, select the protocol security profile to use from the list in the Assigned
Security Profile column.4. Click Save.
Creating and securing an SMTP virtual server and pool
Configure a virtual server and a default pool for your network's SMTP servers, and assign the customSMTP service profile. When the virtual server receives SMTP traffic, the SMTP security profile createdin Application Security Manager™ scans for security vulnerabilities, and then the virtual server can beconfigured to perform other actions (such as load balancing) on traffic that passes the scan.
1. On the Main tab, click Local Traffic > Virtual Servers.The Virtual Server List screen opens.
2. Click the Create button.The New Virtual Server screen opens.
3. In the Name field, type a unique name for the virtual server.4. In the Destination Address/Mask field, type an address, as appropriate for your network.
The supported format is address/prefix, where the prefix length is in bits. For example, an IPv4address/prefix is 10.0.0.1 or 10.0.0.0/24, and an IPv6 address/prefix is ffe1::0020/64 or2001:ed8:77b5:2:10:10:100:42/64. When you use an IPv4 address without specifying a prefix,the BIG-IP® system automatically uses a /32 prefix.
5. In the Service Port field, type 25 or select SMTP from the list.6. From the Configuration list, select Advanced.7. From the SMTP Profile list, select the custom SMTP profile that you created.8. From the Source Address Translation list, select Auto Map.9. In the Resources area of the screen, for the Default Pool setting, click the Create (+) button.
The New Pool screen opens.10. In the Name field, type a unique name for the pool.
BIG-IP Application Security Manager: Implementations
335

11. In the Resources area, for the New Members setting, select the type of new member you are adding,then type the information in the appropriate fields, and click Add to add as many pool members asyou need.
12. Click Finished to create the pool.The screen refreshes, and reopens the New Virtual Server screen. The new pool name appears in theDefault Pool list.
13. Click Finished.
The custom SMTP virtual server appears in the Virtual Servers list.
Reviewing violation statistics for security profiles
You can view statistics and transaction information for each security profile that triggers securityviolations.
1. On the Main tab, click Security > Event Logs > Protocol and click HTTP, FTP, SMTP, or DNS.The appropriate statistics screen opens listing all violations for that protocol, with the number ofoccurrences.
2. Type a Support ID, if you have one, to filter the violations and view one in particular.3. Click a violation's hyperlink to see details about the requests causing the violation.
On the Statistics screen, in the left column, you can review information regarding the traffic volumefor each security profile configured.
Securing SMTP Traffic
336
Legal Notices
Legal notices
Publication Date
This document was published on November 10, 2017.
Publication Number
MAN-0358-10
Copyright
Copyright © 2017, F5 Networks, Inc. All rights reserved.
F5 Networks, Inc. (F5) believes the information it furnishes to be accurate and reliable. However, F5assumes no responsibility for the use of this information, nor any infringement of patents or other rightsof third parties which may result from its use. No license is granted by implication or otherwise underany patent, copyright, or other intellectual property right of F5 except as specifically described byapplicable user licenses. F5 reserves the right to change specifications at any time without notice.
Trademarks
For a current list of F5 trademarks and service marks, see http://www.f5.com/about/guidelines-policies/trademarks.
All other product and company names herein may be trademarks of their respective owners.
Patents
This product may be protected by one or more patents indicated at: https://f5.com/about-us/policies/patents.
Export Regulation Notice
This product may include cryptographic software. Under the Export Administration Act, the UnitedStates government may consider it a criminal offense to export this product from the United States.
RF Interference Warning
This is a Class A product. In a domestic environment this product may cause radio interference, in whichcase the user may be required to take adequate measures.
FCC Compliance
This equipment has been tested and found to comply with the limits for a Class A digital device pursuantto Part 15 of FCC rules. These limits are designed to provide reasonable protection against harmfulinterference when the equipment is operated in a commercial environment. This unit generates, uses, andcan radiate radio frequency energy and, if not installed and used in accordance with the instructionmanual, may cause harmful interference to radio communications. Operation of this equipment in aresidential area is likely to cause harmful interference, in which case the user, at his own expense, will berequired to take whatever measures may be required to correct the interference.

Any modifications to this device, unless expressly approved by the manufacturer, can void the user'sauthority to operate this equipment under part 15 of the FCC rules.
Canadian Regulatory Compliance
This Class A digital apparatus complies with Canadian ICES-003.
Standards Compliance
This product conforms to the IEC, European Union, ANSI/UL and Canadian CSA standards applicable toInformation Technology products at the time of manufacture.
Legal Notices
338

Index
A
access policyconfiguring 124, 321
access profileadding to virtual server 125, 322creating 122, 319
access validation criteria 56action items
reviewing security policy 173AJAX applications
and login response page 156configuring blocking policy 156configuring blocking response 157, 194configuring login response 157, 194overview 155securing JSON data 155using JSON 151
allowed cookiesadding 227deleting 229editing 229
allowed HTTP URL properties 213allowed HTTP URLs
adding 211allowed methods
adding 233allowed URLs
creating for WebSocket 217, 240alpha-numeric parameters, See user-input parametersanonymous proxy, disallowing 91anti-virus protection
creating for email and attachments 334antivirus protection
configuring external 260APM and ASM setup
result 324application security 103Application Security Administrator
creating user accounts 261Application Security Editor
creating user accounts 261application security overview 97ArcSight log message format
about 107ASM
fingerprint command 254ASM_REQUEST_BLOCKING
description 254ASM_REQUEST_DONE
description 254examples 267
ASM_REQUEST_VIOLATIONdescription 254
ASM_RESPONSE_VIOLATIONdescription 254
attacksviewing requests with violations 265
authenticated URLs 53, 56, 312authentication
of logins 53automatic policy building
learning from response codes 169learning from responses 168limiting maximum policy elements 181stopping/starting Policy Builder 184
automatic synchronizationenabling and disabling 287, 305
awareness, user and session 118
B
base64 decodingfor file upload parameters 210for user-input parameters 210
behavioral DDoS protectionenabling 26
Behavioral DoS protectionoverview 16
blockingdefined 185, 251
blocking actionsconfiguring 186configuring cookie hijacking response 112configuring for evasion techniques 187configuring for user-defined violations 267configuring for web services 143, 188configuring login response 192configuring response pages 191customizing XML response 193
blocking methodsoverview 185
blocking policyconfiguring for AJAX 156
blocking response pagelogin response pageconfiguring for AJAX 157, 194
blocking responsesoverview 191
bot defenseconfiguring proactive 21overview 14
Bot Defense 103bot detection
enabling 69bot signature check
configuring 23brute force attacks
about 59about configuring 59configuring automatic protection 62creating a custom configuration 62viewing event logs 66viewing reports 65
brute force mitigationoverview 59
buffer overflow attacks
Index
339

buffer overflow attacks (continued)preventing 249
C
CAPTCHA challengesconfiguring 31
case-sensitive security policy 252certificates
about 139adding 139
character setschanging for parameter names 207changing for parameter values 206
charactersspecifying legal in URLs 220
client certificates 139compliance report
generating PCI 100sample PCI 101
config sync addressesspecifying 283, 293, 301
configuration synchronizationconfiguring for ASM 281, 291, 300performing basic networking 282, 292, 300result for synchronizing multiple ASM systems 289result for two ASM systems 298result of synchronizing ASM devices 307synchronizing ASM devices 291, 299syncing to group 285, 295, 303
contentdefining with queries 142
content profilescollapsing 180creating for URLs 182creating for WebSocket URLs 243overriding meta characters 148
cookie headersetting maximum length 230
cookie hijackingconfiguring response page 112
cookie hijacking hijacking, sessionpreventing 111
cookie protectionexporting 232importing 232overview 231reconfiguring 231
cookiesabout 225about adding 227about pure wildcard 226adding 227adding enforced 228changing how enforced 180changing wildcard order 229collapsing 180deleting 229editing 229learning explicit entities 230
CORSand proactive bot defense 14
CORS (Cross-Origin Resource Sharing)about 133how it works 136replacing headers 134setting up 133
CORS headersdefined 136
credit card maskingconfiguring 95overview 95
cross-domain request enforcementand WebSocket 236defined 133how it works 136replacing CORS headers 134setting up 133
cross-domain requestsabout 17for authorization 136
cross-site request forgery (CSRF)enabling protection 256
CSRFenabling protection 256
custom reportscreating for DoS 39
D
Data Guardand response headers inspected 93protecting sensitive data 93
data maskingdefined 93
database security integrationconfiguring the server 313, 322enabling 314, 323overview 309, 315prerequisites 315result 314
decryptionenabling 140
default DoS profilemodifying 45
defense configurationfine-tuning 145setting definitions 145
denial-of-service protectionadding to a virtual server 32, 46
device discoveryfor device trust 283, 293, 301
device groupscreating 284, 287, 294, 302, 305enabling ASM 288, 297, 306synchronizing ASM-enabled 288, 297, 306
device managementconsiderations 282, 292, 300setting up application security synchronization 281, 291,299, 300
device trustestablishing 283, 293, 301
disallowed file typesadding 198
Index
340

disallowed HTTP URLsadding 217
disallowed WebSocket URLsadding 219, 243
disaster recoveryresult of synchronizing ASM devices 307synchronizing ASM devices 299
displaying 97DoS attacks
about 13about geolocation mitigation 17about heavy URL protection 17about recognizing 13about site-wide mitigation 18about viewing reports 35configuring behavioral/stress-based protection 26configuring bot signature check 23configuring CAPTCHA challenges 31configuring heavy URL protection 29configuring proactive bot defense 21configuring protection 19, 50configuring TPS detection 24investigating 35recording traffic 30viewing DoS Overview 35viewing event logs 37viewing URL Latencies report 38
DoS detectionabout mitigation methods 16
DoS Overview Summaryviewing 35
DoS policy switchingcreating LTM policy 45creating LTM policy rules 45overview 43result 47
DoS profilesassociating with virtual servers 32, 46creating for Layer 7 traffic 44modifying default 45recording traffic 30
DoS protectionabout Behavioral DoS 16about different types 13about stress-based 15about TPS-based 15and HTTP caching 18and RAM cache 18setup overview 19setup result 32
DoS reportscreating custom 39sample Dashboard 36
dynamic content value parameterscreating 204defined 204
dynamic flowsconfiguring for URLs 224
dynamic mitigation 59dynamic parameter name
creating 206dynamic parameters
dynamic parameters (continued)specifying when to learn 179
E
email and attachmentsinspecting 334
encryptionenabling 140
enforced cookiesadding 228deleting 229editing 229
enforcement modechanging 185, 251defined 185, 251
enforcement readinessabout 172
enforcement readiness periodadjusting 252defined 252
enforcement, login 56, 115, 312entities
combining similar 180enforcing 172
evasion techniquesconfiguring blocking 187
event logviewing requests 98
event logsviewing application security 109viewing for DoS 37
explicit entitiesadding cookies 230
export formatsabout 273
F
failover IP addressesspecifying 286, 296, 304
file typesabout adding 197adding 197disallowing 198specifying for URLs 183
file upload parameters, See user-input parametersfile uploads
disallowing in parameters 203fingerprinting
enabling 73flow parameters
creating 201, 223flows to URLs
configuring 222configuring dynamic 224
FTP profilescreating custom security enabled 327creating manually for FTP security 327creating security enabled 325
FTP trafficcreating security profile 327
Index
341

FTP traffic (continued)securing 325, 326
full policy inspectionenabling/disabling 183
G
geolocationconfiguring DoS protection by 19, 50disallowing application use 91enforcing from Requests list 92overview 91
geolocation mitigationabout 17
global parameterscreating 199defined 199
Google Web ToolkitGWT 159see GWT 159
GWTadding to support security policies 159
GWT profileand implementation result 161associating with URL 160creating 159
H
header contentenforcing requests for URLs 219
header normalizationabout 247
header-based content profilesadding 219
headersconfiguring trusted XFF 254
heavy URL protectionabout 17configuring 29
heavy URLsviewing URL Latencies report 38
hijacking, sessionconfiguring response page 112overview 111
host namesabout adding multiple 255adding 255learning automatically 177
HTTP and HTTPSdifferentiating between 252
HTTP cachingand DoS protection 18
HTTP header lengthsetting maximum 249
HTTP header securityconfiguring 248overview 247, 248results 250
HTTP headersabout mandatory 247
HTTP protocol compliance
HTTP protocol compliance (continued)configuring dynamic session IDs 187
HTTP URLsadding cross-domain enforcement 133
HTTPS trafficcreating virtual servers for 121, 318
I
IBM InfoSphere Guardium integrationconfiguring the server 313, 322enabling 314, 323overview 309, 315
ICAP serverconfiguring 260
ignored suggestionsviewing 172
integer parametersspecifying when to learn 178
internal variablesdb variablesvariables, systemadjusting 259
IP address exceptionscreating 87deleting 88overview 87updating 89
IP address intelligencecategories 84downloading the database 81enabling 81logging information 83rejecting bad requests 84
IP address intelligence blockingoverview 81reviewing statistics 83setting up 82
IP addressestracking specific 117
IP intelligence database 84IP intelligence policy
adding to a virtual server 51creating for ASM 51
IP reputation blockingoverview 81
iprep.autoupdate command 81iRule events
activating for ASM 253table for ASM 254
iRulesviolation examples 267
J
JSON datamasking 151, 238
JSON profilecreating 151, 238
L
learningconfiguring learning settings 167
Index
342

learning (continued)overview 165
Learning modeand policy building 184
learning score 165learning suggestions
about 165reviewing 169viewing requests 171
local traffic policiesand ASM 277, 280and manual ASM policies 277
local traffic policyassociating with virtual servers 47creating for DoS 45creating rules 45creating rules for ASM 279
local traffic poolscreating 120, 317
local trust domainand device groups 284, 287, 294, 302, 305defined 283, 293, 301
loggingof IP address intelligence information 83
logging profilesassociating with security policy 106creating for bot defense 40creating for local storage 104creating for remote logging 105examples of 103using the storage filter 108
logging responsesabout 106
login enforcementand WebSocket security 236
login pagesabout creating 53access validation criteria 56creating automatically 53, 60, 113creating manually 54, 60, 113, 311definition 53enforcing 56, 312
login responseconfiguring 192
login response pageconfiguring for AJAX 156
logout pagescreating manually 57
logout URL 56, 312logs
viewing application security 109
M
malicious IP addresses 82mandatory headers
about 247memory optimization
enabling 183meta characters
overriding in content profiles 148methods
methods (continued)adding allowed 233overriding for URLs 221
mitigation methodsabout 16
monitoring application security 97
N
navigation parameterscreating 204defined 204
network failoverconfiguring 284, 294, 302
network firewall 103normalization for headers
about 247
O
open redirectsoverview 129protecting against 129, 130summary 131
P
parameter value types 207parameters
about adding 199adjusting global/URL level 207associating with JSON profiles 153changing character sets 206, 207classifying content 178collapsing 180creating dynamic content value 204creating dynamic names 206creating flow 201, 223creating global 199creating navigation 204creating sensitive 202creating URL 200list of value types 207overview of how processed 208securing base64-encoded 210specifying when to learn dynamic 179specifying when to learn integer 178
parameters pathenforcing security 209overview 209
path parametersenforcing security 209overview 209
PCI Compliance reportgenerating 100sample 101
Policy Builderstopping and starting 184
policy building settingschanging 175
Policy Diff featureoverview 274
Index
343
policy differences 275pools
creating local traffic 120, 317preferences
changing system 259preflight request
defined 136proactive bot defense
and CORS 14and cross-domain requests 17configuring 21overview 14
profilesassociating parameters with JSON 153associating URLs with GWT 160associating URLs with JSON 152associating WebSocket URLs with JSON 244associating WebSocket URLs with text 244creating for FTP security 325, 327creating for SMTP security 331–333creating GWT 159creating JSON 151, 238creating plain text 239
protocol security 103pure wildcard cookies 226
R
redirect URLoverview 191
redirection domainsenforcing 131
redirection protectionchecking status 130configuring 129overview 129summary 131
referrer URLsabout referrer 211
RegExp Validator tool 262regular expressions
validating 262remote logging servers
configuring 105reporting
for DoS attacks 35for IP address intelligence blocking 83
reporting tools 97requests
analyzing violations 98examples of analyzing 99
Requests event logexamples 99
Requests Listviolationsanalyzing illegal requests 98viewing requests 98
response codeslearning from 169specifying allowed 253
response pagesconfiguring 191configuring for cookie hijacking 112
response scrubbingdefined 93
responseslearning from 168
responses to blockingoverview 191
routingbased on XML content 142
rulescreating local traffic policy 279
S
search engine, customizeconsiderations 68
search enginesallowing for web scraping 68supported 68
securityconfiguring for FTP traffic 325, 326configuring for SMTP traffic 331
security for web servicesabout 139
security policiesand local traffic policies 277, 280and manually adding local traffic policies 277
security policyabout configuring automatic build settings 175about export formats 273about general settings 251about learning suggestions 165adding trusted IP addresses 177adjusting the parameter level 207analyzing illegal requests 98changing settings 175comparing 274, 275configuring how entities are learned 167creating simple 121, 155, 278, 310, 318differentiating between HTTP and HTTPS 252editing manually 251exploring action items 173exporting 273fine-tuning 169import/export overview 273importing 274limiting maximum elements 181overview of learning 165setting cookie header length 230setting enforcement mode 185, 251setting enforcement readiness period 252setting HTTP header length 249specifying allowed response codes 253specifying file types for URLs 183synchronizing ASM 288, 297, 306viewing requests 171viewing whether case-sensitive 252
security policy synchronizationconfiguring 281, 291, 299, 300
security profilescreating for FTP 327creating for SMTP 333viewing statistics 326, 329, 332, 336
Index
344

security profiles, protocoland service profiles 328, 335modifying assignments 328, 335
self IP addressesand VLANs 120, 317creating 120, 317
sensitive datamasking 147masking credit card numbers 95masking JSON 151, 238protecting 93protecting, overview 93
sensitive parameterscreating 202
server certificates 139server technologies
about adding 163adding 163
service profilescreating for SMTP security 333
service profiles, protocoland security profiles 328, 335modifying assignments 328, 335
session awarenessenabling 115enabling with APM 125
session hijackingconfiguring response page 112overview 111preventing 111
session ID numberstracking specific 117
session IDsconfiguring dynamic 187, 224
session opening detectionenabling 70
session trackingenabling 115enabling with APM 125overview 112, 118
session transaction anomaliesenabling detection 72
session-based mitigation 59sessions, monitoring 117, 127shun list
associating with virtual server 51definition 49list of system variables 50overview using with L7 DoS 49result of using with L7 DoS 52using with ASM 51
SMTP profilescreating custom security enabled 332creating manually for SMTP security 332creating security enabled 331creating with custom security enabled 333manually creating for SMTP security 333
SMTP trafficcreating security profile 333securing 331
SOAP messagesencrypting 140
SOAP messages (continued)verifying 140
SOAP methodsenabling 148
statisticsviewing for security profiles 326, 329, 332, 336
storage filterconfiguring 108
stress-based DDoS protectionconfiguring 26
stress-based DoS protectionoverview 15
suggestionsTraffic Learning example 166viewing ignored 172
Sync-Failover device groupscreating 284, 294, 302
Sync-Only device groupscreating 287, 305
synchronizationconfiguring for ASM 291, 299result for configuring multiple ASM systems 289result for configuring two ASM systems 298
syslog request formatabout 107
syslog serverconfiguring 105
system preferenceschanging 259
system variablesadjusting 259
T
TCP dumpdiagnosing DoS attacks 30
text profilecreating 239
TPS-based DoS detectionconfiguring 24
Traffic Learning screenexample of suggestions 166
transaction rateabout detection 15
transparentdefined 185, 251
trust domainsand local trust domain 283, 293, 301
trusted IP addressesadding 177
U
unlearnable violationsabout 166
URL Latencies reportsample report 39viewing 38
URL parameterscreating 200defined 200
URLs
Index
345

URLs (continued)about adding 211about heavy URL protection 17about login/logout 53about referrer 211about WebSocket 235adding authenticated 56, 312adding cross-domain enforcement 133adding header-based content profiles 219adding HTTP 211adding logout 56, 312associating with GWT profiles 160associating with JSON profiles 152classifying request content 182classifying WebSocket request content 243collapsing 180configuring dynamic flows 224configuring dynamic session IDs 224configuring flows to 222creating WebSocket 217, 240disallowing HTTP 217disallowing WebSocket 219, 243enforcing requests for 219enforcing specific methods 221modifying legal character set 220replacing CORS headers 134summary of HTTP URL properties 213
user awarenessoverview 118
user informationmonitoring 117, 127tracking specific 117
user interfaceadjusting preferences 259
user rolesfor application security 261
user-defined violationsabout 265creating 266deleting 271example of iRules 267exporting and importing 272
user-input parametersand base64 decoding 210disallowing file upload 203
V
violation ratingabout 264
violationsabout 263about unlearnable 166about user-defined 265changing severity levels 263configuring blocking actions 186configuring blocking for evasion techniques 187configuring blocking for web services 143, 188creating user-defined 266deleting user-defined 271enabling user-defined 267exporting user-defined 272
violations (continued)importing user-defined 272list for WebSocket 244table of types 264viewing descriptions of 263viewing requests with 265
violations statisticsviewing 326, 329, 332, 336
virtual serversassociating DoS profile and IP intelligence policy 51associating DoS profiles 32, 46associating local traffic policy 47associating WebSocket profile 238creating for FTP traffic 325, 328creating for HTTPS traffic 121, 318creating for SMTP traffic 331, 335for FTP, with pool 328
VLANsand self IP addresses 120, 317creating 119, 316
W
web scrapingoverview 67prerequisites 67
web scraping attack types 77web scraping attacks
configuring proactive bot defense 21detecting with fingerprinting 73enabling bot detection 69enabling session opening detection 70enabling session transaction anomalies 72example of statistics chart 78examples of viewing statistics event log 74overview of proactive DoS defense 14result of setting up 78viewing event logs 74viewing statistics 77
web servicesconfiguring blocking 143, 188
web services securityabout 139
WebSocketlist of violations 244
WebSocket connectionscreating URLs for 217, 240defined 235overview of securing 235securing automatically 236
WebSocket profileassociating with virtual server 238creating 237
WebSocket securityabout 235about cross-domain request enforcement 236about login enforcement 236
WebSocket trafficrecognizing 238
WebSocket URLsadding cross-domain enforcement 133adjusting learning settings 242
Index
346

WebSocket URLs (continued)associating with JSON profiles 244associating with text profiles 244classifying content 243
whitelistcreating for DoS 20
wildcard syntax 198, 213, 226wildcard URLs
specifying file types for 183wildcards
and cookies 226changing cookie order 229
X
x509 certificatesfor device trust 283, 293, 301
XFF headersconfiguring trusted 254
XML blocking responsecustomizing 193
XML profiledefense configuration settings 145editing defense configuration 145enabling SOAP methods 148masking sensitive data 147
XPath expressionssamples of syntax 143
XPath queriesrules for writing 142
XPath queryexamples 143
Index
347

Index
348


![Mission Manager[1]](https://static.fdokumen.com/doc/165x107/6313fe215cba183dbf075a68/mission-manager1.jpg)