BD PhaSeal™ Optima System procedures
28
BD PhaSeal ™ Optima System procedures
-
Upload
khangminh22 -
Category
Documents
-
view
0 -
download
0
Transcript of BD PhaSeal™ Optima System procedures

BD PhaSeal™ Optima System procedures
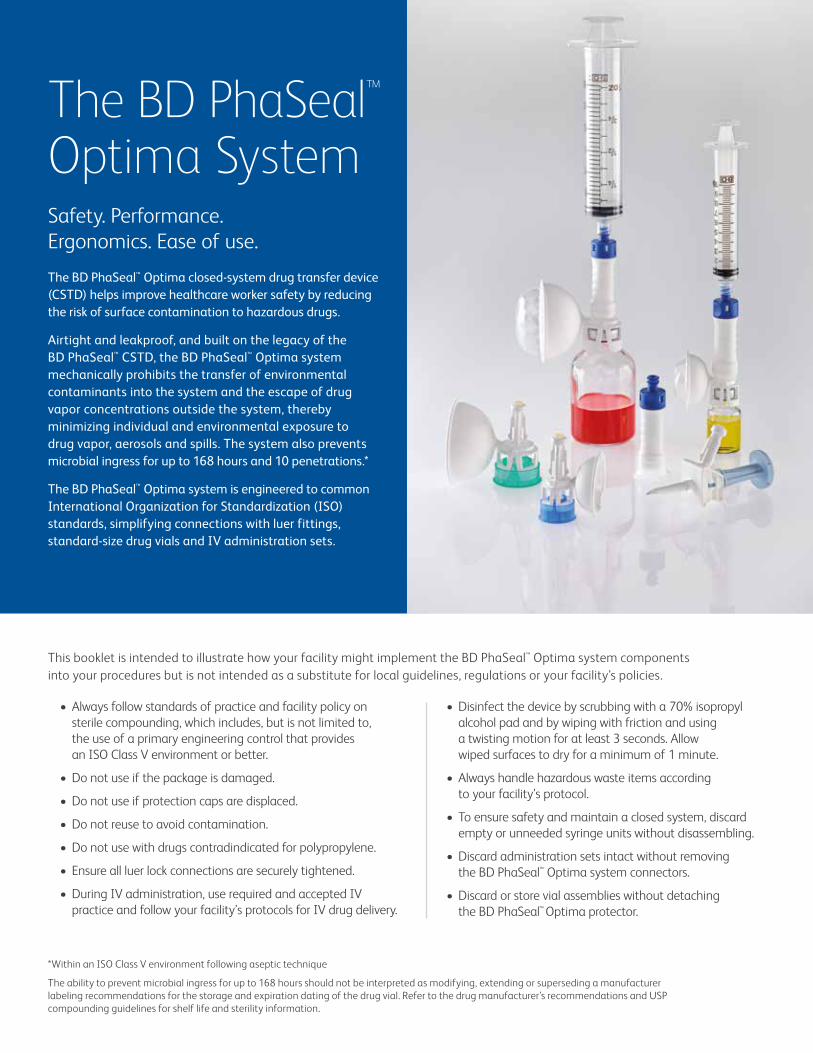
The BD PhaSeal™ Optima SystemSafety. Performance. Ergonomics. Ease of use.
This booklet is intended to illustrate how your facility might implement the BD PhaSeal™ Optima system components into your procedures but is not intended as a substitute for local guidelines, regulations or your facility’s policies.
The BD PhaSeal™ Optima closed-system drug transfer device (CSTD) helps improve healthcare worker safety by reducing the risk of surface contamination to hazardous drugs.
Airtight and leakproof, and built on the legacy of the BD PhaSeal™ CSTD, the BD PhaSeal™ Optima system mechanically prohibits the transfer of environmental contaminants into the system and the escape of drug vapor concentrations outside the system, thereby minimizing individual and environmental exposure to drug vapor, aerosols and spills. The system also prevents microbial ingress for up to 168 hours and 10 penetrations.*
The BD PhaSeal™ Optima system is engineered to common International Organization for Standardization (ISO) standards, simplifying connections with luer fittings, standard-size drug vials and IV administration sets.
• Always follow standards of practice and facility policy on sterile compounding, which includes, but is not limited to, the use of a primary engineering control that provides an ISO Class V environment or better.
• Do not use if the package is damaged.
• Do not use if protection caps are displaced.
• Do not reuse to avoid contamination.
• Do not use with drugs contradindicated for polypropylene.
• Ensure all luer lock connections are securely tightened.
• During IV administration, use required and accepted IV practice and follow your facility’s protocols for IV drug delivery.
• Disinfect the device by scrubbing with a 70% isopropyl alcohol pad and by wiping with friction and using a twisting motion for at least 3 seconds. Allow wiped surfaces to dry for a minimum of 1 minute.
• Always handle hazardous waste items according to your facility’s protocol.
• To ensure safety and maintain a closed system, discard empty or unneeded syringe units without disassembling.
• Discard administration sets intact without removing the BD PhaSeal™ Optima system connectors.
• Discard or store vial assemblies without detaching the BD PhaSeal™ Optima protector.
*Within an ISO Class V environment following aseptic technique
The ability to prevent microbial ingress for up to 168 hours should not be interpreted as modifying, extending or superseding a manufacturer labeling recommendations for the storage and expiration dating of the drug vial. Refer to the drug manufacturer’s recommendations and USP compounding guidelines for shelf life and sterility information.

Table of contents
Preparation .......................................................................................................................................................................................................21.1 Building a syringe unit ................................................................................................................................................................................................ 3
1.2 Building a vial assembly ............................................................................................................................................................................................. 4
1.3 Building a vial assembly using an assembly fixture (M12-O) ............................................................................................................... 5
1.4 Preparing one vial to one syringe ........................................................................................................................................................................ 6
1.5 Preparing two or more vials to one syringe .................................................................................................................................................... 7
1.6 Preparing an IV bag using an infusion adapter (C100-O) ..................................................................................................................... 8
1.7 Preparing/reconstituting with 100 mL of diluent ........................................................................................................................................ 9
1.8 Circle priming: priming with drug in line ........................................................................................................................................................ 10
1.9 Transferring hazardous drug from syringe to syringe (QS-ing)......................................................................................................... 11
1.10 Filtering with a vial ..................................................................................................................................................................................................... 12
1.11 Filtering a syringe........................................................................................................................................................................................................ 13
1.12 Filtering into an IV bag............................................................................................................................................................................................ 14
Administration ................................................................................................................................................................................ 162.1 Administering an IV push ...................................................................................................................................................................................... 17
2.2 Flushing a connector (C35-O) with saline ..................................................................................................................................................... 18
2.3 Flushing through an infusion adapter (C100-O) ....................................................................................................................................... 19
2.4 Using a primary IV administration set for hazardous drug delivery ................................................................................................. 20
2.5 Using a secondary infusion line (piggyback) for hazardous drug delivery ................................................................................ 21
2.6 Backpriming and administering a secondary (piggyback) IV administration set ................................................................. 22
2.7 Intravesicular administration (urine and bladder) .................................................................................................................................. 23
2.8 Circle priming: priming with drug in line ........................................................................................................................................................ 24
2.9 Intramuscular (IM) and subcutaneous (SQ) injections ........................................................................................................................ 25

2
Preparation
2
3
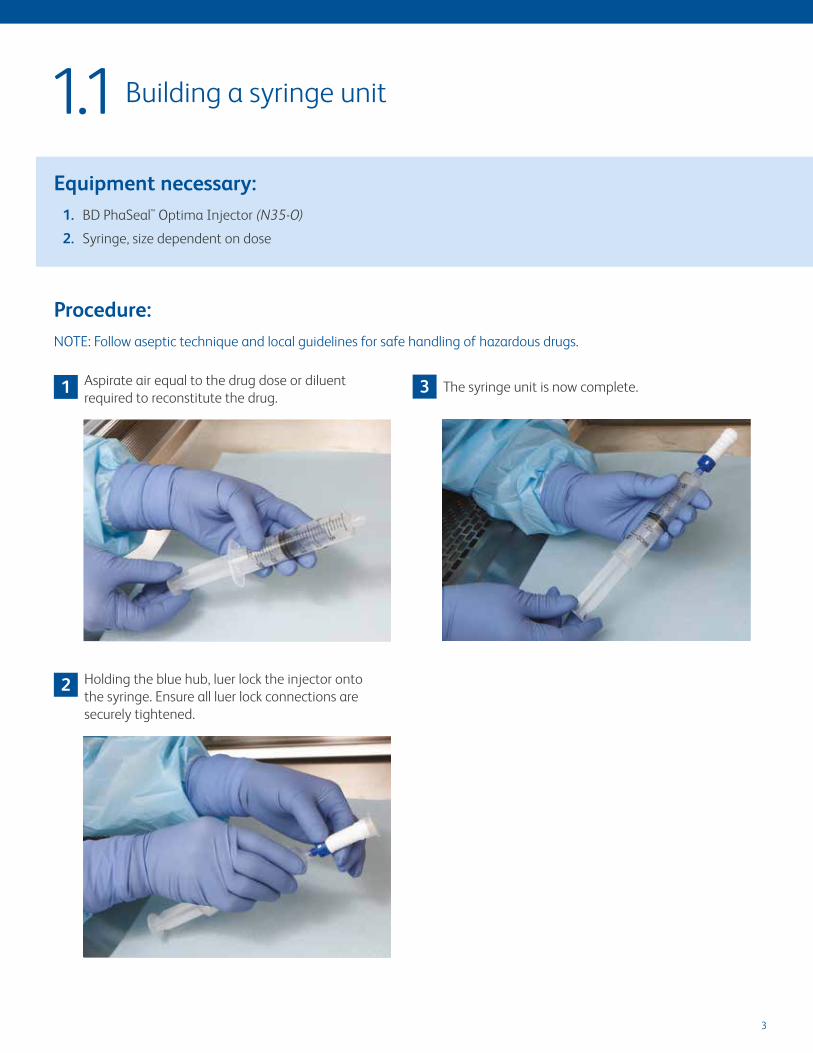
Building a syringe unit
Equipment necessary:1. BD PhaSeal™ Optima Injector (N35-O)
2. Syringe, size dependent on dose
1 Aspirate air equal to the drug dose or diluent required to reconstitute the drug.
2 Holding the blue hub, luer lock the injector onto the syringe. Ensure all luer lock connections are securely tightened.
3 The syringe unit is now complete.
1.1
Procedure:NOTE: Follow aseptic technique and local guidelines for safe handling of hazardous drugs.
4
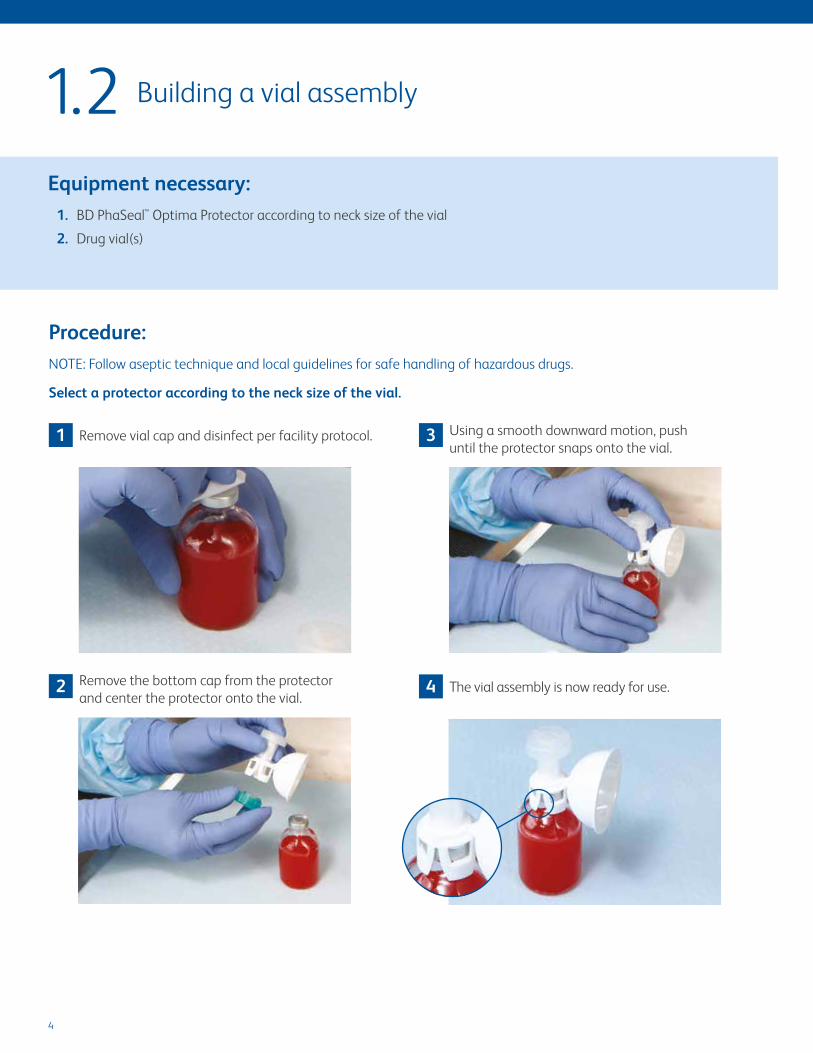
Building a vial assembly1.2Equipment necessary:
1. BD PhaSeal™ Optima Protector according to neck size of the vial
2. Drug vial(s)
Procedure:NOTE: Follow aseptic technique and local guidelines for safe handling of hazardous drugs.
Select a protector according to the neck size of the vial.
1 Remove vial cap and disinfect per facility protocol.
2 Remove the bottom cap from the protector and center the protector onto the vial.
3 Using a smooth downward motion, push until the protector snaps onto the vial.
4 The vial assembly is now ready for use.
5
Building a vial assembly using an assembly fixture (M12-O)
Equipment necessary:1. BD PhaSeal™ Optima Protector according to neck size of the vial
2. BD PhaSeal™ Optima assembly fixture (M12-O)
3. Drug vial(s)
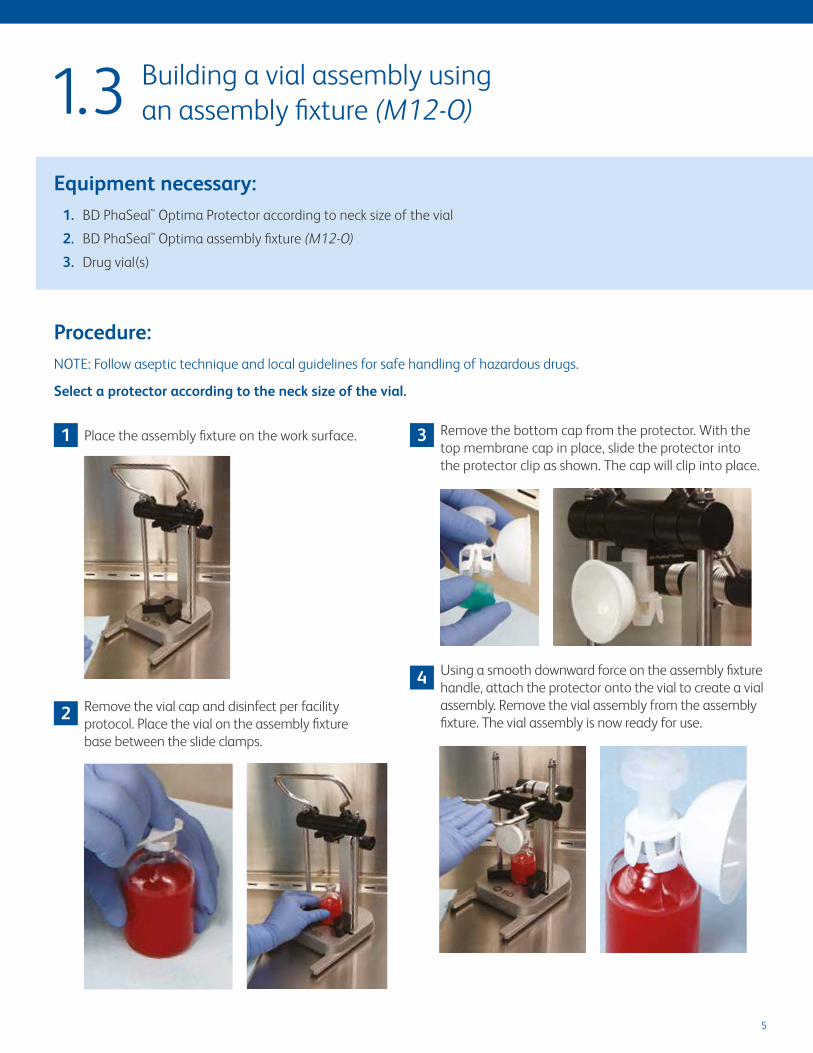
1 Place the assembly fixture on the work surface.
2 Remove the vial cap and disinfect per facility protocol. Place the vial on the assembly fixture base between the slide clamps.
3 Remove the bottom cap from the protector. With the top membrane cap in place, slide the protector into the protector clip as shown. The cap will clip into place.
4 Using a smooth downward force on the assembly fixture handle, attach the protector onto the vial to create a vial assembly. Remove the vial assembly from the assembly fixture. The vial assembly is now ready for use.
Procedure:NOTE: Follow aseptic technique and local guidelines for safe handling of hazardous drugs.
Select a protector according to the neck size of the vial.
1.3
6
Preparing one vial to one syringe
Equipment necessary:1. Vial assembly (Procedure 1.2: Building a vial assembly)
2. Syringe unit (Procedure 1.1: Building a syringe unit)
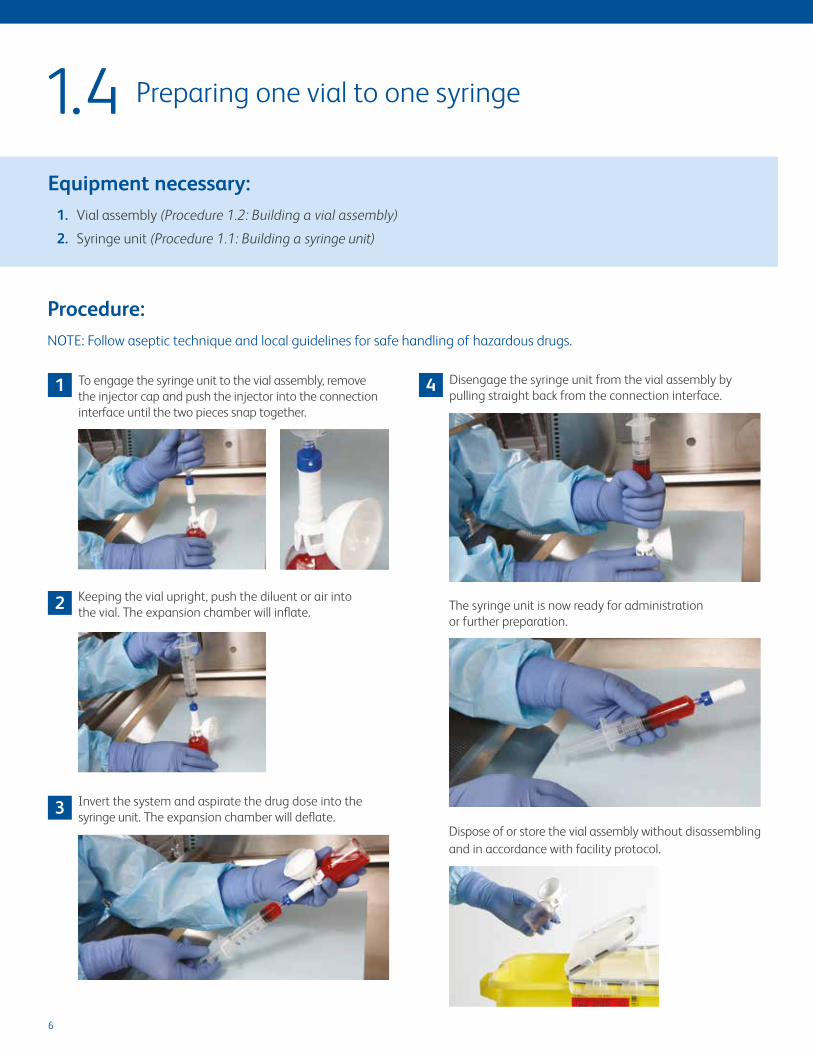
1 To engage the syringe unit to the vial assembly, remove the injector cap and push the injector into the connection interface until the two pieces snap together.
2 Keeping the vial upright, push the diluent or air into the vial. The expansion chamber will inflate.
3 Invert the system and aspirate the drug dose into the syringe unit. The expansion chamber will deflate.
4 Disengage the syringe unit from the vial assembly by pulling straight back from the connection interface.
The syringe unit is now ready for administration or further preparation.
Dispose of or store the vial assembly without disassembling and in accordance with facility protocol.
Procedure:NOTE: Follow aseptic technique and local guidelines for safe handling of hazardous drugs.
1.4

7
Preparing two or more vials to one syringe
Equipment necessary:1. Two or more vial assemblies (Procedure 1.2: Building a vial assembly)
2. One syringe unit (Procedure 1.1: Building a syringe unit)
1 To engage the syringe unit to the first vial assembly, push the injector into the connection interface until the two pieces snap together.
2 Keeping the vial upright, push the volume of diluent or air required into the first vial. The expansion chamber will inflate.
3 Disengage the syringe unit from the vial assembly by pulling the injector straight back from the connection interface.
4 Engage the syringe unit to the second vial assembly and push the remaining volume of diluent or air required into the vial. If additional vials are required, repeat steps 3 and 4 as needed.
5 Invert the vial and aspirate the drug. Disengage the syringe unit from the vial assembly.
6 Engage the syringe unit to additional vial assemblies as needed. Invert the vial and aspirate the drug.
7 Disengage the syringe unit from the vial assembly. The syringe unit is ready for administration or further preparation.
Dispose of or store the vial assembly without disassembling and in accordance with facility protocol.
Procedure:NOTE: Follow aseptic technique and local guidelines for safe handling of hazardous drugs.
If the drug is in liquid form, draw up air equal to the total dose volume required for all vials into the syringe prior to preparing the syringe unit. If the vials are in powder form, draw up the amount of diluent needed to reconstitute all drug vials when preparing the syringe unit.
1.5
8
Preparing an IV bag using an infusion adapter (C100-O)
Equipment necessary:1. Prepared syringe unit(s)
2. BD PhaSeal™ Optima Infusion Adapter (C100-O)
3. IV bag for preparation
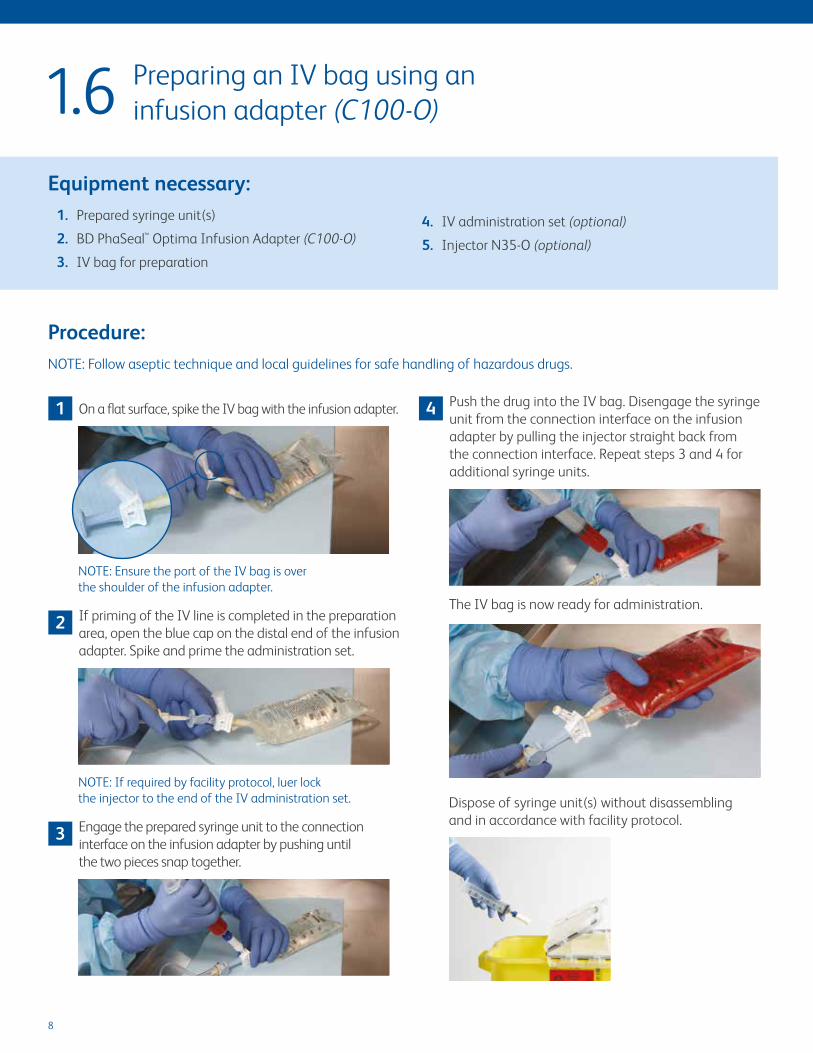
1 On a flat surface, spike the IV bag with the infusion adapter.
NOTE: Ensure the port of the IV bag is over the shoulder of the infusion adapter.
2 If priming of the IV line is completed in the preparation area, open the blue cap on the distal end of the infusion adapter. Spike and prime the administration set.
NOTE: If required by facility protocol, luer lock the injector to the end of the IV administration set.
3 Engage the prepared syringe unit to the connection interface on the infusion adapter by pushing until the two pieces snap together.
4 Push the drug into the IV bag. Disengage the syringe unit from the connection interface on the infusion adapter by pulling the injector straight back from the connection interface. Repeat steps 3 and 4 for additional syringe units.
The IV bag is now ready for administration.
Dispose of syringe unit(s) without disassembling and in accordance with facility protocol.
4. IV administration set (optional)
5. Injector N35-O (optional)
Procedure:NOTE: Follow aseptic technique and local guidelines for safe handling of hazardous drugs.
1.6
9
Preparing/reconstituting with 100 mL of diluent
Equipment necessary:1. Vial assembly with BD PhaSeal™ Optima Protector (P20-O) (Procedure 1.2: Building a vial assembly)
2. Two syringe units, each prepared with 50 mL of diluent (Procedure 1.1: Building a syringe unit)
Syringe unit 1
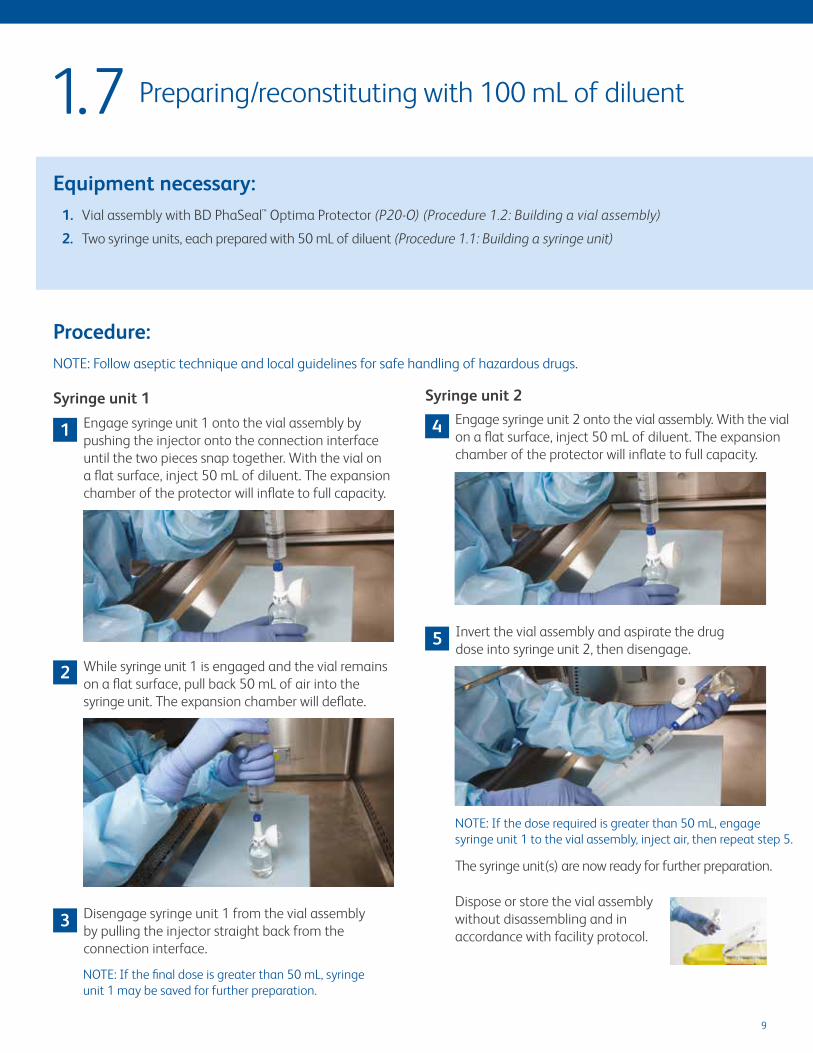
1 Engage syringe unit 1 onto the vial assembly by pushing the injector onto the connection interface until the two pieces snap together. With the vial on a flat surface, inject 50 mL of diluent. The expansion chamber of the protector will inflate to full capacity.
2 While syringe unit 1 is engaged and the vial remains on a flat surface, pull back 50 mL of air into the syringe unit. The expansion chamber will deflate.
3 Disengage syringe unit 1 from the vial assembly by pulling the injector straight back from the connection interface.
NOTE: If the final dose is greater than 50 mL, syringe unit 1 may be saved for further preparation.
Syringe unit 2
4 Engage syringe unit 2 onto the vial assembly. With the vial on a flat surface, inject 50 mL of diluent. The expansion chamber of the protector will inflate to full capacity.
5 Invert the vial assembly and aspirate the drug dose into syringe unit 2, then disengage.
NOTE: If the dose required is greater than 50 mL, engage syringe unit 1 to the vial assembly, inject air, then repeat step 5.
The syringe unit(s) are now ready for further preparation.
Dispose or store the vial assembly without disassembling and in accordance with facility protocol.
Procedure:NOTE: Follow aseptic technique and local guidelines for safe handling of hazardous drugs.
1.7
10
Equipment necessary:1. IV bag prepared with BD PhaSeal™ Optima
Infusion Adapter (C100-O)
2. BD PhaSeal™ Optima Injector (N35-O)
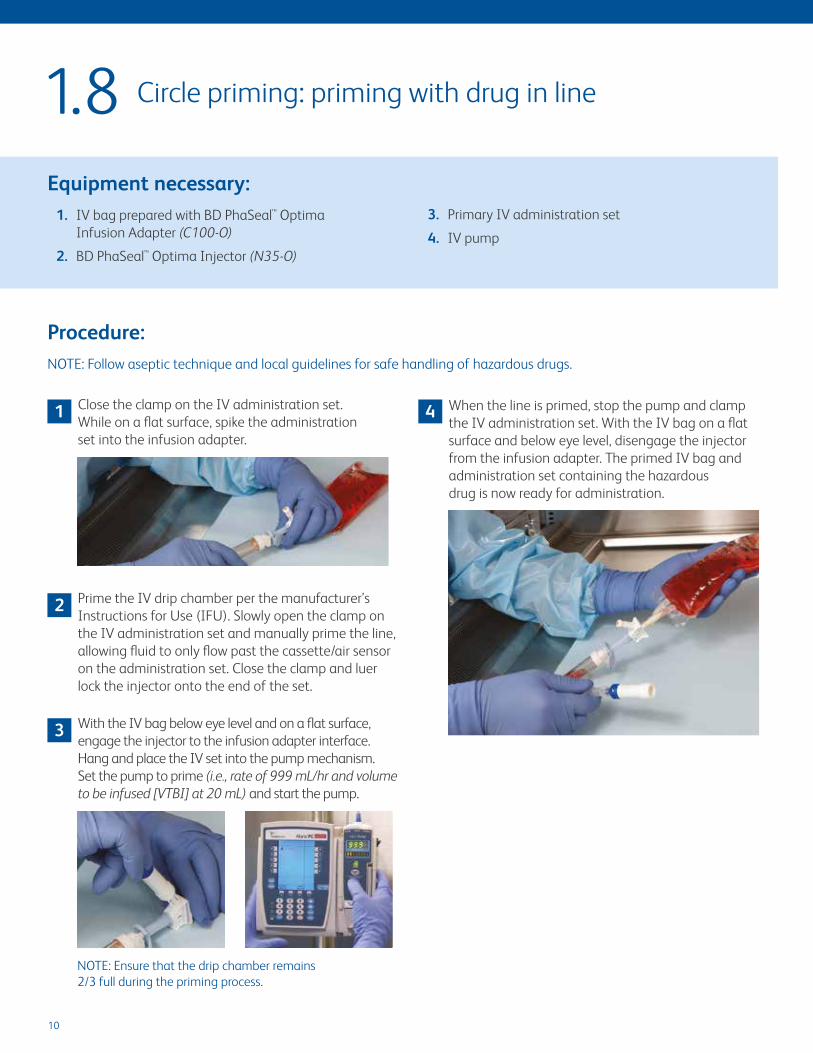
1 Close the clamp on the IV administration set. While on a flat surface, spike the administration set into the infusion adapter.
2 Prime the IV drip chamber per the manufacturer’s Instructions for Use (IFU). Slowly open the clamp on the IV administration set and manually prime the line, allowing fluid to only flow past the cassette/air sensor on the administration set. Close the clamp and luer lock the injector onto the end of the set.
3 With the IV bag below eye level and on a flat surface, engage the injector to the infusion adapter interface. Hang and place the IV set into the pump mechanism. Set the pump to prime (i.e., rate of 999 mL/hr and volume to be infused [VTBI] at 20 mL) and start the pump.
NOTE: Ensure that the drip chamber remains 2/3 full during the priming process.
4 When the line is primed, stop the pump and clamp the IV administration set. With the IV bag on a flat surface and below eye level, disengage the injector from the infusion adapter. The primed IV bag and administration set containing the hazardous drug is now ready for administration.
Procedure:NOTE: Follow aseptic technique and local guidelines for safe handling of hazardous drugs.
Circle priming: priming with drug in line1.8
3. Primary IV administration set
4. IV pump
11
Transferring hazardous drug from syringe to syringe (QS-ing)
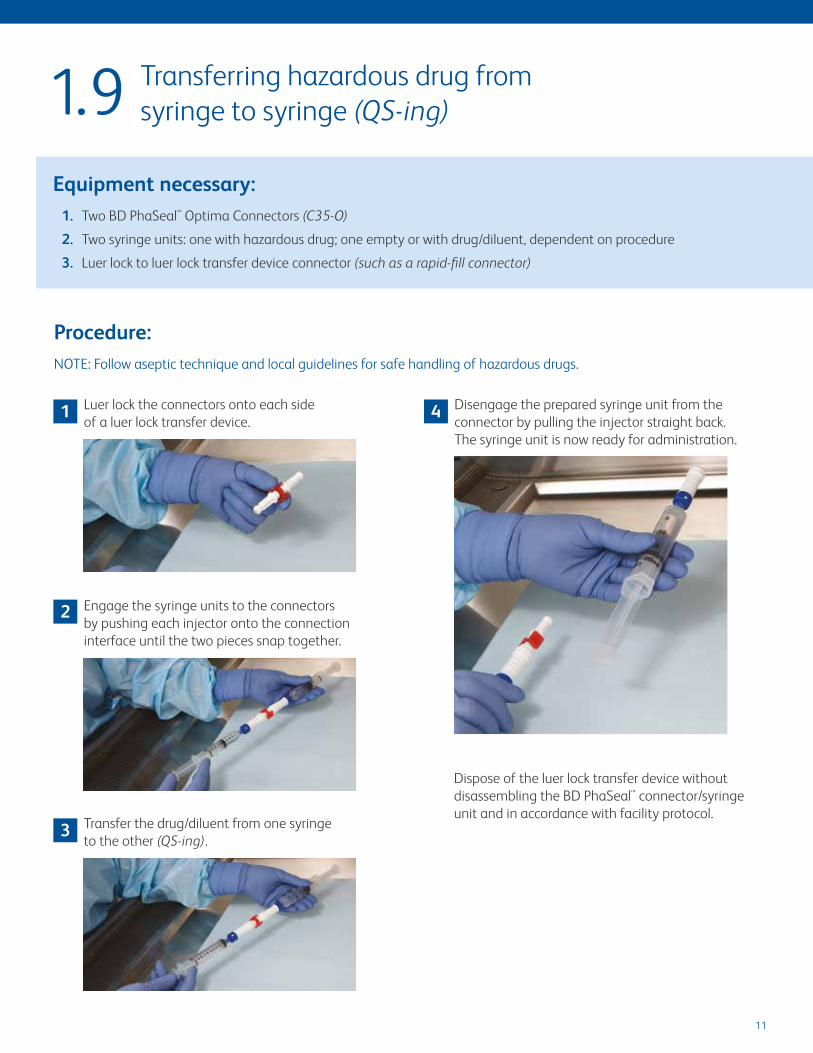
Equipment necessary:1. Two BD PhaSeal™ Optima Connectors (C35-O)
2. Two syringe units: one with hazardous drug; one empty or with drug/diluent, dependent on procedure
3. Luer lock to luer lock transfer device connector (such as a rapid-fill connector)
1 Luer lock the connectors onto each side of a luer lock transfer device.
2 Engage the syringe units to the connectors by pushing each injector onto the connection interface until the two pieces snap together.
3 Transfer the drug/diluent from one syringe to the other (QS-ing).
4 Disengage the prepared syringe unit from the connector by pulling the injector straight back. The syringe unit is now ready for administration.
Dispose of the luer lock transfer device without disassembling the BD PhaSeal™ connector/syringe unit and in accordance with facility protocol.
Procedure:NOTE: Follow aseptic technique and local guidelines for safe handling of hazardous drugs.
1.9
12
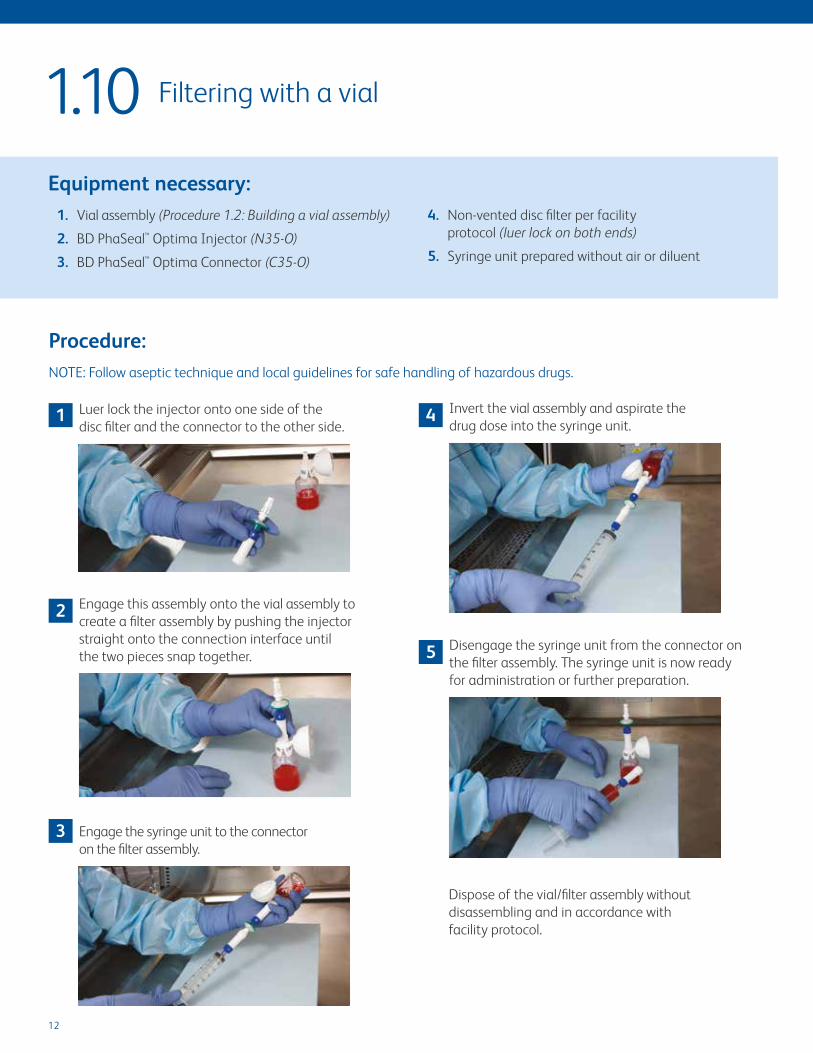
Equipment necessary:1. Vial assembly (Procedure 1.2: Building a vial assembly)
2. BD PhaSeal™ Optima Injector (N35-O)
3. BD PhaSeal™ Optima Connector (C35-O)
1 Luer lock the injector onto one side of the disc filter and the connector to the other side.
2 Engage this assembly onto the vial assembly to create a filter assembly by pushing the injector straight onto the connection interface until the two pieces snap together.
3 Engage the syringe unit to the connector on the filter assembly.
4 Invert the vial assembly and aspirate the drug dose into the syringe unit.
5 Disengage the syringe unit from the connector on the filter assembly. The syringe unit is now ready for administration or further preparation.
Dispose of the vial/filter assembly without disassembling and in accordance with facility protocol.
4. Non-vented disc filter per facility protocol (luer lock on both ends)
5. Syringe unit prepared without air or diluent
Procedure:NOTE: Follow aseptic technique and local guidelines for safe handling of hazardous drugs.
Filtering with a vial1.10

13
Filtering a syringe
Equipment necessary:1. Two syringe units: syringe unit 1 (with drug)
and syringe unit 2 (empty)
2. Non-vented disc filter per facility protocol (luer lock on both ends)
1 Luer lock a connector to each side of the disc filter to create a filter/connector assembly.
2 Engage the syringe units to each side of the filter/connector assembly by pushing the injector straight onto the connection interface until the two pieces snap together. Filter the drug from syringe unit 1 (syringe with drug) into syringe unit 2 (empty syringe).
3 Disengage syringe unit 2 from the filter/connector assembly by pulling the injector straight back. Syringe unit 2 is now ready for administration or further preparation.
Dispose of the syringe unit and filter/connector assembly without disassembling and in accordance with facility protocol.
Procedure:NOTE: Follow aseptic technique and local guidelines for safe handling of hazardous drugs.
1.11
3. Luer lock transfer device
4. Two BD PhaSeal™ Optima Connectors (C35-O)
14
Filtering into an IV bag
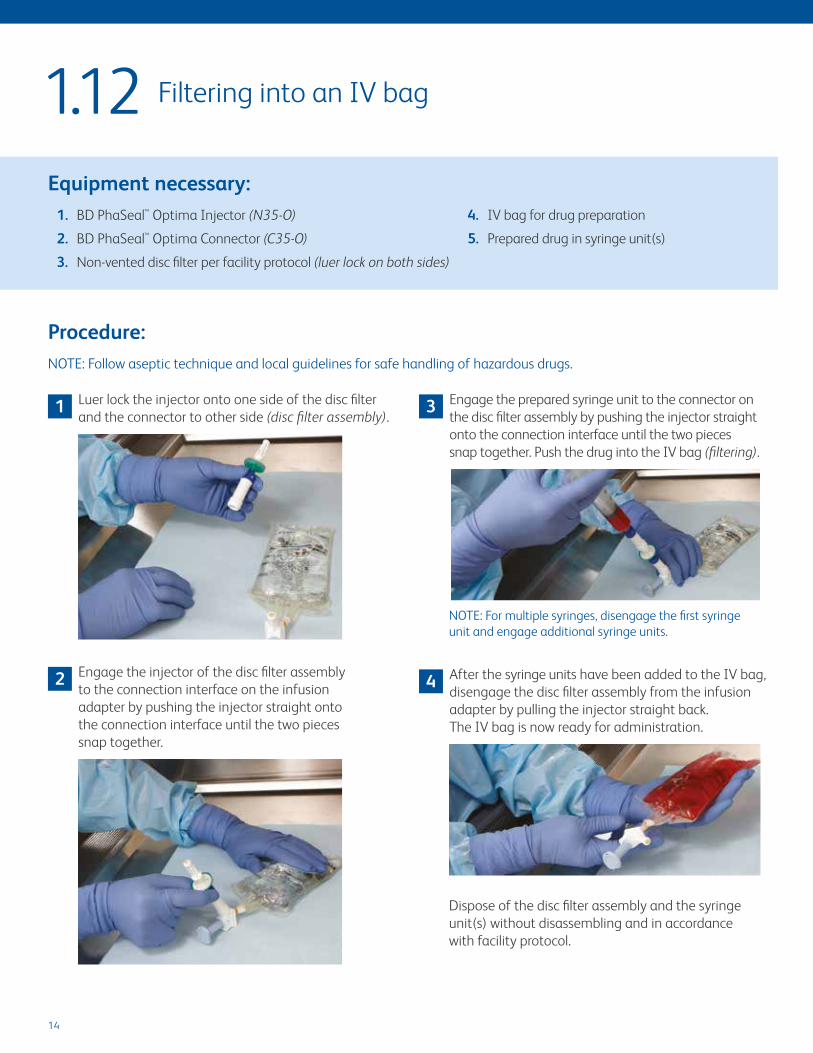
Equipment necessary:1. BD PhaSeal™ Optima Injector (N35-O)
2. BD PhaSeal™ Optima Connector (C35-O)
3. Non-vented disc filter per facility protocol (luer lock on both sides)
1 Luer lock the injector onto one side of the disc filter and the connector to other side (disc filter assembly).
2 Engage the injector of the disc filter assembly to the connection interface on the infusion adapter by pushing the injector straight onto the connection interface until the two pieces snap together.
3 Engage the prepared syringe unit to the connector on the disc filter assembly by pushing the injector straight onto the connection interface until the two pieces snap together. Push the drug into the IV bag (filtering).
NOTE: For multiple syringes, disengage the first syringe unit and engage additional syringe units.
4 After the syringe units have been added to the IV bag, disengage the disc filter assembly from the infusion adapter by pulling the injector straight back. The IV bag is now ready for administration.
Dispose of the disc filter assembly and the syringe unit(s) without disassembling and in accordance with facility protocol.
Procedure:NOTE: Follow aseptic technique and local guidelines for safe handling of hazardous drugs.
4. IV bag for drug preparation
5. Prepared drug in syringe unit(s)
1.12
15

16
Administration
16
17
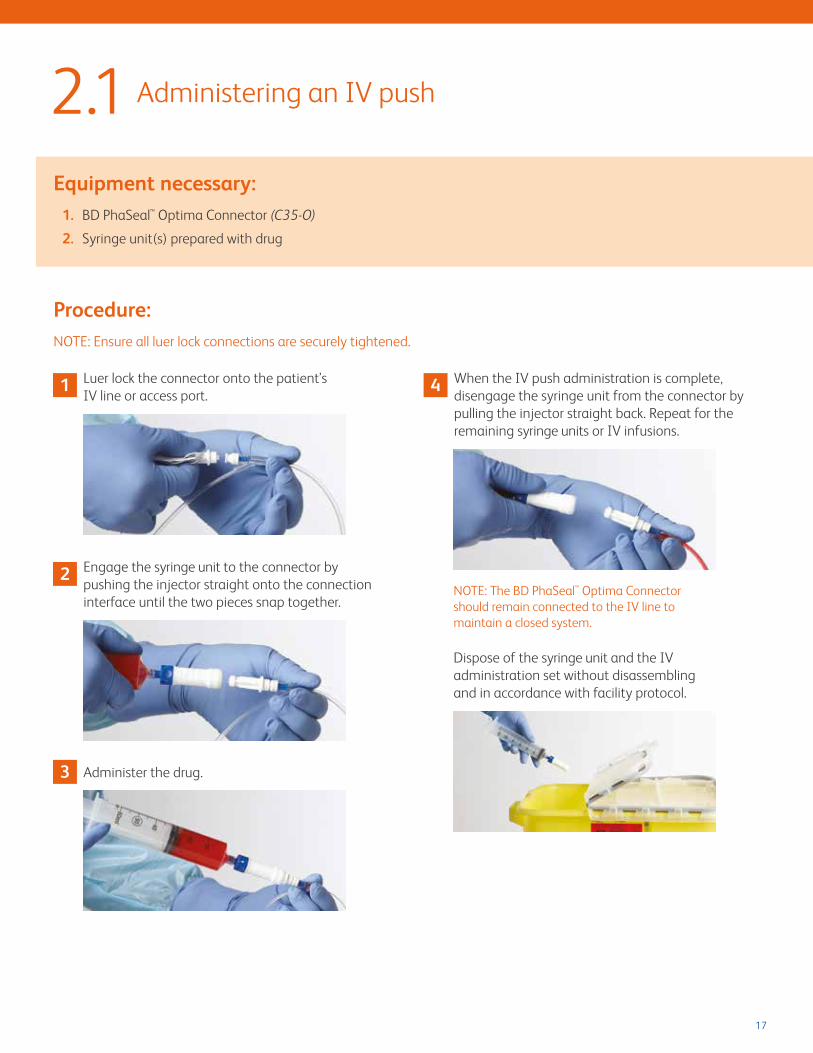
Administering an IV push
Equipment necessary:1. BD PhaSeal™ Optima Connector (C35-O)
2. Syringe unit(s) prepared with drug
1 Luer lock the connector onto the patient’s IV line or access port.
2 Engage the syringe unit to the connector by pushing the injector straight onto the connection interface until the two pieces snap together.
3 Administer the drug.
4 When the IV push administration is complete, disengage the syringe unit from the connector by pulling the injector straight back. Repeat for the remaining syringe units or IV infusions.
NOTE: The BD PhaSeal™ Optima Connector should remain connected to the IV line to maintain a closed system.
Dispose of the syringe unit and the IV administration set without disassembling and in accordance with facility protocol.
Procedure:NOTE: Ensure all luer lock connections are securely tightened.
2.1

18
Flushing a connector (C35-O) with saline
Equipment necessary:1. BD PhaSeal™ Optima Connector (C35-O) on an IV line
2. BD PhaSeal™ Optima Injector (N35-O)
3. Flush syringe per facility protocol
1 Luer lock an injector onto a flush syringe to create a syringe unit.
2 Engage the syringe unit to the connector on the IV line by pushing the injector straight onto the connector interface until the two pieces snap together.
3 Flush per facility protocol.
4 Disengage the syringe unit from the connector by pulling the injector straight back. The connector should remain on the line to maintain a closed system.
Dispose of the syringe unit and IV administration set without disassembling and in accordance with facility protocol.
Procedure:NOTE: Ensure all luer lock connections are securely tightened.
2.2

19
Flushing through an infusion adapter (C100-O)
Equipment necessary:1. Flush syringe per facility protocol
2. BD PhaSeal™ Optima Injector (N35-O)
3. IV bag prepared with BD PhaSeal™ Optima Infusion Adapter (C100-O)
1 Luer lock the injector to the flush syringe to create a syringe unit.
2 Below eye level, engage the syringe unit to the connection interface on the infusion adapter by pushing the injector straight onto the connector interface until the two pieces snap together.
3 Flush into the IV bag. Disengage the syringe unit from the infusion adapter interface by pulling straight back, then flush the IV administration set according to facility protocol.
Dispose of the syringe unit, hazardous drug IV bag and IV administration set without disassembling and in accordance with facility protocol.
Procedure:NOTE: Ensure all luer lock connections are securely tightened.
2.3
20
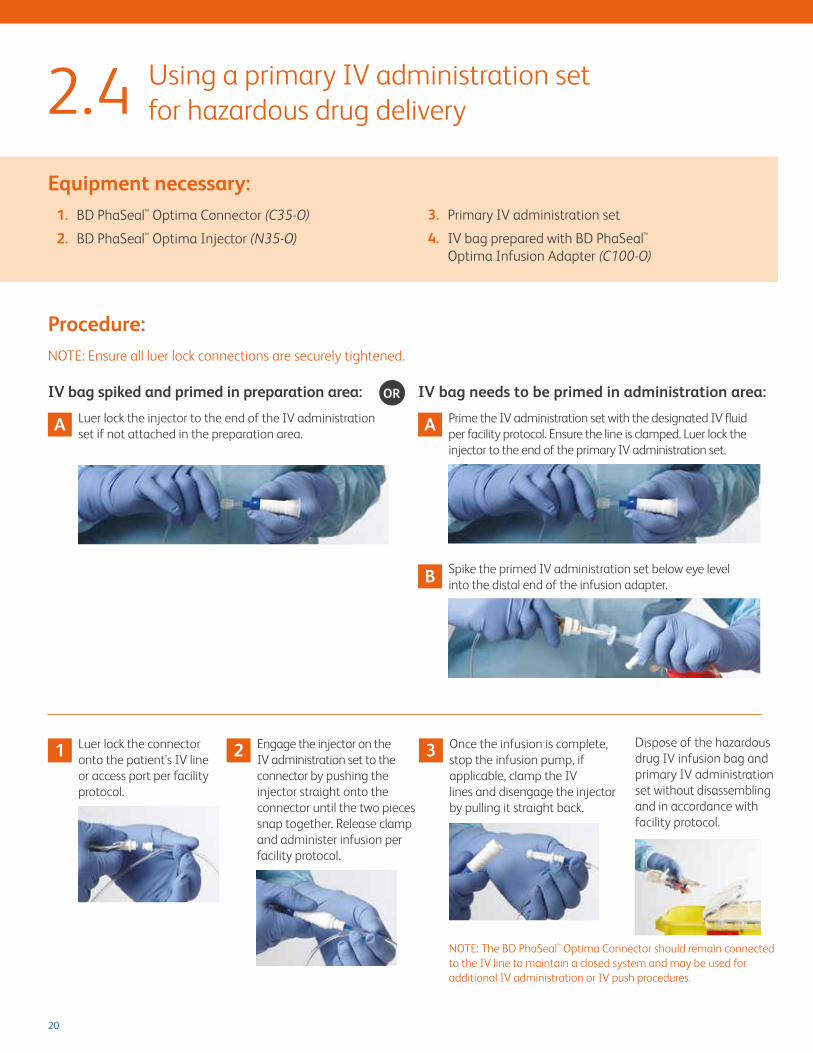
1 Luer lock the connector onto the patient’s IV line or access port per facility protocol.
Using a primary IV administration set for hazardous drug delivery
Equipment necessary:1. BD PhaSeal™ Optima Connector (C35-O)
2. BD PhaSeal™ Optima Injector (N35-O)
IV bag spiked and primed in preparation area:
A Luer lock the injector to the end of the IV administration set if not attached in the preparation area.
Procedure:NOTE: Ensure all luer lock connections are securely tightened.
IV bag needs to be primed in administration area:
A Prime the IV administration set with the designated IV fluid per facility protocol. Ensure the line is clamped. Luer lock the injector to the end of the primary IV administration set.
B Spike the primed IV administration set below eye level into the distal end of the infusion adapter.
2 Engage the injector on the IV administration set to the connector by pushing the injector straight onto the connector until the two pieces snap together. Release clamp and administer infusion per facility protocol.
3 Once the infusion is complete, stop the infusion pump, if applicable, clamp the IV lines and disengage the injector by pulling it straight back.
NOTE: The BD PhaSeal™ Optima Connector should remain connected to the IV line to maintain a closed system and may be used for additional IV administration or IV push procedures.
OR
Dispose of the hazardous drug IV infusion bag and primary IV administration set without disassembling and in accordance with facility protocol.
2.4
3. Primary IV administration set
4. IV bag prepared with BD PhaSeal™ Optima Infusion Adapter (C100-O)

21
Using a secondary infusion line (piggyback) for hazardous drug delivery
Procedure:NOTE: Ensure all luer lock connections are securely tightened.
Equipment necessary:1. BD PhaSeal™ Optima Connector (C35-O)
2. BD PhaSeal™ Optima Injector (N35-O)
1 Luer lock the connector onto the patient’s IV line for a secondary (piggyback) IV infusion.
IV bag spiked and primed in preparation area:
A Luer lock the injector to the end of the secondary IV administration set if not attached in the preparation area.
IV bag needs to be primed in administration area:
A Prime the secondary IV administration set with the designated IV fluid per facility protocol. Ensure the line is clamped. Luer lock the injector to the end of the secondary IV administration set.
B Spike the primed secondary IV administration set below eye level into the distal port of the infusion adapter.
2 Engage the injector on the secondary IV set to the connector by pushing the injector straight onto the connector until the two pieces snap together. Release the clamp and administer the drug.
3 Once the infusion is complete, clamp the secondary set IV line and disengage the injector from the connector by pulling straight back.
NOTE: The BD PhaSeal™ Optima Connector should remain connected to the IV line to maintain a closed system and may be used for additional IV administration or IV push procedures.
Dispose of hazardous drug IV infusion bags and IV administration sets without disassembling and in accordance with facility protocol.
OR
2.5
3. Secondary IV administration set
4. IV bag prepared with BD PhaSeal™ Optima Infusion Adapter (C100-O)

22
Backpriming and administering a secondary (piggyback) IV administration set
1 Ensure the line is clamped. Luer lock the injector to the secondary IV administration set. Spike the IV administration set into the distal end of the infusion adapter.
2 Luer lock the connector to the access port of the IV line for secondary (piggyback) infusion.
3 Engage the injector on the secondary IV set to the connector by pushing the injector straight onto the connector until the two pieces snap together. Release the clamp and backprime the IV line. Administer the infusion.
4 Once the infusion is completed, clamp the secondary set IV line and disengage the injector from the connector by pulling straight back until the two pieces disconnect.
NOTE: The BD PhaSeal™ Optima Connector should remain connected to the IV line to maintain a closed system and may be used for additional IV administration or IV push procedures.
Dispose of the IV administration sets without disassembling and in accordance with facility protocol.
Procedure:NOTE: Ensure all luer lock connections are securely tightened.
2.6Equipment necessary:
1. BD PhaSeal™ Optima Connector (C35-O)
2. BD PhaSeal™ Optima Injector (N35-O)
3. Secondary IV administration set
4. IV bag prepared with BD PhaSeal™ Optima Infusion Adapter (C100-O)
23
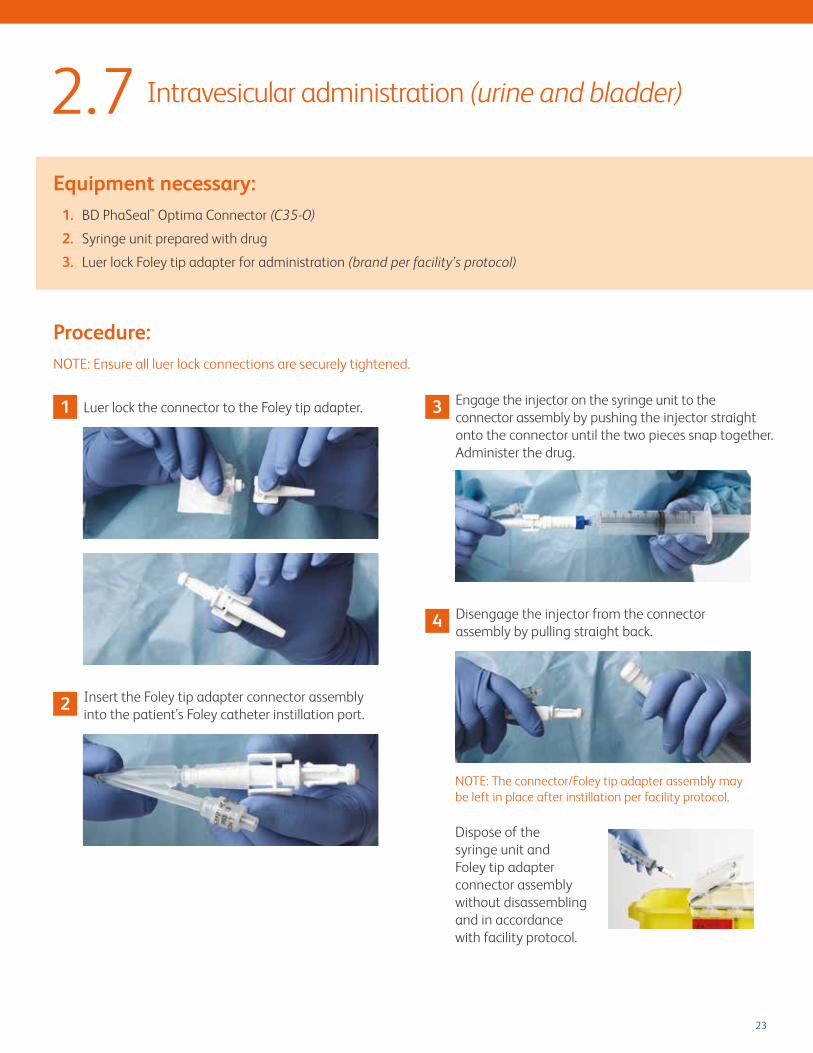
Intravesicular administration (urine and bladder)
Equipment necessary:1. BD PhaSeal™ Optima Connector (C35-O)
2. Syringe unit prepared with drug
3. Luer lock Foley tip adapter for administration (brand per facility’s protocol)
1 Luer lock the connector to the Foley tip adapter.
2 Insert the Foley tip adapter connector assembly into the patient’s Foley catheter instillation port.
3 Engage the injector on the syringe unit to the connector assembly by pushing the injector straight onto the connector until the two pieces snap together. Administer the drug.
4 Disengage the injector from the connector assembly by pulling straight back.
NOTE: The connector/Foley tip adapter assembly may be left in place after instillation per facility protocol.
Dispose of the syringe unit and Foley tip adapter connector assembly without disassembling and in accordance with facility protocol.
Procedure:NOTE: Ensure all luer lock connections are securely tightened.
2.7
24
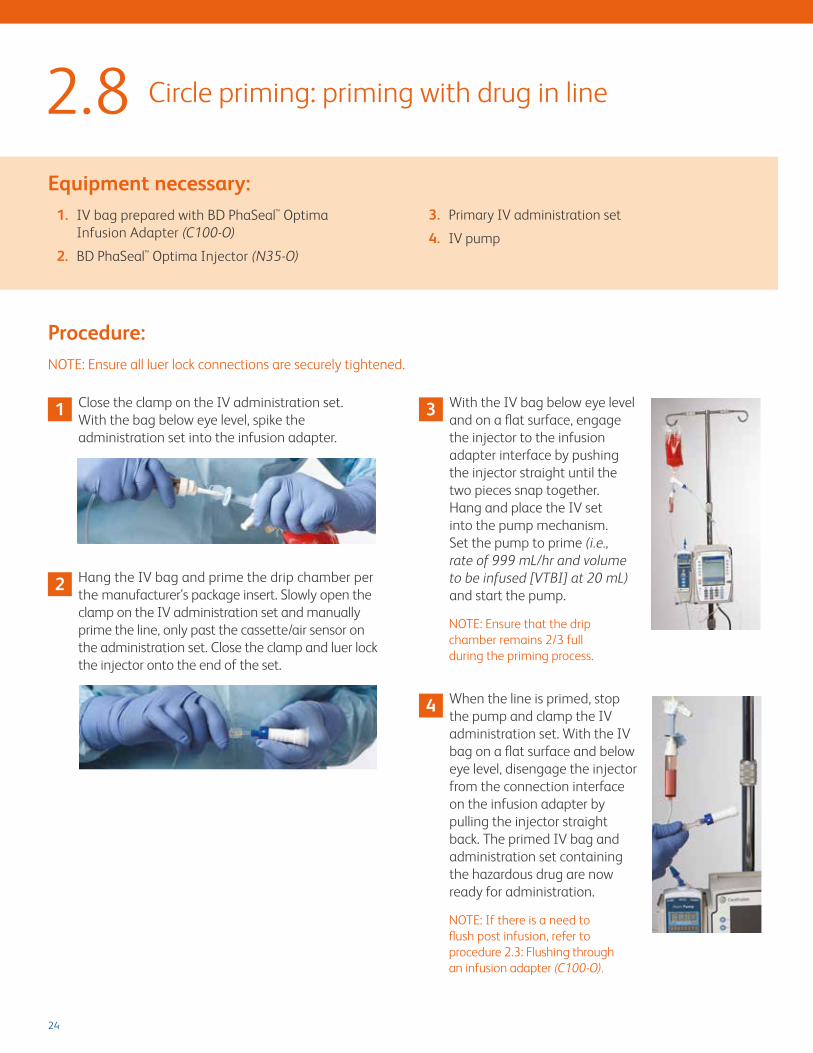
Circle priming: priming with drug in line
Equipment necessary:1. IV bag prepared with BD PhaSeal™ Optima
Infusion Adapter (C100-O)
2. BD PhaSeal™ Optima Injector (N35-O)
1 Close the clamp on the IV administration set. With the bag below eye level, spike the administration set into the infusion adapter.
2 Hang the IV bag and prime the drip chamber per the manufacturer’s package insert. Slowly open the clamp on the IV administration set and manually prime the line, only past the cassette/air sensor on the administration set. Close the clamp and luer lock the injector onto the end of the set.
3 With the IV bag below eye level and on a flat surface, engage the injector to the infusion adapter interface by pushing the injector straight until the two pieces snap together. Hang and place the IV set into the pump mechanism. Set the pump to prime (i.e., rate of 999 mL/hr and volume to be infused [VTBI] at 20 mL) and start the pump.
NOTE: Ensure that the drip chamber remains 2/3 full during the priming process.
4 When the line is primed, stop the pump and clamp the IV administration set. With the IV bag on a flat surface and below eye level, disengage the injector from the connection interface on the infusion adapter by pulling the injector straight back. The primed IV bag and administration set containing the hazardous drug are now ready for administration.
NOTE: If there is a need to flush post infusion, refer to procedure 2.3: Flushing through an infusion adapter (C100-O).
Procedure:NOTE: Ensure all luer lock connections are securely tightened.
2.8
3. Primary IV administration set
4. IV pump

25
Intramuscular (IM) and subcutaneous (SQ) injections
Equipment necessary:1. BD PhaSeal™ Optima Connector (C35-O)
2. Prepared syringe unit
3. Needle for administration
1 Luer lock the required needle for administration to the connector.
Procedure:NOTE: Ensure all luer lock connections are securely tightened.
2 Engage the injector on the syringe unit to the connector needle assembly by pushing the injector until the two pieces snap together. Administer the drug.
Dispose of the syringe unit without disassembling and in accordance with facility protocol.
2.9

Educational Information from BD Medical
Consult instructions for use.
bd.comBD, the BD Logo and BD PhaSeal are trademarks of Becton, Dickinson and Company. All other trademarks are the property of their respective owners. © 2018 BD and its subsidiaries. All rights reserved. BD-7348 (08/18)
BD, Franklin Lakes, NJ, 07417, U.S.