![arXiv:2201.05112v1 [astro-ph.GA] 13 Jan 2022](https://static.fdokumen.com/doc/165x107/631d5e7cfb6d057c8509cda2/arxiv220105112v1-astro-phga-13-jan-2022.jpg)
ASTRO PLANETARIUM - Conrad
68
DE Bedienungsanleitung GB Operating Instructions FR Mode d’emploi NL Handleiding IT Manuale di istruzioni ES Instrucciones de uso HR Upute za rukovanje ASTRO PLANETARIUM
-
Upload
khangminh22 -
Category
Documents
-
view
0 -
download
0
Transcript of ASTRO PLANETARIUM - Conrad

DE BedienungsanleitungGB Operating InstructionsFR Mode d’emploiNL HandleidingIT Manuale di istruzioniES Instrucciones de usoHR Upute za rukovanje
ASTRO PLANETARIUM

DE Bedienungsanleitung .....................................................................4GB Operating Instructions ................................................................. 13FR Mode d’emploi .............................................................................. 22NL Handleiding ................................................................................... 31IT Manuale di istruzioni .................................................................... 40ES Instrucciones de uso ................................................................... 49HR Upute za rukovanje ...................................................................... 58

c
d
e
F
G
J
1)
b
HI
1!
1@
1%
1#
1$
1* 1& 1&
Fig. 1
Fig. 2
Fig. 3

4
GEFAHR von Körperschäden!Dieses Gerät beinhaltet Elektroniktei-le, die über eine Stromquelle (Netzteil
und/oder Batterien) betrieben werden. Las-sen Sie Kinder beim Umgang mit dem Gerät nie unbeaufsichtigt! Die Nutzung darf nur wie in der Anleitung beschrieben erfolgen, andernfalls besteht GEFAHR eines STROM-SCHLAGS!
Kinder sollten das Gerät nur unter Aufsicht be-nutzen. Verpackungsmaterialien (Plastiktüten, Gummibänder, etc.) von Kindern fernhalten! Es besteht ERSTICKUNGSGEFAHR!
Batterien gehören nicht in Kinderhände! Achten Sie beim Einlegen der Batterie auf die richtige Polung. Ausgelaufene oder beschädigte Batte-rien verursachen Verätzungen, wenn Sie mit der Haut in Berührung kommen. Benutzen Sie ge-gebenenfalls geeignete Schutzhandschuhe.
BRAND-/EXPLOSIONSGEFAHR!Setzen Sie das Gerät keinen hohen Temperaturen aus. Benutzen Sie nur
das mitgelieferte Netzteil oder die empfohlenen Batterien. Gerät und Batterien nicht kurzschlie-ßen oder ins Feuer werfen! Durch übermäßige Hitze und unsachgemäße Handhabung können Kurzschlüsse, Brände und sogar Explosionen ausgelöst werden!
Setzen Sie das Gerät keinen Temperaturen über 60° C aus!
GEFAHR von Sachschäden!Bauen Sie das Gerät nicht auseinan-der! Wenden Sie sich im Falle eines
Defekts bitte an das für Ihr Land zuständige Service-Center (auf der Garantiekarte ver-merkt).
Benutzen Sie nur die empfohlenen Batterien. Ersetzen Sie schwache oder verbrauchte Bat-terien immer durch einen komplett neuen Satz Batterien mit voller Kapazität. Verwenden Sie keine Batterien von unterschiedlichen Mar-ken, Typen oder unterschiedlich hoher Kapa-zität. Batterien sollten aus dem Gerät entfernt werden, wenn es längere Zeit nicht benutzt wird!
HINWEISE zur ReinigungTrennen Sie das Gerät vor der Reini-gung von der Stromquelle (Netzstecker
ziehen oder Batterien entfernen)!
Reinigen Sie das Gerät nur äußerlich mit ei-nem trockenen Tuch. Benutzen Sie keine Rei-nigungsflüssigkeit, um Schäden an der Elekt-ronik zu vermeiden.Schützen Sie das Gerät vor Staub und Feuch-tigkeit! Bewahren Sie es in der mitgelieferten
Tasche oder Transportverpackung auf. Batte-rien sollten aus dem Gerät entfernt werden, wenn es längere Zeit nicht benutzt wird.
ENTSORGUNGEntsorgen Sie die Verpackungsmateri-alien sortenrein. Informationen zur ord-
nungsgemäßen Entsorgung erhalten Sie beim kommunalen Entsorgungsdienstleister oder Umweltamt.
Werfen Sie Elektrogeräte nicht in den Hausmüll! Gemäß der Europäischen
Richtlinie 2002/96/EG über Elektro- und Elektronik-Altgeräte und deren Umsetzung in nationales Recht müssen verbrauchte Elek-trogeräte getrennt gesammelt und einer um-weltgerechten Wiederverwertung zugeführt werden.
Entladene Altbatterien und Akkus müssen vom Verbraucher in Batteriesammelgefäßen ent-sorgt werden. Informationen zur Entsorgung alter Geräte oder Batterien, die nach dem 01.06.2006 produziert wurden, erfahren Sie beim kommunalen Entsorgungsdienstleister oder Umweltamt.

5
EG-KonformitätserklärungDie Meade Instruments Europe GmbH & Co. KG, ansässig in 46414 Rhede/
Westf., Gutenbergstr. 2, Germany, erklärt für dieses Produkt die Übereinstimmung mit nachfolgend aufgeführten EG-Richtlinien:
EN-71, Part 1-3, Part 6EN-71, Part 9EN-62115EN-60825-1
Produktbeschreibung: Astro PlanetariumTyp / Bezeichnung: Star Projector
Rhede, 13.03.2009
Meade Instruments Europe GmbH & Co. KG
Helmut EbbertGeschäftsführer
Leuchtdioden (LED‘s): 1 Stück, Typ W42180, N42180, S42180, W42180J, W32180LED Klasse 1EN 60825-1:1994 + A1:2002 + A2:2001
DE

6
Teile-Übersicht (Abb. 1-3)
B PlanetariumskugelC Ein/Aus/Stopp-TasteD Knopf zum Öffnen des Dia-FachsE Taste für die Einstellung des Schlafmodus
(30 oder 60 Minuten)F Rad für die Einstellung des DatumsG ZeitskalaH ObjektivI Rad für die ScharfeinstellungJ Standfuß für die Planetariumskugel1) Diascheiben1! Halterung für die Diascheiben1@ Batteriefachabdeckung1# Batteriehalterung mit Schraube1$ Batteriefach1% Batterien1^ Taste für die rechtsseitige Bildrotation1& Taste für die linksseitige Bildrotation1* Taste zur Aktivierung der Sternschnuppen-
Funktion1( Projektor für die Sternschnuppen-Funktion
Aufbau des Astro-Planetariums
Öffnen Sie die Batteriefachabdeckung 1@ auf der Unterseite der Planetariumskugel B (Abb. 3).
Abb. 3
Lösen Sie die Schraube der Batteriehalterung 1# mit einem Schraubendreher (nicht im Liefer-umfang enthalten).Legen Sie nun die 3 Batterien 1% wie in Abbil-dung 3 dargestellt in das Batteriefach 1$ ein.
WICHTIG: Achten Sie beim Einlegen darauf, dass die Plus- und Minus-Pole der Batterien in die richtige Richtung zeigen. In welche Rich-tung die Pole zeigen müssen, ist aus dem Auf-druck (+/-) im Batteriefach ersichtlich.
Wenn Sie die Batterien 1% eingelegt haben, set-zen Sie die Batteriehalterung 1# wieder auf und verschrauben sie diese.Abschließend setzen Sie die Batteriefachabde-ckung 1@ wieder ein.
Stellen Sie jetzt den Standfuß für die Planeta-riumskugel J auf einen ebenen und stabilen Untergrund (z.B. Tisch) und setzen Sie die Planetariumskugel B hinein. Dabei muss das Objektiv H parallel zur Projektionsfläche (Wand oder Decke) zeigen (Abb. 4).
1,8 bis 2 m
N
Abb. 4
WICHTIG: Der Abstand zwischen Objektiv und Wand oder Decke sollte ungefähr 1,8 bis 2 m betragen.
HINWEIS: Die meisten Zimmerdecken haben eine Höhe von ca. 2,5 m. Nehmen Sie ggf. ein Metermaß zur Hilfe, um den erforderlichen Pro-jektionsabstand einstellen zu können.
Drehen Sie die Planetariumskugel B anschlie-ßend so, dass die der Halterung für die Dia-scheiben 1! gegenüberliegende Seite nach Norden zeigt (Abb. 4).

7
Himmelsprojektion mit dem Astro-PlanetariumDrücken Sie den Knopf zum Öffnen des Dia-Fachs D. Die Lade öffnet sich (Abb. 2) auto-matisch.Legen Sie eine der beiden Diascheiben 1) in die Halterung für die Diascheiben 1! ein.
Abb. 5
WICHTIG: Achten Sie beim Einlegen darauf, dass die Vorsprünge der Halterung 1! in die Kerben der Diascheibe 1) greifen (Abb. 5).Nun müssen Sie die Zeit und das Datum für den Nachthimmel eingeben, den Sie mit dem Astro-Planetarium betrachten möchten (Beob-achtungszeitraum). Drehen Sie dazu das Rad für die Einstellung des Datums F so weit, bis sich das gewünschte Datum unter der Uhrzeit auf der Zeitskala Gbefi ndet (Abb. 6).
Abb. 6
HINWEIS: Aufgrund der Erdrotation ist die An-ordnung der Himmelsobjekte innerhalb eines Jahres immer unterschiedlich. Daher sind nicht immer alle Objekte sichtbar. Aus diesem Grund ist es wichtig, dass immer die korrekte Zeit- und Datumseinstellung vorgenommen wird, bevor Sie eine Projektion mit dem Astro-Planetarium starten.
30 minutes
01:00 00:00 23:00
Abb. 7
Die Zeitskala (6)Dargestellt ist nur der Zeitraum zwischen 20:00 Uhr und 2:00 Uhr. In dieser Zeit kann man zu jeder Jahreszeit Sterne am Himmel
sehen (Nachthimmel). Jeder Strich der Skala entspricht 30 Minuten (Abb. 7).
APR MAY
2 days 30 Apr
1026 28 2 4
Abb. 8
Rad für die Einstellung des Datums (5)Mit der Datumsskala des Rads können die 365 Tage eines Jahres nach Monaten geordnet eingestellt werden. Bei 30 Tagen je Monat ent-spricht jeder Strich auf dem Rad 2 Tagen (Abb. 8). Die langen Linien stellen dabei den letzten Tag des Vormonats dar, darunter ist jeweils der nachfolgende Monat angegeben.
Beispiel für die richtige Zeit- und Datum-seinstellung
Beispiel 1:Sie möchten den Nachthimmel für den 7. Juli, 0:00 Uhr (Mitternacht), mit dem Astro-Planeta-rium anzeigen lassen (Projektion).
JUN JUL AUG SEP 20 10 20 10 20 10 20 10
02:00 01:00 00:00 23:00 22:00 21:00 20:00
JUL
2 4 6 8
10
7/7
Abb. 9
DE

8
Drehen Sie dazu das Rad für die Einstellung des Datums F so weit, bis der Strich für ‚00:00‘ oben auf der Zeitskala G zwischen den beiden kurzen Strichen vor der ‚10‘ im Monat Juli (JUL) steht (Abb. 9).
Beispiel 2:Sie möchten den Nachthimmel für den 30. De-zember, 22:30 Uhr, mit dem Astro-Planetarium anzeigen lassen (Projektion). Drehen Sie dazu das Rad für die Einstellung des Datums F so weit, bis der Strich für ‚22:30‘ oben auf der Zeitskala G kurz vor dem langen Strich für den Monat Januar (JAN) steht (Abb. 10).
NOV DEC JA N FEB 20 10 20 10 20 10 20 10
02:00 01:00 00:00 23:00 22:00 21:00 20:00
JAN
28/12
20
30/12
Abb. 10
Nachdem Sie nun den Beobachtungszeitraum eingestellt haben, können Sie mit der Projekti-on beginnen. Schließen Sie die Halterung für die Diascheiben 1! und betätigen Sie den Ein/Aus/-Taste C, um die Projektion zu starten.Sie können nun noch nachträglich den Pro-jektionswinkel für eine optimale Projektion an Wand oder Decke korrigieren, indem Sie die
Projektionskugel B im Standfuß J bewegen. In Abb. 11 sehen Sie die Möglichkeiten für eine Projektion an der Decke (a) oder Wand (b).
b aAbb. 11
Durch Drehen am Rad für die Scharfeinstellung I kann die richtige Schärfe der Bildprojektion eingestellt werden (Abb. 12).
Abb. 12
WICHTIG: Der richtige Abstand zwischen Objektiv und Wand oder Decke beträgt zwi-schen 1,8 und 2 m. Wenn die Projektion trotz Scharfeinstellung immer noch verschwommen
erscheint, haben Sie vermutlich nicht den rich-tigen Abstand gewählt.
Drücken Sie die Taste für die Einstellung des Schlafmodus E, um die gewünschte Zeit für die Abschaltautomatik (30 oder 60 Minuten) zu aktivieren. Die entsprechende LED-Lampe leuchtet auf. Nach dieser Zeit schaltet das Ge-rät in den Schlafmodus (auch Energiesparmo-dus) um. Wenn Sie den Schlafmodus ausschal-ten möchten, drücken Sie die Taste E, bis die LED-Lampe erlischt. Die Projektion wird dann automatisch nach 2 Stunden beendet, um Energie zu sparen.Wenn Sie das Astro-Planetarium nicht benut-zen, sollten Sie das Gerät durch einfaches Drücken der Ein/Aus/Stopp-Taste C ausschal-ten. Entfernen Sie die Batterien aus dem Ge-rät, wenn Sie es für eine längere Zeit (1 Woche oder länger) nicht benutzen.
Verwendung der BildrotationDrücken Sie die Taste für die linksseitige Ro-tation 1&, um die Projektion des Nachthimmels automatisch gegen den Uhrzeigersinn zu be-wegen. Dies entspricht dem natürlichen Bewe-gungsablauf der nördlichen Halbkugel.Durch erneutes Drücken der Taste beeinfl ussen Sie die Bewegungsgeschwindigkeit. Insgesamt sind 6 unterschiedliche Geschwindigkeiten verfügbar. Das LED-Licht blinkt entsprechend

9
der eingestellten Rotationsgeschwindigkeit.Drücken Sie die Ein/Aus/Stopp-Taste C, um die Rotation zu stoppen.In gleicher Weise können Sie die Bildrotati-on für die südliche Halbkugel aktivieren und anpassen. Drücken Sie dann bitte die Taste für die rechtsseitige Rotation 1^. Alle übrigen Funktionen sind identisch mit denen der links-seitigen Rotation.
Verwendung der Sternschnuppen-FunktionWenn Sie die Bildrotation aktiviert haben, kön-nen Sie auch die Sternschnuppen-Funktion zuschalten. Drücken Sie dazu die Taste für die Aktivierung der Sternschnuppen-Funktion 1*. Nun wird in regelmäßigen Abständen über den Sternschnuppen-Projektor 1( ein Kometen-schweif (Sternschnuppe) in der Bildprojektion dargestellt.Drücken Sie die Taste 1* erneut, um die Stern-schnuppen-Funktion wieder zu deaktivieren.
HINWEIS: Der Zeitintervall, in dem die Stern-schnuppen durchs Bild laufen, kann durch die Erhöhung der Rotationsgeschwindigkeit ver-kürzt werden.
Technische Daten• Projektionsmethode: Optisch • Beobachtungsposition: 35° Nord* • Sternbilder: 61• Sterne: 8.000• Beleuchtung: weiße LED-Beleuchtung
mit hoher Leuchtkraft• Sternbild-Orientierung durch:
Datum, Stunde • Projektionsbereich:
1,8 x 2,2 m bei 2 m Projektionsabstand
• Schlafmodus/Autom. Abschaltung: 30 oder 60 Minuten/ 2 Stunden
• Stromversorgung: 4,5V Wechselstrom (über 3Stck. 1,5V AA/LR6 Batterien)
*Die Projektion bezieht sich immer auf den Beobachtungsort 35° nördlicher Breite. Das ist ein bestimmter Punkt auf der Erde. Wenn man von dort zur gleichen Zeit in den Himmel schaut wie man sie auch am Astro-Planetarium eingestellt hat, so sieht
man am Himmel und auch in der Projektion exakt den gleichen Himmelsausschnitt.
DE

10
SERVICE UND GARANTIE
Für dieses Gerät übernehmen wir eine Garan-tie von 5 Jahren ab Kaufdatum. Bitte bewahren Sie den Kaufbeleg als Nachweis auf.Unser Produkt wurde nach den neuesten Fa-brikationsmethoden hergestellt und einer ge-nauen Qualitätskontrolle unterzogen.
Service-CenterBei Fragen zum Produkt und eventuellen Re-klamationen nehmen Sie bitte mit dem Service-Center Kontakt auf. Die geschulten Mitarbeiter helfen Ihnen hier gern weiter. Die Service-Hotline ist nachfolgend aufgeführt. Sofern eine Garantieleistung (Reparatur oder Tausch) er-forderlich sein sollte, so wird Ihnen über den Service-Mitarbeiter eine Retouren-Adresse mitgeteilt.
Service-Hotline: 00 800 6343 7000
Mängelbehebung und RetourenWir beheben innerhalb der Garantiezeit kos-tenlos alle eventuellen Material- oder Herstel-lungsfehler. Ausgenommen von der Gewähr-leistung sind Mängel, die auf Verschulden des Benutzers oder unsachgemäße Benutzung zurückzuführen sind, wenn an dem Gerät durch nicht autorisierte Dritte Reparaturversu-che oder dergleichen vorgenommen wurden.
Falls eine Reparatur bzw. ein Umtausch des Produkts erforderlich sein sollte, so wird Ihnen über den Mitarbeiter des Service-Centers eine Retouren-Adresse mitgeteilt.
Im Falle einer Retoure beachten Sie bitte Folgendes:• Achten Sie darauf, dass der Artikel sorgfältig
verpackt verschickt wird. Nutzen Sie nach Möglichkeit die Original-Verpackung.
• Füllen Sie die nachfolgende Retourenmel-dung aus und legen Sie es zusammen mit der Kopie Ihres Kaufbelegs der Retouren-sendung bei.
Retourenmeldung
Vorgangsnr.*: ...........................................
Produktbezeichnung: ................................
Kurze Fehlerbeschreibung: ........................
..............................................................
..............................................................
Name, Vorname: ......................................
PLZ / Ort: ...............................................
Straße / Hausnr.: ......................................
Telefon: ...................................................
Kaufdatum: ..............................................
Unterschrift: ............................................
*wird Ihnen vom Service-Center mitgeteilt

11
Problem Möglicher Fehler Problembehebung
Ich kann das Planetarium nicht einschalten.
Die Batterien könnten nicht richtig ein-gelegt sein.
Kontrolliere, ob die Batterien genau wie in der Anleitung beschrieben ein-gelegt sind. Achte besonders auf die richtige Ausrichtung der Batteriepole (+/-).
Die Batterien sind vielleicht leer.Lege neue, unbenutzte Batterien wie in der Anleitung beschrieben in das Planetarium ein. Achte besonders auf die richtige Ausrichtung der Batterie-pole (+/-).
Das Projektionsbild ist ver-zerrt, nicht kreisrund.
Das Objektiv könnte nicht vollkommen parallel zum Projektionsbereich (Wand oder Decke) ausgerichtet sein.
Versuche, das Planetarium im Standfuß J so auszurichten, dass das Objek-tiv parallel zum Projektionsbereich ausgerichtet ist.
Das Projektionsbild ist un-scharf.
Der Abstand zum Projektionsbereich (Wand oder Decke) ist vielleicht zu gering sein.
Das Planetarium muss mindestens einen Abstand von 1,8 bis 2 m zum Pro-jektionsbereich haben. Kontrolliere, ob der Abstand richtig ist und korrigiere ihn gegebenenfalls.
Die Bildschärfe ist vielleicht nicht rich-tig eingestellt.
Versuche, die Schärfe des Bildes zu verbessern, indem du am Rad für die Scharfeinstellung i drehst.
Das Projektionsbild weist Flecken auf.
Die Objektivlinse ist verschmutzt.Reinige das Objektiv mit einem sauberen, fusselfreien Putztuch wie in der Anleitung beschrieben.
Problembehebung
Es kann vorkommen, dass dein Astro-Planetarium nicht richtig funktioniert. Das muss nicht daran liegen, dass es defekt ist! Oft ist es so, dass eine Kleinigkeit beim Aufbau nicht beachtet wurde. Deshalb haben wir dir hier die häufigsten Fehler aufgeschrieben, damit du versuchen kannst, ein Pro-blem selbst zu beheben.
DE

12
Problem Möglicher Fehler Problembehebung
Das Planetarium projeziert nicht den gewünschten Him-melsausschnitt.
Eventuell ist nicht die richtige Dia-scheibe eingelegt.
Lege die Diascheibe 1) mit dem Simulation des Himmels in die Halterung 1! ein.
Vermutlich hast du Datum und Uhrzeit für den Beobachtungszeitraum nicht richtig eingestellt.
Stelle das Datum des Beobachtungszeitraums in Verbindung mit der richti-gen Uhrzeit wie in der Anleitung beschrieben ein.
Das Planetarium projeziert nur einen hellen Lichtkreis.
Du hast bestimmt keine Diascheibe eingelegt.
Lege eine der mitgelieferten Diascheiben 1) in die Halterung 1! ein.
Das Projektionsbild ist nicht sichtbar, obwohl das Gerät eingeschaltet ist.
Wahrscheinlich wurde der Schlafmo-dus aktiviert.
Schalte das Gerät über den Ein/Aus-Schalter c aus und nach ca. 10 Sek. wieder ein. Den Schlafmodus kannst du wie in der Anleitung beschrieben einstellen.
13
Do not dispose of electrical equipment in your ordinary refuse. The European
guideline 2002/96/EU on Electronic and Electrical Equipment Waste and relevant laws applying to it require such used equipment to be separately collected and recycled in an en-vironment-friendly manner. Empty batteries and accumulators must be disposed of separately. Information on disposing of all such equipment made after 01 June 2006 can be obtained from your local authority.
13
RISK of physical injury!This device contains electronic compo-nents that are powered by either a mains
connection or batteries. Never leave a child unsu-pervised with this device. The device should only be used as per these instructions otherwise there is a serious RISK of ELECTRICAL SHOCK.
Children should only use this device under su-pervision. Keep packaging materials (plastic bags, rubber bands, etc.) away from children. There is a RISK of SUFFOCATION.
Batteries should be kept out of children’s reach. When inserting batteries please ensure the po-larity is correct. Leaking or damaged batteries can cause injury if they come into contact with the skin. If you need to handle such batteries please wear suitable safety gloves.
DANGER of fire and explosion!Do not expose the device to high temperatures.
Use only the mains adapter supplied or those battery types recommended. Nev-
er short circuit the device or batteries or throw into a fire. Exposure to high temperatures or misuse of the device can lead to short circuits, fire or even explosion!
Do not subject the device to temperatures ex-ceeding 60 C.
RISK of material damage!Never take the device apart. In the event of a defect, please contact the service
centre responsible for your Federal Land (as indicated on the warranty card).
Only use the batteries that have been recom-mended. Always replace low or used batteries with a completely new set of full capacity batter-ies. Do not combine batteries of different brand, type or capacity. Batteries should be removed from the device after long periods of disuse.
TIPS on cleaningRemove the device from it’s energy source before cleaning (remove plug
from socket / remove batteries).
Clean the exterior of device with a dry cloth. Do not use cleaning fluids so as to avoid causing damage to electronic components.Protect the device from dust and moisture. Store the device in the bag supplied or in its original packaging. Batteries should be re-moved from the device if it is not going to be used for a long period of time.
DISPOSALDispose of the packaging material/s as legally required. Consult the local author-
ity on the matter if necessary.
GB
14
EEC conformity explanationMeade Instruments Europe GmbH & Co KG, resident in 46414 Rhede/
Westf., Gutenbergstr. 2, Germany, explains the agreement with in the following specified EEC guidelines for this product:
EN-71, Part 1-3, Part 6EN-71, Part 9EN-62115EN-60825-1
Product description: Astro PlanetariumModel /Description: Star Projector
Rhede, 13-03-2009
Meade Instruments Europe GmbH & Co. KG
Helmut EbbertManaging director
Light emitting diodes (LEDs): 1 piece, type W42180, N42180, S42180, W42180J, W32180LED class 1EN 60825-1:1994 + A1:2002 + A2:2001

15
Parts overview (figs. 1-3)
B Planetarium sphereC On/off/pause buttonD Button for opening the slide drawerE Button for setting the sleep mode
(30 or 60 minutes)F Knob for setting the dateG Time frameH Objective lensI Focus knobJ Pedestal for the planetarium sphere1) Slide plates1! Battery compartment cover1@ Batteriefachabdeckung1# Battery holder with screw1$ Battery compartment1% Batteries1^ Button for right-sided image rotation1& Button for left-sided image rotation1* Button for activating the shooting stars
function1( Projector for the shooting stars function
Setting up the astro planetarium
Open the battery compartment cover 1@ on the underside of the planetarium sphere b (Fig. 3).
Fig. 3
Loosen the screw on the battery holder 1# with a screwdriver (you’ve surely got one at home).
Now lay the 3 batteries 1% into the battery com-partment 1$ as shown in figure 3.
IMPORTANT: Be sure to place the batteries in so that their positive and negative poles are in the right direction. The little imprints (+/-) in the battery compartment will tell you which direc-tion is right.
After you’ve installed the batteries 1%, put the battery holder 1# back on and screw it in.Finally, you must only set the battery compart-ment cover 1@ on again.
Now place the pedestal for the planetarium sphere J on a level and stable surface (e.g. on a table) and lay the planetarium sphere b in. The objective lens H must be parallel to the projection surface (wall or ceiling) (Fig. 4).
1.8 to 2 m
N
Fig. 4
IMPORTANT: The distance between the ob-jective lens and the wall or ceiling should be at least 1.8 to 2 m.
NOTE: Most ceilings are approx. 2,5 m in height. If required, use a tape measure to help you to set the required projection distance.
Finally, turn the planetarium sphere B in such a way so that the side directly across from the slide plate holder h is pointing north (Fig. 4).
GB

16
GFig. 6
INFO: The stars, planets, etc, are always dif-ferently positioned in the sky because the Earth is rotating. That is what it is not always possible to see all objects. For this reason, it is important that you always set the correct date and time before starting a projection with your Astro-Planetarium.
30 minutes
01:00 00:00 23:00
Fig. 7
Explanation of the time scale gOnly the time span between 8:00 pm and 2:00 am is depicted. During this time, it is possible to see stars in the sky no matter what the season (night sky). Each bar on the scale corresponds to 30 minutes (Fig. 7).
APR MAY
2 days 30 Apr
1026 28 2 4
Fig. 8
Explanation of the knob for setting the date FWith the date scale of the knob, you can set the 365 days of the year according to the month. At 30 days per month, each bar on the scale corresponds to 2 days (Fig. 8). The long lines always represent the last day of the previous month; underneath, the respective following month is always given.
Some examples of correct time and date set-up
Example 1:You would like to have your Astro-Planetarium project the night sky for July 7, 12:00 am (mid-night). Turn the knob for the date set-up F until the bar for “12:00 am” is situated above on the time scale G between the two short bars befo-re the “10” in the month of July (JUL) (Fig. 9).
JUN JUL AUG SEP 20 10 20 10 20 10 20 10
02:00 01:00 00:00 23:00 22:00 21:00 20:00
JUL
2 4 6 8
10
7/7
Fig. 9
Sky projection with the astro planetarium
Press the button for opening the slide drawer d. The tray will open by itself (Fig. 2).
Set one of the two slide plates 1) into the slide plate holder 1!.
Fig. 5
IMPORTANT: Be careful that the protrusions on the holder 1! catch on the notches of the slide plates 1) (Fig. 5).Now you must enter the time and date for the night sky that you would like to see with your Astro-Planetarium (observation time span). To do this, turn the knob for setting the date f until the desired date appears under the time on the time scale g (Fig. 6).

17
Example 2:You would like to project the night sky for De-cember 30, 10:30 pm with your Astro-Planeta-rium. Turn the knob for the date set-up F until the bar for “10:30 pm” is situated above on the time scale G just before the long bar for the month of January (JAN (Fig. 9).
NOV DEC JA N FEB 20 10 20 10 20 10 20 10
02:00 01:00 00:00 23:00 22:00 21:00 20:00
JAN
28/12
20
30/12
Fig. 10
Once you have set the observation period, you are ready to start projecting. Close the slide disc holder 1! and press the on/off/ button C to start the projection. You can make further adjustments to the pro-jection angle for an optimal image on the wall or ceiling by moving the planetarium sphere B in the pedestal j. In fi gure 11, you can see the possibilities for projecting onto the ceiling (a) or the wall (b).
b aFig. 11
By turning the focus knob i, you can obtain the correct focus for image projection (Fig. 12).
Fig. 12
IMPORTANT: The correct distance between the objective lens and the wall or ceiling is be-tween 1.8 and 2 m. If you have tried to focus the image, but it still remains fuzzy, you have probably not chosen the correct projection dis-tance.
Press the sleep mode button E to set the time (30 or 60 minutes) for activating the automatic
shut-down function. The corresponding LED lamp will light up. At the designated time, the device will switch itself to sleep mode (also en-ergy saving mode). If you wish to turn off the sleep mode, press the button E until the LED lamp goes out. In order to save energy, the pro-jection automatically shuts down after 2 hours. When the astro planetarium is not in use, the device should be turned off simply by pressing the on/off/pause button C. Remove the batter-ies from the device if it is out of use for a long period (1 week or more).
Using the image rotation function
Press the button for left-sided rotation 1& to make the night sky projection move in an au-tomatic, anti-clockwise direction. This corre-spods to the natural motion sequence of the northern hemisphere.You can infl uence the speed of movement by pressing the button again. In total, there are 6 different speed settings. The LED light fl ashes according to the set speed.Press the on/off/pause button C to stop the rotation.Similarly, image rotation can also be activated and adjusted to the southern hemisphere. In this case, press the button for right-sided rota-tion 1^. All other functions are identical to those for left-sided rotation.
GB

18
Technical information• Projection method: optical • Observation position: 35° North* • Constellations: 61• Stars: 8.000• Illumination: white LED-lighting with high
luminance.• Constellation-orientation through: Date, time• Projection space:
1.8 x 2.2 m at 2 m projection distance• Sleep mode / automatic shut-off:
30 or 60 minutes / 2 hours• Power supply: 4.5 V AC
(from 3 batteries of 1.5 V AA/LR6)
The projection is always given in terms of a viewing location at 35° north latitude. That is a definite point on the Earth. If you are at this position and you look into the sky at the same time as you have indicated on the Astro-Planetarium, you will see the exact same portion of the sky both in the sky and in the projection.
Using the shooting stars function After activating the image rotation, you can also switch on the shooting stars function. To do this, press the button for activating the shooting stars function 1*. Via the shooting stars projec-tor 1(, you will now see a comet tail (shooting star) passing through the projected image at regular intervals.Press the button 1* again to deactivate the shooting stars function.
NOTE: The intervals at which the shooting stars pass through the image can be reduced by increasing the rotation speed.

19
GB
SERVICE AND GUARANTEE
This device is guaranteed for 5 years from the date of purchase. Please keep the receipt as proof of purchase.Our products are manufactured using the latest manufacturing techniques and undergo rigor-ous quality control.
Service CentrePlease contact the service centre for any ques-tions regarding the product or claims. Our trained staff will be happy to help. The serv-ice hotline is listed below. If it is necessary to make a guarantee claim (repair or exchange), our service staff will supply you with the return address.
Service hotline: 00 800 6343 7000
Correction of defects and returnsWe will repair any material or manufacturing de-fects free of charge during the guarantee peri-od. Excluded from the guarantee are faults due to damage caused by the user, or improper use due to non-authorised third-party attempted re-pairs or similar. If it is necessary to repair or ex-change a product, our service centre employ-ees will supply you with the return address.
In the case of returns, please note the fol-lowing:• Make sure that the article is carefully pack-
aged. If possible use the original packaging. • Fill in the returns form and include it with a
copy of your receipt and the product you are returning.
Returns form
Transaction no.*: ......................................
Product name: .........................................
Short description of defect: ........................
..............................................................
..............................................................
Surname, first name: .................................
Postcode / Town: .....................................
Street / House no.: ...................................
Telephone: ..............................................
Date of purchase: .....................................
Signature: ...............................................
*will be supplied to you by the service centre

20
Problem Possible Mistake Solution
I can’t turn on the planetari-um.
The batteries could be improperly in-stalled.
Check to see whether the batteries are placed in exactly the way described in the instructions. Pay special attention to the directions of the terminals (+/-).
Maybe the batteries are empty.Install new, unused batteries as directed in the instructions. Pay special at-tention to the directions of the terminals (+/-).
The projected image is distor-ted, not completely round.
Maybe the objective lens is not per-fectly parallel to the projection surface (wall or ceiling).
Try to arrange the planetarium in the pedestal so that the objective lens is parallel to the projection surface.
The projected image is fuzzy.
The distance to the projection surface (wall or ceiling) is perhaps too small.
The planetarium be at least 1.8 to 2 m away from the projection surface. Check to see whether the distance is right and correct it if necessary.
The focus may not be adjusted pro-perly.
Try to improve the focus of the image by turning the focus knob i.
The projected image is showing flecks.
The objective lens is dirty.Clean the objective lens with a clean, lint-free cloth, as described in the instructions.
Troubleshooting
It can happen that your Astro-Planetarium doesn’t work properly. That does not mean that there is something wrong with the machine! It is often the case that a small detail was forgotten while you were setting up. For that reason, we have compiled the most common mistakes here so that you can try to fix the problem yourself.

21
Problem Possible Mistake Solution
The planetarium is not pro-jecting the desired portion of the sky
Perhaps the wrong slide plate is in the machine.
Lay the slide plate 1) with the simulation of the sky into the holder 1!.
You have probably adjusted the date and time incorrectly.
Adjust the date of the observation time span along with the correct time, as described in the instructions.
The planetarium is only projecting a bright circle of light.
You have almost certainly forgotten to place a slide plate in the machine.
Set one of the two slide plates 1) into the slide plate holder 1!.
The projected image is not visible even though the ma-chine is turned on.
The sleep mode has probably been activated.
Turn off the machine with the On/Off switch C and after about 10 seconds, turn it back on. You can adjust the sleep mode as described in the instruc-tions.
GB

22
RISQUE de blessures corporelles!Cet appareil contient des pièces électro-niques fonctionnant à l‘aide d’une source
de courant (bloc secteur et/ou piles). Ne lais-sez jamais vos enfants sans surveillance utiliser cet appareil ! L’appareil doit impérativement être utilisé selon les instructions du mode d’emploi : DANGER de CHOC ÉLECTRIQUE !
Les enfants ne devraient utiliser l’appareil que sous surveillance. Gardez hors de leur portée les matériaux d’emballage (sachets en plasti-que, élastiques etc.) ! DANGER D’ÉTOUFFE-MENT !
Les piles doivent être tenues hors de la portée des enfants ! Faites attention à la polarité lors-que vous insérez les piles. Les piles qui ont fui ou qui sont endommagées peuvent provoquer des brûlures lorsqu’elles entrent en contact avec votre peau. Enfilez des gants de protec-tion adaptés le cas échéant.
DANGER D’INCENDIE/D’EXPLOSION!N’exposez pas l’appareil à de fortes températures. Utilisez uniquement le
bloc secteur inclus à la livraison ou bien les piles recommandées. Ne court-circuitez pas l’appareil avec les piles et ne les jetez pas dans le feu! Une chaleur excessive ou un mauvais maniement peut provoquer des courts-circuits,
des incendies voire des explosions!
N’exposez jamais l’appareil à des températures de plus de 60° C !
DANGER de dommage sur le matériel !Ne démontez jamais l’appareil! En cas de défaillance, adressez-vous au centre
de service de votre pays (indiqué sur la carte de garantie).
Utilisez les piles recommandées. Remplacez toujours des piles faibles ou utilisées par de nouvelles piles pleines. N’utilisez aucune pile de marques ou de type différents, ou de puis-sance différente. Les piles doivent être retirées de l’appareil si elles ne sont pas utilisées pen-dant une longue période!
REMARQUES concernant le nettoyageAvant de procéder au nettoyage de l’ap-pareil, séparez-le de la source de cou-rant (retirez le bloc secteur de la prise ou
retirez les piles) !
Ne nettoyez que l’extérieur de l’appareil et à l’aide d’un chiffon propre. N’utilisez pas de li-quide de nettoyage afin d’éviter tout dommage au système électronique.
Tenez l’appareil à l’abri de la poussière et de
l’humidité! Conservez-le dans la sacoche in-cluse à la livraison ou bien dans l’emballage de transport. Retirez les piles de l‘appareil si vous ne n’utilisez pas pendant un certain temps !
ÉLIMINATIONÉliminez les matériaux d’emballage se-lon le type de produit. Pour plus d’infor-
mations concernant l’élimination conforme, contactez le prestataire communal d’élimina-tion des déchets ou bien l’office de l’environ-nement.
Ne jetez pas d’appareils électriques dans les ordures ménagères !
Selon la directive européenne 2002/96/EG relative aux déchets d‘équipements
électriques et électroniques et à sa mise en œu-vre au niveau du droit national, les équipements électriques doivent être triés et déposés à un endroit où ils seront recyclés de façon écolo-gique. Les piles et les accumulateurs usagés doivent être déposés dans des conteneurs de collectes de piles prévus à cet effet. Pour plus d’informations concernant l’élimination confor-me d’appareils usagés et de piles usagées pro-duites après le 01.06.2006, contactez le pres-tataire d’élimination communal ou bien l’office de l’environnement.

23
Certificat de conformité UELa société Meade Instruments Europe Gmbh & Co. KG, domiciliée à 46414
Rhede/Westf., Gutenbergstr. 2, Allemagne, certifie la conformité de ce produit avec les di-rectives de l‘UE ci-après:
EN-71, Part 1-3, Part 6EN-71, Part 9EN-62115EN-60825-1
Description du produit: Astro PlanetariumType / Désignation: Star Projector
Rhede, 13-03-2009
Meade Instruments Europe GmbH & Co. KG
Helmut EbbertGérant
Diodes électroluminescentes (DEL): 1 pièce, type W42180, N42180, S42180, W42180J, W32180DEL de classe 1EN 60825-1:1994 + A1:2002 + A2:2001
FR

24
Aperçu-télé (Ilustr. 1-3)
B Sphère PlanétariumC Touche Marche/Arrêt/StopD Bouton pour ouvrir la fente diapositivesE Touche pour le réglage du mode sommeil
(30 ou 60 Minutes)F Roue pour le réglage de la dateG Echelle de dateH ObjectifI Roue de focalisationJ Support pour globe la Sphère Planétarium1) Disques de diapositives1! Support pour les disques de diapositives1@ Couvercle de compartiment à piles1# Support de pile avec vis1$ Compartiment à piles1% Piles1^ Touche pour la rotation de l’image vers la
droite1& Touche pour la rotation de l’image vers la
gauche1* Touche pour l’activation de la fonction étoi-
les filantes1( Projecteur pour la fonction étoiles filantes
Montage de l’Astro-Planétarium
Ouvrez le couvercle du compartiment à piles 1@ sur la partie inférieure de la Sphère Planéta-rium b (Illustr. 3).
Fig. 3
Desserrez les vis du support de piles 1# avec un tournevis (vous en avez sûrement un à la maison).Posez maintenant les 3 piles 1% dans le com-partiment à piles 1$ de sorte que cela ressem-ble à l’illustration 3.
IMPORTANT : Lors de l’introduction, veillez à ce que les polarités plus et moins des piles soient dans la bonne direction. Vous trouverez une petite impression (+/-) dans le comparti-
ment à piles pour connaître la direction de la polarité.Si tu as introduit les piles 1%, replacez le sup-port de piles 1# et fixez-le.Pour finir, vous devez replacer le couvercle des piles 1@.
Pose maintenant le support de la Sphère Pla-nétarium J sur une surface plane et stable (par ex. sur une table) avant d’y poser le Sphère Planétarium b. A ce stade, l’objectif H doit être parallèle à la surface de projection (mur ou pla-fond) (Illustr. 4).
1,8 á 2 m
N
Fig. 4
IMPORTANT: La distance entre l’objectif et le mur ou le plafond doit être d’environ 1,8 à 2 m.
INDICATION: La plupart des plafonds ont une hauteur d’environ 2,5m. Aidez-vous le cas échéant d’un centimètre pour pouvoir régler à la distance de projection requise.

25
Tournez la Sphère Planétarium B de sorte que la partie en face du support pour les disques de diapositives h soit orientée vers le nord (Illustr. 4).
Projection du ciel avec l’Astro Planétarium
Appuyez sur le bouton pour ouvrir de fente pour diapositives D. Le chargeur s’ouvre (Illustr. 2).Installez une des deux diapositives 1) dans le support pour les disques de diapositives 1!.
Fig. 5
IMPORTANT : Lors de l’insertion, veillez à ce que les ressorts du support 1! agrippe l’enco-che des disques de diapositives 1) (Illustr. 5). Maintenant vous devez entrer la date et l’heure pour le ciel nocturne que tu souhaites observer avec ton Astro-Planétarium (Durée d’observa-tion). Pour ce faire, tournez la roue de réglage de la date f jusqu’à ce que la date souhaité se trouve sous l’heure sur l’échelle temporelle g (Illustr. 6).
Fig. 6
INFO : Les étoiles, planètes, etc. dans le ciel sont toujours différentes, car la terre tourne. C’est pour-quoi on ne peut pas voir tous les objets. Pour cette raison, il est important de toujours effectuer les bons réglages d’heure et de date, avant de com-mencer une projection avec l’Astro-Planétarium.
30 minutes
01:00 00:00 23:00
Fig. 7
Explication de l’échelle temporelle gSeule la période entre 20h et 2 h est représen-tée. Durant cette période, on peut voir des étoi-les dans le ciel durant toutes les saisons (ciel de nuit). Chaque trait de l’échelle correspond à 30 minutes (Illustr. 7).
APR MAY
2 days 30 Apr
1026 28 2 4
Fig. 8
Explication de la roue pour le réglage de la date FAvec l’échelle de date de la roue, les 365 jours de l’année peuvent être réglés selon le mois. Avec 30 jours par mois, chaque trait de la roue correspond à 2 jours (Illustr. 8). Les longues lignes représentent toujours le dernier jour du mois précédent, le mois suivant est indiqué en dessous.
Quelques exemples pour effectuer un bon réglage de l’heure et de la date
Exemple 1 :Vous souhaitez regarder le ciel nocturne le 7 juillet, 0 :00h (minuit) avec votre Astro-Planéta-rium (Projection).
JUN JUL AUG SEP 20 10 20 10 20 10 20 10
02:00 01:00 00:00 23:00 22:00 21:00 20:00
JUL
2 4 6 8
10
7/7
Fig. 9
FR

26
Tournez la roue de réglage de date F jusqu’à ce que le trait pour ’00:00’ soit au dessus sur l’échelle de temps G entre les deux petits traits avant le ‘10’ du mois de juillet (JUL) (Illustr. 9).
Exemple 2 :Vous souhaitez regarder le ciel nocturne le 30 décembre, 22 : 30 h avec ton Astro-Planéta-rium (Projection). Tournez la roue de réglage de date F jusqu’à ce que le trait pour ’22 : 30’ soit au dessus sur l’échelle de temps G un peu avant le long trait indiquant le mois de janvier (JAN) (Illustr. 10).
NOV DEC JA N FEB 20 10 20 10 20 10 20 10
02:00 01:00 00:00 23:00 22:00 21:00 20:00
JAN
28/12
20
30/12
Fig. 10
Une fois que vous avez réglé la période d’ob-servation, vous pouvez commencer la projec-tion. Fermez le support pour les diapositives 1! et activez la touche Marche/Arrêt/Stop C pour lancer la projection.Par la suite, vous avez encore la possibilité de corriger l’angle de projection pour une projec-tion optimale sur le mur ou le plafond, en agi-tant la boule de projection B dans le support J. Dans l’illustr. 11, vous voyez les possibilités pour
une projection sur le plafond (a) ou le mur (b).
b aFig. 11
En tournant sur la roue pour la mise au point I, vous pouvez régler la netteté de la projection de l’image adéquate (Illustr. 12).
Fig. 12
IMPORTANT : La bonne distance entre l’objec-tif et le mur ou le plafond se situe entre 1,8 et 2m. Si la projection apparaît toujours brouillée malgré la mise au point, vous n’avez peut-être pas sélectionné la bonne distance.
Appuyez sur la touche pour le réglage du mode sommeil E pour activer l’heure souhaitée pour le dispositif automatique de déconnexion (30 ou 60 minutes). Le voyant LED correspondant s’éclaire. Après cette heure, l’appareil s’éteint en mode sommeil (également en mode d’éco-nomie d’énergie). Si vous souhaitez éteindre le mode sommeil, appuyez sur la touche E, jusqu’à ce que la lampe LED s’éteigne. La pro-jection s’arrête ensuite automatiquement après 2 heures afi n d’économiser de l’énergie.Si vous n’utilisez pas l’Astro Planétarium, vous devez éteindre l’appareil en appuyant simple-ment sur la touche marche/arrêt/stop C. Re-tirez les piles de l’appareil, si vous ne l’utilisez pas pendant une longue période (1 semaine ou plus).
Utilisation de la rotation de l’imageAppuyez sur la touche pour la rotation vers la gauche 1&, pour déplacer automatiquement la projection du ciel de nuit dans le sens antiho-raire. Cela correspond au mouvement naturel de l’hémisphère nord.En appuyant à nouveau sur la touche, vous infl uencez la vitesse de mouvement. Au total, 6 différentes vitesses sont disponibles. La lu-mière LED clignote selon la vitesse de rotation réglée.

27
Appuyez sur la touche Marche/Arrêt/Stop C pour arrêter la rotation.De la même manière, vous pouvez activer et adapter la rotation de l’image pour l’hémisphère sud. Appuyez ensuite sur la touche pour la rota-tion vers la droite 1^. Toutes les autres fonctions sont identiques à celles de la rotation vers la gauche.
Utilisation des étoiles filantes - fonction Si vous avez activé la rotation de l’image, vous pouvez également connecter la fonction étoiles filantes. Pour ce faire, appuyez sur la touche pour l’activation de la fonction étoiles filantes 1*. Désormais, une queue de comètes (étoile filante) est représentée sur la projection d’ima-ges à intervalles réguliers sur le projecteur d’étoiles filantes 1(.Rappuyez sur la touche 1* pour désactiver à nouveau la fonction étoiles filantes.
INDICATION: L’intervalle durant lequel les étoi-les filantes parcourent l’image peut être réduit en augmentant la vitesse de rotation.
Données techniques• Méthode de projection : Optique • Position d’observation : 35° Nord* • Constellations : 61• Etoiles : 8.000• Eclairage : Eclairage LED blanc avec une
haute intensité lumineuse• Orientation de la constellation par :
Date, heure • Domaine de projection : Distance de
projection de 1,8 x 2,2 m sur 2 m• Mode sommeil/Autom. Déconnexion :
30 ou 60 minutes/2 heures• Alimentation électrique :
4,5 V de courant alternatif (plus de 3 pièces. Piles 1,5V AA/LR6)
* La projection se réfère toujours à la latitude nord 35° du lieu d’observation. C’est un point défini sur la terre. Si de cet endroit, on regarde en même temps le ciel et la manière dont elle est disposée dans l’Astro-Planétarium, on voit dans le ciel et dans la projection exactement le même extrait de ciel.
FR

28
SERVICE ET GARANTIE
Nous offrons une garantie de 5 ans pour cet appareil à partir de la date d’achat. Veuillez garder le ticket de caisse en tant que preuve d’achat.Notre produit a été fabriqué selon les métho-des les plus modernes et il a subi un contrôle de qualité approfondi.
Centre de servicesSi vous avez des questions concernant ce produit ou en cas de réclamations, veuillez prendre contact avec notre centre de services. Nos collaborateurs, parfaitement formés, se tiennent à votre disposition. Vous trouverez ci-dessous le numéro du service en ligne. Si une prestation (réparation ou échange) devait être nécessaire dans le cadre de la garantie, notre collaborateur du centre de services vous indi-quera une adresse de retour.
Service en ligne : 00 800 6343 7000
Réparation des vices de fabrication et re-toursDurant la période de garantie, nous réparons gratuitement tous les défauts éventuels de ma-tériaux ou de fabrication. Sont exclus de la ga-rantie tous les défauts imputables à l’utilisateur ou consécutifs à une utilisation non conforme
lorsque des tiers ont fait des essais de répara-tion ou d’autres travaux de ce genre non auto-risés. Si des réparations ou un échange du produit devaient être nécessaires, notre colla-borateur du centre de services vous indiquera une adresse de retour.
En cas de retour, faites attention aux points suivants :• Veillez à nous envoyer l’article soigneuse-
ment emballé. Utilisez si possible l’emballage d’origine.
• Remplissez la déclaration de retour suivante et joignez-la à votre envoi avec la copie de votre preuve d’achat.
Déclaration de retour
N° de dossier* : ........................................
Désignation du produit : .............................
Courte description du problème : ................
..............................................................
..............................................................
Nom, prénom : .........................................
CP / commune : .......................................
Rue / numéro de rue : ...............................
N° de téléphone : .....................................
Date d’achat : ...........................................
Signature : ...............................................
*vous sera communiqué par le centre de services

29
Problème Erreur possible Dépannage
Je n’arrive pas à allumer le Planétarium.
Les piles ne sont peut-être pas intro-duites correctement.
Vérifie que les piles sont introduites selon le mode d’emploi. Vérifie tout parti-culièrement que l’orientation de la polarité des piles (+/-) est correcte.
Les piles sont peut-être vides.Introduis de nouvelles piles non utilisées comme décrit dans le mode d’emploi. Vérifie tout particulièrement que l’orientation de la polarité des pi-les (+/-) est correcte.
L’image de projection est dé-formée, et non ronde.
L’objectif pourrait ne pas être disposé de manière totalement parallèle au do-maine de projection (mur ou plafond).
Essaie, d’orienter le Planétarium dans le support J de sorte que l’objectif soit parallèle au domaine de projection.
L’image de projection n’est pas nette.
La distance avec le domaine de pro-jection (mur ou plafond) est peut-être trop petite.
Le Planétarium doit au moins avoir une distance de 1,8 à 2m avec le do-maine de projection. Vérifie que la distance est correcte et corrige la le cas échéant.
La netteté de l’image n’est peut-être pas correctement réglée.
Essaie d’améliorer la netteté de l’image en tournant sur la roue de mise au point i.
L’image de projection appa-raît tachetée.
La lentille de l’objectif est sale. Nettoie l’objectif avec un chiffon comme décrit dans le mode d’emploi.
Dépannage
Il peut arriver que ton Astro-Planétarium ne fonctionne pas correctement. Cela ne veut pas nécessairement dire qu’il est défectueux ! Souvent, il s’agit seulement d’un détail de montage qui n’a pas été respecté. C’est pourquoi nous avons décrit ci-dessous les erreurs les plus courantes pour que tu puisses essayer de régler le problème toi-même.
FR

30
Problème Erreur possible Dépannage
Le Planétarium ne projet-te pas les extraits de ciel souhaités.
Peut-être n’as-tu pas introduit la bon-ne diapositive.
Introduis la diapositive 1) avec la simulation su ciel dans le support 1!.
Peut-être n’as-tu pas correctement ré-glé la date ou l’heure pour la période d’observation.
Règle la date de la période d’observation par rapport à la bonne heure com-me décrit dans le mode d’emploi.
Le Planétarium ne projette q’un cercle de lumière clair.
Tu n’as très certainement pas introduit de diapositive.
Introduis une des diapositives fournies 1) dans le support 1!.
L’image de projection n’est pas visible, bien que l’appareil soit allumé.
Le mode sommeil est vraisemblable-ment activé.
Eteins l’appareil en appuyant sur l’interrupteur marche/arrêt C et rallume-le après env. 10 minutes. Tu peux régler le mode sommeil comme cela est décrit dans le mode d’emploi.
31
NL
GEVAAR voor lichamelijk letsel!Dit apparaat bevat elektronische onder-delen die via een stroombron (stroom-
voorziening of batterijen) worden aangedreven. Zorg dat kinderen tijdens de bediening altijd onder toezicht staan! Gebruik mag uitsluitend plaats vinden zoals in de gebruiksaanwijzing staat omschreven, anders bestaat het GEVAAR van een ELEKTRISCHE SCHOK!
Kinderen mogen het apparaat uitsluitend onder toezicht gebruiken. Houdt het verpakkingsma-teriaal (plastic zakken, elastiekjes, e.d.) buiten bereik van kinderen! Hierdoor kunnen ze STIK-KEN!
Batterijen horen buiten het bereik van kinderen te blijven! Let bij het plaatsen van een batterij op de juiste richting (+/-). Lekkende of bescha-digde batterijen veroorzaken irritatie als ze met de huid in aanraking komen. Gebruik in dat ge-val geschikte handschoenen.
BRAND-/EXPLOSIEGEVAAR!Stel het apparaat niet bloot aan hoge temperaturen. Gebruik uitsluitend de
meegeleverde adapter of de aanbevolen batte-rijen. Apparaat en batterijen niet kortsluiten en niet in open vuur gooien! Door overmatige hitte en onoordeelkundig gebruik kunnen kortslui-ting, brand en zelfs explosies optreden!
Stel het apparaat niet bloot aan temperaturen boven de 60ºC!
GEVAAR voor materiële schade!Demonteer het apparaat niet! Neem bij een defect alstublieft contact op met het
Service-Center voor uw land (staat op de ga-rantiekaart vermeld).
Gebruik uitsluitend de aanbevolen batterijen. Vervang zwakke of lege batterijen altijd door een hele nieuwe set volle batterijen. Gebruik geen batterijen van verschillende merken, ty-pes of onderling verschillende capaciteit. Bat-terijen dienen uit het apparaat te worden ver-wijderd als het apparaat gedurende langere tijd niet meer wordt gebruikt!
TIPS voor het schoonmakenOntkoppel het apparaat vóór het schoon-maken van de stroombron (stekker uit het
stopcontact nemen of batterijen verwijderen)!
Reinig het apparaat uitsluitend aan de buiten-zijde met een droge doek. Gebruik geen reini-gingsvloeistof om schade aan de elektronische onderdelen te voorkomen.Bescherm het apparaat tegen stof en vocht! Bewaar het in de meegeleverde tas of verpak-king. De batterijen dienen uit het apparaat te worden verwijderd als het gedurende langere
tijd niet wordt gebruikt.
AFVALVERWERKINGBied het verpakkingsmateriaal op soort gescheiden als afval aan. Informatie over
de juiste afvalverwerking kunt u van uw plaatse-lijke afvalverwerkingsbedrijf of de milieudienst krijgen.
Gooi elektrische apparaten niet weg met het huisvuil!
Volgens de Europese Richtlijn 2002/96/EG over afgedankte elektrische en elektronische apparaten alsmede de daaraan gerelateerde nationale wetgeving moeten gebruikte elektri-sche apparaten gescheiden worden ingeza-meld en volgens de milieurichtlijnen worden gerecycled.
Lege batterijen en accu’s moeten door de ge-bruiker bij inzamelingspunten voor batterijen worden aangeboden. Informatie over de afval-verwerking van oude apparaten of batterijen die na 1 juni 2006 zijn gemaakt, krijgt u van uw plaatselijke afvalverwerkingsbedrijf of de milieudienst.

32
EU-ConformiteitsverklaringMeade Instruments Europe GmbH & Co. KG, gevestigd te 46414 Rhede/
Westf., Gutenbergstr. 2, Germany, verklaart dit product conform aan de volgende EG-richtlij-nen:
EN-71, Part 1-3, Part 6EN-71, Part 9EN-62115EN-60825-1
Productbeschrijving: Astro PlanetariumType / aanduiding: Star Projector
Rhede, 13-03-2009
Meade Instruments Europe GmbH & Co. KG
Helmut EbbertDirecteur
Licht emitterende diodes (LED's): 1 stuk, type W42180, N42180, S42180, W42180J, W32180LED klasse 1EN 60825-1:1994 + A1:2002 + A2:2001

33
NL
Overzicht van de onderdelen (afb. 1-3)
B PlanetariumbolC Aan-/uit-/stop-toetsD Knop om het dia-vak te openenE Toets om de slaapmodus in te stellen
(30 of 60 minuten)F Wiel om de datum mee in te stellenG TijdschaalH ObjectiefI Wieltje voor de scherpteregelingJ Standvoet voor de planetariumbol1) Schijven met dia’s1! Houder voor de diaschijven1@ Deksel batterijvak1# Batterijhouder met schroef1$ Batterijvak1% Batterijen1^ Toets om het beeld naar rechts te laten
roteren1& Toets om het beeld naar links te laten
roteren1* Toets om de vallende-ster-functie te acti-
veren1( Projector voor de vallende-ster-functie
Gebruiksklaar maken van het astro-planetarium
Open het deksel van het batterijvak (12) aan de onderkant van de planetariumbol (afb. 3).
afb. 3
Draai de schroef van de batterijhouder (13) los met een schroevendraaier (heb je vast in huis).Leg nu de 3 batterijen (15) zo in het batterijvak (14) als je op afbeelding 3 ziet.
BELANGRIJK: Let er bij het inleggen van de batterijen op, dat de plus- en minpool van de batterijen in de juiste richting wijzen. In welke richting de polen moeten wijzen, zie je aan de kleine tekens (+/-) in het batterijvak.
Als je de batterijen (15) er goed om in hebt gelegd, zet je de batterijhouder (13) terug en schroeft hem weer vast.Tenslotte moet je het deksel van het batterijvak (12) weer terugplaatsen.
Zet de standvoet van de planetariumbol (9) op een vlakke en stabiele ondergrond (bijv. op een tafel) en doe de planetariumbol (1) erin. Daar-bij moet het objectief (7) parallel staan met het projectievlak (de wand of het plafond) (afb. 4).
1,8 á 2 m
N
afb. 4
BELANGRIJK: De ruimte tussen het objectief en de wand of het plafond moet ongeveer 1,80 tot 2 m bedragen.
LET OP: De meeste plafonds zijn ca. 2,5 m hoog. Gebruik evt. een rolmaat om de beno-digde projectieafstand in te stellen.
Draai de planetariumbol (1) vervolgens zo om, dat de kant die zich tegenover de houder voor

34
de diaschijven (11) bevindt, naar het noorden wijst (afb. 4).
Hemelprojectie met het astro-planetarium
Druk op de knop om het diavak (3) te openen. De la gaat open (afb. 2).Leg een van de twee diaschijven (10) in de hou-der voor de diaschijven (11).
afb. 5
BELANGRIJK: Let er bij het invoeren op, dat de voorsprongen van de houder (11) in de groeven van de diaschijf (10) terechtkomen (afb. 5). Nu moet je de tijd en de datum voor de nacht-hemel invoeren die je met het astro-planetarium wilt bekijken (observatieperiode). Draai daar-voor het wiel om de datum mee in te stellen (5) zo ver door, tot de gewenste datum onder de tijd op de tijdschaal (6) staat (afb. 6).
afb. 6
UITLEG: De sterren, planeten enz. aan de hemel staan altijd anders, omdat de aarde draait. Daarom kun je niet altijd alle hemellichamen zien. Om deze reden is het van belang, dat je altijd de juiste tijd en datum instelt, voordat je aan een projectiesessie met je astro-planetarium begint.
30 minutes
01:00 00:00 23:00
afb. 7
Uitleg bij de tijdschaal (6) Hier zie je alleen de tijd tussen 20:00 uur en 2:00 uur. Tussen deze tijden kun je in alle jaar-getijden sterren aan de hemel bewonderen (de nachthemel). Elke streep op de schaal komt overeen met 30 minuten (afb. 7).
APR MAY
2 days 30 Apr
1026 28 2 4
afb. 8
Uitleg bij het wiel om de datum mee in te stellen (5) Met de datumschaal van het wiel kunnen de 365 dagen van het jaar naar maanden ge-ordend worden ingesteld. Bij 30 dagen per maand komt elke streep op het wiel overeen met 2 dagen (afb. 8). De lange lijnen staan dan steeds voor de laatste dag van de vorige maand, daaronder is dan de volgende maand aangegeven.
Een paar voorbeelden voor de juiste instel-ling van de tijd en de datum
Voorbeeld 1:Je wilt de nachthemel van 7 juli, 0:00 uur (mid-dernacht) met je astro-planetarium bekijken (projecteren).
JUN JUL AUG SEP 20 10 20 10 20 10 20 10
02:00 01:00 00:00 23:00 22:00 21:00 20:00
JUL
2 4 6 8
10
7/7
afb. 9

35
NL
Draai daarvoor het wiel om de datum mee in te stellen (5) zo ver door, tot de streep voor ‚00:00‘ bovenop de tijdschaal (6) tussen de twee korte strepen voor de ‚10‘ in de maand juli (JUL) staat (afb. 9).
Voorbeeld 2:Je wilt de nachthemel van 30 december, 22:30 met je astro-planetarium bekijken (pro-jecteren). Draai daarvoor het wiel om de datum mee in te stellen (5) zo ver door, tot de streep voor ‚22:30‘ bovenop de tijdschaal (6) kort voor de lange streep voor de maand januari (JAN) staat (afb. 10).
NOV DEC JA N FEB 20 10 20 10 20 10 20 10
02:00 01:00 00:00 23:00 22:00 21:00 20:00
JAN
28/12
20
30/12
afb. 10
Nadat de observatieperiode is ingesteld, kan de voorstelling beginnen. Sluit de houder voor de diaschijven (11) en activeer de aan/uit/-toets (2) om de projectie te starten.Nu kun je de projectiehoek nog verder afstellen voor een optimale projectie op de muur of het plafond, door de projectiebol (1) in de standvoet (9) te bewegen. In afb. 11 zie je de mogelijkhe-den voor een projectie tegen het plafond (a) of op de muur (b).
b aafb. 11
De juiste scherpte stel je in door aan het wiel voor de scherpteregeling (8) te draaien (afb. 12).
afb. 12
BELANGRIJK: De juiste afstand tussen het objectief en de wand of het plafond bedraagt tussen 1,8 en 2 m. Als de projectie ondanks de scherpstelling nog steeds wazig is, is er zeker iets mis met de afstand tot het projectievlak.
Druk op de toets om de slaapmodus (4) in te stellen als u wilt dat het apparaat na 30 of 60 mi-
nuten automatisch uitgaat. De betreffende LED-lamp licht op. Na de ingestelde tijd schakelt het apparaat over naar de slaapmodus (ook energie-spaar-modus). Als u de slaapmodus wilt uitscha-kelen, drukt u op toets (4) tot de LED-lamp uit-gaat. De projectie wordt dan automatisch na 2 uur beëindigd, om energie te besparen.Als u het astro-planetarium niet gebruikt, moet het apparaat helemaal worden uitgeschakeld. Druk dan één keer op de aan/uit/stop-toets (2). Haal bovendien de batterijen uit het appa-raat, als u het voorlopig niet van plan bent te gebruiken (1 week of langer).
Gebruik van de afbeeldingsrotatieDruk op de toets voor de rotatie naar links (17), om de projectie van de nachthemel automa-tisch tegen de klok in te laten bewegen. Dit komt overeen met de natuurlijke beweging op het noordelijk halfrond.Door opnieuw op de toets te drukken, veran-dert u de snelheid van de draaiing. In totaal zijn er 6 verschillende snelheden. De LED knippert overeenkomstig de ingestelde rotatiesnelheid.Druk op de aan/uit/stop-toets (2) om het draai-en stil te zetten.Op dezelfde wijze kunt u de beeldrotatie voor het zuidelijk halfrond activeren en aanpassen. Druk dan op de toets voor rotatie rechtsom (16). Alle overige functies zijn hetzelfde als die bij de rotatie linksom.

36
Gebruik van de vallende-ster-functie Als u de beeldrotatie geactiveerd heeft (zie punt 4), kunt u ook de vallende-ster-functie gebruiken. Druk hiervoor op de toets voor de activering van de vallende-ster-functie (18). Nu wordt in regelmatige intervallen een komeet-staart in het beeld geprojecteerd met behulp van de vallende-ster-projector (19).Druk opnieuw op toets (18) om de vallende-ster-functie weer uit te zetten.
LET OP: Het tijdsinterval waarmee de vallende sterren verschijnen, kan door een snellere ro-tatie korter worden.
Technische gegevens• Projectiemethode: Optisch• Observatiepositie: 35° Noord*• Sterrenbeelden: 61• Sterren: 8.000• Verlichting: witte LED-verlichting
met hoge lichtsterkte• Sterrenbeeld-oriëntatie d.m.v.: datum, uur• Projectiebereik:
1,8 x 2,2 m bij 2 m projectieafstand• Slaapmodus/autom. uitschakelen:
30 of 60 minuten/ 2 uur• Stroomvoorziening:
4,5V wisselstroom (met 3 stuks 1,5V AA/LR6 batterijen)
* De projectie heeft steeds als referentiepunt een plaats op 35° noordelijke breedte. Dat is een bepaalde plaats op aarde. Als je van daar op hetzelfde moment naar de hemel kijkt, als je op je astro-planetarium hebt ingesteld, dan zie je aan de hemel en in de projectie precies hetzelfde stukje nachthemel.

37
NL
SERVICE EN GARANTIE
Voor dit apparaat leveren wij een garantie van 5 jaar, vanaf op de aankoopdatum. Gelieve uw aankoopbon of factuur te bewaren als aan-koop- en garantiebewijs.
Ons product is met de modernste productie-methoden gemaakt en is onderworpen aan een strenge kwaliteitscontrole.
Service centrumAls u met betrekking tot het product vragen of eventuele klachten heeft kunt u contact opne-men met het service centrum. De goed opge-leide medewerkers helpen u graag verder. Het telefoonnummer van de servicelijn staat hier-onder vermeld. Indien een garantiehandeling (reparatie of ruil) nodig is, zal de servicemede-werker een retouradres aan u verstrekken.
Servicelijn: 00 800 6343 7000
Reparatie en omruilGedurende de looptijd van de garantie herstel-len we alle eventuele materiaal- of fabricage-fouten. Garantie is uitgesloten voor defecten die zijn ontstaan door schuld van de gebruiker of door incorrect gebruik van het product, of indien een niet geautoriseerde derde heeft ge-probeerd het apparaat te repareren of verande-
ringen aan te brengen. Indien een reparatie of omruil van het apparaat nodig is zal de mede-werker van het servicecentrum een retouradres aan u verstrekken.
Houdt u bij het retourneren van een artikel rekening met het volgende:• Zorg ervoor dat het artikel zorgvuldig verpakt
verstuurd wordt. Gebruik, indien mogelijk, de originele verpakking.
• Vul de retourmelding hieronder in en doe deze samen met een kopie van uw aankoop-bewijs bij het artikel in de verpakking.
Retourmelding
Referentienr.*: ..........................................
Productomschrijving: .................................
Korte probleemomschrijving: ......................
..............................................................
..............................................................
Achternaam, voornaam: .............................
Postcode / woonplaats: .............................
Straat / huisnummer: ................................
Telefoonnummer: ......................................
Aankoopdatum: ........................................
Handtekening:..........................................
*wordt door het servicecentrum verstrekt.

38
Probleem Mogelijke fout Oplossing
Ik planetarium gaat niet aan.
Misschien zitten er geen batterijen in.Controleer, of de batterijen precies zo zijn geplaatst, als in de handleiding is beschreven. Let met name op de juiste positie van de polen (+/-).
Misschien zijn de batterijen leeg.Doe nieuwe, ongebruikte batterijen in de houder, zoals in de handleiding beschreven staat. Let met name op de juiste positie van de polen (+/-).
Het geprojecteerde beeld is vervormd, niet cirkelvormig.
Het object staat misschien niet he-lemaal parallel met het projectievlak (wand of plafond) uitgericht.
Probeer het planetarium in de standvoet (9) zo uit te richten, dat het objec-tief parallel staat met het projectievlak.
Het geprojecteerde beeld is niet scherp.
Dit kan komen doordat de afstand tot het projectievlak (wand of plafond) te klein is.
Het planetarium moet tenminste op 1,80 tot 2 meter afstand van de wand of het plafond staan. Controleer of de afstand klopt en corrigeer dit even-tueel.
Misschien is het beeld nog niet scherpgesteld.
Probeer het beeld scherper te krijgen door aan de scherpteregeling (8) te draaien.
Er zitten vlekken in het ge-projecteerde beeld.
De lens van het objectief is vuil.Reinig het objectief met een schone, niet-pluizende doek, zoals in de hand-leiding beschreven.
Het oplossen van problemen
Het kan gebeuren dat je astro-planetarium niet goed werkt. Het hoeft daarom niet kapot te zijn! Vaak is het zo, dat er een kleinigheid bij de opbouw mis is gegaan. Daarom hebben we hier de meest voorkomende problemen opgesomd, zodat je je probleem zelf kunt proberen op te lossen.
39
NL
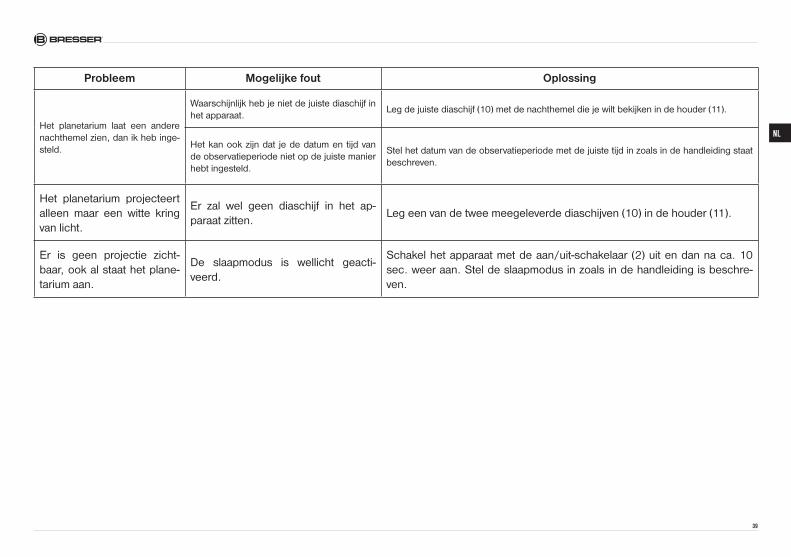
Probleem Mogelijke fout Oplossing
Het planetarium laat een andere nachthemel zien, dan ik heb inge-steld.
Waarschijnlijk heb je niet de juiste diaschijf in het apparaat.
Leg de juiste diaschijf (10) met de nachthemel die je wilt bekijken in de houder (11).
Het kan ook zijn dat je de datum en tijd van de observatieperiode niet op de juiste manier hebt ingesteld.
Stel het datum van de observatieperiode met de juiste tijd in zoals in de handleiding staat beschreven.
Het planetarium projecteert alleen maar een witte kring van licht.
Er zal wel geen diaschijf in het ap-paraat zitten.
Leg een van de twee meegeleverde diaschijven (10) in de houder (11).
Er is geen projectie zicht-baar, ook al staat het plane-tarium aan.
De slaapmodus is wellicht geacti-veerd.
Schakel het apparaat met de aan/uit-schakelaar (2) uit en dan na ca. 10 sec. weer aan. Stel de slaapmodus in zoals in de handleiding is beschre-ven.

40
PERICOLO di lesioni!Il presente apparecchio contiene parti elettroniche che funzionano con l’appor-
to di energia da sorgenti elettriche (alimentato-re e/o batteria). Non lasciare i bambini incusto-diti mentre utilizzano l’apparecchio! L’utilizzo dell'apparecchio è consentito esclusivamente nel rispetto delle istruzioni per l’uso fornite. In caso contrario sussiste il RISCHIO di SCARI-CHE ELETTRICHE!
Non lasciare mai incustoditi i bambini quando usano l’apparecchio. Tenere i materiali di im-ballaggio (buste di plastica, elastici, ecc.) lon-tano dalla portata dei bambini! PERICOLO DI SOFFOCAMENTO!
Non lasciare le batterie nelle mani dei bambini! Al momento di inserire le batterie nell’apposi-to vano, fare attenzione a rispettare le polarità. Non utilizzare batterie danneggiate: le sostanze fuoriuscite dall'interno della batteria sono cor-rosive e possono provocare lesioni se entrano a contatto con la pelle. Utilizzare all’occorrenza guanti protettivi idonei.
PERICOLO DI INNESCO DI INCENDI/ESPLOSIONE!
Non esporre l'apparecchio a tempera-ture elevate. Utilizzare esclusivamente
l’alimentatore in dotazione o le batterie consi-
gliate. Non cortocircuitare l’apparecchio e/o le batterie e non metterli a contatto con fiamme! L’esposizione a temperature eccessive o un uso improprio dell'apparecchio può provocare cortocircuiti, incendi e addirittura esplosioni!
Non esporre l'apparecchio a temperature su-periori ai 60°C!
PERICOLO per danni a cose!Non smontare l’apparecchio! Qualora sia presente un difetto rivolgersi al cen-
tro di assistenza clienti del proprio Paese (indi-cato sul certificato di garanzia).
Utilizzare esclusivamente il tipo di pile consi-gliato. Sostituire sempre tutte le pile in una vol-ta sola, qualora siano scariche o la loro carica sia debole. Non utilizzare pile di marche, tipi e caratteristiche diversi. In caso di inutilizzo pro-lungato rimuovere le pile dall’apparecchio.
AVVERTENZE per la puliziaPer pulire l’apparecchio, scollegarlo dal-la sorgente di energia elettrica (scollega-
re l’alimentatore oppure rimuovere le batterie)!
Pulire l’apparecchio solo esternamente con un panno asciutto. Non utilizzare liquido deter-gente per evitare che i componenti elettronici dell’apparecchio si danneggino.
Proteggere l’apparecchio da polvere e umidità! Conservarlo nella custodia in dotazione o nella confezione originale. Laddove l’apparecchio resti inutilizzato per un periodo di tempo pro-lungato, rimuovere le batterie.
SMALTIMENTOSmaltire i materiali di imballaggio dopo averli suddivisi. Per informazioni sul cor-
retto smaltimento, si prega di rivolgersi all'azien-da municipale che si occupa dello smaltimento dei rifiuti o all’ufficio pubblico competente.
Non gettare apparecchi elettrici nei co-muni rifiuti domestici!
Secondo la direttiva europea 2002/96/CE sul-le apparecchiature elettriche ed elettroniche e ai sensi della legge nazionale che la recepisce, gli apparecchi elettrici devono essere differen-ziati e smaltiti separatamente per poter essere trattati e riciclati nel rispetto dell’ambiente.
Le batterie scariche, anche quelle ricaricabili, devono essere smaltite dal consumatore pres-so gli appositi punti di raccolta. Per maggiori informazioni sullo smaltimento di apparecchi o batterie, prodotti dopo il 01.06.2006, rivolger-si all'azienda municipale che si occupa dello smaltimento dei rifiuti o all’ufficio pubblico com-petente.

41
IT
Dichiarazione di conformità CELa Meade Instruments Europe GmbH & Co. KG, avente sede a 46414 Rhede/
Westf., Gutenbergstr. 2, Germania, dichiara che il presente prodotto è conforme alle se-guenti direttive CE:
EN-71, Part 1-3, Part 6EN-71, Part 9EN-62115EN-60825-1
Descrizione del prodotto: Astro PlanetariumModello / Descrizione: Star Projector
Rhede, 13-03-2009
Meade Instruments Europe GmbH & Co. KG
Helmut EbbertDirettore amministrativo
Diodi luminosi (LED): 1 pezzo, tipo W42180, N42180, S42180, W42180J, W32180Classe LED 1EN 60825-1:1994 + A1:2002 + A2:2001

42
Panoramica dei componenti (Fig. 1-3)
B Sfera planetariaC Tasto ON/OFF/STOPD Tasto per aprire il vano diapositiveE Tasto per l'impostazione della modalità di
sospensione (30 o 60 minuti)F Ruota per l’impostazione della dataG Scala del tempoH ObiettivoI Ruota per la regolazione della messa a
fuocoJ Base di appoggio della sfera planetaria1) Dischi delle diapositive1! Supporto per i dischi delle diapositive1@ Coperchio del vano batteria1# Supporto batteria con vite1$ Vano batteria1% Pile1^ Tasto per la rotazione dell'immagine a
destra1& Tasto per la rotazione dell'immagine a
sinistra1* Tasto per l'attivazione della funzione stelle
cadenti1( Proiettore per la funzione stelle cadenti
Montaggio del planetario astronomico
Apri il coperchio del vano batteria (12) situato nella parte inferiore della sfera planetaria (1) (fig. 3).
afb. 3
Allenta la vite del supporto batteria (13) con un cacciavite (ne troverai sicuramente uno in casa).Inserisci le 3 pile (15) nel vano batteria (16) così come illustrato nella figura 3.
IMPORTANTE: Quando inserisci le pile assicu-rati che il polo positivo e il polo negativo siano correttamente orientati. Il senso corretto per orientare i poli è stampigliato (+/-) all’interno del vano batteria.
Dopo aver messo le pile (15), inserisci nuova-mente il supporto della batteria (13) e riavvitalo.Infine, rimetti al suo posto il coperchio del vano batteria (12).Ora posiziona la base della sfera planetaria (9) su un piano stabile e regolare (per es. su un tavolo) e inserisci la sfera planetaria (1). Fai in modo che l’obiettivo (7) sia rivolto in parallelo alla superficie di proiezione (parete o soffitto) (fig. 4).
1,8 á 2 m
N
afb. 4
IMPORTANTE: La distanza tra l’obiettivo e la parete (o il soffitto) deve essere di circa 1,8 – 2 metri.
AVVERTENZA: La maggior parte dei soffitti ha un'altezza di circa 2,5 m. Se necessario, utiliz-zare un metro per regolare la distanza di proie-zione richiesta.
Orienta la sfera planetaria (1) in modo tale che il lato opposto al supporto per i dischi delle dia-positive (11) sia rivolto verso Nord (fig. 4).

43
IT
Proiezione della volta celeste con il plane-tario astronomico
Premi il tasto per aprire il vano diapositive (3). Il vano si apre (fi g. 2).Inserisci uno dei due dischi (10) nel supporto (11).
afb. 5
IMPORTANTE: Quando inserisci il disco del-le diapositive, assicurati che le sporgenze del supporto (11) si incastrino bene nelle tacche del disco (10) (fi g. 5). Ora inserisci il tempo e la data per il cielo notturno che vuoi vedere con il tuo planetario astronomico (periodo di osservazione). Gira la ruota per l’impostazione della data (5) fi nché sulla scala del tempo (6), sotto l’orario, non ver-rà indicata la data desiderata (fi g. 6).
afb. 6
INFORMAZIONI: La posizione delle stelle, dei pianeti, ecc. varia continuamente perché la Terra gira. Non si possono quindi vedere sempre tutti gli oggetti celesti. Per questo motivo è importante im-postare sempre la data e l'ora prima di cominciare la proiezione con il planetario astronomico.
30 minutes
01:00 00:00 23:00
afb. 7
Informazioni sulla scala del tempo (6) Sulla scala sono riportati solo gli orari compresi tra le ore 20 e le 2. In questo intervallo di tem-po, in ogni stagione, si possono vedere le stel-le del cielo notturno. Ogni trattino della scala corrisponde a 30 minuti (fi g. 7).
APR MAY
2 days 30 Apr
1026 28 2 4
afb. 8
Informazioni sulla ruota per l’impostazione della data (5) Con la scala della data indicata sulla ruota si possono impostare i 365 dell'anno a secon-da del mese. Se si considera un mese di 30 giorni, ciascun trattino sulla ruota corrisponde a 2 giorni (fi g. 8). Le linee più lunghe rappre-sentano sempre l'ultimo giorno del mese pre-cedente; al di sotto è sempre indicato il mese successivo.
Alcuni esempi di impostazione corretta dell'ora e della data
Esempio 1:Con il tuo planetario astronomico vuoi proiet-tare il cielo notturno del 7 luglio alle ore 0:00 (mezzanotte).
JUN JUL AUG SEP 20 10 20 10 20 10 20 10
02:00 01:00 00:00 23:00 22:00 21:00 20:00
JUL
2 4 6 8
10
7/7
afb. 9

44
Gira la ruota per l’impostazione della data (5) fi nché il trattino che corrisponde a “00:00” in alto sulla scala del tempo (6) non si troverà tra i due trattini brevi che precedono il “10” del mese di luglio (JUL) (fi g. 9).
Esempio 2:Con il tuo planetario astronomico vuoi proiet-tare il cielo notturno del 30 dicembre alle ore 22:30. Gira la ruota per l’impostazione della data (5) fi nché il trattino che corrisponde a “22:30” in alto sulla scala del tempo (6) non si troverà immediatamente prima del trattino lun-go per il mese di gennaio (JAN) (fi g. 10).
NOV DEC JA N FEB 20 10 20 10 20 10 20 10
02:00 01:00 00:00 23:00 22:00 21:00 20:00
JAN
28/12
20
30/12
afb. 10
Una volta impostato il periodo di osservazione, è possibile dare inizio alla proiezione. Chiudere il supporto dei dischi di proiezione (11) e pre-mere il tasto ON/OFF (2) per avviare la proie-zione.Puoi correggere l’angolo di proiezione in un secondo tempo muovendo la sfera planetaria (1) nella base (9). Nella fi g. 11 sono illustrate alcune possibilità per proiettare le immagini sul soffi tto (a) o sulla parete (b).
b aafb. 11
Girando la ruota della messa a fuoco (8) puoi regolare la nitidezza dell’immagine proiettata (fi g. 12).
afb. 12
IMPORTANTE: La distanza corretta tra l’obiet-tivo e la parete (o il soffi tto) deve essere di 1,8 – 2 metri. Se nonostante la regolazione della messa a fuoco l'immagine continua ad essere sfuocata signifi ca che probabilmente la distan-za non è corretta.
Premere il tasto per l'impostazione della moda-
lità di sospensione (4) per attivare il tempo di spegnimento automatico desiderato (30 o 60 minuti). La luce a LED corrispondente si accen-de. Trascorso il tempo impostato, l'apparecchio passa in modalità di sospensione (detta anche modalità di risparmio energetico). Per disattivare la modalità di sospensione, premere il tasto (4) fi no a che la luce a LED non si spegne. La pro-iezione verrà terminata automaticamente dopo 2 ore per risparmiare energia.Se il planetario astronomico non viene utilizzato, spegnere l'apparecchio premendo semplice-mente il tasto ON/OFF/STOP (2). Se si prevede di non utilizzare l'apparecchio per un periodo di tempo prolungato (1 settimana o più), rimuovere le batterie.
Utilizzo della rotazione dell'immaginePremere il tasto per la rotazione a sinistra (17) per muovere automaticamente la proiezione del cielo notturno in senso antiorario. Questo movimento corrisponde al movimento naturale dell'emisfero boreale.Premendo nuovamente il tasto è possibile mo-difi care la velocità di movimento. In tutto sono disponibili 6 velocità diverse. Il lampeggio della luce a LED dipende dalla velocità di rotazione impostata.Premere il tasto ON/OFF/STOP (2) per arre-stare la rotazione.Allo stesso modo è possibile attivare e rego-

45
IT
lare la rotazione dell'immagine per l'emisfero australe. A tal proposito, premere il tasto per la rotazione a destra (16). Tutte le altre funzio-ni sono identiche alla rotazione a sinistra (vedi punto 4.1).
Utilizzo della funzione stelle cadenti Una volta attivata la funzione di rotazione dell'immagine (vedi punto 4), è possibile attiva-re anche la funzione stelle cadenti. A tale sco-po, premere il tasto di attivazione della funzione stelle cadenti (18). In questo modo il proiettore delle stelle cadenti (19) proietterà nell'immagi-ne raffigurata, a intervalli regolari, una coda di cometa (stella cadente).Premere nuovamente il tasto (18) per disattiva-re la funzione stelle cadenti.
AVVERTENZA: l'intervallo di tempo con cui le stelle cadenti attraversano l'immagine può essere accorciato aumentando la velocità di rotazione.
Dati tecnici• Sistema di proiezione: ottico• Posizione di osservazione: 35° Nord*• Costellazioni: 61• Stelle: 8.000• Illuminazione: illuminazione a LED bianchi
molto luminosi• Orientamento delle costellazioni mediante:
data, ora• Superficie di proiezione:
1,8 x 2,2 m a 2 m di distanza• Modalità di riposo/spegnimento autom.:
30 oppure 60 minuti / 2 ore• Alimentazione:
corrente alternata 4,5V (con 3 pile da 1,5V AA/LR6)
* La proiezione si riferisce sempre ad un luogo di osservazione situato a 35° di latitu-dine nord. Si tratta di un punto ben preciso della Terra. Se tu guardassi il cielo stellato da questo punto allo stesso orario e nello stesso giorno che hai impostato sul tuo planetario astronomico, vedresti lo stesso settore di cielo.

46
SERVIZIO DI ASSISTENZA E GARANZIA
Per il presente apparecchio viene concessa una garanzia di 5 anni dalla data d’acquisto. Si raccomanda di conservare lo scontrino fiscale come prova d'acquisto.Il nostro prodotto è stato realizzato secondo i metodi di fabbricazione più innovativi e sotto-posto a rigidi controlli qualitativi.
Centro di assistenza clientiIn caso di domande sul prodotto e di eventuali reclami, si prega di contattare il Centro di as-sistenza clienti. I nostri qualificati collaboratori saranno a Vostra disposizione. Il numero della hotline del Centro di assistenza clienti è ripor-tato qui di seguito. Laddove si rendesse neces-saria una prestazione in garanzia (riparazione o sostituzione), l’indirizzo per il rinvio Vi verrà comunicato dagli addetti del servizio di assi-stenza.
Hotline del servizio di assistenza: 00 800 6343 7000
Eliminazione di difetti e rinviiPer l'intera durata della garanzia i prodotti che presentano difetti di materiale o fabbricazione saranno sostituiti gratuitamente. Dalla garanzia è escluso qualsivoglia difetto causato dall'uten-te o da un uso improprio del prodotto o deri-
vante da qualsivoglia tentativo di riparare l’appa-recchio effettuato da persone non autorizzate. Nel caso in cui si renda necessario riparare o sostituire il prodotto, l'indirizzo per il rinvio Vi verrà comunicato dall'addetto del Centro di as-sistenza clienti.
Per i rinvii si prega di osservare quanto se-gue:• Assicurarsi che l'articolo venga spedito ac-
curatamente imballato. Laddove possibile si raccomanda di usare l'imballaggio originale.
• Compilare la seguente notifica di rinvio e al-legarla insieme a una copia della ricevuta di acquisto alla spedizione.
Notifica di rinvio
Numero pratica*: ......................................
Descrizione del prodotto: ...........................
Descrizione sintetica dell'anomalia: ..............
..............................................................
..............................................................
Cognome, nome: .....................................
CAP/Località: ..........................................
Via / n° civico: .........................................
Telefono: .................................................
Data d'acquisto: .......................................
Firma: .....................................................
*Verrà comunicato dal Centro di assistenza clienti.

47
ITProblema Possibile errore Soluzione del problema
Il planetario non si accende.
Probabilmente non hai inserito corret-tamente le pile.
Controlla se hai inserito le pile come descritto nel manuale. Assicurati in par-ticolare di aver rispettato le polarità (+/-).
Forse le pile sono scariche.Metti delle pile nuove nel planetario, seguendo le istruzioni del manuale. As-sicurati in particolare di rispettare le polarità (+/-).
L’immagine proiettata è di-sturbata e non è circolare.
L’obiettivo potrebbe non essere per-fettamente parallelo alla superficie di proiezione (parete o soffitto).
Prova a muovere il planetario nella base (9) così che l’obiettivo sia parallelo alla zona di proiezione.
L’immagine proiettata non è nitida.
La distanza rispetto alla zona di proie-zione (parete o soffitto) è forse troppo ridotta.
Il planetario deve trovarsi ad una distanza di almeno 1,8 - 2 metri dalla su-perficie di proiezione. Verifica se la distanza è giusta e all’occorrenza cor-reggila.
Probabilmente la messa a fuoco non è regolata correttamente.
Prova a migliorare la messa a fuoco dell’immagine agendo sull’apposita ruo-ta di regolazione (8).
L’immagine proiettata pre-senta delle macchie.
La lente obiettiva è sporca.Pulisci l’obiettivo con un panno pulito che non lasci peli, secondo le istruzio-ni contenute nel manuale.
Soluzione dei problemi
Può succedere che il tuo planetario astronomico non funzioni bene. Questo però non vuol dire necessariamente che sia guasto! Spesso è solo così che non si sono osservate delle piccolezze durante il montaggio. Quindi abbiamo raccolto qui gli errori più frequenti in modo tale che tu possa provare a risolvere il problema da solo.
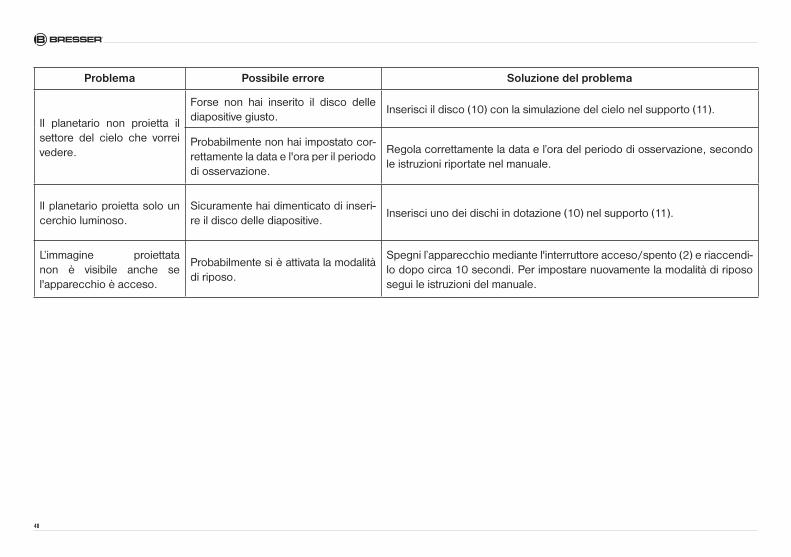
48
Problema Possibile errore Soluzione del problema
Il planetario non proietta il settore del cielo che vorrei vedere.
Forse non hai inserito il disco delle diapositive giusto.
Inserisci il disco (10) con la simulazione del cielo nel supporto (11).
Probabilmente non hai impostato cor-rettamente la data e l'ora per il periodo di osservazione.
Regola correttamente la data e l’ora del periodo di osservazione, secondo le istruzioni riportate nel manuale.
Il planetario proietta solo un cerchio luminoso.
Sicuramente hai dimenticato di inseri-re il disco delle diapositive.
Inserisci uno dei dischi in dotazione (10) nel supporto (11).
L’immagine proiettata non è visibile anche se l'apparecchio è acceso.
Probabilmente si è attivata la modalità di riposo.
Spegni l’apparecchio mediante l'interruttore acceso/spento (2) e riaccendi-lo dopo circa 10 secondi. Per impostare nuovamente la modalità di riposo segui le istruzioni del manuale.

49
¡PELIGRO de lesiones corporales!Este aparato incluye componentes electrónicos operados a través de una
fuente de electricidad (equipo de alimentación y/o pilas). ¡No deje que los niños manejen nun-ca el aparato sin su supervisión! ¡Sólo se pue-de utilizar tal como se indica en el manual de instrucciones, ya que en caso contrario existe PELIGRO de una DESCARGA ELÉCTRICA!
Los niños sólo pueden usar el aparato bajo la supervisión de un adulto. ¡Mantener fuera del alcance de los niños los materiales de emba-laje (bolsas de plástico, cintas de goma, etc.)! ¡Existe PELIGRO DE ASFIXIA!
¡Las pilas no deben llegar a manos de los ni-ños! Al introducir las pilas, preste siempre atención a que la polaridad sea correcta. Las pilas agotadas o defectuosas pueden provocar quemaduras si entran en contacto con la piel. Dado el caso, utilice guantes de protección adecuados.
¡PELIGRO DE INCENDIO/EXPLOSIÓN!No exponga el aparato a temperatu-ras elevadas. Utilice exclusivamente el
equipo de alimentación suministrado o las pilas recomendadas. ¡No poner en cortocircuito el aparato ni las pilas, ni arrojarlos al fuego! ¡Si se calientan en exceso o se manejan de modo
inadecuado se pueden producir cortocircuitos, incendios o incluso explosiones!
¡No exponga el aparato a temperaturas supe-riores a 60 °C!
¡PELIGRO de daños materiales!¡No desmonte el aparato! En caso de que perciba un defecto, diríjase a su
tienda especializada. En caso de que haya algún defecto, le rogamos que se ponga en contacto con el centro de servicio técnico res-ponsable de su país (se indica en la tarjeta de garantía).
Utilice exclusivamente las pilas recomendadas. Recambie siempre las pilas agotadas o muy usadas por un juego completo de pilas nuevas con plena capacidad. No utilice pilas de marcas o modelos distintos ni de distinto nivel de capa-cidad. ¡Hay que retirar las pilas del aparato si no se va a usar durante un período prolongado!
INDICACIONES sobre la limpiezaAntes de limpiarlo, retire el aparato de la fuente de alimentación eléctrica (extraer
el equipo de alimentación o retirar las pilas).Limpie el aparato con un paño seco y sólo por la parte exterior. No utilice ningún agente lim-piador líquido, a fin de evitar daños en el siste-ma electrónico.
¡Proteja el aparato del polvo y la humedad! Guárdelo en el maletín suministrado o en el embalaje de transporte. Se recomienda retirar las pilas del aparato si no se va a utilizar durante un período prolongado.
ELIMINACIÓNElimine los materiales de embalaje sepa-rándolos según su clase. Puede obtener
información sobre la eliminación reglamentaria de desechos en su proveedor de servicios de eliminación de desechos municipal o bien en su oficina de medio ambiente.
¡No deposite aparatos eléctricos en la ba-sura doméstica! Con arreglo a la Directiva
Europea 2002/96/CE sobre aparatos eléc-tricos y electrónicos usados y a su aplicación en las respectivas legislaciones nacionales, los aparatos eléctricos usados deben recopilarse por separado y destinarse a un reciclaje adecua-do desde el punto de vista medioambiental.
Las pilas y los acumuladores gastados o descar-gados deben ser eliminados por el consumidor en recipientes especiales para pilas usadas. Puede obtener información sobre la eliminación de pilas usadas o aparatos fabricados después del 1 de junio de 2006 dirigiéndose a su provee-dor de servicios de eliminación de desechos mu-nicipal o bien a su oficina de medio ambiente.
ES
50
Declaración de conformidad con la UEMeade Instruments Europe GmbH & Co. KG, con sede en 46414 Rhede/
Westf., Gutenbergstr. 2, Alemania, declara que este producto está conforme con las Di-rectivas de la UE enumeradas a continuación:
EN-71, Part 1-3, Part 6EN-71, Part 9EN-62115EN-60825-1
Descripción del producto: Astro PlanetariumModelo/Denominación: Star Projector
Rhede, 13.03.2009
Meade Instruments Europe GmbH & Co. KG
Helmut EbbertGerente
Diodos luminosos (LEDs): 1 unidad, modelo W42180, N42180, S42180, W42180J, W32180LED de clase 1EN 60825-1:1994 + A1:2002 + A2:2001

51
Tele-resumen (Fig. 1-3):
B Esfera del planetarioC Tecla de encendido/apagado/paradaD Botón para abrir el compartimen to de las diapositivasE Tecla para el ajuste del modo stand-by (30 o 60 minutos)F Rueda para el ajuste de la fechaG Escala temporalH ObjetivoI Tornillo micrométricoJ Peana para la esfera del planetario1) Discos de diapositivas1! Soporte para los discos de diapositivas1@ Tapa del compartimento de las pilas1# Soporte de las pilas con tornillo1$ Compartimento de las pilas1% Pilas1^ Tecla de rotación hacia la derecha1& Tecla de rotación hacia la izquierda1* Tecla para la activación de la función de estrellas fugaces1( Proyector para la función de estrellas fugaces
Estructura del planetario astronómico
Abra la tapa del compartimento de las pilas 1@ que se encuentra en la parte inferior de la esfe-ra del planetario b. (Fig. 3).
Fig. 3
Afloje el tornillo del soporte de las pilas 1# con un destornillador (No incluido).Introduzca ahora 3 pilas 1% en el compartimen-to de las pilas 1$ del modo que se indica en la Fig. 3.
IMPORTANTE: Al introducirlas, preste atención a que los polos positivo y negativo de las pilas señalen en la dirección correcta. Para saber en qué dirección deben señalar los polos, debe
fijarse en las pequeñas inscripciones (+/-) que hay en el compartimento de las pilas.
Una vez que haya introducido las pilas 1% vuelva a colocar el soporte 1# y atorníllelo.Por debe, debes volver a colocar la tapa del compartimento de las pilas 1@.
1.8 a 2 m
N
Fig. 4
Coloque ahora la peana de la esfera del pla-netario j sobre una base lisa y estable (p. ej., sobre una mesa) e introduzca en ella la esfera del planetario B. Para ello, el objetivo h debe apuntar en dirección paralela a la superficie de proyección (pared o techo) (Fig. 4).
IMPORTANTE: la distancia entre el objetivo y la pared o el techo debe ser aproximadamente entre 1,8 y 2 m.
INDICACIÓN: La mayoría de los techos de las habitaciones tienen una altura aproximada de 2,5 m. Utilice un metro como ayuda para poder
ES

52
ajustar la distancia de proyección necesaria.A continuación, gire la esfera del planetario B de modo que la parte opuesta al soporte de los discos de diapositivas h señale hacia el Norte (Fig. 4).
Proyección del cielo con el planetario astronómico
Presione el botón para abrir el compartimento de las diapositivas d. Se abre el cajón (Fig. 2).Introduzca uno de los dos discos de diapositi-vas 1) en el soporte 1!.
Fig. 5
IMPORTANTE: Al introducirlo, preste atención a que los salientes del soporte 1! se enganchen en las muescas el disco de diapositivas 1) (Fig. 5).Ahora debe introducir la fecha y la hora del cielo nocturno que desea contemplar con su plane-tario astronómico (período de observación). Para ello, tienes que girar la rueda de ajuste de la fe-cha F hasta que la fecha deseada se encuentre bajo la hora de la escala temporal G (Fig. 6).
Fig. 6
INFORMACIÓN: Las estrellas, planetas, etc., del cielo se encuentran siempre en una posi-ción distinta, ya que la Tierra gira constante-mente. Por eso no siempre se pueden observar todos los objetos. Por este motivo, es impor-tante que realice siempre los ajustes correctos de fecha y hora antes de iniciar la proyección con el planetario astronómico.
30 minutes
01:00 00:00 23:00
Fig. 7
Explicación de la escala temporal gSe representa sólo el período entre las 20:00 y las 2:00. Durante este tiempo se pueden ob-servar las estrellas del cielo (cielo nocturno) en
cualquier estación del año. Cada muesca de la escala se corresponde con 30 minutos (Fig. 7).
APR MAY
2 days 30 Apr
1026 28 2 4
Fig. 8
Explicación de la rueda de ajuste de la fecha FCon la escala de fechas de la rueda se pueden ajustar los 365 días de un año ordenados por meses. Durante 30 días al mes, cada muesca en la rueda se corresponde con 2 días (Fig. 8). Las líneas largas representan siempre el último día del mes anterior, y en la parte inferior se indica respectivamente al mes siguiente.
Algunos ejemplos de ajuste correcto de fe-cha y hora
Ejemplo 1:Le gustaría visualizar (proyección) con su pla-netario astronómico el cielo nocturno del 7 de julio a las 0:00 (medianoche).
JUN JUL AUG SEP 20 10 20 10 20 10 20 10
02:00 01:00 00:00 23:00 22:00 21:00 20:00
JUL
2 4 6 8
10
7/7
Fig. 9

53
Para ello, gire la rueda de ajuste de la fecha F hasta que la muesca correspondiente a «00:00» se encuentre arriba en la escala temporal g en-tre las dos muescas cortas que hay antes del «10» en el mes de julio (JUL) (Fig. 9).
Ejemplo 2:Le gustaría visualizar (proyección) con su pla-netario astronómico el cielo nocturno del 30 de diciembre a las 22:30. Para ello, gire la rue-da de ajuste de la fecha F hasta que la muesca correspondiente a «22:30» se encuentre arri-ba en la escala temporal g poco antes de la muesca larga del mes de enero (JAN).
NOV DEC JA N FEB 20 10 20 10 20 10 20 10
02:00 01:00 00:00 23:00 22:00 21:00 20:00
JAN
28/12
20
30/12
Fig. 10
Una vez que haya ajustado el período de ob-servación, ya puede iniciar la proyección. Cie-rre el soporte de los discos de diapositivas 1! y accione la tecla de encendido/apagado C
para iniciar la proyección.Después puede corregir el ángulo de proyec-ción a fi n de obtener una proyección óptima en la pared o el techo moviendo la esfera de pro-yección B en la peana j. En la Fig. 11 puede
ver las posibilidades de una proyección en el techo (a) o en la pared (b).
b aFig. 11
Girando el tornillo micrométrico I puede ajus-tar la nitidez correcta de la proyección de la imagen (Fig. 12).
Fig. 12
IMPORTANTE: La distancia correcta entre el objetivo y la pared o el techo está entre 1,8 y 2 m. Si la proyección sigue estando difusa a pesar de haber ajustado la nitidez, es probable que no haya seleccionado la distancia correcta.
Presione la tecla para el ajuste del modo stand-by E a fi n de activar el período de estado de desconexión automático (30 o 60 minutos). Se ilumina la lámpara LED correspondiente. Transcurrido este período, el aparato pasa al modo stand-by (también modo de ahorro de energía). Si desea desconectar el modo stand-by, presione la tecla E hasta que se apague la lámpara LED. Entonces la proyección se ter-minará automáticamente tras 2 horas, a fi n de ahorrar energía.Cuando no vaya a utilizar el planetario astronó-mico, debe desconectar el aparato presionan-do una vez la tecla de encendido/apagado/parada C. Retire las pilas del aparato si no lo va a utilizar durante un lapso prolongado (1 se-mana o más).
Uso de la rotación de imagenPresione la tecla de rotación hacia la izquier-da 1& a fi n de desplazar la proyección del cielo nocturno automáticamente en sentido contra-rio al de las agujas del reloj. Esto se corres-ponde con el curso natural del movimiento del hemisferio norte.Si presiona de nuevo la tecla, puede infl uen-ciar la velocidad del movimiento. En total hay disponibles 6 niveles de velocidad diferentes. La lámpara LED parpadea según la velocidad de rotación ajustada.Presione la tecla de encendido/apagado/pa-
ES

54
rada C a fin de detener la rotación.Del mismo modo, puede activar y adaptar la ro-tación de imagen para el hemisferio sur. En ese caso, presione la tecla de rotación hacia la de-recha 1^. Todas las demás funciones son idén-ticas a las de la rotación hacia la izquierda.
Uso de la función de estrellas fugacesUna vez que haya activado la rotación de ima-gen, puede conectar también la función de es-trellas fugaces. Para ello, presione la tecla de activación de la función de estrellas fugaces 1*. Ahora se representa una cola de cometa (es-trella fugaz) a intervalos regulares mediante el proyector de estrellas fugaces 1(.Vuelva a presionar la tecla 1* a fin de desactivar de nuevo la función de estrellas fugaces.
INDICACIÓN: El lapso de tiempo durante el que las estrellas fugaces transitan por la ima-gen puede reducirse elevando la velocidad de rotación.
Datos técnicos• Método de proyección: óptico • Posición de observación: 35° Norte* • Constelaciones: 61• Estrellas: 8.000• Iluminación: iluminación LED blanca
de gran luminosidad• Orientación de las constelaciones
mediante: fecha, hora • Zona de proyección: 1,8 x 2,2 m a 2 m de distancia con respecto a la proyección• Modo de espera/Desconexión automática:
30 o 60 minutos/2 horas• Suministro de corriente:
corriente alterna de 4,5 V (mediante 3 pilas de 1,5V AA/LR6)
* La proyección se refiere siempre al lugar de observación a 35° de latitud norte. Se trata de un punto determinado en la Tierra. Si se mira desde allí hacia el cielo en el mismo punto temporal al que se ha ajustado el planetario astronómico, se puede ver en el cielo y también en la proyección exactamente el mismo fragmento de cielo.
55
ES
SERVICIO TÉCNICO Y GARANTÍA
Para este aparato, asumimos una garantía de 5 años a partir de la fecha de compra. Por favor, conserve el ticket de compra como justificante.Nuestro producto ha sido elaborado según los métodos de fabricación más recientes y ha sido sometido a un estricto control de calidad.
Centro de servicio técnicoSi desea formular alguna pregunta sobre el producto o alguna eventual reclamación, le ro-gamos que se ponga en contacto con el cen-tro de servicio técnico. Nuestro experimentado personal estará encantado de ayudarle. La lí-nea de atención telefónica del servicio técnico se enumera a continuación. Si fuera necesaria una prestación de garantía (reparación o cam-bio), nuestro personal de servicio técnico le facilitará una dirección para la devolución.
Línea de atención telefónica del servicio técnico: 00 800 6343 7000
Reparación de defectos y devolucionesDentro del periodo de garantía, repararemos gratuitamente todos los eventuales efectos de material o fabricación. Quedan excluidos de la garantía defectos provocados por culpa del usuario o un manejo inadecuado, siem-pre que terceras partes no autorizadas hayan
efectuado en el aparato intentos de reparación o similares. Si es necesaria una reparación o un cambio del producto, nuestro personal del centro de servicio técnico le facilitará una di-rección para la devolución.
En caso de una devolución, tenga en cuen-ta lo siguiente:• Procure enviar el artículo debidamente em-
balado. Si es posible, utilice para ello el em-balaje original.
• Cumplimente la siguiente nota de devolución y adjúntela al envío junto con una copia del ticket de compra.
Nota de devolución
N.º de expediente*: ...................................
Denominación del producto: .......................
Descripción breve del error: .......................
..............................................................
..............................................................
Apellido, nombre: .....................................
C.P./Localidad: ........................................
Calle/Número: .........................................
Teléfono: .................................................
Fecha de compra: ....................................
Firma: .....................................................
*le será facilitado por el centro de servicio técnico

56
Problema Posible error Resolución del problema
No puedo encender el pla-netario.
No están introducidas correctamente las pilas.
Controla si las pilas se han introducido exactamente como se describe en las instrucciones. Presta especial atención a que los polos de las pilas (+/-) estén orientados correctamente.
Es posible que las pilas estén descar-gadas.
Introduce en el planetario pilas nuevas sin usar tal como se describe en las instrucciones. Presta especial atención a que los polos de las pilas (+/-) estén orientados correctamente.
La imagen de la proyección está distorsionada, no es re-donda.
El objetivo podría no estar alineado completamente en paralelo con res-pecto a la zona de proyección (pared o techo).
Intenta orientar el planetario en la peana J de modo que el objetivo quede alineado en paralelo con respecto a la zona de proyección.
La imagen de la proyección es poco nítida.
La distancia a la zona de proyección (pared o techo) es quizá demasiado escasa.
El planetario debe estar colocado como mínimo a una distancia de entre 1,8 y 2 m con respecto a la zona de proyección. Controla si la distancia es correcta y, dado el caso, corrígela.
El planetario no proyecta el fragmento de cielo desea-do.
Es posible que no se haya introducido el disco de diapositivas adecuado.
Introduce en el soporte 1! el disco de diapositivas 1) con la simulación del cielo.
Lo más probable es que no hayas ajustado correctamente la fecha y la hora del período de observación.
Ajusta la fecha del período de observación junto con la hora correcta tal como se describe en las instrucciones.
Resolución de problemas
Puede ocurrir que tu planetario astronómico no funcione correctamente. ¡Eso no significa que esté estropeado! Lo que suele pasar es que no se ha tenido en cuenta algún detalle durante el montaje. Por eso vamos a describirte aquí los errores más frecuentes, para que puedas intentar solucionar el problema por ti mismo.

Problema Posible error Resolución del problema
El planetario sólo proyecta un círculo de luz claro.
Seguro que no has introducido ningún disco de diapositivas.
Introduce en el soporte 1! uno de los discos de diapositivas 1) suministra-dos.
A pesar de que el apara-to está encendido, no se puede ver la imagen de la proyección.
Seguramente se ha activado el modo de espera.
Apaga el aparato por medio del interruptor de encendido/apagado C y vuel-ve a encenderlo tras unos 10 segundos. Puedes volver a ajustar el modo de espera tal como se describe en las instrucciones.
ES

OPASNOST od ozljeđivanja tijela!Ovaj uređaj sadrži elektronske dijelove pogonjene preko izvora napona (mrežni
element i/ili baterije). Djeca prilikom rukovanja sa uređajem moraju obavezno biti pod nadzo-rom! Uporaba smije uslijediti isključivo na način opisan u ovim uputama, je u protivnom postoji OPASNOST od STRUJNOG UDARA!
Djeca sa uređajem trebaju rukovati isključivo pod nadzorom. Materijale ambalaže (plastične vrećice, gumene trake i sl.) držite izvan dohvata djece! Postoji OPASNOST OD UGUŠENJA!
Baterije ne smiju dospjeti u dječje ruke! Prilikom umetanja baterija obratite pažnju na ispravan polaritet. Iscurjele ili oštećene baterije izazivaju ozljede, kada dođu u dodir sa kožom. Eventual-no koristite prikladne zaštitne rukavice.
OPASNOST OD POŽARA I EKSPLOZIJE!Uređaj ne izlažite visokim temperatura-ma. Koristite isključivo priloženi mrežni
adapter ili preporučene baterije. Ne izazovite kratki spoj uređaja i baterija, a baterije ne uba-cite u vatru! Prekomjerna vrućina i nestručno rukovanje mogu prouzrokovati kratki spoj, po-žar i eksplozije!
Uređaj ne izložite temperaturama višim od 60° C!
OPASNOST nastanka predmetne štete!Ne rastavite uređaj! U slučaju kvara mo-limo da se obratite servisnom centru
nadležnom za Vašu državu (odgovarajuće po-datke možete pronaći na jamstvenom listu).
Koristite isključivo preporučene vrste baterija. Slabe ili istrošene baterije uvijek zamijenite kompletom novih baterija punog kapaciteta. Ne koristite baterije različite marke, tipa ili nejedna-kog kapaciteta. Baterije bi trebale biti izvađene iz uređaja, ako isti duže vrijeme ne koristite!
NAPOMENE u vezi sa čišćenjemUređaj prije čišćenja odvojite od strujne mreže (izvucite mrežni utikač ili izvadite baterije)!
Uređaj očistite isključivo sa vanjske strane po-moću suhe krpe. Ne koristite tekućinu za čišćenje, kako biste izbjegli nastanak
oštećenja elektronike.Uređaj zaštitite od prašine i vlage! Čuvajte ure-đaj u priloženoj torbi ili u transportnom pakira-nju. Baterije biste trebali izvaditi iz uređaja, ako isti duže vrijeme ne koristite.
ZBRINJAVANJESve materijale ambalaže zbrinite u sorti-ranom stanju. Obavjesti o urednom zbri-
njavanju možete dobiti kod Vaše komunalne službe za zbrinjavanje otpada ili kod službe za okoliš.
Električne uređaje ne bacajte u kućni ot-pad!
U skladu sa europskom smjernicom 2002/96/EG o električnim i elektronskim starim uređaji-ma i realizaciji ove smjernice u okviru nacional-nog prava istrošeni električni uređaji moraju biti posebno sakupljeni i reciklirani na način neš-kodljiv za okoliš.
Istrošene stare baterije i akumulatori mora-ju biti zbrinuti od strane korisnika preko sa-birnih posuda za skupljanje baterija. Oba-vjesti u vezi sa zbrinjavanjem starih uređaja ili baterija proizvedenih nakon 01.06.2006 možete dobiti kod komunalne službe za zbrinjavanje otpada ili kod službe za okoliš.
59
EU-Izjava o konformitetuPoduzeće Meade Instruments Europe GmbH & Co. KG, sa sjedištem u 46414
Rhede/Westf., Gutenbergstr. 2, Njemačka, za ovaj proizvod izjavljuje konformitet sa slijedećim smjernicama EU:
EN-71, Part 1-3, Part 6EN-71, Part 9EN-62115EN-60825-1
Opis proizvoda: Astro PlanetariumTip / Naziv: Star Projector
Rhede, 13.03.2009
Meade Instruments Europe GmbH & Co. KG
Helmut EbbertPoslovođa
Svijetleće diode (LED):1 komad, tip W42180, N42180, S42180, W42180J, W32180LED klasa 1EN 60825-1:1994 + A1:2002 + A2:2001
HR
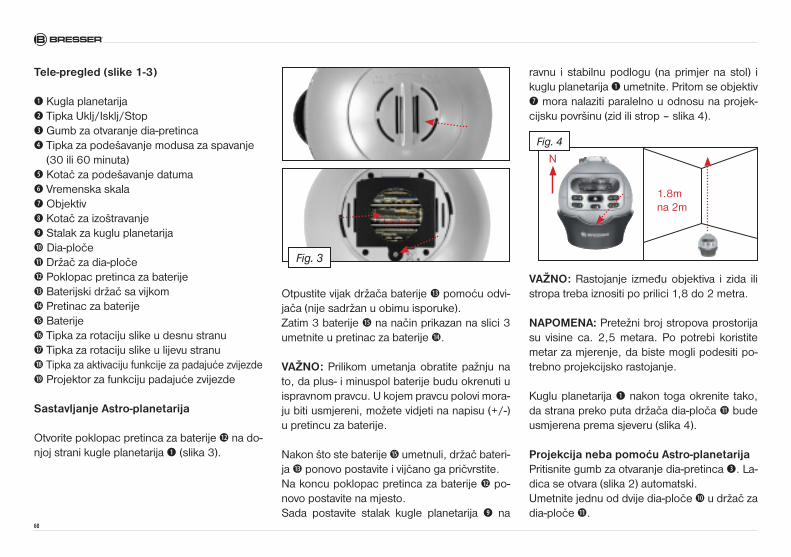
60
Tele-pregled (slike 1-3)
B Kugla planetarijaC Tipka Uklj/Isklj/StopD Gumb za otvaranje dia-pretincaE Tipka za podešavanje modusa za spavanje
(30 ili 60 minuta)F Kotač za podešavanje datumaG Vremenska skalaH ObjektivI Kotač za izoštravanjeJ Stalak za kuglu planetarija1) Dia-ploče1! Držač za dia-ploče1@ Poklopac pretinca za baterije1# Baterijski držač sa vijkom1$ Pretinac za baterije1% Baterije1^ Tipka za rotaciju slike u desnu stranu1& Tipka za rotaciju slike u lijevu stranu1* Tipka za aktivaciju funkcije za padajuće zvijezde1( Projektor za funkciju padajuće zvijezde
Sastavljanje Astro-planetarija
Otvorite poklopac pretinca za baterije 1@ na do-njoj strani kugle planetarija B (slika 3).
Fig. 3
Otpustite vijak držača baterije 1# pomoću odvi-jača (nije sadržan u obimu isporuke).Zatim 3 baterije 1% na način prikazan na slici 3 umetnite u pretinac za baterije 1$.
VAŽNO: Prilikom umetanja obratite pažnju na to, da plus- i minuspol baterije budu okrenuti u ispravnom pravcu. U kojem pravcu polovi mora-ju biti usmjereni, možete vidjeti na napisu (+/-) u pretincu za baterije.
Nakon što ste baterije 1% umetnuli, držač bateri-ja 1# ponovo postavite i vijčano ga pričvrstite.Na koncu poklopac pretinca za baterije 1@ po-novo postavite na mjesto.Sada postavite stalak kugle planetarija J na
ravnu i stabilnu podlogu (na primjer na stol) i kuglu planetarija B umetnite. Pritom se objektiv H mora nalaziti paralelno u odnosu na projek-cijsku površinu (zid ili strop – slika 4).
1.8m na 2m
N
Fig. 4
VAŽNO: Rastojanje između objektiva i zida ili stropa treba iznositi po prilici 1,8 do 2 metra.
NAPOMENA: Pretežni broj stropova prostorija su visine ca. 2,5 metara. Po potrebi koristite metar za mjerenje, da biste mogli podesiti po-trebno projekcijsko rastojanje.
Kuglu planetarija B nakon toga okrenite tako, da strana preko puta držača dia-ploča 1! bude usmjerena prema sjeveru (slika 4).
Projekcija neba pomoću Astro-planetarijaPritisnite gumb za otvaranje dia-pretinca D. La-dica se otvara (slika 2) automatski.Umetnite jednu od dvije dia-ploče 1) u držač za dia-ploče 1!.

Fig. 5
VAŽNO: Prilikom umetanja obratite pažnju na to, da ispusti držača 1! zahvataju utore dia-plo-če 1) (slika 5).Sada trebate unijeti vrijeme i datum za noćno nebo, koje želite promatrati pomoću Astro-pla-netarija (vremenski raspon promatranja). U tu svrhu okrenite kotač za podešavanje datuma F toliko, dok se željeni datum ispod točnog vreme-na na vremenskoj skali G ne pojavi (slika 6).
Fig. 6
NAPOMENA: Na osnovu zemaljske rotacije razmještaj nebeskih objekata se mijenja tijekom
godine. Stoga nisu uvijek vidljivi svi objekti. Iz tog razloga je važno, da uvijek izvršite korektno podešavanje vremena i datuma prije pokretanja projekcije sa Astro-planetarijem.
30 minutes
01:00 00:00 23:00
Fig. 7
Vremenska skala GPrikazano je isključivo vremensko razdoblje između 20:00 i 2:00 sata. U tom razdoblju u svakom godišnjem dobu možemo vidjeti zvijez-de na nebu (noćno nebo). Svaka crta skale od-govara razdoblju od 30 minuta (slika 7).
APR MAY
2 days 30 Apr
1026 28 2 4
Fig. 8
Kotač za podešavanje datuma FSa datumskom skalom kotača možete izvršiti podešavanje 365 dana u godini raspoređenih po mjesecima. Kod 30 dana po mjesecu svaka
crta na kotaču odgovara razdoblju od 2 dana (slika 8). Duge linije pritom predstavljaju zadnji dan prethodnog mjeseca, a ispod toga je nave-den slijedeći mjesec.
Primjer za ispravno podešavanje vremena i datuma
Primjer 1:Želite podesiti prikaz noćnog neba za 7. srpanj u 0:00 sati (ponoć) pomoću Astro-planetarija (projekcija).
JUN JUL AUG SEP 20 10 20 10 20 10 20 10
02:00 01:00 00:00 23:00 22:00 21:00 20:00
JUL
2 4 6 8
10
7/7
Fig. 9
U tu svrhu okrenite kotač za podešavanje da-tuma F toliko, dok crta za ‚00:00‘ gore na vre-menskoj skali G ne dospije između dvije kratke crte ispred broja ‚10‘ u mjesecu srpnju (JUL) (slika 9).
Primjer 2:Želite podesiti prikaz noćnog neba za 30. pro-sinac u 22:30 sata pomoću Astro-planetarija (projekcija). U tu svrhu okrenite kotač za pode-šavanje datuma F toliko, dok crta za ‚22:30‘
HR

62
gore na vremenskoj skali G ne dospije nepo-sredno ispred duge crte za mjesec sijećanj (JAN) (slika 10).
NOV DEC JA N FEB 20 10 20 10 20 10 20 10
02:00 01:00 00:00 23:00 22:00 21:00 20:00
JAN
28/12
20
30/12
Fig. 10
Nakon što ste izvršili podešavanje vremena pro-matranja, možete započeti sa projekcijom. Za-tvorite držač dia-ploča 1! i aktivirajte tipku Uklj/Isklj C, da biste pokrenuli projekciju.Naknadno možete izvršiti korekciju projekcij-skog kuta za postizanje optimalne projekcije na zidu ili stropu tako, što ćete projekcijsku kuglu B u stalku J pomicati. Na slici 11 možete vi-djeti mogućnosti za projekciju na stropu (a) ili zidu (b).
b aFig. 11
Okretanjem kotača za izoštravanje I možete izvršiti podešenje oštrine slikovne projekcije (slika 12).
Fig. 12
VAŽNO: Ispravno rastojanje između objektiva i zida ili stropa iznosi između 1,8 i 2 m. Ako pro-jekcija unatoč izoštravanja ostane nejasna, vje-rojatno niste odabrali ispravno rastojanje.
Pritisnite tipku za podešavanje modusa za spa-vanje E, da biste željeno vrijeme automatike isključivanja (30 ili 60 minuta) aktivirali. Odgo-varajuća LED-lampa počinje svijetliti. Nakon tog vremena uređaj se prebacuje u modus za spavanje (odnosno modus za energetsku ušte-du). Kada želite isključiti modus za spavanje, pritisnite tipku E, dok se LED-lampa ne zagasi. Projekcija će nakon 2 sata automatski biti okon-čana, kako biste uštedjeli energiju.Kada Astro-planetarij ne koristite, trebali biste uređaj jednostavnim pritiskanjem tipke Uklj/Isklj/Stop C isključiti. Izvadite baterije iz uređa-
ja, kada isti duže vrijeme (1 tjedan ili više) ne koristite.
Upotreba slikovne rotacijePritisnite tipku za rotaciju u lijevu stranu 1&, kako biste projekciju noćnog neba automatski pokre-tali u smjeru protivnom kazaljci sata. To odgova-ra prirodnom kretanju sjeverne polulopte.Ponovnim pritiskanjem tipke možete utjecati na brzinu kretanja. Ukupno na raspolaganju stoji 6 raznih stupnjeva brzine. LED-lampa trepti u skladu sa podešenom brzinom rotacije.Pritisnite tipku Uklj/Isklj/Stop C, da biste rota-ciju zaustavili.Na jednaki način možete aktivirati i prilagoditi rotaciju slike za južnu poluloptu. U tom slučaju molimo pritisnite tipku za rotaciju u desnu stra-nu 1^. Sve ostale funkcije su identične sa funk-cijama rotacije u lijevu stranu.
Uporaba funkcije padajuće zvijezdeKada ste aktivirali rotaciju slike, možete dodat-no uključiti i funkciju padajuće zvijezde. U tu svrhu pritisnite tipku za aktivaciju funkcije pada-juće zvijezde 1*. Nakon toga će u redovnim vre-menskim razmacima iznad projektora padajuće zvijezde 1( biti prikazan rep kometa (padajuća zvijezda) u slikovnoj projekciji. Ponovo pritisnite ovu tipku 1*, ako funkciju padajuće zvijezde že-lite deaktivirati.

NAPOMENA: Vremenski interval, u kojima se padajuće zvijezde pojavljuju, može biti skraćen povećanjem rotacijske brzine.
Tehnički podaci
• Projekcijska metoda: Optička• Pozicija promatranja: 35° Sjever*• Zvjezdane slike: 61• Zvijezde: 8.000• Osvjetljenje: bijela LED-rasvjeta sa velikom
snagom osvjetljenja• Orijentacija zvjezdanih slika kroz:
Datum, vrijeme (sati)• Projekcijsko područje: 1,8 x 2,2 m
uz projekcijsko rastojanje od 2 m• Modus za spavanje/Autom. isključivanje:
30 ili 60 minuta/ 2 sata• Snabdijevanje strujom:
4,5V izmjenična struja (preko 3 kom. 1,5V AA/LR6 baterija)
* Projekcija se uvijek odnosi na mjesto promatranja 35° sjeverne širine. To je određena tođka na zemlji. Ako sa tog mjesta gledamo u nebo u isto vrijeme koje smo na Astro-planetariju podesili, na nebu i u projekciji možemo vidjeti egzaktno isti isjeđak neba.
HR

64
SERVIS I JAMSTVO
Za ovaj uređaj dajemo jamstvo od 5 godina počevši od datuma kupovine. Molimo Vas da sačuvate račun kao dokaz kupnje.Naš proizvod je izrađen u skladu sa najnovijim proizvodnim metodama, te je podvrgnut detalj-nom kontrolom kvalitete.
Servisni centarAko imate pitanja u vezi sa proizvodom i even-tualne reklamacije, molimo da se povežete sa servisnim centrom. Školovani servisni suradni-ci će Vam tamo rado pomoći. Dežurni servisni telefon je naveden u nastavku ovog odsjeka. Ukoliko je nepohodna realizacija prava na jam-stvo (popravak ili zamjena), naš servisni surad-nik će vam priopćiti adresu, na koju proizvod trebate poslati.
Dežurna telefonska linija servisa: 00 800 6343 7000
Otklanjanje nedostataka i povratno slanje proizvodaUnutar jamstvenog roka besplatno otklanjamo sve eventualne greške u materijalu ili u izradi. Iz jamstva izuzete su greške nastale uslijed krivi-ce korisnika ili nenamjenske uporabe uređaja, ili kada su neovlaštene treće osobe pokušale izvršiti popravke uređaja ili vršiti slične radnje.
Ukoliko je potrebna popravka, odnosno zamje-na proizvoda, onda će Vam suradnik servisnog centra priopćiti odgovarajuću adresu, na koju proizvod trebate poslati.
U slučaju povratnog slanja molimo obratite pažnju na slijedeće:• Obratite pažnju na to, da proizvod koji šaljete
bude brižljivo zapakiran. Ako je moguće, ko-ristite originalno pakiranje.
• Ispunite prijavu za povratno slanje, koja se nalazi u nastavku teksta, i zajedno sa presli-kom dokaza o kupovini je priložite pošiljci.
Prijava za povratno slanje
Broj za obradu.*: ......................................
Naziv proizvoda: .......................................
Kratak opis pogreške: ...............................
..............................................................
..............................................................
Prezime, ime: ...........................................
P. Br./ mjesto: ..........................................
Ulica / kućni broj: .....................................
Telefon: ...................................................
Datum kupovine: .......................................
Potpis: ....................................................
* će Vam priopćiti servisni centar

65
Problem Mogući kvar Otklanjanje problema
Ne mogu uključiti planetarij.
Baterije možda nisu ispravno umetnute.
Provjeri, da li su baterije umetnute točno na način opisan u uputama za ruko-vanje. Posebno obrati pažnju na ispravno usmjerenje polova baterije (+/-).
Baterije su eventualno prazne.Umetni nove, nekorištene baterije na način opisan u uputama za rukovanje u uređaj. Posebno obrati pažnju na ispravno usmjerenje polova baterije (+/-).
Projektna slika je izobličena, nije okrugla.
Eventualno objektiv nije podešen pot-puno paralelno u odnosu na projekcij-sko područje (zid ili strop).
Pokušaj planetarij u stalku j tako podesiti, da objektiv bude paralelno pode-šen u odnosu na projekcijsko područje.
Projekcijska slika nije oštra.Rastojanje u odnosu na projekcijsko područje (zid ili strop) je možda pre-malo.
Planetarij mora imati rastojanje od minimalno 1,8 do 2 m u odnosu na projek-cijsko područje. Provjeri, da li je rastojanje ispravno i po potrebi ga ispravi.
A imagem projectada apre-senta manchas.
Oštrina slike možda nije ispravno podešena.
Pokušaj oštrinu slike poboljšati okretanjem kotačića za oštrinu I.
Leća objektiva je onečišćena.
Očisti objektiv pomoću čiste krpe koja ne ispušta vlakna, na način opisan u uputama.
Otklanjanje problema
Može se dogoditi, da tvoj Astro-planetarij ne funkcionira kako treba. To ne mora značiti da je uređaj defektan! Često stvari stoje tako, da je neka sitnica prilikom postavljanja zanemarena. Zbog toga smo ovdje naveli najučestalije probleme, pa možeš pokušati probleme samostalno riješiti.
HR

66
Problem Mogući kvar Otklanjanje problema
Planetarij ne projicira željeni isječak neba.
Eventualno nije umetnuta ispravna dia-ploča.
Umetni dia-ploču 1) sa simulacijom neba u držač 1!.
Vjerojatno nisi ispravno podesio datum i vrijeme razdoblja promatranja.
Datum i točno vrijeme razdoblja promatranja podesi na način opisan u upu-tama.
Planetarij projicira samo svi-jetli krug svjetlosti.
Sigurno nisi umetnuo dia-ploču. Umetni jednu od priloženih dia-ploča 1) u držač 1!.
Projekcijska slika nije vidljiva, premda je uređaj uključen.
Vjerojatno je aktiviran modus spavan-ja.
Isključi uređaj pomoću prekidača Uklj/Isklj c i nakon ca. 10 sek. ga pono-vo uključi. Modus spavanja možeš podesiti na način opisan u uputama za rukovanje.

67

Irrtü
mer
und
tech
nisc
he Ä
nder
unge
n vo
rbeh
alte
n. ·
Erro
rs a
nd te
chni
cal c
hang
es re
serv
ed. ·
Sou
s ré
serv
e d’
erre
urs
et d
e m
odifi
catio
ns te
chni
ques
.Ve
rgis
sing
en e
n te
chni
sche
ver
ande
ringe
n vo
orbe
houd
en. ·
Con
rise
rva
di e
rrori
e m
odifi
che
tecn
iche
. Qu
eda
rese
rvad
a la
pos
ibilid
ad d
e in
clui
r mod
ifica
cion
es o
de
que
el te
xto
cont
enga
erro
res.
· Pr
idrž
avam
o pr
avo
na p
ogre
ške
i teh
ničk
e pr
omje
neAN
L954
0100
MSP
0310
BRES
SER Meade Instruments Europe
GmbH & Co. KG
Gutenbergstr. 2DE-46414 RhedeGermany www.bresser.de


![arXiv:2105.02330v1 [astro-ph.IM] 5 May 2021](https://static.fdokumen.com/doc/165x107/631d6d5985e2495e150f726f/arxiv210502330v1-astro-phim-5-may-2021.jpg)


