
2.1-kanaals Blu-ray™ Home Entertainment System - Conrad
320
Ongekende mogelijkheden Bedankt voor het aanschaffen van dit Samsung-product. Voor een completere service kunt u uw product registreren op www.samsung.com/register 2.1-kanaals Blu-ray™ Home Entertainment System gebruikershandleiding HT-E5200 HT-E5200_XU_NL_0223.indd 1 HT-E5200_XU_NL_0223.indd 1 2012-02-23 오후 2:35:05 2012-02-23 오후 2:35:05
-
Upload
khangminh22 -
Category
Documents
-
view
2 -
download
0
Transcript of 2.1-kanaals Blu-ray™ Home Entertainment System - Conrad

Ongekende mogelijkheden
Bedankt voor het aanschaffen van dit Samsung-product.
Voor een completere service kunt u uw product registreren
op
www.samsung.com/register
2.1-kanaals Blu-ray™
Home Entertainment Systemgebruikershandleiding
HT-E5200
HT-E5200_XU_NL_0223.indd 1HT-E5200_XU_NL_0223.indd 1 2012-02-23 오후 2:35:052012-02-23 오후 2:35:05

| 2 Nederlands
VeiligheidsinformatieWaarschuwing
VERWIJDER OM ELEKTRISCHE SCHOKKEN TE VERMIJDEN DE BOVEN- OF ACHTERZIJDE NIET.
AAN DE BINNENZIJDE BEVINDEN ZICH GEEN ONDERDELEN DIE DE GEBRUIKER KAN REPAREREN.
LAAT ONDERHOUD OVER AAN GEKWALIFICEERD PERSONEEL.
LET OP
GEVAAR VAN ELEKTRISCHE SCHOKNIET OPENEN
Dit symbool geeft aan dat er in het product
sprake is van een gevaarlijk voltage dat
elektrische schokken of persoonlijk letsel
kan veroorzaken.
LET OP : OM ELEKTRISCHE SCHOKKEN TE
VOORKOMEN, MOET U DE STEKKER GOED IN
HET STOPCONTACT STEKEN.
Dit symbool geeft aan dat er belangrijke
instructies bij dit product worden geleverd.
WAARSCHUWING• Om het risico op brand of elektrische schokken
te beperken, dient u het apparaat niet aan regen
of vocht bloot te stellen.
LET OP• Het apparaat moet niet worden blootgesteld
aan druppels of spatten en er moeten geen
objecten gevuld met vloeistoffen, zoals vazen,
op het apparaat worden geplaatst.
• De hoofdstekker wordt gebruikt als een
ontkoppelapparaat en dient op ieder moment in
gebruik te kunnen worden genomen.
• Dit apparaat moet altijd worden aangesloten op
een geaard stopcontact.
• Het apparaat moet van het lichtnet worden
afgesloten door de stekker uit het stopcontact
te halen. Het stopcontact moet nu goed
bereikbaar zijn.
CLASS 1 LASER PRODUCT
KLASSE 1 LASER PRODUKT
LUOKAN 1 LASER LAITE
KLASS 1 LASER APPARAT
PRODUCTO LÁSER CLASE 1
LASERPRODUCT VAN KLASSE 1Deze compact disc-speler is geclassificeerd als
een laserproduct van klasse 1.
Gebruik van mechanismen, aanpassingen
of handelingen anders dan zoals in deze
gebruiksaanwijzing vermeld, kunnen blootstelling
aan schadelijke straling tot gevolg hebben.
LET OP• ALS HET APPARAAT WORDT GEOPEND
EN ALS DE VERGRENDELINGEN WORDEN
UITGESCHAKELD, KOMT ONZICHTBARE
LASERSTRALING VRIJ. VOORKOM
BLOOTSTELLING AAN DE LASERBUNDEL.
HT-E5200_XU_NL_0223.indd 2HT-E5200_XU_NL_0223.indd 2 2012-02-23 오후 2:35:322012-02-23 오후 2:35:32

Nederlands 3 |
01Veiligheidsinform
atie
Opslag en beheer van discs
• Discs vasthouden
- Vingerafdrukken of krassen
op de disc kunnen ten koste
gaan van de geluids- en
beeldkwaliteit of leiden tot onderbrekingen in
de weergave.
- Raak het oppervlak van de disc niet aan op
de plaats waar de gegevens zijn opgenomen.
- Houd de disc aan de randen vast zodat
u geen vingerafdrukken op het oppervlak
maakt.
- Plak geen papier of tape op de schijf.
• Discs reinigen
- Als er vingerafdrukken of vuil op
de disc zitten, kunt u de disc
reinigen met een mild, met water
verdund schoonmaakmiddel en
afvegen met een zachte doek.
- Wrijf bij het reinigen zachtjes
vanaf het midden naar de buitenrand van de
disc.
- Bewaren van discs
Bewaar de discs niet in direct zonlicht.
Bewaar de discs in een koele, geventileerde
omgeving.
Bewaar de disc in een schone
beschermhoes en in verticale positie.
Waarschuwingen voor het gebruik
• Stel dit apparaat niet bloot aan druppels of
spatten. Plaats geen objecten op het apparaat
die gevuld zijn met water, zoals een vaas.
• Als u dit apparaat volledig wilt uitschakelen,
moet u de stekker uit het stopcontact trekken.
De stekker moet daarom altijd binnen
handbereik en makkelijk toegankelijk zijn.
• Raak de stekker niet aan met natte handen.
Als u dit wel doet, loopt u het risico op een
elektrische schok.
• Sluit nooit meerdere elektrische apparaten
aan op hetzelfde stopcontact. Een overbelast
stopcontact kan oververhit raken, waardoor
brand kan ontstaan.
• Onderhoud van de behuizing
- Schakel andere de andere componenten die
u op dit product wilt aansluiten, eerst uit.
- Als u het product plotseling van een koude
naar een warme plek verplaatst, kan er
condens op de werkende onderdelen en lens
ontstaan en is het mogelijk dat de disc niet
goed wordt afgespeeld. In dat geval trekt u
de stekker uit het stopcontact en wacht u
twee uur voordat u de stekker weer in het
stopcontact steekt. Plaats vervolgens een
disc en probeer deze opnieuw af te spelen.
• Als het product een vreemd geluid maakt of een
brandlucht of rook produceert, schakelt u het
apparaat meteen uit en trekt u de stekker uit het
stopcontact. Neem vervolgens contact op met het
dichtstbijzijnde servicecentrum voor technische
ondersteuning. Gebruik het product niet. Als u het
product wel gebruikt, kan er brand ontstaan of
loopt u het risico op een elektrisch schok.
• Als u dit apparaat volledig wilt uitschakelen,
moet u de stekker uit het stopcontact trekken.
De stekker moet daarom altijd binnen
handbereik en makkelijk toegankelijk zijn.
De 3D-functie gebruiken
BELANGRIJKE GEZONDHEIDS- EN
VEILIGHEIDSINFORMATIE VOOR 3D-BEELDEN
Lees de volgende veiligheidsgegevens zorgvuldig
door voordat u de 3D-functie gebruikt.
• Sommige kijkers kunnen tijdens het bekijken
van 3D-beelden ongemak ervaren, zoals
duizeligheid, misselijkheid en hoofdpijn. Als u
dergelijke symptomen ervaart, stopt u met het
kijken naar de 3D-beelden, zet u de actieve
3D-bril af en neemt u rust.
• Langdurig kijken naar 3D-beelden kan vermoeide
ogen veroorzaken. Als u last krijgen van vermoeide
ogen, stopt u met het kijken naar de 3D-beelden,
zet u de actieve 3D-bril af en neemt u rust.
• Wanneer de 3D-functie door kinderen
wordt gebruikt, moet een verantwoordelijke
volwassene regelmatig controleren of alles goed
is. Mocht er sprake zijn van vermoeide ogen,
hoofdpijn, duizeligheid of misselijkheid, dan
moet u het kind laten stoppen met het kijken
naar 3D-beelden en laten rusten.
• Gebruik de actieve 3D-bril niet voor andere
doeleinden (als gewone bril, zonnebril,
veiligheidsbril, enzovoort).
HT-E5200_XU_NL_0223.indd 3HT-E5200_XU_NL_0223.indd 3 2012-02-23 오후 2:35:332012-02-23 오후 2:35:33

| 4 Nederlands
Veiligheidsinformatie• Gebruik de 3D-functie of de actieve 3D-bril
niet terwijl u loopt of u zich anderszins
voortbeweegt. Als u de 3D-functie of de actieve
3D-bril gebruikt terwijl u rondloopt, kunt u tegen
voorwerpen aanlopen, struikelen en/of vallen
met mogelijk ernstig letsel tot gevolg.
• Als u 3D-beeldmateriaal wilt bekijken, moet
u een 3D-apparaat (AV-receiver of tv met
3D-functionaliteit) door middel van een high-speed
HDMI-kabel aansluiten op de poort HDMI OUT
van het product. Zet een 3D-bril op voordat u het
3D-beeldmateriaal afspeelt.
• Het product kan de 3D-signalen alleen uitvoeren
via een HDMI-kabel die is aangesloten op de poort
HDMI OUT.
• In de 3D-afspeelmodus wordt de videoresolutie
ingesteld conform de resolutie van de
oorspronkelijke 3D-video. U kunt de resolutie niet
zelf wijzigen.
• Bepaalde functies, zoals BD Wise, het instellen
van de schermgrootte en het aanpassen
van de resolutie, werken mogelijk niet in de
3D-afspeelmodus.
• Voor de juiste uitvoer van het 3D-signaal moet u
een high-speed HDMI-kabel gebruiken.
• Bewaar bij het bekijken van 3D-beelden een
afstand tot de tv van ten minste drie keer de
beelddiagonaal. Als u bijvoorbeeld een scherm van
46 inch/116 cm hebt, bedraagt de kijkafstand ten
minste 3,5 m.
- Plaats het 3D-videoscherm op ooghoogte voor
het beste 3D-beeld.
• Als het product is aangesloten op bepaalde
3D-apparaten, wordt het 3D-effect mogelijk niet
goed weergegeven.
• Dit product zet geen 2D-beelden om in
3D-beelden.
• 'Blu-ray 3D' en het 'Blu-ray 3D'-logo zijn
handelsmerken van de Blu-ray Disc Association.
Copyright
© 2012 Samsung Electronics Co.,Ltd.
Alle rechten voorbehouden. Niets uit
deze gebruikershandleiding mag worden
gereproduceerd of gekopieerd zonder
voorafgaande schriftelijke toestemming van
Samsung Electronics Co.,Ltd.
Licentie
• Dolby en het dubbele D-symbool zijn
geregistreerde handelsmerken van Dolby
Laboratories.
• Geproduceerd onder licentie onder
Amerikaanse octrooinummers: 5,956,674;
5,974,380; 6,226,616; 6,487,535; 7,392,195;
7,272,567; 7,333,929; 7,212,872 en andere
octrooien in de VS en wereldwijd die reeds zijn
verkregen en/of aangevraagd. DTS-HD, het
Symbool, en DTSHD en het Symbool samen
zijn gedeponeerde handelsmerken en DTS-HD
Master Audio | Essential is een handelsmerk van
DTS, Inc. Het Product omvat software. © DTS,
Inc. Alle rechten voorbehouden.
• OVER DIVX VIDEO: DivX® is een digitaal
videoformaat gemaakt door DivX, LLC, een
dochteronderneming van Rovi Corporation.
Dit is een officieel DivX Certified®-apparaat
waarmee DivX-video kan worden afgespeeld.
Ga naar divx.com voor meer informatie en
software om uw bestanden te converteren naar
DivX-video's.
OVER DIVX VIDEO-ON-DEMAND: Dit DivX
Certified®-apparaat moet zijn geregistreerd
om aangeschafte DivX VOD-films (Video-
on-Demand) af te kunnen spelen. U kunt de
registratiecode krijgen door naar het gedeelte
DivX VOD in het instellingenmenu van het
apparaat te gaan. Ga naar vod.divx.com voor
meer informatie over het voltooien van uw
registratie.
DivX Certified® voor het afspelen van DivX®-
video tot HD 1080p, inclusief premium content.
DivX®, DivX Certified® en de bijbehorende
logo's zijn handelsmerken van Rovi Corporation
of zijn dochterondernemingen en worden
gebruikt in overeenstemming met een licentie.
Valt onder een of meer van de volgende
octrooien (VS): 7,295,673; 7,460,668;
7,515,710; 7,519,274
HT-E5200_XU_NL_0223.indd 4HT-E5200_XU_NL_0223.indd 4 2012-02-23 오후 2:35:352012-02-23 오후 2:35:35

Nederlands 5 |
01Veiligheidsinform
atie
• The terms HDMI and HDMI High-Definition
Multimedia Interface, and the HDMI Logo are
trademarks or registered trademarks of HDMI
Licensing LLC in the United States and other
countries.
• Oracle en Java zijn gedeponeerde
handelsmerken van Oracle en/of gelieerde
ondernemingen. Andere namen zijn mogelijk
handelsmerken van hun respectieve eigenaren.
• Dit artikel bevat een
copyrightbeschermingstechnologie die door
Amerikaanse octrooien en andere intellectuele-
eigendomsrechten van Rovi Corporation wordt
beschermd. Reverse engineering en demontage
zijn verboden.
• Blu-ray Disc™, Blu-ray™ en de logo's zijn
handelsmerken van de Blu-ray Disc Association.
• iPad, iPhone, iPod, iPod classic, iPod nano,
iPod shuffle en iPod touch zijn handelsmerken
van Apple Inc. die zijn gedeponeerd in de VS en
andere landen.
• Dit product maakt gebruik van Cinavia-
technologie om het gebruik van illegale
exemplaren van sommige commercieel
geproduceerde films en video's en de
bijbehorende soundtracks te beperken.
Wanneer wordt gedetecteerd dat er een illegaal
exemplaar wordt gebruikt, verschijnt er een
bericht en zal het afspelen of kopiëren worden
onderbroken.
U vindt meer informatie over Cinavia-technologie
bij het Cinavia Online Consumer Information
Centre op http://www.cinavia.com. Als u
aanvullende informatie over Cinavia via de post
wenst te ontvangen, stuurt u een postkaart met
uw postadres naar: Cinavia Consumer Cinavia
Consumer Information Centre, P.O. Box 86851,
San Diego, CA, 92138, USA.
Dit product bevat bedrijfseigen technologie
onder licentie van de Verance Corporation en
wordt beschermd door U.S. Patent 7,369,677
en andere Amerikaanse en internationale
patenten die zijn verstrekt of nog in behandeling
zijn, naast de bescherming van copyrights
en bedrijfsgeheimen voor bepaalde aspecten
van dergelijke technologie. Cinavia is een
handelsmerk van Verance Corporation.
Copyright 2004-2010 Verance Corporation. Alle
rechten voorbehouden door Verance. Reverse
engineering of demontage van het product is
verboden.
• Kennisgeving met betrekking tot Open Source-
licentie
- Wanneer u open source-software gebruikt,
zijn Open Source-licenties beschikbaar in het
productmenu.
HT-E5200_XU_NL_0223.indd 5HT-E5200_XU_NL_0223.indd 5 2012-02-23 오후 2:35:372012-02-23 오후 2:35:37

| 6 Nederlands
InhoudVEILIGHEIDSINFORMATIE
2 Waarschuwing3 Opslag en beheer van discs3 Waarschuwingen voor het gebruik3 De 3D-functie gebruiken4 Copyright4 Licentie
AAN DE SLAG
7 Compatibiliteit van disc en indeling8 Logo’s van discs die door het product
kunnen worden afgespeeld11 Accessoires12 Voorpaneel12 Achterpaneel13 Afstandsbediening
AANSLUITINGEN
15 De toroïdale ferrietkern op het netsnoer van de hoofdeenheid aansluiten
15 De luidsprekers aansluiten15 Luidsprekercomponenten
16 De luidsprekers aansluiten
17 De FM-antenne aansluiten17 Aansluiten op een iPod/iPhone17 Via een USB-kabel
17 Via een dock
18 Aansluiten op een tv18 Methode 1 Aansluiten op een tv
met een HDMI-kabel - beste kwaliteit
(aanbevolen)
18 Methode 2 Aansluiten op een tv met een AV-kabel - goede kwaliteit
19 Externe apparaten aansluiten19 Methode 1 HDMI INGANG : Een
externe component aansluiten met een
HDMI-kabel
19 Methode 2 OPTISCH : Een extern digitaal audiocomponent aansluiten
19 Methode 3 AUX INGANG : Een extern analoog apparaat aansluiten
20 Aansluiten op een netwerkrouter20 Bedraad netwerk
20 Draadloos netwerk
INSTELLINGEN
21 De procedure voor de begininstellingen23 Het startscherm23 Het instellingenscherm openen24 Functies van het menu Instellingen29 Netwerken en internet33 Software upgraden
MEDIA AFSPELEN
35 Het scherm AllShare Play36 Bestanden afspelen op een USB-
opslagapparaat of iPod/iPhone36 iPod-/iPhone-modellen die u bij dit
product kunt gebruiken37 Het scherm Functie37 Commerciële videodiscs afspelen37 Commerciële audiodiscs afspelen38 Een disc met door de gebruiker
opgenomen inhoud afspelen38 De AllShare-netwerkfunctie gebruiken40 Bedieningselementen voor het afspelen
van video42 Bedieningselementen voor het afspelen
van muziek45 Foto’s bekijken45 Het menu Tools gebruiken wanneer een
bestand is gemarkeerd48 Luisteren naar de radio50 De toetsen op de afstandsbediening voor
speciale effecten gebruiken
NETWERKSERVICES
51 Werken met Smart Hub53 BD-LIVE™
BIJLAGE
54 Aanvullende informatie60 Problemen oplossen63 Specificaties
HT-E5200_XU_NL_0223.indd 6HT-E5200_XU_NL_0223.indd 6 2012-02-23 오후 2:35:402012-02-23 오후 2:35:40

Nederlands 7 |
02Aan de Slag
Compatibiliteit van disc en indeling
Disctypen en inhoud die door uw product kunnen worden afgespeeld
Media Disctype Details
VIDEO
Blu-ray-disc
3D-Blu-ray-discBD-ROM of BD-RE/-R-disc opgenomen in de indeling BD-RE.
DVD-VIDEO, DVD-RW,
DVD-R, DVD+RW,
DVD+R
DVD-VIDEO, DVD+RW/DVD-RW(V)/DVD-R/+R die is opgenomen en voltooid of een
USB-opslagmedium met DivX-, MKV-, MP4-inhoud.
MUZIEK
CD-RW/-R,
DVD-RW/-R,
BD-RE/-R
Muziek opgenomen op een CD-RW/-R, DVD-RW/-R, BD-RE/-R of een USB-
opslagmedium met MP3- of WMA-inhoud.
FOTO
CD-RW/-R,
DVD-RW/-R,
BD-RE/-R
Foto's opgenomen op een CD-RW/-R, DVD-RW/-R, BD-RE/-R of een USB-
opslagmedium met JPEG-inhoud.
| OPMERKING |
� Het product kan bepaalde CD-RW/-R- en DVD-R-discs mogelijk niet afspelen vanwege het disctype of de opnamecondities.
� Als een DVD-RW/-R-disc niet goed is opgenomen in een DVD-videoformaat, kan de disc niet worden afgespeeld.
� Uw product speelt geen inhoud af die op een DVD-R is opgenomen met een bitsnelheid van meer dan 10 mbps.
� Uw product speelt geen inhoud af die op een BD-R of USB-medium is opgenomen met een bitsnelheid van meer dan 30
mbps.
� Mogelijk werkt het afspelen niet bij bepaalde typen discs of het uitvoeren van bepaalde bewerkingen, zoals het wijzigen van
het camerastandpunt en de beeldverhoudingen. Op de verpakking van de disc vindt u uitgebreide informatie over de disc.
Raadpleeg deze indien nodig.
� Wanneer u een BD-J-titel afspeelt, duurt het laden mogelijk langer dan bij een normale disc of is het mogelijk dat bepaalde
functies traag reageren.
Disctypen die uw product niet kan afspelen
• HD DVD
• DVD-ROM/PD/
MVDisc enz.
• DVD-RAM
• Super audio-cd's
(behalve de cd-laag)
• DVD-RW(VR-modus)
• CVD/CD-ROM/CDV/
CD-G/CD-I/LD
(CD-G's spelen
alleen audio af, geen
afbeeldingen)
• DVD-R's voor
authoring van 3,9 GB.
| OPMERKING |
� Het is mogelijk dat dit product niet op alle bedieningshandelingen reageert, omdat voor bepaalde Blu-ray-discs, dvd's en
cd's tijdens het afspelen slechts een beperkt aantal of specifieke bedieningsfuncties beschikbaar zijn. Dit is echter geen
defect in het product.
� Samsung kan niet garanderen dat dit product elke disc met het logo Blu-ray Disc, DVD of CD kan afspelen, aangezien
discindelingen kunnen evolueren en omdat er problemen en fouten kunnen optreden tijdens het maken van de software voor
Blu-ray-discs, dvd's en cd's en/of tijdens de productie van de discs.
� Neem contact op met de klantenservice van SAMSUNG als u vragen hebt of als u problemen ondervindt bij het afspelen van
Blu-ray-discs, dvd's of cd's met dit product. Raadpleeg ook de rest van deze gebruiksaanwijzing voor aanvullende informatie
over afspeelbeperkingen.
� Bepaalde commerciële discs en dvd's die u buiten uw regio hebt aangeschaft, kunnen mogelijk niet worden afgespeeld op
dit product.
Aan de Slag
HT-E5200_XU_NL_0223.indd 7HT-E5200_XU_NL_0223.indd 7 2012-02-23 오후 2:35:432012-02-23 오후 2:35:43

| 8 Nederlands
Aan de SlagRegiocodeZowel de producten als de discs zijn voorzien
van een regiocode. De regiocodes moeten
overeenkomen om een disc te kunnen afspelen.
Als de codes niet overeenkomen, kunt u de dvd
niet afspelen.
De regiocode voor dit product staat op de
achterzijde van het product.
Disctype Regiocode Gebied
Blu-ray-disc
ANoord-Amerika, Midden-Amerika,
Zuid-Amerika, Korea, Japan,
Taiwan, Hongkong en Zuidoost-Azië.
BEuropa, Groenland, Franse
gebiedsdelen, Midden-Oosten,
Afrika, Australië en Nieuw-Zeeland.
CIndia, China, Rusland, Centraal-Azië
en Zuid-Azië
DVD-VIDEO
1 De V.S., Amerikaanse territoria en
Canada
2 Europa, Japan, het Midden-Oosten,
Egypte, Zuid-Afrika, Groenland
3 Taiwan, Korea, de Filippijnen,
Indonesië, Hongkong
4Mexico, Zuid-Amerika, Centraal-
Amerika, Australië, Nieuw-Zeeland,
Eilanden in de Stille Zuidzee,
Caraïbisch gebied
5Rusland, Oost-Europa, India,
grootste gedeelte van Afrika, Noord-
Korea, Mongolië
6 China
| OPMERKING |
� Als de regiocode van een Blu-ray-disc/dvd niet
overeenkomt met de regiocode op dit product, kan de
disc niet worden afgespeeld.
Logo's van discs die door het
product kunnen worden afgespeeld
Blu-ray-disc 3D-Blu-ray-disc
BD-LIVE Dolby
DTS DivX
PAL-uitzendsysteem
(Verenigd Koninkrijk,
Frankrijk, Duitsland,
enzovoort)
Java
Ondersteunde indelingen
Ondersteunde muziekbestanden
Bestandsextensie Houder Audiocodec Ondersteuningsbereik
*.mp3 MP3 MP3 -
*.wma WMA WMA
Compatibel met WMA
versie 10
* Samplingfrequenties
(in kHz) - 8, 11, 16,
22, 32, 44,1, 48
* Bitsnelheden - Alle
bitsnelheden in het
bereik van 5 kbps tot
384 kbps
HT-E5200_XU_NL_0223.indd 8HT-E5200_XU_NL_0223.indd 8 2012-02-23 오후 2:35:462012-02-23 오후 2:35:46

Nederlands 9 |
02Aan de Slag
Ondersteunde videobestanden
Bestandsextensie Houder Videocodec Resolutie Beeldsnelheid (fps)
Bitsnelheid (Mbps) Audiocodec
*.avi AVI
DivX 3.11/4.x/5.1/6.0
1920x1080 6 ~ 30 8 MP3AC3
LPCMDTS Core
H.264 BP/MP/HP 1920x1080 6 ~ 30 25
MPEG4 SP/ASP 1920x1080 6 ~ 30 8
*.mkv MKV
DivX 3.11/4.x/5.1/6.0
1920x1080 6 ~ 30 8 MP3AC3
LPCMDTS Core
H.264 BP/MP/HP 1920x1080 6 ~ 30 25
MPEG4 SP/ASP 1920x1080 6 ~ 30 8
*.asf ASF
DivX 3.11/4.x/5.1/6.0
1920x1080 6 ~ 30 8 MP3AC3
LPCMWMA
H.264 BP/MP/HP 1920x1080 6 ~ 30 25
MPEG4 SP/ASP 1920x1080 6 ~ 30 8
*.wmv WMV (wmv9)Window Media
Video v91920x1080 6 ~ 30 25 WMA
*.mp4 MP4H.264 BP/MP/HP 1920x1080 6 ~ 30 25 MP3
AACMPEG4 SP/ASP 1920x1080 6 ~ 30 8
*.3gp 3GPPH.264 BP/MP/HP 1920x1080 6 ~ 30 25
AACMPEG4 SP/ASP 1920x1080 6 ~ 30 8
*.vroVROVOB
MPEG2 1920x1080 24/25/30 25 AC3MPEGLPCMMPEG1 1920x1080 24/25/30 25
*.mpg*.mpeg
PS
MPEG1 1920x1080 24/25/30 25 AC3MPEGLPCMAAC
MPEG2 1920x1080 24/25/30 25
H.264 1920x1080 6 ~ 30 25
*.ts*.tp*.trp
TS
MPEG2 1920x1080 24/25/30 25AC3AACMP3DD+
H.264 1920x1080 6 ~ 30 25
VC1 1920x1080 6 ~ 30 25
Beperkingen - Zelfs als het bestand is gecodeerd via een hierboven genoemde ondersteunde codec, bestaat de kans
dat een bestand niet kan worden afgespeeld als de inhoud een probleem bevat.
- Normale weergave is niet gegarandeerd als de containerinformatie voor het bestand onjuist is of het
bestand zelf beschadigd is.
- Bestanden met een hogere bit- of beeldsnelheid dan de standaardsnelheid worden mogelijk schokkerig
weergegeven bij het afspelen.
HT-E5200_XU_NL_0223.indd 9HT-E5200_XU_NL_0223.indd 9 2012-02-23 오후 2:35:542012-02-23 오후 2:35:54

| 10 Nederlands
Aan de Slag - De functie Zoeken (overslaan) is niet beschikbaar
als de indextabel van het bestand beschadigd is.
- Als u een bestand op extern afspeelt via een
netwerkverbinding, wordt de video mogelijk
schokkerig weergegeven, afhankelijk van de
netwerksnelheid.
Videodecoder - Ondersteunt tot H.264 niveau 4.1
- Biedt geen ondersteuning voor H.264 FMO/
ASO/RS, VC1 SP/MP/AP L4 en AVCHD
- MPEG4 SP, ASP :
Lager dan 1280 x 720: max. 60 frames
Hoger dan 1280 x 720: max. 30 frames
- Biedt geen ondersteuning voor GMC 2 of hoger
Audiodecoder - Ondersteunt WMA 7, 8, 9 en STD
- Biedt geen ondersteuning voor meerkanaals
WMA 9 PRO bij meer dan 2 of wanneer er een
lossless audiocodering voor de bestanden is
vereist.
- Biedt geen ondersteuning voor WMA-
samplingfrequentie van 22050 Hz mono.
� Ondersteunde bestandsindelingen voor DivX-ondertiteling
*.ttxt, *.smi, *.srt, *.sub, *.txt
Opmerkingen over de USB-aansluiting• Uw product ondersteunt USB-opslagmedia,
MP3-spelers, digitale camera's en USB-
kaartlezers.
• Het product ondersteunt geen map- of
bestandsnamen met meer dan 128 tekens.
• Bepaalde USB-apparaten/digitale camera's zijn
mogelijk niet compatibel met het product.
• Uw product ondersteunt de bestandssystemen
FAT 16, FAT 32 en NTFS.
• USB-apparaten moeten rechtstreeks op de
USB-poort van het product worden aangesloten.
Bij aansluiting via een USB-kabel kunnen zich
compatibiliteitsproblemen voordoen.
• Als meer dan één geheugenapparaat wordt
aangesloten op een multikaartlezer, werkt de
kaartlezer mogelijk niet naar behoren.
• Het product ondersteunt het PTP-protocol niet.
• Koppel een USB-apparaat niet los tijdens het
'laadproces'.
• Hoe hoger de beeldresolutie, hoe langer het
duurt voordat het beeld wordt weergegeven.
• Dit product kan geen MP3-bestanden met
DRM (Digital Rights Management) afspelen,
gedownload van een commerciële site.
• Uw product ondersteunt alleen video met een
framesnelheid van maximaal 30 fps.
• Uw product ondersteunt alleen USB-
massaopslagapparaten (MSC) zoals thumbdrives
en USB HDD's. (HUB wordt niet ondersteund.)
• Bepaalde USB HDD-apparaten, multikaartlezers
en thumbdrives zijn mogelijk niet compatibel
met dit product.
• Als bepaalde UBS-apparaten buitensporig veel
stroom verbruiken, worden hun mogelijkheden
wellicht beperkt door de circuitbeveiliging.
• Indien de weergave vanaf een USB HDD
onstabiel is, kunt u de HDD van extra stroom
voorzien door deze aan te sluiten op een
stopcontact. Als het probleem zich blijft
voordoen, neemt u contact op met de fabrikant
van de USB HDD.
• U moet het USB-opslagapparaat op veilige
wijze verwijderen (door de functie 'USB veilig verw.' uit te voeren) om mogelijke schade aan
het USB-geheugen te voorkomen.
Druk op HOME om naar het Home-menu te gaan.
Druk vervolgens op de GELE (C) toets en en op E.
• SAMSUNG is niet verantwoordelijk voor
beschadiging of verlies van gegevens.
AVCHD (Geavanceerde videocodec met hoge resolutie)• Dit product kan discs met een AVCHD-
indeling afspelen. Deze discs worden normaal
gesproken in camcorders gebruikt voor het
maken van opnamen.
• De indeling AVCHD is een indeling voor
videogegevens met een hoge definitie.
• In de indeling MPEG-4 AVC/H.264 worden
beelden gecomprimeerd met hogere
efficiëntie dan conventionele indelingen voor
beeldcompressie.
• Bepaalde AVCHD-discs gebruiken de indeling
'x.v.Colour'. Dit product kan AVCHD-discs met
de indeling 'x.v.Colour' afspelen.
• 'x.v.Colour' is een handelsmerk van Sony
Corporation.
• 'AVCHD' en het AVCHD-logo zijn
handelsmerken van Matsushita Electronic
Industrial Co., Ltd. en Sony Corporation.
HT-E5200_XU_NL_0223.indd 10HT-E5200_XU_NL_0223.indd 10 2012-02-23 오후 2:35:562012-02-23 오후 2:35:56

Nederlands 11 |
02Aan de Slag
| OPMERKING |
� Bepaalde AVCHD-discs worden mogelijk niet afgespeeld. Dit is afhankelijk van de opnamecondities.
� AVCHD-discs moeten worden afgesloten.
� 'x.v.Colour' biedt een breder kleurenspectrum dan normale camcorder-dvd's.
� Bepaalde DivX-, MKV- en MP4-discs worden mogelijk niet afgespeeld. Dit is afhankelijk van de videoresolutie en de
beeldsnelheid.
Accessoires
Controleer de onderstaande meegeleverde accessoires.
FUNCTION
DISC MENU TITLE MENU
MUTE
S/W LEVEL
TOOLS
RETURN EXIT
INFO
MO/ST
3D SOUND
SOUNDvTuner AUDIO
1 2 3
4 5 6
7 8
0
9POPUP
RECEIVER SLEEP
BD TV
TUNERMEMORY
SUBTITLE
SMART SEARCH
A B C D
EFFECT
HUB
VOL TUNING/ CH
TV SOURCE
RDS DISPLAY
PTY- PTY SEARCH PTY+
TA
FULL SCREEN REPEATHOME
Videokabel FM-antenne Gebruikershandleiding
(voor netsnoer)
iPod-dock Toroïdale ferrietkernAfstandsbediening/batterijen
(formaat AAA)
Cijfers en illustraties in deze gebruikershandleiding dienen slechts ter referentie en kunnen afwijken van de werkelijke productvormgeving.
In de volgende gevallen kunnen administratiekosten in rekening worden gebracht:
a. Een technicus komt bij u langs maar de speler vertoont geen gebreken (wanneer u deze gebruikershandleiding niet hebt gelezen).
b. U brengt het product naar een reparatiecentrum maar het product vertoont geen gebreken (wanneer u deze gebruikershandleiding niet hebt gelezen).
U wordt op de hoogte gesteld van deze administratiekosten voordat een dergelijke reparatie of bezoek wordt uitgevoerd.
HT-E5200_XU_NL_0223.indd 11HT-E5200_XU_NL_0223.indd 11 2012-02-23 오후 2:35:572012-02-23 오후 2:35:57

| 12 Nederlands
Aan de SlagVoorpaneel
5V 500mA
BEELDSCHERM AAN/UITSCHIJFLADE USB-AANSLUITING
STOP OPENEN/SLUITEN
VOLUMEREGELING
AFSPELEN/PAUZE INVOEREN
FUNCTIE
SENSOR VOOR AFSTANDSBEDIENING
| OPMERKING | � Om de software van het product te upgraden via de USB-hostaansluiting moet u een USB-geheugenstick gebruiken.
� Op het moment dat het product het menu van een Blu-ray Disc weergeeft, kunt u de film niet starten door op de toets 6
op het product of afstandsbediening te drukken. U kunt de film afspelen door in het discmenu de optie Film afspelen of Start
te selecteren en vervolgens op E te drukken.
Achterpaneel
| OPMERKING | � Laat voor een goede ventilatie een ruimte van 10 cm aan alle zijden van het apparaat vrij. Zorg dat de koelventilator en de
ventilatieopeningen niet worden geblokkeerd.
LANiPod
IMPE
DANC
E : 3
SPEAKERS OUT
IMPE
DANC
E : 3
SPEAKERS OUT
DIGITALAUDIO IN
OPTICAL
VIDEOOUT
AUXIN
FM ANTHDMI IN 21HDMI OUT
DIGITALAUDIO IN
OPTICAL
VIDEOOUT
AUXIN
FM ANTHDMI IN 21HDMI OUTLANiPod
LAN-AANSLUITING
iPod
KOELVENTILATOR
EXTERNE DIGITALE AUDIO-INGANG
(OPTISCH)HDMI INGANG
HDMI-UITGANG
FM-ANTENNE
LUIDSPREKERAANSLUITINGEN
VIDEO-UITGANGAUX INGANG
HT-E5200_XU_NL_0223.indd 12HT-E5200_XU_NL_0223.indd 12 2012-02-23 오후 2:36:032012-02-23 오후 2:36:03

Nederlands 13 |
02Aan de Slag
Afstandsbediening
Uitleg over de afstandsbediening
FUNCTION
DISC MENU TITLE MENU
MUTE
S/W LEVEL
TOOLS
RETURN EXIT
INFO
MO/ST
3D SOUND
SOUNDvTuner AUDIO
1 2 3
4 5 6
7 8
0
9POPUP
RECEIVER SLEEP
BD TV
TUNERMEMORY
SUBTITLE
SMART SEARCH
A B C D
EFFECT
HUB
VOL TUNING/ CH
TV SOURCE
RDS DISPLAY
PTY- PTY SEARCH PTY+
TA
FULL SCREEN REPEATHOME
Druk hierop om het product in en uit te schakelen.
Druk op de toets BD als u naar Home Cinema wilt schakelen.
Druk op de cijfertoetsen om de opties te bedienen.
Druk op deze toetsen om achteruit of vooruit te gaan.
Hiermee regelt u het volume.
Druk op deze toets om het geluid tijdelijk uit te schakelen.
Druk op deze toets om het beeld schermvullend weer te geven op
de tv.
Druk op deze toets om naar het startscherm te gaan.
Hiermee selecteert u items op het scherm en wijzigt u de
menuwaarden.
Hiermee gaat u naar het vorige menu.
Deze toetsen worden gebruikt voor de menu's van het product en voor
diverse Blu-ray-discfuncties.
Druk op deze toets om het discmenu te openen.
Het menu Tools weergeven.
Smart Hub gebruiken.
Hiermee selecteert u de audiotaal voor de disc.
Als u naar de tv-modus wilt schakelen, drukt u op de toets
TV.
Druk op deze toets om een disc te stoppen of af te spelen.
Zoeken naar inhoud.
Druk op deze toets om de vTuner te gebruiken.
Druk op deze toets om geluidseffecten toe te passen.
De sluimertijd voor het uitschakelen van het product instellen.
Druk op deze toets om de modus voor de Blu-ray-speler te selecteren (HDMI1, AUX, BD/DVD enz.).ofDruk op deze toets om de videomodus van de tv te selecteren.
Hiermee selecteert u MONO of STEREO voor radio-uitzendingen.
Druk op deze toets om achteruit of vooruit te zoeken.
Druk op deze toet om een disc te pauzeren.
Hiermee zoekt u naar actieve FM-stations en wijzigt u kanalen.
Hiermee kunt u het niveau van de subwoofer aanpassen.
Het pop-upmenu/titelmenu openen.
Het menu verlaten.
Hiermee kunt u afspeelinformatie
weergeven tijdens het afspelen
van een Blu-ray-disc/dvd.
Hiermee kunt u een radiofrequentie programmeren.
Hiermee kunt u een titel, hoofdstuk, nummer of disc herhalen.
Druk op deze toets om in de 3D-modus naar een normale 2D-video te kijken.
Hiermee selecteert u de taal voor de ondertiteling van de disc.
Druk op deze toets om het 3D-geluidseffect in te schakelen.
Opent en sluit de schijflade.
Gebruik de RDS-functie om FM-stations te ontvangen.
HT-E5200_XU_NL_0223.indd 13HT-E5200_XU_NL_0223.indd 13 2012-02-23 오후 2:36:072012-02-23 오후 2:36:07

| 14 Nederlands
Aan de SlagBatterijen in de afstandsbediening plaatsen
Batterijformaat: AAA
21
| OPMERKING | � Zorg dat de '+' en '-' aan de uiteinden van de
batterijen overeenkomen met het diagram in het
batterijcompartiment.
� Bij normaal gebruik van de tv gaan de batterijen ongeveer
een jaar mee.
� De afstandsbediening heeft een bereik van ongeveer 7
meter in een rechte lijn.
De afstandsbediening instellenU kunt bepaalde functies van uw tv met deze
afstandsbediening bedienen.
De tv bedienen met de afstandsbediening
1 . Druk op de toets TV om de tv-modus van de
afstandsbediening in te schakelen.
2 . Zet uw tv aan.
3 . Houd de knop AAN/UIT ingedrukt en voer de
code in die correspondeert met het merk van
uw tv.
• Als er voor uw merk tv meerdere codes
worden vermeld, probeert u deze een voor
een om te bepalen welke code werkt.
• Voorbeeld: Voor een Samsung-tvHoud de toets AAN/UIT ingedrukt en
gebruik de cijfertoetsen om 00 in te voeren.
Als dit niet werkt, probeert u 15, 16 enz.
4 . Als de tv wordt uitgeschakeld, is de instelling
voltooid.
• U kunt nu de toetsen TV POWER, VOLUME,
CHANNEL en de cijfertoetsen (0-9) gebruiken.
| OPMERKING | � De afstandsbediening werkt mogelijk niet in combinatie
met alle tv-merken. Daarnaast is het mogelijk dat niet
alle functies kunnen worden gebruikt, afhankelijk van het
merk tv.
� De afstandsbediening is standaard ingesteld voor
Samsung-tv's.
TV-besturingscodes
Merk CodeAdmiral
(M.Wards)56, 57, 58
A Mark 01, 15
Anam
01, 02, 03, 04, 05,
06, 07, 08, 09, 10, 11,
12, 13, 14
AOC 01, 18, 40, 48
Bell & Howell (M.Wards)
57, 58, 81
Brocsonic 59, 60
Candle 18
Cetronic 03
Citizen 03, 18, 25
Cinema 97
Classic 03
Concerto 18
Contec 46
Coronado 15
Craig 03, 05, 61, 82, 83, 84
Croslex 62
Crown 03
Curtis Mates 59, 61, 63
CXC 03
Daewoo
02, 03, 04, 15, 16, 17, 18, 19, 20, 21, 22, 23,
24, 25, 26, 27, 28, 29, 30, 32, 34, 35, 36,
48, 59, 90
Daytron 40
Dynasty 03
Emerson03, 15, 40, 46, 59, 61,
64, 82, 83, 84, 85
Fisher 19, 65
Funai 03
Futuretech 03
General Electric (GE)
06, 40, 56, 59, 66, 67, 68
Hall Mark 40
Hitachi 15, 18, 50, 59, 69
Inkel 45
JC Penny 56, 59, 67, 86
JVC 70
KTV 59, 61, 87, 88
KEC 03, 15, 40
KMC 15
LG (Goldstar)01, 15, 16, 17, 37, 38, 39, 40, 41, 42, 43, 44
Luxman 18
LXI (Sears)19, 54, 56, 59, 60, 62,
63, 65, 71
Magnavox15, 17, 18, 48, 54, 59,
60, 62, 72, 89
Marantz 40, 54
Matsui 54
MGA 18, 40
Merk CodeMitsubishi/MGA 18, 40, 59, 60, 75
MTC 18
NEC 18, 19, 20, 40, 59, 60
Nikei 03
Onking 03
Onwa 03
Panasonic06, 07, 08, 09, 54, 66,
67, 73, 74
Penney 18
Philco03, 15, 17, 18, 48, 54,
59, 62, 69, 90
Philips15, 17, 18, 40, 48,
54, 62, 72
Pioneer 63, 66, 80, 91
Portland 15, 18, 59
Proton 40
Quasar 06, 66, 67
Radio Shack 17, 48, 56, 60, 61, 75
RCA/Proscan18, 59, 67, 76, 77, 78,
92, 93, 94
Realistic 03, 19
Sampo 40
Samsung00, 15, 16, 17, 40, 43,
46, 47, 48, 49,59, 60, 98
Sanyo 19, 61, 65
Scott 03, 40, 60, 61
Sears 15, 18, 19
Sharp 15, 57, 64
Signature 2000 (M.Wards)
57, 58
Sony 50, 51, 52, 53, 55
Soundesign 03, 40
Spectricon 01
SSS 18
Sylvania18, 40, 48, 54, 59,
60, 62
Symphonic 61, 95, 96
Tatung 06
Techwood 18
Teknika 03, 15, 18, 25
TMK 18, 40
Toshiba 19, 57, 63, 71
Vidtech 18
Videch 59, 60, 69
Wards15, 17, 18, 40, 48,
54, 60, 64
Yamaha 18
York 40
Yupiteru 03
Zenith 58, 79
Zonda 01
Dongyang 03, 54
HT-E5200_XU_NL_0223.indd 14HT-E5200_XU_NL_0223.indd 14 2012-02-23 오후 2:36:122012-02-23 오후 2:36:12

Nederlands 15 |
03Aansluitingen
AansluitingenIn dit gedeelte worden verschillende methoden beschreven om het product aan te sluiten op andere externe componenten.Schakel het product uit en haal de stekker uit het stopcontact voordat u het product gaat verplaatsen of installeren.
De toroïdale ferrietkern op het netsnoer van de hoofdeenheid aansluiten
Het aansluiten van een toroïdale ferrietkern op het netsnoer van de hoofdeenheid voorkomt storing van radiosignalen.
1. Trek aan het bevestingsclipje van de toroïdale
ferrietkern om deze te openen.
2. Maak een lus die twee keer zo groot is als het
netsnoer van de hoofdeenheid.
3. Bevestig de toroïdale ferrietkern aan het netsnoer
van de hoofdeenheid zoals in de afbeelding wordt
getoond en druk deze aan totdat u een klik hoort.
De luidsprekers aansluiten
LANiPod
IMPE
DANC
E : 3
SPEAKERS OUT
HDMI
Voorste luidsprekers
Plaats deze luidsprekers voor de luisterpositie, naar u toe gericht (ongeveer 45°). Plaats
de voorste luidsprekers zodanig dat de tweeters zich op ongeveer dezelfde hoogte
bevinden als uw oren.
Subwoofer De plaats van de subwoofer is niet zo belangrijk. U kunt deze plaatsen waar u maar wilt.
Positie van het product
Plaats het product op een voet of kastplank of onder de televisie.
De luisterpositie selecteren
De luisterpositie moet zich bevinden op een afstand van ongeveer 2,5 tot 3 maal het formaat van de tv. Als u bijvoorbeeld een scherm van 46 inch hebt, moet de luisterpositie 2,92 tot 3,50 meter vanaf het scherm zijn.
Voorluidspreker (L)
Voorluidspreker (R)
Product
Subwoofer
Luidsprekercomponenten
SUBWOOFER LUIDSPREKERKABELVOOR
(L) (R)
HT-E5200_XU_NL_0223.indd 15HT-E5200_XU_NL_0223.indd 15 2012-02-23 오후 2:36:162012-02-23 오후 2:36:16

| 16 Nederlands
AansluitingenDe luidsprekers aansluiten
1. Sluit elke kabelbundel van de luidspreker op de juiste luidspreker aan door
de kleurencode van de stekker van de bundel te laten overeenkomen met
de gekleurde sticker aan de onderzijde van elke luidspreker.
2. De luidsprekerkabels aansluiten op de speakers:
a. Druk de rode knop op de achterzijde van de luidspreker in, plaats de
rode kabel en laat de knop vervolgens los.
b. Druk de zwarte knop op de achterzijde van de luidspreker in, plaats de
zwarte kabel en laat de knop vervolgens los.
3. Sluit de stekkers van de luidsprekerkabels aan de achterzijde van het
product aan door de juiste kleuren van de luidsprekerstekkers met de
kleuren van de luidsprekeraansluitingen te verbinden.
LANiPod
IMPE
DANC
E : 3
SPEAKERS OUT
IMPE
DANC
E : 3
SPEAKERS OUT
Voorste luidspreker (R)
Subwoofer
Voorste luidspreker (L)
| LET OP | � Als u het product aan de muur wilt bevestigen, moet u de schroeven of spijkers in de muur stevig vastdraaien en de
openingen aan de achterzijde van de luidspreker gebruiken voor bevestiging.
Wanneer u het echter bevestigt, voorziet het bedrijf niet in hulpstukken (spijkers of schroeven) en bevestiging.
� Laat kinderen niet met of in de buurt van de luidsprekers spelen. Zij zouden gewond kunnen raken als een luidspreker
omvalt.
� Let bij het aansluiten van de luidsprekerkabels op de luidsprekers op de juiste polariteit (+/-).
� Houd de sufwoofer buiten bereik van kinderen om te voorkomen dat ze hun handen of andere voorwerpen in de opening van
de subwoofer steken.
� Hang de subwoofer niet aan de opening op.
| OPMERKING | � Als u een luidspreker dicht bij uw tv plaatst, kan de schermkleur veranderen als gevolg van het magnetische veld.
Zwart Rood
HT-E5200_XU_NL_0223.indd 16HT-E5200_XU_NL_0223.indd 16 2012-02-23 오후 2:36:242012-02-23 오후 2:36:24

Nederlands 17 |
03Aansluitingen
De FM-antenne aansluiten
LANiPod
IMPE
DANC
E : 3
SPEAKERS OUT
OPTICAL
VIDEOOUT
AUXIN
DIGITALAUDIO IN
HDMI IN1 2HDMI OUTLANiPod
IMPE
DANC
E : 3
SPEAKERS OUT
OPTICAL
VIDEOOUTOUT
AUXIN
DIGITALAUDIO INN
HDMI IN1 2HDMI OUT FM ANT
FM-antenne (meegeleverd)
1 . Sluit de meegeleverde FM-antenne aan op de FM-antenneaansluiting.
2 . Beweeg de antenne langzaam in het rond totdat u een plek met goede ontvangst vindt. Bevestig de
antenne vervolgens aan een muur of ander vast oppervlak.
| OPMERKING | � Met dit product kunt u geen AM-uitzendingen ontvangen.
Aansluiten op een iPod/iPhone
Via een USB-kabel
Sluit een iPod/iPhone via de USB-kabel aan op de
USB-poort aan de voorzijde.
Via een dock
Er moet een Composite-kabel zijn aangesloten om
een video te kunnen afspelen.
LANiPod
IMPE
DANC
E : 3
UT
OPTICAL
VIDEOOUT
AUXIN
DIGITALAUDIO IN
FM ANTHDMI IN1 2HDMI OUTLAN
IMPE
DANC
E : 3
UT
OPTICAL
VIDEOOUTOU
AUXIN
DIGITALAUDIO INNN
FM ANTHDMI IN1 2HDMI OUT
iPod
| OPMERKING | � Zorg dat de dockconnector zo wordt aangesloten dat het label "" zich aan de bovenkant bevindt.
5V 500mA
5V 500mA
HT-E5200_XU_NL_0223.indd 17HT-E5200_XU_NL_0223.indd 17 2012-02-23 오후 2:36:272012-02-23 오후 2:36:27

| 18 Nederlands
AansluitingenAansluiten op een tv
Selecteer Methode 1 of Methode 2.
• Als u de afstandsbediening van het product hebt geprogrammeerd voor het bedienen van uw tv, drukt u op de toets TV SOURCE op de afstandsbediening en selecteert u de juiste externe bron in de lijst met bronnen van de tv (HDMI, Video In
enz.) om video via de Home Cinema te bekijken.
HDMI IN VIDEO IN
OPTICAL
VIDEOOUT
AUXIN
DIGITALAUDIO IN
FM ANTHDMI IN1 2HDMI OUT
LANiPod
IMPE
DANC
E : 3
SPEAKERS OUT
OPTICAL
VIDEOOUT
AUXIN
DIGITALAUDIO IN
FM ANTHDMI IN1 2HDMI OUT
Methode 1Methode 2
( De kabel is niet meegeleverd.)
Methode 1 Aansluiten op een tv met een HDMI-kabel - beste kwaliteit (aanbevolen)
Sluit de HDMI-kabel (niet meegeleverd) aan op de HDMI-uitgang aan de achterzijde van het product en
de HDMI-ingang op uw tv.
Methode 2 Aansluiten op een tv met een AV-kabel - goede kwaliteitSluit de meegeleverde videokabel aan op de aansluiting VIDEO OUT aan de achterzijde van het product
en de aansluiting VIDEO IN op uw tv.
| OPMERKING | � De uitgang VIDEO OUT voert de gegevens altijd uit met een resolutie van 576i/480i, ongeacht de resolutie die is ingesteld in
het instellingenmenu.
� Sluit het apparaat niet aan via een VCR. Videosignalen die via videorecorders worden gevoed, kunnen worden beïnvloed door
systemen die het auteursrecht beschermen. Het beeld kan hierdoor worden vervormd.
HT-E5200_XU_NL_0223.indd 18HT-E5200_XU_NL_0223.indd 18 2012-02-23 오후 2:36:312012-02-23 오후 2:36:31

Nederlands 19 |
03Aansluitingen
Externe apparaten aansluiten
Om de juiste modus voor een extern apparaat te selecteren, drukt u op de toets FUNCTION. Telkens wanneer u
op de toets drukt, schakelt u naar een andere modus:
BD/DVD � D. IN � AUX � R. IPOD � HDMI1 � HDMI2 � FM � BT
OPTICAL
VIDEOOUT
AUXIN
DIGITALAUDIO IN
FM ANTHDMI IN1 2
AUDIO OUTHDMI OUT OPTICAL OUT
LANiPod
IMPE
DANC
E : 3
SPEAKERS OUT
OPTICAL
VIDEOOUT
AUXIN
DIGITALAUDIO IN
FM ANTHDMI IN1 2HDMI OUT
R Rood
W Wit
Methode 1 Methode 2 Methode 3
Externe apparaten
(De kabel is niet meegeleverd.)
(De kabel is niet meegeleverd.)
(De kabel is niet
meegeleverd.)
Methode 1 HDMI INGANG : Een externe component aansluiten met een HDMI-kabel
Sluit een HDMI-kabel (niet meegeleverd) aan op de HDMI-ingang aan de achterzijde van het product en
de HDMI-uitgang op uw digitale apparaat. Selecteer de modus HDMI1 of HDMI2.
Methode 2 OPTISCH : Een extern digitaal audiocomponent aansluiten
Voor aansluiting op de digitale audio-uitgang van digitale signaalcomponenten, zoals kabel- en
satellietontvanger (settopboxes).
Gebruik een digitale optische kabel (niet meegeleverd) om de optische digitale audio-ingang op het
product aan te sluiten op de digitale optische uitgang van het externe digitale apparaat.
Selecteer de modus D. IN.
Methode 3 AUX INGANG : Een extern analoog apparaat aansluiten
Gebruik een RCA-audiokabel (niet meegeleverd) om de ingang AUDIO In op het product aan te sluiten op
de uitgang AUDIO Out op het externe analoge apparaat. Selecteer de modus AUX.
• Zorg ervoor dat de kleuren van de stekkers overeenkomen met de kleuren op de in- en uitgangen.
| OPMERKING | � Om video te bekijken via uw kabel/satellietontvanger, moet u de video-uitgang van ontvanger rechtstreeks aansluiten op uw tv.
� Dit systeem biedt ondersteuning voor digitale samplefrequenties van 32 kHz of hoger van externe digitale apparaten.
� Dit systeem ondersteunt alleen DTS- en Dolby Digital-audio. MPEG-audio, een bitstreamindeling, wordt niet ondersteund.
HT-E5200_XU_NL_0223.indd 19HT-E5200_XU_NL_0223.indd 19 2012-02-23 오후 2:36:332012-02-23 오후 2:36:33

| 20 Nederlands
AansluitingenAansluiten op een netwerkrouter
U kunt uw product op uw netwerkrouter
aansluiten via een van de methodes die hieronder
geïllustreerd staan.
Bedraad netwerk
LANiPod
IMPE
DANC
E : 3
SPEAKERS OUT
OPTICAL
VIDEOOUT
AUXIN
DIGITALAUDIO IN
FM ANTHDMI IN1 2HDMI OUT
Breedbandservice
Breedbandservice
Breedbandmodem(met ingebouwde router)
Breedbandmodem
Router
Of
| OPMERKING | � Mogelijk kunt u geen verbinding via internet maken
met de Samsung-server voor software-updates. Dit is
afhankelijk van de gebruikte router en het beleid van uw
internetprovider. Neem voor meer informatie contact op
met uw internetprovider.
� Gebruikers met DSL dienen een netwerkverbinding via
de router tot stand te brengen.
� Om de AllShare Play-functie te kunnen gebruiken moet u
uw pc met uw netwerk verbinden, zoals in de afbeelding
links wordt weergegeven.
De verbinding kan draadloos of bedraad zijn.
Draadloos netwerk
5V 500mA
Draadloze IP-verdeler
Breedbandservice
| OPMERKING | � Als de draadloze router ondersteuning biedt voor DHCP,
kan dit product gebruikmaken van DHCP of een statisch
IP-adres om verbinding te maken met het draadloze
netwerk.
� Stel uw draadloze IP-router in op infrastructuurmodus. De
ad-hocmodus wordt niet ondersteund.
� Het product ondersteunt alleen de volgende draadloze
beveiligingsprotocollen:
- WEP (OPEN/SHARED), WPA-PSK (TKIP/AES), WPA2-PSK (TKIP/AES)
� Selecteer op de draadloze IP-router een kanaal dat
momenteel niet wordt gebruikt. Als het geselecteerde
kanaal voor de draadloze IP-router momenteel door een
ander apparaat in de buurt wordt gebruikt, resulteert dit
in storing en communicatiefouten.
� Als u de modus Pure High-throughput (Greenfield)
802.11n selecteert en u stelt het coderingstype voor
uw router of toegangspunt (AP; access point) in op WEP,
TKIP of TKIP-AES (WPS2Mixed), biedt dit product geen
ondersteuning voor een verbinding die voldoet aan de
nieuwe Wi-Fi-certificeringsspecificaties.
� Draadloos LAN kan interferentie veroorzaken, afhankelijk
van de gebruiksomstandigheden (werking van het
AP, afstand, obstakels, interferentie door andere
radioapparatuur, enzovoort).
HT-E5200_XU_NL_0223.indd 20HT-E5200_XU_NL_0223.indd 20 2012-02-23 오후 2:36:352012-02-23 오후 2:36:35

Nederlands 21 |
04Instellingen
De procedure voor de begininstellingen
• Het startmenu wordt niet weergegeven als u de
begininstellingen niet configureert.
• Het OSD kan in dit product veranderen nadat een
upgrade van de softwareversie is uitgevoerd.
• De stappen om toegang te verkrijgen kunnen
verschillen, afhankelijk van het geselecteerde menu.
1 . Schakel uw tv in nadat u het product hebt
aangesloten en schakel vervolgens het product
in. Wanneer u het product voor de eerste keer
aansluit, wordt automatisch het scherm voor
de initiële taalinstellingen weergegeven.
Initial Settings > On-Screen Language
Select a language for the on-screen displays.
Next
▲
▼
Dansk Nederlands
English Eesti keel
Suomi Français
Deutsch Ελληνικά
Hausa Magyar
Asusu Igbo Italiano
Select English as the on-screen menu language.
2 . Gebruik de toetsen ▲▼◄► op de
afstandsbediening om de gewenste taal te
selecteren en druk vervolgens twee keer op
E. Het startscherm verschijnt.
3 . Druk op de toets E om de configuratie
te starten. Het scherm Netwerkinstellingen
verschijnt.
De volgende stap is het instellen van een draadloos netwerk met een interne LAN-adapter.
Als u verbinding wilt maken met uw kabelnetwerk, sluit u een netwerkkabel aan.
Vorige
Overslaan
Volgende
Begininstelling > Netwerkinstellingen (1/5)
4 . Druk op de knop E om de draadloze
netwerkverbinding van het product in
te stellen, of selecteer Overslaan en
druk vervolgens op de knop E om
netwerkinstallatie over te slaan. Als u
Overslaan hebt geselecteerd, gaat u naar
stap 12.
| OPMERKING | � Het product start standaard de procedure voor een
draadloos netwerk. Als u een bedraad netwerk wilt
instellen, selecteert u Overslaan en gaat u, nadat u de
procedure voor de begininstellingen hebt voltooid, naar
het gedeelte 'Uw netwerkverbinding configureren' op
pagina 29.
� Als u de instellingen voor een draadloos netwerk hier
overslaat, gaat u naar 'Draadloos netwerk' op pagina 30
om de draadloze netwerkverbinding voor het product later
in te stellen.
5 . Het product zoekt en geeft vervolgens
een lijst met de beschikbare draadloze
netwerkrouters weer.
Begininstelling > Netwerkinstellingen (2/5)
Vernieuwen
WPS(PBC)
Vorige
Volgende
Overslaan
Selecteer uw draadloze router in de lijst.1 / 4
KIMING_VTOWER
TIASsi-ap
Netwerk toevoegen
surlwang5
6 . Gebruik de toetsen ▲▼ om een router te
selecteren en druk vervolgens op E. De
knop Volgende wordt gemarkeerd.
7 . Druk op E om door te gaan. Het scherm
Veiligheidstoets wordt weergegeven.
| OPMERKING | � Als u een router hebt die compatibel is met WPS(PBC),
selecteert u WPS(PBC), drukt u op E en volgt u de
instructies op het scherm. Als u klaar bent, gaat u naar
stap 10.
Begininstelling > Netwerkinstellingen (4/5)
Vorige
WPS-pin
Overslaan
Volgende
Voer beveilig.code in.
0 ingev.
A/a Spatie
a g m s
e k q w
c i o u
1 4 7 y
b h n t
f l r x
d j p v
2 5 8 z
3 6 9 0
-
8 . Geef de beveiligingssleutel voor uw netwerk
op. Wanneer u klaar bent, gebruikt u de
toetsen ▲▼◄► om Volgende te selecteren.
Vervolgens drukt u op E.
Instellingen
HT-E5200_XU_NL_0223.indd 21HT-E5200_XU_NL_0223.indd 21 2012-02-23 오후 2:36:422012-02-23 오후 2:36:42

| 22 Nederlands
Instellingen| OPMERKING |
� Gebruik de cijfertoetsen op uw afstandsbediening om cijfers
in te voeren.
� Voer letters in door een letter met de toetsen ▲▼◄► te
selecteren en op E te drukken.
� Als u hoofdletters wilt weergeven (of opnieuw kleine
letters wilt weergeven wanneer er hoofdletters worden
weergegeven), selecteert u A/a en drukt u op de toets E.
� Als u symbolen en leestekens wilt weergeven, selecteert u
en drukt u vervolgens op E. Als u opnieuw letters wilt
weergeven, selecteert u en drukt u vervolgens op E.
9 . Als er verbinding is gemaakt, wordt het
scherm Verbinding voltooid weergegeven.
Selecteer Volgende en druk vervolgens op
E. Het scherm Software-update wordt
weergegeven.
| OPMERKING | � Zodra er verbinding is gemaakt, selecteert u
Volgende en drukt u op E. Nadat u de procedure
voor de begininstellingen hebt voltooid, gaat u naar
'Draadloos netwerk' op pagina 30 om de draadloze
netwerkverbinding voor het product later in te stellen.
10 . Als u de software wilt bijwerken, selecteert u
Nu bijwerken en drukt u op E. Als u de het
bijwerken wilt overslaan, selecteert u Later bijwerken, drukt u op E en gaat u naar
stap 12.
| OPMERKING | � Als u de configuratie van de netwerkinstellingen hebt
overgeslagen moet u de software-update ook overslaan.
11 . Als er een software-update beschikbaar
is, wordt de upgrade door het product
gedownload en geïnstalleerd. Dit kan
enige tijd duren. Als er geen software-
update beschikbaar is, wordt het volgende
bericht weergegeven: 'Er zijn geen nieuwe software-updates voor u om te downloaden. U hebt de meest recente versie al.'. Druk vervolgens op E.
Het scherm Beeldverhouding tv wordt
weergegeven.
22
Begininstelling > Beeldverhouding
Vorige
Volgende
Stel in op het type televisie dat is aangesloten.
16:9 Origineel
16:9 volledig
4:3 Brievenbus
4:3 Pan-Scan
Selecteer bij aansluiting op tv met16:9-beeld. Bepaalde films met een 4:3-bron worden weergegeven in 4:3 Pillarbox.
12 . Gebruik de toetsen ▲▼ om een geschikte
beeldverhouding voor uw scherm te selecteren en
druk op E. Selecteer Volgende en druk op E.
U kunt kiezen uit vier opties:
16:9 Origineel - Voor breedbeeld-tv's. De breedbeeldbeelden worden weergegeven in hun oorspronkelijke 16:9-formaat en 4:3-beelden (het oude standaardformaat) in 4:3 pillar box-formaat met zwart balken aan weerszijden van het beeld.16:9 volledig - Voor breedbeeld-tv's. Breedbeeldbeelden worden weergegeven in hun oorspronkelijke 16:9-formaat en 4:3-beelden worden uitgerekt, zodat het volledige 16:9-scherm vullen.4:3 Brievenbus - Voor oudere analoge tv's met een standaardscherm. Beelden met een verhouding van 4:3 worden schermvullend weergegeven en beelden met een verhouding van 16:9 worden weergegeven in het letter box-formaat, waarbij de beeldverhouding 16:9 wordt gehandhaafd maar er zwarte balken aan de onder- en bovenkant van het beeld worden weergegeven.4:3 Pan-Scan - Voor oudere analoge tv's met een standaardscherm. Beelden met een verhouding van 4:3 worden schermvullend weergegeven, Beelden met een verhouding van 16:9 worden weergegeven in een schermvullend Pan-Scan-formaat, maar de linker- en rechterkant van het beeld worden afgesneden en
het midden wordt verticaal groter weergegeven.
Begininstelling > Klaar
Installatie voltooid.
OK
Smart Hub
Schermtaal
Netwerkinstellingen
Software-update -
Norm,/Breedb.
Druk op Smart Hub om allerlei internet inhoud te gebruiken.
13 . Het scherm Instellingen voltooid verschijnt.
Controleer of de instellingen correct zijn.
Selecteer OK en druk vervolgens op E.
Het startscherm wordt weergegeven.
| OPMERKING | � Als u het scherm Eerste instelling nogmaals wilt openen,
bijvoorbeeld om wijzigingen aan te brengen, kiest u de optie
Resetten. (Zie pagina 28)
� Als u een HDMI-kabel gebruikt voor het aansluiten van het
product op een Samsung-tv met de functie Anynet+ (HDMI-
CEC) en 1.) De functie Anynet+ (HDMI-CEC) op ON (Aan) hebt
gezet op zowel de tv als het product en 2.) Als u de tv hebt
ingesteld op een taal die door het product wordt ondersteund,
selecteert het product de desbetreffende taal automatisch als de
voorkeurstaal.
HT-E5200_XU_NL_0223.indd 22HT-E5200_XU_NL_0223.indd 22 2012-02-23 오후 2:36:462012-02-23 오후 2:36:46

Nederlands 23 |
04Instellingen
Het startscherm
Smart Hub Functie Instellingen
d WPS(PBC) 5
4
3
1
2
Video's, foto's of muziek afspelen vanaf een schijf of aangesloten apparaten.
AllShare Play
1Smart Hub. Hiermee wordt Smart Hub gestart. Via
Smart Hub hebt u toegang tot YouTube, games en
andere apps.
2AllShare Play. Hiermee kunt u video's, foto's of
muziekinhoud op discs, USB-apparaten, computers
of mobiele apparaten afspelen.
3Functie. Hiermee selecteert u de invoerbon voor
audio/video.
4Instellingen. Stel allerlei functies in volgens uw
persoonlijke voorkeuren.
5Hiermee worden de gekleurde knoppen op uw
afstandsbediening weergegeven. Deze kunt u
indrukken om functies te openen of uit te voeren.
Een optie in het startscherm selecteren
1 . Als u een optie in het startscherm wilt
selecteren, gebruikt u de toetsen ◄► om de
cursor te verplaatsten, totdat de gewenste
optie wordt gemarkeerd. Vervolgens drukt u
op de toets E.
Het instellingenscherm openen
1 . Selecteer in het startscherm de optie
Instellingen en druk vervolgens op E. Het
instellingenscherm verschijnt.
Weergave
Geluid
Netwerk
Systeem
Ondersteuning
3D-instell.
Beeldverhouding 16:9 Origineel
Schermformaat Smart Hub Grootte 3
BD Wise Uit
Resolutie Auto
Filmbeeld (24Fs) Auto
HDMI-kleurformaat Auto
HDMI diepe kleur Auto
Progressieve functie Auto
2 . Zie de onderstaande afbeelding van de
afstandsbediening voor toegang tot de
menu's, submenu's en opties in het scherm
Instellingen.
| OPMERKING | � Als u het product langer dan 5 minuten in de
stopmodus laat staan zonder dat u het gebruikt, wordt
een schermbeveiliging geactiveerd op uw tv. Als de
schermbeveiliging van het product langer dan 20 minuten
actief is, wordt de stroom automatisch uitgeschakeld.
Toetsen op de afstandsbediening voor het menu Instellingen
TOOLS
RETURN EXIT
INFO
TUNER
FULL SCREEN REPEATHOME
1
2 4
3
1Toets HOME : druk op deze toets om naar het
startscherm te gaan.
2 Toets RETURN : hiermee gaat u naar het vorige menu.
3
Toets E (Invoeren) / RICHTINGSTOETS :
~ Druk op ▲▼◄► om de cursor te verplaatsen
of een item te selecteren.
~ Druk op de toets E om het geselecteerde item
te activeren of om een instelling te bevestigen.
4Toets EXIT : druk op deze toets om het huidige menu
te verlaten.
| OPMERKING | � De toets E op het voorpaneel van het product kan
voor hetzelfde doel worden gebruikt als de E op de
afstandsbediening.
Gedetailleerde functie-informatieDe functies, menu-items en afzonderlijke opties
worden uitvoerig uitgelegd op het scherm. Om een
uitleg weer te geven, gebruikt u de toetsen
▲▼◄► om de functie, het menu-item of de optie
te selecteren. De uitleg verschijnt meestal rechts op
het scherm. Op de volgende pagina vindt u een
korte beschrijving van de instelfuncties. Daarnaast
vindt u in de Bijlage van deze handleiding extra
informatie over bepaalde functies.
HT-E5200_XU_NL_0223.indd 23HT-E5200_XU_NL_0223.indd 23 2012-02-23 오후 2:36:492012-02-23 오후 2:36:49

| 24 Nederlands
InstellingenFuncties van het menu Instellingen
Weergave
3D-instell.
Hier stelt u de 3D-gerelateerde functies in.
3D Blu-ray-weergavemodus: selecteren of een Blu-
ray-disc met 3D-inhoud in de 3D-modus moet worden
afgespeeld. Indien u in de 3D-modus naar het startscherm
of naar het menu Smart Hub Home gaat, schakelt het
product automatisch over naar 2D.
Schermformaat: geef hier de grootte op van de tv die
op het product is aangesloten. Het product past het
beeld van de 3D-uitvoer automatisch aan op basis van de
schermgrootte van uw tv.
BeeldverhoudingHiermee kunt u het beeld van het product aanpassen aan de
schermgrootte van uw tv. Zie pagina 22, stap 12 voor een
beschrijving van de opties voor de schermgrootte.
Schermformaat Smart Hub
Hiermee kunt u de optimale grootte voor het Smart Hub-
scherm selecteren.
BD Wise
BD Wise is het nieuwste op het gebied van interconnectiviteit
van Samsung. Wanneer u een Samsung-product en een
Samsung-tv met BD Wise op elkaar aansluit via HDMI,
en zowel het product als de tv is voorzien van BD Wise,
verstuurt het product de beelden met de beeldresolutie en
framesnelheid van de Blu-ray-disc/dvd.
Resolutie
Stel de uitgangsresolutie van het HDMI-videosignaal in
op Auto, 1080p, 1080i, 720p of 576p/480p. Bij een
composietverbinding wordt alleen de resolutie 576i/480i ondersteund. Het getal staat voor het aantal beeldlijnen
per frame. De i en p staan respectievelijk voor interlaced en
progressieve scan. Hoe meer lijnen, hoe hoger de kwaliteit.
Filmbeeld (24Fs)
Wanneer u de functie Filmbeeld (24Fs) instelt op Auto, kan
de speler de HDMI-uitgang voor een optimale beeldkwaliteit
instellen op 24 frames per seconde, indien aangesloten op
een tv die compatibel is met 24Fs.
• U kunt de functie Movie Frame (24Fs) (Filmbeeld (24Fs))
alleen gebruiken met een tv die deze beeldsnelheid
ondersteunt.
• Filmbeeld is alleen beschikbaar wanneer het product zich in
de uitgangsresolutiemodus HDMI 1080i of 1080p bevindt.
HDMI-kleurformaat
Hiermee kunt u het kleurbereikformaat voor de HDMI-uitgang
instellen zodat dit overeenkomt met de mogelijkheden van het
verbonden apparaat (tv, monitor enzovoort).
HDMI diepe kleur
Hiermee kunt u het product beelden via de uitgang HDMI OUT
laten versturen met een diepe kleur. Met Deep Color worden
de kleuren nauwkeuriger en met een grotere kleurdiepte
gereproduceerd.
Progressieve functie
Hiermee kunt u de beeldkwaliteit verbeteren bij het weergeven
van dvd's.
HT-E5200_XU_NL_0223.indd 24HT-E5200_XU_NL_0223.indd 24 2012-02-23 오후 2:37:052012-02-23 오후 2:37:05

Nederlands 25 |
04Instellingen
Geluid Luidsprekerinst. Hier kunt u de luidsprekeropties instellen.
Toonregeling Hier kunt u de equalizerinstellingen handmatig configureren.
Smart VolumeHiermee kunt u het product zodanig instellen dat het volume
stabiel blijft na een overgang naar een ander scène of als u van
kanaal wisselt.
LuidsprekerselectieHiermee kunt u selecteren welke luidsprekers u wilt gebruiken,
de luidsprekers van de tv of de luidsprekers van het Home
theatre-systeem.
Audio-retourkanaal
Hiermee kunt u het geluid van uw tv weergeven via de Home
Cinema-luidsprekers. Hiervoor hebt u een HDMI-verbinding en
een ARC-compatibele (Audio Return Channel) tv nodig.
• Wanneer Audio-retourkanaal is ingeschakeld, gebruikt u een
HDMI-kabel om het product aan te sluiten op de tv. Op dit
moment kunt u geen optische invoer gebruiken.
• Wanneer Audio-retourkanaal is ingesteld op Auto, gebruikt
u een HDMI-kabel om het product aan te sluiten op de tv.
In dat geval worden ARC en de optie voor optische invoer
automatisch geselecteerd.
Digitaal UIT audio
Hiermee kunt u de digitale uitvoer afstemmen op de
mogelijkheden van de AV-ontvanger die u op het product hebt
aangesloten. Meer informatie vindt u in de tabel voor selectie
van digitale uitvoer. (Zie pagina 59)
Dynamisch bereik
instellen
Hiermee kunt u het dynamisch bereik voor het geluid instellen
op Dolby Digital, Dolby Digital Plus en Dolby True HD.
Auto: het dynamisch bereik van Dolby TrueHD-audio wordt
automatisch bepaald op basis van de informatie in de Dolby
TrueHD-soundtrack. Schakelt het dynamisch bereik ook in
voor Dolby Digital en Dolby Digital Plus.
Uit: het dynamisch bereik wordt niet gecomprimeerd, zodat
het oorspronkelijke geluid wordt weergegeven.
Aan: het dynamisch bereik wordt ingesteld voor alle drie
Dolby-formaten. Zachte geluiden worden luider weergegeven
en harde geluiden zachter.
Audio-sync.
Wanneer het product is aangesloten op een digitale tv, kunt
u hiermee de audiovertraging aanpassen, zodat het geluid
synchroon loopt met de video. U kunt een vertraging tussen 0
en 300 milliseconden instellen.
HT-E5200_XU_NL_0223.indd 25HT-E5200_XU_NL_0223.indd 25 2012-02-23 오후 2:37:072012-02-23 오후 2:37:07

| 26 Nederlands
Instellingen
Netwerk Netwerkinstellingen Zie 'Netwerken en internet' vanaf pagina 29 voor meer informatie
over de netwerkinstellingen en -functies.
Netwerkstatus Hiermee kunt u controleren of een netwerkverbinding en
internetverbinding tot stand zijn gebracht.
Wi-Fi Direct
Hiermee kunt u een Wi-Fi Direct-apparaat op het product
aansluiten via een peer-to-peer-netwerk, zonder dat een
draadloze router nodig is. U kunt het apparaat gebruiken om
het product te bedienen.
Soft AP
Hiermee kunt u draadloos verbinding maken met andere typen
Wi-Fi-apparaten. U hebt u hiervoor een beveiligingssleutel
nodig, die u in de andere Wi-Fi-apparaten moet invoeren
wanneer u ze op het netwerk aansluit.
AllShare-instellingen
Hiermee kunt u externe apparaten als smartphones aansluiten
op het product en de inhoud delen of het product bedienen.
Apparaatnaam
Hier kunt u een naam voor het product opgeven. U kunt deze
naam gebruiken om het product te identificeren wanneer u
verbinding probeert te maken met externe Wi-Fi-apparaten
(smartphones, tablets, etc.).
Instellingen BD-Live
Hiermee kunt u een internetverbinding voor de service BD-Live
toestaan, beperken of verbieden.
HT-E5200_XU_NL_0223.indd 26HT-E5200_XU_NL_0223.indd 26 2012-02-23 오후 2:37:082012-02-23 오후 2:37:08

Nederlands 27 |
04Instellingen
Systeem Begininstelling Hiermee voor u de procedure voor het configureren van de
initiële instellingen uit. Zie pagina 21 voor meer informatie.
Apparaatbeheer
U kunt een draadloos USB-toetsenbord of draadloze USB-
muis aansluiten op de USB-poort aan de voorzijde van het
product.
Toetsenbordinstell.: hiermee kunt u een draadloos
toetsenbord configureren dat op het product is aangesloten.
| OPMERKING | � U kunt het toetsenbord alleen gebruiken wanneer er een QWERTY-
toetsenscherm of -venster wordt weergegeven in de webbrowser.
Muisinstellingen: hiermee kunt u een draadloze USB-muis
configureren die op het product is aangesloten. U kunt de
muis op dezelfde manier als op uw computer gebruiken in
het menu van het product.
Een muis in het menu van het product gebruiken:1 . Sluit de USB-muis aan op het product.
2 . Klik op de primaire knop die u voor Muisinstellingen hebt
geselecteerd. Het eenvoudige menu wordt weergegeven.
3 . Klik op de gewenste opties.
| OPMERKING | � Afhankelijk van het USB-model zijn het HID-toetsenbord en de muis
mogelijk niet compatibel met uw product.
� Bepaalde HID-toetsenborden werken mogelijk niet.
� Bedrade USB-toetsenborden worden niet ondersteund.
� Bepaalde toepassingen worden mogelijk niet ondersteund.
� Als een draadloos HID-toetsenbord niet werkt vanwege interferentie,
plaatst u het toetsenbord dichter bij het product.
Anynet+(HDMI-CEC)
Anynet+ is een handige functie waarmee u dit apparaat kunt
koppelen aan andere Samsung-producten met de Anynet+-
functie en kunt bedienen met de afstandsbediening voor uw
Samsung-tv.
Als u deze functie wilt gebruiken, moet u dit product met een
HDMI-kabel aansluiten op een Anynet+ Samsung-tv.
Taalkeuze
U kunt de taal selecteren waarin u onder meer het
schermmenu, discmenu en de ondertiteling wilt weergeven.
• De taal die u selecteert voor het discmenu, de audio of de
ondertiteling wordt alleen weergegeven als de disc hier
ondersteuning voor biedt.
HT-E5200_XU_NL_0223.indd 27HT-E5200_XU_NL_0223.indd 27 2012-02-23 오후 2:37:102012-02-23 오후 2:37:10

| 28 Nederlands
Instellingen
Beveiliging
De standaardpincode is 0000. Geef de standaardpincode
op om de beveiligingsfunctie te openen als u nog geen eigen
wachtwoord hebt opgegeven.
Filmkeuring BD: hiermee voorkomt u dat Blu-ray-discs die
zijn goedgekeurd voor een bepaalde leeftijdscategorie die u
hebt opgegeven, kan worden afgespeeld zonder pincode.
Filmkeuring dvd: hiermee voorkomt u dat dvd's met een
door u geselecteerde beoordeling boven een bepaalde
numerieke waarde, kan worden afgespeeld zonder pincode.
PIN wijzigen: hiermee wijzigt u de 4-cijferige toegangscode
voor toegang tot de beveiligingsfuncties.
Indien u de pincode vergeet:1 . Verwijder eventuele discs of USB-opslagapparaten.
2 . Houd de toets 5 op het voorpaneel minstens 5
seconden ingedrukt.
Alle instellingen zullen worden teruggezet naar de
fabrieksinstellingen.
| OPMERKING | � Bij het terugzetten van de fabrieksinstellingen worden alle voor de
gebruiker opgeslagen BD-gegevens verwijderd.
Algemeen
U kunt de helderheid van het display en de tijdzone opgeven.
Front paneel: hiermee kunt u de helderheid van het
voorpaneel wijzigen.
Tijdzone: hiermee kunt u de tijdzone opgeven voor uw regio.
Transp. menu: hiermee past u de transparantie van het
menuvak aan.
DivX® Video On Demand
De DivX® VOD-registratiecode weergeven om DivX® VOD-
inhoud te kopen en af te spelen.
Ondersteuning Software-update
Voor meer informatie over de functie Software-update zie het
gedeelte 'Software upgraden' op pagina 33.
Contact opnemen met
SamsungBiedt contactgegevens voor ondersteuning voor uw product.
Extern beheer
Wanneer deze functie is ingeschakeld, kan het callcenter van
Samsung op afstand problemen met het product vaststellen
en oplossen. Hier voor is een actieve internetverbinding
vereist. De service Extern beheer is mogelijk niet in alle landen
beschikbaar.
ResetAlle instellingen worden teruggezet naar de standaardwaarden,
behalve de netwerkinstellingen en de Smart Hub-instellingen.
Het standaardwachtwoord is 0000.
HT-E5200_XU_NL_0223.indd 28HT-E5200_XU_NL_0223.indd 28 2012-02-23 오후 2:37:112012-02-23 오후 2:37:11

Nederlands 29 |
04Instellingen
Netwerken en internet
Wanneer u dit product op een netwerk aansluit,
kunt u netwerktoepassingen en -functies
gebruiken zoals Smart Hub en BD-LIVE, en
de software van het product upgraden via de
netwerkverbinding. Meer informatie over de
toegang tot en het gebruik van internetservices
vindt u in het hoofdstuk Netwerkservices van
deze handleiding op pagina 51-53. De instructies
voor de configuratie van de netwerkverbinding
beginnen hieronder.
Uw netwerkverbinding configurerenNeem voor u begint contact op met uw
internetprovider om te achterhalen of uw IP-
adres statisch of dynamisch is. Als het dynamisch
is en u een bedrade of draadloze verbinding
gebruikt, raden we u aan de hieronder beschreven
automatische procedures te gebruiken.
Indien u verbinding maakt met een bedraad
netwerk, verbindt u het product met uw
router via een LAN-kabel voordat u met de
configuratieprocedure begint.
Indien u verbinding maakt met een draadloos
netwerk, moet u eventuele verbindingen met een
bedraad netwerk loskoppelen voordat u begin.
Om te beginnen met de configuratie van uw
netwerkverbinding, volgt u deze stappen:
1 . Selecteer in het startscherm Instellingen en
druk vervolgens op E.
2 . Selecteer Netwerk en druk vervolgens op
E.
3 . Selecteer Netwerkinstellingen en druk
vervolgens op E.
4 . Ga naar de onderstaande instructies voor
bedrade netwerken of de instructies voor
draadloze netwerken vanaf pagina 30.
Bedraad netwerk
� Bedraad - Automatisch
Nadat u stap 1 tot 3 hierboven hebt gevolgd:
1 . Selecteer Start in het scherm
Netwerkinstellingen en druk vervolgens op
E. Het product detecteert de bedrade
verbinding, controleert de netwerkverbinding
en maakt vervolgens verbinding met het
netwerk.
� Bedraad - HandmatigAls u een statisch IP-adres hebt of de automatische
procedure niet werkt, moet u de waarden voor de
netwerkinstellingen handmatig instellen.
Nadat u stap 1 tot 3 hierboven hebt gevolgd:
1 . Selecteer Start in het scherm Netwerkinstellingen
en druk vervolgens op E. Het scherm
Netwerkstatus wordt weergegeven. Het product
probeert de netwerkverbinding te controleren en
slaagt daar niet in.
Netwerkinstellingen
Bekabelde netwerkverbinding mislukt.
MAC-adres XX:XX:XX:XX:XX:XXIP-adres 0.0.0.0Subnetmasker 0.0.0.0Gateway 0.0.0.0DNS-server 0.0.0.0
Kan geen verbinding maken met netwerk. Probeer dit: controleer of uw IP-adres juist is ingesteld in IP-instellingen. Neem contact op met uw internetprovider voor meer informatie.
Opnieuw
IP-inst.
Vorige
OK
2 . Selecteer in het startscherm de optie IP-inst. en druk vervolgens op E. Het scherm met IP-
instellingen wordt weergegeven.
3 . Selecteer het veld IP-modus en stel het in op
Handm..4 . Gebruik de cijfertoetsen op uw afstandsbediening
om de netwerkwaarden op te geven. Gebruik de
toetsen ▲▼◄► op de afstandsbediening om
door de invoervelden te bladeren.
| OPMERKING | � U kunt deze waarden opvragen bij uw internetprovider. U kunt
deze waarden ook bekijken op de meeste Windows-computers.
Zie het gedeelte 'De waarden voor de netwerkinstellingen
opvragen' op deze pagina voor meer informatie.
5 . Wanneer u klaar bent, markeert u OK en
drukt u vervolgens op E. Het product
controleert de netwerkverbinding en maakt
vervolgens verbinding met het netwerk.
< De waarden voor de netwerkinstellingen opvragen >U kunt de waarden voor uw netwerkinstellingen
bekijken op de meeste Windows-computers.
Om de waarden voor uw netwerkinstellingen te
bekijken, volgt u deze stappen:
• Windows XP
1 . Klik met de rechtermuisknop op het
netwerkpictogram in de rechterbenedenhoek
van het bureaublad van Windows.
HT-E5200_XU_NL_0223.indd 29HT-E5200_XU_NL_0223.indd 29 2012-02-23 오후 2:37:132012-02-23 오후 2:37:13

| 30 Nederlands
Instellingen2 . Klik op Status in het pop-upmenu.
3 . Klik in het dialoogvenster dat wordt geopend,
op de tab Ondersteuning.
4 . Klik op het tabblad Ondersteuning op de
knop Details.
5 . De netwerkinstellingen worden weergegeven.
• Windows 7
1 . Klik op het netwerkpictogram in de
rechterbenedenhoek van het bureaublad van
Windows.
2 . Klik in het pop-upmenu op Netwerkcentrum
openen.
3 . Klik in het dialoogvenster dat wordt
weergegeven, op de LAN-verbinding of
draadloze netwerkverbinding, afhankelijk van
uw netwerkverbinding.
4 . Klik op het tabblad Ondersteuning op de
knop Details.
De netwerkinstellingen worden weergegeven.
| OPMERKING | � De informatie kan verschillen, afhankelijk van uw versie
van Windows.
Draadloos netwerkU kunt het draadloze netwerk op drie manieren
instellen:
- Draadloos automatisch
- Draadloos handmatig
- WPS(PBC)
Wanneer u de draadloze netwerkverbinding
configureert, zal de verbinding met eventuele
draadloze netwerkapparaten die momenteel
via het product zijn aangesloten, of, indien van
toepassing, de huidige bedrade verbinding van
het product, worden verbroken.
� Draadloos (Algemeen) - AutomatischNadat u stap 1 tot 3 in het gedeelte 'Uw
netwerkverbinding configureren' op pagina 29
hebt gevolgd.
1 . Selecteer Start in het scherm
Netwerkinstellingen en druk vervolgens
op E. Het product zoekt vervolgens de
beschikbare netwerken en geeft er een lijst
van weer.
Netwerkinstellingen
Vernieuwen
WPS(PBC)
Vorige
Volgende
Annuleren
Selecteer uw draadloze router in de lijst.1/10
ELT
JSY
KT_WLAN_C361
Mirhenge_edu
SO070VOIP
iptime23
2 . Selecteer het gewenste netwerk en druk
vervolgens op E.
3 . Selecteer Volgende en druk vervolgens
nogmaals op E.
4 . Geef in het scherm Beveiliging de
beveiligingscode of het wachtwoord voor uw
netwerk op. Voer cijfers rechtstreeks in met
de cijfertoetsen op de afstandsbediening.
Voer letters in door een letter met een
pijltjesknop te selecteren en op E te
drukken.
5 . Wanneer u klaar bent, selecteert u Volgende
aan de rechterzijde van het scherm. Het
product controleert de netwerkverbinding
en maakt vervolgens verbinding met het
netwerk.
| OPMERKING | � U vindt de beveiligingscode of het wachtwoord op een
van de installatieschermen die u hebt gebruikt voor het
instellen van uw router of modem.
� Draadloos (Algemeen) - HandmatigAls u een statisch IP-adres hebt of de
automatische procedure niet werkt, moet u de
waarden voor de netwerkinstellingen handmatig
instellen.
Nadat u stap 1 tot 3 in het gedeelte 'Uw
netwerkverbinding configureren' op pagina 29
hebt gevolgd.
1 . Selecteer Start in het scherm
Netwerkinstellingen en druk vervolgens op E.
Het product zoekt vervolgens de beschikbare
netwerken en geeft er een lijst van weer.
2 . Selecteer het gewenste netwerk of Netwerk toevoegen druk vervolgens op E.
3 . Selecteer Volgende en druk vervolgens
nogmaals op E.
HT-E5200_XU_NL_0223.indd 30HT-E5200_XU_NL_0223.indd 30 2012-02-23 오후 2:37:152012-02-23 오후 2:37:15

Nederlands 31 |
04Instellingen
4 . Als u Netwerk toevoegen selecteert, geeft
u de naam van uw draadloze router op om
verbinding te maken. Voer cijfers rechtstreeks in
met de cijfertoetsen op de afstandsbediening.
Voer letters in door een letter met de toetsen
▲▼◄► te selecteren en op E te drukken.
Selecteer Volgende en druk vervolgens
nogmaals op E. U kunt een type beveiliging
kiezen en vervolgen Volgende selecteren en
nogmaals op E drukken.
5 . Geef in het scherm Beveiliging de
beveiligingscode of het wachtwoord voor uw
netwerk op. Voer cijfers rechtstreeks in met
de cijfertoetsen op de afstandsbediening.
Voer letters in door een letter met de toetsen
▲▼◄► te selecteren en op E te drukken.
6 . Wanneer u klaar bent, selecteert u Volgende
aan de rechterkant van het scherm en drukt u
op E.
7 . Het scherm Netwerkstatus wordt weergegeven.
Het product probeert de netwerkverbinding te
controleren en slaagt daar niet in.
8 . Selecteer rechtst op het scherm IP-inst. en druk vervolgens op E. Het scherm IP-
instellingen wordt weergegeven.
9 . Selecteer het veld IP-modus en stel het in op
Handm..10 . Gebruik de cijfertoetsen op uw
afstandsbediening om de netwerkwaarden op
te geven. Gebruik de toetsen ▲▼◄► op de
afstandsbediening om door de invoervelden te
bladeren.
| OPMERKING | � U kunt deze waarden opvragen bij uw internetprovider. U
kunt deze waarden ook bekijken op de meeste Windows-
computers. Zie het gedeelte 'De waarden voor de
netwerkinstellingen opvragen' op pagina 29 voor meer
informatie.
11 . Wanneer u klaar bent, markeert u OK en drukt
u vervolgens op E. Het scherm Netwerkstatus
wordt weergegeven. Het product controleert
de netwerkverbinding en maakt vervolgens
verbinding met het netwerk. Wanneer u klaar
bent, markeert u OK en drukt u vervolgens op
E.
� WPS(PBC)Een van de eenvoudigste manieren om de
draadloze netwerkverbinding in te stellen is met
de functie WPS(PBC). Als uw draadloze router
is voorzien van de toets WPS(PBC), voert u de
volgende stappen uit:
1 . Open het startscherm.
2 . Druk op de BLAUWE (D) toets van uw
afstandsbediening.
3 . Druk binnen twee minuten op de toets
WPS(PBC) op uw router. De benodigde
netwerkinstellingen voor uw product worden
automatisch geconfigureerd en er wordt
automatisch verbinding met het netwerk
gemaakt.
Het scherm Netwerkstatus wordt
weergegeven. Het product maakt een
verbinding met het netwerk nadat de
netwerkverbinding is geverifieerd.
Wi-Fi DirectMet de functie Wi-Fi Direct kunt u Wi-Fi Direct-
apparaten met het product en elkaar verbinden via
een peer-to-peer-netwerk, zonder een draadloze
router.
1 . Schakel het Wi Fi Direct-apparaat in en activeer
de Wi-Fi Direct-functie van het apparaat.
2 . Selecteer in het startscherm Instellingen en
druk vervolgens op E.
3 . Selecteer Netwerk en druk vervolgens op E.
4 . Selecteer Wi-Fi Direct en druk vervolgens op
E.
De Wi-Fi Direct-apparaten die u kunt verbinden,
verschijnen.
Display
Audio
Network
System
Support
Wi-Fi DirectApparaatnaam : [HTS]E5200Sel. Wi-Fi Direct-app. waarmee u verb. wilt maken.
AndroidXXXXXXX Verbinding verbroken
Sluiten
Vernieuwen
m Verpl. " Enter ' Terug
5 . Er zijn drie manieren om de Wi-Fi-verbinding
te maken:
• Via het Wi-Fi-apparaat.
• Via het product met behulp van PBC.
• Via het product met behulp van een
pincode.
Hieronder worden de verschillende methoden
uitgelegd.
HT-E5200_XU_NL_0223.indd 31HT-E5200_XU_NL_0223.indd 31 2012-02-23 오후 2:37:162012-02-23 오후 2:37:16

| 32 Nederlands
InstellingenVia het Wi-Fi-apparaat1 . Volg de procedure op het Wi-Fi-apparaat
om verbinding te maken met een ander
Wi-Fi Direct-apparaat. Raadpleeg de
gebruikershandleiding van het apparaat voor
instructies.
2 . Wanneer u de procedure hebt voltooid, moet
er een pop-up op uw tv-scherm verschijnen
met het bericht dat een apparaat met
ondersteuning voor Wi-Fi Direct om een
verbinding heeft verzocht. Selecteer OK en
druk vervolgens op E om te accepteren.
3 . Het pop-upvenster Verb. maken verschijnt,
gevolgd door de pop-up Verbonden.
Wanneer het pop-upvenster is gesloten, moet
het apparaat in de lijst van het Wi-Fi Direct-
scherm worden weergegeven als verbonden.
Via het product met behulp van PBC1 . Selecteer het Wi-Fi Direct-apparaat dat u met
dit product wilt verbinden en druk vervolgens
op E. De pop-up PBC/PIN verschijnt.
2 . Selecteer PBC en druk vervolgens op E.
De pop-up PBC verschijnt.
3 . Druk binnen de 2 minuten op de knop PBC
op het Wi-Fi Direct-apparaat.
4 . Het pop-upvenster Verb. maken verschijnt,
gevolgd door de pop-up Verbonden.
Wanneer het pop-upvenster is gesloten, moet
het apparaat in de lijst van het Wi-Fi Direct-
scherm worden weergegeven als verbonden.
Via het product met behulp van een pincode1 . Selecteer het Wi-Fi Direct-apparaat dat u met
dit product wilt verbinden en druk vervolgens
op E. De pop-up PBC/PIN verschijnt.
2 . Selecteer PIN en druk vervolgens op E.
De pop-up PIN verschijnt.
3 . Noteer de pincode in het pop-upvenster
en geef deze op in het daarvoor bestemde
veld van het Wi-Fi Direct-apparaat dat u wilt
verbinden.
4 . Het pop-upvenster Verb. maken verschijnt,
gevolgd door de pop-up Verbonden.
Wanneer het pop-upvenster is gesloten, moet
het apparaat in de lijst van het Wi-Fi Direct-
scherm worden weergegeven als verbonden.
| OPMERKING | � De bedrade of draadloze verbinding wordt verbroken
wanneer u de functie Wi-Fi Direct gebruikt.
Soft APMet Soft AP kunt u andere Wi-Fi-apparaten via
het product aansluiten op uw netwerk, zodat ze
toegang hebben tot internet.
U moet hiervoor een beveiligingssleutel maken die
u voor de andere Wi-Fi-apparaten moet opgeven
wanneer u ze op het netwerk aansluit.
1 . Selecteer in het startscherm Instellingen en
druk vervolgens op E.
2 . Selecteer Netwerk en druk vervolgens op
E.
3 . Selecteer Soft AP en druk vervolgens op E.
4 . Selecteer Aan of Uit en druk vervolgens op
E.
< De beveiligingscode van Soft AP instellen >1 . Selecteer in het scherm Soft AP de optie
Beveilig.code en druk vervolgens op
E. Het scherm Beveilig.code wordt
weergegeven.
2 . Geef in het scherm Beveilig.code
een beveiligingscode op. Voer cijfers
rechtstreeks in met de cijfertoetsen op de
afstandsbediening. Voer letters in door een
letter met de toetsen ▲▼◄► te selecteren
en op E te drukken.
3 . Wanneer u klaar bent, gebruikt u de toetsen
▲▼◄► om naar GEREED onder aan het
scherm te gaan en drukt u op E.
Wanneer u een Wi-Fi-apparaat aansluit via de
verbindingsprocedure op het apparaat, geeft u in
het hiervoor bestemde veld de beveiligingscode
op die u hebt gemaakt.
AllShare-instellingenIn het scherm AllShare-instellingen wordt een lijst
weergegeven met de AllShare-apparaten en de
bijbehorende IP-adressen die met het netwerk zijn
verbonden. Via dit scherm kunt u een apparaat
toegang geven tot het product, de toegang
weigeren, of het apparaat uit de AllShare-lijst
verwijderen.
1 . Selecteer in het startscherm Instellingen en
druk vervolgens op E.
2 . Selecteer Netwerk en druk vervolgens op
E.
HT-E5200_XU_NL_0223.indd 32HT-E5200_XU_NL_0223.indd 32 2012-02-23 오후 2:37:262012-02-23 오후 2:37:26

Nederlands 33 |
04Instellingen
3 . Selecteer AllShare-instellingen en druk
vervolgens op E.
4 . Selecteer een apparaat en druk vervolgens
op E. Het pop-upvenster AllShare-
instellingen verschijnt.
5 . Selecteer Toestn, Weiger of Verwijderen in
de lijst en druk vervolgens op E.
Op het scherm AllShare-instellingen worden
alleen apparaten weergegeven indien u
netwerkverbindingen met AllShare-apparaten hebt
gelegd. Zie pagina 35-36 voor meer informatie
over AllShare-apparaten in het netwerk.
Software upgraden
In het menu Software-update kunt de software
van het product upgraden om de prestaties te
verbeteren of extra services toe te voegen.
• Schakel het product nooit handmatig in of uit tijdens
het updateproces.
1 . Selecteer in het startmenu Instellingen en
druk vervolgens op E.
2 . Selecteer Ondersteuning en druk vervolgens
op E.
3 . Selecteer Software-update en druk
vervolgens op E.
4 . Kies een van de volgende methoden:
• Online• Via USB• Op schijf• Via download• Upgrade standby-modus
5 . Druk op de toets E.
Hieronder volgen de aanwijzingen voor elke
methode.
| OPMERKING | � De upgrade is voltooid wanneer het product zichzelf
automatisch uitschakelt en vervolgens weer inschakelt.
� Samsung Electronics accepteert geen aansprakelijkheid
voor storingen aan het product die worden veroorzaakt
door een instabiele internetverbinding of nalatig handelen
van een consument tijdens het uitvoeren van een
software-update.
� Als u de upgrade tijdens het downloaden van de
upgradesoftware wilt annuleren, drukt u op E.
OnlineHet product moet verbonden zijn met internet om
de functie Online te kunnen gebruiken.
1 . Selecteer Online, en druk vervolgens op E.
Er wordt een bericht weergegeven dat er
verbinding met de server wordt gemaakt.
2 . Als een download beschikbaar is, verschijnt
het downloadvenster met een voortgangsbalk
en begint het downloaden.
3 . Wanneer het downloaden is voltooid,
verschijnt er een upgradevenster met drie
opties: Nu bijwerken, Later bijwerken of
Niet bijwerken.
4 . Als u Nu bijwerken selecteert, wordt de
software bijgewerkt en wordt de speler
automatisch uit- en ingeschakeld.
5 . Als u niet binnen een minuut een keuze
maakt of Later bijwerken selecteert, slaat
de speler de nieuwe upgradesoftware op. U
kunt de software dan later bijwerken met de
functie Via download.
6 . Als u Niet bijwerken selecteert, annuleert het
product de upgrade.
By USB
1 . Ga naar www.samsung.com.
2 . Klik rechtsboven aan de pagina op
SUPPORT.
3 . Geef in het zoekveld het modelnummer van
het product op en klik vervolgens op Find Product.
4 . Klik in het midden van de pagina, onder de
koptekst Downloads, op Get downloads.
5 . Klik op Firmware op het midden van de
pagina.
6 . Klik op het ZIP-pictogram in de kolom
Bestand rechts op de pagina.
7 . Klik in het pop-upvenster dat wordt
weergegeven op OK om het firmwarebestand
te downloaden naar uw pc en op te slaan.
8 . Decomprimeer het zip-bestand op uw
computer. Als het goed is, hebt u nu een map
met dezelfde naam als het zip-bestand.
9 . Kopieer de map naar een USB-flashstation.
10 . Controleer of de disclade leeg is en plaats
vervolgens het USB-flashstation in de USB-
poort van het product.
HT-E5200_XU_NL_0223.indd 33HT-E5200_XU_NL_0223.indd 33 2012-02-23 오후 2:37:272012-02-23 오후 2:37:27

| 34 Nederlands
Instellingen11 . Ga in het menu van het product naar
Instellingen > Ondersteuning > Software-update.
12 . Selecteer Via USB.
| OPMERKING | � Tijdens het bijwerken van de software via de USB-
aansluiting mag er geen disc in het apparaat zijn
geplaatst.
� Wanneer de software-update is voltooid, controleert u de
software-informatie in het menu Software-update.
� Schakel het product niet uit tijdens de software-update.
Dit kan de werking van het product kunnen verstoren.
� Software-updates via de USB-hostaansluiting
kunnen alleen worden uitgevoerd met een USB-
flashgeheugenstick.
Op schijf
1 . Ga naar www.samsung.com.
2 . Klik rechtsboven aan de pagina op
SUPPORT.
3 . Geef in het zoekveld het modelnummer van
het product op en klik vervolgens op Find Product.
4 . Klik in het midden van de pagina, onder de
koptekst Downloads, op Get downloads.
5 . Klik op Firmware op het midden van de
pagina.
6 . Klik op het ZIP-pictogram in de kolom
Bestand rechts op de pagina.
7 . Klik in het pop-upvenster dat wordt
weergegeven op OK om het firmwarebestand
te downloaden naar uw pc en op te slaan.
8 . Decomprimeer het zip-bestand op uw
computer. U zou één RUF-bestand moeten
hebben.
9 . Schrijf het RUF-bestand op een disc. We
raden aan een CD-R of DVD-R te gebruiken.
10 . Sluit de disc af voordat u deze uit de
computer neemt.
11 . Plaats de disc in het product.
12 . Ga in het menu van het product naar
Instellingen > Ondersteuning > Software-update.
13 . Selecteer Op schijf.| OPMERKING |
� Wanneer de upgrade van het systeem is voltooid,
controleert u de software-informatie in het menu
Software-update.
� Schakel het product niet uit tijdens de software-update.
Dit kan de werking van het product kunnen verstoren.
Via downloadMet de optie Via download kunt u de upgrade
uitvoeren met een bestand dat het product
eerder heeft gedownload maar dat niet meteen is
geïnstalleerd.
1 . Als er upgradesoftware is gedownload, wordt
rechts naast Via download het versienummer
van de software weergegeven.
2 . Selecteer Via download en druk vervolgens
op E.
3 . Het product toont een bericht om te vragen
of u de upgrade wilt uitvoeren. Selecteer Ja.
De upgrade wordt gestart.
4 . Wanneer de upgrade is voltooid, schakelt het
product zichzelf automatisch uit en weer in.
| OPMERKING | � Wanneer de upgrade van het systeem is voltooid,
controleert u de software-informatie in het menu
Software-update.
� Schakel het product niet uit tijdens de software-update.
Dit kan de werking van het product kunnen verstoren.
Upgrade standby-modusU kunt de functie Upgrade in stand-bymodus
zodanig instellen dat het product nieuwe
upgradesoftware downloadt terwijl dit in de stand-
bystand staat.
In de stand-bymodus staat het product uit, maar
is de internetverbinding wel actief. Op deze manier
kan het product de upgradesoftware automatisch
downloaden op het moment dat u het product
niet gebruikt.
1 . Druk op ▲▼ om Upgrade standby-modus
te selecteren en druk op E.
2 . Selecteer Aan of Uit.Als u Aan selecteert, downloadt het product
de nieuwe upgradesoftware automatisch
wanneer het in de stand-bymodus staat.
Als er nieuwe upgradesoftware wordt
gedownload, vraagt het product of u deze wilt
installeren wanneer u het product inschakelt.
| OPMERKING | � Het product moet zijn verbonden met internet om de
functie Upgrade in stand-bymodus te kunnen gebruiken.
� Als deze functie niet wordt weergegeven, kunt u een
upgrade uitvoeren naar de nieuwste software en de
functie gebruiken.
HT-E5200_XU_NL_0223.indd 34HT-E5200_XU_NL_0223.indd 34 2012-02-23 오후 2:37:292012-02-23 오후 2:37:29

Nederlands 35 |
05M
edia Afspelen
Uw Blu-ray-speler kan via de functie AllShare
inhoud op discs en USB-apparaten afspelen en
de inhoud die zich op uw pc, DNLA-compatibel
mobiele telefoon of NAS bevindt. Zie pagina 38
voor meer informatie over AllShare Play.
Het scherm AllShare Play
Als u het scherm AllShare Play wilt openen,
selecteert in het hoofdscherm het AllShare Play-
pictogram en drukt u op E.
Het scherm AllShare Play gebruiken
Lijst
Video's
Foto's
Muziek
a Aanmelden ' Terug
Laatste spel
Nieuw Pas bijgewerkt 09.Jan.2012
Afspeellst Geen afspeellijsten gemaakt.
Afspeellijst maken voor snelle, eenvoudige toegang tot uw inhoud.
Recent afgespeelde bestanden worden hier weergeg.
Meer weer...
SAM_0001 SAM_0002 SAM_0003 SAM_0004 SAM_0005
AllShare Play / Lijst /
Wanneer het scherm AllShare Play verschijnt,
wordt Lijst en links een lijst met inhoudtypen
weergegeven - video's, foto's en muziek. De
inhoud in Lijst wordt standaard aan de rechterkant
weergegeven: een lijst met onlangs afgespeelde
of weergegeven items, een lijst met de nieuwste
items die u hebt weergegeven of afgespeeld en uw
meest recente afspeellijst. Als u nog nooit items
hebt afgespeeld of weergegeven of nog nooit een
afspeellijst hebt gemaakt, is dit gedeelte leeg.
� Item in Lijst afspelen
Als u de items wilt afspelen die worden
weergegeven in Lijst, moet de bron met de
items op het product hebben aangesloten of in
het product hebben geplaatst. Als de onlangs
weergegeven foto's in Lijst bijvoorbeeld op een
dvd staan, moet u de dvd in het product plaatsen
om de foto's weer te geven.
Als u items in Lijst wilt afspelen of weergeven,
voert u een van de onderstaande acties uit:
• Gebruik de toetsen◄► om een item te
selecteren dat u wilt weergeven of afspelen.
Druk vervolgens op E. Als u een ander item
wilt weergeven of afspelen, drukt u op de toets
RETURN (') en herhaalt u het proces dat in de
eerste zin wordt beschreven.
• Gebruik de toetsen ◄► om een item te
selecteren, druk op de toets TOOLS om het
menu Tools weer te geven, selecteer Afspln en
druk vervolgens op E. Als u een ander item
wilt weergeven of afspelen, drukt u op de toets
RETURN (') en herhaalt u het proces dat in de
eerste zin wordt beschreven.
� Video's, foto's of muziek weergeven1 . Zorg ervoor dat de bron van de inhoud die u
wilt afspelen of weergeven, is aangesloten op
het product of in het product is geplaatst.
2 . Gebruik de toetsen ▲▼ om de Video's,
Foto's of Muziek, te selecteren en druk
vervolgens op E. Aan de rechterkant wordt
de eerste bronselectie gemarkeerd.
3 . Gebruik de toetsen ▲▼ om de bron van de
inhoud te selecteren en druk vervolgens op
E.
| OPMERKING | � De bronnen die voor elk type inhoud worden
weergegeven, kunnen verschillen.
4 . Voor het afspelen van video's, foto's of
muziek zie:
• Bedieningselementen voor het afspelen van
video op pagina 40.
• Bedieningselementen voor het afspelen van
muziek op pagina 42.
• Het menu Tools gebruiken wanneer een
bestand is gemarkeerd op pagina 45-47.
| OPMERKING | � De serie schermen die wordt weergegeven voor het
afspelen, kan verschillen. Dit is afhankelijk van hoe en
wanneer u een inhoudsbron aansluit en van het type
inhoud. Voor alternatieve afspeelmethode zie:
• Bestanden afspelen op een USB-opslagapparaat of
iPod/iPhone op pagina 36.
• Commerciële videodiscs afspelen op pagina 37.
• Commerciële audiodiscs afspelen op pagina 37.
• Een disc met door de gebruiker opgenomen inhoud
afspelen op pagina 38.
Media Afspelen
HT-E5200_XU_NL_0223.indd 35HT-E5200_XU_NL_0223.indd 35 2012-02-23 오후 2:37:332012-02-23 오후 2:37:33

| 36 Nederlands
Media AfspelenBestanden afspelen op een USB-
opslagapparaat of iPod/iPhone
U kunt multimediabestanden afspelen die zich op
een aangesloten USB-opslagapparaat bevinden.
1 . Sluit een USB-opslagapparaat of een iPod/
iPhone aan als het product is uitgeschakeld.
2 . Schakel het product in. Gebruik de toetsen
▲▼ om AllShare Play > Video's, Foto's of
Muziek > Verbonden apparaat te selecteren
en druk vervolgens op E.
Smart Hub Functie Instellingen
� USB veilig verw. d WPS(PBC)
Video's, foto's of muziek afspelen vanaf een schijf of aangesloten apparaten.
AllShare Play
OF1-1. Schakel het product in en sluit een USB-
opslagapparaat of een iPod/iPhone aan.
2-1. Wanneer het onderstaande scherm wordt
weergegeven, gebruikt u de toetsen ▲▼ om
een item te selecteren dat u wilt weergeven
of afspelen. Druk vervolgens op E.
Smart Hub Functie Instellingen
� USB veilig verw. d WPS(PBC)
Video's, foto's of muziek afspelen vanaf een schijf of aangesloten apparaten.
AllShare Play
Smart Hub Functie Instellingen
� USB veilig verw. d WPS(PBC)
Video's, foto's of muziek afspelen vanaf een schijf of aangesloten AllShare Play
b Functie
o's of muziek afspelen vanaf een schijf ofapparaten.
AllShare Play
b Functie I
f toAllShare Play
Nw. app. aangesl.USB DISK
" Enter ' Terug
Video's
Foto's
Muziek
| OPMERKING | � Hoewel het product alle beschikbare mappen weergeeft,
worden alleen de bestanden weergegeven van het
inhoudstype dat u in stap 2 of 2-1 hebt geselecteerd. Als u
bijvoorbeeld muziek hebt geselecteerd, worden er alleen
muziekbestanden weergegeven. U kunt deze selectie
wijzigen met AllShare Play.
3 . Het soort inhoud dat u op het aangesloten
apparaat hebt geselecteerd, wordt
weergegeven. Afhankelijk van hoe de inhoud
is geordend, worden er mappen, afzonderlijke
bestanden of mappen en bestanden
weergegeven.
4 . Gebruik de toetsen ▲▼◄► op uw
afstandsbediening om de gewenste inhoud
te selecteren. Als u een map wilt openen,
selecteert u de map en drukt u op E.
Als u een bestand wilt afspelen, selecteert u
het bestand en drukt u op E.
5 . Druk op de toets RETURN (') om een
map te sluiten of om terug te keren naar het
hoofdscherm.
| LET OP | � U kunt alleen een video afspelen wanneer u de iPod-dock
gebruikt.
| OPMERKING | � Om mogelijke schade aan het USB-geheugen te
voorkomen, moet u het USB-opslagapparaat op veilige
wijze verwijderen door de functie 'USB veilig verw.' uit te
voeren. Druk op HOME om naar het menu Home te gaan.
Druk vervolgens op de GELE (C) toets en op E.
� Het menu Foto's ondersteunt geen iPads of iPhones.
� Alleen het afspeelscherm wordt op de tv weergegeven.
Andere iPod-schermen op de iPod weergeven.
� Als de aangesloten iPod het afspelen van video's niet
ondersteunt, wordt het bericht "Videobestanden afspelen wordt niet ondersteund op dit model iPod." weergegeven
als u het menu Video selecteert.
iPod-/iPhone-modellen die u bij dit
product kunt gebruiken
iPod touch 3e/2e/1e generatieiPod classic / iPod met videoiPod met dockconnectoriPod met klikwieliPod nano 5e/4e/3e/2e generatieiPhone 4S / iPhone 4iPhone 3GS / iPhone 3G / iPhone
HT-E5200_XU_NL_0223.indd 36HT-E5200_XU_NL_0223.indd 36 2012-02-23 오후 2:37:402012-02-23 오후 2:37:40

Nederlands 37 |
05M
edia Afspelen
Het scherm Functie
In het scherm Functie kunt u de audio- en/of
video-ingangsbron selecteren die u wilt weergeven
of waarnaar u wilt luisteren.
| OPMERKING | � U kunt de bron ook wijzigen door op de toets Function
rechtsboven op de afstandsbediening te drukken.
Als u het scherm Functie wilt openen, selecteert in het
hoofdscherm het Function-pictogram en drukt u op E.
Opties in het scherm FunctieAls u een optie wilt selecteren, gebruikt u de toetsen
▲▼ om de gewenste optie te markeren en drukt u
vervolgens op E.
Digitaal inSelecteer deze optie om naar de digitale
audiobron te luisteren die is aangesloten
op de ingang Digital Audio In.
AUXSelecteer deze optie om het geluid van
de analoge audiobron weer te geven die
is aangesloten op de ingang Audio In.
Remote iPodSelecteer dit om naar muziek te luisteren
of naar video's te kijken die zich op de
iPod bevinden die is aangesloten op de
iPod-aansluiting.
HDMI IN 1Selecteer deze optie om video weer te
geven van het apparaat dat is aangesloten
op de ingang HDMI INGANG 1.
HDMI IN 2Selecteer deze optie om video weer te
geven van het apparaat dat is aangesloten
op de ingang HDMI INGANG 2.
Tuner Selecteer deze optie om naar de FM-
radio te luisteren.
Bluetooth Selecteer deze optie om naar de muziek
op het Bluetooth-apparaat te luisteren.
Commerciële videodiscs afspelen
1 . Plaats een schijf in de schijflade met het
etiket van de schijf naar boven en sluit
de lade vervolgens. Het afspelen begint
automatisch. Als de disc niet automatisch
wordt afgespeeld, drukt u op de toets 6 of uw afstandsbediening of selecteert u in
het hoofdscherm de optie AllShare Play en
drukt u op E. Zie 'Video's, foto's of muziek
weergeven' op pagina 35.
Commerciële audiodiscs afspelen
1 . Plaats een vooraf opgenomen in de handel
verkrijgbare audioschijf in de schijflade met het
etiket van de schijf naar boven en sluit de lade
vervolgens. Het scherm AllShare Play Music
wordt weergegeven. Dit scherm bevat een
overzicht met de nummers. Het eerste nummer
wordt automatisch afgespeeld.
AllShare Play / Muziek / Audio-cd 1 / 17
00:00 / 03:59
b� Pg. verpl. / Tools ' Terug
TRACK 001 ٭
► TRACK 001 03:59
TRACK 002 04:34
TRACK 003 04:24
TRACK 004 04:01
TRACK 005 04:26
TRACK 006 05:07
TRACK 007 04:47
TRACK 008 03:59
TRACK 009 04:34
TRACK 010 04:02
TRACK 002 04:34TRACK 002 04 34► TRACK 001 03:59
2 . Als u een bepaald nummer wilt afspelen,
gebruikt u de toetsen ▲▼ op de
afstandsbediening om het nummer te selecteren
en drukt u vervolgens op E.
� Bedieningselementen in het muziekscherm
Een nummer onderbreken.
Een nummer afspelen.
Eén nummer of alle nummers
herhalen.
Nummers in willekeurig volgorde
afspelen.
De equalizer weergeven.
De equalizer handmatig aanpassen.
(Alleen wanneer de equalizermodus
is ingeschakeld.)
| OPMERKING | � De bedieningselementen in het muziekscherm zijn alleen
beschikbaar wanneer er een nummer wordt afgespeeld.
� De bedieningselementen worden niet allemaal tegelijkertijd
weergegeven.
� Zie het gedeelte 'Bedieningselementen voor het afspelen van
muziek' op pagina 42 voor meer informatie.
HT-E5200_XU_NL_0223.indd 37HT-E5200_XU_NL_0223.indd 37 2012-02-23 오후 2:37:532012-02-23 오후 2:37:53

| 38 Nederlands
Media AfspelenEen disc met door de gebruiker
opgenomen inhoud afspelen
U kunt multimediabestanden afspelen die u hebt
opgenomen op een dvd of cd.
1 . Plaats een door de gebruiker opgenomen
schijf in de schijflade met het etiket van de
schijf naar boven en sluit de lade vervolgens.
Het pop-upvenster Apparaat aangesloten
wordt weergegeven.
2 . Gebruik de toetsen ▲▼ om het type inhoud
te selecteren dat u wilt weergeven of afspelen,
Video's, Foto's of Muziek, druk op E.
| OPMERKING | � Hoewel het product mappen voor alle typen inhoud
weergeeft, worden er alleen bestanden weergegeven met
het type inhoud dat u in Stap 2 hebt geselecteerd. Als u
bijvoorbeeld muziek hebt geselecteerd, worden er alleen
muziekbestanden weergegeven. U kunt deze selectie
wijzigen met AllShare Play.
3 . Gebruik de toetsen ▲▼◄► om de map te
selecteren met het type inhoud dat u in Stap 2
hebt geselecteerd, en druk vervolgens op E.
4 . Als u de optie Muziek hebt geselecteerd,
verschijnt het scherm AllShare muziek
afspelen en worden de muziekbestanden op
de disc weergegeven. Gebruik de toetsen
▲▼ om het bestand te selecteren dat u wilt
afspelen, en druk vervolgens op E.
5 . Als u de optie Foto's hebt geselecteerd,
wordt het scherm Allshare foto's afspelen
weergegeven en worden de foto's op de
disc weergegeven. Gebruik de toetsen
▲▼◄► om de foto te selecteren die u wilt
weergeven, en druk vervolgens op E.
6 . Als u Video's hebt geselecteerde, wordt
het scherm Allshare video's afspelen
weergegeven en worden de videobestanden
op de disc weergegeven. Gebruik de toetsen
▲▼◄► om de video te selecteren die u wilt
bekijken, en druk vervolgens op E.
| OPMERKING | � U kunt voor de mappen Muziek en Video ook op de toets
TOOLS op de afstandsbediening drukken en vervolgens
Map afspelen selecteren om alle bestanden in de map
automatisch weer te geven of af te spelen. Selecteer de
map voordat u op de toets TOOLS drukt.
� Zie het gedeelte Bedieningselementen voor het afspelen
van muziek op pagina 42 voor meer informatie over het
afspelen van muziek.
� Zie het gedeelte Het menu Tools gebruiken wanneer
een bestand is gemarkeerd op pagina 45-47 voor meer
informatie over het afspelen van foto's.
� Zie het gedeelte Bedieningselementen voor het afspelen
van video op pagina 40 voor meer informatie over het
afspelen van video's.
De AllShare-netwerkfunctie
gebruiken
Met AllShare kunt u via een draadloze
netwerkverbinding video's, foto's of muziek op
uw pc of een DLNA-compatibel apparaat via uw
product afspelen.
De AllShare-software downloadenAls u AllShare in combinatie met uw pc of DLNA-
apparaat wilt gebruiken, moet u de AllShare-
software op uw pc installeren. U kunt de pc-
software en gedetailleerde instructies voor het
gebruik van AllShare downloaden via de website
Samsung.com.
1 . Ga naar www.samsung.com.
2 . Klik boven aan de pagina op Ondersteuning.
3 . Op de pagina Ondersteuning geeft u in het veld
Model Modelnummer het modelnummer van uw
product op.
4 . Op de pagina die verschijnt, klikt u op Vind
downloads aan de linkerzijde onder Downloads.
Het Downloadcentrum verschijnt.
5 . In het Downloadcentrum klikt u op het tabblad
Software.
6 . Op het tabblad Software klikt u op het
bestandspictogram rechts van de AllShare-
regel.
7 . In het pop-upvenster dat verschijnt, klikt u op
Bestand opslaan.
8 . Zoek het installatiebestand van AllShare op uw
schijf en dubbelklik vervolgens op het bestand.
9 . Klik in het pop-upvenster dat verschijnt, op
Uitvoeren en volg de aanwijzingen op het
scherm.
U kunt de installatie-/instructiehandleiding
voor AllShare ook downloaden via het tabblad
Software, door op het bijbehorende PDF-
bestandssymbool in de kolom Bestand aan de
rechterkant te klikken. Het bestand, met een PDF-
indeling, wordt gedownload en geopend. U kunt
het bestand weergeven en/of opslaan.
HT-E5200_XU_NL_0223.indd 38HT-E5200_XU_NL_0223.indd 38 2012-02-23 오후 2:38:022012-02-23 오후 2:38:02

Nederlands 39 |
05M
edia Afspelen
Inhoud op uw pc of DLNA-apparaat afspelen via het product
5V 500mA
AllShare-verbinding
PCProduct
Bestanden van een pc afspelen
1 . Zorg dat het product, uw pc en/of de DLNA-
compatibele mobiele telefoon verbonden zijn
met hetzelfde draadloze netwerk.
2 . Volg de instructies in de installatie-/
instructiehandleiding van AllShare om
de apparaten en bestanden zodanig
te configureren dat ze kunnen worden
afgespeeld of weergegeven.
3 . Selecteer AllShare Play in het startscherm
van het product en druk vervolgens op
E. Het venster AllShare Play wordt
weergegeven.
4 . Selecteer het verbonden DLNA-apparaat en
druk vervolgens op E. Er wordt een lijst met
de beschikbare bestanden weergegeven.
5 . Selecteer het bestand dat u wilt afspelen of
weergeven en druk vervolgens op E.
Het afspelen van inhoud van uw pc beheren met uw smartphone
5V 500mA
AllShare-verbinding
Beheren van de bestand van uw pc naar het product
PC
Smartphone
Product
Bestanden van een pc afspelen
(Alleen beschikbaar met Samsung-telefoons die
de AllShare-functionaliteit ondersteunen.)
1 . Zorg dat het product, uw pc en de DLNA-
compatibele mobiele telefoon verbonden zijn
met hetzelfde draadloze netwerk.
2 . Volg de instructies in de installatie-/
instructiehandleiding van AllShare om
de apparaten en bestanden zodanig
te configureren dat ze kunnen worden
afgespeeld of weergegeven.
3 . Gebruik de AllShare-software op uw
computer om te bevestigen dat uw telefoon
is aangesloten.
4 . Selecteer op de telefoon het bestand dat u
wilt weergeven of afspelen en selecteer de
Blu-ray-product als het afspeelapparaat.
5 . Speel het bestand af met de telefoon.
HT-E5200_XU_NL_0223.indd 39HT-E5200_XU_NL_0223.indd 39 2012-02-23 오후 2:38:032012-02-23 오후 2:38:03

| 40 Nederlands
Media Afspelen
Afspelen herhalen
Een titel of hoofdstuk herhalen
1 . Druk tijdens het afspelen op de toets
REPEAT op de afstandsbediening.
2 . Druk op ▲▼ om Hoofdstuk, Alle of Titel te selecteren en druk
vervolgens op E.
| OPMERKING |
� Mogelijk wordt de optie Hoofdstuk of
Titel niet meteen weergegeven. Druk
herhaaldelijk op de toetsen ▲▼ totdat uw
keuze wordt weergegeven in het blauwe
veld.
3 . Om het afspelen te hervatten, drukt
u opnieuw op de toets REPEAT.
Vervolgens gebruikt u de toetsen
▲▼ om Uit te selecteren en drukt
u op E.
Een fragment herhalen
1 . Druk tijdens het afspelen op de toets
REPEAT op de afstandsbediening.
2 . Druk op ▲▼ om Herhalen A-B te
selecteren.
| OPMERKING |
� Mogelijk wordt de optie Herhalen A-B niet
meteen weergegeven. Druk herhaaldelijk op
de toetsen ▲▼ totdat Herhalen A-B wordt
weergegeven in het blauwe veld.
3 . Druk voor het begin van het gedeelte
dat u wilt herhalen (A) op E.
4 . Druk voor het einde van het gedeelte
dat u wilt herhalen (B) op E.
5 . Druk nogmaals op REPEAT om de
normale weergave te hervatten.
6 . Druk op de toets E.
| OPMERKING |
� Punt (B) moet minstens 5 seconden na
punt (A) liggen.
Het discmenu, titelmenu, pop-upmenu en de titellijst gebruiken
DISC MENU Tijdens het afspelen drukt u op deze toets
om het discmenu weer te geven.
TITLE MENU
Tijdens het afspelen drukt u op deze toets
om het titelmenu weer te geven.
• Als uw disc een afspeellijst bevat, drukt
u op de GROENE (B) toets om naar de
afspeellijst te gaan.
POPUP MENU Tijdens het afspelen drukt u op deze toets
om het pop-upmenu weer te geven.
DISC MENU of TITLE MENU
Tijdens het afspelen drukt u op deze toets
om de titellijst weer te geven.
AfspeelknoppenIn de modi Zoeken, Vertraagd en Stap voor stap
wordt geen geluid weergegeven.
6 Afspelen starten
5 Afspelen stoppen
7 Afspelen onderbreken
Snel afspelen
Druk tijdens het afspelen op de toets 3 of �.
Telkens wanneer u op de toets 3 of �
drukt, wordt de afspeelsnelheid als volgt
gewijzigd.
Vertraagd afspelen
Druk in de pauzestand op de toets �.
Telkens wanneer u op de toets � drukt,
wordt de afspeelsnelheid gewijzigd.
Stap voor stap afspelen
Druk in de pauzestand op de toets 7.
Telkens wanneer u op de toets 7 drukt,
verschijnt er een nieuw beeld.
Afspelen en overslaan
Druk tijdens het afspelen op de toets 1 of 2.
Telkens wanneer u op de toets 1 of 2
drukt, gaat u naar het vorige of volgende
hoofdstuk of bestand.
Bedieningselementen voor het afspelen van video
U kunt het afspelen van video-inhoud op een Blu-ray-discs, dvd's, cd's en USB-opslagapparaten beheren. Afhankelijk
van de disc is het mogelijk dat bepaalde functies die in deze handleiding worden beschreven, niet beschikbaar zijn.
Toetsen op de afstandsbediening voor het afspelen van video'sDISC MENU TITLE MENU
MUTE
0 POPUP
FULL SCREEN REPEATHOME
HT-E5200_XU_NL_0223.indd 40HT-E5200_XU_NL_0223.indd 40 2012-02-23 오후 2:38:082012-02-23 오후 2:38:08

Nederlands 41 |
05M
edia Afspelen
Het menu TOOLS gebruikenDruk tijdens het afspelen op de toets TOOLS.
Titel zoekenTijd zoeken
Selecteer deze optie om naar de
gewenste titel te gaan als de disc
meerdere titels bevat, om naar de
gewenste scène te gaan of om met Tijd
zoeken naar een bepaald punt in een
film of video te gaan. MetTijd zoeken
kunt u met de afstandsbediening een
specifiek tijdstip opgeven middels een
tijdcoördinaat met de volgende notatie
00:00:00 (uren, minuten, seconden).
Herhalingsmodus
Hiermee kunt u een bepaalde titel,
bepaald hoofdstuk (alleen BD/DVD-discs)
of een gemarkeerde sectie herhalen.
Werkt hetzelfde als de toets REPEAT. Zie
pagina 40.
Voll. schermSelecteer deze optie om de gewenste
grootte van een volledig scherm in te
stellen. U kunt Oorspronkelijk, Modus1
(groter) en Modus2 (grootst) instellen.
Beeldmodus
Selecteer deze optie om de beeldmodus
in te stellen.
- Dynamisch : kies deze optie voor een
scherper beeld.
- Standaard : kies deze instelling voor
de meeste weergavetoepassingen.
- Film : dit is de beste instelling om
films te bekijken.
- Gebruiker : u kunt respectievelijk de
beeldscherpte en de ruisonderdrukking
aanpassen.
| OPMERKING |
� Wanneer u Gebruiker selecteert, wordt
het scherm Gebruikersinstellingen
weergegeven. Selecteer een optie
en druk op E, gebruik de toetsen
◄► om een wijziging aan te
brengen en druk vervolgens op E.
Druk op de toets RETURN (') om
terug te keren naar het menu TOOLS.
� Tijdens het gebruik van de functie BD
WISE is dit menu niet beschikbaar.
Equalizermodus Selecteer deze optie om de equalizer te
gebruiken.
Instell. toonregeling
Hiermee stelt u de equalizer in.
| OPMERKING |
� Wordt alleen weergegeven wanneer
de equalizermodus is ingeschakeld.
Een menu dat alleen wordt weergegeven
wanneer er een BD/DVD wordt afgespeeld
Afspelen vanaf het begin
Selecteer deze optie om de film vanaf
het begin af te spelen.
Hoofdstuk zoeken
Selecteer deze optie om naar het
hoofdstuk te gaan dat u wilt bekijken.
Geluid
Selecteer deze optie om de gewenste
taal voor het geluid in te stellen.
- U kunt deze functie ook uitvoeren
via de toets AUDIO op de
afstandsbediening.
Ondertiteling
Selecteer deze optie om de gewenste
taal voor de ondertiteling in te stellen.
- U kunt deze functie ook uitvoeren
via de toets SUBTITLE op de
afstandsbediening.
Beeldhoek
Selecteer deze optie om een scène
vanuit een andere hoek te bekijken.
Met de optie Angle (Beeldhoek) geeft
u het aantal beschikbare hoeken weer
(1/1, 1/2, 1/3, enz.).
BONUSVIEW Video / BONUSVIEW Audio
Selecteer deze optie om de gewenste
bonusview in te stellen.
Menu dat alleen wordt weergegeven wanneer er een bestand wordt afgespeeld
Ga naar videolijst Naar het scherm met de videolijst.
Scène zoeken Het videobestand per scène
doorzoeken.
Informatie De informatie voor het videobestand
controleren.
| OPMERKING |
� Afhankelijk van de disc of het opslagapparaat kan het
menu Tools verschillen. Mogelijk worden niet alle opties
weergegeven.
HT-E5200_XU_NL_0223.indd 41HT-E5200_XU_NL_0223.indd 41 2012-02-23 오후 2:38:122012-02-23 오후 2:38:12

| 42 Nederlands
Media AfspelenBedieningselementen voor het
afspelen van muziek
U kunt het afspelen van muziek op een dvd, cd of
USB-opslagapparaat beheren.
Toetsen op de afstandsbediening voor het afspelen van muziek
DISC MENU TITLE MENU
MUTE
1 2 3
4 5 6
7 8
0
9POPUP
RDS DISPLAY
PTY- PTY SEARCH PTY+
TA
6
1
3
2
4
5
1
afspelen (alleen audio-cd (CD-DA))Druk tijdens het afspelen op de toets 3 of �.
Telkens wanneer u op de toets 3 of � drukt,
wordt de afspeelsnelheid als volgt gewijzigd.
2 Toets 7 : een nummer onderbreken.
3 Toets 6 : het geselecteerde nummer afspelen.
4 Toets 5 : een nummer stoppen.
5Overslaan : druk tijdens het afspelen op de toets
1 of 2 om naar het vorige of volgende nummer
in de lijst te gaan.
6Cijfertoetsen : druk tijdens het afspelen van de
afspeellijst op de cijfers voor het gewenste nummer.
Het geselecteerde nummer wordt afgespeeld.
Nummers op een audio-cd herhalenU kunt het product zodanig instellen dat de
nummers op een audio-cd (CD-DA/MP3) worden
herhaald.
1 . Gebruik tijdens het afspelen de toets ► om in
de rechterbenedenhoek van het scherm
te selecteren en druk vervolgens op E.
2 . Gebruik de toetsen ▲▼ om de gewenste
herhalingsmodus te selecteren - Uit, Een liedje, of Alle - en druk vervolgens op E.
Nummers op een audio-cd in willekeurige volgorde afspelenU kunt het product zodanig instellen dat de
nummers op een audio-cd (CD-DA/MP3) in
willekeurige volgorde worden afgespeeld.
1 . Gebruik tijdens het afspelen de toets ► om in
de rechterbenedenhoek van het scherm te selecteren en druk vervolgens op E.
2 . Gebruik de toetsen ▲▼ om de Willek. volg. in te
stellen op Aan of Uit, en druk vervolgens op E.
Een afspeellijst maken
AllShare Play / Muziek / Audio-cd 1 / 17
00:00 / 03:59
b� Pg. verpl. / Tools ' Terug
TRACK 001 ٭
► TRACK 001 03:59
TRACK 002 04:34
TRACK 003 04:24
TRACK 004 04:01
TRACK 005 04:26
TRACK 006 05:07
TRACK 007 04:47
TRACK 008 03:59
TRACK 009 04:34
TRACK 010 04:02
TRACK 002 04:34TRACK 002 04 34► TRACK 001 03:59
1 . Druk in het scherm Afspelen op de toets
TOOLS. Het menu Tools wordt weergegeven.
2 . Gebruik de toetsen ▲▼ om Selectie afsp. te
selecteren en druk vervolgens op E. Het scherm
voor het afspelen van de selectie wordt weergegeven.
3 . Gebruik de toetsen ▲▼ om een nummer te
selecteren en druk vervolgens op E. Er wordt
links van het nummer een vinkje weergegeven.
4 . Herhaal Stap 3 om meer nummers te selecteren
en aan te vinken.
5 . U kunt het nummer weer uit de lijst verwijderen
door naar het nummer te lopen en nogmaals op
E te drukken. Het vinkje bij het nummer wordt
verwijderd.
6 . Wanneer u klaar bent, gebruikt u de toetsen ► om
Afspln te selecteren. Vervolgens drukt u op E. Het
scherm voor het afspelen van muziek wordt opnieuw
weergegeven. Het scherm bevat nu alleen de
nummers die u hebt aangevinkt. De geselecteerde
nummers worden automatisch afgespeeld.
| OPMERKING |
� U kunt een afspeellijst met maximaal 99 nummers maken
op audio-cd's (CD-DA).
� Als u een afspeellijst hebt gemaakt, wordt de optie
Selectie afsp. in het Tools vervangen door Lijst bewerken.
HT-E5200_XU_NL_0223.indd 42HT-E5200_XU_NL_0223.indd 42 2012-02-23 오후 2:38:142012-02-23 오후 2:38:14

Nederlands 43 |
05M
edia Afspelen
� In het scherm Selectie afsp. kunt u ook de opties Alles select., Niets select. en Annuleren kiezen.
• Gebruik Alles select. om alle nummers te selecteren.
Hiermee annuleert u de selectie van de afzonderlijke
nummers. Wanneer u op de toets RETURN (') op
uw afstandsbediening drukt of AFSPLN selecteert
en vervolgens op E drukt, worden alle nummers
weergegeven in het scherm voor het afspelen van muziek.
Het product begint met het afspelen van alle nummers,
beginnend bij Track 001.
• Gebruik Niets select. om de selectie van de nummers
in een keer ongedaan te maken. Selecteer vervolgens
afzonderlijke nummers of gebruik Alles selecteren om
alle nummers te selecteren. Druk vervolgens op de toets
RETURN (') op uw afstandsbediening of selecteer
AFSPLN en druk op E. Als u Alles selecteren niet
gebruikt of geen afzonderlijke nummers selecteert, wordt
de afspeellijst niet gewijzigd.
• Met Annuleren annuleert u de wijzigingen die u in
het scherm voor het afspelen van de selectie hebt
aangebracht. Wanneer u terugkeert naar het scherm
AFSPLN, blijft de afspeellijst ongewijzigd.
RippenU kunt de muziek op een muziek-cd rippen naar
een USB-apparaat in de USB-aansluiting.
1 . Plaats een USB-apparaat in de USB-aansluiting
aan de voorzijde van het product en druk
vervolgens op de knop RETURN (') op uw
afstandsbediening.
2 . Plaats de schijf die u wilt rippen in het apparaat
en sluit de schijflade.
3 . Druk in het scherm Afspelen op de toets
TOOLS. Het menu Tools wordt weergegeven.
4 . Gebruik de toetsen ▲▼ om Rip te selecteren
en druk vervolgens op E. Het scherm Rip
wordt weergegeven.
5 . Gebruik de toetsen ▲▼ om een nummer te
selecteren en druk vervolgens op E. Er wordt
links van het nummer een vinkje weergegeven.
6 . Herhaal Stap 5 om meer nummers te selecteren
en aan te vinken.
7 . U kunt het nummer weer uit de lijst verwijderen
door naar het nummer te lopen en nogmaals op
E te drukken. Het vinkje bij het nummer wordt
verwijderd.
8 . Wanneer u klaar bent, drukt u op de de toets ►
om Rip te selecteren. vervolgens drukt u op E.
Het pop-upvenster Rip wordt weergegeven.
9 . Druk op E om het ripproces te starten.
De voortgangsbalk voor het ripproces wordt
weergegeven.
10 . Wanneer het rippen is voltooid, wordt het
bericht 'Rippen voltooid.' weergegeven.
Druk op de toets E.
11 . Druk op de toets RETURN (') om terug te
keren naar het afspeelscherm.
| OPMERKING |
� Wanneer het rippen is voltooid wordt er op het USB-
opslagapparaat een map met de naam MP gemaakt.
Bluetooth gebruikenU kunt een Bluetooth-apparaat gebruiken om
draadloos van muziek te genieten met stereogeluid
van een hoge kwaliteit.
Wat is Bluetooth?
Bluetooth is een technologie waardoor
compatibele apparaten eenvoudig op elkaar
aangesloten kunnen worden via een korte,
draadloze verbinding.
• Een Bluetooth-apparaat kan, afhankelijk van
gebruik, lawaai of storingen veroorzaken.
- Wanneer een deel van het lichaam in contact
is met het zend-/ontvangstsysteem van het
Bluetooth-apparaat of het home cinema-
systeem.
- Spanningsvariatie als gevolg van belemmering
door muren, hoeken of scheidingswanden.
- Elektrische interferentie door apparatuur die
dezelfde frequentie gebruikt, bijvoorbeeld
medische apparatuur, magnetrons en
draadloze LAN’s.
• Sluit het home cinema-systeem aan op het
Bluetooth-apparaat en bewaar een korte afstand.
• Hoe groter de afstand tussen het home cinema-
systeem en het Bluetooth-apparaat, hoe minder
de kwaliteit.
Als de afstand groter is dan het maximale bereik
van het Bluetooth-apparaat, gaat de verbinding
verloren.
• In gebieden met slechte ontvangst werkt de
Bluetooth-verbinding mogelijk niet naar behoren.
• Het effectieve ontvangstbereik van het home
cinema-systeem is maximaal 10 meter in alle
richtingen, mits er geen obstakels zijn. Als
de afstand groter wordt, wordt de verbinding
automatisch verbroken. Zelfs binnen dit bereik
kan de geluidskwaliteit verslechteren door
obstakels zoals muren of deuren.
• Dit draadloze apparaat kan tijdens het gebruik
ervan elektrische interferentie veroorzaken.
HT-E5200_XU_NL_0223.indd 43HT-E5200_XU_NL_0223.indd 43 2012-02-23 오후 2:38:242012-02-23 오후 2:38:24

| 44 Nederlands
Media AfspelenEen verbinding maken tussen het home cinema-systeem en een Bluetooth-apparaat
5V 500mA
Verbinding
Bluetooth-apparaat
Controleer of het Bluetooth-apparaat de Bluetooth-
compatibele stereo-hoofdtelefoonfunctie ondersteunt.
1 . Druk op de toets FUNCTION op de
afstandsbediening van het product om het BT-
bericht weer te geven.
• U ziet twee seconden lang de aanduiding WAIT
en vervolgens READY op het scherm aan de
voorzijde van het home cinema-systeem.
2 . Selecteer het Bluetooth-menu op het Bluetooth-
apparaat waarmee u verbinding wilt maken.
(Raadpleeg de gebruiksaanwijzing van het
Bluetooth-apparaat.)
3 . Selecteer het menu voor een
stereohoofdtelefoon op het Bluetooth-apparaat.
• Er wordt een lijst van aangesloten apparaten
weergegeven.
4 . Selecteer 'SamsungHTS-XXXXXX' in de lijst
met gevonden apparaten.
• Wanneer het home cinema-systeem is
verbonden met het Bluetooth-apparaat, wordt de
apparaatnaam van het aangesloten Bluetooth-
apparaat weergegeven op het display aan de
voorzijde, gevolgd door het home cinema-systeem.
5 . Muziek afspelen op het aangesloten apparaat.
• U kunt de muziek die wordt afgespeeld op het
aangesloten Bluetooth-apparaat, rechtstreeks
via het home cinema-systeem beluisteren.
| OPMERKING |
� Het home cinema-systeem ondersteunt alleen Middle
Quality SBC-gegevens (maximaal 237 kbps bij 48 kHz) en
ondersteunt geen High Quality SBC-gegevens (328 kbps bij
44,1 kHz).
� De functie AVRCP wordt ondersteund, maar de werking ervan
is afhankelijk van de specificaties van het andere apparaat.
� Maak alleen verbinding met een Bluetooth-apparaat dat de
functie A2DP (AV) ondersteunt.
� U kunt slechts één Bluetooth-apparaat tegelijkertijd koppelen.
� In de volgende gevallen is mogelijk dat het product de
zoekfunctie of de verbinding niet naar behoren uitvoert:
- Wanneer er sprake is van een sterke elektrische golf
rondom het home theater-systeem.
- Indien verschillende Bluetooth-apparaten tegelijkertijd
met het product worden gekoppeld.
- Indien het Bluetooth-apparaat is uitgeschakeld, niet is
geplaatst of defect is.
- Apparaten als magnetrons, draadloze LAN-adapters,
tl-lampen en gasfornuizen gebruiken hetzelfde
frequentiebereik als het Bluetooth-apparaat. Dat kan tot
elektrische interferentie leiden.
De verbinding tussen het Bluetooth-apparaaten het home cinema-systeem verbrekenU kunt de verbinding tussen het home cinema-systeem
en het Bluetooth-apparaat verbreken. (Raadpleeg de
gebruiksaanwijzing van het Bluetooth-apparaat.)
• De verbinding met het home cinema-systeem wordt
verbroken.
• Wanneer de verbinding tussen het home cinema-
systeem en het Bluetooth-apparaat wordt verbroken,
wordt op het display van het home cinema-systeem
de tekst DISCONNECTED weergegeven.
De verbinding tussen het home cinema-systeem en het Bluetooth-apparaat verbrekenDruk op de toets ( ) op het voorpaneel van het home cinema-systeem om van BT over te
schakelen naar een andere modus of om het
home cinema-systeem uit te schakelen.
• Het verbonden Bluetooth-apparaat wacht enige
tijd op een reactie van het home cinema-systeem
voordat de verbinding wordt verbroken, behalve
wanneer de verbinding wordt verbroken via
functieconversie. (Hoe lang het duurt voordat de
verbinding wordt verbroken, kan per Bluetooth-
apparaat verschillen.)
• De verbinding met het apparaat wordt verbroken.
| OPMERKING |
� De Bluetooth-verbinding kan worden verbroken als in de
Bluetooth-verbindingsmodus de afstand tussen het home
cinema-systeem en het Bluetooth-apparaat te groot wordt
(10 meter). Als het Bluetooth-apparaat weer binnen het
effectieve bereik komt of opnieuw wordt gestart, moet u
de verbinding herstellen.
� Als het Bluetooth-apparaat weer binnen het effectieve
bereik komt, kunt u opnieuw opstarten om de verbinding
met het Bluetooth-apparaat te herstellen.
HT-E5200_XU_NL_0223.indd 44HT-E5200_XU_NL_0223.indd 44 2012-02-23 오후 2:38:252012-02-23 오후 2:38:25

Nederlands 45 |
05M
edia Afspelen
� Wanneer het apparaat zich in de BT-modus langer dan 5
minuten in de status Gereed bevindt, wordt de schermbeveiliging
ingeschakeld. Als u het BT-apparaat vervolgens wilt
verbinden, moet u de schermbeveiliging uitschakelen. Om de
schermbeveiliging uit te schakelen, drukt u op een toets op de
afstandsbediening. (Bijvoorbeeld de volumetoets enz.)
Foto's bekijken
U kunt foto's bekijken die op een dvd, USB,
mobiel apparaat of pc staan.
Het menu Tools gebruikenDruk tijdens het afspelen op de toets TOOLS.
Ga naar fotolijstSelecteer deze optie om naar de lijst
met foto's op het huidige medium te
gaan.
Begin diashow Selecteer deze optie om een
diavoorstelling te starten.
Snelh. Diashow Selecteer deze optie om een snelheid
in te stellen voor een diashow.
Effect presentatie
Selecteer deze optie om speciale
effecten in te stellen voor een diashow.
Achtergrondmuziek aan
Selecteer deze optie om muziek af te
spelen tijdens een diashow.
Instellingen achtergrondmuziek
Selecteer deze optie om de instellingen
voor de achtergrondmuziek
configureren.
Beeldmodus
Selecteer deze optie om de
beeldinstellingen te configureren.
- Dynamisch : kies deze optie voor
een scherper beeld.
- Standaard : voor de meeste
weergavetoepassingen kunt u deze
optie kiezen.
- Film : dit is de beste instelling om
films te bekijken.
- Gebruiker : u kunt respectievelijk
de beeldscherpte en de
ruisonderdrukking aanpassen.
| OPMERKING |
� Tijdens het gebruik van de
functie BD WISE is dit menu niet
beschikbaar.
ZoomSelecteer deze optie om huidige foto
vergroten. (Maximale vergroting: 4
keer)
DraaienSelecteer deze optie om de foto te
draaien. (Hiermee wordt de afbeelding
rechts- of linksom gedraaid.)
Informatie De fotogegevens worden weergegeven.
| OPMERKING |
� Afhankelijk van de disc of het opslagapparaat kan het menu
Tools verschillen. Mogelijk worden niet alle opties weergegeven.
� Als u de functie Achtergrondmuziek wilt gebruiken, moet het
fotobestand zich op hetzelfde opslagmedium bevinden als het
muziekbestand.
De geluidskwaliteit kan echter nadelig worden beïnvloed door de
bitsnelheid van het MP3-bestand, de grootte van de foto en de
coderingsmethode.
� U kunt de ondertiteling en presentatie-afbeelding niet vergroten
in de modus voor volledig scherm.
Het menu Tools gebruiken wanneer
een bestand is gemarkeerd
Druk op de toets TOOLS wanneer een bestand is
gemarkeerd.
Bekijken
Selecteer deze optie om de sorteeropties
weer te geven: Artiest, Genre, Maandelijks,
Laatste datum enz. Welke sorteeropties er
worden weergegeven, is afhankelijk van
het type opslag en medium.
MapweergaveWordt weergegeven in het scherm van de
functie Bekijken. Selecteer deze optie om
de mappen op het opslagapparaat weer
te geven.
TitelWordt weergegeven in het scherm van
de functie Bekijken. Selecteer deze optie
om alle foto's of videobestanden op het
opslagapparaat te sorteren op de titel.
Artiest
Wordt weergegeven in het scherm van de
functie Bekijken.
Selecteer Artiest om alle nummers op een
opslagapparaat te sorteren op de artiest.
HT-E5200_XU_NL_0223.indd 45HT-E5200_XU_NL_0223.indd 45 2012-02-23 오후 2:38:272012-02-23 오후 2:38:27

| 46 Nederlands
Media Afspelen
AlbumWordt weergegeven in het scherm van
de functie Bekijken. Selecteer Album om
alle nummers op een opslagapparaat te
sorteren op basis van het album.
GenreWordt weergegeven in het scherm van
de functie Bekijken. Selecteer Genre om
alle nummers op een opslagapparaat te
sorteren op basis van het genre.
Laatste datum
Wordt weergegeven in het scherm van
de functie Bekijken. Selecteer deze optie
om alle foto's en videobestanden op
een opslagapparaat te sorteren en weer
te geven van de laatste tot de vroegste
datum.
Vroegste datum
Wordt weergegeven in het scherm van
de functie Bekijken. Selecteer deze optie
om alle foto's en videobestanden op
een opslagapparaat te sorteren en weer
te geven van de vroegste tot de laatste
datum.
Maand.
Wordt weergegeven in het scherm van
de functie Bekijken. Selecteer deze optie
om alle foto's of videobestanden op het
opslagapparaat te sorteren op basis van
de maand waarin ze zijn gemaakt.
Selectie afsp.
Met Selectie afsp. kunt u bepaalde
muziek-, video- en fotobestanden
weergeven. Dit werkt voor alle media op
vrijwel dezelfde manier. Het onderstaande
voorbeeld is voor foto's.
1. Markeer in het scherm met
miniaturen een foto en druk
vervolgens op de toets TOOLS op de
afstandsbediening.
2. Selecteer in het menu Tools de optie
Selectie afsp. en druk vervolgens
op E.
3. Gebruik in het selectiescherm de
toetsen ▲▼◄► om de foto te
selecteren die u wilt weergeven en
druk vervolgens op E.
Er wordt links van de foto een vinkje
weergegeven.
4. Herhaal stap 3 voor elke foto die u
wilt weergeven.
5. Als u de selectie van een foto
ongedaan wilt maken, markeert u de
foto en drukt u op E.
6. Wanneer u klaar bent, gebruikt u
de toetsen ◄► om Afspelen te
selecteren. Vervolgens drukt u op
E. Er wordt een diashow met de
door u geselecteerde foto's gestart.
7. U kunt de diashow onderbreken door
één keer op E te drukken. U kunt
de diashow hervatten door nogmaals
op E te drukken.
8. Als u de diashow wilt stoppen, drukt
u op de toets RETURN (').
| OPMERKING |
� Zodra de diashow is gestart, kunt u
deze beheren door op de toets TOOLS
te drukken en het menu Diashow
weer te geven. Zie 'Het menu Tools
gebruiken' op pagina 45.
Verzenden
Selecteer Verzenden om de geselecteerde
bestanden naar Picasa, Facebook,
Cloud Storage, N Drive of Family Story
te verzenden. Als u Verzenden wilt
gebruiken, moet u een account hebben
voor de online site en u aanmelden met
de aanmeldingsfunctie.
1. Gebruik de toetsen ▲▼◄► om
een bestand te selecteren en druk
vervolgens op E.
2. Herhaal dit voor elk nummer of
bestand dat u wilt uploaden.
| OPMERKING |
� U kunt ook naar Alles select. aan de
rechterkant gaan en op E drukken
om alle nummers of bestanden te
selecteren.
3. Selecteer aan de rechterkant
Verzenden en druk vervolgens op
E.
4. Gebruik de toetsen ▲▼ om de
online site te selecteren waarnaar
u de bestanden of nummers wilt
uploaden en druk vervolgens op E.
HT-E5200_XU_NL_0223.indd 46HT-E5200_XU_NL_0223.indd 46 2012-02-23 오후 2:38:282012-02-23 오후 2:38:28

Nederlands 47 |
05M
edia Afspelen
Aan-/afmeldenMet de functie Aan-/afmelden kunt u
zich aanmelden bij uw online Samsung-
account.
Toev. afspllst
Selecteer deze optie om een afspeellijst
te maken of om bestanden of nummers
aan een afspeellijst toe te voegen.
1. Selecteer Toev. afspllst en druk
vervolgens op E.
2. Gebruik de toetsen ▲▼◄► om
een nummer of bestand te markeren
en druk vervolgens op E.
3. Herhaal dit voor elk nummer of
bestand dat u wilt toevoegen.
4. Selecteer aan de rechterkant
Toevoegen en druk vervolgens op
E.
5. Voer in het scherm dat wordt
weergegeven, een van de volgende
acties uit:
• Selecteer de afspeellijst waaraan u de
nummers of bestanden wilt toevoegen
en druk vervolgens op E.
• Selecteer Nwe maken en druk
vervolgens op E. Geef met het pop-
uptoetsenbord dat wordt weergegeven,
een naam voor de afspeellijst op.
Gebruiker de cijfertoetsen op de
afstandsbediening om nummers op
te geven. Om letters op te geven,
gebruikt u de toetsen ▲▼◄► om
de cursor te verplaatsen en drukt u
vervolgens op E. Wanneer u klaar
bent, gaat u naar DONE onder aan het
scherm en drukt u op E.
Verwijderen (afspeellijst)
Afhankelijk van het scherm dat u
weergeeft, kunt u Verwijderen selecteren
om een bestand of een afspeellijst van
een wisbaar medium (zoals een USB-
apparaat) te verwijderen.
Lijst bewerken
Selecteer Lijst bewerken om bestanden
of nummers uit een bestaande afspeellijst
te verwijderen. Het opslagapparaat
met de afspeellijst moet in het product
zijn geplaatst of op het product zijn
aangesloten.
1. Gebruik de toetsen ▲▼◄► om
een bestand te selecteren en druk
vervolgens op E.
2. Herhaal dit voor elk nummer of
bestand dat u wilt verwijderen.
| OPMERKING |
� U kunt ook naar Alles selecteren
aan de rechterkant gaan en op
E drukken om alle nummers of
bestanden te selecteren.
3. Selecteer aan de rechterkant
Verwijderen en druk vervolgens op
E.
Huid. afsp.
Nadat u hebt gesorteerd op artiest,
genre, album, titel, laatste datum,
vroegste datum of maandelijks, selecteert
u de groep die het resultaat is van de
sorteeractie (bijvoorbeeld alle foto's die
in augustus zijn genomen). Selecteer
vervolgens Huid. afsp. om alleen de
bestanden in de desbetreffende groep af
te spelen of weer te geven.
Ga nr afspeellijst
Selecteer deze optie om naar het
gedeelte Afspeellijst van het hoofdscherm
van AllShare te gaan.
Coderen
Bij de instellingen Coderen, die
afhankelijk is van de taal of het
geografisch gebied, kunt u wijzigen hoe
de speler de bestanden en nummers
sorteert, rangschikt en presenteert, hoe
de datums worden weergegeven enz.
Selecteer Coderen om de codering in te
stellen die overeenkomt met uw taal of
geografisch gebied.
Informatie Informatie Hier vindt u informatie over het
mediabestand en de inhoud.
| OPMERKING |
� Afhankelijk van de disc of het opslagapparaat kan het
menu Tools verschillen. Mogelijk worden niet alle opties
weergegeven.
HT-E5200_XU_NL_0223.indd 47HT-E5200_XU_NL_0223.indd 47 2012-02-23 오후 2:38:292012-02-23 오후 2:38:29

| 48 Nederlands
Media AfspelenLuisteren naar de radio
De toetsen op de afstandsbediening gebruiken
1 . Druk op de toets FUNCTION om FM te
selecteren.
2 . Stem af op het gewenste station.
• Tuner vooraf instellen 1: druk op de toets 5
om PRESET te selecteren en druk vervolgens
op de toets TUNING/CH (,.) om het
voorgeprogrammeerde station te selecteren.
- Voordat u kunt afstemmen op
voorgeprogrammeerde stations, moet u de
voorgeprogrammeerde stations toevoegen
aan het geheugen van het product.
• Handmatig afstemmen: druk op de toets 5
om MANUAL te selecteren en druk op de
toets TUNING/CH (,.) om af te stemmen
op een lagere of hogere frequentie.
• Automatisch afstemmen: druk op de toets 5
om MANUAL te selecteren en houd de toets
TUNING/CH (,.) ingedrukt om automatisch
op de band te zoeken.
Mono/stereo instellenDruk op de toets MO/ST.
• Telkens wanneer op de toets wordt gedrukt,
schakelt het geluid tussen STEREO en MONO.
• Bij een slechte ontvangst, kunt u MONO
selecteren voor een heldere, storingsvrije
uitzending.
Stations voorprogrammerenVoorbeeld: de frequentie 89.10 FM in het
geheugen programmeren.
1 . Druk op de toets FUNCTION om FM te
selecteren.
2 . Druk op TUNING/CH (,.) om <89.10> te
selecteren.
3 . Druk op de toets TUNER MEMORY.
• Het NUMMER knippert op het scherm.
4 . Druk nogmaals op de toets TUNER MEMORY.
• Druk op de toets TUNER MEMORY
voordat het NUMMER vanzelf van het
scherm verdwijnt.
• Nadat u op de toets TUNER MEMORY
hebt gedrukt, verdwijnt het NUMMER en is
het station opgeslagen in het geheugen.
5 . U kunt andere stations instellen door de stap
2 tot en met 4 te herhalen.
• Als u wilt afstemmen op een
voorgeprogrammeerd station, drukt u
op de toets TUNING/CH (,.) op de
afstandsbediening.
Informatie over RDS-uitzending
RDS (Radio Data System) gebruiken om FM-stations te ontvangen
Met RDS kunnen FM-stations een extra signaal
uitzenden naast hun reguliere programmasignalen.
De stations zenden bijvoorbeeld hun naam uit,
maar ook informatie over welk type programma ze
uitzenden, zoals sport of muziek enzovoort.
Wanneer u afstemt op een FM-station dat de
RDS-service biedt, gaat de RDS-indicator op het
scherm branden.
Beschrijving van de RDS-functie• PTY (programmatype): geeft het huidig
uitgezonden type programma weer.
• PS NAME (PS-NAAM) (naam
programmaservice): geeft de naam van het
zendstation aan en bestaat uit 8 tekens.
• RT (radiotekst): decodeert de tekst die door een
station wordt uitgezonden (indien dit gebeurt) en
bestaat uit maximaal 64 tekens.
• CT (tijd klok): decodeert de real-timeklok vanaf
de FM-frequentie. Enkele stations zenden
geen PTY-, RT- of CT-gegevens uit en daarom
worden deze gegevens niet in alle gevallen
weergegeven.
• TA (verkeersinformatie): Met TA AAN/UIT wordt
aangegeven of de verkeersinformatie wordt
uitgevoerd.
| OPMERKING |
� RDS werkt mogelijk niet goed als het station waarop u
hebt afgestemd niet correct RDS-signalen doorgeeft of
wanneer de signaalsterkte zwak is.
HT-E5200_XU_NL_0223.indd 48HT-E5200_XU_NL_0223.indd 48 2012-02-23 오후 2:38:312012-02-23 오후 2:38:31

Nederlands 49 |
05M
edia Afspelen
De RDS-signalen weergevenU kunt de RDS-signalen die het station uitzendt
op het scherm zien.
Druk op de toets RDS DISPLAY terwijl u naar een
FM-station luistert.
• Telkens wanneer u op deze toets drukt,
wordt op het scherm de volgende informatie
weergegeven:
PS NAME � RT� CT � Frequentie
PS (programmaservice)
Tijdens het zoeken wordt<PS NAME>
(PS-NAAM) weergegeven en vervolgens
de naam van het station. <NO PS>
(GEEN PS) wordt weergegeven als er
geen signaal is verzonden.
RT (radiotekst)
Tijdens het zoeken verschijnt <RT>
en vervolgens tekstberichten die het
station verzendt. <NO RT> (GEEN
RT) verschijnt als er geen signaal is
verzonden.
Frequentie Stationfrequentie (geen RDS-service)
Over tekens die op het scherm worden
weergegevenWanneer op het scherm PS- of RT-signalen
worden weergegeven, worden de volgende tekens
gebruikt.
• Het scherm kan geen onderscheid maken
tussen hoofdletters en kleine letters en gebruikt
altijd hoofdletters.
• Op het scherm kunnen geen speciale tekens
worden weergegeven. <A,> kan bijvoorbeeld
voor <A’s> met speciale tekens staan, zoals <À,
Â, Ä, Á, Å en Ã.>
Indicatie PTY (programmatype) en
de PTY-zoekfunctieEen van de voordelen van de RDS-service is dat
u een bepaald programma kunt zoeken in de
voorgeprogrammeerde kanalen met behulp van
de PTY-codes.
Een programma zoeken met behulp van de PTY-codes
� Voordat u begint!• De PTY-zoekfunctie kan alleen worden
toegepast op voorgeprogrammeerde stations.
• Druk tijdens het zoeken op de toets 5 om
tijdens het proces op elk willekeurig moment te
stoppen met zoeken.
• Er is een tijdslimiet bij het uitvoeren van de
volgende stappen. Wanneer de instelling wordt
geannuleerd voordat u klaar bent, begint u
opnieuw bij stap 1.
• Wanneer u op de knoppen van de primaire
afstandsbediening drukt, moet u zorgen dat
u het FM-station hebt geselecteerd met de
primaire afstandsbediening.
221 3
4 5 6
RDS DISPLAY
PTY- PTY SEARCH PTY+
TA
1 . Druk op de toets PTY SEARCH terwijl u naar
een FM-station luistert.
2 . Druk op de toets PTY- of PTY+ totdat
de gewenste PTY-code op het scherm
verschijnt.
• Op het scherm worden de PTY-codes aan
de rechterkant beschreven.
3 . Druk nogmaals op de toets PTY SEARCH
terwijl de PTY-code die u in de vorige stap
hebt geselecteerd nog steeds op het scherm
staat.
• De middelste eenheid doorzoekt de 15
voorgeprogrammeerde FM-stations, stopt
wanneer het geselecteerde station is
gevonden en stemt hierop af.
HT-E5200_XU_NL_0223.indd 49HT-E5200_XU_NL_0223.indd 49 2012-02-23 오후 2:38:322012-02-23 오후 2:38:32

| 50 Nederlands
Media AfspelenDe toetsen op de afstandsbediening
voor speciale effecten gebruiken
GeluidseffectfunctieSOUND
EFFECT
Hiermee kunt u een modus selecteren die het geluid
optimaliseert.
1. Druk op de toets SOUND EFFECT.
2. Druk op ▲▼ om de gewenste modus te selecteren.
DSP of Geluidmodus.
3. Druk op de toetsen ◄► om het gewenste
geluidseffect te selecteren.
� DSPMP3 Enhancer Power Bass Uit• MP3 Enhancer : hiermee kunt u uw geluidsbeleving
verbeteren (bijvoorbeeld MP3-bestanden). U kunt het
geluidsniveau van uw MP3-bestanden (24 kHz, 8 bits)
verhogen tot het geluidsniveau van cd's (44,1 kHz, 16
bits).
• Power Bass : hiermee verhoogt u het volumen van de
bastonen, wat resulteert in bonzende geluidseffecten.
• Uit : selecteer deze optie voor normaal luisteren.
� GeluidmodusVirtual Sound Muziek Nieuws Drama Film Sport Spelcomputer Uit
3D-geluid
U kunt genieten van extra vol en een natuurlijker en
levendiger surroundgeluid door de diepte van het geluid
aan te passen met de niveau-opties.
Uit Hoog Middel Laag| OPMERKING |
� De functie is niet beschikbaar in de modus FM.
Een 2D-video afspelen in 3D-modus
Hiermee kunt u in 3D-modus genieten van een normale
2D-video.
| OPMERKING |
� Als u naar het menu Start of Smart Hub gaat in de
3D-modus, wordt automatisch overgeschakeld naar 2D.
vTunervTuner
vTuner is de functie voor het luisteren naar radio. Als
u op de vTuner-toets drukt, kunt u naar de vTuner-
toepassing gaan. U kunt de vTuner-functie gebruiken
nadat u de vTuner-toepassing hebt gedownload via
Samsung Apps.
HT-E5200_XU_NL_0223.indd 50HT-E5200_XU_NL_0223.indd 50 2012-02-23 오후 2:38:352012-02-23 오후 2:38:35

Nederlands 51 |
06Netw
erkservices
U kunt gebruikmaken van verschillende
netwerkservices, zoals Smart Hub of BD-LIVE,
door het product aan te sluiten op het netwerk.
Als u netwerkservices wilt gebruiken, moet
eerst de volgende handelingen uitvoeren:
1 . Breng een verbinding tot stand tussen het
product en het netwerk.
(Zie pagina 22)
2 . Configureer de netwerkinstellingen.
(Zie pagina 30-32)
Werken met Smart Hub
Met Smart Hub kunt films, video's en muziek
vanaf internet downloaden, toegang verkrijgen
tot diverse toepassingen, zowel gratis als
tegen betaling, en deze afspelen op uw tv. De
toepassingen omvatten onder andere nieuws,
sport, weerberichten, aandelenkoersen,
plattegronden, foto's en games.
Voor instructies over het gebruik van Smart Hub
volgt u de volgende stappen:
1 . Ga naar www.samsung.com.
2 . Klik boven aan de pagina op Ondersteuning.
3 . Op de pagina Ondersteuning geeft u in het
veld Modelnummer het modelnummer van
uw product op.
4 . Op de pagina die verschijnt, klikt u op
Vind downloads aan de linkerzijde onder
Downloads.
Het downloadcentrum verschijnt.
5 . In het Downloadcentrum klikt u op het
tabblad Handleidingen.
6 . Op het tabblad Handleidingen klikt u op
het bestandspictogram rechts van de
gebruikershandleiding van Smart Hub. De
handleiding wordt gedownload.
| OPMERKING |
� De weblocatie van de gebruikershandleiding voor Smart
Hub kan zonder voorafgaande kennisgeving worden
gewijzigd.
Smart Hub in vogelvlucht
xxxxxxxx
Contents 1
xxxxxxxx
Contents 4
xxxxxxxx
Contents 3
xxxxxxxx
Contents 2
Samsung Apps Your Video Family Story Fitness Kids
a Aanmelden b WallPaper / Tools ' Terug
Search
5 6 70
9
1 2 4
8
3
1Your Video : aanbevelingen voor video's op basis
van uw voorkeuren.
2Search : geïntegreerde zoekfunctie voor uw
videoproviders en aangesloten AllShare-apparaten.
3Aanbevolen : aanbevolen inhoud die wordt beheerd
door Samsung.
4Commercial : Toont de Smart Hub-gids, een
kennismaking met het product en introducties van
nieuwe toepassingen.
5
Family Story : een eenvoudige manier om inhoud
voor het hele gezin te zoeken.
• Biedt altijd en overal toegang tot familiefoto's,
berichten en gebeurtenissen.
6
Fitness : de snelste weg naar de globale service
voor uw welzijn.
• Hier vindt u fitnessvideo's van allerlei providers,
met feedback over de verbrande calorieën na
elke oefening.
7
Kids : de kinderservice is een eenvoudige en veilige
manier om kinderen van hun favoriete inhoud te
laten genieten.
• Hier vindt u allerlei leuke en veilige inhoud voor
kinderen.
8
Help bij navigatie : overzicht van de toetsen op
de afstandsbediening die u kunt gebruiken voor de
besturing in Smart Hub.
• ROOD (A) : aanmelden bij Smart Hub.
• GROEN (B) : het achtergrondscherm weergeven.
• Tools : het instellingenvenster weergeven.
• Return : terug naar het vorige menu.
Netwerkservices
HT-E5200_XU_NL_0223.indd 51HT-E5200_XU_NL_0223.indd 51 2012-02-23 오후 2:38:382012-02-23 오후 2:38:38

| 52 Nederlands
Netwerkservices
9
Mijn toepassingen : uw persoonlijke
toepassingengalerij. U kunt toepassingen toevoegen,
wijzigen en verwijderen.
0
Samsung Apps : open Samsung Apps om
verschillende gratis of betaalde toepassingsservices
downloaden.
De webbrowser gebruikenU kunt op internet surfen via de
webbrowsertoepassing. Deze wordt standaard in
het Smart Hub-scherm is geïnstalleerd.
1 . Selecteer Smart Hub in het startscherm en
druk vervolgens op E.
2 . Selecteer de webbrowser in Smart Hub en
druk vervolgens op E.
| OPMERKING |
� Wanneer u de webbrowser uitvoert en het product via
HDMI is aangesloten op een BD Wise-compatibele
tv, en BD Wise is ingeschakeld, wordt de browser
gemaximaliseerd (schermvullend) weergegeven en wordt
automatisch de optimale resolutie van de tv ingesteld.
� De webbrowser is niet compatibel met Java-applicaties.
� Als u een bestand probeert te downloaden en het bestand
niet kan worden opgeslagen, wordt er een foutbericht
weergegeven.
� Het afspelen van flashvideo's wordt niet ondersteund.
� E-commerce, voor het online aankopen van producten,
wordt niet ondersteund.
� ActiveX wordt niet ondersteund.
Webbrowser in een oogopslag
Google Search I’m Feeling Lucky
b Control Panel � Link Browsing / Tools ' Exit
http://www.google.com/
1
2
1
Config.scherm : hiermee worden de verschillende
webbrowserfuncties weergegeven.
• : naar de vorige pagina.
• : hiermee gaat u naar de laatste pagina
voordat u teruggaat.
• : hiermee wordt de huidige pagina opnieuw
geladen, zodat deze wordt vernieuwd op het
scherm.
• : hiermee gaat u naar het startscherm van de
webbrowser.
• : hiermee kunt u met verschillende
percentages inzoomen of uitzoomen op het
scherm.
• : hiermee kunt u specifieke pagina's
markeren, zodat u er gemakkelijk naartoe kunt
gaan.
• : hiermee kunt u de geschiedenis van uw
bezochte pagina's bekijken op basis van de
datum, naam of frequentie.
• http://www.google.com/ : hiermee kunt u
handmatig het adres van een pagina invoeren
of een pagina uit de lijst met bezochte pagina's
selecteren om naar die pagina te gaan.
• : hiermee kunt u gemakkelijk schakelen
tussen de verschillende browservensters die
momenteel geopend zijn.
• : hiermee kunt u informatie opzoeken door
woorden in te voeren.
• : hiermee kunt u de huidige site met uw
familiegroep delen door een bericht te versturen.
• : hiermee kunt u alle instellingen voor het
gebruik van de webbrowser configureren.
HT-E5200_XU_NL_0223.indd 52HT-E5200_XU_NL_0223.indd 52 2012-02-23 오후 2:38:412012-02-23 오후 2:38:41

Nederlands 53 |
06Netw
erkservices
2
Help bij navigatie : overzicht van de toetsen op
de afstandsbediening die u kunt gebruiken voor de
besturing in webbrowser.
• GREEN (B) : om het configuratiescherm weer te
geven.
• YELLOW (C) : Een koppeling zoeken.
• Tools : om het venster Tools weer te geven.
• Exit : terug naar het vorige menu.
BD-LIVE™
Wanneer het product eenmaal is verbonden met
het netwerk, kunt u genieten van allerhande extra
filminhoud als u een disc gebruikt die BD-LIVE
ondersteunt.
1 . Sluit een USB-geheugenstick aan op de
USB-aansluiting aan de voorkant van het
product en controleer hoeveel geheugen
beschikbaar is. Het geheugenapparaat moet
ten minste 1 GB vrije ruimte bieden om de
BD-LIVE-services te kunnen ondersteunen.
2 . Selecteer in het startscherm de optie
Instellingen en druk vervolgens op E.
3 . Selecteer Netwerk en druk vervolgens op
E.
4 . Selecteer Instellingen BD-Live en druk
vervolgens op E.
5 . Selecteer BD-gegevensbeheer en druk
vervolgens op E.
6 . Selecteer Apparaatkeuze en druk vervolgens
op E.
7 . Selecteer USB en druk vervolgens op E.
8 . Plaats een Blu-ray-disc die BD-LIVE
ondersteunt.
9 . Selecteer een item in de lijst met inhoud van
de BD-LIVE-service die door de fabrikant van
de disc wordt geleverd.
| OPMERKING |
� Het gebruik en de geleverde inhoud van BD-LIVE kunnen,
afhankelijk van de fabrikant van de disc, verschillen.
HT-E5200_XU_NL_0223.indd 53HT-E5200_XU_NL_0223.indd 53 2012-02-23 오후 2:38:432012-02-23 오후 2:38:43

| 54 Nederlands
BijlageAanvullende informatie
Opmerking
Aansluitingen
HDMI OUT
• Afhankelijk van uw televisie werken bepaalde HDMI-uitvoerresoluties mogelijk niet.
• U moet over een HDMI-aansluiting beschikken om video's met 3D-technologie te kunnen
bekijken.
• Als u een lange HDMI-kabel gebruikt, treedt er mogelijk beeldruis op. In dat geval schakelt u in
het menu de optie HDMI diepe kleur tot Uit.
Instellingen
3D-instell.
• U kunt tijdens het afspelen in 3D van sommige 3D-discs een film onderbreken door één keer op
5 te drukken. De film stopt en de 3D-modus wordt uitgeschakeld. U kunt de geselecteerde
3D-optie tijdens het afspelen van een 3D-film wijzigen door eenmaal op 5 te drukken. Het Blu-
ray-menu verschijnt. Druk nogmaals op 5 en selecteer 3D-instellingen in het Blu-ray-menu.
• Afhankelijk van het beeldmateriaal en de positie van het beeld op uw tv-scherm worden er
mogelijk u zwarte verticale balken links, rechts of aan beide zijden van het scherm weergegeven.
Norm,/Breedb.
• Afhankelijk van het schijftype zijn sommige beeldverhoudingen niet beschikbaar.
• Als u een beeldverhouding en optie selecteert die afwijkt van de beeldverhouding van uw tv,
wordt het beeld mogelijk vervormd weergegeven.
• Als u 16:9 Origineel selecteert, is het mogelijk dat uw tv beelden weergeeft in een kader van 4:3
met zwarte balken links en rechts naast het beeld (4:3 Pillarbox).
BD Wise (alleen Samsung-producten)
• Als BD Wise is ingeschakeld, wordt de instelling Resolutie automatisch ingesteld op BD Wise en
wordt BD Wise weergegeven in het menu Resolutie.
• Wanneer het product is aangesloten op een apparaat dat BD Wise niet ondersteunt, kunt u de
functie BD Wise niet gebruiken.
• Voor een juiste werking van BD Wise moet u optie BD Wise zowel in het menu van het product
als in het menu van de tv op Aan zetten.
Digitaal UIT audio
• Selecteer de juiste digitale uitvoer, anders hoort u geen geluid of slechts harde ruis.
• Als het HDMI-apparaat (AV-ontvanger, tv) niet kan worden gebruikt met gecomprimeerde
indelingen (Dolby Digital, DTS), wordt het audiosignaal uitgevoerd als PCM.
• Gewone dvd's hebben geen BONUSVIEW-geluid en navigatiegeluidseffecten.
• Sommige Blu-ray-discs hebben geen BONUSVIEW-geluid en navigatiegeluidseffecten.
• Deze instellingen voor Digital Output (Digitaal UIT audio) zijn niet van invloed op de analoge (L/R)
audio of HDMI-audio-uitvoer naar uw tv. Ze zijn van invloed op de optische uitvoer en de uitvoer
van HDMI-audio wanneer het product is aangesloten op een AV-ontvanger.
• Als u MPEG-geluidssporen afspeelt, wordt het audiosignaal uitgevoerd als PCM, ongeacht de
opties voor digitale uitvoer (PCM of Bitstream).
BD-LIVE-internetverbinding
• De internetverbinding kan beperkt zijn wanneer u BD-LIVE-inhoud gebruikt.
HT-E5200_XU_NL_0223.indd 54HT-E5200_XU_NL_0223.indd 54 2012-02-23 오후 2:38:452012-02-23 오후 2:38:45

Nederlands 55 |
07Bijlage
Instellingen
BD-LIVE-internetverbinding
• De internetverbinding kan beperkt zijn wanneer u BD-LIVE-inhoud gebruikt.
Anynet+ (HDMI-CEC)
• Afhankelijk van uw televisie werken bepaalde HDMI-uitvoerresoluties mogelijk niet. Raadpleeg de
gebruiksaanwijzing van uw tv.
• Deze functie is niet beschikbaar wanneer de HDMI-kabel geen CEC ondersteunt.
• Als uw Samsung-tv is voorzien van een Anynet+-logo, ondersteunt deze de Anynet+-functie.
BD-gegevensbeheer
• In de externe geheugenmodus wordt het afspelen van de disc mogelijk gestopt wanneer u de
verbinding met het USB-apparaat tijdens het afspelen verbreekt.
• Alleen de USB-apparaten met de bestandsindeling FAT (volumelabel DOS 8.3) worden
ondersteund. We raden u aan een USB-apparaat te gebruiken die het USB 2.0-protocol
ondersteund, met een lees-/schrijfsnelheid van 4 MB/sec of hoger.
• De functie Afspelen hervatten werkt wellicht niet nadat u het opslagapparaat hebt geformatteerd.
• Het totale beschikbare geheugen voor BD-gegevensbeheer kan afwijken, afhankelijk van de
omstandigheden.
DivX® Video On Demand
• Ga naar 'http://vod.divx.com' voor meer informatie over DivX(R) VOD.
Front paneel
• U kunt de helderheid van de toetsen en VOL +, - niet wijzigen.
Luidsprekerinst.
• Wanneer Luidsprekerselectie is geselecteerd op TV-luidspreker wordt er geluid voortgebracht
via de tv-luidsprekers.
HDMI-audio
• Wanneer het HDMI-geluid wordt uitgevoerd naar de luidspreker van de tv, wordt het geluid
automatisch teruggemengd naar 2 kanalen.
Audio-retourkanaal
• Als Anynet+ (HDMI-CEC) is uitgeschakeld (Off), is de functie Audioretourkanaal niet beschikbaar.
• Als u een HDMI-kabel gebruikt die niet is gecertificeerd voor de functie ARC (Audio Return
Channel), kan dit tot compatibiliteitsproblemen leiden.
• De ARC-functie is alleen beschikbaar als een ARC-compatibele tv is aangesloten.
Digitaal UIT audio
• Digitaal UIT audio kan worden geactiveerd wanneer de optie Luidsprekerselectie is ingesteld
op TV-luidspreker.
HT-E5200_XU_NL_0223.indd 55HT-E5200_XU_NL_0223.indd 55 2012-02-23 오후 2:38:462012-02-23 오후 2:38:46

| 56 Nederlands
Bijlage
Afspelen
Videobestanden afspelen
• Videobestanden met hoge bitsnelheden van 20 Mbps of meer belasten het product zwaar en
kunnen haperen tijdens het afspelen.
De audiotaal selecteren
• De indicator ◄► wordt niet op het scherm weergegeven als de BONUSVIEW-sectie geen audio-
instellingen voor BONUSVIEW bevat.
• Welke audiotalen beschikbaar zijn is afhankelijk van de talen die op de disc zijn opgeslagen. Het
is mogelijk dat deze functie niet beschikbaar is of dat bepaalde talen niet beschikbaar zijn.
• Voor sommige Blu-ray-discs kunt u Engelse soundtracks voor PCM of Dolby Digital Audio
selecteren.
De ondertitelingstaal selecteren
• Afhankelijk van de Blu-ray-disc of dvd kunt u de ondertiteling mogelijk wijzigen in het discmenu.
Druk op de toets DISC MENU.
• Deze functie is afhankelijk van de ondertitelingstalen die op de disc staan en is mogelijk niet op
alle Blu-ray-discs/dvd's beschikbaar.
• Als de Blu-ray-disc een BONUSVIEW-sectie bevat, wordt tevens informatie gegeven over de
hoofdgeluidsmodus en de BONUSVIEW-modus.
• Met deze functie wijzigt u tegelijkertijd de primaire en secundaire ondertiteling.
• Respectievelijk het totale aantal primaire en het totale aantal secundaire ondertitelingen wordt
weergegeven
JPEG-bestanden afspelen
• U kunt de ondertiteling en presentatieafbeelding niet vergroten in de modus voor volledig
scherm.
AllShare Play
De toets TOOLS gebruiken tijdens het weergeven van foto's
• Als het systeem is aangesloten op een tv waarop BD Wise wordt ondersteund en deze functie is
ingeschakeld, wordt het menu Picture Settings (Afbeeldingsinstellingen) niet weergegeven.
• De functie voor de achtergrondmuziek werkt alleen wanneer het muziekbestand en het
fotobestand zich op hetzelfde opslagapparaat bevinden. Ook kan de geluidskwaliteit nadelig
worden beïnvloed door de bitsnelheid van het MP3-bestand, de grootte van de foto en de
coderingsmethode.
Een USB-opslagapparaat afspelen
• U moet het USB-opslagapparaat op veilige wijze verwijderen (door de functie 'USB veilig verw.' uit te voeren) om mogelijke schade aan het USB-geheugen te voorkomen. Druk op HOME om
naar het menu Home te gaan. Druk vervolgens op de GELE (C) toets en op E.
Muziek afspelen
• Zet het volume op een gematigd niveau voordat u uw iPod op het product aansluit.
• Als u een iPod aansluit terwijl het product is ingeschakeld, wordt de batterij van de iPod
opgeladen.
HT-E5200_XU_NL_0223.indd 56HT-E5200_XU_NL_0223.indd 56 2012-02-23 오후 2:38:482012-02-23 오후 2:38:48

Nederlands 57 |
07BijlageAllShare Play
Een film bekijken
• U moet de VIDEO-uitgang (Composite) op uw tv aansluiten als u videobestanden van uw iPod wilt
bekijken (zie pagina 18).
• Als u iPod-video via de VIDEO-uitgang wilt bekijken, zet u Anynet+ (HDMI-CEC) uit.
• Alleen het afspeelscherm wordt op de tv weergegeven. Andere iPod-schermen op de iPod
weergeven.
• Als u wilt teruggaan naar de iPod-menu's terwijl de iPod-speler is aangesloten via de dock,
drukt u op FUNCTION op de afstandsbediening of op op het voorpaneel van het systeem en
selecteert u R. IPOD.
De modus Functie wordt als volgt overgeschakeld:
BD/DVD D. IN AUX R. IPOD HDMI1 HDMI2 FM BT
iPod
iPod-/iPhone-modellen die u bij dit product kunt gebruiken
• De volumeregeling werkt mogelijk niet normaal bij iPod- en iPhone-modellen die worden vermeld
op pagina 36. Als u problemen hebt met de bovenvermelde modellen, moet u de software van de
iPod/iPhone bijwerken naar de nieuwste versie.
• Afhankelijk van de softwareversie van de iPod kunnen zich bedieningsproblemen voordoen. Dit
ligt niet aan de thuisbioscoop.
• Enkele bewerkingen kunnen afwijken, afhankelijk van de softwareversie of het type van de iPod.
Installeer de meest recente iPod-software. (aanbevolen)
• U kunt muziek of video's afspelen via de functie voor Blu-ray-discs/DVD en muziek en video's
afspelen via de functie Externe iPod. U moet de iPod-dock gebruiken om video's te kunnen
afspelen.
• Weergave van de inhoud van toepassingen via het product kan niet worden gegarandeerd. Wij
adviseren u inhoud af te spelen die is gedownload op de iPod.
• Als u problemen ondervindt bij het gebruik van uw iPod kunt u naar www.apple.com/support/
ipod gaan.
HT-E5200_XU_NL_0223.indd 57HT-E5200_XU_NL_0223.indd 57 2012-02-23 오후 2:38:492012-02-23 오후 2:38:49

| 58 Nederlands
BijlageResolutie in overeenstemming met de uitgangsmodus
� Afspelen van Blu-ray-discs/E-inhoud/digitale inhoud
Uitvoer Instellingen
HDMI/aangesloten HDMI/niet aangesloten
HDMI-modusVIDEO-modus VIDEO-modus
Blu-ray-disc E-inhoud/digitale inhoud
BD WiseResolutie van Blu-
ray-disc1080p bij 60 beelden 576i/480i -
AutoMax. resolutie van
tv-invoer
Max. resolutie van tv-
invoer576i/480i -
1080p bij 60 beelden1080p bij 60
beelden1080p bij 60 beelden 576i/480i -
Filmbeeld: Auto (24Fs)1080p bij 24
beelden1080p bij 24 beelden 576i/480i -
1080i 1080i 1080i 576i/480i 576i/480i
720p 720p 720p 576i/480i 576i/480i
576p/480p 576p/480p 576p/480p 576i/480i 576i/480i
576i/480i - - - 576i/480i
� DVD afspelen
Uitvoer Instellingen
HDMI/aangesloten HDMI/niet aangeslotenHDMI-modus VIDEO-modus VIDEO-modus
BD Wise 576i/480i 576i/480i -
Auto Max. resolutie van tv-invoer 576i/480i -
1080p bij 60 beelden 1080p bij 60 beelden 576i/480i -
1080i 1080i 576i/480i 576i/480i
720p 720p 576i/480i 576i/480i
576p/480p 576p/480p 576i/480i 576i/480i
576i/480i - - 576i/480i
HT-E5200_XU_NL_0223.indd 58HT-E5200_XU_NL_0223.indd 58 2012-02-23 오후 2:38:512012-02-23 오후 2:38:51

Nederlands 59 |
07Bijlage
Selectie van digitale uitvoer
Instellingen PCM Bitstream (zonder omzetting)
Bitstream (DTS opnw gecodeerd)
Bitstream (Dolby D opnw
gecodeerd)
AansluitingAV-ontvanger
met HDMI-ondersteuning
OptischAV-ontvanger
met HDMI-ondersteuning
OptischAV-ontvanger met
HDMI-ondersteuning of Optisch
AV-ontvanger met HDMI-ondersteuning
of Optisch
Audiostroom
op Blu-ray-
disc
PCMMaximaal 7.1
PCM-kanalen
PCM
2-kanaalsPCM
PCM
2-kanaals
DTS opnieuw
gecodeerd
Opnieuw gecodeerde
Dolby Digital *
Dolby DigitalMaximaal 7.1
PCM-kanalen
PCM
2-kanaalsDolby Digital
Dolby
Digital
DTS opnieuw
gecodeerd
Opnieuw gecodeerde
Dolby Digital *
Dolby Digital
Plus
Maximaal 7.1
PCM-kanalen
PCM
2-kanaals
Dolby Digital
Plus
Dolby
Digital
DTS opnieuw
gecodeerd
Opnieuw gecodeerde
Dolby Digital *
Dolby TrueHDMaximaal 7.1
PCM-kanalen
PCM
2-kanaalsDolby TrueHD
Dolby
Digital
DTS opnieuw
gecodeerd
Opnieuw gecodeerde
Dolby Digital *
DTSMaximaal 6.1
PCM-kanalen
PCM
2-kanaalsDTS DTS
DTS opnieuw
gecodeerd
Opnieuw gecodeerde
Dolby Digital *
DTS-HD High
Resolution
Audio
Maximaal 7.1
PCM-kanalen
PCM
2-kanaals
DTS-HD High
Resolution
Audio
DTSDTS opnieuw
gecodeerd
Opnieuw gecodeerde
Dolby Digital *
DTS-HD
Master Audio
Maximaal 7.1
PCM-kanalen
PCM
2-kanaals
DTS-HD
Master AudioDTS
DTS opnieuw
gecodeerd
Opnieuw gecodeerde
Dolby Digital *
Audiostroom
op dvd
PCMPCM
2-kanaals
PCM
2-kanaals
PCM
2-kanaals
PCM
2-kanaalsPCM 2-kanaals PCM 2-kanaals
Dolby DigitalMaximaal 5.1
PCM-kanalen
PCM
2-kanaalsDolby Digital
Dolby
DigitalDolby Digital Dolby Digital
DTSMaximaal 6.1
PCM-kanalen
PCM
2-kanaalsDTS DTS DTS DTS
Definitie voor
Blu-ray-discElke
De hoofdaudiostream en
BONUSVIEW-audiostream
worden samen tot PCM-
geluid gedecodeerd
met toevoeging van
navigatiegeluidseffecten.
Alleen de
hoofdgeluidsstroom
wordt uitgevoerd zodat
de AV-ontvanger de
audiobitstream kan
decoderen.
U hoort geen
BONUSVIEW-geluid of
navigatiegeluidseffecten.
De hoofdaudiostream
en BONUSVIEW-
audiostream worden
samen tot PCM-
geluid gedecodeerd
met toevoeging van
navigatiegeluidseffecten,
waarna het PCM-
geluid opnieuw wordt
gecodeerd tot een DTS-
bitstream.
De hoofdaudiostream
en BONUSVIEW-
audiostream worden
samen de PCM-
audio gedecodeerd
met toevoeging van
navigatiegeluidseffecten,
waarna het PCM-
audio opnieuw wordt
gecodeerd tot een Dolby
Digital-bitstream of
PCM.
* Als de bronstream 2-kanaals is, wordt de instelling 'Re-encoded Dolby D' (Dolby D opnieuw gecodeerd)
niet toegepast. Het uitgangssignaal wordt dan PCM 2-kan.
Blu-ray-discs kunnen drie audiostreams bevatten:
- Hoofdgeluid: het geluidsspoor van de hoofdfilm.
- BONUSVIEW-geluid: extra geluidsspoor, bijvoorbeeld met commentaar van de regisseur of van acteurs.
- Navigatiegeluidseffecten: wanneer u bepaalde menuopties kiest, klinken mogelijk navigatiegeluidseffecten.
De navigatiegeluidseffecten zijn op elke Blu-ray-disc anders.
HT-E5200_XU_NL_0223.indd 59HT-E5200_XU_NL_0223.indd 59 2012-02-23 오후 2:38:532012-02-23 오후 2:38:53

| 60 Nederlands
BijlageProblemen oplossen
Raadpleeg de onderstaande tabel als het product niet naar behoren functioneert. Als uw probleem niet
wordt genoemd of als de onderstaande instructies niet helpen, schakelt u het product uit, haalt u de
stekker uit het stopcontact en neemt u contact op met de dichtstbijzijnde erkende dealer of Samsung
Electronics-servicecentrum.
Symptoom Controle/oplossing
Ik kan de disc niet uitwerpen.
• Zit het netsnoer goed in het stopcontact?
• Zet het apparaat uit en weer aan.
De iPod kan niet worden aangesloten.
• Controleer de toestand van de iPod-connector en dock.
• Houd de softwareversie van de iPod actueel.
Het apparaat begint niet met afspelen.
• Controleer het regionummer van de Blu-ray/dvd.
In het buitenland gekochte Blu-ray-discs/dvd’s kunnen mogelijk niet worden afgespeeld.
• Cd-rom's en dvd-rom's kunnen niet op dit product worden afgespeeld.
• Controleer of het classificatieniveau klopt.
Het afspelen start niet onmiddellijk wanneer de toets Afspelen/Pauze wordt ingedrukt.
• Is de disc vervormd of zitten er krassen op het oppervlak?
• Veeg de disc schoon.
Ik hoor geen geluid. • Het home cinema-systeem geeft geen geluid weer bij versneld afspelen, vertraagd afspelen en
stap voor stap afspelen.
• Zijn de luidsprekers goed aangesloten? Zijn de instellingen van de luidsprekers goed aangepast?
• Is de disc ernstig beschadigd?
De afstandsbediening werkt niet.
• Gebruikt u de afstandsbediening binnen het werkbereik en onder de juiste hoek ten opzicht van de
sensor?
• Zijn de batterijen leeg?
• Hebt u de juiste modus (TV/BD) voor de afstandsbediening (TV of BD) geselecteerd?
• De disc draait maar er wordt geen beeld weergegeven.
• De beeldkwaliteit is slecht en het beeld trilt.
• Is de tv ingeschakeld?
• Zijn de videokabels goed aangesloten?
• Is de disc vuil of beschadigd?
• Een slecht gefabriceerde disc kan mogelijk niet worden afgespeeld.
De geluidstaal en ondertiteling werken niet
• De geluidstaal en ondertiteling werken niet als de disc deze niet bevat.
Het menuscherm wordt niet weergegeven, zelfs niet als de menufunctie wordt geselecteerd.
• Gebruikt u een disc die geen menu’s bevat?
De beeldverhoudingen kunnen niet worden gewijzigd.
• U kunt 16:9-bd's/dvd's afspelen in de modus 16:9 Wide (16:9 volledig), 4:3 Letter
Box (4:3 Brievenbus) of 4:3 Pan - Scan. Echter, 4:3-bd's/dvd's kunnen alleen worden
afgespeeld in 4:3. Raadpleeg de hoes van de Blu-ray-disc en selecteer de juiste functie.
HT-E5200_XU_NL_0223.indd 60HT-E5200_XU_NL_0223.indd 60 2012-02-23 오후 2:38:552012-02-23 오후 2:38:55

Nederlands 61 |
07Bijlage
Symptoom Controle/oplossing
• Het product werkt niet.(Bijvoorbeeld: de eenheid wordt uitgeschakeld of maakt een raar geluid.)
• Het product werkt niet normaal.
• Houd de toets 5 op de afstandsbediening 5 seconden of langer ingedrukt in stand-by.
- Met de functie RESET worden alle opgeslagen instellingen gewist.
Gebruik deze optie uitsluitend in noodgevallen.
U bent het wachtwoord voor het classificatieniveau vergeten.
• Houd de toets 5 op het product ten minste 5 seconden ingedrukt zonder disc in het
apparaat. Op het scherm verschijnt de tekst INIT en alle instellingen worden teruggezet
naar de standaardwaarden.
Druk vervolgens op toets AAN/UIT.
- Met de functie RESET worden alle opgeslagen instellingen gewist.
Gebruik deze optie uitsluitend in noodgevallen.
Ik heb geen radio-ontvangst. • Is de antenne goed aangesloten?
• Als het invoersignaal van de antenne zwak is, kunt u een externe FM-antenne installeren
in een gebied met goede ontvangst.
Geen geluid tijdens het beluisteren van het geluid van de televisie via het product.
• Als de toets OPENEN/SLUITEN ^ wordt ingedrukt tijdens het luisteren naar tv-geluid
met D.IN- of AUX-functies, worden de bd/dvd-functies ingeschakeld waardoor het geluid
van de tv wordt gedempt.
Op het scherm verschijnt de tekst 'Niet beschikbaar'.
• De functie of bewerking kan op het moment niet worden uitgevoerd, want:
1. De software van de Blu-ray-disc/dvd staat dit niet toe.
2. De software van de Blu-ray-disc/dvd ondersteunt de functie niet (bijvoorbeeld beeldhoeken).
3. De functie is momenteel niet beschikbaar.
4. U hebt een titel, hoofdstuk of zoektijd opgevraagd die buiten het bereik valt.
Als de HDMI-uitvoer is ingesteld op een resolutie die niet door de tv wordt ondersteund (bijvoorbeeld 1080p), wordt er mogelijk geen beeld weergegeven.
• Houdt de toets 5 op het voorpaneel ten minste 5 seconden ingedrukt zonder disc in het
apparaat. Alle instellingen zullen worden teruggezet naar de fabrieksinstellingen.
Geen HDMI-uitvoer. • Controleer de aansluiting tussen de tv en de HDMI-aansluiting van het product.
• Controleer of uw tv een HDMI-invoerresolutie van 576p/480p/720p/1080i/1080p
ondersteunt.
Abnormaal HDMI-uitvoerbeeld.
• Als u alleen maar ruis op het beeld ziet, betekent dit dat uw televisie geen ondersteuning
biedt voor HDCP (High-bandwidth Digital Content Protection).
De functie AllShare Play
Ik kan wel mappen zien die worden gedeeld via AllShare Play, maar de bestanden in deze mappen zie ik niet.
• AllShare Play toont alleen bestanden uit de categorieën Foto, Muziek en Film.
Bestanden die niet corresponderen met deze categorieën worden mogelijk niet weergegeven.
HT-E5200_XU_NL_0223.indd 61HT-E5200_XU_NL_0223.indd 61 2012-02-23 오후 2:38:572012-02-23 오후 2:38:57

| 62 Nederlands
BijlageSymptoom Controle/oplossing
Video wordt met onderbrekingen afgespeeld
• Controleer of het netwerk stabiel is.
• Controleer of de netwerkkabel goed is aangesloten en of het netwerk niet overbelast is.
• De draadloze verbinding tussen de server en het product is instabiel.
Controleer de verbinding.
De AllShare Play-verbinding tussen tv en pc is instabiel
• IP-adressen in hetzelfde subnetwerk moeten uniek zijn, anders kan een dergelijk fenomeen
ontstaan door IP-conflicten.
• Controleer of u een firewall hebt ingeschakeld.
Als dat zo is, schakelt u de firewallfunctie uit.
BD-LIVE
Ik kan geen verbinding maken met de BD-LIVE-server
• Controleer met de functie Network Status (Netwerkstatus) of er een netwerkverbinding tot
stand is gebracht.
• Controleer of het USB-geheugen is aangesloten op het product.
• Het geheugenapparaat moet ten minste 1 GB vrije ruimte bieden om de BD-LIVE-service te
kunnen ondersteunen.
U kunt in BD-gegevensbeheer de beschikbare ruimte controleren. (Zie pagina 55)
• Controleer of het menu BD-Live internetverbinding is ingesteld op Allow (All) (Toestaan (Alle)).
• Als alle bovenstaande maatregelen het probleem niet verhelpen, neemt u contact op met de
aanbieder van de inhoud of werkt u de firmware bij tot de meest recente versie.
Bij het gebruik van de BD-LIVE-service treedt er een fout op.
• Het geheugenapparaat moet ten minste 1 GB vrije ruimte bieden om de BD-LIVE-service te
kunnen ondersteunen.
U kunt in BD-gegevensbeheer de beschikbare ruimte controleren.
(Zie pagina 55)
| OPMERKING |
� Wanneer de fabrieksinstellingen worden hersteld, worden alle BD-gegevens van de gebruiker gewist.
Hierbij verklaart Samsung Electronics dat dit home cinema-systeem compatibel is met de essentiële vereisten en andere relevante bepalingen van Richtlijn 1999/5/EG.
U kunt de officiële conformiteitsverklaring vinden op http://www.samsung.com. Ga naar Support (Ondersteuning)> Search Product Support (Productondersteuning zoeken) en voer de modelnaam in.
Deze apparatuur mag worden gebruikt in alle EU-landen
Dit apparaat is uitsluitend geschikt voor binnengebruik.
HT-E5200_XU_NL_0223.indd 62HT-E5200_XU_NL_0223.indd 62 2012-02-23 오후 2:38:592012-02-23 오후 2:38:59

Nederlands 63 |
07Bijlage
Specificaties
Algemeen
Gewicht 2,5 kg
Afmetingen 430 (B) x 55 (H) x 255,8 (D) mm
Temperatuurbereik tijdens gebruik +5°C tot +35°C
Vochtigheidsgraad tijdens gebruik 10 % tot 75 %
FM Tuner
Signaal/ruisverhouding 55 dB
Bruikbare gevoeligheid 12 dB
Totale harmonische vervorming 0,5 %
Disc
BD (Blu-ray Disc) Leessnelheid: 9,834 m/sec
DVD (Digital Versatile Disc)Leessnelheid: 6,98 tot 7,68 m/sec.
Geschatte afspeeltijd (enkelzijdige, enkele laag schijf): 135 min.
CD: 12 cm (COMPACT DISC)Leessnelheid: 4,8 tot 5,6 m/sec.
Maximum afspeeltijd: 74 min.
CD : 8cm (COMPACT DISC)Leessnelheid: 4,8 tot 5,6 m/sec.
Maximum afspeeltijd: 20 min.
Video-uitvoer Composite Video1 kanaal: 1,0 Vp-p (75 Ω belasting)
Blu-ray-disc : 576i/480i DVD : 576i/480i
Video/audio HDMI1080p, 1080i, 720p, 576p/480p
PCM-meerkanaalsgeluid, Bitstream-audio, PCM-audio
Versterker
Uitvoer luidspreker voor 165W x 2(3Ω)
Uitvoer subwoofer 170W(3Ω)
FrequentiebereikAnaloge ingang 20 Hz – 20 kHz (±3 dB)
Digitale ingang 20 Hz – 40 kHz (±4 dB)
S/R-verhouding 70 dB
Kanaalscheiding 60 dB
Ingangsgevoeligheid (AUX) 500 mV
Luidspreker
Luidsprekersysteem2,1-kanaals luidsprekersysteem
Front Subwoofer
Impedantie 3 Ω 3 Ω
Frequentiebereik 140Hz~20kHz 40Hz ~ 160Hz
Geluidsdrukniveau 87dB/W/M 88dB/W/M
Nominaal ingangsvermogen 165W 170W
Maximaal ingangsvermogen 330W 340W
Afmetingen (B x H x D) 90 x 207,5 x 68,5 mm 168 x 350 x 285 mm
Gewicht 0,71 kg 2,6 kg
• Netwerksnelheden tot 10 Mbps worden niet ondersteund.
• Samsung Electronics Co., Ltd behoudt zich het recht voor de specificaties zonder voorafgaande
waarschuwing te wijzigen.
• Gewicht en afmetingen zijn bij benadering.
• Vormgeving en specificaties kunnen zonder kennisgeving worden gewijzigd.
• Raadpleeg voor de stroomtoevoer en het stroomverbruik het etiket dat aan het apparaat is bevestigd.
HT-E5200_XU_NL_0223.indd 63HT-E5200_XU_NL_0223.indd 63 2012-02-23 오후 2:39:012012-02-23 오후 2:39:01

Correcte verwijdering van dit product (afval van elektrische en elektronische apparatuur)(Van toepassing in de Europese Unie en andere Europese landen met gescheiden afvalinzamelingssystemen)
Deze markering op het product, de accessoires of de literatuur geeft aan dat het product en de bijbehorende
elektronische accessoires (bijvoorbeeld oplader, hoofdtelefoon, USB-kabel) aan het einde van hun levensduur niet
mogen worden afgevoerd met het huishoudelijk afval. Om negatieve gevolgen voor het milieu en de volksgezondheid
door een ongecontroleerde afvalverwerking te voorkomen, verzoeken we u dit afval te scheiden van andere soorten
afval, zodat de grondstoffen op een verantwoorde wijze kunnen worden gerecycled voor duurzaam hergebruik.
Particulieren kunnen contact opnemen met de leverancier van het product of de lokale overheid voor meer informatie
over het milieuvriendelijk en veilig recyclen van de betreffende items.
Bedrijven moeten contact opnemen met de leverancier en de bepalingen en voorwaarden in het koopcontract
raadplegen. Dit product en de bijbehorende elektronische accessoires mogen niet worden afgevoerd met ander
commercieel afval.
Batterijen in dit product correct verwijderen(Van toepassing in de Europese Unie en andere Europese landen met inzamelpunten voor de verwerking
van oude batterijen.)
Deze markering op de batterij, de handleiding of de verpakking geeft aan dat de batterijen in dit product
niet moeten worden weggegooid bij het normale huisafval aan het einde van hun levensduur. De
chemische symbolen Hg, Cd of Pb geven aan dat de batterij een hoeveelheid kwik, cadmium of lood
bevat die boven de referentieniveaus van de EG Richtlijn 2006/66 ligt. Indien batterijen niet op de juiste
wijze worden verwijderd, kunnen deze stoffen schadelijk zijn voor de volksgezond gezondheid of het
milieu.
Om de natuurlijke bronnen te beschermen en het hergebruik van materiaal te bevorderen, moet u
batterijen gescheiden houden van het restafval en recyclen via uw lokale, gratis inzamelpunten voor de
verwerking van oude batterijen.
Area Contact Centre Web Site` EuropeAlbania 42 27 5755 -
Austria0810 - SAMSUNG (7267864, € 0.07/min)
www.samsung.com
Belgium 02-201-24-18
www.samsung.com/be (Dutch) www.samsung.com/be_fr (French)
Bosnia 05 133 1999 -
Bulgaria 07001 33 11 www.samsung.com
Croatia 062 SAMSUNG (062 726 7864) www.samsung.com
Czech
800-SAMSUNG (800-726786)
www.samsung.comSamsung Zrt., česká organizační složka, Oasis Florenc, Soko-lovská394/17, 180 00, Praha 8
Denmark 70 70 19 70 www.samsung.com
Finland 030 - 6227 515 www.samsung.com
France 01 48 63 00 00 www.samsung.com
Germany01805 - SAMSUNG (726-7864 € 0,14/Min)
www.samsung.com
Hungary 06-80-SAMSUNG (726-7864) www.samsung.com
Italia 800-SAMSUNG (726-7864) www.samsung.com
Kosovo +381 0113216899 -
Luxemburg 261 03 710 www.samsung.com
Macedonia 023 207 777 -
Area Contact Centre Web SiteMontenegro 020 405 888 -
Netherlands0900-SAMSUNG (0900-7267864) (€ 0,10/Min)
www.samsung.com
Norway 815-56 480 www.samsung.com
Poland0 801 1SAMSUNG (172678) / 022-607-93-33
www.samsung.com
Portugal 80820-SAMSUNG (726-7864) www.samsung.com
Rumania
1. 08010 SAMSUNG (72678) - doar din reţeaua Romtelecom, tarif local
2. 021.206.01.10 - din orice reţea, tarif normal
www.samsung.com
Serbia0700 Samsung (0700 726 7864)
www.samsung.com
Slovakia 0800-SAMSUNG (726-7864) www.samsung.com
Spain 902-1-SAMSUNG (902 172 678) www.samsung.com
Sweden 0771 726 7864 (SAMSUNG) www.samsung.com
Switzerland0848-SAMSUNG (7267864, CHF 0.08/min)
www.samsung.com/ch www.samsung.com/ch_fr/(French)
U.K 0330 SAMSUNG (7267864) www.samsung.com
Eire 0818 717100 www.samsung.com
Lithuania 8-800-77777 www.samsung.com
Latvia 8000-7267 www.samsung.com
Estonia 800-7267 www.samsung.com
Neem wereldwijd contact op met SAMSUNGWanneer u vragen of opmerkingen heeft met betrekking tot Samsung-producten,
neem dan contact op met de klantenservice van SAMSUNG.
HT-E5200_XU_NL_0223.indd 64HT-E5200_XU_NL_0223.indd 64 2012-02-23 오후 2:39:022012-02-23 오후 2:39:02

imagine the possibilities
Thank you for purchasing this Samsung product.
To receive more complete service,
please register your product at
www.samsung.com/register
2.1CH Blu-ray™
Home Entertainment Systemuser manual
HT-E5200
HT-E5200_XU_0223.indd 1HT-E5200_XU_0223.indd 1 2012-02-23 오후 2:27:232012-02-23 오후 2:27:23

| 2 English
Safety InformationWarning
TO REDUCE THE RISK OF ELECTRIC SHOCK, DO NOT REMOVE THE COVER(OR BACK).
NO USER-SERVICEABLE PARTS ARE INSIDE. REFER SERVICING TO QUALIFIED SERVICE PERSONNEL.
CAUTION
RISK OF ELECTRIC SHOCKDO NOT OPEN
This symbol indicates “dangerous voltage”
inside the product that presents a risk of
electric shock or personal injury.
CAUTION: TO PREVENT ELECTRIC SHOCK,
MATCH WIDE BLADE OF PLUG TO WIDE SLOT,
FULLY INSERT.
This symbol indicates important
instructions accompanying the product.
Wiring the Main Power Supply Plug (UK Only)
IMPORTANT NOTICEThe mains lead on this equipment is supplied with a moulded plug incorporating a fuse. The value of the fuse is
indicated on the pin face of the plug and if it requires replacing, a fuse approved to BS1362 of the same rating must be
used. Never use the plug with the fuse cover removed. If the cover is detachable and a replacement is required, it must
be of the same colour as the fuse fitted in the plug. Replacement covers are available from your dealer. If the fitted plug
is not suitable for the power points in your house or the cable is not long enough to reach a power point, you should
obtain a suitable safety approved extension lead or consult your dealer for assistance. However, if there is no alternative
to cutting off the plug, remove the fuse and then safely dispose of the plug. Do not connect the plug to a mains socket
as there is a risk of shock hazard from the bared flexible cord. Never attempt to insert bare wires directly into a mains
socket. A plug and fuse must be used at all times.
IMPORTANTThe wires in the mains lead are coloured in accordance with the following code:– BLUE = NEUTRAL BROWN
= LIVE As these colours may not correspond to the coloured markings identifying the terminals in your plug,
proceed as follows:–The wire coloured BLUE must be connected to the terminal marked with the letter N or
coloured BLUE or BLACK. The wire coloured BROWN must be connected to the terminal marked with the
letter L or coloured BROWN or RED.
WARNING : DO NOT CONNECT EITHER WIRE TO THE EARTH TERMINAL WHICH IS MARKED WITH LETTER E OR BY THE EARTH SYMBOL , OR COLOURED GREEN OR GREEN AND YELLOW.
WARNING• To reduce the risk of fire or electric shock, do
not expose this appliance to rain or moisture.
CAUTION• Apparatus shall not be exposed to dripping or
splashing and no objects filled with liquids, such
as vases, shall be placed on the apparatus.
• The Mains plug is used as a disconnect device
and shall stay readily operable at any time.
• This apparatus shall always be connected
to an AC outlet with a protective grounding
connection.
• To disconnect the apparatus from the mains,
the plug must be pulled out from the mains
socket, therefore the mains plug shall be readily
operable.
CLASS 1 LASER PRODUCT
KLASSE 1 LASER PRODUKT
LUOKAN 1 LASER LAITE
KLASS 1 LASER APPARAT
PRODUCTO LÁSER CLASE 1
CLASS 1 LASER PRODUCTThis Compact Disc player is classified as a CLASS
1 LASER product.
Use of controls, adjustments or performance of
procedures other than those specified herein may
result in hazardous radiation exposure.
CAUTION• INVISIBLE LASER RADIATION WHEN OPEN
AND INTERLOCKS DEFEATED, AVOID
EXPOSURE TO BEAM.
HT-E5200_XU_0223.indd 2HT-E5200_XU_0223.indd 2 2012-02-23 오후 2:28:062012-02-23 오후 2:28:06

English 3 |
01Safety Inform
ation
Disc Storage & Management
• Holding Discs
- Fingerprints or scratches on
a disc may reduce sound and
picture quality or cause skipping.
- Avoid touching the surface of a disc where
data has been recorded.
- Hold the disc by the edges so that fingerprints
will not get on the surface.
- Do not stick paper or tape on the disc.
• Cleaning Discs
- If you get fingerprints or dirt on a
disc, clean it with a mild detergent
diluted in water and wipe with a
soft cloth.
- When cleaning, wipe gently from the inside to
the outside of the disc.
- Disc Storage
Do not keep in direct sunlight.
Keep in a cool ventilated area.
Keep in a clean protection jacket and store
vertically.
Handling Cautions
• Do not expose this apparatus to dripping or
splashing. Do not put objects filled with liquids,
such as vases, on the apparatus.
• To turn this apparatus off completely, you must
pull the power plug out of the wall socket.
Consequently, the power plug must be easily
and readily accessible at all times.
• Do not touch the power plug with a wet hand.
It can cause an electric shock.
• Do not plug multiple electric devices into the
same wall socket. Ovedrloading a socket can
cause it to overheat, resulting in a fire.
• Maintenance of the Cabinet
- Before connecting other components to this
product, be sure to turn them off.
- If you move your product suddenly from a
cold place to a warm place, condensation
may occur on the operating parts and lens
and cause abnormal disc playback. If this
occurs, unplug the product, wait for two
hours, and then connect the plug to the
power outlet. Then, insert the disc, and try to
play back again.
• If the product makes an abnormal noise or
produces a burning smell or smoke, turn off
the power switch immediately and disconnect
the power plug from the wall outlet. Then,
contact the nearest customer service centre for
technical assistance. Do not use the product.
Using the product as it is may cause a fire or an
electric shock.
• To turn this apparatus off completely, you must
pull the power plug out of the wall socket.
Consequently, the power plug must be easily
and readily accessible at all times.
Using the 3D Function
IMPORTANT HEALTH AND SAFETY
INFORMATION FOR 3D PICTURES.
Read and understand the following safety
information before using the 3D function.
• Some viewers may experience discomfort while
viewing 3D TV such as dizziness, nausea, and
headaches.
If you experience any such symptom, stop
viewing 3D TV, remove the 3D Active Glasses,
and rest.
• Watching 3D images for an extended period of
time may cause eye strain. If you feel eye strain,
stop viewing 3D TV, remove your 3D Active
Glasses, and rest.
• A responsible adult should frequently check on
children who are using the 3D function.
If there are any reports of tired eyes, headaches,
dizziness, or nausea, have the child stop viewing
3D TV and rest.
• Do not use the 3D Active Glasses for other
purposes (such as general eyeglasses,
sunglasses, protective goggles, etc.)
HT-E5200_XU_0223.indd 3HT-E5200_XU_0223.indd 3 2012-02-23 오후 2:28:072012-02-23 오후 2:28:07

| 4 English
Safety Information• Do not use the 3D function or 3D Active Glasses
while walking or moving around. Using the 3D
function or 3D Active Glasses while moving
around may cause you to bump into objects,
trip, and/or fall, and cause serious injury.
• If you want to enjoy 3D content, connect a 3D
device (3D compliant AV receiver or TV) to the
product’s HDMI OUT port using a high-speed
HDMI cable. Put on 3D glasses before playing
the 3D content.
• The product outputs 3D signals only through
HDMI cable connected to the HDMI OUT port.
• As the video resolution in 3D play mode is fixed
according to the resolution of the original 3D
video, you can not change the resolution to your
preference.
• Some functions such as BD Wise, screen size
adjustment, and resolution adjustment may not
operate properly in 3D play mode.
• You must use a high-speed HDMI cable for
proper output of the 3D signal.
• Stay at least three times the width of the screen
from the TV when watching 3D images. For
example, if you have a 46 inch screen, stay 3.5
meters from the screen.
- Place the 3D video screen at eye level for the
best 3D picture.
• When the product is connected to some 3D
devices, the 3D effect may not function properly.
• This product does not convert 2D content into
3D.
• “Blu-ray 3D” and “Blu-ray 3D” logo are
trademarks of the Blu-ray Disc Association.
Copyright
© 2012 Samsung Electronics Co.,Ltd.
All rights reserved; No part or whole of this user’s
manual may be reproduced or copied without the
prior written permission of Samsung Electronics
Co.,Ltd.
Licence
• Dolby and the double-D symbol are registered
trademarks of Dolby Laboratories.
• Manufactured under licence under U.S. Patent
Nos: 5,956,674; 5,974,380; 6,226,616;
6,487,535; 7,392,195; 7,272,567; 7,333,929;
7,212,872 & other U.S. and worldwide patents
issued & pending. DTS-HD, the Symbol, & DTS-
HD and the Symbol together are registered
trademarks & DTS-HD Master Audio | Essential
is a trademark of DTS, Inc. Product includes
software. © DTS, Inc. All Rights Reserved.
• ABOUT DIVX VIDEO: DivX® is a digital video
format created by DivX, LLC, a subsidiary of Rovi
Corporation. This is an official DivX Certified®
device that plays DivX video. Visit divx.com for
more information and software tools to convert
your files into DivX videos.
ABOUT DIVX VIDEO-ON-DEMAND: This DivX
Certified® device must be registered in order to
play purchased DivX Video-on-Demand (VOD)
movies. To obtain your registration code, locate
the DivX VOD section in your device setup
menu. Go to vod.divx.com for more information
on how to complete your registration.
DivX Certified® to play DivX® video up to HD
1080p, including premium content.
DivX®, DivX Certified® and associated logos
are trademarks of Rovi Corporation or its
subsidiaries and are used under licence.
Covered by one or more of the following U.S.
patents : 7,295,673; 7,460,668; 7,515,710;
7,519,274
HT-E5200_XU_0223.indd 4HT-E5200_XU_0223.indd 4 2012-02-23 오후 2:28:092012-02-23 오후 2:28:09

English 5 |
01Safety Inform
ation
• The terms HDMI and HDMI High-Definition
Multimedia Interface, and the HDMI Logo are
trademarks or registered trademarks of HDMI
Licensing LLC in the United States and other
countries.
• Oracle and Java are registered trademarks of
Oracle and/or its affiliates. Other names may be
trademarks of their respective owners.
• This item incorporates copy protection
technology that is protected by U.S. patents
and other intellectual property rights of
Rovi Corporation. Reverse engineering and
disassembly are prohibited.
• Blu-ray Disc™, Blu-ray™, and the logos are
trademarks of Blu-ray Disc Association.
• iPad, iPhone, iPod, iPod classic, iPod nano,
iPod shuffle, and iPod touch are trademarks
of Apple Inc., registered in the U.S. and other
countries.
• This product uses Cinavia technology to
limit the use of unauthorized copies of some
commercially-produced film and videos and
their soundtracks. When a prohibited use of an
unauthorized copy is detected, a message will
be displayed and playback or copying will be
interrupted.
More information about Cinavia technology
is provided at the Cinavia Online Consumer
Information Centre at http://www.cinavia.com.
To request additional information about Cinavia
by mail, send a postcard with your mailing
address to: Cinavia Consumer Information
Centre, P.O. Box 86851, San Diego, CA, 92138,
USA.”
This product incorporates proprietary technology
under licence from Verance Corporation and is
protected by U.S. Patent 7,369,677 and other
U.S. and worldwide patents issued and pending
as well as copyright and trade secret protection
for certain aspects of such technology. Cinavia
is a trademark of Verance Corporation.
Copyright 2004-2010 Verance Corporation. All
rights reserved by Verance. Reverse engineering
or disassembly is prohibited.
• Open Source Licence Notice
- In the case of using open source software,
Open Source Licences are available on the
product menu.
HT-E5200_XU_0223.indd 5HT-E5200_XU_0223.indd 5 2012-02-23 오후 2:28:122012-02-23 오후 2:28:12

| 6 English
ContentsSAFETY INFORMATION
2 Warning3 Disc Storage & Management3 Handling Cautions3 Using the 3D Function4 Copyright4 Licence
GETTING STARTED
7 Disk and Format Compatibility8 Logos of Discs the product can play11 Accessories12 Front Panel12 Rear Panel13 Remote Control
CONNECTIONS
15 Attaching the Toroidal Ferrite Core to the Power Cord of the Main Unit
15 Connecting the Speakers15 Speaker Components
16 Connecting The Speakers
17 Connecting the FM Antenna17 Connecting to an iPod/iPhone17 Using a USB Cable
17 Using a Dock
18 Connecting to a TV18 Method 1 Connecting to a TV with an
HDMI Cable - Best Quality (Recommended)
18 Method 2 Connecting to a TV with a
Video Cable - Good Quality
19 Connecting to External Devices19 Method 1 HDMI IN : Connecting to an
External Component with an HDMI Cable
19 Method 2 OPTICAL : Connecting an
External Digital Audio Component
19 Method 3 AUX IN : Connecting an
External Analogue Component
20 Connecting to a Network Router20 Wired Network
20 Wireless Network
SETTINGS
21 The Initial Settings Procedure23 The Home Screen23 Accessing the Settings Screen24 Settings Menu Functions29 Networks and the Internet33 Upgrading Software
MEDIA PLAY
35 The AllShare Play Screen36 Playing Files on a USB Storage Device or
iPod/iPhone36 iPod/iPhone Models You Can Use with
This Product37 The Function Screen37 Playing Commercial Video Discs37 Playing Commercial Audio Discs38 Playing a Disc with User Recorded
Content38 Using the AllShare Network Function40 Controlling Video Playback42 Controlling Music Playback45 Playing Photo Contents45 Using the Tools Menu when a File is
Highlighted48 Listening to Radio50 Using the Special Effects Remote Control
Buttons
NETWORK SERVICES
51 Using Smart Hub53 BD-LIVE™
APPENDIX
54 Additional Information60 Troubleshooting63 Specifications
HT-E5200_XU_0223.indd 6HT-E5200_XU_0223.indd 6 2012-02-23 오후 2:28:142012-02-23 오후 2:28:14

English 7 |
02G
etting Started
Getting StartedDisk and Format Compatibility
Disc types and contents your product can play
Media Disc Type Details
VIDEO
Blu-ray Disc
3D Blu-ray DiscBD-ROM or BD-RE/-R disc recorded in the BD-RE format.
DVD-VIDEO, DVD-RW,
DVD-R, DVD+RW,
DVD+R
DVD-VIDEO, recorded DVD+RW/DVD-RW(V)/DVD-R/+R discs that have been
recorded and finalised, or a USB storage media containing DivX, MKV, MP4
contents.
MUSICCD-RW/-R, DVD-RW/-R,
BD-RE/-R
Music recorded on CD-RW/-R, DVD-RW/-R, BD-RE/-R discs or a USB storage
media containing MP3 or WMA contents.
PHOTOCD-RW/-R, DVD-RW/-R,
BD-RE/-R
Photos recorded on CD-RW/-R, DVD-RW/-R, BD-RE/-R discs or a USB storage
media containing JPEG contents.
| NOTE |
� The product may not play certain CD-RW/-R and DVD-R because of the disc type or recording conditions.
� If a DVD-RW/-R disc has not been recorded properly in DVD video format, it will not be playable.
� Your product will not play content that has been recorded on a DVD-R at a bit rate that exceeds 10 Mbps.
� Your product will not play content that has been recorded on a BD-R or USB device at a bit rate that exceeds 30 Mbps.
� Playback may not work for some types of discs, or when you use specific operations, such as angle change and aspect ratio
adjustment. Information about the discs is written in detail on the disc box. Please refer to this if necessary.
� When you play a BD-J title, loading may take longer than a normal title or some functions may perform slowly.
Disc types your product cannot play
• HD DVD
• DVD-ROM/PD/MV-
Disc, etc
• DVD-RAM
• Super Audio CD
(except CD layer)
• DVD-RW(VR mode)
• CVD/CD-ROM/CDV/
CD-G/CD-I/LD
(CD-Gs play audio
only, not graphics.)
• 3.9 GB DVD-R Disc
for Authoring.
| NOTE |
� This product may not respond to all operating commands because some Blu-ray Disc, DVD, and CD discs allow specific or
limited operation and provide only certain features during playback.
Please note that this is not a defect in the product.
� Samsung cannot guarantee that this product will play every disc bearing the Blu-ray Disc, DVD or CD logo because disc
formats evolve, and problems and errors may occur during the creation of Blu-ray Disc, DVD, and CD software and/or the
manufacture of discs.
� Please contact the SAMSUNG Customer Care Centre, if you have questions or encounter difficulty when playing Blu-ray Disc,
DVD, or CD discs in this product. Also, refer to rest of this user manual for additional information on playback restrictions.
� Some commercial discs and DVD discs purchased outside your region may not play on this product.
HT-E5200_XU_0223.indd 7HT-E5200_XU_0223.indd 7 2012-02-23 오후 2:28:182012-02-23 오후 2:28:18

| 8 English
Getting StartedRegion CodeBoth products and discs are coded by region.
These regional codes must match for a disc to
play. If the codes do not match, the disc will not
play.
The Region Number for this product is displayed
on the rear panel of the product.
Disc Type Region Code Area
Blu-ray Disc
A
North America, Central America,
South America, Korea, Japan,
Taiwan, Hong Kong and South
East Asia.
BEurope, Greenland, French
territories, Middle East, Africa,
Australia and New Zealand.
CIndia, China, Russia, Central and
South Asia.
DVD-VIDEO
1 The U.S., U.S. territories and
Canada
2 Europe, Japan, the Middle East,
Egypt, South Africa, Greenland
3 Taiwan, Korea, the Philippines,
Indonesia, Hong Kong
4Mexico, South America,
Central America, Australia,
New Zealand, Pacific Islands,
Caribbean
5Russia, Eastern Europe, India,
most of Africa, North Korea,
Mongolia
6 China
| NOTE |
� If the Region number of a Blu-ray Disc/DVDs does not
correspond to the Region number of this product, the
product cannot play the disc.
Logos of Discs the product can play
Blu-ray Disc 3D Blu-ray Disc
BD-LIVE Dolby
DTS DivX
PAL broadcast system in
U.K, France, Germany, etc.Java
Supported Formats
Music File Support
File Extension Container Audio
Codec Support Range
*.mp3 MP3 MP3 -
*.wma WMA WMA
Compliant with
WMA version 10
* Sampling rates (in
kHz) - 8, 11, 16,
22, 32, 44.1, 48
* Bit rates - All bit
rates in the range
5kbps to 384kbps
HT-E5200_XU_0223.indd 8HT-E5200_XU_0223.indd 8 2012-02-23 오후 2:28:212012-02-23 오후 2:28:21

English 9 |
02G
etting Started
Video File Support
File Extension Container Video Codec Resolution Frame rate(fps)
Bit rate (Mbps) Audio Codec
*.avi AVI
DivX 3.11/4.x/5.1/6.0
1920x1080 6 ~ 30 8 MP3AC3
LPCMDTS Core
H.264 BP/MP/HP 1920x1080 6 ~ 30 25
MPEG4 SP/ASP 1920x1080 6 ~ 30 8
*.mkv MKV
DivX 3.11/4.x/5.1/6.0
1920x1080 6 ~ 30 8 MP3AC3
LPCMDTS Core
H.264 BP/MP/HP 1920x1080 6 ~ 30 25
MPEG4 SP/ASP 1920x1080 6 ~ 30 8
*.asf ASF
DivX 3.11/4.x/5.1/6.0
1920x1080 6 ~ 30 8 MP3AC3
LPCMWMA
H.264 BP/MP/HP 1920x1080 6 ~ 30 25
MPEG4 SP/ASP 1920x1080 6 ~ 30 8
*.wmv WMV (wmv9)Window Media
Video v91920x1080 6 ~ 30 25 WMA
*.mp4 MP4H.264 BP/MP/HP 1920x1080 6 ~ 30 25 MP3
AACMPEG4 SP/ASP 1920x1080 6 ~ 30 8
*.3gp 3GPPH.264 BP/MP/HP 1920x1080 6 ~ 30 25
AACMPEG4 SP/ASP 1920x1080 6 ~ 30 8
*.vroVROVOB
MPEG2 1920x1080 24/25/30 25 AC3MPEGLPCMMPEG1 1920x1080 24/25/30 25
*.mpg*.mpeg
PS
MPEG1 1920x1080 24/25/30 25 AC3MPEGLPCMAAC
MPEG2 1920x1080 24/25/30 25
H.264 1920x1080 6 ~ 30 25
*.ts*.tp*.trp
TS
MPEG2 1920x1080 24/25/30 25AC3AACMP3DD+
H.264 1920x1080 6 ~ 30 25
VC1 1920x1080 6 ~ 30 25
Limitations - Even when a file is encoded by a supported codec listed above, the file might not be played if its
content has a problem.
- Normal playback is not guaranteed if the file’s container information is wrong or the file itself is
corrupted.
- Files having higher bit or frame rates than standard may stutter when played back.
HT-E5200_XU_0223.indd 9HT-E5200_XU_0223.indd 9 2012-02-23 오후 2:28:322012-02-23 오후 2:28:32

| 10 English
Getting Started - The Seek (skip) function is not available if the
file’s index table is damaged.
- When you playback a file remotely through a
network connection, video playback may stutter
depending on the network speed.
Video decoder - Supports up to H.264 Level 4.1
- Does not support H.264 FMO/ASO/RS, VC1
SP/MP/AP L4 and AVCHD
- MPEG4 SP, ASP :
Below 1280 x 720 : 60 frames max
Above 1280 x 720 : 30 frames max
- Does not support GMC 2 or higher
Audio decoder - Supports WMA 7, 8, 9 and STD
- Does not support WMA 9 PRO multi-channel
files if the number of channels is more than 2 or
the files require lossless audio decoding.
- Does not support WMA sampling rate of
22050Hz mono
� Supported DivX subtitle file formats*.ttxt, *.smi, *.srt, *.sub, *.txt
Notes on the USB connection• Your product supports USB storage media,
MP3 players, digital cameras, and USB card
readers.
• The product does not support folder or file
names longer than 128 characters.
• Some USB/digital camera devices may not be
compatible with the product.
• Your product supports the FAT 16, FAT 32, and
NTFS files systems.
• Connect USB devices directly to the product’s
USB port. Connecting through a USB cable
may cause compatibility problems.
• Inserting more than one memory device into
a multi-card reader may cause the reader to
operate improperly.
• The product does not support the PTP protocol.
• Do not disconnect a USB device during a
“loading” process.
• The bigger the image resolution, the longer the
image takes to display.
• This product cannot play MP3 files with DRM
(Digital Rights Management) downloaded from
commercial sites.
• Your product only supports video that is under
30fps (frame rate).
• Your product only supports USB Mass Storage
Class (MSC) devices such as thumb drives and
USB HDD. (HUB is not supported.)
• Certain USB HDD Devices, multi-card readers
and thumb drives may not be compatible with
this product.
• If some USB devices require excessive power,
they may be limited by the circuit safety device.
• If playback from a USB HDD is unstable, provide
additional power by plugging the HDD into a
wall socket. If the problem continues, contact
the USB HDD manufacturer.
• You must remove the USB storage device safely
(by performing the “Safely Remove USB”
function) to prevent possible damage to the
USB memory.
Press the HOME button to move to the home
menu, press the YELLOW (C) button, and then
press the E button.
• SAMSUNG is not responsible for any data file
damage or data loss.
AVCHD (Advanced Video Codec High Definition)• This product can play back AVCHD format
discs. These discs are normally recorded and
used in camcorders.
• The AVCHD format is a high definition digital
video camera format.
• The MPEG-4 AVC/H.264 format compresses
images with greater efficiency than the
conventional image compressing format.
• Some AVCHD discs use the “x.v.Colour” format.
This product can play back AVCHD discs that
use “x.v.Colour” format.
• “x.v.Colour” is a trademark of Sony Corporation.
• “AVCHD” and the AVCHD logo are trademarks
of Matsushita Electronic Industrial Co., Ltd. and
Sony Corporation.
HT-E5200_XU_0223.indd 10HT-E5200_XU_0223.indd 10 2012-02-23 오후 2:28:342012-02-23 오후 2:28:34

English 11 |
02G
etting Started
| NOTE |
� Some AVCHD format discs may not play, depending on the recording conditions.
� AVCHD format discs need to be finalised.
� “x.v.Colour” offers a wider colour range than normal DVD camcorder discs.
� Some DivX, MKV and MP4 format discs may not play, depending on their video resolution and frame rate.
Accessories
Check for the supplied accessories below.
FUNCTION
DISC MENU TITLE MENU
MUTE
S/W LEVEL
TOOLS
RETURN EXIT
INFO
MO/ST
3D SOUND
SOUNDvTuner AUDIO
1 2 3
4 5 6
7 8
0
9POPUP
RECEIVER SLEEP
BD TV
TUNERMEMORY
SUBTITLE
SMART SEARCH
A B C D
EFFECT
HUB
VOL TUNING/ CH
TV SOURCE
RDS DISPLAY
PTY- PTY SEARCH PTY+
TA
FULL SCREEN REPEATHOME
Video Cable FM Antenna User Manual
(For Power cord)
iPod Dock Toroidal Ferrite Core Remote Control /
Batteries (AAA size)
Figures and illustrations in this User Manual are provided for reference only and may differ from actual product appearance.
An administration fee may be charged if either
a. an engineer is called out at your request and there is no defect in the product (i.e. where you have failed to read this user manual)
b. you bring the unit to a repair centre and there is no defect in the product (i.e. where you have failed to read this user manual).
The amount of such administration charge will be advised to you before any work or home visit is carried out.
HT-E5200_XU_0223.indd 11HT-E5200_XU_0223.indd 11 2012-02-23 오후 2:28:362012-02-23 오후 2:28:36

| 12 English
Getting StartedFront Panel
5V 500mA
DISPLAY POWERDISC TRAY USB HOST
STOP OPEN/CLOSE
VOLUME CONTROL
PLAY/PAUSE ENTER
FUNCTION
REMOTE CONTROL SENSOR
| NOTE | � To upgrade the product's software through the USB Host jack, you must use a USB memory stick.
� When the product displays the Blu-ray Disc menu, you cannot start the movie by pressing the 6 button on the product or
the remote. To play the movie, you must select Play Movie or Start in the disc menu, and then press the E button.
Rear Panel
| NOTE | � Ensure a minimum of 10 cm of clear space on all sides of the home cinema to ensure adequate ventilation. Do not obstruct
the cooling fan or ventilation holes.
LANiPod
IMPE
DANC
E : 3
SPEAKERS OUT
IMPE
DANC
E : 3
SPEAKERS OUT
DIGITALAUDIO IN
OPTICAL
VIDEOOUT
AUXIN
FM ANTHDMI IN 21HDMI OUT
DIGITALAUDIO IN
OPTICAL
VIDEOOUT
AUXIN
FM ANTHDMI IN 21HDMI OUTLANiPod
LAN TERMINAL
iPod
COOLING FAN
EXTERNAL DIGITAL AUDIO IN (OPTICAL)
HDMI IN
HDMI OUT
FM ANTENNA
SPEAKER OUTPUT CONNECTORS
VIDEO OUTAUX IN
HT-E5200_XU_0223.indd 12HT-E5200_XU_0223.indd 12 2012-02-23 오후 2:28:432012-02-23 오후 2:28:43

English 13 |
02G
etting Started
Remote Control
Tour of the Remote Control
FUNCTION
DISC MENU TITLE MENU
MUTE
S/W LEVEL
TOOLS
RETURN EXIT
INFO
MO/ST
3D SOUND
SOUNDvTuner AUDIO
1 2 3
4 5 6
7 8
0
9POPUP
RECEIVER SLEEP
BD TV
TUNERMEMORY
SUBTITLE
SMART SEARCH
A B C D
EFFECT
HUB
VOL TUNING/ CH
TV SOURCE
RDS DISPLAY
PTY- PTY SEARCH PTY+
TA
FULL SCREEN REPEATHOME
Turn the product on and off.
To change to Home Cinema, press the BD button.
Press numeric buttons to operate options.
Press to skip backwards or forwards.
Adjust the volume.
Cut off the sound temporarily.
Press this to see the full screen on a TV.
Press to move to the Home screen.
Select on-screen menu items and change menu value.
Return to the previous menu.
These buttons are used both for menus on the product and also
several Blu-ray Disc functions.
Press to view the disc menu.
Press to use the Tools menu.
Press to use Smart Hub.
Selects the disc Audio language.
To change to TV mode, press the TV button.
Press to stop/play a disc.
Press to search contents.
Press this to use the vTuner.Press to apply sound effects.
Set a Sleep time to shut off the product.
Press to select Blu-ray's mode (HDMI1, AUX, BD/DVD, etc.).or Press to select TV's video mode.
Select MONO or STEREO for radio broadcasts.
Press to search backwards or forwards.
Press to pause a disc.
Search for active FM stations and to change channels.
Use to adjust the level of the subwoofer.
Use to enter the Popup menu/Title menu.
Press to exit the menu.
Use to display the playback
information when playing
a Blu-ray/DVD disc.
Use to set a preset radio frequency.
Allows you to repeat a title, chapter, track or disc.
Press to enjoy an ordinary 2D video in 3D mode.
Selects the disc subtitle language.
Press to apply 3D sound effect.
To open and close the disc tray.
Use the RDS function to receive FM stations.
HT-E5200_XU_0223.indd 13HT-E5200_XU_0223.indd 13 2012-02-23 오후 2:28:472012-02-23 오후 2:28:47

| 14 English
Getting StartedInstalling batteries in the Remote Control
Battery size: AAA
21
| NOTE | � Make sure to match the “+” and “–” ends of the batteries
with the diagram inside the compartment.
� Assuming typical TV usage, the batteries last for about
one year.
� The remote control can be used up to approximately
7 meters from the product in a straight line.
Setting the Remote ControlYou can control certain functions of your TV with
this remote control.
When operating a TV with the remote control
1 . Press the TV button to set the remote control
to TV mode.
2 . Turn on your TV.
3 . While holding down the POWER button,
enter the code corresponding to your brand
of TV.
• If there is more than one code listed for
your TV in the table, enter one at a time to
determine which code works.
• Example : For a Samsung TVWhile holding down the POWER button,
use the number buttons to enter 00. If that
does not work, try 15, then 16, etc.
4 . If the TV turns off, the setting is complete.
• You can use the TV POWER, VOLUME,
CHANNEL, and Numeric buttons (0~9).
| NOTE | � The remote control may not work on some brands of TV's.
Also, some operations may not be possible, depending on
your brand of TV.
� The remote control will work with Samsung TVs by
default.
TV Control CodesBrand CodeAdmiral
(M.Wards)56, 57, 58
A Mark 01, 15
Anam
01, 02, 03, 04, 05,
06, 07, 08, 09, 10, 11,
12, 13, 14
AOC 01, 18, 40, 48
Bell & Howell (M.Wards)
57, 58, 81
Brocsonic 59, 60
Candle 18
Cetronic 03
Citizen 03, 18, 25
Cinema 97
Classic 03
Concerto 18
Contec 46
Coronado 15
Craig 03, 05, 61, 82, 83, 84
Croslex 62
Crown 03
Curtis Mates 59, 61, 63
CXC 03
Daewoo
02, 03, 04, 15, 16, 17, 18, 19, 20, 21, 22, 23,
24, 25, 26, 27, 28, 29, 30, 32, 34, 35, 36,
48, 59, 90
Daytron 40
Dynasty 03
Emerson03, 15, 40, 46, 59, 61,
64, 82, 83, 84, 85
Fisher 19, 65
Funai 03
Futuretech 03
General Electric (GE)
06, 40, 56, 59, 66, 67, 68
Hall Mark 40
Hitachi 15, 18, 50, 59, 69
Inkel 45
JC Penny 56, 59, 67, 86
JVC 70
KTV 59, 61, 87, 88
KEC 03, 15, 40
KMC 15
LG (Goldstar)01, 15, 16, 17, 37, 38, 39, 40, 41, 42,
43, 44
Luxman 18
LXI (Sears)19, 54, 56, 59, 60, 62,
63, 65, 71
Magnavox15, 17, 18, 48, 54, 59,
60, 62, 72, 89
Marantz 40, 54
Matsui 54
MGA 18, 40
Brand CodeMitsubishi/
MGA18, 40, 59, 60, 75
MTC 18
NEC 18, 19, 20, 40, 59, 60
Nikei 03
Onking 03
Onwa 03
Panasonic06, 07, 08, 09, 54, 66,
67, 73, 74
Penney 18
Philco03, 15, 17, 18, 48, 54,
59, 62, 69, 90
Philips15, 17, 18, 40, 48,
54, 62, 72
Pioneer 63, 66, 80, 91
Portland 15, 18, 59
Proton 40
Quasar 06, 66, 67
Radio Shack 17, 48, 56, 60, 61, 75
RCA/Proscan18, 59, 67, 76, 77, 78,
92, 93, 94
Realistic 03, 19
Sampo 40
Samsung00, 15, 16, 17, 40, 43,
46, 47, 48, 49,59, 60, 98
Sanyo 19, 61, 65
Scott 03, 40, 60, 61
Sears 15, 18, 19
Sharp 15, 57, 64
Signature 2000
(M.Wards)57, 58
Sony 50, 51, 52, 53, 55
Soundesign 03, 40
Spectricon 01
SSS 18
Sylvania18, 40, 48, 54, 59,
60, 62
Symphonic 61, 95, 96
Tatung 06
Techwood 18
Teknika 03, 15, 18, 25
TMK 18, 40
Toshiba 19, 57, 63, 71
Vidtech 18
Videch 59, 60, 69
Wards15, 17, 18, 40, 48,
54, 60, 64
Yamaha 18
York 40
Yupiteru 03
Zenith 58, 79
Zonda 01
Dongyang 03, 54
HT-E5200_XU_0223.indd 14HT-E5200_XU_0223.indd 14 2012-02-23 오후 2:28:512012-02-23 오후 2:28:51

English 15 |
03Connections
ConnectionsThis section describes various methods of connecting the product to other external components.
Before moving or installing the product, be sure to turn off the power and disconnect the power cord.
Attaching the Toroidal Ferrite Core to the Power Cord of the Main Unit
If you attach a Toroidal ferrite core to the power cord of
the main unit, it will help to prevent RF interference from
radio signals.
1. Pull the fixing tab of the Toroidal ferrite core to open
it.
2. Make a loop twice in the main unit power cord.
3. Attach the Toroidal ferrite core to the main unit power
cord as the figure shows and press it until it clicks.
Connecting the Speakers
LANiPod
IMPE
DANC
E : 3
SPEAKERS OUT
HDMI
Front Speakers Place these speakers in front of your listening position, facing inwards (about 45°)
toward you. Place the front speakers so that their tweeters will be at the same
height as your ear.
Subwoofer The position of the subwoofer is not so critical. Place it anywhere you like.
Position of the productPlace it on a stand or cabinet shelf, or
under the TV stand.
Selecting the Listening Position
The listening position should be
located about 2.5 to 3 times the
distance of the TV's screen size
away from the TV. For example, if
you have a 46 inch screen, locate
the listening position 2.92 to 3.50
meters from the screen.
Front (L)
Front (R)
Product
Subwoofer
Speaker Components
SUBWOOFER SPEAKER CABLEFRONT
(L) (R)
HT-E5200_XU_0223.indd 15HT-E5200_XU_0223.indd 15 2012-02-23 오후 2:28:552012-02-23 오후 2:28:55

| 16 English
ConnectionsConnecting The Speakers
1. Match each speaker cable bundle to the correct speaker by matching the
colour coded plug on each bundle to the coloured sticker on the bottom
of each speaker.
2. To attach speaker wire to each speaker:
a. Press down the red tab on the back of the speaker, insert the red wire,
and then release the tab.
b. Press down the black tab on the back of the speaker, insert the black
wire, and then release the tab.
3. Connect the speaker wire plugs to the back of the product by matching
the colours of the speaker plugs to the colours of the speaker jacks.
| CAUTION | � If you want to install the product on the wall, fasten the screws or nails on the wall firmly and use the holes on the rear of speaker to install.
However, when you install it, accessories (nails or screws) and installation is not provided by the company.
� Do not let children play with or near the speakers. They could get hurt if a speaker falls.
� When connecting the speaker wires to the speakers, make sure that the polarity (+/ –) is correct.
� Keep the subwoofer speaker out of reach of children to prevent children from inserting their hands or alien substances into the duct (hole)
of the subwoofer speaker.
� Do not hang the subwoofer on the wall through the duct (hole).
| NOTE | � If you place a speaker near your TV set, the screen colour may be distorted because of the magnetic field.
Black Red
LANiPod
IMPE
DANC
E : 3
SPEAKERS OUT
IMPE
DANC
E : 3
SPEAKERS OUT
Front Speaker (R)
Subwoofer
Front Speaker (L)
HT-E5200_XU_0223.indd 16HT-E5200_XU_0223.indd 16 2012-02-23 오후 2:29:032012-02-23 오후 2:29:03

English 17 |
03Connections
Connecting the FM Antenna
LANiPod
IMPE
DANC
E : 3
SPEAKERS OUT
OPTICAL
VIDEOOUT
AUXIN
DIGITALAUDIO IN
HDMI IN1 2HDMI OUTLANiPod
IMPE
DANC
E : 3
SPEAKERS OUT
OPTICAL
VIDEOOUTOUT
AUXIN
DIGITALAUDIO INN
HDMI IN1 2HDMI OUT FM ANT
FM Antenna (supplied)
1 . Connect the FM antenna supplied to the FM ANTENNA Jack.
2 . Slowly move the antenna wire around until you find a location where reception is good, then fasten it
to a wall or other rigid surface.
| NOTE | � This product does not receive AM broadcasts.
Connecting to an iPod/iPhone
Using a USB Cable
Connect an iPod/iPhone using the USB cable to
the front USB port.
5V 500mA
5V 500mA
Using a Dock
Composite cable must be connected to play a
video.
LANiPod
IMPE
DANC
E : 3
SPEAKERS OUT
OPTICAL
VIDEOOUT
AUXIN
DIGITALAUDIO IN
FM ANTHDMI IN1 2HDMI OUTLAN
IMPE
DANC
E : 3
SPEAKERS OUT
OPTICAL
VIDEOOUTOU
AUXIN
DIGITALAUDIO INNN
FM ANTHDMI IN1 2HDMI OUT
iPod
| NOTE | � Make sure to connect the dock connector so that the label “” faces upward.
HT-E5200_XU_0223.indd 17HT-E5200_XU_0223.indd 17 2012-02-23 오후 2:29:062012-02-23 오후 2:29:06

| 18 English
ConnectionsConnecting to a TV
Select either Method 1 or Method 2.
• If you have set the product's remote control to operate your TV, press the TV SOURCE button on the remote control,
and then select the correct external source from the TV's source list (HDMI, Video In, etc.) to view video from the home
cinema.
HDMI IN VIDEO IN
OPTICAL
VIDEOOUT
AUXIN
DIGITALAUDIO IN
FM ANTHDMI IN1 2HDMI OUT
LANiPod
IMPE
DANC
E : 3
SPEAKERS OUT
OPTICAL
VIDEOOUT
AUXIN
DIGITALAUDIO IN
FM ANTHDMI IN1 2HDMI OUT
Method 1 Method 2(Cable not supplied.)
Method 1 Connecting to a TV with an HDMI Cable - Best Quality (Recommended)
Connect an HDMI cable (not supplied) from the HDMI OUT jack on the back of the product to the HDMI IN
jack on your TV.
Method 2 Connecting to a TV with a Video Cable - Good Quality
Connect the supplied Video cable from the VIDEO OUT jack on the back of the product to the VIDEO IN
jack on your TV.
| NOTE | � The VIDEO Out jack always outputs in the 576i/480i resolution regardless of the resolution set in the Setup menu.
� Do not connect the unit through a VCR. Video signals fed through VCRs may be affected by copyright protection systems and
the picture will be distorted on the television.
HT-E5200_XU_0223.indd 18HT-E5200_XU_0223.indd 18 2012-02-23 오후 2:29:112012-02-23 오후 2:29:11
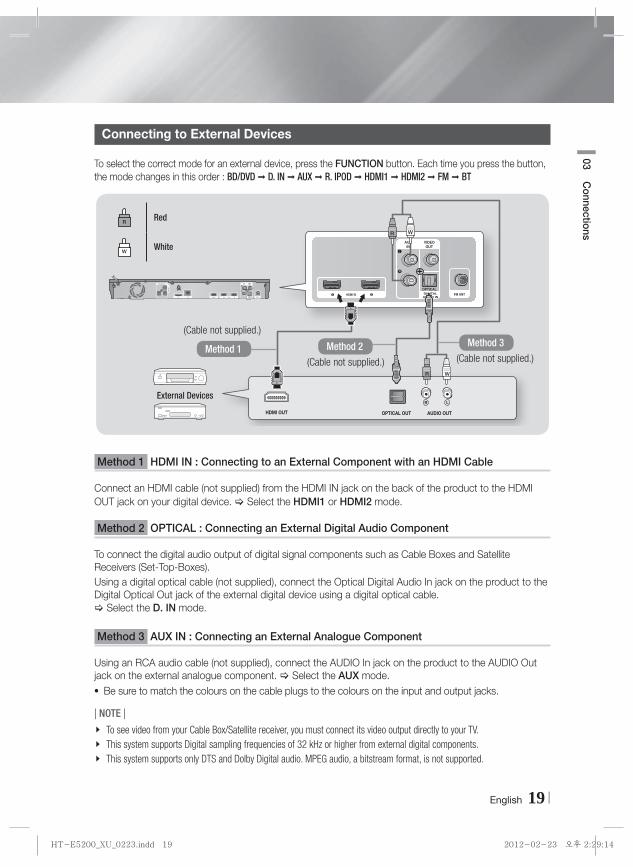
English 19 |
03Connections
Connecting to External Devices
To select the correct mode for an external device, press the FUNCTION button. Each time you press the button,
the mode changes in this order : BD/DVD � D. IN � AUX � R. IPOD � HDMI1 � HDMI2 � FM � BT
OPTICAL
VIDEOOUT
AUXIN
DIGITALAUDIO IN
FM ANTHDMI IN1 2
AUDIO OUTHDMI OUT OPTICAL OUT
LANiPod
IMPE
DANC
E : 3
SPEAKERS OUT
OPTICAL
VIDEOOUT
AUXIN
DIGITALAUDIO IN
FM ANTHDMI IN1 2HDMI OUT
R Red
W White
Method 1 Method 2 Method 3
External Devices
(Cable not supplied.)
(Cable not supplied.) (Cable not supplied.)
Method 1 HDMI IN : Connecting to an External Component with an HDMI Cable
Connect an HDMI cable (not supplied) from the HDMI IN jack on the back of the product to the HDMI
OUT jack on your digital device. Select the HDMI1 or HDMI2 mode.
Method 2 OPTICAL : Connecting an External Digital Audio Component
To connect the digital audio output of digital signal components such as Cable Boxes and Satellite
Receivers (Set-Top-Boxes).
Using a digital optical cable (not supplied), connect the Optical Digital Audio In jack on the product to the
Digital Optical Out jack of the external digital device using a digital optical cable.
Select the D. IN mode.
Method 3 AUX IN : Connecting an External Analogue Component
Using an RCA audio cable (not supplied), connect the AUDIO In jack on the product to the AUDIO Out
jack on the external analogue component. Select the AUX mode.
• Be sure to match the colours on the cable plugs to the colours on the input and output jacks.
| NOTE | � To see video from your Cable Box/Satellite receiver, you must connect its video output directly to your TV.
� This system supports Digital sampling frequencies of 32 kHz or higher from external digital components.
� This system supports only DTS and Dolby Digital audio. MPEG audio, a bitstream format, is not supported.
HT-E5200_XU_0223.indd 19HT-E5200_XU_0223.indd 19 2012-02-23 오후 2:29:142012-02-23 오후 2:29:14

| 20 English
ConnectionsConnecting to a Network Router
You can connect your product to your network
router using one of the methods illustrated below.
Wired Network
LANiPod
IMPE
DANC
E : 3
SPEAKERS OUT
OPTICAL
VIDEOOUT
AUXIN
DIGITALAUDIO IN
FM ANTHDMI IN1 2HDMI OUT
Broadband service
Broadband service
Broadband modem (with integrated router)
Broadband modem
Router
Or
| NOTE | � Internet access to Samsung’s Software Update server
may not be allowed, depending on the router you use or
your ISP’s policy. For more information, contact your ISP
(Internet Service Provider).
� DSL users, please use a router to make a network
connection.
� To use the AllShare Play function, you must connect your
PC to your network as shown in the illustrations on the
left.
The connection can be wired or wireless.
Wireless Network
5V 500mA
Broadband service
Wireless IP sharer
| NOTE | � If your wireless IP router supports DHCP, this product can
use a DHCP or static IP address to connect to the wireless
network.
� Set your wireless IP router to Infrastructure mode. Ad-hoc
mode is not supported.
� The product supports only the following wireless security
key protocols:
- WEP (OPEN/SHARED), WPA-PSK (TKIP/AES), WPA2-PSK (TKIP/AES)
� Select a channel on the wireless IP router that is not
currently being used. If the channel set for the wireless IP
router is currently being used by another device nearby, it
will result in interference and communication failure.
� If you select the Pure High-throughput (Greenfield)
802.11n mode and set the Encryption type on your router
or AP to WEP, TKIP or TKIP-AES (WPS2Mixed), the product
will not support a connection in compliance with new Wi-
Fi certification specifications.
� Wireless LAN, by its nature, may cause interference,
depending on the operating conditions (AP performance,
distance, obstacles, interference by other radio devices,
etc).
HT-E5200_XU_0223.indd 20HT-E5200_XU_0223.indd 20 2012-02-23 오후 2:29:172012-02-23 오후 2:29:17

English 21 |
04Settings
The Initial Settings Procedure
• The Home menu will not appear if you do not configure
the initial settings.
• The OSD (On Screen Display) may change in this
product after you upgrade the software version.
• The access steps may differ depending on the menu
you selected.
1 . Turn on your TV after connecting the product,
and then turn on the product. When you turn
on the product for the first time, the product
automatically displays the Initial Settings
Language screen.
Initial Settings > On-Screen Language
Select a language for the on-screen displays.
Next
▲
▼
Dansk Nederlands
English Eesti keel
Suomi Français
Deutsch Ελληνικά
Hausa Magyar
Asusu Igbo Italiano
Select English as the on-screen menu language.
2 . Use the ▲▼◄► buttons on the remote
to select the desired language, and then
press the E button twice. The Start screen
appears.
3 . Press the E button to start setup. The
Network Settings screen appears.
The next step is to set up a wireless network using an internal LAN Adapter.
If you want to connect to your wired network, plug in a network cable.
Previous
Skip
Next
Initial Settings > Network Settings (1/5)
4 . Press the E button to set up the product’s
wireless network connection or select
Skip, and then press the E button to skip
network setup. If you selected Skip, go to
Step 12.
| NOTE | � The product starts the wireless network connection
procedure by default. If you want to set up a wired
connection, select Skip, and then go to "Configuring
Your Network Connection" on page 29 after you have
completed the Initial Settings Procedure.
� If you skip wireless network setup here, go to "Wireless
Network" on page 30 to set up the product's wireless
network connection later.
5 . The product searches for and then displays
all available wireless router network
connections.
Initial Settings > Network Settings (2/5)
Refresh
WPS(PBC)
Previous
Next
Skip
Select your wireless router from the list.1 / 4
KIMING_VTOWER
TIASsi-ap
Add Network
surlwang5
6 . Use the ▲▼ buttons to select a router, and
then press the E button. The Next button
is highlighted.
7 . Press the E button to continue. The
Security Key screen appears.
| NOTE | � If you have a WPS(PBC) compatible router, select
WPS(PBC) instead, press the E button, and then follow
the directions on the screen. When done, go to Step 10.
Initial Settings > Network Settings (4/5)
Previous
WPS PIN
Skip
Next
Enter security key.
0 entered
A/a Space
a g m s
e k q w
c i o u
1 4 7 y
b h n t
f l r x
d j p v
2 5 8 z
3 6 9 0
-
8 . Enter your network's security key. When
done, use the ▲▼◄► buttons to select
Next, and then press the E button.
Settings
HT-E5200_XU_0223.indd 21HT-E5200_XU_0223.indd 21 2012-02-23 오후 2:29:232012-02-23 오후 2:29:23

| 22 English
Settings| NOTE |
� Enter numbers by pressing the number buttons on your
remote.
� Enter letters by selecting a letter using the ▲▼◄►
buttons, and then press E button.
� To display capital letters (or redisplay small letters if
capital letters are displayed), select A/a, and then press
the E button.
� To display symbols and punctuation, select , and then
press the E button. To redisplay letters, select , and
then press the E button.
9 . If the connection is successful, the
Connection Complete screen appears. Select
Next, and then press the E button. The
Software Update screen appears.
| NOTE | � If the connection is not successful, select Next, and then
press the E button. After you have completed the Initial
Settings procedure, go to "Wireless Network" on page 30
to set up the product's wireless network connection.
10 . To upgrade the software, select Update now, and then press the E button. To skip
the upgrade, select Update later, press the
E button, and go to Step 12.
| NOTE | � If you skipped network set up, you must skip Software
Update also.
11 . If there is a Software Update available,
the product downloads and installs the
upgrade. This can take some time. If there
is no Software Update available, the "There are no new software updates for you to download. You already have the most up to date version." message appears. And
then press the E button. The TV Aspect
Ratio screen appears.
Initial Settings > TV Aspect Ratio
Previous
Next
Set to match the type of television connected.
16:9 Original
16:9 Full
4:3 Letter Box
4:3 Pan-Scan
Select when connecting to a 16:9 TV Screen. All content will be displayed at original aspect ratio. Content formatted in 4:3 will be displayed with black bars on left and right.
12 . Using the ▲▼ buttons, select the aspect ratio
that matches your screen, and then press the
E button. Select Next, and then press the
E button.
You have four choices:
16:9 Original - For widescreen TVs. Displays
widescreen pictures in their original 16:9
format and 4:3 pictures (the old, standard
format) in 4:3 pillar box format with black bars
on the left and right.
16:9 Full - For widescreen TVs. Displays
widescreen pictures in their original 16:9
format and expands 4:3 pictures to fill the
16:9 screen.
4:3 Letter Box - For older, standard screen
analogue TVs. Displays 4:3 pictures in full
screen and 16:9 pictures in letter box format
that retains the 16:9 aspect ratio but puts
black bars above and below the picture.
4:3 Pan-Scan - For older, standard screen
analogue TVs. Displays 4:3 pictures in full
screen and 16:9 pictures in Pan-Scan format
that fills the screen, but cuts off the left and
right sides of the picture and enlarges the
middle vertically.
Initial Settings > Complete
Setup completed.
OK
Smart Hub
On-Screen Language
Network Settings
Software Update -
TV Aspect
Press Smart Hub to enjoy a variety of Internet content.
13 . The Setup completed screen appears. Check
the settings to confirm they are correct.
Select OK, and then press the E button.
The Home screen appears.
| NOTE | � If you want to display the Initial Setting screen again and
make changes, select the Reset option. (See page 28)
� If you use an HDMI cable to connect the product to an
Anynet+ (HDMI-CEC)-compliant Samsung TV and 1.) You
have set the Anynet+ (HDMI-CEC) feature to ON in both
the TV and the product and 2.) You have set the TV to a
language supported by the product, the product will select
that language as the preferred language automatically.
HT-E5200_XU_0223.indd 22HT-E5200_XU_0223.indd 22 2012-02-23 오후 2:29:282012-02-23 오후 2:29:28

English 23 |
04Settings
The Home Screen
Smart Hub Function Settings
d WPS(PBC) 5
4
3
1
2
Play videos or music, or view photos from discs or connected devices.AllShare Play
1Smart Hub. Starts Smart Hub. From Smart Hub,
you can access YouTube, games, and other apps.
2AllShare Play. Play videos, photos or music content
from Disc, USB, PC or mobile devices.
3 Function. Select the audio/video input source.
4Settings. Set various functions to suit your personal
preferences.
5Displays the coloured buttons on your remote that
you can press to access or perform functions.
Selecting an Option on the Home Screen
1 . To select an option on the Home screen,
move the cursor using the ◄► buttons until it
highlights the option of your choice, and then
press the E button.
Accessing the Settings Screen
1 . Select Settings on the Home screen, and
then press E. The Settings screen appears.
Display
Audio
Network
System
Support
3D Settings
TV Aspect Ratio 16:9 Original
Smart Hub Screen Size Size 3
BD Wise Off
Resolution Auto
Movie Frame (24Fs) Auto
HDMI Colour Format Auto
HDMI Deep Colour Auto
Progressive Mode Auto
2 . To access the menus, sub-menus, and
options on the Settings screen, please refer
to the remote control illustration below.
| NOTE | � If you leave the product in the stop mode for more than
5 minutes without using it, a screen saver will appear on
your TV. If the product is left in the screen saver mode for
more than 20 minutes, the power will automatically turn
off.
Buttons on the Remote Control Used for the Settings Menu
TOOLS
RETURN EXIT
INFO
TUNER
FULL SCREEN REPEATHOME
1
2 4
3
1 HOME Button : Press to move to the Home screen.
2 RETURN Button : Return to the previous menu.
3
E (Enter) / DIRECTION Button :
~ Press ▲▼◄► to move the cursor or select
an item.
~ Press the E button to activate the currently
selected item or confirm a setting.
4 EXIT Button : Press to exit the current menu.
| NOTE | � The E button on the product's front panel can be
used for same purpose as the E button on the remote
control.
Detailed Function InformationEach Settings function, menu item, and individual
option is explained in detail on-screen. To view an
explanation, use the ▲▼◄► buttons to select the
function, menu item, or option.
The explanation will usually appear on the right of
the screen. A short description of each Settings
function starts on the next page. Additional
information on some of the functions is also in the
Appendix of this manual.
HT-E5200_XU_0223.indd 23HT-E5200_XU_0223.indd 23 2012-02-23 오후 2:29:302012-02-23 오후 2:29:30

| 24 English
SettingsSettings Menu Functions
Display
3D Settings
Set up the 3D related functions.
3D Blu-ray Playback Mode: Select whether to play a Blu-
ray Disc with 3D contents in 3D Mode. If you move to the
Home or Smart Hub Home menu while in 3D mode, the
product will switch to 2D automatically.
Screen Size: Enter the size of the TV attached to the
product. The product will automatically adjust the 3D output
to the screen size of the TV.
TV Aspect Ratio
Lets you adjust the output of the product to the screen size of
your TV. See page 22, Step 12 for a description of the screen
size options.
Smart Hub Screen Size Lets you select the optimal size for the Smart Hub Screen.
BD Wise
BD Wise is Samsung’s latest inter-connectivity feature.
When you connect a Samsung product and a Samsung TV
with BD Wise to each other via HDMI, and BD Wise is on in
both the product and TV, the product outputs video at the
video resolution and frame rate of the Blu-ray/DVD Disc.
Resolution
Lets you set the output resolution of the HDMI video signal
to Auto, 1080p, 1080i, 720p, 576p/480p. If Composite
is connected, the resolution supports only 576i/480i. The
number indicates the number of lines of video per frame. The
i and p indicate interlaced and progressive scan, respectively.
The more lines, the higher quality.
Movie Frame (24Fs)
Setting the Movie Frame (24Fs) feature to Auto lets the product
adjust its HDMI output to 24 frames per second automatically for
improved picture quality if attached to a 24Fs compatible TV.
• You can enjoy the Movie Frame (24Fs) feature only on a TV
supporting this frame rate.
• Movie Frame is only available when the product is in the
HDMI 1080i or 1080p output resolution modes.
HDMI Colour Format
Lets you set the colour space format for the HDMI output to
match the capabilities of the connected device (TV, monitor, etc).
HDMI Deep Colour
Lets you set the product to output video from the HDMI OUT
jack with Deep Colour. Deep Colour provides more accurate
colour reproduction with greater colour depth.
Progressive Mode Lets you improve picture quality when viewing DVDs.
HT-E5200_XU_0223.indd 24HT-E5200_XU_0223.indd 24 2012-02-23 오후 2:29:482012-02-23 오후 2:29:48

English 25 |
04Settings
Audio Speaker Settings You can set the speaker options.
Equaliser Let you configure the Equaliser settings manually.
Smart VolumeLets you set the product so that the volume remains stable
when a scene change occurs or when you change the
channel.
Speaker Selection
Lets you select which speakers you want active, either the
TV's speakers or the Home cinema's speakers.
Audio Return Channel
Lets you direct the sound from the TV to the Home Cinema
speakers. Requires an HDMI connection and an Audio Return
Channel (ARC) compatible TV.
• When Audio Return Channel set to on, use HDMI Cable to
connect the product to the TV. At this time, optical input
does not work.
• When Audio Return Channel set to auto, use HDMI Cable to
connect the product to the TV. At this time, ARC and optical
input is selected automatically.
Digital OutputLet you set the Digital Output to match the capabilities of the
AV receiver you’ve connected to the product. For more details,
please refer to the digital output selection table. (See page 59)
Dynamic Range Control
Lets you apply dynamic range control to Dolby Digital, Dolby
Digital Plus, and Dolby True HD audio.
Auto: Automatically controls the dynamic range of Dolby
TrueHD audio, based on information in the Dolby TrueHD
soundtrack. Also turns dynamic range control on for Dolby
Digital and Dolby Digital Plus.
Off: Leaves the dynamic range uncompressed, letting you
hear the original sound.
On: Turns dynamic range control on for all three Dolby
formats. Quieter sounds are made louder and the volume of
loud sounds is reduced.
Audio SyncWhen the product is attached to a digital TV, lets you adjust
the audio delay so that the audio syncs with the video. You
can set the delay between 0 and 300 milliseconds.
HT-E5200_XU_0223.indd 25HT-E5200_XU_0223.indd 25 2012-02-23 오후 2:29:512012-02-23 오후 2:29:51

| 26 English
Settings
Network Network Settings
For more information about Network Settings and network
functions, see "Networks and the Internet" starting on page
29.
Network Status
Let you check whether a connection to the network and the
Internet have been established.
Wi-Fi DirectLets you connect a Wi-Fi Direct device to the product using a
Peer-to-Peer network, without a wireless router. You can use
the device to control the product.
Soft AP
Lets you connect other types of Wi-Fi devices to the product
wirelessly. Requires that you create a security key which
you must enter into the other Wi-Fi devices when you are
connecting them to the network.
AllShare Settings
Lets you permit external devices such as smart phones to
connect to the product and share content with or control the
product.
Device NameLets you assign an identifying name to the product. You use
this name to identify the product when you are connecting
external Wi-Fi devices (smart phones, tablets, etc.) to it.
BD-Live Settings
Lets you allow, limit, or prohibit an Internet connection for the
BD-Live service.
HT-E5200_XU_0223.indd 26HT-E5200_XU_0223.indd 26 2012-02-23 오후 2:29:532012-02-23 오후 2:29:53

English 27 |
04Settings
System Initial Settings Lets you re-run the Initial Settings procedure. See page 21 for
details.
Device Manager
You can connect a wireless USB keyboard or mouse to
the USB port on the front of the product.
Keyboard Settings: Lets you configure a wireless USB
keyboard connected to the product.
| NOTE | � You can use the keyboard only when a QWERTY keyboard screen or
window appears in the Web Browser.
Mouse Settings: Lets you configure a wireless USB mouse
connected to the product. You can use the mouse in the
product's menu in the same way you use a mouse on your
PC.
To use a mouse with the product's menu:1 . Connect the USB mouse to the product.
2 . Click the primary button you selected in Mouse Settings.
The Simple Menu appears.
3 . Click the menu options you want.
| NOTE | � Depending on the model of the USB HID keyboard and mouse may not
be compatible with your product.
� Some HID keyboard keys may not work.
� Wired USB keyboards are not supported.
� Some applications may not be supported.
� If a wireless HID Keyboard does not operate because of interference,
move the keyboard closer to the product.
Anynet+(HDMI-CEC)
Anynet+ is a convenient function that offers linked operations
with other Samsung products that have the Anynet+ feature
and lets you control those products with one Samsung TV
remote. To operate this function, you must connect this
product to an Anynet+ Samsung TV using an HDMI cable.
Language
You can select the language you prefer for the On-Screen
menu, disc menu, subtitles, etc.
• The language you select for the disc menu, disc audio, or
subtitles will only appear if it is supported on the disc.
HT-E5200_XU_0223.indd 27HT-E5200_XU_0223.indd 27 2012-02-23 오후 2:29:552012-02-23 오후 2:29:55

| 28 English
Settings
Security
The default PIN is 0000. Enter the default PIN to access the
security function if you haven't created your own password.
BD Parental Rating: Prevents playback of Blu-ray Discs
with a rating equal to or above a specific age rating you
enter unless the PIN is entered.
DVD Parental Rating: Prevents playback of DVDs with a
rating above a specific numerical rating you select unless
the PIN is entered.
Change PIN: Change the 4-digit PIN used to access
security functions.
If you forget your PIN1 . Remove any disc or USB storage device.
2 . Press and hold the 5 button on the front panel for 5
seconds or more.
All settings will revert to the factory settings.
| NOTE | � When the factory default settings are restored, all the user stored BD
data will be deleted.
General
You can specify the display brightness and time zone.
Front Display: Lets you change the brightness of the front
panel.
Time Zone: You can specify the time zone that is applicable
to your area.
Menu Transparency: Adjust the transparency of the menu
box.
DivX® VideoOn Demand
View DivX® VOD Registration Codes to purchase and play
DivX® VOD contents.
Support Software Update
For more information about the Software Update function, see
"Upgrading Software" on page 33.
Contact Samsung Provides contact information for assistance with your product.
Remote Management
When activated, lets Samsung Call Centre agents diagnose
and fix problems with the product remotely. Requires an active
Internet connection. Remote Management service might not
be available in some countries.
ResetAll settings will revert to the default except for the network
and Smart Hub settings. The default security password is
0000.
HT-E5200_XU_0223.indd 28HT-E5200_XU_0223.indd 28 2012-02-23 오후 2:29:572012-02-23 오후 2:29:57

English 29 |
04Settings
Networks and the Internet
When you connect this product to a network,
you can use network based applications and
functions such as Smart Hub and BD-LIVE, and
upgrade the product's software through the
network connection. For more information about
accessing and using Internet services, see the
Network Services chapter of this manual on pages
51~53. Instructions for configuring the network
connection start below.
Configuring Your Network ConnectionBefore you begin, contact your ISP to find out
if your IP address is static or dynamic. If it is
dynamic, and you have a wired or wireless
network, we recommend using the Automatic
configuration procedures described below.
If you are connecting to a wired network, connect
the product to your router using a LAN cable
before you start the configuration procedure.
If you are connecting to a wireless network,
disconnect any wired network connection before
you begin.
To begin configuring your network connection,
follow these steps:
1 . In the Home screen, select Settings, and
then press the E button.
2 . Select Network, and then press the E
button.
3 . Select Network Settings, and then press the
E button.
4 . Go to the instructions for Wired networks
starting below or the instructions for Wireless
networks starting on page 30.
Wired Network
� Wired – Automatic
After following Steps 1 to 3 above:
1 . Select Start in the Network Settings screen,
and then press the E button. The product
detects the wired connection, verifies the
network connection and then connects to the
network.
� Wired - ManualIf you have a static IP address or the Automatic
procedure does not work, you'll need to set the
Network Settings values manually.
After following Steps 1 to 3 above:
1 . Select Start in the Network Settings screen,
and then press the E button. The Network
Status screen appears. The product attempts
to verify the network connection and fails.
Network Settings
Wired network connection failed.
MAC Address XX:XX:XX:XX:XX:XXIP Address 0.0.0.0Subnet Mask 0.0.0.0Gateway 0.0.0.0DNS Server 0.0.0.0
Unable to connect to the network. Try the following:check if your IP address is set correctly in IP Settings.Contact your Internet service provider for more information.
Retry
IP Settings
Previous
OK
2 . Select IP Settings on the right of the screen,
and then press E button.
The IP Settings screen appears.
3 . Select the IP Mode field, and then set it to
Manual.4 . Use the number keypad on your remote to
enter the Network values. Use the ▲▼◄►
buttons on the remote to move from entry
field to entry field.
| NOTE | � You can get these values from your Internet provider. You
can also view these values on most Windows computers.
For instructions, see "Getting the Network Settings
Values." on this page.
5 . When done, highlight OK, and then press
E button. The product verifies the network
connection and then connects to the
network.
< Getting the Network Settings Values >You can view your Network Settings values on
most Windows computers. To view the Network
Settings values, follow these steps:
• Windows XP
1 . Right click the Network icon on the bottom
right of the Windows desktop.
HT-E5200_XU_0223.indd 29HT-E5200_XU_0223.indd 29 2012-02-23 오후 2:29:592012-02-23 오후 2:29:59

| 30 English
Settings2 . In the pop-up menu, click Status.
3 . On the dialog that appears, click the Support
tab.
4 . On the Support tab, click the Details button.
5 . The Network settings are displayed.
• Windows 7
1 . Click the Network icon on the bottom right of
the Windows desktop.
2 . In the pop-up menu, click Network and
Sharing Centre.
3 . On the dialog that appears, click the Local
Area Connection or Wireless Network
Connection depending on your network
connection.
4 . On the Support tab, click the Details button.
The Network settings are displayed.
| NOTE | � Depending on your Windows version, the information may
differ.
Wireless NetworkYou can setup a wireless network connection in
three ways:
- Wireless Automatic
- Wireless Manual
- WPS(PBC)
When you configure the wireless network
connection, any wireless network devices currently
connected through the product or, if applicable,
the product's current wired connection, will be
disconnected.
� Wireless (General) - AutomaticAfter following Steps 1 to 3 in "Configuring Your
Network Connection" on page 29.
1 . Select Start in the Network Settings screen,
and then press the E button.
The product searches for and then displays a
list of the available networks.
Network Settings
Refresh
WPS(PBC)
Previous
Next
Cancel
Select your wireless router from the list.1/10
ELT
JSY
KT_WLAN_C361
Mirhenge_edu
SO070VOIP
iptime23
2 . Select the desired network, and then press
the E button.
3 . Select Next, and then press the E button
again.
4 . On the Security screen, enter your network's
Security Code or Pass Phrase.
Enter numbers directly using the number
buttons on your remote control. Enter letters
by selecting a letter with an arrow button, and
then pressing E button.
5 . When done, select Next at the right of the
screen. The product verifies the network
connection and then connects to the
network.
| NOTE | � You should be able to find the Security Code or Pass
Phrase on one of the set up screens you used to set up
your router or modem.
� Wireless (General) - ManualIf you have a static IP address or the Automatic
procedure does not work, you'll need to set the
Network Settings values manually.
After folloiwng Steps 1 to 3 in "Configuring Your
Network Connection" on page 29.
1 . Select Start in the Network Settings screen,
and then press the E button. The product
searches for and then displays a list of the
available networks.
2 . Select the desired network or the Add Network, and then press the E button.
3 . Select Next, and then press the E button
again.
HT-E5200_XU_0223.indd 30HT-E5200_XU_0223.indd 30 2012-02-23 오후 2:30:022012-02-23 오후 2:30:02

English 31 |
04Settings
4 . If you select the Add Network, enter your
wireless router's name to connect.
Enter numbers directly using the number
buttons on your remote control. Enter letters
by selecting a letter with the ▲▼◄► buttons,
and then pressing the E button.
Select Next, and then press the E button
again. You can select security type, and then
select Next, and then press the E button
again.
5 . On the Security screen, enter your network's
Security Code or Pass Phrase.
Enter numbers directly using the number
buttons on your remote control. Enter
letters by selecting a letter with the ▲▼◄►
buttons, and then pressing the E button.
6 . When done, select Next at the right of the
screen, and then press the E button.
7 . The Network Status screen appears.
The product attempts to verify the network
connection and fails.
8 . Select IP Settings on the right of the screen,
and press the E button. The IP Settings
screen appears.
9 . Select the IP Mode field, and then set it to
Manual.10 . Use the number keypad on your remote to
enter the Network values. Use the ▲▼◄►
buttons on the remote to move from entry
field to entry field.
| NOTE | � You can get these values from your Internet provider. You
can also view these values on most Windows computers.
For instructions, see "Getting the Network Settings
Values." on page 29.
11 . When done, highlight OK, and then press E
button. The Network Status screen appears.
The product verifies the network connection
and then connects to the network. When it
is done, highlight OK, and then press E
button.
� WPS(PBC)
One of the easiest ways to set up the wireless
network connection is using the WPS(PBC)
function. If your wireless router has a WPS(PBC)
button, follow these steps:
1 . Open the Home screen.
2 . Press the BLUE (D) button on the remote
control.
3 . Press the WPS(PBC) button on your
router within two minutes. Your product
automatically acquires all the network
settings values it needs and connects to your
network.
The Network Status screen appears. The
product connects to the network after the
network connection is verified.
Wi-Fi DirectThe Wi-Fi Direct function allows you to connect
Wi-Fi Direct devices to the product and each other
using a peer-to-peer network, without a wireless
router.
1 . Turn on the Wi-Fi direct device and activate
its Wi-Fi Direct function.
2 . In the Home screen, select Settings, and
then press the E button.
3 . Select Network, and then press the E
button.
4 . Select Wi-Fi Direct, and then press the E
button.
The Wi-Fi Direct devices that you can
connect appear.
Display
Audio
Network
System
Support
Wi-Fi DirectDevice Name : [HTS]E5200Select your Wi-Fi Direct device to connect to.
AndroidXXXXXXX Disconnected
Close
Refresh
m Move " Enter ' Return
5 . You have three ways to complete the Wi-Fi
connection:
• Through the Wi-Fi device.
• Through the product using PBC.
• Through the product using a PIN.
Each is covered below.
HT-E5200_XU_0223.indd 31HT-E5200_XU_0223.indd 31 2012-02-23 오후 2:30:042012-02-23 오후 2:30:04

| 32 English
SettingsThrough the Wi-Fi Device
1 . On the Wi-Fi device, follow the procedure on
the device for connecting to another Wi-Fi
Direct device. See the device's user manual
for instructions.
2 . When you have completed the procedure,
you should see a pop-up on your TV screen
saying that a device that supports Wi-Fi
Direct has requested to connect. Select OK,
and then press the E button to accept.
3 . The Connecting pop-up appears, followed
by the Connected pop-up. When it closes,
you should see the device listed on the Wi-Fi
Direct screen as connected.
Through the Product Using PBC
1 . Select the Wi-Fi Direct device you want to
connect to this product, and then press the
E button. The PBC/PIN pop up appears.
2 . Select PBC, and then press the E button.
The PBC pop-up appears.
3 . Press the PBC button on the Wi-Fi Direct
device within 2 minutes.
4 . The Connecting pop-up appears, followed
by the Connected pop-up. When it closes,
you should see the device listed on the Wi-Fi
Direct screen as connected.
Through the Product Using a PIN
1 . Select the Wi-Fi Direct device you want to
connect to this product, and then press the
E button. The PBC/PIN pop up appears.
2 . Select PIN, and then press the E button.
The PIN pop-up appears.
3 . Note the PIN code in the pop-up, and then
enter it into the appropriate field in the Wi-Fi
Direct device you want to connect.
4 . The Connecting pop-up appears, followed
by the Connected pop-up. When it closes,
you should see the device listed on the Wi-Fi
Direct screen as connected.
| NOTE | � The wired or wireless network connection will be
disconnected when you use the Wi-Fi Direct function.
Soft APSoft AP lets you connect other Wi-Fi devices to
your network through the product and lets them
access the Internet.
It requires that you create a security key which you
must enter into the other Wi-Fi devices when you
are connecting them to the network.
1 . In the Home screen, select Settings, and
then press the E button.
2 . Select Network, and then press the E
button.
3 . Select Soft AP, and then press the E
button.
4 . Select On or Off, and then press the E
button.
< To Set the Soft AP Security Key >1 . On the Soft AP screen, select Security Key,
and then press the E button. The Security
Key screen appears.
2 . On the Security key screen, enter a security
key. Enter numbers directly using the number
buttons on your remote control. Enter
letters by selecting a letter with the ▲▼◄►
buttons, and then pressing the E button.
3 . When done, use the ▲▼◄► buttons to
move to DONE at the bottom of the screen,
and then press the E button.
When you connect a Wi-Fi device through the
connection procedure on the device, you must
enter the security key you created here into the
appropriate field.
AllShare SettingsThe AllShare Settings screen lists your network
connected AllShare devices and their IP
addresses. Through this screen, you can allow
a device to access the product, deny access, or
delete the device from the AllShare list.
1 . In the Home screen, select Settings, and
then press the E button.
2 . Select Network, and then press the E
button.
HT-E5200_XU_0223.indd 32HT-E5200_XU_0223.indd 32 2012-02-23 오후 2:30:162012-02-23 오후 2:30:16

English 33 |
04Settings
3 . Select AllShare Settings, and then press the
E button.
4 . Select a device, and then press the E
button. The AllShare Settings pop-up
appears.
5 . Select Allow, Deny, or Delete from List, and
then press the E button.
The AllShare Settings screen only displays devices
if you have established networked connections
to AllShare devices. For more information about
AllShare networked devices, see pages 35~36.
Upgrading Software
The Software Update menu allows you to
upgrade the product’s software for performance
improvements or additional services.
• Never turn the product off or back on manually during
the update process.
1 . In the Home menu, select the Settings, and
then press the E button.
2 . Select Support, and then press the E
button.
3 . Select Software Update, and then press the
E button.
4 . Select one of the following methods:
• Online• By USB• By Disc• By downloaded• Standby Mode Upgrade
5 . Press the E button.
Directions for each method begin below.
| NOTE | � The upgrade is complete when the product turns off, and
then turns on again by itself.
� Samsung Electronics takes no legal responsibility for product
malfunction caused by an unstable Internet connection or
consumer negligence during a Software Update.
� If you want to cancel the upgrade while the upgrade
software is downloading, press the E button.
OnlineYour product must be connected to the Internet to
use the Online function.
1 . Select Online, and then press the E button.
The Connecting to Server message appears.
2 . If there is a download available, the Download
pop-up appears with a progress bar and the
download starts.
3 . When the download is complete, the
Upgrade Query window appears with three
choices: Update now, Update later or
Don’t update.
4 . If you select Update now, the product
upgrades the software, turns off, and then
turns on automatically.
5 . If you do not make a selection in one minute
or select Update later, the product stores
the new upgrade software. You can upgrade
the software later using the By downloaded
function.
6 . If you select Don’t update, the product
cancells the upgrade.
By USB
1 . Visit www.samsung.com.
2 . Click SUPPORT on the top right of the page.
3 . Enter the product's model number into the
search field, and then click Find Product.4 . Click Get downloads in the centre of the
page below the Downloads header.
5 . Click Firmware in the centre of the page.
6 . Click the ZIP icon in the File column on the
right side of the page.
7 . Click OK in the pop-up that appears to
download and save the firmware file to your
PC.
8 . Unzip the zip archive to your computer. You
should have a single folder with the same
name as the zip file.
9 . Copy the folder to a USB flash drive.
10 . Make sure no disc is inserted in the product,
and then insert the USB flash drive into the
USB port of the product.
HT-E5200_XU_0223.indd 33HT-E5200_XU_0223.indd 33 2012-02-23 오후 2:30:182012-02-23 오후 2:30:18

| 34 English
Settings11 . In the product’s menu, go to Settings >
Support > Software Update.
12 . Select By USB.
| NOTE | � There should be no disc in the product when you upgrade
the software using the USB Host jack.
� When the Software Update is done, check the software
details in the Software Update menu.
� Do not turn off the product during the Software Update. It
may cause the product to malfunction.
� Software Updates using the USB Host jack must be
performed with a USB flash memory stick only.
By Disc
1 . Visit www.samsung.com.
2 . Click SUPPORT on the top right of the page.
3 . Enter the product's model number into the
search field, and then click Find Product.4 . Click Get downloads in the centre of the
page below the Downloads header.
5 . Click Firmware in the centre of the page.
6 . Click the ZIP icon in the File column on the
right side of the page.
7 . Click OK in the pop-up that appears to
download and save the firmware file to your
PC.
8 . Unzip the zip archive to your computer. You
should have a single .RUF file.
9 . Write the RUF file onto a disc. We
recommend a CD-R or DVD-R.
10 . Finalise the disc before you remove it from
your computer.
11 . Insert the disc into the product.
12 . In the product’s menu, go to Settings >
Support > Software Update.
13 . Select By Disc.
| NOTE | � When the system upgrade is done, check the software
details in the Software Update menu.
� Do not turn off the product during the Software Update.
It may cause the product malfunction.
By downloadedThe By downloaded option lets you upgrade using
a file the product downloaded earlier but you
decided not to install immediately.
1 . If upgrade software has been downloaded,
you will see the software version number to
the right of By downloaded.
2 . Select By downloaded, and then press the
E button.
3 . The product displays a message asking if you
want to upgrade. Select Yes. The product
begins the upgrade.
4 . When the update is complete, the product
turns off automatically, and then turns on.
| NOTE | � When the system upgrade is done, check the software
details in the Software Update menu.
� Do not turn off the product during the Software Update. It
may cause the product to malfunction.
Standby Mode UpgradeYou can set the Standby Mode Upgrade function
so that the product downloads new upgrade
software when it is in Standby mode.
In Standby mode, the product is off, but its
Internet connection is active. This allows
the product to download upgrade software
automatically, when you are not using it.
1 . Press the ▲▼ buttons to select Standby Mode Upgrade, and then press the E
button.
2 . Select On or Off.If you select On, the product will automatically
download new upgrade software when it
is in Standby mode with the power off. If
it downloads new upgrade software, the
product will ask you if you want to install it
when you turn the product on.
| NOTE | � To use Standby Mode Upgrade function, your product
must be connected to the Internet.
� If this function does not appear, you can upgrade to the
latest software and use it.
HT-E5200_XU_0223.indd 34HT-E5200_XU_0223.indd 34 2012-02-23 오후 2:30:202012-02-23 오후 2:30:20

English 35 |
05M
edia Play
Your Blu-ray product can play Disc and USB
contents and the contents located on your PC,
DLNA compatible mobile phone, or NAS using the
AllShare Play function. For more information about
AllShare Play, refer to page 38.
The AllShare Play Screen
To access the AllShare Play screen, select the
AllShare Play icon on the Main screen, and then
press the E button.
Using the AllShare Play Screen
My List
Videos
Photos
Music
a Login ' Return
Recently played
What's new Recently updated 09.Jan.2012
Playlist No playlists have been created.
Create a playlist to access your content quickly and easily.
Recently played files will be displayed here.
View More
SAM_0001 SAM_0002 SAM_0003 SAM_0004 SAM_0005
AllShare Play / My list /
When the AllShare Play screen appears, it displays
My List and a list of content types - Videos,
Photos, and Music - on the left side. On the right,
it displays, by default, the content in My List: a
list of recently played or viewed items, a list of the
newest items you have viewed or listened to, and
your most recent Playlist. If you have never played
or viewed any items, or created a Playlist, this area
will be empty.
� Playing My List Items
To play displayed My List items, you must have
the source of the items connected to or inserted
in the product. For example, if recently played My
List photos came from a DVD disc, you must have
that disc in the product to view them.
To play or view My List items, perform one of the
actions below:
• Use the ◄► buttons to select an item you
want to view or play, and then press the E
button. To view or play another item, press
the RETURN (') button, and then repeat the
process described in the first sentence.
• Use the ◄► buttons to select an item, press
the TOOLS button to display the Tools menu,
select Play, and then press the E button. To
view or play another item, press the RETURN
(') button, and then repeat the process
described in the first sentence.
� Playing Video, Photo, or Music Content
1 . Make sure that the source of the content
you want to play or view is connected to or
inserted into the product.
2 . Use the ▲▼ buttons to select Videos,
Photos, or Music, and then press the E
button. The first source selection on the right
side is highlighted.
3 . Use the ▲▼ buttons to select the source of
the content, and then press the E button.
| NOTE | � Sources displayed for each content type may differ.
4 . To control the playing of Videos, Photos, or
Music, see:
• Controlling Video Playback on page 40.
• Controlling Music Playback on page 42.
• Playing Photo Contents and Using the Tools
Menu when a File is Highlighted on pages
45~47.
| NOTE | � Depending on how and when you attach a content source
to the product and the content type, the product may
display a different series of screens to start playback. For
alternative playback methods see:
• Playing Files on a USB Storage Device or iPod/iPhone
on page 36.
• Playing Commercial Video Discs on page 37.
• Playing Commercial Audio Discs on page 37.
• Playing a Disc with User Recorded Content on page 38.
Media Play
HT-E5200_XU_0223.indd 35HT-E5200_XU_0223.indd 35 2012-02-23 오후 2:30:232012-02-23 오후 2:30:23

| 36 English
Media PlayPlaying Files on a USB Storage
Device or iPod/iPhone
You can play multimedia files located on a
connected USB device.
1 . With the product turned off, connect a USB
storage device or an iPod/iPhone.
2 . Turn on the product. When the Main screen
appears, select AllShare Play > Videos,
Photos or Music > Connected Device, and
then press the E button.
Smart Hub Function Settings
� Safely Remove USB d WPS(PBC)
Play videos or music, or view photos from discs or connected devices.AllShare Play
OR1-1. With the product turned on, connect a USB
storage device or an iPod/iPhone.
2-1. When screen below appears, use the ▲▼
buttons to select the kind of content you
want to view or play, and then press the E
button.
Smart Hub Function Settings
� Safely Remove USB d WPS(PBC)
Play videos or music, or view photos from discs or connected devices.AllShare Play
Smart Hub Function Settings
� Safely Remove USB d WPS(PBC)
Play videos or music, or view photos from discs or connected devices.AllShare Play
b Function
r music, or view photos from discs or connAllShare Play
Functionb
r music, or view photos from discs or connAllShare Play
New device connected.USB DISK
" Enter ' Return
Videos
Photos
Music
| NOTE | � Even though the product will display all available folders,
it will only display files of the content type you selected
in Step 2 or 2-1. For example, if you selected music, you
will only be able to see music files. You can change this
selection using AllShare Play.
3 . The kind of content you selected on the
connected device is displayed. Depending
on how the contents is arranged, you will see
either folders, individual files, or both.
4 . Using the ▲▼◄► buttons on your remote,
select the desired contents. To open a folder,
select it, and then press the E button.
To play a file, select it, and then press the E
button.
5 . Press the RETURN (') button to exit a folder
or to return to the Main screen.
| CAUTION | � You can play a video only when you use the iPod Dock.
| NOTE | � To prevent possible damage to the USB memory, you
must remove the USB storage device safely using the
“Safely Remove USB” function. Press the HOME button
to move to the Home menu, select the YELLOW (C) button, and then press the E button.
� The Photos menu does not support iPods or iPhones.
� Only the playback screen will appear on the TV. View other
iPod screens on the iPod player.
� If the connected iPod does not support video playback, the
"Playing video files is not supported by this iPod model." message appears when you select the Video menu.
iPod/iPhone Models You Can Use
with This Product
iPod touch 3rd/2nd/1st generationiPod classic / iPod with videoiPod with dock connectoriPod with Click WheeliPod nano 5th/4th/3rd/2nd generationiPhone 4S / iPhone 4iPhone 3GS / iPhone 3G / iPhone
HT-E5200_XU_0223.indd 36HT-E5200_XU_0223.indd 36 2012-02-23 오후 2:30:332012-02-23 오후 2:30:33

English 37 |
05M
edia Play
The Function Screen
On the Function Screen, you can select the audio
and/or video input source to view or listen to.
| NOTE | � You can also change sources by pressing the Function button
in the upper right of the remote.
To access the Function Screen, select the
Function icon on the Main screen, and then press
the E button.
Options on the Function ScreenTo select, highlight an option using the ▲▼
buttons, and then press the E button.
Digital In Select to listen to the digital audio
source connected to Digital Audio In.
AUXSelect to listen to audio from the
analogue audio source connected to
Audio In.
Remote iPodSelect to listen to music or view video
from the iPod connected to the iPod
jack.
HDMI IN 1 Select to view video from the device
connected to HDMI IN 1.
HDMI IN 2 Select to view video from the device
connected to HDMI IN 2.
Tuner Select to listen to the FM radio.
Bluetooth Select to listen to the music in the
Bluetooth device.
Playing Commercial Video Discs
1 . Place a disc into the disc tray with the disc’s
label facing up and then close the disc tray.
Playback starts automatically.
If playback does not start automatically, press
the 6 button on your remote or select the
AllShare Play option on the Main screen,
and then press the E button. See "Playing
Video, Photo, or Music Content" on page 35.
Playing Commercial Audio Discs
1 . Place a pre-recorded, commercial audio disc
into the disc tray with the disc’s label facing up,
and then close the tray. The AllShare Play Music
screen appears listing the tracks. Playback of
the first track starts automatically.
AllShare Play / Music / Audio CD 1 / 17
00:00 / 03:59
b� Page Move / Tools ' Return
TRACK 001 ٭
► TRACK 001 03:59
TRACK 002 04:34
TRACK 003 04:24
TRACK 004 04:01
TRACK 005 04:26
TRACK 006 05:07
TRACK 007 04:47
TRACK 008 03:59
TRACK 009 04:34
TRACK 010 04:02
TRACK 002 04:34TRACK 002 04 34► TRACK 001 03:59
2 . To play a particular track, use the ▲▼ buttons
on the remote to select the track, and then
press the E button.
� Music Screen Controls
Pause a track.
Play a track.
Repeat one track or all tracks.
Play tracks in random order.
Display the Equaliser.
Adjust the equaliser manually.
(Only when equaliser mode is On)
| NOTE | � The Music Screen controls are only accessible when a track
is playing.
� All controls do not appear at the same time.
� For more information about playing music, go to "Controlling
Music Playback" on page 42.
HT-E5200_XU_0223.indd 37HT-E5200_XU_0223.indd 37 2012-02-23 오후 2:30:442012-02-23 오후 2:30:44

| 38 English
Media PlayPlaying a Disc with User Recorded
Content
You can play multimedia files you have recorded
on DVD or CD discs.
1 . Place a user recorded disc into the disc
tray with the disc’s label facing up, and then
close the tray. The Device Connected pop-up
appears.
2 . Use the ▲▼ buttons to select the type of
content you want to view or play - Videos,
Photos, or Music - and then press the E
button.
| NOTE | � Even though the product will display folders for all content
types, it will only display files of the content type you selected
in Step 2. For example, if you selected music, you will only
be able to see music files. You can change this selection
using AllShare Play.
3 . Use the ▲▼◄► buttons to select the folder
containing the content type you selected in Step
2, and then press the E button.
4 . If you selected Music, the AllShare Play Music
screen appears listing the music files on the
disc. Use the ▲▼ buttons to select the file you
want to play, and then press the E button.
5 . If you selected Photos, the AllShare Play Photos
screen appears listing the photos on the disc.
Use the ▲▼◄► buttons to select the photo you
want to view, and then press the Ebutton.
6 . If you selected Videos, the AllShare Play Videos
screen appears listing the video files on the disc.
Use the ▲▼◄► buttons to select the video you
want to watch, and then press the E button.
| NOTE | � For the Music and Video folders, you can also push the
TOOLS button on your remote, and then select Play Folder to
play or view all the files in the folder automatically. Select the
folder first before pushing the TOOLS button.
� For more information about playing music, go to Controlling
Music Playback on page 42.
� For more information about playing photo contents, go to
Playing Photo Contents and Using the Tools Menu when a
File is Highlighted on pages 45~47.
� For more information about playing video contents, go to
Controlling Video Playback on page 40.
Using the AllShare Network
Function
AllShare lets you play Videos, Photos, or Music
located on your PC or your DLNA compatible
device through the product using a wireless
network connection.
To Download the AllShare SoftwareTo use AllShare with your PC or DLNA device, you
must install AllShare software on your PC.
You can download the PC software and get
detailed instructions for using AllShare from the
Samsung.com website.
1 . Go to www.samsung.com.
2 . Click Support at the top of the page.
3 . On the Support page, enter the model
number of your product into the Model
Number field.
4 . On the page that appears, click Get
downloads on the left side under Downloads.
The Download Centre appears.
5 . On the Download Centre page, click the
Software tab.
6 . On the software tab, click the File icon on the
right side of the AllShare line.
7 . In the pop-up that appears, click Save File.
8 . Find the AllShare install file on your disk, and
then double click the file.
9 . In the pop-up that appears, click Run, and
then follow the directions that appear on your
screen.
Download the AllShare Installation/Instruction
manual from the same Software Tab by clicking
the corresponding PDF file symbol in the File
column on the right. The file, in PDF format, will
download and open. You can view and/or save
the file.
HT-E5200_XU_0223.indd 38HT-E5200_XU_0223.indd 38 2012-02-23 오후 2:30:542012-02-23 오후 2:30:54

English 39 |
05M
edia Play
Playing Content Located on Your PC or DLNA Device through the Product
5V 500mA
AllShare Connection
PCProduct
Play back PC's files
1 . Connect the product, your PC, and/or your
DLNA compatible cell phone to the same
wireless network.
2 . Follow the directions in the AllShare software
Installation/Instruction manual to set up
devices and files for playing or viewing.
3 . Select AllShare Play in the product's Home
screen, and then press the E button. The
AllShare Play screen appears.
4 . Select the connected DLNA compatible
device or your PC, and then press the E
button. A screen listing the available files
appears.
5 . Select the file you want to play or view, and
then press the E button.
Controlling the Playback of Content Located on Your PC with Your Smart Phone
5V 500mA
AllShare Connection
Control PC's files to Product
PC
Smart Phone
Product
Play back PC's files
(Only available with Samsung phones supporting
AllShare functionality.)
1 . Connect the product, your PC, and your
DLNA compatible cell phone to the same
wireless network.
2 . Follow the directions in the AllShare software
Installation/Instruction manual to set up
devices and files for playing or viewing.
3 . On your computer, using the AllShare
software, confirm your phone is connected.
4 . On the phone, select the file you want to view
or play, and then select the Blu-ray product
as the playback device.
5 . On the phone, start playback.
HT-E5200_XU_0223.indd 39HT-E5200_XU_0223.indd 39 2012-02-23 오후 2:30:562012-02-23 오후 2:30:56

| 40 English
Media Play
Repeat Playback
Repeat a Title or Chapter
1 . During playback, press the REPEAT
button on the remote control.
2 . Press the ▲▼ buttons to select a
Chapter, All or Title, then press the
E button.
| NOTE |
� The screen may not display Chapter or Title
immediately. Continue to press the ▲▼
buttons until your choice is inside the blue
field.
3 . To return to normal play, press the
REPEAT button again, press the
▲▼ buttons to select Off, and then
press the E button.
Repeat a Section
1 . During playback, press the REPEAT
button on the remote control.
2 . Press the ▲▼ buttons to select
Repeat A-B.
| NOTE |
� The screen may not display Repeat A-B
immediately. Continue to press the ▲▼
buttons until Repeat A-B is inside the blue
field.
3 . Press the E button at the point
where you want repeat play to start (A).
4 . Press the E button at the point
where you want repeat play to stop (B).
5 . To return to normal play, press the
REPEAT button again.
6 . Press the E button.
| NOTE |
� You must set point (B) at least 5 seconds of
playing time after point (A).
Using the disc menu, title menu, popup menu and title list
DISC MENU During playback, press this button to
display the Disc menu.
TITLE MENU
During playback, press this button to
display the Title menu.
• If your disc has a playlist, press the
GREEN (B) button to go to the playlist.
POPUP MENU During playback, press this button to
display the Pop-up menu.
DISC MENU or TITLE MENU
During playback, press this button to
display the title list.
Playback related buttonsThe product does not play sound in Search, Slow,
or Step mode.
6 Starts playback.
5 Stops playback.
7 Pauses playback.
Fast Motion Play
During playback, press the 3 or �
button.
Each time you press the 3 or �
button, the playback speed will change.
Slow Motion Play
In pause mode, press the � button.
Each time you press the � button, the
playback speed will change.
Step Motion Play
In pause mode, press the 7 button.
Each time you press the 7 button, a
new frame appears.
Skip Motion Play
During playback, press the 1 or 2
button.
Each time you press 1 or 2 button,
the disc moves to the previous or next
chapter or file.
Controlling Video Playback
You can control the playback of video files located on Blu-ray, DVD, and CD discs, and on USB storage
devices. Depending on the disc, some of the functions described in this manual may not be available.
Buttons on the Remote Control used for Video PlaybackDISC MENU TITLE MENU
MUTE
0 POPUP
FULL SCREEN REPEATHOME
HT-E5200_XU_0223.indd 40HT-E5200_XU_0223.indd 40 2012-02-23 오후 2:31:012012-02-23 오후 2:31:01

English 41 |
05M
edia Play
Using the TOOLS MenuDuring playback, press the TOOLS button.
Title SearchTime Search
Select to move to a desired title if
the disc has more than one title, to a
desired scene, or, using Time Search,
to a specific point in a movie or video.
With Time Search, you designate
the specific point by entering a time
coordinate in the following format
00:00:00 (hours, minutes, seconds)
using the remote.
Repeat Mode
Select to repeat a specific Title, Chapter
(BD/DVD discs only) or marked section.
Works the same as the REPEAT button.
See page 40.
Full ScreenSelect to set the desired full screen
size. You can select Original, Mode1
(larger), and Mode2 (largest).
Picture Mode
Select to set the picture mode.
- Dynamic : Choose this setting to
increase sharpness.
- Standard : Choose this setting for
most viewing applications.
- Movie : This is the best setting for
watching movies.
- User : Lets you adjust the sharpness
and noise reduction function
respectively.
| NOTE |
� When you select User, the User
Settings screen appears. Select an
option, press E, use the ◄►
buttons to make an adjustment, and
then press E. Press the RETURN
(') button to go back to the TOOLS
menu.
� When you use the BD wise function,
this menu will not appear.
Equaliser Mode Select to use the Equaliser.
Equaliser Settings
Select to set the Equaliser.
| NOTE |
� It only appears when equaliser
mode is on.
Menu that appears only when BD/DVD discplays
Play from the beginning
Select to play the movie from the
beginning.
Chapter Search Select to move to a chapter that you
desire to watch.
Audio
Select to set the desired audio
language.
- You can also operate this function
by pressing the AUDIO button on the
remote control.
Subtitle
Select to set the desired subtitle
language.
- You can also operate this function
by pressing the SUBTITLE button on
the remote control.
Angle
To view a scene from another angle.
The Angle option displays the number
of angles available to view (1/1, 1/2,
1/3, etc.).
BONUSVIEW Video / BONUSVIEW Audio
Select to set the desired bonusview
option.
Menu that appears only when a file plays
Go to Videos List Move to video list screen.
Scene Search Search the video file by the scene.
Information Check the video file's information.
| NOTE |
� Depending on the disc or storage device, the Tools menu
may differ. All options may not be displayed.
HT-E5200_XU_0223.indd 41HT-E5200_XU_0223.indd 41 2012-02-23 오후 2:31:062012-02-23 오후 2:31:06

| 42 English
Media PlayControlling Music Playback
You can control the playback of music content
located on a DVD, CD, or a USB storage device.
Buttons on the Remote Control used for Music Playback
DISC MENU TITLE MENU
MUTE
1 2 3
4 5 6
7 8
0
9POPUP
RDS DISPLAY
PTY- PTY SEARCH PTY+
TA
6
1
3
2
4
5
1
Fast Play (Audio CD (CD-DA) only)During playback, press the 3 or � button.
Each time you press the 3 or � button, the
playback speed will change.
2 7 button : Pause a track.
3 6 button : Plays the currently selected track.
4 5 button : Stops a track.
5Skip : During playback, press the 1 or 2 button
to move to the previous or next music of listed.
6NUMBER buttons : During Playlist playback, press
the desired track number. The selected track is
played.
Repeating Tracks on an Audio CDYou can set the product to repeat tracks on an
audio CD (CD-DA/MP3).
1 . During playback, use the ► button to select
in the lower right corner of the screen,
and then press the E button.
2 . Use the ▲▼ to select the repeat mode you
want - Off, One Song, or All - and then
press the E button.
Shuffling Tracks on an Audio CDYou can set the product to play tracks on an audio
CD (CD-DA/MP3) at random.
1 . During playback, use the ► button to select
in the lower right corner of the screen,
and then press the E button.
2 . Use the ▲▼ to set the Shuffle Mode On or
Off, and then press the E button.
Creating a Playlist
AllShare Play / Music / Audio CD 1 / 17
00:00 / 03:59
b� Page Move / Tools ' Return
TRACK 001 ٭
► TRACK 001 03:59
TRACK 002 04:34
TRACK 003 04:24
TRACK 004 04:01
TRACK 005 04:26
TRACK 006 05:07
TRACK 007 04:47
TRACK 008 03:59
TRACK 009 04:34
TRACK 010 04:02
TRACK 002 04:34TRACK 002 04 34► TRACK 001 03:59
1 . With the Playback screen displayed, press
the TOOLS button. The Tools menu appears.
2 . Use the ▲▼ buttons to select Play selection,
and then press the E button. The Play
selection screen appears.
3 . Use the ▲▼ buttons to select a track, and
then press the E button. A check appears
to the left of the track.
4 . Repeat Step 3 to select and check additional
tracks.
5 . To remove a track from the list, move to the
track, and then press the E button again.
The check on the track is removed.
6 . When done, press the ► button to select
Play, and then press the E button. The
Music Playback screen reappears listing only
the tracks you checked. The selected tracks
play automatically.
| NOTE |
� You can create a playlist with up to 99 tracks on Audio
CDs (CD-DA).
� If you have created a playlist, Play selection is replaced by
Edit playlist on the Tools menu.
HT-E5200_XU_0223.indd 42HT-E5200_XU_0223.indd 42 2012-02-23 오후 2:31:082012-02-23 오후 2:31:08

English 43 |
05M
edia Play
� On the Play selection screen, you can also choose Select All, Deselect All, and Cancel.• Use Select All to select all tracks. This cancells
your individual track selections. When you press the
RETURN (') button on your remote or select PLAY and
then press the E button, all tracks will appear on the
Music Playback screen, and the product will begin to
play all tracks from Track 001.
• Use Deselect All to deselect all selected tracks at once.
Then, select individual tracks or use Select All to select
all the tracks, and then press the RETURN (') button
on your remote or select PLAY and then press the E
button. If you do not use Select All or select individual
tracks, the Playlist will not change.
• Cancel cancells any changes you made on the Play
Select screen. When you return to the Playback screen,
the Playlist will be unchanged.
RippingYou can rip music from a music CD to a USB
device inserted in the USB jack.
1 . Insert a USB device into the USB jack on
the front of the product, and then press the
RETURN (') button on your remote.
2 . Insert the disc you want to rip from into the
product and close the disc tray.
3 . With the Playback screen displayed, press
the TOOLS button. The Tools menu appears.
4 . Use the ▲▼ buttons to select Rip, and
then press the E button. The Rip screen
appears.
5 . Use the ▲▼ buttons to select a track, and
then press the E button. A check appears
to the left of the track.
6 . Repeat Step 5 to select and check additional
tracks.
7 . To remove a track from the list, move to the
track, and then press the E button again.
The check on the track is removed.
8 . When done, press the ► button to select
Rip, and then press the E button. The Rip
pop-up appears.
9 . Press the E button to begin the ripping
process. The Ripping Completion Bar pop-up
appears.
10 . When ripping is complete, the “Ripping completed.” message appears. Press the
E button.
11 . Press the RETURN (') button to go back to
the Playback screen.
| NOTE |
� When Ripping is done, a folder called MP is created in the
USB.
Using BluetoothYou can use a Bluetooth device to enjoy music
with high quality stereo sound, all without wires!
What is Bluetooth?
Bluetooth is a technology that enables Bluetooth-
compliant devices to easily interconnect with each
other using a short wireless connection.
• A Bluetooth device may cause a noise or
malfunction, depending on usage.
- When a part of the body is in contact with the
receiving/transmitting system of the Bluetooth
device or the Home Cinema.
- Electrical variation from obstructions caused
by a wall, corner or office partitioning.
- Electrical interference from same frequency-
band devices including medical equipment,
microwave oven and wireless LAN.
• Pair the Home Cinema with the Bluetooth
device while maintaining a close distance.
• The further the distance is between Home
Cinema and Bluetooth device, the worse the
quality is.
If the distance exceeds the Bluetooth
operational range, the connection is lost.
• In poor reception-sensitivity areas, the Bluetooth
connection may not work properly.
• The Home Cinema has an effective reception
range of up to 10 meters in all directions if
there are no obstacles. The connection will be
automatically cut off if the distance is out of this
range. Even within this range, the sound quality
may be deteriorated by obstacles such as walls
or doors.
• This wireless device may cause an electric
interference during its operation.
HT-E5200_XU_0223.indd 43HT-E5200_XU_0223.indd 43 2012-02-23 오후 2:31:192012-02-23 오후 2:31:19

| 44 English
Media PlayTo connect the Home Cinema to a Bluetooth device
5V 500mA
Connect
Bluetooth device
Check if the Bluetooth device supports the
Bluetoothcompliant stereo headset function.
1 . Press the FUNCTION button on the remote
control of product to display the BT message.
• You will see WAIT for 2 seconds and then
READY on the front display of the Home
Cinema.
2 . Select the Bluetooth menu on Bluetooth
device you want to connect. (refer to
Bluetooth device's user manual)
3 . Select the Stereo headset menu on the
Bluetooth device.
• You will see a list of scanned devices.
4 . Select "SamsungHTS-XXXXXX" from the
searched list.
• When the Home Cinema is connected to
the Bluetooth device, the device name of
the connected Bluetooth device, followed
by the Home Cinema will display the
connected device name on the front display.
5 . Play music on the connected device.
• You can listen to the music playing on the
connected Bluetooth device over the Home
Cinema system.
| NOTE |
� The Home Cinema only supports Middle Quality SBC
data (up to 237kbps@48kHz), and does not support High
Quality SBC data ([email protected]).
� The AVRCP feature is supported and would work
differently according to another device's specification.
� Connect only to a Bluetooth device that supports the
A2DP Profile.
� Only one Bluetooth device can be paired at a time.
� Search or connection by product may not be performed
properly in the following cases:
- If there emits a strong electric wave around Home
theater.
- If several Bluetooth devices are simultaneously paired
with product.
- If the Bluetooth device is turned off, not in place, or
malfunctions.
- Note that such devices as microwave oven, wireless
LAN adaptor, plasma bulb and gas stove use the same
frequency range as the Bluetooth device, which can
cause an electric interference.
To disconnect the Bluetooth device from the Home CinemaYou can disconnect the Home Cinema from the
Bluetooth device. (refer to Bluetooth deivice's
user's manual)
• The Home Cinema will be disconnected.
• When the Home Cinema is disconnected from
the Bluetooth device, the Home Cinema will
display DISCONNECTED on the front display.
To disconnect the Home Cinema from the Bluetooth devicePress the ( ) button on the front panel of the
Home Cinema to switch from BT to another mode
or off the Home Cinema.
• Except disconnect through function conversion,
the connected Bluetooth device will wait a
certain time for response from the Home
Cinema before terminating the connection.
(Disconnection time may differ, depending on
the Bluetooth device)
• The currently connected device will be
disconnected.
| NOTE |
� In Bluetooth connection mode, the Bluetooth connection
will be lost if the distance between the Home Cinema
System and the Bluetooth device exceeds (10 meters).
If the distance is returned to the effective range or you
restart the Bluetooth device, you have to reconnect them.
� If the Bluetooth device falls back in the effective range,
you can restart to restore the pairing with the Bluetooth
device.
HT-E5200_XU_0223.indd 44HT-E5200_XU_0223.indd 44 2012-02-23 오후 2:31:212012-02-23 오후 2:31:21

English 45 |
05M
edia Play
� In BT function mode, Screen saver will operate if
the device keep Ready state last 5 minute. Then, for
connecting the BT device, turn off the screen saver and
connect it. To turn off the Screen saver, operate any
button on the remote control. (e.g. Volume button etc.)
Playing Photo Contents
You can play photo contents located on a DVD,
USB, mobile device or PC.
Using the Tools MenuDuring playback, press the TOOLS button.
Go to Photos List
Select to go to the list of photos on
the current media.
Start Slide Show Select to start the slide show.
Slide Show Speed Select to set a slide show's speed.
Slide Show Effect
Select to set a slide show's special
effects.
Background Music On
Select to listen to music while
viewing a slide show.
Background Music Setting
Select to set the background music
setting.
Picture Mode
Select to set the picture settings.
- Dynamic : Choose to increase
Sharpness.
- Standard : Choose for most
viewing applications.
- Movie : This is the best setting for
watching movies.
- User : Lets you adjust the
sharpness and noise reduction
function respectively.
| NOTE |
� When you use the BD wise
function, this menu will not
appear.
Zoom Select to enlarge the current picture.
(Enlarge up to 4 times)
RotateSelect to rotate the picture. (This will
rotate the picture either clockwise or
counter clockwise.)
Information Shows the picture information.
| NOTE |
� Depending on the disc or storage device, the Tools menu
may differ. All options may not be displayed.
� To enable the background music function, the photo file
must be in the same storage media as the music file.
However, the sound quality can be affected by the bit rate
of the MP3 file, the size of the photo, and the encoding
method.
� You can't enlarge the subtitle and PG graphic in the full
screen mode.
Using the Tools Menu when a File
is Highlighted
When a file is highlighted, press the TOOLS
button.
View
Select to access the sort options: Artist,
Genre, Monthly, Latest Date, etc. The
sort options that appear depend on the
storage and media type.
Folder viewAppears in the View function screen.
Select to display the folders on the
storage device.
TitleAppears on the View function screen.
Select to sort all photo or video files on
a storage device by title.
Artist
Appears on the View function screen.
Select Artist to sort and then display
all music tracks on a storage device by
artist.
HT-E5200_XU_0223.indd 45HT-E5200_XU_0223.indd 45 2012-02-23 오후 2:31:242012-02-23 오후 2:31:24

| 46 English
Media Play
Album
Appears on the View function screen.
Select Album to sort and then display
all music tracks on a storage device by
album.
Genre
Appears on the View function screen.
Select Genre to sort and then display
all music tracks on a storage device by
genre.
Latest Date
Appears on the View function screen.
Select to sort and then display all photo
or video files on a storage device from
the latest to earliest date.
Earliest Date
Appears on the View function screen.
Select to sort and then display all photo
or video files on a storage device from
the earliest to latest date.
MonthlyAppears on the View function screen.
Select to sort all photo or video files on
a storage device by the month created.
Play selection
Play selection lets you select specific
music, video, and photo files to play.
It works essentially the same for all
media. The example below is for
photos.
1. On the Thumbnail View screen,
highlight a photo, and then press
the TOOLS button on the remote.
2. In the Tools menu, select Play selection, and then press the E
button.
3. On the selection screen, use the
▲▼◄► buttons to select a
photo you want to view, and then
press the E button.
A check mark appears to the left
of the picture.
4. Repeat Step 3 for each photo you
want to view.
5. To de-select a photo, highlight it,
and then press the E button.
6. When done, use the ◄► buttons
to select Play, and then press
the E button. A slide show
containing the photos you selected
begins.
7. To pause the slide show, press the
E button once. To restart the
slide show, press the E button
again.
8. To stop the slide show, press the
RETURN (') button.
| NOTE |
� After the slide show begins, you can
control the slide show by pressing
the TOOLS button and displaying
the Slide Show menu. See " Using
the Tools Menu" page 45.
Send
Select Send to upload selected files
to Picasa, Facebook, Cloud Storage, N
Drive, or Family Story.
To use Send, you need to establish an
account with the on-line site, and then
log in using the Log In function.
1. Use the ▲▼◄► buttons to
select a file, and then press the
E button.
2. Repeat for each track or file you
want to upload.
| NOTE |
� You can also move to Select All on
the right, and then press the E button to select all tracks or files.
3. Select Send on the right side, and
then press the E button.
4. Use the ▲▼ buttons to select the
on line site you want to upload the
files or tracks to, and then press
the E button.
HT-E5200_XU_0223.indd 46HT-E5200_XU_0223.indd 46 2012-02-23 오후 2:31:262012-02-23 오후 2:31:26

English 47 |
05M
edia Play
Login / Out The Log In/Out function lets you log in
to your online Samsung account.
Add to Playlist
Select to create a playlist or add files
or tracks to a playlist.
1. Select Add to Playlist, and then
press the E button.
2. Use the ▲▼◄► buttons to
highlight a track or file, and then
press the E button.
3. Repeat for each track or file you
want to add.
4. Select Add on the right, and then
press the E button.
5. On the screen that appears,
perform one of the following
actions:
• Select the Playlist to which you want
to add the tracks or files and then
press E button.
• Select Create new, and then press
the E button. On the keyboard
pop-up that appears, create a name
for the new playlist. Enter numbers
using the numbers on the remote.
Enter letters by using the ▲▼◄►
buttons to move the cursor, and
then pressing the E button.
When finished, move to DONE at
the bottom of the screen, and then
press the E button.
Delete (Playlist)
Depending on the screen you are
viewing, select Delete to erase a file
from erasable media (such as a USB
device) or to delete a playlist.
Edit playlist
Select Edit playlist to remove files or
tracks from an existing playlist. The
storage device containing the playlist
must be inserted into or attached to
the product.
1. Use the ▲▼◄► buttons to
select a file, and then press the
E button.
2. Repeat for each track or file you
want to remove.
| NOTE |
� You can also move to Select All on
the right, and then press the E button to select all tracks or files.
3. Select Remove on the right side,
and then press the E button.
Play Current Group
After you have sorted by Artist, Genre,
Album,Title, Latest Date, Earliest Date,
or Monthly, select a group that is the
result of the sort (for example, all
pictures taken in August), and then
select Play Current Group to play or
view the files in that group only.
Go to Playlist Select to go to the Playlist section of
the Main AllShare screen.
Encoding
Encoding - which changes by language
or by geographical area - modifies
how the product sorts, arranges, and
presents files or tracks, displays dates,
etc. Select Encoding to change the
encoding to match your language or
geographical area.
Information Displays media file and content
information.
| NOTE |
� Depending on the disc or storage device, the Tools menu
may differ. All options may not be displayed.
HT-E5200_XU_0223.indd 47HT-E5200_XU_0223.indd 47 2012-02-23 오후 2:31:282012-02-23 오후 2:31:28

| 48 English
Media PlayListening to Radio
Using Buttons on the Remote Control
1 . Press the FUNCTION button to select FM.
2 . Tune in to the desired station.
• Preset Tuning 1 : Press the 5 button
to select PRESET and then press the
TUNING/CH (,.) button to select the
preset station.
- Before you can tune to preset stations,
you must add preset stations to the
product's memory.
• Manual Tuning : Press the 5 button
to select MANUAL and then press the
TUNING/CH (,.) button to tune in to a
lower or higher frequency.
• Automatic Tuning : Press the 5 button
to select MANUAL and then press and
hold the TUNING/CH (,.) button to
automatically search the band.
Setting Mono/StereoPress the MO/ST button.
• Each time the button is pressed, the sound
switches between STEREO and MONO.
• In a poor reception area, select MONO for a
clear, interference-free broadcast.
Presetting StationsExample : Presetting FM 89.10 into memory.
1 . Press the FUNCTION button to select FM.
2 . Press the TUNING/CH (,.) button to
select <89.10>.
3 . Press the TUNER MEMORY button.
• NUMBER flashes on the display.
4 . Press the TUNER MEMORY button again.
• Press the TUNER MEMORY button before
NUMBER disappears from the display on its
own.
• After you press the TUNER MEMORY
button, NUMBER disappears from the
display and the station is stored in memory.
5 . To preset another station, repeat steps 2 to 4.
• To tune in to a preset station, press the
TUNING/CH (,.) button.
About RDS Broadcasting
Using the RDS (Radio Data System) toreceive FM stationsRDS allows FM stations to send an additional
signal along with their regular program signals.
For example, the stations send their station
names, as well as information about what type of
program they broadcast, such as sports or music,
etc.
When tuned to an FM station which provides the
RDS service, the RDS indicator lights up on the
display.
Description on RDS function• PTY (Program Type) : Displays the type of
program currently being broadcast.
• PS NAME (Program Service Name) : Indicates
the name of broadcasting station and is
composed of 8 characters.
• RT (Radio Text) : Decodes the text broadcast by
a station (if any) and is composed of maximum
64 characters.
• CT (Clock Time) : Decodes the real time clock
from the FM frequency. Some stations may not
transmit PTY, RT or CT information therefore
this may not be displayed in all cases.
• TA (Traffic Announcement) : TA ON/OFF it shows
that the traffic announcement is in progress.
| NOTE |
� RDS may not operate correctly if the station tuned is not
transmitting RDS signal properly or if the signal strength
is weak.
HT-E5200_XU_0223.indd 48HT-E5200_XU_0223.indd 48 2012-02-23 오후 2:31:302012-02-23 오후 2:31:30

English 49 |
05M
edia Play
To show the RDS signalsYou can see the RDS signals the station sends on
the display.
Press the RDS DISPLAY button while listening to
an FM station.
• Each time you press the button, the display
change to show you the following information :
PS NAME � RT� CT � Frequency
PS (Program Service)
While searching, <PS NAME> appears
and then the station names will be
displayed. <NO PS> appears if no
signal is sent.
RT(RadioText)
While searching, <RT> appears and
then text messages the station sends
will be displayed. <NO RT> appears if
no signal is sent.
Frequency Station frequency (non-RDS service)
About characters shown in the displayWhen the display shows PS,or RT signals,the
following characters are used.
• The display window cannot differentiate upper
case and lower case letters and always uses
upper case letters.
• The display window cannot show accented
letters, <A,> for instance, may stands for
accented <A’s> like <À, Â, Ä, Á, Å and Ã.>
PTY (Program Type) indication andPTY-SEARCH functionOne of the advantages of the RDS service is that
you can locate a particular kind of program from
the preset channels by specifying the PTY codes.
To search for a program using the PTYcodes
� Before you start!• The PTY Search is only applicable to preset
stations.
• To stop searching any time during the process,
press 5 button while searching.
• There is a time limit in doing the following steps.
If the setting is cancelled before you finish, start
from step 1 again.
• When pressing the buttons on the primary
remote control, make sure that you have
selected the FM station using the primary
remote control.Usin
221 3
4 5 6
RDS DISPLAY
PTY- PTY SEARCH PTY+
TA
1 . Press the PTY SEARCH button while
listening to an FM station.
2 . Press the PTY- or PTY+ button until the PTY
code you want appears on the display.
• The display gives you the PTY codes
described to the right.
3 . Press the PTY SEARCH button again, while
the PTY code selected in the previous step is
still on the display.
• The centre unit searches 15 preset FM
stations, stops when it finds the one you
have selected, and tunes in that station.
HT-E5200_XU_0223.indd 49HT-E5200_XU_0223.indd 49 2012-02-23 오후 2:31:322012-02-23 오후 2:31:32

| 50 English
Media PlayUsing the Special Effects Remote
Control Buttons
SOUND EFFECT FunctionSOUND
EFFECT
Lets you select a mode that optimizes the sound.
1. Press the SOUND EFFECT button.
2. Press the ▲▼ button to select the desired mode:
DSP or Sound Mode.3. Press the ◄► buttons to select the desired sound
effect.
� DSP
MP3 Enhancer Power Bass Off• MP3 Enhancer : Helps enhance your sound experience
(ex. mp3 music). You can upscale your MP3 level sound
(24 kHz, 8bit) to CD level sound (44.1 kHz, 16bit).
• Power Bass : Increases the volume level of bass tones
and provides thudding sound effects.
• Off : Select this for normal listening.
� Sound ModeVirtual Sound Music News Drama Cinema Sports Game Off
3D Sound
You can enjoy more natural and vivid surround sound
with enriched tones by adjusting the depth of sound
using the level options.
Off High Medium Low
| NOTE |
� It is not available in FM mode.
Playing a 2D video in 3D mode
You can enjoy an ordinary 2D video in 3D mode.
| NOTE |
� If you move to the Home or Smart Hub Home menu in
3D mode, it will switch to 2D automatically.
vTunervTuner
vTuner is the function of the listening a radio. If you press
the vTuner button, you can move to vTuner application.
You can use the vTuner Function after download the
vTuner application from Samsung Apps.
HT-E5200_XU_0223.indd 50HT-E5200_XU_0223.indd 50 2012-02-23 오후 2:31:362012-02-23 오후 2:31:36

English 51 |
07Netw
ork Services
You can enjoy various network services such as
Smart Hub or BD-LIVE by connecting the product
to your network.
To use network services, you must first:
1 . Connect the product to the network.
(See page 20)
2 . Configure the network settings.
(See pages 29~32)
Using Smart Hub
Using Smart Hub, you can download movies,
videos, and music from the Internet, and access
various for pay or free-of-charge applications
and view them on your TV. Application content
includes news, sports, weather forecasts, stock
market quotes, maps, photos, and games.
For instructions that explain how to use Smart
Hub, follow these steps:
1 . Go to www.samsung.com.
2 . Click Support at the top of the page.
3 . On the Support page, enter the model
number of your product into the Model
Number field.
4 . On the page that appears, click Get
downloads on the left side under Downloads.
The Download Centre appears.
5 . On the Download Centre page, click the
Manuals tab.
6 . On the Manuals tab, click the file icon to the
right of Smart Hub Users Manual. The manual
downloads.
| NOTE |
� The web location of the Smart Hub manual is subject to
change without notice.
Smart Hub at a Glance
xxxxxxxx
Contents 1
xxxxxxxx
Contents 4
xxxxxxxx
Contents 3
xxxxxxxx
Contents 2
Samsung Apps Your Video Family Story Fitness Kids
a Login b WallPaper / Tools ' Return
Search
5 6 70
9
1 2 4
8
3
1Your Video : Provides recommendations for videos
based on your tastes.
2Search : Provides an integrated search of your
video providers and connected AllShare devices.
3Recommended : Displays recommended contents
managed by Samsung.
4
Commercial : Displays the Smart Hub Guide, an
introduction to the product, and new application
introductions.
5
Family Story : An effortless way to access family
content.
• Provides access to family photos, messages, and
events, anytime and anywhere.
6
Fitness : Gateway to the Unified Self-Care Service.
• Presents fitness videos from various content
partners with feedback on calories burned after
every workout.
7
Kids : Kids service gives kids an easy and safe way
to enjoy their favourite content.
• Provides a wide variety of fun and safe content
for children.
8
Navigation Help : Displays the remote control
buttons you can use to navigate in Smart Hub.
• RED (A) : To log in to Smart Hub.
• GREEN (B) : To display the background screen.
• Tools : To display the settings window.
• Return : To return to the previous menu.
Network Services
HT-E5200_XU_0223.indd 51HT-E5200_XU_0223.indd 51 2012-02-23 오후 2:31:402012-02-23 오후 2:31:40

| 52 English
Network Services
9
My Applications : Displays your personal gallery
of applications which you can add to, modify, and
delete.
0
Samsung Apps : Open Samsung Apps to download
various for pay or free-of-charge application
services.
Using the Web BrowserYou can access the internet using the Web
Browser application which is installed in the Smart
Hub screen by default.
1 . Select Smart Hub on the Home screen, and
then press the E button.
2 . Select the Web Browser application in Smart
Hub, and then press the E button.
| NOTE |
� When you run the Web Browser with the product
connected by HDMI to a BD Wise compatible TV - and BD
Wise is on - the browser is maximized to fill the screen
and the TV's resolution is set to the optimal resolution
automatically.
� The Web Browser is not compatible with Java
applications.
� If you attempt to download a file, and the file can not be
saved, an error message will appear.
� The playback of Flash videos is not supported.
� E-commerce, for purchasing products online, is not
supported.
� ActiveX is not supported.
Web Browser at a Glance
Google Search I’m Feeling Lucky
b Control Panel � Link Browsing / Tools ' Exit
http://www.google.com/
1
2
1
Control Panel : Displays the various Web Browser
functions.
• : Moves to the previous page.
• : Moves to the last page before going back.
• : Reloads the current page so that it is
refreshed on the screen.
• : Moves to the Home screen of the Web
Browser.
• : Allows you to zoom in or out of the screen at
various percentages.
• : Allows you to bookmark specific pages so
that you can move to them easily.
• : Allows you to view the history of your visited
pages by date, name, or frequency.
• http://www.google.com/ : Allows you to enter a
page address manually or select a page from the
visited page list to move to that page.
• : Allows you to switch easily between
multiple, currently open Web Browser windows.
• : Allows you to search for information by
entering words.
• : Lets you share the current site with your
family group by sending a message.
• : Allows you to configure all settings for using
the Web Browser.
HT-E5200_XU_0223.indd 52HT-E5200_XU_0223.indd 52 2012-02-23 오후 2:31:452012-02-23 오후 2:31:45

English 53 |
07Netw
ork Services
2
Navigation Help : Displays the remote control
buttons you can use to navigate in Web Browser.
• GREEN (B) : To display the Control Panel.
• YELLOW (C) : To search a link.
• Tools : To display Tools window.
• Exit : To return to the previous menu.
BD-LIVE™
Once the product is connected to your network,
you can enjoy various movie-related service
contents available on BD-LIVE compliant discs.
1 . Attach a USB memory stick to the USB jack
on the front of the product, and then check
its remaining memory. The memory device
must have at least 1GB of free space to
accommodate the BD-LIVE services.
2 . Select Settings on the Home screen, and
then press the E button.
3 . Select Network, and then press the E
button.
4 . Select BD-Live Settings, and then press the
E button.
5 . Select BD Data Management, and then
press the E button.
6 . Select Select Device, and then press the
E button.
7 . Select USB, and then press the E button.
8 . Insert a Blu-ray Disc that supports BD-LIVE.
9 . Select an item from the list of BD-LIVE service
contents provided by the disc manufacturer.
| NOTE |
� The way you use BD-LIVE and the provided contents may
differ, depending on the disc manufacturer.
HT-E5200_XU_0223.indd 53HT-E5200_XU_0223.indd 53 2012-02-23 오후 2:31:482012-02-23 오후 2:31:48

| 54 English
AppendixAdditional Information
Note
Connections
HDMI OUT
• Certain HDMI output resolutions may not work, depending on your TV.
• You must have an HDMI connection to enjoy videos with 3D technology.
• A long HDMI cable may cause screen noise. If this occurs, set HDMI Deep Colour to Off in the
menu.
Settings
3D Settings
• For some 3D discs, to stop a movie during 3D playback, press the 5 button once. The movie
stops and the 3D mode option is de-activated.
To change a 3D option selection when you are playing a 3D movie, press the 5 button once.
The Blu-ray menu appears. Press the 5 button again, then select 3D Settings in the Blu-ray
menu.
• Depending on the content and the position of the picture on your TV screen, you may see vertical
black bars on the left side, right side, or both sides.
TV Aspect
• Depending on the disc type, some aspect ratios may not be available.
• If you select an aspect ratio and option which is different than the aspect ratio of your TV screen,
then the picture might appear to be distorted.
• If you select the 16:9 Original, your TV may display 4:3 Pillarbox (black bars on sides of
picture).
BD Wise (Samsung Products only)
• When BD Wise is on, the Resolution setting automatically defaults to BD Wise and BD Wise
appears in the Resolution menu.
• If the product is connected to a device that does not support BD Wise, you can not use the BD
Wise function.
• For proper operation of BD Wise, set the BD Wise option in both the product and the TV to On.
Digital Output
• Be sure to select the correct Digital Output or you will hear no sound or just loud noise.
• If the HDMI device (AV receiver, TV) is not compatible with compressed formats (Dolby digital,
DTS), the audio signal outputs as PCM.
• Regular DVDs do not have BONUSVIEW audio and Navigation Sound Effects.
• Some Blu-ray Discs do not have BONUSVIEW audio and Navigation Sound Effects.
• This Digital Output setup does not affect the analogue (L/R) audio or HDMI audio output to
your TV. It affects the optical and HDMI audio output when your product is connected to an AV
receiver.
• If you play MPEG audio soundtracks, the audio signal outputs as PCM regardless of your Digital
Output selections (PCM or Bitstream).
HT-E5200_XU_0223.indd 54HT-E5200_XU_0223.indd 54 2012-02-23 오후 2:31:502012-02-23 오후 2:31:50

English 55 |
07Appendix
Settings
BD-LIVE Internet Connection
• The Internet connection may be restricted while you are using BD-LIVE contents.
Anynet+ (HDMI-CEC)
• Depending on your TV, certain HDMI output resolutions may not work. Please refer to the user
manual of your TV.
• This function is not available if the HDMI cable does not support CEC.
• If your Samsung TV has an Anynet+ logo, then it supports the Anynet+ function.
BD Data Management
• In the external memory mode, disc playback may be stopped if you disconnect the USB device in
the middle of playback.
• Only those USB devices formatted in the FAT file system (DOS 8.3 volume label) are supported.
We recommend you use USB devices that support USB 2.0 protocol with 4 MB/sec or faster
read/write speed.
• The Resume Play function may not work after you format the storage device.
• The total memory available to BD Data Management may differ, depending on the conditions.
DivX® Video On Demand
• For more information about DivX(R) VOD, visit “http://vod.divx.com”.
Front Display
• You cannot change the brightness of the button and the VOL +, - button.
Speaker Settings
• When Speaker Selection is selected to TV Speaker, audio is produced through TV speakers.
HDMI audio
• When HDMI audio output to the TV speaker, it is automatically down-mixed to 2 channels.
Audio Return Channel
• When Anynet+ (HDMI-CEC) is Off, the Audio Return Channel function is not available.
• Using an HDMI cable not certified for ARC (Audio Return Channel) may cause a compatibility
problem.
• The ARC function is only available if an ARC-compliant TV is connected.
Digital Output
• Digital Output can be activated when Speaker Selection is selected to TV Speaker.
HT-E5200_XU_0223.indd 55HT-E5200_XU_0223.indd 55 2012-02-23 오후 2:31:522012-02-23 오후 2:31:52

| 56 English
Appendix
Playback
Playing a Video files
• Video files with high bit rates of 20Mbps or more strain the product’s capabilities and may stop
playing during playback.
Selecting the Audio Language
• The ◄► indicator will not appear on the screen if the BONUSVIEW section does not contain any
BONUSVIEW audio settings.
• The languages available through the Audio Language function depend on the languages that are
encoded on the disc. This function or certain languages may not be available.
• Some Blu-ray Discs may allow you to select either the PCM or Dolby digital audio soundtrack in
English.
Selecting the Subtitle Language
• Depending on the Blu-ray Disc / DVD, you may be able to change the subtitle language in the
Disc Menu. Press the DISC MENU button.
• This function depends on the selection of subtitles that are encoded on the disc and may not be
available on all Blu-ray Discs/DVDs.
• Information about the main feature BONUSVIEW mode will also appear if the Blu-ray Disc has a
BONUSVIEW section.
• This function changes both the primary and secondary subtitles at the same time.
• The total number of primary and secondary subtitles are displayed respectively.
Playing a JPEG files
• You can’t enlarge the subtitle and PG graphic in the full screen mode.
AllShare Play
Using the TOOLS button while playing pictures
• If the system is connected to a BD Wise compliant TV that has set BD Wise to On, the Picture
Settings menu will not appear.
• The Background Music function will not work unless the music file and the photo file are located
on the same storage media. Also, sound quality can be impacted by the bit rate of the MP3
music file, the size of the photos, and the encoding method.
Playing back a USB Storage Device
• You must remove the USB storage device safely (by performing the “Safely Remove USB”
function) to prevent possible damage to the USB memory. Press the HOME button to move to the
Home menu, select the YELLOW (C) button, and then press the E button.
Playing Music
• Adjust the volume to a moderate level before you connect your iPod to the product.
• When the product is on and you connect an iPod, the product will charge the iPod's battery.
HT-E5200_XU_0223.indd 56HT-E5200_XU_0223.indd 56 2012-02-23 오후 2:31:542012-02-23 오후 2:31:54

English 57 |
07Appendix
AllShare Play
Watching a Movie
• You must have the VIDEO output (Composite) connected to your TV to view iPod video (See page
18).
• If you want to play iPod video via VIDEO output, set Anynet+ (HDMI-CEC) to off.
• Only the playback screen will appear on the TV. View other iPod screens on the iPod player.
• If you want to return to the iPod menus while the iPod player is connected using the dock, press
FUNCTION on the remote control or press on the front panel of the system and select
R. IPOD.
The Function mode switches as follows :
BD/DVD D. IN AUX R. IPOD HDMI1 HDMI2 FM BT
iPod
iPod/iPhone Models You Can Use with This Product
• The volume control may not operate normally with iPod and iPhone models not listed on page
36. If you have a problem with any of the models listed above, please update the software of the
iPod/iPhone to the lastest version.
• Depending on the software version of the iPod, control problems may occur. This is not a
malfunction of the Home Cinema.
• Depending on the software version or the type of iPod, some operations may differ. Install the
latest iPod software. (recommended)
• You can enjoy music or videos through the Blu-ray/DVD disc function and enjoy music, videos
through the Remote iPod function. You need to use the iPod Dock to enjoy videos.
• Playback of applications' contents through the product is not guaranteed. We recommend
playing contents downloaded to the iPod.
• If you have a problem using your iPod, please visit www.apple.com/support/ipod.
HT-E5200_XU_0223.indd 57HT-E5200_XU_0223.indd 57 2012-02-23 오후 2:31:572012-02-23 오후 2:31:57

| 58 English
AppendixResolution according to the output mode
� Blu-ray Disc/E-contents/Digital Contents playback
Output Setup
HDMI/connected HDMI/not connectedHDMI Mode
VIDEO Mode VIDEO ModeBlu-ray Disc E-contents/
Digital contents
BD WiseResolution of Blu-
ray Disc1080p@60F 576i/480i -
AutoMax. Resolution of
TV input
Max. Resolution of TV
input576i/480i -
1080p@60F 1080p@60F 1080p@60F 576i/480i -
Movie Frame : Auto
(24Fs)1080p@24F 1080p@24F 576i/480i -
1080i 1080i 1080i 576i/480i 576i/480i
720p 720p 720p 576i/480i 576i/480i
576p/480p 576p/480p 576p/480p 576i/480i 576i/480i
576i/480i - - - 576i/480i
� DVD playback
Output Setup
HDMI/connected HDMI/not connectedHDMI Mode VIDEO Mode VIDEO Mode
BD Wise 576i/480i 576i/480i -
Auto Max. Resolution of TV input 576i/480i -
1080p@60F 1080p@60F 576i/480i -
1080i 1080i 576i/480i 576i/480i
720p 720p 576i/480i 576i/480i
576p/480p 576p/480p 576i/480i 576i/480i
576i/480i - - 576i/480i
HT-E5200_XU_0223.indd 58HT-E5200_XU_0223.indd 58 2012-02-23 오후 2:31:592012-02-23 오후 2:31:59

English 59 |
07Appendix
Digital Output Selection
Setup PCM Bitstream (Unprocessed)
Bitstream (Re-encoded DTS)
Bitstream (Re-encoded Dolby D)
Connection HDMI supported AV receiver
Audio
Stream on
Blu-ray
Disc
PCM Up to PCM 7.1ch PCM DTS re-encodedRe-encoded
Dolby Digital *
Dolby
DigitalUp to PCM 7.1ch Dolby Digital DTS re-encoded
Re-encoded
Dolby Digital *
Dolby
Digital
Plus
Up to PCM 7.1ch Dolby Digital Plus DTS re-encodedRe-encoded
Dolby Digital *
Dolby
TrueHDUp to PCM 7.1ch Dolby TrueHD DTS re-encoded
Re-encoded
Dolby Digital *
DTS Up to PCM 6.1ch DTS DTS re-encodedRe-encoded
Dolby Digital *
DTS-
HD High
Resolution
Audio
Up to PCM 7.1chDTS-HD High
Resolution AudioDTS re-encoded
Re-encoded
Dolby Digital *
DTS-HD
Master
Audio
Up to PCM 7.1ch DTS-HD Master Audio DTS re-encodedRe-encoded
Dolby Digital *
Audio
Stream on
DVD
PCM PCM 2ch PCM 2ch PCM 2ch PCM 2ch
Dolby
DigitalUp to PCM 5.1ch Dolby Digital Dolby Digital Dolby Digital
DTS Up to PCM 6.1ch DTS DTS DTS
Definition
for Blu-ray
Disc
Any
Decodes the main feature audio and BONUSVIEW audio
stream together into PCM audio and adds
Navigation Sound Effects.
Outputs only the main feature audio stream
so that your AV receiver can decode the audio
bitstream.You will not hear
BONUSVIEW audio or Navigation Sound
Effects.
Decodes the main feature audio and BONUSVIEW audio stream together
into PCM audio and adds Navigation Sound Effects, then re-encodes the PCM audio into DTS bitstream.
Decodes the main feature audio and BONUSVIEW audio
stream together into PCM audio and adds
Navigation Sound Effects, then re-encodes
the PCM audio into Dolby digital bitstream
or PCM.
* If the Source Stream is 2ch or mono, “Re-encoded Dolby D” Setting are not applied. Output will be
PCM 2ch.
Blu-ray Discs may include three audio streams :
- Main Feature Audio : The audio soundtrack of the main feature.
- BONUSVIEW audio : An additional soundtrack such as the director or actor’s commentary.
- Navigation Sound Effects : When you choose some menu navigation, Navigation Sound Effects may
sound. Navigation Sound Effects are different on each Blu-ray Disc.
HT-E5200_XU_0224.indd 59HT-E5200_XU_0224.indd 59 2012-02-24 오후 1:51:442012-02-24 오후 1:51:44

| 60 English
AppendixTroubleshooting
Refer to the table below when this product does not function properly. If the problem you are
experiencing is not listed below or if the instructions below do not help, turn off the product, disconnect
the power cord and contact the nearest authorized dealer or Samsung Electronics Service Centre.
Symptom Check/Remedy
I cannot eject the disc. • Is the power cord plugged securely into the outlet?
• Turn off the power and then turn it back on.
The iPod fails to connect. • Check the condition of the iPod connector and Dock.
• Keep the iPod software version up to date.
Playback does not start.
• Check the region number of the Blu-ray/DVD disc.
Blu-ray/DVD disc purchased from abroad may not be playable.
• CD-ROMs and DVD-ROMs cannot be played on this product.
• Make sure that the rating level is correct.
Playback does not start immediately when the Play/Pause button is pressed.
• Are you using a deformed disc or a disc with scratches on the surface?
• Wipe the disc clean.
Sound is not produced. • The home cinema does not play sound during fast playback, slow playback,and step motion
playback.
• Are the speakers connected properly? Is the speaker setup correctly customized?
• Is the disc severely damaged?
The remote control does not work.
• Are you operating the remote within its operational range and within the proper angle relative to
the sensor?
• Are the batteries drained?
• Have you selected the mode (TV/BD) functions of the remote control (TV or BD) correctly?
• The disc is rotating but no picture is produced.
• Picture quality is poor and picture is shaking.
• Is the TV power on?
• Are the video cables connected properly?
• Is the disc dirty or damaged?
• A poorly manufactured disc may not be playable.
Audio language and subtitles do not work.
• Audio language and subtitles will not work if the disc does not contain them.
The menu screen does not appear even when the menu function is selected.
• Are you using a disc that does not contain menus?
The aspect ratio cannot be changed.
• You can play 16:9 Blu-ray/DVD discs in 16:9 Full mode, 4:3 Letter Box mode, or
4:3 Pan-Scan mode, but 4:3 Blu-ray/DVD discs are played in 4:3 ratio only. Refer to the
Blu-ray Disc jacket and then select the appropriate function.
HT-E5200_XU_0223.indd 60HT-E5200_XU_0223.indd 60 2012-02-23 오후 2:32:032012-02-23 오후 2:32:03

English 61 |
07Appendix
Symptom Check/Remedy
• The product is not working. (Example: The power goes out or a strange noise is heard.)
• The Product is not working normally.
• Press and hold the remote control's 5 button for 5 seconds in STANDBY mode.
- Using the RESET function will erase all stored settings.
Do not use this unless necessary.
You have forgotten the rating level password.
• With no disc in the product, press and hold the product's 5 button for longer than 5
seconds. INIT appears on the display and all settings will return to the default values.
Then, press the POWER button.
- Using the RESET function will erase all stored settings.
Do not use this unless necessary.
Can't receive radio broadcasts.
• Is the antenna connected properly?
• If the antenna's input signal is weak, install an external FM antenna in an area with
good reception.
While listening to TV audio through the Product, no sound is heard.
• If the OPEN/CLOSE ^ button is pressed while listening to TV audio using the D. IN or
AUX functions, the Blu-ray/DVD disc functions are turned on and the TV audio is muted.
"Not Available" appears on screen.
• The features or action cannot be completed at this time because:
1. The Blu-ray/DVD disc's software restricts it.
2. The Blu-ray/DVD disc's software doesn’t support the feature (e.g., angles)
3. The feature is not available at the moment.
4. You’ve requested a title or chapter number or search time that is out of range.
If the HDMI output is set to a resolution your TV cannot support (for example, 1080p), you may not see a picture on your TV.
• Press and hold the 5 button on front panel for more than 5 seconds with no disc
inserted. All settings will revert to the factory settings.
No HDMI output. • Check the connection between the TV and the HDMI jack of the product.
• Check if your TV supports 576p/480p/720p/1080i/1080p HDMI input resolution.
Abnormal HDMI output screen.
• If random noise appears on the screen, it means that TV does not support HDCP (High-
bandwidth Digital Content Protection).
AllShare Play function
I can see folders shared through AllShare Play, but I cannot see the files.
• AllShare Play shows only files corresponding to the Photo, Music, and Movie categories.
Files that do not correspond to these categories may not be displayed.
HT-E5200_XU_0223.indd 61HT-E5200_XU_0223.indd 61 2012-02-23 오후 2:32:052012-02-23 오후 2:32:05

| 62 English
AppendixSymptom Check/Remedy
Video is played intermittently. • Check if the network is stable.
• Check if the network cable is properly connected and if the network is not overloaded.
• The wireless connection between the server and the product is unstable.
Check the connection.
The AllShare Play connection between the TV and PC is unstable.
• IP address under the same subnetwork should be unique, otherwise IP collision can
results in such a phenomenon.
• Check if you have a firewall enabled.
If so, disable the firewall function.
BD-LIVE
I cannot connect to the BD-LIVE server.
• Test whether the network connection is successful by using the Network Status
function.
• Check whether a USB memory device is connected to the product.
• The memory device must have at least 1GB of free space to accommodate the BD-LIVE
service.
You can check the available size in BD Data Management. (See page 55)
• See if the BD-LIVE Internet Connection option is set to Allow(All).
• If all above fails, contact the contents provider or update to the latest firmware.
When using the BD-LIVE service, an error occurs.
• The memory device must have at least 1GB of free space to accommodate the BD-LIVE
service.
You can check the available size in BD Data Management. (See page 55)
| NOTE |
� When the factory default settings are restored, all stored user BD data will be deleted.
Hereby, Samsung Electronics, declares that this Home Cinema System is in compliance with the essential requirements and other relevant provisions of Directive 1999/5/EC.
The official Declaration of Conformity may be found at http://www.samsung.com, go to Support > Search Product Support and enter the model name.
This equipment may be operated in all EU countries.
This equipment may only be used indoors.
HT-E5200_XU_0223.indd 62HT-E5200_XU_0223.indd 62 2012-02-23 오후 2:32:072012-02-23 오후 2:32:07

English 63 |
07Appendix
Specifications
General
Weight 2.5 kg
Dimensions 430 (W) x 55 (H) x 255.8 (D) mm
Operating Temperature Range +5°C to +35°C
Operating Humidity Range 10 % to 75 %
FM Tuner
Signal/noise ratio 55 dB
Usable sensitivity 12 dB
Total harmonic distortion 0.5 %
Disc
BD (Blu-ray Disc) Reading Speed : 9.834 m/sec
DVD (Digital Versatile Disc)Reading Speed : 6.98 ~ 7.68 m/sec.
Approx. Play Time (Single Sided, Single Layer Disc) : 135 min.
CD : 12cm (COMPACT DISC)Reading Speed : 4.8 ~ 5.6 m/sec.
Maximum Play Time : 74 min.
CD : 8cm (COMPACT DISC)Reading Speed : 4.8 ~ 5.6 m/sec.
Maximum Play Time : 20 min.
Video Output Composite Video1 channel : 1.0 Vp-p (75 Ω load)
Blu-ray Disc : 576i/480i DVD : 576i/480i
Video/Audio HDMI1080p, 1080i, 720p, 576p/480p
PCM multichannel audio, Bitstream audio, PCM audio
Amplifier
Front speaker output 165W x 2(3Ω)
Subwoofer speaker output 170W(3Ω)
Frequency responseAnalogue input 20Hz~20kHz (±3dB)
Digital input 20Hz~40kHz (±4dB)
S/N Ratio 70dB
Channel separation 60dB
Input sensitivity (AUX)500mV
Speaker
Speaker system2.1ch speaker system
Front Subwoofer
Impedance 3 Ω 3 Ω
Frequency range 140Hz~20kHz 40Hz ~ 160Hz
Output sound pressure level 87dB/W/M 88dB/W/M
Rated input 165W 170W
Maximum input 330W 340W
Dimensions (W x H x D) 90 x 207.5 x 68.5 mm 168 x 350 x 285 mm
Weights 0.71 kg 2.6 kg
• Network speeds equal to or below 10Mbps are not supported.
• Samsung Electronics Co., Ltd reserves the right to change the specifications without notice.
• Weight and dimensions are approximate.
• Design and specifications are subject to change without prior notice.
• For the power supply and Power Consumption, refer to the label attached to the product.
HT-E5200_XU_0223.indd 63HT-E5200_XU_0223.indd 63 2012-02-23 오후 2:32:092012-02-23 오후 2:32:09

Correct Disposal of This Product (Waste Electrical & Electronic Equipment)(Applicable in the European Union and other European countries with separate collection systems)
This marking on the product, accessories or literature indicates that the product and its electronic accessories (e.g.
charger, headset, USB cable) should not be disposed of with other household waste at the end of their working life.
To prevent possible harm to the environment or human health from uncontrolled waste disposal, please separate
these items from other types of waste and recycle them responsibly to promote the sustainable reuse of material
resources.
Household users should contact either the retailer where they purchased this product, or their local government
office, for details of where and how they can take these items for environmentally safe recycling.
Business users should contact their supplier and check the terms and conditions of the purchase contract.
This product and its electronic accessories should not be mixed with other commercial wastes for disposal.
Correct disposal of batteries in this product(Applicable in the European Union and other European countries with separate battery return systems.)
This marking on the battery, manual or packaging indicates that the batteries in this product should not
be disposed of with other household waste at the end of their working life. Where marked, the chemical
symbols Hg, Cd or Pb indicate that the battery contains mercury, cadmium or lead above the reference
levels in EC Directive 2006/66. If batteries are not properly disposed of, these substances can cause
harm to human health or the environment.
To protect natural resources and to promote material reuse, please separate batteries from other types of
waste and recycle them through your local, free battery return system.
Area Contact Centre Web Site` EuropeAlbania 42 27 5755 -
Austria0810 - SAMSUNG (7267864, € 0.07/min)
www.samsung.com
Belgium 02-201-24-18
www.samsung.com/be (Dutch) www.samsung.com/be_fr (French)
Bosnia 05 133 1999 -
Bulgaria 07001 33 11 www.samsung.com
Croatia 062 SAMSUNG (062 726 7864) www.samsung.com
Czech
800-SAMSUNG (800-726786)
www.samsung.comSamsung Zrt., česká organizační složka, Oasis Florenc, Soko-lovská394/17, 180 00, Praha 8
Denmark 70 70 19 70 www.samsung.com
Finland 030 - 6227 515 www.samsung.com
France 01 48 63 00 00 www.samsung.com
Germany01805 - SAMSUNG (726-7864 € 0,14/Min)
www.samsung.com
Hungary 06-80-SAMSUNG (726-7864) www.samsung.com
Italia 800-SAMSUNG (726-7864) www.samsung.com
Kosovo +381 0113216899 -
Luxemburg 261 03 710 www.samsung.com
Macedonia 023 207 777 -
Area Contact Centre Web SiteMontenegro 020 405 888 -
Netherlands0900-SAMSUNG (0900-7267864) (€ 0,10/Min)
www.samsung.com
Norway 815-56 480 www.samsung.com
Poland0 801 1SAMSUNG (172678) / 022-607-93-33
www.samsung.com
Portugal 80820-SAMSUNG (726-7864) www.samsung.com
Rumania
1. 08010 SAMSUNG (72678) - doar din reţeaua Romtelecom, tarif local
2. 021.206.01.10 - din orice reţea, tarif normal
www.samsung.com
Serbia0700 Samsung (0700 726 7864)
www.samsung.com
Slovakia 0800-SAMSUNG (726-7864) www.samsung.com
Spain 902-1-SAMSUNG (902 172 678) www.samsung.com
Sweden 0771 726 7864 (SAMSUNG) www.samsung.com
Switzerland0848-SAMSUNG (7267864, CHF 0.08/min)
www.samsung.com/ch www.samsung.com/ch_fr/(French)
U.K 0330 SAMSUNG (7267864) www.samsung.com
Eire 0818 717100 www.samsung.com
Lithuania 8-800-77777 www.samsung.com
Latvia 8000-7267 www.samsung.com
Estonia 800-7267 www.samsung.com
Contact SAMSUNG WORLD WIDEIf you have any questions or comments relating to Samsung products, please
contact the SAMSUNG customer care centre.
HT-E5200_XU_0223.indd 64HT-E5200_XU_0223.indd 64 2012-02-23 오후 3:48:212012-02-23 오후 3:48:21

imaginez les possibilitésMerci d'avoir acheté ce produit Samsung.
Pour obtenir notre service complet, veuillez enregistrer votre
produit sur
www.samsung.com/register
Système Home Entertainment
Blu-ray™ 2,1 canaux Manuel d'utilisation
HT-E5200
HT-E5200_XU_FRA_0223.indd 1HT-E5200_XU_FRA_0223.indd 1 2012-02-23 오후 2:33:112012-02-23 오후 2:33:11

| 2 Français
Consignes de SécuritéAvertissement
POUR RÉDUIRE LES RISQUES D’ÉLECTROCUTION, NE RETIREZ JAMAIS LE CAPOT (NI L’ARRIÈRE).
LES PIÈCES DE CE PRODUIT NE SONT PAS RÉPARABLES PAR L’UTILISATEUR. VEUILLEZ CONTACTER
UN TECHNICIEN QUALIFIÉ POUR TOUTE RÉPARATION.
ATTENTION
RISQUE D’ÉLECTROCUTIONNE PAS OUVRIR
Ce symbole indique la présence d’une tension
dangereuse dans l’appareil, présentant un
risque d’électrocution ou de blessures.
ATTENTION : POUR ÉVITER TOUT
RISQUE D’ÉLECTROCUTION, LA BROCHE
LA PLUS LARGE DE LA FICHE DOIT ÊTRE
TOTALEMENT INSÉRÉE DANS LE TROU
PLUS LARGE.
Ce symbole indique les directives
importantes qui accompagnent le produit.
AVERTISSEMENT
• Afin de réduire tout risque d’incendie ou
d’électrocution, n’exposez jamais cet appareil à
la pluie ou à l’humidité.
ATTENTION• Évitez toute projection d’eau sur l’appareil et ne posez
jamais d’objet contenant un liquide dessus (ex : un
vase).
• La fiche permet de débrancher l’appareil et doit
toujours être facilement accessible.
• Cet appareil doit toujours être branché à une prise de
courant alternatif reliée à la terre.
• Pour débrancher l'appareil, il convient de retirer la fiche
de la prise murale, il faut donc que cette dernière soit
facilement accessible.
CLASS 1 LASER PRODUCT
KLASSE 1 LASER PRODUKT
LUOKAN 1 LASER LAITE
KLASS 1 LASER APPARAT
PRODUCTO LÁSER CLASE 1
PRODUIT LASER DE CLASSE 1
Le lecteur de disque compact est homologué
comme produit LASER DE CLASSE 1.
L'utilisation des commandes, les réglages ou
l'exécution de procédures autres que celles
spécifiées ci-dessus peuvent conduire à une
exposition à des radiations dangereuses.
ATTENTION• DES RAYONS LASER INVISIBLES SONT
PRÉSENTS LORSQUE L'APPAREIL EST
OUVERT OU QUE LES DISPOSITIFS DE
VERROUILLAGE SONT CIRCONVENUS.
ÉVITEZ L'EXPOSITION AUX RAYONS.
HT-E5200_XU_FRA_0223.indd 2HT-E5200_XU_FRA_0223.indd 2 2012-02-23 오후 2:33:172012-02-23 오후 2:33:17

Français 3 |
01Consignes de Sécurité
Rangement et gestion des disques
• Comment tenir le disque
- Des empreintes digitales ou
des rayures sur la surface
d'un disque peuvent altérer
la qualité du son et de l’image ou provoquer
des sauts.
- Évitez de toucher la surface du disque sur
laquelle les données ont été enregistrées.
- Tenez le disque par les bords afin de ne pas
laisser d’empreintes sur sa surface.
- Ne collez pas de papier ou d’adhésif sur le
disque.
• Nettoyage des disques
- En cas d’empreintes ou de saleté
sur un disque, nettoyez-le à l'aide
d'eau additionnée de détergent
doux et d’un chiffon doux.
- Lors de son nettoyage, essuyez le disque du
centre vers le bord.
- Rangement des disques
N’exposez pas le disque à la lumière directe
du soleil.
Stockez-le dans un endroit frais et aéré.
Rangez-le dans une pochette propre et
verticalement.
Précautions de manipulation
• Évitez toute projection d’eau sur l’appareil. Ne
posez jamais d’objet contenant un liquide (ex :
un vase) dessus.
• Pour éteindre complètement l'appareil, vous
devez retirer le cordon d'alimentation de
la prise murale. Par conséquent, le cordon
d'alimentation doit être facilement accessible à
tout moment.
• Ne tenez pas le cordon d'alimentation avec les
mains mouillées.
Vous risquez de vous exposer à un choc
électrique.
• Ne branchez pas plusieurs appareils électriques
sur une prise murale. Surcharger une prise
murale peut provoquer une surchauffe et donc
un incendie.
• Entretien du meuble
- Avant de brancher un composant sur cet
appareil, assurez-vous que celui-ci est hors
tension.
- Si vous déplacez soudainement l'appareil
d'un endroit froid à un endroit chaud, de la
condensation pourra se former sur les pièces
et la lentille, et occasionner des problèmes
de lecture. Dans pareil cas, débranchez
l'appareil et patientez deux heures avant de le
rebrancher sur la prise d’alimentation. Insérez
ensuite le disque et essayez à nouveau de le
lire.
• Si vous entendez un bruit inhabituel ou décelez
un dégagement anormal de fumée ou une odeur
suspecte, coupez immédiatement l’alimentation
et débranchez la fiche électrique de la prise
murale. Puis contactez le service après-vente
le plus proche pour obtenir de l’aide. N’utilisez
plus l'appareil. Utiliser l'appareil en l’état peut
provoquer un incendie ou un choc électrique.
• Pour éteindre complètement l'appareil, vous
devez retirer le cordon d'alimentation de
la prise murale. Par conséquent, le cordon
d'alimentation doit être facilement accessible à
tout moment.
Utilisation de la fonction 3D
CONSIGNES IMPORTANTES RELATIVES À LA
SANTÉ ET LA SÉCURITÉ EN CAS DE VISIONNAGE
D'IMAGES 3D.
Lisez attentivement les consignes de sécurité avant
d'utiliser la fonction 3D.
• Certains utilisateurs peuvent ressentir une gêne
en visionnant des images de télévision en 3D,
comme par exemple des vertiges, des nausées
ou des maux de tête. Dès que vous ressentez
l'un de ces symptômes, arrêtez immédiatement
le visionnage en 3D, retirez les lunettes Active
3D et essayez de vous reposer.
• Le visionnage d'images en 3D sur une période
de temps prolongée peut occasionner une
fatigue oculaire. Dès que vous ressentez une
fatigue oculaire, cessez immédiatement le
visionnage en 3D, retirez les lunettes Active 3D
et essayez de vous reposer.
• Des enfants utilisant la fonction 3D doivent
être constamment surveillés par un adulte
responsable.
Au moindre signalement de fatigue visuelle,
mal de tête, vertige ou nausée, interrompez
immédiatement le visionnage en 3D par les
enfants, et laissez-les se reposer.
• N'utilisez pas les lunettes Active 3D à d'autres
fins (comme lunettes de vue, de soleil ou de
protection, par exemple).
HT-E5200_XU_FRA_0223.indd 3HT-E5200_XU_FRA_0223.indd 3 2012-02-23 오후 2:33:192012-02-23 오후 2:33:19

| 4 Français
Consignes de Sécurité• N'utilisez pas la fonction 3D ou les lunettes Active
3D en marchant ou en bougeant. En utilisant la
fonction 3D ou en portant des lunettes Active
3D en cours de marche ou de mouvement, vous
risquez de vous cogner contre des objets, de
trébucher et/ou de tomber, et de vous blesser
gravement.
• Pour bénéficier du visionnage de contenus en
3D, connectez un appareil 3D (récepteur AV ou
téléviseur compatible 3D) au port de sortie SORTIE
HDMI de l'appareil à l'aide d'un câble HDMI haut
débit. Veillez à porter des lunettes 3D avant de
visionner le contenu 3D.
• Le produit émet des signaux 3D uniquement via le
câble HDMI connecté au port de sortie HDMI OUT.
• La résolution de l'image vidéo en mode de lecture
3D étant déterminée par la définition de l'image
vidéo 3D d'origine, vous ne pourrez pas modifier la
résolution de l'image selon vos préférences.
• Des fonctions telles que BD Wise, l'adaptation de
la taille de l'écran ou le réglage de la résolution
peuvent ne pas fonctionner correctement en mode
de lecture 3D.
• Il vous faut obligatoirement utiliser un câble HDMI
haut débit pour garantir une émission appropriée
du signal 3D.
• Lorsque vous visionnez des images en 3D,
assurez-vous de vous tenir éloigné du téléviseur
à une distance équivalente à au moins trois fois
la taille de l'écran. Par exemple, si vous avez
un écran 46 pouces, vous devrez rester à une
distance de 3,5 mètres (138 pouces) du téléviseur.
- Positionnez l'écran à hauteur des yeux pour
mieux apprécier l'image en 3D.
• Lorsque l'appareil est connecté à plusieurs
appareils 3D, l'effet 3D peut ne pas fonctionner
correctement.
• Ce lecteur ne convertit pas de contenus 2D en
contenus 3D.
• « Blu-ray 3D » et le logo « Blu-ray 3D » sont
des marques de commerce de Blu-ray Disc
Association.
Copyright
© 2012 Samsung Electronics Co.,Ltd.
Tous droits réservés ; il est interdit de reproduire
ou de copier tout ou partie de ce manuel
d'utilisation sans l'accord préalable écrit de
Samsung Electronics Co.,Ltd.
Licence
• Dolby et le symbole représentant deux D sont
des marques déposées de Dolby Laboratories.
• Fabriqué sous licence sous les brevets américains
Nº : 5,956,674; 5,974,380; 6,226,616; 6,487,535;
7,392,195; 7,272,567; 7,333,929; 7,212,872
et d’autres brevets américains et internationaux
accordés et en attente. DTS-HD, le symbole, et
DTS-HD et le symbole qui lui est associé sont
des marques déposées, et DTS-HD Master Audio
| Essential est une marque déposée de DTS, Inc.
Ce produit comporte des logiciels. © DTS, Inc.
Tous droits réservés.
• À PROPOS DES VIDÉOS DIVX : DivX® est un
format vidéo numérique créé par la société DivX,
LLC, filiale de Rovi Corporation. Ceci est un
appareil DivX Certified® qui prend en charge la
lecture des vidéos DivX. Pour obtenir les détails
et en savoir plus sur les outils logiciels qui vous
permettent de convertir vos fichiers au format
vidéo DivX, consultez le site Web à l’adresse
suivante : divx.com.
À PROPOS DU FORMAT VIDÉO À LA
DEMANDE DIVX : Cet appareil DivX Certified®
doit être enregistré afin de servir à visionner des
films vidéo à la demande (VOD) au format DivX
achetés dans le commerce. Pour obtenir votre
code d’enregistrement, identifiez l’emplacement
de la section DivX VOD dans le menu de
configuration de votre appareil. Allez sur le site
Web vod.divx.com pour obtenir de plus amples
informations sur la procédure d’enregistrement.
Les appareils DivX Certified® peuvent lire
des vidéos DivX® dans une résolution HD de
1080p, y compris les programmes d’appel.
DivX®, DivX Certified® et les logos qui leur
sont associés sont des marques déposées de
Rovi Corporation ou de ses filiales et font l’objet
d’une licence. Cette norme est couverte par un
ou plusieurs des brevets américains suivants :
7,295,673; 7,460,668; 7,515,710; 7,519,274
HT-E5200_XU_FRA_0223.indd 4HT-E5200_XU_FRA_0223.indd 4 2012-02-23 오후 2:33:212012-02-23 오후 2:33:21

Français 5 |
01Consignes de Sécurité
• The terms HDMI and HDMI High-Definition
Multimedia Interface, and the HDMI Logo are
trademarks or registered trademarks of HDMI
Licensing LLC in the United States and other
countries.
• Oracle et Java sont des marques déposées
de Oracle et/ou ses filiales. D'autres noms
mentionnés peuvent être des marques de
commerce de leurs propriétaires respectifs.
• Ce produit intègre la technique de protection
contre la copie applicable aux brevets
américains ainsi que d’autres droits de propriété
intellectuelle de Rovi Corporation. Il est interdit
de tenter de démonter l’appareil et d’en étudier
le fonctionnement en vue de le reproduire.
• Blu-ray Disc™, Blu-ray™ et les logos y afférents
sont des marques de commerce de Blu-ray
Disc Association.
• iPad, iPhone, iPod, iPod classic, iPod nano,
iPod shuffle et iPod touch sont des marques de
commerce d’Apple Inc., déposées aux États-
Unis et dans d’autres pays.
• Cet appareil utilise la technologie Cinavia qui
limite l'utilisation de copies non autorisées de
certains films et vidéos ainsi que leurs bandes
son disponibles dans le commerce. Lorsqu'une
utilisation interdite d'une copie non autorisée est
détectée, un message s'affiche et la lecture ou la
copie est interrompue.
Pour obtenir de plus amples informations sur la
technologie Cinavia, veuillez consulter le « Cinavia
Online Consumer Information Centre » (Centre
d'informations consommateur en ligne Cinavia)
à l'adresse http://www.cinavia.com. Pour toute
demande d'informations complémentaires par
courrier concernant Cinavia, envoyez une carte
postale comportant votre adresse postale à :
Cinavia Consumer Information Centre, P.O. Box
86851, San Diego, CA, 92138, États-Unis.
Cet appareil intègre une technologie brevetée
sous licence de Verance Corporation et qui
est protégée par le brevet américain 7 369
677 ainsi que par d'autres brevets américains
et internationaux accordés et en attente ainsi
que par des droits d'auteur et une protection
commerciale confidentielle pour certains
aspects de cette technologie. Cinavia est une
marque de commerce de Verance Corporation.
Copyright 2004-2010 Verance Corporation.
Tous droits réservés par Verance. Il est interdit
de tenter de démonter l’appareil et d’en étudier
le fonctionnement en vue de le reproduire.
• Avis de licence libre
- En cas d'utilisation de logiciels libres, les
licences libres sont disponibles dans le menu
du produit.
HT-E5200_XU_FRA_0223.indd 5HT-E5200_XU_FRA_0223.indd 5 2012-02-23 오후 2:33:242012-02-23 오후 2:33:24

| 6 Français
SommaireCONSIGNES DE SÉCURITÉ
2 Avertissement3 Rangement et gestion des disques3 Précautions de manipulation3 Utilisation de la fonction 3D4 Copyright4 Licence
MISE EN ROUTE
7 Compatibilité des disques et des formats8 Logos des disques pouvant être lus sur
cet appareil11 Accessories12 Panneau avant12 Panneau arrière13 Télécommande
BRANCHEMENTS
15 Fixation du noyau torique en ferrite au cordon d’alimentation de l'unité principale
15 Connexion des enceintes15 Accessoires des enceintes
16 Connexion des enceintes
17 Connexion de l’antenne FM17 Connexion à l’iPod/iPhone17 Utilisation d'un câble USB
17 Utilisation d’un dock
18 Connexion de l’appareil à un téléviseur18 Méthode 1 Connexion à un téléviseur
via un câble HDMI - Qualité optimale
(Recommandé)
18 Méthode 2 Connexion à un téléviseur
via un câble vidéo - Bonne qualité
19 Connexion de périphériques externes19 Méthode 1 ENTRÉE HDMI :
Connexion d’un composant externe à
l’aide d’un câble HDMI
19 Méthode 2 OPTIQUE : Connexion
d’un composant audio numérique
externe
19 Méthode 3 ENTRÉE AUX : Connexion
d’un composant analogique externe
20 Connexion à un routeur réseau20 Réseau câblé
20 Réseau sans fil
PARAMÈTRES
21 Procédure de réglage des paramètres initiaux
23 L’écran Accueil23 Accéder à l’écran Paramètres24 Fonctions du menu Paramètres29 Réseaux et Internet33 Mise à niveau du logiciel
MEDIA PLAY
35 Écran AllShare Play36 Lecture des fichiers sur un périphérique
de stockage USB ou sur l'iPod/iPhone36 Modèles d'iPod/iPhone pouvant être
utilisés avec cet appareil37 L’écran Fonction37 Lecture des disques vidéo du commerce37 Lecture des disques audio du commerce38 Lecture d’un disque dont le contenu est
enregistré par l’utilisateur38 Utilisation de la fonction Réseau AllShare40 Contrôle de la lecture Vidéo42 Contrôle de la lecture de Musique45 Visionnage des photos45 Utilisation du menu Outils lorsqu’un
fichier est en surbrillance48 Ecouter la radio50 Utilisation des touches de contrôle
d’effets spéciaux de la télécommande
SERVICES RÉSEAU
51 Utilisation de Smart Hub53 BD-LIVE™
ANNEXES
54 Informations complémentaires60 Dépannage63 Caractéristiques techniques
HT-E5200_XU_FRA_0223.indd 6HT-E5200_XU_FRA_0223.indd 6 2012-02-23 오후 2:33:272012-02-23 오후 2:33:27

Français 7 |
02M
ise en Route
Compatibilité des disques et des formats
Types de disques et contenus pouvant être lus sur cet appareil
Support Type de disque Détails
VIDÉO
Disque Blu-ray
Disque Blu-ray 3DDisque BD-ROM ou BD-RE/-R disc enregistré au format BD-RE.
DVD-VIDEO, DVD-RW,
DVD-R, DVD+RW,
DVD+R
DVD-VIDEO, disques DVD+RW/DVD-RW(V)/DVD-R/+R enregistrés qui ont été
enregistrés et finalisés, ou un support de stockage USB possédant des contenus
DivX, MKV, MP4.
MUSIQUE
CD-RW/-R,
DVD-RW/-R,
BD-RE/-R
Musique enregistrée sur des disques CD-RW/-R, DVD-RW/-R, BD-RE/-R ou un
support de stockage USB possédant des contenus MP3 ou WMA.
PHOTO
CD-RW/-R,
DVD-RW/-R,
BD-RE/-R
Photos enregistrées sur des disques CD-RW/-R, DVD-RW/-R, BD-RE/-R ou un
support de stockage USB possédant des contenus JPEG.
| REMARQUE |
� Selon le type de disque ou les conditions d'enregistrement, il se peut que certains disques CD-RW/-R et DVD-R ne puissent
pas être lus sur cet appareil.
� Si un disque DVD-RW/-R n'a pas été enregistré correctement au format vidéo DVD, il ne pourra pas être lu.
� Votre appareil ne lit pas les contenus ayant été enregistrés sur un disque DVD-R selon un débit binaire dépassant les 10 Mbps.
� Il ne lit pas les contenus ayant été enregistrés sur un disque BD-R ou un périphérique USB selon un débit binaire dépassant les
30 Mbps.
� La lecture peut être inopérante sur certains types de disque ou lorsque vous effectuez des opérations spécifiques telles que les
changements d'angle ou le réglage du format de l'image. Des informations détaillées concernant le disque sont inscrites sur le
boîtier. Consultez-les si nécessaire.
� Lors de la lecture d'un titre BD-J, il se peut que le chargement prenne plus de temps que pour un titre normal et que certaines
fonctions s'exécutent plus lentement que d'habitude.
Types de disques ne pouvant pas être lus sur cet appareil• HD DVD
• Disque DVD-ROM/
PD/MV, etc.
• DVD-RAM
• CD Super Audio (à
l'exception de la
couche CD)
• DVD-RW (mode VR)
• CVD/CD-ROM/
CDV/CD-G/CD-I/
LD (Les CD-G lisent
des données audio
uniquement et
non des données
graphiques.)
• Disque DVD-R 3,9 Go
enregistrable.
| REMARQUE |
� Il se peut que l'appareil ne réponde pas à toutes les commandes car certains disques Blu-ray, DVD et CD ne permettent qu'un
fonctionnement limité ou spécifique et offrent certaines fonctions seulement lors de la lecture.
Nous attirons votre attention sur le fait qu'il ne s'agit pas d'un dysfonctionnement de l'appareil.
� Samsung ne peut garantir que cet appareil pourra lire tous les disques portant les logos Blu-ray, DVD ou CD car les formats évoluent
et des problèmes et erreurs peuvent se produire lors de la création d'un logiciel BD, DVD et CD et/ou la fabrication du disque.
� Veuillez contacter le service après-vente de SAMSUNG pour toute question ou tout problème concernant la lecture des disques Blu-
ray, DVD ou CD sur cet appareil. Vous pouvez également vous reporter au manuel d'utilisation pour obtenir plus d'informations sur
les restrictions en matière de lecture.
� Il se peut que certains disques et DVD du commerce achetés en dehors de votre zone ne puissent pas être lus sur cet appareil.
Mise en Route
HT-E5200_XU_FRA_0223.indd 7HT-E5200_XU_FRA_0223.indd 7 2012-02-23 오후 2:33:312012-02-23 오후 2:33:31

| 8 Français
Mise en RouteCode régionalLes produits et les disques sont codés par région.
Ces codes régionaux doivent correspondre pour
que le disque puisse être lu. Si les codes ne
correspondent pas, le disque ne sera pas lu.
Le code régional de ce lecteur figure sur le
panneau arrière de l’appareil.
Type de disque
Code régional Zone
Disque Blu-ray
A
Amérique du Nord, Amérique
centrale, Amérique du Sud,
Corée, Japon, Taïwan, Hong
Kong et Sud-Est asiatique.
B
Europe, Groenland, France
d'outre-mer, Moyen-Orient,
Afrique, Australie et Nouvelle-
Zélande.
CInde, Chine, Russie, Asie
centrale et Asie du Sud.
DVD VIDÉO
1 États-Unis, Territoires organisés
des États-Unis et Canada
2Europe, Japon, Moyen-
Orient, Égypte, Afrique du Sud,
Groenland
3 Taïwan, Corée, Philippines,
Indonésie, Hong Kong
4Mexique, Amérique du Sud,
Amérique centrale, Australie,
Nouvelle-Zélande, Îles du
Pacifique, Caraïbes
5Russie, Europe de l’Est, Inde,
majorité des pays d’Afrique,
Corée du Nord, Mongolie
6 Chine
| REMARQUE |
� Si le code régional d'un disque Blu-ray/DVD ne
correspond pas à celui de l'appareil, ce dernier ne
peut pas lire le disque.
Logos des disques pouvant être lus
sur cet appareil
Disque Blu-ray Disque Blu-ray 3D
BD-LIVE Dolby
DTS DivX
Norme de lecture PAL au
Royaume-Uni, en France, en
Allemagne, etc.
Java
Formats pris en charge
Prise en charge des fichiers musicaux
Extension de fichier Conteneur Codec
audioPlage de prise en
charge*.mp3 MP3 MP3 -
*.wma WMA WMA
Compatibilité avec le
format WMA version
10
* Taux
d'échantillonnage (en
kHz) - 8, 11, 16, 22,
32, 44,1, 48
* Débits binaires - Tous
les débits binaires
dans la plage allant
de 5 kbps à 384 kbps
HT-E5200_XU_FRA_0223.indd 8HT-E5200_XU_FRA_0223.indd 8 2012-02-23 오후 2:33:372012-02-23 오후 2:33:37

Français 9 |
02M
ise en Route
Prise en charge des fichiers vidéo
Extension de fichier Conteneur Codec vidéo Résolution
(Définition)
Vitesse de défilement
(FPS)
Débit binaire (Mbps) Codec audio
*.avi AVI
DivX 3.11/4.x/5.1/6.0
1920x1080 6 ~ 30 8 MP3AC3
LPCMDTS Core
H.264 BP/MP/HP 1920x1080 6 ~ 30 25
MPEG4 SP/ASP 1920x1080 6 ~ 30 8
*.mkv MKV
DivX 3.11/4.x/5.1/6.0
1920x1080 6 ~ 30 8 MP3AC3
LPCMDTS Core
H.264 BP/MP/HP 1920x1080 6 ~ 30 25
MPEG4 SP/ASP 1920x1080 6 ~ 30 8
*.asf ASF
DivX 3.11/4.x/5.1/6.0
1920x1080 6 ~ 30 8 MP3AC3
LPCMWMA
H.264 BP/MP/HP 1920x1080 6 ~ 30 25
MPEG4 SP/ASP 1920x1080 6 ~ 30 8
*.wmv WMV (wmv9)Window Media
Video v91920x1080 6 ~ 30 25 WMA
*.mp4 MP4H.264 BP/MP/HP 1920x1080 6 ~ 30 25 MP3
AACMPEG4 SP/ASP 1920x1080 6 ~ 30 8
*.3gp 3GPPH.264 BP/MP/HP 1920x1080 6 ~ 30 25
AACMPEG4 SP/ASP 1920x1080 6 ~ 30 8
*.vroVROVOB
MPEG2 1920x1080 24/25/30 25 AC3MPEGLPCMMPEG1 1920x1080 24/25/30 25
*.mpg*.mpeg
PS
MPEG1 1920x1080 24/25/30 25 AC3MPEGLPCMAAC
MPEG2 1920x1080 24/25/30 25
H.264 1920x1080 6 ~ 30 25
*.ts*.tp*.trp
TS
MPEG2 1920x1080 24/25/30 25AC3AACMP3DD+
H.264 1920x1080 6 ~ 30 25
VC1 1920x1080 6 ~ 30 25
Limitations - Même lorsqu'un fichier est codé selon un codec pris en charge mentionné ci-dessus, ce fichier peut ne
pas être lu en cas de problème au niveau de son contenu.
- La lecture normale ne sera pas garantie si les informations relatives au conteneur du fichier sont
erronées ou si le fichier lui-même est corrompu.
- Les fichiers ayant un débit binaire ou une vitesse de défilement supérieur(e) à la normale peuvent
présenter des discontinuités lors de la lecture.
HT-E5200_XU_FRA_0223.indd 9HT-E5200_XU_FRA_0223.indd 9 2012-02-23 오후 2:33:482012-02-23 오후 2:33:48

| 10 Français
Mise en Route - La fonction Recherche (Saut) sera indisponible
si la table d'indexage du fichier est corrompue.
- Lors de la lecture d'un fichier à distance via
une connexion réseau, la lecture vidéo peut
présenter des discontinuités en fonction de la
vitesse du réseau.
Décodeur vidéo - Prend en charge le format H.264 de niveau 4.1
- Ne prend pas en charge les formats H.264
FMO/ASO/RS, VC1 SP/MP/AP L4 et AVCHD
- MPEG4 SP, ASP :
Inférieure à 1280 x 720 : 60 images maxi.
Supérieure à 1280 x 720 : 30 images maxi.
- Ne prend pas en charge le format GMC 2 ou
supérieur
Décodeur audio - Prend en charge les formats WMA 7, 8, 9 et STD
- Ne prend pas en charge les formats multicanaux
WMA 9 PRO lorsque le nombre de canaux est
supérieur à 2 ou si les fichiers demandent un
décodage audio des données sans perte.
- Ne prend pas en charge le taux
d'échantillonnage WMA de 22050 Hz mono
� Formats des fichiers de sous-titrage DivX pris en charge
*.ttxt, *.smi, *.srt, *.sub, *.txt
Remarques sur la connexion USB• Cet appareil prend en charge les supports de
stockage USB, les lecteurs MP3, les caméras
numériques et les lecteurs de carte USB.
• Cet appareil ne gère pas les noms de dossier
ou de ficher dépassant 128 caractères.
• Il peut ne pas être compatible avec certains
périphériques USB ou certaines caméras
numériques.
• Il prend en charge les systèmes de fichiers FAT
16, FAT 32 et NTFS.
• Effectuez la connexion des périphériques USB
directement au port USB de l'appareil. La
connexion via un câble USB peut causer des
problèmes de compatibilité.
• L’insertion de plusieurs périphériques de
mémoire dans un lecteur multicarte peut
entraîner le dysfonctionnement de celui-ci.
• L'appareil ne prend pas en charge le protocole
PTP.
• Ne déconnectez pas un périphérique USB
durant un processus de « chargement ».
• Plus la résolution de l’image est élevée, plus le
délai d'affichage de cette image est long.
• Cet appareil ne peut pas lire les fichiers MP3
de type DRM (Gestion des droits numériques)
téléchargés depuis des sites commerciaux.
• Votre appareil ne prend en charge que les
vidéos dont la vitesse de défilement des images
est inférieure à 30 fps.
• Il ne prend en charge que les périphériques de
classe de stockage de masse (MSC) USB tels
que les clés USB et les disques durs USB. (HUB
n'est pas disponible.)
• Certains disques durs USB, lecteurs multicartes
et clés USB peuvent ne pas être compatibles
avec cet appareil.
• Si certains périphériques USB requièrent une
puissance excessive, ils pourront être limités par
le dispositif de sécurité du circuit.
• Si la lecture à partir d'un disque dur USB
est instable, fournissez-lui une alimentation
supplémentaire en branchant le disque dur
dans une prise murale. Si le problème persiste,
contactez le fabricant du disque dur USB.
• Vous devez retirer le périphérique de stockage
USB en toute sécurité (en exécutant la fonction
« Retirer péri. USB » pour éviter d'endommager
la mémoire USB.
Appuyez sur le bouton HOME pour accéder au
menu d'accueil, appuyez sur le bouton JAUNE (C) puis sur le bouton E.
• SAMSUNG ne peut être tenu responsable de la
corruption de fichiers de données ou de la perte
de données.
AVCHD (Codec vidéo avancé haute définition)• Cet appareil prend en charge les disques au
format AVCHD. Ces disques sont normalement
enregistrés et lus sur des caméscopes.
• Le format AVCHD est un format vidéo
numérique haute définition.
• Le format MPEG-4 AVC/H.264 compresse les
images de manière plus efficace que le format
de compression d'image conventionnel.
• Certains disques AVCHD utilisent le format «
x.v.Colour ». Cet appareil peut lire les disques
AVCHD faisant appel au format « x.v.Colour ».
• « x.v.Colour » est une marque de commerce de
Sony Corporation.
• « AVCHD » et le logo AVCHD sont des marques
de commerce de Matsushita Electronic
Industrial Co., Ltd. et de Sony Corporation.
HT-E5200_XU_FRA_0223.indd 10HT-E5200_XU_FRA_0223.indd 10 2012-02-23 오후 2:33:502012-02-23 오후 2:33:50

Français 11 |
02M
ise en Route
| REMARQUE |
� En fonction des conditions d’enregistrement, il est possible que certains disques au format AVCHD ne puissent pas être lus.
� Les disques au format AVCHD doivent être finalisés.
� Le format « x.v.Colour » offre une gamme de couleurs plus large qu’un DVD de caméscope normal.
� Il est possible que certains disques de format DivX, MKV ou MP4 ne puissent pas être lus, selon leur résolution d’image
vidéo et leur vitesse de défilement.
Accessoires
Vérifiez que les accessoires ci-dessous sont fournis.
FUNCTION
DISC MENU TITLE MENU
MUTE
S/W LEVEL
TOOLS
RETURN EXIT
INFO
MO/ST
3D SOUND
SOUNDvTuner AUDIO
1 2 3
4 5 6
7 8
0
9POPUP
RECEIVER SLEEP
BD TV
TUNERMEMORY
SUBTITLE
SMART SEARCH
A B C D
EFFECT
HUB
VOL TUNING/ CH
TV SOURCE
RDS DISPLAY
PTY- PTY SEARCH PTY+
TA
FULL SCREEN REPEATHOME
Câble vidéo Antenne FM Manuel d'utilisation
(Pour le cordon d’alimentation)
Dock iPod Noyau torique en ferrite Télécommande/Piles (taille AAA)
Les figures et les illustrations du présent Manuel d'utilisation sont fournies à titre de référence uniquement et peuvent différer de l'apparence du produit réel.
Des frais supplémentaires pourront vous être facturés dans les cas suivants :a. vous demandez l'intervention d'un ingénieur mais il s'avère que l'appareil ne présente aucune
anomalie (par ex. vous n'avez pas lu ce Manuel d'utilisation).b. vous portez l'unité à un centre de réparation mais il s'avère que celle-ci ne présente aucune
défaillance (par ex. vous n'avez pas lu ce Manuel d'utilisation). Le montant de ces frais administratifs vous sera notifié avant que tout travail ou toute visite à votre domicile ne soit effectué(e).
HT-E5200_XU_FRA_0223.indd 11HT-E5200_XU_FRA_0223.indd 11 2012-02-23 오후 2:33:522012-02-23 오후 2:33:52

| 12 Français
Mise en RoutePanneau avant
5V 500mA
ÉCRAN MARCHE/ARRÊT
TIROIR DISQUE HÔTE USB
ARRÊT OUVERTURE/FERMETURE
RÉGLAGE DU VOLUME
MARCHE/ARRÊT ENTRÉE
FONCTION
CAPTEUR DE LA TÉLÉCOMMANDE
| REMARQUE | � Pour mettre à niveau le logiciel du produit via la prise de l'hôte USB, vous devez utiliser une carte mémoire flash USB.
� Lorsque l'appareil affiche le menu du disque Blu-ray, vous ne pouvez pas lancer la vidéo en appuyant sur le bouton 6
situé sur l'appareil ou la télécommande. Pour lire la vidéo, sélectionnez Lire la vidéo ou Démarrer dans le menu du disque
puis appuyez sur le bouton E.
Panneau arrière
LANiPod
IMPE
DANC
E : 3
SPEAKERS OUT
IMPE
DANC
E : 3
SPEAKERS OUT
DIGITALAUDIO IN
OPTICAL
VIDEOOUT
AUXIN
FM ANTHDMI IN 21HDMI OUT
DIGITALAUDIO IN
OPTICAL
VIDEOOUT
AUXIN
FM ANTHDMI IN 21HDMI OUTLANiPod
PRISE LAN
iPod
VENTILATEUR
ENTRÉE AUDIO NUMÉRIQUE
EXTÉRIEURE (OPTIQUE)
ENTREE HDMISORTIE HDMI
ANTENNE FM
PRISES DE SORTIE DES ENCEINTES
SORTIE VIDÉOENTRÉE AUX
| REMARQUE | � Veillez à prévoir un minimum d'espace libre de 10 cm sur tous les côtés du Home cinéma dans le but de garantir une
ventilation appropriée. Veillez à ne pas obstruer le ventilateur ou les orifices d’aération.
HT-E5200_XU_FRA_0223.indd 12HT-E5200_XU_FRA_0223.indd 12 2012-02-23 오후 2:33:582012-02-23 오후 2:33:58

Français 13 |
02M
ise en Route
Télécommande
Boîtier de la télécommande
FUNCTION
DISC MENU TITLE MENU
MUTE
S/W LEVEL
TOOLS
RETURN EXIT
INFO
MO/ST
3D SOUND
SOUNDvTuner AUDIO
1 2 3
4 5 6
7 8
0
9POPUP
RECEIVER SLEEP
BD TV
TUNERMEMORY
SUBTITLE
SMART SEARCH
A B C D
EFFECT
HUB
VOL TUNING/ CH
TV SOURCE
RDS DISPLAY
PTY- PTY SEARCH PTY+
TA
FULL SCREEN REPEATHOME
Permet d'allumer et d'éteindre l'appareil.
Pour passer en mode Home Cinéma, appuyez sur la touche
BD.
Appuyez sur les touches numériques pour commander
les options.
Appuyez sur ces touches pour effectuer un saut vers l'arrière ou
l'avant.
Permet de régler le volume.
Permet de couper le son momentanément.
Appuyez sur cette touche pour afficher le mode plein écran sur un
téléviseur.
Appuyez sur cette touche pour passer à l’écran Accueil.
Sélectionnez les éléments de menu à l’écran, puis changez la
valeur du menu sélectionné.
Permet de revenir au menu précédent.
Ces touches sont utilisées à la fois pour les menus de l'appareil
et certaines fonctions liées aux disques Blu-ray.
Appuyez sur cette touche pour visualiser le menu du disque.
Appuyez sur cette touche pour utiliser le menu Outils.
Appuyez sur cette touche pour utiliser Smart Hub.
Permet de sélectionner la langue audio du disque.
Pour passer en mode TV, appuyez sur la touche TV.
Appuyez ici pour arrêter ou démarrer la lecture d'un disque.
Appuyez sur cette touche pour rechercher du contenu.
Permet d'utiliser la fonction vTuner. Appuyez sur cette touche pour appliquer les effets sonores.
Permet de régler l'heure de mise en veille de l'appareil.
Appuyez pour sélectionner le mode de Blu-ray (HDMI1, AUX, BD/DVD, etc.).ouAppuyez ici pour sélectionner le mode vidéo du téléviseur.
Permet de sélectionner les réglages MONO ou STEREO pour les radiodiffusions.
Appuyez sur ces touches pour effectuer une recherche vers l'arrière ou l'avant.
Appuyez sur cette touche pour suspendre la lecture d’un disque.
Permet de rechercher les stations FM actives et de changer les canaux en conséquence.
Permet de régler le niveau du caisson de basses
Permet d'accéder au menu contextuel/menu titre.
Appuyez sur cette touche pour quitter le menu.
Permet d'afficher les informations relatives à la lecture, en cours de lecture d'un disque Blu-ray/DVD.
Permet de configurer une fréquence radio préréglée.
Permet de répéter la lecture d’un titre, d’un chapitre, d’une piste ou d’un disque.
Appuyez sur cette touche pour bénéficier d'une vidéo 2D ordinaire en mode 3D.
Permet de sélectionner la langue de sous-titrage du disque.
Appuyez sur cette touche pour appliquer l'effet sonore 3D.
Permet d’ouvrir et de fermer le tiroir disque.
Utilisez la fonction RDS pour recevoir des stations FM.
HT-E5200_XU_FRA_0223.indd 13HT-E5200_XU_FRA_0223.indd 13 2012-02-23 오후 2:34:022012-02-23 오후 2:34:02

| 14 Français
Mise en RouteInsertion des piles dans la télécommande
Taille des piles : AAA
21
| REMARQUE | � Veillez à faire correspondre les extrémités « + » et
« - » des piles avec le dessin situé à l’intérieur du
compartiment.
� Sur la base d’une utilisation classique, la durée de vie des
piles est d’environ un an.
� La portée de la télécommande en ligne droite est
d'environ 7 mètres par rapport à l'appareil.
Réglage de la télécommandeVous pouvez contrôler certaines fonctions de votre
téléviseur à l’aide de cette télécommande.
Lors du contrôle d'un téléviseur à l’aide de cette télécommande1 . Appuyez sur la touche TV pour régler la
télécommande en mode TV.
2 . Allumez votre téléviseur.
3 . Tout en maintenant la touche MARCHE/ARRÊT
appuyée, saisissez le code correspondant à la
marque de votre téléviseur.
• Si plusieurs codes correspondant à votre téléviseur
figurent dans le tableau, saisissez-les les uns après
les autres afin de déterminer quel code fonctionne.
• Exemple : Dans le cas d'un téléviseur SamsungTout en maintenant la touche MARCHE/ARRÊT
appuyée, utilisez les touches numériques pour
saisir 00. Si cela ne fonctionne pas, essayez 15,
puis 16, etc.
4 . Si le téléviseur s'éteint, le réglage est terminé.
• Vous pouvez utiliser les touches MARCHE/ARRÊT
TV, VOLUME, CANAL ainsi que les touches
numériques (0 à 9).
| REMARQUE | � Il est possible que la télécommande ne soit pas compatible
avec certaines marques de téléviseurs. Il est également
possible que certaines fonctions ne puissent pas être
activées en fonction de la marque de votre téléviseur.
� La télécommande fonctionne par défaut avec les
téléviseurs Samsung.
Codes TV utilisables
Marque CodeAdmiral
(M.Wards)56, 57, 58
A Mark 01, 15
Anam
01, 02, 03, 04, 05,
06, 07, 08, 09, 10, 11,
12, 13, 14
AOC 01, 18, 40, 48
Bell & Howell (M.Wards)
57, 58, 81
Brocsonic 59, 60
Candle 18
Cetronic 03
Citizen 03, 18, 25
Cinema 97
Classic 03
Concerto 18
Contec 46
Coronado 15
Craig 03, 05, 61, 82, 83, 84
Croslex 62
Crown 03
Curtis Mates 59, 61, 63
CXC 03
Daewoo
02, 03, 04, 15, 16, 17, 18, 19, 20, 21, 22, 23,
24, 25, 26, 27, 28, 29, 30, 32, 34, 35, 36,
48, 59, 90
Daytron 40
Dynasty 03
Emerson03, 15, 40, 46, 59, 61,
64, 82, 83, 84, 85
Fisher 19, 65
Funai 03
Futuretech 03
General Electric (GE)
06, 40, 56, 59, 66, 67, 68
Hall Mark 40
Hitachi 15, 18, 50, 59, 69
Inkel 45
JC Penny 56, 59, 67, 86
JVC 70
KTV 59, 61, 87, 88
KEC 03, 15, 40
KMC 15
LG (Goldstar)01, 15, 16, 17, 37, 38, 39, 40, 41, 42, 43, 44
Luxman 18
LXI (Sears)19, 54, 56, 59, 60, 62,
63, 65, 71
Magnavox15, 17, 18, 48, 54, 59,
60, 62, 72, 89
Marantz 40, 54
Matsui 54
MGA 18, 40
Marque CodeMitsubishi/MGA 18, 40, 59, 60, 75
MTC 18
NEC 18, 19, 20, 40, 59, 60
Nikei 03
Onking 03
Onwa 03
Panasonic06, 07, 08, 09, 54, 66,
67, 73, 74
Penney 18
Philco03, 15, 17, 18, 48, 54,
59, 62, 69, 90
Philips15, 17, 18, 40, 48,
54, 62, 72
Pioneer 63, 66, 80, 91
Portland 15, 18, 59
Proton 40
Quasar 06, 66, 67
Radio Shack 17, 48, 56, 60, 61, 75
RCA/Proscan18, 59, 67, 76, 77, 78,
92, 93, 94
Realistic 03, 19
Sampo 40
Samsung00, 15, 16, 17, 40, 43,
46, 47, 48, 49,59, 60, 98
Sanyo 19, 61, 65
Scott 03, 40, 60, 61
Sears 15, 18, 19
Sharp 15, 57, 64
Signature 2000 (M.Wards)
57, 58
Sony 50, 51, 52, 53, 55
Soundesign 03, 40
Spectricon 01
SSS 18
Sylvania18, 40, 48, 54, 59,
60, 62
Symphonic 61, 95, 96
Tatung 06
Techwood 18
Teknika 03, 15, 18, 25
TMK 18, 40
Toshiba 19, 57, 63, 71
Vidtech 18
Videch 59, 60, 69
Wards15, 17, 18, 40, 48,
54, 60, 64
Yamaha 18
York 40
Yupiteru 03
Zenith 58, 79
Zonda 01
Dongyang 03, 54
HT-E5200_XU_FRA_0223.indd 14HT-E5200_XU_FRA_0223.indd 14 2012-02-23 오후 2:34:072012-02-23 오후 2:34:07

Français 15 |
03Branchem
ents
BranchementsDans ce chapitre, vous trouverez plusieurs méthodes vous expliquant comment connecter votre appareil à d’autres composants externes.Avant de déplacer ou d'installer l'appareil, éteignez-le et débranchez le cordon d'alimentation.
Fixation du noyau torique en ferrite au cordon d’alimentation de l'unité principale
Fixez un noyau torique en ferrite au cordon d’alimentation de l'unité principale, afin d’empêcher la génération d’interférences RF à partir de signaux radio.
1. Tirez sur la languette de fixation du noyau torique en ferrite pour l’ouvrir.
2. Enroulez en boucle le cordon d’alimentation de l'unité principale deux fois.
3. Reliez le noyau torique en ferrite au cordon d’alimentation de l'unité principale, tel qu’indiqué sur la figure puis appuyez dessus jusqu’à ce qu’il s’enclenche.
Connexion des enceintes
LANiPod
IMPE
DANC
E : 3
SPEAKERS OUT
HDMI
Enceintes avantPlacez les enceintes face à votre position d’écoute en les orientant vers vous
(d’environ 45°). Positionnez-les de manière à ce que les haut-parleurs d’aigus se
situent à la hauteur de vos oreilles.
Caisson de graves La position du caisson de graves n’a pas d’importance. Vous pouvez l’installer où
vous voulez.
Position de l’appareilPosez-le sur un support, sur une étagère ou sous un meuble TV.
Choix de la position d’écouteLa position d’écoute doit être située à une distance équivalente à environ 2,5 à 3 fois la taille de l’écran du téléviseur. Si vous avez par exemple un écran 46 pouces, situez les positions d’écoute entre 2,92 et 3,5 m de l'écran.
Avant (G)
Avant (D)
Appareil
Caisson de graves
Accessoires des enceintes
CAISSON DE GRAVES CÂBLE POUR ENCEINTEAVANT
(G) (D)
HT-E5200_XU_FRA_0223.indd 15HT-E5200_XU_FRA_0223.indd 15 2012-02-23 오후 2:34:132012-02-23 오후 2:34:13

| 16 Français
BranchementsConnexion des enceintes
1. Chaque ensemble de câble d'enceinte doit être relié à l'enceinte
correspondante. Pour cela, la prise avec le codage couleur sur chaque
ensemble doit correspondre à l'autocollant coloré situé sur la face
inférieure de chaque enceinte.
2. Pour fixer le câble d'enceinte à chaque enceinte :
a. Appuyez sur la languette rouge située à l’arrière de l’enceinte, insérez le
câble rouge, puis relâchez la languette.
b. Appuyez sur la languette noire située à l’arrière de l’enceinte, insérez le
câble noir, puis relâchez la languette.
3. Branchez les fiches des câbles d'enceinte à l’arrière de l'appareil en respectant les couleurs entre les
fiches et les prises femelles des enceintes.
| ATTENTION | � Si vous souhaitez installer l'appareil au mur, fixez les vis ou les clous fermement au mur et utilisez pour l'installation les orifices situés à
l'arrière de l'enceinte.
Cependant, lorsque vous installez l'appareil au mur, les accessoires (clous ou vis) et l'installation ne sont pas fournis par notre entreprise.
� Ne laissez pas jouer des enfants avec ou à proximité des enceintes. Ils peuvent se blesser en cas de chute d'une enceinte.
� Lors du raccordement des câbles d'enceinte aux enceintes, assurez-vous que la polarité (+/ –) est correcte.
� Conservez l'enceinte de caisson de graves hors de portée des enfants afin d'éviter qu'ils ne mettent leurs mains ou des objets étrangers
dans le conduit (orifice) de l'enceinte du caisson de graves.
� N'accrochez pas le caisson de graves au mur à l'aide du conduit (orifice).
| REMARQUE | � Si vous placez une enceinte à proximité de votre téléviseur, la couleur des images peut être déformée en raison du champ magnétique.
Noir Rouge
LANiPod
IMPE
DANC
E : 3
SPEAKERS OUT
IMPE
DANC
E : 3
SPEAKERS OUT
Enceinte avant (D)
Caisson de
graves
Enceinte avant (G)
HT-E5200_XU_FRA_0223.indd 16HT-E5200_XU_FRA_0223.indd 16 2012-02-23 오후 2:34:222012-02-23 오후 2:34:22

Français 17 |
03Branchem
ents
Connexion de l’antenne FM
LANiPod
IMPE
DANC
E : 3
SPEAKERS OUT
OPTICAL
VIDEOOUT
AUXIN
DIGITALAUDIO IN
HDMI IN1 2HDMI OUTLANiPod
IMPE
DANC
E : 3
SPEAKERS OUT
OPTICAL
VIDEOOUTOUT
AUXIN
DIGITALAUDIO INN
HDMI IN1 2HDMI OUT FM ANT
Antenne FM (fournie)
1 . Branchez l’antenne FM fournie dans la prise FM ANTENNA.
2 . Déplacez progressivement le fil de l’antenne jusqu’à trouver une position dans laquelle la réception
est de qualité, fixez-le ensuite solidement à un mur ou une autre surface solide.
| REMARQUE | � Cet appareil ne reçoit pas les émissions AM.
Connexion à l’iPod/iPhone
Utilisation d'un câble USB
Branchez un iPod/iPhone à l'aide d'un câble USB
sur le port USB avant.
5V 500mA
5V 500mA
Utilisation d’un dock
Le câble composite doit être branché pour pouvoir
lire une vidéo.
LANiPod
IMPE
DANC
E : 3
SPEAKERS OUT
OPTICAL
VIDEOOUT
AUXIN
DIGITALAUDIO IN
FM ANTHDMI IN1 2HDMI OUTLAN
IMPE
DANC
E : 3
SPEAKERS OUT
OPTICAL
VIDEOOUTOU
AUXIN
DIGITALAUDIO INNN
FM ANTHDMI IN1 2HDMI OUT
iPod
| REMARQUE | � Veillez à relier le connecteur de dock de sorte que l’étiquette « » soit orientée vers le haut.
HT-E5200_XU_FRA_0223.indd 17HT-E5200_XU_FRA_0223.indd 17 2012-02-23 오후 2:34:262012-02-23 오후 2:34:26

| 18 Français
BranchementsConnexion de l'appareil à un téléviseur
Sélectionnez la méthode 1 ou la méthode 2.
• Si vous avez réglé la télécommande de l'appareil pour commander votre téléviseur, appuyez sur la touche TV SOURCE
de la télécommande puis sélectionnez la source externe correcte parmi la liste des sources du téléviseur (HDMI, Entrée
vidéo, etc.) pour visualiser une vidéo à partir du Home cinéma.
HDMI IN VIDEO IN
OPTICAL
VIDEOOUT
AUXIN
DIGITALAUDIO IN
FM ANTHDMI IN1 2HDMI OUT
LANiPod
IMPE
DANC
E : 3
SPEAKERS OUT
OPTICAL
VIDEOOUT
AUXIN
DIGITALAUDIO IN
FM ANTHDMI IN1 2HDMI OUT
Méthode 1Méthode 2
(Câble non fourni.)
Méthode 1 Connexion à un téléviseur via un câble HDMI - Qualité optimale (Recommandé)
À l'aide d'un câble HDMI (non fourni), connectez la prise HDMI OUT située à l'arrière de l'appareil à la
prise HDMI IN de votre téléviseur.
Méthode 2 Connexion à un téléviseur via un câble vidéo - Bonne qualitéÀ l'aide du câble vidéo fourni, connectez la prise VIDEO OUT située à l'arrière de l'appareil à la prise
VIDEO IN de votre téléviseur.
| REMARQUE | � La prise de sortie VIDÉO émet toujours en résolution 576i/480i quelle que soit la valeur réglée dans le menu de
Configuration.
� Ne connectez pas l’appareil via un magnétoscope. Les signaux vidéo alimentés via les magnétoscopes peuvent être soumis
à des systèmes de protection du droit d'auteur, et l'image pourra de ce fait paraître déformée sur le téléviseur.
HT-E5200_XU_FRA_0223.indd 18HT-E5200_XU_FRA_0223.indd 18 2012-02-23 오후 2:34:302012-02-23 오후 2:34:30

Français 19 |
03Branchem
ents
Connexion de périphériques externes
Pour sélectionner le mode correct pour un périphérique externe, appuyez sur la touche FUNCTION. Chaque
appui sur cette touche change le mode selon cet ordre :
BD/DVD � D. IN � AUX � R. IPOD � HDMI1 � HDMI2 � FM � BT
OPTICAL
VIDEOOUT
AUXIN
DIGITALAUDIO IN
FM ANTHDMI IN1 2
AUDIO OUTHDMI OUT OPTICAL OUT
LANiPod
IMPE
DANC
E : 3
SPEAKERS OUT
OPTICAL
VIDEOOUT
AUXIN
DIGITALAUDIO IN
FM ANTHDMI IN1 2HDMI OUT
R Rouge
W Blanc
Méthode 1 Méthode 2 Méthode 3
Périphériques externes
(Câble non fourni.)
(Câble non fourni.) (Câble non fourni.)
Méthode 1 ENTRÉE HDMI : Connexion d'un composant externe à l'aide d'un câble HDMIÀ l'aide d'un câble HDMI (non fourni), connectez la prise HDMI IN située à l'arrière de l'appareil à la prise
HDMI OUT de votre périphérique numérique. Sélectionnez le mode HDMI1 ou HDMI2.
Méthode 2 OPTIQUE : Connexion d’un composant audio numérique externe
Pour connecter la sortie audio numérique des composants à signaux numériques tels que les récepteurs
câble/satellite (décodeur).
En utilisant un câble optique numérique (non fourni), connectez la prise d'Entrée Audio numérique
optique située sur l'appareil à la prise de Sortie optique numérique située sur le périphérique numérique
externe.
Sélectionnez le mode D. IN.
Méthode 3 ENTRÉE AUX : Connexion d’un composant analogique externeEn utilisant un câble audio RCA (non fourni), connectez la prise d'Entrée AUDIO située sur l'appareil à la
prise de Sortie AUDIO située sur le composant analogique externe. Sélectionnez le mode AUX.
• Assurez-vous de faire correspondre les couleurs des fiches des câbles avec celles des prises d'entrée et
de sortie.
| REMARQUE | � Pour visionner un film depuis votre récepteur câble/satellite, vous devez connecter sa prise de sortie vidéo directement à
votre téléviseur.
� Ce système prend en charge les fréquences d’échantillonnage numériques de 32 kHz minimum provenant de composants
numériques externes.
� Ce système prend en charge uniquement les données audionumériques DTS et Dolby. Les données audio MPEG, un format
type train de bits n'est pas pris en charge.
HT-E5200_XU_FRA_0223.indd 19HT-E5200_XU_FRA_0223.indd 19 2012-02-23 오후 2:34:332012-02-23 오후 2:34:33

| 20 Français
BranchementsConnexion à un routeur réseau
Vous pouvez connecter votre appareil à votre
routeur réseau en utilisant l'une des méthodes
illustrées ci-dessous.
Réseau câblé
LANiPod
IMPE
DANC
E : 3
SPEAKERS OUT
OPTICAL
VIDEOOUT
AUXIN
DIGITALAUDIO IN
FM ANTHDMI IN1 2HDMI OUT
Service large bande
Service large bande
Modem large bande(avec routeur intégré)
Modem large bande
Routeur
Ou
| REMARQUE | � Il est possible que l'accès Internet au serveur de mise à
jour des logiciels Samsung ne soit pas autorisé, selon le
routeur que vous utilisez ou le contrat établi avec votre
fournisseur d'accès. Pour de plus amples informations,
contactez votre fournisseur d'accès Internet.
� Les utilisateurs DSL doivent passer par un routeur pour
la connexion au réseau.
� Pour utiliser la fonction AllShare Play, vous devez
connecter l’ordinateur au réseau, tel qu’indiqué sur la
figure de gauche.
La connexion peut être câblée ou sans fil.
Réseau sans fil
5V 500mA
Dispositif de partage IP sans fil
Service large bande
| REMARQUE | � Si le dispositif de partage IP sans fil prend en charge le
protocole DHCP, votre appareil pourra utiliser une adresse
DHCP ou une adresse IP fixe pour la connexion au réseau
sans fil.
� Réglez le routeur IP sans fil en mode Infrastructure. Le
mode Ad-hoc n'est pas pris en charge.
� L'appareil ne prend en charge que les protocoles de clé
de sécurité sans fil suivants :
- WEP (OPEN/SHARED), WPA-PSK (TKIP/AES), WPA2-PSK (TKIP/AES)
� Sélectionnez un canal qui est actuellement non utilisé sur
le routeur IP sans fil. Si le canal défini pour le routeur IP
sans fil est en cours d’utilisation par un autre périphérique
à proximité, il pourra en résulter des interférences et un
échec de communication.
� Lorsque le mode Pure High-throughput (Greenfield)
802.11n est sélectionné et le type de cryptage défini sur
WEP, TKIP ou TKIP-AES (WPS2Mixed) pour votre routeur
ou votre point d’accès, cet appareil ne gère pas les
connexions compatibles avec les nouvelles spécifications
de certification Wi-Fi.
� Par nature, le réseau LAN peut provoquer des
interférences, selon les conditions de fonctionnement
(performance du point d'accès, distance, obstacles,
interférences avec d'autres appareils radio, etc.).
HT-E5200_XU_FRA_0223.indd 20HT-E5200_XU_FRA_0223.indd 20 2012-02-23 오후 2:34:362012-02-23 오후 2:34:36

Français 21 |
04Param
ètres
Procédure de réglage des
paramètres initiaux
• Le menu Accueil n'apparaîtra pas si vous ne configurez
pas les paramètres initiaux.
• L'affichage à l'écran (OSD) peut changer sur cet
appareil après la mise à niveau de la version du
logiciel.
• Les étapes d'accès peuvent varier selon le menu
sélectionné.
1 . Mettez votre téléviseur sous tension après
avoir connecté l'appareil, puis mettez ce
dernier à son tour sous tension. Lorsque vous
mettez l'appareil sous tension pour la première
fois, il affiche automatiquement l'écran Langue
des paramètres initiaux.
Initial Settings > On-Screen Language
Select a language for the on-screen displays.
Next
▲
▼
Dansk Nederlands
English Eesti keel
Suomi Français
Deutsch Ελληνικά
Hausa Magyar
Asusu Igbo Italiano
Select English as the on-screen menu language.
2 . Utilisez les touches ▲▼◄► de la
télécommande pour sélectionner la langue
souhaitée, puis appuyez deux fois sur la
touche E. L’écran Démarrer s’affiche.
3 . Appuyez sur la touche E pour démarrer
la configuration. L'écran Paramètres réseau
apparaît.
L'étape suivante consiste à configurer un réseau sans fil avec un adaptateur LAN interne.
Pour vous connecter à votre réseau câblé, branchez un câble réseau.
Précédent
Ignorer
Suivant
Configuration > Paramètres réseau (1/5)
4 . Appuyez sur le bouton E pour configurer
la connexion du réseau sans fil de l’appareil
ou sélectionnez Ignorer, puis appuyez sur
le bouton E pour sauter l’étape de la
configuration du réseau. Si vous sélectionnez
Ignorer, passez à l'Étape 12.
| REMARQUE | � L'appareil lance la procédure de connexion au réseau
sans fil par défaut. Si vous souhaitez configurer une
connexion câblée, sélectionnez Ignorer, puis passez à
« Configuration de votre connexion réseau » en page
29 après avoir terminé la procédure de réglage des
paramètres initiaux.
� Si vous sautez ici la configuration du réseau sans fil,
passez à « Réseau sans fil » en page 30 pour configurer
ultérieurement la connexion au réseau sans fil de
l'appareil
5 . L'appareil recherche puis affiche toutes
les connexions réseau par routeur sans fil
disponibles.
Configuration > Paramètres réseau (2/5)
Rafraîchir
WPS(PBC)
Précédent
Suivant
Ignorer
Sélectionnez routeur sans fil dans la liste.1 / 4
KIMING_VTOWER
TIASsi-ap
Ajouter réseau
surlwang5
6 . Sélectionnez un routeur à l’aide des boutons
▲▼, puis appuyez sur le bouton E. Le
bouton Suivant est mis en surbrillance.
7 . Appuyez sur le bouton E pour poursuivre.
L'écran Code de sécurité apparaît.
| REMARQUE | � Si vous possédez un routeur compatible WPS(PBC),
sélectionnez WPS(PBC) à la place, appuyez sur le bouton
E, puis suivez les directives apparaissant à l'écran.
Lorsque vous avez terminé, passez à l'étape 10.
Configuration > Paramètres réseau (4/5)
Précédent
PIN WPS
Ignorer
Suivant
Entrez clé de sécurité.
0 entré.
A/a Espace
a g m s
e k q w
c i o u
1 4 7 y
b h n t
f l r x
d j p v
2 5 8 z
3 6 9 0
-
8 . Saisissez le code de sécurité de votre réseau.
Puis, sélectionnez Suivant à l’aide des boutons
▲▼◄►, et appuyez sur le bouton E.
Paramètres
HT-E5200_XU_FRA_0223.indd 21HT-E5200_XU_FRA_0223.indd 21 2012-02-23 오후 2:34:422012-02-23 오후 2:34:42

| 22 Français
Paramètres| REMARQUE |
� Saisissez les nombres en appuyant sur les touches
numériques de votre télécommande.
� Saisissez les lettres en sélectionnant une lettre à l'aide
des boutons ▲▼◄►, puis appuyez sur le bouton E.
� Pour afficher les lettres en majuscule (ou réaffichez des
lettres en minuscule si des majuscules sont affichées,
sélectionnez A/a, puis appuyez sur le bouton E.
� Pour afficher des symboles et la ponctuation, sélectionnez
, puis appuyez sur le bouton E. Pour réafficher des
lettres, sélectionnez , puis appuyez sur le bouton E.
9 . Si la connexion est réussie, l'écran Connexion
terminée apparaît. Sélectionnez Suivant et
appuyez sur le bouton E. L'écran Mise à
jour logicielle apparaît.
| REMARQUE | � Si la connexion a échoué, sélectionnez Suivant et
appuyez sur le bouton E. Après avoir terminé la
procédure de réglage des paramètres initiaux, passez à «
Réseau sans fil » en page 30 pour configurer la connexion
au réseau sans fil de l'appareil.
10 . Pour mettre à niveau le logiciel, sélectionnez
MàJ maintenant, et appuyez sur le
bouton E. Pour sauter la mise à niveau,
sélectionner Mettre à jour ultér., appuyez sur
le bouton E, puis passez à l'Étape 12.
| REMARQUE | � Si vous avez sauté la configuration réseau, vous devez
sauter également la mise à niveau du logiciel.
11 . Si une mise à niveau du logiciel est
disponible, l'appareil télécharge et installe
cette mise à niveau. Ceci peut prendre un
certain temps. Si aucune mise à niveau
du logiciel n'est disponible, le message «
Aucune nouvelle mise à jour logicielle à télécharger. Vous disposez déjà de la version la plus récente. » apparaît. Appuyez
ensuite sur le bouton E. L'écran Format TV
apparaît.
Configuration > Format TV
Précédent
Suivant
Sélectionnez cette option pour définir le type de télévision connectée.
16:9 Original
16:9 Plein écran
4:3 Letter Box
4:3 Pan-Scan
Sélectionnez cette option si connexion à une télévision 16:9. Les films en source 4:3 sont affichés en 4:3 Pillarbox.
12 . À l’aide des boutons ▲▼, sélectionnez
le format correspondant à votre écran et
appuyez sur le bouton E. Cliquez sur
Suivant et appuyez sur le bouton E.
Vous avez quatre choix :
16:9 Original - Pour les téléviseurs grand
écran. Permet d'afficher les images en grand
écran dans leur format original 16.9 et les
images 4:3 (l'ancien format standard) en format
Encadrement horizontal du 4:3 avec des barres
noires sur la gauche et la droite.
16:9 Plein écran - Pour les téléviseurs grand
écran. Permet d'afficher les images en grand
écran dans leur format original 16.9 et d'étirer
les images 4:3 pour remplir l'écran 16:9.
4:3 Letter Box - Pour les plus anciens
téléviseurs analogiques à écran standard.
Permet d'afficher les images 4:3 en plein écran
et les images 16.9 au format boîte aux lettres qui
conserve le rapport 16:9 mais place des barres
noires au-dessus et en-dessous de l'image.
4:3 Pan-Scan - Pour les plus anciens téléviseurs
analogiques à écran standard. Permet d'afficher
les images 4:3 en plein écran et les images 16.9
au format Pan-Scan qui remplit l'écran, mais
coupe les côtés droit et gauche de l'image et
agrandit le milieu verticalement.
Configuration > Complet
Configuration terminée.
OK
Smart Hub
Langue affichée à l'écran
Paramètres réseau
Mise à jour du logiciel -
Format écran
Appuyez sur Smart Hub pour profiter de divers contenus Internet.
13 . L'écran Configuration terminée apparaît. Vérifiez
les paramètres pour confirmer qu'ils sont
corrects. Sélectionnez OK et appuyez sur le
bouton E. L'écran Accueil apparaît.
| REMARQUE | � Si vous souhaitez afficher à nouveau l'écran Paramètres
initiaux pour procéder à des modifications, sélectionnez
l'option Réinitialisation. (Voir page 28)
� Si vous utilisez un câble HDMI pour connecter l'appareil
à un téléviseur Samsung conforme à la fonctionnalité
Anynet+ (HDMI-CEC) et que ; 1.) Vous avez réglé la fonction
Anynet+ (HDMI-CEC) sur Activé à la fois sur le téléviseur et
l'appareil ; 2.) Vous avez réglé le téléviseur sur une langue
prise en charge par l'appareil, ce dernier sélectionne alors
automatiquement cette langue comme langue préférée.
HT-E5200_XU_FRA_0223.indd 22HT-E5200_XU_FRA_0223.indd 22 2012-02-23 오후 2:34:472012-02-23 오후 2:34:47

Français 23 |
04Param
ètres
L'écran Accueil
Smart Hub Fonction Paramètres
d WPS(PBC) 5
4
3
1
2
Lisez des vidéos, des photos ou de la musique à partir du disque ou des périphériques connectés.
AllShare Play
1Smart Hub. Lancez Smart Hub. Depuis Smart
Hub, vous pouvez accéder à YouTube, des jeux et
d'autres applications.
2
AllShare Play. Permet de lire des vidéos, des
photos ou des fichiers musicaux contenus sur
un disque, une clé USB, un ordinateur ou des
périphériques mobiles.
3Fonction. Permet de sélectionner la source
d'entrée audio/vidéo.
4Paramètres. Permet de régler diverses fonctions
selon vos préférences.
5Permet d'afficher les touches colorées de votre
télécommande sur lesquelles vous pouvez appuyer
pour accéder à des fonctions ou les exécuter.
Sélection d'une option sur l'écran Accueil
1 . Pour sélectionner une option sur l'écran
Accueil, déplacez le curseur à l'aide des
boutons ◄► jusqu'à ce que l'option de votre
choix soit mise en surbrillance, puis appuyez
sur le bouton E.
Accéder à l'écran Paramètres
1 . Sélectionnez Paramètres sur l'écran Accueil,
puis appuyez sur E. L'écran Paramètres
apparaît.
Affichage
Audio
Réseau
Système
Assistance
Paramètres 3D
Format TV 16:9 Original
Taille écran Smart Hub Taille 3
BD Wise Arrêt
Résolution Auto.
Trame vidéo (24Fs) Auto.
Format couleur HDMI Auto.
Couleur intense HDMI Auto.
Mode progressif Auto.
2 . Pour accéder aux menus, sous-menus et
options sur l'écran Paramètres, veuillez vous
reporter à l'illustration de la télécommande ci-
dessous.
| REMARQUE | � Si l'appareil reste en mode Arrêt pendant plus de 5 minutes
sans l'utiliser, un écran de veille s'affichera sur le téléviseur.
Si l'appareil reste en mode d’écran de veille pendant plus de
20 minutes, l'alimentation sera automatiquement coupée.
Touches de la télécommande utilisées pour le menu Paramètres
TOOLS
RETURN EXIT
INFO
MO/STTUNER
MEMORY
FULL SCREEN REPEATHOME
1
2 4
3
1Touche HOME : Appuyez sur cette touche pour
passer à l’écran Accueil.
2Touche RETURN : Permet de revenir au menu
précédent.
3
Touche E (Entrée) / DIRECTION :
~ Appuyez sur ▲▼◄► pour déplacer le
curseur ou sélectionner un élément.
~ Appuyez sur la touche E pour activer
l'élément sélectionné actuellement ou
confirmer un réglage.
4Touche EXIT : Appuyez sur cette touche pour quitter
le menu actuellement sélectionné.
| REMARQUE | � Le bouton E sur le panneau frontal de l'appareil peut
être utilisé dans le même but que la touche E de la
télécommande.
Informations détaillées sur les fonctionsChaque fonction Paramètres, élément de menu, et
chaque option sont expliqués en détails à l'écran.
Pour afficher les informations, utilisez les touches
▲▼◄► pour sélectionner la fonction, l'élément de
menu ou l'option. Les informations apparaissent en
général à droite de l'écran. Vous trouverez une
courte description de chaque fonction Paramètres
à la page suivante. Vous pourrez également trouver
des informations complémentaires sur certaines
fonctions dans l'Annexe de ce manuel.
HT-E5200_XU_FRA_0223.indd 23HT-E5200_XU_FRA_0223.indd 23 2012-02-23 오후 2:34:502012-02-23 오후 2:34:50

| 24 Français
ParamètresFonctions du menu Paramètres
Affichage
Paramètres 3D
Permet de configurer les fonctions relatives à la 3D.
Mode lecture Blu-ray 3D: Vous permet de choisir de lire en
mode 3D ou non un disque Blu-ray comportant des contenus 3D.
Si vous passez au menu Accueil ou Accueil Smart Hub tout en
étant en mode 3D, l'appareil passera automatiquement en 2D.
Taille écran: Permet d'entrer la taille du téléviseur connecté
à l'appareil. L'appareil règle automatiquement la sortie 3D en
fonction de la taille de l'écran du téléviseur.
Format TVVous permet de régler la sortie de l'appareil sur la taille de l'écran
de votre téléviseur. Pour obtenir une description des options de la
taille de l'écran, reportez-vous à la page 22, Étape 12.
Taille écran Smart Hub
Vous permet de sélectionner la taille optimale pour l'écran Smart
Hub.
BD Wise
BD Wise est la fonctionnalité d’interconnectivité de Samsung la
plus récente. Lorsque vous connectez un appareil Samsung et
un téléviseur Samsung doté de la fonction BD Wise via l'interface
HDMI et que l'appareil et le téléviseur disposent tous deux de
la fonctionnalité BD Wise, le produit émet des images dont la
résolution vidéo et la vitesse de défilement sont identiques à celles
du disque Blu-ray/DVD.
Résolution
Cette option vous permet de régler la définition du signal vidéo
HDMI respectivement sur les valeurs Auto., 1080p, 1080i, 720p, 576p/480p. Si Composite est connecté, la résolution prend en
charge 576i/480i uniquement. Ces valeurs sont indicatives du
nombre de lignes vidéo par image. Les lettres i et p signifient
respectivement balayage entrelacé (i) et balayage progressif (p).
Plus il y a de lignes, plus la qualité de l'image est supérieure.
Trame vidéo (24Fs)
Le réglage de la fonction Trame vidéo (24Fs) sur Auto vous
permet de spécifier automatiquement la sortie HDMI de l'appareil
sur 24 images par seconde pour une qualité d'image améliorée si
un téléviseur compatible 24Fs est connecté.
• Vous ne pouvez bénéficier de la fonction Trame vidéo (24Fs)
que sur un téléviseur prenant en charge cette vitesse de
défilement.
• Trame vidéo est uniquement disponible lorsque l'appareil est en
modes de résolution de sortie HDMI 1080i ou 1080p.
Format couleur HDMI
Vous pouvez régler le format de l'espace chromatique pour la
sortie HDMI afin qu'il corresponde aux capacités de l'appareil
branché (télévision, moniteur, etc.).
Couleur intense HDMI
Cette option vous permet de régler l'appareil pour émettre des
données vidéo en sortie avec Couleur intense via la prise HDMI
OUT. L'option Couleur intense permet une reproduction plus fidèle
des couleurs, notamment en termes de profondeur.
Mode progressif
Cette option permet d'améliorer la qualité de l'image lors de la
lecture d'un DVD.
HT-E5200_XU_FRA_0223.indd 24HT-E5200_XU_FRA_0223.indd 24 2012-02-23 오후 2:35:072012-02-23 오후 2:35:07

Français 25 |
04Param
ètres
Audio Paramètre haut-parleur Cette option vous permet de régler les options des enceintes.
Egaliseur Cette option vous permet de configurer manuellement les
réglages de l'égaliseur.
Vol. intelligentCette option vous permet de régler l'appareil de sorte que le
volume demeure stable lorsqu'un changement de scène se
produit ou lorsque vous changez de chaîne.
Sélect. haut-parleur
Cette option vous permet de sélectionner les haut-parleurs
activés, ceux du téléviseur ou ceux du Home cinéma.
Fonct. Retour Audio
Cette option vous permet de diriger le son du téléviseur
vers les haut-parleurs du Home cinéma. Elle nécessite une
connexion HDMI et un téléviseur compatible avec la fonction
Canal de retour audio (ARC).
• Lorsque le Canal de retour audio (ARC) est activé, utilisez un
câble HDMI pour relier l'appareil au téléviseur. À ce stade,
une entrée optique ne fonctionne pas.
• Lorsque la fonction Canal de retour audio (ARC) est réglée
sur auto, utilisez un câble HDMI pour relier l'appareil au
téléviseur. À ce stade, ARC et une entrée optique sont
automatiquement sélectionnés.
Sortie numérique
Cette option vous permet de définir la Sortie numérique de
manière à ce qu'elle corresponde aux capacités du récepteur
AV que vous avez connecté à l'appareil. Pour les détails,
reportez-vous au tableau de sélection des sorties numériques.
(Voir page 59)
Contrôle de la dynamique
Cette option vous permet d'appliquer le contrôle de la
dynamique au son Dolby Digital, Dolby Digital Plus et Dolby
True HD.
Auto.: permet de contrôler automatiquement la plage
dynamique du son Dolby TrueHD, sur la base des
informations contenues dans la bande son de Dolby TrueHD.
Cette option active également le contrôle de la dynamique
pour Dolby Digital et Dolby Digital Plus.
Arrêt: la plage dynamique reste non compressée, vous
permettant ainsi d'entendre le son original.
Activé: cette option active le contrôle de la dynamique
pour les trois formats Dolby. Les sons les moins forts sont
amplifiés et le volume des sons forts est abaissé.
Sync. audio
Lorsque l'appareil est relié à un téléviseur numérique, cette
option vous permet de régler le temps de retard audio afin que
le son soit synchronisé avec la vidéo. Vous pouvez régler le
retard entre 0 et 300 millisecondes.
HT-E5200_XU_FRA_0223.indd 25HT-E5200_XU_FRA_0223.indd 25 2012-02-23 오후 2:35:092012-02-23 오후 2:35:09

| 26 Français
Paramètres
Réseau Paramètres réseau
Pour obtenir de plus amples informations sur les Paramètres
réseau et les fonctions réseau, reportez-vous à la section «
Réseaux et Internet » à partir de la page 29.
État du réseau Cette option vous permet de vérifier si la connexion au réseau
et à Internet a été établie.
Wi-Fi Direct
Cette option vous permet de connecter à l'appareil un
périphérique directement par Wi-Fi en utilisant un réseau point
à point, sans utiliser un routeur sans fil. Vous pouvez utiliser le
périphérique pour contrôler l'appareil.
Soft AP
Cette option vous permet de connecter sans fil d'autres types
de périphériques Wi-Fi à l'appareil. Elle nécessite qu'un code
de sécurité soit créé, vous devez le saisir dans les autres
périphériques Wi-Fi lorsque vous les connectez à l'appareil.
Paramètres AllShare
Cette option vous permet d'autoriser les périphériques
externes tels que les Smartphones à se connecter à l'appareil
et à partager les contenus ou à contrôler l'appareil.
Nom périphérique
Cette option vous permet d'affecter un nom identifiant
l'appareil. Vous utilisez ce nom pour identifier l'appareil
lorsque vous lui connectez des périphériques Wi-Fi externes
(Smartphones, tablettes, etc.)
Paramètres BD-Live
Cette option vous permet d'autoriser, de limiter ou d'interdire
une connexion Internet pour les services BD-Live.
HT-E5200_XU_FRA_0223.indd 26HT-E5200_XU_FRA_0223.indd 26 2012-02-23 오후 2:35:102012-02-23 오후 2:35:10

Français 27 |
04Param
ètres
Système
ConfigurationCette option vous permet de relancer la procédure de réglage
des paramètres initiaux. Reportez-vous à la page 21 pour les
détails.
Gest. périph.
Vous pouvez brancher une souris ou un clavier USB sans fil au
port USB situé à l'avant de l'appareil.
Paramètres clavier: cette option vous permet de configurer
un clavier USB sans fil connecté à l'appareil.
| REMARQUE | � Vous pouvez utiliser le clavier uniquement lorsqu'un écran ou une
fenêtre de clavier QWERTY apparaît dans le navigateur Web.
Paramètres souris: cette option vous permet de configurer
une souris USB sans fil connecté à l'appareil. Vous pouvez
utiliser la souris dans le menu de l'appareil de la même
manière que vous utilisez une souris sur votre ordinateur.
Pour utiliser une souris avec le menu de l'appareil :1 . Connectez la souris USB à l'appareil.
2 . Cliquez sur le bouton principal que vous avez sélectionné
dans Paramètres souris.
Le menu Simple s'affiche.
3 . Cliquez sur les options du menu que vous désirez.
| REMARQUE | � En fonction du modèle HID USB de votre clavier et votre souris, des
problèmes de compatibilité peuvent se produire.
� Certaines touches de clavier HID peuvent ne pas fonctionner.
� Les claviers USB câblés ne sont pas pris en charge.
� Certaines applications peuvent ne pas être prises en charge.
� Si un clavier HID sans fil ne fonctionne pas en raison d'interférence,
rapprochez le clavier de l'appareil.
Anynet+(HDMI-CEC)
Anynet+ est une fonction pratique qui autorise des
commandes liées entre plusieurs produits Samsung
compatibles Anynet+ et vous permet de contrôler ces produits
via une télécommande de téléviseur Samsung.
Pour utiliser cette fonction, vous devez connecter cet appareil
à un téléviseur Samsung Anynet+ à l'aide d'un câble HDMI.
Langue
Vous pouvez sélectionner la langue de votre choix pour le
menu à l’écran, le menu du disque, les sous-titres, etc.
• La langue que vous avez sélectionnée pour le menu du
disque, la bande-son du disque ou les sous-titres apparaîtra
seulement si elle est prise en charge sur le disque.
HT-E5200_XU_FRA_0223.indd 27HT-E5200_XU_FRA_0223.indd 27 2012-02-23 오후 2:35:122012-02-23 오후 2:35:12

| 28 Français
Paramètres
Sécurité
Le code PIN par défaut est 0000. Saisissez ce code PIN par
défaut pour accéder à la fonction de sécurité si vous n'avez
pas créé votre propre mot de passe.
Contrôle parent. BD: cette option empêche la lecture des
disques Blu-ray ayant une classification égale ou supérieure
à une classification d'âge particulière que vous avez définie
jusqu'à la saisie du code PIN.
Contrôle parent. DVD: cette option empêche la lecture
des disques DVD ayant une classification supérieure à
une classification numérique particulière que vous avez
sélectionnée jusqu'à la saisie du code PIN.
Modifier PIN: cette option permet de modifier le code PIN à
4 chiffres utilisé pour accéder aux fonctions de sécurité.
En cas d'oubli du code PIN1 . Retirez tout disque ou périphérique de stockage USB.
2 . Appuyez et maintenez le bouton 5 situé sur la façade
pendant 5 secondes minimum.
Tous les paramètres seront réinitialisés sur leur valeur
d'origine.
| REMARQUE | � Lorsque les réglages d'usine par défaut sont rétablis, toutes les données
Blu-ray utilisateur stockées sur l'appareil seront effacées.
Général
Vous pouvez spécifier la luminosité de l'affichage et le fuseau
horaire.
Affichage du lecteur: cette option permet de modifier la
luminosité du panneau avant.
Fuseau Horaire: vous pouvez spécifier le fuseau horaire
applicable à votre région.
Transparence menu: cette option permet de régler la
transparence du cadre de menu.
DivX® Vidéo à la demande
Affichez les codes d'enregistrement DivX® VOD pour acheter
et lire des contenus DivX® VOD.
Assistance Mise à jour du logiciel
Pour obtenir de plus amples informations sur la fonction de Mise à
jour logicielle, consultez « Mise à niveau du logiciel » en page 33.
Contacter Samsung
Permet d’obtenir les informations de contact pour les
demandes d’assistance portant sur l'appareil.
Gestion à distance
Lorsque cette option est activée, elle permet aux agents
du Centre d’assistance téléphonique de Samsung de
diagnostiquer et de résoudre à distance des problèmes
concernant l'appareil. Elle nécessite une connexion Internet
active. Le service Gestion à distance pourrait ne pas être
disponible dans certains pays.
RéinitialisationTous les paramètres sont rétablis sur leur valeur d'origine
par défaut sauf en ce qui concerne les paramètres réseau et
Smart Hub. Le mot de passe de sécurité par défaut est 0000.
HT-E5200_XU_FRA_0223.indd 28HT-E5200_XU_FRA_0223.indd 28 2012-02-23 오후 2:35:142012-02-23 오후 2:35:14

Français 29 |
04Param
ètres
Réseaux et Internet
Lorsque vous connectez cet appareil à un
réseau, vous pouvez utiliser les applications et les
fonctions basées sur les réseaux telles que Smart
Hub et BD-LIVE, et mettre à niveau le logiciel
de l'appareil via la connexion réseau. Pour plus
d'informations concernant l'accès et l'utilisation
des services Internet, reportez-vous au chapitre
Services réseau de ce manuel en pages 51 à 53.
Les instructions permettant la configuration de la
connexion réseau débutent ci-dessous.
Configuration de votre connexion réseauAvant de commencer, contactez votre fournisseur
de services Internet pour savoir si votre adresse IP
est fixe ou dynamique. Si vous avez une adresse
IP dynamique et utilisez un réseau câblé ou
sans fil, nous vous recommandons de suivre les
procédures de Configuration automatique décrites
ci-dessous.
Si vous vous connectez à un réseau câblé,
connectez l'appareil à votre routeur en utilisant un
câble LAN avant d'entreprendre la procédure de
configuration.
Si vous vous connectez à un réseau sans fil,
débranchez toute connexion au réseau câblé
avant d'entreprendre la procédure.
Pour commencer la configuration de votre
connexion réseau, respectez les étapes suivantes :
1 . Sur l'écran Accueil, sélectionnez Paramètres,
puis appuyez sur le bouton E.
2 . Sélectionnez Réseau et appuyez sur le
bouton E.
3 . Sélectionnez Paramètres réseau et appuyez
sur le bouton E.
4 . Consultez les instructions pour les Réseaux
câblés qui débutent ci-dessous ou les
instructions pour les Réseaux sans fil
commençant en page 30.
Réseau câblé
� Câblé – Automatique
Après avoir suivi les Étapes 1 à 3 ci-dessus :
1 . Sélectionnez Démarrer sur l'écran
Paramètres réseau, puis appuyez sur le
bouton E. L'appareil détecte la connexion
câblée, vérifie la connexion réseau, puis il se
connecte au réseau.
� Câblé – ManuelSi vous disposez d'une adresse IP fixe ou si la
procédure automatique est inopérante, vous
devrez définir les valeurs de Paramètres réseau
manuellement.
Après avoir suivi les Étapes 1 à 3 ci-dessus :
1 . Sélectionnez Démarrer sur l'écran Paramètres
réseau, puis appuyez sur le bouton E.
L'écran État du réseau apparaît. L'appareil
tente de vérifier la connexion réseau et échoue.
Paramètres réseau
Echec de la connexion au réseau câblé.
Adresse MAC XX:XX:XX:XX:XX:XXAdresse IP 0.0.0.0Masque ss-réseau 0.0.0.0Passerelle 0.0.0.0Serveur DNS 0.0.0.0
Echec connexion réseau. Essayez solut. suiv. : vérif. si adr. IP est définie correctement dans Paramètres IP. Contactez le fournisseur de services Internet pour plus d'infos.
Réessayer
Param. IP
Précédent
OK
2 . Sélectionnez Param. IP sur la droite de
l'écran, puis appuyez sur le bouton E.
L'écran Param. IP apparaît.
3 . Sélectionnez le champ Mode IP, puis réglez-
le sur Manuel.4 . Utilisez le pavé numérique de la
télécommande pour saisir les valeurs
Réseau. Utilisez les touches ▲▼◄► de la
télécommande pour vous déplacez d'un
champ d'entrée à l'autre.
| REMARQUE | � Vous pouvez obtenir ces valeurs auprès de votre
fournisseur d'accès Internet. Vous pouvez également
visualiser ces valeurs sur la plupart des ordinateurs
Windows. Pour les instructions, reportez-vous à « Obtenir
les valeurs des paramètres réseau » sur cette page.
5 . Une fois terminé, mettez OK en surbrillance et
appuyez sur le bouton E. L'appareil vérifie
la connexion réseau, puis il se connecte au
réseau.
< Obtenir les valeurs des paramètres réseau >Vous pouvez visualiser les valeurs de vos
paramètres réseau sur la plupart des ordinateurs
Windows. Pour visualiser les valeurs des
paramètres réseau, respectez ces étapes :
• Windows XP
1 . Cliquez avec le bouton droit sur l'icône Réseau,
située en bas à droite du bureau de Windows.
HT-E5200_XU_FRA_0223.indd 29HT-E5200_XU_FRA_0223.indd 29 2012-02-23 오후 2:35:152012-02-23 오후 2:35:15

| 30 Français
Paramètres2 . Dans le menu contextuel, cliquez sur État.
3 . Cliquez sur l'onglet Assistance dans la boîte
de dialogue qui s'affiche.
4 . Sur l'onglet Assistance, cliquez sur le bouton
Détails.
5 . Les réglages réseau s’affichent.
• Windows 7
1 . Cliquez sur l'icône Réseau, située en bas à
droite du bureau de Windows.
2 . Dans le menu contextuel, cliquez sur Centre
Réseau et partage.
3 . Dans la boîte de dialogue qui s’ouvre, cliquez
sur Connexion au réseau local ou Connexion
au réseau sans fil, selon votre type de
connexion réseau.
4 . Sur l'onglet Support, cliquez sur le bouton
Détails.
Les réglages réseau s’affichent.
| REMARQUE | � Ces informations peuvent varier selon la version de
Windows utilisée.
Réseau sans filVous pouvez configurer une connexion à un
réseau sans fil de trois manières :
- Sans fil automatique
- Sans fil manuel
- WPS(PBC)
Lorsque vous configurez la connexion au réseau
sans fil, tous les périphériques réseau sans fil
actuellement connectés via l'appareil ou, le cas
échéant, la connexion câblée actuelle de l'appareil
seront déconnectés.
� Sans fil (Général) - AutomatiqueAprès avoir suivi les Étapes 1 à 3 dans «
Configuration de votre connexion réseau » en
page 29.
1 . Sélectionnez Démarrer sur l'écran
Paramètres réseau puis appuyez sur le
bouton E. L'appareil recherche puis affiche
une liste des réseaux disponibles.
Paramètres réseau
Rafraîchir
WPS(PBC)
Précédent
Suivant
Annuler
Sélectionnez routeur sans fil dans la liste.1/10
ELT
JSY
KT_WLAN_C361
Mirhenge_edu
SO070VOIP
iptime23
2 . Sélectionnez le réseau souhaité et appuyez
sur le bouton E.
3 . Sélectionnez Suivant et appuyez à nouveau
sur le bouton E.
4 . Sur l'écran Sécurité, entrez le code de
sécurité ou la phrase de passe correspondant
à votre réseau.
Saisissez directement les nombres en utilisant
les touches numériques de la télécommande.
Saisissez les lettres en sélectionnant une
lettre à l'aide des touches fléchées, puis
appuyez sur le bouton E.
5 . Une fois effectué, sélectionnez Suivant sur la droite de l'écran. L'appareil vérifie la
connexion réseau, puis il se connecte au
réseau.
| REMARQUE | � Vous devriez pouvoir trouver la phrase de passe ou le
code de sécurité sur l'un des écrans de configuration
servant à la configuration du routeur ou du modem.
� Sans fil (Général) - ManuelSi vous disposez d'une adresse IP fixe ou si la
procédure automatique est inopérante, vous
devrez définir les valeurs de Paramètres réseau
manuellement.
Après avoir suivi les Étapes 1 à 3 dans «
Configuration de votre connexion réseau » en
page 29.
1 . Sélectionnez Démarrer sur l'écran
Paramètres réseau, puis appuyez sur le
bouton E. L'appareil recherche puis affiche
une liste des réseaux disponibles.
2 . Sélectionnez le réseau souhaité ou l'option
Ajouter réseau, et appuyez sur le bouton
E.
3 . Sélectionnez Suivant et appuyez à nouveau
sur le bouton E.
HT-E5200_XU_FRA_0223.indd 30HT-E5200_XU_FRA_0223.indd 30 2012-02-23 오후 2:35:172012-02-23 오후 2:35:17

Français 31 |
04Param
ètres
4 . Si vous sélectionnez Ajouter réseau,
saisissez le nom de votre routeur sans fil pour
vous connecter. Saisissez directement les
nombres en utilisant les touches numériques
de la télécommande. Saisissez les lettres en
sélectionnant une lettre à l'aide des touches
▲▼◄►, puis appuyez sur le bouton E.
Sélectionnez Suivant et appuyez à nouveau
sur le bouton E. Vous pouvez sélectionner
le type de sécurité, puis sélectionner Suivant, et appuyez à nouveau sur le bouton E.
5 . Sur l'écran Sécurité, entrez le code de
sécurité ou la phrase de passe correspondant
à votre réseau. Saisissez directement les
nombres en utilisant les touches numériques
de la télécommande. Saisissez les lettres en
sélectionnant une lettre à l'aide des touches
▲▼◄►, puis appuyez sur le bouton E.
6 . Une fois terminé, sélectionnez Suivant, sur la
droite de l’écran, puis appuyez sur le bouton
E.
7 . L'écran État du réseau apparaît. L'appareil
tente de vérifier la connexion réseau et
échoue.
8 . Sélectionnez Param. IP sur la droite de
l'écran, puis appuyez sur le bouton E.
L'écran Param. IP apparaît.
9 . Sélectionnez le champ Mode IP, puis réglez-
le sur Manuel.10 . Utilisez le pavé numérique de la
télécommande pour saisir les valeurs
Réseau. Utilisez les touches ▲▼◄► de la
télécommande pour vous déplacez d'un
champ d'entrée à l'autre.
| REMARQUE | � Vous pouvez obtenir ces valeurs auprès de votre
fournisseur d'accès Internet. Vous pouvez également
visualiser ces valeurs sur la plupart des ordinateurs
Windows. Pour les instructions, reportez-vous à « Obtenir
les valeurs des paramètres réseau » en page 29.
11 . Une fois terminé, mettez OK en surbrillance
et appuyez sur le bouton E. L'écran État
du réseau apparaît. L'appareil vérifie la
connexion réseau, puis il se connecte au
réseau. Une fois terminé, mettez OK en
surbrillance et appuyez sur le bouton E.
� WPS(PBC)L'une des méthodes la plus facile pour configurer
la connexion au réseau sans fil consiste à utiliser
la fonction WPS(PBC). Si votre routeur sans fil
dispose d'un bouton WPS(PBC), respectez les
étapes suivantes :
1 . Ouvrez l’écran Accueil.
2 . Appuyez sur le bouton BLEU (D) de la
télécommande.
3 . Appuyez sur le bouton WPS(PBC) situé
sur votre routeur dans les deux minutes qui
suivent. L'appareil obtient automatiquement
toutes les valeurs des paramètres réseau
nécessaires et se connecte au réseau.
L'écran État du réseau apparaît. L'appareil se
connecte au réseau une fois que la connexion
réseau a été confirmée.
Wi-Fi DirectLa fonction Wi-Fi Direct vous permet de connecter
les périphériques par Wi-Fi Direct à l'appareil et
entre eux en utilisant un réseau point à point, sans
utiliser un routeur sans fil.
1 . Allumez le périphérique Wi-Fi direct et activez
la fonction Wi-Fi Direct.
2 . Sur l'écran Accueil, sélectionnez Paramètres,
puis appuyez sur le bouton E.
3 . Sélectionnez Réseau et appuyez sur le
bouton E.
4 . Sélectionnez Wi-Fi Direct puis appuyez sur
le bouton E.
Les périphériques Wi-Fi Direct que vous
pouvez connecter s’affichent.
Affichage
Audio
Network
System
Support
Wi-Fi DirectNom du périph. : [HTS]E5200Sélect. le périph. Wi-Fi Direct pour la connexion.
AndroidXXXXXXX Déconnecté
Fermer
Rafraîchir
m Déplacer " Entrer ' Retour
5 . Vous avez trois manières de procéder à la
connexion Wi-Fi.
• Via le périphérique Wi-Fi.
• Via l'appareil en utilisant l'option PBC.
• Via l'appareil en utilisant un code PIN.
Chacune d’elles est indiquée ci-dessous.
HT-E5200_XU_FRA_0223.indd 31HT-E5200_XU_FRA_0223.indd 31 2012-02-23 오후 2:35:192012-02-23 오후 2:35:19

| 32 Français
ParamètresVia le périphérique Wi-Fi.1 . Sur le périphérique Wi-Fi, suivez la procédure
sur le périphérique pour la connexion à un
autre périphérique Wi-Fi Direct. Concernant
les instructions, reportez-vous au manuel
d’utilisation du périphérique.
2 . Lorsque vous aurez terminé la procédure,
vous devriez voir une fenêtre contextuelle sur
l’écran de votre téléviseur indiquant qu’un
périphérique qui prend en charge Wi-Fi
Direct demande à se connecter. Sélectionnez
OK, puis appuyez sur le bouton E pour
accepter.
3 . La fenêtre contextuelle de connexion s’affiche,
suivie de la fenêtre contextuelle Connecté.
Lorsqu’elle se ferme, vous devez voir le
périphérique listé sur l’écran Wi-Fi Direct en
tant que connecté.
Via l'appareil en utilisant l'option PBC1 . Sélectionnez le périphérique Wi-Fi Direct
que vous voulez connecter à cet appareil
puis appuyez sur le bouton E. La fenêtre
contextuelle PBC/PIN s’affiche.
2 . Sélectionnez PBC et appuyez sur le bouton
E. La fenêtre contextuelle PBC s’affiche.
3 . Appuyez sur le bouton PBC du périphérique
Wi-Fi Direct dans les 2 minutes.
4 . La fenêtre contextuelle de connexion s’affiche,
suivie de la fenêtre contextuelle Connecté.
Lorsqu’elle se ferme, vous devez voir le
périphérique listé sur l’écran Wi-Fi Direct en
tant que connecté.
Via l'appareil en utilisant un code PIN1 . Sélectionnez le périphérique Wi-Fi Direct
que vous voulez connecter à cet appareil
puis appuyez sur le bouton E. La fenêtre
contextuelle PBC/PIN s’affiche.
2 . Sélectionnez PIN et appuyez sur le bouton
E. La fenêtre contextuelle PIN s’affiche.
3 . Notez le code PIN de la fenêtre contextuelle,
puis saisissez-le dans le champ approprié
du périphérique Wi-Fi Direct que vous voulez
connecter.
4 . La fenêtre contextuelle de connexion s’affiche,
suivie de la fenêtre contextuelle Connecté.
Lorsqu’elle se ferme, vous devez voir le
périphérique listé sur l’écran Wi-Fi Direct en
tant que connecté.
| REMARQUE | � La connexion au réseau câblée ou sans fil sera
déconnectée lorsque vous utilisez la fonction Wi-Fi Direct.
Soft APLa fonction Soft AP vous permet de connecter
d’autres périphériques Wi-Fi à votre réseau via
l'appareil et leur permet un accès à Internet.
Elle nécessite qu'un code de sécurité soit créé,
vous devez le saisir dans les autres périphériques
Wi-Fi lorsque vous les connectez à l'appareil.
1 . Sur l'écran Accueil, sélectionnez Paramètres,
puis appuyez sur le bouton E.
2 . Sélectionnez Réseau et appuyez sur le
bouton E.
3 . Sélectionnez Soft AP puis appuyez sur le
bouton E.
4 . Sélectionnez Activé ou Arrêt puis appuyez
sur le bouton E.
< Pour régler la clé de sécurité Point d'accès logiciel >
1 . Sur l’écran Point d'accès logiciel,
sélectionnez Code de sécurité, puis appuyez
sur le bouton E. L'écran Code de sécurité
apparaît.
2 . Sur l’écran Code de sécurité, saisissez le
code de sécurité. Saisissez directement les
nombres en utilisant les touches numériques
de la télécommande. Saisissez les lettres en
sélectionnant une lettre à l'aide des touches
▲▼◄►, puis appuyez sur le bouton E.
3 . Une fois terminé, utilisez les touches ▲▼◄►
pour accéder au bouton TERMINÉ de l’écran,
puis appuyez sur le bouton E.
Lorsque vous connectez un périphérique Wi-Fi
via la procédure de connexion sur le périphérique,
vous devez saisir le code de sécurité que vous
avez créé ici dans le champ approprié.
Paramètres AllShareL’écran Réglages du partage liste vos
périphériques AllShare connectés à votre réseau
et leur adresse IP. Dans cet écran, vous pouvez
autoriser un périphérique à accéder à l'appareil,
en interdire l’accès ou le supprimer de la liste
AllShare.
1 . Sur l'écran Accueil, sélectionnez Paramètres,
puis appuyez sur le bouton E.
2 . Sélectionnez Réseau et appuyez sur le
bouton E.
HT-E5200_XU_FRA_0223.indd 32HT-E5200_XU_FRA_0223.indd 32 2012-02-23 오후 2:35:302012-02-23 오후 2:35:30

Français 33 |
04Param
ètres
3 . Sélectionnez Paramètres AllShare puis
appuyez sur le bouton E.
4 . Sélectionnez un périphérique et appuyez
sur le bouton E. La fenêtre contextuelle
Réglages du partage s’affiche.
5 . Sélectionnez Autoriser, Refuser ou
Supprimer dans la liste, puis appuyez sur le
bouton E.
L’écran Réglages du partage affiche uniquement
les périphériques dont vous avez établi les
connexions réseau aux périphériques AllShare.
Pour de plus amples informations concernant les
périphériques en réseau AllShare, reportez-vous
aux pages 35 et 36.
Mise à niveau du logiciel
Le menu Mise à niveau du logiciel vous permet
de mettre le logiciel de l'appareil à niveau pour en
améliorer la performance et obtenir des services
supplémentaires.
• Évitez d’éteindre et de rallumer le produit
manuellement durant le processus de mise à jour.
1 . Sur l'écran Accueil, sélectionnez Paramètres,
puis appuyez sur le bouton E.
2 . Sélectionnez Assistance puis appuyez sur le
bouton E.
3 . Sélectionnez Mise à jour du logiciel, puis
appuyez sur le bouton E.
4 . Sélectionnez l’une des méthodes suivantes :
• En ligne• USB• Via disque• Par téléch.• Mise à niveau en mode veille
5 . Appuyez sur le bouton E.
Les instructions concernant chaque méthode
commencent ci-dessous.
| REMARQUE | � La mise à niveau est terminée lorsque l'appareil s’éteint
et s’allume ensuite par lui-même.
� Samsung Electronics n’accepte aucune responsabilité légale
concernant un dysfonctionnement de l'appareil provoqué par
une connexion Internet instable ou une négligence de la part
de l’utilisateur durant la mise à jour du logiciel.
� Si vous souhaitez annuler la mise à niveau en cours de
téléchargement, appuyez sur le bouton E.
En ligneVotre appareil doit être connecté à Internet pour
exploiter la fonction En ligne.
1 . Sélectionnez En ligne puis appuyez sur le
bouton E. Le message Connexion au serveur
en cours apparaît.
2 . Si un téléchargement est disponible, l'écran
contextuel du téléchargement s'affichera avec
une barre de progression et le téléchargement
démarrera.
3 . Lorsque le téléchargement est terminé, la
fenêtre Demande de mise à niveau apparaît,
proposant trois choix : MàJ maintenant, Mettre à jour ultér., ou Ne pas mettre à jour.
4 . Si vous sélectionnez MàJ maintenant, l'appareil procèdera à la mise à niveau
du logiciel, puis s’éteindra et se rallumera
automatiquement.
5 . Si vous n’effectuez pas de sélection au bout
d’une minute ou sélectionnez Mettre à jour ultér., le nouveau logiciel mis à jour sera stocké
sur l'appareil. Vous pouvez mettre à niveau le
logiciel par la suite en utilisant la fonction Par téléch..
6 . Si vous sélectionnez Ne pas mettre à jour, la
mise à niveau sera annulée par l'appareil.
USB
1 . Connectez-vous sur www.samsung.com.
2 . Cliquez sur SUPPORT en haut à droite de la
page.
3 . Saisissez le numéro de modèle de l'appareil
dans le champ de recherche, puis cliquez sur
Find Product.4 . Cliquez sur Get downloads au centre de la
page sous l’en-tête Téléchargements.
5 . Cliquez sur Firmware au centre de la page.
6 . Cliquez sur l’icône ZIP dans la colonne Fichier
sur le côté droit de la page.
7 . Cliquez sur OK dans la fenêtre contextuelle
qui s’affiche pour télécharger et enregistrer le
micrologiciel sur votre ordinateur.
8 . Dézippez le dossier compressé sur l'ordinateur.
Vous devriez avoir un seul dossier dézippé
portant le même nom que le fichier compressé.
9 . Copiez le dossier sur une clé USB à mémoire
flash.
10 . Vérifiez qu’aucun disque n'est inséré dans
l'appareil, puis insérez la clé USB à mémoire
flash dans le port USB de l'appareil.
HT-E5200_XU_FRA_0223.indd 33HT-E5200_XU_FRA_0223.indd 33 2012-02-23 오후 2:35:322012-02-23 오후 2:35:32

| 34 Français
Paramètres11 . Dans le menu de l'appareil, accédez à
Paramètres > Assistance > Mise à jour du logiciel.
12 . Sélectionnez USB.
| REMARQUE | � Aucun disque ne doit être inséré dans l'appareil lors de la
mise à niveau du logiciel via la prise USB Hôte.
� Une fois la mise à jour du logiciel terminée, consultez les
détails du logiciel dans le menu Mise à jour du logiciel. � N'éteignez pas l'appareil lorsque la Mise à jour du
logiciel est en cours d'exécution. Ceci peut provoquer le
dysfonctionnement de l'appareil.
� Les mises à jour logicielles à l’aide de la prise USB
hôte doivent être effectuées uniquement à l’aide d’une
mémoire flash USB.
Via disque
1 . Connectez-vous sur www.samsung.com.
2 . Cliquez sur SUPPORT en haut à droite de la
page.
3 . Saisissez le numéro de modèle de l'appareil
dans le champ de recherche, puis cliquez sur
Find Product.4 . Cliquez sur Get downloads au centre de la
page sous l’en-tête Téléchargements.
5 . Cliquez sur Firmware au centre de la page.
6 . Cliquez sur l’icône ZIP dans la colonne Fichier
sur le côté droit de la page.
7 . Cliquez sur OK dans la fenêtre contextuelle
qui s’affiche pour télécharger et enregistrer le
micrologiciel sur votre ordinateur.
8 . Dézippez le dossier compressé sur l'ordinateur.
Vous devez avoir un fichier .RUF unique.
9 . Gravez le fichier RUF sur un disque, de
préférence un CD inscriptible ou un DVD
inscriptible.
10 . Finalisez le disque avant de le retirer de votre
ordinateur.
11 . Insérez le disque dans l'appareil.
12 . Dans le menu de l'appareil, accédez à
Paramètres > Assistance > Mise à jour du logiciel.
13 . Sélectionnez Via disque.
| REMARQUE | � Lorsque la mise à niveau du système est terminée,
vérifiez les détails du logiciel dans le menu Mise à jour du logiciel.
� N'éteignez pas l'appareil lorsque la Mise à jour du
logiciel est en cours d'exécution. Ceci peut provoquer le
dysfonctionnement de l'appareil.
Par téléch.L’option Par téléchargement vous permet de
mettre à niveau en utilisant un fichier que l'appareil
a téléchargé auparavant mais vous aviez décidé
de ne pas l’installer immédiatement.
1 . Lorsque le logiciel de mise à niveau a été
téléchargé, le numéro de version du logiciel
s'affiche à droite de l'option Par téléch..
2 . Sélectionnez Par téléch. puis appuyez sur le
bouton E.
3 . L'appareil affiche un message vous demandant
si vous souhaitez procéder à la mise à niveau.
Sélectionnez Oui. L'appareil démarre la mise à
niveau.
4 . Une fois la mise à niveau terminée, l'appareil
s’éteint automatiquement puis se rallume.
| REMARQUE | � Lorsque la mise à niveau du système est terminée,
vérifiez les détails du logiciel dans le menu Mise à jour du logiciel.
� N'éteignez pas l'appareil lorsque la Mise à jour du
logiciel est en cours d'exécution. Ceci peut provoquer le
dysfonctionnement de l'appareil.
Mise à niveau en mode veilleVous pouvez régler la fonction Mise à niveau en
mode Veille de sorte que l'appareil télécharge de
nouveaux logiciels de mise à niveau lorsqu'il est en
mode Veille.
En mode Veille, l'appareil est éteint mais sa
connexion à Internet reste activée. Ceci permet
à l'appareil de télécharger automatiquement des
logiciels de mise à niveau lorsque l’appareil n’est pas
utilisé.
1 . Appuyez sur les touches ▲▼ pour sélectionner
Mise à niveau en mode veille puis appuyez
sur le bouton E.
2 . Sélectionnez Activé ou Arrêt.Si vous sélectionnez Activé, l'appareil
procédera automatiquement au téléchargement
du nouveau logiciel de mise à niveau lorsqu’il
sera en mode Veille et hors tension. Avant de
télécharger le nouveau logiciel de mise à niveau,
l'appareil vous demandera si vous souhaitez
l’installer à la mise sous tension de l’appareil.
| REMARQUE | � Pour utiliser la fonction Mise à niveau en mode Veille,
l'appareil doit être connecté à l’Internet.
� Si cette fonction n'apparaît pas, vous pouvez mettre le
logiciel à jour sur la version la plus récente et l'utiliser.
HT-E5200_XU_FRA_0223.indd 34HT-E5200_XU_FRA_0223.indd 34 2012-02-23 오후 2:35:342012-02-23 오후 2:35:34
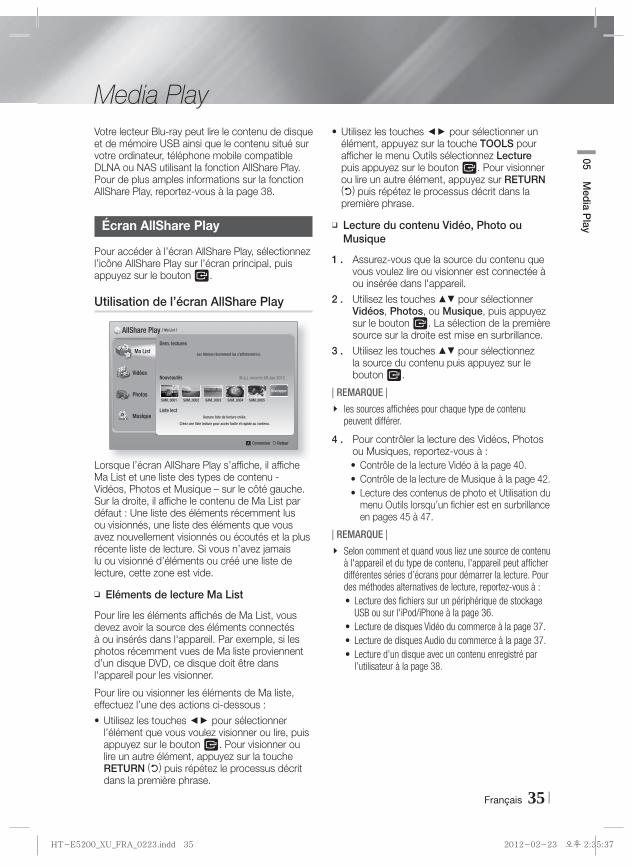
Français 35 |
05M
edia Play
Votre lecteur Blu-ray peut lire le contenu de disque
et de mémoire USB ainsi que le contenu situé sur
votre ordinateur, téléphone mobile compatible
DLNA ou NAS utilisant la fonction AllShare Play.
Pour de plus amples informations sur la fonction
AllShare Play, reportez-vous à la page 38.
Écran AllShare Play
Pour accéder à l’écran AllShare Play, sélectionnez
l’icône AllShare Play sur l’écran principal, puis
appuyez sur le bouton E.
Utilisation de l’écran AllShare Play
Ma List
Vidéos
Photos
Musique
a Connexion ' Retour
Dern. lectures
Nouveautés M.à.j. récente 09.Jan.2012
Liste lect Aucune liste de lecture créée.
Créez une liste lecture pour accès facile et rapide au contenu.
Les fichiers récemment lus s'afficheront ici.
Développer
SAM_0001 SAM_0002 SAM_0003 SAM_0004 SAM_0005
AllShare Play / Ma List /
Lorsque l’écran AllShare Play s’affiche, il affiche
Ma List et une liste des types de contenu -
Vidéos, Photos et Musique – sur le côté gauche.
Sur la droite, il affiche le contenu de Ma List par
défaut : Une liste des éléments récemment lus
ou visionnés, une liste des éléments que vous
avez nouvellement visionnés ou écoutés et la plus
récente liste de lecture. Si vous n’avez jamais
lu ou visionné d’éléments ou créé une liste de
lecture, cette zone est vide.
� Eléments de lecture Ma List
Pour lire les éléments affichés de Ma List, vous
devez avoir la source des éléments connectés
à ou insérés dans l'appareil. Par exemple, si les
photos récemment vues de Ma liste proviennent
d’un disque DVD, ce disque doit être dans
l'appareil pour les visionner.
Pour lire ou visionner les éléments de Ma liste,
effectuez l’une des actions ci-dessous :
• Utilisez les touches ◄► pour sélectionner
l’élément que vous voulez visionner ou lire, puis
appuyez sur le bouton E. Pour visionner ou
lire un autre élément, appuyez sur la touche
RETURN (') puis répétez le processus décrit
dans la première phrase.
• Utilisez les touches ◄► pour sélectionner un
élément, appuyez sur la touche TOOLS pour
afficher le menu Outils sélectionnez Lecture
puis appuyez sur le bouton E. Pour visionner
ou lire un autre élément, appuyez sur RETURN
(') puis répétez le processus décrit dans la
première phrase.
� Lecture du contenu Vidéo, Photo ou Musique
1 . Assurez-vous que la source du contenu que
vous voulez lire ou visionner est connectée à
ou insérée dans l'appareil.
2 . Utilisez les touches ▲▼ pour sélectionner
Vidéos, Photos, ou Musique, puis appuyez
sur le bouton E. La sélection de la première
source sur la droite est mise en surbrillance.
3 . Utilisez les touches ▲▼ pour sélectionnez
la source du contenu puis appuyez sur le
bouton E.
| REMARQUE | � les sources affichées pour chaque type de contenu
peuvent différer.
4 . Pour contrôler la lecture des Vidéos, Photos
ou Musiques, reportez-vous à :
• Contrôle de la lecture Vidéo à la page 40.
• Contrôle de la lecture de Musique à la page 42.
• Lecture des contenus de photo et Utilisation du
menu Outils lorsqu’un fichier est en surbrillance
en pages 45 à 47.
| REMARQUE | � Selon comment et quand vous liez une source de contenu
à l'appareil et du type de contenu, l'appareil peut afficher
différentes séries d’écrans pour démarrer la lecture. Pour
des méthodes alternatives de lecture, reportez-vous à :
• Lecture des fichiers sur un périphérique de stockage
USB ou sur l'iPod/iPhone à la page 36.
• Lecture de disques Vidéo du commerce à la page 37.
• Lecture de disques Audio du commerce à la page 37.
• Lecture d’un disque avec un contenu enregistré par
l’utilisateur à la page 38.
Media Play
HT-E5200_XU_FRA_0223.indd 35HT-E5200_XU_FRA_0223.indd 35 2012-02-23 오후 2:35:372012-02-23 오후 2:35:37

| 36 Français
Media PlayLecture des fichiers sur un périphérique
de stockage USB ou sur l'iPod/iPhone
Vous pouvez lire les fichiers multimédia situés sur
un périphérique USB connecté.
1 . L’appareil étant hors tension, connectez-
lui un périphérique de stockage USB ou un
iPod/iPhone.
2 . Mettez l'appareil sous tension. Lorsque
l’écran principal s’affiche, sélectionnez
AllShare Play > Vidéos, Photos ou
Musique > Périph. connecté, puis appuyez
sur le bouton E.
Smart Hub Fonction Paramètres
� Retirer péri. USB d WPS(PBC)
Lisez des vidéos, des photos ou de la musique à partir du disque ou des périphériques connectés.
AllShare Play
OU1-1. Avec l’appareil sous tension, connectez un
périphérique de stockage USB ou un iPod/
iPhone.
2-1. Lorsque l’écran ci-dessous s’affiche, utilisez
les touches ▲▼ pour sélectionner le genre
de contenu que vous voulez visionner ou lire
puis appuyez sur le bouton E.
Smart Hub Fonction Paramètres
� Retirer péri. USB d WPS(PBC)
Lisez des vidéos, des photos ou de la musique à partir du disque ou des périphériques connectés.
AllShare Play
Smart Hub Fonction Paramètres
� Retirer péri. USB d WPS(PBC)
Lisez des vidéos, des photos ou de la musique à partir du disque ou AllShare Play
b Fonction
déos, des photos ou de la musique à partides périphériques connectés.
AllShare Play
b Fonction P
rdAllShare Play
Nv. périph. conn.USB DISK
" Entrer ' Retour
Vidéos
Photos
Musique
| REMARQUE | � Même si l'appareil affiche tous les dossiers disponibles,
il affiche uniquement les fichiers du type de contenu que
vous avez sélectionné à l’Étape 2 ou 2-1. Par exemple
si vous avez sélectionné Musique, vous ne pourrez voir
que les fichiers musicaux. Vous pouvez changer cette
sélection en utilisant AllShare Play.
3 . Le genre de contenu que vous avez
sélectionné sur le périphérique connecté
s'affiche. En fonction de la manière dont les
contenus sont disposés, vous verrez soit les
dossiers, les fichiers individuels ou les deux.
4 . En utilisant les touches ▲▼◄► de votre
télécommande, sélectionnez les contenus
désirés. Pour ouvrir un dossier, sélectionnez-
le, puis appuyez sur le bouton E.
Pour lire un fichier, sélectionnez-le, puis
appuyez sur le bouton E.
5 . Appuyez sur RETURN (') pour quitter un
dossier ou revenir à l’écran principal.
| ATTENTION | � Vous pouvez uniquement lire une vidéo lorsque vous utilisez
le dock iPod.
| REMARQUE | � Pour éviter un endommagement possible de la mémoire
USB, vous devez retirer le périphérique de stockage USB
en toute sécurité à l’aide de la fonction « Retirer péri. USB ». Appuyez sur le bouton HOME pour accéder au
menu Accueil, sélectionnez le bouton JAUNE (C), puis
appuyez sur le bouton E.
� Le menu Photos ne prend en charge ni iPads ni iPhones.
� Seul l'écran de lecture apparaît sur le téléviseur. Affichez
d'autres écrans iPod sur le lecteur iPod.
� Si l’iPod connecté ne prend pas en charge la lecture vidéo, le
message « Lecture de fichiers vidéo non prise en charge sur ce modèle d'iPod. » apparaîtra lors de la sélection du
menu Video (Vidéo).
Modèles d'iPod/iPhone pouvant
être utilisés avec cet appareil
iPod touch 3ème/2ème/1ère générationiPod classique / iPod avec vidéoiPod avec connecteur de dockiPod avec molette cliquableiPod nano 5ème/4ème/3ème/2ème générationiPhone 4S / iPhone 4iPhone 3GS / iPhone 3G / iPhone
HT-E5200_XU_FRA_0223.indd 36HT-E5200_XU_FRA_0223.indd 36 2012-02-23 오후 2:35:482012-02-23 오후 2:35:48

Français 37 |
05M
edia Play
L’écran Fonction
Sur l’écran Fonction, vous pouvez sélectionner la source d’entrée audio et/ou vidéo à visionner ou écouter.
| REMARQUE | � Vous pouvez aussi changer les sources en appuyant
sur la touche Fonction située en haut à droite de la télécommande.
Pour accéder à l’écran Fonction, sélectionnez l’icône Fonction sur l’écran principal puis appuyez sur le bouton E.
Options de l’écran FonctionPour sélectionner, mettez une option en surbrillance à l’aide des touches ▲▼ puis appuyez
sur le bouton E.
NumériqueSélectionnez cette option pour écouter la source audio numérique connectée à Entrée audio numérique.
AUXSélectionnez cette option pour écouter la source audio analogique connectée à Entrée Audio.
Remote iPodSélectionnez l'écoute de la musique ou la lecture d'une vidéo à partir de l'iPod connecté sur la prise d'iPod.
HDMI IN 1Sélectionnez cette option pour visionner la vidéo depuis le périphérique connecté à ENTREE HDMI 1.
HDMI IN 2Sélectionnez cette option pour visionner la vidéo depuis le périphérique connecté à ENTREE HDMI 2.
Tuner Sélectionnez cette option pour écouter la radio FM.
Bluetooth Sélectionnez cette option pour écouter la musique du périphérique Bluetooth.
Lecture des disques vidéo du commerce
1 . Placez un disque dans le tiroir disque en veillant à ce que l'étiquette du disque soit orientée vers le haut puis fermez le tiroir disque. La lecture commence automatiquement.
Si la lecture ne 6 pas automatiquement, appuyez sur la touche Début de votre télécommande ou sélectionnez l’option AllShare Play, puis appuyez sur le bouton E. Reportez-vous à « Lecture du contenu Vidéo, Photo ou Musique » en page 35.
Lecture des disques audio du
commerce
1 . Placez un disque audio pré-enregistré du
commerce dans le tiroir disque en veillant à
ce que l'étiquette du disque soit orientée vers
le haut puis fermez le tiroir disque. L’écran
Musique Lecture AllShare s’affiche listant
les pistes de lecture. La lecture démarre
automatiquement à la première piste.
AllShare Play / Musique / CD audio 1 / 17
00:00 / 03:59
b� Autre page / Outils ' Retour
TRACK 001 ٭
► TRACK 001 03:59
TRACK 002 04:34
TRACK 003 04:24
TRACK 004 04:01
TRACK 005 04:26
TRACK 006 05:07
TRACK 007 04:47
TRACK 008 03:59
TRACK 009 04:34
TRACK 010 04:02
TRACK 002 04:34TRACK 002 04:34► TRACK 001 03:59
2 . Pour lire une piste particulière, utilisez les
touches ▲▼ de la télécommande pour
sélectionner la piste, puis appuyez sur le bouton
E.
� Commandes de l’écran Musique
Mise en pause d’une piste.
Lecture d’une piste.
Répétition d'une piste ou de toutes
les pistes.
Lecture des pistes dans un ordre
aléatoire.
Affichage de l’égaliseur.
Ajustement manuel de l’égaliseur.
( Uniquement lorsque le mode
Égaliseur est activé)
| REMARQUE | � Les commandes de l’écran Musique sont accessibles
uniquement lorsqu’une piste est en lecture.
� Toutes les commandes ne s’affichent pas simultanément.
� Pour de plus amples informations concernant la lecture
de musique, reportez-vous à « Contrôle de la lecture de
Musique » en page 42.
HT-E5200_XU_FRA_0223.indd 37HT-E5200_XU_FRA_0223.indd 37 2012-02-23 오후 2:36:002012-02-23 오후 2:36:00

| 38 Français
Media PlayLecture d’un disque dont le contenu
est enregistré par l’utilisateur
Vous pouvez lire les fichiers multimédia que vous
avez enregistrés sur des disques DVD ou CD.
1 . Placez un disque enregistré par l'utilisateur
dans le tiroir disque en veillant à ce que
l'étiquette du disque soit orientée vers le
haut puis fermez le tiroir disque. La fenêtre
contextuelle du périphérique connecté
s’affiche.
2 . Utilisez les touches ▲▼ pour sélectionner le
type de contenu que vous voulez visionner
ou lire - Vidéos, Photos ou Musique - puis
appuyez sur le bouton E.
| REMARQUE | � Même si l'appareil affiche les dossiers pour tous les
types de contenus, il affiche uniquement les fichiers du
type de contenu que vous avez sélectionné à l’Étape 2.
Par exemple, si vous avez sélectionné Musique, vous
ne pourrez voir que les fichiers musicaux. Vous pouvez
changer cette sélection en utilisant AllShare Play.
3 . Utilisez les touches ▲▼◄► pour
sélectionnez le dossier contenant le type de
contenu que vous avez sélectionné à l’Étape
2, puis appuyez sur le bouton E.
4 . Si vous sélectionnez Musique, l’écran Musique
Lecture AllShare s’affiche listant les fichiers
musicaux du disque. Utilisez les touches ▲▼
pour sélectionner le fichier que vous voulez lire,
puis appuyez sur le bouton E.
5 . Si vous sélectionnez Photos, l’écran Photos
Lecture AllShare s’affiche listant les fichiers de
photos du disque. Utilisez les touches ▲▼◄►
pour sélectionner le fichier que vous voulez
visualiser, puis appuyez sur le bouton E.
6 . Si vous sélectionnez Vidéos, l’écran Vidéos
Lecture AllShare s’affiche listant les fichiers
vidéo du disque. Utilisez les touches ▲▼◄►
pour sélectionner le fichier que vous voulez
regarder, puis appuyez sur le bouton E.
| REMARQUE | � Pour les dossiers Musique et Vidéo, vous pouvez
également appuyer sur la touche TOOLS de votre
télécommande puis sélectionner Lire dossier pour lire ou
visualiser automatiquement tous les fichiers du dossier.
Sélectionnez d’abord le dossier avant d’appuyer sur la
touche TOOLS.
� Pour de plus amples informations concernant la lecture
de musique, reportez-vous à « Contrôle de la lecture de
Musique » en page 42.
� Pour de plus amples informations concernant la lecture
des contenus photo, reportez-vous à Lecture des
contenus photo et Utilisation du menu Outils lorsqu'un
fichier est en surbrillance en pages 45 à 47.
� Pour de plus amples informations concernant la lecture
de contenus vidéo, reportez-vous à Contrôle de la lecture
Vidéo en page 40.
Utilisation de la fonction Réseau
AllShare
AllShare vous permet de lire des vidéos, regarder
des photos ou écouter de la musique situées sur
votre ordinateur ou un périphérique compatible
DLNA via l'appareil en utilisant une connexion à un
réseau sans fil.
Pour télécharger le logiciel AllSharePour utiliser AllShare avec votre ordinateur ou
un périphérique DLNA, vous devez installer le
logiciel AllShare sur votre ordinateur. Vous pouvez
télécharger le logiciel pour ordinateur et obtenir
des instructions détaillées sur l'utilisation de la
fonction AllShare depuis le site Web Samsung.
com.
1 . Allez sur www.samsung.com.
2 . Cliquez sur Assistance en haut de la page.
3 . Sur la page Assistance, saisissez le numéro
de modèle de votre appareil dans le champ
Numéro de modèle.
4 . Sur la page qui s’affiche, cliquez sur Obtenir
les téléchargements sur le côté gauche
sous Téléchargements. Le Centre de
téléchargement s’affiche.
5 . Sur la page Centre de téléchargement,
cliquez sur l’onglet Logiciel.
6 . Sur l’onglet logiciel, cliquez sur l’icône Fichier
du côté droit de la ligne AllShare.
7 . Dans la fenêtre contextuelle qui s’affiche,
cliquez sur Enregistrer fichier.
8 . Cherchez le fichier d’installation AllShare sur
votre disque et double-cliquez sur ce fichier.
9 . Dans la fenêtre contextuelle qui s’affiche,
cliquez sur Exécuter puis suivez les directives
qui s’affichent sur votre écran.
Téléchargez le manuel d’installation/instruction
AllShare à partir du même onglet Logiciel
en cliquant sur le symbole du fichier PDF
correspondant dans la colonne Fichier sur la
droite. Le fichier, au format PDF, sera téléchargé et
ouvert. Vous pouvez lire et/ou enregistrer le fichier.
HT-E5200_XU_FRA_0223.indd 38HT-E5200_XU_FRA_0223.indd 38 2012-02-23 오후 2:36:102012-02-23 오후 2:36:10

Français 39 |
05M
edia Play
Lecture du contenu situé sur votre ordinateur ou un périphérique DLNA via l'appareil
5V 500mA
Connexion AllShare
OrdinateurAppareil
Lecture des fichiers de l’ordinateur
1 . Connectez l'appareil, votre ordinateur, et/ou
votre téléphone mobile compatible DLNA au
même réseau sans fil.
2 . Suivez les directives du manuel d’installation/
instruction du logiciel AllShare pour installer
les périphériques et les fichiers à lire ou à
visualiser.
3 . Sélectionnez AllShare Play dans l’écran
d’accueil de l'appareil et appuyez sur le
bouton E. L'écran AllShare Play apparaît.
4 . Sélectionnez le périphérique compatible
DLNA connecté ou votre ordinateur, puis
appuyez sur le bouton E. Un écran listant
les fichiers disponibles s'affiche.
5 . Sélectionnez le fichier que vous voulez lire ou
visualiser, puis appuyez sur le bouton E.
Commander la lecture du contenu de votre ordinateur avec votre Smartphone
5V 500mA
Connexion AllShare
Commande des fichiers de l’ordinateur sur l'appareil
Ordinateur
Smartphone
Appareil
Lecture des fichiers de l’ordinateur
( Disponible uniquement avec les téléphones
Samsung qui prennent en charge la fonctionnalité
AllShare)
1 . Connectez l'appareil, votre ordinateur et votre
téléphone mobile compatible DLNA au même
réseau sans fil.
2 . Suivez les directives du manuel d’installation/
instruction du logiciel AllShare pour installer
les périphériques et les fichiers à lire ou à
visualiser.
3 . Sur votre ordinateur, en utilisant le logiciel
AllShare, confirmez la connexion de votre
téléphone.
4 . Sur le téléphone, sélectionnez le fichier
que vous voulez visualiser ou lire, puis
sélectionnez l'appareil Blu-ray en tant que
périphérique de lecture.
5 . Sur le téléphone, démarrez la lecture.
HT-E5200_XU_FRA_0223.indd 39HT-E5200_XU_FRA_0223.indd 39 2012-02-23 오후 2:36:122012-02-23 오후 2:36:12

| 40 Français
Media Play
Répétition de la lecture
Répétition d'un titre ou d'un chapitre
1 . Durant la lecture, appuyez sur la
touche REPEAT de la télécommande.
2 . Appuyez sur les touches ▲▼ pour
sélectionner Chapitre, Tous ou Titre,
puis appuyez sur le bouton E.
| REMARQUE |
� L’écran peut ne pas afficher immédiatement
le chapitre ou le titre. Continuez à appuyer sur
les touches ▲▼ jusqu’à ce que votre choix
soit à l’intérieur du champ bleu.
3 . Pour reprendre la lecture normale, appuyez
une nouvelle fois sur la touche REPEAT,
puis sur les touches ▲▼ pour sélectionner
Arrêt, puis appuyez sur le bouton E.
Répétition d'une section
1 . Durant la lecture, appuyez sur la
touche REPEAT de la télécommande.
2 . Appuyez sur les touches ▲▼ pour
sélectionner Répétition A-B.
| REMARQUE |
� L’écran peut ne pas afficher immédiatement
Répéter A-B. Continuez à appuyer sur les
touches ▲▼ jusqu’à ce que Répéter A-B soit
à l’intérieur du champ bleu.
3 . Appuyez sur le bouton E à
l'emplacement sur lequel vous
souhaitez démarrer la répétition (A).
4 . Appuyez sur le bouton E à
l'emplacement sur lequel vous
souhaitez arrêter la répétition (B).
5 . Pour reprendre le cours normal de la lecture,
appuyez à nouveau sur le bouton REPEAT.
6 . Appuyez sur le bouton E.
| REMARQUE |
� Vous devez régler le point (B) dans les 5
secondes de la durée de lecture après le point (A).
Utilisation du menu du disque, du menu des titres, du menu contextuel et de la liste des titres
DISC MENU Au cours de la lecture, appuyez sur cette
touche pour afficher le menu Disque.
TITLE MENU
Au cours de la lecture, appuyez sur cette
touche pour afficher le menu Titre.
• Si le disque possède une liste de
lecture, appuyez sur le bouton VERT (B) pour y accéder.
POPUP MENUAu cours de la lecture, appuyez sur cette
touche pour afficher le menu Pop-up
(Contextuel).
DISC MENU ou TITLE MENU
Au cours de la lecture, appuyez sur cette
touche pour afficher la liste des titres.
Touches liées à la lectureL'appareil ne lit pas de données audio en mode
Recherche, Lecture au ralenti ou Lecture pas à pas.
6 Permet de démarrer la lecture.
5 Permet d'arrêter la lecture.
7 Permet d’interrompre la lecture.
Lecture rapide
Pendant la lecture, appuyez sur le bouton 3 ou �. Chaque fois que vous
appuyez sur le bouton 3 ou � la
vitesse de lecture change.
Lecture au ralenti
En mode Pause, appuyez sur le bouton �.
Chaque fois que vous appuyez sur le
bouton �, la vitesse de lecture change.
Lecture pas à pas
En mode Pause, appuyez sur le bouton 7. Chaque fois que vous appuyez sur le
bouton 7, une nouvelle image apparaît.
Saut de lecture
Pendant la lecture, appuyez sur le bouton 1 ou 2. Chaque fois que vous
appuyez sur le bouton 1 ou 2, le
disque se déplace sur le chapitre ou le
fichier précédent ou suivant.
Contrôle de la lecture Vidéo
Vous pouvez contrôler la lecture des fichiers vidéo situés dans les disques Blu-ray, DVD et CD et sur les
périphériques de stockage USB. En fonction du disque, certaines fonctions décrites dans ce manuel
peuvent ne pas être disponibles.
Touches de la télécommande servant à la lecture vidéoDISC MENU TITLE MENU
MUTE
0 POPUP
FULL SCREEN REPEATHOME
HT-E5200_XU_FRA_0223.indd 40HT-E5200_XU_FRA_0223.indd 40 2012-02-23 오후 2:36:182012-02-23 오후 2:36:18

Français 41 |
05M
edia Play
Utilisation du menu OUTILSDurant la lecture, appuyez sur le bouton TOOLS.
Recherche titreRecher. temps
Sélectionnez cette option pour accéder au
titre désiré si le disque comporte plusieurs
titres, à une scène désirée ou, à l’aide de
Time Search (Rech. temps), à un point
spécifique dans un film ou une vidéo.
Avec l’option Rech. temps, vous désignez
un point spécifique en saisissant une
coordonnée de temps au format 00:00:00
(heures, minutes, secondes) à l’aide de la
télécommande.
Mode Répétition
Sélectionnez cette option pour répéter un
titre, un chapitre spécifique (uniquement pour
les disques BD/DVD) ou la section repérée.
Fonctionne de la même façon que la touche
REPEAT. Reportez-vous à la page 40.
Plein écranSélectionnez cette option pour régler la
taille plein écran désirée. Vous pouvez
sélectionner Original, Mode1 (plus grand)
et Mode2 (le plus grand).
Mode Image
Sélectionnez cette option pour régler le
mode image.
- Dynamique : Choisissez ce réglage pour
accentuer la Netteté de l'image.
- Standard : Choisissez ce réglage pour la
plupart des applications d'affichage.
- Cinéma : Ceci est le réglage le mieux
adapté au visionnage de films.
- Utilisateur : Ce réglage vous permet
de régler respectivement la fonction de
netteté et de réduction de bruit.
| REMARQUE |
� Lorsque vous sélectionnez Utilisateur,
l’écran Paramètres utilisateur s’affiche.
Sélectionnez une option, appuyez sur
E, utilisez les touches ◄► pour
effectuer un ajustement, puis appuyez
sur E. Appuyez sur la touche RETURN
(') pour revenir au menu OUTILS.
� Ce menu n'apparaît pas lors de
l'utilisation de la fonction BD Wise.
Mode égaliseur Sélectionnez cette option pour utiliser
l’égaliseur.
Paramètres Egaliseur
Sélectionnez cette option pour régler
l’égaliseur.
| REMARQUE |
� Ne s’affiche que lorsque le mode
Égaliseur est activé.
Menu qui s’affiche uniquement lors de la lecture d’un disque BD/DVD
Lire depuis le début
Sélectionnez cette option pour
visionner le film depuis le début.
Rech. chapitreSélectionnez cette option pour accéder
à un chapitre que vous désirez
regarder.
Audio
Sélectionnez cette option pour régler la
langue de bande son souhaitée.
- Vous pouvez également activer cette
fonction en appuyant sur le bouton
AUDIO de la télécommande.
Sous-titres
Sélectionnez cette option pour régler la
langue des sous-titres souhaitée.
- Vous pouvez également activer cette
fonction en appuyant sur le bouton
SUBTITLE de la télécommande.
Angle
Utilisé pour regarder une scène sous
un autre angle.
L’option Angle affiche le nombre
d'angles disponibles (1/1, 1/2, 1/3,
etc.).
BONUSVIEW Vidéo / BONUSVIEW Audio
Sélectionnez cette option pour régler
l’option bonusview désirée.
Menu qui s’affiche uniquement lors de lalecture d’un fichier
Liste des vidéos
Permet d'accéder à l'écran de la liste
des vidéos
Rech. scène Permet de rechercher le fichier vidéo
en fonction de la scène.
Information Permet de vérifier les informations
liées au fichier vidéo.
| REMARQUE |
� Le menu Outils peut varier en fonction du disque ou du
périphérique de stockage. Toutes les options peuvent ne
pas être affichées.
HT-E5200_XU_FRA_0223.indd 41HT-E5200_XU_FRA_0223.indd 41 2012-02-23 오후 2:36:232012-02-23 오후 2:36:23

| 42 Français
Media PlayContrôle de la lecture de Musique
Vous pouvez contrôler la lecture du contenu
musical situé sur un DVD, CD ou un périphérique
de stockage USB.
Touches de la télécommande servant à l'écoute de musique
DISC MENU TITLE MENU
MUTE
1 2 3
4 5 6
7 8
0
9POPUP
RDS DISPLAY
PTY- PTY SEARCH PTY+
TA
6
1
3
2
4
5
1
Lecture rapide (CD audio (CD-DA) uniquement)Pendant la lecture, appuyez sur le bouton 3 ou �.
Chaque fois que vous appuyez sur le bouton 3 ou
�, la vitesse de lecture change.
2 Touche 7 : Mise en pause d’une piste.
3 Touche 6 : permet de lire la plage sélectionnée.
4 Touche 5 : Permet d'arrêter la lecture d'une piste.
5Saut : Pendant la lecture, appuyez sur le bouton
1 ou 2 pour accéder à la musique précédente
ou suivante de la liste.
6
Touches NUMÉRIQUES : Durant l'exécution
de la liste d'écoute, appuyez sur le numéro de
piste souhaitée. La piste sélectionnée est alors
reproduite.
Répétition des pistes d’un CD AudioVous pouvez régler l'appareil pour répéter les
pistes d’un CD audio (CD-DA/MP3).
1 . Pendant la lecture, utilisez la touche ► pour
sélectionner dans le coin à droite en bas
de l’écran, puis appuyez sur le bouton E.
2 . Utilisez les touches ▲▼ pour sélectionner
le mode de répétition que vous souhaitez -
Arrêt, 1 musique, ou Tous – puis appuyez
sur le bouton E.
Lecture aléatoire des pistes d’un CD AudioVous pouvez régler l'appareil pour lire les pistes
d’un CD audio (CD-DA/MP3) de façon aléatoire.
1 . Pendant la lecture, utilisez la touche ► pour
sélectionner dans le coin à droite en bas de l’écran, puis appuyez sur le bouton E.
2 . Utilisez les touches ▲▼ pour activer ou
désactiver (Activé ou Arrêt) le Mode aléatoire
et appuyez sur le bouton E.
Création d’une liste de lecture
AllShare Play / Musique / CD audio 1 / 17
00:00 / 03:59
b� Autre page / Outils ' Retour
TRACK 001 ٭
► TRACK 001 03:59
TRACK 002 04:34
TRACK 003 04:24
TRACK 004 04:01
TRACK 005 04:26
TRACK 006 05:07
TRACK 007 04:47
TRACK 008 03:59
TRACK 009 04:34
TRACK 010 04:02
TRACK 002 04:34TRACK 002 04 34► TRACK 001 03:59
1 . Lorsque l’écran Lecture est affiché, appuyez
sur la touche TOOLS. Le menu Outils
s’affiche.
2 . Appuyez sur les touches ▲▼ pour
sélectionner Lire sélection, puis sur le
bouton E. L’écran de sélection de lecture
s'affiche.
3 . Utilisez les touches ▲▼ pour sélectionner
une piste, puis appuyez sur le bouton E.
Une coche s’affiche à la gauche de la piste.
4 . Répétez l’étape 3 pour sélectionner et cocher
des pistes supplémentaires.
5 . Pour retirer une piste de la liste, accéder à la
piste et appuyez à nouveau sur le bouton E.
La coche de la piste est retirée.
6 . Une fois terminé, appuyez sur la touche ►
pour sélectionner Lecture, puis appuyez
sur le bouton E. L’écran de lecture de
la musique s’affiche en listant uniquement
les pistes que vous avez cochées. Les
pistes sélectionnées sont alors lues
automatiquement.
| REMARQUE |
� Vous pouvez créer une liste de lecture comportant jusqu'à
99 pistes extraites de différents CD audio (CD-DA).
� Si vous avez créé une liste de lecture, la sélection de
lecture est remplacée par Modifier la liste de lecture sur
le menu Outils.
HT-E5200_XU_FRA_0223.indd 42HT-E5200_XU_FRA_0223.indd 42 2012-02-23 오후 2:36:252012-02-23 오후 2:36:25

Français 43 |
05M
edia Play
� Sur l’écran de sélection de lecture, vous pouvez aussi
choisir Sélect. tout, Désélectionner tout, et Annuler.• Utilisez Sélect. tout pour sélectionner toutes les pistes.
Ceci annule vos sélections de piste individuelles.
Lorsque vous appuyez sur la touche RETURN (')
de votre télécommande ou que vous sélectionnez
LECTURE puis appuyez sur le bouton E, toutes les
pistes s’affichent sur l’écran de lecture de musique et
l'appareil commence à lire toutes les pistes à partir de
la piste 001.
• Utilisez l’option Désélectionner tout pour désélectionner
toutes les pistes à la fois. Puis, sélectionnez les pistes
individuelles ou utilisez Sélect. tout pour sélectionner
toutes les pistes et appuyez sur la touche RETURN (')
de votre télécommande ou sélectionnez LECTURE et
appuyez sur le bouton E. Si vous n’utilisez pas Sélect.
tout et ne sélectionnez pas des pistes individuelles, la
liste de lecture ne change pas.
• Annuler annule tout changement effectués sur l’écran
de la sélection de lecture. Lorsque vous revenez à l’écran
de la liste de lecture, elle sera inchangée.
ExtractionVous pouvez extraire de la musique d’un CD ou
d’un périphérique USB inséré dans la prise USB.
1 . Insérez un périphérique USB dans la prise
USB située à l'avant de l'appareil, puis
appuyez sur le bouton RETURN (') de votre
télécommande.
2 . Insérez le disque que vous souhaitez extraire
dans l'appareil et fermez le tiroir disque.
3 . Lorsque l’écran Lecture est affiché, appuyez
sur TOOLS. Le menu Outils s’affiche.
4 . Utilisez les touches ▲▼ pour sélectionner
Extract., puis appuyez sur le bouton E.
L’écran Extraire s’affiche.
5 . Utilisez les touches ▲▼ pour sélectionner
une piste, puis appuyez sur le bouton E.
Une coche s’affiche à la gauche de la piste.
6 . Répétez l’étape 5 pour sélectionner et cocher
des pistes supplémentaires.
7 . Pour retirer une piste de la liste, accéder à la
piste et appuyez à nouveau sur le bouton E.
La coche de la piste est retirée.
8 . Une fois terminé, appuyez sur la touche ►
pour sélectionner Extract., puis appuyez sur
le bouton E. La fenêtre contextuelle Extraire
s’affiche.
9 . Appuyez sur la touche E pour lancer
le processus d'extraction. La fenêtre
contextuelle Barre de défilement de
l'extraction apparaît.
10 . Lorsque l’extraction est terminée, le message
« Extraction terminée. » apparaît. Appuyez
sur le bouton E.
11 . Appuyez sur la touche RETURN (') pour
revenir à l’écran de la liste de lecture.
| REMARQUE |
� Lorsque l’extraction est terminée, un dossier appelé MP
est créé dans le périphérique USB.
Utilisation du système BluetoothVous pouvez utiliser un périphérique Bluetooth
pour écouter de la musique avec un son stéréo de
haute qualité, tout cela sans fil !
Qu’est-ce que Bluetooth ?Le système Bluetooth est une technologie qui
permet de connecter facilement entre eux des
périphériques compatibles Bluetooth à l'aide
d'une liaison sans fil courte distance.
• Un périphérique Bluetooth peut générer du bruit
ou créer des dysfonctionnements en fonction
des conditions d'utilisation.
- Si une partie du corps de l'appareil est en contact
avec le système de réception/transmission du
périphérique Bluetooth ou du Home cinéma.
- S'il est soumis à des variations électriques
provenant d'obstructions provoquées par un mur,
un coin ou des cloisonnements de bureaux.
- Présence d'interférences électriques causées par
des appareils fonctionnant sur la même bande de
fréquence, notamment équipements médicaux,
fours à micro-ondes et LAN sans fil.
• Associer l'Ensemble Home cinéma et le périphérique
Bluetooth tout en maintenant une faible distance.
• Plus la distance est grande entre l'Ensemble Home
cinéma et le périphérique Bluetooth, plus la qualité
de la transmission se dégrade.
Si la distance excède la plage opérationnelle
Bluetooth, la connexion est perdue.
• Dans les zones où la réception est faible, la connexion
Bluetooth peut ne pas fonctionner correctement.
• La portée de réception maximale de l'Ensemble
Home cinéma est de 10 m dans toutes les
directions, si aucun obstacle ne se trouve sur le
chemin parcouru par le signal. La connexion sera
automatiquement coupée si la distance se situe
en dehors de cette plage. Même dans cette plage,
la qualité du son peut être détériorée par des
obstacles tels que des murs ou des portes.
• Ce périphérique sans fil peut provoquer des
interférences électriques durant son fonctionnement.
HT-E5200_XU_FRA_0223.indd 43HT-E5200_XU_FRA_0223.indd 43 2012-02-23 오후 2:36:362012-02-23 오후 2:36:36

| 44 Français
Media PlayPour connecter le Home cinéma à un périphérique Bluetooth
5V 500mA
Connecter
Périphérique Bluetooth
Vérifiez que le périphérique Bluetooth prend en charge
la fonction écouteurs stéréo compatible Bluetooth.
1 . Appuyez sur la touche FUNCTION de la
télécommande de l'appareil pour afficher le
message BT.
• Le message WAIT reste affiché pendant
2 secondes, puis le message READY
apparaît sur la façade du Home cinéma.
2 . Sélectionnez le menu Bluetooth de l’appareil
Bluetooth que vous désirez connecter.
(Reportez-vous au manuel d’utilisation du
périphérique Bluetooth.)
3 . Sélectionnez le menu des écouteurs stéréo
sur le périphérique Bluetooth.
• La liste des appareils détectés s’affiche.
4 . Sélectionnez « SamsungHTS-XXXXXX »
dans la liste.
• Lorsque l'Ensemble Home cinéma est
connecté au périphérique Bluetooth, le nom
de ce périphérique Bluetooth connecté suivi
de Home cinéma s’affiche en façade.
5 . Lisez de la musique sur le périphérique
connecté.
• Vous pouvez maintenant écouter la musique
enregistrée sur le périphérique Bluetooth
connecté depuis votre Home cinéma.
| REMARQUE |
� Le Home cinéma prend en charge uniquement les données
d’ordinateur monocarte de qualité moyenne (jusqu’à 237
kbps@48 kHz) mais il ne prend pas en charge les données
d’ordinateur monocarte de haute qualité (328 kbps@44,1 kHz).
� La disposition AVRCP est prise en charge et fonctionne
différemment en fonction de la spécification de l'autre
périphérique.
� Effectuez uniquement la connexion à un périphérique
Bluetooth qui prend en charge le profil A2DP.
� Un seul périphérique Bluetooth peut être associé à la fois.
� La recherche ou la connexion peut ne pas être effectuée
correctement par l'appareil dans les cas suivants :
- S’il y a une forte émission d’onde électrique autour de
l'Ensemble Home cinéma.
- Si plusieurs périphériques Bluetooth sont associés
simultanément à l'appareil.
- Si le périphérique Bluetooth est éteint, mal positionné
ou s'il connaît des dysfonctionnements.
- Notez que des appareils tels que des fours à micro-
ondes, des adaptateurs LAN sans fil, des ampoules à
plasma et des fours à gaz utilisent la même plage de
fréquences que le périphérique Bluetooth, ce qui peut
provoquer des interférences électriques.
Pour déconnecter le périphérique Bluetooth du Home cinémaVous pouvez déconnecter le Home cinéma d’un
périphérique Bluetooth. (Reportez-vous au manuel
d’utilisation du périphérique Bluetooth).
• Le Home cinéma est alors déconnecté.
• Lorsque le Home cinéma est déconnecté
du périphérique Bluetooth, le message «
DISCONNECTED» s’affiche en façade.
Pour déconnecter le Home cinéma du périphérique BluetoothAppuyez sur le bouton ( ) en façade du Home cinéma pour passer du mode BT à un autre mode
ou éteindre le Home cinéma.
• Sauf s’il est déconnecté par la conversion de
fonction, le périphérique Bluetooth connecté
attend un certain temps la réponse du Home
cinéma avant de terminer la connexion.
(Le temps de déconnexion peut varier en
fonction du périphérique Bluetooth.)
• Le périphérique actuellement connecté est
déconnecté.
| REMARQUE |
� En mode Bluetooth, la connexion sera perdue si
la distance entre l'Ensemble Home cinéma et le
périphérique Bluetooth dépasse 10 m. Si la distance est
ramenée dans la portée conseillée ou si vous réinitialisez
le périphérique Bluetooth, vous devez les reconnecter.
� Si le périphérique Bluetooth est replacé dans la portée
conseillée, vous pouvez redémarrer pour restaurer
l'association avec ce périphérique.
HT-E5200_XU_FRA_0223.indd 44HT-E5200_XU_FRA_0223.indd 44 2012-02-23 오후 2:36:382012-02-23 오후 2:36:38

Français 45 |
05M
edia Play
� En mode de fonction BT, l’économiseur d’écran
fonctionne si le périphérique reste en l’état Prêt pendant
5 minutes. Puis, pour connecter le périphérique BT,
éteignez l’économiseur d’écran et connectez-le. Pour
éteindre l’économiseur d’écran, appuyez sur l’une des
touches de la télécommande. (Par exemple, la touche du
volume, etc.)
Visionnage des photos
Vous pouvez visionner les photos contenues
dans un DVD, une mémoire USB, un périphérique
mobile ou un ordinateur.
Utilisation du menu OutilsDurant la lecture, appuyez sur le bouton TOOLS.
Liste des photos
Sélectionnez cette option pour accéder à
la liste des photos du support actuel.
Lancer le diaporama
Sélectionnez cette option pour démarrer
le diaporama.
Vit. diaporama
Sélectionnez cette option pour régler la
vitesse du diaporama.
Effet du diaporama
Sélectionnez cette option pour régler les
effets spéciaux du diaporama.
Musique de fond activ.
Sélectionnez cette option pour écouter
de la musique tout en visionnant un
diaporama.
Paramètres de musique de fond
Sélectionnez cette option pour définir le
réglage de la musique de fond.
Mode Image
Sélectionnez cette option pour régler les
paramètres des images.
- Dynamique : Cette option permet
d'accroître la netteté.
- Standard : Choisissez cette option
pour la plupart des applications de
visualisation.
- Cinéma : Ceci est le réglage le mieux
adapté au visionnage de films.
- Utilisateur : Ce réglage vous permet
de régler respectivement la fonction
de netteté et de réduction de bruit.
| REMARQUE |
� Ce menu n'apparaît pas lors de
l'utilisation de la fonction BD Wise.
ZoomSélectionnez cette option pour agrandir
l'image actuellement sélectionnée.
(Agrandissement jusqu'à 4 fois la taille
réelle)
Pivoter
Sélectionnez cette option pour faire
tourner l'image. (Ceci entraînera la
rotation de l'image dans le sens des
aiguilles d'une montre ou dans le sens
inverse.)
Information Permet d'afficher les informations
concernant l’image.
| REMARQUE |
� Le menu Outils peut varier en fonction du disque ou du
périphérique de stockage. Toutes les options peuvent ne
pas être affichées.
� Pour activer la fonction de musique de fond, le fichier
photo et le fichier musical doivent être contenus sur le
même support de stockage.
Cependant, la qualité sonore peut être affectée par le
débit binaire du fichier MP3, la taille de la photo et la
méthode d'encodage utilisée.
� Vous ne pouvez pas agrandir les sous-titres ou les
graphiques PG (Accord parental) pour les afficher en
mode plein écran.
Utilisation du menu Outils
lorsqu’un fichier est en surbrillance
Lorsqu’un fichier est en surbrillance, appuyez sur
la touche TOOLS.
Afficher
Sélectionnez cette option pour accéder
au tri des options : Artist, Genre, Monthly,
Latest Date, etc. (Artiste, Genre, Mensuel,
Date + récente, etc.). Le tri des options
qui s’affichent dépend du type de
stockage et du support.
Aperçu dossierS’affiche sur l’écran de la fonction Vue.
Sélectionnez cette option pour afficher
les dossiers contenus sur le périphérique
de stockage.
TitreS’affiche sur l’écran de la fonction Vue.
Sélectionnez cette option pour trier par
titre tous les fichiers photo ou vidéo du
périphérique de stockage.
ArtisteS’affiche sur l’écran de la fonction Vue.
Sélectionnez l’option Artist pour trier par
artiste puis afficher toutes les pistes de
musique du périphérique de stockage.
HT-E5200_XU_FRA_0223.indd 45HT-E5200_XU_FRA_0223.indd 45 2012-02-23 오후 2:36:412012-02-23 오후 2:36:41

| 46 Français
Media Play
AlbumS’affiche sur l’écran de la fonction Vue.
Sélectionnez l’option Album pour trier par
album puis afficher toutes les pistes de
musique du périphérique de stockage.
GenreS’affiche sur l’écran de la fonction Vue.
Sélectionnez l’option Genre pour trier par
genre puis afficher toutes les pistes de
musique du périphérique de stockage.
Date + récente
S’affiche sur l’écran de la fonction
Vue. Sélectionnez cette option pour
trier de la date la plus récente à la plus
ancienne les fichiers photo ou vidéo d’un
périphérique de stockage.
Date + ancienne
S’affiche sur l’écran de la fonction Vue.
Sélectionnez cette option pour trier
de la date la plus ancienne à la plus
récente les fichiers photo ou vidéo d’un
périphérique de stockage.
Mensuel
S’affiche sur l’écran de la fonction Vue.
Sélectionnez cette option pour trier par
mois de création tous les fichiers photos
ou vidéo du périphérique de stockage.
Lire sélection
L’option Lire sélection vous permet de
sélectionner un fichier musical, vidéo et
photo à lire.
Elle fonctionne essentiellement de la
même façon pour tous les supports.
L’exemple ci-dessous concerne les photos.
1. Sur l’écran Affichage vignette,
mettez une photo en surbrillance et
appuyez sur la touche TOOLS de la
télécommande.
2. Dans le menu Outils sélectionnez
Lire sélection, puis appuyez sur le
bouton E.
3. Sur l’écran de sélection, utilisez les
touches ▲▼◄► pour sélectionner
une photo que vous souhaitez
visualiser, puis appuyez sur le bouton
E. Une coche s’affiche à la
gauche de l’image.
4. Répétez l’Étape 3 pour chaque photo
que vous souhaitez visualiser.
5. Pour désélectionner une photo,
mettez-la en surbrillance, puis
appuyez sur le bouton E.
6. Une fois terminé, utilisez les touches
◄► pour sélectionner Lire, puis
appuyez sur le bouton E. Un
diaporama contenant les photos que
vous avez sélectionnées démarre.
7. Pour interrompre le diaporama,
appuyez une fois sur le bouton E.
Pour redémarrer le diaporama,
appuyez sur le bouton E à
nouveau.
8. Pour arrêter le diaporama, appuyez
sur la touche RETURN (').
| REMARQUE |
� Lorsque le diaporama commence, vous
pouvez le contrôler en appuyant sur la
touche TOOLS et en affichant le menu
Diaporama. Reportez-vous à « Utilisation
du menu Outils » en page 45.
Envoyer
Sélectionnez l’option Envoyer pour
télétransmettre des fichiers à Picasa,
Facebook, Cloud Storage, N Drive ou
Family Story.
Pour utiliser Envoyer, vous devez ouvrir
un compte avec le site en ligne, puis
vous connecter en utilisant la fonction Se
connecter.
1. Utilisez les touches ▲▼◄► pour
sélectionner un fichier, puis appuyez
sur le bouton E.
2. Répétez pour chaque piste ou fichier
que vous voulez télétransmettre.
| REMARQUE |
� Vous pouvez aussi accéder à
Sélectionner tout sur la droite, puis
appuyez sur le bouton E pour
sélectionner toutes les pistes ou tous
les fichiers.
3. Sélectionnez Envoyer sur le côté
droit, puis appuyez sur le bouton
E.
4. Utilisez les touches ▲▼ pour
sélectionner le site en ligne auquel
vous souhaitez télétransmettre les
fichiers ou les pistes, puis appuyez
sur le bouton E.
HT-E5200_XU_FRA_0223.indd 46HT-E5200_XU_FRA_0223.indd 46 2012-02-23 오후 2:36:422012-02-23 오후 2:36:42

Français 47 |
05M
edia Play
Connex/Déconnex
La fonction Connexion/Déconnexion vous
permet de vous connecter au compte
Samsung en ligne.
Aj. Liste lect.
Sélectionnez cette option pour créer une
liste de lecture ou ajouter des fichiers ou
des pistes à la liste de lecture.
1. Sélectionnez Aj. Liste lect., puis
appuyez sur le bouton E.
2. Utilisez les touches ▲▼◄► pour
mettre une piste ou un fichier en
surbrillance, puis appuyez sur le
bouton E.
3. Répétez cette action pour chaque
piste ou fichier que vous souhaitez
ajouter.
4. Sélectionnez Ajouter sur la droite,
puis appuyez sur le bouton E.
5. Sur l’écran qui s’affiche, effectuez
l’une des actions suivantes :
• Sélectionnez la Liste de lecture à
laquelle vous souhaitez ajouter les
pistes ou les fichiers et appuyez sur le
bouton E.
• Sélectionnez Créer nouv, puis
appuyez sur le bouton E. Sur
la fenêtre contextuelle du clavier
qui s’affiche, créez un nom pour la
nouvelle liste de lecture. Saisissez
les numéros à l’aide des chiffres
de la télécommande. Saisissez
les lettres à l’aide des touches
▲▼◄► pour déplacer le curseur
et appuyez sur le bouton E. Une
fois terminé, accédez à TERMINÉ
au bas de l’écran et appuyez sur le
bouton E.
Supprimer (liste lecture)
En fonction de l’écran que vous
regardez, sélectionnez Supprimer
pour effacer un fichier d’un support
effaçable (tel qu’un périphérique USB)
ou pour supprimer une liste de lecture.
Modif liste lec
Sélectionnez Modif liste lec pour retirer
des fichiers ou des pistes d’une liste
de lecture existante. Le périphérique de
stockage contenant la liste de lecture
doit être inséré dans ou connecté à
l'appareil.
1. Utilisez les touches ▲▼◄►
pour sélectionner un fichier, puis
appuyez sur le bouton E.
2. Répétez pour chaque piste ou
fichier que vous voulez retirer.
| REMARQUE |
� Vous pouvez aussi accéder à Sélect.
tout sur la droite, puis appuyez sur
le bouton E pour sélectionner
toutes les pistes ou tous les fichiers.
3. Sélectionnez Retirer sur le côté
droit, puis appuyez sur le bouton
E.
Lire groupe
Lorsque vous avez trié par artiste,
genre, album, titre, date + récente,
date + ancienne ou mensuel,
sélectionnez un groupe qui est le
résultat de ce tri (par exemple, toutes
les images prises au mois d’août),
et sélectionnez Play Current Group
(Lire groupe) pour lire ou visionner les
fichiers uniquement de ce groupe.
Liste de lectureSélectionnez cette option pour accéder à
la section de la liste de lecture de l’écran
principal AllShare.
Encodage
Encodage – qui change par langue ou
par zone géographique – modifie la façon
dont l'appareil trie, classe et présente les
fichiers ou les pistes, affiche les dates,
etc. Sélectionnez l'option Encodage pour
changer l’encodage pour correspondre à
votre langue ou votre zone géographique.
Information Fichier support de l'affichage des
informations et relatives au contenu.
| REMARQUE |
� Le menu Outils peut varier en fonction du disque ou du
périphérique de stockage. Toutes les options peuvent ne
pas être affichées.
HT-E5200_XU_FRA_0223.indd 47HT-E5200_XU_FRA_0223.indd 47 2012-02-23 오후 2:36:442012-02-23 오후 2:36:44

| 48 Français
Media PlayEcouter la radio
Utilisation des touches de la télécommande1 . Appuyez sur la touche FUNCTION pour
sélectionner FM.
2 . Syntonisez la station désirée.
• Syntonisation préréglée 1 : Appuyez sur la
touche 5 pour sélectionner PRESET puis
appuyez sur la touche TUNING/CH (,.)
pour sélectionner la station préréglée.
- Avant de syntoniser des stations
préréglées, vous devez ajouter les
stations préréglées à la mémoire de
l'appareil.
• Syntonisation manuelle : Appuyez sur la
touche 5 pour sélectionner MANUAL puis
appuyez sur la touche TUNING/CH (,.)
pour syntoniser une fréquence inférieure ou
supérieure.
• Syntonisation automatique : Appuyez sur la
touche 5 pour sélectionner MANUAL puis
appuyez et maintenez la touche TUNING/CH (,.) pour rechercher la fréquence
automatiquement.
Réglage Mono/StéréoAppuyez sur la touche MO/ST.
• À chaque appui sur la touche, le son commute
entre STEREO et MONO.
• Dans une région où la réception est faible,
sélectionnez MONO pour une diffusion claire et
sans interférence.
Préréglage des stationsExemple : Préréglage de FM 89.10 dans la
mémoire.
1 . Appuyez sur la touche FUNCTION pour
sélectionner FM.
2 . Appuyez sur la touche TUNING/CH (,.)
pour sélectionner <89.10>.
3 . Appuyez sur la touche TUNER MEMORY.
• NUMBER clignote sur l’écran.
4 . Appuyez à nouveau sur la touche TUNER MEMORY.
• Appuyez sur la touche TUNER MEMORY
avant que NUMBER disparaisse lui-même
de l’écran.
• Après avoir appuyé sur la touche TUNER MEMORY, NUMBER disparaît de l’écran et
la station est stockée en mémoire.
5 . Pour prérégler une autre station, répétez les
étapes 2 à 4.
• Pour syntoniser sur une station préréglée,
appuyez sur la touche TUNING/CH (,.).
A propos de la radiodiffusion RDS
Utilisez la fonction RDS (Radio Data System = Système de radiocommunication de données) pour recevoir des stations FM.
Grâce à la fonction RDS, des stations FM peuvent
envoyer un signal supplémentaire avec leurs
signaux de programmes réguliers.
Les stations envoient p. ex. leurs noms de
station ainsi que des informations sur le type de
programme diffusé (sport, musique, etc.).
Lorsque vous réglez une station FM qui fournit le
service RDS, le témoin RDS s'affiche sur l'écran.
Description de la fonction RDS• PTY (Type de programme) : permet d'afficher le
type de programme en cours de diffusion.
• PS NAME (Nom du service de programme)
: permet d'indiquer le nom de la station de
radiodiffusion. Il est composé de 8 caractères.
• RT (Texte de radio) : permet de décoder le
texte diffusé par une station (s'il y en a). Il est
composé de 64 caractères au maximum.
• CT (Heure) : permet de décoder l'heure réelle
de la fréquence FM. Certaines stations peuvent
ne pas transmettre les informations PTY, RT ou
CT. Il n'est donc pas toujours possible de les
afficher.
• TA (Annonce de trafic) : la mention « TA ON/
OFF » (ANNONCE DE TRAFIC ACTIVÉE/
DÉSACTIVÉE) montre l’état de progression de
l’annonce de trafic.
| REMARQUE |
� La fonction RDS peut ne pas fonctionner correctement si
la station réglée ne transmet pas correctement le signal
RDS ou si le signal est faible.
HT-E5200_XU_FRA_0223.indd 48HT-E5200_XU_FRA_0223.indd 48 2012-02-23 오후 2:36:462012-02-23 오후 2:36:46

Français 49 |
05M
edia Play
Pour afficher les signaux RDSVous pouvez visualiser les signaux RDS envoyés
par la station sur l'écran.
Appuyez sur le bouton RDS DISPLAY lorsque
vous écoutez une station FM.
• Chaque fois que vous appuyez sur ce bouton,
l'affichage des informations suivantes est
modifié comme suit : PS NAME � RT� CT �
Fréquence
PS (Service de programme)
Lors de la recherche, <PS NAME>
apparaît, puis les noms de stations
s'affichent. <NO PS> apparaît si aucun
signal n'est envoyé.
RT(Texte de radio)
Lors de la recherche, <RT> apparaît,
puis les messages texte envoyés par la
station s'affichent. <NO RT> apparaît
si aucun signal n'est envoyé.
Fréquence Fréquence de la station (sans service
RDS)
A propos des caractères affichés sur l'écranLorsque l'écran affiche des signaux PS ou RT, les
caractères suivants sont utilisés.
• L'écran d'affichage ne peut pas faire la
différence entre des lettres majuscules et
minuscules et n'utilise que des majuscules.
• L'écran ne peut pas afficher des lettres
accentuées. Par exemple, <A,> peut signifier
des lettres <A’s> accentuées comme <À, Â, Ä,
Á, Å et Ã.>
Indication PTY (Type de programme) et
fonction PTY-SEARCH (RECHERCHER
TYPE DE PROGRAMME)L'un des avantages du service RDS consiste en
la possibilité de localiser un type de programme
particulier à partir des canaux préréglés en
spécifiant les codes PTY.
Pour rechercher un programme à l'aid e des codes PTY
� Avant de démarrer !• La fonction de recherche PTY ne peut être
appliquée qu'aux stations préréglées.
• Pour arrêter la recherche à tout moment au
cours du processus, appuyez sur le bouton 5
pendant que la recherche est en cours.
• Il y a une limite de temps pour réaliser les étapes
suivantes. Si le réglage est annulé avant que
vous ayez terminé, recommencez à nouveau
par l'étape 1.
• Lorsque vous appuyez sur les boutons de la
télécommande principale, assurez-vous d'avoir
sélectionné la station FM à l'aide de cette
télécommande principale.
221 3
4 5 6
RDS DISPLAY
PTY- PTY SEARCH PTY+
TA
1 . Appuyez sur le bouton PTY SEARCH lorsque
que vous écoutez une station FM.
2 . Appuyez sur le bouton PTY- ou PTY+ jusqu'à
ce que le code PTY souhaité s'affiche sur
l'écran.
• L'écran affiche les codes PTY décrits à
droite.
3 . Appuyez à nouveau sur le bouton PTY SEARCH lorsque le code PTY sélectionné
à l'étape précédente est toujours affiché sur
l'écran.
• L'unité centrale recherche les 15 stations
FM préréglées, s'arrête lorsqu'elle trouve la
station sélectionnée et règle cette station.
HT-E5200_XU_FRA_0223.indd 49HT-E5200_XU_FRA_0223.indd 49 2012-02-23 오후 2:36:492012-02-23 오후 2:36:49

| 50 Français
Media PlayUtilisation des touches de contrôle
d’effets spéciaux de la télécommande
Fonction EFFET SONORESOUND
EFFECT
Vous permet de sélectionner un mode qui optimise le
son.
1. Appuyez sur la touche SOUND EFFECT.
2. Appuyez sur les touches ▲▼ pour sélectionner le
mode souhaité. DSP ou Mode Son.
3. Appuyez sur les touches ◄► pour sélectionner l’effet
sonore souhaité.
� DSP
MP3 Enhancer Power Bass Arrêt• MP3 Enhancer : cette fonction permet d’optimiser
votre expérience sonore (ex. : musique mp3) Vous
pouvez effectuer une mise à l’échelle du son MP3 (24
kHz, 8 bits) vers un son de CD (44,1 kHz, 16 bits).
• Power Bass : cette fonction augmente le niveau du
volume des basses et procure des effets de basse plus
puissants.
• Arrêt : sélectionnez cette option pour une écoute
normale.
� Mode SonVirtual Sound Musique Actualités Théâtre Cinéma Sports Jeux Arrêt
Son 3D
Vous pouvez profiter d’un son plus naturel et
ambiophonique clair avec des tonalités enrichies par
ajustement de la profondeur du son à l’aide des options
de niveau.
Arrêt Elevé Moyen Faible| REMARQUE |
� Non disponible en mode FM.
Lecture d’une vidéo 2D en mode 3D.
Vous pouvez profiter d’une vidéo ordinaire 2D en mode
3D.
| REMARQUE |
� Si vous accédez au menu Home (Accueil) ou au
menu Smart Hub Home en mode 3D, il commutera
automatiquement en 2D.
vTunervTuner
vTuner est la fonction d’écoute d’une radio. Si vous
appuyez sur la touche vTuner, vous pouvez accéder à
l’application vTuner.
Vous pouvez utiliser la fonction vTuner après le
téléchargement de l'application vTuner depuis Samsung
Apps.
HT-E5200_XU_FRA_0223.indd 50HT-E5200_XU_FRA_0223.indd 50 2012-02-23 오후 2:36:532012-02-23 오후 2:36:53

Français 51 |
06Services Réseau
Vous pouvez profiter de différents services réseau
tels que Smart Hub ou BD-LIVE en connectant
l'appareil au réseau.
Pour utiliser les services réseau, vous devez
d’abord :
1 . Connectez l'appareil au réseau.
(Voir page 20)
2 . Configurez les paramètres réseau.
(Reportez-vous aux pages 29 à 32)
Utilisation de Smart Hub
Smart Hub vous permet de télécharger des films,
des vidéos et de la musique depuis l'Internet,
et d'accéder à diverses applications gratuites
ou payantes que vous pouvez ensuite visionner
sur votre téléviseur. Ces applications incluent les
actualités, les prévisions météorologiques, les
cours de valeurs mobilières, les cartes, les photos
et les jeux.
Concernant les instructions qui expliquent
l’utilisation de Smart Hub, suivez ces étapes :
1 . Allez sur www.samsung.com.
2 . Cliquez sur Assistance en haut de la page.
3 . Sur la page Assistance, saisissez le numéro
de modèle de votre appareil dans le champ
Numéro de modèle.
4 . Sur la page qui s’affiche, cliquez sur Obtenir
les téléchargements sur le côté gauche
sous Téléchargements. Le Centre de
téléchargement s’affiche.
5 . Sur la page Centre de téléchargement,
cliquez sur l’onglet Manuels.
6 . Sur l’onglet Manuels, cliquez sur l’icône de
fichier à la droite de Manuel utilisateur de
Smart Hub. Le manuel se télécharge.
| REMARQUE |
� L’emplacement Web du manuel Smart Hub est
susceptible de changer sans notification préalable.
Smart Hub d'un coup d'œil
xxxxxxxx
Contents 1
xxxxxxxx
Contents 4
xxxxxxxx
Contents 3
xxxxxxxx
Contents 2
Samsung Apps Your Video Family Story Fitness Kids
a Login b Papier peint / Outils ' Retour
Search
5 6 70
9
1 2 4
8
3
1Your Video : Présente à votre intention des vidéos
qui vous sont recommandées en fonction de vos
goûts.
2Search : Fournit une recherche intégrée de
fournisseurs vidéos et de périphériques AllShare
connectés.
3Recommandé : Affiche les contenus recommandés
gérés par Samsung.
4Informations commerciales : Affiche le Guide
Smart Hub, une présentation de l'appareil et des
introductions aux nouvelles applications.
5
Family Story : Une façon aisée d’accéder au
contenu familial.
• Procure l’accès aux photos de famille, messages
et événements à tout moment et partout.
6
Fitness : Passerelle pour le service unifié d'auto-
prise en charge.
• Présente des vidéos de fitness de partenaires au
contenu divers avec retour d'informations sur les
calories brûlées après chaque exercice.
7
Kids : Le service Enfants procure une voie aisée
et sécurisée leur permettant de profiter de leur
contenu favori.
• Il procure une grande variété de contenus
divertissants et sécurisés pour les enfants.
8
Aide à la navigation : Affiche les touches de
la télécommande que vous pouvez utiliser pour
naviguer dans Smart Hub.
• ROUGE (A) : pour se connecter à Smart Hub.
• VERT (B) : pour afficher le fond d’écran.
• Outils : pour afficher la fenêtre des paramètres.
• Retour : pour revenir au menu précédent.
Services Réseau
HT-E5200_XU_FRA_0223.indd 51HT-E5200_XU_FRA_0223.indd 51 2012-02-23 오후 2:36:582012-02-23 오후 2:36:58

| 52 Français
Services Réseau
9
Mes applications : affiche votre galerie personnelle
d'applications au sein de laquelle vous pouvez
ajouter, modifier ou supprimer des éléments.
0
Samsung Apps : ouvrez Samsung Apps pour
télécharger des services d'applications payants ou
gratuits.
Utilisation de Navigateur WebVous pouvez accéder à Internet en utilisant
l’application Navigateur Web qui est installée par
défaut sur l’écran Smart Hub.
1 . Sélectionnez Smart Hub sur l’écran d’accueil
et appuyez sur le bouton E.
2 . Sélectionnez l’application Navigateur Web
dans Smart Hub et appuyez sur le bouton
E.
| REMARQUE |
� Lorsque vous lancez Navigateur Web avec l'appareil
connecté par HDMI à un téléviseur compatible BD Wise
– et que BD Wise est activé – le navigateur est maximisé
pour remplir l’écran et la résolution du téléviseur est
automatiquement réglée à l’optimum.
� Navigateur Web n’est pas compatible avec les
applications Java.
� Si vous tentez de télécharger un fichier, et que le fichier
ne peut pas être enregistré, un message d’erreur
s’affichera.
� La lecture des vidéos Flash n’est pas prise en charge.
� Le E-commerce, pour l’achat de produits en ligne, n’est
pas pris en charge.
� ActiveX n’est pas pris en charge.
Navigateur Web d’un coup d’œil
Google Search I’m Feeling Lucky
b Control Panel � Link Browsing / Tools ' Exit
http://www.google.com/
1
2
1
Panneau de commande : affiche les diverses
fonctions de Navigateur Web.
• : permet de passer à la page précédente.
• : permet de passer à la dernière page avant
de revenir en arrière.
• : actualise la page actuelle pour la rafraîchir à
l’écran.
• : permet d'accéder à l’écran d’accueil de
Navigateur Web.
• : vous permet de zoomer plus ou moins de
divers pourcentages sur l’écran.
• : vous permet de repérer par un signet des
pages spécifiques pour y accéder facilement.
• : vous permet de visualiser l’historique des
pages visitées par date, nom ou fréquence.
• http://www.google.com/ : vous permet de saisir
manuellement l’adresse d’une page ou de la
sélectionner à partir de la liste des pages visitées
pour l’atteindre.
• : vous permet de basculer facilement
entre de multiples fenêtres ouvertes de
Navigateur Web.
• : vous permet de rechercher des informations
en saisissant des mots.
• : vous permet de partager le site actuel avec
votre groupe familial en envoyant un message.
• : vous permet de configurer tous les
paramètres d’utilisation deNavigateur Web.
HT-E5200_XU_FRA_0223.indd 52HT-E5200_XU_FRA_0223.indd 52 2012-02-23 오후 2:37:032012-02-23 오후 2:37:03

Français 53 |
06Services Réseau
2
Aide à la navigation : Affiche les touches de
la télécommande que vous pouvez utiliser pour
naviguer dans Navigateur Web.
• VERT (B) : permet d'afficher le panneau de
commande.
• JAUNE (C) : Recherche d'un lien.
• Tools : permet d'afficher la fenêtre Outils.
• Exit : permet de revenir au menu précédent.
BD-LIVE™
Une fois que l'appareil est connecté au réseau,
vous pouvez profiter de différents contenus de
services liés aux films en utilisant des disques
compatibles BD-LIVE.
1 . Insérez une clé USB dans la prise USB
située à l’avant de l'appareil, puis contrôlez
sa mémoire restante. Le périphérique de
mémoire doit avoir au moins 1 Go d'espace
libre pour satisfaire aux exigences des
services BD-LIVE.
2 . Sélectionnez Paramètres sur l'écran Accueil,
puis appuyez sur le bouton E.
3 . Sélectionnez Réseau et appuyez sur le
bouton E.
4 . Sélectionnez Paramètres BD-Live, puis
appuyez sur le bouton E.
5 . Sélectionnez Gestion données BD, puis
appuyez sur le bouton E.
6 . Sélectionnez Sélection périph., puis
appuyez sur le bouton E.
7 . Sélectionnez USB, puis appuyez sur le
bouton E.
8 . Insérez un disque Blu-ray prenant en charge
la technologie BD-LIVE.
9 . Sélectionnez un élément dans la liste des
contenus de service BD-LIVE fournis par le
fabricant de disque.
| REMARQUE |
� L’utilisation du service BD-LIVE ainsi que des contenus
fournis peuvent varier selon le fabricant du disque.
HT-E5200_XU_FRA_0223.indd 53HT-E5200_XU_FRA_0223.indd 53 2012-02-23 오후 2:37:072012-02-23 오후 2:37:07

| 54 Français
AnnexesInformations complémentaires
Remarque
Branchements
SORTIE HDMI
• Selon votre téléviseur, il est possible que certaines résolutions de sortie HDMI ne fonctionnent pas.
• Vous devez disposer d'une connexion HDMI pour visionner les vidéos en 3D.
• Un câble HDMI trop long peut provoquer du bruit à l'écran. Si tel est le cas, réglez Couleur intense HDMI sur Arrêt dans le menu.
Paramètres
Paramètres 3D
• Sur certains disques 3D, pour arrêter un film en cours de lecture 3D, appuyez une seule fois sur le
bouton 5 Le film s’arrête et l’option 3D est désactivée. Pour changer la sélection de l’option 3D
lorsque vous regardez un film 3D, appuyez une fois sur le bouton 5. Le menu Blu-ray apparaît.
Appuyez à nouveau sur le bouton 5, puis sélectionnez Paramètres 3D dans le menu Blu-ray.
• Selon le contenu et le positionnement de l'image sur l'écran de votre téléviseur, vous pouvez visualiser
apparaître des barres verticales noires à droite ou à gauche de l'écran ou sur les deux côtés à la fois.
Format écran
• Selon le type de disque utilisé, certains formats d'image peuvent être indisponibles.
• Si vous sélectionnez un format d’image différent de celui de votre téléviseur, il est possible que l’image
affichée soit déformée.
• Si vous sélectionnez l'option 16:9 Original, le téléviseur pourra afficher l'image dans un encadrement
horizontal au format 4:3 Pillarbox (bandes noires sur les côtés de l’image).
BD Wise (produits Samsung uniquement)
• Lorsque la fonction BD Wise est activée, le paramètre Résolution est automatiquement spécifié sur BD
Wise et BD Wise apparaît dans le menu Résolution.
• Si l'appareil est connecté à un appareil ne prenant pas en charge BD Wise, vous ne pourrez pas
utiliser la fonction BD Wise.
• Pour garantir le bon fonctionnement de BD Wise, réglez l’option BD Wise de l'appareil et du téléviseur
sur Activé.
Sortie numérique
• Assurez-vous de sélectionner la sortie numérique appropriée, sinon vous n'entendrez aucun son ou
un son très fort.
• Si le périphérique HDMI (récepteur AV, téléviseur) n'est pas compatible avec les formats compressés
(Dolby digital, DTS), le signal audio sera émis en sortie au format PCM.
• Les DVD n’ont pas habituellement de fonctionnalité audio BONUSVIEW ni d’effet sonore de navigation.
• Certains disques Blu-ray ne sont pas dotés de fonctionnalité audio BONUSVIEW ni d’effet sonore de
navigation.
• La configuration de la sortie numérique n’affecte pas la sortie audio analogique (G/D) ou HDMI de
votre téléviseur.
Elle affecte les sorties audio optique et HDMI lorsque l'appareil est connecté à un récepteur AV.
• Si vous lisez des pistes de son audio MPEG, le signal audio sera émis en sortie au format PCM
indépendamment de vos sélections de sortie numérique (PCM ou Bitstream).
HT-E5200_XU_FRA_0223.indd 54HT-E5200_XU_FRA_0223.indd 54 2012-02-23 오후 2:37:092012-02-23 오후 2:37:09

Français 55 |
07Annexes
Paramètres
Connexion Internet BD-Live
• Il est possible que la connexion Internet soit limitée lorsque vous utilisez des contenus BD-LIVE.
Anynet+ (HDMI-CEC)
• Selon votre téléviseur, il est possible que certaines résolutions de sortie HDMI ne fonctionnent pas.
Veuillez vous reporter au manuel d'utilisation de votre téléviseur.
• Cette fonction sera indisponible si le câble HDMI ne prend pas en charge le format CEC.
• Si votre téléviseur Samsung dispose d'un logo Anynet+, cela signifie qu'il est compatible Anynet+.
Gestion données BD
• En mode mémoire externe, la lecture du disque pourra s’arrêter si vous déconnectez le périphérique
USB en cours d'exécution.
• Seuls les périphériques USB formatés selon le système de fichiers FAT (label de volume DOS 8.3)
sont pris en charge. Nous vous recommandons d'utiliser des périphériques USB prenant en charge le
protocole USB 2.0 avec une vitesse de lecture/d'écriture supérieure ou égale à 4 Mo/s.
• La fonction Resume Play (Reprise de la lecture) peut être inopérante après le formatage du
périphérique de stockage.
• La capacité totale de mémoire disponible pour l'option Gestion données Blu-ray peut varier selon les
conditions.
DivX® Vidéo à la demande
• Pour plus d'informations concernant DivX(R) à la demande(VOD), veuillez visiter le site « http://vod.
divx.com ».
Affichage du lecteur
• Vous ne pouvez pas changer la luminosité de la touche ni de la touche VOL +, -.
Paramètre haut-parleur
• Lorsque Sélect. haut-parleur est sélectionné pour Haut-parleur TV, le son est émis depuis les
enceintes du téléviseur.
Paramètre haut-parleur
• Lorsque le son HDMI sort vers le haut-parleur du téléviseur, il subit automatiquement un mixage final
en deux canaux.
Fonct. Retour Audio
• Lorsque la fonction Anynet+ (HDMI-CEC) est désactivée, la fonction Audio Return Channel (Fonct.
Retour Audio) est indisponible.
• L’utilisation d’un câble HDMI non certifié pour ARC (Audio Return Channel (Fonct. Retour Audio)) peut
provoquer un problème de compatibilité.
• La fonction ARC est uniquement disponible si un téléviseur compatible ARC est connecté.
Sortie numérique
• La sortie numérique peut être activée lorsque Sélect. haut-parleur est sélectionné sur Haut-parleur TV.
HT-E5200_XU_FRA_0223.indd 55HT-E5200_XU_FRA_0223.indd 55 2012-02-23 오후 2:37:112012-02-23 오후 2:37:11

| 56 Français
Annexes
Lecture
Lecture des fichiers vidéo
• La lecture des fichiers vidéo au débit binaire élevé, égal ou supérieur à 20 Mbps, exerce une forte
charge sur les capacités du lecteur et risque, de ce fait, de s’interrompre en cours d’exécution.
Sélection de la langue de la bande son
• L’indicateur ◄► ne s’affichera pas à l’écran si la section BONUSVIEW ne contient pas de réglages
BONUSVIEW audio.
• La disponibilité des langues proposées via la fonction de la langue de la bande son dépend des
langues encodées sur le disque. Par conséquent, cette fonction ou certaines langues peuvent être
indisponibles.
• Certains disques Blu-ray vous autorisent à sélectionner la bande son anglaise PCM ou Dolby Digital.
Sélection de la langue des sous-titres
• En fonction du disque Blu-ray/DVD, vous pouvez changer la langue des sous-titres dans le Menu
du disque. Appuyez sur la touche MENU DU DISQUE.
• Cette fonction dépend de la sélection des sous-titres encodés sur le disque et peut ne pas être
disponible sur tous les disques Blu-ray/DVD.
• Les informations concernant la fonction principale ou le mode BONUSVIEW s’afficheront
également si le disque Blu-ray dispose d'une section BONUSVIEW.
• Cette fonction modifie à la fois les sous-titres principaux et secondaires au même moment.
• Le nombre total de sous-titres principaux et secondaires s’affiche.
Lecture de fichiers JPEG
• Vous ne pouvez pas agrandir les sous-titres ou les graphiques PG (Accord parental) pour les
afficher en mode plein écran.
AllShare Play
Utilisation de la touche TOOLS (OUTILS) lors du visionnage d’images.
• Si le système est connecté à un téléviseur compatible BD Wise dont la fonction BD Wise est
activée, le menu Picture Settings (Paramètres des images) ne s'affiche pas.
• La fonction Background Music (Musique de fond) ne fonctionne que si le fichier musical et le
fichier photo sont situés sur le même support de stockage. Cependant, la qualité sonore peut
être affectée par le débit binaire du fichier musical MP3, la taille des photos et la méthode
d'encodage utilisée.
Lecture de contenu à partir d'un périphérique de stockage USB
• Vous devez retirer le périphérique de stockage USB en toute sécurité (en exécutant la fonction «
Retirer péri. USB » pour éviter d'endommager la mémoire USB. Appuyez sur le bouton HOME
pour accéder au menu Home (Accueil), sélectionnez le bouton JAUNE (C), puis appuyez sur la
touche E.
Lire des fichiers musicaux
• Réglez le volume sur un niveau modéré avant de connecter votre iPod à l'appareil.
• Lorsque vous connectez un iPod alors que l'appareil est sous tension, celui-ci charge la batterie
de votre iPod.
HT-E5200_XU_FRA_0223.indd 56HT-E5200_XU_FRA_0223.indd 56 2012-02-23 오후 2:37:132012-02-23 오후 2:37:13

Français 57 |
07AnnexesAllShare Play
Visionner un film
• Vous devez relier la sortie VIDEO (VIDÉO) (Composite) à votre téléviseur pour visionner une vidéo
iPod (voir page 18).
• Si vous voulez lire une vidéo iPod via la sortie VIDEO (VIDÉO), désactivez Anynet+ (HDMI-CEC).
• Seul l'écran de lecture apparaît sur le téléviseur. Affichez d'autres écrans iPod sur le lecteur
iPod.
• Si vous souhaitez revenir aux menus de l’iPod alors que celui-ci est connecté via le dock,
appuyez sur FUNCTION sur la télécommande ou appuyez sur sur la façade du système et
sélectionnez R. IPOD.
Le basculement du mode Fonction s'effectue comme suit :
BD/DVD D. IN AUX R. IPOD HDMI1 HDMI2 FM BT
iPod
Modèles d'iPod/iPhone pouvant être utilisés avec cet appareil
• Le réglage du volume peut ne pas fonctionner normalement avec les modèles d'iPod et d'iPhone
non listés en page 36. En cas de problèmes avec l'un des modèles listés ci-dessus, actualisez le
logiciel de l'iPod/iPhone pour obtenir la version la plus récente.
• En fonction de la version logicielle de l’iPod, des problèmes de commande peuvent survenir. Il ne
s’agit pas d’un dysfonctionnement du Home Cinema.
• En fonction de la version logicielle ou le type d’iPod, d'autres fonctionnements peuvent être
différents. Installez le logiciel d'iPod le plus récent. (recommandé)
• Vous pouvez profiter de la lecture de fichiers musicaux ou des vidéos à l'aide de la fonction de
disque Blu-ray/DVD et de la fonction Remote iPod (iPod à distance). Vous devez utiliser le dock
iPod pour pouvoir profiter des vidéos.
• La lecture du contenu des applications via l'appareil n'est pas garantie. Nous vous
recommandons de lire le contenu téléchargé sur l'iPod.
• Si vous rencontrez des problèmes lors de l'utilisation de votre iPod, veuillez visiter le site Web
www.apple.com/support/ipod.
HT-E5200_XU_FRA_0223.indd 57HT-E5200_XU_FRA_0223.indd 57 2012-02-23 오후 2:37:152012-02-23 오후 2:37:15

| 58 Français
AnnexesRésolution selon le mode de sortie
� Lecture du disque Blu-ray/des e-contenus/des contenus numériques
Sortie
Configuration
HDMI/connecté HDMI/non connectéMode HDMI
Mode VIDÉO Mode VIDÉODisque Blu-ray E-content/Contenus
numériques
BD WiseRésolution du
disque Bluray1080p@60F 576i/480i -
Auto
Résolution optimale
de l'entrée du
téléviseur
Résolution optimale de
l'entrée du téléviseur576i/480i -
1080p@60F 1080p@60F 1080p@60F 576i/480i -
Trame vidéo : Auto (24Fs) 1080p@24F 1080p@24F 576i/480i -
1080i 1080i 1080i 576i/480i 576i/480i
720p 720p 720p 576i/480i 576i/480i
576p/480p 576p/480p 576p/480p 576i/480i 576i/480i
576i/480i - - - 576i/480i
� Lecture DVD
Sortie Configuration
HDMI/connecté HDMI/non connectéMode HDMI Mode VIDÉO Mode VIDÉO
BD Wise 576i/480i 576i/480i -
AutoRésolution optimale de l'entrée du
téléviseur576i/480i -
1080p@60F 1080p@60F 576i/480i -
1080i 1080i 576i/480i 576i/480i
720p 720p 576i/480i 576i/480i
576p/480p 576p/480p 576i/480i 576i/480i
576i/480i - - 576i/480i
HT-E5200_XU_FRA_0223.indd 58HT-E5200_XU_FRA_0223.indd 58 2012-02-23 오후 2:37:182012-02-23 오후 2:37:18

Français 59 |
07Annexes
Sélections des sorties numériques
Configuration PCM Train de bits (non traités)
Train de bits (DTS Réencodé)
Train de bits (Dolby D. Réencodé)
Connexion Récepteur AV prenant en charge l'interface HDMI
Flux de
données
audio sur
disque
Blu-ray
PCM Jusqu'à PCM 7,1 ca PCM DTS réencodéDolby D.
Réencodé *
Dolby
DigitalJusqu'à PCM 7,1 ca Dolby Digital DTS réencodé
Dolby D.
Réencodé *
Dolby
Digital PlusJusqu'à PCM 7,1 ca Dolby Digital Plus DTS réencodé
Dolby D.
Réencodé *
Dolby
TrueHDJusqu'à PCM 7,1 ca Dolby TrueHD DTS réencodé
Dolby D.
Réencodé *
DTS Jusqu'à PCM 6,1 ca DTS DTS réencodéDolby D.
Réencodé *
DTS-
HD High
Resolution
Audio
Jusqu'à PCM 7,1 caDTS-HD High
Resolution AudioDTS réencodé
Dolby D.
Réencodé *
DTS-HD
Master
Audio
Jusqu'à PCM 7,1 ca DTS-HD Master Audio DTS réencodéDolby D.
Réencodé *
Flux de
données
audio sur
DVD
PCM PCM 2 ca PCM 2 ca PCM 2 ca PCM 2 ca
Dolby
DigitalJusqu'à PCM 5,1 ca Dolby Digital Dolby Digital Dolby Digital
DTS Jusqu'à PCM 6,1 ca DTS DTS DTS
Résolution
pour
disque
Blu-ray
Any
Décode la principale fonction audio et
le flux de données audio BONUSVIEW en
données PCM et ajoute des effets sonores de
navigation.
Émet uniquement le flux de données audio de la fonction principale,
de sorte que votre récepteur AV puisse décoder les trains de
bits audio.
Vous n’entendrez pas de données audio
BONUSVIEW ni d'effets sonores de navigation.
Décode la principale fonction audio et
le flux de données audio BONUSVIEW en
données PCM et ajoute des effets sonores de navigation, puis
réencode les données audio PCM en trains de
bits DTS.
Décode la principale fonction audio et
le flux de données audio BONUSVIEW en
données PCM et ajoute des effets sonores de navigation, puis
réencode les données audio PCM en trains
de bits Dolby Digital ou PCM.
* Si le flux de données source est 2 ca ou mono, le réglage « Re-encoded Dolby D » (Dolby D. réencodé)
ne sera pas appliqué. La sortie sera PCM 2 ca.
Les disques Blu-ray peuvent contenir trois types de flux de données audio :
- Principale fonction audio : Bande son de la fonction principale.
- Fonctionnalité audio BONUSVIEW : Bande son supplémentaire, comportant, par exemple, le commentaire du
réalisateur ou de l’acteur.
- Effets sonores de navigation : Lorsque vous choisissez une navigation via un quelconque menu, les effets sonores
de navigation peuvent retentir. Les effets sonores de navigation sont différents sur chaque disque Blu-ray.
HT-E5200_XU_FRA_0224.indd 59HT-E5200_XU_FRA_0224.indd 59 2012-02-24 오후 1:49:312012-02-24 오후 1:49:31

| 60 Français
AnnexesDépannage
Reportez-vous au tableau ci-dessous lorsque cet appareil ne fonctionne pas correctement. Si le
problème que vous rencontrez n’est pas répertorié ci-dessous ou si les consignes ne vous sont d’aucune
aide, éteignez l’appareil, débranchez le cordon d’alimentation et contactez le revendeur agréé le plus
proche ou un centre de dépannage Samsung Electronics.
Problème Vérification/Solution
Le disque ne peut pas être éjecté.
• Le cordon d’alimentation est-il branché correctement sur la prise secteur ?
• Coupez l’alimentation électrique, puis rallumez-la.
Échec de connexion de l’iPod.
• Vérifiez l'état du connecteur et du dock iPod.
• Veillez à mettre constamment à jour la version logicielle de votre iPod.
La lecture ne démarre pas.
• Vérifiez le numéro de zone du disque Blu-ray/DVD.
Les disques Blu-ray/DVD achetés à l’étranger peuvent ne pas être compatibles.
• Les CD-ROM et DVD-ROM ne peuvent pas être lus sur ce lecteur.
• Vérifiez que le niveau de classification est approprié.
La lecture ne démarre pas immédiatement lorsque le bouton Lecture/Pause est actionné.
• Le disque est-il déformé ou rayé ?
• Nettoyez le disque.
Aucun son n’est produit. • Le système home cinéma n’émet aucun son pendant la lecture rapide, au ralenti, et en mode
pas à pas.
• Les enceintes sont-elles correctement branchées ? La configuration des enceintes est-elle
réglée correctement ?
• Le disque est-il sale ou endommagé ?
La télécommande ne fonctionne pas.
• Faites-vous fonctionner la télécommande dans sa plage opérationnelle et dans l’angle correct par
rapport au capteur ?
• Les piles sont-elles déchargées ?
• Avez-vous sélectionné correctement les fonctions (TV/BD) de mode de la télécommande (TV ou
BD) ?
• Le disque tourne mais aucune image ne s’affiche.
• La qualité est mauvaise et l’image tremble.
• Le téléviseur est-il sous tension ?
• Les câbles vidéo sont-ils correctement branchés ?
• Le disque est-il sale ou endommagé ?
• La lecture d’un disque de mauvaise fabrication peut s’avérer impossible.
La langue de la bande-son et les sous-titres ne fonctionnent pas.
• La langue de la bande son et les sous-titres ne fonctionnent pas si le disque n’en
comporte pas.
L’écran de menu n’apparaît pas même si la fonction de menu est sélectionnée.
• Le disque que vous utilisez contient-il des menus ?
Impossible de modifier le format d'image.
• La lecture des disques Blu-ray/DVD 16:9 est possible en mode 16/9 Plein écran, 4/3
Boîte aux lettres ou 4/3 Panoramique – Balayage en revanche, les disques Blu-ray/DVD
4:3 peuvent être lus au format 4:3 uniquement. Reportez-vous à la pochette du disque
Blu-ray et sélectionnez la fonction appropriée.
HT-E5200_XU_FRA_0223.indd 60HT-E5200_XU_FRA_0223.indd 60 2012-02-23 오후 2:37:222012-02-23 오후 2:37:22

Français 61 |
07Annexes
Problème Vérification/Solution
• L'appareil ne fonctionne pas.(exemple : l’appareil s’éteint ou émet un bruit anormal).
• L'appareil ne fonctionne pas normalement.
• Appuyez et maintenez la touche 5 de la télécommande pendant 5 secondes en mode
VEILLE.
- L’utilisation de la fonction RÉINITIALISATION efface tous les réglages enregistrés.
N’utilisez ce bouton que si cela est vraiment nécessaire.
Vous avez oublié le mot de passe du niveau de classification.
• Sans disque dans le lecteur, appuyez et maintenez la touche 5 de l'appareil pendant
plus de 5 secondes. Le message INIT s’affiche sur l’écran et les réglages par défaut
sont rétablis.
Puis, appuyez sur la touche MARCHE/ARRÊT.
- L’utilisation de la fonction RÉINITIALISATION efface tous les réglages enregistrés.
N’utilisez ce bouton que si cela est vraiment nécessaire.
Réception des émissions de radio impossible.
• L’antenne est-elle correctement branchée ?
• Si le signal d’entrée de l’antenne est faible, installez une antenne FM extérieure dans
une zone bénéficiant d’une bonne réception.
Lors de l’écoute du son du téléviseur via l'appareil, aucun son n’est entendu.
• Si la touche OUVERTURE/FERMETURE ^ est appuyée lors de l’écoute du son du
téléviseur en utilisant le D. IN ou les fonctions AUX, les fonctions du disque Blu-ray/DVD
sont activées et le son du téléviseur est coupé.
« Indisponible » s’affiche à l’écran.
• Les fonctions ou les commandes ne peuvent être exécutées pour le moment car :
1. Le logiciel du disque Blu-ray/DVD les limite.
2. Le logiciel du disque Blu-ray/DVD ne prend pas en charge la fonction en question
(par ex. : les angles).
3. La fonction n'est pas disponible pour le moment.
4. Vous avez demandé un titre, un numéro de chapitre ou un temps de recherche hors de portée
du disque.
Il est possible que l'écran du téléviseur n'affiche pas d'image lorsque la résolution de la sortie HDMI n'est pas prise en charge par le téléviseur (par exemple 1080p).
• Appuyez et maintenez la touche 5 du panneau avant pendant plus de 5 secondes en
l'absence de disque inséré dans l'appareil. Tous les paramètres seront réinitialisés sur
leur valeur d'origine.
Aucune sortie HDMI. • Vérifiez la connexion entre le téléviseur et la prise HDMI de l'appareil.
• Vérifiez que votre téléviseur prend en charge les résolutions d'entrée HDMI
576p/480p/720p/1080i/1080p.
Écran de sortie HDMI anormal.
• Si du bruit aléatoire apparaît à l'écran, cela signifie que le téléviseur ne prend pas en
charge la protection HDCP (High-bandwidth Digital Content Protection).
Fonction de lecture AllShare
Je peux visualiser les dossiers partagés via AllShare mais pas les fichiers.
• La lecture AllShare affiche uniquement les fichiers correspondant aux catégories suivantes :
photo, musique et cinéma.
Les fichiers ne qui correspondent à aucune de ces trois catégories peuvent ne pas s'afficher.
HT-E5200_XU_FRA_0223.indd 61HT-E5200_XU_FRA_0223.indd 61 2012-02-23 오후 2:37:242012-02-23 오후 2:37:24

| 62 Français
AnnexesProblème Vérification/Solution
La vidéo est lue par intermittence.
• Vérifiez si le réseau est stable.
• Vérifiez que le câble réseau est correctement branché et que le réseau n'est pas surchargé.
• La connexion sans fil entre le serveur et l'appareil est instable.
Vérifiez la connexion.
La connexion de lecture AllShare entre le téléviseur et l'ordinateur est instable.
• L’adresse IP sous le même sous-réseau doit être unique, dans le cas contraire une collision
IP peut résulter de ce phénomène.
• Vérifiez si vous avez un pare-feu activé.
Si tel est le cas, désactivez la fonction pare-feu.
BD-LIVE
Je n'arrive pas à me connecter au serveur BD-LIVE.
• Vérifiez si la connexion réseau a été établie ou non en utilisant la fonction État réseau.
• Vérifiez si le périphérique de mémoire USB est connecté à l'appareil.
• Le périphérique de mémoire doit avoir au moins 1 Go d'espace libre pour satisfaire aux
exigences du service BD-LIVE.
Vous pouvez vérifier la taille disponible dans Gestion données Blu-ray. (Voir page 55)
• Vérifiez si l’option Connexion Internet BD-Live est spécifiée sur Allow(All) (Permettre tout).
• Si toutes les mesures préconisées ci-dessus échouent, contactez le fournisseur de contenus
ou mettez à jour l'appareil à l'aide de la dernière version de micrologiciel disponible.
Une erreur s'est produite en cours d'utilisation du service BD-LIVE.
• Le périphérique de mémoire doit avoir au moins 1 Go d'espace libre pour satisfaire aux
exigences du service BD-LIVE.
Vous pouvez vérifier la taille disponible dans Gestion données Blu-ray. (Voir page 55)
| REMARQUE |
� Lorsque les réglages d'usine par défaut sont rétablis, toutes les données Blu-ray utilisateur stockées sur le lecteur
seront effacées.
Par la présente, Samsung Electronics déclare que ce système Home Cinéma est conforme avec les exigences essentielles et autres dispositions relatives de la Directive 1999/5/EC.
Vous pouvez visualiser la Déclaration de Conformité via le site Web http://www.samsung.com, allez sur Support (Assistance) > Search Product Support (Recherche de l'assistance de l'appareil) puis entrez le nom de modèle.
Cet équipement peut être utilisé dans tous les pays de l'Union Européenne.
Cet équipement ne peut être utilisé qu'en intérieur.
HT-E5200_XU_FRA_0223.indd 62HT-E5200_XU_FRA_0223.indd 62 2012-02-23 오후 2:37:252012-02-23 오후 2:37:25

Français 63 |
07Annexes
Caractéristiques techniques
Généralités
Poids 2,5 kg
Dimensions 430 (L) x 55 (H) x 255,8 (P) mm
Plage de températures de fonctionnement +5°C à +35°C
Plage de taux d'humidit 10 % à 75 %
Tuner FM
Rapport signal/bruit 55 dB
Sensibilité utilisable 12 dB
Distorsion harmonique totale 0.5 %
Disque
BD (Blu-ray Disc) Vitesse de lecture : 9,834 m/s
DVD (Digital Versatile Disc)Vitesse de lecture : 6,98 à 7,68 m/s
Temps de lecture approx. (disque à une face, une couche) : 135 min
CD : 12cm (COMPACT DISC)Vitesse de lecture : 4,8 à 5,6 m/s
Temps de lecture maximal : 74 min
CD : 8cm (COMPACT DISC)Vitesse de lecture : 4,8 à 5,6 m/s
Temps de lecture maximal : 20 min
Sortie vidéo Vidéo composite1 canal : 1,0 V crête à crête (charge 75 Ω)
Disque Blu-ray : 576i/480i DVD : 576i/480i
Vidéo/Audio HDMI1080p, 1080i, 720p, 576p/480p
Audio PCM multicanaux, audio Bitstream et audio PCM
Amplificateur
Sortie de l’enceinte avant 165 W x 2(3 Ω)
Sortie du caisson de basse 170 W (3 Ω)
Réponse en fréquenceEntrée analogique 20Hz~20kHz (±3dB)
Entrée numérique 20Hz~40kHz (±4dB)
Rapport signal/bruit 70dB
Séparation des canaux 60dB
Sensibilité d’entrée (AUX)500mV
Enceinte
EnceintesSystème d’enceintes 2.1 canaux
Avant Caisson de graves
Impédance 3 Ω 3 Ω
Plage de fréquences 140Hz~20kHz 40Hz ~ 160Hz
Niveau de pression acoustique
de sortie87dB/W/M 88dB/W/M
Entrée nominale 165W 170W
Entrée maximale 330W 340W
Dimensions (L x H x P) 90 x 207,5 x 68,5 mm 168 x 350 x 285 mm
Poids 0,71 kg 2,6 kg
• Les vitesses de réseau égales ou inférieures à 10 Mbps ne sont pas prises en charge.
• Samsung Electronics Co., Ltd se réserve le droit de modifier les caractéristiques techniques sans avis
préalable.
• Le poids et les dimensions sont approximatifs.
• La conception et les caractéristiques techniques sont susceptibles d'être modifiées sans préavis.
• Pour l’alimentation et la consommation d’énergie, reportez-vous à l'étiquette apposée sur l'appareil.
HT-E5200_XU_FRA_0223.indd 63HT-E5200_XU_FRA_0223.indd 63 2012-02-23 오후 2:37:282012-02-23 오후 2:37:28

Mise au rebut appropriée de ce produit (Déchets d'équipements électriques et électroniques)(Applicable dans l'Union européenne et les autres pays d'Europe dotés d'un système de tri sélectif)
Ce symbole sur le produit, les accessoires ou le manuel indique que le produit et ses accessoires électroniques
(par exemple, le chargeur, les casques ou le câble USB) ne doivent pas être mis au rebut avec les autres déchets
ménagers à la fin de leur durée de vie. Pour éviter toute nuisance à l'environnement ou à la santé par une mise au
rebut incontrôlée des déchets, veuillez séparer ces articles des autres types de déchets et les recycler de façon
responsable pour promouvoir la réutilisation à long terme des ressources matérielles.
Pour assurer un recyclage du produit dans le respect de l'environnement, les particuliers doivent s'enquérir des lieux
et procédures appropriés auprès du détaillant qui leur a vendu ces articles ou auprès des collectivités locales
Les utilisateurs professionnels doivent contacter leur fournisseur et se reporter aux conditions du contrat d'achat.
Ce produit et ses accessoires électroniques ne doivent pas être jetés avec les autres déchets commerciaux.
Mise au rebut appropriée de la batterie de ce produit(Applicable dans l'Union européenne et les autres pays d'Europe dotés d'un système de retour de piles.)
Ce symbole sur la batterie, le manuel ou l'emballage indique que la batterie de ce produit ne doit pas
être mise au rebut avec les autres déchets ménagers à la fin de sa durée de vie. Lorsqu’ils sont indiqués,
les symboles chimiques Hg, Cd ou Pb indiquent que cette batterie contient du mercure, du cadmium ou
de plomb en quantité supérieure aux niveaux de référence de la Directive CE 2006/66. Si les batteries
ne sont pas correctement mises au rebut, ces substances peuvent provoquer un danger pour la santé
humaine ou l’environnement.
Afin de protéger les ressources naturelles et de promouvoir le recyclage, séparez les piles des autres
déchets et recyclez-les via votre système local gratuit de retour de piles.
Area Contact Centre Web Site` EuropeAlbania 42 27 5755 -
Austria0810 - SAMSUNG (7267864, € 0.07/min)
www.samsung.com
Belgium 02-201-24-18
www.samsung.com/be (Dutch) www.samsung.com/be_fr (French)
Bosnia 05 133 1999 -
Bulgaria 07001 33 11 www.samsung.com
Croatia 062 SAMSUNG (062 726 7864) www.samsung.com
Czech
800-SAMSUNG (800-726786)
www.samsung.comSamsung Zrt., česká organizační složka, Oasis Florenc, Soko-lovská394/17, 180 00, Praha 8
Denmark 70 70 19 70 www.samsung.com
Finland 030 - 6227 515 www.samsung.com
France 01 48 63 00 00 www.samsung.com
Germany01805 - SAMSUNG (726-7864 € 0,14/Min)
www.samsung.com
Hungary 06-80-SAMSUNG (726-7864) www.samsung.com
Italia 800-SAMSUNG (726-7864) www.samsung.com
Kosovo +381 0113216899 -
Luxemburg 261 03 710 www.samsung.com
Macedonia 023 207 777 -
Area Contact Centre Web SiteMontenegro 020 405 888 -
Netherlands0900-SAMSUNG (0900-7267864) (€ 0,10/Min)
www.samsung.com
Norway 815-56 480 www.samsung.com
Poland0 801 1SAMSUNG (172678) / 022-607-93-33
www.samsung.com
Portugal 80820-SAMSUNG (726-7864) www.samsung.com
Rumania
1. 08010 SAMSUNG (72678) - doar din reţeaua Romtelecom, tarif local
2. 021.206.01.10 - din orice reţea, tarif normal
www.samsung.com
Serbia0700 Samsung (0700 726 7864)
www.samsung.com
Slovakia 0800-SAMSUNG (726-7864) www.samsung.com
Spain 902-1-SAMSUNG (902 172 678) www.samsung.com
Sweden 0771 726 7864 (SAMSUNG) www.samsung.com
Switzerland0848-SAMSUNG (7267864, CHF 0.08/min)
www.samsung.com/ch www.samsung.com/ch_fr/(French)
U.K 0330 SAMSUNG (7267864) www.samsung.com
Eire 0818 717100 www.samsung.com
Lithuania 8-800-77777 www.samsung.com
Latvia 8000-7267 www.samsung.com
Estonia 800-7267 www.samsung.com
Contacter SAMSUNG WORLD WIDEPour toutes questions ou observations concernant les produits Samsung, veuillez
contacter le service clientèle de SAMSUNG.
HT-E5200_XU_FRA_0223.indd 64HT-E5200_XU_FRA_0223.indd 64 2012-02-23 오후 2:37:302012-02-23 오후 2:37:30

Erleben Sie die Möglichkeiten
Vielen Dank, dass Sie sich für dieses Produkt von Samsung
entschieden haben.
Um unseren umfassenden Service nutzen zu können,
registrieren Sie Ihr Produkt unter
www.samsung.com/register
2.1CH Blu-ray™
Heimkino-SystemBedienungsanleitung
HT-E5200
HT-E5200_XU_GER-0223.indd 1HT-E5200_XU_GER-0223.indd 1 2012-02-23 오후 2:59:522012-02-23 오후 2:59:52

| 2 Deutsch
SicherheitsinformationenWarnung
ZUR VERMEIDUNG VON STROMSCHLÄGEN DARF DIESES GERÄT NICHT GEÖFFNET WERDEN.
ES ENTHÄLT KEINE BAUTEILE, DIE VOM BENUTZER GEWARTET WERDEN KÖNNEN. LASSEN SIE
REPARATUREN NUR VON QUALIFIZIERTEM FACHPERSONAL DURCHFÜHREN.
ACHTUNG
STROMSCHLAGGEFAHR!NICHT ÖFFNEN!
Dieses Symbol weist auf „gefährliche
Netzspannung“ im Inneren des Geräts
hin. Es besteht somit die Gefahr von
Stromschlägen und Verletzungen.
ACHTUNG: UM STROMSCHLÄGE ZU
VERMEIDEN, RICHTEN SIE DEN BREITEN
KONTAKTSTIFT DES STECKERS VOLLIG AN
DEM BREITEN STECKPLATZ AUS.
Dieses Symbol weist auf wichtige
Anweisungen im Begleitmaterial zum
Produkt hin.
WARNUNG• Schützen Sie das Gerät vor Regen und
Feuchtigkeit, um die Gefahr von Bränden oder
Stromschlägen zu verringern.
ACHTUNG• Das Gerät darf keinen Tropfen oder Spritzern
ausgesetzt werden. Außerdem dürfen keine
mit Flüssigkeiten gefüllte Behälter, wie
beispielsweise Vasen, darauf abgestellt werden.
• Um das Gerät vom Netz zu trennen, muss
der Netzstecker aus der Steckdose gezogen
werden. Stellen Sie deshalb sicher, dass Sie den
Netzstecker stets leicht erreichen können.
• Dieses Gerät muss stets an geerdete
Steckdosen angeschlossen werden.
• Entfernen Sie den Stecker aus der Steckdose,
um das Gerät vollständig abzuschalten. Aus
diesem Grund sollte sich der Netzstecker in
Reichweite befinden.
CLASS 1 LASER PRODUCT
KLASSE 1 LASER PRODUKT
LUOKAN 1 LASER LAITE
KLASS 1 LASER APPARAT
PRODUCTO LÁSER CLASE 1
LASERPRODUKT DER KLASSE 1Dieser CD-Player ist ein LASERPRODUKT DER
KLASSE 1.
Bei Verwendung von Bedienelementen bzw.
Einstellungen und Vorgängen, die von den hier
aufgeführten abweichen, kann ein Risiko durch
gefährliche Strahlung entstehen.
ACHTUNG• INVISIBLE LASER RADIATION WHEN OPEN
AND INTERLOCKS DEFEATED, AVOID
EXPOSURE TO BEAM.
HT-E5200_XU_GER-0223.indd 2HT-E5200_XU_GER-0223.indd 2 2012-02-23 오후 3:00:132012-02-23 오후 3:00:13

Deutsch 3 |
01Sicherheitsinform
ationen
Lagerung und Handhabung der Disks
• Halten der Disks
- Fingerabdrücke oder Kratzer
auf der Disk können zu einer
Verschlechterung der Klang-
und Bildqualität oder zu Springen führen.
- Vermeiden Sie die Oberfläche von mit Daten
bespielten Disks zu berühren.
- Halten Sie die Disk mit den Fingerspitzen am
Rand fest damit keine Fingerabdrücke auf der
Oberfläche zurückbleiben.
- Kleben Sie kein Papier oder Klebeband auf
die Disk.
• Reinigen der Disks
- Wenn sich Fingerabdrücke oder
Schmutz auf der Disk befinden,
säubern Sie sie mit einem milden
Reinigungsmittel und einem
weichen Tuch.
- Säubern Sie die Disk von innen nach außen.
- Lagerung der Disks
Setzen Sie die Disk keiner direkten
Sonneneinstrahlung aus.
Bewahren Sie die Disk an einem kühlen, gut
belüfteten Ort auf.
Bewahren Sie die Disk in einer Schutzhülle
auf und lagern Sie sie senkrecht.
Vorsichtsmaßnahmen für den Betrieb
• Das Gerät keinem Spritz- oder Tropfwasser
aussetzen. Keine mit Flüssigkeit gefüllten
Behälter, wie Vasen auf das Gerät stellen.
• Um das Gerät vollständig auszuschalten, muss
der Netzstecker aus der Steckdose gezogen
werden. Somit muss der Netzstecker immer
bequem erreichbar sein.
• Berühren Sie den Netzstecker nicht mit
nassen Händen. Es besteht die Gefahr eines
Stromschlags.
• Schließen Sie nicht mehrere elektrische Geräte
an dieselbe Steckdose an. Eine Überlastung
der Steckdose kann zu Überhitzung und Feuer
führen.
• Pflege des Gehäuses
- Bevor Sie andere Geräte an dieses Gerät
anschließen, müssen alle diese Geräte vorher
abgeschaltet werden.
- Wenn Sie das Gerät aus einer kalten in eine
warme Umgebung bringen, kann Feuchtigkeit
an den Geräteteilen und der Linse kondensieren
und zu Fehlern bei der Wiedergabe führen. Falls
dieser Fall eintritt, den Netzstecker ziehen und
nach zwei Stunden den Stecker wieder in die
Steckdose stecken. Legen Sie anschließend die
Disk ein, und versuchen Sie, die Wiedergabe
der Disk zu starten.
• Wenn unnormale Geräusche zu hören sind oder
sich ein stechender Geruch bemerkbar macht
oder Rauch entsteht, sofort das Gerät über den
Netzschalter ausschalten und den Netzstecker
ziehen. Setzen Sie sich anschließend mit dem
nächsten Kundendienst in Verbindung um
technische Hilfe zu erhalten. Das Gerät nicht weiter
verwenden. Ein Gerät in diesem Zustand kann einen
Brand auslösen oder zu einem Stromschlag führen.
• Um das Gerät vollständig auszuschalten, muss der
Netzstecker aus der Steckdose gezogen werden.
Somit muss der Netzstecker immer bequem
erreichbar sein.
Verwendung der 3 D Funktion
WICHTIGE GESUNDHEITS UND
SICHERHEITSHINWEISE FÜR 3D BILDER.
Lesen Sie die folgenden Sicherheitshinweise aufmerksam
durch, bevor Sie die 3D Funktion verwenden.
• Bei einigen Zuschauern kann es bei der Betrachtung
von 3D Fernsehen zu einem Unwohlsein, wie
Schwindelgefühl, Übelkeit und Kopfschmerzen
kommen. Wenn Sie solche Symptome wahrnehmen,
unterbrechen Sie das Ansehen von 3D Fernsehen,
setzen Sie die 3D Aktiv Brille ab und ruhen Sie sich aus.
• Das Betrachten von 3D Bildern über einen längeren
Zeitraum kann zu einer Augenüberlastung führen.
Wenn Sie eine Überlastung der Augen wahrnehmen,
unterbrechen Sie das Ansehen von 3D Fernsehen,
setzen Sie die 3D Aktiv Brille ab und ruhen Sie sich aus.
• Zuständige Erwachsene müssen Kinder, welche die
3D Funktion nutzen, regelmäßig überwachen. Wenn
die Kinder über ermüdete Augen, Kopfschmerzen,
Schwindelgefühl oder Übelkeit klagen, müssen die
Kinder das Anschauen von 3D Fernsehen abbrechen
und sich ausruhen.
• Verwenden Sie die 3D Aktiv Brille nicht für andere
Zwecke (wie als normale Brille, Sonnenbrille,
Schutzbrille, usw.)
HT-E5200_XU_GER-0223.indd 3HT-E5200_XU_GER-0223.indd 3 2012-02-23 오후 3:00:152012-02-23 오후 3:00:15

| 4 Deutsch
Sicherheitsinformationen• Verwenden Sie die 3D Funktion oder die 3D Aktiv Brille
nicht während Sie herumlaufen oder sich bewegen.
Wenn Sie die 3D Funktion oder die 3D Aktiv Brille
verwenden während Sie sich umher bewegen, können
Sie gegen Gegenstände laufen, stolpern und/oder
hinfallen und sich ernsthaft Verletzungen zuziehen.
• Wenn Sie 3D Inhalte erleben möchten, müssen
Sie ein 3D Gerät (3D fähiger AV-Receiver oder
Fernsehgerät) an den HDMI OUT Ausgang mit
Hilfe eine High-Speed HDMI-Kabels anschließen.
Setzen Sie die 3D Brille auf, bevor Sie 3D Inhalte
wiedergeben.
• Das Gerät gibt 3D Inhalte nur über ein an den
HDMI OUT Ausgang angeschlossenes HDMI-
Kabel wieder.
• Da die Videoauflösung im 3D Wiedergabemodus
fest auf die Auslösung der 3D Videoquelle
eingestellt ist, kann die Auflösung nicht an Ihre
Vorlieben angepasst werden.
• Einige Funktionen, wie BD Wise, Einstellung des
Bildformats und die Einstellung der Auflösung
können im 3D-Modus unter Umständen nicht
richtig funktionieren.
• Für die fehlerfreie Wiedergabe des 3D-Signals
müssen Sie ein High-Speed HDMI-Kabel
verwenden.
• Bei der Betrachtung von 3D Bildern sollten
Sie einen Abstand von mindestens 3 Mal der
Bildschirmbreite vom Fernsehgerät einhalten.
Zum Beispiel, wenn sie einen 46 Zoll Bildschirm
haben, müssen Sie einen Abstand von 3,5 Metern
einhalten.
- Für die beste 3D Bildqualität muss der 3D
Bildschirm in Augenhöhe aufgestellt werden.
• Bei einigen angeschlossenen 3D Geräten kann der
3D Effekt eventuell nicht einwandfrei funktionieren.
• Mit diesem Gerät können 2D Inhalte nicht nach 3D
umgewandelt werden.
• “Blu-ray 3D” und das “Blu-ray 3D” Logo sind
Markenzeichen der Blu-ray Disc Association.
Copyright
© 2012 Samsung Electronics Co.,Ltd.
Alle Rechte vorbehalten. Ohne vorherige
schriftliche Genehmigung von Samsung
Electronics Co.,Ltd. ist das vollständige oder
teilweise Reproduzieren oder Kopieren dieser
Bedienungsanleitung nicht gestattet.
Lizenz
• Dolby sowie das Doppel-D-Symbol sind ein
Warenzeichen der Dolby Laboratories.
• Hergestellt unter Lizenz und US-
Patentnummern: 5,956,674; 5,974,380;
6,226,616; 6,487,535; 7,392,195; 7,272,567;
7,333,929; 7,212,872 sowie anderen in
den USA und weltweit ausgestellten und
angemeldeten Patenten. DTS-HD, das Symbol,
und DTSHD zusammen mit dem Symbol sind
eingetragene Warenzeichen. DTS-HD Master
Audio | Essential ist ein Warenzeichen von DTS,
Inc. Das Produkt enthält Software. © DTS, Inc.
Alle Rechte vorbehalten.
• ÜBER DIVX-VIDEO: DivX® ist ein von
DivX entwickeltes Videoformat, LLC ist ein
Tochterunternehmen der Rovi Corporation. Hierbei
handelt es sich um ein offizielles DivX Certified®, das
DivX Video wiedergeben kann. Nähere Informationen
und Softwareanwendungen zum Konvertieren Ihrer
Videodateien in das DivX Video Format finden Sie
unter www.divx.com.
INFOS ZU DIVX VIDEO-ON-DEMAND: Dieses
DivX®-zertifizierte Gerät muss registriert werden,
damit erworbene Video-On-Demand-Inhalte
(VOD) wiedergegeben werden können. Um den
Registrierungscode zu erhalten, wechseln Sie in
den DivX VOD-Bereich im Setup-Menü des Geräts.
Weitere Informationen über den Abschluss der
Registrierung finden Sie unter vod.divx.com.
DivX Certified® für die Wiedergabe von DivX®
-Videos bis hin zu HD 1080p, einschließlich Premium-
Inhalt.
DivX®, DivX Certified® und die dazugehörigen Logos
sind Markenzeichen der Rovi Corporation oder
ihrer Tochterunternehmen und werden unter Lizenz
verwendet.
Geschützt durch eines oder mehrere der folgenden
U.S. Patente 7,295,673; 7,460,668; 7,515,710;
7,519,274
HT-E5200_XU_GER-0223.indd 4HT-E5200_XU_GER-0223.indd 4 2012-02-23 오후 3:00:172012-02-23 오후 3:00:17

Deutsch 5 |
01Sicherheitsinform
ationen
• The terms HDMI and HDMI High-Definition
Multimedia Interface, and the HDMI Logo are
trademarks or registered trademarks of HDMI
Licensing LLC in the United States and other
countries.
• Oracle und Java sind registrierte Warenzeichen
von Oracle und/oder ihrer Tochterunternehmen.
Andere Namen sind Markenzeichen ihrer
entsprechenden Eigentümer.
• Dieses Gerät nutzt eine durch U.S. Patente und
andere Schutz- und Urheberrechte geschützte
Kopierschutztechnologie der Rovi Corporation.
Reverse Engineering und Disassemblierung sind
verboten.
• Blu-ray Disc™, Blu-ray™, und die Logos sind
Warenzeichen der Blu-ray Disc Association.
• iPad, iPhone, iPod, iPod classic, iPod nano,
iPod shuffle und iPod touch sind in den USA
und anderen Ländern eingetragene Marken der
Apple Inc.
• Dieses Gerät verwendet die Cinavia Technologie,
um die Verwendung illegaler Kopien von einigen
kommerziellen Filmproduktionen und Videos
sowie deren Soundtracks zu verhindern. Wenn
die unzulässige Verwendung einer illegalen
Kopie erkannt wird, erscheint eine Meldung und
die Wiedergabe oder der Kopiervorgang werden
abgebrochen.
Mehr Informationen über die Cinavia
Technologie finden Sie auf dem Online
Verbraucherinformationszentrum unter http://
www.cinavia.com.
Wenn Sie weitere Informationen über Cinavia
über E-Mail erhalten möchten, senden Sie bitte
eine Postkarte mit Ihrer Mail-Adresse an: Cinavia
Consumer Information Centre, P.O. Box 86851,
San Diego, CA, 92138, USA.”
Dieses Gerät beinhaltet geschützte Technologie
unter Lizenz der Verance Corporation und
ist durch das U.S. Patent 7.369.677 und
andere U.S. und weltweit ausgestellte oder
beantragte Patente sowie das Urheberrecht
und das Betriebsgeheimnis bestimmter Aspekte
dieser Technologie geschützt. Cinavia ist ein
Warenzeichen der Verance Corporation.
Copyright 2004-2010 Verance Corporation.
Alle Rechte vorbehalten für Verance. Reverse
Engineering und Disassemblierung sind
verboten.
• Open Source Lizenz Hinweis
- Im Falle der Verwendung von Open
Source Software, stehen die Open Source
Lizenzvereinbarungen im Produktmenü zur
Verfügung.
HT-E5200_XU_GER-0223.indd 5HT-E5200_XU_GER-0223.indd 5 2012-02-23 오후 3:00:202012-02-23 오후 3:00:20

| 6 Deutsch
InhaltSICHERHEITSINFORMATIONEN
2 Warnung3 Lagerung und Handhabung der Disks3 Vorsichtsmaßnahmen für den Betrieb3 Verwendung der 3 D Funktion4 Copyright4 Lizenz
ERSTE SCHRITTE
7 Disk und Format Kompatibilität8 Logos von Disks, die vom Gerät
wiedergegeben werden können11 Zubehör12 Beschreibung12 Rückseite13 Fernbedienung
ANSCHLÜSSE
15 Anbringen des Ferrit Ringkerns am Netzkabel des Hauptgeräts
15 Anschließen der Lautsprecher15 Lautsprecherkomponenten
16 Anschließen der Lautsprecher
17 Zum Anschließen der UKW-Antenne17 Anschließen eines iPods/iPhones17 Anschluss über USB-Kabel
17 Anschluss über die Docking-Station
18 Anschluss an ein Fernsehgerät18 Methode 1 Anschluss an ein
Fernsehgerät mit einem HDMI-Kabel-
Beste Qualität (Empfohlen)
18 Methode 2 Anschluss an ein
Fernsehgerät mit einem Videokabel -
Gute Qualität
19 Externe Geräte anschließen19 Methode 1 HDMI-EINGANG :
Anschluss eines externen Geräts mit
einem HDMI-Kabel
19 Methode 2 OPTISCHER : Anschließen
eines externen Digitalgeräts
19 Methode 3 AUX EINGANG :
Anschließen eines externen Analoggeräts
20 Anschließen an einen Netzwerk Router20 Kabelnetzwerk
20 Wireless-Netzwerk
EINSTELLUNGEN
21 Ersteinstellungen konfigurieren23 Der Home Bildschirm23 Zugriff auf den Einstellungen Bildschirm24 Einstellungen Menü Funktionen29 Netzwerke und das Internet33 Aktualisieren der Software
MEDIA PLAY
35 Der AllShare Wiedergabebildschirm36 Wiedergabe von Dateien auf einem USB-
Speichergerät oder iPod/iPhone36 iPod/iPhone Modelle, die mit diesem
Gerät verwendet werden können.37 Der Funktion Bildschirm37 Wiedergabe von kommerziellen Video
Disks37 Wiedergabe von kommerziellen Audio
Disks38 Wiedergabe von selbst aufgenommenen
Disks38 Verwenden der AllShare
Netzwerkfunktion40 Steuern der Videowiedergabe42 Steuern der Musikwiedergabe45 Anzeigen von Fotos45 Verwenden des Extras Menü, wenn eine
Datei markiert ist48 Radio hören50 Verwenden der Spezialeffekt Tasten auf
der Fernbedienung
NETZWERKDIENSTE
51 Smart Hub verwenden53 BD-LIVE™
ANHANG
54 Zusätzliche Informationen60 Fehlerbehebung63 Technische Daten
HT-E5200_XU_GER-0223.indd 6HT-E5200_XU_GER-0223.indd 6 2012-02-23 오후 3:00:232012-02-23 오후 3:00:23

Deutsch 7 |
02Erste Schritte
Disk und Format Kompatibilität
Disktypen und Inhalte, die von Ihrem Gerät wiedergegeben werden können
Medium Disktyp Details
VIDEO
Blu-ray Disc
3D Blu-ray DiscBD-ROM oder BD-RE/-R Disk aufgenommen im BD-RE Format.
DVD-VIDEO, DVD-RW,
DVD-R, DVD+RW,
DVD+R
DVD-VIDEO, DVD-RW, DVD-R, DVD+RW, DVD+R
DVD-VIDEO, aufgenommene DVD+RW/DVD-RW(V)/DVD-R/+R Disks, die
aufgenommen und abgeschlossen wurden, oder USB-Speichergeräte mit DivX,
MKV, MP4 Inhalten.
MUSIK
CD-RW/-R,
DVD-RW/-R,
BD-RE/-R
Auf CD-RW/-R, DVD-RW/-R, BD-RE/-R Disks aufgenommene Musiktitel oder USB-
Speichergeräte mit MP3 oder WMA Inhalten.
FOTO
CD-RW/-R,
DVD-RW/-R,
BD-RE/-R
Auf CD-RW/-R, DVD-RW/-R, BD-RE/-R Disks aufgenommene Fotos oder USB-
Speichergeräte mit JPEG Inhalten.
| HINWEIS |
� In Abhängigkeit vom Datenträgertyp und den Aufnahmebedingungen können bestimmte CD-RW/-R und DVD-R
möglicherweise nicht vom Gerät wiedergegeben werden.
� Wenn eine DVD-RW/-R-Disk nicht korrekt im DVD-Videoformat aufgenommen wurde, kann sie nicht wiedergegeben werden.
� Das Gerät gibt keine Inhalte wieder, die auf DVD-Rs mit einer Bitrate von mehr als 10 Mbps aufgezeichnet wurden.
� Das Gerät gibt keine Inhalte wieder, die auf BD-Rs oder USB-Geräten mit einer Bitrate von mehr als 30 Mbps aufgezeichnet
wurden.
� Die Wiedergabe kann bei einigen Disktypen oder Verwendung bestimmter Funktionen, wie Blickwinkeländerung und
Bildformat nicht funktionieren Ausführlichere Informationen zu den Disks finden Sie auf der jeweiligen Verpackung. Lesen
Sie diese Informationen bei Bedarf durch.
� Wenn Sie einen BD-J Titel wiedergeben, kann das Laden länger dauern als bei einem normalen Titel oder einige Funktionen
werden langsamer ausgeführt.
Disktypen, die von Ihrem Gerät nicht wiedergegeben werden können
• HD DVD
• DVD-ROM/PD/MV-
Disk usw.
• DVD-RAM
• Super Audio-CD
(außer CD-Layer)
• DVD-RW (VR-Modus)
• CVD/CD-ROM/CDV/
CD-G/CD-I/LD(CD-Gs
nur Audiowiedergabe,
keine Grafiken.)
• 3,9 GB DVD-R für
Videoschnittarbeiten
| HINWEIS |
� Das Gerät führt möglicherweise nicht alle Bedienungsbefehle aus, da einige Blu-ray-Disks, DVDs und CDs bei der
Wiedergabe nicht alle oder nur bestimmte Funktionen unterstützen.
Dies ist keine Fehlfunktion des Players.
� Samsung kann nicht garantieren, dass dieses Gerät jede Disk mit einem Blue Ray-Disk, DVD- oder CD-Logo wiedergibt, da
sich die Diskformate ständig weiterentwickeln und bei der Erstellung von Blu-ray Disc, DVD, CD-Software und/oder bei der
Herstellung von Disks Fehler auftreten können.
� Wenn Sie Fragen haben, oder bei der Wiedergabe von Blu-ray-Disks, DVDs oder CDs mit diesem Gerät Probleme auftreten,
wenden Sie sich bitte an den SAMSUNG Kundendienst. Weitere Informationen zu den Wiedergabebeschränkungen finden
Sie in diesem Handbuch.
� Einige kommerzielle Disks sowie DVDs aus Ländern außerhalb Ihrer Region können unter Umständen mit diesem Produkt
nicht abgespielt werden.
Erste Schritte
HT-E5200_XU_GER-0223.indd 7HT-E5200_XU_GER-0223.indd 7 2012-02-23 오후 3:00:272012-02-23 오후 3:00:27

| 8 Deutsch
Erste SchritteRegionalcodeGeräte und Disks sind nach Regionen codiert.
Für die Wiedergabe müssen diese Regionalcodes
zusammenpassen. Wenn dies nicht der Fall ist,
kann die Disk nicht wiedergegeben werden.
Der Regionalcode dieses Geräts ist auf der
Geräterückseite angebracht.
Disktyp Regionalcode Region
Blu-ray-Disc
A
North America, Central America,
South America, Korea, Japan,
Taiwan, Hong Kong und
Südostasien.
BEuropa, Grönland, Französische
Überseegebiete, Naher Osten,
Afrika, Australien und Neuseeland
CIndien, China, Russland, Zentral-
und Südasien.
DVD-VIDEO
1 USA, US-Territorien und Kanada
2 Europa, Japan, Naher Osten,
Ägypten, Südafrika, Grönland
3 Taiwan, Korea, Philippinen,
Indonesien, Hongkong
4Mexiko, Südamerika,
Mittelamerika, Australien,
Neuseeland, Pazifische Inseln,
Karibik
5Russland, Osteuropa, Indien, die
meisten afrikanischen Länder,
Nordkorea, Mongolei
6 China
| HINWEIS |
� Wenn der Regionalcode einer Blu-ray Disk/DVD nicht
dem Regionalcode dieses Geräts entspricht, kann die
Disk nicht vom Gerät wiedergegeben werden.
Logos von Disks, die vom Gerät
wiedergegeben werden können
Blu-ray-Disc 3D Blu-ray Disc
BD-LIVE Dolby
DTS DivX
PAL-Fernsehsystem in
Großbritannien, Frankreich,
Deutschland usw.
Java
Unterstützte Formate
Unterstützte Musikdatei
Dateierweiterung Container Audio Codec Frequenzbereich
*.mp3 MP3 MP3 -
*.wma WMA WMA
Kompatibel WMA
Version 10
*Samplingraten
sind (in kHz) - 8,
11, 16, 22, 32,
44.1, 48 (im kHz)
*Bitraten - alle
Bitraten im
Bereich 5 kbps zu
384 kbps
HT-E5200_XU_GER-0223.indd 8HT-E5200_XU_GER-0223.indd 8 2012-02-23 오후 3:00:302012-02-23 오후 3:00:30

Deutsch 9 |
02Erste Schritte
Unterstützte Videodatei
Dateierweiterung Container Video Codec Auflösung Bildrate (fps) Bitrate (Mbps) Audio Codec
*.avi AVI
DivX 3.11/4.x/5.1/6.0
1920x1080 6 ~ 30 8 MP3AC3
LPCMDTS Core
H.264 BP/MP/HP 1920x1080 6 ~ 30 25
MPEG4 SP/ASP 1920x1080 6 ~ 30 8
*.mkv MKV
DivX 3.11/4.x/5.1/6.0
1920x1080 6 ~ 30 8 MP3AC3
LPCMDTS Core
H.264 BP/MP/HP 1920x1080 6 ~ 30 25
MPEG4 SP/ASP 1920x1080 6 ~ 30 8
*.asf ASF
DivX 3.11/4.x/5.1/6.0
1920x1080 6 ~ 30 8 MP3AC3
LPCMWMA
H.264 BP/MP/HP 1920x1080 6 ~ 30 25
MPEG4 SP/ASP 1920x1080 6 ~ 30 8
*.wmv WMV (wmv9)Window Media
Video v91920x1080 6 ~ 30 25 WMA
*.mp4 MP4H.264 BP/MP/HP 1920x1080 6 ~ 30 25 MP3
AACMPEG4 SP/ASP 1920x1080 6 ~ 30 8
*.3gp 3GPPH.264 BP/MP/HP 1920x1080 6 ~ 30 25
AACMPEG4 SP/ASP 1920x1080 6 ~ 30 8
*.vroVROVOB
MPEG2 1920x1080 24/25/30 25 AC3MPEGLPCMMPEG1 1920x1080 24/25/30 25
*.mpg*.mpeg
PS
MPEG1 1920x1080 24/25/30 25 AC3MPEGLPCMAAC
MPEG2 1920x1080 24/25/30 25
H.264 1920x1080 6 ~ 30 25
*.ts*.tp*.trp
TS
MPEG2 1920x1080 24/25/30 25AC3AACMP3DD+
H.264 1920x1080 6 ~ 30 25
VC1 1920x1080 6 ~ 30 25
Einschränkungen - Auch wenn eine Datei mit einem unterstützten Codec aus der oben aufgeführten Liste kodiert ist, kann
die Datei eventuell nicht wiedergegeben werden, wenn sie einen Fehler enthält.
- Eine normale Wiedergabe wird nicht garantiert, wenn die Informationen im Container falsch sind oder
die Datei selbst beschädigt ist.
- Dateien mit einer höheren Bitrate oder Bildfrequenz als der Standard, können bei der Wiedergabe
stottern.
HT-E5200_XU_GER-0223.indd 9HT-E5200_XU_GER-0223.indd 9 2012-02-23 오후 3:00:412012-02-23 오후 3:00:41

| 10 Deutsch
Erste Schritte - Die Suchen (Springen) Funktion ist nicht
verfügbar, wenn die Indextabelle der Datei
beschädigt ist.
- Wenn Sie eine Datei entfernt über eine
Netzwerkverbindung wiedergeben,
kann die Videowiedergabe, je nach
Netzwerkgeschwindigkeit, stottern.
Videodecoder - Unterstützt bis H.264 Level 4.1
- H.264 FMO/ASO/RS, VC1 SP/MP/AP L4 und
AVCHD wird nicht unterstützt
- MPEG4 SP, ASP :
Unter 1280 x 720 : max. 60 Bilder
Über 1280 x 720 : max. 30 Bilder
- GMC 2 oder höher wird nicht unterstützt
Audiodecoder - Unterstützt WMA 7, 8, 9 und STD
- WMA 9 PRO Mehrkanal Dateien werden nicht
unterstützt, wenn die Anzahl der Kanäle mehr
als 2 beträgt oder die Datei eine verlustfrei
Audiodecodierung erfordert.
- WMA Abtastrate von 22050Hz Mono wird nicht
unterstützt.
� Unterstützte DivX Untertitel Dateiformate *.ttxt, *.smi, *.srt, *.sub, *.txt
Hinweise zum USB-Anschluss• Ihr Gerät unterstützt USB-Speichergerät, MP3-
Player, Digitalkameras und USB-Kartenleser.
• Das Gerät unterstützt keine Datei- oder
Ordnernamen mit mehr als 128 Zeichen.
• Einige USB/Digitalkameras sind eventuell nicht
mit dem Gerät kompatibel.
• Das Gerät unterstützt die Dateisysteme FAT 16,
FAT 32 und NTFS.
• Schließen Sie USB-Geräte direkt an den USB-
Anschluss Ihres Geräts an. Der Anschluss über
ein USB-Kabel kann Kompatibilitätsprobleme
verursachen.
• Wenn mehr als ein Speichermedium und
einen Multi-Kartenleser eingelegt werden,
kann der Kartenleser eventuell nicht fehlerfrei
funktionieren.
• Das Gerät unterstützt das PTP-Protokoll nicht.
• Das USB-Gerät nicht während des
Ladevorgangs abtrennen.
• Je größer die Bildauflösung, desto länger
braucht das Bild um angezeigt zu werden.
• Dieses Gerät kann keine MP3 Dateien mit DRM
(Digital Rights Management) wiedergeben, die
von kommerziellen Seiten heruntergeladen
wurden.
• Ihr Gerät unterstützt nur Video mit einer
Bildfrequenz von weniger als 30 BpS.
• Ihr Gerät unterstützt nur USB Mass Storage Class
(MSC) Geräte, wie Pendrives und USB-Festplatten.
(HUBs werden nicht unterstützt)
• Bestimmte USB-Festplattengeräte, Multi-
Kartenleser und Pendrives sind eventuell mit
diesem Gerät nicht kompatibel.
• Wenn ein USB-Gerät zu viel Strom benötigt, kann
es von der Sicherheitsschaltung in der Funktion
eingeschränkt werden.
• Wenn die Wiedergabe von einer USB-Festplatte
unstabil ist, muss dem Gerät mehr Strom durch
den Anschluss eine Steckdose zugeführt werden.
Wenn das Problem weiterhin bestehen bleibt,
setzen Sie sich mit dem USB-Festplattenhersteller
in Verbindung.
• Sie müssen das USB-Speichergerät sicher
entfernen, (führen Sie die „USB sicher entfernen“-
Funktion durch) um die gespeicherten Daten auf
Ihrem USB-Gerät nicht zu beschädigen.
Drücken Sie HOME um zum Home Menü zu
wechseln und anschließend die GELBE (C) Taste
und danach die E Taste.
• SAMSUNG übernimmt keine Haftung für die
Beschädigung oder den Verlust von Daten.
AVCHD (Advanced Video Codec Höchauflösung)• Dieses Gerät kann Disks im AVCHD
Format wiedergeben. Diese Disks werden
normalerweise aufgezeichnet und in
Camcordern verwendet .
• Das AVCHD-Format ist ein hochauflösendes
digitales Videokameraformat.
• Das MPEG-4 AVC/H.264 Format komprimiert
Bilder effektiver als das konventionelle
Bildkomprimierungsformat.
• Einige AVCHD-Disks verwenden das „x.v.Color”
Format. Dieses Gerät kann AVCHD Disks
wiedergeben, die das "x.v Colour" Format
verwenden.
• „x.v.Color” ist eine Handelsmarke von Sony
Corporation.
• „AVCHD” und der AVCHD-Logo sind
Handelsmarken von Matsushita Electronic
Industrial Co., Ltd. und Sony Corporation.
HT-E5200_XU_GER-0223.indd 10HT-E5200_XU_GER-0223.indd 10 2012-02-23 오후 3:00:432012-02-23 오후 3:00:43

Deutsch 11 |
02Erste Schritte
| HINWEIS |
� Einige Disk im AVCHD DivX-Format können aufgrund der Aufnahmebedingungen eventuelle nicht wiedergegeben werden.
� AVCHD formatierte Disks müssen finalisiert werden.
� „x.v.Colour” bietet einen größeren Farbbereich als normale Camcorder DVDs.
� Einige Disks im DivX-, MKV- und MP4-Format können möglicherweise aufgrund der Videoauflösung und der Bildfrequenz
nicht wiedergegeben werden.
Zubehör
Überprüfen Sie das Vorhandensein der unten angeführten Zubehörteile.
FUNCTION
DISC MENU TITLE MENU
MUTE
S/W LEVEL
TOOLS
RETURN EXIT
INFO
MO/ST
3D SOUND
SOUNDvTuner AUDIO
1 2 3
4 5 6
7 8
0
9POPUP
RECEIVER SLEEP
BD TV
TUNERMEMORY
SUBTITLE
SMART SEARCH
A B C D
EFFECT
HUB
VOL TUNING/ CH
TV SOURCE
RDS DISPLAY
PTY- PTY SEARCH PTY+
TA
FULL SCREEN REPEATHOME
Videokabel UKW-Antenne Benutzerhandbuch
(Für Netzkabel)
iPod-Docking-Station Ferritringkern Fernbedienung/AAA-Batterien
Die Abbildungen in dieser Anleitung dienen nur als Referenz und können sich vom aktuellen Produkt unterscheiden.
Es kann eine Gebühr erhoben werden, wenn:
a. Ein Ingenieur auf Ihre Anfrage bestellt wird und am Gerät kein Defekt vorliegt (z. B. weil Sie diese Bedienungsanleitung nicht gelesen haben)
b. Sie das Gerät in einer Reparaturwerkstatt abgegeben haben und am Gerät kein Defekt vorliegt (z. B. weil Sie diese Bedienungsanleitung nicht gelesen haben).
Die Höhe dieser Gebühr wird Ihnen mitgeteilt, bevor irgendwelche Arbeiten durchgeführt werden oder der Hausbesuch erfolgt.
HT-E5200_XU_GER-0223.indd 11HT-E5200_XU_GER-0223.indd 11 2012-02-23 오후 3:00:452012-02-23 오후 3:00:45

| 12 Deutsch
Erste SchritteBeschreibung
5V 500mA
ANZEIGE NETZSCHALTERDISK-LADE USB-HOST
STOPP ÖFFNEN/SCHLIESSEN
LAUTSTÄRKEREGLER
WIEDERGABE/PAUSE ENTER
FUNKTION
FERNBEDIENUNGSSENSOR
| HINWEIS | � Um die Software des Geräts über den USB-Anschluss zu aktualisieren, benötigen Sie ein USB-Speicher Stick.
� Wenn das Gerät das Blu-ray-Disk Menü anzeigt, kann der Film nicht durch Drücken der 6 Taste am Gerät oder auf der
Fernbedienung gestartet werden. Um den Film abzuspielen müssen Sie Film Wiedergabe oder Start im Menü der Disk
auswählen und anschließend die E Taste drücken.
Rückseite
LANiPod
IMPE
DANC
E : 3
SPEAKERS OUT
IMPE
DANC
E : 3
SPEAKERS OUT
DIGITALAUDIO IN
OPTICAL
VIDEOOUT
AUXIN
FM ANTHDMI IN 21HDMI OUT
DIGITALAUDIO IN
OPTICAL
VIDEOOUT
AUXIN
FM ANTHDMI IN 21HDMI OUTLANiPod
NETZWERKANSCHLUSS
iPod
LÜFTER
EXTERNER DIGITAL AUDIO EINGANG
(OPTISCH)HDMI-EINGANG
HDMI-AUSGANG
UKW-ANTENNE
LAUTSPRECHER-AUSGÄNGE
VIDEOAUSGANGAUX EINGANG
| HINWEIS | � Beim Aufstellen des Geräts ist ein Abstand von mindestens 10 cm auf allen Seiten einzuhalten um eine ausreichende
Belüftung zu gewährleisten. Halten Sie den Lüfter und die Belüftungsöffnungen stets frei.
HT-E5200_XU_GER-0223.indd 12HT-E5200_XU_GER-0223.indd 12 2012-02-23 오후 3:00:532012-02-23 오후 3:00:53

Deutsch 13 |
02Erste Schritte
Fernbedienung
Übersicht der Fernbedienung
FUNCTION
DISC MENU TITLE MENU
MUTE
S/W LEVEL
TOOLS
RETURN EXIT
INFO
MO/ST
3D SOUND
SOUNDvTuner AUDIO
1 2 3
4 5 6
7 8
0
9POPUP
RECEIVER SLEEP
BD TV
TUNERMEMORY
SUBTITLE
SMART SEARCH
A B C D
EFFECT
HUB
VOL TUNING/ CH
TV SOURCE
RDS DISPLAY
PTY- PTY SEARCH PTY+
TA
FULL SCREEN REPEATHOME
Schaltet das Heimkino-System ein/aus.
Um in den Heimkino-Modus zu wechseln, die BD-Taste drücken.
Drücken Sie die Nummerntasten, um die Optionen zu bedienen.
Zum Vorwärts- oder Rückwärtsspringen.
Lautstärke regeln.
Damit schalten Sie den Ton
vorübergehend aus.
Drücken Sie diese Taste um das Vollfernsehbildschirm anzuzeigen.
Drücken, um den Home Bildschirm aufzurufen.
Zum Auswählen der Bildschirmmenüpunkte und zum
Ändern der Menüwerte.
Rückkehr zum vorherigen Menü.
Diese Tasten werden zur Auswahl der verschiedenen Menüs auf dem
Gerät und auch mehrere Blu-ray-Diskfunktionen.
Zum Ansehen des Diskmenüs diese Taste drücken.
Mit dieser Taste wird das Extras-Menü geöffnet.
Drücken, um Smart Hub zu verwenden.
Auswahl der Audiosprache für die Disk-Wiedergabe.
Um in den TV-Modus zu wechseln, die TV-Taste drücken.
Zum Wiedergeben/Beenden einer Disk.
Drücken, um Inhalte zu suchen.
Diese Taste drücken um den vTuner zu verwenden.
Drücken, um Klangeffekte zu
aktivieren.
Dient zum Einstellen einer Schlummerzeit, nach der das Gerät abgeschaltet wird.
Drücken, um den Modus der Blu-ray zu wählen (HDMI1, AUX, BD/DVD, usw.).oder Zum Auswählen des Fernsehvideomodus die Taste TV drücken.
Stellt MONO oder STEREO für Radiosendungen ein.
Zum Vorwärts- oder Rückwärtsspringen.
Zum Anhalten der Wiedergabe
einer Disk drücken.
Suche nach verfügbaren UKW-Sendern und Kanäle umschalten.
Dient zur Regelung der Lautstärke des Subwoofers.
Mit dieser Taste wird das Popup-Menü/Titelmenü geöffnet.
Drücken, um das Menü zu verlassen.
Dient der Anzeige der Wiedergabe
–Information einer Blu-ray/DVD-
Disk.
Dient zum Einstellen einer gespeicherten Radiofrequenz.
Ermöglicht Ihnen die Wiederholung eines Titels, eines Kapitels, eines Tracks oder einer Disk.
Drücken, um ein gewöhnliches 2D Video im 3D Modus zu erleben.
Auswahl der Untertitelsprache für die Disk-Wiedergabe.
Drücken, um den 3D Klangeffekt zu aktivieren.
Zum Öffnen und Schließen des
Diskfachs.
Verwenden Sie die RDS-Funktion für den UKW-Senderempfang.
HT-E5200_XU_GER-0223.indd 13HT-E5200_XU_GER-0223.indd 13 2012-02-23 오후 3:00:562012-02-23 오후 3:00:56

| 14 Deutsch
Erste SchritteBatterien in die Fernbedienung einsetzen
Batteriegröße: AAA
21
| HINWEIS | � Achten Sie darauf, dass der "+" und "-" Pol der Batterien
wie im Batteriefach angezeigt ausgerichtet sind.
� Bei normaler Nutzung des Fernsehers halten die Batterien
ungefähr ein Jahr.
� Die Fernbedienung hat eine Reichweite von bis zu ca. 7
Metern Luftlinie.
Fernbedienung einrichtenSie können mit dieser Fernbedienung bestimmte
Funktionen Ihres Fernsehgeräts steuern.
Wenn Sie das Fernsehgerät mit der Fernbedienung steuern1 . Drücken Sie die Taste TV, um die Fernbedienung
in den TV-Modus zu setzen.
2 . Schalten Sie Ihr Fernsehgerät ein.
3 . Halten Sie die NETZSCHALTER Taste gedrückt,
und geben Sie den Code für die entsprechende
Marke Ihres Fernsehgeräts ein.
• Wenn in der Tabelle mehr als ein Code für Ihr
Fernsehgerät angegeben ist, geben Sie die
Codes nacheinander ein, um herauszufinden,
welcher Code der richtige ist.
• Beispiel : Bei einem Samsung FernsehgerätDie NETZSCHALTER Taste gedrückt halten und
mit Hilfe der Nummerntasten 00 eingeben. Wenn
dieser Code nicht funktioniert, versuchen Sie 15
und anschließend 16 usw.
4 . Wenn sich das Fernsehgerät ausschaltet, ist die
Einstellung abgeschlossen.
• Sie können nun zur Bedienung des
Fernsehgeräts die Tasten TV NETZSCHALTER,
LAUTSTÄRKE, CHANNEL und die
Nummerntasten verwenden.
| HINWEIS | � Bei einigen Fernsehgeräten funktioniert die Fernbedienung
möglicherweise nicht. Außerdem sind bei einigen Fernsehgeräten
möglicherweise nicht alle Funktionen verfügbar.
� Standardmäßig ist die Fernbedienung für die Steuerung
von Samsung-Fernsehgeräten vorprogrammiert.
Bediencodes für Fernsehgeräte
Marke CodeAdmiral
(M.Wards)56, 57, 58
A Mark 01, 15
Anam
01, 02, 03, 04, 05,
06, 07, 08, 09, 10, 11,
12, 13, 14
AOC 01, 18, 40, 48
Bell & Howell (M.Wards)
57, 58, 81
Brocsonic 59, 60
Candle 18
Cetronic 03
Citizen 03, 18, 25
Cinema 97
Classic 03
Concerto 18
Contec 46
Coronado 15
Craig 03, 05, 61, 82, 83, 84
Croslex 62
Crown 03
Curtis Mates 59, 61, 63
CXC 03
Daewoo
02, 03, 04, 15, 16, 17, 18, 19, 20, 21, 22, 23,
24, 25, 26, 27, 28, 29, 30, 32, 34, 35, 36,
48, 59, 90
Daytron 40
Dynasty 03
Emerson03, 15, 40, 46, 59, 61,
64, 82, 83, 84, 85
Fisher 19, 65
Funai 03
Futuretech 03
General Electric (GE)
06, 40, 56, 59, 66, 67, 68
Hall Mark 40
Hitachi 15, 18, 50, 59, 69
Inkel 45
JC Penny 56, 59, 67, 86
JVC 70
KTV 59, 61, 87, 88
KEC 03, 15, 40
KMC 15
LG (Goldstar)01, 15, 16, 17, 37, 38, 39, 40, 41, 42, 43, 44
Luxman 18
LXI (Sears)19, 54, 56, 59, 60, 62,
63, 65, 71
Magnavox15, 17, 18, 48, 54, 59,
60, 62, 72, 89
Marantz 40, 54
Matsui 54
MGA 18, 40
Marke CodeMitsubishi/MGA 18, 40, 59, 60, 75
MTC 18
NEC 18, 19, 20, 40, 59, 60
Nikei 03
Onking 03
Onwa 03
Panasonic06, 07, 08, 09, 54, 66,
67, 73, 74
Penney 18
Philco03, 15, 17, 18, 48, 54,
59, 62, 69, 90
Philips15, 17, 18, 40, 48,
54, 62, 72
Pioneer 63, 66, 80, 91
Portland 15, 18, 59
Proton 40
Quasar 06, 66, 67
Radio Shack 17, 48, 56, 60, 61, 75
RCA/Proscan18, 59, 67, 76, 77, 78,
92, 93, 94
Realistic 03, 19
Sampo 40
Samsung00, 15, 16, 17, 40, 43,
46, 47, 48, 49,59, 60, 98
Sanyo 19, 61, 65
Scott 03, 40, 60, 61
Sears 15, 18, 19
Sharp 15, 57, 64
Signature 2000 (M.Wards)
57, 58
Sony 50, 51, 52, 53, 55
Soundesign 03, 40
Spectricon 01
SSS 18
Sylvania18, 40, 48, 54, 59,
60, 62
Symphonic 61, 95, 96
Tatung 06
Techwood 18
Teknika 03, 15, 18, 25
TMK 18, 40
Toshiba 19, 57, 63, 71
Vidtech 18
Videch 59, 60, 69
Wards15, 17, 18, 40, 48,
54, 60, 64
Yamaha 18
York 40
Yupiteru 03
Zenith 58, 79
Zonda 01
Dongyang 03, 54
HT-E5200_XU_GER-0223.indd 14HT-E5200_XU_GER-0223.indd 14 2012-02-23 오후 3:01:012012-02-23 오후 3:01:01

Deutsch 15 |
03Anschlüsse
AnschlüsseIn diesem Kapitel werden verschiedene Methoden erläutert, mit denen dieses Gerät an andere externe Komponenten angeschlossen werden kann.Bevor Sie das Hauptgerät installieren oder an einer anderen Stelle aufstellen, müssen Sie es ausschalten
und den Netzstecker ziehen.
Anbringen des Ferrit Ringkerns am Netzkabel des Hauptgeräts
Das Anbringen eines Ferrit Ringkerns am Netzkabel des Hauptgeräts hilft dabei, Störungen durch Radiofunksignale zu unterbinden.
1. Am Befestigungsband des Ferrit Ringkerns ziehen,
um diesen zu öffnen.
2. Machen Sie mit dem Netzkabel des Hauptgeräts
zwei Schlingen.
3. Bringen Sie den Ferrit Ringkern - wie abgebildet -
am Netzkabel des Hauptgeräts an und drücken Sie
solange, bis er einrastet.
Anschließen der Lautsprecher
LANiPod
IMPE
DANC
E : 3
SPEAKERS OUT
HDMI O
FrontlautsprecherPlatzieren Sie diese Lautsprecher vor Ihrer Hörposition so, dass sie nach innen zeigen (in einem
Winkel von ca. 45°) und auf Sie ausgerichtet sind. Platzieren Sie die Lautsprecher so, dass sich die
Hochtöner auf Ohrhöhe befinden.
Subwoofer Die Position des Subwoofers ist nicht wichtig. Sie können ihn beliebig platzieren.
Lautsprecherkomponenten
SUBWOOFER LAUTSPRECHERKABELFRONT
(L) (R)
Platzierung des Hauptgeräts
Platzieren Sie das Hauptgerät auf einem Regal, einer Kommode oder unter dem Fernsehtisch.
Auswahl der Hörposition
Die Hörposition sollte sich in einem Abstand vom Fernsehgerät befinden, die das 2,5 bis 3-fache der Größe des Bildschirms beträgt. Wenn Sie zum Beispiel über einen 46 Zoll Bildschirm verfügen, sollte sich die Hörposition 2,92 bis 3,5 m vom Bildschirm entfernt befinden.
Front (L)
Front (R)
Gerät
Subwoofer
HT-E5200_XU_GER-0223.indd 15HT-E5200_XU_GER-0223.indd 15 2012-02-23 오후 3:01:062012-02-23 오후 3:01:06

| 16 Deutsch
AnschlüsseAnschließen der Lautsprecher
1. Ordnen Sie jedes Lautsprecherkabel dem entsprechenden Lautsprecher
zu, indem Sie die mit einer bestimmten Farbe gekennzeichneten Stecker
den farbigen Aufklebern am Boden eines jeden Lautsprechers zuordnen.
2. Anschließen der Lautsprecherkabel an die Lautsprecher:
a. Drücken Sie die rote Anschlussklemme auf der Rückseite des
Lautsprechers herunter, führen Sie das rote Kabel ein und lassen Sie
die Klemme los.
b. Drücken Sie die schwarze Anschlussklemme auf der Rückseite des
Lautsprechers herunter, führen Sie das schwarze Kabel ein und lassen
Sie die Klemme los.
3. Schließen Sie die Stecker der Lautsprecherkabel auf der Rückseite des
Geräts an, wobei die Farbe des Steckers mit der Farbe der Anschlussbuchse übereinstimmen muss.
LANiPod
IMPE
DANC
E : 3
SPEAKERS OUT
IMPE
DANC
E : 3
SPEAKERS OUT
Front-Lautsprecher (R)
Subwoofer
Front-Lautsprecher (L)
| ACHTUNG | � Wenn Sie die Lautsprecher an der Wand befestigen möchten, bringen Sie die Schrauben oder Nägel fest in der Wand an und verwenden
Sie zum Aufhängen die Öffnungen auf der Rückseite der Lautsprecher. Das Zubehör (Schrauben oder Nägel) für die Wandinstallation ist
nicht im Lieferumfang enthalten.
� Achten Sie darauf, dass Kinder nicht mit den Lautsprechern oder in deren Nähe spielen. Sie können durch umkippende Lautsprecher
verletzt werden.
� Stellen Sie beim Anschluss der Lautsprecherkabel an die Lautsprecher sicher, dass die Polarität (+/ -) korrekt ist.
� Halten Sie den Subwoofer außerhalb der Reichweite von Kindern. Verhindern Sie, dass Kinder ihre Hände oder Fremdkörper in die
Bassreflexöffnung des Subwoofers einführen.
� Hängen Sie den Subwoofer nicht an der Bassreflexöffnung an der Wand auf.
| HINWEIS | � Wenn Sie einen Lautsprecher in der Nähe des Fernsehers aufstellen, kann die Farbwiedergabe auf dem Bildschirm durch die von den
Lautsprechern erzeugten magnetischen Felder gestört werden.
Schwarz Rot
HT-E5200_XU_GER-0223.indd 16HT-E5200_XU_GER-0223.indd 16 2012-02-23 오후 3:01:162012-02-23 오후 3:01:16

Deutsch 17 |
03Anschlüsse
Zum Anschließen der UKW-Antenne
LANiPod
IMPE
DANC
E : 3
SPEAKERS OUT
OPTICAL
VIDEOOUT
AUXIN
DIGITALAUDIO IN
HDMI IN1 2HDMI OUTLANiPod
IMPE
DANC
E : 3
SPEAKERS OUT
OPTICAL
VIDEOOUTOUT
AUXIN
DIGITALAUDIO INN
HDMI IN1 2HDMI OUT FM ANT
UKW-Antenne (mitgeliefert)
1 . Verbinden Sie die mitgelieferte UKW-Antenne mit dem UKW-Anschluss.
2 . Bewegen Sie den Antennendraht langsam hin und her, bis Sie einen guten Empfang haben.
Befestigen Sie den Draht an der Wand oder einer festen Fläche.
| HINWEIS | � Dieses Gerät empfängt keine MW-Sender.
Anschließen eines iPods/iPhones
Anschluss über USB-Kabel
Schließen Sie den iPod/iPhone mit Hilfe des USB-
Kabels an den USB-Anschluss auf der Vorderseite
des Geräts an.
Anschluss über die Docking-Station
Für die Wiedergabe von Videos muss ein
Composite Kabel verwendet werden.
LANiPod
IMPE
DANC
E : 3
UT
OPTICAL
VIDEOOUT
AUXIN
DIGITALAUDIO IN
FM ANTHDMI IN1 2HDMI OUTLAN
IMPE
DANC
E : 3
UT
OPTICAL
VIDEOOUTOU
AUXIN
DIGITALAUDIO INNN
FM ANTHDMI IN1 2HDMI OUT
iPod
| HINWEIS | � Schließen Sie das Kabel der Docking-Station so an, dass das „" Symbol nach oben zeigt.
5V 500mA
5V 500mA
HT-E5200_XU_GER-0223.indd 17HT-E5200_XU_GER-0223.indd 17 2012-02-23 오후 3:01:192012-02-23 오후 3:01:19

| 18 Deutsch
AnschlüsseAnschluss an ein Fernsehgerät
Wählen Sie entweder die Methode 1 oder Methode 2
• Wenn Sie die Fernbedienung des Geräts für die Bedienung Ihres Fernsehgeräts eingestellt haben, die TV SOURCE Taste
auf der Fernbedienung drücken und anschließend die entsprechende externe Quelle aus der Liste des Fernsehgeräts
auswählen (HDMI, Video In, usw.), um Video über das Heimkino abzuspielen.
HDMI IN VIDEO IN
OPTICAL
VIDEOOUT
AUXIN
DIGITALAUDIO IN
FM ANTHDMI IN1 2HDMI OUT
LANiPod
IMPE
DANC
E : 3
SPEAKERS OUT
OPTICAL
VIDEOOUT
AUXIN
DIGITALAUDIO IN
FM ANTHDMI IN1 2HDMI OUT
Methode 1Methode 2(Kabel nicht im Lieferumfang enthalten)
Methode 1 Anschluss an ein Fernsehgerät mit einem HDMI-Kabel- Beste Qualität (Empfohlen)
Schließen Sie ein HDMI-Kabel (nicht mitgeliefert) an den HDMI OUT Ausgang auf der Rückseite des
Geräts und an den HDMI IN Eingang an Ihrem Fernsehgerät an.
Methode 2 Anschluss an ein Fernsehgerät mit einem Videokabel - Gute QualitätVerbinden Sie mit Hilfe des beiliegenden Videokabels den Videoausgang (VIDEO OUT) an der Rückseite
des Hauptgeräts mit dem Videoeingang (VIDEO IN) Ihres Fernsehgeräts.
| HINWEIS | � Der VIDEO OUT Anschluss stellt immer eine Auflösung von 576i/480i bereit, unabhängig von der im Setup-Menü
eingestellten Auflösung.
� Schließen Sie die Einheit nicht über einen Videorekorder an. Videosignale, die über Videorekorder empfangen werden,
können durch Urheberschutzsysteme beeinträchtigt werden, wodurch das Bild am Fernsehgerät verzerrt erscheint.
HT-E5200_XU_GER-0223.indd 18HT-E5200_XU_GER-0223.indd 18 2012-02-23 오후 3:01:242012-02-23 오후 3:01:24

Deutsch 19 |
03Anschlüsse
Externe Geräte anschließen
Um den richtigen Modus für ein externes Gerät zu wählen, die FUNCTION Taste drücken. Durch wiederholtes
Drücken, wird der Modus in folgender Reihenfolge umgeschaltet :
BD/DVD � D. IN � AUX � R.IPOD �HDMI1 � HDMI2 � FM� BT
OPTICAL
VIDEOOUT
AUXIN
DIGITALAUDIO IN
FM ANTHDMI IN1 2
AUDIO OUTHDMI OUT OPTICAL OUT
LANiPod
IMPE
DANC
E : 3
SPEAKERS OUT
OPTICAL
VIDEOOUT
AUXIN
DIGITALAUDIO IN
FM ANTHDMI IN1 2HDMI OUT
R Rot
W Weiß
Methode 1Methode 2 Methode 3
Externe Geräte
(Kabel nicht im Lieferumfang enthalten)
(Kabel nicht im Lieferumfang enthalten)
(Kabel nicht im Lieferumfang enthalten)
Methode 1 HDMI-EINGANG : Anschluss eines externen Geräts mit einem HDMI-Kabel
Verbinden Sie ein HDMI-Kabel (nicht mitgeliefert) über den HDMI-Eingang (HDMI IN) an der Rückseite des Geräts
mit dem HDMI-Ausgang (HDMI OUT) Ihres Digitalgeräts. Wählen Sie den HDMI1 oder HDMI2 Modus.
Methode 2 OPTISCHER : Anschließen eines externen Digitalgeräts
Für den Anschluss von Digitalgeräten mit digitaler Audioausgabe, wie Kabelboxen und Satellitenempfänger
(Set-Top-Boxen).
Mit der Hilfe eines optischen Kabels (nicht mitgeliefert) den optischen Digital Audio Eingang am Gerät mit
dem optischen Digitalausgang am Receiver verbinden.
Wählen Sie den D. IN Modus.
Methode 3 AUX EINGANG : Anschließen eines externen Analoggeräts
Mit Hilfe eines RCA Audiokabels (nicht mitgeliefert) den AUDIO Eingang des Geräts an den AUDIO
Ausgang des externen Analoggeräts anschließen. Wählen Sie den AUX Modus.
• Achten Sie darauf, die farbigen Kabelstecker an die Anschlussbuchsen gleicher Farbe anzuschließen.
| HINWEIS | � Wenn Sie Videobilder über den Kabelanschluss oder den Satellitenempfänger sehen möchten, müssen Sie deren
Videoausgang direkt an das Fernsehgerät anschließen.
� Dieses System unterstützt eine digitale Abtastraten von 32 kHz oder höher von externen digitalen Geräten.
� Dieses System unterstützt nur DTS und Dolby Digital Audio. MPEG Audio, ein Bitstrom Format, wird nicht unterstützt.
HT-E5200_XU_GER-0223.indd 19HT-E5200_XU_GER-0223.indd 19 2012-02-23 오후 3:01:272012-02-23 오후 3:01:27

| 20 Deutsch
AnschlüsseAnschließen an einen Netzwerk Router
Sie können das Gerät mit Hilfe einer der im
Folgenden beschriebenen Methoden mit Ihrem
Netzwerk Router verbinden.
Kabelnetzwerk
LANiPod
IMPE
DANC
E : 3
SPEAKERS OUT
OPTICAL
VIDEOOUT
AUXIN
DIGITALAUDIO IN
FM ANTHDMI IN1 2HDMI OUT
Breitband-Dienste
Breitband-Dienste
Breitbandmodem(mit integriertem Router)
Breitbandmodem
Router
Oder
| HINWEIS | � Der Zugriff auf den Samsung Software-
Aktualisierungsserver ist nicht in jedem Fall möglich.
Dies hängt von Ihrem Router und dem ISP-Vertrag
ab. Weitere Informationen erhalten Sie von Ihrem ISP
(Internetdienstanbieter).
� Bei Verwendung von DSL muss die Netzwerkverbindung
über einen Router hergestellt werden.
� Um die AllShare Play Funktion nutzen zu können, muss
Ihr PC, wie in der Abbildung links dargestellt, mit einem
Netzwerk verbunden sein.
Sie können eine Kabel- oder WLAN-Verbindung
herstellen.
Wireless-Netzwerk
5V 500mA
Drahtloser IP-Sharer
Breitband-Dienste
| HINWEIS | � Wenn der WLAN-Router die DHCP-Funktion unterstützt,
kann dieses Gerät eine DHCP oder statistische IP-Adresse
für den Aufbau einer Netzwerkverbindung verwenden.
� Stellen Sie Ihren WLAN-Router in den Infrastruktur Modus
ein. Der Ad-hoc Modus wird nicht unterstützt.
� Das Gerät unterstützt nur die folgenden
Verschlüsselungsalgorythmen:
- WEP (OPEN/SHARED), WPA-PSK (TKIP/AES), WPA2-PSK (TKIP/AES)
� Wählen Sie einen freien Kanal für den WLAN-
Router. Wenn der für den WLAN-Router gewählte
Kanal gerade von einem anderen Gerät in der Nähe
verwendet wird, führt dies zu Interferenzen und einer
Kommunikationsstörung.
� Wenn Sie den 802.11n Modus auswählen und den
Verschlüsselungalgorythmus des Routers auf WEP, TKIP
oder TKIP oder TKIP-AES (WPS2Mixed) einstellen, baut
das Gerät gemäß den neuen Wi-Fi Zertifizierungsregeln
keine Verbindung auf.
� In WLAN-Netzwerken kann es je nach
Betriebsbedingungen (AP-Leistung, Entfernung,
Hindernisse, Störungen durch andere Funkgeräte, usw.),
zu Interferenzen kommen.
HT-E5200_XU_GER-0223.indd 20HT-E5200_XU_GER-0223.indd 20 2012-02-23 오후 3:01:292012-02-23 오후 3:01:29

Deutsch 21 |
04Einstellungen
Ersteinstellungen konfigurieren
• Das Home-Menü wird nicht angezeigt wenn die
Ersteinstellungen nicht konfiguriert wurden.
• Die OSD (Bildschirmanzeige) dieses Geräts kann
sich möglicherweise nach Aktualisierung der
Softwareversion ändern.
• Die Schritte für den Zugriff können sich je nach
ausgewähltem Menü unterscheiden.
1 . Schalten Sie das Fernsehgerät ein, nachdem
Sie das Gerät angeschlossen haben und
schalten Sie es ein. Wenn Sie das Gerät
das erste Mal einschalten, zeigt das
Gerät automatisch den Bildschirm für die
Spracheinstellung an.
Initial Settings > On-Screen Language
Select a language for the on-screen displays.
Next
▲
▼
Dansk Nederlands
English Eesti keel
Suomi Français
Deutsch Ελληνικά
Hausa Magyar
Asusu Igbo Italiano
Select English as the on-screen menu language.
2 . Wählen Sie mit Hilfe der ▲▼◄► Tasten auf
der Fernbedienung die gewünschte Sprache
aus und drücken Sie zweimal die E Taste.
Der Start Bildschirm wird angezeigt.
3 . Drücken Sie die E Taste, um mit
der Einrichtung zu beginnen. Der
Netzwerkeinstellung Bildschirm erscheint.
Der nächste Schritt ist die Einr. eines Drahtlosnetzwerks mithilfe eines internen LAN-Adapters.
Zum Verbinden mit einem kabelgebundenen Netzwerk stecken Sie ein Netzwerkkabel ein.
Zurück
Überspr
Weiter
Ersteinstellung > Netzwerkeinstellungen (1/5)
4 . Drücken Sie die E Taste, um die WLAN-
Verbindung des Geräts einzurichten oder
wählen Sie Überspr, und drücken Sie die
E Taste um die Netzwerkeinrichtung zu
überspringen. Wenn Sie Überspr gewählt
haben, fahren Sie bitte mit Schritt 12 fort.
| HINWEIS | � Das Gerät beginnt immer mit der Einrichtung der WLAN-
Verbindung. Wenn Sie eine Kabelnetzwerkverbindung
einrichten möchten, drücken Sie auf Überspr und
fahren Sie mit "Konfigurieren Ihrer Netzwerkverbindung"
auf Seite 29 fort, nachdem Sie die Ersteinstellung
abgeschlossen haben.
� Wenn Sie die Einrichtung der WLAN-Verbindung hier
überspringen, gehen Sie bitte zu "WLAN Netzwerk" auf
Seite 30, um die WLAN-Verbindung zu einem späteren
Zeitpunkt einzurichten.
5 . Das Gerät sucht nach Netzwerken und zeigt
alle verfügbaren WLAN-Netzwerke an.
Ersteinstellung > Netzwerkeinstellungen (2/5)
Aktual.
WPS(PBC)
Zurück
Weiter
Überspr
Wählen Sie den drahtl. Router aus d. Liste aus.1 / 4
KIMING_VTOWER
TIASsi-ap
Netzwerk hinzufügen
surlwang5
6 . Wählen Sie mit Hilfe der ▲▼ Tasten einen
Router aus und drücken Sie anschließend die
E Taste. Die Weiter Taste ist markiert.
7 . Drücken Sie die E Taste, um fortzufahren.
Der Sicherheitsschlüssel Bildschirm erscheint.
| HINWEIS | � Wenn Sie über einen WPS(PBC) fähigen Router verfügen,
drücken Sie stattdessen WPS(PBC), drücken Sie die
E Taste und folgen Sie den Anweisungen auf dem
Bildschirm. Gehen Sie anschließend zu Schritt 10 über.
Ersteinstellung > Netzwerkeinstellungen (4/5)
Zurück
WPS-PIN
Überspr
Weiter
Sicherh.-Schl. eing.
0 einge.
A/a Leertaste
a g m s
e k q w
c i o u
1 4 7 y
b h n t
f l r x
d j p v
2 5 8 z
3 6 9 0
-
8 . Geben Sie Ihren Netzwerk
Sicherheitsschlüssel ein. Nach Abschluss
die ▲▼◄► Tasten drücken, um Weiter auszuwählen und anschließend die E Taste
drücken.
Einstellungen
HT-E5200_XU_GER-0223.indd 21HT-E5200_XU_GER-0223.indd 21 2012-02-23 오후 3:01:362012-02-23 오후 3:01:36

| 22 Deutsch
Einstellungen| HINWEIS |
� Geben Sie die Nummern mit Hilfe der Tasten auf der
Fernbedienung ein.
� Geben Sie die Buchstaben mit Hilfe der ▲▼◄►Tasten ein
und drücken Sie anschließend die E Taste.
� Um Großbuchstaben einzugeben (oder um zu Kleinbuchstaben
zurückzukehren), die A/a Taste wählen und dann die E
Taste drücken.
� Um Symbole und Satzzeichen einzugeben, auswählen und
anschließend die E Taste drücken. Um erneut Buchstaben
anzuzeigen, die wählen und dann die E Taste drücken.
9 . Wenn der Verbindungsaufbau erfolgreich war,
wird der Bildschirm Verbindung hergestellt
angezeigt. Wählen Sie Weiter, und drücken
Sie anschließend die E Taste. Der Software-
Update Bildschirm wird eingeblendet.
| HINWEIS | � Wenn der Verbindungsaufbau fehlgeschlagen ist, Weiter
auswählen und anschließend die E Taste drücken.
Nachdem die Ersteinstellungen vorgenommen wurden,
gehen Sie zu "WLAN Netzwerk" auf Seite 30, um die
WLAN-Netzwerkverbindung des Geräts einzurichten.
10 . Um die Software zu aktualisieren, Jetzt aktualisieren wählen und anschließend die
E Taste drücken. Um die Aktualisierung zu
überspringen, Später aktualisieren, wählen
und anschließend die E Taste drücken und mit
Schritt 12 fortfahren.
| HINWEIS | � Wenn Sie die Netzwerkeinrichtung übersprungen haben,
müssen Sie die Software Aktualisierung ebenfalls überspringen.
11 . Wenn eine Software Aktualisierung zur Verfügung
steht, lädt das Gerät die Aktualisierung herunter
und installiert diese. Dies kann einige Zeit
in Anspruch nehmen. Wenn keine Software
Aktualisierung verfügbar ist, erscheint die Meldung
"Es sind keine neuen Softwareaktualisierungen vorhanden. Sie verfügen über die aktuellste Version.". Drücken Sie dann die E Taste. Der
TV Bildformat Bildschirm wird angezeigt.
Ersteinstellung > TV-Format
Zurück
Weiter
Stellen Sie den Typ des angeschlossenen Fernsehgeräts ein.
16:9 Original
16:9 Voll
4:3 Letterbox
4:3 Passend
Wählen, wenn ein 16:9-Fernsehgerät angeschlossen wird. Inhalte im 4:3-Format werden mit schwarzen Balken am linken und rechten Rand angezeigt.
12 . Wählen Sie mit den Tasten ▲▼ das gewünschte
Bildformat Ihres Bildschirms aus, und drücken
Sie die ETaste. Wählen Sie Weiter aus, und
drücken Sie dann die E Taste.
Es stehen vier Auswahlmöglichkeiten bereit:
16:9 Original - Für Breitbild Fernsehgeräte. Zeigt
Breitbandbilder im originalen 16:9 Format und 4:3
Bilder (das alte Standardformat) im 4:3 Pillarbox
Format mit schwarzen Rändern auf der linken und
rechten Seite an.
16:9 Voll - Für Breitbild Fernsehgeräte. Zeigt Breitbild
Bilder im originalen 16:9 Format an und vergrößert
Bilder im 4:3 Format so, dass der 16:9 Bildschirm
ausgefüllt wird.
4:3 Letterbox - Für ältere analog Fernsehgeräte
mit Standardbildschirm. Zeigt Bilder im 4:3 Format
im Vollbildmodus und Bilder mit 16:9 Format im
Letterbox Format an, bei dem das Seitenverhältnis
von 16:9 beibehalten wird, jedoch über und unter
dem Bild schwarze Ränder angezeigt werden.
4:3 Passend - Für ältere analog Fernsehgeräte mit
Standardbildschirm. Zeigt Bilder im 4:3 Format im
Vollbildmodus und Bilder im 16:9 Forma im Pan-Scan
Format an, bei dem der linke und rechte Rand des
Bildes abgeschnitten und die Mitte des Bildes vertikal
vergrößert wird.
Ersteinstellung > Abgeschl.
Setup abgeschlossen.
OK
Smart Hub
Bildschirmsprache
Netzwerkeinstellungen
Software-Update -
TV-Bildformat
Drücken Sie "Smart Hub", um eine Vielfalt an Internetinhalten zu nutz.
13 . Der Setup abgeschlossen Bildschirm
wird angezeigt. Überprüfen Sie, ob die
Einstellungen korrekt sind. Wählen Sie OK
und drücken Sie die E Taste. Der Home
Bildschirm wird angezeigt.
| HINWEIS | � Wenn Sie den Bildschirm mit den Ersteinstellungen erneut
aufrufen wollen, um Änderungen vorzunehmen, müssen Sie
die Zurücksetzen Option auswählen. (Siehe Seite 28.)
� Wenn Sie ein HDMI-Kabel verwenden, um das Gerät an ein
Anynet+ (HDMI-CEC)-kompatibles Samsung-Fernsehgerät
anzuschließen und 1.) Die Anynet+ (HDMI-CEC) Funktion am
Fernsehgerät und dem Gerät auf Ein gestellt haben und 2.)
Das Fernsehgerät auf eine vom Gerät unterstützte Sprache
eingestellt haben, stellt das Gerät diese Sprache automatisch
als die bevorzugte Sprache ein.
HT-E5200_XU_GER-0223.indd 22HT-E5200_XU_GER-0223.indd 22 2012-02-23 오후 3:01:412012-02-23 오후 3:01:41

Deutsch 23 |
04Einstellungen
Der Home Bildschirm
Smart Hub Funktion Einstell.
d WPS(PBC) 5
4
3
1
2
Wiedergabe von Videos, Fotos oder Musik von Disk oder von angeschlossenen Geräten
AllShare Play
1
Smart Hub. Startet Smart Hub. Über Smart Hub
können Sie auf YouTube, Spiele oder andere
Anwendungen zugreifen.
2
AllShare Play. Gibt Videos, Fotos oder Musik von
einer Disk, einem USB-Speichergerät, PC oder
einem mobilen Gerät wieder.
3 Funktion. Dient zur Auswahl der Audio/Videoquelle
4Einstell.. Passt verschiedene Funktionen an Ihre
persönlichen Vorlieben an.
5
Zeigt die farbigen Tasten auf der Fernbedienung
an, die Sie für den Zugriff oder die Ausführung von
Funktionen verwenden können.
Auswahl einer Option auf dem Home Bildschirm
1 . Um eine Option auf dem Home Bildschirm
auszuwählen, müssen Sie mit Hilfe der
◄► Tasten den Cursor bewegen, bis
die gewünschte Option markiert ist und
anschließend die E Taste drücken.
Zugriff auf den Einstellungen Bildschirm
1 . Auf dem Home Bildschirm Einstell. auswählen und anschließend die E Taste
drücken. Der Einstellungen Bildschirm wird
angezeigt.
Anzeige
Audio-Opt.
Netzwerk
System
Unterstützung
3D-Einstell.
TV-Format 16:9 Original
Smart Hub-Bildschirmgröße Größe 3
BD Wise Aus
Auflösung Auto
Film-Bildfrequenz (24 fps) Auto
HDMI-Farbformat Auto
HDMI-Deep Color Auto
Progressiver Modus Auto
2 . Den Zugriff auf die Menüs, Untermenüs
und Optionen, entnehmen Sie bitte der
nachfolgenden Darstellung der Fernbedienung.
| HINWEIS | � Wenn nach Betätigung der Stopp Taste des Geräts das
Gerät länger als 5 Minuten nicht benutzt wird, schaltet sich
automatisch der Bildschirmschoner ein. Wenn sich der
Player länger als 20 Minuten im Bildschirmschonermodus
befindet, wird er automatisch ausgeschaltet.
Im Einstellungen Menü verwendete Fernbedienungstasten
TOOLS
RETURN EXIT
INFO
O/STUNER
FULL SCREEN REPEATHOME
1
2 4
3
1HOME Taste : Drücken, um den Home Bildschirm
aufzurufen.
2 RETURN Taste: Rückkehr zum vorherigen Menü.
3
E (Enter) / RICHTUNGSTASTEN Taste :
~ Mit Hilfe der ▲▼◄► Tasten den Cursor
bewegen oder eine Position auswählen.
~ Drücken Sie die E Taste, um die
ausgewählte Position zu aktivieren oder um
eine Einstellung zu bestätigen.
4 EXIT Taste: Verlassen des Menüs.
| HINWEIS | � Die E Taste auf der Vorderseite des Geräts kann für
denselben Zweck verwendet werden, wie die E Taste
auf der Fernbedienung.
Ausführliche FunktionsinformationenJede Einstellungen Funktion, Menüposition und
individuelle Option wird ausführlich auf dem Bildschirm
erklärt. Um sich eine Erklärung anzeigen zu lassen,
verwenden Sie bitte die ▲▼◄► Tasten, um eine
Funktion, Menüposition oder Option auszuwählen.
Die Erklärung wird für gewöhnlich auf der rechten
Bildschirmseite angezeigt. Eine Kurzbeschreibung
für jede Einstellungen Funktion beginnt auf der
nächsten Seite. Zusätzliche Informationen über
einige der Funktionen befinden sich ebenfalls im
Anhang dieser Anleitung.
HT-E5200_XU_GER-0223.indd 23HT-E5200_XU_GER-0223.indd 23 2012-02-23 오후 3:01:442012-02-23 오후 3:01:44

| 24 Deutsch
EinstellungenEinstellungen Menü Funktionen
Anzeige
3D-Einstell.
Einrichten der 3D Funktionen.
3D Blu-ray-Wiedergabemod.: 3D Blu-ray Playback Mode
(3D Blu-ray-Wiedergabemod.) Sie können auswählen, ob
eine Blu-ray Disk mit 3D-Inhalten im 3D-Modus wiedergeben
soll. Wenn Sie zum Home oder Smart Hub Home Menü
wechseln, während Sie sich im 3D Modus befinden, wird
automatisch in den 2D Modus umgeschaltet.
Bildgröße: Geben Sie die Größe des an das Gerät
angeschlossenen Fernsehgeräts ein. Das Gerät stellt die
3D Ausgabe automatisch auf die Bildschirmgröße des
Fernsehgeräts ein.
TV-FormatMit dieser Funktion kann die Bildausgabe des Geräts an die
Bildschirmgröße Ihres Fernsehgeräts angepasst werden. Siehe
Seite 22 Schritt 12 für eine Beschreibung der Optionen für die
Bildschirmgröße.
Smart Hub-Bildschirmgröße
Mit dieser Funktion könne Sie die optimale Größe des Smart
Hub Bildschirms einstellen.
BD Wise
Wenn Sie ein Samsung Gerät und ein Samsung-Fernsehgerät
mit BD Wise Funktion über HDMI aneinander anschließen und
BD Wise auf beiden Geräten aktiviert ist, gibt das Gerät das
Video mit der Videoauflösung und der Bildfrequenz der BD/
DVD-Disk wieder.
Auflösung
Mit dieser Funktion kann die Auflösung des HDMI Videosignals
auf Auto, 1080p, 1080i, 720p, 576p/480p. eingestellt
werden. Wenn der Anschluss über Composite Kabel erfolgt,
wird nur eine Auflösung von 576i(480i) unterstützt. Die Zahl
zeigt die Anzahl der Zeilen des Videos pro Bild an. Das i und
das p stehen für interlace scan (Zeilensprungverfahren) und
progressive scan (progressive Abtastung). Je mehr Zeilen,
desto höher die Qualität.
Film-Bildfrequenz
(24 fps)
Wenn diese Funktion auf Auto eingestellt wird, wird die HDMI-
Ausgabe des Geräts für eine bessere Bildqualität auf 24 Bilder
pro Sekunde eingestellt, wenn ein 24 fps fähiges Fernsehgerät
angeschlossen ist.
• Voraussetzung für die Nutzung der Film-Bildfrequenz Funktion
ist ein Fernsehgerät, das diese Bildfrequenz unterstützt.
• Film-Bildfrequenz steht nur zur Verfügung, wenn sich
das Gerät im Modus für die HDMI 1080i oder 1080p
Ausgabeauflösung befindet.
HDMI-Farbformat
Hier kann das Farbraumformat für die HDMI-Wiedergabe an
die Möglichkeiten des angeschlossenen Geräts (Fernsehgerät,
Bildschirm, usw.) angepasst werden.
HDMI-Deep Color
Mit dieser Option können Videos über die HDMI OUT Buchse
mit der Deep Colour Farbtiefe wiedergeben werden. Deep
Color bietet genauere Farbwiedergabe mit höherer Farbentiefe.
Progressiver Modus
Mit dieser Funktion kann die Bildqualität bei der Wiedergabe
von DVDs verbessert werden.
HT-E5200_XU_GER-0223.indd 24HT-E5200_XU_GER-0223.indd 24 2012-02-23 오후 3:02:032012-02-23 오후 3:02:03

Deutsch 25 |
04Einstellungen
Audio-Opt. Lautsprechereinst. Sie können die Optionen für die Lautsprecher einstellen.
Equalizer Hier können die Equaliser Einstellungen von Hand konfiguriert werden.
Int. Lautst.Reg.
Sie können das Gerät so einstellen, dass die Lautstärke unverändert
bleibt, wenn ein Szenenwechsel stattfindet oder Sie den Sender
wechseln.
Lautsprecher ausw.
Hier können Sie einstellen, ob Sie die Lautsprecher des Fernsehgeräts
oder die des Heimkinos aktivieren möchten.
Audioausgabekanal
Hier können Sie einstellen, den Ton vom Fernsehgerät auf die
Lautsprecher des Heimkinos umzuleiten. Für diese Funktion werden
eine HDMI-Verbindung und ein Audio Return Channel (ARC)
kompatibles Fernsehgerät benötigt.
• Wann Audio Return Channel auf Ein gestellt ist, muss ein HDMI-
Kabel für den Anschluss des Geräts an das Fernsehgerät verwendet
werden. Der optische Eingang funktioniert dann nicht.
• Wann Audio Return Channel auf Auto gestellt ist, muss ein HDMI-
Kabel für den Anschluss des Geräts an das Fernsehgerät verwendet
werden. ARC oder optischer Eingang werden dann automatisch
gewählt.
Digital-Ausgang
Mit dieser Funktion können Sie den Digital-Ausgang an die
Möglichkeiten des an das Gerät angeschlossenen AV-Receivers
anpassen. Für weitere Einzelheiten, schlagen Sie bitte in der
Auswahltabelle für den Digitalausgang nach. (Siehe Seite 59.)
Dynamikumfangsteuerung
Mit dieser Funktion können Sie die Dynamikumfangsteuerung auf
Dolby Digital, Dolby Digital Plus, und Dolby True HD Audio anwenden.
Auto: Steuert automatisch den Dynamikumfang von Dolby
TrueHD Audio auf Grundlage der Informationen im Dolby TrueHD
Soundtrack. Schaltet ebenfalls die Dynamikumfangsteuerung für
Digital und Dolby Digital Plus ein.
Aus: Der Dynamikumfang wird nicht komprimiert und Sie hören den
Originalklang.
Ein: Schaltet die Dynamikumfangsteuerung für alle drei Dolby
Formate ein. Leisere Töne werden verstärkt und die Lautstärke von
lauten Tönen wird reduziert.
Audio-Sync
Wenn das Gerät an einen Digitalfernsehgerät angeschlossen
ist, können Sie die Audioverzögerung einstellen, so dass die
Audiowiedergabe mit dem Videobild synchron ist. Die Verzögerungszeit
kann 0 und 300 Millisekunden eingestellt werden.
HT-E5200_XU_GER-0223.indd 25HT-E5200_XU_GER-0223.indd 25 2012-02-23 오후 3:02:052012-02-23 오후 3:02:05

| 26 Deutsch
Einstellungen
Netzwerk
NetzwerkeinstellungenFür weitere Informationen über die Netzwerkeinstellungen und
Netzwerkfunktionen siehe "Netzwerke und das Internet" auf Seite
29.
Netzwerkstatus Hier können Sie prüfen, ob eine Verbindung zu einem
Netzwerk und zum Internet hergestellt wurde.
Wi-Fi-Direkt
Mit dieser Funktion können Sie ein Wi-Fi Direkt Gerät an Ihr
Gerät über ein Peer-to-Peer Netzwerk ohne einen WLAN-
Router anschließen. Sie können das Gerät zur Steuerung Ihres
Players verwenden.
Soft-AP
Mit dieser Funktion können Sie andere Arten von Wi-Fi-
Geräten ohne Kabel an das Gerät anschließen. Es ist
erforderlich, einen Sicherheitsschlüssel erstellen, den Sie in
die übrigen Wi-Fi Geräte eingeben müssen, wenn Sie diese an
das Netzwerk anschließen.
AllShare-Einstellungen
Hier können Sie einstellen, ob externe Geräte, wie
Smartphones eine Verbindung zum Gerät aufbauen und die
Inhalte miteinander teilen, oder dieses Gerät steuern dürfen.
Gerätename
Hier können Sie dem Gerät einen Namen zur Identifizierung
geben. Verwenden Sie diesen Namen, um dieses Gerät zu
identifizieren, wenn Sie externe Wi-Fi Geräte (Smartphones,
Tablets, usw.) an dieses Gerät anschließen.
BD-Live-Einstell.
Hier können Sie die Internetverbindung für den BD-Live Dienst
erlauben, einschränken oder untersagen.
HT-E5200_XU_GER-0223.indd 26HT-E5200_XU_GER-0223.indd 26 2012-02-23 오후 3:02:072012-02-23 오후 3:02:07

Deutsch 27 |
04Einstellungen
System Ersteinstellung Mit dieser Funktion können Sie die Ersteinstellungen erneut
konfigurieren. Siehe Seite 21 für weitere Informationen.
Gerätemanager
Sie können eine USB-Tastatur oder eine Maus an den USB-
Anschluss auf der Vorderseite des Geräts anschließen.
Tastatureinstell.: Hier können die Einstellungen für eine
an das Gerät angeschlossene kabellose USB-Tastatur
vorgenommen werden.
| HINWEIS | � Sie können die Tastatur nur dann verwenden, wenn ein QWERTY
Tastatur Bildschirm oder Fenster im Webbrowser erscheint.
Mauseinstellungen: Hier können die Einstellungen
für eine an das Gerät angeschlossene kabellose Maus
vorgenommen werden. Sie können das Menü des Geräts
mit der Maus auf die gleiche Weise bedienen, wie Sie es
vom PC gewöhnt sind.
Das Menü des Geräts mit der Maus bedienen:
1 . Schließen Sie die USB-Maus an das Gerät an.
2 . Klicken Sie mit der Standardtaste, die Sie in den
Mauseinstellungen eingestellt haben. Das Einfache Menü
wird angezeigt.
3 . Wählen Sie die gewünschten Menüoptionen aus.
| HINWEIS | � Nicht alle USB HID Tastaturen und Mäuse sind mit Ihrem Gerät kompatibel.
� Einige Tasten der HID Tastatur können unter Umständen nicht funktionieren.
� Kabel USB-Tastaturen werden nicht unterstützt.
� Einige Anwendungen werden unter Umständen nicht unterstützt.
� Falls die kabellose Tastatur nicht funktioniert, platzieren Sie sie näher am
Gerät.
Anynet+(HDMI-CEC)
Bei Anynet+ handelt es sich um eine nützliche Funktion, die
den vernetzten Betrieb mit anderen Samsung Geräten zur
Verfügung stellt, die über die Anynet+ Funktion verfügen.
Um diese Funktion zu nutzen, müssen Sie dieses Gerät mit
Hilfe eines HDMI-Kabels an ein Samsung Fernsehgerät mit
Anynet+ Funktion anschließen.
Sprache
Sie können die Sprache auswählen in der das Bildschirmmenü
Menü, Disk Menü, usw. angezeigt werden soll.
• Die Sprache, die Sie für das Diskmenü, Disk Audio oder die
Untertitel ausgewählt haben erscheint nur, wenn sie von der
Disk unterstützt wird.
HT-E5200_XU_GER-0223.indd 27HT-E5200_XU_GER-0223.indd 27 2012-02-23 오후 3:02:082012-02-23 오후 3:02:08

| 28 Deutsch
Einstellungen
Sicherheit
Die voreingestellte PIN lautet 0000. Geben Sei die
voreingestellte PIN für den Zugriff auf die Sicherheitsfunktion
ein, wenn Sie keine eigenes Passwort erstellt haben.
BD-Sicherungsstufe: Verhindert die Wiedergabe von Blu-
ray-Disks mit festgelegter Altersbeschränkung, bis die PIN
eingegeben wurde.
DVD-Sicherungsstufe: Verhindert die Wiedergabe von
DVDs mit festgelegter Altersbeschränkung, bis die PIN
eingegeben wurde.
PIN ändern: Ändern der 4-stelligen PIN für den Zugriff auf
Sicherheitsfunktionen.
Wenn Sie die PIN vergessen haben1 . Entfernen Sie alle Disks und USB-Speichergeräte.
2 . Drücken Sie die 5 Taste auf dem Bedienfeld und halten
Sie sie für 5 Sekunden oder länger gedrückt.
Alle Einstellungen werden auf die Werkseinstellungen
zurückgesetzt.
| HINWEIS | � Bei der Wiederherstellung der Werkseinstellungen werden alle vom
Benutzer gespeicherten BD-Daten gelöscht.
Allgemein
Sie können die Bildschirmhelligkeit und die Zeitzone einstellen.
Frontdisplay: Hier können Sie die Helligkeit der
Gerätevorderseite einstellen.
Zeitzone: Sie können die ihrer Region entsprechende
Zeitzone auswählen.
Menütransparenz: Dient zur Einstellung der Transparenz
des Menü Fensters
DivX® Video On Demand
Anzeige von DivX® VOD-Registrierungscodes, um DivX®
VOD-Inhalt zu erwerben und wiedergeben.
Unterstützung Software-Update
Für weitere Informationen über die Software Aktualisierung
siehe "Aktualisieren der Software" auf Seite 33.
Samsung kontaktieren
Hier erhalten Sie Kontaktinformationen, wenn Sie Hilfe für Ihr
Gerät benötigen.
Fernverwaltung
Wenn diese Option aktiviert ist, können die Mitarbeiter des
Samsung Callcenters Probleme aus der Ferne diagnostizieren
und beheben. Hierfür ist eine aktive Internetverbindung
erforderlich. In einigen Ländern steht der Remote Management
Dienst nicht zur Verfügung.
Zurück
Mit Ausnahme der Netzwerk- und Smart Hub Einstellungen
werden alle Einstellungen auf die Voreinstellungen
zurückgesetzt. Das voreingestellte Sicherheitspasswort lautet
0000.
HT-E5200_XU_GER-0223.indd 28HT-E5200_XU_GER-0223.indd 28 2012-02-23 오후 3:02:102012-02-23 오후 3:02:10

Deutsch 29 |
04Einstellungen
Netzwerke und das Internet
Wenn Sie dieses Gerät an ein Netzwerk anschließen,
können Sie auf dem Netzwerk basierende
Anwendungen und Funktionen, wie Smart Hub und
BD-LIVE verwenden sowie die Software des Geräts
aktualisieren. Für weitere Informationen über den
Zugriff und die Verwendung von Internet Diensten,
lesen Sie bitte das Kapitel Netzwerkdienste auf
den Seiten 51-53 in dieser Bedienungsanleitung.
Die Anleitung für die Konfiguration der
Netzwerkverbindung folgt im Anschluss.
Konfigurieren Ihrer NetzwerkverbindungSetzen Sie sich zuerst mit Ihrem Internetanbieter
in Verbindung, um zu erfahren, ob Sie über eine
statische oder dynamische IP-Adresse verfügen.
Wenn es sich um eine dynamische Adresse
handelt und Sie über Kabelnetzwerk oder ein
kabelloses Netzwerk verfügen, empfehlen wir Ihnen
die im Folgenden beschriebenen automatischen
Konfigurationsprozeduren.
Wenn Sie eine Verbindung zu einem Kabelnetzwerk
aufbauen möchten, schließen Sie das Gerät bitte mit
einem Netzwerkkabel an einen Router an, bevor Sie
mit der Konfiguration beginnen.
Wenn Sie eine Verbindung zu einem drahtlosen
Netzwerk herstellen möchten, trennen Sie bitte bevor
Sie beginnen alle Kabelnetzwerkverbindungen ab.
Um mit der Konfiguration der Netzwerkverbindung zu
beginnen, folgen Sie diesen Schritten:
1 . Wählen Sie auf dem Home Bildschirm
Einstell., und drücken Sie die E Taste.
2 . Wählen Sie Netzwerk, und drücken Sie die
E Taste.
3 . Wählen Sie Netzwerkeinstellungen, und
drücken Sie die E Taste.
4 . Fahren Sie mit den Anweisungen für
Kabelnetzwerke fort oder gehen Sie zur Seite
30, um mit den Anweisungen für drahtlose
Netzwerke fortzufahren.
Kabelnetzwerk � Kabelnetzwerk - Automatisch
Nachdem Sie die obigen Schritte 1 bis 3 befolgt haben:
1 . Wählen Sie Start auf dem
Netzwerkeinstellungen Bildschirm und drücken
Sie anschließend die E Taste. Das Gerät
erkennt den Kabelanschluss, überprüft die
Netzwerkverbindung und stellt anschließend
eine Verbindung mit dem Netzwerk her.
� Kabelnetzwerk - ManuellWenn Sie über eine statische IP-Adresse verfügen oder
die automatische Einstellung nicht funktioniert, müssen
Sie die Netzwerkeinstellung manuell durchführen.
Nachdem Sie die obigen Schritte 1 bis 3 befolgt haben:
1 . Wählen Sie Start auf dem Netzwerkeinstellungen
Bildschirm und drücken Sie anschließend die E
Taste. Der Netzwerkstatus-Bildschirm erscheint.
Das Gerät versucht die Netzwerkverbindung zu
prüfen schlägt fehl.
Netzwerkeinstellungen
Verbindung zu kabelgebundenem Netzwerk fehlgeschlagen
Mac-Adresse XX:XX:XX:XX:XX:XXIP-Adresse 0.0.0.0Teilnetzmaske 0.0.0.0Gateway 0.0.0.0DNS-Server 0.0.0.0
Es kann keine Verb. mit d. Netzw. Hergest. werden. Überpr. Sie, ob d. IP in den IP-Einstell. korrekt zugeord. ist. Weitere Infos erhalten Sie von Ihrem Internetdienstanbieter.
Erneut vers.
IP-Einst.
Zurück
OK
2 . Wählen Sie IP-Einst. auf der rechten Seite des
Bildschirms und drücken Sie die E Taste. Der IP-
Einstellungen Bildschirm wird angezeigt.
3 . Gehen Sie zum Feld IP-Modus und setzen Sie es
auf Manuell.4 . Verwenden Sie die Nummerntasten auf
Fernbedienung, um die Netzwerkdaten
einzugeben. Verwenden Sie die ▲▼◄► Tasten
auf der Fernbedienung, um von Eingabefeld zu
Eingabefeld zu wechseln.
| HINWEIS | � Sie können diese Werte bei Ihrem Internetanbieter
erfragen. Diese Werte können Sie ebenfalls auf den
meisten Windows Computern einsehen. Für weitere
Anweisungen, siehe "Abrufen der Werte für die
Netzwerkeinstellungen" auf dieser Seite.
5 . Wenn die Einstellungen abgeschlossen
sind, OK markieren und anschließend die
E Taste drücken. Das Gerät überprüft die
Netzwerkverbindung und stellt anschließend
eine Verbindung zum Netzwerk her.
< Abrufen der Werte für die Netzwerkeinstellungen >Sie können sich die Werte für die Netzwerkeinstellungen
auf den meisten Windows Computern anzeigen lassen.
Um die Werte für die Netzwerkeinstellungen aufzurufen,
folgen Sie bitte diesen Schritten:
• Windows XP
1 . Klicken Sie mit der rechten Maustaste auf das
Netzwerk Symbol in der unteren rechten Ecke des
Arbeitsplatzes.
HT-E5200_XU_GER-0223.indd 29HT-E5200_XU_GER-0223.indd 29 2012-02-23 오후 3:02:122012-02-23 오후 3:02:12

| 30 Deutsch
Einstellungen2 . Klicken Sie auf Status im Pop-up-Menü.
3 . Im angezeigten Dialogfeld klicken Sie auf
Support-Tab.
4 . Auf dem Support-Tab, klicken Sie die Taste
Details.
5 . Die Netzwerkeinstellungen werden angezeigt.
• Windows 7
1 . Klicken Sie auf das Netzwerk Symbol in der
unteren rechten Ecke des Arbeitsplatzes.
2 . In dem Popup-Fenster auf 'Netzwerk- und
Freigabecenter öffnen' klicken.
3 . In dem angezeigten Dialogfenster je nach
Ihrer Netzwerkverbindung auf 'LAN-
Verbindung' oder 'WLAN-Verbindung'
klicken.
4 . Auf dem Support-Tab, klicken Sie die Taste
Details. Die Netzwerkeinstellungen werden
angezeigt.
| HINWEIS | � Je nach Ihrer Windows-Version können die Informationen
unterschiedlich sein.
Wireless-NetzwerkEine drahtlose Netzwerkverbindung kann auf drei
Arten eingerichtet werden:
- WLAN Automatisch
- WLAN Manuell
- WPS(PBC)
Wenn Sie die drahtlose Netzwerkverbindung
konfigurieren, wird jedes über das Gerät
angeschlossene drahtlose Netzwerkgerät oder,
falls zutreffend, die aktuelle Kabelverbindung des
Geräts, getrennt.
� WLAN (Allgemein) - AutomatischBefolgen Sie die Schritte 1 bis 3 unter "Konfigurieren
Ihrer Netzwerkverbindung" auf Seite 29.
1 . Wählen Sie Start auf dem
Netzwerkeinstellungen Bildschirm und
drücken Sie anschließend die E Taste. Das
Gerät sucht nach verfügbaren Netzwerken
und zeigt diese in einer Liste an.
Netzwerkeinstellungen
Aktual.
WPS(PBC)
Zurück
Weiter
Abbr.
Wählen Sie den drahtl. Router aus d. Liste aus.1/10
ELT
JSY
KT_WLAN_C361
Mirhenge_edu
SO070VOIP
iptime23
2 . Wählen Sie das gewünschte Netzwerk aus
und drücken Sie anschließend die E Taste.
3 . Wählen Sie Weiter und drücken Sie
anschließend erneut die E Taste.
4 . Geben Sie im Sicherheitsbildschirm Ihren
Sicherheitscode oder das Passwort ein für das
Netzwerk ein. Geben Sie die Nummern direkt
mit Hilfe der Tasten auf der Fernbedienung
ein. Geben Sie einen Buchstaben ein, indem
Sie ihn mit Hilfe der Pfeiltasten markieren und
anschließend die E Taste drücken.
5 . Nach der Eingabe Weiter auf der rechten
Bildschirmseite wählen. Das Gerät
überprüft die Netzwerkverbindung und stellt
anschließend eine Verbindung zum Netzwerk
her.
| HINWEIS | � Der Sicherheitscode oder das Passwort können Sie
einem der Setup-Bildschirme entnehmen, die Sie bei der
Konfiguration Ihres Modems oder Routers benutzt haben.
� WLAN (Allgemein) - ManuellWenn Sie über eine statische IP-Adresse
verfügen oder die automatische Einstellung nicht
funktioniert, müssen Sie die Netzwerkeinstellung
manuell durchführen.
Befolgen Sie die Schritte 1 bis 3 unter "Konfigurieren
Ihrer Netzwerkverbindung" auf Seite 29.
1 . Wählen Sie Start auf dem Netzwerkeinstellungen
Bildschirm und drücken Sie anschließend die
E Taste. Das Gerät sucht nach verfügbaren
Netzwerken und zeigt diese in einer Liste an.
2 . Wählen Sie das gewünschte Netzwerk oder
Netzwerk hinzufügen, aus und drücken Sie
anschließend die E Taste.
3 . Wählen Sie Weiter, und drücken Sie
anschließend erneut die E Taste.
HT-E5200_XU_GER-0223.indd 30HT-E5200_XU_GER-0223.indd 30 2012-02-23 오후 3:02:152012-02-23 오후 3:02:15

Deutsch 31 |
04Einstellungen
4 . Wenn Sie Netzwerk hinzufügen, gewählt haben,
den Namen des WLAN-Routers eingeben, zu dem
eine Verbindung hergestellt werden soll.
Geben Sie die Nummern direkt mit Hilfe der
Tasten auf der Fernbedienung ein. Geben Sie
einen Buchstaben ein, indem Sie ihn mit Hilfe der
▲▼◄►Tasten markieren und anschließend die
E Taste drücken. Wählen Sie Weiter und drücken
Sie anschließend erneut die E Taste. Wählen Sie
den Typ der Sicherung, anschließend Weiter und
drücken Sie danach die E Taste erneut.
5 . Geben Sie im Sicherheitsbildschirm Ihren
Sicherheitscode oder das Passwort ein für das
Netzwerk ein. Geben Sie die Nummern direkt
mit Hilfe der Tasten auf der Fernbedienung ein.
Geben Sie einen Buchstaben ein, indem Sie
ihn mit Hilfe der ▲▼◄►Tasten markieren und
anschließend die E Taste drücken.
6 . Wählen Sie als nächstes Weiter auf der rechten
Bildschirmseite und drücken Sie anschließend
die E Taste.
7 . Der Netzwerkstatus-Bildschirm erscheint. Das
Gerät versucht die Netzwerkverbindung zu
prüfen schlägt fehl.
8 . Wählen Sie IP-Einst. auf der rechten Seite des
Bildschirms und drücken Sie die E Taste. Der
IP-Einstellungen Bildschirm wird angezeigt.
9 . Gehen Sie zum Feld IP-Modus und setzen Sie
es auf Manuell.10 . Verwenden Sie die Nummerntasten auf
Fernbedienung, um die Netzwerkdaten
einzugeben. Verwenden Sie die ▲▼◄► Tasten
auf der Fernbedienung, um von Eingabefeld zu
Eingabefeld zu wechseln.
| HINWEIS | � Sie können diese Werte bei Ihrem Internetanbieter erfragen.
Diese Werte können Sie ebenfalls auf den meisten Windows
Computern einsehen. Für weitere Anweisungen, siehe "Abrufen
der Werte für die Netzwerkeinstellungen" auf Seite 29.
11 . Wenn die Einstellungen abgeschlossen sind,
OK markieren und anschließend die E Taste
drücken. Der Netzwerkstatus-Bildschirm erscheint.
Das Gerät überprüft die Netzwerkverbindung und
stellt anschließend eine Verbindung zum Netzwerk
her. Wenn dies erfolgt ist, OK markieren und
anschließend die E Taste drücken.
� WPS(PBC)Einer der einfachsten Wege die WLAN-Verbindung
einzurichten, besteht in der Verwendung der WPS(PBC)
Funktion. Wenn Ihr Wireless Router über eine PBC
(WPS) verfügt, folgen Sie bitte diesen Schritten:
1 . Öffnen Sie den Home Bildschirm.
2 . Drücken Sie die BLAUE (D) Taste auf der
Fernbedienung.
3 . Drücken Sie innerhalb von 2 Minuten die
WPS(PBC) Taste auf Ihrem Router. Ihr Gerät
ruft automatisch alle benötigten Werte für
die Netzwerkeinstellungen ab und stellt eine
Verbindung zu Ihrem Netzwerk her.
Der Netzwerkstatus-Bildschirm erscheint.
Das Gerät baut eine Verbindung mit
dem Netzwerk auf, nachdem die
Netzwerkverbindung überprüft wurde.
Wi-Fi-DirektDie Wi-Fi Direkt Funktion ermöglicht es Ihnen, Wi-
Fi Direkt Geräte und alle anderen, ein Peer-to-
Peer Netzwerk verwendenden Geräte ohne einen
WLAN-Router an dieses Gerät anzuschließen.
1 . Schalten Sie das Wi-Fi Direkt Gerät ein und
aktivieren Sie dessen Wi-Fi direkt Funktion.
2 . Wählen Sie auf dem Home Bildschirm
Einstell., und drücken Sie die E Taste.
3 . Wählen Sie Netzwerk, und drücken Sie die
E Taste.
4 . Wählen Sie Wi-Fi-Direkt, und drücken Sie
die E Taste.
Die verfügbaren Wi-Fi Direkt Geräte werden
angezeigt.
Display
Audio
Network
System
Support
Wi-Fi-DirektGerätename : [HTS]E5200Wählen Sie d. Wi-Fi-Direkt-Gerät für d. Verb. aus.
AndroidXXXXXXX Getrennt
Schließen
Aktual.
m Beweg. " Eingabe ' Zurück
5 . Es stehen drei Wege zur Verfügung, die WiFi-
Verbindung abzuschließen:
• Über das Wi-Fi Gerät.
• Über dieses Gerät mit Hilfe von PBC.
• Über dieses Gerät mit Hilfe einer PIN.
Jede dieser Möglichkeiten wird im Folgenden
beschrieben.
HT-E5200_XU_GER-0223.indd 31HT-E5200_XU_GER-0223.indd 31 2012-02-23 오후 3:02:162012-02-23 오후 3:02:16

| 32 Deutsch
EinstellungenÜber das Wi-Fi Gerät.
1 . Folgen Sie auf dem Wi-Fi Gerät den Anweisungen
für den Anschluss an ein anderes Wi-Fi Direkt
Gerät. Schlagen Sie in der Bedienungsanleitung
des Geräts für weitere Anweisungen nach.
2 . Wenn die Prozedur abgeschlossen ist, sollte auf
dem Bildschirm des Fernsehgeräts ein Popup-
Fenster mit der Meldung erscheinen, dass ein die
Wi-Fi Direkt Funktion unterstützendes Gerät eine
Verbindung herstellen möchte. Wählen Sie OK und
drücken Sie dann zum Übernehmen die E Taste.
3 . Das Popup-Fenster für den Verbindungsaufbau
gefolgt vom Popup-Fenster für die hergestellte
Verbindung erscheinen. Wenn das Fenster
geschlossen wird, sollte das Gerät auf dem Wi-
Fi Direkt Bildschirm als verbunden aufgelistet
werden.
Über dieses Gerät mit Hilfe von PBC1 . Wählen Sie das Wi-Fi Direkt Gerät, das Sie an
dieses Gerät anschließen möchten und drücken
Sie anschließend die E Taste. Das PBC/PIN
Popup-Fenster erscheint.
2 . Wählen Sie PBC und drücken Sie dann die E
Taste. Das PBC Popup-Fenster erscheint.
3 . Drücken Sie innerhalb von 2 Minuten die PBC
Taste auf dem Wi-Fi Direkt Gerät.
4 . Das Popup-Fenster für den Verbindungsaufbau
gefolgt vom Popup-Fenster für die hergestellte
Verbindung erscheinen. Wenn das Fenster
geschlossen wird, sollte das Gerät auf dem Wi-Fi
Direkt Bildschirm als verbunden aufgelistet werden.
Über dieses Gerät mit Hilfe einer PIN1 . Wählen Sie das Wi-Fi Direkt Gerät, das Sie an
dieses Gerät anschließen möchten und drücken
Sie anschließend die E Taste. Das PBC/PIN
Popup-Fenster erscheint.
2 . Wählen Sie PIN und drücken Sie die E Taste.
Das PIN Popup-Fenster erscheint.
3 . Notieren Sie den PIN Code in dem Popup-
Fenster und tragen Sie ihn in das entsprechende
Feld des Wi-Fi Direkt Geräts ein, das Sie
anschließen möchten.
4 . Das Popup-Fenster für den Verbindungsaufbau
gefolgt vom Popup-Fenster für die hergestellte
Verbindung erscheinen. Wenn das Fenster
geschlossen wird, sollte das Gerät auf dem Wi-Fi
Direkt Bildschirm als verbunden aufgelistet werden.
| HINWEIS | � Die Kabelnetzwerkverbindung oder die WLAN
Netzwerkverbindung wird unterbrochen, wenn Sie die Wi-
Fi Direkt Funktion nutzen.
Soft-APMit Soft AP können Sie andere Wi-Fi-Geräte über
das Gerät an Ihr Netzwerk anschließen und diese
auf das Internet zugreifen lassen.
Es ist erforderlich, einen Sicherheitsschlüssel
zu erstellen, den Sie in die übrigen Wi-Fi Geräte
eingeben müssen, wenn Sie diese an das
Netzwerk anschließen möchten.
1 . Wählen Sie auf dem Home Bildschirm
Einstell., und drücken Sie die E Taste.
2 . Wählen Sie Netzwerk, und drücken Sie die
E Taste.
3 . Wählen Sie Soft-AP, und drücken Sie die
E Taste.
4 . Wählen Sie Ein oder Aus, und drücken Sie
die E Taste.
< Einstellen des Soft-AP Sicherheitsschlüssels >1 . Auf dem Soft-AP Bildschirm
Sicherheitsschlüssel, auswählen und
anschließend die E Taste drücken. Der
Sicherheitsschlüssel Bildschirm erscheint.
2 . Geben Sie einen Sicherheitsschlüssel ein.
Geben Sie die Nummern direkt mit Hilfe der
Tasten auf der Fernbedienung ein. Geben
Sie einen Buchstaben ein, indem Sie ihn
mit Hilfe der ▲▼◄►Tasten markieren und
anschließend die E Taste drücken.
3 . Wenn die Eingabe abgeschlossen ist, mit
Hilfe der ▲▼◄► Tasten zu FERTIG am
unteren Rand gehen und anschließend die
E Taste drücken.
Wenn Sie ein Wi-Fi-Gerät über die
Anschlussprozedur auf dem Gerät anschließen,
müssen Sie den hier erstellten Sicherheitsschlüssel
in das entsprechende Feld eingeben.
AllShare-EinstellungenDas AllShare Einstellungen Fenster listet alle an das
Netzwerk angeschlossenen AllShare Geräte und deren
IP-Adressen auf. Über diesen Bildschirm können Sie
einem Gerät erlauben, eine Verbindung zu dem Gerät
herzustellen, den Zugriff verweigern oder ein Gerät aus
der AllShare Liste entfernen.
1 . Wählen Sie auf dem Home Bildschirm
Einstell., und drücken Sie die E Taste.
2 . Wählen Sie Netzwerk, und drücken Sie die
E Taste.
HT-E5200_XU_GER-0223.indd 32HT-E5200_XU_GER-0223.indd 32 2012-02-23 오후 3:02:262012-02-23 오후 3:02:26

Deutsch 33 |
04Einstellungen
3 . Wählen Sie AllShare-Einstellungen, und
drücken Sie die E Taste.
4 . Wählen Sie ein Gerät und drücken Sie die E
Taste. Das AllShare Popup-Fenster erscheint.
5 . Wählen Sie Zulassen, Vrbiet., oder
Entfernen aus der Liste und drücken Sie
anschließend die E Taste.
In dem AllShare Einstellungen Fenster
werden nur dann Geräte angezeigt, wenn
Netzwerkverbindungen zu AllShare Geräten
aufgebaut wurden. Für weitere Informationen über
AllShare Netzwerkgeräte, schlagen Sie bitte auf
Seite 35-36 nach.
Aktualisieren der Software
Mit diesem Menü können Sie Software-Updates
herunterladen, welche die Leistung des Geräts verbessern
oder zusätzliche Dienste zur Verfügung stellen.
• Das Gerät während des Aktualisierungsvorgangs
niemals manuell ein oder ausschalten.
1 . Wählen Sie auf dem Home Bildschirm
Einstell., und drücken Sie die E Taste.
2 . Wählen Sie Unterstützung, und drücken Sie
die E Taste.
3 . Wählen Sie Software-Update, und drücken
Sie die E Taste.
4 . Wählen Sie eine der folgenden Methoden:
• Online• PER USB• Über Disk• Über Download• Update im Standby
5 . Drücken Sie die E Taste.
Anweisungen für jede Methode finden Sie im
Folgenden.
| HINWEIS | � Das Upgrade ist abgeschlossen, wenn sich das Gerät
abschaltet und anschließend selbst wieder einschaltet.
� Samsung Electronics haftet nicht für Fehlfunktionen des
Geräts, die auf eine instabile Internetverbindung oder
fahrlässiges Handeln des Benutzers während der Software-
Aktualisierung zurückzuführen sind.
� Wenn Sie das Upgrade während des Herunterladens der
Software abbrechen möchten, müssen Sie die E Taste
drücken.
OnlineIhr Gerät muss mit dem Internet verbunden sein,
um die Online Funktion nutzen zu können.
1 . Wählen Sie Online, und drücken Sie
die E Taste. Die Mitteilung über den
Verbindungsaufbau mit dem Server erscheint.
2 . Wenn ein Download zur Verfügung steht,
wird das Download Popup-Fenster mit
einem Fortschrittsbalken angezeigt und der
Download beginnt.
3 . Wenn der Download abgeschlossen ist,
wird das Upgrade Anfragefenster mit drei
Auswahlmöglichkeiten angezeigt: Jetzt aktualisieren, Später aktualisieren oder Nicht aktualisieren.
4 . Wenn Sie Jetzt aktualisieren, wählen,
aktualisiert das Gerät die Software, schaltet sich
ab und anschließend automatisch wieder ein.
5 . Wenn Sie innerhalb einer Minute keine
Auswahl treffen oder Später aktualisieren,
auswählen, speichert das Gerät das Software
Upgrade. Sie können das Update später
mit Hilfe der Über Download Funktion
durchführen.
6 . Wenn Sie Nicht aktualisieren, auswählen,
bricht das Gerät die Aktualisierung ab.
PER USB1 . Besuchen Sie die Webseite www.samsung.com.
2 . Klicken Sie am oberen Rand der Seite auf
SUPPORT.
3 . Geben Sie den Produktnamen oder die
Artikelnummer in das Suchfeld ein und
klicken Sie anschließend auf Find Product.4 . Klicken Sie im mittleren Teil der Seite auf den
Tab Get downloads.
5 . Klicken Sie auf Firmware.
6 . Klicken Sie in der Spalte Datei auf der rechten
Seite auf das ZIP Symbol.
7 . Klicken Sie in dem angezeigten Popup-
Fenster auf OK, um die Firmware
herunterzuladen und auf Ihrem PC zu
speichern.
8 . Entpacken Sie das Zip-Archiv auf Ihrem
Computer. Sie sollten einen eigenen Ordner
mit dem gleichen Namen wie die Zip-Datei
anlegen.
9 . Den Ordner auf ein USB-Flash-Laufwerk
kopieren.
10 . Stellen Sie sicher, dass sich keine Disk im
Gerät befindet und stecken Sie das USB-Flash-
Laufwerk in den USB-Anschluss des Geräts.
HT-E5200_XU_GER-0223.indd 33HT-E5200_XU_GER-0223.indd 33 2012-02-23 오후 3:02:282012-02-23 오후 3:02:28

| 34 Deutsch
Einstellungen11 . Im Menü des Geräts nach Einstell. >
Unterstützung > Software-Update
wechseln.
12 . Wählen Sie PER USB.
| HINWEIS | � Es darf keine Disk im Gerät eingelegt sein, wenn die
Software über den USB-Anschluss aktualisiert wird.
� Überprüfen Sie nach Abschluss der Aktualisierung im
Menü Software Update die Software Details.
� Schalten das Gerät während der Software-Aktualisierung
nicht aus. Das Gerät könnte beschädigt werden.
� Software-Updates über den USB-Anschluss dürfen nur
mit einem USB-Memorystick durchgeführt werden.
Über Disk1 . Besuchen Sie die Webseite www.samsung.
com.
2 . Klicken Sie am oberen Rand der Seite auf
SUPPORT.
3 . Geben Sie den Produktnamen oder die
Artikelnummer in das Suchfeld ein und
klicken Sie anschließend auf Find Product.4 . Klicken Sie im mittleren Teil der Seite auf den
Tab Get downloads .5 . Klicken Sie auf Firmware.
6 . Klicken Sie in der Spalte Datei auf der rechten
Seite auf das ZIP Symbol.
7 . Klicken Sie in dem angezeigten Popup-
Fenster auf OK um die Firmware
herunterzuladen und auf Ihrem PC zu
speichern.
8 . Entpacken Sie das Zip-Archiv auf Ihrem
Computer. Sie müssen über eine RUF Datei
verfügen.
9 . Schreiben Sie die RUF-Datei auf eine Disk.
Wir empfehlen eine CD-R oder DVD-R zu
verwenden.
10 . Schließen Sie die Disk ab, bevor Sie sie aus
dem Computer entfernen.
11 . Legen Sie die Disk in das Gerät ein.
12 . Im Menü des Geräts nach Einstell. >
Unterstützung > Software-Update
wechseln.
13 . Wählen Sie Über Disk.
| HINWEIS | � Überprüfen Sie nach Abschluss der Aktualisierung im
Menü Software-Update die Software Details.
� Schalten das Gerät während der Software-Aktualisierung
nicht aus. Das Gerät könnte beschädigt werden.
Über DownloadMit der Über Download Methode können Sie das Gerät
über eine Datei aktualisieren, die Sie bereits früher
heruntergeladen, aber noch nicht installiert haben.
1 . Wenn eine Upgrade Software
heruntergeladen wurde, erscheint die
Nummer der Softwareversion auf der rechten
Seite von Über Download.
2 . Wählen Sie Über Download, und drücken
Sie die E Taste.
3 . Sie werden gefragt, ob Sie das Update
durchführen möchten. Wählen Sie Ja. Das
Gerät beginnt mit der Aktualisierung.
4 . Wenn die Aktualisierung abgeschlossen ist,
schaltet sich das Gerät automatisch aus und
wieder ein.
| HINWEIS | � Überprüfen Sie nach Abschluss der Aktualisierung im
Menü Software Update die Software Details.
� Schalten das Gerät während der Software-Aktualisierung
nicht aus. Das Gerät könnte beschädigt werden.
Update im StandbySie können die Funktion Update im Standby
verwenden, damit das Gerät neue Updates
herunterlädt, wenn es sich im Standby-Modus
befindet. Im Standby-Modus ist das Gerät
ausgeschaltet, seine Internetverbindung ist jedoch
aktiv. Dies ermöglicht es dem Gerät Updates
automatisch herunterzuladen, wenn Sie ihn gerade
nicht benutzen.
1 . Wählen Sie mit Hilfe der ▲▼ Tasten Update im Standby, und drücken Sie anschließend
die E Taste.
2 . Wählen Sie Ein oder Aus.
Wenn Sie Ein gewählt haben, wird das
abgeschaltete Gerät automatisch die neuen
Updates herunterladen, wenn es sich im
Standby-Modus befindet. Wenn die neuen
Updates heruntergeladen werden, werden
Sie gefragt, ob Sie das Update installieren
möchten, wenn Sie das Gerät einschalten.
| HINWEIS | � Für die Nutzung des Updates im Standby Funktion muss
Ihr Gerät mit dem Internet verbunden sein.
� Wenn diese Funktion nicht erscheint, können Sie sie
nach der Aktualisierung auf die neueste Software Version
nutzen.
HT-E5200_XU_GER-0223.indd 34HT-E5200_XU_GER-0223.indd 34 2012-02-23 오후 3:02:302012-02-23 오후 3:02:30

Deutsch 35 |
05M
edia Play
Ihr Blu-ray Gerät kann mit Hilfe der AllShare-
Funktion Inhalte auf Disks, USB-Geräten und
Ihrem PC, DLNA kompatiblen Mobiltelefon oder
NAS wiedergeben. Schlagen Sie bitte auf Seite 38
für weitere Informationen über AllShare nach.
Der AllShare Wiedergabebildschirm
Um auf den AllShare Play Bildschirm zuzugreifen,
wählen Sie AllShare Play auf dem Hauptbildschirm
und drücken Sie anschließend die E Taste.
Zugriff auf den AllShare Play Bildschirm
Liste
Videos
Fotos
Musik
a Anmelden ' Zurück
Zuletzt verw.
Neues Kürzl. aktual. 09.Jan..2012
W.-Liste Keine Wiedergabelisten erstellt.
Wdg.liste f. schnellen u. einfachen Zugriff auf Inhalt erstellen.
Recent afgespeelde bestanden worden hier weergeg.
Mehr anze...
SAM_0001 SAM_0002 SAM_0003 SAM_0004 SAM_0005
AllShare Play / Liste /
Wenn der AllShare Play Bildschirm erscheint,
wird Liste und eine Liste der Inhalt Arten - Videos,
Fotos, Musik - auf der linken Seite angezeigt.
Auf der rechten Seite wird standardmäßig der
Inhalt in Liste angezeigt: Eine Liste der zuletzt
wiedergegeben oder angesehenen Positionen,
eine Liste der neuesten Positionen, die Sie
sich angesehen oder gehört haben, und des
letzte Wiedergabeliste. Wenn zuvor noch keine
Positionen wiedergegeben oder angesehen
haben, bzw. noch keine Wiedergabeliste erstellt
haben, ist dieser Bereich leer.
� Positionen aus Liste wiedergebenUm in Liste aufgeführte Positionen wiedergeben
zu können, muss die Quelle mit den Positionen
angeschlossen oder in das Gerät eingelegt sein. Wenn
zum Beispiel die zuletzt wiedergegebenen Fotos in
Liste von einer DVD stammen, muss die Disk in das
Gerät eingelegt sein, um sie ansehen zu können.
Um Positionen aus Liste wiederzugeben, muss
eine der folgenden Aktionen ausgeführt werden:
• Verwenden Sie die ◄► Tasten, um eine Position
für die Wiedergabe auszuwählen und drücken
Sie die E Taste. Um eine andere Position
wiederzugeben, die RETURN (') Taste drücken
und den vorherigen Schritt wiederholen.
• Mit Hilfe der ◄► Tasten eine Position
auswählen, drücken Sie die TOOLS um das
Extras Menü anzuzeigen, wählen Sie Wiederg,
und drücken Sie anschließend die E Taste.
Um eine andere Position wiederzugeben, die
RETURN (') Taste drücken und den vorherigen
Schritt wiederholen.
� Wiedergabe von Video, Foto oder Musik Inhalten
1 . Stellen Sie sicher, dass die Quelle des
wiederzugebenden Inhalts angeschlossen
oder in das Gerät eingelegt ist.
2 . Wählen Sie mit Hilfe der ▲▼ Tasten Videos,
Fotos, oder Musik, aus und drücken
Sie anschließend die E Taste. Die erste
ausgewählte Quelle auf der rechten Seite ist
markiert.
3 . Wählen Sie mit Hilfe der ▲▼ Tasten eine
Quelle aus und drücken Sie anschließend die
E Taste.
| HINWEIS | � Die für jeden Inhaltstyp angezeigten Quellen können sich
unterscheiden.
4 . Für die Steuerung der Video-, Foto- oder
Musikwiedergabe schlage Sie bitte nach unter:
• Steuern der Videowiedergabe auf Seite 40.
• Steuern der Musikwiedergabe auf Seite 42.
• Anzeigen von Fotos und Verwenden des
Extras Menü, wenn eine Datei markiert ist
auf den Seiten 45-47.
| HINWEIS | � Je nachdem wie und wann die Quelle mit dem Inhalt
an das Gerät angeschlossen wurde und je nach Art des
Inhalts kann das Gerät eine unterschiedliche Serie von
Bildschirmen für den Start der Wiedergabe anzeigen.
Alternative Wiedergabemethoden finden Sie unter:
• Wiedergabe von Dateien auf einem USB-Speichergerät iPod/
iPhone auf Seite 36.
• Wiedergabe von kommerziellen Video Disks auf Seite 37.
• Wiedergabe von kommerziellen Audio Disks auf Seite 37.
• Wiedergabe von selbst aufgenommenen Disks auf Seite 38.
Media Play
HT-E5200_XU_GER-0223.indd 35HT-E5200_XU_GER-0223.indd 35 2012-02-23 오후 3:02:332012-02-23 오후 3:02:33

| 36 Deutsch
Media PlayWiedergabe von Dateien auf einem
USB-Speichergerät oder iPod/iPhone
Sie können Multimedia Dateien von einem
angeschlossenen USB-Gerät wiedergeben.
1 . Bei ausgeschaltetem Gerät das USB-
Speichergerät oder den iPod/iPhone
anschließen.
2 . Schalten Sie das Gerät ein. Wenn der
Hauptbildschirm erscheint, AllShare Play
> Videos, Fotos oder Musik > Angeschl. Gerät auswählen und anschließend die E
Taste drücken.
Smart Hub Funktion Einstell.
� USB sicher entfernen d WPS(PBC)
Wiedergabe von Videos, Fotos oder Musik von Disk oder von angeschlossenen Geräten
AllShare Play
ODER1-1. Bei eingeschaltetem Gerät ein USB-Speichergerät
oder den iPod/iPhone anschließen.
2-1. Wenn der unten abgebildete Bildschirm erscheint,
wählen Sie mit Hilfe der ▲▼ Tasten die Art des
Inhalts aus, den Sie wiedergeben möchten und
drücken Sie anschließend die E Taste.
Smart Hub Funktion Einstell.
� USB sicher entfernen d WPS(PBC)
Wiedergabe von Videos, Fotos oder Musik von Disk oder von angeschlossenen Geräten
AllShare Play
Smart Hub Funktion Einstell.
� USB sicher entfernen d WPS(PBC)
Wiedergabe von Videos, Fotos oder Musik von Disk oder von AllShare Play
b Funktion
abe von Videos, Fotos oder Musik von Diskangeschlossenen Geräten
AllShare Play
b Funktion
kaAllShare Play
Neues Gerät angeschlossen.USB DISK
" Eingabe ' Zurück
Videos
Fotos
Musik
| HINWEIS | � Obwohl das Gerät alle verfügbaren Ordner anzeigt,
werden nur Dateien von der Art des Inhalts angezeigt,
den Sie in Schritt 2 oder 2-1 gewählt haben. Wenn Sie
z. B. Musik ausgewählt haben, werden nur Musikdateien
angezeigt. Diese Auswahl können Sie mit Hilfe von
AllShare ändern.
3 . Die Art des Inhalts, den Sie auf dem
angeschlossenen Gerät gewählt haben,
wird angezeigt. Je nachdem, wie der Inhalt
angeordnet ist, sehen Sie entweder Ordner,
einzelne Dateien oder beides.
4 . Mit Hilfe der ▲▼◄► Tasten auf der
Fernbedienung den gewünschten Inhalt
auswählen. Um einen Ordner auszuwählen,
den Ordner markieren und die E Taste
drücken. Um eine Datei auszuwählen, die
Datei markieren und die E Taste drücken.
5 . Drücken Sie die RETURN (') Taste, um
einen Ordner zu verlassen oder um zum
Hauptbildschirm zurückzukehren.
| ACHTUNG | � Videos können nur wiedergegeben werden, wenn die iPod
Docking-Station verwendet wird.
| HINWEIS | � Um eine eventuelle Beschädigung des USB-Speichers zu
vermeiden, müssen Sie das USB-Speichergerät mit Hilfe
der Funktion “USB sicher entfernen” sicher entfernen.
Drücken Sie die HOME Taste, um zum Home Menü zu
wechseln und wählen Sie anschließend die GELBE (C) und danach die E Taste.
� Das Menü Fotos unterstützt keine iPads oder iPhones.
� Nur der Wiedergabebildschirm wird auf dem Fernsehgerät
angezeigt. Anzeigen von iPod Bildschirmen auf dem iPod
Player.
� Wenn der angeschlossene iPod keine Videowiedergabe
unterstützt, wird die Meldung "Dieses iPod-Modell unterstützt keine Videodateien." angezeigt, wenn Sie das
Video Menü auswählen.
iPod/iPhone Modelle, die mit diesem
Gerät verwendet werden können.
iPod touch der3./2./1. GenerationiPod classic / iPod mit VideoiPod mit Docking-Station AnschlussiPod mit Click WheeliPod nano der 5./4./3./2. GenerationiPhone 4S / iPhone 4iPhone 3GS / iPhone 3G / iPhone
HT-E5200_XU_GER-0223.indd 36HT-E5200_XU_GER-0223.indd 36 2012-02-23 오후 3:02:432012-02-23 오후 3:02:43

Deutsch 37 |
05M
edia Play
Der Funktion Bildschirm
Auf dem Funktion Bildschirm kann die Audio- und/
oder Videoquelle ausgewählt werden, von der die
Wiedergabe erfolgen soll.
| HINWEIS | � Sie können die Quelle ebenfalls durch Drücken
der Funktion Taste in der rechten oberen Ecke der
Fernbedienung wechseln.
Um auf den Funktion Bildschirm zuzugreifen,
wählen Sie Funktion auf dem Hauptbildschirm und
drücken Sie anschließend die E Taste.
Optionen des Funktion BildschirmsUm eine Option auszuwählen, die Option mit Hilfe
der ▲▼ Tasten auswählen und anschließend die
E Taste drücken.
Digital InWählen Sie diese Option, wenn Sie den
Ton der an den digitalen Audioeingang
angeschlossenen digitalen Audioquelle
wiedergeben möchten.
AUXWählen Sie diese Option, wenn Sie den Ton
der an den Audioeingang angeschlossenen
analogen Audioquelle wiedergeben möchten.
Remote iPodAuswählen, um Musiktitel oder Videos über den
an den iPod Anschluss angeschlossenen iPod
wiederzugeben.
HDMI IN 1Wählen Sie diese Option, um Video von
dem an den HDMI-EINGANG 1 Eingang
angeschlossenen Gerät wiederzugeben.
HDMI IN 2Wählen Sie diese Option, um Video von
dem an den HDMI-EINGANG 2 Eingang
angeschlossenen Gerät wiederzugeben.
Tuner Wählen Sie diese Option, um Radio zu hören.
Bluetooth Wählen Sie diese Option, um Musik von einem
Bluetooth-Gerät wiederzugeben.
Wiedergabe von kommerziellen Video Disks
1 . Legen Sie eine Disk mit dem Aufdruck nach oben
zeigend in die Disk-Lade ein und schließen Sie die
Disk-Lade. Die Wiedergabe beginnt automatisch.
Wenn die Wiedergabe nicht automatisch startet,
drücken Sie die 6 Taste auf Ihrer Fernbedienung oder wählen Sie AllShare Play auf dem
Hauptbildschirm und drücken Sie anschließend
die E Taste. Siehe "Wiedergabe von Video, Foto
oder Musik Inhalten" auf Seite 35.
Wiedergabe von kommerziellen
Audio Disks
1 . Legen Sie eine kommerzielle Audio Disk mit
dem Aufdruck nach oben zeigend in die Disk-
Lade ein und schließen Sie die Disk-Lade. Der
AllShare Play Musik Bildschirm wird angezeigt,
in dem die Titel aufgelistet sind. Die Wiedergabe
wird automatisch mit dem ersten Titel gestartet.
AllShare Play / Musik / Audio-CD 1 / 17
00:00 / 03:59
b� Page Move / Extras ' Zurück
TRACK 001 ٭
► TRACK 001 03:59
TRACK 002 04:34
TRACK 003 04:24
TRACK 004 04:01
TRACK 005 04:26
TRACK 006 05:07
TRACK 007 04:47
TRACK 008 03:59
TRACK 009 04:34
TRACK 010 04:02
TRACK 002 04:34TRACK 002 04 34► TRACK 001 03:59
2 . Um einen bestimmten Titel wiederzugeben, die
▲▼ Tasten auf der Fernbedienung verwenden,
um den Titel auszuwählen und die E Taste
drücken.
� Musik Bildschirm Steuerelemente
Unterbrechen eines Titels.
Wiedergabe eines Titels.
Einen oder alle Titel wiederholen.
Wiedergabe der Titel in zufälliger
Reihenfolge.
Zeigt den Equalizer an.
Manuelle Einstellung des Equalizers.
(Nur wenn der Equalizer Modus
eingeschaltet ist)
| HINWEIS | � Die Musik Bildschirm Steuerelemente stehen nur zur
Verfügung, wenn ein Titel wiedergegeben wird.
� Es werden nicht alle Elemente gleichzeitig angezeigt.
� Für weitere Informationen über die Musikwiedergabe, gehen
Sie zu "Steuern der Musikwiedergabe" auf der Seite 42.
HT-E5200_XU_GER-0223.indd 37HT-E5200_XU_GER-0223.indd 37 2012-02-23 오후 3:02:542012-02-23 오후 3:02:54

| 38 Deutsch
Media PlayWiedergabe von selbst
aufgenommenen Disks
Sie können Multimedia Dateien wiedergeben, die
Sie auf DVDs oder CDs aufgenommen haben.
1 . Legen Sie eine vom Benutzer aufgezeichnete
Disk mit dem Aufdruck nach oben zeigend
in die Disk-Lade ein und schließen Sie die
Disk-Lade. Das Gerät angeschlossen Popup-
Fenster erscheint.
2 . Mit Hilfe der ▲▼ Tasten die Art des Inhalts
auswählen, den Sie wiedergeben möchten -
Videos, Fotos oder Musik - und drücken Sie
dann die E Taste.
| HINWEIS | � Obwohl das Gerät die Ordner für alle Inhalte anzeigt,
werden nur die Dateien von der Art des Inhalts angezeigt,
die Sie unter Schritt 2 ausgewählt haben. Wenn Sie z.
B. Musik ausgewählt haben, werden nur Musikdateien
angezeigt. Diese Auswahl können Sie mit Hilfe von
AllShare ändern.
3 . Mit Hilfe der ▲▼◄► Tasten den Ordner
mit dem unter Schritt 2 gewählten Inhalt
auswählen und dann die E Taste drücken.
4 . Wenn Sie Musik, gewählt haben, erscheint
der AllShare Play Musik Bildschirm, in dem
die Musikdateien auf der Disk aufgelistet
werden. Verwenden Sie die ▲▼ Tasten, um
eine Datei für die Wiedergabe auszuwählen
und drücken Sie die E Taste.
5 . Wenn Sie Fotos, gewählt haben, erscheint
der AllShare Fotos Bildschirm, in dem die
Fotodateien auf der Disk aufgelistet werden.
Verwenden Sie die ▲▼ ◄► Tasten, um das
Foto auszuwählen, das Sie anzeigen möchten
und drücken Sie die E Taste.
6 . Wenn Sie Videos, gewählt haben, erscheint
der AllShare Videos Bildschirm, in dem die
Videodateien auf der Disk aufgelistet werden.
Verwenden Sie die ▲▼ ◄► Tasten, um das
Video auszuwählen, das Sie wiedergeben
möchten und drücken Sie die E Taste.
| HINWEIS | � Für Musik und Video Ordner können Sie ebenfalls die
TOOLS Taste auf der Fernbedienung drücken und
anschließend Ordner wiedergeben auswählen, um alle
Dateien in dem Ordner automatisch wiederzugeben.
Wählen Sie zuerst den Ordner aus, bevor Sie die TOOLS
Taste drücken.
� Für weitere Informationen über die Musikwiedergabe, gehen
Sie zu "Steuern der Musikwiedergabe" auf Seite 42.
� Für weitere Informationen über die Wiedergabe von Fotos
bitte unter Anzeigen von Fotos und Verwenden des Extra
Menüs, wenn eine Datei markiert ist auf den Seiten 45-
47 nachschlagen.
� Für weitere Informationen über die Videowiedergabe,
gehen Sie bitte zu "Steuern der Videowiedergabe" auf
Seite 40.
Verwenden der AllShare
Netzwerkfunktion
Mit AllShare können Sie Videos, Fotos oder Musik
von Ihrem PC oder DLNA kompatiblen Geräten
über das Gerät mit Hilfe einer WLAN-Verbindung
wiedergeben.
Herunterladen der AllShare SoftwareUm AllShare auf Ihrem PC DLNA-Gerät nutzen
zu können, müssen Sie die AllShare Software
auf Ihrem PC installieren. Sie können die PC
Software herunterladen und erhalten ausführliche
Anweisungen für die Nutzung von AllShare auf der
Webseite www.samsung.com.
1 . Besuchen Sie www.samsung.com.
2 . Klicken Sie am oberen Rand der Seite auf
Support.
3 . Geben Sie auf der Support Seite die
Modellbezeichnung Ihres Geräts in das
Produktsuche Feld ein.
4 . Klicken Sie auf der aufgerufenen Seite unter
Weiterer Support auf AllShare PC S/W
Das Download Center wird aufgerufen.
5 . Klicken Sie auf AllShare-PC-Software
herunterladen.
6 . Es erscheint das Popup-Fenster Öffnen von
AllSharePCSW.exe.
7 . Klicken Sie auf Datei speichern.
8 . Wechseln Sie in das Downloadverzeichnis
mit der heruntergeladenen Datei und
doppelklicken Sie auf die Datei.
9 . In dem angezeigten Popup-Fenster
auf Ausführen klicken. Folgen Sie den
Anweisungen auf Ihrem Bildschirm.
Laden Sie die AllShare Installations-/
Bedienungsanleitung aus dem gleichen Software
Tab durch Anklicken des entsprechenden PDF-
Datei Symbols in der Datei Spalte auf der rechten
Seite herunter. Die PDF-Datei wird heruntergeladen
und geöffnet. Sie können die Datei anzeigen und/
oder speichern.
HT-E5200_XU_GER-0223.indd 38HT-E5200_XU_GER-0223.indd 38 2012-02-23 오후 3:03:032012-02-23 오후 3:03:03

Deutsch 39 |
05M
edia Play
Inhalte auf Ihrem PC oder DLNA-Gerät mit diesem Gerät wiedergeben
5V 500mA
AllShare Verbindung
PCProdukt
Wiedergabe der PC-Dateien
1 . Verbinden Sie das Gerät, Ihren PC und/oder
Ihr DLNA kompatibles Mobiltelefon mit dem
gleichen Netzwerk.
2 . Folgen Sie den Anweisungen aus
Installations- und Bedienungsanleitung der
AllShare Software, um die Geräte und Dateien
für die Wiedergabe einzurichten.
3 . Auf dem Home Bildschirm des Geräts
AllShare Play auswählen und anschließend
die E Taste drücken. Der AllShare Play
bildschirm wird angezeigt.
4 . Wählen Sie das angeschlossene kompatible
DLNA Gerät oder Ihren PC aus und drücken
Sie die E Taste Ein Bildschirm mit den
verfügbaren Dateien wird angezeigt.
5 . Wählen Sie die Dateien, die Sie wiedergeben
möchten, und drücken Sie die E Taste.
Steuern der Wiedergabe des sich auf Ihrem PC befindenden Inhalts mit Hilfe Ihres Smartphones
5V 500mA
AllShare Verbindung
Sendet Dateien vom PC an das Gerät.
PC
Smart Phone
Produkt
Wiedergabe der PC-Dateien
(Steht nur für Samsung Telefone mit AllShare
Unterstützung zur Verfügung.)
1 . Verbinden Sie das Gerät, Ihren PC und Ihr
DLNA kompatibles Mobiltelefon mit dem
gleichen Netzwerk.
2 . Folgen Sie den Anweisungen aus
Installations- und Bedienungsanleitung der
AllShare Software, um die Geräte und Dateien
für die Wiedergabe einzurichten.
3 . Bestätigen Sie in der AllShare Software auf
Ihrem PC, dass Ihr Telefon angeschlossen ist.
4 . Wählen Sie auf dem Telefon die Datei, die
Sie wiedergeben möchten und wählen Sie
anschließend das Gerät als Wiedergabegerät
aus.
5 . Starten Sie die Wiedergabe auf dem Telefon.
HT-E5200_XU_GER-0223.indd 39HT-E5200_XU_GER-0223.indd 39 2012-02-23 오후 3:03:052012-02-23 오후 3:03:05

| 40 Deutsch
Media Play
Wiedergabe wiederholen
Wiederholung eines Kapitels oder Titels.
1 . Drücken Sie während der Wiedergabe die Taste REPEAT auf der Fernbedienung.
2 . Wählen Sie mit Hilfe der ▲▼ Tasten Kapitel, Alle oder Titel, aus und drücken Sie die E Taste.
| HINWEIS |
� Auf dem Bildschirm wird Kapitel oder Titel eventuell nicht sofort angezeigt. Drücken Sie die ▲▼ Tasten solange, bis sich Ihre Auswahl in dem blauen Feld befindet.
3 . Um zur normalen Wiedergabe zurückzukehren, die REPEAT Taste erneut drücken und mit Hilfe der ▲▼ Tasten Aus, auswählen und dann die E Taste betätigen.
Einen Abschnitt wiederholen
1 . Drücken Sie während der Wiedergabe die Taste REPEAT auf der Fernbedienung.
2 . Drücken Sie die ▲▼ Tasten, um Wiederhol. A-B auszuwählen.
| HINWEIS |
� Auf dem Bildschirm wird Wiederhol. A-B eventuell nicht sofort angezeigt. Drücken Sie die ▲▼ Tasten solange, bis sich Wiederhol. A-B in dem blauen Feld befindet.
3 . Drücken Sie die Taste E Taste, um den Punkt zu markieren, an dem die Wiederholung starten soll (A).
4 . Drücken Sie die Taste E Taste, um den Punkt zu markieren, an dem die Wiederholung stoppen soll (B).
5 . Drücken Sie die REPEAT Taste erneut, um in den normalen Wiedergabemodus zurückzukehren.
6 . Drücken Sie die E Taste.
| HINWEIS |
� Der Punkt (B) muss mindestens 5 Sekunden
hinter Punkt (A) liegen.
Bedienen des Disk Menüs, Titel Menüs, Popup Menüs und der Titelliste
DISC MENU Während der Wiedergabe diese Taste
drücken, um das Disk Menü aufzurufen.
TITLE MENU
Während der Wiedergabe diese Taste
drücken, um das Titel Menü aufzurufen.
• Wenn Ihre Disk über eine Playlist-
Funktion verfügt, drücken Sie
die GRÜNE (B) Taste, um zur
Wiedergabeliste zu gelangen.
POPUP MENU Während der Wiedergabe diese Taste
drücken, um das Pop-up Menü aufzurufen.
DISC MENU oder TITLE MENU
Während der Wiedergabe diese Taste
drücken, um die Titelliste aufzurufen.
Tasten für die WiedergabeWährend der Suche, Zeitlupen- oder
Einzelbildwiedergabe wird der Ton nicht wiedergegeben.
6 Beginnt die Wiedergabe
5 Beendet die Wiedergabe.
7 Zum Anhalten der Wiedergabe.
Beschleunigte Wiedergabe
Drücken Sie während der Wiedergabe die 3 oder �.
Jedes Mal, wenn Sie die 3 oder � Taste drücken, ändert sich die
Wiedergabegeschwindigkeit.
Wiedergabe in Zeitlupe
Drücken Sie im Pause-Modus die � Taste.
Jedes Mal, wenn Sie die � Taste drücken,
ändert sich die Wiedergabegeschwindigkeit.
EinzelbildwiedergabeDrücken Sie im Pause-Modus die 7 Taste.
Jedes Mal, wenn Sie die 7 Taste drücken,
wird ein neues Bild angezeigt.
Springen
Drücken Sie während der Wiedergabe die 1 oder 2 Taste.
Jedesmal, wenn Sie die 1 oder 2 Taste
drücken, wird zum nächsten oder vorherigen
Kapitel, bzw. Datei gesprungen.
Steuern der Videowiedergabe
Sie können die Wiedergabe von Videodateien auf Blu-ray-Disks, DVDs, CDs oder USB-Geräten steuern.
Je nach Disk können einige in dieser Anleitung beschriebenen Funktionen nicht zur Verfügung stehen.
Tasten auf der Fernbedienung für die VideowiedergabeDISC MENU TITLE MENU
MUTE
0 POPUP
FULL SCREEN REPEATHOME
HT-E5200_XU_GER-0223.indd 40HT-E5200_XU_GER-0223.indd 40 2012-02-23 오후 3:03:112012-02-23 오후 3:03:11

Deutsch 41 |
05M
edia Play
EXTRAS Menü verwendenDrücken Sie während der Wiedergabe die TOOLS Taste.
TitelsucheZeitsuche
Wählen Sie diese Option, um zum
gewünschten Titel, wenn die Disk über mehr
als einen Titel verfügt, zur gewünschten
Szene zu gelangen, oder verwenden Sie
Time Zeitsuche, um zu einem bestimmen
Punkt in einem Film oder Video zu springen.
Mit Time Zeitsuche können Sie mit Hilfe
der Fernbedienung einen bestimmten
Zeitpunkt im Format 00:00:00
(Stunden:Minuten:Sekunden) eingeben.
Wiederholmod.
Mit dieser Option können Sie einen
bestimmten Titel, ein Kapitel (nur bei
BDs/DVDs) oder markierten Abschnitt
wiederholen. Funktioniert genauso, wie die
REPEAT Taste. Siehe Seite 40.
VollbildWählen Sie diese Option, um den
Vollbildmodus einzustellen. Sie können
zwischen Original, Modus1 (größer), und
Modus2 (am größten) wählen.
Bildmodus
Wählen Sie diese Einstellung, um den
Bildmodus einzustellen.
- Dynamisch : Wählen Sie diese
Einstellung, um die Schärfe zu erhöhen.
- Standard : Wählen Sie diese Einstellung
für die meisten Programme.
- Film : Dies ist die beste Einstellung zum
Ansehen von Filmen.
- Benutzer : Ermöglicht die Einstellung der
Schärfe und der Rauschunterdrückung.
| HINWEIS |
� Wenn Sie Benutzer wählen, wird der
Benutzer Einstellungen Bildschirm
angezeigt. Wählen Sie eine Option,
drücken Sie E, verwenden Sie
die ◄► Tasten um die Einstellung
vorzunehmen, und drücken Sie E.
Drücken Sie die RETURN (') Taste, um
zum TOOLS Menü zurückzukehren.
� Wenn Sie die BD-Wise Funktion
eingeschaltet haben, wird dieses
Menü nicht angezeigt.
Equalizer-Modus
Wählen Sie diese Option, um den
Equalizer zu verwenden.
Equalizer-Einstell.
Wählen Sie diese Option, um den
Equalizer einzustellen.
| HINWEIS |
� Erscheint nur, wenn der Equalizer
Modus eingeschaltet ist.
Das Menü wird nur angezeigt, wenn eineBD/DVD wiedergegeben wird.
Vom Anfang wiedergeben
Wählen Sie diese Option, um den Film
vom Anfang wiederzugeben.
KapitelsucheWählen Sie diese Option, um zu dem
Kapitel zu springen, dass Sie sich
ansehen möchten.
Audio-Opt.
Wählen Sie diese Option, um die
gewünschte Audiosprache einzustellen.
- Sie können diese Funktion auch
durch Drücken der AUDIO Taste auf
der Fernbedienung auswählen.
Untertitel
Wählen Sie diese Option, um die
gewünschte Untertitelsprache
einzustellen.
- Sie können diese Funktion auch
durch Drücken der Taste SUBTITLE
auf der Fernbedienung auswählen.
Winkel
Wählen Sie diese Option, um eine
Szene unter einem anderen Blickwinkel
aus zu betrachten. Die Winkel Option
zeigt die Anzahl der verfügbaren
Blickwinkel an (1/1, 1/2, 1/3 usw.).
BONUSVIEW Video / BONUSVIEW Audio
SelecWählen Sie diese Option, um den
gewünschten Bonusview auszuwählen.
Das Menü wird nur angezeigt, wenn eineDatei wiedergegeben wird.
Zur Videoliste Wechselt zum Videoliste Bildschirm.
Szenensuche Durchsucht die Videodatei nach
Szenen.
Information Prüft die Informationen der Videodatei.
| HINWEIS |
� Abhängig von der Disk oder dem Speichergerät kann
das Extras Menü abweichen. Eventuell werden nicht alle
Optionen angezeigt.
HT-E5200_XU_GER-0223.indd 41HT-E5200_XU_GER-0223.indd 41 2012-02-23 오후 3:03:162012-02-23 오후 3:03:16

| 42 Deutsch
Media PlaySteuern der Musikwiedergabe
Sie können die Wiedergabe von Musikinhalten auf
DVDs, CDs oder USB-Geräten steuern.
Tasten auf der Fernbedienung für die Wiedergabe
DISC MENU TITLE MENU
MUTE
1 2 3
4 5 6
7 8
0
9POPUP
RDS DISPLAY
PTY- PTY SEARCH PTY+
TA
6
1
3
2
4
5
1
Schnelle Wiedergabe (nur bei Audio CDs (CD-DA))Drücken Sie während der Wiedergabe die 3 oder
� Taste.
Jedes Mal, wenn Sie die 3 oder � Taste drücken,
ändert sich die Wiedergabegeschwindigkeit.
2 7 Taste : Unterbrechen eines Titels.
3 6 Taste : Wiedergabe des ausgewählten Musiktitels.
4 5 Taste : Stoppt die Wiedergabe eines Musiktitels.
5Überspringen : Während der Wiedergabe die
Taste 1 oder 2 drücken, um zu vorherige oder
nächste Seite der Wiedergabeliste zu wechseln.
6
Tasten NUMMERNTASTE : Drücken Sie während
der Wiedergabe der Wiedergabeliste die
gewünschte Titelnummer. Das ausgewählte Video
wird wiedergegeben.
Wiederholen von Titeln auf einer Audio CDSie können das Gerät so einstellen, dass die Titel
auf einer Audio-CD (CD-DA/MP3) wiederholt
werden.
1 . Verwenden Sie während der Wiedergabe die
► Taste, um in der unteren rechten Ecke des Bildschirms auszuwählen und drücken
Sie anschließend die E Taste.
2 . Wählen Sie mit Hilfe der ▲▼ Tasten den
gewünschten Wiederholmodus - Aus, Ein Lied, oder Alle - und drücken Sie dann die
E Taste.
Wiedergabe der Titel auf einer Audio CD in zufälliger ReihenfolgeSie können das Gerät so einstellen, dass die Titel auf
einer Audio-CD (CD-DA/MP3) in zufälliger Reihenfolge
wiedergegeben werden.
1 . Verwenden Sie während der Wiedergabe die
► Taste, um in der unteren rechten Ecke des Bildschirms auszuwählen und drücken Sie
anschließend die E Taste.
2 . Schalten Sie mit Hilfe der ▲▼ Tasten
Zufallswiederg. Ein oder Aus, und drücken Sie
dann die E Taste.
Eine Wiedergabeliste erstellen
AllShare Play / Musik / Audio-CD 1 / 17
00:00 / 03:59
b� Page Move / Extras ' Zurück
TRACK 001 ٭
► TRACK 001 03:59
TRACK 002 04:34
TRACK 003 04:24
TRACK 004 04:01
TRACK 005 04:26
TRACK 006 05:07
TRACK 007 04:47
TRACK 008 03:59
TRACK 009 04:34
TRACK 010 04:02
TRACK 002 04:34TRACK 002 04:34► TRACK 001 03:59
1 . Rufen Sie den Wiedergabebildschirm auf und
drücken Sie die TOOLS Taste. Das Extras Menü
wird angezeigt.
2 . Wählen Sie mit Hilfe der ▲▼ Tasten Auswahl wdg., aus und drücken Sie anschließend die E Taste.
Der Ausw. wiederg. Bildschirm wird angezeigt.
3 . Wählen Sie mit Hilfe der ▲▼ Tasten einen Titel aus
und drücken Sie anschließend die E Taste. Auf
der linken Seite des Titels erscheint eine Markierung.
4 . Wiederholen Sie Schritt 3, um weitere Titel
auszuwählen und zu markieren.
5 . Um einen Titel aus der Liste zu entfernen, zum Titel
gehen und die E Taste drücken. Die Markierung
des Titels wird entfernt.
6 . Nach Abschluss die ► Tasten drücken, um Wiederg,
auszuwählen und anschließend die E Taste
drücken. Der Musikwiedergabe Bildschirm erscheint
erneut, in dem nur die von Ihnen ausgewählten Titel
aufgeführt werden. Die ausgewählten Titel werden
automatisch wiedergegeben.
| HINWEIS |
� Sie können auf Audio CDs (CD-DA) eine Wiedergabeliste
mit maximal 99 Titeln erstellen.
� Wenn Sie eine Wiedergabeliste erstellt haben, wird im
Extras Menü Ausw. wiederg. durch Wdg.-L. bearb. ersetzt.
HT-E5200_XU_GER-0223.indd 42HT-E5200_XU_GER-0223.indd 42 2012-02-23 오후 3:03:182012-02-23 오후 3:03:18

Deutsch 43 |
05M
edia Play
� Auf dem Auswahl wiedergeben Bildschirm können Sie
ebenfalls Alles auswählen, Alle abwählen, und Abbr.auswählen.
• Verwenden Sie Alles auswählen um alle Titel
auszuwählen. Dadurch wird die Auswahl einzelner
Titel abgebrochen. Wenn Sie die RETURN (') auf
der Fernbedienung drücken oder die WIEDERGABE
Taste wählen und anschließend die E Taste drücken,
erscheinen alle Titel auf dem Musik Wiedergabe
Bildschirm und das Gerät gibt alle Titel beginnend mit
Titel 001 wieder.
• Verwenden Sie Alle abwählen um alle Titel gleichzeitig
abzuwählen. Wählen Sie anschließend einzelne Titel
aus oder verwenden Sie die Alles auswählen, um alle
Titel auszuwählen und drücken Sie dann die RETURN (') Taste auf der Fernbedienung oder wählen Sie die
WIEDERGABE Taste und drücken Sie anschließend
die E Taste. Wenn Sie nicht Alles auswählen oder
einzelne Titel auswählen, wird die Wiedergabeliste nicht
geändert.
• Abbr. bricht alle Änderungen, die Sie auf dem
Wiedergeben Bildschirm gemacht haben ab. Wenn Sie
zum Wiedergabebildschirm zurückkehren, bleibt die
Wiedergabeliste unverändert.
RippenSie können Musiktitel von einer Musik CD auf ein an den
USB-Anschluss angeschlossenes USB-Gerät rippen.
1 . Schließen Sie ein USB-Gerät an den USB-Anschluss
auf der Vorderseite des Geräts an und drücken Sie
die RETURN (') Taste auf der Fernbedienung.
2 . Legen Sie die Disk ein, die Sie rippen möchten, und
schließen Sie die Disk-Lade.
3 . Rufen Sie den Wiedergabebildschirm auf und
drücken Sie die TOOLS Taste. Das Extras Menü
wird angezeigt.
4 . Mit Hilfe der ▲▼ Tasten Ripp., auswählen, und
die E Taste drücken. Der Rip Bildschirm wird
angezeigt.
5 . Wählen Sie mit Hilfe der ▲▼ Tasten einen Titel aus
und drücken Sie anschließend die E Taste. Auf
der linken Seite des Titels erscheint eine Markierung.
6 . Wiederholen Sie Schritt 5, um weitere Titel
auszuwählen und zu markieren.
7 . Um einen Titel aus der Liste zu entfernen, zum Titel
gehen und die E Taste drücken. Die Markierung
des Titels wird entfernt.
8 . Nach Abschluss die ► Tasten drücken, um Ripp., auszuwählen und anschließend die E Taste
drücken. Das Ripp. Popup-Fenster erscheint.
9 . Drücken Sie die E Taste, um mit dem Rip-Vorgang
zu starten. Der Rippen Fortschrittsbalken erscheint.
10 . Wenn das Rippen abgeschlossen ist, erscheint die
Meldung “Kopieren abgeschlossen.”. Drücken Sie
die E Taste.
11 . Drücken Sie die RETURN (') Taste, um zum
Wiedergabebildschirm zurückzukehren.
| HINWEIS |
� Wenn das Rippen abgeschlossen ist, wird ein Ordner mit
der Bezeichnung MP auf dem USB-Gerät angelegt.
Bluetooth verwendenHören Sie Ihren Lieblingshit in bestem Stereo-
Sound über ein Bluetooth-fähiges Gerät - ganz
ohne Kabel!
Was ist Bluetooth?
Bluetooth ist eine neue Technologie, mit der es
möglich ist, Bluetooth-fähige Geräte über eine
kurze Funkverbindung miteinander zu verbinden.
• Ein Bluetooth-Gerät kann je nach Verwendung
zu Nebengeräuschen oder einer Fehlfunktion
führen.
- Wenn das Empfangs-/Sendesystem eines
Bluetooth-Geräts oder des Blu-ray Home
Cinema berührt wird.
- Wenn Störungen aufgrund von Behinderungen
durch Wände, Ecken oder Bürotrennwände
verursacht werden.
- Wenn Interferenzen durch Geräte, die im
gleichen Frequenzband arbeiten, z. B.
medizinische Geräte, Mikrowellen und WLAN-
Geräte entstehen.
• Verbinden Sie das Heimkino mit dem Bluetooth-
Gerät auf eine kurze Entfernung.
• Mit zunehmender Entfernung zwischen dem
Heimkino und dem Bluetooth-Gerät nimmt die
Qualität der Bluetooth-Verbindung ab. Wenn
die Distanz den Bluetooth-Betriebsbereich
übersteigt, geht die Verbindung verloren.
• In Gebieten mit geringer Empfangssensibilität
ist die Funktion der Bluetooth-Verbindung
möglicherweise eingeschränkt.
• In einer hindernisfreien Umgebung hat das
Heimkino einen Empfangsradius von 10 m. Die
Verbindung wird automatisch unterbrochen,
wenn dieser Radius überschritten wird. Selbst
innerhalb dieses Radius kann die Klangqualität
durch Hindernisse wie Mauern oder Türen
beeinträchtigt werden.
• Dieses Funkgerät kann Interferenzen während
des Betriebs verursachen.
HT-E5200_XU_GER-0223.indd 43HT-E5200_XU_GER-0223.indd 43 2012-02-23 오후 3:03:292012-02-23 오후 3:03:29

| 44 Deutsch
Media PlayAnschließen eines Bluetooth-Geräts an das Heimkino
5V 500mA
Verbinden
Bluetooth-GerätVergewissern Sie sich, dass das Bluetooth-Gerät
die Funktionen des Bluetooth-fähigen Stereo-
Headsets unterstützt.
1 . Drücken Sie die FUNCTION Taste auf der
Fernbedienung des Geräts, um die BT
Meldung anzuzeigen.
• Auf der Anzeige des Heimkinos wird für 2 Sekunden
WAIT und anschließend READY angezeigt.
2 . Wählen Sie auf dem Bluetooth-Gerät, mit dem
Sie eine Verbindung herstellen möchten, das
Bluetooth-Menü aus. (Weitere Informationen dazu
finden Sie im Benutzerhandbuch des Bluetooth-
Geräts.)
3 . Wählen Sie auf dem Bluetooth-Gerät das Stereo-
Headset-Menü aus.
• Es wird eine Liste der erkannten Geräte angezeigt.
4 . Wählen Sie in dieser Liste "SamsungHTS-XXXXXX" aus.
• Wenn die Verbindung zwischen dem Heimkino
dem und Bluetooth-Gerät hergestellt ist,
erscheint der Name des angeschlossenen
Bluetooth Geräts gefolgt von dem Heimkino auf
der Anzeige.
5 . Starten Sie auf dem verbundenen Gerät die
Musikwiedergabe.
• Sie können nun die vom Bluetooth-Gerät
wiedergegebenen Musiktitel über das Heimkino
System hören.
| HINWEIS |
� Das Heimkino unterstützt nur Middle Quality SBC (237kbps bei
48kHz). High Quality SBC (328kbps bei 44.1kHz) wird nicht
unterstützt.
� Die AVRCP Funktion wird unterstützt und funktioniert je nach der
Spezifikation des Geräts anders.
� Nur an ein Bluetooth-Gerät anschließen, das das A2DP Profil
unterstützt.
� Es kann nur eine Verbindung zu einem Bluetooth-Gerät
hergestellt werden.
� Die Suchfunktion oder der Anschluss des Geräts können unter
folgenden Umständen eventuell nicht richtig durchgeführt
werden:
- Wenn in der Umgebung des Heimkinos eine starke
elektromagnetische Wellen ausgesendet werden.
- Wenn mit mehreren Bluetooth-Geräten gleichzeitig eine
Verbindung zum Heimkino hergestellt wurde.
- Wenn das Bluetooth-Gerät ausgeschaltet oder nicht
angeschlossen ist oder nicht richtig funktioniert.
- Beachten Sie, dass Geräte, wie Mikrowellenherde,
WLAN-Geräte, Leuchtstoffröhren und Gasöfen
denselben Frequenzbereich wie Bluetooth-Geräte
verwenden, wodurch es zu Interferenzen kommen kann.
Trennen des Bluetooth-Geräts vom HeimkinoSie können die Verbindung zwischen Bluetooth-Gerät
und dem Heimkino trennen. (Schlagen Sie bitte im
Benutzerhandbuch des Bluetooth-Geräts nach.)
• Das Heimkino wird abgetrennt.
• Sobald das Heimkino-System vom Bluetooth-
Gerät getrennt wurde, wird auf der Vorderseite des
Heimkino-Systems DISCONNECTED angezeigt.
Trennen des Heimkinos vom Bluetooth-GerätDrücken Sie die ( ) Taste auf der Vorderseite des
Heimkinos, um von BT auf einen anderen Modus
umzuschalten oder das Heimkino auszuschalten.
• Das angeschlossene Bluetooth-Gerät wartet eine
gewisse Zeit auf eine Antwort vom Heimkino, bevor
es die Verbindung unterbricht, es sei denn, dass es
durch Umschalten der Funktion abgetrennt wird.
(Je nach Bluetooth-Gerät kann der Zeitraum bis zur
Trennung der Verbindung variieren)
• Die Verbindung mit dem aktuell verbundenen Gerät
wird getrennt.
| HINWEIS |
� Die Bluetooth-Verbindung wird unterbrochen, wenn
der Abstand zwischen dem Heimkino-System und dem
verwendeten Bluetooth-Gerät mehr als 10 m beträgt.
Wenn der Abstand wieder auf die effektive Reichweite
hergestellt wird oder das Bluetooth-Gerät neu gestartet
wird, muss die Verbindung neu hergestellt werden.
� Wenn sich das Bluetooth-Gerät wieder im effektiven
Bereich befindet, können Sie das Gerät neu starten,
um die Verbindung mit dem Bluetooth-Gerät wieder
herzustellen.
HT-E5200_XU_GER-0223.indd 44HT-E5200_XU_GER-0223.indd 44 2012-02-23 오후 3:03:312012-02-23 오후 3:03:31

Deutsch 45 |
05M
edia Play
� Im BT Funktion Modus wird der Bildschirmschoner
aktiviert, wenn sich das Gerät 5 Minuten lang im
Bereitschaftszustand befindet. Zum Anschließen des BT-
Geräts den Bildschirmschoner abstellen und das Gerät
anschließen. Um den Bildschirmschoner abzuschalten
eine beliebige Taste auf der Fernbedienung betätigen. (z. B.
Lautstärkeregelung, usw.)
Anzeigen von Fotos
Sie können auf DVDs, USB-Geräten, mobilen
Geräten oder dem PC gespeicherte Fotos
anzeigen.
Extras Menü verwendenDrücken Sie während der Wiedergabe die TOOLS Taste.
Zur FotolisteWählen Sie diese Option, um zu der
Liste der Fotos auf dem eingelegten
Medium zu wechseln.
Diashow starten Startet die Diashow.
Diashow-Geschw.
Wählen Sie diese Option, um die
Geschwindigkeit der Diashow
einzustellen.
Diashow-EffektWählen Sie diese Option, um
die Spezialeffekte der Diashow
einzustellen.
Hintergrundmusik an
Wählen Sie diese Option, um während
der Diashow Musik zu hören.
Einstellung der Hintergrundmusik
Dient zur Einstellung der
Hintergrundmusik Optionen.
Bildmodus
Wählen Sie diese Option, um den
Bildeinstellungen einzustellen.
- Dynamisch : Wählen Sie diese
Option, um die Schärfe zu erhöhen.
- Standard : Diese Einstellung
kann für die meisten
Wiedergabeanwendungen
verwendet werden.
- Film : Dies ist die beste Einstellung
zum Ansehen von Filmen.
- Benutzer : Ermöglicht die
Einstellung der Schärfe und der
Rauschunterdrückung.
| HINWEIS |
� Wenn Sie die BD-Wise Funktion
eingeschaltet haben, wird dieses
Menü nicht angezeigt.
Zoom Vergrößert das aktuelle Bild.
(bis zu vierfache Vergrößerung.)
DrehenDreht das Bild. (Das Bild wird entweder
im Uhrzeigersinn oder gegen den
Uhrzeigersinn gedreht.)
Information Zeigt die Bildinformationen an.
| HINWEIS |
� Abhängig von der Disk oder dem Speichergerät kann
das Extras Menü abweichen. Eventuell werden nicht alle
Optionen angezeigt.
� Um die Hintergrundmusik Funktion aktivieren zu können,
muss sich die Bilddatei im gleichen Ordner befinden, wie
die Musikdatei. Die Audioqualität kann durch die Bitrate
der MP3-Datei, die Bildgröße und die Kodierungsmethode
beeinträchtigt werden.
� Sie können den Untertitel und die PG-Grafik im
Vollbildmodus nicht vergrößern.
Verwenden des Extras Menü,
wenn eine Datei markiert ist
Wenn eine Datei markiert ist, die TOOLS Taste drücken.
Ansicht
Wählen Sie diese Option, um die
Sortieroptionen einzustellen: Interpret,
Genre, Monatlich, Spätestes Dat. usw.
Die angezeigten Sortieroptionen hängen
von der Art der der Speicherung und des
Speichermediums ab.
OrdneransichtErscheint im Bildschirm der Ansicht
Funktion. Wählen Sie diese Option, um die
Ordner auf dem Speichergerät anzuzeigen.
TitelErscheint im Bildschirm der Ansicht
Funktion. Wählen Sie diese Option, um alle
Fotos oder Videos auf dem Speichergerät
nach Titel zu sortieren.
Interpret
Erscheint im Bildschirm der Ansicht
Funktion. Wählen Sie Interpreten aus
und es werden alle Musiktitel auf dem
Speichergerät nach Interpreten sortiert
angezeigt.
HT-E5200_XU_GER-0223.indd 45HT-E5200_XU_GER-0223.indd 45 2012-02-23 오후 3:03:342012-02-23 오후 3:03:34

| 46 Deutsch
Media Play
AlbumErscheint im Bildschirm der Ansicht
Funktion. Wählen Sie Album aus und
es werden alle Musiktitel auf dem
Speichergerät nach Alben sortiert angezeigt.
Genre
Erscheint im Bildschirm der Ansicht
Funktion. Wählen Sie Genre aus und
es werden alle Musiktitel auf dem
Speichergerät nach Genres sortiert
angezeigt.
Spätestes Dat.
Erscheint im Bildschirm der Ansicht
Funktion. Nach Auswahl dieser Option
werden alle Fotos oder Videos auf
einem Speichergerät vom spätesten bis
zum jüngsten Datum sortiert angezeigt.
Frühestes Dat.
Erscheint im Bildschirm der Ansicht
Funktion. Nach Auswahl dieser Option
werden alle Fotos oder Videos auf einem
Speichergerät vom jüngsten bis zum
spätesten Datum sortiert angezeigt.
Monatlich
Erscheint im Bildschirm der Ansicht
Funktion. Wählen Sie diese Option, um alle
Fotos oder Videos auf dem Speichergerät
nach Erstellungsmonat sortiert anzuzeigen.
Auswahl wdg.
Mit derAusw. wiederg. Funktion
können Sie bestimmte Musik-, Video-
und Fotodateien für die Wiedergabe
auswählen. Funktioniert grundsätzlich
für alle Medien gleich. Das folgende
Beispiel ist für Fotos angegeben.
1. Markieren Sie auf dem Miniaturansicht
Bildschirm ein Foto und drücken
Sie dann die TOOLS Taste auf der
Fernbedienung.
2. Wählen Sie im Extras Menü
Auswahl wdg., aus und drücken Sie
anschließend die E Taste.
3. Verwenden Sie auf dem
Auswahlbildschirm die ▲▼ ◄►
Tasten, um ein Foto auszuwählen, das
Sie anzeigen möchten und drücken Sie
die E Taste. Auf der linken Seite des
Fotos erscheint eine Markierung.
4. Wiederholen Sie Schritt 3 für jedes
Foto, dass Sie anzeigen möchten.
5. Um ein Foto abzuwählen, das Foto
markieren und die E Taste drücken.
6. Nach Abschluss die ◄► Tasten
drücken, um Play auszuwählen und
anschließend die E Taste drücken.
Eine Diashow mit den ausgewählten
Fotos wird gestartet.
7. Um die Diashow zu unterbrechen,
die E Taste einmal drücken. Um
die Diashow fortzusetzen, die E
Taste erneut drücken.
8. Um die Diashow anzuhalten, die
RETURN (') Taste drücken.
| HINWEIS |
� Nachdem die Diashow gestartet
wurde, kann die Diashow durch
Drücken der TOOLS Taste gesteuert
und das Diashow Menü angezeigt
werden. Sieh "EXTRAS Menü
verwenden" auf Seite 45.
Senden
Wählen Sie Senden, um die ausgewählten
Dateien auf Picasa, Facebook, Cloud
Storage, N Drive oder Family Story
hochzuladen. Um Senden nutzen zu
können, müssen Sie ein Konto auf der
Online Seite einrichten sich anschließend
mit der Anmelden Funktion anmelden.
1. Wählen Sie mit Hilfe der ▲▼◄►
Tasten eine Datei aus und drücken
Sie anschließend die E Taste.
2. Wiederholen Sie diese Schritte
für jede Datei, die Sie hochladen
möchten.
| HINWEIS |
� Sie können ebenfalls Alle wählen
auf der rechten Seite verwenden
und die E Taste drücken, um alle
Titel oder Dateien auszuwählen.
3. Wählen Sie Senden auf der
rechten Seite und drücken Sie
anschließend die E Taste.
4. Wählen Sie mit Hilfe der ▲▼
Tasten die Online Seite, auf die Sie
die Dateien oder Titel hochladen
möchten und drücken Sie
anschließend die E Taste.
HT-E5200_XU_GER-0223.indd 46HT-E5200_XU_GER-0223.indd 46 2012-02-23 오후 3:03:362012-02-23 오후 3:03:36

Deutsch 47 |
05M
edia Play
Anmelden/Abm.Mit der An-/Abmelden Funktion können
Sie sich an Ihrem Samsung Online
Konto anmelden.
Zu W.-Li. hinz.
Wählen Sie diese Option, um eine
Wiedergabeliste zu erstellen oder um
Dateien oder Titel zu einer Wiedergabeliste
hinzuzufügen.
1. Wählen Sie Zu W.-Li. hinz., und
drücken Sie die E Taste.
2. Markieren Sie mit Hilfe der
▲▼◄►Tasten einen Titel oder eine
Datei und drücken Sie anschließend
die E Taste.
3. Wiederholen Sie diese Schritte für
jede Datei oder jeden Titel, den Sie
hochladen möchten.
4. Wählen Sie Hinzufügen auf der
rechten Seite und drücken Sie
anschließend die E Taste.
5. Führen Sie in dem angezeigten Fenster
eine der folgenden Aktionen durch:
• Wählen Sie die Wiedergabeliste aus, zu
der Sie die Titel oder Dateien hinzufügen
möchten und drücken Sie die E Taste.
• Wählen Neu erst., und drücken Sie
die E Taste. In dem erscheinenden
Tastatur Popup-Fenster einen Namen
für die neue Wiedergabeliste eingeben.
Mit Hilfe der Nummerntasten auf der
Fernbedienung die Nummern eingeben.
Geben Sie die Buchstaben mit Hilfe der
▲▼◄► Tasten ein und drücken Sie
anschließend die E Taste. Wenn die
Eingabe abgeschlossen ist, FERTIG am
unteren Bildschirmrand auswählen und
anschließend die E Taste drücken.
Entfernen (Wiedergabeliste)
Je nachdem welchen Bildschirm Sie
gerade betrachten, Löschen auswählen,
um eine Datei von einem beschreibbaren
Medium (wie einem USB-Gerät) oder eine
Wiedergabeliste zu löschen.
Wdg.-L. bearb.
Wählen Sie Wdg.-L. bearb. um Dateien
oder Titel aus einer bestehenden
Wiedergabeliste zu löschen. Das
Speichermedium mit der Wiedergabeliste
muss in das Gerät eingelegt oder an
diesen angeschlossen sein.
1. Wählen Sie mit Hilfe der
▲▼◄►Tasten eine Datei aus und
drücken Sie anschließend die E
Taste.
2. Wiederholen Sie diese Schritte für
jede Datei, die Sie löschen möchten.
| HINWEIS |
� Sie können ebenfalls Alle wählen
auf der rechten Seite verwenden
und die E Taste drücken, um alle
Titel oder Dateien auszuwählen.
3. Wählen Sie Entfernen auf der
rechten Seite und drücken Sie
anschließend die E Taste.
Gruppe abspielen
Nachdem Sie nach Interpret, Genre, Album,
Titel, Spätestes Dat., Frühestes Dat. oder
Monatlich sortiert haben, wählen Sie eine
Gruppe aus den Suchergebnissen aus (z. B. alle
im August aufgenommenen Bilder) und wählen
Sie anschließend Gruppe abspielen, um nur die
Dateien aus dieser Gruppe wiederzugeben.
Zur Wiedergabeliste
Wählen Sie diese Option, um zum
Wiedergabeliste Bereich auf dem AllShare
Hauptbildschirm zu wechseln.
Kodierung
Die Kodierung ändert sich je nach Sprache
oder Region und hat Einfluss darauf, wie
das Gerät Dateien und Titel sortiert und
anordnet, bzw. das Datum anzeigt. Wählen
Sie Kodierung, um die Kodierung an Ihre
Sprache oder Region anzupassen.
Information Informationen zeigt die Informationen über
die Mediendatei und den Inhalt an.
| HINWEIS |
� Abhängig von der Disk oder dem Speichergerät kann
das Extras Menü abweichen. Eventuell werden nicht alle
Optionen angezeigt.
HT-E5200_XU_GER-0223.indd 47HT-E5200_XU_GER-0223.indd 47 2012-02-23 오후 3:03:382012-02-23 오후 3:03:38

| 48 Deutsch
Media PlayRadio hören
Verwenden der Tasten auf der Fernbedienung1 . Wählen Sie mit der Taste FUNCTION die
Option FM aus.
2 . Stellen Sie den gewünschten Sender ein.
• Gespeicherter Sender 1 : Drücken Sie
die 5 Taste, um PRESET auszuwählen
und anschließend die TUNING/CH (,.)
Taste, um den voreingestellten Sender
auszuwählen.
- Bevor Sie voreingestellte Sender aufrufen
können, müssen Sie die Sender im Gerät
abspeichern.
• Manuelle Sendersuche : Drücken Sie die 5 Taste, um MANUAL auszuwählen
und anschließend die TUNING/CH (,.)
Taste, um einen auf einer höheren oder
niedrigeren Frequenz ausgestrahlten Sender
auszuwählen.
• Automatische Sendersuche : Drücken Sie
die 5 Taste, um MANUAL auszuwählen
und anschließend die TUNING/CH (,.)
Taste, um das Frequenzband automatisch
zu durchsuchen.
Einstellen des Mono/Stereo-ModusDrücken die MO/ST Taste.
• Durch Drücken diese Taste wird zwischen
STEREO und MONO umgeschaltet.
• Stellen Sie an Orten mit schwachem Empfang
MONO ein, um einen rauschfreien Empfang zu
erhalten.
Sender voreinstellenBeispiel : Speichern des Senders FM 89.10.
1 . Wählen Sie mit der Taste FUNCTION die
Option FM aus.
2 . Drücken Sie die TUNING/CH (,.) Taste,
um <89.10> auszuwählen.
3 . Drücken Sie die TUNER MEMORY Taste.
• Auf dem Display leuchte NUMBER auf.
4 . Drücken Sie die TUNER MEMORY Taste
erneut.
• Drücken Sie die TUNER MEMORY
Taste bevor NUMBER auf der Anzeige
ausgeblendet wird.
• Nachdem Sie die TUNER MEMORY Taste
gedrückt haben, wird NUMBER auf dem
Bildschirm ausgeblendet und der Sender ist
im Speicher gespeichert.
5 . Zur Voreinstellung eines anderen Senders
wiederholen Sie bitte Schritte 2 bis 4.
• Um einen gespeicherten Sender
einzustellen, müssen Sie die TUNING/CH
(,.) Taste drücken.
Über RDS-Sender
Verwenden von RDS (Radio Data System)für den Empfang von UKW-Sendern.RDS ermöglicht es Radiostationen ein zusätzliches
Signal neben den regulären Programmsignalen zu
senden.
Dazu gehören beispielsweise Informationen
über den Sendernamen oder die Art des
Radioprogramms, wie etwa Sport oder Musik
usw.
Wenn Sie eine Radiostation mit RDS-Dienst
gewählt haben, erscheint das RDS-Symbol auf
der Anzeige.
Beschreibung der RDS-Funktion• PTY (Program Type) : Zeigt den Programmtyp
an, der gerade wiedergegeben wird.
• PS NAME (Program Service
Name(Programmdienstname)) : Zeigt den
Namen der Radiostation an und besteht aus 8
Zeichen.
• RT (Radio Text) : Dekodiert die vom Sender
übertragenen Texte (wenn vorhanden) und
besteht aus maximal 64 Zeichen.
• CT (Clock Time (Uhrzeit)): Dekodiert die Echtzeit
aus der Radiofrequenz. Einige Radiostationen
übertragen eventuelle keine PTY, RT oder
CT Informationen. Deswegen können diese
Informationen nicht immer angezeigt werden.
• TA (Traffic Announcement (Verkehrsdurchsage)):
TA ON/OFF zeigt an, dass die
Verkehrsdurchsage gerade läuft.
| HINWEIS |
� RDS funktioniert möglicherweise nicht richtig, wenn die
gewählte Station RDS-Signale nicht korrekt übermittelt
oder das Signal schwach ist.
HT-E5200_XU_GER-0223.indd 48HT-E5200_XU_GER-0223.indd 48 2012-02-23 오후 3:03:402012-02-23 오후 3:03:40

Deutsch 49 |
05M
edia Play
Anzeigen der RDS-SignaleSie können die von der Station gesendeten RDS-
Signale auf dem Display ablesen.
Betätigen Sie die RDS DISPLAY Taste, während
sie eine Radiostation hören.
• Jedes Mal, wenn Sie diese Taste drücken,
ändert sich die auf der Anzeige angezeigte
Informationen in folgender Reihenfolge : PS
NAME � RT� CT � Frequenz
PS (Program Service(Programmdienst))
Während des Suchvorgangs, erscheint
<PS NAME> und danach werden die
Sendernamen angezeigt. <NO PS>
erscheint, wenn kein Signal gesendet wird.
RT(RadioText)
Während des Suchvorgangs erscheint
<RT> und anschließend werden die von
der Radiostation gesendeten Mitteilungen
angezeigt. <NO RT> erscheint wenn kein
Signal gesendet wird.
Frequenz Senderfrequenz (kein-RDS-Service)
Über auf dem Bildschirm angezeigte ZeichenWenn auf der Anzeige PS-, oder RT-Signale
angezeigt werden, werden die folgenden Zeichen
verwendet.
• Die Anzeige unterscheidet nicht zwischen Groß-
und Kleinbuchstaben. Es werden immer nur
Großbuchstaben verwendet.
• Die Anzeige kann keine akzentuierten
Buchstaben anzeigen. <A,> kann beispielsweise
für akzentuierte <A’s> wie <À, Â, Ä, Á, Å und Ã.>
stehen.
PTY (Program-Typ) Anzeige und PTY-SUCH-FunktionEiner der Vorteile des RDS-Service ist dass Sie
eine besondere Art vom Programm von der vor
eingestellten Kanälen durch das Angeben der
PTY-Codes ausfindig machen können.
Programmsuche mithilfe der PTY-Codes
� Bevor Sie beginnen!• Die PTY-Suche steht nur für gespeicherte
Stationen zur Verfügung.
• Um den Suchvorgang vorzeitig abzubrechen,
während der Suche die 5 Taste drücken.
• Es existiert eine Zeitbegrenzung für die
folgenden Schritte. Wenn die Einstellung vor
ihrer Beendigung abgebrochen wird, starten Sie
nochmals mit Schritt 1.
• Wenn Sie die Tasten auf der Hauptfernbedienung
drücken, vergewissern Sie sich, dass Sie die
UKW-Sender mit Hilfe der Hauptfernbedienung
ausgewählt haben.
•
221 3
4 5 6
RDS DISPLAY
PTY- PTY SEARCH PTY+
TA
1 . Wählen Sie während Sie einen UKW-Sender
hören die PTY SEARCH aus.
2 . Drücken Sie die PTY- oder PTY+ Taste,
bis der gewünschte PTY-Code auf dem
Bildschirm angezeigt wird.
• Die beschriebenen PTY-Codes werden auf
der rechten Seite der Anzeige angezeigt.
3 . Drücken Sie die Taste PTY SEARCH erneut,
während der gewünschte PTY-Code noch auf
dem Bildschirm angezeigt wird.
• Das Gerät durchsucht die 15
voreingestellten UKW-Sender und hält an,
wenn der ausgewählte Sender gefunden
wird und stellt ihn ein.
HT-E5200_XU_GER-0223.indd 49HT-E5200_XU_GER-0223.indd 49 2012-02-23 오후 3:03:422012-02-23 오후 3:03:42

| 50 Deutsch
Media PlayVerwenden der Spezialeffekt
Tasten auf der Fernbedienung
SOUND EFFECT FunktionSOUND
EFFECT
Mit dieser Funktion können Sie Modus für die
Klangoptimierung auswählen.
1. Drücken Sie die SOUND EFFECT Taste.
2. Wählen Sie mit den ▲▼ Tasten den gewünschten
Modus: DSP oder Tonmodus.
3. Wählen Sie mit den Tasten ◄► den gewünschten
Klangeffekt aus.
� DSPMP3 Enhancer Power Bass Aus• MP3 Enhancer : Mit dieser Option können Sie ein
besseres Klangerlebnis erzielen (z.B. mp3 Musik) Sie
können die Audioqualität vom MP3-Sound-Level (24
kHz, 8 Bit) auf CD-Sound-Level (44,1 kHz, 16 Bit)
hochskalieren.
• Power Bass : Erhöht den Lautstärkepegel von
Basstönen und sorgt für kräftigere Bässe
• Aus : Auswahl für normalen Klang.
� TonmodusVertical Surround Musik Nachrichten Drama Kino Sport Spiel Aus
3D Sound
Sie können natürlicheren und lebendigeren Surround
Klang erleben, indem Sie die Klangtiefe mit Hilfe der
folgenden Pegeloptionen einstellen.
Aus Hoch Mittel Schwach| HINWEIS |
� Diese Funktion steht im FM Modus nicht zur
Verfügung.
Wiedergabe eines 2D Videos im 3D Modus
Sie können ein gewöhnliches 2D Video im 3D Modus
erleben.
| HINWEIS |
� Wenn Sie im 3D Modus zum Home oder Smart Hub
Home Menü wechseln, wird automatisch in den 2D
Modus umgeschaltet.
vTunervTuner
Die vTuner Funktion dient zum Radio hören. Wenn
die vTuner Taste drücken, wechseln Sie zur vTuner
Anwendung. Sie können die vTuner Funktion nutzen,
nachdem Sie die vTuner Anwendung von Samsung Apps
heruntergeladen haben.
HT-E5200_XU_GER-0223.indd 50HT-E5200_XU_GER-0223.indd 50 2012-02-23 오후 3:03:462012-02-23 오후 3:03:46

Deutsch 51 |
06Netzw
erkdienste
Sie können verschiedene Netzwerkdienste wie
Smart Hub oder BD-LIVE in Anspruch nehmen,
wenn Sie das Gerät an ein Netzwerk anschließen.
Um Netzwerkdienste nutzen zu können,
müssen Sie zuerst:
1 . Schließen Sie das Gerät an ein Netzwerk
an. (Siehe Seite 20)
2 . Die Netzwerkeinstellungen konfigurieren.
(Siehe Seiten 29 - 32)
Smart Hub verwendenb
Mit Hilfe von Smart Hub können Sie Filme, Videos
und Musik direkt aus dem Internet herunterladen,
auf verschiedene gebührenpflichtige oder
gebührenfreie Anwendungen zugreifen und diese
auf Ihrem Fernsehgerät ansehen. Die Inhalte
umfassen Nachrichten, Sport, Wetterberichte,
Börsenkurse, Karten, Fotos und Spiele.
Um Informationen zu erhalten, wie Smart Hub
verwendet werden kann, folgen Sie diesen
Schritten:
1 . Besuchen Sie www.samsung.com.
2 . Klicken Sie am oberen Rand der Seite auf
Support.
3 . Geben Sie auf der Support Seite die
Modellbezeichnung Ihres Geräts in das
Produktsuche Feld ein.
4 . Klicken Sie auf der aufgerufenen Seite unter
Weiterer Support auf AllShare PC S/W. Das
Download Center wird aufgerufen.
5 . Klicken Sie im Download Tab auf Handbuch.
6 . Klicken Sie im Handbuch Tab auf der rechten
Seite auf das Datei Symbol für das Smart
Hub Benutzerhandbuch. Das Handbuch wird
heruntergeladen
| HINWEIS |
� Der Zugang zu Smart Hub Benutzerhandbuch kann ohne
vorherige Ankündigung geändert werden.
Smart Hub Übersicht
xxxxxxxx
Contents 1
xxxxxxxx
Contents 4
xxxxxxxx
Contents 3
xxxxxxxx
Contents 2
Samsung Apps Your Video Family Story Fitness Kids
a Anmelden b WallPaper / Extras ' Zurück
Search
5 6 70
9
1 2 4
8
3
1Your Video : Stellt Empfehlungen für Videos auf der
Grundlage Ihrer Vorlieben zur Verfügung.
2Search : Führt eine integrierte Suche bei Ihren
Video Anbietern und allen angeschlossenen
AllShare-Geräten durch.
3Empfehlungen : Zeigt empfohlene, von Samsung
verwaltete Inhalte an.
4Anleitung : Zeigt eine Smart Hub Anleitung, eine
Einführung in das Gerät und Anleitungen neuer
Anwendungen an.
5
Family Story : Ein einfacher Weg, um auf Family
Inhalte zuzugreifen.
• Stellt zu jeder Zeit und an jedem Ort den Zugang
zu Familienfotos, Nachrichten und Ereignissen
bereit.
6
Fitness : Das Tor zu einem einmaligen Fitness Center.
• Hier werden Fitness Videos von verschiedenen
Anbietern und Informationen über die
verbrannten Kalorien nach jedem Workout zur
Verfügung gestellt.
7
Kids : Der Kids Dienst stellt einen einfachen und
sicheren Weg bereit, um die beliebtesten Inhalte zu
genießen.
• Der Dienst stellt ein verschiedenartiges Angebot
an Spaß und sicheren Inhalten für Kinder zur
Verfügung.
8
Navigationshilfe : Zeigt die Tasten auf der
Fernbedienung an, die für die Navigieren in Smart
Hub verwendet werden können.
• ROT (A) : Anmelden bei Smart Hub.
• GRÜN (B) : Dient zur Anzeige des
Hintergrundbildschirms
• Extras : Zeigt das Einstellungen Fenster an.
• Zurück : Kehrt zum vorherigen Menü zurück.
Netzwerkdienste
HT-E5200_XU_GER-0223.indd 51HT-E5200_XU_GER-0223.indd 51 2012-02-23 오후 3:03:502012-02-23 오후 3:03:50

| 52 Deutsch
Netzwerkdienste
9
Meine Anwendungen : Zeigt Ihre persönliche
Sammlung von Anwendungen an, die Sie ergänzen,
bearbeiten oder löschen können.
0
Samsung Apps : Ermöglicht das Herunterladen von
verschiedenen gebührenpflichtigen oder Freeware
Diensten.
Verwenden des WebbrowsersSie können mit Hilfe des im Smart Hub Bildschirm
integrierten Webbrowsers auf das Internet
zugreifen.
1 . Auf dem Home Bildschirm Smart Hub
auswählen und anschließend die E Taste
drücken.
2 . Wählen Sie die Webbrowser Anwendung in
Smart Hub und drücken Sie die E Taste.
| HINWEIS |
� Wenn der Webbrowser mit einem über ein HDMI-Kabel
angeschlossenen Fernsehgerät ausgeführt wird, der BD-
Wise unterstützt, wird der Webbrowser im Vollbildmodus
ausgeführt und die Bildqualität des Fernsehgeräts wird
automatisch auf die optimale Einstellung eingestellt.
� Der Webbrowser unterstützt keine Java Anwendungen.
� Wenn Sie eine Datei herunterladen möchten und die
Datei nicht gespeichert werden kann, erscheint eine
Fehlermeldung.
� Die Wiedergabe von Flash Videos wird nicht unterstützt.
� Internethandel für den Online Kauf von Produkten wird
nicht unterstützt.
� ActiveX wird nicht unterstützt.
Der Webbrowser im Überblick
Google Search I’m Feeling Lucky
b Control Panel � Link Browsing / Tools ' Exit
http://www.google.com/
1
2
1
Bedienfeld : Zeigt die verschiedenen Webbrowser
Funktionen an.
• : Wechselt zur vorherigen Seite.
• : Wechselt zur nächsten Seite
• : Lädt die aktuelle Seite neu und aktualisiert
sie auf dem Bildschirm.
• : Wechselt zur Startseite des Webbrowsers.
• : Ermöglicht das Vergrößern oder Verkleinern
des Bildschirms auf verschiedene Prozentstufen.
• : Ermöglicht es, bestimmte Seiten als
Lesezeichen zu markieren, damit sie einfacher
aufgerufen werden können.
• : Ermöglicht es, den Verlauf des Besuchs von
Webseiten nach Datum, Name oder Häufigkeit
sortiert anzuzeigen.
• http://www.google.com/ : Ermöglicht es,
eine Seitenadresse manuell einzugeben oder
eine Seite aus der Liste der besuchten Seiten
auszuwählen.
• : Ermöglicht es, einfach zwischen
mehreren geöffneten Webbrowserfenstern
umzuschalten.
• : Ermöglicht die Suche nach Informationen
durch Eingabe von Suchbegriffen.
• : Mit dieser Funktion können sie die aktuelle
Seite mit Ihrer Familiengruppe durch Senden
einer Nachricht teilen.
• : Ermöglicht die Konfiguration aller
Einstellungen des Webbrowsers.
HT-E5200_XU_GER-0223.indd 52HT-E5200_XU_GER-0223.indd 52 2012-02-23 오후 3:03:552012-02-23 오후 3:03:55
Deutsch 53 |
06Netzw
erkdienste
2
Navigationshilfe : Zeigt die Tasten auf der
Fernbedienung an, die für die Navigieren im
Webbrowser verwendet werden können.
• GRÜN (B) : Zeigt die Systemsteuerung an.
• GELBE (C) : Einen Link suchen.
• Tools : Ruft das Extras Fenster auf.
• Exit : Kehrt zum vorherigen Menü zurück.
BD-LIVE™
Sobald das Gerät mit dem Netzwerk verbunden
ist, können sie verschiedene filmbezogene
Serviceinhalte, unter Benutzung einer BD-Live
konformen Disk, genießen.
1 . Schließen Sie einen USB Speicherstick an
die USB-Buchse auf der Vorderseite des
Geräts an und prüfen Sie den zur Verfügung
stehenden Speicherplatz. Das Speichergerät
muss zumindest 1 GB freien Speicherplatz
für die BD-LIVE-Service haben.
2 . Auf dem Home Bildschirm Einstell. auswählen und anschließend die E Taste
drücken.
3 . Wählen Sie Netzwerk, und drücken Sie die
E Taste.
4 . Wählen Sie BD-Live-Einstell., und drücken
Sie die E Taste.
5 . Wählen Sie BD-Datenmanagement, und
drücken Sie die E Taste.
6 . Wählen Sie Geräteauswahl, und drücken Sie
die E Taste.
7 . Wählen Sie USB, und drücken Sie dann die
E Taste.
8 . Legen Sie eine Blue-ray Disk ein, die BD-LIVE
unterstützt.
9 . Wählen Sie eine Position der vom Disk-
Hersteller zur Verfügung gestellten BD-LIVE-
Inhalte aus.
| HINWEIS |
� Wie Sie BD-LIVE und dessen Funktionen nutzen können,
kann je nach Disk variieren.
HT-E5200_XU_GER-0223.indd 53HT-E5200_XU_GER-0223.indd 53 2012-02-23 오후 3:03:572012-02-23 오후 3:03:57

| 54 Deutsch
AnhangZusätzliche Informationen
Hinweis
Anschlüsse
HDMI-AUSGANG
• Je nach Fernsehgerät stehen für den HDMI-Ausgang bestimmte Auflösungen möglicherweise
nicht zur Verfügung.
• Sie müssen eine HDMI-Verbindung verwenden, um Videos mit 3D-Technik zu genießen.
• Ein langes HDMI-Kabel kann Bildrauschen verursachen. Wenn dieser Fall eintritt, HDMI-Deep Color im Menü auf Aus stellen.
Einstell.
3D-Einstell.
• Bei einigen 3D Disks muss zum Anhalten des Films währen einer 3D Wiedergabe die 5 Taste einmal gedrückt werden. Der Film wird angehalten und der 3D-Modus wird deaktiviert.
Um eine 3D Option während der Wiedergabe eines 3D-Films zu ändern, die 5 Taste einmal
drücken. Das Blu-ray Menü wird angezeigt. Drücken Sie die 5 Taste erneut und wählen Sie
anschließend die 3D-Einstellungen im Blu-ray-Menü aus.
• Je nach Inhalt und Position des Bildes auf Ihrem Fernsehbildschirm, können senkrechte
schwarze Balken auf der linken oder rechten Seite, bzw. auf beiden Seiten angezeigt werden.
TV-Bildformat
• Einige Bildformate sind nicht bei allen Disks verfügbar.
• Wenn Sie ein Bildformat und eine Option wählen, welche sich vom Bildformat Ihres
Fernsehgeräts unterscheidet, kann das Bild verzerrt erscheinen.
• Wenn Sie 16:9 Original einstellen, kann Ihr Fernsehgerät das Format 4:3 Pillarbox (schwarze
Streifen an den Bildschirmrändern) anzeigen.
BD Wise (nur bei Samsung Produkten)
• Wenn BD Wise aktiviert ist, wird die Auflösung automatisch auf BD Wise gesetzt und es wird BD
Wise im Menü Auflösung angezeigt.
• Wenn dieses Gerät an ein Gerät angeschlossen ist, das BD Wise nicht unterstützt, können Sie die
BD Wise-Funktion nicht verwenden.
• Damit BD Wise richtig funktioniert, muss die BD Wise-Funktion im Gerät und Fernsehgerät auf
Ein gestellt werden.
Digital-Ausgang
• Achten Sie darauf, den richtigen Digitalausgang auszuwählen, da andernfalls kein Ton oder ein
Störgeräusch zu hören ist.
• Falls das HDMI-Gerät (Empfänger, TV) komprimierte Formate (Dolby digital, DTS) nicht unterstützt,
wird das Audiosignal als PCM wiedergegeben.
• Reguläre DVDs haben keinen BONUSVIEW-Audio und keine Navigationssoundeffekte.
• Einige Blu-ray-Disks haben keinen BONUSVIEW-Audio und keine Navigationssoundeffekte.
• Diese Einstellung der Digitalausgabe hat keinen Einfluss auf die analoge (L/R) Audio oder HDMI
Audio Ausgabe an Ihren Fernseher. Beeinflusst die optische und HDMI Audio Wiedergabe, wenn
Ihr Gerät an einen AV-Receiver angeschlossen ist.
• Bei der Wiedergabe von MPEG- Soundtracks, wird das Audiosignal, unabhängig von der
Digitalausgang Einstellung, als PCM (PCM oder Bitstrom) wiedergeben.
HT-E5200_XU_GER-0223.indd 54HT-E5200_XU_GER-0223.indd 54 2012-02-23 오후 3:03:592012-02-23 오후 3:03:59

Deutsch 55 |
07Anhang
Einstell.
BD-LIVE- Internet-Verbindung
• Die Internetverbindung kann während der Nutzung der BD-LIVE-Inhalte eingeschränkt sein.
Anynet+ (HDMI-CEC)
• Je nach Fernsehgerät stehen für den HDMI-Ausgang bestimmte Auflösungen möglicherweise nicht zur
Verfügung. Informationen dazu finden Sie in der Bedienungsanleitung Ihres Fernsehgeräts.
• Diese Funktion steht nicht zur Verfügung wenn CEC vom HDMI-Kabel nicht unterstützt wird.
• Wenn sich ein Anynet+ Logo auf Ihrem Samsung-Fernsehgerät befindet, wird die Anynet+-Funktion
unterstützt.
BD-Datenmanagement
• Die Wiedergabe einer Disk kann im externen Speichermodus angehalten werden, wenn das USB-Gerät
während der Wiedergabe entfernt wird.
• Es werden nur USB-Geräte mit einem FAT-Dateisystem (DOS 8.3 Datenträgerbezeichnung) unterstützt.
Es wird die Verwendung eines USB-Geräts mit USB 2.0-Protokoll Unterstützung und einer Lese-/
Schreibgeschwindigkeit von 4 MB/Sek. oder mehr empfohlen.
• Nach dem Formatieren des Speichergeräts funktioniert die Funktion Wiedergabe fortsetzen möglicherweise
nicht.
• Die gesamte für das BD-Datenmanagement zur Verfügung stehende Speicherkapazität kann je nach
vorliegenden Bedingungen abweichen.
DivX® Video On Demand
• Für weitere Informationen über DivX(R) VOD besuchen Sie bitte die Webseite "http://vod.divx.com".
Frontdisplay
• Die Helligkeit der Taste und der VOL +, - Taste kann nicht geändert werden.
Lautsprechereinst.
• Wenn Lautsprecher ausw. auf TV-Lautsprecher, eingestellt ist, wird der Ton über die Lautsprecher des
Fernsehgeräts wiedergegeben.
HDMI audio
• Wenn der HDMI/Ton über den Fernsehlautsprecher wiedergegeben wird, wird er automatisch auf 2 Kanäle
heruntergemischt.
Audioausgabekanal
• Wenn Anynet+ (HDMI-CEC) auf Aus eingestellt ist, steht die Audioausgabekanal Funktion nicht zur
Verfügung.
• Bei der Verwendung von HDMI-Kabeln ohne ARC (Audio Return Channel) Zertifikat, kann es zu
Kompatibilitätsproblemen kommen.
• Die ARC-Funktion ist nur verfügbar, wenn ein ARC-fähiges Fernsehgerät angeschlossen ist.
Digital-Ausgang
• Die Digitalausgabe kann aktiviert werden, wenn Lautsprecher ausw. auf TV-Lautsprecher eingestellt ist.
HT-E5200_XU_GER-0223.indd 55HT-E5200_XU_GER-0223.indd 55 2012-02-23 오후 3:04:012012-02-23 오후 3:04:01

| 56 Deutsch
Anhang
Wiedergabe
Wiedergabe einer Videodatei
• Videodateien mit hohen Bitraten von 20Mbps oder mehr beanspruchen das Gerät stark und können zu einer
Unterbrechung der Wiedergabe führen.
Audiosprache wählen
• Die ◄► Anzeige wird nicht auf dem Bildschirm angezeigt, wenn der BONUSVIEW Bereich keine
Einstellungen für BONUSVIEW-Audio enthält.
• Die über die Audiosprache Funktion zur Verfügung stehenden Sprachen hängen von den auf der Disk
kodierten Sprachen ab. Diese Funktion oder einige Sprachen können nicht zur Verfügung stehen.
• Bei einigen Blu-ray-Disks können Sie entweder den englischsprachigen PCM oder Dolby Digital Audio
auswählen.
Untertitelsprache wählen
• Je nach Blu-ray Disc / DVD können Sie den gewünschten Untertitel im Disk-Menü einstellen.
Drücken Sie die DISC MENU Taste.
• Diese Funktion hängt von der Auswahl der Untertitel ab, die auf der Disk codiert sind und können
nicht auf allen Blu-ray Discs/DVDs zur Verfügung stehen.
• Informationen über den Hauptfunktion/BONUSVIEW-Modus werden auch dann angezeigt, wenn
die Blu-ray Disk über einen BONUSVIEW-Bereich verfügt.
• Diese Funktion wechselt gleichzeitig sowohl die primären als auch sekundären Untertitel.
• Es wird entsprechend die Gesamtanzahl der primären oder sekundären Untertitel angezeigt.
JPEG-Dateien wiedergeben
• Sie können den Untertitel und die PG-Grafik im Vollbildschirmmodus nicht vergrößern.
AllShare Play
Verwenden der TOOLS Taste während der Wiedergabe von Bildern.
• Wenn das System an ein BD Wise kompatibles Fernsehgerät angeschlossen ist, bei dem BD
Wise aktiviert ist, wird das Bild Einstellungen Menü nicht angezeigt.
• Die Hintergrundmusik Funktion funktioniert nicht, wenn sich die Fotodatei und die Musikdatei
nicht auf demselben Speichermedium befinden. Die Tonqualität kann durch die Bitrate der MP3-
Datei, die Bildgröße und die Kodierungsmethode beeinträchtigt werden.
Wiedergabe eines USB-Speichergeräts
• Sie müssen das USB-Speichergerät sicher entfernen, (führen Sie die „USB sicher entfernen“
-Funktion durch) um die gespeicherten Daten auf Ihrem USB-Gerät nicht zu beschädigen.
Drücken Sie die HOME Taste, um zum Home Menü zu wechseln und wählen Sie anschließend
die GELBE (C) und danach die E Taste.
Musikwiedergabe
• Stellen Sie vor dem Anschließen Ihres iPods an das Gerät die Lautstärke auf einen moderaten
Wert ein.
• Wenn das Gerät eingeschaltet ist und Sie einen iPod anschließen, wird der Akku des iPod über
das Gerät aufgeladen.
HT-E5200_XU_GER-0223.indd 56HT-E5200_XU_GER-0223.indd 56 2012-02-23 오후 3:04:032012-02-23 오후 3:04:03

Deutsch 57 |
07Anhang
AllShare Play
Einen Film schauen
• Sie müssen den VIDEO-Ausgang (Composite) mit ihrem Fernsehgerät verbunden haben, um
Videos vom iPod zu anzusehen (Siehe Seite 18).
• Wenn Sie iPod-Videos über den VIDEO-Ausgang ansehen möchten, stellen Sie Anynet+ (HDMI
CEC) auf Aus.
• Nur der Wiedergabebildschirm wird auf dem Fernsehgerät angezeigt. Anzeigen von iPod
Bildschirmen auf dem iPod Player.
• Wenn Sie bei mit Hilfe der Docking Station angeschlossenem iPod zu den iPod Menü
zurückkehren wollen, FUNCTION auf der Fernbedienung betätigen oder auf der Vorderseite
des Systems drücken und R. IPOD auswählen.
Die Funktionen wechseln in folgender Reihenfolge:
BD/DVD D. IN AUX R. IPOD HDMI1 HDMI2 FM BT
iPod
iPod/iPhone Modelle, die mit diesem Gerät verwendet werden können.
• Die Lautstärkeregelung kann mit iPod und iPhone Modellen, die nicht auf Seite 36 aufgeführt
sind, eventuell nicht richtig funktionieren. Wenn mit den oben genannten Modellen irgendwelche
Probleme auftreten sollten, aktualisieren Sie bitte die iPod/iPhone Software auf die neueste
Version.
• Je nach Softwareversion des iPods können Bedienungsprobleme auftreten. Dabei handelt es
sich nicht um eine Fehlfunktion des Heimkinos.
• Je nach Softwareversion oder iPod Typ kann die Bedienung unterschiedlich sein. Installieren Sie
die neueste iPod Software. (Empfohlen)
• Sie können Musik oder Videos mit Hilfe der Blu-ray/DVD-Disk Funktion und Musik, Videos über
die Remote iPod Funktion erleben. Sie müssen die iPod Docking-Station verwenden, um Videos
wiedergeben zu können.
• Die Wiedergabe von Anwendungsinhalten über das Gerät kann nicht gewährleistet werden. Wir
empfehlen, heruntergeladene Inhalte auf dem iPod wiederzugeben.
• Falls Sie Probleme mit der Verwendung des iPods haben, besuchen Sie bitte die Webseite www.
apple.com/support/ipod.
HT-E5200_XU_GER-0223.indd 57HT-E5200_XU_GER-0223.indd 57 2012-02-23 오후 3:04:052012-02-23 오후 3:04:05

| 58 Deutsch
AnhangAuflösung nach Wiedergabemodus
� Bei der Wiedergabe von Blu-ray Disk/E-content/Digital Content
Ausgang
Einstellung
HDMI / angeschlossen HDMI / nicht angeschlossen
HDMI-ModusVIDEO Modus VIDEO Modus
Blu-ray Disc E-contents/Digital contents
BD WiseAuflösung der Blu-
ray-Disk1080p@60F 576i/480i -
AutomatischMax. Auflösung des
TV-Eingangs
Max. Auflösung des TV-
Eingangs576i/480i -
1080p@60F 1080p@60F 1080p@60F 576i/480i -
Film-Bildfrequenz : Auto
(24BpS)1080p@24F 1080p@24F 576i/480i -
1080i 1080i 1080i 576i/480i 576i/480i
720p 720p 720p 576i/480i 576i/480i
576p/480p 576p/480p 576p/480p 576i/480i 576i/480i
576i/480i - - - 576i/480i
� DVD-Wiedergabe
Ausgang Einstellung
HDMI / angeschlossen HDMI / nicht angeschlossen
HDMI-Modus VIDEO Modus VIDEO ModusBD Wise 576i/480i 576i/480i -
Auto Max. Auflösung des TV-Eingangs 576i/480i -
1080p@60F 1080p@60F 576i/480i -
1080i 1080i 576i/480i 576i/480i
720p 720p 576i/480i 576i/480i
576p/480p 576p/480p 576i/480i 576i/480i
576i/480i - - 576i/480i
HT-E5200_XU_GER-0223.indd 58HT-E5200_XU_GER-0223.indd 58 2012-02-23 오후 3:04:072012-02-23 오후 3:04:07

Deutsch 59 |
07Anhang
Auswahl des Digitalausgangs
Einstellung PCM Bitstream (Unverarbeitet)
Bitstream (DTS Re-encoded)
Bitstream (Dolby D Re-
encoded)Verbindung HDMI-fähiger AV Receiver
Audiostrom
auf der Blu-
ray Disc
PCM Bis zu PCM 7.1ch PCM DTS re-encodedDolby D. Re-
encoded *
Dolby Digital Bis zu PCM 7.1ch Dolby Digital DTS re-encodedDolby D. Re-
encoded *
Dolby Digital
PlusBis zu PCM 7.1ch Dolby Digital Plus DTS re-encoded
Dolby D. Re-
encoded *
Dolby TrueHD Bis zu PCM 7.1ch Dolby TrueHD DTS re-encodedDolby D. Re-
encoded *
DTS Bis zu PCM 6.1ch DTS DTS re-encodedDolby D. Re-
encoded *
DTS-HD
(Hochauflösender
Audio)
Bis zu PCM 7.1ch
DTS-HD
(Hochauflösender
Audio)
DTS re-encodedDolby D. Re-
encoded *
DTS-HD
Master AudioBis zu PCM 7.1ch
DTS-HD Master
AudioDTS re-encoded
Dolby D. Re-
encoded *
Audiostrom
auf DVD
PCM PCM 2-Kanalton PCM 2-Kanalton PCM 2-Kanalton PCM 2-Kanalton
Dolby Digital Bis zu PCM 5.1ch Dolby Digital Dolby Digital Dolby Digital
DTS Bis zu PCM 6.1ch DTS DTS DTS
Blu-ray Disk
DefinitionJegliche
Decodiert den Hauptaudio und
BONUSVIEW Audio Strom zusammen in PCM Audio und fügt
Navigationssoundeffekte hinzu.
Gibt nur den Haupttonspur wieder, sodass Ihr AV-Receiver das Audiosignal
decodieren kann.
Sie können keinen BONUSVIEW
Ton oder Navigationstöne
hören.
Decodiert den Hauptaudio und
BONUSVIEW Audio Strom zusammen in PCM Audio, fügt
Navigationssoundeffekte hinzu und codiert PCM-
Audio erneut in den DTS-Bitstrom.
Decodiert den Hauptaudio und
BONUSVIEW Audio Strom zusammen in PCM Audio, fügt
Navigationssoundeffekte hinzu und codiert PCM-
Audio erneut in den Dolby Digital-Bitstrom
oder PCM.
* Wenn es sich bei dem Ursprungssignal um ein 2 Kanal oder Mono Signal handelt, wird die "Re-
encoded Dolby D" Einstellung nicht verwendet. Die Wiedergabe erfolgt im PCM 2 Kanal Modus.
Blu-ray Discs können drei Audio-Ströme enthalten :
- Haupt-Audio : Haupt Audio-Soundtrack.
- BONUSVIEW A0udio : Zusätzlicher Soundtrack wie Kommentare von Regisseuren und Schauspielern.
- Navigationssoundeffekte : Bei der Auswahl von einigen Menünavigationsoptionen können
Navigationssoundeffekte zu hören sein. Die Navigationssoundeffekte sind je nach Blu-ray-Disk
unterschiedlich.
HT-E5200_XU_GER-0224.indd 59HT-E5200_XU_GER-0224.indd 59 2012-02-24 오후 1:48:482012-02-24 오후 1:48:48

| 60 Deutsch
AnhangFehlerbehebung
Schlagen Sie in der nachfolgenden Liste nach, wenn das Gerät nicht ordnungsgemäß funktioniert. Falls
ihr Problem unten nicht aufgelistet oder die Problemlösung nicht hilfreich ist, das Gerät abschalten,
den Netzstecker ziehen und setzen Sie sich mit dem nächstgelegenen autorisierten Händler oder dem
Samsung Electronics-Servicecenter in Verbindung.
Symptom Überprüfen/Beheben
Die Disk wird nicht ausgeworfen.
• Ist der Netzstecker sicher angeschlossen?
• Schalten Sie das Gerät aus und wieder ein.
Der iPod stellt keine Verbindung her.
• Überprüfen Sie den Zustand des iPod Anschlusskabels und des Docks.
• Halten Sie die iPod Software auf dem neuesten Stand.
Disk wird nicht wiedergegeben.
• Überprüfen Sie den Regionalcode der Blu-ray/DVD-Disk. Im Ausland gekaufte Blu-ray/
DVDs können möglicherweise mit diesem Produkt nicht wiedergegeben werden.
• CD-ROMs und DVD-ROMs können mit diesem Gerät nicht wiedergegeben werden.
• Überprüfen Sie den Rating-Niveau der Disk.
Wiedergabe startet nicht sofort, wenn die Taste Play/Pause betätigt wird.
• Verwenden Sie eine verformte oder zerkratzte Disk?
• Reinigen Sie die Disk.
Kein Ton hörbar. • Das Heimkino gibt bei der schellen Wiedergabe, der Zeitlupenwiedergabe und der
Einzelbildwiedergabe keinen Ton wieder.
• Sind die Lautsprecher richtig angeschlossen? Sind die Lautsprechereinstellungen korrekt?
• Ist die Disk schwer beschädigt?
Die Fernbedienung funktioniert nicht
• Verwenden Sie die Fernbedienung innerhalb der Reichweite der Fernbedienung und in richtigen
Winkel zum Empfangssensor?
• Überprüfen Sie, ob die Batterien leer sind.
• Haben Sie den Modus (TV/BD) der Fernbedienung (TV oder BD) richtig eingestellt?
• Die Disk dreht sich, es wird jedoch kein Bild angezeigt.
• Die Bildqualität ist schlecht, und das Bild ist instabil.
• Ist das Fernsehgerät eingeschaltet?.
• Sind die Videokabel korrekt angeschlossen?
• Ist die Disk schmutzig oder beschädigt?
• Eine Disk mit Fabrikationsfehlern kann ggf. nicht korrekt wiedergegeben werden.
Die Audio-Sprache sowie die Untertitel funktionieren nicht.
• Nicht alle Disks enthalten Audio-Sprache oder Untertitel.
Der Menü-Bildschirm wird nicht angezeigt, auch wenn die Menü-Funktion ausgewählt wird.
• Verwenden Sie eine Disk, die keine Menüs enthält?
Das Bildformat kann nicht geändert werden.
• Sie können 16:9 Blu-ray/DVD Disks im 16:9 Voll, 4:3 Letter Box Modus oder 4:3
Passend Modus wiedergeben, 4:3 Blu-ray/DVD Disks werden nur im 4:3 Bildformat
wiedergegeben. Greifen Sie auf die Informationen an der Blu-ray Diskhülle zurück und
wählen Sie die entsprechende Funktion.
HT-E5200_XU_GER-0223.indd 60HT-E5200_XU_GER-0223.indd 60 2012-02-23 오후 3:04:112012-02-23 오후 3:04:11

Deutsch 61 |
07Anhang
Symptom Überprüfen/Beheben
• Das Gerät funktioniert nicht.(Beispiel: Das Gerät schaltet sich aus oder es sind ungewöhnliche Geräusche zu hören.)
• Das Gerät funktioniert nicht normal.
• Drücken Sie die Taste 5 der Fernbedienung im STANDBY Modus und halten Sie sie 5
Sekunden lang gedrückt.
- Durch Verwendung der RESET-Funktion gehen alle gespeicherten Einstellungen verloren.
Verwenden Sie diese Funktion nur wenn notwendig.
Sie haben das Passwort für die Altersfreigabe wurde vergessen
• Ohne Disk im Gerät die Taste 5 des Geräts drücken und länger als 5 Sekunden
gedrückt halten. Auf dem Bildschirm erscheint INIT, und alle Einstellungen werden auf
die Werkseinstellungen zurückgesetzt.
Drücken Sie anschließend die NETZSCHALTER Taste.
- Durch Verwendung der RESET-Funktion gehen alle gespeicherten Einstellungen verloren
Verwenden Sie diese Funktion nur wenn notwendig.
Der Radioempfang funktioniert nicht.
• Ist die UKW-Antenne richtig angeschlossen?
• Installieren Sie bei einem schwachen Antennensignal eine externe UKW-Antenne an
einem Ort mit gutem Empfang.
Die Wiedergabe des Fernsehtons über das Gerät funktioniert nicht.
• Wenn Sie die Taste ÖFFNEN/SCHLIESSEN ^ drücken, während der Fernsehton über
D.IN oder AUX wiedergegeben wird, so werden die Blu-ray-/DVD-Funktionen eingeschaltet
und der Fernsehton ausgeschaltet.
„Nicht verfügbar“ erscheint auf dem Bildschirm.
• Die Funktionen oder Option ist zurzeit aus folgenden Gründen nicht verfügbar:
1. Die Software der Blu-ray/DVD Disk lässt die Funktion oder Option nicht zu.
2. Die Blu-ray/DVD-Software unterstützt die Option (z. B. Kamerawinkel) nicht.
3. Die Option ist zurzeit nicht verfügbar.
4. Sie haben einen Titel, ein Kapitel oder eine Abtastzeit außerhalb des zulässigen Bereichs gewählt.
Wenn der HDMI-Ausgang mit einer Auflösung eingestellt ist, die Ihr Fernsehgerät nicht unterstützt (z. B. 1080p), wird möglicherweise kein Bild wiedergegeben.
• Drücken Sie ohne eine Disk im Gerät die 5 Taste auf dem vorderen Bedienfeld
für mindestens 5 Sekunden. Alle Einstellungen werden auf die Werkseinstellungen
zurückgesetzt.
Keine HDMI-Wiedergabe • Prüfen Sie die Verbindung zwischen dem Fernsehgerät und dem HDMI-Anschluss des
Geräts.
• Überprüfen Sie, ob Ihr Fernsehgerät die HDMI-Eingangsauflösungen
576p/480p/720p/1080i/1080p unterstützt.
Ungewöhnliche HDMI-Wiedergabe.
• Wenn auf dem Bildschirm nur Rauschen erscheint, bedeutet dies, dass der Fernseher
HDCP (High-bandwidth Digital Content Protection) nicht unterstützt.
AllShare Play Funktion
Ich kann durch AllShare Play veröffentlichte Ordner sehen, nicht aber die Dateien.
• AllShare Play zeigt nur Dateien an, die den Foto, Musik und Film Kategorien
entsprechen.
Dateien, die diesen Kategorien nicht entsprechen können nicht angezeigt werden.
HT-E5200_XU_GER-0223.indd 61HT-E5200_XU_GER-0223.indd 61 2012-02-23 오후 3:04:132012-02-23 오후 3:04:13

| 62 Deutsch
AnhangSymptom Überprüfen/Beheben
Unterbrechungen bei Videowiedergabe.
• Überprüfen Sie die Stabilität des Netzwerks.
• Anschluss des Netzwerkkabels überprüfen und ob das Netzwerk überlastet ist.
• Die Funknetzwerkverbindung zwischen dem Server und dem Gerät ist instabil.
Verbindung überprüfen.
Die AllShare Play Verbindung zwischen dem Fernsehgerät und dem PC ist nicht stabil.
• IP-Adressen im selben Netzwerk sollten einzigartig sein, ansonsten können
Adresskonflikte ein solches Phänomen verursachen.
• Überprüfen Sie, ob ein Firewall aktiv ist.
Wenn ja, deaktivieren Sie die Firewall-Funktion.
BD-LIVE
Keine Verbindung zum BD-LIVE Server.
• Prüfen Sie mit Hilfe der Netzwerk Status Funktion, ob eine Netzwerkverbindung besteht.
• Überprüfen Sie, ob das USB-Speichergerät an das Gerät angeschlossen ist.
• Das Speichergerät benötigt mindestens 1 GB freien Speicher um BD-LIVE-Service
zu ermöglichen. Die verfügbare Speichermenge ist in der BD-Daten- Verwaltung
überprüfbar. (Siehe Seite 55.)
• Überprüfen Sie, ob die BD-Live Internetverbindungsoption auf Zulassen (Alle) eingestellt
ist.
• Wenn oben genannten Maßnahmen fehlschlagen, setzen Sie sich mit dem Anbieter des
Inhalts in Verbindung oder aktualisieren Sie auf die neueste Firmware Version.
Fehler während der Benutzung von BD-LIVE- Service.
• Das Speichergerät benötigt mindestens 1 GB freien Speicher um BD-LIVE-Service zu
ermöglichen. Die verfügbare Speichermenge ist in der BD-Daten- Verwaltung überprüfbar.
(Siehe Seite 55.)
| HINWEIS |
� Wenn die Werkseinstellungen wieder hergestellt werden, werden alle gespeicherten BD-Daten gelöscht.
Samsung Electronics erklärt hiermit, dass dieses Heimkino System mit den grundlegenden Anforderungen und anderen maßgeblichen Bestimmungen der Richtlinie 1999/5/EG übereinstimmt.
Die offizielle Übereinstimmungserklärung finden Sie auf der Webseite http://www.samsung.com. Öffnen Sie Support und geben Sie bei Produktsuche den Modellnamen ein.
Dieses Gerät darf in allen EG-Staaten betrieben werden.
Dieses Gerät darf nur in Innenräumen verwendet werden.
HT-E5200_XU_GER-0223.indd 62HT-E5200_XU_GER-0223.indd 62 2012-02-23 오후 3:04:142012-02-23 오후 3:04:14

Deutsch 63 |
07Anhang
Technische Daten
Allgemein
Gewicht 2,5 kg
Dimensions 430 (B) x 55 (H) x 255,8 (T) mm
Abmessungen +5°C bis +35°C
Betriebstemperaturbereich 10 % bis 75 %
UKW-Tuner
Signal/Rauschabstand 55 dB
Verwendbare Empfindlichkeit 12 dB
Klirrfaktor (Total Harmonic Distortion) 0,5 %
Disk
BD (Blu-ray Disk) Lesegeschwindigkeit: 9,834 m/Sek.
DVD (Digital Versatile Disc (digitale
vielseitige Scheibe))
Lesegeschwindigkeit: 6,98 bis 7,68 m/Sek.
Ca. Spieldauer (Einseitig, Single Layer Disc): 135 Min.
CD: 12 cm (COMPACT DISK)Lesegeschwindigkeit: 4,8 bis 5,6 m/Sek.
Maximale Spieldauer: 74 Min.
CD: 8cm (COMPACT DISK)Lesegeschwindigkeit: 4,8 ~ 5,6 m/s
Maximale Spieldauer: 20 Min.
Videoausgang Composite Video1 Kanal: 1,0 Vp-p (75 Ω load)
Blu-ray Disk : 576i/480i DVD : 576i/480i
Video/Audio HDMI1080p, 1080i, 720p, 576p/480p
PCM Mehrkanal-Audio, Audio-Bitstrom, PCM-Audio
Verstärker
Ausgangsleistung der Front-Lautsprecher 165W x 2(3Ω)
Ausgangsleistung des Subwoofers 170W(3Ω)
FrequenzgangAnalog-Eingang 20Hz~20kHz (±3dB)
Digitaleingang 20Hz~40kHz (±4dB)
Signal-Rauschabstand 70dB
Kanaltrennung 60dB
Eingangsempfindlichkeit (AUX)500mV
Lautsprecher
Lautsprecher-System2,1-Kanal Lautsprechersystem
Front Subwoofer
Impedanz 3 Ω 3 Ω
Frequenzbereich 140Hz~20kHz 40Hz ~ 160Hz
Schalldruck- Ausgabe 87dB/W/M 88dB/W/M
Eingangs-Bewertung 165W 170W
Maximale Eingangsleistung 330W 340W
Abmessungen (B x H x T) 90 x 207,5 x 68,5 mm 168 x 350 x 285 mm
Gewicht 0,71 kg 2,6 kg
• Netzwerkgeschwindigkeiten von 10Mbps oder weniger werden nicht unterstützt.
• Samsung Electronics Co., Ltd behält sich das Recht auf unangekündigte Änderungen vor.
• Gewicht und Abmessungen können von den Angaben abweichen.
• Das Design und die Technischen Daten können ohne vorherige Ankündigung geändert werden.
• Informationen bezüglich der Netzspannung und Stromaufnahme könne Sie dem Typenschild am Gerät
entnehmen.
HT-E5200_XU_GER-0223.indd 63HT-E5200_XU_GER-0223.indd 63 2012-02-23 오후 3:04:172012-02-23 오후 3:04:17

Korrekte Entsorgung der Akkus in diesem Produkt. (Entsorgung elektrischer & elektronischer Gegenstände)(Gültig in der Europäischen Union und anderen europäischen Ländern mit Abfalltrennungssystem.)
Dieses Kennzeichen weist darauf hin, dass dieses Produkt oder Zubehörteil (z.B. Ladegerät, Kopfhörer, USB-Kabel)
am Ende seiner Nutzungsdauer nicht zusammen mit dem Hausmüll entsorgt werden darf. Um eine Schädigung
der Umwelt oder Gesundheit zu durch unkontrollierte Müllentsorgung zu vermeiden, trennen Sie bitte diese
Gegenstände von anderen Abfallarten und führen Sie sie dem Recycling zu, um die nachhaltige Wiederverwertung
von Materialressourcen zu unterstützen.
Als privater Nutzer wenden Sie sich an den Händler, bei dem Sie dieses Produkt erworben haben oder an die
örtliche Verwaltungsbehörde. Dort erhalten Sie Informationen darüber, wo und wie Sie Ihr Gerät entsorgen und so
einer umweltfreundlichen Wiederverwertung zuführen können.
Gewerbliche Nutzer müssen sich mit Ihrem Lieferanten in Verbindung setzen, und die Kaufbestimmungen und
Bedingungen zu prüfen. Dieses Produkt und sein elektronisches Zubehör darf nicht zusammen mit dem üblichen
Gewerbeabfall entsorgt werden.
Korrekte Entsorgung der Akkus in diesem Produkt(Anwendbar in den Ländern der Europäischen Union und anderen europäischen Ländern mit einem
separaten Sammelsystem)
Die Kennzeichnung auf der Batterie, in der Bedienungsanleitung oder der Verpackung zeigt an, dass die
Batterien in diesem Gerät nicht über den Hausmüll entsorgt werden dürfen. Die chemischen Symbole
Hg, Cd oder Pb geben an, dass die Batterie höhere Konzentrationen an Quecksilber, Cadmium oder
Blei enthält, als in der EU-Richtlinie 2006/66 festgelegt. Werden die Akkus nicht korrekt entsorgt, können
diese Substanzen die Gesundheit Ihrer Mitmenschen oder die Umwelt gefährden.
Um die Umwelt zu schützen und das Recycling zu unterstützen, trennen Sie bitte die Batterien von
anderem Abfall und führen Sie sie ihrem lokalen Batterie Recycling System zu.
Area Contact Centre Web Site` EuropeAlbania 42 27 5755 -
Austria0810 - SAMSUNG (7267864, € 0.07/min)
www.samsung.com
Belgium 02-201-24-18
www.samsung.com/be (Dutch) www.samsung.com/be_fr (French)
Bosnia 05 133 1999 -
Bulgaria 07001 33 11 www.samsung.com
Croatia 062 SAMSUNG (062 726 7864) www.samsung.com
Czech
800-SAMSUNG (800-726786)
www.samsung.comSamsung Zrt., česká organizační složka, Oasis Florenc, Soko-lovská394/17, 180 00, Praha 8
Denmark 70 70 19 70 www.samsung.com
Finland 030 - 6227 515 www.samsung.com
France 01 48 63 00 00 www.samsung.com
Germany01805 - SAMSUNG (726-7864 € 0,14/Min)
www.samsung.com
Hungary 06-80-SAMSUNG (726-7864) www.samsung.com
Italia 800-SAMSUNG (726-7864) www.samsung.com
Kosovo +381 0113216899 -
Luxemburg 261 03 710 www.samsung.com
Macedonia 023 207 777 -
Area Contact Centre Web SiteMontenegro 020 405 888 -
Netherlands0900-SAMSUNG (0900-7267864) (€ 0,10/Min)
www.samsung.com
Norway 815-56 480 www.samsung.com
Poland0 801 1SAMSUNG (172678) / 022-607-93-33
www.samsung.com
Portugal 80820-SAMSUNG (726-7864) www.samsung.com
Rumania
1. 08010 SAMSUNG (72678) - doar din reţeaua Romtelecom, tarif local
2. 021.206.01.10 - din orice reţea, tarif normal
www.samsung.com
Serbia0700 Samsung (0700 726 7864)
www.samsung.com
Slovakia 0800-SAMSUNG (726-7864) www.samsung.com
Spain 902-1-SAMSUNG (902 172 678) www.samsung.com
Sweden 0771 726 7864 (SAMSUNG) www.samsung.com
Switzerland0848-SAMSUNG (7267864, CHF 0.08/min)
www.samsung.com/ch www.samsung.com/ch_fr/(French)
U.K 0330 SAMSUNG (7267864) www.samsung.com
Eire 0818 717100 www.samsung.com
Lithuania 8-800-77777 www.samsung.com
Latvia 8000-7267 www.samsung.com
Estonia 800-7267 www.samsung.com
Wenden Sie sich an SAMSUNG WORLD WIDEWenn Sie Fragen oder Anmerkungen zu Produkten von Samsung haben, wenden
Sie sich an den Kundendienst von SAMSUNG.
HT-E5200_XU_GER-0223.indd 64HT-E5200_XU_GER-0223.indd 64 2012-02-23 오후 3:04:192012-02-23 오후 3:04:19

immagina le possibilità
Grazie per avere acquistato questo prodotto Samsung.
Per ricevere un servizio più completo,
registrare il prodotto all'indirizzo
www.samsung.com/register
Sistema Home Entertainment
Blu-ray™ 2.1 canali
manuale utente
HT-E5200
HT-E5200_XU_ITA_0222.indd 1HT-E5200_XU_ITA_0222.indd 1 2012-02-23 오후 2:16:182012-02-23 오후 2:16:18

| 2 Italiano
Informazioni sulla SicurezzaAvvertenza
PER RIDURRE IL RISCHIO DI SCOSSE ELETTRICHE, NON RIMUOVERE IL COPERCHIO (O LA PARTE
POSTERIORE).
ALL'INTERNO NON VI SONO PARTI RIPARABILI DALL'UTENTE. PER LA MANUTENZIONE RIVOLGERSI
AL PERSONALE DI ASSISTENZA QUALIFICATO.
ATTENZIONE
RISCHIO DI SCOSSE ELETTRICHENON APRIRE
Questo simbolo indica la presenza di
"tensione pericolosa" all'interno del
prodotto, che comporta il rischio di scosse
elettriche o lesioni.
ATTENZIONE: PER EVITARE SCOSSE
ELETTRICHE, INSERIRE A FONDO LO
SPINOTTO PIÙ LARGO DELLA SPINA NELLA
RELATIVA PRESA.
Questo simbolo indica istruzioni importanti
che accompagnano il prodotto.
AVVERTENZA• Per ridurre il rischio di incendio o di scosse
elettriche, non esporre questo apparecchio alla
pioggia o all'umidità.
ATTENZIONE• Non schizzare o sgocciolare liquidi
sull'apparecchio e non porre su di esso oggetti
contenenti liquidi, come ad esempio vasi.
• Poiché la presa di rete viene utilizzata per
scollegare l'apparecchio, deve essere facilmente
accessibile in qualsiasi momento.
• Questa apparecchiatura deve essere sempre
collegata a una presa di rete con collegamento
a terra.
• Per scollegare l'apparecchio dalla corrente è
necessario estrarre la spina dalla presa; perciò
la presa dovrà essere facilmente accessibile.
CLASS 1 LASER PRODUCT
KLASSE 1 LASER PRODUKT
LUOKAN 1 LASER LAITE
KLASS 1 LASER APPARAT
PRODUCTO LÁSER CLASE 1
PRODOTTO LASER CLASSE 1Questo lettore CD è classificato come prodotto
LASER DI CLASSE 1.
L'utilizzo di comandi, regolazioni o funzioni che
si riferiscono a procedure diverse da quelle
specificate può provocare l'esposizione a
radiazioni pericolose.
ATTENZIONE• UN RAGGIO LASER INVISIBILE VIENE
EMESSO NEL CASO IN CUI L'APPARECCHIO
VENGA APERTO CON IL SISTEMA DI
INTERBLOCCO NON FUNZIONANTE IN
MODO CORRETTO, O ESCLUSO. EVITARE LA
DIRETTA ESPOSIZIONE AL RAGGIO LASER.
“ Questo apparecchio è fabbricato in conformità al D.M. 28.08.95 N. 548 ed in particolare a quanto
specificato nell’art. 2, comma 1”
HT-E5200_XU_ITA_0222.indd 2HT-E5200_XU_ITA_0222.indd 2 2012-02-23 오후 2:16:362012-02-23 오후 2:16:36

Italiano 3 |
01Inform
azioni sulla Sicurezza
Conservazione e gestione dei dischi
• Manipolazione dei dischi
- Impronte o graffi sul disco
possono ridurre la qualità
dell'audio e dell'immagine o
far "saltare" il disco.
- Evitare di toccare la superficie di un disco in
cui sono stati registrati dei dati.
- Tenere il disco per i bordi, senza toccare la
superficie con le dita.
- Non incollare carta o nastro adesivo sul disco.
• Pulizia dei dischi
- Se sul disco sono presenti
impronte o sporcizia, pulirlo con
un detergente delicato diluito in
acqua e asciugarlo con un panno
morbido.
- Pulire delicatamente il disco dall'interno verso
l'esterno.
- Conservazione dei dischi
Non conservare alla luce diretta del sole.
Conservare in un luogo fresco e ventilato.
Conservare in una custodia di protezione
pulita e archiviare in posizione verticale.
Precauzioni per la manipolazione
• Non schizzare o sgocciolare liquidi
sull'apparecchio. Non sistemare oggetti pieni di
liquidi, come dei vasi, sull'apparecchio.
• Per spegnere completamente l'apparecchio,
estrarre la spina di alimentazione dalla presa di
rete.
Di conseguenza, la spina di alimentazione deve
essere facilmente e prontamente accessibile in
qualsiasi momento.
• Non toccare la spina di alimentazione con le
mani bagnate.
Rischio di scossa elettrica.
• Non collegare più dispositivi elettrici alla stessa
presa di rete. Una presa sovraccarica può
surriscaldarsi, provocando un incendio.
• Manutenzione della custodia
- Prima di collegare altri componenti a questo
prodotto, controllare che siano spenti.
- Se il prodotto viene spostato improvvisamente
da un luogo freddo a uno caldo, si può
formare condensa sulle parti in funzione e
sull'obiettivo, con il rischio di provocare una
riproduzione anomala del disco. In questo
caso, scollegare l'alimentazione dal prodotto
e attendere due ore prima di collegare la
spina alla presa di corrente. Inserire quindi
il disco e provare nuovamente ad avviare la
riproduzione.
• Se si sente un rumore insolito, odore di bruciato
o si vede del fumo, spegnere immediatamente
l'interruttore di alimentazione e scollegare la
spina dalla presa a muro. Quindi contattare
il centro di assistenza clienti più vicino. Non
utilizzare il prodotto. L'utilizzo del prodotto in
queste condizioni può provocare incendi o
scosse elettriche.
• Per spegnere completamente l'apparecchio,
estrarre la spina di alimentazione dalla presa di
rete. Di conseguenza, la spina di alimentazione
deve essere facilmente e prontamente
accessibile in qualsiasi momento.
Utilizzo della funzione 3D
INFORMAZIONI IMPORTANTI SULLA SALUTE E LA
SICUREZZA PER IMMAGINI 3D.
Leggere e assimilare le seguenti informazioni sulla
sicurezza prima di utilizzare la funzione 3D.
• Alcuni utenti possono provare malessere nel
guardare la TV con funzione 3D, accusando
sintomi quali confusione, nausea e cefalea.
In presenza di questi sintomi, interrompere la
visione della TV in 3D, togliere gli occhiali 3D e
lasciar riposare gli occhi.
• La visione di immagini 3D per un periodo
prolungato può provocare affaticamento oculare. In
presenza di sintomi di affaticamento, interrompere
la visione della TV in 3D, togliere gli occhiali 3D e
lasciar riposare gli occhi.
• I bambini che utilizzano la funzione 3D devono
essere controllati regolarmente da un adulto
responsabile.
Se riporta sintomi di affaticamento degli occhi,
cefalea, confusione o nausea, il bambino deve
interrompere la visione della TV in 3D e lasciar
riposare gli occhi.
• Non utilizzare gli occhiali 3D per altri scopi (ad
esempio come normali occhiali da vista, occhiali
da sole, occhiali protettivi ecc.)
HT-E5200_XU_ITA_0222.indd 3HT-E5200_XU_ITA_0222.indd 3 2012-02-23 오후 2:16:372012-02-23 오후 2:16:37

| 4 Italiano
Informazioni sulla Sicurezza• Non utilizzare la funzione 3D o gli occhiali 3D
quando si è in movimento o ci si sposta. Se si
utilizza la funzione 3D o gli occhiali 3D mentre ci si
sposta si può urtare contro oggetti, inciampare e/o
cadere, provocando lesioni.
• Per vedere un contenuto 3D, collegare un
dispositivo 3D (ricevitore AV 3D o televisore 3D)
alla porta HDMI OUT del prodotto con un cavo
HDMI ad alta velocità. Indossare gli occhiali per la
visione in 3D prima di riprodurre il contenuto 3D.
• Il prodotto emette i segnali 3D esclusivamente
attraverso il cavo HDMI collegato alla porta HDMI
OUT.
• Nel modo di riproduzione in 3D la risoluzione del
video è fissa sulla risoluzione del video 3D originale,
quindi non può essere impostata secondo le
proprie preferenze.
• Alcune funzioni come BD Wise (BD Wise), la
regolazione delle dimensioni dello schermo e
la regolazione della risoluzione potrebbero non
funzionare correttamente nel modo di riproduzione
in 3D.
• Per una corretta trasmissione del segnale 3D
utilizzare un cavo HDMI ad alta velocità.
• Allontanarsi dal televisore di almeno tre volte la
larghezza dello schermo quando si guardano delle
immagini 3D. Ad esempio, se lo schermo è da 46
pollici, allontanarsi di 3,5 metri dallo schermo.
- Per una visione ottimale dell'immagine 3D,
posizionare lo schermo del video 3D a livello
degli occhi.
• Quando il prodotto è collegato ad alcuni dispositivi
3D, l'effetto 3D potrebbe non funzionare
correttamente.
• Questo prodotto non converte i contenuti 2D in
3D.
• "Blu-ray 3D" e il logo "Blu-ray 3D" sono marchi di
Blu-ray Disc Association.
Copyright
© 2012 Samsung Electronics Co., Ltd.
Tutti i diritti riservati; è vietata la riproduzione o la
copia di una parte o dell'intero manuale utente
senza previa autorizzazione scritta di Samsung
Electronics Co., Ltd
Licenza
• Dolby e il simbolo della doppia D sono marchi
registrati di Dolby Laboratories.
• Prodotto su licenza, brevetto USA n.: 5,956,674;
5,974,380; 6,226,616; 6,487,535; 7,392,195;
7,272,567; 7,333,929; 7,212,872 e altri
brevetti USA e mondiali registrati/in attesa di
registrazione. DTS-HD, il simbolo e DTS-HD e il
simbolo insieme sono marchi registrati e DTS-
HD Master Audio| Essential è un marchio di
DTS, Inc. Il prodotto include il software. © DTS,
Inc. Tutti i diritti riservati.
• INFORMAZIONI SUI VIDEO DIVX: DivX® è un
formato video digitale creato da DivX, LLC,
una consociata di Rovi Corporation. Questo
è un dispositivo ufficiale DivX Certified® che
riproduce video DivX. Per ulteriori informazioni e
per gli strumenti software per la conversione dei
file in video DivX, visitare il sito divx.com.
INFORMAZIONI SUI DIVX VIDEO ON DEMAND:
Questo dispositivo DivX Certified® deve essere
registrato per consentire la riproduzione dei film
DivX video on demand (VOD) acquistati. Per
ottenere il codice di registrazione, individuare
la sezione DivX VOD nel menu di impostazione
del dispositivo. Visitare il sito vod.divx.com per
ulteriori informazioni su come completare la
registrazione.
DivX Certified® per riprodurre video DivX® fino
a HD 1080p, compresi i contenuti premium.
DivX®, DivX Certified® e i loghi ad essi associati
sono marchi di Rovi Corporation o delle sue
consociate e sono utilizzati su licenza.
Protetto da uno o più dei seguenti brevetti USA
: 7,295,673; 7,460,668; 7,515,710; 7,519,274
HT-E5200_XU_ITA_0222.indd 4HT-E5200_XU_ITA_0222.indd 4 2012-02-23 오후 2:16:382012-02-23 오후 2:16:38

Italiano 5 |
01Inform
azioni sulla Sicurezza
• The terms HDMI and HDMI High-Definition
Multimedia Interface, and the HDMI Logo are
trademarks or registered trademarks of HDMI
Licensing LLC in the United States and other
countries.
• Oracle e Java sono marchi registrati di Oracle
e/o delle sue filiali. Altri nomi possono essere
marchi dei rispettivi proprietari.
• Questo prodotto è dotato di una tecnologia di
protezione dalla copia tutelata da brevetti U.S.A.
e da altri diritti di proprietà intellettuale di Rovi
Corporation. Sono vietati il reverse engineering
o lo smontaggio.
• Blu-ray Disc™, Blu-ray™ e i loghi sono marchi
di Blu-ray Disc Association.
• iPad, iPhone, iPod, iPod classic, iPod nano,
iPod shuffle e iPod touch sono marchi di Apple
Inc., registrati negli Stati Uniti e in altri Paesi.
• Questo prodotto utilizza tecnologia Cinavia per
limitare l'uso di copie non autorizzate di film e
video commerciali e delle relative tracce audio.
Se viene rilevato l'uso proibito di una copia non
autorizzata, viene visualizzato un messaggio che
interrompe la riproduzione o la copia.
Per maggiori informazioni sulla tecnologia
Cinavia consultare il centro online di informazioni
ai consumatori di Cinavia all'indirizzo http://
www.cinavia.com. Per richiedere maggiori
informazioni su Cinavia per e-mail inviare un
messaggio con il proprio indirizzo a: Centro di
informazioni ai consumatori di Cinavia, casella
postale 86851, San Diego, CA, 92138, USA."
Questo prodotto è dotato di tecnologia
proprietaria su licenza di Verance Corporation
ed è protetto dal brevetto U.S.A. 7.369.677 e
da altri brevetti U.S.A. e di altri Paesi registrati
e in attesa di registrazione, di una protezione
del copyright e del segreto aziendale per alcuni
aspetti di tale tecnologia. Cinavia è un marchio
di Verance Corporation. Copyright 2004-2010
di Verance Corporation. Verance. Tutti i diritti
riservati. Sono vietati il reverse engineering o lo
smontaggio.
• Avviso di licenza open source
- In caso di utilizzo di software open source,
sono disponibili licenze open source nel menu
del prodotto.
HT-E5200_XU_ITA_0222.indd 5HT-E5200_XU_ITA_0222.indd 5 2012-02-23 오후 2:16:392012-02-23 오후 2:16:39

| 6 Italiano
IndiceINFORMAZIONI SULLA SICUREZZA
2 Avvertenza3 Conservazione e gestione dei dischi3 Precauzioni per la manipolazione3 Utilizzo della funzione 3D4 Copyright4 Licenza
GUIDA INTRODUTTIVA
7 Compatibilità dei dischi e dei formati8 Loghi dei dischi riproducibili11 Accessori12 Pannello anteriore12 Pannello posteriore13 Telecomando
CONNESSIONI
15 Collegamento del nucleo toroidale in ferrite al cavo di alimentazione dell'unità principale
15 Collegamento degli altoparlanti15 Componenti degli altoparlanti
16 Collegamento dei diffusori
17 Collegamento dell'antenna FM17 Collegamento di un iPod/iPhone17 Mediante un cavo USB
17 Mediante una basetta dock
18 Collegamento a un televisore18 Metodo 1 Collegamento a un
televisore con cavo HDMI - qualità
massima (consigliato)
18 Metodo 2 Collegamento a un televisore
con un cavo video - buona qualità
19 Collegamento a dispositivi esterni19 Metodo 1 INGRESSO HDMI :
Collegamento a un componente esterno
con cavo HDMI
19 Metodo 2 OTTICO : Collegamento di
un componente audio digitale esterno
19 Metodo 3 INGRESSO AUX :
Collegamento di un componente
analogico esterno
20 Collegamento a un router di rete20 Rete via cavo
20 Rete wireless
IMPOSTAZIONI
21 Procedura di impostazione iniziale23 La schermata iniziale23 Accesso alla schermata di impostazione24 Funzioni del menu Impostazioni29 Le reti e Internet33 Aggiornamento del software
RIPRODUZIONE MULTIMEDIALE
35 La schermata AllShare Play36 Riproduzione di file su un dispositivo di
memorizzazione USB o su iPod/iPhone36 Modelli iPod/iPhone utilizzabili con
questo prodotto37 La schermata Funzione37 Riproduzione di DVD commerciali37 Riproduzione di CD commerciali38 Riproduzione di un disco con contenuti
registrati dall'utente38 Utilizzo della funzione di rete AllShare40 Controllo della riproduzione video42 Controllo della riproduzione musicale45 Riproduzione di contenuti fotografici45 Utilizzo del menu Strumenti quando un
file è selezionato48 Ascolto della radio50 Utilizzo dei tasti degli effetti speciali sul
telecomando
SERVIZI DI RETE
51 Utilizzo di Smart Hub53 BD-LIVE™
APPENDICE
54 Informazioni aggiuntive60 Risoluzione dei problemi63 Specifiche
HT-E5200_XU_ITA_0222.indd 6HT-E5200_XU_ITA_0222.indd 6 2012-02-23 오후 2:16:402012-02-23 오후 2:16:40

Italiano 7 |
02G
uida Introduttiva
Compatibilità dei dischi e dei formati
Tipi di dischi e contenuti riproducibili
Supporto Tipo di disco Dettagli
VIDEO
Disco Blu-ray
Disco Blu-ray 3DDisco BD-ROM o BD-RE/-R registrato in formato BD-RE.
DVD-VIDEO,
DVD-RW, DVD-R,
DVD+RW, DVD+R
DVD-VIDEO, DVD+RW/DVD-RW(V)/DVD-R/+R registrati e finalizzati, o supporti di
memorizzazione USB contenenti file DivX, MKV, MP4.
MUSICA
CD-RW/-R,
DVD-RW/-R,
BD-RE/-R
Musica registrata su CD-RW/-R, DVD-RW/-R, BD-RE/-R o supporti USB
contenenti file MP3 o WMA.
FOTO
CD-RW/-R,
DVD-RW/-R,
BD-RE/-R
Foto registrate su CD-RW/-R, DVD-RW/-R, BD-RE/-R o supporti USB contenenti
file JPEG.
| NOTA |
� Il prodotto potrebbe non riprodurre determinati CD-RW/-R e DVD-R a causa del tipo di disco o delle condizioni di
registrazione.
� I dischi DVD-RW/-R non registrati correttamente in formato DVD Video non possono essere riprodotti.
� Il prodotto non riproduce i contenuti registrati su un DVD-R ad una velocità di trasmissione superiore a 10 Mbps.
� Il prodotto non riproduce i contenuti registrati su un BD-R o su un dispositivo USB ad una velocità di trasmissione superiore
a 30 Mbps.
� La funzione di riproduzione potrebbe non essere disponibile con alcuni tipi di disco oppure quando si eseguono operazioni
specifiche, come la modifica dell'angolo di visualizzazione o del formato. Informazioni dettagliate sui dischi sono stampate
sulla custodia. Consultarle qualora necessario.
� Quando si riproduce un titolo BD-J, il caricamento può richiedere più tempo rispetto a un titolo normale o alcune funzioni
potrebbero essere rallentate.
Tipi di dischi non riproducibili
• HD DVD
• DVD-ROM/PD/MV
ecc.
• DVD-RAM
• Super Audio
CD(eccetto layer CD)
• DVD-RW(modo VR)
• CVD/CD-ROM/CDV/
CD-G/CD-I/LD (per i
CD-G viene riprodotto
solo l'audio, non le
immagini).
• DVD-R da 3,9 GB per
authoring.
| NOTA |
� È possibile che questo prodotto non risponda a tutti i comandi perché alcuni dischi Blu-ray, DVD e CD consentono di
effettuare operazioni specifiche o limitate e offrono solo alcune funzioni durante la riproduzione. Si noti che non si tratta di
un difetto del prodotto.
� Samsung non può garantire che questo prodotto sia in grado di riprodurre tutti i dischi contrassegnati dal logo Blu-ray, DVD
o CD; i formati dei dischi si evolvono e potrebbero verificarsi problemi ed errori nella creazione dei software Blu-ray, DVD, CD
e/o nella fabbricazione dei dischi.
� Per eventuali domande o in caso di difficoltà nella riproduzione di dischi Blu-ray, DVD o CD con questo prodotto, contattare il
Centro assistenza clienti SAMSUNG. Inoltre, fare riferimento al resto di questo manuale utente per ulteriori informazioni sulle
restrizioni per la riproduzione.
� Alcuni dischi commerciali e alcuni dischi DVD acquistati all'estero potrebbero non essere riproducibili con questo prodotto.
Guida Introduttiva
HT-E5200_XU_ITA_0222.indd 7HT-E5200_XU_ITA_0222.indd 7 2012-02-23 오후 2:16:412012-02-23 오후 2:16:41

| 8 Italiano
Guida IntroduttivaCodice regionaleI prodotti e i dischi sono codificati in base alla
regione. Per poter riprodurre un disco, i codici
regionali devono corrispondere. Se i codici non
corrispondono, il disco non viene riprodotto.
Il codice regionale di questo prodotto è indicato
sul pannello posteriore del prodotto.
Tipo di disco Codice regiona Area
Disco Blu-ray
A
America del Nord, America
centrale, America del Sud,
Corea, Giappone, Taiwan, Hong
Kong e Sud-est asiatico.
BEuropa, Groenlandia, territori
francesi, Medio Oriente, Africa,
Australia e Nuova Zelanda.
CIndia, Cina, Russia, Asia centrale
e meridionale.
DVD-VIDEO
1 USA, territori USA e Canada
2Europa, Giappone, Medio
Oriente, Egitto, Sudafrica,
Groenlandia
3 Taiwan, Corea, Filippine,
Indonesia, Hong Kong
4Messico, America del Sud,
America centrale, Australia,
Nuova Zelanda, Isole del
Pacifico, Caraibi
5Russia, Europa orientale, India,
maggior parte dei paesi africani,
Corea del Nord, Mongolia
6 Cina
| NOTA |
� Se il codice regionale di un disco Blu-ray/DVD non
corrisponde a quello del prodotto, il prodotto non può
riprodurre il disco.
Loghi dei dischi riproducibili
Disco Blu-ray Disco Blu-ray 3D
BD-LIVE Dolby
DTS DivX
Sistema di trasmissione PAL
in UK, Francia, Germania,
ecc.
Java
Formati supportati
File musicali supportati
Estensione file Contenitore Codec
audio Intervallo supportato
*.mp3 MP3 MP3 -
*.wma WMA WMA
Compatibile con
WMA versione 10
* Frequenze di
campionamento (in
kHz) - 8, 11, 16,
22, 32, 44.1, 48
* Bit rate - Tutti i bit
rate compresi tra 5
kbps e 384 kbps
HT-E5200_XU_ITA_0222.indd 8HT-E5200_XU_ITA_0222.indd 8 2012-02-23 오후 2:16:432012-02-23 오후 2:16:43

Italiano 9 |
02G
uida Introduttiva
File video supportati
Estensione file Contenitore Codec video RisoluzioneFrequenza fotogrammi
(fps)Bit rate (Mbps) Codec audio
*.avi AVI
DivX 3.11/4.x/5.1/6.0
1920x1080 6 ~ 30 8 MP3AC3
LPCMDTS Core
H.264 BP/MP/HP 1920x1080 6 ~ 30 25
MPEG4 SP/ASP 1920x1080 6 ~ 30 8
*.mkv MKV
DivX 3.11/4.x/5.1/6.0
1920x1080 6 ~ 30 8 MP3AC3
LPCMDTS Core
H.264 BP/MP/HP 1920x1080 6 ~ 30 25
MPEG4 SP/ASP 1920x1080 6 ~ 30 8
*.asf ASF
DivX 3.11/4.x/5.1/6.0
1920x1080 6 ~ 30 8 MP3AC3
LPCMWMA
H.264 BP/MP/HP 1920x1080 6 ~ 30 25
MPEG4 SP/ASP 1920x1080 6 ~ 30 8
*.wmv WMV (wmv9)Window Media
Video v91920x1080 6 ~ 30 25 WMA
*.mp4 MP4H.264 BP/MP/HP 1920x1080 6 ~ 30 25 MP3
AACMPEG4 SP/ASP 1920x1080 6 ~ 30 8
*.3gp 3GPPH.264 BP/MP/HP 1920x1080 6 ~ 30 25
AACMPEG4 SP/ASP 1920x1080 6 ~ 30 8
*.vroVROVOB
MPEG2 1920x1080 24/25/30 25 AC3MPEGLPCMMPEG1 1920x1080 24/25/30 25
*.mpg*.mpeg
PS
MPEG1 1920x1080 24/25/30 25 AC3MPEGLPCMAAC
MPEG2 1920x1080 24/25/30 25
H.264 1920x1080 6 ~ 30 25
*.ts*.tp*.trp
TS
MPEG2 1920x1080 24/25/30 25AC3AACMP3DD+
H.264 1920x1080 6 ~ 30 25
VC1 1920x1080 6 ~ 30 25
Limitazioni - Anche se il file è codificato con un codec supportato elencato sopra, potrebbe non essere riprodotto
se il contenuto è danneggiato.
- La normale riproduzione non è garantita se le informazioni del contenitore del file sono errate o se il file
stesso è danneggiato.
- La riproduzione dei file con un numero di bit/fotogrammi superiore alla norma potrebbe avanzare a
scatti.
HT-E5200_XU_ITA_0222.indd 9HT-E5200_XU_ITA_0222.indd 9 2012-02-23 오후 2:16:462012-02-23 오후 2:16:46

| 10 Italiano
Guida Introduttiva - La funzione di ricerca (salto) non è disponibile se
la tabella degli indici del file è danneggiata.
- Se si riproduce un file da remoto collegandosi
alla rete, la riproduzione video potrebbe
avanzare a scatti a seconda della velocità della
rete.
Decoder video - Supporta fino a H.264 livello 4.1
- Non supporta H.264 FMO/ASO/RS, VC1 SP/
MP/AP L4 e AVCHD
- MPEG4 SP, ASP :
Al di sotto di 1280 x 720: Max. 60 fotogrammi
Al di sopra di 1280 x 720: Max. 30 fotogrammi
- Non supporta GMC 2 o superiore
Decoder audio - Supporta WMA 7, 8, 9 e Standard
- Non supporta i file multicanale WMA 9 PRO
se il numero di canali è superiore a 2 o se i file
richiedono la decodifica audio lossless.
- Non supporta la frequenza di campionamento
WMA mono 22.050 Hz
� Formati file supportati per i sottotitoli DIVx
*.ttxt, *.smi, *.srt, *.sub, *.txt
Note sul collegamento USB• Il prodotto è compatibile con supporti di
memorizzazione USB, lettori MP3, videocamere
digitali e lettori schede USB.
• Il prodotto non supporta nomi di file o cartelle di
lunghezza superiore a 128 caratteri.
• Alcuni dispositivi USB/videocamere digitali
possono non essere compatibili con il prodotto.
• Il prodotto supporta sistemi file FAT 16, FAT 32
e NTFS.
• Collegare i dispositivi USB direttamente alla
porta USB del prodotto. Se si utilizza un cavo
USB per il collegamento possono verificarsi
problemi di compatibilità.
• Se si inserisce più di un dispositivo di memoria
in un lettore multischeda, possono verificarsi
problemi di funzionamento.
• Il prodotto non supporta il protocollo PTP.
• Non scollegare il dispositivo USB durante il
processo di "caricamento".
• Maggiore è la risoluzione dell'immagine,
maggiore è il ritardo nella visualizzazione.
• Questo prodotto non riproduce file MP3 con
DRM (Digital Rights Management) scaricato da
siti commerciali.
• Il prodotto supporta solo video inferiori a 30 fps
(frequenza fotogrammi).
• Il prodotto è compatibile solo con dispositivi di
archiviazione di massa (Mass Storage Class,
MSC) USB, come le unità Thumb e le unità HDD
USB. (Le unità HUB non sono supportate).
• Alcuni dispositivi HDD USB, lettori multischeda
e unità Thumb possono non essere compatibili
con questo prodotto.
• Se alcuni dispositivi USB richiedono troppa
potenza, possono essere limitati dal dispositivo
di sicurezza del circuito.
• Se la riproduzione da un HDD USB è instabile,
aumentare la potenza collegando l'HDD ad una
presa di rete. Se il problema persiste, contattare
il costruttore dell'HDD USB.
• È necessario rimuovere in sicurezza il dispositivo
di memorizzazione USB (eseguendo la funzione
"Rimoz. sicura USB") per evitare possibili danni
alla memoria USB.
Premere il tasto HOME per passare al menu
principale, quindi premere il tasto GIALLO (C) e
il tasto E.
• SAMSUNG non è responsabile per danni ai file
o perdite di dati.
AVCHD (Advanced Video Codec High Definition)• Questo prodotto può riprodurre dischi
AVCHD. Questi dischi sono registrati e utilizzati
normalmente nelle videocamere.
• AVCHD è un formato per videocamere digitali
ad alta definizione.
• Il formato MPEG-4 AVC/H.264 comprime le
immagini con maggiore efficienza rispetto al
formato di compressione tradizionale.
• Alcuni dischi in formato AVCHD utilizzano il
formato "x.v.Colour". Questo prodotto può
riprodurre dischi in formato AVCHD che
utilizzano il formato "x.v.Colour".
• "x.v.Colour" è un marchio di Sony Corporation.
• "AVCHD" e il logo AVCHD sono marchi di
Matsushita Electronic Industrial Co., Ltd. e di
Sony Corporation.
HT-E5200_XU_ITA_0222.indd 10HT-E5200_XU_ITA_0222.indd 10 2012-02-23 오후 2:16:472012-02-23 오후 2:16:47

Italiano 11 |
02G
uida Introduttiva
| NOTA |
� Alcuni dischi AVCHD non si possono riprodurre, a seconda delle condizioni di registrazione.
� I dischi AVCHD devono essere finalizzati.
� "x.v.Colour" offre una gamma di colori più ampia di quella dei normali dischi per videocamere DVD.
� È possibile che alcuni dischi in formato DivX, MKV e MP4 non vengano riprodotti a seconda della risoluzione video e della
frequenza dei fotogrammi.
Accessori
Controllare di seguito gli accessori forniti.
FUNCTION
DISC MENU TITLE MENU
MUTE
S/W LEVEL
TOOLS
RETURN EXIT
INFO
MO/ST
3D SOUND
SOUNDvTuner AUDIO
1 2 3
4 5 6
7 8
0
9POPUP
RECEIVER SLEEP
BD TV
TUNERMEMORY
SUBTITLE
SMART SEARCH
A B C D
EFFECT
HUB
VOL TUNING/ CH
TV SOURCE
RDS DISPLAY
PTY- PTY SEARCH PTY+
TA
FULL SCREEN REPEATHOME
Cavo video Antenna FM Manuale utente
(Per cavo di
alimentazione)
Dock per iPod Nucleo toroidale in ferriteTelecomando/
batterie (formato AAA)
Le figure e le illustrazioni di questo manuale utente sono fornite soltanto come riferimento. Possono differire rispetto all'aspetto effettivo del prodotto.
È possibile che vengano addebitate delle spese amministrative nei seguenti casi
a. L'uscita del tecnico in seguito a una chiamata non rileva difetti nel prodotto (per es. nel caso l'utente abbia omesso di leggere il presente manuale)
b. L'utente ha portato l'unità presso un centro di riparazione che non rileva difetti nel prodotto (per es. nel caso l'utente abbia omesso di leggere il presente manuale).
L'importo di tale quota amministrativa verrà comunicato all'utente prima di eseguire una visita a domicilio o un eventuale intervento di manutenzione.
HT-E5200_XU_ITA_0222.indd 11HT-E5200_XU_ITA_0222.indd 11 2012-02-23 오후 2:16:482012-02-23 오후 2:16:48

| 12 Italiano
Guida IntroduttivaPannello anteriore
5V 500mA
DISPLAY
ACCENSIONEVANO DEL DISCO PORTA USB
ARRESTO APERTURA/CHIUSURA
REGOLAZIONE DEL VOLUME
RIPRODUZIONE/PAUSA INVIO
FUNZIONE
SENSORE TELECOMANDO
| NOTA | � Per aggiornare il software del prodotto attraverso la porta USB, è necessario utilizzare una memoria USB.
� Quando il prodotto visualizza il menu del disco Blu-ray, non è possibile avviare il filmato premendo il tasto 6 sul prodotto
o sul telecomando. Per riprodurre il filmato, è necessario selezionare Riproduci filmato o Avvio nel menu del disco, quindi
premere il tasto E.
Pannello posteriore
| NOTA | � Verificare che su tutti i lati del sistema home cinema ci siano almeno 10 centimetri di spazio libero per garantire una
ventilazione adeguata. Non ostruire la ventola di raffreddamento e i fori di ventilazione.
LANiPod
IMPE
DANC
E : 3
SPEAKERS OUT
IMPE
DANC
E : 3
SPEAKERS OUT
DIGITALAUDIO IN
OPTICAL
VIDEOOUT
AUXIN
FM ANTHDMI IN 21HDMI OUT
DIGITALAUDIO IN
OPTICAL
VIDEOOUT
AUXIN
FM ANTHDMI IN 21HDMI OUTLANiPod
TERMINALE LAN
iPod
VENTOLA DI RAFFREDDAMENTO
INGRESSO AUDIO DIGITALE ESTERNO
(OTTICO)INGRESSO HDMI
USCITA HDMI
ANTENNA FM
CONNETTORI DI USCITA DIFFUSORI
USCITA VIDEOINGRESSO AUX
HT-E5200_XU_ITA_0222.indd 12HT-E5200_XU_ITA_0222.indd 12 2012-02-23 오후 2:16:522012-02-23 오후 2:16:52

Italiano 13 |
02G
uida Introduttiva
Telecomando
Descrizione del telecomando
FUNCTION
DISC MENU TITLE MENU
MUTE
S/W LEVEL
TOOLS
RETURN EXIT
INFO
MO/ST
3D SOUND
SOUNDvTuner AUDIO
1 2 3
4 5 6
7 8
0
9POPUP
RECEIVER SLEEP
BD TV
TUNERMEMORY
SUBTITLE
SMART SEARCH
A B C D
EFFECT
HUB
VOL TUNING/ CH
TV SOURCE
RDS DISPLAY
PTY- PTY SEARCH PTY+
TA
FULL SCREEN REPEATHOME
Accende e spegne il prodotto.
Per passare all'home cinema, premere il tasto BD.
Premere i tasti numerici per attivare le opzioni.
Per saltare in avanti o indietro.
Per regolare il volume.
Per disattivare
temporaneamente l'audio.
Per visualizzare l'immagine a schermo intero sul televisore.
Per passare alla schermata iniziale.
Per selezionare e modificare le voci del menu a video.
Per tornare al menu precedente.
Questi tasti vengono usati sia per
i menu del prodotto sia per varie
funzioni dei dischi Blu-ray.
Per visualizzare il menu del disco.
Per utilizzare il menu Tools (Strumenti).
Per utilizzare Smart Hub.
Per selezionare la lingua audio del disco.
Per passare al modo TV, premere il tasto TV.
Per arrestare/riprodurre un disco.
Per cercare i contenuti.
Per utilizzare il tasto vTuner. Per applicare gli effetti audio.
Per impostare un'ora di disattivazione per spegnere il prodotto.
Per selezionare il modo Blu-ray (HDMI1, AUX, BD/DVD, ecc.).oPer selezionare il modo video del televisore.
Selezionare MONO o STEREO per le trasmissioni radio.
Per eseguire la ricerca avanti o indietro.
Per mettere in pausa un disco.
Per cercare le stazioni FM attive e cambiare canale.
Per regolare il livello del subwoofer
Per accedere al menu popup/titolo.
Per uscire dal menu.
Per visualizzare le informazioni
sulla riproduzione durante la
visione di un disco Blu-ray/DVD.
Per impostare una frequenza radio.
Per ripetere un titolo, un capitolo, una traccia o un disco.
Per vedere un normale video 2D in 3D.
Per selezionare la lingua dei sottotitoli del disco.
Per applicare l'effetto audio 3D.
Usa la funzione RDS per ricevere le stazioni FM.
Apre e chiude il vano del disco.
HT-E5200_XU_ITA_0222.indd 13HT-E5200_XU_ITA_0222.indd 13 2012-02-23 오후 2:16:542012-02-23 오후 2:16:54

| 14 Italiano
Guida IntroduttivaInserimento delle batterie nel telecomando
Tipo batterie: AAA
21
| NOTA | � Assicurarsi che la batteria venga posta con i poli positivo
e negativo in corrispondenza dei simboli "+" e "-" riportati
nell'apposito vano.
� Se impiegate per la TV in modo standard, le batterie
durano circa un anno.
� Il telecomando ha una portata di circa 7 metri dal prodotto
in linea d'aria.
Impostazione del telecomandoIl telecomando consente di controllare determinate
funzioni del televisore.
Per comandare il televisore con il telecomando1 . Premere il tasto TV per impostare il
telecomando sul modo TV.
2 . Accendere il televisore.
3 . Tenendo premuto il tasto ACCENSIONE,
inserire il codice corrispondente alla marca
del proprio televisore.
• Se nella tabella sono riportati più codici per
il proprio televisore, inserirne uno per volta
per individuare quello giusto.
• Esempio: Per un televisore SamsungTenendo premuto il tasto ACCENSIONE,
utilizzare i tasti numerici per inserire 00. Se
non funziona, provare con 15, poi con 16,
ecc.
4 . Se il televisore si spegne, l'impostazione è
terminata.
• È possibile utilizzare i tasti di ACCENSIONE
del televisore, VOLUME, CANALE e i tasti
numerici (0~9).
| NOTA | � Il telecomando potrebbe non funzionare con i televisori di
alcune marche. Inoltre, per alcune marche di televisore
potrebbe non essere possibile eseguire alcune operazioni.
� Per impostazione predefinita, il telecomando funziona con
le TV Samsung.
Codici di comando del televisore
Marca CodiceAdmiral
(M.Wards)56, 57, 58
A Mark 01, 15
Anam
01, 02, 03, 04, 05,
06, 07, 08, 09, 10, 11,
12, 13, 14
AOC 01, 18, 40, 48
Bell & Howell (M.Wards)
57, 58, 81
Brocsonic 59, 60
Candle 18
Cetronic 03
Citizen 03, 18, 25
Cinema 97
Classic 03
Concerto 18
Contec 46
Coronado 15
Craig 03, 05, 61, 82, 83, 84
Croslex 62
Crown 03
Curtis Mates 59, 61, 63
CXC 03
Daewoo
02, 03, 04, 15, 16, 17, 18, 19, 20, 21, 22, 23,
24, 25, 26, 27, 28, 29, 30, 32, 34, 35, 36,
48, 59, 90
Daytron 40
Dynasty 03
Emerson03, 15, 40, 46, 59, 61,
64, 82, 83, 84, 85
Fisher 19, 65
Funai 03
Futuretech 03
General Electric (GE)
06, 40, 56, 59, 66, 67, 68
Hall Mark 40
Hitachi 15, 18, 50, 59, 69
Inkel 45
JC Penny 56, 59, 67, 86
JVC 70
KTV 59, 61, 87, 88
KEC 03, 15, 40
KMC 15
LG (Goldstar)01, 15, 16, 17, 37, 38, 39, 40, 41, 42, 43, 44
Luxman 18
LXI (Sears)19, 54, 56, 59, 60, 62,
63, 65, 71
Magnavox15, 17, 18, 48, 54, 59,
60, 62, 72, 89
Marantz 40, 54
Matsui 54
MGA 18, 40
Marca CodiceMitsubishi/MGA 18, 40, 59, 60, 75
MTC 18
NEC 18, 19, 20, 40, 59, 60
Nikei 03
Onking 03
Onwa 03
Panasonic06, 07, 08, 09, 54, 66,
67, 73, 74
Penney 18
Philco03, 15, 17, 18, 48, 54,
59, 62, 69, 90
Philips15, 17, 18, 40, 48,
54, 62, 72
Pioneer 63, 66, 80, 91
Portland 15, 18, 59
Proton 40
Quasar 06, 66, 67
Radio Shack 17, 48, 56, 60, 61, 75
RCA/Proscan18, 59, 67, 76, 77, 78,
92, 93, 94
Realistic 03, 19
Sampo 40
Samsung00, 15, 16, 17, 40, 43,
46, 47, 48, 49,59, 60, 98
Sanyo 19, 61, 65
Scott 03, 40, 60, 61
Sears 15, 18, 19
Sharp 15, 57, 64
Signature 2000 (M.Wards)
57, 58
Sony 50, 51, 52, 53, 55
Soundesign 03, 40
Spectricon 01
SSS 18
Sylvania18, 40, 48, 54, 59,
60, 62
Symphonic 61, 95, 96
Tatung 06
Techwood 18
Teknika 03, 15, 18, 25
TMK 18, 40
Toshiba 19, 57, 63, 71
Vidtech 18
Videch 59, 60, 69
Wards15, 17, 18, 40, 48,
54, 60, 64
Yamaha 18
York 40
Yupiteru 03
Zenith 58, 79
Zonda 01
Dongyang 03, 54
HT-E5200_XU_ITA_0222.indd 14HT-E5200_XU_ITA_0222.indd 14 2012-02-23 오후 2:16:572012-02-23 오후 2:16:57

Italiano 15 |
03Connessioni
ConnessioniQuesta sezione descrive vari metodi per collegare il prodotto ad altri componenti esterni.
Prima di spostare o installare il prodotto, spegnere l'apparecchio e staccare il cavo di alimentazione.
Collegamento del nucleo toroidale in ferrite al cavo di alimentazione dell'unità principale
Se si collega un nucleo toroidale in ferrite al cavo di
alimentazione dell’unità principale, si può contribuire ad
evitare le interferenze RF provenienti dai segnali radio.
1. Per aprire il nucleo toroidale in ferrite, tirare la linguetta di
fissaggio.
2. Avvolgere due volte il cavo di alimentazione dell’unità principale.
3. Collegare il nucleo toroidale in ferrite al cavo di alimentazione
dell'unità principale come indicato in figura e premerlo finché
non si aggancia.
Collegamento degli altoparlanti
LANiPod
IMPE
DANC
E : 3
SPEAKERS OUT
Altoparlanti anteriori ei
Posizionare questi altoparlanti davanti alla posizione di ascolto; devono essere
rivolti verso l'interno (di circa 45°), in direzione dell'ascoltatore. Posizionare gli
altoparlanti in modo che i tweeter si trovino all'altezza dell'orecchio dell'ascoltatore.
Subwoofer La posizione del subwoofer non è molto rilevante. Posizionarlo dove si preferisce.
Posizionamento del prodottoSistemarlo su un supporto, sul ripiano
di un mobile o nel mobile sotto la TV.
Selezione della posizione di ascolto
La posizione di ascolto deve essere
situata, rispetto al televisore, ad una
distanza pari a circa 2,5 - 3 volte il
formato del televisore. Ad esempio, se
lo schermo è da 46 pollici, collocare la
posizione di ascolto ad una distanza
dallo schermo compresa tra 2,92 e 3,5
metri dallo schermo.
Anteriori (S)
Anteriori (D)
Prodotto
Subwoofer
Componenti degli altoparlanti
SUBWOOFER CAVI DIFFUSORIANTERIORI
(S) (D)
HT-E5200_XU_ITA_0222.indd 15HT-E5200_XU_ITA_0222.indd 15 2012-02-23 오후 2:16:592012-02-23 오후 2:16:59

| 16 Italiano
ConnessioniCollegamento dei diffusori
1. Abbinare ciascun fascio di cavi al rispettivo diffusore facendo corrispondere
i colori delle spine dei cavi agli adesivi in basso sui connettori dei diffusori.
2. Per collegare ciascun filo al relativo diffusore:
a. Premere verso il basso la linguetta rossa dietro il diffusore, inserire il filo
rosso, quindi rilasciare la linguetta.
b. Premere verso il basso la linguetta nera dietro il diffusore, inserire il filo
nero, quindi rilasciare la linguetta.
3. Collegare le spine dei fili dei diffusori sul retro del prodotto facendo
corrispondere i colori delle spine con i connettori dei diffusori.
| ATTENZIONE | � Se si desidera installare il prodotto su una parete, fissare in modo stabile le viti o i chiodi nella parete e utilizzare i fori sul retro del diffusore
per montarlo contro la parete.
Gli accessori (chiodi o viti) necessari per il montaggio non sono forniti in dotazione di fabbrica.
� Non lasciar giocare i bambini con i diffusori o nelle loro vicinanze. La caduta di un diffusore potrebbe provocare lesioni.
� Per collegare i cavi agli altoparlanti, rispettare la polarità (+/ –).
� Tenere il subwoofer lontano dalla portata dei bambini per impedire che mettano le mani o introducano oggetti nel condotto (foro) dello
stesso.
� Non appendere il subwoofer alla parete dal condotto (foro).
| NOTA | � Se si colloca un diffusore vicino al televisore, i colori dello schermo potrebbero apparire distorti a causa del campo magnetico.
Nero Rosso
LANiPod
IMPE
DANC
E : 3
SPEAKERS OUT
IMPE
DANC
E : 3
SPEAKERS OUT
Diffusore anteriore (D)
Subwoofer
Diffusore anteriore (S)
HT-E5200_XU_ITA_0222.indd 16HT-E5200_XU_ITA_0222.indd 16 2012-02-23 오후 2:17:032012-02-23 오후 2:17:03

Italiano 17 |
03Connessioni
Collegamento dell'antenna FM
LANiPod
IMPE
DANC
E : 3
SPEAKERS OUT
OPTICAL
VIDEOOUT
AUXIN
DIGITALAUDIO IN
HDMI IN1 2HDMI OUTLANiPod
IMPE
DANC
E : 3
SPEAKERS OUT
OPTICAL
VIDEOOUTOUT
AUXIN
DIGITALAUDIO INN
HDMI IN1 2HDMI OUT FM ANT
Antenna FM (fornita)
1 . Collegare l'antenna FM fornita al relativo connettore.
2 . Muovere lentamente il filo dell'antenna finché non si trova una posizione con una buona ricezione,
quindi fissarlo a un muro o a un'altra superficie rigida.
| NOTA | � Questo prodotto non riceve le trasmissioni AM.
Collegamento di un iPod/iPhone
Mediante un cavo USB
Collegare un iPod/iPhone alla porta USB anteriore
utilizzando il cavo USB.
5V 500mA
5V 500mA
Mediante una basetta dock
Per riprodurre un video deve essere coIlegato un
cavo Composito.
LANiPod
IMPE
DANC
E : 3
SPEAKERS OUT
OPTICAL
VIDEOOUT
AUXIN
DIGITALAUDIO IN
FM ANTHDMI IN1 2HDMI OUTLAN
IMPE
DANC
E : 3
SPEAKERS OUT
OPTICAL
VIDEOOUTOU
AUXIN
DIGITALAUDIO INNN
FM ANTHDMI IN1 2HDMI OUT
iPod
| NOTA | � Assicurarsi di collegare il connettore del dock in modo che l'etichetta “” sia rivolta verso l'alto.
HT-E5200_XU_ITA_0222.indd 17HT-E5200_XU_ITA_0222.indd 17 2012-02-23 오후 2:17:042012-02-23 오후 2:17:04

| 18 Italiano
ConnessioniCollegamento a un televisore
Selezionare il metodo 1 o il metodo 2.
• Se il telecomando del prodotto è stato impostato per il funzionamento con il televisore, premere il tasto TV SOURCE
sul telecomando e selezionare la corretta sorgente esterna dall'elenco di sorgenti TV (HDMI, ingresso video, ecc.) per
visualizzare il video dal sistema home cinema.
HDMI IN VIDEO IN
OPTICAL
VIDEOOUT
AUXIN
DIGITALAUDIO IN
FM ANTHDMI IN1 2HDMI OUT
LANiPod
IMPE
DANC
E : 3
SPEAKERS OUT
OPTICAL
VIDEOOUT
AUXIN
DIGITALAUDIO IN
FM ANTHDMI IN1 2HDMI OUT
Metodo 1 Metodo 2(cavo non fornito).
Metodo 1 Collegamento a un televisore con cavo HDMI - qualità massima (consigliato)
Collegare un cavo HDMI (non fornito) tra il connettore HDMI OUT sulla parte posteriore del prodotto e il
connettore HDMI IN sul televisore.
Metodo 2 Collegamento a un televisore con un cavo video - buona qualitàCollegare il cavo video fornito tra il connettore VIDEO OUT nella parte posteriore del prodotto e il
connettore VIDEO IN sul televisore.
| NOTA | � Il connettore VIDEO OUT ha sempre una risoluzione di uscita di 576i/480i, indipendentemente dalla risoluzione impostata nel
menu di configurazione.
� Non collegare l'unità tramite un videoregistratore. I segnali video inviati dai videoregistratori potrebbero essere influenzati da
sistemi di protezione del copyright, facendo risultare distorta l'immagine sul televisore.
HT-E5200_XU_ITA_0222.indd 18HT-E5200_XU_ITA_0222.indd 18 2012-02-23 오후 2:17:072012-02-23 오후 2:17:07

Italiano 19 |
03Connessioni
Collegamento a dispositivi esterni
Per selezionare il modo corretto per un dispositivo esterno, premere il tasto FUNCTION. Ogni volta che si preme
il tasto, il modo cambia in questo ordine :
BD/DVD � D. IN � AUX � R. IPOD � HDMI1 � HDMI2 � FM � BT
OPTICAL
VIDEOOUT
AUXIN
DIGITALAUDIO IN
FM ANTHDMI IN1 2
AUDIO OUTHDMI OUT OPTICAL OUT
LANiPod
IMPE
DANC
E : 3
SPEAKERS OUT
OPTICAL
VIDEOOUT
AUXIN
DIGITALAUDIO IN
FM ANTHDMI IN1 2HDMI OUT
R Rosso
W Bianco
Metodo 1 Metodo 2 Metodo 3
Dispositivi esterni
(cavo non fornito).
(cavo non fornito). (cavo non fornito).
Metodo 1 INGRESSO HDMI : Collegamento a un componente esterno con cavo HDMI
Collegare un cavo HDMI (non fornito) tra il connettore HDMI IN sulla parte posteriore del prodotto e il
connettore HDMI OUT sul dispositivo digitale. Selezionare il modo HDMI1 o HDMI2.
Metodo 2 OTTICO : Collegamento di un componente audio digitale esterno
Per collegare l'uscita audio digitale dei componenti con segnale audio digitale quali ricevitori via cavo e via
satellite (Set-Top box).
Utilizzando un cavo ottico digitale (non fornito), collegare il connettore di ingresso ottico digitale sul
prodotto al connettore di uscita ottico digitale del dispositivo digitale esterno.
Selezionare il modo D. IN.
Metodo 3 INGRESSO AUX : Collegamento di un componente analogico esterno
Utilizzando un cavo audio RCA (non fornito), collegare il connettore AUDIO IN sul prodotto al connettore
AUDIO OUT sul componente analogico esterno. Selezionare il modo AUX.
• Assicurarsi di abbinare correttamente i colori dei connettori del cavo ai rispettivi connettori di ingresso e di
uscita.
| NOTA | � Per vedere il video di un ricevitore per TV via cavo/ricevitore satellitare è necessario collegare la relativa uscita video
direttamente a un televisore.
� Questo sistema supporta frequenze di campionamento digitale di 32 kHz o superiori di apparecchi digitali esterni.
� Questo sistema supporta solo l'audio DTS e Dolby Digital. L'audio MPEG, un formato bitstream, non è supportato.
HT-E5200_XU_ITA_0222.indd 19HT-E5200_XU_ITA_0222.indd 19 2012-02-23 오후 2:17:082012-02-23 오후 2:17:08

| 20 Italiano
ConnessioniCollegamento a un router di rete
È possibile collegare il prodotto al router di rete
utilizzando uno dei metodi di seguito illustrati.
Rete via cavo
LANiPod
IMPE
DANC
E : 3
SPEAKERS OUT
OPTICAL
VIDEOOUT
AUXIN
DIGITALAUDIO IN
FM ANTHDMI IN1 2HDMI OUT
Servizio a banda larga
Servizio a banda larga
Modem a banda larga(Con router integrato)
Modem a banda larga
Router
o
| NOTA | � È possibile che, in base al router utilizzato o alla
politica adottata dall'ISP, l'accesso Internet al server di
aggiornamento del software Samsung non sia permesso.
Per ulteriori informazioni, contattare l'ISP (provider di
servizi Internet).
� Gli utenti DSL sono invitati a utilizzare un router per
stabilire una connessione alla rete.
� Per utilizzare la funzione AllShare Play, è necessario
collegare il PC alla rete come mostrato nella figura a
sinistra.
La connessione può essere via cavo o wireless.
Rete wireless
5V 500mA
Servizio a banda larga
IP sharer wireless
| NOTA | � Se il router IP wireless supporta DHCP, questo prodotto
può usare un indirizzo IP statico o DHCP per collegarsi
alla rete wireless.
� Impostare il router IP wireless sul modo infrastruttura. Il
modo ad-hoc non è supportato.
� Il prodotto supporta solo i seguenti protocolli wireless di
codici di sicurezza:
- WEP (OPEN/SHARED), WPA-PSK (TKIP/AES), WPA2-PSK (TKIP/AES)
� Selezionare un canale sul router IP wireless non
attualmente in uso. Se il canale impostato per il router IP
wireless è attualmente utilizzato da un altro dispositivo
nelle vicinanze, ciò provocherà interferenze e problemi di
comunicazione.
� Se è selezionato il modo Pure High-throughput (Greenfield)
802.11n e il tipo di crittografia del router o del punto
di accesso è impostato su WEP, TKIP o TKIP-AES
(WPS2Mixed), il prodotto non supporterà una connessione
conforme alle nuove specifiche di certificazione Wi-Fi.
� Una rete LAN wireless, a causa della sua natura, può
provocare interferenze a seconda delle condizioni
operative (prestazioni AP, distanza, ostacoli, interferenze
dovute ad altri dispositivi radio, ecc.).
HT-E5200_XU_ITA_0222.indd 20HT-E5200_XU_ITA_0222.indd 20 2012-02-23 오후 2:17:092012-02-23 오후 2:17:09

Italiano 21 |
04Im
postazioni
Procedura di impostazione iniziale
• Il menu principale non appare se non si configurano le
impostazioni iniziali.
• L'OSD (On Screen Display) del prodotto potrebbe
cambiare dopo l'aggiornamento della versione del
software.
• I passi da eseguire per accedere possono variare a
seconda del menu selezionato.
1 . Accendere il televisore dopo aver collegato
il prodotto, quindi accendere il prodotto.
Quando si attiva il prodotto per la prima
volta, viene visualizzata automaticamente la
schermata Lingua delle impostazioni iniziali.
Initial Settings > On-Screen Language
Select a language for the on-screen displays.
Next
▲
▼
Dansk Nederlands
English Eesti keel
Suomi Français
Deutsch Ελληνικά
Hausa Magyar
Asusu Igbo Italiano
Select English as the on-screen menu language.
2 . Utilizzare i tasti ▲▼◄► sul telecomando
per selezionare la lingua desiderata, quindi
premere due volte il tasto E. Viene
visualizzata la schermata Iniziale.
3 . Premere il tasto E per avviare la
configurazione. Viene visualizzata la
schermata Impostazioni di rete.
Il pass. success. prevede la configur. di una rete wireless che utilizza un adattatore LAN interno.
Per connettersi alla rete cablata, collegare un cavo di rete.
Precedente
Salta
Succ.
Impostazione iniziale > Impostazioni di rete (1/5)
4 . Premere il tasto E per configurare la
connessione di rete wireless del prodotto
o selezionare Salta, quindi premere il tasto
E per saltare la configurazione della rete.
Selezionando Salta si va al passo 12.
| NOTA | � Per impostazione predefinita il prodotto avvia la procedura
di connessione di rete wireless. Per impostare una
connessione via cavo, selezionare Salta, quindi andare a
"Configurazione del collegamento alla rete" a pagina 29
dopo il completamento della procedura di impostazione
iniziale.
� Se si salta la configurazione della rete wireless, andare a
"Rete wireless" a pagina 30 per impostare in seguito la
connessione di rete wireless del prodotto.
5 . Il prodotto cerca e visualizza tutte le
connessioni di rete di router wireless
disponibili.
Impostazione iniziale > Impostazioni di rete (2/5)
Aggiorna
WPS(PBC)
Precedente
Succ.
Salta
Selezionare dall'elenco il router wireless in uso.1 / 4
KIMING_VTOWER
TIASsi-ap
Aggiungi rete
surlwang5
6 . Utilizzare i tasti ▲▼ per selezionare un router,
quindi premere il tasto E. Il tasto Succ. è
selezionato.
7 . Premere il tasto E per continuare. Viene
visualizzata la schermata del codice di
sicurezza.
| NOTA | � Se si ha un router compatibile WPS(PBC), selezionare
invece WPS(PBC), premere il tasto E, quindi seguire le
indicazioni sullo schermo. A operazione ultimata, andare
al passo 10.
Impostazione iniziale > Impostazioni di rete (4/5)
Precedente
WPS PIN
Salta
Succ.
Immettere chiave di sicurezza.
0 imm.
A/a Spazio
a g m s
e k q w
c i o u
1 4 7 y
b h n t
f l r x
d j p v
2 5 8 z
3 6 9 0
-
8 . Inserire il codice di sicurezza della rete. A
operazione ultimata, utilizzare i tasti ▲▼◄►
per selezionare Succ., quindi premere il tasto
E.
Impostazioni
HT-E5200_XU_ITA_0222.indd 21HT-E5200_XU_ITA_0222.indd 21 2012-02-23 오후 2:17:132012-02-23 오후 2:17:13

| 22 Italiano
Impostazioni| NOTA |
� Inserire i numeri utilizzando i tasti numerici sul
telecomando.
� Inserire le lettere utilizzando i tasti ▲▼◄►, quindi
premere il tasto E.
� Per visualizzare le lettere maiuscole (o visualizzare
le lettere minuscole se sono visualizzate le lettere
maiuscole), selezionare A/a, quindi premere il tasto E.
� Per visualizzare i simboli e la punteggiatura, selezionare
, quindi premere il tasto E. Per visualizzare di nuovo
le lettere, selezionare e quindi premere il tasto E.
9 . Se la connessione viene stabilita, viene
visualizzata la schermata Connessione
completata. Selezionare Succ., quindi
premere il tasto E. Viene visualizzata la
schermata di aggiornamento software.
| NOTA | � Se la connessione non è riuscita, selezionare Succ.,
quindi premere il tasto E. Dopo aver completato
la procedura di impostazione iniziale, andare a "Rete
wireless" a pagina 30 per impostare la connessione di
rete wireless del prodotto.
10 . Per aggiornare il software, selezionare
Aggiorna ora e quindi premere il tasto E.
Per saltare l'aggiornamento, selezionare
Aggiorna più tardi, premere il tasto E e
andare al passo 12.
| NOTA | � Se è stata saltata la configurazione di rete, è necessario
saltare anche l'aggiornamento del software.
11 . Se è disponibile un aggiornamento software,
il prodotto scarica e installa l'aggiornamento.
Questo può richiedere del tempo. Se non
è disponibile un aggiornamento software,
compare il messaggio "Non ci sono nuovi aggiornamenti software pronti per il download. La versione attualmente in uso è la più recente.". Quindi premere il tasto E.
Viene visualizzata la schermata Formato TV.
Impostazione iniziale > Formato TV
Precedente
Succ.
Eseguire l'impostazione in base al tipo di televisore collegato.
16:9 originale
16:9 Pieno
4:3 Letter Box
4:3 Pan-Scan
Selezionare per connettersi a uno schermo TV 16:9. Alcuni film con sorgente 4:3 saranno visualizzati in 4:3 Pillarbox.
12 . Utilizzando i tasti ▲▼, selezionare il formato
che corrisponde allo schermo, quindi premere
il tasto E. Selezionare Succ., poi premere il
tasto E.
Sono disponibili quattro scelte:
16:9 originale - per televisori panoramici.
Visualizza le immagini a schermo largo nel
formato originale in 16:9 e le immagini 4:3
(vecchio formato standard) in formato 4:3
pillarbox con bande nere a sinistra e a destra.
16:9 Pieno - per televisori panoramici.
Visualizza le immagini a schermo largo nel
formato originale in 16:9 e espande le immagini
in 4:3 per riempire lo schermo in 16:9.
4:3 Letter Box - per vecchi televisori analogici
con schermo standard. Visualizza immagini
in 4:3 a schermo intero e immagini in 16:9 in
formato Letter box che mantiene il formato
16:9 e applica bande nere sopra e sotto
l'immagine.
4:3 Pan-Scan - Per vecchi televisori analogici
con schermo standard. Visualizza immagini
in 4:3 a schermo intero e immagini in 16:9 in
formato Pan-Scan che riempie lo schermo, ma
taglia i lati a sinistra e a destra dell'immagine e
ingrandisce verticalmente la parte centrale.
Impostazione iniziale > completata
Configurazione completata.
OK
Smart Hub
Lingua dei menu a video
Impostazioni di rete
Aggiornamento software -
Aspetto TV
Premere Smart Hub per usufruire di un'ampia gamma di cont. Internet.
13 . Viene visualizzata la schermata
Configurazione completata. Controllare le
impostazioni per verificare che siano corrette.
Selezionare OK, quindi premere il tasto E.
Viene visualizzata la schermata iniziale.
| NOTA | � Per visualizzare nuovamente la schermata Initial Setting
(Impostazione iniziale) ed effettuare le modifiche, selezionare
l'opzione Reset (Ripristina). (Vedere a pagina 28)
� Se si utilizza un cavo HDMI per collegare il prodotto a un
televisore Samsung compatibile Anynet+ (HDMI-CEC) e 1).
La funzione Anynet+ (HDMI-CEC) è stata impostata su On
sia nel televisore che nel prodotto e 2). Per il televisore è
impostata una lingua supportata dal prodotto, il prodotto
imposta automaticamente tale lingua come lingua preferita.
HT-E5200_XU_ITA_0222.indd 22HT-E5200_XU_ITA_0222.indd 22 2012-02-23 오후 2:17:152012-02-23 오후 2:17:15

Italiano 23 |
04Im
postazioni
La schermata iniziale
Smart Hub Funzione Impostazioni
d WPS(PBC) 5
4
3
1
2
Consente di riprodurre video, foto o musica da dischi o dispositivi connessi.
AllShare Play
1
Smart Hub. Avvia Smart Hub. Da Smart Hub è
possibile accedere a YouTube, ai giochi e ad altre
applicazioni.
2AllShare Play. Riproduce video, foto o contenuti
musicali da dischi, USB, PC o dispositivi mobili.
3Funzione. Seleziona la sorgente di ingresso audio/
video.
4Impostazioni. Imposta diverse funzioni in base alle
preferenze personali.
5
Visualizza i tasti colorati sul telecomando che
si possono premere per accedere o eseguire le
funzioni.
Selezione di un'opzione nella schermata iniziale
1 . Per selezionare un'opzione nella schermata
iniziale, spostare il cursore utilizzando i tasti
◄► per selezionare l'opzione scelta, quindi
premere il tasto E.
Accesso alla schermata di impostazione
1 . Selezionare Impostazioni nella schermata
iniziale, quindi premere E. Viene visualizzata
la schermata Impostazioni.
Display
Audio
Rete
Sistema
Supporto
Impostazioni 3D
Formato TV 16:9 originale
Dimensioni schermo Smart Hub Dim. 3
BD Wise Off
Risoluzione Auto
Fotogramma Video(24Fs) Auto
Formato colore HDMI Auto
HDMI Profondità colori Auto
Modo progressivo Auto
2 . Per accedere ai menu, ai sottomenu e alle
opzioni della schermata Impostazioni, vedere
la figura del telecomando in basso.
| NOTA | � Se si lascia il prodotto in modo di arresto per oltre 5
minuti, sul televisore appare un salvaschermo. Se il
salvaschermo viene lasciato in funzione per oltre 20
minuti, l'unità si spegne automaticamente.
Tasti del telecomando utilizzati per il menu Impostazioni
TOOLS
RETURN EXIT
INFO
MO/STTUNER
MEMORY
FULL SCREEN REPEATHOME
1
2 4
3
1 Tasto HOME: Per passare alla schermata iniziale.
2 Tasto RETURN: Per tornare al menu precedente.
3
Tasto E (Invio) / DIREZIONE:
~ Premere ▲▼◄► per spostare il cursore o
selezionare una voce.
~ Premere il tasto E per attivare la voce
correntemente selezionata o confermare
un'impostazione.
4 Tasto EXIT: Premere per uscire dal menu corrente.
| NOTA | � Il tasto E sul pannello anteriore del prodotto può avere
la stessa funzione del tasto E sul telecomando.
Informazioni dettagliate sulle funzioniOgni funzione, voce menu o singola opzione della
schermata Impostazioni è spiegata in dettaglio a
video. Per visualizzare la spiegazione, utilizzare i
tasti ▲▼◄► per selezionare la funzione, la voce di
menu o l'opzione. La spiegazione appare di solito
sulla destra della schermata. Per una breve
descrizione di ogni funzione di Impostazioni, vedere
alla pagina successiva. Per ulteriori informazioni su
alcune funzioni vedere anche l'appendice del
manuale.
HT-E5200_XU_ITA_0222.indd 23HT-E5200_XU_ITA_0222.indd 23 2012-02-23 오후 2:17:172012-02-23 오후 2:17:17

| 24 Italiano
ImpostazioniFunzioni del menu Impostazioni
Display
Impostazioni 3D
Imposta le funzioni 3D.
Riproduzione 3D Blu-ray: Selezionare se riprodurre un
disco Blu-ray con contenuti 3D in modo 3D. Se si passa alla
schermata iniziale o al menu principale di Smart Hub mentre
si è in modo 3D, il prodotto passa automaticamente a 2D.
Dim. schermo: Inserire la dimensione del televisore
collegato al prodotto. Il prodotto regola automaticamente
l'uscita 3D in base alla dimensione dello schermo del
televisore.
Formato TVConsente di regolare l'uscita del prodotto in base alla
dimensione dello schermo del televisore. Vedere il passo 12 a
pagina 22 per una descrizione delle possibili dimensioni dello
schermo.
Dimensioni schermo
Smart HubConsente di selezionare le dimensioni ottimali dello schermo
Smart Hub.
BD Wise
BD Wise è la funzione di interconnettività Samsung di ultima
generazione.
Quando si collegano tra loro un prodotto Samsung e un
televisore Samsung con BD Wise tramite HDMI, e BD Wise è
attivo sia sul prodotto che sul televisore, il prodotto trasmette i
video con la risoluzione video e la frequenza di fotogrammi del
disco Blu-ray/DVD.
Risoluzione
Consente di impostare risoluzione di uscita del segnale
video HDMI su Auto, 1080p, 1080i, 720p, 576p/480p. Se
è collegato un cavo composito, la risoluzione supporta solo
576i/480i. Il numero indica il numero di linee del video per
fotogramma. "i" e "p" indicano, rispettivamente, la scansione
interlacciata e progressiva. Maggiore è il numero di linee,
maggiore è la qualità.
Fotogramma Video(24Fs)
Impostando la funzione Fotogramma video (24Fs) su Auto, il
prodotto regola automaticamente la propria uscita HDMI su 24
fotogrammi al secondo per migliorare la qualità dell'immagine
se collegato a un televisore compatibile 24Fs.
• Questa funzione può essere utilizzata soltanto sui televisori
che supportano questa frequenza di fotogrammi.
• Fotogramma video può essere selezionato solo se il
prodotto è nei modi di risoluzione 1080i o 1080p dell'uscita
HDMI.
Formato colore HDMI
Consente di impostare il formato dello spazio colore per l'uscita
HDMI in base alla capacità del dispositivo collegato (televisore,
monitor, ecc.).
HDMI Profondità
colori
Consente di impostare sul prodotto la trasmissione del video
dal connettore HDMI OUT con profondità colori. La profondità
colori consente una riproduzione più fedele con una maggiore
profondità dei colori.
Modo progressivo
Consente di migliorare la qualità dell'immagine durante la
visualizzazione dei DVD.
HT-E5200_XU_ITA_0222.indd 24HT-E5200_XU_ITA_0222.indd 24 2012-02-23 오후 2:17:332012-02-23 오후 2:17:33

Italiano 25 |
04Im
postazioni
Audio Imposta altoparlanti È possibile impostare le opzioni del diffusore.
Equalizzatore Permette di configurare manualmente le impostazioni di
equalizzazione.
Volume SmartPermette di impostare il prodotto in modo che il volume resti
stabile quando si verifica un cambio di scena o quando si
cambia il canale.
Selez. altoparlante
Permette di selezionare se attivare i diffusori del televisore o
dell'home theatre.
Canale ritorno audio
Permette di direzionare il suono dal televisore ai diffusori
dell'Home Cinema. Richiede una connessione HDMI e un
televisore compatibile con la funzione di canale di ritorno audio
(ARC).
• Quando la funzione Canale ritorno audio è su On, utilizzare
il cavo HDMI per collegare il prodotto al televisore. A questo
punto, l'ingresso ottico non funziona.
• Quando la funzione Canale ritorno audio è su Auto, utilizzare
il cavo HDMI per collegare il prodotto al televisore. A questo
punto vengono selezionati automaticamente ARC e ingresso
ottico.
Uscita Digitale
Permette di impostare l'uscita digitale in base alle capacità del
ricevitore AV collegato al prodotto. Per ulteriori dettagli, fare
riferimento alla tabella di selezione delle uscite digitali. (Vedere
a pagina 59)
Controllo gamma
dinamica
Consente di applicare il controllo gamma dinamica sull'audio
Dolby Digital, Dolby Digital Plus e Dolby True HD.
Auto: Controlla automaticamente la gamma dinamica
dell'audio Dolby TrueHD, in base alle informazioni fornite
dalla colonna sonora Dolby TrueHD. Attiva anche il controllo
della gamma dinamica per Dolby Digital e Dolby Digital Plus.
Off: Lascia la gamma dinamica non compressa,
permettendo di sentire il suono originale.
On: Attiva il controllo della gamma dinamica per tutti e tre
i formati Dolby. Il volume dei suoni bassi viene alzato e
quello dei suoni alti viene abbassato.
Sincronia audio
Quando il prodotto è collegato a un televisore digitale,
permette di regolare il ritardo audio in modo che l'audio sia
sincronizzato con il video. È possibile impostare il ritardo tra 0 e
300 millisecondi.
HT-E5200_XU_ITA_0222.indd 25HT-E5200_XU_ITA_0222.indd 25 2012-02-23 오후 2:17:332012-02-23 오후 2:17:33

| 26 Italiano
Impostazioni
Rete Impostazioni di rete
Per ulteriori informazioni sulle impostazioni di rete e le funzioni
di rete, vedere "Le reti e Internet " a partire da pagina 29.
Stato della rete
Permette di controllare se è stata stabilita una connessione
alla rete e a Internet.
Wi-Fi Direct
Consente di collegare un dispositivo Wi-Fi Direct al prodotto
attraverso una rete peer-to-peer, senza utilizzare un router
wireless. È possibile utilizzare il dispositivo per controllare il
prodotto.
Soft AP
Consente di collegare un dispositivo Wi-Fi Direct al prodotto
attraverso una rete peer-to-peer, senza utilizzare un router
wireless. È possibile utilizzare il dispositivo per controllare il
prodotto.
Impostazioni AllShare
Permette di collegare al prodotto dispositivi esterni, ad
esempio smartphone, e di condividere contenuti o controllare
il prodotto.
Nome dispositivo
Permette di assegnare un nome identificativo al prodotto.
Utilizzare questo nome per identificare il prodotto quando lo si
collega a dispositivi Wi-Fi (smartphone, tablet, ecc.).
Impostazioni BD-Live
Permette di autorizzare, limitare o bloccare una connessione
Internet per il servizio BD-Live.
HT-E5200_XU_ITA_0222.indd 26HT-E5200_XU_ITA_0222.indd 26 2012-02-23 오후 2:17:342012-02-23 오후 2:17:34

Italiano 27 |
04Im
postazioni
Sistema Impostazione iniziale
Consente di eseguire nuovamente la procedura di
impostazione iniziale. Vedere a pagina 21 per i dettagli.
Gestione disp
È possibile collegare una tastiera o un mouse USB wireless
alla porta USB sulla parte anteriore del prodotto.
Impostaz. tastiera: Consente di configurare una tastiera
USB wireless collegata al prodotto.
| NOTA | � La tastiera può essere utilizzata solo se nel browser Web appare una
schermata o una finestra con una tastiera QWERTY.
Impostazioni mouse: Consente di configurare un mouse
USB wireless collegato al prodotto. Il mouse può essere
utilizzato nel menu del prodotto nello stesso modo in cui
viene utilizzato sul PC.
Per utilizzare un mouse con il menu del prodotto:1 . Collegare il mouse USB al prodotto.
2 . Fare clic sul pulsante principale selezionato in
Impostazioni mouse.
Appare il menu semplice.
3 . Fare clic sulle opzioni del menu desiderate.
| NOTA | � A seconda del modello USB, la tastiera e il mouse HID potrebbero non
essere compatibili con il prodotto.
� Alcuni tasti della tastiera HID potrebbero non funzionare.
� Le tastiere USB via cavo non sono supportate.
� Alcune applicazioni possono non essere supportate.
� Se una tastiera HID wireless non funziona a causa di interferenze,
avvicinare la tastiera al prodotto.
Anynet+(HDMI-CEC).
Anynet+ è una comoda funzione che permette di sintonizzare
più prodotti Samsung dotati di Anynet+ e di comandarli con
un telecomando Samsung.
Per attivare questa funzione, collegare questo prodotto ad un
televisore Samsung dotato di funzione Anynet+ utilizzando un
cavo HDMI.
Lingua
È possibile selezionare la lingua preferita per il menu a video, il
menu del disco, i sottotitoli, ecc.
• La lingua selezionata per il menu del disco, l'audio del disco
o i sottotitoli appare solo se supportata sul disco.
HT-E5200_XU_ITA_0222.indd 27HT-E5200_XU_ITA_0222.indd 27 2012-02-23 오후 2:17:352012-02-23 오후 2:17:35

| 28 Italiano
Impostazioni
Sicurezza
Il PIN predefinito è 0000. Inserire il PIN predefinito per
accedere alla funzione di sicurezza se non è stata ancora
creata una propria password.
Grado Blocco Can. BD: Se non viene inserito il
PIN, impedisce la riproduzione di dischi Blu-ray con
classificazione uguale o superiore a quella di un'età specifica
inserita.
Grado Blocco Can. DVD: Se non viene inserito il PIN,
impedisce la riproduzione di DVD con classificazione
superiore ad una specifica classificazione numerica
selezionata.
Cambia PIN: Modificare il PIN a quattro cifre utilizzato per
accedere alle funzioni di sicurezza.
Se si è dimenticato il PIN1 . Rimuovere il disco o il dispositivo di memorizzazione USB.
2 . Tenere premuto il tasto 5 sul pannello anteriore per
almeno 5 secondi.
Tutte le impostazioni vengono riportate ai valori predefiniti.
| NOTA | � Quando vengono ripristinate le impostazioni predefinite, tutti i dati BD
personalizzati vengono eliminati.
Generale
È possibile specificare la luminosità dello schermo e il fuso
orario.
Display frontale: Permette di cambiare la luminosità del
pannello anteriore.
Fuso orario: È possibile specificare il fuso orario in vigore
nella propria area.
Trasparenza menu: Regolare la trasparenza della casella
del menu.
DivX® VideoOn Demand
Vedere i codici di registrazione DivX® VOD per acquistare e
riprodurre contenuti DivX® VOD.
Supporto Aggiornamento software
Per ulteriori informazioni sulla funzione Aggiornamento
software, vedere "Aggiornamento del software" a pagina 33.
Contattare Samsung
Fornisce le informazioni di contatto per l'assistenza sul
prodotto.
Gestione remota
Se attivata, consente agli agenti del Call Center Samsung
di diagnosticare e risolvere da remoto i problemi legati al
prodotto. Richiede l'attivazione di una connessione Internet. Il
servizio di gestione remota potrebbe non essere disponibile in
alcuni Paesi.
ResetTutte le impostazioni vengono riportate ai valori predefiniti,
ad eccezione delle impostazioni di rete e di Smart Hub. La
password di sicurezza predefinita è 0000.
HT-E5200_XU_ITA_0222.indd 28HT-E5200_XU_ITA_0222.indd 28 2012-02-23 오후 2:17:352012-02-23 오후 2:17:35

Italiano 29 |
04Im
postazioni
Le reti e Internet
Quando si collega questo prodotto a una rete,
è possibile utilizzare applicazioni e funzioni
basate su una rete come Smart Hub e BD-LIVE
e aggiornare il software del prodotto attraverso il
collegamento alla rete. Per ulteriori informazioni su
come accedere e utilizzare i servizi Internet, vedere
il capitolo Servizi di rete del manuale alle pagine
51~53. Di seguito sono riportate le istruzioni per
configurare il collegamento alla rete.
Configurazione del collegamento alla retePrima di iniziare, contattare l'ISP per sapere se
il proprio indirizzo IP è statico o dinamico. Se è
dinamico e si usa una rete via cavo o wireless,
si raccomanda di utilizzare le procedure di
configurazione automatica di seguito descritte.
Se ci si collega ad una rete via cavo, collegare il
prodotto al router utilizzando un cavo LAN prima
di avviare la procedura di configurazione.
Se ci si collega ad una rete wireless, scollegare
eventuali collegamenti alla rete via cavo prima di
cominciare.
Per avviare la configurazione del collegamento alla
rete, seguire i passi riportati di seguito:
1 . Nella schermata iniziale, selezionare
Impostazioni, quindi premere il tasto E.
2 . Selezionare Rete, quindi premere il tasto E.
3 . Selezionare Impostazioni di rete, quindi
premere il tasto E.
4 . Passare alle istruzioni per reti via cavo che
iniziano di seguito o alle istruzioni per reti
wireless che iniziano a pagina 30.
Rete via cavo
� Via cavo – Automatico
Dopo aver seguito i passi da 1 a 3 sopra riportati:
1 . Selezionare Avvio nelle impostazioni di
rete, quindi premere il tasto E. Il prodotto
rileva la connessione via cavo e verifica la
connessione di rete, quindi si collega alla rete.
� Via cavo - ManualeSe si dispone di un indirizzo IP statico o se la
procedura automatica non funziona, i valori per
le impostazioni di rete devono essere impostati
manualmente.
Dopo aver seguito i passi da 1 a 3 sopra riportati:
1 . Selezionare Avvio nelle impostazioni di rete,
quindi premere il tasto E Viene visualizzata
la schermata Network Status (Stato rete). Il
prodotto tenta di verificare la connessione di
rete senza riuscirvi.
Impostazioni di rete
Connessione alla rete cablata non riuscita.
Indirizzo MAC XX:XX:XX:XX:XX:XXIndirizzo IP 0.0.0.0Masc sottorete 0.0.0.0Gateway 0.0.0.0Server DNS 0.0.0.0
Impossibile connettersi alla rete. Verificare che l'indirizzo IP sia impostato correttamente in Impostazioni IP. Per maggiori informazioni, contattare l'ISP.
Riprova
Impost. IP
Precedente
OK
2 . Selezionare Impost. IP sulla destra della
schermata, quindi premere il tasto EViene visualizzata la schermata Impost. IP.
3 . Selezionare il campo Modalità IP, quindi
impostarlo su Manuale.
4 . Utilizzare il tastierino numerico sul
telecomando per inserire i valori relativi alla
rete. Utilizzare i tasti ▲▼◄► sul telecomando
per spostarsi tra i campi di inserimento.
| NOTA | � È possibile ottenere questi valori dal provider Internet. È
anche possibile visualizzare questi valori sulla maggior
parte dei computer Windows. Per le istruzioni, vedere
"Come ottenere i valori delle impostazioni di rete" in
questa pagina.
5 . A operazione ultimata, selezionare OK, quindi
premere il tasto E. Il prodotto verifica la
connessione di rete, quindi si collega alla rete.
< Come ottenere i valori delle impostazioni di rete >È possibile visualizzare i valori delle impostazioni di
rete sulla maggior parte dei computer Windows.
Per visualizzare i valori delle impostazioni di rete,
seguire i passi riportati di seguito:
• Windows XP
1 . Fare clic con il tasto destro del mouse
sull'icona di rete in basso a destra nel
desktop di Windows.
HT-E5200_XU_ITA_0222.indd 29HT-E5200_XU_ITA_0222.indd 29 2012-02-23 오후 2:17:362012-02-23 오후 2:17:36

| 30 Italiano
Impostazioni2 . Nel menu di scelta rapida, fare clic sullo stato.
3 . Nella finestra di dialogo che appare, fare clic
sulla scheda Supporto.
4 . Nella scheda Supporto, fare clic sul pulsante
Dettagli.
5 . Vengono visualizzate le impostazioni di rete.
• Windows 7
1 . Fare clic sull'icona di rete in basso a destra
nel desktop di Windows.
2 . Nel menu di scelta rapida, fare clic su Centro
connessioni di rete e condivisione.
3 . Nella finestra di dialogo che appare, fare
clic sulla connessione all'area locale o sulla
connessione di rete wireless a seconda della
connessione di rete.
4 . Nella scheda Supporto, fare clic sul pulsante
Dettagli. Vengono visualizzate le impostazioni
di rete.
| NOTA | � Le informazioni possono variare a seconda della versione
di Windows.
Rete wirelessÈ possibile impostare una connessione di rete
wireless in tre modi:
- Wireless automatico
- Wireless manuale
- WPS(PBC)
Quando si configura la connessione di rete
wireless, eventuali dispositivi di rete wireless
attualmente collegati attraverso il prodotto o, se
applicabile, la connessione via cavo attuale del
prodotto, vengono scollegati.
� Wireless (Generale) - AutomaticoDopo aver seguito i passi da 1 a 3 del capitolo
"Come ottenere i valori delle impostazioni di rete"
a pagina 29.
1 . Selezionare Avvio nelle impostazioni di rete,
quindi premere il tasto E. Il prodotto cerca
e visualizza un elenco delle reti disponibili.
Impostazioni di rete
Aggiorna
WPS(PBC)
Precedente
Succ.
Annulla
Selezionare dall'elenco il router wireless in uso.1/10
ELT
JSY
KT_WLAN_C361
Mirhenge_edu
SO070VOIP
iptime23
2 . Selezionare la rete desiderata, quindi premere
il tasto E.
3 . Selezionare Succ., quindi premere di nuovo il
tasto E.
4 . Nella schermata Security (Sicurezza), inserire
il codice di sicurezza o la passphrase della
rete. Inserire i numeri direttamente utilizzando
i tasti numerici del telecomando. Inserire le
lettere selezionandole con il tasto freccia,
quindi premere il tasto E.
5 . A operazione ultimata, selezionare Succ. sulla
destra della schermata. Il prodotto verifica la
connessione di rete, quindi si collega alla rete.
| NOTA | � Il codice di sicurezza o la passphrase dovrebbero essere
disponibili in una delle schermate di configurazione
utilizzate per impostare il router o il modem.
� Wireless (Generale) - ManualeSe si dispone di un indirizzo IP statico o se la
procedura automatica non funziona, i valori per
le impostazioni di rete devono essere impostati
manualmente.
Dopo aver seguito i passi da 1 a 3 del capitolo
"Come ottenere i valori delle impostazioni di rete"
a pagina 29.
1 . Selezionare Avvio nelle impostazioni di rete,
quindi premere il tasto E. Il prodotto cerca
e visualizza un elenco delle reti disponibili.
2 . Selezionare la rete desiderata o Aggiungi rete, quindi premere il tasto E.
3 . Selezionare Succ., quindi premere di nuovo il
tasto E.
HT-E5200_XU_ITA_0222.indd 30HT-E5200_XU_ITA_0222.indd 30 2012-02-23 오후 2:17:372012-02-23 오후 2:17:37

Italiano 31 |
04Im
postazioni
4 . Se si seleziona Aggiungi rete, inserire il
nome del router wireless a cui collegarsi.
Inserire i numeri direttamente utilizzando i
tasti numerici del telecomando. Inserire le
lettere selezionandole con i tasti ▲▼◄►,
quindi premere il tasto E.
Selezionare Succ., quindi premere di nuovo
il tasto E. Selezionare il tipo di sicurezza,
quindi selezionare Succ., e premere di nuovo
il tasto E.
5 . Nella schermata Sicurezza, inserire il codice
di sicurezza o la passphrase della rete.
Inserire i numeri direttamente utilizzando i
tasti numerici del telecomando. Inserire le
lettere selezionandole con i tasti ▲▼◄►,
quindi premere il tasto E.
6 . A operazione ultimata, selezionare Succ. a destra nella schermata, quindi premere il
tasto E.
7 . Viene visualizzata la schermata Stato rete.Il
prodotto tenta di verificare la connessione di
rete senza riuscirvi.
8 . Selezionare Impost. IP a destra nella
schermata, quindi premere il tasto E.
Viene visualizzata la schermata Impost. IP.
9 . Selezionare il campo Modalità IP, quindi
impostarlo su Manuale.
10 . Utilizzare il tastierino numerico sul
telecomando per inserire i valori relativi alla
rete. Utilizzare i tasti ▲▼◄► sul telecomando
per spostarsi tra i campi di inserimento.
| NOTA | � È possibile ottenere questi valori dal provider Internet. È
anche possibile visualizzare questi valori sulla maggior
parte dei computer Windows. Per le istruzioni, vedere
"Come ottenere i valori delle impostazioni di rete" a
pagina 29.
11 . A operazione ultimata, selezionare OK, quindi
premere il tasto E. Viene visualizzata la
schermata Stato rete. Il prodotto verifica la
connessione di rete, quindi si collega alla rete.
A operazione ultimata, selezionare OK, quindi
premere il tasto E.
� WPS(PBC)
Uno dei modi più semplici per impostare la
connessione di rete wireless è utilizzare la funzione
WPS(PBC). Se il router wireless è dotato di
un tasto WPS(PBC), seguire i passi riportati di
seguito:
1 . Aprire la schermata iniziale.
2 . Premere il tasto BLU (D) sul telecomando.
3 . Premere il tasto WPS(PBC) sul router
entro due minuti. Il prodotto acquisisce
automaticamente tutti i valori delle
impostazioni di rete necessari, quindi si
collega alla rete.
Viene visualizzata la schermata Stato rete.
Il prodotto si collega alla rete dopo aver
verificato la connessione di rete.
Wi-Fi DirectLa funzione Wi-Fi Direct consente di collegare
i dispositivi Wi-Fi Direct al prodotto e tra di loro
attraverso una rete peer-to-peer, senza router
wireless.
1 . Accendere il dispositivo Wi-Fi Direct e
attivarne la funzione Wi-Fi Direct.
2 . Nella schermata iniziale, selezionare
Impostazioni, quindi premere il tasto E.
3 . Selezionare Rete, quindi premere il tasto E.
4 . Selezionare Wi-Fi Direct, quindi premere il
tasto E.
Vengono visualizzati i dispositivi Wi-Fi Direct
che è possibile collegare.
Display
Audio
Network
System
Supporto
Wi-Fi DirectNome dispositivo : [HTS]E5200Selez. il disp. Wi-Fi Direct al quale connettersi.
AndroidXXXXXXX Scollegato
Chiudi
Aggiorna
m Sposta " Conferma ' Ritorna
5 . La connessione Wi-Fi può essere stabilita in
tre modi:
• Attraverso il dispositivo Wi-Fi.
• Attraverso il prodotto utilizzando PBC.
• Attraverso il prodotto utilizzando un PIN.
Di seguito sono riportati i dettagli relativi a
ciascun modo.
HT-E5200_XU_ITA_0222.indd 31HT-E5200_XU_ITA_0222.indd 31 2012-02-23 오후 2:17:382012-02-23 오후 2:17:38

| 32 Italiano
ImpostazioniAttraverso il dispositivo Wi-Fi
1 . Sul dispositivo Wi-Fi, seguire la procedura
di connessione del dispositivo a un altro
dispositivo Wi-Fi Direct. Per le istruzioni,
vedere il manuale utente del dispositivo.
2 . Dopo aver completato la procedura, sulla
schermata del televisore viene visualizzato un
popup che riporta la richiesta di collegamento
di un dispositivo con funzione Wi-Fi Direct.
Selezionare OK, aquindi premere il tasto E
per accettare.
3 . Viene visualizzato il popup di collegamento
in corso, seguito dal popup di dispositivo
collegato. Quando si chiude, il dispositivo
viene visualizzato come collegato nell'elenco
della schermata Wi-Fi Direct.
Attraverso il prodotto utilizzando PBC
1 . Selezionare il dispositivo Wi-Fi Direct da
collegare al prodotto, quindi premere il tasto
E. Viene visualizzato il popup PBC/PIN.
2 . Selezionare PBC, quindi premere il tasto E.
Viene visualizzato il popup PBC.
3 . Premere il tasto PBC sul dispositivo Wi-Fi
Direct entro 2 minuti.
4 . Viene visualizzato il popup di collegamento
in corso, seguito dal popup di dispositivo
collegato. Quando si chiude, il dispositivo
viene visualizzato come collegato nell'elenco
della schermata Wi-Fi Direct.
Attraverso il prodotto utilizzando un PIN
1 . Selezionare il dispositivo Wi-Fi Direct da
collegare al prodotto, quindi premere il tasto
E. Viene visualizzato il popup PBC/PIN.
2 . Selezionare PIN, quindi premere il tasto E.
Viene visualizzato il popup PIN.
3 . Prendere nota del codice PIN nel popup,
quindi inserirlo nel relativo campo del
dispositivo Wi-Fi Direct da collegare.
4 . Viene visualizzato il popup di collegamento
in corso, seguito dal popup di dispositivo
collegato. Quando si chiude, il dispositivo
viene visualizzato come collegato nell'elenco
della schermata Wi-Fi Direct.
| NOTA | � La connessione di rete via cavo o wireless viene
scollegata quando si utilizza la funzione Wi-Fi Direct.
Soft APSoft AP permette di collegare altri dispositivi Wi-
Fi alla rete attraverso il prodotto e di consentirne
l'accesso a Internet.
Richiede la creazione di un codice di sicurezza
da inserire negli altri dispositivi Wi-Fi quando li si
collega alla rete.
1 . Nella schermata iniziale, selezionare
Impostazioni, quindi premere il tasto E.
2 . Selezionare Rete, quindi premere il tasto E.
3 . Selezionare Soft AP, quindi premere il tasto
E.
4 . Selezionare On o Off, quindi premere il tasto
E.
< Impostazione del codice di sicurezza Soft AP >
1 . Nella schermata Soft AP, selezionare Chiave sicur, quindi premere il tasto E. Viene
visualizzata la schermata del codice di
sicurezza.
2 . Nella schermata Codice sicurezza, inserire
un codice di sicurezza. Inserire i numeri
direttamente utilizzando i tasti numerici del
telecomando. Inserire le lettere selezionandole
con i tasti ▲▼◄►, quindi premere il tasto
E.
3 . A operazione ultimata, utilizzare i tasti
▲▼◄► per spostarsi su FATTO al fondo
della schermata, quindi premere il tasto E.
Se si collega un dispositivo Wi-Fi utilizzando la
procedura di connessione del dispositivo, inserire
il codice di sicurezza appena creato nel relativo
campo.
Impostazioni AllShareLa schermata Impostazioni AllShare riporta i
dispositivi AllShare collegati in rete e i relativi
indirizzi IP. Attraverso questa schermata, è
possibile consentire o negare l'accesso di un
dispositivo al prodotto o eliminare il dispositivo
dall'elenco AllShare.
1 . Nella schermata iniziale, selezionare
Impostazioni, quindi premere il tasto E.
2 . Selezionare Rete, quindi premere il tasto E.
HT-E5200_XU_ITA_0222.indd 32HT-E5200_XU_ITA_0222.indd 32 2012-02-23 오후 2:17:462012-02-23 오후 2:17:46

Italiano 33 |
04Im
postazioni
3 . Selezionare Impostazioni AllShare, quindi
premere il tasto E.
4 . Selezionare un dispositivo, quindi premere
il tasto E. Viene visualizzato il popup delle
impostazioni AllShare.
5 . Selezionare Consenti, Nega o Elimina da
Elenco, quindi premere il tasto E.
La schermata Impostazioni AllShare visualizza
solo i dispositivi per i quali è stata stabilita una
connessione di rete. Per ulteriori informazioni
sui dispositivi AllShare collegati in rete, vedere le
pagine 35~36.
Aggiornamento del software
Il menu Aggiornamento software permette di
aggiornare il software del prodotto per ottimizzarne
le prestazioni o aggiungere nuovi servizi.
• Mai spegnere e riaccendere il prodotto manualmente
durante il processo di aggiornamento.
1 . Nel menu principale, selezionare
Impostazioni, quindi premere il tasto E.
2 . Selezionare Supporto, quindi premere il tasto
E.
3 . Selezionare Aggiornamento software,
quindi premere il tasto E.
4 . Selezionare uno dei seguenti metodi :
• In linea• Tramite USB• Tramite disco• Con file scaric• Aggiornamento mod Standby
5 . Premere il tasto E.
Di seguito sono riportate le informazioni
relative a ciascun metodo.
| NOTA | � L'aggiornamento è completo quando il prodotto si spegne
e riaccende da solo.
� Samsung Electronics non si assume alcuna responsabilità
legale in caso di malfunzionamento del prodotto dovuto
all'instabilità della connessione Internet o alla negligenza del
cliente durante l'aggiornamento del software.
� Per annullare l'aggiornamento mentre si sta scaricando
l'aggiornamento del software, premere il tasto E.
In lineaPer utilizzare la funzione In linea, il prodotto deve
essere collegato a Internet.
1 . Selezionare In linea, quindi premere il tasto
E. Viene visualizzato il messaggio di
connessione al server in corso.
2 . Se è disponibile un aggiornamento per il
download, viene visualizzato il popup di
download con una barra di avanzamento e il
download viene avviato.
3 . Al termine del download, viene visualizzata
la finestra Richiesta aggiornamento, con tre
possibilità di scelta: Aggiorna ora, Aggiorna più tardi, o Non aggiornare.
4 . Se si seleziona Aggiorna ora, il prodotto
aggiorna il software, quindi si spegne e
riaccende da solo.
5 . Se non si seleziona alcuna opzione entro un
minuto o se si seleziona Aggiorna più tardi, il prodotto memorizza il nuovo aggiornamento
software. È possibile aggiornare il software
in seguito, utilizzando la funzione Con file scaric.
6 . Se si seleziona Non aggiornare, il prodotto
annulla l'aggiornamento.
Tramite USB
1 . Accedere al sito www.samsung.com.
2 . Fare clic su SUPPORT in alto a destra nella
pagina.
3 . Inserire il codice del modello del prodotto
nel campo di ricerca, quindi fare clic su Find Product.
4 . Fare clic su Get downloads al centro della
pagina sotto l'intestazione Download.
5 . Fare clic su Firmware al centro della pagina.
6 . Fare clic sull'icona dello ZIP nella colonna File
a destra nella pagina.
7 . Fare clic su OK nel popup visualizzato per
scaricare e salvare il file del firmware sul PC.
8 . Decomprimere il file zip sul computer. Deve
comparire una sola cartella con lo stesso
nome del file zip.
9 . Copiare la cartella su un'unità flash USB.
10 . Assicurarsi che non vi siano dischi nel
prodotto, quindi inserire l'unità flash USB
nella porta USB del prodotto.
HT-E5200_XU_ITA_0222.indd 33HT-E5200_XU_ITA_0222.indd 33 2012-02-23 오후 2:17:472012-02-23 오후 2:17:47

| 34 Italiano
Impostazioni11 . Nel menu del prodotto, selezionare
Impostazioni > Supporto > Aggiornamento software.
12 . Selezionare Tramite USB.
| NOTA | � Quando si aggiorna il software attraverso la porta USB, non
deve essere inserito nessun disco nel prodotto.
� Al termine dell'aggiornamento del software, verificare i
dettagli del software nel menu Aggiornamento software.
� Non spegnere il prodotto durante l'aggiornamento
del software. Il prodotto potrebbe non funzionare
correttamente.
� Gli aggiornamenti software attraverso la porta USB devono
essere eseguiti esclusivamente con una chiavetta USB.
Tramite disco
1 . Accedere al sito www.samsung.com.
2 . Fare clic su SUPPORT in alto a destra nella
pagina.
3 . Inserire il codice del modello del prodotto
nel campo di ricerca, quindi fare clic su Find Product.
4 . Fare clic su Get downloads al centro della
pagina sotto l'intestazione Download.
5 . Fare clic su Firmware al centro della pagina.
6 . Fare clic sull'icona dello ZIP nella colonna File
a destra nella pagina.
7 . Fare clic su OK nel popup visualizzato per
scaricare e salvare il file del firmware sul PC.
8 . Decomprimere il file zip sul computer. Deve
comparire un solo file .RUF.
9 . Salvare il file RUF su un disco. Si consiglia di
utilizzare un CD-R o un DVD-R.
10 . Finalizzare il disco prima di rimuoverlo dal
computer.
11 . Inserire il disco nel prodotto.
12 . Nel menu del prodotto, selezionare
Impostazioni > Supporto > Aggiornamento software.
13 . Selezionare Tramite disco.
| NOTA | � Al termine dell'aggiornamento del sistema, verificare i
dettagli del software nel menu Aggiornamento software.
� Non spegnere il prodotto durante l'aggiornamento
del software. Il prodotto potrebbe non funzionare
correttamente.
Con file scaricL'opzione Con file scaric permette di eseguire
l'aggiornamento utilizzando un file scaricato in
precedenza dal prodotto, ma che si è deciso di
non installare immediatamente.
1 . Se l'aggiornamento del software è stato
scaricato, a destra di Con file scaric viene
visualizzato il numero della versione del
software.
2 . Selezionare Con file scaric, quindi premere il
tasto E.
3 . Il prodotto visualizza un messaggio
che richiede se si desidera eseguire
l'aggiornamento. Selezionare Sì. Il prodotto
avvia l'aggiornamento.
4 . Al termine dell'aggiornamento, il prodotto si
spegne e riaccende da solo.
| NOTA | � Al termine dell'aggiornamento del sistema, verificare i
dettagli del software nel menu Aggiornamento software.
� Non spegnere il prodotto durante l'aggiornamento
del software. Il prodotto potrebbe non funzionare
correttamente.
Aggiornamento mod StandbyÈ possibile impostare la funzione Aggiornamento mod
Standby in modo che il prodotto scarichi il nuovo
aggiornamento software quando si trova in standby.
In standby il prodotto è spento, ma la connessione
a Internet è attiva. Questo consente al prodotto di
scaricare automaticamente gli aggiornamenti software
quando non è in uso.
1 . Premere i tasti ▲▼ per selezionare
Aggiornamento mod Standby, quindi
premere il tasto E.
2 . Selezionare On o Off.Se si seleziona On, il prodotto scarica
automaticamente i nuovi aggiornamenti
software quando si trova in standby ed
è spento. Se viene scaricato un nuovo
aggiornamento software, alla riaccensione
il prodotto chiederà se si desidera o meno
installare l'aggiornamento.
| NOTA | � Per utilizzare la funzione Aggiornamento mod Standby, il
prodotto deve essere collegato a Internet.
� Se questa funzione non viene visualizzata, è possibile
aggiornare il software alla versione più recente per
utilizzarla.
HT-E5200_XU_ITA_0222.indd 34HT-E5200_XU_ITA_0222.indd 34 2012-02-23 오후 2:17:472012-02-23 오후 2:17:47

Italiano 35 |
05Riproduzione M
ultimediale
Il prodotto Blu-ray permette di riprodurre il
contenuto di dischi, supporti USB e PC, telefoni
cellulari compatibili con DLNA o NAS utilizzando
la funzione AllShare Play. Per ulteriori informazioni
sulla funzione AllShare Play, vedere a pagina 38.
La schermata AllShare Play
Per accedere alla schermata AllShare Play,
selezionare l'icona AllShare Play nella schermata
principale, quindi premere il tasto E.
Utilizzo della schermata AllShare Play
El. pers.
Video
Foto
Musica
a Login ' Ritorna
Ultime riproduz.
Novità Aggiorn. di rec. 09.Gen.2012
Elenco Nessuna playlist creata.
Creare playlist per accedere ai conten. in modo facile e rapido.
Qui verranno visualiz. i file riprod. di recente.
Visualiz altro
SAM_0001 SAM_0002 SAM_0003 SAM_0004 SAM_0005
AllShare Play / El. pers. /
A sinistra nella schermata AllShare Play vengono
visualizzati la sezione El. pers. e i diversi tipi di
contenuto (Video, Foto e Musica). A destra, per
impostazione predefinita, viene visualizzato il
contenuto della sezione El. pers.: un elenco degli
elementi riprodotti o visualizzati di recente, un
elenco degli ultimi elementi inseriti e la playlist
più recente. Se non è mai stato riprodotto o
visualizzato alcun elemento o se non è mai stata
creata una playlist, questa sezione è vuota.
� Riproduzione degli elementi in El. pers.
Per riprodurre gli elementi visualizzati in El. pers., il
supporto che contiene i dati deve essere collegato
o inserito nel prodotto. Ad esempio, se le foto
visualizzate di recente in El. pers. sono contenute
in un disco DVD, il disco deve essere inserito nel
prodotto per poterle visualizzare.
Per riprodurre o visualizzare gli elementi in El.
pers., eseguire una delle seguenti operazioni:
• Utilizzare i tasti ◄► per selezionare un elemento
da visualizzare o riprodurre, quindi premere il
tasto E. Per visualizzare o riprodurre un altro
elemento, premere il tasto RETURN ('), quindi
ripetere l'operazione riportata nella prima frase.
• Utilizzare i tasti ◄► per selezionare un
elemento, premere il tasto TOOLS per
visualizzare il menu Strumenti, selezionare
Riprod, quindi premere il tasto E. Per
visualizzare o riprodurre un altro elemento,
premere il tasto RETURN ('), quindi ripetere
l'operazione riportata nella prima frase.
� Riproduzione dei contenuti in Video, Foto o Musica
1 . Assicurarsi che il supporto che contiene i dati
da riprodurre o visualizzare sia collegato o
inserito nel prodotto.
2 . Utilizzare i tasti ▲▼ per selezionare Video,
Foto, o Musica, quindi premere il tasto E.
A destra viene visualizzato il primo supporto
selezionato.
3 . Utilizzare i tasti ▲▼ per selezionare il
supporto che contiene i dati da riprodurre,
quindi premere il tasto E.
| NOTA | � I supporti visualizzati possono variare in base al tipo di
contenuto.
4 . Per controllare la riproduzione degli elementi
in Video, Foto o Musica, vedere:
• Controllo della riproduzione video a pagina 40.
• Controllo della riproduzione musicale a pagina
42.
• Riproduzione di contenuti fotografici e
Utilizzo del menu Strumenti quando un file è
selezionato alle pagine 45~47.
| NOTA | � A seconda della modalità e del momento in cui il supporto
viene collegato al prodotto e al tipo di contenuto, il
prodotto può visualizzare una serie diversa di schermate
per avviare la riproduzione. Per conoscere i diversi metodi
di riproduzione, vedere:
• Riproduzione di file su un dispositivo di memorizzazione
USB o su iPod/iPhone a pagina 36.
• Riproduzione di DVD commerciali a pagina 37.
• Riproduzione di CD commerciali a pagina 37.
• Riproduzione di un disco con contenuti registrati
dall'utente a pagina 38.
Riproduzione Multimediale
HT-E5200_XU_ITA_0222.indd 35HT-E5200_XU_ITA_0222.indd 35 2012-02-23 오후 2:17:492012-02-23 오후 2:17:49

| 36 Italiano
Riproduzione MultimedialeRiproduzione di file su un dispositivo di
memorizzazione USB o su iPod/iPhone
È possibile riprodurre i file multimediali memorizzati
su un dispositivo USB collegato.
1 . Quando il prodotto è spento collegare un
dispositivo di memorizzazione USB o un
iPod/iPhone.
2 . Accendere il prodotto. Quando viene
visualizzata la schermata principale,
selezionare AllShare Play > Video, Foto
o Musica > Dispositivo connesso, quindi
premere il tasto E.
Smart Hub Funzione Impostazioni
� Rimoz. sicura USB d WPS(PBC)
Consente di riprodurre video, foto o musica da dischi o dispositivi connessi.
AllShare Play
OPPURE1-1. Con prodotto acceso, collegare un dispositivo
di memorizzazione USB o un iPod/iPhone.
2-1. Quando viene visualizzata la schermata di
seguito, utilizzare i tasti ▲▼ per selezionare il
tipo di contenuto da visualizzare o riprodurre,
quindi premere il tasto E.
Smart Hub Function Impostazioni
� Rimoz. sicura USB d WPS(PBC)
Consente di riprodurre video, foto o musica da dischi o dispositivi connessi.
AllShare Play
Smart Hub Function Impostazioni
� Rimoz. sicura USB d WPS(PBC)
Consente di riprodurre video, foto o musica da dischi o dispositivi AllShare Play
b Function
i riprodurre video, foto o musica da dischconnessi.
AllShare Play
b Function I
idAllShare Play
Nuovo dispositivo collegatoUSB DISK
" Conferma ' Ritorna
Video
Foto
Musica
| NOTA | � Anche se il prodotto visualizza tutte le cartelle disponibili,
vengono visualizzati solo i file corrispondenti al tipo di
contenuto selezionato al passo 2 o 2-1. Se, ad esempio,
si è selezionato Musica, vengono visualizzati solo i file
musicali. È possibile modificare la selezione utilizzando
AllShare Play.
3 . Viene visualizzato il tipo di contenuto
selezionato sul dispositivo collegato. A
seconda della disposizione dei contenuti,
vengono visualizzati cartelle, singoli file o
entrambi.
4 . Selezionare i contenuti desiderati utilizzando i
tasti ▲▼◄► sul telecomando. Per aprire una
cartella, selezionarla, quindi premere il tasto
E. Per riprodurre un file, selezionarlo, quindi
premere il tasto E.
5 . Premere il tasto RETURN (') per uscire
dalla cartella o per tornare alla schermata
principale.
| ATTENZIONE | � È possibile riprodurre un video solo utilizzando il dock per
iPod.
| NOTA | � Per evitare di danneggiare la memoria USB, è necessario
rimuovere in sicurezza il dispositivo di memorizzazione
USB utilizzando la funzione “Rimoz. sicura USB”.
Premere il tasto HOME per passare al menu principale,
selezionare il tasto GIALLO (C), quindi premere il tasto
E.
� Il menu Foto non supporta iPad o iPhone.
� Sul televisore viene visualizzata solo la schermata di
riproduzione. Visualizzare le altre schermate iPod sul lettore
iPod.
� Se l'iPod collegato non supporta la riproduzione video,
quando viene selezionato il menu Video appare il messaggio
"Riproduz. di file video non supportata su questo modello di iPod.".
Modelli iPod/iPhone utilizzabili con
questo prodotto
iPod touch 3a/2a/1a generazioneiPod classic / iPod con videoiPod con connettore dockiPod con click wheeliPod nano 5a/4a/3a/2a generazioneiPhone 4S / iPhone 4iPhone 3GS / iPhone 3G / iPhone
HT-E5200_XU_ITA_0222.indd 36HT-E5200_XU_ITA_0222.indd 36 2012-02-23 오후 2:17:552012-02-23 오후 2:17:55

Italiano 37 |
05Riproduzione M
ultimediale
La schermata Funzione
Nella schermata Funzione è possibile selezionare
la sorgente di ingresso video e/o audio da
visualizzare o ascoltare.
| NOTA | � È inoltre possibile cambiare la sorgente premendo il tasto
FUNCTION in alto a destra sul telecomando.
Per accedere alla schermata Funzione, selezionare
l'icona Funzione nella schermata principale, quindi
premere il tasto E.
Opzioni nella schermata FunzionePer selezionare un'opzione, evidenziarla
utilizzando i tasti ▲▼, quindi premere il tasto E.
Ingr. digit.Selezionarla per ascoltare la
sorgente audio digitale collegata
all'ingresso audio digitale.
AUXSelezionarla per ascoltare l'audio
dalla sorgente audio analogica
collegata all'ingresso audio.
Remote iPodPer ascoltare musica o vedere video
dall'iPod collegato al connettore
dell'iPod.
HDMI IN 1Selezionarla per visualizzare il video
dal dispositivo collegato a INGRESSO
HDMI 1.
HDMI IN 2Selezionarla per visualizzare il video
dal dispositivo collegato a INGRESSO
HDMI 2.
Tuner Selezionarla per ascoltare la radio
FM.
Bluetooth Selezionarla per ascoltare la musica
dal dispositivo Bluetooth.
Riproduzione di DVD commerciali
1 . Inserire un disco nell'apposito vano con
l'etichetta rivolta verso l'alto e quindi
chiudere il vano del disco. La riproduzione
si avvia automaticamente. Se così non
fosse, premere il tasto 6 sul telecomando
o selezionare l'opzione AllShare Play nella
schermata principale, quindi premere il tasto
E. Vedere "Riproduzione dei contenuti in
Video, Foto o Musica" a pagina 35.Playin
Riproduzione di CD commerciali
1 . Inserire un disco audio commerciale
preregistrato nell'apposito vano con
l'etichetta rivolta verso l'alto, quindi chiudere il
vano. Viene visualizzata la schermata AllShare
Play - Musica con un elenco delle tracce.
La riproduzione della prima traccia si avvia
automaticamente.
AllShare Play / Musica / CD audio 1 / 17
00:00 / 03:59
b� Sp pagina / Strumenti ' Ritorna
TRACK 001 ٭
► TRACK 001 03:59 TRACK 002 04:34 TRACK 003 04:24 TRACK 004 04:01 TRACK 005 04:26 TRACK 006 05:07 TRACK 007 04:47 TRACK 008 03:59 TRACK 009 04:34 TRACK 010 04:02
TRACK 002 04:34TRACK 002 04 34
► TRACK 001 03:59
2 . Per riprodurre una traccia particolare, utilizzare
i tasti ▲▼ sul telecomando per selezionare la
traccia, quindi premere il tasto E.
� Comandi della schermata Musica
Per mettere in pausa una traccia.
Per riprodurre una traccia.
Per ripetere una o tutte le tracce.
Per riprodurre le tracce in ordine
casuale.
Per visualizzare l'equalizzatore.
Per regolare manualmente
l'equalizzatore. (Solo se il modo
equalizzatore è attivato)
| NOTA | � I comandi della schermata Music (Musica) sono accessibili
solo quando viene riprodotta una traccia.
� I comandi non vengono visualizzati tutti
contemporaneamente.
� Per ulteriori informazioni sulla riproduzione musicale, vedere
"Controllo della riproduzione musicale" a pagina 42.
HT-E5200_XU_ITA_0222.indd 37HT-E5200_XU_ITA_0222.indd 37 2012-02-23 오후 2:18:042012-02-23 오후 2:18:04

| 38 Italiano
Riproduzione MultimedialeRiproduzione di un disco con
contenuti registrati dall'utente
È possibile riprodurre i file multimediali registrati su
dischi DVD o CD.
1 . Inserire un disco registrato dall'utente
nell'apposito vano con l'etichetta rivolta
verso l'alto, quindi chiudere il vano. Viene
visualizzato il popup di dispositivo collegato.
2 . Utilizzare i tasti ▲▼ per selezionare il tipo di
contenuto da visualizzare o riprodurre (Video,
Foto o Musica), quindi premere il tasto E.
| NOTA | � Anche se il prodotto visualizza le cartelle per tutti i tipi di
contenuto, vengono visualizzati solo i file corrispondenti al
tipo di contenuto selezionato al passo 2. Se, ad esempio,
si è selezionato Musica, vengono visualizzati solo i file
musicali. È possibile modificare la selezione utilizzando
AllShare Play.
3 . Utilizzare i tasti ▲▼◄► per selezionare la
cartella con il tipo di contenuto selezionato al
passo 2, quindi premere il tasto E.
4 . Se si è selezionato Musica, viene visualizzata
la schermata AllShare Play - Musica con i file
musicali sul disco. Utilizzare i tasti ▲▼ per
selezionare il file da riprodurre, quindi premere il
tasto E.
5 . Se si è selezionato Foto, viene visualizzata la
schermata AllShare Play - Foto con le foto sul
disco. Utilizzare i tasti ▲▼◄► per selezionare la
foto da visualizzare, quindi premere il tasto E.
6 . Se si è selezionato Video, viene visualizzata
la schermata AllShare Play - Video con i file
video sul disco. Utilizzare i tasti ▲▼◄► per
selezionare il video da visualizzare, quindi
premere il tasto E.
| NOTA | � Per le cartelle Music (Musica) e Videos (Video), è anche
possibile premere il tasto TOOLS sul telecomando, quindi
selezionare Play Folder (Riproduci cartella) per riprodurre
o visualizzare automaticamente tutti i file nella cartella.
Selezionare la cartella prima di premere il tasto TOOLS.
� Per ulteriori informazioni sulla riproduzione musicale,
vedere Controllo della riproduzione musicale a pagina 42.
� Per ulteriori informazioni sulla riproduzione di contenuti
fotografici, vedere Riproduzione di contenuti fotografici e
Utilizzo del menu Strumenti quando un file è selezionato
alle pagine 45~47.
� Per ulteriori informazioni sulla riproduzione di contenuti
video, vedere Controllo della riproduzione video a pagina
40.
Utilizzo della funzione di rete
AllShare
AllShare consente di riprodurre sul prodotto
contenuti video, fotografici o musicali memorizzati
sul PC o sul dispositivo compatibile con DLNA
utilizzando una connessione di rete wireless.
Come scaricare il software AllSharePer utilizzare AllShare con il PC o con il dispositivo
DLNA, è necessario installare il software AllShare
sul PC. Per scaricare il software per PC e ottenere
istruzioni dettagliate sull'uso di AllShare, visitare il
sito Web Samsung.com.
1 . Accedere al sito www.samsung.com.
2 . Fare clic su Support in alto nella pagina.
3 . Nella pagina Assistenza, inserire il codice del
modello del prodotto nel relativo campo.
4 . Nella pagina visualizzata, fare clic sulla
scheda Download e selezionare Accedi a
Centro di download globale per altre lingue.
Viene visualizzata la pagina Centro di
download globale.
5 . Nella pagina Centro di download globale, fare
clic sulla scheda Software.
6 . Nella scheda Software, fare clic sull'icona del
file a destra della riga AllShare.
7 . Nel popup visualizzato, fare clic su Salva file.
8 . Trovare il file di installazione di AllShare sul
disco e farvi doppio clic sopra.
9 . Nel popup visualizzato, fare clic su Esegui,
quindi seguire le istruzioni sulla schermata.
Scaricare il manuale di installazione/istruzioni di
AllShare sempre dalla scheda Software facendo
clic sul simbolo del file PDF corrispondente nella
colonna File a destra. Il file, in formato PDF, viene
scaricato e aperto. È possibile visualizzare e/o
salvare il file.
HT-E5200_XU_ITA_0222.indd 38HT-E5200_XU_ITA_0222.indd 38 2012-02-23 오후 2:18:112012-02-23 오후 2:18:11

Italiano 39 |
05Riproduzione M
ultimediale
Riproduzione dei contenuti memorizzati sul PC o sul dispositivo DLNA sul prodotto
Conexión de AllShare
PCProducto
Reproducir archivos del PC
5V 500mA
1 . Collegare il prodotto, il PC e/o il telefono
cellulare compatibile con DLNA alla stessa
rete wireless.
2 . Seguire le istruzioni riportate nel manuale di
installazione/istruzioni del software AllShare
per impostare i dispositivi e i file da riprodurre
o visualizzare.
3 . Selezionare AllShare Play nella schermata
iniziale del prodotto, quindi premere il tasto
E. Viene visualizzata la schermata AllShare Play.
4 . Selezionare il PC o il dispositivo compatibile
con DLNA collegato, quindi premere il tasto
E. Viene visualizzata una schermata con i
file disponibili.
5 . Selezionare il file da riprodurre o visualizzare,
quindi premere il tasto E.
Controllo della riproduzione dei contenuti memorizzati sul PC tramite smartphone
Conexión de AllShare
Control de archivos del PC en el producto
PC
Smart Phone
Producto
Reproducir archivos del PC
5V 500mA
(Disponibile solo sui telefoni Samsung che
supportano la funzione AllShare).
1 . Collegare il prodotto, il PC e il telefono
cellulare compatibile con DLNA alla stessa
rete wireless.
2 . Seguire le istruzioni riportate nel manuale di
installazione/istruzioni del software AllShare
per impostare i dispositivi e i file da riprodurre
o visualizzare.
3 . Sul computer, verificare che il telefono sia
collegato utilizzando il software AllShare.
4 . Sul telefono, selezionare il file da visualizzare
o riprodurre, quindi selezionare il prodotto
Blu-ray come dispositivo di riproduzione.
5 . Sul telefono, avviare la riproduzione.
HT-E5200_XU_ITA_0222.indd 39HT-E5200_XU_ITA_0222.indd 39 2012-02-23 오후 2:18:112012-02-23 오후 2:18:11

| 40 Italiano
Riproduzione Multimediale
Ripetizione della riproduzione
Ripetizione di un titolo o di un capitolo
1 . Durante la riproduzione, premere il
tasto REPEAT sul telecomando.
2 . Premere i tasti ▲▼ per selezionare
Capitolo, Tutto o Titolo, quindi
premere il tasto E.
| NOTA |
� La schermata potrebbe non visualizzare
subito Capitolo o Titolo. Continuare a premere
i tasti ▲▼ finché la voce selezionata non
viene visualizzata nel campo blu.
3 . Per tornare alla riproduzione normale,
premere di nuovo il tasto REPEAT
premere i tasti ▲▼ per selezionare
Off, quindi premere il tasto E.
Ripetizione di una sezione
1 . Durante la riproduzione, premere il tasto REPEAT sul telecomando.
2 . Premere i tasti ▲▼ per selezionare Ripeti A-B.
| NOTA |
� La schermata potrebbe non visualizzare subito Ripeti A-B. Continuare a premere i tasti ▲▼ finché Ripeti A-B non viene visualizzato nel campo blu.
3 . Premere il tasto E nel punto in cui si desidera venga avviata la ripetizione della riproduzione (A).
4 . Premere il tasto E nel punto in cui si desidera venga interrotta la ripetizione della riproduzione (B).
5 . Per tornare alla riproduzione normale, premere di nuovo il tasto REPEAT.
6 . Premere il tasto E.
| NOTA |
� Il punto (B) deve essere impostato almeno a
5 secondi di riproduzione dopo il punto (A).
Utilizzo del menu del disco, dei titoli e di scelta rapida e dell'elenco dei titoli
DISC MENU Durante la riproduzione, premere questo
tasto per visualizzare il menu del disco.
TITLE MENU
Durante la riproduzione, premere questo
tasto per visualizzare il menu dei titoli.
• Se il disco contiene una playlist,
premere il tasto VERDE (B) per passare
alla playlist.
POPUP MENU Durante la riproduzione, premere questo
tasto per visualizzare il menu di scelta rapida.
DISC MENU o TITLE MENU
Durante la riproduzione, premere questo
tasto per visualizzare l'elenco dei titoli.
Tasti relativi alla riproduzioneIl prodotto non riproduce l'audio nel modo
ricerca, riproduzione rallentata o fotogramma per
fotogramma.
6 Avvia la riproduzione.
5 Arresta la riproduzione.
7 Mette in pausa la riproduzione.
Riproduzione veloce
Durante la riproduzione, premere il tasto
3 o �.
Ogni volta che si preme il tasto 3 o �,
la velocità di riproduzione cambia.
Riproduzione rallentata
Nel modo pausa, premere il tasto �.
Ogni volta che si preme il tasto �, la
velocità di riproduzione cambia.
Riproduzione fotogramma per fotogramma
Nel modo pausa, premere il tasto 7.
Ogni volta che si preme il tasto 7, viene
visualizzato un nuovo fotogramma.
Riproduzione a salti
Durante la riproduzione, premere il tasto
1 o 2.
Ogni volta che si preme il tasto 1 o
2, il disco passa al capitolo o al file
precedente o successivo.
Controllo della riproduzione video
È possibile controllare la riproduzione dei file video memorizzati su dischi Blu-ray, DVD e CD e su dispositivi di
memorizzazione USB. A seconda del disco, alcune funzioni descritte in questo manuale potrebbero non essere disponibili.
Tasti del telecomando utilizzati per la riproduzione videoDISC MENU TITLE MENU
MUTE
0 POPUP
FULL SCREEN REPEATHOME
HT-E5200_XU_ITA_0222.indd 40HT-E5200_XU_ITA_0222.indd 40 2012-02-23 오후 2:18:152012-02-23 오후 2:18:15

Italiano 41 |
05Riproduzione M
ultimediale
Utilizzo del menu StrumentiDurante la riproduzione, premere il tasto TOOLS.
Ricerca titoloRicerca durata
Selezionarlo per passare al titolo
desiderato (se il disco ha più di un titolo),
alla scena desiderata o, utilizzando
Ricerca durata, a un punto specifico di
un film o video. Ricerca durata permette
di definire il punto specifico inserendo il
tempo in formato 00:00:00 (ore, minuti,
secondi) con il telecomando.
Modalità Ripeti
Selezionarlo per ripetere un titolo, un
capitolo (solo dischi BD/DVD) o una
sezione contrassegnata specifici.Funziona
allo stesso modo del tasto REPEAT.
Vedere a pagina 40.
Full Screen
Selezionarlo per impostare il formato
schermo intero desiderato. È possibile
selezionare Originale, Modalità1
(più grande) o Modalità2 (grandezza
massima).
Modalità immagine
Selezionarlo per impostare il modo
immagine.
- Dinamica : Selezionare questa
impostazione per aumentare la nitidezza.
- Standard : Selezionare questa
impostazione per la maggior parte delle
applicazioni.
- Film : Questa è l'impostazione migliore
per guardare i film.
- Utente : Consente di regolare
rispettivamente le funzioni di nitidezza e
riduzione dei disturbi.
| NOTA |
� Se si seleziona Utente, viene visualizzata
la schermata Impostazioni utente.
Selezionare un'opzione, premere E,
utilizzare i tasti ◄► per regolarla,
quindi premere E. Premere il tasto
RETURN (') per tornare al menu
TOOLS.
� Quando si utilizza la funzione BD Wise
(BD Wise), questo menu non viene
visualizzato.
Modalità equaliz. Selezionarlo per utilizzare l'equalizzatore.
Impost. equalizzatore
Selezionarlo per impostare l'equalizzatore.
| NOTA |
� Viene visualizzato solo se il modo
equalizzatore è attivato.
Menu visualizzati solo durante lariproduzione di dischi BD/DVD
Riproduci dall'inizio
Selezionarlo per riprodurre il film
dall'inizio.
Ricerca capitoli Selezionarlo per passare al capitolo
che si desidera guardare.
Audio
Selezionarlo per impostare la lingua
desiderata per l'audio.
- Questa funzione può essere attivata
anche premendo il tasto AUDIO del
telecomando.
Sottotitoli
Selezionarlo per impostare la lingua
desiderata per i sottotitoli.
- Questa funzione può essere attivata
anche premendo il tasto SUBTITLE
del telecomando.
Angolo
Per visualizzare la scena da un'altra
angolazione. L'opzione Angolo
visualizza il numero di angolazioni
disponibili per la visualizzazione (1/1,
1/2, 1/3, ecc.).
Video BONUSVIEW / Audio BONUSVIEW
Selezionarlo per impostare l'opzione
bonusview desiderata.
Menu visualizzati solo durante lariproduzione di un file
Vai a Elenco video
Per passare alla schermata con
l'elenco dei video.
Cerca scena Per cercare una scena all'interno del
file video.
Informazioni Per controllare le informazioni del file
video.
| NOTA |
� Il menu Strumenti può variare in base al disco o al
dispositivo di memorizzazione. È possibile che non
vengano visualizzate tutte le opzioni.
HT-E5200_XU_ITA_0222.indd 41HT-E5200_XU_ITA_0222.indd 41 2012-02-23 오후 2:18:182012-02-23 오후 2:18:18

| 42 Italiano
Riproduzione MultimedialeControllo della riproduzione musicale
È possibile controllare la riproduzione dei contenuti
musicali memorizzati su DVD, CD o dispositivi di
memorizzazione USB.
Tasti del telecomando utilizzati per la riproduzione musicale
DISC MENU TITLE MENU
MUTE
1 2 3
4 5 6
7 8
0
9POPUP
RDS DISPLAY
PTY- PTY SEARCH PTY+
TA
6
1
3
2
4
5
1
Riproduzione veloce (solo CD audio (CD-DA))Durante la riproduzione, premere il tasto 3 o �.
Ogni volta che si preme il tasto 3 o �, la velocità
di riproduzione cambia.
2 Tasto 7 : per mettere in pausa una traccia.
3Tasto 6 : per riprodurre la traccia selezionata al
momento.
4 Tasto 5 : per arrestare una traccia.
5Skip : durante la riproduzione, premere il tasto
1 o 2 per passare alla traccia precedente o
successiva nell'elenco.
6
Tasti NUMERICI : durante la riproduzione di una
playlist, premere il numero corrispondente alla
traccia desiderata. Viene riprodotta la traccia
selezionata.
Ripetizione delle tracce di un CD audioÈ possibile impostare il prodotto in modo che
ripeta le tracce di un CD audio (CD-DA/MP3).
1 . Durante la riproduzione, utilizzare il tasto
► per selezionare nell'angolo in basso
a destra della schermata, quindi premere il
tasto E.
2 . Utilizzare i tasti ▲▼ per selezionare il modo
di ripetizione desiderato - Off, 1 canzone, o
Tutto - quindi premere il tasto E.
Riproduzione casuale delle tracce di un CD audioÈ possibile impostare il prodotto in modo che
riproduca casualmente le tracce di un CD audio
(CD-DA/MP3).
1 . Durante la riproduzione, utilizzare il tasto
► per selezionare nell'angolo in basso
a destra della schermata, quindi premere il
tasto E.
2 . Utilizzare i tasti ▲▼ per impostare Mod. casuale On o Off, quindi premere il tasto E.
Creazione di una playlist
AllShare Play / Musica / CD audio 1 / 17
00:00 / 03:59
b� Sp pagina / Strumenti ' Ritorna
TRACK 001 ٭
► TRACK 001 03:59 TRACK 002 04:34 TRACK 003 04:24 TRACK 004 04:01 TRACK 005 04:26 TRACK 006 05:07 TRACK 007 04:47 TRACK 008 03:59 TRACK 009 04:34 TRACK 010 04:02
TRACK 002 04:34TRACK 002 04 34
► TRACK 001 03:59
1 . Con la schermata di riproduzione visualizzata,
premere il tasto TOOLS. Viene visualizzato il
menu Strumenti.
2 . Utilizzare i tasti ▲▼ per selezionare Rip. selezione, quindi premere il tasto E. Viene
visualizzata la schermata Selezione ripr..
3 . Utilizzare i tasti ▲▼ per selezionare una traccia,
quindi premere il tasto E. A sinistra della
traccia viene visualizzato un segno di spunta.
4 . Ripetere il passo 3 per selezionare altre tracce.
5 . Per rimuovere una traccia dall'elenco, spostarsi
sulla traccia, quindi premere di nuovo il tasto
E. Il segno di spunta sulla traccia viene
rimosso.
6 . A operazione ultimata, premere il tasto ►
per selezionare Riprod, quindi premere il
tasto E. Viene visualizzata di nuovo la
schermata di riproduzione musicale con solo
le tracce selezionate. La riproduzione si avvia
automaticamente.
| NOTA |
� Sui CD audio (CD-DA), è possibile creare una playlist
contenente fino a 99 tracce.
� Se è stata creata una playlist, la voce Selezione ripr. viene
sostituita da Mod. playlist nel menu Strumenti.
HT-E5200_XU_ITA_0222.indd 42HT-E5200_XU_ITA_0222.indd 42 2012-02-23 오후 2:18:192012-02-23 오후 2:18:19

Italiano 43 |
05Riproduzione M
ultimediale
� Nella schermata Selezione ripr., è anche possibile
selezionare Seleziona tutto, Deseleziona tutto, e
Annulla.
• Utilizzare Seleziona tutto per selezionare tutte le
tracce. In questo modo viene annullata la selezione delle
singole tracce. Quando si preme il tasto RETURN (')
sul telecomando o si seleziona RIPROD. e si preme il
tasto E, sulla schermata di riproduzione musicale
vengono visualizzate tutte le tracce e il prodotto avvia la
riproduzione di tutte le tracce partendo dalla numero 001.
• Utilizzare Deseleziona tutto per deselezionare tutte
le tracce selezionate in una volta sola. Selezionare le
singole tracce o utilizzare Seleziona tutto per selezionare
tutte le tracce, quindi premere il tasto RETURN (')
sul telecomando o selezionare RIPROD. e premere il
tasto E. Se non si utilizza Seleziona tutto o non si
selezionano le singole tracce, la playlist non cambia.
• Annulla annulla eventuali modifiche effettuate nella
schermata Selezione ripr.. Quando si torna alla
schermata di riproduzione, la playlist rimane immutata.
RippingÈ possibile trasferire la musica da un CD musicale
a un dispositivo USB inserito nella porta USB.
1 . Inserire un dispositivo USB nel connettore
USB sul pannello anteriore del prodotto,
quindi premere il tasto RETURN (') sul
telecomando.
2 . Inserire il disco del quale si desidera effettuare
un'estrazione nel prodotto e chiudere il vano
del disco.
3 . Con la schermata di riproduzione visualizzata,
premere il tasto TOOLS. Viene visualizzato il
menu Strumenti.
4 . Utilizzare i tasti ▲▼ per selezionare Rip,
quindi premere il tasto E. Viene visualizzata
la schermata Rip.
5 . Utilizzare i tasti ▲▼ per selezionare una
traccia, quindi premere il tasto E. A sinistra
della traccia viene visualizzato un segno di
spunta.
6 . Ripetere il passo 5 per selezionare altre
tracce.
7 . Per rimuovere una traccia dall'elenco,
spostarsi sulla traccia, quindi premere di
nuovo il tasto E. Il segno di spunta sulla
traccia viene rimosso.
8 . A operazione ultimata, premere il tasto ► per
selezionare Rip, quindi premere il tasto E.
Viene visualizzato il popup di ripping.
9 . Premere il tasto E per avviare il processo di
ripping. Viene visualizzato il popup della barra
di completamento del ripping.
10 . Al termine del ripping, viene visualizzato il
messaggio “Ripping completato”. Premere
il tasto E.
11 . Premere il tasto RETURN (') per tornare alla
schermata di riproduzione.
| NOTA |
� Al termine del ripping, sul dispositivo USB viene creata
una cartella MP.
Utilizzo del BluetoothÈ possibile utilizzare un dispositivo Bluetooth per
ascoltare musica con audio stereo di alta qualità,
tutto senza fili!
Che cos'è il Bluetooth?Il Bluetooth è una tecnologia che permette di
collegare facilmente tra di loro dispositivi compatibili
con Bluetooth attraverso una connessione wireless
a breve raggio.
• Un dispositivo Bluetooth può dar luogo a disturbi
o malfunzionamenti, a seconda delle condizioni di
utilizzo.
- Quando una parte del corpo è a contatto con il
sistema di ricezione/trasmissione del dispositivo
Bluetooth o del sistema Home Cinema.
- Quando si verificano variazioni elettriche dovute
a interferenze derivanti da riflessioni dei segnali
su pareti, spigoli o tramezzature d'ufficio.
- Quando si verificano interferenze elettriche
derivanti da dispositivi della stessa banda di
frequenza, incluse apparecchiature mediche,
forni a microonde e LAN wireless.
• Collegare il sistema Home Cinema al dispositivo
Bluetooth mantenendo una distanza ravvicinata.
• Maggiore è la distanza tra il sistema Home
Cinema e il dispositivo Bluetooth, peggiore è la
qualità.
Se la distanza supera il raggio d'azione del
Bluetooth, la connessione si interrompe.
• Nelle zone in cui la ricezione è debole, la
connessione Bluetooth potrebbe non funzionare
correttamente.
• Se non vi sono ostacoli, il campo di ricezione
effettivo del sistema Home Cinema può
raggiungere i 10 m in tutte le direzioni. A una
distanza superiore, la connessione viene
automaticamente interrotta. La qualità del suono
si riduce in presenza di ostacoli quali pareti o
porte, anche entro il limite indicato.
• Questo dispositivo wireless può provocare
interferenze elettriche durante il funzionamento.
HT-E5200_XU_ITA_0222.indd 43HT-E5200_XU_ITA_0222.indd 43 2012-02-23 오후 2:18:262012-02-23 오후 2:18:26
| 44 Italiano
Riproduzione MultimedialeCome collegare il sistema Home Cinema a un dispositivo Bluetooth
5V 500mA
Collegamento
Dispositivo Bluetooth
Verificare che il dispositivo Bluetooth supporti la
funzione di cuffie stereo compatibile con Bluetooth.
1 . Premere il tasto FUNCTION sul telecomando
del prodotto per visualizzare il messaggio BT.
• Sul display anteriore del sistema Home
Cinema viene visualizzato il messaggio
WAIT per 2 secondi, quindi viene
visualizzato il messaggio READY .
2 . Selezionare il menu Bluetooth sul dispositivo
Bluetooth da collegare. (Vedere il manuale
utente del dispositivo Bluetooth)
3 . Selezionare il menu delle cuffie stereo sul
dispositivo Bluetooth.
• Viene visualizzato un elenco dei dispositivi
trovati.
4 . Selezionare "SamsungHTS-XXXXXX"
dall'elenco.
• Quando il sistema Home Cinema è
collegato al dispositivo Bluetooth, sul
display anteriore viene visualizzato il nome
del dispositivo Bluetooth collegato al
sistema Home Cinema.
5 . Riprodurre la musica sul dispositivo collegato.
• Attraverso il sistema Home Cinema, è
possibile ascoltare la musica riprodotta sul
dispositivo Bluetooth collegato.
| NOTA |
� Il sistema Home Cinema supporta solo dati SBC di qualità
media (fino a 237 kbps@48 kHz) e non dati SBC di
qualità elevata (328 kbps@44,1 kHz).
� La funzione AVRCP è supportata e si comporta in modo
diverso secondo la specifica del dispositivo collegato.
� Collegarlo solo a un dispositivo Bluetooth che supporta il
profilo A2DP.
� È possibile collegare solo un dispositivo Bluetooth per
volta.
� Il prodotto potrebbe non eseguire correttamente la ricerca
o la connessione nei seguenti casi:
- In presenza di un forte campo elettrico intorno al
sistema Home Theater.
- Se vi sono più dispositivi Bluetooth collegati
contemporaneamente al prodotto.
- Se il dispositivo Bluetooth è spento, non è in posizione o
non funziona correttamente.
- Tenere presente che tutti i dispositivi come forni a
microonde, adattatori LAN wireless, lampadine al
plasma e fornelli a gas utilizzano la stessa gamma di
frequenza del dispositivo Bluetooth e possono causare
interferenze elettriche.
Come scollegare il dispositivo Bluetooth dal sistema Home CinemaÈ possibile scollegare il sistema Home Cinema dal
dispositivo Bluetooth. (Vedere il manuale utente
del dispositivo Bluetooth)
• Il sistema Home Cinema viene scollegato.
• Quando il sistema Home Cinema è scollegato
dal dispositivo Bluetooth, sul display anteriore
del sistema Home Cinema viene visualizzato
DISCONNECTED.
Come scollegare il sistema Home Cinema dal dispositivo BluetoothPremere il tasto ( ) sul pannello anteriore del sistema Home Cinema per passare dal modo BT a
un altro modo o spegnere il sistema Home Cinema.
• Se non viene scollegato in seguito al cambiamento
di modo, il dispositivo Bluetooth collegato resterà
per un certo tempo in attesa di una risposta dal
sistema Home Cinema prima di interrompere la
connessione. (Il tempo di disconnessione può
differire a seconda del dispositivo Bluetooth)
• Il dispositivo attualmente collegato viene
scollegato.
| NOTA |
� Nel modo di connessione Bluetooth, la connessione
Bluetooth si interrompe se la distanza tra il sistema Home
Cinema e il dispositivo Bluetooth supera i 10 m.
Se si riporta la distanza entro il campo di ricezione
effettivo o si riavvia il dispositivo Bluetooth, è necessario
ristabilire la connessione.
� Riportando il dispositivo Bluetooth nel campo di
ricezione effettivo, è possibile riavviarlo per ripristinare il
collegamento con il dispositivo Bluetooth.
HT-E5200_XU_ITA_0222.indd 44HT-E5200_XU_ITA_0222.indd 44 2012-02-23 오후 2:18:272012-02-23 오후 2:18:27

Italiano 45 |
05Riproduzione M
ultimediale
� Nel modo BT, se lo stato del dispositivo rimane
Ready (Pronto) per 5 minuti, viene visualizzato il
salvaschermo. Per collegare il dispositivo BT, uscire
dal modo salvaschermo e collegarlo. Per uscire dal
modo salvaschermo, premere un qualsiasi tasto sul
telecomando (ad es. il tasto del volume, ecc.)
Riproduzione di contenuti fotografici
È possibile riprodurre i contenuti fotografici
memorizzati su DVD, supporti USB, dispositivi
mobili o PC.
Utilizzo del menu StrumentiDurante la riproduzione, premere il tasto TOOLS.
Vai a Elenco foto
Selezionarlo per andare all'elenco delle
foto sull'attuale supporto.
Avvia proiezione diapositive
Selezionarlo per avviare la
presentazione.
Slide Show Speed
Selezionarlo per impostare la velocità
della presentazione.
Velocità slide show
Selezionarlo per impostare gli effetti
speciali della presentazione.
Musica sottof attiv
Selezionarlo per ascoltare la musica
durante la visualizzazione della
presentazione.
Impostazione musica di sottofondo
Selezionarlo per impostare la musica di
sottofondo.
Modalità immagine
Selezionarlo per impostare l'immagine.
- Dinamica : Selezionare questa
impostazione per aumentare la
nitidezza.
- Standard : Selezionare questa
impostazione per la maggior parte
delle applicazioni.
- Film : Questa è l'impostazione
migliore per guardare i film.
- Utente : Consente di regolare
rispettivamente le funzioni di
nitidezza e riduzione dei disturbi.
| NOTA |
� Quando si utilizza la funzione BD
Wise, questo menu non viene
visualizzato.
ZoomSelezionarlo per ingrandire l'immagine
corrente. (Ingrandisce fino a 4 volte
l'immagine)
RuotaSelezionarlo per ruotare l'immagine.
(L'immagine viene fatta ruotare in
senso orario o antiorario).
Informazioni Mostra le informazioni sull'immagine.
| NOTA |
� Il menu Tools (Strumenti) può variare in base al disco
o al dispositivo di memorizzazione. È possibile che non
vengano visualizzate tutte le opzioni.
� Per abilitare la funzione di musica di sottofondo, il
file della foto deve trovarsi sullo stesso supporto di
memorizzazione del file musicale. Tuttavia, sulla qualità
del suono possono influire il bit rate del file MP3, la
dimensione della foto e il metodo di codifica.
� Non è possibile ingrandire il campo di sottotitoli e PG nel
modo schermo intero.
Utilizzo del menu Strumenti
quando un file è selezionato
Quando un file è selezionato, premere il tasto TOOLS.
Visione
Selezionarlo per accedere alle opzioni
di ordinamento: Artista, Genere,
Mensile, Data ultima, ecc. Le opzioni di
ordinamento visualizzate variano in base
al tipo di memorizzazione e di supporto.
Vista cartellaViene visualizzato sulla schermata della
funzione Visualizza. Selezionarlo per
visualizzare le cartelle sul dispositivo di
memorizzazione.
TitoloViene visualizzato sulla schermata della
funzione Visualizza. Selezionarlo per ordinare
tutti i file foto o video su un dispositivo di
memorizzazione in base al titolo.
Artista
Viene visualizzato sulla schermata
della funzione Visualizza. Selezionarlo
per ordinare e visualizzare tutte le
tracce musicali su un dispositivo di
memorizzazione in base all'artista.
HT-E5200_XU_ITA_0222.indd 45HT-E5200_XU_ITA_0222.indd 45 2012-02-23 오후 2:18:292012-02-23 오후 2:18:29

| 46 Italiano
Riproduzione Multimediale
Album
Viene visualizzato sulla schermata
della funzione Visualizza. Selezionarlo
per ordinare e visualizzare tutte le
tracce musicali su un dispositivo di
memorizzazione in base all'album.
Genere
Viene visualizzato sulla schermata
della funzione Visualizza. Selezionarlo
per ordinare e visualizzare tutte le
tracce musicali su un dispositivo di
memorizzazione in base al genere.
Data ultima
Viene visualizzato sulla schermata della
funzione Visualizza. Selezionarlo per
ordinare e visualizzare tutti i file foto o
video su un dispositivo di memorizzazione
dalla data più vecchia a quella più recente.
Prima data psb
Viene visualizzato sulla schermata
della funzione Visualizza. Selezionarlo
per ordinare e visualizzare tutti i
file foto o video su un dispositivo di
memorizzazione dalla data più recente
a quella più vecchia.
Mensile
Viene visualizzato sulla schermata della
funzione Visualizza. Selezionarlo per
ordinare tutti i file foto o video su un
dispositivo di memorizzazione in base al
mese di creazione.
Rip. selezione
Selezione ripr. consente di selezionare
specifici file musicali, video e foto da
riprodurre. Fondamentalmente funziona
in modo analogo per tutti i supporti.
L'esempio di seguito fa riferimento alle
foto.
1. Nella schermata di visualizzazione
delle miniature, selezionare una foto,
quindi premere il tasto TOOLS sul
telecomando.
2. Nel menu Strumenti, selezionare Rip. selezione, quindi premere il tasto E.
3. Nella schermata di selezione, utilizzare
i tasti ▲▼◄► per selezionare la foto
da visualizzare, quindi premere il tasto
E. A sinistra dell'immagine viene
visualizzato un segno di spunta.
4. Ripetere il passo 3 per ogni foto da
visualizzare.
5. Per deselezionare una foto,
selezionarla, quindi premere il tasto
E.
6. A operazione ultimata, utilizzare i tasti
◄► per selezionare Play (Riprod.),
quindi premere il tasto E. Viene
avviata una presentazione delle foto
selezionate.
7. Per interrompere la presentazione,
premere una volta il tasto E. Per
riavviare la presentazione, premere
di nuovo il tasto E.
8. Per arrestare la presentazione,
premere il tasto RETURN (').
| NOTA |
� Una volta avviata la presentazione,
è possibile controllarla premendo il
tasto TOOLS e visualizzando il menu
Presentazione. Vedere "Utilizzo del
menu Strumenti" a pagina 45.
Invia
Selezionare Invia per caricare i file
selezionati su Picasa, Facebook, Cloud
Storage, NDrive e Family Story.
Per utilizzare Invia, è necessario creare
un account sul sito online, quindi
accedervi utilizzando la funzione Accedi.
1. Utilizzare i tasti ▲▼◄► per
selezionare un file, quindi premere
il tasto E.
2. Ripetere l'operazione per ogni
traccia o file da caricare.
| NOTA |
� È anche possibile spostarsi su
Seleziona tutto a destra, quindi
premere il tasto E per selezionare
tutte le tracce o tutti i file.
3. Selezionare Invia a destra, quindi
premere il tasto E.
4. Utilizzare i tasti ▲▼ per selezionare
il sito online su cui caricare i file o
le tracce, quindi premere il tasto
E.
HT-E5200_XU_ITA_0222.indd 46HT-E5200_XU_ITA_0222.indd 46 2012-02-23 오후 2:18:302012-02-23 오후 2:18:30

Italiano 47 |
05Riproduzione M
ultimediale
Accesso/Discon.
La funzione Accedi / Chiudi sess.
consente di accedere al proprio account
Samsung online.
Agg. a elenco
Selezionarlo per creare una playlist o
aggiungere file o tracce a una playlist.
1. Selezionare Agg. a elenco, quindi
premere il tasto E.
2. Utilizzare i tasti ▲▼◄► per
selezionare una traccia o un file,
quindi premere il tasto E.
3. Ripetere l'operazione per ogni
traccia o file da aggiungere.
4. Selezionare Aggiungi a destra,
quindi premere il tasto E.
5. Nella schermata visualizzata,
eseguire una delle seguenti
operazioni:
• Selezionare la playlist a cui
aggiungere le tracce o i file, quindi
premere il tasto E.
• Selezionare Crea nuova, quindi
premere il tasto E. Nel popup
della tastiera visualizzato, assegnare
un nome alla nuova playlist. Inserire
i numeri utilizzando i tasti numerici
sul telecomando. Inserire le lettere
utilizzando i tasti ▲▼◄► per
spostare il cursore e premendo il
tasto E. Al termine, spostarsi su
FATTO nella parte inferiore della
schermata, quindi premere il tasto
E.
Elimina (Playlist)
A seconda della schermata visualizzata,
selezionare Elimina per cancellare un
file da un supporto cancellabile (come
ad esempio un dispositivo USB) o per
eliminare una playlist.
Mod. playlist
Selezionare Mod. playlist per rimuovere
i file o le tracce da una playlist. Il
dispositivo di memorizzazione che
contiene la playlist deve essere inserito
o collegato al prodotto.
1. Utilizzare i tasti ▲▼◄► per
selezionare un file, quindi premere
il tasto E.
2. Ripetere l'operazione per ogni
traccia o file da rimuovere.
| NOTA |
� È anche possibile spostarsi su Select
All (Seleziona tutto) a destra, quindi
premere il tasto E per selezionare
tutte le tracce o tutti i file.
3. Selezionare Rimuovi a destra,
quindi premere il tasto E.
Riproduci gruppo corrente
Dopo aver effettuato l'ordinamento in
base a Artista, Genere, Album, Titolo,
Data ultima, Data prima o Mensile,
selezionare un gruppo dai risultati
dell'ordinamento (ad esempio, tutte
le foto scattate ad agosto), quindi
selezionare Riproduci gruppo corrente
per riprodurre o visualizzare solo i file di
quel gruppo.
Vai a PlaylistSelezionarlo per andare alla sezione
della playlist nella schermata AllShare
principale.
Codifica
La funzione Codifica (che cambia in
base alla lingua o all'area geografica)
modifica il modo in cui il prodotto
ordina, dispone e presenta file o
tracce, visualizza date, ecc. Selezionare
Codifica per cambiare la codifica in
modo che corrisponda alla propria
lingua o area geografica.
Informazioni Informazioni Visualizza informazioni su
contenuti e file multimediali.
| NOTA |
� Il menu Strumenti può variare in base al disco o al
dispositivo di memorizzazione. È possibile che non
vengano visualizzate tutte le opzioni.
HT-E5200_XU_ITA_0222.indd 47HT-E5200_XU_ITA_0222.indd 47 2012-02-23 오후 2:18:302012-02-23 오후 2:18:30

| 48 Italiano
Riproduzione MultimedialeAscolto della radio
Utilizzo dei tasti del telecomando1 . Premere il tasto FUNCTION per selezionare
FM.
2 . Selezionare la stazione desiderata.
• Sintonizzazione preimpostata 1 : Premere
il tasto 5 per selezionare PRESET quindi
premere il tasto TUNING/CH (,.) per
selezionare la stazione preimpostata.
- Prima di potersi sintonizzare su una
stazione preimpostata, questa deve
essere aggiunta alla memoria del
prodotto.
• Sintonizzazione manuale : Premere il
tasto 5 per selezionare MANUAL quindi
premere il tasto TUNING/CH (,.) per
sintonizzarsi su una frequenza precedente o
successiva.
• Sintonizzazione automatica : Premere il
tasto 5 per selezionare MANUAL quindi
tenere premuto il tasto TUNING/CH (,.)
per ricercare automaticamente la banda.
Impostazione mono/stereoPremere il tasto MO/ST.
• Ogni volta che si preme il tasto, l'audio passa
da STEREO a MONO e viceversa.
• Nelle zone con scarsa ricezione, selezionare
MONO per una trasmissione chiara e priva di
interferenze.
Memorizzazione delle stazioniEsempio: memorizzazione della stazione FM
89.10.
1 . Premere il tasto FUNCTION per selezionare
FM.
2 . Premere il tasto TUNING/CH (,.) per
selezionare <89.10>.
3 . Premere il tasto TUNER MEMORY.
• Il numero lampeggia sul display.
4 . Premere di nuovo il tasto TUNER MEMORY.
• Premere il tasto TUNER MEMORY prima
che il numero scompaia dal display.
• Dopo aver premuto il tasto TUNER MEMORY, il numero scompare dal display
e la stazione viene salvata in memoria.
5 . Per memorizzare un'altra stazione, ripetere i
passi da 2 a 4.
• Per sintonizzarsi su una stazione
preimpostata, premere il tasto TUNING/CH
(,.).
Trasmissione RDS
Utilizzo di RDS (Radio Data System) perricevere le stazioni FML'RDS consente alle stazioni FM di inviare un
segnale aggiuntivo insieme ai normali segnali dei
programmi.
Ad esempio, le stazioni inviano i loro nomi e
informazioni sul tipo di programma che stanno
trasmettendo, ad es. sport, musica, ecc.
Quando la radio si sintonizza su una stazione FM
che offre il servizio RDS, sul display si accende la
spia RDS.
Descrizione della funzione RDS• PTY (Tipo di programma) : Visualizza il tipo di
programma attualmente trasmesso.
• PS NAME (Nome del servizio di programma) :
Indica il nome della stazione ed è composto da
8 caratteri.
• RT (Testo radio) : Decodifica l'eventuale testo
trasmesso da una stazione, composto da un
massimo di 64 caratteri.
• CT (Orologio) : Decodifica l'ora esatta dalla
frequenza FM. Alcuni stazioni potrebbero
non trasmettere le informazioni PTY, RT o CT,
pertanto potrebbero non essere visualizzate in
tutti i casi.
• TA (Annuncio sul traffico) : TA ON/OFF mostra
che l'annuncio sul traffico è in corso.
| NOTA |
� L'RDS potrebbe non funzionare correttamente se la
stazione selezionata non trasmette il segnale RDS
correttamente o se il segnale è debole.
HT-E5200_XU_ITA_0222.indd 48HT-E5200_XU_ITA_0222.indd 48 2012-02-23 오후 2:18:312012-02-23 오후 2:18:31

Italiano 49 |
05Riproduzione M
ultimediale
Per visualizzare i segnali RDSÈ possibile visualizzare sul display i segnali RDS
inviati dalle stazioni.
Premere il tasto RDS DISPLAY durante l'ascolto
di una stazione FM.
• Ogni volta che si preme il tasto, il display mostra
in sequenza le seguenti informazioni:
PS NAME � RT� CT � Frequenza
PS (Servizio di programma)
Durante la ricerca, viene visualizzato
<PS NAME>, quindi vengono
visualizzati i nomi delle stazioni. Viene
visualizzato <NO PS> se non viene
inviato nessun segnale.
RT(Testo radio)
Durante la ricerca, viene visualizzato
<RT>, quindi vengono visualizzati i
messaggi di testo inviati dalla stazione.
Viene visualizzato <NO RT> se non
viene inviato nessun segnale.
Frequenza Frequenza stazione (servizio non RDS)
Caratteri utilizzati sul displayQuando il display mostra i segnali PS o RT,
vengono usati i caratteri seguenti.
• La finestra del display non è in grado di fare
differenza tra maiuscole e minuscole, pertanto
usa sempre le lettere maiuscole.
• La finestra del display non è in grado di
visualizzare i caratteri accentati, <A,> ad
esempio potrebbe indicare le lettere accentate
<A's>, <À, Â, Ä, Á, Å e Ã.>
Indicazione PTY (Tipo programma) e
funzione PTY-SEARCHUno dei vantaggi del servizio RDS è che è
possibile individuare un particolare tipo di
programma nei canali preimpostati specificando i
codici PTY.
Per ricercare un programma usando icodici PTY
� Prima di cominciare• La funzione di ricerca PTY è applicabile soltanto
alle stazioni memorizzate.
• Per interrompere la ricerca in qualsiasi momento
durante il processo, premere il tasto 5 durante
la ricerca.
• È previsto un limite di tempo per eseguire le
operazioni indicate di seguito. Se l'impostazione
viene annullata prima di aver terminato, iniziare
di nuovo dal passo 1.
• Prima di premere i tasti sul telecomando
principale, assicurarsi di aver selezionato la
stazione FM usando il telecomando principale.
221 3
4 5 6
RDS DISPLAY
PTY- PTY SEARCH PTY+
TA
1 . Premere il tasto PTY SEARCH durante
l'ascolto di una stazione FM.
2 . Premere il tasto PTY- o PTY+ finché sullo
schermo viene visualizzato il codice PTY
desiderato.
• Il display mostra i codici PTY descritti a
destra.
3 . Premere di nuovo il tasto PTY SEARCH
mentre il codice PTY selezionato al passo
precedente si trova ancora sul display.
• L'unità centrale ricerca 15 stazioni
memorizzate, si arresta quando trova quella
selezionata, quindi si sintonizza su tale
stazione.
HT-E5200_XU_ITA_0222.indd 49HT-E5200_XU_ITA_0222.indd 49 2012-02-23 오후 2:18:322012-02-23 오후 2:18:32

| 50 Italiano
Riproduzione MultimedialeUtilizzo dei tasti degli effetti
speciali sul telecomando
Funzione EFFETTO AUDIOSOUND
EFFECT
Permette di selezionare un modo per ottimizzare l'audio.
1. Premere il tasto SOUND EFFECT.
2. Premere il tasto ▲▼ per selezionare il modo
desiderato: DSP o Modalità audio.
3. Premere i tasti ◄► per selezionare l'effetto audio
desiderato.
� DSP
MP3 Enhancer Power Bass Off• MP3 Enhancer : migliora le prestazioni audio (ad es.
per file mp3). È possibile effettuare l'upscaling audio da
un livello MP3 (24 kHz, 8bit) a un livello CD (44,1 kHz,
16bit).
• Power Bass : aumenta il volume dei bassi creando
suoni cupi.
• Off : selezionarlo per un ascolto normale.
� Modalità audioVirtual Sound Musica Notiziari Telefilm Cinema Sport Giochi Off
Audio 3D
È possibile godere di un audio surround più naturale
e nitido con toni ricchi regolando l'intensità del suono
attraverso le relative opzioni.
Off Alto Medio Basso| NOTA |
� Non è disponibile nel modo FM.
Riproduzione di video 2D in 3D
È possibile vedere un normale video 2D in 3D.
| NOTA |
� Se si passa alla schermata iniziale o al menu
principale di Smart Hub mentre si è in modo 3D, il
prodotto passa automaticamente al modo 2D.
vTunervTuner
vTuner è la funzione che serve per ascoltare la
radio. Premendo il tasto vTuner, è possibile accedere
all'applicazione vTuner.
È possibile utilizzare la funzione vTuner dopo aver
scaricato l'applicazione vTuner da Samsung Apps.
HT-E5200_XU_ITA_0222.indd 50HT-E5200_XU_ITA_0222.indd 50 2012-02-23 오후 2:18:342012-02-23 오후 2:18:34

Italiano 51 |
06Servizi di Rete
È possibile usufruire di diversi servizi di rete come
Smart Hub o BD-LIVE collegando il prodotto alla
rete.
Per utilizzare i servizi di rete, è necessario
innanzitutto:
1 . Collegare il prodotto alla rete.
(Vedere a pagina 20)
2 . Configurare le impostazioni di rete.
(Vedere alle pagine 29~32)
Utilizzo di Smart Hub
Utilizzando Smart Hub, è possibile scaricare film,
video e musica da Internet, accedere a diverse
applicazioni gratuite o a pagamento e visualizzarle
sul televisore. I contenuti delle applicazioni
comprendono notizie, sport, previsioni del tempo,
mercati azionari, mappe, foto e giochi.
Per istruzioni su come utilizzare la funzione Smart
Hub, seguire i passi riportati di seguito:
1 . Accedere al sito www.samsung.com.
2 . Fare clic su Support in alto nella pagina.
3 . Nella pagina Assistenza, inserire il codice del
modello del prodotto nel relativo campo.
4 . Nella pagina visualizzata, fare clic sulla
scheda Download e selezionare Accedi
a Centro di download globale per altre
lingue. Viene visualizzata la pagina Centro di
download globale.
5 . Nella pagina Centro di download globale, fare
clic sulla scheda Manuali.
6 . Nella scheda Manuali, fare clic sull'icona del
file a destra del manuale utente di Smart Hub.
Viene scaricato il manuale.
| NOTA |
� La posizione sul Web del manuale di Smart Hub può
essere modificata senza preavviso.
Panoramica di Smart Hub
xxxxxxxx
Contents 1
xxxxxxxx
Contents 4
xxxxxxxx
Contents 3
xxxxxxxx
Contents 2
Samsung Apps Your Video Family Story Fitness Kids
a Login b WallPaper / Strumenti ' Ritorna
Search
5 6 70
9
1 2 4
8
3
1Your Video : Fornisce consigli sui video in base ai
gusti personali.
2Search : Fornisce una ricerca integrata dei provider
video e dei dispositivi AllShare collegati.
3Raccomandati : Mostra i contenuti consigliati
gestiti da Samsung.
4
Pubblicità : Visualizza la Guida di Smart Hub,
un'introduzione al prodotto e la presentazione di
nuove applicazioni.
5
Family Story : Un modo semplice per accedere ai
contenuti familiari.
• Permette di accedere a foto, messaggi ed eventi
familiari in qualsiasi luogo e momento.
6
Fitness : Accesso a un servizio unificato per la cura
personale.
• Fornisce video di fitness da diverse fonti con
feedback sulle calorie bruciate dopo ogni
allenamento.
7
Kids : Il servizio Bambini permette ai più piccoli
di accedere ai contenuti preferiti in modo facile e
sicuro.
• Fornisce un'ampia serie di contenuti divertenti e
sicuri per i più piccoli.
8
Guida di navigazione : Visualizza i tasti del
telecomando che è possibile utilizzare per navigare
in Smart Hub.
• ROSSO (A) : Per accedere a Smart Hub.
• VERDE (B) : Per visualizzare la schermata di
sfondo.
• Strumenti : Per visualizzare la finestra delle
impostazioni.
• Ritorna : Per tornare al menu precedente.
Servizi di Rete
HT-E5200_XU_ITA_0222.indd 51HT-E5200_XU_ITA_0222.indd 51 2012-02-23 오후 2:18:362012-02-23 오후 2:18:36

| 52 Italiano
Servizi di Rete
9
Applicazioni personali : Visualizza la galleria
personale delle applicazioni in cui è possibile
aggiungere, modificare ed eliminare applicazioni.
0
Samsung Apps : Aprire Samsung Apps per
scaricare vari servizi applicativi a pagamento o
gratuiti.
Utilizzo del browser WebÈ possibile accedere a Internet utilizzando per
impostazione predefinita il browser Web installato
nella schermata di Smart Hub.
1 . Selezionare Smart Hub nella schermata
iniziale, quindi premere il tasto E.
2 . Selezionare l'applicazione del browser Web di
Smart Hub, quindi premere il tasto E.
| NOTA |
� Se si lancia il browser Web quando il prodotto è collegato
tramite HDMI a un televisore che supporta la funzione BD
Wise(e la funzione BD Wise è attivata), il browser si adatta
alle dimensioni dello schermo intero e la risoluzione
del televisore viene impostata automaticamente sulla
risoluzione ottimale.
� Il browser Web non è compatibile con le applicazioni Java.
� Se si tenta di scaricare un file, ma non si riesce a salvarlo,
viene visualizzato un messaggio di errore.
� La riproduzione di video Flash non è supportata.
� L'e-commerce per l'acquisto dei prodotti online non è
supportato.
� ActiveX non è supportato.
Panoramica del browser Web
Google Search I’m Feeling Lucky
b Control Panel � Link Browsing / Tools ' Exit
http://www.google.com/
1
2
1
Pannello di controllo : Mostra le varie funzioni del
browser Web.
• : Passa alla pagina precedente.
• : Passa all'ultima pagina visitata prima di
tornare indietro.
• : Ricarica la pagina corrente e aggiorna le
informazioni sullo schermo.
• : Passa alla pagina iniziale del browser Web.
• : Permette di aumentare o diminuire lo zoom
della schermata secondo diverse percentuali.
• : Permette di assegnare un segnalibro a
determinate pagine per accedervi facilmente.
• : Permette di visualizzare la cronologia delle
pagine visitate in base alla data, al nome o alla
frequenza.
• http://www.google.com/ : Permette di inserire
manualmente l'indirizzo di una pagina o di
selezionare e accedere a una pagina dall'elenco
di quelle visitate.
• : Permette di passare facilmente tra le
diverse finestre del browser Web aperte.
• : Permette di cercare informazioni inserendo
delle parole chiave.
• : Permette di condividere il sito corrente con il
gruppo familiare inviando un messaggio.
• : Permette di configurare tutte le impostazioni
del browser Web.
HT-E5200_XU_ITA_0222.indd 52HT-E5200_XU_ITA_0222.indd 52 2012-02-23 오후 2:18:382012-02-23 오후 2:18:38

Italiano 53 |
06Servizi di Rete
2
Guida di navigazione : Visualizza i tasti del
telecomando che è possibile utilizzare per navigare
nel browser Web.
• VERDE (B) : Per visualizzare il pannello di
controllo.
• GIALLO (C) : Per cercare un link.
• Tools : Per visualizzare la finestra Strumenti.
• Exit : Per tornare al menu precedente.
BD-LIVE™
Quando il prodotto è collegato alla rete, è possibile
fruire di diversi contenuti di servizi relativi ai film
disponibili su dischi compatibili con BD-LIVE.
1 . Collegare una memoria USB alla porta USB
sul pannello anteriore del prodotto, quindi
verificare lo spazio disponibile in memoria. Il
dispositivo di memoria deve avere almeno 1
GB di spazio libero per poter installare i servizi
BD-LIVE.
2 . Selezionare Impostazioni nella schermata
iniziale, quindi premere il tasto E.
3 . Selezionare Rete, quindi premere il tasto E.
4 . Selezionare Impostazioni BD-Live, quindi
premere il tasto E.
5 . Selezionare Gestione dei dati BD, quindi
premere il tasto E.
6 . Selezionare Scelta dispositivo, quindi
premere il tasto E.
7 . Selezionare USB, quindi premere il tasto E.
8 . Inserire un disco Blu-ray che supporti BD-
LIVE.
9 . Selezionare una voce tra i diversi contenuti
del servizio BD-LIVE forniti dal produttore del
disco.
| NOTA |
� La modalità di utilizzo di BD-LIVE e i contenuti forniti
possono variare a seconda del produttore del disco.
HT-E5200_XU_ITA_0222.indd 53HT-E5200_XU_ITA_0222.indd 53 2012-02-23 오후 2:18:392012-02-23 오후 2:18:39

| 54 Italiano
AppendiceInformazioni aggiuntive
Nota
Connessioni
HDMI OUT
• A seconda del televisore, alcune risoluzioni di uscita HDMI potrebbero non essere utilizzabili.
• Per poter vedere video in 3D, è necessaria una connessione HDMI.
• In questo caso, impostare HDMI Profondità colori su Off nel menu.
Impostazioni
Impostazioni 3D
• Per alcuni dischi 3D, per arrestare un film durante la riproduzione in 3D, premere una volta il
tasto 5. Il film si arresta e l'opzione modo 3D si disattiva.
Per cambiare la selezione di un'opzione 3D durante la riproduzione di un film 3D, premere
una volta il tasto 5. Viene visualizzato il menu Blu-ray. Premere di nuovo il tasto 5 quindi
selezionare Impostazioni 3D nel menu Blu-ray.
• A seconda del contenuto e della posizione dell'immagine sullo schermo del televisore, si possono
vedere delle bande nere verticali sul lato sinistro, sul lato destro o su entrambi i lati.
Aspetto TV
• A seconda del tipo di disco, è possibile che alcuni formati non siano disponibili.
• Se si selezionano un formato e un'opzione diversi dal formato del televisore, l'immagine potrebbe
apparire distorta.
• Selezionando 16:9 originale, è possibile che il televisore visualizzi il formato 4:3 Pillarbox (bande
nere ai lati dell'immagine).
BD Wise (solo prodotti Samsung)
• Se la funzione BD Wise è attivata, la risoluzione viene impostata automaticamente su BD Wise e
nel menu Risoluzione viene visualizzato BD Wise.
• Se il prodotto è collegato a un dispositivo che non supporta la funzione BD Wise, non è possibile
utilizzare questa funzione.
• Per un corretto funzionamento della funzione BD Wise, impostare l'opzione BD Wise su On sia sul
prodotto che sul televisore.
Uscita Digitale
• Assicurarsi di selezionare l'opzione di uscita digitale corretta, altrimenti l'audio non verrà emesso
o risulterà molto disturbato.
• Se il dispositivo HDMI (ricevitore AV, televisore) non è compatibile con i formati compressi (Dolby
Digital, DTS), il segnale audio viene emesso come PCM.
• I normali DVD non dispongono di audio BONUSVIEW ed effetti sonori di navigazione.
• Alcuni dischi Blu-ray non dispongono di audio BONUSVIEW ed effetti sonori di navigazione.
• Questa impostazione dell'uscita digitale non influisce sull'uscita audio analogica (S/D), né
sull'uscita audio HDMI verso il televisore. Influisce, invece, sull'uscita audio HDMI e ottica se il
prodotto è collegato a un ricevitore AV.
• Se vengono riprodotte tracce audio MPEG, il segnale audio viene emesso come PCM
indipendentemente dall'uscita digitale selezionata (PCM o bitstream).
HT-E5200_XU_ITA_0222.indd 54HT-E5200_XU_ITA_0222.indd 54 2012-02-23 오후 2:18:402012-02-23 오후 2:18:40

Italiano 55 |
07Appendice
Impostazioni
Connessione Internet BD-Live
• La connessione a Internet potrebbe essere limitata durante l'utilizzo di contenuti BD-LIVE.
Anynet+ (HDMI-CEC)
• Su alcuni televisori, alcune risoluzioni di uscita HDMI potrebbero non essere utilizzabili.
Consultare il manuale utente del televisore.
• Questa funzione non è disponibile se il cavo HDMI non supporta CEC.
• Il televisore Samsung supporta la funzione Anynet+ se su di esso è presente il logo Anynet+.
Gestione dei dati BD
• Nel modo memoria esterna, la riproduzione del disco può essere interrotta se si scollega il
dispositivo USB durante la riproduzione.
• Sono supportati solo i dispositivi USB formattati nel file system FAT (etichetta di volume DOS 8.3).
Si consiglia di usare dispositivi USB che supportano il protocollo USB 2.0, con velocità di lettura/
scrittura di 4 MB/sec o superiore.
• La funzione Riprendi Riproduzione potrebbe non funzionare dopo aver formattato il dispositivo di
memorizzazione.
• La memoria totale disponibile per Gestione dei dati BD può differire, a seconda delle condizioni.
DivX® Video On Demand
• Per ulteriori informazioni su DivX(R) VOD, visitare il sito "http://vod.divx.com".
Display frontale
• Non è possibile regolare la luminosità dei tasti e VOL +, -.
Imposta altoparlanti
• Se viene selezionato Selez. altoparlante su Altoparlante TV, l'audio è prodotto attraverso i
diffusori TV.
Audio HDMI
• Quando l'audio HDMI viene emesso dai diffusori del televisore, viene convertito automaticamente
in 2 canali.
Canale ritorno audio
• Quando Anynet+ (HDMI-CEC) è su Off, la funzione Canale ritorno audio non è disponibile.
• L'uso di un cavo HDMI non certificato per ARC (Audio Return Channel(Canale ritorno audio)) può
causare problemi di compatibilità.
• La funzione ARC (ARC) è disponibile solo se è collegato un televisore compatibile ARC.
Uscita Digitale
• L'uscita digitale può essere attivata solo se Selez. altoparlante è impostato su Altoparlante TV.
HT-E5200_XU_ITA_0222.indd 55HT-E5200_XU_ITA_0222.indd 55 2012-02-23 오후 2:18:412012-02-23 오후 2:18:41

| 56 Italiano
Appendice
Riproduzione
Riproduzione di file video
• I file video con frequenze di bit elevate, pari o superiori a 20 Mbps, forzano le capacità del
prodotto e potrebbero arrestarsi durante la riproduzione.
Selezione della lingua dell'audio
• L'indicatore ◄► non viene visualizzato sulla schermata se la sezione BONUSVIEW non contiene
impostazioni audio BONUSVIEW.
• Le lingue disponibili attraverso la funzione Lingua audio dipendono dalle lingue codificate sul
disco. Questa funzione o alcune lingue potrebbero non essere disponibili.
• Con alcuni dischi Blu-ray è possibile selezionare tracce audio LPCM o Dolby Digital in inglese.
Selezione della lingua dei sottotitoli
• Su alcuni dischi Blu-ray/DVD è possibile cambiare la lingua dei sottotitoli nel menu del disco.
Premere il tasto DISC MENU.
• Questa funzione dipende dalla selezione dei sottotitoli codificati sul disco, quindi potrebbe non
essere disponibile su tutti i dischi Blu-ray/DVD.
• Se il disco Blu-ray ha una sezione BONUSVIEW, vengono visualizzate anche le informazioni sul
modo BONUSVIEW principale.
• Questa funzione modifica contemporaneamente sottotitoli primari e secondari.
• Vengono visualizzati rispettivamente il numero totale di sottotitoli primari e secondari.
Riproduzione di file JPEG
• Non è possibile ingrandire il campo di sottotitoli e PG nel modo schermo intero.
AllShare Play
Utilizzo del tasto TOOLS durante la riproduzione delle immagini
• Se il sistema è collegato a un televisore che supporta la funzione BD Wise e BD Wise è impostato
su On, il menu Impostazioni immagini non viene visualizzato.
• La funzione di musica di sottofondo funziona solo se il file musicale e il file della foto sono sullo
stesso supporto di memorizzazione. La qualità del suono può anche essere influenzata dal bit
rate del file MP3, dalla dimensione delle foto e dal metodo di codifica.
Riproduzione da un dispositivo di memorizzazione USB
• È necessario rimuovere in sicurezza il dispositivo di memorizzazione USB (eseguendo la funzione
“Rimoz. sicura USB” ) per evitare possibili danni alla memoria USB. Premere il tasto HOME per
passare al menu principale, selezionare il tasto GIALLO (C), quindi premere il tasto E.
Riproduzione dei file musicali
• Regolare il volume a un livello moderato prima di collegare l'iPod al prodotto.
• Quando il prodotto è alimentato e si collega un iPod, il prodotto carica la batteria dell'iPod.
HT-E5200_XU_ITA_0222.indd 56HT-E5200_XU_ITA_0222.indd 56 2012-02-23 오후 2:18:412012-02-23 오후 2:18:41

Italiano 57 |
07Appendice
AllShare Play
Visione di un film
• Per poter visualizzare i video sull'iPod, l'uscita VIDEO (Composito) deve essere collegata al
televisore (vedere a pagina 18).
• Se si desidera riprodurre i video sull'iPod attraverso l'uscita VIDEO, impostare Anynet+ (HDMI-
CEC) su Off.
• Sul televisore viene visualizzata solo la schermata di riproduzione. Visualizzare le altre schermate
iPod sul lettore iPod.
• Per tornare ai menu iPod mentre il lettore iPod è collegato con la basetta dock, premere
FUNCTION sul telecomando o premere sul pannello anteriore del sistema e
selezionare R. IPOD.
Il modo Funzione viene impostato nella sequenza seguente:
BD/DVD D. IN AUX R. IPOD HDMI1 HDMI2 FM BT
iPod
Modelli iPod/iPhone utilizzabili con questo prodotto
• La regolazione del volume potrebbe non funzionare normalmente con l'iPod e modelli iPhone non
elencati a pagina 36. In caso di problemi con i modelli elencati, aggiornare il software dell'iPod/
iPhone all'ultima versione.
• A seconda della versione software dell'iPod, possono verificarsi problemi di comando. Non si
tratta di un malfunzionamento del sistema Home Cinema.
• A seconda della versione software o a seconda del tipo dell'iPod, alcune operazioni possono
differire. Installare l'ultimo software iPod. (raccomandato)
• È possibile riprodurre musica o video con la funzione disco Blu-ray/DVD e musica o video con la
funzione iPod remoto. Per riprodurre i video, è necessario utilizzare il dock per iPod.
• Non è garantita la riproduzione dei contenuti delle applicazioni con il prodotto. Si raccomanda di
riprodurre i contenuti scaricati sull'iPod.
• In caso di problemi di utilizzo dell'iPod, visitare il sito www.apple.com/support/ipod.
HT-E5200_XU_ITA_0222.indd 57HT-E5200_XU_ITA_0222.indd 57 2012-02-23 오후 2:18:422012-02-23 오후 2:18:42

| 58 Italiano
AppendiceRisoluzione in base al modo di uscita
� Riproduzione di dischi Blu-ray/e-Content/contenuti digitali
Uscita Conf.
HDMI/collegata HDMI/non collegataModo HDMI
Modo VIDEO Modo VIDEODisco Blu-ray E-Content/Contenuti
digitali
BD WiseRisoluzione del
disco Blu-ray1080p@60F 576i/480i -
AutoRisoluzione max.
dell'ingresso TV
Risoluzione max.
dell'ingresso TV576i/480i -
1080p@60F 1080p@60F 1080p@60F 576i/480i -
Fotogramma video: auto
(24Fs)1080p@24F 1080p@24F 576i/480i -
1080i 1080i 1080i 576i/480i 576i/480i
720p 720p 720p 576i/480i 576i/480i
576p/480p 576p/480p 576p/480p 576i/480i 576i/480i
576i/480i - - - 576i/480i
� Riproduzione di DVD
Uscita Conf.
HDMI/collegata HDMI/non collegataModo HDMI Modo VIDEO Modo VIDEO
BD Wise 576i/480i 576i/480i -
Auto Risoluzione max. dell'ingresso TV 576i/480i -
1080p@60F 1080p@60F 576i/480i -
1080i 1080i 576i/480i 576i/480i
720p 720p 576i/480i 576i/480i
576p/480p 576p/480p 576i/480i 576i/480i
576i/480i - - 576i/480i
HT-E5200_XU_ITA_0222.indd 58HT-E5200_XU_ITA_0222.indd 58 2012-02-23 오후 2:18:432012-02-23 오후 2:18:43

Italiano 59 |
07Appendice
Selezione dell'uscita digitale
Conf. PCM Bitstream (non elaborato)
Bitstream (DTS ricodificato)
Bitstream (Dolby D ricodificato)
Connessione Ricevitore AV con supporto HDMI
Streaming
audio su
disco Blu-
ray
PCM Fino a PCM 7,1 can. PCM DTS ricodificatoDolby Digital
ricodificato *
Dolby
DigitalFino a PCM 7,1 can. Dolby Digital DTS ricodificato
Dolby Digital
ricodificato *
Dolby
Digital
Plus
Fino a PCM 7,1 can. Dolby Digital Plus DTS ricodificatoDolby Digital
ricodificato *
Dolby
TrueHDFino a PCM 7,1 can. Dolby TrueHD DTS ricodificato
Dolby Digital
ricodificato *
DTS Fino a PCM 6,1 can. DTS DTS ricodificatoDolby Digital
ricodificato *
Audio
DTS-HD
ad alta
risoluzione
Fino a PCM 7,1 can.Audio DTS-HD ad alta
risoluzioneDTS ricodificato
Dolby Digital
ricodificato *
Audio
master
DTS-HD
Fino a PCM 7,1 can. Audio master DTS-HD DTS ricodificatoDolby Digital
ricodificato *
Streaming
audio su
DVD
PCM PCM 2 can. PCM 2 can. PCM 2 can. PCM 2 can.
Dolby
DigitalFino a PCM 5,1 can. Dolby Digital Dolby Digital Dolby Digital
DTS Fino a PCM 6,1 can. DTS DTS DTS
Definizione
per disco
Blu-ray
Qualsiasi
Decodifica il flusso audio principale e il flusso audio
BONUSVIEW combinandoli nell'audio
PCM ed aggiunge effetti sonori di navigazione.
Emette solo il flusso audio principale in
modo che il ricevitore AV possa decodificare
il bitstream audio.
Non si udiranno l'audio BONUSVIEW o gli effetti sonori di navigazione.
Decodifica il flusso audio principale e il flusso audio
BONUSVIEW combinandoli
nell'audio PCM ed aggiunge effetti sonori di navigazione, quindi ricodifica l'audio PCM
in bitstream DTS.
Decodifica il flusso audio principale e il flusso audio
BONUSVIEW combinandoli
nell'audio PCM ed aggiunge effetti sonori di navigazione, quindi ricodifica l'audio PCM
in bitstream Dolby Digital o PCM.
* Se il flusso sorgente è 2 canali o mono, l'impostazione "Dolby D ricodificato" non viene applicata.
L'uscita è PCM 2 canali
I dischi Blu-ray possono comprendere tre flussi audio:
- Audio principale: la traccia audio principale.
- Audio BONUSVIEW: traccia audio aggiuntiva, come i commenti del regista o degli attori.
- Effetti sonori di navigazione: durante la navigazione nei menu è possibile udire i relativi effetti sonori. Gli
effetti sonori di navigazione sono differenti per ciascun disco Blu-ray.
HT-E5200_XU_ITA_0224.indd 59HT-E5200_XU_ITA_0224.indd 59 2012-02-24 오후 1:47:202012-02-24 오후 1:47:20

| 60 Italiano
AppendiceRisoluzione dei problemi
Se il prodotto non funziona correttamente, consultare la tabella che segue. Se il problema non è elencato
nella tabella o se le istruzioni fornite non portano a una soluzione, spegnere il prodotto, scollegare il cavo
di alimentazione e contattare il rivenditore autorizzato più vicino o il Centro di assistenza di Samsung
Electronics.
Sintomo Controlli/Rimedi
Non si riesce ad estrarre il disco.
• Il cavo di alimentazione è ben collegato alla presa?
• Spegnere l'unità, quindi riaccenderla.
L'iPod non si collega. • Verificare le condizioni del connettore dell'iPod e del dock.
• Tenere aggiornata la versione software dell'iPod.
La riproduzione non si avvia.
• Controllare il codice regionale del disco Blu-ray/DVD.
È possibile che i DVD acquistati all'estero non siano riproducibili.
• I CD-ROM e i DVD-ROM non possono essere riprodotti con questo prodotto.
• Assicurarsi che il livello di protezione sia corretto.
La riproduzione non si avvia immediatamente quando viene premuto il tasto di riproduzione/pausa.
• Il disco è deformato o ha la superficie graffiata?
• Pulire il disco.
L'audio non viene riprodotto. • Il sistema Home Cinema non riproduce l'audio durante la riproduzione veloce, la riproduzione
rallentata e la riproduzione fotogramma per fotogramma.
• I diffusori sono collegati correttamente? La configurazione dei diffusori è personalizzata
correttamente?
• Il disco è gravemente danneggiato?
Il telecomando non funziona • Il telecomando è utilizzato entro le distanze ammesse e con una corretta angolazione rispetto al
sensore?
• Le batterie sono scariche?
• Le funzioni del modo (TV/BD) del telecomando sono state selezionate correttamente (TV o BD)?
• Il disco gira, ma non viene riprodotta nessuna immagine.
• La qualità dell'immagine è scarsa e l'immagine è tremolante.
• Il televisore è acceso?
• I cavi video sono collegati correttamente?
• Il disco è sporco o danneggiato?
• I dischi di scarsa qualità potrebbero non essere riproducibili.
La lingua dell'audio e i sottotitoli non funzionano.
• La lingua dell'audio e i sottotitoli non funzionano se il disco non li contiene.
Il menu non viene visualizzato neanche quando viene selezionata la funzione menu.
• Si sta usando un disco che non contiene menu?
Il formato non può essere cambiato.
• È possibile riprodurre i dischi Blu-ray/DVD 16:9 in modo 16:9 Pieno, 4:3 Letter Box o
4:3 Pan-Scan, ma i dischi Blu-ray/DVD 4:3 possono essere visti soltanto in formato 4:3.
Selezionare la funzione appropriata in base alla copertina del disco Blu-ray.
HT-E5200_XU_ITA_0222.indd 60HT-E5200_XU_ITA_0222.indd 60 2012-02-23 오후 2:18:442012-02-23 오후 2:18:44

Italiano 61 |
07Appendice
Sintomo Controlli/Rimedi
• Il prodotto non funziona(esempio: l'apparecchio si spegne o si sentono strani rumori).
• Il prodotto non funziona in modo normale.
• Tenere premuto il tasto 5 sul telecomando per 5 secondi in modo STANDBY.
- Utilizzando la funzione RESET vengono cancellate tutte le impostazioni memorizzate.
Utilizzarla solo se strettamente necessario.
Non si ricorda la password del livello di protezione bambini.
• Senza dischi inseriti nel prodotto, tenere premuto il tasto 5 del prodotto per più di 5
secondi. Sullo schermo viene visualizzato INIT e tutte le impostazioni ritornano ai valori
predefiniti.
Premere quindi il tasto ACCENSIONE- Utilizzando la funzione RESET vengono cancellate tutte le impostazioni memorizzate.
Utilizzarla solo se strettamente necessario.
La radio non funziona. • L'antenna è collegata correttamente?
• Se il segnale di ingresso dell'antenna è debole, installare un'antenna FM esterna in
un'area con una buona ricezione.
Se si ascolta l'audio del televisore attraverso il prodotto, non viene emesso nessun suono.
• Se si preme il tasto di APERTURA/CHIUSURA ^ mentre si ascolta l'audio del televisore
usando le funzioni D.IN o AUX, le funzioni del disco Blu-ray/DVD vengono attivate e l'audio
del televisore viene disattivato..
Sullo schermo viene visualizzato il messaggio "Non disponibile".
• In questo momento non è possibile completare le funzioni o le operazioni perché:
1. L'operazione non è consentita dal software del disco Blu-ray/DVD.
2. La funzione (ad es. di angolatura) non è supportata dal software del disco Blu-ray DVD.
3. La funzione al momento non è disponibile.
4. Sono stati richiesti un numero di titolo o di capitolo o un tempo di ricerca fuori gamma.
Se per l'uscita HDMI è impostata una risoluzione non supportata dal televisore (ad esempio 1080p), è possibile che l'immagine non venga riprodotta sul televisore.
• Tenere premuto il tasto 5 sul pannello anteriore per più di 5 secondi senza dischi
inseriti. Tutte le impostazioni vengono riportate ai valori predefiniti.
Nessuna uscita HDMI. • Controllare il collegamento tra il televisore e il connettore HDMI del prodotto.
• Verificare che il televisore supporti le risoluzioni di ingresso HDMI
576p/480p/720p/1080i/1080p.
Schermata di uscita HDMI anomala.
• Se l'immagine appare disturbata, significa che il televisore non supporta la funzione HDCP
(High-bandwidth Digital Content Protection).
Funzione AllShare Play
Si vedono le cartelle condivise in AllShare Play, ma non i file.
• AllShare Play mostra solo i file corrispondenti alle categorie Video, Foto e Musica.
I file che non corrispondono a queste categorie potrebbero non essere visualizzati.
HT-E5200_XU_ITA_0222.indd 61HT-E5200_XU_ITA_0222.indd 61 2012-02-23 오후 2:18:452012-02-23 오후 2:18:45

| 62 Italiano
AppendiceSintomo Controlli/Rimedi
Il video viene riprodotto in modo intermittente.
• Verificare che la rete sia stabile.
• Verificare che il cavo di rete sia collegato correttamente e che la rete non sia
sovraccarica.
• La connessione wireless tra il server e il prodotto è instabile.
Verificare la connessione.
La connessione AllShare Play tra il televisore e il PC è instabile.
• L'indirizzo IP all'interno della stessa subnet deve essere univoco, altrimenti la presenza di
più IP uguali può provocare fenomeni di questo tipo.
• Verificare se vi è un firewall abilitato.
In questo caso, disabilitare la funzione firewall.
BD-LIVE
Non è possibile collegarsi al server BD-LIVE.
• Verificare che la connessione di rete sia stata stabilita utilizzando il menu Stato rete.
• Verificare che al prodotto sia collegato un dispositivo di memoria USB.
• Il dispositivo di memoria deve avere almeno 1 GB di spazio libero per poter installare il
servizio BD-LIVE.
È possibile controllare lo spazio disponibile in Gestione dei dati BD. (Vedere a pagina 55)
• Verificare che l'opzione della connessione Internet BD-LIVE sia impostata su
Consenti(Tutto).
• Se la procedura precedente non riesce, contattare il fornitore dei contenuti oppure
aggiornare il firmware.
Quando si utilizza il servizio BD-LIVE, si verifica un errore.
• Il dispositivo di memoria deve avere almeno 1 GB di spazio libero per poter installare il
servizio BD-LIVE.
È possibile controllare lo spazio disponibile in BD Data Management (Gestione dei dati
BD). (Vedere a pagina 55)
| NOTA |
� Quando vengono ripristinate le impostazioni predefinite, tutti i dati BD utente memorizzati vengono eliminati.
Samsung Electronics dichiara che questo sistema Home Cinema è conforme ai requisiti essenziali e ad altre disposizioni rilevanti della direttiva 1999/5/CE.
La dichiarazione di conformità ufficiale è reperibile sul sito http://www.samsung.com, selezionando Supporto > Cerca supporto prodotto e inserendo il nome del modello.
Questo apparecchio può essere utilizzato in tutti i Paesi dell'UE.
Questo apparecchio può essere utilizzato soltanto in luoghi chiusi.
HT-E5200_XU_ITA_0222.indd 62HT-E5200_XU_ITA_0222.indd 62 2012-02-23 오후 2:18:462012-02-23 오후 2:18:46

Italiano 63 |
07Appendice
Specifiche
Generale
Peso 2,5 kg
Dimensioni 430 (L) x 55 (A) x 255,8 (P) mm
Temperatura di esercizio da +5°C a +35°C
Umidità di esercizio da 10 % a 75 %
Sintonizzatore FM
Rapporto segnale/rumore 55 dB
Sensibilità utile 12 dB
Distorsione armonica totale 0,5 %
Disco
BD (disco Blu-ray) Velocità di lettura: 9,834 m/sec
DVD (Digital Versatile Disc)
Velocità di lettura: 6,98 ~ 7,68 m/sec.
Tempo approssimativo di riproduzione (Lato singolo, strato
singolo): 135 min.
CD: 12cm (COMPACT DISC)Velocità di lettura: 4,8 ~ 5,6 m/sec.
Tempo massimo di riproduzione: 74 min.
CD : 8cm (COMPACT DISC)Velocità di lettura: 4,8 ~ 5,6 m/sec.
Tempo massimo di riproduzione: 20 min.
Uscita video Video composito1 canale: 1,0 Vp-p (carico 75 Ω)
Disco Blu-ray: 576i/480i DVD : 576i/480i
Video/Audio HDMI1080p, 1080i, 720p, 576p/480p
Audio multicanale PCM, bitstream audio, audio PCM
Amplificatore
Uscita diffusore anteriore 165W x 2(3Ω)
Uscita diffusore subwoofer 170W(3Ω)
Risposta in frequenzaIngresso analogico 20Hz~20kHz (±3dB)
Ingresso digitale 20Hz~40kHz (±4dB)
Rapporto S/N 70dB
Separazione canali 60dB
Sensibilità di ingresso (AUX)500mV
Altoparlante
Sistema di altoparlantiSistema di altoparlanti a 2.1 canali
Parte anteriore Subwoofer
Impedenza 3 Ω 3 Ω
Gamma di frequenze 140Hz~20kHz 40Hz ~ 160Hz
Livello di pressione sonora di uscita 87dB/W/M 88dB/W/M
Ingresso nominale 165W 170W
Ingresso massimo 330W 340W
Dimensioni (L x A x P) 90 x 207,5 x 68,5 mm 168 x 350 x 285 mm
Pesi 0,71 kg 2,6 kg
• Velocità di rete uguali o inferiori a 10 Mbps non sono supportate.
• Samsung Electronics Co., Ltd si riserva il diritto di modificare le specifiche senza preavviso.
• Peso e dimensioni sono approssimativi.
• Le caratteristiche e le specifiche sono soggette a modifiche senza preavviso.
• Per l'alimentazione e il consumo di energia, vedere l'etichetta attaccata al prodotto
HT-E5200_XU_ITA_0222.indd 63HT-E5200_XU_ITA_0222.indd 63 2012-02-23 오후 2:18:462012-02-23 오후 2:18:46

Corretto smaltimento del prodotto (rifiuti elettrici ed elettronici)(Applicabile nell’Unione Europea e in altri paesi europei con sistema di raccolta differenziata)
Il marchio riportato sul prodotto, sugli accessori o sulla documentazione indica che il prodotto e i relativi accessori
elettronici (quali caricabatterie, cuffia e cavo USB) non devono essere smaltiti con altri rifiuti domestici al termine del
ciclo di vita. Per evitare eventuali danni all'ambiente o alla salute causati dall'inopportuno smaltimento dei rifiuti, si
invita l'utente a separare il prodotto e i suddetti accessori da altri tipi di rifiuti e di riciclarli in maniera responsabile per
favorire il riutilizzo sostenibile delle risorse materiali.
Gli utenti domestici sono invitati a contattare il rivenditore presso il quale è stato acquistato il prodotto o l'ufficio locale
preposto per tutte le informazioni relative alla raccolta differenziata e al riciclaggio per questo tipo di materiali.
Gli utenti aziendali sono invitati a contattare il proprio fornitore e verificare i termini e le condizioni del contratto
di acquisto. Questo prodotto e i relativi accessori elettronici non devono essere smaltiti unitamente ad altri rifiuti
commerciali.
Corretto smaltimento delle batterie del prodotto(Applicabile nei paesi dell’Unione Europea e in altri paesi europei con sistemi di conferimento differenziato
delle batterie.)
Il marchio riportato sulla batteria o sulla sua documentazione o confezione indica che le batterie di
questo prodotto non devono essere smaltite con altri rifiuti domestici al termine del ciclo di vita. Dove
raffigurati, i simboli chimici Hg, Cd o Pb indicano che la batteria contiene mercurio, cadmio o piombo in
quantità superiori ai livelli di riferimento della direttiva UE 2006/66. Se le batterie non vengono smaltite
correttamente, queste sostanze possono causare danni alla salute umana o all'ambiente.
Per proteggere le risorse naturali e favorire il riutilizzo dei materiali, separare le batterie dagli altri tipi di rifiuti
e riciclarle utilizzando il sistema di conferimento gratuito previsto nella propria area di residenza.
Area Contact Centre Web Site` EuropeAlbania 42 27 5755 -
Austria0810 - SAMSUNG (7267864, € 0.07/min)
www.samsung.com
Belgium 02-201-24-18
www.samsung.com/be (Dutch) www.samsung.com/be_fr (French)
Bosnia 05 133 1999 -
Bulgaria 07001 33 11 www.samsung.com
Croatia 062 SAMSUNG (062 726 7864) www.samsung.com
Czech
800-SAMSUNG (800-726786)
www.samsung.comSamsung Zrt., česká organizační složka, Oasis Florenc, Soko-lovská394/17, 180 00, Praha 8
Denmark 70 70 19 70 www.samsung.com
Finland 030 - 6227 515 www.samsung.com
France 01 48 63 00 00 www.samsung.com
Germany01805 - SAMSUNG (726-7864 € 0,14/Min)
www.samsung.com
Hungary 06-80-SAMSUNG (726-7864) www.samsung.com
Italia 800-SAMSUNG (726-7864) www.samsung.com
Kosovo +381 0113216899 -
Luxemburg 261 03 710 www.samsung.com
Macedonia 023 207 777 -
Area Contact Centre Web SiteMontenegro 020 405 888 -
Netherlands0900-SAMSUNG (0900-7267864) (€ 0,10/Min)
www.samsung.com
Norway 815-56 480 www.samsung.com
Poland0 801 1SAMSUNG (172678) / 022-607-93-33
www.samsung.com
Portugal 80820-SAMSUNG (726-7864) www.samsung.com
Rumania
1. 08010 SAMSUNG (72678) - doar din reţeaua Romtelecom, tarif local
2. 021.206.01.10 - din orice reţea, tarif normal
www.samsung.com
Serbia0700 Samsung (0700 726 7864)
www.samsung.com
Slovakia 0800-SAMSUNG (726-7864) www.samsung.com
Spain 902-1-SAMSUNG (902 172 678) www.samsung.com
Sweden 0771 726 7864 (SAMSUNG) www.samsung.com
Switzerland0848-SAMSUNG (7267864, CHF 0.08/min)
www.samsung.com/ch www.samsung.com/ch_fr/(French)
U.K 0330 SAMSUNG (7267864) www.samsung.com
Eire 0818 717100 www.samsung.com
Lithuania 8-800-77777 www.samsung.com
Latvia 8000-7267 www.samsung.com
Estonia 800-7267 www.samsung.com
Contatta SAMSUNG WORLD WIDESe avete commenti o domande sui prodotti Samsung, contattate il Servizio Clienti
Samsung.
AH68-02441M-00
HT-E5200_XU_ITA_0222.indd 64HT-E5200_XU_ITA_0222.indd 64 2012-02-23 오후 2:18:472012-02-23 오후 2:18:47