Aram - ERIC
115
ED 106 101 Aram TITLE INSTITUTION SPOTS AGENCY PUB DATE GRAWT, NOTE AVAILABLE IRON EDIS PRICE DESCRIPTORS ABSTRACT DOCUIEWP RESUME S2 010 799 lard, George C. Natural Resources and Career Awareness. A Teacher'si Guide for Grades _E-6.- Pennsylvania State Univ., University Park. Dept. of _ Agricultural Education. Diviiion of Vocational and Technical Education, 8AVT.= _ 73 0EG-0-71 -4432(357)- 115p. _. Superintendent of Doculents, U.S. Government Printing Office, Washington, D.C. 20402 (no price, quoted)-_ 11.40.76 - 11045.70 nes POSTAGE *Career Choice; Career' Edication; Conservation Educatioa; -*Elementary_ Educatioa;-: Instructional Materials; .Interdisciplinary -Approackt-Eindergarten; Learning Activities;--.*Natural-Resources; *OCcupational.-Guidance;.-OutdOor Education; Preschool Education; Science'-iEduCation; *Teaching Guides; Vocational Education- Career.education is a comprehensive,-systematic, and cohesive plan of instruction-that provides each studeat:tho- opportunity to plan and prepare for a meaningful and satisfying role as a working member of society. This guide was designed to offer teachers a sequenced program_ of suggested topics-and-learning- activities in the natural resourcese_and to offer information regarding careers in natural resources.-The guide-is divided into three sections that are based on a sequential progression from kindergarten through grade six. Section A (K-1 -2) explores-the world of the child and divided this world into identifiable-study groups. Section 8 (grades 3-4) deals with the needs of living things and relates them to the use of natural resources.-Section C (grades 576) offers material that will help children become-aware-of specific _ information about interrelationships that exist among natural resources. Career information is included is each section. The sections are subdivided into a number of topics. !act topic includes a goal statement, activities, worksheets, teacher's notes and evaluation strategies'. Reference materials are listed in the appendices. (Author/TX)
-
Upload
khangminh22 -
Category
Documents
-
view
1 -
download
0
Transcript of Aram - ERIC

ED 106 101
AramTITLE
INSTITUTION
SPOTS AGENCY
PUB DATEGRAWT,NOTEAVAILABLE IRON
EDIS PRICEDESCRIPTORS
ABSTRACT
DOCUIEWP RESUME
S2 010 799
lard, George C.Natural Resources and Career Awareness. A Teacher'siGuide for Grades _E-6.-Pennsylvania State Univ., University Park. Dept. of _
Agricultural Education.Diviiion of Vocational and Technical Education,8AVT.= _
730EG-0-71 -4432(357)-115p. _.Superintendent of Doculents, U.S. Government PrintingOffice, Washington, D.C. 20402 (no price, quoted)-_
11.40.76 - 11045.70 nes POSTAGE*Career Choice; Career' Edication; ConservationEducatioa; -*Elementary_ Educatioa;-: InstructionalMaterials; .Interdisciplinary -Approackt-Eindergarten;Learning Activities;--.*Natural-Resources;*OCcupational.-Guidance;.-OutdOor Education; PreschoolEducation; Science'-iEduCation; *Teaching Guides;Vocational Education-
Career.education is a comprehensive,-systematic, andcohesive plan of instruction-that provides each studeat:tho-opportunity to plan and prepare for a meaningful and satisfying roleas a working member of society. This guide was designed to offerteachers a sequenced program_ of suggested topics-and-learning-activities in the natural resourcese_and to offer informationregarding careers in natural resources.-The guide-is divided intothree sections that are based on a sequential progression fromkindergarten through grade six. Section A (K-1 -2) explores-the worldof the child and divided this world into identifiable-study groups.Section 8 (grades 3-4) deals with the needs of living things andrelates them to the use of natural resources.-Section C (grades 576)offers material that will help children become-aware-of specific _
information about interrelationships that exist among naturalresources. Career information is included is each section. Thesections are subdivided into a number of topics. !act topic includesa goal statement, activities, worksheets, teacher's notes andevaluation strategies'. Reference materials are listed in theappendices. (Author/TX)

LU
00
/41
YS INIPARTMENT OP NISAL111.EINICATIONEVNILPAISENATIENALINSTITETS OP
ESSICATISISTHIS DOCUMENT NAS NEN REPRO.00CED EXACTLY AS RECEIVED FROMTHE PERSON OR ORGANIZATION ORIGIN*TING K. POINTS OP VIEW OR OPINIONSSTATED 00 NOT NECESSARILY OEMS.SENT OPINCIAL NATIONAL INSTITUTE OP
.EDUCATION POSITION OR POLICY
Natural Resourcesand
Career Awareness
A Teacher's Guide For Grades K-6
2

.
DISCRIMINATION PROHIBITEDTide VI of the OM Rights Actof 1964 states: "No perm in- the thriMd States I, oir thegrounds of race, color, or national might, be excluded fromparticipation in, be -denied the benefits of, or be sibject todiscrinimation under say -progrant_ or utility receiving Faes'famscial asistrace." Therefereithe Voartiosal Educe** program,like every mown or activity receiving Druid assistance fr01111 theDeportment of Health, Education, and Welfare, must be operated iacompliance with this law.
Tides of ali atuiculum materials resulting from the project, "Career Education lathe Natural Resources," grant No. OEG-0-71-4432(357)
are rested belom
.
Nese& Res:wended Care r A %arenasA Teacher's Guide for Grades K-6
Exploring Occupations in the Netwil ResoweesA Student Resource Guide for the Kiddie School
Oeatpetionel Preparation in the Named RaouteesA Suggested High School Curriculum Guide
Newel Resources TechnologiesA Suggested Post High School Program Development Guide
Cover Photo: Courtesy State Game Department, Olympia, WA.
3

NATURAL RESOURCESAND
CAREER AWARENESS -
A Teacher's Guide For Grades K-6

"The projecipmeated or repotted Weiss was perforneed pursuantto a grant from the U.S. Office of Education, Department of Health,Education, and Welfare. However, the _opinions expremed herein donot necessarily reflect the position or policy of the U.S. Office ofEducation, and no offidal endorsement by the U.S. Office ofEducation should be inferred."
Developed and disseminated pursuant to a grantfrom the U.S. Office of Education
under Part I Curriculum Development in Vocational and Tedmical Education,Vocational Education Amendments of 1968, Public Law 90;576
byDepartment of Agricultural Education
The Pennsylvania State UliversityUniversity Park, Pennsylvania
1973
For Sale by the Superintendent of Documents,U.S. Government Printing Office,
Washington, DC 20402
ii

FOREWORD
Caner education is a comprehensive, systematic, and cohesive plan of instruction that provides eich student .the opportunity to plan andprepare for a sauninglid and *defying role as a workbag member of society.Occupational duster; representative of the entire world of work .and around which a career education system an be denoted, were identified by the U.S. Office of Education. The IS occupational dustersare
Wines' and office consumer and homemaking/elatedmarked* and distribution environmental controlcommunications and media pubic servicesconstruction healthmanufacturing homitalitY.and recreationtransportation personal serviceagribusiness and natunl fine arts and humanities
resources marine science
This teacher's guide is one of foot publications developed by the Department of Agricultural. Education, College of Apiculture, ThePennsylvania State University, as a result of a project entitled "Career Educatkinin the Natural Resources." The projectwas funded under agrant from the Division of Vocational and Technical Education, Office of Education, U.S. Department of Health, Education, and Welfare.This project grew out of a sea for materials offering strategies for implementing career dnelopment_propams in the field of naturalresources, a part of one occupational, duster area. Although there was an abundance of infornsadon concerning vocational developmenttheories, there was an apparent shortage o asterisk offering strategies for implementing these theories into operational programs. Thiiiieidwas caning considerable frustration to Practitionrs who were attempting to design and implement plans for career education. .The purposes of, the overall project wore: (1) to develop appropriate cutricultint -guides in the natural resources suggesting asequentillydeveloped education program offering career awareness, career *vicuna; and job preparation, (2) to acquaint educationalleadership M all states with the curriculum materials relating from this project and promote their use, and (3) to di semiute in the Mate;copies of the curriculum materials produced in the project.
Regional Workshops were held during May and fun, 1973 in nine of the Regional Offices of the U.S. Office of Education in the followingcities: Boston, Philadelphia, -Atlanta, Chicago, Dallas, Kansas City, Denver, Stu Francisco, and Seattle. These meetingswere attendedby morethan 300 daemons *schen, guidance counselors, school administrators, teacher educators, and state education department personnel, whowere acquainted with the outcomes of the Project, reviewed the guide, and were instructed in its effective use and implementation ina IOWprogram. Participants made recommendations for improving the guide and for the purpose of meeting the wide variations in needs and practicesanon the country. These recommendations are reflected in thisfinal document.
Career awareness at the elementary school level is punkan intadisciplinuy effort to inform children in an organized manner about theworld of work (Figure 1). The material in this guide is designed to aid children in developing an sentence' of the importance of naturalresources and some of the occupations that exist in the naturalresources field.
Other curriculum materials resulting from this project area,
Exploring Occupations in the Natural ResourcesA Student Resource Guide for the Middle School
Occupational Preparation hr the Natural RemnrcesA Suggested High School Curriculum Guide
Natural Retources TedsnologlesA Suggested Post High School Program Development Guide
iii
Dr. David R. HeartyProfessor and HadDepartment of Agricultural EdficationThe Pennsylvania State University

PROFESSIONAL
15
14
13
12
cy
ADULT AND CONTINUING DUCAT I f N
TECH-Q0
II
I0
CAREER PREPARATION
9 a......e. 000008
7
CAREER
EXPLORATION
61r5
4
3
2
1
TECHJOR
SPECIALIZEDJUR
RY LEVEL JOB
Figure 1 Career Education. From U.S. Department of Health, Ed-ucation, and Welfare, Office of Education. Career Education: AModel for Implementation, Draft April 1971.
iv

ACKNOWLEDGEMENTS
This teacher's guide was prepared by George C. Ward, Instructor in Agricultural Education, The Pennsylvania State University, withassistance from the faculty of The Pennsylvania State University's Department of Agricultural Education. Illustrations and sketches wereprepared by James P. Campbell. The Project Advisory Committee is extended the sincere appreciation of the authors. Appreciation is alsoextended to William Berndt, Project Officer, and H. Neville Hunsicker, Education Progam Specialist, Agribusiness and Natural ResourcesOccupations, U.S. Office of Education, Bureau of Adult, Vocational and Technical Education, for their directionduring the preparation of thisguide.
_
Project Advisory Committee
Mrs. Eleanor Bennett, Conservation Education Advisor, Bureau of General and Academic Education, Harrisburg, PA 17126.Mr. F. Raymond Brush, Administrator, American Association of Nurserymen, Inc., 230 Southern Building, 15th and H Streets, N.W.,Washington, DC 20005.Dr. Robert D. Herr, Chairman, Agriculture Department, Eastern Lancaster County School District, Route 23 and Tower Road, New Holland,PA 17557.Dr. Clyde W. Hibbs, Director, Natural Resources Institute, Ball State University, Muncie, IN 47306.Mr. Walter E. Teske, Chief, Education and Publications Branch, Soil Conservation Service, U.S. Department of Agriculture, Washington, DC20250.Mrs. Barbara Provost, Assistant Superintendent, Educational Services, Office of Riverside County Superintendent of Schools, Box 868,Riverside, CA 92502.Professor Howard Sidney, Chairman, Division of Agricultural and Natural Resources, State University of New York, Agricultural and TechnicalCollege, Cobleskill, NY 12043.
Project Staff
Faculty and staff of the Department of Agricultural Education, The Pennsylvania State University, contributing to this project were: DavidR. McClay, department head; Richard F. Stinson, project director; James H. Mortensen, assistant project director; Robert L. Soles and GeorgeC. Ward, Instructors; and A. Ronald Attarian and James C. Nichol,graduate assistants.

Chapter
FOREWORD
ACKNOWLEDGEMENTS
INTRODUCTION AND USE OF THE GUIDE
OUR WORLD
Topic I Our WorldTopic II Living Things 3Topic III Non-Living Things 8Topic IV Natural Things 9Topic V Man-Made Things 11Topic VI Interrelationships 13Topic VII People Who Take Care of Our Neighborhood and Our World 15
SECTION B
TABLE OF CONTENTS
SECTION A
Pap
iu
v
ix
1
NEEDS
Topic I Needs 19Topic II Natural Resources 22Topic III Changes in Natural Resources 25Topic IV The Effect of Man's Use of Natural Resources 28Topic V Using Resources Wisely 31Topic VI Renewable Natural Resources 33Topic VII Non - renewable Natural Resources 37Topic VIII People Who Take Care of Natural Resources 40
SECTION C
SOIL
Topic 1 What is Soil? 43Topic II Soil Fo mation 44Topic III Soil and Water 46Topic IV Soil and Plants 48Topic V Soil Particles 49Topic VI Soil and Air 50Topic VII How Soil is Moved 51Topic VIII Man's Effect on Soil 53Topic IX Soil Conservation Occupations 54
PLANTS
Topic I Plant Communities 55Topic II Forest Plants 56Topic III Grassland Plants 59Topic IV Plant Communities Change 62Topic V Green Plants Make Food 64Topic VI People Who Manage Our Forests and Grasslands 66
WILDLIFE
Topic I What is Wildlife? 67Topic II Adaptation 69Topic III Wildlife in or Near the Water 69Topic IV Wildlife on Land 71Topic V Wildlife in the Air 74Topic VI Food Chains 74Topic VII Wildlife Management 77Topic VIII Wildlife and Man 78Topix IX People Who Work with Wildlife 78
WATER
Topic I What is Water? 79Topic II Forms of Water 80Topic III The Water Cycle 80Topic IV Water and Climate 83Topic V Water and Animals 86Topic VI People Who Work with Water 86
9

TABLE OF CONTENTS (Continued)
Section
AIR
Topic I What is Atmosphere? 87Topic II The Atmosphere and Respiration 88Topic III Air Pollution 88Topic IV Atmospheric Cycles and Weather 90Topic V People Who Protect Our Atmosphere 95
LAND SPACE
Topic I Land Use Planning 95Topic II Occupations in Land Use Planning and Outdoor Recreation 96
MINERALS
Topic I Minerals and Minerals Formation 97Topic II Rock and Mineral Identification and Classification 98Topic III Mineral Use 100Topic IV People Who Work with Minerals and Petroieum Fuels 100
Appendices
A SELECTED LIST OF REFERENCE BOOKS FOR EARLY ELEMENTARYSCHOOL CHILDREN 103
B SELECTED LIST OF REFERENCE BOOKS FOR MIDDLE ELEMENTARYSCHOOL CHILDREN 105
C SELECTED UST OF REFERENCE BOOKS FOR ELEMENTARY SCHOOLTEACHERS 107
viii iv

Section A OUR WORLD Topic I
GOALS: After this lesson children should:
Re aware of the ("set that their world is what they hear, smell,touch, see, and taste, and use as many of these senses as areappropriate when exploring the world around them.
be able to recognize shapes that make up their world.
Show evidence that they value sharing ideas and information andbeing clear and accurate in their visual and language artsactivities.
TEACHER'S NOTE: Encourage the children to start their explora-tion with the immediate things that surround them, i.e. their desks,classroom, school building. Go on from there to the world outsideof the school The activities will i.e based on the multi-sensorydiscovery of similarities and differences.
ACTIVITY 1: Using the Senses to Discover Shapes
Put 4 or S items with different shapes into an old sock (sampleitems: a marble, a pencil, a small block, a large nut). Pass thesock around and let each chid try to identify the shapes/items inthe sock. See figure A-1.
Figure A-1: Hidden Objects
Ask the following questions:
'What kind of shapes did you find in the sock?
How did you learn what was in the sock?
What other kinds of things might you learn by using yoursense of touch?
ACTIVITY 2: Learning With the Ears, Nose, Hands, and Eyes
Let the children explore their classroom and ask them to beready to tell the rest of the class about something that each ofthem found. (This may take place over several days or weeksuntil each child has had the opportunity to describe his objectand share a drawing of it.)
ACTIVITY 3: Sharing Information
Have the children describe something that they found in theactivity above and tell how it looked, smelled, sounded, and felt.It may be fun for the rest of the class to try to guess what isbeing described.
ACTIVITY 1: Exploring the World Outside
Take the children on a short (2030 minute) walk around theoutside of the school building. Encourage them to explore withall of their senses and try to find at least one thing that isparticularly good fo: each sense. Worksheet A-1 may serve as agood guide for this activity. Show the children the worksheetbefore they go out so that they will have some idea of what theyare really going to be looking for.
Smell Air, cars, flowers, garbage cans, grass, tree bark
Hear Traffic, birds, airplanes, talking, footsteps, drippingwater
Touch Buildings, cars, tree bark, anything that is safe to touch
See Shapes, sizes, colors
Taste Air, water
ACTIVITY 5: Sharing Ideas, Using Vim's! Arts
As soon as the children onme back to the classroom, have themfill out Worksheet A-1, or ask them how they might share thethings they discovered with sack other and with anyone else whomight come into the classroom.
TEACHER'S NOTE: The answer to this question nisy be anindication of how the children view the function of art. If they onlymention telling sveieune about their experience, then take thisopportunity to: (1) reinforce the idea of sharing, (2) point out thatpictures are one of the best ways to share our ideas and discoveries.
Have the children select some of the items from worksheet A...1and draw larger pictures of them for the development of adisplay or collage called "Our World". Put al of the pictures ona display board and have each member of the lass "explore" Ciedisplay during a general class discussion of the things that 49together to make up the child's environment or world.
TEACHER'S NOTE: This activity may be very helpful in determin-ing how each child perceives the environment, and in Odin theselection of future areas of emphasis. For example, if children didnot include noise as a part of their environment, another short walkjust to explore the "sounds of our world" may be appropriate.
EVALUATION:
When shown pictures of various kinds of neighboihoods,children will chooser, the one that most neatly resembles the onearound their whoa! and home. (Cut pictures from of maga-zines.)
If children were 'tilted to try to tell what was in their lunch boxor bag without looking at it, would they be aware enough of themulti-sensory approach to discovering the answer that theywould feel, sm and taste the lunch without looking at it.
If a right angle, a olive, and a square, were drawn on the boardand the children were asked which one of these shapes they sawthe most/least often in their walk. they would be able to giveananswer that was satisfactory in the judgment of the teacher.
If children are gigen a chance to use models of the vcrious thingsthat represent parts of their environment, they will choose tobuild a model of their world that in the teacher's judgmentcomprises a true representation of the things that surround thechild.
12

If asked as a class project to cut pictures of things they TEACHER'S NOTE: Each of the above may be used as adiscovered in their environment from old magazines and make a supplemental activity where appropriate, or can be used as avery large collage to represent their world they would, as a class, follow-up evaluation activity.select things that really did give a good picture of the immediateworld of the child.
OUR
OUR
t
WORKSHEET A-1
Draw pictures of the things that can be identified by the sense pictured.

Section A LIVING THINGS Topic II
GOALS: After this lesson children should:
Identify as alive anything that needs air to breathe, food to eat,water to drink, grows or moves without assistance, reproducesitself, and eventually stops living.
Recognize the importance of organizing the things found in theworld into groups that have some similarity, in order to be ableto study them better.
Identify all living things as either a plant or an animal.
Begin to realize the relationship of living things to non-livingthings and to each other.
Begin to develop an awareness of the processes involved insolving a problem.
TEACHER'S NOTE: In Topic I, the children became aware of theirworld as a p!ace that is made up of a variety of things. It is nownecessary to help the children organize their world into groups ofthings that have some commonality. The most general way is to firstdivide the components of the environment into groups of living andnonliving things. Living things will then be subdivided into plantsand animals.
ACTIVITY 1: Finding Solutions to the Problem of EnvironmentalOrganization
Give students the opportunity to consider how they might goabout learning more about their world. Point out to them thatthey should really start to try to solve problems, and in order todo this they must first identify what the problem is. Help them,through initial question and answer sessions, to understand thatin a world made up of a variety of things they must find a wayto study groups of things that are similar because there wouldnever be time to study each and every individual thing. Thefollowing questions will help to introduce this concept:
We have found in our exploration of our world that it ismade up of many things. Do you think that we would everhave time to take each and every thing and study it by itself?
What other ways might there be to explore our worldfurther?
If we had to put everything in our classroom into two groups,what would they be? Remember these first two groups wouldhave to be able to accept everything in the dassroom.
What do desks, pencils, paper, and walls have in common?
What can we say about all of them?
How about people, plants, prts, and insects? What can we saythat would be true of all of them?
TEACHER'S NOTE: These questions combined with the use ofWorksheet A-2, will help the children to develop the first set ofstudy gmups: Living and Non-Living Things.
Show the children Worksheet A-2 and ask them to think of twogroups that all of the things on the worksheet might fit into.
When the children have determined that the first two divisionsthey are to make are living and non-living things, have themcircle the living and leave the non-living unmarked.
ACTIVITY 2: Subdividing Living Things into Plants and Animals
Continuing to use Worksheet A-2, ask the children how theymight divide the living things into two study groups. Have themput a check mark beside those things that are animals and an Xbeside those that are plants.
ACTIVITY 3: Studying Animals as Living Things
Ask the children how they might determine what all of theanimals have in common. Do they know of other animals thatmay share some commonality lace those on the worksheet?
Have two children who are obviously different in size and shapestand in front of the room and ask the rest of the class todescribe how the two children are different.
After the children have explored differences and described them,have them discuss similarities. The following questions will help:
How many hands, feet, eyes, and noses do each of the twochildren in the front of the room have?
What kinds of things are the two people doing that aresimilar?
Are they breathing, moving, have they eaten somethingtoday, have they had anything to drink?
Are they groWing? How might we tell this? (This is aivexcellent opportunity to start a growth chart for each child.)
Where did they come from?
Will we all eventually stop living?
Encourage the children to ask the same kinds of questions aboutthe animals that they observe. Some opportunities for this kindof observation may occur when: there are animals, fish,hamsters, and gerbils in the classroom; the class goes on a fieldtrip to a zoo, farm, or nature center; children observe animalsthat they see at home or on the way to and from school; thechildren see films of animals.
As children watch animals emphasize the fact that they arelooking for "signs of life" things that will tell them what allliving things have in common. Ask them if they have seen anyanimal that was alive that did not eat, drink, breathe, grow,reproduce itself, and eventually die.
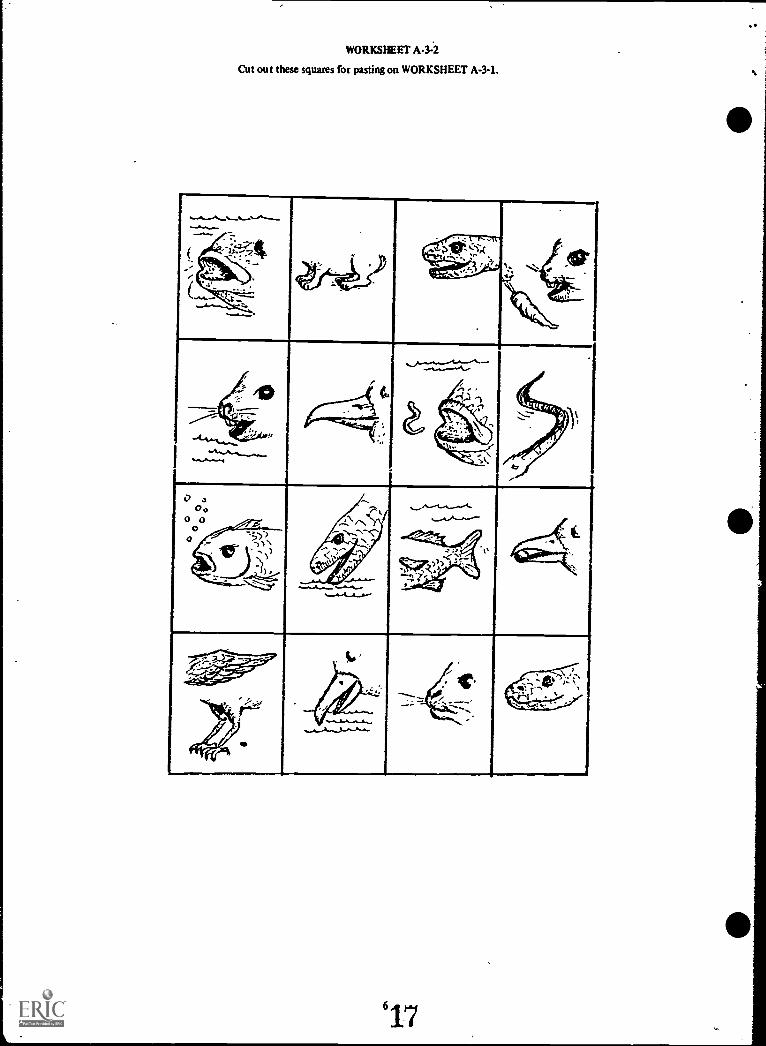
Ask each child to complete Worksheet A-3. The children are tocut out the squares on the second page and paste them on theappropriate places on the first page. For example, the picture ofa bird's wing and feet should be placed under the boy's feet,because this is how the bird moves.
TEACHER'S NOTE: The pictures across the top of sage 5 show ahuman being standing, moving, drinking, breathing, and eating. Thepictures on the second worksheet (page 6) show other animals doingthe same kinds of things. This activity is designed to show the childthe things that all animals have in common.
ACTIVITY 4: Studying Plants as Living Things
TEACHER'S NOTE: Young children very often associate life withunassisted movement and therefore do not realize that plants arealive. Help them to see that while plants do not, as a rule, movefreely about, they still need the basic requirements of living thingsbecause they require air, water, food, and they grow, reproduce, anddie.
Using Worksheet A-4, page 7, give the children the opportunityto explore the school grounds or the block around the schoolbuilding and look for different kinds of plants. Do not be tooconcerned if examples of all of the different kinds of plants arenot found. This activity would best be done when the plants arein foliage and befote the leaves turn color in the fall. If you arein an area where there just are no plants, use pictures or films orany kind of things you have available to help children -finddifferent kinds of plants.
14

WORKSHEET A-2
Circle the following things which are living.
When children have finished the assignment of finding many ofthe plants on Worksheet A-4, have them select a crayon or watercolor and put in the colors that they observed on the plants.Then ask the following questions:
What color did most of the plants have in common?
Were all of the plants attached to something?
Why do plants grow in some places and not in others?
What conditions are needed in order for a plant to grow?
One way to demonstrate the air, water, and food requirementsof plants and how they grow, reproduce, and die, is to performan experiment to show the children what happens to a plant thatis deprived of air, water, or food. This observation will be iriterms of life functions. The plants will either grow andreproduce seed or they will die.
The following activity may be done as a demonstration wherethe children observe the results, or as an experiment where theyparticipate in constructing and conducting the exercise. Thisdecision will be based on the age of the children and theteacher's assessment of their interest and ability.
15
'

Materials needed:
6 small (6-8 or) clear plastic glasses. These are now part ofthe picnic supply section of your local supermarket.
garden bean seeds.
6 small (6" diameter) paper plates. (These are just to put the
cups on so that they don't leak onto the table or countertop.)
TEACHER'S NOTE: If you t? ould decide to let the childrenparticipet8 in the experiment, make sure that all of the followingprocedures are done by someone.
WORKSHEET A-3-1
Cut out the squares on WORKSHEET A-3-2 and paste in theappropriate spaces on this worksheet.
......
of
4---. ........,..
.//0oro
,v7Th
WORKSHEET A -3.2
Cut out these squares for pasting on WORKSHEET A-3-1.
.-..........-,---...,-As....--
................
-P":'.7
-
+ \ - 1101 <-;(
c3 1 1.......". ' A .
bl....
.........._.
.--,
.7---
..../...............1...........A................V.A.,
^. n
P.
p.....
( 7.,LI-WilrFr rA,,,,,
,f...,
0 .2
0 00 0
0O .5))
i,-. "N.s...."-cs
-- \, '..<'
t% /...0..........
...,.......-4-............4.
...........1/4_,...-..-
".: 3-j -
-.1.....);
..V....i..... ........................4...6...11/
5...
,.
> ' ..=....s.,
...
.
...
t-N '.
.........--i-----
617

WORKSHEET A4
After observing the natural color of the following plants, put theproper color on each using either a crayon or water color.
718

a b c dFigure A-2
Procedure:
Set up the following six demonstrations.
a. Seed, Do soil, no water.
b. 2-3 seeds between moist blotting paper and inside wall ofglass.
c. Seed planted against insiZe wall of glass with 3" of soil inglass. Do no water.
d. Seed planted against inside wall of glass with 3" of soil.Keep water level continually at soil surface.
e. Seed plated against inside wall of glass with 3" of soil; nolight.
f. Plant in 3" of soil; normal bright light; watered wheneverthe soil has become dry to touch; and open to air.
Make sure the children know which life requirements are lackingfor each plant.
a. No food or water.
b. Plenty of water, no food.
c. Plenty of food, no water.
d. Plenty of food, water, no air because soil is not drainingand allowing air to enter soil.
e. Plenty of air, food, water, no light.
f. Right amounts of air, water, lightthis plant should growbetter than the rest.
e f
TEACHER'S NOTE: The illustration above will help to determinehow the experiment is going and to know about when to discusswith the children the effects of each variable.
Discuss the differences observed in each plant in relation to theparticular treatment that the plant was given. The followingdiscussion questions will help:
What differences did you notice in the plants that did nothave enough food (soil), water, and light as compared to theplant that was given enough of all of these things?
EVALUATION:
When given the opportunity to use Worksheets A-2, A-3, andA4, the children will indicate that they have developed anunderstanding of the concepts taught by being able to completethe worksheets.
When given the opportunity to separate many different kinds ofthings into groups, the children will start with living andnon-living things.
When separating many living things into groups, the children willseparate them into plants and animals.
Given the opportunity to list or select the common needs of allliving things, the children will demonstrate that they know thatanimals need to move, plants need light, and both plants andanimals need food, air, and water.
Section A NON-LIVING THINGSGOALS: After this lesson children should:
Further develop their ability to recognize similarities anddifferences when asked to put things into study groups.
Recognize the similarities among non-living things.
Begin to develop perspective regarding the number and kind ofnon-living things in their world.
Recognize that living things become part of the non-living.world,
TEACHER'S NOTE: This lesson will help children to explore andmake discoveries about the non-living portion of their worli, andwill prepare them to form two more study groups, Natural Things,Topic IV, and Man-Made Things, Topic V.
ACTIVITY 1: Discovering Things About the Non-Living World
During a show and tell session have the children bring in one oftheir favorite non-living things to show and tell. If their favoritenon-living thing cannot be brought into the classroom, havethem either bring in a picture, or just tell but don't show.
Topic IIIAsk the children to describe similarities and differences betweentwo selected items that they have brought into the classroom.
Ask the children if they can find in the classroom anything thatused to be living but is now non-living. Items made of wood(desks, chairs, pencils, paper) will serve to show the children thatnot only are things in the environment either living or non-living,but that some things change from one form to another. Otherexamples would be sea shells, limestone, coral, and rope.
Using the questions that follow as a guide, have the children goon a short field trip around the school building and find somenon-living things made of the following materials:
Can we find anything that is made of concrete, stone, orbrick? What can we tell about the materials by touchingthem? Are they all the same shape? Are they smooth orrough?
What can we find that is made of metal? How does this feelas compared to the stones and bricks? Why don't we havestone cars?
8
1.9

What part of our world is made of glass? Where does the glasscome from? Could we have a glass building?
Are there any other things in our world that are non-livingthat we have yet to discover? How about plastic? What aboutour clothing, tires on cars, rubber boots, leather belts?
Do we see any wood in our world that is non-living?
Are we missing anything? Have we identified air and water asa part of our world? How about sunlight?
Have the children make a small collection of non-living things tobring back into the classroom for further exploration anddiscussion.
ACTIVITY 2: Exploring the Properties of Non-Living Things
Using the non-living materials collected outside of the classroom,as well as items from the children's pockets and desks, have thechildren explore the properties of each of the items.
Have them answer these questions:
How do the things feel? Hot, cold, soft, hard, rough, smooth?
Do they bend? Why do some of the materials, when bent,stay bent, and others go back to the original shape?
Which of our non-living items have a smell?
Section A
Could we put our non-living items into study groups andlearn more about them? What kind of things could we use todetermine our groups?
How many of our non-living items have been changed byman?
How many have not?
TEACHER'S NOTE: Point out to the children that they havearrived at a place where another decision regarding organization ofstudy groups is necessary. Non-living things are either natural orman-made. Each of these areas will be explored in the topics thatfollow.
EVALUATION:
Given the opportunity to check all non-living things onWorksheet A-2, children will select only those things that arenon-living.
Given the opportunity to put the following items into studygroupsa plant, an animal, a rock, a piece of wood, an article ofclothing, an insectchildren will make at least two initial groups,living and non-living things.
Given the opportunity to separate non-living things, selected bythe teacher, into study groups, children will recognize the initialcategories as natural and man-made.
NATURAL THINGS Topic IVGOALS: After this lesson the children should:
Be able to identify the basic natural resources as air, water, soil,rocks, minerals, plants, and animals.
Recognize change as a natural process, and understand that it iscaused by conditions that surround the natural item.
Recognize the fact that natural things are in limited supply andmust be used carefully because it takes a very long time toreplace them.
TEACHER'S NOTE: The term natural things not only indicates anitem, but also may be used to indicate a process, such as thebreakdown of rocks and decay of leaves.
ACTIVITY I: Discovering Natural Change
Have the children go out on the school grounds, gather two smallstones, and see if they can change them by rubbing themtogether. Look for stones that are piled up on one another andlarge rocks that have broken apart. While the exploration is goingon, ask the following questions:
How might rocks in nature be rubbed together? (Rivers,streams, anything that moves rocks.)
How long would it take you to change enough rocks to makesoil?
How would rocks in nature get crushed? (If many rocks werepiled on top of one another, the force would crush some ofthem and make them smaller.)
Was there any difference in the rocks we found? (Some aresoft, some hard, some round, some angular, some green, grey,brown.)
What would happen to some of this material as the rockparticles get smaller and smaller?
How long do you think it would take for these changes tooccur in nature?
TEACHER'S NOTE: If there is a stream or brook near the schoolthat is shallow enough to be safe and to permit rocks to be seen on
9
the bottom, it will afford an excellent opportunity to study naturalchanges in rocks.
ACTIVITY 2: Exploring the Meaning of Natural Changes byMaking Soil
Materials needed:
Enough rocks or pieces of rock about 3/4" to 1" in size to beable to have about 1-1/2" to 2" of material in each of 5 jars,glasses, or clear plastic containers of any size. Smallercontainers will require less material. Break rocks with ahammer until there are approximately five different sizes, thesmallest of which is about the size of sand grains. Protecteyes when breaking the rocks.
Procedure:
a. Arrange the rocks as shown above; sizes are progressivelysmaller as the numbers go from 1-4. Rock particles in 4and 5 are the same size, but 5 has organic matter added tothe rocks, any kind of leaf or grass material. Only 1-1/2"to 2" of material is needed in each container.
b. Place 7 bean seeds in each container about 1/2" under thesurface and at the side of the container so the childrencan see what happens.
c. Add enough water to keep the material moist but not somuch as to not allow material in 4 and 5 to "breathe."
d. Observe results. The following questions may help toguide the children's discovery in this experiment.
How do rocks break down naturally? (In streams byrubbing up against each other. By being piled one ontop of the other. By freezing and thawing. By tree andplant roots forcing their way into small cracks in largerocks.)
What do you think will happen to the bean seeds ineach of the containers?
What kinds of things are necessary to form a soil?(Small rock particles and organic matter.)

a b C
Figure A-3
How is soil formed in nature? (By the breakdown ofrocks as in 1 above and the addition of organic matterby dead leaves falling, rotting wood, decomposition ofdead animals.)
What would happen if rocks were so hard that theywould not break down or if leaves, plants, and animalsdid not die and return to the earth?
Can you find things in your world that are naturalproducts that are not being returned to the earth?(Desks, clothes.)
TEACHER'S NOTE: It is very important for the children to,become aware of the tremendous time necessary fcr changes tooccur in nature. The basis for the formation of natural resources istime. If a soil that took between 500 and 1,000 years to form iswashed or blown away in a matter of minutes because of poorconservation practices, human beings as well as other plants andanimals which depend on the soil are affected negatively until thesoil is reformed. Take every opportunity to help the children todevelop some concept of the time involved in natural change.
ACTIVITY 3: Finding Further Evidence of Change
Take the children outside one or several times for shortdiscovery trips looking for change. The following suggestionsmay be helpful. The words in parentheses indicate the processesthat cause the observed changes.
A place where soil is being formed. This may be found underhedges, in weed patches, on the floor of woodlots. If there is aplace where leaves ;Ire piled up under plants and have been therefor some time, have the children try to find the oldest leaf. See ifthey can find that place where the leaves stop and soil starts.(decomposition, soil formation)
A dead tree or branch that is rotting. (decomposition, break-down)
Rust on any metal surface. (rusting, oxidation, breakdown,decomposition)
A place where water drips or runs constantly on the pavement orsoil. (erosion, decomposition, building up of material fromwater, calcium sodium salts)
Gathering of small dirt piles in gutters. (How small soil particlesare moved by gravity and water.)
Moss, lichen, or algae growing in damp places on the side ofbuildings or on rocks. (plants starting to grow, die, decay, andpossibly aid soil formation)
Wind or weather changes of any kind. This may be combinedwith a weather unit, emphasizing any aspect that is appropriateto your class.
Building corners, steps, edges of paved areas starting to crumble.Cracks in paved areas. (weathering, breakdown)
Fire burning things. (burning, oxidation)
d e
Sun heating things. (temperature change)
Freezing water, melting water. (freezing, melting)
Plants growing. (growth)
Bird and insect eggs hatching, growing, maturing. (reproduction,birth, growth)
Leaves turning colors, dying, falling to the ground. (death,decomposition)
TEACHER'S NOTE: Be especially aware of the opportunities toidentify the processes: growth; birth, reproduction, decay, burning,temperature change, air movement, that are going on as well as theparticular evidence of change.
ACTIVITY 4: Interpreting Evidence of Change
When the children come back tc the classroom after discoveringsome of the changes and the way things change, ask them todraw -.omething that they sal.v changing in all of its stages. Howdoes it look now? How lid it used to look and how might it lookin the future?
Ask the children to describe in sensory terms the evidence ofchanges that they discovered. How did the dead leaves smell?How did the rocks in the stream feel as compared to those thatwere on the ground? These are just two of the many questionsthat might be asked to encourage each child to interpret changeverbally.
ACTIVITY 5: Discovering the Effect of Surroundings on Change
It is necessary to expose children to the fact that change isnatural and necessary, and that this change is affected byenvironmental forces surrounding the item that is changing.
To demonstrate how natural things change according to theenvironmental forces that affect them, put some ice in a jar andlet it sit in the open air of the classroom. Do the same thing in anarea of bright sunlight, or put it near a source of heat (not soclose that the bottle will break). Have the children see which onemelts/changes first, and then ask them to identify the environ-mental factor or condition that caused the change. Thisexperiment may be done by putting two bottles filled with icecubes in the sunlight and covering one bottle with black paperand one with white paper. (Black and white paint will do thesame job.) This will show the children that color influences thelate of change by causing differences in heat absorption.
It is also quite easy to demonstrate how a living natural thing isaffected by temperature and light. This can be done using twoplants of approximately the same size in one of the followingways:
Cover one of the leaves on either of the plants with blackpaper to show how green plants change when deprived oflight.
io
21

Put one plant near the sunlight and one away from thesunlight and notice that plants grow toward the light,
Put one plant inside and one outside in winter and see howtemperature affects them.
ACTIVITY 6: Learning About Natural Resources
It may be appropriate at this time to establish another studygroup called natural things or resources. The following questionswill help children to see the relationship of change to naturalresources.
What kinds of things did we notice that change by growing?(plants and animals)
What kinds of things were broken down to form soil? (rocks,minerals, plants)
What did we discover that moved all by itself? (air, animals)
What did we discover that changed from liquid to solid?(water)
Section A
What are the things that occur in our world without beingmade by man? (plants, animals, soil, water, air, rocks, andminerals)
EVALUATION:
Given the opportunity to observe natural things, the childrenwill be able to identify the item as either living or non-living andas a plant. animal, rock, mineral, air, or water.
Given the opportunity to observe things change, children willexhibit an understanding of the fact that the change was causedby a natural condition rather than a man-made one.
Given the opportunity to fill out Worksheet A-5, the children willdemonstrate their understanding of the relationship of naturalprocesses, such as, growth, death, decay, breakdown, by beingable to draw a line from left to right between items that change.
MAN-MADE THINGS Topic VGOALS: After this lesson children should:
Be aware of the fact that man uses natural resources to makeplaces in which to live and things that help him to be healthyand comfortable.
Be aware of the fact that all man-made things are still naturalresources but have been changed in a way that is not a naturalprocess.
ACTIVITY 1: Making Something from Natural Resources
Play Dough (No heat)1 cup salt22/2 cups flourSmall amount of cooking oil. Enough water to make mixturethe consistency of dough.
Play Dough (Using heat)PA cups water1/2 cup salt
Mix and boil until salt is dissolved.Remove from heat, add 1 tablespoon cooking oil and 2tablespoons alum.Add 2 cups flour and knead until smooth.
Paste1 cup sugar1 cup flour1 tablespoon alum1 quart waterMix and cook until starch-like.Remove. Mix in 3-4 drops Oil of Cloves. Cover and store.
Have the children make something that they can use. This can becutting and pasting. or anything from building blocks to a paperweight. Try to make real the concept that man takes naturalproducts and changes them to meet his needs. When the class hasfinished the experiment above, have them discuss the followingquestions:
What natural materials did we start with and where did theycome from?
What proce-ses did we use to change the materials?
What will happen to the material in the item we made oncewe are finished with it?
What would happen if we needed this man-made product butcould not get enough of the flour, salt, or water?
1I
ACTIVITY 2: Exploring the Things That Are Used to Make Up TheChild's ManMade World
Go on a materials hunt with the children to see how manydifferent kinds of things are necessary to make up thecommunity, neighborhood, town, city, block where they live.
fake the children outside for a short Walk and try to find outhow many things are made of the following materials: metal,plastic, wood, glass, stone, rubber, leather, paper.
Let them either draw pictures or list some of the many thingsdiscovered that are made of these materials. Encourage them tofeel, listen, smell, and look at these things and to describe themin multi-sensory terms. Remind the children of tf-.:1 importanceof sharing and communicating well.
TEACHER'S NOTE: This outdoor experience should last only15-20 minutes or until the children have stopped discovering or lostinterest in the original purpose of the experience.
After the class returns from the walk, the following questionsmay be appropriate:
What kinds of things did you find?
What were some of these things made from?
How do you think some of the materials were changed inorder to make them into what they are now?
ACTIVITY 3: Playing "What Did It Used To Be?"
Show pictures of man-made things such as buildings, cars, desks,chairs, pencils, roads, clothes, and food, and ask the children totry to figure out what natural resources were used to make theproduct.
ACTIVITY 4: Reinforcing the Above Concepts with DramaticVisual and Language Arts Activities
The class now has enough of a discovery resource to do manydifferent kinds of activities over a long period of time that willreinforce the idea that: (1) the world has many things in it thatare man-made; and (2) all man-made things come from naturalresources. The following are some suggested reinforcementactivities that may be used.
Dramatics: Have each child in a short skit be a natural resourceand say how they turned from a tree to a desk, from rocks and
22

WORKSHEET etS
Draw a line from left to right between items that change.
12 23

minerals to a car, from rubber to a tire, from sunlight toenergy.For example:
The players:1 tree1 logger1 sawmill operator1 carpenter
Dialogue:Tree: Stands tall with arms outstretched.Logger: cuts down tree, takes it to sawmill and sells it tosawmill operator whoSawmill Operator: saws tree and sells lumber to thecarpenter whoCarpenter: makes a desk, chair, hose
Have the children put on one or more of the se short skits foranother class in the school or for themselves.
Art: Have the children draw a story picture. For example: letthem show how the building blocks got where they are, or howpaper was made, or how their clothing was made.
Language Arts: If children have the necessary language artsskills, let them write a story about how a natural resource wasturned into something that man uses.
TEACHER'S NOTE The objective in all of these activities is todevelop the concept that: (1) much of our world is man-made; and(2) even though it is man-made, we still depend on the basic naturalthings for our products.
EVALUATION:
Given the opportunity to discuss where man-made productscome from, children will demonstrate by their comments thatthey realize that all man-made materials are arived from man'schanging natural resources.
Given the opportunity to select man-made and natural productsfrom, Worksheet A-6, the children will demonstrate their abilityto do this.
Given the opportunity to draw a line on Worksheet A-6 from thenatural product to the man-caused/made change, the childrenwill demonstrate their understanding that all man-made productscome from natural resources.
Given the opportunity to answer this question: how long does ittake man to use a natural resource compared to the length oftime it takes nature to make it? Children will demonstrate bytheir answers that they are aware of the tremendous timenecessary for a natural resource to develop and the very shorttime it takes man to change it.
Section A INTERRELATIONSHIPS Topic VIGOALS: After this lesson children should:
Recognize the relationship between the living and nonliving partsof their world.
Recognize the relationship between natural and man-made items.
Recognize food chain relationships
Recognize interaction among living and non-living componentsof the environment.
TEACHER'S NOTE: In the first five topics the child has becomeaware of the general environmental situation that surrounds him anddivided this situation into manageable, logical study groups. TopicVI, Interrelationships, will help the child to put these study groupsinto proper relationship with each other.
ACTIVITY 1: Discussing Needs
Discuss with the children what they would need to take withthem if they were going on a trip into outer space.
Specific questions (such as: do we need to take some air, wateror food? Should we take clothing, toys, and books?) may behelpful.
Point out to the children that what they would really have tc dois take just about everything that they would need along withthem.
In a way the spaceship would be like the earth because it wouldhave to "provide" all of the materials necessary for life. Ask thechildren what would happen to the astronaut when things likeair, water, and food ran out. Would they have to return to theearth and fill up again in order to survive?
Ask the children how the earth is different from a spaceship.
Why don't we run out of air, water, and food?
How does the earth keep making more air, water, and soil?
TEACHER'S NOTE: The following activity will help childrendevelop general concepts by using small parts of the overall picture.
13
ACTIVITY 2: Building a Small Spaceship
Point out to the children that the spaceship they are going tobuild will really not go anywhere. It will recycle air, water, andfood. It will be very much like our earth. Here is a suggested wayto present this activity:
Let's build a spaceship for a very small astronaut. We knowthat astronauts are animals just as we are, and that animalsneed certain things. We have discussed how they need air,water, and food. How could we build a spaceship for a smallanimal that would provide these things on a continuing basisonce they were put into the craft?
Let's perform an experiment to see how this is done. We willsee how the parts of our world work together for oursurvivaL
TEACHER'S NOTE: This experiment will allow the children to seean actual system where life is being maintained because of theinterrelationship of natural, resources i.e., plants, animals, air,water, and soil. The purpose then is to demonstrate real interrela-tionship in a simple, direct, and identifiable manna.
Materials needed: (Cost, approximately $2.50)1 fish bowl about 10" x 10"1 female guppy1 male guppy1 small package of aquarium sand1 piece of Saran Wrap or non-permeable clear material tocover the top of the fish bowl1 bunch of Anacharis1 bunch of Hari Grass(All of the above materials can be purchased in a pet shop,)
Procedure:
a. Fill the bowl with tap water to within 14/2" to 2" fromthe top and allow to stand at room temperature for 24hours.
b. Rinse enough of the aquarium sand to cover the bottomof the bowl with 1" to 1-1/2" of the material. Put thesand into the bowl.

WORKSHEET A-6
auk all man-made things.
14 25
s

c, Anchor plants in bunches in the sand. Do not beconcerned if the plants seem to "fill up" the bowl, justmake sure they are placed so that there is some openwater on the surface.
d. Allow to stand until the water dears and particles settle.(About 15-20 minutes.)
e. Place the two guppies in the bowl, cover the top withSaran Wrap, and place near a window that will provide agood source of sunlight. Have a shade of some sortavailable to prevent the bowl from being overheated bydirect sunlight. Any piece of cardboard of paper will do.
TEACHER'S NOTE: This experiment was tried in connection withthe development of this curriculum guide and was most successful.The plants generated oxygen, the guppies ate the leaves, had babieswhich did quite well, and the whole system worked very nicely.However, any balanced system lice this can go awry. For example, afish may die from old age or disease. Things that are completelyunrelated to the experiment may happen. Point this out to thechildren before starting so that they will be prepared should anabnormality occur.
The folio Ong questions may help guide the children in theirdiscovery and observation:
What natural resources are in our world? This questionshould relate back to the children's original discovery of whatis necessary to support lifeair, water, food, soi', plants,animals.
What arc the nonliVng and living parts of the system we areobserving?
Clete does the air come from? (Children should see bubblesrising from the plants during times when the aquarium isexposed to bright light.)
Where do the plants get the materials they need to makefood?
What might happen if this Aperiment were con:meted in adark place?
What are the fish eating?
Would the fish cat other fish if they were in the tank? Whatmight this depend on?
How long could each of the animals survive in their presentsituation? What does this depend upon?
What would happen if we put in many, many plants?
Section A
What would happen if we put 4, 6, 8, 16, or 32 :ash in thefish bowl?
How is this little spaceship like our world?
What will happen to the leaves that fall from the plants ontothe soil? Remember our experiment with the small rocks inActivity 3, Topic IV?
What happens to the food that passes through the fish?
Can you think of things that you have discovered outsidethat may be similar to what is going on in our spaceship?
What would happen if you took the plants out of the water?
What would the fish be deprived of?
ACTIVITY 3: Explaining Interrelationship and Survival
It is important to point out to children that while the survivalneeds of the small astronauts (fish) and real astronauts in a spacecapsule are the same i.e., food, air, and water the astronautsgo about survival in a different way. Because their time in spaceis limited they carry all food, water, and air necessary for theirstay in space. They must return to the earth before theiravailabte resources are gone.
The earth is very much like a spaceship in that everything neededfor the maintenance of life is cn the earth and the earth istraveling through space and interrelated to the sun by gravity.Natural processes called interrelationships that start with thegreen plants and sunlight allow continuation of this journeywithout returning to another planet to "store up" food, air, andwater. These processes will continue as long as the sun shines andman does not disrupt the natural relationships that surround himand arc necessary for his survival.
ACTIVITY 4: Reviewing Necessary Activities
Review with the children any of the Activities 1-3 that may beappropriate at this time. Remember that the intent is to breakthe vorld down into study groups, not to have the childrenthink thi: the parts of their world stand alone.
EVALUATION:
Giver. the opportunity to answer the questions in Activity 2.children will demonstrate that they understand the relationshipsthat exist among the environmental components (air, water.plants, animals, soil) that , ley see in the fish bowl.
Ira discussing Master A-1, the chPairen will dcmonstrat- theirunderstanding of both the natural and man-made processes.
Topic VII
PEOPLE WHO TAKE CARE OF OURNEIGHBORHOOD AND OUR WORLD
GOALS: After this lesson children should:
Recognize that there are men and women who care for andmaintain the natural and man-made world, and that they maketheir living doing this.
Appreciate these occupations and recognize the importance ofeach one.
Begin to develop an awareness of the world of work in thenatural resources in particular, and other occupational areas ingeneral.
15
ACTIVITY 1: Talking About Caring For
Go over the meaning of the term "to care for." The followingquestions will help:
How should we take care of ourselves? We want to be clean,well fed, warm, and in good health.
How would we take cat of our favorite toy? We know whereit is. We keep it from being broken. We try to keep it dean.
What do we do to take care of our pets or plants?
Who helps us to take care Gi our classroom?
26

MASTER Al -
16
27

ACTIVITY 2: Learning About the People Who Care for the School
If the custodian in the school relates well to the children, it maybe a good idea to have him come into the classroom and help thechildren understand how he takes care of the school.
What would happen to our classroom /school if we didn't havepeople to help us take care of it?
What other kinds of people do we know about who help us takecare of the man-made world around us?
ACTIVITY 3: Exploring Other Occupations That Involve TakingCare of a Part of the World
Using old magazines or newspapers, have the children cut out asmany pictures as they can find of people working. Remindingthem how they have learned to divide information into studygroups, ask the children to divide their pictures into groups ofpeople who are caring for something (mechanics, garbage men,street cleaners, road repairmen, window washers, doctors, nurses,parents, camp counselors, gardeners, farmers, forest rangers,custodians, policemen, firemen, zoo keepers); and who arepetforming a service or producing something (bricklayers,mailmen, bankers, butchers, factory workers, tailors, and sales-men).
Have the children develop a collage or bulletin board of men andwomen who take care of their world. This would involve only,those pictures of people who are caring for something. Let thechildren work in groups and each do a section of the display.Sections may be: people who take care of our world; people whomake things, and people who perform services (such as teaching,selling, and deliveries).
Encourage the children to observe someone who is taking care ofsome part of their world and be able to come back to theclassroom and tell the other children about it. This may happenover a long period of time. From these observations it may beappropriate to develop a list of people who take care of theiractual surroundings.
ACTIVITY 4: Going on Field Trips to Find Out About People WhoTake Care of Things
If a field trip is planned to a fire house, police station, or farm,this series of lessons may well fit into pre-trip and post-tripactivities.
ACTIVITY 5: Figuring Out a Puzzle
Using Worksheet A-7, have the children cut out and put togetherthe puzzles that match a person to his occupation. Thisworksheet is designed as a puzzle because there are someoccupations that the children may not be aware of. Thisworksheet is more of a teaching aid than an evaluation tool.
Have the children discuss those occupations shown in WotksheetA-7 that involve taking care of natural resources and theman-made world. Have them figure out which of the following
titles might apply to natural resource workers; fish protector,gardener, forester, air pollution tester, and refuse collector.
Help the children to see that there are many occupations in thefield of environmental protection or care, and that because thereare so many people in the world, people must constantly be onthe alert for natural resource problems.
ACTIVITY 6: Helping to Take Care of the World
Ask the children how they might help to take care of theirworld, and what kinds of things they might do to show peoplethey care.
Have the children go out or the school grounds and each pickupone piece of paper: it doesn't have to be very large. Chewinggum wrappers and things of that nature are fine. When thechildren come back into the room, have them smell a mayon-naise jar filled with fresh water from the tap. After this, havethem put the trash into the water and close the top. Smell thewater again each day until the point has been made that trashreally does affect water.
Ask the children these questions:
If there are enough trash men and street cleaners to goaround, why do we still see litter and trash on our schoolgrounds?
Would you rather see the city or county spend money onmore trash men or on more parks and play areas?
How can all of us help to keep the places where we live,learn, and play clean?
The effects of litter may also be shown by using the bean seedand some good potting soil as in Activity 3, as compared to abean seed in some soil that is about 1/2 litter and 1/2 soil.
EVALUATION:
Given the opportunity to answer the question: "Who helps totake care of our man-made world?" children will identify thosewho are a real part of the child's world and are truly "careoriented."
When children are asked, after Activity 5 in this topic, toidentify those people who help us take care of our naturalresources, they will demonstrate their ability to recognize thoseoccupations.
Given an opportunity to be exposed to an area on the schoolgrounds or in the school that has litter, the teacher will see
children demonstrate their awareness of responsibility for caringfor the environment by voluntarily picking up litter anddepositing it in a trash container.
Given the opportunity to see his/her children use paper andhaving to throw it away, teachers will observe an increased use oftrash cans and a decrease in the number of times children throwpaper on the floor or ground.
17 04;0

WORKSHEET A-7
Cut out the puzzle pieces and assemble the puzzle matching theworker with his work.
18
29

Sectior' B NEEDS Topic IGOALS: After this lesson children should:
Be aware of the fact that human beings have two kinds ofneedsphysical and emotional.
Know that the life-sustaining or physical needs are food, air,water, shelter or protection, and land space.
Know that food, air, water, shelter and/or protection come fromnatural resources.
Be aware of the fact that a happy, healthy life on this planetdepends upon meeting both physical and emotional needs.
Know that needs are often interrelated.
TEACHER'S NOTE: Review Topic II, Section A, "Living Things,"with special emphasis on the needs that all living things have incommon, i.e., food, water, air, and the need to move, grow, andreproduce.
ACTIVITY I: Identifying Needs
After the above review, ask the children the following questions:
What other kinds of needs do animals have? Let us take alook at ourselves and see if we can think of needs that wehave that are not really necessary to keep us alive, but maywell be necessary to keep us happy.
Do we need friends? Do we need love?
Do we need space to rr.3:e? Do we need to play? Do we needtime to think and be creative? Do we need to learn? Do weneed to share?
TEACHER'S NOTE: The deductive approach may be successful inpresenting these questions. For example:
What would we feel like if we had no friends? Do you think youcould be very happy if you were the only person on earth andhad al the food, clothing, toys, and money that you could everwant?
If the the above situation should arise wliat would you wish formost? (Children's answers to questions of this type may vary inthat they will mention particular kinds of people, i.e., parents,sisters, brothers, friends, and pets. All answers, however, shouldbe in the people category and will give you an excellentopportunity to point out that, without other people to sharethings with, material possessions mean very little. So friendsshould be considered both a need and a resource.)
ACTIVITY 2: Identifying Differences Between NeedsCon-veniencesComforts
Now that the children have explored the kinds of human needs,have them identify or define the words "geed" and "comfort."
For the purpose of this discussion, a need is something that isabsolutely necessary for physical and emotional survival. Acomfort is something tat appeals to people, may make lifeeasier, or may give pleasure, but is, not absolutely necessary forsurvival. We might call these happiness needs.
ACTIVITY 3: Making Decisions About Needs and Comforts
Using Worksheet B-1, have the children cross off or color over allof those things that they could get along without,
TEACHER'S NOTE: Worksheet B-1 gives teachers the opportunityto find out what students think is necessary for survival as well ashappiness. It is important to note that many children will viewthings like toys, cars, and other things as absolute needs. Theobjective here is to help the children to become aware of the factthat the real needs are play and movement. Toys and cars are thethings that man has produced to help meet the needs.
19
Continuing the use of Worksheet B-1, have the children put an(X) inside those boxes that picture a survival need and an (0)inside those boxes that depict a happiness need.
Now ask the children if they can put a priority on the needs thatthey have identified. Which of the things we have identified asneeds are more important? Less important?
TEACHER'S NOTE: The exercise above will be completed indifferent ways by different children. A child who lives right next toa grocery store may not see the relationship between food andtransportation as readily as one who lives far enough away from theretail food market. Use this exercise to determine what the childperceives as a need, and go on from there.
ACTIVITY 4: Combining Happiness and Survival Needs
Point out to the children that a happy life depends upon aproper combination of the things needed to eat, drink, andbreathe as well as the things that make them happy. Again, somedeductive exploration may be helpful here. Explore the need forspace.
Mark out an area on either the floor of the classroom or out onthe school grounds that is 25 square feet. The shape can beanything from square (5 feet by 5 feet) to rectangular, just aslong as a particular amount of space is identified and defined.
Have the class sit around outside the defined space, and haveoneclass member at a time get up and sit in the marked out areauntil there is no more room for anyone. Have the children countthe number of people in the area and divide that number intothe amount of square feet. This should come out to about onesquare foot per student.
TEACHER'S NOTE: This may be an excellent opportunity tointroduce the word population and the term population density ornumber of people in a given amount of land space.
Ask the children what they like or don't like about being in asituation where they only have a limited amount of space.
The following questions may help to make the point:
What kind of things can you do better in a crowded area?(Talk, keep warm.)
What kind of things would you not be able to do if you hadto stay in this situation, assuming that you would be able tohave food, air, and water to take care of basic survival needs?(Couldn't move or exercise, would get sore, couldn't play, liedown, or go to sleep.)
What would happen if we couldn't have our air, food, andwater brought in? Would we have enough space to growfood? Would enough rain fall on this amount of space toenable us to meet our water needs?
Do you think our behavior toward each other might changeafter a period of time in a crowded situation? (There mayhave already been some pushing and shoving as your childrenstart to crowd into a small space. It may be appropriate touse incidents of this nature to emphasize the point that manypeople crowded into a small space may cause a change in theway they treat each other.)
Ask the children to note the kinds of situations where theymost often observe misbehavior. Are these situationscrowded or uncrowded?
ACTIVITY 5: Using Mathematics to Figure Out Space Needs
A math opportunity: This is a very good opportunity tointroduce or use some averaging and measurement techniques inconnection with this lesson.
30

WORKSHEET B-1
Color all the things you could do without. Put an (X) inside thoseboxes that picture a survival need and an (0) inside those boxes thatdepict a happiness need.
Al rit(
\'''------______-
--. -,..-...-
.,,;,,
., in,,000T:NyCil
.,
400 #:. W:4 t;:. 44 7 ..
,,
& 04r v
l.
ffrr
*op
. . sb
oliN, .
1-
v-5
r tie1.11A11
411 /._--AL 111)31 mg) VIII°
,,
,09/1)-rj
.. - -,---------, . - ---....
II
IL
20
31

Give the children the opportunity to work on very real wordproblems such as:
How much space do we have in our classroom per pet ;on?
No. of sq ft(length X width) = sq ft/person (room to work)
No. of people in class
How much space do we have per person on our playground?
No. of sq ftin play area
No. of children whouse it at one time
sq ft/person (room to play)
The following measurement techniques may be helpful:
Teaching children to pace using set theory (see Figure B-1).
a. Mark off an area on the school grounds that is 100 ftlong. This is a number line.
b. Have each child bring a pencil and some paper to writeon.
c. Have each child walk from one end of the number line tothe other. Count the number of steps and put this downon his paper.
d. Askthe following questions:
How many sets of your steps are in a 100 ft number line?
How far do you go with each step you take?
Formula:Number
00of steps
No. ft/step1
ACTIVITY 6: Exploring the Need for Food
Have the children recall Activity 4 where they were crowdedinto the small area and ask these questions:
Suppose there were 30 people in the area but only enoughfood for 25 people. How would this affect the group?
Would the whole group have less to eat than they should, orwould they simply decide to select 5 people and move themout? What if there were no other place to go?
What might be the situation in the space if the animals wererats or dogs or cats? Would they fight for the food? Wouldthe weakest member of the group suffer the most? Wouldthey decrease their own population?
TEACHER'S NOTE: Most animals naturally control their numbers,and this control depends entirely on the amount of food and otherresources available to the particular population. Human beings, onthe other hand, are able to solve problems in a way that mightbenefit or be for the good of the whole group, if these problems canbe identified and people are willing to put forth the time and energynecessary to solve them.
W.W.II. ...MO.
ACTIVITY 7: How Much Food Does One Person Need?
Food requirements for an individual always depend on theamount of energy used by that person per day. If a child is veryactive or has a high metabolic rate, he will bum up more energythan one who is not active or has a low metabolic orenergy-using rate. Energy is measured in calories. Calories areunits of measure that tell us how much energy has been used.They are like feet, inches, and pounds.
TEACHER'S NOTE: The technical definition of calorie is theamount of heat required to raise one liter of water (a little morethan a quart) one degree centigrade.
The average child in the third and fourth grade will need about2,100 calories per day. Ask the children to figure out how manycalories they are using per day. Use a calorie/food chart and haveeach class member list the kinds and approximate amounts offood they eat for one day. Figure total calories and then averagethem for each class member. Have the children compare theamount of food they eat to the amount of activity they have.Point out to the children that each person will vary in theamount of calories they need, since individual calorie require-ments depend on basic metabolic rate and amount of energyneeded.
Food Value: Not only are proper amounts of food necessary forenergy requirements but food must also have materials thatenable the body to grow and function properly.
Essential substances in all foods include carbohydrates, fats,proteins, minerals, vitamins, and water.
The following list shows how the body uses each of the above:
Carbohydrates and fats-Fuel for energyWater-Body structureProteins-Body building (muscles)Minerals-Bones, blood, glandsVitamins-Regulators that help control the way our body
works
How do we know we are eating the right kinds of food?
A good guide to proper nutrition and one that fits into the studygroup format is the basic four food groups:
1. Milk and milk products
2. Meat, poultry, fish, or eggs
3. Bread, flour, cereal (whole grains)
4. Fruits and vegetables
If one eats food from all of the above groups in the properamounts he will have what is called a balanced diet - that is, onethat will supply both the body's energy needs and the materialsneeded for growth and proper functioning.
Now MAMY 5Ers ofMY 57-E.P. GALA- FIT--
9010 100' FEET"?
100'Figure B-1
21
32
.101 1

TEACHER'S NOTE: Use any materials or information availableand appropriate to help children understand why they need foodand the kinds and amounts needed. Suggestions would includescience curriculum guides on health, as well as information and helpfrom the school nurse or physical education teacher. The importantthing here is to have the children become aware of the need for foodin the proper amounts and kinds.
ACTIVITY 8: Exploring the Need for Air
Food taken into the body is actually burned just like the gas in acar or the wood in a fire. Anytime something burns, it requiresoxygen from the air. The following experiment will show this tothe chilar an.
Procedure:
Light a candle and put a glass over it until it goes out. Askthe children what happened. Why did the candle go out?
Relight the candle and put the glass back over it. lust as theflame starts to go down, tilt the glass up and allow more asin. This will allow the flame to burn brighter. This is lice
breathing As air is used we take another breath and replenishit. rs
The amount of air needed is like food in that it depends uponthe amount of fuel (food) being bumed and this depends uponthe amount of work we are doing.
Ask the children:
Why do you breathe more often and harder when you runthan when you are sitting still?
EVALUATION:
Given the opportunity to answer the question: What are twothings we all need? children will demonstrate their awareness ofphysical, emotional, or psychological needs.
Given the opportunity to choose between true needs andcomforts, children will select food, air, space, and water as trueneeds and other things as comforts, wants, pleasures or whateverterm is satisfactory to the teacher.
Given the opportunity to answer the question: why do we needfood, air, water, space? children will demonstrate a knowledge offacts that are appropriate to their learning level.
Section B NATURAL RESOURCESGOALS: After this lesson children should:
Know that natural resources fall into seven basic study groups orareas which are air, water, soil, plants, animals, minerals andmineral fuels, and land space.
Be aware of the relationship that exists betweenresources and the physical needs of man.
natural
Have a stronger understanding of the interrelationships among allnatural resources.
Develop an understanding of the word resource and thedifference between natural and other resources.
ACTIVITY I: Understanding Wise Use of Resources
The development of a wise use concept with children starts byusing something with which they all are familiar words. Pointout to the children that language is a very valuable andimportant resource, and that it should be used well. Ask thefollowing questions:
What are some of the ways that we use our language andwords?
Sharing ideas, communication, learning from the writtenword, expressing our feelings and emotions?
What ways might we use words .unwisely? By talking whenwe should be doing something else or by saying somethingunfair that may hurt someone else's feelings? By writing onthe walls of buildings or on desks and chairs?
TEACHER'S NOTE: It may be appropriate at this time to reviewSection A, Topic I, Activity 3, "Sharing Information".
What other kinds of things do we have that are not reallyproducts or objects, but should be valued.
Time: Time may be one of our most important resources. Arewe using our time well?
Friends: How unimportant everything would seem withoutother people to share things with. How do we use ability tomake people happy?
Love: Do we spread our love around? Are we aware of theimportance of having people love us? How do we treat thepeople whom we love? What makes us love someone?
Topic IIThoughts: Do we use our ability to think as best we can? Whatare some of the ways we use our thoughts wisely and unwisely?
Resources: Ask your children to define the word resources.Using ideas above, help them to develop the concept that aresource is anything that is available for valued use or has humanutility.
What other kinds of things do we have to use?
Review the needs of living things with the children and ask themto list the things that they use to meet these needs. WorksheetB-2 is suggested as an aid in this effort.
ACTIVITY 2: Exploring Things That Are Used
Give each child a copy of Worksheet B-2.
Have the children keep the sheet for 2 to 3 days and as they goabout their daily routines, have them list the things that they useor see being used to accomplish the activities listed on theworksheet. Point out to the students that this assignment is abasis for discussing resources in general, and that they can putdown as many or as few items after each activity as they wantto.
The purpose of this exploration and discovery activity is toreinforce the resource-use relationship and to give the childrenan opportunity to think about where the things they use comefrom and the way they are developed.
After the children have completed their lists, discuss thediscoveries with the whole class, and encourage the students tofill in on their worksheets new thoughts from the discussion.
ACTIVITY 3: Discovering Where Resources Come From
Define the word natural as something that occurs without man'sintervention or is a product of a natural process.
A natural resource is something we use that occurs naturally,without man causing it to occur.
Using Worksheet B-3, take the children on a short walk aroundthe school or through the community and have them rediscoversome of the things they use and try to list them next to thenatural resource that was used to make them or to make themwork. Some items will be put under several natural resources.
22
tit)

WO
RK
SHE
ET
84
Lis
t the
thin
gs th
at y
ou u
se to
acc
ompl
ish
thes
e ac
tiviti
es.
Eating
------- Sleeping
Moving
Transportation
Drinking
Piaying
_---
Communicating
Learning
Sheltering &
Protecting
Energy
Cleaning

WO
RK
SHE
ET
S-3
Lis
t thi
ngs
in y
our
com
mun
ity n
ext t
o th
e na
tura
l res
ourc
e th
at w
as u
sed
to m
ake
them
.
What Do We Make From:
-
Air
Water
Soil
Plants
Animals
Minerals
Space
:*.

Discuss the children's discoveries with them and ask them if theydiscovered anything at all that was made from something not.onthe list.
TEACHER'S NOTE: This question may lead to some interestingdiscussion and some excellent teaching opportunities. For example,what if a child should find something made of plastic? It will not beobvious to the child where plastic comes from or what naturalresources are used to produce it. Many answers to these questionscan be found in the library under "Uses of Wood," "How Steel isMade," and other articles. Give the children the opportunity toanswer the less obvious questions by doing a little research into thematter. Encourage them to use the problem-solving approach.
EVALUATION:
Given the opportunity to define the word resource, the children
will demonstrate an awareness of the fact that a resource isanything that has human utility or value.
Given the opportunity to define the term natural resource,children will demonstrate their Irlowledge of the fact thatnatural resources are those thins :sat occur naturall7 and areused to sustain life.
Given the opportunity to complete Worksheets B-2 and B-3,children will perform these tasks to the satisfaction of theirteacher.
When asked to put the natural resources into study groups, thechildren will demonstrate their knowledge of the fact that thenatural resources are air, water, soil, animals, plants, mineralsand land space.
Section B Topic IIICHANGES IN NATURAL RESOURCES
GOALS: After this lesson children should:
Understand the environmental effects of natural resource usethat involves changes that are not caused by man but are a partof natural process.
Understand that man made changes often have the effect ofremoving material from the natural resource reserve and thatthese changes can be physical or chemical.
Understand that there is a limited amount of matter and that itmust be recycled in order to have enough natural resources.
ACTIVITY 1: Discovering What Matters Most with Matter
What matters most with matter is that it is finite there is onlyso much to go around.
Fill three or four clear drinking glasses with different kinds ofmaterial dirt, marbles, sandpaper anything will do as long asit is matter. Place the glasses in front of the room and ask thechildren what all four things have in common. What can be saidabout all of them? Do they have weight, and do they occupyspace?
Define matter formally as anything that occupies space and hasweight.
ACTIVITY 2: Understanding Physical Changes in Matter
Physical change is any change in size, shape, color, or texture,with the basic natural product or matter remaining what it wasto start with.
Using modeling clay, have the children make Anything that theywant to so long as it would be useful to them or to someone else.Pencil holders, paper weights, or ash trays will do.
When the children have finished, ask these questions:
How did you change the clay?
Did you change its size, shape, weight, texture?
Is it still clay?
Is clay a liquid, a solid, or a gas?
Does the clay have weight and occupy space?
What will happen to the clay when we are finished with it?Can it be used again?
How do we change wood into the things we can use?
Ask the children to look around the classroom and find thingsthat were once a tree. Desks, tables, chairs, pencils, papers are all
25
good examples. Of all these things, which one has changed themost? Paper?
ACTIVITY 3: Making Paper
Materials needed for each 4" x 4" shaet of paper:
100 wooden matchsticks or pieces of soft wood the size ofmatchsticks.
1 glass jar that will hold the matchsticks and bleach, and willfit into the coffee can.
1 piece of window screen, 4 "x 4 "1 one-pound coffee can1 cup of laundry bleach (with chlorine)
Procedure:
a. Break off all match heads. Take them outride and burnthem or otherwise dispose of them in a safe manner.
b. Place matchsticks and 1 cup of bleach in jar and put coveron jar loosely.
c. Paint ..iffee can flat black. (This will cause the reaction tooccur faster.)
d. Place jar inside of can and cover the top of the can withthe lid.
e. Place the can in a sunny spot for 2 to 3 days, until woodfibers start to be suspended in the solution when the jar isslightly shaken.
f. When the whole solution is filled with fibers, stir thesolution with a stick to loos -'n any remaining fibers fromthe matchsticks.
g. Using tongs, remove the matchsticks from the solution.
h. Allow the fibers to settle to the bottom of the solution.
1. Very slowly pour off as much bleach as possible. Somefibers will be lost but there should still be plenty left tomake paper.
j. Add one cup of water to the fibers and shake until allfibers are in suspension.
k. Allow fibers to settle and pour off "rinse" water.
I. Add another cup of water and shake again, until all fibersare suspended.
rn. Pour the solution into a flat pan that is large enough tohold the 4" x 4" screen. Slowly move screen around untilfibers have completely covered it.
uu

n. Gently lift the screen out and place it in a warm (not airy)place to dry.
o. When the material is dry, scrape one corner gently with afingernail until it comes away from the screen, then gentlyremove the completed sheet of paper.
TEACHER'S NOTE: Regular bleach is about 5 percent sodiumhypochlorite. If the children do this experiment, make sure thatthey do not get the bleach into their mouth or eyes, and do notbreathe the fumes for a long period of time. For third and fourthgraders, this may be a teacher-centered demonstration rather than astudent activity.
Physical changes usually do not have the same kind of effect onthe environment as do chemical changes because they are reallyonly a rearrargement of a naturally existing material.
Have the children look at the fibers in the sheet of paper andpoint out to them that even though the wood has changed form,it is still basically wood that has been rearranged.
ACTIVITY 4: Understanding Chemical Changes: Making Charcoal
Chemical changes are those that actually remove a naturalmaterial from the resource bank by converting it to energy, orcause a material to form that is so different and so strong in itsconstruction that it may not go back into the natural cycle for avery long time.
it may be appropriate to discuss atoms and molecules with yourstudents at this time. This decision will depend on the sciencecurriculum schedule for the school system and the teacher'sassessment of the readiness of the children.
Charcoal is made by the burning of wood in a situation wherethe amount of air is controlled. There is a very good opportunityhere for a social studies lesson.
The production of iron in this country used to depend on theproduction of charcoal. Why did they use charcoal instead ofcoal or wood? Why is charcoal used for grilling food?
Charcoal is made by a man called a charcoal burner.
Prepare an overhead transparency from Master B-1 and explainthe production of charcoal to the children. The following stepsmay be used as a guide:
Wood, generally hardwood, was cut into lengths of aboutfour feet and stacked in a circle with a hole left in the middle.This same procedure was followed on the second level of thecharcoal hearth (Frame A).
The whole thing was covered with leaves and dirt except for ahots in the very top. This hole was used to control theamount of air that was allowed to get in (Frame B).
The Cue was started in the center and allowed to burn veryslowly. The charcoal burner's job was to keep the fire goingand to control the amount of air going into the Cue (FrameC).
After about 2 weeks the wood was turned to charcoal andwas ready to be transported to the iron furnace for use inmaking iron (Frame D).
26
TEACHER'S NOTE: There are several activities that may make thismaterial more meaningful to the children. The most important pointto make is that there was a definite relationship between trees andiron production.
Mathematics problems may be developed from the followinginformation:
A cord of wood is a pile 4 feet high, 4 feet wide and 8 feetlong.
It takes 12 trees that are 24 feet high and 8 inches around tomake 1 cord of wood.
It takes 1 cord of wood to make 15 bushels of charcoal.
It takes 180 bushels of charcoal to produce one Um of iron.
Discussion points:
Energy given off when charcoal is used is not recyclable butthe actual matter that made up the wood is. The carbon,hydrogen, and oxygen are changed and put back into theenvironment as either smoke or ashes. Natural processes thenturn this matter back into wood material and photosynthesisstores more energy in the wood.
TEACHER'S NOTE: The activities above are examples of how manhas changed parts of his environment to meet his needs. It is veryimportant to point out to the children that man changes things veryfast. If the climate gets too cold for him he simply gets into a car orplane and mows on, or goes into a heated building, or puts on acoat. All of these solutions to the problem of being cold require atremendous use of natural resources, whereas natural changethrough adaptation occurs rather slowly and, from our point ofview, much more tragically. For example, caribou are migratinganimals. Eacjr year they must move from one range to another inorder to meet their needs. If, for some reason, they were deprived ofthe ability to move, there would be a few individuals in the herdthat would be able to tolerate a particular set of conditions wherethe herd was located. These individuals would be more likely tosurvive and produce offspring which would, through heredity, have asimilar tolerance for-these conditions. Over a long period of time theanimal would change but the resources would remain the same. Thisis not the way of man. He changes very slowly, but can changeresources very rapidly.
EVALUATION:
Given the opportunity to define matter, children will say orwrite "matter is anything that has weight and occupies space."
Given the opportunity to observe chemical and physical changesselected by the teacher,. children will be able to differentiatebetween the two and to describe tht environmental implicationsof each kind of change to the satisfaction of their teacher.
Given the opportunity to answer the general question "Whathappens when material is used for energy?" the children will giveanswers that indicate an understanding of the fact that energy isreleased, never to be returned, but that "matter" or materialdoes return to the environment.
:17

Fram
e B
Fram
e C
---
-Fr
ame
D

Section B THE EFFECT OF MAN'S Topic IVUSE OF NATURAL RESOURCES
GOALS: After this lesson children should:
Understand that man's use of natural resources has a qualitativeand quantitative effect on them.
Explore and understand their own personal effect on the use ofnatural resources.
Understand the need for man to use natural resources wisely.
ACTIVITY 1: Exploring Individual Use of Water
TEACHER'S NOTE: The exploration of individual water use willrequire either a review of the measurement techniques in-olved orthe teaching of these techniques at this time.
The children should know or be taught that:
There are 16 ounces in 1 pint.There are 2 pints in 1 quart.There are 4 quarts in 1 gallon.
Obtain some 8 ounce plastic or paper cups from any grocerystore along with pint, quart, and gallon containers. Each childwill need a cup.
The following is an example of how this may be presented.
We are going to figure out how mush water we use per day as aclass. First, let's consider some of the ways we use water.
We drink some. We wash with some. We use some to carryour waste products away when we go to the bathroom.
Procedure for Measurement:
Some of the mathematical tools we will be using will bemeasurement, ratio and proportion, and averaging.
In order to measure we must have a container that we knowsomething about. The cups that you have been given hold 8ounces of water. It takes 4 cups of water to make 1 quart and4 quarts to make 1 gallon.
Question: How many cups are in a gallon?
Answer: 4 cups/quart x 4 quarts /gallon = 16
We want to use gallons for our final figure because It is a mucheasier set to remember.
There are many ways we could measure the amount of water weuse, but we want to try to figure out the way that will give usthe best answer with the least difficulty.
We could have every person in class simply measure each andevery drop of water he uses and record the results, but thiswould be very time consuming and difficult to do. Instead, wewill develop a way to take samples of how much water theaverage person uses for the three things mentioned at thebeginning of class.
An average is one number that stands for a series of numbers. Ifthe numbers in the series are all the same, then the average isthat number. Usually thhe numbers in a series are not the same.Then we add he numt rs and divide the total by how manynumbers there are in the series. This gives the average number.For example:
If we have 5 people who drink the following amounts of milkper day - (1) 12 oz, (2) 15 oz, (3) 10 oz, (4) 12 oz, (5) 16oz, we could say that the average for this group would be 13oz of milk per day.
Officials of our town, city, or country must figure out how
28
much water the community needs per day, month, or year.
Have the children make a chart for keeping their records. Designthis chart according to the particular need of the class. It maylook something like Figure B2. Have the children make a chartfor each day of the CY petiment
DAY 1
1 2 3 4 5 6 7 8 9 10 11 12 T A Oz Qt Gal
Drink
Wash
Bathroom
Total
Numbers:
T:
A:
Oz:
Qt:
Gal:
Total use:
Figure B2
Number of times
Total times
Personal Average (see below)
Total ounces for activity
Total quarts
Total gallons
Add up all gallor.:t
Average/day/person =Total Use Average amount per person
No. of Days per day
The first thing we must do is figure out how much water wedrink on the average. This can be done during the school day.Pass out the plastic glasses or paper cups and ask the children touse only these whenever they get a drink during the school day.Mark the cups in 8 even segments so that a child can determinehow many ounces he or she drinks.
Have the children simply put on the chart the number of timesthey drink water during the day and the amount they drink eachtitn. :!..-4, measure with their cup.
If a child (Links 4 times with the quantity each time being 4ounces, 8 ounces, 3 ounces, and 5 ounces, then his average perdrink is 5 ounces per drink. Let the children measure as many asthey want, so long as they don't make a drinking contest out ofit.
When each child has figured out the average amount of water hedrinks, have him put this figure on his chart under average drink(A).
To figure the amount of water used for washing, have the childcalculate how much water comes out of the faucet when hewashes his hands one time. Do this by having a team of two,with one measuring at another sink while one washes. In otherwords, as Child A washes his hands, Child B runs thc water inanother sink for the same amount of time snd measures it withhis drinking cup. Figure an average for the whole class and haveeach child insert this figure in the average column for each day(A).

,
29

Accept as valid the average figure of 6 gal/flush for toilet useand avoid measuring, which may cause some sanitary problems.Have the children put 6 gallons in their Bathroom A column foreach time.
Now all the children have to do for 3 days is count the numberof times they take a drink of water, wash their hands, and go tothe bathroom.
Put a mark down for each time, total them up, multiply to figuregallons, and average the days. This will give the amount of waterfor personal use per day.
TEACHER'S NOTE: It is very important to point out to thechildren that there were many things that were not included becauseit would be difficult to calculate them. These were such things asshowers, baths, washing clothes, water contained in food and drink,and the water required to make products and grow food. The totalamount of water used per day for every person in this country isestimated to be about 1,800 gallons. If this is hard to believe, thefollowing facts and figures may be of interest:
It takes about:
300 gallons of water to make 1 gallon of beer,10 gallons of water to refine 1 gallon of gasoline.250 tons of water to make 1 ton of wood pulp.325,800 gallons of water to raise 1 acre of alfalfa.600 to-1,000 tons of water for each ton of coal burned in a
steam power plant.
Therefore, it is very important that children become aware oftheir own personal effect on the use of this one resource, water.
ACTIVITY 2: Exploring Man's Effect on Water Quality
Discuss with the children what happens to water after it is usedby us.
Prepare an overhead transparency from Master B-2, and ask thechildren, "What happens to the water after you use it?"
TEACHER'S NOTE: Cover each step of Master B-2 with a blanksheet of paper, if it is used as a transparency. Local situations willdetermine just how far one can go. In other words, Master B-2 startswith water going down the drain, from there it goes either directlyinto the soil (cesspool, filter pond), into a septic tank system, orinto a community filtration system. Choose the one that isappropriate to your situation and discuss each step with thechildren.
The following questions may be helpful:
What happens to water after we use it? Where does it go?
(Show the children on the transparency that it goes eitherinto the soil, into a septic system, or into a sewage treatmentsystem. Choose the appropriate one and continue.)
How is waste water and sewage cleaned as it goes into thesewer or septic system?
TEACHER'S NOTE: Explain that there are very small animals, sosmall that they could not be seen with the naked eye but wouldhave to be looked at through a microscope. These animals, calledbacteria, live in treatment systems and actually eat the wastematerial in the dirty water and change this material back intoharmless matter. After this, the water is filtered by having it runthrough a series of rock, sand, or soil filters that allow only cleanwater to pass through. It is very appropriate at this point to take thechildren on a field trip to a sewage treatment plant, if this ispossible. If not, the following exercise may help the children tounderstand how water is treated after it is used.
30
ACTIVITY 3: Making a Filter System
Materials needed:
B
A
1 plastic milk bottleA small bag of sand (enough to put 1-1/2" in bottom of
bottle)A small bag of aquarium gravel,(enough to put 1-1/2" on top
of sand)A small bag of crushed stones about 1/4" across (enough for
1-1/2" on top of aquarium gravel)
Procedure:
a. Cut the top off of the milk bottle.
b. Punch holes about every inch or so around the bottom ofthe bottle.
Figure B-3
cut
punch holes
c. Put in 1-1/2" of sand, 1-1/2" of aquarium gravel, and 1-1/2"of crushed stones (Figure B-4).
Figure B4
1/4" stones
aquarium gravel
sand
d. Place the filter in a collecting pan (anything will serve thatwill hold the water once it has passed through the filter).
Figure 13-5
e. Take a glass of water from the tap and put some dirt orsoil in it. Stir until well mixed and pour slowly into thetop of the filter. Repeat this until the water level in thefilter reaches the top of the gravel and allow the water toseep slowly through the filter medium. It may benecessary to repunch the holes from time to time if thewater does not flow.
Ask these questions:
What happened to the dirt that was in the water?

Would you be satisfied to have this water go back into astream or river after filtration?
How much sand and gravel might it take to filter all of ourwaste water?
How much do you think it might cost to do this kind oftreatment?
What would happen if we just dumped dirty water into ourrivers and streams?
TEACHER'S NOTE: It is important to point out to the childrenthat this is just one example of man's effect on one resource andthat man has an effect on each resource he uses. These effects areusually quantitative and qualitative.
EVALUATION:
Given the opportunity to observe children using water, the
teacher will note behavior that in her judgment indicates anawareness of wise use.
Given the opportunity to tell their teacher the amounts of waterthat they use during an average day, children will demonstratethat they have gained correct knowledge about their use ofwater.
Given the opportunity to tell what happens to water after it isused, children will demonstrate their knowledge of the fact thatpeople make water dirty and must therefore clean it up afterthey use it. Knowledge about methods of filtration and watertreatment will at this point depend on the teacher's judgmentabout the child's readiness to learn these concepts.
Given the opportunity to answer the question "In what twoways do people affect natural resources?" children will demon-strate by their answer that they know that people have both aquantitative and qualitative effect on water resources.
Section B Topic VUSING RESOURCES WISELY
GOALS: After this lesson the children should:
Understand that all things must be considered resources and usedin the most desirable ways.
Recognize the importance of wise natural resource use.
Become aware of some of the desirable ways they personally anddirectly use natural resources.
Begin to recognize some of the indirect ways in which they canhelp by being selective in choosing certain kinds of products.
ACTIVITY 1: Learning About Alternatives with a Story
Conservation means wise use and sometimes wise use meanspreservation. What do you think the word preservation means?
Tell the following story:
A little boy named Samuel was rummaging around in hisg.andmother's attic one day when he saw a very old trunk near awindow. The trunk looked and even smelled very old. Strugglingwith the large leather belts and brass latches that held the liddown, he slowly raised the lid. The hinges on the trunk were soold and dry that they made an eerie, creaking sound as the topwas opened.
As the dust cleared away and the light beams from the windowsettled on the contents of the trunk, Samuel saw somethingglitter very brightly: a medal with a beautiful ribbon attached toit. What a find! Samuel reached in and began to pick up themedal, but noticed that it was attached to what looked like anold gray piece of cloth. Not wanting to tear the cloth, Samueldecided to lift it out of the trunk to examine the medal closely.
Another surprise! 1 he old gray cloth was really the coat of anArmy officer; very heavy, very tough, coarse material with brassbuttons and the division insignia on the collar.
Laying the coat aside for a moment, Samuel, now filled withanticipation, began to look and feel around in the trunk for whathe hoped would be the rest of the uniform. A hat, boots,trousers, gloves with beautiful gauntlets attached; what tremen-dous luck! Samuel had found a complete Civil War officer'suniform. He was overjoyed and couldn't wait to run downstairsand ask his grandmother if he could have it.
"Grandma, Grandma, can I have it, can I have it?" Samuelshouted (..,:::.*Nily as he ran into the living room of the old
3I
house. "For Heaven's Sakes," Grandma said, "calm down. Canyou have what?"
Samuel began to relate excitedly his find to his dear oldgrandmother, and as he did so, he noticed her eyes becomecloudy and a look of sadness come over her face. "Have I donewrong, Grandma?" Samuel asked. "I thought it was all right toexplore the attic." Her eyes clouded fora moment by memoriesof long ago, suddenly brightened and she said, "Oh, forgive medear child, but your discovery reminded me again of somethingthat was a very sad part of my life. You see, my father was avery brave and fine man, and when the Civil War broke out he .joined the Army and was made an officer. We did not see himfor over two years. Then one day a messenger came to the housein a horsedrawn carriage with the trunk you found upstairs and asad message that my father had been killed in the Battle of theMonocacy, in the State of Maryland. The medal was awardedhim for bravery."
Samuel felt very sad and confused because he did not knowwhether he had done right or not, but his grandmother madehim feel better when she said with a smile, "So you want theuniform. Well, what do you intend to do with it?" This questionwas difficult for Samuel to answer because he really didn't knowwhy he wanted the uniform. All he knew was that he felt he hadto have it. Finally Samuel said, "I would like to take it to schooland show my friends.'
Grandma thought for a long time, remembering how much theuniform had meant to her family and at the same time, knowinghow happy Samuel would be if he could show it to his friends inschool. Being a typical grandmother, she finally said, "Certainly,you may take it to school and show your friends, but please bevery careful because the material is old and must be treatedgently or it may tear."
Grandma gave Samuel some cardboard boxca to pack the variousparts of the uniform for their trir to achoul. He carefully packedeach cne.
Later that evening, Samuel's parents came to pick him up andhelp him carry his treasures out to the car. Just as they weretaking out the last box Grandma shouted, "Hold on a minute. Ithink there is one more thing around here someplace that youmay want to take along." Grandma walked over to an old chestof drawers in the parlor, and after rummaging around in thebottom drawer exclaimed, "Ah, here it is." When she returned,
42

Samuel couldn't believe his eyes. There stood Grandma with avery real sword and scabbard. Grandma said, "I had almostforgotten this old sword, but I think it is a part of the uniformand should go along with it."
Monday morning Samuel and his dad took the uniform andsword to school and into Samuel's classroom. Mrs. Franklin,Samuel's teacher, was very pleased and assured him and his dadthat the articles would be well taken care of.
Samuel could hardly wait until Mrs: Franklin decided to let himtell about his new find. Finally the big moment came, andSamuel shared the stories his grandmother had told him with hisclassmates while they looked over the old, old treasures.
After the class had the opportunity to touch and look at theuniform, Mrs. Franklin said, "Class, I have a question for you.We have been talking about the wise use of resources. What doyou think might be the best use of this old uniform?"
The class suggested everything from putting it back into thetrunk to letting each class member keep it for a week at a timeto show their friends. --Mrs. Franklin reminded the class that when they discussed theword "conservation" they decided that it meant the wise use ofresources. She then asked, "What could be done with theresource (the uniform) that would benefit the most people? Wecould find someone who needed clothing and give it to them towear. Would this really be a good idea, or might it be best, in thiscase, to preserve the resource? Preservation would mean that wewould put the uniform in a museum so that many people canshare it and find out what a real Civil War uniform looks like."
The class was unanimous in their decision that, in this case,preservation would be best, but someone mentioned it didn'treally matter what they thought best because the uniform wasn'ttheirs anyway.
That afternoon when Samuel's dad came to pick him up at theschool, Mrs. Franklin mentioned her discussion with the classand the decision that they had made regarding the best use ofthe resource. His dad thought that the idea was a very good one,and said he would ask his mother, Samuel's grandmother, whatshe thought.
The happy ending to the story is that Samuel's grandmother wasvery happy to see the uniform put in the local history museumwhere it can be seen by hundreds of people. This is an exampleof both conservation and preservation.
ACTIVITY 2: Finding Other Things to Preserve
What other things might we want to save in our community?
Take the children on a short walk outside the school buildingand try to find some natural resources that may have more thanone use. For example, any tree in the area could be either leftalone for its shade and beauty, or cut down and used for paper,wood, or any of the other wood products. What would theydecide?
In situations where there is open space around the school, askthe children what they think the best use of the open spacemight be. Should they plant food on it, play on it, put buildingson it, or what?
ACTIVITY 3: Making Decisions
As a homework assignment have the children, look for, on theway to and from school, five things they feel are not being usedwisely. Remind the children that they may consider both naturaland man made resources because man made resources are reallymost natural resources in a different form.
The following list of suggestions may help children to discoversome things that are not being used wisely:
Urban:
Park and playgrounds with litter on them.Junk cars sitting on the street.Buses and cars going by with very few people in them.Words on buildings and walls.Space, vacant lots, and stores.Manpower not being used.
Rural:
Poor use of soil.Use of rivers and streams for dumping sewage.Fields taken over by weeds.Plants being destroyed by insects.
Both Urban and Rural:
Poor decisions in the use of time, money, paper, cars. foodand water, and air.
When the children bring in their lists, have them discuss whythey think these things are being used wrong, and help themto come up with possible solutions to the problems.
ACTIVITY 4: Understanding the Relationship Between Values andUse
Pose this problem to the children. If you were on an island thathad no food, no trees, and no fresh water, and an airplane flewover that could either drop you a package with food and water,enough to last until you were rescued, or a package containing amillion dollars, which would you choose and why?
Point out to the children that the use of resources always hasand always will depend upon how much value is placed uponthem. In the case above, a person's value system would change ifhe realized that a million dollars wouldn't be any good at all ascompared to food and water. Ask the following questions:
How could we apply this principle to some of our environ-mental problems?
If water fountains had a coin slot on them and we had to payfor each drink we took, would we drink as much water?
Suppose all soda pop cans and bottles were worth 25 cents.Would we see so many of them lying on the ground andthrown away?
TEACHER'S NOTE: Help the children to discover that naturalresources really do cost something and that they must be taken careof. They could not only cost more money but also affect the abilityof people to live on this planet.
ACTIVITY 5: Relating Use Decisions to Everyday Situations
Have the children consider the following situation: You havebeen sent to the store by your mom to buy the following things:
milk, cola, washing powder, candy bars, some picnic platesand cups, and enough hot dogs for 10 people to eat.
How are you going to answer the following questions?
Milk comes in paper, plastic, and glass containers. From thenatural resources point of view, which one would be best tobuy?
Cola comes in glass bottles that are returnable, glass bottlesthat are non-returnable and aluminum cans. Which is thebest environmental buy?
Washing powder comes in many varieties, some of which do avery good job cleaning our clothers but pollute the streams,while others don't get our clothes as clean but don't pollutethe stream. Which should we buy?
Candy bars come wrapped in paper, plastic, and tinfoil.Which should you buy?
32
43
11

Picnic plates and cups come in plastic and paper. Whichshould you buy?
Hot dogs come in packages of 12. You have 10 people whomay want 2 hot dogs each. Should you buy 1 package andhave 2 people get 1 hot dog or should you buy 2 packagesand have 4 hot dogs left over?
The above exercise is designed to help the children to see whatmight be called the indirect ways that they affect the use ofnatural resources. Take this opportunity to reinforce the conceptthat all man made products are really natural resources inanother form.
ACTIVITY 6: Exploring the Cost of Natural Resource Use
Poor use of natural resources not only affects one's eventualhealth and welfare but it also affects economic situations. Theeconomic effect is immediate and day-to-day, and must beexplored to have a complete understanding of environmentalproblems.
Have the children consider the following questions:
Ten ounces of soda pop costs 5 cents before it is in acontainer. A 10-ounce glass bottle costs 5 cents. A 10-ouncesteel can costs 6 cents. A 10-ounce aluminum can costs 7cents. Which of the soda pop containers would you buy ifyou wanted to make the best use of your money and of thenatural resources used to make the container?
There are two bus companies in your town. Bus company Ahas decided to put anti-pollution devices on all of its buseswhile bus company B has decided to keep its buses runningthe same way they are now. A ride across town on companyA's bus will cost 5 cents more (because of the anti-pollutiondevice) than the same ride on company B's bus. Which of thecompanies would you ride with and why?
By cutting down on the cost of litter removal in a park inyour town, the Park Department can have enough money topay for an extra set of swings and eventually a new baseballfield. Would this be the best way to use their money? Whatmight be other solutions to the problem that would keep thepark dean and also have the swings and ball fields?
The street in front of your house is in very bad shape becauseof holes and ruts. The man in your town who is in charge ofstreets comes by and says that they are going to be able to fixthe street but it will mean they will have to stop picking upgarbage for 6 months. Would you like to see this happen?
There is a very nice park in your town, but taxes are veryhigh and everyone is complaining about _this problem.Election time comes around and one of the men running formayor says that if they sell the park to a man who will buildapartments, there will be more people in a small space andthey can get a very high price for the park land so taxes canbe reduced. Do you think that you would vote for this man ifyou could vote?
Mr. Jones owns a candy store and wraps all of his candy inplastic to keep it fresh. Mr. Smith also owns a candy storebut he goes to his supplier every day to buy fresh candy anddoes not wrap it in plastic. Mr. Smith has to charge a littlemore money for his candy because he has to make more tripsto get it to his store. Which store would be the better place tobuy candy, from a resources point-of-view?
TEACHER'S NOTE: The above questions are designed to helpchildren realize that environmental improvement is often a matterof "trade offs." In the question about the buses, for example,people must pay a little more if they are going to help clean up theair. The point to be made here is that improving the uses of ournatural resources can only be accomplished W the public is willing topay for it.
EVALUATION:
Given the opportunity to explain what wise use of resources is,children will demonstrate their knowledge of the fact thatsometimes it means to preserve or keep and sometimes it meansto use very carefully.
Given the opportunity to observe their community for thepurpose of determining areas where things were being usedunwisely, children will be able to demonstrate their understand-ing by the things that they select.
When Activity 4 is finished and the questions are being answeredand discussed, children will indicate that they have a concept ofhow their selection and buying of products affects the environ-ment.
Given the opportunity to see the children purchase somethingthat had a natural resource relationship such as plastic or paperplates, the teacher would see the child choose the one thatdemonstrated a natural resource value system being developed inthe child.
Given the opportunity to observe the children use resources(pencils, paper, water, etc.) the teacher will notice a reduction inthe amount of things they waste that is a significant indicationof an additional change on the part of the children.
Section B Topic VIRENEWABLE NATURAL RESOURCES
GOALS: After this lesson children should:
Identify the renewable natu-- I resources as air, water, soil,plants, and animals.
Understand the importance of natural processes such as decom-position to the eventual renewal of natural resources.
Understand that the renewal of natural resources is an inter-dependent situation. All natural resources that are renewabledepend upon other natural resources to be renewed.
Have had the opportunity to observe natural change that isrelated to natural resource renewal and to see man's effect onrenewable natural resources.
ACTIVITY 1: Learning the Meaning of Renew
Ask children to think of some words that begin with the prefix"re."
As the children come up with such words as refill, rebuild,restore, renew, recycle, retain, and recreation, put them on theboard and point out to them that the prefix "re" usually means"to do again." Ask them to keep this in mind and to tell whatthe words on the board mean. Emphasize the word renew and besure the children understand that it means to make new again.
ACTIVITY 2: Learning the Meaning of "Decompose"
Ask the children to consider the meaning of the word "com-pose." To compose, of course, is to make. If the children
33
44

compose a song or a poem, they have put words together andmade something. Now have the children recall their experiencewith adding the prefix "re" to a word and changing the word.Ask them how the meaning of the word compose would changeif the prefix "de" were added to it, making the word"decompose." It would then mean "to break down."
"Decompose" is the first step toward remaking some of ourresources. If these resources are not broken down they cannot bemade new again or renewed.
ACTIVITY 3: Finding Evidence of Decomposition
Take the children on a short walk around the school buildingand ask them to look for evidence of breakdown or decomposi-tion. The following examples should help: metal rails showingsigns of rusting, paint chipping, wood rotting, stones and brickscrumbling or gradually wearing away, sidewalks, roads, parkinglots cracking and beginning to break down, and dead plant oranimal material returning to soil components.
Have the children list and possibly sketch some of the things thatthey observe breaking down or decomposing.
TEACHER'S NOTE: Odor is sometimes a good indicator ofbreakdown. Encourage the children to be alert to the things theysmell and to try to seek some of these things out. Garbage cans,barnyards, dumps, compost piles, all have distinct odors. This is avery good chance to point out to the children that they smell thingsin the air just as they taste things in their mouths. Have the childrenadd to their list of things those that they smell.
Should children need more direction in this exploration, teachersmay want to make a scavenger hunt out of it. This is simply done bylocating the things and putting them on a list and letting thechildren hunt for them.
Encourage the children to keep looking for evidence of breakdownand decomposition as they go to and from school.
As the children begin to build a list of observations of breakdown,and you feel that they are beginning to understand the concept,start to emphasize the fact that breakdown and decompositionoften come before rebuilding or renewal.
ACTIVITY 4: Exploring the Relationship of Breakdown to Buildup
TEACHER'S NOTE: Help children to understand the basic struc-ture or composition of some of the things that make up their world.The children will have to be aware of the endpoint of breakdown inorder to understand the relationship of breakdown to building. Theendpoint of most decomposition would be an atom or molecule.
When a person eats food the first thing that he does is break itdown into smaller parts so that it can be swallowed. As the foodis chewed it is also mixed with saliva which contains a chemicalthat aids in the breakdown of food. When the food moves intothe digestive systems it is further mashed by the muscles in thestomach and intestine and mixed with chemicals, releasing theproteins, vitamins, carbohydrates, fats. Discuss this process withthe children and help them to understand how food breakdownand body buildup are related and how this same break down-building relationship happens when many things are renewed.
Let the children take some materials apart and see how small apiece of material they can physically break down. Some goodmaterials for this are chalk, graphite from pencils, strands ofstring, cotton, material from clothing, paper and soft pieces ofwood.
The point to make here is that the first process that occurs inbreakdown or decomposition is usually physical Things changein size and shape, but they do not change in actual compositionuntil they are acted on by chemicals or bacteria. A change incomposition is called a chemical change. The changes that takeplace in decomposition are often both physical and chemical innature. Help the children understand that before something canbe renewed it must be broken down into its component parts. It
34
is very much like a picture puzzle with nature taking it apart andputting it back together.
A good way to demonstrate chemical change is to put a nail in ajar of water and watch the rust form on it. You are actuallyseeing the result of oxygen combining with the iron to formferrous oxide or rust. Ferrous oxide is usually the raw materialfound in iron ore from which steel is made. Given enough timenature may be able to turn steel back into iron ore by theprocess of decomposition.
TEACHER'S NOTE: The breakdown of certain materials can reallybe turned around and looked at as the buildup of something else.For example, the decomposition of leaves and plant material isreally the building up of soil. Look for opportunities to helpchildren understand the importance of death, decay, and decom-position to the overall renewal of our material resources. Allmaterial cycles through the environment, some of it very quickly(water, for example) and some very slowly (iron, for example).
ACTIVITY 5: Studying Soil as a Renewable Natural Resource
The following experiment and demonstration will give thechildren the opportunity to see just how a soil will renew itself.Start the experiment soon so that the children will be able toobserve it for as long as possible.
Materials needed:
2 small (1 cup) containersbean seeds
Procedure:
In the two small containers, put equal amounts of soil andone bean seed. Number the cups 1 and 2. As the bean plantsgrow to a height of about 6 inches, do the following: Removethe plant from cup 1. Throw it away and plant another seed.(Do not remove any soil with this plant.) Remove the plantfrom cup 2 and have the children cut it up into very smallpieces. Mix these with the soil in cup 2 and plant anotherbean seed into the cup.
TEACHER'S NOTE: Keep the above experiment going for as longas it takes to have the children see that the soil in cup 1 is beingused and not renewed, while the soil in cup 2 is also being used, butthrough decomposition it is being renewed and can be used over.
ACTIVITY 6: Studying Air as a Renewable Natural Resource
Air is a natural resource that is made up of oxygen, carbondioxide, water vapor and other gases. Carbon dioxide andoxygen are the two components of air that are most importantfor plant and animal respiration or breathing. Animals breathe inair and use the oxygen in it, and breathe out carbon dioxide(which is the waste product of metabolism or muscular activity).Ask the following questions:
What would happen to the air if animals were the only livingthings?
They would use up all the oxygen and it would be replacedwith carbon dioxide.
Without oxygen what would happen to animal life on theearth?
How is the oxygen used by animals replaced?
Master B-3 may be prepared as an overhead transparency toexplain the following: -
In the presence of sunlight, plants take in carbon dioxide andgive off oxygen.
TEACHER'S NOTE: You may be interested to know now thistakes place. The following formula will help explain it to you:
S unlight6 CO2 + 6 Hot', ----r C6H1206 + 6 02L Chlorophyl
45

v%
ALL GREEN PLANTS(* LAW OR IN tt-r_F)
NIGPT \ DAY
The basic formula for sugar is C6H1206. The verbal explanationwould go like this: In the presence of sunlight and chlorophyl, aplant breathes in carbon dioxide, combines it with water and makessugar. This causes some oxygen (02) to be left over and it is givenoff or breathed out.
As the sun goei down and the plant is deprived of light it gives offCO2 and takes in oxygen just like an animal does.
The interesting and important thing to note is that animals aretotally dependent upon plants for air that has been renewed. Plantscould survive without animals because they release more oxygeninto the air in the daytime that they use during the night.
TEACHER'S NOTE: There are, of course, other things in the airbesides CO2 and 02. These two components are used for explana-tory purposes because they are so important to the respiration ofplants and animals, and their absence would be noticed morequickly than would some of the °the!. components. There is anexcellent opportunity here to emphasize the reality and importanceof interdependence. Even though the quantities of CO2 and 02remain constant they require the interaction of plants and animalsto be used wisely and be renewed.
ACTIVITY 7: Studying Animals and Plants as Renewable NaturalResources
Animal and plant species are renewable natural resources. Theyrenew themselves through the processes of reproduction andgrowth.
TEACHER'S NOTE: This is an excellent time to introduce thewords and concepts associated with reproduction and sex education.The teacher's judgment will be the factor in determining what is oris not appropriate at this point.
The following dialogue is a sample of how these concepts might beintroduced:
We have talked many times about things that are alike and thingsthat are different. Can you tell me how you are different fromeach other?
What two study groups could we put everyone in our class into?(Boys and girls.)
There is a very important reason for our being sexually differentfrom each other and for most animals and plants to be differentsexes. Men and women or males and females are able toreproduce themselves.
What does the word reproduce mean?
Remember when we discussed words that began with the prefix"re" and we said that "re" meant to do again? Well, if"produce" means to make and "re" means to do somethingagain, then what would reproduce mean if we were talking aboutmaking people or animals, or plants?
How are the words reproduce and renew related?
Reproduction is simply the way plants and animals renewthemselves.
TEACHER'S NOTE: The important concept from the naturalresource standpoint is that sexual reproduction is the way mostplants and animals are renewed, and that this renewal depends uponother natural processes for support.
ACTIVITY 8: Exploring Mans Effect on the Renewable NaturalResource: Trees
TEACHER'S NOTE: Our effort here will be to help children tounderstand that man affects renewable natural resources in twomajor ways: (1) he uses them faster than nature can renew them; (2)he makes air and water very dirty and must clean them before theycan be renewed.
36
The rate we use natural resources.
Have the children consider the following problems:
It takes about 50 years to grow a tree that is large enough tobe cut down and sawed into lumber for houses, furniture,and other things. John Jones and his family use 4 trees peryear from a woodlot with 200 trees on it. The oldest trees onthe woodlot are about 50 years old and the youngest juststarting out. There is a fairly equal number of trees in eachage group.
Using the information in the paragraph above, can youanswer the following questions:
If John and his son cut down the 4 oldest trees each yearand do not replace them, how many years will they havetrees to use?
Someone down the road wants to buy 4 trees per yearfrom John. How long could they have trees to use if theystarted cutting down 8 trees a year, assuming that theyreplaced the 8 trees with new ones?
TEACHER'S NOTE: This little math exercise is designed to showthe children that a resource is renewable only if it is used at thesame rate that it renews itself. For example, the forest will renewitself every year if trees are used at the rate of 4 per year because200/4 = 50 years and it takes 50 years for the new trees to grow.If, however, the rate of use increases to 8 trees per year,200/8 = 25, after-the first 25 years there would be no more treesthat were old 'enough to be cut down. In other words, the 8 treesthat were planted the first year would be only 25 years old andwould be the oldest trees in the forest. This kind of exercise may bemade more or less difficult. The point to make is, that man must userenewable natural resources only at the same rate that they arerenewed, or he will use them up.
ACTIVITY 9: Exploring Man's Effect on the Renewable NaturalResource: Air
Review the CO2 - 02 cycle with the children as well as theprocess of respiration and the need for clean air. Then do one orall of the following to demonstrate how man makes air dirty:
Start a car.
Take a white handkerchief or a large wad of cotton and holdit over the exhaust for just a few seconds.
Have the children observe the results.
Pass it around and have them smell and feel the residue onthe handkerchief.
Ask the children where the material goes if there is nohandkerchief to catch it.
Discuss this problem with the children and point olit to themthat when they breathe air that has the solid or particulatematter in it, our lungs have to filter it out just like thehandkerchief did.
Have the children bring in newspaper articles and help themrelate what they saw on the handkerchief to the overall problemof renewable air.
Take the children on a walk around the school building and havethem note all the sources of air pollution that they can see crsmell.
Cover a 3 x 5 card on both sides with masking tape so that thesticky side is out. Have each child place a card on a particularspot on the school ground and note the direction the wind isblowing. Place the card so that one side is into the wind. Thecard should be mounted on a small stick. See Figure 8.6 below.
CV 7

Figure B-6
Have the children observe the r cards for two or three days andthen bring the cards into the tassroom and discuss the results.
EVALUATION:
When asked to identify those resources that are consideredrenewable, children will identify either verbaUy or in writingair, water, soil, plants, and animals.
When asked to define the words "renew" and "decompose," thechildren wiU indicate by their answers that they understand thatto renew means to make again and to decompose means to breakdown.
When asked to give some examples of decomposition, thechildren will indicate that they did understand the meaning ofthe word and can identify those examples of it that wereobserved in Activity 2.
When asked to identify the two ways things change, children w3Urespond by saying physically and chemically, and if given theopportunity to recognize change that is either one or the other,the children will correctly identify the type of change observed.
Given the opportunity to explain the way soil, air, or waterrenew themselves, children will indicate a basic understanding ofthese processes.
Given the opportunity to discuss the way man affects renewablenatural resources, children wiU indicate by their comments thatthey understand that man sometimes uses natural resourcesfaster than they can be renewed an sometimes makes renewablenatural resources dirty so they rue not as easily renewed as theycould be.
Section B Topic VIINON-RENEWABLE NATURAL RESOURCES
GOALS: After this lesson children should:
Be aware of the fact that some resources are exhaustible and wiUrun out.
Have learned that the non-renewable natural resources areminerals and mineral fuels.
Understand the difference between renew and recycle.
Understand that mineral fuels are non-renewable or exhaustiblebecause they are used much faster than they can be replaced bynature.
Understand that minerals are exhaustible because there is only acertain amount of each of them available.
ACTIVITY I: Comparing Renewable and Non-Renewable
The following demonstration wiU enable children to understandthe concepts of renewable and non-renewable.
Materials needed:
3 I lb coffee can2 I qt jars
Procedure:
a. Punch one smaU hole in the bottom center of each can.
b. Place two cans over the two jars, open end up, and fiUthem with water.
c. Water in can C should be colored with food coloring.
d. Place the third can (C) over the top of can A and fill itwith water. See Figure B-7.
Tell the children only this: that the water in cans A and Crepresents aU the water in the world, while the fluid in can Brepresents all of the fuel oil in the world. (Do not worry aboutany definite quantity at this time. Each amount represents allthere is.)
37
Figure B-7
Cans A and B represent the use we make of the naturalresources, water and gasoline (or oil or fuel). The hole in thebottom of each can represents the rate at which we use theresource.
Can C represents the resource (water) being renewed at the samerate it is being used, (one drop used one drop renewed).
As jar number I starts to fill up, "recycle" it by simply pouringit back into can C. As jar number 2 starts to fill up, "burn" it bypouring it down the drain. As this is done, explain to thechildren that once a fuel is used it is no more it isnon-renewable.
As the demonstration proceeds, ask the children these questions:
Which of the resources will run out and which one will not?
If we could not find a replacement for the fuel oil in can 13,what might we consider until one was found?
48

At this point, dramatize this point by simply plugging the hole inthe can with a finger. This will demonstrate a decrease in the rateof use.
If we were to decrease the rate at which we use fuel oiltoday, remembering that fuel oil is also gasoline and jet fuel(kerosene), what would it mean to us?
We would have to walk more, ride less.
What are some ways that we might slow down the use of fueloils?
Point out this fact to your children as they watch the fluid incan B go down the drain: most resources that are trulynon-renewable are the ones we use for energy. These materialsare often referred to as mineral fuels which includes the fossilfuels such as co- al, oil, and gas.
ACTIVITY 2: Exploring the Non-Renewable Resource Fuel
TEACHER'S NOTE: The fact that it took 70 to 100 million yearsto make the coal that is now being used only means something tosomeone who can conceive 70 to 100 million. Children are not ableto do this, nor are most adults. The following two concepts are theimportant points to make: (1) energy fuels were made over a very,very long period of time; (2) when they are used, they are used upvery quickly. Fuel is used much faster than it is made.
Most of the fuel is called fossil fuel. All fossil fuel comes fromenergy that was stored in plants and animals and took a longtime to be formed into the coal, gas, and oil that is found today.
It would be very helpful to take the children on a fossil hunt ifthere are areas near the school where this might be possible. Callthe science coordinator and ask where fossils might be found. Ifthere are none in the vicinity of the school, ask him to help toobtain some examples of fossils and ask the following questions:
What is a fossil?
Were all fossils either plants or animals?
Were all fossils once alive?
How aid are some of the fossils:
How did nature turn plants and animals into fuel?
The following demonstration will help the children to see howgas was formed:
In a small bottle with a small neck (a soda pop bottle will donicely if it is not colored) place a small amount of hamburgerand lettuce leaves. Put a small balloon over the the bottlemouth and place it in a spot where the sunshine will hit it.Leave it for as long as it takes for the balloon to start to fillwith gas.
TEACHER'S NOTE: The hamburger represents an animal that hasdied, the lettuce represents a dead plant, and the bottle is just aplace to observe what happens.
As the plant and animal material begin to decay, gas will be givenoff and trapped in the balloon.
As the children observe this ask them the following questions:
We have observed decomposition on our school grounds andknow that it makes soil. What would happen to the soil asmany, many layers formed and the bottom layer was unartremendous pressure? Would it get harder or softer?
Master B-4 may be prepared as an overhead transparency or youmay duplicate it and pass it out to each child. This and thefollowing explanation may help the children understand howmineral or fossil fuels were formed.
Frame 1: Many, many years ago, before man appeared on earth,there were large areas of swampland that looked something likethe one in Frame 1 of the sheet/transparency.
38
Frame 2: In this picture some of the plants have died and falleninto and under the water. Do you think a plant that is underwater would decompose/rot as fast as one that is exposed to theair? The answer is that it would not, because decompositionrequires oxygen and when the water covers the plants, theydecompose very slowly. This means that the energy that theyhave stored up from the sun is trapped and stays there.
Frame 3: As the years passed, plants continued to die and pileup, and a strange thing occurred: The weather all over the worldbecame warmer and the ice in the north and south polar regionsmelted, causing the sea to rise, and the seas came in and coveredthe swamplands.
Frame 4: The oceans are filled with many small animals andplants called plankton. During the long period of time that theoceans covered the swamplands, these animals died and fell tothe bottom. This caused a great deal of pressure to te put on theoriginal plants shown in Frames I and 2. These plants began toget very hard.
Frame 5: After many years the temperature of the earth beganto get cooler. Ice started to form at the north and south poles.The ice took up a great deal of this water and the sea movedback away from the swamplands, leaving a thick coating of mud.This same thing happened many, many times, and each time theolder layers were put under pressure, the following thingshappened:
Frame 6: The fat from the bodies of the ocean animals that diedwas squeezed out and began to drain down through the rocksbelow. The original plants continued to get harder and harder,and so did the mud that was left after the sea went back eachtime.
Frame 7: As the rocks got harder and harder, the earth's crustbegan to fold causing some of the layers to form little domes likethe one seen in the picture. This made a perfect collecting placefor the oil that was draining down from above, and this is whereit is often found today.
Frame 8: The final picture we see is very much like the situationthat exists today. The very old layers of plants hate turned tocoal and animals have tumed to oil, which has collected in poolsunderground. All of this took some 70 to 100 million years.Does this tell us anything about how fast we should use our oiland coal, and why we consider these resources non-renewable?
ACTIVITY 3r Exploring the Non-Renewable Resource Metals
The children have seen what happens to a steel nail that is madefrom iron if it is exposed to the weather. Oxygen combines withthe iron and tums it back into iron oxide. Man usually preventsthis, however, by painting and coating the metal so that it willnot rust. Have Vie children consider the following questions:
What will happen if we keep producing automobiles that aremade of steel, using iron from the earth? If we keep doingthis at a faster rate than the iron rusts and returns to theearth, then what is eventually going to happen? Will we runout of iron and not be able to make steel, which would meanthat we will not have steel to make any of the follow-ing: cars, trucks, railroad tracks, spoons, bicycles? What isthe answer to this problem?
The metal already taken from the earth must be recycled, andnot so much of the original ion ore should be used.
Discuss the word "recycle" again wth the children and point outto them that once we take something from the earth, it will haveto be used over and over again.
EVALUATION:
Given the opportunity to tell why any resource is considerednon-renewable, the children will indicate to the satisfaction ofthe teacher that they understand the concept of rate of useversus the rate of production of natural resources.
49

/I II PV
.,./
-A 411016-11-.'
moo
-zt.
,.....001111.111111P90
Say-- ---
NO
M
111111/7-21111/4111111r4111 riewi
_
4--
/P
UM
il/:/jogip.-7-1-4111111
-
1- - -
P
-

Givefi the opportunity to tell which groups of resources areconsidered non-renewable, children will say "minerals andmineral fuels."
Given the opportunity to discuss the difference between"renew" and "recycle," the children will indicate by theircomments that the understand that "renewal" means to remakein nature and "recycle" means to reuse again.
Section B PEOPLE WHO TAKE Topic VIIICARE OF NATURAL RESOURCES
GOALS: After this lesson children should:
Be aware of the fact that, because of the tremendous rate ofnatural resources relative to needs, they must be managed,protected, and studied.
Be aware of the kinds of jobs that are available in the field ofnatural resources.
Be aware of the skills and knowledge that natural resourceoccupations require.
TEACHER'S NOTE: The information that follows is in narrativeform and designed to be used with the list of activities. Teachers areencouraged to select one or several of the activities and helpchildren to become aware of the various opportunities for em-ployment that exist in the field of natural resources.
ACTIVITY 1: Have the children develop a bulletin of pictures ofpeople working with natural resources and share the informationbelow with each other and with other classes in the school.Pictures may be found in general publications as well as sportsand outdoor publications. .
ACTIVITY 2: Get in touch with local natural resource agenciesthat may provide resource persons to come and speak to theclass.
ACTIVITY 3: Look into !he field trip possibilities that may exist inthe vicinity of the school that would allow children to meetpeople working in natural resource areas. Water treatment plants,fish hatcheries, zoos, parks, and municipal planning offices alloffer field trip possibilities where children may meet a naturalresource worker.
INFORMATION ABOUT PEOPLE WHO WORK WITH WILDLIFE
The people who work with animals can be divided into twostudy groups, those who work with wild qnimals, and those whowork with domestic animals. The following are examples ofsome of the occupations in the wild animal category.
Wildlife Biologist
The wildlife biologist works in the area of wild animal study,making observations and experimenting with animals (to findout what they need to eat, now they find protection, what theirrelationship is to each other and to the plants in theirsurroundings. etc.) and keeping careful check on the animals'general health and welfare.
Most of the people who i ,ork as wildlife biologists are graduatesof a four-year college program. They spend a great deal of theirtime in the out-of-doors, observing animals and studying animalenvironment. They also spend many hours indoors usingmathematics, science, and language skills to record the evidence.
Game Warden
Many years ago when there were fewer men and more wolves,mountain lions and coyotes, man hunted only because hewanted food. As the years went by, the number of peopleincreased, the number of predators decreased and the naturalbalance of nature was disturbed. Animal populations that were
40
once small and in balance with the available food began to getvery large. There was not enough food to go around andalthough many animals were born, very few of them reachedmaturity. Those that lived were in very poor health because of alack of food. Man, the hunter, has replaced the predator inmany cases. Hunting, however, must be controlled and this iswhere the game warden comes in.
The game warden is a combination of policeman, teacher,scientist, and veterinarian. Laws established by local, state andfederal governments are designed to protect wild animals. Thegame protector must enforce these laws. Observation of animalhabitat and population numbers is another of the duties, as wellas frequently assisting the wildlife biologist by collecting neededinformation about certain wild animals in an area.
A major duty of most game wardens is to teach people to huntsafely and to enforce the hunting laws that exist.
A game warden must have a least a high school degree andusually specialized training by the employing agency. Game laws,law enforcement techniques, public relations, game biology,natural history, outdoor craftsmanship, and the ability to getalong well with people are all skills that a game warden musthave.
Game Farm or Refuge Manager.
There are certain areas in many states that are managed for theexpress purpose of providing the proper habitat for wild animals.Each of these areas requires a game farm or refuge manager,depending upon what the area is called.
The game farm or refuge manager is in some ways similar to afarmer who grows domestic crops and animals. Knowledge ofwhat the animals need in the way of food and protection isrequired.
Game farm and refuge managers must know soils, crops, animalhabits, and needs as well as farming and land use techniques. Theoccupation requires at least a high school education and veryoften experience and/or additional post high school technicaltraining.
INFORMATION ABOUT PEOPLE WHO WORK WITH WATERAND FISH
Waterways Patrolman
Fishing is a very important sport in this country. So manypeople fish that it is necessary to allow fishing only duringcertain times of the year for certain species of fish, and to limitthe number caught on any one day. The waterways patrolmanenforces these laws and serves the same role for fish as the gameprotector serves for wild land animals.
Waterways patrolman also are responsible for checking on thesafety of boats for recreation. They teach people how to useboats and fishing equipment properly, investigate sources ofwater pollution, and generally perform any duty that has to dowith the protection of streams, rivers, and lakes, and the fishthat live in them.
C-1

Water Qualily TesterThere is a great deal of water pollution in our country today.
The water quality tester works with water in rivers, streams, andlakes, or might work for city government and test the water thatis to be used by the people in the city.
People who work with water quality spend much of their time inthe out-of-doors collecting samples from water sources and anequal amount of time in the chemistry laboratory testing thewater to determine its quality,
Most of those people have at least two years of college and manyof them hold college degrees. They must understand chemistryand biology and the methods used to get accurate samples fromthe water thay they want to test.
INFORMATION ABOUT PEOPLE WHO WORK WITH PLANTS
There are many occupations that have to do with plants. Thismaterial will cover three; the forester, the crop farmer and thenurseryman.
Forester
The modern forester is really a farmer. He takes care of largeareas covered with trees, and must decide which trees to cutdown, which trees to leave standing, where to plant new trees,and how to get the trees out of the forest without damagingmore of the area than is necessary.
Skills needed in forestry include knowing how to use everythingfrom axes to saws to very heavy power equipment such asbulldozers and trucks. Sometimes foresters need to know how tofly and parachute to forest fare areas that cannot be reached by aland vehicle.
The kinds of knowledge that a forester must have are very broad,including economics, mathematics, weather prediction, firecontrol, soil science, equipment use and maintenance, and manyother things. It would be unusual for any one forester to be anexpert in all of the fields. The amount of knowledge a forestermay need in a particular area will depend upon particular forestspecialties.
Most foresters have either two-year or four-year degrees with aspecialization in one of the areas of forestry,
Farmer (Crop)
One farmer in this country raises enough food to feed himselfand 48 other people. Farmers raise crops that are either fed toanimals to produce meat and milk products or sold as produce.
Most farmers today are specialists. They grow a single crop. andmust know not only general principles of farming, soil science,fertilization, weather, ungation, equipment use and mainten-ance, marketing and economics. but also the specific principlesthat are relevant to the crop or crops that they are raising.
Farms today are much larger than they used to be. This makes itvery difficult for a young person who does not already live on afarm to decide to become a farmer, purchase the land andequipment, and get started. Most farmers today are persons whowere born and raised on a farm and inherit the business fromtheir family.
Nurseryman
A nurseryman grows plants that are to be replanted later, usuallysold to people to use around their homes and gardens, or tolandscape gardners to use around buildings, streets, and high-ways.
Plants that are raised from seeds require very special care becausethey are easily damaged by disease or improper conditions. Thenurseryman must be aware of proper conditions for raisingyoung plants. Knowing when young plants are ready to be sold
41
and how to take good care of them when they are moved fromone place to another is also necessary.
Running a nursery also requires a knowledge of good businesspractices, equipment use and maintenance, weather, soil andfarm management.
Many nurserymen are college graduates with degrees in horti-culture, plant science, or some other phase of nursery cropproduction. There are also job opportunities for the graduate oftwo-year colleges and technical schools.
PEOPLE WHO WORK WITH MINERAL AND MINERAL FUELS
Petroleum Geologist
Many years ago anyone who looked for minerals or mineralfuels was called a prospects, thought of as a grizzled old manwith a burro and a pan, way back in the hills looking for gold orsilver. Today's prospectors are much different but still havebasically the same objective, to find mineral and mineral fueldeposits in quantities large enough to be commercially valuable.
The petroleum geologist is an example of the modem-dayprospector whose major responsibility is to determine where todrill oil and gas wells. This decision can only be made by aperson who is familiar with the kind of geology in areas whereoil and gas have been found before.
When a drilling operation starts the petroleum geologist mustconstantly check the core samples that are brought up and veryoften must check on several operations at the same time. Muchof the petroleum geologists time is spent out-of-doors.
All petroleum geologists are graduates of a four-year collegeprogram. There are also technical occupations in the field ofpetroleum geology that require a two-year degree.
Mine Conservation Technician
All mining operations today are affected by federal and stateconservations laws. The mine conservation technician usuallyworks for the mine operator and makes sure that all regulationsare followed. Mine conservation technicians working for open pitmine operations must see that the land is returned to a conditionsimilar to what it was before mining started. Soil must be putback, grading must be done, and trees must be planted. The mineconservation technician must be able to understand governmentregulations and supervise the people who operate the gradingequipment and plant the new trees.
Mine conservation technicians also work in the "deep" minesunderground to discover and stop dangerous environmentalconditions caused by poor mining practices. They check theland, water, and air around the mine site to see if the mine iscausing pollution. Stopping mine fires is also an area where themine conservation technician plays a part.
Most of the occupations in mine conservation technology requirea high school degree plus two years of technical training.
PEOPLE WHO WORK WITH LAND SPACE
Land Planner
Man is a social animal, which means that most human beings liketo live near others. They don't, as a rule, want to spread out.When many many people live on a small portion of the land, aland planner can help to make the best use of land space.
The land planner tries to fit the needs of people into the landspace that they occupy and must know the natural resourcecapability of the land being used, such as something aboutgeology to determine whether or not the ground will supportbuildings, and something about water and sewage to make surethat people have enough water to drink and that the soil willtake care of sewage. The recreation needs of people must beknown so that decisions can be made about where to put parksand playgrounds.
7

A four-year college degree in land planning or landscapearchitecture is required for most land planning positions. Thereare many technical positions in assisting land planners thatrequire two years of college training.
PEOPLE WHO WORK WITH AIR
Air Quality Tester
The increasing industrial productivity and transportation needsof the country have caused an ever increasing air pollutionproblem. The air quality tester collects air samples wherepollution is suspected and tests them to determine the amountof pollution present.
The air quality tester must, therefore know how to use therather sophisticated testing equipment available today and howto determine when and where the samples should be taken. Heneeds to know the difference between clean and polluted air,and how much pollution can be tolerated before there is dangerto people.
Air quality testers are usually graduates of 2-year technicalprograms in air pollution technology.
PEOPLE WHO WORK IN RECREATION
Interpretive Naturalist
The interpretive naturalist provides information about thenatural world to people who visit national, state, and local parksand museums. Naturalists must be teachers, communicators, andresearchers.
The naturalist uses the out-of-doors as a classroom includingbiology, zoology, botany, geology, and the natural and earthsciences. The naturalist usually has a college degree in one of theabove and a great deal of knowledge about the rest. Most of histime is spent out-of-doors, but the naturalist must also be able togive effective indoor presentations using audio-visual equipment.
EVALUATION:
Given the opportunity to identify and describe occupations inthe natural resources, children will give answers that indicatethat they understand that people must take care of naturalresources.
42 r)01.)

Section C - SoilWHAT IS SOIL?
GOALS: After this lesson children should:
Know that soil is made up of air, water, broken down rocks,organic matter, and living organisms.
Understand the interaction of the various soil components.
TEACHER'S NOTE: All activities suggested here will be based onthe assumption that there is a place on the school grounds, ornearby, whet* -hildren may learn about soil. These experiences willinvolve digging and sometimes removing a small amount of soil forfurther study in the classroom.
In some situations, the above assumption is not appropriate.
If this is true, teachers must fmd some soil to bring into theclassroom.
ACTIVITY 1: Becoming Acquainted with Soil
A. Temperature and Water
Have the children take a sample ..rf the school ground son "rother appropriate places and explore it with as many sensesas they can. The the following questions may help:
What can we learn about the soil by feeling it?
Is it cool or warm? Is it moist or dry:
If you squeeze a little bit of it in your hand, does it sticktogether? What -rakes it stick together?
Does soil have water in it?
B. Rocks and Organic Matter
Have each child collect or give them a small sample of soil(about 2 cubic inches) and put the sampir in the middle of apiece of 8-1/2" x 11" paper.
Providing the children with a hand lens, magnifying glass, orlow power microscope, will make this experience much morefun and meaningful.
Direct the children to separate the soil sample into thingsthat look differer. and things that look alike. Remind themthat they are still trying to discover what makes up a soil.The following questions may help:
Is there anything that looks like wood?
Is there anything that looks like it used to be a part of atree or plant? (Roots, leaf particles, stems, old leaves.)
Does anything look like small rocks or sand?
Are there any worms or insects in your soil?
TEACHER'S NOTE: In an ideal soil one might fmd all of theabove. This will not ger be the case, however. The very least ateacher should expect from the above activity is to have the childrendiscover that two more components of soil are rock particles andplant parts (organic matter).
C. Air
One way to demonstrate "soil air" to the children is to vinea sample of soil (preferably one that is moist and fresh in a
43
Topic I
jar and slowly pour water down the side of the jar until thewater covers the soil by 3 to 4 inches.
Air will escape from the soil and can be observed rising to theto of the water.
Should the soil be disturbed when the water is poured intothe jar, simply allow it to settle before observing it.
D. A Living Organism
The following demonstration will help teachers and children todiscover the reality or living organisms in a soil.
Materials needed:
Two sections of soil that are approximately the size of anypan that one would use to bake a small meat loaf or bread(approximately 8" x 4" x 4"). These sections should comefrom any place where weeds might be or are growing or fromthe floor of a woodlot or flower bed.
Two containers of ecual size, one of which can be put into anoven. Aluminum pie pans will do.
Procedure:
a. Mix the soil samples together in a box.
b. Put 1/2 of the mixture into one container and 1/2 intothe other.
c. Put one container in an oven for about 45 minutes atapproximately 300° (this will sterilize the sample). (Thesoil should be sprinkled with water and covered tightlywith a sheet of aluminum foil to hold in the steam beforebeing placed in the oven.)
d. Remove the sampltlfrom the oven and place it next to theother one on a sv.helow sill and water each one equallydaily as required.
e. Observe the results over a 2 to 3 week period of time.
TEACHER'S NOTE: The Irving organisms in a soil are differentfrom the organic matter discussed earlier, Organic matter indicatessomething that was once alive but is now dead. Organisms includebacteria, insects, plants, seeds, worms, and mans other living thingsthat live in and interact with the soil.
This demonstration will simply allow the children to see that thereare living things in the soil. Let them follow you through thedemonstration, including the baking of one sample.
EVALUATION:
Given the opportunity to answer the question: if you were tomake some soil, what kinds of things would you need? ildrenwill demonstrate their knowledge of soil components by havingthe following in their answer: air, water, rocks, organic matter,and living organisms.
54

Section C - Soil
SOIL FORMATIONGOALS: After this lesson children should:
Understand the concept that soil is a renewable natural resource,and that its renewal takes tremendous time.
Understand these terms: weathering, soil parent material, soilprofile, and horizon.
Understand basic concepts of soil formation.
Begin to understand the relationship of one area (horizon) of asoil profile to another.
Have the basis for a better understanding of the soil topics thatfollow.
TEACHER'S NOTE: The introduction of the "soil profile" is donehere because it will give the children the total picture of "a soil"from bedrock to surface. Knowing what a profile is will help thechildren to understand better the topics that follow.
ACTIVITY 1: Discussing Soil Profiles
Ask the children to define the word Frofile. When they havearrived at the conclusion that a profile is really a "side view"then ask them to use their imagination and do the following:
Start at the top of a regular piece of notebook paper anddraw what you think a soil profile might look like. You mayuse words at the side of your drawing to describe what youmight find as you go deeper into the soil. Make sure thatyour picture shows where you think soil begins and ends.(Collect the drawings when the children are finished.)
TEACHER'S NOTE: The purpose of this little exercise is to helpteachers to find out what children think they will find in a soilprofile, and to make comparisons between what they will find andeventual discoveries.
EXERCISES
SOME WAYS TO MAKE A SOIL PROFILE
THE SIDE HILL METHOD
BC.
0HORIZONS
Find a side hill and dig straight down until profile is exposed.
Using Master C-1, have students identify the soil horizons.Using the posterboard and glue method described under theAuger Method, have the children take samples and prepare amodel of the soil profile.
THE AUGER METHOD
If you have a soil auger available the following method may beused to make a profile.
You will need:
Poster board, 9" x 22"White glueSoil auger
Topic II
Procedure:
a. Fold poster board along the long axis.
b. Cover middle fold with glue.
c. Take a sample of soil from every 2 inches that the augergoes down into the ground.
d. Put soil samples on board as they are taken out of ground.
e. Press soil gently into glue and allow to dry, for an hour orso.
° GLUE
THE POST HOLE METHOD
Procedure:
a. Dig a hole straight down into the earth. Take a samplefrom each level that you dig out and place it on the posterboard in the same manner as in the auger method. Thenfill up the hole. This meihod will work but is not as easyas any of the other methods.
44
55
AaC
1,
E.
..

-THE ANGLE-IN SLOPE
If a hill is not available for exposure of the soil profile, but onlyflat land exists in the study area, the soil may be removed at anangle into the ground, exposing the soil profile in a vertical wallas shown in the figure. Samples may be taken, and a model ofthe soil profile prepared as previously described. Fill the holewhen the study has been concluded.
WHAT MIGHT BE FOUND
PLANT AND ANIMALDEBRIS AND NEWSOIL, ROOTS, INSECTS.
RATHER CONSTANTPARTICLES OF THESAME SIZE AND COLOR.
LARGE ROCK PAR-TICLES CALLEDSOIL PARENTMATERIAL.
ws......11.0
,r.. ExPosEpI PROFILZ.
iotc. Toea REMOVED
'.
....
%.
.. i':
.'. S1, ,
'
:
A
13
CI,
E
MASTER C-I
.-L. ,,,7(/.0 qi t .1...C., I. i '.
I
.0
:. .
TEACHER'S NOTE: This publication is for nationwide use. It istherefore impossible to show you exactly what a soil profile fromyour area will look like. The profile chart shown above is typical ofa soil suitable for growing crops. There are three areas (A, B,
COLOR
VERY DARK BROWN OR RED
LIGHTER THAN A HORIZON,MAY CHANGE AS YOU GOTHROUGH IT.
WILL BE LIGHTER THAN AAND B, AND ABOUT THECOLOR OF THE ROCK UNDER-NEATH IT.
C) called horizons, and each horizon plays a particular part in theformation and functioning of soil. The depth of these horizonsvaries considerably. In some very shallow soils, B and C horizonsmay be lacking altogether.
45 56

ACTIVITY 2: Making a Soil Profile
There are several ways to make soil profiles, most of which canbe found on Worksheet C-1.
Tools needed for this activity will be one or more of thefollowing: a shovel, a post hole digger, a soil auger. A soil augermay be borrowed from a soil conservation service representativeif one ii not one available in the schooL High schools withvocational agriculture programs would be another source ofequipment. The auger method of making a soil profile is the bestbecause it requires less work, less space, and disturbs hardly anyland. Make sure the children get a good indication of the changeson their poster board.
After the profile has been exposed and a sample of it has beenmade, ask the children the following questions:
What changes did you notice as the soil profile got deeper?
We noticed in the A horizon the breakdown of organicmatter. Is this how a soil gets its organic material, and if so,how does the organic matter get down into the soil?
The middle horizon B may be looked at as the mixing bowLOrganic matter from the top and soil parent material fromthe bottom meet and mix to form the B horizon. Why is thisimportant to plants?
The C horizon of a soil is called the soil parent r arterial. Soilparent material is made up of broken down rock. The rock isbroken down by a process called weathering. Gradually theparticles get smaller and smaller. Why is this important to soilformation?
EVALUATION:
Given the opportunity to explain soil formation, a child willdimonstrate an awareness of the following concepts:
The relationship of soil parent material and weathering.
The relationship between the formation of soil parentmaterial and the addition of organic matter.
The relationship of one area of soil profile to another
Given the opportunity to define the following terms ddldrenwill give a definition that indicates an understanding of theterms:
Soil profileSoil horizonWeatheringSoil parent materialSoil formation
Section C - Soil
SOIL AND WATERGOALS: After this lesson children should:
Understand the relationship of water to soil formation.
Be aware of the effect of man on soil.
Understand the terms drainage and percolation.
ACTIVITY I:. Experimenting With Percolation and Drainage in theClassroom
Water falls to the earth as rain and then does one of two things:goes down into the soil or runs off on top of the soil.
Percolation and drainage are the terms applied to the movementof water down through a soil or the way water runs off of orthrough a soil.
Demonstration in the Classroom
Materials needed:
The inside parts of a coffee percolator.
Place about 3/4 inch of coffee in the top.
Place the coffee holder in a bowl to catch the results ofthe experiment.
Pour enough hot water into the top to cover the coffeeand observe the results.
Ask the children the following questions:
Why is the water in the pan or bowl now the color ofcoffee?
Topic III
Could we say from our ooservation of this experimentthat when water moves down through coffee it takessome of the coffee with it?
What would happen if we replaced the coffee with soil?
ACTIVITY 2: Experimenting with Sod Percolation and DrainageOutside the Classroom
In the following exercise, have students perform a percolationtest.
EXERCISE
MAKING A PERCOLATION TEST
Materials needed:
I watch (either a stop watch or a watch with a second hand).
1 onelb coffee can with both ends cut out of it.
1 one-pint jar or cup (so long as this container is the samesize for everyone it can hold any amount of water that is lessthan the coffee can would hold).
1 plastic jug for carrying extra water.
Procedure:
a. Select four spots on the school grounds or nearby. Two ofthese spots should be places where people seldom or neverwalk.
Examples:
When did the color come from? The middle of a yard that doesn't get much traffic
46
57
A flower bed
Under shrubs and bushes
b. The other two spots should be places where people haveobviously affected the soil by walking on it or standing onit.
Examples:
The area around home plate
The area under swings or see-saws
The corners of buildings where pathways usually arefound
Any other place where the soil is stepped on by people
Soil
r*,.
4 * , f- *.- 4e. e°:
c. Have the children work in teams of three with each childdoing one of the following tasks:
1. Set can in place and pour water
2. Timing
3. Recording
4. One child should also describe the test site
The following chart may help in recording the results:
Site Amount Time Rate GPM1 1 qt 90 sec 1 qt/90 sec 1 1/12 gal/min2 ------,
4
Rate of percolation should be figured as amount of water/time(see example below) and converted to gallons/hour.
1 qt/90 sec = 1 gal/520 sec = 1 gal /12 minor 1/2 gal/min
d. Push the coffee can into the ground at the selected site sothat water poured into it will not seep out from under theedge. (See Figure C-1 below.) All the can does is act as asleeve. The lower edge should be pushed into the soilabout 1 inch.
e. Measure 1 pint of water and pour it directly into the topof the coffee can.
f. Note and write down the time as soon as the water ispoured in.
g. Note and write down the time it takes for the water todisappear. The difference in time is the percolation rate.(This may be very rapid or very slow depending on thesoil type and condition.) You may want to see how longit takes for the water to drop 1 inch or 2 inches. As longas everyone does the same thing, it does not matter. Youare finding the rate of percolation.
After the tests have been made, have the teams draw conclusionsbased on the following questions:
What kind of results did you expect when you started thisexperiment?
What general things could we say about each of the two kindsof areas we observed?
What was the percolation rate at each of the sites?
How and why were they different?
When the children have discovered that soil where people walkwill not percolate as rapidly as soil that is not walked on, ask thefollowing questions:
Why does standing on the soil cause water not to drainthrough it?
What words could we use to describe what might happen to asoil that was continually stepped on?
TEACHER'S NOTE: The technical terms for soil that is treated inthe above manner are impaction or compaction. Activity 3 may helpyou and your children to understand this concept better.
ACTIVITY 3: Studying the Effect of Soil Impaction and Drainage
Figure C-1 shows a microscopic view of soil particles in anon-compacted situation. The spaces between the soil particlesare called pore space. As soil becomes compacted, the soilparticles are so close together that water will not flow downthrough the soil.
SOIL PART1CLEb
0 roFte 6PAW-
Figure C-1
TEACHER'S NOTE: The ability of a soil to hold water is related tothe amount of surface area present in the form of soil particles. Thewater attaches itself to the surface of the soil particles and is heldthere. Pore space simply allows water to contact the individual soilparticles.
Ask the children the following questions:
What happens to soil particles when a soil is compacted?
What relationship does soil compaction have to soil drainage?
if the soil on your school grounds is holding all the water itcan and it starts to rain, what will happen to the water?
Will the water run off at the same rate from all parts of theschool ground?
What determines the rate of water runoff other than thepercolation rate?
TEACHER'S NOTE: The degree of slope on a soil will affect therate of run off and the rate of percolation.
What would happen to water that falls on perfectly level landthat will not absorb any more water?
TEACHER'S NOTE: Soil that will not absorb any more water or is"filled up" has reached what is called field capacity. If thepercolation rate of a lawn is 1 inch per hour and a downpour causes2 inches of rain to fall in one hour, 1 inch will be absorbed and 1inch will either run off or if the lawn is perfectly level, will lie thereand evaporate. This can be observed very nicely if there is a ballfield or playground on the school grounds. After a rain, waterpuddles will usually form in the area around home plate or undersee-saws or swings.
47 58

ACTIVITY 4: Determining the Effect of Percolation on Soil
Two major areas of a soil profile are affected by waterpercolation. They are: (1) the movement of organic matter andnutrients from the top layer of soil down to where root systemsare; (2) weathering of rocks that forms soil parent material.
Prepare an overhead transparency from Master C-1 to explainthis concept.
Point out:
Rain falls on soil and because of gravity starts to move down.
As water moves through the surface soil, it picks up nutrientsfrom the organic matter and carries them through the Ahorizon and into the B horizon.
Material from the surface is deposited in the B horizon calledthe "zone of accumulation."
Water that is not used by plants or other living organisms inthe soil finally reaches the soil parent material where itusually drains away.
Water that reaches bedrock runs along the plane of the rockand enters the water cycle at a spring, stream, river, or well.
Horizon A is often called the "zone of leaching." Leaching isthe term used to describe the removal of a material by water.(Coffee grounds have been leached of their soluble material.)
EVALUATION:
Given the opportunity to define the following terms, thechildren will demonstrate an understanding of the meaning ofthe terms:
percolation, runoff, field capacity, percolation rate, porespace, impaction, degree of slope.
Given the opportunity to trace a drop of water from the surfaceto the bedrock of a soil profile, children will indicate anunderstanding of the relationship of water to the development ofsoil.
Given the opportunity to answer the question "Can you tell oneway that man has a negative effect on soil?" children will give ananswer that indicates that the child understands the relationshipof walking on soil to pore space and the relationship of porespace to water-holding capacity.
Section C - SoilSOIL AND PLANTS
GOALS: After this lesson children should:
Know that plants are very important to soil because they help toprevent soil erosion and also provide organic matter to the soil.
ACTIVITY 1: Discussing Decomposition and Organic Matter
Children should understand that the term "organic" indicatessomething that was once living but has since died and is in theprocess of decomposing. Activity 1 fro Topic VI, Section B,will serve as 1:. good review and dicission guide of therelationship between soil renewal, organic matter, and decom-position.
ACTIVITY 2: Discovering Examples of Organic Matter
Have the children go outside the school building and exploreNkkflowerbeds and areas under trees and shrubs. Ask them to findthings that were once alive but are now nonliving and areundergoing decomposition. The following questions may help:
What are some of the things we notice about things that aredecomposing?
Do they change color and texture?
How do they smell?
How long do you think it will take for the leaves that havefallen this year to turn into part of the soil?
What other evidence of living things can you find?
ACTIVITY 3: Testing for Organic Matter in the Soil
TEACHER'S NoTE: The following activity will depend on r..eavailability of soil testing facilities. Contact the state university ordistrict office of the Soil Conservation Service and obtain informa-tion on the procedure for getting soil samples tested.
This activity is a very good way to show children the effect of plantson the organic content of the soil and to provide an interesting mathproblem.
48
Topic IV
a. Contact the district office of the Soil Conservation Service orstate university and have them send information on how asoil sample can be tested for organic matter content.
b. Have the children go out on the school grounds and collectsamples of soil from the following kinds of areas:
An area where there are no plants growing at all (ball fieldbase paths, home plate, etc.).
An area where grass is growing.
An area where trees and shrubs are growing and dead plantmaterial is evident on the surface of the ground.
c. Send samples to the address obtained in Step A. (Usually soiltesting laboratories will send small packets to put the soil in.)
d. When results return, make a graph similar to the one inFigure C-2 below.
e. Did the sample with lots of plan. cover also contain a largeamount of organic material?
RE-60(13OF
oRdolNIC- -mATtRIAL -
Amomn- OF PLANT cous_a_ J.-ON 5AMPLE, SITE IF
Figure C-2
ACTIVITY 4: Discovering How Plants Help to Hold Soil in Place
Using the following exercise, have the children make a soilrunoff demonstration table and do the experiment.
59

After the experiment, discuss the following:
Why did we find more soil runoff from the uncoveredsample?
How do plant roots help to hold soil in place?
Do plants have any other effect on soil protection?
Have the children dig up a small amount of grass (a teaspoonfulis a small amount) and look at it under a microscope. Ask themto try to discover just how plant roots are attached to soil.
EVALUATION:
Given the opportunity to answer the question "What do plantsdo for soil? children will indicate by their answers that theyknow that plants supply soil with organic matter and help tostabilize the soil.
EXERCISE
HOW TO MAKE A SOIL RUNOFF BOARD
You will need:
2 plastic milk bottles (the more nearly square the better)
2 tin cans
2 quart jars
Procedure:
a. Cut the milk bottles in the manner shown below to maketrays.
b. Mark the quart jars with masking tape in the manner shownbelow.
-L-Gfr-1-
Section C - Soil
c. Punch holes in the bottom of the cans to make sprinklingcans.
d. Obtain one piece of sod that will fit exactly into one of themilk bottle trays; or fill both milk bottle trays with soil andplant rye grass in one of them.
e. As soon as the sod has had a day or two to settle or the grasshas grown to about 5-6" (about 2 months), set the two traysside by side as shown below.
Block up the trays so that they slope about 1 inch from theback to pour out spout.
Place the marked jars so that water from the trays will collectin them.
f. Slowly pour 1 quart of water through the cans so that it fallsonto the middle of each of the samples.
g. Record and observe the amounts of water and soil collectedin jars.
Questions;
1. Which jar has the most water?
2. Does grass help hold water?
3. Which jar had muddy water?
Topic V
SOIL PARTICLESGOALS: After this lesson children should:
Understand that soil is classified by particle size.
Understand the relative size of sand, silt, and clay particles.
ACTIVITY 1: Making a Mechanical Analysis of Soil
Have the children collect from the school grounds or bring fromhome various samples of soil that they have been able to identifyas having a particular color or characteristic that they canidentify usually by feel.
In this method simple sedimentation is employed with aminimum of laboratory equipment.
Materials needed:
Various soil samples, 1/2 cup of each
1 fruit jar and lid for each sample
8 percent Calgon solution Mix 6 tablespoons of Calgon perqt of water
Ruler graduated in the metric system
Measuring cup
Tablespoon
Procedure:
a. Place approximately 1/2 cup of soil in a quart jar. Add 5tablespoons of the 8 percent Calgon and 3 1/2 cups of water.Cap and shake for 5 minutes. Place the jar on the table andlet stand for 24 hours.
A
b. At the end of 24 hours, measure the depth of settled soil.This represents the total depth of soil. Shake thoroughly for5 minutes. Place the jar on the desk and let stand for 40seconds. Now measure the depth of settled soil with a ruler.This is the sand layer.
c. At the end of 30 minutes, measure the depth of settled soiland subtract the depth of sand from this depth to get thedepth of the silt layer.
49
6"ti

Figure C-3
d. The remaining unsettled part represents the clay fraction.
e. Record your results for each of the soil samples.
Section C -. Soil
The measurements may be converted into percentage figuresaccording to the following examples:
A
a. Total depth of soil 23 mm 35 mm
b, Depth of sand layer 9 mm 13 mm
c. Depth of silt layer 10 mm 10 mm
9 12 mm% Sand equals
mm35 mm
x 100 % = 39% x 100% = 34.3%23 mm
103 mm
mm 1
305 mmmfr.% Silt equals
2x 100% = 43.5% x 100% = 28.696
% Clay equals 100% (39% plus 43.5%) = 17.5%100% = (34.3% plus 28.6%)
= 37.1%
EVALUATION:
When asked to name the three general soil particle sizeclassification, children will say day, silt, and sand. When askedto put the three particle size classifications in order, iankingfrom larger to smaller, they will say sand, silt, and clay.
When answering the following questions, children will giveanswers that is the opinion of their teacher are satisfactory.
Which of the soils tested in Activity 1 would hold the mostair?
Which of the soils tested in Activity 1 would allow water topercolate faster?
Which of the soils tested in Activity 1 would have the mostpore space?
SOIL AND AIR
GOALS: After this lesson children should:
Know that soil has an atmosphere of its own and that the aircapacity of a soil is directly related to its structure andcondition.
Have developed an awareness through classroom discussion ofthe relationship of a soil's living organisms to the soil air.
ACTIVITY 1: Discussing Soil Particles and Air
Review Topic I, Activity 1:
We have seen that there is air in soil. Where do you think thisair is located?
What did we mention when we discussed water that mightgive us a clue to where air might be located in the soil?
TEACHER'S NOTE: Soil scientists classify soil particles by size.Sand ranges from 0.5 to 2.0 millimeters, silt from .002 to 0.5millimeters, and clay those smaller than 0.002 millimeters. Mostsoils are made up of particles that are combinations of the above, Itis important to understand this concept, because particle size isimportant to the airholding capacity of a soil, as well as the amountof pore space in a soil.
The capacity of a soil to hold air is dependent upon soil particle sizebecause soil particle size determines the amount of cavity or porespace that will exist between particles. The diagram in Figure C-4below will help to illustrate this point.
50
Topic VI
PORE SPAc-E-tly04,
4/.. soil. pARficle, tiFigure C-4
Ask the children this question:
Will a soil with large particles hold more air than a soil with smallparticles?
ACTIVITY 2: Demonstrating the Effect of Particle Size on PoreSpace
Using two water glasses of equal size, fill one with marbles andone with BBs. Have the children pour measured amounts ofwater into each glass until it is full and then ask the followingquestions:
Which of the glasses took the most water?
Which of the glasses has more space between particles?
Which class of soil has the most air space?
TEACHER'S NOTE: The material above should be related to theeffect of pore space on drainage. Soil with larger particles willusually drain more rapidly and therefore leave more space for air. Ifa soil is poorly drained and water remains in the pore spaces aircapacity will be less.

ACTIVITY 3: Studying the Relationships of Living Organisms andSoil Mr
Plant root tissues and very small soil organisms (everything fromearthworms to bacteria) constantly use oxygen and give offcarbon dioxide. Both of these gases have a characteristic that isvery important to the needs of soil organisms. This is calleddiffusion, which means that a gas (COc or 02) will move towardand occupy an area of lesser concentration. The followingdiagram may be helpful in understanding this concept.
RAR oxYGEIJLow otLYGE-N Son- WRFAc.E
i
Figure C-5
Point out to the children that the movement of gases is veryimportant in maintaining the balance of the soil atmosphere.After an explanation of this concept, ask the children to solvethe following problem.
I I II
1 I1 co:l P 1
i...1).^t__ _A_.1 1
1L______ _ _ _ _ ..,Figure C-6
If in the above diagram the tree roots are within line A, whichway will soil oxygen move, from area A tc area B, or from area Bto area A? Answer the same question about carbon dioxide.
TEACHER'S NOTE: Figure C4 is very arbitrary and meant forillustration only. In actual fact the areas ofgaseous concentrationare much more subtle and seldom could they be defined as a straightline or area A or B.
EVALUATION:
Given the opportunity to define the following terms porespace, soil, air, and diffusion children will give a definitionthat demonstrates a basic understanding of the terms.
Given the opportunity to answer the question: Will a soil withlarge particles hold more air than a soil with small particles? Thechildren will answer that the soil with larger puticles will holdmore air. When asked why this is true, they will respond in a waythat will indicate their knowledge of the proper relationship ofpore space to air-holding capacity and pore space to soil particlesize.
When asked to discuss the relationship of living things to soil air,children will demonstrate by their comments that they have anunderstanding of the fact that plant tissues and other soilorganisms use oxygen and give off carbon dioxide and that thesegases move from areas of high concentration to areas of lowconcentration.
Section C - Soil
HOW SOIL IS MOVEDGOALS: After this lesson children should:
Understand that soil and soil parent material are moved by wind,water, and gravity.
Understand that the movement of soil parent material is animportant factor in the formation of different kinds of soil indifferent parts of the world.
Understand that soil that is not stabilized by pants will bemoved by wind, water, and gravity.
ACTIVITY 1: Observing Evidence of Soil Movement
Soil movement by water can be observed on any hillside that isnot covered with plants of some sort. This is one of the mostcommon forms of erosion.
51
Topic VII
Bank erosion can also be observed on any stream that curves inand out.
Stream bank erosion can best be observed on the side of thestream where the water curves into the bank.
If you have school grounds where you can find some bareground and some grotind covered with grass or other plants (suchas a balifield), the e.xperiment on Worksheet C-3 will be veryhelpful in showing children that water does move soil and thatplants stabilize soil (see Topic IV, Soil and Plants).
Followup suggestions for this activity include:
Why are swales planted with grass that isnever disturbed?
What is the purpose of a diversion terrace? Why is it grassy?
f2

By means of a field trip or slides, show the children contourplanting of field crops. Why is the field plowed across the slopeand not down it?
What is the purpose of grass strips across the slope?
Evidence of soil movement by air can be observed by blowing onany dusty shelf or by observing the wind blowing dust around.
Soil movement by gravity is difficult to observe unless you havesome very steep slopes that are covered with shallow soil andvery little or no ground cover.
ACTIVITY 2: Discussing the Movement of Soil Parent Material
Make an overhead transparency from Master 02, and explain themovement of soil parent material.
TEACHER'S NOTE: The movement of soil parent material bynatural forces is one reason for the many and varied soilclassifications that we have in this country. For further information
on soil classificativn and the origin of soil parent material in yourarea, consult the district office of the Soil Conservation Service.
EVALUATION:
Given the opportunity to tell how soil is moved by naturalforces, children will demonstrate their knowledge that it ismoved by gravity, wind, and water.
Given the opportunity to discuss the importance of ground coverfor soil stabilization, the children will demonstrate by theircomments that they appreciate the value of plants in soilstabilization.
If asked the question: why are there different kinds of soil indifferent parts of the country? Children will answer the questionin a way that will demonstrate that they know the movement ofsoil parent material by wind, water, and gravity, and appreciatethe relationship of the concept to the formation of differentkinds of soils.
MASTER C-2
1. Rocks in valleys and on mountains are weathered and turn to soil parent material.
2. Rocks from mountains are washed, blown, or rolled down to valley.
3. Soil parent material from the mountain mixes with soil parent material and organic matter fromthe valley and makes a soil different from either of the two areas.
4. Son at the base of the mountain will be different from the soil farther out in the valley.
5. These processes are going on all of the time.
_-----------------4..301t. MEV MINIM- Friog pir.:;.61:?!-'.-ad.",:"......, . -
::'5 cIL pAR.Ere iiIiir;;;AL.Fri-L- .
. vALLE.y ,
Cs.
r WiNP -.)._..P ,
RAN -.--
,,,..,......,..-_..._..:..
....
1
./ , 2 . i,,// 1 Ts:44:2::.7.-.
/.
52
6")
r/fu::::.
WEATI4ERIW4of RotK5 ro Mont-IcaPARENT" 6011-- MATERIAL
"----ROCiti POU_E.PBY GRAVITY
MOUNTAIN

Section C - Soil Topic VIIIMAN'S EFFECT ON SOIL
GOALS: After this lesson children should:
Understand one of the ways that people affect soil.
TEACHER'S NOTE: This topic is similar to Topic VI, Grades 3-4,but the activities are more appropriate for Grades 5-6.
ACTIVITY 1: Identifying the Problem
The school ground in most suburban areas is covered with soil.Children play on the school ground. It should therefore beobvious that they have some effect on the soil.
Have the children go outside for a period of exploration. Theywill be looking for particular places where they have caused asurface change in the appearance of the ground.
What is soil? Have the children take some soil from differentareas (where they constantly walk, and where they don't) andbring it into the classroom on a plain sheet of paper, and try toseparate the different things they find and note differences. Thiscan be done in teams.
Answer the question, what is soil made of? Using a hand lens ormicroscope, see if the children can discover what kinds of thingsmake up the different kinds of soils. Rocks, root stems, plantparts, worms, water, air, just what is there?
From the observations made during the trip questions shouldevolve, such questions as: what happens when we constantlywalk over the same place? Does it change the soil to step on itconstantly? Will plants grow in these areas? Why does wateralways stay in these areas longer than other places?
ACTIVITY 2: Measuring Soil Compaction
How can we fmd out what happens when we step on soil? Thebest way to get this answer is by a comparative study. First askthe children what they think happens to the soil. Does it gethard and if so, does this affect its ability to hold water or growplants?
One way we can answer the hardness question is by running asimple penetration experiment:
a. Get one pound of 10 penny nails, and a 12-inch ruler.
b. Going back to the place where they made their originalobservation, have them try to push the nail into the soil withone finger, then two (thumb and forefinger grasp). Cautionthe children not to press with the palm of their hand.
c. Measure how much of the nail stuck out of the soil afterpushing with one finger.
d. Make a note of the distance above ground.
e. Repeat the same procedure using the same steps, only changethe area to any place where there is no visible evidence thatman has affected the soil.
f. Have the children write down the number of inches of nail.isible after they performed the experiment.
Back in the classroom have the children average the distancein man-affected soil and in non-affected soil.
g.
Now we know the soil is harder where man has stepped on it butdoes this make any difference?
Our observations tell us that there were no plants growing on thesoil where we walked. Was this because we killed the plants thatgrew there before they had a chance to grow, or because soil thatis hard or compacted does not grow plants as well as the softersoils? How can we find out?
a. Get some flower pots and a packet of bean seeds.
b. Simply collect soil from the same two areas as above andplant the seeds in them.
c. Try to collect some samples of the impacted soil withoutbreaking it up too much.
d. Place the samples in a place where they will receive the sameamount of sunlight and water.
c. Water them well whenever the surface is dry. Keep records ofhow much water was used.
f. Observe the growth of the bean plants and note differences.
This experiment will yield further evidence regarding man'seffect on the soil.
Does stepping on the soil cause water to not go down into thesoil where it can cleanse itself and be used by plants? How canwe find out? What .did our observations tell us? Discuss with thechildren what happens to water as it hits the soil? What wouldhappen if it all stayed on top? Will stepping on the soil in thesame place all the time cause this to happen?
a. Get enough number 10 cans or any large tin cans for everychild in the class to have one.
b. Cut both ends out of half of all the cans.
c. Fill the other cans 1/2 full of water.
d. Return to the spots where man has affected the soil.
e. The children should be working in teams of two, one withcan with water and one with a cylinder.
f. Place the can with both ends cut out down into the soilabout 1 inch.
g. Pour the water from the other can into this.
h. Note the time it takes for the water to drain or percolatedown into the soil.
i. Repeat the above process in an area not affected by people.
j. Back in the classroom discuss the differences that thechildren found. What does this mean to plants, animals, thewater itself?
EVALUATION:
Given the opportunity to discuss the effect of people on theschool ground soil, children will demonstrate that they are awareof things such as compaction and the relationship of acompacted soil to plant growth and percolation.
53
64

Section C - Soil Topic IX
SOIL CONSERVATION OCCUPATIONS
GOALS: After this lesson children should:
Be aware of the occupations that exist in the area of soilconservation and management.
Understand the nature of the work performed by soils workers.
ACTIVITY 1: Discussing Occupations in Soils
TEACHER'S NOTE: We use the On-SiteSoil Scientist to denotethe soil scientist who actually does on -site work with soil ascompared to the soil scientist who spends time in a laboratory doingbasic physical and chemical tests on soil.
The basic job description of the On-site Soil Scientist would bethat of an information obtainer and problem solver. Suppose, forexample, a building developer wants to use a particular portionof land for building houses. His rust problem is to determinewhether or not the soil in the area is suitable for this kind of use.The on-site soil scientist would be called and would probably dothese things:
a. Gather all available information about the kinds of housesthat are being planned.
b. Gather all available information about the soil.
c. Identify information that is necessary but not available.
d. Work with soil technicians to Bathe any additional informa-tion necessary.
e. Relate all available information about the soil to the needs ofthe housing development and to the rest of the community.
f. Make recommendations to the housing developer that willenable him to use his land properly.
The on-site soil scientist must have many different kinds ofknowledge. He must the general characteristics of all soilsand the particular characteristics of the soils in the area where heworks. He must be familiar with all methods' obtaininginformation about soils, including not only field samplingtechniques but also lib,ary and computer resource materials. Hemust know or be able to determine what effect a particatar kindof activity might have on a soil, and last but not least, he mustknow how to work with people.
Particular kinds of knowledge that the on-site soil scientistwould need to have would include soil science, chemistry,geography, mathematics, mapping, surveying, and public rela-tions.
Most soil scientists are graduates of at least a four-year collegeprogram in soil science, and very often have an area ofspecialization such as forest soils agronomy.
54
Any analysis of soil depends to a great extent on the informationobtained from laboratory testing of soil samples gathered fromparticular areas. It is the job of the laboratory soil scientist to beable to answer particular questions about particular soils and getthis information back to the people working on the site so thatthey can make proper recommendations. The laboratory soilscientist needs to be familiar with all available techniques forphysically and chemically analyzing soil samples, and if given aparticular use for a given soil, must know what soil changes torecommend based on his laboratory analysis.
The laboratory soil scientist is a graduate of at least a four-yearcollege Program and usually has a very strong background in thephysical and chemical properties of soil, as well as the laboratorytechniques necessary to determine these properties.
Soil technicians are important people in the area of soilconservation and work in both laboratory and on-site situations.In general, soil technicians are those who actually run the testsor collect the data needed by the soil scientists. The soiltechnician who works on the site, for example, would have to bevery familiar with field sampling techniques to determine suchthings as percolation rate profile, soil chemistry, and degree ofslope. The soil technician who works in the laboratory on theother hand, would be familiar with tests to determine suchthings as soil moisture, soil air, mineral content, and soil texture.
Soil technicians are high school graduates and very often havetaken twoyear programs after high school. In the future all soiltechnicians will probably need two-year post high school trainingin order to enter the field.
ACTIVITY 2: Interviewing Resource People
The most direct experience that children can have in learningabout soil occupations is by meeting someone who actually is a"soil min." Contact your local, state or federal Soil Conserva-tion Service and arrange for a visit of one of their people to yourclassroom. Local high schools with vocational agriculture pro-grams may also be a good source of information and resourcepeople in this area.
ACTIVITY 3: Preparing a Bulletin Board
Have the children develop a bulletin board of pictures of peopleworking with soil. Group the pictures so as to illustrate clustersof similar careers. Have the students study and react to thedisplay during a class discussion.
EVALUATION:
In an oral exercise, the student can identify at least three typesof workers who help to manage and protect our soil.
The student can state how different soil workers contribute tohis well-being and the welfare of the community.

Section C - PlantsPLANT COMMUNITIES
GOALS: After this lesson children should:
Understand that the environment is made up of physical andbiotic factors that affect each other.
Understand the physical factors of the environment.
Understand that plant communities develop in areas wherephysical factors are suitable for them.
ACTIVITY I: Identifying Biotic Factors EAsk the children to identify some of the living things that affectthem, such as flies, rats, mice, cows, ants, birds, trees, flowers,shrubs, and mold.
Point out to them that all living things are biotic factors in ourenvironment and that these biotic factors are affected by thephysical factors that surround them.
ACTIVITY 2: Identifying Physical Factors
Physical factors in the environment are made up of non-livingthings and energy.
Mk the children to think for a minute and name the physical(non-living) factors that affect a plant community.
They should mention water, air, soil, temperature, and light.
The study of ecology is said to be the sum total of all physicaland biotic factors that affect an organism.
Review Section B, Topic I, "Needs" with the children. Remindthem at this point of the needs that are common to all livingthings, that is, air, water, light, food, and suitable temperature.
TEACHER'S NOTE: While all living things have the same basicneeds, natural communities are based on the fact that among themany species of plants and animals that live on the earth, there is adifference in the amount air, water, food, light, and temperaturethat each species requires. Each species has a "range of tolerance"for each of the factors.
ACTIVITY 3: Discussing the Range of Tolerance.
Every plant and animal lives in an environment in whichtemperature, moisture, light, food, etc. occur within a range thatpermits it to live and grow. Goldfish can live and grow onlywithin a temperature range of 32°F to 107 °F. If the water isfrozen (32°F) or warmer than 107°F for long periods, goldfishdie. The range of tolerance for goldfish, then, is 32°F to I07°F.Goldfish grow most rapidly in the "optimum" range of 71 °F to87°F, as shown in Figure C-7. If any one of the environmentalfactors extends beyond the range of tolerance for the plant oranimal it Is called the controlling factor.
Minimum
Very Slow Growth
Topic I
ACTIVITY 4: Determining Limiting Factors in CommunityDevelopment
A forest or grassland community will be made up of plants andanimals that are in a place where their physical needs are met(fall between the minimum and maximum range).
If the school grounds have any kind of plants growing, you maybe able to show the children the plant community controllingfactors.
A good way to start a school ground example of limiting factorsand community development, would be to do the following:
Have the children go out on the school yard or ball field (anyplace where there is a grass lawn) and ask them the followingquestions:
Why are grassland plants the only plants growing here?
Can you find places on the school ground where grass is notgrowing because of a limiting factor?
TEACHER'S NOTE: The kinds of places to be looking for are areasunder trees, ball field base paths, very stony or steep areasanyplace at all where grass is not growing, but could if a condition werechanged.
Ask the children what the limiting factors might be in the areaswhere no grass grows. The following list may be helpful.
Not enough light
Not enough water
Not enough soil
Too many people stepping on it
Ask the children what would happen to the grass if they left italone. Would it get much higher and reach optimum growth?Point out to them that one of the limiting factors for grass is thelawn mower.
TEACHER'S NOTE: This concept will be discussed more fully inTopic IV, "Plant Communities Change."
EVALUATION:
Given the opportunity to define physical factors, children willdemonstrate their awareness of the fact that physical factors aretemperature, light, air, water, and other living things.
Given the opportunity to describe the meaning of the termsrange of tolerance and controlling 'factor, children will demon-strate an awareness of the correct meaning of the terms and therelationship of the terms to the development of a plantcommunity.
1 Optteum 1
I 1
Minimum
iVery Slow' Growth
3.F 4 60 70 86 4 lido :10.F
water Temperature
Range of Tolerance of Goldfish to Water Temperature
Figure C-7
' 66

Section C '- Plants
FOREST PLANTS
GOALS: After this lesson children should:
He familiar with the kinds of plants that make up a forestcommunity.
Be able to distinguish between broadleaf and narrowleaf trees.
Understand the role of the understory plants.
Understand the structure of forest plants.
TEACHER'S NOTE: The identification of particular trees willdepend on the local area and the information available. Theactivities suggested here an designed to help children learn thestructural differences among the tree species.
ACTIVITY I: Discovering the Upperstory
Forests are usually made up of two "story situations." Theupperstory plants have one very important characteristic: theyhave the genetic ability to grow taller then their understorycompanions. For example, in some of the eastern oak forests theunderstory trees are dogwood and hophornbeam. These twotrees would never grow as large as the oak even if they had idealconditions.
Our effort here should be to help children understand thevarious parts of trees rather than to identify specific trees.
ACTIVITY 2: Discovering the Understory
Many forests have an under story community that is a combina-tion of short trees, shrubs, wildflowers, ferns, mosses, and fungi.
If you are working in a woodIct, have your children explore theunderstory from ground level up.
Certain plants grow best in shady places rather than in full sun.Perhaps by observation you can discover some of these.
Give special attention to the discovery of plants that arenon-green. Mushrooms and other fungi play a very importantpart in the forest cycle in that they are decomposers. They breakdown material and return it to the soil for reuse. Ye will discussthese plants further in Topic IV, "Plant Communitin Change."
TEACHER'S NOTE:If you are working in a woodlot Oa' is madeup of coniferous trees (fu, pine) the understory may net be aspronounced as it is in a broadleaf forest but if you explore dose tothe ground you will fmd that there are a significant numbers ofsmall plants that play a part in the forest community.
ACTIVITY 3: Learning the Parts of a Tree
A forest is sometimes referred to as a collection of trees. Thesetrees provide many different kinds of products; they also providethe environment for soil and water conservation, for wildlife, forrecreation, and for natural beauty. It is important that we knowsomething about trees. There are many definitions of trees. Inone, a tree is defined as a woody, perennial plant having a simplemain stem or trunk with a more or less definitely formed crownand attaining a height of more than 20 feet. Like other livingthings, trees have interesting habits of growth and distinctivefeatures which distinguish one kind from another.
In order to understand how a tree grows it is necessary to knowthe parts of a tree and their functions. In terms of tree growththere are three main pans: crown, trunk, and roots. See MasterC-3.
The crown itself is the top of the tree. It consists of the limbs orbranches which extend to the twigs and terminate with the buds.The leaves, flowers, fruits, and seeds are borne by the branches.
56
Topic II
It is within the crown portion of the tree that many of the vitalprocesses take place which are responsible for growth and .reproduction.
The trunk is the main stem of the tree. It supports the crown,serves as a pipeline Tor the flow of mineral solutions from theroots to the crown, and serves as a storehouse for foodscarbohydrates, fats, and sugars. When a tree is harvested, it ismainly the trunk in which we are interested.
The roots have four functions. They provide a base for the treeand serve as an ^nchor to hold the tree upright; they absorbwater and dissolved minerals from the soil; they serve Asa foodstorehouse, and they have different types of roots. Trees likespruces, hemlock, and white birch have shallow or surf= rootswhich make them vulnerable to windstorms. Other trees like theoak, walnut, and hickory have a central deep-penetrating root,called a tap root, making them very resistant to wind damage.The third and largest group of trees have extensive root systemswith both shallow roots and deep roots like tap roots.
ACTIVITY 4: Becoming Acquainted with Leaves
Leaves. Leaf characteristics which may be used in identificationof trees include kind, shape, arrangement, size, type of apex,type of margin, and leaf composition. Figure C-8 shows theparts of a leaf. Leaves are of different kinds. The conifers haveneedle-like or scale-Ike leaves. Broad4eaved trees have eithersimple or compound leaves. Simple leaves consist of one piecewhile compound leaves we those that are divided into three ormore sections called leaflets.
67
BRANCH VEIN
LOBE
SINUS
MIDRIB
TIP
BASE
PETIOLE
SUGAR MAPLE
Figure C-8
IBA0
E
L

MASTER C-3
HEARTWOOD
CAMBIUM
OUTER BARK
SAPWOOD (XYLEM)
INNER BARK
(PHLOEM)
ROOT HAIR(
TAPROOT
57
9F1
.1...
CROWN
TRUNK
it3OTS

WO
RK
SHE
ET
C-
I
Use
as
a gu
ide
to b
ecom
e fa
mili
ar w
ith th
e pa
rts
of a
tree
.
E A V
BR
OA
DL
EA
FN
AR
RO
W L
EA
FSI
MPL
E.
GoM
Pou
t40
GR
OU
PnA
rcgo
o so
crio
to
# 9.
.
.....
I 1 iao
,..5)
46/L
E.
RA
t4po
m M
SS S
E-C
TIO
M
a°p
ros/
re_
iti-T
aR, N
AT
O.
6 17
i R
At.
Cro
rvta
o)R
Akr
oom
±0
R K
14 o
gAzo
nrrA
t,V
ER
T,c
-AL
6 m
oon.
,C
omo,
WA
T70
1V
1111
1:10
):.
.i..1
mal
liftr
iI
sr,
1111
54.
C:7
I0*
-1
,e -
.
ocA
EA
F49
CP
RS*
01.1
2U
-SH
APE
Den
vqf
pN
riSE
ml.R
OdW
P C
reE
SMO
JTI
Loo
m"
lib/M
AW
V -
5N4r
E17
e u 17".
LA
TE
RA
L-r
emm
i NA
L
oPiv
elm
s

ACTIVITY 5: Examining Trees
Using Worksheet C-1, have the children explore an area near theschool where there are tall trees growing.
The main objective here is to have the children become familiarwith the parts of the tree. They do not have to compare one treeto another, but it will be a much better experience if they cansee that all trees, no matter what kind, have certain similar parts.
EVALUATION:
Given the opportunity to describe the various parts of the trees
observed in the :crest, children will be able to distinguishamong: simple and compound leaves, horizontal, vertical, andsmooth bark, opposite and alternate branching, Literal andterminal buds, cones and other fruits. If given the opportunity toobserve forest plants, children will be able to categorize plants asbelonging to the upperstory or the understory.
Given the opportunity to observe a forest or a picture of a forestcommunity selected by the teacher, the children will be able todistinguish between broadleaf and coniferous forests.
Section C - Plants
GRASSLAND PLANTS
GOALS: After this lesson children should:
Understand that there are certain areas in our country and theworld where, because of low rainfall, grasses grow well, but veryfew trees grow.
ACTIVITY I: Exploring Grassland Areas
After an exploration of forest plants in Topic II, take thechildren out to the school yard or any grassy area and ask themthe following questions:
What is the basic difference between the plants we see here andthe ones we observed in the forest?
Could trees grow here if we did not mow the grass?
TEACHER'S NOTE: The answer to the Last question will dependupon the kind of area where you live. If you live in one of theprairie states, the answer may be no. If you live in a state wheretrees grow all around you, the answer will be yes.
How many different kinds of plants tan you find growing inthat yard?
Using the Exercise which follows, have the children do a studyof the school yard or any grassland that they have access to.
TEACHER'S NOTE: The use of the 10.000th Acre Hoop isapplicable to many different situations. As the children becomefamiliar with it as a tool for study, you may apply it to any naturalarca that your students are working with. The real advantage of thiskind of study is that it breaks numbers down into quantities that areeasy for children to comprehend.
Encourage the children to include anything that they find withinthe hoop.
After the children have explored a grassy area, ask the followingquestions:
How many different things make up the grassland com-munity?
How many different plants d id we discover in the grassy arca?
Were any other kinds of lit e discovered?
ACTIVITY 2: Places Where Only Gras, Will Grow
Using an overhead transparency made from Master C-4. explainto the children that there are certain places in the country whereonly grass will grow instead of forests or dc.sert.
Ask the children if they can figure out some of the reasons forthis being true.
59
Topic III
ACTIVITY 3: Discovering the Relationship Between Grasslands andRainfall.
Using the rainfall map on Master C-5, make a transparency andlay it over the vegetation map on C-4. Point out to the childrenthat one of the conditions required for a forest is at least 20inches of rainfall per year. If this does not occur you are going tohave grass, but no trees. Note how the grassland areas of theUnited States receive less than 20 inches of rainfall annually.
TEACHER'S NOTE: Be sure to tell the children that rainfall is notthe only factor that determines grassland or forest growth, but isprobably the most important one. The comparison of differentmaps as in steps 3 and 4 is a very good way to help children todiscover many relationships that exist between living communitiesand physical environmental factors. Encourage projects of thisnature with the children.
EVALUATION:
Given the opportunity to describe the "grassland" that theyexplored. children will, by their comments, demonstrate anawareness of the fact that grasslands are made up of a number ofdifferent kinds of non -woody green plants.
When asked why certain parts of our country are covered withgassland and not forests or deserts, or children will demonstrateby their answers that they arc aware of the fact that rainfall ofover 20 inches per year is necessary for forest land.
EXERCISE
THE ONE TEN THOUSANDTH 01: AN ACRE HOOP
The use of the I/10,000 of an acre hoop can be the starting pointfor lessons in various curriculum areas. Even the development of thehoop offers students the opportunity to learn the computation ofthe area. radius, -And circumference of a circle.
If it is within the capabilities of the students, has,: them figure thearea and circumference of one ten - thousandth of an acre. If 43,560square feet is the area of an acre. then the area of 1/10,000 becomes4.356 square feet. By using the formulas A = n r2 and C' = n r. thecircumference of the circle can be figured. Therefore:
A = n 1.2
4.356 = 3.14 r21.387 = r2
1.17771 = r
C = 2 n rC= 2 (3.14r)C = 6.28 (1.17771)C = 7' 3.96" or 88 3/4"
Lengths of clothes line wire can be cut to 88 3/4" and taped in ahoop.(Add an extra inch for overlap.) This circle can then be dividedwith twine into four quadrants.
s


MA
STE
R 0
5
r..-
'21.
".
::VI
WI"
Ten
to T
wen
ty I
nche
s
Tw
enty
to T
hirt
y In
ches
Ove
r T
hirt
y In
ches
Les
s th
an T
en I
nche
s

ECOLOGY AND PLOT STUDY
For a general survey of an area, divide the class into groups of five.Have the students toss their hoops on areas of the school grounds orin a park. With a student working in each quadrant and onerecording the information, have them count the number of thingsthey find. At this time it is not necessary to identify everything byname. Interest should be in numbers and varieties. Vegetation,animate, and inanimate items should be all counted and classified.Later the class can compile and compare their samplings.
MATHEMATICS
After tallying all the numbers of plants, animals, insects, andnon-living things, have the students project the number of varietiesin an acre. Each group should total the four quadrants in their hoopand add four zeros. This would be the total for the acre if theirhoop was exactly representative of the area. To get a more accuratepicture, have the groups add all their totals, divide by the number ofgroups and add four zeros to each kind of thing found.
To aid the students in understanding the size of an acre, have themstand on the 90 yd 27 inch line of a standard football field. Thelarger part of the field is equivalent to an acre. (A=1w; A=90 3/4x531/3 yds; A=4,840 sq. yd. or one acre). Consider the LouisianaPurchase in which approximately 82,762,880 square acres of landwas purchased for $15,000,000 or about 18 cents per acre. Comparethis cost with an acre of land in your area now. What is the percentof difference?
LANG U 4GE ARTS
Two areas of language arts which can be developed here ar accuratereporting and creative writing. Recording the data collected fromthe count and reporting them to the class demands accuracy.Descriptions of the various items found in the hoop must becomplete enough to identify later.
Creative compositions and tall tales can be written about the areaexamined. A blade of grass telling why he is taller than the rest, asnail shell telling his life's story, or an acorn reflecting on thedifferent directions his life me.: take are some of the ideas whichmay arise.
CONSERVATION
To demonstrate the problem of litter, have the students toss theirhoops in a littered area around the school ground and have thempkk up ever' scrap of trash in the circle. The trash can be weighedand the projected total of the amount of litter in the scitool groundscan be made. A weekly cleanup of a given area can lead to a yearlyprojection of litter accumulating just on the school grounds. Whatdoes it cost the school, town, and state for litter cleanup annually?
As a graphic demonstration of how bad litter can be, securepermission to display the titter in the school lobby or a display case.
To demonstrate what litter can do to water, place the trash fromone quadrant in a gallon jar partially filed with water. Close the jarand open it again after three days, a week, ten days and two weeks.What do the contents of the jar smell lie eadt time? What physicalchanges occurred in the litter? the water? What relevance doesthis have to the rivers and lakes that are now dying?
Section C - Plants Topic IV
PLANT COMMUNITIES CHANGEGOALS: After this lesson children should:
Be aware of the natural processes of heredity and succession thatcause changes to occur in plant communities.
Understand that the climax vegetation in a given area isdependent on the growth potential of a plant and the physicalfactors that surround it.
ACTIVITY 1: Becoming Familiar with the Concept of Heredity
Explain heredity to your children in general terms. They shouldunderstand that like produces like within a plant species.
Oak trees produce oak trees, not pines.
Part of this explanation should incluue the point that eventhough heredity means the reproduction of one of the samespecies, the offspring may be slightly different from its parents.
The above point can easily be made by having children recall thesimilarities and differences between them and their parents.
Ask them: How are you and your parents alike or different?
Our major point in the explanation of heredity and itsrelationship to plant community change is this: Hereditydetermines the maximum development that a plant can attain.
Heredity and the physical factors that surround a plantdetermine the maximum growth it does attain.
In other words, once an egg is fertilized it has a particular growthpotential and range of tolerance potential that are dependentupon each other. if the seed is planted in an environment whereall phytical factors are ideal, it will reach its full growthpotential.
62
This growth potential-physical factor relationship is the basis forplant community change.
ACTIVITY 2: Discussing Plant Succession
Plants in a community compete for those physical factors thatthey all need.
Plant communities -change as new plants that have a greatergrowth potential are introduced.
The following explanation combined with the use of an overheadtransparency made from Master C-6 will help to introduce plantsuccession or change.
Stage A: Soil conditions are bare rock, no plants growing, butweathering is taking place and the rock is being broken downinto soil parent material. (See Soil Formation, Topic II, Soil.)
Stage 3: A very small plant called a lichen, which is acombination of an alga and a fungi, has its spore blown in by thewind and it starts to grow on the rock. The lichen can actuallyexist with very little soil and it gives off a very weak acid thathelps to break down the rock further into soil parent material.
Stage C: As the parts of the lichen die and start to decay theyadd organic matter to the soil parent material and soil starts toform.
Stage D: Seeds and spores from many kinds of plants are blownin and land on the new soil and start to grow and replace thelichen.
Stage E: The mosses do not need much sunlight but do needmoist conditions so they grow before any of the larger plants.
()4 %

WIL
D
GR
Ass
.?L
ici4
Eu
me7
......
....r
._...
.....4
.411
..3-
YU
Af,
BA
RE
lac.
5cK
1-A
ft4E
TIR
a --%
....
MA
STE
R C
-6
SmA
t-t-
,....,
fiR
EE
5 4
51.1
1Ro0
5
5144
1.1-
.0W
SO
IL.
DE
EP
50/J
_
Com
Far
I n
owFO
RSO
NL
16,1
4r

They grow, die, decay, and form a deeper soil, one that willsupport higher plants.
Stage F: Grasses and wild flowers start to grow in the soilformed by the lichen and the mosses, and because the grassesand flowers can grow larger than the mosses and lichens theydeprive the smaller plants of sunlight, moisture, and minerals,and soon become the predominant plant.
Stage G: Grasses and wild flowers crow, die, and decay, addingto the soil formation (remember that the rock is still beingweathered).
Conditions become favorable for the growth of seeds of certainkinds of shrubs.
Stage H: Shrubs are larger than grasses and wild flowers so theycrowd out the smaller plants and become predominant.
Stage I: Shrub leaves fall to the ground and add to the soilformation which has now become much deeper and will supportlarger plants.
Stage J: Seeds from larger trees then grow and crowd out thesmaller trees, and shrubs.
Climate Stage: When a plant community reaches the stage wherethe plants with the largest growth potential are mature andpredominate in the community then we have a climax forest. (Inthe case of grassland, the ..,max vegetation is grass).
TEACHER'S NOTE: The above explanation of how a plantcommunity changes is very real, but the stages are not as welldefined in nature as they are on these pages. Any one stage may lastfor a very long time, until the physical factors change and way ismade for the next stage.
Section C - Plants
If, for example, the physical factors were ideal for the grass stageand did not change we would have grass but no trees as discussedin Topic III, "Grassland Plants."
ACTIVITY 3: Discovering Examples of Plant Succession
One of the best ways to see plant succession in action is to fenceoff a section of the school yard and just observe it over a periodof years. This may be difficult to do but it would afford you andthe children an opportunity to observe plant succession andchanges in the plant community on a continual basis throughouttheir time in elementary school.
Forest and Field Edges
If your school has land that is bordered by woods or fields andyou can persuade the custodian not to mow the grass so close tothe edges, you will have an excellent place to observe change inplant communities.
Almost any area that is left alone for a period of a month ormore during the growing season will show evidence of change.Seek these areas out and you will be able to offer your children avery good discovery experience.
EVALUATION:
Given the opportunity to give reasons for plant sizes, childrenwill demonstrate an awareness of the role that heredity andenvironmental factors play in determining plant size.
Given the opportunity to discuss plant succession, children willdemonstrate an awareness of the following:
Plant succession depends upon heredity and environmentalfactors.
Plant succession occurs in steps or stages as shown in Activity2.
GREEN PLANTS MAKE FOOD
GOALS: After this lesson children should:
Understand the food making process in green plants.
Understand the structure of plants and the relationship of thisstructure to the food making process.
ACTIVITY I: Studying the Structure of Plants
Review the human processes of absorption, digestion, respira-tion, support, circtuation, and protection with the children.Point out to them that plants depend on the same processes, buttheir structure and method of doing things is a little bitdifferent.
The following analogy has been used successfully to explain thestructure of plants to children. It is based on a comparison ofhuman structure and process to plant structure and process.Make an overhead transparency from Master C-7 to help explainplant structure. You can also use the real parts of plants if theyare available.
Each stage of the explanation should be preceded by a questionabout the human body.
How do we breathe?
We breathe by taking air into our mouth and nose. Plants do nothave a nose, but they do have many tiny mouths in their leaves.
Each mouth is called a stomate. Stomates are openings that areguarded by two semicircular cells that open it in the daytime andclose it at night.
Air comes into the plant and is stored in the air spaces until it isused. This is very similar to our lungs.
We will later see how the air is changed in the leaf. After it ischanged it goes back out through the stomates.
How do we drink?
We take water in through our mouth and it goes to our stomach.The plant takes water in through its root hairs, but the watermust reach the stomach of the plant. Ask the children to startthinking about where the plant's stomach might be.
How does our body transport fluids?
We have a series of arteries and veins that carry material aroundin our bodies. The tree has structures that do this also. Througha process called transpiration, water is carried through the cellsin the sap wood up to the leaves of the tree. Food material usedby the tree is carried from the leaves downward through theinner bark.
How does our body grow?
Our body grows by a process called cell division. The same thingis true in the tree. In a tree the cambium layer is where most
64 75

MASTER C-7
CRLDROpHyL, INPIAL.15APE ta 116
C....0
getwEnt415
SibmAre
oto-eR 13.4.R1rI Wag, 15.4Rts
CAMBIUM1-Altaic
SAPWOOP
14EARrw000
ROO NAIR6
65 76

growth occurs. Cells on the inside of the cambium layer turninto heartwood while those on the outside turn to sap wood.Cells on the outside of the sap wood turn to inner bark and cellson the outside of inner bark turn to outer bark. The tip of eachstem also is a place where cells divide, but in this case new stems,leaves, and flowers are produced.
What supports our body?
We get our support from bones and muscle. The tree gets itssupport from all over. AU of its woody cells support it and holdit upright.
How is our body protected?
Our bodies are protected by a covering of skin. Trees also haveskin called outer bark. The outer layer of cells of leaves is calledthe epidermis, just as our outer layer of cells (our skin) is alsocalled our epidermis.
How do vie use food?
We take food into our bodies and it is digested in our stomachand intestines. The tree actually makes food and uses only a partof it.
ACTIVITY 2: Learning How a Tree Makes Food
We have discussed the way materials enter the tree. Water comesin through the roots and air comes in through the leaves. Thefollowing formula shows how a tree combines water and carbondioxide to produce the basic food sugar plus oxygen.
61120 + 6CO2 ' C-6111206 + 602water carbon sugar oxygen
dioxide
This occurs in the palisade cells of the leaf, which contain thegreen material, chlorophyl. In the presence of sunlight, chlo-rophyl carries out this chemical reaction called photosynthesis.
EVALUATION:
Children can describe how a plant (tree) carries on life processes.and can demonstrate an awareness of the function served by theparts of a tree and a leaf shown on Master C-7 and described inthe questions in Activity 1.
Children will be able to demonstrate their knowledge of the factthat CO2 from air and water from the soil combine in thepresence of sunlight and chlorophyl to produce sugar and giveoff oxygen.
Section C - Plants
PEOPLE WHO MANAGE OUR
FORESTS AND GRASSLANDS
GOALS: After this lesson children should:
Be aware of occupations that exist in the areas of forestry andgrassland management.
Understand the nature of the work tasks performed by forestryand grassland workers.
Appreciate the needs that would be met by work in forestry andrangeland management.
Be aware of how one goes about preparing for such work.
ACTIVITY 1: Discussing Occupations in Forestry
The forests of our country are a very important natural resource.They provide wood for lumber, paper, and fuel. At one time ourcountry was using trees more rapidly than new ones could growto replace them. Now the harvesting of trees is being carefullylimited so that young trees are replacing old ones as rapidly asthe older ones are harvested. Some areas of woodland in whichtrees have never been cut are being preserved so manygenerations of people can see what the forests of our land"originally looked like. Tracts of Giant Sequoia and Redwood inCalifornia have been preserved for this reason. A forester isresponsible for the proper management and protection of treesin a forest area. This individual determines how many trees canbe cut each year; supervises rue protection and rue righting; andplans replanting where needed. The forester often works withthe guile warden in protecting wildlife in a given area. A foresttechnician helps the forester by estimating the volume of lumberin a stand of trees, by making land surveys and maps, and bysupervising the planting of seedling trees. Some forest tech-nicians supervise fire protection and fire fighting crews. Aforester aide works ender the supervision of the forest tech-nician, making actual measurements of trees, measuring land
Topic VI
distances for surveys, recording weather information, plantingseedling trees, and fighting forest rues.
ACTIVITY 2: Discussing Occupations in Grasslands
Grasslands are like forest lands except that the rainfall is less,and this results in far fewer trees and much more grass andshrubs. These areas often receive no rain for periods of severalmonths. Areas that are drier than grasslands are deserts.Grasslands arc suitable for raising cattle and sheep, providedthere are not so many grazing animals in a given area that theyat the pass too close to the ground and it dies. Grasslands oftenhave wildlife that is hunted for recreation.
A range manager supervises the use of public grasslands. Someprivate ranches may hire a person to do the same kind of work.the range manager determines how many grazing animals mayuse a particular area, protects the area from fire, provideswatering places for the animals, supervises the replanting ofovergrazed or burned grassland, and regulates hunting.
A range technician keeps the range manager informed by makingsurveys of the plants and animals in the grassland area (often byairplane, because of the great distances involved) and supervisesthe work of range aides who fight fires, plant grasses, improvewatersheds, and release or protect wildlife.
ACTIVITY 3: Interviewing Workers
Where this is feasible, have one or more students interview aparent, relative, or close friend who is employed in anoccupation dealing with forests and/or grasslands. Have classmembers discuss kinds of informatkin and questions to ask.Following the interview, have the student identify the careerexplored, present findings and answer any questions theirclassmates may ask.
66 -17

ACTIVITY 4: Preparing a Bulletin Board
Have each student cut out an illustration from a magazine ornewspaper which shows forestry or grassland workers.
Group these pictures on a bulletin board so as to illustrate themany different occupations. Have students study and react tothe display in class discussions.
Section C - Wildlife
EVALUATION:
The student can identify at least two occupations in forestry andtwo occupations in grassland management.
The student can state how forestry workers and grasslandmanagers contribute to his well-being and the welfare of thecommunity and nation.
WHAT IS WILDLIFE?GOALS: After this lesson children should:
Understand the difference between wild and domestic animals.Understand the fact that a wild animal's freedom is limited onlyby its ability to meet its needs without the interference of man.
Realize that wildlife must include all life other than human ordomestic animals or plants.
Be aware of the divisions that exist in the animal kingdom.
ACTIVITY I: Defining Wildlife
For our purposes, wildlife will be defined as any living thing thatis not a human or domestic animal or a plant. Our emphasis willbe on the vertebrates, but the interrelationships that exist in allareas of the animal kingdom will be discussed.
Wild animals have one distinct characteristic that may be used todistinguish them from the rest of the animal kingdom. Theirwhole structure and motivation is to move within their naturalsurroundings in order to meet their needs. The only limitationsthat are placed on wild animals are those that come from thenatural environmental forces that surround them.
TEACHER'S NOTE: It will be helpful at this time to review theneeds of all living things with the children, because the differencesthat will be pointed out among wild animals will be very relevant tohow each kind meets its needs.
ACTIVITY 2: Learning About Divisions Within the Animal King-dom
The animal kingdom is divided into groups that have similarcharacteristics. The first two divisions in the animal kingdom arevertebrates, those animals with a backbone, and invertebrates,animals with no backbone.
On Worksheet C-6, have the children pick those animals thatthey think have backbones, and those they think do not,
TEACHER'S NOTE: The animals shown on Worksheet C-6 arerepresentatives not only of veterbrate and invertebrate animals, butalso of the other divisions within the animal kingdom. If yourscience unit suggests that you give children more depth in theinvertebrate classifications, this worksheet will help to introduce theunit. Our work with wildlife will be within the vertebrate division.
ACTIVITY 3: Becoming Acquainted with Divisions Within theVertebrates
Vertebrates can be put into one of five groups. The following arebrief descriptions of each group and may be used with pictures
Topic I
on Worksheet C-2, to help children understand the differencesbetween the groups.
Mammals:
If an animal has hair and mammary glands, it is probably amammal. Mammals also have the kind of teeth that enable themto eat a variety of foods. They have teeth that nip and chop(incisors), teeth that stab (canine) and teeth that grind (molarsand premolars). The young of all mammals feed from themammary glands of the mother.
Ask the children if they have seen a mammal lately.
Reptiles:
Reptiles can best be distinguished by two things: they have askin the' is made up of horny scales, and they have claws.
Amphibians:
Many amphibians resemble reptiles, but there are ways to tell thedifference. Amphibians do not have scales. They usually havetoes (sometime, the 5th toe is hard to locate). Amphibian youngare always born in the water. Amphibians must always stay closeto water because they have no way of preventing large losses ofbody water.
Birds:
Birds have feathers and hollow bones, both of which make themlight enough to fly. Many birds have other adaptations to meettheir needs, and these will be discussed in Topic V "Wildlife inthe Air."
Fishes:
Simply stated, fishes all swim and can breathe under water.Again, we will take a closer look at fishes in our Topic III"Wildlife in or near the Water."
EVALUATION:
Given the opportunity to define wildlife, children will demon-strate a knowledge of the following facts:
Wildlife is any living animal except humans and domesticanimals, whose freedom is limited only by its ability to adapt toits surroundings.
All wildlife can be put into two study groups: those withbackbones and those without.
Given the opportunity to name the five divisions of vertebrates,children will demonstrate a knowledge of the divisions (fish,reptiles, amphibians, mammals, and birds) and will be able todescribe the general differences between them, as stated inSection V.
67 78

WORKSHEET C-2
Mark an (X) by each animal that has a backbone and a (0) by each animal
that does not.
07e
Iow:.......
-1.1
i-
v
--..p. .,---
----.21_
At, ,4
/
v.
Ilw I
I___-..-;r
..,,1,,,,7
.1.,...
Imo- r
I
,-. ' If
. .,
.
/,-.... 119
''''Wop
4 It.

Section C - WildlifeADAPTATION
Food:GOALS: After this lesson children should:
Understand that the word adaptation means change.
Understand that the environmental forces that surround ananimal will dictate th-e way the animal will change.
ACTIVITY 1: Discussing Change
If we did not have clothing to wear, how might our bodieschange to protect us from the cold?
If we had to live in the ocean, what kind of changes in ourbodies would be necessary?
Point out to the children that one of the reasons that the humananimal is so unique is his ability to create artificial adaptationsthat allow him to live and move about in environments otherthan the one he was naturally made for.
Wild animals cannot do this. Thousands of years and manygenerations pass before true adaptation takes place. Whathappens to a species that cannot adjust to changes in itsenvironment?
ACTIVITY 2: Discussing the Environmental Forces That CauseChange
Temperature:
Ask the children if they have ever noticed how the hair on theirpet animals changes in length and thickness as the seasonschange. Only animals that can do this can live in areas where thetemperature changes significantly. How do birds change to meettheir temperature needs? How about fish?
Section C - WildlifeWILDLIFE IN OR
GOALS: After this lesson children should:
Understand that the animals that live in or near the water areusually amphibians and fishes.
Understand the physical structure of fishes and amphibians thatallows them to live in or near the water.
ACTIVITY 1: Discovering How Fig: Swim
Fishes and amphibians are all very good swimmers. Swimming istheir natural form of movement.
The explanation of fish movement can be made easier by the useof an overhead transparency made from Master C-8.
Have the children observe fish in a pond or goldfish bowl, andask the following questions:
How does the movement of fins enable fish to swim?
What particular job does each kind of fin do?
TEACHER'S NOTE: The caudal fin helps the fish to steer andbrake. It also gives forward motion. Dorsal and anal fins help tokeep the fish in an upright position much the same as the keel of aboat or the vertical stabilizer on an airplane. The pectoral fins movethe fish forward on backward, move as well as upward ordownward.
Topic II
Most animals must move around in order to get food. Someanimals have developed fins with which to swim, wings withwhich to fly, or legs for :uniting and climbing.
Protection:
Pave the children discuss the physical features that each of thefollowing animals use for protection:
Elephant, squirrel, robin, snake, lizard, frog.
Why are polar bears white? How well would a black bear do insnow country? How about frogs and toads? Does their coloroften match their surroundings?
What would happen if all of the animals in the world suddenlylost their ability to protect themselves?
TEACHER'S NOTE: The above are but a few of the forces thatcombine to cause changes in animal development. Point out to thechildren that environmental forces act in combination to effectchanges in animals, and that these changes take place very slowlyover a very long period of time.
EVALUATION:
Given the opportunity to define adaptation, a child willdemonstrate his awareness of the fact that adaptation is changebrought about by the environmental forces that surround aspecies of animal.
Topic IIINEAR THE WATER
What do you think enables the fish to stay at a particularup/down level in the water?
TEACHER'S NOTE: Fish have a swim bladder in which they canadjust the amount of air to avoid either floating to the surface orsinking to the bottom. Submarines adjust the air pressure withinthem for the same purpose.
Demonstration of a swim bladder:
Put a small plastic bottle with no water in it, and with the topclosed tightly, in a container filled with water. Have the childrenobserve the floating bottle and then add small amounts of waterto the bottle until it will float somewhere in the middle of thewater. This point is difficult to obtainthe botee will nearlyalways slowly rise or fall. Add more air and the bottle will rise.Add more water and the bottle will sink.
ACTIVITY 2: Learning How Fish Breathe
We know that all living things need air. The fish has a particularorgan called the gill that enables it to separate air from the waterand use it for respiration and to control the swim bladder.
The bottom of Master C-8 may be helpful in explaining thebreathing structure of fish to children.
Water comes into the mouth and then flows over the gills andout the gill slit. Capillary beds are located in the gill folds. As thewater passes through the gill folds, oxygen is taken out of it
69
80

MASTER G8
THE PHYSICAL PARTS OF A FISH THAT ENABLE IT TO SWIM.
poR6AL F I/45
ANAL PINPE-CroR4L
PIPES
THE PHYSICAL PARTS OF A FISH THAT ENABLE IT TO BREATHE.
0. .. ....FoLo; 01* FII-AM --117.5
. ...: .. '.. : - 1.::..:.; -'-', ...m:7-y- I.. . A,_._ WATER
e /.---- FLOW,.... . .....- .
/ GIL-I. 5L17-
GILL.
RAKE.5
70

because the oxygen concentration in the blood is less than in thewater. (Remember, oxygen will move from areas of hlah to lowconcentration.) Carbon dioxide, CO2, is higher in the blood thanin the water so it leaves the blood, goes into the water, Ind thenout the gill slits.
Food u removed from the water by the gill rakes that areconnected to the esophagus and allow the collected food to gointo the digestive system.
ACTIVITY 3: Learning About Amphibians
Frogs and salamanders are examples of amphibians. They spendpart of their life in the water and part of it on land near thewater.
An amphibian must reproduce in the water. Ask the childrenwhat this means regarding the physical characteristics of theyoung? How would they breathe? How would they move?
Metamorphosis is a very good example of animals adapting totheir surroundings.
In the spring get some frog eggs from a local pond or stream andput them in an aquarium so the children can observe first -handthe metamorphic change in amphibians.
In most fresh water ponds in the spring, tadpoles should be veryeasy to catch and bring inside for observation.
The diagram and explanation on Master C-9 will help guide thechildren's observation.
ACTIVITY 4: Discussing the Importance of Clean Water to Fish andAmphibians
In Section C-Air, Topic I, "What is Atmosphere?" air is about 21percent oxygen. When a land animal breathes he has this muchto use.
The amount of oxygen that dissolves in water, however, is only 1percent. If the water became dirty and the 1 percent oxygen wasused for decomposition, fish and amphibian in the first stages oflife could be in trouble. Waters must be clean and free ofoxygen-robbing dirt.
Activity 5: Learning About Other Animals That Live in or Nearthe Water
Muter C-10 shows many pictures of animals that are neither fishnor amphibian, but do live in the sea. Some of these may beobservable in your area. Help the children to discover the specialbody structures evident in each picture tha: enable the animalsto live in the water.
EVALUATIQN:
Whcn asked the question "What kind of vertebrate animalsarc well suited for life in the water?" children will respondwith the answcr, "Fishes and amphibians."
When asked why fishes and amphibians arc well suited for life inthe water, the children will give aLswers that demonstrate theirawareness of the importance of gills, swim bladder, and fins for alife in the water.
Section C - WildlifeWILDLIFE ON LAND
GOALS: After this lesson, the children should:
Be aware of the particular characteristics of lane animal* thatenable them to survive.
Be familiar with the wild animals that live in their area.
TEACHER'S NOTE: This topic will be very general, and willdepend on the kind of land animals that might be found in yourarea. The purpose will be to help the children discover the manyforms of wildlife that surround them.
ACTIVITY I: Gathering information About Wildlife
Ask the children to tell the kinds of wild animals they have seenin their area and make a list of them. When the list is complete,assign the children the task of gathering pictures and informationabout those animals.
Some guidelines for information gathering.
What is the animal called?
How does it move?
What does it eat?
What kind of body covering does it have?
How does it protect itself?
71
Topic IV
In what surroundings is it usually found?
Are there any special characteristics that help the animal getalong well with its surroundings?
ACTIVITY 2: Developing a Bulletin Board
Have the children develop a bulletin board that shows theanimals that live in their area and give information about eachone.
ACTIVITY 3: Interview Resource People
Many state game commissions have excellent resource peoplewho are willing to come and talk t" schol children. Contact thelocal Game Commission and inquire about this service.
A visit from a resource person will give the children theopportunity to ask questions that they have developed inActivities I and 2, but on which they could not find informa-tion.
EVALUATION:
Children will demonstrate the following to the satisfaction oftheir teacher:
A knowledge of the kinds of land animals that live in their area.
The ability to anm ter the questions in Activity I for severalanimals in each of the divisions: mammals, reptiles, birds.
82.11111101011111=101.

MASTER C-9
A. Egg stages.
....
A.
ee
B. In 10 to 14 days the tadpole emerges from the egg.
C. In 2 to 3 months tilt, front legs come through, gill and gill
slits are lost aad the tail absorbed. Teeth are lost, the
tongue develops, eyes and ears change for land use, and the
young frog starts his life on land and lily pad.
72

o
1
Section C - WildlifeWILDLIFE IN THE AIR
GOALS: After this lesson the children should:
Understand the general characteristics of birds.
Possess guidelines and information ..bout how to attract andstudy the birds in their area.
ACTIVITY 1: Examining Birds:
Using WorksheetC-13,(duplicate enough copies to give each childone) have the children observe a bird and fill the information inon the worksheet. This will help the children learn how toobserve birds. At this point, try to help the student discoversimilarities and differences. Do not be concerned about theidentification of particular birds. Some students will naturally bemore interested in this activity than others, so you may want tohave extra worksheets for them.
ACTIVITY 2: Identifying Birds
Worksheet C4 offers sc s fleas for bird feeders that are verysimple to make. Place the feeders at different points around theschool and encouraga the children to observe them on a regularbasis. The frequency of visits to a particular feeder will probablydepend on the amount of cover near the feeder. If cover islacking, make sure to point out to the children that birds neednot only food but cover.
Topic V
Using a good field guide to birds, have the children try toidentify the Firds that they observed. The observation of birdscan and should be an activity that goes on all year. Theestablishment of feeding stations and bird attraction devices willmake the activity very interesting and will give the children theopportunity to observe birds at close range.
ACTIVITY 3: Making Comparative Studies
Place rasal bird feeders with the same kind and amounts offood at different distances from shrubs or trees, and observe theresults.
Have the children develop a list of the birth ooserved in theirarea and notice how the kinds tibias observed change with theseason and time of thy.
EVALUATION:
Given the opportunity to describe a bird that he has observed,the student will mention the following: size, shape of tail, colorof beast, bead, back, wings and throat, and shape of bill.
Given the opportunity to combine the observation of birds witha field guide selected by the teacher, the student will be able toidentify several species of birds that visit feeding stationsaround the school.
Section C - WildlifeFOOD CHAINS
GOALS: After this lesson the children should: ACTIVITY Understanding Why Animals Eat What They Eat
Topic VI
Understand food chains within the wildlife kingdom.
Understand that all living things area part of the food Chain, andare therefore interdependent.
ACTIVITY 1: Classifying Animals by the Food They Eat.
All food is produced by green plants. Review Forests andGrasslands, Topic VI. These plants are called producer&
Animals are consumers, they eat the food that is produced.
Animals that eat plants are called herbivores and are [Maury
Animals that eat meat are called carnivores and are secondary
Animals that at both plants and meat are called omnivores.
TEACHER'S NOTE: The tent meat eaters and plant-eaters may beused without affecting the lesson. If the children are ready for thewords above, use them.
Have the children make lists of animals that are:
1. Herbivores ,
2. Carnivores
3. Omnivores
Which list should include man?
Using the listsbbovi he the childrenwhy certain animals at kcertain things.following questions: 7
If they have kilt, th.14 kind of teeth
How big are their badikift
try to find out11141 them answe he
ido they have?
What kind of feet d:s tl*cy have? (this question is particu&rlyimportant in the case oi.birds.)-
A wolf is a carnivore. He must eat meat (remember "Little RedRiding Hood?"). Lions, tigers, and leopards are also carnivores.
What do all four of the animals above have in common?
ACTIVITY 3: Discussing Predator-Prey Relationships
An animal that is eaten is called the prey.
Predator-prey idationships are very important in nature.
The fur companies in the North keep records of the numb& offox (predator) and rabbit (prey) furst thist are sold to them eachyear. The graph on page 77 is a representation of these findings:Bt able to define the word
74 85

WORKSHEET C-3
Use as an aid in identifying birds.
.5 meicgc:IA,ROSIN, [1::1
&PA gRat) =1
ilAIL 614 APErowap:(4o4Rt)goomPar) 1=1
is-DAPE. of 0,1-1.
laccosi
di=4-1:3
75 go

WORKSHEET C-4
Simple birdfeeders you can make.
DI:WEL
TIN UARTOP
D(XiGI-INUT5
FORPE4NuT BUTTER
oft t-tEtTEP5vEr
METAL50AP 171514ANDSPRING
curFROM
ORANGEoR
ONIONBAG
*JET
WIRECOATHANGER
SUETOR
SEEP
fivEr USEVWIRESCREENFORFEEDERS
SEED
P1A55ACi-iuSETTSAu PuBON 50C..-7
SUET
rGAT END OFT
COCONUTUSE SCREW EYE
ORPOKE OUT EYESAND U5E WIRE
WINDOW FEEDER
1-1INGEDFOR SUET' : .)
AlTRAY FOR SEED
76
%

1211109a7654321
1940 1950 1960 1970
Foxes Rabbits
Figure C-9
Ask the children what this means to them. Why don't the foxeskeep increasing as the rabbits increase? Why do the rabbits andfoxes both fluctuate in their numbers? What kind of informationwould we need to tell the whole story?
TEACHER'S NOTE: As foxes eat more rabbits, there is less foodfor the foxesso there are fewer foxes. Fewer foxes mean morerabbits. Rabbits will only have a certain amount of vegetation uponwhich to live, so when their population reaches a certain peak, thefoxes start to have more food and their population increases, andthe cycle begins again.
Have the children try to discover other predator-prey relation-ships among the animals in their slate.
ACTIVITY 4: Discussing Decomposers
There are animals that at dead animals and return them to thesoil. These are called decomposers. Most decomposers are verysmall in size and large in number. They are not equipped to killtheir own food so they must at animals that are already dead.
EVALUATION:
Given the opportunity to answer the questions below, childrenwill demonstrate an awareness of the way food material cyclesthrough the environment and will be able to explain the role thatproducers, consumers, and decomposers play in that cycle.
What would happen to our soil if organic material were notreturned to it?
What would happen to our plants if the soil did not provide thematerials that they need?
What would happen to our animals if the plants did not grow?
Using drawings, photographs, appropriate labels and arrows, havethe students depict food cycles in the environment on a bulletinboard.
Section C - Wildlife Topic VII
WILDLIFE MANAGEMENTFOALS: After this lesson the children should:
Be able to define the word habitat.
Understand the relationship betweea habitat typeand condition,and population.
Understand the necessity of management of wildlife populationsize.
ACTIVITY is Defining a Habitat.
Habitat may be described as the surroundings that provide ananimal with the proper amounts of food, cover, and water in acondition of proper temperature range.
Have the children explore the areas around their school and tryto discover animal habitats.
TEACHER'S NOTE: This can be done by the observation of anyone animal. Squirrels are a Gocd example because they are abundantin most areas of the country. The grey squirrel requires woodlandand prefers hardwoods. Have the cnildren observe a grey squirrel fora period of time and answer the following questions:
Where did you rust notice the squirrel? (Describe the surround -ings.)
What was the squirrel eating?
Where did the squirrel run whet: he was frightened?
TEACHER'S NOTE: The grey squirrel is us,' '.ere as an example.The same (portions can be asked and anstrered about any animalthat the childreo observe in their neighborhood.
If any ore hntiting factor within a habitat is not within ananimal's range of needs, the number of animals will decrease.
Example:
Squirrels like to eat acorns. In the middle of a meadow there is avery large oak tree occupied by 15 squirres. The squirrels found
plenty to at and had good cover because the tree was very large.But for several years there was no rain and the tree did notproduce enough acorns to feed the 15 squirrels.
Ask the following questions regarding the above statement:
What would happen to the number of squirrels in the tree?
If some squirrels did not leave and find new sources of foodand the number remained the same, what would happen toall 15 of them?
If the tree were in your meadow and you wanted to help thesquirrels during this period of time, what would you do?
ACTIVITY 2: A Simulated Wildlife Management Problem
The average whitetail deer needs about 10 pounds of browse perday in the winter time. (Browse is usually considered twigs thatare 1/8 inch or less in diameter, and 10 pounds is about 1 bushelbasket full.)
The State Game Commission is able to determine the amount ofbrowse that is available for deer to at in the winter woods.
Suppose, for example, the Game Commission determined that aparticular county had enough browse to feed 5,000 deer. Theyalso know that the approximate number of deer in the county is8,500 deer.
This means that if 3,500 deer are not harvested, not only willthey die of starvation, but the other 5,000 deer will not getenough to at and all of them will be affected.
Under natural conditions, the deer population would have beencontrolled by the predatorprey relationship that was discussedin Topic VI, "Food Chains." Man, however, has done away withnatural predators such as mountain lions and wolves becausethey not only ate deer but also cattle and sheep.
The predator then must to replaced awl the hunter serves thisfunction, By keeping careful records of the hunters/hunter-
77
8t3

success ratio, the Game Commission can issue the proper numberof licenses and the proper number of deer will be harvested eachfall.
Have the children figure the following problem.
If 50 percent of the hunters shoot a deer each year and you wantto harvest 2,000 deer, how many hunting licenses should beissued?
TEACHER'S NOTE: While the figures in the above step arefictitious, the facts that support them are accurate and are a verygood example of one of the ways that man must manage his wildliferesources.
EVALUATION:
Given the opportunity to define habitat, children will demon-
,,rate a knowledge of the fact that habitat is the place where ananimal lives and that this place most provide the animal with theconditions necessary for life.
Given the opportunity to answer the question: "What willdetermine the number of animals that can live in a givenhabitat?" children will demonstrate an awareness of the relation-ship of the quantity of food, water, and cover to the number ofanimals in an area.
If asked why we sometimes need to harvest animals as a part of amanagement program, children will demonstrate an awareness ofthe fact that man must sometimes take the place of the predatorin order to keep animal populations in the proper relationship totheir environment.
Section C - Wildlife
WILDLIFE AND MANGOALS: After this lesson the children should:
Appreciate the fact that wildlife provides man with many of thethings he needs.
Understand that wildlife is a very important recreatiohe asset.
ACTIVITY': Understanding the Importance of Wildlife to PrimitiveMan.
Have the children study Indian tribes and answer t followingquestions about them. (Tribes in this case do not mean justAmerican Indians, but also Eskimo, African, South American,and Australian tribes.)
What kind of animals live near the tribes?
What do the animals provide the tribes with?
Do the Indians kill more animals than they need?
ACTIVITY 2: Understanding the importance of Wildlife to ModernMan.
Modern man depends on wildlife to meet not physical, butpsychological and educational needs.
Topic VIII
Modern technology has enabled man to change things in natureto meet his needs. This has caused man to forget that -eventhough he changes natural resources he still depends upon themand must ins,. them well.
Through the observation of wild creatures that use the naturalresources directly, we are reminded of the dependence of livingthings on each other and on the natural resources that surroundthem.
Children should be encouraged to observe and study wildlife.Even if the wildlife is a pigeon or a mouse in the middle of thecity, there is a great deal to learn from their behavior.
EVALUATION:
When asked to discuss the way some tribes used wildlife,children will demonstrate an awareness of the fact that wildlifewas used to meet their physical needs.
If given the opportunity to observe wildlife children will, to thesatisfaction of their teacher, discover that animals are dependentupon natural resources.
Section C - Wildlife Topic IX
PEOPLE WHO WORK WITH WILDLIFEGOALS: After this lesson the children should:
Be aware of the occupations that exist in the area of fish andwildlife management.
Understand the nature of the wen arks performed by fish andwik'ife workers.
ACTIVITY 1: Discussing Occupations in Fish and WildFfe
The fish in our streams and lakes, as well as the deer, rabbit,quail, and turkey in the forests of our country, are examples ofthe wildlife natural resources availWe to us. Although earlysettlers depended heavily upon fish and game animals for foodand fur, people today fish and hunt mostly for recreation.
Some of our streams and lakes are now fished so heavily that thenatural growth In fish population cannot keep up with thenumber of fish removed. Fish hatcheries grow fish from eggs to
fingerling size under controlled conditions. These fish are thenreleased in lakes and streams at a size big enough to continue togrow for months and years. A Fish Hatchery Worker keeps thehatchery tanks clean, collects the fish eggs, and cares for thesmall fish.
An individual who studies the things that affect the number andkinds of fish in a particular stream or lake is called a fishbiologist. By finding out what water temperatures, kinds offood, and water pollution do to fish, this person can recommendways of improving conditions that will result in better fishing.
A fish technician helps the fish biologist by collecting fish todetermine what they have eaten, where they move in a lake orstream, and which kinds grow best in a particular body of water.
Although deer and rabbits are able to maintain their populationswell, the young of amain wild game birds, such as quail, turkey,
78 89

duck, and pheasant do not survive well. A game propagator is aperson who works at a game farm and hatches eggs of thesebirds. The game propagator cares for the small birds until theyare big enough to get along on their own, when they are releasedin forests and open fields.areas where they are likely to develop higher populationswithout any further help. A wildlife biologist studies wildlife todetermine the conditions under whith they grow best, and thentries to provide those conditions. This individual often talks togroups of people who are interested in preserving the wildlife inour forests and natural areas
A wildlife technician helps the wildlife biologist by capturinganimals for study, maintaining study enclosures, and keepingrecords.
A game warden, of game protector, patrols streams, lakes,forests, and wildlife preserve areas to make sure that fishermenand hunters are not taking animals by illegal means or are nottaking them from areas set aside as game preserves. Thisindividual' often helps release fish in streams or animals and birdsin hunting areas or preserves. The game protector is especiallyconcerned to protect species of animals that are in danger ofextinction.
Section C - Water
ACTIVITY 2: Developing a Bulletin Board
Have the children develop a bulletin board of pictures of peopleworking with fish and wildlife. Pictures may be found in sportsof outdoor publications. Group the pictures so as to illustratedusters of similar careers as well 's the many different jobsrepresented in this natural resources area. Have the studentsstudy and react to the display during a class discussion.
ACTIVITY 3: Interviewing Resource Persons
Contact the local game warden and arrange for him to meet yourclass at school or the class to visit his office to become betteracquainted with this work.
EVALUATION:
In an oral exercise, the student can identify at least four types ofworkers who manage and protect the wildlife and fish.
The student can state how different wildlife and fuh workerscontribute to his well-being and the welfare of the community.
WHAT IS WATER?GOALS: After this lesson the children should:
Understand the chemical structure of water.
Be aware of the nature of chemical combinations and how twoatoms can combine and form a molecule.
ACTIVITY 1: Describing a Molecule of Water
An atom is the smallest particle of an element that can beidentified as that element.
Atoms consist of a nucleus that contains rrotons andlutrons,and they also have electOras in orbit around them.
Protons and electrons have eleccrical charj.es while neutrons donot. The path that the electrons take around the nudeus of anatom is called an ort.v. In some atoms with many electrons, theelectrons may be in zribured in several orbits. Each orbit canhold only a certai:, awnoc. cf electron'.. The first bit in an) ox/461,1atom, for example, will hob. only 2 doctrops. Tb orwill hold 8. A hydrowc atom, however, has y one . .ron1nits first orbit because it has Only one proton I one nAtron inits nucleus.
Topic I
An oxygen atom has an outer orbit with 6 electrons andtherefore would need two more because the outer orbit of anoxygen atom will hold 8.
If we hae one oxygen atom that needs two electrons tocomplete its outr orbit and two hydrogen atoms that each needone electron to complete their outer orbits, they will combineand form water. This is why we have the formula H20. There are2 hydroNn atoms for each .p
kxygen atom.; 1 k
tA diagra of this motecule if water would look like this.
EL.SeTROO
PROTOMNEOTROP
Figure C-I 0
An atom that is in this condition will have an electricalattraction for another atom that will share an electron and thuscomplete the outer orbit with 2 electrons.
79
..Ici_0411PRodrEIJ04
/Oos t 0 tEr.
0 %*1::/
Figure C-11
The hydrogen will share one electron from the oxygen atom, andoxygen will share one electron from the hydrogen atom, and thecombination will be balanced.
EVALUATION:
Given the opportunity to explain the process where the atoms ofhydrogen and oxygen combine to form water, children willdemonstrate to the teacher's satisfaction an understanding of thebasic electrical attraction of one atom for another.
0
cs

Section C - Water
FORMS OF WATERGOALS: After this lesson children should:
Understand the physical properties of water.
Understand that a change in the physical form of water is theresult of a change in temperature.
ACTIVITY I: Watching Water Change
Place an ice cube in a saucer and put it in direct sunlight.
Have the children observe the saucer from time to time until thewater is gone and then ask the following questions:
What words could you use to describe the form of the wateras it changed?
The children will observe the solid and liquid state, and mayguess that when the water evaporated it became a gas. Youshould point out to them that they did not really observe the gasor vapor.
How could we prove that the water actually evaporated andwent into the air?
What caused the changes to take place?
ACTIVITY 2: Defining Words About Water Change
Freezing: Water changes from a liquid or vapor to a solid at 32°Farenheit or 0° Centigrade.
Thawing: Water changes from a solid to a liquid at approxi-mately 33° Farenheit or 1° Centigrade.
Entpotation: The change of water from a liquid into a gas(water vapor), usually by dissolving into air. (We discuss thisfurther when we talk about relative humidity in Topic III, TheWater Cycle.)
Condensation: When air with a very high water vapor content issuddenly cooled, droplets of water form as a condensate. (Thiscap be detynstrated by breathing on a mirror or window pane.)
Precipitation: The way that water ell back atearth in theT.form of rain, sleet, snow, or hail as a result of water
'condensation in the atmosphere.I
?ACTIVITY 3: Studying the Effect of Temperature on Wat4r
All changes in the form of water depend upon temperatire, andwater reacts in unique ways as the temperature changes.
For example:
Cold
As the temperature of water gets very close to the freezing point,water starts to expand rather than contract. This can bedemonstrated by putting a small bottle filled with water inside aplastic container and letting the water freeze. This will break theglass bottle. (The plastic container will keep the broken glass inone place. Do not forget to put the cap tightly on the bottle andmake sure it is completely filled with water.)
After children have observed the above demonstration, ask thenthe following question:
In what way does this demonstration explain the weatheringof rocks?
Topic II
TEACHER'S NOTE: It is this characteristic of water that causesrocks to be broken apart by alternate freezing and thawing.
Heat
As water reaches approximately 212° F (at sea level), it boils.As water boils, it goes into a gaseous or vapor stage (steam).
The warmer water gets, the more rapidly it evaporates; and as itevaporates it absorbs heat from whatever surface it touches. Thisis called the Heat of Evapora.ion, and is very important to ourweather patterns as we will see in the following topics on water.
EVALUATION:
When aked to identify and describe the physical forms of water,the children will describe them as solid (ice), liquid, and gas orvapor.
When asked to describe the following list of terms, children willgive descriptions that are satisfactory in the judgment of the
i teacher:
freezing, thawing, evaporation, precipitation, condensation
When asked to discuss the relationship of water to temperaturechange, children will, by their comments, demonstrate a knowl-edge of the effect of a rise or fall in temperature on water.
Secti9n\CWatere WTHE WATER CYCLE
GOALS: After this lesson children should:
Understand that water is a renewable natural resource.
Understand the relationship of water's physical prope:ties toweather phenomena.
TEACHER'S NOTE: The organization of this topic will be to rustexplain the general water cycle and then to explain and demonstratethe relationship of the physical properties of water to each stage ofthe cycle. Make an overhead transparency. from Master C-11 for usewhen explaining the water cycle. The aim for now will be simply tohave the children understand what happens to the water, not howit happens.
80
Topic III
ACTIVITY 1: Learning About Water Form Vegetation
Plants give off water through a process called transpiration.Transpiration is the evaporation of water directly from plant leafsurfa:es.
The dew point is reached whenever moist air comes into contactwith a surface that is cool enough to cause the water to condenseon that cool -face. (That surface could be a house roof, anautomobile, or t. leaf blade.)
ACTIVITY 2: Learning About Water from !cc
If the vapor pressure (amount of water vapor in the air) above anice or snow field is less than that on the surface, water will go
9

MA
STE
R C
-I I
WA
TE
R V
A P
OR
6-(e
Loci
os)

directly into the atmosphere as vapor through a process calledsublimation.
TEACHER'S NOTE: The process of sublimation also works inreverse. If the vapor pressure above the ice or snow is greater thanthat on the surface and the dew point is below the freezingtemperature, water condenses on the snow or ice.
ACTIVITY 3: Learning About Water from Streams and Soil
Water from streams, soil, oceans, and rivers or any other water ofland body, evaporates and goes into the vapor state in theatmosphere.
TEACHER'S NOTE: Rememt.a that all of the methods mentioned(transpiration and sublimation) are forms of evaporation anddepend upon the same properties of water. We will now discuss therelationship of evaporation to weather.
ACTIVITY 4: Learning About Evaporation and Relative Humidity
Relative humidity is the term that describes the amount of waterthat a given quantity of air contains at a particular temperaturecompared with the quantity it could hold if the air were fullysaturated at the same temperature. It is always stated in percent.A 50 percent relative humidity means that the air containsone-half the amount of water it would hold if fully saturated.
If you have weather instruments, you will either use a wet-drybulb thermometer or a sling psychrometer to measure relativehumidity. If you do not have instruments for the measurementof relative humidity, you may make a sling psychrometer byusing the following exercise.
Have small groups of children im.:..ure the relative humidity andask them the following questions:
Why does the temperature on the wet bulb side change? (If itdid not change, you have a relative humidity of 100 percent.Simply re- phrase the question to why didn't it change?
What happens to the water as we sling the psychrometeraround or as air flows over the wet bulb?
EXERCISE
Make a sling psychrometer.
Procedure:
Purchase two inexpenske metal backed thermometers.
Place the thermometejsback to back and drill boles at points
a.
b.
A, ft, and C as shownt ow.
Put mall bolts and nthen °meters together:
d Put a mall key ring throki
through hol. s B and C to hog the
h the hole inlpoint A.
Attach a length of corccol light chain through the key ring(bout 12 inches in length).
f.l A tach the other end of the cord or chain to a handle so that..,t psychrometer will swing freely. ..
1Ming cotton, make a small sock that will fit snugly over ofof the thermometer bulbs. Just wrap one layer of the cotta:around the bulb and tie it at the top and bottom as show?below
g.
h. Soak the sock in water until it is saturated.X
i. Sling the psychrometer around for 1 minute after reading anarecording both sides.
Read and record the temperature from both sides again andrefer to the chart below for the relative humidity.
j-
Example: A dry bulb reading of 73°F and a wet bulb reading of65°F would mean a relative humidity of 65%.
82
7071727)74
7176
7479
so
fy.n S. MUM lloala Nam Dava fromWsl MW Py M tso0a0044
Oromet Is 4144sualinaa law. rw .114+.+...0.1...
0121436769101112111411IGO%
100100100100
100100100100
100100100100100
200100100100100
100
9411 0/014 0104 I/a aa 907) 0
9011 90a 90
93 90a 90a 91a 91
91 91
16 9116 91
16 91
16 9116 91
16 91
711 210 WI 0II 2M 41 641 4011 HS Ms VS- 74 6$ 44 W 0 0 H U
71 74 69 44 60 25 SO 44 01 H79 74 70 63 60 Si 0 42
79 71 70 44 61 M Si 0 0 71 H HSO 71 70 44 62 0 H 0 0 0 H UI0 76 71 44 62 U H 0 0 42 V HSO 76 71 17 62 H H H HSI 74 72 17 al HHHOWa 77 72 611 44 SS 11 H 0 M 0SI 77 72 61 44 60 16 12 a 64 40 17
01 77 7) 69 44 60 31 41 41 41 1202 74 7) 61 63 17 31 41 46 42 1102 70 71 69 63 61 SO 46 41 4002 70 74 744 44 62 31 47 64 40
70 74 70 44 61 39 44 64 41
41 70 74 70 67 61 12 42 41 42113 71 71 71 61 341 12 49 46 4241 71 71 71 64 40 17 31 SO 44 41113 79 71 71 6$ 64' '7 34 30 47 64
0 71 71 72 U 64 01 17* 24 ,1 47
TEACHER'S NOTE: As the water evaporates from the sock, heat isrequired. This heat of evaporation comes from the thermometerbulb and is reflected by its reading. This same principle is veryimportant to the human body. Perspiration forms on our body,evaporates, and takes heat away. This helps us to maintain ourtemperature a t 98.6°.
What would happen to the water in the sock if we slung itaround inside of a cloud where the humidity if 100 percent?
No watei would evaporate because the air will not accept anymore. No evaporation, no heat taken away, no temperaturechange.
ACTIVITY 5 studying the Formation of Qouds
We have discussed the various ways that water gets from thevarious earth sources into the atmosphere, and how moist anddry air mix together.
tThe i,ext step in the wate cycre is the movement of moist air.
Air that is heated by th su rags any other method willexpand and rise. The sa vo mate.ot 'arm air is lighter thancool air, so it rises. Rising it kyx es a point high in theatmosphere where it is co ed surrc ding cool air and thewater dissolved in it starts totcorgense o ny dust particles thatare alVoys preSent in the airiThoconde tion of water on thedust particles makes very fine water drop14, which we can see asa cloud. t
TEACHER'S NOTE: This same phenomenon can be observed closeto the ground as fog. On ti, relatively calm, warm day, it is sometimespossible to "±piatch cloudt form and enlarge overlizati as masses ofheated airin,te into a cool Mir layer.
Fog is kt:dly a very locv cloud and is formed when the amount ofmoisture:evaporated (foes into air that does not move upwardanu *'.he proper tevhperature to cause condensation.
tHot mvi)1 breath exheJed on a cold day will also produce animmediately observabl;:. cloud, a3 will water vapor (steam)coming from a tea pot.
In the cases of fog, visible breath,,and steam a mass of air at 100percent R.H. is suddenly cooled, and the air can no longer holdall of the water vapor that it contains ,(it has pissed the "dewpoint"), so the water vapor condenses to form droplets that arevisible.

TEACHER'S NOTE: Discuss the movement of air and air masses inTopic IV, "Atmospheric Cycles and Weather" in the section on Air.For now, our concern is to have children understand that as air risesit cools and water condenses.
ACTIVITY 6: Learning About Precipitation
Water has now reached the point through evaporation upwardmovement, and condensation where all it really has to do is fallout of the sky and it is back where it started from.'
The condensed water that we observe in clouds is exactly thesame thing that we observe when precipitation occurs except forone major difference. Water in clouds is too light to fall from thecloud.
This "light water" is usually held up in The cloud because ofupward air currents. In order for it to rain, the droplets of waterin the cloud must "grow" large enough to become so heavy thatthese upward air currents can no longer hold them against theforce of gravity.
Ask the children this question and see if they can sec therelationship between a drop of condensed water and the watervapor that surrounds the drop.
How does a water droplet grow?
Prepare an overhead transparency from Master C-12. This will behelpful in explaining how water droplets grow.
TEACHER'S NOTE: In order for precipitation to be understood,recall some of the things learned about water. For example: if thevapor pressure surrounding a water droplet is less than 100 percent,
the water droplet will evaporate. If the temperature is above thedei point, water will not condense. Also, warm air is capable ofherding more water vapor than cold air. Keep these things in mindwhen explaining precipitation and help children to recall theproperties of water that cause rain, snow, sleet, or hail to occur. Adrop of water falling from a cloud travels very fast and can hit theground with great force.
(Review Topic VI, Step I, "Soil Moves.") It is important for thechildren to be reminded of the role that plant leaf surfaces play inintercepting a water droplet and slowing it down before it reachesthe soil.
EVALUATIM:
Using Master C-II as a criterion, children will be able to explainthe pathway that a drop of water takes from any point on thechart through the water cycle.
When shown Master C-11 and asked to exp:ain what is happeningto water at points "A," children will identify evaporation andtranspiration. At point "B" they will identify upward move-ment, cooling, and condensation. At point "C" they will identifyprecipitation, and at point "D" they will explain that leafsurfaces break the fall of water.
Given the opportunity to define the terms evaporation, tran-spiration, sublimation, dew point, relative humidity, and vaporpressure, children will demonstrate their understanding of theseterms to the satisfaction of their teacher.
Section C - Water
WATER AND CLIMATE
GOALS\.%After this lesson the children should:
Understand that water changes temperature very slowly ascompared to land and air.
Understand the relationship of the cooling or heating of water tothe movement of air. 'v
ACTIVITY 1: Water Tempel ture
Water is very slow to heahas a very high Specifymeant of heat requir
substance a particular nut
p or cool down. This is because waterHeat. Specific. heat is defined as the
to raise a particular amount ofber of degrees.
One calorie heat is the amount of heat needed to raise 1 gram ofwater 1 degree centigrade. The specific heat of water is I calorie.
Compare the specific heat of water I caloric to the specificheat of sand .188 calories and you can see that the amountof time it would take for the sun to warm the two surfaceswould be quite different.
The sand would heat up much more rapidly than the waterduring the day and would caol much more rapidly at night. Thissame thing is true of any land surface, and is very important tothe climatic situation in a given area. Plants contain a lot ofwater; this is why forests and grasslands change temperaturemuch less rapidly and violently than deserts.
Topic IV
ACTIVITY 2: Learning About Land and Sea Breezes
Make an overhead transparency from Master C-I 3 to show theeffect of the different ways that land and water take up andretain heat.
During the day the land is heated more than the water. The airover the land warms rapidly and rises. The cooler,* over thewater, being more dense, moves in to replace the heled air overthe land. the lower air masses then move from the wgwr towardthe land. At night the land cools more quickly than the air, thereverse takes place, and the wind direction changes.
TEACHERS NOTE: This landhea breeze phenemPnor is men-tioned here because it is particularly relevant to water. Therelationship of this to overall weather conditions will be furtherdiscussed in the section on Air, Topic IV, "Atmospheric Cycles andWeather." It should be pointed out that this occurs only in local'situations, and is mentioned here as an example.
EVALUATION:
Given the opportunity to discuss land and sea breezes, childrenwill demonstrate a knowledge and understanding of the relation-ship of the specific heat of water to the movement of air asdescribed in Activities I and 2.
83
94

I
MA
STE
R C
-12
.e
0 ce
00
Dust Particles
Water vapor pressure of 100%
(2)
surrounding the dust particles
(2)that have reached the dew 0
(2)
point temper
ure.
al
IP
QA droplet of water that has
condense will cause more
water vapor to gather or
consense on it.
O
Upward Pressure

a
MASTER C-13
A
SEA BREEZE- PAY
80° kv
lobIw.
70 °
."'"..
85 96

Section C - Water Topic V
WATER AND ANIMALSGOALS: After this lesson children should:
Understand the importance of water to anim
ACTIVITY I: Review
Review "The Effect of Man's Use of Natural Resources," Sm-tionB, Topic IV.
ACTIVITY 2: Discussing the importance of Water to Animal Life
The human body is approximately 71 percent water. A jellyfishis over 99 percent water! An embryo is bathed in a waterysolution until birth; animals depend on water for every organicfunction.
A solution of water is necessary for breathing, excretion,glandular activity, digestion, and heat dissipation.
Water Loss
Water is lost from animal tissue through excretion and evapora-tion.
Ask the children to figure out why they perspire. How doesperspiration relate to the things we learned about water in TopicIll?
Water Replacement
We must maintain a constant amount of water in our bodies.
The average person in the temperate zone must replace 5-6 pintsof water per day that is lost through perspiration and excretion.
hitter and Survival
History is filled with stories of people who have not been able tosurvive because they could not find a source of fresh water.
It has been estimated that an animal could lose nearly all of itsfat and 50 percent of its protein and still survive, but if the bodywere to lose about 10 percent of its water, death would occur.
Drs. Frank and John Craighead, writing in Now to Survive onLand and Sea, report that "without water, a man in good healthwill become delirious in about four days; death will occur infrom eight to twelve days. If you have water and are in goodhealth, you may live weeks without food. Survivors have beenknown to live for 10 days or more on as little as two or threeounces of water per day without causing any apparent bodilydamage."
ACTIVITY 3: Constructing a Solar Still
An activity that you might use to help children to appreciatewater and to simulate a method of obtaining water in a survival
situation is the construction of a solar still shown on theExercise below. This activity may also be used to demonstratethe water-holding capacity of soil.
EVALUATION:
Given the opportunity to give reasons for our needing water,children will indicate a knowledge of the fact that none of ourorganic functions would work without water.
Given the opportunity to describe the relationship of perspira-tion to body temperature regulation, children vidt demonstrateknowledge of the way water reacts to changes in temperatureand relative humidity..
EXERCISE
A SOLAR STILL
You will need: I piece 3' x 3' plasticI tin can or jar
Procedure:
a. Dig hole 2 feet in diameter sloping to a depth of 1 foot.
b. Save soil from hole.
c. layer plastic over hole after placing can or jar in low partof hole to catch water.
d. Seal edges with soil that they will also serve to holdplastic.
e. Place stone in middle of plastic and allow plastic to slipuntil stone is right above but not touching jar.
'GOOR
V.
ROCKS
PLASTIC.
What will happen:
The sun will heat the air between the soil and the plasticcausing water in the soil to evaporate. This evaporated waterwill condense on the plastic, run downhill because of thestone, and drip into the jar.
Section C - Water Topic VI
PEOPLE WHO WORK WITH WATERGOALS: After this lesson children should:
List four or more occupations which deal with the naturalresource water.
Understand how different workers in water contribute to thechildren? well-being and the welfare of the community.
ACTIVITY I: Discussing Occupations Relating to Water
Water is one of our most important natural resources. Crops canbe grown only in good soil supplied with enough water. ("Stiescan grow only if there is enough MC water for drinking,cooking, and washing. Paper mills, steel mills, food processingcompanies, and many other industries can be located only where
897

there h an abundance of good water. The waste water from acommunity must be returned to the streams and riven in cleanenough condition so that the next community downstream canreuse it. In desert areas the water stored behind dams can beused for irupting crops that could not otherwise be grown. Thewater falling from these dams is often used to turn turbines thatproduce electrical power for pumping the irrigation water to thecrop fields.
Salt water fish are now eaten almost everywhere in the UnitedStates. Some people study the plant and animal life of theoceans so more fish can be caught.
A man who checks up on the quality of water for drinking,cooking, and washing is called a water resource bwestigator. If hefinds that water used for this purpose has become polluted, hemust find the source of pollution and get it cleaned up so peoplewill not get sick from drinking unclean water.
A water well inspector does the same thing, except that insteadof testing lakes, streams, and rivers he tests water from wells.
Drinking water in most communities goes through a treatmentplant before it is piped to homes, schools, businesses, andfactories.
Any silt or other solid particles in it are filtered out and it ischlorinated to kill disease germs that might be present. A widertreatment technician operates the pumps, filter leads, andchlorinating machines that are und in doing this.
The watei that has been used for food preparation, washingdishes and people, or disposing of waste, is piped to a wastewater
treatment plant where it is treated before being returned to astream, river, or lake. The man who controls the filter beds,processing tanks, and machines for adding chemicals is called awastewater treatment plant technician. It is his job to see thatthe water that has been used by a community Is clean for thenext community that will use it.
An oceanographer has an interesting job. He studies the plantand animal life in an ocean, the, ocean currents, tides, andtemperatures. He may help commercial fishermen catch morefish; he may help people planning to build protecting breakwaterwalls or ship channels; he may help locate underwater mineraldeposits.
ACTIVITY 2: Taking A Field Trip
Take the class to a water treatment plant or wastewatertreatment plant. Have the attendant describe his duties as heguides the students through the plant.
ACTIVITY 3: Developing a Bulleun Board
Have the children develop a bulletin board with pictures ofworkers maintaining, developing, and protecting the naturalresource of water. Have the children react to the display in classdiscussions.
EVALUATION:
Identify at least four occupations in the natural resource area ofwater.
State how different water workers contribute to your well-beingand the welfare of the community and nation.
Section C - Air
WHAT IS ATMOSPHERE?GOALS: After this lesson the children should:
Understand the general composition of the atmosphere.
Understand the dimensions and divisions of the atmosphere.
ACTIVITY 1: Becoming Familiar with the Atmosphere
Composition of the atmosphere by percentages.
Nitrogen: Nitrogen gas makes up about 4/5 of the earth'satmosphere. This gas is very important to all living things becauseit is the essential element in proteins (see Step V, Grade 34, TheNeed for Food).
Oxygen: Without oxygen, plants and animals could not breathe,nor could fuels burn. Oxygen makes up about 1/5 of the earth'satmosphere.
Carbon Dioxide: The photosynthetic process tells us of theimportance of carbon dioxide, CO, to the food-making capa-bility of plants. No CO, no foodno living things. CO:makes up a very small percentage of the earth's atmosphcre,about 311000 of 1 percent.
Water Vapor: The amount of water vapor present in the air variesdepending on conditions. (See Section CWater, Topic III.) Theamount of water vapor ranges from 04 percent.
Dust Particles: There is a very small amount of dust in theatmosphere. This dust plays an Important role in the formation ofwater droplets. (See Section C"Water," Topic Ill.)
Other Gases: Helium, krypton, hydrogen, xenon, argon, and neonare also part of the atmosphere and are very important to man.
Topic I
TEACHER'S NOTE: The important thing to emphasize whenteaching children about the components of the atmosphere is that itis made up of particular things that have a particular purpose. Thiswill be the basis for having the children understand the effect of airpollution.
ACTIVITY 2: Becoming Familiar With Atmospheric Layers
The atmosphere is an ocean of air that surrounds the earth andacts as a reservoir for the gases that are so vital to life on earth.The atmosphere has four divisions: troposphere, stratosphere,ionosphere, and exosphere.
Troposphere: We live in a troposphere, a layer of air that extendsfrom 5-10 miles above the earth. We can live in it because theconditions for human lifetemperature, pressure, and amounts ofnecessary gasesale present only in the lower part of this layer.As we go up in altitude and reach a level of 3-1/2 miles, there is,for example, only 1/2 as much oxygen as there is at sea level andthe temperature is about 55°F. All weather occurs in thetroposphere.
Stratosphere: The stratosphere extends from 10-50 miles up andis clear and cloudless except for occasional ice crystal clouds atabout 15 miles.
A very important put of the atmosphere located 20.40 miles upis the ozone layer. This layer of very special oxygen atoms has theability to absorb ultra-violet radiation from the sun. If all of theserays reached the earth, they would be deadly to living things.
Ionosphere: Between 50 and 400 miles above the earth there is aninteresting layer called the ionosphere. An ion is an electrically

charged particle and the ionosphere is filled with them. The alt inthe ionosphere is very, very thin, but still thick enough to causemeteors and meteorites to burn up; thus they do not damage theearth. The ionosphere also allows man to send radio messagesaround the world by "bouncing" electrical signals off theelectrically charged particles (ions) and back down to the earth.
Exosphere: Air in the exosphere, which extends from 400 milesabove the earth to 10-18,000 miles or until it can no longer bedistinguished from outer space, is so thin that air molecules musttravel enormous distaiices even to touch one another.
TEACHERS NOTE: When teaching children about the divisions ofthe atmosphere, the emphasis shouts be on the relevance of eachlayer to life on earth. The fact that the layers exist, and that eachplays an important role in making life possible on earth, is moresignificant than distances or amounts.
Section C - Air
EVALUATION:
When children are asked to list the things that make up theatmosphere, they will include in their list: water vapor, dustparticles, oxygen, nitrogen, carbon dioxide, and other gases.
When children are asked to tell what each of the above gasescontributes to life on the planet earth (not to include othergases), they will demonstrate a knowledge satisfactory to theteacher of those uses mentioned in Activity 1.
When asked to describe the atmosphere in terms of layers goingfrom the earth toward outer space, children will be able to putthe layers mentioned in Activity 2 in the proper vertical sequenceand demonstrate a knowledge of the characteristics of each layerthat is satisfactory to the teacher.
Topic II
THE ATMOSPHERE AND RESPIRATIONGOALS: After this lesson the children should:
Understand the body's need for oxygen.
Understand the process of respiration in relation to theatmosphere.
ACIWITY 1: Learning about Respiration
The body bums fuel (food) and the burning of. fuel requiresoxygen and gives off carbon dioxide. This occurs in the cells ofanimals. Blood from the lungs is rich in oxygen and low in carbondioxide. Blood from the cells where fuel is being burned is low inoxygen and high in carbon dioxide.
Make an overhead transparency from Master C-14 and trace amolecule of oxygen and a molecule of carbon dioxide outside inand inside out.
1. The muscle is doing work and the cells in the muscle are usingoxygen to burn fuel. This lowers the amount of oxygen in thecell below the amount in the blood stream and oxygen movesinto the cell to be used.
2. While oxygen is being used to burn fuel, carbon dioxide isgiven off in the cell. This causes the amount of carbon dioxidein the cell to be greater than that in the blood and the carbondioxide moves out of the cell and into the blood stream to becarried back to the lungs.
Section C - Air
3. Blood arrives at the lungs in a condition of low oxygen andhigh carbon dioxide. The air in the lungs is high in oxygen andlow in carbon dioxide. The carbon dioxide goes out of theblood into the an and the oxygen goes out of the air into theblood.
4. Blood with high oxygen is pumped around the body by theheart and the process continues.
TEACHER'S NOTE: Point out to the children that the real reasonfor breathing and circulation is to deliver oxygen to and removecarbon dioxide from the body's tissues. Children must understandthe body's need for air with a particular quantity of pure oxygen init or they will not understand the effect of air pollution on thehuman body.
EVALUATION:
Given the opportunity to explain the body's need for oxygen, thechild will be able to demonstrate an understanding of thefollowing:
Cells and tissues need oxygen to use food. When food is used,carbon dioxide is given off. Oxygen and carbon dioxide aretransferred into and out of the body because they move fromareas of high concentration to areas of low concentration.
AIR POLLUTIONGOALS: After this lesson the children should:
Understand the sources and effects of air pollution on respiration.
ACTIVITY I: Discussing Air Pollution and Health
While the gas carbon dioxide is so necessary to life, the removalof one atom of oxygen produces carbon monoxide, which is adanger to life.
Carbon monoxide is a colorless, odorless, tasteless gas that we cantake into our lungs without even knowing it.
Topic III
Ask the children what would happen to them if they breathe 1 aircontaining high amounts of carbon monoxide.
TEACHER'S NOTE: If the children understand that the tisstsneed oxygen, then their initial conclusion should be that anythingbesides oxygen may be harmful. The following information mayhelp to explain exactly why just one pollutant, carbon monoxide, isharmful to them.
We have discussed the body's need for oxygen and the way thebody takes care of that need. If the air we breathe has highamounts of carbon monoxide in it, then the blood cannot carryenough oxygen to the tissues where food is being burned, and thetissues will be harmed.
88iimaiL,


ACTIVITY 2: Solving Air Pollution Problems
It is necessary to give children some idea of where air pollutioncomes from or they will not realize the effects of trying to stopit.
About 50 percent of all air pollution comes from transportation:cars, trucks, and so forth.
.21 percent of air pollution comes from energy production(electricity).
14 percent from industrial processes.
8 percent from forest rues.
5 percent from solid waste disposal.
It is easy to see that any effort we make to reduce air pollution isgoing. to affect four areas that are very important to us:transportation, electric power, industrial products, and solidwaste disposal.
Using the figures above, have the class discuss the effect onthemselves of solving air pollution problems.
The following question may help to start the discussion:
What would happen if the manufacturer of your favorite candybar were forced to put a one million dollar anti-pollutiondevice on his factory's smokestack? How would it affect you?How would it affect you if he did not have to put thea:I.:pollution device on his smokestack, but just kept onproducing pollution?
EVALUATION:
When asked to explain the effects of carbon monoxide pollutionon the body, children will demonstrate an awareness of the factthat carbon monoxide in the air gets into the blood and causesthe blood to be unable to carry as much oxygen as it should.
When asked to discuss the solution of air pollution problems,children will demonstrate by their comments that they are awareof the fact that pollution solutions are going to take money andcitizens will have to pay at least a portion of that money.
Given the opportunity to set in order the sources of air pollutionfrom highest to lowest, children will list as stated in Activity 2.
Section C - Air Topic IV
ATMOSPHERIC CYCLES AND WEATHERGOALS: After this lesson the children should:
Understand that weather is a condition of the atmosphere.
Understand and use knowledge about atmospheric conditionsthat will help them to forecast weather.
TEACHER'S NOTE: Relative humidity has been discussed under"The Water Cycle," Topic III, Section C"Water," and will be usedwith this topic on weather.
ACTIVITY 1: Watching the Weather Report
Assign the children the task of watching a weather forecast ontelevision for one week with the following objectives in mind:
To become familiar with the terms used, especially relativehumidity, windspeed, wind direction, barometric pressure,cloud cover and type, precipitation, and cold and mumfronts.
At the end of the week, ask the children the following question:
What records would you need to keep in order to do yourown weather prediction?
The class should now be familiar enough with weather terms tobe able to know the components of a weather station.
ACTIVITY 2: Constructing a Weather Station
When the children are familiar with the kinds of informationnecessary to predict the weather, give them the opportunity todevelop their own weather station, and to discover more abouteach facet of the atmosphere.
The development of weather instruments such as the wet-drybulb hygrometer, the sling psychrometer, the barometer, theanemometer, the rain gauge, and the wind direction indicatorwill help the children to understand better each of the thingsthat the instruments measure.
Should commercial instruments be available, the children shouldstill be encouraged to make their own or at least be able toexplain how the commercial instruments work. Commercialinstruments are very helpful in testing homemade ones foraccuracy.
90
Placement of the Weather Station: A weather station should beplaced in an open area. It should be well ventilated but coveredto protect the instruments from rain. Barometers can be placedin the classroom. The air pressure will be the same inside as it isoutside. Worksheet C-5 provides plans for a weather station.
Contents of the Weather Station: A weather station shouldinclude a wet and dry bulb thermometer or a sling psychrometer,a rain gauge, a barometer, and a chart showing cloud types.Worksheet C-5 gives plans and parts for the construction of aweather station house and stand that can be made fromdecorative shutters.
Barometer: An Exercise on page 92 shows how to make ahomemade barometer. If the children make one of these, havethem explain to the class how and why it works. Ask them tothink about other ways to measure barometric pressure.
TEACHER'S NOTE: Barometric pressure is really the pressurecaused by the weight of the air above the barometer. It weighsabout 15 pounds. If one were to weigh a 1 square inch column of airtaken from sea level to the edge of the exosphere it would weighapproximately 15 pounds. The weight of the air will vary from dayto day in the same place. This happens for two reasons: Warm air islighter than cold air. Moist air is lighter than dry air.
You can see that an instrument that measures the temperature andmoisture of the air above us would be very important in theprediction of weather. A change in the weight of the air can mean achange in moisture content or temperature or both.
Thermometer: The temperature at the weather station should berecorded at two times during the day, the highest point and thelowest point. This may be difficult to do because the lowesttemperature usually occurs at night and the children are not inschool. The local television or radio station gives highs and lowsfor the day. This can be used to supplement the record.
Rain Gauge: An Exercise on page 92 shows how to make a raingauge. The dimensions are fairly important. Can the childrenfigure out why this .ts so?
Precipitation sNould be measured over 24-hour periods of timeand recorded.
Wet-Dry bulb Thermometer or Sling Psychrometer: See page 82.

I
CODE
A 1
B 1
C 1
D 1
E 4
F 1
G 1
H 2
I 1
3 4
K 1
L 1
M 1
N 1
DESCRIPTION
Plywood 1/2" x 17" x 28"AA Exterior Fir
White Pine 3/4" x 1-1/2" x 24"
White Pine 3/4" x 1" x 24"
Plywood 1/2" x 13" x 24"AA Exterior Fir
White Pine Shutters 1" x 12" x 18"
Plywood 3/4" x 14-3/8" x 24"AA Exterior Fir
Window Sash and Pane1-1/4" x 20" x 24"
White Pine 3/4" x 1" x 18"
Masonite-Pegboard1/8" x 16" x 18"
White Pine 1-1/2" x 2" x 42"
White Pine 1-1/2" x 2" x 18"
White Pine 1-1/2" x 2" x 19"
White Pine 1-1/2" x 2" x 27"
White Pine 1-1/2" x 2" x 29"
WORKSHEET C-S
1 rI
i !i t,--_ Irte'.77...cI. t ,a z i 63-- 7, /1
--.1. "
A1
3 I
rt-E---- r : 4
Weather Station
91

EXERCISEMAKING A BAROMETER
Make a tin can barometer.
Materials:
One tin cane a broom straw or soda straw, a rubber band, a pieceof Saran Wrap (large enough to cover the top of the can), a pieceof scrap papa, and a paper clip.
Construction:
Place Saran Wrap over the top of the tin can and hold tight withthe rubber band.
Wrap the paper around the can so part of it is higher than thetop of the can, and staple in place.
Attach straw to the middle of the Saran Wrap with glue or tape.
Mark the position of the straw on the paper with a paper clip,and watch to see if the straw moves up or down.
Aith.... =. Paper
etpSlitIoW
,.. _
If the straw moves toward the high, the weather will be fair.
If the straw moves toward the low, there is a storm coming.
92
EXERCISEMAKING A RAIN GAUGE
Materials Needed:
1 1" olive jar (pickle jars will do if they are long and narrow)
1 5" funnel
1 coffee can (24)
1 small file
If funnels or bottles of the sizes mentioned above are notavailable, the following formula may be used to determine theamount of rainfall:
r2i; x D = Rainfall in inches
Procedure:
r = Radius of olive jar
R = Radius of funnel
D = Depth of water in smallcontainer
a. Mark the pickle or olive jar in 1/4" incre-nents using asmall file to mark glass.
b. Place the funnel so that the rain goes directly into the smallpickle or olive jar.
c. The coffee can should be completely covered by the funnelso that water will not get into the can unless it overflowsfrom the pickle or olive jar.
FUNNEL
CoFFEE CAW
Livg 111Z
Wind Speed: Worksheet C-6 contains a Beaufort Scale of windforce which can be used to estimate the speed of the wind.
ACTIVITY 3: Predicting the Weather
Using the chart on Worksheet C-I5 have the children keepaccurate records of the instrument readings and observations.The first month should be devoted to the correct gathering ofinformation and description of the actual weather that existseach day.
After one month of collecting data and recording actual weatherconditions, let the children see if they can predict weather forthe days ahead by using the data collected before.
This is a matter of looking at a particular set of conditions andsaying, the last time these conditions were present such and sucha thing happened Let them discover the relationship betweenaccurate oata collection and prediction from put records.
EVALUATION:
Given the opportunity to explain weather instrumentconstruction and use, children will demonstrate anunderstanding of the particular principles that make the in-struments work.
Given the opportunity to predict the weather, children will beable to demonstrate an ability to recognize cause and effectrelationships between recorded weather data and actual weatherconditions.
103

WORKSHEET C-6
Beaufort Scale of Wind Force
BeaufortNumber Specifications for Use on Land Miles s per Hour
(
Terms Used inU. S. Weather Bureau
Forecasts
0 - Calm; smoke rises vertically Less than 1
1 _ Direction of wind shown by smokedraft, but not by wind vanes 1-3
2 _ Wind felt on face; leaves rustle;ordinary vane moved by wind 4-7 Light3_ Leaves and small twigs in constantmotion; wind extends lightflag 8-12 Gentle
4 Raises dust and loose paper, small_branches are moved 13-18 Moderate
5 Small trees in leaf begin to sway;crested wavelets form on inland
_waters 19-24 Fresh
6 Large branches in motion;whistling heard in telegraph wires;
_umbrellas used with difficulty 25-31
7 Whole trees in motion; inconvenience-felt in walking against wind 32-38 Strong
8
__Breaks twigs off trees; generallyimpedes progress 39-469_ Slight structural damage occurs(chimney pots and slateremoved) 47-54 Gale
10 Seldom experienced inland, treesuprooted, considerable structural
_damage occurs 55-63
11_ Very rarely experienced; accom-panied by wide-spreaddamage 64-75 Whole
gale
12 Above 75 Hurricane
93
nil,1t tri

III
ag
i4
I1
ICIE
1225
Iit
I
OM
EN
11152:1 ILIU
M
1114 31

Section C - Air Topic V
PEOPLE WHO PROTECT OUR ATMOSPHEREGOALS: After this lesson the children should:
Be aware of the occupations that are available in the naturalresource area of air.
Understand the nature of the work tasks performed by airpollution control workers.
ACTIVITY 1: Discussing Air Pollution Control Occupations
The air surrounding the earth is so vast that it is difficult tothink that we can actually put enough harmful materials into itto cause injury to plants, animals, and to ourselves. Yet this isexactly what has happened to the air around many cities. Theproblem is especially bad on hot days when there is very little airmovement. The exhaust gases from automobiles contribute aMajor portion of these air pollutants, while industrial plantscontribute much of the rest.
The cities, states, and the federal government employ airpollution control supervisors who conduct studies of air pol-lution, recommend control measures, and report air polluterswho refuse to comply with laws designed to reduce pollution.They are assisted tv air pollution control technicians who collectand analyze air samples for detection of air polluting chemicals,test anti-pollution devices, investigate cases of pollution, andestimate costs of equipment to control air pollution. Airpollution control technicians usually specialize in a particularkind of work, and may be called air monitoring technicians,source testing technicians, compliance section technicians, orengineering section technicians. A person who helps thesetechnicians by keeping equipment in working condition, oper-
ating equipment, and recording readings is an air pollutioncontrol aide.
ACTIVITY 2: Taking a Field Trip
Arrange to take the class to an air monitoring station. Have theair monitoring personnel discuss their work with the class.
ACTIVITY 3: Preparing a Bulletin Board
Have each child cut out an Illustration from a magazine ornewspaper which illustrates air pollution control workers. Groupthese pictures on a bulletin board so as to illustrate the manydifferent jobs in the protection of the air.
Have students study and react to the display in class discussiou.
ACTIVITY 4: Interviewing Workers
If possible, have one or more students interview a parent,relative, or close friend who is employed in an occupationdealing with 'minearals and/or petroleum products. Have classmembers discuss kinds of information and questions to ask.Following the interview, have the students identify the careerexplored, present findings, and answer any questions theclassmates may ask.
EVALUATION:
In an oral exercise, the student can identify at least two types ofworkers who contribute to the protection of the atmosphere.The student can state how different air pollution controlworkers contribute to his well being and the welfare of thecommunity.
Section C - Land SpaceLAND USE PLANNING
GOALS: After this lesson the children should:
Understand man's use of land space in terms of agriculture,buildings, transportation, and recreation.
Appreciate the amount of land used for each of the abovepurposes.
Be able to measure land.
ACTIVITY 1: Pacing
Land is usually measured in acres or parts of an acre. An acre ofland consists of 43,560 square feet. This figure is relativelymeaningless to a child because it is difficult for a child or anadult to conceive 43,560 of anything. it is much more effectiveto have the child experience an acre. This activity is a good mathexperience and will help the child to appreciate better an acre ofland space.
Each child will have a pace or step that is unique to him.
Measure off 100 feet on the school grounds and have each childwalk the 100 feet and count the stops it takes him to walk upand back, one round trip.
Have the children divide the number of steps by two and get theaverage number of steps per 100 feet.
Topic I
Ask the children to figure out how far they walk when they takeone normal step. For example, if a child takes 50 steps per 100feet, then the length of his step is two feet.
A pace is defined as two steps. Therefore, the child in theexample above would have a pace of four feet.
ACTIVITY 2: Measuring Land
The children are now ready to mesure land space and tocompare the amount of space used for different things.
If your school ground is four sided, have the children pace offthe perimeter and figure out how many acres are in the totalschool property. If the school does not lend itself to this kind ofmeasurement, then make measurements of particular things suchas:
Area used for the school building.
Area used for parking cars.
Area used for sidewalks.
Area used for play.
Area used for other things.
95
06

If you have enough open space around the school, let thechildren measure off one acre. This is a square with about 208fat on a side. Let them walk around it, stand inside of it andlook out, and generally get the feeling for its size.
ACTIVITY 3: Discussing Land Use
TEACHER'S NOTE: There are 2 billion, 266 million acres of landin this country. Out problem is to help the chUdre:: to see how it isused. The following activity will help them to do this:
We have identified one acre in Activity 2. The followinginformation can be used to show the children how 'much of eachacre in our country is used for cropland (2124), grazing land(28%), forest land (33%), recreational land (3%), special use oflandhighways, roads, towns, airports, wildlife refuges, and anyland requiring development (4%), and miscellaneous usesdeserts, marshes, bare rock areas, tundra-12%).
Have the children divide a square acre into segments proportional to land uses in this country.
Cropland: Measure 41.6 feet along one side and draw aperpendicular line to the other side.
Grazing Land and Pasture Land: Measure 56.6 feet and draw aperpendicular line to the other side.
Forest Land: Measure 68.6 feet and draw a perpendicular line tothe other side.
Recreation Land: Measure 6.2 feet along one side and draw aperpendicular line to the other side.
Special Purpose Land: Measure 8.3 feet along one side and drawa perpendicular line to the other side.
Miscellaneous Load: Measure 25 feet along one side and draw aperpendicular line to the other side.
TEACHER'S NOTE: Every year as out population grows, the wayland is used changes. For example, about 2 million atres of landeach year are converted from agricultural to non-agricultural use.One million acres are converted to recreation areas, 160,000 arecovered by highways, 420,000 become reservoirs and flood controlprojects, and 420,000 are developed for urban ur.s.
A square out of the acre that shows the amount of land peopleactually live on in this country would be wry SINK in comparisonto the others, and would measure about' 20 feet cm a side. We usemore land for highways and roads than we live on.
Point out the relationship of population growth to land usepatterns.
Ask the children this question: If out population keepsincreasing and our cities keep getting larger and larger, what willhappen to the rest of the land?
One mile of interstate highway takes about 10 acres of land.What will happen if we continue to build highways? What willhappen if we do not?
EVALUATION:
Given the opportunity to measure an area of open space bypacing, the child will be able to measure it and determine howmany acres or what part of an acre the land is.
Given the opportunity to list the ways that land is used in thiscolmfty, the child will mention forest land, grazing land,cropland, recreation land, land to live and travel on, and landthat is not used because it is desert, tundra, or marsh.
Section C - Land Space Topic IIOCCUPATIONS IN LAND USE
PLANNING AND OUTDOOR RECREATIONGOALS: After this lesson the children should:
Be aware of occupations in the areas of land use planning,zoning, and outdoor recreation.
Understand the nature of the work tasks performed by workersin these areas.
ACTIVITY I: Discussing Occupations in Land Use Planning
Our country has many kinds of landmountains, plains, -hills,swamps, deserts. Some soil is rocky and steep; some is deep andfertile. Our most important land is the land that is suitable forgrowing crops that feed us. It must have adequate rainfall (orirrigation water) and be reasonably level and free of rocks somachinery can be used on it. It must drain well and bereasonably fertile. Our next most important land is wherefactories, houses, schools, and public buildings are built. Thesemake up towns and cities. They require fairly level land thatdrains well; the soil need not be fertile, and rocks are not aserious problem. Land that is too steep, rocky, and infertile forcities or farms is often reserved as forests which supply us withwood for buildin, furniture, and paper. Rangelands are areas oflimited rainfall suitable for cattle and sheep if they are givenplenty of space to search for food.
When our country was young, there were far fewer people andthere seemed to be plenty of land for all purposes. Now citiesand towns are trowing, farms must produce more food thanbefore, and even lur forests must be carefully managed so wecan have a steady supply of wood products. Frequently people
96
in a community now have to ask themselves if a particular areaof land would be best used for producing crops or for newfactories and houses. Often so many facts have to be collectedand studied before a decision can be made that a community,township, county, or state may have experts in land planning tohelp them.
Land planning usually involves a study of the land area as it isnow used and making plans that involve its future use. Rarely isit possible to plan a new city where none existed before; and awhole new area of cropland is developed only on the unusualoccasion of a large new dam being built to supply irriptionwater.
A chief planner is a person who has very carefully studiedalternative ways to use land. He has traveled a lot to study howpeople have used land and how they have decided upon the bestuse. His main work is to advise land planners and municipalitiesas they work together to solve land use problems. He is an expertconsultant.
A land planner (also often called city planner, urban planner,regional planner, or town planner) is usually employed full timeby a city, township, or county to recommend how its and canbest be used. He studies maps of the physical features of the areaand suggests ways of improving what is already there. He makesmaps of proposed use, showing where homes, stores, schools,apartments, and factories might best be placed. He also showswhere roads and water and sewage lines should go and whereparks should be located so most people can get to them easily.
PHI

C
A pknning technician (also often called a planning associate orplanning analyst) is responsible to the land planner. He collectsthe information Jbout an area, such as soil type, land features,existing structures, road systems, sewage systems, water systems,and ekctrit A 1.,:swer. He also determines how rapidly people,businesses, and industry or agriculture are likely to move intothe area. From all of this information he draws plans (perhapsseveral alternative ones) showing how the land space could bestbe used to satisfy the interests of everyone concerned.
A planning nide works under the supervision of a planningtechnician. He collects the information needed by examiningmaps and in some cases by surveying an area. He does the actualdrawing of alternative plans under the direction of the planningtechnician.
A zoning inspector works for a city or town or township. Heinspects houses, factories, and other buildings or structuresunder construction to see that they comply with zoning laws andsafety codes. Most cities, towns, and townships have mappedcertain places for houses, others for apartments, businesses, andfactories. Each of these areas is a "zone." The inspector makessure that someone does not build a factory (for example) in aplace where only houses are supposed to be built. A zoningtechnician helps the zoning insrector by drawing maps, answer-ing questions about zoning, end sometimes by also makinginspections.
ACTIVITY 2: Discussing Occupations in Outdoor Recreation
Many cities have open spaces with trees and lawns and play areasbecause mo..t people are happier when they can be outdoorsplaying games, walking, or resting in pleasant places during theirleisure time.
Many states have large parks on rivers, lakes, oceans, or inforested land where people can go hiking, swimming, or fishing.There are similar privately owned areas that are camps and parkswhere the same things can be done.
The federal government also has developed national forests,parks, and "monuments" where people can enjoy their vacationsdoing interesting things outdoors. Many of these national areasare especially preserved because of their historical importance,such as Valley Forge or Gettysburg. Others are preserved fortheir natural wonders, such as the Grand Canyon or Glari^rNational Park.
The parks are kept neat and dean by park workers who mow thelawns, care fur the trees and shrubs, repair buildings andstructures, and dispose of rubbish.
In a campground, the person who maintains the park is called acampground caretaker. He makes sure the campground is neatand dean at all times and that campers obey the rules that areset up so everyone will enjoy camping. People working under hisdirection collect camping fees, mow lawns, collect rubbish, anddo many other things. If there is swimming, he supervises the lifeguards.
If the park is a large one with interesting plants, animals, trees,streams, or rock formations, it may have a park naturalist. Heoften conducts tours, gives talks, or sets up exhibits to explain tovisitors the special things in the park.
Some parks are so large that people can easily get lost in themwhile hunting or fishing. Hunting and fishing guides may behired to help visitors find their way in parks. These guides alsknow where certain fish or animals are most likely to be found.
A park of any size usually has a park foreman who supervises theworkers in the park and keep things running smoothly so visitorsenjoy being in the park.
ACTIVITY 3: Taking a Field Trip
Arrange to take the class to a regional planning office and/or amunicipal, state, or federal park. Have the workers describe theirwork duties to the children.
ACTIVITY 4: Preparing a Bulletin Board
Have each child cut out an illustration from a magazine ornewspaper which illustrates land use planning and outdoorrecreation workers. Group these pictures on a bulletin board soas to illustrate the many different jobs in these areas. Havestudents stt..ty and react to the display in class discussions.
EVALUATION:
In an oral exercise, the student can identify at least threeoccupations in land use planning and three occupations inoutdoor recreation.
The child can state how these different occupations cont.ibuteto his well Ling and the welfare of the community.
Section C - Minerals Topic IMINERALS AND MINERAL FORMATION
GOALS: After this lesson the children should:
Understand the structure and formation of minerals.
ACTIVITY 1: Discussing Minerals
Minerals are elements or combination of elements.
Discuss the following statements with the children:
Gold is an element and a mineral. It is not combined withanything else and can be found in nature in the pure state.
Quartz on the other hand, is a combination of two elements,silicone and oxygen. These two elements combine to form Si02or quartz.
Minerals that are elements were formed when the earth wasborn.
97
Elemi,:ts then began to combine under certain conditions oftemperature and pressure and form other minerals.
ACTIVITY 2: Growing Crystals
One of the physical characteristics that is unique to minerals iscrystal formation.
Have tne children look at grains of sand, salt, and sugar under amicroscope and draw the predominate shape they see. Theseshapes ar.: unique to each of the minerals and can be used toidentify them.
The following demonstration will give the children the op-portunity to observe crystal formation.
Materials Needed:
1/4 cup salt1/4 cup bluing1/4 cup water1 tablespoon ammonia
108

Procedure:
Mix the above together and pour over crumbled paper towelsin a pie pan. Add small amounts of food coloring and thecolors will show up in the crystals. Crystals will start to formin about one hour and will continue for about five hours.
Have the children observe and describe some of the crystals.
TEACHER'S NOTE: The observation of crystal growth above is a"fast" version of what happens in nature. Certain materials have an
Section C - Minerals
affinity for combining with each other and forming crystals. Thisusually takes a very long time and depends on the propertemperature and pressure.
EVALUATION:
Given the opportunity to discuss minerals, the children willdemonstrate by-their comments a knowledge of the following:
Minerals are elements or combinations of elements. Mineralshave definite chemical and crystalline structures.
Topic II
ROCK AND MINERALIDENTIFICATION AND CLASSIFICATION
GOALS: After this lesson the children should:
Understand that pressure and temperature are both factors in theformation of rocks and minerals, and that rocks and minerals canchange after their initial formation.
Be familiar with basic techniques for determining physical andchemical characteristics of rocks and minerals.
ACTIVITY 1: Classifying Rocks.
Rocks are simply combinations of minerals. Some rocks aremade up of one major mineral, limestone is a good example ofthis. It is very important to have children discover that there aremany different kinds of rocks that have many different uses.
Rocks are classified according to the manner in which they wereformed.
Sedimentary Rock:
The seas crept onto the land and then receded over and overagain when the earth was very young. Each time this happened, alayer of mud and sand settled out and remained behind.
As one layer after another built up the lower layers began to becompressed and form rock.
One of the characteristics of the sedimentary rock is thislayering. If there are rock outcroppings near the school thatshow definite layers, it is probably sedimentary rock.
Igneous Rock:
Molten material from within the earth that cooled and hardenedformed igneous rocks. Igneous rocks usually occur well belowthe surface of the earth.
Metamorphic Rock:
The word metamorphic means change. Metamorphic rocks arethose that have been changed by heat and pressure from igneousor sedimentary rocks. These rocks were usually formed duringthe mountain forming period when the bending of the earth'scrust caused the tremendous heat and pressure necessary tochange rocks. Metamorphic rocks are usually layered or banded.
ACTIVITY 2: Identifying-Rocks
The first step in the identification of rocks is to , 4 them intothe proper formation category. Use Worksheet G1 a guide.
Layering:
If a rock is banded or layered, it is not igneous.
If the rock is layered and the layers are very thick, one to twofeet, it is probably a sedimentary rock.
The layering in metamorphic rocks is usually thin and each layerrepresents a particular mineral. Often light and dark coloredminerals alternate with each other.
After a rock has been put into a general classification, furtherinvestigation is necessary in order_ to give the rock a particularidentification.
Hardness:
All rocks and minerals have a particular degree of lzrdness asmeasured on the hardness scale of 1-10. Number 1 is talc andNumber 10 is diamond. Commercial hardness scales are availablebut not necessary for the elementary exploration of rocks. Thefollowing guide can be used:
Hardness Item
2 Fingernail3 Copper penny5 Nail5-1/2 Window glass6-1/2 Steel file
Color of Streak:
Very often the exterior color of a rock is misleading. It may haveoxides on it that hide the true color of the minerals that make itup. The streak is uncovered by rubbing a piece of rock on awhite unglazed tile. (The back of any piece of bathroom tile willserve this purpose very well.)
Texture:
Have the children feel the rock. Is it rough or smooth?
Luster:
There are two divisions of luster that are easily observable.Metallic (shiny) or nonmetallic (dull).
Crystal Shape:
Some rocks will have crystals that are large enough to recognizewithout a magnifying lens, while some will require very heavymagnification to see the crystals.
Effervescence:
Some rocks will react to acid dropped on them by giving offbubbles. This is especially true of the carbonate minerals.Vinegar can be used as the acid.
ACTIVITY 3: Building a Rock Collection
The most important concept for children to develop at this levelis that rocks are different and can be put into various studygroups according to the criteria mentioned above.
98
09

WO
RK
SHE
ET
08
No.
Color
Outside
Color
Streak
..
Texture
Hardness
Luster
Crystal
Vinegai
Test
.
Classification:
Igneous,
Metamorphic or Sedimentary
--_-
_,
.
,
'
..
,
NII
.m.
V4.
4111
M C-

Have the children bring some rocks into the classroom to study,and to compare. A chart like the one shown in Worksheet C-17,will help the children to compare their rocks. A small dab ofwhite paint can be put on each rock so that an identificationnumber can be written on it.
Information should be placed on the chart according to the testsor Indicated observations mentioned in Activity 2.
After this is done, have the children go to the library, and try tofind information about the particular kinds of rocks that theyhave been studying.
EVALUATION:
Given the opportunity to discuss the formation of rocks andminerals, the children will demonstrate an awareness of thefollowing:
Rocks and minerals are formed by one of three processes: heat(igneous), pressure (sedimentary), and change (metamorphic).
Given the opportunity to identify an unknown rock, the childwill demonstrate an awareness of the fact that he mustdetermine the following:
Hardness, luster, color, streak color, texture, effervescence, andcrystal shape.
Section C - MineralsMINERAL USE
GOALS: After this lesson the children should:
Appreciate the value of minerals in a technological society.
Understand the kinds of, and uses for, minerals.
ACTIVITY 1: Inventorying Minerals
Have the children make a list of all the things they see aroundthem that are made from or require theuse of minerals. This cantake as long as necessary, but two or three days of casualobservation should provide a good list.
Now divide the general list into use categories as suggestedbelow:
Buildings:Clothing:Transportation:Toys:Jewelry:Other:
ACTIVITY 2: Determining the Source of Minerals and MineralProducts
Have each child choose a mineral from the list and find out asmuch about it as he can. The following guidelines will help:
Topic III
What is the material?
What minerals go into the making of the material?
Where do the minerals 03111C from?
How much of the minerals are there on earth?
What kinds of processes are used to make the minerals usable?
What kinds of jobs are necessary to find the minerals?
Have the children share the information they found.
ACTIVITY 3: Using Minerals Well
Have the children find samples of unwise use of non-renewableresources and discuss possible solutions to the problems.
EVALUATION:
Given the opportunity to identify mineral uses, the child will, t.sthe satisfaction of the teacher, demonstrate an awareness of theuses that are made of minerals and mineral fuels in hisneighborhood.
Given the opportunity to study a particular non-renewablenatural resource, the child will demonstrate, through sharinginformation with his classmates, a knowledge of the answers tothe questions in Activity 3.
Section C - Minerals
PEOPLE WHO WORK WITHMINERALS AND PETROLEUM FUELS
Topic IV
GOALS: After this lesson the children should:
Be aware of occupations that are available in the area of mineralsand petroleum fuels.
Understand the nature of the work tasks performed by selectedmineral and petroleum fuel workers.
ACTIVITY I: Discussing Occupations in the Mineral and PetroleumFields
Oil, gas, coal, limestone, and other minerals are natural resourcesthat are extracted from the ground by means of wells, tunnels,or open pits. These materials are not replaceable, and must beused wisely. People are employed in finding these minerals, intaking them from the earth, and in making sure that the work is
done safely with as little damage to the environment as possible.A petroleum geologist studies rock formations and maps ofexisting oil and gas wells to figure out places where oil and gasare likely to be found. By examining the material removed fromtest drilling, this individual can tell whether it is worthwhile tocontinue to test drill at a particular site. An oil and gas inspectorinspects oil and gas wells and processing plants to determinewhether all safety laws and laws to protect the environment arebeing followed. Lealcing gas or oil or by-products can causesevere damage to plants and animals. Fires are a constant hazard.A mining area restoration technician runs tests on the air, land,and water in the vicinity of mines to determine whether theenvironment is being damaged by acid mine water, air pollutants,or seepage from mine dumps. This individual offers advice on

how to stop the pollution if it is found. The mining arearestoration technician also supervises the filling in and dosing ofold mines for public safety and supervises the fighting of minefires. An open pit mine conservation inspector makes sure thatall state and federal safety laws are obeyed in open pit-miningoperations. When mining operations are having a harmful effectupon the environment, this individual takes the necessary stepsto stop pollution. The open pit mine conservation inspector maysupervise the regrading of the land and the planting of treeseedlings.
ACTIVITY 2: Role Playing
After discussing the occupations in minerals and petroleum fuels,have each student select an occupation of interest to him,investigate the occupation more thoroughly in reference books
and encyclopedias, and role play a typical work role or jobsituation.
ACTIVITY 3: Interviewing a Resource Person
Invite a worker in the area of minerals and .petroleum fuels tocome and speak to the class about his occupation and typicalwork tasks performed.
EVALUATION:
Tile student can state how different mineral and petroleum fuelsworkers contribute to his well-being and the welfare of thecommunity and nation.
The student can identify at least four types of workers whowork with minerals and petroleum fuels.
101
1 91-It _A. Awl

Appendix A
SELECTED LIST OF REFERENCE BOOKSFOR EARLY ELEMENTARY SCHOOL CHILDREN
Allen, Gertrude. Everyday Trees. Boston: Houghton Mifflin, 1%8.Bendick, Jeanne. A Place to Live. New York: Parents' Magazine
Press, 1970.Bloomie, Enid. The Air We Breathe. New York: Doubleday and Co.,
Inc.,1971.Carrick, Carol, and Donald Carrick. The Pond. New York: Mac-
millan, 1970.Gates, Richard. The True Book of Conservation. Chicago: Children's
Press, 1959.Hogner, Dorothy Childs. Birds of Prey. New York: Cowell, 1969.Homblow, Leonora, and Arthur Homblow. Animals do the Strang-
est Things. New York: Random House, 1964.Howell, Ruth R. Everything Changes. New York: Atheneum, 1968.
Knight, David C. Let's Find Out About Weather. New York:Franklin Watts, Inc., 1967.
Laycock, G. Animal Movers: A Collection of Ecological Surprises.New York: Doubleday and Co., 1971.
Oppenheim, Joanne. Have You Seen Trees? New York: William R.Scott, Inc., 1967.
Peterson, Otis. Junior Science Book of Water. Champaign, IL:Garrard Publishing Co., 1%6.
Selsam, Millicent. You and the World Around You Garden City,New York: Doubleday and Co., Inc., 1963.
Tresselt, Alvin. The Beaver Pond New York: Lothrop, Lee andShepard Co., 1970.
Wentworth, Daniel F. Pollution: Examining Your Environment.Minneapolis; Mine Publications, Inc., 1972.
103
1 I
Appendix B
SELECTED LIST OF REFERENCE BOOKSFOR MIDDLE ELEMENTARY SCHOOL CHILDREN
Allen, Dorothy Holmes. The Story of Soil. New York G. P.Putnam's Sons, 1971.
Arbital, Samuel L. Cities and Metropolitan Areas in Today's World.Mankato, MN: Creative Education Society, 1968.
Billington, Elizabeth T. Understanding Ecology. New York: Fred-erick Warne and Co., 1968.
Buehr, Walter. Water: Our Vital Need. New York: W. W. Norton andCo., 1967.
Busch, Phyllis S. At Home in Its Habitat: Animal Neighborhoods.Cleveland: The World Publishing Co., 1970.
City Lots: Living Things In VacantSpots. Cleveland: The World Publishing Co., 1970.
Once There Was a Tree: The Story ofthe Tree, Changing Home for Plants and Animals. Cleveland: TheWorld Publishing Co., 1969.
Puddles and Ponds: Living Things inWatery Places. Cleveland: Tire World Publishing Co., 1969.
Cohen, Daniel. Animal., of the City. New York: McGraw-Hill BookCo., 1969.
Freeman, Mae. When Air Moves. New York: McGrawHM Book Co.,1968.
Friendly, Natalie. Miraculous Web: The Balance of Life. EnglewoodCliffs, New krsey: Urentice-Hall, 1968.
Gallant, Roy A., and Christopher J. Schuberth. Discovering Rocksand Minerals: A Nature and Science Guide to Their Collectionand Identification. Garden City, New York: Natural HistoryPress, 1967.
Gay Kathyln. Where the People Are: Cities and Their Future. NewYork: Delacorte Press, 1969.
Grossman, Shelly, and Mary Grossman. The How and Why WonderBook of Ecology. New York: Grosse! and Dunlap, 1971.
Leinwand, Gerald, ed. Air and Water Pollution, New York:Washington Square Press, 1969.
Matthews, William H. III. The Story of the Earth. Irving-on-Hudson,New York: Harvey House, Inc., 1968.
Mattison, Charles W., and Joseph Alvarez. Man and His Resources.Mankato, MN: Creative Educational Society, 1967.
Raskin, Edith. The Pyramid of Living Things New York: McGraw-Hill Book Co., 1967.
Russell, Helen R. City Crittert New York: Meredith Press, 1969.. The True Book of Buds; Surprise
Packages. Chicago: Children's Press, 1970.Stone, A Harris and Irving Leskowitz. Plants Are Like That
Englewood Cliffs, NJ: Prentice-Hill, 1968.Zarcone, John. Our Cities, Our Pride and Our Problem. New York:
Makor Educational Industries, 1969.
104
114

Appendix C
SELECTED LIST OF REFERENCE BOOKSFOR ELEMENTARY SCHOOL TEACHERS
Boyer, Robert E. and Jon L. Higgins. Activities and Demonstrationsfor Earth Science. Englewood Cliffs, NJ: Prentice-Hall, 1970.
Carvojal, Joan and Martha E. Munzer. Conservation Education: ASelected Bibliography Supplement. Danville, IL: The InterstatePrinters and Publishers, 1971.
Day, Albert M. Making a Living in Conservation. Harrisburg, PA:Stackpole Books, 1971.
Fanning, Odom. Opportunities in Environmental Careers. NewYork: Universal Publishing and Distributing Corp., 1971.
Jones, Orville C., and Malcolm D. Swan: Discovering Your Environ-ment. Danville, IL: Interstate Printers and Publishers, 1971.
Koestner, E. J., J. McHugh, and R. Kircher. The Do It YourselfEnvironmental Handbook Boston: Little Brown and Co., 1972.
Leavitt, Jerome and John Huntsberger. Terrariums and AquariumsChicago: Childrens Press, 1964.
Milliken, Margaret, Austin F. Hamer, and Ernest C. McDonald. FieldStudy Manual for Outdoor Living. Minneapolis, MN: BurgessPublishing Co., 1968.
Pringle, Laurence P., ed. Discovering the Outdoors: A Nature andScience Guide to Investigating Life in Fields, Forests, and Ponds.New York: Natural History Press, 1969.
U.S. Department of Agriculture, Soil Conservation Service. AnOutline For Teaching Conservation in Elementary Schools,PA268. Washington, DC: U.S. Government Printing Office,1971.
. Outdoor Classrooms on School Sites,PA-975. Washington, DC: U.S. Government Printing Office,1972.
Teaching Soil and Water Conserva-tion, A Classroom and Field Guide. Washington, DC: U.Government Printing Office, 1970.
1051 1 5