Amazon Location Service - Developer Guide
239
Amazon Location Service Developer Guide
-
Upload
khangminh22 -
Category
Documents
-
view
4 -
download
0
Transcript of Amazon Location Service - Developer Guide

Amazon Location ServiceDeveloper Guide

Amazon Location Service Developer Guide
Amazon Location Service: Developer GuideCopyright © Amazon Web Services, Inc. and/or its affiliates. All rights reserved.
Amazon's trademarks and trade dress may not be used in connection with any product or service that is notAmazon's, in any manner that is likely to cause confusion among customers, or in any manner that disparages ordiscredits Amazon. All other trademarks not owned by Amazon are the property of their respective owners, who mayor may not be affiliated with, connected to, or sponsored by Amazon.

Amazon Location Service Developer Guide
Table of ContentsWelcome .... . . . . . . . . . . . . . . . . . . . . . . . . . . . . . . . . . . . . . . . . . . . . . . . . . . . . . . . . . . . . . . . . . . . . . . . . . . . . . . . . . . . . . . . . . . . . . . . . . . . . . . . . . . . . . . . . . . . . . . . . . . . . . . . . . . . . . . . 1
What is Amazon Location Service? .... . . . . . . . . . . . . . . . . . . . . . . . . . . . . . . . . . . . . . . . . . . . . . . . . . . . . . . . . . . . . . . . . . . . . . . . . . . . . . . . . . . . . . . . . . . . 1Key features .... . . . . . . . . . . . . . . . . . . . . . . . . . . . . . . . . . . . . . . . . . . . . . . . . . . . . . . . . . . . . . . . . . . . . . . . . . . . . . . . . . . . . . . . . . . . . . . . . . . . . . . . . . . . . . . . . . . . . . . . . . . 1Related services .... . . . . . . . . . . . . . . . . . . . . . . . . . . . . . . . . . . . . . . . . . . . . . . . . . . . . . . . . . . . . . . . . . . . . . . . . . . . . . . . . . . . . . . . . . . . . . . . . . . . . . . . . . . . . . . . . . . . . . 2
Quick start ... . . . . . . . . . . . . . . . . . . . . . . . . . . . . . . . . . . . . . . . . . . . . . . . . . . . . . . . . . . . . . . . . . . . . . . . . . . . . . . . . . . . . . . . . . . . . . . . . . . . . . . . . . . . . . . . . . . . . . . . . . . . . . . . . . . . . . 4Create resources .... . . . . . . . . . . . . . . . . . . . . . . . . . . . . . . . . . . . . . . . . . . . . . . . . . . . . . . . . . . . . . . . . . . . . . . . . . . . . . . . . . . . . . . . . . . . . . . . . . . . . . . . . . . . . . . . . . . . . . 4Setup authentication .... . . . . . . . . . . . . . . . . . . . . . . . . . . . . . . . . . . . . . . . . . . . . . . . . . . . . . . . . . . . . . . . . . . . . . . . . . . . . . . . . . . . . . . . . . . . . . . . . . . . . . . . . . . . . . . 5Next step .... . . . . . . . . . . . . . . . . . . . . . . . . . . . . . . . . . . . . . . . . . . . . . . . . . . . . . . . . . . . . . . . . . . . . . . . . . . . . . . . . . . . . . . . . . . . . . . . . . . . . . . . . . . . . . . . . . . . . . . . . . . . . . . 6Creating a web app .... . . . . . . . . . . . . . . . . . . . . . . . . . . . . . . . . . . . . . . . . . . . . . . . . . . . . . . . . . . . . . . . . . . . . . . . . . . . . . . . . . . . . . . . . . . . . . . . . . . . . . . . . . . . . . . . . 6
Creating HTML .... . . . . . . . . . . . . . . . . . . . . . . . . . . . . . . . . . . . . . . . . . . . . . . . . . . . . . . . . . . . . . . . . . . . . . . . . . . . . . . . . . . . . . . . . . . . . . . . . . . . . . . . . . . . . . . . 6Adding the map .... . . . . . . . . . . . . . . . . . . . . . . . . . . . . . . . . . . . . . . . . . . . . . . . . . . . . . . . . . . . . . . . . . . . . . . . . . . . . . . . . . . . . . . . . . . . . . . . . . . . . . . . . . . . . . 9Adding search .... . . . . . . . . . . . . . . . . . . . . . . . . . . . . . . . . . . . . . . . . . . . . . . . . . . . . . . . . . . . . . . . . . . . . . . . . . . . . . . . . . . . . . . . . . . . . . . . . . . . . . . . . . . . . . . 12Final application .... . . . . . . . . . . . . . . . . . . . . . . . . . . . . . . . . . . . . . . . . . . . . . . . . . . . . . . . . . . . . . . . . . . . . . . . . . . . . . . . . . . . . . . . . . . . . . . . . . . . . . . . . . . . 15What's next ... . . . . . . . . . . . . . . . . . . . . . . . . . . . . . . . . . . . . . . . . . . . . . . . . . . . . . . . . . . . . . . . . . . . . . . . . . . . . . . . . . . . . . . . . . . . . . . . . . . . . . . . . . . . . . . . . . . 18
Creating an Android app .... . . . . . . . . . . . . . . . . . . . . . . . . . . . . . . . . . . . . . . . . . . . . . . . . . . . . . . . . . . . . . . . . . . . . . . . . . . . . . . . . . . . . . . . . . . . . . . . . . . . . . . . 19Creating the app .... . . . . . . . . . . . . . . . . . . . . . . . . . . . . . . . . . . . . . . . . . . . . . . . . . . . . . . . . . . . . . . . . . . . . . . . . . . . . . . . . . . . . . . . . . . . . . . . . . . . . . . . . . . 19Adding the map .... . . . . . . . . . . . . . . . . . . . . . . . . . . . . . . . . . . . . . . . . . . . . . . . . . . . . . . . . . . . . . . . . . . . . . . . . . . . . . . . . . . . . . . . . . . . . . . . . . . . . . . . . . . . 19Adding search .... . . . . . . . . . . . . . . . . . . . . . . . . . . . . . . . . . . . . . . . . . . . . . . . . . . . . . . . . . . . . . . . . . . . . . . . . . . . . . . . . . . . . . . . . . . . . . . . . . . . . . . . . . . . . . . 24Final application .... . . . . . . . . . . . . . . . . . . . . . . . . . . . . . . . . . . . . . . . . . . . . . . . . . . . . . . . . . . . . . . . . . . . . . . . . . . . . . . . . . . . . . . . . . . . . . . . . . . . . . . . . . . . 29What's next ... . . . . . . . . . . . . . . . . . . . . . . . . . . . . . . . . . . . . . . . . . . . . . . . . . . . . . . . . . . . . . . . . . . . . . . . . . . . . . . . . . . . . . . . . . . . . . . . . . . . . . . . . . . . . . . . . . . 29
Amazon Location concepts .... . . . . . . . . . . . . . . . . . . . . . . . . . . . . . . . . . . . . . . . . . . . . . . . . . . . . . . . . . . . . . . . . . . . . . . . . . . . . . . . . . . . . . . . . . . . . . . . . . . . . . . . . . . . . 30Overview .... . . . . . . . . . . . . . . . . . . . . . . . . . . . . . . . . . . . . . . . . . . . . . . . . . . . . . . . . . . . . . . . . . . . . . . . . . . . . . . . . . . . . . . . . . . . . . . . . . . . . . . . . . . . . . . . . . . . . . . . . . . . . . 30Maps .... . . . . . . . . . . . . . . . . . . . . . . . . . . . . . . . . . . . . . . . . . . . . . . . . . . . . . . . . . . . . . . . . . . . . . . . . . . . . . . . . . . . . . . . . . . . . . . . . . . . . . . . . . . . . . . . . . . . . . . . . . . . . . . . . . . . 31
Map styles ... . . . . . . . . . . . . . . . . . . . . . . . . . . . . . . . . . . . . . . . . . . . . . . . . . . . . . . . . . . . . . . . . . . . . . . . . . . . . . . . . . . . . . . . . . . . . . . . . . . . . . . . . . . . . . . . . . . . . 32Map rendering .... . . . . . . . . . . . . . . . . . . . . . . . . . . . . . . . . . . . . . . . . . . . . . . . . . . . . . . . . . . . . . . . . . . . . . . . . . . . . . . . . . . . . . . . . . . . . . . . . . . . . . . . . . . . . . 32Maps terminology .... . . . . . . . . . . . . . . . . . . . . . . . . . . . . . . . . . . . . . . . . . . . . . . . . . . . . . . . . . . . . . . . . . . . . . . . . . . . . . . . . . . . . . . . . . . . . . . . . . . . . . . . . 33
Places search .... . . . . . . . . . . . . . . . . . . . . . . . . . . . . . . . . . . . . . . . . . . . . . . . . . . . . . . . . . . . . . . . . . . . . . . . . . . . . . . . . . . . . . . . . . . . . . . . . . . . . . . . . . . . . . . . . . . . . . . . 34Geocoding concepts .... . . . . . . . . . . . . . . . . . . . . . . . . . . . . . . . . . . . . . . . . . . . . . . . . . . . . . . . . . . . . . . . . . . . . . . . . . . . . . . . . . . . . . . . . . . . . . . . . . . . . . . 35Search results ... . . . . . . . . . . . . . . . . . . . . . . . . . . . . . . . . . . . . . . . . . . . . . . . . . . . . . . . . . . . . . . . . . . . . . . . . . . . . . . . . . . . . . . . . . . . . . . . . . . . . . . . . . . . . . . . 35Multiple results and relevance .... . . . . . . . . . . . . . . . . . . . . . . . . . . . . . . . . . . . . . . . . . . . . . . . . . . . . . . . . . . . . . . . . . . . . . . . . . . . . . . . . . . . . . . . . 35Address results ... . . . . . . . . . . . . . . . . . . . . . . . . . . . . . . . . . . . . . . . . . . . . . . . . . . . . . . . . . . . . . . . . . . . . . . . . . . . . . . . . . . . . . . . . . . . . . . . . . . . . . . . . . . . . . . 36Storing geocode results ... . . . . . . . . . . . . . . . . . . . . . . . . . . . . . . . . . . . . . . . . . . . . . . . . . . . . . . . . . . . . . . . . . . . . . . . . . . . . . . . . . . . . . . . . . . . . . . . . . . 37Places terminology .... . . . . . . . . . . . . . . . . . . . . . . . . . . . . . . . . . . . . . . . . . . . . . . . . . . . . . . . . . . . . . . . . . . . . . . . . . . . . . . . . . . . . . . . . . . . . . . . . . . . . . . . 38
Routes .... . . . . . . . . . . . . . . . . . . . . . . . . . . . . . . . . . . . . . . . . . . . . . . . . . . . . . . . . . . . . . . . . . . . . . . . . . . . . . . . . . . . . . . . . . . . . . . . . . . . . . . . . . . . . . . . . . . . . . . . . . . . . . . . . 38Route calculator resources .... . . . . . . . . . . . . . . . . . . . . . . . . . . . . . . . . . . . . . . . . . . . . . . . . . . . . . . . . . . . . . . . . . . . . . . . . . . . . . . . . . . . . . . . . . . . . . 38Calculating a route .... . . . . . . . . . . . . . . . . . . . . . . . . . . . . . . . . . . . . . . . . . . . . . . . . . . . . . . . . . . . . . . . . . . . . . . . . . . . . . . . . . . . . . . . . . . . . . . . . . . . . . . . 39Planning routes .... . . . . . . . . . . . . . . . . . . . . . . . . . . . . . . . . . . . . . . . . . . . . . . . . . . . . . . . . . . . . . . . . . . . . . . . . . . . . . . . . . . . . . . . . . . . . . . . . . . . . . . . . . . . . 40Route terminology .... . . . . . . . . . . . . . . . . . . . . . . . . . . . . . . . . . . . . . . . . . . . . . . . . . . . . . . . . . . . . . . . . . . . . . . . . . . . . . . . . . . . . . . . . . . . . . . . . . . . . . . . . 40
Geofences and Trackers ... . . . . . . . . . . . . . . . . . . . . . . . . . . . . . . . . . . . . . . . . . . . . . . . . . . . . . . . . . . . . . . . . . . . . . . . . . . . . . . . . . . . . . . . . . . . . . . . . . . . . . . . . . . 41Geofences .... . . . . . . . . . . . . . . . . . . . . . . . . . . . . . . . . . . . . . . . . . . . . . . . . . . . . . . . . . . . . . . . . . . . . . . . . . . . . . . . . . . . . . . . . . . . . . . . . . . . . . . . . . . . . . . . . . . . . 41Trackers ... . . . . . . . . . . . . . . . . . . . . . . . . . . . . . . . . . . . . . . . . . . . . . . . . . . . . . . . . . . . . . . . . . . . . . . . . . . . . . . . . . . . . . . . . . . . . . . . . . . . . . . . . . . . . . . . . . . . . . . . . 43Geofence terminology .... . . . . . . . . . . . . . . . . . . . . . . . . . . . . . . . . . . . . . . . . . . . . . . . . . . . . . . . . . . . . . . . . . . . . . . . . . . . . . . . . . . . . . . . . . . . . . . . . . . . 45Tracker terminology .... . . . . . . . . . . . . . . . . . . . . . . . . . . . . . . . . . . . . . . . . . . . . . . . . . . . . . . . . . . . . . . . . . . . . . . . . . . . . . . . . . . . . . . . . . . . . . . . . . . . . . . 45
Common use cases .... . . . . . . . . . . . . . . . . . . . . . . . . . . . . . . . . . . . . . . . . . . . . . . . . . . . . . . . . . . . . . . . . . . . . . . . . . . . . . . . . . . . . . . . . . . . . . . . . . . . . . . . . . . . . . . . 46User engagement and geomarketing applications .... . . . . . . . . . . . . . . . . . . . . . . . . . . . . . . . . . . . . . . . . . . . . . . . . . . . . . . . . . . . . . 47Asset tracking applications .... . . . . . . . . . . . . . . . . . . . . . . . . . . . . . . . . . . . . . . . . . . . . . . . . . . . . . . . . . . . . . . . . . . . . . . . . . . . . . . . . . . . . . . . . . . . . 48Delivery applications .... . . . . . . . . . . . . . . . . . . . . . . . . . . . . . . . . . . . . . . . . . . . . . . . . . . . . . . . . . . . . . . . . . . . . . . . . . . . . . . . . . . . . . . . . . . . . . . . . . . . . . 49
Data providers ... . . . . . . . . . . . . . . . . . . . . . . . . . . . . . . . . . . . . . . . . . . . . . . . . . . . . . . . . . . . . . . . . . . . . . . . . . . . . . . . . . . . . . . . . . . . . . . . . . . . . . . . . . . . . . . . . . . . . . . 50Map styles ... . . . . . . . . . . . . . . . . . . . . . . . . . . . . . . . . . . . . . . . . . . . . . . . . . . . . . . . . . . . . . . . . . . . . . . . . . . . . . . . . . . . . . . . . . . . . . . . . . . . . . . . . . . . . . . . . . . . . 51Data provider coverage and error reporting .... . . . . . . . . . . . . . . . . . . . . . . . . . . . . . . . . . . . . . . . . . . . . . . . . . . . . . . . . . . . . . . . . . . . . . 51Esri .. . . . . . . . . . . . . . . . . . . . . . . . . . . . . . . . . . . . . . . . . . . . . . . . . . . . . . . . . . . . . . . . . . . . . . . . . . . . . . . . . . . . . . . . . . . . . . . . . . . . . . . . . . . . . . . . . . . . . . . . . . . . . . . . 51HERE Technologies .... . . . . . . . . . . . . . . . . . . . . . . . . . . . . . . . . . . . . . . . . . . . . . . . . . . . . . . . . . . . . . . . . . . . . . . . . . . . . . . . . . . . . . . . . . . . . . . . . . . . . . . . 58
Regions and endpoints ... . . . . . . . . . . . . . . . . . . . . . . . . . . . . . . . . . . . . . . . . . . . . . . . . . . . . . . . . . . . . . . . . . . . . . . . . . . . . . . . . . . . . . . . . . . . . . . . . . . . . . . . . . . . 62Regions .... . . . . . . . . . . . . . . . . . . . . . . . . . . . . . . . . . . . . . . . . . . . . . . . . . . . . . . . . . . . . . . . . . . . . . . . . . . . . . . . . . . . . . . . . . . . . . . . . . . . . . . . . . . . . . . . . . . . . . . . 62
iii

Amazon Location Service Developer Guide
Endpoints ... . . . . . . . . . . . . . . . . . . . . . . . . . . . . . . . . . . . . . . . . . . . . . . . . . . . . . . . . . . . . . . . . . . . . . . . . . . . . . . . . . . . . . . . . . . . . . . . . . . . . . . . . . . . . . . . . . . . . . 62Service quotas .... . . . . . . . . . . . . . . . . . . . . . . . . . . . . . . . . . . . . . . . . . . . . . . . . . . . . . . . . . . . . . . . . . . . . . . . . . . . . . . . . . . . . . . . . . . . . . . . . . . . . . . . . . . . . . . . . . . . . . 63
Managing your Amazon Location service quotas .... . . . . . . . . . . . . . . . . . . . . . . . . . . . . . . . . . . . . . . . . . . . . . . . . . . . . . . . . . . . . . . . 70How to use Amazon Location .... . . . . . . . . . . . . . . . . . . . . . . . . . . . . . . . . . . . . . . . . . . . . . . . . . . . . . . . . . . . . . . . . . . . . . . . . . . . . . . . . . . . . . . . . . . . . . . . . . . . . . . . . 71
Account prerequisites ... . . . . . . . . . . . . . . . . . . . . . . . . . . . . . . . . . . . . . . . . . . . . . . . . . . . . . . . . . . . . . . . . . . . . . . . . . . . . . . . . . . . . . . . . . . . . . . . . . . . . . . . . . . . . . 72Sign up for AWS .... . . . . . . . . . . . . . . . . . . . . . . . . . . . . . . . . . . . . . . . . . . . . . . . . . . . . . . . . . . . . . . . . . . . . . . . . . . . . . . . . . . . . . . . . . . . . . . . . . . . . . . . . . . 72Manage access to your AWS resources .... . . . . . . . . . . . . . . . . . . . . . . . . . . . . . . . . . . . . . . . . . . . . . . . . . . . . . . . . . . . . . . . . . . . . . . . . . . . . 72Grant access to Amazon Location Service .... . . . . . . . . . . . . . . . . . . . . . . . . . . . . . . . . . . . . . . . . . . . . . . . . . . . . . . . . . . . . . . . . . . . . . . . . 73Next steps for access .... . . . . . . . . . . . . . . . . . . . . . . . . . . . . . . . . . . . . . . . . . . . . . . . . . . . . . . . . . . . . . . . . . . . . . . . . . . . . . . . . . . . . . . . . . . . . . . . . . . . . 74
Using maps .... . . . . . . . . . . . . . . . . . . . . . . . . . . . . . . . . . . . . . . . . . . . . . . . . . . . . . . . . . . . . . . . . . . . . . . . . . . . . . . . . . . . . . . . . . . . . . . . . . . . . . . . . . . . . . . . . . . . . . . . . . 74Prerequisites ... . . . . . . . . . . . . . . . . . . . . . . . . . . . . . . . . . . . . . . . . . . . . . . . . . . . . . . . . . . . . . . . . . . . . . . . . . . . . . . . . . . . . . . . . . . . . . . . . . . . . . . . . . . . . . . . . . 75Displaying maps .... . . . . . . . . . . . . . . . . . . . . . . . . . . . . . . . . . . . . . . . . . . . . . . . . . . . . . . . . . . . . . . . . . . . . . . . . . . . . . . . . . . . . . . . . . . . . . . . . . . . . . . . . . . . 75Drawing on a map .... . . . . . . . . . . . . . . . . . . . . . . . . . . . . . . . . . . . . . . . . . . . . . . . . . . . . . . . . . . . . . . . . . . . . . . . . . . . . . . . . . . . . . . . . . . . . . . . . . . . . . . 113Managing map resources .... . . . . . . . . . . . . . . . . . . . . . . . . . . . . . . . . . . . . . . . . . . . . . . . . . . . . . . . . . . . . . . . . . . . . . . . . . . . . . . . . . . . . . . . . . . . . . 113
Places search .... . . . . . . . . . . . . . . . . . . . . . . . . . . . . . . . . . . . . . . . . . . . . . . . . . . . . . . . . . . . . . . . . . . . . . . . . . . . . . . . . . . . . . . . . . . . . . . . . . . . . . . . . . . . . . . . . . . . . . 115Prerequisites ... . . . . . . . . . . . . . . . . . . . . . . . . . . . . . . . . . . . . . . . . . . . . . . . . . . . . . . . . . . . . . . . . . . . . . . . . . . . . . . . . . . . . . . . . . . . . . . . . . . . . . . . . . . . . . . . 116Geocoding .... . . . . . . . . . . . . . . . . . . . . . . . . . . . . . . . . . . . . . . . . . . . . . . . . . . . . . . . . . . . . . . . . . . . . . . . . . . . . . . . . . . . . . . . . . . . . . . . . . . . . . . . . . . . . . . . . . 118Reverse geocoding .... . . . . . . . . . . . . . . . . . . . . . . . . . . . . . . . . . . . . . . . . . . . . . . . . . . . . . . . . . . . . . . . . . . . . . . . . . . . . . . . . . . . . . . . . . . . . . . . . . . . . . . 122Autocomplete .... . . . . . . . . . . . . . . . . . . . . . . . . . . . . . . . . . . . . . . . . . . . . . . . . . . . . . . . . . . . . . . . . . . . . . . . . . . . . . . . . . . . . . . . . . . . . . . . . . . . . . . . . . . . . 125Tutorial: Database enrichment .... . . . . . . . . . . . . . . . . . . . . . . . . . . . . . . . . . . . . . . . . . . . . . . . . . . . . . . . . . . . . . . . . . . . . . . . . . . . . . . . . . . . . . . 128Managing place index resources .... . . . . . . . . . . . . . . . . . . . . . . . . . . . . . . . . . . . . . . . . . . . . . . . . . . . . . . . . . . . . . . . . . . . . . . . . . . . . . . . . . . . 137
Calculating routes .... . . . . . . . . . . . . . . . . . . . . . . . . . . . . . . . . . . . . . . . . . . . . . . . . . . . . . . . . . . . . . . . . . . . . . . . . . . . . . . . . . . . . . . . . . . . . . . . . . . . . . . . . . . . . . . . 140Prerequisites ... . . . . . . . . . . . . . . . . . . . . . . . . . . . . . . . . . . . . . . . . . . . . . . . . . . . . . . . . . . . . . . . . . . . . . . . . . . . . . . . . . . . . . . . . . . . . . . . . . . . . . . . . . . . . . . . 140Calculate route .... . . . . . . . . . . . . . . . . . . . . . . . . . . . . . . . . . . . . . . . . . . . . . . . . . . . . . . . . . . . . . . . . . . . . . . . . . . . . . . . . . . . . . . . . . . . . . . . . . . . . . . . . . . . 142Route planning .... . . . . . . . . . . . . . . . . . . . . . . . . . . . . . . . . . . . . . . . . . . . . . . . . . . . . . . . . . . . . . . . . . . . . . . . . . . . . . . . . . . . . . . . . . . . . . . . . . . . . . . . . . . . 145Positions not located on a road .... . . . . . . . . . . . . . . . . . . . . . . . . . . . . . . . . . . . . . . . . . . . . . . . . . . . . . . . . . . . . . . . . . . . . . . . . . . . . . . . . . . . . 148Departure time .... . . . . . . . . . . . . . . . . . . . . . . . . . . . . . . . . . . . . . . . . . . . . . . . . . . . . . . . . . . . . . . . . . . . . . . . . . . . . . . . . . . . . . . . . . . . . . . . . . . . . . . . . . . . 150Travel mode .... . . . . . . . . . . . . . . . . . . . . . . . . . . . . . . . . . . . . . . . . . . . . . . . . . . . . . . . . . . . . . . . . . . . . . . . . . . . . . . . . . . . . . . . . . . . . . . . . . . . . . . . . . . . . . . . 150Managing route resources .... . . . . . . . . . . . . . . . . . . . . . . . . . . . . . . . . . . . . . . . . . . . . . . . . . . . . . . . . . . . . . . . . . . . . . . . . . . . . . . . . . . . . . . . . . . . . 151
Geofencing and tracking .... . . . . . . . . . . . . . . . . . . . . . . . . . . . . . . . . . . . . . . . . . . . . . . . . . . . . . . . . . . . . . . . . . . . . . . . . . . . . . . . . . . . . . . . . . . . . . . . . . . . . . 154Step 1: Add geofences .... . . . . . . . . . . . . . . . . . . . . . . . . . . . . . . . . . . . . . . . . . . . . . . . . . . . . . . . . . . . . . . . . . . . . . . . . . . . . . . . . . . . . . . . . . . . . . . . . 154Step 2: Start tracking .... . . . . . . . . . . . . . . . . . . . . . . . . . . . . . . . . . . . . . . . . . . . . . . . . . . . . . . . . . . . . . . . . . . . . . . . . . . . . . . . . . . . . . . . . . . . . . . . . . . 158Step 3: Link a tracker to a geofence collection .... . . . . . . . . . . . . . . . . . . . . . . . . . . . . . . . . . . . . . . . . . . . . . . . . . . . . . . . . . . . . . . . 163Step 4: Evaluate device positions against geofences .... . . . . . . . . . . . . . . . . . . . . . . . . . . . . . . . . . . . . . . . . . . . . . . . . . . . . . . . . 164Reacting to geofence events with EventBridge .... . . . . . . . . . . . . . . . . . . . . . . . . . . . . . . . . . . . . . . . . . . . . . . . . . . . . . . . . . . . . . . . 165Tracking using MQTT .... . . . . . . . . . . . . . . . . . . . . . . . . . . . . . . . . . . . . . . . . . . . . . . . . . . . . . . . . . . . . . . . . . . . . . . . . . . . . . . . . . . . . . . . . . . . . . . . . . . 167Managing geofence resources .... . . . . . . . . . . . . . . . . . . . . . . . . . . . . . . . . . . . . . . . . . . . . . . . . . . . . . . . . . . . . . . . . . . . . . . . . . . . . . . . . . . . . . . 171Managing tracker resources .... . . . . . . . . . . . . . . . . . . . . . . . . . . . . . . . . . . . . . . . . . . . . . . . . . . . . . . . . . . . . . . . . . . . . . . . . . . . . . . . . . . . . . . . . . 176
Tagging your resources .... . . . . . . . . . . . . . . . . . . . . . . . . . . . . . . . . . . . . . . . . . . . . . . . . . . . . . . . . . . . . . . . . . . . . . . . . . . . . . . . . . . . . . . . . . . . . . . . . . . . . . . . 179Restrictions .... . . . . . . . . . . . . . . . . . . . . . . . . . . . . . . . . . . . . . . . . . . . . . . . . . . . . . . . . . . . . . . . . . . . . . . . . . . . . . . . . . . . . . . . . . . . . . . . . . . . . . . . . . . . . . . . . 180Grant permission to tag .... . . . . . . . . . . . . . . . . . . . . . . . . . . . . . . . . . . . . . . . . . . . . . . . . . . . . . . . . . . . . . . . . . . . . . . . . . . . . . . . . . . . . . . . . . . . . . . 180Add a tag to a resource .... . . . . . . . . . . . . . . . . . . . . . . . . . . . . . . . . . . . . . . . . . . . . . . . . . . . . . . . . . . . . . . . . . . . . . . . . . . . . . . . . . . . . . . . . . . . . . . . 181Track cost by tag .... . . . . . . . . . . . . . . . . . . . . . . . . . . . . . . . . . . . . . . . . . . . . . . . . . . . . . . . . . . . . . . . . . . . . . . . . . . . . . . . . . . . . . . . . . . . . . . . . . . . . . . . . 181Control access to resources using tags .... . . . . . . . . . . . . . . . . . . . . . . . . . . . . . . . . . . . . . . . . . . . . . . . . . . . . . . . . . . . . . . . . . . . . . . . . . . . 182Learn more .... . . . . . . . . . . . . . . . . . . . . . . . . . . . . . . . . . . . . . . . . . . . . . . . . . . . . . . . . . . . . . . . . . . . . . . . . . . . . . . . . . . . . . . . . . . . . . . . . . . . . . . . . . . . . . . . . 182
Grant access to Amazon Location .... . . . . . . . . . . . . . . . . . . . . . . . . . . . . . . . . . . . . . . . . . . . . . . . . . . . . . . . . . . . . . . . . . . . . . . . . . . . . . . . . . . . . . . . . . 182Using Amazon Cognito .... . . . . . . . . . . . . . . . . . . . . . . . . . . . . . . . . . . . . . . . . . . . . . . . . . . . . . . . . . . . . . . . . . . . . . . . . . . . . . . . . . . . . . . . . . . . . . . . . 182
Monitoring Amazon Location Service .... . . . . . . . . . . . . . . . . . . . . . . . . . . . . . . . . . . . . . . . . . . . . . . . . . . . . . . . . . . . . . . . . . . . . . . . . . . . . . . . . . . . . 188Monitoring with CloudWatch .... . . . . . . . . . . . . . . . . . . . . . . . . . . . . . . . . . . . . . . . . . . . . . . . . . . . . . . . . . . . . . . . . . . . . . . . . . . . . . . . . . . . . . . . . 188Using CloudTrail with Amazon Location .... . . . . . . . . . . . . . . . . . . . . . . . . . . . . . . . . . . . . . . . . . . . . . . . . . . . . . . . . . . . . . . . . . . . . . . . . . 192
Using AWS CloudFormation to create resources .... . . . . . . . . . . . . . . . . . . . . . . . . . . . . . . . . . . . . . . . . . . . . . . . . . . . . . . . . . . . . . . . . . . . . . . 194Amazon Location and AWS CloudFormation templates .... . . . . . . . . . . . . . . . . . . . . . . . . . . . . . . . . . . . . . . . . . . . . . . . . . . . . 195Learn more about AWS CloudFormation .... . . . . . . . . . . . . . . . . . . . . . . . . . . . . . . . . . . . . . . . . . . . . . . . . . . . . . . . . . . . . . . . . . . . . . . . . 195
Code examples .... . . . . . . . . . . . . . . . . . . . . . . . . . . . . . . . . . . . . . . . . . . . . . . . . . . . . . . . . . . . . . . . . . . . . . . . . . . . . . . . . . . . . . . . . . . . . . . . . . . . . . . . . . . . . . . . . . . . . . . . . . . . 196Tutorial: Quick start ... . . . . . . . . . . . . . . . . . . . . . . . . . . . . . . . . . . . . . . . . . . . . . . . . . . . . . . . . . . . . . . . . . . . . . . . . . . . . . . . . . . . . . . . . . . . . . . . . . . . . . . . . . . . . . 196Tutorial: Database enrichment .... . . . . . . . . . . . . . . . . . . . . . . . . . . . . . . . . . . . . . . . . . . . . . . . . . . . . . . . . . . . . . . . . . . . . . . . . . . . . . . . . . . . . . . . . . . . . . . 197Example: Explore app .... . . . . . . . . . . . . . . . . . . . . . . . . . . . . . . . . . . . . . . . . . . . . . . . . . . . . . . . . . . . . . . . . . . . . . . . . . . . . . . . . . . . . . . . . . . . . . . . . . . . . . . . . . . 197
iv

Amazon Location Service Developer Guide
Example: Style a map .... . . . . . . . . . . . . . . . . . . . . . . . . . . . . . . . . . . . . . . . . . . . . . . . . . . . . . . . . . . . . . . . . . . . . . . . . . . . . . . . . . . . . . . . . . . . . . . . . . . . . . . . . . 198Example: Draw markers ... . . . . . . . . . . . . . . . . . . . . . . . . . . . . . . . . . . . . . . . . . . . . . . . . . . . . . . . . . . . . . . . . . . . . . . . . . . . . . . . . . . . . . . . . . . . . . . . . . . . . . . . . 198Example: Draw clustered points ... . . . . . . . . . . . . . . . . . . . . . . . . . . . . . . . . . . . . . . . . . . . . . . . . . . . . . . . . . . . . . . . . . . . . . . . . . . . . . . . . . . . . . . . . . . . . . 199Example: Draw a polygon .... . . . . . . . . . . . . . . . . . . . . . . . . . . . . . . . . . . . . . . . . . . . . . . . . . . . . . . . . . . . . . . . . . . . . . . . . . . . . . . . . . . . . . . . . . . . . . . . . . . . . 199
Security and best practices .... . . . . . . . . . . . . . . . . . . . . . . . . . . . . . . . . . . . . . . . . . . . . . . . . . . . . . . . . . . . . . . . . . . . . . . . . . . . . . . . . . . . . . . . . . . . . . . . . . . . . . . . . . . 200Data protection .... . . . . . . . . . . . . . . . . . . . . . . . . . . . . . . . . . . . . . . . . . . . . . . . . . . . . . . . . . . . . . . . . . . . . . . . . . . . . . . . . . . . . . . . . . . . . . . . . . . . . . . . . . . . . . . . . . . 200
Data privacy .... . . . . . . . . . . . . . . . . . . . . . . . . . . . . . . . . . . . . . . . . . . . . . . . . . . . . . . . . . . . . . . . . . . . . . . . . . . . . . . . . . . . . . . . . . . . . . . . . . . . . . . . . . . . . . . . 201Data retention .... . . . . . . . . . . . . . . . . . . . . . . . . . . . . . . . . . . . . . . . . . . . . . . . . . . . . . . . . . . . . . . . . . . . . . . . . . . . . . . . . . . . . . . . . . . . . . . . . . . . . . . . . . . . . 201Configuration and vulnerability analysis ... . . . . . . . . . . . . . . . . . . . . . . . . . . . . . . . . . . . . . . . . . . . . . . . . . . . . . . . . . . . . . . . . . . . . . . . . . 201Data at rest encryption .... . . . . . . . . . . . . . . . . . . . . . . . . . . . . . . . . . . . . . . . . . . . . . . . . . . . . . . . . . . . . . . . . . . . . . . . . . . . . . . . . . . . . . . . . . . . . . . . 201Data in transit encryption .... . . . . . . . . . . . . . . . . . . . . . . . . . . . . . . . . . . . . . . . . . . . . . . . . . . . . . . . . . . . . . . . . . . . . . . . . . . . . . . . . . . . . . . . . . . . . 210
Identity and Access Management .... . . . . . . . . . . . . . . . . . . . . . . . . . . . . . . . . . . . . . . . . . . . . . . . . . . . . . . . . . . . . . . . . . . . . . . . . . . . . . . . . . . . . . . . . . . 210Audience .... . . . . . . . . . . . . . . . . . . . . . . . . . . . . . . . . . . . . . . . . . . . . . . . . . . . . . . . . . . . . . . . . . . . . . . . . . . . . . . . . . . . . . . . . . . . . . . . . . . . . . . . . . . . . . . . . . . . 210Authenticating with identities ... . . . . . . . . . . . . . . . . . . . . . . . . . . . . . . . . . . . . . . . . . . . . . . . . . . . . . . . . . . . . . . . . . . . . . . . . . . . . . . . . . . . . . . . 211Managing access using policies ... . . . . . . . . . . . . . . . . . . . . . . . . . . . . . . . . . . . . . . . . . . . . . . . . . . . . . . . . . . . . . . . . . . . . . . . . . . . . . . . . . . . . . . 213How Amazon Location Service works with IAM ..... . . . . . . . . . . . . . . . . . . . . . . . . . . . . . . . . . . . . . . . . . . . . . . . . . . . . . . . . . . . . . . 214Identity-based policy examples .... . . . . . . . . . . . . . . . . . . . . . . . . . . . . . . . . . . . . . . . . . . . . . . . . . . . . . . . . . . . . . . . . . . . . . . . . . . . . . . . . . . . . 217Troubleshooting .... . . . . . . . . . . . . . . . . . . . . . . . . . . . . . . . . . . . . . . . . . . . . . . . . . . . . . . . . . . . . . . . . . . . . . . . . . . . . . . . . . . . . . . . . . . . . . . . . . . . . . . . . . 223
Incident response .... . . . . . . . . . . . . . . . . . . . . . . . . . . . . . . . . . . . . . . . . . . . . . . . . . . . . . . . . . . . . . . . . . . . . . . . . . . . . . . . . . . . . . . . . . . . . . . . . . . . . . . . . . . . . . . . 224Logging and Monitoring .... . . . . . . . . . . . . . . . . . . . . . . . . . . . . . . . . . . . . . . . . . . . . . . . . . . . . . . . . . . . . . . . . . . . . . . . . . . . . . . . . . . . . . . . . . . . . . . 225
Compliance validation .... . . . . . . . . . . . . . . . . . . . . . . . . . . . . . . . . . . . . . . . . . . . . . . . . . . . . . . . . . . . . . . . . . . . . . . . . . . . . . . . . . . . . . . . . . . . . . . . . . . . . . . . . . 225Resilience .... . . . . . . . . . . . . . . . . . . . . . . . . . . . . . . . . . . . . . . . . . . . . . . . . . . . . . . . . . . . . . . . . . . . . . . . . . . . . . . . . . . . . . . . . . . . . . . . . . . . . . . . . . . . . . . . . . . . . . . . . . . 226Infrastructure security ... . . . . . . . . . . . . . . . . . . . . . . . . . . . . . . . . . . . . . . . . . . . . . . . . . . . . . . . . . . . . . . . . . . . . . . . . . . . . . . . . . . . . . . . . . . . . . . . . . . . . . . . . . . 226Security best practices .... . . . . . . . . . . . . . . . . . . . . . . . . . . . . . . . . . . . . . . . . . . . . . . . . . . . . . . . . . . . . . . . . . . . . . . . . . . . . . . . . . . . . . . . . . . . . . . . . . . . . . . . . 226
Detective best practices .... . . . . . . . . . . . . . . . . . . . . . . . . . . . . . . . . . . . . . . . . . . . . . . . . . . . . . . . . . . . . . . . . . . . . . . . . . . . . . . . . . . . . . . . . . . . . . . . 227Preventive best practices .... . . . . . . . . . . . . . . . . . . . . . . . . . . . . . . . . . . . . . . . . . . . . . . . . . . . . . . . . . . . . . . . . . . . . . . . . . . . . . . . . . . . . . . . . . . . . . 227
Best practices .... . . . . . . . . . . . . . . . . . . . . . . . . . . . . . . . . . . . . . . . . . . . . . . . . . . . . . . . . . . . . . . . . . . . . . . . . . . . . . . . . . . . . . . . . . . . . . . . . . . . . . . . . . . . . . . . . . . . . . 228Security ... . . . . . . . . . . . . . . . . . . . . . . . . . . . . . . . . . . . . . . . . . . . . . . . . . . . . . . . . . . . . . . . . . . . . . . . . . . . . . . . . . . . . . . . . . . . . . . . . . . . . . . . . . . . . . . . . . . . . . . 228Resource management .... . . . . . . . . . . . . . . . . . . . . . . . . . . . . . . . . . . . . . . . . . . . . . . . . . . . . . . . . . . . . . . . . . . . . . . . . . . . . . . . . . . . . . . . . . . . . . . . . 228Billing and cost management .... . . . . . . . . . . . . . . . . . . . . . . . . . . . . . . . . . . . . . . . . . . . . . . . . . . . . . . . . . . . . . . . . . . . . . . . . . . . . . . . . . . . . . . . 228Quotas and usage .... . . . . . . . . . . . . . . . . . . . . . . . . . . . . . . . . . . . . . . . . . . . . . . . . . . . . . . . . . . . . . . . . . . . . . . . . . . . . . . . . . . . . . . . . . . . . . . . . . . . . . . 229
Amazon Location APIs ... . . . . . . . . . . . . . . . . . . . . . . . . . . . . . . . . . . . . . . . . . . . . . . . . . . . . . . . . . . . . . . . . . . . . . . . . . . . . . . . . . . . . . . . . . . . . . . . . . . . . . . . . . . . . . . . . . . 230Working with AWS SDKs .... . . . . . . . . . . . . . . . . . . . . . . . . . . . . . . . . . . . . . . . . . . . . . . . . . . . . . . . . . . . . . . . . . . . . . . . . . . . . . . . . . . . . . . . . . . . . . . . . . . . . . 230
Document history .... . . . . . . . . . . . . . . . . . . . . . . . . . . . . . . . . . . . . . . . . . . . . . . . . . . . . . . . . . . . . . . . . . . . . . . . . . . . . . . . . . . . . . . . . . . . . . . . . . . . . . . . . . . . . . . . . . . . . . . . 231AWS glossary .... . . . . . . . . . . . . . . . . . . . . . . . . . . . . . . . . . . . . . . . . . . . . . . . . . . . . . . . . . . . . . . . . . . . . . . . . . . . . . . . . . . . . . . . . . . . . . . . . . . . . . . . . . . . . . . . . . . . . . . . . . . . . . 234
v

Amazon Location Service Developer GuideWhat is Amazon Location Service?
Welcome to Amazon LocationService
Welcome to the Amazon Location Service Developer Guide.
The following topics can help you get started in the documentation, based on what you are trying to do.
Get an overview of Amazon Location
• Learn about the concepts in Amazon Location (p. 30).
• Dive deeper into the functionality in the How to use Amazon Location Service (p. 71) chapter.
• Use the Amazon Location Service console to explore the functionality first-hand.
Use Amazon Location as a developer
• Build your first app with the Quick start (p. 4).
• Learn how the various Amazon Location Service features work in the How to use Amazon LocationService (p. 71) chapter.
• See code examples and tutorials (p. 196) that you can use in your own apps.
• Get information about Amazon Location APIs in the API Reference guide (p. 230).
What is Amazon Location Service?Amazon Location Service lets you add location data and functionality to applications, which includescapabilities such as maps, points of interest, geocoding, routing, geofences, and tracking. AmazonLocation provides location-based services (LBS) using high-quality data from global, trusted providersEsri and HERE. With affordable data, tracking and geofencing capabilities, and built-in metrics for healthmonitoring, you can build sophisticated location-enabled applications.
With Amazon Location, you retain control of your organization’s data. Amazon Location anonymizes allqueries sent to data providers by removing customer metadata and account information. Additionally,sensitive tracking and geofencing location information, such as facility, asset, and personnel locations,does not leave your AWS account at all. This helps you protect sensitive information from third parties,protect user privacy, and reduce your application’s security risks. With Amazon Location, Amazon andthird parties do not have rights to sell your data or use it for advertising.
Amazon Location is fully integrated with services such as AWS CloudTrail, Amazon CloudWatch,Amazon EventBridge, and AWS Identity and Access Management (IAM). Amazon Location simplifiesyour development workflow with data integration, and fast tracks apps to production with built-inmonitoring, security, and compliance features.
For highlights, product details, and pricing, see the service page for Amazon Location Service.
Key features in Amazon LocationAmazon Location provides the following features:
1

Amazon Location Service Developer GuideRelated services
Maps
Amazon Location Service Maps lets you visualize location information and is the foundations ofmany location-based service capabilities. Amazon Location Service provides map tiles of differentstyles sourced from global location data providers Esri and HERE.
Places
Amazon Location Service Places lets you integrate search functionality into your application,convert addresses into geographic coordinates in latitude and longitude (geocoding), and convert acoordinate into a street address (reverse geocoding). Amazon Location Service sources high-qualitygeospatial data from Esri and HERE to support Places functions.
Routing
Amazon Location Service Routes lets you find routes and estimate travel time based on up-to-dateroadway and live traffic information. Build features that allow your application to request the traveltime, distance, and directions between any two locations. Calculate the time and distance for amatrix of routes to use in route planning.
Geofencing
Amazon Location Service Geofences lets you give your application the ability to detect and act whena device enters or exits a defined geographical boundary known as a geofence. Automatically sendan entry or exit event to Amazon EventBridge when a geofence breach is detected. This lets youinitiate downstream actions such as sending a notification to a target.
Trackers
Amazon Location Service Trackers lets you retrieve the current and historical location of devicesthat are running your tracking-enabled application. You can also link trackers with AmazonLocation Service geofences to evaluate location updates from your devices against your geofencesautomatically. Trackers can help you reduce costs by filtering position updates that haven't movedbefore storing or evaluating them against geofences.
When you use trackers, sensitive location information on your tracked devices does not leave yourAWS account. This helps protect sensitive information from third parties, protect user privacy, andreduce security risks.
Services you can use with Amazon LocationUse the following services along with Amazon Location Service.
Integrated monitoring and management
Amazon Location Service is integrated with Amazon CloudWatch, AWS CloudTrail, and AmazonEventBridge for efficient monitoring and data management:• Amazon CloudWatch – View metrics on service usage and health, including requests,
latency, faults, and logs. For more information, see the section called “Monitoring withCloudWatch” (p. 188).
• AWS CloudTrail – Log and monitor your API calls, which include actions taken by a user, roleor an AWS service. For more information, see the section called “Using CloudTrail with AmazonLocation” (p. 192).
2

Amazon Location Service Developer GuideRelated services
• Amazon EventBridge – Enable an event-driven application architecture so you can useAWS Lambda functions to activate other parts of your application and work flows. For moreinformation, see the section called “Reacting to geofence events with EventBridge” (p. 165).
Developer tools
Amazon Location Service offers a variety of tools for developers to build location-enabledapplications. These include the standard AWS SDKs, mobile and web SDKs, and sample code tocombine them with open source libraries such as MapLibre GL. Use the Amazon Location Serviceconsole to learn about resources, and to get started with a visual and interactive learning tool.
3

Amazon Location Service Developer GuideCreate resources
Quick start with Amazon LocationService
The most efficient way to get started with Amazon Location Service is to use the Amazon Locationconsole. You can create and manage your resources and try the Amazon Location functionality using theExplore page.
NoteTo use the Amazon Location Service console, or following the rest of this tutorial, requires thatyou first complete the Prerequisites for using Amazon Location Service (p. 72), includingcreating an AWS account, and allowing access to Amazon Location.
To begin learning about the Amazon Location APIs, use the following tutorial to create a simpleapplication that displays an interactive map and uses search functionality. The tutorial shows you how tocreate a simple webpage using JavaScript, or an Android application using Kotlin. The first few steps arecommon to both.
Creating Amazon Location resources for your appIf you do not already have them, you must create the Amazon Location resources that your applicationwill use. Here, you create a map resource to display maps in your application, and a place index to searchfor locations on the map.
To add location resources to your application
1. Choose the map style that you want to use.
a. In the Amazon Location console, on the Maps page, choose Create map to preview map styles.b. Add a Name and Description for the new map resource. Make a note of the name that you use
for the map resource. You will need it when creating your script file later in the tutorial.c. Choose a map.
NoteChoosing a map style also chooses which map data provider that you will use. If yourapplication is tracking or routing assets that you use in your business, such as deliveryvehicles or employees, you may only use HERE as your geolocation provider. For moreinformation, see section 82 of the AWS service terms.
d. Agree to the Amazon Location Terms and Conditions, then choose Create map. You caninteract with the map that you've chosen: zoom in, zoom out, or pan in any direction.
e. Make a note of the Amazon Resource Name (ARN) that is shown for your new map resource.You'll use it to create the correct authentication later in this tutorial.
2. Choose the place index that you want to use.
a. In the Amazon Location console on the Place indexes page, choose Create place index.b. Add a Name and Description for the new place index resource. Make a note of the name that
you use for the place index resource. You will need it when creating your script file later in thetutorial.
c. Choose a data provider.
NoteIn most cases, choose the data provider that matches the map provider that youalready chose. This helps to ensure that the searches will match the maps.
4

Amazon Location Service Developer GuideSetup authentication
If your application is tracking or routing assets that you use in your business, such asdelivery vehicles or employees, you may only use HERE as your geolocation provider.For more information, see section 82 of the AWS service terms.
d. Choose the Data storage option. For this tutorial, the results are not stored, so you can choose No, single use only.
e. Agree to the Amazon Location Terms and Conditions, then choose Create place index.f. Make a note of the ARN that is shown for your new place index resource. You'll use it to create
the correct authentication in the next section of this tutorial.
Setting up authentication for your applicationThe application that you create in this tutorial has anonymous usage, meaning that your users are notrequired to sign into AWS to use the application. However, the Amazon Location Service APIs requireauthentication to use. You can use Amazon Cognito to provide authentication and authorization foranonymous users. Before you can use Amazon Cognito in your application, you must create an AmazonCognito identity pool.
NoteFor more information about using Amazon Cognito with Amazon Location Service, see Grantingaccess to Amazon Location Service (p. 182).
To set up authentication for your application
1. Go to the Amazon Cognito console.2. Choose Manage Identity Pools.3. Choose Create new identity pool, then enter a name for your identity pool.
ImportantThe pool that you create must be in the same AWS account and AWS Region as the AmazonLocation Service resources that you created in the previous section.
4. From the Unauthenticated identities collapsible section, choose Enable access to unauthenticatedidentities.
5. Choose Create Pool.6. Choose which IAM roles you want to use with your identity pool.7. Expand View Details.8. Under Unauthenticated identities, enter a role name.9. Expand the View Policy Document section, then choose Edit to add your policy.10. Add your policy to grant access to your resources.
The following are policy examples for Maps, Places, Trackers, and Routes. To use the examples foryour own policy, replace the region and accountID placeholders:
The following policy grants read-only access to Amazon Location Service resources. Supply thecorrect ARNs for the resources that you created in the previous section. If you do not remember theARNs, you can find them by selecting the appropriate resource on the Amazon Location consoleMaps page or Place indexes page.
{ "Version": "2012-10-17", "Statement": [ { "Sid": "LocationReadOnly", "Effect": "Allow", "Action": [
5
Amazon Location Service Developer GuideNext step
"geo:GetMapStyleDescriptor", "geo:GetMapGlyphs", "geo:GetMapSprites", "geo:GetMapTile", "geo:SearchPlaceIndex*" ], "Resource": [ "arn:aws:geo:<region>:<accountID>:map/<ExampleMap>", "arn:aws:geo:<region>:<accountID>:place-index/<ExamplePlaceIndex>" ] } ]}
NoteWhile unauthenticated identity pools are intended for exposure on unsecured internet sites,note that they will be exchanged for standard, time-limited AWS credentials.It's important to scope the IAM roles associated with unauthenticated identity poolsappropriately. For more information about using and appropriately scoping policies inAmazon Cognito with Amazon Location Service, see Granting access to Amazon LocationService (p. 182).
11. Choose Allow to create your identity pools.12. On the Sample code page, select the Platform of JavaScript. Then copy or write down the
IdentityPoolId that you will use later in your browser script.
Next stepNow that you have created your Amazon Location Service and Amazon Cognito resources, your nextstep is to use those resources to create your application. This tutorial shows you how to create a webapplication with JavaScript, or an Android application with Kotlin.
• Create a web application (p. 6)• Create an Android application (p. 19)
Creating a web appIn this section, you will create a static webpage with a map and the ability to search at a location. Beforeyou proceed, make sure that you have already created your Amazon Location resources and createdan Amazon Cognito identity for your application, as described in the initial Quick start with AmazonLocation Service (p. 4) topic.
Creating the HTML for your applicationIn this tutorial, you will create a static HTML page that embeds a map, and allows the user to find what'sat a location on the map. The app will consist of three files: an HTML file and CSS file for the webpage,and a JavaScript (.js) file for the code that creates the map and responds to the user's interactions andmap events.
First, let's create the HTML and CSS framework that will be used for the application. This will be a simplepage with a <div> element to hold the map container and a <pre> element to show the JSON responsesto your queries.
To create the HTML for your quick start application
1. Create a new file called quickstart.html.
6

Amazon Location Service Developer GuideCreating HTML
2. Edit the file in the text editor or environment of your choice. Add the following HTML to the file.
<!DOCTYPE html><html> <head> <meta charset="utf-8"> <title>Quick start tutorial</title>
<!-- Styles --> <link href="main.css" rel="stylesheet" /> </head> <body> <header> <h1>Quick start tutorial</h1> </header> <main> <div id="map"></div> <aside> <h2>JSON Response</h2> <pre id="response"></pre> </aside> </main> <footer>This is a simple Amazon Location Service app. Pan and zoom. Click to see details about entities close to a point.</footer> </body></html>
This HTML has a pointer to the CSS file that you will create in the next step, some placeholderelements for the application, and some explanatory text.
There are two placeholder elements that you will use later in this tutorial. The first is the <divid="map> element, which will hold the map control. The second is the <pre id="response">element, which will show the results of searching on the map.
3. Save your file.
Now add the CSS for the webpage. This will set the style of the text and placeholder elements for theapplication.
To create the CSS for your quick start application
1. Create a new file called main.css, in the same folder as the quickstart.html file created in theprevious procedure.
2. Edit the file in whatever editor that you want to use. Add the following text to the file.
* { box-sizing: border-box; font-family: Arial, Helvetica, sans-serif;}
body { margin: 0;}
header { background: #000000; padding: 0.5rem;}
h1 {
7

Amazon Location Service Developer GuideCreating HTML
margin: 0; text-align: center; font-size: 1.5rem; color: #ffffff;}
main { display: flex; min-height: calc(100vh - 94px);}
#map { flex: 1;}
aside { overflow-y: auto; flex: 0 0 30%; max-height: calc(100vh - 94px); box-shadow: 0 1px 1px 0 #001c244d, 1px 1px 1px 0 #001c2426, -1px 1px 1px 0 #001c2426; background: #f9f9f9; padding: 1rem;}
h2 { margin: 0;}
pre { white-space: pre-wrap; font-family: monospace; color: #16191f;}
footer { background: #000000; padding: 1rem; color: #ffffff;}
This sets the map to fill the space not used by anything else, sets the area for our responses to takeup 30% of the width of the app, and sets color and styles for the title and explanatory text.
3. Save the file.
4. You can now view the quickstart.html file in a browser to see the layout of the application.
8

Amazon Location Service Developer GuideAdding the map
Next, you will add the map control to the application.
Adding an interactive map to your applicationNow that you have a framework and a div placeholder, you can add the map control to your application.This tutorial uses MapLibre GL JS as a map control, getting data from Amazon Location Service. You willalso use a helper function from the Amplify libraries to facilitate signing of calls to the Amazon LocationAPIs with Amazon Cognito.
To add an interactive map to your application
1. Open the quickstart.html file that you created in the previous section.
2. Add references to the needed libraries, and the script file that you will create. The changes you needto make are shown in green.
<!DOCTYPE html><html> <head> <meta charset="utf-8"> <title>Quick start tutorial</title>
<!-- Styles --> <link href="https://unpkg.com/[email protected]/dist/maplibre-gl.css" rel="stylesheet" /> <link href="main.css" rel="stylesheet" /> </head> <body> ... <footer>This is a simple Amazon Location Service app. Pan and zoom. Click to see details about entities close to a point.</footer> <!-- JavaScript dependencies --> <script src="https://unpkg.com/[email protected]/dist/maplibre-gl.js"></script> <script src="https://sdk.amazonaws.com/js/aws-sdk-2.1030.0.min.js"></script> <script src="https://unpkg.com/@aws-amplify/[email protected]/dist/aws-amplify-core.min.js"></script> <!-- JavaScript for the app --> <script src="main.js"></script> </body></html>
This adds the following dependencies to your app:
• MapLibre GL JS. This library and stylesheet include a map control that displays map tiles andincludes interactivity, such as pan and zoom. The control also allows extensions, such as drawingyour own features on the map.
• AWS SDK version 2. As part of the overall AWS functionality, this provides interfaces for theAmazon Location functionality needed to get map data, and to search for places on the map.
• AWS Amplify. Amplify provides many helpful functions for working with AWS, including AmazonLocation. In this case, we will use it for signing to provide authentication for the AWS SDK.
This step also adds a reference to main.js, which you will create next.
NoteIt is a good idea to use the most recent build of the AWS SDK (and other SDKs) in yourproject, and to keep it up to date. This provides you the latest features and functionality,
9

Amazon Location Service Developer GuideAdding the map
and also security updates. To find the latest build of the AWS SDK, see the browserinstallation topic in the AWS SDK for JavaScript.
3. Save the quickstart.html file.
4. Create a new file called main.js in the same folder as your HTML and CSS files, and open it forediting.
5. Add the following script to your file. The text in red should be replaced with the Amazon CognitoARN, map resource name, and place resource name that you created earlier.
// Use Signer from @aws-amplify/coreconst { Signer } = window.aws_amplify_core;
// AWS Resources// Cognito:const identityPoolId = "region:sample12-3456-abcd-7890-ef1234567890";
// Amazon Location Service resource names:const mapName = "explore.map";const placesName = "explore.place";
// Extract the region from the Identity Pool IDAWS.config.region = identityPoolId.split(":")[0];
// Instantiate a Cognito-backed credential providerconst credentials = new AWS.CognitoIdentityCredentials({ IdentityPoolId: identityPoolId,});
// Sign requests made by MapLibre GL JS using AWS SigV4:function transformRequest(url, resourceType) { if (resourceType === "Style" && !url.includes("://")) { // Resolve to an AWS URL url = `https://maps.geo.${AWS.config.region}.amazonaws.com/maps/v0/maps/${url}/style-descriptor`; }
if (url.includes("amazonaws.com")) { // Sign AWS requests (with the signature as part of the query string) return { url: Signer.signUrl(url, { access_key: credentials.accessKeyId, secret_key: credentials.secretAccessKey, session_token: credentials.sessionToken, }), }; }
// If not amazonaws.com, falls to here without signing return { url };}
// Initialize a mapasync function initializeMap() { // Load credentials and set them up to refresh await credentials.getPromise(); // Initialize the map const mlglMap = new maplibregl.Map({ container: "map", // HTML element ID of map element center: [-77.03674, 38.891602], // Initial map centerpoint zoom: 16, // Initial map zoom style: mapName, transformRequest, });
10

Amazon Location Service Developer GuideAdding the map
// Add navigation control to the top left of the map mlglMap.addControl(new maplibregl.NavigationControl(), "top-left"); return mlglMap;}
async function main() { // Initialize map and AWS SDK for Location Service: const map = await initializeMap();}
main();
This code sets up AWS and Amazon Location resources, then configures MapLibre GL JS to use anAmplify helper function to sign requests to AWS. Finally, it initializes the map control and places it inyour <div> element with the id map.
The first half of this file is setting up the use of your Amazon Cognito credentials to sign requeststo Amazon Location. This code will probably be similar for most apps that you create. TheinitializeMap() function is important to understand. It creates a new MapLibre GL map control(called mlglMap locally, but called map in the rest of the code) that is used to render the map in yourapplication.
// Initialize the map const mlglMap = new maplibregl.Map({ container: "map", // HTML element ID of map element center: [-77.03674, 38.891602], // Initial map centerpoint zoom: 16, // Initial map zoom style: mapName, transformRequest, });
When you create a new MapLibre GL map control, the parameters that you pass indicate the initialstate of the map control. Here, we set the following parameters.
• HTML container, which uses the map div element in our HTML.
• The initial center of the map to a point in Washington, DC.
• The zoom level to 16 (zoomed into a neighborhood or block level).
• The style to use for the map (the name of your map resource).
• You also pass in a pointer to the transformRequest function, which uses Amazon Cognito tosign any API calls that the map control makes on your behalf.
6. Save your JavaScript file, and open it with a browser. You now have a map on your page, where youcan use pan and zoom actions.
NoteYou can use this app to see how the MapLibre map control behaves. You can try using Ctrlor Shift while using a dragging operation, to see other ways to interact with the map. All ofthis functionality is customizable.
11

Amazon Location Service Developer GuideAdding search
Your app is nearly complete. In the next section, you will handle choosing a location on the map, andshow the address of the location chosen. You will also show the resulting JSON on the page, to see thefull results.
Adding search to your applicationThe last step for your application is to add searching on the map. In this case, you will add a reversegeocoding search, where you find the items at a location.
NoteAmazon Location Service also provides the ability to search by name or address to find thelocations of places on the map.
To add search functionality to your application
1. Open the main.js file that you created in the previous section.2. Modify the main function, as shown. The changes you need to make are shown in green.
async function main() { // Initialize map and AWS SDK for Location Service: const map = await initializeMap();
const location = new AWS.Location({credentials, region: AWS.config.region});
// On mouse click, get results: map.on("click", function(e) { // Set up parameters for search call let params = { IndexName: placesName, Position: [e.lngLat.lng, e.lngLat.lat], Language: "en", MaxResults: "5" };
// Search for results around clicked point location.searchPlaceIndexForPosition(params, function(err, data) { if (err) { // Alert user about an error
12

Amazon Location Service Developer GuideAdding search
alert("There was an error searching.");
// Write JSON response error to HTML document.querySelector("#response").textContent = JSON.stringify(err, undefined, 2); } else { // Write JSON response data to HTML document.querySelector("#response").textContent = JSON.stringify(data, undefined, 2);
// Display place label in an alert box alert(data.Results[0].Place.Label); } }); });}
This code starts by creating an AWS Location object, using the Amazon Cognito credentials that youset up earlier, and the region that you are using.
const location = new AWS.Location({credentials, region: AWS.config.region});
Next, the code responds to the user choosing a spot on the map control. It does this by catching aMapLibre GL provided event for click.
map.on("click", function(e) { ... });
The MapLibre GL click event provides parameters that include the latitude and longitude that theuser chose (e.lngLat). Within the click event, the code calls the searchPlaceIndexForPositionaction, to find the entities at the given latitude and longitude.
// Set up parameters for search call let params = { IndexName: placesName, Position: [e.lngLat.lng, e.lngLat.lat], Language: "en", MaxResults: "5" };
// Search for results around clicked point location.searchPlaceIndexForPosition(params, function(err, data) { ... });
Here, the IndexName is the name of the Place Index resource that you created earlier, the Positionis the latitude and longitude to search for, Language is the preferred language for results, andMaxResults tells Amazon Location to return only a maximum of five results.
The remaining code checks for an error, and then displays the results of the search in the <pre>element called response, and shows the top result in an alert box.
3. (Optional) If you save and open the quickstart.html file in a browser now, choosing a location onthe map will show you the name or address of the place that you chose.
4. The final step in the application is to use the MapLibre functionality to add a marker on the spotthat the user selected. Modify the main function as follows. The changes you need to make areshown in green.
async function main() {
13
Amazon Location Service Developer GuideAdding search
// Initialize map and AWS SDK for Location Service: const map = await initializeMap(); const location = new AWS.Location({credentials, region: AWS.config.region});
// Variable to hold marker that will be rendered on click let marker;
// On mouse click, display marker and get results: map.on("click", function(e) { // Remove any existing marker if(marker) { marker.remove(); }
// Render a marker on clicked point marker = new maplibregl.Marker() .setLngLat([e.lngLat.lng, e.lngLat.lat]) .addTo(map);
// Set up parameters for search call let params = { IndexName: placesName, Position: [e.lngLat.lng, e.lngLat.lat], Language: "en", MaxResults: "5" };
// Search for results around clicked point location.searchPlaceIndexForPosition(params, function(err, data) {...
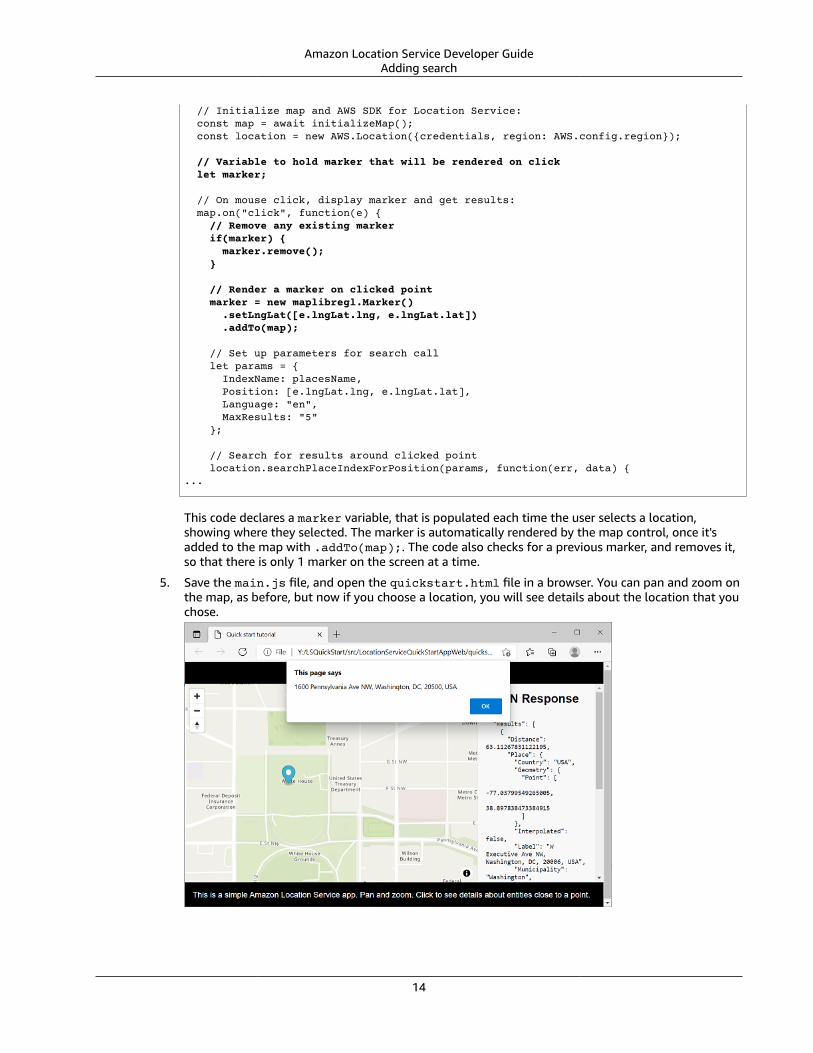
This code declares a marker variable, that is populated each time the user selects a location,showing where they selected. The marker is automatically rendered by the map control, once it'sadded to the map with .addTo(map);. The code also checks for a previous marker, and removes it,so that there is only 1 marker on the screen at a time.
5. Save the main.js file, and open the quickstart.html file in a browser. You can pan and zoom onthe map, as before, but now if you choose a location, you will see details about the location that youchose.
14

Amazon Location Service Developer GuideFinal application
Your quick start application is complete. This tutorial has shown you how to create a static HTMLapplication that:
• Creates a map that users can interact with.• Handles a map event (click).• Calls an Amazon Location Service API, specifically to search the map at a location, usingsearchPlaceIndexForPosition.
• Uses the MapLibre map control to add a marker.
Seeing the final applicationThe final source code for this application is included in this section. You can also find the final project onGitHub.
Overview
Select each tab to view the final source code of the files in this quick start tutorial.
The files are:
• quickstart.html — the framework for your application, including the HTML element holders forthe map and search results.
• main.css — the stylesheet for the application.• main.js — the script for your application that authenticates the user, creates the map, and
searches on a click event.
quickstart.html
The HTML framework for the quick start application.
<!DOCTYPE html><html> <head> <meta charset="utf-8"> <title>Quick start tutorial</title>
<!-- Styles --> <link href="https://unpkg.com/[email protected]/dist/maplibre-gl.css" rel="stylesheet" /> <link href="main.css" rel="stylesheet" /> </head> <body> <header> <h1>Quick start tutorial</h1> </header> <main> <div id="map"></div> <aside> <h2>JSON Response</h2> <pre id="response"></pre> </aside> </main> <footer>This is a simple Amazon Location Service app. Pan and zoom. Click to see details about entities close to a point.</footer> <!-- JavaScript dependencies --> <script src="https://unpkg.com/[email protected]/dist/maplibre-gl.js"></script> <script src="https://sdk.amazonaws.com/js/aws-sdk-2.1030.0.min.js"></script>
15

Amazon Location Service Developer GuideFinal application
<script src="https://unpkg.com/@aws-amplify/[email protected]/dist/aws-amplify-core.min.js"></script> <!-- JavaScript for the app --> <script src="main.js"></script> </body></html>
main.css
The stylesheet for the quick start application.
* { box-sizing: border-box; font-family: Arial, Helvetica, sans-serif;}
body { margin: 0;}
header { background: #000000; padding: 0.5rem;}
h1 { margin: 0; text-align: center; font-size: 1.5rem; color: #ffffff;}
main { display: flex; min-height: calc(100vh - 94px);}
#map { flex: 1;}
aside { overflow-y: auto; flex: 0 0 30%; max-height: calc(100vh - 94px); box-shadow: 0 1px 1px 0 #001c244d, 1px 1px 1px 0 #001c2426, -1px 1px 1px 0 #001c2426; background: #f9f9f9; padding: 1rem;}
h2 { margin: 0;}
pre { white-space: pre-wrap; font-family: monospace; color: #16191f;}
footer { background: #000000; padding: 1rem; color: #ffffff;
16

Amazon Location Service Developer GuideFinal application
}
main.js
The code for the quick start application. The text in red should be replaced with the appropriateAmazon Cognito or Amazon Location object names.
// Use Signer from @aws-amplify/coreconst { Signer } = window.aws_amplify_core;
// AWS Resources// Cognito:const identityPoolId = "region:sample12-3456-abcd-7890-ef1234567890";
// Amazon Location Service resource names:const mapName = "explore.map";const placesName = "explore.place";
// Extract the region from the Identity Pool IDAWS.config.region = identityPoolId.split(":")[0];
// Instantiate a Cognito-backed credential providerconst credentials = new AWS.CognitoIdentityCredentials({ IdentityPoolId: identityPoolId,});
// Sign requests made by MapLibre GL JS using AWS SigV4:function transformRequest(url, resourceType) { if (resourceType === "Style" && !url.includes("://")) { // Resolve to an AWS URL url = `https://maps.geo.${AWS.config.region}.amazonaws.com/maps/v0/maps/${url}/style-descriptor`; }
if (url.includes("amazonaws.com")) { // Sign AWS requests (with the signature as part of the query string) return { url: Signer.signUrl(url, { access_key: credentials.accessKeyId, secret_key: credentials.secretAccessKey, session_token: credentials.sessionToken, }), }; }
// If not amazonaws.com, falls to here without signing return { url };}
// Initialize a mapasync function initializeMap() { // Load credentials and set them up to refresh await credentials.getPromise(); // Initialize the map const mlglMap = new maplibregl.Map({ container: "map", // HTML element ID of map element center: [-77.03674, 38.891602], // Initial map centerpoint zoom: 16, // Initial map zoom style: mapName, transformRequest, });
// Add navigation control to the top left of the map mlglMap.addControl(new maplibregl.NavigationControl(), "top-left");
17

Amazon Location Service Developer GuideWhat's next
return mlglMap;}
async function main() { // Initialize map and AWS SDK for Location Service: const map = await initializeMap(); const location = new AWS.Location({credentials, region: AWS.config.region});
// Variable to hold marker that will be rendered on click let marker;
// On mouse click, display marker and get results: map.on("click", function(e) { // Remove any existing marker if(marker) { marker.remove(); }
// Render a marker on clicked point marker = new maplibregl.Marker() .setLngLat([e.lngLat.lng, e.lngLat.lat]) .addTo(map);
// Set up parameters for search call let params = { IndexName: placesName, Position: [e.lngLat.lng, e.lngLat.lat], Language: "en", MaxResults: "5" };
// Search for results around clicked point location.searchPlaceIndexForPosition(params, function(err, data) { if (err) { // Write JSON response error to HTML document.querySelector("#response").textContent = JSON.stringify(err, undefined, 2);
// Display error in an alert box alert("There was an error searching."); } else { // Write JSON response data to HTML document.querySelector("#response").textContent = JSON.stringify(data, undefined, 2);
// Display place label in an alert box alert(data.Results[0].Place.Label); } }); });}
main();
What's nextYou have completed the quick start tutorial, and should have an idea of how Amazon Location Serviceis used to build applications. To get more out of Amazon Location, you can check out the followingresources:
• Dive deeper into the concepts of Amazon Location Service (p. 30)
18

Amazon Location Service Developer GuideCreating an Android app
• Get more information about how to use Amazon Location features and functionality (p. 71)• See how to expand on this sample and build more complex applications by looking at code examples
using Amazon Location (p. 196)
Creating an Android appIn this section, you will create an Android application with a map and the ability to search at a location.Before you proceed, make sure that you have already created your Amazon Location resources andcreated an Amazon Cognito identity for your application, as described in the initial Quick start withAmazon Location Service (p. 4) topic.
NoteThis tutorial uses Amplify, AndroidStudio and the Kotlin language. You must already haveAndroidStudio and Kotlin set up with a working environment.
Creating the base Android applicationIn this tutorial, you will create an Android application that embeds a map, and allows the user to findwhat's at a location on the map.
First, let's create an empty Kotlin application using AndroidStudio's new project wizard.
To create an empty application (AndroidStudio)
1. Start AndroidStudio. On the menu, choose File, New, New Project.2. From the Phone and Tablet tab, select Empty Activity, and then choose Next.3. Choose a Name, Package name, and Save location for your application.4. In the dropdown list for Language, select Kotlin.5. Choose Finish to create your blank application.6. (Optional). By default, the theme used for a blank application includes a text bar across
the top of the app with the name of the application. You can remove the text bar byediting the app/manifests/AndroidManifest.xml file in your project. Change the lineandroid:theme="@style/Theme.<packagename>" to android:theme="@style/Theme.AppCompat.NoActionBar".
Next, you will add the map control to the application.
Adding an interactive map to your applicationNow that you have a framework, you can add the map control to your application. This tutorial usesAmplify libraries for managing the map view in the application. The map control itself is part theMapLibre GL JS library, Amplify and MapLibre get the map data from Amazon Location Service. TheAmplify libraries facilitate signing of calls to the Amazon Location APIs with Amazon Cognito.
To add the map, you'll perform these steps:
1. Add the location dependencies to your project.2. Set up the map view in your layout.3. Write the code for showing the map.4. Create a configuration file for your resources.
The following procedures take you through each of these steps.
19

Amazon Location Service Developer GuideAdding the map
1 - Add location dependencies to your project
1. In AndroidStudio, select the View menu, and choose Tool Windows, Project. This will open theProject window, which gives you access to all the files in your project.
2. In the Project window, open Gradle Scripts in the tree view, and select the build.gradle file foryour application module. This will open the build.gradle file for editing.
3. At the bottom of the file, in the dependencies section, add the following dependencies. The changesthat you must make are shown in green. The existing dependencies may not look the same as thefollowing, depending on your version of AndroidStudio and options selected for your projects.
dependencies {
implementation 'androidx.core:core-ktx:1.7.0' implementation 'androidx.appcompat:appcompat:1.3.0' implementation 'com.google.android.material:material:1.4.0' implementation 'androidx.constraintlayout:constraintlayout:2.0.4' testImplementation 'junit:junit:4.13.2' androidTestImplementation 'androidx.test.ext:junit:1.1.3' androidTestImplementation 'androidx.test.espresso:espresso-core:3.4.0'
// added for location services: implementation 'org.maplibre.gl:android-sdk:9.5.2' implementation 'com.amplifyframework:aws-auth-cognito:1.31.3' implementation 'com.amplifyframework:aws-geo-location:0.3.1' implementation 'com.amplifyframework:maplibre-adapter:0.3.1'}
4. After you finish editing the Gradle dependencies, AndroidStudio must re-sync the project. At the topof the build.gradle editing window, AndroidStudio prompts you to sync. Select SyncNow to syncyour project before continuing.
5. From the Project window, open App, Java, <your package name> in the tree view, and select theMainActivity.kt file.
6. In the MainActivity.kt file, expand the Imports section, if it isn't already. Add the green importsfrom the following list. Again, your existing imports may not match, depending on yourAndroidStudio options.
import androidx.appcompat.app.AppCompatActivityimport android.os.Bundleimport android.util.Logimport android.view.animation.OvershootInterpolatorimport android.widget.ImageViewimport android.widget.TextViewimport com.amplifyframework.AmplifyExceptionimport com.amplifyframework.auth.cognito.AWSCognitoAuthPluginimport com.amplifyframework.core.Amplifyimport com.amplifyframework.geo.location.AWSLocationGeoPluginimport com.amplifyframework.geo.location.models.AmazonLocationPlaceimport com.amplifyframework.geo.maplibre.view.MapLibreViewimport com.amplifyframework.geo.maplibre.view.support.fadeInimport com.amplifyframework.geo.maplibre.view.support.fadeOutimport com.amplifyframework.geo.models.Coordinatesimport com.amplifyframework.geo.options.GeoSearchByCoordinatesOptionsimport com.mapbox.mapboxsdk.camera.CameraPositionimport com.mapbox.mapboxsdk.geometry.LatLngimport com.mapbox.mapboxsdk.maps.MapboxMapimport kotlin.math.abs
NoteIf your imports do not include android.util.log, android.widget.ImageView, orandoid.widget.TextView, you will need to add those imports, as well.
20

Amazon Location Service Developer GuideAdding the map
7. Save the files that you have edited, build.gradle and MainActivity.kt.
This adds the following dependencies to your app:
• AWS Amplify. Amplify provides many helpful functions for working with AWS, including AmazonLocation.
• MapLibre GL JS. This library includes a map control that displays map tiles and includes interactivity,such as pan and zoom. The control also allows extensions, such as drawing your own features on themap.
2 - Add the map view to your project
1. In the AndroidStudio Project window, open app, res, layout in the tree view, and select theactivity_main.xml file. This will open the build.gradle file for editing. If it's not alreadyselected, in the top right of the activity_main.xml editing window, select Code to view the XMLfor your layout directly.
2. Delete the default TextView created by AndroidStudio, and add an Amplify map view instead. TheXML that you add is shown in green, as follows.
<?xml version="1.0" encoding="utf-8"?><androidx.constraintlayout.widget.ConstraintLayout xmlns:android="http://schemas.android.com/apk/res/android" xmlns:app="http://schemas.android.com/apk/res-auto" xmlns:tools="http://schemas.android.com/tools" android:layout_width="match_parent" android:layout_height="match_parent" tools:context=".MainActivity">
<com.amplifyframework.geo.maplibre.view.MapLibreView android:id="@+id/mapView" android:layout_width="match_parent" android:layout_height="match_parent" app:mapbox_foregroundLoadColor="@color/white" app:mapbox_renderTextureMode="true" app:mapbox_renderTextureTranslucentSurface="true" />
</androidx.constraintlayout.widget.ConstraintLayout>
3. Save the file that you edited, activity_main.xml.
Now you are ready to write the code to create the map view.
3 - Add the code for your interactive map
1. From the Project window, open App, Java, <your package name> in the tree view, and select theMainActivity.kt file.
2. Add the following code to your MainActivity.kt file. The new code is in green.
class MainActivity : AppCompatActivity() { private val mapView by lazy { findViewById<MapLibreView>(R.id.mapView) }
override fun onCreate(savedInstanceState: Bundle?) { super.onCreate(savedInstanceState) initAmplify() setContentView(R.layout.activity_main)
21

Amazon Location Service Developer GuideAdding the map
mapView.getMapAsync { map -> val initialPosition = LatLng(47.6160281982247, -122.32642111977668) map.cameraPosition = CameraPosition.Builder() .target(initialPosition) .zoom(13.0) .build() } }
private fun initAmplify() { try { Amplify.addPlugin(AWSCognitoAuthPlugin()) Amplify.addPlugin(AWSLocationGeoPlugin()) Amplify.configure(applicationContext) Log.i("AndroidQuickStart", "Initialized Amplify") } catch (error: AmplifyException) { Log.e("AndroidQuickStart", "Could not initialize Amplify", error) } }
override fun onStart() { super.onStart() mapView?.onStart() }
override fun onResume() { super.onResume() mapView?.onResume() }
override fun onPause() { super.onPause() mapView?.onPause() }
override fun onStop() { super.onStop() mapView?.onStop() }
override fun onSaveInstanceState(outState: Bundle) { super.onSaveInstanceState(outState) mapView?.onSaveInstanceState(outState) }
override fun onLowMemory() { super.onLowMemory() mapView?.onLowMemory() }
override fun onDestroy() { super.onDestroy() mapView?.onDestroy() }}
3. Save the MainActivity.kt file.
Let's break down what the new code is doing.
• mapView function — This is a helper function to find and reference the mapView that you created inthe layout.
• initAmplify — This function initializes the Amplify library.
22

Amazon Location Service Developer GuideAdding the map
• mapView.getMapAsync — This code, called in onCreate, sets up the initial location and zoom levelof the map view.
• Overridden events (onStart, etc) — These are to make sure that the mapView gets the events that itneeds to operate within the application appropriately.
Now the app needs a small amount of configuration, and it will be able to run, showing an interactivemap.
4 - Create configuration for Amplify
1. In AndroidStudio, select the File menu, then choose New, Android Resource Directory. For theResource type, select raw from the dropdown list. This will also give the directory the name raw,automatically. Choose Ok to create the directory.
2. In the Project window, open app, res, raw in the tree view. Choose or right-click raw in the tree view,and choose New, File. For the New File name, choose amplifyconfiguration.json, and thenpress Enter.
3. In the new file, add the following code. Replace the red text with values from your own AmazonLocation and Amazon Cognito resources. You created these resources in the beginning of the Quickstart chapter.
{ "UserAgent": "aws-amplify-cli/2.0", "Version": "1.0", "geo": { "plugins": { "awsLocationGeoPlugin": { "region": "<Amazon Location region>", "maps": { "items": { "<Amazon Location map resource name>": { "style": "<A name you choose for the style of the resource>" } }, "default": "<the map resource name again>" }, "searchIndices": { "items": [ "<Amazon Location place resource name>" ], "default": "<the place resource name again>" } } } }, "auth": { "plugins": { "awsCognitoAuthPlugin": { "UserAgent": "aws-amplify-cli/0.1.0", "Version": "0.1.0", "IdentityManager": { "Default": {} }, "CredentialsProvider": { "CognitoIdentity": { "Default": { "PoolId": "<your Amazon Cognito identity pool ID>", "Region": "<the region of your Amazon Cognito identity pool>" } } } }
23

Amazon Location Service Developer GuideAdding search
} }}
4. Save the amplifyconfiguration.json file.
You can now build the application. To run it, you may have to set up a device to emulate inAndroidStudio, or use the app on your own device. Use this app to see how the Amplify map controlbehaves. You can pan by dragging on the map, and pinching to zoom. On your own, you can change howthe map control works to customize to the needs of your application.
In the next section, you will add a marker on the map, and show the address of the location where themarker is as you move the map.
Adding search to your applicationThe last step for your application is to add searching on the map. In this case, you will add a reversegeocoding search, where you find the items at a location. To simplify the use for an Android app, we willsearch the center of the screen. To find a new location, move the map to where you want to search. Wewill place a marker at the center of the map to show where we are searching.
24

Amazon Location Service Developer GuideAdding search
NoteAmazon Location Service also provides the ability to search by name or address to find thelocations of places on the map.
Adding search will consist of two parts.
1. Add a marker at the center of the screen to show the user where we are searching.
2. Add a text box for results, then search what is at the location of the marker, and show in the text box.
To add a marker to your application
1. Save this image to your project, in the app, res, drawable folder, as red_marker.png (you can alsoaccess the image from GitHub). Alternatively, you can create your own image. You can also usea .png file with transparency for the parts that you don't want shown.
2. In AndroidStudio, expand app, res, layout in the tree view, then open the activity_main.xml file.
3. Add an ImageView for the marker. The changes that you need to make are shown in green.
<?xml version="1.0" encoding="utf-8"?><androidx.constraintlayout.widget.ConstraintLayout xmlns:android="http://schemas.android.com/apk/res/android" xmlns:app="http://schemas.android.com/apk/res-auto" xmlns:tools="http://schemas.android.com/tools" android:layout_width="match_parent" android:layout_height="match_parent" tools:context=".MainActivity">
<ImageView android:id="@+id/map_view_marker" android:layout_width="30dp" android:layout_height="30dp" android:elevation="2dp" app:layout_constraintBottom_toBottomOf="parent" app:layout_constraintEnd_toEndOf="parent" app:layout_constraintStart_toStartOf="parent" app:layout_constraintTop_toTopOf="parent" app:srcCompat="@drawable/red_marker" />
<com.amplifyframework.geo.maplibre.view.MapLibreView android:id="@+id/mapView" android:layout_width="match_parent" android:layout_height="match_parent" app:mapbox_foregroundLoadColor="@color/white" app:mapbox_renderTextureMode="true" app:mapbox_renderTextureTranslucentSurface="true" />
</androidx.constraintlayout.widget.ConstraintLayout>
4. Save your files, and (optionally) build and run your app to preview the functionality.
25

Amazon Location Service Developer GuideAdding search
Your app now has a marker on the screen. In this case, it is a static image that doesn't move. It is used toshow the center of the map view, which is where we will search. In the next procedure, we will add thesearch at that location.
To add search at a location to your app
1. If it's not open already, open the activity_main.xml file, as in the previous procedure. Add thefollowing code, where the changes that you need to make are in green. This will create a TextViewwhere we can see the results of our search at the location.
<?xml version="1.0" encoding="utf-8"?><androidx.constraintlayout.widget.ConstraintLayout xmlns:android="http://schemas.android.com/apk/res/android" xmlns:app="http://schemas.android.com/apk/res-auto" xmlns:tools="http://schemas.android.com/tools" android:layout_width="match_parent" android:layout_height="match_parent" tools:context=".MainActivity">
<ImageView android:id="@+id/map_view_marker" android:layout_width="30dp" android:layout_height="30dp" android:elevation="2dp" app:layout_constraintBottom_toBottomOf="parent" app:layout_constraintEnd_toEndOf="parent" app:layout_constraintStart_toStartOf="parent" app:layout_constraintTop_toTopOf="parent" app:srcCompat="@drawable/red_marker" />
<TextView android:id="@+id/description_text_view" android:layout_width="match_parent" android:layout_height="wrap_content" android:layout_marginBottom="70dp" android:background="#E6FFFFFF" android:elevation="4dp" android:padding="14dp" android:textAlignment="center" android:textColor="@android:color/black" app:layout_constraintBottom_toBottomOf="parent" /> <com.amplifyframework.geo.maplibre.view.MapLibreView android:id="@+id/mapView" android:layout_width="match_parent" android:layout_height="match_parent" app:mapbox_foregroundLoadColor="@color/white" app:mapbox_renderTextureMode="true" app:mapbox_renderTextureTranslucentSurface="true" />
</androidx.constraintlayout.widget.ConstraintLayout>
2. In the app, java, <package name> folder in AndroidStudio, open the MainActivity.kt file.Modify the code as shown, with the changes that you need to make shown in green (in this case,only part of the file is shown.)
...class MainActivity : AppCompatActivity() { private val mapView by lazy { findViewById<MapLibreView>(R.id.mapView) }
private val descriptionView by lazy {
26

Amazon Location Service Developer GuideAdding search
findViewById<TextView>(R.id.description_text_view) }
override fun onCreate(savedInstanceState: Bundle?) { super.onCreate(savedInstanceState) initAmplify() setContentView(R.layout.activity_main)
mapView.getMapAsync { map -> val initialPosition = LatLng(47.6160281982247, -122.32642111977668) map.cameraPosition = CameraPosition.Builder() .target(initialPosition) .zoom(13.0) .build()
map.addOnCameraMoveStartedListener { toggleDescriptionText() } map.addOnCameraIdleListener { reverseGeocode(map) } } }
private fun reverseGeocode(map: MapboxMap) { val options = GeoSearchByCoordinatesOptions.builder() .maxResults(1) .build()
val centerCoordinates = Coordinates().apply { longitude = map.cameraPosition.target.longitude latitude = map.cameraPosition.target.latitude } Amplify.Geo.searchByCoordinates(centerCoordinates, options, { result -> result.places.firstOrNull()?.let { place -> val amazonPlace = (place as AmazonLocationPlace) runOnUiThread { toggleDescriptionText(amazonPlace.label) } } }, { exp -> Log.e("AndroidQuickStart", "Failed to reverse geocode : $exp") } ) }
private fun toggleDescriptionText(label: String? = "") { if (label.isNullOrBlank()) { descriptionView.fadeOut() } else { descriptionView.text = label descriptionView.fadeIn() } }
private fun initAmplify() { try { Amplify.addPlugin(AWSCognitoAuthPlugin()) Amplify.addPlugin(AWSLocationGeoPlugin()) Amplify.configure(applicationContext) Log.i("AndroidQuickStart", "Initialized Amplify") } catch (error: AmplifyException) { Log.e("AndroidQuickStart", "Could not initialize Amplify", error) } }
override fun onStart() { super.onStart() mapView?.onStart() }
27

Amazon Location Service Developer GuideAdding search
...
This code works with the map view. The map view in MapLibre GL is defined by a virtual cameraposition. Moving the map can be thought of as moving that virtual camera.
• descriptionView function — This is a helper function to find and reference the TextView thatyou created in the layout.
• onCreate — This function is updated to register two new events.
The onCameraMove event happens whenever the user is moving the map. In general, whenmoving the map, we want to hide the search until the user is done moving the map.
The onCameraIdle event happens when the user pauses moving the map. This event will call ourreverseGeocode function, to search at the center of the map.
• reverseGeocode — This function, called in the event onCameraIdle, searches at the center ofthe map for a location and updates the TextView to show the results. It uses the camera target,which defines the center of the map (where the camera is looking).
• toggleDescriptionText — This function updates the result text, or hides the TextView whenthere is nothing to see.
3. Save your files, and build and run your app to see it working.
Your quick start application is complete. This tutorial has shown you how to create an Androidapplication that:
• Creates a map that users can interact with.
• Handles several map events associated with the user changing the map view (cameraMoveStartedand CameraIdle).
• Calls an Amazon Location Service API, specifically to search the map at a location, using Amplify'ssearchByCoordinates operation.
28

Amazon Location Service Developer GuideFinal application
Seeing the final applicationThe final project and source code for this application is available on GitHub.
What's nextYou have completed the quick start tutorial, and should have an idea of how Amazon Location Serviceis used to build applications. To get more out of Amazon Location, you can check out the followingresources:
• Dive deeper into the concepts of Amazon Location Service (p. 30)• Get more information about how to use Amazon Location features and functionality (p. 71)• See how to expand on this sample and build more complex applications by looking at code examples
using Amazon Location (p. 196)
29

Amazon Location Service Developer GuideOverview
Amazon Location Service conceptsWith Amazon Location Service, you can securely add location data to your application. Explore some ofthe capabilities by using the visual and interactive tool, available on the Amazon Location console. Usingthe explore tool, you can manipulate a default map, search for points of interest, draw geofences aroundareas of interest, and simulate sending device locations to a tracker.
When you are ready to build, create your resources and choose from a variety of map styles and dataproviders. Then you can install the SDK that matches your development environment, and use theAmazon Location APIs using the instructions in this guide. Additionally, you can integrate monitoring byusing Amazon CloudWatch and AWS CloudTrail.
The topics in this section provide you an overview of the Amazon Location core concepts and prepareyou to start working with location in your own applications.
Topics
• Amazon Location overview (p. 30)
• Maps (p. 31)
• Places search (p. 34)
• Routes (p. 38)
• Geofences and Trackers (p. 41)
• Common use cases for using Amazon Location Service (p. 46)
• What is a data provider? (p. 50)
• Amazon Location Regions and endpoints (p. 62)
• Amazon Location Service quotas (p. 63)
Amazon Location overviewAmazon Location Service provides access to location-based functionality and data providers throughAWS resources. Amazon Location offers five types of AWS resources, depending on the type offunctionality you need. Use the different resources together to create a full location-based application.You can create one or more of these resources by using the Amazon Location console, the AmazonLocation APIs, or the SDKs.
30

Amazon Location Service Developer GuideMaps
Each resource defines the underlying data provider (p. 50) to be used (where applicable), and givesaccess to functionality related to its type.
For example:
• Amazon Location Service Maps (p. 31) lets you choose a map from a map provider to use on yourmobile or web application.
• Amazon Location Service Places (p. 34) lets you choose a data provider for searching for points ofinterest, completing partial text, geocoding, and reverse geocoding.
• Amazon Location Service Routes (p. 38) lets you choose a data provider and find routes andestimate travel time based on up-to-date roadway and live traffic information.
• Amazon Location Service Geofences (p. 41) let you define areas of interest as a virtual boundary.You can then evaluate locations against them and get notifications of entry and exit events.
• Amazon Location Service Trackers (p. 41) receive location updates from your devices. You can linktrackers to geofence collections so that all position updates are automatically evaluated against yourgeofences.
You can use IAM policies to manage and authorize access to your Amazon Location resources. You canalso organize your resources into resource groups to manage and automate tasks as your resourcenumbers grow. For more information about managing AWS resources, see What are AWS ResourceGroups? In the AWS Resource Groups User Guide.
Location is defined by using latitude and longitude coordinates that follow the World Geodetic System(WGS 84), commonly used as the standard coordinate reference system for Global Positioning System(GPS) services.
The following sections describe how the components of Amazon Location work.
MapsThe Amazon Location Service Map resource gives you access to the underlying basemap data for a map.You use the Map resource with a map rendering library to add an interactive map to your application.You can add other functionality to your map, such as markers (or pins), routes, and polygon areas, asneeded for your application.
NoteFor information about how to use map resources in practice, see Using Amazon Location Maps inyour application (p. 74).
The following is an overview of how to create and use map resources:
31

Amazon Location Service Developer GuideMap styles
1. You create a map resource in your AWS account by selecting a map style from a data provider.
2. You can then select and install the SDK that matches your development environment andapplications. For more information about available options, see the topic about Accessing AmazonLocation (p. 182).
3. To display a map in your application, combine a map resource with a rendering library, such asAmplify, MapLibre GL, or Tangram. For more information. see Using maps (p. 74) in this guide.
4. You can then integrate monitoring by using services, such as Amazon CloudWatch and AWS CloudTrailwith Amazon Location. For more information see, Monitoring Amazon Location Service with AmazonCloudWatch (p. 188) and Logging and monitoring with AWS CloudTrail (p. 192).
Map stylesWhen you create a map resource, you must choose a map style for that resource. Map styles define thelook of the rendered map. For example, the following image shows the same data provider with twodifferent styles from different map resources in Amazon Location. One style is a typical road style, basedon the vector data in the map. The other includes raster data showing satellite imagery. The style maychange as you zoom in or out on the map, but typically styles have a consistent theme. It's possible tooverride parts or all of the style information before passing it to the map rendering library.
Map renderingTo render a map in your application, you will typically use a map rendering library. There are severalcommon options for libraries to use:
• Amplify – Amplify is an open source framework for building applications for the web, iOS, Android,and more. Amplify includes libraries specifically for creating Amazon Location based applications,including rendering maps. Amplify uses MapLibre GL to render the map, but provides additionalfunctionality that is specific to Amazon Location Service to make it more efficient to use, and alsoadding search and other functionality.
• MapLibre GL – MapLibre GL is an open source library specifically for rendering interactive maps.MapLibre GL includes the ability to render raster and vector data from a data source (such as anAmazon Location map resource). You can extend MapLibre GL to draw your own data on the map.
• Tangram – Tangram is an alternative open source library that renders interactive maps, similar toMapLibre GL.
32

Amazon Location Service Developer GuideMaps terminology
The map rendering library pulls data from Amazon Location Service at runtime, rendering the map databased on the map resource you select. The map resource defines the data provider and map style thatwill be used.
The following image shows how the map resource is used in Amazon Location Service along with a maprendering library to create the final map.
1. You create a map resource in Amazon Location Service, using the AWS Management Console or AWSCLI. This defines the data provider and the map style that you want to use.
2. Your application includes a map rendering library. You give the map rendering library the name of themap resource to use. The map rendering library pulls data and style information for that map resourcefrom Amazon Location and renders the map on screen.
Maps terminologyMap resource
Allows you to access map data from a selected provider. Use the map resource to fetch map tilesthat contain map data and a style descriptor to specify how features render on a map.
Basemap
Provides geographic context to your map, which is stored as vector tile layers. Tile layers includegeographical context such as street names, buildings, and land use for visual reference.
Vector
Vector data is shape data made up of points, lines, and polygons. It is often used to store and displayroads, locations, and areas on a map. A vector shape can also be used as icons for markers on a map.
Raster
Raster data is image data, made up of a grid, usually of colors. It is often used to store and display arepresentation of continuous data on maps, such as terrain, satellite imagery, or heat maps. Rasterimages can also be used as images or icons.
Map Style
Vector data does not inherently include information about how to draw the layers of data to createthe final map. A map style defines color and other style information for the data to define how itwill look when rendered. Map resources include style information for the map.
Amazon Location Service provides styles following the Mapbox GL style specification.
33

Amazon Location Service Developer GuidePlaces search
Vector tile
A tile format that stores map data using vector shapes. This data results in a map that can adjustto the display resolution, and selectively render features in a number of ways, while maintaining asmall file size for optimal performance.
Supported vector file format: Mapbox Vector Tiles (MVT).
Glyph file
A binary file containing encoded Unicode characters. Used by a map renderer to display labels.
Sprite file
A Portable Network Graphic (PNG) image file that contains small raster images, with locationdescriptions in a JSON file. Used by a map renderer to render icons or textures on a map.
Places searchA key function of Amazon Location Service is the ability to search the geolocation information. AmazonLocation provides this functionality via the Place index resource.
NoteFor information about how to use place index resources to search in practice, see Searchingplace and geolocation data using Amazon Location (p. 115).
You can use the place index APIs to search for:
• Points of interest, such as restaurants and landmarks. Search by name, and optional location to searcharound, and receive a list of options ordered by relevance.
• A street address, receiving a latitude and longitude for that address. This is known as geocoding.
• A latitude and longitude position, receiving the associated street address or other information aboutthe location. This is known as reverse geocoding.
• A partial or misspelled free-form text query, typically as a user types. This is known as autocomplete,autosuggest, or fuzzy matching.
The place index includes which data provider to use for the search.
NoteMap data and other geolocation information, including exact locations, can vary across dataproviders. As a best practice, use the same data provider for your place index, map, and otherAmazon Location resources. For example, if the places returned by your place index do notmatch the location of the same places provided by your map resource, you can place a marker inwhat appears to be the wrong location on the map.
The following shows you how to create and use place index resources:
34

Amazon Location Service Developer GuideGeocoding concepts
1. First, you create a place index resource in your AWS account by selecting a data provider.
2. You can then select and install the SDK that matches your development environment andapplications. For more information about available options, see the topic about Accessing AmazonLocation.
3. Start using the Amazon Location Places APIs . For more information, see the topic about using Placessearch (p. 115).
4. You can then integrate monitoring using services such as Amazon CloudWatch and AWS CloudTrail.For more information see, the section called “Monitoring with CloudWatch” (p. 188) and the sectioncalled “Using CloudTrail with Amazon Location” (p. 192).
Geocoding conceptsAn Amazon Location place index provides an action called SearchPlaceIndexForText that allows youto specify text to search. For example, you can search for:
• Places – a search for Paris could return the location of the city in France.
• Businesses – a search for coffee shop could return a list of coffee shops, including their names andlocations. You can also specify a location to search around or a bounding box to search within, to makethe results more relevant. In this case, providing a location in downtown Seattle, Washington, wouldreturn coffee shops in that area.
• Addresses – a search for 1600 Pennsylvania Ave, Washington D.C. could return the locationof the White House in the United States (which is at that address).
Searching for text in this way is generally referred to as geocoding, which involves finding a geographiclocation for the address or place.
Amazon Location Service also provides a reverse geocoding action calledSearchPlaceIndexForPosition. This takes a geographic location and returns the address, business,or other information about what is at that location.
Search resultsWhen you make a successful search request in Amazon Location Service, one or more results arereturned. Each result includes a label, which is the name or description of the result. For example, asearch for coffee shop, might return a result with the label Hometown Cafe, telling you that acoffee shop called "Hometown Cafe" was found. The search result will also typically include a structuredaddress (with properties such as the address number, street, and postal code). Depending on the dataprovider, it will include other meta data, as well, such as the country and time zone.
For a search on a business name or category (such as coffee shop), you might want to showall returned results on a map. For an address search, you might want to just use the first resultautomatically. See the next topic for information about relevance.
Multiple results and relevanceWhen searching by text, Amazon Location Service will often find more than a single result. For example,a search for Paris may return the city in France, but also the city in Texas. The results are sorted by therelevance, as determined by the data provider.
NoteResults are returned in relevance order from all providers. If you choose Esri as your dataprovider, the results include a relevance value that you can use to understand the relativerelevance between the results of a single request.
35
Amazon Location Service Developer GuideAddress results
Specifying additional information, such as a country name, or a location to search around, can changethe order of results, reduce the number of results, or even change the set of results returned. Forexample, a search for Paris with a location in Texas to search around is more likely to return Paris,Texas as the first result than Paris, France.
In an interactive application, you can use relevance to help decide whether to accept the top result, orto ask a user to disambiguate between multiple returned results. If the first result has a high relevance,you might just accept it as the correct answer. If there are multiple high relevance results, or no highrelevance results, you might want to list the results and let the user select the best result.
Address resultsYou can search for addresses with Amazon Location Service using the sameSearchPlaceIndexForText action. The more information that you provide, the more likely theaddress returned will match the one given. For example, 123 Main St is less likely to find a correctresult than 123 Main St, Anytown, California, 90210.
Addresses have multiple attributes, such as the street number, street, city, region, and postal code, etc.Those attributes are used to find an address in the place index that matches as many aspects as possible.The more attributes found, the more relevant the match is considered, and the more likely it will bereturned.
NoteThe relevance for address results is based on how closely the result matches the input. Thiscould be the number of the attributes that matched, but also how closely the results match theinput. For example, an input of 123 Main St would have a higher relevance when Main St isfound in the data, than if Maine St is the only result. Maine St will still be returned, but likelywith a lower relevance value.
The search results include a label for the full address (123 Main St, Anytown, California,90210), but also the individual structured attributes of the returned address. This is helpful, because youcan use that, for example, to populate address fields in a database, or to examine the results and find thecity, region, or postal code of the found location.
Interpolation
Addresses in the place index data includes exact address matches. For example, suppose that there is astreet, 9th street and one block has 2 houses, 220 and 240, as in the following image.
36

Amazon Location Service Developer GuideStoring geocode results
The data provider creates the geolocation data with those two known addresses. You can search forthose two addresses, and they are found. After the data provider creates the map data, let's suppose thata new house is added, between the first two addresses. This new house is given the address 230. If yousearch for 230 S 9th St, the data provider will still find a result. Instead of using a known address,it will interpolate between the already known addresses, and estimate the position of the new addressfrom those. In this case, it might assume that 230 is halfway between 220 and 240 (and on the same sideof the street), and return an approximate location based on that.
NoteData providers periodically update their geolocation data with new addresses. In this case, 230S 9th St would get added to the data provider data, but there will typically be a period whena new address has been created but is not yet added to the data.
In this case, the data provider can't tell whether the new address exists in the world, as it is not yet in thedata, but provides the best answer it can from the information it has. This result is called interpolated,and can be returned by the data provider in the results. If interpolated returns false, it is a knownaddress. If it returns true, it's an approximated address. If it's not returned, then the data provider didnot provide the information about whether the result came from interpolation.
ImportantThe data provider may also return interpolated results for addresses that don't exist at all. Forexample in this case, if you entered 232 S 9th St, the provider would find this nonexistentaddress, and return a location close to 230, but on the 240 side. Interpolated addresses areuseful for getting you to the right location, but it is good to keep in mind that they are notknown addresses.
Storing geocode resultsWhen you create a place index resource, you must specify a Data storage option (called IntendedUsein the API). That can set to be either single use or stored results. This is asking about your intended use ofthe results. If you are going to store the results (even for caching purposes), you must choose the storageoption, not the single use option.
37

Amazon Location Service Developer GuidePlaces terminology
NoteWhen you chose the stored option (labeled as Yes, results will be stored in the console, orchoosing storage in the CreatePlaceIndex API), Amazon Location Service does not storethe results for you. This is an indication that you are planning to store the results.
When looking at how you are going to use the results of your queries to Amazon Location Service, youshould always be aware of the AWS Service Terms that apply.
Places terminologyPlace index resource
Allows you to choose a data source to support search queries. For example, you can search for pointsof interest, addresses, or coordinates. When a search query is sent to a place index resource, it'sfulfilled using the resource's configured data source.
Geocoding
Geocoding is the process of taking a text input, searching for it in the place index, and returningresults with position.
Relevance
Relevance is how closely a result matches the input. It is not a measure of correctness.
Interpolation
Interpolation is the process of finding unknown addresses by using known address locations as guidepoints.
ISO 3166 country codes
Amazon Location Service Places uses the International Organization for Standardization (ISO) 3166 country codes to refer to countries or regions.
To find the code for a specific country or region, use the ISO Online Browsing Platform.
RoutesThis section provides an overview of the concepts around routing using Amazon Location Service.
NoteFor information about how to use route resources in practice, see Calculating routes usingAmazon Location Service (p. 140).
Route calculator resourcesRoute calculator resources allow you to find routes and estimate travel time based on up-to-date roadnetwork and live traffic information from your chosen data provider.
You can use the Routes APIs to build features that allow your application to request the travel time,distance, and geometry of the route between any two locations. You can also use the Routes API torequest travel time and distance between a set of departures and destinations in a single request tocalculate a matrix.
38

Amazon Location Service Developer GuideCalculating a route
The following shows you how to create and use a route calculator resource:
1. First, you create a route calculator resource in your AWS account by selecting a data provider.
2. You can then select and install the SDK that matches your development environment andapplications.
3. Start using the Amazon Location Routes APIs . For more information about how to use the routingAPIs, see the topic on the section called “Calculating routes” (p. 140).
4. You can then integrate monitoring using services such as Amazon CloudWatch and AWS CloudTrail.For more information see, the section called “Monitoring with CloudWatch” (p. 188) and the sectioncalled “Using CloudTrail with Amazon Location” (p. 192).
Calculating a routeAn Amazon Location route calculator resource provides an action called CalculateRoute that youcan use to create a route between two geographic locations (the departure and the destination). Thecalculated route includes the geometry for drawing the route on a map, plus the overall time anddistance of the route.
Using waypoints
When you are creating your route request, you can add additional waypoints to the route. These arepoints between the departure and the destination that act as stops along the route. The route will becalculated through each of the waypoints specified. The route from one point in the request to the nextis called a Leg. Each leg includes a distance, time, and the geometry for that part of the route.
NoteThe waypoints are routed in the order given in the request. They are not re-ordered for theshortest path. See the ??? (p. 40)section for information on finding the shortest path.
You can include up to 25 waypoints in a single request to calculate a route.
Traffic and departure time
The Amazon Location Service takes traffic into account when calculating a route. The trafffic that itconsiders is based on the time that you specify. You can specify to depart now, or you can provide aspecific time that you want to leave, which will affect the route result by adjusting for traffic at thespecified time.
NoteYou can calculate the arrival time using the departure time and route response time, to estimatethe arrival of a driver, for example.
If you want Amazon Location to not take traffic into account, then do not specify a departure time anddo not specify depart now. This will calculate a route that assumes the best traffic conditions for theroute.
Travel mode options
You can set the travel mode when calculating a route using Amazon Location Service. The default travelmode is car, but you can alternately select either truck or walking.
39

Amazon Location Service Developer GuidePlanning routes
If you specify either car or truck mode, you can specific additional options, as well.
For car mode, you can specify that you wish to avoid toll roads or ferries. This will attempt to avoidferries and toll roads, but will still route along them, if they are the only way to get to the destination.
For truck mode, you can also avoid ferries and toll roads, but additionally, you can specify the size andweight of the truck, to avoid routes that will not accommodate the truck.
Planning routesYou can use Amazon Location Service to create inputs to your route planning and optimization software.You can create route results, including travel time and travel distance, for routes between a set ofdeparture positions and a set of destination positions. This is called creating a route matrix.
NoteThere are many varying scenarios that route planning and optimization software can solve. Forexample, planning software can use the set of times and distances between points to calculatethe shortest path that stops at each point, providing an efficient route for a single driver.Alternatively, planning software can be used to split stops between multiple trucks, providingefficiencies across a fleet, or to make sure that each customer is visited within the time framethat they require. Amazon Location provides the routing functions in an efficient way to allowthe planning software to complete it's task.
For example, given departure positions A and B, and destination positions X and Y, Amazon LocationService will return travel time and travel distance for routes from A to X, A to Y, B to X, and B to Y.
As with calculating a single route, you can calculate the routes with different modes of transportation,avoidances, and traffic conditions. For example, you can specify that the vehicle is a truck that is 35 feetlong, and the route calculated will use those restrictions to determine the travel time and travel distance.You can't include waypoints in a route matrix calculation.
The number of results returned (and routes calculated) is the number of departure positions multipliedby the number of destination positions. You are charged for each route calculated, not each request tothe service, so a route matrix with 10 departures and 10 destinations will be billed as 100 routes.
Route terminologyRoute calculator resource
An AWS resource that enables you to estimate travel time, distance, and plot routes on a map withtraffic and road network data sourced from your chosen data provider.
Using route calculator resources, you calculate routes for different modes of transportation, detours,and traffic conditions.
Route
A route contains details used when traveling along a path from the departure position, waypointpositions, and destination position.
Examples of details in a route include:
• The distance from one position to another position.
• The time it takes to travel from one position to the next position.
• The LineString geometry representing the path of the route.
For more information about routes, see the response syntax for the CalculateRoute operation in theAmazon Location Service Routes API reference.
40
Amazon Location Service Developer GuideGeofences and Trackers
Route matrix
A list of routes, from a set of departure positions to a set of destination positions. Useful as inputsinto route planning or optimization software.
For more information about calculating a route matrix, see the syntax for the CalculateRouteMatrixoperation in the Amazon Location Service Routes API reference.
LineString geometry
An Amazon Location route consists of one or more legs (a route from one waypoint to anotherwithin the overall route). The geometry of each leg is a polyline represented as a LineString. ALineString is an ordered array of positions that can be used to plot a route on a map.
The following is an example of a LineString with three points:
[ [-122.7565,49.0021], [-122.3394,47.6159], [-122.1082,45.8371]]
Waypoint
Waypoints are intermediate positions that act as stops along a route between the departure positionand destination position. The stopover order on the route follows the order that you provide thewaypoint positions in the request.
Leg
A single leg is the journey from one position to another position. If the positions aren't located ona road, they're moved to the nearest road. The number of legs in a route is one less than the totalnumber of positions.
A route with no waypoints consists of a single leg, from the departure position to the destination. Aroute with 1 waypoint consists of 2 legs, from the departure position to the waypoint, and then fromthe waypoint to the destination.
Step
A step is a subsection of a leg. Each step provides summary information for that step in the leg.
Geofences and TrackersThis section provides and overview of the concepts of working with Amazon Location Service geofencesand trackers. Geofences are polygon boundaries that you can use to be notified when devices orpositions move in and out of the areas. Tracker resources are used to store and update positions fordevices as they move.
NoteFor information about how to use geofences and trackers in practice, see Geofencing an area ofinterest using Amazon Location (p. 154).
GeofencesGeofence collection resources allow you to store and manage geofences—virtual boundaries on a map.You can evaluate locations against a geofence collection resource and get notifications when the locationupdate crosses the boundary of any of the geofences in the geofence collection.
41

Amazon Location Service Developer GuideGeofences
The following shows you how to create and use geofence collection resources:
1. You create a geofence collection resource in your AWS account.2. You add geofences to that collection. You can do so by either using the geofence upload tool on the
Amazon Location console, or by using the Amazon Location Geofences API. For more informationabout available options, see the topic about Accessing Amazon Location.
3. You can start evaluating locations against all your geofences. When a location update crosses theboundaries of one or more geofences, your geofence collection resource emits one of the followinggeofence event types on Amazon EventBridge:• ENTER – One event is generated for each geofence where the location update crosses its boundary
by entering it.• EXIT – One event is generated for each geofence where the location update crosses its boundary by
exiting it.
For more information, see the section called “Reacting to geofence events withEventBridge” (p. 165). You can also integrate monitoring using services such as AmazonCloudWatch and AWS CloudTrail. For more information see, the section called “Monitoring withCloudWatch” (p. 188) and the section called “Using CloudTrail with Amazon Location” (p. 192).
For example, if you are tracking a fleet of trucks, and you want to get notified when a truck comes withina certain area of any of your warehouses. You can create a geofence for the area around each warehouse.Then, when the trucks send you updated locations, you can use Amazon Location Service to evaluatethose positions and see if a truck has entered (or exited) one of the geofence areas.
NoteYour are billed by the number of geofence collections you evaluate against. Your bill is notaffected by the number of geofences in each collection. Since each geofence collectionmay contain up to 50,000 geofences, you may want to combine your geofences into fewercollections, where possible, to reduce your cost of geofence evaluations. The events generatedwill include the ID of the individual geofence in the collection, as well as the ID of the collection.
Geofence eventsLocations for positions you are monitoring are referenced by an ID called a DeviceId (and the positionsare referred to as device positions). You can send a list of device positions to evaluate directly to thegeofence collection resource, or you can use a tracker. See the next section for more information ontrackers.
You receive events (via Amazon EventBridge) only when a device enters or exits a geofence, not for everyposition change. This means that you will typically receive events and have to respond to them much lessfrequently than every device position update.
NoteFor the first location evaluation for a specific DeviceID, it is assumed that the device waspreviously not in any geofences. So the first update will generate an ENTER event, if inside ageofence in the collection, and no event if not.
In order to calculate whether a device has entered or exited a geofence, Amazon Location Service mustkeep previous position state for the device. This position state is stored for 30 days. After 30 dayswithout an update for a device, a new location update will be treated as the first position update.
42

Amazon Location Service Developer GuideTrackers
TrackersA tracker stores position updates for a collection of devices. The tracker can be used to query the devices'current location or location history. It stores the updates, but reduces storage space and visual noise byfiltering the locations before storing them.
Each position update stored in your tracker resources can include a measure of position accuracy and upto 3 fields of metadata about the position or device that you want to store. The metadata is stored askey-value pairs, and can store information such as speed, direction, tire pressure, or engine temperature.
NoteTracker storage is encrypted with AWS owned keys automatically. You can add another layer ofencryption using KMS keys that you manage, to ensure that only you can access your data. Formore information, see Data encryption at rest for Amazon Location Service (p. 201).
Tracker position filtering and storage are useful on their own, but trackers are especially useful whenpaired with geofences. You can link trackers to one or more of your geofence collection resources, andposition updates are evaluated automatically against the geofences in those collections. Proper use offiltering can greatly reduce the costs of your geofence evaluations, as well.
The following diagram shows you how to create and use tracker resources:
1. First, you create a tracker resource in your AWS account.
2. Next, decide how you send location updates to your tracker resources. The Android and iOS SDKsoffer integrated tracking capabilities for your mobile applications. Alternately, you can use MQTT byfollowing step-by-step directions in tracking using MQTT (p. 167) in this guide.
3. You can now use your tracker resource to record location history and visualize it on a map.
4. You can also link your tracker resource to one or more geofence collections so that every positionupdate sent to your tracker resource is automatically evaluated against all the geofence in all thelinked geofence collections. You can link resource on the tracker resource details page of the AmazonLocation console or by using the Amazon Location Trackers API.
5. You can then integrate monitoring using services such as Amazon CloudWatch and AWS CloudTrail.For more information see, the section called “Monitoring with CloudWatch” (p. 188) and the sectioncalled “Using CloudTrail with Amazon Location” (p. 192).
Using trackers with geofences
Trackers provide additional functionality when paired with geofences. You associate a tracker with ageofence collection, either through the Amazon Location console or the API, to automatically evaluatetracker locations. Each time the tracker receives an updated location, that location will be evaluatedagainst each geofence in the collection, and the appropriate ENTER and EXIT events are generated inAmazon EventBridge. You can also apply filtering to the tracker, and, depending on the filtering, you canreduce the costs for geofence evaluations by only evaluating meaningful location updates.
If you associate the tracker with a geofence collection after it has already received some positionupdates, the first position update after association is treated as an initial update for the geofenceevaluations. If it is within a geofence, you will receive an ENTER event. If it is not within any geofencesyou will not receive an EXIT event, regardless of the previous state.
43

Amazon Location Service Developer GuideTrackers
Position filteringTrackers can automatically filter the positions that are sent to them. There are several reasons why youmight want to filter out some of your device location updates. If you have a system that only sendsreports every minute or so, you might want to filter devices by time, storing and evaluating positionsonly every 30 seconds. Even if you are monitoring more frequently, you might want to filter positionupdates to clean up the noisiness of GPS hardware. GPS position locations are inherently noisy. Theiraccuracy is not 100% perfect, so even a device that is stationary appears to be moving around slightly. Atlow speeds, this jitter causes visual clutter and can cause false entry and exit events if the device is nearthe edge of a geofence.
The position filtering works as position updates are received by a tracker, reducing visual noise in yourdevice paths (jitter), reducing the number of false geofence entry and exit events, and helping managecosts by reducing the number of position updates stored and geofence evaluations triggered.
Trackers offer three position filtering options to help manage costs and reduce jitter in your locationupdates.
• Accuracy-based – Use with any device that provides an accuracy measurement. Most GPS and mobiledevices provide this information. The accuracy of each position measurement is affected by manyenvironmental factors, including GPS satellite reception, landscape, and the proximity of wifi andbluetooth devices. Most devices, including most mobile devices, can provide an estimate of theaccuracy of the measurement along with the measurement. With AccuracyBased filtering, AmazonLocation ignores location updates if the device moved less than the measured accuracy. For example,if two consecutive updates from a device have an accuracy range of 5 m and 10 m, Amazon Locationignores the second update if the device has moved less than 15 m. Amazon Location neither evaluatesignored updates against geofences, nor stores them.
When accuracy is not provided, it is treated as zero, and the measurement is considered perfectlyaccurate, and no filtering will be applied to the updates.
NoteYou can use accuracy-based filtering to remove all filtering. If you select accuracy-basedfiltering, but override all accuracy data to zero, or omit the accuracy entirely, then AmazonLocation will not filter out any updates.
In most scenarios, accuracy-based filtering is a good choice for filtering position updates, providing abalance of tracking location while filtering out unneeded updates, thereby reducing costs.
• Distance-based – Use when your devices do not provide an accuracy measurement, but you still want totake advantage of filtering to reduce jitter and manage costs. DistanceBased filtering ignores locationupdates in which devices have moved less than 30 m (98.4 ft). When you use DistanceBased positionfiltering, Amazon Location neither evaluates these ignored updates against geofences nor stores theupdates.
The accuracy of most mobile devices, including the average accuracy of iOS and Android devices,is within 15 m. In most applications, DistanceBased filtering can reduce the effect of locationinaccuracies when displaying device trajectory on a map, and the bouncing effect of multipleconsecutive entry and exit events when devices are near the border of a geofence. It can also helpreduce the cost of your application, by making fewer calls to evaluate against linked geofences orretrieve device positions.
Distance-based filtering is useful if you want to filter, but your device doesn't provide accuracymeasurements, or you want to filter out a larger number of updates than with accuracy-based.
• Time-based – (default) Use when your devices send position updates very frequently (more than onceevery 30 seconds), and you want to achieve near real-time geofence evaluations without storing everyupdate. In TimeBased filtering, every location update is evaluated against linked geofence collections,but not every location update is stored. If your update frequency is more often than 30 seconds, onlyone update per 30 seconds is stored for each unique device ID.
44

Amazon Location Service Developer GuideGeofence terminology
Time-based filtering is particularly useful when you want to store fewer positions, but want everyposition update to be evaluated against the associated geofence collections.
NoteBe mindful of the costs of your tracking application when deciding your filtering methodand the frequency of position updates. You are billed for every location update and once forevaluating the position update against each linked geofence collection. For example, when usingtime-based filtering, if your tracker is linked to two geofence collections, every position updatewill count as one location update request and two geofence collection evaluations. If you arereporting position updates every 5 seconds for your devices and using time-based filtering, youwill be billed for 720 location updates and 1,440 geofence evaluations per hour for each device.
Geofence terminologyGeofence Collection
Contains zero or more geofences. It is capable of geofence monitoring by emitting Entry and Exitevents, when requested, to evaluate a device position against its geofences.
Geofence
A polygon geometry that defines a virtual boundary on a map.
Polygon geometry
An Amazon Location geofence is a virtual boundary for a geographical area and is represented as apolygon geometry.
A Polygon is an array composed of 1 or more linear rings. A linear ring is an array of four or morevertices, where the first and last vertex are the same to form a closed boundary. Each vertex is a 2-dimensional point of the form [longitude, latitude], where the units of longitude and latitudeare degrees. The vertices must be listed in counter-clockwise order around the polygon.
NoteAmazon Location Service doesn't support polygons with more than one ring. This includesholes, islands or multipolygons. Amazon Location also doesn't support polygons that arewound clockwise, or that cross the antimeridian.
The following is an example of a single linear external ring:
[ [ [-5.716667, -15.933333], [-14.416667, -7.933333], [-12.316667, -37.066667], [-5.716667, -15.933333] ]]
Tracker terminologyTracker resource
An AWS resource that receives location updates from devices. The tracker resource provides supportfor location queries, such as current and historic device location. Linking a tracker resource to
45

Amazon Location Service Developer GuideCommon use cases
a geofence collection evaluates location updates against all geofences in the linked geofencecollection automatically.
Position data tracked
A tracker resource stores information about your devices over time. The information includes a seriesof position updates, where each updated includes location, time, and metadata. The metadata caninclude a position's accuracy, and up to three key-value pairs to help you track key information abouteach position, such as speed, direction, tire pressure, remaining fuel, or engine temperature of thevehicle you are tracking. Trackers maintain device location history for 30 days.
Position filtering
Position filtering can help you control costs and improve the quality of your tracking application byfiltering out position updates that don't provide valuable information before the updates are storedor evaluated against geofences.
You can choose AccuracyBased, DistanceBased, or TimeBased filtering. By default, positionfiltering is set to TimeBased.
You can configure position filtering when you create or update tracker resources.
RFC 3339 timestamp format
Amazon Location Service Trackers uses the RFC 3339 format, which follows the InternationalOrganization for Standardization (ISO) 8601 format for dates and time.
The format is “YYYY-MM-DDThh:mm:ss.sssZ+00:00”:
• YYYY-MM-DD — Represents the date format.
• T — Indicates that the time values will follow.
• hh:mm:ss.sss — Represents the time in 24-hour format.
• Z — Indicates that the time zone used is UTC, which can be followed with deviations from the UTCtime zone.
• +00:00 — Optionally indicate deviations from the UTC time zone. For example, +01:00 indicatesUTC + 1 hour.
Example
For July 2, 2020, at 12:15:20 in the afternoon, with an adjustment of an additional 1 hour to theUTC time zone.
2020-07-02T12:15:20.000Z+01:00
Common use cases for using Amazon LocationService
Amazon Location Service lets you build a range of applications, from asset tracking to location-basedmarketing. The following are common use cases:
User engagement and geomarketing
Use location data to build solutions that improve user engagement with marketing to targetcustomers. For example, Amazon Location can trigger an event that prompts a notification
46

Amazon Location Service Developer GuideUser engagement and geomarketing applications
when a customer who ordered a coffee on their mobile app is nearby. Additionally, you can buildgeotargeting features so that retailers can send discount codes or digital flyers to customers who arenear target stores.
Asset tracking
Build asset tracking features to help businesses understand the current and historical locations oftheir products, personnel, and infrastructure. With asset tracking features, you can build a number ofsolutions that optimize remote staffing, secure shipment en-route, and maximize dispatch efficacy.
Delivery
Integrate location features into delivery applications to store, track, and coordinate the departurelocation, delivery vehicles, and their destination. For example, a food delivery application withAmazon Location features built-in has location tracking and geofencing capabilities that canautomatically notify a restaurant when a delivery driver is nearby. This reduces the wait time andhelps maintain the quality of the food delivered.
This topic provides you an overview of the architecture and steps for applications you can build withAmazon Location.
Topics
• User engagement and geomarketing applications (p. 47)
• Asset tracking applications (p. 48)
• Delivery applications (p. 49)
User engagement and geomarketing applicationsThe following is an illustration of a user engagement and geomarketing application architecture usingAmazon Location:
With this architecture, you can:
• Initiate events based on the proximity of a target so that you can send offers to nearby customers orengage those who recently left your establishment (called geotargeting).
• Visualize customer device locations on a map to monitor trends over time.
• Store customer device locations that you can analyze over time.
• Analyze location history to identify trends and opportunities for optimization.
47

Amazon Location Service Developer GuideAsset tracking applications
The following is an overview of the steps required to build a user engagement and geomarketingapplication:
1. Create your geofences in Geofence Collections and link Trackers to them. For more information, seethe section called “Geofencing and tracking” (p. 154).
2. Configure Amazon EventBridge to send a notification to customers who enter or exit a geofencedarea of interest. For more information, see the section called “Reacting to geofence events withEventBridge” (p. 165).
3. Display customer locations and geofences on a map. For more information, see Using maps.
4. Save location data to long-term storage for further analysis.
5. Once you have built your application, you can use Amazon CloudWatch and AWS CloudTrailto manage your application. For more information, see the section called “Monitoring withCloudWatch” (p. 188) and the section called “Using CloudTrail with Amazon Location” (p. 192).
Asset tracking applicationsThe following is an illustration of an asset tracking application architecture using Amazon Location:
With this architecture, you can:
• Display asset locations on a map to illustrate the big picture. For example, showing a heat map usinghistorical locations or events to help an operations or planning team.
• Initiate events based on asset proximity to provide notice to a receiving department to prepare for ashipment arrival and reduce processing time.
• Store asset locations to initiate actions in your backend applications or to analyze data over time.
• Analyze location history to identify trends and opportunities for optimization.
48
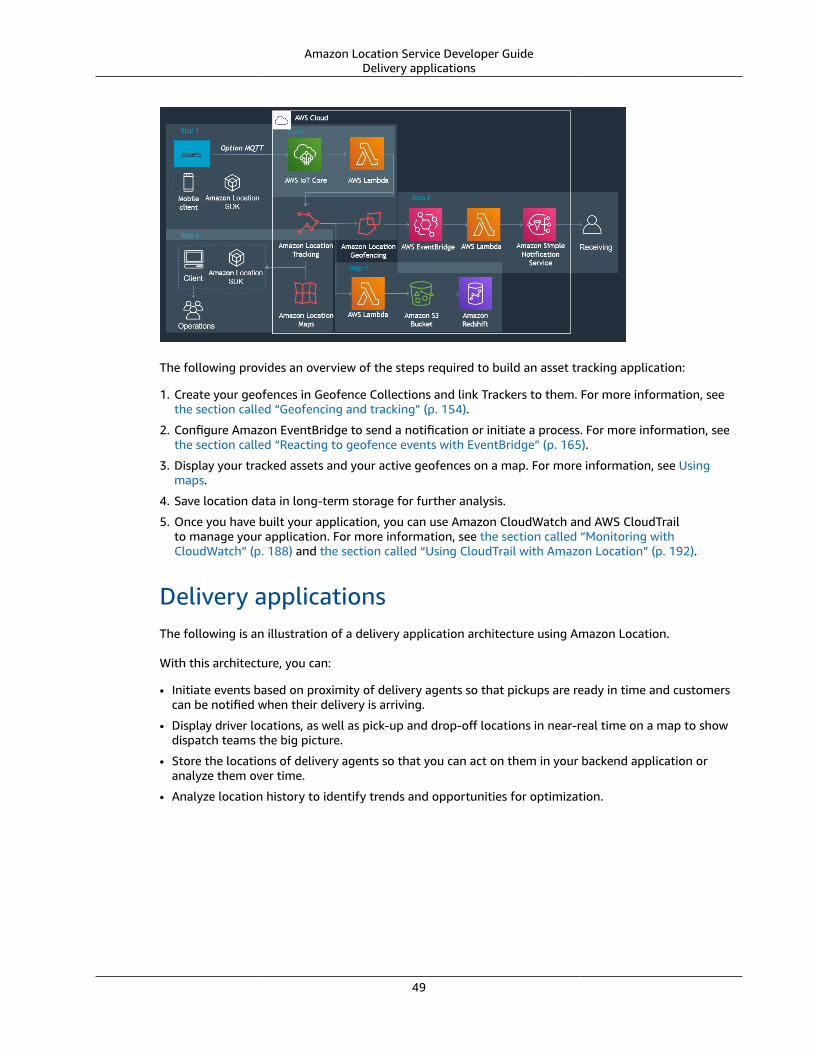
Amazon Location Service Developer GuideDelivery applications
The following provides an overview of the steps required to build an asset tracking application:
1. Create your geofences in Geofence Collections and link Trackers to them. For more information, seethe section called “Geofencing and tracking” (p. 154).
2. Configure Amazon EventBridge to send a notification or initiate a process. For more information, seethe section called “Reacting to geofence events with EventBridge” (p. 165).
3. Display your tracked assets and your active geofences on a map. For more information, see Usingmaps.
4. Save location data in long-term storage for further analysis.
5. Once you have built your application, you can use Amazon CloudWatch and AWS CloudTrailto manage your application. For more information, see the section called “Monitoring withCloudWatch” (p. 188) and the section called “Using CloudTrail with Amazon Location” (p. 192).
Delivery applicationsThe following is an illustration of a delivery application architecture using Amazon Location.
With this architecture, you can:
• Initiate events based on proximity of delivery agents so that pickups are ready in time and customerscan be notified when their delivery is arriving.
• Display driver locations, as well as pick-up and drop-off locations in near-real time on a map to showdispatch teams the big picture.
• Store the locations of delivery agents so that you can act on them in your backend application oranalyze them over time.
• Analyze location history to identify trends and opportunities for optimization.
49

Amazon Location Service Developer GuideData providers
The following is an overview of the steps required to build a delivery application:
1. Create your geofence collections and link tracked devices to the collection. For more information see,the section called “Geofencing and tracking” (p. 154).
2. Create an AWS Lambda function to automatically add and remove geofences as your orders arebooked.
3. Configure Amazon EventBridge to send notifications or initiate a processes. For more information, seethe section called “Reacting to geofence events with EventBridge” (p. 165).
4. Display tracked assets and active geofences on a map. For more information, see Using maps.5. Save location data to long-term storage for further analysis.6. Once you have built your application, you can use Amazon CloudWatch and AWS CloudTrail
to manage your application. For more information, see the section called “Monitoring withCloudWatch” (p. 188) and the section called “Using CloudTrail with Amazon Location” (p. 192).
What is a data provider?Use Amazon Location Service to access geolocation resources from multiple data providers through yourAWS account without requiring third-party contracts or integrations. This can help you focus on buildingyour application, without having to manage third-party accounts, credentials, licenses, and billing.
The following Amazon Location services use data providers.
• Maps – Choose styles from different map providers when you create a map resource. You can use mapresources to build an interactive map to visualize data.
• Places – Choose a data provider when you create a place index resource to support queries forgeocoding, reverse geocoding, and searches.
• Routes – Choose a data provider to support queries for route calculations in different geographies andapplications when you create a route calculator resource. With your chosen data provider, AmazonLocation Service enables you to calculate routes based on up-to-date road network data, live trafficdata, planned closures, and historic traffic patterns.
Each provider gathers and curates their data using different means. They may also have varying expertisein different regions of the world. This section provides details about our data providers. You may selectany data provider based on your preference.
50

Amazon Location Service Developer GuideMap styles
Make sure you read the terms of conditions when using Amazon Location Service data providers. Formore information, see the AWS Service Terms. Also see the the section called “Data privacy” (p. 201)section for more information about how Amazon Location protects your privacy.
Map stylesEach data provider provides a set of map styles to render the map data that they provide. For examplea style might include satellite imagery, or might be optimized to show the roads for navigation. You canfind the list and examples of the styles for each provider in the following topics.
• Esri map styles (p. 51)
• HERE map styles (p. 58)
Data provider coverage and error reportingEach data provider gathers and produces data in different ways. You can learn more about their coverageareas in the following topics:
• Coverage: Esri (p. 57)
• Coverage: HERE (p. 61)
If you encounter a problem with the data and want to report an error to the data provider, see thefollowing topics
• Error reporting to Esri (p. 58)
• Error reporting to HERE (p. 62)
More details about each data provider
• Esri (p. 51)
• HERE Technologies (p. 58)
EsriAmazon Location Service uses Esri's location services to help AWS customers to use maps, geocode, andcalculate routes effectively. Esri’s location services are built with high-quality, authoritative, and ready-to-use location data, curated by expert teams of cartographers, geographers, and demographers.
For additional capability information, see Esri on Amazon Location Service data providers.
Topics
• Esri map styles (p. 51)
• Coverage: Esri (p. 57)
• Terms of use and data attribution: Esri (p. 57)
• Error reporting to Esri (p. 58)
Esri map styles
Amazon Location Service supports the following Esri map styles when creating a map resource:
51

Amazon Location Service Developer GuideEsri
NoteEsri map styles that are not listed in this section are currently not supported.
Esri Light Map
Esri Light Map
Map style name: VectorEsriTopographic
This provides a detailed basemap for the world symbolized with a classic Esri map style. Thisincludes highways, major roads, minor roads, railways, water features, cities, parks, landmarks,building footprints, and administrative boundaries.
This basemap is compiled from a variety of authoritative sources from several data providers,including the US Geological Survey (USGS), US Environmental Protection Agency (EPA), US NationalPark Service (NPS), Food and Agriculture Organization of the United Nations (FAO), Departmentof Natural Resources Canada (NRCAN), HERE, and Esri. Data for select areas is sourced fromOpenStreetMap contributors. Additionally, data is provided by the GIS community.
Fonts
Amazon Location serves fonts using GetMapGlyphs. The following are available font stacks for thismap:
• Noto Sans Italic
• Noto Sans Regular
• Noto Sans Bold
• Noto Serif Regular
• Roboto Condensed Light Italic
Esri World Streets
Esri World Streets
52

Amazon Location Service Developer GuideEsri
Map style name: VectorEsriStreets
This vector tile layer provides a detailed basemap for the world symbolized with a classic Esri streetmap style. The vector tile layer is similar in content and style to the World Street Map raster map.This vector tile layer provides unique capabilities for customization and high-resolution display.
This comprehensive street map includes highways, major roads, minor roads, railways, waterfeatures, cities, parks, landmarks, building footprints, and administrative boundaries. The vector tilelayer is built using the same data sources used for the raster basemap World Street Map raster mapand other Esri basemaps.
For more information, see Esri World Street on the Esri website.
Fonts
Amazon Location serves fonts using GetMapGlyphs. The following are available font stacks for thismap:
• Arial Italic
• Arial Regular
• Arial Bold
Esri World Navigation
Esri World Navigation
53

Amazon Location Service Developer GuideEsri
Map style name: VectorEsriNavigation
This map provides a detailed basemap for the world symbolized with a custom navigation map stylethat's designed for use during the day in mobile devices.
This comprehensive street map includes highways, major roads, minor roads, railways, waterfeatures, cities, parks, landmarks, building footprints, and administrative boundaries. The vector tilelayer in this map is built using the same data sources used for the World Street Map and other Esribasemaps.
For more information, see Esri World Navigation on the Esri website.
Fonts
Amazon Location serves fonts using GetMapGlyphs. The following are available font stacks for thismap:
• Arial Italic
• Arial Regular
• Arial Bold
Esri Dark Gray Canvas
Esri Dark Gray Canvas
54

Amazon Location Service Developer GuideEsri
Map style name: VectorEsriDarkGrayCanvas
This map provides a detailed vector basemap for the world symbolized with a dark gray, neutralbackground style with minimal colors, labels, and features that's designed to draw attention to yourthematic content.
This map includes highways, major roads, minor roads, railways, water features, cities, parks,landmarks, building footprints, and administrative boundaries. The vector tile layers in this mapare built using the same data sources used for the Dark Gray Canvas raster map and other Esribasemaps.
For more information, see Esri Dark Gray Canvas on the Esri website.
Fonts
Amazon Location serves fonts using GetMapGlyphs. The following are available font stacks for thismap:
• Ubuntu Medium Italic
• Ubuntu Medium
• Ubuntu Italic
• Ubuntu Regular
• Ubuntu Bold
Esri Light Gray Canvas
Esri Light Gray Canvas
55
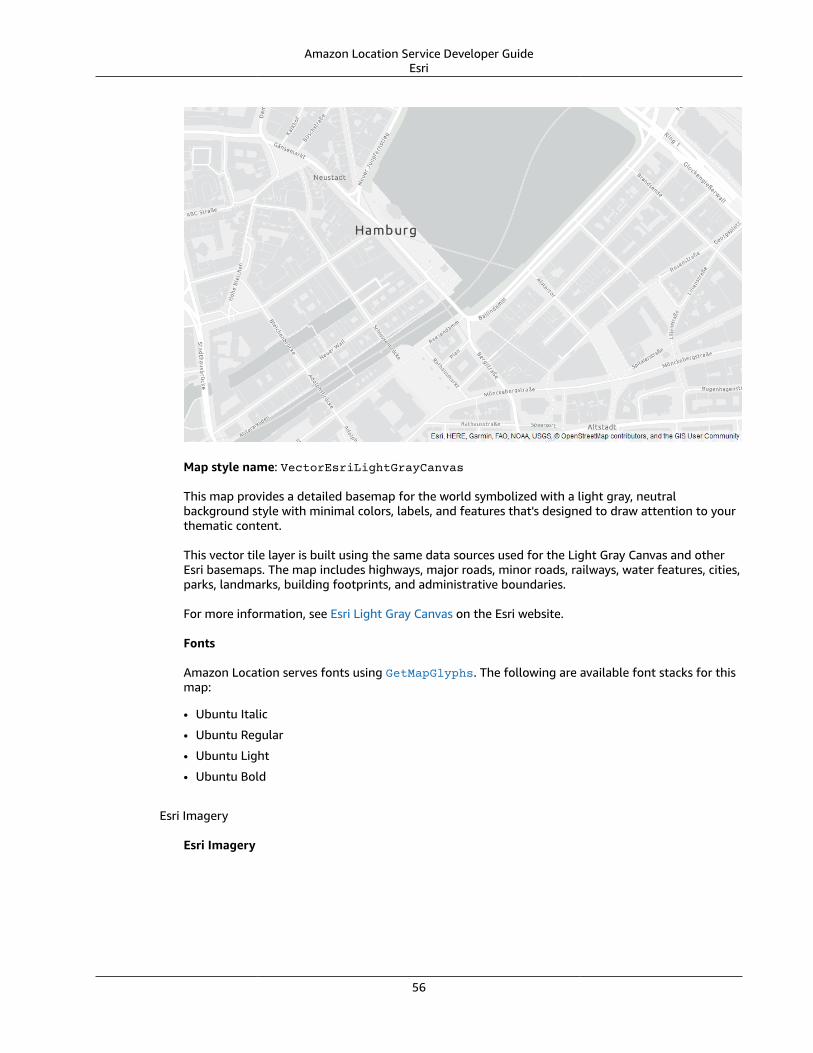
Amazon Location Service Developer GuideEsri
Map style name: VectorEsriLightGrayCanvas
This map provides a detailed basemap for the world symbolized with a light gray, neutralbackground style with minimal colors, labels, and features that's designed to draw attention to yourthematic content.
This vector tile layer is built using the same data sources used for the Light Gray Canvas and otherEsri basemaps. The map includes highways, major roads, minor roads, railways, water features, cities,parks, landmarks, building footprints, and administrative boundaries.
For more information, see Esri Light Gray Canvas on the Esri website.
Fonts
Amazon Location serves fonts using GetMapGlyphs. The following are available font stacks for thismap:
• Ubuntu Italic
• Ubuntu Regular
• Ubuntu Light
• Ubuntu Bold
Esri Imagery
Esri Imagery
56

Amazon Location Service Developer GuideEsri
Map style name: RasterEsriImagery
This map provides one meter or better satellite and aerial imagery in many parts of the world andlower resolution satellite imagery worldwide.
The map includes 15m imagery at small and mid-scales (~1:591M down to ~1:72k) and 2.5mSPOT Imagery (~1:288k to ~1:72k) for the world. The map features 0.5m resolution imagery in thecontinental United States and parts of Western Europe from Maxar. This map features additionalMaxar submeter imagery in many parts of the world. In other parts of the world, the GIS UserCommunity has contributed imagery at different resolutions. In select communities, very high-resolution imagery (down to 0.03m) is available down to ~1:280 scale.
For more information, see Esri World Imagery on the Esri website.
Coverage: Esri
You can use Esri as a data provider to support queries for geocoding, reverse geocoding, and searcheswhen you create a place index resource, or to support queries to calculate a route when you create aroute calculator resource.
Esri provides different levels of data quality in different regions of the world. For additional informationabout coverage in your region of interest, see:
• Esri details on geocoding coverage
• Esri details on street networks and traffic coverage
Terms of use and data attribution: Esri
Before you use a data provider, be sure you can comply with all applicable legal requirements, includinglicense terms applicable to the use of the provider. For more information, see AWS Service Terms.
57

Amazon Location Service Developer GuideHERE Technologies
When using a data provider with your Amazon Location resources for your application or documentation,be sure to provide attributions for each data provider you use. For more information about attributionguidelines, see Esri's Data Attributions and Terms of Use.
Error reporting to Esri
If you encounter a problem with the data and want to report errors and discrepancies to Esri, follow Esri'stechnical support article for How to: Provide feedback on basemaps and geocoding.
HERE TechnologiesAmazon Location Service uses HERE Technologies’ location services to help AWS customers use maps,geocode, and calculate routes effectively. HERE's location data offers a location-centric platform that'sopen, secure, and private. By selecting HERE location data, you are selecting accurate, fresh, and robustdata that's deployed natively on the AWS Cloud.
For additional capability information, see HERE on Amazon Location Service data providers.
Topics
• HERE map styles (p. 58)
• Coverage: HERE (p. 61)
• Terms of use and data attribution: HERE (p. 62)
• Error reporting to HERE (p. 62)
HERE map styles
Amazon Location Service supports the following HERE map styles when creating a map resource:
NoteHERE map styles that are not listed in this section are currently not supported.
HERE Contrast (Berlin)
HERE Contrast (Berlin)
58

Amazon Location Service Developer GuideHERE Technologies
Map style name: VectorHereContrast
HERE Contrast (Berlin)
A detailed base map of the world that blends 3D and 2D rendering. The high contrast street mapincludes highways, major roads, minor roads, railways, water features, cities, parks, landmarks,building footprints, and administrative boundaries.
Fonts
Amazon Location serves fonts using GetMapGlyphs. The following are available font stacks for thismap:
• Fira GO Regular
• Fira GO Bold
NoteThis style was renamed from VectorHereBerlin (HERE Berlin maps).VectorHereBerlin is deprecated, but will continue to work in applications that use it.
HERE Explore
HERE Explore
59
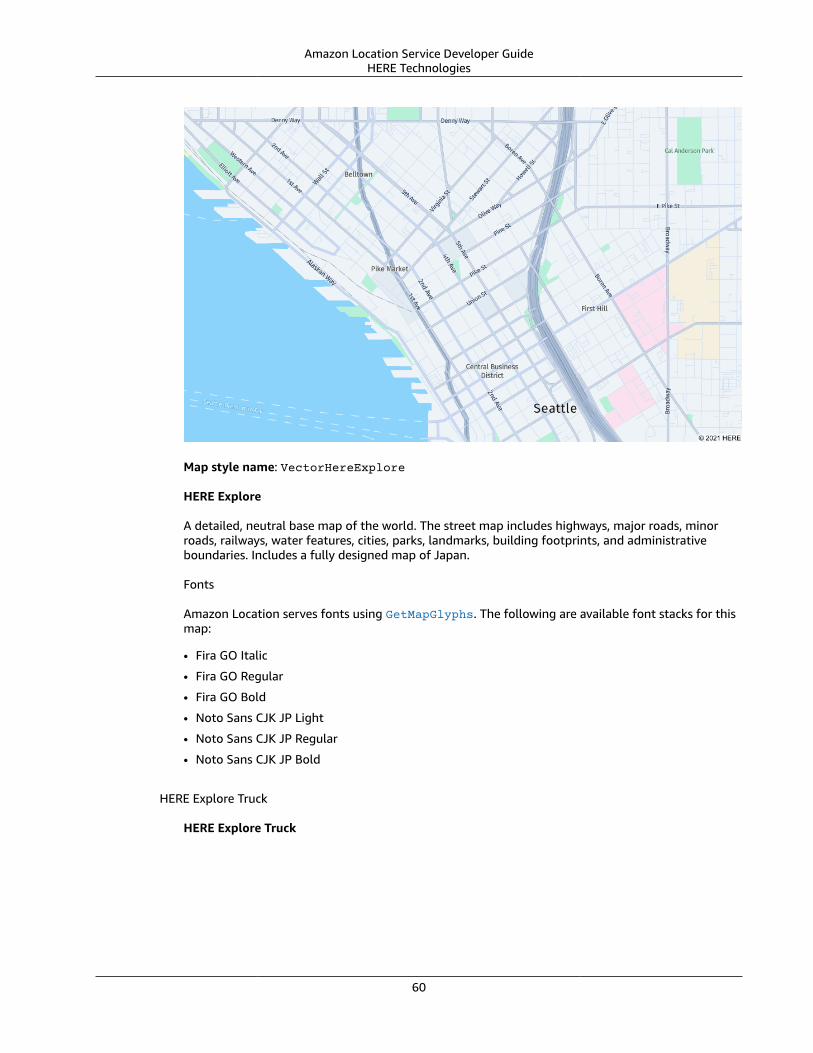
Amazon Location Service Developer GuideHERE Technologies
Map style name: VectorHereExplore
HERE Explore
A detailed, neutral base map of the world. The street map includes highways, major roads, minorroads, railways, water features, cities, parks, landmarks, building footprints, and administrativeboundaries. Includes a fully designed map of Japan.
Fonts
Amazon Location serves fonts using GetMapGlyphs. The following are available font stacks for thismap:
• Fira GO Italic
• Fira GO Regular
• Fira GO Bold
• Noto Sans CJK JP Light
• Noto Sans CJK JP Regular
• Noto Sans CJK JP Bold
HERE Explore Truck
HERE Explore Truck
60

Amazon Location Service Developer GuideHERE Technologies
Map style name: VectorHereExploreTruck
HERE Explore Truck
A detailed, neutral base map of the world. The street map builds on top of the HERE Explore style,and highlights track restrictions and attributes (including width, height, and HAZMAT) with symbolsand icons, to support use cases within transport and logistics.
Fonts
Amazon Location serves fonts using GetMapGlyphs. The following are available font stacks for thismap:
• Fira GO Italic
• Fira GO Regular
• Fira GO Bold
• Noto Sans CJK JP Light
• Noto Sans CJK JP Regular
• Noto Sans CJK JP Bold
For additional information about map data quality in different regions of the world, see HERE mapcoverage.
Coverage: HEREYou can use HERE as a data provider to support queries for geocoding, reverse geocoding, and searcheswhen you create a place index resource, or to support queries to calculate a route when you create aroute calculator resource.
HERE provides different levels of data quality in different regions of the world. For additionalinformation about coverage in your region of interest, see the following:
61

Amazon Location Service Developer GuideRegions and endpoints
• HERE geocoding coverage• HERE car routing coverage• HERE truck routing coverage
Terms of use and data attribution: HEREBefore you use a data provider, be sure you can comply with all applicable legal requirements, includinglicense terms applicable to the use of the provider. For more information, see AWS Service Terms.Because of licensing limitations, you may not use HERE to store geocoding results for locations in Japan.
When using a data provider with your Amazon Location resources for your application or documentation,be sure to provide attributions for each data provider you use. For additional information aboutattribution guidelines, see HERE Technologies' Supplier Terms Applicable to Location and Other Content.
Error reporting to HERETo report map errors and discrepancies to HERE, go to https://www.here.com/contact and chooseReport a map error.
Amazon Location Regions and endpointsAmazon Location is available in the following AWS Regions:
Regions
Region name Region code
Asia Pacific (Tokyo) ap-northeast-1
Asia Pacific (Singapore) ap-southeast-1
Asia Pacific (Sydney) ap-southeast-2
Europe (Frankfurt) eu-central-1
Europe (Ireland) eu-west-1
Europe (Stockholm) eu-north-1
US East (N. Virginia) us-east-1
US East (Ohio) us-east-2
US West (Oregon) us-west-2
EndpointsThe general syntax for an Amazon Location regional endpoint is as follows:
protocol://service-code.geo.region-code.amazonaws.com
Within this syntax, Amazon Location uses the following service codes:
62

Amazon Location Service Developer GuideService quotas
Service Service code
Amazon Location Maps maps
Amazon Location Places places
Amazon Location Geofences geofencing
Amazon Location Trackers tracking
Amazon Location Routes routes
For example, the regional endpoint for Amazon Location Maps for US East (N. Virginia) would be:https://maps.geo.us-east-1.amazonaws.com.
Amazon Location Service quotasThis topic provides a summary of rate limits and quotas for Amazon Location Service.
NoteIf you require a higher quota, you can use the Service Quotas console to request quota increasesfor adjustable quotas. When requesting a quota increase, select the Region you require thequota increase in since most quotas are specific to the AWS Region.
Service Quotas are maximum number of resources you can have per AWS account and AWS Region.Amazon Location Service denies additional requests that exceed the service quota.
Rate limits (quotas that start with Rate of...) are the maximum number of requests per second, witha burst rate of 80 percent of the limit within any part of the second, defined for each API operation.Amazon Location Service throttles requests that exceed the operation's rate limit.
Name Default AdjustableDescription
Geofence Collection resources per account Each supportedRegion: 1,000
Yes The maximum numberof Geofence Collectionresources that you cancreate per account.
Geofences per Geofence Collection Each supportedRegion: 50,000
Yes The maximum numberof Geofences that youcan create per GeofenceCollection.
Map resources per account Each supportedRegion: 20
Yes The maximum number ofMap resources that you cancreate per account.
Place Index resources per account Each supportedRegion: 20
Yes The maximum number ofPlace Index resources thatyou can create per account.
Rate of AssociateTrackerConsumer APIrequests
Each supportedRegion: 10 persecond
Yes The maximum number ofAssociateTrackerConsumerrequests that you can makeper second. Additionalrequests are throttled.
63
Amazon Location Service Developer GuideService quotas
Name Default AdjustableDescription
Rate of BatchDeleteDevicePositionHistoryAPI requests
Each supportedRegion: 50 persecond
Yes The maximum number ofBatchDeleteDevicePositionHistoryrequests that you can makeper second. Additionalrequests are throttled.
Rate of BatchDeleteGeofence API requests Each supportedRegion: 50 persecond
Yes The maximum numberof BatchDeleteGeofencerequests that you can makeper second. Additionalrequests are throttled.
Rate of BatchEvaluateGeofences APIrequests
Each supportedRegion: 50 persecond
Yes The maximum number ofBatchEvaluateGeofencesrequests that you can makeper second. Additionalrequests are throttled.
Rate of BatchGetDevicePosition APIrequests
Each supportedRegion: 50 persecond
Yes The maximum number ofBatchGetDevicePositionrequests that you can makeper second. Additionalrequests are throttled.
Rate of BatchPutGeofence API requests Each supportedRegion: 50 persecond
Yes The maximum number ofBatchPutGeofence requeststhat you can make persecond. Additional requestsare throttled.
Rate of BatchUpdateDevicePosition APIrequests
Each supportedRegion: 50 persecond
Yes The maximum number ofBatchUpdateDevicePositionrequests that you can makeper second. Additionalrequests are throttled.
Rate of CalculateRoute API requests Each supportedRegion: 10 persecond
Yes The maximum number ofCalculateRoute requeststhat you can make persecond. Additional requestsare throttled.
Rate of CalculateRouteMatrix API requests Each supportedRegion: 5 persecond
Yes The maximum numberof CalculateRouteMatrixrequests that you can makeper second. Additionalrequests are throttled.
Rate of CreateGeofenceCollection APIrequests
Each supportedRegion: 10 persecond
Yes The maximum number ofCreateGeofenceCollectionrequests that you can makeper second. Additionalrequests are throttled.
64

Amazon Location Service Developer GuideService quotas
Name Default AdjustableDescription
Rate of CreateMap API requests Each supportedRegion: 10 persecond
Yes The maximum number ofCreateMap requests thatyou can make per second.Additional requests arethrottled.
Rate of CreatePlaceIndex API requests Each supportedRegion: 10 persecond
Yes The maximum number ofCreatePlaceIndex requeststhat you can make persecond. Additional requestsare throttled.
Rate of CreateRouteCalculator APIrequests
Each supportedRegion: 10 persecond
Yes The maximum numberof CreateRouteCalculatorrequests that you can makeper second. Additionalrequests are throttled.
Rate of CreateTracker API requests Each supportedRegion: 10 persecond
Yes The maximum number ofCreateTracker requests thatyou can make per second.Additional requests arethrottled.
Rate of DeleteGeofenceCollection APIrequests
Each supportedRegion: 10 persecond
Yes The maximum number ofDeleteGeofenceCollectionrequests that you can makeper second. Additionalrequests are throttled.
Rate of DeleteMap API requests Each supportedRegion: 10 persecond
Yes The maximum number ofDeleteMap requests thatyou can make per second.Additional requests arethrottled.
Rate of DeletePlaceIndex API requests Each supportedRegion: 10 persecond
Yes The maximum number ofDeletePlaceIndex requeststhat you can make persecond. Additional requestsare throttled.
Rate of DeleteRouteCalculator APIrequests
Each supportedRegion: 10 persecond
Yes The maximum numberof DeleteRouteCalculatorrequests that you can makeper second. Additionalrequests are throttled.
Rate of DeleteTracker API requests Each supportedRegion: 10 persecond
Yes The maximum number ofDeleteTracker requests thatyou can make per second.Additional requests arethrottled.
65

Amazon Location Service Developer GuideService quotas
Name Default AdjustableDescription
Rate of DescribeGeofenceCollection APIrequests
Each supportedRegion: 10 persecond
Yes The maximum number ofDescribeGeofenceCollectionrequests that you can makeper second. Additionalrequests are throttled.
Rate of DescribeMap API requests Each supportedRegion: 10 persecond
Yes The maximum number ofDescribeMap requests thatyou can make per second.Additional requests arethrottled.
Rate of DescribePlaceIndex API requests Each supportedRegion: 10 persecond
Yes The maximum numberof DescribePlaceIndexrequests that you can makeper second. Additionalrequests are throttled.
Rate of DescribeRouteCalculator APIrequests
Each supportedRegion: 10 persecond
Yes The maximum number ofDescribeRouteCalculatorrequests that you can makeper second. Additionalrequests are throttled.
Rate of DescribeTracker API requests Each supportedRegion: 10 persecond
Yes The maximum number ofDescribeTracker requeststhat you can make persecond. Additional requestsare throttled.
Rate of DisassociateTrackerConsumer APIrequests
Each supportedRegion: 10 persecond
Yes The maximum number ofDisassociateTrackerConsumerrequests that you can makeper second. Additionalrequests are throttled.
Rate of GetDevicePosition API requests Each supportedRegion: 50 persecond
Yes The maximum number ofGetDevicePosition requeststhat you can make persecond. Additional requestsare throttled.
Rate of GetDevicePositionHistory APIrequests
Each supportedRegion: 50 persecond
Yes The maximum number ofGetDevicePositionHistoryrequests that you can makeper second. Additionalrequests are throttled.
Rate of GetGeofence API requests Each supportedRegion: 50 persecond
Yes The maximum number ofGetGeofence requests thatyou can make per second.Additional requests arethrottled.
66

Amazon Location Service Developer GuideService quotas
Name Default AdjustableDescription
Rate of GetMapGlyphs API requests Each supportedRegion: 50 persecond
Yes The maximum number ofGetMapGlyphs requeststhat you can make persecond. Additional requestsare throttled.
Rate of GetMapSprites API requests Each supportedRegion: 50 persecond
Yes The maximum number ofGetMapSprites requeststhat you can make persecond. Additional requestsare throttled.
Rate of GetMapStyleDescriptor APIrequests
Each supportedRegion: 50 persecond
Yes The maximum number ofGetMapStyleDescriptorrequests that you can makeper second. Additionalrequests are throttled.
Rate of GetMapTile API requests Each supportedRegion: 500 persecond
Yes The maximum number ofGetMapTile requests thatyou can make per second.Additional requests arethrottled.
Rate of ListDevicePositions API requests Each supportedRegion: 50 persecond
Yes The maximum numberof ListDevicePositionsrequests that you can makeper second. Additionalrequests are throttled.
Rate of ListGeofenceCollections APIrequests
Each supportedRegion: 10 persecond
Yes The maximum number ofListGeofenceCollectionsrequests that you can makeper second. Additionalrequests are throttled.
Rate of ListGeofences API requests Each supportedRegion: 50 persecond
Yes The maximum number ofListGeofences requests thatyou can make per second.Additional requests arethrottled.
Rate of ListMaps API requests Each supportedRegion: 10 persecond
Yes The maximum numberof ListMaps requests thatyou can make per second.Additional requests arethrottled.
Rate of ListPlaceIndexes API requests Each supportedRegion: 10 persecond
Yes The maximum number ofListPlaceIndexes requeststhat you can make persecond. Additional requestsare throttled.
67

Amazon Location Service Developer GuideService quotas
Name Default AdjustableDescription
Rate of ListRouteCalculators API requests Each supportedRegion: 10 persecond
Yes The maximum numberof ListRouteCalculatorsrequests that you can makeper second. Additionalrequests are throttled.
Rate of ListTagsForResource API requests Each supportedRegion: 10 persecond
Yes The maximum numberof ListTagsForResourcerequests that you can makeper second. Additionalrequests are throttled.
Rate of ListTrackerConsumers API requests Each supportedRegion: 10 persecond
Yes The maximum numberof ListTrackerConsumersrequests that you can makeper second. Additionalrequests are throttled.
Rate of ListTrackers API requests Each supportedRegion: 10 persecond
Yes The maximum number ofListTrackers requests thatyou can make per second.Additional requests arethrottled.
Rate of PutGeofence API requests Each supportedRegion: 50 persecond
Yes The maximum number ofPutGeofence requests thatyou can make per second.Additional requests arethrottled.
Rate of SearchPlaceIndexForPosition APIrequests
Each supportedRegion: 50 persecond
Yes The maximum number ofSearchPlaceIndexForPositionrequests that you can makeper second. Additionalrequests are throttled.
Rate of SearchPlaceIndexForSuggestionsAPI requests
Each supportedRegion: 50 persecond
Yes The maximum number ofSearchPlaceIndexForSuggestionsrequests that you can makeper second. Additionalrequests are throttled.
Rate of SearchPlaceIndexForText APIrequests
Each supportedRegion: 50 persecond
Yes The maximum number ofSearchPlaceIndexForTextrequests that you can makeper second. Additionalrequests are throttled.
Rate of TagResource API requests Each supportedRegion: 10 persecond
Yes The maximum number ofTagResource requests thatyou can make per second.Additional requests arethrottled.
68

Amazon Location Service Developer GuideService quotas
Name Default AdjustableDescription
Rate of UntagResource API requests Each supportedRegion: 10 persecond
Yes The maximum number ofUntagResource requeststhat you can make persecond. Additional requestsare throttled.
Rate of UpdateGeofenceCollection APIrequests
Each supportedRegion: 10 persecond
Yes The maximum number ofUpdateGeofenceCollectionrequests that you can makeper second. Additionalrequests are throttled.
Rate of UpdateMap API requests Each supportedRegion: 10 persecond
Yes The maximum number ofUpdateMap requests thatyou can make per second.Additional requests arethrottled.
Rate of UpdatePlaceIndex API requests Each supportedRegion: 10 persecond
Yes The maximum number ofUpdatePlaceIndex requeststhat you can make persecond. Additional requestsare throttled.
Rate of UpdateRouteCalculator APIrequests
Each supportedRegion: 10 persecond
Yes The maximum number ofUpdateRouteCalculatorrequests that you can makeper second. Additionalrequests are throttled.
Rate of UpdateTracker API requests Each supportedRegion: 10 persecond
Yes The maximum number ofUpdateTracker requeststhat you can make persecond. Additional requestsare throttled.
Route Calculator resources per account Each supportedRegion: 20
Yes The maximum number ofRoute Calculator resourcesthat you can create peraccount.
Tracker consumers per tracker Each supportedRegion: 5
Yes The maximum number ofGeofence Collection thatTracker resource can beassociated with.
Tracker resources per account Each supportedRegion: 100
Yes The maximum number ofTracker resources that youcan create per account.
NoteYou can monitor your usage against your quotas with Cloudwatch. For more information, seeUsing CloudWatch to monitor usage against quotas (p. 190).
69

Amazon Location Service Developer GuideManaging your Amazon Location service quotas
Managing your Amazon Location service quotasAmazon Location Service is integrated with Service Quotas, an AWS service that enables you to view andmanage your quotas from a central location. For more information, see What Is Service Quotas? in theService Quotas User Guide.
Service Quotas makes it easy to look up the value of your Amazon Location service quotas.
AWS Management Console
To view Amazon Location service quotas using the console
1. Open the Service Quotas console at https://console.aws.amazon.com/servicequotas/.2. In the navigation pane, choose AWS services.3. From the AWS services list, search for and select Amazon Location.
In the Service quotas list, you can see the service quota name, applied value (if it is available),AWS default quota, and whether the quota value is adjustable.
4. To view additional information about a service quota, such as the description, choose the quotaname.
5. (Optional) To request a quota increase, select the quota that you want to increase, selectRequest quota increase, enter or select the required information, and select Request.
To work more with service quotas using the console see the Service Quotas User Guide. To request aquota increase, see Requesting a quota increase in the Service Quotas User Guide.
AWS CLI
To view Amazon Location service quotas using the AWS CLI
Run the following command to view the default Amazon Location quotas.
aws service-quotas list-aws-default-service-quotas \ --query 'Quotas[*].{Adjustable:Adjustable,Name:QuotaName,Value:Value,Code:QuotaCode}' \ --service-code geo \ --output table
To work more with service quotas using the AWS CLI, see the Service Quotas AWS CLI CommandReference. To request a quota increase, see the request-service-quota-increase command inthe AWS CLI Command Reference.
70

Amazon Location Service Developer Guide
How to use Amazon Location ServiceYou can use Amazon Location Service capabilities to complete geographic and location-related tasks.You can then combine these tasks to address more complex uses cases such as geomarketing, delivery,and asset tracking.
When you're ready to build location features into your application, use the following methods to use theAmazon Location Service functionality, depending on your goals and inclinations:
• Exploration tools – If you want to experiment with Amazon Location resources, the following tools arethe fastest way to access and try out the APIs:
• The Amazon Location console provides a variety of quick-access tools. You can create and manageyour resources and try the APIs using the Explore page. The console is also useful for creatingresources (typically a one-time task) in preparation for using any of the other methods describedlater.
• The AWS Command Line Interface (CLI) lets you create resources and access the Amazon LocationAPIs using a terminal. The AWS CLI handles authentication when you configure it with yourcredentials.
• You can see code examples and tutorials (p. 196) that show how to perform tasks using theAmazon Location Service APIs. This includes an example (p. 197) that mimics much of thefunctionality of the Explore page in the console.
• Platform SDKs – If you aren't visualizing data on a map, you can use any of the AWS standard tools tobuild on AWS.
• The following SDKs are available: C++, Go, Java, JavaScript, .NET, Node.js, PHP, Python, and Ruby.
• Frontend SDKs and libraries – If you want to use Amazon Location to build an application on a mobileplatform or visualize data on a map on any platform, you have the following options:
• The AWS Amplify libraries integrate Amazon Location within iOS, Android, and JavaScript webapplications.
• The MapLibre GL libraries let you render client-side maps into iOS, Android, and JavaScript webapplications using Amazon Location.
• Tangram ES libraries enable you to render 2D and 3D maps from vector data using OpenGL ESwithin iOS and Android web applications. There is also Tangram for JavaScript web applications.
• Sending direct HTTPS requests – If you are working with a programming language for which thereis no SDK available, or if you want more control over how you send a request to AWS, you can accessAmazon Location by sending direct HTTPS requests authenticated by the Signature Version 4 signingprocess. For more information on the Signature Version 4 signing process, see the AWS GeneralReference.
This chapter describes many of the tasks that are common to applications using location data. Thecommon use cases section describes how to combine these with other AWS services to achieve morecomplex use cases.
Topics• Prerequisites for using Amazon Location Service (p. 72)
• Using Amazon Location Maps in your application (p. 74)
• Searching place and geolocation data using Amazon Location (p. 115)
• Calculating routes using Amazon Location Service (p. 140)
• Geofencing an area of interest using Amazon Location (p. 154)
71

Amazon Location Service Developer GuideAccount prerequisites
• Tagging your Amazon Location Service resources (p. 179)• Granting access to Amazon Location Service (p. 182)• Monitoring Amazon Location Service (p. 188)• Creating Amazon Location Service resources with AWS CloudFormation (p. 194)
Prerequisites for using Amazon Location ServiceThis section describes what you need to do to use Amazon Location Service. You must have an AWSaccount and have set up access to Amazon Location for users that want to use it.
Sign up for AWSIf you're new to Amazon Web Services AWS, sign up for an AWS account.
To create an AWS account
1. Open https://portal.aws.amazon.com/billing/signup.2. Choose Create an AWS Account.3. Follow the instructions.
NoteYou'll need your 12-digit AWS account ID to verify your AWS account through a phone calland by entering a PIN using your phone keypad. For more information about Finding yourAWS account ID, see The AWS General Reference Guide.
Manage access to your AWS resources using IAMAWS Identity and Access Management (IAM) is a web service that enables you to manage access to yourAWS resources by controlling who is authenticated and authorized to use resources.
When you sign up for an AWS account, you start with a root account.
There are two different types of users in AWS:
• Root user — The administrative account used by the account owner to allow full access to all resourcesin the account.
• IAM user — An account created by the root user, which is granted targeted access to resources usingattached permissions specified by an IAM policy.
You cannot use IAM policies to explicitly deny the root user access to resources. Therefore, it's a bestpractice to avoid using your AWS root user account for everyday tasks where it’s not required. Werecommend that you set up and use an IAM user account with targeted access and permissions toperform specific tasks and access resources. This enables you to lock away the access keys for the rootuser. For more information about tasks that require a root user, see the IAM User Guide.
When you create a new IAM user, you can view and download your user credentials, which are youraccount ID, account key ID, and secret key. You will need these later to set up authentication to accessAWS resources.
ImportantThis is the only time that you can view and download your secret access key. You can select theDownload .csv option to keep record of your access key ID and secret access key. If you lose yourcredentials, you can create new credentials.
72

Amazon Location Service Developer GuideGrant access to Amazon Location Service
To create an IAM user account
Console
Creating an IAM User and Administrator Group using the IAM Console
You can create an IAM user and group using the AWS Management Console. For information aboutCreating an IAM Admin User and Group (Console) , see the IAM User Guide.
If you're new to AWS, see Getting Started with a Service in the AWS Management Console GettingStarted guide.
CLI
Creating an IAM User and Administrator Group using AWS CLI
Alternatively, you can create an IAM user and group using AWS CLI. For information about Creatingan IAM Admin User and Group (AWS CLI), see the IAM User Guide.
If you're new to AWS Command Line Interface (AWS CLI), see Getting Set Up with the AWSCommand Line Interface in the AWS Command Line Interface User Guide.
Grant access to Amazon Location ServiceYour new IAM user account has no permissions by default. Before you can access Amazon Location, youmust grant permission by attaching an IAM policy with specific permissions. Make sure to follow theprinciple of least privilege when granting access to resources.
To grant access to Amazon Location, you must create an IAM policy to assign to IAM users.
To create a policy to grant permission to an IAM user
1. Open the IAM console at https://console.aws.amazon.com/iam/.2. In the navigation pane, choose Policies, then Create policy.3. Open the JSON tab to enter the following:
In this example policy, the new user is given permission to access Amazon Location operations.
{ "Version": "2012-10-17", "Statement": [ { "Action": [ "geo:*" ], "Resource": "*", "Effect": "Allow" } ]}
For more examples, see the section called “Identity-based policy examples” (p. 217).4. Choose Review policy.5. For Name, enter a unique name for this policy. For example, AmazonLocationAccessPolicy .6. Choose Create policy.
For more information about request property descriptions, see the IAM JSON Policy Elements Referencein the AWS Identity and Access Management User Guide.
73

Amazon Location Service Developer GuideNext steps for access
Next steps for accessNow that your account is set up:
• Learn more about Accessing Amazon Location Service (p. 182).
Optionally:
• If you want an alternative to using IAM directly with both frontend SDKs and direct HTTPS requests,see Enabling unauthenticated access using Amazon Cognito (p. 182).
• To see more examples of IAM policies that you can implement for Amazon Location, see the sectioncalled “Identity-based policy examples” (p. 217).
Using Amazon Location Maps in your applicationAmazon Location maps are cost-effective and interactive. You can replace an existing map in yourapplication to save money, or add a new one to display location-based data visually, such as your storelocation.
Amazon Location Service lets you choose a data provider for map operations by creating and configuringa map resource. The map resource configures the data provider and the style that is used to render themap.
After you create your resource, you can send requests by using the AWS SDK directly, or by using a librarymade specifically for rendering maps in your environment.
NoteFor an overview of map concepts, see Maps (p. 31).
Topics• Prerequisites (p. 75)
74

Amazon Location Service Developer GuidePrerequisites
• Display a map in your application (p. 75)
• Drawing data features on a map (p. 113)
• Managing your map resources (p. 113)
PrerequisitesBefore you display a map in your application follow the prerequisite steps:
Topics
• Create a map resource (p. 75)
• Authenticating your requests (p. 75)
Create a map resource
To create a map resource
1. In the Amazon Location console, on the Maps page, choose Create map to preview map styles.
2. Add a name and description for the new map resource.
3. Choose a map.
NoteIf your application is tracking or routing assets that you use in your business, such asdelivery vehicles or employees, you may only use HERE as your geolocation provider. Formore information, see section 82 of the AWS service terms.
4. Agree to the Amazon Location Terms and Conditions, then choose Create map. You can interactwith the map that you've chosen: zoom in, zoom out, or pan in any direction.
5. To allow your users to switch styles (for example, to allow them to switch between satellite imageryand vector style), you must create a map resource for each style.
You can delete resources with map styles that you don’t want to use on the Maps home page in theconsole.
Authenticating your requestsOnce you create a map resource and you're ready to begin building location features into yourapplication, choose how you would authenticate your requests:
• To explore ways you can access the servcies, see Granting access to Amazon Location Service (p. 182).
• If you have a website with anonymous users, or you want to use your own authenticatino process,or combine multiple authentication methods, see Allowing unauthenticated guest access to yourapplication using Amazon Cognito (p. 182).
Display a map in your applicationThis section provides tutorials on how to use map rendering tools to display a map in your mobile orweb application when using Amazon Location APIs. As mentioned in the How to use Amazon LocationService (p. 71) topic, you have a choice of libraries to use when rendering maps with Amazon Location,inlcuding Amplify, MapLibre GL, and Tangram.
Do one of the following to display a map in your application:
75

Amazon Location Service Developer GuideDisplaying maps
• The most efficient way to display a map on your website, or in any JavaScript application is to use theAWS Amplify Geo SDK. To use Amplify in your application, follow the Amplify tutorial.
• To display a map in your Android and iOS applications, or if you prefer not use Amplify Geo, follow theMapLibre tutorial (p. 80).
• If you are an existing user of Tangram, and want to continue to use it to render your map, whilemoving to Amazon Location Service, follow the Tangram tutorial (p. 95).
Topics
• Using the Amplify library with Amazon Location Service (p. 76)
• Using the MapLibre library with Amazon Location Service (p. 80)
• Using Tangram with Amazon Location Service (p. 94)
Using the Amplify library with Amazon Location ServiceThe following tutorial walks you through using AWS Amplify with Amazon Location. Amplify usesMapLibre GL JS to render maps in your JavaScript-based application.
Amplify is a set of open-source client libraries that provide interfaces to different categories of services,including Amplify Geo, which is powered by Amazon Location Service. Learn more about the AWSAmplify Geo JavaScript library.
NoteThis tutorial assumes that you have already followed the steps in Using maps - To add a map toyour application (p. 75).
Building the application: Scaffolding
This tutorial creates a web application that uses JavaScript to build a map on an HTML page.
Begin by creating an HTML page (index.html) that includes the map's container:
• Enter a div element with an id of map to apply the map's dimensions to the map view. Thedimensions are inherited from the viewport.
<html> <head> <style> body { margin: 0; } #map { height: 100vh; } /* 100% of viewport height */ </style> </head>
<body> <!-- map container --> <div id="map" /> </body></html>
Building the application: Adding dependencies
Add the following dependencies to your application:
• AWS Amplify map and geo libraries.
• AWS Amplify core library.
76

Amazon Location Service Developer GuideDisplaying maps
• AWS Amplify auth library.• AWS Amplify stylesheet.
<!-- CSS dependencies --> <link href="https://cdn.amplify.aws/packages/maplibre-gl/1.15.2/maplibre-gl.css" rel="stylesheet" integrity="sha384-DrPVD9GufrxGb7kWwRv0CywpXTmfvbKOZ5i5pN7urmIThew0zXKTME+gutUgtpeD" crossorigin="anonymous" referrerpolicy="no-referrer"></link>
<!-- JavaScript dependencies --> <script src="https://cdn.amplify.aws/packages/maplibre-gl/1.15.2/maplibre-gl.js" integrity="sha384-rwYfkmAOpciZS2bDuwZ/Xa/Gog6jXem8D/whm3wnsZSVFemDDlprcUXHnDDUcrNU" crossorigin="anonymous" referrerpolicy="no-referrer"></script> <script src="https://cdn.amplify.aws/packages/core/4.3.0/aws-amplify-core.min.js" integrity="sha384-7Oh+5w0l7XGyYvSqbKi2Q7SA5K640V5nyW2/LEbevDQEV1HMJqJLA1A00z2hu8fJ" crossorigin="anonymous" referrerpolicy="no-referrer"></script> <script src="https://cdn.amplify.aws/packages/auth/4.3.8/aws-amplify-auth.min.js" integrity="sha384-jfkXCEfYyVmDXYKlgWNwv54xRaZgk14m7sjeb2jLVBtUXCD2p+WU8YZ2mPZ9Xbdw" crossorigin="anonymous" referrerpolicy="no-referrer"></script> <script src="https://cdn.amplify.aws/packages/geo/1.1.0/aws-amplify-geo.min.js" integrity="sha384-TFMTyWuCbiptXTzvOgzJbV8TPUupG1rA1AVrznAhCSpXTIdGw82bGd8RTk5rr3nP" crossorigin="anonymous" referrerpolicy="no-referrer"></script> <script src="https://cdn.amplify.aws/packages/maplibre-gl-js-amplify/1.1.0/maplibre-gl-js-amplify.umd.min.js" integrity="sha384-7/RxWonKW1nM9zCKiwU9x6bkQTjldosg0D1vZYm0Zj+K/vUSnA3sOMhlRRWAtHPi" crossorigin="anonymous" referrerpolicy="no-referrer"></script><script> // application-specific code</script>
This creates an empty page with the map's container.
Building the application: Configuration
To configure your application using JavaScript:
1. Enter the identifiers of the unauthenticated identity pool that you created in Using maps - Step 2,Set up authentication (p. 75).
// Cognito Identity Pool IDconst identityPoolId = "region:identityPoolID"; // for example: us-east-1:123example-1234-5678// extract the Region from the Identity Pool IDconst region = identityPoolId.split(":")[0];
2. Configure AWS Amplify to use the resources you've created, including the identity pool and the Mapresource (shown here with the default name of explore.map).
// Configure Amplifyconst { Amplify } = aws_amplify_core;const { createMap } = AmplifyMapLibre;
Amplify.configure({ Auth: { identityPoolId, region, }, geo: { AmazonLocationService: { maps: { items: { "explore.map": { style: "Default style"
77

Amazon Location Service Developer GuideDisplaying maps
}, }, default: "explore.map", }, region, }, }});
Building the application: Map initialization
For the map to display after the page is loaded, you must initialize the map. You can adjust the initialmap location, add additional controls, and overlay data.
async function initializeMap() { const map = await createMap( { container: "map", center: [-123.1187, 49.2819], zoom: 10, hash: true, } );
map.addControl(new maplibregl.NavigationControl(), "top-left");}
initializeMap();
NoteYou must provide word mark or text attribution for each data provider that you use, either onyour application or your documentation. Attribution strings are included in the style descriptorresponse under the sources.esri.attribution and sources.here.attribution keys.Amplify will automatically provide attribution. When using Amazon Location resources withdata providers, make sure to read the service terms and conditions.
Running the application
You can run this sample application by using it in a local web server, or opening it in a browser.
To use a local web server, you can use npx, installed as part of Node.js, or any other web server of yourchoice. To use npx, type npx serve from within the same directory as index.html. This serves theapplication on localhost:5000.
NoteIf the policy that you created for your unauthenticated Amazon Cognito role includes areferer condition, you might be blocked from testing with localhost: URLs. In this case. youcan test with a web server that provides a URL that is in your policy.
After completing the tutorial, the final application looks like the following example.
<html> <head> <!-- CSS dependencies --> <link href="https://cdn.amplify.aws/packages/maplibre-gl/1.15.2/maplibre-gl.css" rel="stylesheet" integrity="sha384-DrPVD9GufrxGb7kWwRv0CywpXTmfvbKOZ5i5pN7urmIThew0zXKTME+gutUgtpeD" crossorigin="anonymous" referrerpolicy="no-referrer"></link>
<!-- JavaScript dependencies -->
78
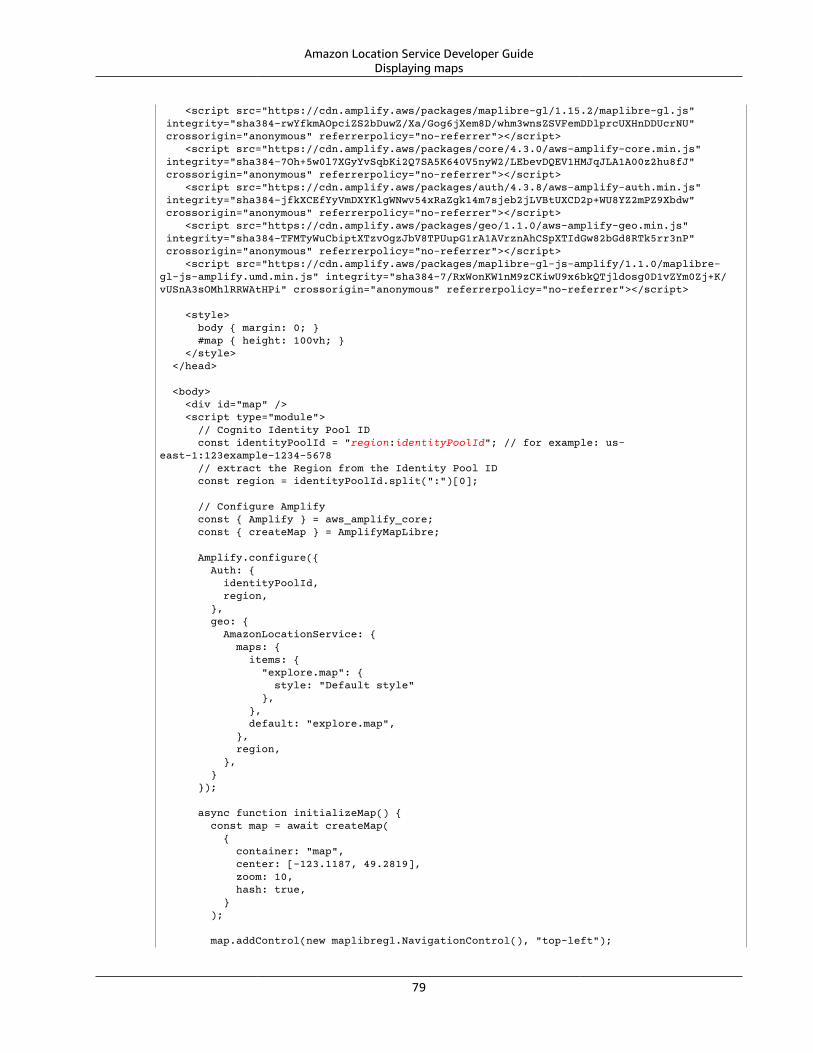
Amazon Location Service Developer GuideDisplaying maps
<script src="https://cdn.amplify.aws/packages/maplibre-gl/1.15.2/maplibre-gl.js" integrity="sha384-rwYfkmAOpciZS2bDuwZ/Xa/Gog6jXem8D/whm3wnsZSVFemDDlprcUXHnDDUcrNU" crossorigin="anonymous" referrerpolicy="no-referrer"></script> <script src="https://cdn.amplify.aws/packages/core/4.3.0/aws-amplify-core.min.js" integrity="sha384-7Oh+5w0l7XGyYvSqbKi2Q7SA5K640V5nyW2/LEbevDQEV1HMJqJLA1A00z2hu8fJ" crossorigin="anonymous" referrerpolicy="no-referrer"></script> <script src="https://cdn.amplify.aws/packages/auth/4.3.8/aws-amplify-auth.min.js" integrity="sha384-jfkXCEfYyVmDXYKlgWNwv54xRaZgk14m7sjeb2jLVBtUXCD2p+WU8YZ2mPZ9Xbdw" crossorigin="anonymous" referrerpolicy="no-referrer"></script> <script src="https://cdn.amplify.aws/packages/geo/1.1.0/aws-amplify-geo.min.js" integrity="sha384-TFMTyWuCbiptXTzvOgzJbV8TPUupG1rA1AVrznAhCSpXTIdGw82bGd8RTk5rr3nP" crossorigin="anonymous" referrerpolicy="no-referrer"></script> <script src="https://cdn.amplify.aws/packages/maplibre-gl-js-amplify/1.1.0/maplibre-gl-js-amplify.umd.min.js" integrity="sha384-7/RxWonKW1nM9zCKiwU9x6bkQTjldosg0D1vZYm0Zj+K/vUSnA3sOMhlRRWAtHPi" crossorigin="anonymous" referrerpolicy="no-referrer"></script>
<style> body { margin: 0; } #map { height: 100vh; } </style> </head>
<body> <div id="map" /> <script type="module"> // Cognito Identity Pool ID const identityPoolId = "region:identityPoolId"; // for example: us-east-1:123example-1234-5678 // extract the Region from the Identity Pool ID const region = identityPoolId.split(":")[0];
// Configure Amplify const { Amplify } = aws_amplify_core; const { createMap } = AmplifyMapLibre;
Amplify.configure({ Auth: { identityPoolId, region, }, geo: { AmazonLocationService: { maps: { items: { "explore.map": { style: "Default style" }, }, default: "explore.map", }, region, }, } });
async function initializeMap() { const map = await createMap( { container: "map", center: [-123.1187, 49.2819], zoom: 10, hash: true, } );
map.addControl(new maplibregl.NavigationControl(), "top-left");
79

Amazon Location Service Developer GuideDisplaying maps
}
initializeMap(); </script> </body></html>
Running this application displays a full-screen map using your chosen map style. This sample is alsodescribed on the Embed map tab of any Map resource page in the Amazon Location Service console.
After you complete this tutorial, go to the Display a map topic in the AWS Amplify documentation tolearn more, including how to display markers on the map.
Using the MapLibre library with Amazon Location ServiceThe following tutorials walk you through using the MapLibre Library with Amazon Location.
Topics• Using MapLibre GL JS with Amazon Location Service (p. 80)• Using the MapLibre GL Native SDK for Android with Amazon Location Service (p. 84)• Using the MapLibre GL Native SDK for iOS with Amazon Location Service (p. 90)
Using MapLibre GL JS with Amazon Location Service
Use MapLibre GL JS to embed client-side maps into web applications.
MapLibre GL JS is an open-source JavaScript library that's compatible with the styles and tiles providedby the Amazon Location Service Maps API. You can integrate MapLibre GL JS within a basic HTML orJavaScript application to embed customizable and responsive client-side maps.
This tutorial describes how to integrate MapLibre GL JS with Amazon Location within a basic HTMLand JavaScript application. The same libraries and techniques presented in this tutorial also apply toframeworks, such as React and Angular.
The sample application for this tutorial is available as part of the Amazon Location Service samplesrepository on GitHub.
Building the application: Scaffolding
This tutorial creates a web application that uses JavaScript to build a map on an HTML page.
Begin by creating an HTML page (index.html) that includes the map's container:
• Enter a div element with an id of map to apply the map's dimensions to the map view. Thedimensions are inherited from the viewport.
<html> <head> <style> body { margin: 0; } #map { height: 100vh; /* 100% of viewport height */ } </style> </head>
80

Amazon Location Service Developer GuideDisplaying maps
<body> <!-- map container --> <div id="map" /> </body></html>
Building the application: Adding dependencies
Add the following dependencies to your application:
• MapLibre GL JS (v1.14.0 or later), and its associated CSS.• AWS SDK for JavaScript.• AWS Amplify core library.
<!-- CSS dependencies --><link href="https://unpkg.com/[email protected]/dist/maplibre-gl.css" rel="stylesheet"/><!-- JavaScript dependencies --><script src="https://unpkg.com/[email protected]/dist/maplibre-gl.js"></script><script src="https://sdk.amazonaws.com/js/aws-sdk-2.784.0.min.js"></script><script src="https://unpkg.com/@aws-amplify/[email protected]/dist/aws-amplify-core.min.js"></script><script> // application-specific code</script>
This creates an empty page with the map's container.
Building the application: Configuration
To configure your application using JavaScript:
1. Enter the names and identifiers of your resources.
// Cognito Identity Pool IDconst identityPoolId = "us-east-1:54f2ba88-9390-498d-aaa5-0d97fb7ca3bd";// Amazon Location Service Map nameconst mapName = "ExampleMap";
2. Instantiate a credential provider using the unauthenticated identity pool you created in Using maps -Step 2, Set up authentication (p. 75).
// extract the Region from the Identity Pool ID; this will be used for both Amazon Cognito and Amazon LocationAWS.config.region = identityPoolId.split(":")[0]; // instantiate an Amazon Cognito-backed credential providerconst credentials = new AWS.CognitoIdentityCredentials({ IdentityPoolId: identityPoolId,});
3. Because this uses credentials outside the normal AWS SDK work flow sessions expire after one hour.
The following is an example of a function that will automatically renew credentials before theyexpire:
async function refreshCredentials() {
81

Amazon Location Service Developer GuideDisplaying maps
await credentials.refreshPromise(); // schedule the next credential refresh when they're about to expire setTimeout(refreshCredentials, credentials.expireTime - new Date());}
Building the application: Request transformation
MapLibre GL JS map instances include a transformRequest option, which you use to intercept andmodify requests before they're made.
To sign AWS requests using Signature Version 4 with credentials obtained from Amazon Cognito, enterthe following function.
// use Signer from @aws-amplify/coreconst { Signer } = window.aws_amplify_core; /** * Sign requests made by MapLibre GL JS using AWS SigV4. */function transformRequest(url, resourceType) { if (resourceType === "Style" && !url.includes("://")) { // resolve to an AWS URL url = `https://maps.geo.${AWS.config.region}.amazonaws.com/maps/v0/maps/${url}/style-descriptor`; } if (url.includes("amazonaws.com")) { // only sign AWS requests (with the signature as part of the query string) return { url: Signer.signUrl(url, { access_key: credentials.accessKeyId, secret_key: credentials.secretAccessKey, session_token: credentials.sessionToken, }), }; } // don't sign return { url };}
Building the application: Map initialization
For the map to display after the page is loaded, you must initialize the map. You can adjust the initialmap location, add additional controls, and overlay data.
async function initializeMap() { // load credentials and set them up to refresh await credentials.getPromise(); // Initialize the map const map = new maplibregl.Map({ container: "map", center: [-123.1187, 49.2819], // initial map centerpoint zoom: 10, // initial map zoom style: mapName, transformRequest, }); map.addControl(new maplibregl.NavigationControl(), "top-left");}
82

Amazon Location Service Developer GuideDisplaying maps
initializeMap();
NoteYou must provide word mark or text attribution for each data provider that you use, either onyour application or your documentation. Attribution strings are included in the style descriptorresponse under the sources.esri.attribution and sources.here.attribution keys.MapLibre GL JS will automatically provide attribution. When using Amazon Location resourceswith data providers, make sure to read the service terms and conditions.
Running the application
You can run this sample application by using it in a local web server, or opening it in a browser.
To use a local web server, you can use npx, because it's installed as part of Node.js. You can usenpx serve from within the same directory as index.html. This serves the application onlocalhost:5000.
NoteIf the policy you created for your unauthenticated Amazon Cognito role includes a referercondition, you might be blocked from testing with localhost: URLs. In this case. you can testwith a web server that provides a URL that is in your policy.
After completing the tutorial, the final application looks like the following example.
<!-- index.html --><html> <head> <link href="https://unpkg.com/[email protected]/dist/maplibre-gl.css" rel="stylesheet" /> <style> body { margin: 0; } #map { height: 100vh; } </style> </head> <body> <!-- map container --> <div id="map" /> <!-- JavaScript dependencies --> <script src="https://unpkg.com/[email protected]/dist/maplibre-gl.js"></script> <script src="https://sdk.amazonaws.com/js/aws-sdk-2.784.0.min.js"></script> <script src="https://unpkg.com/@aws-amplify/[email protected]/dist/aws-amplify-core.min.js"></script> <script> // use Signer from @aws-amplify/core const { Signer } = window.aws_amplify_core; // configuration const identityPoolId = "us-east-1:54f2ba88-9390-498d-aaa5-0d97fb7ca3bd"; // Cognito Identity Pool ID const mapName = "ExampleMap"; // Amazon Location Service Map Name // extract the region from the Identity Pool ID AWS.config.region = identityPoolId.split(":")[0]; // instantiate a Cognito-backed credential provider
83

Amazon Location Service Developer GuideDisplaying maps
const credentials = new AWS.CognitoIdentityCredentials({ IdentityPoolId: identityPoolId, }); /** * Sign requests made by MapLibre GL JS using AWS SigV4. */ function transformRequest(url, resourceType) { if (resourceType === "Style" && !url.includes("://")) { // resolve to an AWS URL url = `https://maps.geo.${AWS.config.region}.amazonaws.com/maps/v0/maps/${url}/style-descriptor`; } if (url.includes("amazonaws.com")) { // only sign AWS requests (with the signature as part of the query string) return { url: Signer.signUrl(url, { access_key: credentials.accessKeyId, secret_key: credentials.secretAccessKey, session_token: credentials.sessionToken, }), }; } // don't sign return { url }; } /** * Initialize a map. */ async function initializeMap() { // load credentials and set them up to refresh await credentials.getPromise(); // Initialize the map const map = new maplibregl.Map({ container: "map", center: [-123.1187, 49.2819], // initial map centerpoint zoom: 10, // initial map zoom style: mapName, transformRequest, }); map.addControl(new maplibregl.NavigationControl(), "top-left"); } initializeMap(); </script> </body></html>
Running this application displays a full-screen map using your chosen map style. This sample is availablein the Amazon Location Service samples repository on GitHub.
Using the MapLibre GL Native SDK for Android with Amazon Location Service
Use MapLibre GL Native SDK to embed interactive maps into your Android applications.
The MapLibre GL Native SDK for Android is a library based on Mapbox GL Native, and is compatible withthe styles and tiles provided by the Amazon Location Service Maps API. You can integrate MapLibre GLNative SDK for Android to embed interactive map views with scalable, customizable vector maps in yourAndroid applications.
84

Amazon Location Service Developer GuideDisplaying maps
This tutorial describes how to integrate the MapLibre GL Native SDK for Android with Amazon Location.The sample application for this tutorial is available as part of the Amazon Location Service samplesrepository on GitHub.
Building the application: Initialization
To initialize your application:
1. Create a new Android Studio project from the Empty Activity template.
2. Ensure that Kotlin is selected for the project language.
3. Select a Minimum SDK of API 14: Android 4.0 (Ice Cream Sandwich) or newer.
4. Open Project Structure, then go to File > Project Structure... to choose the Dependencies section.
5. With <All Modules> selected,then choose the + button to add a new Library Dependency.
6. Add AWS Android SDK version 2.20.0 or later. For example: com.amazonaws:aws-android-sdk-core:2.20.0
7. Add the MapLibre GL Native SDK for Android version 9.4.0 or later. For example:org.maplibre.gl:android-sdk:9.4.0
8. At the project level of your build.gradle file, add the following maven repository to access theMapLibre packages for Android:
allprojects { repositories { // Retain your existing repositories google() jcenter() // Declare the repositories for MapLibre mavenCentral() }}
Building the application: Configuration
To configure your application with your resources and AWS Region:
<?xml version="1.0" encoding="utf-8"?><resources> <string name="identityPoolId">us-east-1:54f2ba88-9390-498d-aaa5-0d97fb7ca3bd</string> <string name="mapName">ExampleMap</string> <string name="awsRegion">us-east-1</string></resources>
Building the application: Activity layout
Edit app/src/main/res/layout/activity_main.xml:
• Add a MapView, which renders the map. This will also set the map's initial center point.
• Add a TextView, which displays attribution.
<?xml version="1.0" encoding="utf-8"?><androidx.constraintlayout.widget.ConstraintLayout xmlns:android="http://schemas.android.com/apk/res/android" xmlns:app="http://schemas.android.com/apk/res-auto" xmlns:tools="http://schemas.android.com/tools"
85

Amazon Location Service Developer GuideDisplaying maps
android:layout_width="match_parent" android:layout_height="match_parent" tools:context=".MainActivity"> <com.mapbox.mapboxsdk.maps.MapView android:id="@+id/mapView" android:layout_width="match_parent" android:layout_height="match_parent" app:mapbox_cameraTargetLat="49.2819" app:mapbox_cameraTargetLng="-123.1187" app:mapbox_cameraZoom="12" app:mapbox_uiAttribution="false" app:mapbox_uiLogo="false" /> <TextView android:id="@+id/attributionView" android:layout_width="wrap_content" android:layout_height="wrap_content" android:background="#80808080" android:padding="5sp" android:textColor="@android:color/black" android:textSize="10sp" app:layout_constraintBottom_toBottomOf="parent" app:layout_constraintEnd_toEndOf="parent" tools:ignore="SmallSp" /></androidx.constraintlayout.widget.ConstraintLayout>
NoteYou must provide word mark or text attribution for each data provider that you use, either onyour application or your documentation. Attribution strings are included in the style descriptorresponse under the sources.esri.attribution and sources.here.attribution keys.When using Amazon Location resources with data providers, make sure to read the service termsand conditions.
Building the application: Request transformation
Create a class named SigV4Interceptor to intercept AWS requests and sign them using SignatureVersion 4. This will be registered with the HTTP client used to fetch map resources when the MainActivity is created.
package aws.location.demo.okhttp import com.amazonaws.DefaultRequestimport com.amazonaws.auth.AWS4Signerimport com.amazonaws.auth.AWSCredentialsProviderimport com.amazonaws.http.HttpMethodNameimport com.amazonaws.util.IOUtilsimport okhttp3.HttpUrlimport okhttp3.Interceptorimport okhttp3.Requestimport okhttp3.Responseimport okio.Bufferimport java.io.ByteArrayInputStreamimport java.net.URI class SigV4Interceptor( private val credentialsProvider: AWSCredentialsProvider, private val serviceName: String) : Interceptor { override fun intercept(chain: Interceptor.Chain): Response { val originalRequest = chain.request() if (originalRequest.url().host().contains("amazonaws.com")) {
86

Amazon Location Service Developer GuideDisplaying maps
val signer = if (originalRequest.url().encodedPath().contains("@")) { // the presence of "@" indicates that it doesn't need to be double URL-encoded AWS4Signer(false) } else { AWS4Signer() } val awsRequest = toAWSRequest(originalRequest, serviceName) signer.setServiceName(serviceName) signer.sign(awsRequest, credentialsProvider.credentials) return chain.proceed(toSignedOkHttpRequest(awsRequest, originalRequest)) } return chain.proceed(originalRequest) } companion object { fun toAWSRequest(request: Request, serviceName: String): DefaultRequest<Any> { // clone the request (AWS-style) so that it can be populated with credentials val dr = DefaultRequest<Any>(serviceName) // copy request info dr.httpMethod = HttpMethodName.valueOf(request.method()) with(request.url()) { dr.resourcePath = uri().path dr.endpoint = URI.create("${scheme()}://${host()}") // copy parameters for (p in queryParameterNames()) { if (p != "") { dr.addParameter(p, queryParameter(p)) } } } // copy headers for (h in request.headers().names()) { dr.addHeader(h, request.header(h)) } // copy the request body val bodyBytes = request.body()?.let { body -> val buffer = Buffer() body.writeTo(buffer) IOUtils.toByteArray(buffer.inputStream()) } dr.content = ByteArrayInputStream(bodyBytes ?: ByteArray(0)) return dr } fun toSignedOkHttpRequest( awsRequest: DefaultRequest<Any>, originalRequest: Request ): Request { // copy signed request back into an OkHttp Request val builder = Request.Builder() // copy headers from the signed request for ((k, v) in awsRequest.headers) { builder.addHeader(k, v) }
87

Amazon Location Service Developer GuideDisplaying maps
// start building an HttpUrl val urlBuilder = HttpUrl.Builder() .host(awsRequest.endpoint.host) .scheme(awsRequest.endpoint.scheme) .encodedPath(awsRequest.resourcePath) // copy parameters from the signed request for ((k, v) in awsRequest.parameters) { urlBuilder.addQueryParameter(k, v) } return builder.url(urlBuilder.build()) .method(originalRequest.method(), originalRequest.body()) .build() } }}
Building the application: Main activity
The Main Activity is responsible for initializing the views that will be displayed to users. This involves:
• Instantiating an Amazon Cognito CredentialsProvider.• Registering the Signature Version 4 interceptor.• Configuring the map by pointing it at a map style descriptor, and displaying appropriate attribution.
MainActivity is also responsible for forwarding life cycle events to the map view, allowing it topreserve the active viewport between invocations.
package aws.location.demo.maplibre import android.os.Bundleimport android.widget.TextViewimport androidx.appcompat.app.AppCompatActivityimport aws.location.demo.okhttp.SigV4Interceptorimport com.amazonaws.auth.CognitoCachingCredentialsProviderimport com.amazonaws.regions.Regionsimport com.mapbox.mapboxsdk.Mapboximport com.mapbox.mapboxsdk.maps.MapViewimport com.mapbox.mapboxsdk.maps.Styleimport com.mapbox.mapboxsdk.module.http.HttpRequestUtilimport okhttp3.OkHttpClient private const val SERVICE_NAME = "geo" class MainActivity : AppCompatActivity() { private var mapView: MapView? = null override fun onCreate(savedInstanceState: Bundle?) { super.onCreate(savedInstanceState) // configuration val identityPoolId = getString(R.string.identityPoolId) val region = getString(R.string.awsRegion) val mapName = getString(R.string.mapName) // Credential initialization val credentialProvider = CognitoCachingCredentialsProvider( applicationContext, identityPoolId, Regions.fromName(identityPoolId.split(":").first()) )
88

Amazon Location Service Developer GuideDisplaying maps
// initialize MapLibre Mapbox.getInstance(this, null) HttpRequestUtil.setOkHttpClient( OkHttpClient.Builder() .addInterceptor(SigV4Interceptor(credentialProvider, SERVICE_NAME)) .build() ) // initialize the view setContentView(R.layout.activity_main) // initialize the map view mapView = findViewById(R.id.mapView) mapView?.onCreate(savedInstanceState) mapView?.getMapAsync { map -> map.setStyle( Style.Builder() .fromUri("https://maps.geo.${region}.amazonaws.com/maps/v0/maps/${mapName}/style-descriptor") ) { style -> findViewById<TextView>(R.id.attributionView).text = style.sources.first()?.attribution } } } override fun onStart() { super.onStart() mapView?.onStart() } override fun onResume() { super.onResume() mapView?.onResume() } override fun onPause() { super.onPause() mapView?.onPause() } override fun onStop() { super.onStop() mapView?.onStop() } override fun onSaveInstanceState(outState: Bundle) { super.onSaveInstanceState(outState) mapView?.onSaveInstanceState(outState) } override fun onLowMemory() { super.onLowMemory() mapView?.onLowMemory() } override fun onDestroy() { super.onDestroy() mapView?.onDestroy() }}
Running this application displays a full-screen map in the style of your choosing. This sample is availableas part of the Amazon Location Service samples repository on GitHub.
89

Amazon Location Service Developer GuideDisplaying maps
Using the MapLibre GL Native SDK for iOS with Amazon Location Service
Use MapLibre GL Native SDK for iOS to embed client-side maps into iOS applications.
The MapLibre GL Native SDK for iOS is a library based on Mapbox GL Native, and is compatible withthe styles and tiles provided by the Amazon Location Service Maps API. You can integrate MapLibre GLNative SDK for iOS to embed interactive map views with scalable, customizable vector maps into youriOS applications.
This tutorial describes how to integrate the MapLibre GL Native SDK for iOS with Amazon Location.The sample application for this tutorial is available as part of the Amazon Location Service samplesrepository on GitHub.
Building the application: Initialization
To initialize your application:
1. Create a new Xcode project from the App template.2. Select SwiftUI for its interface.3. Select SwiftUI application for its Life Cycle.4. Select Swift for its language.
Adding MapLibre dependencies using Swift Packages
To add a package dependency to your Xcode project:
1. Navigate to File > Swift Packages > Add Package Dependency.2. Enter the repository URL: https://github.com/maplibre/maplibre-gl-native-
distribution
NoteFor more information about Swift Packages see Adding Package Dependencies to Your Appat Apple.com
3. In your terminal, install CocoaPods:
sudo gem install cocoapods
4. Navigate to your application's project directory and initialize the Podfile with the CocoaPodspackage manager:
pod init
5. Open the Podfile to add AWSCore as a dependency:
platform :ios, '12.0' target 'Amazon Location Service Demo' do use_frameworks! pod 'AWSCore'end
6. Download and install dependencies:
pod install --repo-update
7. Open the Xcode workspace that CocoaPods created:
90

Amazon Location Service Developer GuideDisplaying maps
xed .
Building the application: Configuration
Add the following keys and values to Info.plist to configure the application:
Key Value
AWSRegion us-east-1
IdentityPoolId us-east-1:54f2ba88-9390-498d-aaa5-0d97fb7ca3bd
MapName ExampleMap
Building the application: ContentView layout
To render the map, edit ContentView.swift:
• Add a MapView which renders the map.• Add a TextField which displays attribution.
This also sets the map's initial center point.
import SwiftUI struct ContentView: View { @State private var attribution = "" var body: some View { MapView(attribution: $attribution) .centerCoordinate(.init(latitude: 49.2819, longitude: -123.1187)) .zoomLevel(12) .edgesIgnoringSafeArea(.all) .overlay( TextField("", text: $attribution) .disabled(true) .font(.system(size: 12, weight: .light, design: .default)) .foregroundColor(.black) .background(Color.init(Color.RGBColorSpace.sRGB, white: 0.5, opacity: 0.5)) .cornerRadius(1), alignment: .bottomTrailing) }} struct ContentView_Previews: PreviewProvider { static var previews: some View { ContentView() }}
NoteYou must provide word mark or text attribution for each data provider that you use, either onyour application or your documentation. Attribution strings are included in the style descriptorresponse under the sources.esri.attribution and sources.here.attribution keys.
91

Amazon Location Service Developer GuideDisplaying maps
When using Amazon Location resources with data providers, make sure to read the service termsand conditions.
Building the application: Request transformation
Create a new Swift file named AWSSignatureV4Delegate.swift containing the following classdefinition to intercept AWS requests and sign them using Signature Version 4. An instance of this classwill be assigned as the offline storage delegate, which is also responsible for rewriting URLs, in the mapview.
import AWSCoreimport Mapbox class AWSSignatureV4Delegate : NSObject, MGLOfflineStorageDelegate { private let region: AWSRegionType private let identityPoolId: String private let credentialsProvider: AWSCredentialsProvider init(region: AWSRegionType, identityPoolId: String) { self.region = region self.identityPoolId = identityPoolId self.credentialsProvider = AWSCognitoCredentialsProvider(regionType: region, identityPoolId: identityPoolId) super.init() } class func doubleEncode(path: String) -> String? { return path.addingPercentEncoding(withAllowedCharacters: .urlPathAllowed)? .addingPercentEncoding(withAllowedCharacters: .urlPathAllowed) } func offlineStorage(_ storage: MGLOfflineStorage, urlForResourceOf kind: MGLResourceKind, with url: URL) -> URL { if url.host?.contains("amazonaws.com") != true { // not an AWS URL return url } // URL-encode spaces, etc. let keyPath = String(url.path.dropFirst()) guard let percentEncodedKeyPath = keyPath.addingPercentEncoding(withAllowedCharacters: .urlPathAllowed) else { print("Invalid characters in path '\(keyPath)'; unsafe to sign") return url } let endpoint = AWSEndpoint(region: region, serviceName: "geo", url: url) let requestHeaders: [String: String] = ["host": endpoint!.hostName] // sign the URL let task = AWSSignatureV4Signer .generateQueryStringForSignatureV4( withCredentialProvider: credentialsProvider, httpMethod: .GET, expireDuration: 60, endpoint: endpoint!, // workaround for https://github.com/aws-amplify/aws-sdk-ios/issues/3215 keyPath: AWSSignatureV4Delegate.doubleEncode(path: percentEncodedKeyPath), requestHeaders: requestHeaders, requestParameters: .none, signBody: true) task.waitUntilFinished() if let error = task.error as NSError? {
92

Amazon Location Service Developer GuideDisplaying maps
print("Error occurred: \(error)") } if let result = task.result { var urlComponents = URLComponents(url: (result as URL), resolvingAgainstBaseURL: false)! // re-use the original path; workaround for https://github.com/aws-amplify/aws-sdk-ios/issues/3215 urlComponents.path = url.path // have Mapbox GL fetch the signed URL return (urlComponents.url)! } // fall back to an unsigned URL return url }}
Building the application: Map view
The Map View is responsible for initializing an instance of AWSSignatureV4Delegate and configuringthe underlying MGLMapView, which fetches resources and renders the map. It also handles propagatingattribution strings from the style descriptor's source back to the ContentView.
Create a new Swift file named MapView.swift containing the following struct definition:
import SwiftUIimport AWSCoreimport Mapbox struct MapView: UIViewRepresentable { @Binding var attribution: String private var mapView: MGLMapView private var signingDelegate: MGLOfflineStorageDelegate init(attribution: Binding<String>) { let regionName = Bundle.main.object(forInfoDictionaryKey: "AWSRegion") as! String let identityPoolId = Bundle.main.object(forInfoDictionaryKey: "IdentityPoolId") as! String let mapName = Bundle.main.object(forInfoDictionaryKey: "MapName") as! String let region = (regionName as NSString).aws_regionTypeValue() // MGLOfflineStorage doesn't take ownership, so this needs to be a member here signingDelegate = AWSSignatureV4Delegate(region: region, identityPoolId: identityPoolId) // register a delegate that will handle SigV4 signing MGLOfflineStorage.shared.delegate = signingDelegate mapView = MGLMapView( frame: .zero, styleURL: URL(string: "https://maps.geo.\(regionName).amazonaws.com/maps/v0/maps/\(mapName)/style-descriptor")) _attribution = attribution } func makeCoordinator() -> Coordinator { Coordinator($attribution) }
93

Amazon Location Service Developer GuideDisplaying maps
class Coordinator: NSObject, MGLMapViewDelegate { var attribution: Binding<String> init(_ attribution: Binding<String>) { self.attribution = attribution } func mapView(_ mapView: MGLMapView, didFinishLoading style: MGLStyle) { let source = style.sources.first as? MGLVectorTileSource let attribution = source?.attributionInfos.first self.attribution.wrappedValue = attribution?.title.string ?? "" } } // MARK: - UIViewRepresentable protocol func makeUIView(context: UIViewRepresentableContext<MapView>) -> MGLMapView { mapView.delegate = context.coordinator mapView.logoView.isHidden = true mapView.attributionButton.isHidden = true return mapView } func updateUIView(_ uiView: MGLMapView, context: UIViewRepresentableContext<MapView>) { } // MARK: - MGLMapView proxy func centerCoordinate(_ centerCoordinate: CLLocationCoordinate2D) -> MapView { mapView.centerCoordinate = centerCoordinate return self } func zoomLevel(_ zoomLevel: Double) -> MapView { mapView.zoomLevel = zoomLevel return self }}
Running this application displays a full-screen map in the style of your choosing. This sample is availableas part of the Amazon Location Service samples repository on GitHub.
Using Tangram with Amazon Location ServiceThis section provides the following tutorials on how to integrate Tangram with Amazon Location.
ImportantThe Tangram styles in the following tutorials are only compatible with Amazon Location mapresources configured with the VectorHereContrast style.
The following is an example of an AWS CLI command to create a new map resource calledTangramExampleMap using the VectorHereContrast style:
aws --region us-east-1 \ location \ create-map \ --map-name "TangramExampleMap" \ --configuration "Style=VectorHereContrast"
NoteBilling is determined by your usage. You may incur fees for the use of other AWS services. Formore information, see Amazon Location Service pricing.
94
Amazon Location Service Developer GuideDisplaying maps
Topics• Using Tangram with Amazon Location Service (p. 95)• Using Tangram ES for Android with Amazon Location Service (p. 103)• Using Tangram ES for iOS with Amazon Location Service (p. 108)
Using Tangram with Amazon Location Service
Tangram is a flexible mapping engine, designed for real-time rendering of 2D and 3D maps from vectortiles. It can be used with Mapzen-designed styles and the HERE tiles provided by the Amazon LocationService Maps API. This guide describes how to integrate Tangram with Amazon Location within abasic HTML/JavaScript application, although the same libraries and techniques also apply when usingframeworks like React and Angular.
Tangram is built atop Leaflet, an open-source JavaScript library for mobile-friendly interactive maps.This means that many Leaflet-compatible plugins and controls also work with Tangram.
Tangram styles built to work with the Tilezen schema are largely compatible with Amazon Location whenusing maps from HERE. These include:
• Bubble Wrap – A full-featured wayfinding style with helpful icons for points of interest• Cinnabar – A classic look and go-to for general mapping applications• Refill – A minimalist map style designed for data visualization overlays, inspired by the seminal Toner
style by Stamen Design• Tron – An exploration of scale transformations in the visual language of TRON• Walkabout – An outdoor-focused style that's perfect for hiking or getting out and about
This guide describes how to integrate Tangram with Amazon Location within a basic HTML/JavaScriptapplication using the Tangram Style called Bubble Wrap. This sample is available as part of the AmazonLocation Service samples repository on GitHub.
While other Tangram styles are best accompanied by raster tiles, which encode terrain information, thisfeature is not yet supported by Amazon Location.
ImportantThe Tangram styles in the following tutorial are only compatible with Amazon Location mapresources configured with the VectorHereContrast style.
Building the application: Scaffolding
The application is an HTML page with JavaScript to build the map on your web application. Create anHTML page (index.html) and create the map's container:
• Enter a div element with an id of map to apply the map's dimensions to the map view.• The dimensions are inherited from the viewport.
<html> <head> <style> body { margin: 0; } #map { height: 100vh; /* 100% of viewport height */ } </style>
95

Amazon Location Service Developer GuideDisplaying maps
</head> <body> <!-- map container --> <div id="map" /> </body></html>
Building the application: Adding dependencies
Add the following dependencies:
• Leaflet and its associated CSS.• Tangram.• AWS SDK for JavaScript.
<!-- CSS dependencies --><link rel="stylesheet" href="https://unpkg.com/[email protected]/dist/leaflet.css" integrity="sha512-xodZBNTC5n17Xt2atTPuE1HxjVMSvLVW9ocqUKLsCC5CXdbqCmblAshOMAS6/keqq/sMZMZ19scR4PsZChSR7A==" crossorigin=""/><!-- JavaScript dependencies --><script src="https://unpkg.com/[email protected]/dist/leaflet.js"></script><script src="https://unpkg.com/tangram"></script><script src="https://sdk.amazonaws.com/js/aws-sdk-2.784.0.min.js"></script><script> // application-specific code</script>
This creates an empty page with the necessary prerequisites. The next step guides you through writingthe JavaScript code for your application.
Building the application: Configuration
To configure your application with your resources and credentials:
1. Enter the names and identifiers of your resources.
// Cognito Identity Pool IDconst identityPoolId = "us-east-1:54f2ba88-9390-498d-aaa5-0d97fb7ca3bd";// Amazon Location Service map name; must be HERE-backedconst mapName = "TangramExampleMap";
2. Instantiate a credential provider using the unauthenticated identity pool you created in Using maps- Step 2, Set up authentication (p. 75). Since this uses credentials outside the normal AWS SDKwork flow, sessions expire after one hour.
// extract the region from the Identity Pool ID; this will be used for both Amazon Cognito and Amazon LocationAWS.config.region = identityPoolId.split(":", 1)[0]; // instantiate a Cognito-backed credential providerconst credentials = new AWS.CognitoIdentityCredentials({ IdentityPoolId: identityPoolId,});
3. While Tangram allows you to override the URL(s) used to fetch tiles, it doesn't include the ability tointercept requests so that they can be signed.
96

Amazon Location Service Developer GuideDisplaying maps
To work around this, override sources.mapzen.url to point to Amazon Location using a synthetichost name amazon.location, which will be handled by a service worker. The following is anexample of scene configuration using Bubble Wrap:
const scene = { import: [ // Bubble Wrap style "https://www.nextzen.org/carto/bubble-wrap-style/10/bubble-wrap-style.zip", "https://www.nextzen.org/carto/bubble-wrap-style/10/themes/label-7.zip", "https://www.nextzen.org/carto/bubble-wrap-style/10/themes/bubble-wrap-road-shields-usa.zip", "https://www.nextzen.org/carto/bubble-wrap-style/10/themes/bubble-wrap-road-shields-international.zip", ], // override values beneath the `sources` key in the style above sources: { mapzen: { // point at Amazon Location using a synthetic URL, which will be handled by the service // worker url: `https://amazon.location/${mapName}/{z}/{x}/{y}`, }, // effectively disable raster tiles containing encoded normals normals: { max_zoom: 0, }, "normals-elevation": { max_zoom: 0, }, },};
Building the application: Request transformation
To register and initialize the service worker, create a registerServiceWorker function to be calledbefore the map is initialized. This registers the JavaScript code provided in a separate file called sw.js asthe service worker controlling index.html.
Credentials are loaded from Amazon Cognito and are passed into the service worker alongside theRegion to provide information to sign tile requests with Signature Version 4.
/** * Register a service worker that will rewrite and sign requests using Signature Version 4. */async function registerServiceWorker() { if ("serviceWorker" in navigator) { try { const reg = await navigator.serviceWorker.register("./sw.js"); // refresh credentials from Amazon Cognito await credentials.refreshPromise(); await reg.active.ready; if (navigator.serviceWorker.controller == null) { // trigger a navigate event to active the controller for this page window.location.reload(); } // pass credentials to the service worker reg.active.postMessage({
97

Amazon Location Service Developer GuideDisplaying maps
credentials: { accessKeyId: credentials.accessKeyId, secretAccessKey: credentials.secretAccessKey, sessionToken: credentials.sessionToken, }, region: AWS.config.region, }); } catch (error) { console.error("Service worker registration failed:", error); } } else { console.warn("Service worker support is required for this example"); }}
The Service Worker implementation in sw.js listens for message events to pick up credential andRegion configuration changes. It also acts as a proxy server by listening for fetch events. fetch eventstargeting the amazon.location synthetic host name will be rewritten to target the appropriateAmazon Location API and signed using Amplify Core's Signer.
// sw.jsself.importScripts( "https://unpkg.com/@aws-amplify/[email protected]/dist/aws-amplify-core.min.js"); const { Signer } = aws_amplify_core; let credentials;let region; self.addEventListener("install", (event) => { // install immediately event.waitUntil(self.skipWaiting());}); self.addEventListener("activate", (event) => { // control clients ASAP event.waitUntil(self.clients.claim());}); self.addEventListener("message", (event) => { const { data: { credentials: newCredentials, region: newRegion }, } = event; if (newCredentials != null) { credentials = newCredentials; } if (newRegion != null) { region = newRegion; }}); async function signedFetch(request) { const url = new URL(request.url); const path = url.pathname.slice(1).split("/"); // update URL to point to Amazon Location url.pathname = `/maps/v0/maps/${path[0]}/tiles/${path.slice(1).join("/")}`; url.host = `maps.geo.${region}.amazonaws.com`; // strip params (Tangram generates an empty api_key param) url.search = "";
98

Amazon Location Service Developer GuideDisplaying maps
const signed = Signer.signUrl(url.toString(), { access_key: credentials.accessKeyId, secret_key: credentials.secretAccessKey, session_token: credentials.sessionToken, }); return fetch(signed);} self.addEventListener("fetch", (event) => { const { request } = event; // match the synthetic hostname we're telling Tangram to use if (request.url.includes("amazon.location")) { return event.respondWith(signedFetch(request)); } // fetch normally return event.respondWith(fetch(request));});
To automatically renew credentials and send them to the service worker before they expire, use thefollowing function within index.html:
async function refreshCredentials() { await credentials.refreshPromise(); if ("serviceWorker" in navigator) { const controller = navigator.serviceWorker.controller; controller.postMessage({ credentials: { accessKeyId: credentials.accessKeyId, secretAccessKey: credentials.secretAccessKey, sessionToken: credentials.sessionToken, }, }); } else { console.warn("Service worker support is required for this example."); } // schedule the next credential refresh when they're about to expire setTimeout(refreshCredentials, credentials.expireTime - new Date());}
Building the application: Map initialization
For the map to display after the page is loaded, you must initialize the map. You have the option toadjust the initial map location, add additional controls, and overlay data.
NoteYou must provide word mark or text attribution for each data provider that you use, either onyour application or your documentation. Attribution strings are included in the style descriptorresponse under the sources.esri.attribution and sources.here.attribution keys.Because Tangram doesn't request these resources, and is only compatible with maps from HERE,use "© 2020 HERE". When using Amazon Location resources with data providers, make sure toread the service terms and conditions.
/** * Initialize a map. */async function initializeMap() { // register the service worker to handle requests to https://amazon.location
99

Amazon Location Service Developer GuideDisplaying maps
await registerServiceWorker(); // Initialize the map const map = L.map("map").setView([49.2819, -123.1187], 10); Tangram.leafletLayer({ scene, }).addTo(map); map.attributionControl.setPrefix(""); map.attributionControl.addAttribution("© 2020 HERE");} initializeMap();
Running the application
To run this sample, you can:
• Use a host that supports HTTPS,• Use a local web server to comply with service worker security restrictions.
To use a local web server, you can use npx, because it's installed as a part of Node.js. You can use npxserve from within the same directory as index.html and sw.js. This serves the application onlocalhost:5000.
The following is the index.html file:
<!-- index.html --><html> <head> <link rel="stylesheet" href="https://unpkg.com/[email protected]/dist/leaflet.css" integrity="sha512-xodZBNTC5n17Xt2atTPuE1HxjVMSvLVW9ocqUKLsCC5CXdbqCmblAshOMAS6/keqq/sMZMZ19scR4PsZChSR7A==" crossorigin="" /> <style> body { margin: 0; } #map { height: 100vh; } </style> </head> <body> <div id="map" /> <script src="https://unpkg.com/[email protected]/dist/leaflet.js"></script> <script src="https://unpkg.com/tangram"></script> <script src="https://sdk.amazonaws.com/js/aws-sdk-2.784.0.min.js"></script> <script> // configuration // Cognito Identity Pool ID const identityPoolId = "<Identity Pool ID>"; // Amazon Location Service Map name; must be HERE-backed const mapName = "<Map name>"; AWS.config.region = identityPoolId.split(":")[0]; // instantiate a credential provider credentials = new AWS.CognitoIdentityCredentials({
100

Amazon Location Service Developer GuideDisplaying maps
IdentityPoolId: identityPoolId, }); const scene = { import: [ // Bubble Wrap style "https://www.nextzen.org/carto/bubble-wrap-style/10/bubble-wrap-style.zip", "https://www.nextzen.org/carto/bubble-wrap-style/10/themes/label-7.zip", "https://www.nextzen.org/carto/bubble-wrap-style/10/themes/bubble-wrap-road-shields-usa.zip", "https://www.nextzen.org/carto/bubble-wrap-style/10/themes/bubble-wrap-road-shields-international.zip", ], // override values beneath the `sources` key in the style above sources: { mapzen: { // point at Amazon Location using a synthetic URL, which will be handled by the service // worker url: `https://amazon.location/${mapName}/{z}/{x}/{y}`, }, // effectively disable raster tiles containing encoded normals normals: { max_zoom: 0, }, "normals-elevation": { max_zoom: 0, }, }, }; /** * Register a service worker that will rewrite and sign requests using Signature Version 4. */ async function registerServiceWorker() { if ("serviceWorker" in navigator) { try { const reg = await navigator.serviceWorker.register("./sw.js"); // refresh credentials from Amazon Cognito await credentials.refreshPromise(); await reg.active.ready; if (navigator.serviceWorker.controller == null) { // trigger a navigate event to active the controller for this page window.location.reload(); } // pass credentials to the service worker reg.active.postMessage({ credentials: { accessKeyId: credentials.accessKeyId, secretAccessKey: credentials.secretAccessKey, sessionToken: credentials.sessionToken, }, region: AWS.config.region, }); } catch (error) { console.error("Service worker registration failed:", error); } } else { console.warn("Service Worker support is required for this example"); } }
101

Amazon Location Service Developer GuideDisplaying maps
/** * Initialize a map. */ async function initializeMap() { // register the service worker to handle requests to https://amazon.location await registerServiceWorker(); // Initialize the map const map = L.map("map").setView([49.2819, -123.1187], 10); Tangram.leafletLayer({ scene, }).addTo(map); map.attributionControl.setPrefix(""); map.attributionControl.addAttribution("© 2020 HERE"); } initializeMap(); </script> </body></html>
The following is the sw.js file:
// sw.jsself.importScripts( "https://unpkg.com/@aws-amplify/[email protected]/dist/aws-amplify-core.min.js"); const { Signer } = aws_amplify_core; let credentials;let region; self.addEventListener("install", (event) => { // install immediately event.waitUntil(self.skipWaiting());}); self.addEventListener("activate", (event) => { // control clients ASAP event.waitUntil(self.clients.claim());}); self.addEventListener("message", (event) => { const { data: { credentials: newCredentials, region: newRegion }, } = event; if (newCredentials != null) { credentials = newCredentials; } if (newRegion != null) { region = newRegion; }}); async function signedFetch(request) { const url = new URL(request.url); const path = url.pathname.slice(1).split("/"); // update URL to point to Amazon Location url.pathname = `/maps/v0/maps/${path[0]}/tiles/${path.slice(1).join("/")}`; url.host = `maps.geo.${region}.amazonaws.com`;
102

Amazon Location Service Developer GuideDisplaying maps
// strip params (Tangram generates an empty api_key param) url.search = ""; const signed = Signer.signUrl(url.toString(), { access_key: credentials.accessKeyId, secret_key: credentials.secretAccessKey, session_token: credentials.sessionToken, }); return fetch(signed);} self.addEventListener("fetch", (event) => { const { request } = event; // match the synthetic hostname we're telling Tangram to use if (request.url.includes("amazon.location")) { return event.respondWith(signedFetch(request)); } // fetch normally return event.respondWith(fetch(request));});
This sample is available as part of the Amazon Location Service samples repository on GitHub.
Using Tangram ES for Android with Amazon Location Service
Tangram ES is a C++ library for rendering 2D and 3D maps from vector data using OpenGL ES. It's thenative counterpart to Tangram.
Tangram styles built to work with the Tilezen schema are largely compatible with Amazon Location whenusing maps from HERE. These include:
• Bubble Wrap – A full-featured wayfinding style with helpful icons for points of interest.• Cinnabar – A classic look and go-to for general mapping applications.• Refill – A minimalist map style designed for data visualization overlays, inspired by the seminal Toner
style by Stamen Design.• Tron – An exploration of scale transformations in the visual language of TRON.• Walkabout – An outdoor-focused style that's perfect for hiking or getting out and about.
This guide describes how to integrate Tangram ES for Android with Amazon Location using the Tangramstyle called Cinnabar. This sample is available as part of the Amazon Location Service samples repositoryon GitHub.
While other Tangram styles are best accompanied by raster tiles, which encode terrain information, thisfeature isn't yet supported by Amazon Location.
ImportantThe Tangram styles in the following tutorial are only compatible with Amazon Location mapresources configured with the VectorHereContrast style.
Building the application: Initialization
To initialize your application:
1. Create a new Android Studio project from the Empty Activity template.2. Ensure that Kotlin is selected for the project language.3. Select a Minimum SDK of API 16: Android 4.1 (Jelly Bean) or newer.4. Open Project Structure to select File, Project Structure..., and choose the Dependencies section.
103

Amazon Location Service Developer GuideDisplaying maps
5. With <All Modules> selected, choose the + button to add a new Library Dependency.
6. Add AWS Android SDK version 2.19.1 or later. For example: com.amazonaws:aws-android-sdk-core:2.19.1
7. Add Tangram version 0.13.0 or later. For example: com.mapzen.tangram:tangram:0.13.0.
NoteSearching for Tangram: com.mapzen.tangram:tangram:0.13.0 will generate amessage that it's "not found", but choosing OK will allow it to be added.
Building the application: Configuration
To configure your application with your resources and AWS Region:
1. Create app/src/main/res/values/configuration.xml.
2. Enter the names and identifiers of your resources, and also the AWS Region they were created in:
<?xml version="1.0" encoding="utf-8"?><resources> <string name="identityPoolId">us-east-1:54f2ba88-9390-498d-aaa5-0d97fb7ca3bd</string> <string name="mapName">TangramExampleMap</string> <string name="awsRegion">us-east-1</string> <string name="sceneUrl">https://www.nextzen.org/carto/cinnabar-style/9/cinnabar-style.zip</string> <string name="attribution">© 2020 HERE</string></resources>
Building the application: Activity layout
Edit app/src/main/res/layout/activity_main.xml:
• Add a MapView, which renders the map. This will also set the map's initial center point.
• Add a TextView, which displays attribution.
This will also set the map's initial center point.
NoteYou must provide word mark or text attribution for each data provider that you use, either onyour application or your documentation. Attribution strings are included in the style descriptorresponse under the sources.esri.attribution and sources.here.attribution keys.Because Tangram doesn't request these resources, and is only compatible with maps from HERE,use "© 2020 HERE". When using Amazon Location resources with data providers, make sure toread the service terms and conditions.
<?xml version="1.0" encoding="utf-8"?><androidx.constraintlayout.widget.ConstraintLayout xmlns:android="http://schemas.android.com/apk/res/android" xmlns:app="http://schemas.android.com/apk/res-auto" xmlns:tools="http://schemas.android.com/tools" android:layout_width="match_parent" android:layout_height="match_parent" tools:context=".MainActivity"> <com.mapzen.tangram.MapView android:id="@+id/map" android:layout_height="match_parent" android:layout_width="match_parent" />
104

Amazon Location Service Developer GuideDisplaying maps
<TextView android:id="@+id/attributionView" android:layout_width="wrap_content" android:layout_height="wrap_content" android:background="#80808080" android:padding="5sp" android:textColor="@android:color/black" android:textSize="10sp" app:layout_constraintBottom_toBottomOf="parent" app:layout_constraintEnd_toEndOf="parent" tools:ignore="SmallSp" /></androidx.constraintlayout.widget.ConstraintLayout>
Building the application: Request transformation
Create a class named SigV4Interceptor to intercept AWS requests and sign them using SignatureVersion 4. This will be registered with the HTTP client used to fetch map resources when the MainActivity is created.
package aws.location.demo.okhttp import com.amazonaws.DefaultRequestimport com.amazonaws.auth.AWS4Signerimport com.amazonaws.auth.AWSCredentialsProviderimport com.amazonaws.http.HttpMethodNameimport com.amazonaws.util.IOUtilsimport okhttp3.HttpUrlimport okhttp3.Interceptorimport okhttp3.Requestimport okhttp3.Responseimport okio.Bufferimport java.io.ByteArrayInputStreamimport java.net.URI class SigV4Interceptor( private val credentialsProvider: AWSCredentialsProvider, private val serviceName: String) : Interceptor { override fun intercept(chain: Interceptor.Chain): Response { val originalRequest = chain.request() if (originalRequest.url().host().contains("amazonaws.com")) { val signer = if (originalRequest.url().encodedPath().contains("@")) { // the presence of "@" indicates that it doesn't need to be double URL-encoded AWS4Signer(false) } else { AWS4Signer() } val awsRequest = toAWSRequest(originalRequest, serviceName) signer.setServiceName(serviceName) signer.sign(awsRequest, credentialsProvider.credentials) return chain.proceed(toSignedOkHttpRequest(awsRequest, originalRequest)) } return chain.proceed(originalRequest) } companion object { fun toAWSRequest(request: Request, serviceName: String): DefaultRequest<Any> { // clone the request (AWS-style) so that it can be populated with credentials val dr = DefaultRequest<Any>(serviceName)
105

Amazon Location Service Developer GuideDisplaying maps
// copy request info dr.httpMethod = HttpMethodName.valueOf(request.method()) with(request.url()) { dr.resourcePath = uri().path dr.endpoint = URI.create("${scheme()}://${host()}") // copy parameters for (p in queryParameterNames()) { if (p != "") { dr.addParameter(p, queryParameter(p)) } } } // copy headers for (h in request.headers().names()) { dr.addHeader(h, request.header(h)) } // copy the request body val bodyBytes = request.body()?.let { body -> val buffer = Buffer() body.writeTo(buffer) IOUtils.toByteArray(buffer.inputStream()) } dr.content = ByteArrayInputStream(bodyBytes ?: ByteArray(0)) return dr } fun toSignedOkHttpRequest( awsRequest: DefaultRequest<Any>, originalRequest: Request ): Request { // copy signed request back into an OkHttp Request val builder = Request.Builder() // copy headers from the signed request for ((k, v) in awsRequest.headers) { builder.addHeader(k, v) } // start building an HttpUrl val urlBuilder = HttpUrl.Builder() .host(awsRequest.endpoint.host) .scheme(awsRequest.endpoint.scheme) .encodedPath(awsRequest.resourcePath) // copy parameters from the signed request for ((k, v) in awsRequest.parameters) { urlBuilder.addQueryParameter(k, v) } return builder.url(urlBuilder.build()) .method(originalRequest.method(), originalRequest.body()) .build() } }}
Building the application: Main activity
The Main Activity is responsible for initializing the views that will be displayed to users. This involves:
106

Amazon Location Service Developer GuideDisplaying maps
• Instantiating an Amazon Cognito CredentialsProvider.
• Registering the Signature Version 4 interceptor.
• Configuring the map by pointing it at a map style, overriding tile URLs, and displaying appropriateattribution.
MainActivity is also responsible for forwarding life cycle events to the map view.
package aws.location.demo.tangram import android.os.Bundleimport android.widget.TextViewimport androidx.appcompat.app.AppCompatActivityimport aws.location.demo.okhttp.SigV4Interceptorimport com.amazonaws.auth.CognitoCachingCredentialsProviderimport com.amazonaws.regions.Regionsimport com.mapzen.tangram.*import com.mapzen.tangram.networking.DefaultHttpHandlerimport com.mapzen.tangram.networking.HttpHandler private const val SERVICE_NAME = "geo" class MainActivity : AppCompatActivity(), MapView.MapReadyCallback { private var mapView: MapView? = null override fun onCreate(savedInstanceState: Bundle?) { super.onCreate(savedInstanceState) setContentView(R.layout.activity_main) mapView = findViewById(R.id.map) mapView?.getMapAsync(this, getHttpHandler()) findViewById<TextView>(R.id.attributionView).text = getString(R.string.attribution) } override fun onMapReady(mapController: MapController?) { val sceneUpdates = arrayListOf( SceneUpdate( "sources.mapzen.url", "https://maps.geo.${getString(R.string.awsRegion)}.amazonaws.com/maps/v0/maps/${ getString( R.string.mapName ) }/tiles/{z}/{x}/{y}" ) ) mapController?.let { map -> map.updateCameraPosition( CameraUpdateFactory.newLngLatZoom( LngLat(-123.1187, 49.2819), 12F ) ) map.loadSceneFileAsync( getString(R.string.sceneUrl), sceneUpdates ) } } private fun getHttpHandler(): HttpHandler {
107

Amazon Location Service Developer GuideDisplaying maps
val builder = DefaultHttpHandler.getClientBuilder() val credentialsProvider = CognitoCachingCredentialsProvider( applicationContext, getString(R.string.identityPoolId), Regions.US_EAST_1 ) return DefaultHttpHandler( builder.addInterceptor( SigV4Interceptor( credentialsProvider, SERVICE_NAME ) ) ) } override fun onResume() { super.onResume() mapView?.onResume() } override fun onPause() { super.onPause() mapView?.onPause() } override fun onLowMemory() { super.onLowMemory() mapView?.onLowMemory() } override fun onDestroy() { super.onDestroy() mapView?.onDestroy() }}
Running this application displays a full-screen map in the style of your choosing. This sample is availableas part of the Amazon Location Service samples repository on GitHub.
Using Tangram ES for iOS with Amazon Location Service
Tangram ES is a C++ library for rendering 2D and 3D maps from vector data using OpenGL ES. It's thenative counterpart to Tangram.
Tangram styles built to work with the Tilezen schema are largely compatible with Amazon Location whenusing maps from HERE. These include:
• Bubble Wrap – A full-featured wayfinding style with helpful icons for points of interest
• Cinnabar – A classic look and go-to for general mapping applications
• Refill – A minimalist map style designed for data visualization overlays, inspired by the seminal Tonerstyle by Stamen Design
• Tron – An exploration of scale transformations in the visual language of TRON
• Walkabout – An outdoor-focused style that's perfect for hiking or getting out and about
This guide describes how to integrate Tangram ES for iOS with Amazon Location using the Tangram stylecalled Cinnabar. This sample is available as part of the Amazon Location Service samples repository onGitHub.
108

Amazon Location Service Developer GuideDisplaying maps
While other Tangram styles are best accompanied by raster tiles, which encode terrain information, thisfeature isn't yet supported by Amazon Location.
ImportantThe Tangram styles in the following tutorial are only compatible with Amazon Location mapresources configured with the VectorHereContrast style.
Building the application: Initialization
To initialize the application:
1. Create a new Xcode project from the App template.2. Select SwiftUI for its interface.3. Select SwiftUI application for its Life Cycle.4. Select Swift for its language.
Building the application: Add dependencies
To add dependencies, you can use a dependency manager, such as CocoaPods:
1. In your terminal, install CocoaPods:
sudo gem install cocoapods
2. Navigate to your application's project directory and initialize the Podfile with the CocoaPodspackage manager:
pod init
3. Open the Podfile to add AWSCore and Tangram-es as dependencies:
platform :ios, '12.0' target 'Amazon Location Service Demo' do use_frameworks! pod 'AWSCore' pod 'Tangram-es'end
4. Download and install dependencies:
pod install --repo-update
5. Open the Xcode workspace that CocoaPods created:
xed .
Building the application: Configuration
Add the following keys and values to Info.plist to configure the application and disable telemetry:
Key Value
AWSRegion us-east-1
109

Amazon Location Service Developer GuideDisplaying maps
Key Value
IdentityPoolId us-east-1:54f2ba88-9390-498d-aaa5-0d97fb7ca3bd
MapName ExampleMap
SceneURL https://www.nextzen.org/carto/cinnabar-style/9/cinnabar-style.zip
Building the application: ContentView layout
To render the map, edit ContentView.swift:
• Add a MapView which renders the map.
• Add a TextField which displays attribution.
This also sets the map's initial center point.
NoteYou must provide word mark or text attribution for each data provider that you use, either onyour application or your documentation. Attribution strings are included in the style descriptorresponse under the sources.esri.attribution and sources.here.attribution keys.When using Amazon Location resources with data providers, make sure to read the service termsand conditions.
import SwiftUIimport TangramMap struct ContentView: View { var body: some View { MapView() .cameraPosition(TGCameraPosition( center: CLLocationCoordinate2DMake(49.2819, -123.1187), zoom: 10, bearing: 0, pitch: 0)) .edgesIgnoringSafeArea(.all) .overlay( Text("© 2020 HERE") .disabled(true) .font(.system(size: 12, weight: .light, design: .default)) .foregroundColor(.black) .background(Color.init(Color.RGBColorSpace.sRGB, white: 0.5, opacity: 0.5)) .cornerRadius(1), alignment: .bottomTrailing) }} struct ContentView_Previews: PreviewProvider { static var previews: some View { ContentView() }}
110

Amazon Location Service Developer GuideDisplaying maps
Building the application: Request transformation
Create a new Swift file named AWSSignatureV4URLHandler.swift containing the following classdefinition to intercept AWS requests and sign them using Signature Version 4. This will be registered as aURL handler within the Tangram MapView.
import AWSCoreimport TangramMap class AWSSignatureV4URLHandler: TGDefaultURLHandler { private let region: AWSRegionType private let identityPoolId: String private let credentialsProvider: AWSCredentialsProvider init(region: AWSRegionType, identityPoolId: String) { self.region = region self.identityPoolId = identityPoolId self.credentialsProvider = AWSCognitoCredentialsProvider(regionType: region, identityPoolId: identityPoolId) super.init() } override func downloadRequestAsync(_ url: URL, completionHandler: @escaping TGDownloadCompletionHandler) -> UInt { if url.host?.contains("amazonaws.com") != true { // not an AWS URL return super.downloadRequestAsync(url, completionHandler: completionHandler) } // URL-encode spaces, etc. let keyPath = String(url.path.dropFirst()) guard let keyPathSafe = keyPath.addingPercentEncoding(withAllowedCharacters: .urlPathAllowed) else { print("Invalid characters in path '\(keyPath)'; unsafe to sign") return super.downloadRequestAsync(url, completionHandler: completionHandler) } // sign the URL let endpoint = AWSEndpoint(region: region, serviceName: "geo", url: url) let requestHeaders: [String: String] = ["host": endpoint!.hostName] let task = AWSSignatureV4Signer .generateQueryStringForSignatureV4( withCredentialProvider: credentialsProvider, httpMethod: .GET, expireDuration: 60, endpoint: endpoint!, keyPath: keyPathSafe, requestHeaders: requestHeaders, requestParameters: .none, signBody: true) task.waitUntilFinished() if let error = task.error as NSError? { print("Error occurred: \(error)") } if let result = task.result { // have Tangram fetch the signed URL return super.downloadRequestAsync(result as URL, completionHandler: completionHandler) } // fall back to an unsigned URL return super.downloadRequestAsync(url, completionHandler: completionHandler) }
111

Amazon Location Service Developer GuideDisplaying maps
}
Building the application: Map view
The map view is responsible for initializing an instance of AWSSignatureV4Delegate and configuringthe underlying MGLMapView, which fetches resources and renders the map. It also handles propagatingattribution strings from the style descriptor's source back to the ContentView.
Create a new Swift file named MapView.swift containing the following struct definition:
import AWSCoreimport TangramMapimport SwiftUI struct MapView: UIViewRepresentable { private let mapView: TGMapView init() { let regionName = Bundle.main.object(forInfoDictionaryKey: "AWSRegion") as! String let identityPoolId = Bundle.main.object(forInfoDictionaryKey: "IdentityPoolId") as! String let mapName = Bundle.main.object(forInfoDictionaryKey: "MapName") as! String let sceneURL = URL(string: Bundle.main.object(forInfoDictionaryKey: "SceneURL") as! String)! let region = (regionName as NSString).aws_regionTypeValue() // rewrite tile URLs to point at AWS resources let sceneUpdates = [ TGSceneUpdate(path: "sources.mapzen.url", value: "https://maps.geo.\(regionName).amazonaws.com/maps/v0/maps/\(mapName)/tiles/{z}/{x}/{y}")] // instantiate a TGURLHandler that will sign AWS requests let urlHandler = AWSSignatureV4URLHandler(region: region, identityPoolId: identityPoolId) // instantiate the map view and attach the URL handler mapView = TGMapView(frame: .zero, urlHandler: urlHandler) // load the map style and apply scene updates (properties modified at runtime) mapView.loadScene(from: sceneURL, with: sceneUpdates) } func cameraPosition(_ cameraPosition: TGCameraPosition) -> MapView { mapView.cameraPosition = cameraPosition return self } // MARK: - UIViewRepresentable protocol func makeUIView(context: Context) -> TGMapView { return mapView } func updateUIView(_ uiView: TGMapView, context: Context) { }}
Running this application displays a full-screen map in the style of your choosing. This sample is availableas part of the Amazon Location Service samples repository on GitHub.
112

Amazon Location Service Developer GuideDrawing on a map
Drawing data features on a mapAfter you have an application that renders a map, using Amplify, MapLibre, or Tangram to render themap, a natural next step is to draw features on top of the map. For example, you might want to renderyour customer locations as markers on the map.
In general, you can use the Places search functions (p. 115) to find locations from your data, and thenuse the functionality of Amplify, MapLibre, or Tangram to render the locations.
To see samples of rendering different types of objects on map, see the following MapLibre samples:
• Example: Draw markers (p. 198)• Example: Draw clustered points (p. 199)• Example: Draw a polygon (p. 199)
For more samples and tutorials, see Code Examples and tutorials for working with Amazon LocationService (p. 196).
Managing your map resourcesYou can manage your map resources using the Amazon Location console, the AWS CLI, or the AmazonLocation APIs.
List map resourcesYou can view a list of your map resources using the Amazon Location console, the AWS CLI, or theAmazon Location APIs.
Console
To view a list of existing map resources using the Amazon Location console
1. Open the Amazon Location console at https://console.aws.amazon.com/location/.2. Choose Maps from the left navigation pane.3. View a list of your map resources under My maps.
API
Use the ListMaps operation from the Amazon Location Maps APIs.
The following example is an API request to get a list of map resources in the AWS account.
POST /maps/v0/list-maps
The following is an example response for ListMaps:
{ "Entries": [ { "CreateTime": 2020-10-30T01:38:36Z, "DataSource": "Esri", "Description": "string", "MapName": "ExampleMap", "UpdateTime": 2020-10-30T01:38:36Z } ],
113

Amazon Location Service Developer GuideManaging map resources
"NextToken": "1234-5678-9012"}
CLI
Use the list-map command.
The following example is an AWS CLI to get a list of map resources in the AWS account.
aws location list-maps
Get map resource detailsYou can get details about any map resource in your AWS account using the Amazon Location console, theAWS CLI, or the Amazon Location APIs.
Console
To view the details of a map resource using the Amazon Location console
1. Open the Amazon Location console at https://console.aws.amazon.com/location/.2. Choose Maps from the left navigation pane.3. Under My maps, select the name link of the target map resource.
API
Use the DescribeMap operation from the Amazon Location Maps APIs.
The following example is an API request to get the map resource details for ExampleMap.
GET /maps/v0/maps/ExampleMap
The following is an example response for DescribeMap:
{ "Configuration": { "Style": "VectorEsriNavigation" }, "CreateTime": 2020-10-30T01:38:36Z, "DataSource": "Esri", "Description": "string", "MapArn": "arn:aws:geo:us-west-2:123456789012:maps/ExampleMap", "MapName": "ExampleMap", "Tags": { "Tag1" : "Value1" }, "UpdateTime": 2020-10-30T01:40:36Z}
CLI
Use the describe-map command.
The following example is an AWS CLI to get the map resource details for ExampleMap.
aws location describe-map \ --map-name "ExampleMap"
114

Amazon Location Service Developer GuidePlaces search
Delete a map resourceYou can delete a map resource from your AWS account using the Amazon Location console, the AWS CLI,or the Amazon Location APIs.
WarningThis operation deletes the resource permanently.
Console
To delete an existing map resource using the Amazon Location console
1. Open the Amazon Location console at https://console.aws.amazon.com/location/.2. Choose Maps from the left navigation pane.3. Under My maps list, select the target map from the list.4. Choose Delete map.
API
Use the DeleteMap operation from the Amazon Location Maps APIs.
The following example is an API request to delete the map resource ExampleMap.
DELETE /maps/v0/maps/ExampleMap
The following is an example success response for DeleteMap:
HTTP/1.1 200
CLI
Use the delete-map command.
The following example is an AWS CLI command to delete the map resource ExampleMap.
aws location delete-map \ --map-name "ExampleMap"
Searching place and geolocation data usingAmazon Location
Amazon Location includes the ability to search the geolocation, or place, data of your chosen provider.There are several kinds of searching available.
• Geocoding – Geocoding is the process of searching for addresses, regions, business names, or otherpoints of interest, based on text input. It returns details and the location (in latitude and longitude) ofthe results found.
• Reverse geocoding – Reverse geocoding allows you to find places near a given location.• Autocomplete – Autocomplete is the process of making automatic suggestions as the user types in a
query. For example, if they type Par one suggestion might be Paris, France.
115

Amazon Location Service Developer GuidePrerequisites
Amazon Location lets you choose a data provider for place search operations by creating and configuringa place index resource.
Once you create your resource, you can send requests using the AWS SDK for your preferred language,Amplify, or the REST API endpoints. You can use data from the response to mark locations on a map,enrich position data, and to convert positions into human-readable text.
NoteFor an overview of searching place concepts, see Places search (p. 34).
Topics• Prerequisites (p. 116)
• Geocoding (p. 118)
• Reverse geocoding (p. 122)
• Autocomplete (p. 125)
• Amazon Aurora PostgreSQL user-defined functions for Amazon Location Service (p. 128)
• Managing your place index resources (p. 137)
PrerequisitesBefore you begin geocoding, reverse geocoding or searching for places, follow the prerequisite steps:
Topics• Create a place index resource (p. 116)
• Authenticating your requests (p. 118)
Create a place index resourceBegin by creating a place index resource in your AWS account.
When you create a place index resource, you can choose from the data providers available to supportqueries for geocoding, reverse geocoding, and searches:
1. Esri – For more information about Esri's coverage in your region of interest, see Esri geocodingcoverage in this guide.
2. HERE Technologies – For more information about HERE's coverage in your region of interest, seeHERE geocoding coverage in this guide.
You can do this using the Amazon Location Service console, the AWS CLI, or the Amazon Location APIs.
Console
To create a place index resource using the Amazon Location Service console
1. Open the Amazon Location Service console at https://console.aws.amazon.com/location/.
2. In the left navigation pane, choose Place indexes.
3. Choose Create place index.
4. Fill out the following boxes:
• Name – Enter a name for the place index resource. For example, ExamplePlaceIndex.Maximum 100 characters. Valid entries include alphanumeric characters, hyphens, periods,and underscores.
116

Amazon Location Service Developer GuidePrerequisites
• Description – Enter an optional description.
5. Under Data providers, choose an available data provider to use with your place index resource.
NoteIf your application is tracking or routing assets that you use in your business, such asdelivery vehicles or employees, you may only use HERE as your geolocation provider.For more information, see section 82 of the AWS service terms.
6. Under Data storage options, specify if you intend to store search results from your place indexresource.
7. (Optional) Under Tags, enter a tag Key and Value. This adds a tag your new place indexresource. For more information, see Tagging your resources (p. 179).
8. Choose Create place index.
API
To create a place index resource using the Amazon Location APIs
Use the CreatePlaceIndex operation from the Amazon Location Places APIs.
The following example is an API request to create a place index resource calledExamplePlaceIndex using the data provider Esri.
POST /places/v0/indexesContent-type: application/json
{ "DataSource": "Esri", "DataSourceConfiguration": { "IntendedUse": "SingleUse" }, "Description": "string", "IndexName": "ExamplePlaceIndex", "Tags": { "Tag1" : "Value1" }}
AWS CLI
To create a place index resource using AWS CLI commands
Use the create-place-index command.
The following example creates a place index resource called ExamplePlaceIndex using Esri asthe data provider.
aws location \ create-place-index \ --data-source "Esri" \ --description "Example place index" \ --index-name "ExamplePlaceIndex" \ --tags Tag1=Value1
NoteBilling depends on your usage. You may incur fees for the use of other AWS services. For moreinformation, see Amazon Location Service pricing.
117

Amazon Location Service Developer GuideGeocoding
Authenticating your requestsOnce you create a place index resource and you're ready to begin building location features into yourapplication, choose how you would authenticate your requests:
• To explore ways you can access the services, see Accessing Amazon Location Service (p. 182).• If you have a website with anonymous users, or you want to use your own authentication process,
or combine multiple authentication methods, see Allowing unauthenticated guest access to yourapplication using Amazon Cognito (p. 182).
Example
The following example shows the passing of the unauthenticated identity pool as credentials whenusing the AWS JavaScript SDK.
const AWS = require("aws-sdk");
const credentials = new AWS.CognitoIdentityCredentials({ IdentityPoolId: "us-east-1:54f2ba88-9390-498d-aaa5-0d97fb7ca3bd" });
const client = new AWS.Location({ credentials, region: AWS.config.region // region containing the identity pool});
// rsp.Results contains search results for geocodingconst rsp = await location.searchPlaceIndexForText({ IndexName: "ExamplePlaceIndex", Text: "Anyplace", BiasPosition: [-123.4567, 45.6789]}).promise();
GeocodingGeocoding is a process that converts text, such as an address, a region, a business name, or point ofinterest, into a set of geographic coordinates. You can use place index resources to submit geocodingrequests and incorporate data retrieved from geocoding to display data on a map for your web or mobileapplication.
This section guides you through how to send a simple geocoding request, and how to send geocodingrequests with optional specifications.
GeocodingYou can submit a simple request to geocode using the SearchPlaceIndexForText operation toconvert an address to a set of coordinates. A simple request contains the following required parameter:
• Text – An address, name, city, or region to convert to a set of coordinates. For example, the string AnyTown.
To specify a maximum number of results per pages, use the following optional parameter:
• MaxResults – Limits the maximum number of results returned in the query response.
You can use the AWS CLI or the Amazon Location APIs.
118

Amazon Location Service Developer GuideGeocoding
API
The following example is a SearchPlaceIndexForText request to search the place index resource,ExamplePlaceIndex, for an address, name, city or region called Any Town.
POST /places/v0/indexes/ExamplePlaceIndex/search/text Content-type: application/json
{ "Text": "Any Town", "MaxResults": 10}
AWS CLI
The following example is a search-place-index-for-text command to search the place indexresource, ExamplePlaceIndex, for an address, name, city or region called Any Town.
aws location \ search-place-index-for-text \ --index-name ExamplePlaceIndex \ --text "Any Town" \ --max-results 10
Geocode near a positionWhen geocoding, you can geocode near a given position with the following optional parameter:
• BiasPosition – The position you want to search nearby. This narrows your search by searching forresults closest to the given position. Defined as [longitude, latitude]
The following example is a SearchPlaceIndexForText request to search the place index resource foran address, name, city or region called Any Town near the position [-123.4567,45.6789].
POST /places/v0/indexes/ExamplePlaceIndex/search/text Content-type: application/json
{ "Text": "Any Town", "BiasPosition": [-123.4567,45.6789]}
Geocode within a bounding boxYou can geocode within a bounding box to narrow your results to coordinates within a given boundaryusing the following optional parameter:
• FilterBBox – A bounding box that you specify to filter your results to coordinates within the box'sboundaries. Defined as [LongitudeSW, LatitudeSW, LongitudeNE, LatitudeNE]
NoteA request can't contain both the FilterBBox and BiasPosition parameters. Specifyingboth parameters in the request returns a ValidationException error.
The following example is a SearchPlaceIndexForText request to search within a bounding box for anaddress, name, city or region called Any Town. The bounding box follows that:
119

Amazon Location Service Developer GuideGeocoding
• The longitude of the southwest corner is -124.1450.• The latitude of the southwest corner is 41.7045.• The longitude of the northeast corner is -124.1387.• The latitude of the northeast corner is 41.7096.
POST /places/v0/indexes/ExamplePlaceIndex/search/text Content-type: application/json
{ "Text": "Any Town", "FilterBBox": [ -124.1450,41.7045, -124.1387,41.7096 ]}
Geocode within a countryYou can geocode within one or more countries you specify by using the following optional parameter:
• FilterCountries – The country or region you want to geocode within. You can define up to100 countries in one request using a ISO 3166 three letter country code. For example, use AUS forAustralia.
The following example is a SearchPlaceIndexForText request to search for an address, name, city orregion called Any Town in Germany and France.
POST /places/v0/indexes/ExamplePlaceIndex/search/text Content-type: application/json
{ "Text": "Any Town", "FilterCountries": ["DEU","FRA"]}
Geocode in a preferred languageYou can set a language preference for results of your search by using the optional Languageparameter. For example, a search for 100 Main St, Anytown, USA may return 100 Main St, AnyTown, USA by default. But if you select fr as the Language, then the results may return 100 RuePrincipale, Any Town, États-Unis instead.
• Language – A language code to use for rendering the results of your query. The value must be a validBCP 47 language code. For example, en for English.
NoteIf Language is not specified, or the specified language is not supported for a result, thepartner's default language for that result will be used.
The following example is a SearchPlaceIndexforText request to search for a place called Any Townwith the preferred language specified as de.
POST /places/v0/indexes/ExamplePlaceIndex/search/text Content-type: application/json
120

Amazon Location Service Developer GuideGeocoding
{ "Text": "Any Town", "Language": "de"}
Example response
Example
The following is an example response when you call the SearchPlaceIndexForText operation fromthe Amazon Location Places APIs. The results include relevant places and the request summary. Tworesponses are shown, based on selecting Esri or HERE as the partner.
Example request
POST /places/v0/indexes/ExamplePlaceIndex/search/text Content-type: application/json
{ "Text": "Amazon", "MaxResults": 1, "FilterCountries": ["USA"], "BiasPosition": [-112.10, 46.32]}
Example response (Esri)
{ "Results": [ { "Place": { "Country": "USA", "Geometry": { "Point": [ -112.10667999999998, 46.319090000000074 ] }, "Interpolated": false, "Label": "Amazon, MT, USA", "Municipality": "Amazon", "Region": "Montana", "SubRegion": "Jefferson County" }, "Distance": 523.4619749879726, "Relevance": 1 } ], "Summary": { "BiasPosition": [ -112.1, 46.32 ], "DataSource": "Esri", "FilterCountries": [ "USA" ], "MaxResults": 1, "ResultBBox": [ -112.10667999999998, 46.319090000000074, -112.10667999999998,
121

Amazon Location Service Developer GuideReverse geocoding
46.319090000000074 ], "Text": "Amazon" }}
Example response (HERE)
{ "Summary": { "Text": "Amazon", "BiasPosition": [ -112.1, 46.32 ], "FilterCountries": [ "USA" ], "MaxResults": 1, "ResultBBox": [ -112.10668, 46.31909, -112.10668, 46.31909 ], "DataSource": "Here" }, "Results": [ { "Place": { "Label": "Amazon, Jefferson City, MT, United States", "Geometry": { "Point": [ -112.10668, 46.31909 ] }, "Neighborhood": "Amazon", "Municipality": "Jefferson City", "SubRegion": "Jefferson", "Region": "Montana", "Country": "USA", "Interpolated": false, "TimeZone": { "Name": "America/Denver", "Offset": -25200 } }, "Distance": 523.4619749905755 } ]}
Reverse geocodingReverse geocoding is a process that converts a set of coordinates into meaningful text, such as anaddress, a region, a business name, or point of interest. You can use place index resources to submitreverse geocoding requests and incorporate data retrieved from reverse geocoding to display data on amap for your web or mobile application.
This section guides you through how to send a simple reverse geocoding request.
122

Amazon Location Service Developer GuideReverse geocoding
Reverse geocoding
You can submit a simple request to reverse geocode a set of coordinates and convert them toa meaningful address, a point of interest or a general location without an address using theSearchPlaceIndexForPosition operation. A simple request contains the following requiredparameter:
• Position – A set of coordinates that you want to convert to an address, point of interest, or generallocation. Defined using the format [longitude,latitude].
To specify a maximum number of results per pages, add the following optional parameter:
• MaxResults – Limits the maximum number of results returned in the query response.
If you want to specify a preferred language for the results of your query, use the following optionalparameter:
• Language – A language code to be used for rendering results. The value must be a valid BCP 47language code. For example, en for English.
NoteIf Language is not specified, or the specified language is not supported for a result, thepartner's default language for that result will be used.
You can use the AWS CLI or the Amazon Location APIs.
API
The following example is a SearchPlaceIndexForPosition request to search the place indexresource, ExamplePlaceIndex, for a meaningful address, point of interest or general location nearthe position [122.3394,47.6159].
POST /places/v0/indexes/ExamplePlaceIndex/search/positionContent-type: application/json
{ "Position": [-122.3394,47.6159], "MaxResults": 5, "Language": "de"}
AWS CLI
The following example is a search-place-index-for-position command to search theplace index resource, ExamplePlaceIndex, for a meaningful address, point of interest or generallocation near the position [122.3394,47.6159].
aws location \ search-place-index-for-position \ --index-name ExamplePlaceIndex \ --position -122.3394 47.6159 \ --max-results 5 \ --language de
123
https://docs.aws.amazon.com/location-places/latest/APIReference/API_SearchPlaceIndexForPosition.html

Amazon Location Service Developer GuideReverse geocoding
Example response
Example
The following is an example response when calling the SearchPlaceIndexForPosition operationfrom the Amazon Location Places APIs. The results return relevant places and the request summary. Tworesponses are shown, based on selecting Esri or Here as the partner.
Example request
POST /places/v0/indexes/ExamplePlaceIndex/search/positionContent-type: application/json
{ "Position": [-122.3394,47.6159], "MaxResults": 1}
Example response (Esri)
{ "Results": [ { "Place": { "AddressNumber": "2111", "Country": "USA", "Geometry": { "Point": [ -122.33937999999995, 47.61591000000004 ] }, "Interpolated": false, "Label": "The Spheres, 2111 7th Ave, Seattle, WA, 98121, USA", "Municipality": "Seattle", "Neighborhood": "Belltown", "PostalCode": "98121", "Region": "Washington", "SubRegion": "King County" }, "Distance": 1.8685861313438727 } ], "Summary": { "DataSource": "Esri", "MaxResults": 1, "Position": [ -122.3394, 47.6159 ] }}
Example response (HERE)
{ "Summary": { "Position": [ -122.3394, 47.6159 ],
124

Amazon Location Service Developer GuideAutocomplete
"MaxResults": 1, "DataSource": "Here" }, "Results": [ { "Place": { "Label": "2111 7th Ave, Seattle, WA 98121-5114, United States", "Geometry": { "Point": [ -122.33938, 47.61591 ] }, "AddressNumber": "2111", "Street": "7th Ave", "Neighborhood": "Belltown", "Municipality": "Seattle", "SubRegion": "King", "Region": "Washington", "Country": "USA", "PostalCode": "98121-5114", "Interpolated": false, "TimeZone": { "Name": "America/Los_Angeles", "Offset": -28800 } }, "Distance": 1.868586125090601 } ]}
AutocompleteAutocomplete provides responsive feedback to end users as they are typing their search query. Itprovides suggestions for addresses and points of interest based on partial or misspelled free-formtext. You can use place index resources to request autocomplete suggestions, and display the resultingsuggestions in your application.
Amazon Location does not support storage of autocomplete suggestions. An error is returned if the placeindex used for an autocomplete call is configured for use with stored geocodes. To use stored geocodesand query for suggestions, create and configure multiple place indexes.
This section describes how to send an autocomplete request. It starts with the most basic form of therequest, and then shows optional parameters that you can use to increase the relevance of autocompletesearch results.
Basic autocompleteYou can submit a simple request for autocomplete suggestions by using theSearchPlaceIndexForSuggestions operation. The simplest form of the request has a single requiredparameter, the query Text:
• Text – The free-form partial text to use to generate place suggestions. For example, the stringeiffel tow.
To limit the number of results returned, add the optional MaxResults parameter:
• MaxResults – Limits the number of results returned in the query response.
125

Amazon Location Service Developer GuideAutocomplete
You can use the Amazon Location APIs or the AWS CLI.
API
The following example is a SearchPlaceIndexForSuggestions request to search the place indexresource, ExamplePlaceIndex, for up to 10 suggestions based on the partial place name kamp.
POST /places/v0/indexes/ExamplePlaceIndex/search/suggestionsContent-type: application/json
{ "Text": "kamp", "MaxResults": 10}
AWS CLI
The following example is a search-place-index-for-suggestions command to search theplace index resource, ExamplePlaceIndex, for up to 10 suggestions based on the partial placename kamp.
aws location \ search-place-index-for-suggestions \ --index-name ExamplePlaceIndex \ --text kamp \ --max-results 10
Autocomplete near a positionWhen you search for autocomplete place suggestions by using SearchPlaceIndexForSuggestions,you can get more locally-relevant suggestions by adding the following optional parameter:
• BiasPosition – The position you want to search nearby. Defined as [longitude, latitude].
The following example uses a SearchPlaceIndexForSuggestions request to search the place indexresource ExamplePlaceIndex for place suggestions matching the partial query kamp near the position[32.5827,0.3169].
POST /places/v0/indexes/ExamplePlaceIndex/search/suggestionsContent-type: application/json
{ "Text": "kamp", "BiasPosition": [32.5827,0.3169]}
The suggestions returned for the same Text can be different if a different BiasPosition is chosen,such as [-96.7977, 32.7776].
Autocomplete within a bounding boxYou can narrow your autocomplete search to receive only suggestions for places which are located withina given boundary by adding the following optional parameter:
• FilterBBox – A bounding box that you specify to filter your results to coordinates within the box'sboundaries. Defined as [LongitudeSW, LatitudeSW, LongitudeNE, LatitudeNE]
126

Amazon Location Service Developer GuideAutocomplete
NoteA request can't contain both the FilterBBox and BiasPosition parameters. Specifyingboth parameters in the request returns a ValidationException error.
The following example uses a SearchPlaceIndexForSuggestions request to search the place indexresource ExamplePlaceIndex for place suggestions matching the partial query kamp, and which arecontained within the bounding box where:
• The longitude of the southwest corner of the bounding box is 32.5020.• The latitude of the southwest corner of the bounding box is 0.2678.• The longitude of the northeast corner of the bounding box is 32.6129.• The latitude of the northeast corner of the bounding box is 0.3502.
POST /places/v0/indexes/ExamplePlaceIndex/search/suggestionsContent-type: application/json
{ "Text": "kamp", "FilterBBox": [ 32.5020, 0.2678, 32.6129, 0.3502 ]}
The suggestions returned for the same Text are different if a different FilterBBox is chosen, such as[-97.9651, 32.0640, -95.1196, 34.0436].
Autocomplete within a countryYou can narrow your autocomplete search to receive only suggestions for places which are located withina given country, or set of countries, by adding the following optional parameter:
• FilterCountries – The countries you want to search for place suggestions within. You can specifyup to 100 countries in one request using a ISO 3166 three-letter country code. For example, use AUSfor Australia.
The following example uses a SearchPlaceIndexForSuggestions request to search the place indexresource ExamplePlaceIndex for place suggestions matching the partial query kamp and which arecontained within Uganda, Kenya, or Tanzania:
POST /places/v0/indexes/ExamplePlaceIndex/search/suggestionsContent-type: application/json
{ "Text": "kamp", "FilterCountries": ["UGA", "KEN", "TZA"]}
The suggestions returned for the same Text are different if a different FilterCountries list is chosen,such as ["USA"].
Example responseThe following is an example response of suggested autocompletions for theSearchPlaceIndexForSuggestions operation, using the text kamp.
127

Amazon Location Service Developer GuideTutorial: Database enrichment
{ "Results": [ { "Text": "Kampuchea" }, { "Text": "Kampoul, Kabul, AFG" }, { "Text": "Kampala, UGA" }, { "Text": "Kampar, Riau, IDN" }, { "Text": "Kampung Pasir Gudang Baru, Johor, MYS" } ], "Summary": { "DataSource": "Esri", "MaxResults": 5, "Text": "kamp" }}
Amazon Aurora PostgreSQL user-defined functionsfor Amazon Location ServiceYou can use Amazon Location Service to work with coordinates and addresses stored in database tablesto to clean and enrich your geospatial data.
For example:
• You can use geocoding to convert addresses to coordinates to normalize and fill gaps in data foraddresses stored in a database table.
• You can geocode addresses to obtain their positions and use the coordinates with database spatialfunctions, such as a function that shows rows in a specified area.
• You can use enriched data to generate automated reporting, such as generating an automated reportthat illustrates all devices in a given area, or an automated report for machine learning that illustratesareas with higher failure rates when sending location updates.
This tutorial shows how to format and enrich addresses stored in an Amazon Aurora PostgreSQLdatabase table using Amazon Location Service.
• Amazon Aurora PostgreSQL – A fully managed relational database engine, compatible with MySQLand PostgreSQL, that outputs up to five times the throughput of MySQL and up to three times thethroughput of PostgreSQL without changing most of your existing application. For more information,see What is Amazon Aurora? in the Amazon Aurora User Guide.
ImportantThe resulting application in this tutorial uses a place index that stores geocoding results. Forinformation about applicable charges for storing geocoding results, see Amazon LocationService pricing.
Sample code is available in the Amazon Location Service samples repository on GitHub, which includesan AWS CloudFormation template.
128

Amazon Location Service Developer GuideTutorial: Database enrichment
Topics• Overview (p. 129)• Prerequisites (p. 129)• Quick start (p. 130)• Create a place index resource (p. 130)• Create an AWS Lambda function for geocoding (p. 130)• Grant Amazon Aurora PostgreSQL access to AWS Lambda (p. 132)• Invoke the AWS Lambda function (p. 134)• Enriching a database containing address data (p. 136)• Next steps (p. 137)
Overview
The architecture involves the following integrations:
• This solution uses an Amazon Location place index resource to support geocoding queries using theoperation SearchPlaceIndexForText.
• AWS Lambda uses a Python Lambda that geocodes addresses when an IAM policy gives permission toallow AWS Lambda to call the Amazon Location geocoding operation, SearchPlaceIndexForText.
• Grant permission to Amazon Aurora PostgreSQL to invoke the geocoding Lambda function using anSQL user-defined function.
PrerequisitesBefore you begin, you need the following prerequisites:
• An Amazon Aurora PostgreSQL cluster. For more information about Creating an Amazon Aurora DBcluster, see the Amazon Aurora User Guide.
NoteIf your Amazon Aurora cluster isn't publicly available, you must also configure Amazon Aurorato connect to AWS Lambda in a virtual private cloud (VPC) in your AWS account. For moreinformation, see the section called “Grant Aurora access to Lambda” (p. 132).
129

Amazon Location Service Developer GuideTutorial: Database enrichment
• An SQL developer tool to connect to the Amazon Aurora PostgreSQL cluster.
Quick startAs an alternative to going through the steps in this tutorial, you can launch a quick stack to deploy anAWS Lambda function supporting the Amazon Location operation SearchPlaceIndexForText. Thisautomatically configures your AWS account to allow Amazon Aurora to call AWS Lambda.
Once you configure your AWS account, you will need to:
• Add the Lambda feature to Amazon Aurora. See Add the IAM role to a Amazon Aurora DB cluster in thesection called “Grant Aurora access to Lambda” (p. 132).
• Load the user-defined function into your database. See the section called “Invoke the Lambdafunction” (p. 134).
Create a place index resourceStart by creating a place index resource to support geocoding queries.
1. Open the Amazon Location Service console at https://console.aws.amazon.com/location/.2. In the left navigation pane, choose Place indexes.3. Fill out the following boxes:
• Name – Enter a name for the place index resource. For example, AuroraPlaceIndex. Maximum100 characters. Valid entries include alphanumeric characters, hyphens, periods, and underscores.
• Description – Enter an optional description. For example, Place index for Amazon Aurora.4. Under Data providers, choose an available data provider to use with your place index resource. If
you have no preference, we recommend starting with Esri.5. Under Data storage options, specify Yes, results will be stored. This indicates that you intend to
save the geocoding results in a database.6. (Optional) Under Tags, enter a tag Key and Value. This adds a tag your new place index resource. For
more information, see Tagging your resources (p. 179).7. Choose Create place index.
Create an AWS Lambda function for geocodingTo create a connection between Amazon Aurora PostgreSQL and Amazon Location Service, you need anAWS Lambda function to handle requests from the database engine. This function translates the Lambdauser-defined function event and calls the Amazon Location operation SearchPlaceIndexForText.
You can create the function using the AWS Lambda console, the AWS Command Line Interface, or theAWS Lambda APIs.
To create a Lambda user-defined function using the console
1. Open the AWS Lambda console at https://console.aws.amazon.com/lambda/.2. From the left navigation, choose Functions.3. Choose Create Function, and make sure that Author from scratch is selected.4. Fill out the following boxes:
130

Amazon Location Service Developer GuideTutorial: Database enrichment
• Function name – Enter a unique name for your function. Valid entries include alphanumericcharacters, hyphens, and underscores with no spaces. For example, AuroraGeocoder.
• Runtime – Choose Python 3.8.
5. Choose Create function.
6. Choose the Code tab to open the editor.
7. Overwrite the placeholder code in lambda_function.py with the following:
from os import environ
import boto3from botocore.config import Config
# load the place index name from the environment, falling back to a defaultPLACE_INDEX_NAME = environ.get("PLACE_INDEX_NAME", "AuroraPlaceIndex")
location = boto3.client("location", config=Config(user_agent="Amazon Aurora PostgreSQL"))
"""This Lambda function receives a payload from Amazon Aurora and translates it toan Amazon Location `SearchPlaceIndex` call and returns the results as-is, to bepost-processed by a PL/pgSQL function."""def lambda_handler(event, context): kwargs = {} if event.get("biasPosition") is not None: kwargs["BiasPosition"] = event["biasPosition"]
if event.get("filterBBox") is not None: kwargs["FilterBBox"] = event["filterBBox"]
if event.get("filterCountries") is not None: kwargs["FilterCountries"] = event["filterCountries"]
if event.get("maxResults") is not None: kwargs["MaxResults"] = event["maxResults"] return location.search_place_index_for_text( IndexName=PLACE_INDEX_NAME, Text=event["text"], **kwargs)["Results"]
8. If you've named your place index something other than AuroraPlaceIndex, create an environmentvariable named PLACE_INDEX_NAME to assign the resource name to:
• From the Configuration tab, choose Environment Variables.
• Choose Edit, then choose Add environment variable.
• For Key: Enter PLACE_INDEX_NAME.
• For Value: Enter the name of your place index resource.
9. Choose Deploy to save the updated function.
10. From the Test drop-down menu, choose Configure test Event.
11. Choose Create new test event.
12. Enter the following test event:
{ "text": "Baker Beach", "biasPosition": [-122.483, 37.790],
131

Amazon Location Service Developer GuideTutorial: Database enrichment
"filterCountries": ["USA"]}
13. Choose Test to test the Lambda function.14. Choose the Configuration tab.15. Under General configuration: Choose Permissions.16. Under Execution role: Choose the hyper linked Role name to grant Amazon Location Service
permissions to your Lambda function.17. Under the Permissions tab: Choose Add inline policy.18. Choose the JSON tab.19. Add the following IAM policy:
• The following policy gives permission to send SearchPlaceIndexForText to the place indexresource AuroraPlaceIndex.
{ "Version": "2012-10-17", "Statement": [ { "Effect": "Allow", "Action": "geo:SearchPlaceIndexForText", "Resource": "arn:aws:geo:<Region>:<AccountId>:place-index/AuroraPlaceIndex" } ]}
20. Choose Review policy.21. Enter a policy name. For example, AuroraPlaceIndexReadOnly.22. Choose Create policy.
Grant Amazon Aurora PostgreSQL access to AWS LambdaBefore Amazon Aurora PostgreSQL can invoke an AWS Lambda function, you must grant accesspermission.
If your Amazon Aurora PostgreSQL cluster isn't publicly accessible, you will need to first create a VPCendpoint for AWS Lambda in order for Amazon Aurora to call your Lambda function.
Create a VPC Endpoint for AWS Lambda
NoteThis step is only required if your Amazon Aurora PostgreSQL cluster isn't publicly accessible.
1. Open the Amazon Virtual Private Cloud Console.2. In the left navigation, choose Endpoints.3. Choose Create endpoint.4. In the Service Name filter, enter "lambda", then choose com.amazonaws.<region>.lambda.5. Choose the VPC containing your Aurora cluster.6. Choose a subnet for each availability zone.7. In the Security group filter, enter "default" or the name of the security group your Aurora cluster is a
member of, then choose the security group.8. Choose Create endpoint.
Create an IAM policy to grant permission to invoke your AWS Lambda function
132

Amazon Location Service Developer GuideTutorial: Database enrichment
1. Open the IAM console.2. In the left navigation, expand Access Management to choose Policies.3. Choose Create policy.4. On the JSON tab, input the following policy:
• The following is an example of an IAM policy that grants Amazon Aurora PostgreSQL permissionto invoke the AuroraGeocoder AWS Lambda function.
{ "Version": "2012-10-17", "Statement": [ { "Effect": "Allow", "Action": "lambda:InvokeFunction", "Resource": [ "arn:aws:lambda:<Region>:<AccountId>:function:AuroraGeocoder" ] } ]}
5. Choose Next: Tags to add optional tags.6. Choose Next: Review.7. Review your policy and enter the following details for the policy:
• Name – Use alphanumeric and '+=,.@-_' characters. Maximum 128 characters. For example,AuroraGeocoderInvoke.
• Description – Enter an optional description. Use alphanumeric and '+=,.@-_' characters. Maximum1000 characters.
8. Choose Create policy. Note the ARN for this policy, which you use to attach the policy to an IAMrole.
Create an IAM role to give permission to Amazon Relational Database Service (Amazon RDS)
By creating an IAM role, Amazon Aurora PostgreSQL can assume the role on your behalf to access yourLambda function. For more information, see Creating a role to delegate permissions to an IAM user in theIAM User Guide.
The following example is an AWS CLI command that creates a role namedAuroraGeocoderInvokeRole:
aws iam create-role --role-name rds-lambda-role --assume-role-policy-document '{ "Version": "2012-10-17", "Statement": [ { "Effect": "Allow", "Principal": { "Service": "rds.amazonaws.com" }, "Action": "sts:AssumeRole" } ] }'
Attach your IAM policy to the IAM role
When you have an IAM role, attach the IAM policy that you've created.
133

Amazon Location Service Developer GuideTutorial: Database enrichment
The following example is an AWS CLI command that attaches the policy AuroraGeocoderInvoke tothe role AuroraGeocoderInvokeRole.
aws iam attach-role-policy --policy-arn AuroraGeocoderInvoke --role-name AuroraGeocoderInvokeRole
Add the IAM role to a Amazon Aurora DB cluster
The following example is an AWS CLI command to add an IAM role to a Amazon Aurora PostgreSQL DBcluster named MyAuroraCluster.
aws rds add-role-to-db-cluster \--db-cluster-identifier MyAuroraCluster \--feature-name Lambda \--role-arn AuroraGeocoderInvokeRole \--region your-region
Invoke the AWS Lambda functionAfter you grant permission to Amazon Aurora PostgreSQL to invoke your geocoding Lambda function,you can create an Amazon Aurora PostgreSQL user-defined function to invoke the geocoding AWSLambda function. For more information, see Invoking an AWS Lambda function from an Amazon AuroraPostgreSQL DB cluster in the Amazon Aurora User Guide.
Install the required PostgreSQL extensions
To install the required PostgreSQL extensions aws_lambda and aws _commons extensions, seeOverview of using a Lambda function in the Amazon Aurora User Guide.
CREATE EXTENSION IF NOT EXISTS aws_lambda CASCADE;
Install the required PostGIS extensions
PostGIS is an extension to PostgreSQL for storing and managing spatial information. For moreinformation, see Working with the PostGIS extension on the Amazon Relational Database Service UserGuide.
CREATE EXTENSION IF NOT EXISTS postgis;
Create an SQL user-defined function that invokes the Lambda function
In an SQL editor, create a new user-defined function f_SearchPlaceIndexForText to invoke thefunction AuroraGeocoder:
CREATE OR REPLACE FUNCTION f_SearchPlaceIndexForText( text text, bias_position geometry(Point, 4326) DEFAULT NULL, filter_bbox box2d DEFAULT NULL, filter_countries text[] DEFAULT NULL, max_results int DEFAULT 1) RETURNS TABLE ( label text, address_number text, street text, municipality text, postal_code text, sub_region text, region text,
134

Amazon Location Service Developer GuideTutorial: Database enrichment
country text, geom geometry(Point, 4326) ) LANGUAGE plpgsql IMMUTABLEAS $function$begin RETURN QUERY WITH results AS ( SELECT json_array_elements(payload) rsp FROM aws_lambda.invoke( aws_commons.create_lambda_function_arn('AuroraGeocoder'), json_build_object( 'text', text, 'biasPosition', CASE WHEN bias_position IS NOT NULL THEN array_to_json(ARRAY[ST_X(bias_position), ST_Y(bias_position)]) END, 'filterBBox', CASE WHEN filter_bbox IS NOT NULL THEN array_to_json(ARRAY[ST_XMin(filter_bbox), ST_YMin(filter_bbox), ST_XMax(filter_bbox), ST_YMax(filter_bbox)]) END, 'filterCountries', filter_countries, 'maxResults', max_results ) ) ) SELECT rsp->'Place'->>'Label' AS label, rsp->'Place'->>'AddressNumber' AS address_number, rsp->'Place'->>'Street' AS street, rsp->'Place'->>'Municipality' AS municipality, rsp->'Place'->>'PostalCode' AS postal_code, rsp->'Place'->>'SubRegion' AS sub_region, rsp->'Place'->>'Region' AS region, rsp->'Place'->>'Country' AS country, ST_GeomFromGeoJSON( json_build_object( 'type', 'Point', 'coordinates', rsp->'Place'->'Geometry'->'Point' ) ) geom FROM results;end;$function$;
Call the SQL function to geocode from Aurora
Running the SQL statement invokes the Lambda function AuroraGeocoder, which takes addressrecords from the database table in the Amazon Aurora PostgreSQL database and geocodes them using aplace index resource.
NoteAmazon Aurora PostgreSQL invokes the Lambda function for each call to the SQL user-definedfunction.If you are geocoding 50 rows, Amazon Aurora PostgreSQL invokes the Lambda function 50times. One invocation for each row.
The following f_SearchPlaceIndexForText SQL function makes requests to Amazon Location'sSearchPlaceIndexForText API through the AuroraGeocoder Lambda function. The functionreturns a geom column that's a PostGIS geometry, which ST_AsText(geom) converts to text.
SELECT *, ST_AsText(geom)
135

Amazon Location Service Developer GuideTutorial: Database enrichment
FROM f_SearchPlaceIndexForText('Vancouver, BC');
By default, the return will contain one row. To request additional rows, up to the MaxResults limit, runthe following SQL statement while providing a BiasPosition and limiting to results in Canada.
SELECT *FROM f_SearchPlaceIndexForText('Mount Pleasant', ST_MakePoint(-123.113, 49.260), null, '{"CAN"}', 5);
To filter results using a bounding box, then pass a Box2D as filter_bbox:
• FilterBBox – Filters the results by returning places within a bounding box. This is an optionalparameter.
SELECT *FROM f_SearchPlaceIndexForText('Mount Pleasant', null, 'BOX(-139.06 48.30, -114.03 60.00)'::box2d, '{"CAN"}', 5);
For more information on PostGIS types and functions, see the PostGIS Reference.
Enriching a database containing address dataYou can construct a formatted address and simultaneously normalize and geocode using the AmazonLocation operation SearchPlaceIndexForText given a database table with the following data brokenout into the following columns:
• id
• address
• city
• state
• zip
WITH source_data AS ( SELECT id, address || ', ' || city || ', ' || state || ', ' || zip AS formatted_address FROM addresses),geocoded_data AS ( SELECT *, (f_SearchPlaceIndexForText(formatted_address)).* FROM source_data)SELECT id, formatted_address, label normalized_address, ST_Y(geom) latitude, ST_X(geom) longitudeFROM geocoded_data-- limit the number of rows that will be geocoded; remove this to geocode the entire tableLIMIT 1;
The following example illustrates one resulting datatable row:
136

Amazon Location Service Developer GuideManaging place index resources
id | formatted_address | normalized_address | latitude | longitude----+--------------------------------+--------------------------------------------+------------------+------------------- 42 | 123 Anytown Ave N, Seattle, WA | 123 Anytown Ave N, Seattle, WA, 12345, USA | 47.6223000127926 | -122.336745971039(1 row)
Update the database table and populate columns
The following example updates the table and populates columns with results ofSearchPlaceIndexForText queries:
WITH source_data AS ( -- select rows that have not been geocoded and created a formatted address for each SELECT id, address || ', ' || city || ', ' || state || ', ' || zip AS formatted_address FROM addresses WHERE label IS NULL -- limit the number of rows that will be geocoded; remove this to geocode the entire table LIMIT 1),geocoded_data AS ( -- geocode each row and keep it linked to the source's ID SELECT id, (f_SearchPlaceIndexForText(formatted_address)).* FROM source_data)UPDATE addresses-- populate columnsSET normalized_address = geocoded_data.label, latitude = ST_Y(geocoded_data.geom), longitude = ST_X(geocoded_data.geom)FROM geocoded_data-- ensure that rows matchWHERE addresses.id = geocoded_data.id;
Next stepsSample code is available in the Amazon Location Service samples repository on GitHub, which includesan AWS CloudFormation template.
Managing your place index resourcesYou can manage your place index resources using the Amazon Location console, the AWS CLI, or theAmazon Location APIs.
List your place index resourcesYou can view your place index resources list using the Amazon Location console, the AWS CLI, or theAmazon Location APIs:
Console
To view a list of place index resources using the Amazon Location console
137

Amazon Location Service Developer GuideManaging place index resources
1. Open the Amazon Location console at https://console.aws.amazon.com/location/.
2. Choose Place indexes from the left navigation pane.
3. View a list of your place index resources under the My place indexes.
API
Use the ListPlaceIndexes operation from the Amazon Location Places APIs.
The following example is an API request to get a list of place index resources in the AWS account.
POST /places/v0/list-indexes
The following is an example response for ListPlaceIndexes:
{ "Entries": [ { "CreateTime": 2020-10-30T01:38:36Z, "DataSource": "Esri", "Description": "string", "IndexName": "ExamplePlaceIndex", "UpdateTime": 2020-10-30T01:40:36Z } ], "NextToken": "1234-5678-9012"}
CLI
Use the list-place-indexes command.
The following example is an AWS CLI to get a list of place index resources in the AWS account.
aws location list-place-indexes
Get place index resource detailsYou can get details about any place index resource in your AWS account using the Amazon Locationconsole, the AWS CLI, or the Amazon Location APIs:
Console
To view the details of a place index resource using the Amazon Location console
1. Open the Amazon Location console at https://console.aws.amazon.com/location/.
2. Choose Place indexes from the left navigation pane.
3. Under My place indexes, select the name link of the target place index resource.
API
Use the DescribePlaceIndex operation from the Amazon Location Place APIs.
The following example is an API request to get the place index resource details forExamplePlaceIndex.
138

Amazon Location Service Developer GuideManaging place index resources
GET /places/v0/indexes/ExamplePlaceIndex
The following is an example response for DescribePlaceIndex:
{ "CreateTime": 2020-10-30T01:38:36Z, "DataSource": "Esri", "DataSourceConfiguration": { "IntendedUse": "SingleUse" }, "Description": "string", "IndexArn": "arn:aws:geo:us-west-2:123456789012:place-indexes/ExamplePlaceIndex", "IndexName": "ExamplePlaceIndex", "Tags": { "string" : "string" }, "UpdateTime": 2020-10-30T01:40:36Z}
CLI
Use the describe-place-index command.
The following example is an AWS CLI to get the place index resource details forExamplePlaceIndex.
aws location describe-place-index \ --index-name "ExamplePlaceIndex"
Delete a place index resourceYou can delete a place index resource from your AWS account using the Amazon Location console, theAWS CLI, or the Amazon Location APIs:
Console
To delete a place index resource using the Amazon Location console
WarningThis operation deletes the resource permanently.
1. Open the Amazon Location console at https://console.aws.amazon.com/location/.
2. Choose Place indexes from the left navigation pane.
3. Under My place index, select the target place index resource.
4. Choose Delete place index.
API
Use the DeletePlaceIndex operation from the Amazon Location Places APIs.
The following example is an API request to delete the place index resource ExamplePlaceIndex.
DELETE /places/v0/indexes/ExamplePlaceIndex
139

Amazon Location Service Developer GuideCalculating routes
The following is an example success response for DeletePlaceIndex:
HTTP/1.1 200
CLI
Use the delete-place-index command.
The following example is an AWS CLI command to delete the place index resourceExamplePlaceIndex.
aws location delete-place-index \ --index-name "ExamplePlaceIndex"
Calculating routes using Amazon Location ServiceAmazon Location lets you select a data provider for calculating a route by creating and configuring aroute calculator resource.
You can use the route calculator resource to calculate a route (p. 142) given specific parameters usingthe AWS SDK, or the REST API endpoints. Use this route calculator resource to calculate routes betweenan origin, a destination and up to 23 waypoints for different modes of transportation, avoidances, andtraffic conditions.
You can also use the route calculator resource to create inputs for your route planning algorithms orproducts by calculating a route matrix (p. 145). Calculate the travel time and travel distance betweena set of departure positions and a set of destination positions. Route planning software can use thattime and distance data to optimize a route or a set of routes; for example, if you are planning multipledelivery routes, and want to find the best route and time for each stop. You can calculate a matrix ofroutes for different modes of transportation, avoidances, and traffic conditions.
NoteFor an overview of routing concepts, see Routes (p. 38).
Topics
• Prerequisites (p. 140)
• Calculate a route (p. 142)
• Route planning with a route matrix (p. 145)
• Positions not located on a road (p. 148)
• Departure time (p. 150)
• Travel mode (p. 150)
• Managing your route calculator resources (p. 151)
PrerequisitesBefore you begin calculating routes, follow the prerequisite steps:
Topics
• Create a route calculator resource (p. 141)
• Authenticating your requests (p. 142)
140

Amazon Location Service Developer GuidePrerequisites
Create a route calculator resourceBefore you can calculate a route, create a route calculator resource in your AWS account.
When you create a route calculator resource, you can choose from the data providers available:
1. Esri – For more information about Esri's coverage in your region of interest, see Esri details on streetnetworks and traffic coverage.
2. HERE Technologies – For more information about HERE's coverage in your region of interest, seeHERE car routing coverage and HERE truck routing coverage.
NoteIf your application is tracking or routing assets that you use in your business, such as deliveryvehicles or employees, you may only use HERE as your geolocation provider. For moreinformation, see section 82 of the AWS service terms.
You can do this using the Amazon Location Service console, the AWS CLI, or the Amazon Location APIs.
Console
To create a route calculator resource using the Amazon Location console
1. Open the Amazon Location console at https://console.aws.amazon.com/location/.2. In the left navigation pane, choose Route calculators.3. Choose Create route calculator.4. Fill out the following boxes:
• Name – Enter a name for the route calculator resource. For example, ExampleCalculator.Maximum 100 characters. Valid entries include alphanumeric characters, hyphens, periods,and underscores.
• Description – Enter an optional description.5. For Data providers, choose a data provider to use as a route calculator.6. (Optional) Under Tags, enter a tag Key and Value. This adds a tag your new route calculator
resource. For more information, see Tagging your resources (p. 179).7. Choose Create route calculator.
API
To create a route calculator resource using the Amazon Location APIs
Use the CreateRouteCalculator operation from the Amazon Location Places APIs.
The following example is an API request to create a route calculator resource calledExampleCalculator using the data provider Esri.
POST /routes/v0/calculatorsContent-type: application/json
{ "CalculatorName": "ExampleCalculator", "DataSource": "Esri", "Description": "string", "Tags": { "Tag1" : "Value1" }}
141

Amazon Location Service Developer GuideCalculate route
AWS CLI
To create a place index resource using AWS CLI commands
Use the create-route-calculator command.
The following example creates a route calculator resource called ExampleCalculator using Esrias the data provider.
aws location \ create-route-calculator \ --calculator-name "ExampleCalculator" \ --data-source "Esri" \ --tags Tag1=Value1
NoteBilling depends on your usage. You may incur fees for the use of other AWS services. For moreinformation, see Amazon Location Service pricing.
Authenticating your requestsOnce you create a route calculator resource and you're ready to begin building location features into yourapplication, choose how you would authenticate your requests:
• To explore ways you can access the services, see Accessing Amazon Location Service (p. 182).
• If you have a website with anonymous users, or you want to use your own authentication process,or combine multiple authentication methods, see Allowing unauthenticated guest access to yourapplication using Amazon Cognito (p. 182).
Example
The following example shows the passing of the unauthenticated identity pool as credentials whenusing the AWS JavaScript SDK.
const AWS = require("aws-sdk");
const credentials = new AWS.CognitoIdentityCredentials({ IdentityPoolId: "us-east-1:54f2ba88-9390-498d-aaa5-0d97fb7ca3bd"});
const location = new AWS.Location({ credentials, region: AWS.config.region // region containing Cognito pool});
// rsp.Results contains calculated routeconst rsp = await location.calculateRoute({ CalculatorName: "ExampleCalculator", DeparturePosition: [-123.4567, 45.6789], DestinationPosition: [-123.123, 45.234]}).promise();
Calculate a routeYou can use Amazon Location Service to calculate routes between an origin and a destination, with up to23 waypoints along the route, for different modes of transportation, avoidances, and traffic conditions.
142

Amazon Location Service Developer GuideCalculate route
NoteYou must first create a route calculator resource and set up authentication for your requests toAmazon Location. For more information, see Prerequisites (p. 140).
Start calculating routesSubmit a simple request by using the CalculateRoute operation. A simple request contains thefollowing required fields:
• DeparturePosition – The starting position for which to calculate the route from. Defined as[longitude, latitude]
• DestinationPosition – The end position to which to calculate the route. Defined as [longitude,latitude].
NoteIf you specify a departure or destination position that's not located on a road, Amazon Locationmoves the position to the nearest road (p. 148).
You can optionally specify waypoints (p. 144), a departure time (p. 150), and a travel mode (p. 150)in your request.
You can use the AWS CLI or the Amazon Location APIs.
API
The following example is a CalculateRoute request using the route calculator resourceExampleCalculator. The request specifies calculating a route from a departure position[-122.7565, 49.0021] to a destination position [-122.3394, 47.6159].
POST /routes/v0/calculators/ExampleCalculator/calculate/routeContent-type: application/json{ "DeparturePosition": [-122.7565,49.0021], "DestinationPosition": [-122.3394, 47.6159]}
AWS CLI
The following example is a calculate-route command using the route calculator resourceExampleCalculator. The request specifies calculating a route from a departure position[-122.7565, 49.0021] to a destination position [-122.3394, 47.6159].
aws location \ calculate-route \ --calculator-name ExampleCalculator \ --departure-position -122.7565 49.0021 \ --destination-position -122.3394 47.6159
By default, the response returns Distance in kilometers. You can change the unit of measurement tomiles using the following optional parameter:
• DistanceUnit – Specifies the unit system to use for the distance results.
Example
POST /routes/v0/calculators/ExampleCalculator/calculate/route
143

Amazon Location Service Developer GuideCalculate route
Content-type: application/json{ "DeparturePosition": [-122.7565,49.0021], "DestinationPosition": [-122.3394, 47.6159], "DistanceUnit": "Miles"}
Setting waypointsWhen calculating a route, you can specify up to 23 intermediate stopover points between the departureposition and the destination position using waypoint positions.
• WaypointPositions – Specifies an ordered list of intermediate positions to include along a routebetween the departure position and destination position.
NoteIf you specify a waypoint position that's not located on a road, Amazon Location moves theposition to the nearest road.
Example
The following CalculateRoute request calculates a route with 2 waypoints:
• The departure position is [-122.7565, 49.0021], and the destination position is [-122.3394, 47.6159].
• For the request parameter WaypointPositions:
• The first stop over position is [-122.1884, 48.0936].
• The second stop over position is [-122.3493, 47.6205].
• To include the leg linestring geometry between these two waypoints, set the following optionalparameter to true:
• IncludeLegGeometry – Includes the geometry of each path between a pair of positions in theresponse.
POST /routes/v0/calculators/ExampleCalculator/calculate/routeContent-type: application/json{ "DeparturePosition": [-122.7565,49.0021], "DestinationPosition": [-122.3394, 47.6159], "WaypointPositions":[ [-122.1884,48.0936], [-122.3493,47.6205] ], "IncludeLegGeometry": true}
Example responseThe following is an example request with the corresponding response when calling theCalculateRoute operation from the Amazon Location Routes API with the IncludeLegGeometryset to true, which includes the linestring geometry of each path between a pair of positions in theresponse.
Example request
POST /routes/v0/calculators/ExampleCalculator/calculate/routeContent-type: application/json
144

Amazon Location Service Developer GuideRoute planning
{ "DeparturePosition": [-122.7565,49.0021], "DestinationPosition": [-122.3394, 47.6159], "IncludeLegGeometry": true}
Example response
{ "Legs": [ { "Distance": 178.5, "DurationSeconds": 6480, "EndPosition": [-122.3394,47.6159], "Geometry": { "LineString": [ [-122.7565,49.0021], [-122.3394,47.6159] ] }, "StartPosition": [-122.7565,49.0021], "Steps": [ { "Distance": 178.5, "DurationSeconds": 6480, "EndPosition": [-122.3394,47.6159], "GeometryOffset": 0, "StartPosition": [-122.7565,49.0021] } ] } ], "Summary": { "DataSource": "Esri", "Distance": 178.5, "DistanceUnit": "Kilometers", "DurationSeconds": 6480, "RouteBBox": [ -122.7565,49.0021, -122.3394,47.6159 ] }}
Route planning with a route matrixYou can use Amazon Location Service to create inputs to your route planning and optimization software.You can create route results, including travel time and travel distance, for routes between a set ofdeparture positions and a set of destination positions.
For example, given departure positions A and B, and destination positions X and Y, Amazon LocationService will return travel time and travel distance for routes from A to X, A to Y, B to X, and B to Y.
You can calculate the routes with different modes of transportation, avoidances, and traffic conditions.For example, you can specify that the vehicle is a truck that is 35 feet long, and the route calculated willuse those restrictions to determine the travel time and travel distance.
The number of results returned (and routes calculated) is the number of departure positions multipliedby the number of destination positions. You are charged for each route calculated, not each request tothe service, so a route matrix with 10 departures and 10 destinations will be billed as 100 routes.
145
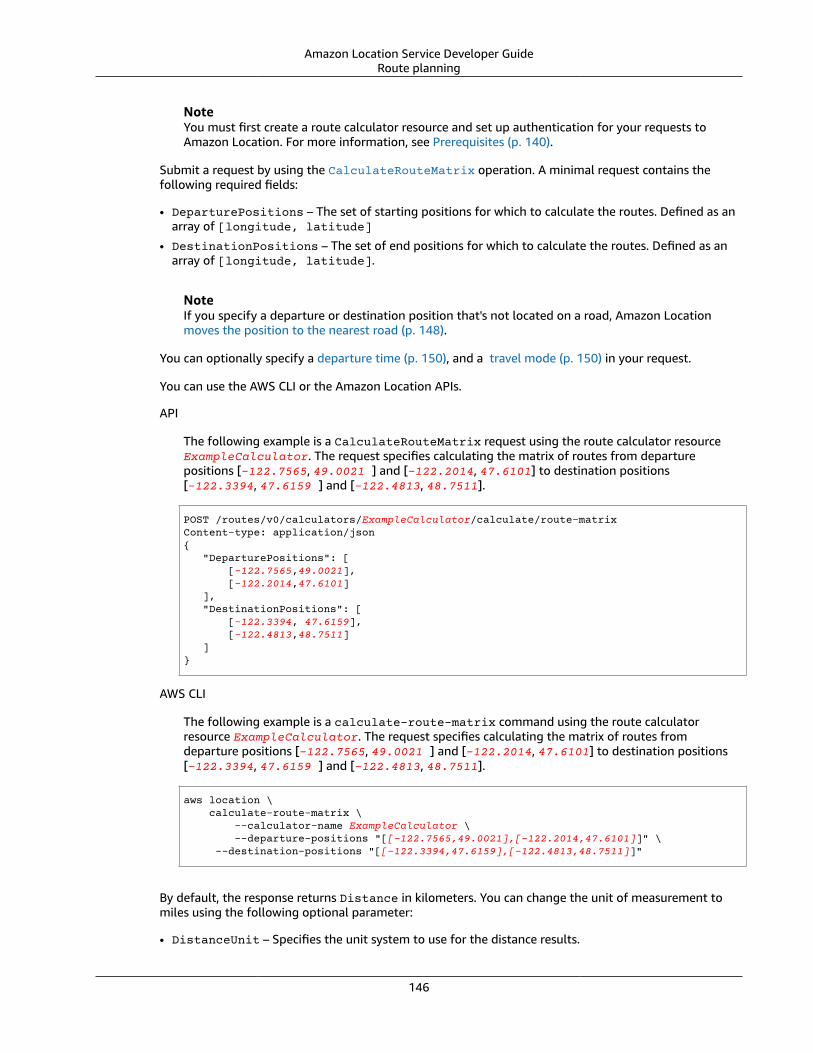
Amazon Location Service Developer GuideRoute planning
NoteYou must first create a route calculator resource and set up authentication for your requests toAmazon Location. For more information, see Prerequisites (p. 140).
Submit a request by using the CalculateRouteMatrix operation. A minimal request contains thefollowing required fields:
• DeparturePositions – The set of starting positions for which to calculate the routes. Defined as anarray of [longitude, latitude]
• DestinationPositions – The set of end positions for which to calculate the routes. Defined as anarray of [longitude, latitude].
NoteIf you specify a departure or destination position that's not located on a road, Amazon Locationmoves the position to the nearest road (p. 148).
You can optionally specify a departure time (p. 150), and a travel mode (p. 150) in your request.
You can use the AWS CLI or the Amazon Location APIs.
API
The following example is a CalculateRouteMatrix request using the route calculator resourceExampleCalculator. The request specifies calculating the matrix of routes from departurepositions [-122.7565, 49.0021 ] and [-122.2014, 47.6101] to destination positions[-122.3394, 47.6159 ] and [-122.4813, 48.7511].
POST /routes/v0/calculators/ExampleCalculator/calculate/route-matrixContent-type: application/json{ "DeparturePositions": [ [-122.7565,49.0021], [-122.2014,47.6101] ], "DestinationPositions": [ [-122.3394, 47.6159], [-122.4813,48.7511] ]}
AWS CLI
The following example is a calculate-route-matrix command using the route calculatorresource ExampleCalculator. The request specifies calculating the matrix of routes fromdeparture positions [-122.7565, 49.0021 ] and [-122.2014, 47.6101] to destination positions[-122.3394, 47.6159 ] and [-122.4813, 48.7511].
aws location \ calculate-route-matrix \ --calculator-name ExampleCalculator \ --departure-positions "[[-122.7565,49.0021],[-122.2014,47.6101]]" \ --destination-positions "[[-122.3394,47.6159],[-122.4813,48.7511]]"
By default, the response returns Distance in kilometers. You can change the unit of measurement tomiles using the following optional parameter:
• DistanceUnit – Specifies the unit system to use for the distance results.
146

Amazon Location Service Developer GuideRoute planning
Example
POST /routes/v0/calculators/ExampleCalculator/calculate/route-matrixContent-type: application/json{ "DeparturePositions": [ [-122.7565,49.0021], [-122.2014,47.6101] ], "DestinationPositions": [ [-122.3394, 47.6159], [-122.4813,48.7511] ], "DistanceUnit": "Miles"}
Restrictions on departure and destination positionsThere are some restrictions on the departure and destination positions that you can use when calculatinga route matrix. These restrictions vary depending on the provider used by the RouteCalculatorresource.
Limitation Esri HERE
Number of positions Up to 10 departure positionsand 10 destination positions.
Up to 350 departure positionsand 350 destination positions.
Distance between positions Any pair of departure anddestination positions must bewithin 400 km of each other(40km for walking routes).
All departure and destinationpositions must fall within a 180km diameter circle.
Route length Routes will not be completedif the total travel time for theroute is over 400 minutes.
Routes that deviate more than10 km outside a circle aroundthe departure and destinationpoints will not be calculated.
Regions Calculating a route matrix is notsupported in Korea.
No additional restrictions.
Example responseThe following is an example request with the corresponding response when calling theCalculateRouteMatrix operation from the Amazon Location Routes API.
Example request
POST /routes/v0/calculators/ExampleCalculator/calculate/route-matrixContent-type: application/json{ "DeparturePositions": [ [-122.7565,49.0021], [-122.2014,47.6101] ], "DestinationPositions": [ [-122.3394, 47.6159], [-122.4813,48.7511]
147
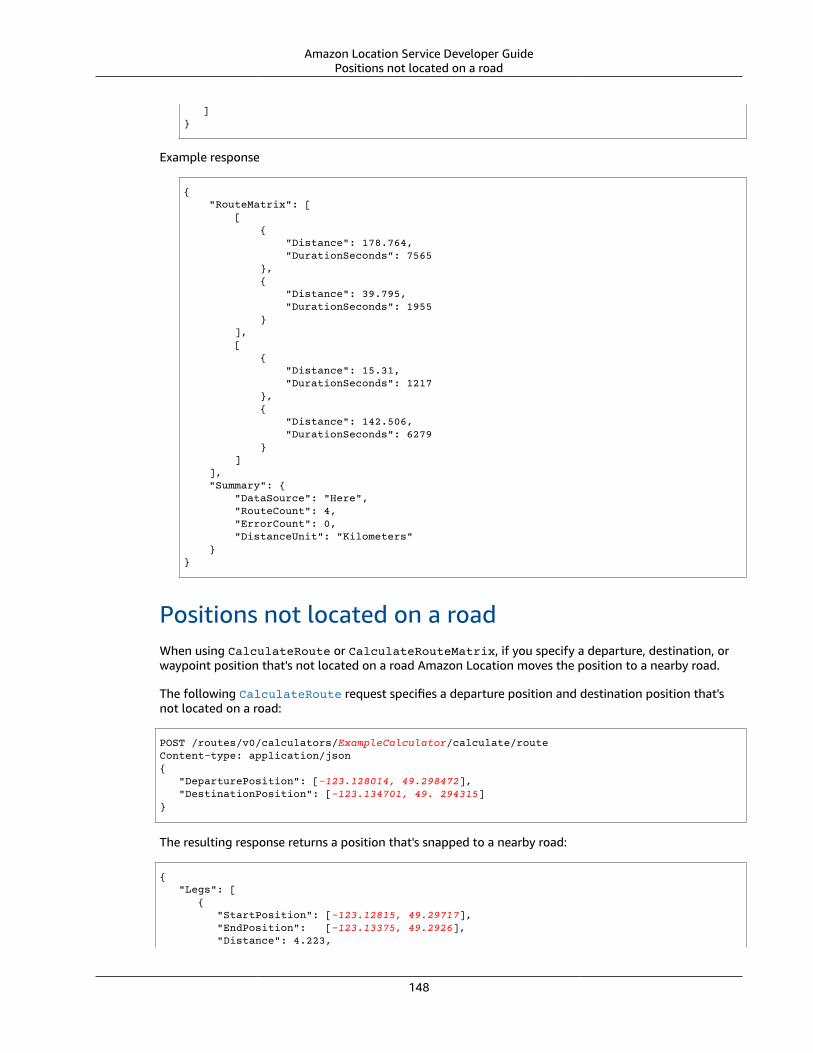
Amazon Location Service Developer GuidePositions not located on a road
]}
Example response
{ "RouteMatrix": [ [ { "Distance": 178.764, "DurationSeconds": 7565 }, { "Distance": 39.795, "DurationSeconds": 1955 } ], [ { "Distance": 15.31, "DurationSeconds": 1217 }, { "Distance": 142.506, "DurationSeconds": 6279 } ] ], "Summary": { "DataSource": "Here", "RouteCount": 4, "ErrorCount": 0, "DistanceUnit": "Kilometers" }}
Positions not located on a roadWhen using CalculateRoute or CalculateRouteMatrix, if you specify a departure, destination, orwaypoint position that's not located on a road Amazon Location moves the position to a nearby road.
The following CalculateRoute request specifies a departure position and destination position that'snot located on a road:
POST /routes/v0/calculators/ExampleCalculator/calculate/routeContent-type: application/json{ "DeparturePosition": [-123.128014, 49.298472], "DestinationPosition": [-123.134701, 49. 294315]}
The resulting response returns a position that's snapped to a nearby road:
{ "Legs": [ { "StartPosition": [-123.12815, 49.29717], "EndPosition": [-123.13375, 49.2926], "Distance": 4.223,
148

Amazon Location Service Developer GuidePositions not located on a road
"DurationSeconds": 697, "Steps": [ { "StartPosition": [ -123.12815, 49.29717 ], "EndPosition": [ -123.12806, 49.29707 ], "Distance": 0.013, "DurationSeconds": 8 }, { "StartPosition": [ -123.12806, 49.29707 ], "EndPosition": [ -123.1288, 49.29659 ], "Distance": 0.082, "DurationSeconds": 36 }, { "StartPosition": [ -123.1288, 49.29659 ], "EndPosition": [ -123.12021, 49.29853 ], "Distance": 0.742, "DurationSeconds": 128 }, { "StartPosition": [ -123.12021, 49.29853 ], "EndPosition": [ -123.1201, 49.29959 ], "Distance": 0.131, "DurationSeconds": 26 }, { "StartPosition": [ -123.1201, 49.29959 ], "EndPosition": [ -123.13562, 49.30681 ], "Distance": 1.47, "DurationSeconds": 238 }, { "StartPosition": [ -123.13562, 49.30681 ], "EndPosition": [ -123.13693, 49.30615 ], "Distance": 0.121, "DurationSeconds": 28 }, { "StartPosition": [ -123.13693, 49.30615 ], "EndPosition": [ -123.13598, 49.29755 ], "Distance": 0.97, "DurationSeconds": 156 }, { "StartPosition": [ -123.13598, 49.29755 ], "EndPosition": [ -123.13688, 49.29717 ], "Distance": 0.085, "DurationSeconds": 15 }, { "StartPosition": [ -123.13688, 49.29717 ], "EndPosition": [ -123.13375, 49.2926 ], "Distance": 0.609, "DurationSeconds": 62 } ] } ], "Summary": { "RouteBBox": [ -123.13693, 49.2926, -123.1201, 49.30681 ], "DataSource": "Here", "Distance": 4.223, "DurationSeconds": 697, "DistanceUnit": "Kilometers" }
149

Amazon Location Service Developer GuideDeparture time
}
Departure timeBy default, when you call CalculateRoute or CalculateRouteMatrix, if you don't provide adeparture time in the request, the calculated routes reflects optimal traffic conditions.
You can set a specific a departure time to use live and predictive traffic conditions from your chosen dataprovider, by using one of the following options:
• DepartNow – When set to true, it uses live traffic conditions to calculate the fastest travel path.
• DepartureTime – When provided, it uses predictive and known traffic conditions for the requestedtime. This field doesn’t accept a departure time in the past. Defined in the following format: YYYY-MM-DDThh:mm:ss.sssZ.
Example
The following CalculateRoute request sets the departure time to July 2, 2024, at 12:15:20 UTC.
POST /routes/v0/calculators/ExampleCalculator/calculate/routeContent-type: application/json{ "DeparturePosition": [-122.7565,49.0021], "DestinationPosition": [-122.3394, 47.6159], "WaypointPositions":[ [-122.1884,48.0936], [-122.3493,47.6205] ] "IncludeLegGeometry": true, "DepartureTime": 2024-07-02T12:15:20.000Z,}
Travel modeYou can set a travel mode when using CalculateRoute or CalculateRouteMatrix. The mode oftravel affects speed of travel and road compatibility. While the default mode of travel is by car, youcan specify which mode of travel you're using while traveling along a route with the following optionalparameter:
• TravelMode – Specifies the mode of transport when calculating a route, such as: Car, Truck, orWalking.
NoteIf you specify Walking for the travel mode and your data provider is Esri, the start anddestination must be within 40km.
If you specify a TravelMode of Car, you can specify additional route preferences with the followingoptional parameter:
• CarModeOptions – Specifies route preferences when traveling in a car, such as AvoidFerries orAvoidTolls.
If you specify a TravelMode of Truck, you can specify additional route preferences with the followingoptional parameter:
150

Amazon Location Service Developer GuideManaging route resources
• TruckModeOptions – Specifies route preferences when traveling in a truck, such as AvoidFerriesor AvoidTolls, in addition to specifying routes that can accommodate the TruckDimensions andTruckWeight.
Example
The following CalculateRoute request specifies Truck as the mode of travel. Additional routerestrictions include: avoiding routes that use ferries and avoiding roads that can't accommodate the truckdimensions and weight.
{ "DeparturePosition": [-122.7565,49.0021], "DestinationPosition": [-122.3394, 47.6159], "DepartNow": true, "TravelMode": "Truck", "TruckModeOptions": { "AvoidFerries": true, "AvoidTolls": false, "Dimensions": { "Height": 4.5, "Length": 15.5, "Unit": "Meters", "Width": 4.5 }, "Weight": { "Total": 7500, "Unit": "Pounds" } }}
Managing your route calculator resourcesYou can manage your route calculator resources using the Amazon Location console, the AWS CLI, or theAmazon Location APIs.
List your route calculator resourcesYou can view your route calculator list using the Amazon Location console, the AWS CLI, or the AmazonLocation APIs:
Console
To view a list of route calculators using the Amazon Location console
1. Open the Amazon Location console at https://console.aws.amazon.com/location/.2. Choose Route calculators from the left navigation pane.3. View the route calculator details under My route calculators.
API
Use the ListRouteCalculators operation from the Amazon Location Routes APIs.
The following example is an API request to get a list of route calculators in the AWS account.
POST /routes/v0/list-calculators
151

Amazon Location Service Developer GuideManaging route resources
The following is an example response for ListRouteCalculators:
{ "Entries": [ { "CalculatorName": "ExampleCalculator", "CreateTime": 2020-09-30T22:59:34.142Z, "DataSource": "Esri", "Description": "string", "UpdateTime": 2020-09-30T23:59:34.142Z } ], "NextToken": "1234-5678-9012" }
CLI
Use the list-route-calculators command.
The following example is an AWS CLI to get a list of route calculators in the AWS account.
aws location list-route-calculators
Get route calculator detailsYou can get details about any route calculator resource in your AWS account using the Amazon Locationconsole, the AWS CLI, or the Amazon Location APIs:
Console
To view the details of a route calculator using the Amazon Location console
1. Open the Amazon Location console at https://console.aws.amazon.com/location/.
2. Choose Route calculators from the left navigation pane.
3. Under My route calculators, select the name link of the target route calculator.
API
Use the DescribeRouteCalculator operation from the Amazon Location Routes APIs.
The following example is an API request to get the route calculator details forExampleCalculator.
GET /routes/v0/calculators/ExampleCalculator
The following is an example response for DescribeRouteCalculator:
{ "CalculatorArn": "arn:aws:geo:us-west-2:123456789012:route-calculator/ExampleCalculator", "CalculatorName": "ExampleCalculator", "CreateTime": 2020-09-30T22:59:34.142Z, "DataSource": "Esri", "Description": "string", "Tags": {
152

Amazon Location Service Developer GuideManaging route resources
"Tag1" : "Value1" }, "UpdateTime": 2020-09-30T23:59:34.142Z }
CLI
Use the describe-route-calculator command.
The following example is an AWS CLI to get the route calculator details for ExampleCalculator.
aws location describe-route-calculator \ --calculator-name "ExampleCalculator"
Delete a route calculatorYou can delete a route calculator from your AWS account using the Amazon Location console, the AWSCLI, or the Amazon Location APIs:
Console
To delete a route calculator using the Amazon Location console
WarningThis operation deletes the resource permanently.
1. Open the Amazon Location console at https://console.aws.amazon.com/location/.
2. Choose Route calculators from the left navigation pane.
3. Under My route calculators, select the target route calculator.
4. Choose Delete route calculator.
API
Use the DeleteRouteCalculator operation from the Amazon Location Routes APIs.
The following example is an API request to delete the geofence collection ExampleCalculator.
DELETE /routes/v0/calculators/ExampleCalculator
The following is an example response for DeleteRouteCalculator:
HTTP/1.1 200
CLI
Use the delete-route-calculator command.
The following example is an AWS CLI command to delete the geofence collectionExampleCalculator.
aws location delete-route-calculator \ --calculator-name "ExampleCalculator"
153

Amazon Location Service Developer GuideGeofencing and tracking
Geofencing an area of interest using AmazonLocation
A geofencing application evaluates a tracked device’s position relative to previously registered areas ofinterest. This enables actions to be taken based on position updates. For example, you can trigger anevent that prompts a notification when a customer who ordered coffee on their mobile app is near astore.
NoteFor an overview of geofencing and tracker concepts, see Geofences and Trackers (p. 41).
This section of the guide provides step-by-step instructions for creating a geofencing application usingAmazon Location Service.
Overview of steps
1. Add geofences around areas of interest and store them in a geofence collection resource.2. Start tracking your target devices and store the device location history in a tracker resource.3. Link your tracker resource to your geofence collection resource so that device location updates are
automatically evaluated against all your geofences.4. You can evaluate device positions directly against your geofence collection resources if you don’t
want to use Amazon Location Trackers to keep your devices’ location history.
After you implement your geofencing solution, your geofence collection resource emits the followingevents:
• ENTER — A tracked device enters a geofence within a geofence collection.• EXIT — A tracked device exits a geofence within a geofence collection.
You can use Amazon EventBridge to react to events by routing them elsewhere.
As an alternative to sending updates via the Amazon Location Service APIs from each device, you can useMQTT to send device updates.
The following topics describe these steps and alternatives in detail.
Topics• Add geofences (p. 154)• Start tracking (p. 158)• Link a tracker to a geofence collection (p. 163)• Evaluate device positions against geofences (p. 164)• Reacting to Amazon Location Service events with Amazon EventBridge (p. 165)• Tracking using MQTT with Amazon Location Service (p. 167)• Managing your geofence collection resources (p. 171)• Managing your tracker resources (p. 176)
Add geofencesGeofences contain points and vertices that form a closed boundary, which defines an area of interest.Geofence collections store and manage one or multiple geofences.
154

Amazon Location Service Developer GuideStep 1: Add geofences
Amazon Location geofence collections stores geofences defined by using a standard geospatial dataformat called GeoJSON (RFC 7946). You can use tools, such as geojson.io, at no charge to draw yourgeofences graphically and save the output GeoJSON file.
NoteAmazon Location doesn't support polygons with holes, multipolygons, clockwise polygons, andgeofences that cross the antimeridian.
Create a geofence collectionCreate a geofence collection to store and manage geofences by using the Amazon Location console, theAWS CLI, or the Amazon Location APIs.
Console
To create a geofence collection using the Amazon Location console
1. Open the Amazon Location Service console at https://console.aws.amazon.com/location/.
2. In the left navigation pane, choose Geofence collections.
3. Choose Create geofence collection.
4. Fill out the following boxes:
• Name – Enter a unique name. For example, ExampleGeofenceCollection. Maximum 100characters. Valid entries include alphanumeric characters, hyphens, periods, and underscores.
• Description – Enter an optional description to differentiate your resources.
5. Under EventBridge rule with CloudWatch as a target, you can create an optional EventBridgerule to get started reacting to geofence events. (p. 165) This enables Amazon Location topublish events to Amazon CloudWatch Logs.
6. (Optional) Under Tags, enter a tag Key and Value. This adds a tag your new geofence collection.For more information, see Tagging your Amazon Location Service resources (p. 179).
7. (Optional) Under Customer managed key encryption, you can choose to Add a customermanaged key. This adds a symmetric customer managed key that you create, own, andmanage over the default AWS owned encryption. For more information, see Encrypting data atrest (p. 201).
8. Choose Create geofence collection.
API
To create a geofence collection using the Amazon Location APIs
Use the CreateGeofenceCollection operation from the Amazon Location Geofences APIs.
The following example uses an API request to create a geofence collection calledExampleGeofenceCollection. The geofence collection is associated with a customer managedKMS key to encrypt customer data (p. 201).
POST /geofencing/v0/collectionsContent-type: application/json
{ "CollectionName": "ExampleGeofenceCollection", "Description": "Geofence collection 1 for shopping center", "KmsKeyId": "1234abcd-12ab-34cd-56ef-1234567890ab", "Tags": { "Tag1" : "Value1" }
155

Amazon Location Service Developer GuideStep 1: Add geofences
}
AWS CLI
To create a geofence collection using AWS CLI commands
Use the create-geofence-collection command.
The following example uses an AWS CLI to create a geofence collection calledExampleGeofenceCollection. The geofence collection is associated with a customer managedKMS key to encrypt customer data (p. 201).
aws location \ create-geofence-collection \ --collection-name "ExampleGeofenceCollection" \ --description "Shopping center geofence collection" \ --kms-key-id "1234abcd-12ab-34cd-56ef-1234567890ab" \ --tags Tag1=Value1
NoteBilling depends on your usage. You may incur fees for the use of other AWS services. For moreinformation, see Amazon Location Service pricing.
Draw geofences using a GeoJSON toolNow that you've created your geofence collection, you can define your geofences by using a GeoJSONediting tool, such as geojson.io.
To create a GeoJSON file
1. Open a GeoJSON editing tool. For example, geojson.io.2. Choose the Draw a polygon icon and draw your area of interest.3. Choose Save, then choose GeoJSON from the dropdown menu.
Put geofences in a geofence collectionYou can use the resulting GeoJSON file to upload your geofences using the Amazon Location Serviceconsole, the AWS CLI, or the Amazon Location APIs:
Console
To add a geofence to a geofence collection using the Amazon Location Service console
1. Open the Amazon Location Service console at https://console.aws.amazon.com/location/.2. In the left navigation pane, choose Geofence collections.3. From the Geofence collections list, select the name link for the target geofence collection.4. Under Geofences, choose Create geofences.5. In the Add geofences window, drag, and drop your GeoJSON into the window.6. Choose Add geofences.
API
To add geofences using the Amazon Location APIs
156

Amazon Location Service Developer GuideStep 1: Add geofences
Use the PutGeofence operation from the Amazon Location Geofences APIs.
The following example uses an API request to add a geofence given the ID GEOFENCE-EXAMPLE1 toa geofence collection called ExampleGeofenceCollection:
PUT /geofencing/v0/collections/ExampleGeofenceCollection/geofence/GEOFENCE-EXAMPLE1Content-type: application/json
{ "Geometry": { "Polygon": [ [ [-5.716667, -15.933333], [-14.416667, -7.933333], [-12.316667, -37.066667], [-5.716667, -15.933333] ] ] }}
Alternatively, you can add more than one geofence using the BatchPutGeofence operation.
POST /geofencing/v0/collections/ExampleGeofenceCollection/put-geofencesContent-type: application/json
{ "Entries": [ { "GeofenceId": "GEOFENCE-EXAMPLE1", "Geometry": { "Polygon": [ [ [-5.716667, -15.933333], [-14.416667, -7.933333], [-12.316667, -37.066667], [-5.716667, -15.933333] ] ] } } ]}
AWS CLI
To add a geofence to a geofence collection using AWS CLI commands
Use the put-geofence command.
The following example uses an AWS CLI to add a geofence to a geofence collection calledExampleGeofenceCollection.
$ aws location \ put-geofence \ --collection-name ExampleGeofenceCollection \ --geofence-id ExampleGeofenceTriangle \ --geometry 'Polygon=[[[-5.716667, -15.933333],[-14.416667, -7.933333],[-12.316667, -37.066667],[-5.716667, -15.933333]]]'{ "CreateTime": "2020-11-11T00:16:14.487000+00:00", "GeofenceId": "ExampleGeofenceTriangle", "UpdateTime": "2020-11-11T00:19:59.894000+00:00"
157

Amazon Location Service Developer GuideStep 2: Start tracking
}
Start trackingThis section guides you through building a tracking application that captures device locations.
Create a trackerCreate a tracker resource to store and process position updates from your devices. You can use theAmazon Location Service console, the AWS CLI, or the Amazon Location APIs.
Each position update stored in your tracker resources can include a measure of position accuracy, and upto 3 fields of metadata about the position or device that you want to store. The metadata is stored askey-value pairs, and can store information such as speed, direction, tire pressure, or engine temperature.
Trackers filter position updates as they are received, reducing visual noise in your device paths (calledjitter), reducing the number of false geofence entry and exit events, and helping manage costs byreducing the number of position updates stored and geofence evaluations triggered.
Trackers offer three position filtering options to help manage costs and reduce jitter in your locationupdates.
• Accuracy-based – Use with any device that provides an accuracy measurement. Most mobiledevices provide this information. The accuracy of each position measurement is affected by manyenvironmental factors, including GPS satellite reception, landscape, and the proximity of wifi andbluetooth devices. Most devices, including most mobile devices, can provide an estimate of theaccuracy of the measurement along with the measurement. With AccuracyBased filtering, AmazonLocation ignores location updates if the device moved less than the measured accuracy. For example,if two consecutive updates from a device have an accuracy range of 5 m and 10 m, Amazon Locationignores the second update if the device has moved less than 15 m. Amazon Location neither evaluatesignored updates against geofences, nor stores them.
When accuracy is not provided, it is treated as zero, and the measurement is considered perfectlyaccurate.
NoteYou can also use accuracy-based filtering to remove all filtering. If you select accuracy-basedfiltering, but override all accuracy data to zero, or omit the accuracy entirely, then AmazonLocation will not filter out any updates.
• Distance-based – Use when your devices do not provide an accuracy measurement, but you still want totake advantage of filtering to reduce jitter and manage costs. DistanceBased filtering ignores locationupdates in which devices have moved less than 30 m (98.4 ft). When you use DistanceBased positionfiltering, Amazon Location neither evaluates these ignored updates against geofences nor stores theupdates.
The accuracy of most mobile devices, including the average accuracy of iOS and Android devices,is within 15 m. In most applications, DistanceBased filtering can reduce the effect of locationinaccuracies when displaying device trajectory on a map, and the bouncing effect of multipleconsecutive entry and exit events when devices are near the border of a geofence. It can also helpreduce the cost of your application, by making fewer calls to evaluate against linked geofences orretrieve device positions.
• Time-based – (default) Use when your devices send position updates very frequently (more than onceevery 30 seconds), and you want to achieve near real-time geofence evaluations without storing everyupdate. In TimeBased filtering, every location update is evaluated against linked geofence collections,but not every location update is stored. If your update frequency is more often than 30 seconds, onlyone update per 30 seconds is stored for each unique device ID.
158

Amazon Location Service Developer GuideStep 2: Start tracking
NoteBe mindful of the costs of your tracking application when deciding your filtering methodand the frequency of position updates. You are billed for every location update and once forevaluating the position update against each linked geofence collection. For example, when usingtime-based filtering, if your tracker is linked to two geofence collections, every position updatewill count as one location update request and two geofence collection evaluations. If you arereporting position updates every 5 seconds for your devices and using time-based filtering, youwill be billed for 720 location updates and 1,440 geofence evaluations per hour for each device.Your bill is not affected by the number of geofences in each collection. Since each geofencecollection may contain up to 50,000 geofences, you may want to combine your geofences intofewer collections, where possible, to reduce your cost of geofence evaluations.
Console
To create a tracker using the Amazon Location console
1. Open the Amazon Location Service console at https://console.aws.amazon.com/location/.2. In the left navigation pane, choose Trackers.3. Choose Create tracker.4. Fill the following fields:
• Name – Enter a unique name. For example, ExampleTracker. Maximum 100 characters.Valid entries include alphanumeric characters, hyphens, periods, and underscores.
• Description – Enter an optional description.5. Under Position filtering, choose the option that best fits how you intend to use your tracker
resource. If you do not set Position filtering, the default setting is TimeBased. For moreinformation, see Trackers (p. 43) in this guide, and PositionFiltering in the AmazonLocation Service Trackers API reference.
6. (Optional) Under Tags, enter a tag Key and Value. This adds a tag your new geofence collection.For more information, see Tagging your resources (p. 179).
7. (Optional) Under Customer managed key encryption, you can choose to Add a customermanaged key. This adds a symmetric customer managed key that you create, own, andmanage over the default AWS owned encryption. For more information, see Encrypting data atrest (p. 201).
8. Choose Create tracker.
API
To create a tracker by using the Amazon Location APIs
Use the CreateTracker operation from the Amazon Location Trackers APIs.
The following example uses an API request to create a tracker called ExampleTracker. The trackerresource is associated with a customer managed KMS key to encrypt customer data (p. 201).
POST /tracking/v0/trackersContent-type: application/json
{ "TrackerName": "ExampleTracker", "Description": "string", "KmsKeyId": "1234abcd-12ab-34cd-56ef-1234567890ab", "PositionFiltering": "AccuracyBased", "Tags": { "string" : "string" }
159

Amazon Location Service Developer GuideStep 2: Start tracking
}
AWS CLI
To create a tracker using AWS CLI commands
Use the create-tracker command.
The following example uses the AWS CLI to create a tracker called ExampleTracker. The trackerresource is associated with a customer managed KMS key to encrypt customer data (p. 201).
aws location \ create-tracker \ --tracker-name "ExampleTracker" \ --position-filtering "AccuracyBased" \ --kms-key-id "1234abcd-12ab-34cd-56ef-1234567890ab"
NoteBilling depends on your usage. You may incur fees for the use of other AWS services. For moreinformation, see Amazon Location Service pricing.
Authenticating your requestsOnce you create a tracker resource and you're ready to begin evaluating device positions againstgeofences, choose how you would authenticate your requests:
• To explore ways you can access the services, see Accessing Amazon Location Service (p. 182).• If you have a website with anonymous users, or you want to use your own authentication process,
or combine multiple authentication methods, see Allowing unauthenticated guest access to yourapplication using Amazon Cognito (p. 182).
Example
The following example shows the passing of the unauthenticated identity pool as credentials whenusing the AWS JavaScript SDK.
const AWS = require("aws-sdk"); // Exchange the unauthenticated identity pool you created for credentialsconst credentials = new AWS.CognitoIdentityCredentials({ IdentityPoolId: "us-east-1:54f2ba88-9390-498d-aaa5-0d97fb7ca3bd"}); const client = new AWS.Location({ credentials, region: "us-east-1" // The region containing both the identity pool and tracker resource});
// Send device position updatesconst rsp = await location .batchUpdateDevicePosition({ TrackerName: "ExampleTracker", Updates: [ { DeviceId: "ExampleDevice-1", Position: [-123.4567, 45.6789], SampleTime: "2020-10-02T19:09:07.327Z" }, {
160

Amazon Location Service Developer GuideStep 2: Start tracking
DeviceId: "ExampleDevice-2", Position: [-123.123, 45.123], SampleTime: "2020-10-02T19:10:32Z" } ] }) .promise()
Update your tracker with a device positionTo track your devices, you can post device position updates to your tracker. You can later retrieve thesedevice positions or the device position history from your tracker resource.
Each position update must include the device ID, a time stamp, and a position. You may optionallyinclude other metadata, including accuracy and up to 3 key-value pairs for your own use.
If your tracker is linked to one or more geofence collections, updates will be evaluated against thosegeofences (following the filtering rules that you specified for the tracker). If a device breaches ageofenced area (by moving from inside the area to outside, or vice versa), you will receive events inEventBridge. These ENTER or EXIT events include the position update details, including the device ID,the timestamp, and any associated metadata.
NoteFor more information about position filtering, see Create a tracker (p. 158).For more information about geofence events, see Reacting to Amazon Location Service eventswith Amazon EventBridge (p. 165).
Use any of these methods to send device updates:
• Integrate the tracking SDK in your Android and iOS application.• Send MQTT updates to an AWS IoT Core resource and link it to your tracker resource.• Send location updates using the Amazon Location Trackers API, by using the AWS CLI, or the Amazon
Location APIs.
API
To send a position update using the Amazon Location APIs
Use the BatchUpdateDevicePosition operation from the Amazon Location Trackers APIs.
The following example uses an API request to post a device position update for ExampleDevice toa tracker ExampleTracker.
POST /tracking/v0/trackers/ExampleTracker/positionsContent-type: application/json{ "Updates": [ { "DeviceId": "ExampleDevice", "Position": [-123.17805, 49.19284], "SampleTime": "2020-10-02T19:09:07.327Z", "Accuracy": { "Horizontal": 3.14 }, "PositionProperties": { "field1": "value1", "field2": "value2" } }
161

Amazon Location Service Developer GuideStep 2: Start tracking
]}
AWS CLI
To send a position update using AWS CLI commands
Use the batch-update-device-position command.
The following example uses an AWS CLI to post a device position update for ExampleDevice-1 andExampleDevice-2 to a tracker ExampleTracker.
aws location batch-update-device-position \--tracker-name ExampleTracker \--updates '[{"DeviceId":"ExampleDevice-1","Position":[-123.123,47.123],"SampleTime":"2021-11-30T21:47:25.149Z"},{"DeviceId":"ExampleDevice-2","Position":[-123.123,47.123],"SampleTime":"2021-11-30T21:47:25.149Z","Accuracy":{"Horizontal":10.30},"PositionProperties":{"field1":"value1","field2":"value2"}}]'
Get a device's location history from a trackerYour Amazon Location tracker resource maintains the location history of all your tracked devices for aperiod of 30 days. You can retrieve device location history, including all associated metadata, from yourtracker resource. The following examples use the AWS CLI, or the Amazon Location APIs.
API
To get the device location history from a tracker using the Amazon Location APIs
Use the GetDevicePositionHistory operation from the Amazon Location Trackers APIs.
The following example uses an API URI request to get the device location history ofExampleDevice from a tracker called ExampleTracker starting from 19:05:07 (inclusive) andends at 19:20:07 (exclusive) on 2020–10–02.
POST /tracking/v0/trackers/ExampleTracker/devices/ExampleDevice/list-positions Content-type: application/json{ "StartTimeInclusive": "2020-10-02T19:05:07.327Z", "EndTimeExclusive": "2020-10-02T19:20:07.327Z"}
AWS CLI
To get the device location history from a tracker using AWS CLI commands
Use the get-device-position-history command.
The following example uses an AWS CLI to get the device location history of ExampleDevicefrom a tracker called ExampleTracker starting from 19:05:07 (inclusive) and ends at 19:20:07(exclusive) on 2020–10–02.
aws location \ get-device-position-history \ --device-id "ExampleDevice" \ --start-time-inclusive "2020-10-02T19:05:07.327Z" \ --end-time-exclusive "2020-10-02T19:20:07.327Z" \ --tracker-name "ExampleTracker"
162

Amazon Location Service Developer GuideStep 3: Link a tracker to a geofence collection
Link a tracker to a geofence collectionNow that you have a geofence collection and a tracker, you can link them together so that locationupdates are automatically evaluated against all of your geofences. If you don’t want to evaluate alllocation updates, or alternatively, if you aren't storing some of your locations in a tracker resource, youcan evaluate device positions against geofences on demand.
When device positions are evaluated against geofences, events are generated. You can set an action tothese events. For more information about actions that you can set for geofence events, see Reacting toAmazon Location Service events with Amazon EventBridge.
An Amazon Location event includes the attributes of the device position update that generates it andsome attributes of the geofence that is entered or exited. For more information about the data includedin a geofence event, see Amazon EventBridge event examples for Amazon Location Service (p. 166).
The following examples link a tracker resource to a geofence collection using the console, the AWS CLI,or the Amazon Location APIs.
Console
To link a tracker resource to a geofence collection using the Amazon Location Service console
1. Open the Amazon Location Service console at https://console.aws.amazon.com/location/.2. In the left navigation pane, choose Trackers.3. Under Device trackers, select the name link of the target tracker.4. Under Linked Geofence Collections, choose Link Geofence Collection.5. In the Linked Geofence Collection window, select a geofence collection from the dropdown
menu.6. Choose Link.
After you link the tracker resource, it will be assigned an Active status.API
To link a tracker resource to a geofence collection using the Amazon Location APIs
Use the AsssociateTrackerConsumer operation from the Amazon Location Trackers APIs.
The following example uses an API request that associates ExampleTracker with a geofencecollection using its Amazon Resource Name (ARN).
POST /tracking/v0/trackers/ExampleTracker/consumersContent-type: application/json
{ "ConsumerArn": "arn:aws:geo:us-west-2:123456789012:geofence-collection/ExampleGeofenceCollection"}
AWS CLI
To link a tracker resource to a geofence collection using AWS CLI commands
Use the associate-tracker-consumer command.
The following example uses an AWS CLI to create a geofence collection calledExampleGeofenceCollection.
163
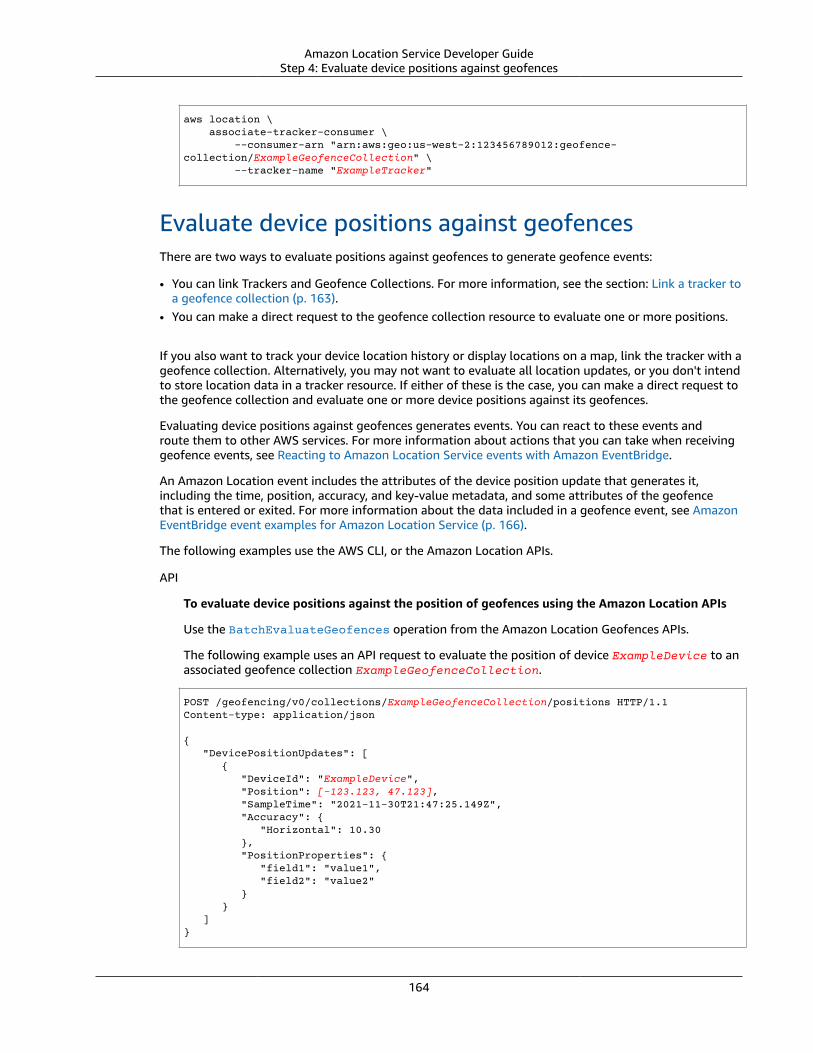
Amazon Location Service Developer GuideStep 4: Evaluate device positions against geofences
aws location \ associate-tracker-consumer \ --consumer-arn "arn:aws:geo:us-west-2:123456789012:geofence-collection/ExampleGeofenceCollection" \ --tracker-name "ExampleTracker"
Evaluate device positions against geofencesThere are two ways to evaluate positions against geofences to generate geofence events:
• You can link Trackers and Geofence Collections. For more information, see the section: Link a tracker toa geofence collection (p. 163).
• You can make a direct request to the geofence collection resource to evaluate one or more positions.
If you also want to track your device location history or display locations on a map, link the tracker with ageofence collection. Alternatively, you may not want to evaluate all location updates, or you don't intendto store location data in a tracker resource. If either of these is the case, you can make a direct request tothe geofence collection and evaluate one or more device positions against its geofences.
Evaluating device positions against geofences generates events. You can react to these events androute them to other AWS services. For more information about actions that you can take when receivinggeofence events, see Reacting to Amazon Location Service events with Amazon EventBridge.
An Amazon Location event includes the attributes of the device position update that generates it,including the time, position, accuracy, and key-value metadata, and some attributes of the geofencethat is entered or exited. For more information about the data included in a geofence event, see AmazonEventBridge event examples for Amazon Location Service (p. 166).
The following examples use the AWS CLI, or the Amazon Location APIs.
API
To evaluate device positions against the position of geofences using the Amazon Location APIs
Use the BatchEvaluateGeofences operation from the Amazon Location Geofences APIs.
The following example uses an API request to evaluate the position of device ExampleDevice to anassociated geofence collection ExampleGeofenceCollection.
POST /geofencing/v0/collections/ExampleGeofenceCollection/positions HTTP/1.1Content-type: application/json
{ "DevicePositionUpdates": [ { "DeviceId": "ExampleDevice", "Position": [-123.123, 47.123], "SampleTime": "2021-11-30T21:47:25.149Z", "Accuracy": { "Horizontal": 10.30 }, "PositionProperties": { "field1": "value1", "field2": "value2" } } ]}
164

Amazon Location Service Developer GuideReacting to geofence events with EventBridge
AWS CLI
To evaluate device positions against the position of geofences using AWS CLI commands
Use the batch-evaluate-geofences command.
The following example uses an AWS CLI to evaluate the position of ExampleDevice-1 andExampleDevice-2 against an associated geofence collection ExampleGeofenceCollection.
aws location \ batch-evaluate-geofences \ --collection-name ExampleGeofenceCollection \ --device-position-updates '[{"DeviceId":"ExampleDevice","Position":[-123.123,47.123],"SampleTime":"2021-11-30T21:47:25.149Z","Accuracy":{"Horizontal":10.30},"PositionProperties":{"field1":"value1","field2":"value2"}}]'
Reacting to Amazon Location Service events withAmazon EventBridgeAmazon EventBridge is a serverless event bus that efficiently connects applications together using datafrom AWS services like Amazon Location. EventBridge receives geofence events from Amazon Locationand routes that data to targets like AWS Lambda. You can set up routing rules to determine where tosend your data to build application architectures that react in real time.
For more information, see the Events and Event Patterns in the Amazon EventBridge User Guide.
Topics• Create event rules for Amazon Location (p. 165)• Amazon EventBridge event examples for Amazon Location Service (p. 166)
Create event rules for Amazon LocationYou can create up to 300 rules per event bus in EventBridge to configure actions taken in response to anAmazon Location event.
For example, you can create a rule for geofence events where a push notification will be sent when aphone is detected within a geofenced boundary.
To create a rule for Amazon Location events
Using the following values, create an EventBridge rule based on Amazon Location events:
• For Rule type, choose Rule with an event pattern.• In the Event pattern box, add the following pattern:
{ "source": ["aws.geo"], "detail-type": ["Location Geofence Event"]}
You can optionally specify only ENTER or EXIT events by adding a detail tag:
{ "source": ["aws.geo"],
165

Amazon Location Service Developer GuideReacting to geofence events with EventBridge
"detail-type": ["Location Geofence Event"], "detail": { "EventType": ["ENTER"] }}
• For Select targets, choose the target action to take when a geofence event is received from AmazonLocation Service.
For example, use an Amazon Simple Notification Service (SNS) topic to send an email or text messagewhen an event occurs. You first need to create an Amazon SNS topic using the Amazon SNS console.For more information, see Using Amazon SNS for user notifications.
WarningIt's best practice to confirm that the event rule was successfully applied or your automatedaction may not trigger as expected. To verify your event rule, initiate conditions for the eventrule. For example, simulate a device entering a geofenced area.
You can also capture all events from Amazon Location, by just excluding the detail-type section. Forexample:
{ "source": [ "aws.geo" ]}
NoteThe same event may be delivered more than one time. You can use the event id to de-duplicatethe events that you receive.
Amazon EventBridge event examples for Amazon LocationServiceThe following is an example of an event for entering a geofence triggered by callingBatchUpdateDevicePosition.
{ "version": "0", "id": "aa11aa22-33a-4a4a-aaa5-example", "detail-type": "Location Geofence Event", "source": "aws.geo", "account": "636103698109", "time": "2020-11-10T23:43:37Z", "region": "eu-west-1", "resources": [ "arn:aws:geo:eu-west-1:0123456789101:geofence-collection/GeofenceEvents-GeofenceCollection_EXAMPLE", "arn:aws:geo:eu-west-1:0123456789101:tracker/Tracker_EXAMPLE" ], "detail": { "EventType": "ENTER", "GeofenceId": "polygon_14", "DeviceId": "Device1-EXAMPLE", "SampleTime": "2020-11-10T23:43:37.531Z", "Position": [ -123.12390073297821, 49.23433613216247 ],
166

Amazon Location Service Developer GuideTracking using MQTT
"Accuracy": { "Horizontal": 15.3 }, "PositionProperties": { "ExampleKey": "ExampleField" } }}
The following is an example of an event for exiting a geofence triggered by callingBatchUpdateDevicePosition.
{ "version": "0", "id": "aa11aa22-33a-4a4a-aaa5-example", "detail-type": "Location Geofence Event", "source": "aws.geo", "account": "123456789012", "time": "2020-11-10T23:41:44Z", "region": "eu-west-1", "resources": [ "arn:aws:geo:eu-west-1:0123456789101:geofence-collection/GeofenceEvents-GeofenceCollection_EXAMPLE", "arn:aws:geo:eu-west-1:0123456789101:tracker/Tracker_EXAMPLE" ], "detail": { "EventType": "EXIT", "GeofenceId": "polygon_10", "DeviceId": "Device1-EXAMPLE", "SampleTime": "2020-11-10T23:41:43.826Z", "Position": [ -123.08569321875426, 49.23766166742559 ], "Accuracy": { "Horizontal": 15.3 }, "PositionProperties": { "ExampleKey": "ExampleField" } }}
Tracking using MQTT with Amazon Location ServiceMQTT is a lightweight and widely adopted messaging protocol designed for constrained devices. AWSIoT Core supports device connections that use the MQTT protocol and MQTT over WebSocket Secure(WSS) protocol.
AWS IoT Core connects devices to AWS and enables you to send and receive messages between them.The AWS IoT Core rules engine stores queries about your devices' message topics and enables you todefine actions for sending messages to other AWS services, such as Amazon Location Service. Devicesthat are aware of their location as coordinates can have their locations forwarded to Amazon Locationthrough the rules engine. For more information about this pattern, see the reference architecture.
Topics• Prerequisite (p. 168)• Create a Lambda function (p. 168)• Create an AWS IoT Core rule (p. 170)• Test your AWS IoT Core rule in the console (p. 170)
167
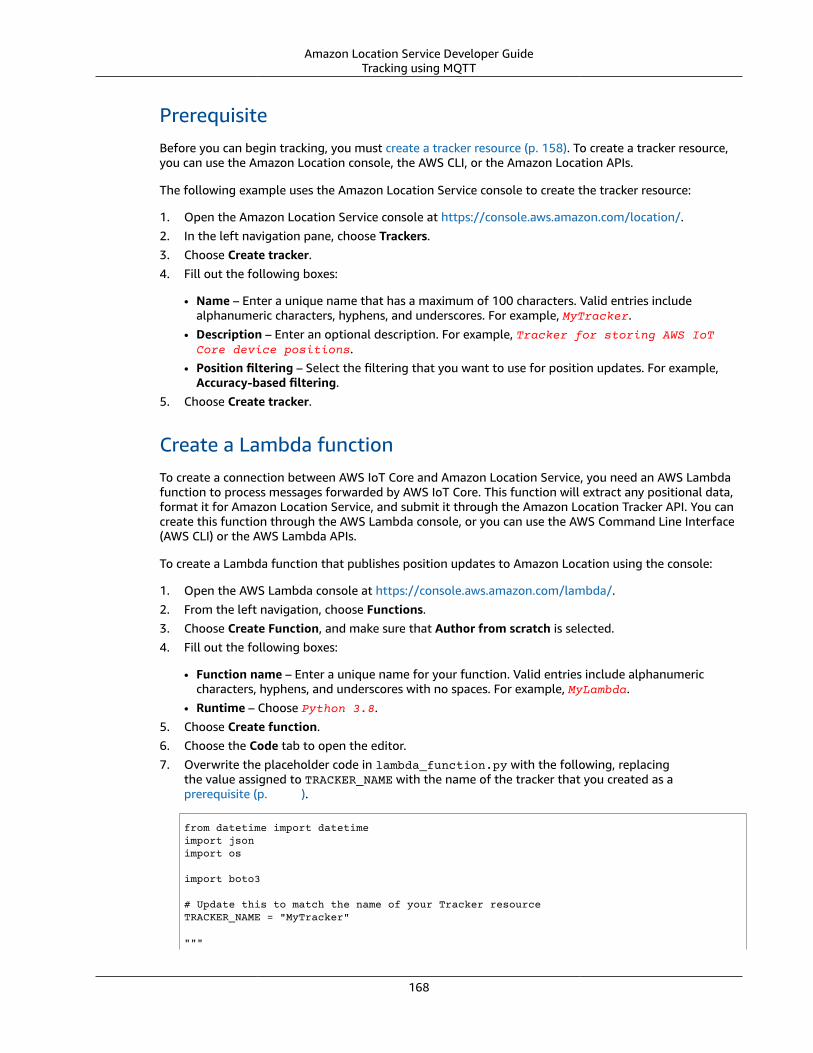
Amazon Location Service Developer GuideTracking using MQTT
PrerequisiteBefore you can begin tracking, you must create a tracker resource (p. 158). To create a tracker resource,you can use the Amazon Location console, the AWS CLI, or the Amazon Location APIs.
The following example uses the Amazon Location Service console to create the tracker resource:
1. Open the Amazon Location Service console at https://console.aws.amazon.com/location/.2. In the left navigation pane, choose Trackers.3. Choose Create tracker.4. Fill out the following boxes:
• Name – Enter a unique name that has a maximum of 100 characters. Valid entries includealphanumeric characters, hyphens, and underscores. For example, MyTracker.
• Description – Enter an optional description. For example, Tracker for storing AWS IoTCore device positions.
• Position filtering – Select the filtering that you want to use for position updates. For example,Accuracy-based filtering.
5. Choose Create tracker.
Create a Lambda functionTo create a connection between AWS IoT Core and Amazon Location Service, you need an AWS Lambdafunction to process messages forwarded by AWS IoT Core. This function will extract any positional data,format it for Amazon Location Service, and submit it through the Amazon Location Tracker API. You cancreate this function through the AWS Lambda console, or you can use the AWS Command Line Interface(AWS CLI) or the AWS Lambda APIs.
To create a Lambda function that publishes position updates to Amazon Location using the console:
1. Open the AWS Lambda console at https://console.aws.amazon.com/lambda/.2. From the left navigation, choose Functions.3. Choose Create Function, and make sure that Author from scratch is selected.4. Fill out the following boxes:
• Function name – Enter a unique name for your function. Valid entries include alphanumericcharacters, hyphens, and underscores with no spaces. For example, MyLambda.
• Runtime – Choose Python 3.8.5. Choose Create function.6. Choose the Code tab to open the editor.7. Overwrite the placeholder code in lambda_function.py with the following, replacing
the value assigned to TRACKER_NAME with the name of the tracker that you created as aprerequisite (p. ).
from datetime import datetimeimport jsonimport os
import boto3
# Update this to match the name of your Tracker resourceTRACKER_NAME = "MyTracker"
"""
168
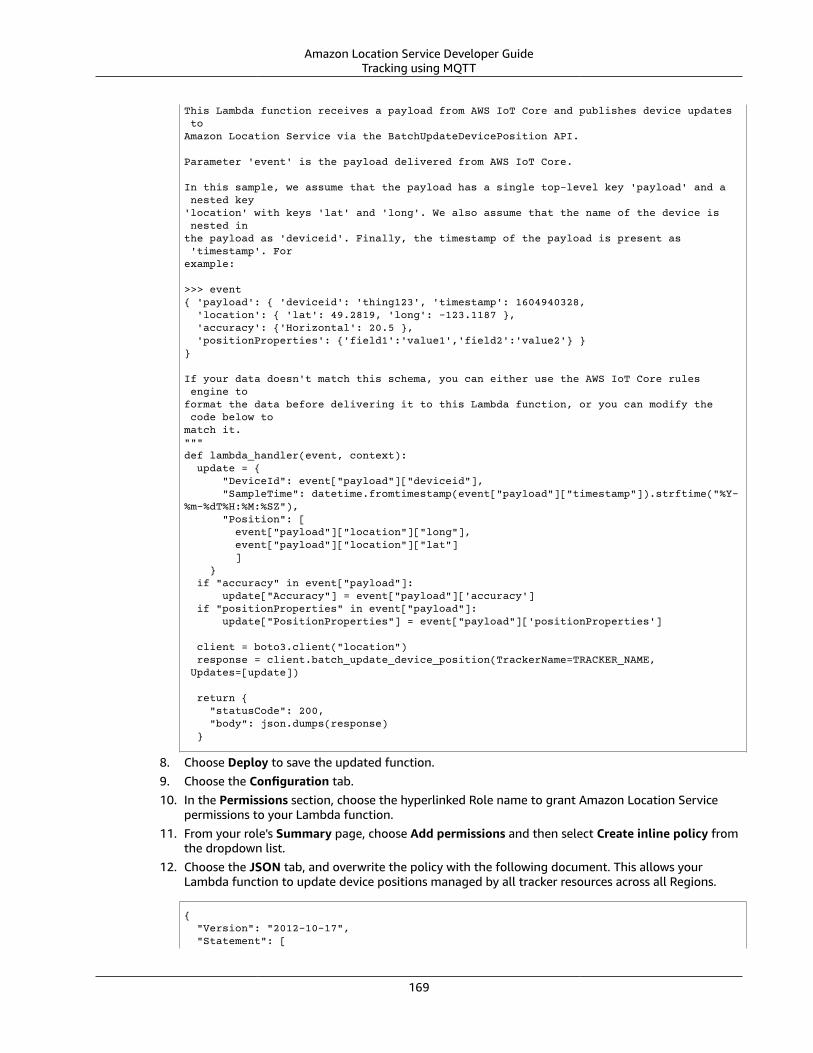
Amazon Location Service Developer GuideTracking using MQTT
This Lambda function receives a payload from AWS IoT Core and publishes device updates to Amazon Location Service via the BatchUpdateDevicePosition API.
Parameter 'event' is the payload delivered from AWS IoT Core.
In this sample, we assume that the payload has a single top-level key 'payload' and a nested key'location' with keys 'lat' and 'long'. We also assume that the name of the device is nested inthe payload as 'deviceid'. Finally, the timestamp of the payload is present as 'timestamp'. Forexample:
>>> event{ 'payload': { 'deviceid': 'thing123', 'timestamp': 1604940328, 'location': { 'lat': 49.2819, 'long': -123.1187 }, 'accuracy': {'Horizontal': 20.5 }, 'positionProperties': {'field1':'value1','field2':'value2'} }}
If your data doesn't match this schema, you can either use the AWS IoT Core rules engine toformat the data before delivering it to this Lambda function, or you can modify the code below tomatch it."""def lambda_handler(event, context): update = { "DeviceId": event["payload"]["deviceid"], "SampleTime": datetime.fromtimestamp(event["payload"]["timestamp"]).strftime("%Y-%m-%dT%H:%M:%SZ"), "Position": [ event["payload"]["location"]["long"], event["payload"]["location"]["lat"] ] } if "accuracy" in event["payload"]: update["Accuracy"] = event["payload"]['accuracy'] if "positionProperties" in event["payload"]: update["PositionProperties"] = event["payload"]['positionProperties'] client = boto3.client("location") response = client.batch_update_device_position(TrackerName=TRACKER_NAME, Updates=[update])
return { "statusCode": 200, "body": json.dumps(response) }
8. Choose Deploy to save the updated function.9. Choose the Configuration tab.10. In the Permissions section, choose the hyperlinked Role name to grant Amazon Location Service
permissions to your Lambda function.11. From your role's Summary page, choose Add permissions and then select Create inline policy from
the dropdown list.12. Choose the JSON tab, and overwrite the policy with the following document. This allows your
Lambda function to update device positions managed by all tracker resources across all Regions.
{ "Version": "2012-10-17", "Statement": [
169

Amazon Location Service Developer GuideTracking using MQTT
{ "Sid": "WriteDevicePosition", "Effect": "Allow", "Action": "geo:BatchUpdateDevicePosition", "Resource": "arn:aws:geo:*:*:tracker/*" } ]}
13. Choose Review policy.14. Enter a policy name. For example, AmazonLocationTrackerWriteOnly.15. Choose Create policy.
You can modify this function code, as necessary, to adapt to your own device message schema.
Create an AWS IoT Core ruleNext, create an AWS IoT Core rule to forward your devices' positional telemetry to the AWS Lambdafunction for transformation and publication to Amazon Location Service. The example rule providedassumes that any necessary transformation of device payloads is handled by your Lambda function. Youcan create this rule through the AWS IoT Core console, the AWS Command Line Interface (AWS CLI), orthe AWS IoT Core APIs.
NoteWhile the AWS IoT console handles the permission necessary to allow AWS IoT Core to invokeyour Lambda function, if you are creating your rule from the AWS CLI or SDK, you mustconfigure a policy to grant permission to AWS IoT.
To create an AWS IoT Core using the console
1. Sign in to the AWS IoT Core console at https://console.aws.amazon.com/iot/.2. In the left navigation, expand Act, and choose Rules.3. Choose Create a rule to start the new rule wizard.4. Enter a name and description for your rule.5. For the Rule query statement, update the FROM attribute to refer to a topic where at least one
device is publishing telemetry that includes location. If you are testing the solution, no modificationis needed.
SELECT * FROM 'iot/topic'
6. Under Set one or more actions , choose Add action.7. Select Send a message to a lambda function.8. Choose Configure action.9. Find and select your Lambda function from the list.10. Choose Add action.11. Choose Create rule.
Test your AWS IoT Core rule in the consoleIf no devices are currently publishing telemetry that includes location, you can test your rule and thissolution using the AWS IoT Core console. The console has a test client where you can publish a samplemessage to verify the results of the solution.
1. Sign in to the AWS IoT Core console at https://console.aws.amazon.com/iot/.
170

Amazon Location Service Developer GuideManaging geofence resources
2. In the left navigation, expand Test, and choose MQTT test client.3. Under Publish to a topic, set the Topic name to iot/topic (or the name of the topic that you
set up in your AWS IoT Core rule, if different), and provide the following for the Message payload.Replace the timestamp 1604940328 with a valid timestamp within the last 30 days (any timestampsolder than 30 days are ignored).
{ "payload": { "deviceid": "thing123", "timestamp": 1604940328, "location": { "lat": 49.2819, "long": -123.1187 }, "accuracy": { "Horizontal": 20.5 }, "positionProperties": { "field1": "value1", "field2": "value2" } }}
4. Choose Publish to topic to send the test message.5. To validate that the message was received by Amazon Location Service, use the following AWS CLI
command. If you modified them during setup, replace the tracker name and device id with the onesthat you used.
aws location batch-get-device-position --tracker-name MyTracker --device-ids thing123
Managing your geofence collection resourcesManage your geofence collections using the Amazon Location console, the AWS CLI, or the AmazonLocation APIs.
List your geofence collection resourcesYou can view your geofence collection list using the Amazon Location console, the AWS CLI, or theAmazon Location APIs:
Console
To view a list of geofence collections using the Amazon Location console
1. Open the Amazon Location console at https://console.aws.amazon.com/location/.2. Choose Geofence collections from the left navigation pane.3. View a list of your geofence collections under My geofence collections.
API
Use the ListGeofenceCollections operation from the Amazon Location Geofences APIs.
The following example is an API request to get a list of geofence collections in the AWS account.
POST /geofencing/v0/list-collections
The following is an example response for ListGeofenceCollections:
{ "Entries": [ { "CollectionName": "ExampleCollection",
171

Amazon Location Service Developer GuideManaging geofence resources
"CreateTime": 2020-09-30T22:59:34.142Z, "Description": "string", "UpdateTime": 2020-09-30T23:59:34.142Z }, "NextToken": "1234-5678-9012"}
CLI
Use the list-geofence-collections command.
The following example is an AWS CLI to get a list of geofence collections in the AWS account.
aws location list-geofence-collections
Get geofence collection detailsYou can get details about any geofence collection resource in your AWS account using the AmazonLocation console, the AWS CLI, or the Amazon Location APIs:
Console
To view the details of a geofence collection using the Amazon Location console
1. Open the Amazon Location console at https://console.aws.amazon.com/location/.2. Choose Geofence collections from the left navigation pane.3. Under My geofence collections, select the name link of the target geofence collection.
API
Use the DescribeGeofenceCollection operation from the Amazon Location Geofences APIs.
The following example is an API request to get the geofence collection details forExampleCollection.
GET /geofencing/v0/collections/ExampleCollection
The following is an example response for DescribeGeofenceCollection:
{ "CollectionArn": "arn:aws:geo:us-west-2:123456789012:geofence-collection/GeofenceCollection", "CollectionName": "ExampleCollection", "CreateTime": 2020-09-30T22:59:34.142Z, "Description": "string", "KmsKeyId": "1234abcd-12ab-34cd-56ef-1234567890ab", "Tags": { "Tag1" : "Value1" }, "UpdateTime": 2020-09-30T23:59:34.142Z}
CLI
Use the describe-geofence-collection command.
The following example is an AWS CLI to get the geofence collection details forExampleCollection.
172

Amazon Location Service Developer GuideManaging geofence resources
aws location describe-geofence-collection \ --collection-name "ExampleCollection"
Delete a geofence collectionYou can delete a geofence collection from your AWS account using the Amazon Location console, theAWS CLI, or the Amazon Location APIs.
Console
To delete a geofence collection using the Amazon Location console
WarningThis operation deletes the resource permanently.
1. Open the Amazon Location console at https://console.aws.amazon.com/location/.2. Choose Geofence collections from the left navigation pane.3. Under My geofence collection, select the target geofence collection.4. Choose Delete geofence collection.
API
Use the DeleteGeofenceCollection operation from the Amazon Location Geofences APIs.
The following example is an API request to delete the geofence collection ExampleCollection.
DELETE /geofencing/v0/collections/ExampleCollection
The following is an example response for DeleteGeofenceCollection:
HTTP/1.1 200
CLI
Use the delete-geofence-collection command.
The following example is an AWS CLI command to delete the geofence collectionExampleCollection.
aws location delete-geofence-collection \ --collection-name "ExampleCollection"
List stored geofencesYou can list geofences stored in a specified geofence collection using the Amazon Location console, theAWS CLI, or the Amazon Location APIs.
Console
To view a list of geofences using the Amazon Location console
1. Open the Amazon Location console at https://console.aws.amazon.com/location/.2. Choose Geofence collections from the left navigation pane.
173

Amazon Location Service Developer GuideManaging geofence resources
3. Under My geofence collection, select the name link of the target geofence collection.4. View geofences in the geofence collection under Geofences
API
Use the ListGeofences operation from the Amazon Location Geofences APIs.
The following example is an API request to get a list of geofences stored in the geofence collectionExampleCollection.
POST /geofencing/v0/collections/ExampleCollection/list-geofences
The following is an example response for ListGeofences:
{ "Entries": [ { "CreateTime": 2020-09-30T22:59:34.142Z, "GeofenceId": "geofence-1", "Geometry": { "Polygon": [ [-5.716667, -15.933333, [-14.416667, -7.933333], [-12.316667, -37.066667], [-5.716667, -15.933333] ] }, "Status": "ACTIVE", "UpdateTime": 2020-09-30T23:59:34.142Z } ], "NextToken": "1234-5678-9012"}
CLI
Use the list-geofences command.
The following example is an AWS CLI to get a list of geofences stored in the geofence collectionExampleCollection.
aws location list-geofences \ --collection-name "ExampleCollection"
Get geofence detailsYou can get the details of a specific geofence, such as the create time, update time, geometry, andstatus, from a geofence collection using the Amazon Location console, AWS CLI, or the Amazon LocationAPIs.
Console
To view the status of a geofence using the Amazon Location console
1. Open the Amazon Location console at https://console.aws.amazon.com/location/.2. Choose Geofence collections from the left navigation pane.3. Under My geofence collection, select the name link of the target geofence collection.
174

Amazon Location Service Developer GuideManaging geofence resources
4. Under Geofences, you’ll be able to view the status of your geofences.
API
Use the GetGeofence operation from the Amazon Location Geofences APIs.
The following example is an API request to get the geofence details from a geofence collectionExampleCollection.
GET /geofencing/v0/collections/ExampleCollection/geofences/ExampleGeofence1
The following is an example response for GetGeofence:
{ "CreateTime": 2020-09-30T22:59:34.142Z, "GeofenceId": "ExampleGeofence1", "Geometry": { "Polygon": [ [-1,-1], [1,-1], [0,1], [-1,-1] ] }, "Status": "ACTIVE", "UpdateTime": 2020-09-30T23:59:34.142Z}
CLI
Use the get-geofence command.
The following example is an AWS CLI to get the geofence collection details forExampleCollection.
aws location get-geofence \ --collection-name "ExampleCollection" \ --geofence-id "ExampleGeofence1"
Delete geofencesYou can delete geofences from a geofence collection using the Amazon Location console, the AWS CLI, orthe Amazon Location APIs.
Console
To delete a geofence using the Amazon Location console
WarningThis operation deletes the resource permanently.
1. Open the Amazon Location console at https://console.aws.amazon.com/location/.2. Choose Geofence collections from the left navigation pane.3. Under My geofence collection, select the name link of the target geofence collection.4. Under Geofences, select the target geofence.5. Choose Delete geofence.
175

Amazon Location Service Developer GuideManaging tracker resources
API
Use the BatchDeleteGeofence operation from the Amazon Location Geofences APIs.
The following example is an API request to delete geofences from the geofence collectionExampleCollection.
POST /geofencing/v0/collections/ExampleCollection/delete-geofencesContent-type: application/json
{ "GeofenceIds": [ "ExampleGeofence11" ]}
The following is an example success response for BatchDeleteGeofence.
HTTP/1.1 200
CLI
Use the batch-delete-geofence command.
The following example is an AWS CLI command to delete geofences from the geofence collectionExampleCollection.
aws location batch-delete-geofence \ --collection-name "ExampleCollection" \ --geofence-ids "ExampleGeofence11"
Managing your tracker resourcesYou can manage your trackers using the Amazon Location console, the AWS CLI, or the Amazon LocationAPIs.
List your trackersYou can view your trackers list using the Amazon Location console, the AWS CLI, or the Amazon LocationAPIs:
Console
To view a list of existing trackers using the Amazon Location console
1. Open the Amazon Location console at https://console.aws.amazon.com/location/.2. Choose Trackers from the left navigation.3. View a list of your tracker resources under My trackers.
API
Use the ListTrackers operation from the Amazon Location Trackers APIs.
The following example is an API request to get a list of trackers in your AWS account.
POST /tracking/v0/list-trackers
The following is an example response for ListTrackers:
176

Amazon Location Service Developer GuideManaging tracker resources
{ "Entries": [ { "CreateTime": 2020-10-02T19:09:07.327Z, "Description": "string", "TrackerName": "ExampleTracker", "UpdateTime": 2020-10-02T19:10:07.327Z } ], "NextToken": "1234-5678-9012"}
CLI
Use the list-trackers command.
The following example is an AWS CLI to get a list of trackers in your AWS account.
aws location list-trackers
Disconnecting a tracker from a geofence collectionYou can disconnect a tracker from a geofence collection using the Amazon Location console, the AWSCLI, or the Amazon Location APIs:
Console
To disassociate a tracker from an associated geofence collection using the Amazon Locationconsole
1. Open the Amazon Location console at https://console.aws.amazon.com/location/.2. Choose Trackers from the left navigation pane.3. Under My trackers, select the name link of the target tracker.4. Under Linked Geofence Collections, select a geofence collection with a Linked status.5. Choose Unlink.
API
Use the DisassociateTrackerConsumer operation from the Amazon Location Trackers APIs.
The following example is an API request to disassociate a tracker from an associated geofencecollection.
DELETE /tracking/v0/trackers/ExampleTracker/consumers/arn:aws:geo:us-west-2:123456789012:geofence-collection/ExampleCollection
The following is an example response for DisassociateTrackerConsumer:
HTTP/1.1 200
CLI
Use the disassociate-tracker-consumer command.
The following example is an AWS CLI command to disassociate a tracker from an associatedgeofence collection.
177

Amazon Location Service Developer GuideManaging tracker resources
aws location disassociate-tracker-consumer \ --consumer-arn "arn:aws:geo:us-west-2:123456789012:geofence-collection/ExampleCollection" \ --tracker-name "ExampleTracker"
Get tracker detailsYou can get details about any tracker in your AWS account by using the Amazon Location console, theAWS CLI, or the Amazon Location APIs.
Console
To view tracker details by using the Amazon Location console
1. Open the Amazon Location console at https://console.aws.amazon.com/location/.2. Choose Trackers from the left navigation.3. Under My trackers, select the name link of the target tracker.4. View the tracker details under Information.
API
Use the DescribeTracker operation from the Amazon Location Tracker APIs.
The following example is an API request to get the tracker details for ExampleTracker.
GET /tracking/v0/trackers/ExampleTracker
The following is an example response for DescribeTracker:
{ "CreateTime": 2020-10-02T19:09:07.327Z, "Description": "string", "KmsKeyId": "1234abcd-12ab-34cd-56ef-1234567890ab", "PositionFiltering": "TimeBased", "Tags": { "Tag1" : "Value1" }, "TrackerArn": "arn:aws:geo:us-west-2:123456789012:tracker/ExampleTracker", "TrackerName": "ExampleTracker", "UpdateTime": 2020-10-02T19:10:07.327Z}
CLI
Use the describe-tracker command.
The following example is an AWS CLI command to get tracker details for ExampleTracker.
aws location describe-tracker \ --tracker-name "ExampleTracker"
Delete a trackerYou can delete a tracker from your AWS account using the Amazon Location console, the AWS CLI, or theAmazon Location APIs:
178

Amazon Location Service Developer GuideTagging your resources
Console
To delete an existing map resource using the Amazon Location console
WarningThis operation deletes the resource permanently. If the tracker resource is in use, youmay encounter an error. Make sure that the target resource isn't a dependency for yourapplications.
1. Open the Amazon Location console at https://console.aws.amazon.com/location/.2. Choose Trackers from the left navigation pane.3. Under My trackers, select the target tracker.4. Choose Delete tracker.
API
Use the DeleteTracker operation from the Amazon Location Tracker APIs.
The following example is an API request to delete the tracker ExampleTracker.
DELETE /tracking/v0/trackers/ExampleTracker
The following is an example response for DeleteTracker:
HTTP/1.1 200
CLI
Use the delete-tracker command.
The following example is an AWS CLI command to delete the tracker ExampleTracker.
aws location delete-tracker \ --tracker-name "ExampleTracker"
Tagging your Amazon Location Service resourcesUse resource tagging in Amazon Location to create tags to categorize your resources by purpose, owner,environment, or criteria. Tagging your resources helps you manage, identify, organize, search, and filteryour resources.
For example, with AWS Resource Groups, you can create groups of AWS resources based on one or moretags or portions of tags. You can also create groups based on their occurrence in an AWS CloudFormationstack. Using Resource Groups and Tag Editor, you can consolidate and view data for applications thatconsist of multiple services, resources, and Regions in one place. For more information on CommonTagging Strategies, see the AWS General Reference.
Each tag is a label consisting of a key and value that you define:
• Tag key – A general label that categorizes the tag values. For example, CostCenter.• Tag value – An optional description for the tag key category. For example,MobileAssetTrackingResourcesProd.
This topic helps you get started with tagging by reviewing tagging restrictions. It also shows you how tocreate tags and use tags to track your AWS cost for each active tag by using cost allocation reports.
179

Amazon Location Service Developer GuideRestrictions
Topics• Tagging restrictions (p. 180)• Grant permission to tag resources (p. 180)• Add a tag to an Amazon Location Service resource (p. 181)• Track resource cost by tag (p. 181)• Control access to Amazon Location Service resources using tags (p. 182)• Learn more (p. 182)
Tagging restrictionsThe following basic restrictions apply to tags:
• Maximum tags per resource – 50• For each resource, each tag key must be unique, and each tag key can have only one value.
NoteIf you add a new tag with the same tag key as an existing tag, the new tag overwrites theexisting tag.
• Maximum key length – 128 Unicode characters in UTF-8• Maximum value length – 256 Unicode characters in UTF-8• The allowed characters across services are: letters, numbers, and spaces representable in UTF-8, and
the following characters: + - = . _ : / @.• Tag keys and values are case-sensitive.• The aws: prefix is reserved for AWS use. If a tag has a tag key with this prefix, then you can't edit or
delete the tag's key or value. Tags with the aws: prefix don't count against your tags per resourcelimit.
Grant permission to tag resourcesYou can use IAM policies to control access to your Amazon Location resources and grant permission totag a resource on creation. In addition to granting permission to create resources, the policy can includeAction permissions to allow tagging operations:
• geo:TagResource – Allows a user to assign one or more tags to a specified Amazon Locationresource.
• geo:UntagResource – Allows a user to remove one or more tags from a specified Amazon Locationresource.
• geo:ListTagsForResource – Allows a user to list all the tags assigned to an Amazon Locationresource.
The following is a policy example to allow a user to create a geofence collection and tag resources:
{ "Version": "2012-10-17", "Statement": [ { "Sid": "AllowTaggingForGeofenceCollectionOnCreation", "Effect": "Allow", "Action": [ "geo:CreateGeofenceCollection", "geo:TagResource"
180

Amazon Location Service Developer GuideAdd a tag to a resource
], "Resource": "arn:aws:geo:region:accountID:geofence-collection/*" ]}
Add a tag to an Amazon Location Service resourceYou can add tags when creating your resources using the Amazon Location console, the AWS CLI, or theAmazon Location APIs:
• Create a map resource (p. 75)• Create a place index resource (p. 116)• Create a route calculator resource (p. 141)• Create a geofence collection (p. 155)• Create a tracker resource (p. 158)
To tag existing resources, edit or delete tags
1. Open the Amazon Location console at https://console.aws.amazon.com/location/.2. In the left navigation pane, choose the resource you want to tag. For example, Maps.3. Choose a resource from the list.4. Choose Manage tags to add, edit, or delete your tags.
Track resource cost by tagYou can use tags for cost allocation to track your AWS cost in detail. After you activate the cost allocationtags, AWS uses the cost allocation tags to organize your resource billing on your cost allocation report.This helps you categorize and track your usage costs.
There are two types of cost allocation tags you can activate:
• AWS-generated – These tags are generated by AWS. AWS tags use the aws: prefix, for example,aws:createdBy.
• User-defined – These are custom tags that you create. The user-defined tags use the user: prefix, forexample, user:CostCenter.
You must activate each tag type individually. After your tags are activated, you can enable AWS CostExplorer or view your monthly cost allocation report.
AWS-generated tags
To activate AWS-generated tags
1. Open the Billing and Cost Management console at https://console.aws.amazon.com/billing/.2. In the left navigation pane, choose Cost Allocation Tags.3. Under the AWS-Generated Cost Allocation Tags tab, select the tag keys that you want to
activate.4. Choose Activate.
User-defined tags
To activate user-defined tags
181

Amazon Location Service Developer GuideControl access to resources using tags
1. Open the Billing and Cost Management console at https://console.aws.amazon.com/billing/.2. In the left navigation pane, choose Cost Allocation Tags.3. Under the User-Defined Cost Allocation Tags tab, select the tag keys you want to activate.4. Choose Activate.
After you activate your tags, AWS generates a monthly Cost Allocation Report for your resource usageand cost. This cost allocation report includes all of your AWS costs for each billing period, includingtagged and untagged resources. For more information, see Using Cost Allocation Tags in the AWS Billingand Cost Management User Guide.
Control access to Amazon Location Service resourcesusing tagsAWS Identity and Access Management (IAM) policies support tag-based conditions, which enables you tomanage authorization for your resources based on specific tags key and values. For example, an IAM useror role policy can include conditions to limit access to specific environments, such as development, test,or production, based on tags.
For more information, see the topic on control resource access based on tags (p. 222).
Learn moreFor more information about:
• Tagging best practices, see Tagging AWS resources in the AWS General Reference.• Using tags to control access to AWS resources, see Controling access to and for IAM users and roles
using tags in the IAM User Guide.
Granting access to Amazon Location ServiceTo use Amazon Location Service, your AWS account must be granted access to the resources and APIsthat make up Amazon Location. To grant access to an AWS account, use AWS Identity and AccessManagement (IAM), and create a policy that grants access to the resources that you want. For moreinformation about IAM and Amazon Location, see Identity and Access Management for Amazon LocationService (p. 210).
You can also use Amazon Cognito to grant anonymous access, or to use your own separateauthentication with Amazon Location Service.
Allowing unauthenticated guest access to yourapplication using Amazon CognitoYou can use Amazon Cognito authentication as an alternative to directly using AWS Identity and AccessManagement (IAM) with both frontend SDKs and direct HTTPS requests.
You may want to use this form of authentication for the following reasons:
• Unauthenticated users – If you have a website with anonymous users, you can use AmazonCognito identity pools. For more information, see the section on the section called “Using AmazonCognito” (p. 182).
182

Amazon Location Service Developer GuideUsing Amazon Cognito
• Your own authentication – If you would like to use your own authentication process, or combinemultiple authentication methods, you can use Amazon Cognito Federated Identities. For moreinformation, see Getting Started with Federated Identities in the Amazon Cognito Developer Guide.
Amazon Cognito provides authentication, authorization, and user management for web and mobileapps. You can use Amazon Cognito unauthenticated identity pools with Amazon Location as a way forapplications to retrieve temporary, scoped-down AWS credentials.
For more information, see Getting Started with User Pools in the Amazon Cognito Developer Guide.
Create an Amazon Cognito identity poolYou can create Amazon Cognito identity pools to allow unauthenticated guest access to your applicationthrough the Amazon Cognito console, the AWS CLI, or the Amazon Cognito APIs.
ImportantThe pool that you create must be in the same AWS account and AWS Region as the AmazonLocation Service resources that you're using.
You can use IAM policies associated with unauthenticated identity roles with the following actions:
• geo:GetMap*
• geo:SearchPlaceIndex*
• geo:CalculateRoute*
• geo:GetGeofence
• geo:ListGeofences
• geo:PutGeofence
• geo:BatchDeleteGeofence
• geo:BatchPutGeofence
• geo:BatchEvaluateGeofences
• geo:GetDevicePosition*
• geo:ListDevicePositions
• geo:BatchDeleteDevicePositionHistory
• geo:BatchGetDevicePosition
• geo:BatchUpdateDevicePosition
Including other Amazon Location actions will have no effect, and unauthenticated identities will beunable to call them.
Example
To create an identity pool using the Amazon Cognito console
1. Go to the Amazon Cognito console.2. Choose Manage Identity Pools.3. Choose Create new identity pool, then enter a name for your identity pool.4. From the Unauthenticated identities collapsible section, choose Enable access to unauthenticated
identities.5. Choose Create Pool.6. Choose which IAM roles you want to use with your identity pool.7. Expand View Details.8. Under Unauthenticated identities, enter a role name.
183

Amazon Location Service Developer GuideUsing Amazon Cognito
9. Expand the View Policy Document section, then choose Edit to add your policy.
10. Add your policy to grant access to your resources.
The following are policy examples for Maps, Places, Trackers, and Routes. To use the examples foryour own policy, replace the region and accountID placeholders:
Maps policy example
The following policy grants read-only access to a map resource named ExampleMap.
{ "Version": "2012-10-17", "Statement": [ { "Sid": "MapsReadOnly", "Effect": "Allow", "Action": [ "geo:GetMapStyleDescriptor", "geo:GetMapGlyphs", "geo:GetMapSprites", "geo:GetMapTile" ], "Resource": "arn:aws:geo:region:accountID:map/ExampleMap" } ]}
Adding an IAM condition that matches aws:referer lets you limit browser access to yourresources to a list of URLs or URL prefixes. The following example denies access to a mapresource named RasterEsriImagery from all referring websites except example.com:
{ "Version": "2012-10-17", "Statement": [ { "Effect": "Allow", "Action": "geo:GetMap*", "Resource": "arn:aws:geo:us-west-2:111122223333:map/RasterEsriImagery", "Condition": { "StringLike": { "aws:referer": [ "https://example.com/*", "https://www.example.com/*" ] } } } ]}
If you're using Tangram to display a map, it doesn't use the style descriptors, glyphs, or spritesreturned by the Maps API. Instead, it's configured by pointing to a .zip file that contains stylerules and necessary assets. The following policy grants read-only access to a map resourcenamed ExampleMap for the GetMapTile operation.
{ "Version": "2012-10-17", "Statement": [ { "Sid": "MapsReadOnly", "Effect": "Allow",
184

Amazon Location Service Developer GuideUsing Amazon Cognito
"Action": [ "geo:GetMapTile" ], "Resource": "arn:aws:geo:region:accountID:map/ExampleMap" } ]}
Places policy example
The following policy grants read-only access to a place index resource namedExamplePlaceIndex to search for places by text or positions.
{ "Version": "2012-10-17", "Statement": [ { "Sid": "PlacesReadOnly", "Effect": "Allow", "Action": "geo:SearchPlaceIndex*", "Resource": "arn:aws:geo:region:accountID:place-index/ExamplePlaceIndex" } ]}
Adding an IAM condition that matches aws:referer lets you limit browser access to yourresources to a list of URLs or URL prefixes. The following example denies access to a place indexresource named ExamplePlaceIndex from all referring websites, except example.com.
{ "Version": "2012-10-17", "Statement": [ { "Effect": "Allow", "Action": "geo:*", "Resource": "arn:aws:geo:us-west-2:111122223333:place-index/ExamplePlaceIndex", "Condition": { "StringLike": { "aws:referer": [ "https://example.com/*", "https://www.example.com/*" ] } } } ]}
Trackers policy example
The following policy grants access to a tracker resource named ExampleTracker to updatedevice positions.
{ "Version": "2012-10-17", "Statement": [ { "Sid": "UpdateDevicePosition", "Effect": "Allow", "Action": [
185
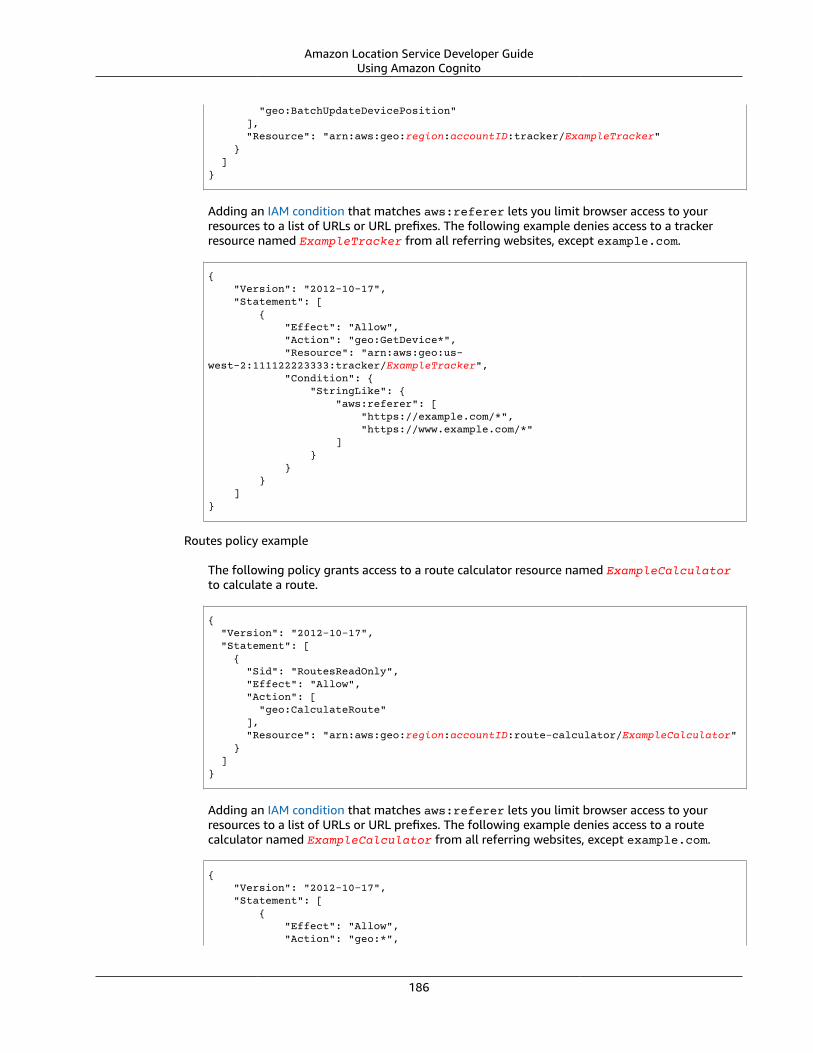
Amazon Location Service Developer GuideUsing Amazon Cognito
"geo:BatchUpdateDevicePosition" ], "Resource": "arn:aws:geo:region:accountID:tracker/ExampleTracker" } ]}
Adding an IAM condition that matches aws:referer lets you limit browser access to yourresources to a list of URLs or URL prefixes. The following example denies access to a trackerresource named ExampleTracker from all referring websites, except example.com.
{ "Version": "2012-10-17", "Statement": [ { "Effect": "Allow", "Action": "geo:GetDevice*", "Resource": "arn:aws:geo:us-west-2:111122223333:tracker/ExampleTracker", "Condition": { "StringLike": { "aws:referer": [ "https://example.com/*", "https://www.example.com/*" ] } } } ]}
Routes policy example
The following policy grants access to a route calculator resource named ExampleCalculatorto calculate a route.
{ "Version": "2012-10-17", "Statement": [ { "Sid": "RoutesReadOnly", "Effect": "Allow", "Action": [ "geo:CalculateRoute" ], "Resource": "arn:aws:geo:region:accountID:route-calculator/ExampleCalculator" } ]}
Adding an IAM condition that matches aws:referer lets you limit browser access to yourresources to a list of URLs or URL prefixes. The following example denies access to a routecalculator named ExampleCalculator from all referring websites, except example.com.
{ "Version": "2012-10-17", "Statement": [ { "Effect": "Allow", "Action": "geo:*",
186
Amazon Location Service Developer GuideUsing Amazon Cognito
"Resource": "arn:aws:geo:us-west-2:111122223333:route-calculator/ExampleCalculator", "Condition": { "StringLike": { "aws:referer": [ "https://example.com/*", "https://www.example.com/*" ] } } } ]}
NoteWhile unauthenticated identity pools are intended for exposure on unsecured internet sites,note that they will be exchanged for standard, time-limited AWS credentials.It's important to scope the IAM roles associated with unauthenticated identity poolsappropriately.Using an aws:referer condition adds security by limiting browser access to a list of URLsor URL prefixes. Adding an aws:referer condition may also limit testing when usinglocalhost: URLs.
11. Choose Allow to create your identity pools.
The resulting identity pool follows the syntax <region>:<GUID>.
For example:
us-east-1:54f2ba88-9390-498d-aaa5-0d97fb7ca3bd
For more policy examples specific to Amazon Location, see the section called “Identity-based policyexamples” (p. 217).
Using the Amazon Cognito identity pools in JavaScriptThe following example exchanges the unauthenticated identity pool that you've created for credentialsthat are then used to fetch the style descriptor for your map resource ExampleMap.
const AWS = require("aws-sdk");
const credentials = new AWS.CognitoIdentityCredentials({ IdentityPoolId: "<identity pool ID>" // e.g., us-east-1:d40a3a95-a6b5-4816-a15c-a15ac4f0930d});
const client = new AWS.Location({ credentials, region: AWS.config.region || "<region>"});
console.log(await client.getMapStyleDescriptor("ExampleMap").promise());
NoteRetrieved credentials from unauthenticated identities are valid for one hour.
The following is an example of a function that automatically renews credentials before they expire.
async function refreshCredentials() {
187

Amazon Location Service Developer GuideMonitoring Amazon Location Service
await credentials.refreshPromise(); // schedule the next credential refresh when they're about to expire setTimeout(refreshCredentials, credentials.expireTime - new Date());}
Next steps• To modify your roles, go to the IAM console.• To manage your identity pools, go to the Amazon Cognito console.
Monitoring Amazon Location ServiceWhen using Amazon Location Service, you can monitor your usage and resources over time by using:
• Amazon CloudWatch. Monitors your Amazon Location Service resources, and provides metrics withstatistics in near-real time.
• AWS CloudTrail. Provides event tracking of all calls to Amazon Location Service APIs.
This section provides information about using these services.
Topics• Monitoring Amazon Location Service with Amazon CloudWatch (p. 188)• Logging and monitoring with AWS CloudTrail (p. 192)
Monitoring Amazon Location Service with AmazonCloudWatchAmazon CloudWatch monitors your AWS resources and the applications that you run on AWS in near-real time. You can monitor Amazon Location resources using CloudWatch, which collects raw data andprocesses metrics into meaningful statistics in near-real time. You can view historical information for upto 15 months, or search metrics to view in the Amazon CloudWatch console for more perspective aboutyour Amazon Location resources. You can also set alarms by defining thresholds, and send notificationsor take actions when those thresholds are met.
For more information, see the Amazon CloudWatch User Guide
Topics• Amazon Location Service metrics exported to Amazon CloudWatch (p. 188)• View Amazon Location Service metrics (p. 189)• Create CloudWatch alarms for Amazon Location Service metrics (p. 190)• Using CloudWatch to monitor usage against quotas (p. 190)• CloudWatch metric examples for Amazon Location Service (p. 191)
Amazon Location Service metrics exported to AmazonCloudWatchMetrics are time-ordered data points that are exported to CloudWatch. A dimension is a name/valuepair that identifies the metric. For more information, see Using CloudWatch metrics and CloudWatchdimensions in the Amazon CloudWatch User Guide.
188

Amazon Location Service Developer GuideMonitoring with CloudWatch
The following are metrics that Amazon Location Service exports to CloudWatch in the AWS/Locationnamespace.
Metric Description
CallCount The number of calls made to a given API endpoint.
Valid Dimensions: Amazon Location Service API names
Valid Statistic: Sum
Units: Count
ErrorCount The number of error responses from calls made to a given API endpoint.
Valid Dimensions: Amazon Location Service API names
Valid Statistic: Sum
Units: Count
SuccessCount The number of successful calls made to a given API endpoint.
Valid Dimensions: Amazon Location Service API names
Valid Statistic: Sum
Units: Count
CallLatency The amount of time the operation takes to process and return a responsewhen a call is made to a given API endpoint.
Valid Dimensions: Amazon Location Service API names
Valid Statistic: Average
Units: Milliseconds
View Amazon Location Service metrics
You can view metrics for Amazon Location Service on the Amazon CloudWatch console or by using theAmazon CloudWatch API.
To view metrics using the CloudWatch console
Example
1. Open the CloudWatch console at https://console.aws.amazon.com/cloudwatch/.
2. In the navigation pane, choose Metrics.
3. On the All metrics tab, choose the Amazon Location namespace.
4. Select the type of metric to view.
5. Select the metric and add it to the chart.
For more information, see View Available Metrics in the Amazon CloudWatch User Guide.
189
Amazon Location Service Developer GuideMonitoring with CloudWatch
Create CloudWatch alarms for Amazon Location Service metrics
You can use CloudWatch to set alarms on your Amazon Location Service metrics. For example, you cancreate an alarm in CloudWatch to send an email whenever an error count spike occurs.
The following topics give you a high-level overview of how to set alarms using CloudWatch. For detailedinstructions, see Using Alarms in the Amazon CloudWatch User Guide.
To set alarms using the CloudWatch console
Example
1. Open the CloudWatch console at https://console.aws.amazon.com/cloudwatch/.
2. In the navigation pane, choose Alarm.
3. Choose Create Alarm.
4. Choose Select metric.
5. On the All metrics tab, select the Amazon Location namespace.
6. Select a metric category.
7. Find the row with the metric you want to create an alarm for, then select the check box next to thisrow.
8. Choose Select metric.
9. Under Metric, fill in the values .
10.Specify the alarm Conditions .
11.Choose Next.
12.If you want to send a notification when the alarm conditions are met:
• Under Alarm state trigger, select the alarm state to prompt a notification to be sent.
• Under Select an SNS topic, choose Create new topic to create a new Amazon Simple NotificationService (Amazon SNS) topic. Enter the topic name and the email to send the notification to.
• Under Send a notification to enter additional email addresses to send the notification to.
• Choose Add notification. This list is saved and appears in the field for future alarms.
13.When done, choose Next.
14.Enter a name and description for the alarm, then choose Next.
15.Confirm the alarm details, then choose Next.
NoteWhen creating a new Amazon SNS topic, you must verify the email address before a notificationcan be sent. If the email is not verified, the notification will not be received when an alarm isinitiated by a state change.
For more information about how to set alarms using the CloudWatch console, see Create an Alarm thatSends Email in the Amazon CloudWatch User Guide.
Using CloudWatch to monitor usage against quotas
You can create Amazon CloudWatch alarms to notify you when your utilization of a given quota exceedsa configurable threshold. This enables you to recognize when you are close to your quota limits,and either adapt your utilization to avoid cost overruns, or request a quota increase, if needed. Forinformation about how to use CloudWatch to monitor quotas, see Visualizing your service quotas andsetting alarms in the Amazon CloudWatch User Guide.
190

Amazon Location Service Developer GuideMonitoring with CloudWatch
CloudWatch metric examples for Amazon Location Service
You can use the GetMetricData API to retrieve metrics for Amazon Location.
• For example, you can monitor CallCount and set an alarm for when a drop in number occurs.
Monitoring the CallCount metrics for SendDeviceLocation can help give you perspective ontracked assets. If the CallCount drops, it means that tracked assets, such as a fleet of trucks, havestopped sending their current locations. Setting an alarm for this can help notify you an issue hasoccurred.
• For another example, you can monitor ErrorCount and set an alarm for when a spike in numberoccurs.
Trackers must be associated with geofence collections in order for device locations to be evaluatedagainst geofences. If you have a device fleet that requires continuous location updates, seeing theCallCount for BatchEvaluateGeofence or BatchPutDevicePosition drop to zero indicatesthat updates are no longer flowing.
The following is an example output for GetMetricData with the metrics for CallCount and ErrorCountfor creating map resources.
{ "StartTime": 1518867432, "EndTime": 1518868032, "MetricDataQueries": [ { "Id": "m1", "MetricStat": { "Metric": { "Namespace": "AWS/Location", "MetricName": "CallCount", "Dimensions": [ { "Name": "SendDeviceLocation", "Value": "100" } ] }, "Period": 300, "Stat": "SampleCount", "Unit": "Count" } }, { "Id": "m2", "MetricStat": { "Metric": { "Namespace": "AWS/Location", "MetricName": "ErrorCount", "Dimensions": [ { "Name": "AssociateTrackerConsumer", "Value": "0" } ] }, "Period": 1, "Stat": "SampleCount", "Unit": "Count" } }
191
Amazon Location Service Developer GuideUsing CloudTrail with Amazon Location
]}
Logging and monitoring with AWS CloudTrailAWS CloudTrail is a service that provides a record of actions taken by a user, role, or an AWS service.CloudTrail records all API calls as events. You can use Amazon Location Service with CloudTrail tomonitor your API calls, which include calls from the Amazon Location Service console and AWS SDK callsto the Amazon Location Service API operations.
When you create a trail, you can enable continuous delivery of CloudTrail events to an S3 bucket,including events for Amazon Location Service. If you don't configure a trail, you can still view the mostrecent events in the CloudTrail console in Event history. Using the information collected by CloudTrail,you can determine the request that was made to Amazon Location Service, the IP address from whichthe request was made, who made the request, when it was made, and additional details.
For more information about CloudTrail, see the AWS CloudTrail User Guide.
Topics
• Amazon Location Service Information in CloudTrail (p. 192)
• Understanding Amazon Location Service Log File Entries (p. 193)
Amazon Location Service Information in CloudTrailCloudTrail is enabled on your AWS account when you create the account. When activity occurs in AmazonLocation Service, that activity is recorded in a CloudTrail event along with other AWS service eventsin Event history. You can view, search, and download recent events in your AWS account. For moreinformation, see Viewing Events with CloudTrail Event History.
For an ongoing record of events in your AWS account, including events for Amazon Location Service,create a trail. A trail enables CloudTrail to deliver log files to an S3 bucket. By default, when you createa trail in the console, the trail applies to all AWS Regions. The trail logs events from all Regions in theAWS partition and delivers the log files to the S3 bucket that you specify. Additionally, you can configureother AWS services to further analyze and act upon the event data collected in CloudTrail logs.
For more information, see the following:
• Overview for Creating a Trail
• CloudTrail Supported Services and Integrations
• Configuring Amazon SNS Notifications for CloudTrail
• Receiving CloudTrail Log Files from Multiple Regions and Receiving CloudTrail Log Files from MultipleAccounts
All Amazon Location Service actions are logged by CloudTrail and are documented in the AmazonLocation Service API references. For example, calls to the CreateTracker, UpdateTracker andDescribeTracker actions generate entries in the CloudTrail log files.
Every event or log entry contains information about who generated the request. The identityinformation helps you determine whether the request was made:
• With root or AWS Identity and Access Management (IAM) user credentials.
• With temporary security credentials for a role or federated user.
• By another AWS service.
192

Amazon Location Service Developer GuideUsing CloudTrail with Amazon Location
For more information, see the CloudTrail userIdentity Element.
Understanding Amazon Location Service Log File EntriesA trail is a configuration that enables delivery of events as log files to an S3 bucket that you specify, orto Amazon CloudWatch Logs. For more information, see Working with CloudTrail log files in the AWSCloudTrail User Guide.
CloudTrail log files contain one or more log entries. An event represents a single request from any sourceand includes information about the requested operation, the date and time of the operation, requestparameters, and so on.
NoteCloudTrail log files aren't an ordered stack trace of the public API calls, so they don't appear inany specific order. To determine the order of operations, use eventTime.
The following example shows a CloudTrail log entry that demonstrates the CreateTracker operation,which creates a tracker resource.
{ "eventVersion": "1.05", "userIdentity": { "type": "AssumedRole", "principalId": "123456789012", "arn": "arn:aws:geo:us-east-1:123456789012:tracker/ExampleTracker" "accountId": "123456789012", "accessKeyId": "123456789012", "sessionContext": { "sessionIssuer": { "type": "Role", "principalId": "123456789012", "arn": "arn:aws:geo:us-east-1:123456789012:tracker/ExampleTracker", "accountId": "123456789012", "userName": "exampleUser", }, "webIdFederationData": {}, "attributes": { "mfaAuthenticated": "false", "creationDate": "2020-10-22T16:36:07Z" } } }, "eventTime": "2020-10-22T17:43:30Z", "eventSource": "geo.amazonaws.com", "eventName": "CreateTracker", "awsRegion": "us-east-1", "sourceIPAddress": "192.0.2.0/24—TEST-NET-1", "userAgent": "aws-internal/3 aws-sdk-java/1.11.864 Linux/4.14.193-110.317.amzn2.x86_64 OpenJDK_64-Bit_Server_VM/11.0.8+10-LTS java/11.0.8 kotlin/1.3.72 vendor/Amazon.com_Inc. exec-env/AWS_Lambda_java11", "requestParameters": { "TrackerName": "ExampleTracker", "Description": "Resource description" }, "responseElements": { "TrackerName": "ExampleTracker", "Description": "Resource description" "TrackerArn": "arn:partition:service:region:account-id:resource-id", "CreateTime": "2020-10-22T17:43:30.521Z" }, "requestID": "557ec619-0674-429d-8e2c-eba0d3f34413", "eventID": "3192bc9c-3d3d-4976-bbef-ac590fa34f2c", "readOnly": false,
193

Amazon Location Service Developer GuideUsing AWS CloudFormation to create resources
"eventType": "AwsApiCall", "recipientAccountId": "123456789012",}
The following shows a log entry for the DescribeTracker operation, which returns the details of atracker resource.
{ "eventVersion": "1.05", "userIdentity": { "type": "AssumedRole", "principalId": "123456789012", "arn": "arn:partition:service:region:account-id:resource-id", "accountId": "123456789012", "accessKeyId": "123456789012", "sessionContext": { "sessionIssuer": { "type": "Role", "principalId": "123456789012", "arn": "arn:partition:service:region:account-id:resource-id", "accountId": "123456789012", "userName": "exampleUser", }, "webIdFederationData": {}, "attributes": { "mfaAuthenticated": "false", "creationDate": "2020-10-22T16:36:07Z" } } }, "eventTime": "2020-10-22T17:43:33Z", "eventSource": "geo.amazonaws.com", "eventName": "DescribeTracker", "awsRegion": "us-east-1", "sourceIPAddress": "192.0.2.0/24—TEST-NET-1", "userAgent": "aws-internal/3 aws-sdk-java/1.11.864 Linux/4.14.193-110.317.amzn2.x86_64 OpenJDK_64-Bit_Server_VM/11.0.8+10-LTS java/11.0.8 kotlin/1.3.72 vendor/Amazon.com_Inc. exec-env/AWS_Lambda_java11", "requestParameters": { "TrackerName": "ExampleTracker" }, "responseElements": null, "requestID": "997d5f93-cfef-429a-bbed-daab417ceab4", "eventID": "d9e0eebe-173c-477d-b0c9-d1d8292da103", "readOnly": true, "eventType": "AwsApiCall", "recipientAccountId": "123456789012",}
Creating Amazon Location Service resources withAWS CloudFormation
Amazon Location Service is integrated with AWS CloudFormation, a service that helps you to modeland set up your AWS resources so that you can spend less time creating and managing your resourcesand infrastructure. You create a template that describes all the AWS resources that you want (such asAmazon Location resources), and AWS CloudFormation provisions and configures those resources foryou.
194

Amazon Location Service Developer GuideAmazon Location and AWS CloudFormation templates
When you use AWS CloudFormation, you can reuse your template to set up your Amazon Locationresources consistently and repeatedly. Describe your resources once, and then provision the sameresources over and over in multiple AWS accounts and Regions.
Amazon Location and AWS CloudFormationtemplatesTo provision and configure resources for Amazon Location and related services, you must understandAWS CloudFormation templates. Templates are formatted text files in JSON or YAML. These templatesdescribe the resources that you want to provision in your AWS CloudFormation stacks. If you'reunfamiliar with JSON or YAML, you can use AWS CloudFormation Designer to help you get started withAWS CloudFormation templates. For more information, see What is AWS CloudFormation Designer? inthe AWS CloudFormation User Guide.
Amazon Location supports creating the following resource types in AWS CloudFormation:
• AWS::Location::Map• AWS::Location::PlaceIndex• AWS::Location::RouteCalculator• AWS::Location::Tracker• AWS::Location::TrackerConsumer• AWS::Location::GeofenceCollection
For more information, including examples of JSON and YAML templates for Amazon Location resources,see the Amazon Location Service resource type reference in the AWS CloudFormation User Guide.
Learn more about AWS CloudFormationTo learn more about AWS CloudFormation, see the following resources:
• AWS CloudFormation• AWS CloudFormation User Guide• AWS CloudFormation API Reference• AWS CloudFormation Command Line Interface User Guide
195

Amazon Location Service Developer GuideTutorial: Quick start
Code Examples and tutorials forworking with Amazon LocationService
This topic shows a list of code examples and tutorials to help you learn about Amazon Location Service.Each code example includes a description of how it works.
You can also find additional samples on the AWS GitHub page for Amazon Location.
The quick start tutorial is a good place to start before using other samples, as it shows how to completeprerequisites that are useful for most of the samples.
Topics• Tutorial: Quick start (p. 196)• Tutorial: Database enrichment (p. 197)• Example: Explore app (p. 197)• Example: Style a map (p. 198)• Example: Draw markers (p. 198)• Example: Draw clustered points (p. 199)• Example: Draw a polygon (p. 199)
Tutorial: Quick start
This tutorial shows you how to add an interactive map to an application, and how to make calls to theAmazon Location Service APIs from your application. The tutorial is available for JavaScript in a staticweb page, or Kotlin for an Android phone application.
196

Amazon Location Service Developer GuideTutorial: Database enrichment
Documentation link: Quick start with Amazon Location Service (p. 4)
Tutorial: Database enrichment
This tutorial shows you how to use Amazon Location Service to normalize addresses and add latitudeand longitude to records in a database. Uses Amazon Aurora and AWS Lambda.
Documentation link: Amazon Aurora PostgreSQL user-defined functions for Amazon LocationService (p. 128)
Example: Explore app
One of the best ways to learn about the functionality of Amazon Location Service is to use the Explorefunctionality within the Amazon Location console. This full web application example mimics the maps,places, routes, geofences, and trackers functionality from the console to show you how to recreate thesefeature in your own app. Uses Amplify, React, and JavaScript.
GitHub link: Explore sample application
197

Amazon Location Service Developer GuideExample: Style a map
Example: Style a map
This code example shows how to switch between a satellite map and a vector road map, using MapLibreGL in JavaScript. Uses MapLibre GL, Node.js, React, and JavaScript.
GitHub link: Interactive map with style switching
Example: Draw markers
This code example shows Amazon Locker locations in Vancouver, BC, Canada. It shows how to drawmarkers at point locations. Uses MapLibre GL, Node.js, React, and JavaScript.
GitHub link: Interactive map with markers at points
198
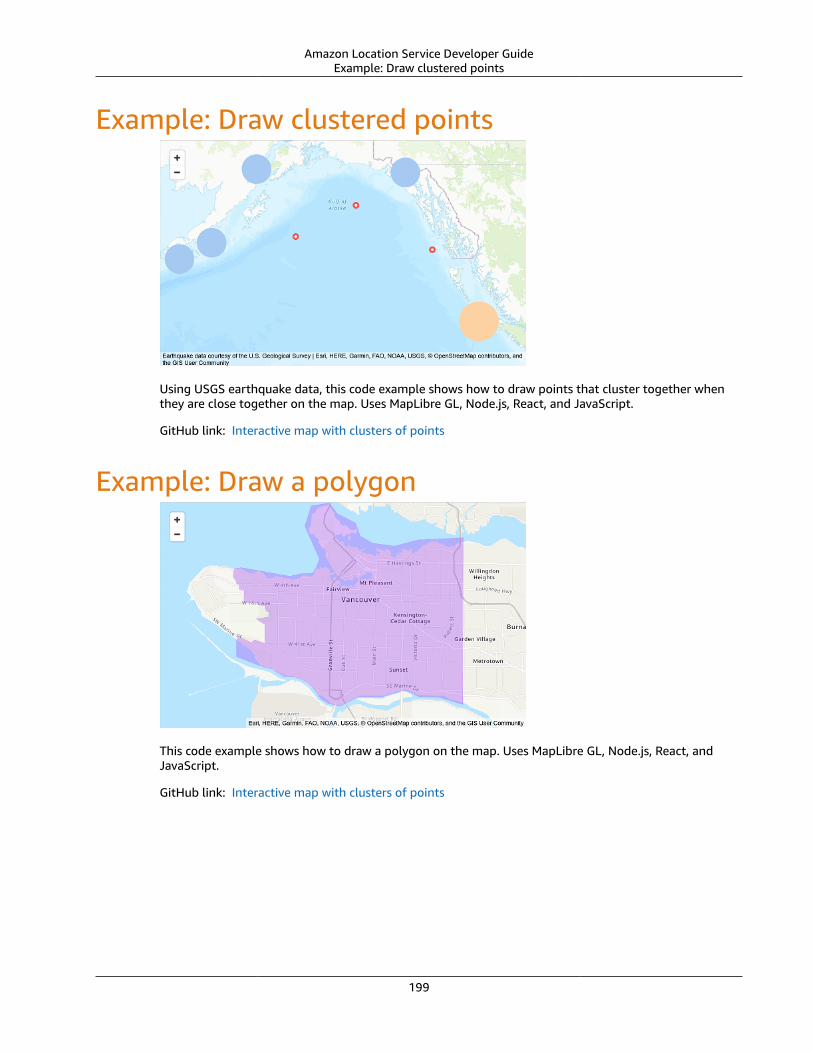
Amazon Location Service Developer GuideExample: Draw clustered points
Example: Draw clustered points
Using USGS earthquake data, this code example shows how to draw points that cluster together whenthey are close together on the map. Uses MapLibre GL, Node.js, React, and JavaScript.
GitHub link: Interactive map with clusters of points
Example: Draw a polygon
This code example shows how to draw a polygon on the map. Uses MapLibre GL, Node.js, React, andJavaScript.
GitHub link: Interactive map with clusters of points
199

Amazon Location Service Developer GuideData protection
Security and best practices inAmazon Location Service
Cloud security at AWS is the highest priority. As an AWS customer, you benefit from data centersand network architectures that are built to meet the requirements of the most security-sensitiveorganizations.
Security is a shared responsibility between AWS and you. The shared responsibility model describes thisas security of the cloud and security in the cloud:
• Security of the cloud – AWS is responsible for protecting the infrastructure that runs AWS services inthe AWS Cloud. AWS also provides you with services that you can use securely. Third-party auditorsregularly test and verify the effectiveness of our security as part of the AWS Compliance Programs. Formore information about the compliance programs that apply to Amazon Location Service, see AWSServices in Scope by Compliance Program.
• Security in the cloud – Your responsibility is determined by the AWS service that you use. You are alsoresponsible for other factors including the sensitivity of your data, your company’s requirements, andapplicable laws and regulations.
This documentation helps you understand how to apply the shared responsibility model when usingAmazon Location. The following topics show you how to configure Amazon Location to meet yoursecurity and compliance objectives. You also learn how to use other AWS services that help you tomonitor and secure your Amazon Location resources.
Topics• Data protection in Amazon Location Service (p. 200)• Identity and Access Management for Amazon Location Service (p. 210)• Incident Response in Amazon Location Service (p. 224)• Compliance validation for Amazon Location Service (p. 225)• Resilience in Amazon Location Service (p. 226)• Infrastructure security in Amazon Location Service (p. 226)• Security best practices for Amazon Location Service (p. 226)• Best practices for Amazon Location Service (p. 228)
Data protection in Amazon Location ServiceThe AWS shared responsibility model applies to data protection in Amazon Location Service. Asdescribed in this model, AWS is responsible for protecting the global infrastructure that runs allof the AWS Cloud. You are responsible for maintaining control over your content that's hosted onthis infrastructure. This content includes the security configuration and management tasks for theAWS services that you use. For more information about data privacy, see the Data Privacy FAQ. Forinformation about data protection in Europe, see the AWS Shared Responsibility Model and GDPR blogpost on the AWS Security Blog.
For data protection purposes, we recommend that you protect AWS account credentials and set upindividual user accounts with AWS Identity and Access Management (IAM). That way each user is given
200

Amazon Location Service Developer GuideData privacy
only the permissions necessary to fulfill their job duties. We also recommend that you secure your datain the following ways:
• Use multi-factor authentication (MFA) with each account.• Use SSL/TLS to communicate with AWS resources. We recommend TLS 1.2 or later.• Set up API and user activity logging with AWS CloudTrail.• Use AWS encryption solutions, along with all default security controls within AWS services.• Use advanced managed security services such as Amazon Macie, which assists in discovering and
securing personal data that's stored in Amazon S3.
We strongly recommend that you never put sensitive identifying information, such as your customers'account numbers, into free-form fields such as a Name field. This includes when you work with AmazonLocation or other AWS services using the console, API, AWS CLI, or AWS SDKs. Any data that you enterinto Amazon Location or other services might get picked up for inclusion in diagnostic logs. When youprovide a URL to an external server, don't include credentials information in the URL to validate yourrequest to that server.
Data privacyWith Amazon Location Service, you retain control of your organization’s data. Amazon Locationanonymizes all queries sent to data providers by removing customer metadata and account information.
Amazon Location doesn't use data providers for tracking and geofencing. This means your sensitive dataremains in your AWS account. This helps shield sensitive location information, such as facility, asset, andpersonnel location, from third parties, protect user privacy, and reduce your application's security risk.
For additional information, see the AWS Data Privacy FAQ.
Data retention in Amazon LocationThe following characteristics relate to how Amazon Location collects and stores data for the service:
• Amazon Location Service Trackers – When you use the Trackers APIs to track the location of entities,their coordinates can be stored. Device locations are stored for 30 days before being deleted by theservice.
• Amazon Location Service Geofences – When you use the Geofences APIs to define areas of interest,the service stores the geometries you provided. They must be explicitly deleted.
NoteDeleting your AWS account delete all resources within it. For additional information, see theAWS Data Privacy FAQ.
Configuration and vulnerability analysis in AmazonLocationConfiguration and IT controls are a shared responsibility between AWS and you, our customer. For moreinformation, see the AWS shared responsibility model.
Data encryption at rest for Amazon Location ServiceAmazon Location Service provides encryption by default to protect sensitive customer data at rest usingAWS owned encryption keys.
201

Amazon Location Service Developer GuideData at rest encryption
• AWS owned keys — Amazon Location uses these keys by default to automatically encrypt personallyidentifiable data. You can't view, manage, or use AWS owned keys, or audit their use. However, youdon't have to take any action or change any programs to protect the keys that encrypt your data. Formore information, see AWS owned keys in the AWS Key Management Service Developer Guide.
Encryption of data at rest by default helps reduce the operational overhead and complexity involved inprotecting sensitive data. At the same time, it enables you to build secure applications that meet strictencryption compliance and regulatory requirements.
While you can't disable this layer of encryption or select an alternate encryption type, you can adda second layer of encryption over the existing AWS owned encryption keys by choosing a customermanaged key when you create your tracker and geofence collection resources:
• Customer managed keys — Amazon Location supports the use of a symmetric customer managed keythat you create, own, and manage to add a second layer of encryption over the existing AWS ownedencryption. Because you have full control of this layer of encryption, you can perform such tasks as:• Establishing and maintaining key policies• Establishing and maintaining IAM policies and grants• Enabling and disabling key policies• Rotating key cryptographic material• Adding tags• Creating key aliases• Scheduling keys for deletion
For more information, see customer managed key in the AWS Key Management Service DeveloperGuide.
The following table summarizes how Amazon Location encrypts personally identifiable data.
Data type AWS owned key encryption Customer managed keyencryption (Optional)
Position
A point geometry containing thedevice position details.
Enabled Enabled
PositionProperties
A set of key-value pairsassociated with the positionupdate.
Enabled Enabled
GeofenceGeometry
A polygon geofence geometryrepresenting the geofencedarea.
Enabled Enabled
DeviceId
The device identifier specifiedwhen uploading a deviceposition update to a trackerresource.
Enabled Not supported
202

Amazon Location Service Developer GuideData at rest encryption
Data type AWS owned key encryption Customer managed keyencryption (Optional)
GeofenceId
An identifier specified whenstoring a geofence geometry, ora batch of geofences in a givengeofence collection.
Enabled Not supported
NoteAmazon Location automatically enables encryption at rest using AWS owned keys to protectpersonally identifiable data at no charge.However, AWS KMS charges apply for using a customer managed key. For more informationabout pricing, see the AWS Key Management Service pricing.
For more information on AWS KMS, see What is AWS Key Management Service?
How Amazon Location Service uses grants in AWS KMSAmazon Location requires a grant to use your customer managed key.
When you create a tracker resource or geofence collection encrypted with a customer managed key,Amazon Location creates a grant on your behalf by sending a CreateGrant request to AWS KMS. Grants inAWS KMS are used to give Amazon Location access to a KMS key in a customer account.
Amazon Location requires the grant to use your customer managed key for the following internaloperations:
• Send DescribeKey requests to AWS KMS to verify that the symmetric customer managed KMS key IDentered when creating a tracker or geofence collection is valid.
• Send GenerateDataKeyWithoutPlaintext requests to AWS KMS to generate data keys encrypted byyour customer managed key.
• Send Decrypt requests to AWS KMS to decrypt the encrypted data keys so that they can be used toencrypt your data.
You can revoke access to the grant, or remove the service's access to the customer managed key at anytime. If you do, Amazon Location won't be able to access any of the data encrypted by the customermanaged key, which affects operations that are dependent on that data. For example, if you attempt toget device positions from an encrypted tracker that Amazon Location can't access, then the operationwould return an AccessDeniedException error.
Create a customer managed keyYou can create a symmetric customer managed key by using the AWS Management Console, or the AWSKMS APIs.
To create a symmetric customer managed key
Follow the steps for Creating symmetric customer managed key in the AWS Key Management ServiceDeveloper Guide.
Key policy
Key policies control access to your customer managed key. Every customer managed key must haveexactly one key policy, which contains statements that determine who can use the key and how they can
203

Amazon Location Service Developer GuideData at rest encryption
use it. When you create your customer managed key, you can specify a key policy. For more information,see Managing access to customer managed keys in the AWS Key Management Service Developer Guide.
To use your customer managed key with your Amazon Location resources, the following API operationsmust be permitted in the key policy:
• kms:CreateGrant – Adds a grant to a customer managed key. Grants control access to a specifiedKMS key, which allows access to grant operations Amazon Location requires. For more informationabout Using Grants, see the AWS Key Management Service Developer Guide.
This allows Amazon Location to do the following:
• Call GenerateDataKeyWithoutPlainText to generate an encrypted data key and store it,because the data key isn't immediately used to encrypt.
• Call Decrypt to use the stored encrypted data key to access encrypted data.
• Set up a retiring principal to allow the service to RetireGrant.
• kms:DescribeKey – Provides the customer managed key details to allow Amazon Location tovalidate the key.
The following are policy statement examples you can add for Amazon Location:
"Statement" : [ { "Sid" : "Allow access to principals authorized to use Amazon Location", "Effect" : "Allow", "Principal" : { "AWS" : "*" }, "Action" : [ "kms:DescribeKey", "kms:CreateGrant" ], "Resource" : "*", "Condition" : { "StringEquals" : { "kms:ViaService" : "geo.region.amazonaws.com", "kms:CallerAccount" : "111122223333" } }, { "Sid": "Allow access for key administrators", "Effect": "Allow", "Principal": { "AWS": "arn:aws:iam::111122223333:root" }, "Action" : [ "kms:*" ], "Resource": "arn:aws:kms:region:111122223333:key/key_ID" }, { "Sid" : "Allow read-only access to key metadata to the account", "Effect" : "Allow", "Principal" : { "AWS" : "arn:aws:iam::111122223333:root" }, "Action" : [ "kms:Describe*", "kms:Get*", "kms:List*", "kms:RevokeGrant" ],
204

Amazon Location Service Developer GuideData at rest encryption
"Resource" : "*" } ]
For more information about specifying permissions in a policy, see the AWS Key Management ServiceDeveloper Guide.
For more information about troubleshooting key access, see the AWS Key Management Service DeveloperGuide.
Specifying a customer managed key for Amazon LocationYou can specify a customer managed key as a second layer encryption for the following resources:
• Tracker resource (p. 158)• Geofence collection (p. 155)
When you create a resource, you can specify the data key by entering a KMS ID, which Amazon Locationuses to encrypt the identifiable personal data stored by the resource.
• KMS ID — A key identifier for an AWS KMS customer managed key. Enter a key ID, key ARN, aliasname, or alias ARN.
Amazon Location Service encryption contextAn encryption context is an optional set of key-value pairs that contain additional contextualinformation about the data.
AWS KMS uses the encryption context as additional authenticated data to support authenticatedencryption. When you include an encryption context in a request to encrypt data, AWS KMS binds theencryption context to the encrypted data. To decrypt data, you include the same encryption context inthe request.
Amazon Location Service encryption context
Amazon Location uses the same encryption context in all AWS KMS cryptographic operations, where thekey is aws:geo:arn and the value is the resource Amazon Resource Name (ARN).
Example
"encryptionContext": { "aws:geo:arn": "arn:aws:geo:us-west-2:111122223333:geofence-collection/SAMPLE-GeofenceCollection"}
Using encryption context for monitoring
When you use a symmetric customer managed key to encrypt your tracker or geofence collection, youcan also use the encryption context in audit records and logs to identify how the customer managedkey is being used. The encryption context also appears in logs generated by AWS CloudTrail or AmazonCloudWatch Logs (p. 206).
Using encryption context to control access to your customer managed key
You can use the encryption context in key policies and IAM policies as conditions to control access toyour symmetric customer managed key. You can also use encryption context constraints in a grant.
205
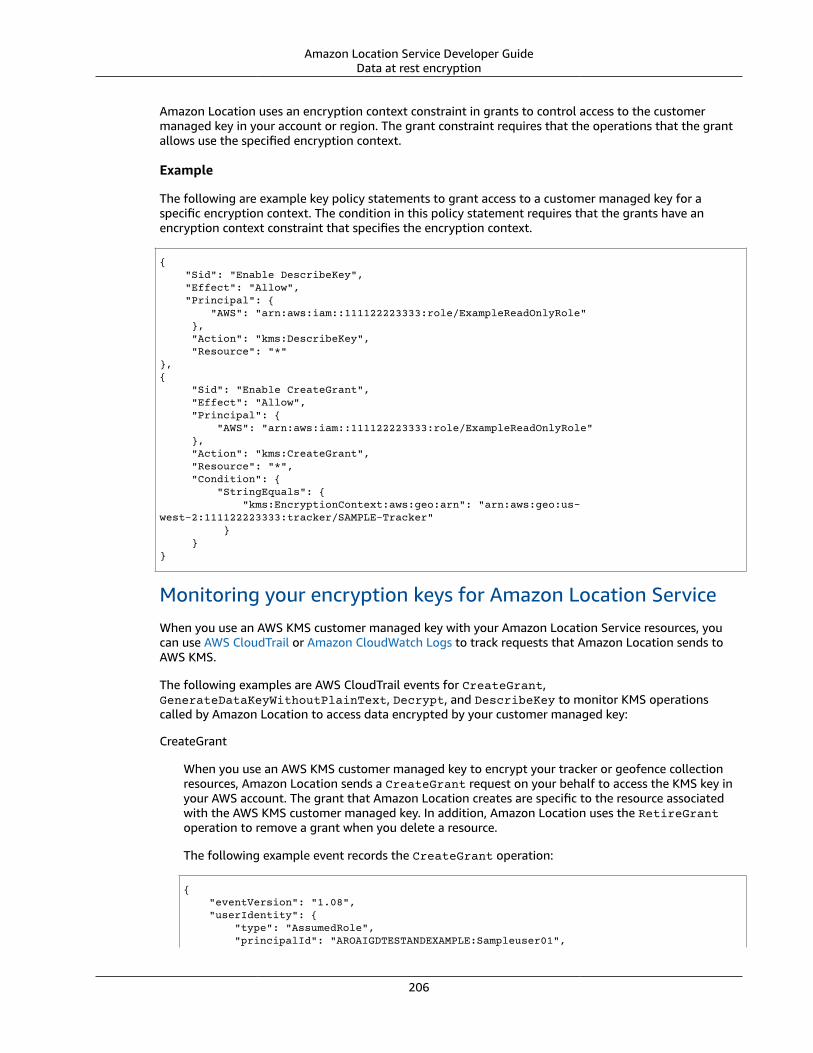
Amazon Location Service Developer GuideData at rest encryption
Amazon Location uses an encryption context constraint in grants to control access to the customermanaged key in your account or region. The grant constraint requires that the operations that the grantallows use the specified encryption context.
Example
The following are example key policy statements to grant access to a customer managed key for aspecific encryption context. The condition in this policy statement requires that the grants have anencryption context constraint that specifies the encryption context.
{ "Sid": "Enable DescribeKey", "Effect": "Allow", "Principal": { "AWS": "arn:aws:iam::111122223333:role/ExampleReadOnlyRole" }, "Action": "kms:DescribeKey", "Resource": "*"},{ "Sid": "Enable CreateGrant", "Effect": "Allow", "Principal": { "AWS": "arn:aws:iam::111122223333:role/ExampleReadOnlyRole" }, "Action": "kms:CreateGrant", "Resource": "*", "Condition": { "StringEquals": { "kms:EncryptionContext:aws:geo:arn": "arn:aws:geo:us-west-2:111122223333:tracker/SAMPLE-Tracker" } }}
Monitoring your encryption keys for Amazon Location ServiceWhen you use an AWS KMS customer managed key with your Amazon Location Service resources, youcan use AWS CloudTrail or Amazon CloudWatch Logs to track requests that Amazon Location sends toAWS KMS.
The following examples are AWS CloudTrail events for CreateGrant,GenerateDataKeyWithoutPlainText, Decrypt, and DescribeKey to monitor KMS operationscalled by Amazon Location to access data encrypted by your customer managed key:
CreateGrant
When you use an AWS KMS customer managed key to encrypt your tracker or geofence collectionresources, Amazon Location sends a CreateGrant request on your behalf to access the KMS key inyour AWS account. The grant that Amazon Location creates are specific to the resource associatedwith the AWS KMS customer managed key. In addition, Amazon Location uses the RetireGrantoperation to remove a grant when you delete a resource.
The following example event records the CreateGrant operation:
{ "eventVersion": "1.08", "userIdentity": { "type": "AssumedRole", "principalId": "AROAIGDTESTANDEXAMPLE:Sampleuser01",
206

Amazon Location Service Developer GuideData at rest encryption
"arn": "arn:aws:sts::111122223333:assumed-role/Admin/Sampleuser01", "accountId": "111122223333", "accessKeyId": "AKIAIOSFODNN7EXAMPLE3", "sessionContext": { "sessionIssuer": { "type": "Role", "principalId": "AROAIGDTESTANDEXAMPLE:Sampleuser01", "arn": "arn:aws:sts::111122223333:assumed-role/Admin/Sampleuser01", "accountId": "111122223333", "userName": "Admin" }, "webIdFederationData": {}, "attributes": { "mfaAuthenticated": "false", "creationDate": "2021-04-22T17:02:00Z" } }, "invokedBy": "geo.amazonaws.com" }, "eventTime": "2021-04-22T17:07:02Z", "eventSource": "kms.amazonaws.com", "eventName": "CreateGrant", "awsRegion": "us-west-2", "sourceIPAddress": "172.12.34.56", "userAgent": "ExampleDesktop/1.0 (V1; OS)", "requestParameters": { "retiringPrincipal": "geo.region.amazonaws.com", "operations": [ "GenerateDataKeyWithoutPlaintext", "Decrypt", "DescribeKey" ], "keyId": "arn:aws:kms:us-west-2:111122223333:key/1234abcd-12ab-34cd-56ef-123456SAMPLE", "granteePrincipal": "geo.region.amazonaws.com" }, "responseElements": { "grantId": "0ab0ac0d0b000f00ea00cc0a0e00fc00bce000c000f0000000c0bc0a0000aaafSAMPLE" }, "requestID": "ff000af-00eb-00ce-0e00-ea000fb0fba0SAMPLE", "eventID": "ff000af-00eb-00ce-0e00-ea000fb0fba0SAMPLE", "readOnly": false, "resources": [ { "accountId": "111122223333", "type": "AWS::KMS::Key", "ARN": "arn:aws:kms:us-west-2:111122223333:key/1234abcd-12ab-34cd-56ef-123456SAMPLE" } ], "eventType": "AwsApiCall", "managementEvent": true, "eventCategory": "Management", "recipientAccountId": "111122223333"}
GenerateDataKeyWithoutPlainText
When you enable an AWS KMS customer managed key for your tracker or geofencecollection resource, Amazon Location creates a unique table key. It sends aGenerateDataKeyWithoutPlainText request to AWS KMS that specifies the AWS KMScustomermanaged key for the resource.
The following example event records the GenerateDataKeyWithoutPlainText operation:
207

Amazon Location Service Developer GuideData at rest encryption
{ "eventVersion": "1.08", "userIdentity": { "type": "AWSService", "invokedBy": "geo.amazonaws.com" }, "eventTime": "2021-04-22T17:07:02Z", "eventSource": "kms.amazonaws.com", "eventName": "GenerateDataKeyWithoutPlaintext", "awsRegion": "us-west-2", "sourceIPAddress": "172.12.34.56", "userAgent": "ExampleDesktop/1.0 (V1; OS)", "requestParameters": { "encryptionContext": { "aws:geo:arn": "arn:aws:geo:us-west-2:111122223333:geofence-collection/SAMPLE-GeofenceCollection" }, "keySpec": "AES_256", "keyId": "arn:aws:kms:us-west-2:111122223333:key/1234abcd-12ab-34cd-56ef-123456SAMPLE" }, "responseElements": null, "requestID": "ff000af-00eb-00ce-0e00-ea000fb0fba0SAMPLE", "eventID": "ff000af-00eb-00ce-0e00-ea000fb0fba0SAMPLE", "readOnly": true, "resources": [ { "accountId": "111122223333", "type": "AWS::KMS::Key", "ARN": "arn:aws:kms:us-west-2:111122223333:key/1234abcd-12ab-34cd-56ef-123456SAMPLE" } ], "eventType": "AwsApiCall", "managementEvent": true, "eventCategory": "Management", "recipientAccountId": "111122223333", "sharedEventID": "57f5dbee-16da-413e-979f-2c4c6663475e"}
Decrypt
When you access an encrypted tracker or geofence collection,Amazon Location calls the Decryptoperation to use the stored encrypted data key to access the encrypted data.
The following example event records the Decrypt operation:
{ "eventVersion": "1.08", "userIdentity": { "type": "AWSService", "invokedBy": "geo.amazonaws.com" }, "eventTime": "2021-04-22T17:10:51Z", "eventSource": "kms.amazonaws.com", "eventName": "Decrypt", "awsRegion": "us-west-2", "sourceIPAddress": "172.12.34.56", "userAgent": "ExampleDesktop/1.0 (V1; OS)", "requestParameters": { "encryptionContext": { "aws:geo:arn": "arn:aws:geo:us-west-2:111122223333:geofence-collection/SAMPLE-GeofenceCollection" },
208

Amazon Location Service Developer GuideData at rest encryption
"keyId": "arn:aws:kms:us-west-2:111122223333:key/1234abcd-12ab-34cd-56ef-123456SAMPLE", "encryptionAlgorithm": "SYMMETRIC_DEFAULT" }, "responseElements": null, "requestID": "ff000af-00eb-00ce-0e00-ea000fb0fba0SAMPLE", "eventID": "ff000af-00eb-00ce-0e00-ea000fb0fba0SAMPLE", "readOnly": true, "resources": [ { "accountId": "111122223333", "type": "AWS::KMS::Key", "ARN": "arn:aws:kms:us-west-2:111122223333:key/1234abcd-12ab-34cd-56ef-123456SAMPLE" } ], "eventType": "AwsApiCall", "managementEvent": true, "eventCategory": "Management", "recipientAccountId": "111122223333", "sharedEventID": "dc129381-1d94-49bd-b522-f56a3482d088"}
DescribeKey
Amazon Location uses the DescribeKey operation to verify if the AWS KMS customer managed keyassociated with your tracker or geofence collection exists in the account and region.
The following example event records the DescribeKey operation:
{ "eventVersion": "1.08", "userIdentity": { "type": "AssumedRole", "principalId": "AROAIGDTESTANDEXAMPLE:Sampleuser01", "arn": "arn:aws:sts::111122223333:assumed-role/Admin/Sampleuser01", "accountId": "111122223333", "accessKeyId": "AKIAIOSFODNN7EXAMPLE3", "sessionContext": { "sessionIssuer": { "type": "Role", "principalId": "AROAIGDTESTANDEXAMPLE:Sampleuser01", "arn": "arn:aws:sts::111122223333:assumed-role/Admin/Sampleuser01", "accountId": "111122223333", "userName": "Admin" }, "webIdFederationData": {}, "attributes": { "mfaAuthenticated": "false", "creationDate": "2021-04-22T17:02:00Z" } }, "invokedBy": "geo.amazonaws.com" }, "eventTime": "2021-04-22T17:07:02Z", "eventSource": "kms.amazonaws.com", "eventName": "DescribeKey", "awsRegion": "us-west-2", "sourceIPAddress": "172.12.34.56", "userAgent": "ExampleDesktop/1.0 (V1; OS)", "requestParameters": { "keyId": "00dd0db0-0000-0000-ac00-b0c000SAMPLE" }, "responseElements": null,
209

Amazon Location Service Developer GuideData in transit encryption
"requestID": "ff000af-00eb-00ce-0e00-ea000fb0fba0SAMPLE", "eventID": "ff000af-00eb-00ce-0e00-ea000fb0fba0SAMPLE", "readOnly": true, "resources": [ { "accountId": "111122223333", "type": "AWS::KMS::Key", "ARN": "arn:aws:kms:us-west-2:111122223333:key/1234abcd-12ab-34cd-56ef-123456SAMPLE" } ], "eventType": "AwsApiCall", "managementEvent": true, "eventCategory": "Management", "recipientAccountId": "111122223333"}
Learn moreThe following resources provide more information about data encryption at rest.
• For more information about AWS Key Management Service basic concepts, see the AWS KeyManagement Service Developer Guide.
• For more information about Security best practices for AWS Key Management Service, see the AWS KeyManagement Service Developer Guide.
Data in transit encryption for Amazon LocationServiceAmazon Location protects data in transit, as it travels to and from the service, by automaticallyencrypting all inter-network data using the Transport Layer Security (TLS) 1.2 encryption protocol. DirectHTTPS requests sent to the Amazon Location Service APIs are signed by using the AWS Signature Version4 Algorithm to establish a secure connection.
Identity and Access Management for AmazonLocation Service
AWS Identity and Access Management (IAM) is an AWS service that helps an administrator securelycontrol access to AWS resources. IAM administrators control who can be authenticated (signed in) andauthorized (have permissions) to use Amazon Location resources. IAM is an AWS service that you can usewith no additional charge.
AudienceHow you use AWS Identity and Access Management (IAM) differs, depending on the work that you do inAmazon Location.
Service user – If you use the Amazon Location service to do your job, then your administrator providesyou with the credentials and permissions that you need. As you use more Amazon Location features todo your work, you might need additional permissions. Understanding how access is managed can helpyou request the right permissions from your administrator. If you cannot access a feature in AmazonLocation, see Troubleshooting Amazon Location Service identity and access (p. 223).
210

Amazon Location Service Developer GuideAuthenticating with identities
Service administrator – If you're in charge of Amazon Location resources at your company, you probablyhave full access to Amazon Location. It's your job to determine which Amazon Location features andresources your employees should access. You must then submit requests to your IAM administrator tochange the permissions of your service users. Review the information on this page to understand thebasic concepts of IAM. To learn more about how your company can use IAM with Amazon Location, seeHow Amazon Location Service works with IAM (p. 214).
IAM administrator – If you're an IAM administrator, you might want to learn details about how you canwrite policies to manage access to Amazon Location. To view example Amazon Location identity-basedpolicies that you can use in IAM, see Amazon Location Service identity-based policy examples (p. 217).
Authenticating with identitiesAuthentication is how you sign in to AWS using your identity credentials. For more information aboutsigning in using the AWS Management Console, see Signing in to the AWS Management Console as anIAM user or root user in the IAM User Guide.
You must be authenticated (signed in to AWS) as the AWS account root user, an IAM user, or by assumingan IAM role. You can also use your company's single sign-on authentication or even sign in using Googleor Facebook. In these cases, your administrator previously set up identity federation using IAM roles.When you access AWS using credentials from another company, you are assuming a role indirectly.
To sign in directly to the AWS Management Console, use your password with your root user emailaddress or your IAM user name. You can access AWS programmatically using your root user or IAMusers access keys. AWS provides SDK and command line tools to cryptographically sign your requestusing your credentials. If you don't use AWS tools, you must sign the request yourself. Do this usingSignature Version 4, a protocol for authenticating inbound API requests. For more information aboutauthenticating requests, see Signature Version 4 signing process in the AWS General Reference.
Regardless of the authentication method that you use, you might also be required to provide additionalsecurity information. For example, AWS recommends that you use multi-factor authentication (MFA) toincrease the security of your account. To learn more, see Using multi-factor authentication (MFA) in AWSin the IAM User Guide.
AWS account root user
When you first create an AWS account, you begin with a single sign-in identity that has complete accessto all AWS services and resources in the account. This identity is called the AWS account root user andis accessed by signing in with the email address and password that you used to create the account. Westrongly recommend that you do not use the root user for your everyday tasks, even the administrativeones. Instead, adhere to the best practice of using the root user only to create your first IAM user. Thensecurely lock away the root user credentials and use them to perform only a few account and servicemanagement tasks.
IAM users and groups
An IAM user is an identity within your AWS account that has specific permissions for a single person orapplication. An IAM user can have long-term credentials such as a user name and password or a set ofaccess keys. To learn how to generate access keys, see Managing access keys for IAM users in the IAMUser Guide. When you generate access keys for an IAM user, make sure you view and securely save the keypair. You cannot recover the secret access key in the future. Instead, you must generate a new access keypair.
An IAM group is an identity that specifies a collection of IAM users. You can't sign in as a group. Youcan use groups to specify permissions for multiple users at a time. Groups make permissions easier tomanage for large sets of users. For example, you could have a group named IAMAdmins and give thatgroup permissions to administer IAM resources.
211

Amazon Location Service Developer GuideAuthenticating with identities
Users are different from roles. A user is uniquely associated with one person or application, but a roleis intended to be assumable by anyone who needs it. Users have permanent long-term credentials, butroles provide temporary credentials. To learn more, see When to create an IAM user (instead of a role) inthe IAM User Guide.
IAM roles
An IAM role is an identity within your AWS account that has specific permissions. It is similar to an IAMuser, but is not associated with a specific person. You can temporarily assume an IAM role in the AWSManagement Console by switching roles. You can assume a role by calling an AWS CLI or AWS APIoperation or by using a custom URL. For more information about methods for using roles, see Using IAMroles in the IAM User Guide.
IAM roles with temporary credentials are useful in the following situations:
• Temporary IAM user permissions – An IAM user can assume an IAM role to temporarily take ondifferent permissions for a specific task.
• Federated user access – Instead of creating an IAM user, you can use existing identities from AWSDirectory Service, your enterprise user directory, or a web identity provider. These are known asfederated users. AWS assigns a role to a federated user when access is requested through an identityprovider. For more information about federated users, see Federated users and roles in the IAM UserGuide.
• Cross-account access – You can use an IAM role to allow someone (a trusted principal) in a differentaccount to access resources in your account. Roles are the primary way to grant cross-account access.However, with some AWS services, you can attach a policy directly to a resource (instead of using a roleas a proxy). To learn the difference between roles and resource-based policies for cross-account access,see How IAM roles differ from resource-based policies in the IAM User Guide.
• Cross-service access – Some AWS services use features in other AWS services. For example, when youmake a call in a service, it's common for that service to run applications in Amazon EC2 or store objectsin Amazon S3. A service might do this using the calling principal's permissions, using a service role, orusing a service-linked role.• Principal permissions – When you use an IAM user or role to perform actions in AWS, you are
considered a principal. Policies grant permissions to a principal. When you use some services, youmight perform an action that then triggers another action in a different service. In this case, youmust have permissions to perform both actions. To see whether an action requires additionaldependent actions in a policy, see Actions, Resources, and Condition Keys for Amazon LocationService in the Service Authorization Reference.
• Service role – A service role is an IAM role that a service assumes to perform actions on your behalf.An IAM administrator can create, modify, and delete a service role from within IAM. For moreinformation, see Creating a role to delegate permissions to an AWS service in the IAM User Guide.
• Service-linked role – A service-linked role is a type of service role that is linked to an AWS service.The service can assume the role to perform an action on your behalf. Service-linked roles appearin your IAM account and are owned by the service. An IAM administrator can view, but not edit thepermissions for service-linked roles.
• Applications running on Amazon EC2 – You can use an IAM role to manage temporary credentialsfor applications that are running on an EC2 instance and making AWS CLI or AWS API requests.This is preferable to storing access keys within the EC2 instance. To assign an AWS role to an EC2instance and make it available to all of its applications, you create an instance profile that is attachedto the instance. An instance profile contains the role and enables programs that are running on theEC2 instance to get temporary credentials. For more information, see Using an IAM role to grantpermissions to applications running on Amazon EC2 instances in the IAM User Guide.
To learn whether to use IAM roles or IAM users, see When to create an IAM role (instead of a user) in theIAM User Guide.
212
https://docs.aws.amazon.com/service-authorization/latest/reference/list_awskeymanagementservice.html

Amazon Location Service Developer GuideManaging access using policies
Managing access using policies
You control access in AWS by creating policies and attaching them to IAM identities or AWS resources. Apolicy is an object in AWS that, when associated with an identity or resource, defines their permissions.You can sign in as the root user or an IAM user, or you can assume an IAM role. When you then makea request, AWS evaluates the related identity-based or resource-based policies. Permissions in thepolicies determine whether the request is allowed or denied. Most policies are stored in AWS as JSONdocuments. For more information about the structure and contents of JSON policy documents, seeOverview of JSON policies in the IAM User Guide.
Administrators can use AWS JSON policies to specify who has access to what. That is, which principal canperform actions on what resources, and under what conditions.
Every IAM entity (user or role) starts with no permissions. In other words, by default, users cando nothing, not even change their own password. To give a user permission to do something, anadministrator must attach a permissions policy to a user. Or the administrator can add the user to agroup that has the intended permissions. When an administrator gives permissions to a group, all usersin that group are granted those permissions.
IAM policies define permissions for an action regardless of the method that you use to perform theoperation. For example, suppose that you have a policy that allows the iam:GetRole action. A user withthat policy can get role information from the AWS Management Console, the AWS CLI, or the AWS API.
Identity-based policies
Identity-based policies are JSON permissions policy documents that you can attach to an identity, suchas an IAM user, group of users, or role. These policies control what actions users and roles can perform,on which resources, and under what conditions. To learn how to create an identity-based policy, seeCreating IAM policies in the IAM User Guide.
Identity-based policies can be further categorized as inline policies or managed policies. Inline policiesare embedded directly into a single user, group, or role. Managed policies are standalone policies thatyou can attach to multiple users, groups, and roles in your AWS account. Managed policies include AWSmanaged policies and customer managed policies. To learn how to choose between a managed policy oran inline policy, see Choosing between managed policies and inline policies in the IAM User Guide.
Resource-based policies
Resource-based policies are JSON policy documents that you attach to a resource. Examples of resource-based policies are IAM role trust policies and Amazon S3 bucket policies. In services that support resource-based policies, service administrators can use them to control access to a specific resource. For theresource where the policy is attached, the policy defines what actions a specified principal can performon that resource and under what conditions. You must specify a principal in a resource-based policy.Principals can include accounts, users, roles, federated users, or AWS services.
Resource-based policies are inline policies that are located in that service. You can't use AWS managedpolicies from IAM in a resource-based policy.
Access Control Lists (ACLs)
Access control lists (ACLs) control which principals (account members, users, or roles) have permissions toaccess a resource. ACLs are similar to resource-based policies, although they do not use the JSON policydocument format.
213

Amazon Location Service Developer GuideHow Amazon Location Service works with IAM
Amazon S3, AWS WAF, and Amazon VPC are examples of services that support ACLs. To learn more aboutACLs, see Access control list (ACL) overview in the Amazon Simple Storage Service Developer Guide.
Other policy types
AWS supports additional, less-common policy types. These policy types can set the maximumpermissions granted to you by the more common policy types.
• Permissions boundaries – A permissions boundary is an advanced feature in which you set themaximum permissions that an identity-based policy can grant to an IAM entity (IAM user or role).You can set a permissions boundary for an entity. The resulting permissions are the intersection ofentity's identity-based policies and its permissions boundaries. Resource-based policies that specifythe user or role in the Principal field are not limited by the permissions boundary. An explicit denyin any of these policies overrides the allow. For more information about permissions boundaries, seePermissions boundaries for IAM entities in the IAM User Guide.
• Service control policies (SCPs) – SCPs are JSON policies that specify the maximum permissions foran organization or organizational unit (OU) in AWS Organizations. AWS Organizations is a service forgrouping and centrally managing multiple AWS accounts that your business owns. If you enable allfeatures in an organization, then you can apply service control policies (SCPs) to any or all of youraccounts. The SCP limits permissions for entities in member accounts, including each AWS accountroot user. For more information about Organizations and SCPs, see How SCPs work in the AWSOrganizations User Guide.
• Session policies – Session policies are advanced policies that you pass as a parameter when youprogrammatically create a temporary session for a role or federated user. The resulting session'spermissions are the intersection of the user or role's identity-based policies and the session policies.Permissions can also come from a resource-based policy. An explicit deny in any of these policiesoverrides the allow. For more information, see Session policies in the IAM User Guide.
Multiple policy types
When multiple types of policies apply to a request, the resulting permissions are more complicated tounderstand. To learn how AWS determines whether to allow a request when multiple policy types areinvolved, see Policy evaluation logic in the IAM User Guide.
How Amazon Location Service works with IAMBefore you use IAM to manage access to Amazon Location, you should understand what IAM features areavailable to use with Amazon Location. For a high-level view of how Amazon Location and other AWSservices work with IAM, see AWS Services That Work with IAM in the IAM User Guide.
Topics• Identity-based policies (p. 214)• Amazon Location resource-based policies (p. 217)• Amazon Location IAM roles (p. 217)
Identity-based policiesWith IAM identity-based policies, you can specify allowed or denied actions and resources as well asthe conditions under which actions are allowed or denied. Amazon Location supports specific actions,resources, and condition keys. To learn about all of the elements that you use in a JSON policy, see IAMJSON Policy Elements Reference in the IAM User Guide.
214
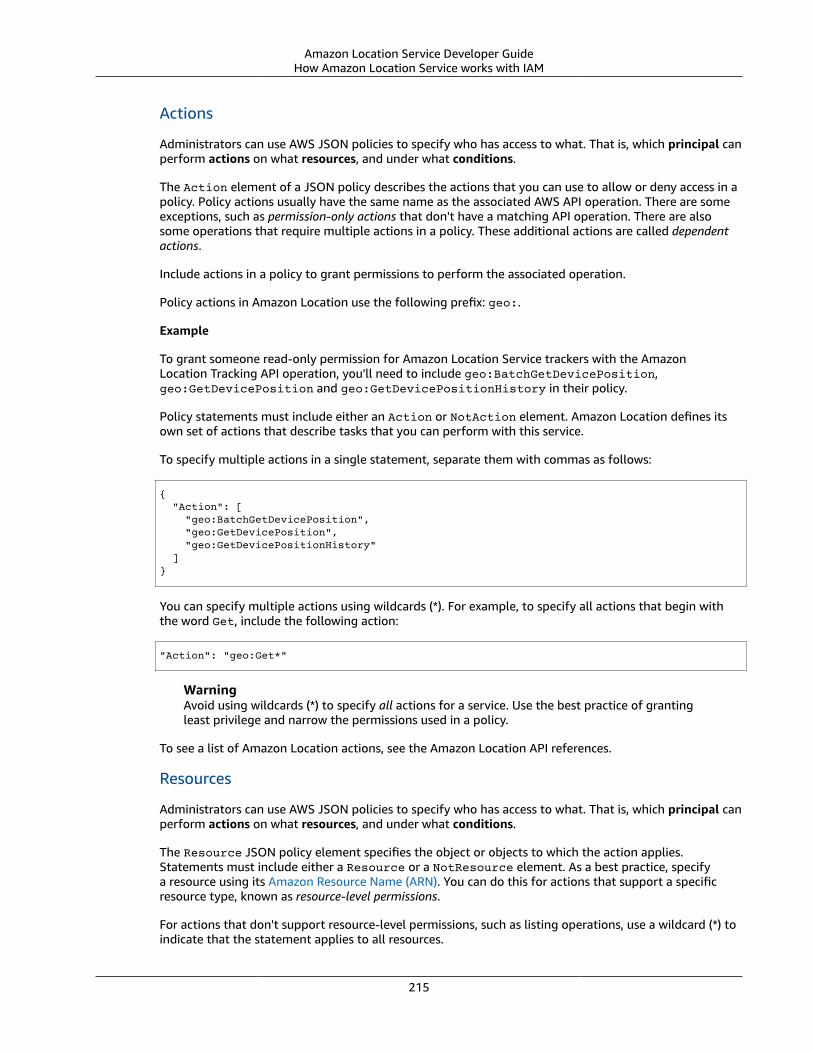
Amazon Location Service Developer GuideHow Amazon Location Service works with IAM
Actions
Administrators can use AWS JSON policies to specify who has access to what. That is, which principal canperform actions on what resources, and under what conditions.
The Action element of a JSON policy describes the actions that you can use to allow or deny access in apolicy. Policy actions usually have the same name as the associated AWS API operation. There are someexceptions, such as permission-only actions that don't have a matching API operation. There are alsosome operations that require multiple actions in a policy. These additional actions are called dependentactions.
Include actions in a policy to grant permissions to perform the associated operation.
Policy actions in Amazon Location use the following prefix: geo:.
Example
To grant someone read-only permission for Amazon Location Service trackers with the AmazonLocation Tracking API operation, you'll need to include geo:BatchGetDevicePosition,geo:GetDevicePosition and geo:GetDevicePositionHistory in their policy.
Policy statements must include either an Action or NotAction element. Amazon Location defines itsown set of actions that describe tasks that you can perform with this service.
To specify multiple actions in a single statement, separate them with commas as follows:
{ "Action": [ "geo:BatchGetDevicePosition", "geo:GetDevicePosition", "geo:GetDevicePositionHistory" ]}
You can specify multiple actions using wildcards (*). For example, to specify all actions that begin withthe word Get, include the following action:
"Action": "geo:Get*"
WarningAvoid using wildcards (*) to specify all actions for a service. Use the best practice of grantingleast privilege and narrow the permissions used in a policy.
To see a list of Amazon Location actions, see the Amazon Location API references.
Resources
Administrators can use AWS JSON policies to specify who has access to what. That is, which principal canperform actions on what resources, and under what conditions.
The Resource JSON policy element specifies the object or objects to which the action applies.Statements must include either a Resource or a NotResource element. As a best practice, specifya resource using its Amazon Resource Name (ARN). You can do this for actions that support a specificresource type, known as resource-level permissions.
For actions that don't support resource-level permissions, such as listing operations, use a wildcard (*) toindicate that the statement applies to all resources.
215

Amazon Location Service Developer GuideHow Amazon Location Service works with IAM
"Resource": "*"
Amazon Location Service uses the following prefixes for resources:
Amazon Location resource prefix
Resource Resource prefix
Map resources map
Place resources place-index
Route resources route-calculator
Tracking resources tracker
Geofence Collection resources geofence-collection
Use the following ARN syntax:
arn:Partition:geo:Region:Account:ResourcePrefix/ResourceName
For more information about the format of ARNs, see Amazon Resource Names (ARNs) and AWS ServiceNamespaces.
Examples
• Use the following ARN to allow access to a specified map resource.
"Resource": "arn:aws:geo:us-west-2:account-id:map/map-resource-name"
• To specify access to all map resources that belong to a specific account, use the wildcard (*):
"Resource": "arn:aws:geo:us-west-2:account-id:map/*"
• Some Amazon Location actions, such as those for creating resources, can't be performed on a specificresource. In those cases, you must use the wildcard (*).
"Resource": "*"
Many Amazon Location Service API actions involve multiple resources. For example, getting maptiles requires the IAM user to have permissions to retrieve map tiles, sprite files, glyphs, and the styledescriptor file.
To specify multiple resources in a single statement, separate the ARNs with commas:
{ "Resource": [ "geo:GetMapTile", "geo:GetMapSprites", "geo:GetMapGlyphs", "geo:GetMapStyleDescriptor" ]}
216

Amazon Location Service Developer GuideIdentity-based policy examples
Condition keys
Amazon Location does not provide any service-specific condition keys, but it does support using someglobal condition keys. To see all AWS global condition keys, see AWS Global Condition Context Keys inthe IAM User Guide.
Amazon Location resource-based policies
Amazon Location does not support resource-based policies.
Amazon Location IAM rolesAn IAM role is an entity within your AWS account that has specific permissions.
Using temporary credentials with Amazon Location
You can use temporary credentials to sign in with federation, assume an IAM role, or to assume a cross-account role. You obtain temporary security credentials by calling AWS STS API operations such asAssumeRole or GetFederationToken.
Amazon Location supports using temporary credentials.
Amazon Location Service identity-based policyexamplesBy default, IAM users and roles don't have permission to create or modify Amazon Location resources.They also can't perform tasks using the AWS Management Console, AWS CLI, or AWS API. An IAMadministrator must create IAM policies that grant users and roles permission to perform specific APIoperations on the specified resources they need. The administrator must then attach those policies tothe IAM users or groups that require those permissions.
To learn how to create an IAM identity-based policy using these example JSON policy documents, seeCreating Policies on the JSON Tab in the IAM User Guide.
Policy best practicesIdentity-based policies are very powerful. They determine whether someone can create, access, or deleteAmazon Location resources in your account. These actions can incur costs for your AWS account. Whenyou create or edit identity-based policies, follow these guidelines and recommendations:
• Get started using AWS managed policies – To start using Amazon Location quickly, use AWSmanaged policies to give your employees the permissions they need. These policies are alreadyavailable in your account and are maintained and updated by AWS. For more information, see Getstarted using permissions with AWS managed policies in the IAM User Guide.
• Grant least privilege – When you create custom policies, grant only the permissions requiredto perform a task. Start with a minimum set of permissions and grant additional permissions asnecessary. Doing so is more secure than starting with permissions that are too lenient and then tryingto tighten them later. For more information, see Grant least privilege in the IAM User Guide.
• Enable MFA for sensitive operations – For extra security, require IAM users to use multi-factorauthentication (MFA) to access sensitive resources or API operations. For more information, see Usingmulti-factor authentication (MFA) in AWS in the IAM User Guide.
• Use policy conditions for extra security – To the extent that it's practical, define the conditions underwhich your identity-based policies allow access to a resource. For example, you can write conditions to
217

Amazon Location Service Developer GuideIdentity-based policy examples
specify a range of allowable IP addresses that a request must come from. You can also write conditionsto allow requests only within a specified date or time range, or to require the use of SSL or MFA. Formore information, see IAM JSON policy elements: Condition in the IAM User Guide.
Allow users to view their own permissionsThis example shows how you might create a policy that allows IAM users to view the inline and managedpolicies that are attached to their user identity. This policy includes permissions to complete this actionon the console or programmatically using the AWS CLI or AWS API.
{ "Version": "2012-10-17", "Statement": [ { "Sid": "ViewOwnUserInfo", "Effect": "Allow", "Action": [ "iam:GetUserPolicy", "iam:ListGroupsForUser", "iam:ListAttachedUserPolicies", "iam:ListUserPolicies", "iam:GetUser" ], "Resource": [ "arn:aws:iam::*:user/${aws:username}" ] }, { "Sid": "NavigateInConsole", "Effect": "Allow", "Action": [ "iam:GetGroupPolicy", "iam:GetPolicyVersion", "iam:GetPolicy", "iam:ListAttachedGroupPolicies", "iam:ListGroupPolicies", "iam:ListPolicyVersions", "iam:ListPolicies", "iam:ListUsers" ], "Resource": "*" } ]}
Permissions required to use the Amazon Location consoleTo access the Amazon Location Service console, and be able to create, delete, list and view details aboutAmazon Location resources in your AWS account, you will need to grant permission to access all AmazonLocation resources. For more information, see Adding Permissions to a User in the IAM User Guide.
To grant permission to access to all Amazon Location resources for the Amazon Location Service console:
{ "Version": "2012-10-17", "Statement": [ { "Sid": "GeoPowerUser", "Effect": "Allow", "Action": [
218
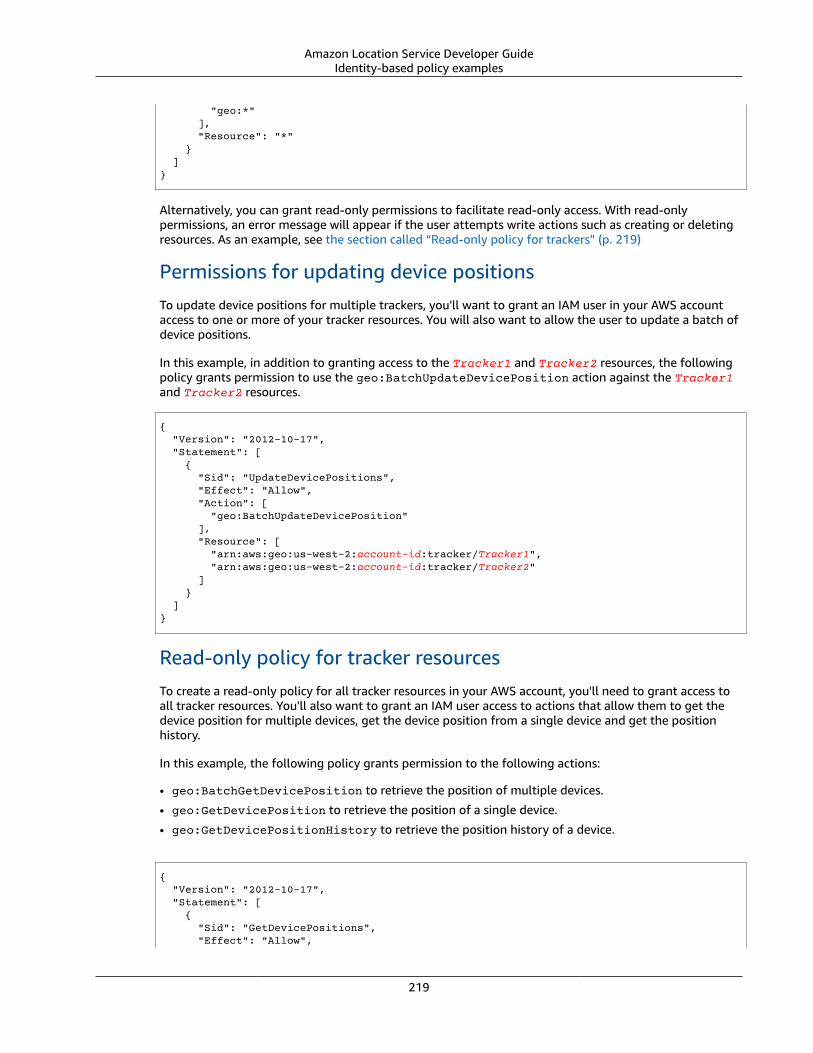
Amazon Location Service Developer GuideIdentity-based policy examples
"geo:*" ], "Resource": "*" } ]}
Alternatively, you can grant read-only permissions to facilitate read-only access. With read-onlypermissions, an error message will appear if the user attempts write actions such as creating or deletingresources. As an example, see the section called “Read-only policy for trackers” (p. 219)
Permissions for updating device positionsTo update device positions for multiple trackers, you'll want to grant an IAM user in your AWS accountaccess to one or more of your tracker resources. You will also want to allow the user to update a batch ofdevice positions.
In this example, in addition to granting access to the Tracker1 and Tracker2 resources, the followingpolicy grants permission to use the geo:BatchUpdateDevicePosition action against the Tracker1and Tracker2 resources.
{ "Version": "2012-10-17", "Statement": [ { "Sid": "UpdateDevicePositions", "Effect": "Allow", "Action": [ "geo:BatchUpdateDevicePosition" ], "Resource": [ "arn:aws:geo:us-west-2:account-id:tracker/Tracker1", "arn:aws:geo:us-west-2:account-id:tracker/Tracker2" ] } ]}
Read-only policy for tracker resourcesTo create a read-only policy for all tracker resources in your AWS account, you'll need to grant access toall tracker resources. You'll also want to grant an IAM user access to actions that allow them to get thedevice position for multiple devices, get the device position from a single device and get the positionhistory.
In this example, the following policy grants permission to the following actions:
• geo:BatchGetDevicePosition to retrieve the position of multiple devices.
• geo:GetDevicePosition to retrieve the position of a single device.
• geo:GetDevicePositionHistory to retrieve the position history of a device.
{ "Version": "2012-10-17", "Statement": [ { "Sid": "GetDevicePositions", "Effect": "Allow",
219

Amazon Location Service Developer GuideIdentity-based policy examples
"Action": [ "geo:BatchGetDevicePosition", "geo:GetDevicePosition", "geo:GetDevicePositionHistory" ], "Resource": "arn:aws:geo:us-west-2:account-id:tracker/*" } ]}
Policy for creating geofencesTo create a policy to allow an IAM user to create geofences, you'll need to grant access to specific actionsthat allow users to create one or more geofences on a geofence collection.
The policy below grants permission to the following actions on Collection:
• geo:BatchPutGeofence to create multiple geofences.• geo:PutGeofence to create a single geofence.
{ "Version": "2012-10-17", "Statement": [ { "Sid": "CreateGeofences", "Effect": "Allow", "Action": [ "geo:BatchPutGeofence", "geo:PutGeofence" ], "Resource": "arn:aws:geo:us-west-2:account-id:geofence-collection/Collection" } ]}
Read-only policy for geofencesTo create a read-only policy for geofences stored in a geofence collection in your AWS account, you'llneed to grant access to actions that read from the geofence collection storing the geofences.
The policy below grants permission to the following actions on Collection:
• geo:ListGeofences to list geofences in the specified geofence collection.• geo:GetGeofence to retrieve a geofence from the geofence collection.
{ "Version": "2012-10-17", "Statement": [ { "Sid": "GetGeofences", "Effect": "Allow", "Action": [ "geo:ListGeofences", "geo:GetGeofence" ], "Resource": "arn:aws:geo:us-west-2:account-id:geofence-collection/Collection" } ]
220

Amazon Location Service Developer GuideIdentity-based policy examples
}
Permissions for rendering a map resourceTo grant sufficient permissions to render maps, you'll need to grant access to map tiles, sprites, glyphs,and the style descriptor:
• geo:GetMapTile retrieves map tiles used to selectively render features on a map.• geo:GetMapSprites retrieves the PNG sprite sheet and corresponding JSON document describing
offsets within it.• geo:GetMapGlyphs retrieves the glyphs used for displaying text.• geo:GetMapStyleDescriptor retrieves the map’s style descriptor, containing rendering rules.
{ "Version": "2012-10-17", "Statement": [ { "Sid": "GetTiles", "Effect": "Allow", "Action": [ "geo:GetMapTile", "geo:GetMapSprites", "geo:GetMapGlyphs", "geo:GetMapStyleDescriptor" ], "Resource": "arn:aws:geo:us-west-2:account-id:map/Map" } ]}
Permissions to allow search operationsTo create a policy to allow search operations, you'll first need to grant access to the place index resourcein your AWS account. You'll also want to grant access to actions that let the IAM user search using text bygeocoding and search using a position by reverse geocoding.
In this example, in addition to granting access to PlaceIndex, the following policy also grantspermission to the following actions:
• geo:SearchPlaceIndexForPosition allows you to search for places, or points of interest near agiven position.
• geo:SearchPlaceIndexForText allows you to search for an address, name, city or region usingfree-form text.
{ "Version": "2012-10-17", "Statement": [ { "Sid": "Search", "Effect": "Allow", "Action": [ "geo:SearchPlaceIndexForPosition", "geo:SearchPlaceIndexForText" ], "Resource": "arn:aws:geo:us-west-2:account-id:place-index/PlaceIndex" }
221

Amazon Location Service Developer GuideIdentity-based policy examples
]}
Read-only policy for route calculatorsYou can create a read-only policy to allow an IAM user access to a route calculator resource to calculate aroute.
In this example, in addition to granting access to ExampleCalculator, the following policy grantspermission to the following operation:
• geo:CalculateRoute calculates a route given a departure position, destination positon, and a list ofwaypoint positions.
{ "Version": "2012-10-17", "Statement": [ { "Sid": "RoutesReadOnly", "Effect": "Allow", "Action": [ "geo:CalculateRoute" ], "Resource": "arn:aws:geo:us-west-2:accountID:route-calculator/ExampleCalculator" } ]}
Control resource access based on tagsWhen you create an IAM policy to grant access to use your Amazon Location resources, you can useattribute-based access control for better control over which resources a user can modify, use, or delete.You can do this by including tag information in the Condition element of your policy to control accessbased on your resource tags (p. 179).
The following example policy shows how you might create a policy that allows an IAM user to creategeofences. This grants the permission to the following actions to create one or more geofences on ageofence collection called Collection:
• geo:BatchPutGeofence to create multiple geofences.• geo:PutGeofence to create a single geofence.
However, this policy uses the Condition element to grant the permission only if the Collection tag,Owner, has the value of that user's user name.
• For example, if a user named richard-roe attempts to view an Amazon Location Collection, theCollection must be tagged Owner=richard-roe or owner=richard-roe. Otherwise the user isdenied access.
NoteThe condition tag key Owner matches both Owner and owner because condition key namesare not case-sensitive. For more information, see IAM JSON Policy Elements: Condition in theIAM User Guide.
{ "Version": "2012-10-17",
222
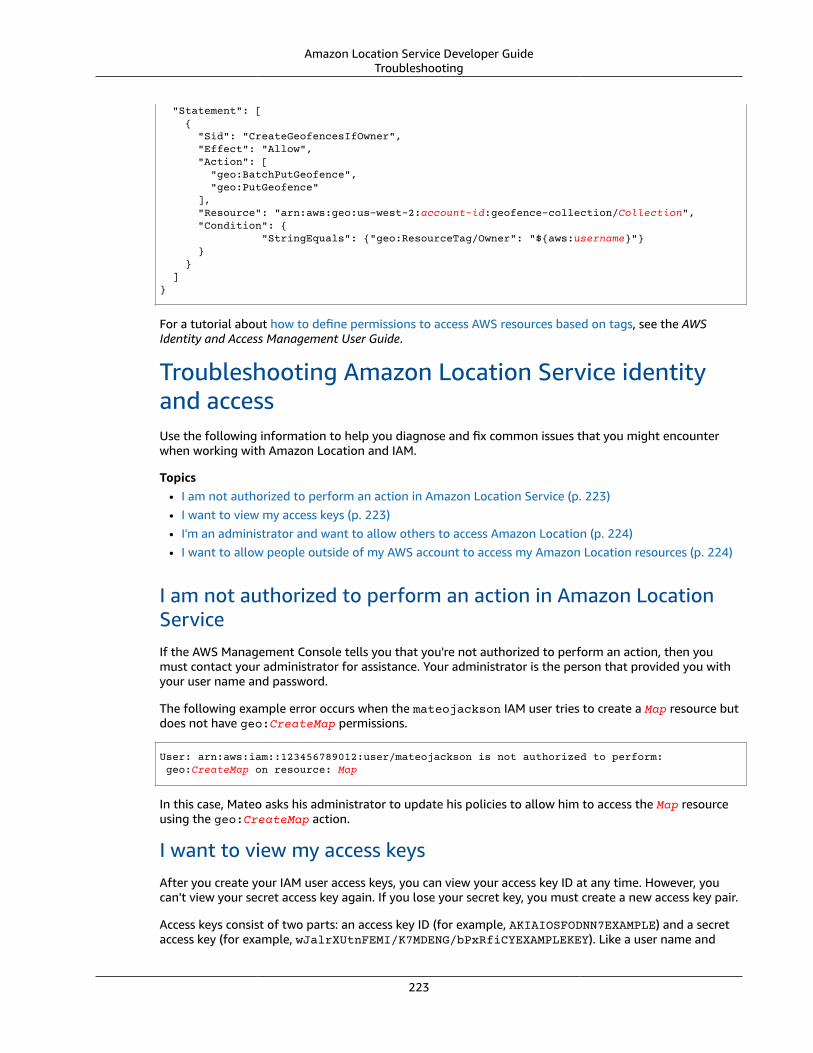
Amazon Location Service Developer GuideTroubleshooting
"Statement": [ { "Sid": "CreateGeofencesIfOwner", "Effect": "Allow", "Action": [ "geo:BatchPutGeofence", "geo:PutGeofence" ], "Resource": "arn:aws:geo:us-west-2:account-id:geofence-collection/Collection", "Condition": { "StringEquals": {"geo:ResourceTag/Owner": "${aws:username}"} } } ]}
For a tutorial about how to define permissions to access AWS resources based on tags, see the AWSIdentity and Access Management User Guide.
Troubleshooting Amazon Location Service identityand accessUse the following information to help you diagnose and fix common issues that you might encounterwhen working with Amazon Location and IAM.
Topics• I am not authorized to perform an action in Amazon Location Service (p. 223)• I want to view my access keys (p. 223)• I'm an administrator and want to allow others to access Amazon Location (p. 224)• I want to allow people outside of my AWS account to access my Amazon Location resources (p. 224)
I am not authorized to perform an action in Amazon LocationServiceIf the AWS Management Console tells you that you're not authorized to perform an action, then youmust contact your administrator for assistance. Your administrator is the person that provided you withyour user name and password.
The following example error occurs when the mateojackson IAM user tries to create a Map resource butdoes not have geo:CreateMap permissions.
User: arn:aws:iam::123456789012:user/mateojackson is not authorized to perform: geo:CreateMap on resource: Map
In this case, Mateo asks his administrator to update his policies to allow him to access the Map resourceusing the geo:CreateMap action.
I want to view my access keysAfter you create your IAM user access keys, you can view your access key ID at any time. However, youcan't view your secret access key again. If you lose your secret key, you must create a new access key pair.
Access keys consist of two parts: an access key ID (for example, AKIAIOSFODNN7EXAMPLE) and a secretaccess key (for example, wJalrXUtnFEMI/K7MDENG/bPxRfiCYEXAMPLEKEY). Like a user name and
223
Amazon Location Service Developer GuideIncident response
password, you must use both the access key ID and secret access key together to authenticate yourrequests. Manage your access keys as securely as you do your user name and password.
ImportantDo not provide your access keys to a third party, even to help find your canonical user ID. Bydoing this, you might give someone permanent access to your account.
When you create an access key pair, you are prompted to save the access key ID and secret access key ina secure location. The secret access key is available only at the time you create it. If you lose your secretaccess key, you must add new access keys to your IAM user. You can have a maximum of two access keys.If you already have two, you must delete one key pair before creating a new one. To view instructions,see Managing access keys in the IAM User Guide.
I'm an administrator and want to allow others to access AmazonLocationTo allow others to access Amazon Location, you must create an IAM entity (user or role) for the person orapplication that needs access. They will use the credentials for that entity to access AWS. You must thenattach a policy to the entity that grants them the correct permissions in Amazon Location.
To get started right away, see Creating your first IAM delegated user and group in the IAM User Guide.
I want to allow people outside of my AWS account to access myAmazon Location resourcesYou can create a role that users in other accounts or people outside of your organization can use toaccess your resources. You can specify who is trusted to assume the role. For services that supportresource-based policies or access control lists (ACLs), you can use those policies to grant people access toyour resources.
To learn more, consult the following:
• To learn whether Amazon Location supports these features, see How Amazon Location Service workswith IAM (p. 214).
• To learn how to provide access to your resources across AWS accounts that you own, see Providingaccess to an IAM user in another AWS account that you own in the IAM User Guide.
• To learn how to provide access to your resources to third-party AWS accounts, see Providing access toAWS accounts owned by third parties in the IAM User Guide.
• To learn how to provide access through identity federation, see Providing access to externallyauthenticated users (identity federation) in the IAM User Guide.
• To learn the difference between using roles and resource-based policies for cross-account access, seeHow IAM roles differ from resource-based policies in the IAM User Guide.
Incident Response in Amazon Location ServiceSecurity is the highest priority at AWS. As part of the AWS Cloud shared responsibility model, AWSmanages a data center and network architecture that meets the requirements of the most security-sensitive organizations. As an AWS customer, you share a responsibility for maintaining security in thecloud. This means you control the security you choose to implement from the AWS tools and featuresyou have access to.
By establishing a security baseline that meets the objectives for your applications running in the cloud,you're able to detect deviations that you can respond to. Since security incident response can be a
224

Amazon Location Service Developer GuideLogging and Monitoring
complex topic, we encourage you to review the following resources so that you are better able tounderstand the impact that incident response (IR) and your choices have on your corporate goals: AWSSecurity Incident Response Guide, AWS Security Best Practices whitepaper, and the Security Perspectiveof the AWS Cloud Adoption Framework (CAF) white paper.
Logging and Monitoring in Amazon Location ServiceLogging and monitoring are an important part of incident response. It lets you establish a securitybaseline to detect deviations that you can investigate and respond to. By implementing loggingand monitoring for Amazon Location Service, you're able to maintain the reliability, availability, andperformance for your projects and resources.
AWS provides several tools that can help you log and collect data for incident response:
AWS CloudTrail
Amazon Location Service integrates with AWS CloudTrail, which is a service that provides a record ofactions taken by a user, role or AWS service. This includes actions from the Amazon Location Serviceconsole, and programmatic calls to Amazon Location API operations. These records of action arecalled events. For more information, see Logging and monitoring Amazon Location Service with AWSCloudTrail.
Amazon CloudWatch
You can use Amazon CloudWatch to collect and analyze metrics related to your Amazon LocationService account. You can enable CloudWatch alarms to notify you if a metric meets certainconditions, and has reached a specified threshold. When you create an alarm, CloudWatch sends anotification to an Amazon Simple Notification Service that you define. For more information, see theMonitoring Amazon Location Service with Amazon CloudWatch.
AWS Health Dashboards
Using AWS Health Dashboards, you can verify the status of the Amazon Location Service service.You can also monitor and view historical data about any events or issues that might affect your AWSenvironment. For more information, see the AWS Health User Guide.
Compliance validation for Amazon LocationService
Third-party auditors assess the security and compliance of AWS services as part of multiple AWScompliance programs, such as SOC, PCI, FedRAMP, and HIPAA.
To learn whether or other AWS services are within the scope of specific compliance programs, see AWSServices in Scope by Compliance Program. For general information, see AWS Compliance Programs.
You can download third-party audit reports using AWS Artifact. For more information, see DownloadingReports in AWS Artifact.
Your compliance responsibility when using AWS services is determined by the sensitivity of your data,your company's compliance objectives, and applicable laws and regulations. AWS provides the followingresources to help with compliance:
• Security and Compliance Quick Start Guides – These deployment guides discuss architecturalconsiderations and provide steps for deploying baseline environments on AWS that are security andcompliance focused.
225

Amazon Location Service Developer GuideResilience
• Architecting for HIPAA Security and Compliance on Amazon Web Services – This whitepaper describeshow companies can use AWS to create HIPAA-eligible applications.
NoteNot all AWS services are HIPAA eligible. For more information, see the HIPAA Eligible ServicesReference.
• AWS Compliance Resources – This collection of workbooks and guides might apply to your industryand location.
• Evaluating Resources with Rules in the AWS Config Developer Guide – The AWS Config service assesseshow well your resource configurations comply with internal practices, industry guidelines, andregulations.
• AWS Security Hub – This AWS service provides a comprehensive view of your security state within AWSthat helps you check your compliance with security industry standards and best practices.
• AWS Audit Manager – This AWS service helps you continuously audit your AWS usage to simplify howyou manage risk and compliance with regulations and industry standards.
Resilience in Amazon Location ServiceThe AWS global infrastructure is built around AWS Regions and Availability Zones. AWS Regions providemultiple physically separated and isolated Availability Zones, which are connected with low-latency,high-throughput, and highly redundant networking. With Availability Zones, you can design and operateapplications and databases that automatically fail over between zones without interruption. AvailabilityZones are more highly available, fault tolerant, and scalable than traditional single or multiple datacenter infrastructures.
For more information about AWS Regions and Availability Zones, see AWS Global Infrastructure.
In addition to the AWS global infrastructure, Amazon Location offers several features to help supportyour data resiliency and backup needs.
Infrastructure security in Amazon Location ServiceAs a managed service, Amazon Location Service is protected by the AWS global network securityprocedures that are described in the Amazon Web Services: Overview of Security Processes whitepaper.
You use AWS published API calls to access Amazon Location through the network. Clients must supportTransport Layer Security (TLS) 1.0 or later. We recommend TLS 1.2 or later. Clients must also supportcipher suites with Perfect Forward Secrecy, such as Ephemeral Diffie-Hellman (DHE) or Elliptic CurveEphemeral Diffie-Hellman (ECDHE). Most modern systems, such as Java 7 and later, support thesemodes.
Additionally, requests must be signed by using an access key ID and a secret access key that is associatedwith an IAM principal. Or you can use the AWS Security Token Service (AWS STS) to generate temporarysecurity credentials to sign requests.
Security best practices for Amazon LocationService
Amazon Location Service provides a number of security features to consider as you develop andimplement your own security policies. The following best practices are general guidelines and don’t
226

Amazon Location Service Developer GuideDetective best practices
represent a complete security solution. Because these best practices might not be appropriate orsufficient for your environment, treat them as helpful considerations rather than prescriptions.
Detective security best practices for Amazon LocationServiceThe following best practices for Amazon Location Service can help detect security incidents:
Implement AWS monitoring tools
Monitoring is critical to incident response and maintains the reliability and security of AmazonLocation Service resources and your solutions. You can implement monitoring tools from the severaltools and services available through AWS to monitor your resources and your other AWS services.
For example, Amazon CloudWatch allows you to monitor metrics for Amazon Location Service andenables you to setup alarms to notify you if a metric meets certain conditions you've set and hasreached a threshold you've defined. When you create an alarm, you can set CloudWatch to sent anotification to alert using Amazon Simple Notification Service. For more information, see the sectioncalled “Logging and Monitoring” (p. 225).
Enable AWS logging tools
Logging provides a record of actions taken by a user, role or an AWS service in Amazon LocationService. You can implement logging tools such as AWS CloudTrail to collect data on actions to detectunusual API activity.
When you create a trail, you can configure CloudTrail to log events. Events are records of resourceoperations performed on or within a resource such as the request made to Amazon Location, theIP address from which the request was made, who made the request, when the request was made,along with additional data. For more information, see Logging Data Events for Trails in the AWSCloudTrail User Guide.
Preventive security best practices for AmazonLocation ServiceThe following best practices for Amazon Location Service can help prevent security incidents:
Use secure connections
Always use encrypted connections, such as those that begin with https:// to keep sensitiveinformation secure in transit.
Implement least privilege access to resources
When you create custom policies to Amazon Location resources, grant only the permissionsrequired to perform a task. It's recommended to start with a minimum set of permissions and grantadditional permissions as needed. Implementing least privilege access is essential to reducing therisk and impact that could result from errors or malicious attacks. For more information, see thesection called “Identity and Access Management” (p. 210).
Use globally-unique IDs as device IDs
Use the following conventions for device IDs.• Device IDs must be unique.• Device IDs should not be secret, because they can be used as foreign keys to other systems.• Device IDs should not contain personally-identifiable information (PII), such as phone device IDs or
email addresses.
227

Amazon Location Service Developer GuideBest practices
• Device IDs should not be predictable. Opaque identifiers like UUIDs are recommended.
Best practices for Amazon Location ServiceThis topic provides best practices to help you use Amazon Location Service. While these best practicescan help you take full advantage of the Amazon Location Service, they do not represent a completesolution. You should follow only the recommendations that are applicable for your environment.
Topics• Security (p. 228)• Resource management (p. 228)• Billing and cost management (p. 228)• Quotas and usage (p. 229)
SecurityTo help manage or even avoid security risks, consider the following best practices:
• Use identity federation, IAM users, and IAM roles to manage, control, or limit access to your AmazonLocation resources. For more information, see IAM Best Practices in the IAM User Guide.
• Follow the Principle of Least Privilege to grant only the minimum required access to your AmazonLocation Service resources. For more information, see the section called “Managing access usingpolicies” (p. 213).
• Use monitoring and logging tools to track resource access and usage. For more information, see thesection called “Logging and Monitoring” (p. 225) and Logging Data Events for Trails in the AWSCloudTrail User Guide.
• Use secure connections, such as those that begin with https:// to add security and protect usersagainst attacks while data is being transmitted between the server and browser.
For more information about detective and preventive security best practices, see the topic on the sectioncalled “Security best practices” (p. 226).
Resource managementTo help effectively manage your location resources in Amazon Location Service, consider the followingbest practices:
• Use regional endpoints that are central to your expected user base to improve their experience. Forinformation about region endpoints, see Amazon Location Regions and endpoints (p. 62).
• For resources that use data providers, such as map resources and Place index resources, make sureto follow the terms of use agreement of the specific data provider. For more information, see Dataproviders (p. 50).
Billing and cost managementTo help manage your costs and billing, consider the following best practice:
• Use monitoring tools, such as Amazon CloudWatch, to track your resource usage. You can set alertsthat notify you when usage is about to exceed your specified limits. For more information, see Creatinga Billing Alarm to Monitor Your Estimated AWS Charges in the Amazon CloudWatch User Guide.
228

Amazon Location Service Developer GuideQuotas and usage
Quotas and usageYou AWS account includes quotas that set a default limit your usage amount. You can set up alarms toalert you when your usage is getting close to your limit, and you can request a raise to a quota, when youneed it. For information about how to work with quotas, see the following topics.
• Amazon Location Service quotas (p. 63)• Using CloudWatch to monitor usage against quotas (p. 190)• Visualizing your service quotas and setting alarms in the Amazon CloudWatch User Guide.
You can create alarms to give you advance warning when you are close to exceeding your limits. Werecommend setting alarms for each quota in each AWS Region where you use Amazon Location. Forexample, you can monitor your use of the SearchPlaceIndexForText operation, and create an alarmwhen you exceed 80 percent of your current quota.
When you get an alarm warning about your quota, you must decide what to do. You might be usingadditional resources because your customer base has grown. In that case you may want to request anincrease to your quota, such as a 50 percent increase in the quota for an API call in that Region. Or,maybe there's an error in your service that causes you to make additional unnecessary calls to AmazonLocation. In that case you'd want to solve the problem in your service.
229

Amazon Location Service Developer GuideWorking with AWS SDKs
Amazon Location APIsAmazon Location Service provides API operations to programmatically access the location functionality.This includes APIs for Maps, Places, Routes, Trackers, Geofences, and tagging your resources. Forinformation about the available API actions, see the Amazon Location Service API reference.
You can find samples in the Code examples (p. 196) chapter of this guide.
Using this service with an AWS SDKAWS software development kits (SDKs) are available for many popular programming languages. EachSDK provides an API, code examples, and documentation that make it easier for developers to buildapplications in their preferred language.
SDK documentation Code examples
AWS SDK for C++ AWS SDK for C++ code examples
AWS SDK for Go AWS SDK for Go code examples
AWS SDK for Java AWS SDK for Java code examples
AWS SDK for JavaScript AWS SDK for JavaScript code examples
AWS SDK for .NET AWS SDK for .NET code examples
AWS SDK for PHP AWS SDK for PHP code examples
AWS SDK for Python (Boto3) AWS SDK for Python (Boto3) code examples
AWS SDK for Ruby AWS SDK for Ruby code examples
Example availabilityCan't find what you need? Request a code example by using the Provide feedback link at thebottom of this page.
SDK VersionsWe recommend that you use the most recent build of the AWS SDK, and any other SDKs, thatyou use in your projects, and to keep the SDKs up to date. The AWS SDK provides you withthe latest features and functionality, and also security updates. To find the latest build of theAWS SDK for JavaScript, for example, see the browser installation topic in the AWS SDK forJavaScript documentation.
230

Amazon Location Service Developer Guide
Document historyThe following table describes the documentation for Amazon Location Service. For notification aboutupdates you can subscribe to an RSS feed.
update-history-change update-history-description update-history-date
Combined APIreference (p. 231)
Amazon Location Service nowhas a single API reference guide,rather than separate guidesfor each subservice. For moreinformation about the APIs, see Amazon Location APIs.
July 7, 2022
Service Quotasintegration (p. 231)
Amazon Location is now integrated with Service Quotasallowing you to view andmanage your quotas through theAWS Management Console orusing the AWS CLI.
July 6, 2022
Updated conceptsdocumentationchapter (p. 231)
The Amazon Location conceptschapter has been updated withmore information for users ofAmazon Location.
April 22, 2022
New Android quick starttutorial (p. 231)
A new quick start tutorial forAndroid development usingKotlin has been added to getdevelopers up and runningquickly.
April 15, 2022
New HERE Map styles (p. 231) Two new map styles have beenadded for maps using HEREas a data provider. For moreinformation, see HERE mapstyles.
March 15, 2022
Restructure documentationwith added code examples andtutorials (p. 231)
This developer guide has beenrestructured to find topics moreeasily, including new Quick startand Code examples chapters.
February 25, 2022
Accuracy-based position filteringfor trackers (p. 231)
You can now use accuracy-basedfilters when creating a trackerresource.
December 7, 2021
Autocomplete for placeindexes (p. 231)
You can now use autocompletewhen searching place indexes.
December 6, 2021
New Amplify tutorial for usingmaps (p. 231)
A new tutorial is availableshowing how to use AWSAmplify to display maps in aweb application. The tutorial isavailable at Using the Amplifylibrary with Amazon LocationService.
November 24, 2021
231
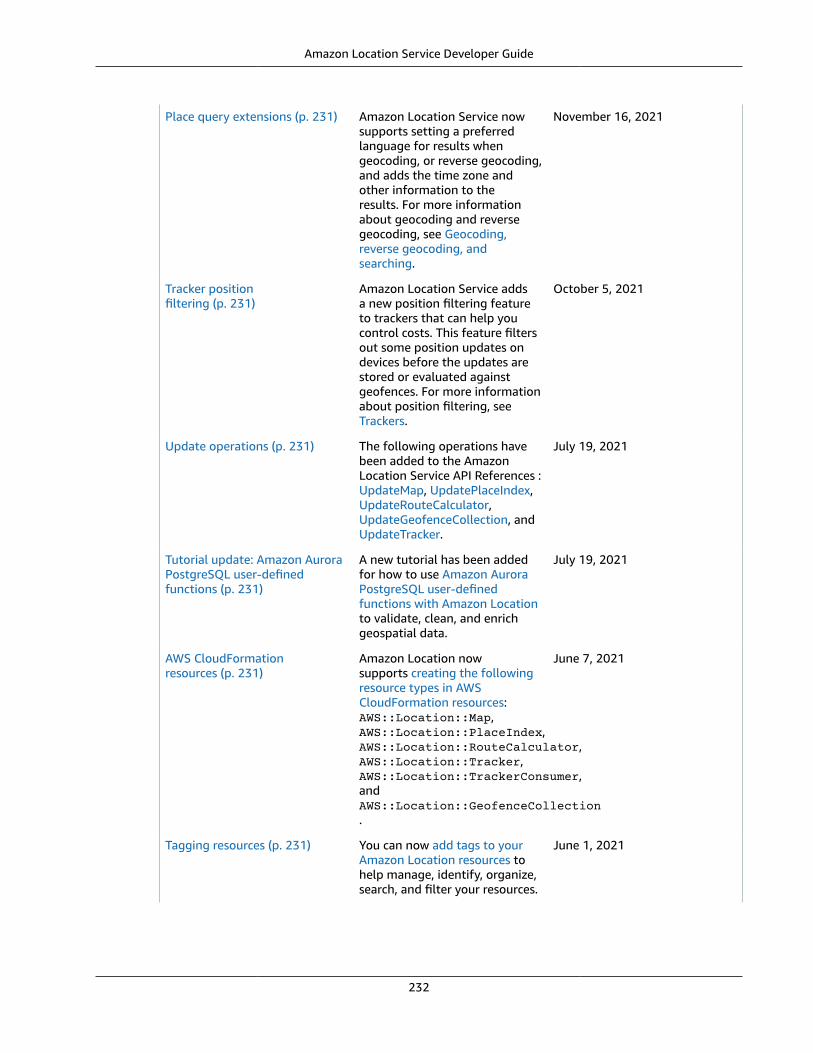
Amazon Location Service Developer Guide
Place query extensions (p. 231) Amazon Location Service nowsupports setting a preferredlanguage for results whengeocoding, or reverse geocoding,and adds the time zone andother information to theresults. For more informationabout geocoding and reversegeocoding, see Geocoding,reverse geocoding, andsearching.
November 16, 2021
Tracker positionfiltering (p. 231)
Amazon Location Service addsa new position filtering featureto trackers that can help youcontrol costs. This feature filtersout some position updates ondevices before the updates arestored or evaluated againstgeofences. For more informationabout position filtering, seeTrackers.
October 5, 2021
Update operations (p. 231) The following operations havebeen added to the AmazonLocation Service API References :UpdateMap, UpdatePlaceIndex,UpdateRouteCalculator,UpdateGeofenceCollection, andUpdateTracker.
July 19, 2021
Tutorial update: Amazon AuroraPostgreSQL user-definedfunctions (p. 231)
A new tutorial has been addedfor how to use Amazon AuroraPostgreSQL user-definedfunctions with Amazon Locationto validate, clean, and enrichgeospatial data.
July 19, 2021
AWS CloudFormationresources (p. 231)
Amazon Location nowsupports creating the followingresource types in AWSCloudFormation resources:AWS::Location::Map,AWS::Location::PlaceIndex,AWS::Location::RouteCalculator,AWS::Location::Tracker,AWS::Location::TrackerConsumer,andAWS::Location::GeofenceCollection.
June 7, 2021
Tagging resources (p. 231) You can now add tags to yourAmazon Location resources tohelp manage, identify, organize,search, and filter your resources.
June 1, 2021
232
https://docs.aws.amazon.com/location-geofences/latest/APIReference/API_UpdateGeofenceCollection.html

Amazon Location Service Developer Guide
General availability (p. 231) General availability release ofthe Amazon Location Servicedeveloper documentation:Region and endpoints andservice quotas updated.
June 1, 2021
Esri Imagery (p. 231) Amazon Location now supportsthe use of Esri map style: EsriImagery. For more information,see Esri World Imagery on theEsri website.
June 1, 2021
Calculating routes (p. 231) You can now use AmazonLocation route calculators tocalculate routes and estimatetravel time based on up-to-dateroad network and live trafficinformation from your chosendata provider.
June 1, 2021
AWS KMS customer managedkey encryption for data atrest (p. 231)
Amazon Location now supportsthe use of a symmetric customermanaged key that you create,own, and manage to add asecond layer of encryptionover the existing AWS ownedencryption.
June 1, 2021
Public preview release (p. 231) Initial release of the publicpreview documentation.
December 16, 2020
Tutorial update: Displayingmaps (p. 231)
Tutorials for displaying mapsusing MapLibre GL for Androidand iOS have been updated touse the MapLibre GL native SDK.
March 17, 2020
233

Amazon Location Service Developer Guide
AWS glossaryFor the latest AWS terminology, see the AWS glossary in the AWS General Reference.
234