AiOS Lifestyle Series - Cary Audio
66
OWNER’S MANUAL o o o o o o o o o o o o o o o o o o o o o o o o o o o o o o o o o o o o o o o o o o o o o o o o o o o o o o o o o o o o o o o o o o o o o o o o o o o o o o o o o o o o o o o o o o o o o o o o o o o o o o o o o o o o o o o o o o o o o o o o o o o o o o o o o o o o o o o o o o o o o o o o o o o o o o o o o o o o o o o o o o o o o o o o o o AiOS All-in-One System as of February 10, 2020 Lifestyle Series NOTE: Before installing your new component, please read this manual carefully as it will inform you of the product specifications, proper installation and correct operating procedures for your unit. Also included in this manual are guidelines on how to service and care for your new Cary Audio Design product.
-
Upload
khangminh22 -
Category
Documents
-
view
1 -
download
0
Transcript of AiOS Lifestyle Series - Cary Audio

OWNE
R’S M
ANUA
L oo
oo
oo
oo
oo
oo
oo
oo
oo
oo
oo
oo
oo
oo
oo
oo
oo
oo
oo
oo
oo
oo
oo
oo
oo
oo
oo
oo
oo
oo
oo
oo
oo
oo
oo
oo
oo
oo
oo
oo
oo
oo
oo
oo
o o o o o o o o o o o o o o o o o o o o o o o o o o o o o o o o o o o o o o o o o o o o o o o o o o o o o o o o o o o o o o o o o o o o o o o o o o o o o o o o o o o o o o o o o o o o o o o o o o o o o o o o o o o o o o o o o o o o o o o o o o o o o o o o o o o o o o o o o o o o o o o o o o o o o o o o o o o o o o o o o o o o o o o o o o o o o
AiOSAll-in-One Systemas of February 10, 2020
Lifestyle Series
NOTE: Before installing your new component, please read this manual carefully as it will inform you of the product specifications, proper installation and correct operating procedures for your unit. Also included in this manual are guidelines on how to service and care for your new Cary Audio Design product.
TABLE OF CONTENTS
Important Safety Instructions ............................................................................................................... 4
Welcome
Thank You ............................................................................................................................................. 6
Useful Terms .......................................................................................................................................... 7
About AiOS ............................................................................................................................................ 8
Installation
Unpacking .............................................................................................................................................. 9
Warranty Card ........................................................................................................................................ 9
Placement ............................................................................................................................................ 10
Features
Product Features .................................................................................................................................. 11
Disclaimer
Disclaimer ............................................................................................................................................ 13
Controls and Displays
Front Panel .......................................................................................................................................... 14
Rear Panel ........................................................................................................................................... 15
Remote Control Operation
IR Remote Control ................................................................................................................................ 17
Navigating AiOS
iOS and Andriod Control Apps ................................................................................................................ 18
AiOS Navigation Basics .......................................................................................................................... 18
Using Remote Control Alphanumeric Keys .............................................................................................. 18
Setting AiOS Adjustable Colors
Color Operation .................................................................................................................................... 19
Front Panel Display
Now Playing Screens ............................................................................................................................. 20
Volume Control ..................................................................................................................................... 21
Settings Menu Overview
Settings Menu Overview ........................................................................................................................ 22
File Sharing Configuration
Configuring Computer(s) for Sharing Files .............................................................................................. 25
Setting Up Wired Ethernet Connection
Setup Wired Ethernet Connection .......................................................................................................... 26
Setting Up Wireless Wi-Fi Connection
Setup Wireless Wi-Fi Connection ............................................................................................................ 27
TABLE OF CONTENTS
User Interface Icons
Graphic Icon Key .................................................................................................................................. 28
Network Audio Operations
Network Audio Playback (Streaming) ..................................................................................................... 29
Internet Music Service Operation
Internet Music Services/Streaming ......................................................................................................... 31
USB Flash/HDD and SD Card Operation
USB and SD Card Audio Playback ........................................................................................................... 32
Operating AiOS from a Computer
Sending/Pushing Music to AiOS from a Networked Computer ................................................................... 34
Creating and Editing Playback Lists (Queues)
Queue Function .................................................................................................................................... 36
Creating and Editing Playlists
Playlist Function ................................................................................................................................... 38
Digital and Analog Input Operation
Listening to Coaxial and Optical Digital Inputs ......................................................................................... 40
Listening to Analog Line Level Input ....................................................................................................... 40
Using Pre-Out, Main-In and Sub-Out Functions
Pre-Out Funtion .................................................................................................................................... 41
Using AiOS as a Source Only ................................................................................................................. 41
Main-In Function .................................................................................................................................. 41
Subwoofer Output ................................................................................................................................ 41
Airplay and Phoneshare Operations
Airplay and Phoneshare Playback and Connection ................................................................................... 42
Bluetooth Receive Setup
Bluetooth Overview .............................................................................................................................. 43
Pairing a Bluetooth Device ..................................................................................................................... 43
Bluetooth Playback Operation
Bluetooth Input (Receive) Playback ........................................................................................................ 45
Bluetooth Send Setup and Operation
Bluetooth Send (Transmit) Function ....................................................................................................... 46
Pairing Bluetooth Headphones or Speakers to AiOS ................................................................................. 46
Equalizer Operation
Equalizer Function ................................................................................................................................ 48
How to Custom Name Inputs
Renaming Inputs .................................................................................................................................. 49
TABLE OF CONTENTS
How to Change/Create Custom Turn On/Off Messages
Custom Greetings and Goodbye Messages .............................................................................................. 50
Understanding File Upsampling and Conversion
PCM to DSD Conversion ........................................................................................................................ 51
PCM to DSD Upsampling ....................................................................................................................... 51
Using File Upsampling and Conversion
Using PCM to DSD Conversion and Upsampling ....................................................................................... 52
DSD and MQA Operation
Direct Stream Digital (DSD) Playback ..................................................................................................... 53
Master Quality Authenticated (MQA) Playback Notification ....................................................................... 53
Roon Ready Operation
Roon Overview ..................................................................................................................................... 54
Roon Setup ........................................................................................................................................ 54
Roon Ready Operation ...................................................................................................................... 56
Specifications
Basic Specifications ............................................................................................................................... 57
Service and Care
Care and Cleaning ................................................................................................................................ 60
AC Power Fuse Replacement ................................................................................................................. 60
Factory Service ..................................................................................................................................... 60
Non-Warranty Repairs ........................................................................................................................... 60
Limited Warranty .................................................................................................................................. 61

IMPORTANT SAFETY INSTRUCTIONS
WARNING: The triangle with the lightning flash symbol displayed on the unit advises the user of dangerous un-insulated voltage inside the product’s enclosure.
CAUTION: To reduce the risk of electric shock, do not remove the cover. There are no user-serviceable parts inside; it is recommended that only qualified personnel service this component.
ALERT: The triangle with the exclamation point symbol on the component suggests that the owner refer to important operating and maintenance instructions in the owner’s manual.
1. OWNER’S MANUAL: Before powering up the equipment, read all safety and operating instructions and follow them as
instructed. Retain the safety and operating instructions for future reference. 2. ATTACHMENTS: Use only those attachments recommended by the unit manufacturer, as others may cause hazards. 3. ACCESSORIES: Do not place the unit on an unstable cart, stand, tripod, bracket, or table. The unit may fall, causing
injury to a person or damage to the unit. Mount the unit according to the manufacturer’s instructions with the suggested mounting accessory.
4. WALL OR CEILING MOUNTING: Mount the unit to a wall or ceiling only in the manner recommended by the manufacturer.
5. WATER AND MOISTURE: Do not use the unit near water (for example, near a swimming pool, bath tub, wash bowl, kitchen sink, or laundry tub) or in a damp environment (like a basement or outside in the rain).
6. OBJECT AND LIQUID ENTRY: Do not push objects of any kind into the unit through openings as they could touch dangerous voltage points and short-out parts, possibly resulting in a fire or electric shock. Avoid spilling liquid of any kind on the unit. If water or any metal object (such as a paper clip, coin, or staple) accidentally falls inside the unit, disconnect it from the AC power source immediately and contact Cary Audio Design for further instructions.
7. HEAT: Position the unit away from heat sources such as radiators, heat registers, stoves, or other units (including amplifiers) that produce heat.
8. VENTILATION: Slots and openings in the cabinet create ventilation to protect the component from overheating. These openings on the top and bottom panels must remain unobstructed. Allow at least 6 inches (16cm) of clearance above the unit and an opening behind the unit for airflow. Do not place the unit on a bed, sofa, rug, built- in bookcase, or rack without adequate ventilation.
9. GROUNDING OR POLARIZATION: As a safety feature, the unit may be equipped with a polarized alternating current line plug in which one blade is wider than the other. This plug will fit into the power outlet only one way. If you cannot insert the plug fully into the outlet, try reversing the plug. If the plug still will not fit, contact a licensed electrician to update your obsolete outlet. Do not defeat the safety purpose of the polarized plug.
10. POWER SOURCES: Operate the unit only from the power source indicated on the marking label. If you are unsure of the type of power supplied to your home, consult your unit dealer or local power company.
11. POWER CORD PROTECTION: Arrange power supply cords so that they do not suffer from foot traffic or pinching by items placed on or against them. Pay close attention to cords where plug enter the AC outlet and where they exit from the unit.
12. LIGHTNING: For added protection during a lightning storm or when the component is idle for long periods of time, unplug the unit from the wall outlet and disconnect the antenna or cable system. This will help protect the unit from lightning and power line surge damage.
13. POWER LINES: Do not locate an outside antenna system in the vicinity of overhead power lines or other electric light or power circuits. When installing an outside antenna system, take extreme care to avoid touching the power lines or circuits; contact with them could be fatal.
14. OVERLOADING: Do not overload wall outlets, extension cords, or integral convenience receptacles as this increases the risk of fire or electric shock.
15. REPLACEMENT PARTS: When replacement parts are required, be sure the service technician has used replacement parts specified by the manufacturer or those having the same characteristics as the original parts. Unauthorized substitutions may result in fire, electric shock or other hazards.
16. SAFETY CHECK: Upon completion of any service or repairs to the unit, ask the service technician to perform safety checks to ensure the unit is in proper operating condition.
4

IMPORTANT SAFETY INSTRUCTIONS
17. IMPORTANT SAFETY NOTE:
• Before connecting a new product such as the Cinema 12 to your audio or home theater system, turn off all other equipment (preferably unplugging them from the AC power source). Many audio components feature automatic turn-on circuits that may activate during an installation, potentially causing damage to electronic components and/or speakers. This type of damage is not covered by product warranties, and Cary Audio specifically disclaims responsibility for any such damage.
• Power Cord: The removable power cord provided with your unit was specifically designed for use with this product, but other AC cords may be used. Consult your dealer for advice on AC power cords and high quality wire in your system.
• AC Fuse: The fuse is located inside the chassis and is not user serviceable. If the unit does not power up, contact an authorized service representative
• Wiring: Cables running inside walls should have the appropriate markings to indicate compliance and listing by the UL, CSA or other standards required by the UL, CSA, NEC or your local building code. Questions about cables inside of walls should be referred to a qualified custom installer, a licensed electrician, or low-voltage contractor.
18. RECORDING COPYRIGHT: Recording of copyrighted material for other than personal use is illegal without permission of the copyright holder.
19. NOTE TO CATV SYSTEM INSTALLER: This reminder is provided to call the CATV system installer's attention to article 820-40 of the NEC, ANSI/NFPA 70, which provides guidelines for proper grounding and, in particular, specifies that the cable ground shall be connected to the grounding system of the building as close to the point of cable entry as practical.
20. FCC INFORMATION FOR USER: • CAUTION: Any changes or modifications not expressly approved by Cary
Audio Design could void the user's authority to operate the equipment. • NOTE: This equipment has been tested and found to comply with the limits for a
Class B digital device pursuant to Part 15 of the FCC Rules. • These limits are designed to provide reasonable protection against harmful interference in a residential
installation. This equipment generates and can radiate radio frequency energy, and if not installed and used in accordance with the instructions it may cause harmful interference to radio communications. However, there is no guarantee that interference will not occur in a particular installation. If this equipment does cause harmful interference to radio or television reception, which can be determined by turning the equipment off and on, the user is encouraged to try to correct the interference by one or more of the following measures:
• Reorient or relocate the receiving antenna. • Increase the separation between the equipment and receiver. • Connect the equipment into an outlet on a circuit different from where the receiver is connected.
21. OUTDOOR ANTENNA INSTALLATION/SAFE ANTENNA AND CABLE CONNECTION: • If an outside antenna or cable system is connected to the
equipment, be sure the antenna or cable system is grounded in order to provide protection against built-up static charges and voltage surges. Article 810 of the National Electrical Code, ANSI/NFPA 70 (in Canada, Part 1 of the Canadian Electrical Code) provides information regarding proper grounding of the mast and supporting structure, grounding of the lead-in wire to an antenna discharge unit, size of grounding conductors, location of antenna discharge unit, connection to grounding electrodes and requirements for the grounding electrode.
• Outside antenna system should be located well away from power lines, electric light or power circuits and where it will never come into contact with these power sources if it should happen to fall. When installing an outside antenna, extreme care should be taken to avoid touching power lines, circuits or other power sources as this could be fatal. Because of the hazards involved, antenna installation should be left to a professional.
5
WELCOME
THANK YOU
Congratulations on becoming a Cary Audio owner! Cary Audio would like to thank you for purchasing our products.
Since its founding in 1989, Cary Audio has stayed at the forefront of home entertainment equipment by stubbornly adhering to the principles of quality and musicality upon which it was founded. It’s not enough just to be able to build great sounding gear, but it needs to be well-made, reliable, and maintain its performance and value for many years. Cary Audio has certain criteria that have guided us since we began, and are still our primary focus.
We firmly believe in high performance products that offer incredible value for the money, backed by superior engineering and design, and supported by exceptional customer service. Whether a headphone amplifier or a world-class surround sound processor, Cary Audio uses the highest quality components available within the audio circuit, resulting in extraordinary sound quality. This is a well-known hallmark of all Cary Audio products.
For over a quarter century of providing the best in high performance music systems, Cary Audio remains committed to our goals of building the very best products, at real-world prices, and supporting them with world-class service. Let our passion for the very finest sound and picture quality help you better enjoy your music and movies! Thank you for your continued support!
The Cary Audio Team
6
GLOSSARY OF TERMS
USEFUL TERMS Network Connection – A connection to a home network router (needed for Network Music) which in turn is typically connected to the Internet. Although an Internet connection is not necessary for a home network or Network Music, it is needed for Internet Music. A network connection can be either wired, or wireless.
Client – A component that finds music stored on network devices and retrieves it for playback over its own music playing software.
Renderer – A component that lets other devices such as computers or Apps push music to the component for playback via the media player of the computer or App.
Wired Connection (Ethernet) – A connection to the router with an Ethernet (Cat5e, etc.) cable.
Wireless Connection (Wi-Fi) – A connection to the router via a components built-in Wi-Fi. Router must also be Wi-Fi capable.
Network Music – A broad term that refers to music originating from a computer or NAS drive that is connected to a home network for playback over a Digital Music Streamer/Network Audio Player.
Digital Music Streamer/Network Audio Player – An audio component like AiOS that connects to a home network that can access Network Music for playback.
NAS Drive – (Network Attached Storage) An external hard drive that connects directly to a network router (wired or wirelessly), unlike a USB hard drive that connects to a computer or audio component.
Internet Music – Music from an Internet music service, such as Spotify, Tidal, Internet Radio, etc. Requires a router connected to the Internet.
Server – for the purposes of this manual, a server is a software application installed on a computer or NAS drive that monitors a music library and “serves” files to a Digital Music Streamer/Network Audio Player. Server software can be lite background “server only” applications (i.e.; Twonky), or part of a larger suite of software within a Media Player application (i.e.; JRiver).
Computer-less –Playback that doesn’t require a computer or network setup. For example; directly connecting a USB flash/HDD drive, or SD Card to AiOS for playback.
Local Music – This includes Computer-less USB HDD, flash/thumb drives, SD Cards, or other components (CD players, Cable Boxes, etc.) connected directly to AiOS for playback.
App or Control App – A free iOS or Android App that can take the place of the hand held IR remote to control all functions of AiOS from a comfortable position away from the unit itself.
SMB/PC Share – A standard computer protocol for sharing files across computers & networks.
UPnP/DLNA – A more specialized protocol to serve files to computers across network connections.
7

ABOUT AIOS
ABOUT AIOS Hello, I’m AiOS, pronounced [a-ous]. Why AiOS? It’s simple, I’m the first All-in-One System of its kind for Cary Audio. I was developed at Cary Audio by the same folks that have made the Cary Audio brand synonymous with the world’s best high-end luxury audio products since 1989, of which I embody the same DNA. I display the same Cary Audio family name as my bigger siblings, but I’m designed for a new age of music listening and enjoyment. One where simplicity, compactness, and aesthetics take precedence. One where enjoying music isn’t an end-all, be-all serious critiquing matter, but rather something to sing and dance to, bop your head, or tap your foot as you listen or go about other activities. One where music sources come together as one from the internet, computers, mobile phones and tablets, USB sticks, hard disc drives, SD Cards, or from your other digital and analog connected sources. Hence the Lifestyle Series Moniker. Lifestyle Series means AiOS is designed to fit into your lifestyle both aesthetically and for listening preference. The switchable color illumination and optional matching color side panels for AiOS makes for an exceptionally flexible and handsome music system. AiOS is for all. Whether it’s your first music system, downsizing from large separate components, upgrading from another “me-too” compact system, for a college dorm, secondary rooms such as bedroom or office, or as a main system to show front and center along with your personal touches, AiOS is sure to please the eye as well as the ear.
your LIFE, your STYLE, your MUSIC.
8
INSTALLATION
UNPACKING
This section describes the proper unpacking and installation procedures.
Unpacking All Cary Audio shipping cartons have been specially designed to protect their contents and special care has been taken to prevent damage under normal shipping conditions. Mishandling should be evident upon inspection of the shipping container. If shipping damage is found after visual inspection, take care not to destroy the evidence. If necessary, document the damage with photographs and contact the transport carrier immediately.
Carefully remove your new component from its packing carton and examine it closely for signs of shipping damage. We strongly recommend saving all original packing cartons to protect your component from damage should you wish to store it or ship it at a later date. Power Requirements AiOS is designed to operate from AC main current. The design AC voltage is either 110V-120V or 220V-240V AC at 50-60 Hz.
In the Box When unpacking AiOS, make sure the following accessories are included. You should find the following items within the box:
• Remote Control • Power Cable • Owner’s Manual • Warranty Card • Three Screw on Adjustable Angle Antennas
WARRANTY CARD IN THE USA: If you are the original purchaser of a new unit purchased from an authorized Cary Audio dealer or from CaryDirect.com, please fill out the enclosed warranty registration card and return it to Cary Audio within 15 days of your purchase. Cary Audio also suggests that you keep your original packing cartons in case you ever need to ship the unit. Warranty restrictions apply. Consult the warranty section at the end of this manual for details. Please be certain to keep a copy of the original sales receipt from your direct purchase from Cary Audio or your authorized Cary Audio dealer to validate the warranty if ever needed. The warranty is for the original purchaser only and does not transfer to any subsequent owner.
OUTSIDE THE USA: Your local authorized Cary Audio distributor will make his own warranty policy for your country. Please check with them for the terms of warranty for your new amplifier.
9

INSTALLATION
PLACEMENT
In general, the location of your new AIOS is not critical. Certain precautions must be taken to ensure optimum performance. Avoid extremely hot locations such as near radiators or other heating units. Keep the top of AiOS clear of books, paper or other equipment to protect against overheating.
10
FEATURES
Described below are AiOS’ more unique features. Please read the Operation Section of this manual to learn more on utilizing these features. The features are subject to change without notice or obligation.
LIFESTYLE DESIGN When we say AiOS is a Lifestyle product, we mean it! About the footprint of a mid-sized laptop, AiOS’ front to back gently curved aluminum chassis embossed with “AiOS” is a modern stylized work of art. Similar to the top contour the bottom is also curved although a bit gentler. This sleek modern look is also meant to blend into your décor. No longer do you need to build a room around your audio system. Now you can customize the audio system to your room, both in placement and looks. The front panel of AiOS when off is unassuming yet artistic. When on, the center LCD screen and touch sensitive engraved buttons we refer to as “keys” can be set to 1 of 7 preset colors as one, or independently of each other. To further expand the lifestyle customization, we offer 5 additional interchangeable color side panels. These features create literally hundreds of design combinations! Now that’s Lifestyle! MQA (MASTER QUALITY AUTHENTICATED) 16x RENDERING AiOS is fully MQA Certified. MQA is a technology that captures the full magic of an original studio performance. Using pioneering scientific research into how people hear, MQA delivers master quality audio in a file that’s small enough to stream or download – the days of sacrificing quality for convenience are over. Every nuance and subtlety of the artist’s performance – every tiny drop of emotion is authentically reproduced. When you listen, you’ll be transported right into the very moment of creation. The AiOS is only the second of MQA’s partner products, behind our own DMS-500, to offer 16x rendering of MQA files, meaning all MQA files will play up to 705.6 or 768 kHz sampling rates. fi™ BLUETOOTH IMPLEMENTATION Bluetooth modules are a fantastic and convenient way in which to share and listen to music from online and mobile sources. It’s not unusual for companies to use such modules as a complete end-to-end or add on solution whereby using the cheap low-grade onboard DAC chips included in the modules and simply passing the analog signal of the module to the analog output section. Our solution is to fully integrate (fi™) the digital information of the Qualcomm aptX® Bluetooth receiver into the entire digital circuit of AiOS. This approach ensures that Bluetooth sources have the potential to sound like any other expensive input source whereby utilizing our sophisticated digital topology of parallel DACs and our other integrated digital features such as; TruBit™ Upsampling, and OSO™ Reclocking. Now your Bluetooth sources can truly be high fi.
BLUETOOTH SEND If you notice, AiOS has no headphone jack. Why is that? Today, Bluetooth headphones have overtaken wired headphones overall in sales. This means customer’s lifestyles demand no wires and on-the-go listening. With AiOS’ Bluetooth SEND feature, you can send any of AiOS’ sources to your Bluetooth enabled headphones. Sit back and enjoy your music without tripping or tangling yourself, or others, in the process. Another great way to utilize the Bluetooth SEND feature is to use a pair of stereo Bluetooth speakers. This allows you to forego speaker wires altogether and place you speakers anywhere that’s best for you and your lifestyle.
CLASS A AMPLIFIER TECHNOLOGY AND LINEAGE Cary Audio has always been known for making some of the best sounding audio components around the world. We’ve always taken a no compromise approach to sound quality. Sure, we
11
FEATURES
make audio amplifiers in excess of $22,000. However, AiOS was designed for a new age customer and for those that love their music. Just because AiOS is very affordable doesn’t mean you can’t get great sound. While most so called mini systems, or all in one systems rely on inexpensive Class D amplifiers, we don’t! Class D is a much cheaper way of designing an amplifier and is okay for some applications, but not for enjoying music the way it was intended to be enjoyed. Actually, the amplifier circuit alone in AiOS is the same amplifier circuit design in our $4,000 SA-200.2 amplifier with MOSFET Class A/B sound, albeit less power and using integrated micro surface mounted devices as opposed to fully discrete components, and of course, smaller power supply, etc. This means the sound of AiOS runs in Class A, the best sound possible, for a good range of its power. Only when you want to rock it out does it transition to Class A/B. All the world’s best amplifiers are Class A or Class A/B designs and AiOS is no exception.
BUILT-IN EQUALIZER FUNCTION Because AiOS is designed to be a Lifestyle product, meaning you place it where it’s best for you, we’ve incorporated a 15 band equalizer with a plus/minus 12dB range per band. Why is this important? Because if you place you speaker(s) based on convenience and aesthetics around your décor, it could affect the sound of the speakers because speaker placement is actually very important to achieve the best sound. AiOS deals with this by providing 9 custom preset equalizer curves including a custom setting. Regardless of the placement of your speakers this ensures you’re able to get the best possible sound by utilizing the 15 band equalizer built into AiOS and to adjust for speaker placement as well as suit your sound and musical style preferences.
TruBit™ DSD & PCM Upsampling & PCM to DSD CONVERSION Upsampling can be messy, leaving behind lots of digital artifacts resulting in noise and inaccurate signal generation. On the surface, upsampling may seem like a good idea. But if not implemented properly it can be disastrous. Typically, upsampling is done as a predefined one-size-fits-all approach, such as 96 kHz or 384 kHz. Utilizing a dedicated 128 bit DSP engine, Cary Audio’s TruBit™ Upsampling allows for up to 10 different selectable sample rates and an increased bit depth of 32 bits or 1 bit for DSD conversion. The result is a signal free from digital artifacts that sounds accurate, pure, and a joy to listen to.
What’s more, PCM sources can be converted to 1 of 3 DSD levels (DSD64, 128, or 256). Alternatively, a lower native DSD source can be Upsampled to a higher DSD rate. PCM to DSD conversion and DSD upsampling takes our TruBit™ technology to a whole new level of pure silky smooth analog like sound like never before from digital sources.
OSO™ RECLOCKING Once a digital signal is transferred into Cary Audio’s digital ecosystem via the digital inputs, it is processed with extreme care to ensure the best possible sound achievable. As a digital source transfers from point A to point B it creates an insidious digital problem called ‘jitter’. To deal with this, Cary Audio developed something we call OSO™ Re-clocking. This solution re-clocks all signals again once onboard as to ensure all jitter is virtually eliminated to a minute degree. We call this OSO™, short for “Onboard Signal Origination” because this re-clocking and buffering creates a signal so stable and jitter free it’s as if the origin of the signal was generated onboard and not from an external source.
12
DISCLAIMER
The operation of AiOS assumes all users have at minimum a moderate level of understanding of computers, file sharing principles, computer networks, and other associated peripherals such as; routers, Ethernet, Wi-Fi, USB hard disc and flash drives, SD Cards, NAS drives, computer operating systems, third party software such as media/music servers and media players, digital music downloading and storage, music library and file management such as tagging, imbedding of artwork, etc.
Cary Audio makes no warranties regarding such items and is not responsible to support such items as it related to the installation and operation of AiOS beyond what is discussed within this manual. All operation methods herein refer to AiOS’s hand held IR remote control unless otherwise specified. For information operating the AIOS via an iOS or Android app, please visit the AiOS product page on the Cary Audio website and look for the “APP QUICK GUIDE” on the right side of the page or under the Downloads Tab.
13
CONTROLS AND DISPLAYS
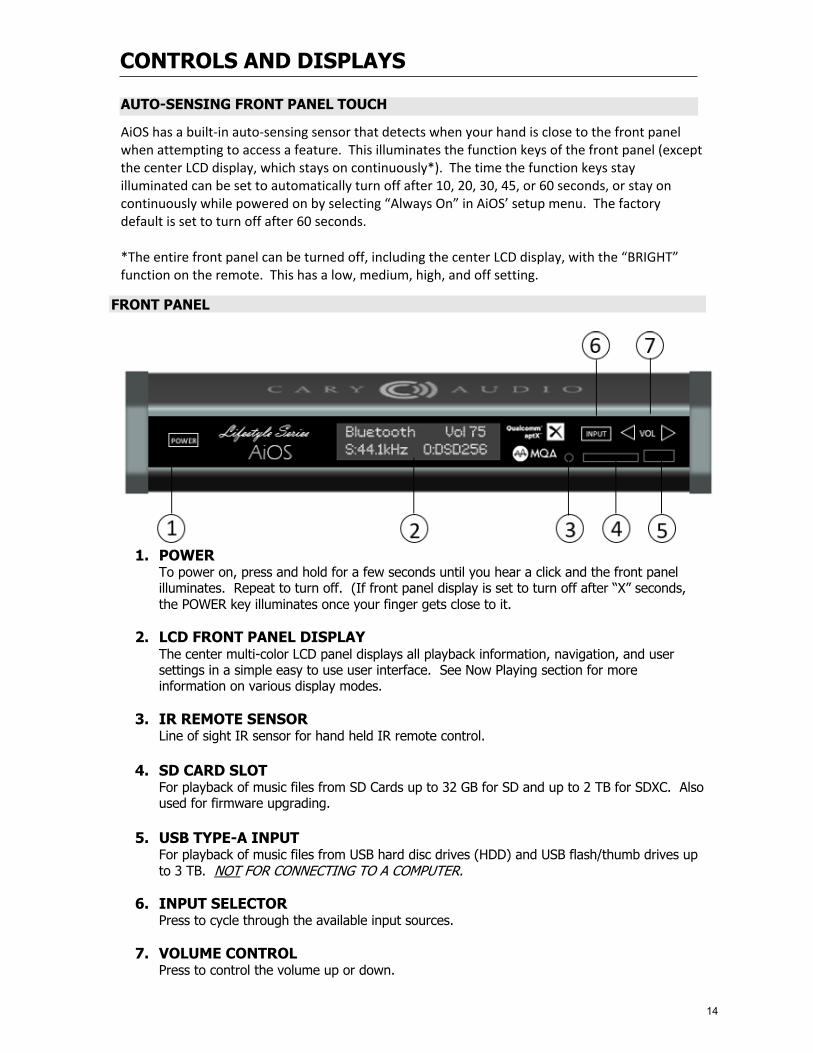
AUTO-SENSING FRONT PANEL TOUCH
AiOS has a built-in auto-sensing sensor that detects when your hand is close to the front panel when attempting to access a feature. This illuminates the function keys of the front panel (except the center LCD display, which stays on continuously*). The time the function keys stay illuminated can be set to automatically turn off after 10, 20, 30, 45, or 60 seconds, or stay on continuously while powered on by selecting “Always On” in AiOS’ setup menu. The factory default is set to turn off after 60 seconds. *The entire front panel can be turned off, including the center LCD display, with the “BRIGHT” function on the remote. This has a low, medium, high, and off setting.
FRONT PANEL
1. POWER
To power on, press and hold for a few seconds until you hear a click and the front panel illuminates. Repeat to turn off. (If front panel display is set to turn off after “X” seconds, the POWER key illuminates once your finger gets close to it.
2. LCD FRONT PANEL DISPLAY The center multi-color LCD panel displays all playback information, navigation, and user settings in a simple easy to use user interface. See Now Playing section for more information on various display modes.
3. IR REMOTE SENSOR Line of sight IR sensor for hand held IR remote control.
4. SD CARD SLOT For playback of music files from SD Cards up to 32 GB for SD and up to 2 TB for SDXC. Also used for firmware upgrading.
5. USB TYPE-A INPUT For playback of music files from USB hard disc drives (HDD) and USB flash/thumb drives up to 3 TB. NOT FOR CONNECTING TO A COMPUTER.
6. INPUT SELECTOR Press to cycle through the available input sources.
7. VOLUME CONTROL Press to control the volume up or down.
14
CONTROLS AND DISPLAYS
REAR PANEL
1. RIGHT CHANNEL SPEAKER OUTPUT Use these jacks for connecting to your RIGHT speakers positive (+) and negative (-) jacks.
2. LEFT CHANNEL SPEAKER OUTPUT Use these jacks for connecting to your LEFT speakers positive (+) and negative (-) jacks.
3. LINE 1 ANALOG INPUT JACKS (STEREO RCA) Use this jack for connecting to a stereo analog source.
4. LINE 2 ANALOG INPUT JACKS (STEREO RCA)
Use this jack for connecting to a stereo analog source.
5. LINE 3 ANALOG INPUT JACKS (STEREO 3.5mm jack) Use this jack for connecting to a stereo analog source that uses a 3.5mm mini jack output, such as phones and tablets, etc.
6. MAIN-IN INPUT For connecting to the audio outputs of a processing source, such as an analog based equalizer, room enhancer, etc. This creates a “loop” when used with the pre-outs. Refer to the MAIN-IN function of this manual for further explanation.
7. PRE-OUT JACKS
For connecting to an external amplifier or distributed audio system. Refer to the PRE-OUT function of this manual for further explanation.
8. SUBWOOFER OUTPUT For connecting to an active /powered subwoofer. Refer to the SUBWOOFER OUTPUT function of this manual for further explanation.
9. DIGITAL OUTPUT JACK (COAXIAL)
16 – 24 Bit, 44.1 kHz – 192 kHz digital data output. MQA nor DSD files can be outputted.
10. DIGITAL INPUT JACK (COAXIAL) 16 – 24 Bit, 44.1 kHz - 192 kHz digital data Input. MQA nor DSD files can be inputted.
11. DIGITAL INPUT JACK (OPTICAL) 16 – 24 Bit, 44.1 kHz - 192 kHz digital data Input. MQA nor DSD files can be inputted.
15
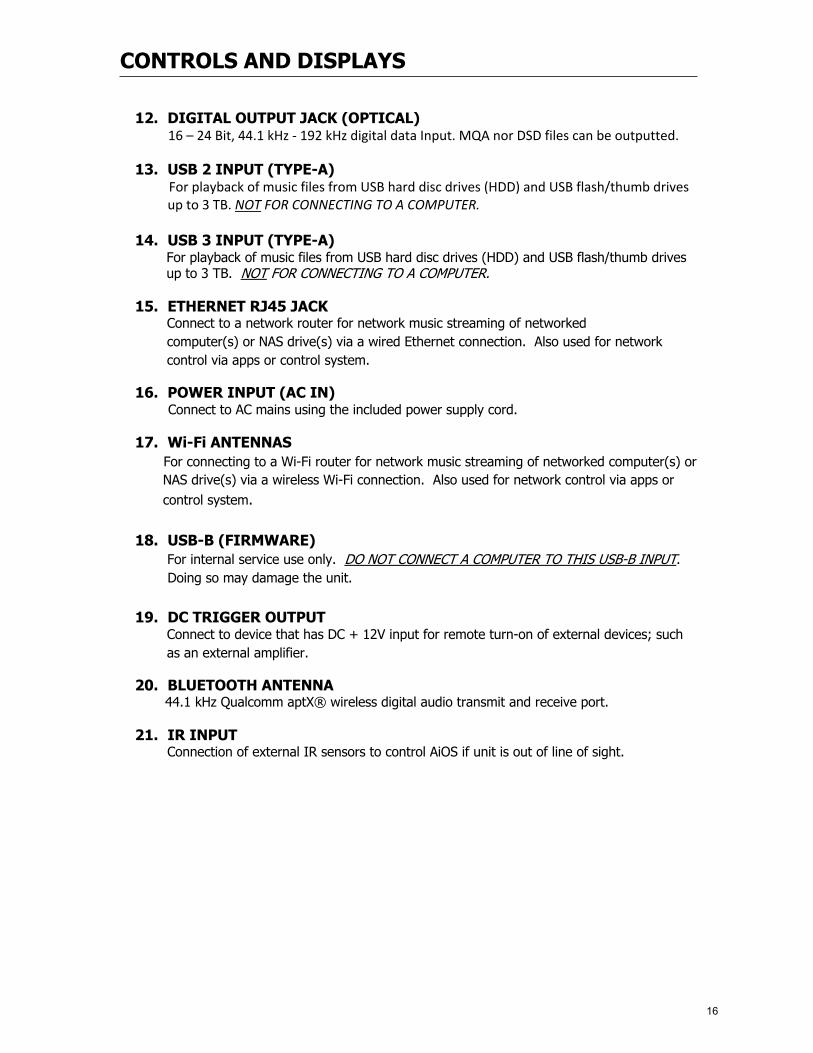
CONTROLS AND DISPLAYS
12. DIGITAL OUTPUT JACK (OPTICAL) 16 – 24 Bit, 44.1 kHz - 192 kHz digital data Input. MQA nor DSD files can be outputted.
13. USB 2 INPUT (TYPE-A) For playback of music files from USB hard disc drives (HDD) and USB flash/thumb drives up to 3 TB. NOT FOR CONNECTING TO A COMPUTER.
14. USB 3 INPUT (TYPE-A) For playback of music files from USB hard disc drives (HDD) and USB flash/thumb drives up to 3 TB. NOT FOR CONNECTING TO A COMPUTER.
15. ETHERNET RJ45 JACK Connect to a network router for network music streaming of networked computer(s) or NAS drive(s) via a wired Ethernet connection. Also used for network control via apps or control system.
16. POWER INPUT (AC IN) Connect to AC mains using the included power supply cord.
17. Wi-Fi ANTENNAS For connecting to a Wi-Fi router for network music streaming of networked computer(s) or NAS drive(s) via a wireless Wi-Fi connection. Also used for network control via apps or control system.
18. USB-B (FIRMWARE) For internal service use only. DO NOT CONNECT A COMPUTER TO THIS USB-B INPUT. Doing so may damage the unit.
19. DC TRIGGER OUTPUT Connect to device that has DC + 12V input for remote turn-on of external devices; such as an external amplifier.
20. BLUETOOTH ANTENNA 44.1 kHz Qualcomm aptX® wireless digital audio transmit and receive port.
21. IR INPUT Connection of external IR sensors to control AiOS if unit is out of line of sight.
16
REMOTE CONTROL OPERATION
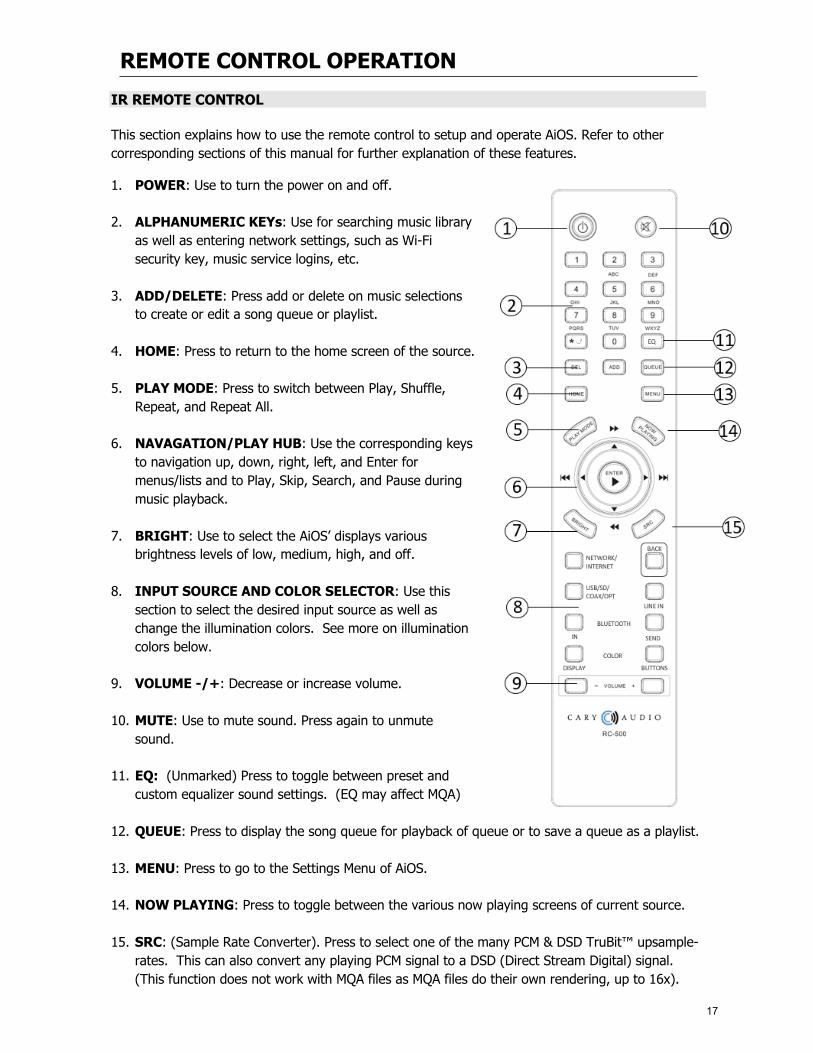
IR REMOTE CONTROL This section explains how to use the remote control to setup and operate AiOS. Refer to other corresponding sections of this manual for further explanation of these features.
1. POWER: Use to turn the power on and off.
2. ALPHANUMERIC KEYs: Use for searching music library as well as entering network settings, such as Wi-Fi security key, music service logins, etc.
3. ADD/DELETE: Press add or delete on music selections to create or edit a song queue or playlist.
4. HOME: Press to return to the home screen of the source.
5. PLAY MODE: Press to switch between Play, Shuffle, Repeat, and Repeat All.
6. NAVAGATION/PLAY HUB: Use the corresponding keys to navigation up, down, right, left, and Enter for menus/lists and to Play, Skip, Search, and Pause during music playback.
7. BRIGHT: Use to select the AiOS’ displays various brightness levels of low, medium, high, and off.
8. INPUT SOURCE AND COLOR SELECTOR: Use this section to select the desired input source as well as change the illumination colors. See more on illumination colors below.
9. VOLUME -/+: Decrease or increase volume.
10. MUTE: Use to mute sound. Press again to unmute sound.
11. EQ: (Unmarked) Press to toggle between preset and custom equalizer sound settings. (EQ may affect MQA)
12. QUEUE: Press to display the song queue for playback of queue or to save a queue as a playlist.
13. MENU: Press to go to the Settings Menu of AiOS.
14. NOW PLAYING: Press to toggle between the various now playing screens of current source.
15. SRC: (Sample Rate Converter). Press to select one of the many PCM & DSD TruBit™ upsample-rates. This can also convert any playing PCM signal to a DSD (Direct Stream Digital) signal. (This function does not work with MQA files as MQA files do their own rendering, up to 16x).
17
NAVIGATING AIOS
iOS AND ANDROID CONTROL APPS You can download free Control Apps for either iOS on iTunes Store or Android on Google Play Store. Each app is highly intuitive and easy to operate. Please refer to the apps for instructions.
AIOS NAVIGATION BASICS Using AiOS is very intuitive. This manual covers the operations of AiOS via the provided IR hand held remote control. (Free iOS and Android control apps are also available from the iTunes and Google Play stores).
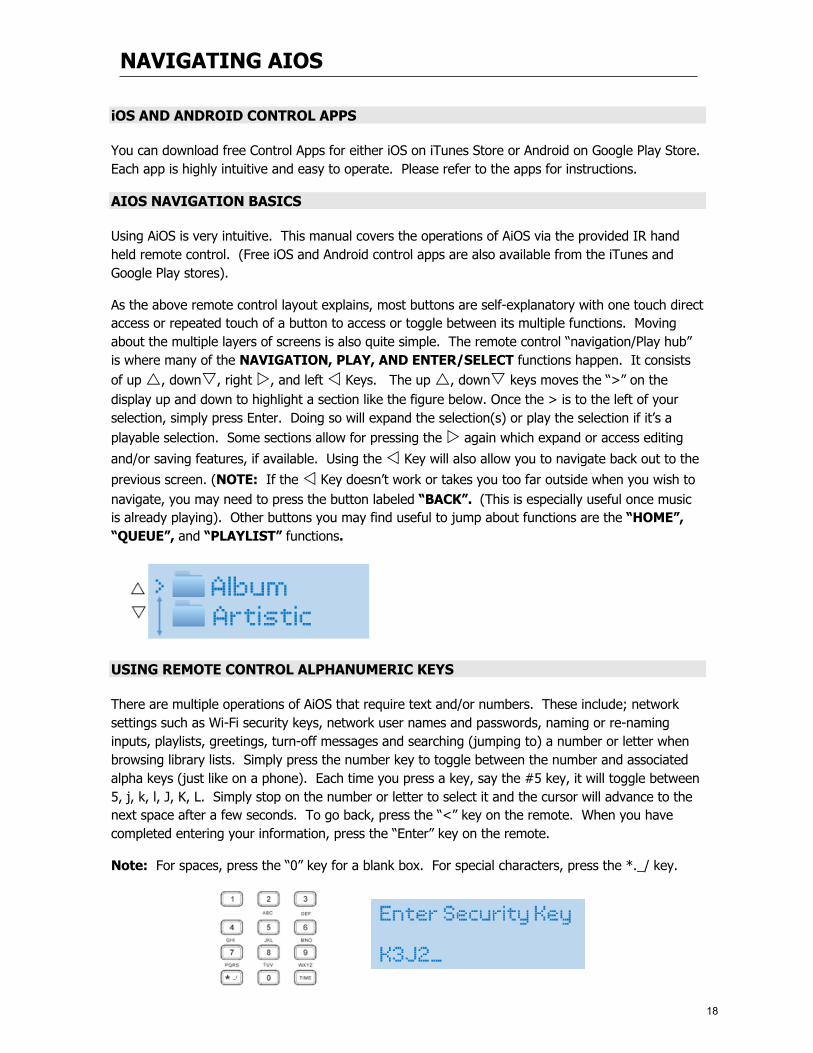
As the above remote control layout explains, most buttons are self-explanatory with one touch direct access or repeated touch of a button to access or toggle between its multiple functions. Moving about the multiple layers of screens is also quite simple. The remote control “navigation/Play hub” is where many of the NAVIGATION, PLAY, AND ENTER/SELECT functions happen. It consists of up r, downs, right w, and left v Keys. The up r, downs keys moves the “>” on the display up and down to highlight a section like the figure below. Once the > is to the left of your selection, simply press Enter. Doing so will expand the selection(s) or play the selection if it’s a playable selection. Some sections allow for pressing the w again which expand or access editing and/or saving features, if available. Using the v Key will also allow you to navigate back out to the previous screen. (NOTE: If the v Key doesn’t work or takes you too far outside when you wish to navigate, you may need to press the button labeled “BACK”. (This is especially useful once music is already playing). Other buttons you may find useful to jump about functions are the “HOME”, “QUEUE”, and “PLAYLIST” functions.
USING REMOTE CONTROL ALPHANUMERIC KEYS There are multiple operations of AiOS that require text and/or numbers. These include; network settings such as Wi-Fi security keys, network user names and passwords, naming or re-naming inputs, playlists, greetings, turn-off messages and searching (jumping to) a number or letter when browsing library lists. Simply press the number key to toggle between the number and associated alpha keys (just like on a phone). Each time you press a key, say the #5 key, it will toggle between 5, j, k, l, J, K, L. Simply stop on the number or letter to select it and the cursor will advance to the next space after a few seconds. To go back, press the “<” key on the remote. When you have completed entering your information, press the “Enter” key on the remote.
Note: For spaces, press the “0” key for a blank box. For special characters, press the *._/ key.
18
SETTING AIOS ADJUSTABLE COLORS
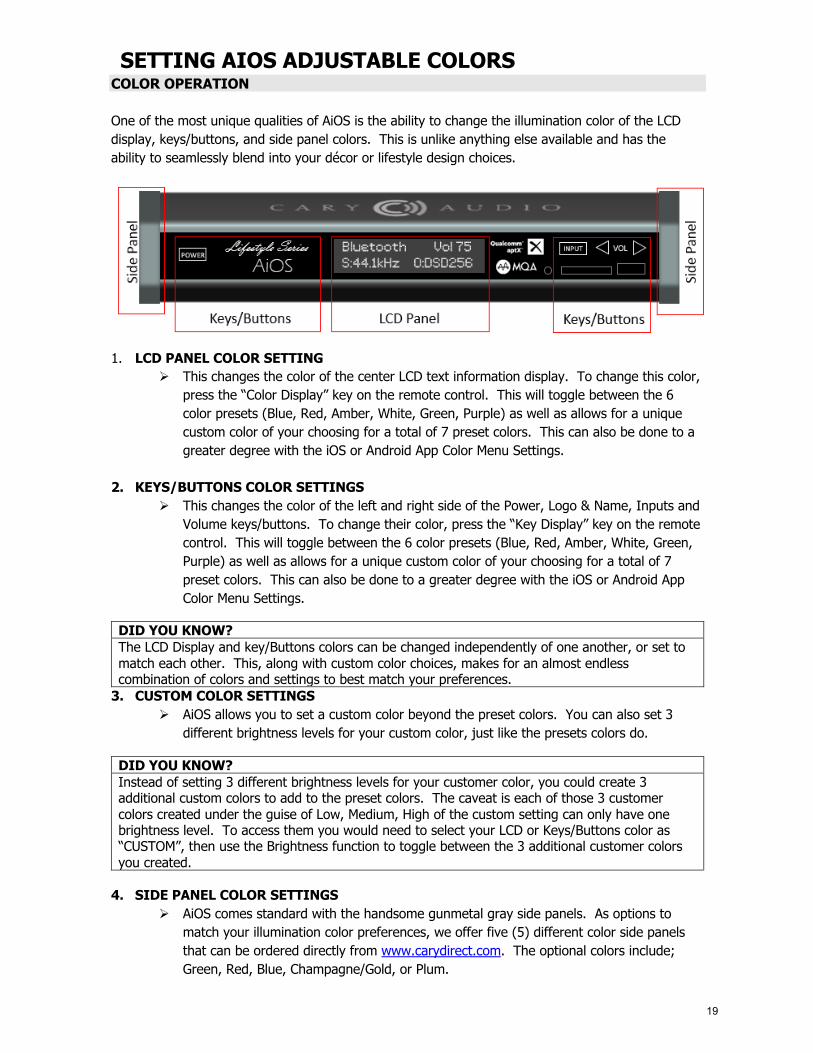
COLOR OPERATION One of the most unique qualities of AiOS is the ability to change the illumination color of the LCD display, keys/buttons, and side panel colors. This is unlike anything else available and has the ability to seamlessly blend into your décor or lifestyle design choices.
1. LCD PANEL COLOR SETTING Ø This changes the color of the center LCD text information display. To change this color,
press the “Color Display” key on the remote control. This will toggle between the 6 color presets (Blue, Red, Amber, White, Green, Purple) as well as allows for a unique custom color of your choosing for a total of 7 preset colors. This can also be done to a greater degree with the iOS or Android App Color Menu Settings.
2. KEYS/BUTTONS COLOR SETTINGS Ø This changes the color of the left and right side of the Power, Logo & Name, Inputs and
Volume keys/buttons. To change their color, press the “Key Display” key on the remote control. This will toggle between the 6 color presets (Blue, Red, Amber, White, Green, Purple) as well as allows for a unique custom color of your choosing for a total of 7 preset colors. This can also be done to a greater degree with the iOS or Android App Color Menu Settings.
DID YOU KNOW? The LCD Display and key/Buttons colors can be changed independently of one another, or set to match each other. This, along with custom color choices, makes for an almost endless combination of colors and settings to best match your preferences.
3. CUSTOM COLOR SETTINGS Ø AiOS allows you to set a custom color beyond the preset colors. You can also set 3
different brightness levels for your custom color, just like the presets colors do.
DID YOU KNOW? Instead of setting 3 different brightness levels for your customer color, you could create 3 additional custom colors to add to the preset colors. The caveat is each of those 3 customer colors created under the guise of Low, Medium, High of the custom setting can only have one brightness level. To access them you would need to select your LCD or Keys/Buttons color as “CUSTOM”, then use the Brightness function to toggle between the 3 additional customer colors you created.
4. SIDE PANEL COLOR SETTINGS Ø AiOS comes standard with the handsome gunmetal gray side panels. As options to
match your illumination color preferences, we offer five (5) different color side panels that can be ordered directly from www.carydirect.com. The optional colors include; Green, Red, Blue, Champagne/Gold, or Plum.
19
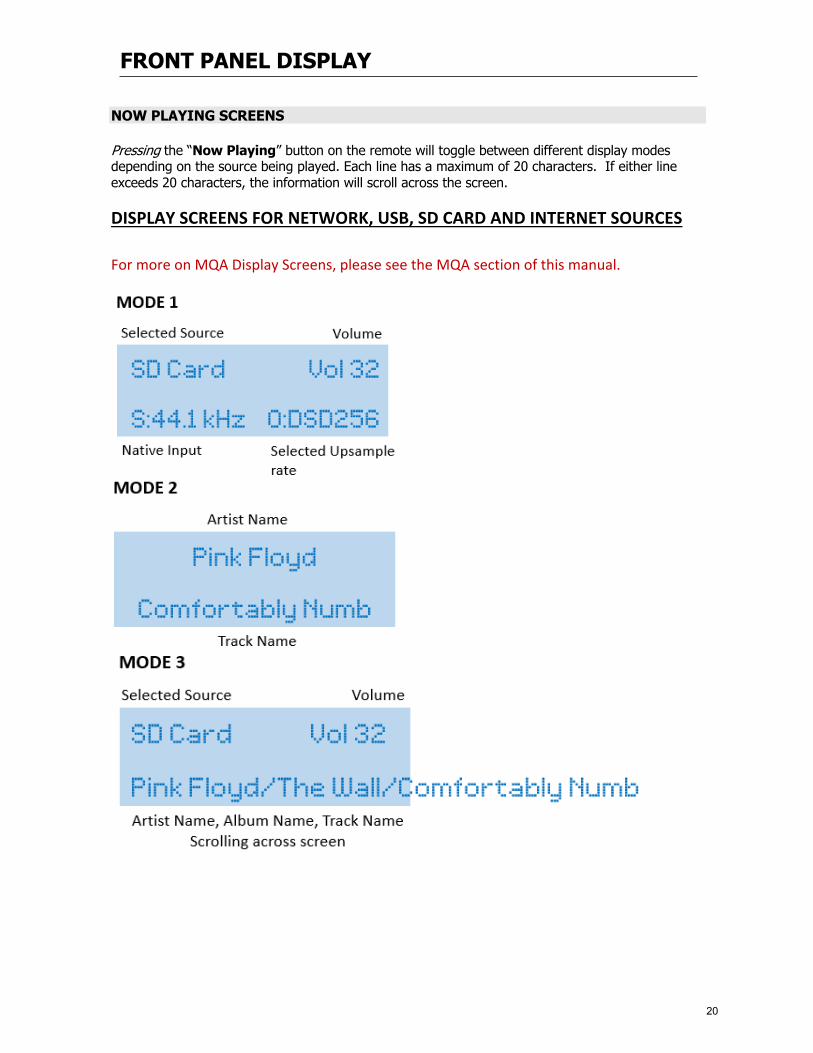
FRONT PANEL DISPLAY
NOW PLAYING SCREENS Pressing the “Now Playing” button on the remote will toggle between different display modes depending on the source being played. Each line has a maximum of 20 characters. If either line exceeds 20 characters, the information will scroll across the screen. DISPLAY SCREENS FOR NETWORK, USB, SD CARD AND INTERNET SOURCES For more on MQA Display Screens, please see the MQA section of this manual.
20
FRONT PANEL DISPLAY
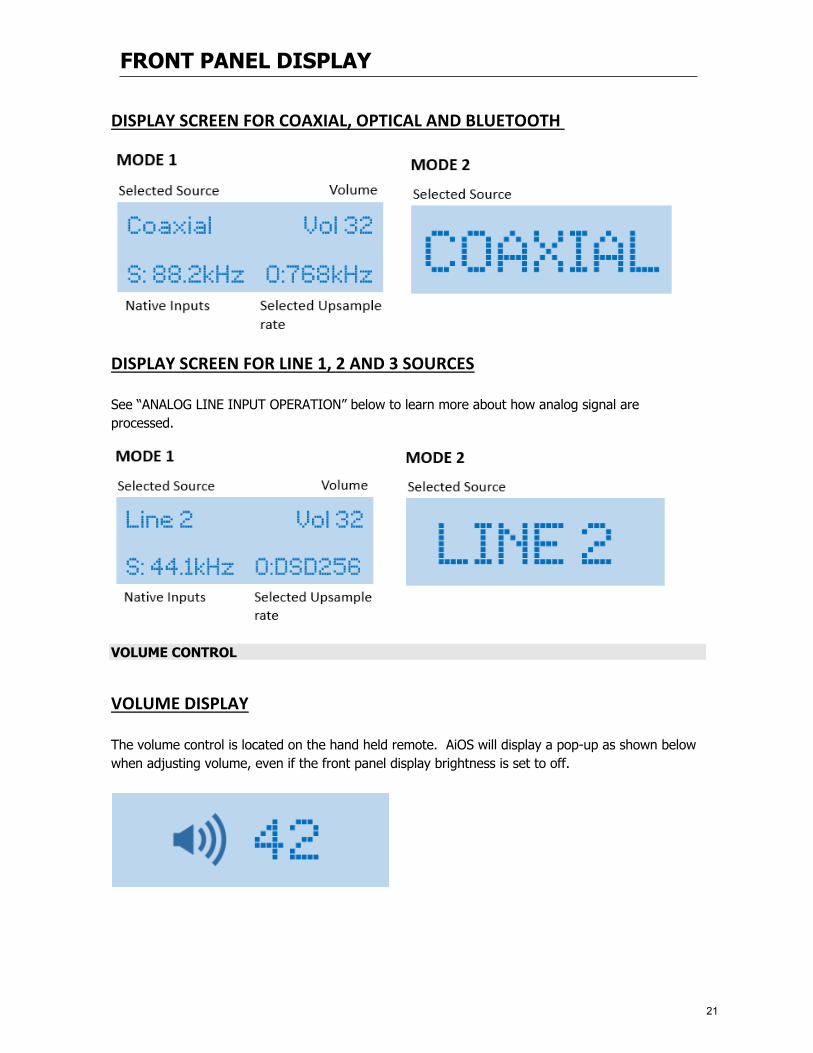
DISPLAY SCREEN FOR COAXIAL, OPTICAL AND BLUETOOTH
DISPLAY SCREEN FOR LINE 1, 2 AND 3 SOURCES See “ANALOG LINE INPUT OPERATION” below to learn more about how analog signal are processed.
VOLUME CONTROL
VOLUME DISPLAY The volume control is located on the hand held remote. AiOS will display a pop-up as shown below when adjusting volume, even if the front panel display brightness is set to off.
21
SETTINGS MENU
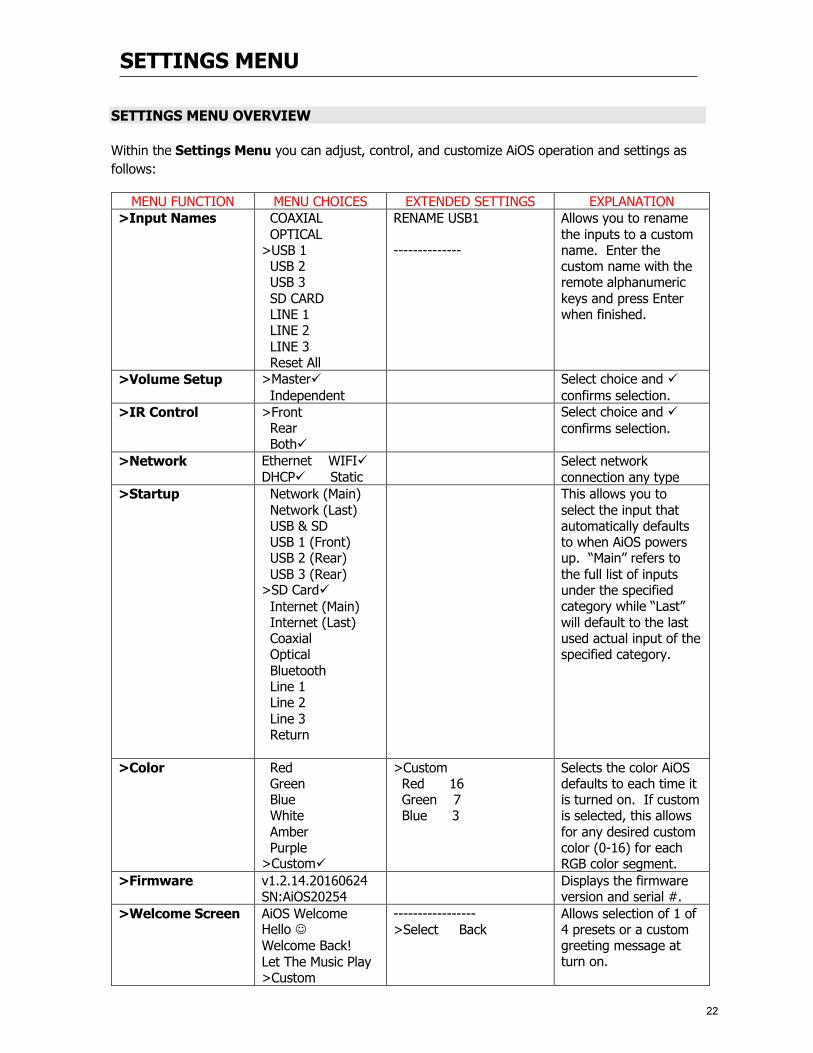
SETTINGS MENU OVERVIEW Within the Settings Menu you can adjust, control, and customize AiOS operation and settings as follows:
MENU FUNCTION MENU CHOICES EXTENDED SETTINGS EXPLANATION >Input Names COAXIAL
OPTICAL >USB 1 USB 2 USB 3 SD CARD LINE 1 LINE 2 LINE 3 Reset All
RENAME USB1 --------------
Allows you to rename the inputs to a custom name. Enter the custom name with the remote alphanumeric keys and press Enter when finished.
>Volume Setup >Masterü Independent
Select choice and ü confirms selection.
>IR Control >Front Rear Bothü
Select choice and ü confirms selection.
>Network Ethernet WIFIü DHCPü Static
Select network connection any type
>Startup Network (Main) Network (Last) USB & SD USB 1 (Front) USB 2 (Rear) USB 3 (Rear) >SD Cardü Internet (Main) Internet (Last) Coaxial Optical Bluetooth Line 1 Line 2 Line 3 Return
This allows you to select the input that automatically defaults to when AiOS powers up. “Main” refers to the full list of inputs under the specified category while “Last” will default to the last used actual input of the specified category.
>Color Red Green Blue White Amber Purple >Customü
>Custom Red 16 Green 7 Blue 3
Selects the color AiOS defaults to each time it is turned on. If custom is selected, this allows for any desired custom color (0-16) for each RGB color segment.
>Firmware v1.2.14.20160624 SN:AiOS20254
Displays the firmware version and serial #.
>Welcome Screen AiOS Welcome Hello J Welcome Back! Let The Music Play >Custom
----------------- >Select Back
Allows selection of 1 of 4 presets or a custom greeting message at turn on.
22

SETTINGS MENU
>Goodbye Screen Goodbye L Awe, You Leaving? So Long, For Now… I’ll BE BACK >Custom
----------------- >Select Back
Allows selection of 1 of 4 presets or a custom goodbye message at turn off.
>Status Connection: Ethernet IP Assign: DHCP IP Address: 186.145.4.8 Net Mask Address: 255.255.255.0 Gateway Address 186.145.4.3 MAC Address 3r:8e:4m:3d:G7:2e >Reset
Status displays all the network information based on the network connectivity of the AiOS’ connection.
>Bluetooth Send >BT: OFF / ON Turns Bluetooth SEND transmitter ON or OFF.
>EQ Settings >EQ: ON Pop Rock Jazz Classical Vocal Acoustic Hip Hop Late-night >Customü
EQ Custom Reset 25 Hz 0.0 40 Hz 0.0 63 Hz 0.0 >100 Hz 0.0 160 Hz 0.0 250 Hz 0.0 400 Hz 0.0 630 Hz 0.0 1 kHz 0.0 1.6 kHz 0.0 2.5 kHz 0.0 4.0 kHz 0.0 6.3 kHz 0.0 10 kHz 0.0 16 kHz 0.0 Return
Allows user to turn EQ ON or OFF. When ON, user can select any preset EQ setting or select Custom to design their own EQ curve. Each of the 15 bands can be adjusted +/- 12dB.
>Speaker OUT >ONü OFF
When Bluetooth SEND is turned ON, the speaker outputs will be turned off. If User desires both BT Send and Speaker ON, they can do so within this menu setting. EXTREME CAUTION is urged as speakers will be MUCH louder than Bluetooth headphone/speaker.
>Key Backlight Mode
>Auto-Sensingü Always ON
Auto-Sensing 10 sec 20 sec 30 sec 45 secü
The Key Backlight refers to all illuminated keys other than the center LCD display. These keys can be set
23

SETTINGS MENU
60 sec to Always ON or set to turn off after a preset amount of time in the Auto-Sensing mode. When the illumination is turned off, it will automatically turn on when your hand approaches the front panel. Hence “Auto-Sensing.”
>Reset Reset AiOS? >NO YES
This will Reset AiOS to factory default settings.
>Power Trigger Power Trigger >OFF ON
AiOS has a trigger output so it can turn on an external amplifier (as an example) when AiOS is turned on. This is only useful if AiOS is connected to other components that include Power Trigger inputs.
>Main In Main In Loop >OFF ON
If AiOS is connected to an external processor that must route the signal back through AiOS’ amplifier output, then Main-In Loop should be turned on.
>System Update Check for Updates? NO >YES
No Updates Available >OK
Firmware updates are automatically downloaded and installed when checked. This can add new features or improvements to AiOS functions and features.
>Exit Exit will back out of the menu settings
WARNING: Do not select Rear if you do not have a rear mounted IR sensor. Otherwise, you could be locked out of all IR command control. If this happens and you have previously connected an iOS or Android app to AiOS, you can use the app to change this setting. If not, you must reset AiOS.
24
FILE SHARING CONFIGURATION
CONFIGURING COMPUTER(S) FOR SHARING FILES AiOS is an extremely versatile network audio component and can access/stream music in multiple ways. With AiOS, you can use the dedicated IR remote control or the custom AiOS app for either iOS or Android. However, this manual primarily discusses IR remote operation.
AiOS can also can play music from portable devices in a variety of ways, these include Qualcomm aptX® Bluetooth, Airplay, and Phoneshare. These sections below will discuss each of these options.
Prior to making a network connection to AiOS (as described below), it’s easy to share all your music stored across all your network connected computers with AiOS. However, you must make sure your network computers are setup for file sharing, and permission settings are set for everyone. This manual goes over some basics of computer settings, but it is the responsibility of the user to know how to setup computer networks and file sharing permissions. Cary Audio does not offer personal IT support beyond what is covered in this manual.
Provided file sharing is set up correctly, there are two methods for AiOS to find and playback music stored across your network computers.
1. PC Share, otherwise known as Service Message Block (SMB) which is a standard built-in protocol for PC’s and MAC’s. This is automatic once you setup file sharing. Any computer AiOS finds with file sharing turned on will be displayed with a “hand sharing a folder” icon in front of the computer name.
2. Servers using DLNA or UPnP protocols to share files is the second method but is a bit more advanced. It requires installed software on your computer called a “Server”. The server “serves” music to AiOS and typically has more advanced user settings. However, the payoff for using a server can be advantageous as it can allow for all sorts of custom settings. Any computer AiOS finds using a Server will have a “Computer” icon in front of the computer name.
Note: iTunes is not a server. Windows Media Player does include a sort of server (Windows Media Server). Using the Windows Media severely limits support for various file types and resolutions. It is not recommended but will show up as an available server. We suggest using dedicated media server software, such as JRiver, Foobar2000, Media Monkey, etc., for the advanced user, and PC Share/PC SHARE/SMB for the less advanced user. PC SHARE/SMB uses Service Message Block (PC SHARE/SMB) protocol to communicate with a PC or MAC. This requires very little setup and no third party software. Even though PC SHARE/SMB is suggested for the less advanced user it is sometimes preferred due to easy setup and support for any file type or resolution. DLNA/UPnP vs. PC Share/SMB each have their advantages. It’s best to experiment with both to determine your preference. See more on these differences below.
25

SETTING UP WIRED ETHERNET CONNECTION
HERE ARE SOME HELPFUL PLACES TO START IF YOU ARE NEW TO NETWORK AUDIO STREAMING.
WINDOWS
Getting Started with Media Streaming http://windows.microsoft.com/en-us/windows7/getting-started-with-media-streaming
File Sharing Essentials http://windows.microsoft.com/en-us/windows/file-sharing-essentials#1TC=windows-7
Enable File and Printer Sharing http://windows.microsoft.com/en-us/windows-vista/enable-file-and-printer-sharing
APPLE
How to Connect with File Sharing on your MAC https://support.apple.com/en-us/HT204445
SETUP WIRED ETHERNET CONNECTION The first step to enjoying AiOS’ impressive features is connecting AiOS to your home network. This step assumes you have an active home network and router installed in your home.
1. For Ethernet (wired) connection, place AiOS within a cable run to your router or to an Ethernet port which is wired back to the router.
2. Connect an Ethernet cable to the back of AiOS and plug the other end into your router, or Ethernet Port. AiOS should automatically connect to the network. If not follow these steps.
a. Press the MENU button on the IR remote. b. Scroll down to “Network” and press Enter.
c. The following screen will display. Press the right w, and left v Keys to select Ethernet and press Enter. Once selected a ü will appear next to the selection. Press the right w, and left v Keys once again to select DHCP (recommended) or Static, and press Enter.
NOTE: Static IP addressing is typically only for advanced users to manually enter a user specific IP address that is constant, hence the term static, meaning it does not change.
d. Follow the preceding on-screen instructions to connect to your network. When complete, the display should say “Connected”.
26
SETTING UP WIRELESS WI-FI CONNECTION
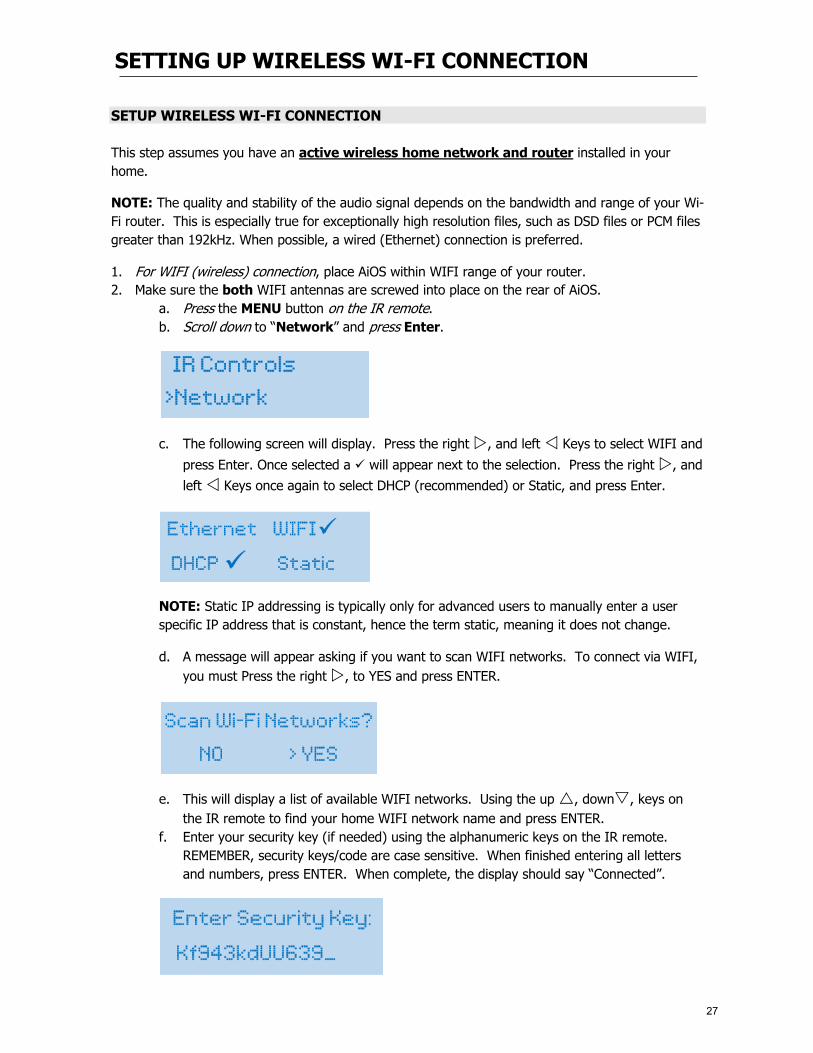
SETUP WIRELESS WI-FI CONNECTION This step assumes you have an active wireless home network and router installed in your home.
NOTE: The quality and stability of the audio signal depends on the bandwidth and range of your Wi-Fi router. This is especially true for exceptionally high resolution files, such as DSD files or PCM files greater than 192kHz. When possible, a wired (Ethernet) connection is preferred.
1. For WIFI (wireless) connection, place AiOS within WIFI range of your router. 2. Make sure the both WIFI antennas are screwed into place on the rear of AiOS.
a. Press the MENU button on the IR remote. b. Scroll down to “Network” and press Enter.
c. The following screen will display. Press the right w, and left v Keys to select WIFI and press Enter. Once selected a ü will appear next to the selection. Press the right w, and left v Keys once again to select DHCP (recommended) or Static, and press Enter.
NOTE: Static IP addressing is typically only for advanced users to manually enter a user specific IP address that is constant, hence the term static, meaning it does not change.
d. A message will appear asking if you want to scan WIFI networks. To connect via WIFI, you must Press the right w, to YES and press ENTER.
e. This will display a list of available WIFI networks. Using the up r, downs, keys on the IR remote to find your home WIFI network name and press ENTER.
f. Enter your security key (if needed) using the alphanumeric keys on the IR remote. REMEMBER, security keys/code are case sensitive. When finished entering all letters and numbers, press ENTER. When complete, the display should say “Connected”.
27
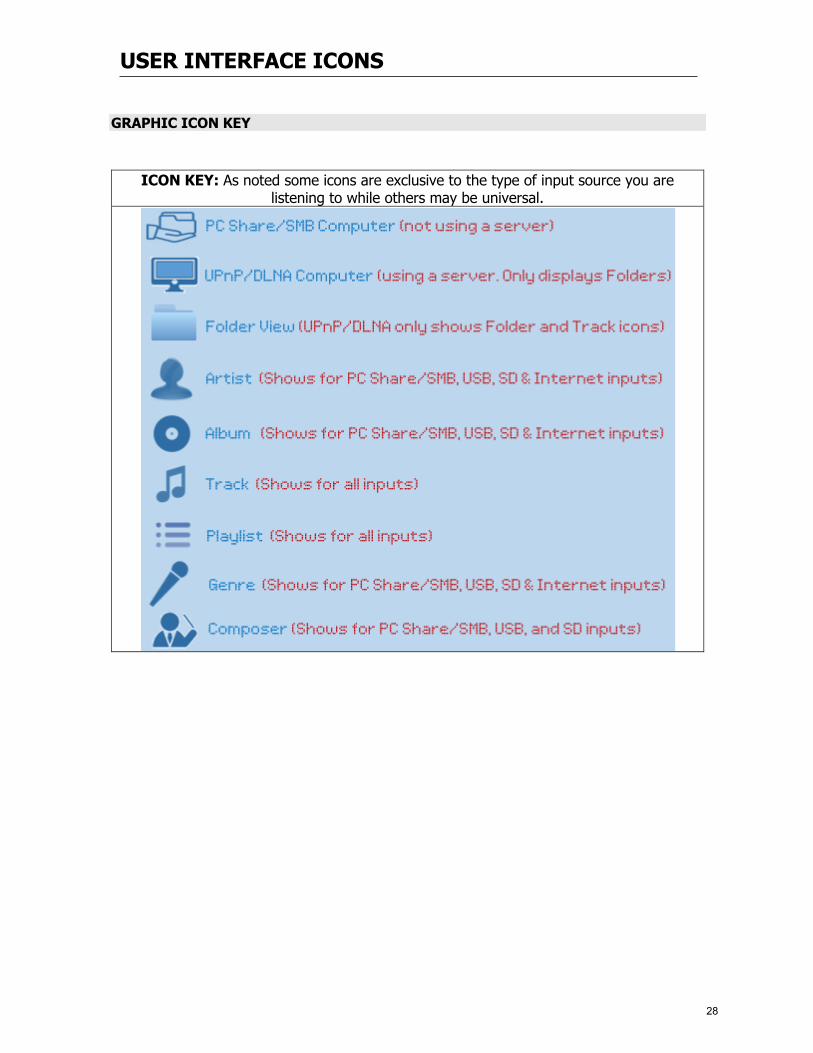
USER INTERFACE ICONS
GRAPHIC ICON KEY
ICON KEY: As noted some icons are exclusive to the type of input source you are listening to while others may be universal.
28
NETWORK AUDIO OPERATIONS
NETWORK AUDIO PLAYBACK (STREAMING) Network streaming allows the playback of digital music files stored on computers or NAS Drives connected to your network. The advantage of network streaming is you don’t have to have the computer(s) or NAS Drive(s) located anywhere near AiOS. However, the computer(s) or NAS Drives must remain powered on for AiOS or any network audio player to access them.
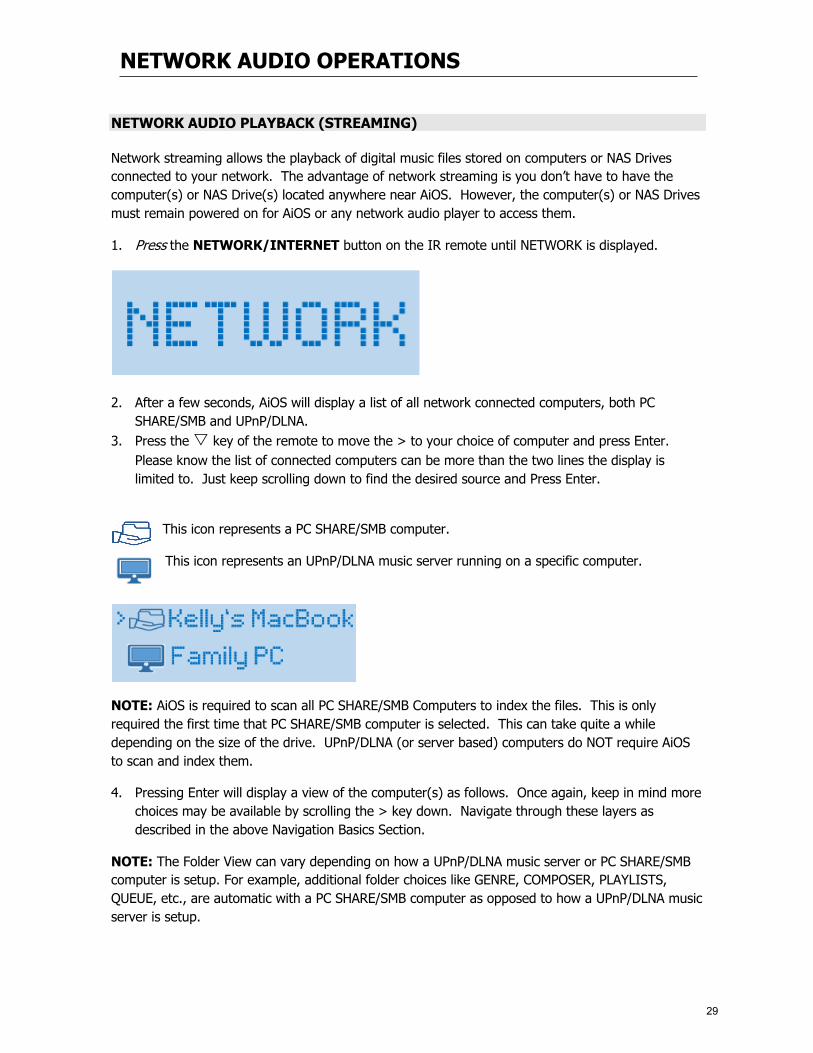
1. Press the NETWORK/INTERNET button on the IR remote until NETWORK is displayed.
2. After a few seconds, AiOS will display a list of all network connected computers, both PC SHARE/SMB and UPnP/DLNA.
3. Press the s key of the remote to move the > to your choice of computer and press Enter. Please know the list of connected computers can be more than the two lines the display is limited to. Just keep scrolling down to find the desired source and Press Enter.
This icon represents a PC SHARE/SMB computer.
This icon represents an UPnP/DLNA music server running on a specific computer.
NOTE: AiOS is required to scan all PC SHARE/SMB Computers to index the files. This is only required the first time that PC SHARE/SMB computer is selected. This can take quite a while depending on the size of the drive. UPnP/DLNA (or server based) computers do NOT require AiOS to scan and index them.
4. Pressing Enter will display a view of the computer(s) as follows. Once again, keep in mind more choices may be available by scrolling the > key down. Navigate through these layers as described in the above Navigation Basics Section.
NOTE: The Folder View can vary depending on how a UPnP/DLNA music server or PC SHARE/SMB computer is setup. For example, additional folder choices like GENRE, COMPOSER, PLAYLISTS, QUEUE, etc., are automatic with a PC SHARE/SMB computer as opposed to how a UPnP/DLNA music server is setup.
29
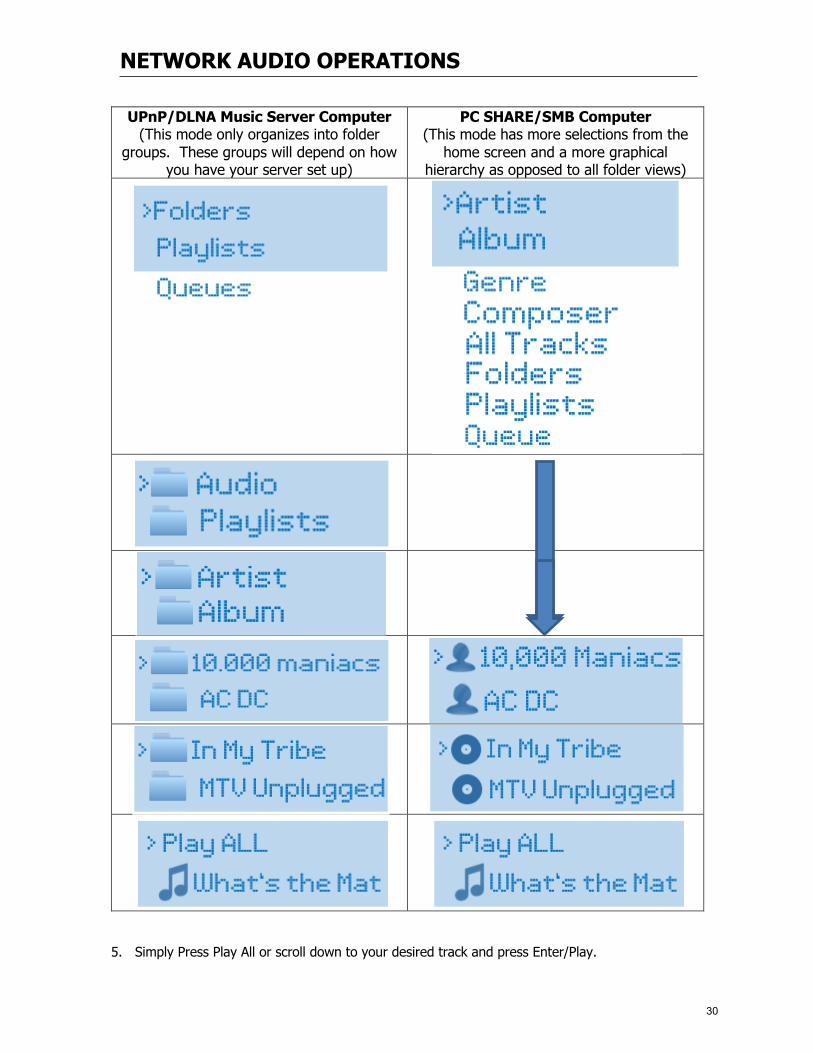
NETWORK AUDIO OPERATIONS
UPnP/DLNA Music Server Computer (This mode only organizes into folder
groups. These groups will depend on how you have your server set up)
PC SHARE/SMB Computer (This mode has more selections from the
home screen and a more graphical hierarchy as opposed to all folder views)
5. Simply Press Play All or scroll down to your desired track and press Enter/Play.
30
INTERNET MUSIC SERVICE OPERATION
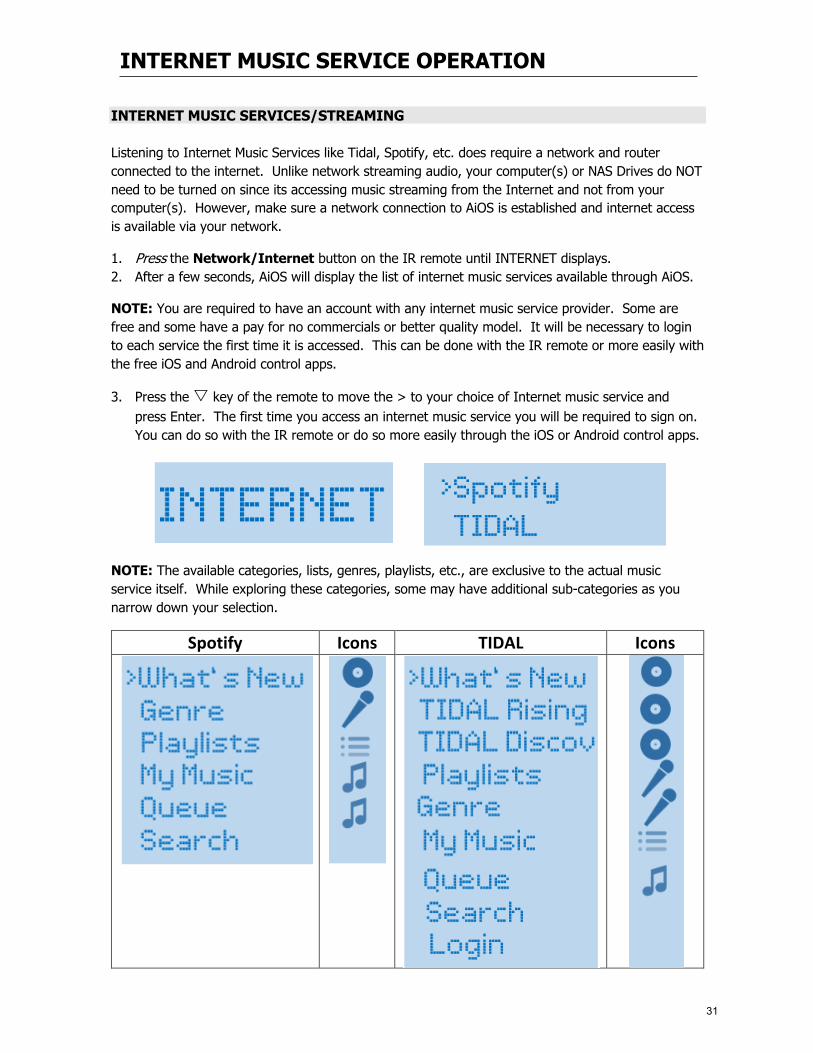
INTERNET MUSIC SERVICES/STREAMING Listening to Internet Music Services like Tidal, Spotify, etc. does require a network and router connected to the internet. Unlike network streaming audio, your computer(s) or NAS Drives do NOT need to be turned on since its accessing music streaming from the Internet and not from your computer(s). However, make sure a network connection to AiOS is established and internet access is available via your network.
1. Press the Network/Internet button on the IR remote until INTERNET displays. 2. After a few seconds, AiOS will display the list of internet music services available through AiOS.
NOTE: You are required to have an account with any internet music service provider. Some are free and some have a pay for no commercials or better quality model. It will be necessary to login to each service the first time it is accessed. This can be done with the IR remote or more easily with the free iOS and Android control apps.
3. Press the s key of the remote to move the > to your choice of Internet music service and press Enter. The first time you access an internet music service you will be required to sign on. You can do so with the IR remote or do so more easily through the iOS or Android control apps.
NOTE: The available categories, lists, genres, playlists, etc., are exclusive to the actual music service itself. While exploring these categories, some may have additional sub-categories as you narrow down your selection.
Spotify Icons TIDAL Icons
31
USB FLASH/HDD AND SD CARD OPERATION
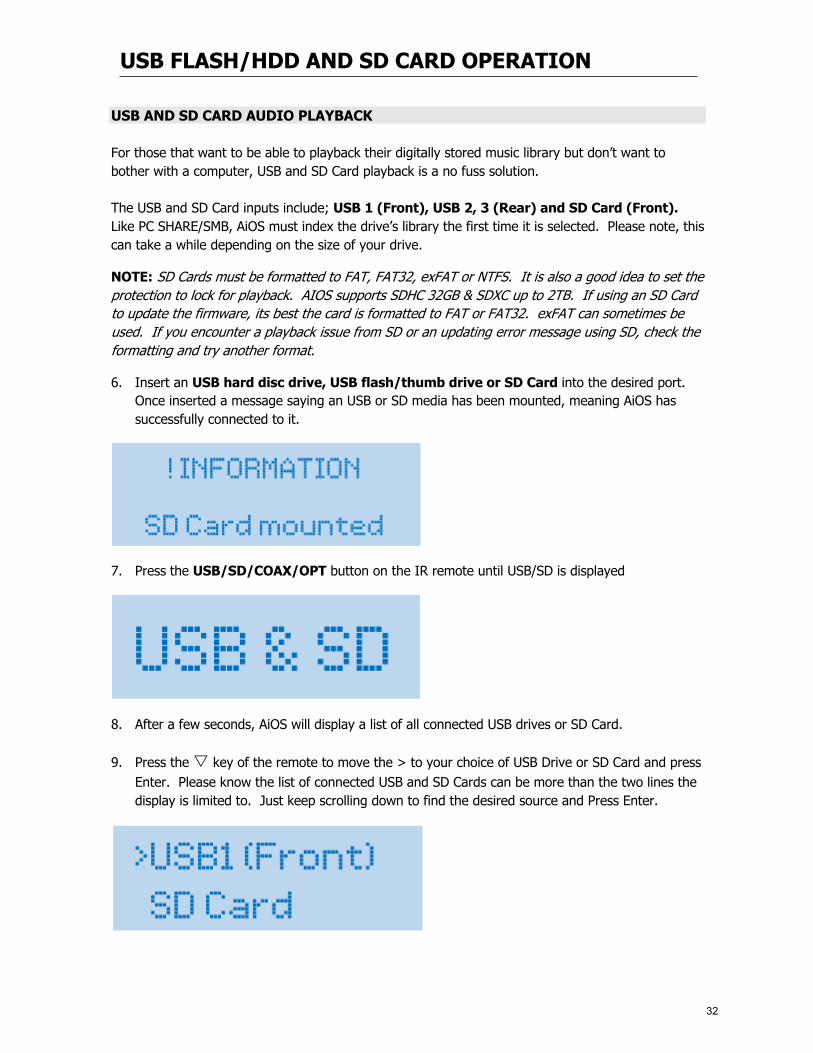
USB AND SD CARD AUDIO PLAYBACK For those that want to be able to playback their digitally stored music library but don’t want to bother with a computer, USB and SD Card playback is a no fuss solution. The USB and SD Card inputs include; USB 1 (Front), USB 2, 3 (Rear) and SD Card (Front). Like PC SHARE/SMB, AiOS must index the drive’s library the first time it is selected. Please note, this can take a while depending on the size of your drive.
NOTE: SD Cards must be formatted to FAT, FAT32, exFAT or NTFS. It is also a good idea to set the protection to lock for playback. AIOS supports SDHC 32GB & SDXC up to 2TB. If using an SD Card to update the firmware, its best the card is formatted to FAT or FAT32. exFAT can sometimes be used. If you encounter a playback issue from SD or an updating error message using SD, check the formatting and try another format.
6. Insert an USB hard disc drive, USB flash/thumb drive or SD Card into the desired port. Once inserted a message saying an USB or SD media has been mounted, meaning AiOS has successfully connected to it.
7. Press the USB/SD/COAX/OPT button on the IR remote until USB/SD is displayed
8. After a few seconds, AiOS will display a list of all connected USB drives or SD Card.
9. Press the s key of the remote to move the > to your choice of USB Drive or SD Card and press Enter. Please know the list of connected USB and SD Cards can be more than the two lines the display is limited to. Just keep scrolling down to find the desired source and Press Enter.
32

USB FLASH/HDD AND SD CARD OPERATION
10. Once a USB or SD Card is selected, note the name of the actual drive will appear in front of the category list.
USB & SD Cards (Like network PC SHARE/SMB, this mode
has more selections from the home screen and a more graphical hierarchy as opposed
to all folder views)
11. Simply Press Play All or scroll down to your desired track and press Enter/Play.
33
OPERATING AIOS FROM A COMPUTER
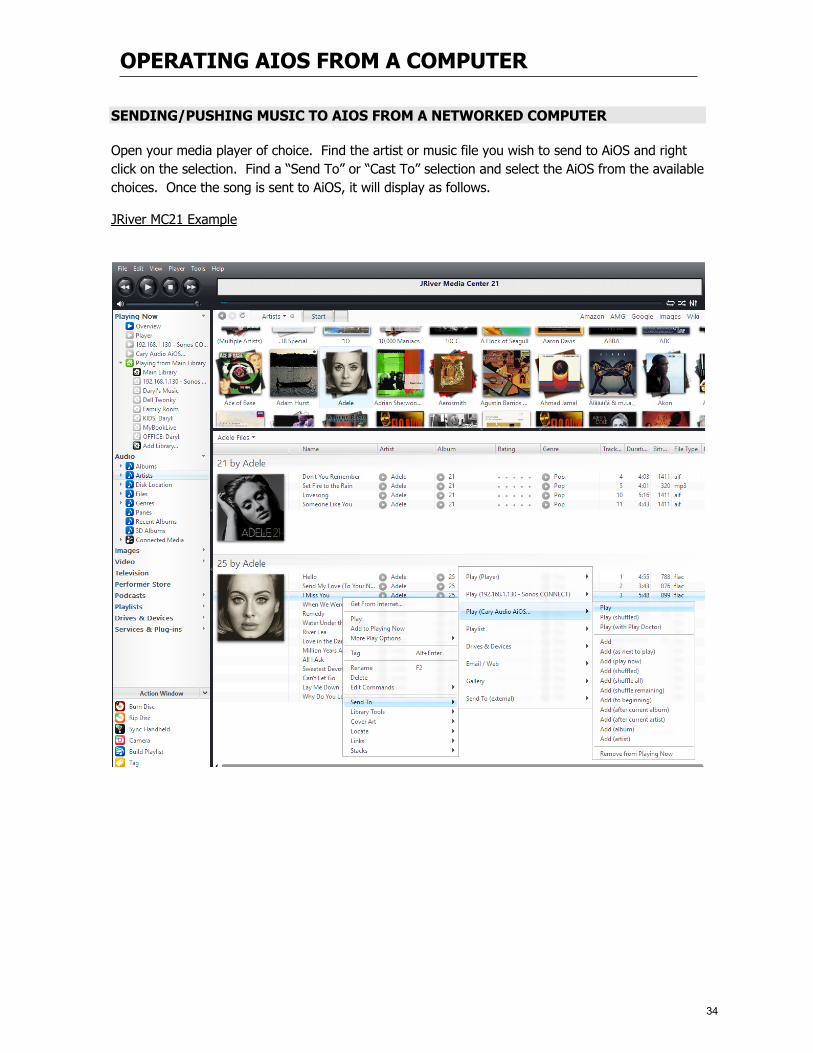
SENDING/PUSHING MUSIC TO AIOS FROM A NETWORKED COMPUTER Open your media player of choice. Find the artist or music file you wish to send to AiOS and right click on the selection. Find a “Send To” or “Cast To” selection and select the AiOS from the available choices. Once the song is sent to AiOS, it will display as follows.
JRiver MC21 Example
34
OPERATING AIOS FROM A COMPUTER
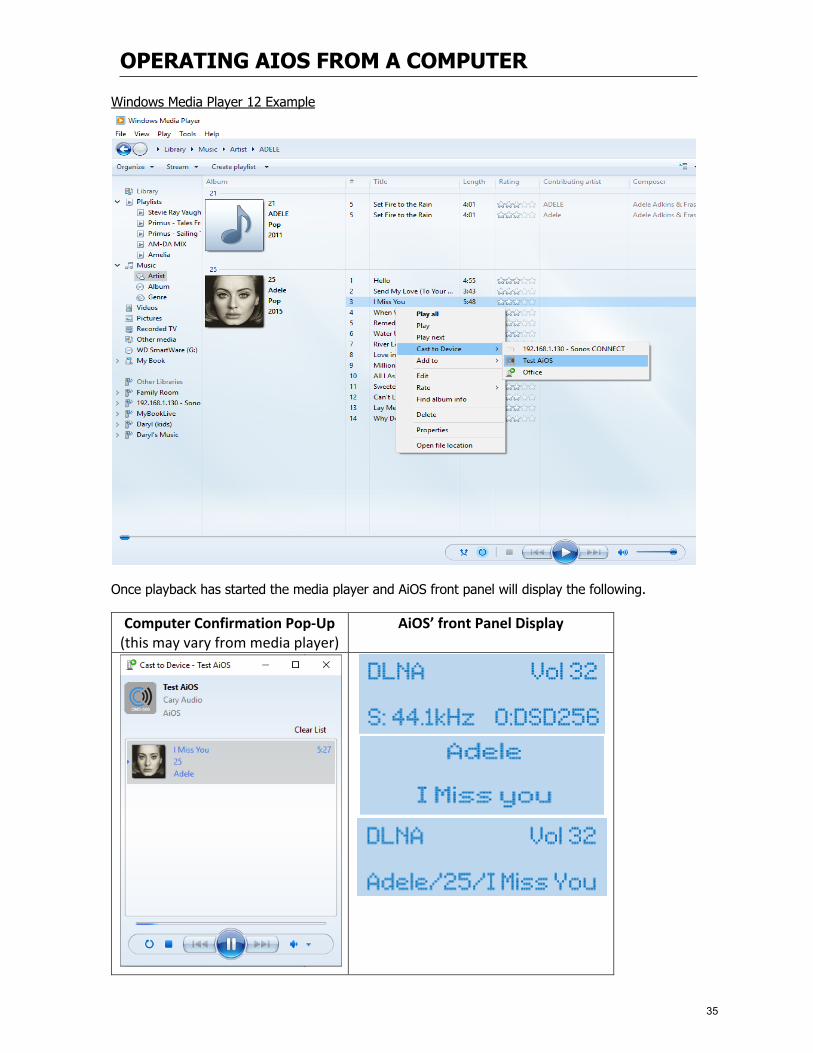
Windows Media Player 12 Example
Once playback has started the media player and AiOS front panel will display the following.
Computer Confirmation Pop-Up (this may vary from media player)
AiOS’ front Panel Display
35
CREATING AND EDITING PLAYBACK LISTS (QUEUES)
QUEUE FUNCTION A Queue is a temporary list of music. This includes all music that is played during a given session, or manually added to the queue while listening to a Network, USB, or SD Card source. All music temporarily stored in a queue is specific to that source. All music played during a session is stored in the Queue with the most current selection being added to the bottom of the list. All music stored in the queue will be cleared at turn off. To save the Queue, please see Playlists below.
To ADD music to a Queue
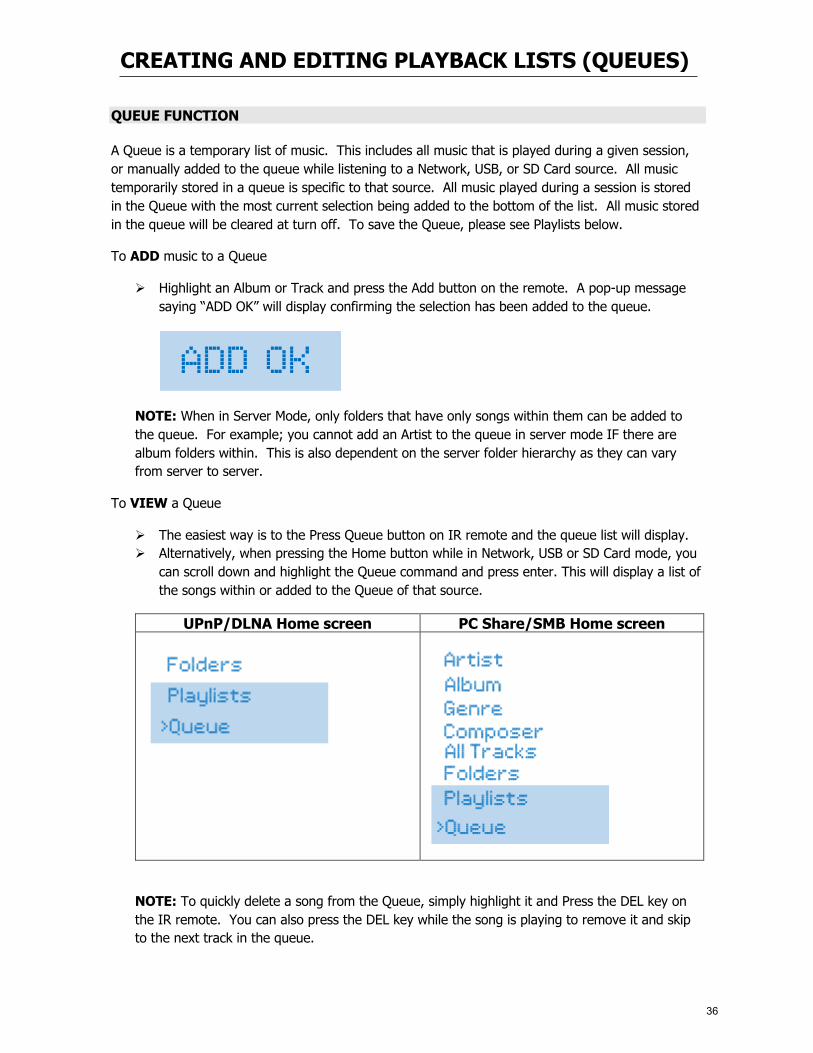
Ø Highlight an Album or Track and press the Add button on the remote. A pop-up message saying “ADD OK” will display confirming the selection has been added to the queue.
NOTE: When in Server Mode, only folders that have only songs within them can be added to the queue. For example; you cannot add an Artist to the queue in server mode IF there are album folders within. This is also dependent on the server folder hierarchy as they can vary from server to server.
To VIEW a Queue
Ø The easiest way is to the Press Queue button on IR remote and the queue list will display. Ø Alternatively, when pressing the Home button while in Network, USB or SD Card mode, you
can scroll down and highlight the Queue command and press enter. This will display a list of the songs within or added to the Queue of that source.
UPnP/DLNA Home screen PC Share/SMB Home screen
NOTE: To quickly delete a song from the Queue, simply highlight it and Press the DEL key on the IR remote. You can also press the DEL key while the song is playing to remove it and skip to the next track in the queue.
36
CREATING AND EDITING PLAYBACK LISTS (QUEUES)
To PLAY or EDIT the Queue
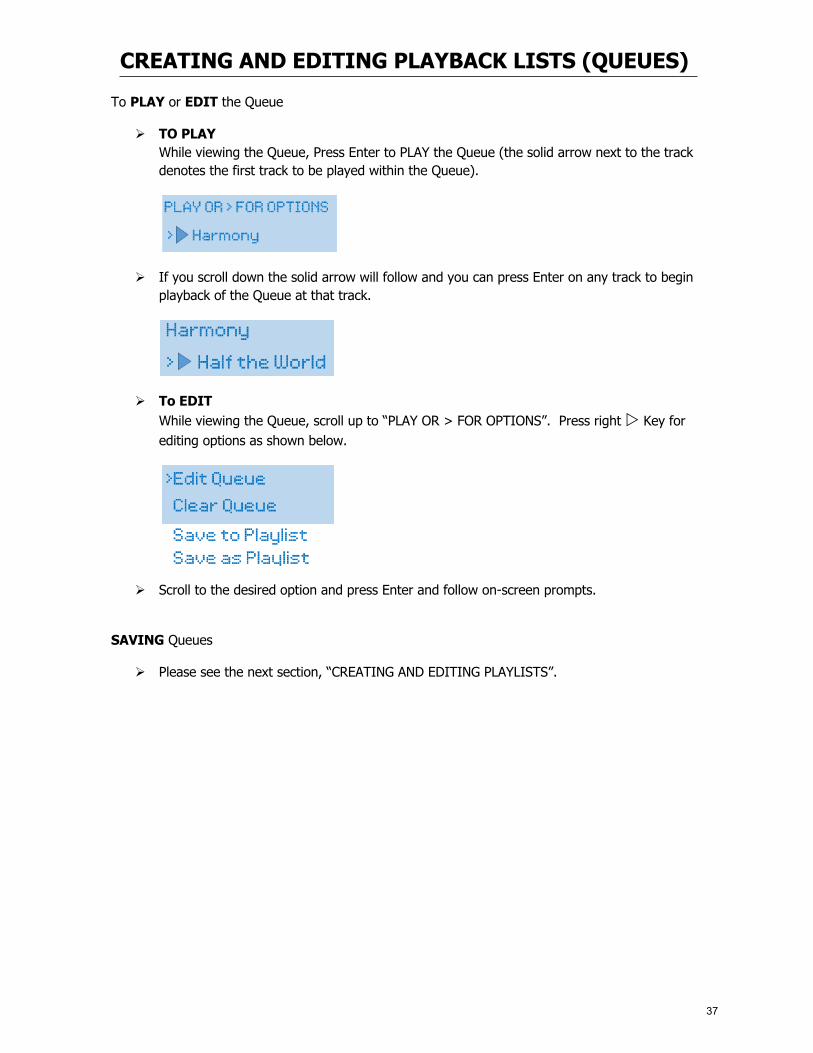
Ø TO PLAY While viewing the Queue, Press Enter to PLAY the Queue (the solid arrow next to the track denotes the first track to be played within the Queue).
Ø If you scroll down the solid arrow will follow and you can press Enter on any track to begin playback of the Queue at that track.
Ø To EDIT While viewing the Queue, scroll up to “PLAY OR > FOR OPTIONS”. Press right w Key for editing options as shown below.
Ø Scroll to the desired option and press Enter and follow on-screen prompts.
SAVING Queues
Ø Please see the next section, “CREATING AND EDITING PLAYLISTS”.
37
CREATING AND EDITING PLAYLISTS
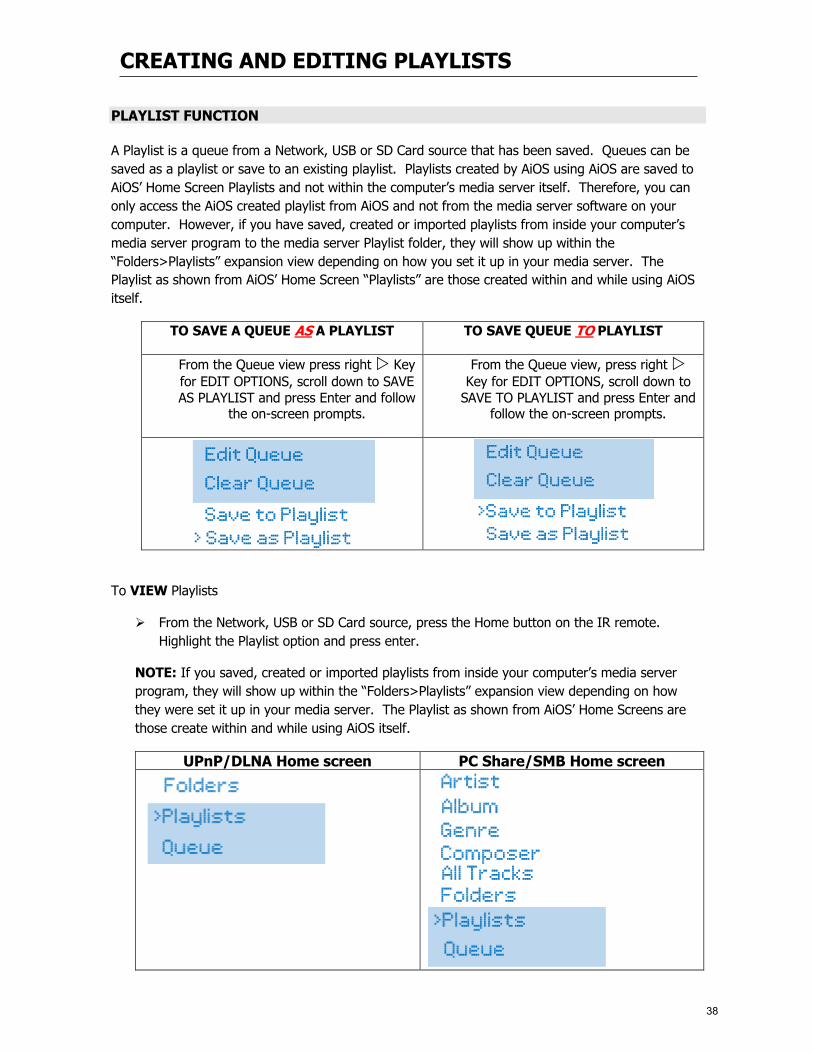
PLAYLIST FUNCTION A Playlist is a queue from a Network, USB or SD Card source that has been saved. Queues can be saved as a playlist or save to an existing playlist. Playlists created by AiOS using AiOS are saved to AiOS’ Home Screen Playlists and not within the computer’s media server itself. Therefore, you can only access the AiOS created playlist from AiOS and not from the media server software on your computer. However, if you have saved, created or imported playlists from inside your computer’s media server program to the media server Playlist folder, they will show up within the “Folders>Playlists” expansion view depending on how you set it up in your media server. The Playlist as shown from AiOS’ Home Screen “Playlists” are those created within and while using AiOS itself.
TO SAVE A QUEUE AS A PLAYLIST TO SAVE QUEUE TO PLAYLIST
From the Queue view press right w Key for EDIT OPTIONS, scroll down to SAVE AS PLAYLIST and press Enter and follow
the on-screen prompts.
From the Queue view, press right w Key for EDIT OPTIONS, scroll down to
SAVE TO PLAYLIST and press Enter and follow the on-screen prompts.
To VIEW Playlists
Ø From the Network, USB or SD Card source, press the Home button on the IR remote. Highlight the Playlist option and press enter.
NOTE: If you saved, created or imported playlists from inside your computer’s media server program, they will show up within the “Folders>Playlists” expansion view depending on how they were set it up in your media server. The Playlist as shown from AiOS’ Home Screens are those create within and while using AiOS itself.
UPnP/DLNA Home screen PC Share/SMB Home screen
38

CREATING AND EDITING PLAYLISTS
Ø This will display a list of any saved/created Playlists. All Playlists will have the “Playlist Icon” in front of it.
To PLAY a Playlist
Ø While viewing Playlists, simply highlight the desired Playlist and press Enter.
To EDIT, DELETE, or RENAME a Playlist
Ø While viewing Playlists, press right w Key for EDIT OPTIONS.
Ø Select the desired option and press Enter and follow the on-screen prompts.
39
DIGITAL AND ANALOG INPUT OPERATION
LISTENING TO COAXIAL AND OPTICAL DIGITAL INPUTS COAXIAL and OPTICAL Digital inputs are designed to be connected to the digital outputs of older or legacy digital products such as CD players, Satellite/cable TV converter boxes, DVD players, Game consoles, etc., or any device that has a Coaxial or Optical digital output. The Coaxial and Optical digital inputs can only accept PCM signal up to 24 Bit 192 kHz. Trying to pass a non PCM signal or anything thing greater than 24 Bit 192 kHz may cause noise or damage to the units.
1. Select the desired input by repeatedly pressing USB/SD/COAX/OPT button on the IR remote and simply stop on COAXIAL or OPTICAL input as desired.
2. Initiate playback of the corresponding digital source. Refer to the Now Playing Screen section of
this manual to learn about how and what information is displayed on AiOS’ front panel.
DID YOU KNOW? Using Cary Audio’s proprietary TruBit™ PCM and DSD Upsampling and conversion technology allows you to get the most out of the digital input signals during playback for a superior listening experience. With TruBit™, you can upsample to 1 or 7 different sample rates or 1 of 3 different PCM to DSD conversion rates. See more on this in the in the PCM to DSD upsampling/conversion section of the manual.
LISTENING TO ANALOG LINE LEVEL INPUT The LINE INPUTS are traditional analog inputs you can connect using standard RCA or 3.5mm mini jack connections.
NOTE: You cannot connect a phono input [record player/turntable] unless it has a built in phono-preamp or using a separate phono-preamp.
1. Select the desired input by pressing the LINE IN button on the IR remote. Repeatedly pressing this button will cycle through Line inputs 1, 2, and 3. Simply stop on the input you desire to listen to.
a. LINE 1 – Standard pair of stereo RCA connections. b. LINE 2 – Standard pair of stereo RCA connections. c. LINE 3 - 3.5mm stereo mini jack. (phone, tablets or other devices that use a 3.5mm
mini jack output)
2. Initiate playback of the corresponding analog (Line level) source. Refer to the Now Playing Screen section of this manual to learn about how and what information is displayed on AiOS’ front panel.
DID YOU KNOW? AiOS actually converts your analog line level inputs into a digital signal so Cary Audio can utilize its proprietary TruBit™ PCM and DSD Upsampling and conversion technology allowing you to get the most out of the analog input signals during playback for a superior listening experience. This converts the signal to digital then allows you to upsample it to 1 or 7 different sample rates or 1 of 3 different PCM to DSD conversion rates before converting back to analog for listening. See more on this in the in the PCM to DSD upsampling/conversion section of the manual. This is also necessary (and advantageous) so you can listen to your analog line level source through our Bluetooth SEND feature (See below).
40
USING PRE-OUT, MAIN-IN AND SUB-OUT FUNCTIONS
PRE-OUTPUT FUNCTIONS The PRE-OUT jacks have multiple functions.
1. Using AiOS as a SOURCE only: If wanting to use AiOS strictly as a source, bypassing its amplifier, follow these steps after disconnecting your speakers and connect AiOS pre-outs to your preamplifier, integrated amplifier or receiver.
a. In AiOS’ menu, set Speaker Out to OFF. This will turn off the main amplifier. b. Set the volume to 87 for full 3.0v output or 74 for a 2.0v output.
2. Adding more power, speakers, or distributed audio: If requiring more power than AiOS provides, you can use the pre-out to connect to the inputs of a separate power amplifier to drive your speakers or an additional set of speakers, a set of active/powered speakers, or even use to input into a distributed audio system.
3. Using an external “loop” processor: If using an analog based equalizer, room enhancer, etc. connect the pre-out of AiOS to the inputs of the processor. IMPORTANT: the outputs of the processor must be connected to the Main-in jack of the AiOS to create the “loop” and the MAIN-IN function of AiOS MUST be turned on. See more on this below in the MAIN-IN section
NOTE: The PRE-OUT jack are always active and cannot be turned off. If the pre-outs are connected to additional amplifier(s) while listening to AiOS but you do not wish to listen to those additional speakers/zones, you must manually turn off the external amplifier(s). Also refer to Bluetooth SEND function below.
MAIN-IN FUNCTION The MAIN-IN function works only in conjunction with the PRE-OUTPUT of AiOS. This creates a signal loop. For example: Maybe you have a room enhancer/correction processor. AiOS will send out its “unprocessed” signal via the pre-out and send it to the processor. The processor processes the signal and sends the “processed” signal back to AiOS via the MAIN-IN and then amplifies it. To activate the loop, you MUST turn on the MAIN-IN function in AiOS’ menu (or control app).
SUBWOOFER OUTPUT The SUBWOOFER OUTPUT is designed to be connected to an active (powered) subwoofer to complement your main speaker’s bass performance. The Subwoofer output is a full range signal.
1. Connect the SUBWOOFER OUT to the line level stereo RCA inputs of an active subwoofer. If the subwoofer only has a mono input, use a Y-connector.
2. Use your subwoofers lo-pass crossover to set the frequency level cut off point to match your speakers along with your subwoofer volume control to match the sensitivity of your speakers for a balanced sound. Once these adjustments have been made on the subwoofer, you should only have to adjust AiOS’ volume up or down and the subwoofer will adjust accordingly.
DID YOU KNOW? When Bluetooth SEND is turned on, AiOS’ main amplifier/speaker connections are turned off/muted. Since the speaker outputs are turned off during Bluetooth SEND, the subwoofer output will also be cut off. As noted, the subwoofer output is a full-range signal. So, if you are using the SUBWOOFER OUTPUT to drive a stereo amplifier for an additional zone in lieu of a subwoofer, please also keep in mind the output will be cut off when Bluetooth SEND is on.
41
AIRPLAY AND PHONESHARE OPERATIONS
AiOS can play music from phones and tablets in several ways. These methods include Airplay, Phoneshare, and Qualcomm aptX® Bluetooth. Airplay and PhoneShare operate via the same method although AirPlay is primarily for iOS devices and PhoneShare for Android devices.
AIRPLAY AND PHONESHARE PLAYBACK AND CONNECTION Airplay is primarily for iOS devices while PhoneShare is for Android devices. They both require a wireless connection of your portable device to your network and sends music from your device to your router over Wi-Fi. The router then sends it to AiOS either Wi-Fi or wired Ethernet depending on how your AIOS is connected to your network router. The advantages of AirPlay and PhoneShare is that since it relies on Wi-Fi the range which you can send music to AiOS from your portable device is much greater than Bluetooth. Airplay only transmits at 44.1 kHz. PhoneShare will send signals greater than 44.1 kHz, even DSD natively without any conversion.
(1) Open your desired music app and look for this icon (2) Tap on the icon and wait for available device(s) to appear. (3) Select “Cary Audio AIOS” with “Airplay” icon and start playback of your music selection. (4) AiOS will display all track information on the front panel. (5) To use PhoneShare from Android devices, PhoneShare will be listed as an INPUT on the
android app. Select it to view and play the music on that device to AiOS.
DID YOU KNOW? Using Cary Audio’s proprietary TruBit™ PCM and DSD Upsampling and conversion technology allows you to get the most out of AirPlay signals during playback for a superior listening experience. With TruBit™, you can upsample to 1 or 7 different sample rates or 1 of 3 different PCM to DSD conversion rates. See more on this in the in the PCM to DSD upsampling/conversion section of the manual.
NOTE: Volume control during Airplay is taken over by the portable device. Therefore, you can increase and decrease AIOS’ volume with the portable device itself (this is opposite of how Bluetooth volume operates).
42

BLUETOOTH RECEIVE SETUP
BLUETOOTH OVERVIEW Bluetooth can work for both iOS and Android devices. The advantage of Bluetooth is it’s a point to point signal, meaning no Wi-Fi or router connection is required to work. However, the range of Bluetooth is much shorter than other playback connections.
Qualcomm aptX® Bluetooth audio is capable of CD quality audio. For more information, please visit Qualcomm’s web site at https://www.aptx.com/aptx
PAIRING A BLUETOOTH DEVICE Just like connecting a phone to your car’s Bluetooth, you can connect your phone to AiOS.
Pairing a device with AiOS When connecting a Bluetooth device to the unit for the first time, you must “pair” it to AiOS. Once pairing is completed, subsequent connection can be made with a couple of easy steps.
Initial Pairing Steps
1. Select the BLUETOOTH input on AiOS and the display will show as follows;
2. Go to the “Settings” of your portable device and find Bluetooth settings and make sure Bluetooth function is ON and in search mode.
43

BLUETOOTH RECEIVE SETUP
3. Cary Audio AIOS” should appear on your portable device as shown. Select it.
4. After pairing is complete, the device will show “Connected”.
NOTE: If Cary Audio AiOS is listed but you receive an error message when trying to connect, you must delete or forget the Cary Audio AiOS device from your phone and do another search to reconnect it. If this happens, it is because at some point after making the pairing you have enabled Bluetooth SEND. Please read the Bluetooth Send Section below.
44
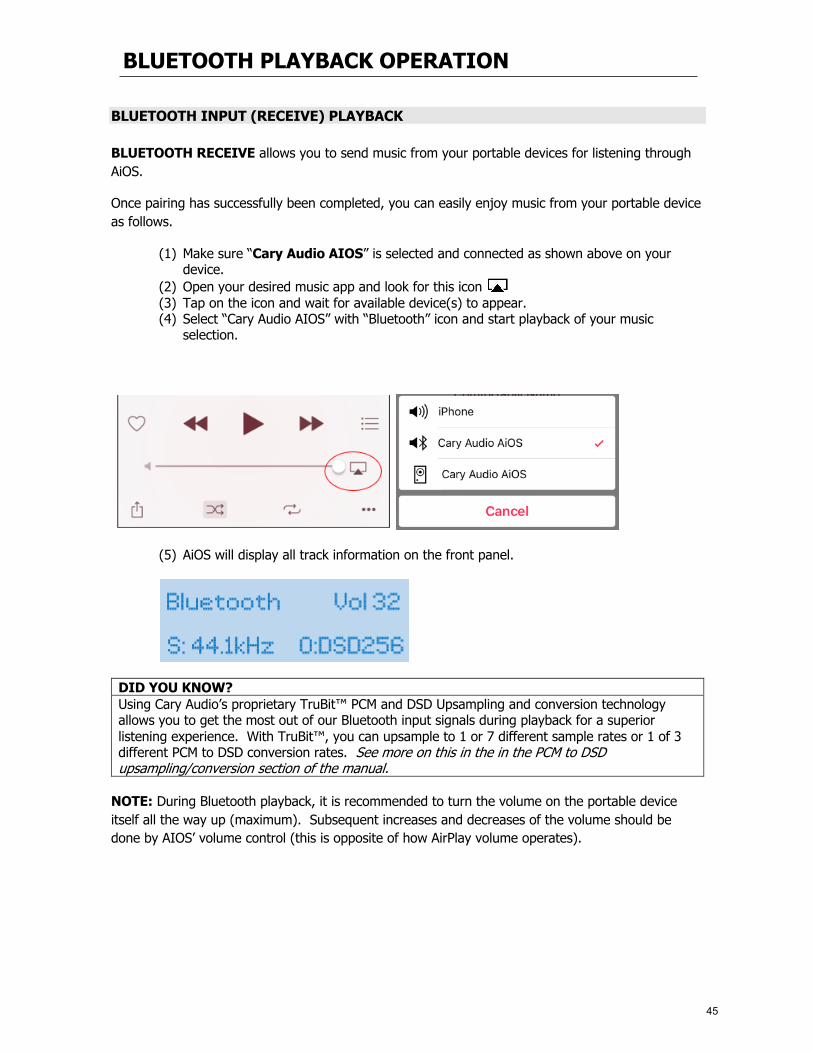
BLUETOOTH PLAYBACK OPERATION
BLUETOOTH INPUT (RECEIVE) PLAYBACK BLUETOOTH RECEIVE allows you to send music from your portable devices for listening through AiOS.
Once pairing has successfully been completed, you can easily enjoy music from your portable device as follows.
(1) Make sure “Cary Audio AIOS” is selected and connected as shown above on your device.
(2) Open your desired music app and look for this icon (3) Tap on the icon and wait for available device(s) to appear. (4) Select “Cary Audio AIOS” with “Bluetooth” icon and start playback of your music
selection.
(5) AiOS will display all track information on the front panel.
DID YOU KNOW? Using Cary Audio’s proprietary TruBit™ PCM and DSD Upsampling and conversion technology allows you to get the most out of our Bluetooth input signals during playback for a superior listening experience. With TruBit™, you can upsample to 1 or 7 different sample rates or 1 of 3 different PCM to DSD conversion rates. See more on this in the in the PCM to DSD upsampling/conversion section of the manual.
NOTE: During Bluetooth playback, it is recommended to turn the volume on the portable device itself all the way up (maximum). Subsequent increases and decreases of the volume should be done by AIOS’ volume control (this is opposite of how AirPlay volume operates).
45

BLUETOOTH SEND SETUP AND OPERATION
BLUETOOTH SEND (TRANSMIT) FUNCTION How is Bluetooth SEND different from connecting my phone to AiOS like the section above details? BLUETOOTH SEND is different because it allows you to send music FROM AiOS to your Bluetooth enabled headphones or speakers (unlike sending music from your phone to AiOS). This is a very unique feature for a product like AiOS and makes it very conducive to your music lifestyle by eliminating the need for troublesome wires when listening to headphones. As we know, Bluetooth headphone popularity has surpassed conventional wired headphones. Or, perhaps you just can’t, or prefer not to, have wires running to your main speakers. In this instance, using a pair of quality Bluetooth speakers allows AiOS to create a wireless listening solution. Whichever your preference, AiOS accommodates!
NOTE: When Bluetooth SEND function is on/enabled, it will automatically mute the sound to the speakers you have connected/wired to AiOS. When Bluetooth SEND function is on/enabled AiOS volume will be preset to level 45 allowing for a good balance of volume control up or down from your Bluetooth headphones or speakers. When Bluetooth Send is turned off/disabled, music will resume again to the wired speakers at the previous level you had it set to.
DID YOU KNOW? It is possible to turn the wired speakers back on while Bluetooth Send is on/enabled within AiOS’ menu settings. However, this means the volume to the speakers will be at level 45, or the level you’ve adjusted AiOS to while using BT Send. The result of doing this is that the sound level of the wired speakers will be considerably higher than Bluetooth speaker(s). If enabling the wired speakers when Bluetooth SEND is on, please take caution.
PAIRING BLUETOOTH HEADPHONES OR SPEAKERS TO AIOS
1. Press the Bluetooth Out on the IR remote.
2. To turn on or enable Bluetooth SEND, simply press Enter on the IR remote. A message will appear on screen saying “INFORMATION; main speaker off”. This is normal for the BT SEND function.
46
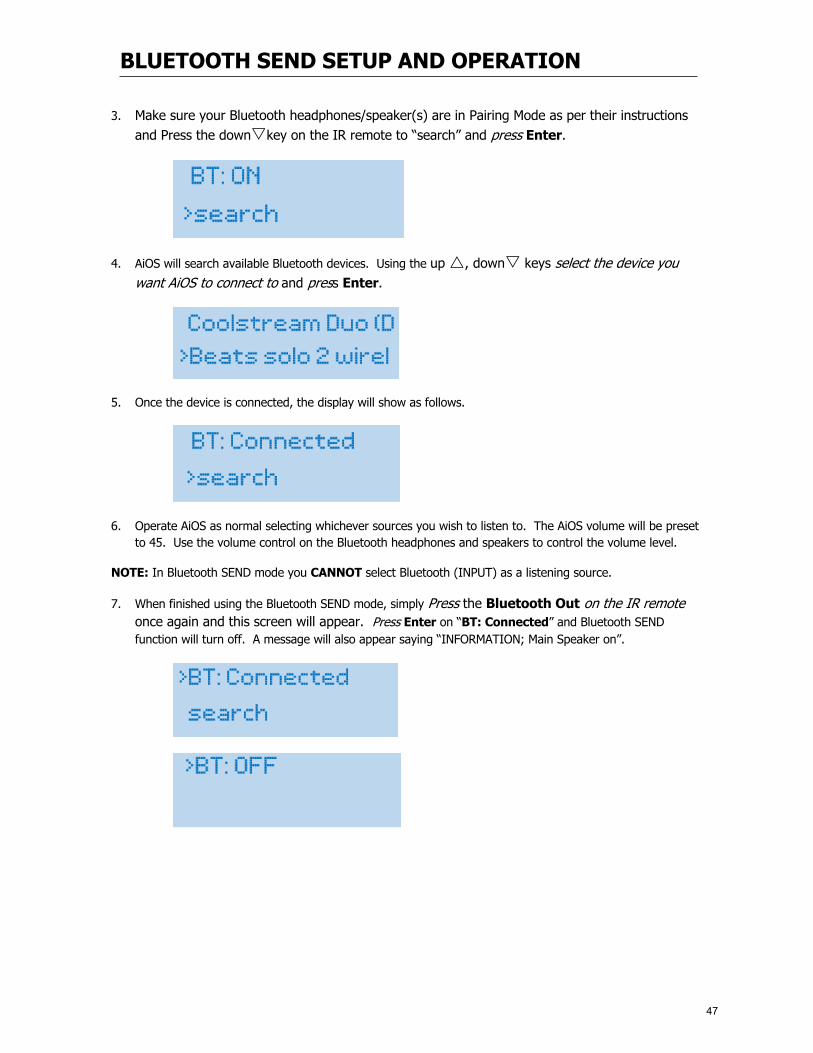
BLUETOOTH SEND SETUP AND OPERATION
3. Make sure your Bluetooth headphones/speaker(s) are in Pairing Mode as per their instructions and Press the downskey on the IR remote to “search” and press Enter.
4. AiOS will search available Bluetooth devices. Using the up r, downs keys select the device you want AiOS to connect to and press Enter.
5. Once the device is connected, the display will show as follows.
6. Operate AiOS as normal selecting whichever sources you wish to listen to. The AiOS volume will be preset to 45. Use the volume control on the Bluetooth headphones and speakers to control the volume level.
NOTE: In Bluetooth SEND mode you CANNOT select Bluetooth (INPUT) as a listening source.
7. When finished using the Bluetooth SEND mode, simply Press the Bluetooth Out on the IR remote once again and this screen will appear. Press Enter on “BT: Connected” and Bluetooth SEND function will turn off. A message will also appear saying “INFORMATION; Main Speaker on”.
47

EQUALIZER OPERATION
EQUALIZER FUNCTION Holding true to the Lifestyle Series moniker, AiOS packs yet another powerful feature to enhance you listening experience to meet your Lifestyle or personal listening preferences.
AiOS comes complete with a 15 band EQ +/-12 dB with 8 preset configurations plus 1 custom user setting. These 9 total EQ presets can enhance the sound based on your room acoustics, speaker types, and personal preferences. Each preset can be adjusted for extra tweaking to your liking. The presets include; POP, ROCK, JAZZ, CLASSICAL, VOCAL, ACOUSTIC, HIP HOP/R&B, LATENIGHT, CUSTOM and OFF. (NOTE: The sound of your MQA file may be affected while EQ is on)
To Operate the EQ function;
1. Press the “EQ” button on the IR remote. Each time you press the EQ button within 5 seconds the EQ preset will change with AiOS’ front panel confirming your selection. To select a particular preset, just keep pressing the EQ button until you find the one you like and stop.
2. You can also access the EQ setting through the Menu as discussed in the Menu Setting of AiOS. The Custom setting allows for a curve of 15 bands of the following frequencies with a +/- 12 range per band. You can also tweak any preset to your liking and save that as your preset through the use of the Android and iOS control apps. You may find adjusting the EQ setting through the control app easier and more intuitive.
>EQ: ON Pop Rock Jazz Classical Vocal Acoustic Hip Hop Late-night >Customü
EQ Custom Reset 25 Hz 0.0 40 Hz 0.0 63 Hz 0.0 >100 Hz 0.0 160 Hz 0.0 250 Hz 0.0 400 Hz 0.0 630 Hz 0.0 1 kHz 0.0 1.6 kHz 0.0 2.5 kHz 0.0 4 kHz 0.0 6.3 kHz 0.0 10 kHz 0.0 16 kHz 0.0 Return
48

HOW TO CUSTOM NAME INPUTS
RENAMING INPUTS One again, AiOS is all about Lifestyle audio and customization. This means you can rename any input to something more familiar or easily understood. For example, if you have a CD player connected to “LINE 1”, you can rename LINE 1 to “CD Player”. This allows anyone who uses your AiOS system to easily navigate through the connected sources.
1. Press the MENU Button on the IR remote and scroll down to “Input Names” and press Enter.
2. This will display all the default input names as follows; COAXIAL, OPTICAL, BLUETOOTH, LINE1, LINE 2, LINE 3, and Reset All.
3. Scroll to the desired input and press Enter. For example; highlight LINE 1 and press Enter.
4. Using the alphanumeric keys on the IR remote, type the new name and press Enter when done.
5. From now on input LINE 1 will be called “CD Player”. 6. To reset all custom names, scroll down to Reset All and press Enter.
NOTE: You can rename all inputs except Network, Internet, USB and SD Card. If you reset or update AiOS firmware it is possible you may lose your stored information.
49

HOW TO CHANGE/CREATE CUSTOM TURN ON/OFF MESSAGES
CUSTOM GREETINGS AND GOODBYE MESSAGES Going one step further, AiOS Lifestyle sensibility can get even more personal. AiOS comes with 4 preset turn on (WELCOME) messages and 4 preset turn off (GOODBYE) messages. Additionally, both welcome and goodbye messages allow for 1 each custom message you can create yourself.
1. Press the MENU Button on the IR remote and scroll down to “Welcome Screen” or “Goodbye Screen” and press Enter.
2. Scroll down to select your preset message and press Enter which will be confirmed by a ü.
WELCOME SCREENS
1) AiOS Welcome 2) Hello J 3) Welcome Back! 4) Let The Music Play 5) Custom GOODBYE SCREENS
1. Goodbye L 2. Awe, You Leaving? 3. So Long, For Now… 4. I’ll BE BACK 5. Custom
3. If you want to create your own custom message, scroll down to “Custom” and press Enter.
4. Using the alphanumeric keys on the IR remote, type your new WELCOME or GOODBYE message. Highlight “Select” and press Enter.
NOTE: Messages of 10 characters or less will display as double sized single line and messages from 11-20 characters will be two rows of standard size text.
50

UNDERSTANDING FILE UPSAMPLING AND CONVERSION
PCM TO DSD CONVERSION Through use of our TruBit™ Upsampling technology as described below, it is now possible to convert PCM files to DSD. For those that prefer DSD this is an extremely powerful feature. Imagine taking any source or sample rate (excluding MQA files) from network, internet, Bluetooth, AirPlay, or SPDIF and converting to DSD64, 128 or 256. Whether you’re in the PCM or DSD camp, AiOS accommodates both! Not only can you convert any PCM sample rate up to 768 kHz in the PCM domain, TruBit™ Upsampling also allows you to convert that 16, 24 bit PCM to a 1-bit direct stream digital signal with sample rates of 2.8224 MHz (64 or standard rate), 5.6448 MHz (128 or Double rate), 11.2 MHz (256 or Quad rate). You can even up-convert a native DSD64 file to a higher level of DSD128 or DSD256. By using superior no compromise AKM DACs and our exclusive 128-bit DSP engine, any native DSD or PCM to DSD converted signal is processed as true DSD. In other words, AiOS does NOT down-convert a DSD signal to PCM within the DAC chips. This is actually somewhat rare as many so called DSD players actually down-convert the DSD signal to PCM inside the DAC chip(s) without you knowing it.
PCM AND DSD UPSAMPLING TruBit™ Upsampling is a powerful upsampling technology used to upsample lower sample rates (excluding MQA files) to higher sample rate and increases the bit depth to 32 bits for PCM and 1 Bit for DSD in the digital domain via a dedicated 128 bit DSP engine prior to analog conversion. This can be very useful in achieving a more enjoyable listening experience. Once a native input signal is changed to a selected higher sample rate, the bit depth will also automatically increase to 32 bits for PCM or change to 1 bit for DSD conversion. However, like all powerful tools, this too should be used prudently. We do not take a blanket “higher is better” approach to upsampling. It is important to experiment with different rates depending on your source or source material. Many times a native rate might be preferred whereas some recordings or file formats might benefit from a higher sampling rate, and so on.
The available selectable sample rates depend on the input signal’s original sample rate. For example, above 192 kHz the available PCM rate(s) will only be in multiples of either 44.1 kHz or 48 kHz as follows:
Input signal rates of 44.1 or multiples of:
44.1 ---> 48 ---> 88.2 ---> 96--> 176.4 ---> 192 ---> 352.8---> 705.6 ---> DSD64 ---> DSD128 ---> DSD256.
Input signal rates of 48 or multiples of:
48 ---> 88.2 ---> 96--> 176.4 ---> 192 ---> 384--->768 ---> DSD64 ---> DSD128 ---> DSD256. If “BYPASS” appears momentarily next to Upsample Rate it means AiOS will pass the input signal rate out in its native rate without any upsampling.
51

USING FILE UPSAMPLING AND CONVERSION
USING PCM TO DSD CONVERSION AND UPSAMPLING Pressing the “SRC” button on the hand held remote will cycle through the available sample rates This can also be accomplished by selecting the desired rate itself rather than cycling through all rates using the free iOS and Android control apps.
SRC or PCM to DSD function does not work on MQA files as MQA uses its own rendering to render up to 16x.
How it works:
• When an upsample rate is selected higher than the native input rate, AiOS will upsample all incoming rates lower than the selected upsample rate up to the selected upsample rate (as well as change the bit depth to 32 bits for PCM or 1 bit for DSD).
• Any signals played that are equal to or higher than the selected upsample rate will playback unchanged as evident by the display’s “Upsample Rate” showing “BYPASS” or the same upsample rate as the input rate. Subsequent playback of lower input rates behaves as described above. Each of AiOS’ inputs will remember the upsample rate set for that input.
52
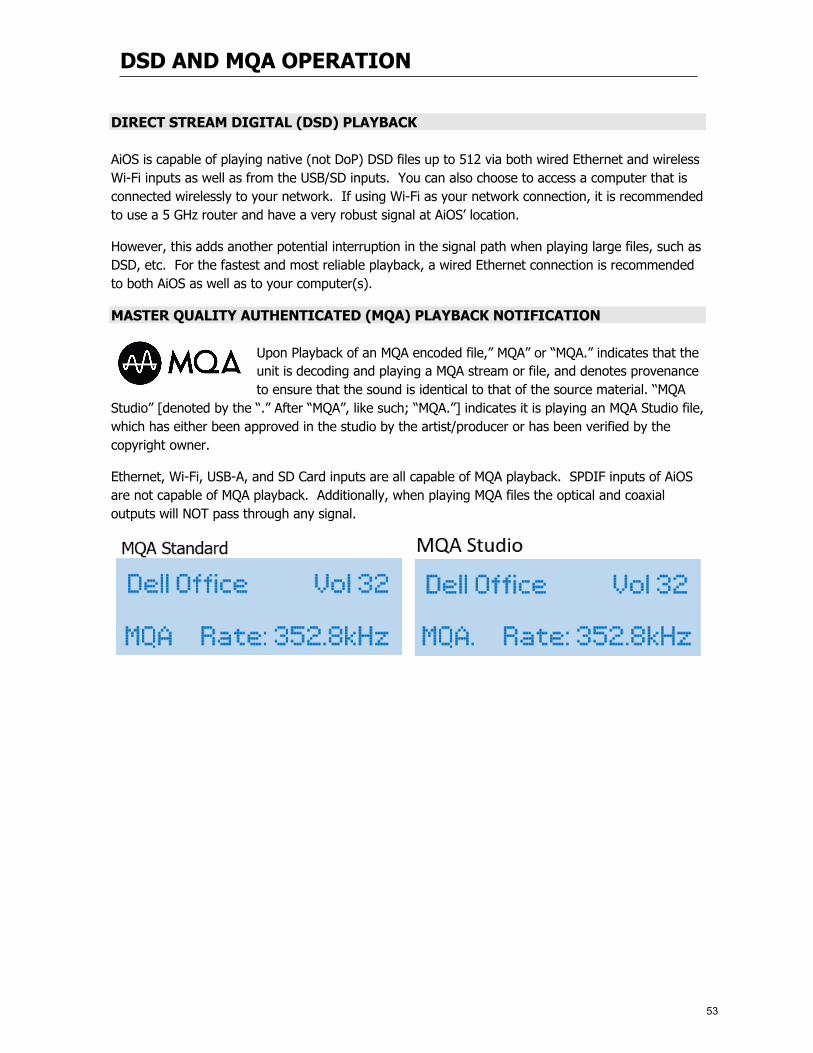
DSD AND MQA OPERATION
DIRECT STREAM DIGITAL (DSD) PLAYBACK AiOS is capable of playing native (not DoP) DSD files up to 512 via both wired Ethernet and wireless Wi-Fi inputs as well as from the USB/SD inputs. You can also choose to access a computer that is connected wirelessly to your network. If using Wi-Fi as your network connection, it is recommended to use a 5 GHz router and have a very robust signal at AiOS’ location.
However, this adds another potential interruption in the signal path when playing large files, such as DSD, etc. For the fastest and most reliable playback, a wired Ethernet connection is recommended to both AiOS as well as to your computer(s).
MASTER QUALITY AUTHENTICATED (MQA) PLAYBACK NOTIFICATION Upon Playback of an MQA encoded file,” MQA” or “MQA.” indicates that the unit is decoding and playing a MQA stream or file, and denotes provenance to ensure that the sound is identical to that of the source material. ‘‘MQA
Studio” [denoted by the “.” After “MQA”, like such; “MQA.”] indicates it is playing an MQA Studio file, which has either been approved in the studio by the artist/producer or has been verified by the copyright owner.
Ethernet, Wi-Fi, USB-A, and SD Card inputs are all capable of MQA playback. SPDIF inputs of AiOS are not capable of MQA playback. Additionally, when playing MQA files the optical and coaxial outputs will NOT pass through any signal.
53
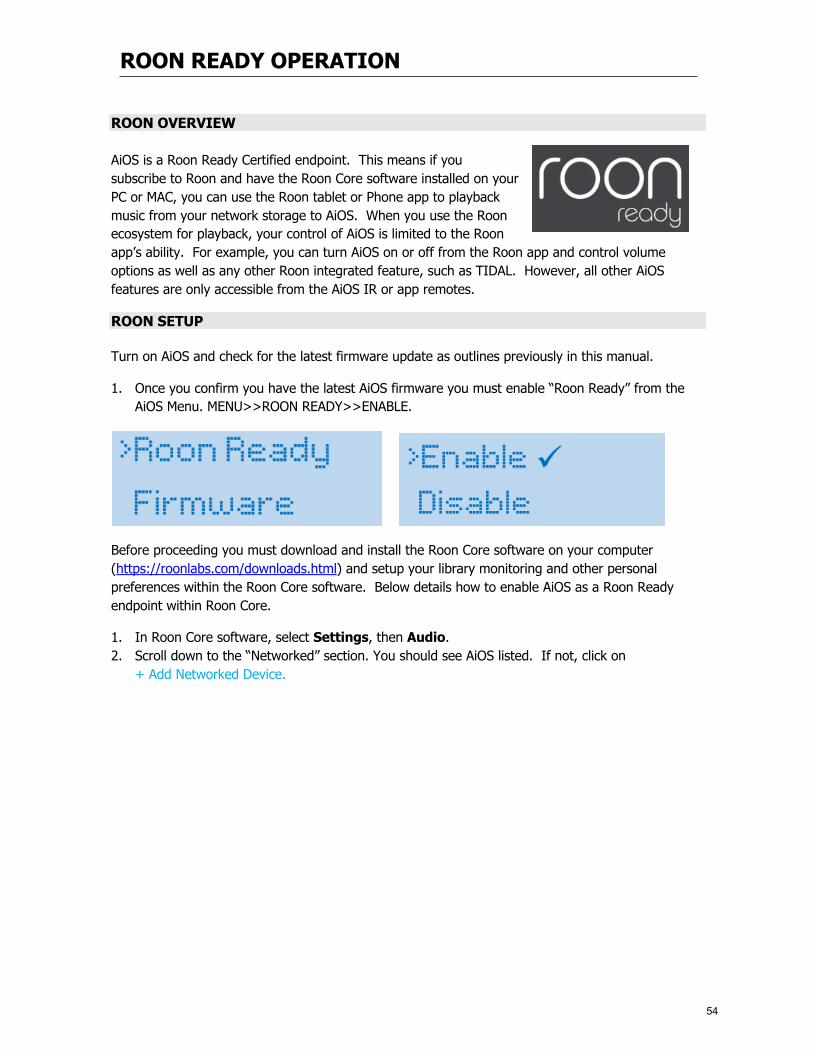
ROON READY OPERATION
ROON OVERVIEW AiOS is a Roon Ready Certified endpoint. This means if you subscribe to Roon and have the Roon Core software installed on your PC or MAC, you can use the Roon tablet or Phone app to playback music from your network storage to AiOS. When you use the Roon ecosystem for playback, your control of AiOS is limited to the Roon app’s ability. For example, you can turn AiOS on or off from the Roon app and control volume options as well as any other Roon integrated feature, such as TIDAL. However, all other AiOS features are only accessible from the AiOS IR or app remotes.
ROON SETUP Turn on AiOS and check for the latest firmware update as outlines previously in this manual.
1. Once you confirm you have the latest AiOS firmware you must enable “Roon Ready” from the AiOS Menu. MENU>>ROON READY>>ENABLE.
Before proceeding you must download and install the Roon Core software on your computer (https://roonlabs.com/downloads.html) and setup your library monitoring and other personal preferences within the Roon Core software. Below details how to enable AiOS as a Roon Ready endpoint within Roon Core.
1. In Roon Core software, select Settings, then Audio. 2. Scroll down to the “Networked” section. You should see AiOS listed. If not, click on
+ Add Networked Device.
54
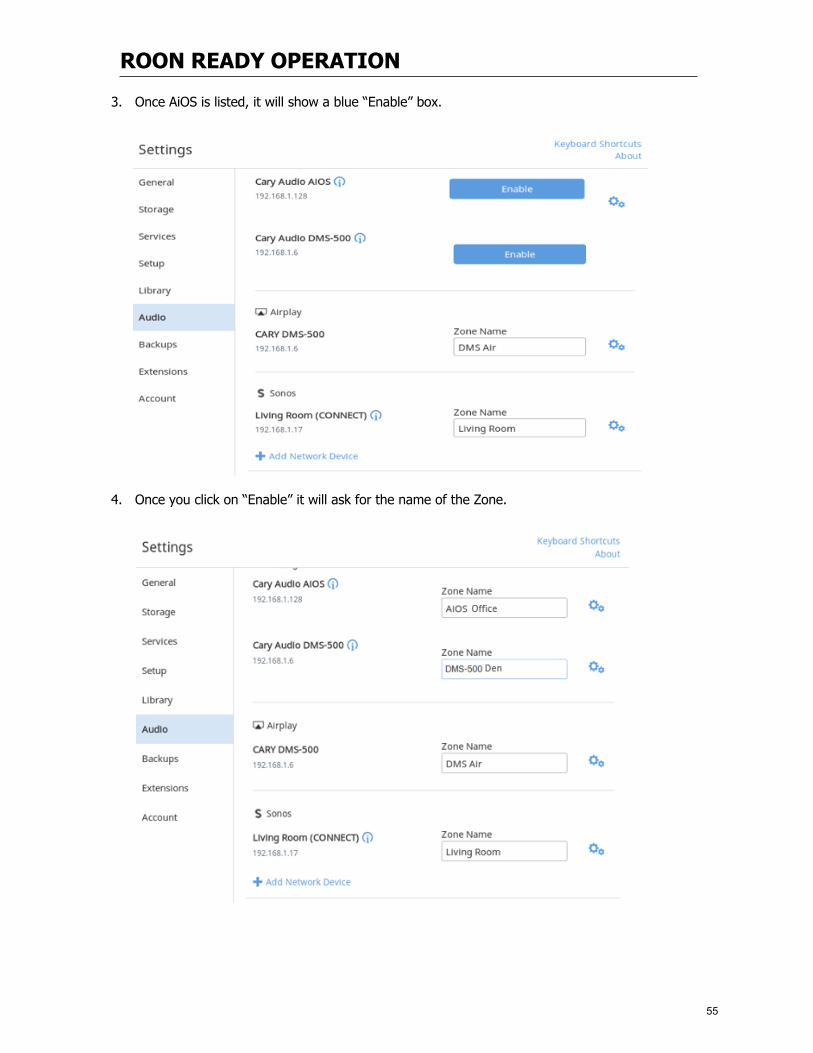
ROON READY OPERATION
3. Once AiOS is listed, it will show a blue “Enable” box.
4. Once you click on “Enable” it will ask for the name of the Zone.
55

ROON READY OPERATION
5. You can leave the Roon Core settings for AiOS in their default setting.
ROON READY OPERATION After completing the above steps of enabling AiOS Roon Ready capability and downloading, installing, setting up the Roon Core computer software, you can follow the below steps to playback music files via the Roon ecosystem.
1. Open the Roon tablet or phone app. 2. Press the Select an Audio Zone. 3. Select AiOS as the desired zone and Press the Sound Icon, which will reveal a dropdown
box. 4. In this box is a Power Button Icon. Press it and AiOS should power on. 5. Once AiOS is fully powered up and ready to go, you can simply browse the Roon App
interface to select any music you wish. Once you select Play, it will send the music to AiOS via a bit perfect stream of data.
For more in-depth details of operation Roon Core and Roon App(s), please refer to the Roon website. https://kb.roonlabs.com/Roon_User_Guide
56
SPECIFICATIONS
The following section describes AiOS and its basic specifications. The specifications are subject to change without notice or obligation. Master Quality Authenticated (MQA) The AiOS includes MQA technology, which enables you to play back MQA audio files and streams, delivering the sound of the original master recording. This ensures that MQA-encoded audio files and streams sound exactly like the source. ‘MQA’ or ‘MQA.’ (Studio indicates that the unit is decoding and playing a MQA stream or file, and denotes provenance to ensure that the sound is identical to that of the source material. ‘‘MQA Studio’ [‘MQA.’ ]* indicates it is playing a MQA Studio file, which has either been approved in the studio by the artist/producer or has been verified by the copyright owner. POWER AMPLIFIER …………………………………………………………………………………………………………………………………. Analog Input Single-Ended RCA x 3 for Main-In, Line 1, Line 2 3.5mm Stereo Jack x 1 ………………………………………………………………………………………………………………………………………… Analog Input Impedance 10KW Unbalanced, ………………………………………………………………………………………………………………………………………… Power Amplifier Output 2 x 75W RMS in 8 W from 20Hz to 20KHz 2 x 125W RMS in 4 W from 20Hz to 20KHz ………………………………………………………………………………………………………………………………………… Circuit Type Solid State, Power MOSFET Transistor, Class A/B ………………………………………………………………………………………………………………………………………... Frequency Response 10Hz – 50KHz +/- 0.1dB
(at 10db below rated output power) ………………………………………………………………………………………………………………………………………… Distortion (SAMPTE-1M) <0.5% ………………………………………………………………………………………………………………………………………… S/N Ratio >100dB, “A” Weighted ………………………………………………………………………………………………………………………………………… Protections Full short circuit, thermal, Ultrasonic, RF Signal muting & Current limiter. ……………………………………………………………………………………………………..
BASIC SPECIFICATIONS ................................................................................................................................................ Master Clock Jitter Below measurable levels ................................................................................................................................................ Digital Sampling Rates (Fs) 44.1 kHz to 768 kHz ................................................................................................................................................ Digital Filter 32-Bit 8x Oversampling Digital Filter ................................................................................................................................................ Digital/Analog Converters 1 - 2 channel AK4490EQ ................................................................................................................................................ BLUETOOTH Qualcomm aptX® decoder and transmitter ........................................................................................................................................... Analog Filter 3rd Order Bessel ................................................................................................................................................ Analog SUB Outputs Single – Ended RCA ................................................................................................................................................
57

SPECIFICATIONS
Digital Outputs Coaxial, Toslink operating at Sample Frequency (Fs) from
44.1 kHz to 192 kHz, 16 bit to 24 bit ................................................................................................................................................ Digital Inputs USB-A x 3, SD Card x 1
BLUETOOTH In & Out x1 Coaxial x1, Toslink x1 ................................................................................................................................................ Digital Input Sample Rate USB operating at Sample Frequency (Fs) from 44.1 kHz to
384 kHz, 16 bit to 32 bit, DSD 64, 128, 256 and 512. BLUETOOTH Sample Frequency (Fs) 48 kHz, 16 bit.
Coaxial, Toslink operating at Sample Frequency (Fs) from 44.1 kHz to 192 kHz, 16bit to 24 bit
................................................................................................................................................ Control Trigger output 12VDC x1 IR control x1 ................................................................................................................................................ Communication Ethernet Wi-Fi 802.11 b/g/n ................................................................................................................................................ Power Input Configured at factory for either 110-120 or 220-240 VAC, 50-60 Hz ................................................................................................................................................ Power Consumption 225 Watts ................................................................................................................................................ Dimensions 3.0″ H x 14.2″ W x 11.0” D ................................................................................................................................................ Weight 15 lbs. ……………………………………………………………………………………………………………………………………………
AUDIO (LPCM) ................................................................................................................................................ Frequency Range 2 Hz - 22 kHz (44.1 kHz) ................................................................................................................................................ Amplitude Linearity 0.1 dB (20 Hz – 20 kHz) ................................................................................................................................................ Phase Linearity 3 degrees (20 Hz - 20 kHz) ................................................................................................................................................ Dynamic Range 117 dB (1 kHz) ................................................................................................................................................ Signal-to-Noise Ratio 107 dB (1 kHz) ................................................................................................................................................ Channel Separation 106 dB (1 kHz) ................................................................................................................................................ Total Harmonic Distortion 0.0004% (1 kHz) ................................................................................................................................................ Pre-Amp Output Level 3.0V RMS (220 Ω output impedance) for maximum
volume ................................................................................................................................................
58
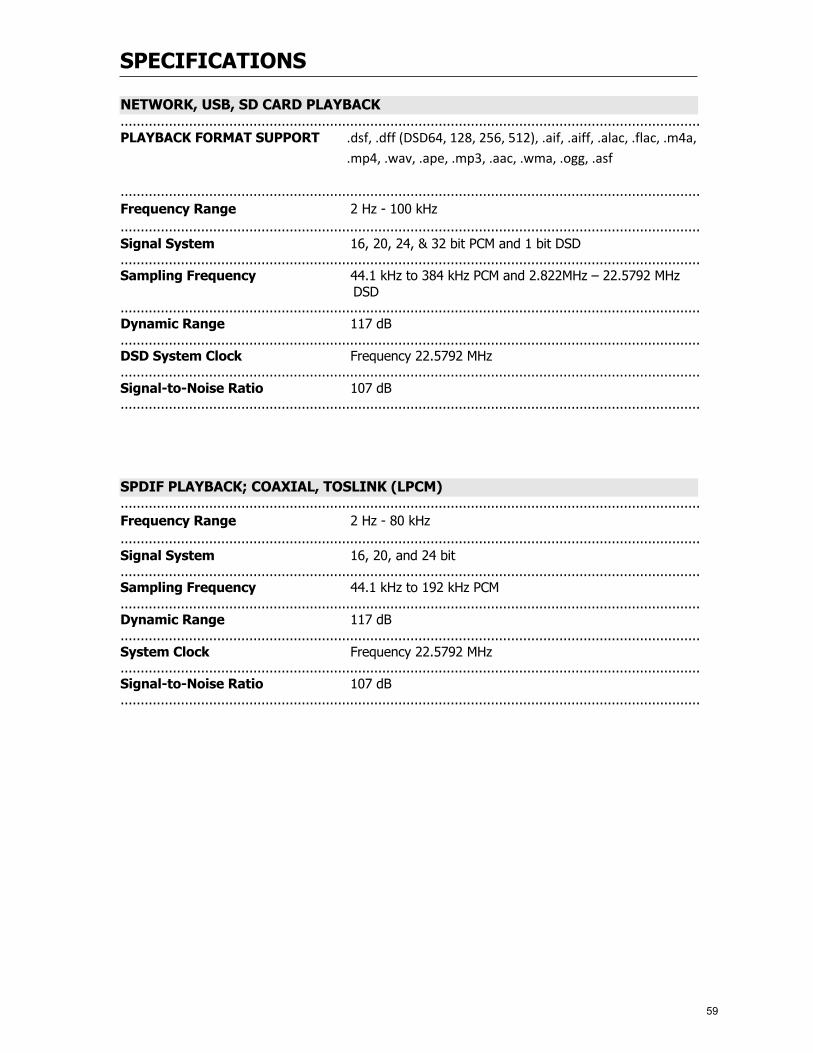
SPECIFICATIONS
NETWORK, USB, SD CARD PLAYBACK ................................................................................................................................................ PLAYBACK FORMAT SUPPORT .dsf, .dff (DSD64, 128, 256, 512), .aif, .aiff, .alac, .flac, .m4a,
.mp4, .wav, .ape, .mp3, .aac, .wma, .ogg, .asf
................................................................................................................................................ Frequency Range 2 Hz - 100 kHz ................................................................................................................................................ Signal System 16, 20, 24, & 32 bit PCM and 1 bit DSD ................................................................................................................................................ Sampling Frequency 44.1 kHz to 384 kHz PCM and 2.822MHz – 22.5792 MHz
DSD ................................................................................................................................................ Dynamic Range 117 dB ................................................................................................................................................ DSD System Clock Frequency 22.5792 MHz ................................................................................................................................................ Signal-to-Noise Ratio 107 dB ................................................................................................................................................ SPDIF PLAYBACK; COAXIAL, TOSLINK (LPCM) ................................................................................................................................................ Frequency Range 2 Hz - 80 kHz ................................................................................................................................................ Signal System 16, 20, and 24 bit ................................................................................................................................................ Sampling Frequency 44.1 kHz to 192 kHz PCM ................................................................................................................................................ Dynamic Range 117 dB ................................................................................................................................................ System Clock Frequency 22.5792 MHz ................................................................................................................................................ Signal-to-Noise Ratio 107 dB ................................................................................................................................................
59

SERVICE AND CARECARE AND CLEANING
The cabinet housing and front panel of AiOS may be cleaned with a soft cloth and Windex or a window cleaner. The frequency of cleaning will be governed by how many hours AiOS is operated and by operating environment cleanliness.
CAUTION: • Do not let any liquids spill into the vents on top of the unit.
AC POWER FUSE REPLACEMENT
WARNING: When replacing the power fuse, make sure the unit is NOT PLUGGED IN.
The value for the fuse whether in the US or Non-US countries should be replaced using a 3.15A 250V Slow Blow fuse. Since this value is universal it will work in all countries.
Note: Customers within countries that support 110V-130V, the 3.15A 250V Slow Blow fuse can be replaced with a 6.3A 125V Slow Blow fuse.
To access the AC fuse, remove the left side panel (left side while facing the front of the unit) by removing the two screws on the bottom and one screw on the rear of the side panel using a small Phillips head screw driver. At the rear left portion of the circuit board next to the AC socket, you will see a glass fuse with a plastic housing. Remove this housing and replace the fuse with the value and type listed above, then reinstall the left side panel with the three screws.
FACTORY SERVICE
Careful consideration has been given to the design of your AIOS to keep maintenance problems to a minimum. Any problems or requests for service should be referred to our Customer Service Department at 919-355-0010. DO NOT return AiOS to the factory without a Return Merchandise Authorization (RMA) number from our online Customer Service Center (www.caryaudio.com).
Cary Audio will assume no responsibility if the shipping company refuses to pay for damage due to your improper packing or lack of insurance should the unit be lost or damaged in shipment. Please retain and always use the original shipping carton for shipping the player. Also, Cary Audio reserves the right to return products sent in for service in a new box set at the customer’s expense if the original packing material was damaged in the initial shipment, or if it is deemed unsatisfactory to use in return shipping.
NON-WARRANTY REPAIRS
Cary Audio will provide repair service for its products charging on a time and expense basis. At this time, the standard non-warranty service bench fee is $125 for the first hour and $95 per hour thereafter. Parts used for repairs as well as return shipping are additional. This may change and is not a quote for service. Please call us at 919-355-0010 for more information about out-of-warranty service and repair fees.
CAUTION: • Never remove or insert the back panel AC plug when the unit is on or the AC
cord is plugged into the wall.
60

LIMITED WARRANTY
This warranty has been included with a Cary Audio product that is intended to be sold and used only within the United States and Canada. Accordingly, this Warranty only applies to Products which are purchased in the United States or Canada, and only applies while such products are used in the United States or Canada. Products purchased outside the United States or Canada, and failures occurring outside the United States or Canada, are not covered by this Warranty.
Cary Audio Warrants to the Original United States and Canada Purchaser for use in the United States or Canada the Following Cary Audio Products for the Periods Indicated:
1. Power Amplifiers, Integrated Amplifiers, and Preamplifiers have a three (3) year parts and labor
warranty from the date of the original purchase from Cary Audio. 2. Network Audio Players and DACs have a two (2) year parts and labor warranty from the date of
the original purchase from Cary Audio. 3. CD players or Digital Music Centers have an eighteen (18) month parts and labor warranty from
the date of the original purchase from Cary Audio. 4. Vacuum tubes, if any are used in the component, are offered a 90-day exchange policy against
defects with the exception of the 300B vacuum tube that has a one (1) year exchange policy from the date of the original purchase from Cary Audio.
Limitations on Non-Cary Audio Provided Services
Certain Cary Audio Products are designed to employ non-Cary Audio provided services (such as, by way of example only, Spotify, Tidal, etc.), some of which require separate customer subscriptions and some of which do not, as part of the Products’ functionality. Because Cary Audio cannot control the providers of such services or the services themselves, the owner of the Product therefore assumes all risks related to the use of services provided by anyone other than Cary Audio itself. Cary Audio cannot and does not warrant against, and shall have no liability of any kind for any of the following that are attributable to non-Cary Audio providers or services: (1) interruption, discontinuance, or other unsatisfactory performance of service, (2) reduced Product functionality that is so attributable, or (3) any other loss or damage of any kind that is so attributable.
What is Covered and What is Not Covered
Except as specified below, this warranty covers parts and labor to correct all defects in materials and workmanship. The following are not covered by the warranty:
1. Damage, deterioration, malfunction or failure to meet performance specifications resulting from:
a. Accident, acts of nature, misuse, abuse, neglect or unauthorized product modifications b. Improper installation, removal or maintenance, or failure to follow instructions supplied
with the product. c. Repair or attempted repair by anyone not authorized by Cary Audio to repair the product. d. Any shipment of the product (claims must be presented to the carrier). e. Any cause other than a product defect.
2. Cleaning, initial set-up, check-ups with no defects found, or charges incurred for installation, removal or reinstallation of the product.
3. Any product, on which the serial number has been defaced, modified or removed. 4. Batteries.
61
LIMITED WARRANTY
5. Accessories, including but not limited to, batteries, cables, mounting hardware and brackets, cleaning accessories, antenna and detachable power cords.
6. Warranty is void if purchase was made from anyone other than directly from Cary Audio or an authorized Cary Audio dealer.
Who May Enforce the Warranty?
This warranty extends to products purchased directly from Cary Audio or an authorized Cary Audio dealer. Purchasers should inquire of the dealer regarding the nature and extent of the dealer’s warranty, if any.
To obtain such warranty service, the original purchaser must complete the Warranty Registration form online at www.caryaudio.com within 15 days of purchase. You can find the Warranty Registration form on www.caryaudio.com under the Support tab.
What Will We Pay For?
We will pay for all labor and material expenses for items covered by the warranty. Payment of shipping charges is discussed in the next section of this warranty.
How Can You Get Service?
In the event that the owner needs to return the unit to Cary Audio for service or repair of a possible defect, he must follow the following steps:
1. Create a new account or login to our Customer Service Center (www.caryaudio.com) to obtain a
Return Merchandise Authorization (RMA) number. Once the account is set up or you have logged in, click on “Open New RMA” to begin entering the information to create an RMA that is needed to return or exchange a product. You will be given an RMA number, which must appear on the label of the box you ship back.
2. Submit a copy of the original sales receipt. Blank receipts will not validate the limited warranty for service by Cary Audio. The original sales receipt must contain the following information:
a. The authorized Cary Audio dealer’s name b. The date of purchase c. The unit’s sales price d. The buyer’s name and address e. Describe in detail the problem. f. Note the unit’s model number and serial number.
3. Deliver by either of these methods: a. With all freight and insurance charges prepaid and in its original packing container or
equivalent, ship the component to Cary Audio, 6301 Chapel Hill Road, Raleigh, NC 27607. b. Hand-deliver the product to Cary Audio (address noted above) or the nearest authorized
service facility.
62
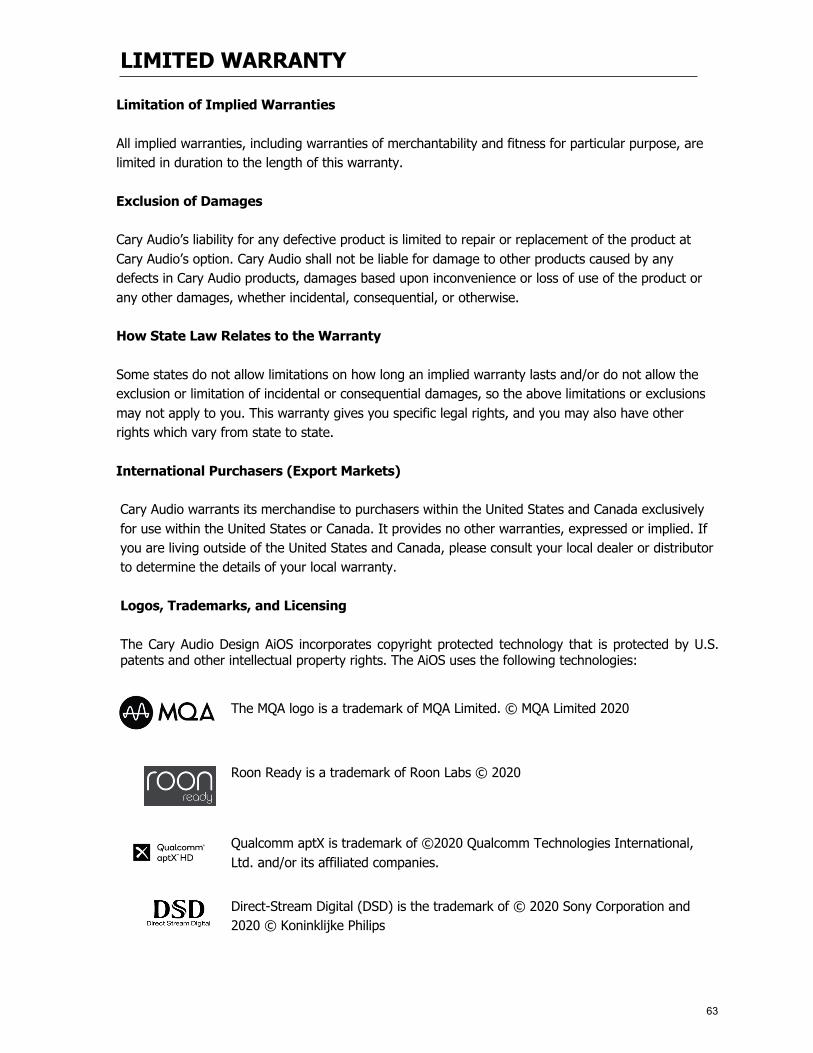
LIMITED WARRANTY
Limitation of Implied Warranties
All implied warranties, including warranties of merchantability and fitness for particular purpose, are limited in duration to the length of this warranty.
Exclusion of Damages
Cary Audio’s liability for any defective product is limited to repair or replacement of the product at Cary Audio’s option. Cary Audio shall not be liable for damage to other products caused by any defects in Cary Audio products, damages based upon inconvenience or loss of use of the product or any other damages, whether incidental, consequential, or otherwise.
How State Law Relates to the Warranty
Some states do not allow limitations on how long an implied warranty lasts and/or do not allow the exclusion or limitation of incidental or consequential damages, so the above limitations or exclusions may not apply to you. This warranty gives you specific legal rights, and you may also have other rights which vary from state to state.
International Purchasers (Export Markets)
Cary Audio warrants its merchandise to purchasers within the United States and Canada exclusively for use within the United States or Canada. It provides no other warranties, expressed or implied. If you are living outside of the United States and Canada, please consult your local dealer or distributor to determine the details of your local warranty. Logos, Trademarks, and Licensing
The Cary Audio Design AiOS incorporates copyright protected technology that is protected by U.S. patents and other intellectual property rights. The AiOS uses the following technologies:
The MQA logo is a trademark of MQA Limited. © MQA Limited 2020 Roon Ready is a trademark of Roon Labs © 2020
Qualcomm aptX is trademark of ©2020 Qualcomm Technologies International, Ltd. and/or its affiliated companies.
Direct-Stream Digital (DSD) is the trademark of © 2020 Sony Corporation and 2020 © Koninklijke Philips
63

LIMITED WARRANTY
Written Offer for Source Code
For third party technology that you receive from Cary Audio in binary form which is licensed under an open source license that gives you the right to receive the source code for that binary, you can obtain a copy of the applicable source code below.
For AiOS and the DMS-500: https://www.caryaudio.com/wp-content/uploads/2020/02/mpd-caryaudio-aios-20200210.tar.gz
For the DMS-550 and DMS-600: https://www.caryaudio.com/wp-content/uploads/2020/02/mpd-caryaudio-600-20200210.tar.gz
64

CARY AUDIO
6301 Chapel Hill RoadRaleigh, NC 27607
919.355.0010caryaudio.comcarydirect.com
oo
oo
oo
oo
oo
oo
oo
oo
oo
oo
oo
oo
oo
o o o o o o o o o o o o o o o o o o o o o o o o o o o o o o o o o o o o o o o o o o o o o o o o o o o o o o o o o o o o o o o o o o o o o o o o o o o o o o o o o o o o o o o o o o o o o o o o o o o o o o o o o o o o o o o o o o o o o o o o o o o o o o o o o o o o o o o o o o o o o o o o o o o o o o o o o o o o o o o o o o o o o o o o o o o o o