ahelm106.pdf - Activity
54
245 Mathematics OBJECTIVE To make different types of prisms and pyramids and verifying Euler’s formula MATERIAL REQUIRED Thick sheet, drawing sheet, pencil, colours, adhesive, scissors, white sheet, cellotape. METHOD OF CONSTRUCTION Prism 1. Draw an equilateral triangle of side ‘a’ (say 5 cm) on a thick sheet. 2. Cut it out and make a copy of it using thick sheet. 3. Make congruent rectangles whose breadth is the same as the side of the triangle and length b (say 8 cm) using thick sheet. 4. Arrange these triangles and rectangles using cellotape to get a solid as shown in Fig. 1. 5. Make 4 cutouts of equilateral triangles of side a using thick sheet. 6. Arrange these triangles to get a solid as shown in Fig. 2 Fig. 2 75 Activity Fig. 1
-
Upload
khangminh22 -
Category
Documents
-
view
4 -
download
0
Transcript of ahelm106.pdf - Activity

245Mathematics
Objective
To make different types of prisms and pyramids and verifying Euler’s formula
Material required
Thick sheet, drawing sheet, pencil, colours, adhesive, scissors, white sheet, cellotape.
MethOd Of cOnstructiOn
Prism
1. Draw an equilateral triangle of side ‘a’ (say 5 cm) on a thick sheet.
2. Cut it out and make a copy of it using thick sheet.
3. Make congruent rectangles whose breadth is the same as the side of the triangle and length b (say 8 cm) using thick sheet.
4. Arrange these triangles and rectangles using cellotape to get a solid as shown in Fig. 1.
5. Make 4 cutouts of equilateral triangles of side a using thick sheet.
6. Arrange these triangles to get a solid as shown in Fig. 2
Fig. 2
75Activity
Fig. 1
Lab manual Upper Primary Class Activity 75 to 93.indd 245 26-Jun-19 4:04:10 PM

246Laboratory Manual – Elementary Stage
deMOnstratiOn
1. Solid in Fig. 1, is a prism of base as a triangle. It is a triangular prism
2. Solid in Fig. 2, is a pyramid of base as a triangle. It is a triangular pyramid.
3. Similarly you can make a square, pentagonal prism or regular hexagonal prism by taking base and top as regular pentagon or regular hexagon, respectively.
4. Similarly you can make pyramids with base as square, pentagon and hexagon.
5. In prism (Fig.1),
Number of faces (F) = 5, Number of vertices (V) = 6
Number of edges (E) = 9.
Thus,F+V–E=5+6–9=2
6. In pyramid (Fig. 2)
Number of faces (F) = 4, Number of vertices (V) = 4
Number of edges (E) = 6.
Thus,F+V–E=4+4–6=2
Hence, the Euler’s formula is verified both for prism and pyramid.
ObservatiOn
Prism
Base Number of faces (F)
Number of edges
(E)
Number of vertices
(V)
F + V – E =
Triangle
Square
Regular pentagon
Regular hexagon
5
___
___
___
___
___
___
___
___
___
___
___
2
___
___
___
Lab manual Upper Primary Class Activity 75 to 93.indd 246 26-Jun-19 4:04:11 PM

247Mathematics
Pyramid
Base Number of faces
(F)
Number of edges
(E)
Number of vertices
(V)
F + V – E =
Triangle
Square
Regular pentagon
Regular hexagon
4
___
___
___
___
___
___
___
___
___
___
___
2
___
___
___
HenceF+V–E=_______,ineachcase.
applicatiOn
This activity may be used to explain construction of prisms and pyramids and to identify their faces, edges and vertices.
Lab manual Upper Primary Class Activity 75 to 93.indd 247 26-Jun-19 4:04:11 PM

248Laboratory Manual – Elementary Stage
Objective
To verify the algebraic identity : (a + b)2 = a2 + 2ab + b2
Material required
Drawing sheet, cardboard, adhesive, coloured papers, cutter and ruler.
MethOd Of cOnstructiOn
1. Cut out a square of side with length a units from a drawing sheet/cardboard and name it as square ABCD [see Fig. 1].
2. Cut out another square of length b units from a drawing sheet/cardboard and name it as square CHGF [see Fig. 2].
Fig. 1 Fig. 2
3. Cut out a rectangle of length a units and breadth b units from a drawing sheet/cardboard and name it as a rectangle DCFE [see Fig. 3].
Activity 76
Lab manual Upper Primary Class Activity 75 to 93.indd 248 26-Jun-19 4:04:11 PM

249Mathematics
4. Cut out another rectangle of length b units and breadth a units from a drawing sheet/cardboard and name it as a rectangle BIHC [see Fig. 4].
Fig. 3 Fig. 4
Fig. 5
deMOnstratiOn
1. Arrange the four quadrilaterals as shown in Fig. 5.
2. Total area of these four cut out figures.
= Area of square ABCD + Area of square CHGF + Area of rectangle DCFE + Area of rectangle BIHC.
= a2 + b2 + ab + ba = a2 + b2 + 2ab.
Lab manual Upper Primary Class Activity 75 to 93.indd 249 26-Jun-19 4:04:11 PM

250Laboratory Manual – Elementary Stage
3. Clearly, AIGE is a square of side (a + b). Therefore, its area is (a + b)2.
Hence, the algebraic identity (a + b)2 = a2 + 2ab + b2 is verified.
Here, area is in square units.
ObservatiOn
On actual measurement:
a = cm, b = cm,
So, (a + b) = cm.
a2 = , b2 = , ab = ,
(a + b)2 = , 2ab = .
Therefore, (a + b)2 = a2 + 2ab + b2 .
The identity may be verified by taking different values of a and b.
applicatiOn
The identity may be used for
1. calculating the square of a number by expressing it as the sum of two convenient numbers.
2. simplification/factorisation of some algebraic expressions.
Lab manual Upper Primary Class Activity 75 to 93.indd 250 26-Jun-19 4:04:11 PM

251Mathematics
77Activity
Objective
To verify the algebraic identity : (a – b)2 = a2 – 2ab + b2
Material required
Drawing sheets, cardboard, coloured papers, scissors, ruler and adhesive.
MethOd Of cOnstructiOn
1. Cut out a square ABCD of side a units from a drawing sheet/cardboard [see Fig. 1].
2. Cut out a square EBHI of side b units (b < a) from a drawing sheet/cardboard [see Fig. 2].
3. Cut out a rectangle GDCJ of length a units and breadth b units from a drawing sheet/cardboard [see Fig. 3].
4. Cut out a rectangle IFJH of length a units and breadth b units from a drawing sheet/cardboard [see Fig. 4].
Fig. 2
Fig. 1
Fig. 3
Fig. 4
Lab manual Upper Primary Class Activity 75 to 93.indd 251 26-Jun-19 4:04:11 PM

252Laboratory Manual – Elementary Stage
deMOnstratiOn 1. Arrange these cutouts as shown
in Fig. 5.
2. According to Fig.1, 2, 3 and 4, Area of square ABCD = a2, Area of square EBHI = b2. Area of rectangle GDCJ = ab, Area of rectangle IFJH = ab
3. From Fig. 5, area of square AGFE = AG × GF
= (a – b) (a – b) = (a – b)2
4. Now, area of square AGFE = Area of square ABCD + Area of
squareEBHI–AreaofrectangleIFJH
–AreaofrectangleGDCJ
= a2 + b2–ab–ab = a2–2ab + b2
Here, area is in square units.
ObservatiOn On actual measurement:
a = , b = ,
So, (a – b) = ,
a2 = , b2 = , (a – b)2 = ,
ab = , 2ab = .
Therefore, (a – b)2 = a2–2ab + b2
applicatiOn
The identity may be used for
1. calculating the square of a number expressed as a difference of two convenient numbers.
2. simplifying/factorisation of some algebraic expressions.
Fig. 5
Lab manual Upper Primary Class Activity 75 to 93.indd 252 26-Jun-19 4:04:11 PM

253Mathematics
78Activity
Objective
To verify the algebraic identity : a2 – b2 = (a + b)(a – b)
Material required
Drawing sheets, cardboard, coloured papers, scissors, sketch pen, ruler, transparent sheet.
MethOd Of cOnstructiOn
1. Take a cardboard of convenient size and paste a coloured paper on it.
2. Cut out one square ABCD of side a units from a drawing sheet [see Fig. 1].
3. Cut out one square AEFG of side b units (b < a) from another drawing sheet [see Fig. 2].
Fig. 1
Fig. 2
Lab manual Upper Primary Class Activity 75 to 93.indd 253 26-Jun-19 4:04:11 PM

254Laboratory Manual – Elementary Stage
4. Arrange these squares as shown in Fig. 3.
5. Join F to C using sketch pen. Cut out trapeziums congruent to EBCF and GFCD using a transparent sheet and name them as EBCF and GFCD, respectively [see Fig. 4 and 5].
Fig. 3
Fig. 6
Fig. 4 Fig. 5
deMOnstratiOn 1. Arrange the trapeziums in Figures 4 and
5 as shown in Fig. 6.
2. Area of square ABCD = a2
3. Area of square AEFG = b2
In Fig. 3,
Area of square ABCD – Area of squareAEFG
= Area of trapezium EBCF + Area of trapezium GFCD
= Area of rectangle EBGD [Fig. 6].
= ED × DG.
Lab manual Upper Primary Class Activity 75 to 93.indd 254 26-Jun-19 4:04:11 PM
255Mathematics
Thus, a2–b2 = (a + b) (a – b)
Here, area is in square units.
ObservatiOn On actual measurement:
a = , b = ,
So, (a + b) = ,
a2 = , b2 = , (a – b) = ,
a2 – b2 = , (a + b) (a – b) = ,
Therefore, a2 – b2 = (a + b) (a – b).
applicatiOn
The identity may be used for finding values of
1. difference of two squares.
2. some products involving two numbers.
3. This identity may be used for simplification and factorisation of algebraic expressions.
Lab manual Upper Primary Class Activity 75 to 93.indd 255 26-Jun-19 4:04:11 PM

256Laboratory Manual – Elementary Stage
Objective
To obtain a formula for the area of a trapezium
Material required
Cardboard, coloured glaze papers, adhesive, scissors.
MethOd Of cOnstructiOn
1. Take a piece of cardboard to serve as a base for the activity.
2. Draw two identical trapeziums of parallel sides as ‘a’ and ‘b’ units on a coloured paper and cut them out (see Fig. 1).
3. Place them on the cardboard as shown in Fig. 2.
Fig. 1
Fig. 2
Activity 79
Lab manual Upper Primary Class Activity 75 to 93.indd 256 26-Jun-19 4:04:12 PM

257Mathematics
deMOnstratiOn 1. Figure formed by the two trapeziums [see Fig. 2] is a parallelogram
ABCD.
2. Side AB of the parallelogram = (a + b) units and its corresponding altitude = h units.
3. Area of each trapezium = 12 (area of parallelogram) =
12
(a + b ) × h
Therefore, area of trapezium = 12
(a + b ) × h
= 12 (sum of parallel sides) × perpendicular
distance between parallel sides.
Here, area is in square units.
ObservatiOn On actual measurement:
a = _________, b = ____________.
Distance between parallel sides = h = _________.
So, the area of the parallelogram in Fig. 2 = _________.
Thus, the area of the trapezium = 12
(sum of _________ sides) × _________.
applicatiOn
1. This may be used in finding the area of a field which can be split into different trapeziums and right triangles.
2. This concept is also used for finding the formula for area of a triangle in coordinate geometry which you will study in higher classes.
Lab manual Upper Primary Class Activity 75 to 93.indd 257 26-Jun-19 4:04:12 PM

258Laboratory Manual – Elementary Stage
Objective
To form a cube and obtain a formula for its surface area
Material required
Cardboard, ruler, cutter, cellotape, sketch pen/pencil, white paper, chart paper.
MethOd Of cOnstructiOn
1. Take a cardboard of convenient size and paste a white paper on it.
2. Make a shape involving six identical squares each of side a units, using a thick chart paper as shown in Fig. 1.
3. Fold the squares along the dotted markings to form a solid as shown in Fig. 2.
Fig. 1
Activity 80
Lab manual Upper Primary Class Activity 75 to 93.indd 258 26-Jun-19 4:04:12 PM

259Mathematics
NO
TE
deMOnstratiOn 1. Solid obtained in Fig. 2 is a cube. Place the
cube on the cardboard.
2. Each face of the cube so obtained is a square of side a. Therefore, the area of one face of the cube is a2.
3. Thus, the surface area of the cube with side a units = 6a2.
ObservatiOn On actual measurement:
Length of side a = ,
So, area of one face = a2 = .
The sum of the areas of all the faces = + + + + + .
Therefore, the surface area of the cube = 6a2.
applicatiOn
This result is useful in estimating materials required for making cubical boxes needed for packing.
Shape in Fig. 1 is called a net of the cube.
Fig. 2
Lab manual Upper Primary Class Activity 75 to 93.indd 259 26-Jun-19 4:04:12 PM

260Laboratory Manual – Elementary Stage
Objective
To form a cuboid and obtain a formula for its surface area
Material required
Cardboard, cellotape, cutter, ruler, sketch pen, pencil, white paper, chart paper.
MethOd Of cOnstructiOn
1. Take a cardboard of convenient size and paste a white paper on it.
2. Make a shape involving two identical rectangles of dimensions a units × b units, two identical rectangles of dimensions b units × c units and two identical rectangles of dimensions c units × a units, using a thick chart paper as shown in Fig. 1.
3. Fold the six rectangles along the dotted lines to obtain a solid as shown in Fig. 2.
Activity 81
Fig. 1
Fig. 2
Lab manual Upper Primary Class Activity 75 to 93.indd 260 26-Jun-19 4:04:12 PM

261Mathematics
NO
TE
deMOnstratiOn
1. Solid obtained in Fig. 2 is a cuboid. Place it on the cardboard.
2. Area of a rectangle of dimensions ( a units × b units) = ab square units.
3. Area of a rectangle of dimensions ( b units × c units) = bc square units.
4. Area of a rectangle of dimensions ( c units × a units) = ca square units.
5. Surface area of the cuboid so formed
= (2 × ab + 2 × bc + 2 × ca) = 2 (ab + bc + ca).
ObservatiOn On actual measurement:
a = _____________, b = _____________, c = _____________,
So, ab = _____________, bc = _____________, ca = _____________,
2ab = _____________, 2bc = _____________, 2ca = ____________,
Sum of areas of all the six rectangles = ________.
Therefore, surface area of the cuboid = 2 (ab + bc + ca).
applicatiOn
This result is useful in estimating materials required for making cuboidal boxes/almirahs etc.
Shape in Fig. 1 is called the net of the cuboid.
Lab manual Upper Primary Class Activity 75 to 93.indd 261 26-Jun-19 4:04:12 PM

262Laboratory Manual – Elementary Stage
Objective
To obtain a formula for finding the volume of a cuboid
Material required
Net of a cuboid, plasticine or clay, cutter, ruler, cardboard.
MethOd Of cOnstructiOn
1. Take net of a cuboid of length l, breadth b and height h (say l = 5 units, b = 4 units, h = 2 units)
2. Fold it to form an open cuboid. Fill this cuboid with clay/plasticine and remove the net.
3. Place the cuboid on the cardboard and cut it into five equal pieces along its length as in Fig. 1.
Fig. 1
4. Cut the cuboid into four equal pieces along its breadth as shown in Fig. 2.
Activity 82
Lab manual Upper Primary Class Activity 75 to 93.indd 262 26-Jun-19 4:04:12 PM

263Mathematics
5. Now cut the cuboid into two equal pieces along its height as shown in Fig. 3.
Fig. 2 Fig. 3
deMOnstratiOn
1. The cuboid is divided into cubes of unit length (i.e., unit cubes).
2. The number of unit cubes so formed is 40, which can be expressed as 5 × 4 × 2.
3. Volume of the cuboid is = 5 × 4 × 2 cubic units i.e., l × b × h.
4. Similarly, make cuboids of dimensions 2 × 1 × 2 cubic units, 3 × 4 × 2 cubic units, 5 × 4 × 2 cubic units, 5 × 3 × 2 cubic units and repeat the above steps.
ObservatiOn
S. No l b h No. of Units cuboids (Volume)
l × b × h (Volume)
1.
2.
3.
4.
5
2
3
5
4
1
4
3
2
2
2
2
40
__
__
__
5 × 4 × 2
__ × __ × __
__ × __ × __
__ × __ × __
applicatiOn
This activity can be used in explaining the formula for volume of a cube.
Lab manual Upper Primary Class Activity 75 to 93.indd 263 26-Jun-19 4:04:12 PM

264Laboratory Manual – Elementary Stage
Objective
To establish a formula for the volume of a right circular cylinder
Material required
Cylindrical can, cutter, plastic clay, ruler, piece of cardboard, pen/pencil
MethOd Of cOnstructiOn
1. Take any metallic cylindrical can open at both ends. Measure its height. Let it be h.
2. Put this firmly on the cardboard and fill it with plastic clay.
3. Push the clay gently out of the can.
4. Cut the clay into as many sections as you can as shown below and number them as 1, 2, 3, 4, 5, 6, 7, 8… (Fig. 1).
Activity 83
Fig. 1
5. Arrange these sections as shown in Fig. 2.
deMOnstratiOn
The shape in Fig. 2 looks like a cuboid.
Fig. 2
Lab manual Upper Primary Class Activity 75 to 93.indd 264 26-Jun-19 4:04:13 PM

265Mathematics
Length of cuboid = 12 the circumference of the base of the cylinder
= 12 × (2πr) = πr
Breadth of cuboid = radius of cylinder
= r
Height of cuboid = Height of cylinder
= h
Volume of cuboid = l × b × h
= πr × r × h
= πr2h
Volume of the cylinder = Volume of cuboid = πr2h.
ObservatiOn
On actual measurement:
Height of the cuboid (cylinder) = _____.
Radius of the base = _____.
Breadth of the cuboid (cylinder) = _____ (= r)
Length of the cuboid (cylinder) = _____ (= 12
× 2πr)
Volume of the cuboid = l × b × h = _____.
Volume of the cylinder = _____.
Thus, volume of the cylinder = Volume of the cuboid ______.
= 12 × 2πr × r × h = _____.
= _____.
applicatiOn
This activity is useful in finding the volumes and capacities of various cylindrical objects/containers.
Lab manual Upper Primary Class Activity 75 to 93.indd 265 26-Jun-19 4:04:13 PM

266Laboratory Manual – Elementary Stage
Objective
To obtain a formula for the curved surface area of a right circular cylinder
Material required
Coloured chart paper, cellotape, ruler.
MethOd Of cOnstructiOn
1. Take a rectangular chart paper of length l units and breadth b units
[see Fig. 1].
2. Fold this paper along its breadth and join the two ends by using
cellotape and obtain a solid as shown in Fig. 2.
Fig. 1 Fig. 2
deMOnstratiOn 1. The solid obtained is a cylinder.
Activity 84
Lab manual Upper Primary Class Activity 75 to 93.indd 266 26-Jun-19 4:04:13 PM

267Mathematics
2. Length of the rectangular paper = l = circumference of the base of the cylinder = 2πr, where r is the radius of the cylinder.
3. Breadth of the rectangular paper = b = height (h) of the cylinder.
4. The curved surface area of the cylinder is equal to the area of the rectangle = l × b = 2πr × h = 2πrh square units.
ObservatiOn On actual measurement :
l = , b = ,
So, 2πr = l = , h = b = ,
Area of the rectangular paper = l × b = .
Therefore, the curved surface area of the cylinder = 2πrh.
applicatiOn
This result can be used in finding the material used in making cylindrical containers, i.e., powder tins, drums, oil tanks used in industrial units, overhead water tanks etc.
Lab manual Upper Primary Class Activity 75 to 93.indd 267 26-Jun-19 4:04:13 PM

268Laboratory Manual – Elementary Stage
Objective
To verify that the opposite sides of a parallelogram are equal
Material required
Cardboard, white sheet of paper, adhesive, scissors, red sketch pen.
MethOd Of cOnstructiOn
1. Take a cardboard of convenient size and paste a white paper on it.
2. Draw two identical parallelograms on a white sheet of paper. Name them as ABCD. Join AC in both the parallelograms. Cut out both the parallelograms.
3. Paste one of the parallelograms on the cardboard (Fig. 1).
4. Cut the other parallelogram ABCD along the diagonal AC as shown in Fig. 2 to get two triangles ABC and ACD.
5. Superpose and paste the triangle CDA on the triangle ABC as shown in Fig. 3.
Fig. 2 Fig. 3
Activity 85
Fig. 1
Lab manual Upper Primary Class Activity 75 to 93.indd 268 26-Jun-19 4:04:13 PM

269Mathematics
NO
TE
deMOnstratiOn
Triangle CDA exactly covers the triangle ABC.
The vertex A of ∆ CDA falls on the vertex C of ∆ ABC.
The vertex C of ∆ CDA falls on the vertex A of ∆ ABC.
The vertex D of ∆ CDA falls on the vertex B of ∆ ABC.
This shows that the side AB of ∆ ABC is equal to the side DC of ∆ CDA and the side BC of ∆ ABC is equal to the side AD of ∆ CDA.
Thus, the opposite sides of a parallelogram are equal.
ObservatiOn
In Fig. 1, length of the side AB of parallelogram ABCD = _________ cm.
Length of the side BC = ________________ cm,
Length of the side CD = ________________ cm,
Length of the side AD = ________________ cm.
In Fig. 3, side CD covers the side ______________,
side DA covers the side ______________.
Thus,
AB = _________,
and BC = _________.
i.e. opposite sides of a parallelogram are equal _________ .
applicatiOn
This result is useful in solving many other geometrical problems and also in the construction of parallelograms.
1. The parallelogram ABCD may also be cut along the diagonal BD.
2. This activity can be used to show that the opposite angles of a parallelogram are equal.
Lab manual Upper Primary Class Activity 75 to 93.indd 269 26-Jun-19 4:04:13 PM

270Laboratory Manual – Elementary Stage
Objective
To verify that adjacent angles of a parallelogram are supplementary
Material required
Cardboard, coloured glaze paper, set square, ruler, pencil, colours, scissors.
MethOd Of cOnstructiOn
1. Take a cardboard of convenient size and paste a light coloured glaze paper on it.
2. Draw a parallelogram ABCD on a paper and paste it on the cardboard.
3. Make a trace copy of this parallelogram.
4. Colour the angles of the parallelogram ABCD in such a way that colours of A and C and that of B and D are same (Fig. 1).
5. Cut the four angles from the trace copy as shown in Fig. 2.
Fig. 1 Fig. 2
Activity 86
Lab manual Upper Primary Class Activity 75 to 93.indd 270 26-Jun-19 4:04:13 PM

271Mathematics
6. Draw a straight line l and take points P and Q on it at sufficient distance.
7. Place the cut outs of ∠A and ∠D at the point P so that there is no gap between the two angles (Fig. 3).
8. Place the cut outs of ∠B and ∠C at the point Q so that there is no gap between the two angles as shown in Fig. 3.
Fig. 3
9. Try this placement with ∠A and ∠B, ∠C and ∠D.
deMOnstratiOn
1. ∠A and ∠D form a straight angle.
2. ∠B and ∠C form a straight angle.
3. ∠A + ∠D = 180°
∠B + ∠C = 180°.
4. ∠A and ∠B form a straight angle. Angles C and D also form a straight angle.
5. ∠A + ∠B = 180°
∠C + ∠D = 180°.
ObservatiOn
On actual measurement:
∠A = ____________,
∠B = ____________,
∠C = ____________,
∠D = ____________.
Lab manual Upper Primary Class Activity 75 to 93.indd 271 26-Jun-19 4:04:13 PM

272Laboratory Manual – Elementary Stage
Therefore, ∠A + ∠D = __________, ∠B + ∠C = ___________,
∠A + ∠B = __________, ∠C + ∠D = ___________,
applicatiOn
1. This activity can be used to verify that adjacent angles of a square, rectangle and rhombus are supplementary.
2. This activity can also be used to verify that when two parallel lines are intersected by a transversal then its consecutive interior angles are supplementary.
Lab manual Upper Primary Class Activity 75 to 93.indd 272 26-Jun-19 4:04:13 PM

273Mathematics
87Activity
Objective
To verify that the diagonals of a parallelogram bisect each other
Material required
Cardboard, white sheet of paper, adhesive, scissors, geometry box, coloured sketch pens, thumb pins, thick tracing paper.
MethOd Of cOnstructiOn
1. Take a cardboard of convenient size and paste a white paper on it.
2. Make two identical parallelograms using a white paper and a thick tracing paper. Name them as ABCD. Join their diagonals AC and BD using different colours. Let O be their point of intersection.
3. Paste parallelogram ABCD (drawn on white paper) on the cardboard (Fig. 1).
4. Place the other parallelogram (drawn on thick tracing paper) on the first parallelogram using a thumb pin at O as shown in Fig. 3.
deMOnstratiOn
1. Rotate the upper parallelogram clockwise (or anticlockwise) till the upper parallelogram covers exactly the other parallelogram again as shown in Fig. 3.
Fig. 1
Fig. 2
Lab manual Upper Primary Class Activity 75 to 93.indd 273 26-Jun-19 4:04:13 PM

274Laboratory Manual – Elementary Stage
2. From Fig. 3,
AO = OC
OB = OD
Thus, the d iagonals o f a parallelogram bisect each other.
ObservatiOn
On actual measurement:
In Fig. 2,
OA = ____________, OC = ____________,
OB = ____________, OD = ____________,
AC = ____________, AD = ____________.
OA = 12
AC
OB = 12
_________.
In Fig. 3, OA of upper parallelogram falls exactly on _______ of lower parallelogram.
OB of the upper parallelogram falls exactly on ________ of lower parallelogram.
OC and OD of upper parallelogram falls exactly on ____ and ____ respectively of lower parallelogram.
Thus, the diagonals of a parallelogram ________ each other.
This shows that diagonals of a parallelogram bisect each other.
applicatiOn
1. This result is useful in solving many other geometrical problems related to parallelograms.
2. This activity can be used in verifying the other properties of a parallelogram such as opposite angles are equal, opposite sides are equal.
Fig. 3
Lab manual Upper Primary Class Activity 75 to 93.indd 274 26-Jun-19 4:04:13 PM

275Mathematics
Objective
To multiply two linear algebraic expressions (polynomials) using different strips of cardboard
Material required
Cardboard, coloured papers (green, blue and red), geometry box, cutter, eraser, adhesive, sketch pen.
MethOd Of cOnstructiOn
1. Take three pieces of cardboard and paste coloured papers on them. Green on one, blue on the other and red on the last one.
2. Make a large number of squares of side x units using green cardboard and cut them out [Fig. 1].
3. Similarly, draw many rectangles of dimensions x units × 1 unit using blue coloured cardboard and squares of dimensions 1 unit × 1 unit on red coloured paper and cut them out [Fig. 2 and 3].
deMOnstratiOn
1. To represent a l g e b r a i c e x p r e s s i o n 3x + 5, arrange these strips as in Fig. 4.
88Activity
Fig. 1
Fig. 3Fig. 2
Fig. 4
Lab manual Upper Primary Class Activity 75 to 93.indd 275 26-Jun-19 4:04:13 PM

276Laboratory Manual – Elementary Stage
2. Similarly, represent the algebraic expression 2x + 3, as in Step 1 in
Fig. 5.
Fig. 5
3. Make a rectangle whose length and breadth are 3x + 5 and 2x + 3
respectively (Fig. 6).
3 + 5x
x x x 1 1 1 1 1
1
1
1
x
x
2x +
3
Fig. 6
4. Arrange the strips obtained in Steps 2 and 3 in the rectangle of Fig. 6
as shown in Fig. 7.
Lab manual Upper Primary Class Activity 75 to 93.indd 276 26-Jun-19 4:04:14 PM

277Mathematics
3 + 5x
x x x 1 1 1 1 1
1
1
1
x
x
2x +
3
Fig. 7
Area of rectangle in Fig. 6 = l × h = (3x + 5) (2x + 3)
Area of strips in Fig. 7 = 6x2 + 19x + 15
So, (3x + 5) (2x + 3) = 6x2 + 19x + 15
Similarly, find the product of some other two linear algebraic expressions.
ObservatiOn1. In Fig. 6, area of the rectangle = (3x + 5) × ( ____ + ____ ).
2. In Fig. 7:
(a) Number of green strips = _________.
(b) Number of blue strips = _________.
(c) Number of red strips = _________.
(d) Algebraic expressions represented = _________.
3. Thus (3x + 5) (2x + 3) =
= ____ x2 + _____ x + _____.
applicatiOn
The activity is useful in explaining the concept of multiplication of two linear algebraic expressions.
Lab manual Upper Primary Class Activity 75 to 93.indd 277 26-Jun-19 4:04:14 PM
278Laboratory Manual – Elementary Stage
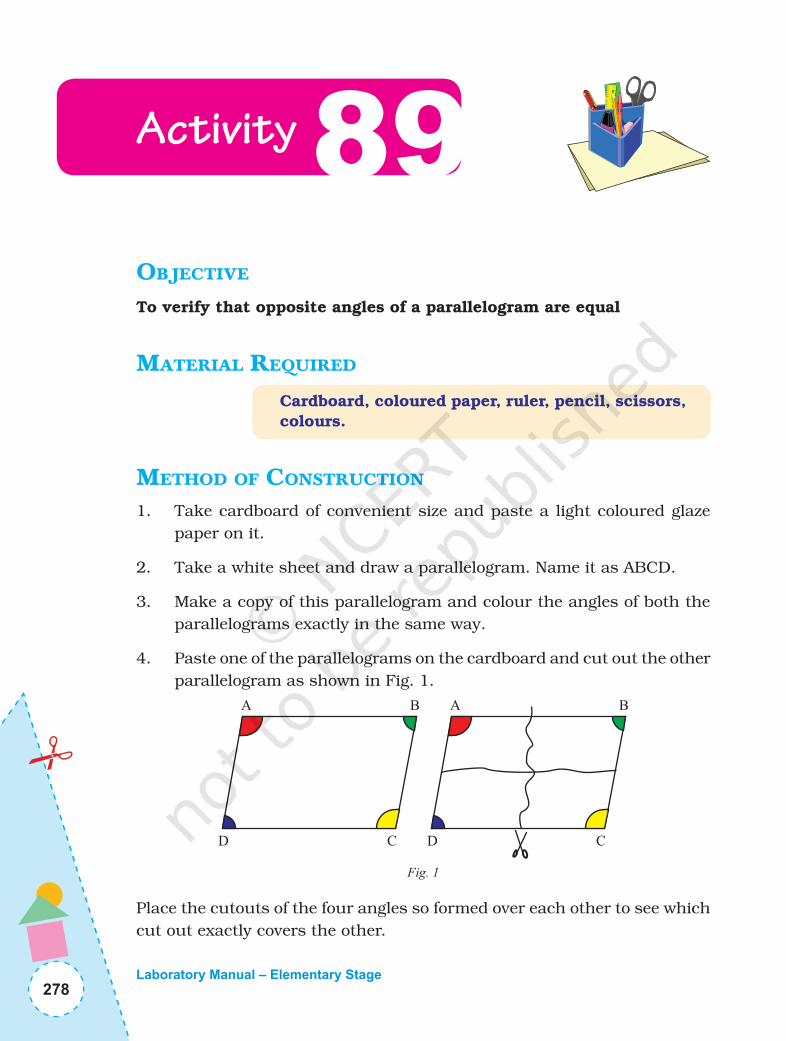
Objective
To verify that opposite angles of a parallelogram are equal
Material required
Cardboard, coloured paper, ruler, pencil, scissors, colours.
MethOd Of cOnstructiOn
1. Take cardboard of convenient size and paste a light coloured glaze paper on it.
2. Take a white sheet and draw a parallelogram. Name it as ABCD.
3. Make a copy of this parallelogram and colour the angles of both the parallelograms exactly in the same way.
4. Paste one of the parallelograms on the cardboard and cut out the other parallelogram as shown in Fig. 1.
Fig. 1
Place the cutouts of the four angles so formed over each other to see which cut out exactly covers the other.
Activity 89
Lab manual Upper Primary Class Activity 75 to 93.indd 278 26-Jun-19 4:04:14 PM

279Mathematics
deMOnstratiOn
1. Place the cutouts of the four angles so formed over each other to see which cut out exactly covers the other.
2. Cut out of ∠A exactly covers the cut out of ∠C.
So, ∠A = ∠C
3. Cut out of ∠B exactly covers cut out of ∠D.
So, ∠B = ∠D
Thus, opposite angles of a parallelogram are equal.
ObservatiOn
On actual measurement:
Measure of ∠A = __________,
Measure of ∠C = __________,
Measure of ∠B = __________,
Measure of ∠D = __________.
So, ∠A = ______ , _______ = ∠D
Opposite angles of a parallelogram are ________.
applicatiOn
This activity can be used to verify that opposite angles of the following figures are equal:
(i) Square
(ii) Rectangle
(iii) Rhombus
Lab manual Upper Primary Class Activity 75 to 93.indd 279 26-Jun-19 4:04:14 PM

280Laboratory Manual – Elementary Stage
Objective
To factorise a polynomial, say (2x2 + 4x)
Material required
Blue and red chart papers, scissors, geometry box, eraser, pen/pencil
MethOd Of COnstructiOn
1. Cut out sufficient number of pieces of dimensions 3 cm × 3 cm to represent x 2 from a blue coloured chart paper and of 3 cm × 1 cm to represent x from a red coloured chart paper (Fig. 1).
deMOnstratiOn
1. Take 2x2 and 4x using the above cut outs as in Fig. 2.
Fig. 2
Activity 90
Fig. 1
Lab manual Upper Primary Class Activity 75 to 93.indd 280 26-Jun-19 4:04:14 PM

281Mathematics
2. Try to form different types of rectangles using all cutouts of Fig. 2. (Fig. 3 and 4).
Fig. 3
3. From Fig. 3, dimensions of rectangle are x and 2x + 4.
So, area of the rectangle is x (2x + 4).
Thus, 2x2 + 4x = x (2x + 4).
4. Also from Fig. 4, 2x2 + 4x = 2x (x + 2).
ObservatiOn
In Fig. 3,
(i) Length of rectangle = ________.
(ii) Breadth of rectangle = _______.
(iii) Area of rectangle = _______.
So, 2x2 + 4x = ____× (2x + ___).
In Fig. 4,
(iv) Length of rectangle = ________.
(v) Breadth of rectangle = _______.
(vi) Area of rectangle = _________.
So, 2x2 + 4x = 2x × (____+ ____).
applicatiOn
This activity is useful in understanding the concept of factorisation of a polynomial.
Fig. 4
Lab manual Upper Primary Class Activity 75 to 93.indd 281 26-Jun-19 4:04:14 PM

282Laboratory Manual – Elementary Stage
Objective
To factorise a polynomial , say (x2 + 4x + 3)
Material required
Blue chart paper/rubber sheet, scissors, scale, eraser etc.
MethOd Of cOnstructiOn
1. Cut some pieces from blue chart paper/rubber sheet as shown in Fig. 1.
The big square piece represents x2, the rectangular piece represents x and the small square piece represents 1.
Activity 91
Fig. 1
deMOnstratiOn
1. Represent polynomial (x2 + 4x + 3), as in Fig. 2.
Fig. 2
Lab manual Upper Primary Class Activity 75 to 93.indd 282 26-Jun-19 4:04:14 PM

283Mathematics
2. Try to form a new rectangle (if possible, a square) taking all pieces at a time as shown in Fig. 3.
Fig. 3
3. The area of the above rectangle
= Sum of the areas of all rectangles of which the bigger rectangle is made.
= x2 + 4x + 3.
4. The sides of the above rectangle are (x + 3) and (x + 1).
So area of the rectangle = (x + 3) (x + 1)
So, x2 + 4x + 3 = (x + 3) (x + 1).
Repeat the activity to factorise some other polynomials.
ObservatiOn
Complete the table
Polynomial Factors
x2 + 4x + 3
x2 + 8x + 7
x2 + 8x + 16
2x2 + 3x + 1
(x + 3) (x + 1)
______________
______________
______________
applicatiOn
This activity is useful in explaining the meaning of factors of a polynomial.
Lab manual Upper Primary Class Activity 75 to 93.indd 283 26-Jun-19 4:04:14 PM

284Laboratory Manual – Elementary Stage
Objective
To solve a linear equation, say 2x + 3 = 5
Materials required
Blue and red chart papers/rubber sheets, scissors, ruler, pencil, eraser, cardboard, white paper, adhesive.
MethOd Of cOnstructiOn
1. Take a cardboard and paste a white paper on it.
2. Cut some blue and red rectangular pieces (size x × 1) and some blue and red square pieces (size 1 × 1) from the chart paper/rubber sheet as shown in Fig.1.
Fig. 1
3. Consider each blue rectangular piece as (+x) and red rectangular piece as(–x). Similarly consider the blue and red square pieces as (+1) and (–1)respectively.
Activity 92
Lab manual Upper Primary Class Activity 75 to 93.indd 284 26-Jun-19 4:04:14 PM

285Mathematics
deMOnstratiOn
1. For the equation 2x + 3 = 5, arrange 2 rectangular and 8 blue square pieces on the cardboard in the following manner (Fig. 2).
Fig. 2
2. Add three red small square pieces on both sides (Fig. 3).
Fig. 3
3. Pair each red square with a blue square as shown in Fig. 3.
4. Remove these pairs to obtain Fig. 4.
Fig. 4
5. Taking half the number of pieces on both sides we get Fig. 5.
Lab manual Upper Primary Class Activity 75 to 93.indd 285 26-Jun-19 4:04:14 PM

286Laboratory Manual – Elementary Stage
Fig. 5
Thus, solution of the equation 2x + 3 = 5 is x = 1.
This activity may be repeated by taking some more linear equations.
ObservatiOns
Equation Pieces in LHS
Pieces in RHS
Pieces added on both sides
Solution
Rectangle Square Rectangle Square Rectangle Square
2x + 3 = 5 2 Blue 3 Blue 0 5 Blue 0 3 Red x = 1
2x–7=3 2 Blue 7 Red ___ ___ ___ 7 Blue x = 5
3x–2=x + 4 ___ ___ 1 Blue ___ 1 Red ___ __ = __
2x–7=5–2x ___ ___ 2 Red ___ 2 Blue ___ __ = __
applicatiOn
This application is useful in explaining the process of solving an equation.
Lab manual Upper Primary Class Activity 75 to 93.indd 286 26-Jun-19 4:04:15 PM

287Mathematics
93Activity
Objective
To sketch a cube on an isometric dot paper and also to draw its oblique sketch on the square paper
Materials required
Isometric dot paper, ruler, sketch pen, squared dot paper, pencil.
MethOd Of cOnstructiOn
1. Take an isometric dot paper and mark a point A on it as shown in Fig. 1.
2. Draw a horizontal line through A.
3. Identify 3 dots nearest to the point A which are above the horizontal line and mark them as X, Y and Z [See Fig. 1].
Fig. 2
Fig. 1
Lab manual Upper Primary Class Activity 75 to 93.indd 287 26-Jun-19 4:04:15 PM

288Laboratory Manual – Elementary Stage
4. Starting from point A, move 4 dots along AX and mark 4th dot as B [Fig. 2].
5. Starting from point B, now move 4 dots upward and mark the 4th dot as C [Fig. 2].
6. Starting from point A, move 4 dots along AY and mark the 4th dot as D [Fig. 2].
7. Starting from point A, move 4 dots along AZ and mark the 4th dot as E [Fig. 2].
8. Starting from point E, move 4 dots in the upward direction and mark the 4th dot as F [Fig. 2].
9. Join F, D and C, D.
10. Starting from point C move 4 dots in the direction parallel to DF. Mark the 4th dot as G.
11. Join FG, CG, BC, AB, AE, EF and AD [Fig. 3].
Oblique sketch Of the cube
1. Take a squared dot paper and mark a point A on it [Fig. 4].
2. Starting from A, move 4 dots to the right and mark the 4th dot as B.
3. Again, starting from A, move 4 dots vertically upwards from the point B and mark the 4th dot as C. Similarly, starting from A, move 4 dots vertically upward and mark the fifth dot as D [Fig. 4].
4. Join AB, BC, CD and AD to get the square ABCD of side 4 units.
5. Now take one more point say E on the square dot paper and draw the square EFGH of side 4 units by following steps 2 to 4 [Fig. 5].
Fig. 3
Fig. 4
Fig. 5
Lab manual Upper Primary Class Activity 75 to 93.indd 288 26-Jun-19 4:04:15 PM

289Mathematics
6. Join AE, BF, CG and DH as shown in Fig. 6.
Fig. 6 Fig. 7
deMOnstratiOn
1. In Fig. 3, ABCDEFG is an isometric sketch of the cube of side 4 units.
2. In Fig. 7, ABCDEFG is an oblique sketch of the cube of side 4 units.
ObservatiOn
On actual measurement:
1. In Fig. 3, AB = _____, AD = _____, AE = _____
So, AB = _____ = _____.
Thus, shape obtained in Fig. 3 is an isometric ________ of a cube of side _______.
2. In Fig. 6, AB = _____ , AD = _____ and AE = _____.
So, AB = _____.
Thus, shape obtained in Fig. 6 is an ________ sketch of a cube of side _______.
applicatiOn
This activity is useful in drawing a 3-D shape in 2-D shape.
Similar activity may be performed for a cuboid.
Lab manual Upper Primary Class Activity 75 to 93.indd 289 26-Jun-19 4:04:15 PM

290Laboratory Manual – Elementary Stage
backgrOund
The most common problems that people come across in daily life are to fence their fields and to determine the size of the field to grow a particular type of crop. These two problems are closely related with the mathematical concepts - perimeter and area, respectively. There is an impression that if the perimeter of a figure is increased, then its area will also increase and vice-versa. However, this impression is not always correct. This project tries to explain this idea by taking rectangle as a basic figure.
Objective
To explore the changes in behaviours of perimeters and areas of rectangles with respect to each other.
descriptiOn
(A) Rectangles with equal perimeters
Let us consider the rectangles of the following lengths and breadths:
(i) Length = 10 cm ; Breadth = 6 cm
(ii) Length = 11 cm ; Breadth = 5 cm
(iii) Length = 8 cm ; Breadth = 8 cm
(iv) Length = 9.5 cm ; Breadth = 6.5 cm
(v) Length = 8.5 cm ; Breadth = 7.5 cm
We may note that perimeter of each of the above rectangles is the same, namely, 32 cm. Let us calculate the areas of these rectangles:
(i) Area of the rectangle of length 10 cm and breadth 6 cm
= 10 cm × 6 cm = 60 cm2.
Project 1[periMeters and areas Of rectangles]
Lab manual Upper Primary Class Activity 75 to 93.indd 290 26-Jun-19 4:04:15 PM

291Mathematics
(ii) Area of the rectangle of length 11 cm and breadth 5 cm
= 11 cm × 5 cm = 55 cm2
(iii) Area of the rectangle of length 8 cm and breadth 8 cm
= 8 cm × 8 cm = 64 cm2 (Maximum)
(iv) Area of the rectangle of length 9.5 cm and breadth 6.5 cm
= 9.5 cm × 6.5 cm = 61.75 cm2
(v) Area of the rectangle of length 8.5 cm and breadth 7.5 cm
= 8.5 cm × 7.5 cm = 63.75 cm2
From the above, it can be observed that in case (iii), the rectangle has the maximum area. Also, in this case, the rectangle is a square.
(B) Rectangles with equal areas
Let us consider the rectangles with following lengths and breadths:
(i) Length = 16 cm ; Breadth = 4 cm
(ii) Length = 8 cm ; Breadth = 8 cm
(iii) Length = 10 cm ; Breadth = 6.4 cm
(iv) Length = 32 cm ; Breadth = 2 cm
(v) Length = 64 cm ; Breadth = 1 cm
We may note that area of each of the above rectangles is the same, namely, 64 cm2. Let us calculate the perimeter of each of these rectangles:
(i) Perimeter of rectangle of length 16 cm and breadth 4 cm
= 2 (16 + 4) cm = 40 cm
(ii) Perimeter of rectangle of length 8 cm and breadth 8 cm
= 2 (8 + 8) cm = 32 cm (Minimum)
(iii) Perimeter of rectangle of length 10 cm and breadth 6.4 cm
= 2 (10 + 6.4) cm = 32.8 cm
(iv) Perimeter of rectangle of length 32 cm and breadth 2 cm
= 2 (32 + 2) cm = 68 cm
Lab manual Upper Primary Class Activity 75 to 93.indd 291 26-Jun-19 4:04:15 PM

292Laboratory Manual – Elementary Stage
(v) Perimeter of rectangle of length 64 cm and breadth 1 cm
= 2 (64 + 1) cm = 130 cm
From the above, it can be observed that in case (ii), the rectangle has the minimum perimeter. Further, in this case, the rectangle is a square.
cOnclusiOn
The impression that when the perimeter of a rectangle is increased, its area is also increased and vice-versa is not correct. In fact,
(i) Of all the rectangles with equal perimeters, the square has the maximum area.
(ii) Of all the rectangles with equal areas, the square has the minimum perimeter.
applicatiOn
1. This project is useful in estimating a field of maximum area within a given fencing (perimeter) and also a fencing (or boundary) of minimum length enclosed in a given area.
2. A square is a regular quadrilateral. Increasing the number of sides of a regular polygon, we can arrive at the result in Description (A) above, that with a given perimeter, a circle has the maximum area.
3. If the measures of length and breadth are considered only in terms of natural numbers, then in Description (B) above, it can be seen that with a given area, the perimeter is maximum, when one of the sides is of unit length [case (v) of B]. However, if this condition is not there, then there is no limit for the perimeter to be maximum. That is, for a given area, a rectangle can have infinitely large perimeter.
Is it not surprising that you can make a belt of infinite length having a given area ?
Lab manual Upper Primary Class Activity 75 to 93.indd 292 26-Jun-19 4:04:15 PM

293Mathematics
2Project
backgrOund
In a circle, the ratio of the circumference to its diameter is a constant and is denoted by Greek letter π. For calculation purpose, value of πis generally
taken as 227
or 3.14.
Objective
In this project, an attempt has been made to find some approximation to the value of π, using simple different methods.
descriptiOn
Method-1
Take a circular disc. Mark a point on the edge of the disc. Take a cardboard
of convenient size and paste a white paper on it. Draw a line on the paper.
Mark a point P on the
line. Place the card on the
line such that the point
marked on it touches
the point marked on the
line (Fig. 1). Now roll the
card along the line till
its marked point again
touches the line at some
point Q (Fig. 2).
[MethOds fOr finding value Of π]
Fig. 1
Fig. 2
Lab manual Upper Primary Class Activity 75 to 93.indd 293 26-Jun-19 4:04:15 PM

294Laboratory Manual – Elementary Stage
PQ is the circumference of the disc. Denote it by c. Measure the diameter
of the circular disc and denote it by d. Find the ratio cd
which is equal to π.
Thus π = cd
.
On actual measurement:
c = 21.9 cm
d = 7.0 cm
So, π = 21.9
7 = 3.13 approx.
Method-2:
A Take a squared paper of dimensions say 20 cm × 20 cm. Draw a circle of radius say 8 cm on it as shown in Fig. 3.
Fig. 3
Lab manual Upper Primary Class Activity 75 to 93.indd 294 04-Jul-19 10:03:39 AM

295Mathematics
Count the number of complete squares inside the circle and denote it by a.
Count the number of squares through which the circle passes and denote it by b.
Find a +b
2 In this case, a = 14 × 6 + 12 × 4 + 10 × 2 + 6 × 2 = 164
b = 60
So a +b
2 = 164 + 60
2 = 164 + 30 = 194
That is area of the circle = 194 sq. units approx.
Divide a +b
2 by (radius)2, to get approximate value of π,
Fig. 4
Lab manual Upper Primary Class Activity 75 to 93.indd 295 04-Jul-19 10:03:39 AM

296Laboratory Manual – Elementary Stage
i.e. 19482
= 19464
= 3.03125 (approx.).
B Again draw a circle of radius 10 cm on the squared paper and repeat the above process to find value of π.
In this case,
a = 18 × 8 + 16 × 4 + 14 × 2 + 12 × 2 + 8 × 2 = 276
b = 68
So a + b
2 = 276 +
682
= 310
Thus π = 310102
= 310100
= 3.1 approx.
As radius r increases, the value of π comes closer to 3.14.
Method-3:
Take a squared paper of dimension say 20 cm × 20 cm. Draw a circle of radius say 10 cm on it as shown in Fig. 4.
Count the number of vertices of the squares in the circles. Let it be a.
Divide a by r2 to get value of π.
In this case, π = 317102
= 317100
= 3.17
As radius r increases, the value of π comes closer to 3.14.
ConClusion
The ratio of the circumference and diameter of a circle is always constant and is denoted by π. Its approximate value is 3.14.
Lab manual Upper Primary Class Activity 75 to 93.indd 296 04-Jul-19 10:03:39 AM

297Mathematics
1. About an Indian mathematician and his/her contributions to mathematics.
2. Verification of Pythagoras theorem in different ways.
3. Magic squares : 3 × 3, 4 × 4, and 5 × 5.
4. Congruent shapes.
5. Exploring Pythagorean Triplets.
6. Drawing map of your school/locality.
7. Collection of data and its pictorial representation in different ways.
8. Decimal system versus other number systems with base 5, 8 and 2.
9. Divisibility Tests with special reference to 7, 11 and 13.
10. Verification of Euler’s formula for different 3 D shapes (polyhedra).
11. Application of direct and inverse proportions in day to day life.
12. Use of double bar graph in different situations.
13. Hardy–RamanujanNumbers.
14. Use of algebraic identities in solving problems.
15. Areas of different polygons.
16. Graphs in day to day life.
Suggested List of Projects
Lab manual Upper Primary Class Activity 75 to 93.indd 297 26-Jun-19 4:04:15 PM

298Laboratory Manual – Elementary Stage
Notes
Lab manual Upper Primary Class Activity 75 to 93.indd 298 26-Jun-19 4:04:15 PM