Adobe After Effects Classroom in a Book (2021)
23
Sample pages
-
Upload
khangminh22 -
Category
Documents
-
view
1 -
download
0
Transcript of Adobe After Effects Classroom in a Book (2021)
Sample
page
s
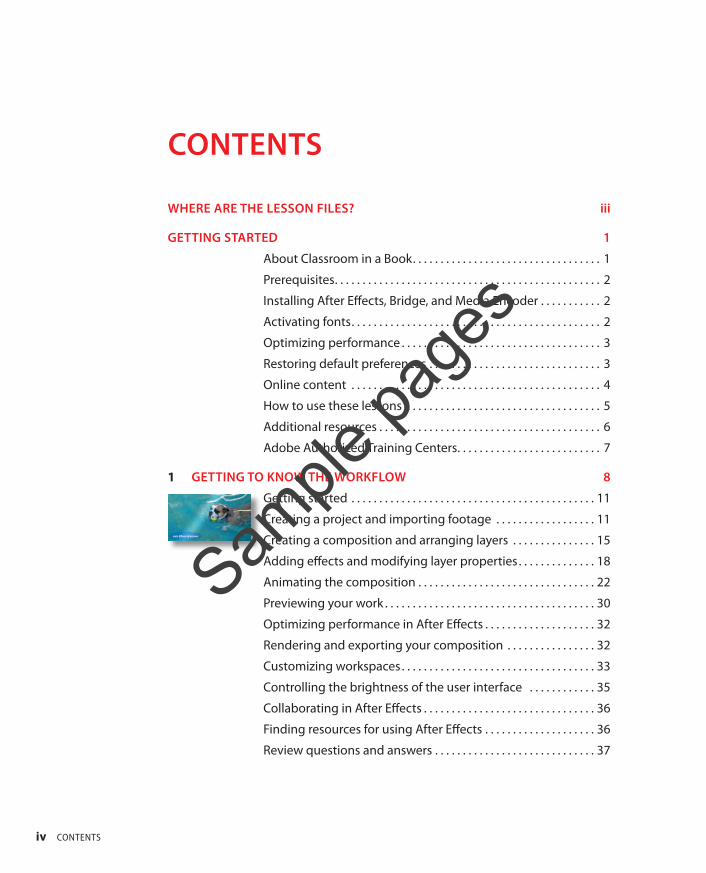
CONTENTS
iv CONTENTS
WHERE ARE THE LESSON FILES? iii
GETTING STARTED 1
About Classroom in a Book . . . . . . . . . . . . . . . . . . . . . . . . . . . . . . . . . . 1
Prerequisites . . . . . . . . . . . . . . . . . . . . . . . . . . . . . . . . . . . . . . . . . . . . . . . . 2
Installing After Effects, Bridge, and Media Encoder . . . . . . . . . . . 2
Activating fonts . . . . . . . . . . . . . . . . . . . . . . . . . . . . . . . . . . . . . . . . . . . . . 2
Optimizing performance . . . . . . . . . . . . . . . . . . . . . . . . . . . . . . . . . . . . 3
Restoring default preferences . . . . . . . . . . . . . . . . . . . . . . . . . . . . . . . 3
Online content . . . . . . . . . . . . . . . . . . . . . . . . . . . . . . . . . . . . . . . . . . . . . 4
How to use these lessons . . . . . . . . . . . . . . . . . . . . . . . . . . . . . . . . . . . 5
Additional resources . . . . . . . . . . . . . . . . . . . . . . . . . . . . . . . . . . . . . . . . 6
Adobe Authorized Training Centers . . . . . . . . . . . . . . . . . . . . . . . . . . 7
1 GETTING TO KNOW THE WORKFLOW 8
Getting started . . . . . . . . . . . . . . . . . . . . . . . . . . . . . . . . . . . . . . . . . . . . 11
Creating a project and importing footage . . . . . . . . . . . . . . . . . . 11
Creating a composition and arranging layers . . . . . . . . . . . . . . . 15
Adding effects and modifying layer properties . . . . . . . . . . . . . . 18
Animating the composition . . . . . . . . . . . . . . . . . . . . . . . . . . . . . . . . 22
Previewing your work . . . . . . . . . . . . . . . . . . . . . . . . . . . . . . . . . . . . . . 30
Optimizing performance in After Effects . . . . . . . . . . . . . . . . . . . . 32
Rendering and exporting your composition . . . . . . . . . . . . . . . . 32
Customizing workspaces . . . . . . . . . . . . . . . . . . . . . . . . . . . . . . . . . . . 33
Controlling the brightness of the user interface . . . . . . . . . . . . 35
Collaborating in After Effects . . . . . . . . . . . . . . . . . . . . . . . . . . . . . . . 36
Finding resources for using After Effects . . . . . . . . . . . . . . . . . . . . 36
Review questions and answers . . . . . . . . . . . . . . . . . . . . . . . . . . . . . 37
Sample
page
s
ADOBE AFTER EFFECTS CLASSROOM IN A BOOK (2021 RELEASE) v
2 CREATING A BASIC ANIMATION USING EFFECTS AND PRESETS 38
Getting started . . . . . . . . . . . . . . . . . . . . . . . . . . . . . . . . . . . . . . . . . . . . 40
Importing footage using Adobe Bridge . . . . . . . . . . . . . . . . . . . . . 41
Creating a new composition . . . . . . . . . . . . . . . . . . . . . . . . . . . . . . . 43
Working with imported Illustrator layers . . . . . . . . . . . . . . . . . . . . 46
Applying effects to a layer . . . . . . . . . . . . . . . . . . . . . . . . . . . . . . . . . . 48
Applying an animation preset . . . . . . . . . . . . . . . . . . . . . . . . . . . . . . 50
Precomposing layers for a new animation . . . . . . . . . . . . . . . . . . 51
Previewing the effects . . . . . . . . . . . . . . . . . . . . . . . . . . . . . . . . . . . . . 52
Adding transparency . . . . . . . . . . . . . . . . . . . . . . . . . . . . . . . . . . . . . . 53
Rendering the composition . . . . . . . . . . . . . . . . . . . . . . . . . . . . . . . . 54
Review questions and answers . . . . . . . . . . . . . . . . . . . . . . . . . . . . . 57
3 ANIMATING TEXT 58
Getting started . . . . . . . . . . . . . . . . . . . . . . . . . . . . . . . . . . . . . . . . . . . . 60
About text layers . . . . . . . . . . . . . . . . . . . . . . . . . . . . . . . . . . . . . . . . . . 62
Installing a font using Adobe Fonts . . . . . . . . . . . . . . . . . . . . . . . . . 62
Creating and formatting point text . . . . . . . . . . . . . . . . . . . . . . . . . 65
Animating with scale keyframes . . . . . . . . . . . . . . . . . . . . . . . . . . . . 67
Using a text animation preset . . . . . . . . . . . . . . . . . . . . . . . . . . . . . . 69
Animating imported Photoshop text . . . . . . . . . . . . . . . . . . . . . . . 72
Animating type tracking . . . . . . . . . . . . . . . . . . . . . . . . . . . . . . . . . . . 75
Animating text opacity . . . . . . . . . . . . . . . . . . . . . . . . . . . . . . . . . . . . . 77
Animating an image to replace text . . . . . . . . . . . . . . . . . . . . . . . . 77
Using a text animator group . . . . . . . . . . . . . . . . . . . . . . . . . . . . . . . 80
Animating a layer’s position . . . . . . . . . . . . . . . . . . . . . . . . . . . . . . . . 83
Adding motion blur . . . . . . . . . . . . . . . . . . . . . . . . . . . . . . . . . . . . . . . . 85
Review questions and answers . . . . . . . . . . . . . . . . . . . . . . . . . . . . . 87
4 WORKING WITH SHAPE LAYERS 88
Getting started . . . . . . . . . . . . . . . . . . . . . . . . . . . . . . . . . . . . . . . . . . . . 90
Creating the composition . . . . . . . . . . . . . . . . . . . . . . . . . . . . . . . . . . 90
Adding a shape layer . . . . . . . . . . . . . . . . . . . . . . . . . . . . . . . . . . . . . . . 91
Creating a self-animating shape . . . . . . . . . . . . . . . . . . . . . . . . . . . . 93
Duplicating a shape . . . . . . . . . . . . . . . . . . . . . . . . . . . . . . . . . . . . . . . . 95
Creating custom shapes with the Pen tool . . . . . . . . . . . . . . . . . . 99
Sample
page
s
Positioning layers with snapping . . . . . . . . . . . . . . . . . . . . . . . . . . 101
Animating a shape . . . . . . . . . . . . . . . . . . . . . . . . . . . . . . . . . . . . . . . . 103
Animating using parenting . . . . . . . . . . . . . . . . . . . . . . . . . . . . . . . . 107
Using nulls to connect points . . . . . . . . . . . . . . . . . . . . . . . . . . . . . 111
Previewing the composition . . . . . . . . . . . . . . . . . . . . . . . . . . . . . . 113
Review questions and answers . . . . . . . . . . . . . . . . . . . . . . . . . . . . 115
5 ANIMATING A MULTIMEDIA PRESENTATION 116
Getting started . . . . . . . . . . . . . . . . . . . . . . . . . . . . . . . . . . . . . . . . . . . 118
Adjusting anchor points . . . . . . . . . . . . . . . . . . . . . . . . . . . . . . . . . . 121
Parenting layers . . . . . . . . . . . . . . . . . . . . . . . . . . . . . . . . . . . . . . . . . . 123
Precomposing layers . . . . . . . . . . . . . . . . . . . . . . . . . . . . . . . . . . . . . 125
Keyframing a motion path . . . . . . . . . . . . . . . . . . . . . . . . . . . . . . . . 127
Animating additional elements . . . . . . . . . . . . . . . . . . . . . . . . . . . . 131
Applying an effect . . . . . . . . . . . . . . . . . . . . . . . . . . . . . . . . . . . . . . . . 135
Animating precomposed layers . . . . . . . . . . . . . . . . . . . . . . . . . . . 138
Animating the background . . . . . . . . . . . . . . . . . . . . . . . . . . . . . . . 141
Adding an audio track . . . . . . . . . . . . . . . . . . . . . . . . . . . . . . . . . . . . 143
Review questions and answers . . . . . . . . . . . . . . . . . . . . . . . . . . . . 145
6 ANIMATING LAYERS 146
Getting started . . . . . . . . . . . . . . . . . . . . . . . . . . . . . . . . . . . . . . . . . . . 148
Simulating lighting changes . . . . . . . . . . . . . . . . . . . . . . . . . . . . . . 151
Duplicating an animation using the pick whip . . . . . . . . . . . . . 153
Using a track matte to confine animation . . . . . . . . . . . . . . . . . . 156
Animating using the Corner Pin effect . . . . . . . . . . . . . . . . . . . . . 161
Simulating a darkening sky . . . . . . . . . . . . . . . . . . . . . . . . . . . . . . . . 163
Retiming the composition . . . . . . . . . . . . . . . . . . . . . . . . . . . . . . . . 167
Review questions and answers . . . . . . . . . . . . . . . . . . . . . . . . . . . . 177
7 WORKING WITH MASKS 178
About masks . . . . . . . . . . . . . . . . . . . . . . . . . . . . . . . . . . . . . . . . . . . . . 180
Getting started . . . . . . . . . . . . . . . . . . . . . . . . . . . . . . . . . . . . . . . . . . . 180
Creating a mask with the Pen tool . . . . . . . . . . . . . . . . . . . . . . . . . 182
Editing a mask . . . . . . . . . . . . . . . . . . . . . . . . . . . . . . . . . . . . . . . . . . . . 183
Feathering the edges of a mask . . . . . . . . . . . . . . . . . . . . . . . . . . . 186
Replacing the content of the mask . . . . . . . . . . . . . . . . . . . . . . . . 187
vi CONTENTS
Sample
page
s
ADOBE AFTER EFFECTS CLASSROOM IN A BOOK (2021 RELEASE) vii
Adjusting the opacity . . . . . . . . . . . . . . . . . . . . . . . . . . . . . . . . . . . . . 189
Adding a shadow . . . . . . . . . . . . . . . . . . . . . . . . . . . . . . . . . . . . . . . . . 190
Creating a vignette . . . . . . . . . . . . . . . . . . . . . . . . . . . . . . . . . . . . . . . 195
Review questions and answers . . . . . . . . . . . . . . . . . . . . . . . . . . . . 199
8 DISTORTING OBJECTS WITH THE PUPPET TOOLS 200
Getting started . . . . . . . . . . . . . . . . . . . . . . . . . . . . . . . . . . . . . . . . . . . 202
About the Puppet tools . . . . . . . . . . . . . . . . . . . . . . . . . . . . . . . . . . . 207
Adding Position pins . . . . . . . . . . . . . . . . . . . . . . . . . . . . . . . . . . . . . . 208
Adding Advanced and Bend pins . . . . . . . . . . . . . . . . . . . . . . . . . . 210
Stiffening an area . . . . . . . . . . . . . . . . . . . . . . . . . . . . . . . . . . . . . . . . . 213
Animating pin positions. . . . . . . . . . . . . . . . . . . . . . . . . . . . . . . . . . . 214
Using the Puppet tools to animate video . . . . . . . . . . . . . . . . . . 215
Recording animation. . . . . . . . . . . . . . . . . . . . . . . . . . . . . . . . . . . . . . 216
Review questions and answers . . . . . . . . . . . . . . . . . . . . . . . . . . . . 219
9 USING THE ROTO BRUSH TOOL 220
About rotoscoping . . . . . . . . . . . . . . . . . . . . . . . . . . . . . . . . . . . . . . . . 222
Getting started . . . . . . . . . . . . . . . . . . . . . . . . . . . . . . . . . . . . . . . . . . . 222
Creating a segmentation boundary . . . . . . . . . . . . . . . . . . . . . . . . 224
Fine-tuning the matte . . . . . . . . . . . . . . . . . . . . . . . . . . . . . . . . . . . . 230
Freezing your Roto Brush tool results . . . . . . . . . . . . . . . . . . . . . . 232
Changing the background . . . . . . . . . . . . . . . . . . . . . . . . . . . . . . . . 234
Adding animated text . . . . . . . . . . . . . . . . . . . . . . . . . . . . . . . . . . . . . 236
Outputting your project. . . . . . . . . . . . . . . . . . . . . . . . . . . . . . . . . . . 238
Review questions and answers . . . . . . . . . . . . . . . . . . . . . . . . . . . . 239
10 PERFORMING COLOR CORRECTION 242
Getting started . . . . . . . . . . . . . . . . . . . . . . . . . . . . . . . . . . . . . . . . . . . 244
Adjusting color balance with levels . . . . . . . . . . . . . . . . . . . . . . . . 247
Adjusting color with the Lumetri Color effect . . . . . . . . . . . . . . 250
Replacing the background . . . . . . . . . . . . . . . . . . . . . . . . . . . . . . . . 252
Color-correcting using Auto Levels . . . . . . . . . . . . . . . . . . . . . . . . 257
Motion tracking the clouds . . . . . . . . . . . . . . . . . . . . . . . . . . . . . . . . 258
Replacing the sky in the second clip . . . . . . . . . . . . . . . . . . . . . . . 260
Color grading . . . . . . . . . . . . . . . . . . . . . . . . . . . . . . . . . . . . . . . . . . . . . 265
Review questions and answers . . . . . . . . . . . . . . . . . . . . . . . . . . . . 271
Sample
page
s
11 CREATING MOTION GRAPHICS TEMPLATES 272
Getting started . . . . . . . . . . . . . . . . . . . . . . . . . . . . . . . . . . . . . . . . . . . 274
Preparing a master composition . . . . . . . . . . . . . . . . . . . . . . . . . . . 274
Setting up a template . . . . . . . . . . . . . . . . . . . . . . . . . . . . . . . . . . . . . 280
Adding properties to the Essential Graphics panel . . . . . . . . . 281
Providing image options . . . . . . . . . . . . . . . . . . . . . . . . . . . . . . . . . . 284
Protecting the timing of a section . . . . . . . . . . . . . . . . . . . . . . . . . 287
Exporting the template . . . . . . . . . . . . . . . . . . . . . . . . . . . . . . . . . . . 288
Review questions and answers . . . . . . . . . . . . . . . . . . . . . . . . . . . . 291
12 USING 3D FEATURES 292
Getting started . . . . . . . . . . . . . . . . . . . . . . . . . . . . . . . . . . . . . . . . . . . 294
Creating 3D layers . . . . . . . . . . . . . . . . . . . . . . . . . . . . . . . . . . . . . . . . 295
Animating 3D layers . . . . . . . . . . . . . . . . . . . . . . . . . . . . . . . . . . . . . . 300
Adding ambient light . . . . . . . . . . . . . . . . . . . . . . . . . . . . . . . . . . . . . 303
Precomposing layers . . . . . . . . . . . . . . . . . . . . . . . . . . . . . . . . . . . . . . 304
Creating 3D text . . . . . . . . . . . . . . . . . . . . . . . . . . . . . . . . . . . . . . . . . . 305
Using 3D views . . . . . . . . . . . . . . . . . . . . . . . . . . . . . . . . . . . . . . . . . . . 308
Adding a camera. . . . . . . . . . . . . . . . . . . . . . . . . . . . . . . . . . . . . . . . . . 310
Lighting a scene . . . . . . . . . . . . . . . . . . . . . . . . . . . . . . . . . . . . . . . . . . 313
Review questions and answers . . . . . . . . . . . . . . . . . . . . . . . . . . . . 319
13 WORKING WITH THE 3D CAMERA TRACKER 320
About the 3D Camera Tracker effect . . . . . . . . . . . . . . . . . . . . . . . 322
Getting started . . . . . . . . . . . . . . . . . . . . . . . . . . . . . . . . . . . . . . . . . . . 322
Tracking the footage . . . . . . . . . . . . . . . . . . . . . . . . . . . . . . . . . . . . . . 324
Creating a ground plane, a camera, and the initial text . . . . . 325
Creating additional text elements . . . . . . . . . . . . . . . . . . . . . . . . . 329
Locking an image to a plane with a solid layer . . . . . . . . . . . . . 332
Tidying the composition . . . . . . . . . . . . . . . . . . . . . . . . . . . . . . . . . . 335
Adding a final object . . . . . . . . . . . . . . . . . . . . . . . . . . . . . . . . . . . . . . 336
Creating realistic shadows. . . . . . . . . . . . . . . . . . . . . . . . . . . . . . . . . 337
Adding ambient light . . . . . . . . . . . . . . . . . . . . . . . . . . . . . . . . . . . . . 339
Adding an effect . . . . . . . . . . . . . . . . . . . . . . . . . . . . . . . . . . . . . . . . . . 339
Previewing the composition . . . . . . . . . . . . . . . . . . . . . . . . . . . . . . 340
Review questions and answers . . . . . . . . . . . . . . . . . . . . . . . . . . . . 341
viii CONTENTS
Sample
page
s

ADOBE AFTER EFFECTS CLASSROOM IN A BOOK (2021 RELEASE) ix
14 ADVANCED EDITING TECHNIQUES 342
Getting started . . . . . . . . . . . . . . . . . . . . . . . . . . . . . . . . . . . . . . . . . . . 344
Stabilizing a shot . . . . . . . . . . . . . . . . . . . . . . . . . . . . . . . . . . . . . . . . . 344
Using single-point motion tracking . . . . . . . . . . . . . . . . . . . . . . . . 350
Removing unwanted objects . . . . . . . . . . . . . . . . . . . . . . . . . . . . . . 355
Creating a particle simulation . . . . . . . . . . . . . . . . . . . . . . . . . . . . . 360
Retiming playback using the Timewarp effect . . . . . . . . . . . . . . 371
Review questions and answers . . . . . . . . . . . . . . . . . . . . . . . . . . . . 377
15 RENDERING AND OUTPUTTING 378
Getting started . . . . . . . . . . . . . . . . . . . . . . . . . . . . . . . . . . . . . . . . . . . 380
About rendering and output . . . . . . . . . . . . . . . . . . . . . . . . . . . . . . 381
Exporting using the Render Queue . . . . . . . . . . . . . . . . . . . . . . . . 381
Creating templates for the Render Queue. . . . . . . . . . . . . . . . . . 385
Rendering movies with Adobe Media Encoder . . . . . . . . . . . . . 386
Review questions and answers . . . . . . . . . . . . . . . . . . . . . . . . . . . . 393
INDEX 395
Sample
page
s
38
CREATING A BASIC ANIMATION USING EFFECTS AND PRESETS
Lesson overviewIn this lesson, you’ll learn how to do the following:
• Use Adobe Bridge to preview and import footage items.
• Work with the layers of an imported Adobe Illustrator file.
• Use guides to position objects.
• Apply drop-shadow and emboss effects.
• Apply a text animation preset.
• Precompose layers.
• Apply a dissolve transition effect.
• Adjust the transparency of a layer.
• Render an animation for broadcast use.
This lesson will take about an hour to complete. If you haven’t already done so, download the project files for this lesson from www.adobepress.com/AfterEffectsCIB2021, following the instructions in the Getting Started section under “Accessing the lesson files and Web Edition.”
2
Sample
page
s

39
Hit the ground running with a variety of effects and animation presets in After Effects. You can use them to create great-looking animations quickly and easily.
PROJECT: ANIMATED LOGO Sample
page
s
40 LESSON 2 Creating a Basic Animation Using Effects and Presets
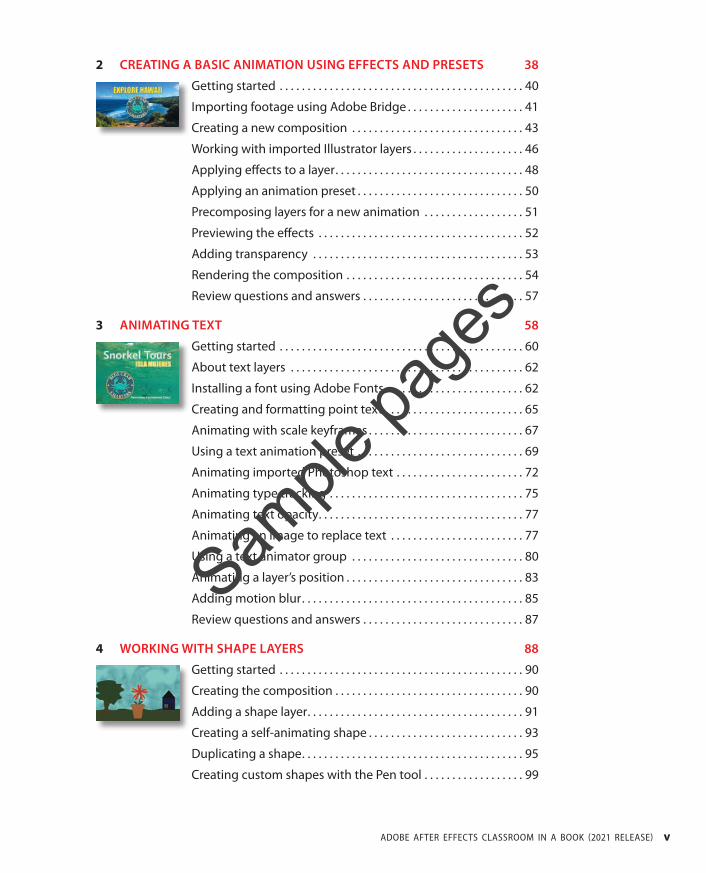
Getting startedIn this lesson, you will become more familiar with the Adobe After Effects project workflow. You’ll learn new ways to accomplish basic tasks as you create a simple identification graphic for the introduction to a video presentation called “Explore Hawaii” for the fictional Blue Crab Charter Services. You will animate the title and logo so that they fade to become a watermark in the lower right corner of the screen during the presentation. Then you’ll export the introduction for broadcast output.
First, take a look at the final project files to see what you’ll be doing.
1 Make sure the following files are in the Lessons/Lesson02 folder on your hard disk, or download them from www.adobepress.com now:
• In the Assets folder: BlueCrabLogo.ai, MauiCoast.jpg
• In the Sample_Movies folder: Lesson02.avi, Lesson02.mov
2 Open and play the Lesson02.avi sample movie in Windows Movies & TV or the Lesson02.mov sample movie in QuickTime Player to see what you will create in this lesson. When you are done, close Windows Movies & TV or QuickTime Player. You may delete the sample movies from your hard disk if you have limited storage space.
Before you begin the lesson, you’ll restore the default application settings for After Effects. See “Restoring default preferences” on page 3 for more information.
3 Start After Effects, and then immediately hold down Ctrl+Alt+Shift (Windows) or Command+Option+Shift (macOS) to restore default preferences settings. When prompted, click OK to delete your preferences.
4 In the Home window, click New Project.
After Effects opens to display a blank, untitled project.
5 Choose File > Save As > Save As.
6 In the Save As dialog box, navigate to the Lessons/Lesson02/ Finished_Project folder.
7 Name the project Lesson02_Finished.aep, and then click Save.
Sample
page
s
ADOBE AFTER EFFECTS CLASSROOM IN A BOOK (2021 RELEASE) 41
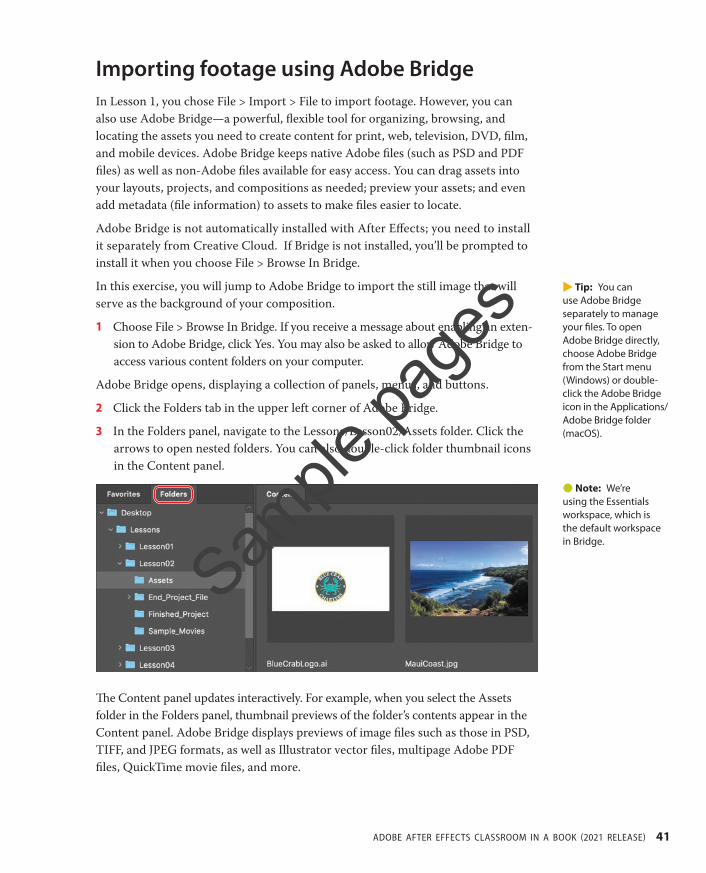
Importing footage using Adobe BridgeIn Lesson 1, you chose File > Import > File to import footage. However, you can also use Adobe Bridge—a powerful, flexible tool for organizing, browsing, and locating the assets you need to create content for print, web, television, DVD, film, and mobile devices. Adobe Bridge keeps native Adobe files (such as PSD and PDF files) as well as non-Adobe files available for easy access. You can drag assets into your layouts, projects, and compositions as needed; preview your assets; and even add metadata (file information) to assets to make files easier to locate.
Adobe Bridge is not automatically installed with After Effects; you need to install it separately from Creative Cloud. If Bridge is not installed, you’ll be prompted to install it when you choose File > Browse In Bridge.
In this exercise, you will jump to Adobe Bridge to import the still image that will serve as the background of your composition.
1 Choose File > Browse In Bridge. If you receive a message about enabling an exten-sion to Adobe Bridge, click Yes. You may also be asked to allow Adobe Bridge to access various content folders on your computer.
Adobe Bridge opens, displaying a collection of panels, menus, and buttons.
2 Click the Folders tab in the upper left corner of Adobe Bridge.
3 In the Folders panel, navigate to the Lessons/Lesson02/Assets folder. Click the arrows to open nested folders. You can also double-click folder thumbnail icons in the Content panel.
The Content panel updates interactively. For example, when you select the Assets folder in the Folders panel, thumbnail previews of the folder’s contents appear in the Content panel. Adobe Bridge displays previews of image files such as those in PSD, TIFF, and JPEG formats, as well as Illustrator vector files, multipage Adobe PDF files, QuickTime movie files, and more.
EE Tip: You can use Adobe Bridge separately to manage your files. To open Adobe Bridge directly, choose Adobe Bridge from the Start menu (Windows) or double-click the Adobe Bridge icon in the Applications/ Adobe Bridge folder (macOS).
Note: We’re using the Essentials workspace, which is the default workspace in Bridge.
Sample
page
s
42 LESSON 2 Creating a Basic Animation Using Effects and Presets
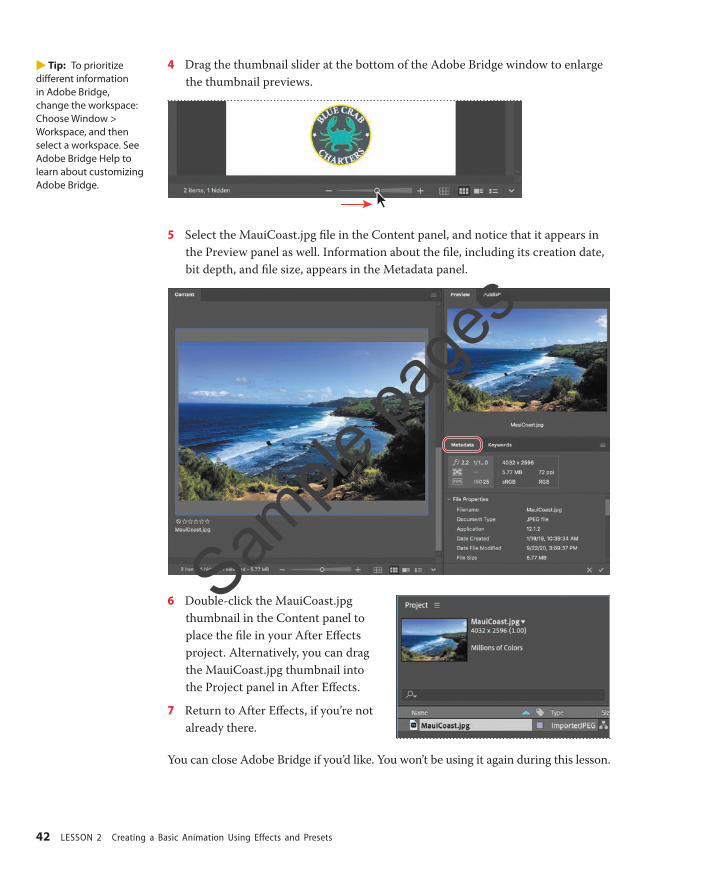
4 Drag the thumbnail slider at the bottom of the Adobe Bridge window to enlarge the thumbnail previews.
5 Select the MauiCoast.jpg file in the Content panel, and notice that it appears in the Preview panel as well. Information about the file, including its creation date, bit depth, and file size, appears in the Metadata panel.
6 Double-click the MauiCoast.jpg thumbnail in the Content panel to place the file in your After Effects project. Alternatively, you can drag the MauiCoast.jpg thumbnail into the Project panel in After Effects.
7 Return to After Effects, if you’re not already there.
You can close Adobe Bridge if you’d like. You won’t be using it again during this lesson.
EE Tip: To prioritize different information in Adobe Bridge, change the workspace: Choose Window > Workspace, and then select a workspace. See Adobe Bridge Help to learn about customizing Adobe Bridge.
Sample
page
s
ADOBE AFTER EFFECTS CLASSROOM IN A BOOK (2021 RELEASE) 43
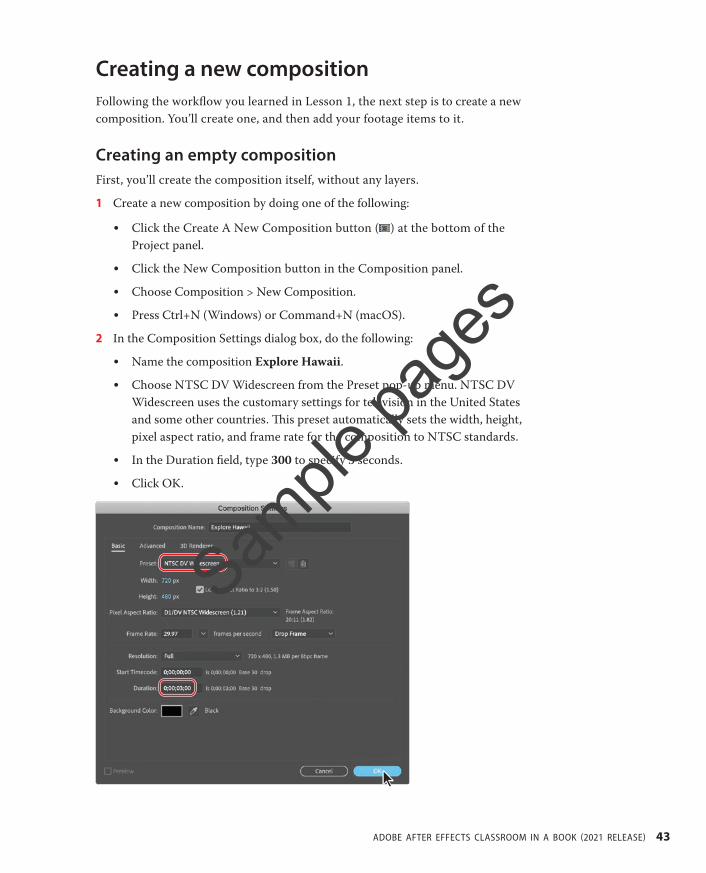
Creating a new compositionFollowing the workflow you learned in Lesson 1, the next step is to create a new composition. You’ll create one, and then add your footage items to it.
Creating an empty compositionFirst, you’ll create the composition itself, without any layers.
1 Create a new composition by doing one of the following:
• Click the Create A New Composition button ( ) at the bottom of the Project panel.
• Click the New Composition button in the Composition panel.
• Choose Composition > New Composition.
• Press Ctrl+N (Windows) or Command+N (macOS).
2 In the Composition Settings dialog box, do the following:
• Name the composition Explore Hawaii.
• Choose NTSC DV Widescreen from the Preset pop-up menu. NTSC DV Widescreen uses the customary settings for television in the United States and some other countries. This preset automatically sets the width, height, pixel aspect ratio, and frame rate for the composition to NTSC standards.
• In the Duration field, type 300 to specify 3 seconds.
• Click OK.
Sample
page
s
44 LESSON 2 Creating a Basic Animation Using Effects and Presets
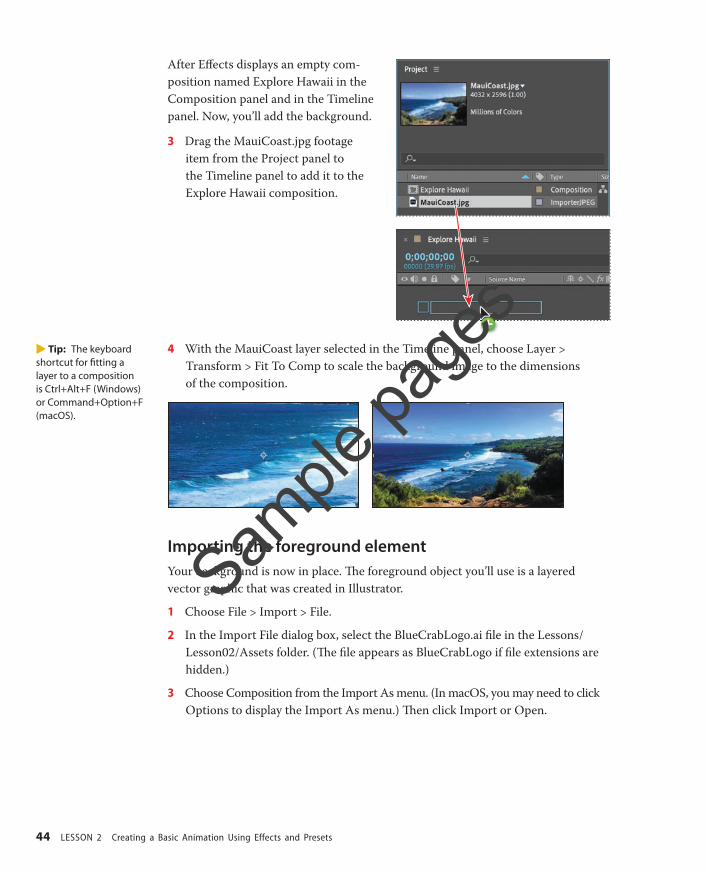
After Effects displays an empty com-position named Explore Hawaii in the Composition panel and in the Timeline panel. Now, you’ll add the background.
3 Drag the MauiCoast.jpg footage item from the Project panel to the Timeline panel to add it to the Explore Hawaii composition.
4 With the MauiCoast layer selected in the Timeline panel, choose Layer > Transform > Fit To Comp to scale the background image to the dimensions of the composition.
Importing the foreground elementYour background is now in place. The foreground object you’ll use is a layered vector graphic that was created in Illustrator.
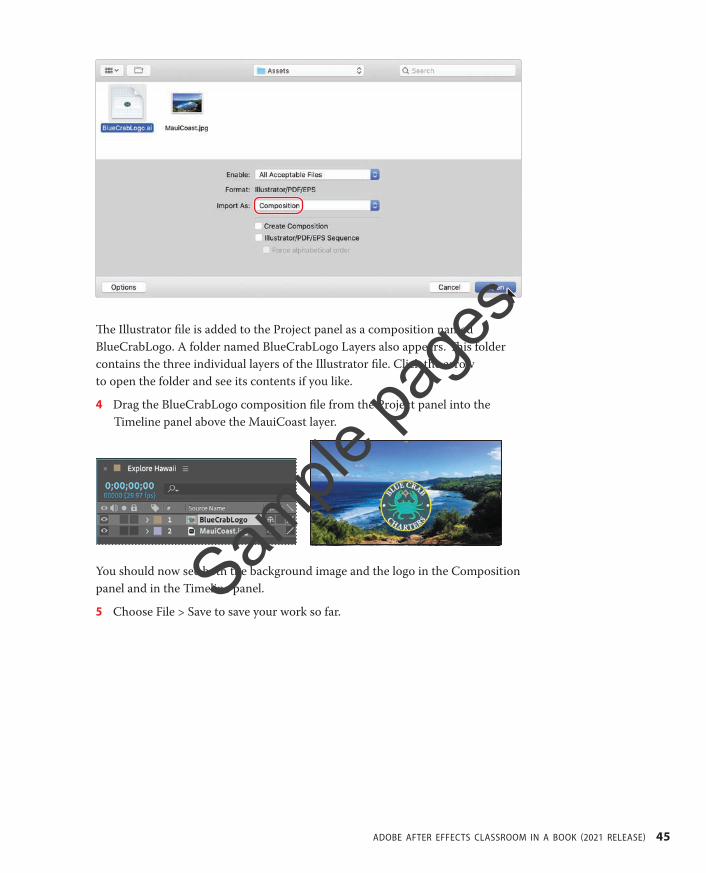
1 Choose File > Import > File.
2 In the Import File dialog box, select the BlueCrabLogo.ai file in the Lessons/Lesson02/Assets folder. (The file appears as BlueCrabLogo if file extensions are hidden.)
3 Choose Composition from the Import As menu. (In macOS, you may need to click Options to display the Import As menu.) Then click Import or Open.
EE Tip: The keyboard shortcut for fitting a layer to a composition is Ctrl+Alt+F (Windows) or Command+Option+F (macOS).
Sample
page
s
ADOBE AFTER EFFECTS CLASSROOM IN A BOOK (2021 RELEASE) 45
The Illustrator file is added to the Project panel as a composition named BlueCrabLogo. A folder named BlueCrabLogo Layers also appears. This folder contains the three individual layers of the Illustrator file. Click the arrow to open the folder and see its contents if you like.
4 Drag the BlueCrabLogo composition file from the Project panel into the Timeline panel above the MauiCoast layer.
You should now see both the background image and the logo in the Composition panel and in the Timeline panel.
5 Choose File > Save to save your work so far.Sam
ple pa
ges
46 LESSON 2 Creating a Basic Animation Using Effects and Presets
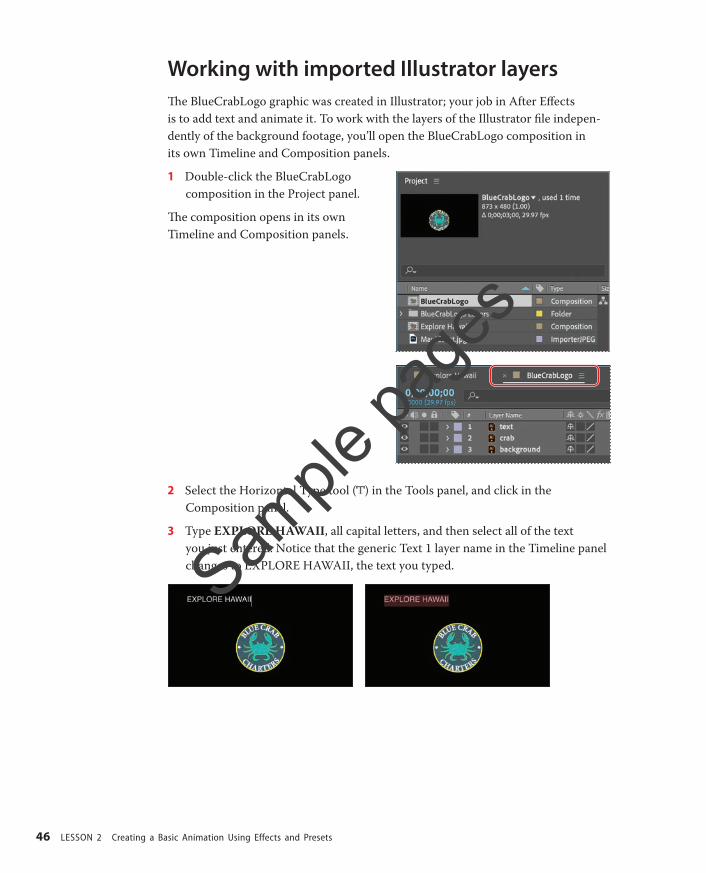
Working with imported Illustrator layersThe BlueCrabLogo graphic was created in Illustrator; your job in After Effects is to add text and animate it. To work with the layers of the Illustrator file indepen-dently of the background footage, you’ll open the BlueCrabLogo composition in its own Timeline and Composition panels.
1 Double-click the BlueCrabLogo composition in the Project panel.
The composition opens in its own Timeline and Composition panels.
2 Select the Horizontal Type tool ( ) in the Tools panel, and click in the Composition panel.
3 Type EXPLORE HAWAII, all capital letters, and then select all of the text you just entered. Notice that the generic Text 1 layer name in the Timeline panel changes to EXPLORE HAWAII, the text you typed. Sam
ple pa
ges

ADOBE AFTER EFFECTS CLASSROOM IN A BOOK (2021 RELEASE) 47
4 In the Character panel, select a sans serif typeface such as Impact, and change the font size to 80 pixels. Click the eyedropper ( ) in the Character panel, and click the outer border on the logo to select the yellow color. After Effects applies it to the text you typed. Leave all other options in the Character panel at their defaults.
You’ll position the text you just typed using a guide.
5 Select the Selection tool ( ) in the Tools panel.
6 Choose View > Show Rulers, and then drag a guide from the top ruler into the Composition panel.
7 Right-click or Control-click the guide, click Edit Position, type 120 in the Edit Value dialog box, and click OK. The guide moves to the position you specified.
8 Drag the text so that it is centered over the image, snapping its bottom side to the guide.
9 Drag another guide from the top ruler, right-click or Control-click it, click Edit Position, type 150 in the Edit Value dialog box, and click OK.
10 In the Timeline panel, select the background layer, and then Shift-select the text layer to select all three logo layers. Align the top of the logo with the lower guide.
Note: If the Character panel isn’t open, choose Window > Character. You may need to expand the width of the panel to see the eyedropper.
EE Tip: You can also choose View > Show Grid to make the nonprinting grid visible to help you position objects. Choose View > Show Grid again to hide the grid later.
Sample
page
s
48 LESSON 2 Creating a Basic Animation Using Effects and Presets
11 Choose View > Show Rulers, and then choose View > Show Guides, to hide the ruler and the guide.
12 Choose File > Save to save your work.
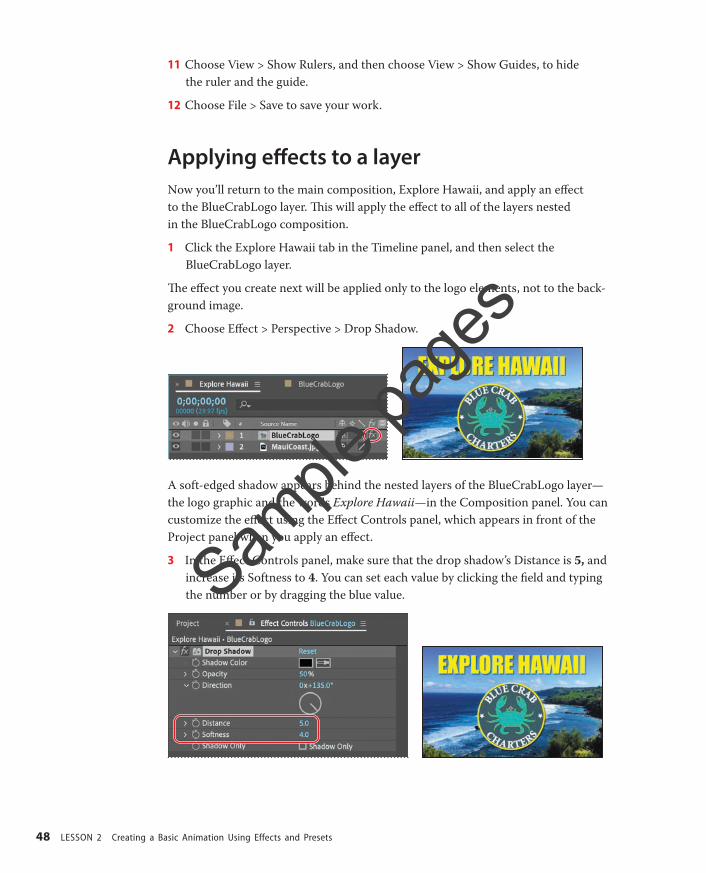
Applying effects to a layerNow you’ll return to the main composition, Explore Hawaii, and apply an effect to the BlueCrabLogo layer. This will apply the effect to all of the layers nested in the BlueCrabLogo composition.
1 Click the Explore Hawaii tab in the Timeline panel, and then select the BlueCrabLogo layer.
The effect you create next will be applied only to the logo elements, not to the back-ground image.
2 Choose Effect > Perspective > Drop Shadow.
A soft-edged shadow appears behind the nested layers of the BlueCrabLogo layer—the logo graphic and the words Explore Hawaii—in the Composition panel. You can customize the effect using the Effect Controls panel, which appears in front of the Project panel when you apply an effect.
3 In the Effect Controls panel, make sure that the drop shadow’s Distance is 5, and increase its Softness to 4. You can set each value by clicking the field and typing the number or by dragging the blue value.Sam
ple pa
ges
ADOBE AFTER EFFECTS CLASSROOM IN A BOOK (2021 RELEASE) 49
Applying and controlling effectsYou can apply or remove an effect at any time. Once you’ve applied effects to a layer, you can temporarily turn off one or all of the effects in the layer to concentrate on another aspect of your composition. Effects that are turned off do not appear in the Composition panel, and typically aren’t included when the layer is previewed or rendered.
By default, when you apply an effect to a layer, the effect is active for the duration of the layer. However, you can make an effect start and stop at specific times, or make the effect more or less intense over time. You’ll learn more about creating animation using keyframes and expressions in Lesson 5, “Animating a Multimedia Presentation,” and Lesson 6, “Animating Layers.”
You can apply and edit effects on adjustment layers just as you do with other layers. Note, however, that when you apply an effect to an adjustment layer, the effect is applied to all layers below it in the Timeline panel.
Effects can also be saved, browsed, and applied as animation presets.
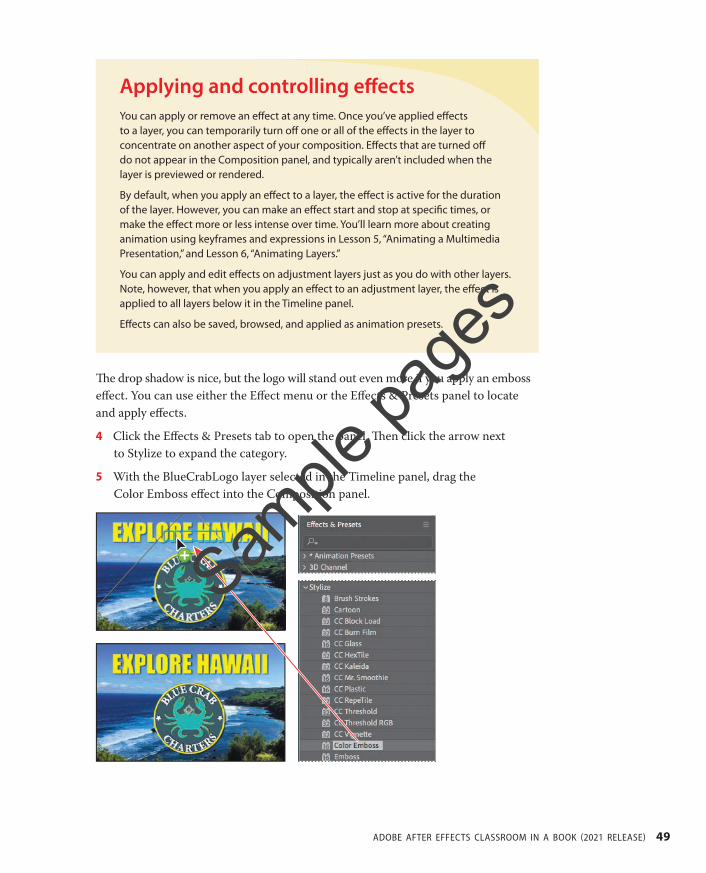
The drop shadow is nice, but the logo will stand out even more if you apply an emboss effect. You can use either the Effect menu or the Effects & Presets panel to locate and apply effects.
4 Click the Effects & Presets tab to open the panel. Then click the arrow next to Stylize to expand the category.
5 With the BlueCrabLogo layer selected in the Timeline panel, drag the Color Emboss effect into the Composition panel.
Sample
page
s
50 LESSON 2 Creating a Basic Animation Using Effects and Presets
The Color Emboss effect sharpens the edges of objects in the layer without sup-pressing the original colors. The Effect Controls panel displays the Color Emboss effect and its settings below the Drop Shadow effect.
6 Choose File > Save to save your work.
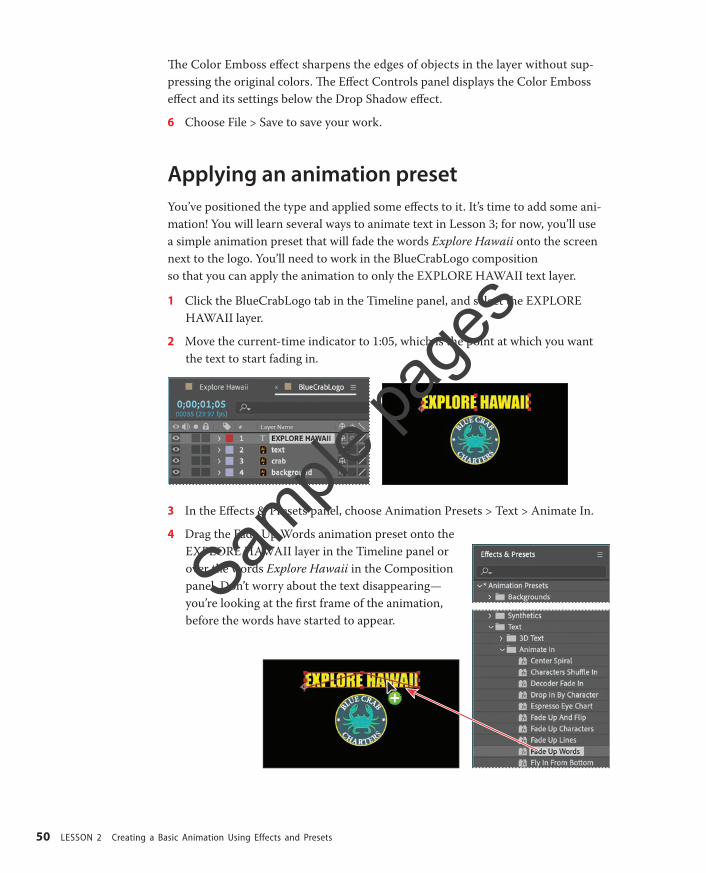
Applying an animation presetYou’ve positioned the type and applied some effects to it. It’s time to add some ani-mation! You will learn several ways to animate text in Lesson 3; for now, you’ll use a simple animation preset that will fade the words Explore Hawaii onto the screen next to the logo. You’ll need to work in the BlueCrabLogo composition so that you can apply the animation to only the EXPLORE HAWAII text layer.
1 Click the BlueCrabLogo tab in the Timeline panel, and select the EXPLORE HAWAII layer.
2 Move the current-time indicator to 1:05, which is the point at which you want the text to start fading in.
3 In the Effects & Presets panel, choose Animation Presets > Text > Animate In.
4 Drag the Fade Up Words animation preset onto the EXPLORE HAWAII layer in the Timeline panel or over the words Explore Hawaii in the Composition panel. Don’t worry about the text disappearing— you’re looking at the first frame of the animation, before the words have started to appear.
Sample
page
s
ADOBE AFTER EFFECTS CLASSROOM IN A BOOK (2021 RELEASE) 51
5 Click a blank area of the Timeline panel to deselect the EXPLORE HAWAII layer, and then drag the current-time indicator to 2:10 to manually preview the text animation. The text appears, one word at a time, until the words Explore Hawaii are fully onscreen at 2:10.
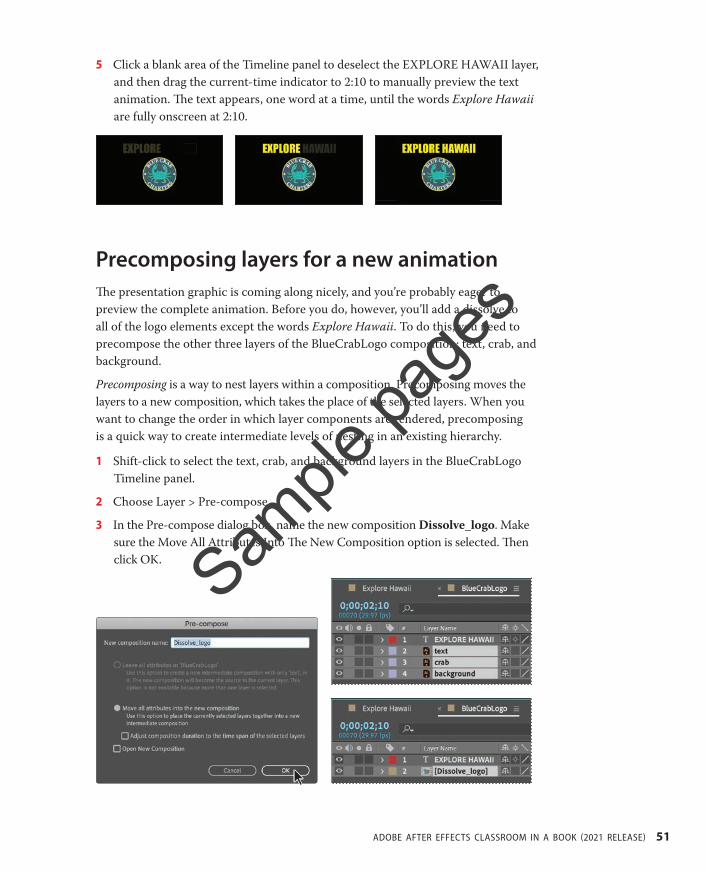
Precomposing layers for a new animationThe presentation graphic is coming along nicely, and you’re probably eager to preview the complete animation. Before you do, however, you’ll add a dissolve to all of the logo elements except the words Explore Hawaii. To do this, you need to precompose the other three layers of the BlueCrabLogo composition: text, crab, and background.
Precomposing is a way to nest layers within a composition. Precomposing moves the layers to a new composition, which takes the place of the selected layers. When you want to change the order in which layer components are rendered, precomposing is a quick way to create intermediate levels of nesting in an existing hierarchy.
1 Shift-click to select the text, crab, and background layers in the BlueCrabLogo Timeline panel.
2 Choose Layer > Pre-compose.
3 In the Pre-compose dialog box, name the new composition Dissolve_logo. Make sure the Move All Attributes Into The New Composition option is selected. Then click OK. Sam
ple pa
ges
52 LESSON 2 Creating a Basic Animation Using Effects and Presets
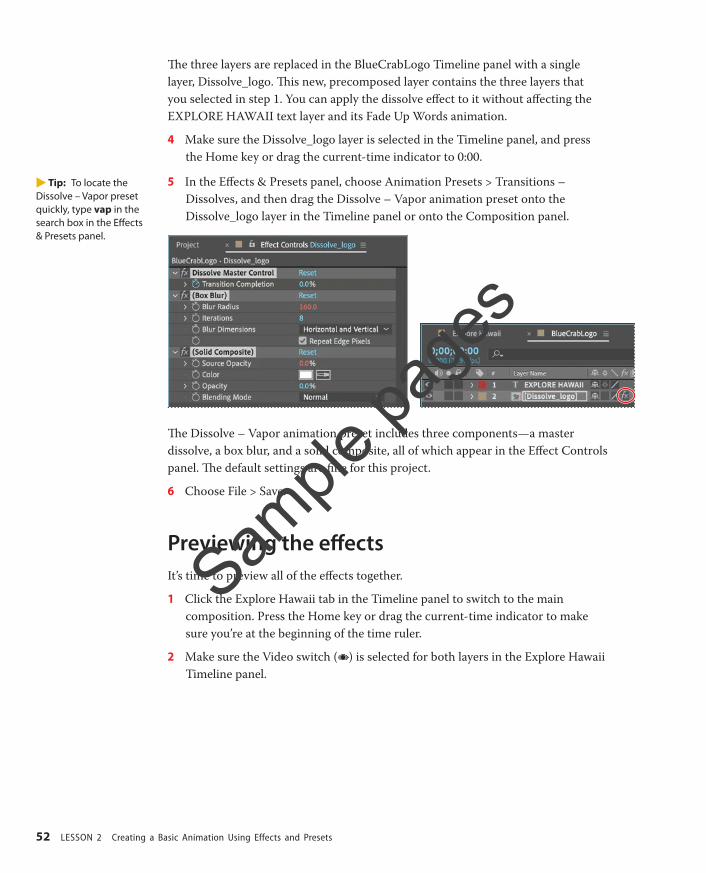
The three layers are replaced in the BlueCrabLogo Timeline panel with a single layer, Dissolve_logo. This new, precomposed layer contains the three layers that you selected in step 1. You can apply the dissolve effect to it without affecting the EXPLORE HAWAII text layer and its Fade Up Words animation.
4 Make sure the Dissolve_logo layer is selected in the Timeline panel, and press the Home key or drag the current-time indicator to 0:00.
5 In the Effects & Presets panel, choose Animation Presets > Transitions – Dissolves, and then drag the Dissolve – Vapor animation preset onto the Dissolve_logo layer in the Timeline panel or onto the Composition panel.
The Dissolve – Vapor animation preset includes three components—a master dissolve, a box blur, and a solid composite, all of which appear in the Effect Controls panel. The default settings are fine for this project.
6 Choose File > Save.
Previewing the effectsIt’s time to preview all of the effects together.
1 Click the Explore Hawaii tab in the Timeline panel to switch to the main composition. Press the Home key or drag the current-time indicator to make sure you’re at the beginning of the time ruler.
2 Make sure the Video switch ( ) is selected for both layers in the Explore Hawaii Timeline panel.
EE Tip: To locate the Dissolve – Vapor preset quickly, type vap in the search box in the Effects & Presets panel.
Sample
page
s
ADOBE AFTER EFFECTS CLASSROOM IN A BOOK (2021 RELEASE) 53
3 Click the Play button ( ) in the Preview panel, or press the spacebar, to watch the preview. Press the spacebar to stop playback at any time.
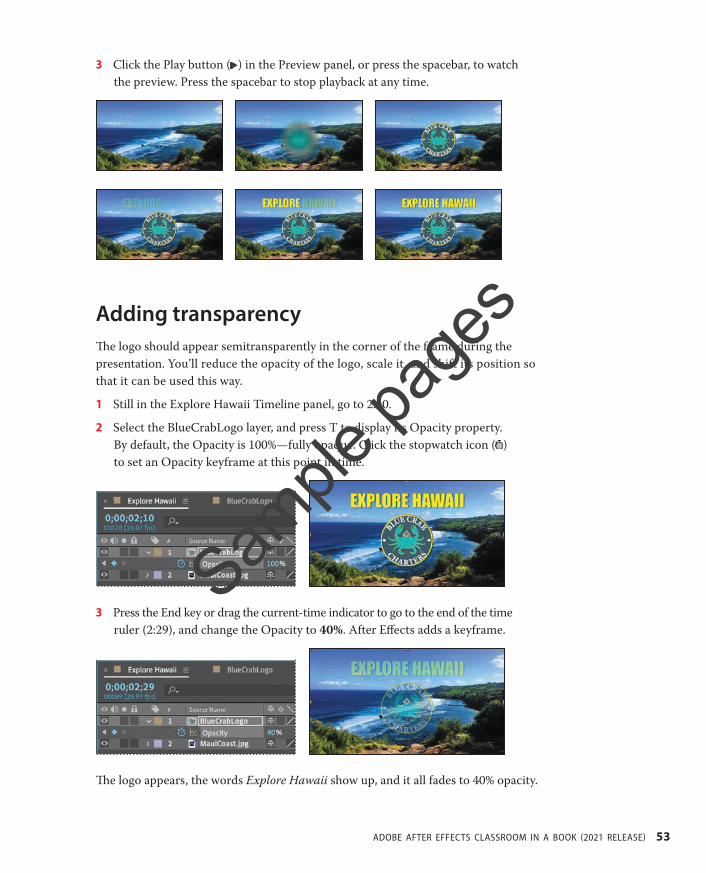
Adding transparencyThe logo should appear semitransparently in the corner of the frame during the presentation. You’ll reduce the opacity of the logo, scale it, and shift its position so that it can be used this way.
1 Still in the Explore Hawaii Timeline panel, go to 2:10.
2 Select the BlueCrabLogo layer, and press T to display its Opacity property. By default, the Opacity is 100%—fully opaque. Click the stopwatch icon ( ) to set an Opacity keyframe at this point in time.
3 Press the End key or drag the current-time indicator to go to the end of the time ruler (2:29), and change the Opacity to 40%. After Effects adds a keyframe.
The logo appears, the words Explore Hawaii show up, and it all fades to 40% opacity.
Sample
page
s