Administration Guide for Connecting to SAP R/3
213
One Identity Manager 8.0.1 Administration Guide for Connecting to SAP R/3
-
Upload
khangminh22 -
Category
Documents
-
view
1 -
download
0
Transcript of Administration Guide for Connecting to SAP R/3

One Identity Manager 8.0.1
Administration Guide for Connectingto SAP R/3

Copyright 2018 One Identity LLC.
ALL RIGHTS RESERVED.
This guide contains proprietary information protected by copyright. The software described in this guideis furnished under a software license or nondisclosure agreement. This software may be used or copiedonly in accordance with the terms of the applicable agreement. No part of this guide may be reproducedor transmitted in any form or by any means, electronic or mechanical, including photocopying andrecording for any purpose other than the purchaser’s personal use without the written permission ofOne Identity LLC .The information in this document is provided in connection with One Identity products. No license,express or implied, by estoppel or otherwise, to any intellectual property right is granted by thisdocument or in connection with the sale of One Identity LLC products. EXCEPT AS SET FORTH IN THETERMS AND CONDITIONS AS SPECIFIED IN THE LICENSE AGREEMENT FOR THIS PRODUCT,ONE IDENTITY ASSUMES NO LIABILITYWHATSOEVER AND DISCLAIMS ANY EXPRESS, IMPLIED ORSTATUTORYWARRANTY RELATING TO ITS PRODUCTS INCLUDING, BUT NOT LIMITED TO, THEIMPLIEDWARRANTY OF MERCHANTABILITY, FITNESS FOR A PARTICULAR PURPOSE, OR NON-INFRINGEMENT. IN NO EVENT SHALL ONE IDENTITY BE LIABLE FOR ANY DIRECT, INDIRECT,CONSEQUENTIAL, PUNITIVE, SPECIAL OR INCIDENTAL DAMAGES (INCLUDING,WITHOUTLIMITATION, DAMAGES FOR LOSS OF PROFITS, BUSINESS INTERRUPTION OR LOSS OFINFORMATION) ARISING OUTOF THE USE OR INABILITY TOUSE THIS DOCUMENT, EVEN IFONE IDENTITY HAVE BEEN ADVISED OF THE POSSIBILITY OF SUCH DAMAGES. One Identity make norepresentations or warranties with respect to the accuracy or completeness of the contents of thisdocument and reserves the right to make changes to specifications and product descriptions at anytime without notice. One Identity do not make any commitment to update the information containedin this document.If you have any questions regarding your potential use of this material, contact:
One Identity LLC.Attn: LEGAL Dept4 Polaris WayAliso Viejo, CA 92656
Refer to our Web site (http://www.OneIdentity.com) for regional and international office information.
Patents
One Identity is proud of our advanced technology. Patents and pending patents may apply to thisproduct. For the most current information about applicable patents for this product, please visit ourwebsite at http://www.OneIdentity.com/legal/patents.aspx.
Trademarks
One Identity and the One Identity logo are trademarks and registered trademarks of One IdentityLLC. in the U.S.A. and other countries. For a complete list of One Identity trademarks, please visitour website at www.OneIdentity.com/legal. All other trademarks are the property of theirrespective owners.
Legend
WARNING: A WARNING icon indicates a potential for property damage, personalinjury, or death.
CAUTION: A CAUTION icon indicates potential damage to hardware or loss of data ifinstructions are not followed.
IMPORTANT, NOTE, TIP, MOBILE, or VIDEO: An information icon indicates supportinginformation.
One Identity Manager Administration Guide for Connecting to SAP R/3Updated - March 2018Version - 8.0.1

Contents
Managing SAP R/3 Environments 8
Architecture Overview 8
One Identity Manager Users for Managing an SAP R/3 11
Setting up SAP R/3 Synchronization 14
Users and Permissions for Synchronizing with SAP R/3 15
Installing the One Identity Manager Business Application Programing Interface 17
Uninstalling BAPI Transports 18
Setting Up the Synchronization Server 18
Creating a Synchronization Project for initial Synchronization of an SAP Client 22
Special Features of Synchronizing with a CUA Central System 33
Excluding child Systems from Synchronization 34
Show Synchronization Results 36
Customizing Synchronization Configuration 37
How to Configure SAP R/3 Synchronization 38
Configuring Synchronization of Different Clients 38
Updating Schemas 39
Adding Other Schema Types 40
Configuring a Schema Extension File 42
Defining Tables 43
Defining Functions 46
Defining Schema Types 47
Speeding Up Synchronization with Revision Filtering 51
Synchronizing Collective Roles 51
Restricting Synchronization Objects using User Permissions 52
Post-Processing Outstanding Objects 53
Configuring Memberships Provisioning 55
Help for Analyzing Synchronization Issues 56
Deactivating Synchronization 56
Base Data for Managing SAP R/3 58
Setting Up Account Definitions 59
Creating an Account Definition 60
One Identity Manager 8.0.1 Administration Guide for Connecting to SAPR/3 3
Master Data for an Account Definition 60
Setting Up Manage Levels 63
Master Data for a Manage Level 64
Creating a Formatting Rule for IT Operating Data 65
Determining IT Operating Data 66
Modifying IT Operating Data 68
Assigning Account Definitions to Employees 69
Assigning Account Definitions to Departments, Cost Centers and Locations 70
Assigning Account Definitions to Business Roles 70
Assigning Account Definitions to all Employees 70
Assigning Account Definitions Directly to Employees 71
Assigning Account Definitions to System Roles 71
Adding Account Definitions in the IT Shop 72
Assigning Account Definitions to a Target System 73
Deleting an Account Definition 74
Basic Data for User Account Administration 76
User Account Types 76
External Identifier Types 77
Parameter 77
Printers 78
Cost centers 78
Start Menu 78
Companies 79
Login Languages 79
Security Policies 79
Communications Types 79
Licenses 80
Special Versions 81
Password Policies 81
Predefined Password Policies 82
Editing Password Policies 83
Custom Scripts for Password Requirements 85
Restricted Passwords 88
Testing a Password 88
Testing Generating a Password 88
One Identity Manager 8.0.1 Administration Guide for Connecting to SAPR/3 4
Assigning a Password Policy 89
Initial Password for New SAP User Accounts 90
Email Notifications about Login Data 92
Editing a Server 93
Master Data for a Job Server 94
Specifying Server Functions 96
Target System Managers 98
SAP Systems 101
SAP Clients 102
General Master Data for an SAP Client 102
Specifying Categories for Inheriting SAP Groups, SAP Roles and SAP Profiles 104
How to Edit a Synchronization Project 105
SAP User Accounts 106
Linking User Accounts to Employees 106
Supported User Account Types 107
Central User Administration in One Identity Manager 110
Entering Master Data for SAP User Accounts 111
General Master Data for an SAP User Account 112
SAP User Account Login Data 116
Phone numbers 117
Fax numbers 118
Email addresses 119
Fixed Values for an SAP User Account 120
Measurement Data 121
Assigning Parameters 121
SNC Data for an SAP User Account 122
Additional Tasks for Managing SAP User Accounts 122
Overview of SAP User Accounts 122
Changing the Manage Level of an SAP User Account 122
Assigning SAP Groups and SAP Profiles Directly to an SAP User Account 123
Assigning SAP Roles Directly to an SAP User Account 124
Assigning Structural Profiles 125
Assigning Child Systems 126
Assigning SAP Licenses 126
One Identity Manager 8.0.1 Administration Guide for Connecting to SAPR/3 5

Lock SAP User Account 128
Assigning Extended Properties 128
Automatic Assignment of Employees to SAP User Accounts 129
Editing Search Criteria for Automatic Employee Assignment 131
Locking SAP User Accounts 134
Deleting and Restoring SAP User Accounts 136
Entering External User Identifiers for an SAP User Account 136
SAP Groups, SAP Roles and SAP Profiles 139
Editing Master Data for SAP Groups, SAP Roles and SAP Profiles 139
General Master Data for SAP Groups 140
General Master Data for SAP Roles 142
General Master Data for SAP Profiles 143
Assigning SAP Groups, SAP Roles and SAP Profiles to SAP User Accounts 145
Assigning SAP Groups, SAP Roles and SAP Profiles to Organizations 145
Assigning SAP Groups, SAP Roles and SAP Profiles to Business Roles 147
Assigning SAP User Accounts directly to SAP Groups and SAP Profiles 149
Assigning SAP User Accounts directly to SAP Roles 150
Adding SAP Groups, SAP Roles and SAP Profiles to System Roles 151
Adding SAP Groups, SAP Roles and SAP Profiles to the IT Shop 152
Role Assignment Validity Period 154
Assigning and Passing on SAP Profiles and SAP Roles to SAP User Accounts 156
Additional Tasks for Managing SAP Groups, SAP Roles and SAP Profiles 157
Overview of SAP Groups, SAP Roles and SAP Profiles 157
Effectiveness of SAP Groups, SAP Roles and SAP Profiles 158
Inheriting SAP Groups, SAP Roles and SAP Profiles based on Categories 161
Assigning Extended Properties to SAP Groups, SAP Roles and SAP Profiles 163
Showing SAP Authorizations 164
Calculating the Validity Date of Inherited Role Assignments 164
SAP Products 167
General Master Data for SAP Products 168
SAP Product Assignments to Employees 170
Assigning SAP Products to Organizations 170
Assigning SAP Products to Business Roles 171
Assigning SAP Products directly to Employees 172
One Identity Manager 8.0.1 Administration Guide for Connecting to SAPR/3 6

Adding SAP Products in System Roles 172
Adding SAP Products to the IT Shop 173
Additional Tasks for Managing SAP Products 174
Overview of SAP Products 175
Assigning SAP Groups, SAP Roles and SAP Profiles to an SAP Product 175
Assigning Account Definitions to SAP Products 176
Assigning Subscribable Reports to SAP Products 177
Assigning Extended Properties to SAP Products 177
Edit Conflicting System Roles 178
Providing System Measurement Data 179
Mapping Measurement Data 180
Entering licenses for SAP User Accounts 182
Finding Licenses using SAP Roles and SAP Profiles 183
Determining an SAP User Account Rating 184
Transferring Calculated Licenses 186
Reports about SAP Systems 188
Overview of all Assignments 189
Appendix: Configuration Parameters for Managing SAP R/3 191
Appendix: Default Project Templates for Synchronizing an SAP R/3 Envir-onment 196
Project Template for Client without CUA 196
Project Template for the CUA Central System 197
Project Template for CUA Subsystems 199
Appendix: Referenced SAP R/3 Tables and BAPI Calls 200
Appendix: Example of a Schema Extension File 203
About us 207
Contacting us 207
Technical support resources 207
Index 208
One Identity Manager 8.0.1 Administration Guide for Connecting to SAPR/3 7
1
Managing SAP R/3 Environments
One Identity Manager offers simplified user administration for SAP R/3 environments. TheOne Identity Manager concentrates on setting up and processing user accounts as well asgroup, role and profile assignments. External identifiers and parameters can also beassigned to user accounts. The necessary data for system measurement is also mapped.TheOne Identity Manager system measurement data is available in , but the measurementitself takes place in the environment.SAP R/3
One Identity Manager provides company employees with the necessary user accounts. Forthis, you can use different mechanisms to connect employees to their user accounts. Youcan also manage user accounts independently of employees and therefore set upadministrator user accounts.
Groups, roles and profiles are mapped in the One Identity Manager, in order to provide thenecessary permissions for user accounts. Groups, roles and profiles can be grouped intoproducts and assigned to employees. One Identity Manager ensures that the right groupmemberships are created for the employee’s user account.
If user accounts are managed through the central user administration (CUA) in SAP R/3,access to the child client can be guaranteed to or withdrawn from user accounts in OneIdentity Manager.
Architecture Overview
The following servers are used for managing an SAP R/3 system in One Identity Manager:
l SAP R/3 application server
Application server for synchronization. The synchronization server connects to thisserver in order to access SAP R/3 objects.
l SAP R/3 database
Server installed with the SAP R/3 application database.
l Synchronization server
The synchronization server for synchronizing the One Identity Manager database withthe SAP R/3 system. The One Identity Manager Service is installed on this server
One Identity Manager 8.0.1 Administration Guide for Connecting to SAPR/3
Managing SAP R/3 Environments
8

with the SAP R/3 connector. The synchronization server connects to the SAP R/3server.
l SAP R/3 router
Router, which provides a network port for the SAP connector for communicating withthe SAP R/3 application server.
l SAP R/3 message server
Server with which the SAP R/3 connector communicates if a direct connection toapplication servers is not permitted.
The One Identity Manager SAP R/3 connector executes synchronization and provision ofdata between SAP R/3 and the One Identity Manager database. The SAP R/3 connector usesthe SAP connector for Microsoft .NET (NCo 3.0) for 64-bit systems for communicating withthe target system.
One Identity Manager is responsible for synchronizing data between the SAP R/3 databaseand the One Identity Manager Service. The application server ABAP must be installed as aprerequisite for synchronization. An SAP system that is only based on a Java applicationserver cannot be accessed with the SAP R/3 connector.
Figure 1: Architecture for Synchronization - Direct Communication
One Identity Manager 8.0.1 Administration Guide for Connecting to SAPR/3
Managing SAP R/3 Environments
9

Figure 2: Architecture for Synchronization - Communication throughMessage Server
One Identity Manager 8.0.1 Administration Guide for Connecting to SAPR/3
Managing SAP R/3 Environments
10

Figure 3: Architecture for Synchronization - Communication through router
One Identity Manager Users forManaging an SAP R/3
The following users are used for setting up and administration of an SAP R/3 system.
User Task
Target system admin-istrators
Target system administrators must be assigned to theapplication role Target system | Administrators.
Users with this application role:
l Administrate application roles for individual targetsystems types.
l Specify the target system manager.
l Set up other application roles for target system managersif required.
l Specify which application roles are conflicting for targetsystem managers
Table 1: User
One Identity Manager 8.0.1 Administration Guide for Connecting to SAPR/3
Managing SAP R/3 Environments
11

User Task
l Authorize other employee to be target system admin-istrators.
l Do not assume any administrative tasks within the targetsystem.
Target systemmanagers
Target system managers must be assigned to the applicationrole Target systems | SAP R/3 or a sub application role.
Users with this application role:
l Assume administrative tasks for the target system.
l Create, change or delete target system objects, like useraccounts or groups.
l Edit password policies for the target system.
l Prepare system entitlements for adding to the IT Shop.
l Configure synchronization in the Synchronization Editorand defines the mapping for comparing target systemsand One Identity Manager.
l Edit the synchronization's target system types andoutstanding objects.
l Authorize other employees within their area of respons-ibility as target system managers and create child applic-ation roles if required.
One Identity Manageradministrators
l Create customized permissions groups for applicationroles for role-based login to administration tools in theDesigner, as required.
l Create system users and permissions groups for non-rolebased login to administration tools, as required.
l Enable or disable additional configuration parameters inthe Designer, as required.
l Create custom processes in the Designer, as required.
l Create and configures schedules, as required.
l Create and configure password policies, as required.
Administrators for theIT Shop
Administrators must be assigned to the application roleRequest & Fulfillment | IT Shop | Administrators.
Users with this application role:
l Assign system authorizations to IT Shop structures.
Administrators fororganizations
Administrators must be assigned to the application roleIdentity Management | Organizations | Administrators.
One Identity Manager 8.0.1 Administration Guide for Connecting to SAPR/3
Managing SAP R/3 Environments
12

User Task
Users with this application role:
l Assign system entitlements to departments, cost centersand locations.
Business roles admin-istrators
Administrators must be assigned to the application roleIdentity Management | Business roles | Administrators.
Users with this application role:
l Assign system authorizations to business roles.
One Identity Manager 8.0.1 Administration Guide for Connecting to SAPR/3
Managing SAP R/3 Environments
13

2
Setting up SAP R/3 Synchronization
One Identity Manager supports synchronization with SAP systems in versions SAP WebApplication Server 6.40 and SAP NetWeaver Application Server 7.00, 7.01, 7.02, 7.10,7.11, 7.20, 7.31, 7.40 SR2, 7.41 and 7.50 as well as SAP S/4HANA on-premise edition. Thisensures that all variations of the installation based on SAP ECC 5.0 and 6.0 are fullysupported. Central User Administration is supported for all versions named here.
To load SAP R/3 objects into the One Identity Manager database for thefirst time
1. Prepare a user account with sufficient permissions for synchronizing in SAP R/3.
2. Install the One Identity Manager Business Application Programming Interface in theSAP R/3 system.
3. The One Identity Manager parts for managing SAP R/3 systems are available if theconfiguration parameter "TargetSystem\SAPR3" is set.
l Check whether the configuration parameter is set in the Designer. Otherwise,set the configuration parameter and compile the database.
l Other configuration parameters are installed when the module is installed.Check the configuration parameters and modify them as necessary to suit yourrequirements.
4. Download the installation source for the SAP .Net Connector for .NET 4.0 on x64, withat least version 3.0.15.0.
5. Install and configure a synchronization server and declare the server as Job server inOne Identity Manager.
6. Create a synchronization project with the Synchronization Editor.
Detailed information about this topic
l Users and Permissions for Synchronizing with SAP R/3 on page 15
l Installing the One Identity Manager Business Application Programing Interfaceon page 17
l Setting Up the Synchronization Server on page 18
l Creating a Synchronization Project for initial Synchronization of an SAP Clienton page 22
One Identity Manager 8.0.1 Administration Guide for Connecting to SAPR/3
Setting up SAP R/3 Synchronization
14

Users and Permissions forSynchronizing with SAP R/3
The following users are involved in synchronizing One Identity Manager with SAP R/3.
User Authorizations
One IdentityManager Serviceuser account
The user account for the One Identity Manager Service requires accessrights to carry out operations at file level (issuing user rights, addingdirectories and files to be edited).
The user account must belong to the group "Domain Users".
The user account must have the extended access right "Log on as aservice".
The user account requires access rights to the internal web service.
NOTE: If the One Identity Manager Service runs under thenetwork service (NT Authority\NetworkService), you can issueaccess rights for the internal web service with the followingcommand line call:
netsh http add urlacl url=http://<IP address>:<port number>/user="NT AUTHORITY\NETWORKSERVICE"
The user account needs full access to the One Identity ManagerService installation directory in order to automatically update the OneIdentity Manager.
In the default installation the One Identity Manager is installed under:
l %ProgramFiles(x86)%\One Identity (on 32-bit operating systems)
l %ProgramFiles%\One Identity (on 64-bit operating systems)
User foraccessing thetarget system
You must provide a user account with the following authorizations forfull synchronization of SAP R/3 objects with the supplied One IdentityManager default configuration.
Required authorization objects and their meanings:
l S_TCODE with a minimum of transaction codes SU01, SU53,PFCG
l S_ADDRESS1 with activities 01, 02, 03, 06 and valid addressgroups (min."BC01")
l S_USER_AGR (role maintenance) with activities 02, 03, 22, 78possibly with restrictions in name ranges (for example "Z*")
l S_USER_GRP (group maintenance) with activities 02, 03, 22
Table 2: Users for Synchronization
One Identity Manager 8.0.1 Administration Guide for Connecting to SAPR/3
Setting up SAP R/3 Synchronization
15

User Authorizations
l S_USER_AUT (authorizations) with activities 03, 08
l S_USER_PRO (profile) with activities 01, 02, 03, 22
l S_USER_SAS (system specific assignments) with activities 01,06, 22
l S_RFC (authorization check by RFC access) with activity 16 atleast for function groups ZVI, /VIAENET/ZVI0, /VIAENET/ZVI_L,/VIAENET/Z_HR, SU_USER, SYST, SDTX, RFC1, RFC_METADATA, SDIFRUNTIME, SYSU
l S_TABU_DIS (use of standard tools like SM30 for maintainingtables) with activity 03
Apart from the permissions listed, the user account has to get allobjects from the authorization classes "ZVIH_AUT", "ZVIA_AUT", and"ZVIL_AUT" which are installed by the transport package forsynchronization.
The following authorization objects are required in addition for thechild system in order to synchronize central user administration:
l S_RFC with the function group SUU6
l S_TCODE with the transaction code SU56
User foraccessing theOne IdentityManagerdatabase
The default system user "Synchronization" is available to runsynchronization over an application server.
TIP: The transport file provided by default, "SAPRole.zip", includes a transportpackage with a role that the base authorization object already possesses. This rolecan be assigned to the user account. You will find the transport files on the OneIdentity Manager installation medium in the directory ..\Modules\SAP\dvd\AddOn\Bapi.
The named authorizations are required so that the SAP R/3 connector has read and writeaccess to the SAP R/3 system. If only read access should be permitted, setting up a profilewhich has executable permission for transactions SU01 and PFCG but prevents writing atactivity or field level is recommended.
The user account requires the user type "dialog", "communication" or "system" to loadmore information.
One Identity Manager 8.0.1 Administration Guide for Connecting to SAPR/3
Setting up SAP R/3 Synchronization
16

NOTE: In SAP R/3 versions up to and including SAP Web Application Server 6.40, thepassword and user input are not case sensitive. this no longer applies to thepassword for SAP NetWeaver Application Server 7.0 and later. The password is casesensitive.
All SAP’s own tools that are supplied up to SAP Web Application Server 6.40, apartfrom the SAP GUI (RFC-SDK, SAP .Net Connector), therefore change the password tocapital letters before passing them to SAP R/3. You must set the password in capitalletters for the user account used by the SAP .Net Connector to authenticate itself onthe SAP R/3 system. If this is done, all the usual tools can be accessed on SAPNetWeaver Application Server 7.0 by RFC.
Related Topics
l Appendix: Referenced SAP R/3 Tables and BAPI Calls on page 200
Installing the One Identity ManagerBusiness Application ProgramingInterface
In order to access SAP R/3 data and business processes with the One Identity Manager, youmust load the Business Application Programming Interface (BAPI) into the SAP R/3 system.You will find the required transport files on the One Identity Manager installation medium inthe directory ..\Modules\SAP\dvd\AddOn\Bapi.
TIP: Instead of installing the transport file SAPTRANSPORT_70.ZIP, you can also installthe Assembly Kit C360020276329_0000007.PAT. For more information, see UninstallingBAPI Transports on page 18.
Install the BAPI transport in the following order:
Transport Explanation
1 SAPRepository.zip Creates the /VIAENET/ in the SAP system repository.
2 SAPTable.zip Defines the table structure for /VIAENET/USERS in the SAPsystem dictionary.
3 SAPTRANSPORT_70.ZIP
Contains the functions defined in the /VIAENET/ environment.
Archive directory UNICODE: Transports for systems supportingunicode
Archive directory NON_UNICODE: Transports for systems notsupporting unicode
Table 3: BAPI transport
One Identity Manager 8.0.1 Administration Guide for Connecting to SAPR/3
Setting up SAP R/3 Synchronization
17

NOTE: If your SAP system supports unicode, select the unicode transport file fromthe archive file. The archive files contain transport packages for systems notsupporting unicode in the respective directories.
Set the following import options for the transport:
l Overwrite Originals
l Overwrite Objects in Unconfirmed Repairs
l Ignore Non-Matching Component Versions
The SAP R/3 connector uses other SAP R/3 BAPIs in parallel. For more information, seeAppendix: Referenced SAP R/3 Tables and BAPI Calls on page 200.
Uninstalling BAPI Transports
The SAP Add-On Assembly Kit allows SAP to support deinstallation of a BAPI. Anuninstallable Assembly Kit is proved for this.
Prerequisites
l SAP NetWeaver Application Server 7.00 or later
l SAP ECC 6.0
l SAP Add-On Assembly Kit 5.0 or later
l Unicode is supported.
To uninstall a BAPI transport at a later date
l Install the Assembly Kit C360020276329_0000007.PAT instead of the transport fileSAPTRANSPORT_70.ZIP.
You will find the kit on the One Identity Manager installation medium in the directory..\Modules\SAP\dvd\AddOn\Bapi.
The kit contains the functions that are defined in the /VIAENET/ environment. The kit hasthe option deinstall_allowed set.
Related Topics
l Installing the One Identity Manager Business Application Programing Interfaceon page 17
Setting Up the Synchronization Server
To set up synchronization with an SAP R/3 environment a server has to be available thathas the following software installed on it:
One Identity Manager 8.0.1 Administration Guide for Connecting to SAPR/3
Setting up SAP R/3 Synchronization
18

l Windows operating system
Following versions are supported:
l Windows Server 2008 (non-Itanium based 64-bit) Service Pack 2 or later
l Windows Server 2008 R2 (non-Itanium based 64-bit) Service Pack 1 or later
l Windows Server 2012
l Windows Server 2012 R2
l Windows Server 2016
l Microsoft .NET Framework Version 4.5.2 or later
NOTE: Microsoft .NET Framework version 4.6 is not supported.
NOTE: Take the target system manufacturer's recommendations into account.
l Windows Installer
l SAP .Net Connector for .NET 4.0 on x64, with at least version 3.0.15.0
l One Identity Manager Service, Synchronization Editor, SAP R/3 connector
l Install One Identity Manager components with the installation wizard.
1. Select the option Select installation modules with existingdatabase.
2. Select the machine role Server | Job server | SAP R/3.
Further requirements
l Following files must either be in the Global Assemblies Cache (GAC) or in the OneIdentity Manager installation directory.
l libicudecnumber.dll
l rscp4n.dll
l sapnco.dll
l sapnco_utils.dll
l Following files must either be in the Global Assemblies Cache (GAC) or inC:\Windows\System32 or in the One Identity Manager's installation directory.
l msvcp100.dll
l msvcr100.dll
All One Identity Manager Service actions are executed against the target systemenvironment on the synchronization server. Data entries required for synchronization andadministration with the One Identity Manager database, are processed by thesynchronization server. The synchronization server must be declared as a Job server inOne Identity Manager.
NOTE: If several target system environments of the same type are synchronizedunder the same synchronization server, it is useful to set up a job server for eachtarget system on performance grounds. This avoids unnecessary swapping of connec-tion to target systems because a job server only has to process tasks of the sametype (re-use of existing connections).
One Identity Manager 8.0.1 Administration Guide for Connecting to SAPR/3
Setting up SAP R/3 Synchronization
19
Use the Server Installer to install the One Identity Manager Service. This programexecutes the following steps.
l Setting up a Job server.
l Specifying machine roles and server function for the Job server.
l Remote installation of One Identity Manager Service components corresponding tothe machine roles.
l Configures the One Identity Manager Service.
l Starts the One Identity Manager Service.
NOTE: The program executes remote installation of the One Identity ManagerService. Local installation of the service is not possible with this program. Remoteinstallation is only supported within a domain or a trusted domain.
To install and configure the One Identity Manager Service remotely on a server
1. Start the program Server Installer on your administrative workstation.
2. Enter valid data for connecting to One Identity Manager on the Databaseconnection page and click Next.
3. Specify on which server you want to install the One Identity Manager Service on theServer properties page.
a. Select a job server in the Server menu.
- OR -
Click Add to add a new job server.
b. Enter the following data for the Job server.
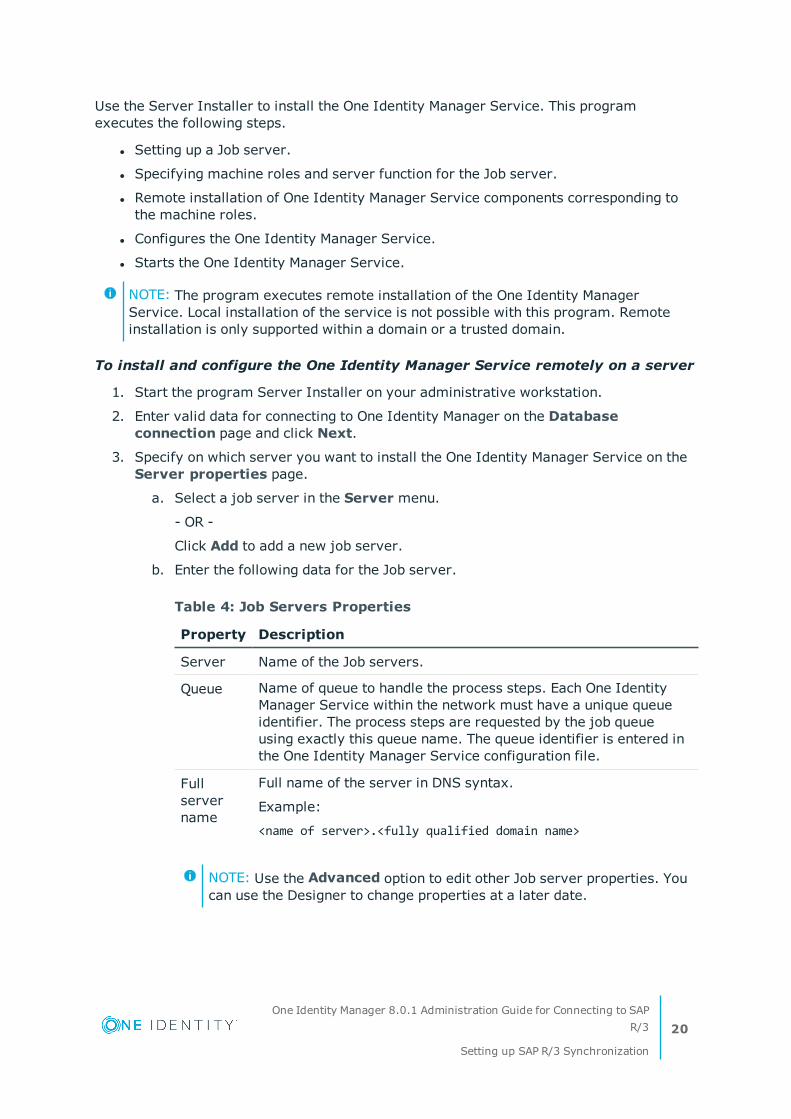
Property Description
Server Name of the Job servers.
Queue Name of queue to handle the process steps. Each One IdentityManager Service within the network must have a unique queueidentifier. The process steps are requested by the job queueusing exactly this queue name. The queue identifier is entered inthe One Identity Manager Service configuration file.
Fullservername
Full name of the server in DNS syntax.
Example:
<name of server>.<fully qualified domain name>
Table 4: Job Servers Properties
NOTE: Use the Advanced option to edit other Job server properties. Youcan use the Designer to change properties at a later date.
One Identity Manager 8.0.1 Administration Guide for Connecting to SAPR/3
Setting up SAP R/3 Synchronization
20
4. Specify which job server roles to include in One Identity Manager on the Machinerole page. Installation packages to be installed on the Job server are founddepending on the selected machine role.
Select at least the following roles:
l SAP R/3
5. Specify the server's functions in One Identity Manager on the Server functionspage. One Identity Manager processes are handled depending on the server function.
The server's functions depend on which machine roles you have selected. You canlimit the server's functionality further here.
Select the following server functions:
l SAP R/3 connector
6. Check the One Identity Manager Service configuration on the Servicesettings page.
NOTE: The initial service configuration is already predefined. If further changesneed to be made to the configuration, you can do this later with the Designer.For more detailed information about configuring the service, see One IdentityManager Configuration Guide.
7. To configure remote installations, click Next.
8. Confirm the security prompt with Yes.
9. Select the directory with the install files on the Select installation source page.
10. Select the file with the private key on the page Select private key file.
NOTE: This page is only displayed when the database is encrypted.
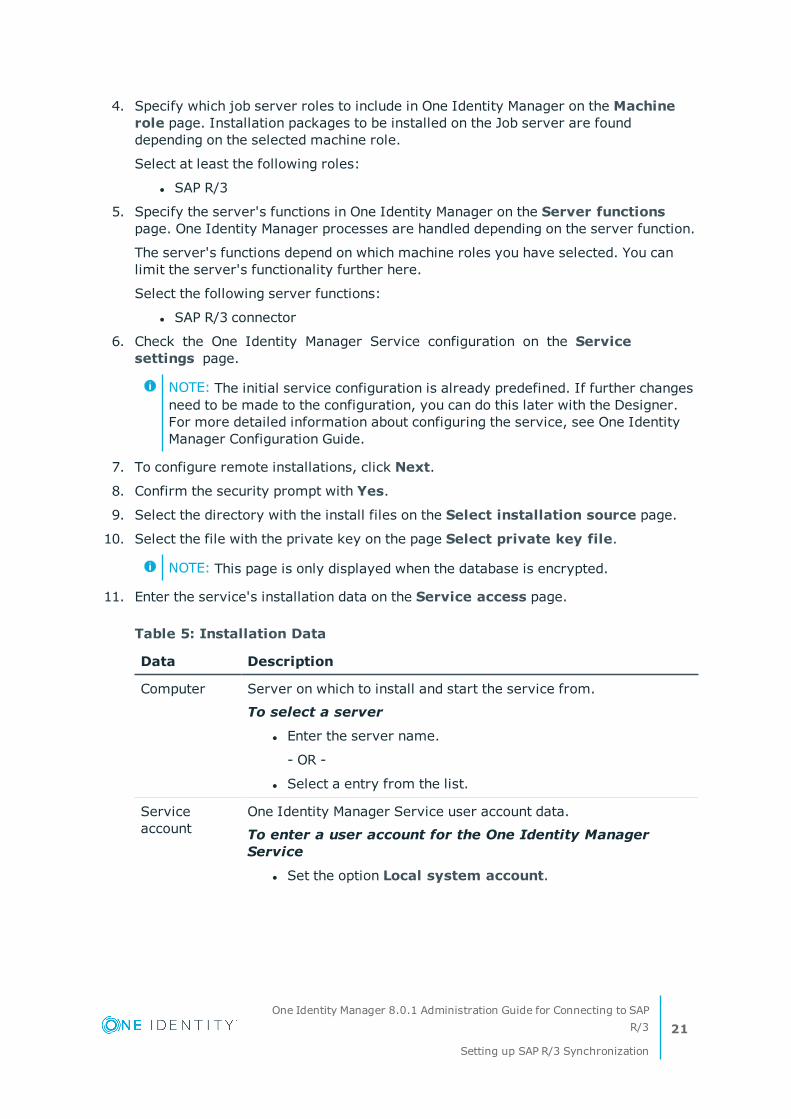
11. Enter the service's installation data on the Service access page.
Data Description
Computer Server on which to install and start the service from.
To select a server
l Enter the server name.
- OR -
l Select a entry from the list.
Serviceaccount
One Identity Manager Service user account data.
To enter a user account for the One Identity ManagerService
l Set the option Local system account.
Table 5: Installation Data
One Identity Manager 8.0.1 Administration Guide for Connecting to SAPR/3
Setting up SAP R/3 Synchronization
21
Data Description
This starts the One Identity Manager Service under theaccount "NT AUTHORITY\SYSTEM".
- OR -
l Enter user account, password and password confirmation.
Installationaccount
Data for the administrative user account to install the service.
To enter an administrative user account for installation
Enable Advanced
l .
l Enable the option Current user.
This uses the user account of the current user.
- OR -
l Enter user account, password and password confirmation.
12. Click Next to start installing the service.
Installation of the service occurs automatically and may take some time.
13. Click Finish on the last page of the Server Installer.
NOTE: The is entered with the name "One Identity Manager Service" in theserver's service administration.
Creating a Synchronization Project forinitial Synchronization of an SAP Client
Use Synchronization Editor to configure synchronization between the One Identity Managerdatabase and SAP R/3. The following describes the steps for initial configuration of asynchronization project.
After the initial configuration, you can customize and configure workflows within thesynchronization project. Use the workflow wizard in the Synchronization Editor for this.The Synchronization Editor also provides different configuration options for asynchronization project.
Have the following information available for setting up a synchronization project.
Data Explanation
SAP R/3 applic- Name of the application server used to RFC communication.
Table 6: Information Required for Setting up a Synchronization Project
One Identity Manager 8.0.1 Administration Guide for Connecting to SAPR/3
Setting up SAP R/3 Synchronization
22

Data Explanation
ation server
System number Number of the SAP R/3 system for connecting the SAP connector.
System ID System ID of this SAP system.
Client Number of the client to be synchronized. You need the central system'sclient number to synchronize central user administration (CUA).
Login name andpassword
The name and password of the user account used by the SAP R/3connector to log in to the SAP R/3 system. Make a user accountavailable with sufficient permissions.
If the network connection must be secure, you require the useraccount's SNC name.
Login language Login language for logging the SAP R/3 connection into the SAP R/3system.
Synchronizationserver
All One Identity Manager Service actions are executed against thetarget system environment on the synchronization server. Data entriesrequired for synchronization and administration with the One IdentityManager database, are processed by the synchronization server.
Installed components:
l SAP .Net Connector for .NET 4.0 on x64, with at least version3.0.15.0
l One Identity Manager Service (started)
l Synchronization Editor
l SAP R/3 connector
The synchronization server must be declared as a Job server in OneIdentity Manager. Use the following properties when you set up the Jobserver.
Property Value
Server Function SAP R/3 connector
Machine role Server/Job server/SAP R/3
Table 7: Additional Properties for the Job Server
For more information, see Setting Up the Synchronization Server onpage 18.
One IdentityManagerDatabase
SQL Server:
l Database server
One Identity Manager 8.0.1 Administration Guide for Connecting to SAPR/3
Setting up SAP R/3 Synchronization
23

Data Explanation
ConnectionData
l Database
l Database user and password
l Specifies whether Windows authentication is used.
This type of authentication is not recommended. If you decide touse it anyway, ensure that your environment supports Windowsauthentication.
Oracle:
l Species whether access is direct or through the Oracle client
Which connection data is required, depends on how this option isset.
l Database server
l Oracle instance port
l Service name
l Oracle database user and password
l Data source (TNS alias name from TNSNames.ora)
Remote connec-tion server
To configure synchronization with a target system, One IdentityManager must load the data from the target system. One IdentityManager communicates directly with target system to do this.Sometimes direct access from the workstation on which theSynchronization Editor is installed is not possible, because of thefirewall configuration, for example, or because the workstation doesnot fulfill the necessary hardware and software requirements. If directaccess to the workstation is not possible, you can set up a remoteconnection.
The remote connection server and the workstation must be in the sameActive Directory domain.
Remote connection server configuration:
l One Identity Manager Service is started
l RemoteConnectPlugin is installed
l SAP R/3 connector is installed
The remote connection server must be declared as a Job server in OneIdentity Manager. The Job server name is required.
One Identity Manager 8.0.1 Administration Guide for Connecting to SAPR/3
Setting up SAP R/3 Synchronization
24
Data Explanation
TIP: The remote connection server requires the same config-uration (with respect to the installed software) as the synchron-ization server. Use the synchronization as remote connectionserver at the same time, by simply installing the RemoteCon-nectPlugin as well.
For more detailed information about setting up a remote connection,see the One Identity Manager Target System SynchronizationReference Guide.
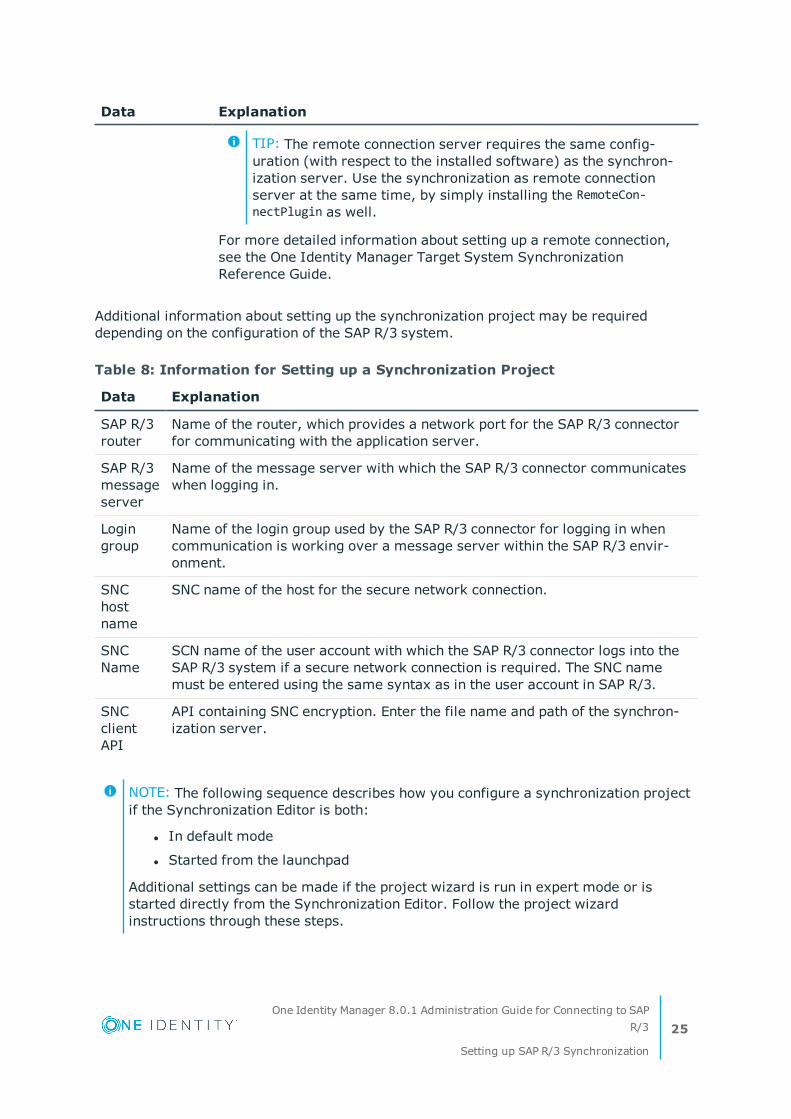
Additional information about setting up the synchronization project may be requireddepending on the configuration of the SAP R/3 system.
Data Explanation
SAP R/3router
Name of the router, which provides a network port for the SAP R/3 connectorfor communicating with the application server.
SAP R/3messageserver
Name of the message server with which the SAP R/3 connector communicateswhen logging in.
Logingroup
Name of the login group used by the SAP R/3 connector for logging in whencommunication is working over a message server within the SAP R/3 envir-onment.
SNChostname
SNC name of the host for the secure network connection.
SNCName
SCN name of the user account with which the SAP R/3 connector logs into theSAP R/3 system if a secure network connection is required. The SNC namemust be entered using the same syntax as in the user account in SAP R/3.
SNCclientAPI
API containing SNC encryption. Enter the file name and path of the synchron-ization server.
Table 8: Information for Setting up a Synchronization Project
NOTE: The following sequence describes how you configure a synchronization projectif the Synchronization Editor is both:
l In default mode
l Started from the launchpad
Additional settings can be made if the project wizard is run in expert mode or isstarted directly from the Synchronization Editor. Follow the project wizardinstructions through these steps.
One Identity Manager 8.0.1 Administration Guide for Connecting to SAPR/3
Setting up SAP R/3 Synchronization
25

To set up initial synchronization project for an SAP client.
1. Start the Launchpad and log on to the One Identity Manager database.
NOTE: If synchronization is executed by an application server, connect thedatabase through the application server.
2. Select the entry SAP R/3 target system type. Click Run.
This starts the Synchronization Editor's project wizard.
3. Specify how the One Identity Manager can access the target system on the Systemaccess page.
l If you have access from the workstation from which you started theSynchronization Editor, do not set anything.
l If you do not have access from the workstation from which you started theSynchronization Editor, you can set up a remote connection.
In this case, set the option Connect using remote connection server andselect, under Job server, the server you want to use for the connection.
4. Select a connection type on the Connection type tab.
Property Description
SAP R/3 Application serveror SAP R/3 router
Specifies whether the connection is establishedthrough an application server or a router.
SAP R/3 message server Specifies whether the connection is establishedthrough a message server.
Table 9: Connection Types
l Enter the connection data for connection type "SAP R/3 application server orSAP R/3 router" on the Connection data page.
Property Description
SAP R/3 hostor router
Name of the application server or router used by the SAP R/3connector for communicating.
Systemnumber
Number of the system.SAP
System ID System ID of the system.SAP This is used as the displayname in One Identity Manager tools.
Table 10: System Connection
l Enter the connection data for the connection type "SAP R/3 message server" onthe Message server page.
One Identity Manager 8.0.1 Administration Guide for Connecting to SAPR/3
Setting up SAP R/3 Synchronization
26

Property Description
SAP R/3messageserver
Name of the message server used to establish the connec-tion.
Logon group Name of the logon group used by the SAP R/3 connector.
SAP R/3 router Name of the router if the SAP R/3 connector communicatesthrough a router.
Systemnumber
Number of the SAP system.
System ID System ID of the system.SAP This is used as the displayname in One Identity Manager tools.
Table 11: System Connection
5. Enter the network settings on Secure network communication.
Property Description
ProgramID
Identifier for the connection the SAP R/3 connector establishes with theSAP R/3 system.
SNC login Specifies whether the SNC user account name is used when the SAP R/3connector logs in on the SAP R/3 system.
Table 12: Network Settings
6. If you have enabled the option SNC login on the Secure connection page, the pageSNC connection configuration is opened. Enter the data required for logging intothe target system using a secure network connection.
Property Description
Client Number of the client to be synchronized. Enter the central system'sclient number if central user administration is to be synchronized.
SNC hostname
Name of the SNC host for the secure network connection.
SNC name The name of the user account used by the SAP R/3 connector to login to the SAP R/3 system.
SNC client API API containing the SCN encryption.
Table 13: SNC Configuration
One Identity Manager 8.0.1 Administration Guide for Connecting to SAPR/3
Setting up SAP R/3 Synchronization
27

Property Description
Authentication
Select a security level for logging into the SAP R/3 system.
Integrityprotection
Encryption
Highest avail.level
Loginlanguage
Login language for logging the SAP R/3 connection into the SAP R/3system. The language selected determines the language forcaptions for all the client's oSAPbjects. If you select "EN", all thetext from SAP groups, roles, profiles and start menus is synchron-ized in English.
7. Enter data for logging into the target system on the Login data page.
Property Description
Client Number of the client to be synchronized. Enter the central system'sclient number if central user administration is to be synchronized.
Loginname
Name of the user account used by the SAP R/3 connector to log into theSAP R/3 system. If you have enabled the option SNC login on theSecure connection page, enter the SNC name of this user account.
Loginpassword
User account's password the SAP R/3 connector uses to log into the SAPR/3 system.
Loginlanguage
Login language for logging the SAP R/3 connection into the SAP R/3system. The language selected determines the language for captionsfor all the client's SAP objects. If you select "EN", all the text from SAPgroups, roles, profiles and start menus is synchronized in English.
Table 14: Login Data
8. Supply additional information about synchronizing objects and properties on theAdditional settings. You can check the connection settings.
l Specify in Central user administration (CUA) whether the connection to acentral user administration's central system should be established. In thiscase, set CUA central system.
l You can test the connection in Verify connection settings. Click onVerify project.
The system tries to connect to the server. If the option CUA central systemis set, the given client is tested to see if it is the central system of a CUA.
NOTE: Checks whether the supplied BAPI is installed.
One Identity Manager 8.0.1 Administration Guide for Connecting to SAPR/3
Setting up SAP R/3 Synchronization
28

l Click Finish, to end the system connection wizard and return to theproject wizard.
9. Click Next on the SAP HCM settings page.
This page is only needed for synchronizing additional personnel planning data in theSAP R/3 Structural Profiles Add-on Module.
10. Click Next on the SAP connector schema page.
TIP: You can enter a file with additional schema types on this page. Theconnector schema is extended by these custom schema types. You can alsoenter this data after saving the synchronization project. For more information,see Adding Other Schema Types on page 40.
11. Verify the One Identity Manager database connection data on the One IdentityManager connection page. The data is loaded from the connected database.Reenter the password.
NOTE: Reenter all the connection data if you are not working with an encryptedOne Identity Manager database and no synchronization project has been savedyet in the database. This page is not shown if a synchronization project alreadyexists.
12. The wizard loads the target system schema. This may take a few minutes dependingon the type of target system access and the size of the target system.
13. Select a project template on the Select project template page to use for setting upthe synchronization configuration.
Projecttemplate
Description
SAP R/3 (CUAsubsystem)
Use this project template for initially setting up the synchron-ization project for a CUA child system, which belongs to anotherSAP system than the central system.
SAP R/3 synchron-ization (baseadministration)
Use this project template for initially setting up the synchron-ization project for single clients of a CUA's central system.
Table 15: Default Project Templates
NOTE: A default project template ensures that all required information is addedin the One Identity Manager. This includes mappings, workflows and thesynchronization base object. If you do not use a default project template youmust declare the synchronization base object in One Identity Manageryourself.Use a default project template for initially setting up the synchron-ization project. For custom implementations, you can extend the synchron-ization project with the .Synchronization Editor
One Identity Manager 8.0.1 Administration Guide for Connecting to SAPR/3
Setting up SAP R/3 Synchronization
29

14. Specify how system access should work on the page Restrict target systemaccess. You have the following options:
Option Meaning
Read-only accessto target system.
Specifies whether a synchronization workflow should be setup to initially load the target system into the One IdentityManager database.
The synchronization workflow has the followingcharacteristics:
l Synchronization is in the direction of "One IdentityManager".
l Processing methods in the synchronization steps areonly defined in synchronization direction "One IdentityManager".
Changes are alsomade to the targetsystem.
Specifies whether a provisioning workflow should be set up inaddition to the synchronization workflow to initially load thetarget system.
The provisioning workflow displays the followingcharacteristics:
l Synchronization in the direction of the "target system"
l Processing methods are only defined in the synchron-ization steps in synchronization direction "targetsystem".
l Synchronization steps are only created for such schemaclasses whose schema types have write access.
Table 16: Specifying Target System Access
This page is only shown if the project template "SAP® R/3® synchronization (basicadministration)" was selected. If the project template " "SAP® R/3® (child CUAsystem)" was selected, the option Read-only access to target system is set.
15. Select the synchronization server to execute synchronization on theSynchronization server page.
If the synchronization server is not declare as a job server in the One IdentityManager database yet, you can add a new job server.
l Click to add a new job server.
l Enter a name for the job server and the full server name conforming toDNS syntax.
l Click OK.
The synchronization server is declared as job server for the target system inthe One Identity Manager database.
One Identity Manager 8.0.1 Administration Guide for Connecting to SAPR/3
Setting up SAP R/3 Synchronization
30
NOTE: Ensure that this server is set up as the synchronization serverafter saving the synchronization project.
16. Click Finish to complete the project wizard.
This creates and allocates a default schedule for regular synchronization. Enable theschedule for regular synchronization.
The synchronization project is created, saved and enabled immediately.
NOTE: If the synchronization project is not going to be executed immediately,disable the option Activate and save the new synchronization projectautomatically.
In this case, save the synchronization project manually before closing theSynchronization Editor.
Disable this option, if you want to add your own schema types in thissynchronization project.
NOTE: The target system connection data is saved in a variable set, which youcan change in the Synchronization Editor under Configuration | Variables ifnecessary.
To configure the content of the synchronization log
1. To configure the synchronization log for target system connection, select thecategory Configuration | Target system.
2. To configure the synchronization log for the database connection, select the categoryConfiguration | One Identity Manager connection.
3. Select General view and click Configure....
4. Select the Synchronization log view and set Create synchronization log.
5. Enable the data to be logged.
NOTE: Certain content create a lot of log data.
The synchronization log should only contain the data necessary for erroranalysis and other evaluations.
6. Click OK.
To synchronize on a regular basis
1. Select the category Configuration | Start up configurations.
2. Select a start up configuration in the document view and click Edit schedule....
3. Edit the schedule properties.
4. To enable the schedule, click Activate.
5. Click OK.
One Identity Manager 8.0.1 Administration Guide for Connecting to SAPR/3
Setting up SAP R/3 Synchronization
31

To start initial synchronization manually
1. Select the category Configuration | Start up configurations.
2. Select a start up configuration in the document view and click Execute.
3. Confirm the security prompt with Yes.
NOTE: Following synchronization, employees are automatically created for useraccounts in the default installation. If there are no account definitions for the client atthe time of synchronization, user accounts are linked to employees. However,account definitions are not assigned. The user accounts are, therefore, in a "Linked"state.
To select user accounts through account definitions
1. Create an account definition.
2. Assign an account definition to the client.
3. Assign the account definition and manage level to the user accounts in a"linked" state.
a. Select the category SAP R/3 | User accounts | Linked but notconfigured | <client>.
b. Select the task Assign account definition to linked accounts.
Detailed information about this topic
l One Identity Manager Target System Synchronization Reference Guide
Related Topics
l Setting Up the Synchronization Server on page 18
l Users and Permissions for Synchronizing with SAP R/3 on page 15
l Show Synchronization Results on page 36
l Customizing Synchronization Configuration on page 37
l Speeding Up Synchronization with Revision Filtering on page 51
l Appendix: Default Project Templates for Synchronizing an SAP R/3 Environmenton page 196
l Setting Up Account Definitions on page 59
l Automatic Assignment of Employees to SAP User Accounts on page 129
l Adding Other Schema Types on page 40
One Identity Manager 8.0.1 Administration Guide for Connecting to SAPR/3
Setting up SAP R/3 Synchronization
32

Special Features of Synchronizing witha CUA Central System
NOTE:
l Only child system roles and profiles that match the login language of the admin-istrative user account for synchronization are mapped in One Identity Manager.
l Maintain all child system roles and profile in the target system in the languageset as login language in the synchronization project for the central system inthe system connection.
If a central user administration is connected to One Identity Manager, regularsynchronization is only required with the central system. The synchronizationconfiguration is created for the client labeled as central system. The CUA Application LinkEnabling (ALE) distribution model is loaded during synchronization and tries to assign allclients, which are configured as child systems, to the central system in One IdentityManager. All clients in the same SAP system as the central system are automaticallyadded in One Identity Manager in the process and assigned to the central system (in CUAcentral system). All clients in another SAP system, must already exist in One IdentityManager at this point in time.
If a text comparison of roles and profiles between child and central systems was executedthe target system in the target system, the child system roles and profiles are taken intoaccount by synchronization. These roles and profiles are assigned to the originating clientin the One Identity Manager.
Roles and profile are saved in the table USRSYSACTT with respect to language by textcomparison of roles and profiles in the target system. Only roles and profile matching thelogin language of the administrative account for synchronization are read from the tableUSRSYSACTT during synchronization with One Identity Manager. If single roles and profilesare not maintained in this language, they are not transferred to One Identity Manager. Inorder to map all roles and profiles from child systems in One Identity Manager, they mustall be all maintained in the language specified as login language in the central system.
To set up an initial synchronization project for central user administration
1. Create synchronization projects the child systems, not in the same SAP system asthe central system.
Proceed as described in section Creating a Synchronization Project for initialSynchronization of an SAP Client on page 22. The following anomalies apply:
a. Select the project template "SAP R/3 (CUA subsystem)" on the Select projecttemplate page in the project wizard.
b. The page Restrict target system access is not shown. The target system isonly loaded.
c. Start synchronization manually to load the required data.
All clients from the selected system and their license data are loaded.
One Identity Manager 8.0.1 Administration Guide for Connecting to SAPR/3
Setting up SAP R/3 Synchronization
33

NOTE: Do not synchronize using schedules. Re-synchronizing is onlynecessary, if the active price lists for charging licenses were changed inthe target system.
2. Repeat step 1 for all child system in other SAP subsystems.
3. Create a synchronization project for the central system.
Proceed as described in section Creating a Synchronization Project for initialSynchronization of an SAP Client on page 22. The following special cases apply:
a. Set the option CUA central system on the Additional settings page.
b. Select the project template "SAP R/3 synchronization (base administration)" onthe Select project template page.
c. Configure scheduled synchronization
4. Start central system synchronization, after all child systems have been loaded in theSAP database from One Identity Manager subsystems.
Related Topics
l General Master Data for an SAP Client on page 102
l Excluding child Systems from Synchronization on page 34
Excluding child Systems fromSynchronization
Certain administrative task in SAP R/3 required that the child system is temporarilyexcluded from the central user administration. If these child system are synchronizedduring this period, the SAP roles and SAP profile of the temporarily excluded child systemare marked as outstanding or deleted in the One Identity Manager database. To preventthis, remove the child system from the synchronization scope.
SAP roles and profiles are removed from the synchronization scope by deleting theALE model name in the client. The client properties are synchronized anyway. Toensure that the ALE model name is not reintroduced, disable the rule for mapping thisschema property.
To exclude a child system from synchronization
1. Select the category SAP R/3 | Tenants.
2. Select the child system in the result list. Select Change master data in thetask view.
3. Delete the entry in ALE model name.
4. Save the changes.
5. Open the synchronization project in the Synchronization Editor.
6. Select the categoryWorkflows.
One Identity Manager 8.0.1 Administration Guide for Connecting to SAPR/3
Setting up SAP R/3 Synchronization
34

7. Select the workflow to use for synchronizing the central system in thenavigation view.
8. Double-click on the synchronization step "client" in the workflow view.
9. Select the Rule filter tab.
10. Select the property mapping rule "ALEModelName_ALEModelName" in Exludedrules.
11. Click OK.
12. Save the changes.
NOTE: Unsuccessful database operations for assigning SAP roles and profiles to useraccount that originate from the temporarily excluded child system are loggeddepending on the setting in the synchronization log. You can ignore these messages.Once the child system is available again, the memberships are handled properly.
You must reactivate synchronization of the child system's SAP role and profiles themoment it becomes part of the central user administration again.
To re-include a child system in synchronization
1. Select the category SAP R/3 | Tenants.
2. Select the child system in the result list. Select Change master data in thetask view.
3. Enter the ALE model name of the central system's CUA in the textbox ALEmodel name.
The child system is only synchronized if the same ALE model named is entered in thecentral system and the child system.
4. Save the changes.
5. Open the synchronization project in the Synchronization Editor.
6. Select the categoryWorkflows.
7. Select the workflow in the navigation, to use for synchronizing the central system(default is "Initial Synchronization").
8. Double-click on the synchronization step "client" in the workflow view.
9. Select the Rule filter tab.
10. Deselect the property mapping rule "ALEModelName_ALEModelName" inExluded rules.
11. Click OK.
12. Save the changes.
For more information about editing synchronization steps, see One Identity Manager TargetSystem Synchronization Reference Guide.
Related Topics
l General Master Data for an SAP Client on page 102
One Identity Manager 8.0.1 Administration Guide for Connecting to SAPR/3
Setting up SAP R/3 Synchronization
35

Show Synchronization Results
Synchronization results are summarized in the synchronization log. You can specify theextent of the synchronization log for each system connection individually. One IdentityManager provides several reports in which the synchronization results are organized underdifferent criteria.
To display a synchronization log
1. Open the synchronization project in the Synchronization Editor.
2. Select the category Logs.
3. Click in the navigation view toolbar.
Logs for all completed synchronization runs are displayed in the navigation view.
4. Select a log by double-clicking on it.
An analysis of the synchronization is shown as a report. You can save the report.
To display a provisioning log.
1. Select the category Logs.
2. Click in the navigation view toolbar.
Logs for all completed provisioning processes are displayed in the navigation view.
3. Select a log by double-clicking on it.
An analysis of the provisioning is show as a report. You can save the report.
The log is marked in color in the navigation view. This mark shows you the execution statusof the synchronization/provisioning.
Synchronization logs are stored for a fixed length of time. The retention period is set in theconfiguration parameter "DPR\Journal\LifeTime" and its sub parameters.
To modify the retention period for synchronization logs
l Set the configuration parameter "Common\Journal\LifeTime" in the Designer andenter the maximum retention time for entries in the database journal. Use theconfiguration sub parameters to specify the retention period for each warning level.
l If there is a large amount of data, you can specify the number of objects to deleteper DBQueue Processor operation and run in order to improve performance. Use theconfiguration parameters "Common\Journal\Delete\BulkCount" and"Common\Journal\Delete\TotalCount" to do this.
l Configure and set the schedule "Delete journal" in the Designer.
One Identity Manager 8.0.1 Administration Guide for Connecting to SAPR/3
Setting up SAP R/3 Synchronization
36

Customizing SynchronizationConfiguration
You have used the Synchronization Editor to set up a synchronization project for initialsynchronization of an SAP client. You can use this synchronization project to load SAPobjects into the One Identity Manager database. If you manage user accounts and theirauthorizations with One Identity Manager, changes are provisioned in the SAPenvironment.
You must customize the synchronization configuration in order to compare the SAP R/3database with the regularly and to synchronize changes.
l Create a workflow with the direction of synchronization "target system" to use OneIdentity Manager as the master system for synchronization.
l To specify which SAP objects and database object are included in synchronization,edit the scope of the target system connection and the One Identity Managerdatabase connection. To prevent data inconsistencies, define the same scope in bothsystems. If no scope is defined, all objects will be synchronized.
l You can use variables to create generally applicable synchronization configurationswhich contain the necessary information about the synchronization objects whensynchronization starts. Variables can be implemented in base objects, schemaclasses or processing methods, for example.
l Use variables to set up a synchronization project which can be used for severaldifferent clients. Store a connection parameter as a variable for logging in tothe clients.
l Update the schema in the synchronization project, if the One Identity Managerschema or target system schema has changed. Then you can add the changes tothe mapping.
l Add your own schema types if you want to synchronize data, which does not haveschema types in the connector schema.
IMPORTANT: As long as synchronization is running, you must not start anothersynchronization for the same target system. This applies especially, if the samesynchronization objects would be processed.
l The moment another synchronization is started with the same start up config-uration, the running synchronization process is stopped and given the status,"Frozen". An error message is written to the One Identity Manager Service logfile.
l If another synchronization is started with another start up configuration, thataddresses same target system, it may lead to synchronization error or loss ofdata. Specify One Identity Manager behavior in this case, in the start up config-uration. Group start up configurations with the same start up behavior.
For more detailed information about configuring synchronization, see the One IdentityManager Target System Synchronization Reference Guide.
One Identity Manager 8.0.1 Administration Guide for Connecting to SAPR/3
Setting up SAP R/3 Synchronization
37

Detailed information about this topic
l How to Configure SAP R/3 Synchronization on page 38
l Configuring Synchronization of Different Clients on page 38
l Updating Schemas on page 39
l Adding Other Schema Types on page 40
How to Configure SAP R/3 Synchronization
The synchronization project for initial synchronization provides a workflow for initialloading of target system objects (initial synchronization) and one for provisioning objectmodifications from the One Identity Manager database to the target system (provisioning).You also require a workflow with synchronization in the direction of the "target system" touse One Identity Manager as the master system for synchronization.
To create a synchronization configuration for synchronizing SAP R/3
1. Open the synchronization project in the Synchronization Editor.
2. Check whether existing mappings can be used for synchronizing the target system.Create new maps if required.
3. Create a new workflow with the workflow wizard.
This adds a workflow for synchronizing in the direction of the target system.
4. Create a new start up configuration. Use the new workflow to do this.
5. Save the changes.
6. Run a consistency check.
Related Topics
l Configuring Synchronization of Different Clients on page 38
Configuring Synchronization of DifferentClients
Prerequisites
l The target system schema of both clients are identical.
l All virtual schema properties used in the mapping must exist in the extended schemaof both clients.
One Identity Manager 8.0.1 Administration Guide for Connecting to SAPR/3
Setting up SAP R/3 Synchronization
38

To customize a synchronization project for synchronizing another client
1. Prepare a user account with sufficient permissions for synchronizing in theother client.
2. Open the synchronization project in the Synchronization Editor.
3. Create a new base object for the other clients. Use the wizards to attach abase object.
l Select the SAP connector in the wizard and enter the connection parameters.The connection parameters are saved in a special variable set.
A start up configuration is created, which uses the new variable set.
4. Change other elements of the synchronization configuration as required.
5. Save the changes.
6. Run a consistency check.
Related Topics
l How to Configure SAP R/3 Synchronization on page 38
Updating Schemas
All the schema data (schema types and schema properties) of the target system schemaand the One Identity Manager schema are available when you are editing asynchronization project. Only a part of this data is really needed for configuringsynchronization. If a synchronization project is finished, the schema is compressed toremove unnecessary data from the synchronization project. This can speed up loading thesynchronization project. Deleted schema data can be added to the synchronizationconfiguration again at a later point.
If the target system schema or the One Identity Manager schema has changed, thesechanges must also be added to the synchronization configuration. Then the changes can beadded to the schema property mapping.
To include schema data that have been deleted through compressing and schemamodifications in the synchronization project, update each schema in the synchronizationproject. This may be necessary if:
l A schema was changed by:
l Changes to a target system schema
l Customizations to the One Identity Manager schema
l A One Identity Manager update migration
l A schema in the synchronization project was shrunk by:
l Activating the synchronization project
l Synchronization project initial save
One Identity Manager 8.0.1 Administration Guide for Connecting to SAPR/3
Setting up SAP R/3 Synchronization
39

l Compressing a schema
To update a system connection schema
1. Open the synchronization project in the Synchronization Editor.
2. Select the category Configuration | Target system.
- OR -Select the category
Configuration | One Identity Manager connection.
3. Select the view General and click Update schema.
4. Confirm the security prompt with Yes.
This reloads the schema data.
To edit a mapping
1. Open the synchronization project in the Synchronization Editor.
2. Select the category Mappings.
3. Select a mapping in the navigation view.
Opens the Mapping Editor. For more detailed information about editing mappings,see One Identity Manager Target System Synchronization Reference Guide.
NOTE: The synchronization is deactivated if the schema of an activated synchron-ization project is updated. Reactivate the synchronization project to synchronize.
Adding Other Schema Types
Add your own schema types if you want to synchronize data, which does not haveschema types in the connector schema. You can let your own schema types be addedwhen setting up the initial synchronization project with the project wizard, However, youcan also add them after saving the synchronization project. This method is described inthe following section.
You can obtain an overview of which schema types are defined in the connector schema inthe Synchronization Editor target system browser.
IMPORTANT: Both used and unused schema types are displayed in the Target SystemBrowser. If the synchronization project is set, unused system types are deleted fromthe schema. Then they are longer appear in the Target System Browser.
Check the schema type list before you enable the synchronization project.
To start the Target System Browser
1. Open the synchronization project in the Synchronization Editor.
2. Select the category Configuration | Target systems.
One Identity Manager 8.0.1 Administration Guide for Connecting to SAPR/3
Setting up SAP R/3 Synchronization
40

3. Select the General view and click Browse....
This opens the Target System Browser. You will see all the schema types used in thissynchronization project in the upper pane of the Schema types view. The lowerpane contains the list of unused schema types
To extend the connector schema with your own schema types
1. Find which out schema types you require.
2. Create a schema extension file. Save this file and keep the file name and pathat the ready.
For more information, see Configuring a Schema Extension File on page 42.
3. Open the synchronization project in the Synchronization Editor.
4. Select the category Configuration | Target systems.
5. Select the General view and click Edit connection....
This starts the system connection wizard.
6. Verify the data.
7. Enter the name and path of your schema extension file on the SAP connectorschema page.
l To check the schema extension file for logical error, click Check file.
This lists all the system types that are defined.
l Click Next.
8. Click Finish to end the system connection wizard.
9. Select the view General and click Update schema.
10. Confirm the security prompt with Yes.
The schema types, including your new schema types, are loaded.
11. Open the Target System Browser and check whether the schema types havebeen added.
The schema types are displayed in the list of used schema types.
12. Select the category Mapping ad create mappings for the your new schema types.
For more information about setting up mappings and schema classes, see the OneIdentity Manager Target System Synchronization Reference Guide.
13. Select the categoryWorkflows and edit the workflow 'Initial Synchronization'.Create additional synchronization steps for the new mappings.
For more detailed information about setting up synchronization steps, see the OneIdentity Manager Target System Synchronization Reference Guide.
14. Save the synchronization project in the database.
15. Run a consistency check.
16. Activate the synchronization project.
One Identity Manager 8.0.1 Administration Guide for Connecting to SAPR/3
Setting up SAP R/3 Synchronization
41
Configuring a Schema Extension File
Define all the schema types you want to use to extend the connector schema in the schemaextension file. The schema extension file is an XML file with a structure identical to theconnector schema. It describes the definitions for table queries and BAPI calls for the newschema types. If a new schema type has the same name as an already existing schematype, the extension is ignored.
The file is divided into three main sections:
l Table section
l Functions section
l Schema types section
Basically, tables and functions required to access data for defined schema types, must bedeclared first. Then, after this, you can define new schema types in the schema typessection. You can use functions and tables in different schema type definitions in this case. Aschema type definition must contain at least one call for an object list.
Schema Extension File Structure
<?xml version="1.0" encoding="utf-8" ?>
<SAP>
<Tables>
...
</Tables>
<Functions>
...
</Functions>
<SAPExtendedSchematypes>
...
</SAPExtendedSchematypes>
</SAP>
Predefined Variables
You can use variables in the table and function sections. These can be all the systemvariables known to the SAP module RFC_READ_TABLE.
One Identity Manager 8.0.1 Administration Guide for Connecting to SAPR/3
Setting up SAP R/3 Synchronization
42
Variable Description
sy-langu Currently selected login language.
sy–datum Current date.
sy-mandant Current client.
Table 17: System Variable Examples
You can also use variables known to the SAP R/3 connector, for example, from the processparameter definition.
Variable Description
$Value$ Input parameter for the One Identity Manager Service call.
$Mandt$ Current client's number.
$Date$ Current date.
Table 18: Predefined SAP R/3Connector Variables
Detailed information about this topic
l Defining Tables on page 43
l Defining Functions on page 46
l Defining Schema Types on page 47
l Appendix: Example of a Schema Extension File on page 203
Defining Tables
In the section for tables (Tables), you can select tables and columns required for accessingthe data for the schema types, which will be defined. The SAP R/3 connector requires adefinition for each table to load the slim object list. To do this, you define exactly thosecolumns the SAP R/3 connector required when it loaded the synchronization objects. Allcolumns in the table are loaded when single objects are accessed.
Attribute Description
Definition Symbolic name for using the definition.
TableName Name of the table in the SAP database.
Key Key term for formatting the distinguished name. Multiple values can beentered in a comma delimited list.
X500 Abbreviation for the key term in the attribute Key. Multiple values can be
Table 19: Table definition
One Identity Manager 8.0.1 Administration Guide for Connecting to SAPR/3
Setting up SAP R/3 Synchronization
43
Attribute Description
entered in a comma delimited list.
SQL Limiting WHERE clause.
NOTE: There are a number of restrictions for parsing SQL operators inthe SAP R/3 system. Take the following rules into account to ensurecorrectness:
l The column name must be in front of the operator in a compar-ison and the comparison value after it (example: BEGDA LT sy-datum).
l The comparison operators "<" and ">" cause parsing errors inXML. Use the operators LT and GT instead. For more information,see Permitted Operators in the SQL Attribute on page 45.
Distinct Counts the columns that the Distinct filter applies to (as comma delimitedlist).
Load Columns to load when the object list is loaded. These columns can be for canbe used to format the schema type's display name (DisplayPattern) asrevision counters, for example, or as input parameters in a function,
If the object list is loaded from a table but single objects from a function, allthe columns used within the synchronization project mapping must be givenhere.
IMPORTANT: Each column, which must be additionally loaded whenthe object list is loaded, creates extra load for One Identity Manager.This can make synchronization much slower if there is a lot of data.Only enter columns that you really need for further object processing.
No data is required for single object access.
Advice
l Several table definitions with different symbolic names can be defined that refer tothe same table in the SAP database.
l Key columns are always loaded. They should not, therefore, be given in theLoad attribute.
l The Load attribute only works when loading the object list. All columns of the tableare always loaded for single object access.
One Identity Manager 8.0.1 Administration Guide for Connecting to SAPR/3
Setting up SAP R/3 Synchronization
44

l Operators permitted in the Where clause are:
Operator Function/Example
EQ =
NE <>
GT >
LT <
GE >=
LE <=
BETWEEN ENDDA BETWEEN '20090101' AND '20090131'
Table 20: Permitted Operators in the SQLAttribute
l A table definition can also contain a mapping block. This block is used to replaceparameters that are supposed to be used in WHERE clauses but were selected withanother name in the object list.
In the example, every occurrence of the variable $BNAME$ was replaced with the valuein the column USERNAME when single objects were loaded from the table RSECUSERAUTHbefore SQL selection was run. The column USERNAMEmust be loaded into an object listbeforehand.
Table definitions with a mapping are used primarily to load single objects.
l Predefined variables can be used as well as custom defined parameters in theWHERE clause. For more information, see Configuring a Schema Extension Fileon page 42.
Example:
<Tables>
<TABLE Definition = "HRP1001-Table" TableName="HRP1001"Key="OTJID,SUBTY,BEGDA,ENDDA" X500="CN,OU,OU,OU" SQL="MANDT = sy-mandt"Load="VARYF" Distinct="OTJID,SUBTY,VARYF" />
<TABLE Definition = "HRP1000-Table" TableName="HRP1000"Key="OTJID,LANGU,BEGDA,ENDDA" X500="CN,OU,OU,OU" SQL="MANDT = sy-mandt" Load=""Distinct="OTJID" />
<TABLE Definition = "RSECUSERAUTH-SingleUser" TableName="RSECUSERAUTH" Key="AUTH"X500="CN" SQL="UNAME = '$BNAME$'" Load="" >
<Mapping>
<Data ParameterName = "$BNAME$" PropertyName = "USERNAME" />
</Mapping>
</TABLE>
One Identity Manager 8.0.1 Administration Guide for Connecting to SAPR/3
Setting up SAP R/3 Synchronization
45

</Tables>
Defining Functions
In the section for functions (Functions), you can describe the interfaces to BAPI functionsrequired for accessing the data for the schema types, which will be defined.
Attribute Description
Definition Symbolic name for using the definition.
FunctionName Function name in the SAP R/3 system.
OutStructure Name of an SAP structure given as a return value. (Optional)
Key Key term for formatting the distinguished name. Multiple values can beentered in a comma delimited list.
X500 Abbreviation for the key term in the attribute Key. Multiple values can beentered in a comma delimited list.
Table 21: Function definition
In the optional mapping block, you define how the values are passed to the functioncall parameters. To do this, an object list must be created before the function call. Theparameters for the function call can be filled from this object list's properties. In theexample below, BNAME is a property, which is determined from the object list of thetable USR02.
Predefined variables can be passed to the parameters. For more information, seeConfiguring a Schema Extension File on page 42. Apart from that, it is possible to pass afixed value to a function parameter. The following notation is provided for this.
<Data ParameterName = "<Name>" PropertyName = "VALUE=<fixed value>" />
Example:
<Tables>
<TABLE Definition = "USR02-Table" TableName="USR02" Key="BNAME" X500="CN"SQL="MANDT = '$MANDT$'" Load="" />
</Tables>
<Functions>
<Function Definition = "USER GET" FunctionName="BAPI_USER_GET_DETAIL"OutStructure = "" Key ="USERNAME" X500 ="CN">
<Mapping>
<Data ParameterName = "USERNAME" PropertyName = "BNAME" />
</Mapping>
One Identity Manager 8.0.1 Administration Guide for Connecting to SAPR/3
Setting up SAP R/3 Synchronization
46

</Function>
</Functions>
Related Topics
l Appendix: Example of a Schema Extension File on page 203
Defining Schema Types
In the section for schema types (SAPExtendedSchematypes), you can define schema typesthat exist in the SAP schema and can be used to extend the connector schema. Theidentifier given in the attribute Name is used as the name. This identifier must be unique inthe extended connector schema.
Attribute Description
Bem Internal description
Name Name of the schema type in the extended connector schema.
DisplayPattern Definition of a display pattern for displaying objects in theSynchronization Editor (for example, in the target systembrowser or defining schema classes). (Optional) Only columnsthat are loaded in the table definition (attribute Key or Load) canbe used.
IMPORTANT: Each column, which must be additionallyloaded when the object list is loaded, creates extra load forOne Identity Manager. This can make synchronizationmuch slower if there is a lot of data. Only enter columnsthat you really need for further object processing.
RevisionProperty Name of a property contain the revision counter. (Optional)
ListObjectsDefinition Function or table definition for calling an object list.
ReadObjectDefinition Function or table definition for calling a single object.
WriteObjectDefinition Function definition for writing an object. (Optional)
DeleteObjectDefinition Function definition for deleting an object. (Optional)
ParentType Context of the schema type. (Optional)
By default, the schema types are client related(ParentType="SAPMANDANT"). If the new schema type is valid in allSAP R/3 system clients, enter the ParentType with the value"SAPSYSTEM".
If this attribute is not defined, the schema type is client related.
Table 22: Schema type definition
One Identity Manager 8.0.1 Administration Guide for Connecting to SAPR/3
Setting up SAP R/3 Synchronization
47

A schema type definition must contain at least one object list call (attributeListObjectsDefinition). In this case, you can enter a table or a function definition. To call asingle object (attribute ReadObjectDefinition), the object list must have been loadedpreviously. The list call and single object call can refer to different tables, however the keycolumns for identifying single objects must either have the same name or have beenmapped in the table definition for the single object call. In the example below, the singleobjects from table RSECUSERAUTH are determined for an object from the table USR02. The keycolumns for identifying the objects are USR02.BNAME and RSECUSERAUTH.UNAME. The columnshave different names and are therefore mapped using the parameter $BNAME$.
If is possible to define a Properties block for declaring any number of other objectproperties and the types of access to them.P One single property is defined by the Propertytag, which can have the following attributes.
Attribute Description
Name Name of the property. It must be unique within the schema type.
Description Property description.
ListFunction Function or table for calling all values.
AddFunction Function for adding a value. (Optional)
DelFunction Function for deleting a value. (Optional)
ReplaceFunction Replaces the entire contents of the property. (Optional)
IsMultivalued Specifies whether the property has multiple values. (Optional)
If this attribute is not defined, the property is not mult-value.
Table 23: Property Definition
Example:
<Tables>
<TABLE Definition = "USR04-Table" TableName="USR04" Key="BNAME,MANDT"X500="CN,OU" SQL="MANDT = sy-mandt" Load="" />
<TABLE Definition = "USR02-Table" TableName="USR02" Key="BNAME" X500="CN"SQL="MANDT = sy-mandt" Load="MANDT,TRDAT" />
<TABLE Definition = "RSECUSERAUTH-SingleUser" TableName="RSECUSERAUTH" Key="AUTH"X500="CN" SQL="UNAME = '$BNAME$'" Load="" >
<Mapping>
<Data ParameterName = "$BNAME$" PropertyName = "BNAME" />
</Mapping>
</TABLE>
</Tables>
<Functions>
<Function Definition = "USER GET" FunctionName="BAPI_USER_GET_DETAIL"
One Identity Manager 8.0.1 Administration Guide for Connecting to SAPR/3
Setting up SAP R/3 Synchronization
48

OutStructure = "" Key ="USERNAME" X500 ="CN">
<Mapping>
<Data ParameterName = "USERNAME" PropertyName = "BNAME" />
</Mapping>
</Function>
<Function Definition = "USER SET" FunctionName="BAPI_USER_CHANGE" OutStructure="" Key ="USERNAME" X500 ="CN">
<Mapping>
<Data ParameterName = "USERNAME" PropertyName = "BNAME" />
</Mapping>
</Function>
<Function Definition = "USER DEL" FunctionName="BAPI_USER_DELETE" OutStructure="" Key ="USERNAME" X500 ="CN" >
<Mapping>
<Data ParameterName = "USERNAME" PropertyName = "BNAME" />
</Mapping>
</Function>
<Function Definition = "USER PROFILE SET" FunctionName="BAPI_USER_PROFILES_ASSIGN" OutStructure ="" Key ="USERNAME" X500 ="CN">
<Mapping>
<Data ParameterName = "USERNAME" PropertyName = "BNAME" />
<Data ParameterName = "BAPIPROF~BAPIPROF" PropertyName = "$Value$" />
</Mapping>
</Function>
<Function Definition = "BWProfileDelFkt" FunctionName="/VIAENET/SAPHR_RSECUSERAUT_DEL" OutStructure ="" Key ="ZUSRNAME,ZHIER" X500 ="CN,OU">
<Mapping>
<Data ParameterName = "ZUSRNAME" PropertyName = "BNAME" />
<Data ParameterName = "ZHIER" PropertyName = "$VALUE$" />
</Mapping>
</Function>
<Function Definition = "BWProfileAddFkt" FunctionName="/VIAENET/SAPHR_RSECUSERAUT_ADD" OutStructure ="" Key ="ZUSRNAME,ZHIER" X500 ="CN,OU">
<Mapping>
<Data ParameterName = "ZUSRNAME" PropertyName = "BNAME" />
<Data ParameterName = "ZHIER" PropertyName = "$VALUE$" />
</Mapping>
One Identity Manager 8.0.1 Administration Guide for Connecting to SAPR/3
Setting up SAP R/3 Synchronization
49

</Function>
</Functions>
<SAPExtendedSchematypes>
<SAPExtendedSchematype Bem = "all users" Name = "UserFunctionTable"DisplayPattern="%BNAME% (%MANDT%)" RevisionProperty="TRDAT" ListObjectsDefinition= "USR02-Table" ReadObjectDefinition ="USER GET" WriteObjectDefinition = "USERSET" DeleteObjectDefinition = "USER DEL">
<Properties>
<Property Name = "SAPBWP" Description="all the user's BWprofiles" ListFunction="RSECUSERAUTH-SingleUser"AddFunction="BWProfileAddFkt" DelFunction="BWProfileDelFkt"ReplaceFunction="" IsMultivalued = "true" />
<Property Name = "USERPROFILE" Description="all the user's profiles"ListFunction="USR04-Table" AddFunction="" DelFunction=""ReplaceFunction="USER PROFILE SET" IsMultivalued = "true" />
</Properties>
</SAPExtendedSchematype>
</SAPExtendedSchematypes>
Explanation:
The list of schema type objects UserFunctionTable is created by using the table USR02.Reading, writing and deleting is done with USER-BAPI functions, which each have beendeclared as a Function.
The schema type has a properties block. Two properties are defined here that are neitherreturned through the list call's table definition nor through the single object call's functiondefinition. A multi-value property SAPBWP is defined, whose value is taken from the tableRSECUSERAUTH. The single objects are identified by the columns USR02.BNAME andRSECUSERAUTH.UNAME. BAPI calls, which are defined as functions, are used for inserting anddeleting values.
The property Userprofile is an example of a multi-value property, which has values readfrom a table (USER04) and a Replace function. Therefore, all values that need to remain inthe property must always be given when changes are made. The write function is theoriginal USER-BAPI function for setting profiles in the user (function definition for BAPI_USER_PROFILES_ASSIGN). Single objects are identified using the columns USR02.BNAME andUSR04.BNAME. There is no mapping required for the table definition because the key columnshave the same name.
One Identity Manager 8.0.1 Administration Guide for Connecting to SAPR/3
Setting up SAP R/3 Synchronization
50

Speeding Up Synchronization withRevision Filtering
When you start synchronization, all synchronization objects are loaded. Some of theseobjects have not be modified since the last synchronization and, therefore, must not beprocessed. Synchronization is accelerated by only loading those object pairs that havechanged since the last synchronization. One Identity Manager uses revision filtering toaccelerate synchronization.
SAP R/3 supports revision filtering. The SAP objects' date of last change is used as revisioncounter. Each synchronization save its last execution date as revision in the the OneIdentity Manager database (table DPRRevisionStore, column Value). This value is used as acomparison for revision filtering when the same workflow is synchronized the next time.When this workflow is synchronized the next time, the SAP objects' change date iscompared with the revision saved in the One Identity Manager database. Only thoseobjects that have been changed since this date are loaded from the target system.
NOTE: SAP roles are given the last date the role was generated in the target system.Only SAP roles that have be regenerated since the last synchronization are updated inthe database on synchronization with revision filtering.
The revision is found at start of synchronization. Objects changed after this point areincluded with the next synchronization.
Revision filtering can be applied to workflows and start up configuration.
To permit revision filtering on a workflow
l Open the synchronization project in the Synchronization Editor.
l Edit the workflow properties. Select the entry Use revision filter fromRevision filtering.
To permit revision filtering for a start up configuration
l Open the synchronization project in the Synchronization Editor.
l Edit the start up configuration properties. Select the entry Use revision filter fromRevision filtering.
Detailed information about this topic
l One Identity Manager Target System Synchronization Reference Guide
Synchronizing Collective Roles
Only directly assigned single and collective roles are mapped in the table SAPUserInSAPRole.Assignments of single roles to collective roles are mapped in the SAPCollectionRPG table.
One Identity Manager 8.0.1 Administration Guide for Connecting to SAPR/3
Setting up SAP R/3 Synchronization
51
You can establish which single roles are indirectly assigned to a user account through bothtables.
By default, the following applies to inheritance of single roles by user accounts: If a singlerole is assigned to a user account and the single role is part of a collective role, which isalso assigned to the user account the single role is not inherited by the user account aswell. This removes membership of user accounts in single roles when group membershipsare provisioned in SAP R/3. This membership is deleted from the One Identity Managerdatabase by the next synchronization or marked as outstanding, depending on thesynchronization's configuration.
To prevent memberships being removed from single roles when single rolesare part of collective roles
l Set the configuration parameter "TargetSystem\SAP\KeepRedundantProfiles" inthe Designer.
Restricting Synchronization Objectsusing User Permissions
The One Identity Manager offers the possibility to restrict user account and groups forsynchronization by using user permissions. In this case, only the user accounts and groupsare synchronized that the user account used by the SAP R/3 connector to log into the targetsystem, is authorized for. All other groups and user accounts are filtered out of the userlists and the groups list of the function module "/VIAENET/U". If only a small part of theuser account in the SAP R/3 environment should be synchronized with the One IdentityManager then the synchronization can be accelerated with this method.
Prerequisites
l The user account used by the SAP R/3 connector to log into the target system, isassigned exactly those groups in the SAP R/3 authorization object S_USER_GRP,characteristic CLASS, that should be synchronized.
l There are user accounts that one of these groups is assigned to in the SAP R/3environment as user group for testing authorization (in the login data).
During synchronization, the groups are loaded into the One Identity Manager database thatthe user account used by the SAP R/3 connector to log into the target system, has access toin the authorization object SUSER_GRP. All user accounts that are assigned one of thesegroups as user group for authorization testing, are also synchronized. All other groups anduser accounts are handled as non-existent objects in the target system duringsynchronization.
One Identity Manager 8.0.1 Administration Guide for Connecting to SAPR/3
Setting up SAP R/3 Synchronization
52
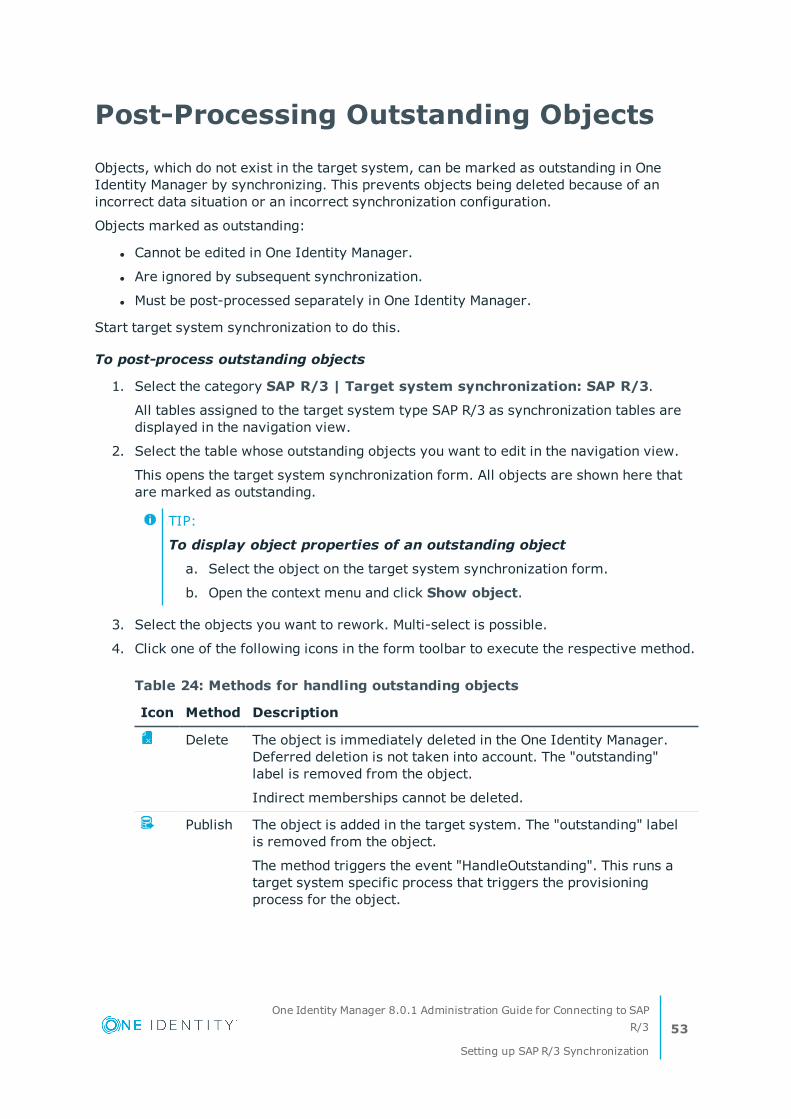
Post-Processing Outstanding Objects
Objects, which do not exist in the target system, can be marked as outstanding in OneIdentity Manager by synchronizing. This prevents objects being deleted because of anincorrect data situation or an incorrect synchronization configuration.
Objects marked as outstanding:
l Cannot be edited in One Identity Manager.
l Are ignored by subsequent synchronization.
l Must be post-processed separately in One Identity Manager.
Start target system synchronization to do this.
To post-process outstanding objects
1. Select the category SAP R/3 | Target system synchronization: SAP R/3.
All tables assigned to the target system type SAP R/3 as synchronization tables aredisplayed in the navigation view.
2. Select the table whose outstanding objects you want to edit in the navigation view.
This opens the target system synchronization form. All objects are shown here thatare marked as outstanding.
TIP:
To display object properties of an outstanding object
a. Select the object on the target system synchronization form.
b. Open the context menu and click Show object.
3. Select the objects you want to rework. Multi-select is possible.
4. Click one of the following icons in the form toolbar to execute the respective method.
Icon Method Description
Delete The object is immediately deleted in the One Identity Manager.Deferred deletion is not taken into account. The "outstanding"label is removed from the object.
Indirect memberships cannot be deleted.
Publish The object is added in the target system. The "outstanding" labelis removed from the object.
The method triggers the event "HandleOutstanding". This runs atarget system specific process that triggers the provisioningprocess for the object.
Table 24: Methods for handling outstanding objects
One Identity Manager 8.0.1 Administration Guide for Connecting to SAPR/3
Setting up SAP R/3 Synchronization
53

Icon Method Description
Prerequisites:
l The table containing the object can be published.
l The target system connector has write access to the targetsystem.
Reset The "outstanding" label is removed from the object.
5. Confirm the security prompt with Yes.
NOTE: By default, the selected objects are processed in parallel, which speeds upexecution of the selected method. If an error occurs during processing, the action isstopped and all changes are discarded.
Bulk processing of objects must be disabled if errors are to be localized, which meansthe objects are processed sequentially. Failed objects are named in the errormessage. All changes that were made up until the error occurred are saved.
To disable bulk processing
l Deactivate in the form toolbar.
You must customize synchronization to synchronize custom tables.
To add custom tables to the target system synchronization.
1. Select the category SAP R/3 | Basic configuration data | Target systemtypes.
2. Select the target system type SAP R/3 in the result list.
3. Select Assign synchronization tables in the task view.
4. Assign custom tables whose outstanding objects you want to handle in Addassignments.
5. Save the changes.
6. Select Configure tables for publishing.
7. Select custom tables whose outstanding objects can be published in the targetsystem and set the option Publishable.
8. Save the changes.
NOTE: The target system connector must have write access to the target system inorder to publish outstanding objects that are being post-processed. That means, theoption Connection is read only must no be set for the target system connection.
One Identity Manager 8.0.1 Administration Guide for Connecting to SAPR/3
Setting up SAP R/3 Synchronization
54

Configuring Memberships Provisioning
Memberships, for example, user accounts in groups, are saved in assignment tables in theOne Identity Manager database. During provisioning of modified memberships, changesmade in the target system will probably be overwritten. This behavior can occur under thefollowing conditions:
l Memberships are saved in the target system as an object property in list form(Example: List of role assignments in the property AGR_NAME for an SAP R/3 user).
l Memberships can be modified in either of the connected systems.
l A provisioning workflow and provisioning processes are set up.
If a membership in One Identity Manager changes, the complete list of members istransferred to the target system by default. Memberships, previously added to the targetsystem are removed by this; previously deleted memberships are added again.
To prevent this, provisioning can be configured such that only the modified membership isprovisioned in the target system. The corresponding behavior is configured separately foreach assignment table.
To allow separate provisioning of memberships
1. Start the Manager.
2. Select the category SAP R/3 | Basic configuration data | Target systemtypes.
3. Select the target system type SAP R/3 in the result list.
4. Select Configure tables for publishing.
5. Select the assignment tables for which you want to allow separate provisioning.Multi-select is possible.
l The option can only be set for assignment tables whose base table has aXDateSubItem or a CCC_XDateSubItem .
l Assignment tables, which are grouped together in a virtual schema property inthe mapping, must be labeled identically.
6. Click Enable merging.
7. Save the changes.
For each assignment table labeled like this, the changes made in the One Identity Managerare saved in a separate table. During modification provisioning, the members list in thetarget system is compared to the entries in this table. This means that only modifiedmemberships are provisioned and the members list does not get entirely overwritten.
NOTE: The complete members list is updated by synchronization. During this process,objects with changes but incomplete provisioning are not handled. These objects arelogged in the synchronization log.
For more detailed information about provisioning memberships, see the One IdentityManager Target System Synchronization Reference Guide.
One Identity Manager 8.0.1 Administration Guide for Connecting to SAPR/3
Setting up SAP R/3 Synchronization
55

NOTE: Changes to user account memberships in single role are always provisionedindividually. Therefore, single provisioning cannot be configured for the table SAPUser-InSAPRole.
Help for Analyzing SynchronizationIssues
You can generate a report for analyzing problems which occur during synchronization, forexample, insufficient performance. The report contains information such as:
l Consistency check results
l Revision filter settings
l Scope applied
l Analysis of the synchronization buffer
l Object access times in the One Identity Manager database and in the target system
To generate a synchronization analysis report
1. Open the synchronization project in the Synchronization Editor.
2. Select the menu Help | Generate synchronization analysis report and answerthe security prompt with Yes.
The report may take a few minutes to generate. It is displayed in a separate window.
3. Print the report or save it in one of the available output formats.
Deactivating Synchronization
Regular synchronization cannot be started until the synchronization project and theschedule are active.
To prevent regular synchronization
l Select the start up configuration and deactivate the configured schedule.
Now you can only start synchronization manually.
An activated synchronization project can only be edited to a limited extend. The schema inthe synchronization project must be updated if schema modifications are required. Thesynchronization project is deactivated in this case and can be edited again.
Furthermore, the synchronization project must be deactivated if synchronization should notbe started by any means (not even manually).
One Identity Manager 8.0.1 Administration Guide for Connecting to SAPR/3
Setting up SAP R/3 Synchronization
56
To deactivate the loaded synchronization project
1. Select General on the start page.
2. Click Deactivate project.
Detailed information about this topic
l Creating a Synchronization Project for initial Synchronization of an SAP Clienton page 22
One Identity Manager 8.0.1 Administration Guide for Connecting to SAPR/3
Setting up SAP R/3 Synchronization
57

3
Base Data for Managing SAP R/3
To manage an SAP R/3 environment in One Identity Manager, the following data isrelevant.
l Configuration parameter
Use configuration parameters to configure the behavior of the system's basicsettings. One Identity Manager provides default settings for different configurationparameters. Check the configuration parameters and modify them as necessary tosuit your requirements.
Configuration parameters are defined in the One Identity Manager modules. EachOne Identity Manager module can also install configuration parameters. You can findan overview of all configuration parameters in the category Base data | General |Configuration parameters in the Designer.
For more information, see Appendix: Configuration Parameters for Managing SAPR/3 on page 191.
l Account definitions
One Identity Manager has account definitions for automatically allocating useraccounts to employees during working hours. You can create account definitions forevery target system. If an employee does not have a user account in the targetsystem, a new user account is created. This is done by assigning accountdefinitions to an employee using the integrated inheritance mechanism followed byprocess handling.
For more information, see Setting Up Account Definitions on page 59.
l Password policies
One Identity Manager provides you with support for creating complex passwordpolicies, for example, for system user passwords, the employees' central passwordas well as passwords for individual target systems. Password polices apply not onlywhen the user enters a password but also when random passwords are generated.
Predefined password policies are supplied with the default installation that you canuser or customize if required. You can also define your own password policies.
For more information, see Password Policies on page 81.
One Identity Manager 8.0.1 Administration Guide for Connecting to SAPR/3
Base Data for Managing SAP R/3
58

l Initial Password for New User Accounts
You have the different options for issuing an initial password for user accounts. Thecentral password of the assigned employee can be aligned with the user accountpassword, a predefined, fixed password can be used or a randomly generated initialpassword can be issued.
For more information, see Initial Password for New SAP User Accounts on page 90.
l Email notifications about login data
When a new user account is created, the login data are send to a specified recipient.In this case, two messages are sent with the user name and the initial password. Mailtemplates are used to generate the messages.
For more information, see Email Notifications about Login Data on page 92.
l Login Languages
User accounts can be assigned a default login language. Login languages can beloaded into the One Identity Manager database through synchronization.
For more information, see Login Languages on page 79.
l Target system types
Target system types are required for configuring target system comparisons. Tablescontaining outstanding objects are maintained on target system types.
For more information, see Post-Processing Outstanding Objects on page 53.
l Server
In order to handle SAP R/3 specific processes in One Identity Manager, thesynchronization server and its server functionality must be declared.
For more information, see Editing a Server on page 93.
l Target system managers
A default application role exists for the target system manager in the One IdentityManager. Assign this application to employees who are authorized to edit the clientsin One Identity Manager.
Define other application roles, if you want to limit target system managers' accesspermissions to individual clients. The application roles must be added under thedefault application role.
For more information, see Target System Managers on page 98.
Setting Up Account Definitions
One Identity Manager has account definitions for automatically allocating user accounts toemployees during working hours. You can create account definitions for every targetsystem. If an employee does not have a user account in the target system, a new useraccount is created. This is done by assigning account definitions to an employee using theintegrated inheritance mechanism followed by process handling.
One Identity Manager 8.0.1 Administration Guide for Connecting to SAPR/3
Base Data for Managing SAP R/3
59

The data for the user accounts in the respective target system comes from the basicemployee data. The assignment of the IT operating data to the employee’s user account iscontrolled through the primary assignment of the employee to a location, a department, acost center, or a business role (template processing). Processing is done throughtemplates. There are predefined templates for determining the data required for useraccounts included in the default installation. You can customize templates as required.
For more details about the basics, see the One Identity Manager Target System BaseModule Administration Guide.
The following steps are required to implement an account definition:
l Creating an Account Definition
l Setting Up Manage Levels
l Creating a Formatting Rule for IT Operating Data
l Determining IT Operating Data
l Assigning Account Definitions to Employees
l Assigning Account Definitions to a Target System
Creating an Account Definition
To create a new account definition
1. Select the category SAP R/3 | Basic configuration data | Account definitions| Account definitions.
2. Select an account definition in the result list. Select Change master data inthe task view.
- OR -
Click in the result list toolbar.
3. Enter the account definition's master data.
4. Save the changes.
Detailed information about this topic
l Master Data for an Account Definition on page 60
Master Data for an Account Definition
Enter the following data for an account definition:
One Identity Manager 8.0.1 Administration Guide for Connecting to SAPR/3
Base Data for Managing SAP R/3
60
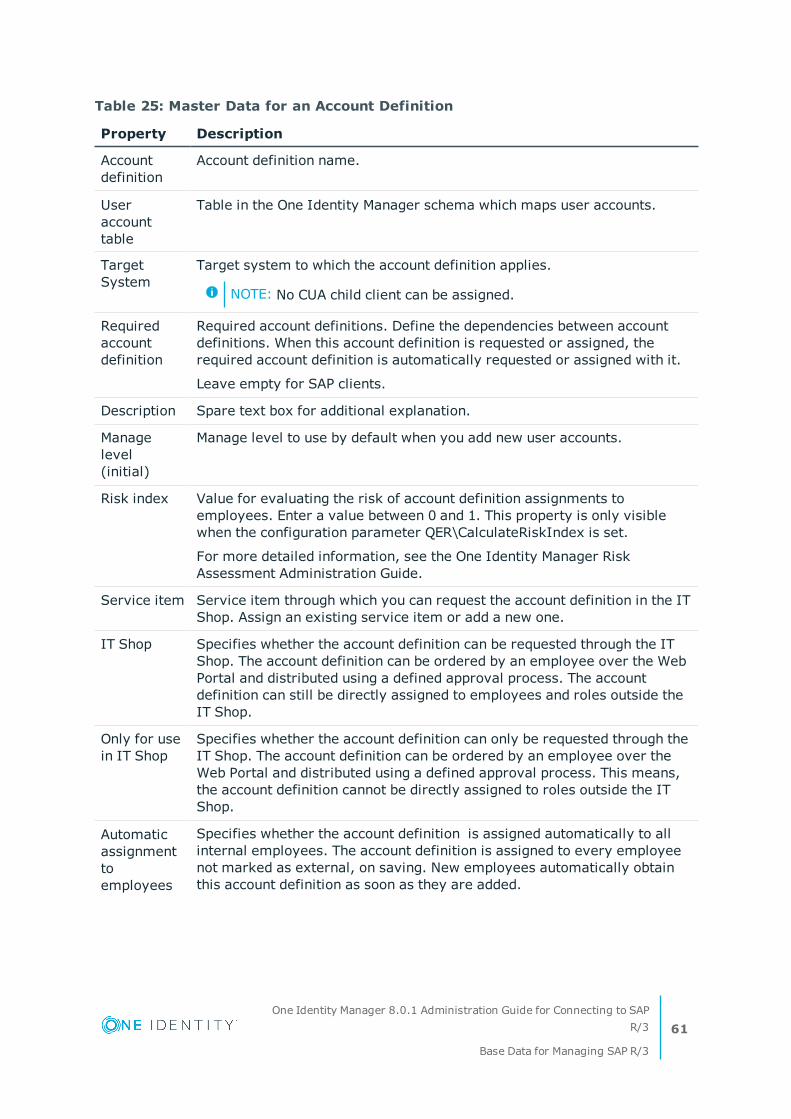
Property Description
Accountdefinition
Account definition name.
Useraccounttable
Table in the One Identity Manager schema which maps user accounts.
TargetSystem
Target system to which the account definition applies.
NOTE: No CUA child client can be assigned.
Requiredaccountdefinition
Required account definitions. Define the dependencies between accountdefinitions. When this account definition is requested or assigned, therequired account definition is automatically requested or assigned with it.
Leave empty for SAP clients.
Description Spare text box for additional explanation.
Managelevel(initial)
Manage level to use by default when you add new user accounts.
Risk index Value for evaluating the risk of account definition assignments toemployees. Enter a value between 0 and 1. This property is only visiblewhen the configuration parameter QER\CalculateRiskIndex is set.
For more detailed information, see the One Identity Manager RiskAssessment Administration Guide.
Service item Service item through which you can request the account definition in the ITShop. Assign an existing service item or add a new one.
IT Shop Specifies whether the account definition can be requested through the ITShop. The account definition can be ordered by an employee over the WebPortal and distributed using a defined approval process. The accountdefinition can still be directly assigned to employees and roles outside theIT Shop.
Only for usein IT Shop
Specifies whether the account definition can only be requested through theIT Shop. The account definition can be ordered by an employee over theWeb Portal and distributed using a defined approval process. This means,the account definition cannot be directly assigned to roles outside the ITShop.
Automaticassignmenttoemployees
Specifies whether the account definition is assigned automatically to allinternal employees. The account definition is assigned to every employeenot marked as external, on saving. New employees automatically obtainthis account definition as soon as they are added.
Table 25: Master Data for an Account Definition
One Identity Manager 8.0.1 Administration Guide for Connecting to SAPR/3
Base Data for Managing SAP R/3
61
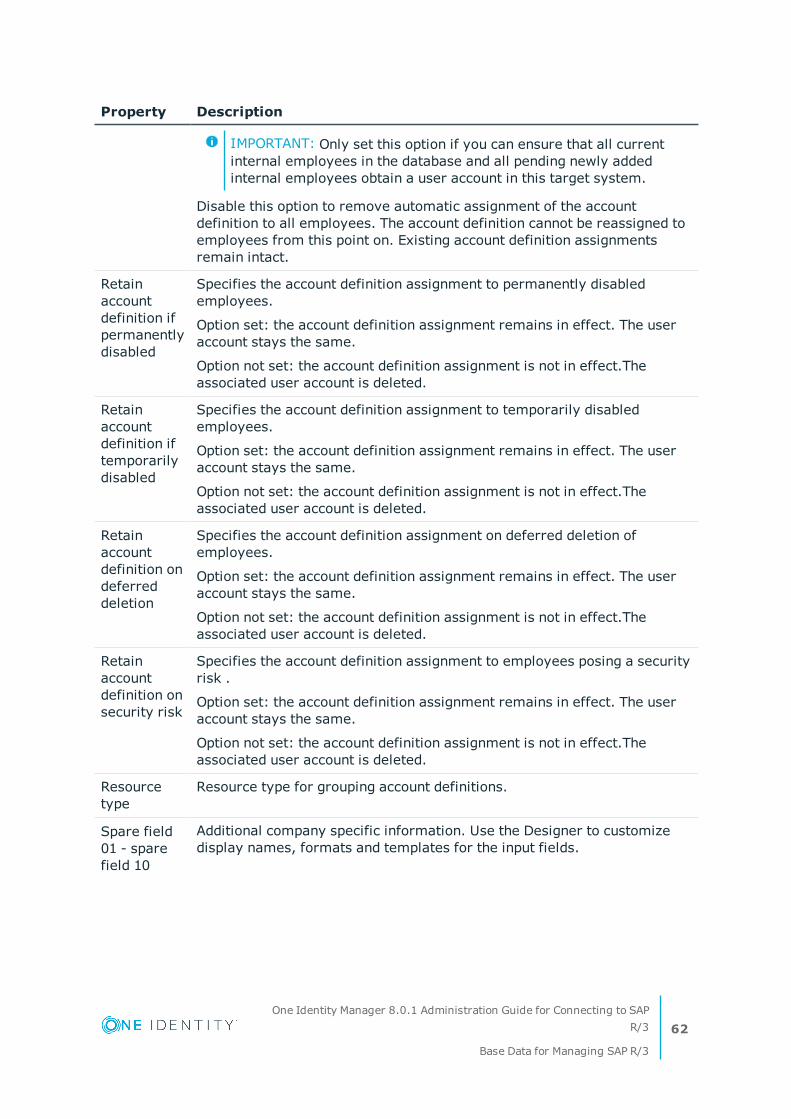
Property Description
IMPORTANT: Only set this option if you can ensure that all currentinternal employees in the database and all pending newly addedinternal employees obtain a user account in this target system.
Disable this option to remove automatic assignment of the accountdefinition to all employees. The account definition cannot be reassigned toemployees from this point on. Existing account definition assignmentsremain intact.
Retainaccountdefinition ifpermanentlydisabled
Specifies the account definition assignment to permanently disabledemployees.
Option set: the account definition assignment remains in effect. The useraccount stays the same.
Option not set: the account definition assignment is not in effect.Theassociated user account is deleted.
Retainaccountdefinition iftemporarilydisabled
Specifies the account definition assignment to temporarily disabledemployees.
Option set: the account definition assignment remains in effect. The useraccount stays the same.
Option not set: the account definition assignment is not in effect.Theassociated user account is deleted.
Retainaccountdefinition ondeferreddeletion
Specifies the account definition assignment on deferred deletion ofemployees.
Option set: the account definition assignment remains in effect. The useraccount stays the same.
Option not set: the account definition assignment is not in effect.Theassociated user account is deleted.
Retainaccountdefinition onsecurity risk
Specifies the account definition assignment to employees posing a securityrisk .
Option set: the account definition assignment remains in effect. The useraccount stays the same.
Option not set: the account definition assignment is not in effect.Theassociated user account is deleted.
Resourcetype
Resource type for grouping account definitions.
Spare field01 - sparefield 10
Additional company specific information. Use the Designer to customizedisplay names, formats and templates for the input fields.
One Identity Manager 8.0.1 Administration Guide for Connecting to SAPR/3
Base Data for Managing SAP R/3
62

Setting Up Manage Levels
Specify the manage level for an account definition for managing user accounts. The useraccount’s manage level specifies the extent of the employee’s properties that are inheritedby the user account. This allows an employee to have several user accounts in one targetsystem, for example:
l Default user account that inherits all properties from the employee
l Administrative user account that is associated to an employee but should not inheritthe properties from the employee.
The One Identity Manager supplies a default configuration for manage levels:
l Unmanaged
User accounts with a manage level of "Unmanaged" become linked to an employeebut do not inherit any other properties. When a new user account is added with thismanage level and an employee is assigned, some of the employee's properties aretransferred initially. If the employee properties are changed at a later date, thechanges are not passed onto the user account.
l Full managed
User accounts with a manage level of "Full managed" inherit specific properties fromthe assigned employee.
NOTE: The manage levels "Full managed" and "Unmanaged" are evaluated in thetemplates. You can customize the supplied templates in the Designer.
You can define other manage levels depending on your requirements. You need toamend the templates to include manage level approaches.
Specify the effect of temporarily or permanently disabling, deleting or the security risk ofan employee on its user accounts and group memberships for each manage level. For moredetailed information about manage levels, see the One Identity Manager Target SystemBase Module Administration Guide.
l Employee user accounts can be locked when they are disabled, deleted or rated as asecurity risk so that permissions are immediately withdrawn. If the employee isreinstated at a later date, the user accounts are also reactivated.
l You can also define group membership inheritance. Inheritance can be discontinuedif desired when, for example, the employee’s user accounts are disabled andtherefore cannot be members in groups. During this time, no inheritance processesshould be calculated for this employee. Existing group memberships are deleted!
To assign manage levels to an account definition
1. Select the category SAP R/3 | Basic configuration data | Account definitions| Account definitions.
2. Select an account definition in the result list.
3. Select Assign manage level in the task view.
One Identity Manager 8.0.1 Administration Guide for Connecting to SAPR/3
Base Data for Managing SAP R/3
63
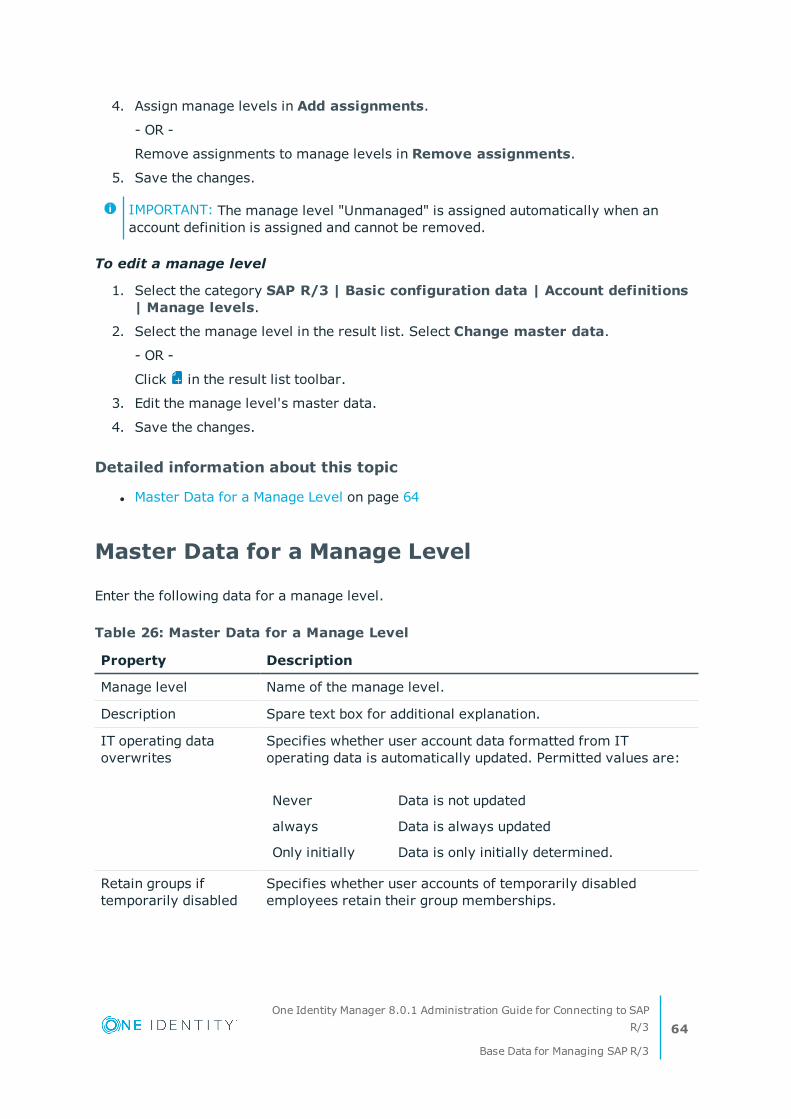
4. Assign manage levels in Add assignments.
- OR -
Remove assignments to manage levels in Remove assignments.
5. Save the changes.
IMPORTANT: The manage level "Unmanaged" is assigned automatically when anaccount definition is assigned and cannot be removed.
To edit a manage level
1. Select the category SAP R/3 | Basic configuration data | Account definitions| Manage levels.
2. Select the manage level in the result list. Select Change master data.
- OR -
Click in the result list toolbar.
3. Edit the manage level's master data.
4. Save the changes.
Detailed information about this topic
l Master Data for a Manage Level on page 64
Master Data for a Manage Level
Enter the following data for a manage level.
Property Description
Manage level Name of the manage level.
Description Spare text box for additional explanation.
IT operating dataoverwrites
Specifies whether user account data formatted from IToperating data is automatically updated. Permitted values are:
Never Data is not updated
always Data is always updated
Only initially Data is only initially determined.
Retain groups iftemporarily disabled
Specifies whether user accounts of temporarily disabledemployees retain their group memberships.
Table 26: Master Data for a Manage Level
One Identity Manager 8.0.1 Administration Guide for Connecting to SAPR/3
Base Data for Managing SAP R/3
64

Property Description
Lock user accounts iftemporarily disabled
Specifies whether user accounts of temporarily disabledemployees are locked.
Retain groups ifpermanently disabled
Specifies whether user accounts of permanently disabledemployees retain group memberships.
Lock user accounts ifpermanently disabled
Specifies whether user accounts of permanently disabledemployees are locked.
Retain groups ondeferred deletion
Specifies whether user accounts of employees marked fordeletion retain their group memberships.
Lock user accounts ifdeletion is deferred
Specifies whether user accounts of employees marked fordeletion are locked.
Retain groups onsecurity risk
Specifies whether user accounts of employees posing a securityrisk retain their group memberships.
Lock user accounts ifsecurity is at risk
Specifies whether user accounts of employees posing a securityrisk are locked.
Retain groups if useraccount disabled
Specifies whether locked user accounts retain their groupmemberships.
Creating a Formatting Rule for ITOperating Data
An account definition specifies which rules are used to form the IT operating data andwhich default values will be used if no IT operating data can be found through theemployee's primary roles.
The following IT operating data is used in the One Identity Manager defaultconfiguration for automatic creating and modifying of user accounts for an employee inthe target system.
l Groups can be inherited
l Identity
l Privileged user account
To create a mapping rule for IT operating data
1. Select the category SAP R/3 | Basic configuration data | Account definitions| Account definitions.
2. Select an account definition in the result list.
3. Select Edit IT operating data mapping in the task view and enter the
One Identity Manager 8.0.1 Administration Guide for Connecting to SAPR/3
Base Data for Managing SAP R/3
65

following data.
Property Description
Column User account property for which the value is set.
Source Specifies which roles to use in order to find the user account properties.You have the following options:
l Primary department
l Primary location
l Primary cost center
l Primary business roles
NOTE: Only use the primary business role if the Business Ro-les Module is installed.
l Empty
If you select a role, you must specify a default value and set theoption Always use default value.
Defaultvalue
Default value of the property for an employee's user account if thevalue is not determined dynamically from the IT operating data.
Alwaysusedefaultvalue
Specifies whether user account properties are always filled with thedefault value. IT operating data is not determined dynamically from arole.
Notifywhenapplyingthestandard
Specifies whether email notification to a defined mailbox is sent whenthe default value is used. Use the mail template "Employee - new useraccount with default properties created". To change the mail template,modify the configuration parameter"TargetSystem\SAPR3\Accounts\MailTemplateDefaultValues".
Table 27: Mapping rule for IT operating data
4. Save the changes.
Determining IT Operating Data
In order for an employee to create user accounts with the manage level "Full managed",the necessary IT operating data must be determined. The operating data required toautomatically supply an employee with IT resources is shown in the departments,locations, cost centers, and business roles. An employee is assigned to one primarylocation, one primary department, one primary cost center or one primary business role.The necessary IT operating data is ascertained from these assignments and used increating the user accounts. Default values are used if valid IT operating data cannot befound over the primary roles.
One Identity Manager 8.0.1 Administration Guide for Connecting to SAPR/3
Base Data for Managing SAP R/3
66

You can also specify IT operating data directly for a specific account definition.
Example:
Normally, each employee in department A obtains a default user account in the client A.In addition, certain employees in department A obtain administrative user accounts inthe client A.
Create an account definition A for the default user account of the client A and an accountdefinition B for the administrative user account of client A. Specify the property"Department" in the IT operating data formatting rule for the account definitions A and B inorder to determine the valid IT operating data.
Specify the effective IT operating data of department A for the client A. This IT operatingdata is used for standard user accounts. In addition, specify the effective accountdefinition B IT operating data for department A. This IT operating data is used foradministrative user accounts.
To specify IT operating data
1. Select the role in the category Organizations or Business roles.
2. Select Edit IT operating data in the task view and enter the following data.
Property Description
Organization/Businessrole
Department, cost center, location or business role forwhich the IT operating data is valid.
Effects on IT operating data application scope. The IT operating datacan be used for a target system or a defined account defin-ition.
To specify an application scope
a. Click next to the text box.
b. Select the table under Table, which maps the targetsystem or the table TSBAccountDef for an accountdefinition.
c. Select the concrete target system or concreteaccount definition under Effects on.
d. Click OK.
Column User account property for which the value is set.
Columns using the script template TSB_ITDataFromOrg intheir template are listed. For more detailed information,see the One Identity Manager Target System Base ModuleAdministration Guide.
Value Concrete value which is assigned to the user accountproperty.
Table 28: IT Operating Data
One Identity Manager 8.0.1 Administration Guide for Connecting to SAPR/3
Base Data for Managing SAP R/3
67

3. Save the changes.
Modifying IT Operating Data
If IT operating data changes, you must transfer these changes to the existing useraccounts. To do this, templates must be rerun on the affected columns. Before you can runthe templates, you can check what the effect of a change to the IT operating data has onthe existing user accounts. You can decide whether the change is transferred to thedatabase in the case of each affected column in each affected database.
Prerequisites
l The IT operating data of a department, cost center, business role or a locationwas changed.
- OR -
l The default values in the IT operating data template were modified for an accountdefinition.
NOTE: If the assignment of an employee to a primary department, cost center,business role or to a primary location changes, the templates are automaticallyexecuted.
To execute the template
1. Select the category SAP R/3 | Basic configuration data | Account definitions| Account definitions.
2. Select an account definition in the result list.
3. Select Execute templates in the task view
This displays a list of all user account, which are created through the selectedaccount definition and whose properties are changed by modifying the IToperating data.
Old value Current value of the object property.
Newvalue
Value applied to the object property after modifying the IT operatingdata.
Selection Specifies whether the modification is applied to the user account.
4. Mark all the object properties in the selection column that will be given thenew value.
5. Click Apply.
The templates are applied to all selected user accounts and properties.
One Identity Manager 8.0.1 Administration Guide for Connecting to SAPR/3
Base Data for Managing SAP R/3
68

Assigning Account Definitions to Employees
Account definitions are assigned to company employees. Indirect assignment is the defaultmethod for assigning account definitions to employees. Account definitions are assigned todepartments, cost centers, locations or roles. The employees are categorized into thesedepartments, cost centers, locations or roles depending on their function in the companyand thus obtain their account definitions. To react quickly to special requests, you canassign individual account definitions directly to employees. You can automatically assignspecial account definitions to all company employees. It is possible to assign accountdefinitions to the IT Shop as requestable products. A department manager can then requestuser accounts from the Web Portal for his staff. It is also possible to add account definitionsto system roles. These system roles can be assigned to employees through hierarchicalroles or directly or added as products in the IT Shop.
In the One Identity Manager default installation, the processes are checked at the start tosee if the employee already has a user account in the target system that has an accountdefinition. If no user account exists, a new user account is created with the accountdefinition’s default manage level.
NOTE: If a user account already exists and is disabled, then it is re-enabled. You haveto alter the user account manage level afterwards in this case.
Prerequisites for indirect assignment of account definitions toemployees
l Assignment of employees and account definitions is permitted for role classes(department, cost center, location or business role).
For detailed information about preparing role classes to be assigned, see the One IdentityManager Identity Management Base Module Administration Guide.
Detailed information about this topic
l Assigning Account Definitions to Departments, Cost Centers and Locations on page 70
l Assigning Account Definitions to Business Roles on page 70
l Assigning Account Definitions to all Employees on page 70
l Assigning Account Definitions Directly to Employees on page 71
l Assigning Account Definitions to a Target System on page 73
One Identity Manager 8.0.1 Administration Guide for Connecting to SAPR/3
Base Data for Managing SAP R/3
69

Assigning Account Definitions to Departments,Cost Centers and Locations
To add account definitions to hierarchical roles
1. Select the category SAP R/3 | Basic configuration data | Account definitions| Account definitions.
2. Select an account definition in the result list.
3. Select Assign organizations.
4. Assign organizations in Add assignments.
l Assign departments on the Departments tab.
l Assign locations on the Locations tab.
l Assign cost centers on the Cost center tab.
- OR -
Remove the organizations from Remove assignments.
5. Save the changes.
Assigning Account Definitions to Business Roles
Installed Modules: Business Roles Module
To add account definitions to hierarchical roles
1. Select the category SAP R/3 | Basic configuration data | Account definitions| Account definitions.
2. Select an account definition in the result list.
3. Select Assign business roles in the task view.
4. Assign business roles in Add assignments.
- OR -
Remove business roles in Remove assignments.
5. Save the changes.
Assigning Account Definitions to all Employees
To assign an account definition to all employees
1. Select the category SAP R/3 | Basic configuration data | Account definitions| Account definitions.
2. Select an account definition in the result list.
One Identity Manager 8.0.1 Administration Guide for Connecting to SAPR/3
Base Data for Managing SAP R/3
70
3. Select Change master data in the task view.
4. Set the option Automatic assignment to employees on the General tab.
IMPORTANT: Only set this option if you can ensure that all current internalemployees in the database and all pending newly added internal employeesobtain a user account in this target system.
5. Save the changes.
The account definition is assigned to every employee that is not marked as external. Newemployees automatically obtain this account definition as soon as they are added. Theassignment is calculated by the DBQueue Processor.
NOTE: Disable the option Automatic assignment to employees to removeautomatic assignment of the account definition to all employees. The account defin-ition cannot be reassigned to employees from this point on. Existing assignmentsremain intact.
Assigning Account Definitions Directly toEmployees
To assign an account definition directly to employees
1. Select the category SAP R/3 | Basic configuration data | Account definitions| Account definitions.
2. Select an account definition in the result list.
3. Select Assign to employees in the task view.
4. Assign employees in Add assignments.
- OR -
Remove employees from Remove assignments.
5. Save the changes.
Assigning Account Definitions to System Roles
Installed Modules: System Roles Module
NOTE: Account definitions with the option Only use in IT Shop can only by assignedto system roles that also have this option set.
One Identity Manager 8.0.1 Administration Guide for Connecting to SAPR/3
Base Data for Managing SAP R/3
71

To add account definitions to a system role
1. Select the category SAP R/3 | Basic configuration data | Account definitions| Account definitions.
2. Select an account definition in the result list.
3. Select Assign system roles in the task view.
4. Assign system roles in Add assignments.
- OR -
Remove assignments to system roles in Remove assignments.
5. Save the changes.
Adding Account Definitions in the IT Shop
A account definition can be requested by shop customers when it is assigned to an IT Shopshelf. To ensure it can be requested, further prerequisites need to be guaranteed.
l The account definition must be labeled with the IT Shop option.
l The account definition must be assigned to a service item.
l If the account definition is only assigned to employees using IT Shop assignments,you must also set the option Only for use in IT Shop. Direct assignment tohierarchical roles may not be possible.
NOTE: IT Shop administrators can assign account definitions to IT Shop shelves iflogin is role-based. Target system administrators are not authorized to add accountdefinitions in the IT Shop.
To add an account definition to the IT Shop
1. Select the category SAP R/3 | Basic configuration data | Account definitions(non role-based login).
– OR –
Select the category Entitlements | Account definitions (role-based login).
2. Select an account definition in the result list.
3. Select Add to IT Shop in the task view.
4. Assign the account definition to the IT Shop shelf in Add assignments
5. Save the changes.
To remove an account definition from individual IT Shop shelves
1. Select the category SAP R/3 | Basic configuration data | Account definitions(non role-based login).
– OR –
One Identity Manager 8.0.1 Administration Guide for Connecting to SAPR/3
Base Data for Managing SAP R/3
72
Select the category Entitlements | Account definitions (role-based login).
2. Select an account definition in the result list.
3. Select Add to IT Shop in the task view.
4. Remove the account definition from the IT Shop shelves in Remove assignments.
5. Save the changes.
To remove an account definition from all IT Shop shelves
1. Select the category SAP R/3 | Basic configuration data | Account definitions(non role-based login).
– OR –
Select the category Entitlements | Account definitions (role-based login).
2. Select an account definition in the result list.
3. Select Remove from all shelves (IT Shop) in the task view.
4. Confirm the security prompt with Yes.
5. Click OK.
The account definition is removed from all shelves by the One Identity ManagerService. All requests and assignment requests with this account definition arecanceled in the process.
For more detailed information about request from company resources through the IT Shop,see the One Identity Manager IT Shop Administration Guide.
Related Topics
l Master Data for an Account Definition on page 60
l Assigning Account Definitions to Departments, Cost Centers and Locations on page 70
l Assigning Account Definitions to Business Roles on page 70
l Assigning Account Definitions Directly to Employees on page 71
l Assigning Account Definitions to System Roles on page 71
Assigning Account Definitions to a TargetSystem
NOTE: To use automatic employee assignment for central user administration (CUA)user accounts, assign the account definition to the CUA central system. Accountdefinitions cannot be used to assign user accounts to child systems.
The following prerequisites must be fulfilled if you implement automatic assignment ofuser accounts and employees resulting in administered user accounts (state "Linkedconfigured"):
One Identity Manager 8.0.1 Administration Guide for Connecting to SAPR/3
Base Data for Managing SAP R/3
73
l The account definition is assigned to the target system.
l The account definition has the default manage level.
User accounts are only linked to the employee (state "Linked") if no account definition isgiven. This is the case on initial synchronization, for example.
To assign the account definition to a target system
1. Select the client in the category SAP R/3 | Clients.
2. Select Change master data in the task view.
3. Select the account definition for user accounts from Account definition (initial).
4. Save the changes.
Deleting an Account Definition
You can delete account definitions if they are not assigned to target systems, employees,hierarchical roles or any other account definitions.
NOTE: If an account definition is deleted, the user accounts arising from this accountdefinition are deleted.
To delete an account definition
1. Remove automatic assignments of the account definition from all employees.
a. Select the category SAP R/3 | Basic configuration data | Accountdefinitions | Account definitions.
b. Select an account definition in the result list.
c. Select Change master data in the task view.
d. Disable the option Automatic assignment to employees on the General tab.
e. Save the changes.
2. Remove direct assignments of the account definition to employees.
a. Select the category SAP R/3 | Basic configuration data | Accountdefinitions | Account definitions.
b. Select an account definition in the result list.
c. Select Assign to employees in the task view.
d. Remove employees from Remove assignments.
e. Save the changes.
3. Remove the account definition's assignments to departments, cost centers andlocations.
a. Select the category SAP R/3 | Basic configuration data | Accountdefinitions | Account definitions.
One Identity Manager 8.0.1 Administration Guide for Connecting to SAPR/3
Base Data for Managing SAP R/3
74

b. Select an account definition in the result list.
c. Select Assign organizations.
d. Remove the account definition's assignments to departments, cost centers andlocations in Remove assignments.
e. Save the changes.
4. Remove the account definition's assignments to business roles.
a. Select the category SAP R/3 | Basic configuration data | Accountdefinitions | Account definitions.
b. Select an account definition in the result list.
c. Select Assign business roles in the task view.
Remove business roles from Remove assignments.
d. Save the changes.
5. If the account definition was requested through the IT Shop, it must be canceled andremoved from all IT Shop shelves. For more detailed information, see the OneIdentity Manager IT Shop Administration Guide.
6. Remove the account definition assignment as required account definition for anotheraccount definition. As long as the account definition is required for another accountdefinition, it cannot be deleted. Check all the account definitions.
a. Select the category SAP R/3 | Basic configuration data | Accountdefinitions | Account definitions.
b. Select an account definition in the result list.
c. Select Change master data in the task view.
d. Remove the account definition from the Required account definitionmenu.
e. Save the changes.
7. Remove the account definition's assignments to target systems.
a. Select the client in the category SAP R/3 | Clients.
b. Select Change master data in the task view.
c. Remove the assigned account definitions on the General tab.
d. Save the changes.
8. Delete the account definition.
a. Select the category SAP R/3 | Basic configuration data | Accountdefinitions | Account definitions.
b. Select an account definition in the result list.
c. Click , to delete the account definition.
One Identity Manager 8.0.1 Administration Guide for Connecting to SAPR/3
Base Data for Managing SAP R/3
75

Basic Data for User AccountAdministration
The One Identity Manager supplies the following basic data for user administration,by default:
l User Account Types on page 76
l External Identifier Types on page 77
Other basic data is read from SAP R/3 during synchronization, if configured, and cannot beediting in One Identity Manager. This merely allows assignment to an SAP user account.These include:
l Parameter on page 77
l Printers on page 78
l Cost centers on page 78
l Start Menu on page 78
l Companies on page 79
l Login Languages on page 79
l Licenses on page 80
l Special Versions on page 81
Certain user account properties can be defined as default for all user accounts through theconfiguration settings. These include:
l Initial Password for New SAP User Accounts on page 90
l Email Notifications about Login Data on page 92
User Account Types
The user account types are available in One Identity Manager by default. SAP R/3recognizes the user account types listed below.
User accounttype
Meaning
Dialog (A) Dialog user in a system.
System (B) Background processing within an system.
Communication(C)
Communication between systems without a dialog.
Table 29: User Account Types
One Identity Manager 8.0.1 Administration Guide for Connecting to SAPR/3
Base Data for Managing SAP R/3
76
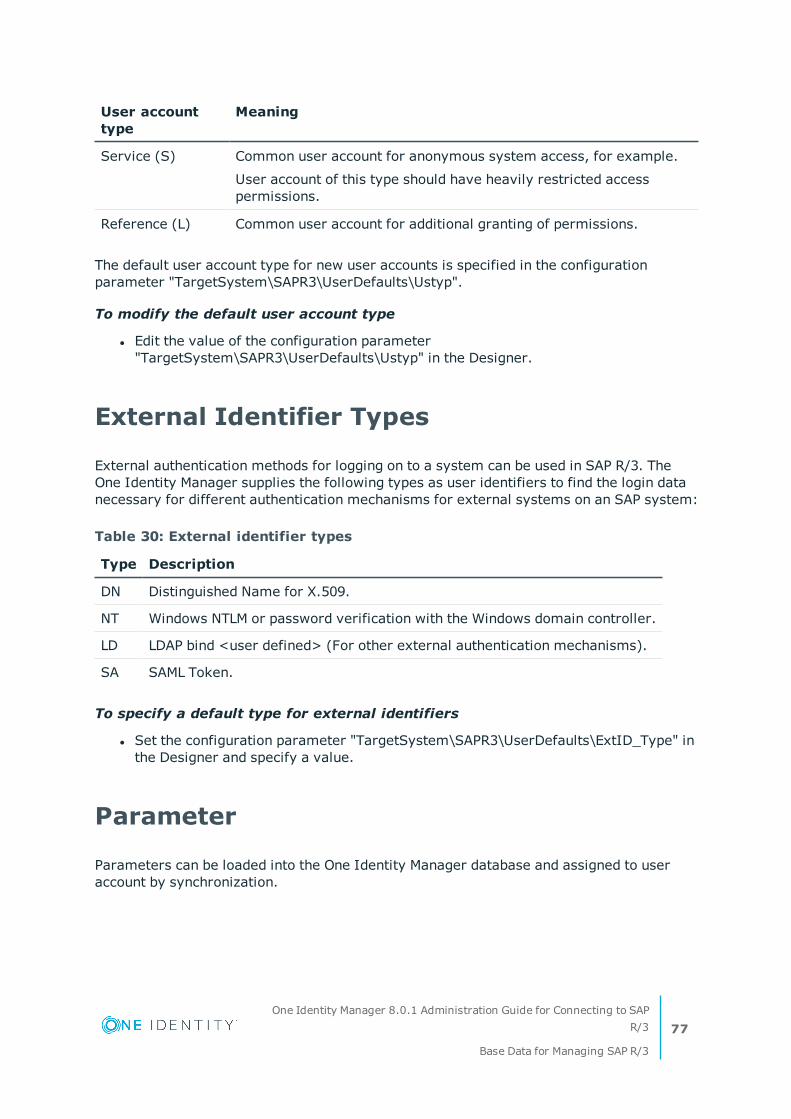
User accounttype
Meaning
Service (S) Common user account for anonymous system access, for example.
User account of this type should have heavily restricted accesspermissions.
Reference (L) Common user account for additional granting of permissions.
The default user account type for new user accounts is specified in the configurationparameter "TargetSystem\SAPR3\UserDefaults\Ustyp".
To modify the default user account type
l Edit the value of the configuration parameter"TargetSystem\SAPR3\UserDefaults\Ustyp" in the Designer.
External Identifier Types
External authentication methods for logging on to a system can be used in SAP R/3. TheOne Identity Manager supplies the following types as user identifiers to find the login datanecessary for different authentication mechanisms for external systems on an SAP system:
Type Description
DN Distinguished Name for X.509.
NT Windows NTLM or password verification with the Windows domain controller.
LD LDAP bind <user defined> (For other external authentication mechanisms).
SA SAML Token.
Table 30: External identifier types
To specify a default type for external identifiers
l Set the configuration parameter "TargetSystem\SAPR3\UserDefaults\ExtID_Type" inthe Designer and specify a value.
Parameter
Parameters can be loaded into the One Identity Manager database and assigned to useraccount by synchronization.
One Identity Manager 8.0.1 Administration Guide for Connecting to SAPR/3
Base Data for Managing SAP R/3
77

To display parameters
1. Select the category SAP R/3 | Parameters.
2. Select the parameter in the result list. Select Change master data in the task view.
Property Description
System System to which the parameter belongs.
Parameter Parameter name.
Text Description of the parameter.
Table 31: Parameter Properties
Related Topics
l Assigning Parameters on page 121
Printers
To display a printer
1. Select the category SAP R/3 | Printers.
2. Select the printer in the result list.
The printer's properties, assigned SAP system and assigned user accounts are displayed onthe overview form.
Cost centers
To display a cost center
1. Select the category SAP R/3 | Cost centers.
2. Select the cost center in the result list.
The cost center properties and assigned client are displayed on the overview form.
Start Menu
To display a start menu
1. Select the category SAP R/3 | Start menus.
2. Select the start menu in the result list.
One Identity Manager 8.0.1 Administration Guide for Connecting to SAPR/3
Base Data for Managing SAP R/3
78

The start menu's properties, assigned client and assigned user accounts are displayed onthe overview form.
Companies
To display a company
1. Select the category SAP R/3 | Companies.
2. Select the company in the result list.
The company's properties, assigned client and assigned user accounts are displayed on theoverview form.
Login Languages
To display a login language
1. Select the category SAP R/3 | Basic configuration data | Login languages.
2. Select the login language in the result list.
The login language's properties, the associated SAP system and assigned user accounts aredisplayed on the overview form.
Security Policies
You can load security policies into the One Identity Manager database usingsynchronization and assign then to a user account.
To display security policies
1. Select the category SAP R/3 | Security policies.
2. Select the security policy in the result list. Select Change master data inthe task view.
Valid security policy attributes, the assigned client and user account accounts are displayedon the overview form.
Communications Types
Communication types can be loaded into the One Identity Manager database bysynchronization and assigned to user accounts.
One Identity Manager 8.0.1 Administration Guide for Connecting to SAPR/3
Base Data for Managing SAP R/3
79

To display communication types
1. Select the category SAP R/3 | Start communication.
2. Select the communication type from the result list.
The assign user accounts are shown on the overview form.
Licenses
Licenses are required for user account system measurement. Select the following objectsin the synchronization configuration to be able to synchronize licenses and their propertieswith the database after initial migration.
To enter a rating for a license
1. Select the category SAP R/3 | Licenses.
2. Select the license in the result list. Select Change master data in the task view.
3. Enter a value in Rating.
4. Save the changes.
The following information is shown for Licenses:
Property Description
License Unique license identifier. Used to determine the system measurement ratingif no license rating is entered.
System Associated SAP system.
User type User type of the SAP system to which the license applies.
Price list(token)
Number in the price list.
Price list(text)
Description in the price list.
Rating License rating as alphanumeric string. Enter any alphanumeric characterstring. Case sensitivity is not taken into account when determining the ratingfor system measurement.
The license rating is evaluated when the system measurement ratings aredetermined. If no rating is entered the license ID for determining the ratingfor system measurement is used.
Enabled Specifies whether the license is enabled.
Specialversion
Specifies whether special versions can be selected for this license.
Table 32: License Master Data
One Identity Manager 8.0.1 Administration Guide for Connecting to SAPR/3
Base Data for Managing SAP R/3
80
Property Description
Countrysurcharge
Specifies whether country surcharges can be selected for this license.
Detailed information about this topic
l Providing System Measurement Data on page 179
Special Versions
If special versions are installed in an SAP R/3 environment for license extension, useraccounts for system measurement must be classified accordingly.
You can see the CUA assignment to user accounts on the special version overview form.Navigate to the user account with the mouse and edit the special version assignment.
To obtain an overview of an e special version
1. Select the category SAP R/3 | Special versions.
2. Select the special version in the result list.
Password Policies
One Identity Manager provides you with support for creating complex password policies,for example, for system user passwords, the employees' central password as well aspasswords for individual target systems. Password polices apply not only when the userenters a password but also when random passwords are generated.
Predefined password policies are supplied with the default installation that you can user orcustomize if required. You can also define your own password policies.
Detailed information about this topic
l Predefined Password Policies on page 82
l Editing Password Policies on page 83
l Custom Scripts for Password Requirements on page 85
l Restricted Passwords on page 88
l Testing a Password on page 88
l Testing Generating a Password on page 88
l Assigning a Password Policy on page 89
One Identity Manager 8.0.1 Administration Guide for Connecting to SAPR/3
Base Data for Managing SAP R/3
81

Predefined Password Policies
You can customize predefined password policies to meet your own requirements, ifnecessary.
Password for logging into One Identity Manager
The password policy "One Identity Manager password policy" is used for logging into OneIdentity Manager. This password policy defined the settings for the system user passwords(DialogUser.Password and Person.DialogUserPassword) as well as the access code for a oneoff log in on the Web Portal (Person.Passcode).
The password policy "One Identity Manager password policy" is also labeled as the defaultand is used when no other password policy is found.
Password policy for forming employees' central passwords
An employee's central password is formed from the target system specific user accountsby respective configuration. The password policy "Employee central password policy"defines the settings for the central password (Person.CentralPassword).
IMPORTANT: Ensure that the password policy "Employee central password policy"does not violate the target system specific password requirements.
Password policies for target systems
A predefined password policy that you can apply to the user account password columns, isprovided for every target system.
NOTE: When you update One Identity Manager version 7.x to One Identity Managerversion 8.0.1, the configuration parameter settings for forming passwords are passedon to the target system specific password policies.
IMPORTANT: If you are not working with target system specific password policies,the default policy applies. In this case, ensure that the password policy "One IdentityManager password policy" does not violate the target system requirements.
The password policy "SAP R/3 password policy" is predefined for SAP R/3. You can applythis password policy to SAP user accounts (SAPUser.Password) of an SAP client.
If the clients' password requirements differ, it is recommended that you set up your ownpassword policies for each client.
One Identity Manager 8.0.1 Administration Guide for Connecting to SAPR/3
Base Data for Managing SAP R/3
82

Editing Password Policies
To edit a password policy
1. Select the category Manager | Basic configuration data | Password policiesin the SAP R/3.
2. Select the password policy in the result list and select Change master data inthe task view.
- OR -
Click in the result list toolbar.
3. Edit the password policy's master data.
4. Save the changes.
Detailed information about this topic
l General Master Data for a Password Policy on page 83
l Policy Settings on page 84
l Character Sets for Passwords on page 84
l Custom Scripts for Password Requirements on page 85
General Master Data for a Password Policy
Enter the following master data for a password policy.
Property Meaning
Display name Password policy name. Translate the given text using thebutton.
Description Spare text box for additional explanation. Translate the giventext using the button.
Error Message Custom error message outputted if the policy is not fulfilled.Translate the given text using the button.
Owner (Application Role) Application roles whose members can configure the passwordpolicies.
Default policy Mark as default policy for passwords.
NOTE: The password policy "One Identity Managerpassword policy" is marked as the default policy. Thispassword policy is applied if no other password policiescan be found.
Table 33: Master Data for a Password Policy
One Identity Manager 8.0.1 Administration Guide for Connecting to SAPR/3
Base Data for Managing SAP R/3
83

Policy Settings
Define the following settings for a password policy on the Password tab.
Property Meaning
Initial password Initial password for new user accounts. If no password isgiven when the user account is added or a random passwordis generated, the initial password is used.
Password confirmation Reconfirm password.
Min. Length Minimum length of the password. Specify the number ofcharacters a password must have.
Max. length Maximum length of the password. Specify the number ofcharacters a password can have.
Max. errors Maximum number of errors. Set the number of invalidpasswords. If the user has reached this number the useraccount is blocked.
Validity period Maximum age of the password. Enter the length of time apassword can be used before it expires.
Password history Enter the number of passwords to be saved. If the value '5' isentered, for example, the last 5 passwords of the user aresaved.
Min. password strength Specifies how secure the password must be. The higher thepassword strength, the more secure it is. The passwordstrength is not tested if the value is '0'. The values '1', '2', '3'and '4' gauge the required complexity of the password. Thevalue '1' demands the least complex password. The value '4'demands the highest complexity.
Name properties denied Specifies whether name properties are permitted in thepassword.
Table 34: Policy Settings
Character Sets for Passwords
Use the Character classes tab to specify which characters are permitted for a password.
Property Meaning
Min. letters Specifies the minimum number of alphabetical charactersthe password must contain.
Table 35: Character Classes for Passwords
One Identity Manager 8.0.1 Administration Guide for Connecting to SAPR/3
Base Data for Managing SAP R/3
84
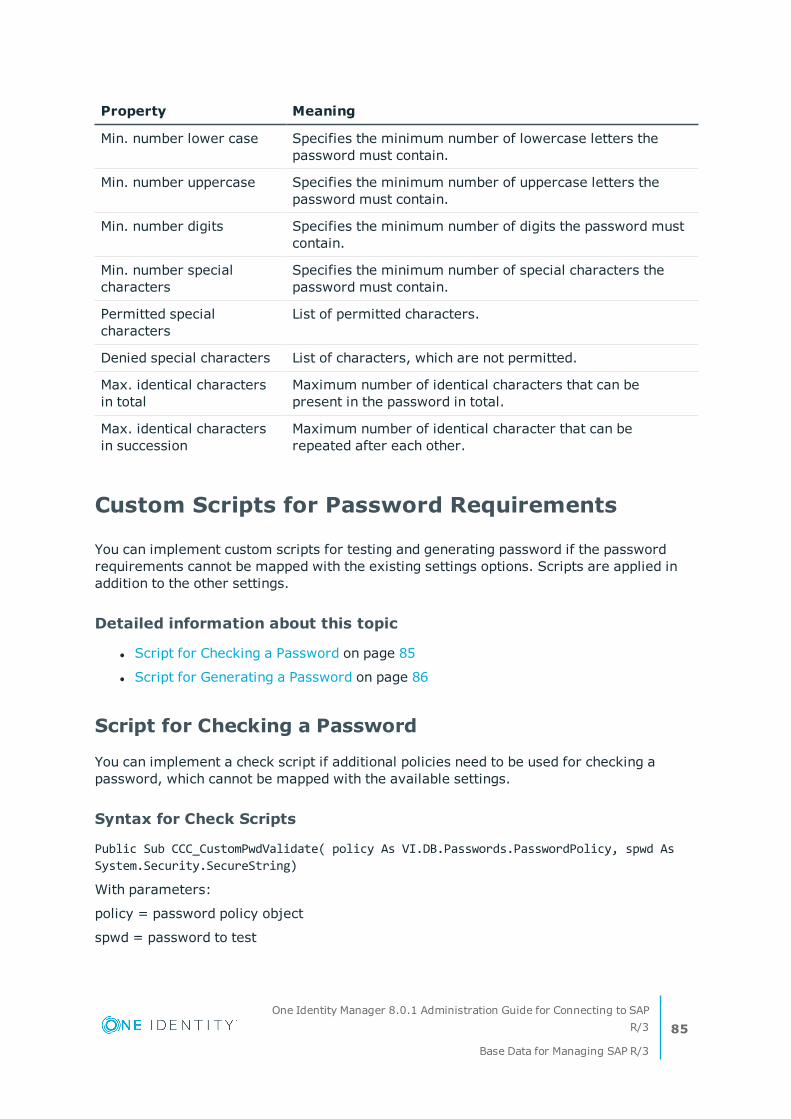
Property Meaning
Min. number lower case Specifies the minimum number of lowercase letters thepassword must contain.
Min. number uppercase Specifies the minimum number of uppercase letters thepassword must contain.
Min. number digits Specifies the minimum number of digits the password mustcontain.
Min. number specialcharacters
Specifies the minimum number of special characters thepassword must contain.
Permitted specialcharacters
List of permitted characters.
Denied special characters List of characters, which are not permitted.
Max. identical charactersin total
Maximum number of identical characters that can bepresent in the password in total.
Max. identical charactersin succession
Maximum number of identical character that can berepeated after each other.
Custom Scripts for Password Requirements
You can implement custom scripts for testing and generating password if the passwordrequirements cannot be mapped with the existing settings options. Scripts are applied inaddition to the other settings.
Detailed information about this topic
l Script for Checking a Password on page 85
l Script for Generating a Password on page 86
Script for Checking a Password
You can implement a check script if additional policies need to be used for checking apassword, which cannot be mapped with the available settings.
Syntax for Check Scripts
Public Sub CCC_CustomPwdValidate( policy As VI.DB.Passwords.PasswordPolicy, spwd AsSystem.Security.SecureString)
With parameters:
policy = password policy object
spwd = password to test
One Identity Manager 8.0.1 Administration Guide for Connecting to SAPR/3
Base Data for Managing SAP R/3
85
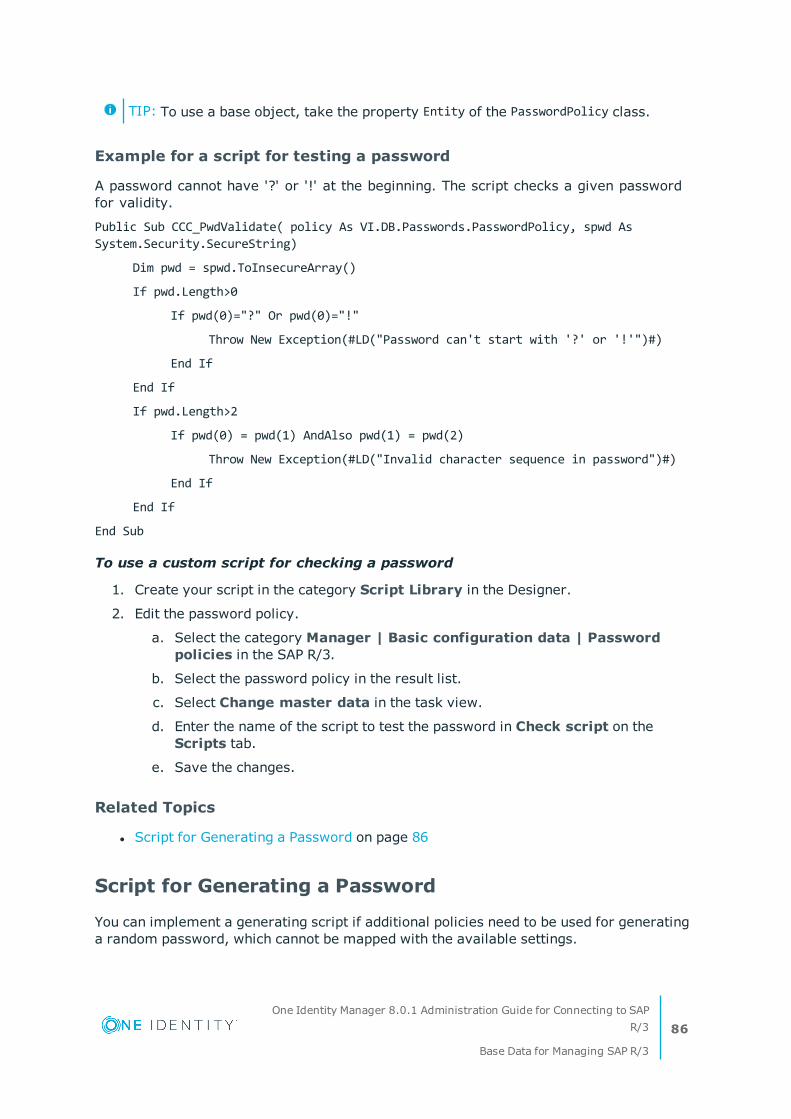
TIP: To use a base object, take the property Entity of the PasswordPolicy class.
Example for a script for testing a password
A password cannot have '?' or '!' at the beginning. The script checks a given passwordfor validity.
Public Sub CCC_PwdValidate( policy As VI.DB.Passwords.PasswordPolicy, spwd AsSystem.Security.SecureString)
Dim pwd = spwd.ToInsecureArray()
If pwd.Length>0
If pwd(0)="?" Or pwd(0)="!"
Throw New Exception(#LD("Password can't start with '?' or '!'")#)
End If
End If
If pwd.Length>2
If pwd(0) = pwd(1) AndAlso pwd(1) = pwd(2)
Throw New Exception(#LD("Invalid character sequence in password")#)
End If
End If
End Sub
To use a custom script for checking a password
1. Create your script in the category Script Library in the Designer.
2. Edit the password policy.
a. Select the category Manager | Basic configuration data | Passwordpolicies in the SAP R/3.
b. Select the password policy in the result list.
c. Select Change master data in the task view.
d. Enter the name of the script to test the password in Check script on theScripts tab.
e. Save the changes.
Related Topics
l Script for Generating a Password on page 86
Script for Generating a Password
You can implement a generating script if additional policies need to be used for generatinga random password, which cannot be mapped with the available settings.
One Identity Manager 8.0.1 Administration Guide for Connecting to SAPR/3
Base Data for Managing SAP R/3
86

Syntax for Generating Script
Public Sub CCC_PwdGenerate( policy As VI.DB.Passwords.PasswordPolicy, spwd AsSystem.Security.SecureString)
With parameters:
policy = password policy object
spwd = generated password
TIP: To use a base object, take the property Entity of the PasswordPolicy class.
Example for a script to generate a password
The script replaces the invalid characters '?' and '!' in random passwords.
Public Sub CCC_PwdGenerate( policy As VI.DB.Passwords.PasswordPolicy, spwd AsSystem.Security.SecureString)
Dim pwd = spwd.ToInsecureArray()
' replace invalid characters at first position
If pwd.Length>0
If pwd(0)="?" Or pwd(0)="!"
spwd.SetAt(0, CChar("_"))
End If
End If
End Sub
To use a custom script for generating a password
1. Create your script in the category Script Library in the Designer.
2. Edit the password policy.
a. Select the category Manager | Basic configuration data | Passwordpolicies in the SAP R/3.
b. Select the password policy in the result list.
c. Select Change master data in the task view.
d. Enter the name of the script to generate a password in Generation script onthe Scripts tab.
e. Save the changes.
Related Topics
l Script for Checking a Password on page 85
One Identity Manager 8.0.1 Administration Guide for Connecting to SAPR/3
Base Data for Managing SAP R/3
87
Restricted Passwords
You can add words to a list of restricted terms to prohibit them from being used inpasswords.
NOTE: The restricted list applies globally to all password policies.
To add a term to the restricted list
1. Select the category Base Data | Security Settings | Restricted passwords inthe Designer.
2. Create a new entry with the menu item Object | New an enter the term to excludedto the list.
3. Save the changes.
Testing a Password
When you test a password, all the password policy settings, custom scripts and therestricted passwords are taken into account.
To test whether a password conforms to the password policy
1. Select the category Manager | Basic configuration data | Password policiesin the SAP R/3.
2. Select the password policy in the result list.
3. Select Change master data in the task view.
4. Select the Test tab.
5. Select the table and object to be tested in Base object for test.
6. Enter a password in Enter password to test.
A display next to the password shows whether it is valid or not.
Testing Generating a Password
When you generate a password, all the password policy settings, custom scripts and therestricted passwords are taken into account.
To generate a password that conforms to the password policy
1. Select the category Manager | Basic configuration data | Password policiesin the SAP R/3.
2. Select the password policy in the result list.
3. Select Change master data in the task view.
One Identity Manager 8.0.1 Administration Guide for Connecting to SAPR/3
Base Data for Managing SAP R/3
88

4. Select the Test tab.
5. Click Generate.
This generates and displays a password.
Assigning a Password Policy
The password policy "SAP R/3 password policy" is predefined for SAP R/3. You can applythis password policy to SAP user accounts (SAPUser.Password) of an SAP client.
If the clients' password requirements differ, it is recommended that you set up your ownpassword policies for each client.
IMPORTANT: If you are not working with target system specific password policies,the default policy applies. In this case, ensure that the password policy "One IdentityManager password policy" does not violate the target system requirements.
To reassign a password policy
1. Select the category Manager | Basic configuration data | Password policiesin the SAP R/3.
2. Select the password policy in the result list.
3. Select Assign objects in the task view.
4. Click Add in the Assignments section and enter the following data.
Property Description
Apply to Application scope of the password policy.
To specify an application scope
a. Click next to the text box.
b. Select the table which contains the password columnunder Table.
c. Select the specific target system under Apply to.
d. Click OK.
Passwordcolumn
The password column's identifier.
Password policy The identifier of the password policy to be used.
Table 36: Assigning a Password Policy
5. Save the changes.
One Identity Manager 8.0.1 Administration Guide for Connecting to SAPR/3
Base Data for Managing SAP R/3
89

To change a password policy's assignment
1. Select the category Manager | Basic configuration data | Password policiesin the SAP R/3.
2. Select the password policy in the result list.
3. Select Assign objects in the task view.
4. Select the assignment you want to change in Assignments.
5. Select the new password policy to apply from the Password Policies menu.
6. Save the changes.
Initial Password for New SAP User Accounts
Configuration parameter Meaning
QER\Person\UseCentralPassword This configuration parameterspecifies whether the employee'scentral password is used in the useraccounts. The employee’s centralpassword is automatically mapped tothe employee’s user account in allpermitted target systems. Thisexcludes privileged user accounts,which are not updated.
QER\Person\UseCentralPassword\PermanentStore This configuration parametercontrols the storage period forcentral passwords. If the parameteris set, the employee’s centralpassword is permanently stored. Ifthe parameter is not set, the centralpassword is only used for publishingto existing target system specificuser accounts and is subsequentlydeleted from the One IdentityManager database.
TargetSystem\SAPR3\Accounts\InitialRandomPassword
This configuration parameterspecifies whether a randomgenerated password is issued when anew user account is added. Thepassword must contain at least thosecharacter sets that are defined in thepassword policy.
Table 37: Configuration Parameters for Formatting Initial Passwords for UserAccounts
One Identity Manager 8.0.1 Administration Guide for Connecting to SAPR/3
Base Data for Managing SAP R/3
90

You have the following possible options for issuing an initial password for a new SAPuser account.
l User the employee's central password. The employee’s central password is mappedto the user account password.
l Set the configuration parameter "QER\Person\UseCentralPassword" in theDesigner.
If the configuration parameter "QER\Person\UseCentralPassword" is set, theemployee's central password is automatically mapped to an employee's useraccount in each of the target systems. This excludes privileged user accounts,which are not updated.
l Use the configuration parameter"QER\Person\UseCentralPassword\PermanentStore" in the Designer to specifywhether an employee’s central password is permanently saved in the OneIdentity Manager database or only until the password has been published in thetarget system.
The password policy "Employee central password policy" is used to format thecentral password.
IMPORTANT: Ensure that the password policy "Employee central passwordpolicy" does not violate the target system specific password requirements.
l Create user accounts manually and enter a password in their master data.
l Specify an initial password to be used when user accounts are created automatically.
l Apply the target system specific password policies and enter an initialpassword in the password policies.
l Assign a randomly generated initial password to enter when you create useraccounts.
l Set the configuration parameter"TargetSystem\SAPR3\Accounts\InitialRandomPassword" in the Designer.
l Apply target system specific password policies and define the character setsthat the password must contain.
l Specify which employee will receive the initial password by email.
Related Topics
l Password Policies on page 81
l Email Notifications about Login Data on page 92
One Identity Manager 8.0.1 Administration Guide for Connecting to SAPR/3
Base Data for Managing SAP R/3
91

Email Notifications about Login Data
Configuration parameter Meaning
TargetSystem\SAPR3\Accounts\InitialRandomPassword\SendTo
This configuration parameter specifies to whichemployee the email with the random generatedpassword should be sent (manager costcenter/department/location/business role,employee’s manager or XUserInserted). If norecipient can be found, the password is sent to theaddress stored in the configuration parameter"TargetSystem\SAP3\DefaultAddress".
TargetSystem\SAPR3\Accounts\InitialRandomPassword\SendTo\MailTemplateAccountName
This configuration parameter contains the nameof the mail template sent to inform users abouttheir initial login data (name of the user account).Use the mail template "Employee - new accountcreated".
TargetSystem\SAPR3\Accounts\InitialRandomPassword\SendTo\MailTemplatePassword
This configuration parameter contains the nameof the mail template sent to inform users abouttheir initial login data (initial password). Use themail template "Employee - initial password fornew user account".
TargetSystem\SAPR3\DefaultAddress The configuration parameter contains therecipient's default email address for sendingnotifications about actions in the target system.
Table 38: Configuration Parameters for Notifications about Actions in theTarget System
You can configure the login information for new user accounts to be sent by email to aspecified person. In this case, two messages are sent with the user name and the initialpassword. Mail templates are used to generate the messages. The mail text in a mailtemplate is defined in several languages, which means the recipient’s language can betaken into account when the email is generated. Mail templates are supplied in the defaultinstallation with which you can configure the notification procedure.
To use email notifications about login data
1. Ensure that the email notification system is configured in One Identity Manager. Formore detailed information, see the One Identity Manager Configuration Guide.
2. Enable the configuration parameter "Common\MailNotification\DefaultSender" in theDesigner and enter the email address for sending the notification.
3. Ensure that all employees have a default email address. Notifications are sent to thisaddress. For more detailed information, see the One Identity Manager IdentityManagement Base Module Administration Guide.
One Identity Manager 8.0.1 Administration Guide for Connecting to SAPR/3
Base Data for Managing SAP R/3
92

4. Ensure that a language culture can be determined for all employees. Only then canthey receive email notifications in their own language. For more detailedinformation, see the One Identity Manager Identity Management Base ModuleAdministration Guide.
When a randomly generated password is issued for the new user account, the initial logindata for a user account is sent by email to a previously specified person.
To send initial login data by email
1. Set the configuration parameter"TargetSystem\SAPR3\Accounts\InitialRandomPassword" in the Designer.
2. Set the configuration parameter"TargetSystem\SAPR3\Accounts\InitialRandomPassword\SendTo" in the Designerand enter the message recipient as value.
3. Set the configuration parameter"TargetSystem\SAPR3\Accounts\InitialRandomPassword\SendTo\MailTemplateAccountName" in the Designer.
By default, the message sent uses the mail template "Employee - new accountcreated". The message contains the name of the user account.
4. Set the configuration parameter"TargetSystem\SAPR3\Accounts\InitialRandomPassword\SendTo\MailTemplatePassword" in the Designer.
By default, the message sent uses the mail template "Employee - initial password fornew user account". The message contains the initial password for the user account.
TIP: Change the value of the configuration parameter in order to use custom mailtemplates for these mails.
Editing a Server
In order to handle SAP R/3 specific processes in One Identity Manager, the synchronizationserver and its server functionality must be declared. You have several options for defininga server's functionality:
l Create an entry for the Job server in the category Base Data | Installation | Jobserver in the Designer. For detailed information, see the One Identity ManagerConfiguration Guide.
l Select an entry for the Job server in the category SAP R/3 | Basic configurationdata | Server in the Manager and edit the Job server master data.
Use this task if the Job server has already been declared in One Identity Manager andyou want to configure special functions for the Job server.
NOTE: One Identity Manager must be installed, configured and started in order for aserver to execute its function in the One Identity Manager Service network. Proceedas follows in the One Identity Manager Installation Guide.
One Identity Manager 8.0.1 Administration Guide for Connecting to SAPR/3
Base Data for Managing SAP R/3
93

To edit a Job server and its functions
1. Select the category SAP R/3 | Basic configuration data | Server in theManager.
2. Select the Job server entry in the result list.
3. Select Change master data in the task view.
4. Edit the Job server's master data.
5. Select Assign server functions in the task view and specify server functionality.
6. Save the changes.
Detailed information about this topic
l Master Data for a Job Server on page 94
l Specifying Server Functions on page 96
Related Topics
l Setting Up the Synchronization Server on page 18
Master Data for a Job Server
NOTE: All editing options are available to you in the Designer, in the category BaseData | Installation | Job server.
Property Meaning
Server Job server name.
Fullservername
Full server name in accordance with DNS syntax.
Example:
<Name of servers>.<Fully qualified domain name>
TargetSystem
Computer account target system.
Languageculture
Language of the server.
Server iscluster
Specifies whether the server maps a cluster.
Table 39: Job Server Properties
One Identity Manager 8.0.1 Administration Guide for Connecting to SAPR/3
Base Data for Managing SAP R/3
94

Property Meaning
Serverbelongsto cluster
Cluster to which the server belongs.
NOTE: The properties Server is cluster and Server belongs tocluster are mutually exclusive.
IPaddress(IPv6)
Internet protocol version 6 (IPv6) server address.
IPaddress(IPv4)
Internet protocol version 4 (IPv4) server address.
Copyprocess(sourceserver)
Permitted copying methods that can be used when this server is the source ofa copy action. Only the methods "Robocopy" and "Rsync" are currentlysupported.
If no method is given, the One Identity Manager Service determines theoperating system of the server during runtime. Replication then takes placebetween servers with a Windows operating system using "Robocopy" andbetween servers with the Linux operating system using "rsync". If theoperating systems of the source and destination servers differ, it is importantthat the right copy method is applied for successful replication. A copymethod is chosen that supports both servers.
Copyprocess(targetserver)
Permitted copying methods that can be used when this server is the destin-ation of a copy action.
Coding Character set coding that is used to write files to the server.
ParentJobserver
Name of the parent Job server.
Executingserver
Name of the executing server. The name of the server that exists physicallyand where the processes are handled.
This input is evaluated when One Identity Manager Service is automaticallyupdated. If the server is handling several queues the process steps are notsupplied until all the queues that are being processed on the same serverhave completed their automatic update.
Queue Name of the queue to handle the process steps. Each One Identity ManagerService within the network must have a unique queue identifier. The processsteps are requested by the job queue using exactly this queue name. Thequeue identifier is entered in the One Identity Manager Service configurationfile.
One Identity Manager 8.0.1 Administration Guide for Connecting to SAPR/3
Base Data for Managing SAP R/3
95

Property Meaning
Serveroperatingsystem
Operating system of the server. This input is required to resolve the pathname for replicating software profiles. Permitted values are "Win32","Windows", "Linux" and "Unix". If the input is empty, "Win32" is assumed.
Serviceaccountdata
One Identity Manager Service user account information. In order to replicatebetween non-trusted systems (non-trusted domains, Linux server) the OneIdentity Manager Service user information has to be declared for the serversin the database. This means that the service account, the service accountdomain and the service account password have to be entered for the server.
OneIdentityManagerServiceinstalled
Specifies whether a One Identity Manager Service is installed on this server.This option is enabled by the procedure QBM_PJobQueueLoad the moment thequeue is called for the first time.
The option is not automatically removed. If necessary, you can reset thisoption manually for servers whose queue is no longer enabled.
Stop OneIdentityManagerService
Specifies whether the One Identity Manager Service has stopped. If thisoption is set for the Job server, the One Identity Manager Service does notprocess any more tasks.
You can make the service start and stop with the appropriate administrativepermissions in program "Job Queue Info".
Noautomaticsoftwareupdate
Specifies whether to exclude the server from automatic software updating.
NOTE: Servers must be manually updated if this option is set.
Softwareupdaterunning
Specifies whether a software update is currently being executed.
ServerFunction
Server functionality in One Identity Manager. One Identity Managerprocesses are handled depending on the server function.
Related Topics
l Specifying Server Functions on page 96
Specifying Server Functions
NOTE: All editing options are available to you in the Designer, in the category BaseData | Installation | Job server.
The server function defines the functionality of a server in One Identity Manager. OneIdentity Manager processes are handled depending on the server function.
NOTE: More server functions may be available depending on which modules areinstalled.
One Identity Manager 8.0.1 Administration Guide for Connecting to SAPR/3
Base Data for Managing SAP R/3
96

ServerFunction
Remark
CSV connector Server on which the CSV connector for synchronization is installed.
Domaincontroller
The Active Directory domain controller. Servers that are not labeled asdomain controller are considered to be member servers.
Printer server Server which acts as a print server.
Generic server Server for generic synchronization with a custom target system.
Home server Server for adding home directories for user accounts.
Update Server This server executes automatic software updating of all other servers.The server requires a direct connection to the database server that theOne Identity Manager database is installed on. The server can executeSQL tasks.
The server with the installed One Identity Manager database, is labeledwith this functionality during initial installation of the schema.
SQL processingserver
This server can process SQL tasks. Several SQL processing servers canbe set up to spread the load of SQL processes. The system distributesthe generated SQL processes throughout all the Job servers with thisserver function.
Nativedatabaseconnector
The server can connect to an ADO.Net database.
One IdentityManagerdatabaseconnector
Server on which the One Identity Manager connector is installed. Thisserver executes synchronization with the target system One IdentityManager.
One IdentityManagerServiceinstalled
Server on which a One Identity Manager Service is installed.
Primarydomaincontroller
Primary domain controller.
Profile Server Server for setting up profile directories for user accounts.
SAMsynchronizationServer
Server for running synchronization with an SMB-based target system.
SAP R/3 Server on which the SAP R/3 connector is installed. This server
Table 40: Permitted Server Functions
One Identity Manager 8.0.1 Administration Guide for Connecting to SAPR/3
Base Data for Managing SAP R/3
97

ServerFunction
Remark
connector executes synchronization with the target system SAP R/3.
SMTP host Server from which the One Identity Manager Service sends emailnotifications. Prerequisite for sending mails using the One IdentityManager Service is SMTP host configuration.
Default reportserver
Server on which reports are generated.
WindowsPowerShellconnector
The server can run Windows PowerShell version 3.0 or later.
Related Topics
l Master Data for a Job Server on page 94
Target System Managers
For more detailed information about implementing and editing application roles, see theOne Identity Manager Application Roles Administration Guide.
Implementing Application Roles for Target System Managers
1. The One Identity Manager administrator assigns employees to be targetsystem managers.
2. These target system managers add employees to the default application role fortarget system managers.
The default application role target system managers are entitled to edit all clients inOne Identity Manager.
3. Target system managers can authorize more employees as target system managers,within their scope of responsibilities and create other child application roles andassign individual clients.
User Task
TargetSystemManagers
Target system managers must be assigned to the application role Targetsystems | SAP R/3 or a sub application role.
Users with this application role:
l Assume administrative tasks for the target system.
Table 41: Default Application Roles for Target System Managers
One Identity Manager 8.0.1 Administration Guide for Connecting to SAPR/3
Base Data for Managing SAP R/3
98

User Task
l Create, change or delete target system objects, like user accountsor groups.
l Edit password policies for the target system.
l Prepare system entitlements for adding to the IT Shop.
l Configure synchronization in the Synchronization Editor and definesthe mapping for comparing target systems and One IdentityManager.
l Edit the synchronization's target system types and outstandingobjects.
l Authorize other employees within their area of responsibility astarget system managers and create child application roles ifrequired.
To initially specify employees to be target system administrators
1. Log in to the Manager as One Identity Manager administrator (application role Baserole | Administrators)
2. Select the category One Identity Manager Administration | Target systems |Administrators.
3. Select Assign employees in the task view.
4. Assign the employee you want and save the changes.
To add the first employees to the default application as target systemmanagers.
1. Log yourself into the Manager as target system administrator (application roleTarget systems | Administrator).
2. Select the category One Identity Manager Administration | Targetsystems | SAP R/3.
3. Select Assign employees in the task view.
4. Assign the employees you want and save the changes.
To authorize other employees as target system managers when you are atarget system manager
1. Login to the Manager as target system manager.
2. Select the application role in the category SAP R/3 | Basic configuration data |Target system managers.
3. Select Assign employees in the task view.
4. Assign the employees you want and save the changes.
One Identity Manager 8.0.1 Administration Guide for Connecting to SAPR/3
Base Data for Managing SAP R/3
99

To define target system managers for individual clients.
1. Login to the Manager as target system manager.
2. Select the category SAP R/3 | Clients.
3. Select the client from the result list.
4. Select Change master data in the task view.
5. Select the application role on the General tab in the Target systemmanager menu.
- OR -
Click next to the Target system manager menu to create a new application role.
l Enter the application role name and assign the parent application role Targetsystem | SAP R/3.
l Click OK to add the new application role.
6. Save the changes.
7. Assign the application role to employees, who are authorized to edit the client in OneIdentity Manager.
Related Topics
l One Identity Manager Users for Managing an SAP R/3 on page 11
l General Master Data for an SAP Client on page 102
One Identity Manager 8.0.1 Administration Guide for Connecting to SAPR/3
Base Data for Managing SAP R/3
100
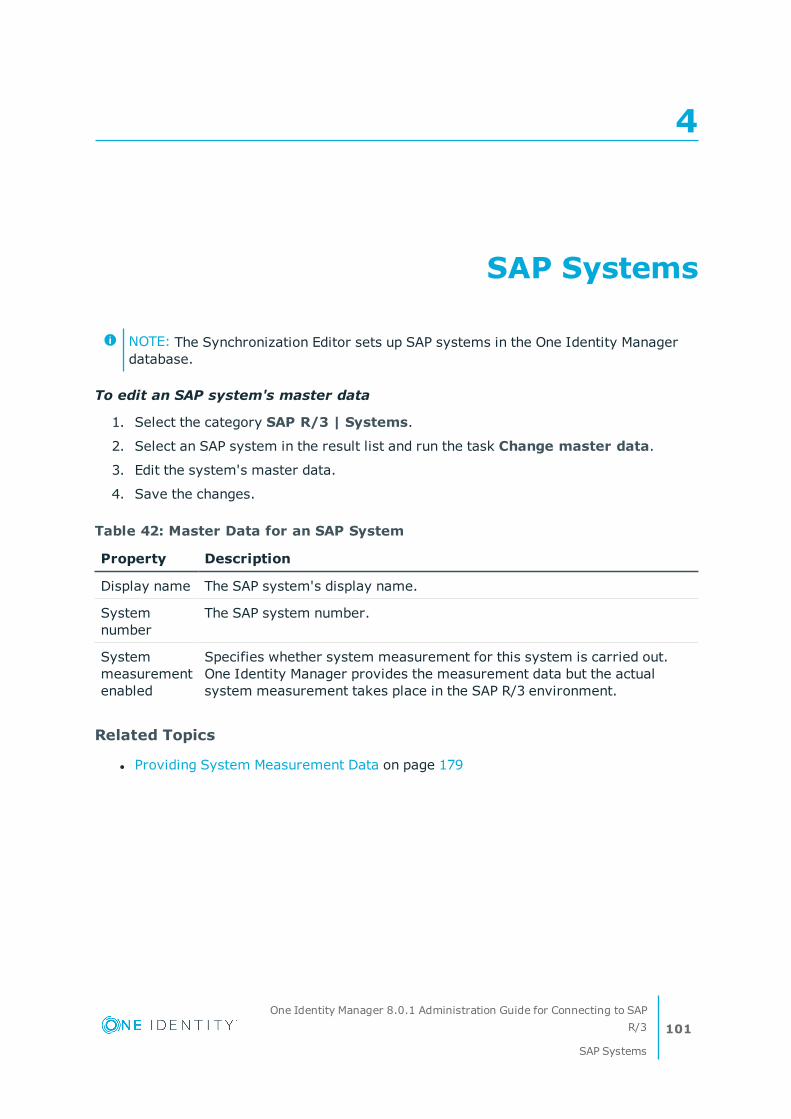
4
SAP Systems
NOTE: The Synchronization Editor sets up SAP systems in the One Identity Managerdatabase.
To edit an SAP system's master data
1. Select the category SAP R/3 | Systems.
2. Select an SAP system in the result list and run the task Change master data.
3. Edit the system's master data.
4. Save the changes.
Property Description
Display name The SAP system's display name.
Systemnumber
The SAP system number.
Systemmeasurementenabled
Specifies whether system measurement for this system is carried out.One Identity Manager provides the measurement data but the actualsystem measurement takes place in the SAP R/3 environment.
Table 42: Master Data for an SAP System
Related Topics
l Providing System Measurement Data on page 179
One Identity Manager 8.0.1 Administration Guide for Connecting to SAPR/3
SAP Systems
101
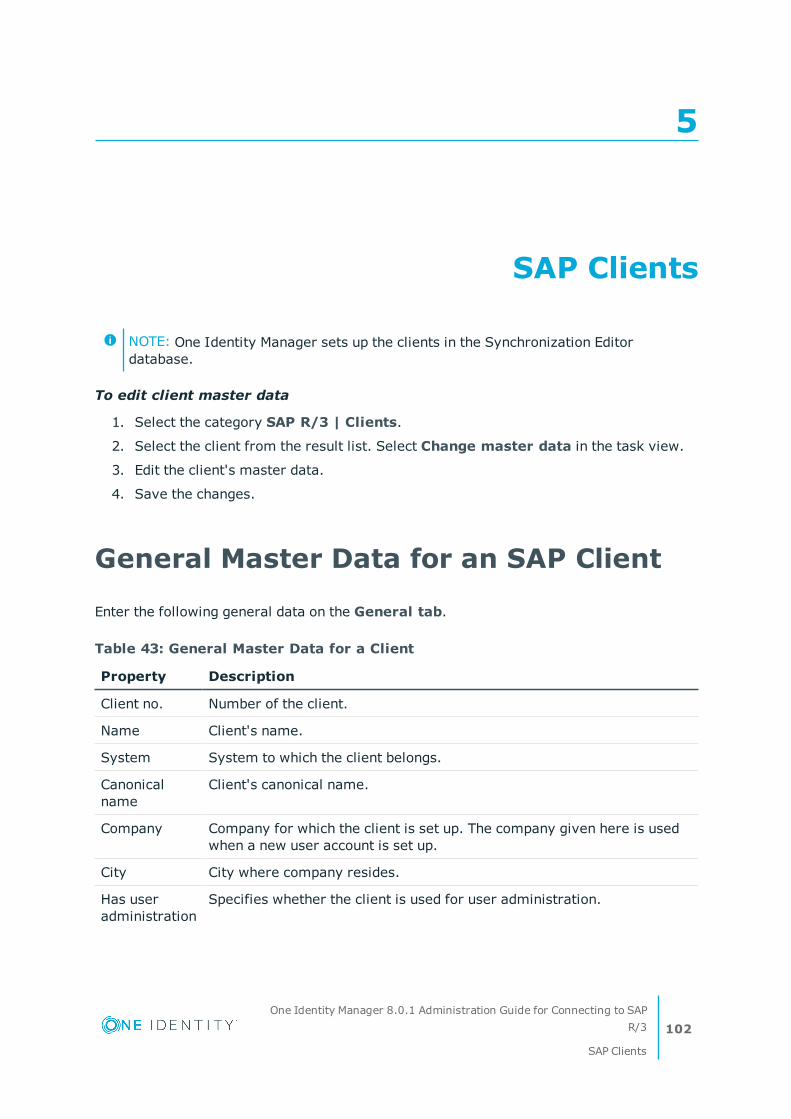
5
SAP Clients
NOTE: One Identity Manager sets up the clients in the Synchronization Editordatabase.
To edit client master data
1. Select the category SAP R/3 | Clients.
2. Select the client from the result list. Select Change master data in the task view.
3. Edit the client's master data.
4. Save the changes.
General Master Data for an SAP Client
Enter the following general data on the General tab.
Property Description
Client no. Number of the client.
Name Client's name.
System System to which the client belongs.
Canonicalname
Client's canonical name.
Company Company for which the client is set up. The company given here is usedwhen a new user account is set up.
City City where company resides.
Has useradministration
Specifies whether the client is used for user administration.
Table 43: General Master Data for a Client
One Identity Manager 8.0.1 Administration Guide for Connecting to SAPR/3
SAP Clients
102

Property Description
Account defin-ition (initial)
Initial account definition for creating user accounts. These accountdefinitions are used if automatic assignment of employees to useraccount is used for this domain resulting in administered user accounts(state "Linked configured"). The account definition's default managelevel is applied.
User accounts are only linked to the employee (state "Linked") if noaccount definition is given. This is the case on initial synchronization, forexample.
NOTE: The account definition can only be assigned if no CUA statusis entered or CUA status "central system" is assigned.
Target systemmanagers
Application role in which target system managers are specified for theclient. Target system managers only edit client objects that are assignedto them. Each client can have a different target system managerassigned to it.
Select the One Identity Manager application role whose members areresponsible for administration of this client. Use the button to add anew application role.
Synchronizedby
NOTE: You can only specify the synchronization type when adding anew client. No changes can be made after saving.
Use "One Identity Manager" when you create a client with theSynchronization Editor.
Specify how the data will be synchronized between the target system andthe One Identity Manager. Choose between "One Identity Manager","FIM" and "No synchronization".
Value Synchronization by Provisioned by
One Identity Manager SAP R/3 connector SAP R/3 connector
No synchronization none none
Table 44: Permitted Values
NOTE: If you select "No synchronization" you can define customprocesses to exchange data between One Identity Manager and thetarget system.
ALE name Name used to map the client as logical system in the SAP distributionmodel.
ALE modelname
Name of the SAP distribution model that maps the relation between thelogical systems of the central user administration. SAP roles and profiles
One Identity Manager 8.0.1 Administration Guide for Connecting to SAPR/3
SAP Clients
103

Property Description
of all child systems with the same ALE model name as the centralsystem, are synchronized when the central system is synchronized.
CUA status Labels client usage when CUA is enabled. Possible values are "Central","Child" and "None". If Central User Administration is not enabled, do notenter a value.
CUA centralsystem
Central system to which the client belongs. Assign the valid centralsystem to clients with CUA status "Child".
Description Spare text box for additional explanation.
Related Topics
l Setting Up Account Definitions on page 59
l Assigning Account Definitions to a Target System on page 73
l Target System Managers on page 98
l Special Features of Synchronizing with a CUA Central System on page 33
l Excluding child Systems from Synchronization on page 34
Specifying Categories for InheritingSAP Groups, SAP Roles and SAP Profiles
NOTE: In order to easy understanding the behavior is described with respect to SAPgroups in this section. It applies in the same way to roles and profiles.
In One Identity Manager, groups can be selectively inherited by user accounts. For this,groups and user accounts are divided into categories. The categories can be freely selectedand are specified by a template. Each category is given a specific position within thetemplate. The mapping rule contains different tables. Use the user account table to specifycategories for target system dependent user accounts. Enter your categories for thestructural profiles, administrative roles, subscriptions and disabled service plans in the .Each table contains the category items "Position1" to "Position31".
NOTE: If central user administration is implemented, define the categories in thecentral system as well as in the child system. The same categories must be defined inthe child system as in the central system so that groups from a child system can beinherited by user accounts.
To define a category
1. Select the category SAP R/3 | Clients.
2. Select the client from the result list.
One Identity Manager 8.0.1 Administration Guide for Connecting to SAPR/3
SAP Clients
104

3. Select Change master data in the task view.
4. Switch to the Mapping rule category tab.
5. Expand the respective base node of a table.
6. Click to enable category.
7. Enter a name for the user account and group categories in the current language.
8. Save the changes.
Detailed information about this topic
l Inheriting SAP Groups, SAP Roles and SAP Profiles based on Categories on page 161
l One Identity Manager Target System Base Module Administration Guide
How to Edit a Synchronization Project
Synchronization projects, in which a client is already used as a base object, can also beopened using the Manager. You can, for example, check the configuration or view thesynchronization log in this mode. The Synchronization Editor is not started with its fullfunctionality. You cannot run certain functions, such as, running synchronization orsimulation, starting the target system browser and others.
NOTE: The Manager is locked for editing throughout. To edit objects in the Manager,close the Synchronization Editor.
To open an existing synchronization project in the Synchronization Editor
1. Select the category SAP R/3 | Clients.
2. Select the client from the result list. Select Change master data in the task view.
3. Select Edit synchronization project... from the task view.
Detailed information about this topic
l One Identity Manager Target System Synchronization Reference Guide
Related Topics
l Customizing Synchronization Configuration on page 37
One Identity Manager 8.0.1 Administration Guide for Connecting to SAPR/3
SAP Clients
105

6
SAP User Accounts
You can manage the users of a One Identity Manager environment with the SAP R/3. OneIdentity Manager concentrates on setting up and editing SAP user accounts. Groups, rolesand profiles are mapped in SAP, in order to provide the necessary permissions for OneIdentity Manager user accounts. The necessary data for system measurement is alsomapped. The system measurement data is available in One Identity Manager, but themeasurement itself takes place in the SAP R/3 environment.
If user accounts are managed through the central user administration (CUA) in SAP R/3,access to the child client can be guaranteed to or withdrawn from user accounts in OneIdentity Manager.
Detailed information about this topic
l Linking User Accounts to Employees on page 106
l Supported User Account Types on page 107
l Entering Master Data for SAP User Accounts on page 111
Linking User Accounts to Employees
The central component of the One Identity Manager is to map employees and their masterdata with permissions through which they have control over different target systems. Forthis purpose, information about user accounts and permissions can be read from the targetsystem into the One Identity Manager database and linked to employees. This gives anoverview of the permissions for each employees in all of the connected target systems.One Identity Manager provides the possibility to manage user accounts and theirpermissions. You can provision modifications in the target systems. Employees aresupplied with the necessary permissions in the connected target systems according to theirfunction in the company. Regular synchronization keeps data consistent between targetsystems and the One Identity Manager database.
Because requirements vary between companies, the One Identity Manager offers differentmethods for supplying user accounts to employees. One Identity Manager supports thefollowing method for linking employees and their user accounts.
One Identity Manager 8.0.1 Administration Guide for Connecting to SAPR/3
SAP User Accounts
106

l Employees and user accounts can be entered manually and assigned to each other.
l Employees can automatically obtain their account definitions using user accountresources. If an employee does not have a user account in a client, a new useraccount is created. This is done by assigning account definitions to an employeeusing the integrated inheritance mechanism followed by process handling.
When you manage account definitions through user accounts, you can specify theway user accounts behave when employees are enabled or deleted.
NOTE: If employees obtain their user accounts through account definitions,they have to have a central SAP user account.
l An existing employee is automatically assigned when a user account is added or anew employee is created if necessary. In this case, employee master data is createdon the basis of the existing user account master data. This mechanism can beimplemented if a new user account is created manually or by synchronization. Thismethod, however, is not the One Identity Manager default method. Define criteria forfinding employees for automatic employee assignment.
Related Topics
l Entering Master Data for SAP User Accounts on page 111
l Setting Up Account Definitions on page 59
l Automatic Assignment of Employees to SAP User Accounts on page 129
For more detailed information about employee handling and administration, see the OneIdentity Manager Target System Base Module Administration Guide.
Supported User Account Types
Different types of user accounts, such as default user accounts, administrative useraccounts or service accounts, can be mapped in One Identity Manager.
The following properties are used for mapping different user account types.
l Identity (column IdentityType)
The identity describes the type of user account.
Identity Description Value of thecolumn"IdentityType"
Primaryidentity
Employee's default user account. Primary
Table 45: Identities of User Accounts
One Identity Manager 8.0.1 Administration Guide for Connecting to SAPR/3
SAP User Accounts
107

Identity Description Value of thecolumn"IdentityType"
Organizationalidentity
Secondary user account used for various roleswithin the organization, f. ex. In sub-agree-ments with other functional areas.
Organizational
Personalizedadmin identity
User account with administration rights used byone person.
Admin
Sponsoredidentity
User account used for example for trainingpurposes.
Sponsored
Sharedidentity
User account with administration rights used byseveral people.
Shared
Serviceidentity
Service account. Service
l Privileged user account (column IsPrivilegedAccount)
Use this option to flag user accounts with special, privileged permissions. Thisincludes administrative user accounts or service accounts, for example. This optionis not used to flag default user accounts.
Default User Accounts
Normally, each employee obtains a default user account, which has the permissions theyrequire for their regular work. The user accounts are linked to the employee. The effect ofthe link and the scope of the employee’s inherited properties on the user accounts can beconfigured through an account definition and its manage levels.
To create default user accounts through account definitions
1. Create an account definition and assign the manage level "Unmanaged" or "Fullmanaged" to it.
2. Specify the effect of temporarily or permanently disabling, deleting or thesecurity risk of an employee on its user accounts and group memberships foreach manage level.
3. Create a formatting rule for IT operating data.
An account definition specifies which rules are used to generate the IT operating datafor example, whether the container for a user account is made up of the employee'sdepartment, cost center, location or business role and which default values will beused if no IT operating data can be found through the employee's primary roles.
Which IT operating data is required, depends on the target system. The followingsetting are recommended for default user accounts:
l Use the default value "1" in the formatting rule for the column IsGroupAccountand set the option Always use default value.
One Identity Manager 8.0.1 Administration Guide for Connecting to SAPR/3
SAP User Accounts
108

l Use the default value "primary" in the formatting rule for the columnIdentityType and set the option Always use default value.
4. Enter the effective IT operating data for the target system. Select the concrete targetsystem under Effects on.
Specify in the departments, cost centers, locations or business roles, which IToperating data should apply when you set up a user account.
5. Assign the account definition to employees.
When the account definition is assigned to an employee, a new user account iscreated through the inheritance mechanism and subsequent processing.
Administrative User Accounts
An administrative user account must be used for certain administrative tasks.Administrative user accounts are normally predefined in the target system and have fixedidentifiers and login names, for example, "Administrator".
Administrative user accounts are loaded through synchronization into the One IdentityManager. To assign a manager to administrative user accounts, assign an employee to theuser account in One Identity Manager.
NOTE: You can automatically label administrative user accounts as privileged useraccounts. To do this, set the schedule "Mark selected user accounts as privileged" inthe Designer.
Privileged User Accounts
Privileged user accounts are used to provide employees with additional privileges. Thisincludes administrative user accounts or service accounts, for example. The user accountsare marked with the property Privileged user account (IsPrivilegedAccount).
NOTE: The criteria used to label user accounts automatically as privileged, aredefined as extensions to the view definition (ViewAddOn) on the tableTSBVAccountIsPrivDetectRule (table type "Union"). The evaluation is done in the scriptTSB_SetIsPrivilegedAccount.
To create privileged users through account definitions
1. Create an account definition. Create a new manage level for privileged user accountsand assign this manage level to the account definition.
2. If you want to prevent properties for privileged user accounts being overwritten, setthe property IT operating data overwrites for the manage level, to the value"Only initially". In this case, the properties are populated just once when the useraccounts is created.
3. Specify the effect of temporarily or permanently disabling, deleting or thesecurity risk of an employee on its user accounts and group memberships foreach manage level.
One Identity Manager 8.0.1 Administration Guide for Connecting to SAPR/3
SAP User Accounts
109

4. Create a formatting rule for IT operating data.
An account definition specifies which rules are used to generate the IT operating datafor example, whether the container for a user account is made up of the employee'sdepartment, cost center, location or business role and which default values will beused if no IT operating data can be found through the employee's primary roles.
Which IT operating data is required, depends on the target system. The followingsettings are recommended for privileged user accounts:
l Use the default value "1" in the formatting rule for the columnIsPrivilegedAccount and set the option Always use default value.
l You can also specify a formatting rule for the column IdentityType. The columnowns different permitted values, which represent user accounts.
l To prevent privileged user accounts inheriting default user groups, define atemplate for the column IsGroupAccount with the default value "0" and set theoption Always use default value.
5. Enter the effective IT operating data for the target system.
Specify in the departments, cost centers, locations or business roles, which IToperating data should apply when you set up a user account.
6. Assign the account definition directly to employees who work with privilegeduser accounts.
When the account definition is assigned to an employee, a new user account iscreated through the inheritance mechanism and subsequent processing.
NOTE: Specify a formatting rule for a naming schema if it is required by the companyfor privileged user account login names.
Central User Administration in OneIdentity Manager
If user accounts are managed through the central user administration (CUA) in SAP R/3,access to the child client can be guaranteed to or withdrawn from user accounts in OneIdentity Manager. To do this, clients are marked as central system or child system in OneIdentity Manager. User accounts are managed in the central system. You specify the childsystem in which each user account obtains its access permissions (tableSAPUserInSAPMandant). Only SAP groups, role or profiles from these clients and from thecentral system can be assigned to a user account.
To use automatic employee assignment for central user administration (CUA) useraccounts, assign the account definition to the CUA central system. Account definitionscannot be used to assign user accounts to child systems.
One Identity Manager 8.0.1 Administration Guide for Connecting to SAPR/3
SAP User Accounts
110

To grant access permissions in a child system to a user account
1. Assign all the clients to the user account to which it can have access permissions.
For more information, see Assigning Child Systems on page 126.
2. Assign SAP groups, roles, profiles from the child systems to the user account.
For more information, see Additional Tasks for Managing SAP User Accountson page 122.
Related Topics
l General Master Data for an SAP Client on page 102
l General Master Data for an SAP User Account on page 112
l Setting Up Account Definitions on page 59
Entering Master Data for SAP UserAccounts
A user account can be linked to an employee in the One Identity Manager. You can alsomanage user accounts separately from employees.
NOTE: It is recommended to use account definitions to set up user accounts forcompany employees. In this case, some of the master data described in the followingis mapped through templates from employee master data.
NOTE: If employees obtain their user accounts through account definitions, they haveto have a central SAP user account.
To edit master data for a user account
1. Select the category SAP R/3 | User accounts.
2. Select the user account in the result list and run the task Change master data.
- OR-
Click in the result list toolbar.
3. Edit the user account's resource data.
4. Save the changes.
To manually assign or create a user account for an employee
1. Select the Employees | Employees.
2. Select the employee in the result list and run Assign SAP user accounts fromthe task view.
One Identity Manager 8.0.1 Administration Guide for Connecting to SAPR/3
SAP User Accounts
111
3. Assign a user account.
4. Save the changes.
Detailed information about this topic
l General Master Data for an SAP User Account on page 112
l SAP User Account Login Data on page 116
l Phone numbers on page 117
l Fax numbers on page 118
l Email addresses on page 119
l Assigning Parameters on page 121
l Fixed Values for an SAP User Account on page 120
l Measurement Data on page 121
l SNC Data for an SAP User Account on page 122
General Master Data for an SAP UserAccount
Configurationparameter
Active Meaning
QER\CalculateRiskIndex Preprocessor relevant configuration parameter controllingsystem components for calculating an employee's risk index.Changes to the parameter require recompiling the database.
If the parameter is set, values can be entered and calculatedfor the risk index.
Table 46: Configuration Parameters for Risk Assessment of SAP User Accounts
NOTE: You can only add user account to client which are marked as central system ifuser accounts in the SAP system manged with central user administration.
Enter general data for a user account on the Address tab.
Property Description
Employee Employee that uses this user account. An employee is already enteredif the user account was generated by an account definition. If youcreate the user account manually, you can select an employee in themenu. If you use automatic employee assignment, an associated
Table 47: SAP User Account Address Data
One Identity Manager 8.0.1 Administration Guide for Connecting to SAPR/3
SAP User Accounts
112

Property Description
employee is created and entered into the user account when the useraccount is saved.
Accountdefinition
Account definition through which the user account was created.
Use the account definition to automatically fill user account masterdata and to specify a manage level for the user account. The OneIdentity Manager finds the IT operating data of the assigned employeeand enters it in the corresponding fields in the user account.
NOTE: The account definition cannot be changed once the useraccount has been saved.
Manage level User account's manage level. Select a manage level from the menu.You can only specify the manage level can if you have also entered anaccount definition. All manage levels of the selected account definitionare available in the menu.
Client The client to be added in the user account. Central system, if useraccounts are manged with CUA. You can only edit the client when theuser account is added.
User account User account identifier. If you have assigned an account definition, theinput field is automatically filled out with respect to the manage level.
NOTE: Existing user accounts cannot be renamed.
First name The user’s first name. If you have assigned an account definition, theinput field is automatically filled out with respect to the manage level.
Last name The user’s last name. If you have assigned an account definition, theinput field is automatically filled out with respect to the manage level.
Form of address Form of address in the associated client's language. If you haveassigned an account definition, the form of address is found bytemplate rule depending on the mange level. The form of addressdepends on the gender of the assigned employee.
Academic title Additional information about the user account.
Alias Alternative ID for the user account that is used as log in for certaininternet transactions.
Nickname Additional information about the user account.
Name format-ting
Name format and country for name formatting. Name and countryformats determine the formatting rules for composing a full name ofan employee in SAP R/3. Name formatting specifies the order in whichparts of names are put together so that an employee‘s name is repres-ented in an extensively long form. The country is serves to uniquelyidentify the formatting rule.
Country forname format-ting
One Identity Manager 8.0.1 Administration Guide for Connecting to SAPR/3
SAP User Accounts
113

Property Description
ISO 639 -language
Default language for the user account according to ISO 639
Function Additional information about the user account. Used when addressesare printed.
Employeenumber
SAP internal key for identifying an employee.
Department Additional information about the user account. Used when addressesare printed.
Room in building Additional information about the user account.
Floor Additional information about the user account.
Building(number ortoken)
Additional information about the user account.
Communicationstype
Unique identifier for the communications type
Company The company to which the user account is assigned.
When a user account is added, the company of the assigned client isused. If the client is not assigned to a company, the company with thesmallest address number is found and assigned to the user account.
NOTE: Company is a mandatory field! Changes to user accountscannot be saved in on synchronization SAP R/3 if a company isnot assigned to them in .One Identity Manager
Assign these user accounts a default company in the SAP R/3system where possible.
Risk index(calculated)
Maximum risk index values for all assigned groups, roles and profiles.This property is only visible if the configuration parameter"QER\CalculateRiskIndex" is set. For more detailed information, seethe One Identity Manager Risk Assessment Administration Guide.
Category Categories for the inheritance of groups, roles and profiles by the useraccount. Select one or more categories from the menu. Groups, rolesand profiles can be selectively inherited by user accounts. To do this,groups, roles and profiles and user accounts or contacts are dividedinto categories.
Identity User account's identity type
One Identity Manager 8.0.1 Administration Guide for Connecting to SAPR/3
SAP User Accounts
114

Property Description
Value Description
Primaryidentity
Employee's default user account.
Organizationalidentity
Secondary user account used for different roles inthe organization, for example for subcontracts withother functional areas.
Personalizedadmin identity
User account with administrative permissions, usedby one employee.
Sponsoredidentity
User account that is used for training purposes, forexample.
Sharedidentity
User account with administrative permissions, usedby several employees.
Serviceidentity
Service account.
Table 48: Permitted values for the identity.
Privileged useraccount
Specifies whether this is a privileged user account.
Groups can beinherited
Specifies whether the user account groups, roles and profiles caninherit through the employee. If this option is set, the user accountinherits groups, roles and profiles through hierarchical roles or IT Shoprequests.
l If you add an employee with a user account to a department, forexample, and you have assigned groups to this department, theuser account inherits these groups.
l If an employee has requested group membership in the IT Shopand the request is granted approval, the employee's useraccount only inherits the group if the option is set.
Related Topics
l Linking User Accounts to Employees on page 106
l Supported User Account Types on page 107
l Setting Up Account Definitions on page 59
l Specifying Categories for Inheriting SAP Groups, SAP Roles and SAP Profileson page 104
l General Master Data for an SAP Client on page 102
l One Identity Manager Identity Management Base Module Administration Guide
One Identity Manager 8.0.1 Administration Guide for Connecting to SAPR/3
SAP User Accounts
115

l One Identity Manager Target System Base Module Administration Guide
l One Identity Manager Risk Assessment Administration Guide
SAP User Account Login Data
When a user is added, you issue them with a password. Once you have saved the useraccount password with the Manager it cannot be changed.
Enter the following data on the Login data tab.
Property Description
Password Password for the user account. Depending on the configuration parameter"Person\UseCentralPassword" the employee’s central password can bemapped to the user account‘s password. If you use an initial password forthe user accounts, it is automatically entered when a user account iscreated.
NOTE: One Identity Manager password policies are taken intoaccount when a user password is being verified. Ensure that thepassword policy does not violate the target system's requirements.
Passwordconfirmation
Reconfirm password.
Set effectivepassword
Specifies whether the password status "Active password" is set if it ischanged in the target system.
Disabledpassword
Specifies whether the password is disabled (if single sign-on is used forlogging in).
Securitypolicy
Security policy for this user account.
User group The user account contains authorizations for this SAP group.
Referenceuser
The user account contains authorizations for this reference user.
A reference user is user account with the user type "Reference". Usereference users to supply identical authorizations to different useraccounts within one client.
Account isvalid from
Validity period of the SAP user account.Account isvalid until
Accountingnumber
Number for user account's accounting.
Table 49: SAP User Account Login Data
One Identity Manager 8.0.1 Administration Guide for Connecting to SAPR/3
SAP User Accounts
116

Property Description
Cost center Cost center for the user account's accounting.
Useraccount type
Type of user account. The default user account type is specified in theconfiguration parameter "TargetSystem\SAPR3\Accounts\Ustyp".
Useraccountlocked
Specifies that the user account is locked.
Last login Date and time of last target SAP system login.
Related Topics
l Password Policies on page 81
l Initial Password for New SAP User Accounts on page 90
l Email Notifications about Login Data on page 92
l User Account Types on page 76
l Lock SAP User Account on page 128
l Security Policies on page 79
Phone numbers
You can edit user account email addresses on the Phone numbers tab.
To assign a phone number to a user account
1. Select the Phone numbers tab.
2. Click Add.
This inserts a new row in the table.
3. Mark this row. Edit the telephone number master data.
4. Save the changes.
To edit a phone number
1. Select the Phone numbers tab.
2. Select the phone number in the list.
3. Edit the telephone number master data.
4. Save the changes.
To remove a phone number assignment
1. Select the Phone numbers tab.
2. Select the phone number in the list.
One Identity Manager 8.0.1 Administration Guide for Connecting to SAPR/3
SAP User Accounts
117

3. Click Delete.
4. Save the changes.
Property Description
Type Type of phone connection Select either "Phone", "Phone (default)", "Mobile(default)" or "Mobile".
Country Country for determining the country code.
Telephonenumber
Phone number with local code. Enter an extension number in the extra field.If you have assigned an account definition, the telephone number is found bytemplate rule depending on the mange level.
Phonenumber(complete)
Full phone number. Contains dialing code, connection and extensionnumbers.
Defaultnumber
Specifies whether this phone number is the user's default number.
Homeaddress
Specifies whether this phone number is the user's home number.
SMS-enabled
Specifies whether text messages can be sent through this phone number.
Table 50: Phone Number Properties
Fax numbers
You can edit user account email addresses on the Fax numbers tab.
To assign a fax number to a user account
1. Select the Fax numbers tab.
2. Click Add.
This inserts a new row in the table.
3. Mark this row. Edit the fax number master data.
4. Save the changes.
To edit a fax number
1. Select the Fax numbers tab.
2. Select the fax number in the list.
3. Edit the fax number master data.
4. Save the changes.
One Identity Manager 8.0.1 Administration Guide for Connecting to SAPR/3
SAP User Accounts
118

To remove a fax number assignment
1. Select the Fax numbers tab.
2. Select the fax number in the list.
3. Click Delete.
4. Save the changes.
Property Description
Country Country for determining the country code.
FAX number Fax number with local area code. Enter an extension number in theextra field.
FAX number(complete)
Full fax number. Contains dialing code, connection and extensionnumbers.
Default number Specifies whether this fax number is the user's default number.
Home address Specifies whether this fax number is the user's home number.
Table 51: Fax numbers
Email addresses
You can edit user account email addresses on the Email addresses tab.
To assign an email address to a user account
1. Select the Email addresses tab.
2. Click Add.
This inserts a new row in the table.
3. Mark this row. Edit the email address master data.
4. Save the changes.
To edit an email address
1. Select the Email addresses tab.
2. Select the email address in the list.
3. Edit the email address master data.
4. Save the changes.
To remove an email address assignment
1. Select the Email addresses tab.
2. Select the email address in the list.
One Identity Manager 8.0.1 Administration Guide for Connecting to SAPR/3
SAP User Accounts
119

3. Click Delete.
4. Save the changes.
Property Description
Email address(SMTP)
Email address.
Email addresssearch
Contains the first 20 characters of the email address in normalizedform.
Default address Specifies whether this email address is the user's default address.
Home address Specifies whether this email address is the user's home address.
Table 52: Email address data
Fixed Values for an SAP User Account
Configuration parameter Active Meaning
TargetSystem\SAPR3\Accounts\Datfm Specifies the default date format for SAP useraccounts.
TargetSystem\SAPR3\Accounts\Dcpfm Specifies the default decimal point format forSAP user accounts.
TargetSystem\SAPR3\Accounts\Fax_Group
Specifies the default fax group for SAP useraccounts.
TargetSystem\SAPR3\Accounts\Guiflag Specifies whether secure communication ispermitted for SAP user accounts.
TargetSystem\SAPR3\Accounts\Spda Specifies default setting for printer parameter 3(delete after print).
TargetSystem\SAPR3\Accounts\Spdb Specifies default setting for printer parameter 3(print immediately).
TargetSystem\SAPR3\Accounts\Splg Specifies the default printer (print parameter1).
TargetSystem\SAPR3\Accounts\Time_zone
Specifies the default time zone value for theSAP user account’s address.
TargetSystem\SAPR3\Accounts\Tzone Specifies the default value for the time zone.
Table 53: Configuration Parameters for Setting up User Accounts
Enter the default values that are to be put into effect for the user account on the Fixedvalues tab. This includes data such as the start menu, which should be shown after login,
One Identity Manager 8.0.1 Administration Guide for Connecting to SAPR/3
SAP User Accounts
120

the default login language, personal time zone, decimal representation or date format thatthe user is going to work with.
To specify default values for fixed values
l Set the configuration parameter values under "TargetSystem\SAPR3\Accounts" inthe Designer.
Measurement Data
The license data for system measurement are shown on the Measurement data tab. Formore information, see Providing System Measurement Data on page 179.
Assigning Parameters
You can assign a user account parameter on the Parameter tab and specify its values.
To assign a parameter to a user account
1. Select the Parameter tab.
2. Click Add.
This inserts a new row in the table.
3. Mark this row. Select a parameter from the Parameter list and specify aparameter value.
4. Save the changes.
To edit a parameter value
1. Select the Parameter tab.
2. Select the parameter whose value you want to edit, in the list.
3. Change the parameter value.
4. Save the changes.
To remove a parameter assignment
1. Select the Parameter tab.
2. Select the parameter you want to remove.
3. Click Remove.
4. Save the changes.
One Identity Manager 8.0.1 Administration Guide for Connecting to SAPR/3
SAP User Accounts
121

SNC Data for an SAP User Account
Enter the data required for logging into the system over secure network communications(SNC) on the SNC tab.
Properties Description
SNC Name User account's SNC name. You can find the syntax for SNCnames in the SNC user manual.
Insecure commu-nication allowed
Specifies whether insecure communication is permitted for thisuser account.
Table 54: User Account SNC Data
Additional Tasks for Managing SAPUser Accounts
After you have entered the master data, you can apply different tasks to it. The task viewcontains different forms with which you can run the following tasks.
Overview of SAP User Accounts
To obtain an overview of a user account
1. Select the category SAP R/3 | User accounts.
2. Select the user account in the result list.
3. Select SAP user account overview in the task view.
Changing the Manage Level of an SAP UserAccount
The default manage level is applied if you create user accounts using automatic employeeassignment. You can change a user account manage level later.
To change the manage level for a user account
1. Select the category SAP R/3 | User accounts.
2. Select the user account in the result list.
One Identity Manager 8.0.1 Administration Guide for Connecting to SAPR/3
SAP User Accounts
122

3. Select Change master data in the task view.
4. Select the manage level in the Manage level menu on the tab Address.
5. Save the changes.
Related Topics
l General Master Data for an SAP User Account on page 112
Assigning SAP Groups and SAP ProfilesDirectly to an SAP User Account
Groups and profiles can be assigned directly or indirectly to a user account. Indirectassignment is carried out by allocating the employee, groups and profiles in hierarchicalroles, like departments, cost centers, locations or business roles. If the employee has anSAP user account, the groups and profiles in the role are inherited by the user account.
To react quickly to special requests, you can assign groups and profiles directly to theuser account.
NOTE:
l Only profiles that are not assigned to SAP roles can be assigned to useraccounts.
l Generated profiles cannot be assigned to user accounts.
l If the user account is managed through a CUA, groups and profiles can beselected from all clients assigned to this user account.
To assign groups and profiles directly to user accounts
1. Select the category SAP R/3 | User accounts.
2. Select the user account in the result list.
3. Select one of the following tasks.
l Assign groups, to assign SAP groups directly.
l Assign profiles, to assign SAP profiles directly.
4. Assign groups or profiles in Add assignments.
- OR -
Remove groups or profiles from Remove assignments.
5. Save the changes.
Related Topics
l Assigning SAP Groups, SAP Roles and SAP Profiles to SAP User Accounts on page 145
One Identity Manager 8.0.1 Administration Guide for Connecting to SAPR/3
SAP User Accounts
123

Assigning SAP Roles Directly to an SAPUser Account
Roles can be assigned directly or indirectly to a user account. Indirect assignment iscarried out by allocating the employee and roles in hierarchical roles, like departments,cost centers, locations or business roles. If the employee has an SAP user account, the SAProles in the hierarchical roles are inherited by the user account.
To react quickly to special requests, you can assign roles directly to the user account.
If the user account is managed through a CUA, roles can be selected from all clientsassigned to this user account.
To assign roles directly to user accounts
1. Select the category SAP R/3 | User accounts.
2. Select the user account in the result list.
3. Select the task Assign roles.
To assign a role
1. Click Add.
This inserts a new row in the table.
2. Select the role you want to assign from the Role menu.
3. Enter a validity period for the role assignment in Valid from and Valid until,if it applies.
4. Assign more roles as necessary.
5. Save the changes.
To edit a role assignment
1. Select the role assignment you want to edit in the table. Edit the validity period.
2. Save the changes.
To remove a role assignment.
1. Select the role assignment you want to remove in the table.
2. Click Delete.
3. Save the changes.
Related Topics
l Assigning SAP User Accounts directly to SAP Roles on page 150
One Identity Manager 8.0.1 Administration Guide for Connecting to SAPR/3
SAP User Accounts
124

Assigning Structural Profiles
Installed Module: SAP R/3 Structural Profiles Add-on Module
Structural profiles can be assigned directly or indirectly to a user account. Indirectassignment is carried out by allocating the employee and structural profiles in hierarchicalroles, like departments, cost centers, locations or business roles. If the employee has anSAP user account, the structural profiles in the role are inherited by the user account.
To react quickly to special requests, you can assign structural profiles directly to theuser account.
To assign structural profiles directly to user accounts
1. Select the category SAP R/3 | User accounts.
2. Select the user account in the result list.
3. Select Assign structural profiles in the task view.
To assign a structural profile
1. Click Add.
This inserts a new row in the table.
2. Select the structural profile to assign from the Structural profile menu.
3. Enter a validity period for the profile assignment in Valid from and Valid until,if it applies.
4. Assign more structural profiles as necessary.
5. Save the changes.
To edit a profile assignment
1. Select the profile assignment you want to edit in the table. Edit the validity period.
2. Save the changes.
To remove a profile assignment
1. Select the profile assignment you want to remove in the table.
2. Click Delete.
3. Save the changes.
Detailed information about this topic
l One Identity Manager Administration Guide for SAP R/3 Structural Profiles Add-on
One Identity Manager 8.0.1 Administration Guide for Connecting to SAPR/3
SAP User Accounts
125

Assigning Child Systems
User accounts, administered through central user administration (CUA), have control overaccess permissions in several clients. You can use this task to assign clients containinguser logon authorization to user accounts. You can select the central system and the childsystem. If a user account is not assigned to a client, it cannot be assigned groups, roles orprofiles either.
This task is only available if the client of the selected user account is labeled ascentral system.
To assign a user account to clients
1. Select the category SAP R/3 | User accounts.
2. Select the user account in the result list.
3. Select Assign SAP child systems in the task view.
4. Assign clients in which users should obtain user logon authorizations, in Addassignments.
- OR -
Remove clients in Remove assignments.
5. Save the changes.
Assigning SAP Licenses
NOTE: This task is only available for user account managed through CUA.
SAP licenses in child system and in the central system can be assigned to user accountfor system measurement. For more information, see Providing System MeasurementData on page 179.
To assign licenses to a user account
1. Select the category SAP R/3 | User accounts.
2. Select the user account in the result list.
3. Select Assign SAP licenses in client systems in the task view.
4. Click Add.
This inserts a new row in the table.
5. Mark this row. Enter the measurement data.
6. Save the changes.
One Identity Manager 8.0.1 Administration Guide for Connecting to SAPR/3
SAP User Accounts
126

To edit a license assignment
1. Select the category SAP R/3 | User accounts.
2. Select the user account in the result list.
3. Select Assign SAP licenses in client systems in the task view.
4. Select an assignment in the table.
5. Edit the measurement data.
6. Save the changes.
To remove a license assignment
1. Select the category SAP R/3 | User accounts.
2. Select the user account in the result list.
3. Select Assign SAP licenses in client systems in the task view.
4. Select an assignment in the table.
5. Click Delete.
6. Save the changes.
The following license information is displayed on the form.
Property Description
Recipientclient
Client containing the user account which is assigned a license. You canselect the central system or a assigned child system.
License User account license in the selected client.
Licenseextension
License extension for the installed special version. Select the specialversion ID from the menu.
Countrysurcharge
Additional license fee.
Chargeablesystem
SAP system containing the client to be charged. This field is only shown if"04 (substitute)" or "11 (Multi-client/system)" is entered.
Chargeableclient
Client containing the user account to be charged. This field is only shown if"04 (substitute)" or "11 (Multi-client/system)" is entered.
Chargeableuser account
User account to be charged if "04 (substitute)" or "11 (Multi-client/sys-tem)" is entered.
Substitutedfrom Time period in which another user account assumes responsibility. This
input field is enabled if the active license is set to "04 (substitute)".Substituteduntil
Table 55: Measurement Data for a Centrally administrated User Account
One Identity Manager 8.0.1 Administration Guide for Connecting to SAPR/3
SAP User Accounts
127
Related Topics
l Special Versions on page 81
Lock SAP User Account
The way that user accounts are managed determines how you lock them. User accountsthat are not linked to an employee, can be locked with the task Lock user account.
To lock a user account
1. Select the category SAP R/3 | User accounts.
2. Select the user account in the result list.
3. Select Lock user account from the task view.
4. Confirm the prompt with OK.
This generates a process that publishes the change in the target system. The optionUser account locked is enabled the moment the process is successfully completed.
To unlock a user account
1. Select the category SAP R/3 | User accounts.
2. Select the SAP user account in the result list.
3. Select Unlock user account from the task view.
4. Confirm the prompt with OK.
This generates a process that publishes the change in the target system. The optionUser account locked is enabled the moment the process is successfully completed.
Detailed information about this topic
l Locking SAP User Accounts on page 134
Assigning Extended Properties
Extended properties are meta objects that cannot be mapped directly in the One IdentityManager, for example, operating codes, cost codes or cost accounting areas.
To specify extended properties for a user account
1. Select the category SAP R/3 | User accounts.
2. Select the user account in the result list.
3. Select Assign extended properties in the task view.
One Identity Manager 8.0.1 Administration Guide for Connecting to SAPR/3
SAP User Accounts
128
4. Assign extended properties in Add assignments.
- OR -
Remove extended properties from Remove assignments.
5. Save the changes.
Detailed information about this topic
l One Identity Manager Identity Management Base Module Administration Guide
Automatic Assignment of Employees toSAP User Accounts
Configuration parameter Meaning
TargetSystem\SAPR3\PersonAutoFullsync This configuration parameterspecifies the mode for automaticemployee assignment for useraccounts added to or updated in thedatabase through synchronization.
TargetSystem\SAPR3\PersonAutoDefault This configuration parameterspecifies the mode for automaticemployee assignment for useraccounts added to the databaseoutside synchronization.
TargetSystem\SAPR3\PersonExcludeList List of all user accounts for whichautomatic employee assignmentshould not take place. Names givenin a pipe (|) delimited list that ishandled as a regular search pattern.
Example:
SAP*|SAPCPIC|SAPJSF|DDIC|J2EE_ADMIN|J2EE_GUEST
TargetSystem\SAPR3\PersonAutoDisabledAccounts This configuration parametersspecifies whether employees areautomatically assigned to disableuser accounts. User accounts do notobtain an account definition.
Table 56: Configuration Parameters for Automatic Employee Assignment
When you add a user account, an existing employee can be assigned automatically oradded if necessary. In the process, the employee master data is created based for existing
One Identity Manager 8.0.1 Administration Guide for Connecting to SAPR/3
SAP User Accounts
129
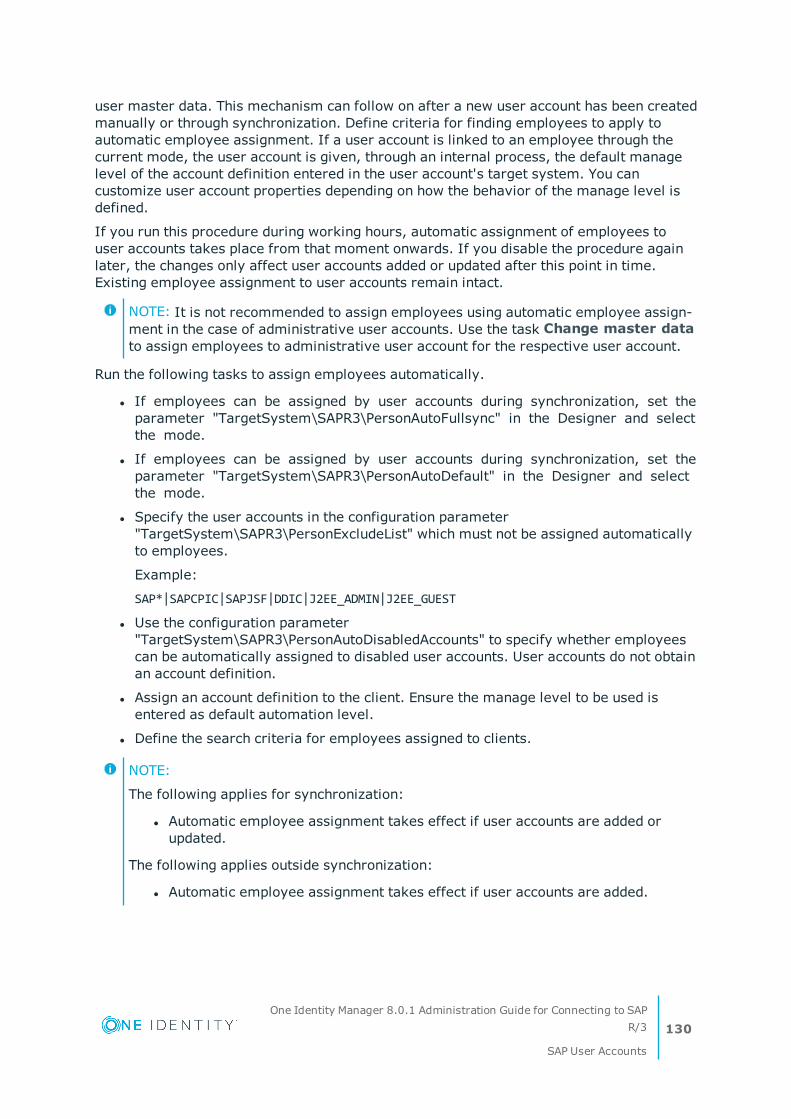
user master data. This mechanism can follow on after a new user account has been createdmanually or through synchronization. Define criteria for finding employees to apply toautomatic employee assignment. If a user account is linked to an employee through thecurrent mode, the user account is given, through an internal process, the default managelevel of the account definition entered in the user account's target system. You cancustomize user account properties depending on how the behavior of the manage level isdefined.
If you run this procedure during working hours, automatic assignment of employees touser accounts takes place from that moment onwards. If you disable the procedure againlater, the changes only affect user accounts added or updated after this point in time.Existing employee assignment to user accounts remain intact.
NOTE: It is not recommended to assign employees using automatic employee assign-ment in the case of administrative user accounts. Use the task Change master datato assign employees to administrative user account for the respective user account.
Run the following tasks to assign employees automatically.
l If employees can be assigned by user accounts during synchronization, set theparameter "TargetSystem\SAPR3\PersonAutoFullsync" in the Designer and selectthe mode.
l If employees can be assigned by user accounts during synchronization, set theparameter "TargetSystem\SAPR3\PersonAutoDefault" in the Designer and selectthe mode.
l Specify the user accounts in the configuration parameter"TargetSystem\SAPR3\PersonExcludeList" which must not be assigned automaticallyto employees.
Example:
SAP*|SAPCPIC|SAPJSF|DDIC|J2EE_ADMIN|J2EE_GUEST
l Use the configuration parameter"TargetSystem\SAPR3\PersonAutoDisabledAccounts" to specify whether employeescan be automatically assigned to disabled user accounts. User accounts do not obtainan account definition.
l Assign an account definition to the client. Ensure the manage level to be used isentered as default automation level.
l Define the search criteria for employees assigned to clients.
NOTE:
The following applies for synchronization:
l Automatic employee assignment takes effect if user accounts are added orupdated.
The following applies outside synchronization:
l Automatic employee assignment takes effect if user accounts are added.
One Identity Manager 8.0.1 Administration Guide for Connecting to SAPR/3
SAP User Accounts
130

NOTE: Following synchronization, employees are automatically created for useraccounts in the default installation. If there are no account definitions for the client atthe time of synchronization, user accounts are linked to employees. However,account definitions are not assigned. The user accounts are, therefore, in a "Linked"state.
To select user accounts through account definitions
1. Create an account definition.
2. Assign an account definition to the client.
3. Assign the account definition and manage level to the user accounts in a"linked" state.
a. Select the category SAP R/3 | User accounts | Linked but notconfigured | <client>.
b. Select the task Assign account definition to linked accounts.
Detailed information about this topic
l One Identity Manager Target System Base Module Administration Guide
Related Topics
l Creating an Account Definition on page 60
l Assigning Account Definitions to a Target System on page 73
l Editing Search Criteria for Automatic Employee Assignment on page 131
Editing Search Criteria for AutomaticEmployee Assignment
Criteria for employee assignment are defined in the client. In this case, you specifywhich user account properties must match the employee’s properties such that theemployee can be assigned to the user account. You can limit search criteria further byusing format definitions. The search criteria are written in XML notation in the column"Search criteria for automatic employee assignment" (AccountToPersonMatchingRule) ofthe SAPMandant table.
Search criteria are evaluated when employees are automatically assigned to useraccounts. Furthermore, you can create a suggestion list for assignments of employees touser accounts based on the search criteria and make the assignment directly.
One Identity Manager 8.0.1 Administration Guide for Connecting to SAPR/3
SAP User Accounts
131
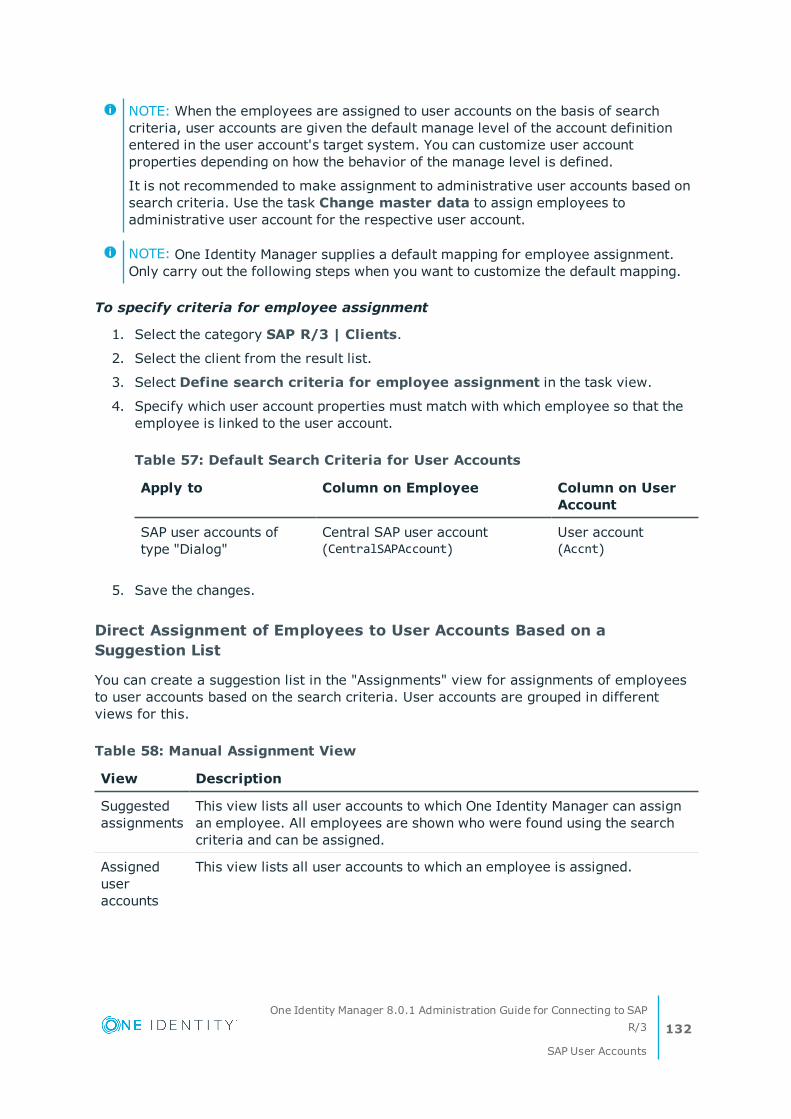
NOTE: When the employees are assigned to user accounts on the basis of searchcriteria, user accounts are given the default manage level of the account definitionentered in the user account's target system. You can customize user accountproperties depending on how the behavior of the manage level is defined.
It is not recommended to make assignment to administrative user accounts based onsearch criteria. Use the task Change master data to assign employees toadministrative user account for the respective user account.
NOTE: One Identity Manager supplies a default mapping for employee assignment.Only carry out the following steps when you want to customize the default mapping.
To specify criteria for employee assignment
1. Select the category SAP R/3 | Clients.
2. Select the client from the result list.
3. Select Define search criteria for employee assignment in the task view.
4. Specify which user account properties must match with which employee so that theemployee is linked to the user account.
Apply to Column on Employee Column on UserAccount
SAP user accounts oftype "Dialog"
Central SAP user account(CentralSAPAccount)
User account(Accnt)
Table 57: Default Search Criteria for User Accounts
5. Save the changes.
Direct Assignment of Employees to User Accounts Based on aSuggestion List
You can create a suggestion list in the "Assignments" view for assignments of employeesto user accounts based on the search criteria. User accounts are grouped in differentviews for this.
View Description
Suggestedassignments
This view lists all user accounts to which One Identity Manager can assignan employee. All employees are shown who were found using the searchcriteria and can be assigned.
Assigneduseraccounts
This view lists all user accounts to which an employee is assigned.
Table 58: Manual Assignment View
One Identity Manager 8.0.1 Administration Guide for Connecting to SAPR/3
SAP User Accounts
132

View Description
Withoutemployeeassignment
This view lists all user accounts to which no employee is assigned and forwhich no employee was found using the search criteria.
TIP: By double-clicking on an entry in the view, you can view the user account andemployee master data.
To apply search criteria to user accounts
l Click Reload.
All possible assignments based on the search criteria are found in the target systemfor all user accounts. The three views are updated.
To assign employees directly over a suggestion list
1. Click Suggested assignments.
a. Click Select for all user accounts to be assigned to the suggested employee.Multi-select is possible.
b. Click Assign selected.
c. Confirm the security prompt with Yes.
The selected user accounts are assigned to the employees found using thesearch criteria.
– OR –
2. Click No employee assignment.
a. Click Select employee... for the user account to which you want to assign theemployee. Select an employee from the menu.
b. Click Select for all user accounts to which you want to assign the selectedemployees. Multi-select is possible.
c. Click Assign selected.
d. Confirm the security prompt with Yes.
This assigns the selected user accounts to the employees shown in the"Employee" column.
To remove assignments
1. Click Assigned user accounts.
a. Click Select for all user accounts whose employee assignment you want toremove. Multi-select is possible.
b. Click Delete selected.
c. Confirm the security prompt with Yes.
The assigned employees are deleted from the selected user accounts.
One Identity Manager 8.0.1 Administration Guide for Connecting to SAPR/3
SAP User Accounts
133

Detailed information about this topic
l For more information, see theOne Identity Manager Target System Base ModuleAdministration Guide.
Related Topics
l Automatic Assignment of Employees to SAP User Accounts on page 129
Locking SAP User Accounts
Configuration parameter Meaning
QER\Person\TemporaryDeactivation This configuration parameter specifies whetheruser accounts for an employee are locked if theemployee is temporarily or permanently disabled.
Table 59: Configuration Parameter for Locking User Accounts
The way you lock user accounts depends on how they are managed.
Scenario:
l The user account is linked to employees and is managed through account definitions.
User accounts managed through account definitions are locked when the employee istemporarily or permanently disabled. The behavior depends on the user account managelevel. User accounts with the manage level "Full managed" are disabled depending on theaccount definition settings. You cannot apply the tasks Lock user account and Unlockuser account to these user accounts. For user accounts with another manage level,modify the column template SAPUser.U_Flag accordingly.
Scenario:
l The user accounts are linked to employees. No account definition is applied.
User accounts managed through user account definitions are locked when the employee istemporarily or permanently disabled. The behavior depends on the configurationparameter "QER\Person\TemporaryDeactivation".
l If the configuration parameter is set, the employee’s user accounts are locked if theemployee is permanently or temporarily disabled. You cannot apply the tasks Lockuser account and Unlock user account to these user accounts.
l If the configuration parameter is not set, the employee’s properties do not have anyeffect on the associated user accounts.
One Identity Manager 8.0.1 Administration Guide for Connecting to SAPR/3
SAP User Accounts
134

To lock a user account when the configuration parameter is disabled
3. Select the category SAP R/3 | User accounts.
4. Select the user account in the result list.
5. Select Lock user account from the task view.
6. Confirm the prompt with OK.
Scenario:
l User accounts not linked to employees.
To lock a user account, which is not linked to an employee
2. Select the category SAP R/3 | User accounts.
3. Select the user account in the result list.
4. Select Lock user account from the task view.
5. Confirm the prompt with OK.
A process is generated, which publishes this user account modification in the targetsystem. Once the lock has been published in the target system, the option User accountlocked is enabled on the master data form, Login data tab. The user can no longer log inwith this user account.
To unlock a user account
1. Select the category SAP R/3 | User accounts.
2. Select the user account in the result list.
3. Select Unlock user account from the task view.
4. Confirm the prompt with OK.
This generates a process that publishes the change in the target system. The optionUser account locked is enabled the moment the process is successfully completed.
Detailed information about this topic
For more information, see theOne Identity Manager Target System Base ModuleAdministration Guide.
Related Topics
l Setting Up Account Definitions on page 59
l Setting Up Manage Levels on page 63
One Identity Manager 8.0.1 Administration Guide for Connecting to SAPR/3
SAP User Accounts
135

Deleting and Restoring SAP UserAccounts
NOTE: As long as an account definition for an employee is valid, the employee retainsthe user account that was created by it. If the account definition assignment isremoved, the user account created through this account definition, is deleted.
To delete a user account
1. Select the category SAP R/3 | User accounts.
2. Select the user account in the result list.
3. Click to delete the user account.
4. Confirm the security prompt with Yes.
To restore user account
1. Select the category SAP R/3 | User accounts.
2. Select the user account in the result list.
3. Click in the result list toolbar.
Configuring Deferred Deletion
By default, user accounts are finally deleted from the database after 30 days.The useraccounts are initially disabled. You can reenable the user accounts until deferred deletion isrun. After deferred deletion is run, the user account are deleted from the database andcannot be restored anymore.You can configure an alternative deletion delay on the tableSAPUser in the Designer. Deferred deletion has no influence over the login permission inassigned CUA child systems.
Entering External User Identifiers for anSAP User Account
External authentication methods for logging on to a system can be used in SAP R/3. WithOne Identity Manager, you can maintain login data for logging in external system users, forexample, Active Directory on an SAP R/3 environment.
You can use One Identity Manager to enter external user IDs and delete them. You can onlychange the option "Account is enabled" for existing user ID's.
One Identity Manager 8.0.1 Administration Guide for Connecting to SAPR/3
SAP User Accounts
136

To enter external IDs
1. Select the category SAP R/3 | External IDs.
2. Select the external identifier in the result list. Select Change master data inthe task view.
- OR -
Click in the result list toolbar.
3. Enter the required data on the master data form.
4. Save the changes.
Enter the following data for an external identifier.
Property Description
Externaluser ID
User login name for the user to log into external systems. The syntax yourequire depends on the type of authentication selected. The complete useridentifier is compiled by template.
NOTE: The BAPI One Identity Manager uses default settings of theprogram RSUSREXT for generating the user identifier, that means, theuser name is reset. The value provided in the interface is passed asprefix.
If you SAP R/3 environment uses something other than these defaultsettings, modify the template for column SAPUserExtId.EXTIDrespectively.
Externalidentifiertype
Authentication type for the external user. This results in the syntax for theexternal identifier.
Distinguished Namefor X.509
Login uses the distinguished name for X.509.
Windows NTLM orpasswordverification
Login uses Windows NT Lan Manager or passwordverification with the Windows domain controller.
LDAP bind <userdefined>
Login uses LDAP bind (for other authenticationmechanisms).
SAML token Authentication uses an SAML token profile.
Table 61: External Identifier Types
The default type is specified in the configuration parameter"TargetSystem\SAPR3\Accounts\ExtID_Type".
Targetsystem
Can be called up together with the external ID type to test the login data. Thedefault type is specified in the configuration parameter "TargetSys-
Table 60: External ID Properties
One Identity Manager 8.0.1 Administration Guide for Connecting to SAPR/3
SAP User Accounts
137
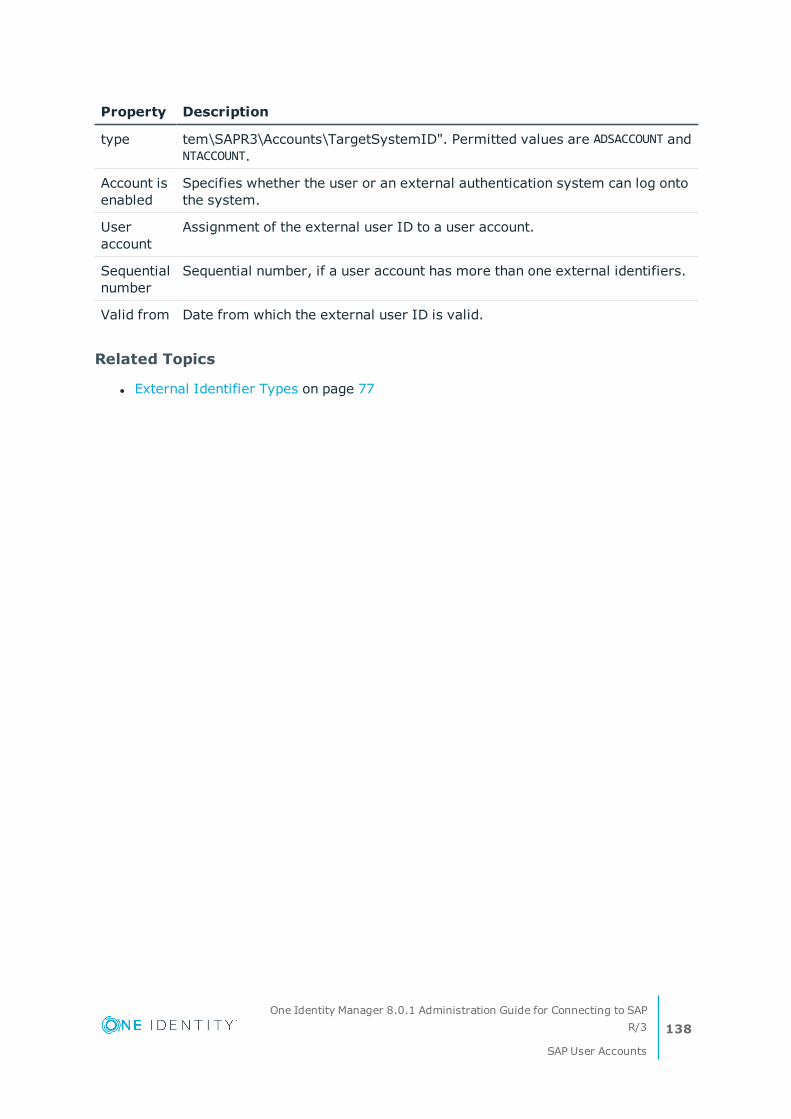
Property Description
type tem\SAPR3\Accounts\TargetSystemID". Permitted values are ADSACCOUNT andNTACCOUNT.
Account isenabled
Specifies whether the user or an external authentication system can log ontothe system.
Useraccount
Assignment of the external user ID to a user account.
Sequentialnumber
Sequential number, if a user account has more than one external identifiers.
Valid from Date from which the external user ID is valid.
Related Topics
l External Identifier Types on page 77
One Identity Manager 8.0.1 Administration Guide for Connecting to SAPR/3
SAP User Accounts
138

7
SAP Groups, SAP Roles and SAPProfiles
Groups, roles and profiles are mapped in the One Identity Manager, in order to provide thenecessary permissions for user accounts. Groups, roles and profiles can be assigned touser accounts, requested or inherited through hierarchical roles in One Identity Manager.No new groups, roles or profiles can be added or deleted.
Groups
You can share maintenance of user accounts over different administrators by assigninguser accounts to groups.
roles
A role includes all transactions and user menus that an SAP user requires to fulfill its tasks.Roles are separated into single and collective roles. Single roles can be group together intocollective roles. User account member in the roles can be set for a limit period.
Profiles
Access permissions to the system are regulated though profiles. Profiles are assignedthrough single roles or directly to user accounts. Profiles can be grouped intocollective profiles.
Editing Master Data for SAP Groups,SAP Roles and SAP Profiles
You can edit the following data about groups, roles and profiles in One Identity Manager:
l Assigned SAP user accounts
l Usage in the IT Shop
l Risk Assessment
One Identity Manager 8.0.1 Administration Guide for Connecting to SAPR/3
SAP Groups, SAP Roles and SAP Profiles
139
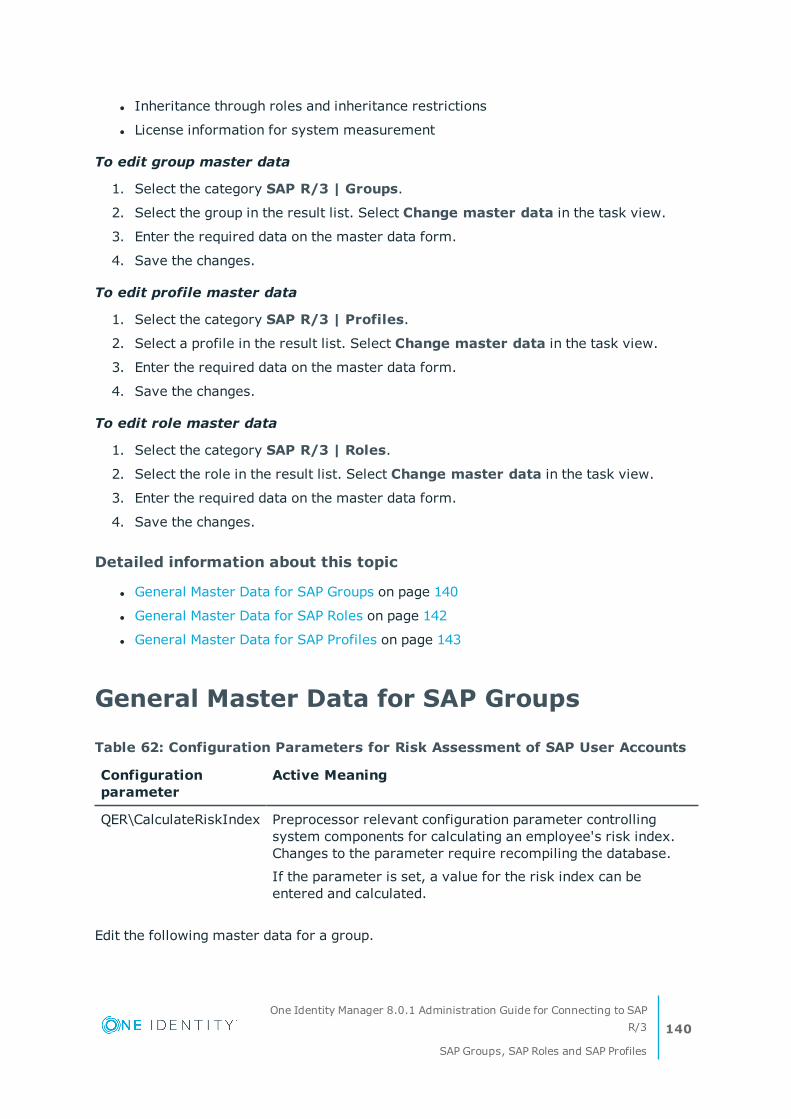
l Inheritance through roles and inheritance restrictions
l License information for system measurement
To edit group master data
1. Select the category SAP R/3 | Groups.
2. Select the group in the result list. Select Change master data in the task view.
3. Enter the required data on the master data form.
4. Save the changes.
To edit profile master data
1. Select the category SAP R/3 | Profiles.
2. Select a profile in the result list. Select Change master data in the task view.
3. Enter the required data on the master data form.
4. Save the changes.
To edit role master data
1. Select the category SAP R/3 | Roles.
2. Select the role in the result list. Select Change master data in the task view.
3. Enter the required data on the master data form.
4. Save the changes.
Detailed information about this topic
l General Master Data for SAP Groups on page 140
l General Master Data for SAP Roles on page 142
l General Master Data for SAP Profiles on page 143
General Master Data for SAP Groups
Configurationparameter
Active Meaning
QER\CalculateRiskIndex Preprocessor relevant configuration parameter controllingsystem components for calculating an employee's risk index.Changes to the parameter require recompiling the database.
If the parameter is set, a value for the risk index can beentered and calculated.
Table 62: Configuration Parameters for Risk Assessment of SAP User Accounts
Edit the following master data for a group.
One Identity Manager 8.0.1 Administration Guide for Connecting to SAPR/3
SAP Groups, SAP Roles and SAP Profiles
140
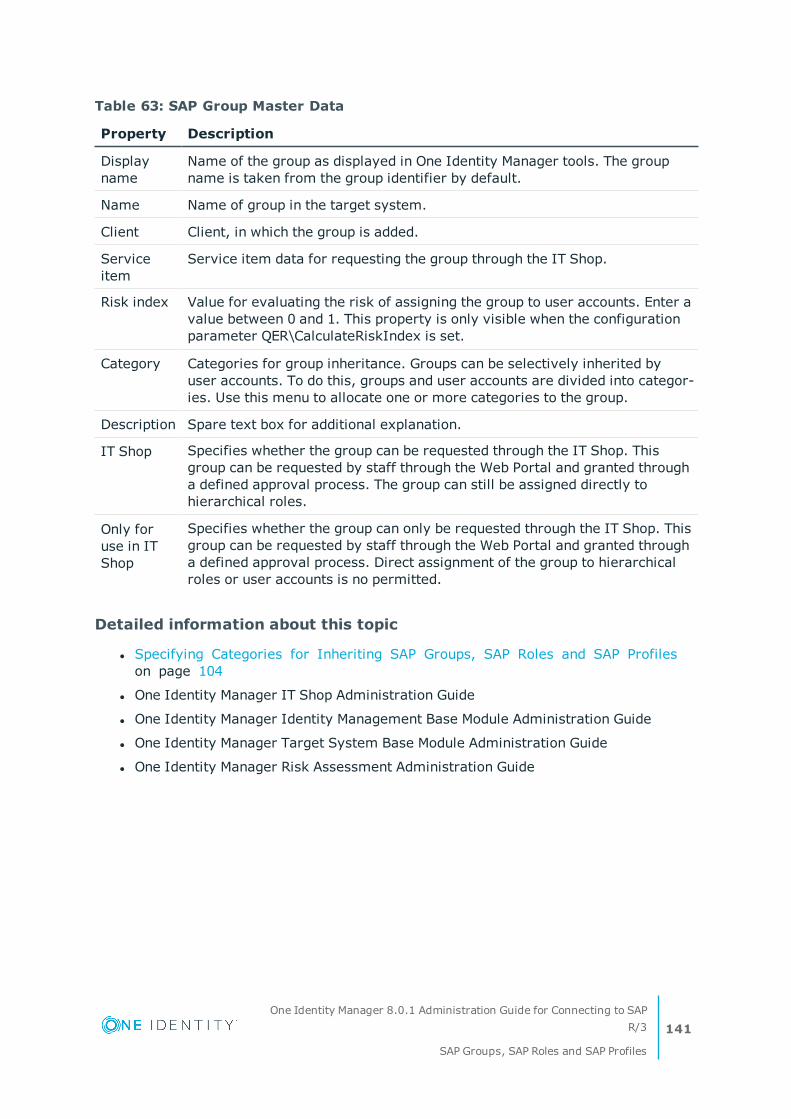
Property Description
Displayname
Name of the group as displayed in One Identity Manager tools. The groupname is taken from the group identifier by default.
Name Name of group in the target system.
Client Client, in which the group is added.
Serviceitem
Service item data for requesting the group through the IT Shop.
Risk index Value for evaluating the risk of assigning the group to user accounts. Enter avalue between 0 and 1. This property is only visible when the configurationparameter QER\CalculateRiskIndex is set.
Category Categories for group inheritance. Groups can be selectively inherited byuser accounts. To do this, groups and user accounts are divided into categor-ies. Use this menu to allocate one or more categories to the group.
Description Spare text box for additional explanation.
IT Shop Specifies whether the group can be requested through the IT Shop. Thisgroup can be requested by staff through the Web Portal and granted througha defined approval process. The group can still be assigned directly tohierarchical roles.
Only foruse in ITShop
Specifies whether the group can only be requested through the IT Shop. Thisgroup can be requested by staff through the Web Portal and granted througha defined approval process. Direct assignment of the group to hierarchicalroles or user accounts is no permitted.
Table 63: SAP Group Master Data
Detailed information about this topic
l Specifying Categories for Inheriting SAP Groups, SAP Roles and SAP Profileson page 104
l One Identity Manager IT Shop Administration Guide
l One Identity Manager Identity Management Base Module Administration Guide
l One Identity Manager Target System Base Module Administration Guide
l One Identity Manager Risk Assessment Administration Guide
One Identity Manager 8.0.1 Administration Guide for Connecting to SAPR/3
SAP Groups, SAP Roles and SAP Profiles
141

General Master Data for SAP Roles
Configurationparameter
Active Meaning
QER\CalculateRiskIndex Preprocessor relevant configuration parameter controllingsystem components for calculating an employee's risk index.Changes to the parameter require recompiling the database.
If the parameter is set, a value for the risk index can beentered and calculated.
Table 64: Configuration Parameters for Risk Assessment of SAP User Accounts
Edit the following master data for a role.
Property Description
Displayname
Name of the role as displayed in One Identity Manager tools. Taken from therole identifier by default.
Name Name of role in the target system.
Client Client, in which the role is added.
License Role license. This task is needed for finding system measurement for useraccounts and is assigned once after synchronization.
Role type Role type for differentiating between single and collective roles.
Serviceitem
Service item data for requesting the role through the IT Shop.
Risk index Value for evaluating the risk of assigning the role to user accounts. Enter avalue between 0 and 1. This property is only visible if the configurationparameter "QER\CalculateRiskIndex" is set.
Category Categories for role inheritance. User accounts can inherit roles selectively.To do this, roles and user accounts are divided into categories. Use thismenu to allocate one or more categories to the role.
Description Spare text box for additional explanation.
Roledescription
Spare text box for additional explanation.
IT Shop Specifies whether the role can be requested through the IT Shop. This rolecan be requested by staff through the Web Portal and granted through adefined approval procedure. The role can still be assigned directly toemployees and hierarchical roles.
Table 65: SAP Role Master Data
One Identity Manager 8.0.1 Administration Guide for Connecting to SAPR/3
SAP Groups, SAP Roles and SAP Profiles
142

Property Description
Only foruse in ITShop
Specifies whether the role can only be requested through the IT Shop. Thisrole can be requested by staff through the Web Portal and granted through adefined approval procedure. The role may not assigned directly to hierarch-ical roles.
Detailed information about this topic
l Licenses on page 80
l Providing System Measurement Data on page 179
l Specifying Categories for Inheriting SAP Groups, SAP Roles and SAP Profileson page 104
l One Identity Manager IT Shop Administration Guide
l One Identity Manager Identity Management Base Module Administration Guide
l One Identity Manager Target System Base Module Administration Guide
l One Identity Manager Risk Assessment Administration Guide
General Master Data for SAP Profiles
Configurationparameter
Active Meaning
QER\CalculateRiskIndex Preprocessor relevant configuration parameter controllingsystem components for calculating an employee's risk index.Changes to the parameter require recompiling the database.
If the parameter is set, a value for the risk index can beentered and calculated.
Table 66: Configuration Parameters for Risk Assessment of SAP User Accounts
Edit the following master data for a profile.
Property Description
Displayname
Name of the profile as displayed in One Identity Manager tools. The profilename is taken from the profile identifier by default.
Name Name of profile in the target system.
Client Client, in which the profile is added.
License Profile license. This task is needed for finding system measurement for SAP
Table 67: SAP Profile Master Data
One Identity Manager 8.0.1 Administration Guide for Connecting to SAPR/3
SAP Groups, SAP Roles and SAP Profiles
143

Property Description
user accounts and is assigned once after synchronization.
Profile type Profile type for differentiating between single, collective and generatedprofiles.
Serviceitem
Service item data for requesting the profile through the IT Shop.
Risk index Value for evaluating the risk of assigning the profile to account accounts.Enter a value between 0 and 1. This property is only visible if theconfiguration parameter "QER\CalculateRiskIndex" is set.
Category Category for profile inheritance. User accounts can selectively inheritprofiles. To do this, profiles and user accounts are divided into categories.Use this menu to allocate one or more categories to the profile.
Description Spare text box for additional explanation.
Profile isenabled
Specifies whether the profile is enabled or a maintenance version.
Limitedassignment
Specifies whether the profile is assigned to an SAP role. The profile then nolonger be directly assigned to user accounts, business roles, organizationsor IT Shop shelves.
IT Shop Specifies whether the profile can be requested through the IT Shop. Thisprofile can be requested by staff through the Web Portal and grantedthrough a defined approval procedure. The profile can still be assigneddirectly to hierarchical roles. This option cannot be enabled for generatedprofiles.
Only foruse in ITShop
Specifies whether the profile can only be requested through the IT Shop.This profile can be requested by staff through the Web Portal and grantedthrough a defined approval procedure. The profile may not assigned directlyto hierarchical roles. This option cannot be enabled for generated profiles.
Detailed information about this topic
l Licenses on page 80
l Providing System Measurement Data on page 179
l Specifying Categories for Inheriting SAP Groups, SAP Roles and SAP Profileson page 104
l One Identity Manager IT Shop Administration Guide
l One Identity Manager Identity Management Base Module Administration Guide
l One Identity Manager Target System Base Module Administration Guide
l One Identity Manager Risk Assessment Administration Guide
One Identity Manager 8.0.1 Administration Guide for Connecting to SAPR/3
SAP Groups, SAP Roles and SAP Profiles
144

Assigning SAP Groups, SAP Roles andSAP Profiles to SAP User Accounts
Groups, roles and profiles can be directly and indirectly assigned to user accounts. In thecase of indirect assignment, employees, groups, roles and profiles are arranged inhierarchical roles. The number of groups, roles and profiles assigned to an employee iscalculated from the position in the hierarchy and the direction of inheritance. If you add anemployee to roles and that employee owns a user account, the user account is added to thegroup, role or profile. Prerequisites for indirect assignment of employees to user accounts:
l Assignment of employees and groups, roles and profiles is permitted for role classes(department, cost center, location or business role).
l The user accounts are marked with the option Groups can be inherited.
l User accounts and groups, roles and profiles belong to the same SAP clients.
Furthermore, groups, roles and profiles can be assigned to employees through IT Shoprequests. Add employees to a shop as customers so that groups, roles and profiles can beassigned through IT Shop requests. All groups, roles and profiles are assigned to this shopcan be requested by the customers. Requested groups, roles and profiles are assigned tothe employees after approval is granted.
NOTE: Only profiles that are not assigned to an SAP role can be assigned to hierarch-ical roles.
Detailed information about this topic
l Assigning SAP Groups, SAP Roles and SAP Profiles to Organizations on page 145
l Assigning SAP Groups, SAP Roles and SAP Profiles to Business Roles on page 147
l Assigning SAP User Accounts directly to SAP Groups and SAP Profiles on page 149
l Adding SAP Groups, SAP Roles and SAP Profiles to System Roles on page 151
l Adding SAP Groups, SAP Roles and SAP Profiles to the IT Shop on page 152
l Assigning and Passing on SAP Profiles and SAP Roles to SAP User Accounts onpage 156
l One Identity Manager Identity Management Base Module Administration Guide
Assigning SAP Groups, SAP Roles and SAPProfiles to Organizations
Assign groups, roles and profiles to departments, cost centers and locations in order toassign user accounts to them through these organizations.
One Identity Manager 8.0.1 Administration Guide for Connecting to SAPR/3
SAP Groups, SAP Roles and SAP Profiles
145
To assign a group to departments, cost centers or locations (non role-based login)
1. Select the category SAP R/3 | Groups.
2. Select the group in the result list.
3. Select Assign organizations.
4. Assign organizations in Add assignments.
l Assign departments on the Departments tab.
l Assign locations on the Locations tab.
l Assign cost centers on the Cost center tab.
- OR -
Remove the organizations in Remove assignments.
5. Save the changes.
To assign a role to departments, cost centers or locations (non role-basedlogin)
1. Select the category SAP R/3 | Roles.
2. Select the role in the result list.
3. Select Assign organizations.
4. Assign organizations in Add assignments.
l Assign departments on the Departments tab.
l Assign locations on the Locations tab.
l Assign cost centers on the Cost center tab.
- OR -
Remove the organizations in Remove assignments.
5. Save the changes.
To assign a profile to departments, cost centers or locations (non role-based login)
1. Select the category SAP R/3 | Profiles.
2. Select a profile in the result list.
3. Select Assign organizations.
4. Assign organizations in Add assignments.
l Assign departments on the Departments tab.
l Assign locations on the Locations tab.
l Assign cost centers on the Cost center tab.
- OR -
Remove the organizations in Remove assignments.
One Identity Manager 8.0.1 Administration Guide for Connecting to SAPR/3
SAP Groups, SAP Roles and SAP Profiles
146

5. Save the changes.
To assign groups, roles or profiles to departments, cost centers or locations(non role-based login)
1. Select the category Organizations | Departments.
- OR -
Select the category Organizations | Cost centers.
- OR -
Select the category Organizations | Locations.
2. Select the department, cost center or location in the result list.
3. Select Assign SAP groups in the task view.
- OR -
Select Assign SAP roles in the task view.
- OR -
Select Assign SAP profiles in the task view.
4. Select the groups, roles or profiles in Add assignments.
- OR -
Remove the groups, roles or profiles in Remove assignments.
5. Save the changes.
Related Topics
l Assigning SAP Groups, SAP Roles and SAP Profiles to Business Roles on page 147
l Assigning SAP User Accounts directly to SAP Groups and SAP Profiles on page 149
l Adding SAP Groups, SAP Roles and SAP Profiles to System Roles on page 151
l Adding SAP Groups, SAP Roles and SAP Profiles to the IT Shop on page 152
l One Identity Manager Users for Managing an SAP R/3 on page 11
Assigning SAP Groups, SAP Roles and SAPProfiles to Business Roles
Installed Module: Business Roles Module
You assign groups, roles and profiles to business roles in order to assign them to useraccounts over business roles.
One Identity Manager 8.0.1 Administration Guide for Connecting to SAPR/3
SAP Groups, SAP Roles and SAP Profiles
147

To assign a group to a business role (non role-based login)
1. Select the category SAP R/3 | Groups.
2. Select the group in the result list.
3. Select Assign business roles in the task view.
4. Assign business roles in Add assignments.
- OR -
Remove business roles from Remove assignments.
5. Save the changes.
To assign a role to a business role (non role-based login)
1. Select the category SAP R/3 | Roles.
2. Select the role in the result list.
3. Select Assign business roles in the task view.
4. Assign business roles in Add assignments.
- OR -
Remove business roles from Remove assignments.
5. Save the changes.
To assign a profile to a business role (non role-based login)
1. Select the category SAP R/3 | Profiles.
2. Select a profile in the result list.
3. Select Assign business roles in the task view.
4. Assign business roles in Add assignments.
- OR -
Remove business roles from Remove assignments.
5. Save the changes.
To assign groups, roles or profiles to a business role (non role-based login)
1. Select the category Business roles | <Role class>.
2. Select the business role in the result list.
3. Select Assign SAP groups in the task view.
- OR -
Select Assign SAP roles in the task view.
- OR -
Select Assign SAP profiles in the task view.
4. Select the groups, roles or profiles in Add assignments.
- OR -
One Identity Manager 8.0.1 Administration Guide for Connecting to SAPR/3
SAP Groups, SAP Roles and SAP Profiles
148

Remove the groups, roles or profiles in Remove assignments.
5. Save the changes.
Related Topics
l Assigning SAP Groups, SAP Roles and SAP Profiles to Organizations on page 145
l Assigning SAP User Accounts directly to SAP Groups and SAP Profiles on page 149
l Adding SAP Groups, SAP Roles and SAP Profiles to System Roles on page 151
l Adding SAP Groups, SAP Roles and SAP Profiles to the IT Shop on page 152
l One Identity Manager Users for Managing an SAP R/3 on page 11
Assigning SAP User Accounts directly to SAPGroups and SAP Profiles
To react quickly to special requests, you can assign groups and profiles directly touser accounts.
NOTE:
l Only profiles that are not assigned to SAP roles can be assigned to useraccounts.
l Generated profiles cannot be assigned to user accounts.
The following applies if user accounts are managed by CUA:
l The group (the profile) is assigned to the central system, or
l The group's (the profile's) client is assigned as a child system to the useraccounts
To assign a group directly to user accounts
1. Select the category SAP R/3 | Groups.
2. Select the group in the result list.
3. Select Assign user accounts in the task view.
4. Assign user accounts in Add assignments.
- OR -
Remove user accounts in Remove assignments.
5. Save the changes.
To assign a profile directly to user accounts
1. Select the category SAP R/3 | Profiles.
2. Select a profile in the result list.
One Identity Manager 8.0.1 Administration Guide for Connecting to SAPR/3
SAP Groups, SAP Roles and SAP Profiles
149

3. Select Assign user accounts in the task view.
4. Assign user accounts in Add assignments.
- OR -
Remove user accounts in Remove assignments.
5. Save the changes.
Related Topics
l Assigning SAP Groups and SAP Profiles Directly to an SAP User Account on page 123
l Assigning SAP Groups, SAP Roles and SAP Profiles to Organizations on page 145
l Assigning SAP Groups, SAP Roles and SAP Profiles to Business Roles on page 147
l Adding SAP Groups, SAP Roles and SAP Profiles to System Roles on page 151
l Adding SAP Groups, SAP Roles and SAP Profiles to the IT Shop on page 152
Assigning SAP User Accounts directly toSAP Roles
To react quickly to special requests, you can assign roles directly to user accounts.
The following applies if user accounts are managed by CUA:
l The role is assigned to the central system, or
l The role's client is assigned as a child system to the user accounts.
To assign a role directly to user accounts
1. Select the category SAP R/3 | Roles.
2. Select the role in the result list.
3. Select Assign user accounts in the task view.
To assign a role to a user account
1. Click Add.
This inserts a new row in the table.
2. Select the user account you want to assign to the role from the User account menu.
3. Enter a validity period for the role assignment in Valid from and Valid until,if it applies.
4. Enter another user account if required.
5. Save the changes.
One Identity Manager 8.0.1 Administration Guide for Connecting to SAPR/3
SAP Groups, SAP Roles and SAP Profiles
150

To edit a role assignment
1. Select the role assignment you want to edit in the table. Edit the validity period.
2. Save the changes.
To remove a role assignment.
1. Select the role assignment you want to remove in the table.
2. Click Delete.
3. Save the changes.
Related Topics
l Assigning SAP Roles Directly to an SAP User Account on page 124
l Assigning SAP Groups, SAP Roles and SAP Profiles to Organizations on page 145
l Assigning SAP Groups, SAP Roles and SAP Profiles to Business Roles on page 147
l Adding SAP Groups, SAP Roles and SAP Profiles to System Roles on page 151
l Adding SAP Groups, SAP Roles and SAP Profiles to the IT Shop on page 152
Adding SAP Groups, SAP Roles and SAPProfiles to System Roles
Installed Module: System Roles Module
Groups, roles and profiles can be added to different system roles. When you assign asystem role to an employee, the groups, roles and profiles are inherited by all SAP useraccounts that these employees have. System roles that exclusively contain SAP groups,roles or profiles can be labeled with the system role type "SAP product". Groups, roles andprofiles can also be added to system roles that are not SAP products.
NOTE: Only profiles that are not assigned to an SAP role can be assigned to systemroles.
NOTE: Groups, roles and profiles with the option Only use in IT Shop can only beassigned to system roles that also have this option set. For more detailed informationabout providing system roles in the IT Shop, see the One Identity Manager SystemRoles Administration Guide.
To assign a group to system roles
1. Select the category SAP R/3 | Groups.
2. Select the group in the result list.
3. Select Assign system roles in the task view.
One Identity Manager 8.0.1 Administration Guide for Connecting to SAPR/3
SAP Groups, SAP Roles and SAP Profiles
151

4. Assign system roles in Add assignments.
- OR -
Remove system roles from Remove assignments.
5. Save the changes.
To assign a role to system roles
1. Select the category SAP R/3 | Roles.
2. Select the role in the result list.
3. Select Assign system roles in the task view.
4. Assign system roles in Add assignments.
- OR -
Remove system roles from Remove assignments.
5. Save the changes.
To assign a profile to system roles
1. Select the category SAP R/3 | Profiles.
2. Select a profile in the result list.
3. Select Assign system roles in the task view.
4. Assign system roles in Add assignments.
- OR -
Remove system roles from Remove assignments.
5. Save the changes.
Detailed information about this topic
l SAP Products on page 167
Related Topics
l Assigning SAP Groups, SAP Roles and SAP Profiles to Organizations on page 145
l Assigning SAP Groups, SAP Roles and SAP Profiles to Business Roles on page 147
l Assigning SAP User Accounts directly to SAP Groups and SAP Profiles on page 149
l Adding SAP Groups, SAP Roles and SAP Profiles to the IT Shop on page 152
Adding SAP Groups, SAP Roles and SAPProfiles to the IT Shop
NOTE: Only profiles that are not assigned to SAP roles can be assigned to IT Shopshelves.
One Identity Manager 8.0.1 Administration Guide for Connecting to SAPR/3
SAP Groups, SAP Roles and SAP Profiles
152

Once a grouprole or profile has been assigned to an IT Shop shelf, it can be requested bythe shop customers. To ensure it can be requested, further prerequisites need to beguaranteed.
l The group, role or profile must be labeled with the option IT Shop.
l The group, role or profile must be assigned to a service item.
l The group, role or profile must be labeled with the option Only use in IT Shop if thegroup, role or profile can only be assigned to employees through IT Shop requests.Direct assignment to hierarchical roles or user accounts is no longer permitted.
NOTE: IT Shop administrators can assign groups, roles and profiles to IT Shopshelves in the case of role-based login. Target system administrators are not author-ized to add groups, roles and profiles in the IT Shop.
To add a group, role or profile to the IT Shop
1. Select the category SAP R/3 | Groups or SAP R/3 | Roles or SAP R/3 |Profiles (non role-based login).
- OR -
Select the category Entitlements | SAP groups or Entitlements | SAP roles orEntitlements | SAP profiles (role-based login).
2. Select the group, role or profile in the result list.
3. Select Add to IT Shop in the task view.
4. Assign the group, role or profile to the IT Shop shelves in Add assignments.
5. Save the changes.
To remove a group, role or profile from individual IT Shop shelves.
1. Select the category SAP R/3 | Groups or SAP R/3 | Roles or SAP R/3 |Profiles (non role-based login).
- OR -
Select the category Entitlements | SAP groups or Entitlements | SAP roles orEntitlements | SAP profiles (role-based login).
2. Select the group, role or profile in the result list.
3. Select Add to IT Shop in the task view.
4. Remove the group, role or profile from the IT Shop shelves in Removeassignments.
5. Save the changes.
To remove a group, role or profile from all IT Shop shelves.
1. Select the category SAP R/3 | Groups or SAP R/3 | Roles or SAP R/3 |Profiles (non role-based login).
- OR -
One Identity Manager 8.0.1 Administration Guide for Connecting to SAPR/3
SAP Groups, SAP Roles and SAP Profiles
153

Select the category Entitlements | SAP groups or Entitlements | SAP roles orEntitlements | SAP profiles (role-based login).
2. Select the group, role or profile in the result list.
3. Select Remove from all shelves (IT Shop) in the task view.
4. Confirm the security prompt with Yes.
5. Click OK.
This removes the group, role or profile from all One Identity Manager Serviceshelves. All requests and assignment requests with this group, role or profile arecanceled in the process.
For more detailed information about request from company resources through the IT Shop,see the One Identity Manager IT Shop Administration Guide.
Related Topics
l General Master Data for SAP Groups on page 140
l Assigning SAP Groups, SAP Roles and SAP Profiles to Organizations on page 145
l Assigning SAP Groups, SAP Roles and SAP Profiles to Business Roles on page 147
l Assigning SAP User Accounts directly to SAP Groups and SAP Profiles on page 149
l Adding SAP Groups, SAP Roles and SAP Profiles to System Roles on page 151
Role Assignment Validity Period
Configuration parameter Active Meaning
TargetSystem\SAPR3\ValidDateHandling Configuration parameterfor handling the validityperiod in SAP user accountassignments to SAP roles.
TargetSystem\SAPR3\ValidDateHandling\DoNotUsePWODate This configurationparameter specifieswhether the validity datesfrom request procedureare copied from SAP useraccount assignments toSAP roles. If the config-uration parameter is set,the dates, "Valid from"and "Valid to" from therequest procedure, are
Table 68: Configuration parameter for handling the Validity Period of requestedSAP Roles
One Identity Manager 8.0.1 Administration Guide for Connecting to SAPR/3
SAP Groups, SAP Roles and SAP Profiles
154

Configuration parameter Active Meaning
not copied from SAP useraccount assignments toSAP roles.
Assignment of SAP roles to user accounts can be limited to set periods in your SAP R/3environment. There are different ways of specifying time limits for role assignments in OneIdentity Manager.
1. Synchronizing Role Assignments
The columns "Valid from" and "Valid to" are taken into account in the defaultmapping. Synchronization writes the role assignment's validity period into the OneIdentity Manager database.
2. Direct assignment of SAP roles to user accounts in the Manager
A validity period can be entered for direct assignment of roles to user accounts."Valid from" and "Valid to" dates are provisioned in the target system.
3. Limited time period requests in the IT Shop
A validity period for a request can be entered in the IT Shop. An entry in thetable SAPUserInSAPRole only exist between the first and last days of the request'svalidity period.
a. Directly requesting an SAP role
Once the request is approved and the "Valid from" date has been reached,the request recipient's SAP user account inherits the SAP role. The roleassignments are automatically canceled and deleted when the validityperiod expires.
The request's validity period is copied to the table SAPUserInSAPRole by default.This means that the data is provisioned in the SAP environment.
To prevent the request's validity date is copied to the roleassignment
l Set the configuration parameter"TargetSystem\SAPR3\ValidDateHandling\DoNotUsePWODate" in theDesigner.
b. Membership request in a hierarchical role (a department, for example)
l The hierarchical role is assigned to an SAP role.
Once the request is approved and the "Valid from" date is reached, theemployees becomes a member in the hierarchical role. The employee's SAPuser account inherits the SAP role. The membership is automatically canceledand the role assignment deleted when the validity period expires.
c. Request for assignment of an SAP role to a hierarchical role.
l Employees with an SAP user account are members of thishierarchical role.
One Identity Manager 8.0.1 Administration Guide for Connecting to SAPR/3
SAP Groups, SAP Roles and SAP Profiles
155
Once the request is approved and the "Valid from" date is reached, the SAProle is assigned to the hierarchical role. The role member's SAP user accountsinherit the SAP role. The assignment is automatically canceled and the roleassignment deleted when the validity period expires.
The request's validity period is copied to the table SAPUserInSAPRole by default.This means that the data is provisioned in the SAP environment.
To prevent the request's validity date is copied to the roleassignment
l Set the configuration parameter"TargetSystem\SAPR3\ValidDateHandling\DoNotUsePWODate" in theDesigner.
The table SAPUserInSAPRole contains all role assignments, limited and unlimited. The tableHelperSAPUserInSAPRole only contains current valid role assignments. Tables are calculatedon a schedule.
Detailed information about this topic
l Assigning SAP Roles Directly to an SAP User Account on page 124
l Adding SAP Groups, SAP Roles and SAP Profiles to the IT Shop on page 152
l One Identity Manager Web Portal User Guide
Related Topics
l Assigning SAP Groups, SAP Roles and SAP Profiles to SAP User Accounts on page 145
Assigning and Passing on SAP Profiles andSAP Roles to SAP User Accounts
The following SAP sided limitation influence the user account assignment and inheritance ofprofiles and roles in One Identity Manager.
l Collective profiles can be put together from 0...n profiles or collective profiles. If auser account is assigned an collective profile, the target system only returns the useraccount membership in the assigned collective profile and not the membership insubprofiles.
l Single roles can put together from 0..n profiles. Only profiles that are not collectiveprofiles can be assigned. Profiles that are assigned to a single role can no longer beassigned to a user account.
l Collective roles can be made up of 0...n single roles. Assignment of profiles orcollective profiles to collective roles is not possible.
These limitations result in the following:
In assignment:
One Identity Manager 8.0.1 Administration Guide for Connecting to SAPR/3
SAP Groups, SAP Roles and SAP Profiles
156

l Triggering prevents the assignment of roles which are assigned to single roles, touser accounts, products, roles and employees.
In inheritance behavior:
l If a user account is assigned a collective role that owns single roles, the single rolesare not added to the table SAPuserInSAPGroupTotal.
l If a user account is assigned a single role that owns profiles, the profiles are notadded to the table SAPUserInSAPProfile
l If a user account is assigned a single role and this single role is part of a collectiverole that is also assigned to this user account, the single role is not added to the tableSAPUserInSAPRole.
l If a user account is assigned a collective profile with child profiles, the child profilesare not added to the table SAPUserInSAPProfile.
If a user account obtains additional roles or profiles through a reference user, these rolesor profiles are only added in tables SAPUserInSAPRole and SAPUserInSAPProfile for thereference user. When company resources assigned to an employee (table PersonHasObject)are calculated, the roles and profiles inherited by a user account through single roles,collective roles, collective profiles and reference users are also taken into account.
Additional Tasks for Managing SAPGroups, SAP Roles and SAP Profiles
After you have entered the master data, you can apply different tasks to it. The task viewcontains different forms with which you can run the following tasks.
Overview of SAP Groups, SAP Roles andSAP Profiles
To obtain an overview of a group
1. Select the category SAP R/3 | Groups.
2. Select the group in the result list.
3. Select SAP group overview in the task view.
To obtain an overview of a profile
1. Select the category SAP R/3 | Profiles.
2. Select a profile in the result list.
3. Select SAP profile overview in the task view.
One Identity Manager 8.0.1 Administration Guide for Connecting to SAPR/3
SAP Groups, SAP Roles and SAP Profiles
157
To obtain an overview of a role
1. Select the category SAP R/3 | Roles.
2. Select the role in the result list.
3. Select SAP role overview in the task view.
Effectiveness of SAP Groups, SAP Roles andSAP Profiles
NOTE: In order to easy understanding the behavior is described with respect to SAPgroups in this section. It applies in the same way to roles and profiles.
Configuration parameter Active Meaning
QER\Structures\Inherite\GroupExclusion Preprocessor relevant configuration parameterfor controlling effectiveness of groupmemberships. If the parameter is set,memberships can be reduced on the basis ofexclusion definitions. The database has to berecompiled after changes have been made tothe parameter.
Table 69: Configuration Parameter for Conditional Inheritance
When groups are assigned to user accounts an employee may obtain two or more groups,which are not permitted in this combination. To prevent this, you can declare mutuallyexclusive groups. To do this, you specify which of the two groups should apply to the useraccounts if both are assigned.
It is possible to assign an excluded group directly, indirectly or by IT Shop request at anytime. One Identity Manager determines whether the assignment is effective.
NOTE:
l You cannot define a pair of mutually exclusive groups. That means, the defin-ition "Group A excludes group B" AND "Group B excludes groups A" is notpermitted.
l You must declare each group to be excluded from a group separately. Exclusiondefinitions cannot be inherited.
The effect of the assignments is mapped in the tables SAPUserInSAPGrp andBaseTreeHasSAPGrp through the column XIsInEffect.
One Identity Manager 8.0.1 Administration Guide for Connecting to SAPR/3
SAP Groups, SAP Roles and SAP Profiles
158

Example of the effect of group memberships
l Group A is defined with permissions for triggering requests in a client. A group B isauthorized to make payments. A group C is authorized to check invoices.
l Group A is assigned through the department "Marketing", group B through "Finance"and group C through the business role "Control group".
Clara Harris has a user account in this client. She primarily belongs to the department"marketing". The business role "Control group" and the department "Finance" are assignedto her secondarily. Without an exclusion definition, the user account obtains all thepermissions of groups A, B and C.
By using suitable controls, you want to prevent an employee from being able to trigger arequest and to pay invoices. That means, groups A, B and C are mutually exclusive. Anemployee that checks invoices may not be able to make invoice payments as well. Thatmeans, groups B and C are mutually exclusive.
Effective Group Excluded Group
Group A
Group B Group A
Group C Group B
Table 70: Specifying excluded groups (table SAPGrpExclusion)
Employee Member in Role Effective Group
Ben King Marketing Group A
Jan Bloggs Marketing, finance Group B
Clara Harris Marketing, finance, control group Group C
Jenny Basset Marketing, control group Group A, Group C
Table 71: Effective Assignments
Only the group C assignment is in effect for Clara Harris. It is published in the targetsystem. If Clara Harris leaves the business role "control group" at a later date, group Balso takes effect.
The groups A and C are in effect for Jenny Basset because the groups are not defined asmutually exclusive. If this should not be allowed, define further exclusion for group C.
Employee Member inRole
AssignedGroup
ExcludedGroup
EffectiveGroup
JennyBasset
Marketing Group AGroup C
Control group Group C Group B
Group A
Table 72: Excluded groups and effective assignments
One Identity Manager 8.0.1 Administration Guide for Connecting to SAPR/3
SAP Groups, SAP Roles and SAP Profiles
159

Prerequisites
l The configuration parameter "QER\Inherite\GroupExclusion" is enabled.
l Mutually exclusive groups, roles and profiles belong to the same client.
To exclude a group
1. Select the category SAP R/3 | Groups.
2. Select the group in the result list.
3. Select Exclude groups in the task view.
4. Assign the groups that are mutually exclusive to the selected group in Addassignments.
- OR -
Remove the conflicting groups that are no longer mutually exclusive in Removeassignments.
5. Save the changes.
To exclude roles
1. Select the category SAP R/3 | Roles.
2. Select the role in the result list.
3. Select Exclude SAP roles in the task view.
4. Assign the roles that are mutually exclusive to the selected role in Addassignments.
- OR -
Remove roles that are no longer mutually exclusive in Remove assignments.
5. Save the changes.
To exclude profiles
1. Select the category SAP R/3 | Profiles.
2. Select a profile in the result list.
3. Select Exclude roles in the task view.
4. Assign the profiles that are mutually exclusive to the selected profile in Addassignments.
- OR -
Remove profiles that are no longer mutually exclusive in Remove assignments.
5. Save the changes.
One Identity Manager 8.0.1 Administration Guide for Connecting to SAPR/3
SAP Groups, SAP Roles and SAP Profiles
160

Inheriting SAP Groups, SAP Roles and SAPProfiles based on Categories
NOTE: In order to easy understanding the behavior is described with respect to SAPgroups in this section. It applies in the same way to roles and profiles.
In One Identity Manager, groups can be selectively inherited by user accounts. For this,groups and user accounts are divided into categories. The categories can be freely selectedand are specified by a template. Each category is given a specific position within thetemplate. The mapping rule contains different tables. Use the user account table to specifycategories for target system dependent user accounts. Enter your categories for thestructural profiles, administrative roles, subscriptions and disabled service plans in the .Each table contains the category items "Position1" to "Position31".
Every user account can be assigned to one or more categories. Each group can also beassigned to one or more categories. The group is inherited by the user account when atleast one user account category item matches an assigned group. The group is alsoinherited by the user account if the group or the user account is not put into categories.
NOTE: Inheritance through categories is only taken into account when groups areassigned indirectly through hierarchical roles. Categories are not taken into accountwhen groups are directly assigned to user accounts.
CategoryPosition
Categories for UserAccounts
Categories for Groups
1 Default user Default permissions
2 System user System user permissions
3 System administrator System administrator permis-sions
Table 73: Category Examples
One Identity Manager 8.0.1 Administration Guide for Connecting to SAPR/3
SAP Groups, SAP Roles and SAP Profiles
161
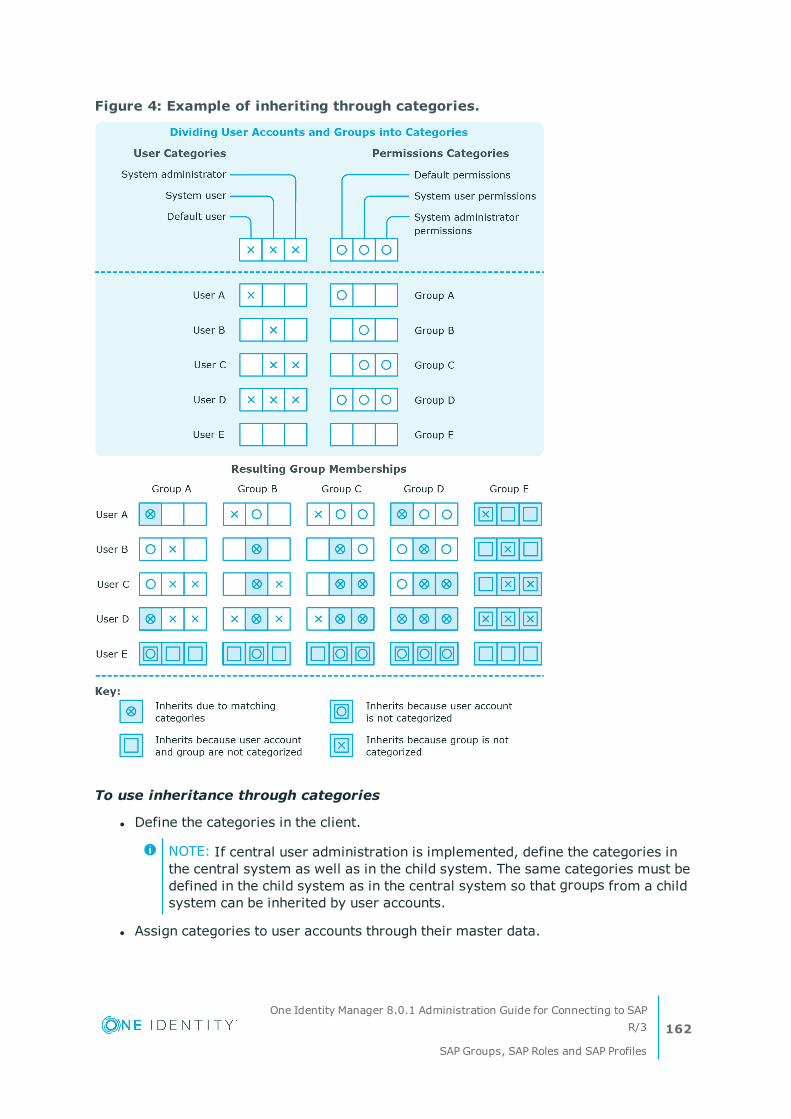
Figure 4: Example of inheriting through categories.
To use inheritance through categories
l Define the categories in the client.
NOTE: If central user administration is implemented, define the categories inthe central system as well as in the child system. The same categories must bedefined in the child system as in the central system so that groups from a childsystem can be inherited by user accounts.
l Assign categories to user accounts through their master data.
One Identity Manager 8.0.1 Administration Guide for Connecting to SAPR/3
SAP Groups, SAP Roles and SAP Profiles
162

l Assign categories to groups, roles and profiles through their master data.
Related Topics
l Specifying Categories for Inheriting SAP Groups, SAP Roles and SAP Profileson page 104
l General Master Data for an SAP User Account on page 112
l General Master Data for SAP Groups on page 140
l General Master Data for SAP Roles on page 142
l General Master Data for SAP Profiles on page 143
Assigning Extended Properties to SAPGroups, SAP Roles and SAP Profiles
Extended properties are meta objects that cannot be mapped directly in the One IdentityManager, for example, operating codes, cost codes or cost accounting areas.
To specify extended properties for a group
1. Select the category SAP R/3 | Groups.
2. Select the group in the result list.
3. Select Assign extended properties in the task view.
4. Assign extended properties in Add assignments.
- OR -
Remove extended properties from Remove assignments.
5. Save the changes.
To specify extended properties for a role
1. Select the category SAP R/3 | Roles.
2. Select the role in the result list.
3. Select Assign extended properties in the task view.
4. Assign extended properties in Add assignments.
- OR -
Remove extended properties from Remove assignments.
5. Save the changes.
To specify extended properties for a profile
1. Select the category SAP R/3 | Profiles.
2. Select a profile in the result list.
One Identity Manager 8.0.1 Administration Guide for Connecting to SAPR/3
SAP Groups, SAP Roles and SAP Profiles
163
3. Select Assign extended properties in the task view.
4. Assign extended properties in Add assignments.
- OR -
Remove extended properties from Remove assignments.
5. Save the changes.
Showing SAP Authorizations
You can view authorization objects and authorizations of SAP roles and profiles in OneIdentity Manager. All single profiles with their associated authorization objects and fieldsare displayed in a hierarchical overview.
To display role authorizations
1. Select the category SAP R/3 | Roles.
2. Select the role in the result list.
3. Select Show SAP authorizations in the task view.
To display profile authorizations
1. Select the category SAP R/3 | Profiles.
2. Select a profile in the result list.
3. Select Show SAP authorizations in the task view.
Calculating the Validity Date ofInherited Role Assignments
Configuration parameter Active Meaning
TargetSystem\SAPR3\ValidDateHandling Configuration parameter forhandling the validity period in SAPuser account assignments to SAProles.
TargetSystem\SAPR3\ValidDateHandling\ReuseInheritedDate
This configuration parameterspecifies whether the validity dateof inherited SAP user accountassignments to SAP roles remains
Table 74: Configuration Parameters for handling for Validity Dates fromindirectly assigned SAP Roles
One Identity Manager 8.0.1 Administration Guide for Connecting to SAPR/3
SAP Groups, SAP Roles and SAP Profiles
164
Configuration parameter Active Meaning
intact. The configurationparameter is only relevant insystems that were migrated froma pre 7.0 version. If the config-uration parameter is set, the datevalues "Valid from" and "Valid to"stays the same if SAP useraccount assignments to roles areinherited.
TargetSystem\SAPR3\ValidDateHandling\ReuseInheritedDate\UseTodayForInheritedValidFrom
This configuration parameterspecifies whether the "Valid from"date in inherited SAP useraccounts assignments to SAProles is set to <Today> or to"1900-01-01".
Validity dates of indirectly assigned SAP roles have been saved in a modified format in theOne Identity Manager database sinceOne Identity Manager version 7.0 and later.
One Identity Managerversion
Valid from (ValidFrom) Valid until(ValidUntil)
>= 7.0 1900-01-01 9999-12-31
< 7.0 Date on which the role assignmentwas created
9998-12-31
Table 75: Default Date Values for Validity Dates of indirectly assigned SAPRoles (Table SAPUserInSAPRole)
Existing validity dates in databases migrated from versions older that 7.0 remain as theyare. Once a inheritance is recalculated for a user account, all indirectly assigned SAP rolesare saved with new validity dates. These changes are immediately provisioned in SAP. Thismight result in a heavy load on the connected SAP system.
To prevent validity dates from adjusting to the new format when recalculatinginheritance
l Set the configuration parameter"TargetSystem\SAPR3\ValidDateHandling\ReuseInheritedDate" in the Designer.
IMPORTANT: In order to ensure that the validity period is correctly calculatedstraight after migration, set the configuration parameter with a custom changein the migration package. For more detailed information about creating acustom migration package, see the One Identity One Identity Manager 7.0.2.Migration Guide to Upgrading Previous Versions of One Identity Manager.
One Identity Manager 8.0.1 Administration Guide for Connecting to SAPR/3
SAP Groups, SAP Roles and SAP Profiles
165

If the configuration parameter is set, the validity dates stays the same for existing indirectrole assignments meaning that no provisioning tasks are queued. These assignments arenot reworked during synchronization with revision filtering.
The new date values are set for newly added indirect assignments. Therefore, it is notobvious when the assignment is valid in the SAP R/3 environment after provisioning. If thisinformation is required, you can enter the actual date that the role assigned is created inthe "Valid from" date.
To apply the current date as "Valid from" date for new indirect assignments
l Set the configuration parameter"TargetSystem\SAPR3\ValidDateHandling\ReuseInheritedDate\UseTodayForInheritedValidFrom" in the Designer.
The date the role assignment was created is entered in the "Valid from" date if it isan indirect assignment.
IMPORTANT: Calculating indirect role assignments can become much slowerdepending on the amount of data to be processed.
If it not really necessary to know since when the role assignment is valid in theSAP R/3 environment, do not set this configuration parameter.
One Identity Manager 8.0.1 Administration Guide for Connecting to SAPR/3
SAP Groups, SAP Roles and SAP Profiles
166

8
SAP Products
Installed Module: System Roles Module
You can define One Identity Manager products as a collection of different groups, roles orprofiles in SAP. SAP products are system roles with the system role type "SAP product".Employees can obtain SAP products directly, inherit them though hierarchical role orrequest them in the IT Shop.
The employee’s user account is assigned the groups, roles and profiles in the SAP productindependent of the assignment method. If an SAP product changes by adding or removing agroup, role or a profile in One Identity Manager, user account memberships are changedaccordingly.
To edit SAP products
1. Select the category SAP R/3 | Products.
2. Select an SAP product in the result list.
- OR -
Click in the result list toolbar.
This opens the master data form for a system role.
3. Edit the system role's master data.
4. Save the changes.
Detailed information about this topic
l One Identity Manager System Roles Administration Guide
One Identity Manager 8.0.1 Administration Guide for Connecting to SAPR/3
SAP Products
167

General Master Data for SAP Products
Configurationparameter
Active Meaning
QER\CalculateRiskIndex Preprocessor relevant configuration parameter controllingsystem components for calculating an employee's risk index.Changes to the parameter require recompiling the database.
"If the parameter is set, a value for the risk index can beentered and calculated.
Table 76: Configuration Parameters for Risk Assessment of SAP User Accounts
Enter the following data for a system role.
Property Description
DisplayName
Name for displaying the system roles in One Identity Manager tools.
Systemrole
Unique identifier for the system role.
Internalproductnames
An additional internal name for the system role.
Systemrole type
Specifies the type of company resources, which comprise the system role.
Serviceitem
In order to use a service item within the IT Shop, assign a service item to itor add a new service item. For more information about service items, seethe One Identity Manager IT Shop Administration Guide.
Systemrolemanager
You can assign any employee to be a manager for the system role. Thisemployee can edit system role master data. They can be used as attestorsfor system role properties.
Share date Specify a date for enabling the system role. If the date is in the future, thesystem role is considered to be disabled. If the date is reached, the systemrole is enabled. Employees inherit company resources that are assigned tothe system role.
If the share date is exceeded or no date is entered, the system role ishandled as an enabled system role. Company resource inheritance can becontrolled with the option Disabled in these cases.
Table 77: System Role Master Data
One Identity Manager 8.0.1 Administration Guide for Connecting to SAPR/3
SAP Products
168

Property Description
NOTE: Configure and set the schedule "Share system roles" in theDesigner to check the share date. For more information aboutschedules, see the One Identity Manager Configuration Guide.
Risk index(calculated)
Maximum risk index values for all company resources. This property is onlyvisible if the configuration parameter "QER\CalculateRiskIndex" is set. Formore information about calculating risk indexes, see the One IdentityManager Risk Assessment Administration Guide.
Comment Spare text box for additional explanation.
Remarks Spare text box for additional explanation.
Description Spare text box for additional explanation.
Disabled Specifies whether employees and workdesks inherit the company resourcescontained in the system role.
If this option is set, the system role can be assigned to employees,workdesks, hierarchical roles and IT Shop shelves. However they cannotinherit the company resources contained in the system role. The systemrole cannot be requested in the Web Portal.
If this option is not set, company resources assigned to the system role areinherited. If the option is enabled at a later date, existing assignments areremoved.
IT Shop Specifies whether the system role can be requested through the IT Shop.This system role can be requested by staff through the Web Portal and therequest granted by a defined approval procedure. The system role can stillbe assigned directly to employees and hierarchical roles. For moreinformation about the IT Shop, see the One Identity Manager IT ShopAdministration Guide.
Only foruse in ITShop
Specifies whether the system role can only be requested through the ITShop. This system role can be requested by staff through the Web Portaland the request granted by a defined approval procedure. The system rolemay not assigned directly to hierarchical roles.
Spare fieldsno.01.....sparefield no. 10
Additional company specific information. Use the Designer to customizedisplay names, formats and templates for the input fields.
For more detailed information about system roles, see the One Identity Manager SystemRoles Administration Guide.
One Identity Manager 8.0.1 Administration Guide for Connecting to SAPR/3
SAP Products
169

SAP Product Assignments to Employees
SAP products can be assigned directly or indirectly to employees. In the case of indirectassignment, employees and SAP products are arranged in hierarchical roles. The numberof SAP products assigned to an employee is calculated from the position in the hierarchyand the direction of inheritance.
If you add an employee to roles and that employee owns a user account, the user accountis added to all groups, roles or profiles included in the SAP products owned by theemployee. The groups, roles or profiles are not inherited if the SAP product is disabled or ifthe share date is still in the future.
Prerequisites for indirect assignment:
l Assignment of system roles, employees, groups, roles and profiles is permitted forrole classes (department, cost center, location or business role).
l The user accounts are marked with the option Groups can be inherited.
l User accounts and groups, roles and profiles belong to the same SAP clients.
Furthermore, IT Shop products can be assigned to employees through SAP requests. SAPproducts can be assigned through IT Shop requests by adding employees to a shop ascustomers. All SAP products are assigned to this shop can be requested by the customers.Requested SAP products are assigned to the employees after approval is granted.
Detailed information about this topic
l Assigning SAP Products to Organizations on page 170
l Assigning SAP Products to Business Roles on page 171
l Assigning SAP Products directly to Employees on page 172
l Adding SAP Products in System Roles on page 172
l Adding SAP Products to the IT Shop on page 173
l One Identity Manager Identity Management Base Module Administration Guide
Related Topics
l Assigning SAP Groups, SAP Roles and SAP Profiles to SAP User Accounts on page 145
Assigning SAP Products to Organizations
Assign SAP products to departments, cost centers and locations in order to assignemployees to them through these organizations.
One Identity Manager 8.0.1 Administration Guide for Connecting to SAPR/3
SAP Products
170

To assign an SAP product to departments, cost centers or locations
1. Select the category SAP R/3 | Products.
2. Select the SAP product in the result list.
3. Select Assign organizations.
4. Assign organizations in Add assignments.
l Assign departments on the Departments tab.
l Assign locations on the Locations tab.
l Assign cost centers on the Cost center tab.
- OR -
Remove the organizations in Remove assignments.
5. Save the changes.
Related Topics
l Assigning SAP Products to Business Roles on page 171
l Adding SAP Products to the IT Shop on page 173
l Assigning SAP Products directly to Employees on page 172
l Adding SAP Products in System Roles on page 172
l Assigning SAP Groups, SAP Roles and SAP Profiles to Organizations on page 145
Assigning SAP Products to Business Roles
Installed Module: Business Roles Module
You assign SAP products to business roles in order to assign them to user accounts overbusiness roles.
To assign an SAP product to business roles
1. Select the category SAP R/3 | Products.
2. Select the SAP product in the result list.
3. Select Assign business roles in the task view.
4. Assign business roles in Add assignments.
- OR -
Remove business roles from Remove assignments.
5. Save the changes.
One Identity Manager 8.0.1 Administration Guide for Connecting to SAPR/3
SAP Products
171
Related Topics
l Assigning SAP Products to Organizations
l Adding SAP Products in System Roles on page 172
l Assigning SAP Products directly to Employees on page 172
l Adding SAP Products to the IT Shop on page 173
l Assigning SAP Groups, SAP Roles and SAP Profiles to Business Roles on page 147
Assigning SAP Products directly toEmployees
You can assign SAP products directly to employees. All groups, roles and profiles areassigned to this SAP product can be inherited by these employees.
To assign an SAP product directly to employees
1. Select the category SAP R/3 | Products.
2. Select the SAP product in the result list.
3. Select Assign to employees in the task view.
4. Assign employees in Add assignments.
- OR -
Remove employees from Remove assignments.
5. Save the changes.
Related Topics
l Assigning SAP Products to Organizations on page 170
l Assigning SAP Products to Business Roles on page 171
l Adding SAP Products to the IT Shop on page 173
l Adding SAP Products in System Roles on page 172
Adding SAP Products in System Roles
You can group individual SAP products into a package. To do this, you assign SAP productsto system roles.
NOTE: SAP products with the option Only use in IT Shop set can only be assignedto system roles that also have this option set.
One Identity Manager 8.0.1 Administration Guide for Connecting to SAPR/3
SAP Products
172

To assign an SAP product to system roles
1. Select the category SAP R/3 | Products.
2. Select the SAP product in the result list.
3. Select Assign system roles in the task view.
4. Select the tab System role contained in to assign parent system roles.
l Assign system roles in Add assignments.
- OR -
Remove assignments to system roles in Remove assignments.
5. Select the tab System role contains to assign child system roles.
l Assign system roles in Add assignments.
- OR -
Remove assignments to system roles in Remove assignments.
6. Save the changes.
Related Topics
l Assigning SAP Products to Organizations on page 170
l Assigning SAP Products to Business Roles on page 171
l Assigning SAP Products directly to Employees on page 172
l Adding SAP Products to the IT Shop on page 173
l Adding SAP Groups, SAP Roles and SAP Profiles to System Roles on page 151
Adding SAP Products to the IT Shop
Once an SAP product has been assigned to an IT Shop shelf, it can be requested by the shopcustomers. To ensure the SAP product is requestable, further prerequisites need to beguaranteed.
l The product must be labeled with SAPthe option IT Shop.
l The SAP product must be assigned to a service item.
l The SAP product must be also labeled with the option Only use in IT Shop if theSAP product can only be assigned to employees using IT Shop requests. Then, theSAP product may no longer be assigned directly to hierarchical roles.
To add an SAP product to the IT Shop
1. Select the category SAP R/3 | Products.
2. Select the SAP product in the result list.
3. Select Add to IT Shop in the task view.
One Identity Manager 8.0.1 Administration Guide for Connecting to SAPR/3
SAP Products
173
4. Add the SAP product to the IT Shop shelves in Add assignments.
5. Save the changes.
To remove an SAP product from individual IT Shop shelves
1. Select the category SAP R/3 | Products.
2. Select the SAP product in the result list.
3. Select Add to IT Shop in the task view.
4. Remove the SAP product from the IT Shop shelves in Remove assignments.
5. Save the changes.
To remove an SAP product from all IT Shop shelves
1. Select the category SAP R/3 | Products.
2. Select the SAP product in the result list.
3. Select Remove from all shelves (IT Shop) in the task view.
4. Confirm the security prompt with Yes.
5. Click OK.
The SAP product is removed from all shelves by the One Identity ManagerService. All requests and assignment requests are canceled along with the SAPproduct as a result.
For more detailed information about providing products in the IT Shop, see the OneIdentity Manager IT Shop Administration Guide.
Related Topics
l Assigning SAP Products directly to Employees on page 172
l Assigning SAP Products to Organizations on page 170
l Adding SAP Products in System Roles on page 172
l Assigning SAP Products to Business Roles on page 171
l Adding SAP Groups, SAP Roles and SAP Profiles to the IT Shop on page 152
Additional Tasks for Managing SAPProducts
After you have entered the master data, you can apply different tasks to it. The task viewcontains different forms with which you can run the following tasks.
One Identity Manager 8.0.1 Administration Guide for Connecting to SAPR/3
SAP Products
174

Overview of SAP Products
To obtain an overview of an SAP product
1. Select the category SAP R/3 | Products.
2. Select the SAP product in the result list.
3. Select System role overview in the task view.
Assigning SAP Groups, SAP Roles and SAPProfiles to an SAP Product
Assign the groups, roles and profiles you want to include to the SAP product. Employees towhich you assign this SAP product, will inherit these groups, roles and profiles.
NOTE: Groups, roles and profiles with the option Only use in IT Shop can only beassigned to SAP products that also have this option set.
NOTE: Groups, roles and profiles can also be added to system roles that are not SAPproducts.
To assign groups to an SAP product
1. Select the category SAP R/3 | Products.
2. Select the SAP product in the result list.
3. Select Assign SAP groups in the task view.
4. Assign groups in Add assignments.
- OR -
Remove groups in Remove assignments.
5. Save the changes.
To assign profiles to an SAP product.
1. Select the category SAP R/3 | Products.
2. Select the SAP product in the result list.
3. Select Assign SAP profiles in the task view.
4. Assign profiles in Add assignments.
- OR -
Remove profiles in Remove assignments.
5. Save the changes.
One Identity Manager 8.0.1 Administration Guide for Connecting to SAPR/3
SAP Products
175

To assign roles to an SAP product
1. Select the category SAP R/3 | Products.
2. Select the SAP product in the result list.
3. Select Assign SAP roles in the task view.
4. Assign roles in Add assignments.
- OR -
Remove roles in Remove assignments.
5. Save the changes.
Related Topics
l SAP Product Assignments to Employees on page 170
Assigning Account Definitions to SAPProducts
Use this task to add account definitions to an SAP product. If you assign the SAPproduct to employees, the account definitions contained in the SAP product are inheritedby the employees.
NOTE: Account definitions roles with the option Only use in IT Shop set, can onlybe assigned to SAP products that also have this option set.
To assign account definition to an SAP product
1. Select the category SAP R/3 | Products.
2. Select the SAP product in the result list.
3. Select Assign account definitions.
4. Assign account definitions in Add assignments.
- OR -
Remove account definitions in Remove assignments.
5. Save the changes.
Detailed information about this topic
l Setting Up Account Definitions
One Identity Manager 8.0.1 Administration Guide for Connecting to SAPR/3
SAP Products
176

Assigning Subscribable Reports to SAPProducts
Installed Module: Report Subscription Module
Use this task to add subscribable reports to an SAP product. If you assign the SAPproduct to employees, the subscribable reports contained in the SAP product areinherited by the employees.
NOTE: Subscribable reports with the option Only use in IT Shop set, can only beassigned to SAP products that also have this option set.
To assign subscribable reports to an SAP product
1. Select the category SAP R/3 | Products.
2. Select the SAP product in the result list.
3. Select Assign subscribable reports in the task view.
4. Assign subscribable reports in Add assignments.
- OR -
Remove subscribable reports in Remove assignments.
5. Save the changes.
Detailed information about this topic
l One Identity Manager Report Subscriptions Administration Guide
Assigning Extended Properties to SAPProducts
Extended properties are meta objects that cannot be mapped directly in the One IdentityManager, for example, operating codes, cost codes or cost accounting areas.
To specify extended properties for an SAP product
1. Select the category SAP R/3 | Products.
2. Select the SAP product in the result list.
3. Select Assign extended properties in the task view.
4. Assign extended properties in Add assignments.
- OR -
Remove extended properties from Remove assignments.
One Identity Manager 8.0.1 Administration Guide for Connecting to SAPR/3
SAP Products
177

5. Save the changes.
Related Topics
l Assigning Extended Properties to SAP Groups, SAP Roles and SAP Profiles onpage 163
Edit Conflicting System Roles
Configuration parameter Active Meaning
QER\Structures\ExcludeStructures Preprocessor relevant configuration parameter forcontrolling the model parts that specify conflictsbetween roles. Changes to the parameter requirerecompiling the database.
If the parameter is set, you can specify which rolesare mutually exclusive.
Table 78: Configuration Parameters for Editing Mutually Exclusive Roles
It is possible that employees may not own certain groups, roles and profiles at the sametime. To avoid this, you can assign mutually exclusive groups, roles and profiles todifferent SAP products. Define these SAP products afterward as conflicting system roles.This means that conflicting system roles can be grouped together into a system role.
NOTE: Only SAP products, which are defined directly as conflicting system rolescannot be assigned to the same employee. Definitions made on parent or child SAPproducts do not affect the assignment.
To implement conflicting system roles
l Set the configuration parameter "QER\Structures\ExcludeStructures" in the Designerand compile the database.
To define conflicting system roles
1. Select the category SAP R/3 | Products.
2. Select the SAP product in the result list for which you want to define conflictingsystem roles.
3. Select Edit conflicting system roles from the task view.
4. Double-click on the system roles in Add assignments to exclude them from theselected SAP product.
- OR -
Double-click on the system roles in Remove assignments which are nolonger excluded.
5. Save the changes.
One Identity Manager 8.0.1 Administration Guide for Connecting to SAPR/3
SAP Products
178

9
Providing System MeasurementData
User account license information can be mapped in One Identity Manager. An employeecan have several user accounts which belong to different clients and systems. Theemployee's most significant user account is required for system measurement. This useraccount is determined as a chargeable user account by system measurement. One IdentityManager calculates user account ratings from the licenses assigned.
The employee's most significant user account is automatically determined from all useraccounts not managed though CUA. CUA user accounts are mapped in the licenseinformation in One Identity Manager and can be edited. The most significant user account isnot, however, determined automatically.
System measurement data is supplied in One Identity Manager. The actual measurementtakes place in the target system.
To make system measurement data available
1. Set the option Enable system measurement in the SAP system.
2. Set the option Has user administration in the client.
3. Enter the license data
a. Enter the license for roles and profiles. One Identity Manager finds the useraccount's licenses from the licenses of all roles and profiles in which the useraccount is a member.
– OR –
b. Enter the active license directly in the user account.
One Identity Manager calculates the most significant user account license from thelicenses entered.
4. Publish the measurement data.
The calculated licenses are transferred to the active licenses. Active licenses arepublished in the target system. System measurement can be carried out there.
One Identity Manager 8.0.1 Administration Guide for Connecting to SAPR/3
Providing System Measurement Data
179

Detailed information about this topic
l SAP Systems on page 101
l General Master Data for an SAP Client on page 102
l Finding Licenses using SAP Roles and SAP Profiles on page 183
l Entering licenses for SAP User Accounts on page 182
l Transferring Calculated Licenses on page 186
Mapping Measurement Data
Measurement data is displayed on the master data form for user accounts whichare not CUA.
To display measurement data
1. Select the category SAP R/3 | User accounts.
2. Select the user account in the result list.
3. Change to the Inventory data tab.
This open the master data form with synchronized and calculated data for systemmeasurement.
The following license information is displayed on the form.
Property Description
ActiveLicense
User account's license. The active license is loaded into the One IdentityManager database by synchronization or found from the calculated,employee-related license.
NOTE: The active license can be edited directly and changed. Changesto the active license are published immediately in the target system.The licenses stored with the roles and profiles are not effective in thiscase.
NOTE: If licenses are stored with roles or profiles in which the useraccount is a member and the task Publishing calculated licensesis run, the active license stored directly with the user account isoverwritten by the calculated license!
Specialversion ID
License extension for the installed special version. Select the specialversion ID from the menu. This is only enabled if special versions arepermitted for the active license.
Table 79: User Account Measurement Data
One Identity Manager 8.0.1 Administration Guide for Connecting to SAPR/3
Providing System Measurement Data
180

Property Description
Countrysurcharge
Additional license fee. This is only enabled if country surcharges arepermitted for the active license.
Substitute Link to the user account which takes over as deputy for a specified timeperiod. This field is only active if "04 (substitute)" or "11 (Multi-client/sys-tem)" is entered. The substitute user account obtains roles and profiles ofthe displayed user account for a specified time period.
Substitutedfrom Time period in which another user account assumes responsibility. This
input field is enabled if the active license is set to "04 (substitute)".Substituteduntil
Calculatedlicense(client)
License determined from user account assigned roles and profiles within theclient.
Calculatedlicense(employee)
License of most significant employee user account.
The client related calculated license is entered for the most significant useraccount. For all the other employee’s user accounts, the employee relatedcalculated license "11 (Multi-client/system user)" is entered. This alsocontains a reference to the calculated most significant user account(Calculated ref. name).
Calculatedref. name
Link to the calculated most significant user account if "11 (Multi-client/sys-tem user)" is entered.
Measurement data is displayed for each user account assignment to the target system andto child systems if the user accounts are managed over CUA,
To display measurement data for a centrally administered user account
1. Select the category SAP R/3 | User accounts.
2. Select the user account in the result list.
3. Select Assign SAP licenses in client systems in the task view.
4. Select an assignment in the table.
The following license information is displayed on the form.
Property Description
Recipientclient
Client containing the user account which is assigned a license. You canselect the central system or a assigned child system.
License User account license in the selected client.
License License extension for the installed special version. Select the special
Table 80: Measurement Data for a Centrally administrated User Account
One Identity Manager 8.0.1 Administration Guide for Connecting to SAPR/3
Providing System Measurement Data
181
Property Description
extension version ID from the menu.
Countrysurcharge
Additional license fee.
Chargeablesystem
SAP system containing the client to be charged. This field is only shown if"04 (substitute)" or "11 (Multi-client/system)" is entered.
Chargeableclient
Client containing the user account to be charged. This field is only shown if"04 (substitute)" or "11 (Multi-client/system)" is entered.
Chargeableuser account
User account to be charged if "04 (substitute)" or "11 (Multi-client/sys-tem)" is entered.
Substitutedfrom Time period in which another user account assumes responsibility. This
input field is enabled if the active license is set to "04 (substitute)".Substituteduntil
Related Topics
l Entering licenses for SAP User Accounts on page 182
l Finding Licenses using SAP Roles and SAP Profiles on page 183
l Determining an SAP User Account Rating on page 184
l Transferring Calculated Licenses on page 186
l Special Versions on page 81
l Licenses on page 80
Entering licenses for SAP User Accounts
In order to maintain system measurement data directly in user accounts, enter theactive license in the user accounts. This might be necessary, for example, for storingsubstitute licenses.
To enter a user account active license
1. Select the category SAP R/3 | User accounts.
2. Select the user account in the result list.
3. Select the Measurement data tab.
4. Select a license Active license from the menu.
5. Enter any other data required, if necessary.
6. Save the changes.
One Identity Manager 8.0.1 Administration Guide for Connecting to SAPR/3
Providing System Measurement Data
182

The active license is published in the target system.
NOTE: If licenses are stored with roles or profiles in which the user account is amember and the task Publishing calculated licenses is run, the active licensestored directly with the user account is overwritten by the calculated license!
To enter the centrally administrated user account's license
1. Select the category SAP R/3 | User accounts.
2. Select the user account in the result list.
3. Select Assign SAP licenses in client systems in the task view.
4. Click Add.
This inserts a new row in the table.
5. Mark this row. Enter the measurement data.
6. Save the changes.
Detailed information about this topic
l Mapping Measurement Data on page 180
l Finding Licenses using SAP Roles and SAP Profiles on page 183
Finding Licenses using SAP Roles andSAP Profiles
The most significant license can be determined from role and profile licenses that are notmanaged through CUA. You must make the initial assignment of licenses manually aftersynchronizing roles and profiles. One Identity Manager determines the user account'shighest rated license through user account memberships in roles and profiles. Theemployee's most significant user account is found across clients and system. The mostsignificant license is added to the user account as the active license and published in thetarget system.
To assign roles and profiles
1. Select the category SAP R/3 | Roles.
– OR –
Select the category SAP R/3 | Profiles.
2. Select the role or profile in the result list.
3. Assign a license in License.
4. Save the changes.
One Identity Manager 8.0.1 Administration Guide for Connecting to SAPR/3
Providing System Measurement Data
183

Related Topics
l Licenses on page 80
l General Master Data for SAP Profiles on page 143
l General Master Data for SAP Roles on page 142
Determining an SAP User Account Rating
NOTE: In this section, roles and profiles are grouped under the term "SAP systemauthorizations" to make it easier to understand.
A rating for a user account is determined in One Identity Manager by rating profiles androles in which the user account is a member. Licenses have to be entered for the profilesand roles as a prerequisite. You have to make this assignment once manually after theobjects have been synchronized. When the most significant user account is determined, thelicense names and any manually issued license value are taken into account.
A recalculation task for the DBQueue Processor is generated to determine license rating.The recalculation task is generated when:
l The option System measurement enabled for the SAP system isdisabled/enabled.
l The option Has user account management for the SAP client is disabled/enabled.
l User account assignments to roles or profiles are changed
l Role assignment validity periods are changed
l License's rating changes
l License assignments to roles or profiles are changed
l Employee assignment to user accounts
l The user account substitute is changed
The most highly rated user account is determined in One Identity Manager in a twostep process.
1. Determining the significance of a user account within a client (client related)
Memberships in system authorizations within a client are calculated for a userSAPaccount. Through this, the SAP system authorization is found with the highest rating.The license for the most significant SAP system authorization is added to the useraccount as Calculated license (client). The most significant SAP systemauthorization fulfills the following criteria:
a. The assigned license has the lowest license rating (in alphanumeric sort order).
b. If several SAP system authorizations with the same license rating areassigned or no license rating has been given, the valid license is the one withthe highest rating.
One Identity Manager 8.0.1 Administration Guide for Connecting to SAPR/3
Providing System Measurement Data
184

2. Determining the most highly rated user account (employee related)
a. The most significant user account is determined from all the employee’s useraccount sin all clients and all systems. The criteria from 1a) and 1b) apply forthese user accounts. The license for the most highly rated user account isadded to the user account as Calculated license (employee). A reference tothe user account calculated with the most significance is entered for the all theemployee's other user accounts in Calculated ref. name. These user accountcontain the license "11 (Multi-client/system) or "04 (substitute)".
User accounts Calculatedlicense(employee)
Most significant user account Calculated license(client)
Remaining user accounts in clients of the same systemsas the most significant user account
04 (substitute)
Remaining user accounts in clients of the other systemsthan the most significant user account
11 (Multi-client/sys-tem)
Table 81: Employee related license
b. If a user account is not assigned an employee, the rating calculated under 1) isseen as the most significant and the license entry is added to the user accountas Calculated license (employee).
One Identity Manager 8.0.1 Administration Guide for Connecting to SAPR/3
Providing System Measurement Data
185
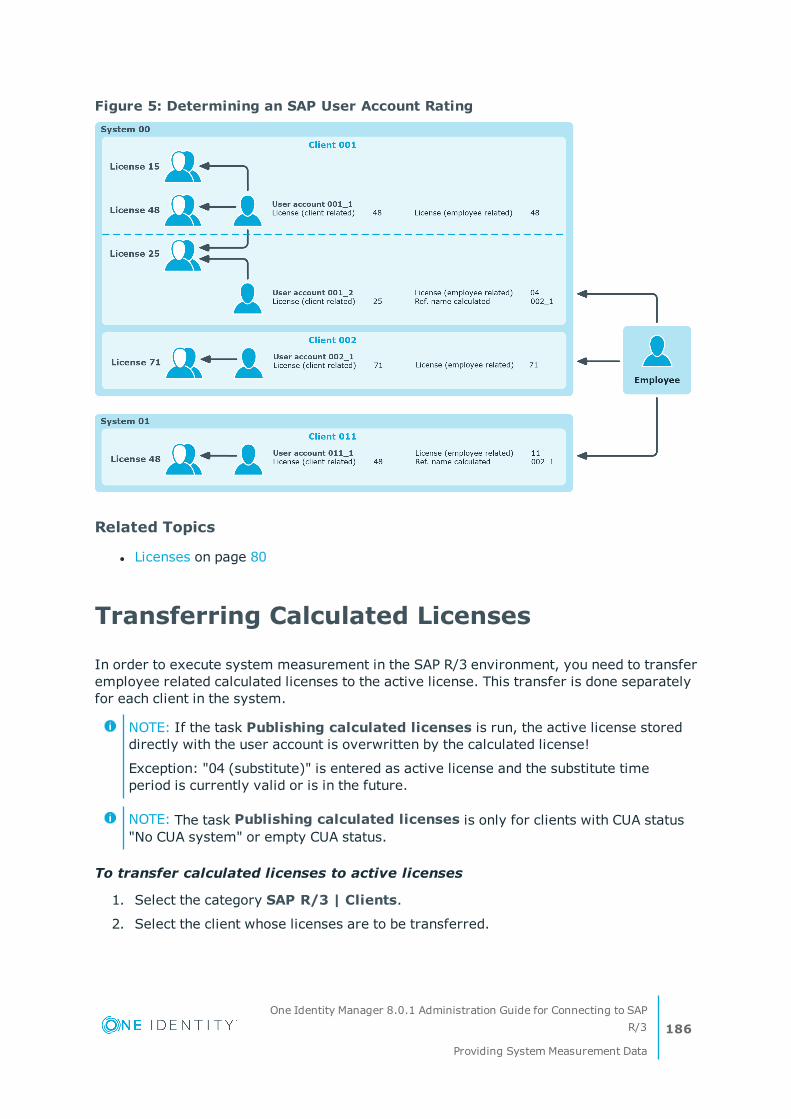
Figure 5: Determining an SAP User Account Rating
Related Topics
l Licenses on page 80
Transferring Calculated Licenses
In order to execute system measurement in the SAP R/3 environment, you need to transferemployee related calculated licenses to the active license. This transfer is done separatelyfor each client in the system.
NOTE: If the task Publishing calculated licenses is run, the active license storeddirectly with the user account is overwritten by the calculated license!
Exception: "04 (substitute)" is entered as active license and the substitute timeperiod is currently valid or is in the future.
NOTE: The task Publishing calculated licenses is only for clients with CUA status"No CUA system" or empty CUA status.
To transfer calculated licenses to active licenses
1. Select the category SAP R/3 | Clients.
2. Select the client whose licenses are to be transferred.
One Identity Manager 8.0.1 Administration Guide for Connecting to SAPR/3
Providing System Measurement Data
186

3. Select Publish calculated licenses.
A security prompt appears.
4. Confirm the security prompt with Yes.
Once the calculated licenses are transferred to active licenses, the active licenses arepublished in the target system.
The One Identity Manager transfers the calculated employee related license for all thisclient‘s user accounts to the active license. You can edit this data later, if required. Oncethe licenses are published in the SAP R/3 system and system measurement has beencarried out, you can synchronize the current measurement data with the One IdentityManager database.
Special Features for User Accounts with a Substitute's License
If the active license "04 (substitute)" is entered in the user account and the substitutionperiod is current valid, the active license is not replaced by the calculated employee-related license. The same applies if the substitution period is in the future (Substitutedfrom later than "today").
If the substitution period has expired, the calculated employee-related license istransferred to the active license by the task Publishing calculated licenses.Information about the substitute and the substitution period is deleted from the useraccount.
NOTE: In order to publish a active license "04 (substitute) in the target system, theprice list and all usable user types must be enabled in the program part systemmeasurement in the SAP R/3 environment.
Related Topics
l Mapping Measurement Data on page 180
One Identity Manager 8.0.1 Administration Guide for Connecting to SAPR/3
Providing System Measurement Data
187

10
Reports about SAP Systems
One Identity Manager makes various reports available containing information about theselected base object and its relations to other One Identity Manager database objects. Thefollowing reports are available for SAP systems.
NOTE: Other sections may be available depending on the which modules areinstalled.
Report Description
Overview of all assign-ments (system)
This report finds all roles containing employees with at leastone user account in the selected system.
Overview of all assign-ments (client)
This report finds all roles containing employees with at leastone user account in the selected client.
Overview of all assign-ments (group, role,profile)
This report find all roles containing employees with theselected group, role or profile.
Show orphaned useraccounts
This report shows all user accounts in the client, which are notassigned to an employee. The report contains assigned systementitlements and risk assessment.
Show employees withmultiple user accounts
This report shows all employees with more than one useraccount in the client. The report contains a risk assessment.
Show entitlement drifts This report shows all the client's system entitlements that arethe result of manual operations in the target system ratherthan using the One Identity Manager provisioning engine.
Show unused useraccounts
This report shows all the client's user accounts that have notbeen used in the last few months.
Show user accounts withan above averagenumber of systementitlements
This report contains all the client's user accounts with anabove average number of system entitlements.
Table 82: Reports for the Target System
One Identity Manager 8.0.1 Administration Guide for Connecting to SAPR/3
Reports about SAP Systems
188

Report Description
SAP user account andgroup administration
This report contains a summary of user account and groupdistribution in all clients. You can find the report in thecategory My One Identity Manager | Target systemoverviews.
Data quality summaryfor SAP user accounts
This report contains different evaluations of user account dataquality in all clients. You can find the report in the category MyOne Identity Manager | Data quality analysis.
Overview of all Assignments
The report "Overview of all Assignments" is displayed for certain objects, for example,permissions, compliance rules or roles. The report finds all the roles, for example,departments, cost centers, locations, business roles and IT Shop structures in which thereare employee who own the selected base object. In this case, direct as well as indirectbase object assignments are included.
Example
l If the report is created for a resource, all roles are determined in which there areemployees with this resource.
l If the report is created for a group, all roles are determined in which there areemployees with this group.
l If the report is created for a compliance rule, all roles are determined in which thereare employees with this compliance rule.
l If the report is created for a department, all roles are determined in whichemployees of the selected department are also members.
l If the report is created for a business role, all roles are determined in whichemployees of the selected business role are also members.
To display detailed information about assignments
l To display the report, select the base object from the navigation or the result list andselect the report Overview of all assignments.
l Use the Used by button in the report's toolbar to select the role class(department, location, business role or IT Shop structure) for which you determine ifroles exist in which there are employees with the selected base object.
All the roles of the selected role class are shown. The color coding of elementsidentifies the role in which there are employees with the selected base object. Themeaning of the report control elements is explained in a separate legend. In thereport's toolbar, click to open the legend.
l Double-click a control to show all child roles belonging to the selected role.
One Identity Manager 8.0.1 Administration Guide for Connecting to SAPR/3
Reports about SAP Systems
189

l By clicking the button in a role's control, you display all employees in the role withthe base object.
l Use the small arrow next to to start a wizard that allows you to bookmark this listof employee for tracking. This creates a new business role to which the employeesare assigned.
Figure 6: Toolbar for Report "Overview of all assignments"
Icon Meaning
Show the legend with the meaning of the report control elements
Saves the current report view as a graphic.
Selects the role class used to generate the report.
Displays all roles or only the affected roles.
Table 83: Meaning of Icons in the Report Toolbar
One Identity Manager 8.0.1 Administration Guide for Connecting to SAPR/3
Reports about SAP Systems
190

A
Appendix: Configuration Parametersfor Managing SAP R/3
The following configuration parameters are additionally available in One Identity Managerafter the module has been installed.
Configuration parameter Description
TargetSystem\SAPR3 SAP is supported. The parameteris a precompiler dependent config-uration parameter. Changes tothe parameter require recom-piling the database.
TargetSystem\SAPR3\Accounts Default values should be used forSAP user accounts.
TargetSystem\SAPR3\Accounts\Datfm Specifies the default date formatfor SAP user accounts.
TargetSystem\SAPR3\Accounts\Dcpfm Specifies the default decimalpoint format for SAP useraccounts.
TargetSystem\SAPR3\Accounts\ExtID_Type Specifies the default type forexternal identification of SAP useraccounts.
TargetSystem\SAPR3\Accounts\Fax_Group Specifies the default fax group forSAP user accounts.
TargetSystem\SAPR3\Accounts\Guiflag Specifies whether secure commu-nication is permitted for SAP useraccounts.
TargetSys-tem\SAPR3\Accounts\InitialRandomPassword
This configuration parameterspecifies whether a randomgenerated password is issued
Table 84: Configuration parameter
One Identity Manager 8.0.1 Administration Guide for Connecting to SAPR/3
Appendix: Configuration Parameters for Managing SAP R/3
191
Configuration parameter Description
when a new user account isadded. The password mustcontain at least those charactersets that are defined in thepassword policy.
TargetSys-tem\SAPR3\Accounts\InitialRandomPassword\SendTo
This configuration parameterspecifies to which employee theemail with the random generatedpassword should be sent(manager cost center-/department/location/businessrole, employee’s manager orXUserInserted). If no recipientcan be found, the password issent to the address stored in theconfiguration parameter"TargetSys-tem\SAP\DefaultAddress".
TargetSys-tem\SAPR3\Accounts\InitialRandomPassword\SendTo\MailTemplateAccountName
This configuration parametercontains the name of the mailtemplate sent to inform usersabout their initial login data(name of the user account). Usethe mail template "Employee -new account created".
TargetSys-tem\SAPR3\Accounts\InitialRandomPassword\SendTo\MailTemplatePassword
This configuration parametercontains the name of the mailtemplate sent to inform usersabout their initial login data(initial password). Use the mailtemplate "Employee - initialpassword for new user account".
TargetSystem\SAPR3\Accounts\Langu_p Specifies default language key forSAP users.
TargetSystem\SAPR3\Accounts\Langup_iso Specifies default language (ISO639).
TargetSystem\SAPR3\Accounts\MailTemplateDefaultValues
This configuration parametercontains the mail template usedto send notifications if default IToperating data mapping valuesare used for automaticallycreating a user account. Use the
One Identity Manager 8.0.1 Administration Guide for Connecting to SAPR/3
Appendix: Configuration Parameters for Managing SAP R/3
192
Configuration parameter Description
mail template "Employee - newuser account with defaultproperties created".
TargetSystem\SAPR3\Accounts\Spda Specifies default setting forprinter parameter 3 (delete afterprint).
TargetSystem\SAPR3\Accounts\Spdb Specifies default setting forprinter parameter 3 (printimmediately).
TargetSystem\SAPR3\Accounts\Splg Specifies the default printer (printparameter 1).
TargetSystem\SAPR3\Accounts\TargetSystemID Specifies default target systemidentification for mappingexternal users.
TargetSystem\SAPR3\Accounts\Time_zone Specifies the default time zonevalue for the SAP user account’saddress.
TargetSystem\SAPR3\Accounts\Tzone Specifies the default value for thetime zone.
TargetSystem\SAPR3\Accounts\Ustyp Specifies the default user type forSAP user accounts.
TargetSystem\SAPR3\DefaultAddress Default email address (recipient)for messages about actions in thetarget system.
TargetSystem\SAPR3\KeepRedundantProfiles This configuration parameterregulates behavior for handlingsingle role and profileassignments to users.
If the parameter is set, the user'ssingle roles or profiles, which arealready part of the user'scollective roles, are retained.
If the parameter is not set, theuser's single roles or profiles,which are already part of theuser's collective roles, areremoved (default).
TargetSystem\SAPR3\MaxFullsyncDuration Specifies the maximum runtimefor synchronization.
One Identity Manager 8.0.1 Administration Guide for Connecting to SAPR/3
Appendix: Configuration Parameters for Managing SAP R/3
193

Configuration parameter Description
TargetSystem\SAPR3\PersonAutoDefault This configuration parameterspecifies the mode for automaticemployee assignment for useraccounts added to the databaseoutside synchronization.
TargetSystem\SAPR3\PersonAutoDisabledAccounts This configuration parametersspecifies whether employees areautomatically assigned to disableuser accounts. User accounts donot obtain an account definition.
TargetSystem\SAPR3\PersonAutoFullSync This configuration parameterspecifies the mode for automaticemployee assignment for useraccounts added to or updated inthe database throughsynchronization.
TargetSystem\SAPR3\ValidDateHandling Configuration parameter forhandling the validity period inSAP user account assignments toSAP roles.
TargetSystem\SAPR3\ValidDateHandling\DoNotUsePWODate
This configuration parameterspecifies whether the validitydates from request procedure arecopied from SAP user accountassignments to SAP roles. If theconfiguration parameter is set,the dates, "Valid from" and "Validto" from the request procedure,are not copied from SAP useraccount assignments to SAProles.
TargetSystem\SAPR3\ValidDateHandling\ReuseInheritedDate
This configuration parameterspecifies whether the validitydate's format of inherited SAPuser account assignments to SAProles remains intact. The config-uration parameter is onlyrelevant in systems that weremigrated from a pre 7.0 version.If the configuration parameter isset, the format of the dates "Validfrom" and "Valid to" stays thesame if SAP user account assign-
One Identity Manager 8.0.1 Administration Guide for Connecting to SAPR/3
Appendix: Configuration Parameters for Managing SAP R/3
194

Configuration parameter Description
ments to roles are inherited.
TargetSystem\SAPR3\ValidDateHandling\ReuseInheritedDate\UseTodayForInheritedValidFrom
This configuration parameterspecifies whether the "Validfrom" date in inherited SAP useraccounts assignments to SAProles is set to <Today> or to"1900-01-01".
TargetSystem\SAPR3\VerifyUpdates This configuration parameterspecifies whether modifiedproperties are checked byupdating. If this parameter is set,the objects in the target systemare verified after every update.
One Identity Manager 8.0.1 Administration Guide for Connecting to SAPR/3
Appendix: Configuration Parameters for Managing SAP R/3
195

B
Appendix: Default Project Templatesfor Synchronizing an SAP R/3
Environment
A default project template ensures that all required information is added in the OneIdentity Manager. This includes mappings, workflows and the synchronization base object.If you do not use a default project template you must declare the synchronization baseobject in One Identity Manager yourself.
Use a default project template for initially setting up the synchronization project. Forcustom implementations, you can extend the synchronization project with the.Synchronization Editor
Detailed information about this topic
l Project Template for Client without CUA on page 196
l Project Template for the CUA Central System on page 197
l Project Template for CUA Subsystems on page 199
Project Template for Client without CUA
Use the project template "SAP® R/3® synchronisation (base administration)" forsynchronizing clients, which are not connected to a central system. The template usesmappings for the following schema types.
Schema Type in the Target System Table in the One Identity Manager schema
Company SAPCompany
GROUP SAPGrp
Table 85: Mapping SAP R/3 schema types to tables in the One Identity Managerschema.
One Identity Manager 8.0.1 Administration Guide for Connecting to SAPR/3
Appendix: Default Project Templates for Synchronizing an SAP R/3Environment
196

Schema Type in the Target System Table in the One Identity Manager schema
LICENSETYPE SAPLicence
LicenceExtension SAPLicenceExtension
LoginLanguage SAPLoginLanguages
CLIENT SAPMandant
parameter SAPParameter
Printer SAPPrinter
PROFILE SAPProfile
ProfileInProfile SAPProfileInSAPProfile
ProfileInRole SAPProfileInSAPRole
PROFITCENTER SAPProfitCenter
ROLE SAPRole
RoleInRole SAPRoleInSAPRole
STARTMENUE SAPStartMenu
SAPTSAD3T SAPTitle
USER SAPUser
UserComFax SAPComFax
UserComPhone SAPComPhone
UserComSMTP SAPComSMTP
SAPCOMMTYPE SAPCommType
UserExtId SAPUserExtId
UserHasParameter SAPUserHasParameter
UserInGroup SAPUserInSAPGrp
UserInProfile SAPUserInSAPProfile
UserInRole SAPUserInSAPRole
Project Template for the CUA CentralSystem
Use the project template "SAP® R/3® synchronisation (base administration)" forsynchronizing a central user administration central system. The template uses mappings
One Identity Manager 8.0.1 Administration Guide for Connecting to SAPR/3
Appendix: Default Project Templates for Synchronizing an SAP R/3Environment
197

for the following schema types.
Schema Type in the Target System Table in the One Identity Manager schema
ALE SAPMandant
CLIENT SAPMandant
Company SAPCompany
GROUP SAPGrp
LICENSETYPE SAPLicence
LicenceExtension SAPLicenceExtension
LoginLanguage SAPLoginLanguages
Parameter SAPParameter
Printer SAPPrinter
CUAProfile SAPProfile
ProfileInProfile SAPProfileInSAPProfile
ProfileInRole SAPProfileInSAPRole
PROFITCENTER SAPProfitCenter
CUARole SAPRole
RoleInRole SAPRoleInSAPRole
STARTMENUE SAPStartMenu
SAPTSAD3T SAPTitle
USER SAPUser
UserComFax SAPComFax
UserComPhone SAPComPhone
UserComSMTP SAPComSMTP
UserExtId SAPUserExtId
UserHasLicense SAPUserHasLicence
UserHasParameter SAPUserHasParameter
UserInGroup SAPUserInSAPGrp
UserInMandant SAPuser accountInSAPMandant
UserInCUAProfile SAPUserInSAPProfile
UserInCUARole SAPUserInSAPRole
Table 86: Mapping SAP R/3 schema types to tables in the One Identity Managerschema.
One Identity Manager 8.0.1 Administration Guide for Connecting to SAPR/3
Appendix: Default Project Templates for Synchronizing an SAP R/3Environment
198

Project Template for CUA Subsystems
Use the project template "SAP® R/3® (CUA subsystem)" for synchronizing central useradministration child systems that are not in the same SAP system. The template usesmappings for the following schema types.
Schema Type in the Target System Table in the One Identity Manager schema
LICENSETYPE SAPLicence
LicenceExtension SAPLicenceExtension
LoginLanguage SAPLoginLanguages
CLIENT SAPMandant
Table 87: Mapping SAP R/3 schema types to tables in the One Identity Managerschema.
One Identity Manager 8.0.1 Administration Guide for Connecting to SAPR/3
Appendix: Default Project Templates for Synchronizing an SAP R/3Environment
199
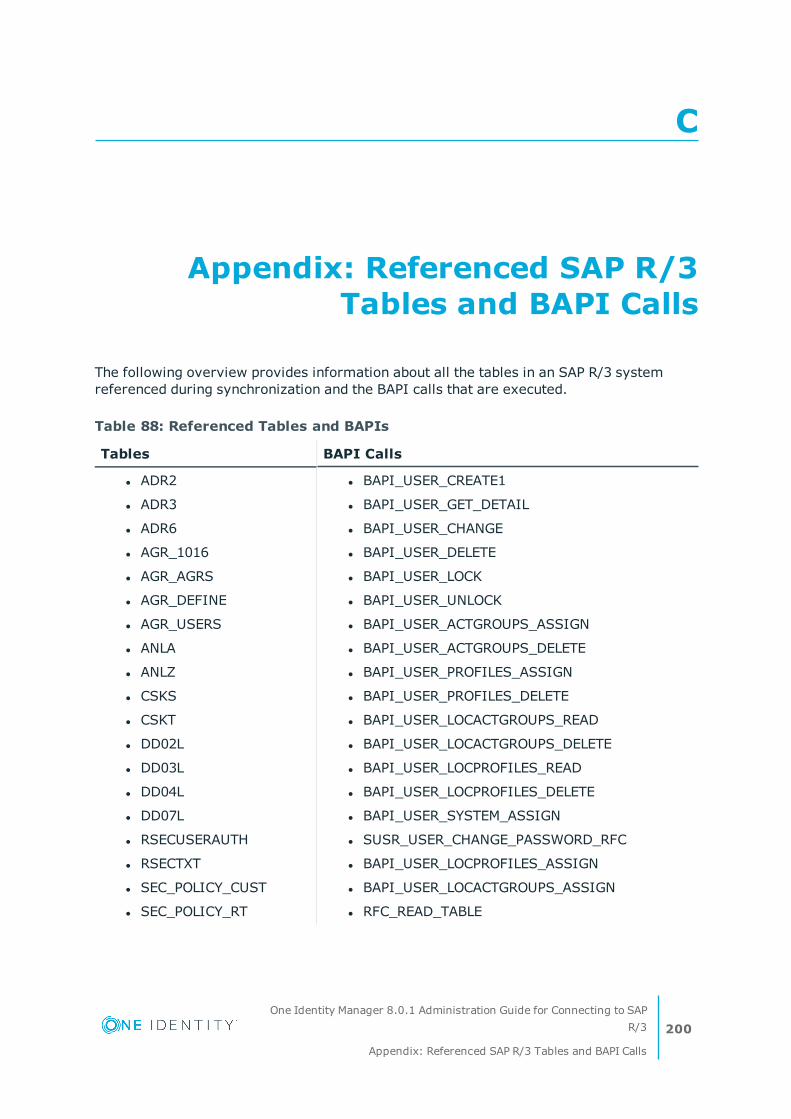
C
Appendix: Referenced SAP R/3Tables and BAPI Calls
The following overview provides information about all the tables in an SAP R/3 systemreferenced during synchronization and the BAPI calls that are executed.
Tables BAPI Calls
l ADR2
l ADR3
l ADR6
l AGR_1016
l AGR_AGRS
l AGR_DEFINE
l AGR_USERS
l ANLA
l ANLZ
l CSKS
l CSKT
l DD02L
l DD03L
l DD04L
l DD07L
l RSECUSERAUTH
l RSECTXT
l SEC_POLICY_CUST
l SEC_POLICY_RT
l BAPI_USER_CREATE1
l BAPI_USER_GET_DETAIL
l BAPI_USER_CHANGE
l BAPI_USER_DELETE
l BAPI_USER_LOCK
l BAPI_USER_UNLOCK
l BAPI_USER_ACTGROUPS_ASSIGN
l BAPI_USER_ACTGROUPS_DELETE
l BAPI_USER_PROFILES_ASSIGN
l BAPI_USER_PROFILES_DELETE
l BAPI_USER_LOCACTGROUPS_READ
l BAPI_USER_LOCACTGROUPS_DELETE
l BAPI_USER_LOCPROFILES_READ
l BAPI_USER_LOCPROFILES_DELETE
l BAPI_USER_SYSTEM_ASSIGN
l SUSR_USER_CHANGE_PASSWORD_RFC
l BAPI_USER_LOCPROFILES_ASSIGN
l BAPI_USER_LOCACTGROUPS_ASSIGN
l RFC_READ_TABLE
Table 88: Referenced Tables and BAPIs
One Identity Manager 8.0.1 Administration Guide for Connecting to SAPR/3
Appendix: Referenced SAP R/3 Tables and BAPI Calls
200
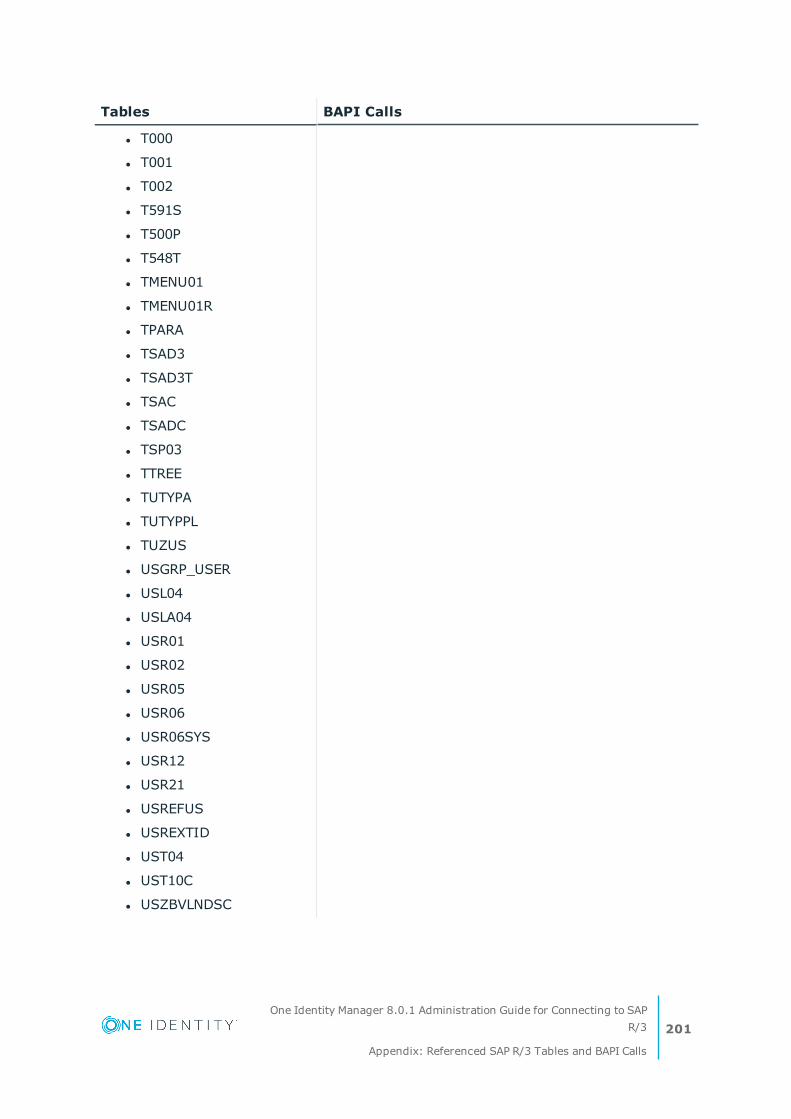
Tables BAPI Calls
l T000
l T001
l T002
l T591S
l T500P
l T548T
l TMENU01
l TMENU01R
l TPARA
l TSAD3
l TSAD3T
l TSAC
l TSADC
l TSP03
l TTREE
l TUTYPA
l TUTYPPL
l TUZUS
l USGRP_USER
l USL04
l USLA04
l USR01
l USR02
l USR05
l USR06
l USR06SYS
l USR12
l USR21
l USREFUS
l USREXTID
l UST04
l UST10C
l USZBVLNDSC
One Identity Manager 8.0.1 Administration Guide for Connecting to SAPR/3
Appendix: Referenced SAP R/3 Tables and BAPI Calls
201

Tables BAPI Calls
l USZBVLNDRC
l USZBVSYS
l USRSYSACTT
l USRSYSPRF
l USRSTAMP
l V_USCOMPA
One Identity Manager 8.0.1 Administration Guide for Connecting to SAPR/3
Appendix: Referenced SAP R/3 Tables and BAPI Calls
202
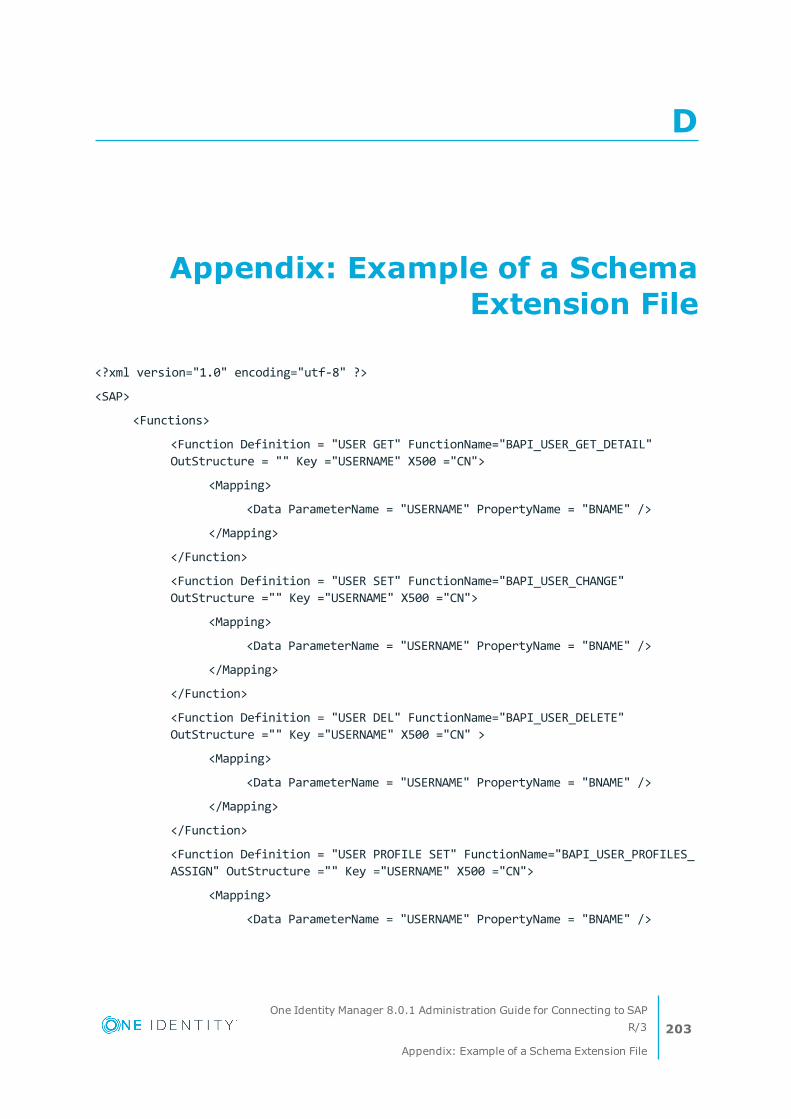
D
Appendix: Example of a SchemaExtension File
<?xml version="1.0" encoding="utf-8" ?>
<SAP>
<Functions>
<Function Definition = "USER GET" FunctionName="BAPI_USER_GET_DETAIL"OutStructure = "" Key ="USERNAME" X500 ="CN">
<Mapping>
<Data ParameterName = "USERNAME" PropertyName = "BNAME" />
</Mapping>
</Function>
<Function Definition = "USER SET" FunctionName="BAPI_USER_CHANGE"OutStructure ="" Key ="USERNAME" X500 ="CN">
<Mapping>
<Data ParameterName = "USERNAME" PropertyName = "BNAME" />
</Mapping>
</Function>
<Function Definition = "USER DEL" FunctionName="BAPI_USER_DELETE"OutStructure ="" Key ="USERNAME" X500 ="CN" >
<Mapping>
<Data ParameterName = "USERNAME" PropertyName = "BNAME" />
</Mapping>
</Function>
<Function Definition = "USER PROFILE SET" FunctionName="BAPI_USER_PROFILES_ASSIGN" OutStructure ="" Key ="USERNAME" X500 ="CN">
<Mapping>
<Data ParameterName = "USERNAME" PropertyName = "BNAME" />
One Identity Manager 8.0.1 Administration Guide for Connecting to SAPR/3
Appendix: Example of a Schema Extension File
203
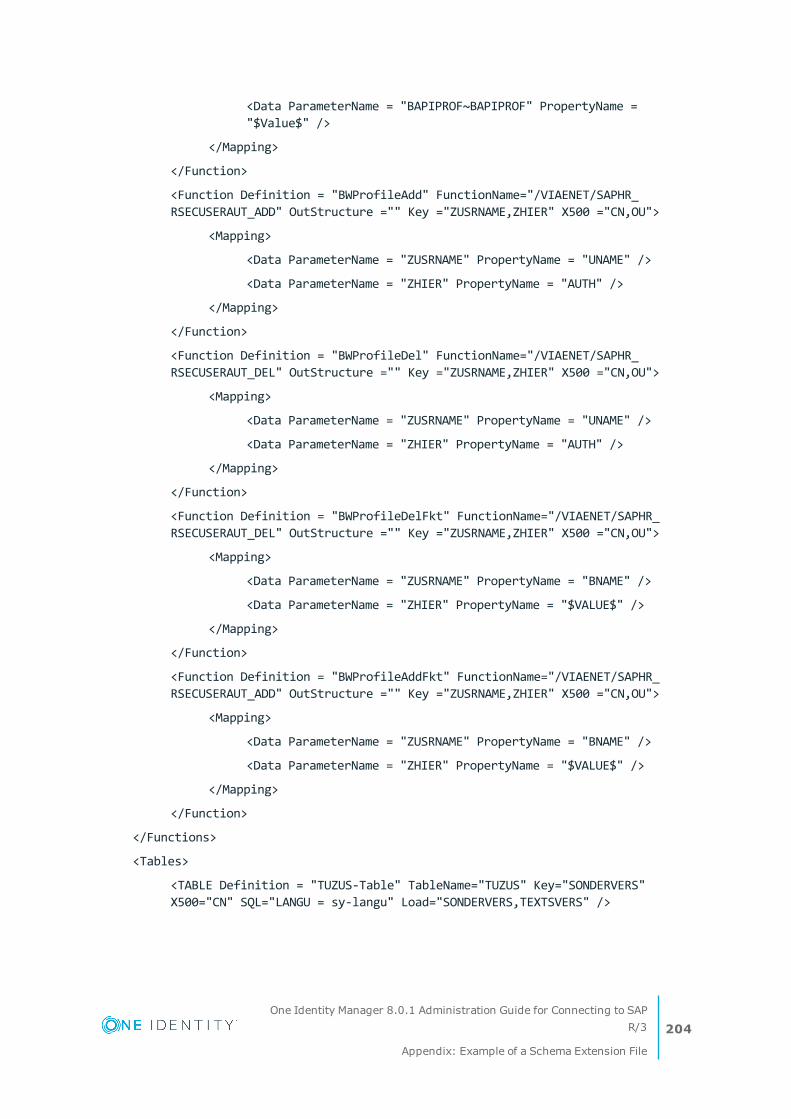
<Data ParameterName = "BAPIPROF~BAPIPROF" PropertyName ="$Value$" />
</Mapping>
</Function>
<Function Definition = "BWProfileAdd" FunctionName="/VIAENET/SAPHR_RSECUSERAUT_ADD" OutStructure ="" Key ="ZUSRNAME,ZHIER" X500 ="CN,OU">
<Mapping>
<Data ParameterName = "ZUSRNAME" PropertyName = "UNAME" />
<Data ParameterName = "ZHIER" PropertyName = "AUTH" />
</Mapping>
</Function>
<Function Definition = "BWProfileDel" FunctionName="/VIAENET/SAPHR_RSECUSERAUT_DEL" OutStructure ="" Key ="ZUSRNAME,ZHIER" X500 ="CN,OU">
<Mapping>
<Data ParameterName = "ZUSRNAME" PropertyName = "UNAME" />
<Data ParameterName = "ZHIER" PropertyName = "AUTH" />
</Mapping>
</Function>
<Function Definition = "BWProfileDelFkt" FunctionName="/VIAENET/SAPHR_RSECUSERAUT_DEL" OutStructure ="" Key ="ZUSRNAME,ZHIER" X500 ="CN,OU">
<Mapping>
<Data ParameterName = "ZUSRNAME" PropertyName = "BNAME" />
<Data ParameterName = "ZHIER" PropertyName = "$VALUE$" />
</Mapping>
</Function>
<Function Definition = "BWProfileAddFkt" FunctionName="/VIAENET/SAPHR_RSECUSERAUT_ADD" OutStructure ="" Key ="ZUSRNAME,ZHIER" X500 ="CN,OU">
<Mapping>
<Data ParameterName = "ZUSRNAME" PropertyName = "BNAME" />
<Data ParameterName = "ZHIER" PropertyName = "$VALUE$" />
</Mapping>
</Function>
</Functions>
<Tables>
<TABLE Definition = "TUZUS-Table" TableName="TUZUS" Key="SONDERVERS"X500="CN" SQL="LANGU = sy-langu" Load="SONDERVERS,TEXTSVERS" />
One Identity Manager 8.0.1 Administration Guide for Connecting to SAPR/3
Appendix: Example of a Schema Extension File
204

<TABLE Definition = "USR05-Table" TableName="USR05" Key="BNAME,PARID"X500="CN,OU" SQL="MANDT = '$MANDT$'" Load="BNAME,PARID,PARVA">
<Mapping>
<Data ParameterName = "$BNAME$" PropertyName = "BNAME" />
<Data ParameterName = "$PARID$" PropertyName = "PARID" />
</Mapping>
</TABLE>
<TABLE Definition = "USR04-Table" TableName="USR04" Key="BNAME,MANDT"X500="CN,OU" SQL="MANDT = sy-mandt" Load="" />
<TABLE Definition = "RSECUSERAUTH-Table" TableName="RSECUSERAUTH"Key="UNAME,AUTH" X500="CN,OU" SQL="" Load="" />
<TABLE Definition = "RSECUSERAUTH-SingleUser" TableName="RSECUSERAUTH"Key="AUTH" X500="CN" SQL="UNAME = '$BNAME$'" Load="" >
<Mapping>
<Data ParameterName = "$BNAME$" PropertyName = "BNAME" />
</Mapping>
</TABLE>
</Tables>
<SAPExtendedSchematypes>
<SAPExtendedSchematype Bem = "M:N, add/del - function" Name = "BWUserInBWP"DisplayPattern="%UNAME% - %AUTH%" ListObjectsDefinition = "RSECUSERAUTH-Table" ReadObjectDefinition = "RSECUSERAUTH-Table" InsertObjectDefinition ="BWProfileAdd" DeleteObjectDefinition = "BWProfileDel" />
<SAPExtendedSchematype Bem = "simple read only table" Name ="LicenceExtension" DisplayPattern="%SONDERVERS%" ListObjectsDefinition ="TUZUS-Table" ReadObjectDefinition ="TUZUS-Table" InsertObjectDefinition ="" WriteObjectDefinition = "" DeleteObjectDefinition = "" ParentType ="SAPSYSTEM" />
<SAPExtendedSchematype Bem = "Test" Name = "USERFunctionTable"DisplayPattern="%BNAME% (%MANDT%)" ListObjectsDefinition = "USR05-Table"ReadObjectDefinition ="USER GET" WriteObjectDefinition = "USER SET"DeleteObjectDefinition = "USER DEL" >
<Properties>
<Property Name = "SAPBWP" Description="all the user's BWprofiles" ListFunction="RSECUSERAUTH-SingleUser"AddFunction="BWProfileAddFkt" DelFunction="BWProfileDelFkt"ReplaceFunction="" IsMultivalued = "true" />
<Property Name = "USERPROFILE" Description="all the user'sprofiles" ListFunction="USR04-Table" AddFunction=""
One Identity Manager 8.0.1 Administration Guide for Connecting to SAPR/3
Appendix: Example of a Schema Extension File
205

DelFunction="" ReplaceFunction="USER PROFILE SET" IsMultivalued= "true" />
</Properties>
</SAPExtendedSchematype>
</SAPExtendedSchematypes>
</SAP>
One Identity Manager 8.0.1 Administration Guide for Connecting to SAPR/3
Appendix: Example of a Schema Extension File
206

About us
About us
One Identity solutions eliminate the complexities and time-consuming processes oftenrequired to govern identities, manage privileged accounts and control access. Our solutionsenhance business agility while addressing your IAM challenges with on-premises, cloud andhybrid environments.
Contacting us
For sales or other inquiries, visit https://www.oneidentity.com/company/contact-us.aspxor call +1-800-306-9329.
Technical support resources
Technical support is available to One Identity customers with a valid maintenance contractand customers who have trial versions. You can access the Support Portal athttps://support.oneidentity.com/.
The Support Portal provides self-help tools you can use to solve problems quickly andindependently, 24 hours a day, 365 days a year. The Support Portal enables you to:
l Submit and manage a Service Request
l View Knowledge Base articles
l Sign up for product notifications
l Download software and technical documentation
l View how-to-videos at www.YouTube.com/OneIdentity
l Engage in community discussions
l Chat with support engineers online
l View services to assist you with your product
One Identity Manager 8.0.1 Administration Guide for Connecting to SAPR/3
About us
207
I ndex
A
account definition 110
add to IT Shop 72
assign automatically 60
assign role 70
assign to business role 70
assign to client 73
assign to employee 70-71
assign to system roles 71
create 60
delete 74
for IT Shop 60
inheritance 60, 64, 69
ALE model name 34
application role 11
application server 8
architecture 8
B
BAPI transport 17-18
uninstall 18
business role
assign role 147
assign to group 147
assign to product 171
assign to profile 147
C
calculation schedule
disable 56
category 104
central user administration 110
user account 126
child system
access permissions 110
no synchronization 34
client 102
category 161
employee assignment 131
login data 102
main system 102
target system manager 102
collective role
synchronizing 51
communications type 79
company address 79
connection parameter 22
connector schema
extend 40
cost center
assign to group 145
assign to product 170
assign to profile 145
assign to role 145
SAP R/3 78
country surcharge 80, 180
CUA 110
D
database server 8
One Identity Manager 8.0.1 Administration Guide for Connecting to SAPR/3
Index
208
Index
department
assign to group 145
assign to product 170
assign to profile 145
assign to role 145
deputy
license data 180
direction of synchronization
direction target system 22, 38
in the Manager 22
E
email address 119
email notification 92
employee assignment
manual 132
remove 132
search criteria 131
exclusion definition 158
external ID
type 77
F
fax 118
G
group
assign business roles 147
assign cost center 145
assign department 145
assign extended properties 163
assign location 145
assign shelf 152
assign system role 151
assign user account 149
category 140, 161
effective 158
exclusion 158
inheritance 64
IT Shop 140
manage 139
overview 157
risk index 140
I
inheritance
category 161
IT operating data
change 68
create mapping rule 65
IT Shop shelf
assign account definition 72
J
Job server
properties 94
L
license 80
active 180
country surcharge 80
rating 80
special version 80
license extension 81
location
assign to group 145
assign to product 170
assign to profile 145
One Identity Manager 8.0.1 Administration Guide for Connecting to SAPR/3
Index
209

assign to role 145
login data 92
login language 79
M
main system 110
synchronizing 33
manage level
edit 63
inheritance 64
membership
modify provisioning 55
message server 8
N
notification 92
O
object
delete immediately 53
outstanding 53
publish 53
outstanding object 53
P
parameter 77
assign 121
password
initial 90, 92
password policy 81
assign 89
character sets 84
check password 88
conversion script 85-86
default policy 83, 89
display name 83
edit 83
error message 83
excluded list 88
failed logins 84
generate password 88
initial password 84
name components 84
password age 84
password cycle 84
password length 84
password strength 84
predefined 82
test script 85
phone 117
printer 78
product 167
assign business role 171
assign cost center 170
assign department 170
assign employee 172
assign extended properties 177
assign group 175
assign location 170
assign profile 175
assign role 175
assign shelf 173
assign system role 172
conflicting system role 178
disable 168
IT Shop 168
manager 168
overview 175
One Identity Manager 8.0.1 Administration Guide for Connecting to SAPR/3
Index
210
remove from IT Shop 173
risk index 168
share date 168
profile
assign business roles 147
assign cost center 145
assign department 145
assign extended properties 163
assign location 145
assign shelf 152
assign system role 151
assign user account 149
calculated license 183
category 143, 161
effective 158
exclusion 158
IT Shop 143
license 143
manage 139
overview 157
pass down
limit 156
risk index 143
show authorization object 164
project template 196
provisioning
members list 55
R
report
overview of all assignments 189
revision filter 51
role
assign business roles 147
assign cost center 145
assign department 145
assign extended properties 163
assign location 145
assign shelf 152
assign system role 151
assign user account 150
calculated license 183
category 142, 161
effective 158
exclusion 158
IT Shop 142
license 142
manage 139
only synchronize changes 51
overview 157
pass down
limit 156
risk index 142
show authorization object 164
role assignment
validity period 154
router 8
S
SAP product
assign account definition 176
assign subscribable reports 177
schema
changes 39
shrink 39
update 39
schema type
add additionally 40
security policies 79, 116
security policy attribute 79
One Identity Manager 8.0.1 Administration Guide for Connecting to SAPR/3
Index
211
server function 96
special version 80-81, 180
start menu 78
subscribable report 177
synchronization
accelerate 51
base object
create 38
configure 22, 37
connection data 22
connection parameter 22, 37-38
different clients 38
extended schema 38
limit synchronization object 52
only changes 51
permissions 15
prevent 56
scope 37
start 22
synchronization project
create 22
target system schema 38
variable 37
variable set 38
workflow 22, 38
synchronization analysis report 56
synchronization configuration
customize 37-38
synchronization log 36
synchronization project
create 22
disable 56
edit 105
project template 196
synchronization server 8
configure 18
edit 93
install 18
server function 96
synchronization workflow
create 22, 38
system 101
report 188
system connection 22
system measurement 179
CUA system 126
deputy license 187
determine active license 183
enter active license 126
find rating 184
license extension 126
publish license 186
register active license 182
T
target system managers 98
target system synchronization 53
template
IT operating data, modify 68
U
user account
address data 112
administrative user account 107
apply template 68
assign employee 106, 129
assign extended properties 128
assign group 123
One Identity Manager 8.0.1 Administration Guide for Connecting to SAPR/3
Index
212

assign profile 123
assign role 124
assign structural profiles 125
calculated license 186
category 112, 161
child system 126
default user accounts 107
delete 136
deputy 180
deputy license 187
email address 119
external ID 136
fax number 118
fixed value 120
identity 107, 112
license data 180
lock 64, 128, 134, 136
login data 116
main system 126
manage 106
manage level 122
measurement data 180
overview form 122
password 90, 116
notification 92
privileged user account 107, 112
productive license 182, 186
rating 184
reference user 116
retrieve 136
risk index 112
set up 111
SNC name 122
telephone number 117
type 107
user name 112
user account type 76, 116
V
valid from 154
format 164
valid until 154
format 164
validity date
inherited SAP roles 164
MIGRATION 164
One Identity Manager 8.0.1 Administration Guide for Connecting to SAPR/3
Index
213