Adjusting Image using Adobe Photoshop EN.docx - ON-CALL
13
Lay Family Health Advisors Curriculum Unit 4 Annex 2 - Image optimization using Adobe Photoshop
-
Upload
khangminh22 -
Category
Documents
-
view
3 -
download
0
Transcript of Adjusting Image using Adobe Photoshop EN.docx - ON-CALL

Lay Family Health Advisors Curriculum Unit 4 Annex 2 - Image optimization using Adobe Photoshop

Adobe Photoshop is the most popular professional image processing software on the market. There are many other options of Photoshop available, starting with Adobe Photoshop Elements 2019, with a resale price of about $ 100. Photoshop Elements is a simplified version of Photoshop CC, offering however modern tools for image processing. The instructions below are based on the Photoshop CC version, but also apply to Photoshop Elements. There are also many free programs on the market, Gimp being the most commonly used (https://www.gimp.org/). When it comes to features Gimp comes very close to the industry standard, Adobe Photoshop.
In this guide we get to know the basics of Adobe Photoshop:
• Getting started / open an image; • Automatic adjustments; • Changing the image size; • Saving an image.
Open Adobe Photoshop
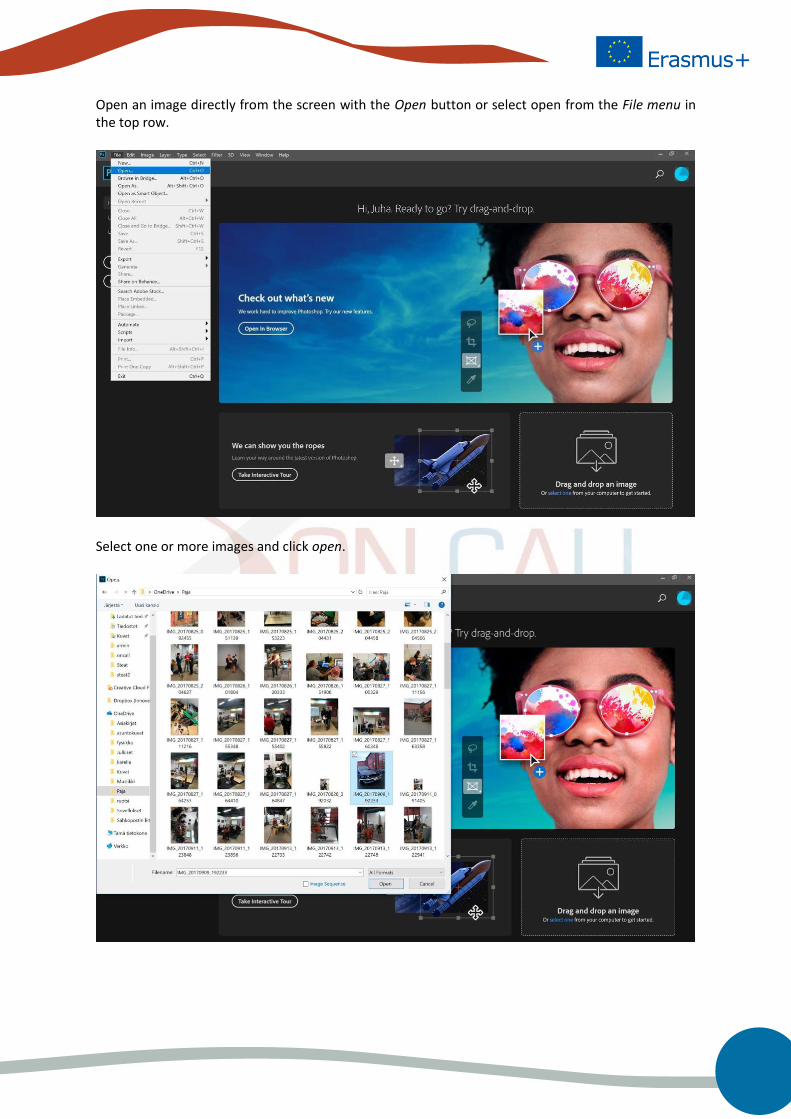
Open an image directly from the screen with the Open button or select open from the File menu in the top row.
Select one or more images and click open.

Click ok to not to change the color profile (use the color information that comes with the image).
The image opens on the Photoshop workspace.

Adjustments It is advisable to always make changes to the non-reduced image file. When you make changes to a large file, small errors are not visible after reducing the image to the final image size. So make your changes and fixes first and reduce the file at the end (just before saving the image). Photoshop has countless ways and options for adjusting the image, now we focus on three: Automatic adjustments Photoshop's three important and easy automatic controls are:
• auto tone • auto contrast • auto color
The image adjustment functions can be found under the picture in the top menu. When using automatic adjustments, the program will set the optimal adjustments for the image based on the assumptions and information available. Click to adjust each of the three tone adjustments. If you process pictures often, it would be wise to learn key commands, such as Shift + Control (Ctrl) + L (for the auto tone). The use of key commands speeds up the processing of images significantly.

On the left there is the original image, on the right there is the same image after automatic adjustments. The tone of the picture became much more natural. There are countless ways to manually adjust an image in Photoshop, of which these two may be the most important (in the top menu: Image/Adjustments/) Brightness/Contrast Use the upper slider to adjust the brightness of the image (from dark to light) and lower to increase or decrease the contrast of the image. Try how the controls effects the image. When you have reached the desired result, click OK. Adobe - Adjust brightness and contrast Hue/Saturation
Try the effect of three sliders on the image. Hue control to change the color tone of the image. Saturation control increases and decreases the color saturation of the image, drag the controller to the left (-100) and the image turns into a grayscale image. Brightness control will darken or lighten the image. Pressing the color check box will make the image a monochrome image that can be adjusted with the sliders. When you have reached the desired result, click OK.
Adobe - Adjust hue and saturation
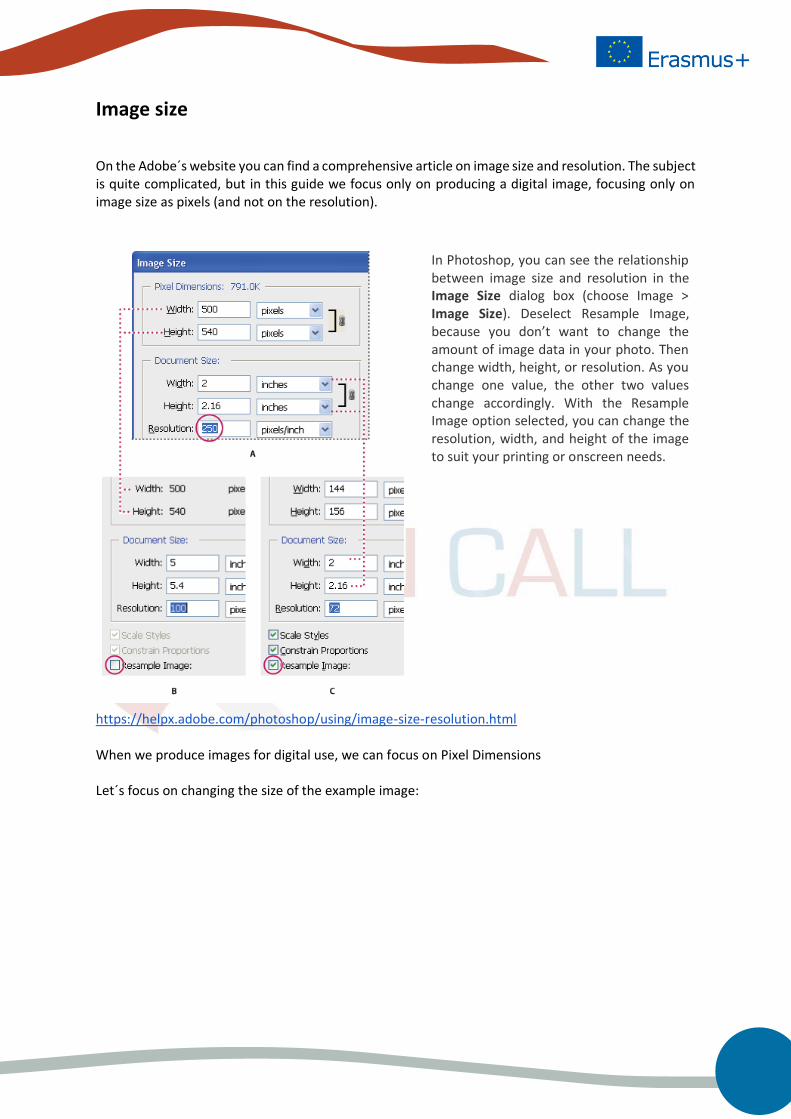
Image size
On the Adobe´s website you can find a comprehensive article on image size and resolution. The subject is quite complicated, but in this guide we focus only on producing a digital image, focusing only on image size as pixels (and not on the resolution).
In Photoshop, you can see the relationship between image size and resolution in the Image Size dialog box (choose Image > Image Size). Deselect Resample Image, because you don’t want to change the amount of image data in your photo. Then change width, height, or resolution. As you change one value, the other two values change accordingly. With the Resample Image option selected, you can change the resolution, width, and height of the image to suit your printing or onscreen needs.
https://helpx.adobe.com/photoshop/using/image-size-resolution.html When we produce images for digital use, we can focus on Pixel Dimensions Let´s focus on changing the size of the example image:

Adobe´s picture of Image Size is from an earlier version of Photoshop, in the latest one (Photoshop CC) it looks like this. The image is already quite small, with measures of 1200 pixels wide and 1600 pixels high, with an image file size of 5.49 MB. There is no need to pay attention to millimeters or resolution of the image because we are not making a image to print.
As such, the image is perfectly suitable for example to load it to Facebook, so Facebook would automatically resize the image. But let's look how we´ll get the best possible quality in this case for a image to use in Facebook. Facebook instructions: We automatically resize your photos when you upload them to Facebook. Your images will appear as high quality as you can with the following tips: Change your picture of any of the following supported sizes: Ordinary images: 720, 960, or 2,048 pixels wide Cover images: 851 x 315 pixels Avoid compression when downloading your cover art by ensuring that the file size is less than 100KB. Save the image in JPEG format with sRGB color profile. First change the image width (to the recommended minimum): Select Image > Image size and change the width to 720 pixels. When the width and height are anchored, the height of the image (new height 960 px) will change automatically and the proportions of the image will be preserved. Choose ok.

Now the picture is in line with Facebook's recommendations. If desired, you can still crop the image (reduce height) before recording. Select the cropping tool from the left toolbar. Drag the small white rectangle at the top to the desired position and press Enter.

The picture is now cropped to height of your choice.
Saving a image
The tones of the image are now adjusted, the image´s size is as desired. The image must still be saved. Facebook Help said: Avoid compression when downloading your cover art by ensuring that the file size is less than 100KB. Save the image in JPEG format with sRGB color profile. When saving images for Internet or social media use, it is recommended to use the Save for web function, which has been created for this purpose. It produces high-quality images with small file size. Choose File > Export > Save for Web or use Alt + Shift + ctrl + S. The dialog box opens.

Make sure the format is JPEG (the right choice when we want a small file size for the tone image) and Convert to sRGB is chosen. All other Facebook image requirements are now met, except the file size is too large (135.4 KB). If your image is over 100KB, Facebook will compress it and the result may be of lower quality.
Let´s lower the file size by lowering the quality, the initial situation is 60. By lowering the quality to 45, the file size is reduced to under 100KB (96.75KB). Now the image meets all the criterias and you can choose

Save.
Now, we've gone through the basics of Photoshop; adjusting the tones, resizing image and saving the image for digital use. Photoshop is full of features and maybe the most important ones to explore independently are:
• adding text to images • use of layers • use of blending options (for shadows, strokes etc. ) • processing large amount of image. When dealing with large number of images, it's good to
familiarize yourself with the use of macros (Actions). You can save the changes you made to a single image and run the same actions to other images by one click.
Adobe offers a wide range of help videos on its site: https://helpx.adobe.com/photoshop/view-all-tutorials.html#!photo-editing-for-beginners