Adeptus Titanicus - Tactical Command
39
ADEPTUS TITANICUS Ben Skinner Draft D
-
Upload
khangminh22 -
Category
Documents
-
view
0 -
download
0
Transcript of Adeptus Titanicus - Tactical Command

ADEPTUS
TITANICUS
Ben Skinner
Draft D


CONTENTS
INTRODUCTION - Page x *** BACKGROUND - HISTORY OF A SPECIFIC CAMPAIGN (With Photoshopped battle pictures) *** - TECHNICAL DRAWING (Orthographic) BREAKDOWNS (Cutaway views might be interesting?) *** - FEATURE PAGES (Every titan type will have at least one page with a Photoshop picture, and a page of background) *** CORE RULES - Pages x to x 1.0 - BASIC PRINCIPLES 1.1 - BASIC TITAN STATS 1.2 - SEQUENCE OF PLAY 1.3 - THE STRATEGY PHASE 1.4 - THE ORDERS PHASE 1.5 - ORDERS 1.6 - MOVEMENT 1.7 - TURNING 1.8 - ZONES OF CONTROL 1.9 - TERRAIN 2.0 - SHOOTING 2.1 - THE SHOOTING PROCEDURE 2.2 - ROLLING TO HIT 2.3 - MODIFIERS TO THE TO-HIT ROLL 2.4 - ALLOCATE HITS TO LOCATIONS ON THE TARGET 2.5 - DEALING WITH DIFFERENT TYPES OF HIT 2.6- ARMOUR SAVES 2.7 - LEVELS OF DAMAGE 2.8 - REPAIRING DAMAGE 2.9 - OVERWATCH 3.0 - CHARGES / ASSAULTS 3.1 - THE END PHASE 3.2 - SPECIAL RULES GAMING RULES - Pages x to x 3.3 - BUILDING YOUR TITAN 3.4 - WHAT TYPE OF GAME? 3.5 - MISSIONS DATASHEETS—Pages x to x IMPERIAL WEAPON COSTS & STATS IMPERIAL TITAN DATASHEETS WARHOUND REAVER WARLORD EMPEROR (Imperator Class) EMPEROR (Warmonger Class) CHAOS TITANS (Rules on using modified Imperial Datasheets) ELDAR WEAPON COSTS & STATS ELDAR TITAN DATASHEETS REVENANT PHANTOM WARLOCK ORK WEAPON COSTS & STATS *** ORK GARGANT DATASHEETS *** (Supa?) (Mekboy ?) STOMPA *** GARGANT *** MEGA-GARGANT *** APPENDIX 1- CAMPAIGN RULES (Including race-specific campaign upgrade tables & long-term damage tables) APPENDIX 2- HISTORICAL SCENARIOS *** APPENDIX 3- EXAMPLE GAME TURN *** APPENDIX 4– TITAN DAMAGE TABLES Total size ~80 pages. *** == Not included yet.
Other resources: DOWNLOADABLE ROSTER SHEET DOWNLOADABLE RACE-SPECIFIC PLAYSHEETS (Rules, Orders, etc on one side, race-specific damage tables and hit locations on the other side)

IMPERIAL WARHOUND TITAN
The Warhound Titan is the smallest of the three main Imperial Titan classes, those Titans that the Adeptus Mechanicus most regularly uses in its warfare.
Warhound Titans typically operate in pairs, ranging ahead of the main Titan battlegroups either to turn the enemy’s flank, undertake forward observation, or engage w ith their opposite numbers in skirmishes that serve to distract the enemy’s own scout Titans from harrying the larger Battle Titans.
It is rare for Warhound Titan pairs (Or ‘packs’, as they are known) to operate in battlezones that do not harbour larger Titan classes however; Although Warhound Titans are fearsome engines of war when placed against basic infantry or armoured tank columns, against enemy Battle Titans their formidable power is matched against superior armour and even greater attack capabilities.
Only through superior manoeuvrability and weight in numbers can Warhound Titans hope to bring down larger prey. As the lightest of the Titan classes regularly deployed by the Adeptus Mechanicus, the Warhound Titan is a fairly common sight amongst the enemies of the Imperium; Faster than a Reaver or Warlord Titan, and more numerous than Reaver Titans in
particular, the Warhound’s great speed often make it seem to be the most common Titan class on any particular battlefield, as its rapid pace ensures that it w ill be seen on all quarters of the battlefield, darting back-and-forth in rapid strikes before slinking away to stalk new prey. Thus, whilst it may not be the most numerous Titan class involved in Titan-vs-Titan warfare, its typical method of war w ill make it seem (To enemy commanders, at least) as if there are orders of magnitude more Warhound Titans operat ing in the area than
are really present, so w ide-ranging are their standard tactics. When a Warhound is finally pinned down and forced to fight, it can prove itself a worthy adversary, capable of striking w ith surprising power when cornered. However, its comparably weak armoured protection means that it cannot w ithstand incoming fire
for long. This fact means that Warhound-versus-Warhound engagements tend to be short and decisive, as an ambushing Warhound Titan quickly gains the upper hand and destroys its off-guard enemy. Ultimately, the Warhound Titan is an essential component to Adeptus Mechanicus Titan Battlegroups, as what it lacks in raw
firepower and armoured protection, it makes up for in speed and tactical utility.
ADEPTUS MECHANICUS DEPARTMENTO MANUFACTURUM
TECHNICAL SPECIFICATIONS
Vehicle Designation Vehicle Name .......... .... ..... .... ..... ..... .... ..... ..... .... ..... .... ..... ..... .... ...
Forge World of Origin .......... ..... .... ..... ..... .... ..... .... ..... ..... .... .....
Known Patterns .......... ..... .... ..... .... ..... ..... .... ..... .... ..... ..... .... ..... ...
Crew ........... ..... .... ..... .... ..... ..... .... ..... .... ..... ..... .... ..... .... ..... ..... .... .....
Powerplant ......... ..... .... ..... ..... .... ..... .... ..... ..... .... ..... .... ..... ..... .... ...
Weight ......... ..... .... ..... .... ..... ..... .... ..... .... ..... ..... .... ..... .... ..... ..... .... ...
Length ..... .... ..... ..... .... ..... .... ..... ..... .... ..... .... ..... ..... .... ..... .... ..... ..... ..
Width ............ ..... .... ..... ..... .... ..... .... ..... ..... .... ..... ..... .... ..... .... ..... ..... .
Height ...... ..... ..... .... ..... .... ..... ..... .... ..... ..... .... ..... .... ..... ..... .... ..... .... ..
Ground Clearance ....... ..... .... ..... .... ..... ..... .... ..... ..... .... ..... .... ..... .
Max Speed / On Road .......... ..... .... ..... ..... .... ..... ..... .... ..... .... ..... .
Max Speed / Off Road ............. ..... ..... .... ..... .... ..... ..... .... ..... .... ...
Main Armament ..... ..... ..... .... ..... .... ..... ..... .... ..... .... ..... ..... .... ..... ...
Secondary Armament ..... ..... ..... .... ..... .... ..... ..... .... ..... .... ..... .....
Traverse ........ .... ..... ..... .... ..... ..... .... ..... .... ..... ..... .... ..... .... ..... ..... .... .
Elevation ............ .... ..... .... ..... ..... .... ..... .... ..... ..... .... ..... .... ..... ..... ....
Main Ammunition ..... ..... .... ..... .... ..... ..... .... ..... .... ..... ..... .... ..... ....
Secondary Ammunition ......... ..... ..... .... ..... ..... .... ..... .... ..... ..... .
Armour ....... ..... .... ..... ..... .... ..... ..... ......... .... ..... ..... .... ..... .... ..... ..... .. Turret .... ..... ..... .... ..... .... ..... ..... .... ..... .... ..... ..... .... ..... ..... .... ... Superstructure ........ ..... ..... .... ..... .... ..... ..... .... ..... ..... .... ..... ... Hull ........ ..... ..... .... ..... .... ..... ..... .... ..... .... ..... ..... .... ..... .... ..... ... Gun Mantlet .. ..... ..... .... ..... .... ..... ..... .... ..... .... ..... ..... .... ..... .....
Date.................... Signature....................... ..... Magos Fabrica tor WARHOUND TITAN
LUCIUS
III-XXI
PREFECT, 2X MODERATI, TECHPRIEST
TYPE XIB PLASMA REACTOR
410 TONNES
12.1 M
11 M
14 M AT REST
6.5 M
58 KPH 8.25M STRIDE LENGTH
42 KPH
PLASMA BLASTGUN
VULCAN MEGABOLTER
1000
-330 TO +360
UNLIMITED FROM REACTOR
14000 ROUNDS
N/A 95 MM 95 MM
N/A
0550-4332-982-WH 04
1474099.M39 Johm Rycloth

IMPERIAL WARHOUND TITAN
Warhound Titan Photoshop 2.

CORE RULES
1.0—BASIC PRINCIPLES Although these rules cover the operation of many different massive war machines of the 41st millennium, such as Imperial Titans, Ork Gargants, Tyranid Bio-Titans, Tau Mantas, etc, for brevity’s sake the following rules will refer to all of the aforementioned vehicles as ‘Titans’, and unless specifically mentioned, all follow the same basic rules.
Dice The Adeptus Titanicus rules make heavy use of Dice to decide what happens on the battlefield. The dice used are six-sided dice, with each side marked with a number from 1 to 6 (Henceforth referred to as the ‘D6’). Sometimes you will be asked to roll more than one D6, and for brevity we will refer to this using a simple shorthand method; If you are required to roll three dice, this will be shortened to ‘3D6’, if required to roll five dice this will be shortened to ‘5D6’, etc. The other dice you will come across in the Adeptus Titanicus rules is the D3; If you need to roll a D3, simply roll a D6 and count a roll of
1-2 as 1, 3-4 as 2, and 5-6 as 3. Measurements: All measurements are listed in Centimetres. Pre-Measuring is not allowed ; This means that orders, and shooting attacks, must be declared before measuring any distances on the tabletop. 1.1—BASIC TITAN STATS
Each Titan in the Adeptus Titanicus game system has a set of values that tell you about the basic abilities of the Titan. For example, the basic stats of a Warhound Titan look like this:
Speed: This tells you the distance the Titan can travel in centimetres each time it moves. You will find during your games that as your Titan is dam-aged, this speed may decrease. Void Shields: All Imperial Titans carry Void Shields, these are powerful barriers of pure energy that wrap the Titan in a protective bubble. The more shields you have, the longer you can keep taking hits before the enemy’s attacks start hitting your hull. As with your Titan’s speed, you will find that the rigours of battle will sometimes damage or even destroy your Void Shield Generator.
Close Combat: This value denotes how skilled your Titan is at causing damage when engaged in Close Combat. Size: A Titan’s size is used for various ‘book-keeping’ purposes, such as checking victory conditions in scenarios, or for comparing the total size of rival player’s Titan battlegroups.
1.2—SEQUENCE OF PLAY Adeptus Titanicus games use a sequence of play that is composed of turns, which are themselves composed of three distinct phases. Each turn is composed of the following three phases: 1—The Strategy Phase
2—The Orders Phase 3—The End Phase After a turn is complete, you check the ‘Victory Conditions’ of the game you are playing… if someone has won, you stop there, otherwise, you play another turn, starting again with the Strategy Phase.
Speed Void Shields Close Combat Size
30cm 2 5+ 3

CORE RULES
1.3—THE STRATEGY PHASE During the Strategy Phase, each player rolls a D6, and adds that to the strategy rating of their chosen army. The highest scoring player will be entitled to choose whether to go first or second in the Orders Phase.
The strategy ratings of the various forces available in Adeptus Titanicus are as follows:
1.4—THE ORDERS PHASE In the orders phase, players take it in turns to issue orders to their Titans, starting with the player selected to have the first order in the Strategy Phase. Once every Titan in the game has been issued one order, the turn is complete and the End Phase will begin.
A Titan may only undertake one Order per turn, and you must declare which order your Titan will use before you begin moving it, or shoot-ing with it. 1.5—ORDERS The following orders may be issued to your Titan:
1.6—MOVEMENT When a Titan takes an Order that allows it to move, it moves up to the distance in centimetres as indicated on the ‘speed’ value on its datasheet. If a Titan takes a Double order, it may move up to twice the speed indicated on its datasheet.
1.7—TURNING For every 10cm a Titan is entitled to move, it may turn 45 degrees either left or right. Note that these turns may be taken at any point in the Titan’s movement, so for example a Reaver Titan (Which is allowed 2 turns when Advancing 20cm) could turn 90 degrees on the spot, then move 20cm directly forwards.
Alignment Strategy Rating
Imperial Titans 3
Chaos Titans 3
Eldar Titans 4
Ork Gargants 2
Tyranid Bio-Titans 1
Order Effect
ADVANCE Your Titan may make one move and then shoot.
DOUBLE Your Titan may make two moves, then shoot with –1 to hit.
OVERWATCH Your Titan may not move, but instead enters Overwatch. Being in Overwatch allows the Titan to interrupt an enemy Titan’s movement to shoot at it.
SUSTAINED FIRE The Titan may not move (Not even to turn) but its guns receive +1 to-hit.
CHARGE The Titan may make one move into base contact with an enemy Titan, and then engage it in a Close Combat.
MARSHALL The Titan may move once, or shoot (No turning allowed). In addition, the Titan may roll 1D6, and roll to attempt to raise that number of Void Shields, or roll to attempt to repair that many points of damage , or any combination of the two.

CORE RULES
1.8—ZONES OF CONTROL A Titan may not voluntarily approach within 5cm of an enemy Titan unless it is undertaking a Charge Order. After Charges have been resolved, the charging Titan must step back 5cm so that it is no longer within the Charged Titan’s zone of control
(Titans that are immobilised are allowed to remain in place). 1.9—TERRAIN In Adeptus Titanicus, Terrain affects a Titan’s movement in one of four ways: - The terrain has no effect at all. - The terrain is impassable to the Titan so that it cannot move into or through it at any time.
- The terrain is dangerous to move through. - The terrain increases the Titan’s speed, as long as it spends its entire move on the terrain (Roads). If the terrain is dangerous, then a Titan must roll a D6 when it makes a move that passes through the dangerous terrain. On a result of ‘1’, the Titan must make an armour save on its legs, if this save is failed, it takes a level of damage to its legs (Yes, this can potentially destroy your Titan!). In order to take advantage of the speed increase afforded by roads, the Titan’s entire move must be made upon the road. Note that if the Titan undertakes a ‘Double’ order, then both moves made by the Titan can benefit from the +5cm speed boost from travelling along the road (As long as both moves are made along the road). Alternatively, one move could be made along the road, followed by a second move that does not benefit from the +5cm speed bonus, as the Titan leaves the road during its second move. The following chart covers the most common types of terrain found in Adeptus Titanicus, and the effect is has upon Titans:
2.0—SHOOTING Many Orders allow a Titan to shoot its ranged weapons. This takes place in the Orders phase after the Titan undertaken any moves it may be permitted by its Order. Picking Targets When a Titan undertakes an Order, each weapon it carries may fire at any target that is in its Line Of Fire (All of i ts weapons do not have to target the same enemy Titan). Each weapon’s Line Of Fire is determined individually. All of the Titan’s weapon targets must be nominated before any
attack dice are rolled. Line Of Fire The Line Of Fire (LOF) is a straight line drawn from the Titan’s weapon to its target. The LOF may be partially or totally blocked by intervening terrain features such as tall buildings, or other Titans. A partially blocked LOF will make it harder for your Titan to hit its target, whilst a totally blocked LOF will make it impossible to hit the target. Range
In order for a weapon to shoot at an enemy Titan, the weapon must be within range to shoot (Note that you may not measure the distance to the target until after you have picked your targets).
Terrain Effect
Buildings, Cliffs Impassable
Jungle, Woods, Marsh, River, Ruins, Rubble Dangerous
Open Ground / Hill Slopes / Scrub No Effect
Roads +5cm speed per move (As long as the move starts and finishes on the road)

CORE RULES
2.0—SHOOTING (CONTINUED) Weapon Fire Arcs Weapons fitted to Titans are only able to fire according to the Fire Arcs listed on their Titan’s datasheet; There are two types of Weapon Fire Arcs in Adeptus Titanicus:
- Weapons with a Forward Fire Arc have an 180˚ arc of fire to the front of the Titan. - Weapons with a Fixed Forward Fire Arc have a 90˚ arc of fire to the front of the Titan.
2.1—THE SHOOTING PROCEDURE The shooting procedure is as follows: I - Nominate the target for each weapon on the Titan. Slow-Firing weapons must nominate how many of their shots they will fire. II - Roll to hit the target(s).
III - Find which areas of the target(s) have been hit. IV - Take armour saves on the locations that have been hit. 2.2—ROLLING TO HIT In order to hit the target, weapons must roll equal to or higher than their ‘Firepower’ value. For example, if a weapon has a Firepower value
of 4+, you must roll a 4 or more to hit. A roll of 1 to hit is always a miss, regardless of any modifiers which may apply. If a weapon has a multiplier listed in brackets after its Firepower value, then you may roll that many dice, and each one will apply a hit if it rolls equal to or over the Firepower value. For example, here are the basic stats of a fairly common weapon, the Vulcan Megabolter:
So, what can we understand about the Vulcan Megabolter from this? - It has a range of 45cm - It hits on a D6 roll of 5+
- It fires six shots - It has no special rules (Any special rules a weapon may have will be listed under ‘notes’) - It is Free (We’ll get to what that means later!)
Weapon Range Firepower Notes Cost
Vulcan Megabolter 45cm 5+ (x6) Free
180˚
Forward Arc
90˚
Fixed Forward Arc

CORE RULES
2.3—MODIFIERS TO THE TO-HIT ROLL The list of possible modifiers to the to-hit roll are presented on the right:
Sometimes, modifiers will mean that you may need a 7 or more to hit… as this is not technically possible to achieve whilst
using a standard 6-sided dice, you should use the following method, which uses two successive dice rolls: 2.4—ALLOCATE HITS TO LOCATIONS ON THE TARGET In order to find out where your enemy has been hit, take those dice which have hit, and roll each dice on your target’s hit location chart
using the particular aspect (Front, Side or Rear) which faces the attacker.
After you have worked out which aspect is being presented to the attacking Titan, work out where your hits have struck by rolling on the suitable Hit Location Chart. Presented below is the hit location chart for the rear aspect of a Reaver Titan:
So, if the Reaver Titan is hit four times in the rear aspect, you roll 4d6 to f ind out where each hit strikes. If those 4d6 roll: 1, 2, 3 & 4, the Reaver will be hit in the legs twice, hit in an arm weapon once, and hit in its carapace weapon once. Sometimes a hit location will tell you (Like the ‘arm weapon’ result here) that the hit has struck
a random visible item. If there are two of these items visible (For example, two arm weapons), then roll a further D6 to find which of the visible items has been struck; On a roll of 4-6, the item on the right takes the hit, on a 1-3, the item on the left takes the hit. If a location is rolled that is not within the LOF of the attacking weapon, apply the hit
anyway (Sometimes, shots will pass straight through intervening buildings, or between the legs of other Titans!).
Front Aspect
Side Aspect Side Aspect
Rear Aspect
Origin of Attack
TARGETTING ASPECTS (1) TARGETTING ASPECTS (2)
In this example, the Warhound Titan is being attacked by an enemy Titan in its rear aspect, and so any hits that are rolled will be rolled against its rear Hit
Location Chart. In a case where it is not clear which aspect is being presented to the attacker, the defending player may choose where his Titan will take the hits.
REAVER TITAN REAR HIT LOCATIONS
REAR
Roll 1d6:
1-2 - Legs 3 - Arm Weapon * 4 - Carapace Weapon 5 - Void Shield Generator 6 - Plasma Reactor * Hits a random visible weapon.
Situation Effect
Target is in soft cover (25-50% of the model is obscured, by terrain or another Titan) -1
Target is in hard cover (50% or more of the model is obscured) -2
Attacker has undertaken a Double Order previously during the current turn. -1
Attacker has undertaken a Sustained Fire Order previously during the current turn. +1
Roll to hit required Second Dice Roll
7 4, 5 or 6
8 5 or 6
9 6
10 or more May not be hit
First Dice Roll
6
6
6
6

CORE RULES
2.5—DEALING WITH DIFFERENT TYPES OF HIT A Titan’s weapons can be fired in any order the controlling player chooses, and hit results are applied and saved against immediately after each weapon shoots. Note that some types weapon will have special abilities that will mean that its hits are worked out in a different manner to a ‘normal’ hit.
For example: - A Warhound Titan elects to shoot both of its guns at an enemy Reaver Titan. - The Warhound is in the Reaver’s rear aspect, so any hits will be rolled on the rear Hit Location Chart. - It rolls to hit with its Vulcan Mega Bolter, needing 5+ to hit, with six shots. It rolls: 1, 1, 2, 3, 4, 5, meaning it has the Reaver Titan once. - A D6 is rolled on the Reaver’s rear Hit Location Chart. It rolls a 1, meaning that the legs have been hit by the Megabolter. - The Reaver takes an Armour Save on its legs (See Rule 2.6 - Armour Saves) - The Warhound now rolls to hit with its Plasma Blastgun, needing 2+ to hit. It rolls: 1 & 2, meaning it has hit once. - The Plasma Blastgun’s hit is rolled against the Hit Location Chart. It rolls a 1, so the legs have been hit again.. - As the Plasma Blastgun has the Macro Weapon special rule, its hit will have a special effect (See Rule 3.2 for the full list of special rules and their effects) 2.6—ARMOUR SAVES After the hits have been allocated to specific areas of the Titan, those locations must pass an armour save or suffer damage.
To take an armour save, a D6 must be rolled, and if the D6 rolls higher than the armour value of that particular location then the armour save is passed. If the dice result is lower than the armour value, then the armour save is failed and that location takes damage. If a Titan is shot at in its rear aspect, then its armour save is reduced by 1 (So a 4+ save becomes 5+, etc). So, if a Warhound Titan took two hits to the Plasma Reactor, it would need to roll 2 D6’s. For each failed armour save, it would take a level of damage to its Plasma Reactor. As you can see by checking the Warhound Titan Datasheet below, the armour save of its Plasma Reactor is 4+. 2.7—LEVELS OF DAMAGE
A Titan is composed of many constituent parts, and under the right circumstances, most of those parts can be destroyed! Shown to the right is the datasheet for a Warhound Titan, and circled in red are a set of ‘tickboxes’ which are used for showing how many levels of dam-age have been taken by the Titan.
- The first time a location suffers damage, tick the box marked ‘minor’. - The second time a location suffers damage, tick the box marked ‘major’. - The third time a location suffers damage, tick the box marked ’disabled’. Each time a location suffers damage, you should check your race’s dam-age table to see what effect the hit has caused. The damage tables for the various factions available in Adeptus Titanicus are found on pages xx-xx.
In this case, the Warhound has suffered two levels of damage to its legs, and one level of damage to its right arm. This means that we can tell (By checking the Imperial Damage Tables on page xx) that the Titan is currently suffering from –10cm to its movement until its legs are repaired, and its Vulcan Megabolter cannot fire until it too is repaired. Some exceptionally large or resilient Titans will have a level of damage
box marked ‘None’. This box must be ticked (Damaged) before ‘real’ damage may be inflicted on the Titan. In addition, this ‘None’ box may be repaired like any other damage box (See Rule 2.8 - Repairing Damage). Sometimes a third level of damage will knock your Titan out of the game entirely, either it will be simply disabled, or totally destroyed (This difference is important in campaigns), but either way, it may no longer participate in the current game.

CORE RULES
2.8—REPAIRING DAMAGE Not all damage is as severe as it might at first seem; During battles, your Titan’s Tech-Priest can attempt to repair or route around damaged areas. There are two situations where this is possible.
- When attempting repairs in the end phase of a turn. - When undertaking the ‘Marshall’ Order . In the end phase, you are allowed to attempt repairs once. When using the Marshall Order, you are allowed to attempt repairs D6 times. In either situation, the procedure for attempting a repair is the same:
- Roll a D6. If it result is 4 or more, then one system may be repaired. If the Titan is an Imperial or Chaos Titan, it may choose to raise one Void Shield instead. The controlling player may choose after rolling his dice and seeing the result(s) which system(s) he would like to repair. When repairing systems, simply erase one level of damage from any titan system of your choice (We find it is best to mark damage in pencil, so that repairing a system is simply a matter of erasing the mark denoting damage).
Example of play: - A Titan has no void shields, and is damaged in two locations. - It elects to undertake a Marshall Order. - After shooting at its target, it rolls 1D6 to determine how many attempts to repair it may make: It rolls a 4. - 4D6 are rolled, three of which roll a 4 or more (So the Titan is entitled to repair three systems) - The Titan elects to repair both damaged locations, and raise a single void shield. 2.9—OVERWATCH
A Titan that undertakes an Overwatch Order may not move, but may shoot outside of the normal turn sequence in response to the movement of an enemy Titan. It is worthwhile placing a suitable marker next to a Titan on Overwatch, to remind both you and your opponent of its status. A Titan on Overwatch is allowed to shoot at an enemy Titan at the end of any of its moves, before the target is able to shoot its own weapons or attack in Close Combat, as long as there is a valid Line Of Fire to the target. Note that if an enemy Titan is undertaking a Double Order, the Titan on Overwatch may choose to fire after the first or second move by the enemy Titan, or even elect not to fire at all and wait for another
target to cross its Line Of Fire. Also note that a Titan on Overwatch may only fire at an enemy Titan when it moves; If an enemy Titan within LOF Sustains Fire, for example, that does not trigger Overwatch fire as it does not move. Resolve the shooting attacks against the Titan that triggered the Overwatch fire in the normal manner. A Titan may remain on Overwatch after the end phase of a turn, and remains on Overwatch into the following turn. Overwatch status can only be ended either by the Titan using the Overwatch ability to shoot, or by undertaking a different Order in a subsequent turn. If a Titan uses its
Overwatch ability to shoot at an enemy Titan, that counts as its Order for the turn, even if it went on Overwatch in the previous turn and has not yet been issued an Order in the new turn. Example of play: Turn 1—Player A puts Titan A on Overwatch. Player B Advances Titan B, but Titan A cannot see it so it is safe from Overwatch fire. Since it did not use its Overwatch ability, Titan A will remain on Overwatch into turn 2.
Turn 2—Player B wins the strategy roll-off, and issues the first Order of the turn. Player B Advances Titan B, bringing it into the LOF of Titan A. As Titan A is still on Overwatch, Player A declares that Titan A is going to use its Overwatch to fire at Titan B Titan A shoots at Ti tan B. After all hits have been applied and saved against, Titan B (If it survived) may now shoot. Note that Ti tan A’s use of Overwatch counts as its Order for turn 2, and it may not now undertake a new Order until turn three.

CORE RULES
3.0—CHARGES / ASSAULTS Sometimes, ranged weapons are not enough… One of the Orders available to the Titans in Adeptus Titanicus is ‘Charge’; Titans that carry out a Charge Order are allowed to make one
move, and if it reaches base-to-base contact with an enemy Titan, fight a Close Combat, as the two massive war machines come to close quarters and attempt to force their opponent to the ground. Note that Void Shields may not be used in close combat. Charge Procedure: 1 - Choose target Titan. 2 - The Charging Titan makes a charge move. If the Titan fails to reach base-to-base with
the enemy Titan, then the Charge stalls here and the Close Combat does not take place. 3 - The Charging Titan attacks and allocates hits to the Defending Titan. 4 - The Defending Titan takes armour saves. 5 - The Defending Titan may now attack the Charging Titan. 6 - The Charging Titan takes armour saves. 7 - If neither Titan was destroyed in the Close Combat, the smaller combatant Titan is now moved back 5cm. To outline the Charge/Close Combat procedure in more detail:
Choose Target Titan : The Titan undertaking the Charge Order must nominate an enemy Titan to be the target of its Charge. Before it moves, the enemy Titan must be visible in the Forward Arc of the Charging Titan. Make Charge Move: This is simply a normal move, like any other. The only exception is that the Charging Titan is allowed to move within 5cm of enemy Titans whilst Charging (Remember that this is not normally allowed). If the Charging Titan fails to reach base-to-base contact with the enemy Titan, then the
Charging Titan simply moves up to its full distance as directly as possible towards the enemy Titan. If the Charge would have brought it within 5cm of the enemy Titan, then the charging Titan stops 5cm away from its target. This (Rather ineffective) manoeuvre then counts as its Order for the turn… the charge has failed! Assuming the Charging Titan makes it into base-to-base contact with the target Titan, proceed to the next step… The Titans Attack Each Other: Each Titan has two values that directly affect how well it performs when charging. These values are ‘Size’ and ‘Close Combat’.
- ‘Size’ determines how many attack dice a Titan may roll when fighting in a Charge. - ‘Close Combat’ determines what those dice require to apply a hit. So for example a Warhound Titan is size 3, and has a Close Combat value of 5+, meaning it rolls 3 dice to-hit, each of which will apply a hit on an enemy Titan on a 5 or a 6. After you have worked out how many hits the Charging Titan has achieved, allocate them to locations on the enemy Titan in the usual man-
ner, just as if the attacks were from ranged shooting (Note that the –1 armour save modifier for being attacked in the rear aspect does apply as normal). Once you have allocated the attacks to specific locations, the Defending Titan takes armour saves as normal. If the Defending Titan is not knocked out of action, then it may now strike back at its attacker. Do so in the same manner as the Charging Titan made its own attacks, taking armour saves and applying damage if necessary. Post-Combat: If both Titans have survived the Close Combat without being destroyed, the Titan with the smaller ’size’ value is now moved backwards
5cm, as it steps back out of Close Combat range, after which the turn can continue as before. If both Titans are the same size, move both Titans backwards 2.5cm.

CORE RULES
3.1—THE END PHASE Once every Titan in the game has undertaken one Order, the End Phase begins. The end phase procedure is as follows:
1 - Check Victory Conditions 2 - Attempt repairs. Check Victory Conditions: Each mission in the standard scenarios for Adeptus Titanicus has a set of ‘victory conditions’, which are counted up at the end of each turn (See page xx for the standard missions of Adeptus Titanicus). In general, most games will finish when one or the other player reaches 50 Victory Points. Attempt Repairs:
In the end phase of the turn, each Titan may attempt to repair a damaged system, or raise one Void Shield. Roll a D6, and on a 4-6 you may repair one system as normal (See Rule 2.7). 3.2—SPECIAL RULES Assault Weapon Assault Weapons may only use their Firepower abilities when they are used in a Close Combat.
Demolisher Demolisher weapons are allowed to target buildings. Roll to hit the affected building as if it were an enemy Titan; If a building is hit by a Demolisher weapon, remove it from the tabletop. Titans with an Assault Weapon that possesses the Demolisher special rule are allowed to undertake Charge Orders against buildings. D(x) Hits Some weapons are incredibly destructive, or the attacks they fire are wide-ranging and indiscriminate. Whatever the cause, when a
Titan is hit by a weapon that causes D’x’ Hits, (Where ‘x’ is a number) you should roll D’x’ times on the relevant Hit Location Chart when you assign the weapon’s hit(s) to a location on the enemy Titan. For example: A Warhound Titan is hit by a Vol cano Cannon, which causes D3 hits. A D3 is rolled and it rolls a 2. Therefore the Titan will be hit by two hits from the Volcano Cannon. You then roll twice on the Hit Location Chart to see which areas of the Titan are hit by the Volcano Cannon. Extra Attacks: Some types of Close Combat weapon are noted as having extra attacks (N). Titans armed with these weapons receive a number of
extra attacks equal to ‘N’ during a close combat. For example, a weapon with extra attacks (3) allows the Titan using it to roll three extra attack dice in a Close Combat. First Strike Some types of Assault Weapon may be noted as having the first strike special rule. This rule allows them to roll any extra attacks that the weapon has before an enemy Titan, regardless of which Titan charged. If two Titans with first strike weapons meet in combat, roll both Titan’s first strike attacks simultaneously.
Indirect Fire Indirect Fire weapons may fire without LOF restrictions (Though they must still obey Weapon Arc Restrictions, see Rule 2.0-Shooting), but only if the Titan wishing to fire a weapon with the Indirect Fire special rule has undertaken a Sustain Fire special order that turn. This rule allows the weapon to fire over a building or other LOF obstruction, even if the enemy Titan is completely hidden from view, as long as the enemy Titan lies within a valid Weapon Fire Arc and is within range, it may be attacked by the Indirect Fire weapon. Macro-Weapons All of the weapons used in Adeptus Titanicus are huge, but some of them are considerably more destructive than o t h e rs, t h e se
weapons are known as Macro-Weapons. The power of these large weapons adversely affects enemy Titans’ armour saves: - Locations with standard armour saves are not allowed an armour save against Macro-Weapons. - Locations with Reinforced Armour are not allowed to re-roll their armour save, as they may against less powerful hits. Macro-Weapons in Close Combat Some weapons may be noted as having the Macro-Weapon special ability. Note that only the weapon’s Extra Attacks benefit from the Macro-Weapon special rule; The weapon does not transfer its Macro-Weapon ability onto the Titan’s basic attacks.

CORE RULES
3.2—SPECIAL RULES (Continued) Reinforced Armour: This special rule denotes an area of the Titan fitted with stronger armour. The rule allows failed armour saves for a location with reinforced armour to be re-rolled.
Single Shot: Some weapons are noted as being single shot. These weapons may only be used once per battle. Slow Firing: Some weapons are noted as being slow firing. These weapons must take one turn to reload after they have fired. For slow firing weapons with multiple shots (Such as a Plasma Blastgun, which has x2 shots), you may hold shots in reserve for the following turn.
For example, if a Plasma Blastgun fires both of its shots on turn 1, it will not be able to fire any shots on turn 2 as they are both recharging. If it fires only one shot one turn 1, it will still be able to fire its second shot on turn 2, while its first shot is recharging. Template Some weapons have the Template special rule, which means that instead of firing discrete shots that only affect a small area, they simply bombard the target area with either multiple small shots, or a single huge explosion.
Template attacks use the Games Workshop 5-inch diameter circular template. When firing a Template weapon, place it anywhere you like on the board, and check if it is in range (And LOF). Depending on what Order the Titan firing it is using, the Template attack will now scatter in a random direction (Use a Games Workshop scatter dice, or similar):
- If the Titan is Sustaining Fire, scatter the Template 1D6cm in a random direction. - If the Titan is Doubling, scatter the Template 3D6cm in a random direction. - If the Titan is undertaking any other type of Order, scatter the Template 2D6 in a random direction. Note that if you are using a Games Workshop Scatter Dice to find the random direction, the template attack always scatters, even if you roll a ‘hit’ (Use the tiny arrow on the ‘hit’ face as the random direction). After the Template has been moved into its new position, any Titan which is even partially under the Template will
receive the number of attacks listed on the weapon’s profile. For example, a Reaver Titan fires an Apocalypse Missile Launcher. The template is placed, and then scattered 2D6 cm because the Reaver is undertaking an Advance Order. After it has been scattered, it is left partially touching two Warhound Titans, so each Warhound Titan will be attacked. An Apocalypse Missile Launcher’s Firepower value is ‘4+ (x2)’, so both Ti tans will be attacked by two dice, which will apply hits on a 4+, meaning that four attack dice will be rolled in total. Titan-Killer
Some weapons are noted as having the Titan Killer special rule. Enemy Titans hit be Titan-Killer weapons are not allowed any save at all, unless specifically noted otherwise… even the thickest Reinforced Armour is no help against a Titan Killer hit. Void Shields Void Shields are overlapping energy fields that protect Titans from damage. Each Imperial Titan type has a number of Void Shields that are listed on its datasheet. Each Void Shield may take one hit by an enemy weapon before it is removed (Do not take armour saves for the hit, the Void Shield is automatically ‘destroyed’). Once a Titan has no Void Shields remaining, it may be hit normally and you must pass armour saves against enemy hits or take damage accordingly.
Void Shields may not be used to take hits during a Close Combat. Void Shields that have been knocked down can be repaired (See Rule 2.8 - Repairing Damage).
GAMING RULES
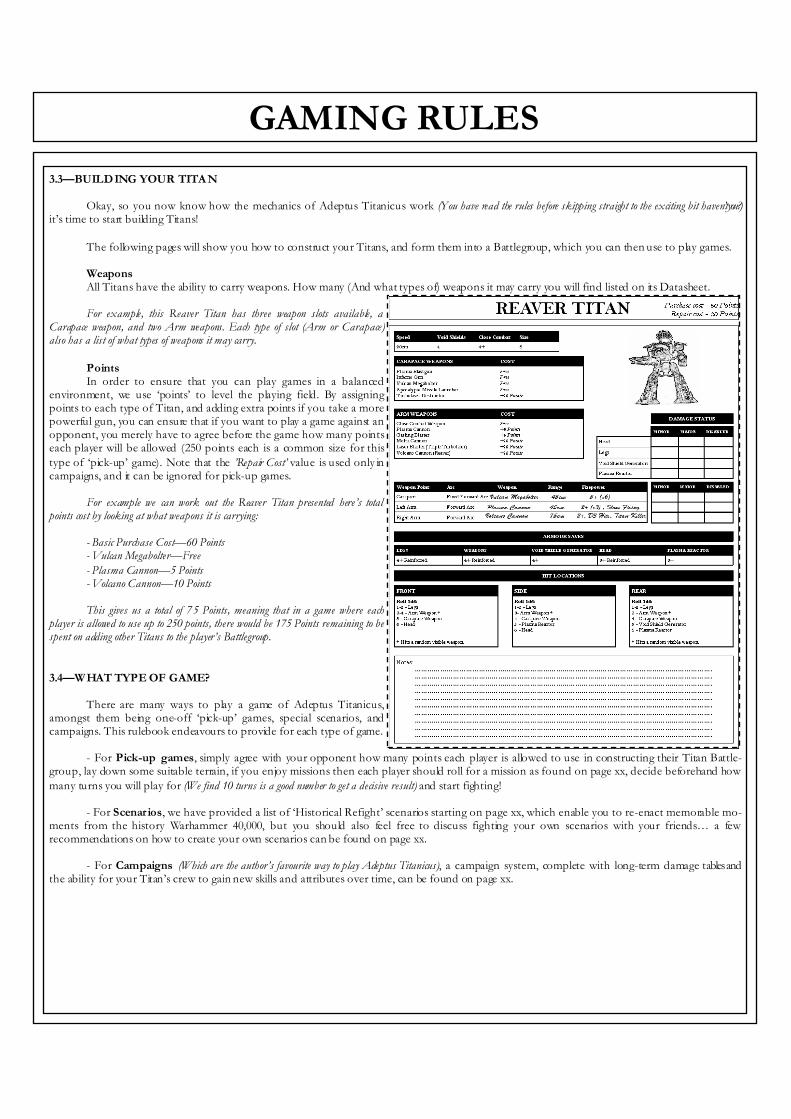
3.3—BUILDING YOUR TITAN Okay, so you now know how the mechanics of Adeptus Titanicus work (You have read the rules before skipping straight to the exciting bit haven’t you?) it’s time to start building Titans!
The following pages will show you how to construct your Titans, and form them into a Battlegroup, which you can then use to play games. Weapons All Titans have the ability to carry weapons. How many (And what types of) weapons it may carry you will find listed on its Datasheet. For example, this Reaver Titan has three weapon slots available, a Carapace weapon, and two Arm weapons. Each type of slot (Arm or Carapace) also has a list of what types of weapons it may carry.
Points In order to ensure that you can play games in a balanced environment, we use ‘points’ to level the playing field. By assigning points to each type of Titan, and adding extra points if you take a more powerful gun, you can ensure that if you want to play a game against an opponent, you merely have to agree before the game how many points each player will be allowed (250 points each is a common size for this
type of ‘pick-up’ game). Note that the ’Repair Cost’ value is used only in campaigns, and it can be ignored for pick-up games. For example we can work out the Reaver Titan presented here’s total points cost by looking at what weapons it is carrying: - Basic Purchase Cost—60 Points - Vulcan Megabolter—Free
- Plasma Cannon—5 Points - Volcano Cannon—10 Points This gives us a total of 75 Points, meaning that in a game where each player is allowed to use up to 250 points, there would be 175 Points remaining to be spent on adding other Titans to the player’s Battlegroup.
3.4—WHAT TYPE OF GAME? There are many ways to play a game of Adeptus Titanicus, amongst them being one-off ‘pick-up’ games, special scenarios, and campaigns. This rulebook endeavours to provide for each type of game. - For Pick-up games, simply agree with your opponent how many points each player is allowed to use in constructing their Titan Battle-group, lay down some suitable terrain, if you enjoy missions then each player should roll for a mission as found on page xx, decide beforehand how
many turns you will play for (We find 10 turns is a good number to get a decisive result) and start fighting! - For Scenarios, we have provided a list of ‘Historical Refight’ scenarios starting on page xx, which enable you to re-enact memorable mo-ments from the history Warhammer 40,000, but you should also feel free to discuss fighting your own scenarios with your friends… a few recommendations on how to create your own scenarios can be found on page xx. - For Campaigns (Which are the author’s favourite way to play Adeptus Titanicus), a campaign system, complete with long-term damage tables and the ability for your Titan’s crew to gain new skills and attributes over time, can be found on page xx.


12” 48”
MISSIONS
3.5—MISSIONS Standard games of Adeptus Titanicus are played according to the following Missions; Rather than simply lining up your Titans and blasting away in an effort to see who is the more capable at destroying the enemy, Missions add an extra layer of complexity and tactical challenge to your games.
In a one-off game, both players select a Titan Battlegroup from a pre-agreed points total. Once both players have picked their Titans, roll a D6 to choose the deployment zones you will be using for your game (Step 1). Next, both players roll a D6 to find out what mission they have been ordered to undertake (Step 2). If a player rolls a mission that refers to an objective marker, roll a D3 to select which objective layout to use (Step 3), and then randomly select an objective as being the one their mission refers to (Note that it is possible for both players to be issued orders referring to the same objective!). Whether you are playing a ‘pick up’ game, a game as part of a campaign, or even playing in a tournament, the game ends under the following circumstances:
• When one player has accrued a total of 50 Victory Points.
• When one player has no operat ional Titans remaining on the battlefield.
• When ten turns have elapsed s ince the beginning of the game. You may wish to play for more Victory Points or turns if you are playing a particularly large game.
PRE-GAME PROCEDURE
STEP 1—SET DEPLOYMENT ZONES
1—Side-to-side. 2—Corner-to-corner. 3—Surrounded
STEP 2—SELECT MISSION
1—Take and hold. 2—Seek and destroy. 3—Blockade. 4—Breakthrough. 5—Rescue Mission. 6—Holding action.
STEP 3—SET OBJECTIVES (If necessary)
1—Pattern A 2—Pattern B 3—Pattern C
12”
PLAYER A
36”
PLAYER A
24”
36”
24”
12” 48” 12”
48”
12”
PLAYER B 12”
24”
PLAYER B 12”
12”
24” 12”
PLAYER B 6”
PLAYER B
PLAYER A 12”
DEPLOYMENT ZONES
OBJECTIVES
SIDE-TO-SIDE CORNER-TO-CORNER SURROUNDED
PATTERN A PATTERN B PATTERN c
1
2
3
1 2
3 4
1 2 3

MISSION ONE : TAKE AND HOLD
You have been tasked to secure a particular point on the battlefield, and hold it for as long as possible.
Use a D6 to randomly select one of the objectives. You must have a Titan within 15cm of the objective at the end of each turn.
If there is one of your Titans within 15cm at the end of the turn, claim 5 victory points.
If one of your Titans claims the objective, and there are no enemy Titans also within 15cm, claim an additional 5 victory points.
MISSIONS TABLE
MISSION TWO : SEEK AND DESTROY
You have been ordered to engage the enemy’s main force in a decisive battle.
You must knock out at least one half of the enemy force (Worked out by Titan size values). If you achieve this, claim 50 victory
points.
MISSION THREE : BLOCKADE
You have been ordered to contain the enemy force rather than fully engage it.
There must be no enemy Titans in your deployment zone at the end of the turn.
If you satisfy this victory condition at the end of a turn, claim 10 victory points.
MISSION FOUR : BREAKTHROUGH
You have been ordered to advance at full speed, plunging as deep as possible into enemy territory.
At least half of your force (In ‘size’ value) must be in the enemy deployment zone at the end of the turn.
If you satisfy this victory condition at the end of a turn, claim 25 victory points.
MISSION FIVE : RESCUE MISSION
A signal has been detected that indicates a high-value Imperial asset (Perhaps a Titan Princeps or an Imperial Guard General)
has become trapped by an enemy attack. It is of the highest priority that you undertake a rescue mission.
Use a D6 to randomly select one objective marker.
During the game, any of your Titans may pick up the objective marker simply by moving over it. If your Titan is wrecked or destroyed it immediately drops the objective marker d6cm in a random direction.
If the objective marker is still being carried by one of your Titans at the end of the turn, claim 10 victory points.
MISSION SIX : HOLDING ACTION
Through a careful reading of the Emperor’s Tarot, an Imperial Psyker has gleaned an aspect of the enemy’s plan.
Instead of undertaking a mission of your own, you must prevent your opponent from completing his mission (Use a D6 to
randomly select one if he has more than one mission).
For each turn that you prevent your enemy from carrying out his mission, claim 10 victory points.
If both players end up with ‘Holding Action’ missions linked to each other, then there will be no victory points available, and the mission can safely be ignored (Although you’ll still have a battle to fight!).

IMPERIAL TITAN WEAPONS
Weapon Range Firepower Notes Cost
Apocalypse Missile Launcher 60cm 4+ (x3) Template, Demolisher Free
Close Combat Weapon (Base Contact) Extra Attack (x3) Titan-Killer, D3 Hits, Assault Weapon, Demolisher Free
Gatling Blaster 60cm 4+ (x5) Free
Inferno Gun 30cm 3+ (x2) D3 Hits Free
Laser Blaster 60cm 3+ (x6) +15 Points
Melta Cannon 30cm 15cm
2+ and 2+
Titan-Killer Titan-Killer, D3 Hits
+10 Points
Plasma Blastgun 45cm 2+ (x2) Slow Firing, Macro-Weapon Free
Plasma Cannon 45cm 2+ (x3) Slow Firing, Macro-Weapon +5 Points
Plasma Destructor 75cm 2+ (x4) Slow Firing, Macro-Weapon +15 Points
Quake Cannon 120cm 2+ Template, Slow Firing, Macro-Weapon, D3 hits, Demolisher +10 Points
Support Missile Unlimited Special (Select a Warhead below) Indirect Fire. Single Shot. +15 Points
Turbolaser Destructor 60cm 3+ (x4) +10 Points
Volcano Cannon (Reaver) 75cm 2+ Titan Killer, D3 Hits. +10 Points
Volcano Cannon (Warlord) 90cm 2+ Titan Killer, D3 Hits. +10 Points
Vulcan Megabolter 45cm 5+ (x6) Free
Warhead Range Firepower
Deathstrike Missi le Unlimited 2+
Warp Missile Unlimited 2+
Barrage Missile Unlimited 3+ (x2D6)
Vortex Missile Unlimited 2+
Titan-Killer, D6 Hits
Titan-Killer, D3 Hits, Ignores Shields and Power Fields
Template, Destroyer
Template, Titan-Killer, D3+1 Hits, Demolisher

Speed Void Shields Close Combat Size
25cm 2 5+ 3
WARHOUND TITAN
ARM WEAPONS
Plasma Blastgun Inferno Gun Vulcan Megabolter Turbolaser Destructor
COST
Free Free Free +10 Points
Weapon Point Arc Weapon Range Firepower
Left Arm Forward Arc
Right Arm Forward Arc
HIT LOCATIONS
Purchase cost - 25 Points Repair cost - 10 Points
Notes: ………………………………………………………………………………………………………………………….
…………………………………………………………………………………………………………………………. …………………………………………………………………………………………………………………………. …………………………………………………………………………………………………………………………. ………………………………………………………………………………………………………………………….
…………………………………………………………………………………………………………………………. …………………………………………………………………………………………………………………………. …………………………………………………………………………………………………………………………. ………………………………………………………………………………………………………………………….
…………………………………………………………………………………………………………………………. …………………………………………………………………………………………………………………………. …………………………………………………………………………………………………………………………. ………………………………………………………………………………………………………………………….
………………………………………………………………………………………………………………………….
MINOR
MAJOR
DISABLED
Legs
Void Shield Generators
Plasma Reactor
Head
DAMAGE STATUS
ARMOUR SAVES
LEGS
5+ Reinforced.
WEAPONS
5+ Reinforced.
VOID SHIELD GENERATOR
5+
HEAD
4+ Reinforced.
PLASMA REACTOR
4+
MINOR MAJOR DISABLED
FRONT
Roll 1d6: 1-2 - Legs 3-4 - Arm Weapon * 5 - Void Shield Generator 6 - Head * Hits a random visible weapon.
SIDE
Roll 1d6: 1-3 - Legs 4-5 - Arm Weapon 6 - Head
REAR
Roll 1d6: 1-2 - Legs 3-4 - Arm Weapon * 5 - Void Shield Generator 6 - Plasma Reactor * Hits a random visible weapon.

Speed Void Shields Close Combat Size
20cm 4 4+ 6
REAVER TITAN
CARAPACE WEAPONS
Plasma Blastgun Inferno Gun Vulcan Megabolter Apocalypse Missile Launcher Turbolaser Destructor
COST
Free Free Free Free +10 Points
Weapon Point Arc Weapon Range Firepower
Carapace Fixed Forward Arc
Left Arm Forward Arc
Right Arm Forward Arc
HIT LOCATIONS
FRONT
Roll 1d6:
1-2 - Legs 3-4 - Arm Weapon * 5 - Carapace Weapon 6 - Head * Hits a random visible weapon.
SIDE
Roll 1d6:
1-2 - Legs 3- Arm Weapon * 4 - Carapace Weapon 5 - Plasma Reactor 6 - Head
REAR
Roll 1d6:
1-2 - Legs 3 - Arm Weapon * 4 - Carapace Weapon 5 - Void Shield Generator 6 - Plasma Reactor * Hits a random visible weapon.
Purchase cost - 60 Points Repair cost - 20 Points
ARM WEAPONS
Close Combat Weapon Plasma Cannon Gatling Blaster Melta Cannon Laser Blaster (Triple Turbo laser) Volcano Cannon (Reaver)
COST
Free +5 Points +5 Points +10 Points +10 Points +10 Points
Notes:
………………………………………………………………………………………………………………………….
………………………………………………………………………………………………………………………….
………………………………………………………………………………………………………………………….
………………………………………………………………………………………………………………………….
………………………………………………………………………………………………………………………….
………………………………………………………………………………………………………………………….
………………………………………………………………………………………………………………………….
………………………………………………………………………………………………………………………….
………………………………………………………………………………………………………………………….
………………………………………………………………………………………………………………………….
MINOR
MAJOR
DISABLED
Legs
Void Shield Generators
Plasma Reactor
Head
DAMAGE STATUS
ARMOUR SAVES
LEGS
4+ Reinforced.
WEAPONS
4+ Reinforced.
VOID SHIELD GENERATOR
4+
HEAD
3+ Reinforced.
PLASMA REACTOR
3+
MINOR
MAJOR
DISABLED

CARAPACE WEAPONS
Plasma Blastgun Inferno Gun Vulcan Megabolter Apocalypse Missile Launcher Turbolaser Destructor Support Missile
COST
Free Free Free Free +10 Points +15 Points
ARM WEAPONS
Close Combat Weapon Gatling Blaster Melta Cannon Laser Blaster (Triple Turbo laser) Volcano Cannon (Warlord) Quake Cannon Plasma Destructor
COST
Free +5 Points +10 Points +10 Points +10 Points +10 Points +15 Points
Speed Void Shields Close Combat Size
15cm 6 3+ 9
WARLORD TITAN
Weapon Point Arc Weapon Range Firepower
Left Carapace Fixed Forward Arc
Left Arm Forward Arc
Right Arm Forward Arc
Right Carapace Fixed Forward Arc
HIT LOCATIONS
FRONT
Roll 1d6:
1-2 - Legs 3 - Arm Weapon * 4 - Carapace Weapon * 5 - Plasma Reactor 6 - Head * Hits a random visible weapon.
SIDE
Roll 1d6:
1-2 - Legs 3- Arm Weapon 4 - Carapace Weapon 5 - Void Shield Generator 6 - Head
REAR
Roll 1d6:
1-2 - Legs 3-4 - Arm Weapon * 5 - Plasma Reactor 6 - Void Shield Generator * Hits a random visible weapon.
Purchase cost - 80 Points Repair cost - 30 Points
Notes:
………………………………………………………………………………………………………………………….
………………………………………………………………………………………………………………………….
………………………………………………………………………………………………………………………….
………………………………………………………………………………………………………………………….
………………………………………………………………………………………………………………………….
………………………………………………………………………………………………………………………….
………………………………………………………………………………………………………………………….
………………………………………………………………………………………………………………………….
………………………………………………………………………………………………………………………….
MINOR
MAJOR
DISABLED
Legs
Void Shield Generators
Plasma Reactor
Head
DAMAGE STATUS
ARMOUR SAVES
LEGS
3+ Reinforced.
WEAPONS
3+ Reinforced.
VOID SHIELD GENERATOR
4+
HEAD
3+ Reinforced.
PLASMA REACTOR
3+
MINOR
MAJOR
DISABLED

Speed Void Shields Close Combat Size
15cm 8 4+ 12
EMPEROR TITAN (IMPERATOR CLASS)
Weapon Point Arc Weapon Range Firepower
Lower Carapace Fixed Forward Arc Quake Cannon 120cm 2+, Template, Slow Firing, Macro-Weapon, D3 Hits, Demolisher
Left Arm Forward Arc Plasma Annihilator 90cm 2+ (x4), Titan Kil ler, Slow Firing
Right Arm Forward Arc Hellstorm Cannon 60cm 3+ (x4), Template
Carapace Gun Array Forward Arc Battlecannons 75cm 4+ (x4)
Upper Carapace Fixed Forward Arc Defence Laser 90cm 2+, Titan Killer, D3 Hits
HIT LOCATIONS
FRONT
Roll 1d6:
1-2 - Legs 3 - Arm Weapon * 4 - Carapace Weapon * 5 - Void Shield Generator 6 - Head * Hits a random visible weapon.
SIDE
Roll 1d6:
1-2 - Legs 3- Arm Weapon 4 - Carapace Weapon 5 - Void Shield Generator 6 - Head
REAR
Roll 1d6:
1-2 - Legs 3-4 - Arm Weapon * 5-6 - Plasma Reactor * Hits a random visible weapon.
Purchase cost - 150 Points Repair cost - 30 Points
Notes:
………………………………………………………………………………………………………………………….
………………………………………………………………………………………………………………………….
………………………………………………………………………………………………………………………….
………………………………………………………………………………………………………………………….
………………………………………………………………………………………………………………………….
………………………………………………………………………………………………………………………….
………………………………………………………………………………………………………………………….
………………………………………………………………………………………………………………………….
………………………………………………………………………………………………………………………….
MINOR
MAJOR
DISABLED
Legs
Void Shield Generators
Plasma Reactor
Head
NONE
DAMAGE STATUS
ARMOUR SAVES
LEGS
3+ Reinforced.
WEAPONS
3+ Reinforced.
VOID SHIELD GENERATOR
4+
HEAD
3+ Reinforced.
PLASMA REACTOR
3+
MINOR MAJOR DISABLED
Lower Carapace
Carapace Gun Array
Upper Carapace
Left Arm
Right Arm

Speed Void Shields Close Combat Size
15cm 8 4+ 12
EMPEROR TITAN (WARMONGER CLASS)
Weapon Point Arc Weapon Range Firepower
Chin Turret Fixed Forward Arc Head Cannon 45cm 4+
Carapace Forward Arc Hydra Autocannons 45cm 6+ (x8)
Left Arm Forward Arc Vengeance Cannon 90cm 2+ (x2), Titan Kil ler, D3 Hits
Right Arm Forward Arc 8x Doomstrike Missiles Unlimited Special (Select 8x missile Warheads before the battle), Single Shot, Indirect Fire The Warmonger may only fire one Doomstrike missile per turn.
HIT LOCATIONS
FRONT
Roll 1d6:
1-2 - Legs 3 - Arm Weapon * 4 - Carapace Weapon * 5 - Void Shield Generator 6 - Head ** * Hits a random visible weapon. **Roll again, on a 4+ the hit is applied to the Chin Turret.
SIDE
Roll 1d6:
1-2 - Legs 3- Arm Weapon 4 - Carapace Weapon 5 - Void Shield Generator 6 - Head * * Roll again, on a 4+ the hit is applied to the Chin Turret.
REAR
Roll 1d6:
1-2 - Legs 3-4 - Arm Weapon * 5-6 - Plasma Reactor * Hits a random visible weapon.
Purchase cost - 170 Points Repair cost - 30 Points
Notes:
………………………………………………………………………………………………………………………….
………………………………………………………………………………………………………………………….
………………………………………………………………………………………………………………………….
………………………………………………………………………………………………………………………….
………………………………………………………………………………………………………………………….
………………………………………………………………………………………………………………………….
………………………………………………………………………………………………………………………….
………………………………………………………………………………………………………………………….
………………………………………………………………………………………………………………………….
MINOR
MAJOR
DISABLED
Legs
Void Shield Generators
Plasma Reactor
Head
NONE
DAMAGE STATUS
ARMOUR SAVES
LEGS
3+ Reinforced.
WEAPONS
3+ Reinforced.
VOID SHIELD GENERATOR
4+
HEAD
3+ Reinforced.
PLASMA REACTOR
3+
MINOR MAJOR DISABLED
Chin Turret
Carapace
Left Arm
Right Arm

CHAOS TITAN RULES
Many of the traitor Titan crews will ultimately pledge their Titan to the service of one of the four great powers of Chaos,
and will reap the benefits of their pledge accordingly by receiving unholy mutations and blessings, which serve to make them more efficient instruments of their chosen God’s will.
Your Chaos Titans may buy Marks of Chaos, which will affect how your Titan operates in battle.
Each type of Chaos Mark will have a specific effect on the Titan, if you wish to purchase marks of Chaos for your Titan,
consult the table below; A Titan may only have one mark of Chaos.
MARKS OF CHAOS
Mark of Chaos Effect Cost
Mark of Khorne +2 Extra Close Combat Attacks 10 Points
Mark of Nurgle Receives a +2 modi fier to the d ice ro ll when rolling to repair damage; –5cm speed. Free
Mark of Tzeentch Special 5+ armour saving throw against Titan-Killer hits (Note that Void Shields do not benefit fr om this rule). 10 Points
Mark of Slaanesh +5cm speed 25 Points
In Campaigns, it is easy to acquire mutations on your Titan, and these mutations add a uniqueness to each Titan under
your command. However, what if you want to use your campaign-mutated monstrosity in a one-off ‘pick-up’ game?
If you wish to use Chaos Mutations in pick-up games, you may pay 10 points to roll on the Titan’s Chaos mutation table. You may roll as many times as you like.
If you would rather pick a speci fic mutation, you may pay 10 points to pick specific mutations, rather than rolling for
them. (You may pick up to 3 mutations in this manner).
The Chaos Mutations tables can be found on page xx
USING CHAOTIC MUTATIONS IN ONE-OFF ‘PICK UP’ GAMES
For ten thousand years, the fallen Titan Legions have attacked and harried their erstwhile creators, in an almost-eternal
struggle to overthrow the proud Forgeworlds which first created them.
Structurally and operationally, most Chaos Titans are identical to their loyalist counterparts ; When playing games with Chaos Titans, use the Imperial Titan datasheets and the Imperial Damage Tables. The main difference will be that instead of
repairing damage in the end phase of the turn on a D6 roll of 4+, Chaos Titans repair damage on a 5+.
THE CHAOTIC TITAN LEGIONS

ELDAR TITAN RULES
The enigmatic race known as the Eldar make use of their own massive Titans, which are grown rather than constructed from an eldritch substance known as Wraithbone. Protected by arcane Holofields, which distort and shatter the light reflecting from the Titan’s body, Eldar Titans appear to their enemies as strange blurs and fragmentary images scattered in the air, coalescing to appear as solid shapes for bare seconds as they pour coruscations of horrible energy at their target before moving onwards in an incredible dance of destruction.
THE ELDAR TITANS
Eldar Titans are products of a race so te chnologically advanced that its ‘machines’ are literally living beings, bearing souls and of possessing emotions deeper than any mere Human can even conceive of, let alone experience. All Eldar Titans are affected by the following Special Rules:
- HOLOFIELDS - UNSURPASSED MANOEUVRABILITY - PULSAR WEAPONS In addition, Revenant Titans also benefit from the following special rule: - REVENANT JUMP ENGINES When applying damage on Eldar Titans, use the Imperial damage chart, but with the following changes:
- If the Fusion Reactor is hit, apply the result for ‘Plasma Reactor’ instead. - Additionally, the Holofield Generator is analogous to the Void Shield Generator of an Imperial Titan and is treated in much the same way when damaged: - If the Holofield Generator is hit, halve its normal effect (Rounding fractions up down, to a minimum of –1 to-hit) instead of halv-ing the number of Void Shields. - If the Holofield Generator is hit a second time, the Holofield Generator will have no effect until it is repaired.
- If the Holofield Generator is hit a third time, apply the same result as if a Void Shield Generator had been hit three times.
GAMING WITH AN ELDAR TITAN FORCE
E1 - HOLOFIELDS Eldar Titans are protected by arcane holofields, so that when they move their image appears to distort, break up, and when moving very fast, disappear altogether; Fighting Eldar Titans is like striking at shadows. Weapons fired at Eldar Titans suffer the following modifiers to-hit:
- If the Eldar Titan is in a close combat, attack dice suffer -1 to-hit. - If the Eldar Titan is shot at, all ranged weapon roll suffer -2 to-hit. - If the Eldar Titan is moving, and is shot at by Overwatch fire, then attack rolls suffer -3 to-hit.
ELDAR SPECIAL RULES

ELDAR TITAN WEAPONS Weapon Range Firepower Notes Cost
D-Cannon 45cm 2+ Template, Titan-Killer, D6 Hits, Demoli sher +20 Points
Fusion Lance 50cm 2+ Titan Killer, 5-1 hits per 10cm of range to target.* +15 Points
Power Fist 30cm or (Base Contact)
4+ (x6) Extra Attack (x2)
— Titan-Killer, D3 Hits, Assault Weapon, Demolisher
Free
Psychic Lance 30cm 2+ Template, Titan Killer, D3 Hits +10 Points
Pulsar (Light) 45cm 3+ Macro-Weapon, Pulsar Weapon Free
Pulsar (Heavy) 75cm 3+ Titan-Killer, Pulsar Weapon Free
Sonic Lance 45cm 4+ (x Size of target) Free
Tremor Cannon 75cm 4+ (x Size of target) D3 Hits Free
* The fusion Lance will apply a different amount of hits depending on its distance from the target: - 1-10cm : 5 Hits - 11-20cm : 4 Hits - 21-30cm : 3 Hits
- 31-40cm : 2 Hits - 41-50cm : 1 Hit
E2 - UNSURPASSED MANOEUVRABILITY Eldar Titans can spin on their heels and leap into the air, spreading torrents of weapons fire in all directions. Eldar Titans may choose to shoot before moving if they wish, instead of after moving like other Titans. Note that this rule also applies to the Double Order.
Example of Play 1 - Eldar Titan A chooses the Advance Order. It shoots, and then makes a single move. Example of Play 2 - Eldar Titan B chooses the Double Order. It moves, shoots, and then makes its second move. Example of Play 3 - Eldar Titan C chooses the Double Order. It shoots, then moves twice. In addition, unlike other Titans, Eldar Titans may always turn as much as they like, even on a Sustain Fire Order ; Unlike other Titans they do not need to be entitled to move 10cm before making 45 degree turns.
E3 - PULSAR WEAPONS Eldar Pulse weapons fire a horrendously rapid stream of laser bolts, with each successive blast guided in a chain to the target by the Titan’s semi-sentient subsystems. If an Eldar Pulse weapon achieves a hit, it may roll another attack. If this second attack also hits, it may roll a third attack. No more than three attacks per Pulsar Weapon is possible. E4 - REVENANT JUMP ENGINES Revenant Titans are more manoeuvrable than any other equivalently sized war engine in existence, able to soar over buildings and even leap over enemy Titans.
As long as the Revenant Titan’s Fusion Reactor is fully functional, the Revenant Titan may ignore impassable and dangerous terrain, it may literally leap over it. If the Revenant Titan lands (Finishes a move) in dangerous terrain however, it must take a dangerous terrain test. If an intact building has a suitably large flat area on its roof, the Revenant Titan may even finish its move on top of the building, despite its status as impassable for other race’s Titans.
ELDAR SPECIAL RULES

ARM WEAPONS
Pulsar (Light) Sonic Lance
COST
Free Free
Speed Close Combat Size
35cm 6+ 3
REVENANT TITAN
Weapon Point Arc Weapon Range Firepower
Left Arm Forward Arc
Right Arm Forward Arc
HIT LOCATIONS
FRONT
Roll 1d6:
1-2 - Legs 3-4 - Arm Weapon * 5 - Fusion Reactor 6 - Head * Hits a random visible weapon.
SIDE
Roll 1d6:
1-2 - Legs 3 - Arm Weapon 4 - Holofield Generator 5 - Fusion Reactor 6 - Head
REAR
Roll 1d6:
1-2 - Legs 3 - Arm Weapon * 4 - Holofield Generator 5 - Fusion Reactor 6 - Head * Hits a random visible weapon.
Purchase cost - 35 Points Repair cost - 15 Points
Notes:
………………………………………………………………………………………………………………………….
………………………………………………………………………………………………………………………….
………………………………………………………………………………………………………………………….
………………………………………………………………………………………………………………………….
………………………………………………………………………………………………………………………….
………………………………………………………………………………………………………………………….
………………………………………………………………………………………………………………………….
………………………………………………………………………………………………………………………….
………………………………………………………………………………………………………………………….
MINOR MAJOR DISABLED
DAMAGE STATUS
ARMOUR SAVES
LEGS
5+
WEAPONS
5+
HOLOFIELD GENERATOR
4+
HEAD
4+
FUSION REACTOR
3+
MINOR MAJOR DISABLED
Head
Legs
Holofield Generator
Fusion Reactor

ARM WEAPONS
D-Cannon Fusion Lance Power Fist Pulsar (Heavy) Tremor Cannon
COST
+20 Points +15 Points Free Free Free
Speed Close Combat Size
30cm 4+ 6
PHANTOM TITAN
Weapon Point Arc Weapon Range Firepower
Left Arm Forward Arc
Right Arm Forward Arc
HIT LOCATIONS
FRONT
Roll 1d6:
1-2 - Legs 3-4 - Arm Weapon * 5 - Reactor 6 - Head * Hits a random visible weapon.
SIDE
Roll 1d6:
1-2 - Legs 3-4 Arm Weapon * 5 - Reactor 6 - Head * Hits a random visible weapon.
REAR
Roll 1d6:
1-2 - Legs 3-4 Arm Weapon * 5 - Reactor 6 - Head * Hits a random visible weapon.
Purchase cost - 90 Points Repair cost - 35 Points
Notes:
………………………………………………………………………………………………………………………….
………………………………………………………………………………………………………………………….
………………………………………………………………………………………………………………………….
………………………………………………………………………………………………………………………….
………………………………………………………………………………………………………………………….
………………………………………………………………………………………………………………………….
………………………………………………………………………………………………………………………….
………………………………………………………………………………………………………………………….
………………………………………………………………………………………………………………………….
MINOR MAJOR DISABLED
DAMAGE STATUS
ARMOUR SAVES
LEGS
5+ Reinforced
WEAPONS
5+ Reinforced
HOLOFIELD GENERATOR
5+ Reinforced
HEAD
4+ Reinforced
FUSION REACTOR
3+
MINOR MAJOR DISABLED
Head
Legs
Holofield Generator
Fusion Reactor

Speed Close Combat Size
25cm 3+ 6
WARLOCK TITAN
Weapon Point Arc Weapon Range Firepower
Left Arm Forward Arc
Right Arm Forward Arc
HIT LOCATIONS
FRONT
Roll 1d6:
1-2 - Legs 3-4 - Arm Weapon * 5 - Reactor 6 - Head * Hits a random visible weapon.
SIDE
Roll 1d6:
1-2 - Legs 3-4 Arm Weapon * 5 - Reactor 6 - Head * Hits a random visible weapon.
REAR
Roll 1d6:
1-2 - Legs 3-4 Arm Weapon * 5 - Reactor 6 - Head * Hits a random visible weapon.
Purchase cost - 100 Points Repair cost - 40 Points
Notes:
………………………………………………………………………………………………………………………….
………………………………………………………………………………………………………………………….
………………………………………………………………………………………………………………………….
………………………………………………………………………………………………………………………….
………………………………………………………………………………………………………………………….
………………………………………………………………………………………………………………………….
………………………………………………………………………………………………………………………….
………………………………………………………………………………………………………………………….
………………………………………………………………………………………………………………………….
DAMAGE STATUS
ARMOUR SAVES
LEGS
5+ Reinforced
WEAPONS
5+ Reinforced
HOLOFIELD GENERATOR
5+ Reinforced
HEAD
4+ Reinforced
FUSION REACTOR
3+
MINOR MAJOR DISABLED
ARM WEAPONS
D-Cannon Fusion Lance Power Fist Psychic Lance Pulsar (Heavy) Tremor Cannon
COST
+20 Points +15 Points Free +10 Points Free Free
MINOR MAJOR DISABLED
Head
Legs
Holofield Generator
Fusion Reactor

APPENDIX I - CAMPAIGNS
Although it is certainly possible for two players to simply select two forces of Titans to an equal points value and fight a one-off battle, one of the more challenging and fun ways to play Adeptus Titanicus is via the use of Missions as part of an ongoing Campaign. If you wish to undertake a campaign, these are the ‘default’ campaign rules:
1—Before the first game, all participating players select a Titan Battlegroup from 150 points or less. Any Points that are not used may be kept in that player’s Points Reserve for future use. 2—Play a game! 3—After each game, follow the Post-Game Sequence, then go back to step 2! You can chose many different ways to declare a winner of your campaign, but some popular methods include:
- The first player to have a Titan Battlegroup with a total size rating of 50 is the winner. - The first player to have a total of 400 Points in his Points Reserve is the winner. - The player with the biggest Titan Battlegroup after six weeks is the winner. - The player with the most victories after six weeks is the winner. - The player with the only remaining functional Titan Battlegroup after as many games as it takes is the winner. - The player who is the only one with functional Titans remaining after a campaign-finishing ‘mega battle’ involving all the campaign partici-pants is the winner.
Rather than laying down the law on which campaign style is most suitable for you, we will leave it up to your own best judgement as far as determining the most suitable victory conditions for your gaming group. You can select from any of the above criteria, or make up your own when starting a campaign, but it is important to make all participating players aware of what the end point of the campaign is expected to be. Note that you should keep track of how many damaging hits your Titans cause on their enemies, because for every ten points of damage they cause, they are entitled to roll on their race’s Upgrade Chart… as long as they survive the battle that is!
PLAYING GAMES OF ADEPTUS TITANICUS AS PART OF A CAMPAIGN
THE POST-GAME SEQUENCE
1 - Any Titans which were completely destroyed at the end of the game are striken from the player’s Battleforce lists, as they are too badly damaged to be salvageable. 2 - Any Titans which were left Out of Action or Burning at the end of the game may be recovered and used again (It is assumed that the dam-aged Titans were recovered after the battle, or limped home under their own power after affecting temporary repairs) must roll on the Long-Term Damage Table,
to see what toll the battle has taken on your venerable machine. 3 - Both players take their Victory Points total from the game and add that to their Reserve Points. Reserve Points are used as an abstraction in campaigns to represent how much success your Battlegroup has met with ; The more Reserve Points you have, the more acclaim you have amongst your army, the more influence you have with your superiors, and this influence can then be used to maintain your current Titans, and also to bring new Titans under your command. Note that no more than 50 Victory Points can be added to your Reserve Points at the end of a game, regardless of your actual Victory Points total.
4 - Both players pay upkeep for each of their Titans. Each Titan’s upkeep costs the same as a Titan’s size rating (So a Warhound Titan will cost 3 points to pay for its Upkeep after each battle). If a player cannot afford the upkeep cost of their Titans, each Titan that does not have points ex-pended on it for upkeep must roll on the Long-Term Damage Table, to represent the lack of maintenance. Players can repair Long Term Damage that their Titan(s) have suffered by paying an amount of points equivalent to the Titan’s repair cost (Each Titan’s repair cost is listed on its Datasheet). 5 - Both players may now purchase new Titans or new weapons for their existing Titans by using their Reserve Points. Old / unneeded weapons may be ‘sold’ for half their original value.
6 - Both players now check to see if any of their Titans are due a campaign upgrade (See page x), and if necessary roll on the appropriate upgrade table.
APPENDIX I - CAMPAIGNS
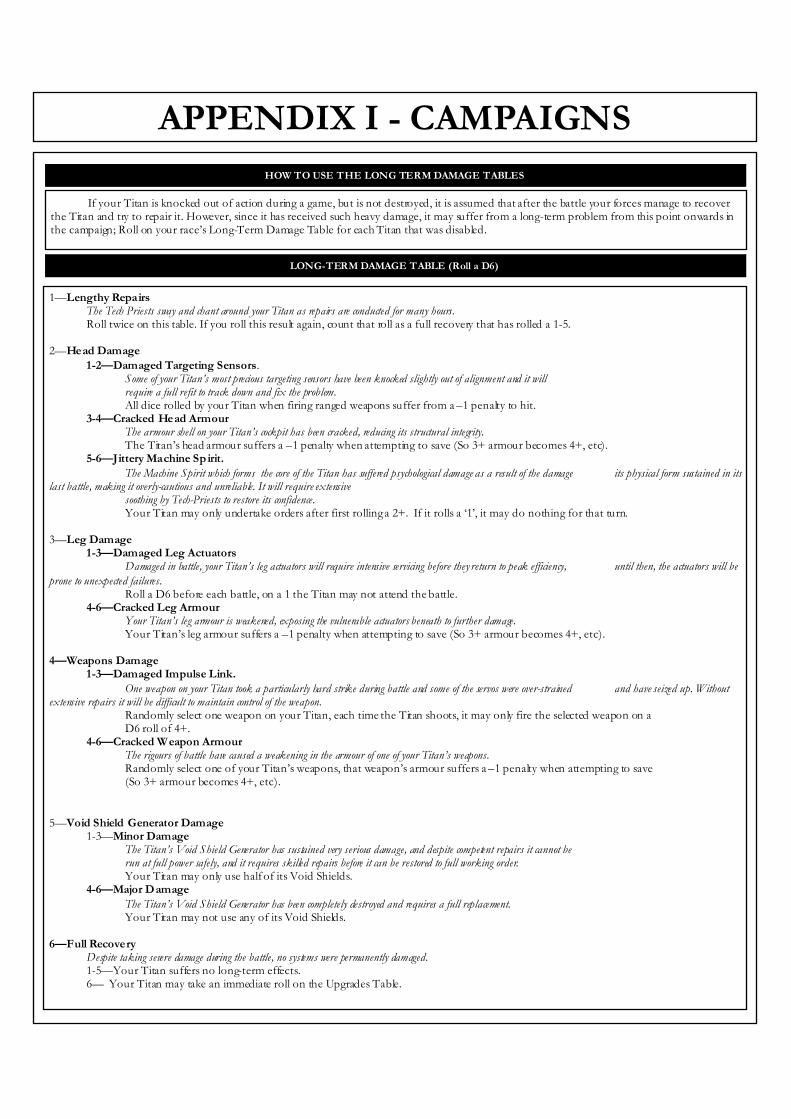
1—Lengthy Repairs The Tech Priests sway and chant around your Titan as repairs are conducted for many hours. Roll twice on this table. If you roll this result again, count that roll as a full recovery that has rolled a 1-5. 2—Head Damage
1-2—Damaged Targeting Sensors. Some of your Titan’s most precious targeting sensors have been knocked slightly out of alignment and it will require a full refit to track down and fix the problem. All dice rolled by your Titan when firing ranged weapons suffer from a –1 penalty to hit. 3-4—Cracked Head Armour The armour shell on your Titan’s cockpit has been cracked, reducing its structural integrity. The Titan’s head armour suffers a –1 penalty when attempting to save (So 3+ armour becomes 4+, etc). 5-6—Jittery Machine Spirit.
The Machine Spirit which forms the core of the Titan has suffered psychological damage as a result of the damage its physical form sustained in its last battle, making it overly-cautious and unreliable. It will require extensive soothing by Tech-Priests to restore its confidence. Your Titan may only undertake orders after first rolling a 2+. If it rolls a ‘1’, it may do nothing for that turn. 3—Leg Damage 1-3—Damaged Leg Actuators Damaged in battle, your Titan’s leg actuators will require intensive servicing before they return to peak efficiency, until then, the actuators will be
prone to unexpected failures. Roll a D6 before each battle, on a 1 the Titan may not attend the battle. 4-6—Cracked Leg Armour Your Titan’s leg armour is weakened, exposing the vulnerable actuators beneath to further damage. Your Titan’s leg armour suffers a –1 penalty when attempting to save (So 3+ armour becomes 4+, etc). 4—Weapons Damage 1-3—Damaged Impulse Link.
One weapon on your Titan took a particularly hard strike during battle and some of the servos were over-strained and have seized up. Without extensive repairs it will be difficult to maintain control of the weapon. Randomly select one weapon on your Titan, each time the Titan shoots, it may only fire the selected weapon on a D6 roll of 4+. 4-6—Cracked Weapon Armour The rigours of battle have caused a weakening in the armour of one of your Titan’s weapons. Randomly select one of your Titan’s weapons, that weapon’s armour suffers a –1 penalty when attempting to save (So 3+ armour becomes 4+, etc).
5—Void Shield Generator Damage 1-3—Minor Damage The Titan’s Void Shield Generator has sustained very serious damage, and despite competent repairs it cannot be run at full power safely, and it requires skilled repairs before it can be restored to full working order. Your Titan may only use half of its Void Shields. 4-6—Major Damage
The Titan’s Void Shield Generator has been completely destroyed and requires a full replacement. Your Titan may not use any of its Void Shields. 6—Full Recovery Despite taking severe damage during the battle, no systems were permanently damaged. 1-5—Your Titan suffers no long-term effects. 6— Your Titan may take an immediate roll on the Upgrades Table.
LONG-TERM DAMAGE TABLE (Roll a D6)
If your Titan is knocked out of action during a game, but is not destroyed, it is assumed that after the battle your forces manage to recover the Titan and try to repair it. However, since it has received such heavy damage, it may suffer from a long-term problem from this point onwards in the campaign; Roll on your race’s Long-Term Damage Table for each Titan that was disabled.
HOW TO USE THE LONG TERM DAMAGE TABLES

APPENDIX I - CAMPAIGNS
1-2—Crew Skills— 1—Veteran Princeps The Titan’s Pri nceps has become o ne with his Titan, metal or fle sh, he c an no longer tell the differenc e. Once per game, after issuing an order to one of your Titans, instead of allowing your opponent to issue an order to one of his Titans, the Titan’s Veteran Princeps may take an order of his own (As long as he has not yet undertaken an order in t he current turn). After the Veteran Princeps has undertaken his order, the ini tiative is handed to the opponent as normal. 2—Veteran Moderati One of the Titan’s Moderati has become a t ruly expert gun-layer. The Titan may modify the dice results for one of its weapons by ’1’, either up or down, when rolling to see whi ch location has been struck on an enemy Ti tan (Nominate which weapon t he Moderati has become skilled with randomly, this weapon alone will benefit from this upgrade). 3—Efficient Servitors Your Titan has been refitted wit h fresher, more active Servitors. When attempting to repair, roll 1 extra repair dice. 4—Experienced Tech Adept Your Titan’s Tech-Pri est has been inducted into the mo st sec ret myst eries of the Machine God. The Titan now repairs damage on a 3+ instead of 4+. 5—Renowned Your Titan’s fame has spread amo ngst the high command, and more resourc es have been made available to your Battleforce as a co nsequence. Claim 5 extra points for your Points Reserve after each battle, as long as the Titan is not knocked out of action. 6—Lucky Streak Your Titan’s c rew is, quite frankly, lucky, but luck doesn’t last forever. Next time your Titan is required to roll on the Long Term Damage table, the result may be ignored on a 3+. This 3+ ‘save’ may be taken repeatedly over multiple games until it is failed. Once it is failed, the luck y streak ends and the save is no longer available. 3-6—Titan Refits— 1-2—Weapons— 1-3—Extended Barrels Your Titan has been refitted wit h an ancient, more reliable weapon. Randomly pick one weapon on your Titan, it now has +15cm range. 4-6—New Weapon Your superiors have gifted you with a new weapon for t his Titan. Randomly select one weapon from the list of weapons available to this Titan. If you wish, you may exchange one of your Titan’s current weapons for the randomly selected weapon. 3-4—Shields— 1-2—Extra Shield Generator An extra Shield Generato r has been inst alled on your Titan. Add +1 Void Shield to your Titan. 3-4—Improved Rechargers An extra Servitor has been i nstalled to service t he Void S hield Generators. Whenever the Titan is allowed to raise its shields, raise one extra shield. 5-6—Overcharged Shielding More efficient power conduits are rare, but are occasio nally gifted to the more deserving Princeps. Whenever a Void Shield on this Titan tak es a hit, roll a D6, on a 5+ the hi t is ignored. This special save does not work against Macro-Weapon or Titan-Killer hits. 5-6—Hull— 1-3—Extra Armour Plating High command has deemed t hat this Titan should be fitted wit h heavier armo ur. The armour on the Titan’s Void Shield Generator and the Plasma Reactor becomes Reinforced. Reduce your Titan’s speed by 5cm. 4-6—Enhanced Servomotors High command has deci ded that your Titan needs great er speed. Add +5cm to your Titan’s speed.
IMPERIAL / CHAOS / ELDAR UPGRADES TABLE
During games keep track of how many damaging hits your Titan inflicts on its enemies ; For every 10 levels of damage a Titan causes to its enemies, it is entitled to roll for an Upgrade on its race-specific upgrade table (So a Titan is entitled to roll once it has caused 10 damaging hits, then again when it has caused 20 damaging hits, etc…). Titans may not have more than one of each upgrade; If an upgrade is rolled that at Titan already possesses, roll again on the table.
HOW TO USE THE CAMPAIGN UPGRADES TABLES

APPENDIX I - CAMPAIGNS
When your Chaos Titan is eligible to roll on the Campaign Upgrades Table (Having caused 10 damage points on its enemies, or a multiple thereof), it is able to roll on the Imperial Upgrades Table. However, if you wish, your Titan can instead roll on the Chaos Gifts table of its patron deity. If a Titan gains a mutation it already possesses, re-roll on the table. Be aware however, that calling upon the blessings of the Chaos Gods too many times can be very dangerous, as the Warp Deities are fickle
and do not tolerate overly-familiar worshippers lightly!
HOW TO USE THE CHAOS GIFTS TABLE
1—Chaos Spawn Roll the dice again. On a ‘1’, your Titan mutates into a giant spawn, and whatever strange will it now obeys, it is not your own. Remove the Titan from your Battleforce’s roster as if it had been completely destroyed in battle. 2—Chaotic Tail Your Titan sprouts a bizarre tail-like appendage, giving it +2 Extra Attacks in Close Combats.
3—Unholy Fury Your Titan gains a +1 to-hit roll modifier on all Close Combat attacks (So a basic to-hit stat of 4+ becomes a 3+, for example). 4—Doomfist Your Titan gains a new arm weapon which has the stats of both a Vulcan Megabolter and a Close Combat Weapon. Discard a random arm weapon and replace it with the Doomfist. 5—Weapon Head Your Titan sprouts a cannon from its head, which uses the stats of an Inferno Gun.
6—Daemonic Posession Your Titan’s Princeps’ soul is snatched away into the void, and is replaced by something altogether more evil. From this point onwards, whenever your Titan is permitted to roll for repairs, it passes automatically.
BLESSINGS OF KHORNE
1—Chaos Spawn Roll the dice again. On a ‘1’, your Titan mutates into a giant spawn, and whatever strange will it now obeys, it is not your own. Remove the Titan from your Battleforce’s roster as if it had been completely destroyed in battle. 2—Chaotic Tail Your Titan sprouts a bizarre tail-like appendage, giving it +2 Extra Attacks in Close Combats.
3—Bubolic Recuperation Your Titan gains an extra +1 modifier to its dice roll when rolling to repair (Meaning that it now repairs on a 2+) 4—Clouds of Flies Enemies attacking your Titan in close-combat suffer a –1 to-hit modifier on all attack dice rolls. 5—Nurgle’s Rot Enemy Titans in base-to-base contact take one 6+ attack for each point of size, in addition to other Close Combat attacks. These attacks are worked out at the same time as the Nurgle-blessed Titan’s other close-combat attacks. 6—Daemonic Posession Your Titan’s Princeps’ soul is snatched away into the void, and is replaced by something altogether more evil. From this point onwards, whenever your Titan is permitted to roll for repairs, it passes automatically.
BLESSINGS OF NURGLE

1—Chaos Spawn Roll the dice again. On a ‘1’ or a ‘2’, your Titan mutates into a giant spawn, and whatever strange will it now obeys, it is not your own. Re-move the Titan from your Battleforce’s roster as if it had been completely destroyed in battle. 2—Chaotic Tail Your Titan sprouts a bizarre tail-like appendage, giving it +2 Extra Attacks in Close Combats.
3—Unholy Precognition The presence of your Titan on the table grants you +1 when rolling to see who has the first order each turn. 4—Arcane Warp Blast Once per game your Titan may unleash a mystical attack that counts as a Melta Cannon attack.. 5—Eldritch Shield Your Tzeentch Titan’s special saving throw is improved to become a 4+ instead of a 5+. 6—Daemonic Posession Your Titan’s Princeps’ soul is snatched away into the void, and is replaced by something altogether more evil. From this point onwards,
whenever your Titan is permitted to roll for repairs, it passes automatically.
BLESSINGS OF TZEENTCH
1—Chaos Spawn Roll the dice again. On a ‘1’, your Titan mutates into a giant spawn, and whatever strange will it now obeys, it is not your own. Remove the Titan from your Battleforce’s roster as if it had been completely destroyed in battle. 2—Chaotic Tail Your Titan sprouts a bizarre tail-like appendage, giving it +2 Extra Attacks in Close Combats.
3—Slaanesh’s Skill Your Titan gains the First Strike ability on any Close Combat weapons it carries (This can be used in combination with a Chaotic Tail blessing). 4—Slaanesh’s Swiftness Your Titan gains +5cm speed. 5—Slaanesh’s Sound Your Titan is fitted with sense-enhancing speakers, which proclaim the glory of Slaanesh over the battlefield. A Titan wishing to fire ranged weapons within 30cm of the Slaanesh-blessed Titan (Either friend or foe!) may only attack on a 4+, as it is distracted by the discordant cacophony.
6—Daemonic Posession Your Titan’s Princeps’ soul is snatched away into the void, and is replaced by something altogether more evil. From this point onwards, whenever your Titan is permitted to roll for repairs, it passes automatically.
BLESSINGS OF SLAANESH
APPENDIX I - CAMPAIGNS

APPENDIX IV - DAMAGE TABLES
LEGS
1- Minor Damage
Your Titan’s legs suffer a hit that temporarily degrades its mobility. The Titan loses 5cm movement until the damage i s repaired. 2- Major Damage
Your Titan has taken a more serious hit to the legs and it begins to stumble, almost toppling over. The Titan loses another 5cm movement until the damage is repaired. 3– Crit ical Damage
Your Titan’s legs cannot keep functioning under this level of punishment, and they seize up. Roll on the Critical Damage Table.
WEAPON
1- Minor Damage
The hit has knocked the weapon offline, though your Titan’s Tech-Priest is sure it can be restored to working order quickly. The weapon cannot be used until it is repaired. 2- Major Damage
The damage has become more severe, and will take longer to repair. The weapon cannot be used until it is ful ly repaired. 3– Disabling Damage
The crippled weapon cracks open, as flames race through conduits throughout the Titan, causing further internal damage. The weapon is knocked out of action, in addition, roll again on the hit location chart.
VOID SHIELD GENERATOR
1- Minor Damage
The Void Shield Generator has sustained a glancing blow. Half of your Void Shields are knocked o ffline and may not be raised again until repairs have been carried out. 2- Major Damage
Hit hard, the Titan’s Tech Priest is forced to deactivate the Void Shields ; frantically uttering devotions to Omnissiah the Titan’s Tech Priest struggles to contain the damage. All Void Shields are knocked off line and may not be used until the damage has been repaired. 3 - Disabling Damage
The Titan’s Tech-Priest can no longer contain the damage to the Void Shield Generator, and is helpless as secondary explosions ripple throughout the Titan. The Void Shield Generator is kno cked off line. In addition, roll again on the hit location chart.
HEAD
1- Minor Damage
Your Titan’s Princeps is stunned by the hit. The Titan may not move until the damage is repaired. 2- Major Damage
The impact rocks your Titan, as the Princeps struggles to remain conscious. The Titan may not move or shoot until the damage is repaired. 3– Crit ical Damage
The shot completely disables the Titan’s crew. Roll on the Critical Damage Table.
PLASMA REACTOR
1- Minor Damage
The reactor has become dangerously unstable. Roll a d6 when trying to activate the Titan. On a 3+, the Titan may be used as normal. On a 1-2 the Titan may not do anything. This roll must be made each turn until the damage i s repaired. 2- Major Damage
The failing reactor has become more unreliable, and your Titan’s Tech-Priest is struggling to keep control of the great engine. Roll a d6 when trying to activate the Titan. On a 5+, the Titan may be used as normal. On a 1-4 the Titan may not do anything. This roll must be made each turn until the damage i s repaired. 3– Crit ical Damage
Venting plasma in super-hot plumes that wreathe the Titan, the reactor fails completely. The Titan is knocked out of action! Roll on the Critical Damage Table with a +2 modifier. If the result is ‘Burning Wreck’, the +2 modifier is not carri ed over onto further rolls.
CRITICAL DAMAGE
A violent catastrophe has occurred! Roll 2d6:
2-6 - Out of Action.
Leave the Titan in place as impassable terrain. 7-9 - Burning Wreck.
Roll again on this chart in the next end phase. 10 - Explosion.
Apply D3 hits to every Titan within 3D6cm, and remove the Titan from the table. 11 - Plasma Explosion.
Apply D3 Macro-Weapon hits to every Titan within 4D6cm and remove the Titan from the table. 12 - Meltdown.
Apply D3 Titan-Killer hits to every unit within 5D6cm and remove the Titan from the table.
REPAIRS
In the end phas e of each turn, roll 1D6 for each Titan. On a 4+ (5+ for Chaos Titans), a single Void Shield may be raised, or a single item of damage may be repaired. The owning player may decide which item of damage is repaired. If an item of Major Damage is repaired, it is downgraded to Minor Damage. If an item of Minor Damage is repaired, it is fully repaired and no longer troubles the Titan. Note that you may not repair any item of ‘Disabling Damage’, as the damage has become too s evere to be repairable within the period of time represented by a single game of Adeptus Titani cus; If an area that already has Disabling Damage takes an unsaved hit, roll again on a different location of the Titan as directed in the Disabli ng Damage text.
Every time your Titan suffers a level of damage to one of its locations, apply the following effects to it. Note that Eldar Titans use a slightly modified form of this table (See page xx).
IMPERIAL / CHAOS / ELDAR DAMAGE TABLES

WARHOUND TITAN
FRONT
Roll 1d6:
1-2 - Legs 3-4 - Arm Weapon * 5 - Void Shield Generator 6 - Head * Hits a random visible weapon.
SIDE
Roll 1d6:
1-3 - Legs 4-5 - Arm Weapon * 6 - Head * Hits the nearest arm weapon.
REAR
Roll 1d6:
1-2 - Legs 3-4 - Arm Weapon * 5 - Void Shield Generator 6 - Plasma Reactor * Hits a random visible weapon.
REAVER TITAN
WARLORD TITAN
IMPERIAL REFERENCE SHEET
LEGS
1- Minor Damage
The Titan loses 5cm movement until it is repaired. 2- Major Damage
The Titan loses another 5cm movement until it is repaired. 3– Crit ical Damage
Roll on the Critical Damage Table.
WEAPON
1- Minor Damage
The weapon cannot be used until repaired. 2- Major Damage
The weapon cannot be used until repaired. 3– Disabling Damage
The weapon is knocked out of action, in addition, roll again on the hit location chart.
VOID SHIELD GENERATOR
1- Minor Damage
Half of your Void Shields may not be used unti l repaired. 2- Major Damage
All Void Shields are knocked off line until repaired. 3 - Disabling Damage
The Void Shield Generator is kno cked off line. In addition, roll again on the hit location chart.
HEAD
1- Minor Damage
The Titan may not move until repaired. 2- Major Damage
The Titan may not move or shoot until repaired. 3– Crit ical Damage
Roll on the Critical Damage Table.
PLASMA REACTOR
1- Minor Damage
Roll a d6 when trying to activate the Titan. On a 3+, the Titan may be used as normal. On a 1-2 the Titan may not do anything. Roll every turn until repaired. 2- Major Damage
Roll a d6 when trying to activate the Titan. On a 5+, the Titan may be used as normal. On a 1-4 the Titan may not do anything. Roll every turn until repaired. 3– Crit ical Damage
The Titan is knocked out of action! Roll on the Critical Damage Table with a +2 modifier. If the result is ‘Burning Wreck’, the +2 modifier is not carri ed over onto further rolls.
CRITICAL DAMAGE
Roll 2d6:
2-6 - Out of Action. Leave the Titan in place as impassable t errain. 7-9 - Burning Wreck. Roll again on this chart in the next end phase. 10 - Explosion. Apply D3 hits to every Titan within 3D6cm. 11 - Plasma Explosion. Apply D3 Macro-Weapon hits to every Titan
within 4D6cm. 12 - Meltdown. Apply D3 Titan-Killer hits to every unit within 5D6cm
FRONT
Roll 1d6:
1-2 - Legs 3 - Arm Weapon * 4 - Carapace Weapon * 5 - Plasma Reactor 6 - Head * Hits a random visible weapon.
SIDE
Roll 1d6:
1-2 - Legs 3- Arm Weapon* 4 - Carapace Weapon* 5 - Void Shield Generator 6 - Head *Hits the nearest suitable w eapon.
REAR
Roll 1d6:
1-2 - Legs 3-4 - Arm Weapon * 5 - Plasma Reactor 6 - Void Shield Generator * Hits a random visible weapon.
FRONT
Roll 1d6:
1-2 - Legs 3-4 - Arm Weapon * 5 - Carapace Weapon 6 - Head * Hits a random visible weapon.
SIDE
Roll 1d6:
1-2 - Legs 3- Arm Weapon * 4 - Carapace Weapon 5 - Plasma Reactor 6 - Head * Hits the nearest arm weapon.
REAR
Roll 1d6:
1-2 - Legs 3 - Arm Weapon * 4 - Carapace Weapon 5 - Void Shield Generator 6 - Plasma Reactor * Hits a random visible weapon.

Speed Void Shields Close Combat Size
Weapon Point Arc Weapon Range Firepower
Left Carapace Fixed Forward Arc
Left Arm Forward Arc
Right Arm Forward Arc
Right Carapace Fixed Forward Arc
MINOR
MAJOR
DISABLED
Legs
Void Shield Generators
Plasma Reactor
Head
DAMAGE STATUS
LEGS
WEAPONS
VOID SHIELD GENERATOR
HEAD
PLASMA REACTOR
MINOR
MAJOR
DISABLED
TITAN NAME:
REPAIR COST:
Campaign Notes:
………………………………..………………………………..………………………………..………………………………..………………………………..………………………………..………………………………..………………………………..………………………………..………………………………..………………………………..………………………………..………………………………..………………………………..………………………………..………………………………..………………………………..………………………………..………………………………..………………………………..………………………………..………………………………..………………………………..………………………………..………………………………..………………………………..………………………………..………………………………..………………………………..………………………………..
ARMOUR SAVES
ROSTER SHEET