Evaluating Patient Outcomes When Adding Licensed Practical ...
Upload
khangminh22Category
view
3download
0
Adding Audio Clips Functionality to TaleBlazer
by
Manali A. Naik
Submitted to the Department of Electrical Engineering and Computer
Science
in partial fulfillment of the requirements for the degree of
Master of Engineering in Electrical Engineering and Computer Science
at the
MASSACHUSETTS INSTITUTE OF TECHNOLOGY
February 2016
c○ Manali A. Naik, MMXVI. All rights reserved.
The author hereby grants to MIT permission to reproduce and to
distribute publicly paper and electronic copies of this thesis document
in whole or in part in any medium now known or hereafter created.
Author . . . . . . . . . . . . . . . . . . . . . . . . . . . . . . . . . . . . . . . . . . . . . . . . . . . . . . . . . . . . . . . .
Department of Electrical Engineering and Computer Science
February 23, 2016
Certified by. . . . . . . . . . . . . . . . . . . . . . . . . . . . . . . . . . . . . . . . . . . . . . . . . . . . . . . . . . . .
Professor Eric Klopfer
Director, MIT Scheller Teacher Education Program
Thesis Supervisor
Accepted by . . . . . . . . . . . . . . . . . . . . . . . . . . . . . . . . . . . . . . . . . . . . . . . . . . . . . . . . . . .
Professor Christopher J. Terman
Chairman, Masters of Engineering Thesis Committee

2
Adding Audio Clips Functionality to TaleBlazer
by
Manali A. Naik
Submitted to the Department of Electrical Engineering and Computer Scienceon February 23, 2016, in partial fulfillment of the
requirements for the degree ofMaster of Engineering in Electrical Engineering and Computer Science
Abstract
TaleBlazer is a platform for creating and playing mobile location-based augmentedreality games. This thesis describes the design and implementation of audio clipsfunctionality in the platform. Audio clips are recordings that can be attached to textin TaleBlazer games. This report presents results from conducting user testing ofthe new feature and specifies the subsequent improvements that were made. It alsodetails the infrastructure enhancements made to improve all media support on theplatform, including audio clips.
Thesis Supervisor: Professor Eric KlopferTitle: Director, MIT Scheller Teacher Education Program
3

4
Acknowledgments
First of all, I’d like to thank Eric Klopfer, Lisa Stump, and Judy Perry for giving me
the opportunity to work on the TaleBlazer team. I have learned so much during my
UAP and MEng, and this experience would not have been possible without them.
I’d like to thank Judy Perry for guiding me throughout the project and helping
me to manage my timeline. I’d also like to thank Lisa Stump for her insight when it
came to design decisions and technical questions. Their support made it possible for
me to stay on course and complete this project.
I’d like to thank the rest of the TaleBlazer team for making the past year and a
half so enjoyable. I’d like to thank my fellow MEng students Jacqueline Hung, Ellen
Finch, Bobby Fortanely, Sarah Edris, Arjun Narayanan, and Evan Wang, and also
the undergraduate students Elaine Gan, Remi Mir, Kevin Chen, Mary Ann Jin, and
Zachary Neely.
I’d like to thank Susan Baron, Danny Fain, Tyrone Bellamy-Wood, Sylvester
Arnab, and Alex Masters for taking the time to help us with user testing and providing
us with invaluable feedback.
I’d also like to thank my friends for their constant support and kindness, even
(and especially) during the most stressful times.
Finally, I’d like to thank my family for their unending support and guidance.
Without them, I would not be where I am today.
5

6
Contents
1 Introduction 15
1.1 Motivations . . . . . . . . . . . . . . . . . . . . . . . . . . . . . . . . 16
1.2 Chapter Summary . . . . . . . . . . . . . . . . . . . . . . . . . . . . 17
2 Background 19
2.1 TaleBlazer Platform . . . . . . . . . . . . . . . . . . . . . . . . . . . 19
2.1.1 Overview . . . . . . . . . . . . . . . . . . . . . . . . . . . . . 20
2.1.2 Game Mechanics . . . . . . . . . . . . . . . . . . . . . . . . . 21
2.1.3 Technologies . . . . . . . . . . . . . . . . . . . . . . . . . . . . 24
2.1.4 Image Support . . . . . . . . . . . . . . . . . . . . . . . . . . 24
2.1.5 Video Support . . . . . . . . . . . . . . . . . . . . . . . . . . . 25
2.1.6 Audio Support . . . . . . . . . . . . . . . . . . . . . . . . . . 26
2.2 Prior Work on Audio Clips . . . . . . . . . . . . . . . . . . . . . . . . 27
2.2.1 Prototype Overview . . . . . . . . . . . . . . . . . . . . . . . 27
2.2.2 Uploading Audio Files . . . . . . . . . . . . . . . . . . . . . . 28
2.2.3 Attaching Audio Clips to Rich Text . . . . . . . . . . . . . . . 29
2.2.4 Saving Games . . . . . . . . . . . . . . . . . . . . . . . . . . . 29
2.2.5 Comparison to Existing Assets . . . . . . . . . . . . . . . . . . 30
2.2.6 Playing Games with Audio Clips . . . . . . . . . . . . . . . . 32
2.2.7 Advantages of Audio Clips . . . . . . . . . . . . . . . . . . . . 32
2.2.8 Challenges . . . . . . . . . . . . . . . . . . . . . . . . . . . . . 33
2.3 Similar Platforms . . . . . . . . . . . . . . . . . . . . . . . . . . . . . 35
2.3.1 ARIS . . . . . . . . . . . . . . . . . . . . . . . . . . . . . . . . 35
7

2.3.2 7Scenes . . . . . . . . . . . . . . . . . . . . . . . . . . . . . . 36
3 Audio Clips on Mobile 39
3.1 Audio Playback Controls . . . . . . . . . . . . . . . . . . . . . . . . . 39
3.1.1 Design Decisions . . . . . . . . . . . . . . . . . . . . . . . . . 40
3.1.2 Implementation . . . . . . . . . . . . . . . . . . . . . . . . . . 42
3.2 Audio Settings . . . . . . . . . . . . . . . . . . . . . . . . . . . . . . 44
3.2.1 Design Decisions . . . . . . . . . . . . . . . . . . . . . . . . . 45
3.2.2 Implementation . . . . . . . . . . . . . . . . . . . . . . . . . . 45
4 Audio Clips in the Editor 49
4.1 Audio Tile . . . . . . . . . . . . . . . . . . . . . . . . . . . . . . . . . 49
4.1.1 Design Decisions . . . . . . . . . . . . . . . . . . . . . . . . . 50
4.1.2 Implementation . . . . . . . . . . . . . . . . . . . . . . . . . . 50
4.2 Audio Picker . . . . . . . . . . . . . . . . . . . . . . . . . . . . . . . 52
4.2.1 Design Decisions . . . . . . . . . . . . . . . . . . . . . . . . . 52
4.2.2 Implementation . . . . . . . . . . . . . . . . . . . . . . . . . . 53
4.3 Renaming Audio Clips . . . . . . . . . . . . . . . . . . . . . . . . . . 55
4.3.1 Design Decisions . . . . . . . . . . . . . . . . . . . . . . . . . 55
4.3.2 Implementation . . . . . . . . . . . . . . . . . . . . . . . . . . 56
5 User Testing of Audio Clips 59
5.1 Overview . . . . . . . . . . . . . . . . . . . . . . . . . . . . . . . . . . 59
5.2 Demo Game . . . . . . . . . . . . . . . . . . . . . . . . . . . . . . . . 60
5.2.1 Game Overview . . . . . . . . . . . . . . . . . . . . . . . . . . 61
5.2.2 Game Mechanics . . . . . . . . . . . . . . . . . . . . . . . . . 61
5.2.3 Testing Guidelines . . . . . . . . . . . . . . . . . . . . . . . . 65
5.3 In-Editor Tasks . . . . . . . . . . . . . . . . . . . . . . . . . . . . . . 65
5.4 Optional Game Creation . . . . . . . . . . . . . . . . . . . . . . . . . 66
5.5 Results . . . . . . . . . . . . . . . . . . . . . . . . . . . . . . . . . . . 67
5.5.1 Feedback on Mobile . . . . . . . . . . . . . . . . . . . . . . . . 67
8
5.5.2 Feedback on the Editor . . . . . . . . . . . . . . . . . . . . . . 70
5.6 Improvements . . . . . . . . . . . . . . . . . . . . . . . . . . . . . . . 71
5.6.1 Editor Interface Adjustments . . . . . . . . . . . . . . . . . . 71
5.6.2 Integration with Game Summary . . . . . . . . . . . . . . . . 72
5.6.3 Improving Audio Clip Renaming . . . . . . . . . . . . . . . . 76
6 Improving Media Uploading 79
6.1 Software Updates . . . . . . . . . . . . . . . . . . . . . . . . . . . . . 80
6.2 Editor Upload Size Limits . . . . . . . . . . . . . . . . . . . . . . . . 80
6.3 File Type Verification . . . . . . . . . . . . . . . . . . . . . . . . . . . 81
6.4 Media Compression . . . . . . . . . . . . . . . . . . . . . . . . . . . . 83
6.4.1 Images . . . . . . . . . . . . . . . . . . . . . . . . . . . . . . . 83
6.4.2 Videos . . . . . . . . . . . . . . . . . . . . . . . . . . . . . . . 84
6.4.3 Audio Clips . . . . . . . . . . . . . . . . . . . . . . . . . . . . 85
7 In-Editor Media Tutorials 87
7.1 Overview . . . . . . . . . . . . . . . . . . . . . . . . . . . . . . . . . . 87
7.2 Adding Audio Clips . . . . . . . . . . . . . . . . . . . . . . . . . . . . 88
7.3 Media Documentation . . . . . . . . . . . . . . . . . . . . . . . . . . 88
8 Future Work 93
8.1 Agent Overview Integration . . . . . . . . . . . . . . . . . . . . . . . 94
8.2 Improving Audio Settings on Mobile . . . . . . . . . . . . . . . . . . 94
8.3 Pilot Testing . . . . . . . . . . . . . . . . . . . . . . . . . . . . . . . . 95
8.4 Further Media Customizations . . . . . . . . . . . . . . . . . . . . . . 95
8.5 Full-Screen Image Mode . . . . . . . . . . . . . . . . . . . . . . . . . 96
8.6 Additional Media Upload Improvements . . . . . . . . . . . . . . . . 96
8.7 Media Picker Tab Pagination . . . . . . . . . . . . . . . . . . . . . . 97
8.8 Video Script Blocks . . . . . . . . . . . . . . . . . . . . . . . . . . . . 98
9 Conclusion 99
9
A Research Instruments 101
10
List of Figures
2-1 Typical TaleBlazer agent dashboard . . . . . . . . . . . . . . . . . . . 21
2-2 Example TaleBlazer script . . . . . . . . . . . . . . . . . . . . . . . . 22
2-3 World and player dashboards . . . . . . . . . . . . . . . . . . . . . . 23
2-4 Image picker in the editor . . . . . . . . . . . . . . . . . . . . . . . . 24
2-5 Custom image map . . . . . . . . . . . . . . . . . . . . . . . . . . . . 25
2-6 Video picker in the editor . . . . . . . . . . . . . . . . . . . . . . . . 26
2-7 Prototype version of the rich text editor . . . . . . . . . . . . . . . . 28
2-8 Audio file processing on the server . . . . . . . . . . . . . . . . . . . . 29
2-9 Audio asset saving process . . . . . . . . . . . . . . . . . . . . . . . . 30
2-10 Prototype version of the rich text editor with attached audio . . . . . 35
2-11 ARIS audio asset editor . . . . . . . . . . . . . . . . . . . . . . . . . 36
2-12 ARIS mobile app audio interface . . . . . . . . . . . . . . . . . . . . 37
2-13 7Scenes audio uploader . . . . . . . . . . . . . . . . . . . . . . . . . . 38
2-14 7Scenes mobile app audio player . . . . . . . . . . . . . . . . . . . . . 38
3-1 Audio playback controls . . . . . . . . . . . . . . . . . . . . . . . . . 43
3-2 Audio settings in the mobile application . . . . . . . . . . . . . . . . 46
4-1 Rich text editor with audio tile . . . . . . . . . . . . . . . . . . . . . 51
4-2 Audio picker . . . . . . . . . . . . . . . . . . . . . . . . . . . . . . . . 54
4-3 Audio picker in loading state . . . . . . . . . . . . . . . . . . . . . . . 55
4-4 Rename audio clip dialog . . . . . . . . . . . . . . . . . . . . . . . . . 57
5-1 Demo game introduction . . . . . . . . . . . . . . . . . . . . . . . . . 62
11
5-2 Demo game player and world dashboards . . . . . . . . . . . . . . . . 62
5-3 Unlocking the Gringotts Bank vault in the demo game . . . . . . . . 64
5-4 Audio picker with accepted file types . . . . . . . . . . . . . . . . . . 72
5-5 Stacked editor audio dialogs . . . . . . . . . . . . . . . . . . . . . . . 73
5-6 Audio clip integration with the game summary . . . . . . . . . . . . . 75
5-7 Typical agent overview . . . . . . . . . . . . . . . . . . . . . . . . . . 76
5-8 Audio clip rename dialog error messages . . . . . . . . . . . . . . . . 77
6-1 Audio picker with size limit exceeded . . . . . . . . . . . . . . . . . . 82
7-1 Adding audio clips tutorial excerpt . . . . . . . . . . . . . . . . . . . 88
7-2 In-depth media tutorials . . . . . . . . . . . . . . . . . . . . . . . . . 89
12

List of Tables
2.1 One-minute video and audio file sizes estimates . . . . . . . . . . . . 34
6.1 Editor Upload Size Limits . . . . . . . . . . . . . . . . . . . . . . . . 81
6.2 High-resolution smart phone specifications . . . . . . . . . . . . . . . 84
6.3 High-resolution tablet specifications . . . . . . . . . . . . . . . . . . . 84
7.1 Recommended audio formats and codecs . . . . . . . . . . . . . . . . 90
7.2 Recommended video formats and codecs . . . . . . . . . . . . . . . . 91
13

14

Chapter 1
Introduction
The MIT Scheller Teacher Education Program (STEP) lab has developed several
educational platforms targeted towards middle and high school students. TaleBlazer
is one such project that is designed for making and playing educational mobile games.
The platform is used to create location-based augmented reality (AR) games that
use the GPS found on most mobile devices to trigger in-game actions based on the
player’s real-world location. Each game is associated with one or more real-world
regions specified by latitudinal and longitudinal boundaries. When players move to
locations marked by an icon on the screen, they can interact with virtual objects,
characters, or data in the game world. The TaleBlazer platform also includes an
online editor that is used by game designers to create AR games using a blocks-based
programming language. The goal of the TaleBlazer platform is to encourage players
to learn about their surroundings in an interactive and engaging manner.
With the original production version of TaleBlazer, game designers used large
amounts of text to relay critical game information to players. Games designers could
enrich their games by supplementing this text with optional images and video. How-
ever, even with this media support, TaleBlazer games required players to focus their
attention on their mobile device screens rather than their surroundings. This is un-
desirable from a design perspective since the platform is meant to augment − not
replace − the experience of exploring a particular location. The goal of this project
is to reduce the time players spend looking at their devices by adding audio support
15

to the platform. Adding audio to games allows players to make progress in the game
while still interacting with the physical space around them. It also gives game design-
ers the chance to add personality and dimension to their games, resulting in a richer
experience for players. For instance, designers can use accents or background music
to add to the aesthetic of the game. This thesis will describe the design of the new
audio feature, as well as the infrastructure improvements that were made to deploy
it.
1.1 Motivations
The original implementation of TaleBlazer relied on text to impart game information
to players. In particular, game designers often added descriptions to characters in
their games using large blocks of richly-formatted text, which is text with extra
formatting (positioning, coloring, etc.). These text-heavy games are not ideal for
players for two main reasons: player age and the setting in which games are played.
First, many TaleBlazer users are young students who may find it difficult to read
several paragraphs of text at a time. Second, most games developed using the platform
are played outdoors due to TaleBlazer’s reliance on GPS. For example, organizations
like the Columbia Zoo & Aquarium use the platform to create games that students
can play during field trips. In these settings, it often becomes difficult for players
to read large amounts of text due to screen size/resolution, screen glare, and outside
distractions.
While the original version of the platform supported images and videos, it still
forced players to constantly look at their mobile devices during gameplay. As a result,
screen glare was an issue in outdoor settings. Furthermore, game designers still used
text as the primary method of communicating information to players; images and
video were oftentimes used to supplement and enhance the text.
The original codebase also contained a prototype of the audio feature described
in this thesis; I had developed this prototype as part of a prior project [11]. Upon
starting my thesis work, the prototype had not yet been shipped to the public. This
16

project involved completing it and making usability and infrastructure improvements
to prepare it for deployment. The prototype feature introduced the notion of audio
clips − audio recordings associated with pieces of rich text. Game designers would
record audio and attach it to rich text in the online editor. Then during gameplay,
players would be presented with the rich text on-screen accompanied by the associated
audio recording.
The addition of audio to the platform reduces TaleBlazer’s reliance on text, re-
sulting in more complex and diverse games. Rather than reading large blocks of text,
players can listen to audio recordings to learn key game information. This is partic-
ularly useful because players will no longer have to constantly look at their mobile
devices. They will have the chance to explore and learn from their surroundings
while listening to in-game audio. One potential use case would be designing audio
tour games for students on field trips. These games could combine the educational
value of an audio tour with the engaging and interactive elements of gameplay, re-
sulting in a highly enriching experience for students. Another use case would be
supplementing an existing TaleBlazer game with audio to encourage players to look
up from their devices. The introduction of audio to TaleBlazer can change the way
existing games are played, as well as broaden the horizons for the types of games that
can be developed.
1.2 Chapter Summary
Chapter 2 provides background information on TaleBlazer and the original state of
media support on the platform. Chapter 3 details the steps taken to improve usability
of the existing audio clips feature in the mobile application, and Chapter 4 explains
the audio clip improvements made to the editor. Chapter 5 describes user testing
of audio clips and summarizes the feedback that was received. Chapter 6 discusses
platform infrastructure improvements that were made to improve uploading of audio
clips and all other media assets. Chapter 7 describes media tutorials that were added
17

to the TaleBlazer editor for new users. Chapter 8 suggests future enhancements to
the audio clips feature and to other forms of supported media. Chapter 9 concludes.
18

Chapter 2
Background
For nearly two decades, the MIT STEP Lab has developed many different platforms
for educational gaming. TaleBlazer is one such project that utilizes location-based
AR to facilitate real-world exploration and learning. The new audio clips functional-
ity builds upon existing infrastructure to make the gaming experience seamless and
intuitive for TaleBlazer users.
2.1 TaleBlazer Platform
TaleBlazer is a platform for both creating and playing educational location-based AR
games. The target audience therefore includes game designers and players. The pri-
mary audience of game designers consists of partner organizations, students making
games in summer camps or after-school programs, and facilitators who work with
youth to create TaleBlazer games. Our partner organizations include the Columbus
Zoo & Aquarium and the Missouri Botanical gardens [18]. These organizations use
TaleBlazer to create games to teach visitors about the sites they are exploring. Stu-
dents taking part in TaleBlazer programs range from fifth grade on up, and they
create and play their own games to get experience with game design. The students
are generally accompanied by facilitators who guide them through the process and
teach them about the platform. As such, typical TaleBlazer players include students,
as well as visitors to our partner organizations.
19

2.1.1 Overview
The TaleBlazer platform consists of three main parts:
∙ Online editor where game designers create games
∙ Server where games are saved
∙ Mobile application with which players can download and play games.
Game designers use the online editor to create their games and save their work to the
TaleBlazer server. With the editor interface, they can specify regions of gameplay
− real-world locations with latitudinal and longitudinal boundaries where games are
typically played. A single game can have multiple regions that indicate different
physical locations or just different chapters or stages of the game in the same location.
Within these regions, game designers can select locations at which to place agents −
virtual objects and characters. When a game designer saves a game on the editor,
the data models used to represent the game on the editor are serialized and saved
into a text file − called the game file − on the server.
In order to play these games, players use the TaleBlazer mobile application which
is supported on both Android and iOS devices. The mobile application downloads
games from the TaleBlazer server by first downloading the game file and parsing it.
This allows the application to recreate all the data models from the editor. These
data models must contain the URLs of all media asset files needed in the game so that
the mobile application can download them from the server. After the app finishes
downloading all the necessary media, the player can begin playing the game.
To make it easier for game designers to share games with each other, the TaleBlazer
server has a remixing feature. Remixing allows designers to copy a game from another
TaleBlazer designer’s account into their own account. While designers can’t modify
the original game since it belongs to another user, they can edit their remixed copy
of the game.
20

Figure 2-1: Typical TaleBlazer agent dashboard. The agent “Treasure Chest” hastwo actions: script action “Open Chest” and text action “Find Treasure”.
2.1.2 Game Mechanics
On the TaleBlazer mobile app, players are presented with a rich text game introduction
upon starting a new game. During gameplay, players see a map of the current region
marked with agent locations. When players move to the location of an agent, they
bump into the agent; at this point, the mobile application displays the agent dashboard
− a screen containing rich text and an image describing the agent (Figure 2-1). Agents
can be characters in the game world that users interact with, or they can be virtual
objects that can be picked up and stored in the player’s inventory.
Agents can be associated with one or more actions, which appear as buttons on
the agent dashboard. Players use these buttons to select which actions to perform,
and they have the option to close the dashboard (by hitting the “OK” button) without
choosing any actions.
21

Figure 2-2: Example TaleBlazer script. The script defines a script action called“Sail” that moves the player’s location in the game, displays some text, and switches
to the Map tab in the mobile application.
There are four types of actions that have different effects when clicked:
∙ Text − displays richly-formatted text
∙ Video − plays an in-game video
∙ Script − executes a custom script created by the game designer
∙ Built-in − performs built-in functionality, such as picking up/dropping virtual
objects.
Script actions are defined by writing scripts using a blocks-based programming
language in the online editor. Script blocks are visual objects that can be dragged
and chained together on the editor to write custom script logic. The blocks support
standard control flow logic, as well as behavior specific to TaleBlazer games, such
as moving agent locations on the map or enabling/disabling the display of actions.
Figure 2-2 shows an example TaleBlazer script.
There are two special types of agents that can be used to hide information from
the user until they enter a valid code: password-protected agents and clue code agents.
A password-protected agent requires players to enter the correct password in order to
gain access to the agent’s actions. Clue code agents can be summoned by the player
at any time or location by entering the correct code into the Clue Code tab of the
mobile interface.
22

Figure 2-3: World (left) and player (right) dashboards. Both are tabs in theTaleBlazer mobile interface.
TaleBlazer also supports the creation of role-playing games in which the player
can assume one of many virtual characters defined by the game designer. In these
games, the player makes their role selection at the beginning of the game. If the
game designer enables the display of the player dashboard, players can navigate to
the Player tab in the mobile interface and see which role they selected, along with a
corresponding rich text description and image. Similarly, there is an additional world
dashboard (on the World tab) which contains information about the overall game
world. It can also be customized with a rich text description and an image. Like
the agent dashboard, the player and world dashboards can contain actions. However,
they differ from the agent dashboard in that they are tabs on the mobile interface
and therefore always accessible during gameplay (Figure 2-3). The agent dashboard,
on the other hand, is only displayed when the player bumps into the agent.
23

Figure 2-4: Image picker in the editor. The Game Files tab lists images used in thecurrent game, and the My Files tab lists all images uploaded by the designer. TheTaleBlazer Files tab contains images that can be shared by all game designers, but
this tab is currently empty.
2.1.3 Technologies
The TaleBlazer editor is written in JavaScript with an HTML and CSS front end.
It is hosted on the TaleBlazer server, which also stores all game data and account
information. The server is written in PHP and uses a MySQL database. The mobile
application is developed using the Appcelerator Titanium platform, which compiles
JavaScript code into native iOS and Android applications.
2.1.4 Image Support
As described in the previous section, images are used to customize the look of the
agent, player, and world dashboards. These dashboards contain the custom image,
followed by an optional rich text description. To customize the image for a particular
dashboard, a game designer opens the image picker from the editor (Figure 2-4).
This picker lets the designer upload a new image file, select an image that is already
being used in the game, or select an image from one of their other games.
24

Figure 2-5: Custom image map.
Besides the various dashboards, custom images can be used for depicting regions.
To specify the locations of agents in a region, game designers choose from a set of
possible icons. These icons are displayed on a map during gameplay. For outdoor
games, designers use either a dynamic map or a static custom map image to depict
a region so that players can find nearby agents. While dynamic maps use the mobile
device’s maps API, custom map images are selected by the game designer and can be
modified to fit the theme of the game (Figure 2-5). Custom map images are also used
for indoor regions in which GPS location-tracking is not possible. In indoor regions,
players enable the tap to visit setting, allowing them to tap on the agent icons to
bump into them.
2.1.5 Video Support
The only way to add custom video to games is with a video action. To select video
for a video action, game designers use the video picker on the editor, which is very
similar to the image picker. As shown in Figure 2-6, designers can upload new video
files, or reuse video files they have already uploaded in the past.
25
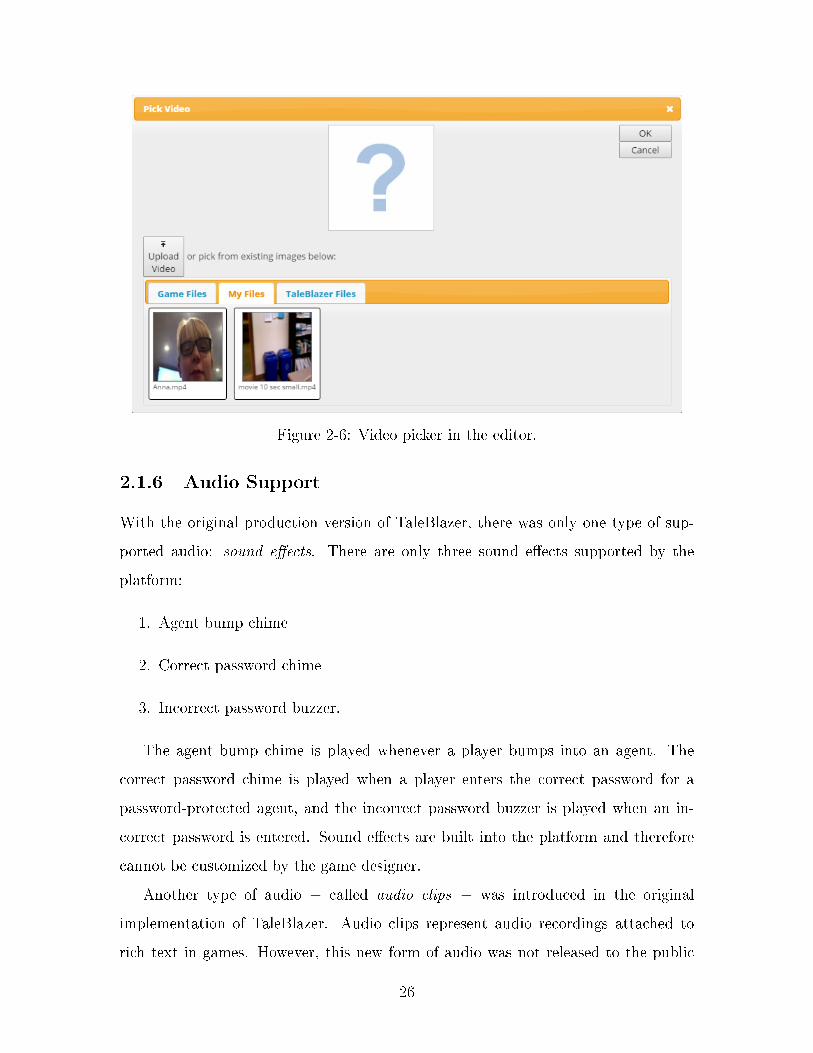
Figure 2-6: Video picker in the editor.
2.1.6 Audio Support
With the original production version of TaleBlazer, there was only one type of sup-
ported audio: sound effects. There are only three sound effects supported by the
platform:
1. Agent bump chime
2. Correct password chime
3. Incorrect password buzzer.
The agent bump chime is played whenever a player bumps into an agent. The
correct password chime is played when a player enters the correct password for a
password-protected agent, and the incorrect password buzzer is played when an in-
correct password is entered. Sound effects are built into the platform and therefore
cannot be customized by the game designer.
Another type of audio − called audio clips − was introduced in the original
implementation of TaleBlazer. Audio clips represent audio recordings attached to
rich text in games. However, this new form of audio was not released to the public
26

prior to this project; sounds effects were the only supported form of audio in the
production version of the platform. Section 2.2 describes in more detail the work
done on audio clips prior to this project.
2.2 Prior Work on Audio Clips
The original implementation of TaleBlazer contained a prototype of the audio clips
feature that I developed earlier. It is important to note that this prototype was not
yet released to the public at the start of this project. The prototype served as the
foundation for this project, and the work described in Chapters 3-7 has made it ready
for deployment. The new version of the audio clips feature has now been released
and is in the production version of TaleBlazer. This section describes the design and
implementation of the prototype of the audio clips feature.
2.2.1 Prototype Overview
The prototype feature introduced the notion of audio clips to the platform. Audio
clips represented audio recordings attached to rich text. Game designers could attach
audio clips to rich text by uploading audio files on the rich text editor (Figure 2-7).
During gameplay, players were presented with the visual text on the screen accom-
panied by the attached audio clip. The recording did not necessarily have to match
the text being displayed, differentiating this from text-to-speech. Instead, audio clips
could be used to enhance gameplay in whatever way the designer saw fit. This could
mean recording the exact words that appeared in the rich text, summarizing the text
in a more concise manner, or having a voice actor read the text more dramatically.
There are five main ways of displaying rich text in TaleBlazer games:
∙ Game introduction
∙ Text action
∙ “Say rich text” script block
27

Figure 2-7: Prototype version of the rich text editor. Game designers could uploadand attach audio clips directly from the dialog.
∙ “Set description to rich text” script block
∙ Agent/Player/World dashboard
Since audio clips were so tightly coupled with rich text, it was not possible to use
them outside of the five modes described above.
2.2.2 Uploading Audio Files
A new database table was created for storing metadata of the uploaded audio files.
This metadata included: the file path of the recording on the server, its duration in
seconds, and the name of the audio clip. The audio clip name defaulted to the name
of the uploaded file.
After database support was added, the audio file uploader was implemented uti-
lizing PHP’s built-in uploading capabilities. The uploader accepted the following
audio file types: mp3, wma, m4a, and wav. If there was a name collision between the
uploaded file and an existing audio file on the server, the server gave the new file a
unique name.
28

Figure 2-8: Audio file processing on the server. Uploaded files were converted to wavfor SoX volume adjustment. FFmpeg compressed and converted files to m4a. Thefinal output files were saved on the server and intermediate results were deleted.
The volume of uploaded recordings was normalized and maximized using the
Sound eXchange (SoX) command line utility [17]. In order to use SoX, uploaded
files were first converted to wav using a free software tool called FFmpeg [6]. To
ensure correct playback of audio on mobile devices, the volume-adjusted recordings
were compressed and converted to m4a using FFmpeg. This process is shown in Fig-
ure 2-8. We chose this file format because it is a standard supported by FFmpeg,
Titanium, and most mobile devices. If the upload was successful, metadata from the
file was collected and saved to the database.
This audio conversion and compression process is very similar to the existing video
upload processing on the server. SoX is used to maximize the volume of the audio
track in videos, and FFmpeg is used to convert video files to the mp4 format.
2.2.3 Attaching Audio Clips to Rich Text
In order to preserve the connection between rich text and its associated audio, changes
were made to the underlying JavaScript data models on the editor. In particular, the
editor was modified to store a numeric audio server id alongside each piece of rich
text. This server id was the server-side database id of the corresponding entry in the
audio table. Upon successfully uploading an audio file, the server responded with this
id, and the editor saved it as a new field in the appropriate data model.
2.2.4 Saving Games
Supporting proper audio downloading from the mobile application required making
updates to the way games were saved on the editor. In particular, audio clip URLs
29
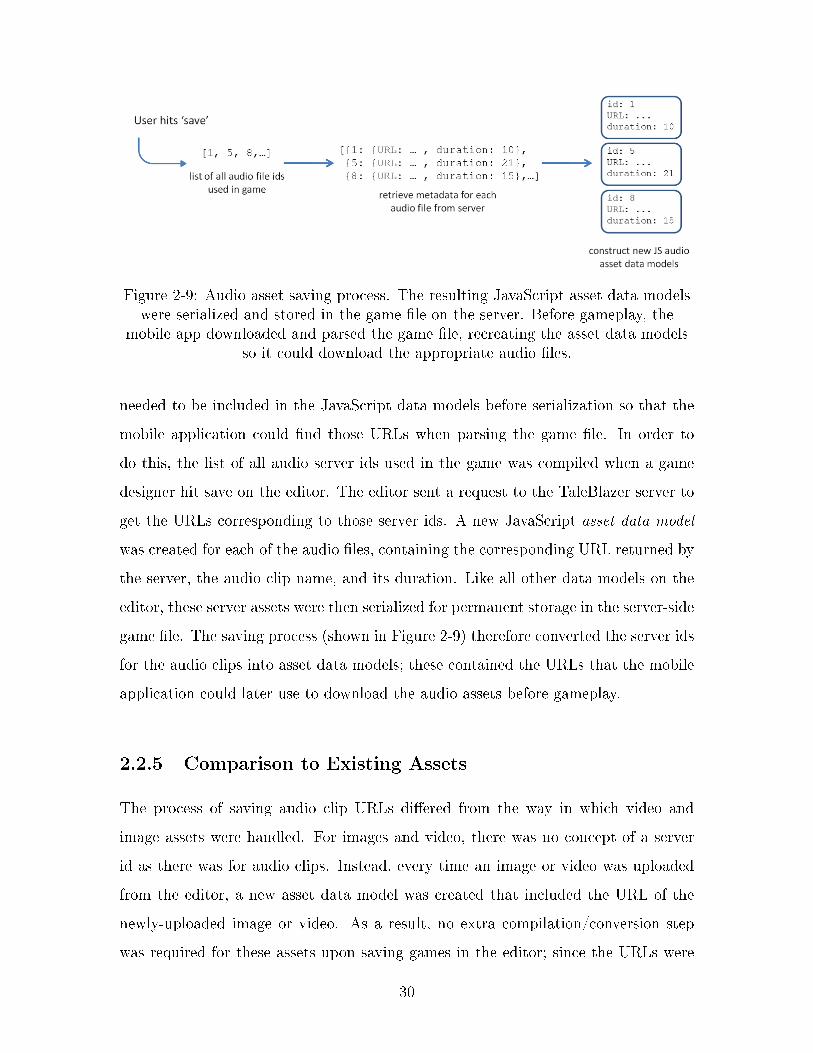
Figure 2-9: Audio asset saving process. The resulting JavaScript asset data modelswere serialized and stored in the game file on the server. Before gameplay, the
mobile app downloaded and parsed the game file, recreating the asset data modelsso it could download the appropriate audio files.
needed to be included in the JavaScript data models before serialization so that the
mobile application could find those URLs when parsing the game file. In order to
do this, the list of all audio server ids used in the game was compiled when a game
designer hit save on the editor. The editor sent a request to the TaleBlazer server to
get the URLs corresponding to those server ids. A new JavaScript asset data model
was created for each of the audio files, containing the corresponding URL returned by
the server, the audio clip name, and its duration. Like all other data models on the
editor, these server assets were then serialized for permanent storage in the server-side
game file. The saving process (shown in Figure 2-9) therefore converted the server ids
for the audio clips into asset data models; these contained the URLs that the mobile
application could later use to download the audio assets before gameplay.
2.2.5 Comparison to Existing Assets
The process of saving audio clip URLs differed from the way in which video and
image assets were handled. For images and video, there was no concept of a server
id as there was for audio clips. Instead, every time an image or video was uploaded
from the editor, a new asset data model was created that included the URL of the
newly-uploaded image or video. As a result, no extra compilation/conversion step
was required for these assets upon saving games in the editor; since the URLs were
30
already in the game’s data models, they were present during serialization and therefore
included in the game file.
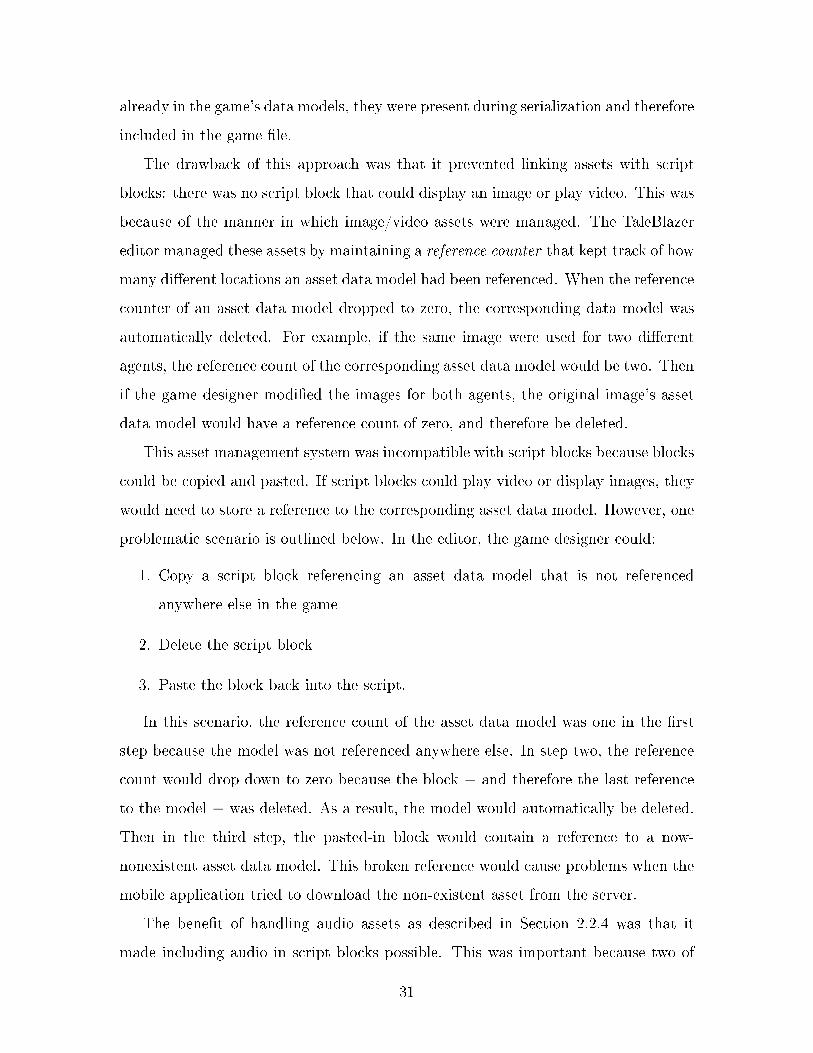
The drawback of this approach was that it prevented linking assets with script
blocks: there was no script block that could display an image or play video. This was
because of the manner in which image/video assets were managed. The TaleBlazer
editor managed these assets by maintaining a reference counter that kept track of how
many different locations an asset data model had been referenced. When the reference
counter of an asset data model dropped to zero, the corresponding data model was
automatically deleted. For example, if the same image were used for two different
agents, the reference count of the corresponding asset data model would be two. Then
if the game designer modified the images for both agents, the original image’s asset
data model would have a reference count of zero, and therefore be deleted.
This asset management system was incompatible with script blocks because blocks
could be copied and pasted. If script blocks could play video or display images, they
would need to store a reference to the corresponding asset data model. However, one
problematic scenario is outlined below. In the editor, the game designer could:
1. Copy a script block referencing an asset data model that is not referenced
anywhere else in the game
2. Delete the script block
3. Paste the block back into the script.
In this scenario, the reference count of the asset data model was one in the first
step because the model was not referenced anywhere else. In step two, the reference
count would drop down to zero because the block − and therefore the last reference
to the model − was deleted. As a result, the model would automatically be deleted.
Then in the third step, the pasted-in block would contain a reference to a now-
nonexistent asset data model. This broken reference would cause problems when the
mobile application tried to download the non-existent asset from the server.
The benefit of handling audio assets as described in Section 2.2.4 was that it
made including audio in script blocks possible. This was important because two of
31

the ways of displaying rich text were with script blocks (Section 2.2.1). With the new
design, rich text script blocks could store the audio server id, and when blocks were
copied/pasted, the same server id would be present in the pasted block. The issue
of broken references in script blocks was avoided by bypassing the asset management
system that maintained reference counters. Instead, all necessary audio asset data
models were constructed when the game was saved, avoiding the problem of dangling
references to nonexistent assets.
2.2.6 Playing Games with Audio Clips
Since the editor converted audio server ids into URLs during game saving, these URLs
were present in the game file that the mobile application downloaded from the server.
The mobile app could therefore download the necessary audio clips to the device
before gameplay.
During gameplay, audio clips were played automatically when the corresponding
rich text was displayed on-screen. Since the rich text was internally represented
as HTML, the mobile application used the Titanium web view to render rich text
to the screen. Upon rendering, the app found the corresponding audio file in local
storage and automatically began playback using the Titanium Sound API, which has
resources for playing audio. Audio playback was stopped when the player exited out
of the rich text screen. For the player/world dashboards, this would occur when the
player switched tabs in the mobile app. For all other rich text in the game, this would
happen when the player hit the “OK” button (shown in Figure 2-1), closing the web
view.
2.2.7 Advantages of Audio Clips
Since there was no audio clip support in the original production version of TaleBlazer,
designers used video actions when they wanted to include audio in their games. For
example, they would record videos with the desired audio track, leaving the video
32
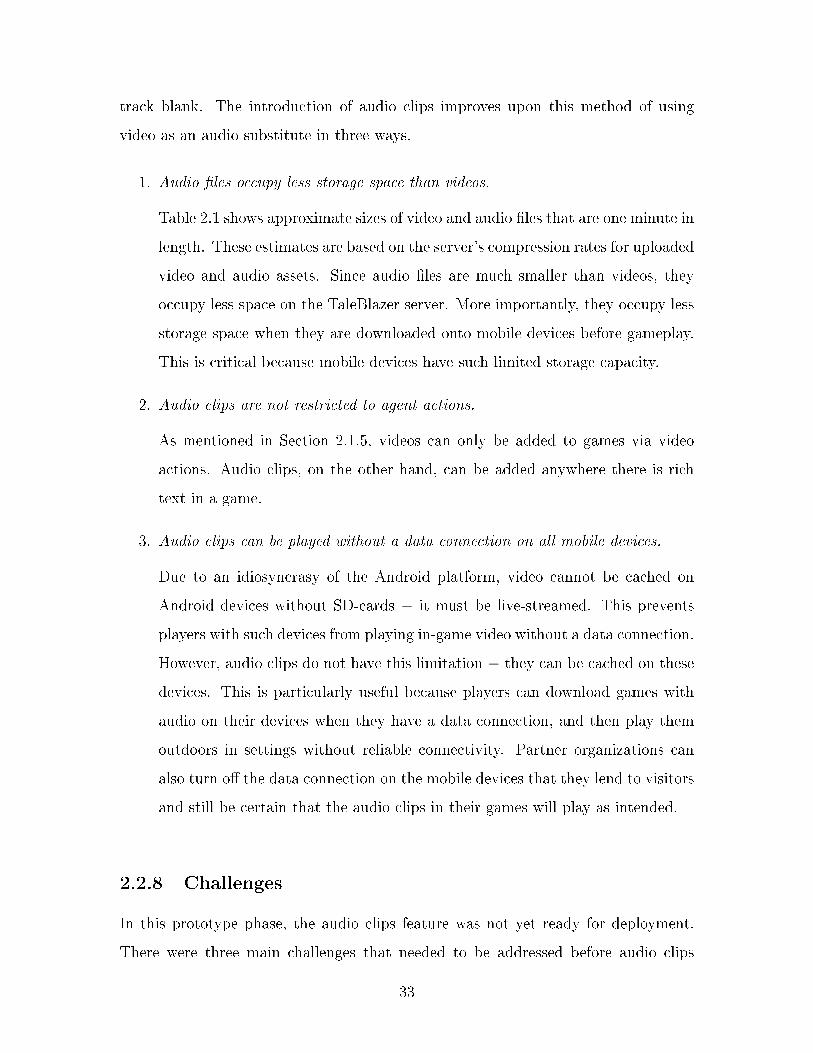
track blank. The introduction of audio clips improves upon this method of using
video as an audio substitute in three ways.
1. Audio files occupy less storage space than videos.
Table 2.1 shows approximate sizes of video and audio files that are one minute in
length. These estimates are based on the server’s compression rates for uploaded
video and audio assets. Since audio files are much smaller than videos, they
occupy less space on the TaleBlazer server. More importantly, they occupy less
storage space when they are downloaded onto mobile devices before gameplay.
This is critical because mobile devices have such limited storage capacity.
2. Audio clips are not restricted to agent actions.
As mentioned in Section 2.1.5, videos can only be added to games via video
actions. Audio clips, on the other hand, can be added anywhere there is rich
text in a game.
3. Audio clips can be played without a data connection on all mobile devices.
Due to an idiosyncrasy of the Android platform, video cannot be cached on
Android devices without SD-cards − it must be live-streamed. This prevents
players with such devices from playing in-game video without a data connection.
However, audio clips do not have this limitation − they can be cached on these
devices. This is particularly useful because players can download games with
audio on their devices when they have a data connection, and then play them
outdoors in settings without reliable connectivity. Partner organizations can
also turn off the data connection on the mobile devices that they lend to visitors
and still be certain that the audio clips in their games will play as intended.
2.2.8 Challenges
In this prototype phase, the audio clips feature was not yet ready for deployment.
There were three main challenges that needed to be addressed before audio clips
33

File Type Bitrate (kbps) Size of File (MB)Audio 128 0.96Video 639 4.79
Table 2.1: One-minute video and audio file sizes estimates. The audio bitrate isbased on the FFmpeg defaults for the AAC encoder. The video bitrate is based onthe FFmpeg defaults using the MPEG-4 encoder for a frame rate of 29.97 and
dimensions of 720x480. The estimates show that a one-minute audio file occupiesroughly 20% of the storage space required for a video of the same duration.
functionality could be released to the public: two challenges with the mobile interface,
and one with the editor interface. Chapter 3 describes the work done to address the
challenges in the mobile application. Chapter 4 does the same for the challenge in
the editor.
The first challenge was to add playback controls for audio clips in the mobile
application. With these controls, players could rewind and replay audio if they missed
critical game information. In the prototype implementation, the mobile application
displayed no playback controls, and recordings would start playing automatically,
giving players no chance to rewind or pause audio.
The second challenge was to include audio settings in the mobile application.
These would allow players to turn off audio clips or disable autoplay, facilitating
gameplay in quiet conditions. The prototype implementation had no settings per-
taining to audio, forcing players to rely on their mobile device sound settings while
using the TaleBlazer application.
Finally, the third challenge was to improve the interface on the editor so that
game designers could review and manage their uploaded audio assets. For example,
with the prototype implementation, the rich text editor only displayed the server id
for the uploaded audio clip (Figure 2-10), making it impossible for designers to know
which clip they had attached to the text. With an improved interface, game designers
could view details about the clip attached to a piece of rich text.
These three challenges were addressed in this project, resulting in a more polished
version of the audio clips feature that has been shipped to the public.
34

Figure 2-10: Prototype version of the rich text editor with attached audio. Theeditor only displayed the numeric server id for the attached audio clip.
2.3 Similar Platforms
The space of location-based augmented reality games is small but growing with the
popularization of mobile devices. As we introduced audio to TaleBlazer, it was useful
to consider how audio and other forms of media were used by existing platforms in
this space.
2.3.1 ARIS
Like TaleBlazer, ARIS is a platform for playing and creating AR location-based mo-
bile games [4]. The platform consists of an online editor and a mobile application
supported on iOS. ARIS players can walk around in the real world and interact with
objects in the game world. The ARIS app uses GPS location to trigger interaction
between objects and players. The objects contain the media content that the game
designer would like to show the player. ARIS game designers specify the content for
objects by uploading media on the editor. The platform handles all image, audio,
and video uploads from the same interface. Media assets can also be edited using
35

Figure 2-11: ARIS audio asset editor.
the dialog shown in Figure 2-11. For audio in particular, an HTML5 audio player
allows game designers to listen to uploaded audio assets. Furthermore, assets can be
renamed so that designers can easily identify them without having to rely on audio
playback. ARIS’s handling of audio provides insight into the types of features game
designers will expect from the TaleBlazer editor. The audio upload feature in ARIS
is therefore a useful guideline for the design of audio clip uploads in the TaleBlazer
editor.
Figure 2-12 shows how the ARIS mobile application displays objects with audio.
Players are shown a microphone icon, which they click to start the QuickTime au-
dio player. There are no audio playback controls, but players can replay the clip by
tapping the microphone icon again. The TaleBlazer mobile interface for audio im-
proves upon this, giving players the chance to pause, fast-forward, and rewind clips.
The TaleBlazer audio playback controls are also docked to the bottom of the screen,
allowing players to listen to audio while reading the associated text.
2.3.2 7Scenes
7Scenes is another platform for designing and playing AR location-based mobile games
[1]. Organizations and other game designers use the online editor to design their
interactive games. They add markers to a map to create places, real-world locations
that have media and other content associated with them in the game. Figure 2-13
36

Figure 2-12: ARIS mobile app audio interface. When the microphone icon (left) istapped, the QuickTime audio player (right) begins.
shows the dialog box for adding a new place with audio. The dialog allows designers
to upload a new audio file or select from a previously uploaded file. Audio places can
also have an optional image to accompany the recording.
In the 7Scenes mobile app, players can see a map of all nearby places, and they
can tap on these markers to view the attached content. Figure 2-14 shows the 7Scenes
mobile interface for viewing a place with an attached image and audio file. The player
can use the audio playback controls to rewind and replay the clip as needed.
The 7Scenes editor and mobile application provide examples of the type of audio
functionality that TaleBlazer users will expect from the platform. Some of the audio
features in 7Scenes have therefore been incorporated into the design of the audio clips
feature. For example, the new TaleBlazer mobile application includes audio playback
controls (Section 3.1) to provide a usable interface for players. Additionally, the new
version of the TaleBlazer editor allows game designers to view their existing audio
uploads (Section 4.2), as in the 7Scenes editor.
37

Figure 2-13: 7Scenes audio uploader.
Figure 2-14: 7Scenes mobile app audio player.
38

Chapter 3
Audio Clips on Mobile
As described in Section 2.1.6, the audio clips feature was in a prototype phase at the
start of this project. There were two main challenges we needed to address before
shipping audio clips functionality on TaleBlazer mobile (Section 2.2.8). The first
challenge was to display audio playback controls while playing audio clips. With the
prototype implementation, there were no controls, making it impossible for players
to rewind and replay clips if they missed any important information. The second
challenge was to add audio settings in the mobile application. There were no such
settings in the prototype version, preventing players from disabling audio clips or
sound effects. These two challenges have been addressed in this project, and this
chapter describes the steps that were taken for each.
3.1 Audio Playback Controls
The first challenge was to add playback controls for audio clips in the mobile appli-
cation. The original implementation of audio clips did not allow players to pause,
rewind, or replay audio in the mobile application. This is a major limitation be-
cause most TaleBlazer games are played outdoors, so it’s easy to imagine a scenario
in which outside distractions might cause players to miss parts of the clip. Without
playback controls, it would become difficult for players to replay the clip and listen
to the parts that they missed. In the new version of the audio clips feature, audio
39
playback controls are displayed at the bottom of the screen so that players can easily
pause and replay audio as necessary.
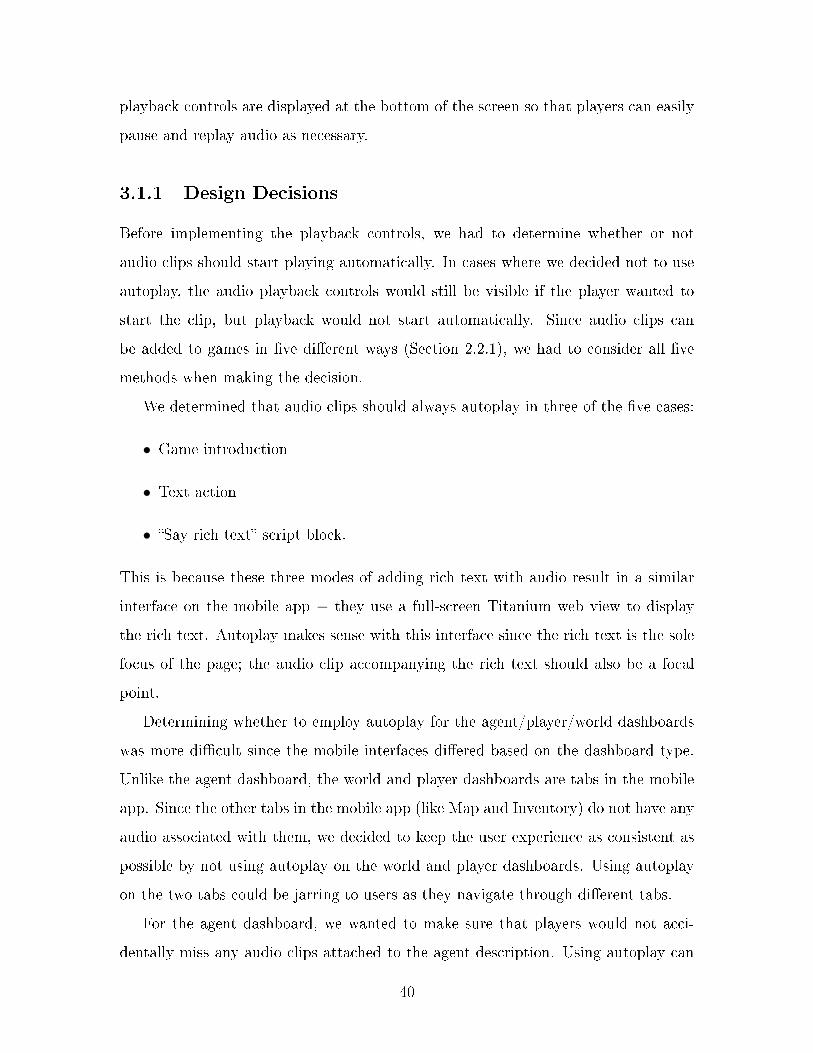
3.1.1 Design Decisions
Before implementing the playback controls, we had to determine whether or not
audio clips should start playing automatically. In cases where we decided not to use
autoplay, the audio playback controls would still be visible if the player wanted to
start the clip, but playback would not start automatically. Since audio clips can
be added to games in five different ways (Section 2.2.1), we had to consider all five
methods when making the decision.
We determined that audio clips should always autoplay in three of the five cases:
∙ Game introduction
∙ Text action
∙ “Say rich text” script block.
This is because these three modes of adding rich text with audio result in a similar
interface on the mobile app − they use a full-screen Titanium web view to display
the rich text. Autoplay makes sense with this interface since the rich text is the sole
focus of the page; the audio clip accompanying the rich text should also be a focal
point.
Determining whether to employ autoplay for the agent/player/world dashboards
was more difficult since the mobile interfaces differed based on the dashboard type.
Unlike the agent dashboard, the world and player dashboards are tabs in the mobile
app. Since the other tabs in the mobile app (like Map and Inventory) do not have any
audio associated with them, we decided to keep the user experience as consistent as
possible by not using autoplay on the world and player dashboards. Using autoplay
on the two tabs could be jarring to users as they navigate through different tabs.
For the agent dashboard, we wanted to make sure that players would not acci-
dentally miss any audio clips attached to the agent description. Using autoplay can
40

notify players that there is attached audio that may contain important game informa-
tion. We therefore determined that audio clips should always autoplay when a player
bumps into an agent; that way, players will not miss important details included in
the recording. Without autoplay, players might not realize that there is an attached
audio clip. Players can also view the agent dashboard from the History tab of the
mobile interface. This tab allows players to view the agents they have bumped into
in the past. To keep the player experience consistent, we also decided to autoplay
clips on the agent dashboard from the History tab.
Next, we decided how to handle agent actions. Text and video actions open up
a new page on top of the agent dashboard; when the player exits out of the action
by closing the new page, they return to the agent dashboard. Script actions may
open up new pages (i.e. if a “Say rich text” block is executed), or they may not
open any new pages, leaving the player on the agent dashboard. However, a script
action can potentially change the audio clip attached to an agent description. In
particular, the “Set description to rich text” script block changes the agent dashboard
by updating the rich text description. By updating the description, the block can
potentially attach a different audio clip to the agent description. A script action
that uses this block may therefore change the audio clip associated with the agent
description during its execution.
Since audio is so closely correlated with rich text, designers that want to update
the rich text description of an agent will most likely also want to update the associated
clip. The old audio clip attached to the original description is not likely to match the
new description text. As a result, we decided that by default, no audio clip will be
attached to the new description (instead of defaulting to the old audio clip). Note
that if a game designer wishes to change the rich text description of an agent but
keep the same audio clip attached to the text, they must manually attach the same
clip again to the new text via the rich text editor.
Since the audio clip attached to the agent description may change over the course
of an action, we wanted to make sure that players were aware of these changes to the
attached audio. This is because the new audio clip may contain new information that
41

the player needs to make progress in the game. Therefore, after an action is executed
and the player is back on the agent dashboard, we decided to autoplay the audio clip
attached to agent description if it had changed over the course of the action. Not
autoplaying the new clip could confuse players, as they might not realize that the
attached audio clip had changed while running the action. If the clip attached to
the description was the same as before, the player would have already listened to the
recording upon bumping the agent, and we decided correspondingly not to autoplay
the clip. Furthermore, agents might have many actions, and it would be irritating if
the same audio clip automatically restarted every time the player ran another action
and returned to the dashboard.
With these design decisions, we handled all five methods of adding audio clips
into TaleBlazer games, tailoring autoplay for each one. The other major decision
involving audio playback controls was whether or not to save the player’s progress in
the audio clip. If we saved the progress, a player could listen to an audio clip partway
through and leave the page; when the player returned and played the clip, it would
resume where they left off. It is important to note that most audio clips in TaleBlazer
games will be short − less than two minutes in length. Game designers will not want
to force players to listen to long recordings during gameplay, as this would make the
game less engaging. Saving progress in audio clips is therefore not essential because
players can easily use rewind/fast-forward controls to find their place in the short
clips. As a result, we decided not to save progress in audio clips, instead restarting
the clip from the beginning when the player reloaded the page.
3.1.2 Implementation
The final implementation of the audio playback controls in the mobile app uses a
footer docked to the bottom of the screen. We use our own playback controls interface
since the Titanium platform does not provide a built-in one. Our custom controls
interact with the Titanium Sound object used to play the audio file (Section 2.2.6).
Tap and touch events on the custom playback controls are used to manipulate the
underlying Sound object.
42

Figure 3-1: Audio playback controls. This shows playback controls in the gameintroduction (left), agent dashboard (middle), and world dashboard (right). Theinterface for text actions and “Say rich text” blocks is identical to that of the game
introduction. The Player tab interface is identical to that of the World tab.
Figure 3-1 shows the appearance of the controls on different mobile layouts. In
order, from left to right, the function of each button on the footer is: restart, rewind,
pause/play, and fast-forward. The restart button was added so that players would
not have to rewind through an entire recording to replay it. Tapping the rewind
button allows players to skip back five seconds, while holding it down allows them to
continuously rewind at 4x speed. Similarly, the fast-forward button allows players to
skip forward five seconds or fast-forward continuously. These two modes of rewinding
and fast-forwarding let players navigate the clip based on their needs. The pause/play
button toggles back and forth, depending on whether the clip is currently playing or
paused. The final component of the playback controls is the current-time indicator,
which displays the player’s progress in the clip, as well as the overall duration of the
recording.
In cases where the audio clip is autoplayed, playback starts automatically, display-
ing the pause button in the playback controls footer and updating the current-time
indicator. If the clip is not autoplayed, as in the case of the world and player dash-
43

boards, the player must tap the play button to begin the clip. One special case is
the agent bump. In this scenario, first the agent bump chime is played. Then, if the
agent description has an attached audio clip, the clip is autoplayed. It is important
to note that the audio playback controls footer is still visible when the sound effect
is played; however, at this stage, the controls are disabled. The buttons on the con-
trols are non-responsive, and the current-time indicator is fixed at zero progress. The
controls are enabled only after the sound effect has completed and the audio clip is
autoplayed. We leave the controls visible while the sound effect plays since having
them suddenly appear on-screen after the sound effect finishes could be visually jar-
ring. Disabling them prevents players from trying to start the clip while the sound
effect is still playing.
Audio clips can also interact with the other two sound effects (correct password
chime, incorrect password buzzer). For example, if the player bumps into a password-
protected agent, the agent bump chime first plays. Then, if the agent description
has an attached audio clip, the clip is autoplayed. If the player submits an incorrect
password while the audio clip is playing, the clip is stopped and the incorrect password
buzzer is played. Similarly, submitting a correct password will stop the playing audio
clip and trigger the correct password chime. The audio clip playback controls are
disabled while the incorrect/correct password sound effects are playing. After the
sound effects have finished, the controls are re-enabled but the clip is still stopped.
3.2 Audio Settings
The second challenge with improving audio clips functionality in the mobile appli-
cation was to add audio settings. Most commercial mobile applications that have
in-game audio also have settings to disable those sounds. Users expect these settings
so that they can use the mobile app in quiet locations without having to silence their
phones. To align with these expectations, we have added audio settings to the Tale-
Blazer mobile app so players can enable/disable the different types of audio in games.
The player can modify these settings on the existing settings page in the mobile app.
44
In the original implementation of TaleBlazer, sound effects were always enabled and
could not be turned off during gameplay. This resulted in players muting their phones
if they wanted to play silently. The new settings fix this existing issue in the platform
and also add options that will be useful for the new audio clips feature.
3.2.1 Design Decisions
There are two separate settings pages in the mobile app: one for application-level
settings, and one for in-game settings. The application-level settings include battery
power settings, and they affect the behavior of the app across all games played. On the
other hand, in-game settings only affect the current game being played. Application-
level settings, unlike in-game settings, cannot be modified during gameplay. To allow
players to change the game’s sound settings without pausing or leaving the game, we
decided to add audio settings to the in-game settings page. This also allows players
to customize audio settings according the current game. Future improvements to this
setup are described in Section 8.2.
In order to give players more control over in-game audio, we decided to have one
setting to enable/disable sound effects, and another to enable/disable audio clips. By
separating the two, players can disable both to use the app silently, or they can use
any combination depending on their preference. Next, we decided to add another
setting to enable/disable audio clip autoplay. With this option enabled, audio clips
will autoplay according to the rules specified in Section 3.1.1. When disabled, audio
clips will never autoplay. This is an important feature because some players may not
want audio clips to start automatically; disabling autoplay gives them the chance to
control exactly when audio clips start playing.
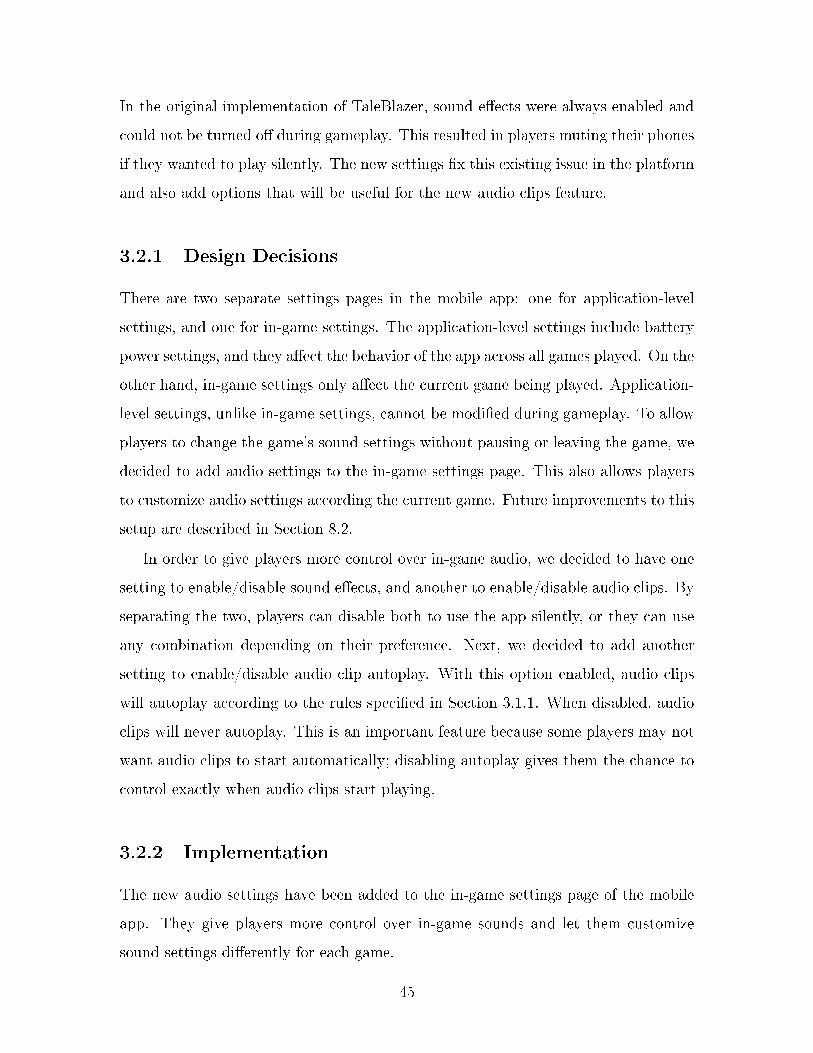
3.2.2 Implementation
The new audio settings have been added to the in-game settings page of the mobile
app. They give players more control over in-game sounds and let them customize
sound settings differently for each game.
45

Figure 3-2: Audio settings in the mobile application.
The new Settings page is shown in Figure 3-2. The three added settings are:
∙ Enable/Disable Sound Effects
∙ Enable/Disable Audio Clips
∙ Enable/Disable Audio Clips Autoplay
Enabling sound effects causes the three built-in sound effects to play as they would
in the original implementation. Disabling sound effects prevents them from playing.
When audio clips are enabled, the audio playback controls are displayed and the audio
clip can be played. When this setting is disabled, no playback controls are shown and
no audio clips are played. Therefore, disabling audio clips and enabling sound effects
results in behavior identical to the original implementation in production. When
audio clip autoplay is enabled, audio clips start automatically in the cases defined
in Section 3.1.1. When the setting is disabled, the audio controls are shown at the
bottom of the screen, but players must tap the play button to start. In the special
case of an agent bump, the controls are disabled until after the agent bump chime
46

has finished playing. Afterwards, the controls are re-enabled, but the player must
still tap the play button to start the clip.
47

48

Chapter 4
Audio Clips in the Editor
There was one main challenge we needed to address before shipping audio clip func-
tionality on the editor: we needed to design an interface for game designers to view
and manage their uploaded audio clips (Section 2.2.8). In the original prototype im-
plementation, designers could upload new audio files and attach them to rich text,
but they could not view detailed information about these files or play them from the
editor. This would have made it difficult for designers to check if they had uploaded
the correct audio files. Additionally, there was no centralized location for designers to
see all of their uploaded audio clips, which was inconsistent with the way the editor
handled image and video assets. These shortcomings have been resolved by the editor
updates described in this chapter.
4.1 Audio Tile
When updating the audio clips feature on the editor, we first considered the rich
text editor dialog. Figure 2-10 shows what the rich text editor in the prototype
implementation looked like for text that was associated with an audio clip. The
minimal interface only showed the server id of the selected clip. However, the server
id would be meaningless to game designers. Instead, we created a new user interface
component on the editor called an audio tile that displayed audio file information
useful to the game designer.
49

4.1.1 Design Decisions
We wanted the audio tile component to contain data that would help game designers
identify the audio clip. In particular, we decided to include the followingaudio clip
metadata: audio clip name, file size, and duration. Furthermore, we chose to include
an audio player so that the game designer could play the clip directly from the editor.
The new audio tile component would be placed at the bottom of the rich text editor,
replacing the current indication of the numerical audio clip server id. The content of
the tile would help game designers verify that they had uploaded the correct audio
file for the corresponding text.
For audio playback, we chose to use an HTML5 audio player in the tile. Alterna-
tively, we had considered using the JavaScript library called audio.js [5], which uses
the HTML5 audio player if possible and falls back to a Flash player if HTML5 is
unsupported. However, since most modern browsers support HTML5, we decided
not to use the external library. This way, the audio clips feature would not have any
dependencies on Flash or external libraries.
4.1.2 Implementation
The audio tile for a given audio clip is constructed dynamically using JavaScript.
Given the server id for an audio clip, an asynchronous JavaScript (AJAX) query is
used to gather the audio clip metadata and audio file URL from the TaleBlazer server.
This required adding a file size field to the audio table in the database. The metadata
from the server is used to generate the HTML for the audio tile. The retrieved audio
file URL from the server is used to load the HTML5 audio player, and the player is
added to the bottom of the tile. Figure 4-1 shows the audio tile located at the bottom
of the rich text editor. Note that an AJAX query is needed to gather this data from
the server because of the way in which audio assets are managed (Section 2.2). Only
the server ids of the audio clips are stored in the editor’s data models; the audio clip
metadata and audio file URL are stored on the server.
50
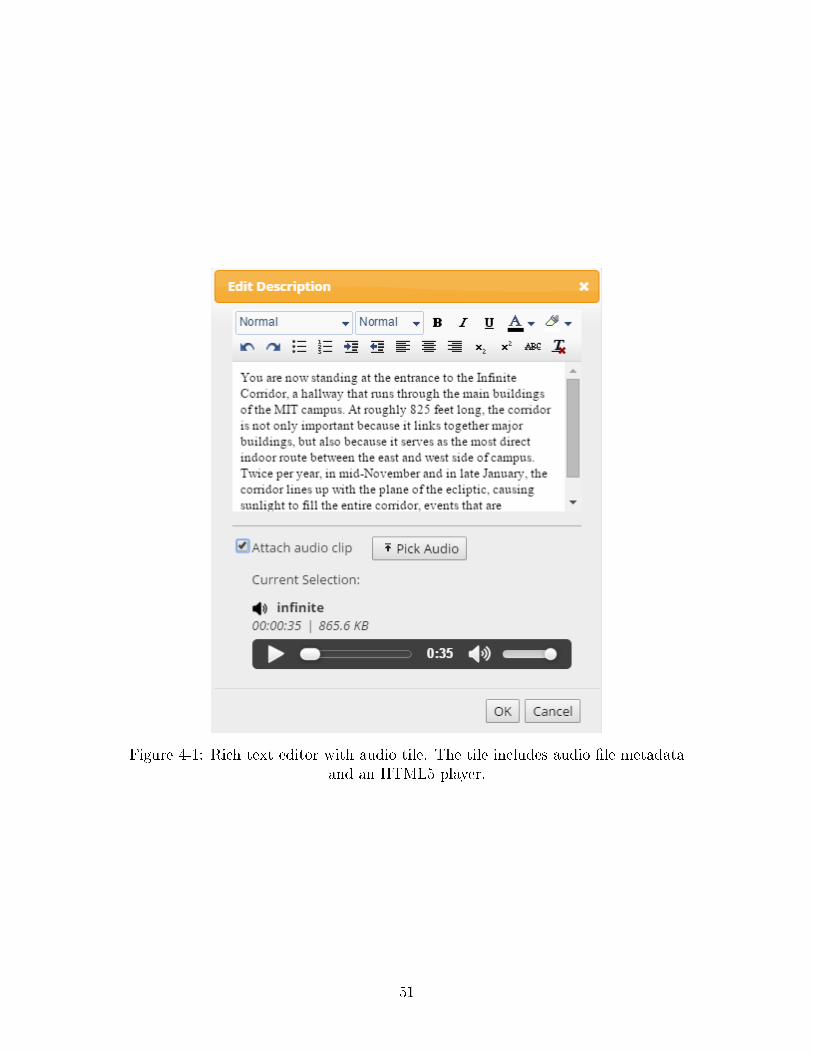
Figure 4-1: Rich text editor with audio tile. The tile includes audio file metadataand an HTML5 player.
51
If the AJAX query to the server fails or the server response cannot be parsed
correctly, an error message is displayed in the tile. In this case, game designers can
try closing and re-opening the rich text editor in order to retry the AJAX query.
Alternatively, they can retry the upload.
4.2 Audio Picker
While the new audio tile allowed game designers to see useful information about the
audio clip attached to a selection of rich text, the audio clips feature was not consistent
with how the editor handled image and video assets. As shown in Figures 2-4 and 2-6,
the image and video pickers are used to upload new image/video assets or select from
existing ones. We decided to keep the audio clips implementation consistent with this
design by creating a new audio picker. Instead of having the audio file upload button
directly in the rich text editor, we decided to move it to the audio picker. Like the
existing pickers, the audio picker would also allow the game designer to choose from
audio clips they had previously uploaded.
4.2.1 Design Decisions
One major difference between the audio picker and image/video pickers is the way in
which assets are represented visually. The image/video pickers use thumbnails to help
game designers identify their existing assets. The currently selected asset is displayed
as an enlarged thumbnail at the top of the picker. This cannot be done in the case
of audio since it has no visual component.
For the currently selected audio clip, we wanted to ensure that game designers
could play the clip and verify that it was the correct selection. As a result, we chose
to preview the selected clip with an audio tile at the top of the picker. For the game
designer’s existing audio clips, we wanted to display all audio clip metadata so design-
ers could easily identify them. However, we did not want to include audio players for
these clips because that would result in a cluttered interface with numerous HTML5
52

players on-screen. We therefore decided to represent these clips using elements similar
to the audio tile, but without the HTML5 player.
4.2.2 Implementation
With the new picker, the process for attaching audio clips to rich text is slightly
different from the prototype implementation. As before, the designer must open
the rich text editor and select the “Attach audio clip” checkbox. However, with the
new implementation, checking the box displays a “Pick Audio” button (Figure 4-1).
Clicking this button opens the audio picker, where the game designer can create a
new clip or choose an existing one. After making the selection, the designer returns
to the rich text editor, which displays an audio tile containing information about the
selected clip.
When the picker is opened, it uses two AJAX queries to retrieve all metadata
for the game designer’s existing audio clips: one query for audio clips used in the
current game, and the other for all clips the designer has uploaded to the server. The
response from each query is used to populate two separate tabs at the bottom of the
picker: Game Files and My Files. This interface is identical to the existing image and
video pickers, creating a consistent experience for game designers. The TaleBlazer
Files tab also exists in the image/video pickers, and is meant to contain media built
into the platform that all game designers can use. However, we do not have any such
audio clips yet and so the tab is currently empty.
Note that unlike the image/video pickers, the audio picker needs to use an AJAX
query to gather metadata about clips used in the current game. This is because
only the server ids of audio clips are stored in the editor’s data models (Section 2.2).
For images/video, the data models in the editor already include all metadata for the
images and videos in the current game.
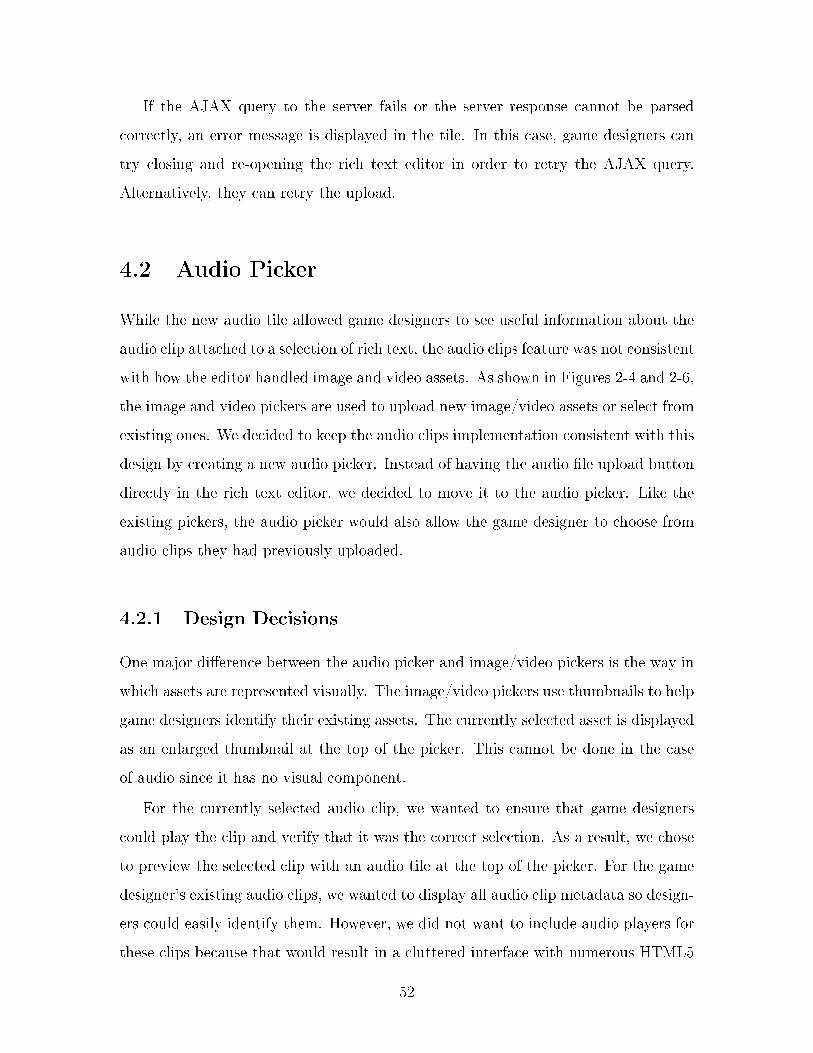
The new audio picker is shown in Figure 4-2. When no audio clip is selected,
the preview box at the top states “No audio clip selected”. When a clip has been
selected, an audio tile is used as a preview at the top of the picker. Game designers
can select existing clips by clicking on elements under the Game Files or My Files
53
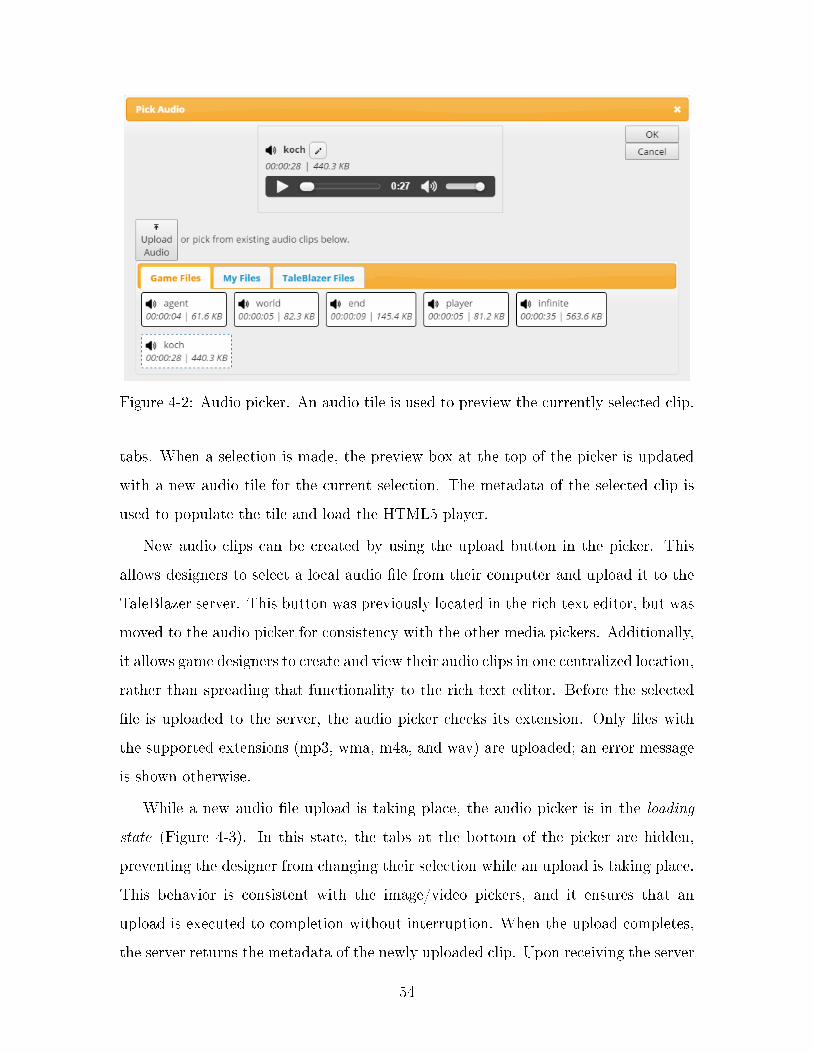
Figure 4-2: Audio picker. An audio tile is used to preview the currently selected clip.
tabs. When a selection is made, the preview box at the top of the picker is updated
with a new audio tile for the current selection. The metadata of the selected clip is
used to populate the tile and load the HTML5 player.
New audio clips can be created by using the upload button in the picker. This
allows designers to select a local audio file from their computer and upload it to the
TaleBlazer server. This button was previously located in the rich text editor, but was
moved to the audio picker for consistency with the other media pickers. Additionally,
it allows game designers to create and view their audio clips in one centralized location,
rather than spreading that functionality to the rich text editor. Before the selected
file is uploaded to the server, the audio picker checks its extension. Only files with
the supported extensions (mp3, wma, m4a, and wav) are uploaded; an error message
is shown otherwise.
While a new audio file upload is taking place, the audio picker is in the loading
state (Figure 4-3). In this state, the tabs at the bottom of the picker are hidden,
preventing the designer from changing their selection while an upload is taking place.
This behavior is consistent with the image/video pickers, and it ensures that an
upload is executed to completion without interruption. When the upload completes,
the server returns the metadata of the newly uploaded clip. Upon receiving the server
54

Figure 4-3: Audio picker in loading state.
response, the picker automatically closes, taking the game designer back to the rich
text editor. When the picker closes, it passes the metadata of the new audio clip to
the rich text editor, which uses it to update the audio tile.
4.3 Renaming Audio Clips
With the new audio picker, game designers can review all their audio clip assets and
create new ones in one place. However, most platforms also let designers edit the
names of their media assets (Section 2.3). We decided that a rename feature for
audio clips would help designers manage their clips more efficiently.
4.3.1 Design Decisions
Unlike image and video assets, audio clips have no visual component, so game design-
ers will rely on the audio clip name as the primary way of identifying a clip. Most
recording software outputs files with nonsensical default names. Since the name of
an audio clip defaults to the name of the uploaded file, audio clips would potentially
have meaningless names. Furthermore, uploading multiple audio files with the same
name would result in multiple audio clips with the same name. We therefore decided
to allow game designers to rename audio clips from the audio picker. This way, de-
signers could give their clips unique and meaningful names, allowing them to check
that they had attached the correct clips in the editor.
55

We chose to put this functionality in the audio picker and not the rich text editor,
since the picker is the centralized location for managing and reviewing audio clips;
we did not want to spread audio management functionality across too many separate
interfaces in the editor. It is important to note that renaming clips has no effect on
gameplay; the audio clip names are only used in the editor to make it easier for game
designers to identify their clips.
4.3.2 Implementation
The audio clip rename feature is implemented as a dialog box that can be opened
from the audio picker. In the audio picker, the currently selected clip is previewed at
the top using an audio tile. As shown in Figure 4-2, this preview audio tile contains
a button with a pencil icon next to the clip name. Clicking this button opens the
dialog box shown in Figure 4-4. When the game designer hits “OK”, an AJAX request
containing the audio clip server id and new name is sent to the TaleBlazer server.
The server then updates the audio table in the database to reflect the name change,
and responds with the name of the clip that is stored in the database. If the name
change was successful, the name stored in the database should match the new name
that was sent to the server. When the editor receives the server response, it checks
that the response matches the new name. The dialog closes if the name change was
successful, taking the game designer back to the audio picker. Otherwise, an error
message is shown.
Since the rename functionality updates the server’s database, name changes be-
come permanent the moment the database record is changed. For instance, renaming
a clip and then hitting “Cancel” in the audio picker will not undo the rename. This
implementation of renaming also ensures that the new name will be used to identify
the clip across all games, everywhere it is used.
The main benefit to this approach is that audio clips will have consistent naming
across games; designers will not have to rename a clip repeatedly in every game it
is being used. However, one potential drawback is that the new clip name will be
visible in remixed games. This is discussed further in Section 5.6.3.
56
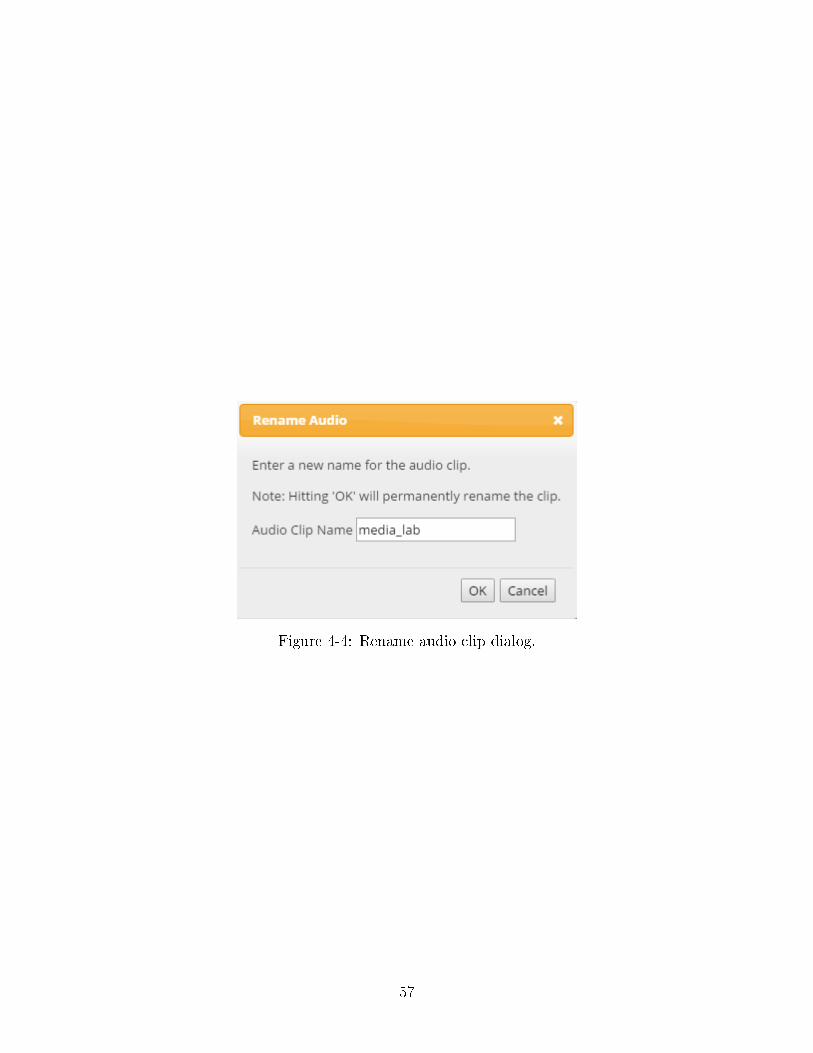
Figure 4-4: Rename audio clip dialog.
57

58

Chapter 5
User Testing of Audio Clips
After finishing the work described in Chapters 3 and 4 on the audio clips feature, we
conducted user testing to gather feedback. We set up a test server (separate from the
production TaleBlazer server) that supported the new audio clips feature. This test
server provided the editor and backend support needed for audio clips. Additionally,
we created an Android build of the mobile application with audio clips functionality.
The resulting Android Application Package file (APK) was sent to our testers so they
could download and run it on their Android devices. User testing was not conducted
on iOS because that required using TestFlight − Apple’s framework for beta testing
iOS apps − and would have significantly slowed down our timeline for shipping the
next version of TaleBlazer mobile.
We created a testing guide document (Appendix A) containing detailed instruc-
tions for our user testers, listing specific questions for which we wanted to gather
their responses. These questions allowed us to collect feedback on the different design
decisions we had made earlier. We reached out to a few TaleBlazer users that had
shown prior interest in an audio feature for the platform.
5.1 Overview
We designed three different tasks that we wanted our testers to perform:
1. Play a demo game with audio clips in the mobile application
59
2. Perform a few tasks with audio clips in the editor
3. (Optional) Create a new game in the editor with audio clips
The first task would allow us to obtain feedback on the new mobile interface for
audio clips, including the playback controls and audio settings. The second task
pertained to the new editor interface, namely the changes to the rich text editor and
the new audio picker. For this task, our testers would modify an existing game that
we created with audio clips on the test server. The optional third task gave our
testers the chance to create a new game using audio clips. We made this an optional
task because the testers would have already experimented with the editor changes
in the second task. However, making a new game would allow testers to brainstorm
about how audio clips can be used effectively in games. It would also force them to
experiment with recording software as they made their own clips.
The goal of our user testing was to gather feedback on the behavior and func-
tionality of audio clips on the editor and in the mobile application. In particular, we
wanted to gauge user response to the design decisions we made (described in Chap-
ters 3 and 4). For example, we were interested in learning how the testers would
respond to our use of autoplay in the mobile application. Our testing was focused on
evaluating the mechanics of the new feature and determining whether the behavior
of audio clips was aligned with user expectations.
5.2 Demo Game
We created a demo game called Going to Hogwarts to test the use of audio clips in
the mobile application. The game is based on an existing TaleBlazer game of the
same title which was created before the addition of audio clips. The new version has
a similar storyline, but it includes a wider range of TaleBlazer game mechanics in
order to test audio clips under various circumstances. In particular, the demo game
exercises all five ways of adding audio clips to games for more exhaustive testing of
the new feature.
60

5.2.1 Game Overview
Going to Hogwarts is located on the MIT campus, but is designed to be played from
anywhere using the tap to visit option. Since our testers were physically located far
apart from each other, we could not design a demo game that they could all play in the
real world. Going to Hogwarts is meant to be a short game that can be played in 10
minutes; it was designed to test audio clips with various TaleBlazer game mechanics.
The objective of the game is to purchase all the supplies needed to enter Hogwarts
School of Witchcraft and Wizardry from the Harry Potter series. Each player starts
out with no cash and a Gringotts bank account with 50 galleons. Players need to
withdraw cash from the bank using their vault key. Then they use their cash to
purchase an owl from Eeylop’s Owl Emporium and a wand from Ollivander’s Wand
Store. After buying the owl and wand, they can get past the entrance to Hogwarts
and enter the Great Hall, ending the game.
5.2.2 Game Mechanics
The game begins with a rich text game introduction and an attached audio clip
which summarizes the text (Figure 5-1). As seen in Figure 5-2, the player and world
dashboards have audio clips attached to the descriptions. The player dashboard
additionally has two script actions: “Check Account” and “How am I doing?”. The
first action checks the balance of the player’s Gringotts account, which starts out
at 50 galleons. This number is updated as the player makes withdrawals from their
bank account. The “How am I doing?” script action checks if the player has finished
purchasing their school supplies, namely the owl and the wand. The action displays
different text with an accompanying audio clip depending on whether or not the
player has finished buying the school supplies.
The Entrance to Hogwarts, Great Hall, Ollivander’s Wand Store, Eeylops Owl
Emporium, and Gringotts Bank are all TaleBlazer agents that the player visits over
the course of the game. The Entrance to Hogwarts has a single script action that
checks if the player has finished school shopping. If the player is not done, a “Say rich
61

Figure 5-1: Demo game introduction.
Figure 5-2: Demo game player (left) and world (right) dashboards.
62
text” block with accompanying audio is used to notify the player that they still have
work to do. If the player is done, they are moved to a new region in the game with a
single agent − the Great Hall. The Great Hall agent has a rich text description and
accompanying audio clip that congratulates the player for completing the game.
The wand store and owl store both have audio clips attached to their descriptions.
In the owl store, the player can use the “Buy Owl” script action to purchase an owl.
Similarly, there is a “Buy Wand” action in the wand store. The wand store has
an additional “Buy Potion” action; this is a text action that displays rich text with
audio. The wand and the owl are additional TaleBlazer agents, and they each cost
10 galleons. The “Buy Owl” and “Buy Wand” script actions check if the player has
enough cash to purchase the corresponding item. If the purchase is successful, the
Owl agent or Wand agent is added to the player’s inventory, respectively.
When the player first bumps the Gringotts Bank agent, the rich text description
and accompanying audio instruct the player to find their vault key in order to make
a withdrawal. The vault key is a password-protected agent that the player must pick
up and store in their inventory in order to access their bank account. The audio
clip attached to the vault key description contains a clue for the password, so players
must listen to the clip before proceeding. When an incorrect password is entered, the
buzzer sound effect stops any audio clip that was playing, and the player can make
another guess. When the correct password is entered, the “Pick Up” action becomes
available.
When the vault key is picked up, the Gringotts Bank agent description and asso-
ciated audio is updated using the “Set description to rich text” script block. The new
audio and description notify players that they can now withdraw money from their
accounts using their key. When players return to the bank agent, they are presented
with the new description and attached audio, as well as a script action called “With-
draw Money” that was previously hidden. This script action withdraws 10 galleons
from the player’s bank account, adding this to the player’s cash total. Figure 5-3
shows how the Key agent is used to unlock the Gringotts vault.
63
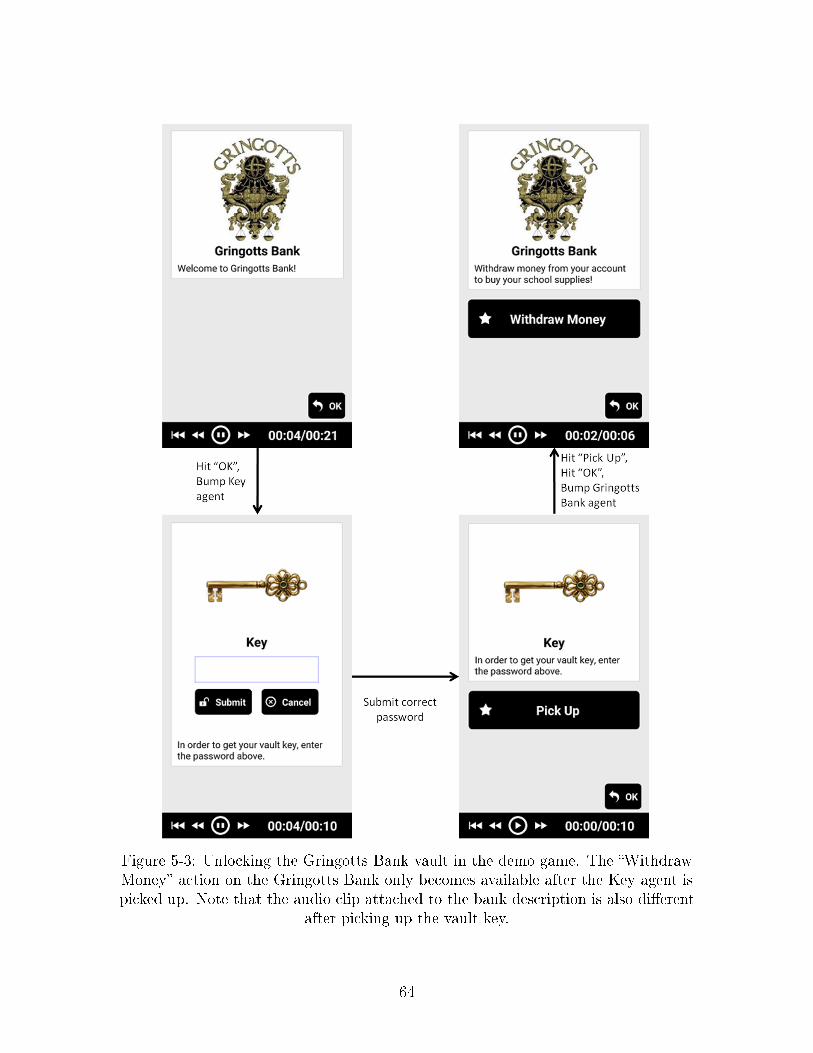
Figure 5-3: Unlocking the Gringotts Bank vault in the demo game. The “WithdrawMoney” action on the Gringotts Bank only becomes available after the Key agent ispicked up. Note that the audio clip attached to the bank description is also different
after picking up the vault key.
64

The demo game therefore tests all five ways of adding audio clips into games: the
game introduction, text actions, “Say rich text” script block, “Set description to rich
text” script block, and the agent/player/world dashboards.
5.2.3 Testing Guidelines
We first provided our testers with a video tutorial that briefly demonstrated the use
of audio clips in the mobile application. Since the feature had never been released to
the public, we wanted to use the tutorial to define audio clips and give an overview
of the changes made to the mobile interface. Our testers were then instructed to
play through the demo game and answer a series of questions regarding their experi-
ence. They were also asked to experiment with different audio settings to see if the
application behaved as they would have expected. The questions were grouped into
four categories, relating to different areas we wanted feedback on: audio quality, audio
playback controls, game mechanics, and audio settings. The questions are reproduced
in Appendix A.
The audio quality questions were designed to check if the audio clips were un-
derstandable, and gauge the feature’s usability under real-world conditions. The
questions regarding audio playback controls and audio settings were written to de-
termine if the new mobile interfaces and setting names were intuitive. Finally, the
questions about game mechanics were used to check if the behavior of audio clips was
what our testers expected. In particular, we were most interested to see if our design
decisions regarding autoplay made sense to game players.
5.3 In-Editor Tasks
To gather user feedback on the audio clips feature in the TaleBlazer editor, we gave
our testers a series of audio-related tasks to complete in the new version of the editor.
We first provided our testers with a short video tutorial to introduce the changes in
the editor. The video reminded our users of how to access the rich text editor, and
it explained the basics of attaching and renaming audio clips. Although we wanted
65
to gauge if the audio clips interface on the editor was intuitive, we also wanted to
provide our testers with some background information regarding the new feature.
Our testing guide document instructed our testers to first create a new account
on the test server. After logging in, they were told to remix the Going to Hogwarts
game that they had just played on the mobile app. By remixing the demo game, they
could experiment with a game that they were already familiar with.
In their own copy of the demo game, the testers were asked to create a new agent
and attach an audio clip to the agent description. We asked them to upload a new
audio file using the audio picker. They could either record their own audio for this
purpose or use a sample file that we had provided. We also instructed them to play
the clip directly from the editor via the HTML5 audio player and to rename the clip.
Next, the testing guide instructed our testers to create and attach audio to a text
action and to a “Say rich text” script block. They were also asked to use the tabs at
the bottom of the audio picker to attach an existing audio clip to rich text.
The testing guide document included a series of questions about the audio clips
feature in the editor. The questions (reproduced in Appendix A) were designed to
determine the usability of the additions to the editor and to find potential issues in
functionality.
5.4 Optional Game Creation
The third and final task for our audio testers was to create a new game using audio
clips. Instead of modifying a remixed game, they were asked to design their own game
and include audio. This was an optional task since it was more time-consuming, and
because the other two tasks already tested the mobile and editor functionality of
audio clips.
We also gave testers the option to add audio clips to one of their existing games
on the TaleBlazer production server. Since user testing was conducted on the test
server, this would have required manually copying the game file and associated assets
from the production server to the test server. If our testers wished to use this option,
66
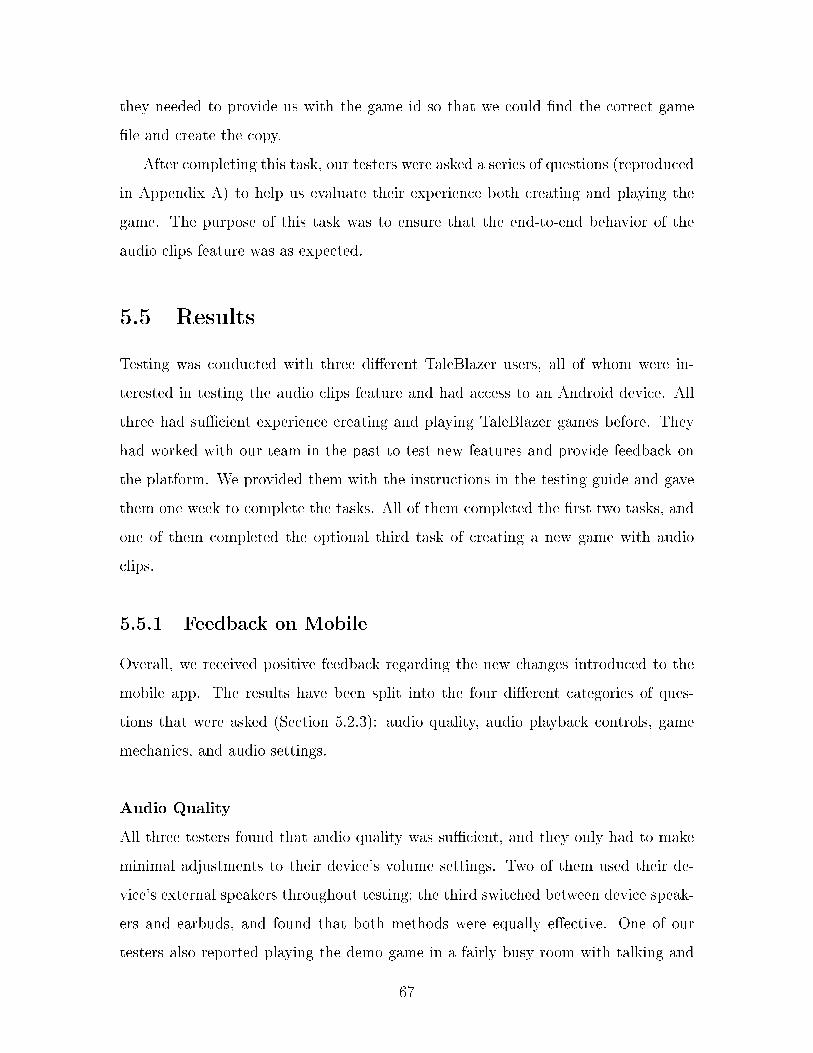
they needed to provide us with the game id so that we could find the correct game
file and create the copy.
After completing this task, our testers were asked a series of questions (reproduced
in Appendix A) to help us evaluate their experience both creating and playing the
game. The purpose of this task was to ensure that the end-to-end behavior of the
audio clips feature was as expected.
5.5 Results
Testing was conducted with three different TaleBlazer users, all of whom were in-
terested in testing the audio clips feature and had access to an Android device. All
three had sufficient experience creating and playing TaleBlazer games before. They
had worked with our team in the past to test new features and provide feedback on
the platform. We provided them with the instructions in the testing guide and gave
them one week to complete the tasks. All of them completed the first two tasks, and
one of them completed the optional third task of creating a new game with audio
clips.
5.5.1 Feedback on Mobile
Overall, we received positive feedback regarding the new changes introduced to the
mobile app. The results have been split into the four different categories of ques-
tions that were asked (Section 5.2.3): audio quality, audio playback controls, game
mechanics, and audio settings.
Audio Quality
All three testers found that audio quality was sufficient, and they only had to make
minimal adjustments to their device’s volume settings. Two of them used their de-
vice’s external speakers throughout testing; the third switched between device speak-
ers and earbuds, and found that both methods were equally effective. One of our
testers also reported playing the demo game in a fairly busy room with talking and
67

music playing in the background. Even in this scenario, they were able to hear the
audio clips and play through the game without issues. One of our responses indicated
that the sound effects were oftentimes much louder than the audio clips, but that was
due to the quality of the recordings that were used in the demo game. Game design-
ers can avoid this issue by using better recording software to produce more polished
audio. Furthermore, we already use a tool called SoX to normalize and increase the
volume of uploaded audio files on the TaleBlazer server (Section 2.2.2).
Audio Controls
No issues were reported regarding the audio playback controls; the user interface was
intuitive and the buttons functioned as expected. One of the testers reported that
they did not need to use the playback controls since they could easily make progress
in the game without having to rewind or replay the clips.
Game Mechanics
Our testers found that the different uses of autoplay in the demo game were intuitive.
For example, one reported that autoplaying agent dashboard descriptions made the
game more engaging. They cited previous TaleBlazer games where students were
impatient to skip ahead and therefore did not read text-based agent descriptions. As
a result, these students would miss critical game information and get stuck later on
during gameplay. With our use of audio clip autoplay, the tester hypothesized that
students would be more likely to listen to the information presented in the clips and
therefore less likely to get stuck later on.
Most of our results show that it makes sense from a player’s perspective not to au-
toplay audio clips attached to the world/player dashboards. However, we received one
suggestion to autoplay the audio clip the first time the player visits the World/Player
tab. The tester was concerned that players would not notice that there was audio
attached to the rich text on the tab and therefore never listen to the clip. We decided
not to change our implementation since we wanted to prevent navigation between
tabs from triggering audio clip playback. In an effort to keep the Player and World
68

tabs as consistent as possible with the other tabs in the mobile user interface, we
chose to keep our current implementation of autoplay.
We also received positive feedback regarding how audio clips interact with the
password sound effects. Our testers bumped into a password-protected agent with an
audio clip attached to the description. While the clip was playing, they submitted
guesses for the password, triggering the correct/incorrect password sound effects.
Two of the testers responded that stopping the audio clip to play the sound effect
was intuitive from a player’s perspective. One noted that it may be useful if the audio
clip could automatically restart or continue after playing the sound effect. However,
we decided against making this change because players that have already listened to
the entire clip will not want it to replay. Those that did not finish listening before
submitting a password can also use the controls to manually play the clip again.
One final suggestion we received regarding audio playback was in relation to the
sandwich menu and the “More” menu. The sandwich menu allows the player to access
game-level options, like modifying in-game settings, or pausing/leaving the current
game. The “More” menu lets the player switch tabs in the mobile interface. Au-
dio clips are always paused when these menus are opened. One tester suggested
continuing playback in this case so that players can listen to audio while reviewing
their options in the menus. However, we decided to keep our current implementa-
tion because the menus are displayed on top of the current tab, partially covering its
contents. Since the tab is no longer the focus of the screen, it follows that any audio
playing on the tab should also be paused.
Audio Settings
Overall, the audio settings for sound effects and audio clips were intuitive and resulted
in the behavior that our testers expected. Our feedback shows that playing the demo
game with sound effects disabled, audio clips enabled, and audio clip autoplay enabled
was the preferred mode of gameplay.
All three testers agreed that the names of the audio settings could be clearer.
The video tutorials our testers had watched had explained the distinction between
69
audio clips and sound effects, but this difference may not be clear to all players.
One suggestion we received was to rename the “Audio Clips” setting to “Custom
Audio.” However, we decided against renaming the setting since future work may
involve customizing sound effects, blurring the distinction between custom audio and
sound effects. Proposed future work on improving the learnability of audio settings
is described in Section 8.2.
5.5.2 Feedback on the Editor
We received mostly positive feedback regarding the audio clips feature on the edi-
tor. Our testers reported that the rich text editor and audio picker were usable and
functional. They were able to exercise all the new features on the editor, including
creating new audio clips and renaming existing clips.
We received some specific comments regarding the audio clip rename functionality.
First, one tester proposed moving the rename functionality from the audio picker to
the rich text editor. However, we chose to leave renaming in the picker since we wanted
the audio picker to be the centralized interface for the creation and modification of
audio clips. Moving the rename function to the rich text editor would spread audio
clip modification to another interface, resulting in a less modular design. The second
comment we received was that the function of the rename button was not entirely
clear since the pencil icon was unfamiliar. To alleviate this issue, we have added a
new section on audio clips to the in-editor tutorials. Chapter 7 details the additions
made to the tutorials.
Regarding the audio picker interface, one tester commented that it was unclear
what audio file types were supported. Although uploading an unsupported file type
would yield an error message listing all supported types, it would be clearer to provide
an explicit list of file extensions in the picker. Section 5.6.1 details the adjustments
that were made to the picker.
70
One tester also reported a potential issue in the overall user interface flow for
attaching and renaming clips. In a normal user flow, a game designer might open the
rich text editor, open the audio picker to select a clip, and then open the rename dialog
to rename the selected clip. The rich text editor, audio picker, and rename dialog
are all dialog windows that get stacked on top of each other. Since the dialogs have
thin, non-contrasting borders, game designers can accidentally hit “OK” or “Cancel”
on the wrong dialog. Section 5.6.1 describes the changes made to fix this issue.
The final comment we received was that it was difficult for game designers to see
all the places where audio was being used in a game. For instance, a designer could
see what audio clips were currently being used in the game, but not where in the
game they were being used. Section 5.6.2 discusses the steps taken to alleviate this
problem.
5.6 Improvements
Using the results of our testing, we were able to make several improvements to the
audio clips feature before releasing it to the public.
5.6.1 Editor Interface Adjustments
We slightly modified the audio picker to list the supported audio file types (Figure 5-
4). This change will make it easier for game designers to start using the new feature
quickly. A similar modification was also made to the existing image and video pickers
for consistency.
We also fixed a user interface issue related to the stacking of the rich text editor,
audio picker, and rename dialogs. Figure 5-5a shows the interface with all three
dialogs opened. All three of these interfaces are active dialogs that are stacked on top
of each other. To prevent game designers from accidentally clicking “OK” or “Cancel”
on the wrong dialog, we now ensure that only one dialog is active at a time (Figure 5-
5b). We deactivate dialog windows lower in the stack by adding a grayed-out overlay.
71
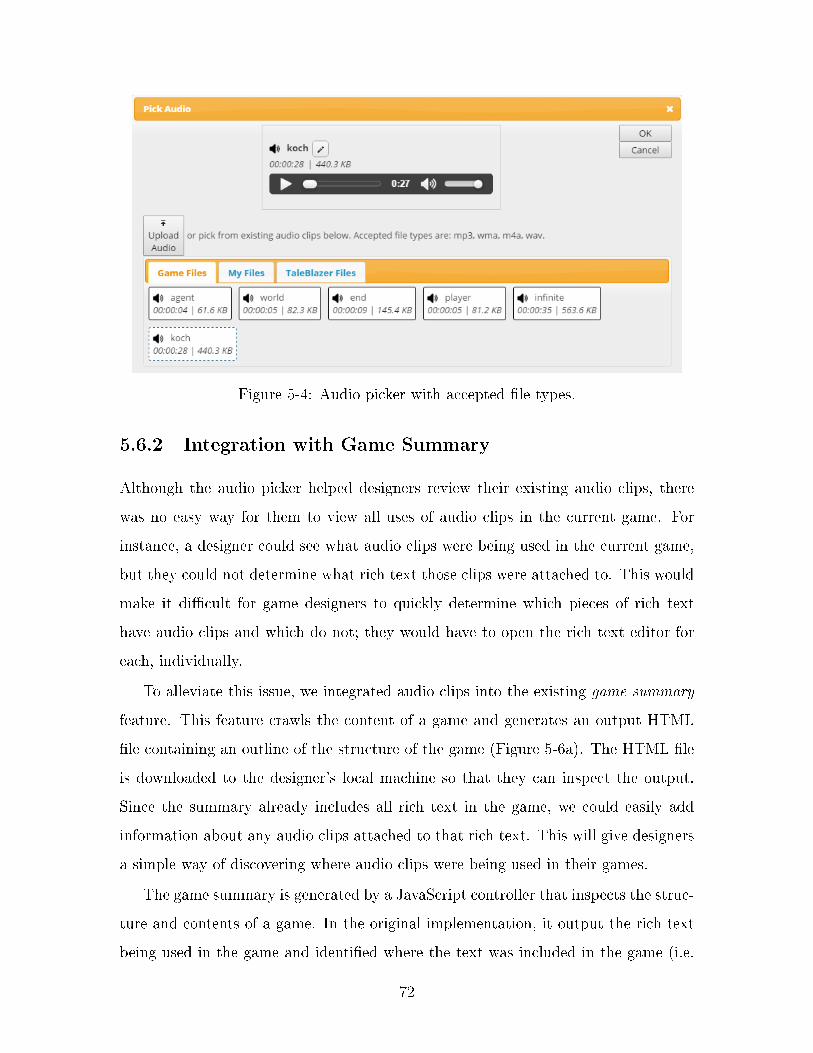
Figure 5-4: Audio picker with accepted file types.
5.6.2 Integration with Game Summary
Although the audio picker helped designers review their existing audio clips, there
was no easy way for them to view all uses of audio clips in the current game. For
instance, a designer could see what audio clips were being used in the current game,
but they could not determine what rich text those clips were attached to. This would
make it difficult for game designers to quickly determine which pieces of rich text
have audio clips and which do not; they would have to open the rich text editor for
each, individually.
To alleviate this issue, we integrated audio clips into the existing game summary
feature. This feature crawls the content of a game and generates an output HTML
file containing an outline of the structure of the game (Figure 5-6a). The HTML file
is downloaded to the designer’s local machine so that they can inspect the output.
Since the summary already includes all rich text in the game, we could easily add
information about any audio clips attached to that rich text. This will give designers
a simple way of discovering where audio clips were being used in their games.
The game summary is generated by a JavaScript controller that inspects the struc-
ture and contents of a game. In the original implementation, it output the rich text
being used in the game and identified where the text was included in the game (i.e.
72

(a)
(b)
Figure 5-5: Stacked editor audio dialogs. The rich text editor, audio picker, andrename dialogs are shown before (top) and after (bottom) the addition of the
overlay.
73

an agent dashboard, a text action, etc.). To include information on audio clips, the
new implementation first makes an AJAX request to the server to gather metadata
on all clips used in the game. It builds a mapping from the server id of each clip,
to the retrieved metadata. Then it proceeds to crawl the game as it did before, out-
putting rich text as it goes. When the crawler comes across a piece of rich text with
an attached audio clip, it retrieves the server id of the associated clip. It looks up
the server id in its mapping from server id to metadata, and appends that data to
the summary (Figure 5-6b). We have also included an HTML5 audio player so that
designers can play the clip directly from the summary page.
Before we decided to integrate audio clips with the game summary, we had also
discussed integration with the agent overview. As shown in Figure 5-7, the agent
overview is a mode of viewing and editing agents in the editor. It displays high-level
information about each agent, including its description, image, and actions. At first,
we considered listing the names of all audio clips associated with each agent in the
overview; this would include clips attached to the description, or to any text/script
actions of the agent. However, listing clip names would result in a cluttered interface
if an agent had many associated clips. Furthermore, it would still be difficult for
designers to determine if a particular clip was attached to the description or to a
specific action.
Instead of listing audio clips, we also considered including an audio icon next to
the description or action name if it had attached audio. However, we decided that
including just an icon would not help game designers determine which clip had been
attached to the description or action; they would still need to open the rich text
editor to identify the audio clip. For the purposes of this project, we decided that
integration with the game summary would be enough to make the audio clips feature
usable and ready for deployment. Integration with the agent overview has been left
as a future task and is discussed further in Section 8.1.
74

(a)
(b)
Figure 5-6: Game summary excerpt shown before (top) and after (bottom) theintegration with audio clips.
75
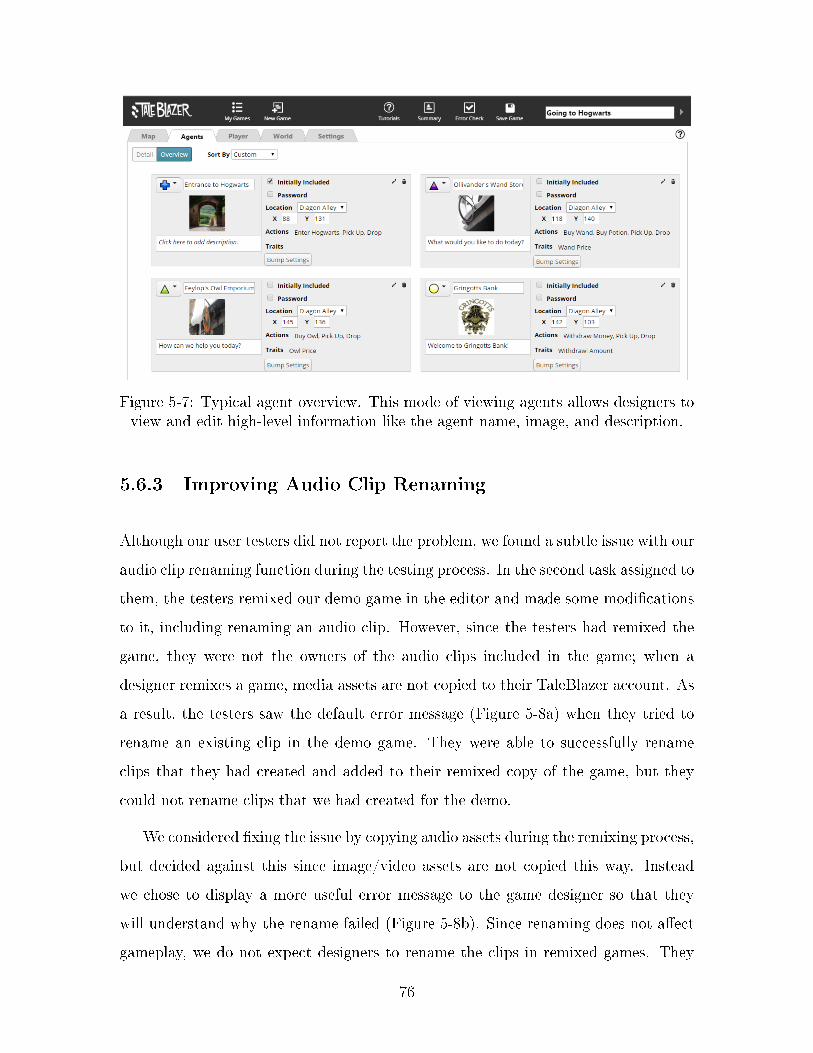
Figure 5-7: Typical agent overview. This mode of viewing agents allows designers toview and edit high-level information like the agent name, image, and description.
5.6.3 Improving Audio Clip Renaming
Although our user testers did not report the problem, we found a subtle issue with our
audio clip renaming function during the testing process. In the second task assigned to
them, the testers remixed our demo game in the editor and made some modifications
to it, including renaming an audio clip. However, since the testers had remixed the
game, they were not the owners of the audio clips included in the game; when a
designer remixes a game, media assets are not copied to their TaleBlazer account. As
a result, the testers saw the default error message (Figure 5-8a) when they tried to
rename an existing clip in the demo game. They were able to successfully rename
clips that they had created and added to their remixed copy of the game, but they
could not rename clips that we had created for the demo.
We considered fixing the issue by copying audio assets during the remixing process,
but decided against this since image/video assets are not copied this way. Instead
we chose to display a more useful error message to the game designer so that they
will understand why the rename failed (Figure 5-8b). Since renaming does not affect
gameplay, we do not expect designers to rename the clips in remixed games. They
76

(a) (b)
Figure 5-8: Audio clip rename dialog error messages. An error message is displayedwhen a game designer attempts to rename an audio clip they do not own. The
images show the error message before (left) and after (right) the change.
are more likely to rename audio clips that they have created, in which case they will
have the permissions to do so.
Another potential issue involving remixing can occur when the creator of a game
renames an audio clip. In this case, the name change will be visible to any game
designers that had remixed the game. This could be confusing for owners of remixed
games since clip names may change without their knowledge. However, based on our
feedback from our user testers, we have concluded that the rename functionality will
most likely be used sparingly − if at all − by game designers. We have kept the
feature as a utility, but we expect that designers will not rename an audio clip more
than once. Therefore this issue is not likely to cause confusion among designers.
77

78

Chapter 6
Improving Media Uploading
A number of improvements were made to the media upload process on the editor
before the audio clips feature was released. These changes affected all forms of sup-
ported media on TaleBlazer: images, videos and audio clips. There were three main
challenges we addressed to enhance media uploading: improving usability of the video
uploader, increasing server security, and enhancing media quality.
The first challenge was to improve usability of the video uploader. In particular,
we had received reports from users of failed video uploads. To address this, we
updated the software used to process video files on the TaleBlazer server. Section 6.1
describes this change in more detail.
The next challenge was to increase server security. We wanted to prevent malicious
uploads from compromising the TaleBlazer server. To address this challenge, we made
two enhancements. First, we added upload file size limits to all three media pickers
on the editor. Second, we added file type verification for uploaded audio/video files.
Sections 6.2 and 6.3 describe these two changes in more detail.
The final challenge was to improve media quality during gameplay. To address
this, we reduced the compression of uploaded images and videos. Section 6.4 describes
this in more detail.
79
6.1 Software Updates
As described in Section 2.2.2, uploaded audio and video files are processed on the
TaleBlazer server using FFmpeg. The tool is used to compress uploaded files and
convert them into standard file formats. In particular, uploaded videos are converted
into mp4 files, and audio uploads are converted to m4a. We use mp4 and m4a file
formats since they are widely supported on mobile devices. After compressing and
converting the uploaded files, they are permanently saved to the TaleBlazer server.
The production TaleBlazer server originally had an outdated version of FFmpeg
(version 0.8.3) which was causing video upload issues. We received bug reports from
users who could not upload mp4 videos, even after ensuring that their video files had
the proper encoding. We discovered that the issue stemmed from our use of the old
version of FFmpeg, which could not properly decode the uploaded files. As a solution,
we updated our version of FFmpeg to version 2.8.1, the newest stable release available
at the time.
6.2 Editor Upload Size Limits
Originally, there were no in-editor upload size checks to prevent game designers from
uploading arbitrarily-large files. This could be problematic from a security standpoint
as a malicious user could flood the server with numerous uploads and consume a large
amount of server storage. The TaleBlazer server configuration prevented uploads of
files larger than 50 MB, but there were no other restrictions in place. We decided
to add upload size checks in the editor to impose different size limits on different
types of media. This adds another layer of security and ensures that in the event
that the server configuration is accidentally changed, the upload size limits will still
be maintained. Adding the checks directly in the editor also prevents the server from
processing requests with excessively large media files.
The upload size checks occur in the audio, image, and video pickers, and different
size limits are set according to the media type. Table 6.1 shows the different upload
80
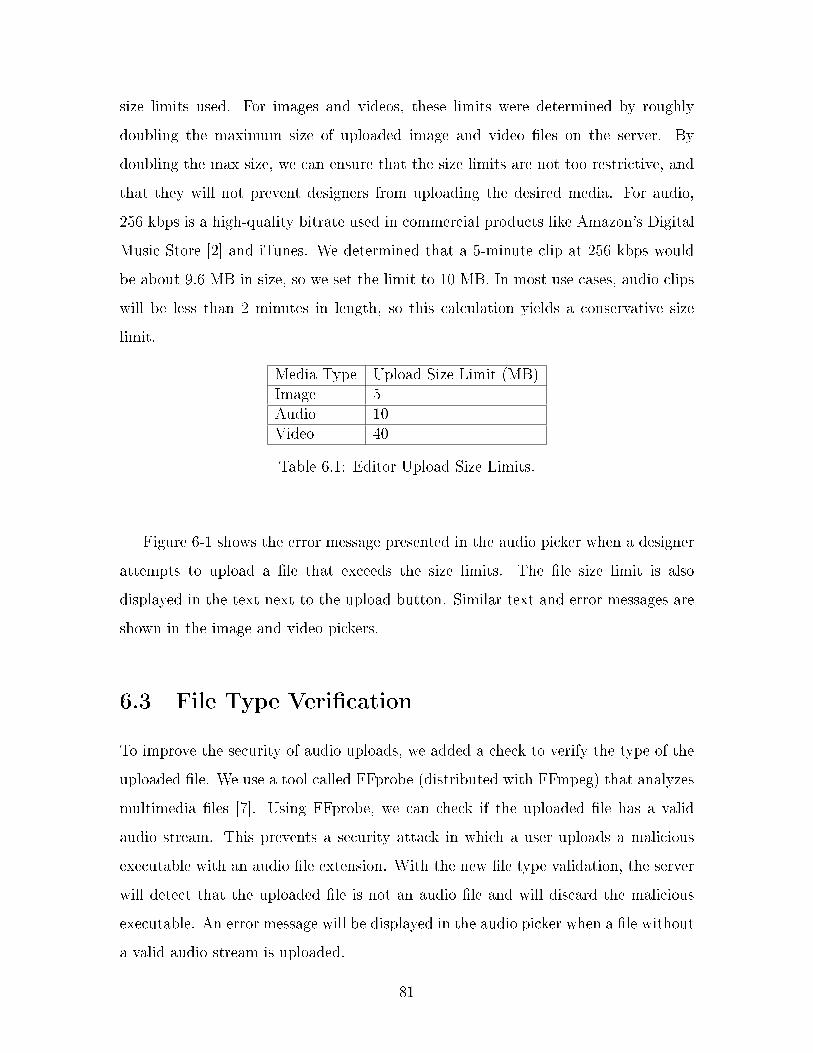
size limits used. For images and videos, these limits were determined by roughly
doubling the maximum size of uploaded image and video files on the server. By
doubling the max size, we can ensure that the size limits are not too restrictive, and
that they will not prevent designers from uploading the desired media. For audio,
256 kbps is a high-quality bitrate used in commercial products like Amazon’s Digital
Music Store [2] and iTunes. We determined that a 5-minute clip at 256 kbps would
be about 9.6 MB in size, so we set the limit to 10 MB. In most use cases, audio clips
will be less than 2 minutes in length, so this calculation yields a conservative size
limit.
Media Type Upload Size Limit (MB)Image 5Audio 10Video 40
Table 6.1: Editor Upload Size Limits.
Figure 6-1 shows the error message presented in the audio picker when a designer
attempts to upload a file that exceeds the size limits. The file size limit is also
displayed in the text next to the upload button. Similar text and error messages are
shown in the image and video pickers.
6.3 File Type Verification
To improve the security of audio uploads, we added a check to verify the type of the
uploaded file. We use a tool called FFprobe (distributed with FFmpeg) that analyzes
multimedia files [7]. Using FFprobe, we can check if the uploaded file has a valid
audio stream. This prevents a security attack in which a user uploads a malicious
executable with an audio file extension. With the new file type validation, the server
will detect that the uploaded file is not an audio file and will discard the malicious
executable. An error message will be displayed in the audio picker when a file without
a valid audio stream is uploaded.
81

Figure 6-1: Audio picker with size limit exceeded.
The existing video uploader used MIME (Multipurpose Internet Mail Extensions)
type checks to verify the type of uploaded video files. During the upload process, the
Linux “file” command was used to get the MIME type of the uploaded file, and then
the server checked if that type was included in a list of accepted video MIME types.
We planned to use the same approach for audio uploads, but we found that the “file”
command produced different MIME type results on different machines. Furthermore,
the same file extension could result in many different MIME types, depending on
the audio recording source. For example, some m4a audio files were assigned the
“audio/mp4” MIME type, while others were assigned “video/3gpp.” This made main-
taining a list of accepted audio MIME types difficult. The “file” command tended to
produce less variable results for video files, which made the original implementation
possible.
However, there was one significant problem with the existing video uploader: one
of the accepted video MIME types was “application/octet-stream.” This value rep-
resents either an unrecognized type, or a binary file type. The type had been added
to the whitelist since some uploaded video files had MIME types that were unrecog-
82
nizable to the server. However, including “application/octet-stream” made our server
vulnerable to attacks; users could upload malicious binary files with video file exten-
sions, and the server would validate the MIME type. We therefore updated the video
uploader to also use FFprobe as a means of type validation.
6.4 Media Compression
When video and image support was first introduced to TaleBlazer, mobile devices had
relatively poor screen resolution and minimal storage space compared to the modern
devices available today. As a result, the media files that game designers uploaded in
the editor were highly compressed to minimize the space requirements of TaleBlazer
games on mobile devices. However, devices have evolved over recent years to support
larger storage capacity and higher screen resolutions. The compressed images and
videos used in games therefore look blurry on these devices. To improve the quality
of media during gameplay, we reduced the compression of images and videos during
the upload process. With this in mind, we implemented audio uploading to use a
lower level of compression.
6.4.1 Images
In the original implementation, custom map images were resized so that the maximum
dimension was 600 pixels; for all other images, the max size was 300 pixels. Taking
into account device screen resolutions and the amount of screen space used by images
in TaleBlazer games, we increased the maximum dimension size to 800 pixels for
all uploaded images. We removed the distinction between custom maps and other
images since it was an obsolete check designed to improve the quality of maps on
low-resolution devices. With modern smart phones and tablets, all uploaded images
can be saved at a higher resolution.
In the TaleBlazer mobile app, the custom map image is resized to occupy most of
the screen: 100% of screen width and 80% of screen height. All other images in the
game (like agent dashboard images) use less screen space: 90% of the screen width and
83

30% of screen height. Tables 6.2 and 6.3 show the specifications for currently-available
phones and tablets with the highest pixel densities [16]. Setting our maximum di-
mension to 800 pixels will improve the quality of images during gameplay on these
high-resolution devices. Although the change may pose problems for players using
older devices with less storage capacity, the TaleBlazer mobile app allows players to
delete games saved to their devices so they can free up storage space.
Device Name Width (px) Height (px) Pixel Density (ppi)LG G4 1440 2560 538LG G3 1440 2560 538HTC One 1080 1920 468Blackberry Passport 1440 1440 453LG Nexus 5 1080 1920 445
Table 6.2: High-resolution smart phone specifications.
Device Name Width (px) Height (px) Pixel Density (ppi)Apple iPad mini 2, 3 1536 2048 326Asus Nexus 7 (v2) 1080 1920 323Samsung Nexus 10 1600 2560 300HTC Nexus 9 1538 2048 281LG G Pad 8.3 1200 1920 273
Table 6.3: High-resolution tablet specifications.
6.4.2 Videos
Uploaded video files were originally compressed to 480x320 pixels. In TaleBlazer
games, video actions play full-screen video. The low quality of the videos in the
original implementation was therefore very apparent during gameplay. Using the
screen resolution data from the previous section, we increased the dimensions of
video to 720x480 pixels. The original implementation encoded the audio stream in
videos using the FFmpeg AAC encoder’s default bitrate of 128 kbps. This bitrate
results in decent audio quality while avoiding excessive storage costs, and it is used
84

in commercial products like YouTube [19]. As a result, we decided to keep the same
audio bitrate as before.
6.4.3 Audio Clips
While developing the audio clips feature, we made sure to take into account the fact
that mobile device storage capacities have increased in recent years. As mentioned in
Section 6.4.2, the AAC audio encoder in FFmpeg has a default bitrate of 128 kbps.
Since this results in good quality audio, we chose to use this bitrate.
85

86
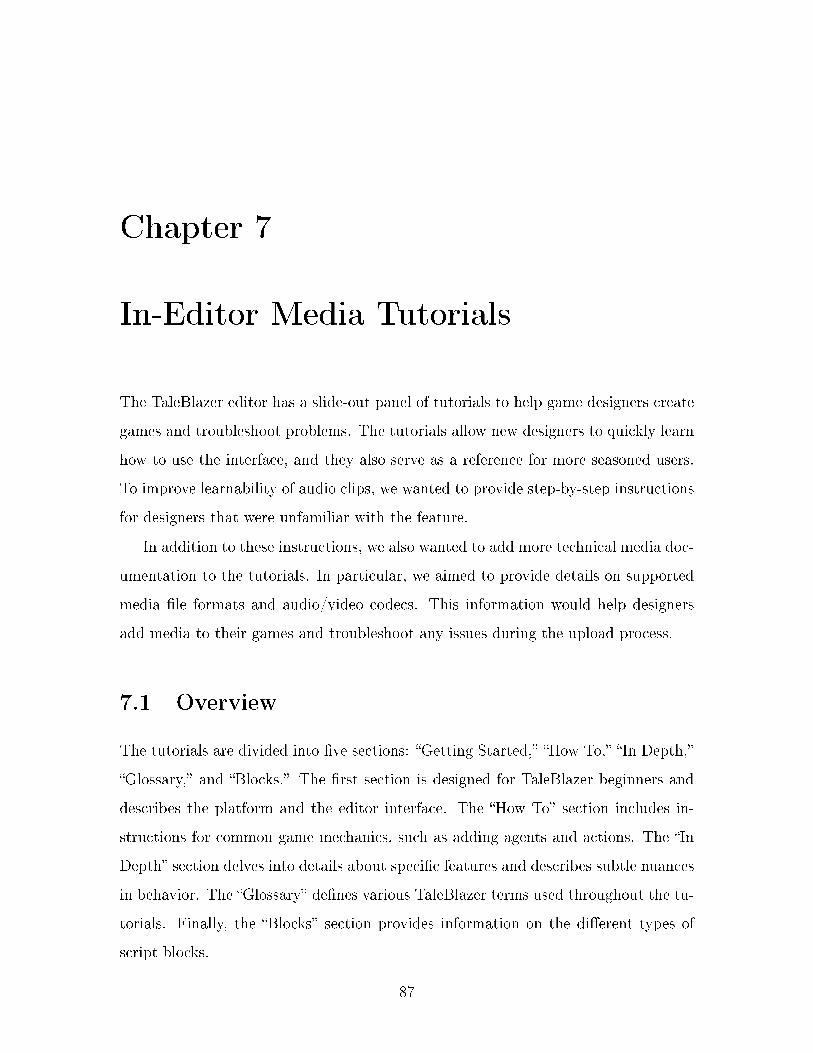
Chapter 7
In-Editor Media Tutorials
The TaleBlazer editor has a slide-out panel of tutorials to help game designers create
games and troubleshoot problems. The tutorials allow new designers to quickly learn
how to use the interface, and they also serve as a reference for more seasoned users.
To improve learnability of audio clips, we wanted to provide step-by-step instructions
for designers that were unfamiliar with the feature.
In addition to these instructions, we also wanted to add more technical media doc-
umentation to the tutorials. In particular, we aimed to provide details on supported
media file formats and audio/video codecs. This information would help designers
add media to their games and troubleshoot any issues during the upload process.
7.1 Overview
The tutorials are divided into five sections: “Getting Started,” “How To,” “In Depth,”
“Glossary,” and “Blocks.” The first section is designed for TaleBlazer beginners and
describes the platform and the editor interface. The “How To” section includes in-
structions for common game mechanics, such as adding agents and actions. The “In
Depth” section delves into details about specific features and describes subtle nuances
in behavior. The “Glossary” defines various TaleBlazer terms used throughout the tu-
torials. Finally, the “Blocks” section provides information on the different types of
script blocks.
87
Figure 7-1: Adding audio clips tutorial excerpt. Clicking on “Overview” on the leftpanel displays the panel on the right.
7.2 Adding Audio Clips
We added a new tutorial section called “How To: Adding Audio Clips” (Figure 7-1).
The tutorial explains what audio clips are and how they can be attached to rich text.
It also describes the renaming functionality.
7.3 Media Documentation
The original implementation of the editor provided limited documentation regarding
the types of supported media. The image and video pickers displayed error messages
listing the supported file extensions if a designer uploaded an unsupported file, but
this list was not documented elsewhere. We added the list of supported file extensions
and upload size limits to the text in the media pickers. Additionally, we included this
documentation under the “In Depth” section of the tutorials. In particular, we added
88

Figure 7-2: In-depth media tutorials. Clicking “About Images” on the left panelopens the panel on the right.
these details to the “About Images,” “About Videos,” and “About Audio Clips” panels
(Figure 7-2).
While this file extension and upload size limit documentation is sufficient for
images, video and audio require more detailed information. This is because uploading
a video or audio file with the correct file extension can still fail due to unsupported
encodings. As a solution, we added documentation about FFmpeg to the “About
Audio Clips” and “About Videos” panels. We also provided game designers with a
link to the FFmpeg site, as well as a list of all codecs supported by our current version
of the tool.
Although the information about FFmpeg makes our uploading process more trans-
parent to game designers, it will not be useful for those who are unfamiliar with the
technical details of audio and video processing. To address this, we researched the
most common applications for recording and editing audio/video [13, 14]. Then we
89

determined the encodings supported by these applications that were also supported
by our version of FFmpeg [12, 15, 10, 3, 8, 9]. Tables 7.1 and 7.2 show the results.
Although the aiff audio file extension is not accepted by the audio picker on the editor,
we have included it in the results since aiff files can easily be converted to accepted
file formats using audio applications like iTunes. Given the default encodings used on
mobile devices, we decided to additionally support mov and 3gp video files, as well as
3gp audio files. Using these results, we updated our tutorials to describe how game
designers can create audio clips and video files compatible with TaleBlazer. The in-
structions mention some specific audio/video recording and processing software that
game designers can use to produce assets supported by the platform.
ApplicationType
Application Name Recommended AudioFormat/Codec
Desktop
Mac OS QuickTime WAV, AIFF, MP3 (withdownloaded encoder)
Windows Sound Recorder WMAGarageBand AIFFFL Studio WAV, MP3Pro Tools WAV, MP3, AIFFAbleton Live WAV, AIFF
Mobile
iOS Voice Memos (default app) System default (typicallyM4A/AAC, M4A/ALAC)*
iOS Voice Record Pro M4A/AAC, WAV, MP3Android default recording app System default (typically
M4A/AAC, 3GP/AAC)*Android Smart Voice Recorder (SmartMob) WAVAndroid Easy Voice Recorder (Digipom) M4A/AAC, WAVAndroid Voice Recorder (Splend Apps) M4A/AAC, WAV
Table 7.1: Recommended audio formats and codecs.*System defaults may vary across devices
90

ApplicationType
ApplicationName
File Extension RecommendedAudioFormat/Codec
RecommendedVideoFormat/Codec
Desktop
iMovie MP4 AAC MPEG-4, H.264QuickTimePlayer
MP4 AAC MPEG-4, H.264
Final Cut Pro MP4 AAC MPEG-4, H.264Windows LiveMovie Maker
WMV WMA WMV, H.264(available Version 2012)
MobileiOS default cam-era app
System default(typicallyMOV)*
System default(typically AAC)*
System default(typically H.264)*
Android defaultcamera app
System default(typically MP4,3GP)*
System default(typically AAC)*
System default(typically H.264,H.263)*
Table 7.2: Recommended video formats and codecs.*System defaults may vary across devices
91

92

Chapter 8
Future Work
Although the audio clips feature is now in the production version of TaleBlazer, there
is still more work to be done to improve audio functionality. Integrating audio clips
in the agent overview on the editor will improve usability for game designers. On
the mobile app, the audio settings are still unclear for players unfamiliar with the
audio clips feature, and therefore adjustments must be made to enhance learnability.
Furthermore, we have yet to pilot test the audio clips feature with players in a real-
world scenario. Observing gameplay in outdoor settings will help us to determine
if the feature met our goal of creating a more engaging platform with the ability to
reach a broader audience.
Besides further improvements to audio clips, there are a number of tasks remaining
to improve media support in general. For one, we would like to give game designers
the option to customize sound effects and agent map icons, both of which are currently
built into the platform. Additionally, adding a full-screen image viewing mode in the
mobile application will allow players to view images in more detail during gameplay.
Also, more improvements can be made to the media upload process to improve asset
quality and server security. Further changes to the media pickers in the editor can
be employed to improve perfomance. Finally, adding a script block to play video will
result in more media-rich games.
93

8.1 Agent Overview Integration
As described in Section 5.6.2, audio clips have been integrated with the game summary
feature in the editor; however, more integration work remains. In particular, the agent
overview is an alternative mode of viewing agents and is used commonly by designers
for a high-level summary of all agents. Incorporating audio clips into this view would
make it easier for designers to locate the usage of audio clips in their games.
There are several approaches to this, including listing the names and metadata
of all audio clips used in the agent’s description or actions, or adding an audio icon
next to the description or action name if there is attached audio. Determining which
approach to use will require conducting interviews with game designers and collect-
ing their feedback. We will want to find a balance between providing useful audio
information on the agent overview while maintaining a clean and simple interface.
8.2 Improving Audio Settings on Mobile
The distinction between the “Audio Clips” and “Sound Effects” settings will likely
be confusing for players unfamiliar with the new feature. While we have provided
tutorials in the editor that define what audio clips are, there is no corresponding
documentation in the mobile app. One potential solution is to provide helper text
next to the setting names. For example, we can indicate that an agent bump chime
is an example of a sound effect, while audio clips are recordings presented with text
in the game. The mobile app also has a “How to Play” tutorial section that we can
update to include details about audio settings.
Another issue with the current implementation of audio settings is that they are
in-game settings, and not application-level settings. While this is useful for players
who want to customize their audio settings for different games, it can be problematic
for organizations that use TaleBlazer. These organizations typically create games and
lend devices to visitors who play those games. Having application-level audio settings
would allow organizations to easily configure in-game audio on all their devices. With
94

only game-level settings, organizations would have to rely on players selecting the
correct audio settings upon starting the game. At the same time, audio settings
should also remain on the in-game settings page so that players do not have to pause
the game in order to change them. One solution is to have application-level audio
settings that define the default in-game audio settings of all games played on the
device. That way, organizations can set the default settings for all their devices, and
players who wish to modify the settings can do so without pausing the game.
8.3 Pilot Testing
Audio clips were developed with the intention of reducing the amount of time players
had to look at their devices during gameplay. However, we cannot judge whether
or not we met this goal without pilot testing the feature. Running a demo game
outdoors with children − our target audience − will demonstrate whether audio clips
result in a more engaging form of gameplay. We can run an experiment comparing
the same game with and without audio, and ask players to rate their level of interest
and engagement. Direct observation will also allow us to judge whether players spent
less time looking at their device screens and more time looking at the surrounding
environment.
Furthermore, observing gameplay will help us to determine whether the feature
is usable in real-world settings. For example, it is critical that players can still hear
the clips even when they are surrounded by other players who are also listening to
in-game audio. Additionally, player feedback will reveal if any parts of the mobile
interface are unintuitive or confusing.
8.4 Further Media Customizations
While audio clips are custom recordings uploaded by game designers, sound effects
are not customizable. The three sound effects in the platform (agent bump chime,
correct password chime, incorrect password buzzer) cannot be modified by the game
95
designer on the editor. Allowing customization of sound effects will improve the use of
audio on the platform. To give game designers even more creative flexibility, we can
allow them to define different sound effects for different agents. This feature should
also let designers suppress sound effects directly from the editor. When suppressed,
sound effects will not be played even if the sound effects setting is enabled. This is
useful for designers that are creating games for quiet settings; they will not have to
rely on mobile audio settings to ensure that their games are silent.
Agent map icons are also currently built into the platform and not customizable.
We can add functionality to allow game designers to upload custom icons that fit the
theme of their game.
8.5 Full-Screen Image Mode
In the mobile application, images in games are restricted in size so that they can fit
on the agent/player/world dashboards. This prevents players from seeing the images
in more detail. Adding a full-screen image mode can resolve this issue, giving players
the opportunity to look more closely at the images associated with the dashboard.
For example, players could tap or swipe across the image to turn on full-screen mode
and view the image more closely; swiping or tapping again could return the player to
the dashboard.
8.6 Additional Media Upload Improvements
One major improvement to be made is ensuring that the aspect ratio of uploaded video
files is maintained during the resizing process. With the current implementation,
videos are resized to 720x480 pixels, causing videos with different aspect ratios to be
distorted.
Another improvement would be to use the H.264 video encoder for video processing
on the server. Currently, uploaded video files are compressed and converted to mp4
files with MPEG-4 video encoding and AAC audio encoding. The H.264 encoding
96

format is newer and more robust than MPEG-4, and will result in better video quality
and more efficient compression.
To further improve video quality, the bitrate of the video encoder should be ad-
justed. Both the MPEG-4 and H.264 video encoders in FFmpeg use a variable bi-
trate that depends on the desired frame rate, dimensions, and quality of the encoded
video. The quality can be adjusted by changing an FFmpeg parameter. Increasing
the quality will result in a higher bitrate and therefore higher file size. As a result, an
appropriate quality parameter must be chosen to boost perceived video quality but
avoid excessive storage costs.
To improve performance on the editor, thumbnails should also be generated for
images during the upload process. With the current implementation, only the full-size
image is saved to the server. As a result, the full-size image needs to be downloaded
just to display a small thumbnail on the editor. Especially with the reduced image
compression described in Section 6.4.1, the editor is forced to download large amounts
of image data to render agent image thumbnails. Furthermore, the image picker
downloads full-size images to display thumbnails of the game designer’s existing image
assets. Downloading a smaller copy of these images will decrease download time,
improving editor performance.
A final improvement would be adding security checks for image uploads similar
to those used for video and audio (Section 6.3). We could use FFprobe to verify that
the uploaded files are indeed images. We could also experiment with using MIME
types for this verification to check if the results of the Linux “file” command are more
reliable for images than for audio/video.
8.7 Media Picker Tab Pagination
Performance in the editor can be improved by using pagination in the tabs at the
bottom of the media pickers. This is especially critical for the My Files tab, which
displays all the image, video, or audio assets a game designer has uploaded to the
server. With the current implementation, the tabs in the pickers can be populated
97

with an arbitrarily-large number of assets. For the image and video pickers, this will
result in a high volume of synchronized image downloads. Using pagination to display
a smaller number of assets at once will reduce the time it takes to retrieve image data
from the server and render the content of the picker tabs. It will also reduce the
amount of synchronized load the server needs to handle. Note that this is not an
issue for the audio picker since it only uses two AJAX requests to populate the tabs,
regardless of the size of the tab contents (Section 4.2.2). However, pagination should
still be used in the audio picker for consistency with the other pickers.
8.8 Video Script Blocks
The overall use of media in TaleBlazer can be improved by adding script blocks to
play video. Expanding video usage to scripts will give game designers more ways of
including media in their games. Like video actions, the blocks can be used to play
full-screen video. This will lead to more engaging, less text-heavy games. However,
implementing this will involve changing the underlying design of video asset manage-
ment. As described in Section 2.2.5, audio clips use a different asset management
scheme from images/video so they can be played from scripts. Adding a script block
to play video will require changing the implementation to use a similar scheme for
videos as well.
Initially, we had also considered adding a script block to play audio. However,
since audio does not have a visual component, it would be unclear what should
be displayed on-screen in the mobile app while the audio script block is executing.
Although this is still something that can be implemented in the future, video script
blocks are a more straight-forward first step towards media-rich scripts.
98
Chapter 9
Conclusion
The TaleBlazer platform supports creating and playing location-based AR games.
With the introduction of the new audio clips feature, game designers will be able to
produce more engaging games, relying less on text to convey information. Players will
also be able to look up from their mobile devices and explore their surroundings while
playing these games. Our user testing and infrastructure improvements have made
the feature ready for its public release, and tutorials have enhanced the learnability
of all media support on the editor. Future work with TaleBlazer media will continue
to enrich and expand the space of games that can be created with the platform.
99

100

Appendix A
Research Instruments
This appendix gives the guide that was provided to testers during user testing. Links
to the video tutorials describing the changes to the mobile application and editor are
included in the text of the user testing guide. The links have also been reproduced
below.
Mobile Video Tutorial: https://www.youtube.com/watch?v=IpSECIERPtE
Editor Video Tutorial: https://www.youtube.com/watch?v=lOQSRZ6KZUg
101

TaleBlazer “Audio Clips” Testing Guide
Description of Audio Clips Feature
The new audio clips feature allows game designers to attach audio recordings to pieces of rich
text via the rich text editor. During gameplay, players will be presented with the visual text on
the screen accompanied by an optional audio recording selected by the game designer. The
designer selects this recording by uploading audio files on the editor via the rich text dialog. The
recording does not necessarily have to match the text being displayed, differentiating this from
text-to-speech. Instead, audio clips can be used to enhance gameplay in whatever way the
designer sees fit; this could mean recording the exact words that appear in the rich text,
summarizing the text in a more concise manner, or having a voice actor read the text more
dramatically.
Since audio clips are coupled with rich text, there are five different ways to add them to games:
Game introduction
Text action
“Say rich text” script block
“Set description to rich text” script block
Agent/Player/World dashboard
Note that we differentiate between audio clips, which represent audio recordings that are
attached to rich text, and sound effects, which represent the default bump/password sounds that
are already included in TaleBlazer. To clarify, this project focuses exclusively on audio clips.
We would like to test the changes to both the editor and mobile app, and gauge the usability and
functionality of the new feature. There are two (or three) tasks we would like you to complete:
1. Play a demo game to test mobile changes
2. Complete a few tasks on the new version of the editor
3. (Optional) Make a game with audio or add audio to an existing game
Details for each of these tasks are listed below. Each task includes a series of questions that we
would like you to answer. You can type your responses inline in this doc, and informal answers
(bullet points, etc) are perfectly fine.
Target Date: We would like to collect feedback by October 16, but this is a flexible deadline.
Please let us know if you would like more time to complete testing.
102

Task 1: Play a Demo Game
1. Watch a quick video on mobile changes: https://www.youtube.com/watch?v=IpSECIERPtE
2. Uninstall the production app from your Android device. You will need to reinstall it after
you complete all testing in order to use TaleBlazer and have access to your games. The
new build you will be using for testing points to a test server, which does not contain your
existing TaleBlazer games.
3. Download and install the APK for the new version of the app from http://bit.ly/1FRIM0a
onto your Android device. Note that it is case-sensitive. If this URL does not work, try the
full URL: https://www.dropbox.com/s/n75c7a44lfz1etp/TaleBlazer.apk?dl=0 .
4. Download and play the demo audio game Going to Hogwarts. This is a sample game, so you
can find it directly on the home screen (under the MIT organization). Alternatively, you can
find it with the game code: gjlfjsn. While playing the demo game, please consider the
following questions and type your answers below.
Audio Quality
How is the audio volume? Did you adjust your phone volume settings?
Could you hear/understand the recordings? Did you use earbuds or the phone’s speakers?
Audio Controls
Use the different controls on the audio player. Did the buttons work as expected?
How often did you use the controls during gameplay? Did you rewind and re-listen often?
Game Mechanics
With the Audio Clips Autoplay setting on, note when audio autoplays and when it
doesn’t. Is the behavior what you would expect? How does it affect gameplay? Try the
following scenarios, paying attention to when autoplay occurs:
Autoplaying on agent dashboards vs. Player/World tabs
Bump into Ollivander’s Wand Store, hit Buy Potion, then hit ‘OK’ to return to the
agent dashboard.
Bump into the Key agent, unlock it, and hit ‘Pick Up’. This will update the Key’s
agent description and associated audio.
The Key agent is password-protected. Note how the audio clip attached to its description
interacts with the password buzzer/chime. Is the behavior what you would expect?
Audio Settings
Try changing the audio settings on the Settings page. Restart/replay the game for each of
the setting combinations below. You don’t have to replay the entire game; just bump into
some agents, run some actions, and look at the Player/World tab. Experiment with more
combinations if you have time. Did the behavior match your expectations?
Sound Effects on, Audio Clips on, Audio Clips Autoplay off
Sound Effects on, Audio Clips off
Sound Effects off, Audio Clips on, Audio Clips Autoplay on
Do the setting names make sense? Is the distinction between audio clips and sound
effects clear?
103

Task 2: Work with the Editor
1. Watch a quick video on editor changes: https://www.youtube.com/watch?v=lOQSRZ6KZUg
2. Go to the new version of the online editor at http://54.158.22.210/
3. Make a new account and log in.
4. Remix the Going to Hogwarts demo game by going to http://54.158.22.210/profile/manali
and clicking remix next to the Hogwarts game.
5. Add a new agent. You can name it whatever you want, and place it any region you wish.
6. Edit the description of the new agent. Check “Attach Audio” at the bottom of the rich text
editor and upload a new file for the description. You can either record your own, or you can
use this sample file: http://bit.ly/1RsWoQy . If this URL does not work, try the following:
https://www.dropbox.com/s/xuez932gju4aav5/sample_audio.m4a?dl=0 .
7. Try playing the audio clip from the editor and renaming it.
8. Close the rich text editor. Reopen it and try switching the audio clip to an existing recording
from the audio picker.
9. Give your agent a text action and try attaching audio to it.
10. Add a script action that uses the “say rich text block” and try attaching audio to it.
Feel free to experiment with the editor further if you wish. Here are some questions to keep in
mind while completing this task. Please include your answers below.
Was the editor interface intuitive? Did you understand where/how to upload recordings?
Did the rename functionality make sense and work as expected?
Was the player on the editor functional?
Were you confused or frustrated at any point, even slightly? Please describe/explain
where/why.
104
(Optional) Task 3: Create/Play your Own Game
If you have extra time, create your own new game with audio! If you have an existing game that
you would like to add audio to, email me the id and game code, and I’ll make it accessible on the
new server. Remember, this does not have to be a polished game; you can use scratch audio
recordings just to test functionality.
Things to consider while testing are listed below. Please comment on each with your feedback
(positive/negative).
When you play your newly-created game, did the audio appear where you expected it to?
Try recording and using clips of different length. How is the experience from both the
game designer and player perspectives?
What functionality or settings would you have liked to see on the editor to make the
process simpler? What about on the mobile app?
105

106

Bibliography
[1] 7Scenes. http://7scenes.com/. Accessed: 2015-03-30.
[2] Amazon - About Media Formats. http://www.amazon.com/gp/help/
customer/display.html?nodeId=201379550. Accessed: 2015-11-13.
[3] Supported Media Formats. http://developer.android.com/guide/
appendix/media-formats.html. Accessed: 2015-11-13.
[4] ARIS. http://arisgames.org/. Accessed: 2015-03-30.
[5] audio.js. http://kolber.github.io/audiojs/. Accessed: 2015-04-25.
[6] FFmpeg. https://ffmpeg.org/. Accessed: 2015-01-16.
[7] FFprobe. https://ffmpeg.org/ffprobe.html. Accessed: 2015-11-15.
[8] Using Audio. https://developer.apple.com/library/ios/documentation/
AudioVideo/Conceptual/MultimediaPG/UsingAudio/UsingAudio.html. Ac-cessed: 2015-11-13.
[9] Still and Video Media Capture. https://developer.apple.com/library/
mac/documentation/AudioVideo/Conceptual/AVFoundationPG/Articles/
04_MediaCapture.html. Accessed: 2015-11-13.
[10] iTunes: How to convert a song to a different file format. https://support.
apple.com/en-us/HT204310. Accessed: 2015-11-13.
[11] Manali Naik. Custom audio in taleblazer. Undergraduate thesis, MassachusettsInstitute of Technology, December 2014.
[12] Windows Help - What kind of files can I use in Movie Maker? http://windows.
microsoft.com/en-us/windows-live/movie-maker-file-types-faq. Ac-cessed: 2015-11-13.
[13] The 7 Best Programs for Mixing Professional Audio. http://www.
digitaltrends.com/home-theater/best-music-editing-software/. Ac-cessed: 2015-11-12.
107

[14] Best Free Video Editing Software. http://www.digitaltrends.com/
computing/best-free-video-editing-software-version-1443042612/.Accessed: 2015-11-12.
[15] QuickTime Components. http://www.apple.com/quicktime/resources/
components.html. Accessed: 2015-11-13.
[16] mydevice.io. http://mydevice.io/devices/. Accessed: 2015-03-20.
[17] SoX - Sound eXchange. http://sox.sourceforge.net/. Accessed: 2015-01-16.
[18] TaleBlazer for Research. http://taleblazer.org/about/taleblazer_for#
research. Accessed: 2015-11-09.
[19] YouTube Help - Recommended upload encoding settings (Advanced). https:
//support.google.com/youtube/answer/1722171?hl=en. Accessed: 2015-11-15.
108
Copyright © 2022 FDOKUMEN