Accident Avoidance Workshops
22
1- Student’s first and last name (please print): 2- Learner’s permit or driver’s license number*: (*Required to attend class) 3- Vehicle make: Model: Year: 4- Go to http://www.kbb.com/compare-cars/ . Under “Select a Vehicle”, select new or used, make, model, year and trim, and then click “Add”. 5- Now, off to the right, under “Selected Cars”, click on the “Overview and Pricing” link. 6- Click on the “Specs” tab, then under “Specifications”, click on the “Tech Specs” tab, and record the following information from the information in that tab: “Horsepower”: hp. (disregard RPM) “Curb Weight”: lb. “Height”: INCHES. “Wheelbase”: INCHES. CRITICAL!: “Turning Diameter” ft. (Probably in the 31.8 to 46.0 range) (Note: We do not recommend teens operate any vehicles less than 2,400 pounds. 8- Determine “Power/Weight Ratio” (Horsepower divided by Curb Weight): .0_ _ :1 (Probably in the .050 to .073 range.) Determine “Height/Wheelbase Ratio” (Overall Height divided by Wheelbase): . _ _ _ :1 (Probably in the .500 to .652 range.) 9- Give the HORSEPOWER, the CURB WEIGHT, and both of the above ratios to your parents to record in the beginning of their notes. 10- Does your vehicle have a switch to turn “Traction Control” on and off?) 11- What one word best describes the color of the vehicle? (Tan, Gray, etc.): 12- Optional: Does your vehicle have a pet name, and if so, what is it? 13- Parent(s) name(s) who will be attending the driving session with you: (Please print) (If two students are attending with two parents, and they will be in separate vehicles, just list here the name of the parent who will be riding with this particular student .) A- B- This packet is for the driver to print out and manage, (not the parent),with respect to the vehicle they will drive during the driving session. This will familiarize them with how to research vehicles when it comes time to make a buying decision, and introduce them to terms they will be exposed to throughout the Accident Avoidance Workshops. Accident Avoidance Workshops Vehicle Specification sheet to turn in when arriving at classroom
-
Upload
khangminh22 -
Category
Documents
-
view
0 -
download
0
Transcript of Accident Avoidance Workshops
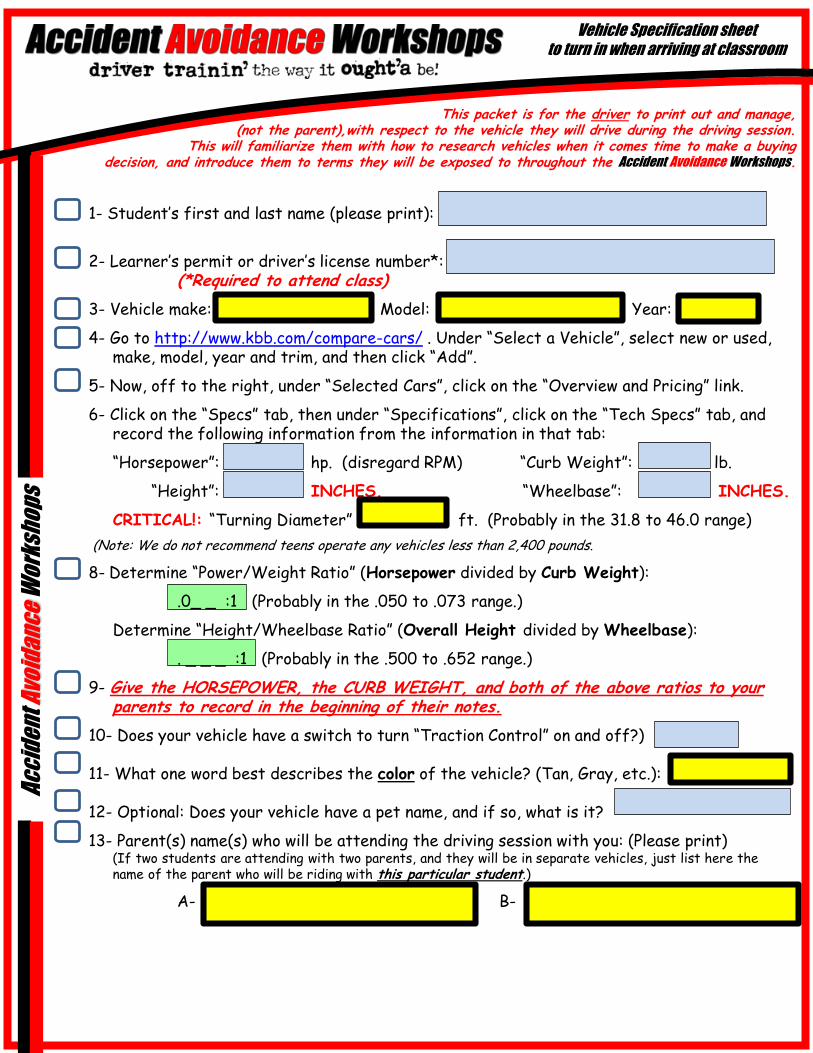
1- Student’s first and last name (please print):
2- Learner’s permit or driver’s license number*:(*Required to attend class)
3- Vehicle make: Model: Year:
4- Go to http://www.kbb.com/compare-cars/ . Under “Select a Vehicle”, select new or used, make, model, year and trim, and then click “Add”.
5- Now, off to the right, under “Selected Cars”, click on the “Overview and Pricing” link.
6- Click on the “Specs” tab, then under “Specifications”, click on the “Tech Specs” tab, and record the following information from the information in that tab:
“Horsepower”: hp. (disregard RPM) “Curb Weight”: lb.
“Height”: INCHES. “Wheelbase”: INCHES.
CRITICAL!: “Turning Diameter” ft. (Probably in the 31.8 to 46.0 range)
(Note: We do not recommend teens operate any vehicles less than 2,400 pounds.
8- Determine “Power/Weight Ratio” (Horsepower divided by Curb Weight):
.0_ _ :1 (Probably in the .050 to .073 range.)
Determine “Height/Wheelbase Ratio” (Overall Height divided by Wheelbase):
. _ _ _ :1 (Probably in the .500 to .652 range.)
9- Give the HORSEPOWER, the CURB WEIGHT, and both of the above ratios to your parents to record in the beginning of their notes.
10- Does your vehicle have a switch to turn “Traction Control” on and off?)
11- What one word best describes the color of the vehicle? (Tan, Gray, etc.):
12- Optional: Does your vehicle have a pet name, and if so, what is it?
13- Parent(s) name(s) who will be attending the driving session with you: (Please print)(If two students are attending with two parents, and they will be in separate vehicles, just list here the name of the parent who will be riding with this particular student.)
A- B-
This packet is for the driver to print out and manage, (not the parent),with respect to the vehicle they will drive during the driving session.
This will familiarize them with how to research vehicles when it comes time to make a buying decision, and introduce them to terms they will be exposed to throughout the Accident Avoidance Workshops.
Ac
cid
en
t A
void
an
ce
Wo
rksh
op
sVehicle Specification sheet
to turn in when arriving at classroom

A program by:BristolATLANTA
This is the same program available at:
MOTOR SPEEDWAY
Motor Speedway
Determine the steering wheel’s range of motion. How far is it from “Left Lock” to “Right Lock”? Get in the vehicle and turn the steering wheel all the way to the left. Now turn it all the way to the right counting revolutions as you go to the nearest ¼ turn. Most vehicles are somewhere in the 3 to 4 turn range from lock-to-lock.
Exercise #1: Several times during the driving session, you will need to straighten your front wheels to aim your car straight. To prepare you for this, can you think of a way to know FOR SURE when your car is pointed straight without looking at the wheels? First of all, any words or logos printed on your steering wheel should be right side up if it’s aimed straight. But there are probably three places in the range of steering where this could happen. So, supposing this is the case, then “straight” would be the middle one, wouldn’t it? How do you find the middle one? Easy. Just turn the wheel all the way to the “lock” in EITHER direction, … and then back it off until the words or logos are straight for the SECOND time!
EXERCISE #2: Prior to the classroom session, YOU MUST determine which type of braking system your vehicle is equipped with a Conventional, or an Anti-Lock Brakes system (ABS).
Conventional Brakes: (Tires skid under maximum braking)Anti-Lock Brakes: (Brake pedal pulses under maximum braking.)
* DO NOT rely on the owner’s manual for this information. The owner’s manual only indicates whether or not your vehicle was AVAILABLE with Anti-Lock Brakes.
What type of braking system a vehicle has is one of the biggest factors one considers in purchasing a vehicle, so I apologize in advance for insulting your intelligence by suggesting you may not know how to see if a vehicle has ABS. But on the outside chance that you are in the small percentage of those who never bothered to check, here’s one way that is semi-reliable to do so: Turn the key on as far as it can go without going to that last position which actually starts the car. All of the instrumentation lights should light up. You need to look for a light like this:
First of all, as I’m sure you understand, if the light bulb is burned out, you won’t see a light even if your vehicle IS equipped with ABS … which is why this means is not necessarily conclusive.
Secondly, if you have a truck, this means doesn’t work either. Federal Law mandates trucks manufactured after March 1st, 1999 be equipped with ABS on the REAR as an absolute minimum. This is because the back of the truck is so light, and is more prone to spin out if the rear tires lock up. So you could turn on the key, and see the light … but STILL not have ABS on the front.
Nope … you’re gonna have to actually TEST YOUR BRAKES to learn which braking system you have.
Here’s how: In a safe, controlled environment, such as an abandoned road or a wide open empty parking lot, slam on the brakes as hard as possible from a speed of about 20 to 25 mph. Slippery pavement, a dirt road or even a grassy surfaces work well. A vibrating brake pedal accompanied by shaking sound from under the hood would indicate you have ABS. If the tires lock up or skid … you have conventional brakes. YOU MUST be absolutely positive as to which system you have prior to attending.
Ac
cid
en
t A
void
an
ce
Wo
rksh
op
sVehicle Specification sheet
For the family to keep
A program by:
Here are two exercises you need to do before you arrive at the classroom session. No need to turn in this page,
but be familiar with the terminology for class.

Ac
cid
en
t A
void
an
ce
Wo
rksh
op
s
1- Reason #1 why you’re here: _________________.
2- 16 year olds are ______ times as likely to be involved in a crash.
3- One out of _____ (how many?) 16 year olds will crash a vehicle.
4- ___________ is the science of how our BODIES come “wired from the factory”.
5- What sort of activity is driving? It’s a _______________ - __________________ skill.
6- One important skill that needs to be developed is the ability to make decisions based on…
__________________ ___________________________,
7- The part of the brain that makes decisions based on _______________ _______________
doesn’t develop until __________.
8- In what % of teen accidents was excessive speed a factor? ________%
9- What percent of teen crashes are attributed to a “driver mistake”? _____%
10- Every crash is caused because SOMEBODY did SOMETHING that everyone else_____________ ___________________ them to do.
11- There are 2 types of driving conditions:a- ____________ driving conditions, and ____________ driving conditions.
12- What percent of drivers actually have training in handling emergency driving conditions? _______%
(More than 10 minutes)
13- How long does the average crash take? __________
14- Most drivers freeze or lock up when faced with Emergency Driving Conditions because they have
______ ______________ _____________________ to play in that situation!
15- THE key to the Accident Avoidance Workshops is: “Driving by instinct _________ _________!
16- “Instincts” that we have that make driving inherently difficult:
1- Your hands are hard-wired to your __________.
2- Your brain does not process ________________ information easily.
Student Name: _____________________
A program by:BristolATLANTA
This is the same program available at:
MOTOR SPEEDWAY
Motor Speedway
Student Note Sheet
Page 1 of 2

A program by:BristolATLANTA
This is the same program available at:
MOTOR SPEEDWAY
Motor Speedway
Ac
cid
en
t A
void
an
ce
Wo
rksh
op
s
17- At any speed over 37 or 38 MPH, _____________________________ can cause
immediate loss of control.
18- The elemental difference between a regular crash and a fatal crash, is a
Sudden ____________________ of ____________________.
19- A ________________ _______________ CANNOT steer the car!
20- There are two types of braking systems: ________________ and ______-_________.
21- Hot-Tip from Uncle Homer #1: “___________ _________ ____________________!”
22- Another way to prepare for emergency situations?: Build a ____________ database.
23- Your parents are worried about you getting behind the wheel simply because
you have ____ _______________.
24- The #1 teen-fatality crash is caused by: ______-_______________
25- What should your first reaction be if you drop a wheel off the side of the road? _______ _______.
26- For how long did the driver of the vehicle Jason’s was riding in lose his license? _______
27- You don’t wear a seat belt for your safety…. you wear it for _________ ______________.
28- You are ______ times as likely to crash if you are on the cell phone,
and ______ times as likely if it’s “hands-free”.
29- Drivers are obligated by law to do everything possible to ____________ ___ _______________.
30- What percentage of accidents are attributed to “Distracted Driving”? _______%
31- “Distracted Driving; Cell phone” kills/injures how many each year? ______
32- What are the 3 different types of distractions? ___________ _____________ ______________.
33- How much more likely are you to crash if you’re texting? ___
34- Parking on the wrong side of the road can result in a fine of $_____.
35- Which is better: 10&2 or 9&3? _______________.
36- How fast is an airbag moving when it deploys? _______________ mph.
37- Kinesthetically, what is the fastest way to turn the steering wheel? ______ - ______ - _______.
38- If you wear _____-______ to the driving session,
we’re sending you home.
Student Note Sheet
Page 2 of 2

Ac
cid
en
t A
void
an
ce
Wo
rksh
op
s
1- Reason #1 why you’re here: _________________.
2- 16 year olds are ______ times as likely to be involved in a crash.
3- One out of _____ (how many?) 16 year olds will crash a vehicle.
4- ___________ is the science of how our BODIES come “wired from the factory”.
5- What sort of activity is driving? It’s a _______________ - __________________ skill.
6- One important skill that needs to be developed is the ability to make decisions based on…
__________________ ___________________________,
7- The part of the brain that makes decisions based on _______________ _______________
doesn’t develop until __________.
8- In what % of teen accidents was excessive speed a factor? ________%
9- What percent of teen crashes are attributed to a “driver mistake”? _____%
10- Every crash is caused because SOMEBODY did SOMETHING that everyone else_____________ ___________________ them to do.
11- There are 2 types of driving conditions:a- ____________ driving conditions, and ____________ driving conditions.
12- What percent of drivers actually have training in handling emergency driving conditions? _______%
(More than 10 minutes)
13- How long does the average crash take? __________
14- Most drivers freeze or lock up when faced with Emergency Driving Conditions because they have
______ ______________ _____________________ to play in that situation!
15- THE key to the Accident Avoidance Workshops is: “Driving by instinct _________ _________!
16- “Instincts” that we have that make driving inherently difficult:
1- Your hands are hard-wired to your __________.
2- Your brain does not process ________________ information easily.
Student Name: _____________________
A program by:BristolATLANTA
This is the same program available at:
MOTOR SPEEDWAY
Motor Speedway
Student Note Sheet
Page 1 of 2

A program by:BristolATLANTA
This is the same program available at:
MOTOR SPEEDWAY
Motor Speedway
Ac
cid
en
t A
void
an
ce
Wo
rksh
op
s
17- At any speed over 37 or 38 MPH, _____________________________ can cause
immediate loss of control.
18- The elemental difference between a regular crash and a fatal crash, is a
Sudden ____________________ of ____________________.
19- A ________________ _______________ CANNOT steer the car!
20- There are two types of braking systems: ________________ and ______-_________.
21- Hot-Tip from Uncle Homer #1: “___________ _________ ____________________!”
22- Another way to prepare for emergency situations?: Build a ____________ database.
23- Your parents are worried about you getting behind the wheel simply because
you have ____ _______________.
24- The #1 teen-fatality crash is caused by: ______-_______________
25- What should your first reaction be if you drop a wheel off the side of the road? _______ _______.
26- For how long did the driver of the vehicle Jason’s was riding in lose his license? _______
27- You don’t wear a seat belt for your safety…. you wear it for _________ ______________.
28- You are ______ times as likely to crash if you are on the cell phone,
and ______ times as likely if it’s “hands-free”.
29- Drivers are obligated by law to do everything possible to ____________ ___ _______________.
30- What percentage of accidents are attributed to “Distracted Driving”? _______%
31- “Distracted Driving; Cell phone” kills/injures how many each year? ______
32- What are the 3 different types of distractions? ___________ _____________ ______________.
33- How much more likely are you to crash if you’re texting? ___
34- Parking on the wrong side of the road can result in a fine of $_____.
35- Which is better: 10&2 or 9&3? _______________.
36- How fast is an airbag moving when it deploys? _______________ mph.
37- Kinesthetically, what is the fastest way to turn the steering wheel? ______ - ______ - _______.
38- If you wear _____-______ to the driving session,
we’re sending you home.
Student Note Sheet
Page 2 of 2
A program by:BristolATLANTA
This is the same program available at:
MOTOR SPEEDWAY
Motor Speedway
Ac
cid
en
t A
void
an
ce
Wo
rksh
op
s
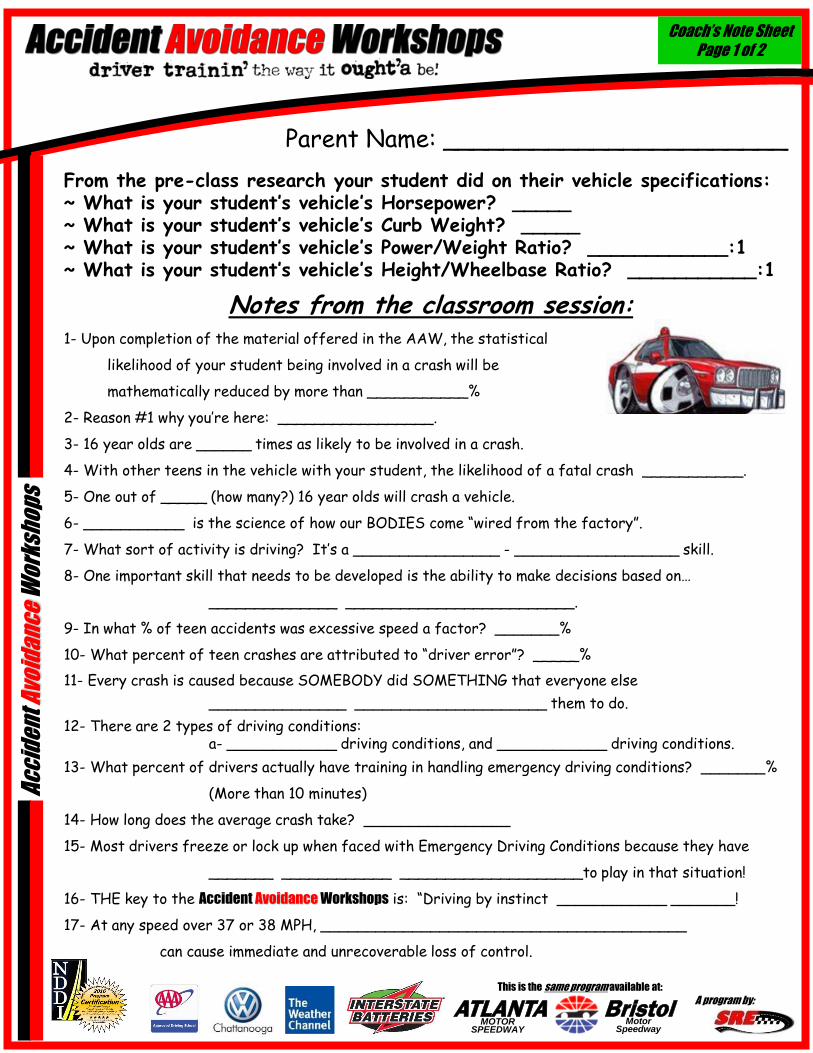
From the pre-class research your student did on their vehicle specifications:~ What is your student’s vehicle’s Horsepower? _____~ What is your student’s vehicle’s Curb Weight? _____ ~ What is your student’s vehicle’s Power/Weight Ratio? ____________:1~ What is your student’s vehicle’s Height/Wheelbase Ratio? ___________:1
Notes from the classroom session:1- Upon completion of the material offered in the AAW, the statistical
likelihood of your student being involved in a crash will be
mathematically reduced by more than ___________%
2- Reason #1 why you’re here: _________________.
3- 16 year olds are ______ times as likely to be involved in a crash.
4- With other teens in the vehicle with your student, the likelihood of a fatal crash ___________.
5- One out of _____ (how many?) 16 year olds will crash a vehicle.
6- ___________ is the science of how our BODIES come “wired from the factory”.
7- What sort of activity is driving? It’s a ________________ - __________________ skill.
8- One important skill that needs to be developed is the ability to make decisions based on…
______________ _________________________.
9- In what % of teen accidents was excessive speed a factor? _______%
10- What percent of teen crashes are attributed to “driver error”? _____%
11- Every crash is caused because SOMEBODY did SOMETHING that everyone else
_______________ _____________________ them to do.
12- There are 2 types of driving conditions:a- ____________ driving conditions, and ____________ driving conditions.
13- What percent of drivers actually have training in handling emergency driving conditions? _______%
(More than 10 minutes)
14- How long does the average crash take? ________________
15- Most drivers freeze or lock up when faced with Emergency Driving Conditions because they have
_______ ____________ ____________________to play in that situation!
16- THE key to the Accident Avoidance Workshops is: “Driving by instinct ____________ _______!
17- At any speed over 37 or 38 MPH, ________________________________________
can cause immediate and unrecoverable loss of control.
Parent Name: _______________________
Coach’s Note Sheet
Page 1 of 2

A program by:BristolATLANTA
This is the same program available at:
MOTOR SPEEDWAY
Motor Speedway
Ac
cid
en
t A
void
an
ce
Wo
rksh
op
sCoach’s Note Sheet
Page 2 of 2
18- The elemental difference between a regular crash and a fatal crash, is a
sudden ____________________ of ____________________.
19- A ________________ _______________ CANNOT steer the car!
20- There are two types of braking systems: _________________ and _______________.
21- Hot-Tip from Uncle Homer #1: “___________ _________ ____________________!”
22- The leading reason your students are under-developed at driving is because they have spent
________ hours ________________ _______.
23- The #1 teen-fatality crash is caused by: _______-______________.
24- You don’t wear a seat belt for your safety…. you wear it for _________ ______________.
25- You are ______ times as likely to crash if you are on the cell phone,
and ______ times as likely if it’s “blue-tooth”, “speaker-phone” or “hands-free”.
26- What percentage of accidents are attributed to “Distracted Driving”? _______%
27- Drivers are obligated by law to do everything possible to __________ _____ __________.
28- “Distracted Driving; Cell phone” kills/injures how many each year? _____.
29- What are the 3 different types of distractions? _________ ____________ ___________.
30- How much more likely are you to crash if you’re texting? ___
31- Two characteristics of vehicles that make a vehicle dangerous for a new driver are:
_________ to __________ _______ and __________ of ____________.
P/W parameters: Up to .058 / .058 to .066 / .066 to .073 / over .073 )H/W parameters: Up to .587 / .587 to .620 / .620 to .652 / over .652 )
32- Parking on the wrong side of the road can result in a fine of $ _____
33- Which is correct: 10&2 or 9&3? _______________.
34- How fast is an airbag moving when it deploys? _______________ mph.
35- What is Step #1 when your student demonstrates “Rookie Steering” during the Workshops?
_________________________ _______________!
36- Kinesthetically, what is the fastest way to turn the steering wheel? ________-_______-________
37- This weekend, what time do you need to arrive on the parking lot? _____:_____.
38- And what time do you need to be standing in front of your instructor? _____:_____
39- Where do you park when you arrive at the Workshops?
Next to the ______________!!!
40- What MUST you bring with you to the driving session in order to complete the program requirements?
____________________ ______________.

A program by:BristolATLANTA
This is the same program available at:
MOTOR SPEEDWAY
Motor Speedway
Ac
cid
en
t A
void
an
ce
Wo
rksh
op
s
From the pre-class research your student did on their vehicle specifications:~ What is your student’s vehicle’s Horsepower? _____~ What is your student’s vehicle’s Curb Weight? _____ ~ What is your student’s vehicle’s Power/Weight Ratio? ____________:1~ What is your student’s vehicle’s Height/Wheelbase Ratio? ___________:1
Notes from the classroom session:1- Upon completion of the material offered in the AAW, the statistical
likelihood of your student being involved in a crash will be
mathematically reduced by more than ___________%
2- Reason #1 why you’re here: _________________.
3- 16 year olds are ______ times as likely to be involved in a crash.
4- With other teens in the vehicle with your student, the likelihood of a fatal crash ___________.
5- One out of _____ (how many?) 16 year olds will crash a vehicle.
6- ___________ is the science of how our BODIES come “wired from the factory”.
7- What sort of activity is driving? It’s a ________________ - __________________ skill.
8- One important skill that needs to be developed is the ability to make decisions based on…
______________ _________________________.
9- In what % of teen accidents was excessive speed a factor? _______%
10- What percent of teen crashes are attributed to “driver error”? _____%
11- Every crash is caused because SOMEBODY did SOMETHING that everyone else
_______________ _____________________ them to do.
12- There are 2 types of driving conditions:a- ____________ driving conditions, and ____________ driving conditions.
13- What percent of drivers actually have training in handling emergency driving conditions? _______%
(More than 10 minutes)
14- How long does the average crash take? ________________
15- Most drivers freeze or lock up when faced with Emergency Driving Conditions because they have
_______ ____________ ____________________to play in that situation!
16- THE key to the Accident Avoidance Workshops is: “Driving by instinct ____________ _______!
17- At any speed over 37 or 38 MPH, ________________________________________
can cause immediate and unrecoverable loss of control.
Parent Name: _______________________
Coach’s Note Sheet
Page 1 of 2

A program by:BristolATLANTA
This is the same program available at:
MOTOR SPEEDWAY
Motor Speedway
Ac
cid
en
t A
void
an
ce
Wo
rksh
op
sCoach’s Note Sheet
Page 2 of 2
18- The elemental difference between a regular crash and a fatal crash, is a
sudden ____________________ of ____________________.
19- A ________________ _______________ CANNOT steer the car!
20- There are two types of braking systems: _________________ and _______________.
21- Hot-Tip from Uncle Homer #1: “___________ _________ ____________________!”
22- The leading reason your students are under-developed at driving is because they have spent
________ hours ________________ _______.
23- The #1 teen-fatality crash is caused by: _______-______________.
24- You don’t wear a seat belt for your safety…. you wear it for _________ ______________.
25- You are ______ times as likely to crash if you are on the cell phone,
and ______ times as likely if it’s “blue-tooth”, “speaker-phone” or “hands-free”.
26- What percentage of accidents are attributed to “Distracted Driving”? _______%
27- Drivers are obligated by law to do everything possible to __________ _____ __________.
28- “Distracted Driving; Cell phone” kills/injures how many each year? _____.
29- What are the 3 different types of distractions? _________ ____________ ___________.
30- How much more likely are you to crash if you’re texting? ___
31- Two characteristics of vehicles that make a vehicle dangerous for a new driver are:
_________ to __________ _______ and __________ of ____________.
P/W parameters: Up to .058 / .058 to .066 / .066 to .073 / over .073 )H/W parameters: Up to .587 / .587 to .620 / .620 to .652 / over .652 )
32- Parking on the wrong side of the road can result in a fine of $ _____
33- Which is correct: 10&2 or 9&3? _______________.
34- How fast is an airbag moving when it deploys? _______________ mph.
35- What is Step #1 when your student demonstrates “Rookie Steering” during the Workshops?
_________________________ _______________!
36- Kinesthetically, what is the fastest way to turn the steering wheel? ________-_______-________
37- This weekend, what time do you need to arrive on the parking lot? _____:_____.
38- And what time do you need to be standing in front of your instructor? _____:_____
39- Where do you park when you arrive at the Workshops?
Next to the ______________!!!
40- What MUST you bring with you to the driving session in order to complete the program requirements?
____________________ ______________.

A program by:
To make sure you’re prepared:
Pre-Driving Session Vehicle Preparation:
Most parents want to make sure their kids have reliable transportation, and from my 30+ years in the automotive parts industry, I know a Dad will spend more on his wife’s car than on his own … and even more on his kids car. Today, most students enrolled in to this program are driving newer and better cars than even I am able to afford.
But for those of you who focus strictly on economy, be advised, whereas we will not be doing anything more severe or extreme than you did when you test-drove the vehicle, we will be doing exercises in extreme driving conditions. You need to make sure your vehicle is properly maintained, up to the challenge, and capable of undertaking the rigors of this program.
1- HAVE THE BATTERY TESTED. If your battery is over 4 years old, replace it … you don’t want to be worrying about your kid’s car not starting in an empty parking lot after a football game. If it’s a newer battery, contact your local Interstate Battery dealer, they can load-test your battery free of charge. The only battery brand we recommend, or use in our equipment is Interstate Batteries.
2- Check oil, automatic transmission fluid, brake fluid, power steering fluid and windshield washer fluids.
3- Check anti-freeze/coolant level, belts and hoses.
4- Be sure the vehicle is not in any state of disrepair.
5- Be sure all doors and windows are functional.
6- Be sure all lights work. (Headlights, turn signals, all three brake lights, taillights, etc.)
7- Check the sticker inside your door jamb for proper tire inflation level, then over-inflate the front tires by 2 pounds, and the rear tires by 1 pound.
8- Be sure the vehicle is full of fuel. (The additional weight is important.)
9- Remove all mirror bling, GPS systems, insurance tracking devices, radar detectors, visual obstructions and any non-essential window decals.
10- No steering wheel (“suicide”) knobs or fuzzy steering wheel covers permitted.
11- Cones can damage front license plates when you hit them … I’m just sayin’.
12- Remove the driver’s side floor mat. (Unless it’s made by r),or actually ANCHORED to the floor.
13- Plan on attending the entire event … all the way through graduation … to complete the requirements of the program and be eligible for a Defensive Driving Certificate.
14- Although you needn’t provide them to us when you arrive, be sure to have your license/permit, registration and proof of insurance with you.
Ac
cid
en
t A
void
an
ce
Wo
rksh
op
sPre-Driving Session
Preparation List

A program by:
To make sure you’re prepared:
Pre-Driving Session Driver preparation:
1- Be sure to bring your Performance Record (the following pages) with you! PRIOR TO COMING TO THE DRIVING SESSION, both parent and student should read the entire Performance Record together and become familiar with the exercises and terminology, AND COMPLETE THE PRE-CLASS POSITIONING EXERCISE!
2- Just like any classroom, come prepared. Be sure each person brings a pen with which to take notes. (Don’t forget, a parent must attend with the student.)
3- Drivers (male or female) with hair long enough to touch their eyes, or obstruct their forward or peripheral vision, should wear something to restrain their hair.
4- Teach your student how to manually turn their headlights on and off.
5- We believe everyone should know how to drive a manual (standard, or “stick shift”) transmission … but not when they’re first learning how to drive. We prefer the student’s focus remain OUTSIDE the vehicle, rather than focusing on which gear, clutch in, clutch out, etc. But if you choose to attend in a vehicle equipped with a manual transmission, your student needs to be completely fluent in its operation. Smooth starts, short-shifting, speed shifting, managing slip, etc. Typically the experience pre-requisite to this course would include a few years of motorcycle or 4-wheeler shifting experience. If they’re not completely fluent in clutch operation, they stand to do damage to the clutch in these exercises.
6- We will spend quite a bit of time walking around the parking lot discussing the exercises. Students, we will be making a considerable effort to help show your parents you are capable of making good decisions so they feel more comfortable about letting you drive. If you show up in 40 degree temperatures with shorts and no jacket, or on a 90 degree day with a wool stocking cap … it’s not going to send a very good message to them! Be prepared to endure the elements. (Bring plenty of water to drink, your choice of rain gear, jacket, hat, gloves if necessary, and since part of the driving will require you putting your arm on the outside of your door, BRING A TOWEL if it’s over 75 degrees!)
7- Be sure not to wear anything that restricts your movement, or interferes with your ability to control the vehicle. For example, your entire hand must be able to contact the steering wheel, so don’t wear sleeves that extend beyond your arm, or have thumb-holes in them.
8- Get plenty of rest the night prior to the driving session, as you would for a workout. This will be a very draining day, you will need to be sharp, and plan on relaxing afterwards!
9- No flip-flops … no sandals … no open-toed shoes … no barefoot … period.
Ac
cid
en
t A
void
an
ce
Wo
rksh
op
sPre-Driving Session
Preparation List
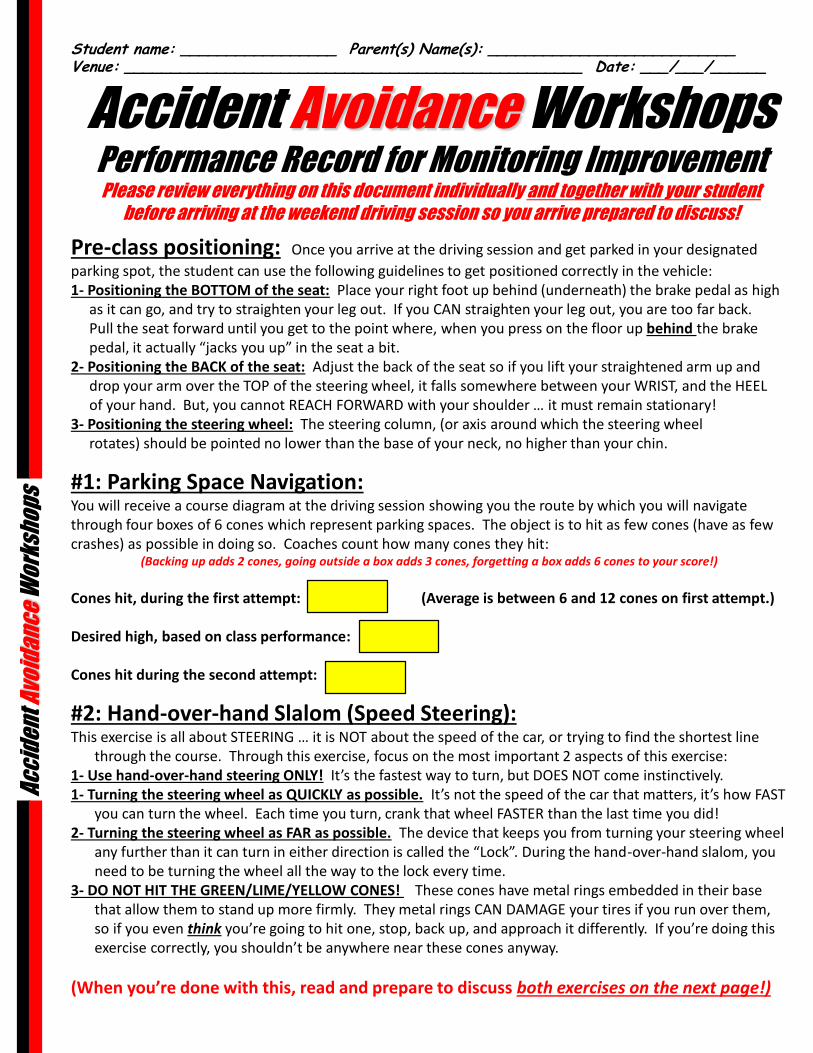
Accident Avoidance Workshops Performance Record for Monitoring ImprovementPlease review everything on this document individually and together with your student
before arriving at the weekend driving session so you arrive prepared to discuss!
Pre-class positioning: Once you arrive at the driving session and get parked in your designated
parking spot, the student can use the following guidelines to get positioned correctly in the vehicle:1- Positioning the BOTTOM of the seat: Place your right foot up behind (underneath) the brake pedal as high
as it can go, and try to straighten your leg out. If you CAN straighten your leg out, you are too far back. Pull the seat forward until you get to the point where, when you press on the floor up behind the brake pedal, it actually “jacks you up” in the seat a bit.
2- Positioning the BACK of the seat: Adjust the back of the seat so if you lift your straightened arm up and drop your arm over the TOP of the steering wheel, it falls somewhere between your WRIST, and the HEEL of your hand. But, you cannot REACH FORWARD with your shoulder … it must remain stationary!
3- Positioning the steering wheel: The steering column, (or axis around which the steering wheel rotates) should be pointed no lower than the base of your neck, no higher than your chin.
#1: Parking Space Navigation:You will receive a course diagram at the driving session showing you the route by which you will navigate through four boxes of 6 cones which represent parking spaces. The object is to hit as few cones (have as few crashes) as possible in doing so. Coaches count how many cones they hit:
(Backing up adds 2 cones, going outside a box adds 3 cones, forgetting a box adds 6 cones to your score!)
Cones hit, during the first attempt: (Average is between 6 and 12 cones on first attempt.)
Desired high, based on class performance:
Cones hit during the second attempt:
#2: Hand-over-hand Slalom (Speed Steering):This exercise is all about STEERING … it is NOT about the speed of the car, or trying to find the shortest line
through the course. Through this exercise, focus on the most important 2 aspects of this exercise:1- Use hand-over-hand steering ONLY! It’s the fastest way to turn, but DOES NOT come instinctively.1- Turning the steering wheel as QUICKLY as possible. It’s not the speed of the car that matters, it’s how FAST
you can turn the wheel. Each time you turn, crank that wheel FASTER than the last time you did!2- Turning the steering wheel as FAR as possible. The device that keeps you from turning your steering wheel
any further than it can turn in either direction is called the “Lock”. During the hand-over-hand slalom, you need to be turning the wheel all the way to the lock every time.
3- DO NOT HIT THE GREEN/LIME/YELLOW CONES! These cones have metal rings embedded in their base that allow them to stand up more firmly. They metal rings CAN DAMAGE your tires if you run over them, so if you even think you’re going to hit one, stop, back up, and approach it differently. If you’re doing this exercise correctly, you shouldn’t be anywhere near these cones anyway.
(When you’re done with this, read and prepare to discuss both exercises on the next page!)
Student name: _________________ Parent(s) Name(s): ___________________________ Venue: __________________________________________________ Date: ___/___/______
Ac
cid
en
t A
void
an
ce
Wo
rksh
op
s

#3: Emergency Braking Dry: Coaches, keep this chart handy during this exercise, pen in hand!
1- You will be asked if you’re ready. Acknowledge with a “thumbs up” out the window.2- When the green flag is held out, the green flag means:
“accelerate moderately”. (What does that mean?): You will let off the brakes, and step on the gas as though the light just turned green. The most frequent mistake students make is to just let off the brake and roll forward … that’s not how you would leave an intersection, you must accelerate moderately.
3- When the green flag waves, floor it!4- When the red flag waves, SLAM on the brakes using ONLY your
right foot. 5- Bring the car to a STOP AND STAY STOPPED!
(Coaches, don’t forget as we covered in class … if they hit the gas by mistake … throw it in neutral.)
Note: Anti-lock Braking Systems (ABS), are made up of many moving components. The internal ABS components may have seized up rendering the system inoperative if they have remained unused or untested for a long period of time. Manufacturers recommend owners activate their ABS systems at least every few months to keep the parts moving freely. Therefore, it is possible to have ABS on your vehicle and yet skid the tires on the first few attempts at this exercise. This may or may not persist depending on how severely the internal components have seized, but even mildly seized components may release before the end of these exercises.
#4: Emergency Braking Wet / Lane Positioning:It is important the braking distance we give you INCLUDES your reaction time. So WE need to be the reason you slam onthe brakes … not just because you made it to what YOU THINKis the braking zone. Be sure to keep your tires in the lane tracks!
Simply put, it’s the same procedure as in exercise #3. Just obeythe flags. Also, be sure to read the following to your student so they understand the differences in driving conditions here:
Conditions:“Dry”: Self-explanatory“New Rain”: The material we put down is calibrated to best-replicate the “coefficient of friction” you will
experience when it first starts raining. That’s when water flows down in to the pits of the road surface, displacing the oil which then comes to the top because oil floats on water.
“Drizzle”: After driving through the above material, some of the product may remain on your tires when you attempt the even-numbered passes, and therefore, it’s not exactly “Dry” conditions anymore.
“Rain”: As the exercise progresses, the material will once again recede in to the pits of the pavement and lose some of the effect of “NEW” rain, which simulates conditions closer to actual “Rain” conditions.
*Please be advised, these braking distances will be shorter than what you can expect in the real world for two reasons:1- Being less travelled, parking lots are typically better than road conditions, and will offer a higher coefficient of friction, stopping you sooner.2- In the real world, this number would need to include not just the car’s braking distance and the driver’s reaction time, but the driver’s
“perception time” as well. We simply cannot simulate that because the students do this exercise KNOWING we’re going to wave the red flag!
Do not compare odd-numbered pass data to even-numbered pass data. In many cases, one side varies from the other in texture, slope, or condition. Also, one instructor may have a different reaction time than others in waving the flag.Depending on the product used to reduce the coefficient of friction, residue left on your vehicle from the last exercise is most easily removed early with a degreasing soap such as Dawn. If it’s allowed to stay on too long, WD-40 or Bug and Tar remover will work well to remove it too.
Footnote #1: Notice to students driving GM trucks (Suburbans, Tahoes, GM Trucks): After maximum braking, you may experience the rear-end locking up as indicated by one tire scuffing as you turn leaving the exercise. This is normal, and will reset automatically.
Footnote #2: Notice to students driving vehicles equipped with electronic handling assistance, and/or stabilization packages: After engaging ABS, some of these vehicles are designed to limit acceleration in subsequent passes. If this happens even once, simply “reboot” between every subsequent passes. (Turn vehicle off and then restart.)
(When you’re done with this, read and prepare to discuss both exercises on the next page!
Ac
cid
en
t A
void
an
ce
Wo
rksh
op
s
Pass Condition Speed Distance*
5 New Rain
6 Drizzle
7 Rain
8 Drizzle
We will use pass #7 (Rain) data in exercise #5, so copy THESE numbers to the next page RIGHT NOW!
Pass Condition Speed Distance*
1 Dry
2 Dry
3 Dry
4 Dry
Driver:

Ac
cid
en
t A
void
an
ce
Wo
rksh
op
s#5: “Let’s all go to the movies!”:
Only when directed by your instructor are you to complete this exercise.Remember from the classroom session, there are two ways to prepare for Emergency Driving Conditions:
1- Conjure up your own scenarios and plan a response (Hit the squirrel!)2- Build a database of MOVIES.
During this exercise, we will gather as a group, and make several movies in our heads.
Here are your instructions for this exercise:Student: Assume control of this page. Keep it with you for this next talk.A- Transfer the information from pass #7 of the previous page to here:
Braking Distance: Speed:
B- Once you’re standing on your distance, consult with your coaches and collectively estimate the answer to the following:
When the instructor gives it to you, write the actual braking distance here: feet.
C- Now, when you’ve got ALL THREE squares above filled in, get out of your vehicle, go stand on the braking distance CIRCLED IN RED above, (your instructor will show you the distances)
D- Memorize the speed from the GREEN SQUARE above and be ready to call it out when asked for it.
“Knowing whatyou now know about braking
distances, what do you think MY
braking distance is from 65 mph?”
ft.

#6: Accident Avoidance (“Go for the Gold!”)
Your instructor will assign your vehicle a target speed. Write it here: mph.When instructed, you will accelerate to, and maintain within 1 mph of that targeted speed.
Hint 1:You are to use our radar screen as your speedometer, so your eyes are up duringthis exercise instead of looking down at your vehicle’s speedometer.
Hint 2: The radar won’t pick you up until you get to around 11 mph, so if you just let off and roll forward waiting for it to pick you up … it never will.
Hint 3- Having just completed an exercise going much faster than your new target speed,you will find yourself reaching your target speed quickly … so be ready for it. If you get going too fast, DO NOT go for the brakes to slow down … just back off the accelerator and slow down by coasting.
The instructor will throw their hands left or right. When they do, AND NO SOONER … BRAKE, as hard as you can, and bring the car to a stop AND STAY STOPPED as quickly as you can.
ABS folks: Show pulsing brakes all the way until you’re stopped … and stay stopped!Non-ABS folks: Skid the tires, “lift” to stop the skid, then re-apply the brake just enough to
make the tires strain but not skid.(Coaches, if they hit the gas by mistake throw it in neutral.)
Hint 4: It takes more leg power to engage ABS or skid the tires from lower speeds, so you will have to HIT THE BRAKES HARDER than you have up to this point to achieve maximum braking!
TURN… as fast as you can, all the way to the lock in the direction of the hands, being sure to LOOK that direction too, because remember, you steer the car with your eyes.
You only control 2 things: Speed and Direction. Therefore, we are only scoring you on full change of speed and full change of direction. If you lose control of your speed and get going too fast, or lose control of your direction and veer to the edge of the lane on the way down the course, we will abort the run by holding our hands up indicating “stop”.
Coach’s score sheet: ( = “yes” … = “no”)
Attempt: #1 #2
The “Gold Medal” (The only two important factors of this):
Did they demonstrate the limits of braking,
(including staying stopped?):
Did they demonstrate the limits of steering?:
If they do BOTH, they earned the letter (K), which means
(they (K)now the limits of their vehicle), and won the “Trophy”!
So when you return to the queue, please place their trophy,
(the AAW CERTIFIED decal) on the window as shown here:
Ac
cid
en
t A
void
an
ce
Wo
rksh
op
s

For the last two attempts, we will add cones in to the mix to represent one possible crash situation just to mess you up, add some complexity. You will see first hand how much stuff needs to happen in such a REALLY short period of time and why everyone says accidents “happen so fast”! The only difference this makes to you is, you need to decide WHEN you want to make that turn. You don’t want to turn so early that you hit the first two cones, and you don’t want to wait so long that you hit the wall of 7 cones. Good luck, and have fun!
Coach’s score sheet: ( = “yes” … = “no”)
Attempt: #3 #4The “Gold Medal” (The only two important factors of this):
Did they demonstrate the limits of braking,
(including staying stopped?):
Did they demonstrate the limits of steering?:
“The Raspberries” (The “PFFBLT!!! go try again” stuff.):(These don’t disqualify you from the decal … just the “Bow”.)
Proper speed maintained? (Too fast aborts the run):
Good lane positioning? (Hitting a cyclist aborts the run):
Waited to brake until hands were thrown?:
Turned in the direction indicated?:
The “Bronze” If they miss the TP, GM and CCs, they earned the letter (A)
because they Avoided all the big cones that matter!
Miss all the TALL cones?:
The “Silver” If they missed all the GCs as well, they earned the letter (O)
because they met the Objective of the exercise re: the cones.
Drivers of vehicles not equipped with ABS systems have additional things
on their plate, (the “lift” off the brake pedal) so as consideration for the
additional effort on their part, we take this last section OFF of their plate.
So if they get their “A”, then this “O” is given automatically.
Miss all the SHORT cones as well?:
Ac
cid
en
t A
void
an
ce
Wo
rksh
op
s
A program by:BristolATLANTA
This is the same program available at:
MOTOR SPEEDWAY
Motor Speedway
“Special note to the participants”: It is NOT important how well you “score” in these
exercises. Everyone knows NOBODY perfects ANYTHING in a few tries. Remember, the objective of this program IS NOT to get a sticker … or to earn any of the three letters for that matter … it is for you to be given the opportunity to use full-braking and full steering simultaneously, make that “movie” in your head, and have the opportunity to get a better “feel” of what the car can, and cannot do. We just want to expose you to a set of skills you are to master at a later date, show you the technique behind those skills, and show your coaches how to coach it. The reason we don’t put emphasis on the cones is because as you can imagine, if the instructor is even a fraction of a second off when they give you the signal, then THEY can be the reason you hit the cones. That’s why the sticker is awarded based ENTIRELY on YOUR ability to use full braking and full steering … that way, we are not part of that “Gold Medal” equation. As you saw from the first two attempts at this, you don’t need the cones to practice these skills … and you don’t need us. The coach can just ride with you across an empty parking (ideally on a rainy day), at the speed we gave you … and suddenly, point and/or yell out “Left!” or “Right!” You know what full braking looks like … and you know what full steering looks like … and when you do both … it’s STICKER-TIME!
No, those who succeed at any portion of this exercise in one of these few attempts don’t impress us. Anyone can get lucky. But when you do it for the 300th time, having nailed it the last 65 times …
… THEN… they will have some movies!