815DT Smart Differential Pressure Transmitter - SOR Inc.
24
Form 1588 (06.20) ©SOR Inc. 1/24 815DT Smart Differential Pressure Transmitter General Instructions These instructions provide information for installation, process connection, electrical connection, configuration, operation and maintenance of the 815DT Smart Differential Pressure Transmitter. The 815DT consists of a field proven stainless steel pressure transducer and a reliable switching output. The housing features a stainless steel construction. The 815DT is capable of powering long cable lengths. See Formula on page 3 for maximum loop resistance. NOTE: If you suspect that an instrument is defective, contact the factory or the SOR ® representative in your area for a return authorization number (RMA). This product should only be installed by trained and competent personnel. Registered Quality System to ISO 9001 Installation Ensure that wiring conforms to all applicable local and national electrical codes and install unit(s) according to relevant national and local safety codes. Normally, line mounting provides adequate support for the instrument. 1st Step: Make the Process Connections (Hi & Lo) n The process connections can be threaded onto fittings within an adequately supported process piping system. The Lo side may be vented to atmospheric pressure. o Use two open end wrenches when connecting the pressure ports to a process piping system: One wrench to hold the hex flats on the pressure port, the other to tighten the process pipe or tube fittings. p Process connection pipe or tubing may be rigid or flexible. Design and specifications are subject to change without notice. For latest revision, go to SORInc.com. Table of Contents Installation ........................................... 1 Additional Install Steps for Special Units................ 2 Electrical Termination - 4-20 mA Output ........ 3 Electrical Termination - 1-5 VDC Output ........ 4 Switch Operation.................................. 4-6 Device Variables & Fault Current Indicators ........ 7 Configuration with External Magnetic Targets .. 8 Configuration with HART ® Communicator .......... 9 HART Commands.................................... 9 Modbus Register Mapping ....................... 19 Factory Modbus Settings ......................... 20 Dimensions ......................................... 21 Maintenance ........................................ 22 ATEX/IECEx Marking Details ..................... 22 Declaration of Conformity ........................ 23 on. C t
-
Upload
khangminh22 -
Category
Documents
-
view
0 -
download
0
Transcript of 815DT Smart Differential Pressure Transmitter - SOR Inc.

Form 1588 (06.20) ©SOR Inc. 1/24
815DT Smart Differential
Pressure Transmitter
General Instructions
These instructions provide information for installation, process connection, electrical connection, configuration, operation and maintenance of the 815DT Smart Differential Pressure Transmitter. The 815DT consists of a field proven stainless steel pressure transducer and a reliable switching output. The housing features a stainless steel construction.
The 815DT is capable of powering long cable lengths. See Formula on page 3 for maximum loop resistance.
NOTE: If you suspect that an instrument is defective, contact the factory or
the SOR® representative in your area for a return authorization number (RMA).
This product should only be installed by trained and competent personnel.
Registered Quality System to ISO 9001
Installation
Ensure that wiring conforms to all applicable local and national electrical codes and install unit(s) according to relevant national and local safety codes.
Normally, line mounting provides adequate support for the instrument.
1st Step: Make the Process Connections (Hi & Lo)
The process connections can be threaded onto fittings within an adequately supported process piping system. The Lo side may be vented to atmospheric pressure.
Use two open end wrenches when connecting the pressure ports to a process piping system: One wrench to hold the hex flats on the pressure port, the other to tighten the process pipe or tube fittings. Process connection pipe or tubing may be rigid or flexible.
Design and specifications are subject to change
without notice.
For latest revision, go to SORInc.com.
Table of ContentsInstallation ........................................... 1Additional Install Steps for Special Units ................ 2Electrical Termination - 4-20 mA Output ........ 3Electrical Termination - 1-5 VDC Output ........ 4Switch Operation .................................. 4-6Device Variables & Fault Current Indicators ........ 7Configuration with External Magnetic Targets .. 8Configuration with HART® Communicator .......... 9HART Commands .................................... 9Modbus Register Mapping ....................... 19Factory Modbus Settings ......................... 20Dimensions ......................................... 21Maintenance ........................................ 22ATEX/IECEx Marking Details ..................... 22Declaration of Conformity ........................ 23
on.
C t

2/24 Form 1588 (06.20) ©SOR Inc.
NAMEPLATEAREA
EXTERNALGROUND
PROVISION
SET SCREWANNUNCIATION
PATH
2nd Step: Make the Electrical Connection
The electrical connection may be installed on an adequately supported rigid conduit system. Use suitable locknuts (not provided) when mounting the instrument to an unthreaded (knockout) hole.
Securely connect the conduit pipe or fitting by holding the flats on the electrical connection while tightening.
Electrical connection may be rigid or flexible conduit.
Unit in Hazardous Locations - Prior to removal from service, make sure that the
work area is declassified. Failure to do so could result in severe personal injury
or substantial property damage.
Failure to follow these additional installation instructions may diminish the “Ingress Protection” and “NEMA” ratings of the “Dual Seal” instruments. An improper installation will void the warranty.
Vertical Installation
The figure on the right depicts the vertical installation profile; with the electrical leads on top. The
instrument may be installed with the electrical leads on the bottom.
The nameplate (tag) should cover the set screw (annunciation path). Position the nameplate
slot opposite the set screw; i.e., the nameplate slot should be located 180° from the set screw.
Additional Install Steps for “Dual Seal” Units
Do not exceed 1,000 psi of static pressure. HI inlet pressure and LO inlet
pressure differential should not exceed 3 times the full scale pressure range.
NOTE: The high pressure side (stamped H) and the low pressure side (stamped L) have 1/4” NPT(F) process connections as standard.
NOTE: This product should be installed by trained and competent personnel only.
Drawing
0091555

Form 1588 (06.20) ©SOR Inc. 3/24
NAMEPLATE AREA
SET SCREWANNUNCIATION PATH
EXTERNAL GROUNDPROVISION
Electrical Termination - 4-20 mA Output
Drawing
0091546
Formula for determining
maximum loop resistance
RL (MAX) = VSupply - 10V 20mA
NOTE: An external ground screw is included for additional
earth ground connection.
72” flying leads are provided for connection to a terminal strip within a cabinet or a splice within an outlet box:
Red (+) Loop Voltage: 10 to 36 VDC Black (–) Output: 4 to 20 mA
Orange Switch Contacts: Yellow Normally Open Solid-State Relay Brown RS-485 (A) White RS-485 (B) Blue (Used for 1-5 VDC Output) Green Earth Ground Bare Drain Wire - Connected to Earth Ground (trimmed at factory)
}}}
Horizontal Installation
The following figure depicts the proper horizontal installation profile; with the external ground provision and set screw (annunciation path) oriented downward.
The nameplate (tag) should not cover the set screw. Align the nameplate slot with the set screw; i.e., the set screw should be visible in the nameplate slot.
Drawing
0091555

4/24 Form 1588 (06.20) ©SOR Inc.
THIS DRAWING IS THNO USE WHATSOEVER O
HEREON, NOR REPRODUMADE WITHOUT THE EXP
TOLERANCES:(UNLESS OTHERWISE FRACTIONS: ±1/64DECIMALS: .XXX±.00ANGLES: ±1°MACHINE FINISH: 63
Electrical Termination - 1-5 VDC Output
NOTE: An external ground screw is included for additional earth ground connection.
72” flying leads are provided for connection to a terminal strip within a cabinet or a splice within an outlet box:
Red (+) 10-36 VDC + Power Connection Black (–) Power Supply Ground
Orange Switch Contacts: Yellow Normally Open Solid-State Relay Brown RS-485 (A) White RS-485 (B) Blue (1-5 VDC Output) Green Earth Ground Bare Drain Wire - Connected to Earth Ground (trimmed at factory)
}}
Switch Operation
The 815DT switch output is a solid state, normally open relay that is rated to 30V, 120mA. This switch can be configured nine different ways depending on your application requirements, as noted below. Specific switch action can be requested at the time of order. In all nine configurations, the fail-safe state for the 815DT switch output will be open (i.e., if power is removed from the 815DT, the switch contacts will open automatically). The 815DT has a 0.25% URL switch set point accuracy.
Switch Output Default – Mode 3 is the default configuration for the 815DT switch output. In this mode the switch output is closed when the process pressure is within a user selectable range and open when the pressure is outside of these boundaries. This is designed for applications where there is a known acceptable operating pressure range. For example, the “window” could be set for an acceptable operating range of 50PSI to 150PSI. The 815DT switch output will be closed when the pressure being monitored is between 50 and 150 PSI. If the pressure goes below 50PSI or above 150PSI, the 815DT switch output will open (See
, page 5).
}
Drawing
0091546

Form 1588 (06.20) ©SOR Inc. 5/24
Windowed, Normally-Closed
The 815DT switch Offcan be configured Windowed, Normally-Opennine different ways: Windowed, Normally-Closed
Single Point, Normally-Open (Close on Rise/Open on Fall) Single Point, Normally-Closed (Open on Rise/Close on Fall) PWM (Pulse Width Modulation), Pulsed Low PWM (Pulse Width Modulation), Pulsed High Dead Band, Normally-Open Dead Band, Normally-Closed
Single Point, Normally-Open (Close on Rise/Open on Fall)
In this configuration, the switch output will be open when the process pressure is within a user selectable range and closed when the pressure is outside of these boundaries. This is designed for applications where there is a known acceptable operating pressure range.
Windowed, Normally-Open
In this configuration, the switch output will be closed when the process pressure is within a user selectable range and open when the pressure is outside of these boundaries. This is designed for applications where there is a known acceptable operating pressure range.
In this configuration, the switch output will be open for pressures less than the selected setpoint. The switch output would then be closed for pressures greater than the setpoint.

6/24 Form 1588 (06.20) ©SOR Inc.
In this configuration, the switch output will be closed for pressures less than the selected setpoint. The switch output would then be open for pressures greater than the setpoint.
Single Point, Normally-Closed (Open on Rise/Close on Fall)
Pulse Width Modulation - Pulsed Lo Pulse Width Modulation - Pulsed Hi
The diagram above depicts an adjustable dead band. Dead band is the range through which an input can be varied without initiating an observable response. Dead band is usually expressed in percent of span.
EXAMPLE: A 20% total dead band is applied to the setpoint of a monitored parameter. The relay will turn on and off as indicated in the graph above.
& Dead Band

Form 1588 (06.20) ©SOR Inc. 7/24
The table below contains a short description of the four 815DT device variables.Device Definition Table
Variables Value Default Unit
Primary Variable (PV) Pressure PSI
Secondary Variable (SV) Temperature Degrees Celcius
Third Variable (TV) Loop voltage Volts
Fourth Variable (FV) Dynamic n/a
Under normal operating conditions, the analog output signal of the 815DT will remain between 4mA and 20mA. In the event that the pressure goes beyond the normal operating range of the device or in a fault condition, the 815DT will indicate the condition on the 4-20 mA loop. The table below summarizes the 815DT loop current with the associated fault indication.
Fault Current IndicationLoop Current Description3.6 mA Fault Indication (Configurable: 3.6 mA or 21.0 mA)3.8 mA Low limit of output range20.5 mA High limit of output range21.0 mA Fault Indication (Configurable: 3.6 mA or 21.0 mA)
Device Variables and Fault Current Indicators

8/24 Form 1588 (06.20) ©SOR Inc.
As a standard option, each 815DT includes external magnetic targets for simple calibration of the zero and the span. Located on the casting is a circle (O) for setting the zero and a triangle (Δ) for setting the span. The magnetic targets provide a convenient method for calibrating the 4-20mA output in the field.
Setting the Zero
1. Depending on the desired zero value, the 815DT will either need to be connected to an adjustable pressure source or exposed to the atmosphere.
2. Bring the pressure to the desired zero value. 3. Touch the circle (O) target with a magnet for 3 seconds. 4. The transmitter output will change to 4mA indicating
the zero has been calibrated successfully.
Setting the Span
1. Connect the 815DT to an adjustable pressure source. 2. Bring the pressure to the desired span value. 3. Touch the triangle (Δ) target with a magnet for
3 seconds. 4. The transmitter output will change to 20mA
indicating the span has been calibrated successfully.
Test Mode
1. If a magnet is applied to both the zero (O) and span (Δ) targets at the same time for 3 seconds the device will enter test mode. 2. While in test mode the 815DT will output a signal of 12mA continuously for 30 seconds. 3. This feature can be used to verify the 815DT is properly connected to and communicating with the system.
Configuration with External Magnetic Targets

Form 1588 (06.20) ©SOR Inc. 9/24
Configuration with HART CommunicatorRL > 250
4-20 mA Output
1-5 VDC Output
HART Commands
The following pages summarize all HART commands currently supported by the 815PT.
HART Command Description
Command Data Command Reply Data
Byte Description Byte Description
0 Read unique identifier Read only
0 Always 254
1-2 Device type code
3 Number of preambles
4 Universal command revision
5 Transmit-specific command revision
6 Software revision
7 Hardware revision
8 Device function flags
9-11 Device ID number
12 Minimum number of preambles
13 Maximum number of preambles
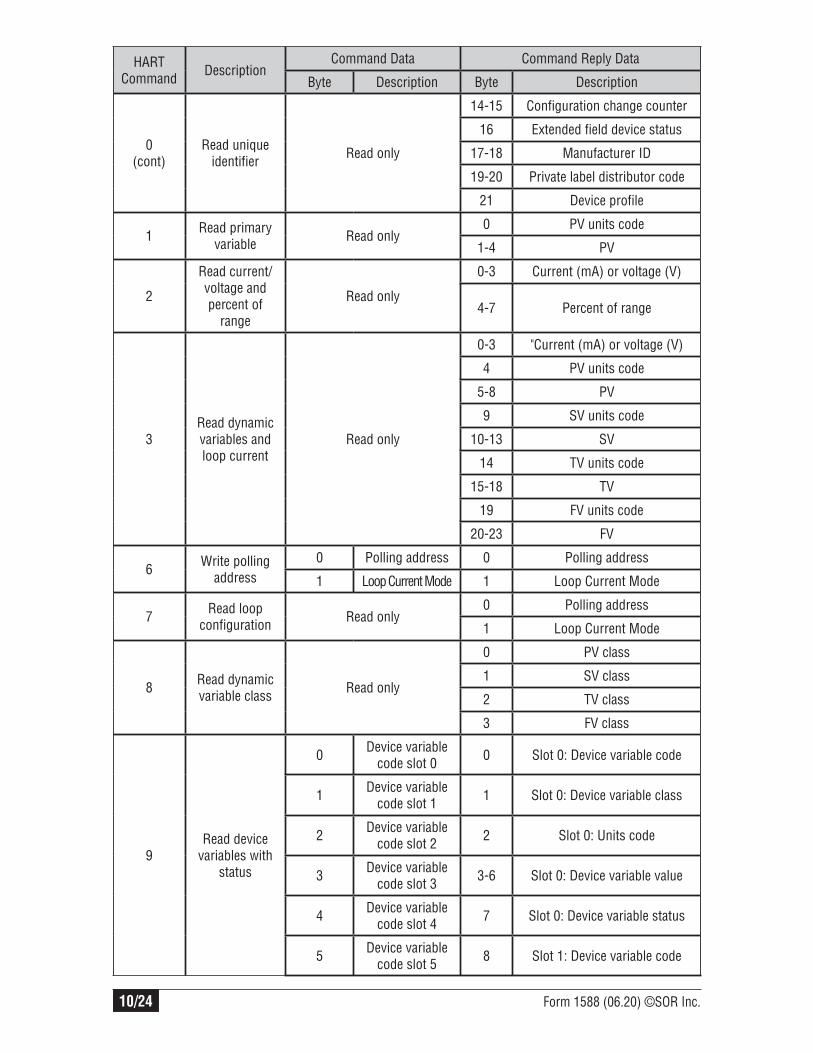
10/24 Form 1588 (06.20) ©SOR Inc.
HART Command Description
Command Data Command Reply Data
Byte Description Byte Description
0(cont)
Read unique identifier Read only
14-15 Configuration change counter
16 Extended field device status
17-18 Manufacturer ID
19-20 Private label distributor code
21 Device profile
1 Read primary variable Read only
0 PV units code
1-4 PV
2
Read current/voltage and percent of
range
Read only
0-3 Current (mA) or voltage (V)
4-7 Percent of range
3Read dynamic variables and loop current
Read only
0-3 "Current (mA) or voltage (V)
4 PV units code
5-8 PV
9 SV units code
10-13 SV
14 TV units code
15-18 TV
19 FV units code
20-23 FV
6 Write polling address
0 Polling address 0 Polling address
1 Loop Current Mode 1 Loop Current Mode
7 Read loop configuration Read only
0 Polling address
1 Loop Current Mode
8 Read dynamic variable class Read only
0 PV class
1 SV class
2 TV class
3 FV class
9Read device
variables with status
0 Device variable code slot 0 0 Slot 0: Device variable code
1 Device variable code slot 1 1 Slot 0: Device variable class
2 Device variable code slot 2 2 Slot 0: Units code
3 Device variable code slot 3 3-6 Slot 0: Device variable value
4 Device variable code slot 4 7 Slot 0: Device variable status
5 Device variable code slot 5 8 Slot 1: Device variable code

Form 1588 (06.20) ©SOR Inc. 11/24
HART Command Description
Command Data Command Reply Data
Byte Description Byte Description
9(cont)
Read device variables with
status
6 Device variable code slot 6 9 Slot 1: Device variable class
7 Device variable code slot 7 10 Slot 1: Units code
11-14 Slot 1: Device variable value
15 Slot 1: Device variable status
16 Slot 2: Device variable code
17 Slot 2: Device variable class
18 Slot 2: Units code
19-22 Slot 2: Device variable value
23 Slot 2: Device variable status
24 Slot 3: Device variable code
25 Slot 3: Device variable class
26 Slot 3: Units code
27-30 Slot 3: Device variable value
31 Slot 3: Device variable status
32 Slot 4: Device variable code
33 Slot 4: Device variable class
34 Slot 4: Units code
35-38 Slot 4: Device variable value
39 Slot 4: Device variable status
40 Slot 5: Device variable code
41 Slot 5: Device variable class
42 Slot 5: Units code
43-46 Slot 5: Device variable value
47 Slot 5: Device variable status
48 Slot 6: Device variable code
49 Slot 6: Device variable class
50 Slot 6: Units code
51-54 Slot 6: Device variable value
55 Slot 6: Device variable status
56 Slot 7: Device variable code
57 Slot 7: Device variable class
58 Slot 7: Units code
59-62 Slot 7: Device variable value
63 Slot 7: Device variable status
64-67 Timestamp

12/24 Form 1588 (06.20) ©SOR Inc.
HART Command Description
Command Data Command Reply Data
Byte Description Byte Description
11
Read unique identifier
associated with tag
0-5 Device tag 0 Always 254
1 Manufacturer ID
2 Device type code
3 Number of preambles
4 Universal command revision
5 Transmit-specific command revision
6 Software revision
7 Hardware revision
8 Device function flags
9-11 Device ID number
12 Minimum number of preambles
13 Maximum number of preambles
14-15 Configuration change counter
16 Extended field device status
12 Read message Read only 0-2 Device message
13 Read tag, descriptor, date Read only
0-5 Tag
6-17 Descriptor
18-20 Date (dd-mm-yyyy)
14 Read PV sensor information Read only
0-2 Sensor serial number
3 Units code for sensor limits and minimum span
4-7 Upper sensor limit
8-11 Lower sensor limit
12-15 Minumum span
15 Read output information Read only
0 Alarm select code
1 Transfer function code
2 PV/range units code
3-6 Upper range value
7-10 Lower range value
11-14 Damping value (sec)
15 Write-protect code
16 Private-label distributor code
17 PV analog channel flags
16Read final assembly number
Read only 0-2 Final assembly number
17 Write message 0-2 Message 0-2 Message

Form 1588 (06.20) ©SOR Inc. 13/24
HART Command Description
Command Data Command Reply Data
Byte Description Byte Description
18 Write tag, descriptor, date
0-5 Tag 0-5 Tag
6-17 Descriptor 6-17 Descriptor
18-20 Date (dd-mm-yyyy) 18-20 Date (dd-mm-yyyy)
19Write final assembly number
0-2 Final assembly number 0-2 Final assembly number
20 Read long tag Read only 0-31 Long tag
21
Read unique identifier
associated with long tag
0-31 Long tag 0 Always 254
1 Manufacturer ID
2 Device type code
3 Number of preambles
4 Universal command revision
5 Transmit-specific command revision
6 Software revision
7 Hardware revision
8 Device function flags
9-11 Device ID number
12 Minimum number of preambles
13 Maximum number of preambles
14-15 Configuration change counter
16 Extended field device status
22 Write long tag 0-31 Long tag 0-31 Long tag
33 Read device variables
0 Transmit variable code slot 0 0 Transmit variable code slot 0
1 Transmit variable code slot 1 1 Units code slot 0
2 Transmit variable code slot 2 2-5 Variable slot 0
3 Transmit variable code slot 3 6 Transmit variable code slot 1
7 Units code slot 1
8-11 Variable slot 1
12 Transmit variable code slot 2
13 Units code slot 2
14-17 Variable slot 2
18 Transmit variable code slot 3
19 Units code slot 3
20-23 Variable slot 3

14/24 Form 1588 (06.20) ©SOR Inc.
HART Command Description
Command Data Command Reply Data
Byte Description Byte Description
34 Write PV damping value 0-3 Dampaing value
(seconds) 0-3 Dampaing value (seconds)
35 Write PV range values
0 Range units code 0 Range units code
1-4 Upper range value 1-4 Upper range value
5-8 Lower range value 5-8 Lower range value
36 Set PV as upper range value None Write only
37 Set PV as lower range value None Write only
38Reset
configuration changed flag
0-1 Configuration change flag 0-1 Configuration change flag
40 Enter/Exit fixed current mode 0-3 Current (mA), 0
to exit 0-3 Current (mA), 0 to exit
41 Perform self test None Write only
42 Perform device reset None Write only
43 Set PV zero None Write only
44 Write PV units 0 PV units code 0 PV units code
45 Trim loop current zero 0-3
Trim loop current zero
value0-3 Trim loop current zero value
46 Trim loop current gain 0-3 Trim loop
current gain value 0-3 Trim loop current gain value
47 Write PV transfer function 0 Transfer function
code 0 Transfer function code
48 Read additional device status
0 Device-Specific Status Byte 0 0 Device-Specific Status Byte 0
1 Device-Specific Status Byte 1 1 Device-Specific Status Byte 1
2 Device-Specific Status Byte 2 2 Device-Specific Status Byte 2
3 Device-Specific Status Byte 3 3 Device-Specific Status Byte 3
4 Device-Specific Status Byte 4 4 Device-Specific Status Byte 4

Form 1588 (06.20) ©SOR Inc. 15/24
HART Command Description
Command Data Command Reply Data
Byte Description Byte Description
48(cont)
Read additional device status
5 Device-Specific Status Byte 5 5 Device-Specific Status Byte 5
6 Extended Device Status dataTy 6 Extended Device Status dataTy
7 Device Operation Mode 7 Device Operation Mode
8 Standardized Status 0 8 Standardized Status 0
9 Standardized Status 1 9 Standardized Status 1
10 Analog Channel Saturated data 10 Analog Channel Saturated data
11 Standardized Status 2 11 Standardized Status 2
12 Standardized Status 3 12 Standardized Status 3
13 Analog Channel Fixed 13 Analog Channel Fixed
14 Device-Specific Status Byte 6 14 Device-Specific Status Byte 6
15 Device-Specific Status Byte 7 15 Device-Specific Status Byte 7
16 Device-Specific Status Byte 8 16 Device-Specific Status Byte 8
17 Device-Specific Status Byte 9 17 Device-Specific Status Byte 9
18 Device-Specific Status Byte 10 18 Device-Specific Status Byte 10
19 Device-Specific Status Byte 11 19 Device-Specific Status Byte 11
20 Device-Specific Status Byte 12 20 Device-Specific Status Byte 12
21 Device-Specific Status Byte 13 21 Device-Specific Status Byte 13
22 Device-Specific Status Byte 14 22 Device-Specific Status Byte 14
23 Device-Specific Status Byte 15 23 Device-Specific Status Byte 15
24 Device-Specific Status Byte 16 24 Device-Specific Status Byte 16

16/24 Form 1588 (06.20) ©SOR Inc.
HART Command Description
Command Data Command Reply Data
Byte Description Byte Description
53 Write device variable units
59Write number of response preambles
1Number of response
preambles1 Number of response preambles
122
Write manufacturer device type
code
0-1 Manufacturer device type code 0-1 Manufacturer device type code
123 Write device ID code 0-2 Serial number 0-2 Serial number
128 Device information Read only
0-1 Main product ID
1-2 Main model ID
3-6 Main serial number
7 BSL firmware build
8 BSL firmware version
9 BSL firmware revision
10 Firmware build
11 Firmware version
12 Firmware revision
13-14 Sensor product ID
15-16 Sensor model ID
17-20 Sensor serial number
129 Device status Read only
0 Overall unit status, invalid if set
1 Pad
2-5 Temperature
6-9 AD5421 loop voltage
10-13 VO_S voltage
14-17 VREGOUT_S voltage

Form 1588 (06.20) ©SOR Inc. 17/24
HART Command Description
Command Data Command Reply Data
Byte Description Byte Description
132
Device configuration
0
"Configuration part type: 3: Switch Output Mode
4: Zero/Span Switches Enabled 5: Loop Type
6: Loop Alarm Direction 7: Fixed Output Duration
8: Fixed Output Span Percentage 13: Switch Point Low 14: Switch Point High
15: PWM Frequency Minimum 16: PWM Frequency Maximum 17: PWM Duty Cycle Minimum 18: PWM Duty Cycle Maximum
19: Modbus Slave ID 20: Modbus Parity
21: Modbus Baud Rate 24: Current Loop Trim Offset 25: Current Loop Trim Gain
26: Voltage Loop Trim Offset 27: Voltage Loop Trim Gain"
Write only
1 Always 1
"Parts 3-6, 19-20:
2 Parts 7, 15-16, 24-25:
2-3 Parts 8, 13-14, 17-18, 21, 26-27:
2-5"
Configuration part value
133 0
"Configuration part type: 3: Switch Output Mode
4: Zero/Span Switches Enabled 5: Loop Type
6: Loop Alarm Direction 7: Fixed Output Duration
8: Fixed Output Span Percentage 13: Switch Point Low 14: Switch Point High
15: PWM Frequency Minimum 16: PWM Frequency Maximum 17: PWM Duty Cycle Minimum 18: PWM Duty Cycle Maximum
19: Modbus Slave ID 20: Modbus Parity
21: Modbus Baud Rate 24: Current Loop Trim Offset 25: Current Loop Trim Gain
26: Voltage Loop Trim Offset 27: Voltage Loop Trim Gain"
"Parts 3-6,
19-20: 0
Parts 7, 15-16, 24-25:
0-1
Parts 8, 13-14, 17-18, 21, 26-
27: 0-3"
Configuration part value

18/24 Form 1588 (06.20) ©SOR Inc.
HART Command Description
Command Data Command Reply Data
Byte Description Byte Description
134Device
configuration
0"Configuration part type: 3: Pressure Point Zero 4: Pressure Point Span" n/a
1 Always 1
2-5 Configuration part value
135 0"Configuration part type: 3: Pressure Point Zero 4: Pressure Point Span"
0-3 Configuration part value
139 Device history 0
"Unit history part type: 0: Unit on time (seconds)
1: Unit power ups 2: Low pressure (PSI) 3: High pressure (PSI)
4: Low temperature (°C) 5: High temperature (°C) 6: Low loop voltage (V) 7: High loop voltage (V)
8: Unit status flags"
0-3 Unit history part value
140Read ignore
status variable
Read only UINT8
"0: Overall unit status not ignored 1: Overall unit status ignored"
141Write ignore
status variable
0"0: Do not ignore overall unit
status 1: Ignore overall unit status"
Write only
180
Write number of points
in transfer function
0 Number of points 0 Number of points
181
Read number of points
in transfer function
Read only 0 Number of points
182
Write transfer function
point data
0 Point number 0 Point number
1-4 Pressure value 1-4 Pressure value
5-8 Loop Current value 5-8 Loop Current value
183
Read transfer function
point data
0 Point number 0 Point number
1-4 Pressure value
5-8 Loop Current value

Form 1588 (06.20) ©SOR Inc. 19/24
Modbus Register Register Definition Read/Write "Data
Type" Description
0 Loop current/voltage R Float Current (mA)/Voltage (V)
4 PV unit R UINT8 PV units code
8 PV R Float PV
12 SV unit R UINT8 SV units code
16 SV R Float SV
20 TV unit R UINT8 TV units code
24 TV R Float TV
28 FV unit R UINT8 FV units code
32 FV R Float FV
36 Current and percent of range R Float Percentage of range
40 Modbus slave ID R/W UINT8 Modbus Slave ID
44 Device Status R UINT32 Unit status flags
48 R Float Temperature
52 R Float AD5421 loop voltage
56 R Float VO_S voltage
60 R Float VREGOUT_S voltage
64 Device Information R UINT16 Main product ID
68 R UINT16 Main model ID
72 R UINT32 Main serial number
76 R UINT8 BSL firmware build
Modbus Register Mapping
HART Command Description
Command Data Command Reply Data
Byte Description Byte Description
200 Write password 0-6 Password 0-6 Access level
201
Enable/Disable write
protection
Read only 0 Write protect code
202Change
user password
0-6 New password 0-6 New password
203Change service
password0-6 New password 0-6 New
password
204Return
to default passwords
None Write only
The following table summarizes the Modbus register mapping assignments for the 815DT.

20/24 Form 1588 (06.20) ©SOR Inc.
Modbus Register Register Definition Read/Write "Data
Type" Description
80 R UINT8 BSL firmware version
84 R UINT8 BSL firmware revision
88 R UINT8 Firmware build
92 R UINT8 Firmware version
96 R UINT8 Firmware revision
100 R UINT16 Sensor product ID
104 R UINT16 Sensor model ID
108 R UINT32 Sensor serial number
112 Device History R UINT32 Unit on time (seconds)
116 R UINT32 Unit power ups
120 R Float Low pressure (PSI)
124 R Float High pressure (PSI)
128 R Float Low temperature (°C)
132 R Float High temperature (°C)
136 R Float Low loop voltage (V)
140 R Float High loop voltage (V)
144 R UINT32 Status Flags
148 Set fixed output mode R/W Float Percentage of span to write
152 Pressure point zero R/W Float Pressure Point Zero
156 Pressure point span R/W Float Pressure Point Span
160 Perform self test W n/a Write only
Note: All Modbus command data is sent and received as 4 bytes. For an eight-bit variable, the least significant byte contains the value.
Factory Modbus Settings
The following summarizes the Modbus settings for the 815DT as shipped from the factory:
Slave ID: 1 Baud Rate: 19200 Data Bits: 8 Parity: Even Stop Bits: 1 Flow Control: None

Form 1588 (06.20) ©SOR Inc. 21/24
34.11-11/32
146.25-3/4 158.9
6-1/4
27.91.10
55.92.20
ELECTRICALCABLE
ELECTRICALCONNECTION
1/2 NPTM
28.61-1/8 WRENCH
FLATS
ZEROMAGNETIC
TARGET
SPANMAGNETICTARGET
MODELDP86CV
1/4 NPTFLO SIDEPROCESSCONNECTION
1/4 NPTFHI SIDE
PROCESSCONNECTION
EXTERNALGROUNDPROVISION
NAMEPLATE
Dimensions
Dimensions are for reference only.Contact the factory
for certified drawings for a particular model number.
Linear = mm/inches
Drawing 0091544

22/24 Form 1588 (06.20) ©SOR Inc.
ATEX/IECEx Marking Details
Serial Number (First Two Numbers Indicate Year of Manufacture)
Manufacturer’s Registered Trademark
ATEX/IECEx Listing Information
Thread Form Information
Product Model Identification
Drawing 0720600For ATEX/IECEx Certified Models
Maintenance
The 815DT contains no user serviceable parts and cannot be repaired on site. It must be returned to the factory. Disassembly of the instrument by unauthorized persons will invalidate the warranty. If there is a risk of debris accumulating in the pressure ports, they should be cleaned. Care and caution must be taken when cleaning the pressure port to prevent damage to the diaphragm.
Special Condition for Safe Use
Flamepath joints are not intended to be repaired

Form 1588 (06.20) ©SOR Inc. 23/24
EU Declaration of Conformity
14685 West 105th Street, Lenexa, KS 66215-2003913-888-2630 • 800-676-6794 USA • 913-888-0767 FAX
Engineered to Order with Off-the-Shelf Speed
Product
ManufacturerPlace of Issue
Date of Issue
We declare under our sole responsibility that
the above products conform to the following
specifications and directives
Carries the marking
Reference documents
ATEX Notified Body
Person responsible
800 Series Electronic Pressure Transmitters
SOR Inc.14685 West 105th StreetLenexa, Kansas 66215-2003United States of America
June 18, 2020
ATEX Directive (2014/34/EU) EN 60079-0:2018, EN 60079-1:2014, IEC 60079-0:2017EN 60529:1991 + A1:2000 + A2:2013, IEC 60079-1:2014-06
EMC Directive (2004/108/EC) IEC 61326-1:2006, IEC 61000-4-2:2008IEC 61000-4-3:2008, IEC 61000-4-4:2006IEC 61000-4-5:2005, IEC 61000-4-6:2008IEC 61000-4-8:2009
II 2 G Ex db IIC T5 Gb, Ta + -40°C to +80°C IP66
FM 09 ATEX 0045 Issued September 29, 2009IECEx FMG 19.0018X Issued February 11, 2020
EMC Test Report 7914-623Issued September 24, 2009
SGS Fimko Oy (Notified Body No. 0598)Takomotie 8Helsinki, 00380Finland
Michael J. Bequette (VP of Engineering)
Michael J. Bequette
Form 1445 (06.20) SOR Inc.

24/24 Form 1588 (06.20) ©SOR Inc.
14685 West 105th Street, Lenexa, KS 66215 913-888-2630 800-676-6794 USA SORInc.com
Registered Quality System to ISO 9001