48pfd5519_30_dfu_zht.pdf - philips com/support
58
42PFD5519/30 48PFD5519/30 32PFD5319/30 Register your product and get support at www.philips.com/welcome EN User Manual ZH-HK 用戶手冊
-
Upload
khangminh22 -
Category
Documents
-
view
0 -
download
0
Transcript of 48pfd5519_30_dfu_zht.pdf - philips com/support

42PFD5519/30
48PFD5519/30
32PFD5319/30
Register your product and get support at
www.philips.com/welcome
EN User Manual
ZH-HK 用戶手冊


1EN-GB
Engli
sh
Contents
1 NOTICE 2
2 IMPORTANT 3
3 TV Overview 5Control Pannel 5Remote Control 5Use Remote Control 6
4 Using TV 7Turn on the TV or switch to standby 7Change Channel 7To view the connected device(s) 8Adjust the TV volume 8
5 USING MORE FEATURES OF YOUR TV 9Accessing TV Menus 9Changing the Language 9Switching the TV to standby automatically
(Sleep Time) 9Changing Picture and Sound Settings 9Using the Options Menu 12Creating and Using List of Favourite
Channels 12Using TV Locks 12Accessing the USB Storage Device to
view photos and play Music or Video 13Changing TV Preferences 14Starting a TV Demo 14
6 INSTALLING CHANNELS 15Installing Channels Automatically 15Installing Channels Manually 15Installing Digital Channels 15Renaming Channels 16Rearranging Channels 16
7 NETWORK SETTINGS 17Network Type 17Wired Installation 17Wireless Installation 17Viewing Network Settings 18
8 CONNECTING DEVICES 19Bottom Connectors 19Side Connectors 20Connecting a Computer 21Using Philips EasyLink 22Using a Kensington Security Lock 23
9 PRODUCT INFORMATION 24Supported Input Signal Formats 24Multimedia 24Tuner / Reception / Transmission 24Remote Control 24Power 24Supported TV Mounts 24
10 TROUBLESHOOTING 25General TV Issues 25TV Channel Issues 25Picture Issues 25Sound Issues 26HDMI Connection Issues 26Computer Connection Issues 26Network Connection Issues 26Contact Us 26

2 EN-GB
CopyrightAll other registered and unregistered trademarks are the property of their respective owners.® Kensington and Micro Saver are registered US trademarks of ACCO World Corporation with issued registrations and pending applications in other countries throughout the world.© The FreeType Project (www.freetype.org) owns the copyright to the software.
Manufactured under license from Dolby Laboratories. Dolby and the double D symbol are trademarks of Dolby Laboratories.
HDMI, the HDMI logo and High-Definition Multimedia Interface are trademarks or registered trademarks of HDMI Licensing LLC.
Philips and the Philips Shield Emblem are registered trademarks of Koninklijke Philips N.V. and are used under licence from Koninklijke Philips N.V.
1 NOTICE2014 © TP Vision Europe B.V. All Right Is Reserved. Specifications are subject to change without notice. Trademarks are the property of Koninklijke Philips N.V or their respective owners. TP Vision Europe B.V. reserves the right to change products at any time without being obliged to adjust earlier supplies accordingly. The material in this manual is believed adequate for the intended use of the system. If the product, or its individual modules or procedures, are used for purposes other than those specified herein, confirmation of their validity and suitability must be obtained. TP Vision Europe B.V. warrants that the material itself does not infringe any United States patents. No further warranty is expressed or implied. TP Vision Europe B.V. will not be responsible for any errors in the content of this document, nor any issues caused by the content of this document. Errors reported to Philips will be adapted and published on the Philips support website as soon as possible.
Pixel CharacteristicsThis LCD product has a high number of colour pixels. Although it has effective pixels of 99.999% or more, black dots or bright points of light (red, green or blue) may still appear constantly on the screen. This is a structural property of the display (within common industry standards) and is not a malfunction.
WarrantyYou cannot replace any components. DO NOT open or remove the rear chassis of the TV to expose the product’s interior. Always contact Philips Service Centre or its authorised repair shops for service or repairs. Otherwise, all express or implied warranties will become void.Any operation expressly prohibited in this manual, or any adjustment or assembly procedure not recommended or authorised in this manual, is not covered under warranty.

3EN-GB
• When wall mounting the TV, use only a wall mount that can support the weight of the TV. Secure the wall mount to a wall that can support the combined weight of the TV and wall mount. TP Vision Europe B.V. bears no responsibility for improper wall mounting that result in accident, injury or damage.
• Parts of this product may be made of glass. Handle with care to avoid injury and damage.
Risk of injury to children!Follow these precautions to prevent the TV from toppling over and causing injury to children:• Never place the TV on a surface covered
by a cloth or other material that can be pulled away.
• Ensure that no part of the TV hangs over the edge of the surface.
• Never place the TV on tall furniture (such as a bookcase) without anchoring both the furniture and TV to the wall or a suitable support.
• Educate children about the dangers of climbing on furniture to reach the TV.
Risk of swallowing batteries!• The product/remote control may contain a
coin-type battery, which can be swallowed. Keep the battery out of reach of children at all times!
Beware of overheating!• Never install the TV in a confined space.
Always leave a space of at least 4 inches or 10 cm around the TV for ventilation. Ensure curtains or other objects never cover the ventilation slots on the TV.
Risk of damage to the TV!• Before you connect the TV to the power
outlet, ensure that the power voltage matches the value printed on the back of the TV. Never connect the TV to the power outlet if the voltage is different.
• If you need to store the TV, disassemble the stand from the TV. Never lay the TV on its back with the stand installed.
2 IMPORTANTRead and understand all instructions before you use your TV. If damage is caused by failure to follow instructions, the warranty does not apply.
SafetyRisk of electric shock or fire!!• Never expose the TV to rain or water.
Never place liquid containers, such as vases, near the TV. If liquids are spilt on or into the TV, disconnect the TV from the power outlet immediately. Contact Philips Consumer Care to have the TV checked before use.
• Never place the TV, remote control or batteries near naked flames or other heat sources, including direct sunlight.To prevent the spread of fire, keep candles or other flames away from the TV, remote control and batteries at all times.
• Never insert objects into the ventilation slots or other openings on the TV.
• When the TV is swivelled ensure that no strain is exerted on the power cord. Strain on the power cord can loosen connections and cause arcing.
Risk of short circuit or fire!• Never expose the remote control or
batteries to rain, water or excessive heat.• Avoid force coming onto power plugs.
Loose power plugs can cause arcing or fire.Risk of injury or damage to the TV!• Two people are required to lift and carry a
TV that weighs more than 25 kg or 55 lbs.• When stand mounting the TV, use only the
supplied stand. Secure the stand to the TV tightly. Place the TV on a flat, level surface that can support the combined weight of the TV and the stand.
Engli
sh

4 EN-GB
Disposal of Your Old Product and Batteries
Your product is designed and manufactured with premium materials and elements,which can be recycled and reused.
If the product comes with crossed recycle bin lable, it means the European Directive 2002/96/EC is applicable to the product. Please check the local electronics and electronic products separate collection system for information.Please dispose according to the local regulations; please do not dispose the products with other household waste.Proper disposal of the product can help reduce the negative impacts on the environment and mankind health.
Your product contains the batteries that are compliance to Eurioean Directive 2006/66/EC, and may not be disposed together with other household waste.Please note the local regulations related to batteries separate collection as proper disposal of the product can help reduce the negative impacts on the environment and mankind health.
Risk of injury, fire or power cord damage!• Never place the TV or any objects on the
power cord.• To easily disconnect the TV power cord
from the power outlet, ensure that you have full access to the power cord at all times.
• When you disconnect the power cord, always pull the plug, never the cable.
• Disconnect the TV from the power outlet and antenna before lightning storms. During lightning storms, never touch any part of the TV, power cord or antenna cable.
Risk of hearing damage!• Avoid using earphones or headphones at
high volumes or for prolonged periods of time.
Low temperatures• If the TV is transported in temperatures
below 5°C or 41°F, unpack the TV and wait until the TV temperature matches room temperature before connecting the TV to the power outlet.
Screen Care• Avoid stationary images as much as
possible. Stationary images are images that remain on-screen for extended periods of time. Examples include: on-screen menus, black bars and time displays. If you must use stationary images, reduce screen contrast and brightness to avoid screen damage.
• Unplug the TV before cleaning.• Clean the TV and frame with a soft, damp
cloth. Never use substances such as alcohol, chemicals or household cleaners on the TV.
• Risk of damage to the TV screen! Never touch, push, rub or strike the screen with any object.
• To avoid deformations and colour fading, wipe off water drops as soon as possible.

5EN-GB
Remote Control
a (Standby-Power On)• When the TV is on, switch it to standby.• Power on when the TV is in standby
mode.b Play Button
Control the play of the image, music and video.
c FORMATChanges the Picture Format.
d TVToggle the source of the signal to watch TV.
e (Home)Visit Main Menu
3 TV Overviewcongratulations for purchasing and using Philips product! In order to enjoy all the supports provided by Philips, please register your TV at www.philips.com/welcome
Control Pannel
1 2
3
45
a Volume -: Used to lower the volume when there is no keyboard menu available; when the keyboard menu is displayed, move the reflective options left or right.
b Volume +: Used to higher the volume when there is no keyboard menu available; when the keyboard menu is displayed, move the reflective options left or right.
c Channel +: Used to toggle to the next channel when there is no keyboard menu available; when the keyboard menu is displayed, move the reflective options up or down.
d Channel -: Used to toggle to the previous channel when there is no keyboard menu available; when the keyboard menu is displayed, move the reflective options up or down.
e Menu: When in standby, the menu key is used as the power button; press this key to power up. After powering up, the menu key is used to open the keyboard menu function. When the keyboard menu is opened, the menu key is used as confirmation key.
Engli
sh

6 EN-GB
Use Remote ControlWhen using the remote control, press and hold the controller at a close distance to the TV and point it toward the remote control sensor. Ensure there are no furnitures, walls or other objects in between the controller and the TV.
~5m
~30˚
f INFOShow the message of current activities.
g (Navi Button)Navi between menus and select items.
h OKConfrim the entry or selection.
i OPTIONSVisits the current activities or available options.
j (BACK)• Return to the previoius screen.• Return to the previous played channel.
k CH + / -CHANNEL+/- Toggle to the previous or the next channel.
l (MUTE)To mute or to restore the volume.
m +/- (VOLUME)To higher and lower the volume.
n COLOR BUTTONTo choose the tasks or options.
o 0-9 NUMBER BUTTONSTo select the channel or setting.
p TEXTNo function.
q SUBTITLETo enable or disable the subtitle.
r ADJUSTVisit the setting menu.
s LISTTo display the channel grid.
t SOURCE To select the connected device(s).
7EN-GB
Engli
sh
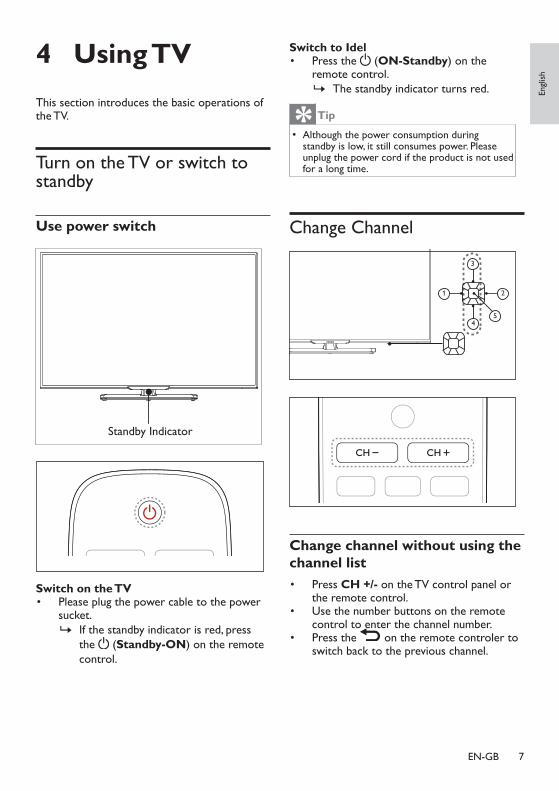
4 Using TVThis section introduces the basic operations of the TV.
Turn on the TV or switch to standby
Use power switch
Standby Indicator
Switch on the TV• Please plug the power cable to the power
sucket. » If the standby indicator is red, press
the (Standby-ON) on the remote control.
Switch to Idel• Press the (ON-Standby) on the
remote control. » The standby indicator turns red.
Tip
• Although the power consumption during standby is low, it still consumes power. Please unplug the power cord if the product is not used for a long time.
Change Channel
1 2
3
45
Change channel without using the channel list• Press CH +/- on the TV control panel or
the remote control.• Use the number buttons on the remote
control to enter the channel number.• Press the on the remote controler to
switch back to the previous channel.

8 EN-GB
1 Press SOURCE. » The signal source list appears.
2 Press to select a device.3 Press OK to select.
» The TV siwtches to the selected device.
Adjust the TV volume
1 2
3
45
Volum up or down• Press the Volume+/- on the remote control.Mute or unmute• Press (Mute).• Press again to unmute.
Change channels with the channel listYou can use the channel list to view all the received channels.
1 Press LIST. » To display the channel grid.
2 Press to select channels.3 Press OK to view the selected channel.4 Press to return to the previously
watched channel.
To view the connected device(s)
Note • Before selecting the external signal source, please turn on the external device.
To use the signal source button

9EN-GB
Engli
sh
2 Select Settings > TV Settings > General Settings > Menu Language, and press .
3 Select your desired language and press OK.
Switching the TV to standby automatically (Sleep Time)Sleep time switches the TV to standby after a pre-defined period of time.
Note
• You can switch off your TV earlier or reset the sleep time during the countdown.
1 Press (Home).2 Select Settings > TV Settings >
General Settings > Sleep Time. » The sleep time displays.
3 Select a valune bwtween 0 to 180 minutes. » The setting unit of the sleep time is 5
minutes. If set to zero, the sleep time is switched off.
4 Press OK to open timer. » The TV switches to standby after the
specified time.
Changing Picture and Sound SettingsChange picture and sound settings to suit your preferences. You can apply pre-defined settings or change settings manually.
Quick picture and sound settingsThis feature helps you configure picture and sound settings quickly.1 Press (Home).2 Select Settings > Quick Picture and
Sound, and press OK.
5 USING MORE FEATURES OF YOUR TV
Accessing TV MenusMenus help you to install channels, change picture and sound settings and access other features.1 Press (Home).
» The menu screen appears.
Watching TV TV Program Guide Signal Source Settings Help
2 Please press OK after selecting the following options:• [Watch TV]: When other signal
sources have been selected, select this option to switch back to the TV channel.
• [TV Program Guide]: Displays the TV Program Guide.
• [Signal Source]: Enters the signal source menu.
• [Setup]: Changes the picture, sound and other settings.
• [Help]: Entrs the TV User Manual.
Changing the LanguageYou can choose to change the language of the menu.
Changing the menu language
1 Press (Home).

10 EN-GB
3 Select Continue, and press OK.4 Select your favourite settings according
to the on-screen instructions.
Use Picture StyleUse Picture Style to apply pre-defined picture settings.1 Press OPTIONS, select
Picture and Audio > Picture Style, and press OK.
2 Select one of the following settings and OK.• [Personal]: Uses Quick Setting
picture settings.• [Vivid]: Applies rich and dynamic
settings, ideal for daylight use.• [Natural]: Applies a natural setting.• [Cinema]: Applies settings for
watching movies.• [Game]: Applies settings for gaming.• [Energy saving]: Applies low-
energy settings.• [Standard]: Adjusts picture settings
to suit most environments and types of video.
• [Photo]: Applicable to viewing of photos.
• [Custom]: Customises and stores your personal settings.
Adjusting picture settings manually
1 Press (Home).2 Select Settings > TV Settings, and
press OK.3 Select Picture, select one of the
following settings and press OK.• [Picture Style]: Selects pre-
defined settings.• [Reset]: Resets all settings to their
factory default values.• [Manul Backlight]: Adjusts the
lightness of the backlight.• [Brightness]: Adjusts the intensity
and details of darker areas.• [Contrast]: Adjusts the contrast
to enhance the strength difference between the light and the shadow.
• [Colour]: Adjusts colour saturation.• [Tine]: Compensates the YUV. It is
displayed under NTSC System.• [Sharpness]: Adjusts sharpness of
the image.• [Noise Reduction]: Filters and
reduces noise in an image.• [Color Temperature]: Adjusts the
colour balance in an image.• [Pixel Plus]: Fine tunes each pixel
to match the surrounding pixles in order to prduce the perfect HD picture.• [Advanced Sharpness]: Enables
superb picture clarity.• [Dynamic Contrast]: Enhances
contrast dynamically according to changes in the picture.
• [Dynamic backlight]: Adjusts brightness of the TV backlight to match lighting conditions.
• [Colour enhancement]: Makes colours more vivid and rich.
• [Gamma]: Makes colours more vivid and rich.
• [HDMI Mode]: When the picture is not functioning properly or the signal source format is uncertain, the display can sometimes be enhanced through manual setting in HDMi mode.• The option is only available
when the HDMI input signal is 480P/576P/720P/1080P.
• Please select Vido when connecting DVD; please select PC when connecting PC.
• The compatibility cannot be guaranteed 100% valid as the signal source equipments may be different.
• [Picture format]: Changes the picture format.
• [Screen Edges]: Adjusts the size of the viewing area. (When set to the minimum, you might see noise or a rough edge of an image.)
• [Picture Shift]: Adjusts the position of the picture for various picture formats.

11EN-GB
Engli
sh
Changes the Picture Format
1 Press (Home).2 Select Settings > TV Settings > Picture
> Picture Format, and press .
Summary of Picture FormatsThe following picture settings can be configured.
Note • Depending on the format of the picture source, some picture settings are not available.
[Wide Screen]: Adjusts the classic standard format ratio to wide screen.
[4:3]: Displays classic picture format.
[Zoom1]: Horizontal extension of wide screen picture display. Both sides on the left and the right will be partially cut off using this picture mode; not applicable to VGA signal source.[Zoom2]: Adjusts the standard proportion to wide screen; not applicable to VGA signal source.[Dot by Dot]: Adjusts the picture display automatically according to the input signal for the best clarity. Some mild distortion may be presented due to the broadcaster’s systems. Set your PC resolution to wide-screen mode for the best display results.
Using Sound StyleUses Sound Style to apply pre-defined audio settings.1 Press OPTIONS, select Picture and
Sound > Audio Style, and press OK.
2 Select one of the following settings and OK.• [Personal]: Applies the custom sound
settings set up in sound options.• [Standard]: Adjusts sound settings
to suit most environments and types of audio.
• [News]: Applies sound settings for spoken audio, such as news.
• [Cinema]: Applies sound settings for movies.
• [Game]: Applies sound settings for games.
• [Drama]: Applies sound settings for drama programmes.
• [Sports]: Applies sound settings for sports programmes.
Adjusting sound settings manually1 Press (Home).2 Select Settings > TV Settings, and press
OK.3 Select Sound, then select one of the
following settings and press OK.• [Sound Style]: Accesses the
pre-defined Sound Style setting.• [Reset]: Revert back to the factory
default values.• [Clear Sound]: Enhance the clarity
of sound.• [Bass]: Adjusts the bass level.• [Treble]: Adjusts the treble level.• [Virtual Surround]: Enables spatial
sound.• [Auto Volume leveling]:
Automatically reduces sudden volume changes when switching channels.
• [Balance]: Adjusts the balance of the right and left speakers.
• [Digital Output]: Selects the audio type via digital audio output interface.• [PCM]: Transfers the non-PCM
audio type to PCM audio format.• [RAW]: Exports the original audio
data to home stereo devices.

12 EN-GB
Using the Options MenuAccesses options relating to the current activity or selection.1 When watching TV, press OPTIONS.
» The options menu appears.
2 Select one of the following items and press OK:• [Subtitles]: Sets DTV channel
subtitles. (Displayed when the subtitles can be adjusted in DTV channels)
• [Show Remote Control]: Opens EasyLink remote control menu. (Displayed when HDMI opens EasyLink remote control)
• [Status]: Shows the status of the currently viewed program.
• [Video Track]: Sets DTV channel video track. (Displayed when the video tracks can be adjusted in DTV channels).
Tip
• Press OPTIONS on the remote control to enter the menu.
Creating and Using List of Favourite ChannelsYou can create a list of your preferred TV channels so that you can find those channels easily.
Viewing channels in the favourite list
1 When watching TV, press LIST. » The channel grid appears.
2 Press OPTIONS, select Select List > Favourite, and press OK.
» Only channels in the favourite list appear in the channel grid.
Note
• The favourite channel grid is empty until you add channels into the favourite lists.
Viewing all channels
1 When watching TV, press LIST. » The channel grid appears.
2 Press OPTIONS, select Select List > All, and press OK.
» All channels are displayed in the channel grid.
Note
• All favourite channels are marked by an asterisk when you view the channel grid.
Adding or removing channels to a favourite list
1 When watching TV, press LIST. » The channel grid appears.
2 Press OPTIONS, select Select List > All, and press OK.
» All channels are displayed in the channel grid.
3 Press Select Channel, and press OPTIONS.
4 Select Mark as Favourite or Unmark as Favourite, and press OK.
» This channel is added to or removed from the favourite list.
Using TV LocksYou can prevent your children from watching certain programmes or channels by locking the TV controls.
Setting or changing your code1 Press (Home).2 Press Settings > Channel Settings >
Child Lock > Password Settings.
13EN-GB
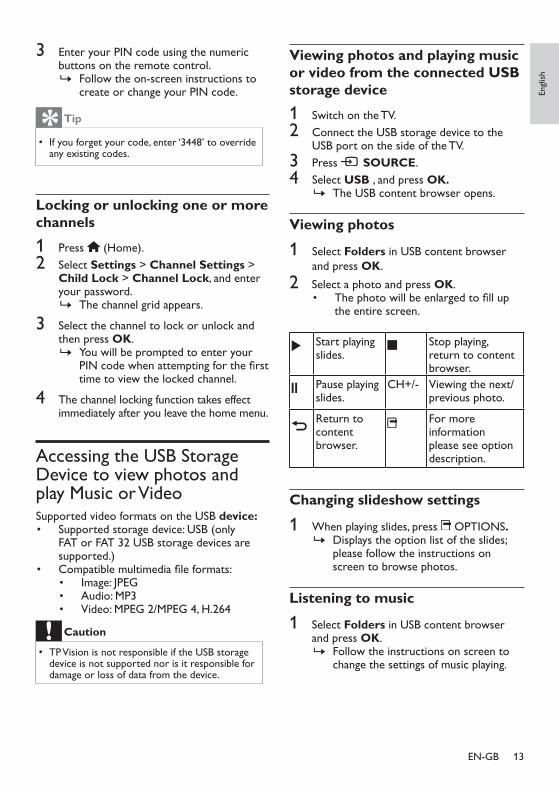
3 Enter your PIN code using the numeric buttons on the remote control.
» Follow the on-screen instructions to create or change your PIN code.
Tip
• If you forget your code, enter ‘3448’ to override any existing codes.
Locking or unlocking one or more channels1 Press (Home).2 Select Settings > Channel Settings >
Child Lock > Channel Lock, and enter your password.
» The channel grid appears.
3 Select the channel to lock or unlock and then press OK.
» You will be prompted to enter your PIN code when attempting for the first time to view the locked channel.
4 The channel locking function takes effect immediately after you leave the home menu.
Accessing the USB Storage Device to view photos and play Music or VideoSupported video formats on the USB device:• Supported storage device: USB (only
FAT or FAT 32 USB storage devices are supported.)
• Compatible multimedia file formats:• Image: JPEG• Audio: MP3• Video: MPEG 2/MPEG 4, H.264
Caution
• TP Vision is not responsible if the USB storage device is not supported nor is it responsible for damage or loss of data from the device.
Viewing photos and playing music or video from the connected USB storage device1 Switch on the TV.2 Connect the USB storage device to the
USB port on the side of the TV.3 Press SOURCE.4 Select USB , and press OK.
» The USB content browser opens.
Viewing photos
1 Select Folders in USB content browser and press OK.
2 Select a photo and press OK.• The photo will be enlarged to fill up
the entire screen.
Start playing slides.
Stop playing, return to content browser.
Pause playing slides.
CH+/- Viewing the next/previous photo.
Return to content browser.
For more information please see option description.
Changing slideshow settings
1 When playing slides, press OPTIONS. » Displays the option list of the slides;
please follow the instructions on screen to browse photos.
Listening to music
1 Select Folders in USB content browser and press OK.
» Follow the instructions on screen to change the settings of music playing.
Engli
sh

14 EN-GB
Start playing music.
Stop playing, return to content browser.
Starts playing music.
CH+/- Previous/Next track.
Returns to content browser.
For more information please see option description.
Playing music while watching slideshowYou can play background music while watching a slideshow.1 Select a music album.2 Press OK.3 Press to return to the USB content
browser.4 Select a photo album.5 Press OK to play slides.
Watching videos
1 Press Folder in content browser.2 Press OK to play video.
» Follow the instructions on screen to change the settings of video playing.
Start playing video.
Stop playing, return to content browser.
Pause playing video.
CH+/- View the next/previous video.
Return to content browser.
For more information please see option description.
USB storage device automatic update
1 Press (Home).2 Select Settings > Update Software.3 Follow the on-screen instructions to
update the software.
Caution • The TV reboots automatically after the software update is completed.
• Please ensure that power and internet connection are not interrupted during software updates.
Changing TV Preferences1 Press (Home).2 Select Settings > TV Settings >
General Settings.3 Select one of the following items and press
OK.• [Menu Language]: Selects the
language to be used for displaying the menu.
• [Sleep Time]: Sets the time for the TV to go on hibernation.
• [Location]: Optimises TV settings for your location - home or shop.
• [Auto Switch Off]: In order to save power, the TV will automatically shut down after a certain period of standby time when there is no signal.
• [EasyLink]: Opens or closes EasyLink.
• [TV position]: Select your TV mounting method.
• [VGA]: Automatically adjusts picture settings in VGA mode.
• [Factory Settings]: Restores the picture sound and other settings to the original values.
• [Reinstall TV]: Restores all settings; all installed channels will be cleared.
Starting a TV DemoYou can gain a better understanding of the TV’s functions by watching a TV demo. This function is not available in certain models.1 When watching TV, press (Home).2 Select Help > TV Tour and press OK.3 Select Connected Devices or HD TV and
press OK to watch.

15EN-GB
6 INSTALLING CHANNELS
The first time you set up your TV, you are prompted to select a menu language and to install TV channels. This section provides instructions on how to re-install and fine-tune channels.
Installing Channels Automatically
Finding Channels Automatically1 Press (Home).2 Select Settings > Auto Search and
press OK.3 Press OK to start searching for channels
automatically.
Installing Channels Manually
Step 1 Select your system
Note
• Skip this step if your system settings are correct.
1 Press (Home).2 Select Settings > Channel Settings >
Channel Settings > Analog TV.3 Select your Color System and Sound
System.
Step 2 Search and store new TV channels1 Press (Home).
Engli
sh
2 Select Settings > Channel Settings > Channel Settings > Analog TV > Search.• You can enter the channel frequency
directly.• Select Search, press OK and start
searching.3 When the search is completed, select
Done to exit the menu.• Select Save as New Channel to
store the channel search results.• Select Save as Current Channel
to override the existing channel number with the channel search results.
Step 3 Fine-tune analogue channels
1 Press (Home).2 Select Settings > Channel Settings
> Channel Settings > Analog TV > AFC.
3 Press Select "Off" or "On".4 Select Done and press OK.
Installing Digital Channels1 Press (Home).
2 Select Settings > Channel Settings > Channel Settings > Digital TV, and press OK.
3 Press to adjust the channel frequency or enter the channel frequency directly.
4 Select Search and press OK to start searching.
5 When the channel is found, select Save and press OK.
6 Press to exit.

16 EN-GB
Renaming ChannelsYou can rename channels. The name appears when you select the channel.1 When watching TV, press LIST.
» The channel grid appears.
2 Select the channel to be renamed and press OPTIONS, then select Rename Channel.
» The screen for entering the channel name appears.
3 Press OK. » A dynamic keyboard for entering texts
appears.
4 Press to select characters and enter the channel name, then select Done and press OK.
Rearranging ChannelsAfter you install channels, you can rearrange the order in which they appear.1 When watching TV, press LIST.
» The channel grid appears.
2 Press OPTIONS. » The channel options menu appears.
3 Select Reorder and press OK.4 Select the channel to rearrange and then
press OK. » The selected channel is highlighted.
5 Move the highlighted channel to the desired location and press OK.
6 Press OPTIONS.7 Select Done Reordering and press OK.

17EN-GB
Engli
sh
7 NETWORK SETTINGS
You can set up the network for software updates.
Network TypeYou can select the type of network setup.1 Press (Home).2 Select Settings > Network Settings >
Network Type.3 Select Wired or Wireless. Requires
to install wired and wireless network to switch.
Wired InstallationTo connect the TV to the computer network, you need to install a router in your computer network. Use an Ethernet cable to connect the router to the TV.
Use a network cable to connect the router to the network interface on the side of the TV, and switch on the router before installing the network.
Wired network settings - Automatic search
1 Click (Home ).2 Select Settings > Connect Network >
Connect > Wired.3 Finish the installation according to the
instructions.
Wired network settings - Manual entry1 Click (Home).2 Select Settings > Network Settings >
Network Settings > Network Settings > Static IP.
3 Press OK after selecting. » Static IP options appear.
4 Select IP Settings, and use numberbuttons to enter IP Address, Netmask, Gateway, DNS 1 and DNS 2 parameters. Please refer to your telecom equipments for respective values.
5 After completing the entry, select Doneand press OK.
Wireless InstallationPlease connect USB wireless network interface card (NIC) before the installation. This machine does not include built-in wireless NIC; Please purchase USB wireless NIC first. The recommended models are as follow:
Brand Model No.
Netcore NW362(V2)MTN MT-WN711N
MT-WN716NMT-WN712N-F1MT-WN718N-F1MT-WN811NMT-WN819N
D-Link DWA-130DWA-133DWL-G122
TP-Link TL-WN723N 2.0TL-WN821NTL-WN823N(mini)MU3-WN823NTL-WN723N
Mercury (TP-Link Sub-brand)
MW300UMW300UM(mini)MW150UM 1.0MW300UM 1.0
Fast (TP-Link Sub-brnad)
FW300UFW300UM(mini)FW150UM 1.0FW300UM 1.0
Totolink N150UM215

18 EN-GB
Wireless network settings - Automatic search1 Press (Home ).2 Select Settings > Connect Network >
Connect > Wireless.3 Finish the installation according to the
instructions
Viewing Network SettingsYou can see the status of the current network setup.1 Press (Home).2 Select Settings > Network Settings >
View Network Settings. » The current network settings will be
displayed on the screen.

19EN-GB
8 CONNECTING DEVICES
This section describes how to connect devices with different connectors.
Note
• You can use different types of connectors to connect a device to your TV.
Bottom Connectorsa HDMI 1/HDMI 2
Digital audio and video input from high-definition digital devices such as Blu-ray players.
b PC input (VGA and audio)Audio and video input from a computer.(Note: The VGA interface of this product is designed to be slanted at 6 degrees. Please align properly with the interface when plugging and unplugging devices.)
VGA Input
VGA Audio
VGA
Engli
sh
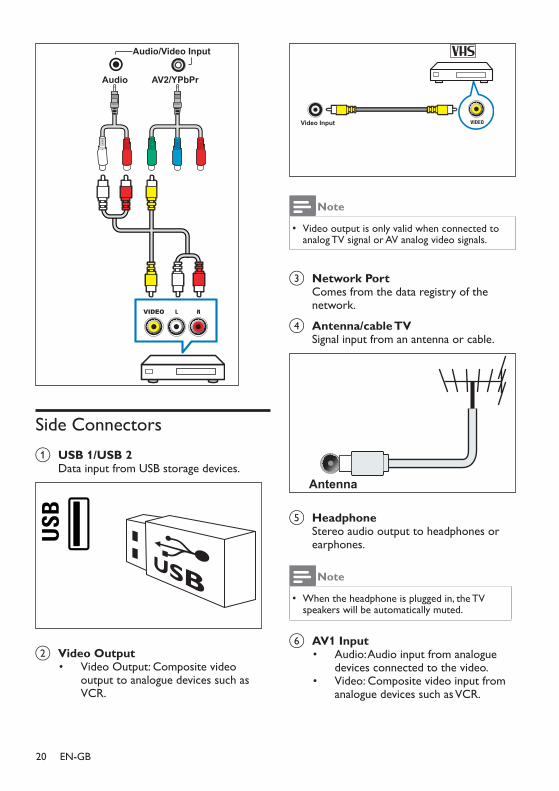
c Component input (PC/Component input audio input)• The analog audio and video input of
the analog or digital devices, such as DVD players and game consoles.
AV2/YPbPrAudio
Audio/Video Input
d AV2 Input • Audio: Audio input from analogue
devices connected to the video.• Video: Composite video input from
analogue devices such as VCR.
20 EN-GB
VIDEO
AV2/YPbPrAudio
Audio/Video Input
Side Connectorsa USB 1/USB 2
Data input from USB storage devices.
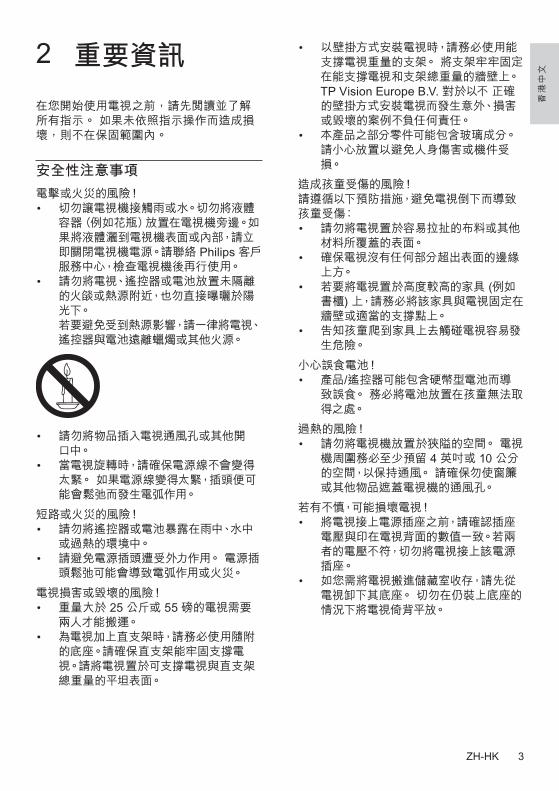
b Video Output• Video Output: Composite video
output to analogue devices such as VCR.
Video Input
Note
• Video output is only valid when connected to analog TV signal or AV analog video signals.
c Network PortComes from the data registry of the network.
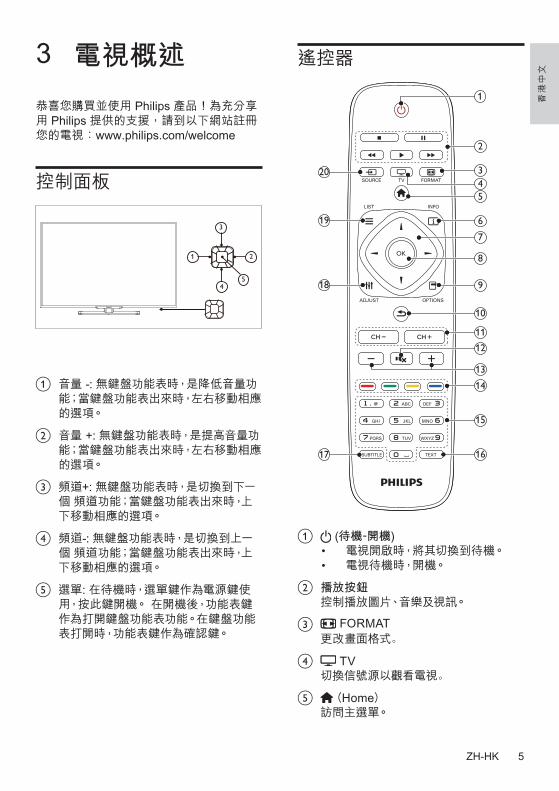
d Antenna/cable TVSignal input from an antenna or cable.
Antenna
e HeadphoneStereo audio output to headphones or earphones.
Note
• When the headphone is plugged in, the TV speakers will be automatically muted.
f AV1 Input• Audio: Audio input from analogue
devices connected to the video.• Video: Composite video input from
analogue devices such as VCR.

21EN-GB
VIDEO
AV1 Input
Video Left Right
Connecting a ComputerBefore you connect a computer to the TV• Set the screen refresh rate on your
computer to 60Hz.• Select a supported screen resolution on
your computer.Connect a computer with one of the following connectors:
Note
• Connections via VGA require an additional audio cable.
• HDMI cable
Engli
sh
• DVI-HDMI cable
DVI
Audio
• HDMI cable and HDMI-DVI adaptor
DVI
Audio
• VGA cable
VGA Input
VGA Audio
VGA

22 EN-GB
Using Philips EasyLinkMaximising the use of your Philips EasyLink HDMI-CEC-compatible device can enhance its control functions to the maximum level of efficiency. HDMI-CEC-compliant devices that are connected through HDMI connectors can be controlled by the TV’s remote control.To enable Philips EasyLink, you’ll need to:• Connect two or more HDMI-CEC
compatible devices through the HDMI interface
• Confirm that every HDMI-CEC compatible device is functioning properly.
• Switch to EasyLink
Note • The EasyLink-compliant device must be switched on and selected as the source.
• Philips does not guarantee 100% interoperability with all HDMI CEC devices.
• HDMI 1 and HDMI 2 have CEC functions.
Enabling or disabling EasyLinkAfter enabling the HDMI-CEC-compliant device, the TV will automatically turn on and switch to the correct source.
Note
• Do not enable Philips EasyLink if you do not intend to use it.
1 Press (Home).2 Select Settings > TV Settings >
General Settings > EasyLink > EasyLink.
3 Select Off or On and press OK.
Use One-touch Play
1 After enabling EasyLink, press play on your device.
» The TV will automatically switch to the correct source.
Use One-touch Standby
1 Press (Standby-On) on the remote control.
» The TV and all connected HDMI devices will switch to standby.
Setting up TV Speakers
1 Press (Home).2 Select Settings > TV Settings >
General Settings > EasyLink > TV Speakers.
3 Select one of the following items and press OK.• Close: Turns off the TV Speakers.• Open: Turns on the TV Speakers.• [EasyLink]: Audio from TV
programmes continues to be broadcasted through the TV speakers. You can switch the TV audio to connected HDMI- CEC audio devices through Experisnce menu.
• [EasyLink autostart]: Automatically disables the TV speakers and transmits audio and video signals from the TV to the connected HDMI-CEC audio frequency device.
Using HDMI-Audio Output
1 Open EasyLink.2 Set up TV speakers and turn on EasyLink
Auto Startup].3 Turn on HDMI2-Audio Output.4 TV audio is switched to connected HDMI-
CEC audio devices.

23EN-GB
Using a Kensington Security LockThere is a Kensington security slot at the back of the TV. Prevent theft by looping a Kensington lock between the slot and a permanent object, such as a heavy table.
Engli
sh

24 EN-GB
Remote Control• Battery: 2 × AAA (R03 Type)
Power• Mains power: 110 - 240 V, 50-60 Hz• Standby power: ≤ 0.5 W• Ambient temperature: 5 to 40 degrees
Celsius• For power consumption, see the product
specifications at www.philips.com/support.
Supported TV MountsTo mount the TV, please purchase a Philips TV mount.
Warning
• Follow all instructions provided with the TV mount. TP Vision Europe B.V. bears no responsibility for improper TV mounting that results in accident, injury or damage.
1 Please first lock the mount behind the TV.2 To prevent damage to cables and
connectors, be sure to leave a clearance of at least 2.2 inches or 5.5cm from the back of the locked TV (including the protruding parts of the speakers) to the wall.
3 Make sure that your mounting bolts follow these specifications:
TV Required Pitch (mm)
Required Mounting Screws
42PFD5519/30 400 × 200 4 x M6 (15 mm)
48PFD5519/30 400 × 200 4 x M6 (15 mm)
32PFD5319/30 100 × 100 4 x M4 (15mm)
9 PRODUCT INFORMATION
Product information is subject to change without notice. For detailed product information, please visit www.philips.com/support
Supported Input Signal FormatsComputer Formats• Resolution - refresh rate:
• 640 × 480 - 60Hz• 800 × 600 - 60Hz• 1024 × 768 - 60Hz• 1360 × 768 - 60Hz• 1920 × 1080 - 60Hz
Video Formats• Resolution - refresh rate:
• 480i - 60Hz• 480p - 60Hz• 576i - 50Hz• 576p - 50Hz• 720p - 50Hz, 60Hz• 1080i - 50Hz, 60Hz• 1080p - 24Hz, 50Hz, 60Hz
Multimedia• Supported storage device: USB (only
FAT or FAT 32 USB storage devices are supported.)
• Compatible multimedia file formats:• Image: JPEG• Audio: MP3• Video: MPEG 2/MPEG 4, H.264
Tuner / Reception / Transmission• Aerial input: 75 ohm coaxial (IEC75)• TV system: PAL I • Video playback: NTSC, SECAM, PAL• Tuner bands: UHF, VHF

25EN-GB
Engli
sh
10 TROUBLE-SHOOTING
This section describes the commonly encountered issues and accompanying solutions.
General TV IssuesThe TV does not switch on: • Disconnect the power cable from the
power outlet. Wait for one minute before reconnecting it.
• Check that the power cable is securely connected.
The remote control is not working properly: • Check that the remote control batteries
are correctly inserted according to the +/- orientation.
• Please replace the remote control batteries if they are flat or weak.
• Clean the remote control and TV sensor lens.
The standby light on the TV blinks red: • Disconnect the power cable from the
power outlet. Wait until the TV cools down before reconnecting the power cable. If the blinking continues to occur, please contact Philips Customer Care Centre.
You forgot the code to unlock the TV lock feature • Enter ‘3448’.
The TV menu is displayed in the wrong language. • Change the TV menu to your preferred
language.
When turning the TV on/off or to standby, you hear a creaking sound from the TV chassis: • No action is required. The creaking sound is
normal expansion and contraction of the TV as it cools down and warms up. This does not impact performance.
TV Channel IssuesPreviously installed channels do not appear in the channel list: • Check that the correct channel list is
selected.
Picture IssuesThe TV is on, but there is no picture: • Check that the antenna is properly
connected to the TV. • Check that the correct device is selected as
the TV source.
There is sound but no picture: • Check that the picture settings are
correctly set.
There is poor TV reception from an antenna connection: • Check that the antenna is properly
connected to the TV. • Loudspeakers, unearthed audio devices,
neon lights, high buildings and other large objects can influence reception quality. If possible, try to improve the reception quality by changing the antenna direction or moving devices away from the TV.
• If reception on only one channel is poor, please fine tune this channel.
There is poor picture quality from connected devices: • Check that the devices are connected
properly. • Check that the picture settings are
correctly set.The TV did not save your picture settings: • Check that the TV location is set to the
home setting. This mode offers you the flexibility to change and save settings.
The picture does not fit the screen; it is too big or too small: • Try using a different picture format.
The picture position is incorrect: • Picture signals from some devices may not
fit the screen correctly. Please check the signal output of the device.

26 EN-GB
Sound IssuesThere is a picture but sound quality is poor:
Note • If no audio signal is detected, the TV automatically switches the audio output off - this does not indicate malfunction.
• Check that all cables are properly connected.
• Check that the volume is not set to 0. • Check that the sound is not muted.
There is a picture but sound quality is poor: • Check that the sound settings are correctly
set.
There is a picture but sound comes from one speaker only: • Verify that sound balance is set to the
centre.
There is a picture in the TV channel, but the sound is noisy • Check that the sound system setting of the
channel settings is correctly set.
HDMI Connection IssuesThere are problems with HDMI devices: • Please note that HDCP (High-bandwidth
Digital Content Protection) support can delay the time taken for a TV to display content from a HDMI device.
• If the TV does not recognise the HDMI device and no picture is displayed, please try switching the signal source from one device to another and back again.
• If there are intermittent sound disruptions, please check that output settings from the HDMI device are correct.
Computer Connection IssuesThe computer display on the TV is not stable: • Check that your PC uses the supported
resolution and refresh rate. • Set the TV picture format to unscaled.
Network Connection IssuesWeb browsing is not working properly: • If the router connection settings are
correct, please check the connection between the router and the Internet.
Computer or web browsing speed is very slow: • Please refer to the router’s user manual,
to have a better understanding of the transmission rate and other signal quality factors.
• You need to have a high-speed Internet connection that can work with the router.
Contact UsIf you cannot resolve your problem, please refer to the FAQs for this TV at www.philips.com/support.If the problem remains unresolved, please contact the local Philips Customer Service Centre.
Warning
• Do not attempt to repair the TV yourself. This may cause severe injury, irreparable damage to your TV or void your warranty.
Note
• Please make a note of your TV model and serial number before you contact Philips Customer Service Centre. These numbers are printed on the back of the TV and on the packaging.

27EN-GB
Table of the Name and Contents of Toxic and Hazardous Substances or Elements Contained in this Product
Part Name
Toxic and Hazardous Substances or Elements
Lead (Pb)
Mercury (Hg)
Cadmium (Cd)
Hexavalent chromium (Cr6 +)
Polybrominated biphenyls (PBBs)
Polybrominated diphenyl ethers
(PBDEs)Plastic frame ○ ○ ○ ○ ○ ○Rear chassis ○ ○ ○ ○ ○ ○LCD panel
CCFL × × ○ ○ ○ ○LED × ○ ○ ○ ○ ○
Power supply’s baseplate × ○ ○ ○ ○ ○
Main baseplate × ○ ○ ○ ○ ○Keypad baseplate × ○ ○ ○ ○ ○Base ○ ○ ○ ○ ○ ○Power cable × ○ ○ ○ ○ ○Other materials × ○ ○ ○ ○ ○Remote Control × ○ ○ ○ ○ ○
*: The circuit board assemblies, including the printed circuit board and its component parts, such as resistors, capacitors, integrated circuits and connectors.
○: It indicates that this hazardous substance contained in all of the homogeneous materials for this part is below the limit requirement in GB/T 26572-2011.×: It indicates that this hazardous substance contained in at least one of the homogeneous materials used for this part is above the limit requirement in GB/T 26572-2011.Note: The hazardous substance contained in some of the parts represented by “x” above exceeds the limit requirement due to limitations of the existing technological capabilities of the industry, and use thereof is, for the time being, unable to be replaced or reduced.
Environmental Protection Use Period
This logo labelled on the product itself indicates that the environmental protection use period thereof is 10 years.The environmental protection use period of electrical information products means the period whereby the toxic and hazardous substances or elements contained therein will not leak or become deformed, and the users of such products will not cause any serious environmental pollution or damages.During the environmental protection use period, please use this product according to the instructions given in this user manual.The environmental protection use period does not cover consumable parts: the battery.
Suggestive description of the Recycling Administrative Regulations for Waste Electrical and Electronics ProductsIn order to care and protect the Earth in a better way, when the user no longer needs to use this product, or it has reached the end of the use period, please adhere to the national and applicable laws in relation to the recycling management of waste electrical and electronics products.
China Electronic Information Products Pollution Control Identification Requirements


1ZH-HK
香港中文
目錄
1 注意 2
2 重要資訊 3
3 電視概述 5控制面板 5遙控器 5遙控器使用 6
4 使用電視 7打開電視或切換為待機 7切換頻道 7觀看連接的裝置 8調整電視音量 8
5 使用更多電視功能 9存取電視選單 9變更語言 9自動將電視切換到待機(睡眠時間) 9更改畫面和聲音設定 9使用選項選單 11建立和使用喜愛頻道清單 11使用電視機鎖定 12從USB儲存裝置中查看相片和播放音樂及影片 13
更改電視的偏好設定 14觀看電視示範 14
6 安裝頻道 15自動安裝頻道 15手動安裝頻道 15安裝數碼頻道 15重新命名頻道 15重排頻道 16
7 網絡設定 17網絡類型 17有線網絡安裝 17無線網絡安裝 17檢視網絡設定 18
8 連接裝置 19底部介面 19側面介面 20連接到電腦 21使用PhilipsEasyLink 22使用Kensington防盜鎖 23
9 產品資訊 24支援的輸入訊號格式 24多媒體 24調諧器/接收/傳輸 24遙控器 24電源 24支援的電視機安裝托架 24
10故障排除 25一般電視問題 25電視頻道問題 25畫面問題 25聲音問題 25HDMI連接問題 26電腦連接問題 26網絡連接問題 26聯絡我們 26

2 ZH-HK
版權所有其他已註冊與未註冊的商標是其各自擁有者之財產。©Kensington和MicroSaver是ACCOWorldCorporation在美國註冊和全球其他國家/地區已註冊及正在申請的商標。本軟件部分版權屬©TheFreeTypeProject(www.freetype.org)所有。
由DolbyLaboratories授權所製造。Dolby與雙D符號為DolbyLaboratories之商標。
HDMI、HDMI標誌和高清多媒體介面是HDMILicensingLLC的商標或註冊商標。
Philips和Philips盾牌圖形是皇家飛利浦股份有限公司的註冊商標,其使用需遵循皇家飛利浦股份有限公司的許可。
1 注意
2014©TPVisionEuropeB.V.版權所有。規格如有更改,恕不另行通知。各商標 均為KoninklijkePhilipsN.V或其個別擁有者之財產。TPVisionEuropeB.V.保留隨時變更產品的權利,毋需因應調整早期庫存。本手冊中的內容適合用於此系統。如果本產品或其個別元件或程序的使用目的不在本手冊的指定範圍內,則必須確保其有效性及適用性。TPVisionEuropeB.V.保證本手冊內容本身並未侵害任何美國專利。不做其他明示或暗示保證。對於本文檔內容中之任何錯誤,以及因本文檔內容造成之任何問題,TPVisionEuropeB.V.概不負責。報告給Philips的錯誤會盡快地套用並公佈在Philips支援網站。
像素特性此液晶顯示產品具有高彩色像素。儘管其有效像素高達99.999%或更高,但螢幕仍可能持續出現黑點或亮點(紅色、綠色或藍色)。這是顯示器的結構屬性(在通用業界標準之內),並非故障。
維修保養用戶不可更換任何元件。請勿打開或取下電視機後蓋,暴露產品內部。必須由Philips服務中心和官方維修商進行維修。否則所有聲明或暗示的保養服務均將失效。本手冊明確禁止的任何操作、本手冊中未建議或授權的任何調整或裝配步驟,均不在保固範圍內。
3ZH-HK
• 以壁掛方式安裝電視時,請務必使用能支撐電視重量的支架。將支架牢牢固定在能支撐電視和支架總重量的牆壁上。TPVisionEuropeB.V.對於以不正確的壁掛方式安裝電視而發生意外、損害或毀壞的案例不負任何責任。
• 本產品之部分零件可能包含玻璃成分。請小心放置以避免人身傷害或機件受損。
造成孩童受傷的風險!請遵循以下預防措施,避免電視倒下而導致孩童受傷:• 請勿將電視置於容易拉扯的布料或其他
材料所覆蓋的表面。• 確保電視沒有任何部分超出表面的邊緣
上方。• 若要將電視置於高度較高的家具(例如
書櫃)上,請務必將該家具與電視固定在牆壁或適當的支撐點上。
• 告知孩童爬到家具上去觸碰電視容易發生危險。
小心誤食電池!• 產品/遙控器可能包含硬幣型電池而導
致誤食。務必將電池放置在孩童無法取得之處。
過熱的風險!• 請勿將電視機放置於狹隘的空間。電視
機周圍務必至少預留4英吋或10公分的空間,以保持通風。請確保勿使窗簾或其他物品遮蓋電視機的通風孔。
若有不慎,可能損壞電視!• 將電視接上電源插座之前,請確認插座
電壓與印在電視背面的數值一致。若兩者的電壓不符,切勿將電視接上該電源插座。
• 如您需將電視搬進儲藏室收存,請先從電視卸下其底座。切勿在仍裝上底座的情況下將電視倚背平放。
2 重要資訊
在您開始使用電視之前,請先閱讀並了解所有指示。如果未依照指示操作而造成損壞,則不在保固範圍內。
安全性注意事項
電擊或火災的風險!• 切勿讓電視機接觸雨或水。切勿將液體
容器(例如花瓶)放置在電視機旁邊。如果將液體灑到電視機表面或內部,請立即關閉電視機電源。請聯絡Philips客戶服務中心,檢查電視機後再行使用。
• 請勿將電視、遙控器或電池放置未隔離的火燄或熱源附近,也勿直接曝曬於陽光下。若要避免受到熱源影響,請一律將電視、遙控器與電池遠離蠟燭或其他火源。
• 請勿將物品插入電視通風孔或其他開口中。
• 當電視旋轉時,請確保電源線不會變得太緊。如果電源線變得太緊,插頭便可能會鬆弛而發生電弧作用。
短路或火災的風險!• 請勿將遙控器或電池暴露在雨中、水中
或過熱的環境中。• 請避免電源插頭遭受外力作用。電源插
頭鬆弛可能會導致電弧作用或火災。
電視損害或毀壞的風險!• 重量大於25公斤或55磅的電視需要
兩人才能搬運。• 為電視加上直支架時,請務必使用隨附
的底座。請確保直支架能牢固支撐電視。請將電視置於可支撐電視與直支架總重量的平坦表面。
香港中文

4 ZH-HK
當產品附有交叉的附輪回收筒標籤時,代表產品適用於歐洲指導原則(EuropeanDirective)2002/96/EC。請瞭解當地電子及電器產品分類收集系統的相關資訊。請根據當地法規處理,請勿將廢棄產品與其他一般家用廢棄物共同丟棄。正確處理廢棄產品有助於避免對環境和人類健康帶來潛在的負面影響。
您的產品包括了符合歐洲規格(EuropeanDirective)2006/66/EC的電池,不得與其他一般家庭廢棄物一併丟棄。請注意有關電池分類收集的當地法規,因為正確處理廢棄產品有助避免對環境和人類健康帶來負面影響。
損害、火災或電源線毀壞的風險!• 請勿將電視或任何物品置於電源線上。• 為了能夠輕易從電源插座拔除電視的電
源線,應始終保持通道順暢方便接近電源線。
• 拔除電源線時,務必從插頭部位拉起,切莫拉扯纜線。
• 在雷雨來臨之前,請切斷電視與電源插座和天線之間的連接。在雷雨期間,請勿觸碰電視的任何部位、電源線或天線纜線。
聽力受損的風險!• 耳機的音量切勿過大,也不要長期使用
耳機。
低溫• 如果電視機在運送過程中的環境溫度
低於5°C或41°F,請在電視機開箱之後等待一段時間,直到電視機的溫度與室溫相同時,才將電視機與電源插座連接。
屏幕保護
• 請盡量避免讓螢幕呈現固定影像。所謂固定影像,就是長時間停留在屏幕上的影像。例如,屏幕選單、黑色條狀區域和時間顯示。如果您必須使用固定影像,請降低屏幕的對比和亮度,避免屏幕損壞。
• 在清潔電視之前請先將電源線拔除。• 請使用微濕的軟布來清潔電視和外框。
請勿使用酒精、化學藥劑或家用清潔劑等物質清潔電視。
• 若有不慎,可能損壞電視屏幕!請勿使用物品觸碰、推擠、摩擦或撞擊屏幕。
• 若要避免變形和褪色,請盡快擦除水滴。
處理廢棄產品及電池
您的產品是使用優質材料和元件所設計及製造,均可回收和重複使用。
5ZH-HK
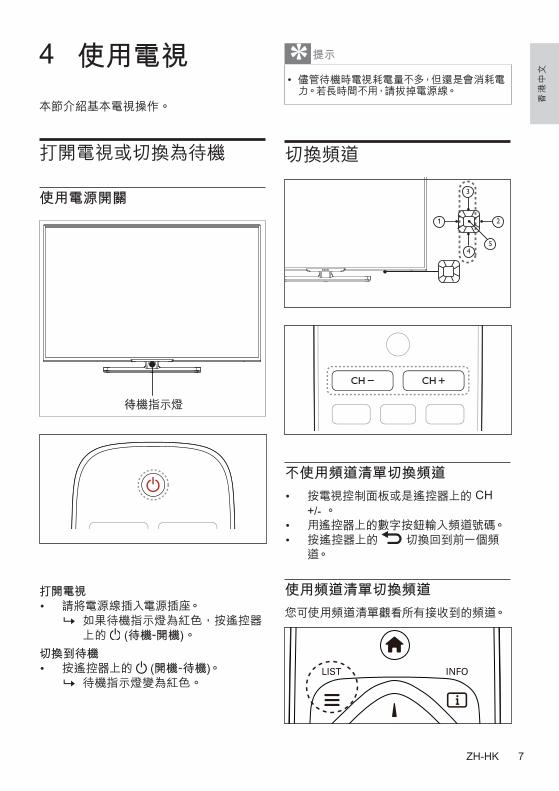
遙控器
a (待機-開機)• 電視開啟時,將其切換到待機。• 電視待機時,開機。
b 播放按鈕控制播放圖片、音樂及視訊。
c FORMAT更改畫面格式。
d TV切換信號源以觀看電視。
e (Home)訪問主選單。
3 電視概述
恭喜您購買並使用Philips產品!為充分享用Philips提供的支援,請到以下網站註冊您的電視:www.philips.com/welcome
控制面板
1 2
3
45
a 音量-:無鍵盤功能表時,是降低音量功能;當鍵盤功能表出來時,左右移動相應的選項。
b 音量+:無鍵盤功能表時,是提高音量功能;當鍵盤功能表出來時,左右移動相應的選項。
c 頻道+:無鍵盤功能表時,是切換到下一個頻道功能;當鍵盤功能表出來時,上下移動相應的選項。
d 頻道-:無鍵盤功能表時,是切換到上一個頻道功能;當鍵盤功能表出來時,上下移動相應的選項。
e 選單:在待機時,選單鍵作為電源鍵使用,按此鍵開機。在開機後,功能表鍵作為打開鍵盤功能表功能。在鍵盤功能表打開時,功能表鍵作為確認鍵。
香港中文

6 ZH-HK
遙控器使用使用遙控器時,按住遙控器靠近電視,並指向遙控器感應器。確保遙控器和電視之間,沒有被傢俱、牆壁或其他物件妨礙。
~5m
~30˚
f INFO顯示當前活動的訊息。
g (導航按鈕)在選單之間導航及選擇項目。
h OK確認輸入或選擇。
i OPTIONS訪問有關當前活動或可選擇的選項。
j (返回)• 返回上一個螢幕。• 返回前個播放的頻道。
k CH + / -(頻道+/-) 切換到上一個或下一個頻道。
l (靜音)靜音或恢復音量。
m +/- (音量)調高和降低音量。
n 彩色按鈕選擇任務或選項。
o 0-9 數字按鈕選擇頻道或設定。
p TEXT無作用。
q SUBTITLE啟用或禁用字幕。
r ADJUST訪問設置選單。
s LIST顯示頻道清單。
t SOURCE(訊號來源) 選擇連接的裝置。
7ZH-HK
香港中文
4 使用電視
本節介紹基本電視操作。
打開電視或切換為待機
使用電源開關
待機指示燈
打開電視• 請將電源線插入電源插座。
» 如果待機指示燈為紅色,按遙控器上的 (待機-開機)。
切換到待機• 按遙控器上的 (開機-待機)。
» 待機指示燈變為紅色。
提示
• 儘管待機時電視耗電量不多,但還是會消耗電力。若長時間不用,請拔掉電源線。
切換頻道
1 2
3
45
不使用頻道清單切換頻道
• 按電視控制面板或是遙控器上的CH +/- 。
• 用遙控器上的數字按鈕輸入頻道號碼。• 按遙控器上的 切換回到前一個頻
道。
使用頻道清單切換頻道
您可使用頻道清單觀看所有接收到的頻道。

8 ZH-HK
調整電視音量
1 2
3
45
調高或降低音量• 按遙控器上的音量+/-。靜音或取消靜音• 按 (靜音)。• 再按一次 恢復聲音。
1 按 LIST(頻道清單)。 » 顯示頻道清單。
2 按 選擇頻道。
3 按OK觀看所選頻道。
4 按 回復到之前觀看的頻道。
觀看連接的裝置
註
• 選擇外部訊號來源前,請開啟外接裝置。
使用訊號來源按鈕
1 按 SOURCE(訊號來源)。 » 出現訊號來源清單。
2 按 選擇一個裝置。
3 按OK選擇。 » 電視切換到所選裝置。

9ZH-HK
香港中文
自動將電視切換到待機(睡眠時間)睡眠時間可以在預定義的時間過后,將電視切換到待機。
註
• 您可以提前關閉電視,也可以在倒計時期間重新設置睡眠時間。
1 按 (主頁)。
2 選擇[設定]>[電視設置]>[首選項]>[睡眠時間]。
» 睡眠時間顯示。
3 從0到180分鐘之間選擇一個預定時間。 » 睡眠時間以五分鐘為單位做設定。若定時器被設定為0,睡眠時間功能將被關閉。
4 按OK開啟時間定時器。 » 當預定時間到時,電視將會切換成待機模式。
更改畫面和聲音設定更改畫面和聲音設定以迎合喜好。您可以套用預設定義的設定或手動更改設定。
快速設定畫面和聲音設定
此功能可讓您快速設定畫面和聲音。
1 按 (主頁)。
2 選擇[設定]>[快速畫面和聲音],然後按OK。
3 選擇 [繼續],然後按OK。
4 依照畫面上的說明,選擇您喜愛的設定。
使用畫面風格
使用畫面風格套用預設定義的畫面設定。
5 使用更多電視功能
存取電視選單選單可讓您設定頻道,更改畫面和聲音設定,以及存取其他功能。
1 按 (主頁)。 » 開啟選單。
2 選擇下列選項後,請按OK:• [觀看電視]:當選取其他訊號源時,
選擇此項以切換回電視頻道。• [電視節目指南]:顯示電視節目指
南。• [信號源]:進入信號源選擇選單。• [設定]:更改畫面、聲音及其他設
定。• [幫助]:進入電視使用說明書。
變更語言您可選擇變更選單語言。
變更選單語言
1 按 (主頁)。
2 選擇[設定]>[電視設置]>[首選項]>[功能表語言],然後按 。
3 選取您想要的語言,然後按OK。

10 ZH-HK
1 按 OPTIONS(選項),選擇[圖像和聲音] > [畫面風格],然後按OK。
2 選擇下列其中一項設定後按OK。• [個人]:使用快速設定畫面設定。• [鮮艷]:套用多彩動態設定,適用於
白天觀賞時使用。• [自然]:套用自然畫面品質。• [電影]:套用觀看電影設定。• [遊戲]:套用遊戲設定。• [省電]:套用低耗能設定。• [標準]:調整畫面設定以適應大部分
視訊環境和類型。• [相片]:適用於欣賞相片。• [自訂]:自訂並儲存您的個人設定。
手動調整畫面設定
1 按 (主頁)。
2 選擇[設定] > [電視設置],然後按OK。
3 選擇 [圖像]後,選擇下列其中一項設定後按OK。• [畫面風格]:選取預設定義的設定。• [重置]:將設定重設至最初預設值。• [背光]:調整背光強度差異。• [亮度]:調整較暗區域的強度和細
緻度。• [對比度]:調整對比度,增加亮部與
暗部的強度差異。• [色彩]:調整色彩飽和度。• [色調]:補償色差。NTSC制式下有
顯示。• [清晰度]:調整圖像清晰度。• [降噪]:過濾和降低圖像中的噪點。• [色溫]:調整畫面色彩平衡。• [PixelPlus]微調每個像素以配合
周圍像素,產生完美高清圖像。• [高級清晰度]:啟用超高畫面清
晰度。• [動態對比度]:隨圖像變化增強
對比度。• [動態背光]:調整電視背光的亮度
以配合燈光條件。• [色彩增強]:使色彩更鮮豔、更
豐富。• [伽馬]:使色彩更鮮豔、更豐富。
• [HDMI模式]:在畫面異常或信號源格式不確定的情況下,通過HDMI模式選項進行手動設定有時可以獲得更佳的顯示效果。• 只有HDMI輸入信號為
480P/576P/720P/1080P時才會有此選項。
• 連接DVD時請選擇視訊,連接電腦時請選擇電腦。
• 因信號源設備差異,無法確保100%的相容有效性。
• [畫面格式]:更改畫面格式。• [屏幕邊緣修整]:調整觀看的畫面
大小。(當設定為最小值時,您可能會看見畫面邊緣出現雜訊及不平整。)
• [畫面移動]:調整各個畫面格式的畫面位置。
更改畫面格式
1 按 (主頁)。
2 選擇[設定] > [電視設置] > [圖像] >[畫面格式],然後按 。
畫面格式摘要
可以設定以下畫面設定。
註
• 根據畫面來源格式,有些畫面設定不可用。
[寬屏幕]:將經典的標準格式比例調整為寬屏。
[4:3]:顯示經典的畫面格式。
[縮放1]:水準延展的寬屏圖像顯示。使用此模式圖像的左右兩邊會被部分切除,但不適用於VGA信號源。

11ZH-HK
香港中文
[縮放2]:將標準格式比例調整為寬屏,但不適用於VGA信號源。
[點對點]:根據輸入信號自動調整畫面顯示,達到最佳清晰度。由於電視臺的播放系統,畫面可能會有輕微變形。將你的電腦解析度設定在寬螢幕模式以取得最佳顯示效果。
使用聲音風格
使用聲音風格套用預設定義的聲音設定。
1 按 OPTIONS(選項),選擇 [圖像和聲音] > [聲音風格],然後按OK。
2 選擇下列其中一項設定後按OK。• [個人]:使用在聲音選項中所設的自
訂聲音設定。• [標準]:適用於大多數環境與類型的
聲音設定。• [新聞]:適用於語音(如新聞)的聲
音設定。• [電影]:適用於電影的聲音設定。• [遊戲]:適用於遊戲的聲音設定。• [戲劇]:適用於戲劇節目的聲音設
定。• [體育]:適用於運動型節目的聲音
設定。
手動調整聲音設定
1 按 (主頁)。
2 選擇[設定] > [電視設置],然後按OK。
3 選擇[聲音]後選擇下列其中一項設定後按確定。• [聲音風格]:存取預設定義的聲音風
格設定。• [重置]:回復到原始預設值。• [晶晰聲效]:增加聲音的清晰度。• [低音]:調整低音。• [高音]:調整高音。• [虛擬環繞]:開啟環繞音效。
• [自動音量調整]:切換頻道時,自動減小突然的音量變化。
• [平衡]:調整左右喇叭的平衡。• [數位輸出]:選擇通過數位音訊輸出
介面的音訊類型。• [PCM]:將非PCM的音訊類型轉
換為PCM音訊格式。• [RAW]:將原始音訊資料輸出到
家庭影院裝置。
使用選項選單存取與目前活動或選擇相關的選項。
1 觀看電視時,按 OPTIONS(選項)。 » 顯示選項目錄。
2 選擇下列其中一個項目後按OK:• [字幕]:設置DTV頻道字幕。(在
DTV頻道可調整字幕時顯示)• [顯示遙控器]:開啟EasyLink遙控器
選單。(HDMI開啟EasyLink遙控器時顯示)
• [狀態]:顯示當前觀看節目的狀態。• [音軌]:設置DTV頻道音軌。(在DTV
頻道可調整音軌時顯示)。
提示
• 按遙控器上的 OPTIONS(選項)進入選單。
建立和使用喜愛頻道清單您可以建立所喜愛電視頻道的清單,助您可以輕鬆找出這些頻道。
觀看喜愛清單中的頻道
1 觀看電視時,按 LIST。 » 出現頻道清單。
2 按 OPTIONS(選項),選取[選擇列表]>[喜好頻道],然後按OK。
» 只有喜愛列表中的頻道會出現在頻道清單中。

12 ZH-HK
註
• 您將頻道加到喜愛列表之前,喜愛頻道列表是空的。
查看所有頻道
1 觀看電視時,按 LIST。 » 出現頻道清單。
2 按 OPTIONS(選項),選取[選擇列表] >[全部],然後按OK。
» 所有頻道會顯示在頻道清單中。
註
• 您查看頻道清單時,所有喜愛頻道會標有一個星號。
將頻道從喜愛清單中增加或移除
1 觀看電視時,按 LIST。 » 出現頻道清單。
2 按 OPTIONS(選項),選取[選擇列表]>[全部],然後按OK。
» 所有頻道會顯示在頻道清單中。
3 按 選擇頻道,然後按 OPTIONS(選項)。
4 選取[標記為喜好頻道]或[取消標記為喜好頻道],然後按OK。
» 該頻道被增加到喜愛清單或從喜愛清單中移除。
使用電視機鎖定鎖定電視控制,您可防止兒童觀看某些節目或頻道。
設定或更改代碼
1 按 (主頁)。
2 選擇[設定]>[頻道設置]>[童鎖]> [密碼設置]。
3 使用遙控器上的數字鍵輸入您的密碼。 » 依照螢幕上的指示設定或更改您的代碼。
提示
• 如果您忘記代碼,請輸入「3448」覆蓋現有密碼。
鎖定或解鎖一個或多個頻道
1 按 (主頁)。
2 選擇[設定]>[頻道設置]>[童鎖]>[頻道鎖定],然後輸入您的密碼。
» 顯示頻道清單。
3 選擇要鎖定或解除鎖定的頻道後,按OK。
» 當您第一次觀看被鎖定的頻道時,您將會被要求輸入PIN碼。
4 離開主選單後,鎖定頻道功能會立即生效。

13ZH-HK
從USB儲存裝置中查看相片和播放音樂及影片USB支援的視訊格式:• 支援的儲存裝置:USB(僅支援FAT或
FAT32USB儲存裝置。)• 支援的多媒體檔格式:
• 圖像:JPEG• 音訊:MP3• 視訊:MPEG2/MPEG4、H.264
注意
• 對於不支援USB儲存裝置以及該裝置中的資料損壞或丟失,TPVision概不負責。
從連接的USB儲存裝置中觀看相片與播放音樂及影片
1 打開電視。
2 連接USB儲存裝置到電視側的USB插槽。
3 按 SOURCE(信號源)。
4 選擇[USB],然後按OK。 » 瀏覽頁開啟。
觀看相片
1 在USB瀏覽頁中選取[文件夾],然後按OK。
2 選取一張相片後按OK。• 該相片將會放大至全螢幕。
開始播放幻燈片。
停止播放,返回至流覽頁。
暫停播放幻燈片。
CH+/- 觀看下一張/上一張相片。
返回至流覽頁。
詳見選項說明。
更改播放幻燈片的設定
1 播放幻燈片時,按 OPTIONS(選項)。 » 顯示幻燈片的選項目錄,依照螢幕上的指示流覽相片。
聆聽音樂
1 在USB瀏覽頁中選擇[文件夾]後按OK。
» 依照螢幕上的指示更改播放音樂的設定。
開始播放音樂。
停止播放,返回流覽頁。
暫停播放音樂。
CH+/- 上一首/下一首曲目。
返回至流覽頁。
詳見選項說明。
觀看幻燈片時播放音樂
您可在觀看幻燈片的同時播放背景音樂。
1 選擇一個音樂專輯。
2 按OK。
3 按 回到USB瀏覽頁。
4 選擇一個相簿。
5 按OK播放幻燈片。
觀看影片
1 在流覽頁中選擇[文件夾]。
2 按OK播放影片。 » 依照螢幕上的指示更改播放影片的設定。
開始播放影片。
停止播放,返回至流覽頁。
暫停播放影片。
CH+/- 觀看下一部/上一部影片。
返回至流覽頁。
詳見選項說明。
USB儲存裝置自動更新
1 按 (主頁)。
2 選擇[設定]> [更新軟體]。
3 依照畫面上的說明更新軟體。
香港中文

14 ZH-HK
注意
• 軟體更新完成后電視會重新開機。 • 請確保電源與網路在軟體更新時不中斷。
更改電視的偏好設定
1 按 (主頁)。
2 選擇[設定]>[電視設置]>[首選項]。
3 選擇下列其中一個項目後按OK。• [功能表語言]:選擇選單顯示的語
言。• [睡眠時間]:在預設時間後讓電視進
入休眠。• [位置]:針對您的電視所選環境設
定–家庭或是商店。• [自動關機]:為節省能源,在無訊號
狀態下,當電視機閒置一段時間,電視將自動關機。
• [EasyLink]:開啟或關閉EasyLink。
• [電視位置]:選擇您的電視安裝方式。
• [電腦]:在電腦模式下,自動調整畫面設置。
• [出廠設置]:將圖像聲音和其他設定恢復初始值。
• [重新設定電視機]:將所有設定重置,已安裝的頻道會被清除。
觀看電視示範您可從電視示範中更瞭解電視的功能。某些型號沒有此示範功能。
1 觀看電視時,按 (主頁)。
2 選擇 [幫助]>[電視旅遊],然後按OK。
3 選擇[連接設置]或[高清電視]后,然後按OK觀看。
15ZH-HK
6 安裝頻道
第一次設定電視時,會提示您選擇一個選單語言和安裝電視訊道。本章介紹如何重新安裝和微調頻道。
自動安裝頻道
自動搜尋頻道
1 按 (主頁)。
2 選擇[設定]>[自動搜臺],然後按OK。
3 按OK開始自動搜尋頻道。
手動安裝頻道
步驟1選擇您的系統
註
• 如果您的系統設定正確,可以略過這個步驟。
1 按 (主頁)。
2 選擇[設定]>[頻道設置]>[頻道設置] >[模擬電視]。
3 選擇您的[彩色制式]及[聲音製式]。
步驟2搜尋並儲存新的頻道
1 按 (主頁)。
2 選擇[設定]>[頻道設置]>[頻道設置]>[模擬電視]>[搜索]。• 可直接輸入頻道頻率。• 選擇 [搜索],按OK,開始搜尋。
3 當搜尋完成,選[完成]離開選單。• 選擇[存儲為新頻道]儲存搜尋到
的頻道。• 選擇[存儲為當前頻道]將搜尋到的
頻道覆蓋現有頻道號碼。
香港中文
步驟3微調類比頻道
1 按 (主頁)。
2 選擇[設定]>[頻道設置]>[頻道設置]>[模擬電視]>[自動頻率微調]。
3 按 選擇“關”或“開”。
4 選擇[完成],然後按[OK]。
安裝數碼頻道
1 按 (主頁)。
2 選擇[設定]>[頻道設置]>[頻道設置]>[數位電視],然後按[OK]。
3 按 調整頻道頻率,或直接輸入頻道頻率。
4 選擇[搜索],然後按[OK]開始搜尋。
5 找到頻道時,選擇[保存],然後按[OK]。
6 按 退出。
重新命名頻道您可以重新命名頻道。選擇頻道時會出現名稱。
1 觀看電視時,按 LIST。 » 出現頻道清單。
2 選擇要重新命名的頻道,按 OPTIONS(選項)選項後選擇[重命名頻道]。
» 輸入頻道名稱的畫面出現。
3 按OK。 » 輸入文字的動態鍵盤畫面出現。
4 按 選取字母鍵入頻道名稱後,選擇[完成]後,按OK。

16 ZH-HK
重排頻道安裝頻道後,可以重排頻道顯示的順序。
1 觀看電視時,按 LIST。 » 頻道清單選單出現。
2 按 OPTIONS(選項)。 » 頻道選項選單出現。
3 選擇[重新排序],然後按OK。
4 選擇要重新排序的頻道,然後按OK。 » 所選頻道被突出顯示。
5 將突出顯示的頻道移到新位置,然後按OK。
6 按 OPTIONS(選項)。
7 選擇[重新排序完成],然後按OK。
17ZH-HK
香港中文
7 網絡設定
您可以設定網絡以便更新軟體。
網絡類型您可以選擇網絡設定類型。
1 按 (主頁)。
2 選擇[設定]>[網絡設置]>[網絡類型]。
3 選擇[有線]或[無線]。需要安裝有線和無線網絡才可切換。
有線網絡安裝如要將電視連上電腦網絡,請在電腦網絡中安裝路由器。使用乙太網絡線將路由器連接到電視。
使用網絡電纜將路由器連接至電視側面的介面,並在開始網絡安裝之前打開路由器。
有線網絡設定-自動搜尋
1 按 (主頁)。
2 選擇 [設定]>[連接網絡]>[連接]>[有線]。
3 按照提示完成安裝。
有線網絡設定-手動輸入
1 按 (主頁)。
2 選擇[設定]>[網絡設置]>[網絡設置]>[網絡設置]>[靜態IP]。
3 選擇之後按OK。 » 靜態IP選項出現。
4 選擇[IP設置],並使用數字按鈕輸入[IP位址]、[網絡掩碼]、[網關]、[DNS1]和[DNS2]參數。相關設定值請參考所使用的網路設備。
5 輸入完後,選擇[完成]後按OK。
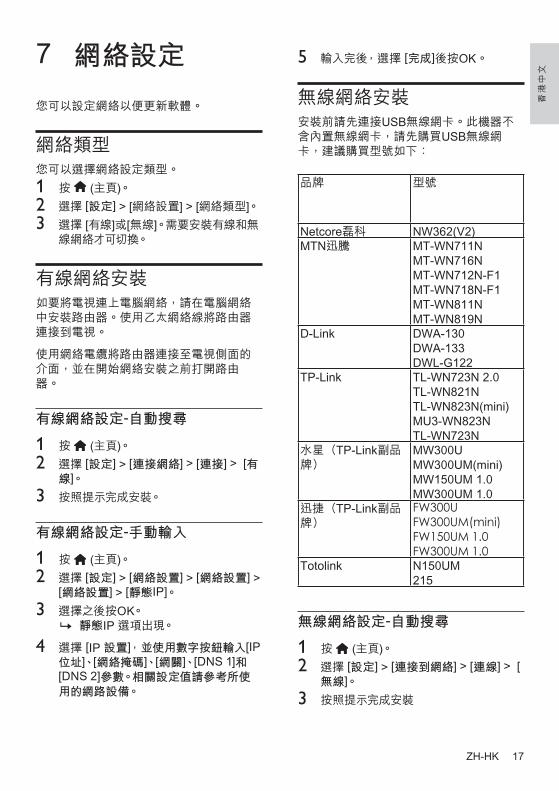
無線網絡安裝安裝前請先連接USB無線網卡。此機器不含內置無線網卡,請先購買USB無線網卡,建議購買型號如下:
品牌 型號
Netcore磊科 NW362(V2)MTN迅騰 MT-WN711N
MT-WN716NMT-WN712N-F1MT-WN718N-F1MT-WN811NMT-WN819N
D-Link DWA-130DWA-133DWL-G122
TP-Link TL-WN723N2.0TL-WN821NTL-WN823N(mini)MU3-WN823NTL-WN723N
水星(TP-Link副品牌)
MW300UMW300UM(mini)MW150UM1.0MW300UM1.0
迅捷(TP-Link副品牌)
FW300UFW300UM(mini)FW150UM 1.0FW300UM 1.0
Totolink N150UM215
無線網絡設定-自動搜尋
1 按 (主頁)。
2 選擇 [設定]>[連接到網絡]>[連線]>[無線]。
3 按照提示完成安裝

18 ZH-HK
檢視網絡設定您可以查看目前的網絡設定狀態。
1 按 (主頁)。
2 選擇[設定]>[網絡設置]>[查看網絡設置]。
» 畫面將會顯示目前設定的網絡參數。

19ZH-HK
8 連接裝置
本節介紹如何連接含不同介面的裝置。
註
• 您可以使用不同類型的介面將裝置連接到電視。
底部介面
a HDMI1/HDMI2Blu-ray播放機等高清數位裝置中的數位音訊和視訊輸入。
b 電腦輸入(VGA及音訊)電腦中的音訊和視訊輸入。(注意:本機VGA介面為6度傾斜設計,插拔時請對準介面後插入)
VGA
香港中文
c 分量輸入(電腦/分量輸入音訊輸入)• DVD播放機或遊戲機等類比或數位
設備中的類比音訊和視頻輸入。
AV2/YPbPr
d AV2輸入 • 音訊:視訊上所連類比裝置中的音
訊輸入。• 視訊:VCR等類比裝置中的複合視
訊輸入。

20 ZH-HK
VIDEO
AV2/YPbPr
側面介面
a USB1/USB2USB儲存裝置中的資料登錄。
b 視頻輸出• 視頻輸出:VCR等類比裝置中的複
合視訊輸出。
註
• 視頻輸出僅在接入類比電視訊號或AV類比視訊訊號時有效。
c 網口來自網絡的資料登錄。
d 天線/有線電視來自天線或纜線的輸入訊號。
e 耳機立體聲音訊輸出到耳機。
註
• 耳機插入時,電視喇叭會自動靜音。
f AV1輸入• 音訊:視訊上所連類比裝置中的音
訊輸入。• 視訊:VCR等類比裝置中的複合視
訊輸入。

21ZH-HK
VIDEO
AV1输入
视频 左 右
連接到電腦將電腦連接到電視前• 將電腦上的螢幕刷新率設定為60Hz。• 在電腦上選擇一個支援的螢幕解析度。通過以下一種介面連接電腦:
註
• 通過VGA連接需要額外一條音訊線。
• HDMI線
香港中文
• DVI-HDMI線纜
DVI
• HDMI線纜和HDMI-DVI轉接器
DVI
• VGA線
VGA

22 ZH-HK
使用PhilipsEasyLink充分利用您的PhilipsEasyLink相容裝置可增強控制功能而達到最大效益。透過HDMI介面連接的HDMI-CEC相容裝置可以由電視遙控器進行控制。要啟用PhilipsEasyLink,您需要:• 透過HDMI介面連接兩個以上的
HDMI-CEC相容裝置• 確認每個HDMI-CEC相容裝置皆正常
運作• 切換到EasyLink
註
• EasyLink相容裝置必須已經打開並被選作訊號來源。
• Philips不保證100%與所有HDMICEC裝置實現互操作性。
• HDMI1和HDMI2有CEC功能。
打開或關閉EasyLink
啟用HDMI-CEC相容裝置後,電視會自動打開並切換到正確的訊號來源。
註
• 如果您不打算使用PhilipsEasyLink,請不要啟用它。
1 按 (主頁)。
2 選擇[設定]>[電視設置]>[首選項]>[EasyLink]>[EasyLink]。
3 選擇[關閉]或是[開啟],然後按OK。
使用快速播放
1 啟用EasyLink後,在裝置上按下播放。 » 電視會自動切換到正確訊號來源。
使用快速待機
1 按遙控器上的 (待機-開機)。 » 電視及所有連接的HDMI裝置將會切換到待機。
設定電視揚聲器
1 按 (主頁)。
2 選擇[設定]>[電視設置]>[首選項] >[EasyLink]>[電視揚聲器]。
3 選擇下列其中一個項目後按OK。• [關閉]:關閉電視機揚聲器。• [開啟]:打開電視機揚聲器。• [EasyLink]:電視節目的音訊,將持
續透過電視揚聲器播送。可透過體驗選單,將電視音訊切換到連接的HDMI-CEC音訊裝置。
• [EasyLink自動啟動]:自動禁用電視機揚聲器,將電視音訊傳輸到相連的HDMI-CEC音訊裝置中。
使用HDMI-音訊輸出
1 打開EasyLink。
2 配置電視揚聲器,將[EasyLink自動啟動]開啟。
3 開啟[HDMI2-音頻輸出]。
4 電視音訊被切換到相連的HDMI-CEC音訊設備。

23ZH-HK
使用Kensington防盜鎖本電視背面設有Kensington防盜鎖插槽。將Kensington防盜鎖穿鎖在插槽和固定物件(如笨重的桌子)上,便可防止被盜。
香港中文

24 ZH-HK
遙控器• 電池:2×AAA(R03類型)
電源• 主電源:110-240V,50-60Hz• 待機耗電:≤0.5W• 環境溫度:攝氏5~40度• 若需功耗的相關資訊,請參閱
www.philips.com/support中的產品規格。
支援的電視機安裝托架如要安裝電視機,請購買飛利浦電視機安裝托架。
警告
• 請按照電視機安裝托架隨付所有說明操作。TPVisionEuropeB.V.對於因安裝不當而造成的事故、人身傷害或損失,概不負責。
1 請先將托架鎖於電視機背後。
2 為避免損壞電纜和插口,請確保將鎖好托架的電視機背面(含音箱凸包處)與牆面間至少保留2.2吋或5.5公分的間隙。
3 確定壁掛螺栓符合下列規格:
電視需要的點距(mm)
需要的安裝螺釘
42PFD5519/30400×200
4×M6(建議長度15mm)
48PFD5519/30400×200
4×M6(建議長度15mm
32PFD5319/30100×100
4×M4(建議長度15mm
9 產品資訊
產品資訊可能會隨時變更,恕不另行通知。產品相關詳細資訊,請至 www.philips.com/support
支援的輸入訊號格式電腦格式• 解析度-刷新率:
• 640×480-60Hz• 800×600-60Hz• 1024×768-60Hz• 1360×768-60Hz• 1920×1080-60Hz
視訊格式• 解析度-刷新率:
• 480i-60Hz• 480p-60Hz• 576i-50Hz• 576p-50Hz• 720p-50Hz,60Hz• 1080i-50Hz,60Hz• 1080p-24Hz,50Hz,60Hz
多媒體• 支援的儲存裝置:USB(僅支援FAT或
FAT32USB儲存裝置。)• 支援的多媒體檔格式:
• 圖像:JPEG• 音訊:MP3• 視訊:MPEG2/MPEG4、H.264
調諧器/接收/傳輸• 天線輸入:75ohm同軸(IEC75)• 電視系統:PALI• 視訊播放:NTSC,SECAM,PAL• 調諧器波段:UHF、VHF

25ZH-HK
香港中文10故障排除
本節介紹常見問題及其解決辦法。
一般電視問題電視無法開機: • 從電源插座上拔下電源線插頭。待一分鐘
後重新連接。 • 檢查電源線是否已牢固連接。
遙控器操作不正常: • 檢查遙控器電池的+/-極是否安裝正確。 • 如遙控器電池耗盡或漏液,請予以更換。 • 清潔遙控器和電視感應器鏡頭。
電視待機指示燈閃爍紅色: • 從電源插座上拔下電源線插頭。等到電視
冷卻再重新連接電纜。如果指示燈仍然閃爍,請聯繫Philips客戶服務中心。
忘記解鎖電視鎖功能的密碼 • 輸入‘3448’。
電視選單顯示語言錯誤。 • 將電視選單更改想要的語言。
打開/關閉電視至待機狀態時,聽到電視機
箱中發出吱吱聲: • 無需執行任何操作。吱吱聲是電視冷卻和
預熱時正常伸縮時,發出的正常聲響。不會影響性能。
電視頻道問題上一個安裝的頻道沒有出現在頻道清單: • 檢查選擇的頻道清單是否正確。
畫面問題電視已打開,但沒有畫面: • 檢查天線是否已正確連接到電視。
• 檢查是否選擇正確裝置作電視訊號來源。
有聲音沒畫面: • 檢查畫面設定是否正確。天線連接造成電視接收訊號不好: • 檢查天線是否已正確連接到電視。 • 擴音器、未接地的音訊裝置、霓虹燈、高層
建築和其他巨形物件會影響接收品質。可能的話,請嘗試通過改變天線方向或將上述裝置遠離電視來改善接收品質。
• 若只有一個頻道的接收效果差,請微調此頻道。
所連裝置的畫面品質差: • 檢查裝置是否連接正確。 • 檢查畫面設定是否正確。
電視沒有保存畫面設定: • 檢查電視位置是否設定為家庭設定。此模
式可以讓您靈活更改和保存設定。
畫面不適合螢幕,太大或大小: • 嘗試使用不同的畫面格式。
畫面位置不正確: • 有些裝置中的畫面訊號可能無法正確符合
螢幕。請檢查該裝置的訊號輸出。
聲音問題有畫面,但聲音品質差:
註
• 如果檢測不到音訊訊號,則電視會自動關閉音訊輸出—這不表示有故障。
• 檢查所有線纜是否連接正確。 • 檢查音量是否設定為0。 • 檢查聲音沒有靜音。
有畫面,但聲音品質差: • 檢查聲音設定是否正確。
有畫面,但只有一個喇叭有聲音: • 檢查聲音平衡是否設定為中間。
電視頻道,有畫面,但聲音雜音 • 檢查頻道設定的音效系統設定是否正確。

26 ZH-HK
HDMI連接問題HDMI裝置有問題: • 請注意,HDCP(高頻寬數位內容保護)
支援可能會延遲電視顯示HDMI裝置中內容的時間。
• 如果電視不識別HDMI裝置,並且不顯示畫面,請嘗試將訊號來源從一個裝置切換另一個後再重新切換回。
• 如果聲音斷斷續續,請檢查一下HDMI裝置的輸出設定是否正確。
電腦連接問題電視上的電腦顯示不穩定: • 檢查您的電腦使用支援的解析度和刷新
率。 • 將電視畫面格式設定為無壓縮。
網絡連接問題不能正常上網: • 如果與路由器的連接設定正確,請驗證路
由器與互聯網的連接。
瀏覽電腦或上網速度很慢: • 請參閱路由器用戶手冊,了解有關傳送速
率及其他訊號品質因素的資訊。 • 您需要適用於路由器的高速互聯網連接。
聯絡我們如果您無法解決問題,請到以下網址參考本電視的常見問題:www.philips.com/support如果問題仍未解決,請聯絡當地Philips客戶服務中心。
警告
• 請勿嘗試自行維修電視。這可能會造成嚴重人身傷害、對電視造成無法挽回的損壞,或者使保養服務失效。
註
• 聯絡Philips客服中心前,請將電視機型號及序號記錄起來。這些號碼印刷在電視機的後殼及包裝上。

27ZH-HK
本產品有毒有害物質或元素的名稱及含量識別表
零件名稱
有毒有害物質或元素
鉛(Pb) 汞(Hg) 鎘(Cd) 六價鉻(Cr6+)
多溴聯苯(PBBs)
多溴二苯醚(PBDEs)
塑膠外框 ○ ○ ○ ○ ○ ○後殼 ○ ○ ○ ○ ○ ○LCD面板
CCFL × × ○ ○ ○ ○LED × ○ ○ ○ ○ ○
電源基板 × ○ ○ ○ ○ ○主基板 × ○ ○ ○ ○ ○按鍵基板 × ○ ○ ○ ○ ○底座 ○ ○ ○ ○ ○ ○電源線 × ○ ○ ○ ○ ○其他線材 × ○ ○ ○ ○ ○遙控器 × ○ ○ ○ ○ ○
*:電路板元件包括印刷電路板及其構成的零件,如電阻、電容、積體電路、連接器等。
○:表示該有害物質在該部件所有均質材料中的含量,均在GB/T26572-2011規定的限量要求以下。×:表示該有害物質至少在該部件的某一均質材料中的含量超出GB/T26572-2011規定的限量要求。備註:以上「×」的部件中,部分含過量有害物質超過,因目前業界技術水平所限,暫時無法替代或減量該物質。
環保使用期限
產品本體上標示的該標誌表示,環境保護使用期限為10年。電子資訊產品的環境保護使用期限,是指電子資訊產品中所含的有毒有害物質或元素不會向外部洩漏或出現突然變異,並且電子資訊產品的用戶在使用該電子資訊產品時也不會嚴重污染環境或嚴重損害人體、財產的期限。環境保護期限內,請按照使用說明書使用本產品。本環境保護使用期限不覆蓋易損件:電池。
《廢棄電器電子產品回收處理管理條例》提示性說明為了更好的關愛及保護地球,當用戶不再需要此產品或產品無法再用時,請遵守國家廢棄電器電子產品回收處理相關法律法規,將其交予當地具國家認可的回收處理資質的廠商,進行回收處理。
中國電子資訊產品污染控制識別要求

© 2014 Koninklijke Philips N.V.All rights reserved.Document order number:Philips and the Philips’ Shield Emblem are registered trademarks of Koninklijke Philips N.V.
and are used under licence from Koninklijke Philips N.V.