4-H Forestry Project - Purdue Extension
27
F O R E S T R Y 4-H-1008-W PURDUE EXTENSION Leader’s Guide
-
Upload
khangminh22 -
Category
Documents
-
view
2 -
download
0
Transcript of 4-H Forestry Project - Purdue Extension

FORESTRY
4-H-1008-W
Purdue extension
Leader’s Guide

2
4-H ForestryStudying and learning about trees and forestry is fun. The Indiana 4-H Forestry curriculum was written for youth who enjoy learning about nature. The key to learning with any 4-H project is for youth to enjoy their studies and to learn at their own pace. We hope this study is just the start of a lifetime knowledge and enjoyment of trees, forests, and being outside. Youth can enhance their learning experience by using additional resources from the Internet, school, or a local library.
Parents can be a big help if they are involved with their child’s learning, especially for younger 4-H members. Parents that sit in on meetings and ask their child about what they learned and what they did not understand help their child have a stronger learning experience. Youth are more excited to learn if they have parental support and interest in what they are doing. As they mature, youth should take on more responsibility for their learning and move to independent learning. Parental interest will reinforce what youth learn at any age.
General information about the Indiana natural resource projects, including Frequently Asked Questions and exhibit pictures from the Indiana State Fair, are available at: www.four-h.purdue.edu/staff.home/natalie/4h.html
Exhibit guidelines and record sheets are available online at: www.four-h.purdue.edu/projects.
Author: Natalie Carroll, Extension SpecialistEditor: Becky GoetzDesign & Layout: Jessica Seiler
4-H Forestry Project

3
The Experiential Learning Model ................................................................4
Youth Development Stages ..........................................................................5
Answers and Suggestions ............................................................................7
Forestry Level 1, Follow the Path ..........................................................7
Forestry Level 2, Reach for the Canopy ..............................................10
Forestry Level 3, Explore the Deep Woods .........................................16
Poster Exhibit Guidelines and Suggestions ...............................................21
Action Demonstration Guidelines ..............................................................24
Resources ...................................................................................................26
Youth Learning Goals4-H Forestry, Level 1
Begin to learn about trees and forest communities. •Develop an understanding of, and an appreciation for,• trees and tree parts, including leaves, roots, and crowns. Exhibit work to others in an engaging manner.•
4-H Forestry, Level 2
Learn more about trees and forestry, including diseases, pests, invasive species, and •forestfires.Learn about state forests and journaling. •Exhibit work to others in an engaging manner.•
4-H Forestry, Level 3
Identify trees from leaves, bark, and fruits.•Learn about world forests, urban forestry, and careers in forestry.•Educate others about forestry through exhibits, presentations, and action •demonstrations; mentor younger 4-H members.
Table of Contentspage

4
(Source: Excerpted and adapted from “Experiential Learning in 4-H Project Experiences, 4-H Volunteer Leaders’ Series,” University of Arkansas Cooperative Extension Service, Dr. D. Z. Baker. You may view the entire document at: http://publications.uaex.edu/. Search using the word “experiential.”)
The Experiential Learning Model is a way of teaching to help youth make the most of any activity that they experience. Experiential learning distinguishes 4-H activities from many othereducationalmethods.Experientiallearningisaprocessthatallowsyouthtofirstlearnby doing, before being told or shown how, and then process the experience. Activities are designed so youth experience a learning activity, share what they did, process what they did (discuss,analyze,reflect),generalize what they learned (to test the 4-H members’ comprehensionandappreciationoftheactivity),andthenthinkabouthowtheycanapply whattheylearnedtoothersituations(generalize).
The advantages of using the experiential learning process in group settings include:The adult can quickly assess the student’s knowledge of the subject.•The student builds on past experience or knowledge.•The adult is a coach rather than a teacher.•The youth relate the experience to their own •lives and experiences.Mentors may use a variety of methods to •involve the youth in the experience.Youth with many different learning styles can •be successful.Discussions can move from the concrete to the •abstract and analytical, at the middle and high school ages.Youth are stimulated to learn through discovery •and to draw meaning from the experience.Youth can work together, share information, •provide explanations, and evaluate themselves and others.Youth take responsibility for their own learning. •
Evaluating youth learning using a simple rubric (such as the one shown) can help 4-H volunteer leaders assess the effectiveness of their teaching methodology and youth interest. Evaluate each step of the experiential model by indicating what you think the 4-H members learned in a particular activity (your best guess). Work on improving any low scores.
The Experiential Learning Model
Step Excellent Average MinimalExperienceShareProcessGeneralizeApply

5
Understanding the physical, mental, social, and emotional development of youth will help you when working with the 4-H members in your club. No two youth develop at the same rate and transitions are often gradual. Your teaching and involvement helps 4-H club membersgrowandmatureandmakes4-Harewardingandfulfillingexperience.
Activities at 4-H club meetings are not always as successful as you, the volunteer leader, had planned. Sometimes youth talk among themselves rather than listening to you; sometimes no onecomestoaplannedfieldtrip;orsometimesnoonespeaksuptoansweryourquestionswhen you are trying to involve the youth in the discussion. If you are working with a broad agerange,theactivitymaybetoosimplefortheolderyouthandtoodifficultfortheyoungerones. This is very challenging for the 4-H leader. Giving the older 4-H members leadership opportunities can be very effective.
Youth of the same age can vary greatly in physical, mental, social, and emotional growth and interests. These differences are even more marked between age groups. Research has shown that there are some generalities that can help you understand how to plan activities for different age groups.
EarlyElementary(Pre4-HAge)This is a very active age, so it is important to keep children in their early elementary years busy. They are concrete thinkers and need to understand what you want them to do and how to do it. They are generally more interested in making something than in completing a project (processismoreinterestingthanproduct).Youthinthisagegrouptendtoseekadultapprovaland depend upon adults, although the opinions of their peers are beginning to be important. They do best in small groups with set rules and rituals. Competition is inappropriate for this age group.
Upper ElementaryThis is also a very physically active age so hands-on activities work best. Youth in the upper elementarygradesarestillfairlyconcretethinkers(thingsareblack/whiteorright/wrong),but are beginning to think logically and symbolically. Because this age group has a strong need to feel accepted, it is best for an adult to evaluate each product, rather than hold competition among peers with only one winner. This age child prefers to know how much they have improved against past efforts and how to improve in the future.
These youth are beginning to identify with peers, but continue to value adult guidance. They arealsobeginningtodiscoverthebenefitsofmakingotherpeoplehappy,butmoreforthebenefitstothemselvesratherthanthebenefittoothers.Theybegintotakeresponsibilityfortheir actions at this age and begin to develop an increased independence of thought, which may allow them to try new things. Letting this age group help in the decisions of the club helps them start to learn about leadership.
Youth Development Stages

6
Middle SchoolMiddle school youth are beginning to move to more abstract thinking. Justice and equality are important to this age. Therefore, project judging may now be viewed in terms of what is fair,aswellasbeingregardedasareflectionofself-worth.Youthintheirmiddleschoolyearsprefertofindtheirownsolutions,ratherthantobegivensolutionsbyadults.Trytoprovidesupervision without interference. Independence of thoughts and actions begins to emerge. Avoid comparing middle school youth with each other – performance should be compared with past accomplishments.
Junior volunteer organizations often are popular with teens toward the end of this age group, particularly if there are opportunities for developing leadership and interacting with youth of the opposite sex.
High SchoolMost high school-aged teens know their abilities, interests, and talents. They tend to be very concerned with themselves and their peer group. While they can understand the feelings of others, they tend to be self-absorbed, particularly in the earlier years of high school. Relation-ship skills are usually fairly well developed. Getting a driver’s license increases both inde-pendence and dating. Acceptance by members of the opposite sex is very important.High school-aged youth begin to think about the future and make realistic plans. They enjoy careerexplorationandpreparation.Theirvocationalgoalsinfluencetheactivitiestheyselect.Projects requiring research and creativity give teens an opportunity to demonstrate how much they have learned and what they can accomplish. Teens set goals based on their personal needs and priorities – goals set by others are generally rejected.
As teens master abstract thinking, they may try new ideas in ways that confuse adults. Teens can generally initiate and complete tasks without supervision. A leader can help by arranging new experiences in areas of interest to teens, but must be sure to allow them plenty of input. Assume the role of advisor/coach for independent workers, rather than teacher/lecturer. Club meetings, rituals, and uniforms do not generally appeal to this group. Many teens enjoy look-ing back on their achievements in 4-H and on teaching younger 4-H members, and appreciate special recognition for leadership activities. By the time they graduate from high school and begin college or a career, youth feel they have reached the stage of full maturity and expect to be treated as such.
Some Final ThoughtsYou, as the club volunteer, are a valuable asset to your community and to the members of your club. The guidelines for the stages of child and youth development – in combination with your special skills and interests in youth – will help you plan and carry out a successful 4-H program and make a positive impact on the lives of young people.
These guidelines only give a brief overview of child and youth development. They are in-tended as a resource to help you plan your activities as a volunteer leader. The publication, Ages and Stages of Child and Youth Development,* has more in-depth information and is availablefromyourcountyExtensionoffice.
* Ages and Stages of Child and Youth Development, A Guide for 4-H Leaders, NCR 292

7
Forestry Level 1
Chapter 1. Know Your TreesTalking Trunks – This activity shows how to examine tree trunk rings to find the age of a tree
and to learn how big the trunk was when the 4-H member was born [by counting as many rings as their age from the outside of the tree (bark) towards the center of the trunk]. The tree is 30 years old.
Leafing Out – This activity teaches differences between conifer needles and broad-leaf (deciduous) leaves. It also introduces the following information.
Meet “Your Highness” – This activity introduces the parts of the tree:
Hold On Tight! – This activity introduces the tree root system. Roots are very important to trees, because they supply water and minerals, and anchor the tree firmly in the ground.
Chapter 2: Know Your Forests
Home, Tree, Home – Youth need a resource book that lists tree ranges and forest types to complete this activity.
Bark Buddies – Youth categorize trees into four different types, then draw a map to show the types of trees that they found. The following is additional information about Indiana for-ests (from Dr. G. Parker, Purdue Department of Forestry and Natural Resources): about 87% (about 21 million acres) of Indiana was forest land before European settlement. Land was cleared to provide room for development and areas for agriculture. Lands used for timber production remain in a forested state through sustainable forestry practices that manage this renewable resource. Today there are about 4.1 million acres of forest land in Indiana. About three-fourths of all forested land is controlled by small, private, non-industrial forest owners with varying objectives for their land. However, current harvest patterns are such that average size and quality of trees harvested for forest products are declining. Responsible forest management is essential to ensure an ample supply of high quality wood products for future generations.
Answers and Suggestions
Parts of a Deciduous Leaf Tree Silhouettes
A. Apex A. ConiferB. Margin B. Needle-leafC. Base of blade C. DeciduousD. Base of leaf D. Broad-leafE. PetioleF. Blade
1. Crown 5. Trunk
2. Leaves 6. Bark3. Branches 7. Roots4. Twigs

8
Strait and Tall – Youth are to carefully observe and draw a tree.
In the Tree’s House – Youth think about organisms that live in the forest and how forests provide food, shelter, and space. Animals that they may find in a tree include birds, squirrels, and insects. Many animals use the forest. Youth may mention deer, raccoons, skunks, snakes, or other species.
Chapter 3: Forests Have Needs
Down in the Dirt – Youth dig roots from three different sites and compare them to see what differences they observe.
Thirsty Trees – This activity allows youth to observe transpiration, an important process in the water cycle. The “Branching Out” section asks youth to repeat the same process, but in the dark. Youth should hypothesize what they think will happen before they start.
Spotlight: Trees – Youth begin to learn about the importance of sunshine by covering some leaves with poster board or cardboard for a few days. They should report what the leaves look like before and after the experiment.
Makin’ Maps – Youth begin to learn how to read a topographic map. Topographic maps are available online at:
www.topozone.com http://terraserver.microsoft.com/default.asp
The National 4-H Forestry Invitational Web site is also given as a resource to use for learning to read a topographic map. This Web site is found at: www.aces.edu/n4hfi/.
Chapter 4: People Need Forests
Where’s the Water?– Youth will begin to understand the differences between water runoff from impervious surfaces (such as parking lots, roofs, etc.) and forested lands by measur-ing the amount of water collected from an impervious surface and a potted plant.
My Couch Is a Tree?– This word-find activity encourages youth to think about many differ-ent common products that depend on trees and forests. The answers to the Word Find are given in the Group Helper’s Guide (BU-08038), page 32.
Fun in the Forest – This activity requires research about Indiana state forests. Information is available online at www.state.in.us/dnr/forestry/.

9
Trees at Work – This activity encourages youth to consider various careers that involve trees and/or forests. However the activity is very difficult, if not impossible to do, because the terms they are asking for cannot be found in the book or the text. This activity was supposed to have the Word Bank, given below.
An alternative crossword puzzle for this activity is given below. It might be more age appro-priate.
Across Down2. I work with many kinds of wood to
build people’s homes.4. I work outdoors, harvesting trees in
managed forests to send to veneer mills, sawmills, handle plants, stave mills, pulp mills, and other wood-using industries.
6. I care for the forests to keep them healthy.
1. I plan and build, set up, and/or maintain equipment in a mill (saw mills, stave mills, pulp mills).
2. I am an athlete and very particular about the kind of wood my bat is made from and how it is made. I play ________________.
3. I carve duck decoys out of wood. Sometimes I find my own wood and sometimes I purchase it from a mill.
5. I am in the secondary wood-using industries. I purchase lumber from the primary industries and use it to make furniture.
Glossary Word Find – The answers to the Word Find are given in the Group Helper’s Guide (BU-08038), page 32.
Word BankCarpenterEcologistForesterLogger
NurserymanSurveyor
Tree planterLumberman
Answers
Down Across1. Ecologist 1. Carpenter2. Nurseryman 2. Lumberman3. Logger 3. Tree planter
4. Forester5. Surveyor

10
Chapter 1: Meet the Trees
Water on the Move – Youth observe how different materials transport water at different rates. They begin to understand how trees transport water and why some trees are more suited to wet soils and others to dry soils.
The Leaf Machine – Youth label the parts of the leaf: Cuticle (a)1. Upper epidermis (b)2. Spongy layer (e)3. Lower epidermis (f)4. Stomata (g)5. Vein (d)6. Palisade layer (c)7.
4-H members also write the equation for photosynthesis. The equation should be “balanced.” The equation is balanced when there is the same number of atoms of each element on each side of the arrow. The equation below is balanced. There are 6 molecules of carbon dioxide (CO
2) which has 6 atoms of carbon and 12 atoms of oxygen (the
subscript 2 shows that each carbon dioxide molecule has two atoms of oxygen).6CO
2 + 6H
20 60
2 + C
6H
12O
6
Comparing the two sides:
Tick, Tock, Tick, Tock – This activity encourages youth to think about the entire life cycle of a tree and to write a story about it. The pictures show: 1) seed, 2) sprout, 3) sapling, 4) mature tree with seeds, and 5) dead tree.
Dead Ringer – Youth determine the age of a tree they find or the one given in the activity. The tree shown on page 12 may not be clear enough to count the rings. The color picture given below may be easier to use, although it is still not very clear. A real tree trunk would be much better, if you have one. Youth also write a fictional history of the tree using what they know. They can relate to their own family history, Indiana history, or world history.
Forestry Level 2
Left hand side: 6CO2 + 6H
20 Right hand side: 60
2 + C
6H
12O
6
[6 carbon atoms + (6x2) oxygen atoms] + [(6x2) hydrogen atoms + 6 oxygen atoms]
(6x2) oxygen atoms] + [6 carbon atoms + 12 hydrogen atoms + 6 oxygen atoms]
= 6 C + 12 O + 12H + 6 O = 12 O + 6 C + 12 H + 6 O= 6 C + 18 O + 12 H = 18 O + 6 C + 12 HThese have the same number of atoms of each element.QED (indicates that it is proven.)

11
Chapter 2: Know Your Forests
My State Forests – Youth research locations of Indiana’s state forests. The Internet is the easiest place to find this information (www.state.in.us/dnr/forestry/). Youth who do not have access to the Internet can ask for help at their county Extension office or library where a computer with Internet access may be available for them to use. Or, they can ask a librarian for help finding this information the “old-fashioned” way (on paper).
Ch-ch-ch-changes – Youth read the “Budding Knowledge” section (page 17) that discusses successional and human-caused changes a forest may experience. They then find a forest and imagine the changes it has gone through.
A Home in the Trees – Youth take a hike, look for ten (10) organisms in one habitat and draw a picture or take a photograph of each. The organisms they draw or photograph will include both plants and animals. These pictures, along with identification and additional information about the habitat will form the basis of a photo-journal (field guide).
Forest Invasion – Youth think about the niche each organism holds in a forest and what might happen if the organism was replaced. The “Budding Knowledge” section (page 21) discusses the importance of fungi and asks youth to consider what might happen if a non-native species of fungi were introduced to the forest. Many youth will have heard of non-native species, some of which become invasive and cause a lot of problems for our native Indiana species. Garlic mustard is one example of a problem species that outcom-petes native species for resources.

12
Chapter 3: Forests Have Needs
Someone Call a (Tree) Doctor! – Youth read the information about tree diseases given in “Budding Knowledge,” draw a picture of a tree, and locate the parts that might be affected by infectious diseases (leaf: anthracnose, stem: rusts, cankers, galls, diebacks, wilts, and rots). They also list noninfectious diseases (air and water pollution, sudden temperature changes, and mechanical injuries). Answers:
The following information about tree diseases was taken from the old (2004) Indiana 4-H Forestry manuals.
Tree diseases cause great losses in our forests. Not as spectacular as fire, diseases work slowly and frequently go unnoticed until the trees are severely damaged or killed. Like insects, tree diseases can affect the leaves, stem, or roots. They cause losses by killing or deforming trees, by lessening their rate of growth, and by destroying the wood already produced.
Diseasesareclassifiedintotwotypes:(1)noninfectiousdiseasescausedbythenonlivingenvironmentand(2)infectiousdiseasescausedbylivingorganismssuchasfungi. Noninfectious diseases result from sudden change in environmental conditions such as air and water pollution, a sudden change in temperature or in soil and water relationships, and from mechanical injuries.
Infectious leaf diseases such as anthracnose of sycamores and oaks or tar spots of maples can occur year after year without apparent injury to the tree; even one complete defoliation rarely kills a previously healthy tree. Most of the serious forest tree diseases affect the stem and roots of trees.
Stem diseases include rusts, cankers, galls, diebacks, wilts, and rots. Important examples include butternut dieback, verticillium wilt, Dutch elm disease, oak wilt, numerous stem cankers, heart rot, butt rot, and root rots. Stem decay fungi enter trees primarily through wounds and cause nearly 80 percent of the disease losses in standing hardwood timber in the eastern and southern United States. Spores originating in conks or mushrooms on a diseased tree are carried by the wind to wounds on other trees. Usually they grow slowly, and external evidence of decay might not be evident for several years. As the tree becomes weakened, it becomes more vulnerable to wind damage. Wounds caused by fire,wind,poorpruning,andlogginginjury,whichpermittheentranceofdecay-causingorganisms, usually can be prevented by good forest management.
Tar spots affect the foliage.•Root rot affects roots.•Cankers affect stems.•Anthracnose affects the leaf and shoot veins.•Galls affect stems.•Noninfectiousdiseases:airpollution,injury,chemicalinjury,saltinjury,frostcracks.•

13
Some Important Indiana Forest Tree Diseases
For additional information about forest diseases, see: Diseases in Hardwood Tree Plantings
Stop Bugging Me! – Youth look for signs of insect damage to trees and record where they see the infestation and how widespread it is. The following information about tree diseases was taken from the old (2004) Indiana 4-H Forestry manuals.
Insects are the most numerous of all the forms of animal life in the forest. While most insectsarebeneficialorarerelativelyharmless,manyareverydestructivetoforesttrees.Each year in the United States, forest insects destroy more than 5 billion board-feet of saw-timber,enoughtobuildmore1½millionhomes.Insectdamageontreesinparksandrecreational areas reduce their attractiveness and our enjoyment of the environment.
Insectsattackalllivingpartsofatree.Whitegrubs(larvaeoftheJunebeetle)feedontheroots; weevils feed on the buds and twigs; caterpillars feed on leaves and needles of trees; onespeciesdestroyflowersandseeds;andothersfeedunderthebark,makingtunnelsinto the wood or girdling the tree. One attack might only weaken a tree, but continuous attacks over three or four years usually result in death of the tree.
Many of our most serious insect problems have been caused by species brought to the UnitedStatesfromforeigncountries.TheseincludetheEuropeanpinesawfly,Europeanpine shoot moth, European elm bark beetle, and the gypsy moth.
Diseases Frequent Hosts
WiltsDutch elm disease ElmsOak wilt OaksVerticillium wilt Maples
Anthracnose Ash, white oaks, maple, sycamore
Heart rots and decay (various fungi)White trunk rot Ash, basswood, beech, black locust,
red maple, tulip treeTarget cankers Ash, basswood, beech, maples, oaksButternut canker Butternut
Root and crown rot (shoestring root rot) Oaks
Diplodiatip blight Pines, especially Austrian pine
“Decline” Ash, sugar maple, sweet gum

14
Insect outbreaks are more likely in pure stands of one tree species; over-mature stands; plantations;andstandsweakenedbywind,droughtorfire.They’relesslikelyinwell-managed, healthy, natural stands.
The long lives of forest trees and their ability to withstand some infestations without serious damage provide opportunities to use several methods of control. Outbreaks of certain leaf-feeding insects might be minimized by changing the species composition and densityofsusceptiblestands.Theremovalofinfestedslash(loggingwaste)andsalvageof infested trees before the emergence of beetle broods can help prevent or suppress bark beetle attacks. Maintaining thrifty, vigorous stands by harvesting mature and damaged trees before they deteriorate helps avoid insect problems. Although chemical controls are commonly used to prevent widespread damage, biological controls through parasites, predators, and pathogens effectively suppress certain destructive insects.
Foliage Insects Frequent HostsTent caterpillar Black cherry, oak, and other speciesWalnut caterpillar Walnut, hickory, and other speciesLocust leaf miner Black locust, cherry, elm, oakLinden looper Hickory, oak, maple, elm
Wood-Borers Frequent HostsLocust borer Black locustCarpenter worm Red oak groupRed oak borer Red, black, scarlet oaksColumbian timber beetle Soft maple, sycamore
Insects That Attack Conifers Frequent HostsPine sawflies Most species of pinesPine shoot moths Most species of pines except white pinePine weevils Most pines and other conifersBagworm Conifers and hardwoods: aborvitae and red
cedar preferred
Some Important Forest Tree Insects That Attack Primarily Hardwoods
Fires in the Forest – Youth read about the fire triangle (“Budding Knowledge”) and consider the ease of burning of various materials in two different forest habitats. The answers to the activity are given below, listed in ease-of-burn order.
Hot-Dry-Windy Conditions Cool-Foggy-Calm ConditionsNeedlesNewspaperSmall pieces of pine shavingsChunks of barkBroken branchesSmall log
NewspaperNeedlesSmall pieces of pine shavingsChunks of barkBroken branchesSmall log

15
Move Over, Please! – Forest density is introduced and youth consider different tree character-istics for different densities.
More Dense Less DenseHigh mortalityShort crownNo understoryCrowns touching Crowns overtopped
Self prunedClose annual rings Shade BeetlesLow vigor
Small knotsHiding coverThin bole
GrassyPark-likeShade needlesLarge limbs
Fast growthRegeneration
Chapter 4: People Need Forests
Growing Every Day – The “Budding Knowledge” section describes how trees are measured (DBH). Youth are to measure three trees and calculate the board-foot content of the trees using the table given in the activity.
The following is taken from the old (pre-2004) Indiana 4-H Forestry manual, Woodland Management: since the logs cannot be directly measured in a standing tree, their volume must be estimated. Tree measuring sticks have been developed to aid in making this estimate more accurate. The tree measuring stick is used to determine the tree diameter at breast height (DBH or 4.5 feet above the ground) and the number of logs in the tree. After allowing for defects, these measurements are referred to a tree volume table to obtain the number of board feet in the tree. The blueprint form you will use to make a tree measur-ing stick has the tree volume table printed on it. Record the species, tree DBH, usable height, and volume on a timber estimate tally sheet as shown in Table 3. (See the publica-tion, How to Make and Use a Tree Measuring Stick (FNR-4) for more information. This publication is available at your county Extension office or on the Internet at www.exten-sion.purdue.edu/new.
Breathing Easier – This exercise is given to have youth think about the importance of trees in exchanging carbon dioxide for oxygen. The instructions indicate that the 4-H member is to pretend that four trees are needed to exchange the pollution from one car. These val-ues are fabricated for the activity because, in reality, there are many variables that would enter into an actual equation, from the age, size, and health of the trees to the size, effi-ciency, and other characteristics of the cars.
Town Number of People Number of Cars Number of Trees Needed Ash 500 100 500 + 400 = 900Beech 1,000 250 1,000 + 1,000 = 2,000Cherry 10,000 4,000 10,000 + 16,000 = 26,000Dogwood 50,000 20,000 50,000 + 80,000 = 130,000
City Trees – Youth think about the value trees add to urban settings by drawing trees around a house. Some benefits are discussed in the “Budding Knowledge” section.
Glossary Word Find – The answers to the Word Find are given in the Group Helper’s Guide (BU-08038), page 33.

16
The Level 3, 4-H Forestry manual may not be challenging enough for many Indiana high school youth, especially those in 11th and 12th grades. Consequently, high school youth may create an exhibit based on an activity from the manual or choose one of the other options for exhibits, including planting trees, making an herbarium collection, and independent study (choosing their own study topic or mentoring younger 4-H members).
Meet the TreesKey That Tree! – Youth are to use the Dichotomous Tree Key (“Budding Knowledge”) to
identify each leaf shown. The booklet, 50 Trees of Indiana (4-H 15-80 or CD-FNR-2 for the CD-ROM) has a more extensive dichotomous key that many Indiana youth use to identify trees.
White pineA.
CatalpaB.
SassafrasC.
Black locust D.
The Education Store, www.extension.purdue.edu/new, has the following publication to help with conifer tree identification: Identification of Common Indiana Conifers (FNR-12).
Winter Trees – While beginners are taught to identify trees by looking at their leaves, experts learn to indentify trees by bark and other parts. Youth begin to look at differences in tree bark by making rubbings and identifying the tree. In the summer, they can use leaves for identification, but in the winter they need an identification book that shows tree bark. The CD-Rom, Trees of Indiana: Their Identification and Uses (CD-FNR-1) is an excellent resource for high school youth.
Fruity Finds – This activity introduces youth to tree fruits and how to use them to identify trees. As discussed for the Winter Trees activity, leaves can be used to identify trees when youth are collecting the fruits, but a good identification book is needed if 4-H members are learning to identify the fruits without the leaves. The CD-Rom, Trees of Indiana: Their Identification and Uses (CD-FNR-1) is an excellent resource for high school youth.
A Leafy Heritage – Youth interview a forester or other knowledgeable person to find out about historical trees in their city, county, or state.
Chapter 2: Know Your Forests
Turn Left at the Tree – Youth make a map and timeline of local forests. They also get addi-tional information from parents, grandparents, neighbors, or others to find out all they can about changes to the forest.
A World of Forests – Youth think about climate and different forest types around the world. A map and the major characteristics of forest biomes are given in the Group Helper’s Guide (BU-08041).
Forestry Level 3
17
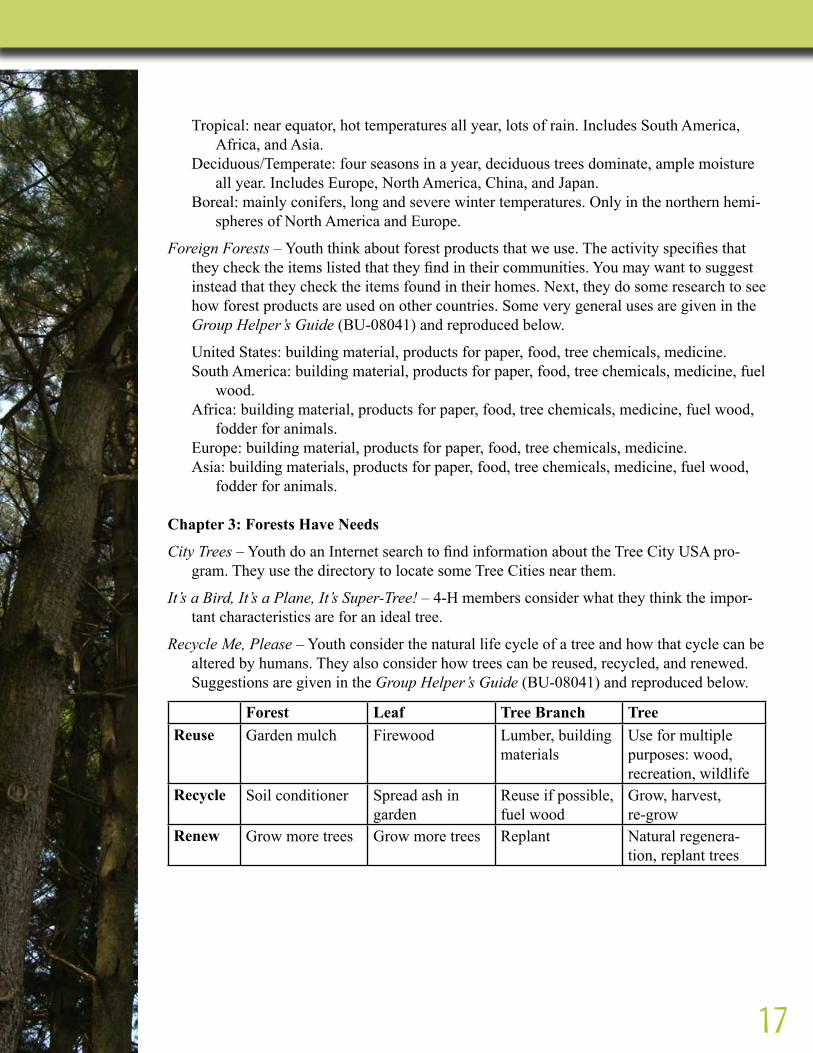
Tropical: near equator, hot temperatures all year, lots of rain. Includes South America, Africa, and Asia.
Deciduous/Temperate: four seasons in a year, deciduous trees dominate, ample moisture all year. Includes Europe, North America, China, and Japan.
Boreal: mainly conifers, long and severe winter temperatures. Only in the northern hemi-spheres of North America and Europe.
Foreign Forests – Youth think about forest products that we use. The activity specifies that they check the items listed that they find in their communities. You may want to suggest instead that they check the items found in their homes. Next, they do some research to see how forest products are used on other countries. Some very general uses are given in the Group Helper’s Guide (BU-08041) and reproduced below.
United States: building material, products for paper, food, tree chemicals, medicine.South America: building material, products for paper, food, tree chemicals, medicine, fuel
wood.Africa: building material, products for paper, food, tree chemicals, medicine, fuel wood,
fodder for animals. Europe: building material, products for paper, food, tree chemicals, medicine.Asia: building materials, products for paper, food, tree chemicals, medicine, fuel wood,
fodder for animals.
Chapter 3: Forests Have Needs
City Trees – Youth do an Internet search to find information about the Tree City USA pro-gram. They use the directory to locate some Tree Cities near them.
It’s a Bird, It’s a Plane, It’s Super-Tree! – 4-H members consider what they think the impor-tant characteristics are for an ideal tree.
Recycle Me, Please – Youth consider the natural life cycle of a tree and how that cycle can be altered by humans. They also consider how trees can be reused, recycled, and renewed. Suggestions are given in the Group Helper’s Guide (BU-08041) and reproduced below.
Forest Leaf Tree Branch TreeReuse Garden mulch Firewood Lumber, building
materialsUse for multiple purposes: wood, recreation, wildlife
Recycle Soil conditioner Spread ash in garden
Reuse if possible, fuel wood
Grow, harvest, re-grow
Renew Grow more trees Grow more trees Replant Natural regenera-tion, replant trees

18
Youth also research the approximate age at which three species reach maturity. These are given as:
White pine – 80 to 120 yearso
Red maple – 50 to 100 yearso
Giant redwood – 200 to 2,000 yearso
Trim the Trees – Youth study natural tree shapes and consider how weight can affect tree limbs by holding various items. Valuable trees are often pruned to help them stay healthy. Some information about pruning trees is given in “Budding Knowledge.” Additional information about pruning trees can be found at The Education Store, www.extension.purdue.edu/new.
Black Walnut Plantation Managemen• t
Environmental and Management Injury in Hardwood Tree Plantation• s
Fertilizing, Pruning, and Thinning Hardwood Plantation• s
Planting & Transplanting Landscape Trees and Shrub• s
Storms and Tree• s
Tree Response to Prunin• g
What’s Wrong with Topping Trees• ?
Chapter 4: People Need Forests
Wanted: Forest Owners – Youth explore forest ownership. They find out what activities are allowed and what activities are not allowed in a forest near them.
Anyone Need a Tree? – This activity encourages youth to think about managing forests, from the organisms that use forests to the uses humans make of forests and what the forests need to stay healthy.
Houses & Chairs Are Harvested – Youth assume they have a property that has timber for sale. They need to read the “Budding Knowledge” section and do research to find answers to the many questions they must consider before marketing and harvesting timber.
My Boss Is a Tree – This activity encourages career exploration as youth consider their interests and strengths and research the skills and work that people in different forestry-related careers do.

19
Additional information about forest management can be found at The Education Store, www.extension.purdue.edu/new.
A Landowner’s Guide to Sustainable Forestry: Part 1: Sustainable Forestry—What 1. Does It Mean for Indiana?
A Landowner’s Guide to Sustainable Forestry: Part 2: Planning for the Futur2. e
A Landowner’s Guide to Sustainable Forestry: Part 3: Keeping Your Forest Healthy 3. and Productive
A Landowner’s Guide to Sustainable Forestry: Part 4: Conserving Natur4. e
A Landowner’s Guide to Sustainable Forestry: Part 5: Forests and Wate5. r
A Landowner’s Guide to Sustainable Forestry: Part 6: Maintaining the Aesthetic 6. Beauty...Cultural Values of Your Forest
A Landowner’s Guide to Sustainable Forestry: Part 7: Managing for a Diversity of 7. Value-Added Forest Products
A Landowner’s Guide to Sustainable Forestry: Part 8: Help8. !
Forestry and Wildlife Management Assistance Available to Indiana Woodland Own-9. ers: Providers and Programs
Minimizing Federal Income Tax for Forest Land Owner10. s
Resources and Assistance Available for Planting Hardwood Seedling11. s
Timber Harvesting and Logging Practices for Private Woodland12. s
Information about timber sales can be found at The Education Store, https://secure.agriculture.purdue.edu/store/:
Marketing Timbe• r
Timber Harvesting and Logging Practices for Private Woodland• s
Suggestions for Personal ResearchYouth should choose a topic that interests them, collect information, organize their facts, and outline their study to learn all they can. They should write a short manuscript with pictures and graphs, and list the works cited to describe any experiments they performed and what they learned. A common paper format would include:
Title•Abstract, 250-500 words (1 page or less)•Research (outline, organize logically)•Discussion •Conclusions •References•

20
Suggestions for MentoringYouth should plan what they want to teach younger 4-H members, compile all materials needed, and write a lesson plan that includes all the steps they will follow. They should work with a 4-H leader, parent, or teacher to plan their lesson and should record the time spent and how the lesson went. Afterwards, they should document the challenges and advantages of mentoring, what they would do differently, and how the experience might be useful in their lives. Photographs and other documentation are encouraged.
A lesson plan might include the following components:What Youth Will Do: • Write a simple statement (5-10 words) describing what the 4-H members will be doing in this activity. Start with an action verb.Project Skill: • Use an action verb(making, learning, identifying) to describe the proj-ect skill the student(s) will be doing.Introduction: • Interest the student(s)in the topic and the activity. Do the Activity: • Outline what the student(s) will do.More Challenges (5-20 words):• List two to three activities that the student(s) could do to further explore the subject matter. Each activity listed should be related to the main activity. Be sure to ask the student to share the experience with someone. Subject Matter Information: • Include information, art, etc., that enhance your content or subject matter.Resources: • List the resources you used to create your activity.Glossary Words: • List new content words and their definitions to make sure student(s) understand them.

21
Poster Exhibit Guidelines and SuggestionsFair exhibits give youth the opportunity to show the public what they have learned in their beekeeping proj-ect work. Indiana State Fair guidelines require the following:
Exhibits must be displayed horizontally, sized 22” x 28”, mounted on a firm backing (foam-core •board or other), and covered in clear plastic or other transparent material.A display box (18” x 24”), orientated horizontally, may be used to make specimens more secure.•Each exhibit must include a label with name, grade, and county. •The exhibit title should indicate the level: Beekeeping 1, 2, or 3. The sub-title should explain the •topic being exhibited. The Indiana State Fair exhibit guidelines are given on the Indiana 4-H Web site •
(www.four-h.purdue.edu, click on “Projects” in the menu bar right under the green “Indiana 4-H”).
↑22”↓ 28”↑ ↑
Exhibit Suggestions, adapted from suggestions developed by Roger Sherer, Extension Youth Educator in Wells County.
Poster board1. – use white when required. Youth can experiment with other colors when white is not required. Mounting adhesives2. – the best is rubber cement since it leaves no marks and won’t wrinkle paper. White glue should be used only in cases where wrinkling or damage will not occur.Colored pencils3. – the best are soft-leaded – they are easy to color and blend easily – strokes will not show if handled properly. Soft-leaded pencils can be purchased at art stores. Hard-leaded pencils are less expensive, but are more difficult to use. Labels4. – plain 3” x 5” file cards work well as they have a smooth finish and are sturdy enough for gluing and removing smudges.Stiff backing5. – any material that will keep the poster from bending will work. Foam-core board works well, if you can find it in the correct size, because it can take the place of poster and backing. Examples of backing include: foam-core board, very stiff cardboard, plywood (which makes the poster heavy), and masonite (1/8” thick works well and can be re-used). Acetate or other clear plastic covering 6. – this is required for most posters to keep them clean before judging and if fairgoers touch them. Coverings generally come in various thickness (3, 5, 7 ½, and 10 mill) in rolls or sheets.Plastic tape7. – not necessary but it makes attaching poster board to stiff backing easy. Tape is available in many colors and widths, and may be cloth or plastic. The 1 ½” wide tape can give the poster a border. Available at discount stores.Lettering8. – type labels and title on a computer or typewriter or use stencils, self-adhesive, or press-type letters purchased at discount or art stores. County ID labels9. – an identification label should be placed in the lower right hand corner of poster projects. Check your county guidelines for requirements.Your poster should read like a dollar bill:10.

22
A Good Poster Planning
Tips - Do’s
Don’t
Steps to Making Your Poster
Attracts attention•Is simple and clear•Interests someone in some aspect of •your project
Know the project requirements.•Read the manual – look for ideas.•Brainstorm ideas and make a list.•Think of titles with alliteration (repeating a •sound in words).Look at other posters for ideas – but • don’t copy.
Don’t use too many words. The •poster is not intended to show all that you know, but to teach some aspect of your project.Use a combination of illustrations •and words.Be as neat as you can.•Cut evenly, cement carefully, blend •colors when using crayons or colored pencils.Leave white space on the poster.•Make sure the poster is balanced.•
Choose colors carefully. General guidelines:Black tends to be more formal, neat, rich, •strong.Blue is cool, melancholy, or depressed.•Purple is considered royal, rich, imperial.•Red stands for love as well as anger and •hatred.Orange is generally used for Halloween •and is festive and gay.Yellow tends to be warm, light, or ripe.•Green is fresh, young, or growing.•White means pure, clean, and neat.•
Make a vertical poster.•Use Saran Wrap to cover.•Use staples, tacks, or tape.•Use fluorescent posters.•Create a poster that is all words or a poster that is all pictures.•Put too much information on the poster. Fairgoers rarely look at a poster for more than •10-20 seconds. If it catches their interest right away, they might read it for 1-2 minutes.
Read your project manual.1. Read your county project requirements.2. Decide on information to include on the poster.3. Sketch out your idea.4. Collect supplies.5. Mark guidelines for lettering and pictures (lightly).6. Layout letters, pictures, etc., on the poster. 7. Cement (glue, etc.).8. Clean up the poster so it is neat. Erase any guidelines that are showing. Remove excess 9. rubber cement or glue.Glue poster to backing.10. Cover poster with plastic.11. Take your poster to the fair on the right day and at the right time.12.
Exhibit suggestions, adapted from suggestions developed by Amy Nierman, Extension educator, Washington County, and Angela Apple (1998 Indiana State Leaders’ Conference)

23
Reminder — The goal for all project work is to give guidance to youth as they learn about something they have a particular interest in. The goal of a poster is for the 4-H member to share information that they have learned by doing their project work. The poster is not in-tended to show all that the 4-H member knows, but to teach some aspect of their project. Posters should be eye-catching and attractive. Fairgoers rarely will look at a poster for more than 10–20 seconds, unless it catches their interest right away. Then, they might read it for a minute or two.
Age-appropriate judging is critical so that each youth is treated fairly. Young 4-H members (grades 3–5) should not be expected to have the fine motor coordination or advanced think-ing skills of an older 4-H member. Older youth should begin to take the concepts they have learned and apply them to a particular situation. Originality is expected of high school youth.
Poster Judging Suggestions for Judges

24
What is an action demonstration (action demo)?
An action demo is a fun way to share what you have learned in your 4-H project with others. It’s a kind of “Show and Tell” but with more action. Action means that you need to get the audience involved in what you are doing, not just show them. An action demo is not like a regular demonstration where the audience sits and listens to a prepared talk. An action demo gets the audience involved. Action demos can be given anywhere there are a lot of people, such as a county or state fair, shopping mall, street fair, or any 4-H event. Your job as a demonstrator is to interest the audience in your topic so that they stop and learn something new or try their hand at what you are doing.
How do I choose a topic for my action demo?
Your action demo should be related to this project. Consider the following questions when choosing a topic:
• Can you complete the action demonstration in 3 to 5 minutes?
• Is your action demo showing something that would interest the general public?
• Is there a good way to involve your audience in your action demo (“hands-on” or
answering questions)?
• If you will be doing it multiple times: Can the supplies for the “hands-on” section be
used over and over again, or will they need to be replaced? (Remember – if the materials
must be replaced, it will cost more to do the demonstration.)
How can I get the audience involved?The first thing you need to do is be enthusiastic and attract people’s attention as they walk by your table. You might have a colorful tablecloth or poster to spark their interest. You might ask them a question, “Can you tell what mineral this is?” or “How old do you think this fossil is?” Many people enjoy hands-on activities, so once you get a few people at your table, they will attract others. Some ideas for getting your audience involved include:
• Show how you would identify a fossil or mineral.
• Use your audience to make a geologic timeline.
• Judge the quality of various items.
• Play a game.
• Answer questions.
How long does my action demo have to be?
Your action demo may vary in length. But the demonstration itself should last only 3-5 minutes, because most people do not like to stop to watch very long presentations. If you do your Action Demo at the Indiana State Fair, be prepared to repeat your action demo over and over again with different people during your assigned time.
Action Demonstrations

25
Topic Yes NoWas the topic interesting to the general public, causing them to stop, watch, or participate?Did the topic stimulate questions from the audience?Was the topic of suitable length?Did the topic include something “hands-on” for the audience to do?Organizing the Content Yes NoWas the topic organized into short “show and tell” segments, which were done repeatedly?Were segments presented in logical order?Were segments explained so that the audience understands “why?”Was it evident that the 4-H member was knowledgeable about their subject and could answer questions?Did visuals, pictures, posters, or actual objects clarify the important ideas?Presenting the Demonstration Yes NoDid the 4-H member seem enthusiastic?Did the 4-H member encourage the audience to become involved in the demonstration?Did the 4-H member speak directly to the audience?Did the 4-H member show evidence of practice and experience?Did the 4-H member show that she/he enjoys talking to the audience?Did the 4-H member show friendliness and a business-like manner?Did the 4-H member tell about what they learned through this 4-H project?Comments:
Action Demo Checklist

26
Q. Where can I get herbarium paper?A. Herbarium paper is available from:
1. The Education Store, www.extension.purdue.edu/new, Leaf Collection Mounting Paper (110 lb.) $3.00/pkg of 25, 4-H 840
2. BioQuip, www.bioquip.com, mounting cards – good quality, heavy white tag stock, 11.5 x 16.5, $1.70/dozen
3. Carolina Biological Supply, www.carolina.com, good grade, acid-free, flexible, white, watermarked ledger paper, 11.5x16.5, order # WW-66-3211, $15.75/pkg of 100
Resources

It is the policy of the Purdue University Cooperative Extension Service that all persons have equal opportunity and access to its educational programs, services, activities, and facilities without regard to race, religion, color, sex, age, national origin or ancestry, marital status, parental status, sexual orientation, disability or status as a veteran.
Purdue University is an Affirmative Action institution. This material may be available in alternative formats.
Purdue Agriculture
Order or download materials at the Purdue Extension Education Store • www.extension.purdue.edu/new
New XX/08


![Untitled - Physics Purdue [Edu]](https://static.fdokumen.com/doc/165x107/6329787bbfbc0e632409212c/untitled-physics-purdue-edu.jpg)