taper lock htd® timing belt pulley 14mm pitch (taper lock (tl ...
Upload
khangminh22Category
view
0download
0
0
3001D Smart Safe Manual
For 3001D-1HL/3001D-3HL/3001D-5HL

SMART SAFE 3001D-1HL/3HL/5HL
SMART SAFE 3001D 1HL/3HL/5HL 1-11
SUMMARY
Thank you for using our company’s smart safe. Before you use this product, please read this manual carefully, it will help you to use the smart safe in a correct way. Compare with the general safe, this smart safe will be more securely and conveniently. Welcome to visit our web site, please contact us if you have any demands and comments in our product.
SMART SAFE 3001D-1HL
SMART SAFE 3001D-3HL
SMART SAFE 3001D-5HL

SMART SAFE 3001D-1HL/3HL/5HL
SMART SAFE 3001D 1HL/3HL/5HL 2-11
ELECTRONIC PARAMETERS
Power supply: 4*AA alkaline batteries
Alarm voltage: DC 4.2V±0.2V
Static current: ≤30uA
Dynamic current: ≤400mA
Working temperature: 0℃~55℃
Working humidity: 20% ~ 93% ± 2RH

SMART SAFE 3001D-1HL/3HL/5HL
SMART SAFE 3001D 1HL/3HL/5HL 3-11
NOTICES
Position the smart safe in a level and a covert area.
Place the smart safe in cool and dry place.
Avoid direct sunlight.
Do not dismantle the smart safe privately.
Do not tread on the smart safe.
Do not mix the different types of batteries or mix new batteries and the old batteries together.
Make sure that the positive and negative electrodes are connected correctly.
The man-made destruction is not on the warranty in the contract scope.

SMART SAFE 3001D-1HL/3HL/5HL
SMART SAFE 3001D 1HL/3HL/5HL 4-11
MATERIAL CONTAINED INSIDE THE PACKAGING

SMART SAFE 3001D-1HL/3HL/5HL
SMART SAFE 3001D 1HL/3HL/5HL 5-11
INSATLLATION
When you received the smart safe, you need to carry out some simple operations.
INSTALLING BATTERIES
Remove the protective lid unscrewing the screws, and fit the batteries into their seats.

SMART SAFE 3001D-1HL/3HL/5HL
SMART SAFE 3001D 1HL/3HL/5HL 6-11
POSITION
Now you can position the smart safe on the top of a piece of furniture, or inside a cabinet. Lock it in place using the 2 wooden screw provided with the smart safe. For fastening in place, the smart safe has 4 through holes – 2 on the back wall and 2 on the horizontal surface. The installer should use these, at his own discretion, depending on where the smart safe is to be placed.

SMART SAFE 3001D-1HL/3HL/5HL
SMART SAFE 3001D 1HL/3HL/5HL 7-11
DRILLING DIAGRAMS
SMART SAFE 3001D-1HL SMART SAFE 3001D-3HL SMART SAFE 3001D-5HL
SMART SAFE 3001D-1HL/3HL/5HL
SMART SAFE 3001D 1HL/3HL/5HL 8-11
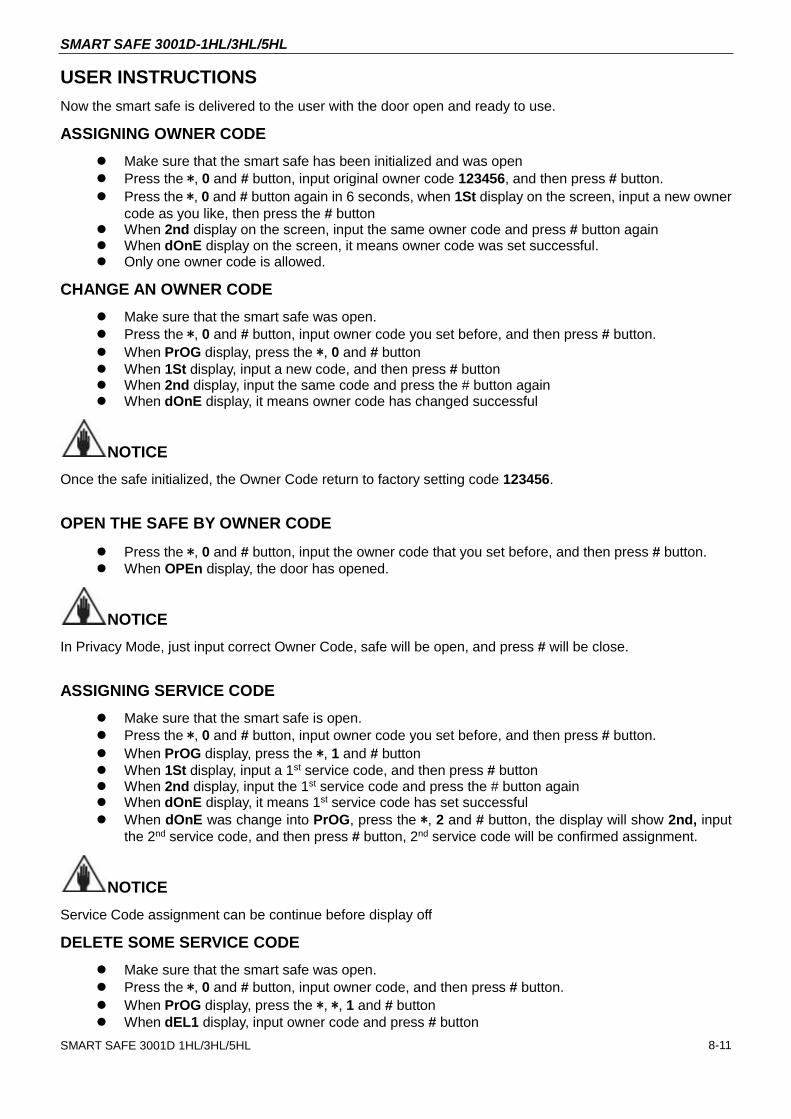
USER INSTRUCTIONS
Now the smart safe is delivered to the user with the door open and ready to use.
ASSIGNING OWNER CODE
Make sure that the smart safe has been initialized and was open
Press the *, 0 and # button, input original owner code 123456, and then press # button.
Press the *, 0 and # button again in 6 seconds, when 1St display on the screen, input a new owner
code as you like, then press the # button When 2nd display on the screen, input the same owner code and press # button again When dOnE display on the screen, it means owner code was set successful. Only one owner code is allowed.
CHANGE AN OWNER CODE
Make sure that the smart safe was open.
Press the *, 0 and # button, input owner code you set before, and then press # button.
When PrOG display, press the *, 0 and # button
When 1St display, input a new code, and then press # button When 2nd display, input the same code and press the # button again When dOnE display, it means owner code has changed successful
NOTICE
Once the safe initialized, the Owner Code return to factory setting code 123456.
OPEN THE SAFE BY OWNER CODE
Press the *, 0 and # button, input the owner code that you set before, and then press # button.
When OPEn display, the door has opened.
NOTICE
In Privacy Mode, just input correct Owner Code, safe will be open, and press # will be close.
ASSIGNING SERVICE CODE
Make sure that the smart safe is open.
Press the *, 0 and # button, input owner code you set before, and then press # button.
When PrOG display, press the *, 1 and # button
When 1St display, input a 1st service code, and then press # button When 2nd display, input the 1st service code and press the # button again When dOnE display, it means 1st service code has set successful
When dOnE was change into PrOG, press the *, 2 and # button, the display will show 2nd, input
the 2nd service code, and then press # button, 2nd service code will be confirmed assignment.
NOTICE
Service Code assignment can be continue before display off
DELETE SOME SERVICE CODE
Make sure that the smart safe was open.
Press the *, 0 and # button, input owner code, and then press # button.
When PrOG display, press the *, *, 1 and # button
When dEL1 display, input owner code and press # button

SMART SAFE 3001D-1HL/3HL/5HL
SMART SAFE 3001D 1HL/3HL/5HL 9-11
When dOnE display and after one beep sounded, 1st service code has been deleted. Service key can be deleted until the display off
DELETE ALL SERVICE CODE
Make sure that the smart safe was open.
Press the *, 0 and # button, input owner code, and then press # button.
When PrOG display, press the *, *, *,and # button
When dEL ALL display, input owner code and press # button When dOnE display and after one beep sounded, all of service codes have been deleted.
OPEN THE SAFE BY SERVICE CODE
Press the *, 1~5 and # button, input the corresponding service code that you set before, and then
press # button. (1~5 corresponding service code group 1 to group 5 ) When OPEn display, the door has opened.
SWITCH TO SHARE MODE/ PRIVACY MODE
Switch to SHARE MODE : Press the Reset button last one second, release the button if heard “Beep”, continuous “Beep” will indicated Share Mode has been activated.
Switch to PRIVACY MODE : Press the Reset button last three seconds, release the button if heard “Beep Beep”, continuous “Beep” will indicated Privacy Mode has been activated.
CLOSING AND OPENING THE SAFE IN SHARE MODE
To close the safe, the user must keep the door pressed and key the code onto the keyboard, followed by the key #. This code may consist of anything between 4 and 9 digits, at the discretion of the user. To indicate that the door has closed, CLSd will show up on the display. To open the safe, you just need to key in the same code. As you set the code, if you key in a wrong digit, you
can press * to delete it and re-key in the right digit.
You can change the One-Time Code during any safe closing or opening cycle.
CLOSING AND OPENING THE SAFE IN PRIVACY MODE
To close the safe, the user must keep the door be pressed and press the button #. To indicate that the door has closed, CLSd will show up on the display. To open the safe, you just need to key in the Owner Code as you set before, In Privacy Mode, don’t need to
key in *, 0 and # any more before key in Owner Code, but should be key in *, 1~5 and # button before
inputting any group of Service Code. One Time Code will not available when safe work on Privacy Mode.

SMART SAFE 3001D-1HL/3HL/5HL
SMART SAFE 3001D 1HL/3HL/5HL 10-11
NOTICE
If you key in a wrong digit, you can press * to clear the display and re-key in the right digit again.
NOTICE
For the public area, double press * before input the secret code, the safe will turn into Security Mode. It
means that the LED screen will not display the code numbers. The sign “-” will be instead of the code number.
NOTICE
If someone input the wrong password for more than 5 times, the keypad will locked and the LED screen will show HOLd. The keypad will be available again after 5 minutes.
USING THE MECHANICAL KEY
In case of accidental forget the owner code and the service code; you can open the safe by the mechanical key, proceeding as follows. Take the front adhesive off from the door and put the mechanical key – provided with the product – into the lock. You may now open the door manually.
NOTICE
Never leave the mechanical key and the hand terminal inside the safe.
UNIVERSAL SOCKET (OPTIONAL)
On request, a universal power socket can be provided. It will be located on the inside of the door of the safe. It can connect various devices – for example, a personal computer or a cell phone battery charger – to the power mains. The power supply cable of this socket comes out from the back of the safe, and ends with three small cables (phase, neutral and earth) which can be directly connected to the terminals of the wiring system, or to a normal plug. In case of direct connection to the wiring system, the wiring system must be equipped with a complete line cut off device, with a contact opening distance of at least 3.5mm. If the power supply cable is connected to a normal plug, the plug must be perfectly accessible.

SMART SAFE 3001D-1HL/3HL/5HL
SMART SAFE 3001D 1HL/3HL/5HL 11-11
NOTICE
If the power supply cable is damaged for any reason whatsoever, disconnect it from the power supply system – or take the plug out of the socket – and get in touch with our Sales Service.
ERROR LIST INTRODUCTION
Err0 Inputted code less than 4 digit or more than 9 digit. Incorrect Code
Err2 Latch bolt didn’t reach to corresponding places.
P_Lo Battery low voltage
HOLd Keypad locked down
OPEn Success to open
CLSd Success to close
PrOG Entered into programming mode
1St Please input code once
2nd Please input code again
dEL* Delete service code (* digit will display 1 to 5, corresponding service code group 1 to group 5)
dEL ALL Delete all service code
_ Processing bar, will moving when closing and opening
Id_* Please input your own code (* will display 0 to 5, Id_0 corresponding Owner Code, Id_1~Id_5 corresponding service code group 1 to group 5)
dOnE Setup success
Copyright © 2022 FDOKUMEN


![Prosiding[Halal Hotel]](https://static.fdokumen.com/doc/165x107/6345e46cdf19c083b10845eb/prosidinghalal-hotel.jpg)