Engagement through microblogging: Educator professional development via Twitter
Upload
khangminh22Category
view
2download
0
WSIPC Guide to
Educator Access Plus for
Teachers and Advisors

WSIPC Guide to Educator Access Plus for Teachers and Advisors (September 2016) i
Version 05.16.06.00.06
Contents
Contents i
About This Guide 1
What You Should Know Before You Start 1 Be Sure You’re Signed In 1
How to Use This Guide 1 Navigation Paths 2 Getting Around 2 Screen Shots 2
What’s in a WSIPC Guide 2 Do Not Post This Guide to the Public Internet 3
What’s New in This Edition 3
Signing In to Educator Access Plus 4
My Gradebook 6
My Students 7
Profile 9 Emailing Teachers 10 Managing Student Access Credentials 11 Editing Guardian Home Email Address 13
Class Summary 13 Attendance 15 Schedule 16 Add/Drops 17 Entry/Withdrawal 18 RTI 18 IHP 18 Emergency Contacts 18 Discipline 19
Adding Referrals 20 NCLB 22 Academic History 23 Graduation Requirements 24 Educational Milestones 25
Editing an Educational Milestone for a Single Student 26 Student Services 27 Test Scores 28
Entering Scores for a Test 28 Reviewing Other Students’ Scores for a Selected Test 29
Busing 30 Student Portfolio 31 Recommendations 31
Contents
WSIPC Guide to Educator Access Plus for Teachers and Advisors (September 2016) ii
Version 05.16.06.00.06
Family Access History 32 Activities 32 Custom Forms 33 Family Access and Student Access Display 34 Reports 34
Information Report 34
My Classes 35
Accessing the Class Profile 36 Options 37 Class Profile 39 Class Roster 39 Enrollment Stats 39 Grades or Attendance Graph 39
Accessing Class Options 40 My Gradebook 42 Attendance 42 Discipline 42 Message Center 43 Report Card Posting 43 Athletic Eligibility Posting 45 Survey 45 Food Service 46 Educational Milestones 46 Test Scores 48 Busing 49 Recommendations 49 Curriculum Maps 50 Reports 50 Lesson Scheduler 50 Textbooks 51 Gradebook Tracker 52 Online Assignment Templates 56 Custom Forms 56
My Lesson Scheduler 57
Post Daily Attendance 58
Accessing the Class Listing 58 Choosing an Attendance Method 60
Taking Daily Attendance Using a Class Roster 60 Entering Attendance Using a Seating Chart 62
Configuring the Seating Chart 64
Positive Attendance 67
Setting Up Positive Attendance Scanning 68 Entering Positive Attendance 71 Viewing the Room Roster 72
Contents
WSIPC Guide to Educator Access Plus for Teachers and Advisors (September 2016) iii
Version 05.16.06.00.06
My Homeroom 73
Filters and Sort Options 73 Student Roster 74 Using Student Search and Reports 74 Running Available Reports 75
My Activities 77
My Students with Disabilities 78
My LEP Students 79
My Section 504 Students 80
My Gifted and Talented Students 81
My Conference Scheduler 82
Student Services Access 83
Gifted and Talented Options 83 My Cases as Case Manager Options 83 My Students as IEP Manager Options 85 My Calendar Options 87
Advisor Access 88
Advisor Options 88 Searching for a Student 89 Advisor Access Reports 89 Message Center 94 Managing Food Service Information 94
My Food Service Information 95 My Students Homeroom Entry 96 Setting Purchase Entry by Homeroom Defaults 96 Entering Purchases Using Purchase Entry by Homeroom 98 Entering Payments Using Purchase Entry by Homeroom 100

WSIPC Guide to Educator Access Plus for Teachers and Advisors (September 2016) 1
Version 05.16.06.00.06
About This Guide
This Guide discusses all features of Educator Access Plus relevant to teachers and
advisors. You can use the and the area in Educator
Access Plus to manage daily activities, such as taking attendance, creating lesson
plans, tracking students’ academic progress, recording grades, running reports, and
much more.
Your Security level may prevent you from accessing all features described in this
Guide. If you don’t have access to a feature you need, contact the person in your
district responsible for setting up Security in Skyward’s School Management System.
This Guide does not cover Secondary and Standards Gradebook, Lesson Plans,
Survey, Message Center, Conference Scheduler, Food Service, Special Education, nor
the reports related to those modules. To learn more about these modules and their
reports, see the corresponding WSIPC Guides.
The WSIPC Guide to Attendance contains more detailed information about the
Attendance module, and is intended for attendance office personnel and
administrators.
What You Should Know Before You Start You’ll find that this Guide is much more helpful if you’re familiar with student
information that’s maintained in areas of the software such as Attendance, Family
and Student Access, Gradebook, and Student Demographics.
Be Sure You’re Signed In This Guide is intended to be read while you are working in Educator Access Plus, so
be sure you are signed in. Many of the procedures and concepts discussed in the
Guide are best understood if you practice as you read.
How to Use This Guide This section shows you how to follow navigation paths in a Guide, and how to
navigate around the Guide using various features. This section also describes how
and when screen shots are used in the Guide.
About This Guide
WSIPC Guide to Educator Access Plus for Teachers and Advisors (September 2016) 2
Version 05.16.06.00.06
Navigation Paths The procedures in this Guide begin with navigation menu paths. Select the
check box in User Preferences to ensure that you can follow
these paths. The option is not available in User Preferences if it is already enabled for
the entire district. To learn more about setting User Preferences, see the WSIPC Guide
to Skyward’s School Management System.
Getting Around If you’re using this Guide electronically, you can click any text in blue font to move to
the section of the Guide that the text refers to. Because the Guides are published in
PDF format, you can also use the PDF navigation pane to quickly move from one
section to another. If the pane is hidden, click the button in the menu
bar on the left side of the screen.
Screen Shots You’ll find screen shots throughout the guide to help you learn how to use the
software. The data entered in the screen shots in this Guide is an example of the data
you might enter. These screen shots are updated with each edition to make sure
what you see on your screen matches what you see in the Guide. To prevent the
Guide from becoming a lengthy picture book, WSIPC Guides use screen shots only to
help illustrate a key idea or when options on a screen are described. This allows
WSIPC Guides to be effective and concise.
What’s in a WSIPC Guide WSIPC Guides are designed to provide readers with everything they need to know to
safely and effectively use Skyward’s software. WSIPC strives to make Guides that
address the diverse needs of these audiences. Therefore, this Guide doesn’t contain
information customized for specific audiences, districts, or schools.
If you need to create educational materials that address the specific needs of your
Service Center or district, consider using this Guide as a starting point for developing
your own customized materials.
About This Guide
WSIPC Guide to Educator Access Plus for Teachers and Advisors (September 2016) 3
Version 05.16.06.00.06
Do Not Post This Guide to the Public Internet The information contained in this Guide is copyright protected. You may store a
digital copy of this Guide on your internal server for access by authorized users.
Allowing access to this Guide by anonymous users, including search engine crawlers,
is not permitted. If you are unsure whether your website is open or your server is
protected from crawlers, contact your systems administrator.
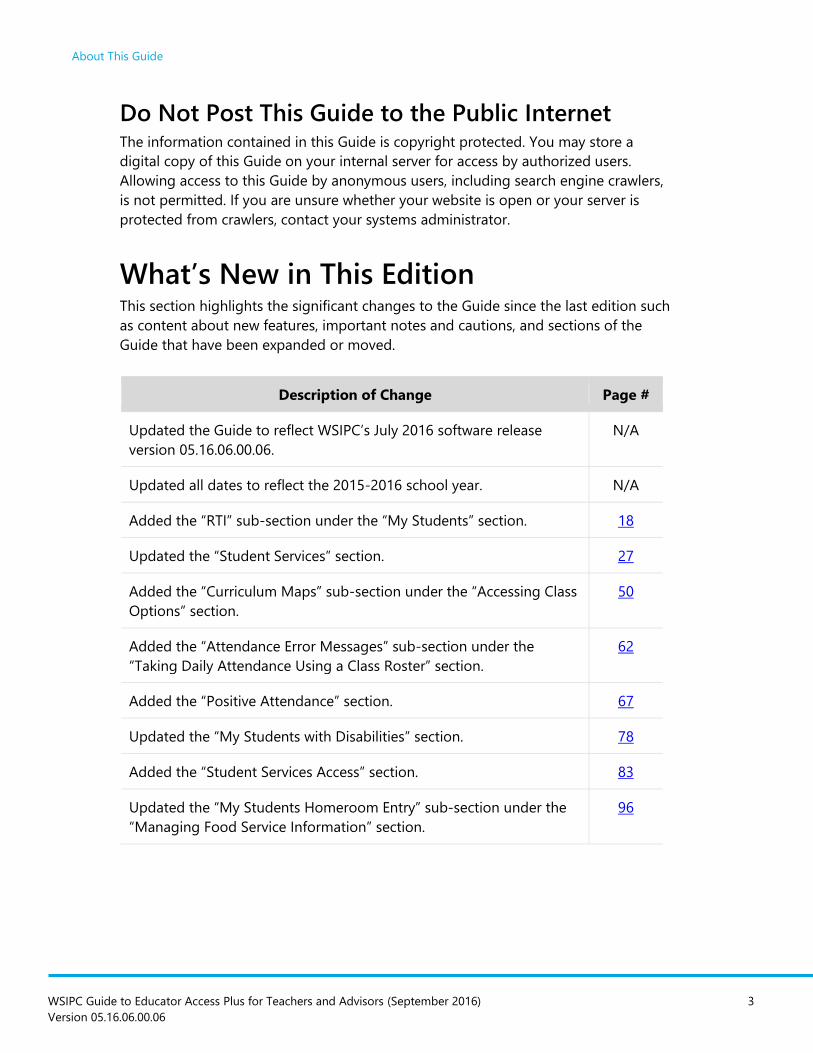
What’s New in This Edition This section highlights the significant changes to the Guide since the last edition such
as content about new features, important notes and cautions, and sections of the
Guide that have been expanded or moved.
Description of Change Page #
Updated the Guide to reflect WSIPC’s July 2016 software release
version 05.16.06.00.06.
N/A
Updated all dates to reflect the 2015-2016 school year. N/A
Added the “RTI” sub-section under the “My Students” section. 18
Updated the “Student Services” section. 27
Added the “Curriculum Maps” sub-section under the “Accessing Class
Options” section.
50
Added the “Attendance Error Messages” sub-section under the
“Taking Daily Attendance Using a Class Roster” section.
62
Added the “Positive Attendance” section. 67
Updated the “My Students with Disabilities” section. 78
Added the “Student Services Access” section. 83
Updated the “My Students Homeroom Entry” sub-section under the
“Managing Food Service Information” section.
96
WSIPC Guide to Educator Access Plus for Teachers and Advisors (September 2016) 4
Version 05.16.06.00.06
Signing In to Educator Access Plus
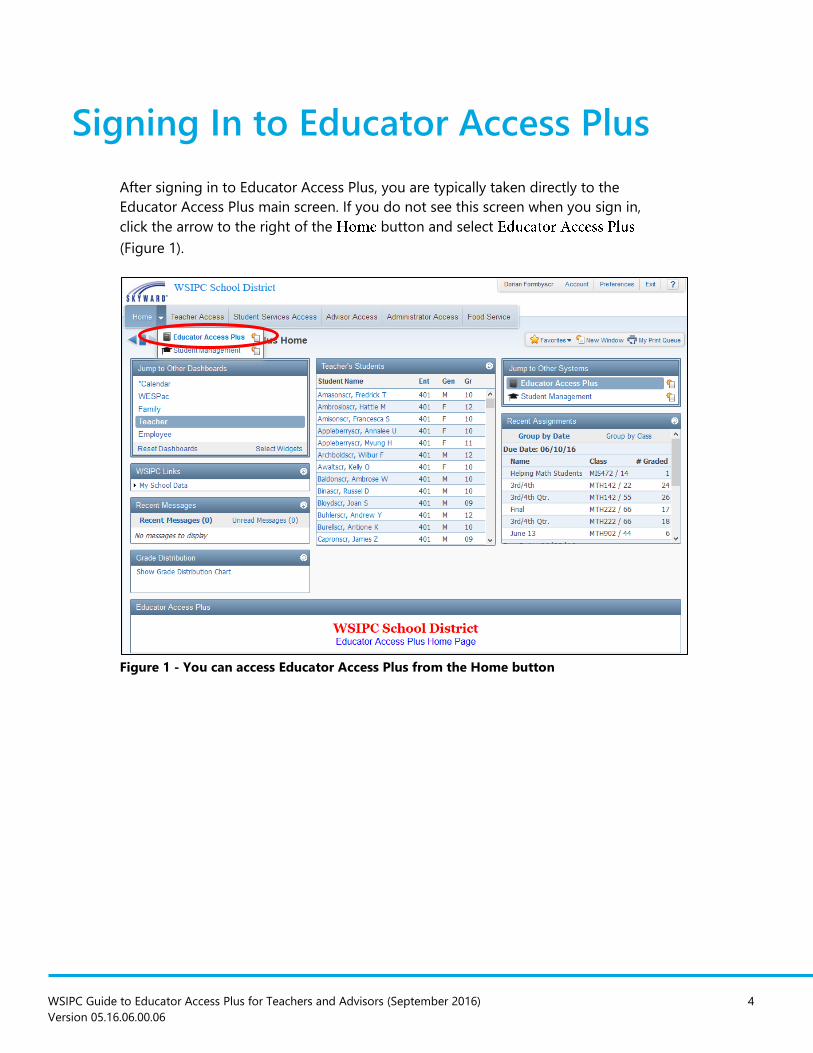
After signing in to Educator Access Plus, you are typically taken directly to the
Educator Access Plus main screen. If you do not see this screen when you sign in,
click the arrow to the right of the button and select
(Figure 1).
Figure 1 - You can access Educator Access Plus from the Home button
Signing In to Educator Access Plus
WSIPC Guide to Educator Access Plus for Teachers and Advisors (September 2016) 5
Version 05.16.06.00.06
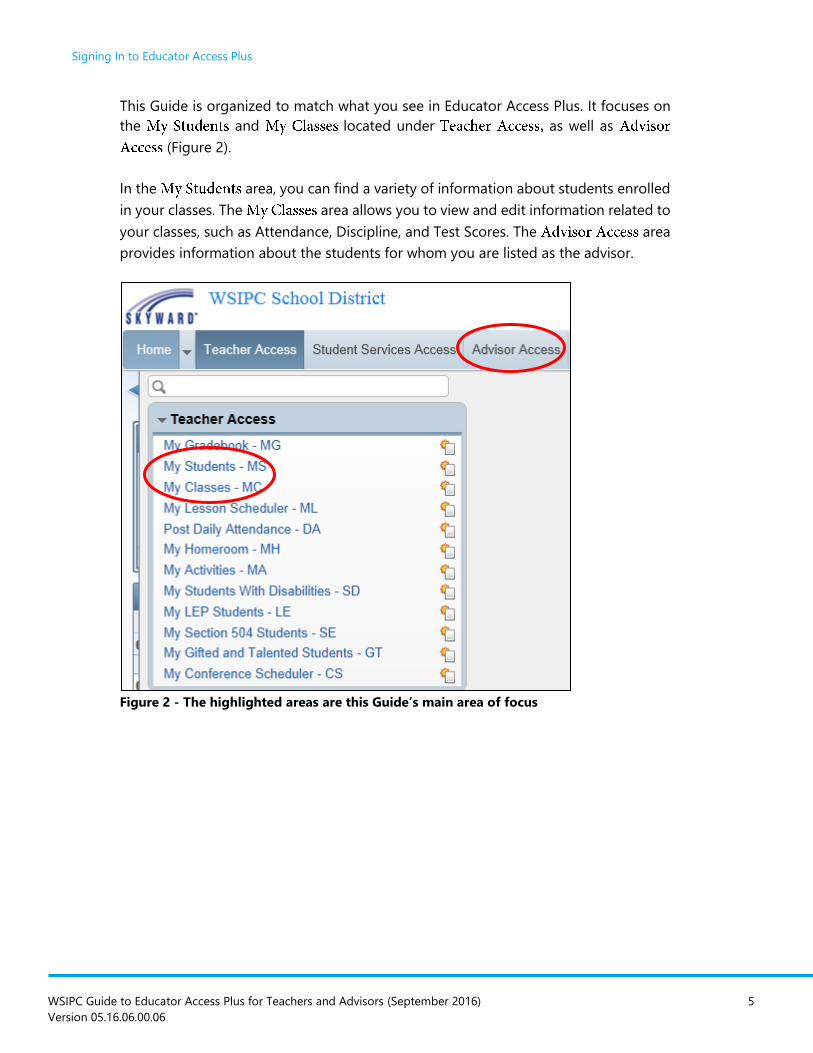
This Guide is organized to match what you see in Educator Access Plus. It focuses on
the and located under as well as
(Figure 2).
In the area, you can find a variety of information about students enrolled
in your classes. The area allows you to view and edit information related to
your classes, such as Attendance, Discipline, and Test Scores. The area
provides information about the students for whom you are listed as the advisor.
Figure 2 - The highlighted areas are this Guide’s main area of focus
WSIPC Guide to Educator Access Plus for Teachers and Advisors (September 2016) 6
Version 05.16.06.00.06
My Gradebook
You can use the link to access your Secondary and Standards
Gradebook. To learn how to use each of the Gradebooks, see the WSIPC Guide to
Secondary Gradebook for Teachers and the WSIPC Guide to Standards Gradebook for
Teachers.
WSIPC Guide to Educator Access Plus for Teachers and Advisors (September 2016) 7
Version 05.16.06.00.06
My Students
You can use the area to view information about students enrolled in
your classes. Your Security level may prevent you from accessing all features
described in this section. If you don’t have access to a feature you need, contact the
person in your district responsible for setting up Security in Skyward’s School
Management System.
To access :
1. Click .
Tip Click any blue hyperlinked column heading to change the
sort order in the list. For example, click the
column heading to sort by this column.
2. Select a student and click .
Tip To find a student, type the student’s last name in the
search box in the lower-right corner of the screen and
press on your keyboard.
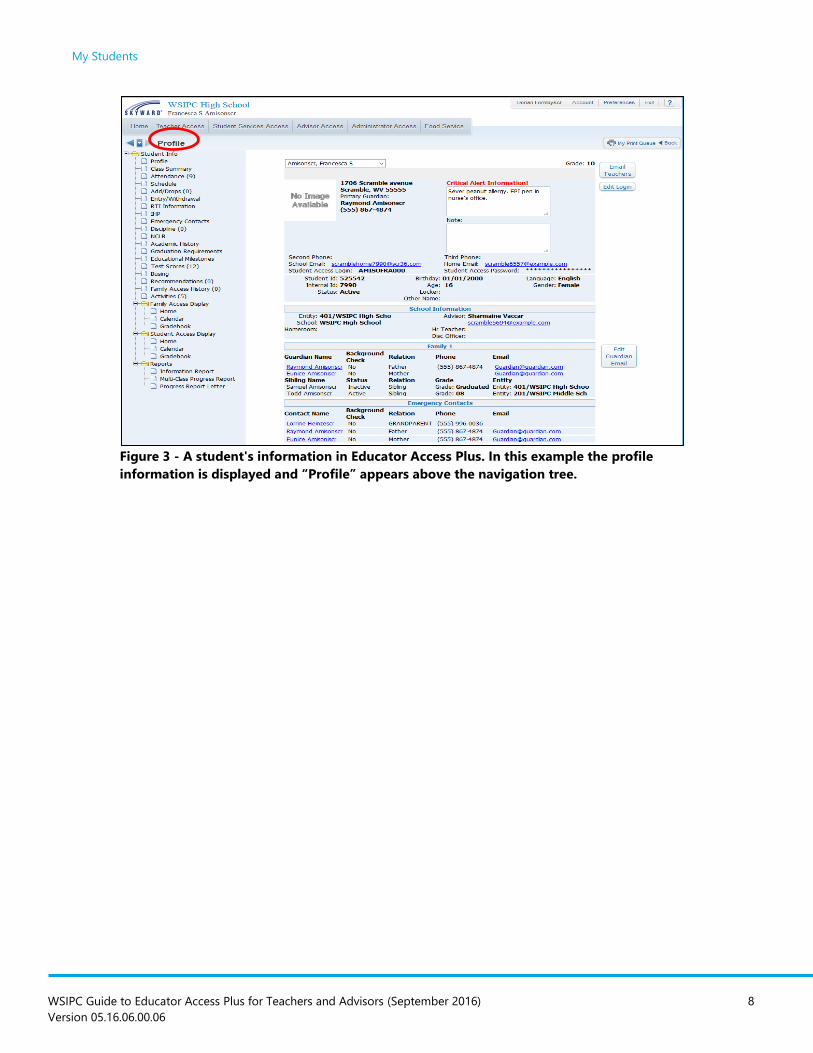
The screen appears with a navigation tree on the left (Figure 3). The
available information about the student is divided into areas, and each area
appears as an item in the navigation tree.
3. To view an area, click the area in the navigation tree. Information for that area
appears on the right side of the screen. The areas in the navigation tree are
described in the sections below Figure 3.
Note The name of the area you are currently viewing for the
student appears above the navigation tree. For example, in
Figure 3 “Profile” appears above the navigation tree. If you
click in the navigation tree, “Schedule” appears
above the navigation tree.
My Students
WSIPC Guide to Educator Access Plus for Teachers and Advisors (September 2016) 8
Version 05.16.06.00.06
Figure 3 - A student's information in Educator Access Plus. In this example the profile
information is displayed and “Profile” appears above the navigation tree.
My Students
WSIPC Guide to Educator Access Plus for Teachers and Advisors (September 2016) 9
Version 05.16.06.00.06
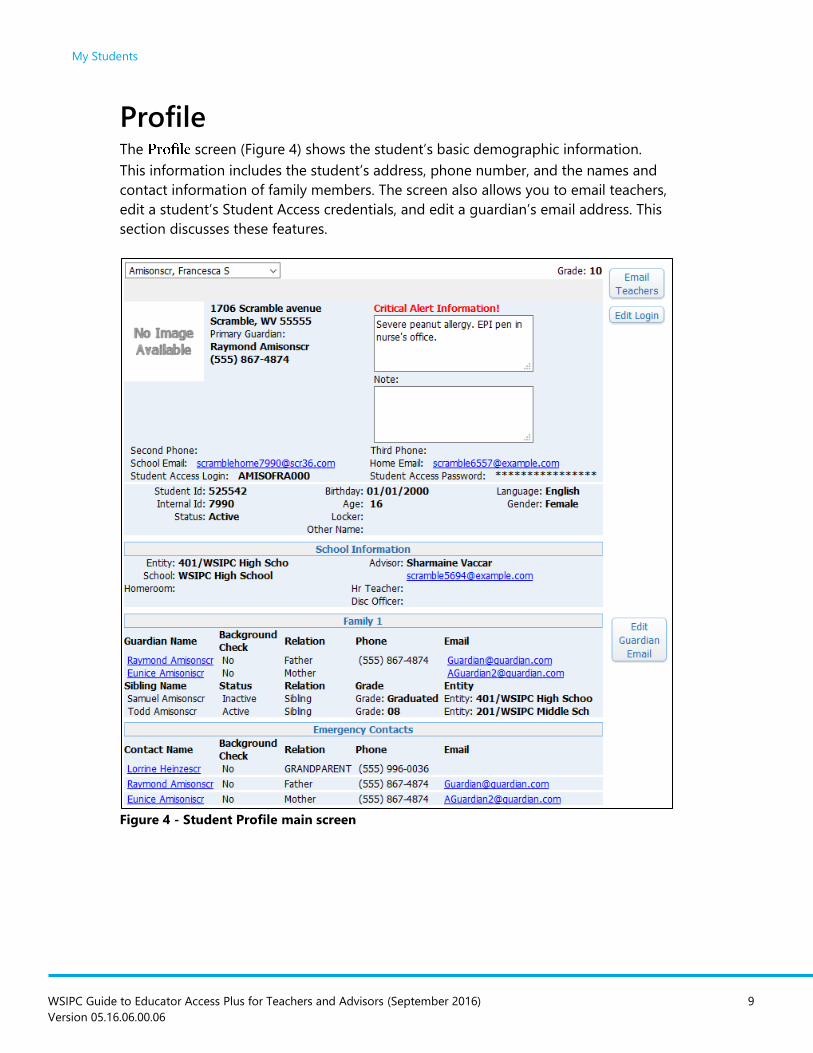
Profile The screen (Figure 4) shows the student’s basic demographic information.
This information includes the student’s address, phone number, and the names and
contact information of family members. The screen also allows you to email teachers,
edit a student’s Student Access credentials, and edit a guardian’s email address. This
section discusses these features.
Figure 4 - Student Profile main screen
My Students
WSIPC Guide to Educator Access Plus for Teachers and Advisors (September 2016) 10
Version 05.16.06.00.06
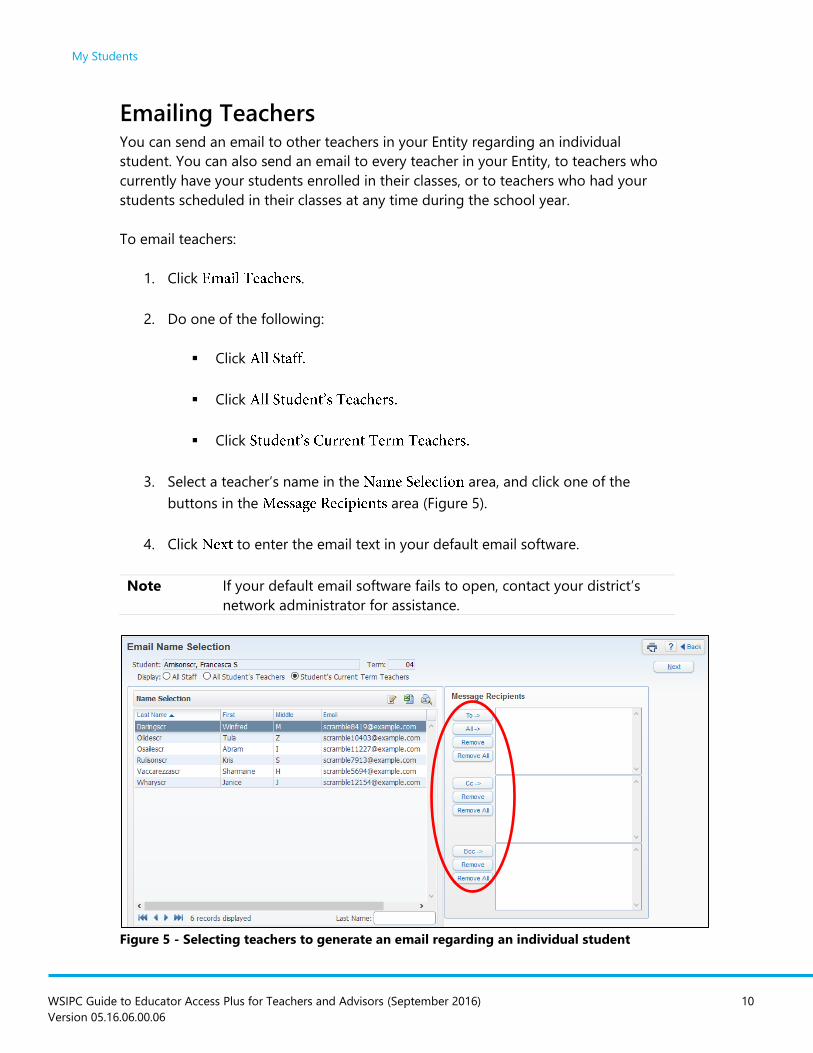
Emailing Teachers You can send an email to other teachers in your Entity regarding an individual
student. You can also send an email to every teacher in your Entity, to teachers who
currently have your students enrolled in their classes, or to teachers who had your
students scheduled in their classes at any time during the school year.
To email teachers:
1. Click .
2. Do one of the following:
Click
Click
Click
3. Select a teacher’s name in the area, and click one of the
buttons in the area (Figure 5).
4. Click to enter the email text in your default email software.
Note If your default email software fails to open, contact your district’s
network administrator for assistance.
Figure 5 - Selecting teachers to generate an email regarding an individual student
My Students
WSIPC Guide to Educator Access Plus for Teachers and Advisors (September 2016) 11
Version 05.16.06.00.06
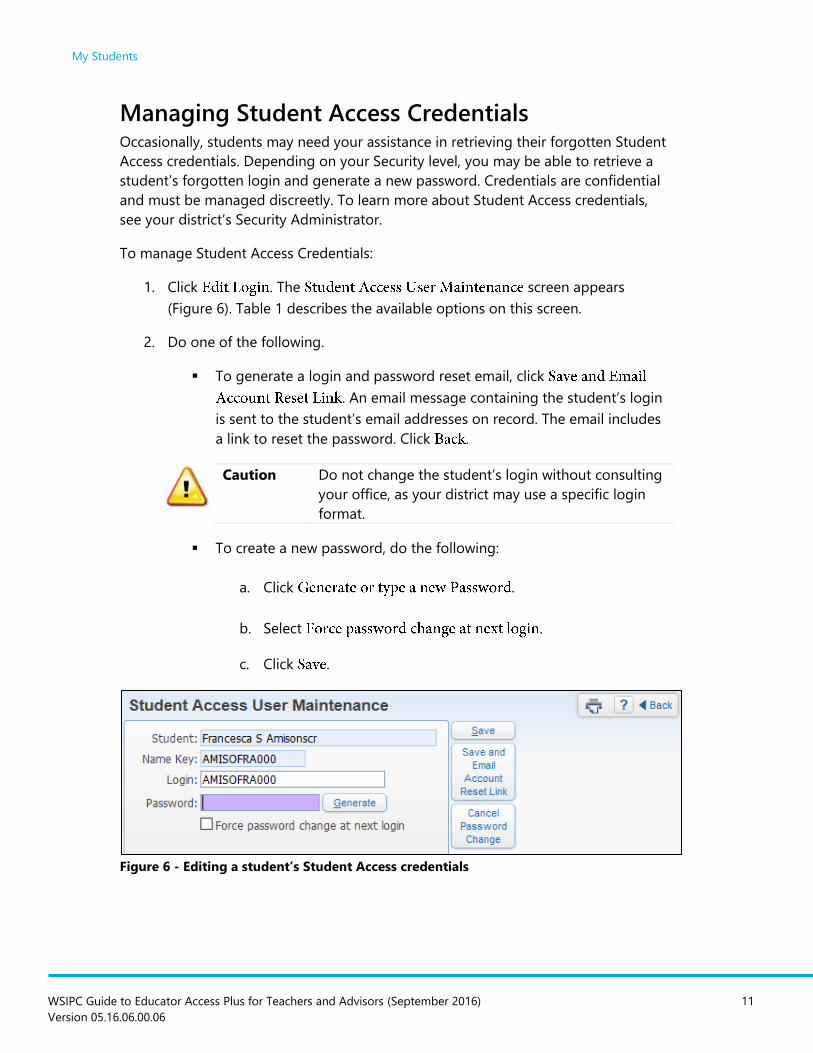
Managing Student Access Credentials Occasionally, students may need your assistance in retrieving their forgotten Student
Access credentials. Depending on your Security level, you may be able to retrieve a
student’s forgotten login and generate a new password. Credentials are confidential
and must be managed discreetly. To learn more about Student Access credentials,
see your district’s Security Administrator.
To manage Student Access Credentials:
1. Click . The screen appears
(Figure 6). Table 1 describes the available options on this screen.
2. Do one of the following.
To generate a login and password reset email, click
. An email message containing the student’s login
is sent to the student’s email addresses on record. The email includes
a link to reset the password. Click .
Caution Do not change the student’s login without consulting
your office, as your district may use a specific login
format.
To create a new password, do the following:
a. Click .
b. Select .
c. Click .
Figure 6 - Editing a student’s Student Access credentials
My Students
WSIPC Guide to Educator Access Plus for Teachers and Advisors (September 2016) 12
Version 05.16.06.00.06
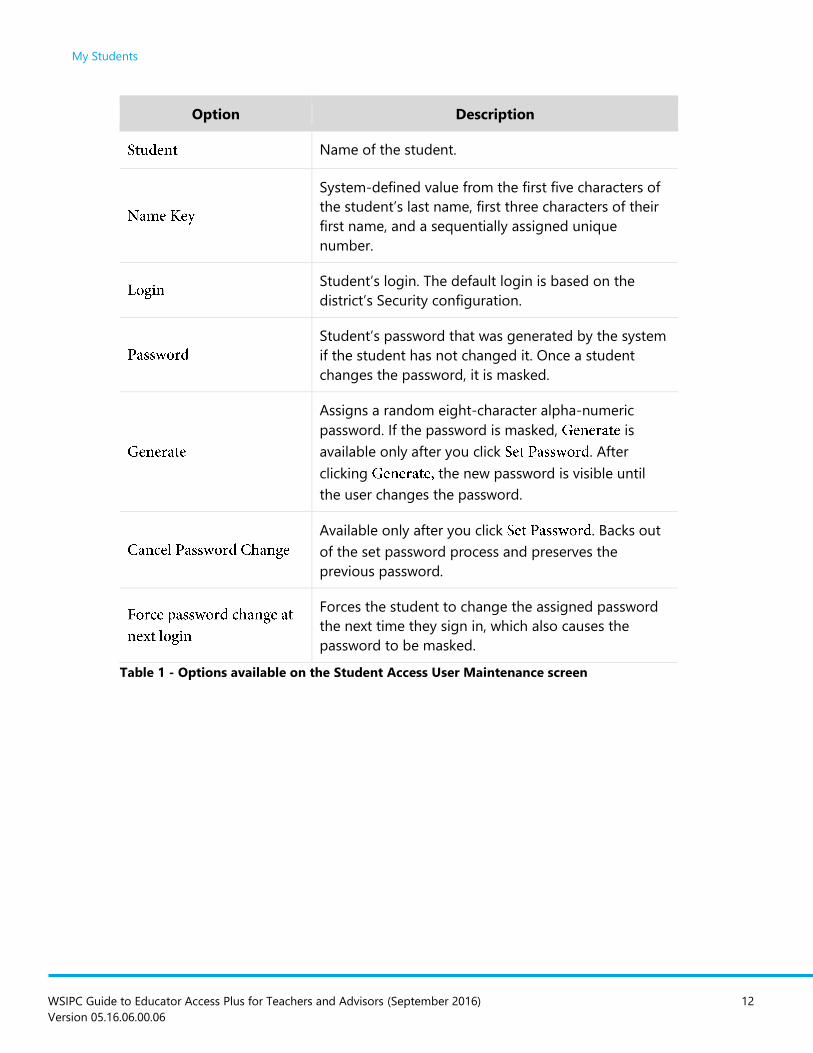
Option Description
Name of the student.
System-defined value from the first five characters of
the student’s last name, first three characters of their
first name, and a sequentially assigned unique
number.
Student’s login. The default login is based on the
district’s Security configuration.
Student’s password that was generated by the system
if the student has not changed it. Once a student
changes the password, it is masked.
Assigns a random eight-character alpha-numeric
password. If the password is masked, is
available only after you click . After
clicking the new password is visible until
the user changes the password.
Available only after you click . Backs out
of the set password process and preserves the
previous password.
Forces the student to change the assigned password
the next time they sign in, which also causes the
password to be masked.
Table 1 - Options available on the Student Access User Maintenance screen

My Students
WSIPC Guide to Educator Access Plus for Teachers and Advisors (September 2016) 13
Version 05.16.06.00.06
Editing Guardian Home Email Address At a guardian’s request, you can modify the guardian’s home email address on the
screen (Figure 7). To see more information about a
guardian or emergency contact, you can click the person’s blue hyperlinked name on
the screen (Figure 4 on page 9). You can also click any blue hyperlinked email
address to send an email message to that address.
To edit a guardian’s home email address:
1. Click .
2. In the list, select a guardian and click .
3. In the box, enter the new email address.
4. Click .
Figure 7 - Changing a guardian’s home email address
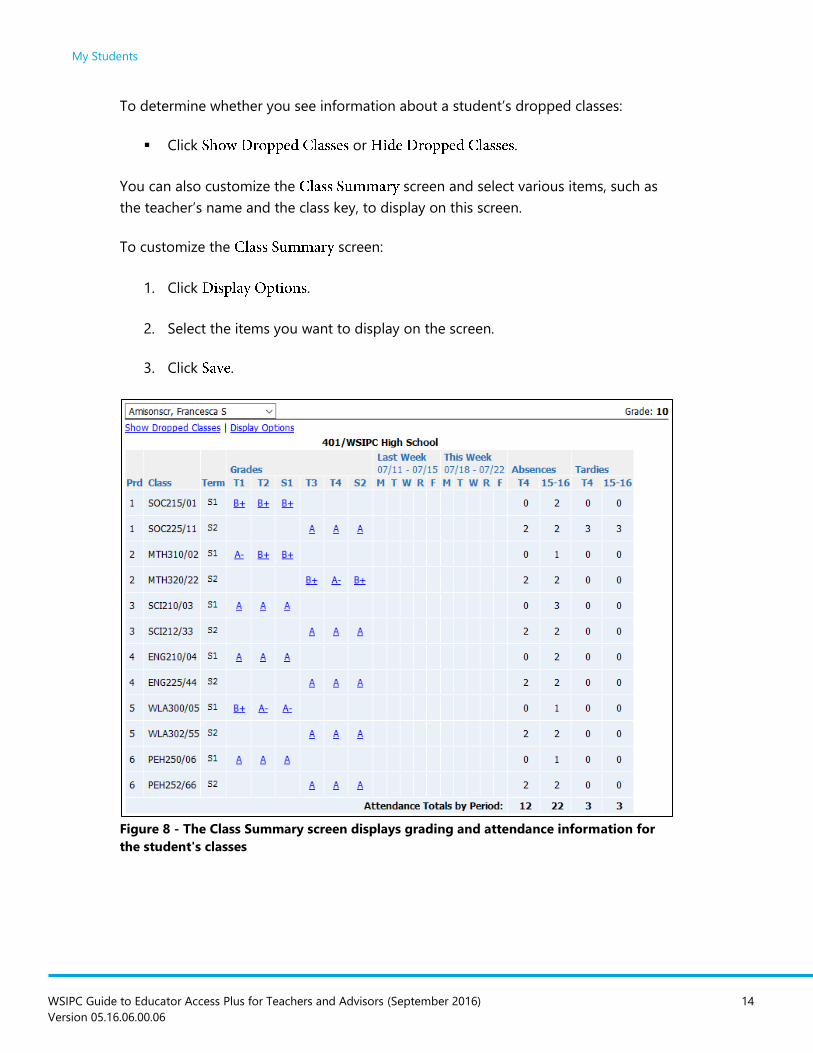
Class Summary The screen (Figure 8) shows grading and attendance information for
each of the student’s classes. The current grade is listed for each term or semester of
the student’s classes, and attendance information is listed for each day in the current
and previous week. Attendance totals for the current term and the school year to
date also appear.
Students’ dropped classes are hidden by default, but you can choose to display them.
When displayed, dropped classes are marked with a red asterisk.
My Students
WSIPC Guide to Educator Access Plus for Teachers and Advisors (September 2016) 14
Version 05.16.06.00.06
To determine whether you see information about a student’s dropped classes:
Click or .
You can also customize the screen and select various items, such as
the teacher’s name and the class key, to display on this screen.
To customize the screen:
1. Click .
2. Select the items you want to display on the screen.
3. Click .
Figure 8 - The Class Summary screen displays grading and attendance information for
the student's classes
My Students
WSIPC Guide to Educator Access Plus for Teachers and Advisors (September 2016) 15
Version 05.16.06.00.06
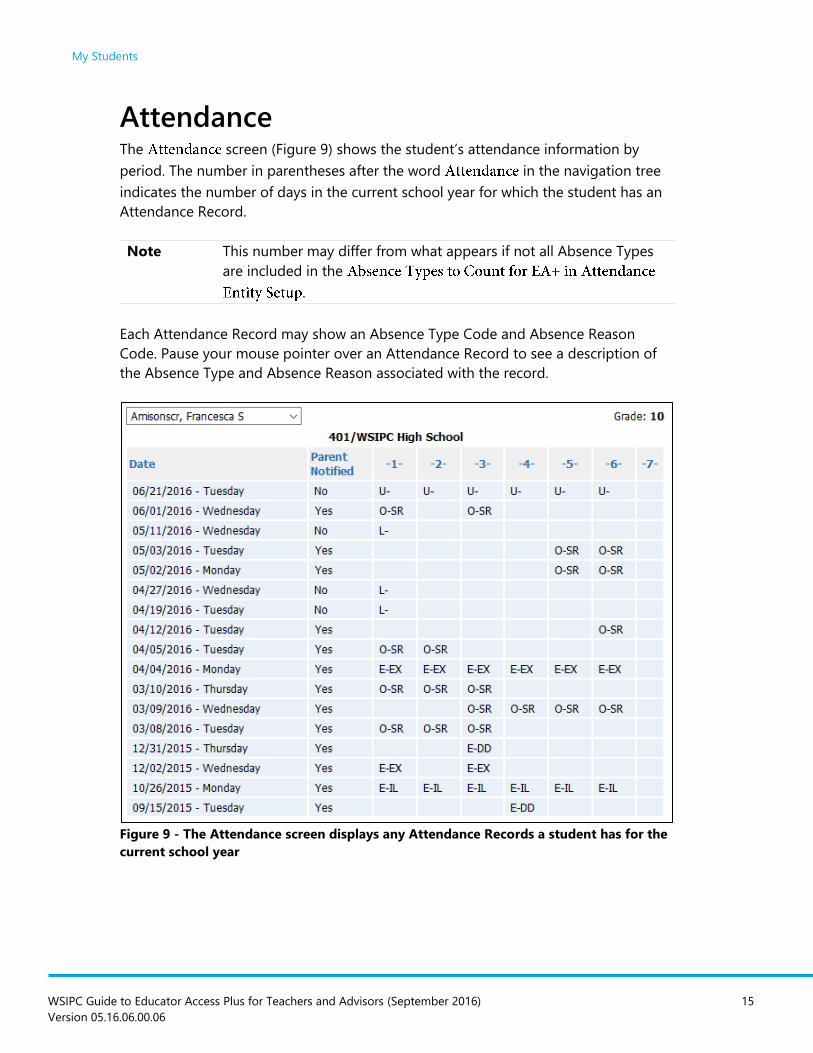
Attendance The screen (Figure 9) shows the student’s attendance information by
period. The number in parentheses after the word in the navigation tree
indicates the number of days in the current school year for which the student has an
Attendance Record.
Note This number may differ from what appears if not all Absence Types
are included in the
.
Each Attendance Record may show an Absence Type Code and Absence Reason
Code. Pause your mouse pointer over an Attendance Record to see a description of
the Absence Type and Absence Reason associated with the record.
Figure 9 - The Attendance screen displays any Attendance Records a student has for the
current school year
My Students
WSIPC Guide to Educator Access Plus for Teachers and Advisors (September 2016) 16
Version 05.16.06.00.06
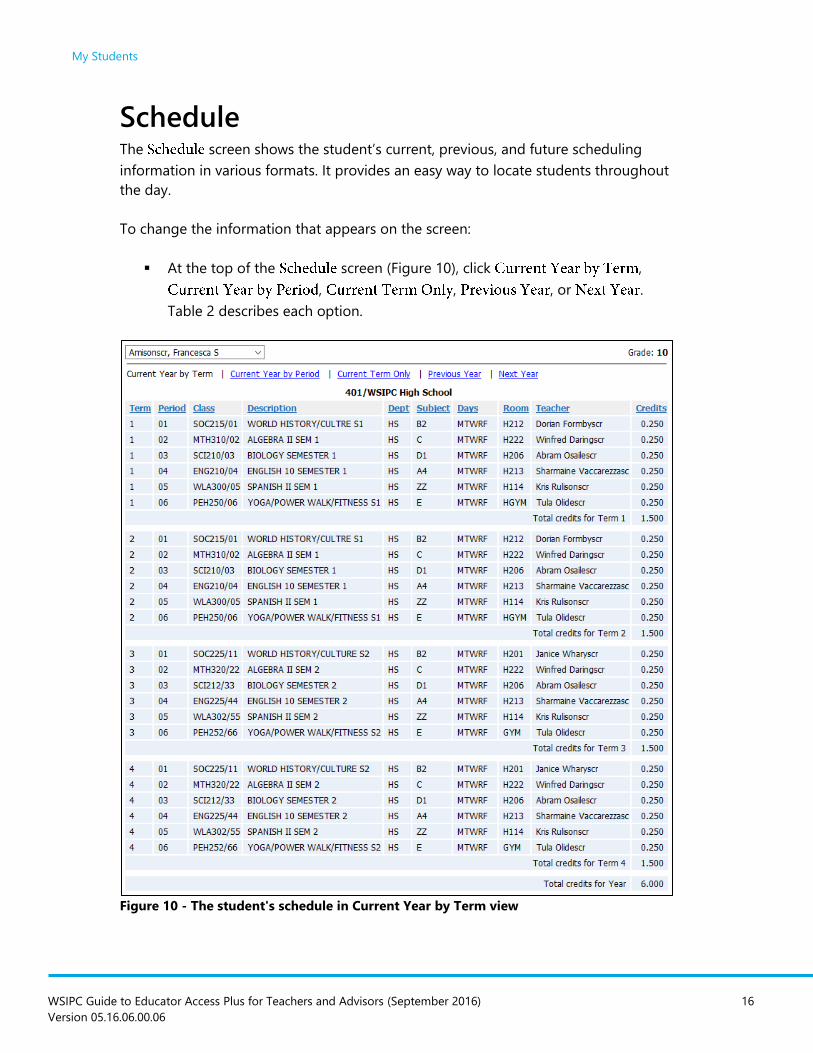
Schedule The screen shows the student’s current, previous, and future scheduling
information in various formats. It provides an easy way to locate students throughout
the day.
To change the information that appears on the screen:
At the top of the screen (Figure 10), click ,
, , , or .
Table 2 describes each option.
Figure 10 - The student's schedule in Current Year by Term view

My Students
WSIPC Guide to Educator Access Plus for Teachers and Advisors (September 2016) 17
Version 05.16.06.00.06
Option Description
Shows this year’s schedule by term in a list format.
Shows this year’s schedule in a grid format.
Shows the current term’s schedule in a list format.
Shows the previous year’s schedule (if available) in a
list format.
Shows the next year’s schedule (if available) in a list
format.
Table 2 - The view options available on the Schedule screen
Add/Drops The screen (Figure 11) shows a log of the student’s scheduling
transactions. This can help you find out when a student transferred into or out of a
class. The number in parentheses next to in the navigation tree indicates
the number of Scheduling Transaction Records logged for the student in the current
school year.
Figure 11 - The student's schedule changes for the current school year appear on the
Add/Drops screen
My Students
WSIPC Guide to Educator Access Plus for Teachers and Advisors (September 2016) 18
Version 05.16.06.00.06
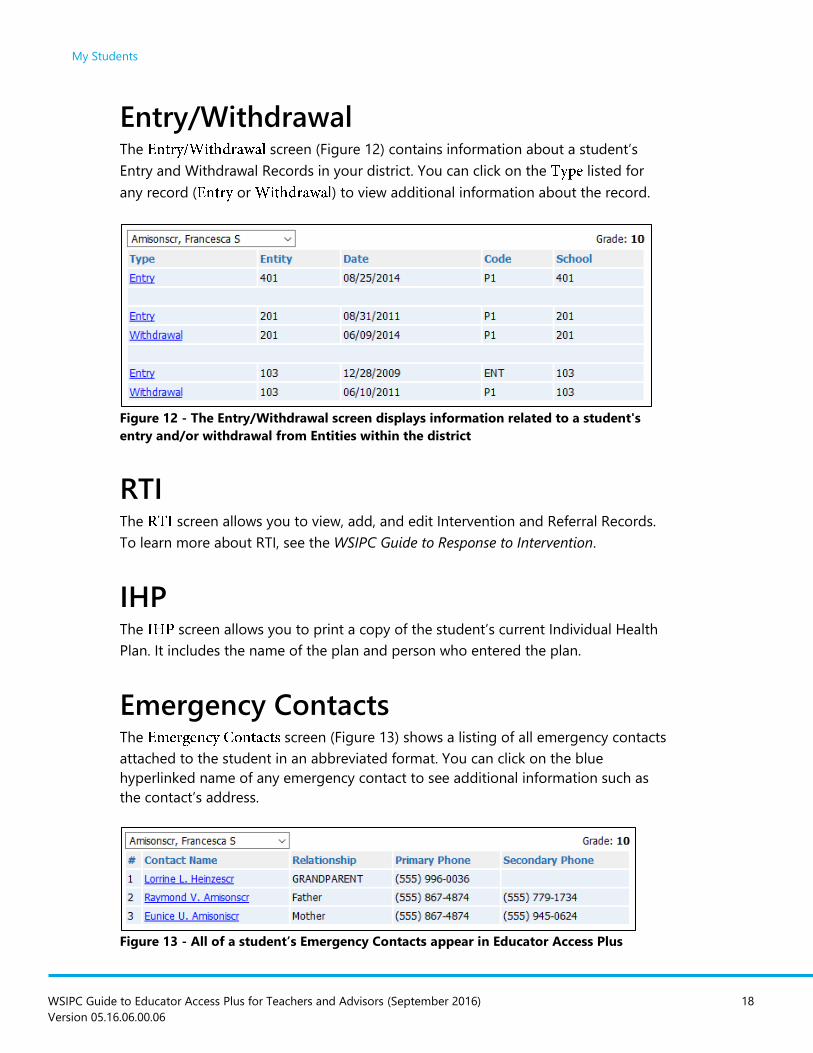
Entry/Withdrawal The screen (Figure 12) contains information about a student’s
Entry and Withdrawal Records in your district. You can click on the listed for
any record ( or ) to view additional information about the record.
Figure 12 - The Entry/Withdrawal screen displays information related to a student's
entry and/or withdrawal from Entities within the district
RTI The screen allows you to view, add, and edit Intervention and Referral Records.
To learn more about RTI, see the WSIPC Guide to Response to Intervention.
IHP The screen allows you to print a copy of the student’s current Individual Health
Plan. It includes the name of the plan and person who entered the plan.
Emergency Contacts The screen (Figure 13) shows a listing of all emergency contacts
attached to the student in an abbreviated format. You can click on the blue
hyperlinked name of any emergency contact to see additional information such as
the contact’s address.
Figure 13 - All of a student’s Emergency Contacts appear in Educator Access Plus
My Students
WSIPC Guide to Educator Access Plus for Teachers and Advisors (September 2016) 19
Version 05.16.06.00.06
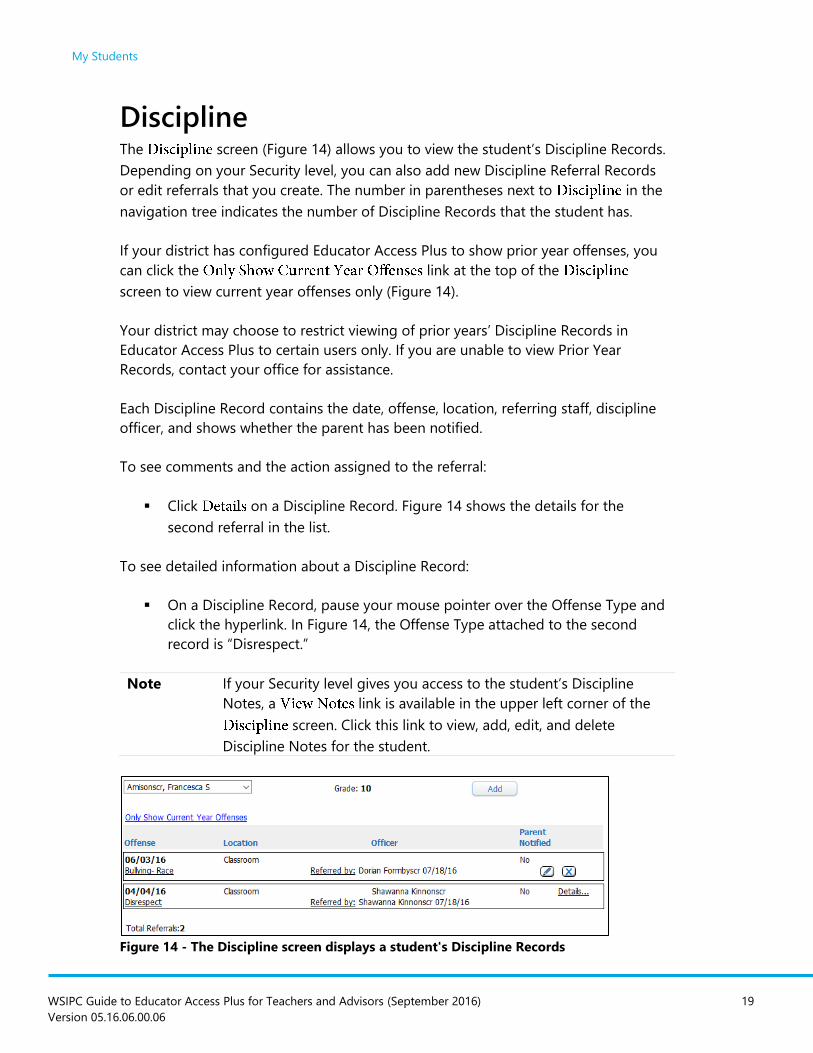
Discipline The screen (Figure 14) allows you to view the student’s Discipline Records.
Depending on your Security level, you can also add new Discipline Referral Records
or edit referrals that you create. The number in parentheses next to in the
navigation tree indicates the number of Discipline Records that the student has.
If your district has configured Educator Access Plus to show prior year offenses, you
can click the link at the top of the
screen to view current year offenses only (Figure 14).
Your district may choose to restrict viewing of prior years’ Discipline Records in
Educator Access Plus to certain users only. If you are unable to view Prior Year
Records, contact your office for assistance.
Each Discipline Record contains the date, offense, location, referring staff, discipline
officer, and shows whether the parent has been notified.
To see comments and the action assigned to the referral:
Click on a Discipline Record. Figure 14 shows the details for the
second referral in the list.
To see detailed information about a Discipline Record:
On a Discipline Record, pause your mouse pointer over the Offense Type and
click the hyperlink. In Figure 14, the Offense Type attached to the second
record is “Disrespect.”
Note If your Security level gives you access to the student’s Discipline
Notes, a link is available in the upper left corner of the
screen. Click this link to view, add, edit, and delete
Discipline Notes for the student.
Figure 14 - The Discipline screen displays a student's Discipline Records
My Students
WSIPC Guide to Educator Access Plus for Teachers and Advisors (September 2016) 20
Version 05.16.06.00.06
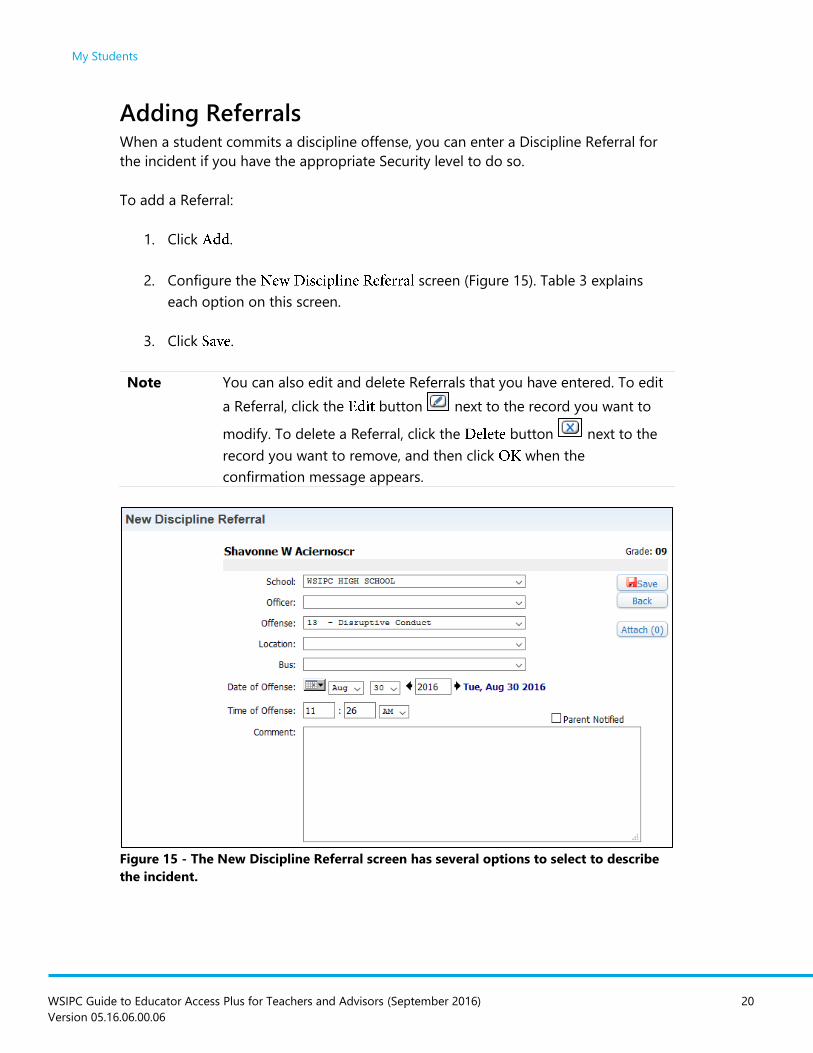
Adding Referrals When a student commits a discipline offense, you can enter a Discipline Referral for
the incident if you have the appropriate Security level to do so.
To add a Referral:
1. Click .
2. Configure the screen (Figure 15). Table 3 explains
each option on this screen.
3. Click .
Note You can also edit and delete Referrals that you have entered. To edit
a Referral, click the button next to the record you want to
modify. To delete a Referral, click the button next to the
record you want to remove, and then click when the
confirmation message appears.
Figure 15 - The New Discipline Referral screen has several options to select to describe
the incident.
My Students
WSIPC Guide to Educator Access Plus for Teachers and Advisors (September 2016) 21
Version 05.16.06.00.06
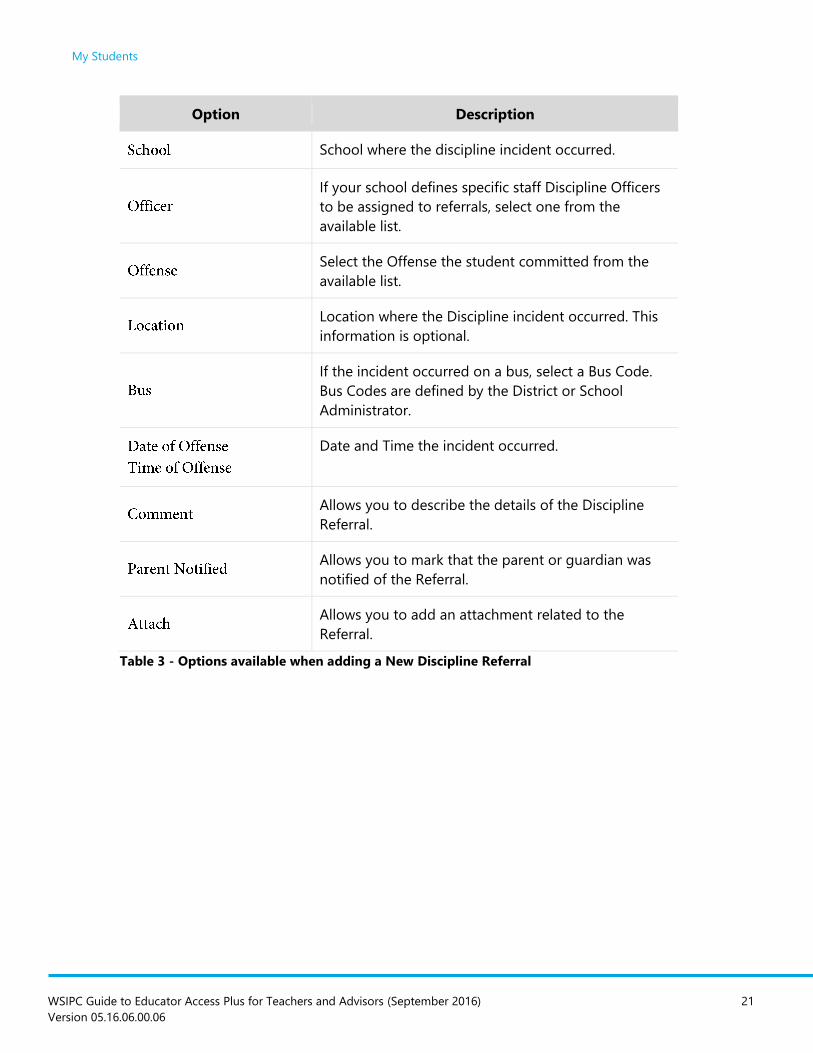
Option Description
School where the discipline incident occurred.
If your school defines specific staff Discipline Officers
to be assigned to referrals, select one from the
available list.
Select the Offense the student committed from the
available list.
Location where the Discipline incident occurred. This
information is optional.
If the incident occurred on a bus, select a Bus Code.
Bus Codes are defined by the District or School
Administrator.
Date and Time the incident occurred.
Allows you to describe the details of the Discipline
Referral.
Allows you to mark that the parent or guardian was
notified of the Referral.
Allows you to add an attachment related to the
Referral.
Table 3 - Options available when adding a New Discipline Referral
My Students
WSIPC Guide to Educator Access Plus for Teachers and Advisors (September 2016) 22
Version 05.16.06.00.06
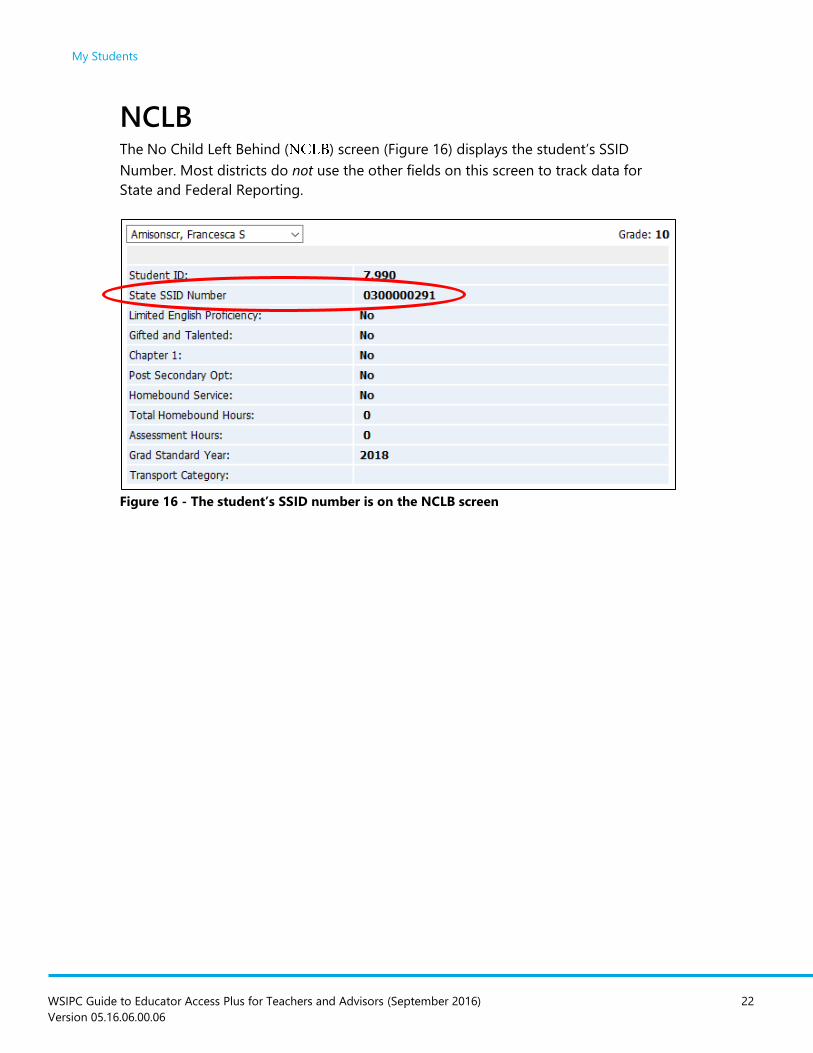
NCLB The No Child Left Behind ( ) screen (Figure 16) displays the student’s SSID
Number. Most districts do not use the other fields on this screen to track data for
State and Federal Reporting.
Figure 16 - The student’s SSID number is on the NCLB screen
My Students
WSIPC Guide to Educator Access Plus for Teachers and Advisors (September 2016) 23
Version 05.16.06.00.06
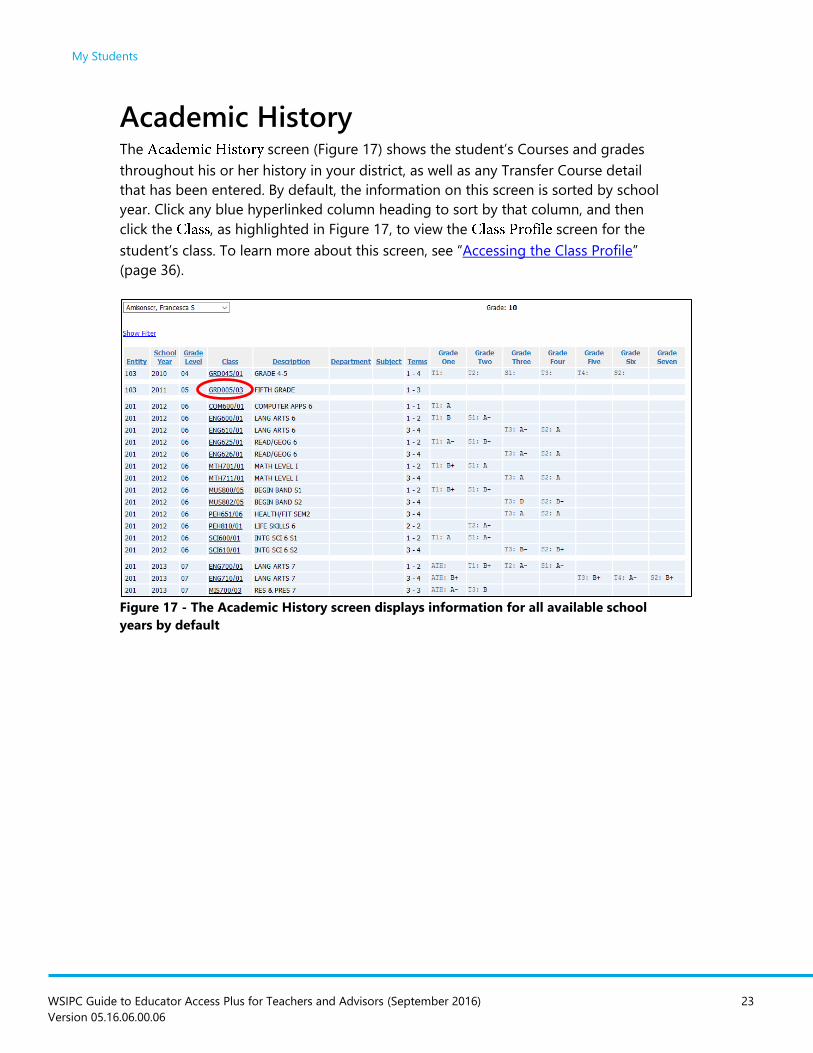
Academic History The screen (Figure 17) shows the student’s Courses and grades
throughout his or her history in your district, as well as any Transfer Course detail
that has been entered. By default, the information on this screen is sorted by school
year. Click any blue hyperlinked column heading to sort by that column, and then
click the , as highlighted in Figure 17, to view the screen for the
student’s class. To learn more about this screen, see “Accessing the Class Profile”
(page 36).
Figure 17 - The Academic History screen displays information for all available school
years by default

My Students
WSIPC Guide to Educator Access Plus for Teachers and Advisors (September 2016) 24
Version 05.16.06.00.06
Graduation Requirements The screen (Figure 18) contains information about a
student’s progress in Coursework Requirement Areas (CRAs) towards graduation.
This screen displays the total number of credits required for each CRA, along with the
number completed, the number in progress, the number scheduled for the next
school year, and the number remaining. The final column shows the status of the
CRA.
Figure 18 - The Graduation Requirements screen
My Students
WSIPC Guide to Educator Access Plus for Teachers and Advisors (September 2016) 25
Version 05.16.06.00.06
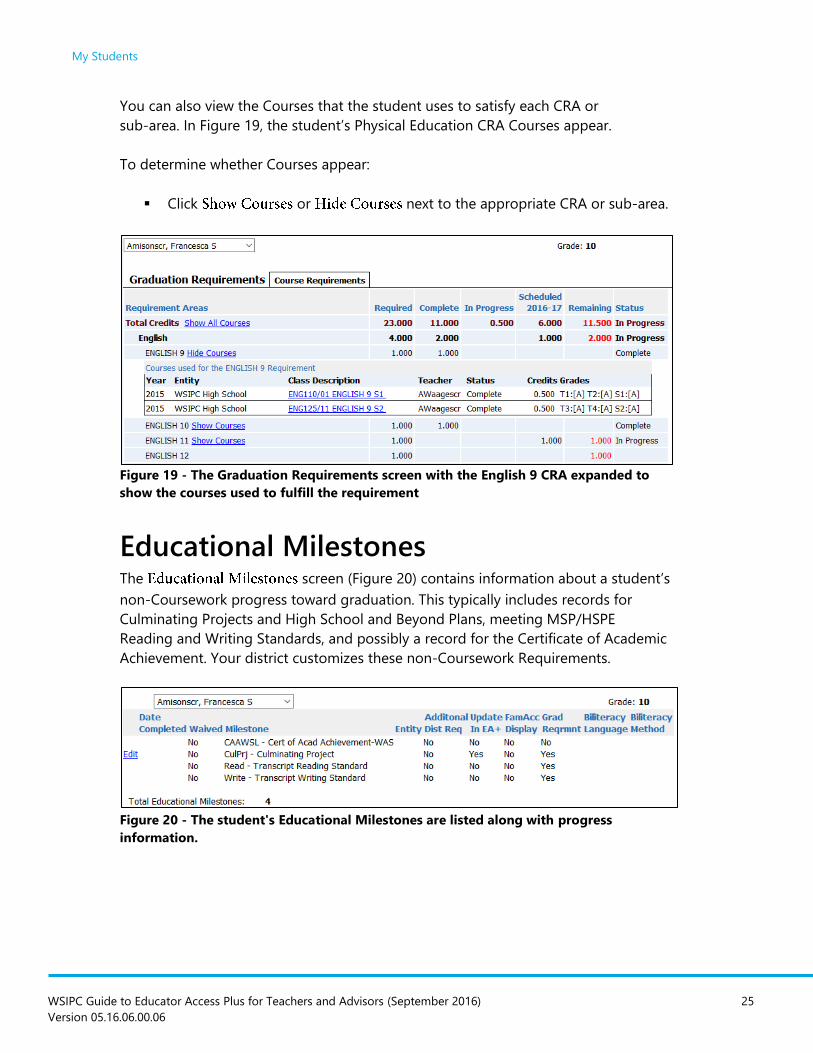
You can also view the Courses that the student uses to satisfy each CRA or
sub-area. In Figure 19, the student’s Physical Education CRA Courses appear.
To determine whether Courses appear:
Click or next to the appropriate CRA or sub-area.
Figure 19 - The Graduation Requirements screen with the English 9 CRA expanded to
show the courses used to fulfill the requirement
Educational Milestones The screen (Figure 20) contains information about a student’s
non-Coursework progress toward graduation. This typically includes records for
Culminating Projects and High School and Beyond Plans, meeting MSP/HSPE
Reading and Writing Standards, and possibly a record for the Certificate of Academic
Achievement. Your district customizes these non-Coursework Requirements.
Figure 20 - The student's Educational Milestones are listed along with progress
information.
My Students
WSIPC Guide to Educator Access Plus for Teachers and Advisors (September 2016) 26
Version 05.16.06.00.06
Editing an Educational Milestone for a Single
Student Your district may have configured Educational Milestones so that you can update
them in Educator Access Plus. If an Educational Milestone is available for editing, an
hyperlink appears to the left of the Educational Milestone.
To edit an Educational Milestone for a single student:
1. Click next to the desired Educational Milestone.
2. Configure the screen (Figure 21).
3. Click .
Figure 21 - You can edit students' Educational Milestones from within Educator Access
Plus
My Students
WSIPC Guide to Educator Access Plus for Teachers and Advisors (September 2016) 27
Version 05.16.06.00.06
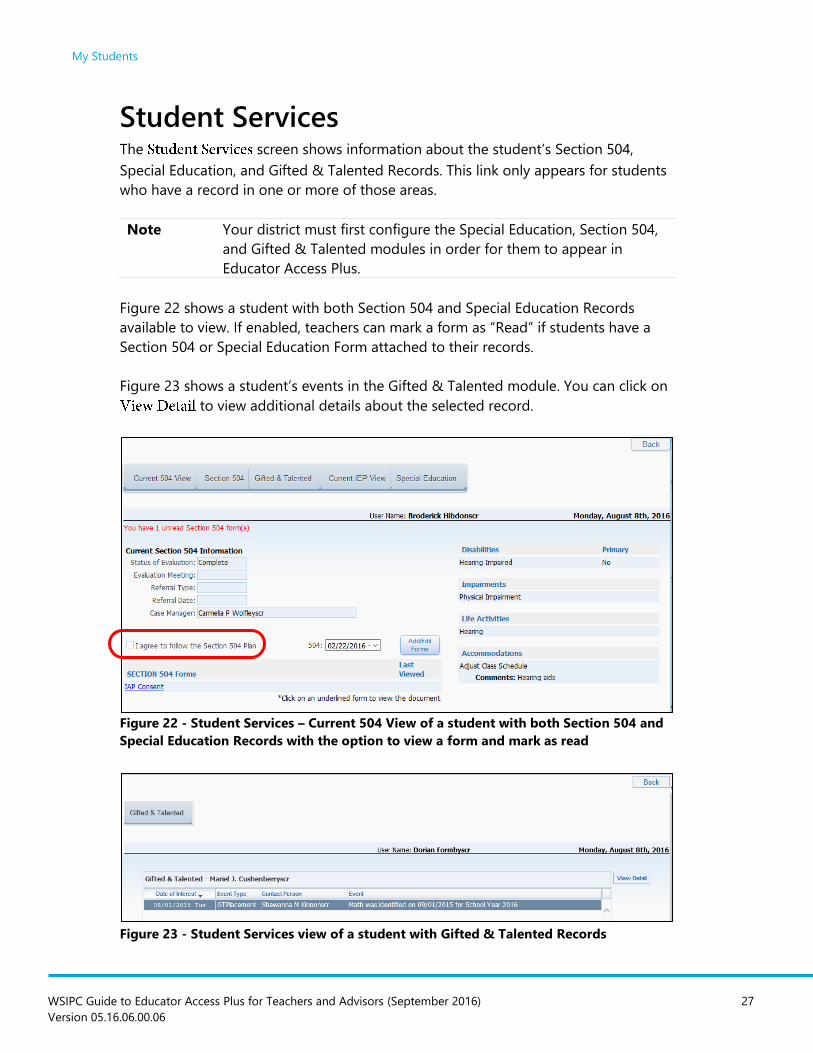
Student Services The screen shows information about the student’s Section 504,
Special Education, and Gifted & Talented Records. This link only appears for students
who have a record in one or more of those areas.
Note Your district must first configure the Special Education, Section 504,
and Gifted & Talented modules in order for them to appear in
Educator Access Plus.
Figure 22 shows a student with both Section 504 and Special Education Records
available to view. If enabled, teachers can mark a form as “Read” if students have a
Section 504 or Special Education Form attached to their records.
Figure 23 shows a student’s events in the Gifted & Talented module. You can click on
to view additional details about the selected record.
Figure 22 - Student Services – Current 504 View of a student with both Section 504 and
Special Education Records with the option to view a form and mark as read
Figure 23 - Student Services view of a student with Gifted & Talented Records
My Students
WSIPC Guide to Educator Access Plus for Teachers and Advisors (September 2016) 28
Version 05.16.06.00.06
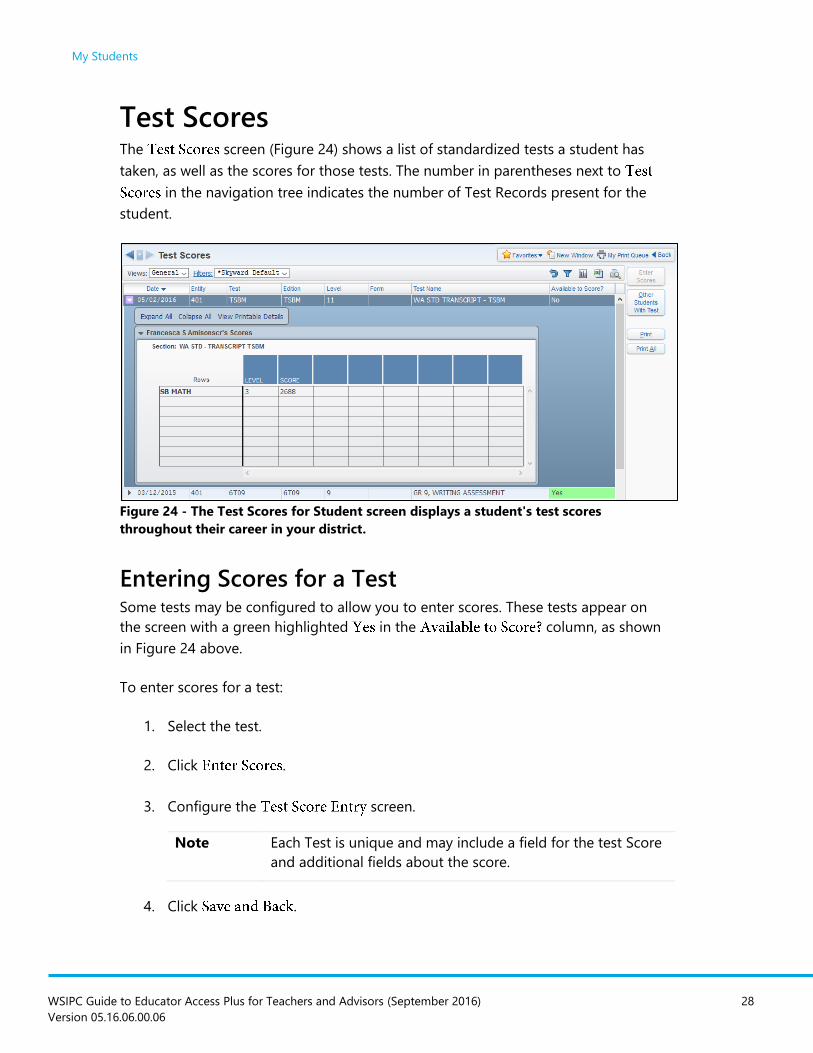
Test Scores The screen (Figure 24) shows a list of standardized tests a student has
taken, as well as the scores for those tests. The number in parentheses next to
in the navigation tree indicates the number of Test Records present for the
student.
Figure 24 - The Test Scores for Student screen displays a student's test scores
throughout their career in your district.
Entering Scores for a Test Some tests may be configured to allow you to enter scores. These tests appear on
the screen with a green highlighted in the column, as shown
in Figure 24 above.
To enter scores for a test:
1. Select the test.
2. Click .
3. Configure the screen.
Note Each Test is unique and may include a field for the test Score
and additional fields about the score.
4. Click .
My Students
WSIPC Guide to Educator Access Plus for Teachers and Advisors (September 2016) 29
Version 05.16.06.00.06
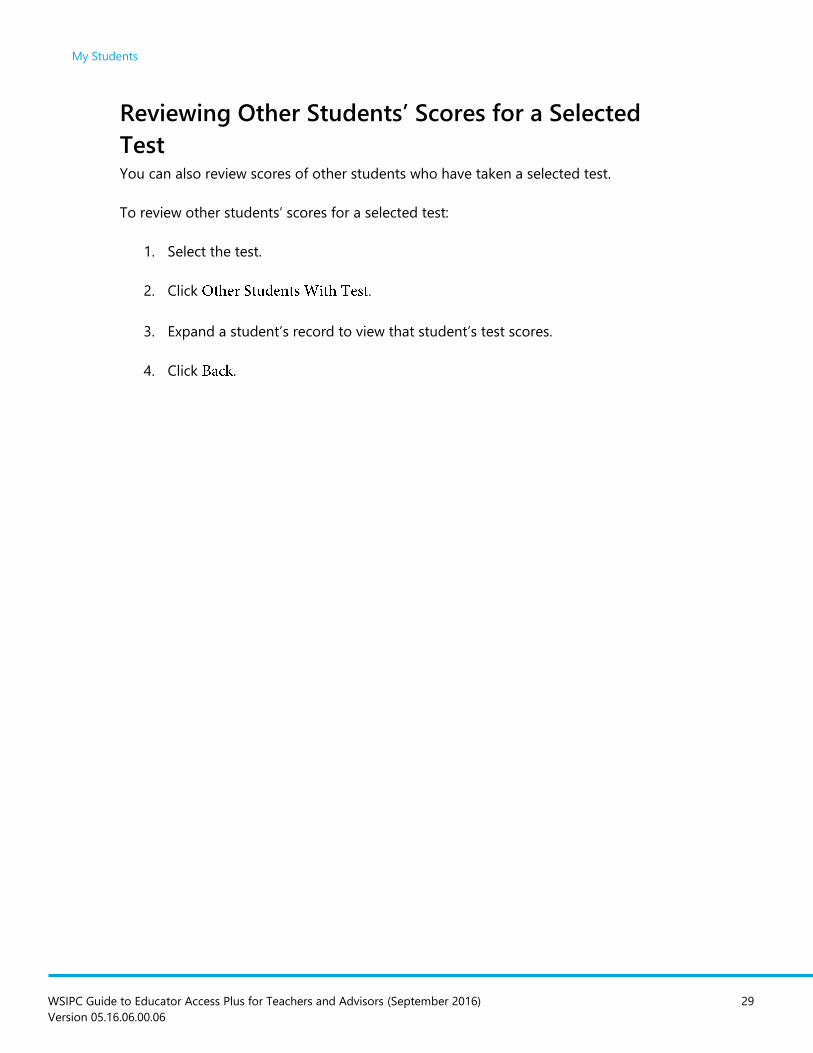
Reviewing Other Students’ Scores for a Selected
Test You can also review scores of other students who have taken a selected test.
To review other students’ scores for a selected test:
1. Select the test.
2. Click .
3. Expand a student’s record to view that student’s test scores.
4. Click .
My Students
WSIPC Guide to Educator Access Plus for Teachers and Advisors (September 2016) 30
Version 05.16.06.00.06
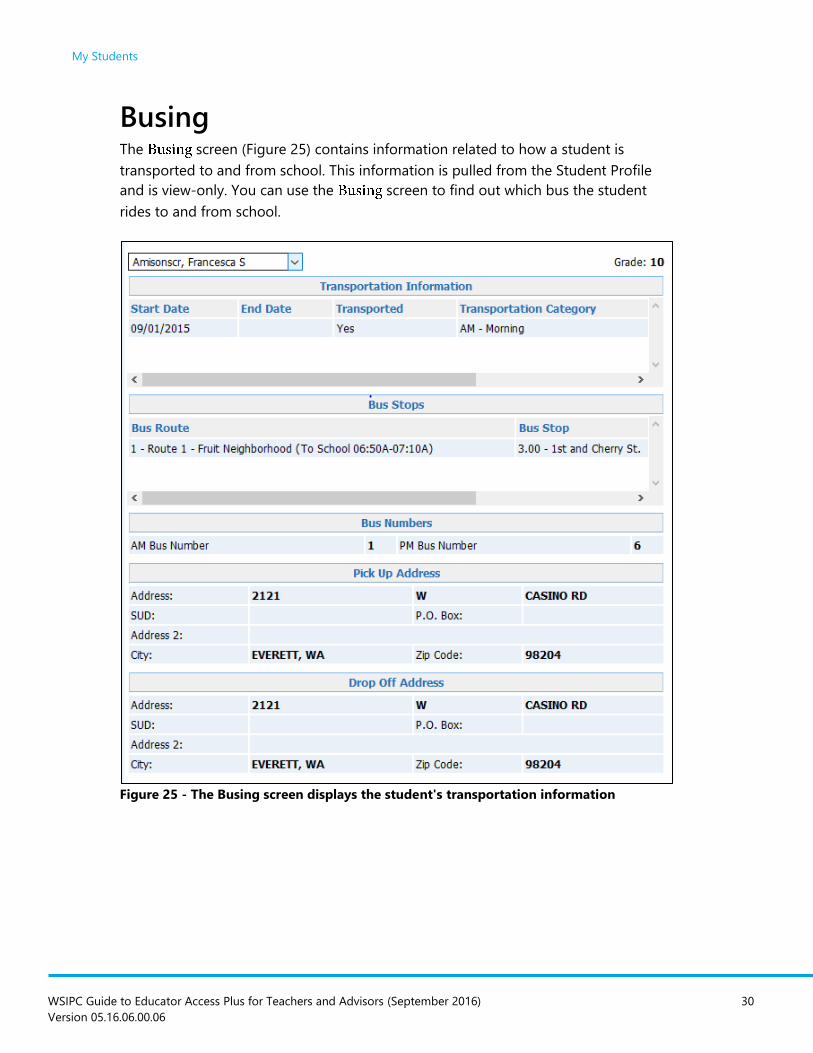
Busing The screen (Figure 25) contains information related to how a student is
transported to and from school. This information is pulled from the Student Profile
and is view-only. You can use the screen to find out which bus the student
rides to and from school.
Figure 25 - The Busing screen displays the student's transportation information
My Students
WSIPC Guide to Educator Access Plus for Teachers and Advisors (September 2016) 31
Version 05.16.06.00.06
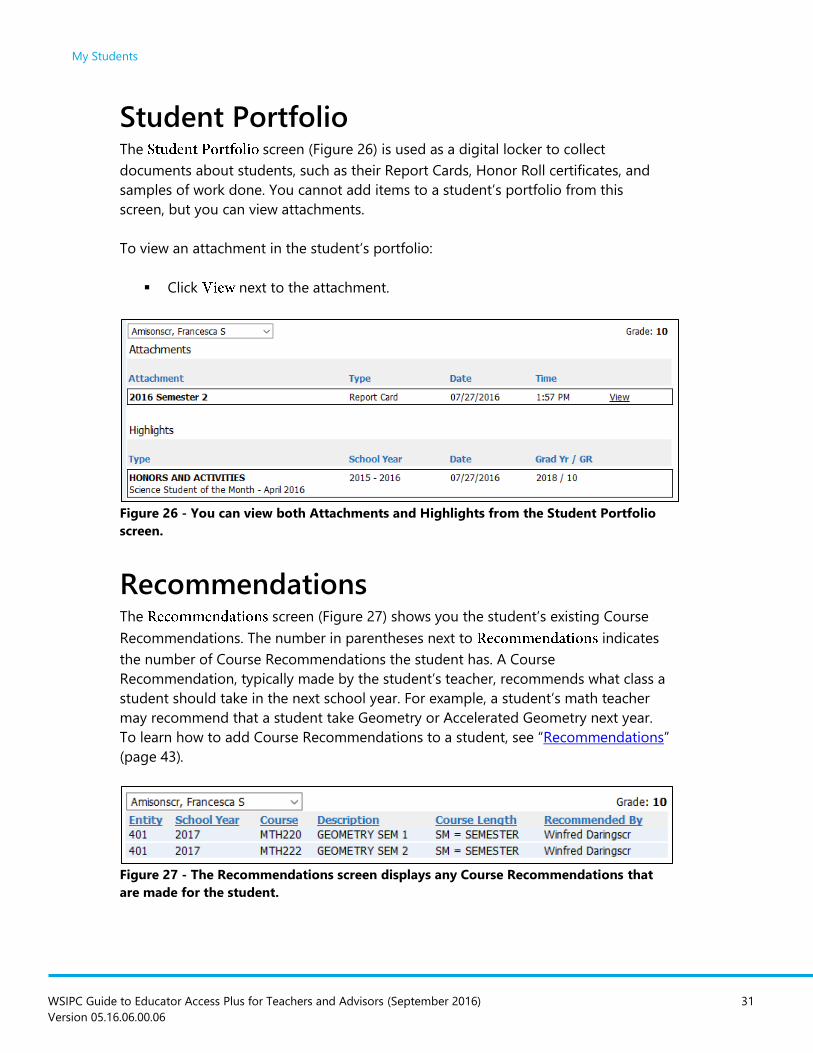
Student Portfolio The screen (Figure 26) is used as a digital locker to collect
documents about students, such as their Report Cards, Honor Roll certificates, and
samples of work done. You cannot add items to a student’s portfolio from this
screen, but you can view attachments.
To view an attachment in the student’s portfolio:
Click next to the attachment.
Figure 26 - You can view both Attachments and Highlights from the Student Portfolio
screen.
Recommendations The screen (Figure 27) shows you the student’s existing Course
Recommendations. The number in parentheses next to indicates
the number of Course Recommendations the student has. A Course
Recommendation, typically made by the student’s teacher, recommends what class a
student should take in the next school year. For example, a student’s math teacher
may recommend that a student take Geometry or Accelerated Geometry next year.
To learn how to add Course Recommendations to a student, see “Recommendations”
(page 43).
Figure 27 - The Recommendations screen displays any Course Recommendations that
are made for the student.
My Students
WSIPC Guide to Educator Access Plus for Teachers and Advisors (September 2016) 32
Version 05.16.06.00.06
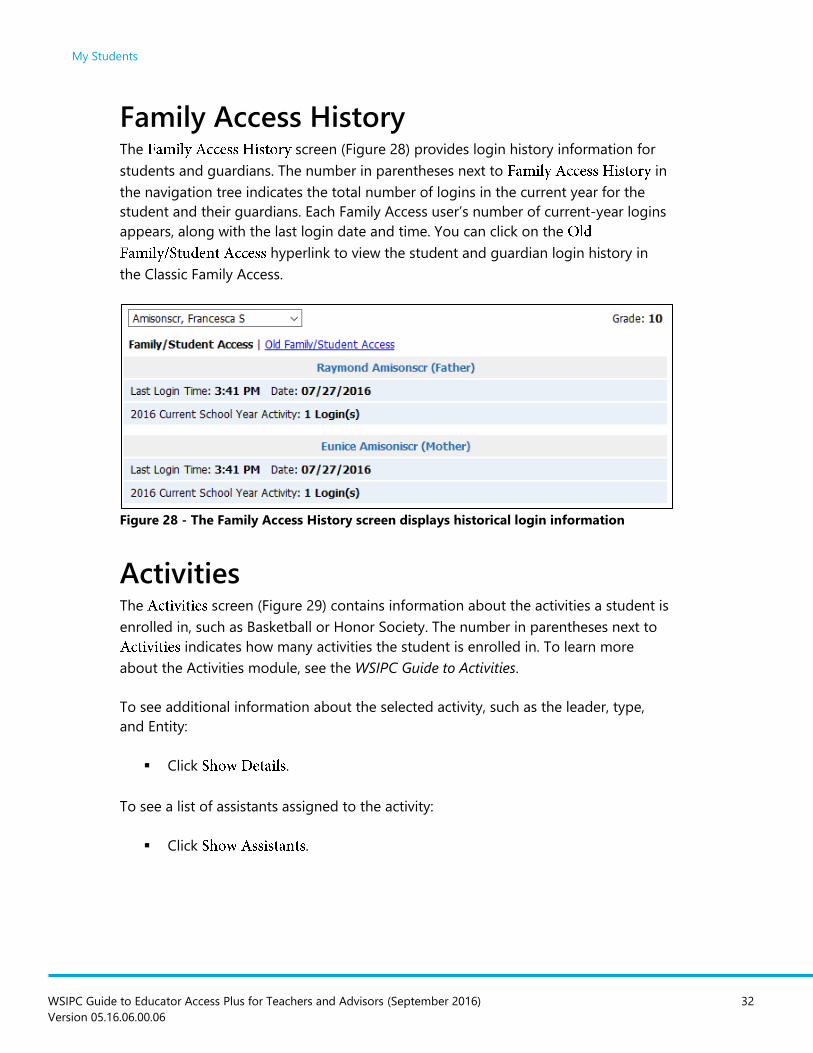
Family Access History The screen (Figure 28) provides login history information for
students and guardians. The number in parentheses next to in
the navigation tree indicates the total number of logins in the current year for the
student and their guardians. Each Family Access user’s number of current-year logins
appears, along with the last login date and time. You can click on the
hyperlink to view the student and guardian login history in
the Classic Family Access.
Figure 28 - The Family Access History screen displays historical login information
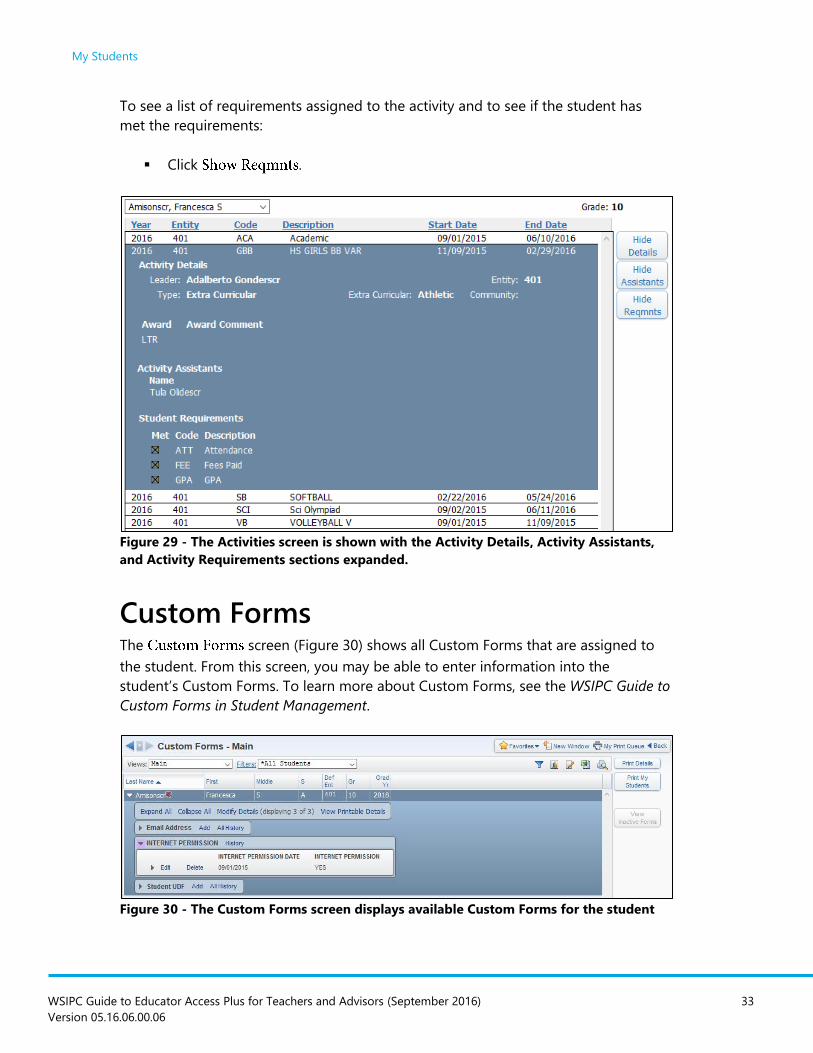
Activities The screen (Figure 29) contains information about the activities a student is
enrolled in, such as Basketball or Honor Society. The number in parentheses next to
indicates how many activities the student is enrolled in. To learn more
about the Activities module, see the WSIPC Guide to Activities.
To see additional information about the selected activity, such as the leader, type,
and Entity:
Click .
To see a list of assistants assigned to the activity:
Click .
My Students
WSIPC Guide to Educator Access Plus for Teachers and Advisors (September 2016) 33
Version 05.16.06.00.06
To see a list of requirements assigned to the activity and to see if the student has
met the requirements:
Click .
Figure 29 - The Activities screen is shown with the Activity Details, Activity Assistants,
and Activity Requirements sections expanded.
Custom Forms The screen (Figure 30) shows all Custom Forms that are assigned to
the student. From this screen, you may be able to enter information into the
student’s Custom Forms. To learn more about Custom Forms, see the WSIPC Guide to
Custom Forms in Student Management.
Figure 30 - The Custom Forms screen displays available Custom Forms for the student
My Students
WSIPC Guide to Educator Access Plus for Teachers and Advisors (September 2016) 34
Version 05.16.06.00.06
Family Access and Student Access
Display Family Access and Student Access Display shows you exactly what a student or
guardian sees in the , , and areas when they sign in to
Family Access or Student Access.
To view information:
1. In the navigation tree, click the plus sign next to or
.
2. Click , , or .
To learn more about the Home, Calendar, and Gradebook in Family and Student
Access, see the WSIPC Guide to Family and Student Access for Students and
Guardians.
Reports Several reports are available from . Only the Information Report is
covered in this Guide. To learn about the Multi-Class Progress Report, the Progress
Report, the Progress Report Letter, and the Standards Report Card, see the WSIPC
Guide to Secondary Gradebook for Teachers and the WSIPC Guide to Standards
Gradebook for Teachers.
Information Report The Information Report allows you to select information about the student from
several different areas of the system to be included on the report. For example, some
of the items that you can include on this report are the student’s picture, emergency
contacts, current schedule, discipline information, and academic history. You can
customize this report to include information about individual students as necessary.
WSIPC Guide to Educator Access Plus for Teachers and Advisors (September 2016) 35
Version 05.16.06.00.06
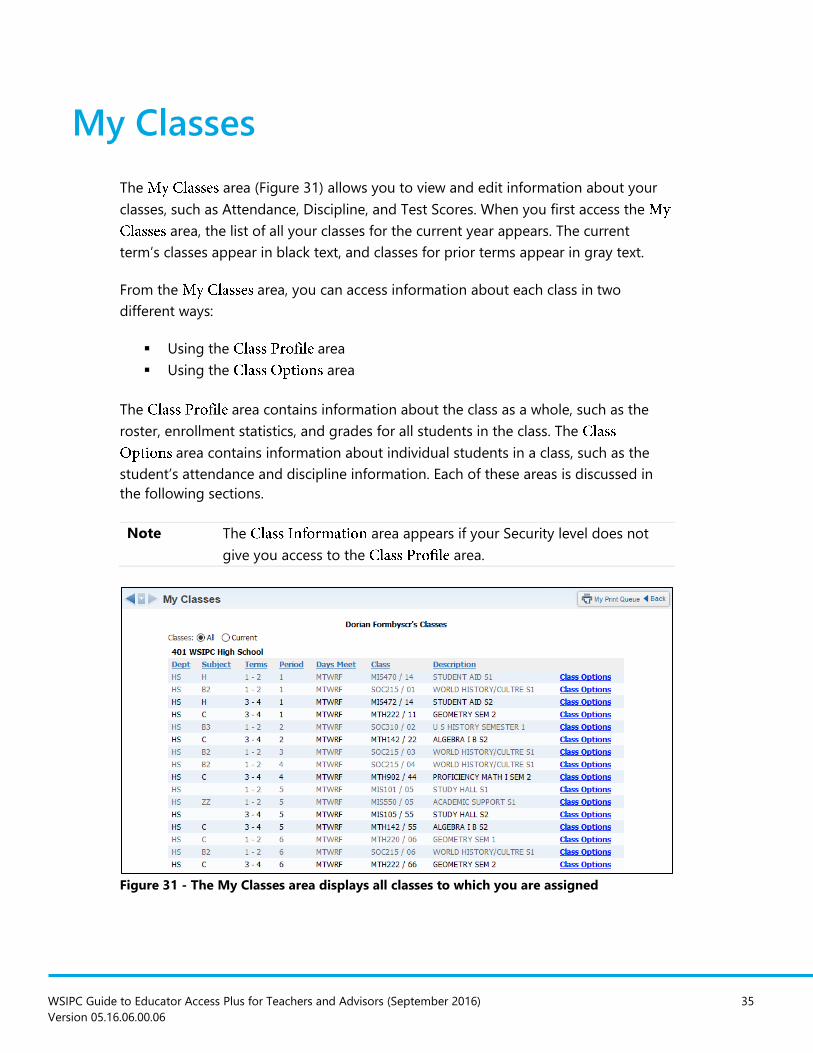
My Classes
The area (Figure 31) allows you to view and edit information about your
classes, such as Attendance, Discipline, and Test Scores. When you first access the
area, the list of all your classes for the current year appears. The current
term’s classes appear in black text, and classes for prior terms appear in gray text.
From the area, you can access information about each class in two
different ways:
Using the area
Using the area
The area contains information about the class as a whole, such as the
roster, enrollment statistics, and grades for all students in the class. The
area contains information about individual students in a class, such as the
student’s attendance and discipline information. Each of these areas is discussed in
the following sections.
Note The area appears if your Security level does not
give you access to the area.
Figure 31 - The My Classes area displays all classes to which you are assigned
My Classes
WSIPC Guide to Educator Access Plus for Teachers and Advisors (September 2016) 36
Version 05.16.06.00.06
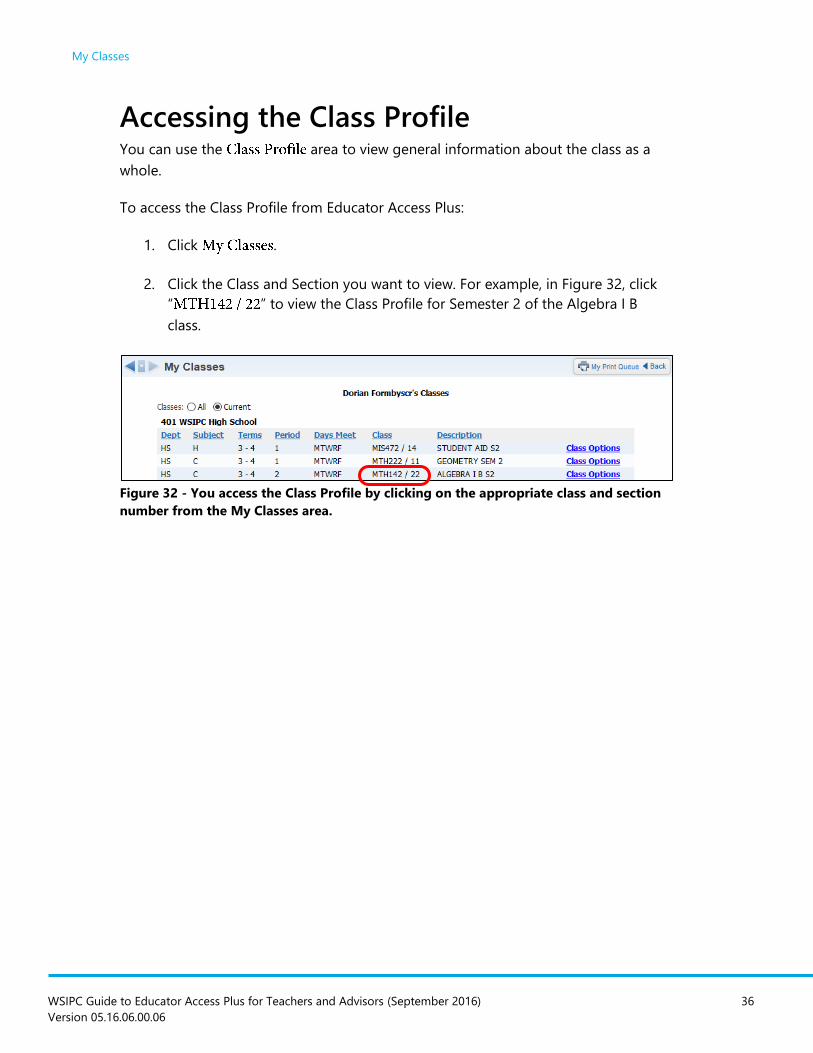
Accessing the Class Profile You can use the area to view general information about the class as a
whole.
To access the Class Profile from Educator Access Plus:
1. Click .
2. Click the Class and Section you want to view. For example, in Figure 32, click
“ ” to view the Class Profile for Semester 2 of the Algebra I B
class.
Figure 32 - You access the Class Profile by clicking on the appropriate class and section
number from the My Classes area.
My Classes
WSIPC Guide to Educator Access Plus for Teachers and Advisors (September 2016) 37
Version 05.16.06.00.06
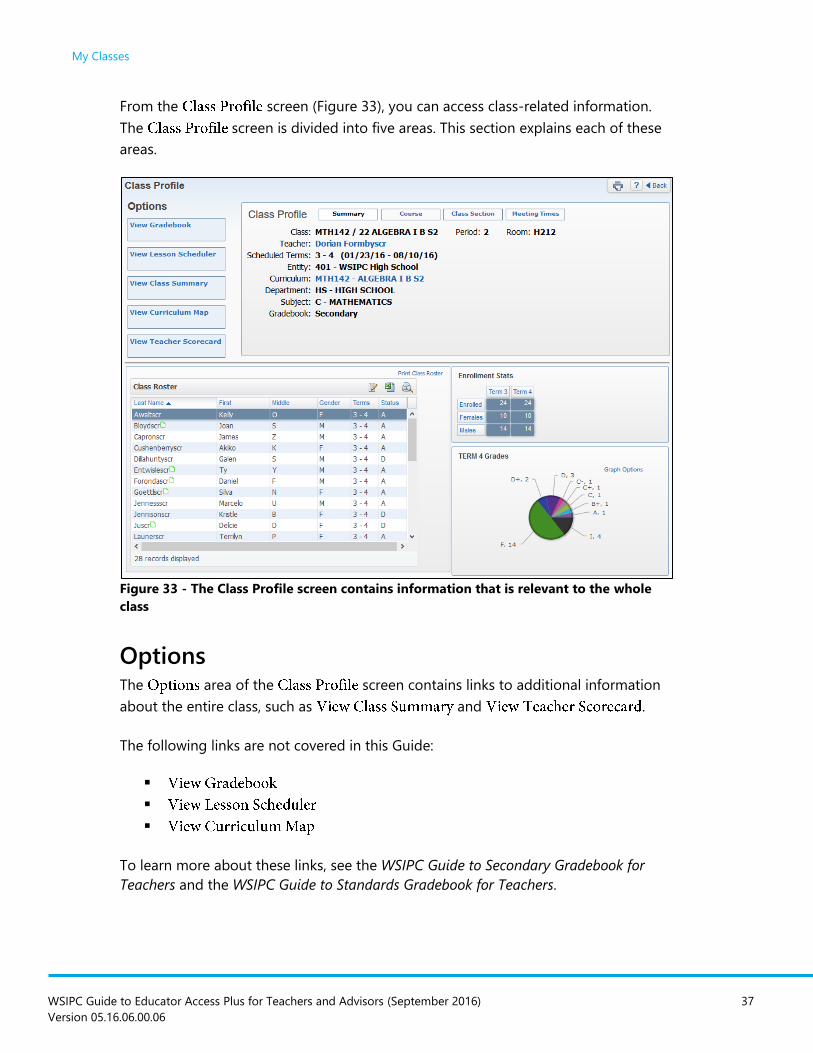
From the screen (Figure 33), you can access class-related information.
The screen is divided into five areas. This section explains each of these
areas.
Figure 33 - The Class Profile screen contains information that is relevant to the whole
class
Options The area of the screen contains links to additional information
about the entire class, such as and .
The following links are not covered in this Guide:
To learn more about these links, see the WSIPC Guide to Secondary Gradebook for
Teachers and the WSIPC Guide to Standards Gradebook for Teachers.
My Classes
WSIPC Guide to Educator Access Plus for Teachers and Advisors (September 2016) 38
Version 05.16.06.00.06
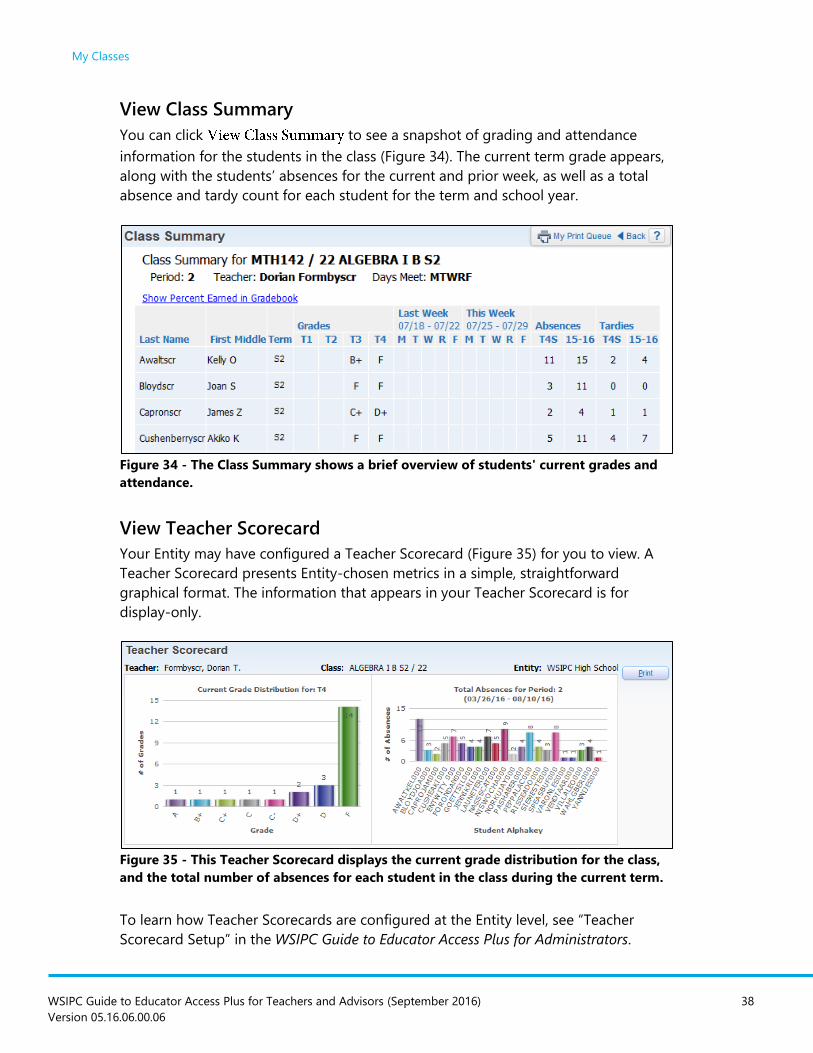
View Class Summary
You can click to see a snapshot of grading and attendance
information for the students in the class (Figure 34). The current term grade appears,
along with the students’ absences for the current and prior week, as well as a total
absence and tardy count for each student for the term and school year.
Figure 34 - The Class Summary shows a brief overview of students' current grades and
attendance.
View Teacher Scorecard
Your Entity may have configured a Teacher Scorecard (Figure 35) for you to view. A
Teacher Scorecard presents Entity-chosen metrics in a simple, straightforward
graphical format. The information that appears in your Teacher Scorecard is for
display-only.
Figure 35 - This Teacher Scorecard displays the current grade distribution for the class,
and the total number of absences for each student in the class during the current term.
To learn how Teacher Scorecards are configured at the Entity level, see “Teacher
Scorecard Setup” in the WSIPC Guide to Educator Access Plus for Administrators.
My Classes
WSIPC Guide to Educator Access Plus for Teachers and Advisors (September 2016) 39
Version 05.16.06.00.06
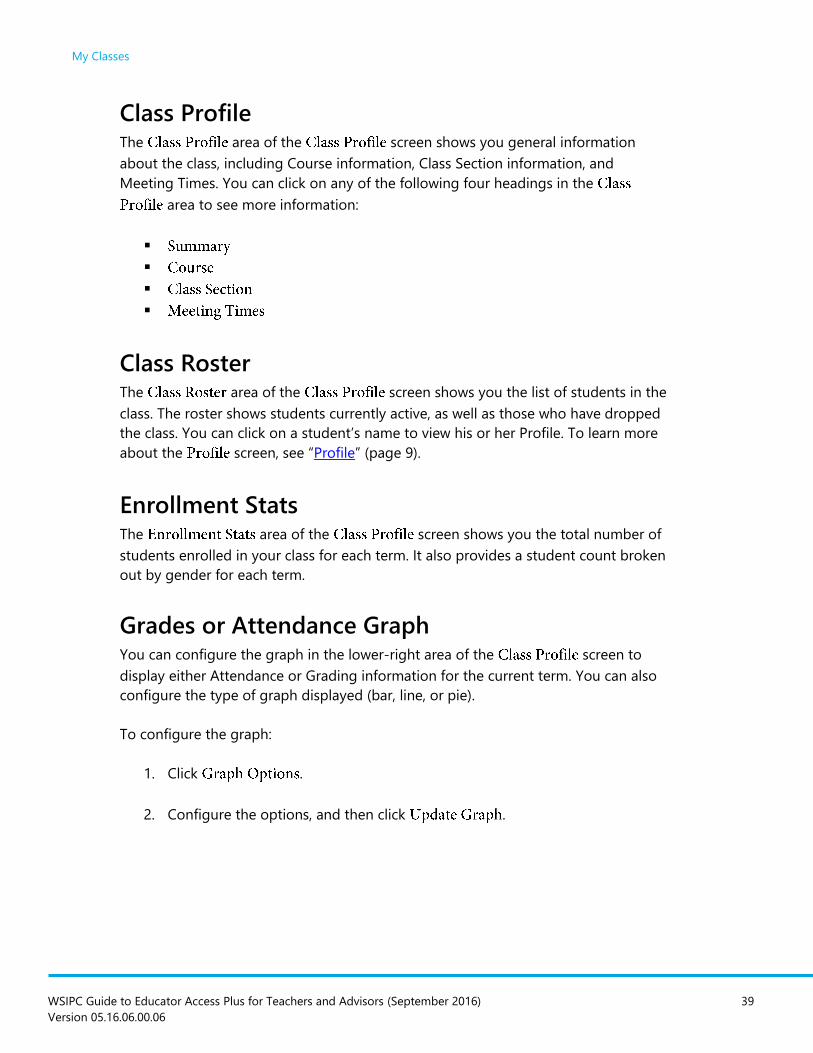
Class Profile The area of the screen shows you general information
about the class, including Course information, Class Section information, and
Meeting Times. You can click on any of the following four headings in the
area to see more information:
Class Roster The area of the screen shows you the list of students in the
class. The roster shows students currently active, as well as those who have dropped
the class. You can click on a student’s name to view his or her Profile. To learn more
about the screen, see “Profile” (page 9).
Enrollment Stats The area of the screen shows you the total number of
students enrolled in your class for each term. It also provides a student count broken
out by gender for each term.
Grades or Attendance Graph You can configure the graph in the lower-right area of the screen to
display either Attendance or Grading information for the current term. You can also
configure the type of graph displayed (bar, line, or pie).
To configure the graph:
1. Click .
2. Configure the options, and then click .
My Classes
WSIPC Guide to Educator Access Plus for Teachers and Advisors (September 2016) 40
Version 05.16.06.00.06
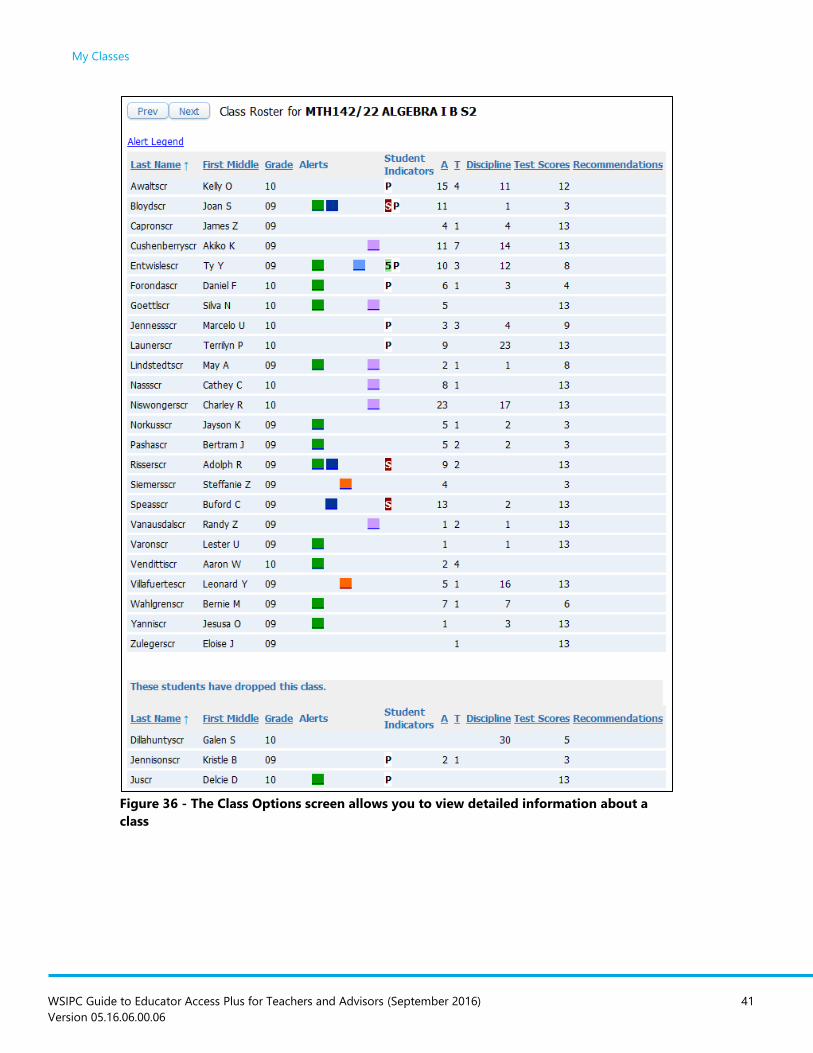
Accessing Class Options You can use the screen to view a class roster and see detailed
information about the students in your class.
To access the screen:
1. Click .
2. Click the or button to determine whether only classes
from the current term or classes from the entire school year appear.
3. Click next to the class you want to work with. The class roster
appears (Figure 36).
My Classes
WSIPC Guide to Educator Access Plus for Teachers and Advisors (September 2016) 41
Version 05.16.06.00.06
Figure 36 - The Class Options screen allows you to view detailed information about a
class
My Classes
WSIPC Guide to Educator Access Plus for Teachers and Advisors (September 2016) 42
Version 05.16.06.00.06
The class roster’s default sort is alphabetical by last name. Click any blue hyperlinked
column heading to change the sort order. Click or to access the previous
or next class in your list of classes.
Some students in your class roster may have color blocks in the column. To
see what each color represents, click . On some Alerts, you may be able
to click the color block to see more information.
You can also click a student’s name from the class roster to access student Profile
information. See “My Students” (page 7) to learn more about student Profiles in
Educator Access Plus.
This section explains the additional areas that appear in the menu tree on the left
side of the screen.
My Gradebook The of takes you to the Secondary or Standards
Gradebook associated with the class. To learn more about these two type of
Gradebooks, see the WSIPC Guide to Secondary Gradebook for Teachers and the
WSIPC Guide to Standards Gradebook for Teachers.
Attendance When you click , the screen appears. To
learn how to take attendance, see “Taking Daily Attendance Using a Class Roster”
(page 60).
Discipline When you click , a roster of students enrolled in the current class appears.
You can select a student to view their discipline referrals. Depending on your security,
you may be able to add referrals to a student from this screen. To learn how to add a
Discipline Referral Record to a student, see “Adding Referrals” (page 20).
My Classes
WSIPC Guide to Educator Access Plus for Teachers and Advisors (September 2016) 43
Version 05.16.06.00.06
Message Center The area allows you to post messages about your classes for
students and guardians to view in Family Access. For example, you can notify
guardians and students about upcoming tests, projects, and events. You can also
schedule messages to be emailed to students and guardians at a later time, create a
message for a specific class, or create a message for students and their guardians in
several classes. Your district may also enable a feature that allows guardians and
students to use Message Center to send messages to you.
To learn how to use Message Center to create, view, and manage messages, see the
WSIPC Guide to Message Center for Teachers, Advisors, and Activity Leaders.
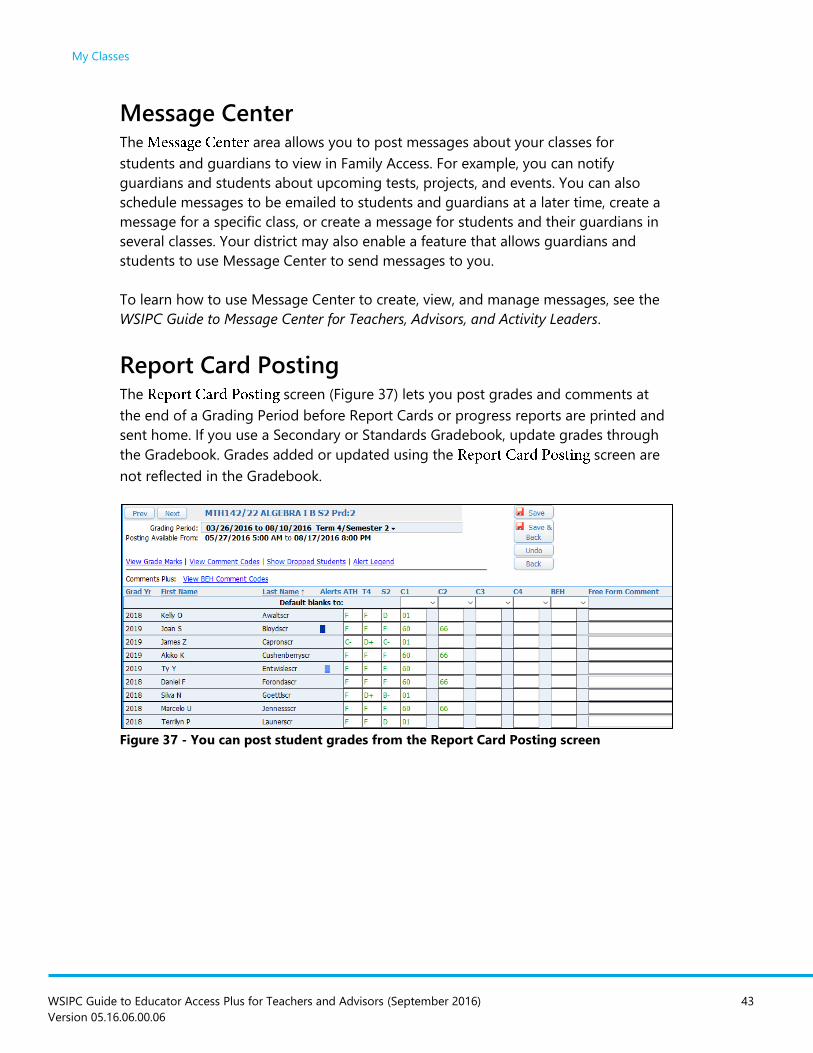
Report Card Posting The screen (Figure 37) lets you post grades and comments at
the end of a Grading Period before Report Cards or progress reports are printed and
sent home. If you use a Secondary or Standards Gradebook, update grades through
the Gradebook. Grades added or updated using the screen are
not reflected in the Gradebook.
Figure 37 - You can post student grades from the Report Card Posting screen
My Classes
WSIPC Guide to Educator Access Plus for Teachers and Advisors (September 2016) 44
Version 05.16.06.00.06
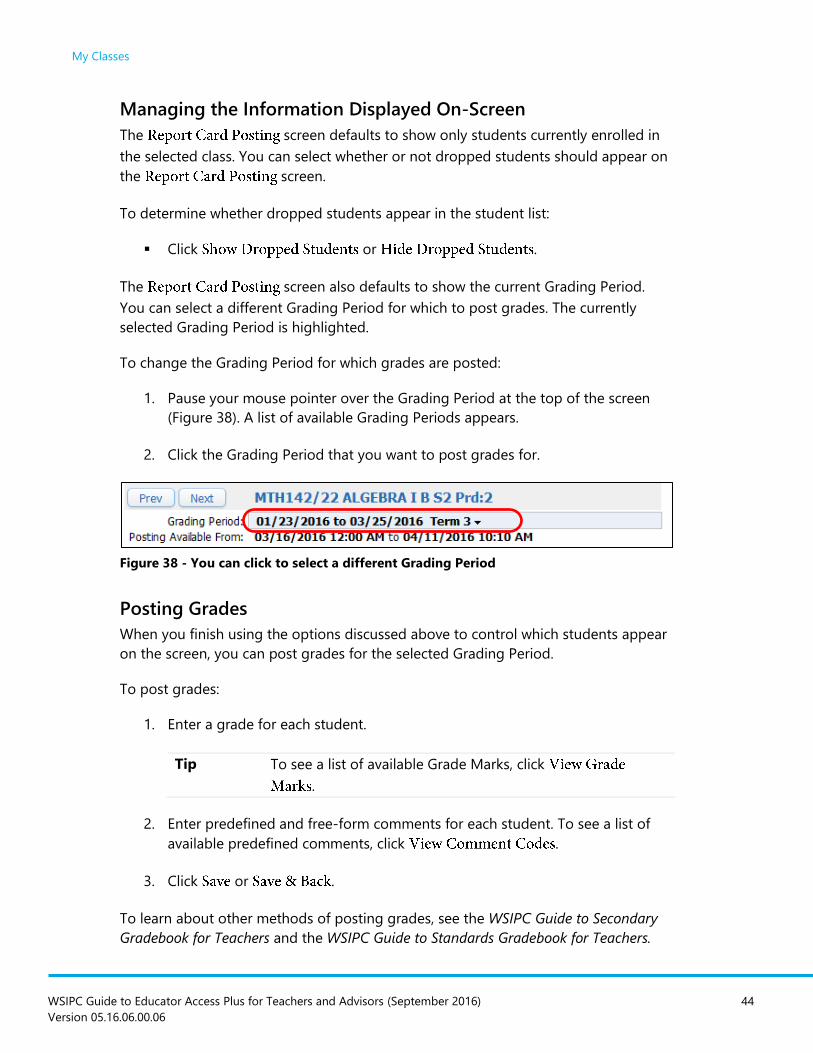
Managing the Information Displayed On-Screen
The screen defaults to show only students currently enrolled in
the selected class. You can select whether or not dropped students should appear on
the screen.
To determine whether dropped students appear in the student list:
Click or .
The screen also defaults to show the current Grading Period.
You can select a different Grading Period for which to post grades. The currently
selected Grading Period is highlighted.
To change the Grading Period for which grades are posted:
1. Pause your mouse pointer over the Grading Period at the top of the screen
(Figure 38). A list of available Grading Periods appears.
2. Click the Grading Period that you want to post grades for.
Figure 38 - You can click to select a different Grading Period
Posting Grades
When you finish using the options discussed above to control which students appear
on the screen, you can post grades for the selected Grading Period.
To post grades:
1. Enter a grade for each student.
Tip To see a list of available Grade Marks, click
.
2. Enter predefined and free-form comments for each student. To see a list of
available predefined comments, click .
3. Click or .
To learn about other methods of posting grades, see the WSIPC Guide to Secondary
Gradebook for Teachers and the WSIPC Guide to Standards Gradebook for Teachers.
My Classes
WSIPC Guide to Educator Access Plus for Teachers and Advisors (September 2016) 45
Version 05.16.06.00.06
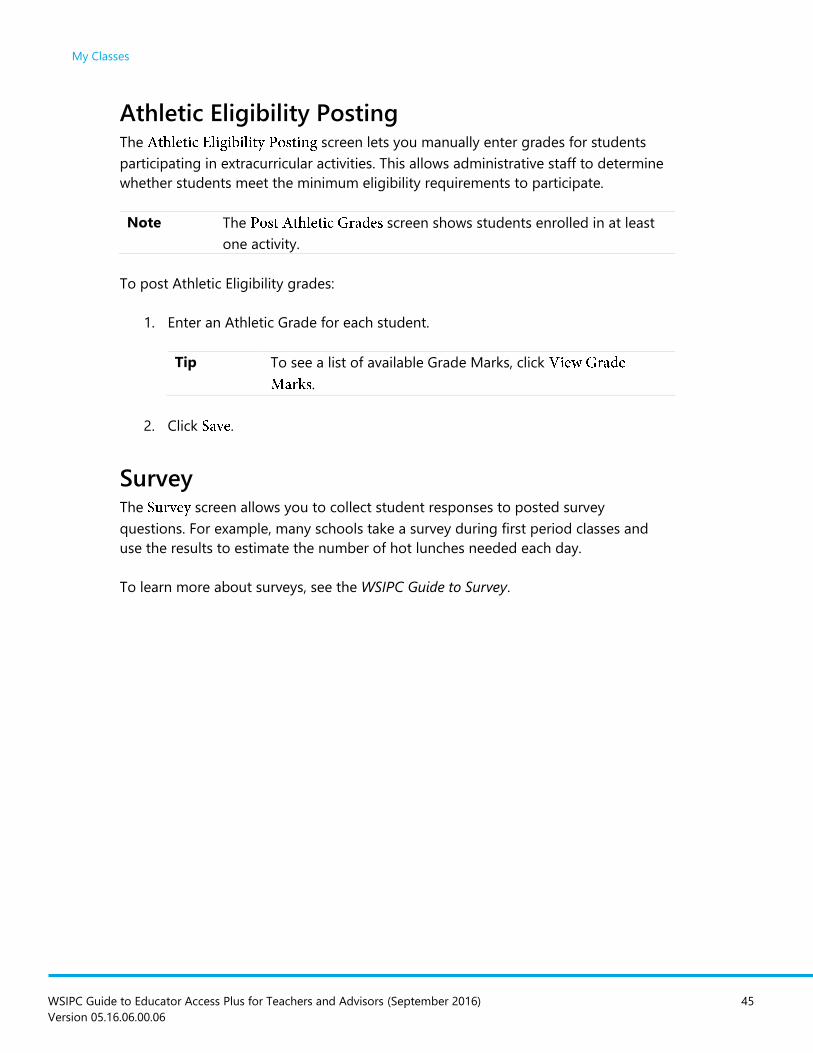
Athletic Eligibility Posting The screen lets you manually enter grades for students
participating in extracurricular activities. This allows administrative staff to determine
whether students meet the minimum eligibility requirements to participate.
Note The screen shows students enrolled in at least
one activity.
To post Athletic Eligibility grades:
1. Enter an Athletic Grade for each student.
Tip To see a list of available Grade Marks, click
.
2. Click .
Survey The screen allows you to collect student responses to posted survey
questions. For example, many schools take a survey during first period classes and
use the results to estimate the number of hot lunches needed each day.
To learn more about surveys, see the WSIPC Guide to Survey.

My Classes
WSIPC Guide to Educator Access Plus for Teachers and Advisors (September 2016) 46
Version 05.16.06.00.06
Food Service Your district may choose to make limited Food Service capability available in
Educator Access Plus. If configured by your district, you can use the
screen (Figure 39) to mark food items that your students want to purchase.
When you select Food Service from My Classes and select the check box for
available item(s), you can add the selected items to the student’s food service
purchases for the day (Figure 39).
Figure 39 – Food Service screen
Educational Milestones You can use the screen (Figure 40) to view a list of
your students’ Educational Milestones, which contain information about a student’s
non-Coursework progress towards graduation. This typically includes records for
High School and Beyond Plans, meeting MSP/HSPE/Smarter Balance
English-Language Arts and Math Standards, and possibly a record for the Certificate
of Academic Achievement. Your district customizes these non-Coursework
Requirements.
Figure 40 - Student Educational Milestones screen
My Classes
WSIPC Guide to Educator Access Plus for Teachers and Advisors (September 2016) 47
Version 05.16.06.00.06
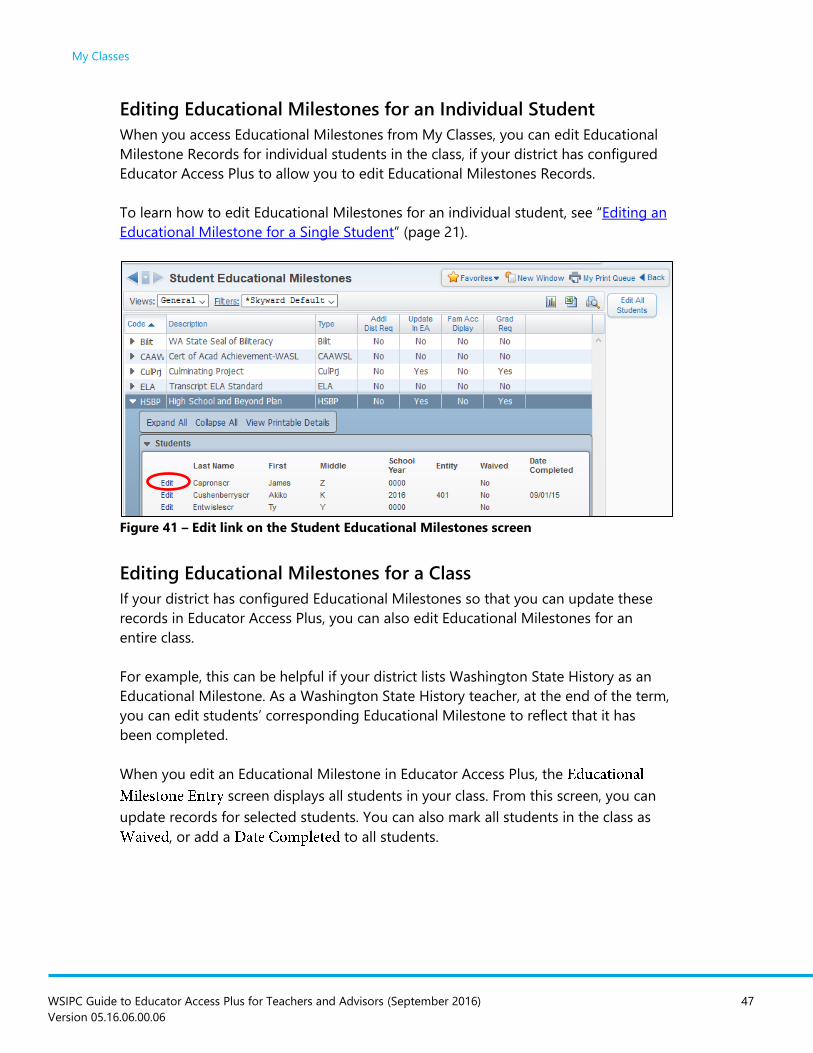
Editing Educational Milestones for an Individual Student
When you access Educational Milestones from My Classes, you can edit Educational
Milestone Records for individual students in the class, if your district has configured
Educator Access Plus to allow you to edit Educational Milestones Records.
To learn how to edit Educational Milestones for an individual student, see “Editing an
Educational Milestone for a Single Student” (page 21).
Figure 41 – Edit link on the Student Educational Milestones screen
Editing Educational Milestones for a Class
If your district has configured Educational Milestones so that you can update these
records in Educator Access Plus, you can also edit Educational Milestones for an
entire class.
For example, this can be helpful if your district lists Washington State History as an
Educational Milestone. As a Washington State History teacher, at the end of the term,
you can edit students’ corresponding Educational Milestone to reflect that it has
been completed.
When you edit an Educational Milestone in Educator Access Plus, the
screen displays all students in your class. From this screen, you can
update records for selected students. You can also mark all students in the class as
, or add a to all students.
My Classes
WSIPC Guide to Educator Access Plus for Teachers and Advisors (September 2016) 48
Version 05.16.06.00.06
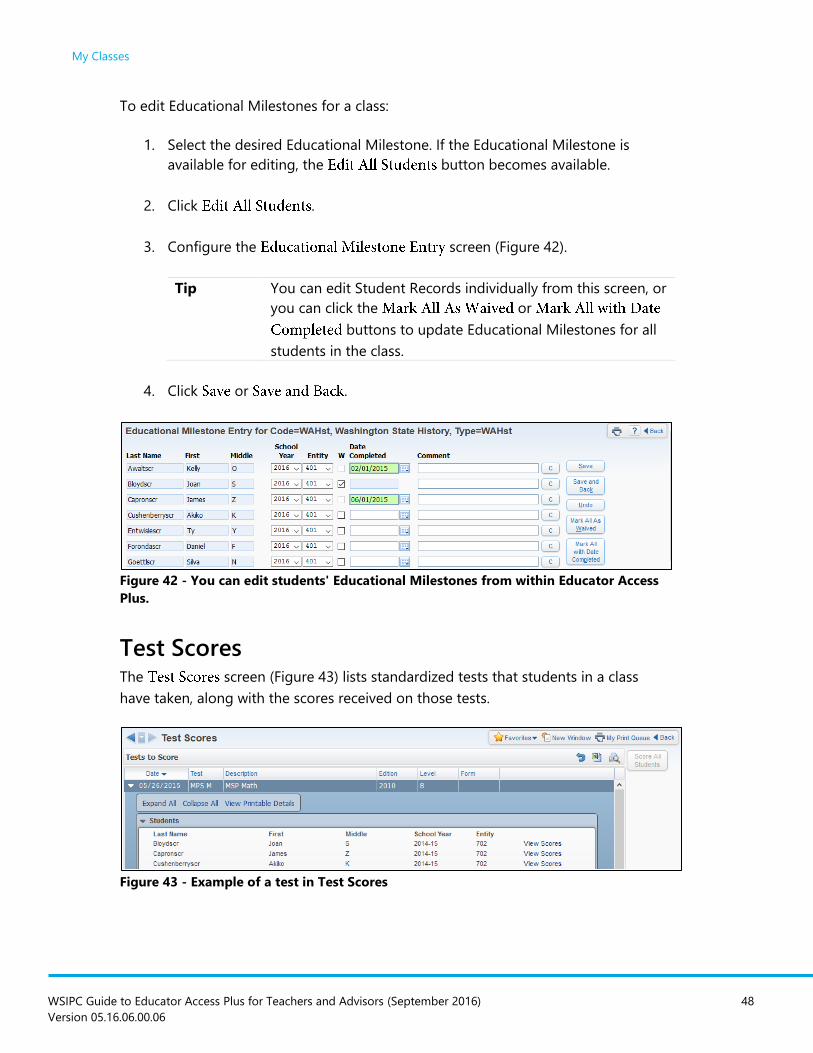
To edit Educational Milestones for a class:
1. Select the desired Educational Milestone. If the Educational Milestone is
available for editing, the button becomes available.
2. Click .
3. Configure the screen (Figure 42).
Tip You can edit Student Records individually from this screen, or
you can click the or
buttons to update Educational Milestones for all
students in the class.
4. Click or .
Figure 42 - You can edit students' Educational Milestones from within Educator Access
Plus.
Test Scores The screen (Figure 43) lists standardized tests that students in a class
have taken, along with the scores received on those tests.
Figure 43 - Example of a test in Test Scores
My Classes
WSIPC Guide to Educator Access Plus for Teachers and Advisors (September 2016) 49
Version 05.16.06.00.06
To see student scores for a test:
1. Expand the Test Score Record for the test you want to view.
2. Click .
3. To the right of the student’s record, click .
Busing You can use the screen to view a list of students in your class. When you
select a student from the list, the screen from the student’s screen
appears. See “My Students” (page 7) to learn more about students’ Profiles in
Educator Access Plus.
Recommendations If your school uses Course Recommendations, you can suggest future Courses for
students enrolled in your classes. These recommended Courses are used in the
Future Scheduling process.
Note You can recommend a Course only if it is configured it to be
assigned as a recommendation.
Making Course Recommendations
You can add recommendations to individual students or groups of students. For
example, if you teach an Algebra Course, you can recommend that some students
take Geometry the following year, some take Trigonometry, and some take Algebra
again.
To make Course Recommendations for a single student:
1. Click .
2. Expand a student’s record.
3. Click .
4. Select the Course you’d like to recommend.
My Classes
WSIPC Guide to Educator Access Plus for Teachers and Advisors (September 2016) 50
Version 05.16.06.00.06
5. Click to move it from the left side of the screen to the right.
6. Click .
To make Course Recommendations for multiple students:
1. Click .
2. On the screen, click .
3. Select the Course you’d like to recommend.
4. Click to move it from the left side of the screen to the right.
5. Review the list of students in the area of the screen and
clear the check box for any students for whom the current recommendation
does not apply.
6. Click .
Curriculum Maps A Curriculum Map identifies key components of the curriculum taught, including
standards, benchmarks, key concepts, activities, assessments, and resources. To learn
more about Curriculum Maps, see the WSIPC Guide to Curriculum Mapping.
Reports You can access a number of reports from the area. Some of these reports
are also available under . Reports appear by category, such as
Gradebook and Progress Reports. To learn more about reports available to teachers
and advisors, see the WSIPC Guide to Secondary Gradebook for Teachers and the
WSIPC Guide to Standards Gradebook for Teachers.
Lesson Scheduler The area contains a detailed description of which activities,
assignments, and assessments are done on a specific day. To learn more about
Lesson Scheduler, see the WSIPC Guide to Lesson Scheduler and Lesson Plans for
Teachers.
My Classes
WSIPC Guide to Educator Access Plus for Teachers and Advisors (September 2016) 51
Version 05.16.06.00.06
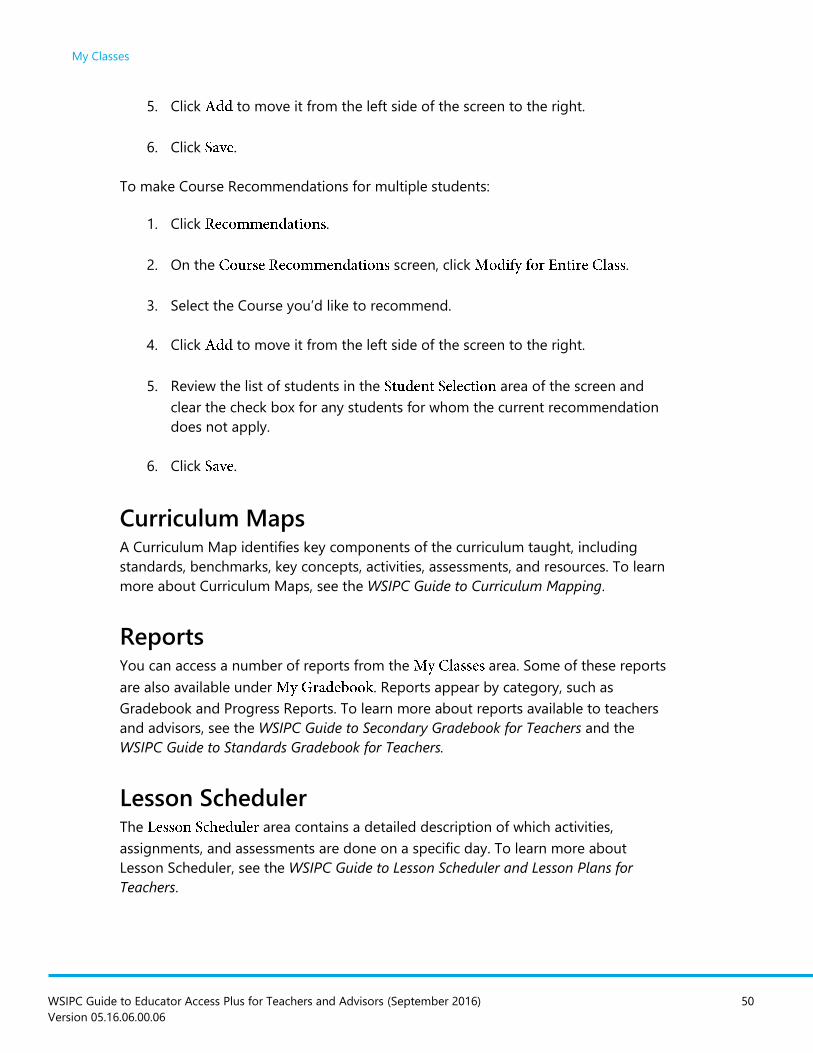
Textbooks You can use the screen (Figure 44) to see which
textbook is assigned to which student in your class. You can also use it to assign and
collect textbooks to and from students. To learn more about textbooks, see the
WSIPC Guide to Textbook.
To view textbooks assigned to a student:
1. Expand the student’s record.
2. Expand the area.
Figure 44 - Viewing textbooks assigned to a student
Assigning Textbooks
You can make textbook assignments at any time, though they are most frequently
done at the beginning of a term.
To assign a textbook to a student:
1. Click .
2. Expand a student’s record.
3. Click .
4. Select a book number from the menu next to the book title.
5. Click .
My Classes
WSIPC Guide to Educator Access Plus for Teachers and Advisors (September 2016) 52
Version 05.16.06.00.06
Collecting Textbooks
Textbook returns are done at any time, usually at the end of a term or when a
student is dropped from the class. If a student loses a textbook, handle the loss the
same way as a return.
To record collection of a book checked out to a student:
1. Click .
2. Expand a student’s record.
3. Click next to the textbook.
4. Enter the following information:
and
OR
5. Click .
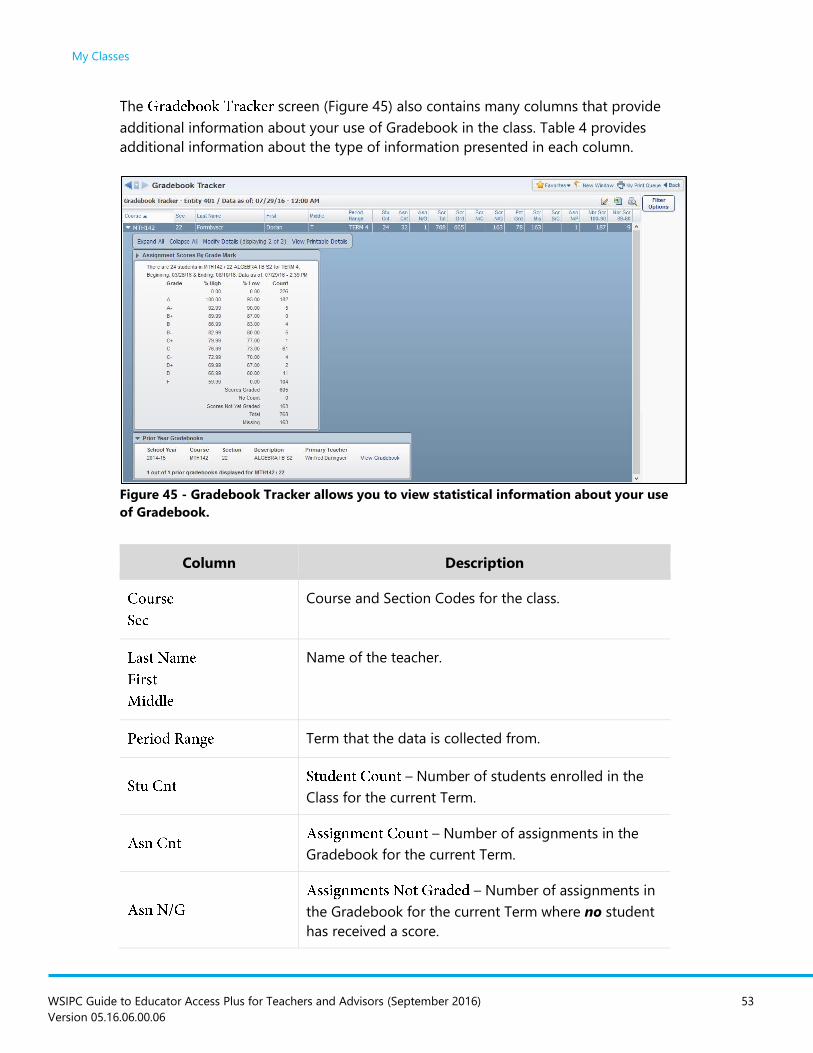
Gradebook Tracker Gradebook Tracker provides statistical information on your Gradebook usage. The
software runs the Gradebook Tracker Utility nightly, so any changes made in your
Gradebook are not reflected in Gradebook Tracker until the next morning.
Gradebook Tracker does not provide real-time information.
There are two expandable areas on the screen:
- Shows a count of all students in your
class for the current term, and a breakdown of the number of assignments
receiving each score.
- Lists any prior instances of the class that you have
taught, and provides a link to your historical Gradebook for
that class.
My Classes
WSIPC Guide to Educator Access Plus for Teachers and Advisors (September 2016) 53
Version 05.16.06.00.06
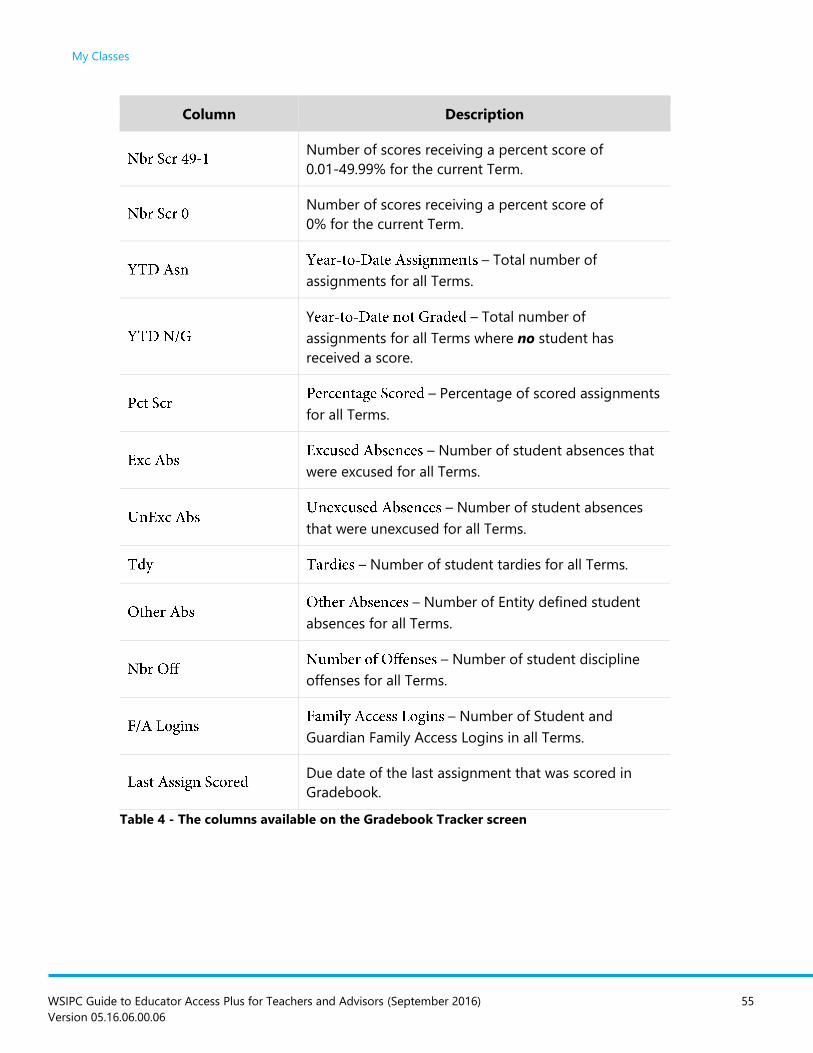
The screen (Figure 45) also contains many columns that provide
additional information about your use of Gradebook in the class. Table 4 provides
additional information about the type of information presented in each column.
Figure 45 - Gradebook Tracker allows you to view statistical information about your use
of Gradebook.
Column Description
Course and Section Codes for the class.
Name of the teacher.
Term that the data is collected from.
– Number of students enrolled in the
Class for the current Term.
– Number of assignments in the
Gradebook for the current Term.
– Number of assignments in
the Gradebook for the current Term where no student
has received a score.

My Classes
WSIPC Guide to Educator Access Plus for Teachers and Advisors (September 2016) 54
Version 05.16.06.00.06
Column Description
– Total number of possible assignment
scores for the current Term (number of assignments x
number of students).
– Total number of assignment scores
that have been Graded for the current Term.
– Total number of assignments
marked as for the current Term.
– Total number of assignment
scores that have not been Graded for the current Term.
– Percentage of assignments that
have been scored or marked as for the
current Term (rounded to the nearest percent).
– Total number of assignments marked
as for the current Term.
– Total number of
assignments marked with a for the
current Term.
– Total number of scored
assignments that have the check
box cleared for the current Term.
Number of scores receiving a percent score of
90-100% for the current Term.
Number of scores receiving a percent score of
80-89.99% for the current Term.
Number of scores receiving a percent score of
70-79.99% for the current Term.
Number of scores receiving a percent score of
60-69.99% for the current Term.
Number of scores receiving a percent score of
50-59.99% for the current Term.
My Classes
WSIPC Guide to Educator Access Plus for Teachers and Advisors (September 2016) 55
Version 05.16.06.00.06
Column Description
Number of scores receiving a percent score of
0.01-49.99% for the current Term.
Number of scores receiving a percent score of
0% for the current Term.
– Total number of
assignments for all Terms.
Y – Total number of
assignments for all Terms where no student has
received a score.
– Percentage of scored assignments
for all Terms.
– Number of student absences that
were excused for all Terms.
– Number of student absences
that were unexcused for all Terms.
– Number of student tardies for all Terms.
– Number of Entity defined student
absences for all Terms.
– Number of student discipline
offenses for all Terms.
– Number of Student and
Guardian Family Access Logins in all Terms.
Due date of the last assignment that was scored in
Gradebook.
Table 4 - The columns available on the Gradebook Tracker screen
My Classes
WSIPC Guide to Educator Access Plus for Teachers and Advisors (September 2016) 56
Version 05.16.06.00.06
Online Assignment Templates The area allows you to create assignment templates
that can be attached to assignments that students can complete in Student Access.
You can have these assignments automatically scored and put directly into your
Gradebook. To learn more about Online Assignments, see the WSIPC Guide to Online
Assignments for Teachers.
Custom Forms The screen shows all Custom Forms that are created for students in
your class. You may be able to enter information into the student’s Custom Forms
from the screen. To learn more about Custom Forms, see the WSIPC Guide to Custom
Forms in Student Management.
WSIPC Guide to Educator Access Plus for Teachers and Advisors (September 2016) 57
Version 05.16.06.00.06
My Lesson Scheduler
A Lesson Schedule is a detailed description of what activities, assignments, and
assessments are done on a specific day in a class. Lesson Scheduler is a separate
module and is not covered in this Guide. To learn more about Lesson Scheduler, see
the WSIPC Guide to Lesson Scheduler and Lesson Plans for Teachers.
WSIPC Guide to Educator Access Plus for Teachers and Advisors (September 2016) 58
Version 05.16.06.00.06
Post Daily Attendance
You can take attendance for the current day only, using .
Posting daily attendance involves the following processes:
Accessing the Class Listing
Choosing an Attendance Method
Configuring the Seating Chart
This section explains each process.
Note You must take attendance even if no students are absent.
Attendance is not recorded until you click on the
screen.
Accessing the Class Listing Before you can take attendance, you must access the class listing. This allows you to
see which classes you take attendance for.
Note The procedures in “Choosing an Attendance Method” (page 60) and
“Configuring the Seating Chart” (page 64) assume that you have
accessed the class listing.
To access the class listing:
1. Go to Educator Access Plus\Teacher Access\Post Daily Attendance.
2. If desired, click , or Figure 46 to
determine whether only classes from the entire school year, classes from the
current term, or only classes that meet today appear.

Post Daily Attendance
WSIPC Guide to Educator Access Plus for Teachers and Advisors (September 2016) 59
Version 05.16.06.00.06
3. Do one of the following:
Next to , click . This view lets you take attendance for each
class individually, either or Additionally,
you can click to place the students in a seating
arrangement that is viewed when taking attendance .
Next to , click If you teach more than one class in the
same period, such as Pre-Algebra and Algebra I, this view allows you
to take attendance for the classes with . If you teach more
than one class in the same period, and
is not available (Figure 46).
4. Continue to “Choosing an Attendance Method” (page 60).
Figure 46 - The class list is currently set to Only Show Current Classes, and the Period
View is selected. The By Seating Chart and Assign Seats options aren’t available because
the teacher has two classes scheduled for Period 5.
Tip Select (Figure 46) to view only your classes
that are scheduled to meet on the day you take attendance.
Post Daily Attendance
WSIPC Guide to Educator Access Plus for Teachers and Advisors (September 2016) 60
Version 05.16.06.00.06
Choosing an Attendance Method You can take attendance using either a class roster or a seating chart. Either of these
methods is acceptable when taking attendance. This section describes both methods.
Taking Daily Attendance Using a Class Roster You can take attendance using a class roster. This method is available whether you
select the or view.
To take daily attendance using a class roster:
1. Click next to the class or period for which you want to take
attendance.
2. Select or if a student is not present. The default value selected
for all students is .
3. Click to return to the screen.
Editing Daily Attendance Using a Class Roster
After you take attendance, you can edit attendance until a predetermined time set by
your district, usually at the end of the school day. For example, you may need to do
this if a student arrives to class late and you need to change the Attendance Record
from Absent to Tardy.
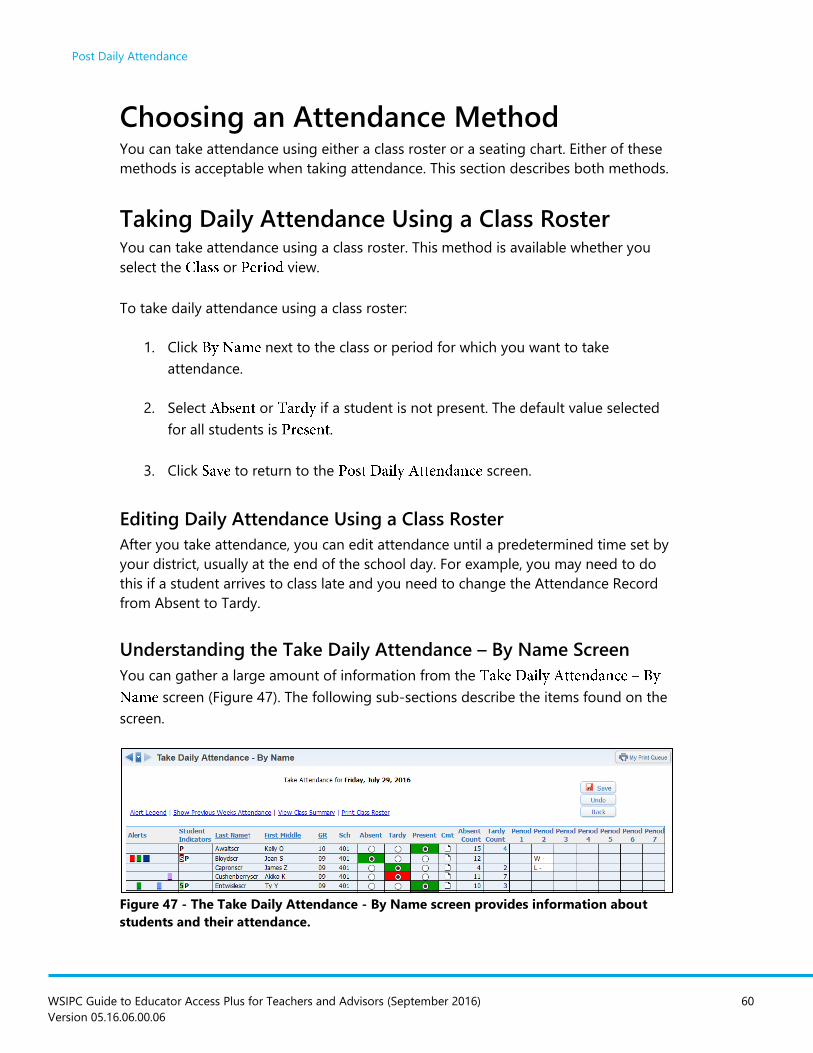
Understanding the Take Daily Attendance – By Name Screen
You can gather a large amount of information from the
screen (Figure 47). The following sub-sections describe the items found on the
screen.
Figure 47 - The Take Daily Attendance - By Name screen provides information about
students and their attendance.

Post Daily Attendance
WSIPC Guide to Educator Access Plus for Teachers and Advisors (September 2016) 61
Version 05.16.06.00.06
Viewing Alert Indicators and Student Indicators
On the class roster, you may see some students with color blocks in the or
column. In some cases, you may be able to click the Alert or
Student Indicator color block to reveal additional information.
Accessing the Student Profile
You can click on a student’s name on the class roster to access the student’s Profile
information. To learn more about student Profiles in Educator Access Plus, see “My
Students” (page 7).
Absent Count and Tardy Count Columns
The and columns show the total number of absences
and tardies each student has incurred since the first day of class.
Attendance Display Options
You can choose to show students’ attendance history for the current class in previous
weeks or the students’ attendance for the current day for all periods.
To change your Attendance Display Options:
At the top of the screen, click
or .
Figure 48 shows the screen with
selected. When a student is present, the corresponding
cell is blank. If a student is absent or tardy for a period, the Attendance Type and
Reason Codes appear in the corresponding cell. Pause your mouse pointer over an
Absence Code to see the definition of that code (Figure 48).
Figure 48 - The Take Daily Attendance - By Name screen with the Show Today’s
Attendance for All Periods option selected. An Absence Code definition tool tip is
highlighted.
Post Daily Attendance
WSIPC Guide to Educator Access Plus for Teachers and Advisors (September 2016) 62
Version 05.16.06.00.06
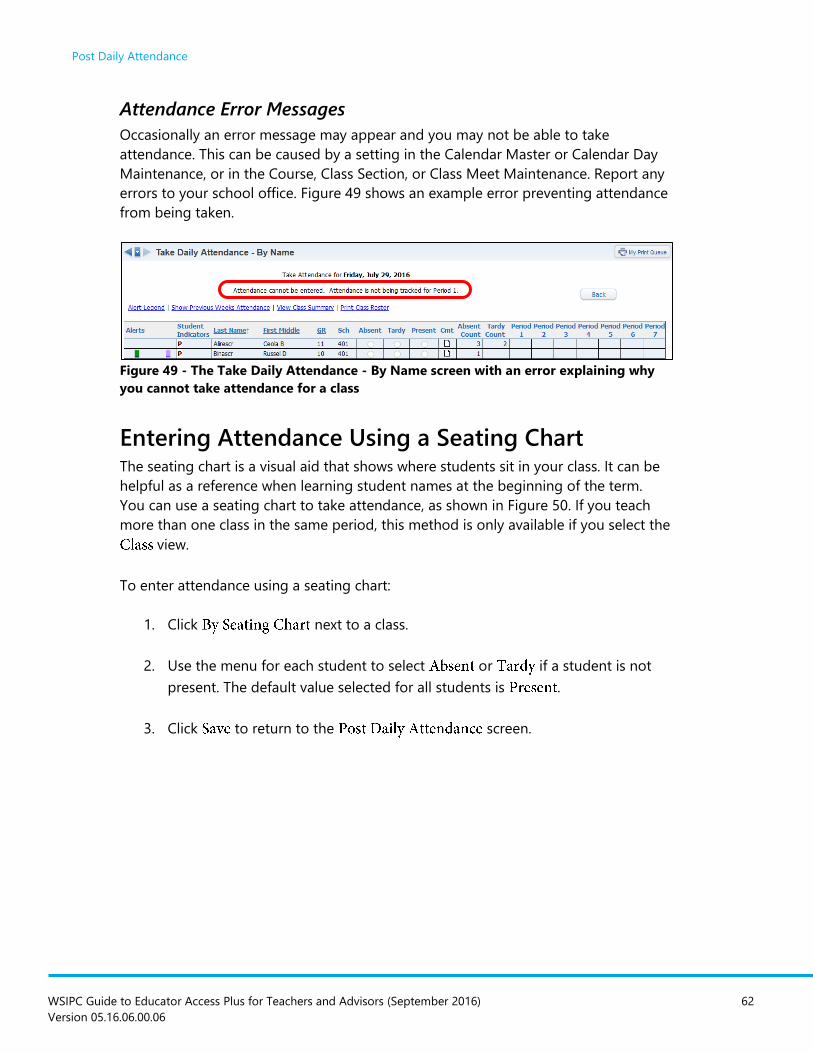
Attendance Error Messages
Occasionally an error message may appear and you may not be able to take
attendance. This can be caused by a setting in the Calendar Master or Calendar Day
Maintenance, or in the Course, Class Section, or Class Meet Maintenance. Report any
errors to your school office. Figure 49 shows an example error preventing attendance
from being taken.
Figure 49 - The Take Daily Attendance - By Name screen with an error explaining why
you cannot take attendance for a class
Entering Attendance Using a Seating Chart The seating chart is a visual aid that shows where students sit in your class. It can be
helpful as a reference when learning student names at the beginning of the term.
You can use a seating chart to take attendance, as shown in Figure 50. If you teach
more than one class in the same period, this method is only available if you select the
view.
To enter attendance using a seating chart:
1. Click next to a class.
2. Use the menu for each student to select or if a student is not
present. The default value selected for all students is .
3. Click to return to the screen.
Post Daily Attendance
WSIPC Guide to Educator Access Plus for Teachers and Advisors (September 2016) 63
Version 05.16.06.00.06
Figure 50 - Taking attendance using a seating chart. Note the alert indicators below
several students’ names.
Editing Daily Attendance Using a Seating Chart
After you take attendance for a class, you can edit attendance until a predetermined
time set by your district, usually at the end of the school day. For example, you may
need to do this if a student arrives in class late and you need to change the
Attendance Record from Absent to Tardy.
Viewing Alert Indicators and Student Indicators
In the seating chart, you may see some students with color blocks in the row.
To see what each color represents, click . On some Alerts, you may be
able to click the color block to reveal more information.
Accessing the Student Profile
Click on a student’s name on the seating chart to access the student’s Profile
information. To learn more about student Profiles in Educator Access Plus, see “My
Students” (page 7).
Printing Seating Charts
When a teacher is absent and a substitute is teaching the class, print a copy of the
seating chart for the substitute’s use to learn students’ names and take attendance.
To print the seating chart:
Click and use your Web browser’s print function.

Post Daily Attendance
WSIPC Guide to Educator Access Plus for Teachers and Advisors (September 2016) 64
Version 05.16.06.00.06
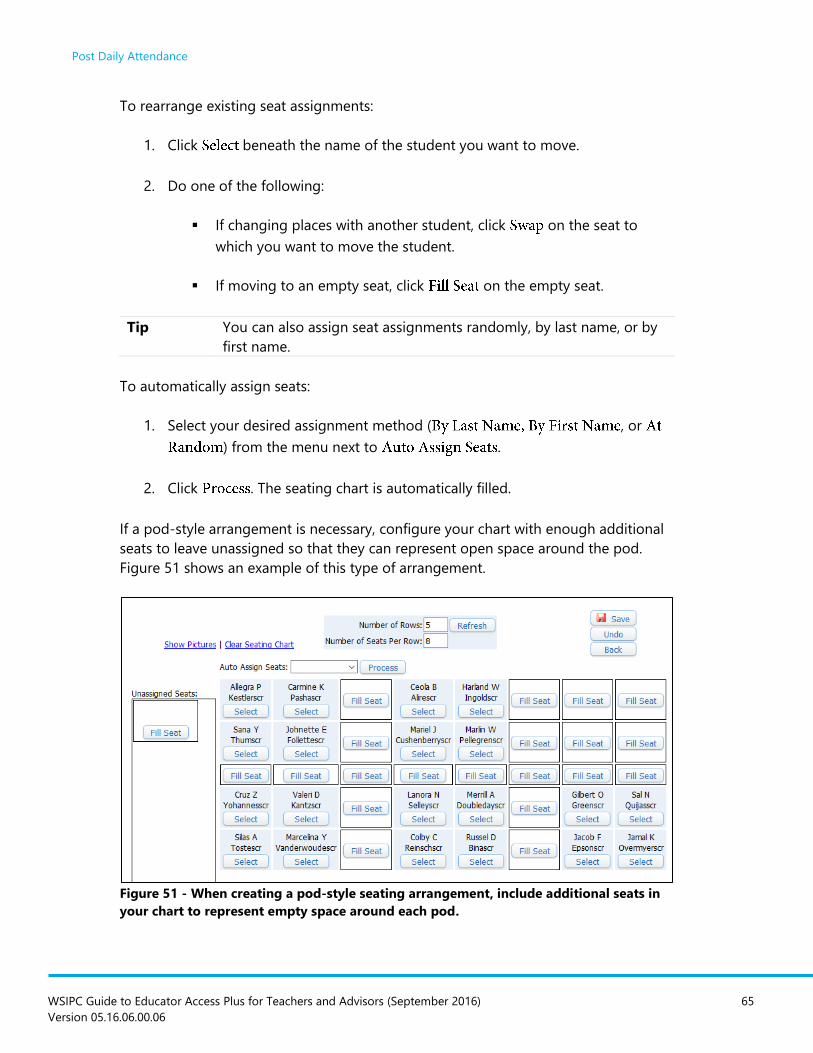
Configuring the Seating Chart You can use the tool to create and edit seating charts. You cannot
configure seating charts when you select the view for periods that have
multiple classes.
To configure the seating chart for a class:
Click
To change the number of rows and seats per row on a seating chart:
1. In the box at the top of the screen, enter the desired
number of rows.
2. In the box, enter the desired number of seats per
row.
3. Click to update the screen. The new arrangement appears.
Note If you do not see all students enrolled in your class, there are not
enough seats available. Add more rows or more seats per row.
To determine whether student photos appear in the seating chart:
Click or .
Assigning Seats
Once you arrange the seating chart, you can assign students to each seat. There are
several ways to do this.
To assign a student to an empty seat:
1. Locate the desired student in the list.
2. Click below the student’s name.
3. Click on the appropriate seat location.
Post Daily Attendance
WSIPC Guide to Educator Access Plus for Teachers and Advisors (September 2016) 65
Version 05.16.06.00.06
To rearrange existing seat assignments:
1. Click beneath the name of the student you want to move.
2. Do one of the following:
If changing places with another student, click on the seat to
which you want to move the student.
If moving to an empty seat, click on the empty seat.
Tip You can also assign seat assignments randomly, by last name, or by
first name.
To automatically assign seats:
1. Select your desired assignment method ( , or
) from the menu next to .
2. Click . The seating chart is automatically filled.
If a pod-style arrangement is necessary, configure your chart with enough additional
seats to leave unassigned so that they can represent open space around the pod.
Figure 51 shows an example of this type of arrangement.
Figure 51 - When creating a pod-style seating arrangement, include additional seats in
your chart to represent empty space around each pod.
Post Daily Attendance
WSIPC Guide to Educator Access Plus for Teachers and Advisors (September 2016) 66
Version 05.16.06.00.06
Unassigning Seats
You can unassign students from their seats at any time during the term.
To unassign seats:
1. Do one of the following:
If you want to unassign all seats, click
If you want to unassign seats individually, click under the
student’s name.
2. When you finish working with the seating chart, click
WSIPC Guide to Educator Access Plus for Teachers and Advisors (September 2016) 67
Version 05.16.06.00.06
Positive Attendance
The area of Educator Access Plus allows you to track students as
they check in or out of different locations in the district. Students do not have to be
scheduled into a class in the room they are checking in to, nor with the teacher
overseeing the room. For example, students are allowed to go to several locations
during a period of the day for Study Hall or focused support, and the district wants
to track where the students go. Positive Attendance has also been used in Alternative
Learning settings where the district wants to record contact time. If your Security
level allows, you can set up a dedicated computer or kiosk where students can check
in and out of the room or area.
Positive Attendance uses the Attendance Period Time Code associated with a Bell
Schedule (which is associated with the Calendar Day) to identify the period of the day
that a student is checking in or out of a location. Use an Absence Type Code that is
unique to the Positive Attendance Record to help differentiate between a Positive
Attendance Record and an Absence Record. You can also include the Location and
Absence Reason Codes in the Positive Attendance Record.
Your district has two options for tracking Positive Attendance:
Option 1 - Create an Attendance Record using a unique Absence Type Code
and an optional Absence Reason Code when a student checks in to a
location. This option allows you to report on who checked in to a location.
Option 2 - Have the office use a utility to add an Attendance Type (such as
“No Show”) to each student and have the Positive Attendance process
remove the Absence Type and reason from the selected period for students
entering the room. This option allows you to report on which students did not
check in to a location.
Positive Attendance
WSIPC Guide to Educator Access Plus for Teachers and Advisors (September 2016) 68
Version 05.16.06.00.06
Setting Up Positive Attendance Scanning The screen identifies where the student is checking in to,
what period to update, the option to use, which Scan Mode
(Staff Monitored or Student Only) to use, and the defaults for Student Lookup.
Figure 52 shows the screen. Table 5 describes the options
on this screen.
Figure 52 - The Positive Attendance Setup screen using the option to Fill Period with an
Absence Type
Option Description
Entity taking Positive Attendance. All Entities that your
Security level allows access to appear for selection. This
is typically the location of the Building and Room.
Building and Room the students are checking in to. The
available rooms are based on the selected building. The
Location is optional and is used to identify a specific
location within a room, such as a sub-area of a larger
room.
Positive Attendance
WSIPC Guide to Educator Access Plus for Teachers and Advisors (September 2016) 69
Version 05.16.06.00.06
Option Description
Mode used on the scanning screen. Your district may
use a third-party system to scan IDs. The Scan Modes
are described below.
- A staff member checks in the
students. A staff member must ok the scan before the
Attendance Record is saved.
- Students scan themselves in. A staff
member doesn’t monitor the students. After students
enter their ID, the records are saved without any
confirmation from the students.
Allows the user’s Login ID to be automatically populated
on the login screen without exiting the Scan Mode. This
option is only available when the Scan Mode is set to
.
Type of identifier used to look up a student’s record on
the screen.
Allows users to see name suggestions while entering
Name Keys when Scan Mode is set to
and Student Lookup is set to .
Allows you to select which Entity the attendance is tied
to if students from multiple Entities in the district can
check in to the Room. Options include:
Creates the Attendance Record in
the Entity specified in the field, which
may be different than the student’s default Entity.
Creates the Attendance
Record in the student’s default Entity. You might use
this option if students from across the district have the
choice to attend the class in this location’s Building or
Room.
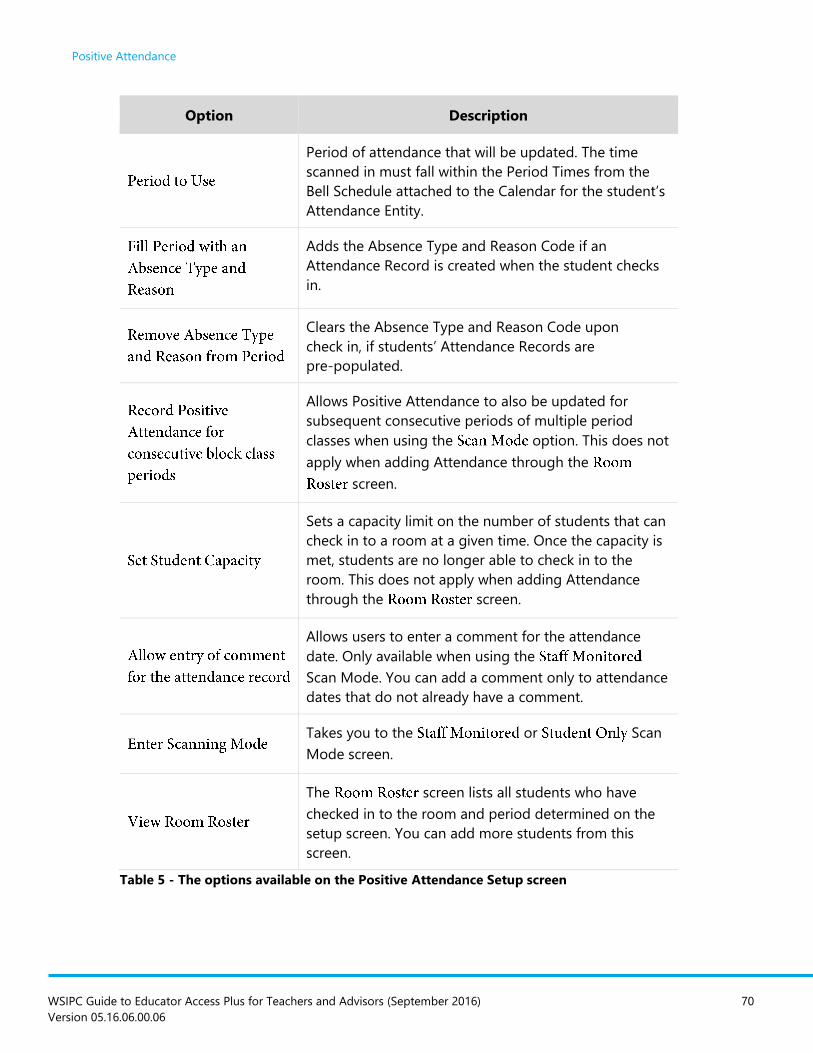
Positive Attendance
WSIPC Guide to Educator Access Plus for Teachers and Advisors (September 2016) 70
Version 05.16.06.00.06
Option Description
Period of attendance that will be updated. The time
scanned in must fall within the Period Times from the
Bell Schedule attached to the Calendar for the student’s
Attendance Entity.
Adds the Absence Type and Reason Code if an
Attendance Record is created when the student checks
in.
Clears the Absence Type and Reason Code upon
check in, if students’ Attendance Records are
pre-populated.
Allows Positive Attendance to also be updated for
subsequent consecutive periods of multiple period
classes when using the option. This does not
apply when adding Attendance through the
screen.
Sets a capacity limit on the number of students that can
check in to a room at a given time. Once the capacity is
met, students are no longer able to check in to the
room. This does not apply when adding Attendance
through the screen.
Allows users to enter a comment for the attendance
date. Only available when using the
Scan Mode. You can add a comment only to attendance
dates that do not already have a comment.
Takes you to the or Scan
Mode screen.
The screen lists all students who have
checked in to the room and period determined on the
setup screen. You can add more students from this
screen.
Table 5 - The options available on the Positive Attendance Setup screen
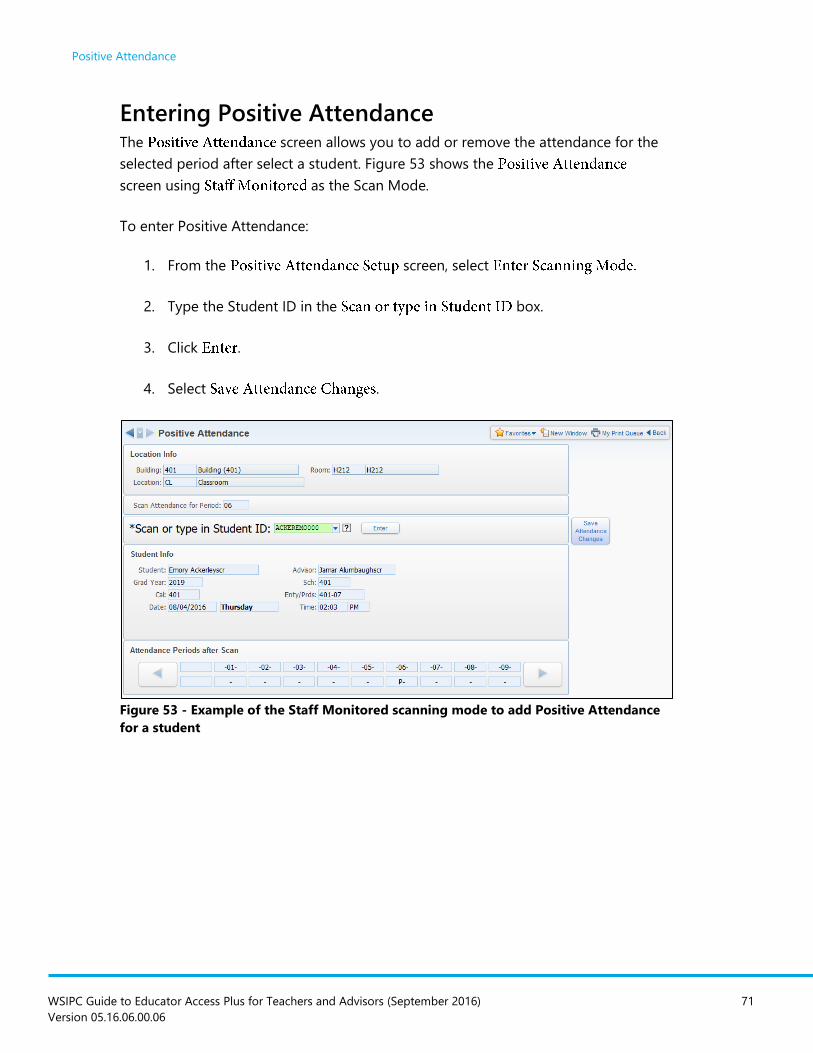
Positive Attendance
WSIPC Guide to Educator Access Plus for Teachers and Advisors (September 2016) 71
Version 05.16.06.00.06
Entering Positive Attendance The screen allows you to add or remove the attendance for the
selected period after select a student. Figure 53 shows the
screen using as the Scan Mode.
To enter Positive Attendance:
1. From the screen, select
2. Type the Student ID in the box.
3. Click .
4. Select .
Figure 53 - Example of the Staff Monitored scanning mode to add Positive Attendance
for a student
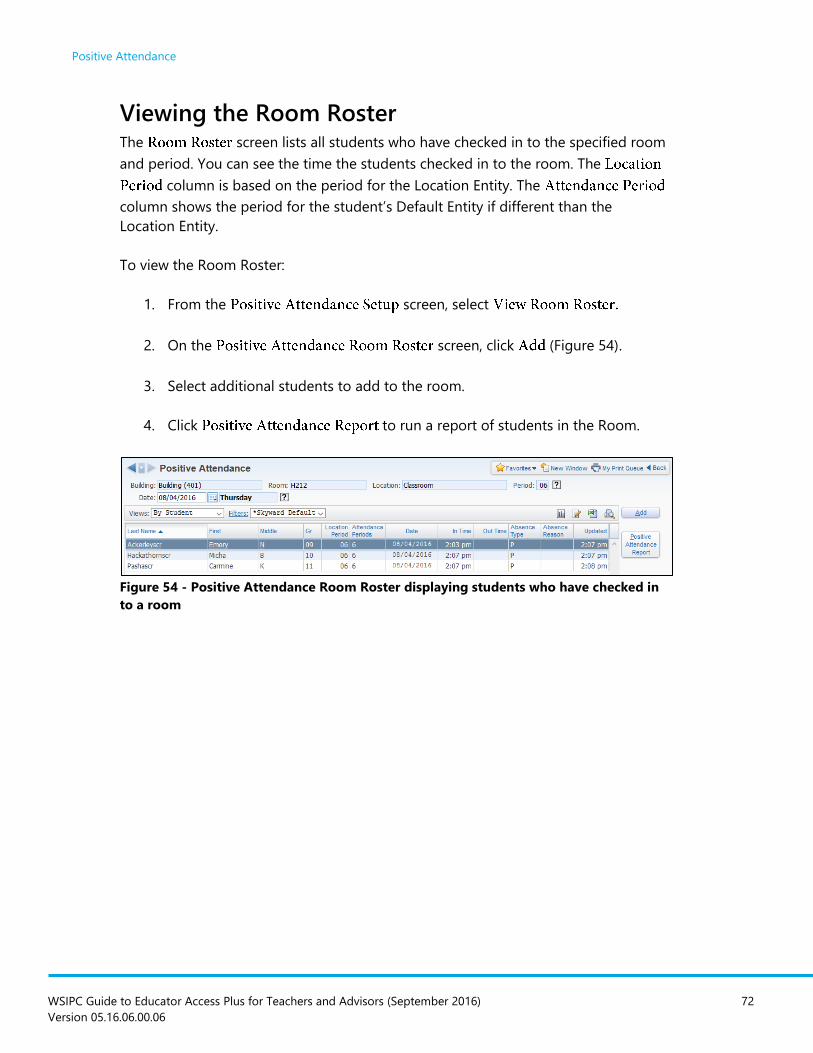
Positive Attendance
WSIPC Guide to Educator Access Plus for Teachers and Advisors (September 2016) 72
Version 05.16.06.00.06
Viewing the Room Roster The screen lists all students who have checked in to the specified room
and period. You can see the time the students checked in to the room. The
column is based on the period for the Location Entity. The
column shows the period for the student’s Default Entity if different than the
Location Entity.
To view the Room Roster:
1. From the screen, select
2. On the screen, click (Figure 54)
3. Select additional students to add to the room.
4. Click to run a report of students in the Room.
Figure 54 - Positive Attendance Room Roster displaying students who have checked in
to a room
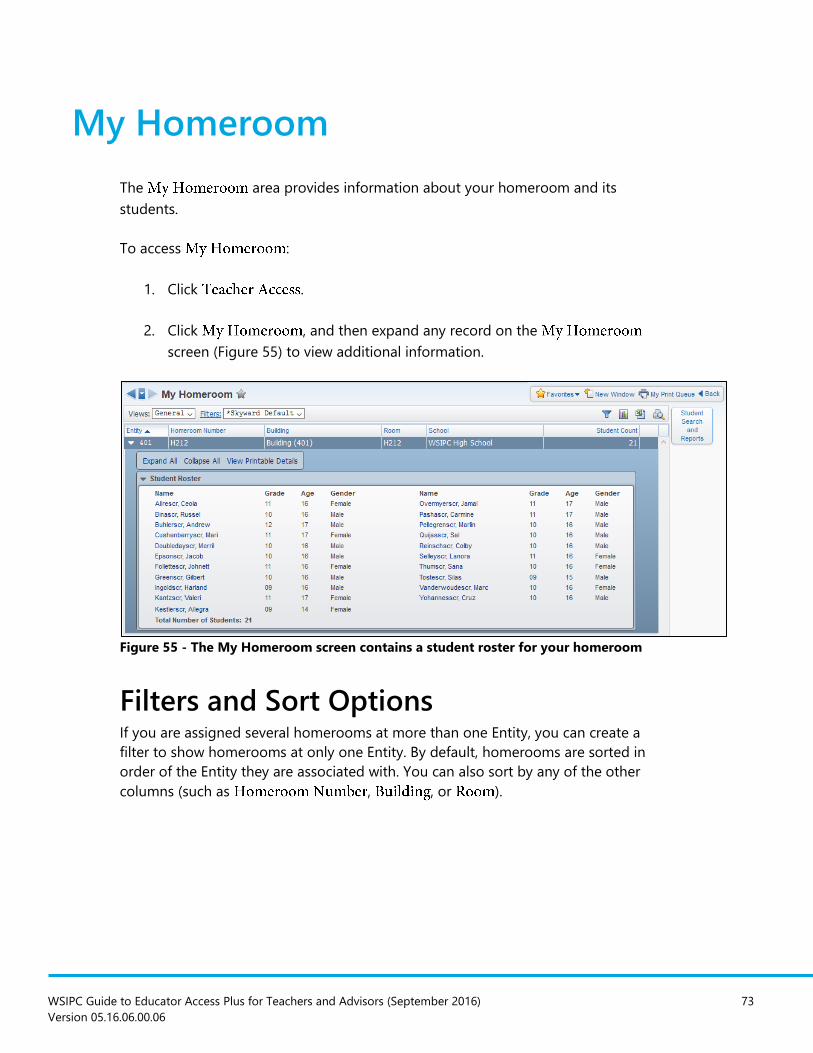
WSIPC Guide to Educator Access Plus for Teachers and Advisors (September 2016) 73
Version 05.16.06.00.06
My Homeroom
The area provides information about your homeroom and its
students.
To access :
1. Click .
2. Click , and then expand any record on the
screen (Figure 55) to view additional information.
Figure 55 - The My Homeroom screen contains a student roster for your homeroom
Filters and Sort Options If you are assigned several homerooms at more than one Entity, you can create a
filter to show homerooms at only one Entity. By default, homerooms are sorted in
order of the Entity they are associated with. You can also sort by any of the other
columns (such as , , or ).
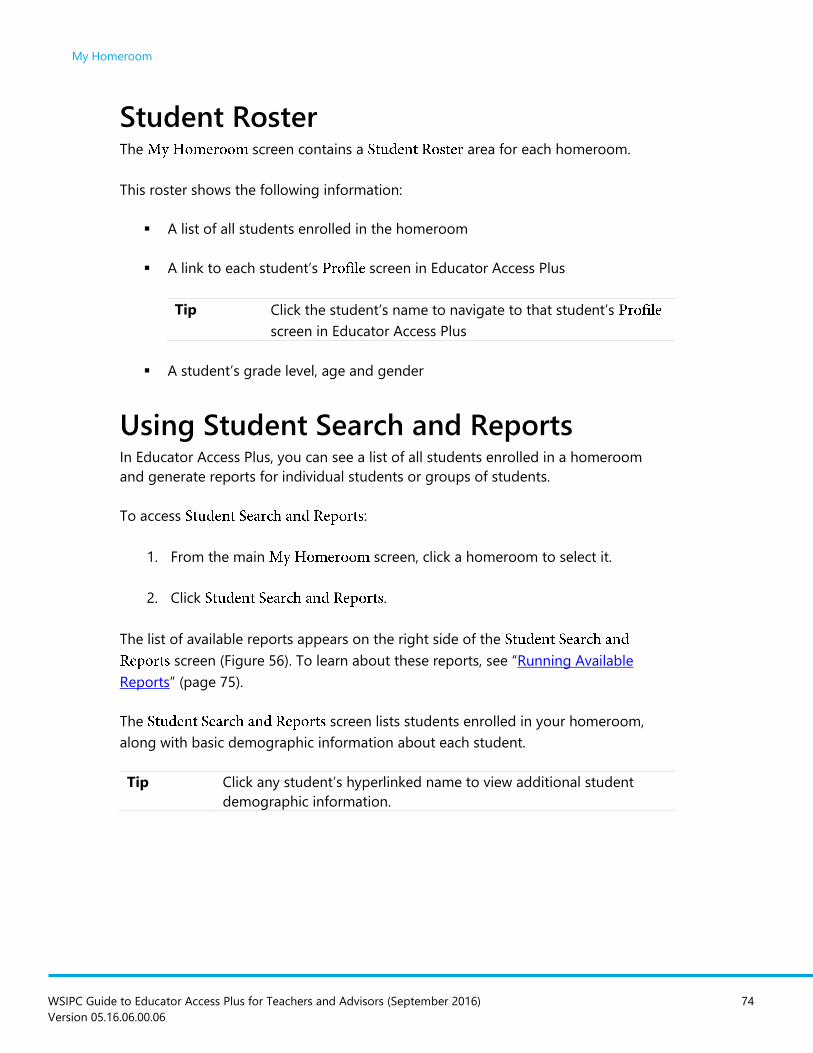
My Homeroom
WSIPC Guide to Educator Access Plus for Teachers and Advisors (September 2016) 74
Version 05.16.06.00.06
Student Roster The screen contains a area for each homeroom.
This roster shows the following information:
A list of all students enrolled in the homeroom
A link to each student’s screen in Educator Access Plus
Tip Click the student’s name to navigate to that student’s
screen in Educator Access Plus
A student’s grade level, age and gender
Using Student Search and Reports In Educator Access Plus, you can see a list of all students enrolled in a homeroom
and generate reports for individual students or groups of students.
To access :
1. From the main screen, click a homeroom to select it.
2. Click .
The list of available reports appears on the right side of the
screen (Figure 56). To learn about these reports, see “Running Available
Reports” (page 75).
The screen lists students enrolled in your homeroom,
along with basic demographic information about each student.
Tip Click any student’s hyperlinked name to view additional student
demographic information.
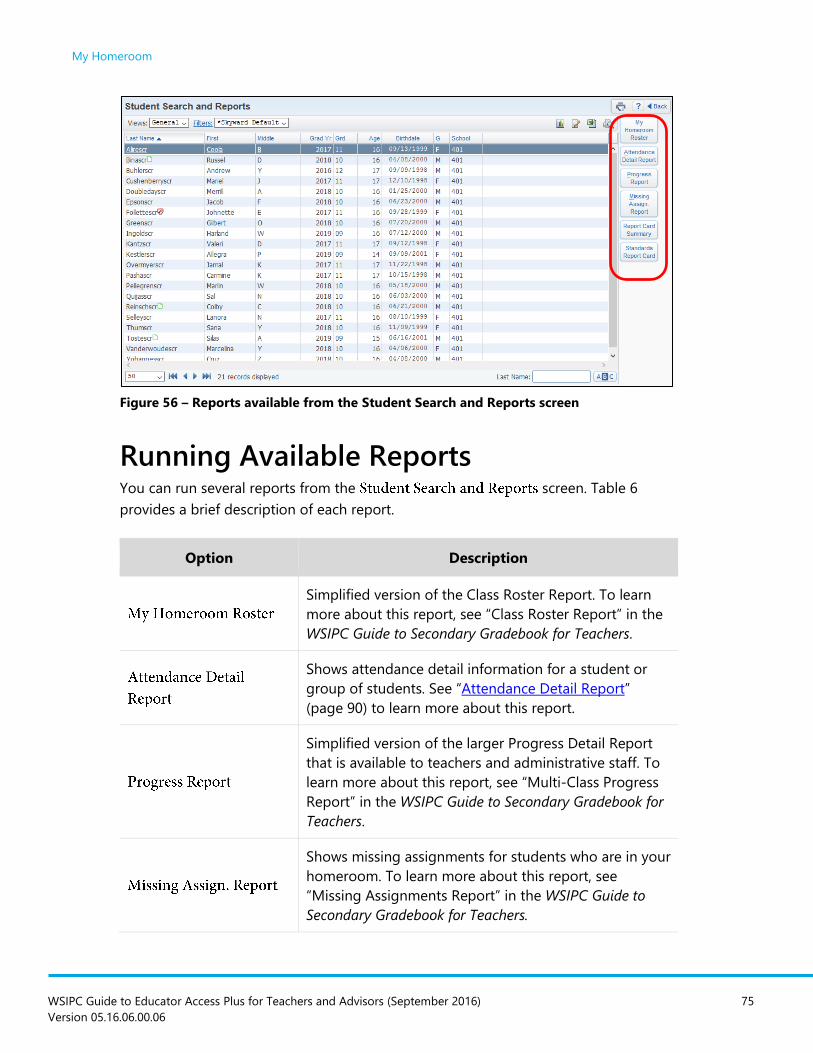
My Homeroom
WSIPC Guide to Educator Access Plus for Teachers and Advisors (September 2016) 75
Version 05.16.06.00.06
Figure 56 – Reports available from the Student Search and Reports screen
Running Available Reports You can run several reports from the screen. Table 6
provides a brief description of each report.
Option Description
Simplified version of the Class Roster Report. To learn
more about this report, see “Class Roster Report” in the
WSIPC Guide to Secondary Gradebook for Teachers.
Shows attendance detail information for a student or
group of students. See “Attendance Detail Report”
(page 90) to learn more about this report.
Simplified version of the larger Progress Detail Report
that is available to teachers and administrative staff. To
learn more about this report, see “Multi-Class Progress
Report” in the WSIPC Guide to Secondary Gradebook for
Teachers.
Shows missing assignments for students who are in your
homeroom. To learn more about this report, see
“Missing Assignments Report” in the WSIPC Guide to
Secondary Gradebook for Teachers.
My Homeroom
WSIPC Guide to Educator Access Plus for Teachers and Advisors (September 2016) 76
Version 05.16.06.00.06
Option Description
Shows individual or multiple students’ Report Cards. See
“Report Card Summary“ (page 92) to learn more about
this report.
Provides a report of students’ academic progress. To
learn more about this report, see “Standards Report
Card” in the WSIPC Guide to Standards Gradebook for
Teachers.
Table 6 - The reports available from the Student Search and Reports screen
WSIPC Guide to Educator Access Plus for Teachers and Advisors (September 2016) 77
Version 05.16.06.00.06
My Activities
The area allows you to view information and run reports on students in
activities for which you are an activity leader or activity assistant. To learn more about
the options available in this area, see the WSIPC Guide to Educator Access Plus for
Activity Leaders and Assistants.
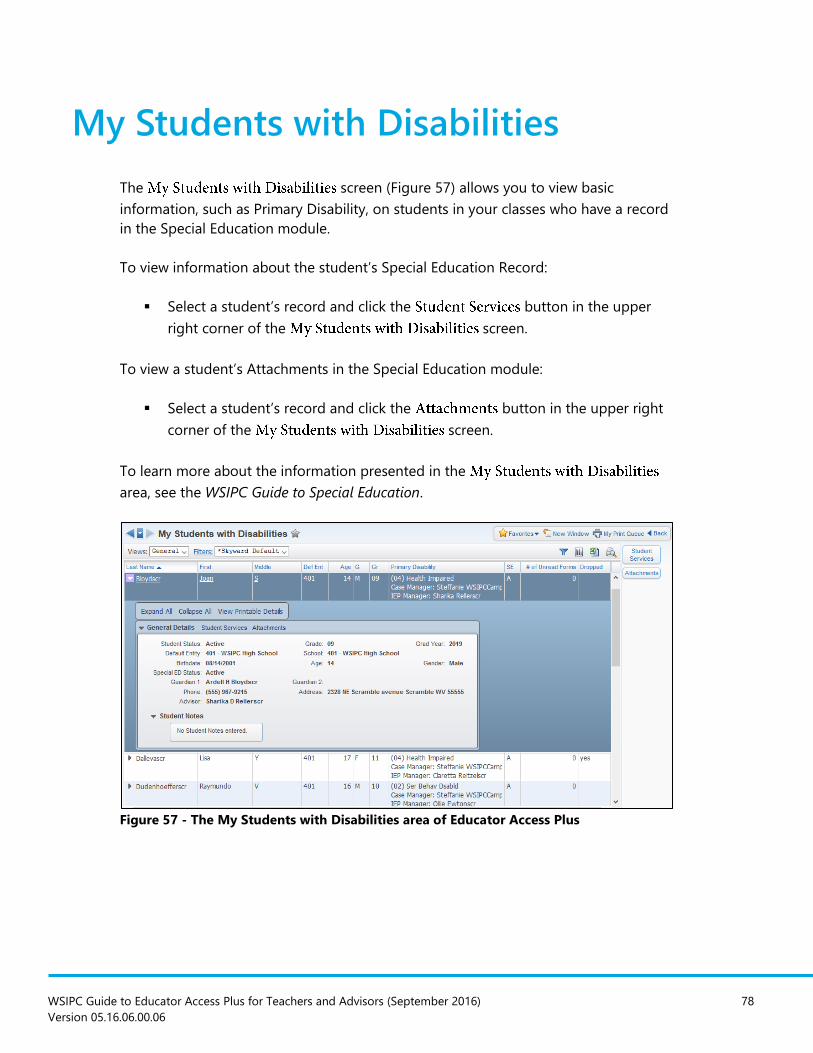
WSIPC Guide to Educator Access Plus for Teachers and Advisors (September 2016) 78
Version 05.16.06.00.06
My Students with Disabilities
The screen (Figure 57) allows you to view basic
information, such as Primary Disability, on students in your classes who have a record
in the Special Education module.
To view information about the student’s Special Education Record:
Select a student’s record and click the button in the upper
right corner of the screen.
To view a student’s Attachments in the Special Education module:
Select a student’s record and click the button in the upper right
corner of the screen.
To learn more about the information presented in the
area, see the WSIPC Guide to Special Education.
Figure 57 - The My Students with Disabilities area of Educator Access Plus
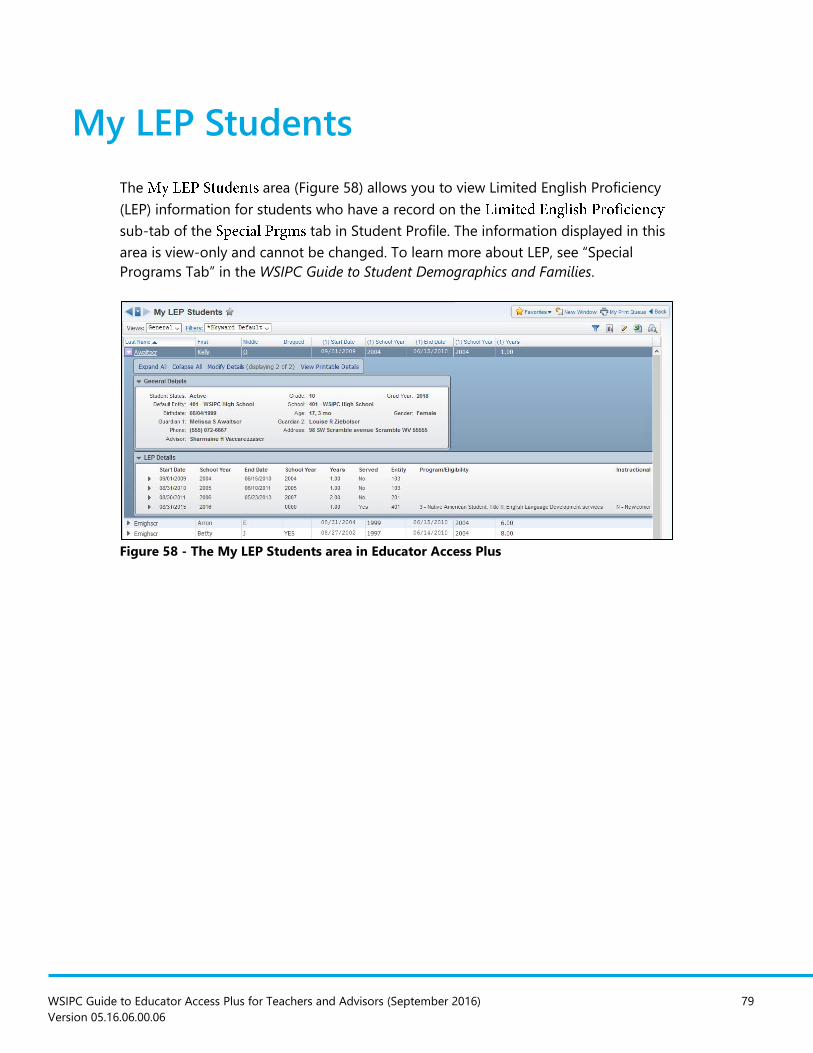
WSIPC Guide to Educator Access Plus for Teachers and Advisors (September 2016) 79
Version 05.16.06.00.06
My LEP Students
The area (Figure 58) allows you to view Limited English Proficiency
(LEP) information for students who have a record on the
sub-tab of the tab in Student Profile. The information displayed in this
area is view-only and cannot be changed. To learn more about LEP, see “Special
Programs Tab” in the WSIPC Guide to Student Demographics and Families.
Figure 58 - The My LEP Students area in Educator Access Plus
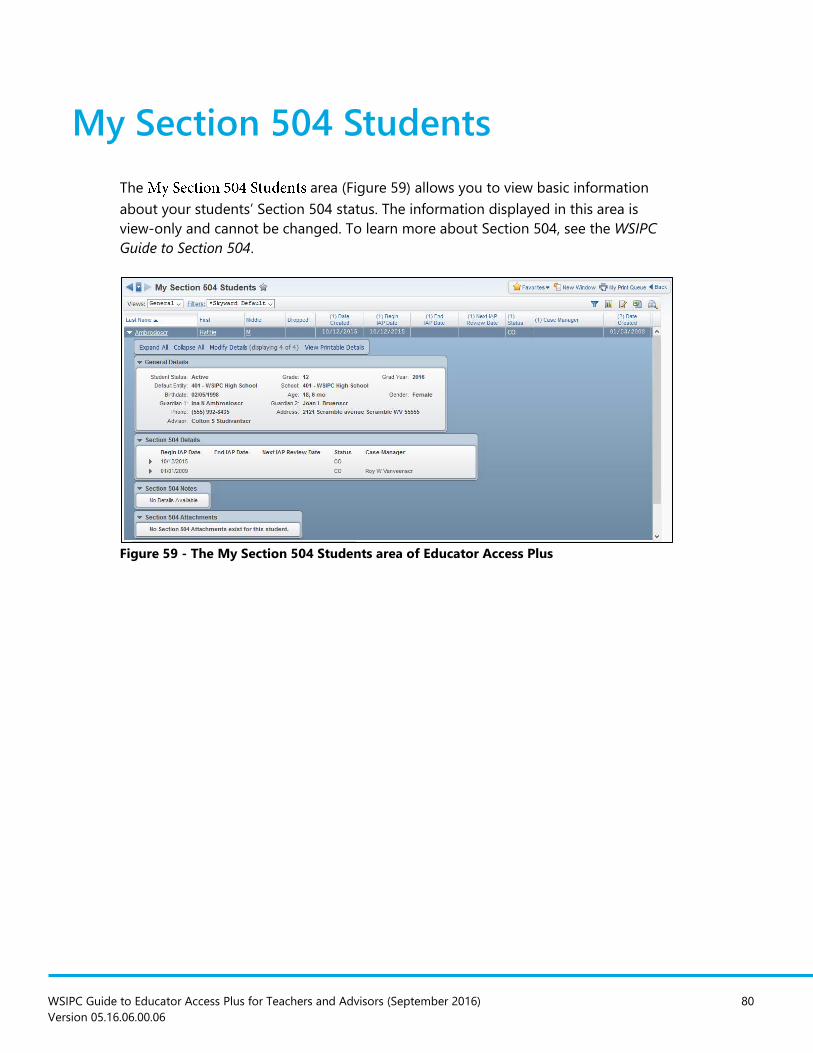
WSIPC Guide to Educator Access Plus for Teachers and Advisors (September 2016) 80
Version 05.16.06.00.06
My Section 504 Students
The area (Figure 59) allows you to view basic information
about your students’ Section 504 status. The information displayed in this area is
view-only and cannot be changed. To learn more about Section 504, see the WSIPC
Guide to Section 504.
Figure 59 - The My Section 504 Students area of Educator Access Plus
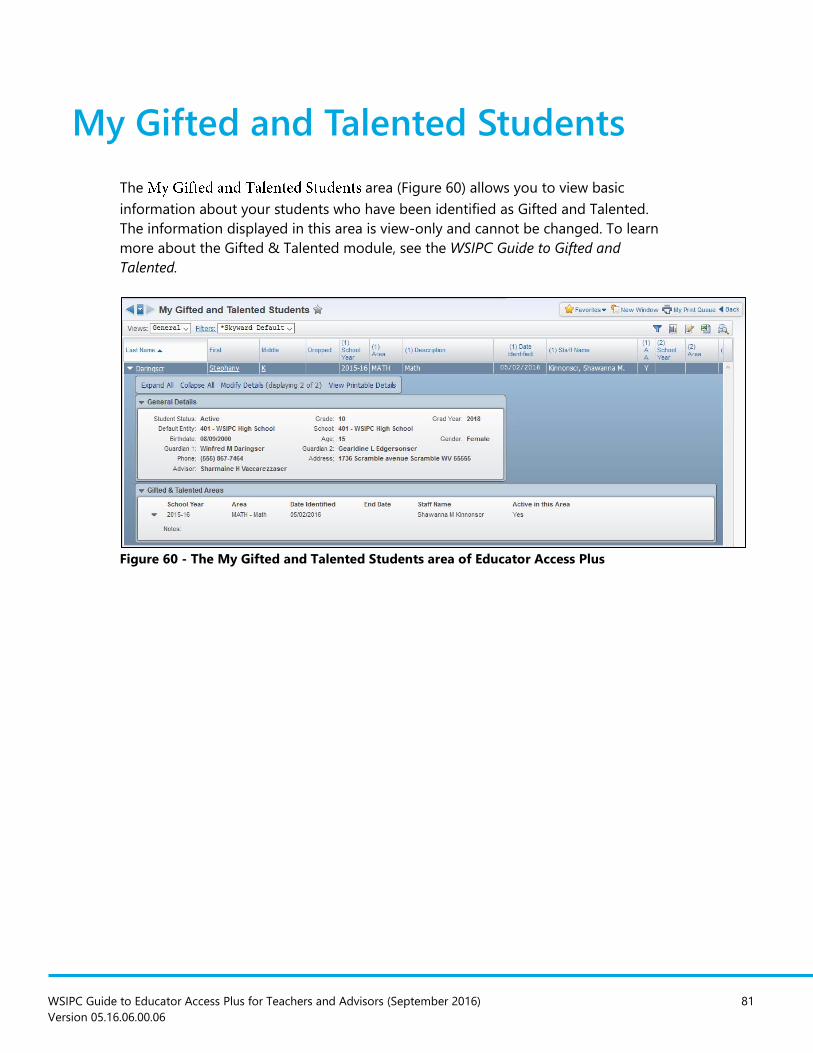
WSIPC Guide to Educator Access Plus for Teachers and Advisors (September 2016) 81
Version 05.16.06.00.06
My Gifted and Talented Students
The area (Figure 60) allows you to view basic
information about your students who have been identified as Gifted and Talented.
The information displayed in this area is view-only and cannot be changed. To learn
more about the Gifted & Talented module, see the WSIPC Guide to Gifted and
Talented.
Figure 60 - The My Gifted and Talented Students area of Educator Access Plus
WSIPC Guide to Educator Access Plus for Teachers and Advisors (September 2016) 82
Version 05.16.06.00.06
My Conference Scheduler
You can use My Conference Scheduler to schedule conferences with students and
their guardians. Your district can also assign staff members, such as secretaries, to
schedule conferences for you. To learn more about My Conference Scheduler, see
the WSIPC Guide to Conference Scheduler for Teachers.
WSIPC Guide to Educator Access Plus for Teachers and Advisors (September 2016) 83
Version 05.16.06.00.06
Student Services Access
If you are a Case Manager or IEP Manager, you can use the area of
Educator Access Plus to monitor your students’ academic progress; view a roster of
students assigned to you; view students’ Attendance Records, Progress Reports,
grades, and missing assignments; and view and maintain your calendar. If you are an
administrator for Gifted and Talented students, you can use this area to update
students’ Gifted &Talented Records.
This section explains each of the areas available through Student Services Access.
To access Student Services information about the students you manage:
1. Go to Educator Access Plus\Student Services Access.
2. Select one of the following areas:
Each area is described below.
Gifted and Talented Options With access to the area, you can add new records (for Highly
Capable students for example), and edit information on existing Student Records. To
learn more about working with this area, see the WSIPC Guide to Gifted and Talented.
My Cases as Case Manager Options If you are a Special Education staff member who is designated as a Case Manager for
students, you can use the My screen. This screen shows a list
of students whose cases you manage. From this screen, you can get a list of your
students, as well as the status of an individual student’s most recent Special
Education Record.
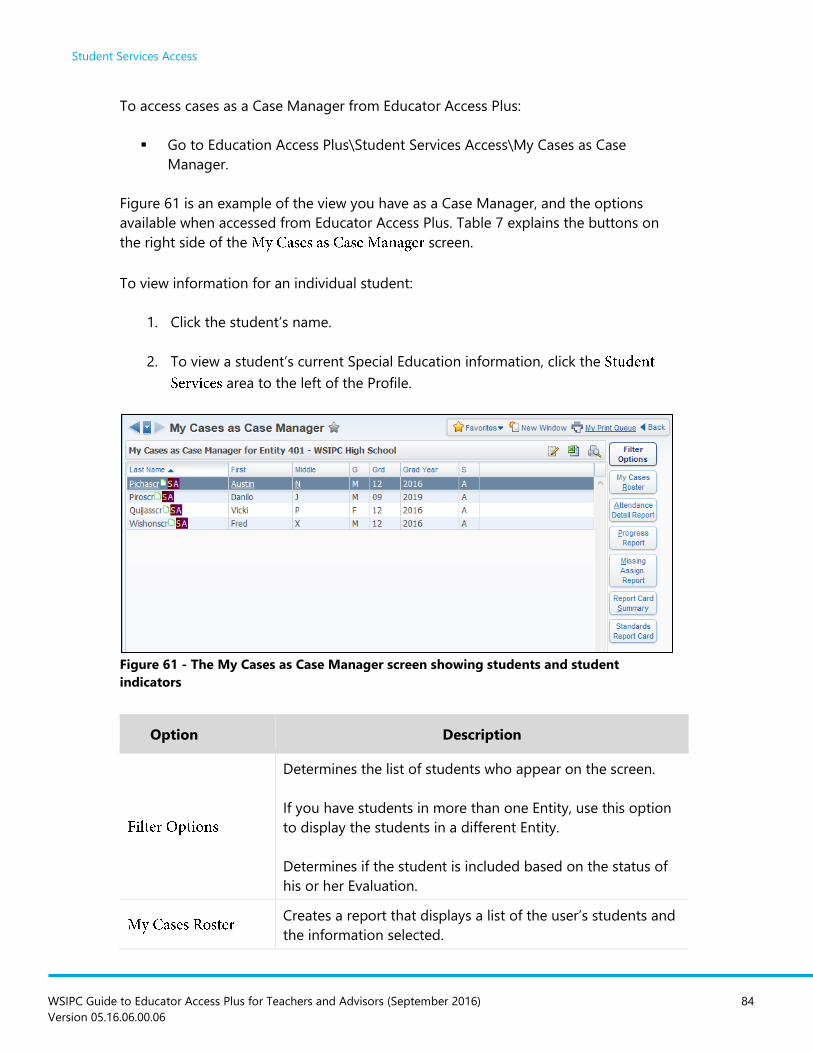
Student Services Access
WSIPC Guide to Educator Access Plus for Teachers and Advisors (September 2016) 84
Version 05.16.06.00.06
To access cases as a Case Manager from Educator Access Plus:
Go to Education Access Plus\Student Services Access\My Cases as Case
Manager.
Figure 61 is an example of the view you have as a Case Manager, and the options
available when accessed from Educator Access Plus. Table 7 explains the buttons on
the right side of the screen.
To view information for an individual student:
1. Click the student’s name.
2. To view a student’s current Special Education information, click the
area to the left of the Profile.
Figure 61 - The My Cases as Case Manager screen showing students and student
indicators
Option Description
Determines the list of students who appear on the screen.
If you have students in more than one Entity, use this option
to display the students in a different Entity.
Determines if the student is included based on the status of
his or her Evaluation.
Creates a report that displays a list of the user’s students and
the information selected.
Student Services Access
WSIPC Guide to Educator Access Plus for Teachers and Advisors (September 2016) 85
Version 05.16.06.00.06
Option Description
Creates a report that displays a list of the user’s students and
attendance information in the format selected.
Creates a report that displays a list of the user’s students and
a Progress Report for each student.
To learn more about Progress Reports, see “Working with
Secondary Gradebook Reports” in the WSIPC Guide to
Secondary Gradebook for Teachers.
Creates a report that lists the missing assignments from the
gradebook for the selected student.
Creates a report that displays a list of the user’s students and
a Summary Report Card from the Secondary Gradebook for
each student.
See “Report Card Summary“ (page 92) to learn more about
this report.
Provides a report of students’ academic progress. To learn
more about this report, see “Standards Report Card”
(page 94).
To learn more about Report Cards, see “Working with
Standards Gradebook Reports” in the WSIPC Guide to
Standards Gradebook for Teachers.
Table 7 - My Cases as Case Manager options
My Students as IEP Manager Options If you are a Special Education staff member who is designated as an IEP Manager for
students, you can get a list of your students, as well as the status of an individual
student’s most recent Special Education Record. The
screen shows a list of students whose IEP you manage.
To access students as an IEP Manager from Educator Access Plus:
Go to Education Access Plus\Student Services Access\My Students as IEP
Manager.
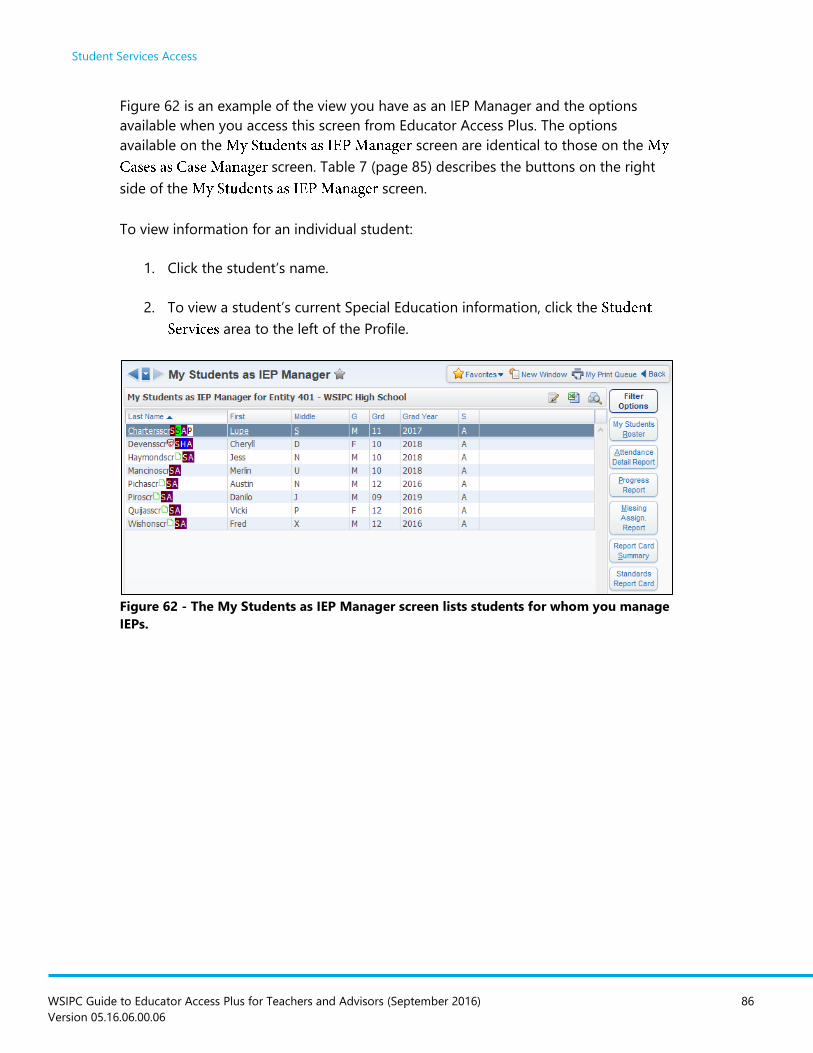
Student Services Access
WSIPC Guide to Educator Access Plus for Teachers and Advisors (September 2016) 86
Version 05.16.06.00.06
Figure 62 is an example of the view you have as an IEP Manager and the options
available when you access this screen from Educator Access Plus. The options
available on the screen are identical to those on the
screen. Table 7 (page 85) describes the buttons on the right
side of the screen.
To view information for an individual student:
1. Click the student’s name.
2. To view a student’s current Special Education information, click the
area to the left of the Profile.
Figure 62 - The My Students as IEP Manager screen lists students for whom you manage
IEPs.
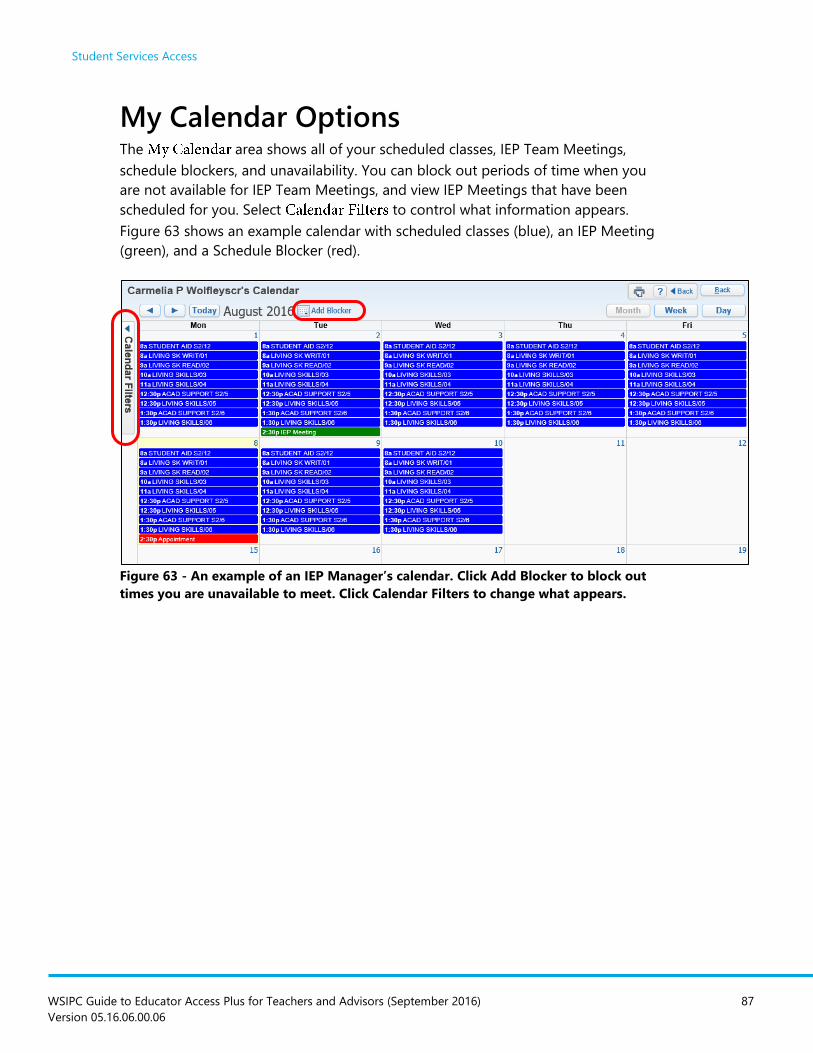
Student Services Access
WSIPC Guide to Educator Access Plus for Teachers and Advisors (September 2016) 87
Version 05.16.06.00.06
My Calendar Options The area shows all of your scheduled classes, IEP Team Meetings,
schedule blockers, and unavailability. You can block out periods of time when you
are not available for IEP Team Meetings, and view IEP Meetings that have been
scheduled for you. Select to control what information appears.
Figure 63 shows an example calendar with scheduled classes (blue), an IEP Meeting
(green), and a Schedule Blocker (red).
Figure 63 - An example of an IEP Manager’s calendar. Click Add Blocker to block out
times you are unavailable to meet. Click Calendar Filters to change what appears.
WSIPC Guide to Educator Access Plus for Teachers and Advisors (September 2016) 88
Version 05.16.06.00.06
Advisor Access
As an advisor, you can use the area of Educator Access Plus to
monitor students’ academic progress; view a roster of students assigned to you; and
view students’ Attendance Records, Progress Reports, missing assignments, and
grades.
To see information about the students you advise:
1. Go to Educator Access Plus\Advisor Access\My Students.
2. Select from the listing of on the left side of the screen. To
learn about these options, see “Advisor Options” below.
Advisor Options On the screen (Figure 64) you can search for a student, view
information about students you advise in different Entities, access a student’s profile
information, and run various reports from this area. Available reports are listed on the
left side of the screen. To learn more about these reports, see “Advisor Access
Reports” (page 89).
The screen shows a list of your active students by Entity.
To show inactive students in the list of advisees:
Select the check box.
The Entities that appear on the screen are determined by the
students to which you are assigned as advisor, and your security access. When you
access the screen, active students at the lowest-numbered Entity
appear by default.
To see your active students at a different Entity:
In the box in the upper-left corner, select a different Entity.
The students that appear on the screen are sorted in alphabetical
order by last name. One letter of the alphabet appears at a time. To learn how to
search for students, see “Searching for a Student” (page 89).

Advisor Access
WSIPC Guide to Educator Access Plus for Teachers and Advisors (September 2016) 89
Version 05.16.06.00.06
Figure 64 - The Advisor Options area with the Select letter in Alphabet to search on area
and the Lookup by Last Name box highlighted
Searching for a Student The list of students is filtered by last name. By default, students whose last name
begins with the letter A appear. You can search for students by their last name.
To view students whose last name begins with a different letter:
In the option area, click the
corresponding letter (Figure 64 above).
To search for a student by last name:
1. Type the student’s last name in the box
(Figure 64 above).
2. Click .
Advisor Access Reports You can access a number of reports from the screen. Some of these
reports are also available under or . Not all of these
reports are discussed in this Guide. To learn more about reports available to teachers
and advisors, see the WSIPC Guide to Secondary Gradebook for Teachers and the
WSIPC Guide to Standards Gradebook for Teachers.
Advisor Access
WSIPC Guide to Educator Access Plus for Teachers and Advisors (September 2016) 90
Version 05.16.06.00.06
Advising Roster
The Advising Roster Report is a Class Roster Report that contains students you
advise. This report displays a list of students assigned to you as an advisor. You can
configure the report to include additional information about the student, such as
phone number, address, gender, picture, and email address.
Attendance Detail Report
The Attendance Detail Report displays attendance detail for students you advise for
all periods for a specific Term or date range. Choose the Absence Types to include in
the report.
Progress Report
You can create Progress Reports for students you advise. This report is a simplified
version of the larger Progress Detail Report available to teachers and administrative
staff.
Note You cannot run this report for classes that use Standards Gradebook.
To run the Progress Report from the area:
1. Click .
2. Configure the screen. Figure 65 shows
the parameters available for the Progress Report. Table 8 provides additional
information about each parameter.
3. Do one of the following:
To print the report for all students you advise, click
.
To print the report for selected students you advise, click
.

Advisor Access
WSIPC Guide to Educator Access Plus for Teachers and Advisors (September 2016) 91
Version 05.16.06.00.06
Figure 65 - The Progress Report parameters screen for Advisor students
Option Description
Allows you to select the term for which you’d like to
see grades. The default value is the current term.
Shows individual assignments on the report.
Allows you to restrict the report output to students
with grades at or below a desired level.
Causes lines to appear at the bottom of the report
after the words “Signature” and “Date” so that the
Guardian can sign and date this information, if the
Progress Report is to be returned.
Prints each student’s report on a separate page.
Allows you to type free-form comments in the header
area, up to 70 characters per line.
Allows you to type free-form comments in the footer
area, up to 70 characters per line.
Table 8 - The fields available for configuration on the Progress Report for Advisor
Student parameters screen
Advisor Access
WSIPC Guide to Educator Access Plus for Teachers and Advisors (September 2016) 92
Version 05.16.06.00.06
Missing Assignments Report
The Missing Assignments Report allows you to quickly view missing assignments for
students you advise. The report considers an Assignment missing if the
check box is selected for a student. Assignments may also appear on the report if
they are ungraded and past the due date.
Report Card Summary
The Report Card Summary shows Report Cards for individual students, or for many
students.
Note You cannot run this report for classes that use Standards Gradebook.
To run the Report Card Summary from the area:
1. Click .
2. Configure the screen. Figure 66
shows the fields available for the Report Card Summary. Table 9 provides
additional information about each parameter.
3. Do one of the following:
To print the report for all students you advise, click
.
To print the report for selected students you advise, click
.
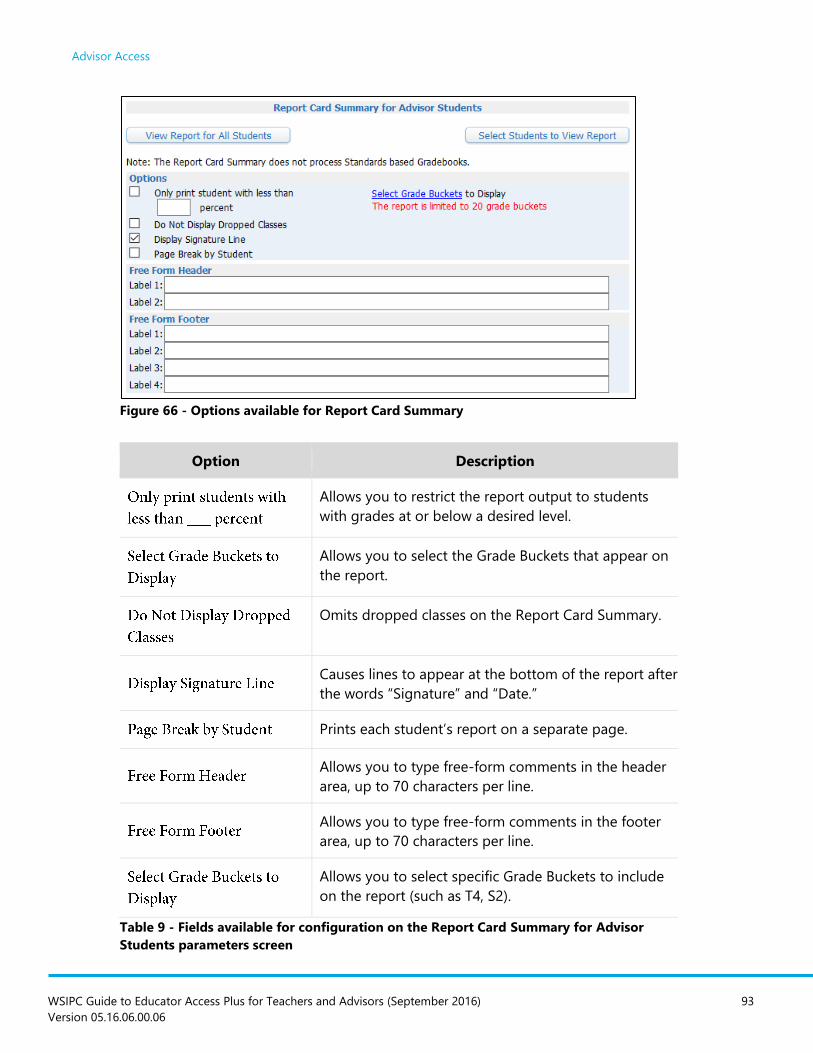
Advisor Access
WSIPC Guide to Educator Access Plus for Teachers and Advisors (September 2016) 93
Version 05.16.06.00.06
Figure 66 - Options available for Report Card Summary
Option Description
Allows you to restrict the report output to students
with grades at or below a desired level.
Allows you to select the Grade Buckets that appear on
the report.
Omits dropped classes on the Report Card Summary.
Causes lines to appear at the bottom of the report after
the words “Signature” and “Date.”
Prints each student’s report on a separate page.
Allows you to type free-form comments in the header
area, up to 70 characters per line.
Allows you to type free-form comments in the footer
area, up to 70 characters per line.
Allows you to select specific Grade Buckets to include
on the report (such as T4, S2).
Table 9 - Fields available for configuration on the Report Card Summary for Advisor
Students parameters screen
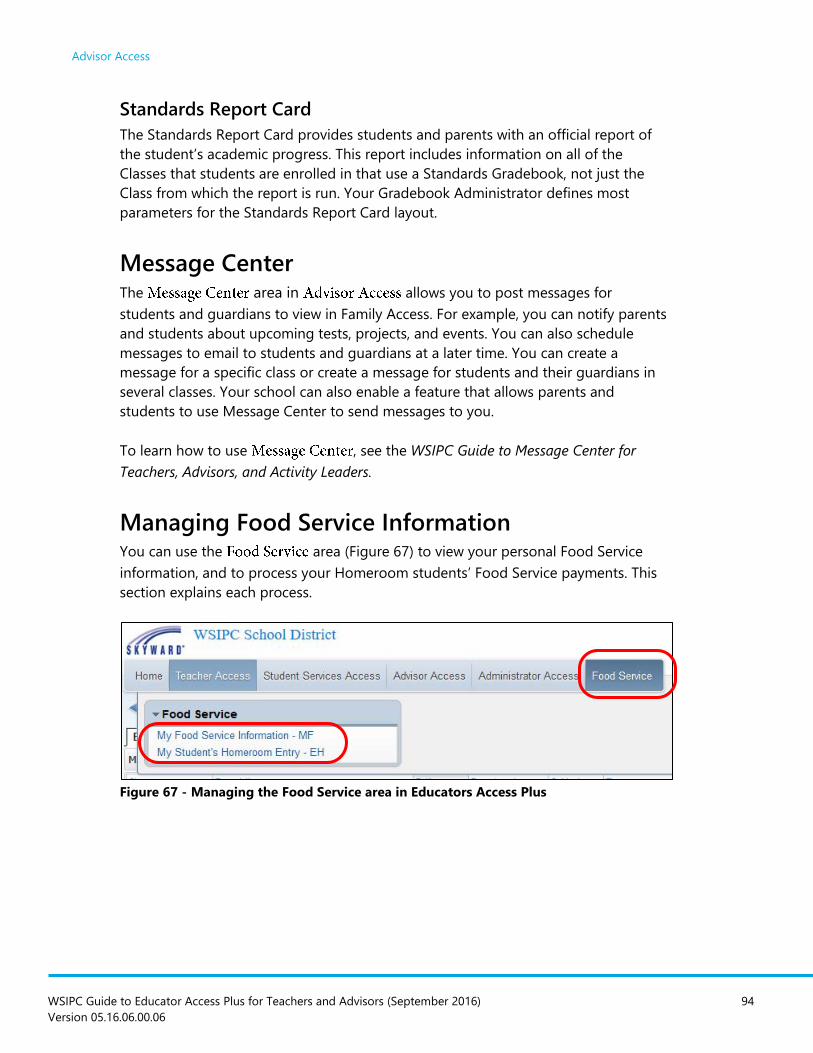
Advisor Access
WSIPC Guide to Educator Access Plus for Teachers and Advisors (September 2016) 94
Version 05.16.06.00.06
Standards Report Card
The Standards Report Card provides students and parents with an official report of
the student’s academic progress. This report includes information on all of the
Classes that students are enrolled in that use a Standards Gradebook, not just the
Class from which the report is run. Your Gradebook Administrator defines most
parameters for the Standards Report Card layout.
Message Center The area in allows you to post messages for
students and guardians to view in Family Access. For example, you can notify parents
and students about upcoming tests, projects, and events. You can also schedule
messages to email to students and guardians at a later time. You can create a
message for a specific class or create a message for students and their guardians in
several classes. Your school can also enable a feature that allows parents and
students to use Message Center to send messages to you.
To learn how to use , see the WSIPC Guide to Message Center for
Teachers, Advisors, and Activity Leaders.
Managing Food Service Information You can use the area (Figure 67) to view your personal Food Service
information, and to process your Homeroom students’ Food Service payments. This
section explains each process.
Figure 67 - Managing the Food Service area in Educators Access Plus
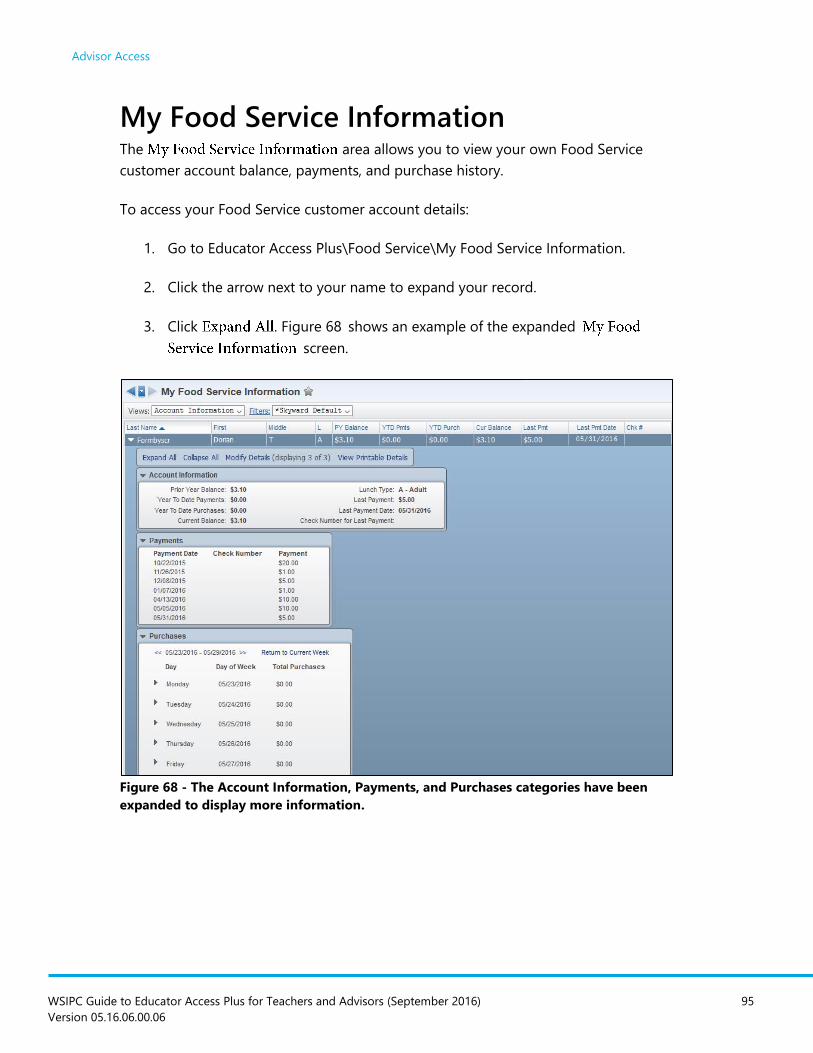
Advisor Access
WSIPC Guide to Educator Access Plus for Teachers and Advisors (September 2016) 95
Version 05.16.06.00.06
My Food Service Information The area allows you to view your own Food Service
customer account balance, payments, and purchase history.
To access your Food Service customer account details:
1. Go to Educator Access Plus\Food Service\My Food Service Information.
2. Click the arrow next to your name to expand your record.
3. Click . Figure 68 shows an example of the expanded screen.
Figure 68 - The Account Information, Payments, and Purchases categories have been
expanded to display more information.
Advisor Access
WSIPC Guide to Educator Access Plus for Teachers and Advisors (September 2016) 96
Version 05.16.06.00.06
The section shows an overview of your Food Service account,
including the current balance and year-to-date payments and purchases.
The section shows a history of payments made on your Food Service
Account.
Note If your district works with a vendor for entering Online Payments,
you may have a link in the Payment header.
Click the link to open the screen.
The section shows information on your purchases for the current week by
default.
To view purchases from other weeks:
Click the arrows to the left and right of .
My Students Homeroom Entry The area allows you to enter Food Service purchases
and payments for your Homeroom students. This is useful in a school where the
students eat together as a class. Before you can use this feature, your district must
first enable it in the Food Service module, assign staff to Homeroom Codes, assign
Homerooms to students, and then assign staff the appropriate Security level to
.
This section explains how to set Purchase Entry by Homeroom Defaults, and how to
enter purchases and payments using Purchase Entry by Homeroom.
The screen contains a area for each
homeroom assigned to you.
Setting Purchase Entry by Homeroom Defaults Purchase Defaults assist you with setting up available items for selection when using
Purchase Entry by Homeroom. You can also make an item selection and assign it to
the Customer as a default, similar to the Standard Item in Point of Sale.
Advisor Access
WSIPC Guide to Educator Access Plus for Teachers and Advisors (September 2016) 97
Version 05.16.06.00.06
To set Purchase Entry by Homeroom Defaults:
1. Go to Educator Access Plus\Food Service\EH.
2. Locate a Homeroom and click .
3. Configure the screen (Figure 69). Table 10 describes the
options on this screen.
Tip Consider changing your if the
changes, or if you want to change the available items.
4. Click .
Figure 69 - Entry by Homeroom Purchase Defaults screen
Option Description
Purchases are applied under the Customer’s default Cafeteria.
Specifies which location you want purchases and payments
applied to. This option varies by cashier based on the
cafeteria/line you work in.
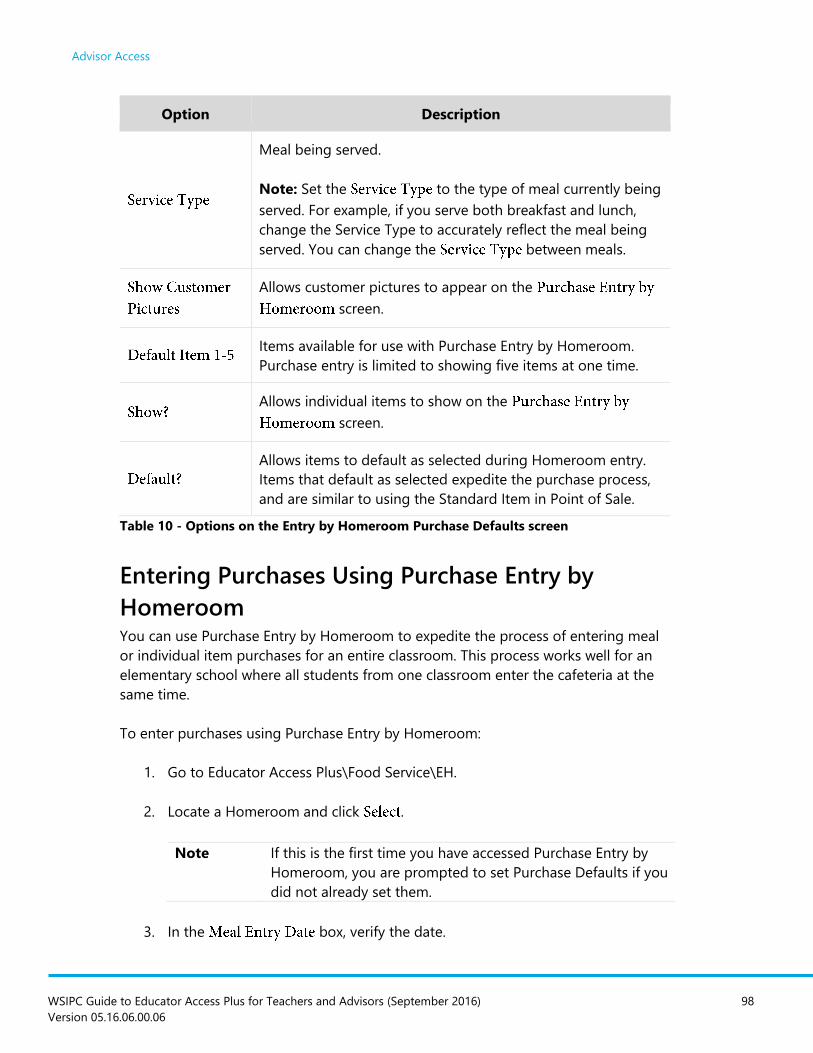
Advisor Access
WSIPC Guide to Educator Access Plus for Teachers and Advisors (September 2016) 98
Version 05.16.06.00.06
Option Description
Meal being served.
Note: Set the to the type of meal currently being
served. For example, if you serve both breakfast and lunch,
change the Service Type to accurately reflect the meal being
served. You can change the between meals.
Allows customer pictures to appear on the
screen.
Items available for use with Purchase Entry by Homeroom.
Purchase entry is limited to showing five items at one time.
Allows individual items to show on the
screen.
Allows items to default as selected during Homeroom entry.
Items that default as selected expedite the purchase process,
and are similar to using the Standard Item in Point of Sale.
Table 10 - Options on the Entry by Homeroom Purchase Defaults screen
Entering Purchases Using Purchase Entry by
Homeroom You can use Purchase Entry by Homeroom to expedite the process of entering meal
or individual item purchases for an entire classroom. This process works well for an
elementary school where all students from one classroom enter the cafeteria at the
same time.
To enter purchases using Purchase Entry by Homeroom:
1. Go to Educator Access Plus\Food Service\EH.
2. Locate a Homeroom and click .
Note If this is the first time you have accessed Purchase Entry by
Homeroom, you are prompted to set Purchase Defaults if you
did not already set them.
3. In the box, verify the date.
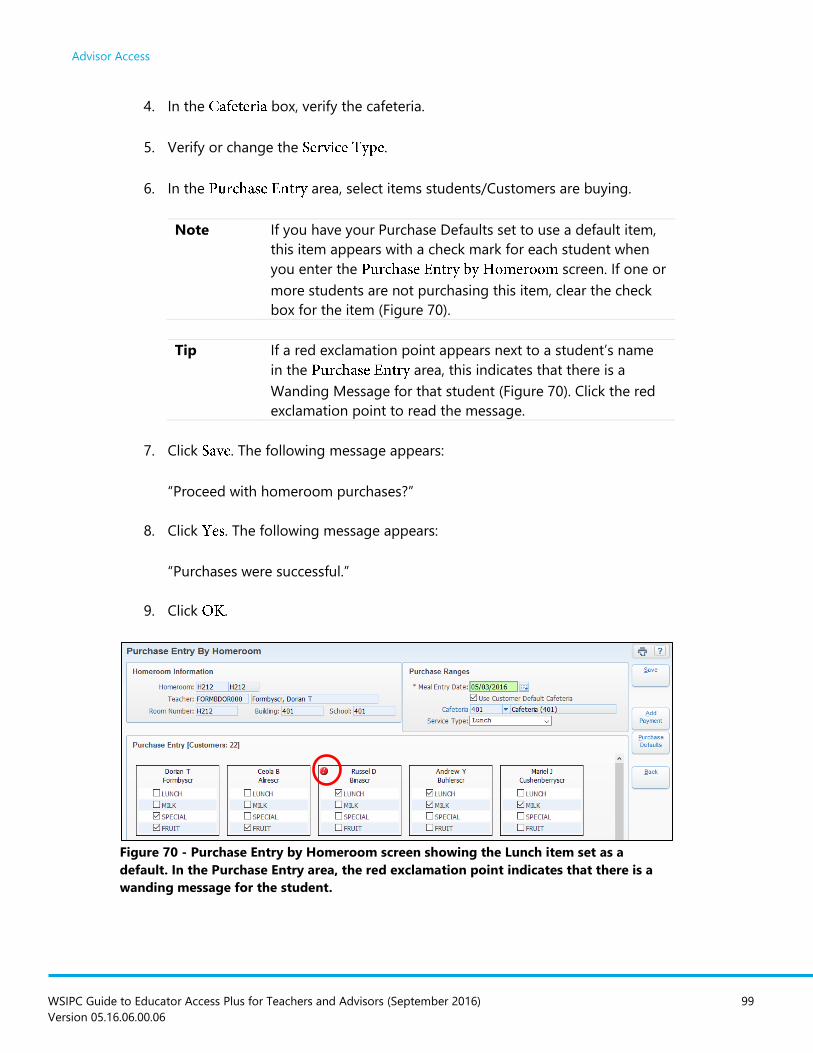
Advisor Access
WSIPC Guide to Educator Access Plus for Teachers and Advisors (September 2016) 99
Version 05.16.06.00.06
4. In the box, verify the cafeteria.
5. Verify or change the .
6. In the area, select items students/Customers are buying.
Note If you have your Purchase Defaults set to use a default item,
this item appears with a check mark for each student when
you enter the screen. If one or
more students are not purchasing this item, clear the check
box for the item (Figure 70).
Tip If a red exclamation point appears next to a student’s name
in the area, this indicates that there is a
Wanding Message for that student (Figure 70). Click the red
exclamation point to read the message.
7. Click . The following message appears:
“Proceed with homeroom purchases?”
8. Click . The following message appears:
“Purchases were successful.”
9. Click .
Figure 70 - Purchase Entry by Homeroom screen showing the Lunch item set as a
default. In the Purchase Entry area, the red exclamation point indicates that there is a
wanding message for the student.
Advisor Access
WSIPC Guide to Educator Access Plus for Teachers and Advisors (September 2016) 100
Version 05.16.06.00.06
Entering Payments Using Purchase Entry by
Homeroom You can also add payments to Customers using Purchase Entry by Homeroom. You
can enter payments during a meal service, or use Purchase Entry by Homeroom as a
payment entry screen only.
Note If entering payments outside a meal service, make sure you clear the
check box for any default items.
To enter payments using Purchase Entry by Homeroom:
1. Go to Educator Access Plus\Food Service\EH.
2. Locate a Homeroom and click .
3. Click .
4. Locate a Customer on the screen (Figure 71), and click .
5. Configure the screen (Figure 72). Table 11 describes
the options on this screen.
6. Click .
7. If you have additional payments to enter, repeat steps 4 through 6 until all
payments are entered.
8. Click .
9. After you finish entering payments, do one of the following:
Continue selecting items for purchase, and click .
If you were in the screen for payments
only, click .
Note Payments are saved when you select on
the screen.

Advisor Access
WSIPC Guide to Educator Access Plus for Teachers and Advisors (September 2016) 101
Version 05.16.06.00.06
Figure 71 - Purchase Entry by Homeroom Payment Entry screen
Figure 72 - Payment Maintenance screen showing Check Number and Payment Amount
entered
AREA PURPOSE OF AREA
Customer information populated from the Food
Service Customer Record.
AREA PURPOSE OF AREA
Guardian/Payor information populated from the
Customer’s Food Service Record.
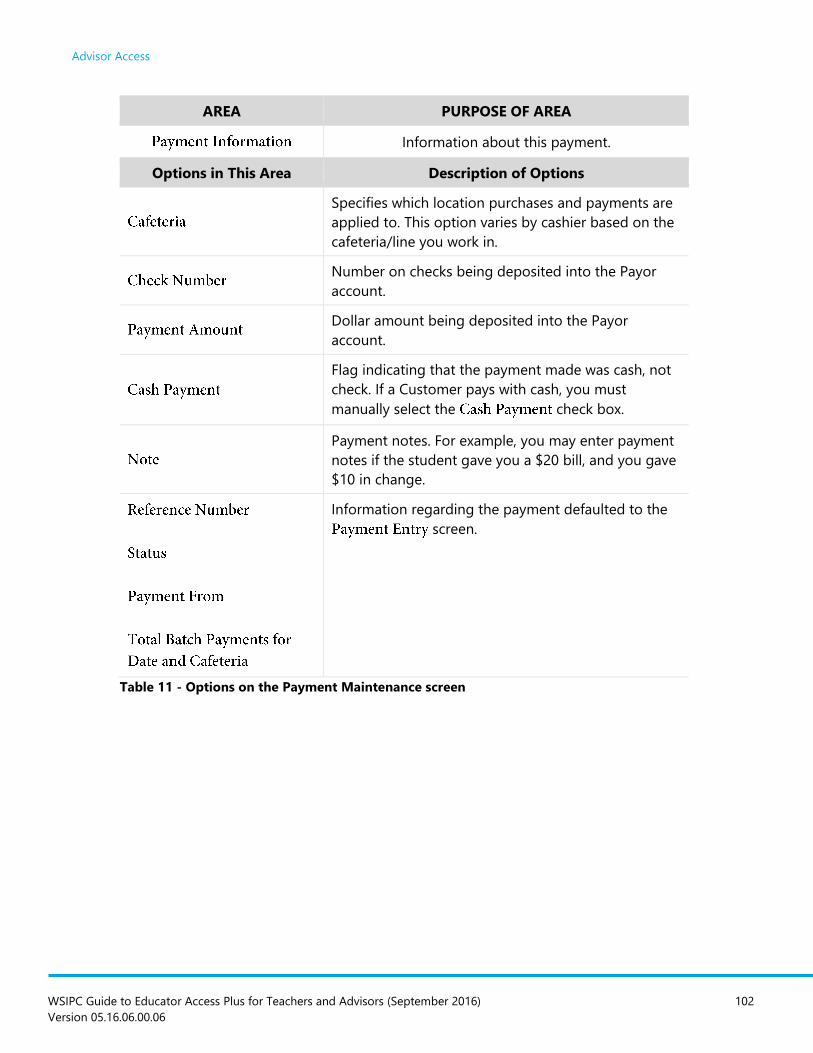
Advisor Access
WSIPC Guide to Educator Access Plus for Teachers and Advisors (September 2016) 102
Version 05.16.06.00.06
AREA PURPOSE OF AREA
Information about this payment.
Options in This Area Description of Options
Specifies which location purchases and payments are
applied to. This option varies by cashier based on the
cafeteria/line you work in.
Number on checks being deposited into the Payor
account.
Dollar amount being deposited into the Payor
account.
Flag indicating that the payment made was cash, not
check. If a Customer pays with cash, you must
manually select the check box.
Payment notes. For example, you may enter payment
notes if the student gave you a $20 bill, and you gave
$10 in change.
Information regarding the payment defaulted to the
screen.
Table 11 - Options on the Payment Maintenance screen

TERMS OF USE
The information contained herein is licensed, trade-secret and proprietary and may not be used,
disclosed or reproduced without permission of the licensing authorities, WSIPC and/or Skyward, Inc. As
a condition of use, the User agrees to protect and keep the information from disclosure or falling into
the public domain. The failure to comply with this agreement may result in the immediate termination
of the User’s right to access the information.
COPYRIGHT
© Copyright 2016 WSIPC. All rights reserved.
Reproduction of any part of this manual in any medium without the express and written permission of
WSIPC is prohibited by law.
This edition is printed in the United States of America. The contents may be corrected or modified by
revisions without prior notice. Pages may be added, deleted, or changed as required.
The WSIPC logo is a registered trademark of WSIPC.
Skyward® is the registered trademark for Skyward, Inc. located in Stevens Point, Wisconsin.
WSIPC
2121 West Casino Road
Everett, WA 98204
425.349.6600 www.wsipc.org
Copyright © 2022 FDOKUMEN