Dell Latitude 3300 · 6. For more information, see Create a USB recovery drive for Windows. 6 Set...
37
Dell Latitude 3300 Setup and Specifications Guide Regulatory Model: P95G Regulatory Type: P95G001
Transcript of Dell Latitude 3300 · 6. For more information, see Create a USB recovery drive for Windows. 6 Set...
Dell Latitude 3300Setup and Specifications Guide
Regulatory Model: P95GRegulatory Type: P95G001
Catatan, perhatian, dan peringatan
CATATAN Sebuah CATATAN menandakan informasi penting yang membantu Anda untuk menggunakan yang terbaik dari
produk Anda.
PERHATIAN PERHATIAN menunjukkan kemungkinan terjadinya kerusakan pada perangkat keras atau hilangnya data,
dan memberi tahu Anda mengenai cara menghindari masalah tersebut.
PERINGATAN PERINGATAN menunjukkan potensi kerusakan harta benda, cedera pribadi, atau kematian
© 2018 - 2019 Dell Inc. atau anak-anak perusahaannya. Seluruh hak cipta dilindungi oleh undang-undang. Dell, EMC, dan merek dagang lainnya adalah merek dagang dari Dell Inc. atau anak-anak perusahaannya. Merek dagang lain dapat merupakan merek dagang dari pemiliknya masing-masing.
2019 - 01
Rev. A00
1 Set up your computer................................................................................................................... 5
2 Ikhtisar Sasis............................................................................................................................... 7Tampilan depan...................................................................................................................................................................... 7Tampilan kiri............................................................................................................................................................................8Tampilan kanan...................................................................................................................................................................... 8Tampilan bagian dasar...........................................................................................................................................................9
3 Keyboard shortcuts.....................................................................................................................10
4 Spesifikasi Teknis........................................................................................................................11Processor............................................................................................................................................................................... 11Memori................................................................................................................................................................................... 11Penyimpanan.........................................................................................................................................................................12System board connectors................................................................................................................................................... 12Pembaca kartu media.......................................................................................................................................................... 12Audio...................................................................................................................................................................................... 12Integrated graphics.............................................................................................................................................................. 13Kamera...................................................................................................................................................................................13Komunikasi............................................................................................................................................................................ 13Wireless (Nirkabel)............................................................................................................................................................... 13Ports and connectors.......................................................................................................................................................... 14Display....................................................................................................................................................................................14Keyboard............................................................................................................................................................................... 15Panel sentuh......................................................................................................................................................................... 15Battery...................................................................................................................................................................................15Adaptor daya.........................................................................................................................................................................16Dimensi dan berat.................................................................................................................................................................17Lingkungan komputer.......................................................................................................................................................... 17Security..................................................................................................................................................................................17Perangkat Lunak Keamanan............................................................................................................................................... 18
5 System setup (Pengaturan sistem).............................................................................................. 19Menu Boot............................................................................................................................................................................ 19Tombol navigasi.................................................................................................................................................................... 19Opsi pengaturan sistem......................................................................................................................................................20
General options...............................................................................................................................................................21System configuration.................................................................................................................................................... 22Opsi layar video..............................................................................................................................................................23Security........................................................................................................................................................................... 24Secure boot....................................................................................................................................................................25Opsi Intel Software Guard Extensions (Ekstensi Pelindung Perangkat Lunak Intel)............................................ 26Performance...................................................................................................................................................................26Power management...................................................................................................................................................... 27
Contents
Contents 3
Post behavior................................................................................................................................................................. 28Dukungan virtualisasi.....................................................................................................................................................29Wireless options.............................................................................................................................................................30Maintenance (Pemeliharaan).......................................................................................................................................30Log sistem....................................................................................................................................................................... 31SupportAssist System Resolution................................................................................................................................ 31
Boot Sequence (Urutan Boot)........................................................................................................................................... 31Memperbarui BIOS pada Windows.................................................................................................................................... 31
Memperbarui BIOS sistem Anda menggunakan USB flash drive............................................................................ 32Memperbarui BIOS Dell pada lingkungan Linux dan Ubuntu....................................................................................33
Kata sandi sistem dan pengaturan.................................................................................................................................... 33Menetapkan kata sandi penyiapan sistem.................................................................................................................. 33Menghapus atau mengganti kata sandi pengaturan sistem saat ini........................................................................34
6 Perangkat Lunak dan Penemuan Kesalahan...................................................................................35Sistem operasi......................................................................................................................................................................35Membuat drive pemulihan USB untuk Windows.............................................................................................................35Mengunduh driver .............................................................................................................................................................. 35
7 Mendapatkan bantuan.................................................................................................................37Menghubungi Dell................................................................................................................................................................ 37Menghubungi Dell................................................................................................................................................................ 37
4 Contents

Set up your computer1. Connect the power adapter and press the power button.
NOTE: To conserve battery power, the battery might enter power saving mode.
2. Finish the Windows system setup.3. Follow the on-screen instructions to complete the setup. When setting up, Dell recommends that you:
• Connect to a network for Windows updates.NOTE: If connecting to a secured wireless network, enter the password for the wireless network access when
prompted.
• If connected to the internet, sign-in with or create a Microsoft account. If not connected to the internet, create an offline account.• On the Support and Protection screen, enter your contact details.
4. Locate and use Dell apps from the Windows Start menu—RecommendedTable 1. Locate Dell apps
Dell apps Details
Dell Product Registration
Register your computer with Dell.
Dell Help & Support
Access help and support for your computer.
SupportAssist
Proactively checks the health of your computer’s hardware and software.
NOTE: Renew or upgrade your warranty by clicking the warranty expiry date in SupportAssist.
1
Set up your computer 5

Dell apps Details
Dell Update
Updates your computer with critical fixes and important device drivers as they become available.
Dell Digital Delivery
Download software applications including software that is purchased but not pre-installed on your computer.
5. Create recovery drive for Windows.
NOTE: It is recommended to create a recovery drive to troubleshoot and fix problems that may occur with Windows.
6. For more information, see Create a USB recovery drive for Windows.
6 Set up your computer
Ikhtisar Sasis
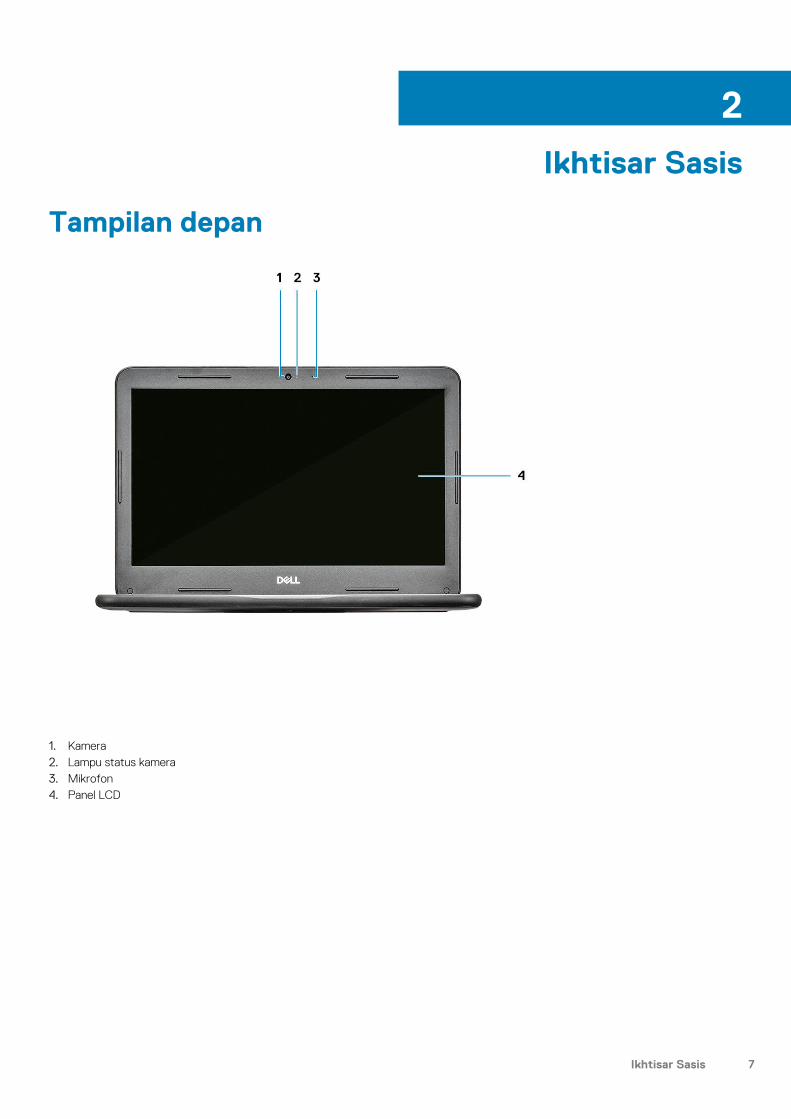
Tampilan depan
1. Kamera2. Lampu status kamera3. Mikrofon4. Panel LCD
2
Ikhtisar Sasis 7
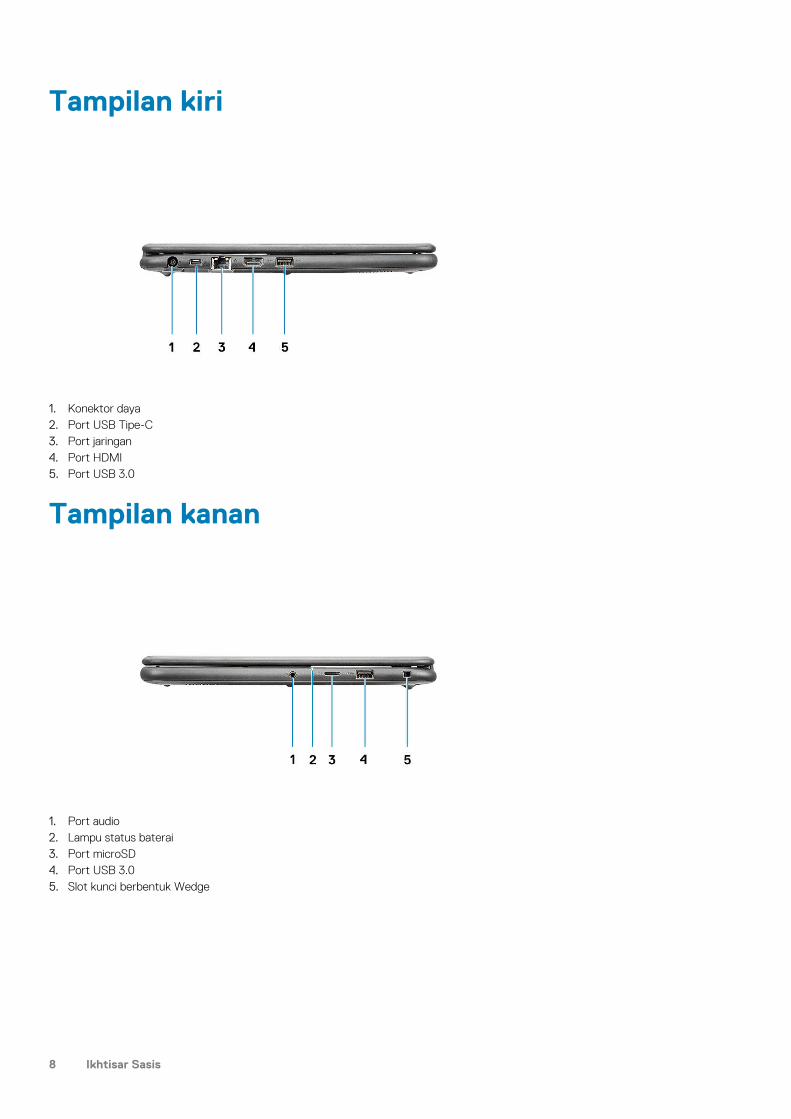
Tampilan kiri
1. Konektor daya2. Port USB Tipe-C3. Port jaringan4. Port HDMI5. Port USB 3.0
Tampilan kanan
1. Port audio2. Lampu status baterai3. Port microSD4. Port USB 3.05. Slot kunci berbentuk Wedge
8 Ikhtisar Sasis
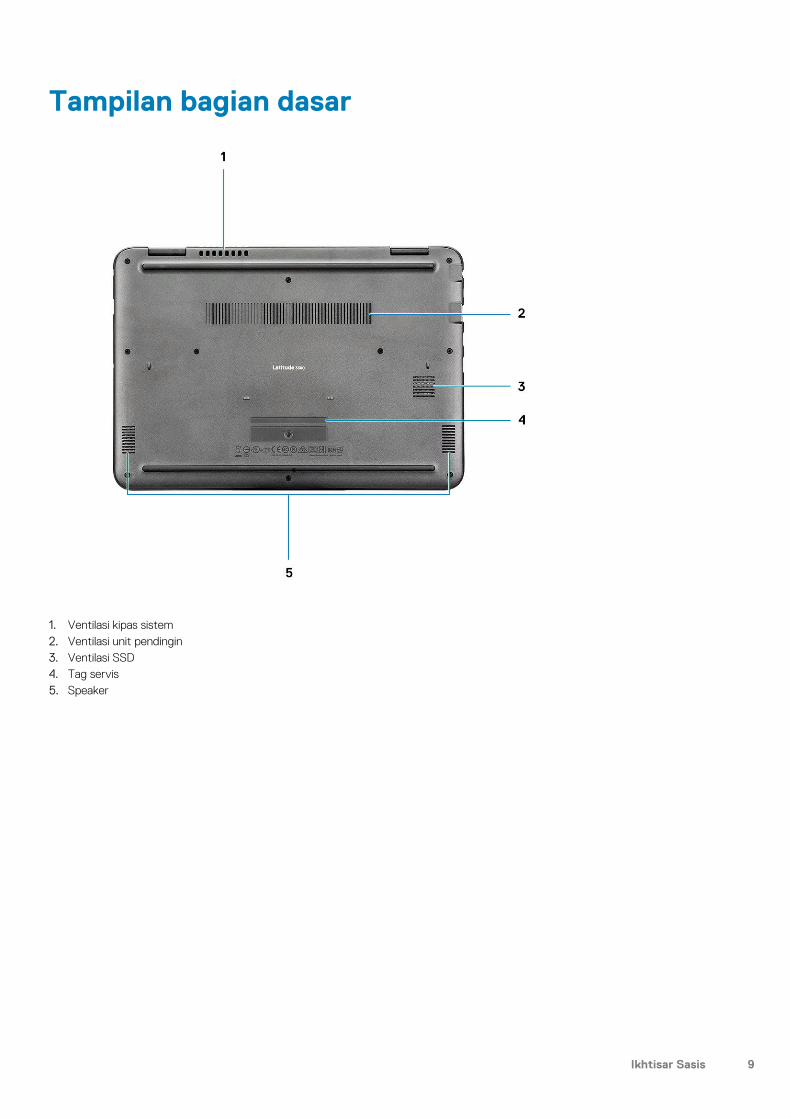
Tampilan bagian dasar
1. Ventilasi kipas sistem2. Ventilasi unit pendingin3. Ventilasi SSD4. Tag servis5. Speaker
Ikhtisar Sasis 9
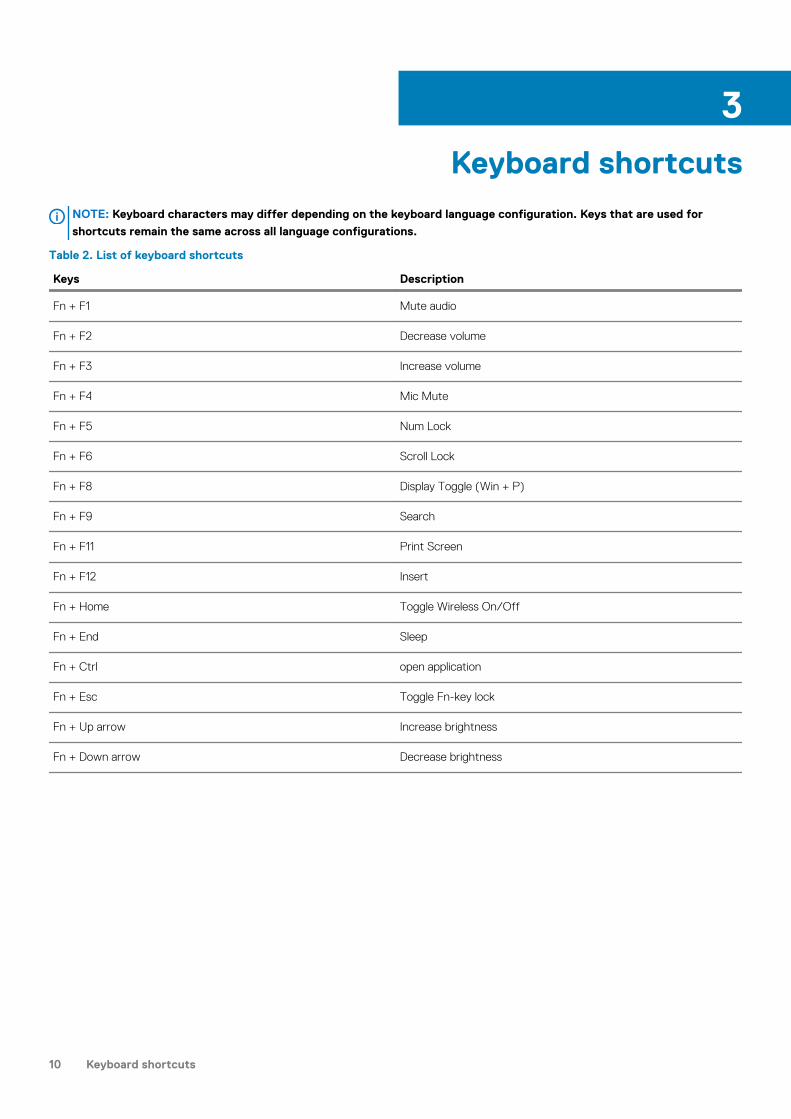
Keyboard shortcutsNOTE: Keyboard characters may differ depending on the keyboard language configuration. Keys that are used for
shortcuts remain the same across all language configurations.
Table 2. List of keyboard shortcuts
Keys Description
Fn + F1 Mute audio
Fn + F2 Decrease volume
Fn + F3 Increase volume
Fn + F4 Mic Mute
Fn + F5 Num Lock
Fn + F6 Scroll Lock
Fn + F8 Display Toggle (Win + P)
Fn + F9 Search
Fn + F11 Print Screen
Fn + F12 Insert
Fn + Home Toggle Wireless On/Off
Fn + End Sleep
Fn + Ctrl open application
Fn + Esc Toggle Fn-key lock
Fn + Up arrow Increase brightness
Fn + Down arrow Decrease brightness
3
10 Keyboard shortcuts

Spesifikasi Teknis
ProcessorNOTE: Jumlah prosesor bukanlah ukuran kinerja. Ketersediaan prosesor bisa berubah dan mungkin berbeda-beda di
setiap negara.
Table 3. Processor specifications
Tipe Tipe UMA Graphics
Intel Core i3 - 7020U
(Dual Core, # of Threads: 4, TDP:15 W, 3 M cache, 2.3 GHz)
Kaby Lake U Intel HD Graphic 620
Intel Celeron Processor 3865U
(Dual Core, # of Threads: 2, TDP:15 W, 2 M cache, 1.80 GHz)
Kaby Lake U Intel HD Graphic 610
Intel Pentium Processor 4415U
(Dual Core, # of Threads: 4, TDP:15 W, 2 M cache, 2.3 GHz)
Kaby Lake U Intel HD Graphic 610
Intel Core i5-8250U
(Quad Core, # of Threads : 8, TDP:15 W, 6 M cache, 1.6 GHz)
Kaby Lake R Intel UHD Graphic 620
MemoriTabel 4. Spesifikasi memori
Spesifikasi memori
Konfigurasi memori minimum 4 GB
Konfigurasi memori maksimum 16 GB
Jumlah slot 1 SODIMM
Memori maksimum yang didukung per slot 16 GB
Opsi memori • 4 GB - 1 x 4 GB• 8 GB- 1 x 8 GB• 16 GB - 1 x 16 GB
Tipe DDR4
Kecepatan • KBL-U: 2133 MHz• KBL-R: 2400 MHz
4
Spesifikasi Teknis 11
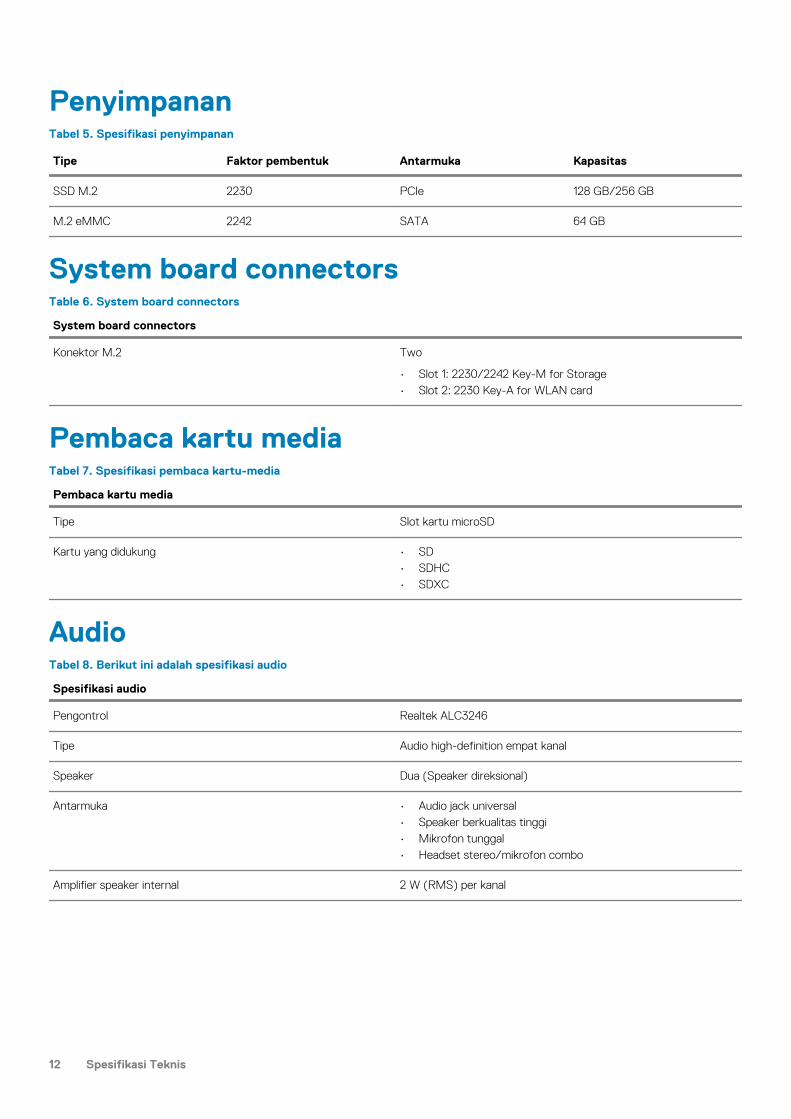
PenyimpananTabel 5. Spesifikasi penyimpanan
Tipe Faktor pembentuk Antarmuka Kapasitas
SSD M.2 2230 PCIe 128 GB/256 GB
M.2 eMMC 2242 SATA 64 GB
System board connectorsTable 6. System board connectors
System board connectors
Konektor M.2 Two
• Slot 1: 2230/2242 Key-M for Storage• Slot 2: 2230 Key-A for WLAN card
Pembaca kartu mediaTabel 7. Spesifikasi pembaca kartu-media
Pembaca kartu media
Tipe Slot kartu microSD
Kartu yang didukung • SD• SDHC• SDXC
AudioTabel 8. Berikut ini adalah spesifikasi audio
Spesifikasi audio
Pengontrol Realtek ALC3246
Tipe Audio high-definition empat kanal
Speaker Dua (Speaker direksional)
Antarmuka • Audio jack universal• Speaker berkualitas tinggi• Mikrofon tunggal• Headset stereo/mikrofon combo
Amplifier speaker internal 2 W (RMS) per kanal
12 Spesifikasi Teknis
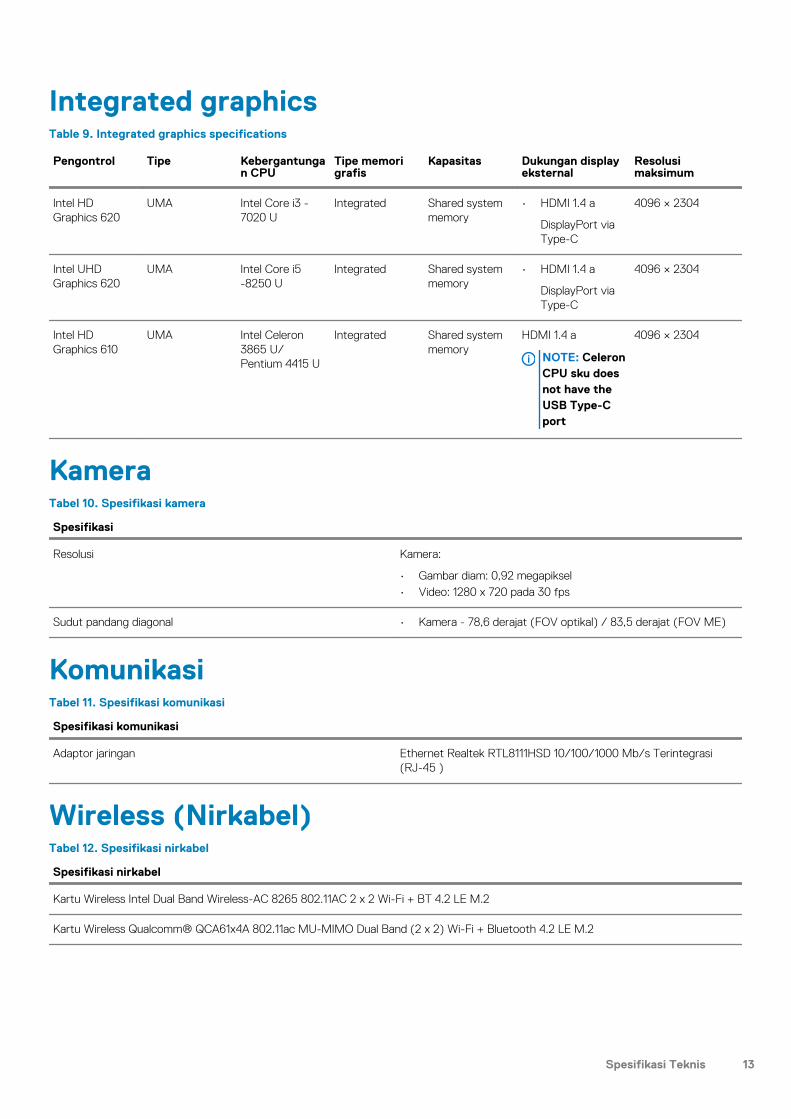
Integrated graphicsTable 9. Integrated graphics specifications
Pengontrol Tipe Kebergantungan CPU
Tipe memori grafis
Kapasitas Dukungan display eksternal
Resolusi maksimum
Intel HD Graphics 620
UMA Intel Core i3 - 7020 U
Integrated Shared system memory
• HDMI 1.4 a
DisplayPort via Type-C
4096 × 2304
Intel UHD Graphics 620
UMA Intel Core i5 -8250 U
Integrated Shared system memory
• HDMI 1.4 a
DisplayPort via Type-C
4096 × 2304
Intel HD Graphics 610
UMA Intel Celeron 3865 U/ Pentium 4415 U
Integrated Shared system memory
HDMI 1.4 a
NOTE: Celeron CPU sku does not have the USB Type-C port
4096 × 2304
KameraTabel 10. Spesifikasi kamera
Spesifikasi
Resolusi Kamera:
• Gambar diam: 0,92 megapiksel• Video: 1280 x 720 pada 30 fps
Sudut pandang diagonal • Kamera - 78,6 derajat (FOV optikal) / 83,5 derajat (FOV ME)
KomunikasiTabel 11. Spesifikasi komunikasi
Spesifikasi komunikasi
Adaptor jaringan Ethernet Realtek RTL8111HSD 10/100/1000 Mb/s Terintegrasi (RJ-45 )
Wireless (Nirkabel)Tabel 12. Spesifikasi nirkabel
Spesifikasi nirkabel
Kartu Wireless Intel Dual Band Wireless-AC 8265 802.11AC 2 x 2 Wi-Fi + BT 4.2 LE M.2
Kartu Wireless Qualcomm® QCA61x4A 802.11ac MU-MIMO Dual Band (2 x 2) Wi-Fi + Bluetooth 4.2 LE M.2
Spesifikasi Teknis 13

Ports and connectorsTable 13. Following are ports and connectors specifications
Ports and connectors specifications
Pembaca kartu memori microSD 3.0 memory card reader
USB • Two USB 3.1 Gen 1 Type-A ports• One USB 3.1 Gen 1 Type-C port (except Celeron sku)
Security (Keamanan) Noble Wedge shaped lock slot
Audio • Universal audio jack• Single microphone
Video • HDMI 1.4 a• DisplayPort through Type-C port
Adaptor jaringan One RJ-45 connector
DisplayTabel 14. Berikut ini adalah spesifikasi display
Spesifikasi display
Tipe • Layar sentuh WLED 13,3 inci FHD WVA (1920 x 1080) True-life (16:9)
• Non-layar sentuh WLED 13,3 inci-HD (1366 x 768) Anti-silau (16:9)
Tinggi (Area aktif): FHD: 165,24 mm
HD: 164,97 mm
Lebar (Area aktif): FHD: 293,76 mm
HD: 293,42 mm
Diagonal FHD: 337,044 mm (13,3 inci)
HD: 336,616 mm (13,3 inci)
Pencahayaan/Kecerahan (khusus) 220 nit
Laju refresh 60 Hz
Sudut tampilan horizontal (min) FHD: +/- 80
HD: +/- 40
Sudut tampilan vertikal (min) FHD: +/- 80
HD: +10/- 40
14 Spesifikasi Teknis
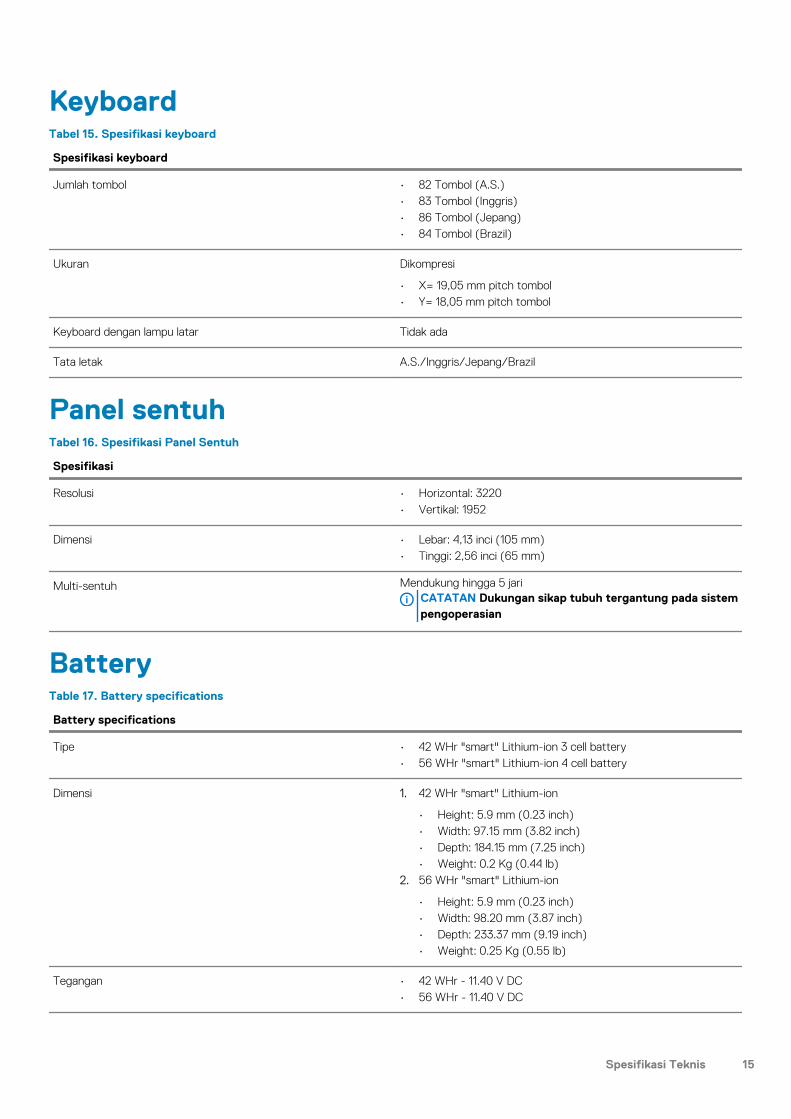
KeyboardTabel 15. Spesifikasi keyboard
Spesifikasi keyboard
Jumlah tombol • 82 Tombol (A.S.)• 83 Tombol (Inggris)• 86 Tombol (Jepang)• 84 Tombol (Brazil)
Ukuran Dikompresi
• X= 19,05 mm pitch tombol• Y= 18,05 mm pitch tombol
Keyboard dengan lampu latar Tidak ada
Tata letak A.S./Inggris/Jepang/Brazil
Panel sentuhTabel 16. Spesifikasi Panel Sentuh
Spesifikasi
Resolusi • Horizontal: 3220• Vertikal: 1952
Dimensi • Lebar: 4,13 inci (105 mm)• Tinggi: 2,56 inci (65 mm)
Multi-sentuh Mendukung hingga 5 jariCATATAN Dukungan sikap tubuh tergantung pada sistem pengoperasian
BatteryTable 17. Battery specifications
Battery specifications
Tipe • 42 WHr "smart" Lithium-ion 3 cell battery• 56 WHr "smart" Lithium-ion 4 cell battery
Dimensi 1. 42 WHr "smart" Lithium-ion
• Height: 5.9 mm (0.23 inch)• Width: 97.15 mm (3.82 inch)• Depth: 184.15 mm (7.25 inch)• Weight: 0.2 Kg (0.44 lb)
2. 56 WHr "smart" Lithium-ion
• Height: 5.9 mm (0.23 inch)• Width: 98.20 mm (3.87 inch)• Depth: 233.37 mm (9.19 inch)• Weight: 0.25 Kg (0.55 lb)
Tegangan • 42 WHr - 11.40 V DC• 56 WHr - 11.40 V DC
Spesifikasi Teknis 15
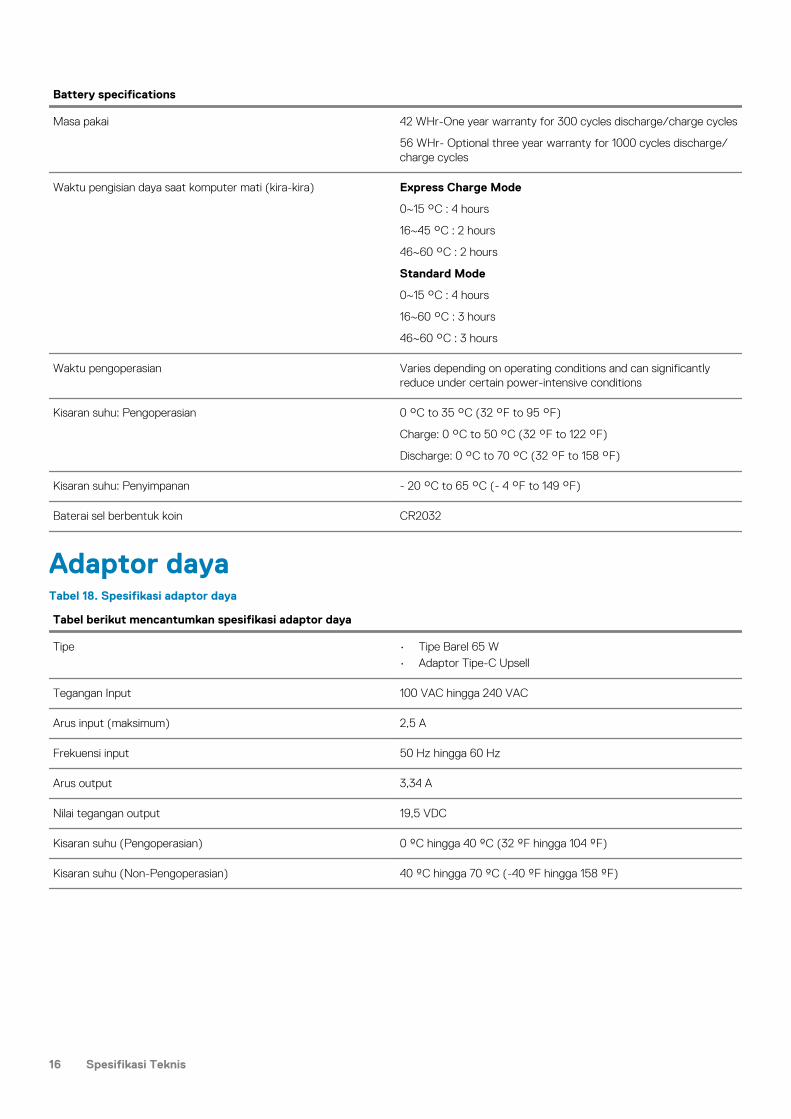
Battery specifications
Masa pakai 42 WHr-One year warranty for 300 cycles discharge/charge cycles
56 WHr- Optional three year warranty for 1000 cycles discharge/charge cycles
Waktu pengisian daya saat komputer mati (kira-kira) Express Charge Mode
0~15 °C : 4 hours
16~45 °C : 2 hours
46~60 °C : 2 hours
Standard Mode
0~15 °C : 4 hours
16~60 °C : 3 hours
46~60 °C : 3 hours
Waktu pengoperasian Varies depending on operating conditions and can significantly reduce under certain power-intensive conditions
Kisaran suhu: Pengoperasian 0 °C to 35 °C (32 °F to 95 °F)
Charge: 0 °C to 50 °C (32 °F to 122 °F)
Discharge: 0 °C to 70 °C (32 °F to 158 °F)
Kisaran suhu: Penyimpanan - 20 °C to 65 °C (- 4 °F to 149 °F)
Baterai sel berbentuk koin CR2032
Adaptor dayaTabel 18. Spesifikasi adaptor daya
Tabel berikut mencantumkan spesifikasi adaptor daya
Tipe • Tipe Barel 65 W• Adaptor Tipe-C Upsell
Tegangan Input 100 VAC hingga 240 VAC
Arus input (maksimum) 2,5 A
Frekuensi input 50 Hz hingga 60 Hz
Arus output 3,34 A
Nilai tegangan output 19,5 VDC
Kisaran suhu (Pengoperasian) 0 ºC hingga 40 ºC (32 ºF hingga 104 ºF)
Kisaran suhu (Non-Pengoperasian) 40 ºC hingga 70 ºC (-40 ºF hingga 158 ºF)
16 Spesifikasi Teknis

Dimensi dan beratTabel 19. Dimensi dan berat
Dimensi dan berat
Tinggi Tinggi depan - 0,88 inci (22,3 mm)
Tinggi belakang - 0,88 inci (22,3 mm)
Panjang 12,98 inci (329,6 mm)
Lebar 9,07 inci (230,45 mm)
Berat Mulai dari 3,52 lb (1,59 kg)
Lingkungan komputerCATATAN Level kontaminan di udara: G1 sebagaimana ditetapkan oleh ISA-S71.04-1985.
Untuk informasi tentang Keamanan Produk Dell, EMC dan Lembar Data Lingkungan, lihat https://www.dell.com/learn/us/en/uscorp1/product-info-datasheets-safety-emc-environmental.
Tabel 20. Lingkungan komputer
Lingkungan fisik Pengoperasian Penyimpanan
Kisaran suhu 0 °C hingga 35 °C (32 °F hingga 95 °F) - 40 °C hingga 65 °C (- 40 °F hingga 149 °F)
Kelembapan relatif (maksimum) 10 % hingga 90 % (tanpa kondensasi)CATATAN Suhu titik embun maksimum = 26 °C
0% hingga 95% (tanpa kondensasi)CATATAN Suhu titik embun maksimum = 33 °C
Getaran (maksimum) 2 Hz hingga 600 Hz pada 0,66 Grms 2 Hz hingga 600 Hz pada 1,33 Grms
Guncangan (maksimum) 160 G† 160 G‡
Ketinggian (maksimum) 3048 m (10.000 ft) 10.668 m (35.000 ft)
* Diukur menggunakan spektrum getaran acak yang mensimulasikan lingkungan pengguna.
† Diukur menggunakan pulsa setengah sinus 2 ms ketika hard disk sedang digunakan.
‡ Diukur menggunakan pulsa setengah sinus 2 ms ketika kepala hard disk dalam posisi parkir.
SecurityTable 21. Security
Security
Firmware TPM Yes
Windows Hello Support Optional
Cable cover No
Chassis lock slot and loop support Yes
Spesifikasi Teknis 17
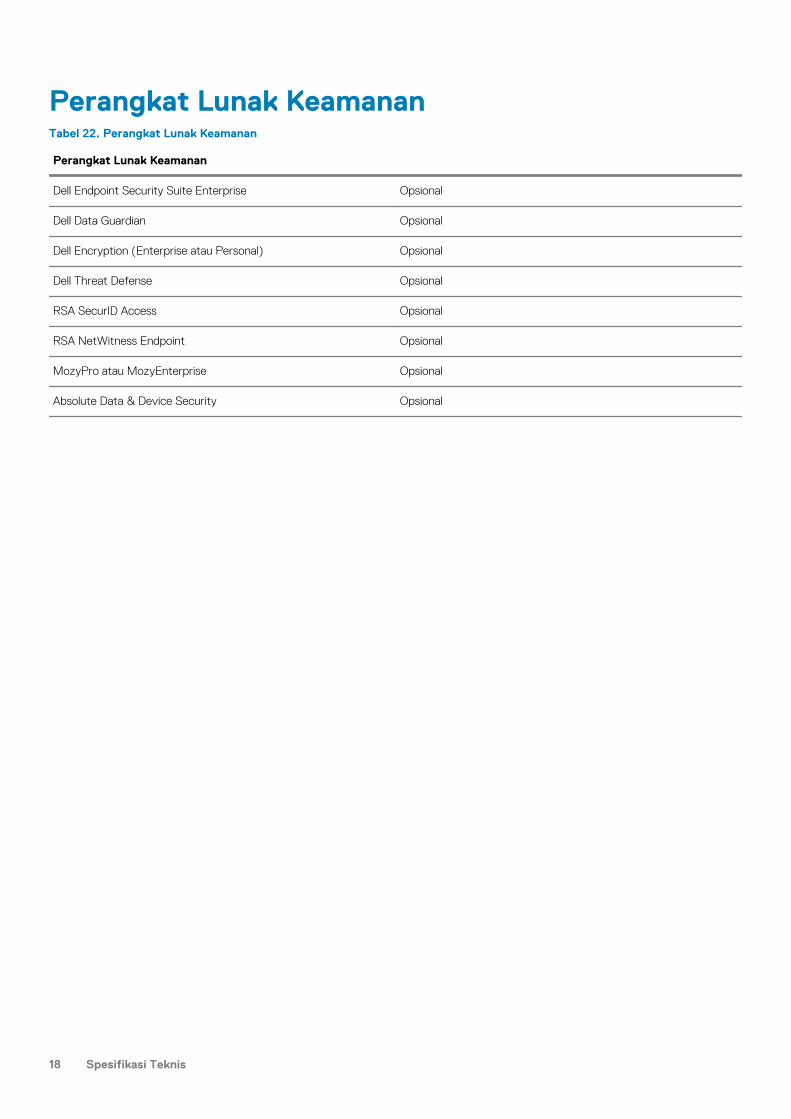
Perangkat Lunak KeamananTabel 22. Perangkat Lunak Keamanan
Perangkat Lunak Keamanan
Dell Endpoint Security Suite Enterprise Opsional
Dell Data Guardian Opsional
Dell Encryption (Enterprise atau Personal) Opsional
Dell Threat Defense Opsional
RSA SecurID Access Opsional
RSA NetWitness Endpoint Opsional
MozyPro atau MozyEnterprise Opsional
Absolute Data & Device Security Opsional
18 Spesifikasi Teknis
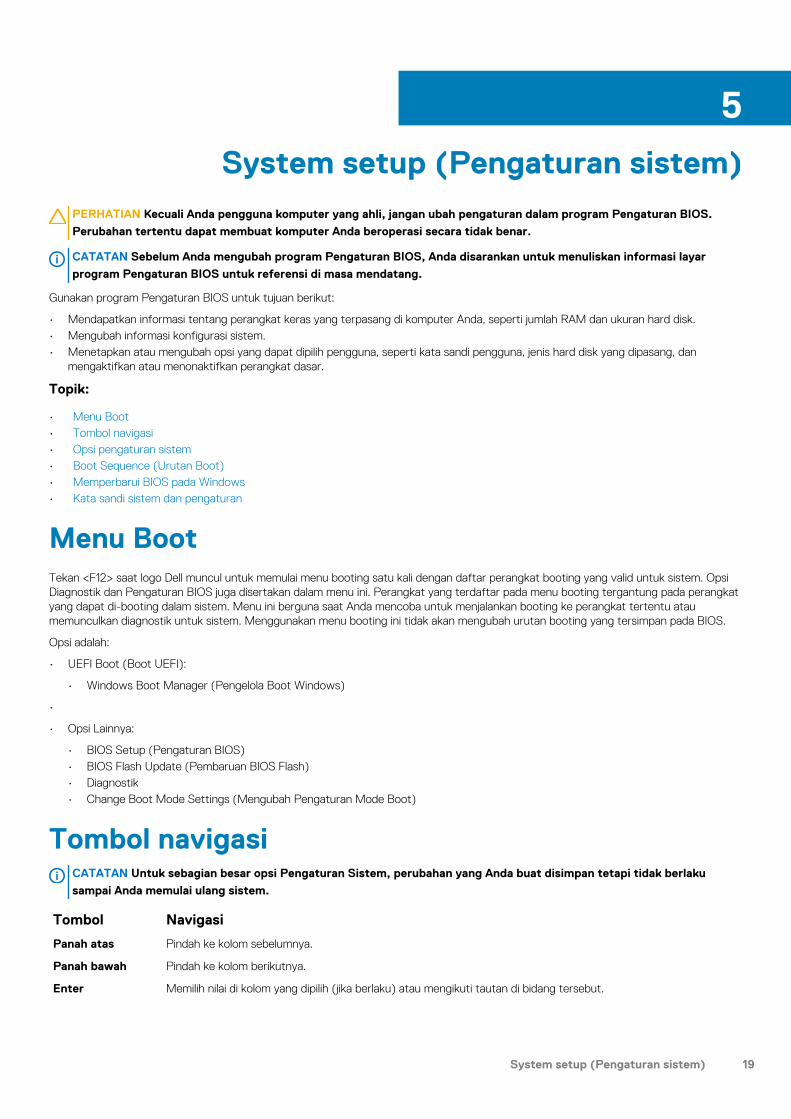
System setup (Pengaturan sistem)PERHATIAN Kecuali Anda pengguna komputer yang ahli, jangan ubah pengaturan dalam program Pengaturan BIOS.
Perubahan tertentu dapat membuat komputer Anda beroperasi secara tidak benar.
CATATAN Sebelum Anda mengubah program Pengaturan BIOS, Anda disarankan untuk menuliskan informasi layar
program Pengaturan BIOS untuk referensi di masa mendatang.
Gunakan program Pengaturan BIOS untuk tujuan berikut:
• Mendapatkan informasi tentang perangkat keras yang terpasang di komputer Anda, seperti jumlah RAM dan ukuran hard disk.• Mengubah informasi konfigurasi sistem.• Menetapkan atau mengubah opsi yang dapat dipilih pengguna, seperti kata sandi pengguna, jenis hard disk yang dipasang, dan
mengaktifkan atau menonaktifkan perangkat dasar.
Topik:
• Menu Boot• Tombol navigasi• Opsi pengaturan sistem• Boot Sequence (Urutan Boot)• Memperbarui BIOS pada Windows• Kata sandi sistem dan pengaturan
Menu BootTekan <F12> saat logo Dell muncul untuk memulai menu booting satu kali dengan daftar perangkat booting yang valid untuk sistem. Opsi Diagnostik dan Pengaturan BIOS juga disertakan dalam menu ini. Perangkat yang terdaftar pada menu booting tergantung pada perangkat yang dapat di-booting dalam sistem. Menu ini berguna saat Anda mencoba untuk menjalankan booting ke perangkat tertentu atau memunculkan diagnostik untuk sistem. Menggunakan menu booting ini tidak akan mengubah urutan booting yang tersimpan pada BIOS.
Opsi adalah:
• UEFI Boot (Boot UEFI):
• Windows Boot Manager (Pengelola Boot Windows)
•
• Opsi Lainnya:
• BIOS Setup (Pengaturan BIOS)• BIOS Flash Update (Pembaruan BIOS Flash)• Diagnostik• Change Boot Mode Settings (Mengubah Pengaturan Mode Boot)
Tombol navigasiCATATAN Untuk sebagian besar opsi Pengaturan Sistem, perubahan yang Anda buat disimpan tetapi tidak berlaku
sampai Anda memulai ulang sistem.
Tombol Navigasi
Panah atas Pindah ke kolom sebelumnya.
Panah bawah Pindah ke kolom berikutnya.
Enter Memilih nilai di kolom yang dipilih (jika berlaku) atau mengikuti tautan di bidang tersebut.
5
System setup (Pengaturan sistem) 19

Tombol Navigasi
Spacebar Perluas atau perkecil daftar turun ke bawah, jika ada.
Tab Pindah ke area fokus berikutnya.
Esc Pindah ke halaman sebelumnya sampai Anda melihat layar utama. Menekan Esc di layar utama menampilkan pesan yang meminta Anda untuk menyimpan perubahan yang belum disimpan dan memulai ulang sistem.
Opsi pengaturan sistemCATATAN Bergantung pada laptop dan perangkat yang dipasang padanya, item yang tercantum pada bagian ini dapat
muncul atau juga tidak.
20 System setup (Pengaturan sistem)
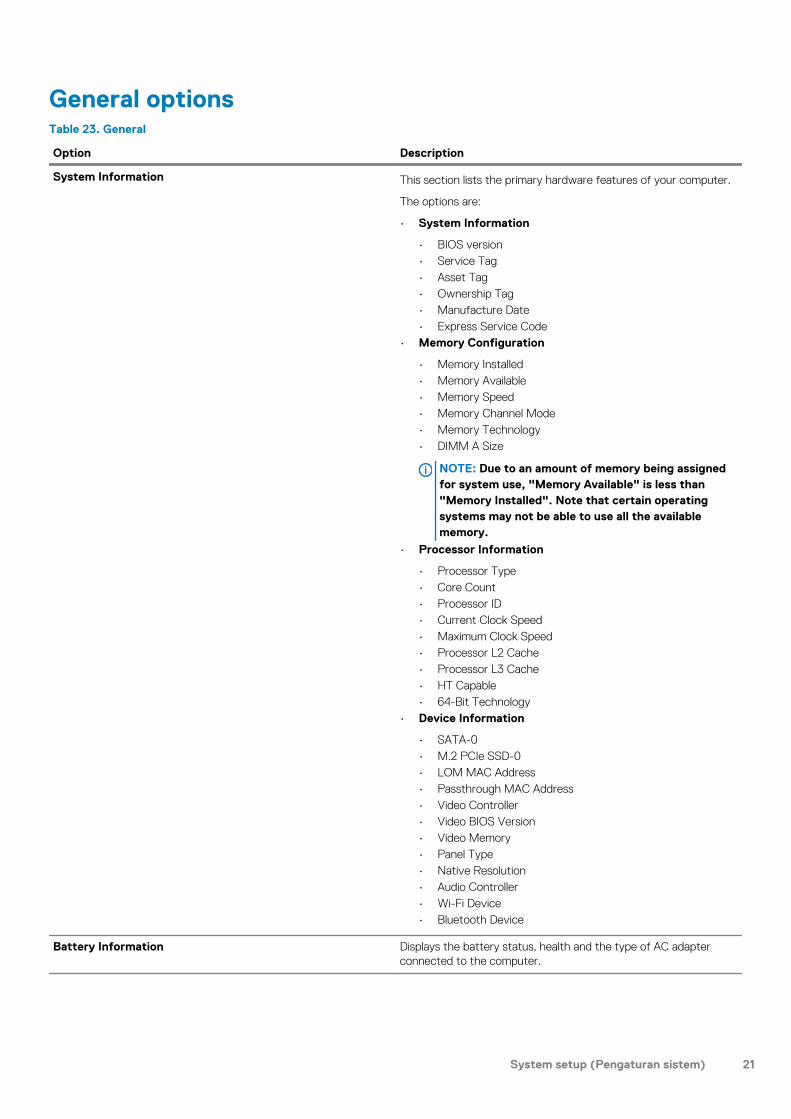
General optionsTable 23. General
Option Description
System Information This section lists the primary hardware features of your computer.
The options are:
• System Information
• BIOS version• Service Tag• Asset Tag• Ownership Tag• Manufacture Date• Express Service Code
• Memory Configuration
• Memory Installed• Memory Available• Memory Speed• Memory Channel Mode• Memory Technology• DIMM A Size
NOTE: Due to an amount of memory being assigned for system use, "Memory Available" is less than "Memory Installed". Note that certain operating systems may not be able to use all the available memory.
• Processor Information
• Processor Type• Core Count• Processor ID• Current Clock Speed• Maximum Clock Speed• Processor L2 Cache• Processor L3 Cache• HT Capable• 64-Bit Technology
• Device Information
• SATA-0• M.2 PCIe SSD-0• LOM MAC Address• Passthrough MAC Address• Video Controller• Video BIOS Version• Video Memory• Panel Type• Native Resolution• Audio Controller• Wi-Fi Device• Bluetooth Device
Battery Information Displays the battery status, health and the type of AC adapter connected to the computer.
System setup (Pengaturan sistem) 21
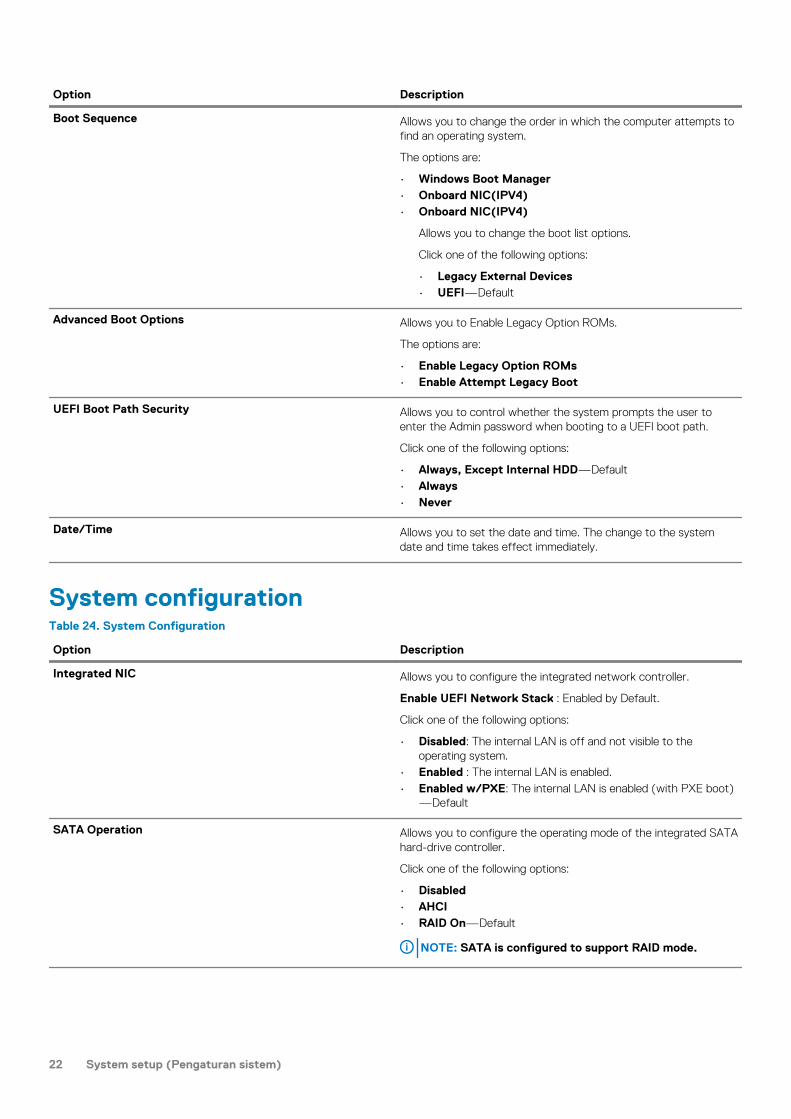
Option Description
Boot Sequence Allows you to change the order in which the computer attempts to find an operating system.
The options are:
• Windows Boot Manager• Onboard NIC(IPV4)• Onboard NIC(IPV4)
Allows you to change the boot list options.
Click one of the following options:
• Legacy External Devices• UEFI—Default
Advanced Boot Options Allows you to Enable Legacy Option ROMs.
The options are:
• Enable Legacy Option ROMs• Enable Attempt Legacy Boot
UEFI Boot Path Security Allows you to control whether the system prompts the user to enter the Admin password when booting to a UEFI boot path.
Click one of the following options:
• Always, Except Internal HDD—Default• Always• Never
Date/Time Allows you to set the date and time. The change to the system date and time takes effect immediately.
System configurationTable 24. System Configuration
Option Description
Integrated NIC Allows you to configure the integrated network controller.
Enable UEFI Network Stack : Enabled by Default.
Click one of the following options:
• Disabled: The internal LAN is off and not visible to the operating system.
• Enabled : The internal LAN is enabled.• Enabled w/PXE: The internal LAN is enabled (with PXE boot)
—Default
SATA Operation Allows you to configure the operating mode of the integrated SATA hard-drive controller.
Click one of the following options:
• Disabled• AHCI• RAID On—Default
NOTE: SATA is configured to support RAID mode.
22 System setup (Pengaturan sistem)

Option Description
Drives These fields let you enable or disable various drives on board.
The options are:
• SATA-0• M.2 PCIe SSD-0
SMART Reporting This field controls whether hard drive errors for integrated drives are reported during startup.
The option is disabled by default.
USB Configuration Allows you to enable or disable the internal/integrated USB configuration.
The options are:
• Enable USB Boot Support• Enable External USB Ports
All the options are set by default.
NOTE: USB keyboard and mouse always work in the BIOS setup irrespective of these settings.
Dell Type-C Dock Configuration Allows you to connect to Dell WD and TB family of docks(Type-C Docks) independent of USB and thunderbolt adapter configuration.
This option is enabled by default.
Audio Allows you to enable or disable the integrated audio controller. By default, the Enable Audio option is selected.
The options are:
• Enable Microphone• Enable Internal Speaker
This option is set by default.
Touchscreen This option controls whether the touchscreen is enabled or disabled
This option is enabled by default.
Miscellaneous devices Allows you to enable or disable various on board devices.
• Enable Camera—Default• Enable Secure Digital (SD) Card — Enabled Default• Secure Digital (SD) Card Boot - Disabled• Secure Digital Card (SD) Read-Only Mode - Disabled
Opsi layar videoTabel 25. Video
Opsi Deskripsi
Kecerahan Layar Memungkinkan Anda untuk menetapkan kecerahan display tergantung pada sumber daya. Dengan Baterai(50% adalah bawaan) dan Dengan Daya AC (100 % bawaan).
System setup (Pengaturan sistem) 23
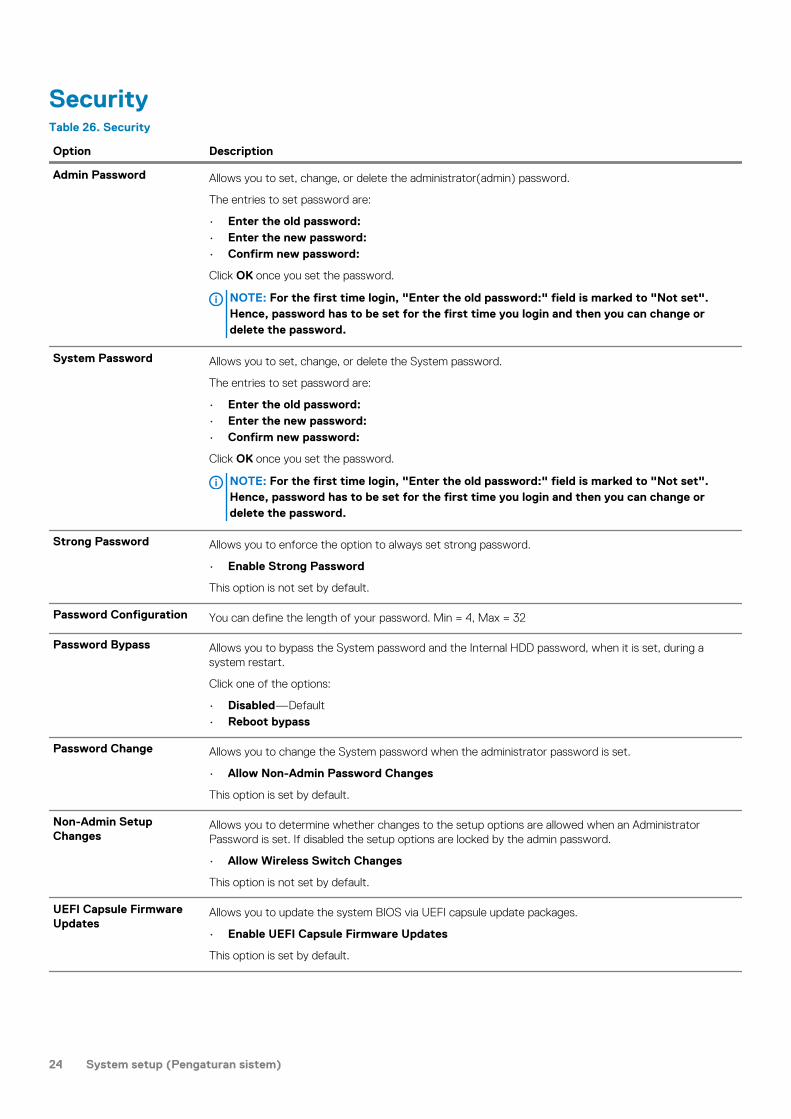
SecurityTable 26. Security
Option Description
Admin Password Allows you to set, change, or delete the administrator(admin) password.
The entries to set password are:
• Enter the old password:• Enter the new password:• Confirm new password:
Click OK once you set the password.
NOTE: For the first time login, "Enter the old password:" field is marked to "Not set". Hence, password has to be set for the first time you login and then you can change or delete the password.
System Password Allows you to set, change, or delete the System password.
The entries to set password are:
• Enter the old password:• Enter the new password:• Confirm new password:
Click OK once you set the password.
NOTE: For the first time login, "Enter the old password:" field is marked to "Not set". Hence, password has to be set for the first time you login and then you can change or delete the password.
Strong Password Allows you to enforce the option to always set strong password.
• Enable Strong Password
This option is not set by default.
Password Configuration You can define the length of your password. Min = 4, Max = 32
Password Bypass Allows you to bypass the System password and the Internal HDD password, when it is set, during a system restart.
Click one of the options:
• Disabled—Default• Reboot bypass
Password Change Allows you to change the System password when the administrator password is set.
• Allow Non-Admin Password Changes
This option is set by default.
Non-Admin Setup Changes
Allows you to determine whether changes to the setup options are allowed when an Administrator Password is set. If disabled the setup options are locked by the admin password.
• Allow Wireless Switch Changes
This option is not set by default.
UEFI Capsule Firmware Updates
Allows you to update the system BIOS via UEFI capsule update packages.
• Enable UEFI Capsule Firmware Updates
This option is set by default.
24 System setup (Pengaturan sistem)
Option Description
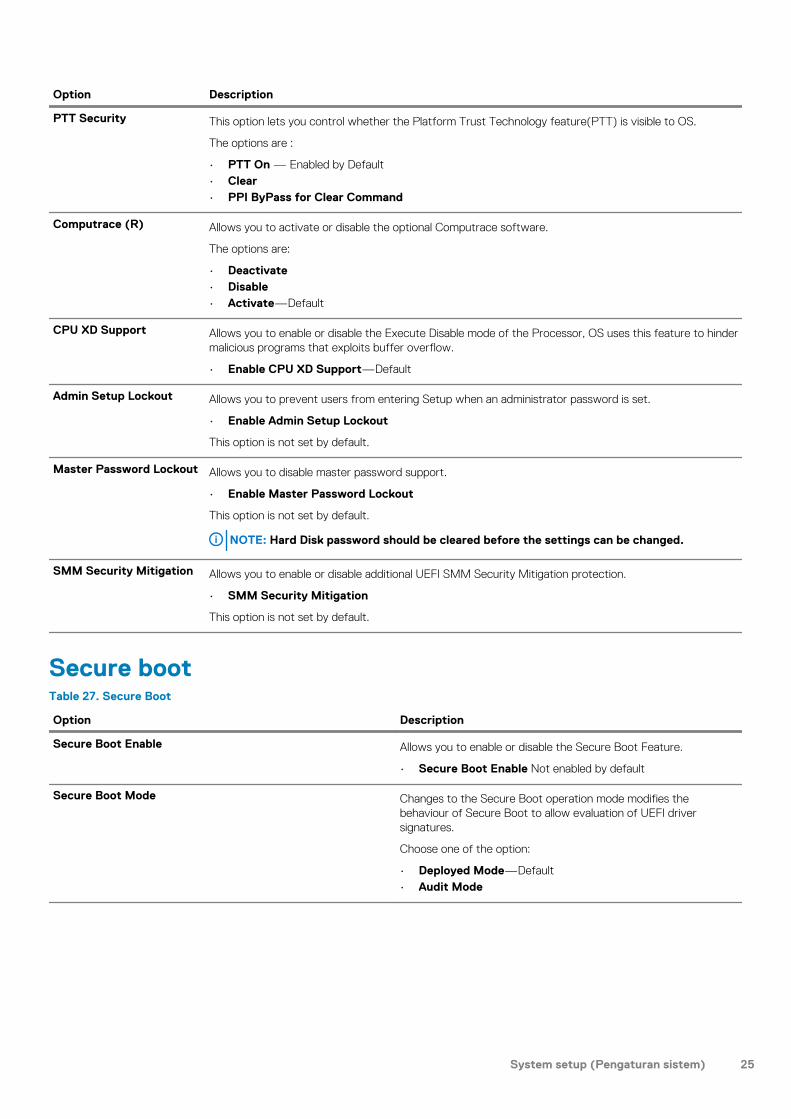
PTT Security This option lets you control whether the Platform Trust Technology feature(PTT) is visible to OS.
The options are :
• PTT On — Enabled by Default• Clear• PPI ByPass for Clear Command
Computrace (R) Allows you to activate or disable the optional Computrace software.
The options are:
• Deactivate• Disable• Activate—Default
CPU XD Support Allows you to enable or disable the Execute Disable mode of the Processor, OS uses this feature to hinder malicious programs that exploits buffer overflow.
• Enable CPU XD Support—Default
Admin Setup Lockout Allows you to prevent users from entering Setup when an administrator password is set.
• Enable Admin Setup Lockout
This option is not set by default.
Master Password Lockout Allows you to disable master password support.
• Enable Master Password Lockout
This option is not set by default.
NOTE: Hard Disk password should be cleared before the settings can be changed.
SMM Security Mitigation Allows you to enable or disable additional UEFI SMM Security Mitigation protection.
• SMM Security Mitigation
This option is not set by default.
Secure bootTable 27. Secure Boot
Option Description
Secure Boot Enable Allows you to enable or disable the Secure Boot Feature.
• Secure Boot Enable Not enabled by default
Secure Boot Mode Changes to the Secure Boot operation mode modifies the behaviour of Secure Boot to allow evaluation of UEFI driver signatures.
Choose one of the option:
• Deployed Mode—Default• Audit Mode
System setup (Pengaturan sistem) 25
Option Description
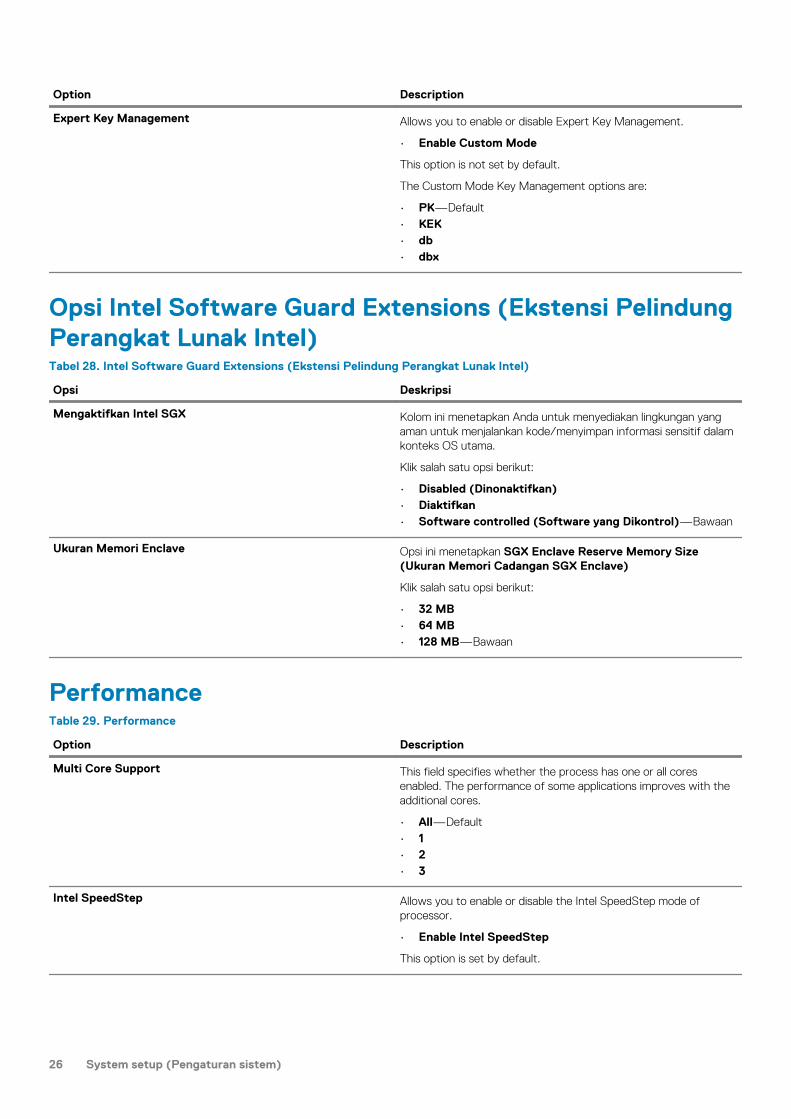
Expert Key Management Allows you to enable or disable Expert Key Management.
• Enable Custom Mode
This option is not set by default.
The Custom Mode Key Management options are:
• PK—Default• KEK• db• dbx
Opsi Intel Software Guard Extensions (Ekstensi Pelindung Perangkat Lunak Intel)Tabel 28. Intel Software Guard Extensions (Ekstensi Pelindung Perangkat Lunak Intel)
Opsi Deskripsi
Mengaktifkan Intel SGX Kolom ini menetapkan Anda untuk menyediakan lingkungan yang aman untuk menjalankan kode/menyimpan informasi sensitif dalam konteks OS utama.
Klik salah satu opsi berikut:
• Disabled (Dinonaktifkan)• Diaktifkan• Software controlled (Software yang Dikontrol)—Bawaan
Ukuran Memori Enclave Opsi ini menetapkan SGX Enclave Reserve Memory Size (Ukuran Memori Cadangan SGX Enclave)
Klik salah satu opsi berikut:
• 32 MB• 64 MB• 128 MB—Bawaan
PerformanceTable 29. Performance
Option Description
Multi Core Support This field specifies whether the process has one or all cores enabled. The performance of some applications improves with the additional cores.
• All—Default• 1• 2• 3
Intel SpeedStep Allows you to enable or disable the Intel SpeedStep mode of processor.
• Enable Intel SpeedStep
This option is set by default.
26 System setup (Pengaturan sistem)
Option Description
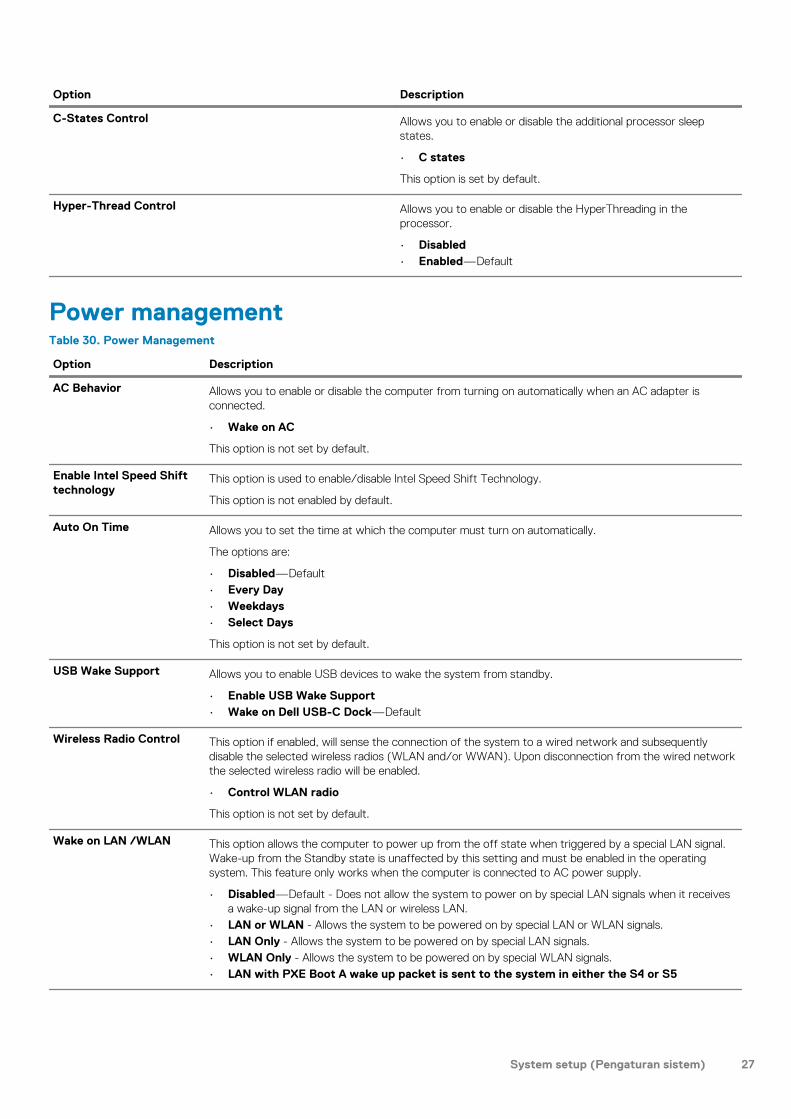
C-States Control Allows you to enable or disable the additional processor sleep states.
• C states
This option is set by default.
Hyper-Thread Control Allows you to enable or disable the HyperThreading in the processor.
• Disabled• Enabled—Default
Power managementTable 30. Power Management
Option Description
AC Behavior Allows you to enable or disable the computer from turning on automatically when an AC adapter is connected.
• Wake on AC
This option is not set by default.
Enable Intel Speed Shift technology
This option is used to enable/disable Intel Speed Shift Technology.
This option is not enabled by default.
Auto On Time Allows you to set the time at which the computer must turn on automatically.
The options are:
• Disabled—Default• Every Day• Weekdays• Select Days
This option is not set by default.
USB Wake Support Allows you to enable USB devices to wake the system from standby.
• Enable USB Wake Support• Wake on Dell USB-C Dock—Default
Wireless Radio Control This option if enabled, will sense the connection of the system to a wired network and subsequently disable the selected wireless radios (WLAN and/or WWAN). Upon disconnection from the wired network the selected wireless radio will be enabled.
• Control WLAN radio
This option is not set by default.
Wake on LAN /WLAN This option allows the computer to power up from the off state when triggered by a special LAN signal. Wake-up from the Standby state is unaffected by this setting and must be enabled in the operating system. This feature only works when the computer is connected to AC power supply.
• Disabled—Default - Does not allow the system to power on by special LAN signals when it receives a wake-up signal from the LAN or wireless LAN.
• LAN or WLAN - Allows the system to be powered on by special LAN or WLAN signals.• LAN Only - Allows the system to be powered on by special LAN signals.• WLAN Only - Allows the system to be powered on by special WLAN signals.• LAN with PXE Boot A wake up packet is sent to the system in either the S4 or S5
System setup (Pengaturan sistem) 27
Option Description
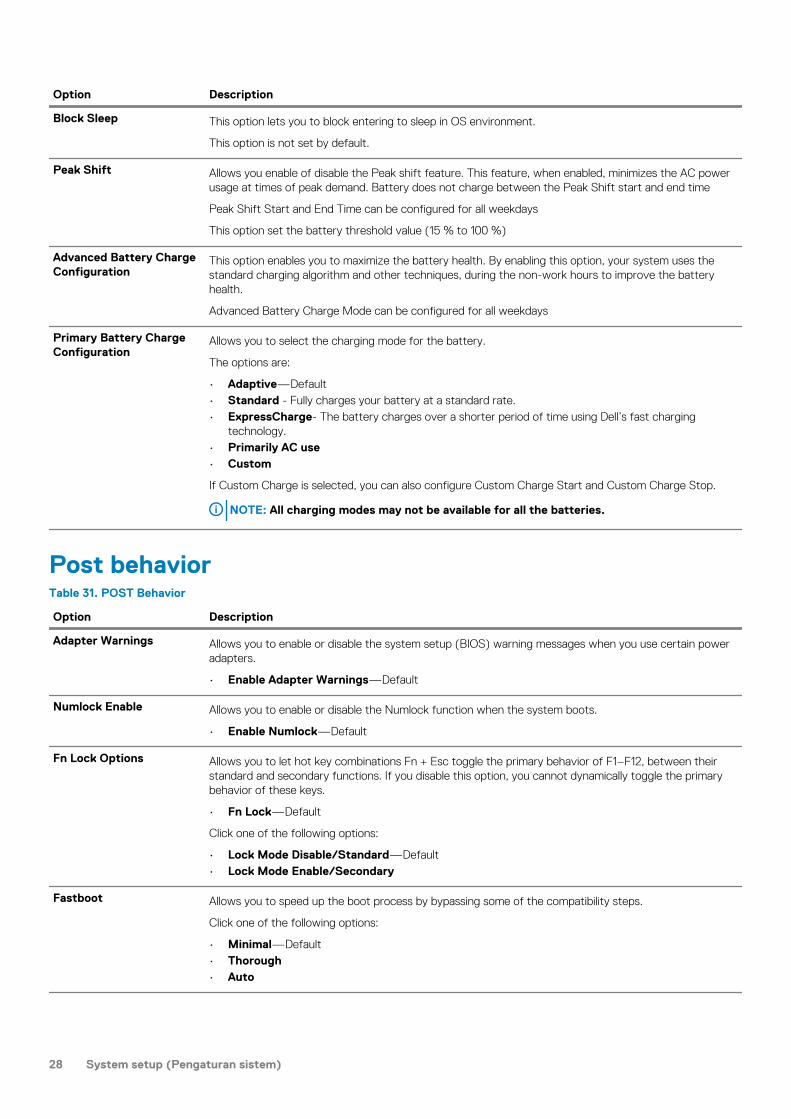
Block Sleep This option lets you to block entering to sleep in OS environment.
This option is not set by default.
Peak Shift Allows you enable of disable the Peak shift feature. This feature, when enabled, minimizes the AC power usage at times of peak demand. Battery does not charge between the Peak Shift start and end time
Peak Shift Start and End Time can be configured for all weekdays
This option set the battery threshold value (15 % to 100 %)
Advanced Battery Charge Configuration
This option enables you to maximize the battery health. By enabling this option, your system uses the standard charging algorithm and other techniques, during the non-work hours to improve the battery health.
Advanced Battery Charge Mode can be configured for all weekdays
Primary Battery Charge Configuration
Allows you to select the charging mode for the battery.
The options are:
• Adaptive—Default• Standard - Fully charges your battery at a standard rate.• ExpressCharge- The battery charges over a shorter period of time using Dell’s fast charging
technology.• Primarily AC use• Custom
If Custom Charge is selected, you can also configure Custom Charge Start and Custom Charge Stop.
NOTE: All charging modes may not be available for all the batteries.
Post behaviorTable 31. POST Behavior
Option Description
Adapter Warnings Allows you to enable or disable the system setup (BIOS) warning messages when you use certain power adapters.
• Enable Adapter Warnings—Default
Numlock Enable Allows you to enable or disable the Numlock function when the system boots.
• Enable Numlock—Default
Fn Lock Options Allows you to let hot key combinations Fn + Esc toggle the primary behavior of F1–F12, between their standard and secondary functions. If you disable this option, you cannot dynamically toggle the primary behavior of these keys.
• Fn Lock—Default
Click one of the following options:
• Lock Mode Disable/Standard—Default• Lock Mode Enable/Secondary
Fastboot Allows you to speed up the boot process by bypassing some of the compatibility steps.
Click one of the following options:
• Minimal—Default• Thorough• Auto
28 System setup (Pengaturan sistem)
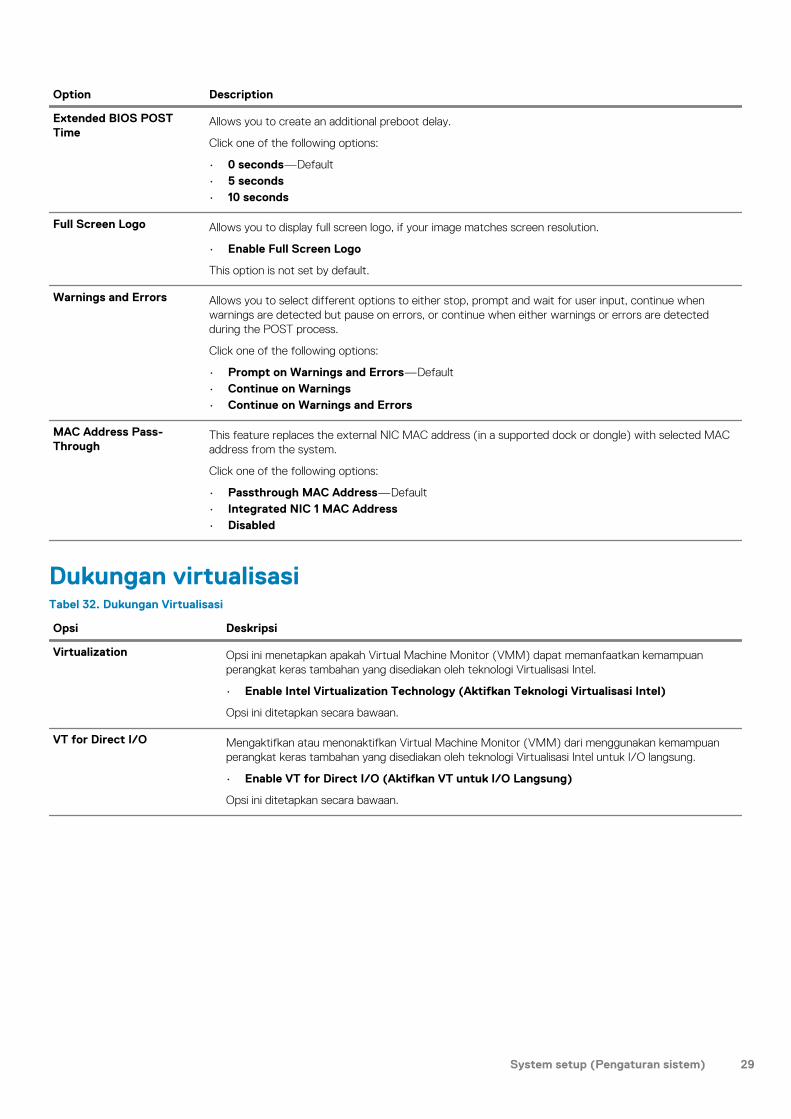
Option Description
Extended BIOS POST Time
Allows you to create an additional preboot delay.
Click one of the following options:
• 0 seconds—Default• 5 seconds• 10 seconds
Full Screen Logo Allows you to display full screen logo, if your image matches screen resolution.
• Enable Full Screen Logo
This option is not set by default.
Warnings and Errors Allows you to select different options to either stop, prompt and wait for user input, continue when warnings are detected but pause on errors, or continue when either warnings or errors are detected during the POST process.
Click one of the following options:
• Prompt on Warnings and Errors—Default• Continue on Warnings• Continue on Warnings and Errors
MAC Address Pass- Through
This feature replaces the external NIC MAC address (in a supported dock or dongle) with selected MAC address from the system.
Click one of the following options:
• Passthrough MAC Address—Default• Integrated NIC 1 MAC Address• Disabled
Dukungan virtualisasiTabel 32. Dukungan Virtualisasi
Opsi Deskripsi
Virtualization Opsi ini menetapkan apakah Virtual Machine Monitor (VMM) dapat memanfaatkan kemampuan perangkat keras tambahan yang disediakan oleh teknologi Virtualisasi Intel.
• Enable Intel Virtualization Technology (Aktifkan Teknologi Virtualisasi Intel)
Opsi ini ditetapkan secara bawaan.
VT for Direct I/O Mengaktifkan atau menonaktifkan Virtual Machine Monitor (VMM) dari menggunakan kemampuan perangkat keras tambahan yang disediakan oleh teknologi Virtualisasi Intel untuk I/O langsung.
• Enable VT for Direct I/O (Aktifkan VT untuk I/O Langsung)
Opsi ini ditetapkan secara bawaan.
System setup (Pengaturan sistem) 29
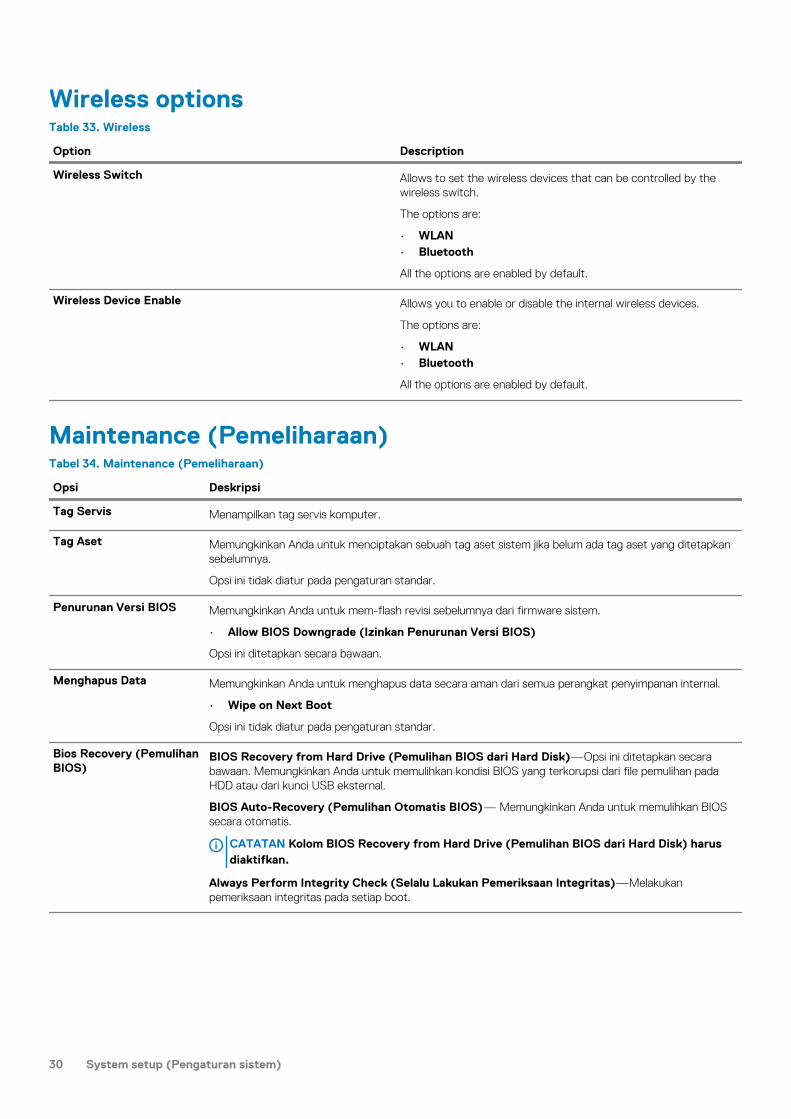
Wireless optionsTable 33. Wireless
Option Description
Wireless Switch Allows to set the wireless devices that can be controlled by the wireless switch.
The options are:
• WLAN• Bluetooth
All the options are enabled by default.
Wireless Device Enable Allows you to enable or disable the internal wireless devices.
The options are:
• WLAN• Bluetooth
All the options are enabled by default.
Maintenance (Pemeliharaan)Tabel 34. Maintenance (Pemeliharaan)
Opsi Deskripsi
Tag Servis Menampilkan tag servis komputer.
Tag Aset Memungkinkan Anda untuk menciptakan sebuah tag aset sistem jika belum ada tag aset yang ditetapkan sebelumnya.
Opsi ini tidak diatur pada pengaturan standar.
Penurunan Versi BIOS Memungkinkan Anda untuk mem-flash revisi sebelumnya dari firmware sistem.
• Allow BIOS Downgrade (Izinkan Penurunan Versi BIOS)
Opsi ini ditetapkan secara bawaan.
Menghapus Data Memungkinkan Anda untuk menghapus data secara aman dari semua perangkat penyimpanan internal.
• Wipe on Next Boot
Opsi ini tidak diatur pada pengaturan standar.
Bios Recovery (Pemulihan BIOS)
BIOS Recovery from Hard Drive (Pemulihan BIOS dari Hard Disk)—Opsi ini ditetapkan secara bawaan. Memungkinkan Anda untuk memulihkan kondisi BIOS yang terkorupsi dari file pemulihan pada HDD atau dari kunci USB eksternal.
BIOS Auto-Recovery (Pemulihan Otomatis BIOS)— Memungkinkan Anda untuk memulihkan BIOS secara otomatis.
CATATAN Kolom BIOS Recovery from Hard Drive (Pemulihan BIOS dari Hard Disk) harus diaktifkan.
Always Perform Integrity Check (Selalu Lakukan Pemeriksaan Integritas)—Melakukan pemeriksaan integritas pada setiap boot.
30 System setup (Pengaturan sistem)

Log sistemTabel 35. System Logs (Log Sistem)
Opsi Deskripsi
Peristiwa BIOS Memungkinkan Anda untuk menampilkan dan menghapus peristiwa Pengaturan Sistem (BIOS) POST
Peristiwa Termal Memungkinkan Anda untuk menampilkan dan menghapus peristiwa Pengaturan Sistem (Termal).
Peristiwa Daya Memungkinkan Anda untuk menampilkan dan menghapus peristiwa Pengaturan Sistem (Daya).
SupportAssist System ResolutionTable 36. SupportAssist System Resolution
Option Description
Auto OS Recovery Threshold
The Auto OS Recovery threshold setup options controls the automatic flow for SupportAssist System Resolution Console and for Dell OS Recovery Tool.
The options are:
• 0• 1• 2—Default• 3
SupportAssist OS Recovery
The SupportAssist OS Recovery option will enable or disable the boot flow for SupportAssist OS Recovery tool in the event of certain system errors.
This option is not set by default.
Boot Sequence (Urutan Boot)Urutan Booting memungkinkan Anda untuk mengabaikan urutan perangkat booting–Pengaturan Sistem yang ditentukan dan melakukan booting langsung ke perangkat tertentu (misalnya: drive optik atau hard disk). Saat Power-on Self Test (POST) (Pengujian Mandiri Nyala-Daya), saat logo dell muncu, Anda dapat:
• Mengakses System Setup (Pengaturan Sistem) dengan menekan tombol F2• Memunculkan menu boot satu-kali dengan menekan tombol F12
Menu boot satu-kali menampilkan perangkat yang dapat Anda lakukan proses boot termasuk opsi diagnostik. Opsi menu boot adalah:
• Removable Drive (Drive yang Dapat Dilepas) (jika ada)• Drive STXXXX
CATATAN XXX menyatakan nomor drive SATA.
• Drive Optik (jika ada)• Hard Disk SATA (jika ada)• Diagnostik
CATATAN Memilih Diagnostics (Diagnostik), akan menampilkan layar ePSA diagnostics (Diagnostik ePSA).
Layar boot sequence (urutan boot) juga menampilkan opsi untuk mengakses layar System Setup (Pengaturan Sistem).
Memperbarui BIOS pada WindowsDirekomendasikan untuk memperbarui BIOS (Pengaturan Sistem) Anda saat mengganti board sistem atau jika pembaruan tersedia. Untuk laptop, pastikan baterai komputer Anda penuh dan terhubung dengan stopkontak listrik.
CATATAN Jika BitLocker diaktifkan, tundalah terlebih dahulu sebelum memperbarui sistem BIOS, lalu aktifkan kembali
setelah pembaruan BIOS selesai.
System setup (Pengaturan sistem) 31
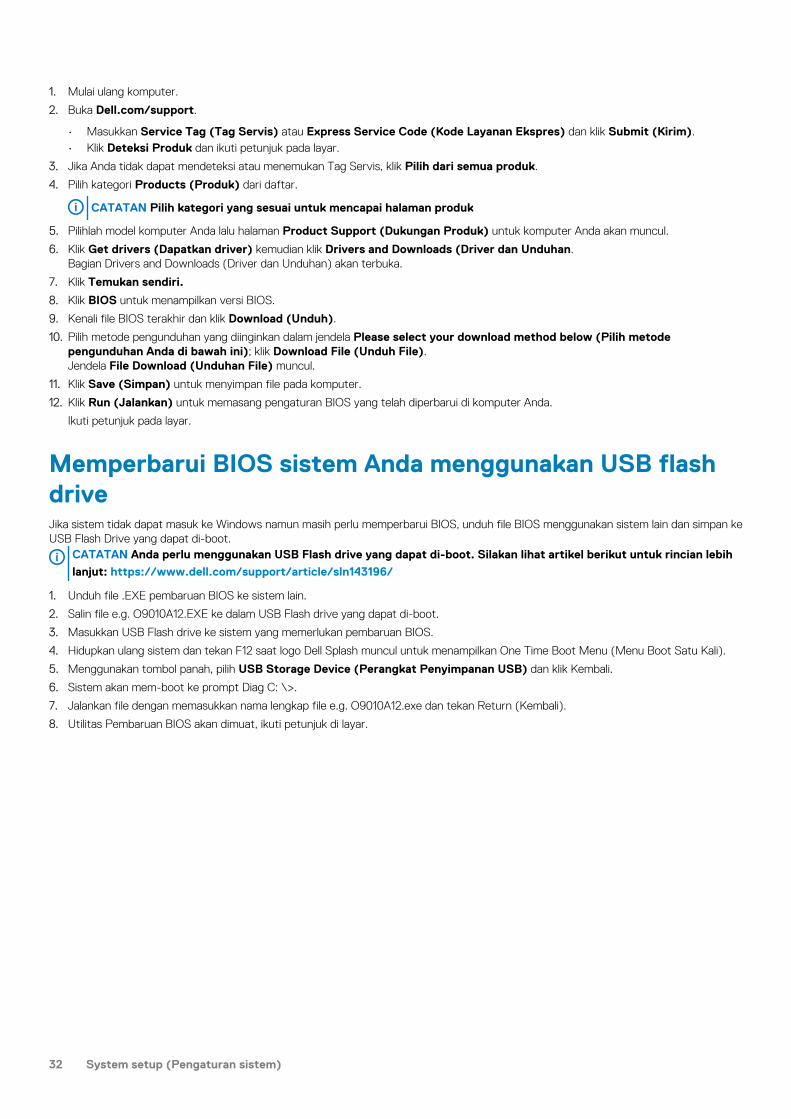
1. Mulai ulang komputer.
2. Buka Dell.com/support.
• Masukkan Service Tag (Tag Servis) atau Express Service Code (Kode Layanan Ekspres) dan klik Submit (Kirim).• Klik Deteksi Produk dan ikuti petunjuk pada layar.
3. Jika Anda tidak dapat mendeteksi atau menemukan Tag Servis, klik Pilih dari semua produk.
4. Pilih kategori Products (Produk) dari daftar.
CATATAN Pilih kategori yang sesuai untuk mencapai halaman produk
5. Pilihlah model komputer Anda lalu halaman Product Support (Dukungan Produk) untuk komputer Anda akan muncul.
6. Klik Get drivers (Dapatkan driver) kemudian klik Drivers and Downloads (Driver dan Unduhan.Bagian Drivers and Downloads (Driver dan Unduhan) akan terbuka.
7. Klik Temukan sendiri.
8. Klik BIOS untuk menampilkan versi BIOS.
9. Kenali file BIOS terakhir dan klik Download (Unduh).
10. Pilih metode pengunduhan yang diinginkan dalam jendela Please select your download method below (Pilih metode pengunduhan Anda di bawah ini); klik Download File (Unduh File).Jendela File Download (Unduhan File) muncul.
11. Klik Save (Simpan) untuk menyimpan file pada komputer.
12. Klik Run (Jalankan) untuk memasang pengaturan BIOS yang telah diperbarui di komputer Anda.
Ikuti petunjuk pada layar.
Memperbarui BIOS sistem Anda menggunakan USB flash driveJika sistem tidak dapat masuk ke Windows namun masih perlu memperbarui BIOS, unduh file BIOS menggunakan sistem lain dan simpan ke USB Flash Drive yang dapat di-boot.
CATATAN Anda perlu menggunakan USB Flash drive yang dapat di-boot. Silakan lihat artikel berikut untuk rincian lebih
lanjut: https://www.dell.com/support/article/sln143196/
1. Unduh file .EXE pembaruan BIOS ke sistem lain.
2. Salin file e.g. O9010A12.EXE ke dalam USB Flash drive yang dapat di-boot.
3. Masukkan USB Flash drive ke sistem yang memerlukan pembaruan BIOS.
4. Hidupkan ulang sistem dan tekan F12 saat logo Dell Splash muncul untuk menampilkan One Time Boot Menu (Menu Boot Satu Kali).
5. Menggunakan tombol panah, pilih USB Storage Device (Perangkat Penyimpanan USB) dan klik Kembali.
6. Sistem akan mem-boot ke prompt Diag C: \>.
7. Jalankan file dengan memasukkan nama lengkap file e.g. O9010A12.exe dan tekan Return (Kembali).
8. Utilitas Pembaruan BIOS akan dimuat, ikuti petunjuk di layar.
32 System setup (Pengaturan sistem)
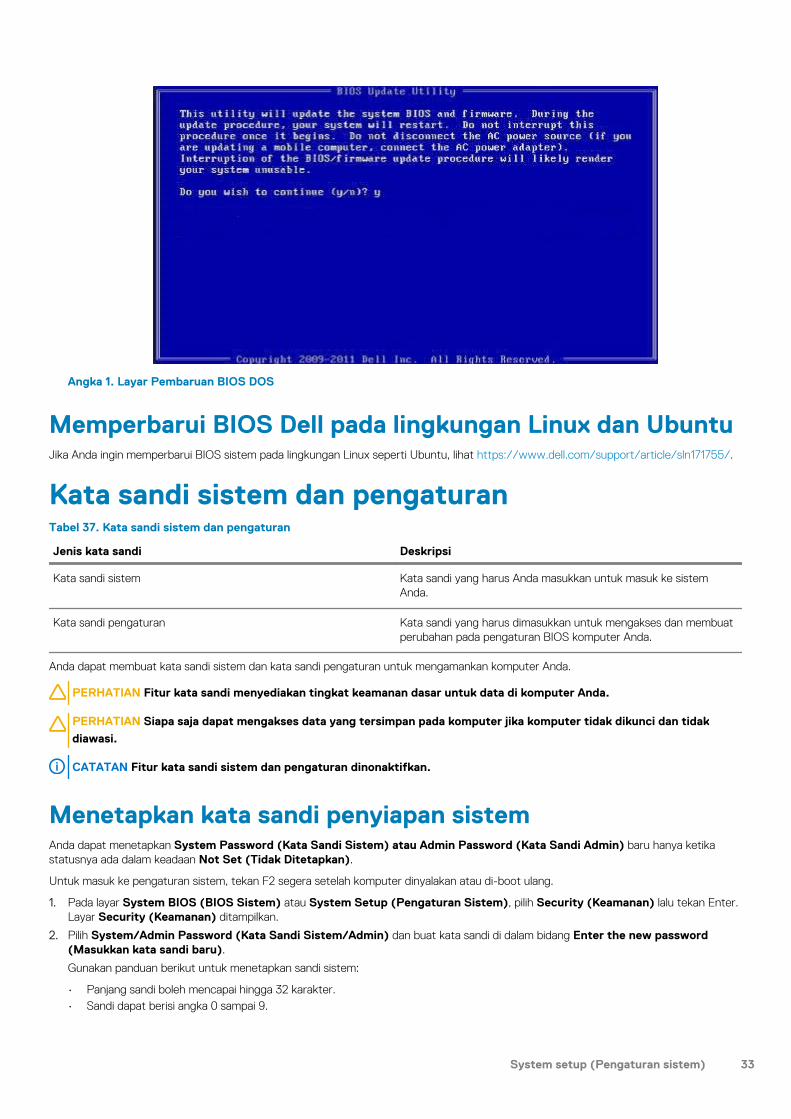
Angka 1. Layar Pembaruan BIOS DOS
Memperbarui BIOS Dell pada lingkungan Linux dan UbuntuJika Anda ingin memperbarui BIOS sistem pada lingkungan Linux seperti Ubuntu, lihat https://www.dell.com/support/article/sln171755/.
Kata sandi sistem dan pengaturanTabel 37. Kata sandi sistem dan pengaturan
Jenis kata sandi Deskripsi
Kata sandi sistem Kata sandi yang harus Anda masukkan untuk masuk ke sistem Anda.
Kata sandi pengaturan Kata sandi yang harus dimasukkan untuk mengakses dan membuat perubahan pada pengaturan BIOS komputer Anda.
Anda dapat membuat kata sandi sistem dan kata sandi pengaturan untuk mengamankan komputer Anda.
PERHATIAN Fitur kata sandi menyediakan tingkat keamanan dasar untuk data di komputer Anda.
PERHATIAN Siapa saja dapat mengakses data yang tersimpan pada komputer jika komputer tidak dikunci dan tidak
diawasi.
CATATAN Fitur kata sandi sistem dan pengaturan dinonaktifkan.
Menetapkan kata sandi penyiapan sistemAnda dapat menetapkan System Password (Kata Sandi Sistem) atau Admin Password (Kata Sandi Admin) baru hanya ketika statusnya ada dalam keadaan Not Set (Tidak Ditetapkan).
Untuk masuk ke pengaturan sistem, tekan F2 segera setelah komputer dinyalakan atau di-boot ulang.
1. Pada layar System BIOS (BIOS Sistem) atau System Setup (Pengaturan Sistem), pilih Security (Keamanan) lalu tekan Enter.Layar Security (Keamanan) ditampilkan.
2. Pilih System/Admin Password (Kata Sandi Sistem/Admin) dan buat kata sandi di dalam bidang Enter the new password (Masukkan kata sandi baru).
Gunakan panduan berikut untuk menetapkan sandi sistem:
• Panjang sandi boleh mencapai hingga 32 karakter.• Sandi dapat berisi angka 0 sampai 9.
System setup (Pengaturan sistem) 33
• Hanya huruf kecil saja yang valid, huruf besar tidak dibolehkan.• Hanya karakter khusus berikut yang dibolehkan: spasi, (”), (+), (,), (-), (.), (/), (;), ([), (\), (]), (`).
3. Ketikkan kata sandi sistem yang telah Anda masukkan sebelumnya ke dalam bidang Confirm new password (Konfirmasikan kata sandi baru) lalu klik OK.
4. Tekan Esc dan sebuah pesan meminta Anda untuk menyimpan perubahan tersebut.
5. Tekan Y untuk menyimpan perubahan.Komputer akan melakukan boot ulang.
Menghapus atau mengganti kata sandi pengaturan sistem saat iniPastikan bahwa Password Status (Kata Sandi Status) Tidak Terkunci (dalam System Setup) sebelum mencoba untuk menghapus atau mengubah kata sandi Sistem dan/atau Pengaturan saat ini. Anda tidak dapat menghapus atau mengubah kata sandi Sistem atau Pengaturan, jika Password Status (Kata Sandi Status) Terkunci.
Untuk masuk ke Pengaturan Sistem, tekan F2 segera setelah komputer dinyalakan atau di-boot ulang.
1. Pada layar System BIOS (BIOS Sistem) atau System Setup (Pengaturan Sistem), pilih System Security (Keamanan Sistem) dan tekan tombol Enter.Layar System Security (Keamanan Sistem) ditampilkan.
2. Pada layar Keamanan Sistem, verifikasikan bahwa Status Sandi dalam keadaan Tidak Terkunci.
3. Pilih System Password (Kata Sandi Sistem), ubah atau hapus kata sandi sistem saat ini dan tekan Enter atau Tab.
4. Pilih Setup Password (Kata Sandi Pengaturan), ubah atau hapus kata sandi pengaturan saat ini dan tekan Enter atau Tab.
CATATAN Jika Anda mengganti kata sandi Sistem dan/atau Pengaturan, masukkan kembali kata sandi baru saat
diminta. Jika Anda menghapus kata sandi Sistem dan/atau Pengaturan, konfirmasi penghapusan saat diminta.
5. Tekan Esc dan sebuah pesan meminta Anda untuk menyimpan perubahan tersebut.
6. Tekan Y untuk menyimpan perubahan dan keluar dari System Setup (Pengaturan Sistem).Komputer akan melakukan boot ulang.
34 System setup (Pengaturan sistem)
Perangkat Lunak dan Penemuan Kesalahan
Sistem operasiTabel 38. Sistem operasi
Sistem operasi
Sistem operasi yang didukung • Windows 10 Home (64 bit)• Windows 10 Professional (64 bit)• Windows 10 Professional mode S• Windows 10 Professional Embedded (khusus pelanggan OEM)• Ubuntu 16.04 LTS (64 bit)
Membuat drive pemulihan USB untuk WindowsBuat drive pemulihan untuk memecahkan masalah dan memperbaiki masalah yang mungkin terjadi pada Windows. Flash drive USB kosong dengan kapasitas minimal 16 GB diperlukan untuk membuat drive pemulihan.
CATATAN Proses ini membutuhkan waktu hingga satu jam untuk menyelesaikannya.
CATATAN Langkah-langkah berikut mungkin berbeda-beda tergantung versi Windows yang terinstal. Lihat Situs
dukungan Microsoft untuk instruksi terbaru.
1. Sambungkan flash drive USB ke komputer Anda.
2. Dalam pencarian Windows, ketik Recovery (Pemulihan).
3. Dalam hasil pencarian, klik Create a recovery drive (Buat drive pemulihan).Jendela User Account Control (Kontrol Akun Pengguna) ditampilkan.
4. Klik Yes (Ya) untuk melanjutkan.Jendela Recovery Drive (Drive Pemulihan) ditampilkan.
5. Pilih Back up system files to the recovery drive (Cadangkan file sistem ke drive pemulihan) dan klik Next (Selanjutnya).
6. Pilih USB flash drive (Flash drive USB) dan klik Next (Selanjutnya).Sebuah pesan ditampilkan, menunjukkan bahwa semua data di flash drive USB akan dihapus.
7. Klik Create (Buat).
8. Klik Finish (Selesai).Untuk informasi lebih lanjut mengenai memasang ulang Windows menggunakan drive pemulihan USB, lihat bagian Pemecahan Masalah dari Manual Servis produk Anda di www.dell.com/support/manuals.
Mengunduh driver1. Nyalakan notebook.
2. Kunjungi Dell.com/support.
3. Klik Product support (Dukungan Produk), masukkan Tag Servis pada notebook Anda, lalu klik Submit (Ajukan).
CATATAN Jika Anda tidak memiliki Tag Servis, gunakan fitur deteksi otomatis atau telusuri secara manual untuk
melihat model notebook Anda.
4. Klik Drivers and Downloads.
5. Pilih sistem operasi yang terpasang di notebook Anda.
6. Gulir halaman ke bawah dan pilih driver yang akan dipasang.
7. Klik Download File (Unduh File) guna mengunduh driver untuk notebook Anda.
8. Setelah pengunduhan selesai, navigasikan ke folder tempat Anda menyimpan file driver tersebut.
6
Perangkat Lunak dan Penemuan Kesalahan 35

9. Klik dua kali pada ikon file driver tersebut lalu ikuti petunjuk di layar.
36 Perangkat Lunak dan Penemuan Kesalahan
Mendapatkan bantuan
Topik:
• Menghubungi Dell• Menghubungi Dell
Menghubungi DellCATATAN Jika Anda tidak memiliki sambungan Internet aktif, Anda dapat menemukan informasi kontak pada faktur
pembelian, slip kemasan, tagihan, atau katalog produk Dell.
Dell menyediakan beberapa dukungan berbasis online dan telepon serta opsi servis. Ketersediaan bervariasi menurut negara dan produk, dan sebagian layanan mungkin tidak tersedia di daerah Anda. Untuk menghubungi Dell atas masalah penjualan, dukungan teknis, atau layanan pelanggan:
1. Buka Dell.com/support.
2. Pilih kategori dukungan Anda.
3. Verifikasikan negara atau kawasan Anda di daftar tarik turun Choose A Country/Region (Pilih Negara/Kawasan) pada bagian bawah halaman.
4. Pilih tautan layanan atau tautan yang terkait berdasarkan kebutuhan Anda.
7
Mendapatkan bantuan 37