


Bahasa
Halaman
Hukum

Transitioning volumes by using the 7-ModeTransition Tool CLIONTAP 7-Mode TransitionNetAppDecember 14, 2021
This PDF was generated from https://docs.netapp.com/us-en/ontap-7mode-transition/copy-based/concept_scenarios_for_selecting_volumes_in_a_session.html on December 14, 2021. Alwayscheck docs.netapp.com for the latest.

Table of Contents
Transitioning volumes by using the 7-Mode Transition Tool CLI . . . . . . . . . . . . . . . . . . . . . . . . . . . . . . . . . . . . . 1
Scenarios for selecting volumes in a project . . . . . . . . . . . . . . . . . . . . . . . . . . . . . . . . . . . . . . . . . . . . . . . . . . 1
Transitioning volumes by using the 7-Mode Transition Tool CLI . . . . . . . . . . . . . . . . . . . . . . . . . . . . . . . . . . . 2
Commands for managing transition . . . . . . . . . . . . . . . . . . . . . . . . . . . . . . . . . . . . . . . . . . . . . . . . . . . . . . . . 18
Transitioning volumes by using the 7-ModeTransition Tool CLI
The 7-Mode Transition Tool provides commands that enable you to transition 7-Mode
volumes. If you have the 7-Mode Transition Tool installed on a Linux system, you must
use the CLI to perform the transition.
The tool collects the 7-Mode storage system’s volume and IP address information, verifies the 7-Mode
configuration, and interacts with the cluster to apply the configuration on the SVM.
Scenarios for selecting volumes in a project
Planning a project composition and deciding which 7-Mode volumes to transition in a
single transition operation can help in reducing the downtime for applications.
Understanding some sample scenarios can help you while creating projects in your
environment.
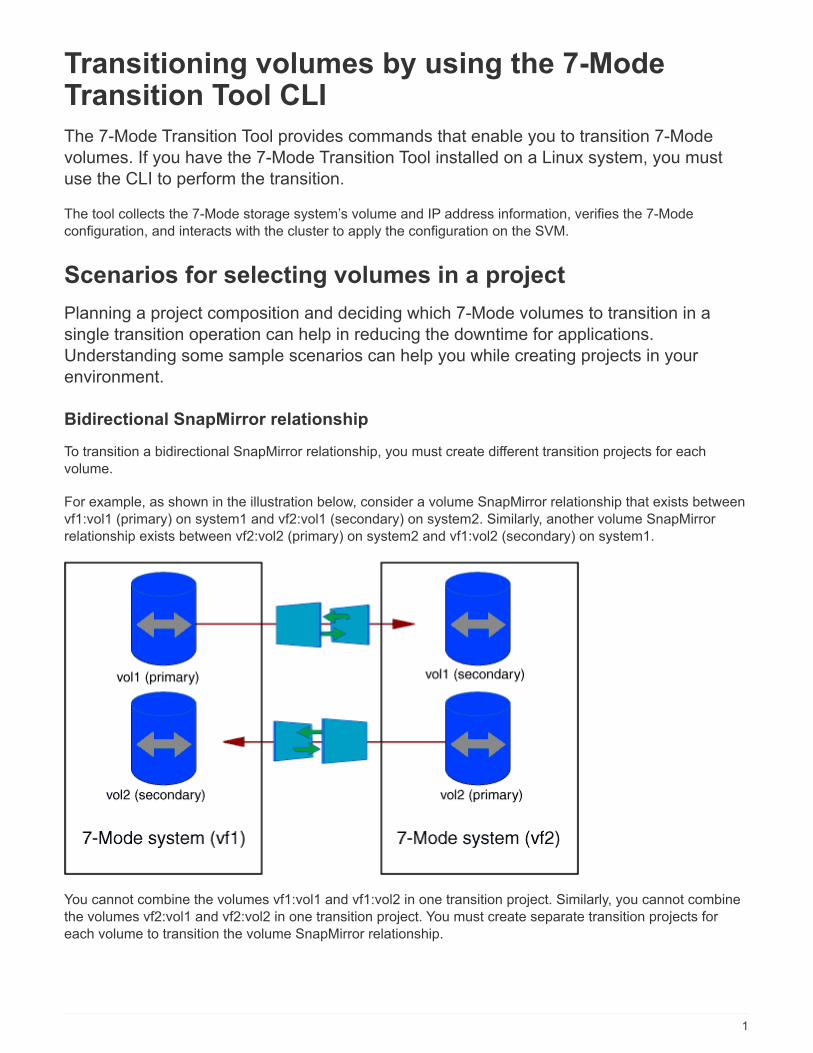
Bidirectional SnapMirror relationship
To transition a bidirectional SnapMirror relationship, you must create different transition projects for each
volume.
For example, as shown in the illustration below, consider a volume SnapMirror relationship that exists between
vf1:vol1 (primary) on system1 and vf2:vol1 (secondary) on system2. Similarly, another volume SnapMirror
relationship exists between vf2:vol2 (primary) on system2 and vf1:vol2 (secondary) on system1.
You cannot combine the volumes vf1:vol1 and vf1:vol2 in one transition project. Similarly, you cannot combine
the volumes vf2:vol1 and vf2:vol2 in one transition project. You must create separate transition projects for
each volume to transition the volume SnapMirror relationship.
1
Volumes with CIFS configuration
You must group volumes that have CIFS configuration in one project so that all the CIFS-related configuration
is transitioned completely to the SVM.
For example, if 10 volumes in a 7-Mode system or a vFiler unit have associated CIFS shares, home-directory
search path, and audit configuration, these 10 volumes must be transitioned in one project . This ensures that
all the volumes and CIFS configuration are completely applied on the SVM after transition.
SnapMirror relationship between a primary volume and multiple secondaryvolumes
If a SnapMirror relationship exists between a primary volume and multiple secondary volumes and if all the
secondary volumes are on the same 7-Mode controller, you can create a secondary project to group all the
secondary volumes and complete the transition of all secondary volumes in that project. You can then create a
primary project to transition the primary volume and complete the SnapMirror transition.
Transitioning volumes by using the 7-Mode Transition ToolCLI
The 7-Mode Transition Tool provides commands that enable you to transition 7-Mode
volumes. If you have the 7-Mode Transition Tool installed on a Linux system, you must
use the CLI to perform the transition.
The tool collects the 7-Mode storage system’s volume and IP address information, verifies the 7-Mode
configuration, and interacts with the cluster to apply the configuration on the SVM.
Creating a transition project
You can create a transition project that identifies the 7-Mode objects to be transitioned
and how they map to the ONTAP objects. While creating the project, the 7-Mode
Transition Tool collects and saves the information about the transition objects. You can
use this project information to perform the transition in stages.
You must have gathered the following information:
• Project type: Possible values are stand-alone, primary, or secondary
• FQDN or IP address of the 7-Mode storage system or the default vFiler unit, if MultiStore is licensed
• Administrative user name and password of the 7-Mode storage system
• List of 7-Mode volumes
• FQDN of the cluster or IP address of the cluster-management LIF
• SVM name
Steps
1. From the Start menu, click All Programs > NetApp 7-Mode Transition Tool > NetApp 7-Mode
Transition Tool (CLI) 3.0 to open the 7-Mode Transition Tool command prompt.
2. Add the user name and password of the systems that are a part of the transition project:
2
transition credentials add -h host_name -u user_name
host_name is FQDN or IP address of the 7-Mode system or cluster.
user_name is the administrative user name for the system.
You must repeat this step for each storage system that you want to add to the transition
projects.
7-Mode Transition Tool>transition credentials add -h system1.example.com
-u root
Enter password for '[email protected]':
3. Create a transition project:
transition cbt create -p project_name -t project_type -n 7-Mode_system -c
data-copy-ipaddress [-f vfiler_name] [-h cluster -v vserver_name
project_name is the name of the transition project.
project_type is the project type. Valid values are standalone, secondary, or primary.
7-Mode_system is the FQDN or IP address of the 7-Mode system.
cluster is the FQDN of the cluster or IP address of the cluster-management LIF.
The host names of your 7-Mode system and cluster must be the same as those you had
provided while creating the project.
data-copy-ipaddress is the IP address over which data is copied.
vfiler_name is the name of the nondefault vFiler unit.
vserver_name is the name of the SVM.
For a new SVM, you must provide the aggregate name of the root volume of the SVM with
the -g option.
7-Mode Transition Tool>transition cbt create -p sample_project -t
standalone -n system1.example.com -n 10.238.55.33 -h
cluster1.example.com -v vs2
The transition project moves to the preparation state.
4. Add the 7-Mode volume and ONTAP volume to the project:
transition cbt volumepair add -p project_name -v 7-Mode_volume -c
3
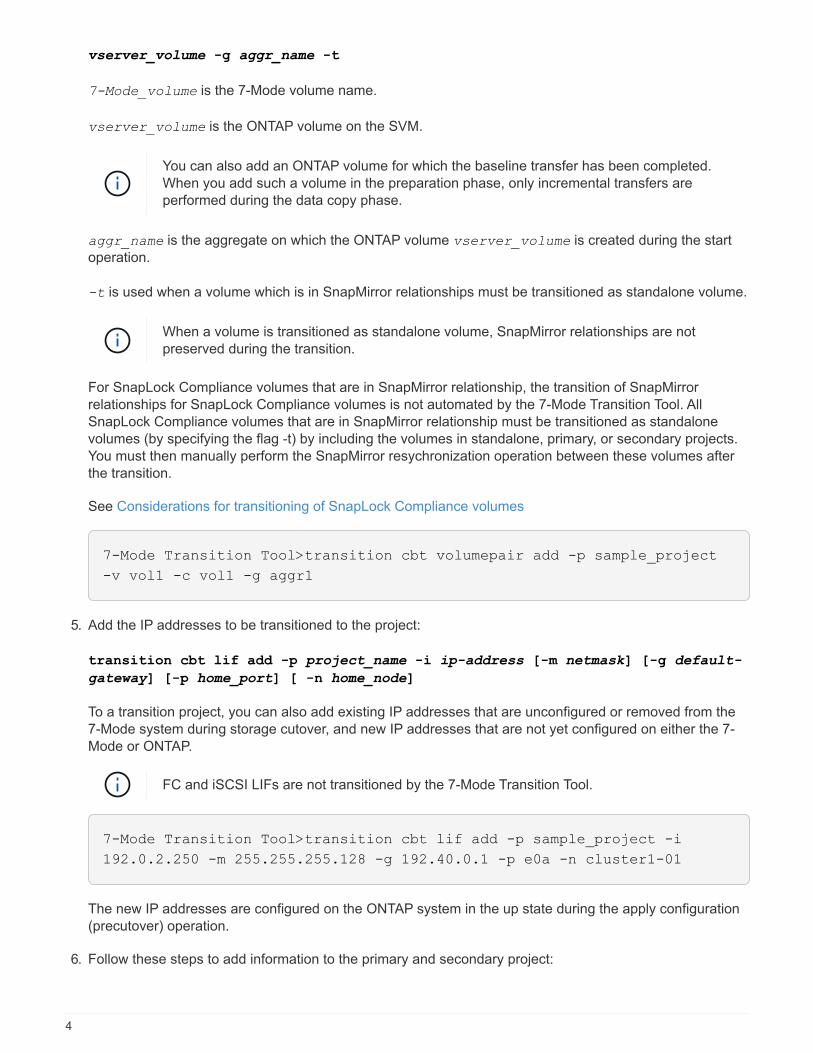
vserver_volume -g aggr_name -t
7-Mode_volume is the 7-Mode volume name.
vserver_volume is the ONTAP volume on the SVM.
You can also add an ONTAP volume for which the baseline transfer has been completed.
When you add such a volume in the preparation phase, only incremental transfers are
performed during the data copy phase.
aggr_name is the aggregate on which the ONTAP volume vserver_volume is created during the start
operation.
-t is used when a volume which is in SnapMirror relationships must be transitioned as standalone volume.
When a volume is transitioned as standalone volume, SnapMirror relationships are not
preserved during the transition.
For SnapLock Compliance volumes that are in SnapMirror relationship, the transition of SnapMirror
relationships for SnapLock Compliance volumes is not automated by the 7-Mode Transition Tool. All
SnapLock Compliance volumes that are in SnapMirror relationship must be transitioned as standalone
volumes (by specifying the flag -t) by including the volumes in standalone, primary, or secondary projects.
You must then manually perform the SnapMirror resychronization operation between these volumes after
the transition.
See Considerations for transitioning of SnapLock Compliance volumes
7-Mode Transition Tool>transition cbt volumepair add -p sample_project
-v vol1 -c vol1 -g aggr1
5. Add the IP addresses to be transitioned to the project:
transition cbt lif add -p project_name -i ip-address [-m netmask] [-g default-
gateway] [-p home_port] [ -n home_node]
To a transition project, you can also add existing IP addresses that are unconfigured or removed from the
7-Mode system during storage cutover, and new IP addresses that are not yet configured on either the 7-
Mode or ONTAP.
FC and iSCSI LIFs are not transitioned by the 7-Mode Transition Tool.
7-Mode Transition Tool>transition cbt lif add -p sample_project -i
192.0.2.250 -m 255.255.255.128 -g 192.40.0.1 -p e0a -n cluster1-01
The new IP addresses are configured on the ONTAP system in the up state during the apply configuration
(precutover) operation.
6. Follow these steps to add information to the primary and secondary project:
4
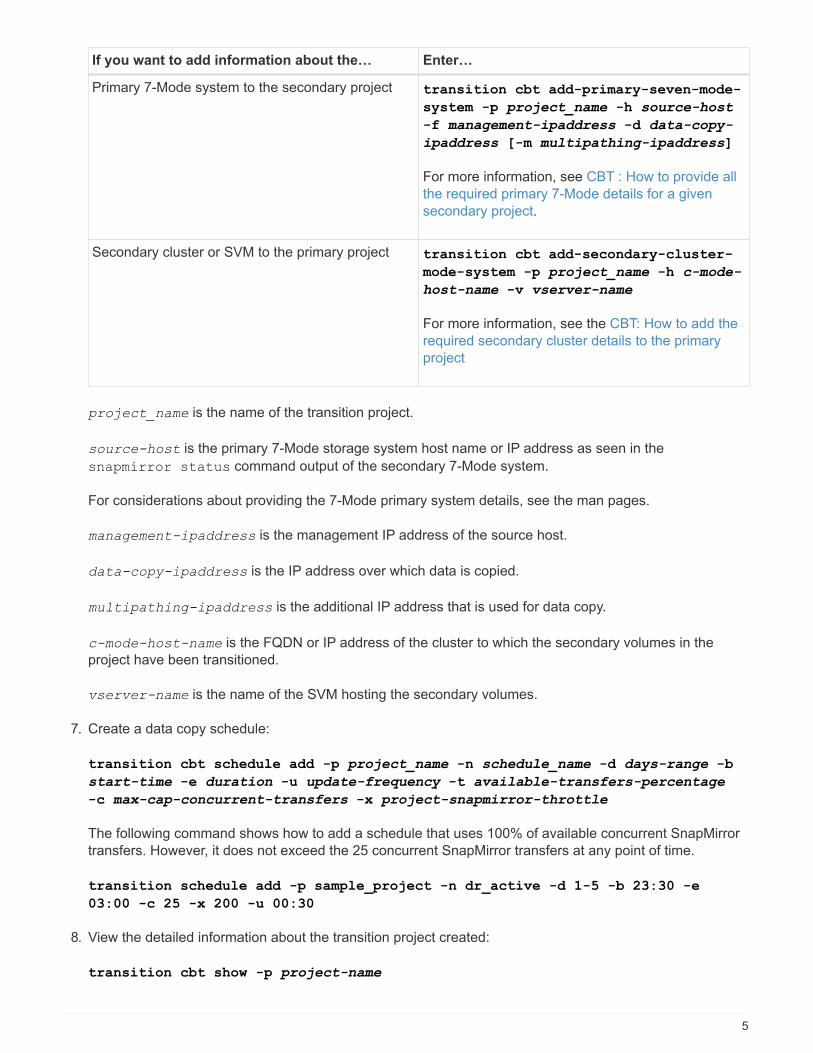
If you want to add information about the… Enter…
Primary 7-Mode system to the secondary project transition cbt add-primary-seven-mode-
system -p project_name -h source-host
-f management-ipaddress -d data-copy-
ipaddress [-m multipathing-ipaddress]
For more information, see CBT : How to provide all
the required primary 7-Mode details for a given
secondary project.
Secondary cluster or SVM to the primary project transition cbt add-secondary-cluster-
mode-system -p project_name -h c-mode-
host-name -v vserver-name
For more information, see the CBT: How to add the
required secondary cluster details to the primary
project
project_name is the name of the transition project.
source-host is the primary 7-Mode storage system host name or IP address as seen in the
snapmirror status command output of the secondary 7-Mode system.
For considerations about providing the 7-Mode primary system details, see the man pages.
management-ipaddress is the management IP address of the source host.
data-copy-ipaddress is the IP address over which data is copied.
multipathing-ipaddress is the additional IP address that is used for data copy.
c-mode-host-name is the FQDN or IP address of the cluster to which the secondary volumes in the
project have been transitioned.
vserver-name is the name of the SVM hosting the secondary volumes.
7. Create a data copy schedule:
transition cbt schedule add -p project_name -n schedule_name -d days-range -b
start-time -e duration -u update-frequency -t available-transfers-percentage
-c max-cap-concurrent-transfers -x project-snapmirror-throttle
The following command shows how to add a schedule that uses 100% of available concurrent SnapMirror
transfers. However, it does not exceed the 25 concurrent SnapMirror transfers at any point of time.
transition schedule add -p sample_project -n dr_active -d 1-5 -b 23:30 -e
03:00 -c 25 -x 200 -u 00:30
8. View the detailed information about the transition project created:
transition cbt show -p project-name
5
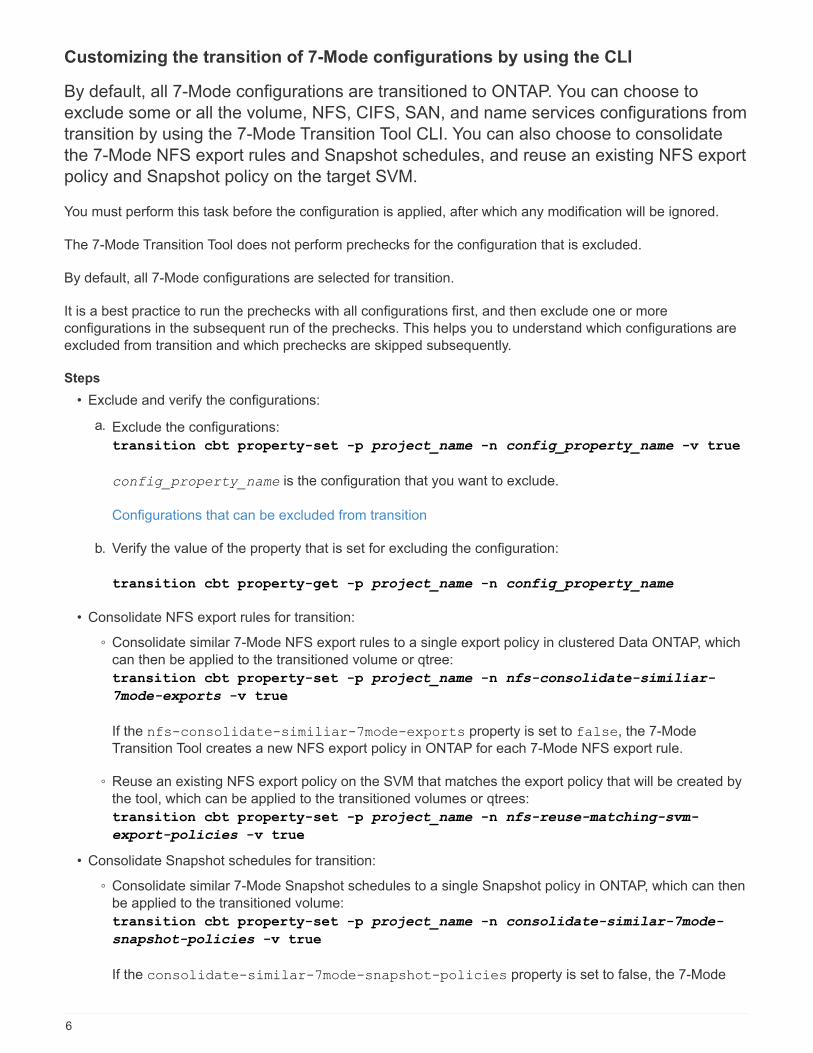
Customizing the transition of 7-Mode configurations by using the CLI
By default, all 7-Mode configurations are transitioned to ONTAP. You can choose to
exclude some or all the volume, NFS, CIFS, SAN, and name services configurations from
transition by using the 7-Mode Transition Tool CLI. You can also choose to consolidate
the 7-Mode NFS export rules and Snapshot schedules, and reuse an existing NFS export
policy and Snapshot policy on the target SVM.
You must perform this task before the configuration is applied, after which any modification will be ignored.
The 7-Mode Transition Tool does not perform prechecks for the configuration that is excluded.
By default, all 7-Mode configurations are selected for transition.
It is a best practice to run the prechecks with all configurations first, and then exclude one or more
configurations in the subsequent run of the prechecks. This helps you to understand which configurations are
excluded from transition and which prechecks are skipped subsequently.
Steps
• Exclude and verify the configurations:
a. Exclude the configurations:
transition cbt property-set -p project_name -n config_property_name -v true
config_property_name is the configuration that you want to exclude.
Configurations that can be excluded from transition
b. Verify the value of the property that is set for excluding the configuration:
transition cbt property-get -p project_name -n config_property_name
• Consolidate NFS export rules for transition:
◦ Consolidate similar 7-Mode NFS export rules to a single export policy in clustered Data ONTAP, which
can then be applied to the transitioned volume or qtree:
transition cbt property-set -p project_name -n nfs-consolidate-similiar-
7mode-exports -v true
If the nfs-consolidate-similiar-7mode-exports property is set to false, the 7-Mode
Transition Tool creates a new NFS export policy in ONTAP for each 7-Mode NFS export rule.
◦ Reuse an existing NFS export policy on the SVM that matches the export policy that will be created by
the tool, which can be applied to the transitioned volumes or qtrees:
transition cbt property-set -p project_name -n nfs-reuse-matching-svm-
export-policies -v true
• Consolidate Snapshot schedules for transition:
◦ Consolidate similar 7-Mode Snapshot schedules to a single Snapshot policy in ONTAP, which can then
be applied to the transitioned volume:
transition cbt property-set -p project_name -n consolidate-similar-7mode-
snapshot-policies -v true
If the consolidate-similar-7mode-snapshot-policies property is set to false, the 7-Mode
6

Transition Tool creates a new Snapshot policy in ONTAP for each Snapshot schedule.
◦ Reuse an existing Snapshot policy on the SVM that matches the Snapshot policy that will be created
by the tool, which can be applied to the transitioned volumes:
transition cbt property-set -p project_name -n reuse-matching-svm-snapshot-
policies -v true
Configurations that can be excluded from transition
You can customize the configuration transition by excluding some volume-level or SVM-
level configurations for NFS, CIFS, SAN, and name services configurations from
transition by specifying the property name with the transition cbt property-set
command of the 7-Mode Transition Tool CLI.
NFS
7-Mode configuration to exclude Property name
Export policies ignore-nfs-exports-transition
NFS options ignore-nfs-options-transition
All NFS configurations ignore-all-nfs-configurations-
transition
CIFS
7-Mode configuration to exclude Property name
Local users and groups ignore-local-users-groups-transition
Home directory paths ignore-cifs-home-directory-paths-
transition
Symbolic links ignore-cifs-symlinks-transition
Widelinks ignore-cifs-widelinks-transition
Shares and Share ACLs ignore-cifs-shares-and-acls-transition
CIFS options ignore-cifs-options-transition
Name mapping ignore-cifs-name-mapping-transition
Audit configuration ignore-cifs-audit-transition
7
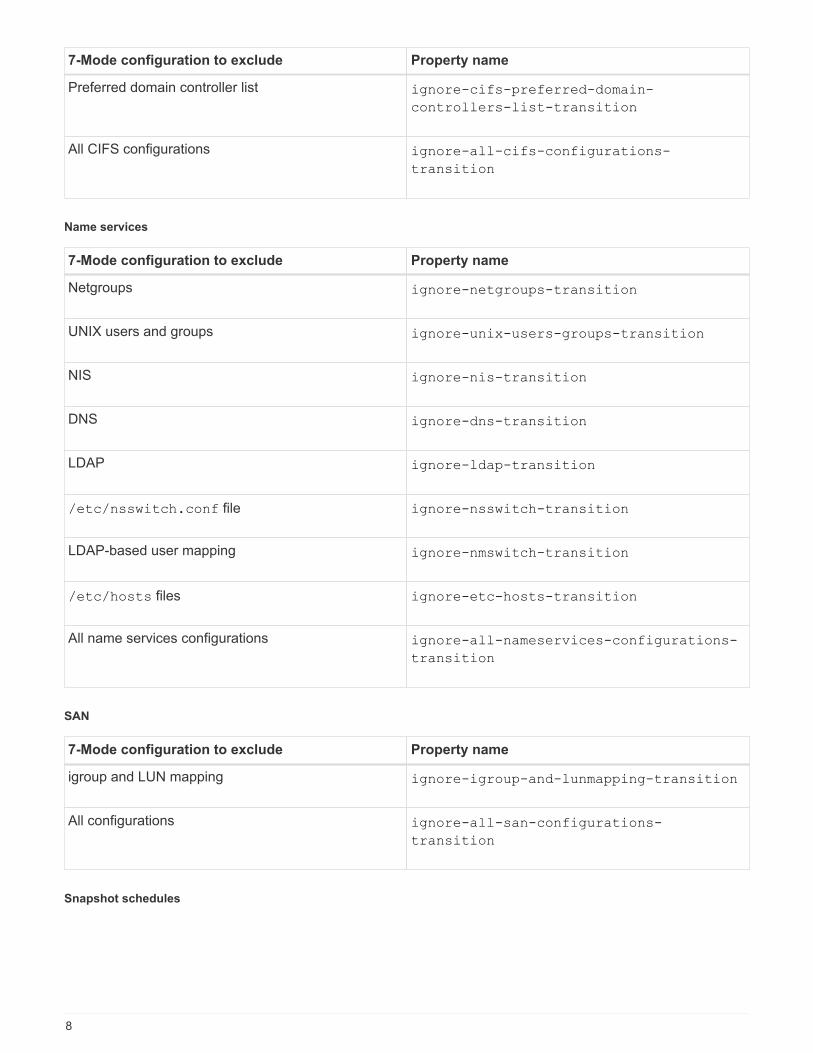
7-Mode configuration to exclude Property name
Preferred domain controller list ignore-cifs-preferred-domain-
controllers-list-transition
All CIFS configurations ignore-all-cifs-configurations-
transition
Name services
7-Mode configuration to exclude Property name
Netgroups ignore-netgroups-transition
UNIX users and groups ignore-unix-users-groups-transition
NIS ignore-nis-transition
DNS ignore-dns-transition
LDAP ignore-ldap-transition
/etc/nsswitch.conf file ignore-nsswitch-transition
LDAP-based user mapping ignore-nmswitch-transition
/etc/hosts files ignore-etc-hosts-transition
All name services configurations ignore-all-nameservices-configurations-
transition
SAN
7-Mode configuration to exclude Property name
igroup and LUN mapping ignore-igroup-and-lunmapping-transition
All configurations ignore-all-san-configurations-
transition
Snapshot schedules
8
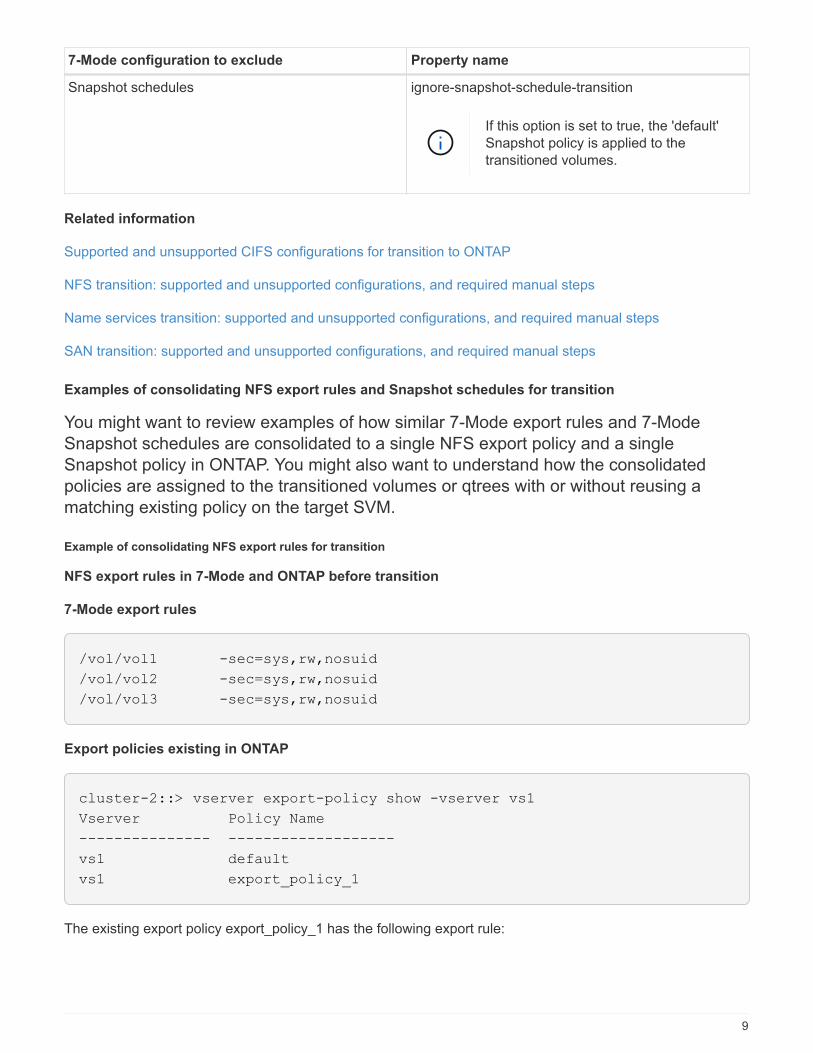
7-Mode configuration to exclude Property name
Snapshot schedules ignore-snapshot-schedule-transition
If this option is set to true, the 'default'
Snapshot policy is applied to the
transitioned volumes.
Related information
Supported and unsupported CIFS configurations for transition to ONTAP
NFS transition: supported and unsupported configurations, and required manual steps
Name services transition: supported and unsupported configurations, and required manual steps
SAN transition: supported and unsupported configurations, and required manual steps
Examples of consolidating NFS export rules and Snapshot schedules for transition
You might want to review examples of how similar 7-Mode export rules and 7-Mode
Snapshot schedules are consolidated to a single NFS export policy and a single
Snapshot policy in ONTAP. You might also want to understand how the consolidated
policies are assigned to the transitioned volumes or qtrees with or without reusing a
matching existing policy on the target SVM.
Example of consolidating NFS export rules for transition
NFS export rules in 7-Mode and ONTAP before transition
7-Mode export rules
/vol/vol1 -sec=sys,rw,nosuid
/vol/vol2 -sec=sys,rw,nosuid
/vol/vol3 -sec=sys,rw,nosuid
Export policies existing in ONTAP
cluster-2::> vserver export-policy show -vserver vs1
Vserver Policy Name
--------------- -------------------
vs1 default
vs1 export_policy_1
The existing export policy export_policy_1 has the following export rule:
9

cluster-2::> vserver export-policy rule show -vserver vs1 -policyname
export_policy_1
Policy Rule Access Client RO
Vserver Name Index Protocol Match Rule
------------ --------------- ------ -------- ---------------------
---------
vs1 export_policy_1 1 nfs 0.0.0.0/0 sys
Export policies in ONTAP after transition with consolidation (no reuse)
Volumes vol1, vol2, and vol3 have similar export rules in 7-Mode; therefore, a new consolidated export policy,
transition_export_policy_1, is assigned to these volumes after transition:
cluster-2::> vserver export-policy show -vserver vs1
Vserver Policy Name
--------------- -------------------
vs1 default
vs1 export_policy_1
vs1 transition_export_policy_1
3 entries were displayed.
cluster-2::> vserver export-policy rule show -vserver vs1 -policyname
transition_export_policy_1
Policy Rule Access Client RO
Vserver Name Index Protocol Match Rule
------------ --------------- ------ -------- ---------------------
---------
vs1 transition_export_policy_1
1 nfs 0.0.0.0/0 sys
cluster-2::> volume show -vserver vs1 -volume vol1,vol2,vol3 -fields
policy
vserver volume policy
------- ------ --------------------------
vs1 vol1 transition_export_policy_1
vs1 vol2 transition_export_policy_1
vs1 vol3 transition_export_policy_1
3 entries were displayed.
Export policies in ONTAP after transition with consolidation and reuse
Volumes vol1, vol2, and vol3 have similar export rules in 7-Mode; therefore, a consolidated export policy is
assigned to these volumes after transition. The export policy, export_policy_1, which matches the 7-Mode
10
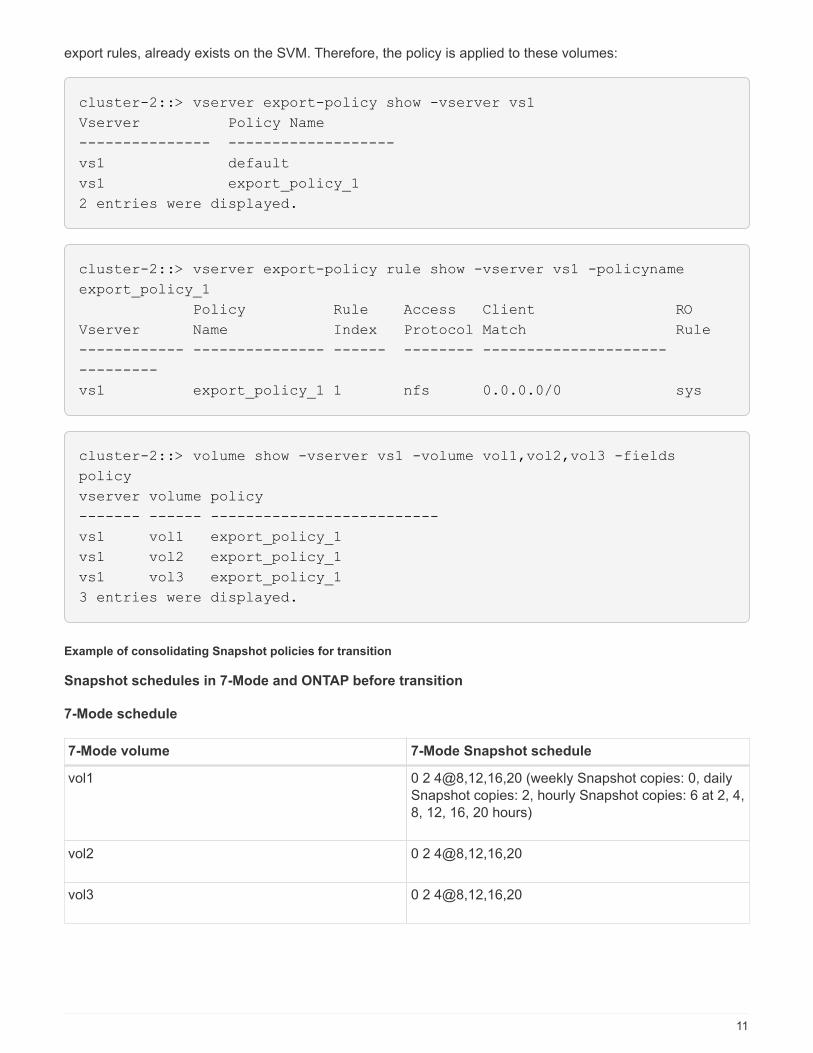
export rules, already exists on the SVM. Therefore, the policy is applied to these volumes:
cluster-2::> vserver export-policy show -vserver vs1
Vserver Policy Name
--------------- -------------------
vs1 default
vs1 export_policy_1
2 entries were displayed.
cluster-2::> vserver export-policy rule show -vserver vs1 -policyname
export_policy_1
Policy Rule Access Client RO
Vserver Name Index Protocol Match Rule
------------ --------------- ------ -------- ---------------------
---------
vs1 export_policy_1 1 nfs 0.0.0.0/0 sys
cluster-2::> volume show -vserver vs1 -volume vol1,vol2,vol3 -fields
policy
vserver volume policy
------- ------ --------------------------
vs1 vol1 export_policy_1
vs1 vol2 export_policy_1
vs1 vol3 export_policy_1
3 entries were displayed.
Example of consolidating Snapshot policies for transition
Snapshot schedules in 7-Mode and ONTAP before transition
7-Mode schedule
7-Mode volume 7-Mode Snapshot schedule
vol1 0 2 4@8,12,16,20 (weekly Snapshot copies: 0, daily
Snapshot copies: 2, hourly Snapshot copies: 6 at 2, 4,
8, 12, 16, 20 hours)
vol2 0 2 4@8,12,16,20
vol3 0 2 4@8,12,16,20
11
7-Mode volume 7-Mode Snapshot schedule
vol4 1 2 3@8,12,16 (weekly Snapshot copies: 1, daily
Snapshot copies: 2, hourly Snapshot copies: 3 at
8,12,16 hours)
vol5 2 2 3@8,12,16 (weekly Snapshot copies: 2, daily
Snapshot copies: 2, hourly Snapshot copies: 3 at
8,12,16 hours)
Snapshot policies existing in ONTAP
Snapshot policy name Policy details
ScheduleWeekly Weekly, count: 1
ScheduleDailyHourly4 Schedule details
• Schedule1: daily, count1: 2
• Schedule2: hourly, count2: 4 every 8, 12, 16, 20
hours
ScheduleHourly1 Hourly at 8, 12, 16, 20 hours, count: 4
Snapshot policy in ONTAP after transition with consolidation (no reuse)
7-Mode volume 7-Mode Snapshot schedule Snapshot policy in ONTAP
vol1 0 2 4@8,12,16,20 (weekly
Snapshot copies: 0, daily Snapshot
copies: 2, hourly Snapshot copies:
4 at 8, 12, 16, 20 hours)
Consolidated policy for vol1,
vol2, and vol3
• Name:
transition_snapshot_policy_0
• Schedule details
◦ Schedule1: daily, count1: 2
◦ Schedule2: hourly, count2:
4 every 8, 12, 16, 20 hours
vol2 0 2 4@8,12,16,20 vol3
0 2 4@8,12,16,20 vol4 1 2 3@8,12,16 (weekly Snapshot
copies: 1, daily Snapshot copies: 2,
hourly Snapshot copies: 3 at
8,12,16 hours)
12
7-Mode volume 7-Mode Snapshot schedule Snapshot policy in ONTAP
• Name:
transition_snapshot_policy_1
• Schedule details
◦ Schedule1: weekly, count1:
1
◦ Schedule2: daily, count2: 2
◦ Schedule3: hourly, count3:
3 every 8,12,16 hours
vol5 2 2 3@8,12,16 (weekly Snapshot
copies: 2, daily Snapshot copies: 2,
hourly Snapshot copies: 3 at
8,12,16 hours)
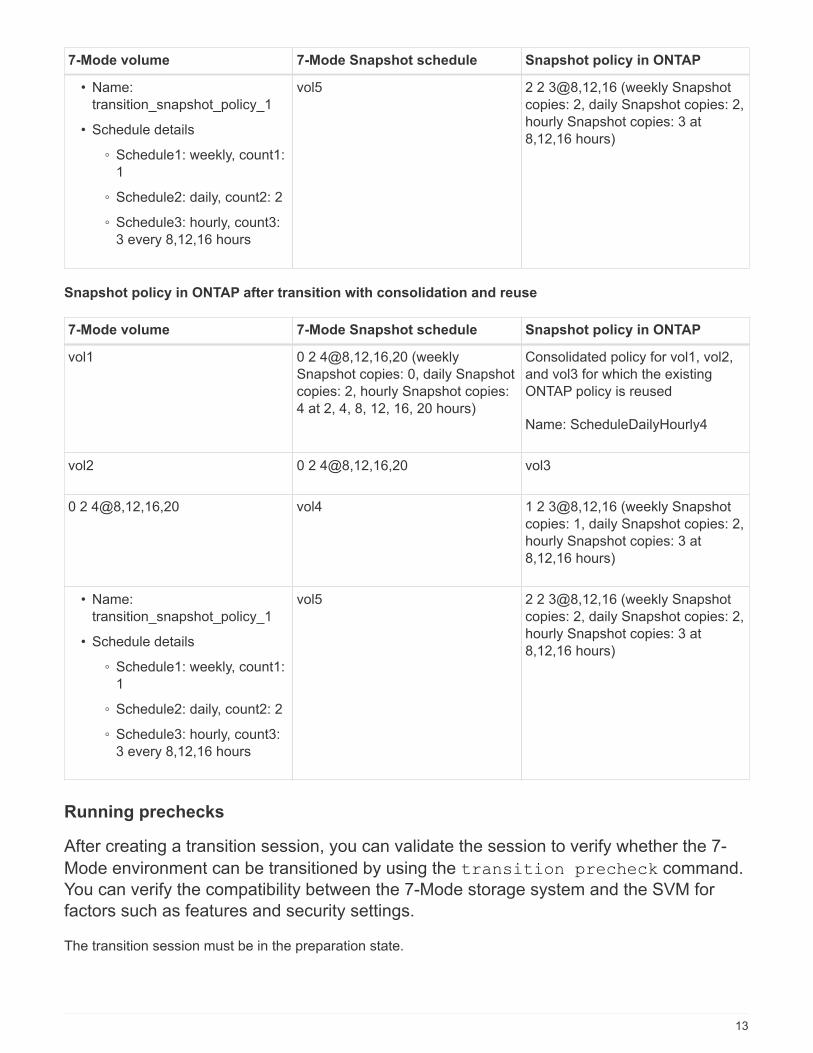
Snapshot policy in ONTAP after transition with consolidation and reuse
7-Mode volume 7-Mode Snapshot schedule Snapshot policy in ONTAP
vol1 0 2 4@8,12,16,20 (weekly
Snapshot copies: 0, daily Snapshot
copies: 2, hourly Snapshot copies:
4 at 2, 4, 8, 12, 16, 20 hours)
Consolidated policy for vol1, vol2,
and vol3 for which the existing
ONTAP policy is reused
Name: ScheduleDailyHourly4
vol2 0 2 4@8,12,16,20 vol3
0 2 4@8,12,16,20 vol4 1 2 3@8,12,16 (weekly Snapshot
copies: 1, daily Snapshot copies: 2,
hourly Snapshot copies: 3 at
8,12,16 hours)
• Name:
transition_snapshot_policy_1
• Schedule details
◦ Schedule1: weekly, count1:
1
◦ Schedule2: daily, count2: 2
◦ Schedule3: hourly, count3:
3 every 8,12,16 hours
vol5 2 2 3@8,12,16 (weekly Snapshot
copies: 2, daily Snapshot copies: 2,
hourly Snapshot copies: 3 at
8,12,16 hours)
Running prechecks
After creating a transition session, you can validate the session to verify whether the 7-
Mode environment can be transitioned by using the transition precheck command.
You can verify the compatibility between the 7-Mode storage system and the SVM for
factors such as features and security settings.
The transition session must be in the preparation state.
13
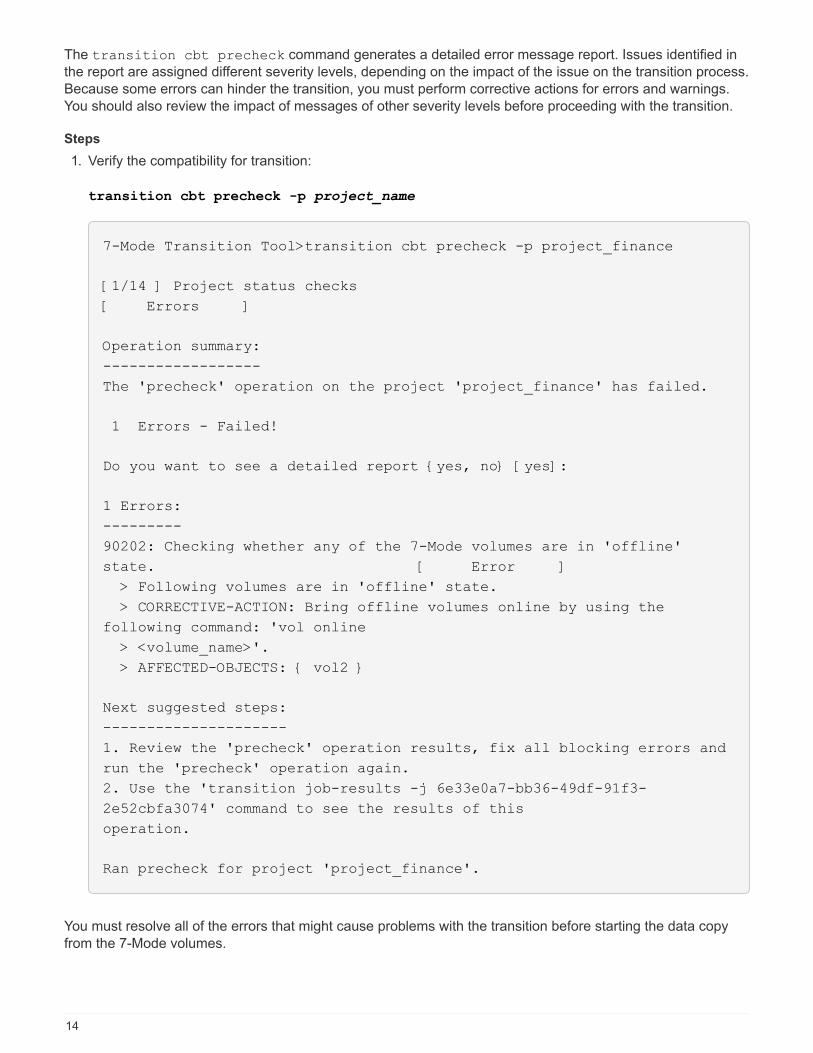
The transition cbt precheck command generates a detailed error message report. Issues identified in
the report are assigned different severity levels, depending on the impact of the issue on the transition process.
Because some errors can hinder the transition, you must perform corrective actions for errors and warnings.
You should also review the impact of messages of other severity levels before proceeding with the transition.
Steps
1. Verify the compatibility for transition:
transition cbt precheck -p project_name
7-Mode Transition Tool>transition cbt precheck -p project_finance
[1/14 ] Project status checks
[ Errors ]
Operation summary:
------------------
The 'precheck' operation on the project 'project_finance' has failed.
1 Errors - Failed!
Do you want to see a detailed report {yes, no} [yes]:
1 Errors:
---------
90202: Checking whether any of the 7-Mode volumes are in 'offline'
state. [ Error ]
> Following volumes are in 'offline' state.
> CORRECTIVE-ACTION: Bring offline volumes online by using the
following command: 'vol online
> <volume_name>'.
> AFFECTED-OBJECTS: { vol2 }
Next suggested steps:
---------------------
1. Review the 'precheck' operation results, fix all blocking errors and
run the 'precheck' operation again.
2. Use the 'transition job-results -j 6e33e0a7-bb36-49df-91f3-
2e52cbfa3074' command to see the results of this
operation.
Ran precheck for project 'project_finance'.
You must resolve all of the errors that might cause problems with the transition before starting the data copy
from the 7-Mode volumes.
14
Starting data copy for a transition project
You can initiate a data copy from 7-Mode volumes to ONTAP volumes for a baseline
transfer. The baseline transfer starts when the data copy schedules configured in a
project becomes active. After the baseline transfer is complete, the ONTAP volumes are
updated periodically based on the data copy schedule.
• You must have run a precheck on the project and resolved all errors.
• You must have configured a dedicated, high-bandwidth, low-latency network between the source and
destination systems for data transfer.
You can use SnapMirror multipathing to balance the data transfer load between the two
paths.
• A data copy schedule must be configured for the session.
If you are transitioning to an existing SVM, the volumes are created during this operation. If you are
transitioning to a new SVM, the SVM and its volumes get created during this operation.
SnapMirror relationships are created between 7-Mode and ONTAP volumes.
Steps
1. Start the data copy:
transition start -p project_name
If the start operation fails and data copy is not started, you must resolve the issues and run the
transition start command again.
7-Mode Transition Tool>transition start -p project_finance
[1/17 ] Project status checks [
Ok ]
[2/17 ] Validating 7-Mode system information [
Ok ]
[3/17 ] Validating 7-Mode volumes information [
Ok ]
[4/17 ] Validating Cluster-Mode system information [
Ok ]
[5/17 ] Validating Cluster-Mode volume information [
Ok ]
[6/17 ] Validating LIF information [
Notifications ]
[7/17 ] WAFL prechecks [
Ok ]
[8/17 ] UNIX users and groups prechecks [
Warnings ]
[9/17 ] SnapMirror prechecks [
15
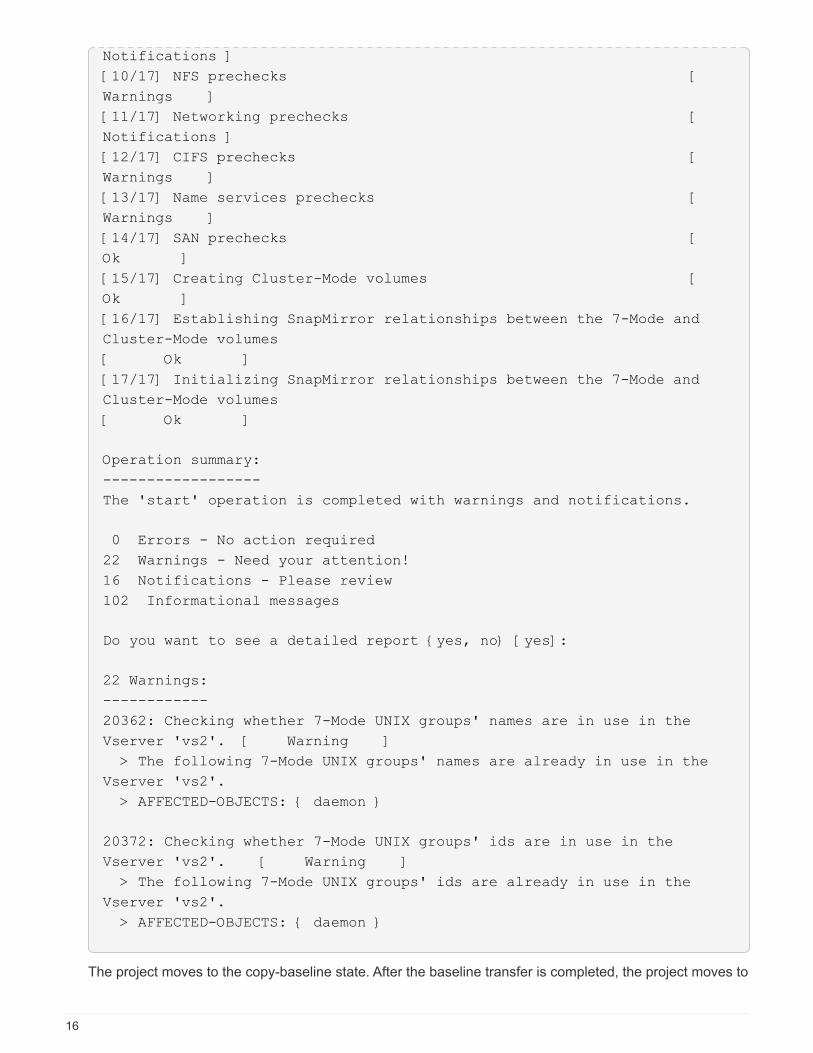
Notifications ]
[10/17] NFS prechecks [
Warnings ]
[11/17] Networking prechecks [
Notifications ]
[12/17] CIFS prechecks [
Warnings ]
[13/17] Name services prechecks [
Warnings ]
[14/17] SAN prechecks [
Ok ]
[15/17] Creating Cluster-Mode volumes [
Ok ]
[16/17] Establishing SnapMirror relationships between the 7-Mode and
Cluster-Mode volumes
[ Ok ]
[17/17] Initializing SnapMirror relationships between the 7-Mode and
Cluster-Mode volumes
[ Ok ]
Operation summary:
------------------
The 'start' operation is completed with warnings and notifications.
0 Errors - No action required
22 Warnings - Need your attention!
16 Notifications - Please review
102 Informational messages
Do you want to see a detailed report {yes, no} [yes]:
22 Warnings:
------------
20362: Checking whether 7-Mode UNIX groups' names are in use in the
Vserver 'vs2'. [ Warning ]
> The following 7-Mode UNIX groups' names are already in use in the
Vserver 'vs2'.
> AFFECTED-OBJECTS: { daemon }
20372: Checking whether 7-Mode UNIX groups' ids are in use in the
Vserver 'vs2'. [ Warning ]
> The following 7-Mode UNIX groups' ids are already in use in the
Vserver 'vs2'.
> AFFECTED-OBJECTS: { daemon }
The project moves to the copy-baseline state. After the baseline transfer is completed, the project moves to
16
the copy-update state.
Applying configurations to ONTAP volumes
After the baseline data copy is completed, you can copy and apply all NAS configurations
from the 7-Mode system (including protocols and services configuration) to the ONTAP
volumes. If the target cluster is running Data ONTAP 8.3.2 or later, SAN configurations
are transitioned in this phase.
• The configurations are applied in the precutover phase, which has two modes: precutover read-only mode
and precutover read/write mode.
• The precutover read/write mode is not supported when the project contains the following:
◦ SAN volumes and the target cluster is running Data ONTAP 8.3.1 or earlier. In this situation, the
following configurations are not applied in the precutover phase, instead they are applied during the
cutover phase:
▪ SAN configurations
▪ Snapshot Schedule configurations
◦ SnapLock Compliance volumes.
If the project contains SnapLock Compliance volumes, then the Snapshot Schedule configurations are
not applied in the precutover phase, instead these configurations are applied during the cutover phase.
See Considerations for transitioning of SnapLock Compliance volumes.
• If the target cluster is running Data ONTAP 8.3.1 or earlier, the read/write mode is not supported during
precutover if any volume in the project contains LUNs.
• If the target cluster is running Data ONTAP 8.3.1 or earlier and a project contains both SAN and NAS
volumes, only NAS configurations are transitioned in the precutover phase, and these NAS configurations
can be tested only in the read-only mode.
SAN configurations are transitioned only in the storage cutover phase.
SAN LIFs are not configured.
• If the target cluster is running Data ONTAP 8.3.1 or earlier and the project contains SAN volumes, then
Snapshot schedule configuration is not applied during apply configuration (precutover) phase.
These configurations are applied during the cutover phase.
• If the target cluster is running Data ONTAP 8.3.1 or earlier and the project contains SAN volumes, then
Snapshot schedule configuration is not applied during apply configuration (precutover) phase.
These configurations are applied during the cutover phase.
Steps
• Run the transition operation in read-only mode:
transition cbt precutover -p project_name -m ro_test -c
max_cap_concurrent_transfers -b snapmirror_throttle
17
• Run the transition operation in read/write mode:
a. Apply the configurations to ONTAP: + transition cbt precutover -p project_name -m
rw_test -c max_cap_concurrent_transfers -b snapmirror_throttle
b. Manually test and verify the configurations in ONTAP.
c. Start the resynchronization operation: + transition cbt resync -p project_name
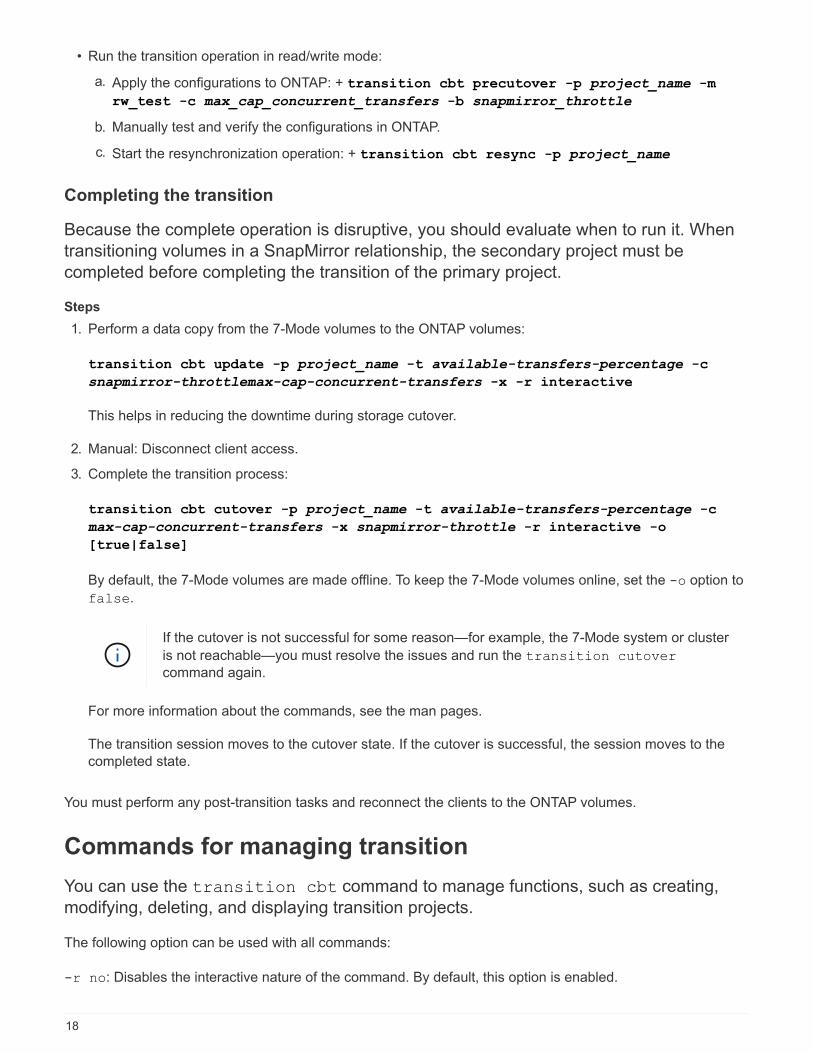
Completing the transition
Because the complete operation is disruptive, you should evaluate when to run it. When
transitioning volumes in a SnapMirror relationship, the secondary project must be
completed before completing the transition of the primary project.
Steps
1. Perform a data copy from the 7-Mode volumes to the ONTAP volumes:
transition cbt update -p project_name -t available-transfers-percentage -c
snapmirror-throttlemax-cap-concurrent-transfers -x -r interactive
This helps in reducing the downtime during storage cutover.
2. Manual: Disconnect client access.
3. Complete the transition process:
transition cbt cutover -p project_name -t available-transfers-percentage -c
max-cap-concurrent-transfers -x snapmirror-throttle -r interactive -o
[true|false]
By default, the 7-Mode volumes are made offline. To keep the 7-Mode volumes online, set the -o option to
false.
If the cutover is not successful for some reason—for example, the 7-Mode system or cluster
is not reachable—you must resolve the issues and run the transition cutover
command again.
For more information about the commands, see the man pages.
The transition session moves to the cutover state. If the cutover is successful, the session moves to the
completed state.
You must perform any post-transition tasks and reconnect the clients to the ONTAP volumes.
Commands for managing transition
You can use the transition cbt command to manage functions, such as creating,
modifying, deleting, and displaying transition projects.
The following option can be used with all commands:
-r no: Disables the interactive nature of the command. By default, this option is enabled.
18
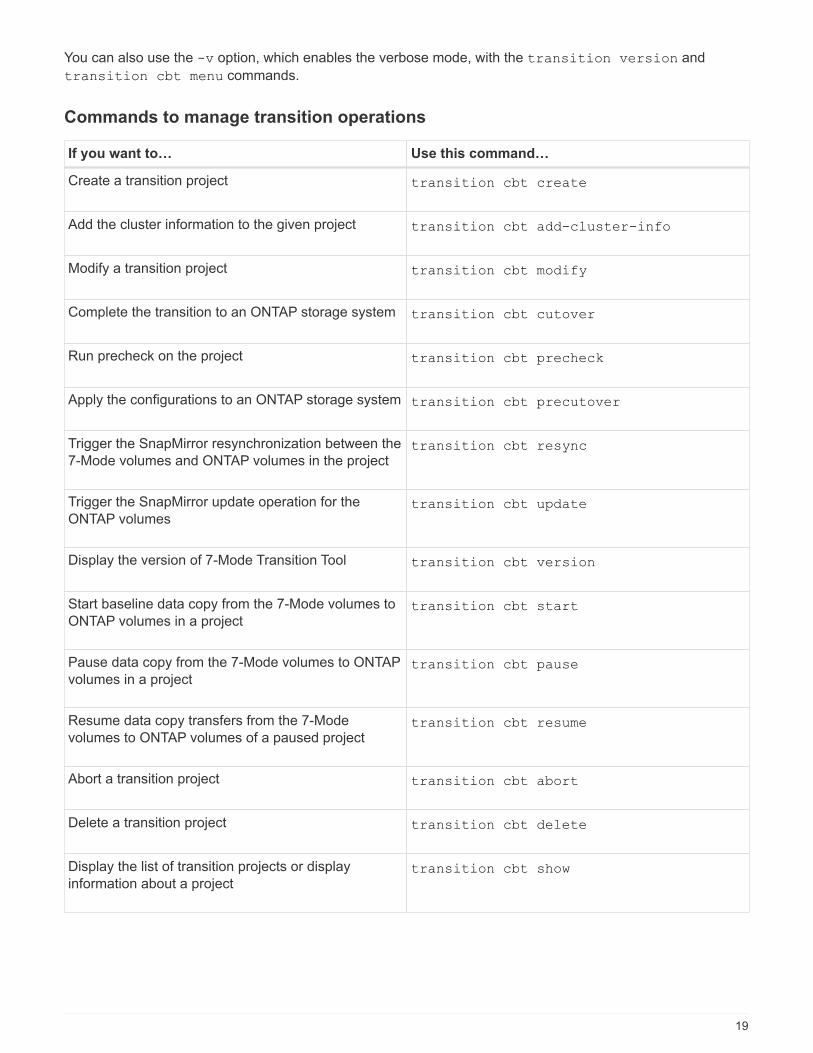
You can also use the -v option, which enables the verbose mode, with the transition version and
transition cbt menu commands.
Commands to manage transition operations
If you want to… Use this command…
Create a transition project transition cbt create
Add the cluster information to the given project transition cbt add-cluster-info
Modify a transition project transition cbt modify
Complete the transition to an ONTAP storage system transition cbt cutover
Run precheck on the project transition cbt precheck
Apply the configurations to an ONTAP storage system transition cbt precutover
Trigger the SnapMirror resynchronization between the
7-Mode volumes and ONTAP volumes in the projecttransition cbt resync
Trigger the SnapMirror update operation for the
ONTAP volumestransition cbt update
Display the version of 7-Mode Transition Tool transition cbt version
Start baseline data copy from the 7-Mode volumes to
ONTAP volumes in a projecttransition cbt start
Pause data copy from the 7-Mode volumes to ONTAP
volumes in a projecttransition cbt pause
Resume data copy transfers from the 7-Mode
volumes to ONTAP volumes of a paused projecttransition cbt resume
Abort a transition project transition cbt abort
Delete a transition project transition cbt delete
Display the list of transition projects or display
information about a projecttransition cbt show
19
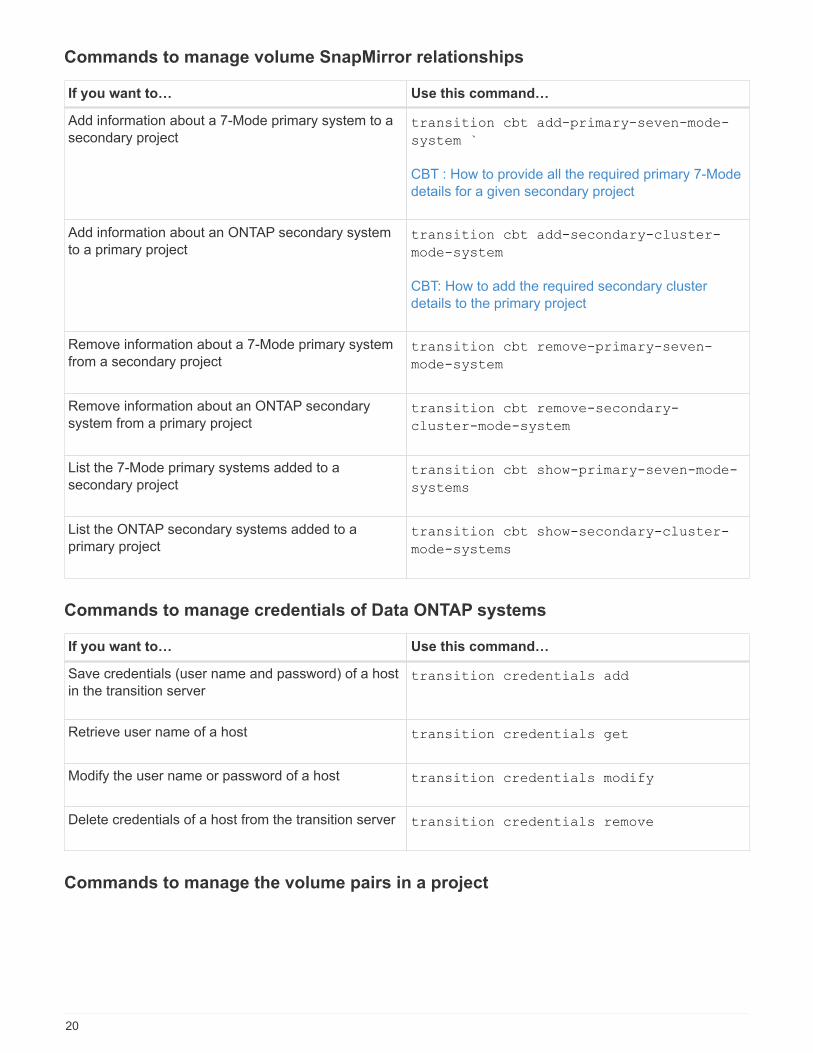
Commands to manage volume SnapMirror relationships
If you want to… Use this command…
Add information about a 7-Mode primary system to a
secondary projecttransition cbt add-primary-seven-mode-
system `
CBT : How to provide all the required primary 7-Mode
details for a given secondary project
Add information about an ONTAP secondary system
to a primary projecttransition cbt add-secondary-cluster-
mode-system
CBT: How to add the required secondary cluster
details to the primary project
Remove information about a 7-Mode primary system
from a secondary projecttransition cbt remove-primary-seven-
mode-system
Remove information about an ONTAP secondary
system from a primary projecttransition cbt remove-secondary-
cluster-mode-system
List the 7-Mode primary systems added to a
secondary projecttransition cbt show-primary-seven-mode-
systems
List the ONTAP secondary systems added to a
primary projecttransition cbt show-secondary-cluster-
mode-systems
Commands to manage credentials of Data ONTAP systems
If you want to… Use this command…
Save credentials (user name and password) of a host
in the transition servertransition credentials add
Retrieve user name of a host transition credentials get
Modify the user name or password of a host transition credentials modify
Delete credentials of a host from the transition server transition credentials remove
Commands to manage the volume pairs in a project
20
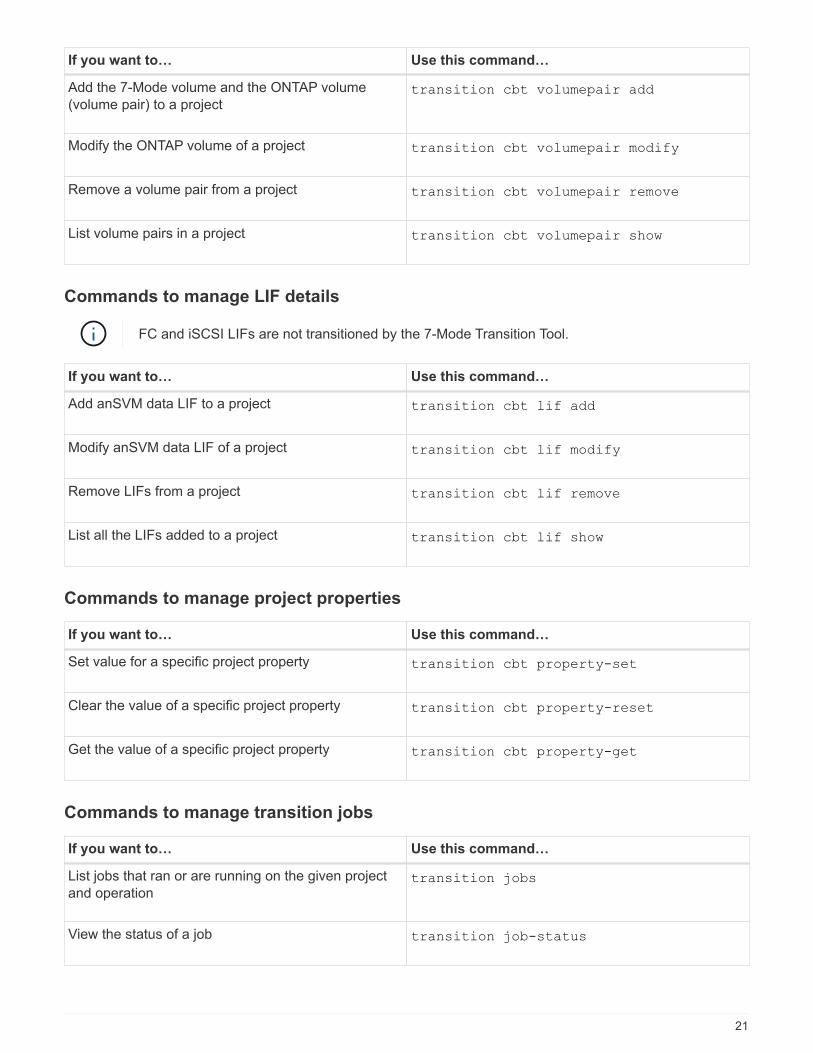
If you want to… Use this command…
Add the 7-Mode volume and the ONTAP volume
(volume pair) to a projecttransition cbt volumepair add
Modify the ONTAP volume of a project transition cbt volumepair modify
Remove a volume pair from a project transition cbt volumepair remove
List volume pairs in a project transition cbt volumepair show
Commands to manage LIF details
FC and iSCSI LIFs are not transitioned by the 7-Mode Transition Tool.
If you want to… Use this command…
Add anSVM data LIF to a project transition cbt lif add
Modify anSVM data LIF of a project transition cbt lif modify
Remove LIFs from a project transition cbt lif remove
List all the LIFs added to a project transition cbt lif show
Commands to manage project properties
If you want to… Use this command…
Set value for a specific project property transition cbt property-set
Clear the value of a specific project property transition cbt property-reset
Get the value of a specific project property transition cbt property-get
Commands to manage transition jobs
If you want to… Use this command…
List jobs that ran or are running on the given project
and operationtransition jobs
View the status of a job transition job-status
21
If you want to… Use this command…
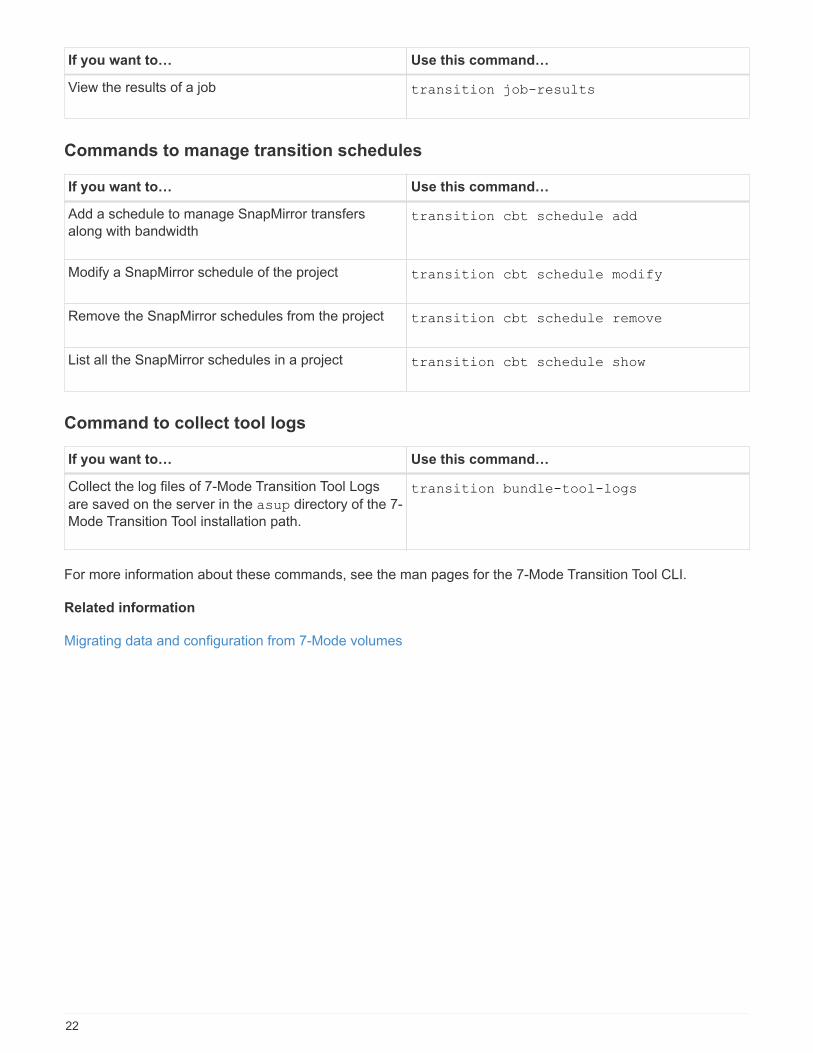
View the results of a job transition job-results
Commands to manage transition schedules
If you want to… Use this command…
Add a schedule to manage SnapMirror transfers
along with bandwidthtransition cbt schedule add
Modify a SnapMirror schedule of the project transition cbt schedule modify
Remove the SnapMirror schedules from the project transition cbt schedule remove
List all the SnapMirror schedules in a project transition cbt schedule show
Command to collect tool logs
If you want to… Use this command…
Collect the log files of 7-Mode Transition Tool Logs
are saved on the server in the asup directory of the 7-
Mode Transition Tool installation path.
transition bundle-tool-logs
For more information about these commands, see the man pages for the 7-Mode Transition Tool CLI.
Related information
Migrating data and configuration from 7-Mode volumes
22

Copyright Information
Copyright © 2021 NetApp, Inc. All rights reserved. Printed in the U.S. No part of this document covered by
copyright may be reproduced in any form or by any means-graphic, electronic, or mechanical, including
photocopying, recording, taping, or storage in an electronic retrieval system- without prior written permission of
the copyright owner.
Software derived from copyrighted NetApp material is subject to the following license and disclaimer:
THIS SOFTWARE IS PROVIDED BY NETAPP “AS IS” AND WITHOUT ANY EXPRESS OR IMPLIED
WARRANTIES, INCLUDING, BUT NOT LIMITED TO, THE IMPLIED WARRANTIES OF MERCHANTABILITY
AND FITNESS FOR A PARTICULAR PURPOSE, WHICH ARE HEREBY DISCLAIMED. IN NO EVENT SHALL
NETAPP BE LIABLE FOR ANY DIRECT, INDIRECT, INCIDENTAL, SPECIAL, EXEMPLARY, OR
CONSEQUENTIAL DAMAGES (INCLUDING, BUT NOT LIMITED TO, PROCUREMENT OF SUBSTITUTE
GOODS OR SERVICES; LOSS OF USE, DATA, OR PROFITS; OR BUSINESS INTERRUPTION) HOWEVER
CAUSED AND ON ANY THEORY OF LIABILITY, WHETHER IN CONTRACT, STRICT LIABILITY, OR TORT
(INCLUDING NEGLIGENCE OR OTHERWISE) ARISING IN ANY WAY OUT OF THE USE OF THIS
SOFTWARE, EVEN IF ADVISED OF THE POSSIBILITY OF SUCH DAMAGE.
NetApp reserves the right to change any products described herein at any time, and without notice. NetApp
assumes no responsibility or liability arising from the use of products described herein, except as expressly
agreed to in writing by NetApp. The use or purchase of this product does not convey a license under any
patent rights, trademark rights, or any other intellectual property rights of NetApp.
The product described in this manual may be protected by one or more U.S. patents, foreign patents, or
pending applications.
RESTRICTED RIGHTS LEGEND: Use, duplication, or disclosure by the government is subject to restrictions
as set forth in subparagraph (c)(1)(ii) of the Rights in Technical Data and Computer Software clause at DFARS
252.277-7103 (October 1988) and FAR 52-227-19 (June 1987).
Trademark Information
NETAPP, the NETAPP logo, and the marks listed at http://www.netapp.com/TM are trademarks of NetApp, Inc.
Other company and product names may be trademarks of their respective owners.
23
Top Related
Copyright © 2022 FDOKUMEN

