


Bahasa
Halaman
Hukum

TFT-LCD TV
READ CAREFULLYBEFORE OPERATION
USER MANUAL
W150TCI
W150TCI

Before connecting the AC power cord to the DC adapter outlet ,make sure the
voltage designation of the LCD TV corresponds to the local electrical supply .
If you are unsure of your power supply , ask your local power company .
Never insert anything metallic into the cabinet openings of the LCD TV;
otherwise may cause the danger of electric shock.
To avoid electric shock, never touch the inside of the LCD TV / adapter.
Only a qualified technician should open the case of the LCD TV/adapter.
Never use your LCD TV/adapter when the power cord has been damaged .
Make sure there is nothing resting on the power cord, and keep the cord
away from places where people can trip over it .
Be sure to hold the plug, not the cord when disconnecting the adapter from
an electric socket.
CAUTIONRISK OF ELECTRIC SHOCK.
DO NOT OPEN.
TO PREVENT ELECTRICAL SHOCK.
DO NOT REMOVE THIS COVER. NO
USER- SERVICEABLE PARTS INSIDE.
REFER SERVICING TO QUALIFIED
SERVICE PERSONNEL.
This symbol indicatesdangerous vo l tage
inside the product thatpresents a risk of electricshock or personal injury.
This symbol indicatesimportant instructionsaccompanying theproduct.
Please read this manual carefully before using this product.
IMPORTANT SAFETY INSTRUCTIONS
Openings in the LCD TV/adapter cabinet are provided for ventilation.
To prevent overheating, these openings should not be blocked or covered.
Also, avoid using the LCD TV on a bed ,sofa ,rug, or other soft surface. As
this, may block the ventilation openings in the bottom of the cabinet. If you
put the LCD TV in a bookcase or some other airless space, be sure to provide
adequate ventilation.
Do not expose the LCD TV to extreme temperature conditions or to extreme
humidity conditions.
The apparatus should not be exposed to dripping or splashing and no objects
filled with liquids, such as vases, should be placed on the apparatus.

Do not clean the front with keton-type materials (e.g.Acetone ),ethyl alcohol,
toluene, ethy lacid, methyl, or chloride-these may damage the panel.
Locate your DC adapter near an easily accessible AC outlet.
If your LCD TV does not operate normally in particular, if there are any
unusual sounds or smells coming from it unplug it immediately and
contact an authorized dealer or service center.
High temperature can cause problems. Don t use your LCD TV in direct
sunlight, and keep it away from heaters, stoves, fireplaces, and other
sources of heat.
'
Unplug the DC adapter when it is going to be left unused for a long time .
To reduce the risk of fire or electric shock, and annoying interference, use the
recommended accessories only.
If the LCD TV is broken, do not try to repair it yourself. Contact qualified service
personnel.
Unplug your DC adapter from the AC outlet before any service.
Be sure the service technician uses authorized replacement parts or their equi-
valents. Unauthorized parts may cause fire, electrical shock, or other hazards.
Following any service or repair, be sure the service technician performs safety
checks to certify that your TFT-LCD TV is in a safe operating order.
The apparatus with CLASS I construction shall be connected to a MAINS
socket outlet with a protective earthing connection.
IMPORTANT SAFETY INSTRUCTIONS

CONTENT
AV SCART SETUPand
Video setting menu 17
EXTERNAL EQUIPMENT
Connecting diagram 4
LET'S START
Changing source operation 8
REMOTE CONTROL HANDSET
Remote buttons 5 Battery installation 7
PANEL BUTTON FUNCTIONS
Panel control 2 3 Rear panel
INSTALLATION
Normal installation 1
TELETEXT FUNCTION
Teletext function 16
TV MENU SETUP
Picture Sound
TV setup OSD setup
9 11
12 14
Function 15
VGA SETUP
Picture Sound
Monitor setup OSD setup
18
20
19
21
Function 22
DISPLAY MODE
33 Display mode
SPECIFICATIONS
Specifications 32
TROUBLE SHOOTING
Display troubleshooting Sound and TV troubleshooting 31 31
DVB FUNCTION SETUP
General setup 23
Advanced setting
Channel manage
27
25
Electronic program guide 28
System info 28 Program information 29
MHEG5 30

1, Hook the tache (labeled A)of the kickstand onto the plate (labeled C).
2, Tighten the screws ( M4 10) through the ostium (labeled B).
3, Figure shows the finished installation. The kickstand can rotate 15 -degree.
Kickstand
Ostium
1
1
INSTALLATION
NORMAL INSTALLATION
A B
M4 10Screw 1pcs
C
Hook
Rear viewing of LCD TV
1
1010
2525

2
PANEL BUTTON FUNCTIONS
Indicator( )Indicator is red when in standby mode, green when working normally.
1 IR sensor window
2
Front panel
CH+/- (Increase or decrease channel number)
6
5
VOL+/-(Increase or decrease volume)
SOURCE (Enter to exit source menu)
7
4
SETUP (Enter or exit setup menu)
STANDBY (To switch between standby mode and power-on mode)
8
Left panel
9
Headphone jack
Right panel
PANEL CONTROL
3
POWER(Turns on or off the power supply).
1 2
10
10
3
4
5
6
7
8
9
PCMCIA CARD (Slots for external Conditional Access(CA)-modules).

PANEL BUTTON FUNCTIONS
3
REAR PANEL
2
SCART input terminal
5
12V DC input terminal
1
2
4
5
6
Coaxial digital audio output
7
PC audio input
4
7
R input terminalF
SCART
COAXIAL
VIDEO
1
3
VGA input terminal
3
Composite video/audio input
6

SCART
COAXIAL
VIDEO
DVD or VCR player
RL
EXTERNAL EQUIPMENT
NOTE
CONNECTING DIAGRAM
You should connect the interconnecting cables BEFORE plugging in the power cord.
Power amplifier (with coaxial digital audio in)
R cableF
4

REMOTE CONTROLLER
5
REMOTE BUTTONS
Direct source buttons1Select signal source directly: DTV, TV, SCART,AV, VGA.
Number button3
To select program number.
OK button7To confirm the selections.
15 SUBPAGE/PAGE-
To display the subpage of the teletext in TV/browse the previous page of favorite in DTV.
14 REVEAL/EPGDisplay the hidden teletext information/ in DTV.To display the program guide
16 CYANCYAN button.
DTV SETUP9
Enter or exit setup menu.
NICAMSwitch in NICAM,A2 and mono channel (It is effective in TV signal input with NICAM or A2 function).
2
5Long press (more than 3 seconds) the button to start auto scan in TV/DTV.
TUNE/AQT
11 CHANNEL+/-
To increase or decrease program number inTV/DTV.
8 Left/Right cursor(menu adjustment )To move leftward/ rightward or adjust theselected item in the menu, or adjust sound volume (invalid in DTV).
INDEX/PAGE+To display main content page when playing the teletext in TV/browse the next page of favoritetable in DTV .
13
17 YELLOWYELLOW button.
4 RETURNTo exchange channel between the previous program and the current program in TV andDTV.
6 FAVORITEDisplay your favorite channel list in DTV.
EXIT10
To exit current menu except MUTE menu.
1
2
3
5
7
12
9
11
13
15
16
4
6
8
10
14
17
12 HOLD/INFOTo stop teletext on current page/To display thelanguage and sound track in DTV.

6
REMOTE CONTROLLER
SOURCETo select input source: TV, DTV, AV, SCART,VGA.
21
UP/DOWN cursor
To select upward/downward in the menu orchange the channel in TV/DTV.
22
To display TV and teletext in the simultaneously/Selects the subtitle language in DTV.
MIX/SUBT26
Volume +/-25
To increase or decrease sound volume.
RED button. RED30
TEXT/TEXT27
To enable or disable the function of teletext.
GREENGreen button.
31
TV SETUPTo display system menu.
23
STANDBY18
To switch between standby mode and power-on mode.
20 TWO-DIGIT NUMBER BUTTON
To switch between one or two-digit programnumber.
MUTESound mute switch.
24
CANCEL/AUDIOTo cancel teletext in TV/To change the audio language and sound track in DTV.
28
SIZE/TV/To magnify teletext page/To switch betweenTV and Radio modes in DTV.
29
21
22
25
24
26
31
30
28
29
27
18
20
23
19
LANG19
To switch the output language in DTV.

7
REMOTE CONTROLLER
Remove the battery cover. Insert two SUM-4(AAA) batteries matching the -/+ polarities of the battery to the -/+ marks inside the battery compartment, as in the following figure:
BATTERY LIFE
Generally speaking, the battery may be used for one year, but the battery life is also related to the usage times and remote controller operation.
If the remote controller is still not operating when very near to the remote sensor window, please replace the battery.
Please use SUM-4(AAA) battery.
NOTES
Never use rechargeable battery.
Never charge, short-circuit, disassemble and heat the battery, or throw it into fire.
Pay attention not to fall or knock the remote controller, which may cause damage or function failure to it.
Do not use new and old battery together.
If electrolyte splashes into body, please clean it with water.
CAUTIONPlease put the battery in a place children cannot access. If swallowed by accident, please contact your local doctor immediately.
BATTERY INSTALLATION
When not using the remote controller for a long time, please take out the batteries to avoid
liquid leakage. Before replacing new batteries, please clean the electrolyte in the remote
controller.
Please confirm whether the accessories contain the power adapter.
Please make sure to use power adapter within the specification range, otherwise it will cause damage.
POWER SUPPLY
Use the car adapter in the accessories, connect one end to the socket in you car, the other to the DC socket in the TV.
The input voltage of the car adapter should be 12Volts.

LET'S START
You can change the input source by using the source Menu. Press [SOURCE] button or
[SOURCE] key to show the menu as follows:
The current source item is highlighted. Press [ ] button on the remote control or [ CH+
/CH- ] key to select the source you want, Press [ ] button, [VOL+/VOL-] key or [OK]
button to confirm your choice .
CHANGE SOURCE OPERATION
ANALOGUE TV
DIGITAL TV
AV
SCART
VGA
8
STANDBY
After this unit is well fixed on the desk or on the wall, and the cords are well connected
for input and output, what you should do next is:
Firstly, connect the adapter to the LCD TV, and turn on the power switch then the unit will go
into standby mode, you can see the indicator turn red.
Secondly, press [STANDBY] key on the left side of the LCD TV or [STANDBY] button on the
remote control to make the unit switch into working mode, and you will see the indicator turns
green. Now you can enjoy all exciting features of the whole new product.
INDICATOR
STANDBY
Power switch
Item
BRIGHTNESS To adjust brightness.
CONTRAST To adjust contrast.
SATURATION To adjust color saturation.
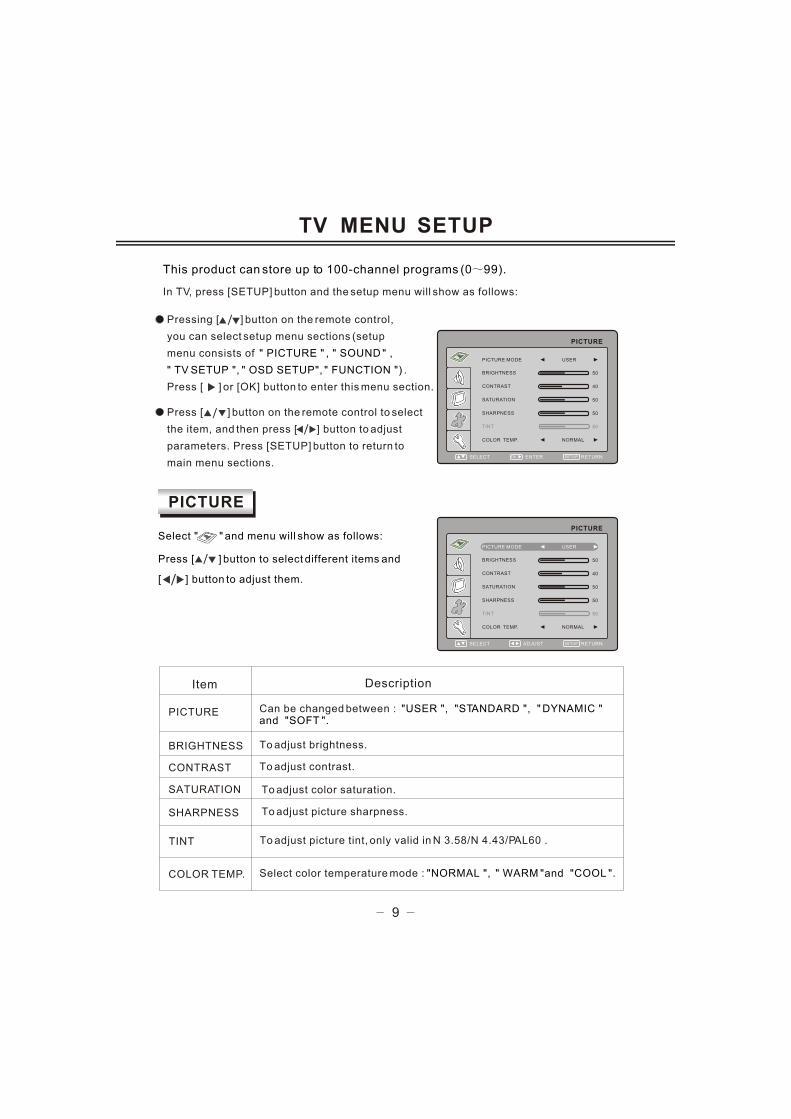
This product can store up to 100-channel programs (0 99).
In TV, press [SETUP] button and the setup menu will show as follows:
Pressing [ ] button on the remote control,
you can select setup menu sections (setup
menu consists of
.
Press [ ] or [OK] button to enter this menu section.
" PICTURE " , " SOUND " ,
" TV SETUP ", " OSD SETUP", " FUNCTION ")
Press [ ] button on the remote control to select
the item, and then press [ ] button to adjust
parameters. Press [SETUP] button to return to
main menu sections.
Select " " and menu will show as follows:
Press [ ] button to select different items and
[ ] button to adjust them.
TV MENU SETUP
Description
TINT To adjust picture tint, only valid in N 3.58/N 4.43/PAL60 .
9
PICTURE
PICTURE Can be changed between : "USER ", "STANDARD ", " DYNAMIC " and "SOFT ".
SHARPNESS
COLOR TEMP.
To adjust picture sharpness.
Select color temperature mode : "NORMAL ", " WARM "and "COOL ".
PICTURE
SELECT RETURNSETUPENTEROK
PICTURE MODE USER
SATURATION 50
CONTRAST 40
BRIGHTNESS 50
TINT 50
COLOR TEMP. NORMAL
SHARPNESS 50
PICTURE
SELECT RETURNSETUPADJUST
SATURATION 50
CONTRAST 40
BRIGHTNESS 50
TINT 50
COLOR TEMP. NORMAL
SHARPNESS 50
PICTURE MODE USER

TV MENU SETUP
10
NOTE
Select "BRIGHTNESS " to adjust it, the sub item will show as follows :
press [ ] button to adjust the value of brightness.
BRIGHTNESS
50
CONTRAST , TINT , SHARPNESS , SATURATION are as the same.
If you have adjusted the upper items not at USER mode, the adjusted value
will automatically overlay the USER mode parameters.
" " " " " " " "
" "
" "

Item
BALANCE
TREBLE
To adjust balance of left and right sound channels.
To adjust bass.
To adjust treble.
Select " "and menu will show as follows:
TV MENU SETUP
BASS
Description
SOUND MODE Can be changed between USER , , FILM ." " "MUSIC" " " and "NEWS"
11
SOUND
Press [ ] button to select different items and press [ ] button to adjust them. The
following are the descriptions of the sound item.
NICAM
Nicam/A2 function is only valid in TV while current program coming with Nicam/A2 signal.
If you can receive Nicam/A2 signal, you can operate as follows to enjoy that.
You can select Nicam stereo, mono channel or bilingual through NICAM button or in the
upper menu. If Nicam/A2 signal is too weak, it will switch into mono channel automatically.
NOTES
Select NICAM mode( please refer to the notes).
SOUND
SELECT RETURNSETUPENTEROK
50BALANCE
SOUND MODE USER
50BASS
50TREBLE
NICAM MONO

TV MENU SETUP
12
Press [ ] button to select different items and press [ ] button to adjust them.
Item
CHANNEL To change the channel number.
CHANNEL EDIT
FINE TUNING Adjust the channel frequency accurately to make the soundand picture effect better.
MANUAL SEARCH Only scan program of current channel .
Description
AUTO SEARCH Scan all programs and store them automatically.
Select " " and TV setup menu will show as follows:
T V S E T U P
NOTES
Enter its submenu and use the correlative functions of the
channels. Please refer to the next page.
COLOR SYSTEM
SOUND SYSTEM
Can be changed between: "AUTO ", "PAL " and " SECAM ".
Can be changed between: "AUTO", "BG ", " I " , "DK " and " L ".
Which COLOR SYSTEM mode and SOUND SYSTEM mode to use is related to the
local TV broadcasting system.
" " " "
If the local system is SECAM L, the sound system must be selected as L , or else the search
result is bad.
TV SETUP
SELECT RETURNSETUPENTEROK
CHANNEL 1
COLOR SYSTEM AUTO
SOUND SYSTEM AUTO
FINE TUNING 40.00MHZ
MANUAL SEARCH
AUTO SEARCH
CHANNEL EDIT

Item
CHANNEL
Description
SKIP
SWAP
SAVE
To select current channel here.
To select "YES " or "NO ", you can select "YES " to make current channel unaccessible while using [CH+/-] button to browse chann-els (but you can access it in the TV SETUP menu or this menu).
Select or directly input the channel number you want to swap withcurrent channel.
Press the [OK] button to confirm the swap operation.
13
TV MENU SETUP
Select "CHANNEL EDIT " , the menu will show as follows:
AUTO SEARCH
112.25MHZVHF L
Select "AUTO SEARCH " , the searching menu will show as follows:
3
1
2
3
The number of programs have been found.
The current searching frequency Band, 3 Bands in total: "VHF L" ,"VHF H"," UHF".
The current searching frequency.
2
1
SELECT RETURNSETUPADJUST
CHANNEL EDIT
SKIP
SWAP
SAVE
5CHANNEL
NO
?
_ _
2
PRESS SETUP TO EXIT

TV MENU SETUP
Select " " item and OSD SETUP menu will show as follows:
14
OSD SETUP
You can adjust the relative parameters of OSD itself here.
Description
LANGUAGE
OSD H-POSITON
TRANSPARENCY
Set OSD language.
Press [ ] button to select different items and press [ ] button to adjust them.
Item
OSD DURATION
To adjust OSD vertical position.
To adjust the main menu display duration time.
To adjust OSD horizontal position.
SELECT RETURNSETUPENTER
OSD SETUP
LANGUAGE ENGLISH
OSD H-POSITION
OSD V-POSITION
OSD DURATION
TRANSPARENCY
OK
50
50
25
25
OSD V-POSITON
To adjust transparency of OSD.

Select " " item and FUNCTION menu will show as follows:
FUNCTION
Description
ASPECT RATIO
Press [ ] button to select different items and press [ ] button to adjust them.
Item
TV MENU SETUP
15
SELECT RETURNSETUPENTER
FUNCTION
ASPECT RATIO FULL
NOISE REDUCE MID
SLEEP OFF
OK
RESET
NOISE REDUCE
SLEEP To set the sleep time.
RESET To reset all parameters to default.
To switch the video format between "FULL" ,"ZOOM",
" NORMAL" and "LETTERBOX".
To reduce the noise of the image.

16
Most TV stations provide cost-free teletext information, including the latest news,
weather information, TV program list and stock information, etc.
You just input the needed teletext page according to the teletext content.
TELETEXT FUNCTION
TELETEXT DISPLAYSelect the channel with teletext signal;
Press [TEXT] button;
Select the corresponding page according to the colorized buttons on the remote control;
Press [TEXT] again and TV screen will display.
PAGE SELECTIONYou can input 3 digital numbers to enter the page you want to watch through numberbuttons. If the inputted number is invalid, you need to input correct 3 digital numbersagain after you finished inputting this 3 digital numbers.
You can select to turn pages forward or backward through [CH+/-] button.
NOTE: Press [CANCEL] button to cancel teletext.
MIX MODEThis function may let you enjoy TV and teletext information at the same time.
When a certain teletext page displays, press [MIX] button, TV and teletext information will display on screen at the same time.
Press [MIX] button again and only teletext image displays.
In mix mode, the disturbance lines on teletext characters are easy to appear, so you are not recommended to select this mode.
LOCKYou can press [HOLD] button to lock teletext page. Press this button again to cancel locking.
INDEXPressing [INDEX] button to display content page.
Enter a certain teletext page through inputting number buttons.
Press [REVEAL] button to display the hidden teletext information. Press this button again to cancel teletext information displaying.
DISPLAY MODE
COLORIZED BUTTONS (RED, YELLOW, GREEN, CYAN)Select the corresponding teletext page through colorized buttons.
When teletext page shows, you may double zoom in to display this teletext page;
Press [SIZE] button to zoom in the upper half part of teletext page;
Press [SIZE] button again to enter the under half part of teletext page;
Press this button for the third time to return to original display mode.
ZOOM IN TELETEXT
User could press [SUBPAGE] button to select to the subpage of teletext.
SUBPAGE

In TV, if you first use the set or havn't tuned, the hint will display as follow:
NOTE
AV and SCART SETUP
17
VIDEO SETTING MENU
This unit will go into standby mode automatically with no signal input after 5 minutes.
The menu setup of AV/SCART modes is much the same as that of TV mode,
except the " " section is invalid and a bit difference in sound mode. It is not
repeated here. You can find it in preceding pages.
If the input source is SCART, this unit will automatically recognise its RGB and CVBS
signal. If RGB is recognised, it will auto switch into RGB mode, or else it will work at
CVBS mode. The relative information will be automatically displayed on the right upper
of the screen .
If no signal input in AV, SCART the screen will show a similar signal to the following figure.
While, if the input has no signal, the hint will display as this:
ANALOGUE TV
4:50
OR RETUNE
AV
NO SIGNAL
4:50
NO SIGNAL
ANALOGUE TV
PLEASE TUNE -
4:50
PRESS AND
HOLD DOWN AQT

With the VGA mode supported up to 1024*768@75Hz, and speakers built in, you can use
this unit as a multimedia PC monitor. When this unit works in VGA mode, the following setup
can be done.
Press [SETUP] button to enter main section. Press [ ] button to select sections and then
press [ ] button or [OK] button to enter.
Press [ ] button to select " ", and press [ /OK] button to enter.
To adjust brightness of picture .
Item Description
BRIGHTNESS
COLOR TEMPERATURE
CONTRAST
AUTO CONFIG
STATUS
Press [ ] button to adjust value of item.
To adjust contrast of picture .
Enter sub menu to adjust color temperature of picture. Press [ /OK ] button to enter.(details refer to the next page)
Auto config horizontal/vertical position, phase and frequency.Press [ /OK] button to activate.
The format of the input signal.
18
VGA SETUP
P I C T U R E
PICTURE
SELECT RETURNSETUP
AUTO CONFIG
BRIGHTNESS
COLOR TEMPERATURE
CONTRAST
50
40
1024 X768 @75 HZ
ENTEROK

VGA SETUP
Here shows the color temperature sub menu.
19
Item Description
MODE
RED
GREEN
BLUE
Select color temperature mode :"USER", "NORMAL", "WARM"and "COOL".
Adjust red gain value of color temperature.
Adjust green gain value of color temperature.
Adjust blue gain value of color temperature.
S O U N D
Press [ ] button to select " " and press [ /OK] button to enter.
The operation of sound section here is the same as that in TV mode except the NICAM is invalid. Please refer to P11.
Press [ ] button to select item and press [ ] button to adjust the value of the item.
NOTE: The adjust value will be stored in USER mode." "
COLOR TEMPERATION
BLUE
GREEN
RED 50
50
50
NORMALMODE
SOUND
SELECT RETURNSETUPENTEROK
50
50
50
SOUND MODE
BASS
BALANCE
TREBLE
USER

VGA SETUP
M O N I T O R S E T U P
SELECT RETURNSETUPENTER
MONITOR SETUP
V - POSITION
FREQUENCY
PHASE
H - POSITION 50
50
100
50
OK
Press [ ] button to select " " and press [ /OK] button to enter.
Item Description
H - POSITION
FREQUENCY
PHASE
To adjust screen horizontal position.
To adjust screen vertical position.
To adjust frequency.
To adjust phase.
V - POSITION
20

VGA SETUP
21
O S D S E T U P
Press [ ] button to select " " and press [ /OK] button to enter.
Item Description
LANGUAGE
OSD H-POSITION
TRANSPARENCY
Select OSD language.
To adjust OSD horizontal position.
Transparency of OSD.
Press [ ] button to select different items and press [ ] button to adjust .
NOTE
VGA
NO SIGNAL
4:50
If you use this unit as a PC-monitor:
If no signal input ,after 5 minutes, this unit will go into sleep mode .
In this mode, the indicator will turn red, and the screen is turned off.
You can wake it up by waking up your PC .
If the unit hasn't been connected with VGA line to external
equipment, the CABLE NOT CONNECT menu will automatically
display on the screen; and if the input signal is beyond the support
scope, the MODE NOT SUPPORTED menu will automatically display on the screen.
At these two occasion, after 5 minutes, the unit will enter real standby mode (you
must use Power button or Power key to power it).
SELECT RETURNSETUPENTER
OSD SETUP
LANGUAGE ENGLISH
OSD H-POSITION
OSD V-POSITION
OSD DURATION
TRANSPARENCY
OK
50
50
25
25
OSD V-POSITION To adjust OSD vertical position.
OSD DURATION To adjust the main menu display duration time.

VGA SETUP
22
F U N C T I O N
Press [ ] button to select " ", and press [ /OK] button to enter.
Press [ ] button to select different items and press [ ] button to adjust .
Item Description
ASPECT RATIO
NOISE REDUCE Invalid in VGA.
SLEEP To set the sleep time.
SELECT RETURNSETUPENTER
FUNCTION
ASPECT RATIO FULL
NOISE REDUCE MID
SLEEP OFF
OK
RESET
RESET Reset all parameters default .
Because the panel type is 4:3,here we only supply "FULL"
for choosing.
If the "SLEEP" function is set, when it is only one minute left to automatically enter standby mode, the "STANDBY" hint will display on the screen as following:
you can press "OK"or "Exit"to cancel the function, or you can "SLEEP" to adjust the sleep time over again; Certainly, you can press"POWER" to directly make system enter standbymode immediately.
STANDBY: 30S

23**
DTV MENU OPERATION
Press the [DTV SETUP] button, then the Main Menu will be displayed, you can set your
preferences in that, such as search channels, edit the channel list or your favorite list ,
view Programme Guide Information.
It is easy to see that the Main Menu is composed
of six parts: General Setting, Channel Install,
Channel Manage, Advanced Channel , EPG,
System Info.
GENERAL SETTING
You can set the base environment of the DTV.
Note: When you connect an active antenna to the R input connector, please turn on the
antenna power so that the signal quality could be improved.
" "
Note: Select different item using the[ ]button ,and press [OK] or [ ] to enter it.
You can select the auto search or manual search.
Main Menu
General Setting
Channel Install
Channel Manage
Advanced Setting
EPG
System Info
OK EXIT
General Setting
Menu language
Audio language
Subtitle language
Subtitle display
Opacity Level
Antenna Power
OK EXIT
English
English
English
Off
100%
Off
Channel Search
Auto Search
Manual Search
OK EXIT
CHANNEL SEARCH
Menu Language: Set the default menu language.
Audio Language: Set the default audio language.
Subtitle Language: Set the default subtitle language.
Subtitle Display: Set the default subtitle as show
or not.
Opacity Level: Set the default menu opacity level.
Antenna power: Set the default antenna power turn on or off.
F
SETUP
SETUP
SETUP

DTV MENU OPERATION
Channel Search
OK EXIT
Channell Search
Installation type New
You can set the search mode as new or add .
Note: If the mode is new, will delete the old
channel the current frequency.
If the mode is add, do not delete the
old channel the current frequency.
Manual Search
Select the Chanel item you can select the
frequency by the [ ] or [ ] button.
Search Result
You can see all TV and Radio channels found while the channel search is in progress.
A pop-up will indicate you that the automatic installation is finished. This pop-up will
disappear automatically after a few seconds.
Channel
Frequency
OK EXIT
Manual Search
Quality
21
474.000
SETUP
24
Then press [ OK ] button to confirm it.
Then press [ OK ] button to search the channel.
SETUP
Search Result .....
TV channels: 6 Radios: 2
Progress:
Installtion completed
Please wait...
BBC THREE BBC Radio Wales
BBC 2W BBC Radio Cymru
BBC ONE Wales
CBC channel
BBC NEWS 24
BBCi

Create a favourite list
Name
Channels
OK EXIT
RFAV1
Radios
SETUP
DTV MENU OPERATION
The Favorite lists menu allows you to create,
modify and delete your own favorite lists but not
the two default service lists (TV, Radio).
Four TV favorite lists and four radio favorite
lists can be created.
FAV 1
EXITSETUP
1 BBC Radio Wales
2 BBC Radio Cymru
PAG +-
Lock Skip Sort/move Skip/Add All
This screen allows you to modify a favourite list. The current favourite list name is
displayed on the top of the screen.
All the channels matching the criteria selected at the creation of the favourite list are
listed. Each favourite list has its own channel numbering.
In case of a favourite list, you can lock or unlock a channel, skip or add some channels
or all channels. You can also sort the channels by alphabetical order, by providers or
manually. All these action are performed using screen color buttons (RED, GREEN,
YELLOW, CYAN).
If the list is the default TV and Radio lists, only the Lock/Unlock option is available.
At the top of the list, the favourite list name and type, the provider name are displayed.
The last viewed service is displayed in the video window.
Warning : The only modification you can make in the two default TV and Radio lists is
to lock or unlock a channel.
" "
Channel Manage
Create a favourite list
Modeify a favourite list
OK EXIT
Delete a favourite list
SETUP
This screen allows you to create a new favorite
channels list with selection criteria. The name
of the list is set to FAV x for TV services and
RFAV x for Radio.
" "
" "
Modify a favourite list
RADIO
OK EXITSETUP
Create a favourite list
CHANNEL MANAGE
Modifying a Favourite List
25
TV
FAV1

DTV MENU OPERATION
Default TV/Radio lists
On these lists, only the Lock/unlock option is available: a press on the [RED] button will
lock the highlighted channel if unlock and vice-versa (toggle behavior).
" "
Delete a favorite list
This screen allows you to delete a favorite list.
This pop-up allows you to confirm or not the
deletion of a favorite list:
You can going to remove the
favorite list, press OK to confirm.
OK EXIT
Delete a favourite list
OK EXIT
FAV2
FAV1
SETUP
SETUP
Add All/Skip All: accessed by a press on the [CYAN] button . Allows you to generalize the
Add or Skip operations to all channels.
Sort/Move: Accessed by a press on the [YELLOW] button. Sort can be made in a few
different ways, by alphabetical or by provider. In this screen, the selected services will be
sorted and placed at the beginning of the list, and the other (not selected) will be sorted
and placed at the end of the list.
Move actions consist in highlighting the channel to move, pressing the [OK] button to
select it, moving the cursor to the destination item and pressing the [OK] button to finalize
the move operation.
Lock/Unlock: Toggle behavior on the [RED] button, in front of the channel list a color icon
indicate the status (red for locked, blue for unlock), this option is only available if channel
is added.
Add/Skip: Toggle behavior on the [GREEN] button, in front of the channel list a color icon
indicates the status (white for skipped, blue for added).
TV/Radio favourite lists
For all these lists, a few actions are available:
26

DTV MENU OPERATION
Advanced Setting
PIN change
Parental control
OK EXIT
Disabled
Channel lock
Maturity level
No
No
SETUP
The parental control item allows you to enable or disable the locking management.
A parental rating (between 1 and 18 years) is available. In this case, all services which
are not in the age limits become inaccessible unless enter the PIN code. This parental
rating depends of the information forwarded or not by the broadcaster.
Enter PIN code
This menu is locked
A press on red button allows you to modify the PIN code which will be asked when try to
access to a protected part defined just above.
The menu to modify PIN code is protected by requesting PIN code access.
The default DTV PIN code (after the First Time Installation or Factory System
Reinstallation ) is 0000 .
Then enter the new wanted PIN code, enter it a second time in Confirm item, just to be
sure that there is no typing fault.
" " "
" " "
PIN Change
PIN code
New PIN code
Confirm
If the parental control item is disabled then all the locking are deactivated, If it is enabled
then all the locking are applied according to your choice.
Parental Control
ADVANCED SETTING
Channel Lock
Allows you to lock a specific service (the PIN code is requested when you zap to the
locked services). To lock / unlock a service, see modify a favorite list )." "
Maturity Level
WARNING: If maturity level access control is activated, all access to timer feature
request the PIN code.
27
EXITSETUP EXITSETUP
Conditional Access
System Information
Factory Settings
System info
DTV MENU OPERATION
40 BBC Radio Wales
EXITSETUP
Tuesdays 30/01
PAG +-
15:50 The Likeaballs
15:25 Lazytown
16:20 Raven: The lsland
15:51 30/01/2007
INFO
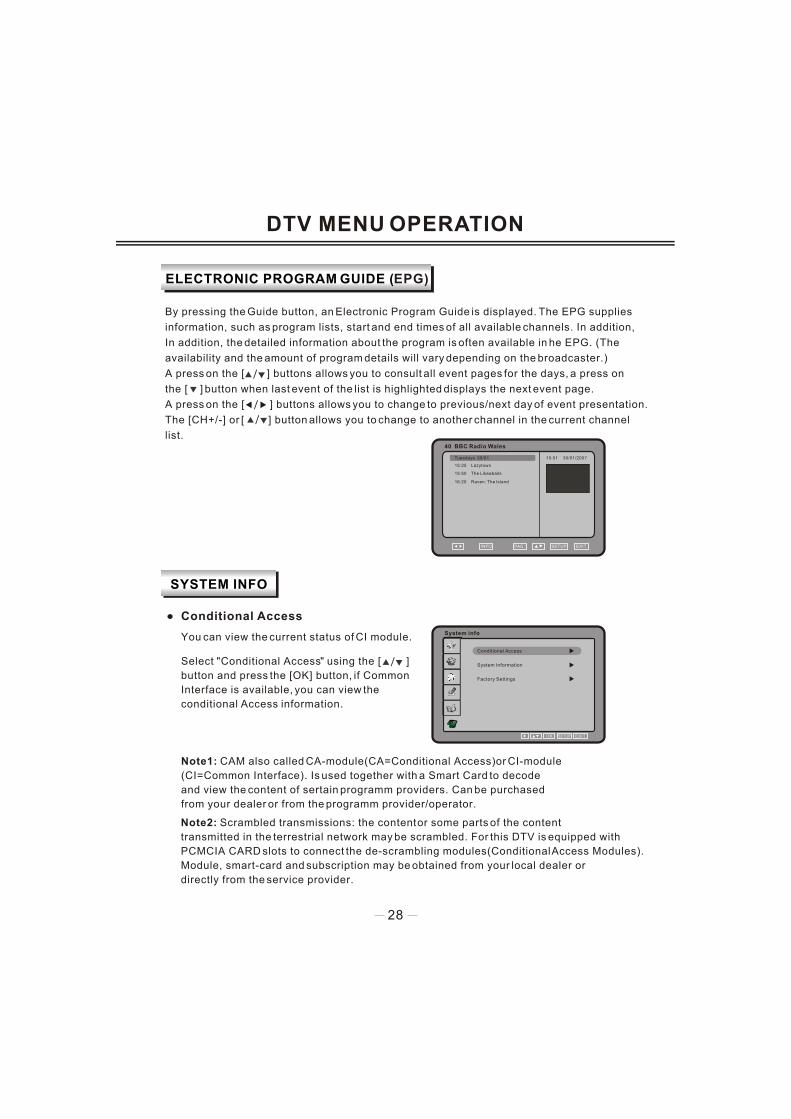
ELECTRONIC PROGRAM GUIDE (EPG)
By pressing the Guide button, an Electronic Program Guide is displayed. The EPG supplies
information, such as program lists, start and end times of all available channels. In addition,
In addition, the detailed information about the program is often available in he EPG. (The
availability and the amount of program details will vary depending on the broadcaster.)
A press on the [ ] buttons allows you to consult all event pages for the days, a press on
the [ ] button when last event of the list is highlighted displays the next event page.
A press on the [ ] buttons allows you to change to previous/next day of event presentation.
The [CH+/-] or [ ] button allows you to change to another channel in the current channel
list.
SYSTEM INFO
28
Conditional Access
You can view the current status of CI module.
Select Conditional Access using the [ ]
button and press the [OK] button, if Common
Interface is available, you can view the
conditional Access information.
" "
Note1: CAM also called CA-module(CA=Conditional Access)or CI-module
(CI=Common Interface). Is used together with a Smart Card to decode
and view the content of sertain programm providers. Can be purchased
from your dealer or from the programm provider/operator.
Note2: Scrambled transmissions: the content or some parts of the content
transmitted in the terrestrial network may be scrambled. For this DTV is equipped with
PCMCIA CARD slots to connect the de-scrambling modules(Conditional Access Modules).
Module, smart-card and subscription may be obtained from your local dealer or
directly from the service provider.
OK EXITSETUP
System Information
W150TCI_ICE_ 2008_03_06_V1.0
DTV MENU OPERATION
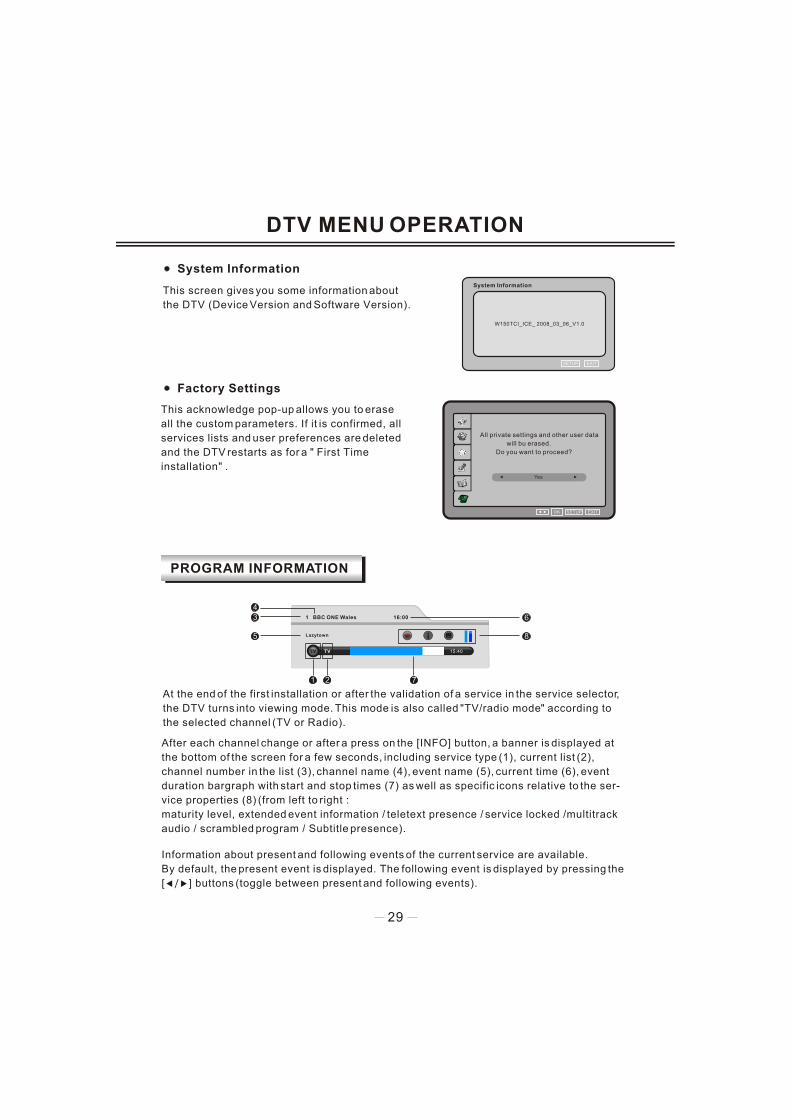
This acknowledge pop-up allows you to erase
all the custom parameters. If it is confirmed, all
services lists and user preferences are deleted
and the DTV restarts as for a First Time
installation .
"
"
Factory Settings
This screen gives you some information about
the DTV (Device Version and Software Version).
Yes
All private settings and other user data
will bu erased.
Do you want to proceed?
System Information
29
EXITSETUP
1 BBC ONE Wales 16:00
Lazytown
TV TV 15:40
At the end of the first installation or after the validation of a service in the service selector,
the DTV turns into viewing mode. This mode is also called TV/radio mode according to
the selected channel (TV or Radio).
" "
PROGRAM INFORMATION
After each channel change or after a press on the [INFO] button, a banner is displayed at
the bottom of the screen for a few seconds, including service type (1), current list (2),
channel number in the list (3), channel name (4), event name (5), current time (6), event
duration bargraph with start and stop times (7) as well as specific icons relative to the ser-
vice properties (8) (from left to right :
maturity level, extended event information / teletext presence / service locked /multitrack
audio / scrambled program / Subtitle presence).
1 2
5
3
4
7
8
6
Information about present and following events of the current service are available.
By default, the present event is displayed. The following event is displayed by pressing the
[ ] buttons (toggle between present and following events).
EXITOK SETUP
DTV MENU OPERATION
MHEG5
Newsround
15:50 30 Jan
B B C NEWS
CBBC
Press TEXT to exit
press 0 for full screen TV
HOME SHORTCUTSB B C BACK INDEX
571
'Super-lice' fighting nitshampoo
Jonny wilkinson back forEngland
Grey wolf makes amazingcomeback
Elephants stage highwayrobberies
McLeish named new Sottlandcoach
More...
30
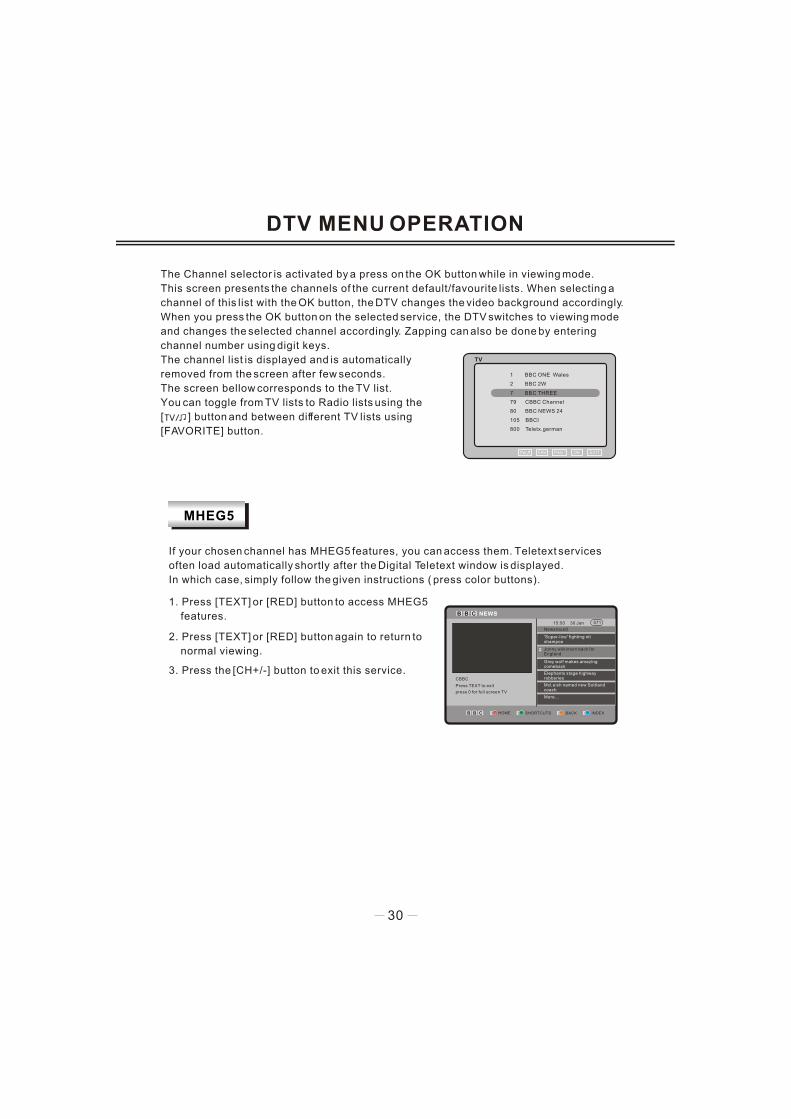
If your chosen channel has MHEG5 features, you can access them. Teletext services
often load automatically shortly after the Digital Teletext window is displayed.
In which case, simply follow the given instructions ( press color buttons).
1. Press [TEXT] or [RED] button to access MHEG5
features.
2. Press [TEXT] or [RED] button again to return to
normal viewing.
3. Press the [CH+/-] button to exit this service.
TV
1 BBC ONE Wales
2 BBC 2W
79 CBBC Channel
80 BBC NEWS 24
105 BBCI
800 Teletx.german
7 BBC THREE
EXITOKPAG +-FAV
The Channel selector is activated by a press on the OK button while in viewing mode.
This screen presents the channels of the current default/favourite lists. When selecting a
channel of this list with the OK button, the DTV changes the video background accordingly.
When you press the OK button on the selected service, the DTV switches to viewing mode
and changes the selected channel accordingly. Zapping can also be done by entering
channel number using digit keys.
The channel list is displayed and is automatically
removed from the screen after few seconds.
The screen bellow corresponds to the TV list.
You can toggle from TV lists to Radio lists using the
[ ] button and between different TV lists using
[FAVORITE] button.

Please check for causes of problems in accordance with the following chart before contacting
maintenance personnel.
Cannot power on Please make sure the power cord is correctly connected
No sound
Please make sure the audio cord is correctly connected
Check volume
Volume too low
Check volume
If volume is still too low when adjusting volume to maximum,
please check whether the input device is correctly
Please make sure the antenna is well connected
Remote control failure
Check whether remote control battery is full chargedWhether battery installation is correct
Whether obstacles exists between remote control and the unit's receiving windowCheck whether receiving window has strong light
Symptom Causes and Correction
Symptom Causes and Correction
Black screen, powerindicator light off
Check whether the power cord is well connected, andwhether this unit is powered on
Check whether the signal cord of input device is well connected
Check whether input device is powered on
Check whether the input device signal is in this unit's specification
Check computer output mode: control panel-display-setup
If the setup does not accord with this unit's specification, please change the display setup
Horizontal scanning frequency: 30kHz 75kHz
Max display mode: 1024X768 75 Hz@
Image display flicker,unstable
~
Vertical scanning frequency: 50 Hz 75Hz~
TROUBLESHOOTING
DISPLAY TROUBLESHOOTING
SOUND AND TV TROUBLESHOOTING
Snowy picture
31
Make sure there is nothing plugged into the headphone jack
Unstable image orabnormal picture color
Correct the TV set settings
Reset the TV set to default setting

32
VGA
SCART
W H D
DTVInput connector
Frequency range (VHF/UHF)
Channel range(VHF/UHF)
IEC-Type, IEC 169-2, Female
174MHz~858MHz
7 & 8 Mhz
NormalStandby mode Less than
Power

Format (Hz )
Ver scanning frequency
SUPPORTED PC INPUT MODE
31.5 70.0 DOS640 350 25.17
720 400 31.5 70.0 28.32 DOS
640 480 31.5 60.0 25.18 DOS
640 480 37.9 72.0 31.50 VESA
640 480 37.5 75.0 31.50 VESA
800 600 35.1 56.2 36.00 VESA
800 600 37.9 60.0 40.00 VESA
800 600 48.1 72.0 50.00 VESA
800 600 46.9 75.0 49.50 VESA
Hor scanning frequency
(KHz)
Pixel frequency
To prolong this unit's service life, you are suggested to use power management function
of computer.
Because of the difference of display card output signal (especially non-standard signal
output), the display image may appear little disturbance which can be adjusted through
" AUTO CONFIG " in the "PICTURE" menu by users.
This product does not support the display mode not listed above. In order to achieve
the best display effect, please select the above-listed 12 display modes input signal.
DISPLAY MODE
Resolution (MHz)
33
1024 768 48.4 60.0 65.00 VESA
1024 768 VESA
VESA
56.5 70.11 75.00
1024 768 60.0 75.0 78.75
NOTES

DISPLAY MODE
Ver scanning frequency
(HZ)
Hor scanning frequency
( KHZ)
SUPPORTED VIDEO INPUT MODE
Format Vert scan type
720X480 31.5 60 480P
720X480 15.6 60 480i
720X576 31.2 50 576P
720X576 15.6 50 576i
Specifications and designs are subject to change without notice.
NOTE
34
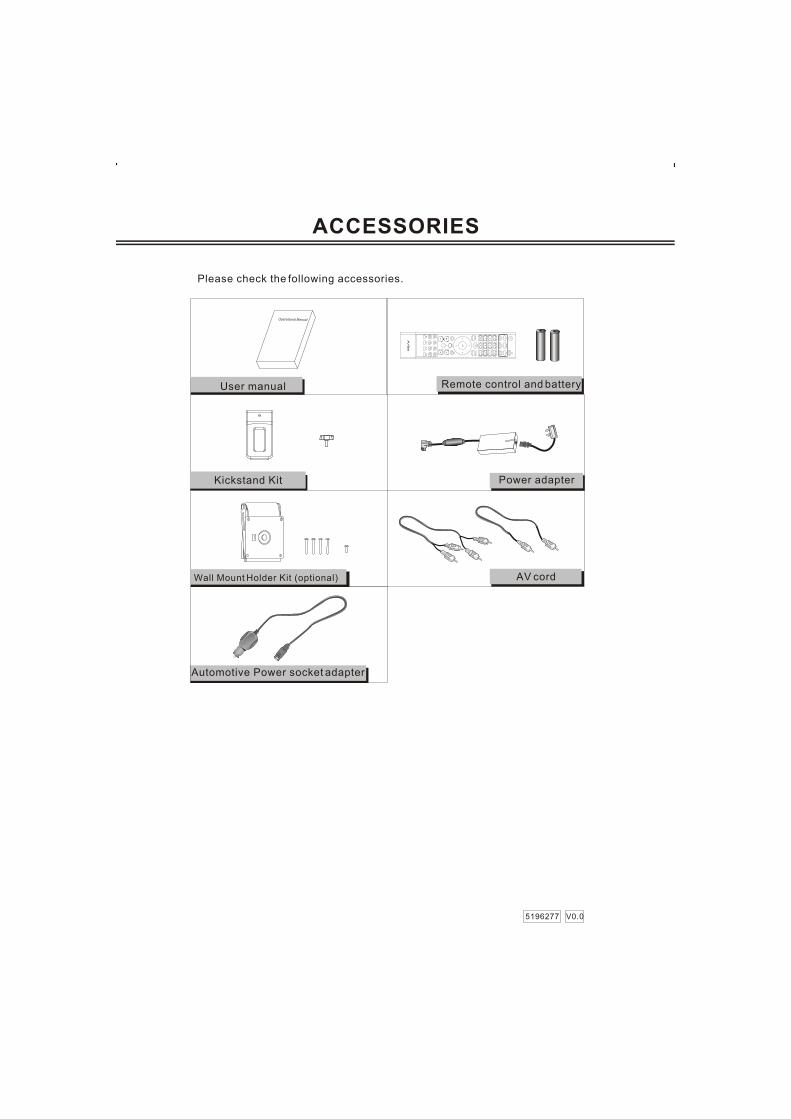
Please check the following accessories.
User manual
AV cord
Remote control and battery
Power adapter
Operational Manual
ACCESSORIES
Kickstand Kit
V0.05196277
Wall Mount Holder Kit (optional)
**
**
Automotive Power socket adapter
Top Related
Copyright © 2022 FDOKUMEN

