


Bahasa
Halaman
Hukum


Spectrum™ Technology PlatformVersion 12.0
Siebel Module User Guide

1 - Introduction to the SiebelModule
Siebel Module 4Siebel Module Services 6Siebel Module Databases 6
2 - Integrating Siebel withSpectrum
Integrating with Siebel Data Quality 14Integrating with Siebel Non-SDQ 42
3 - Configuring Siebel
4 - Using the Siebel Modulewith Siebel SDQ
Siebel Module OPT File Options 62Specifying Data Quality Settings 66Merging Duplicate Records 67Running a Batch Job 68Testing EAI 70
5 - Using the Siebel Modulewith Siebel Non-SDQ
Configuring Siebel non-SDQ 74Validating an Address 87Merging Duplicate Records 87
Adding D&B Information to a Record 88Running a Batch Job 90
6 - Services Reference
Siebel Business Name Standardization 92Siebel Generate Match Key 92Siebel Generate Match Score 92Siebel Generate Search Key 93Siebel Standardize Name 93Siebel Validate Address With No Candidates 93Validate Address With Candidates 93Appendix A: Validate Address Confidence
Algorithm
Introduction to the Validate Address ConfidenceAlgorithm 95
Confidence Algorithm for U.S. and CanadianAddresses 95
Confidence Algorithm for InternationalAddresses 96
Appendix B: Match and Location Codes for U.S.Geocoding
Match Codes 102Location Codes 108Appendix C: Encountering False Positives
What is a False-Positive? 127Reporting DPV False-Positive Violations 127Reporting LACS/Link False-Positive Violations 130
Table of Contents
1 - Introduction to theSiebel Module
In this section
Siebel Module 4Siebel Module Services 6Siebel Module Databases 6
Siebel Module
The Spectrum™ Technology Platform Siebel Module identifies and manages duplicate records,standardizes and validates addresses, standardizes and validates names, and auto-populatesmissing fields. Records in your Siebel system are checked against known, up-to-date referencedata from sources such as regulatory bodies (for example, the United States Postal Service),third-party data providers (for example, Dun & Bradstreet) or your company's internal referencesources (for example, accounting data).
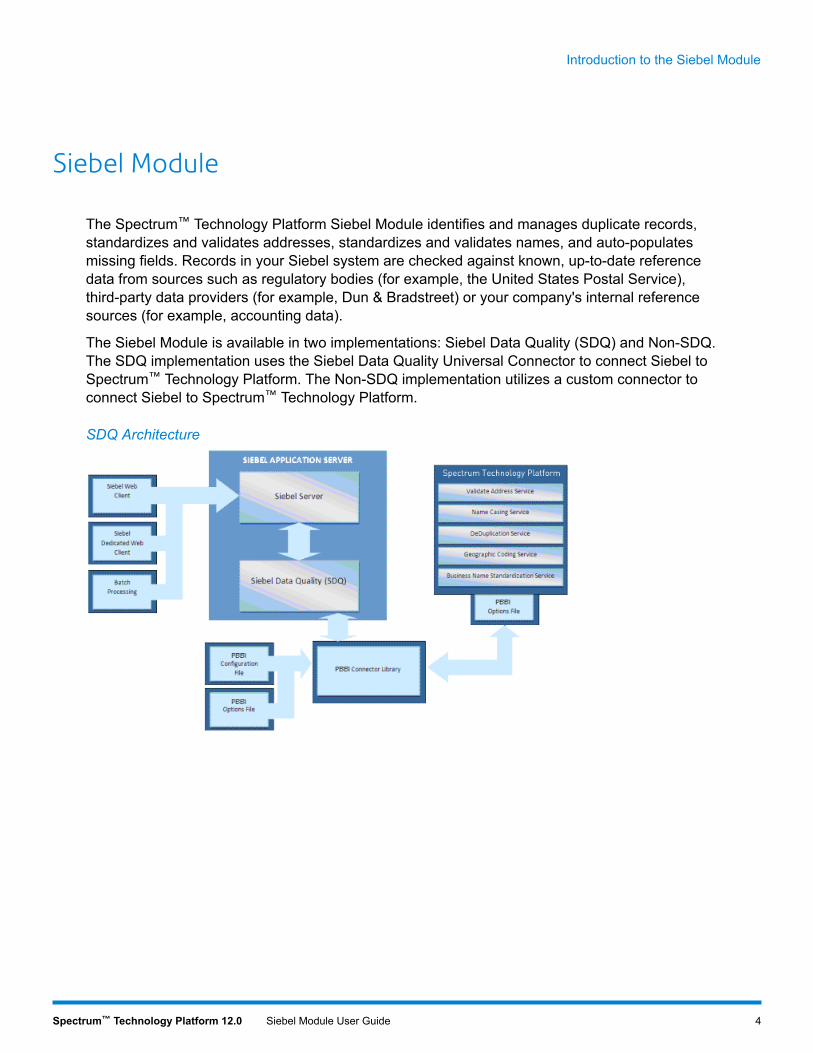
The Siebel Module is available in two implementations: Siebel Data Quality (SDQ) and Non-SDQ.The SDQ implementation uses the Siebel Data Quality Universal Connector to connect Siebel toSpectrum™ Technology Platform. The Non-SDQ implementation utilizes a custom connector toconnect Siebel to Spectrum™ Technology Platform.
SDQ Architecture
4Spectrum™ Technology Platform 12.0 Siebel Module User Guide
Introduction to the Siebel Module
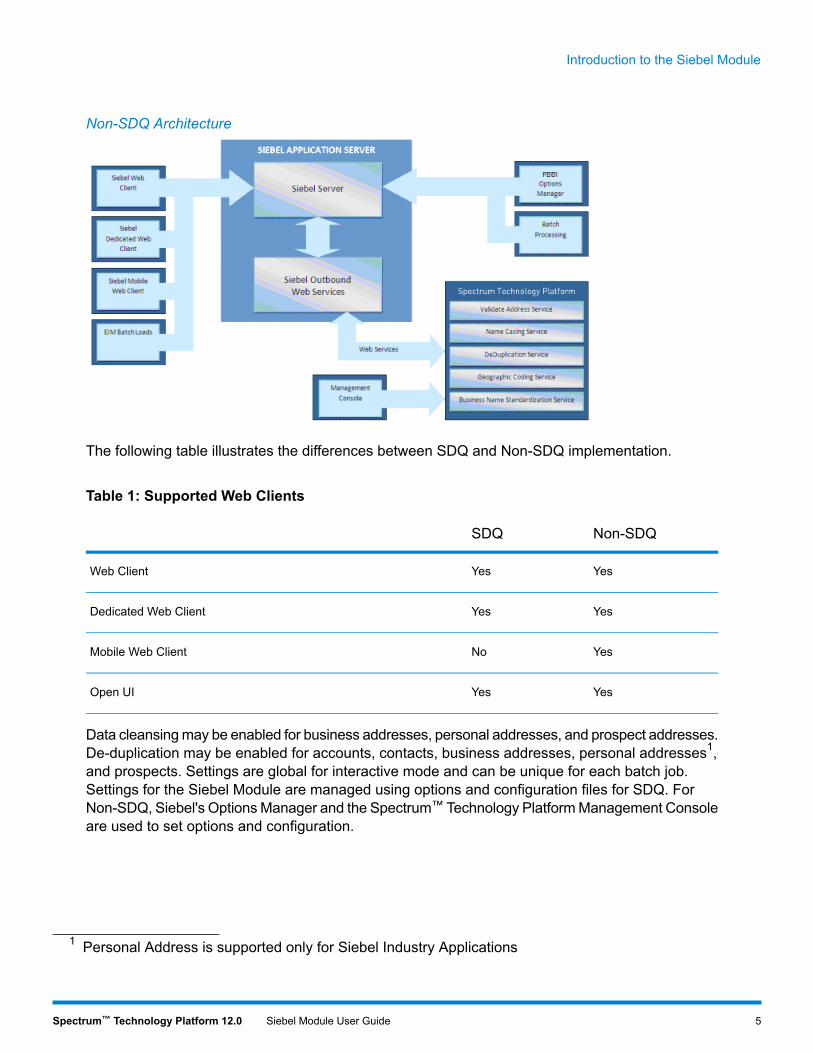
Non-SDQ Architecture
The following table illustrates the differences between SDQ and Non-SDQ implementation.
Table 1: Supported Web Clients
Non-SDQSDQ
YesYesWeb Client
YesYesDedicated Web Client
YesNoMobile Web Client
YesYesOpen UI
Data cleansingmay be enabled for business addresses, personal addresses, and prospect addresses.De-duplication may be enabled for accounts, contacts, business addresses, personal addresses1,and prospects. Settings are global for interactive mode and can be unique for each batch job.Settings for the Siebel Module are managed using options and configuration files for SDQ. ForNon-SDQ, Siebel's OptionsManager and the Spectrum™ Technology PlatformManagement Consoleare used to set options and configuration.
1 Personal Address is supported only for Siebel Industry Applications
5Spectrum™ Technology Platform 12.0 Siebel Module User Guide
Introduction to the Siebel Module

Siebel Module Services
The Siebel Module consists of the following services.
• Siebel Business Name Standardization—Standardizes terms against a previously validatedform of that term and applies the standard version. This evaluation is done by searching a tablefor the term to be standardized. If the term is found, the term is either replaced with the standardversion or it is extracted from the field. Standardization can include changing full words toabbreviations, changing abbreviations to full words, changing nick names to full names ormisspellings to corrected spellings.
• Siebel Generate Match Key—Generates a match key. The match key is generated using asubstring or consonant algorithm.
• Siebel Generate Match Score—Compares candidate records and generate a score that reflectsits similarity. The higher the score, the closer the match.
• Siebel Generate Search Key—Used for duplicate detection and error-tolerant searching.• Siebel Standardize Name—Formats input data with either mixed case or upper case.• Siebel Validate Address With No Candidates—Validates addresses. If you have licensed theEnterprise Geocoding Module, it also returns latitude and longitude. If the address is not found,no candidates are returned.
• Validate Address With Candidates—Validates addresses. If you have licensed the EnterpriseGeocoding Module, it also returns the latitude and longitude. If the address is not found, it returnsa list of possible matches (candidates).
Siebel Module Databases
The Siebel Module relies on other Spectrum™ Technology Platform modules to provide variouscapabilities such as address standardization and geocoding. Depending on the features you havelicensed youmay have one or more of the followingmodules. Eachmodule requires certain referencedata (databases) to be installed on the Spectrum™ Technology Platform server.
Note: For instructions on installing these databases, see the Spectrum™ Technology PlatformInstallation Guide.
Address Now Module Database
The Address Now database contains postal data from all supported countries. You can install theentire database or the data for specific countries only. The database is installed on the server. Thisdatabase is available by subscription from Pitney Bowes and is updated monthly.
6Spectrum™ Technology Platform 12.0 Siebel Module User Guide
Introduction to the Siebel Module
U.S. Geocoding Databases (U.S. Only)
These databases contain the spatial data necessary to perform address standardization andgeocoding. You must install at least one of these databases to perform geocoding for USA. You setthe database that you want to match against with the processing options. Enterprise Geocodingtries to match to the database you indicate. To verify you are matching to the database you want,you can review the value returned in the StreetDataType output field.
These databases use proprietary files called GSD files. For ZIP Code centroid matching, the fileus.Z9 contains all the centroid info for all states and normally has a z9 extension.
• Centrus Enhanced Geocoding—This database consists of TIGER data provided by the U.S.Geological Survey and address data provided by the U.S. Postal Service.
• TomTomGeocoding—This database provides more up-to-date data than the Centrus EnhancedGeocoding database. It requires an additional license. This data is provided by TomTom, athird-party provider of spatial data, and postal data from the U.S. Postal Service.
• NAVTEQGeocoding—This database provides more up-to-date data than the Centrus EnhancedGeocoding database. It requires an additional license. NAVTEQ data is provided by NAVTEQ, athird-party provider of spatial data. For more information about these databases, contact yoursales representative.
• ZIP + 4 Centroid—This database provides only address standardization and ZIP + 4 centroidmatching. It does not provide street-level matching.
Each geocoding database has an optional Statewide Intersections Index. The Statewide IntersectionIndex is designed to enable fast intersection identification on a statewide basis. For example, theStatewide Intersection Index will allow the database search for "1st and Main St, CO" and return alist of possible matches in Colorado more quickly than searching the entire geocoding database foreach instance of the intersection.
U.S. Points Databases (U.S. Only)
Points databases contain data for locating the center of a parcel. These databases provides enhancedgeocoding accuracy for internet mapping, property and casualty insurance, telecommunications,utilities, and others.
These databases are optional, but either Centrus Enhanced Points or Centrus Premium Points isrequired for Reverse Assessor's Parcel Number (APN) Lookup. These databases are also separatelylicensed.
• Centrus Points—This database contains the data necessary to locate the center of a parcel orbuilding. It does not contain Assessor's Parcel Number (APN) or elevation data.
• Centrus Elevation—This database contains the same data as Centrus Points, plus elevationdata.
• Centrus Enhanced Points—This database contains the same data as Centrus Points, plus APNdata.
• Centrus Premium Points—This database contains the same data as Centrus Points, plus bothAPN and elevation data.
7Spectrum™ Technology Platform 12.0 Siebel Module User Guide
Introduction to the Siebel Module

• Centrus TomTom Points Database—The data in this database is provided by TomTom, athird-party provider of spatial data.
• Master Location Data— This database provides the best available address point location forevery mailable and deliverable address in the United States.
Reverse Geocoding Database (U.S. Only)
This database contains the data you need to convert a latitude/longitude location to an address.
This database is optional, but is required for Reverse Geocode US . This database is also separatelylicensed.
Auxiliary Files (U.S. Only)
Auxiliary files contain user-defined records. You can use auxiliary files to provide custom data touse in address matching and geocode matching.
DPV® Database (U.S. Only)
The Delivery Point Validation database allows you to check the validity of any individual mailingaddress in the U.S. The DPV database is distributed as an optional feature and can be installed toenhance the geocoding database's ability to validate mailing addresses. Each time an edition of thegeocoding database is released, a corresponding edition of the optional DPV database is released.The date of the DPV database must match the date of the geocoding database for DPV processingto function. DPV lookups may not be performed after the expiration date of the DPV database.
This database is optional, but is required for CASS Certified™ processing. The DPV database isalso required to determine ZIP + 4 and ZIP + 4 related output (DPBC, USPS record type, etc.). Thisdatabase is also separately licensed.
Note:
Postal Service licensing prohibits using DPV for the generation of addresses or address lists,and also prohibits the DPV database being exported outside the United States.
EWS Database (U.S. Only)
The Early Warning System (EWS) database contains data that prevents address records frommiscoding due to a delay in postal data reaching the U.S. Postal database.
The USPS® refreshes the EWS file on a weekly basis. Unlike the DPV and LACSLink databases,the EWS database does not need to have the same date as the geocoding database. You candownload the EWS.zip file free of charge from the CASS section of the USPS® RIBBS website at:
https://ribbs.usps.gov//index.cfm?page=doclist
When you download the EWS database, you will receive a file named OUT. You must rename theOUT file to EWS.txt before using it.
8Spectrum™ Technology Platform 12.0 Siebel Module User Guide
Introduction to the Siebel Module
LACS Link Database (U.S. Only)
The LACSLink database allows you to correct addresses that have changed as a result of a ruralroute address converting to street-style address, a PO Box renumbering, or a street-style addresschanging.
This database is optional, but is required for CASS Certified™ processing. The LACSLink databaseis also required in CASS mode to receive ZIP + 4 and ZIP + 4 related output (delivery point barcode, USPS record type, etc.).
The date of the LACSLink database must match the date of the geocoding database for LACSLink
processing to function.
Note:
USPS licensing prohibits using LACSLink for the generation of addresses or address lists,and also prohibits the LACSLink database being exported outside the United States.
Universal Addressing Module Databases
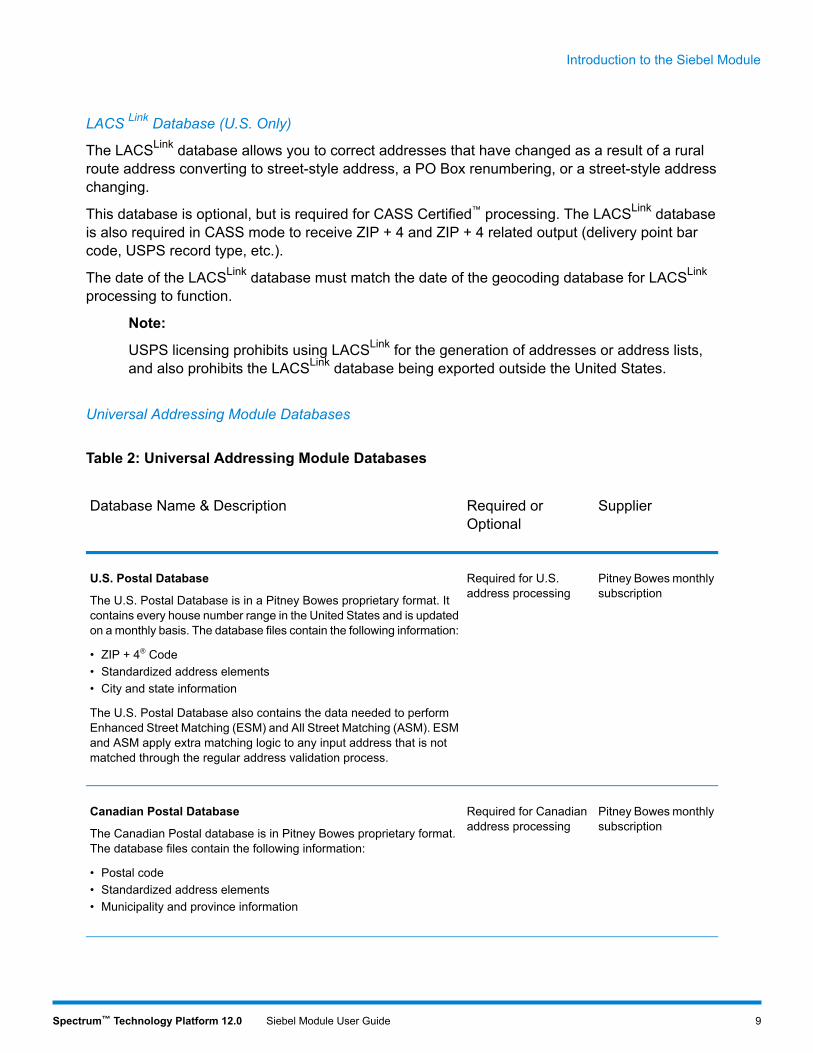
Table 2: Universal Addressing Module Databases
SupplierRequired orOptional
Database Name & Description
Pitney Bowesmonthlysubscription
Required for U.S.address processing
U.S. Postal Database
The U.S. Postal Database is in a Pitney Bowes proprietary format. Itcontains every house number range in the United States and is updatedon a monthly basis. The database files contain the following information:
• ZIP + 4® Code• Standardized address elements• City and state information
The U.S. Postal Database also contains the data needed to performEnhanced Street Matching (ESM) and All Street Matching (ASM). ESMand ASM apply extra matching logic to any input address that is notmatched through the regular address validation process.
Pitney Bowesmonthlysubscription
Required for Canadianaddress processing
Canadian Postal Database
The Canadian Postal database is in Pitney Bowes proprietary format.The database files contain the following information:
• Postal code• Standardized address elements• Municipality and province information
9Spectrum™ Technology Platform 12.0 Siebel Module User Guide
Introduction to the Siebel Module

SupplierRequired orOptional
Database Name & Description
Pitney Bowesquarterly subscription
Required forInternational addressprocessing
International Postal Database
The International Postal Database is a collection of postal address datafrom around the world. Data from each country is categorized accordingto the level of data available. The categories are:
• Category A—Enables the validation and correction of an address'spostal code, city name, state/county name, street address elements,and country name.
• Category B—Enables the validation and correction of an address'spostal code, city name, state/county name, and country name. It doesnot support the validation or correction of street address elements.
• Category C—Enables the validation and correction of the countryname, and the validation of the format of the postal code.
Pitney Bowesmonthlysubscription
Optional, but requiredfor CASS Certified™
processing; U.S.addresses only
DPV® Database
The Delivery Point Validation database allows you to check the validityof an individual mailing address in the U.S. The DPV database enhancesthe U.S. Postal database's ability to validate mailing addresses.
Note: The DPV database also contains the data required forCommercial Mail Receiving Agency (CMRA) processing.
Each time an edition of the U.S. Postal database is released, acorresponding edition of the DPV database is released. Although USPSlicensing allows the use of the U.S. Postal database beyond theexpiration date (with certain restrictions), DPV lookups may not beperformed after the expiration date of the DPV database.
USPS licensing prohibits using DPV data for the generation of addressesor address lists. To prevent the generation of address lists, the DPVdatabase contains "false positive records." False positive records areartificially manufactured addresses. For each negative response thatoccurs in a DPV query, a query is made to the False/Positive table inthe DPV database. A match to this table will stop DPV processing.
USPS licensing also prohibits exporting the DPV data outside the UnitedStates.
10Spectrum™ Technology Platform 12.0 Siebel Module User Guide
Introduction to the Siebel Module
SupplierRequired orOptional
Database Name & Description
Pitney Bowesmonthlysubscription
Optional; U.S.addresses only
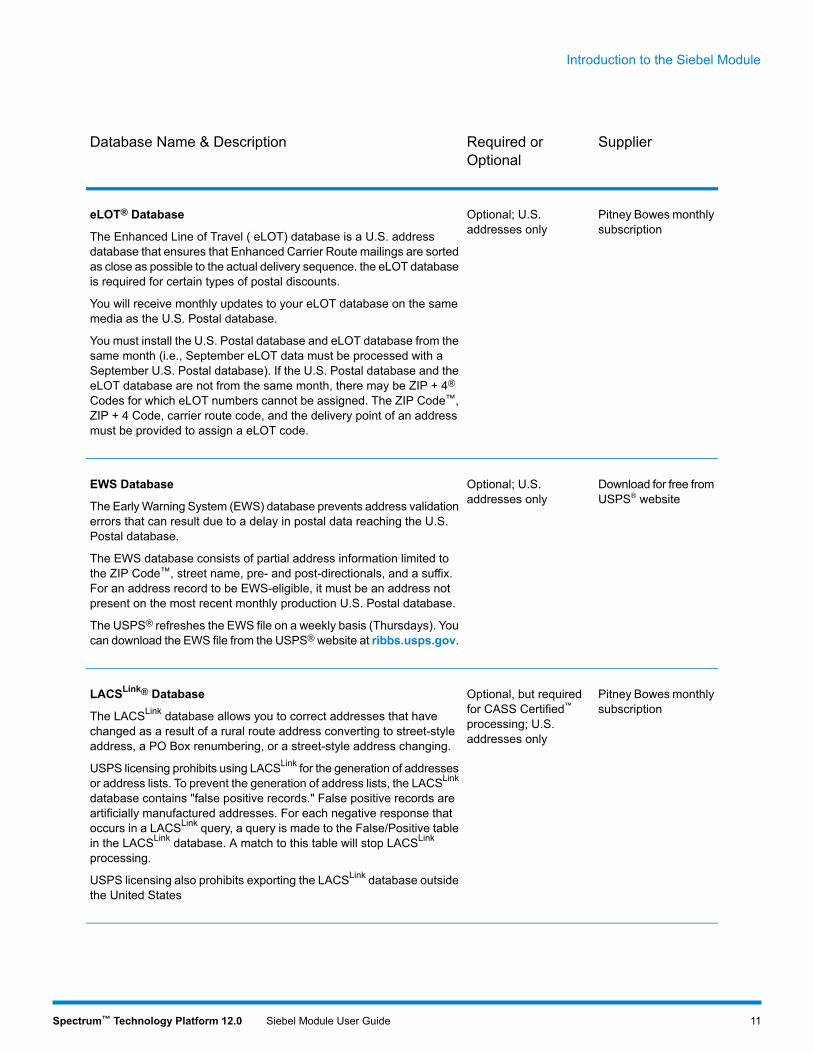
eLOT® Database
The Enhanced Line of Travel ( eLOT) database is a U.S. addressdatabase that ensures that Enhanced Carrier Route mailings are sortedas close as possible to the actual delivery sequence. the eLOT databaseis required for certain types of postal discounts.
You will receive monthly updates to your eLOT database on the samemedia as the U.S. Postal database.
You must install the U.S. Postal database and eLOT database from thesame month (i.e., September eLOT data must be processed with aSeptember U.S. Postal database). If the U.S. Postal database and theeLOT database are not from the same month, there may be ZIP + 4®
Codes for which eLOT numbers cannot be assigned. The ZIP Code™,ZIP + 4 Code, carrier route code, and the delivery point of an addressmust be provided to assign a eLOT code.
Download for free fromUSPS® website
Optional; U.S.addresses only
EWS Database
The EarlyWarning System (EWS) database prevents address validationerrors that can result due to a delay in postal data reaching the U.S.Postal database.
The EWS database consists of partial address information limited tothe ZIP Code™, street name, pre- and post-directionals, and a suffix.For an address record to be EWS-eligible, it must be an address notpresent on the most recent monthly production U.S. Postal database.
The USPS® refreshes the EWS file on a weekly basis (Thursdays). Youcan download the EWS file from the USPS®website at ribbs.usps.gov.
Pitney Bowesmonthlysubscription
Optional, but requiredfor CASS Certified™
processing; U.S.addresses only
LACSLink® Database
The LACSLink database allows you to correct addresses that havechanged as a result of a rural route address converting to street-styleaddress, a PO Box renumbering, or a street-style address changing.
USPS licensing prohibits using LACSLink for the generation of addressesor address lists. To prevent the generation of address lists, the LACSLink
database contains "false positive records." False positive records areartificially manufactured addresses. For each negative response thatoccurs in a LACSLink query, a query is made to the False/Positive tablein the LACSLink database. A match to this table will stop LACSLink
processing.
USPS licensing also prohibits exporting the LACSLink database outsidethe United States
11Spectrum™ Technology Platform 12.0 Siebel Module User Guide
Introduction to the Siebel Module

SupplierRequired orOptional
Database Name & Description
License directly fromUSPS®
Optional; U.S.addresses only
RDI™ Database
The Residential Delivery Indicator (RDI™) database contains data thatcan help you determine the best cost for shipping your packages.
RDI is similar to DPV in that the RDI data is supplied as hash tables.However, RDI is a much simpler process than DPV in that the standardhash algorithm is only determined for the 9-digit and 11-digit ZIP Code™
rather than the entire address.
Pitney Bowesmonthlysubscription
Optional; U.S.addresses only
SuiteLink™ Database
SuiteLink™ corrects secondary address information for U.S. businessaddresses whose secondary address information could not be validated.If SuiteLink processing is enabled, Validate Address attempts to matchthe value in the FirmName field to a database of known firm names.Validate Address then supplies the correct secondary addressinformation.
12Spectrum™ Technology Platform 12.0 Siebel Module User Guide
Introduction to the Siebel Module
2 - Integrating Siebelwith Spectrum
In this section
Integrating with Siebel Data Quality 14Integrating with Siebel Non-SDQ 42
Integrating with Siebel Data Quality
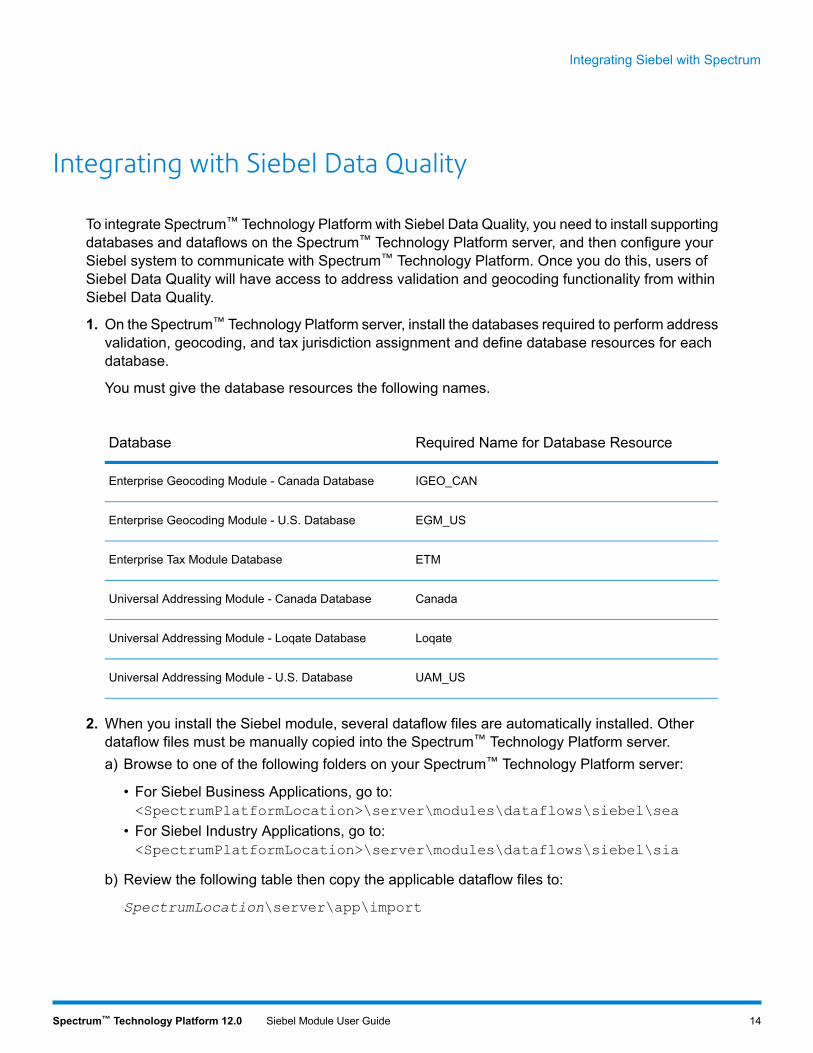
To integrate Spectrum™ Technology Platform with Siebel Data Quality, you need to install supportingdatabases and dataflows on the Spectrum™ Technology Platform server, and then configure yourSiebel system to communicate with Spectrum™ Technology Platform. Once you do this, users ofSiebel Data Quality will have access to address validation and geocoding functionality from withinSiebel Data Quality.
1. On the Spectrum™ Technology Platform server, install the databases required to perform addressvalidation, geocoding, and tax jurisdiction assignment and define database resources for eachdatabase.
You must give the database resources the following names.
Required Name for Database ResourceDatabase
IGEO_CANEnterprise Geocoding Module - Canada Database
EGM_USEnterprise Geocoding Module - U.S. Database
ETMEnterprise Tax Module Database
CanadaUniversal Addressing Module - Canada Database
LoqateUniversal Addressing Module - Loqate Database
UAM_USUniversal Addressing Module - U.S. Database
2. When you install the Siebel module, several dataflow files are automatically installed. Otherdataflow files must be manually copied into the Spectrum™ Technology Platform server.a) Browse to one of the following folders on your Spectrum™ Technology Platform server:
• For Siebel Business Applications, go to:<SpectrumPlatformLocation>\server\modules\dataflows\siebel\sea
• For Siebel Industry Applications, go to:<SpectrumPlatformLocation>\server\modules\dataflows\siebel\sia
b) Review the following table then copy the applicable dataflow files to:
SpectrumLocation\server\app\import
14Spectrum™ Technology Platform 12.0 Siebel Module User Guide
Integrating Siebel with Spectrum

Table 3: Dataflow Files To Import
Copy these dataflow files to the import folderIf you are installing this set ofmodules
SiebelGetGlobalCandidateAddresses.dfValidateAddressWithCandidates.ADN.df
Address Now Module only
SiebelGetGlobalCandidateAddresses.dfValidateAddressWithCandidates.UAM_ADN.df
Address Now ModuleUniversal Addressing Module
GeocodeUSAddressWithCandidates.dfSiebelGetGlobalCandidateAddresses.dfValidateAddressWithCandidates.EGM_ADN.df
Address Now ModuleEnterprise Geocoding Module
GeocodeUSAddressWithCandidates.dfSiebelGetGlobalCandidateAddresses.dfValidateAddressWithCandidates.UAM_EGM_ADN.df
Address Now ModuleEnterprise Geocoding ModuleUniversal Addressing Module
ValidateAddressWithCandidates_UAM.dfUniversal Addressing Module only
GeocodeUSAddressWithCandidates.dfValidateAddressWithCandidates_UAM_EGM.df
Universal Addressing ModuleEnterprise Geocoding Module
GeocodeUSAddressWithCandidates.dfValidateAssignGeoTAXInfo.dfValidateAddressWithCandidates_UAM_ETM.df
Universal Addressing ModuleEnterprise Tax Module
ValidateAddressWithCandidates_UAM_Loqate.dfUniversal Address Module with Loqate
ValidateAddressWithCandidates_Loqate_EGM.dfUniversal Addressing Module withLoqateEnterprise Geocoding Module
15Spectrum™ Technology Platform 12.0 Siebel Module User Guide
Integrating Siebel with Spectrum

Copy these dataflow files to the import folderIf you are installing this set ofmodules
ValidateAddressWithCandidates_Loqate_EGM.dfUniversal Addressing Module, LoqateonlyEnterprise Geocoding Module
ValidateAddressWithCandidates_UAM_Loqate_ETM.dfUniversal Addressing Module withLoqateEnterprise Tax Module
ValidateAddressWithCandidates_UAM_Loqate_EGM_ETM.dfUniversal Addressing Module withLoqateEnterprise Geocoding ModuleEnterprise Tax Module
ValidateAddressWithCandidates_Loqate.dfUniversal Addressing Module, Loqateonly
ValidateAddressWithCandidates_EGM.dfEnterprise Geocoding Module
ValidateAssignGeoTAXInfo.dfEnterprise Tax Module
Note: If errors occur in Management Console or Enterprise Designer, delete the clientcache. To delete the client cache, go to Tools > Options in Management Console orEnterprise Designer, click the Advanced tab, then click Clear Cache. After you clearthe cache, restart Management Console or Enterprise Designer.
3. Optional: If you are using the Enterprise Geocoding Module, configure the geocoding dataflowto use the geocoding database resource name you have configured on your system:a) In Enterprise Designer, open the dataflow GeocodeUSAddressWithCandidates.b) In each dataflow, open the Geocode US Address stage.c) In the Database field, select the name of the geocoding database as defined in the
Management Console. The default name is KGDDatasource but if the geocoding databasehas a different name on your system, select the appropriate name.
Note: For more information about database resources, see the Spectrum™ TechnologyPlatform Administration Guide.
16Spectrum™ Technology Platform 12.0 Siebel Module User Guide
Integrating Siebel with Spectrum

d) Save and close each dataflow.
4. Copy Siebel objects to your system:a) Browse to the location where you downloaded the Spectrum™ Technology Platform installer.b) Browse to the appropriate folder for your version of Siebel as shown in the following table.
FolderSiebel Version
Siebel Objects\8.0\Business\SDQSiebel Business Applications 8.0 SDQ
Siebel Objects\8.1.1\Business\SDQSiebel Business Applications 8.1.1 SDQ
Siebel Objects\8.0\Industry\SDQSiebel Industry Applications 8.0 SDQ
Siebel Objects\8.1.1\Industry\SDQSiebel Industry Applications 8.1.1 SDQ
c) Copy the contents of the folder to a temporary directory.
Note: This temporary folder will be the referred to as <Spectrum Package> in thefollowing steps.
5. Create objects and allow object locking:a) Log in to Siebel Tools as the user SADMIN. In the Connect to field select Server.b) In the Object Explorer, click Project.c) Create three new records using the following values in the Name column. To create a new
record, right-click in the Projects area and select New Record.
Group 1 Data QualityGroup 1 EAI TestingGroup 1 Workflow
d) Open the file <Spectrum Package>\tools\CDQP_Queries.txt.e) Copy and paste the query contents to the Project list of your Object Manager. Cross-check
the query result with the table below and perform the action suggested. To toggle objectlocking, go to Object Explorer and browse to the Project object. From the Project area, right-clickand select the project, and select Toggle Object Locking.
17Spectrum™ Technology Platform 12.0 Siebel Module User Guide
Integrating Siebel with Spectrum
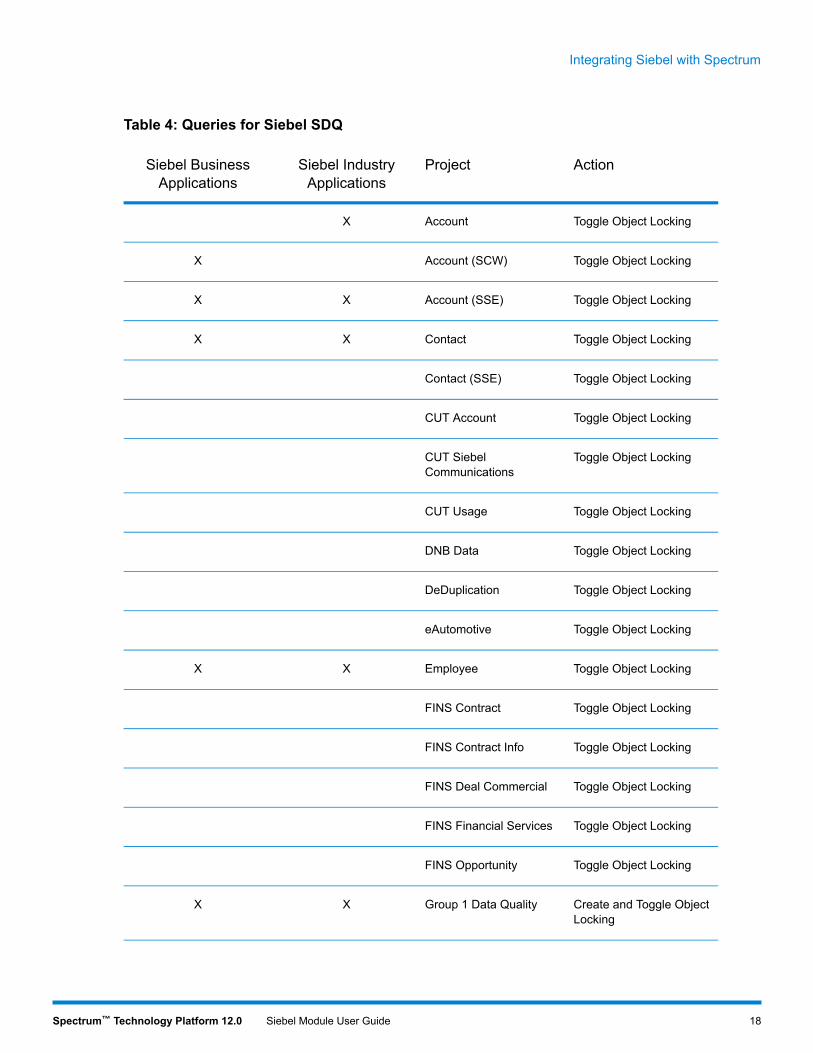
Table 4: Queries for Siebel SDQ
ActionProjectSiebel IndustryApplications
Siebel BusinessApplications
Toggle Object LockingAccountX
Toggle Object LockingAccount (SCW)X
Toggle Object LockingAccount (SSE)XX
Toggle Object LockingContactXX
Toggle Object LockingContact (SSE)
Toggle Object LockingCUT Account
Toggle Object LockingCUT SiebelCommunications
Toggle Object LockingCUT Usage
Toggle Object LockingDNB Data
Toggle Object LockingDeDuplication
Toggle Object LockingeAutomotive
Toggle Object LockingEmployeeXX
Toggle Object LockingFINS Contract
Toggle Object LockingFINS Contract Info
Toggle Object LockingFINS Deal Commercial
Toggle Object LockingFINS Financial Services
Toggle Object LockingFINS Opportunity
Create and Toggle ObjectLocking
Group 1 Data QualityXX
18Spectrum™ Technology Platform 12.0 Siebel Module User Guide
Integrating Siebel with Spectrum

ActionProjectSiebel IndustryApplications
Siebel BusinessApplications
Create and Toggle ObjectLocking
Group 1 EAI TestingXX
Create and Toggle ObjectLocking
Group 1 WorkflowXX
Toggle Object LockingList Mgmt (Import)
Toggle Object LockingList Mgmt (UI)XX
Toggle Object LockingMvg
Toggle Object LockingOppty
Toggle Object LockingOppty (SSE)
Toggle Object LockingPersonal ContactX
Toggle Object LockingPicklistXX
Toggle Object LockingServer ComponentRequests
Toggle Object LockingSiebel Sales Enterprise
Toggle Object LockingSiebel Universal Agent
Toggle Object LockingVERT CUT AddressX
Toggle Object LockingVERT Cut Common
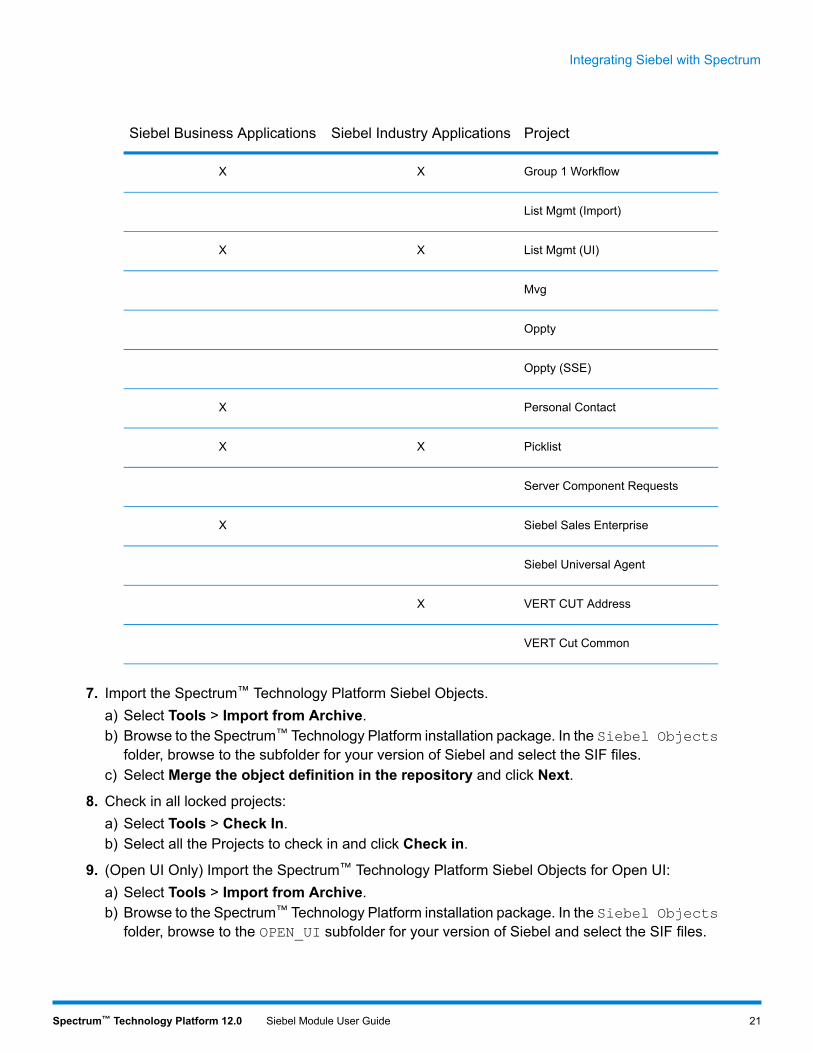
6. Check out the Siebel Projects:a) Log in to Siebel Tools as the user SADMIN. In the Connect to field select Local.b) Select Tools > Check Out.c) Select the projects indicated in the following table and click Checkout.
19Spectrum™ Technology Platform 12.0 Siebel Module User Guide
Integrating Siebel with Spectrum

Table 5: Siebel Projects for SDQ
ProjectSiebel Industry ApplicationsSiebel Business Applications
AccountX
Account (SCW)XX
Account (SSE)XX
ContactXX
Contact (SSE)
CUT Account
CUT Siebel Communications
CUT Usage
DNB Data
DeDuplication
eAutomotive
EmployeeXX
FINS Contract
FINS Contract Info
FINS Deal Commercial
FINS Financial Services
FINS Opportunity
Group 1 Data Quality
Group 1 EAI TestingXX
20Spectrum™ Technology Platform 12.0 Siebel Module User Guide
Integrating Siebel with Spectrum
ProjectSiebel Industry ApplicationsSiebel Business Applications
Group 1 WorkflowXX
List Mgmt (Import)
List Mgmt (UI)XX
Mvg
Oppty
Oppty (SSE)
Personal ContactX
PicklistXX
Server Component Requests
Siebel Sales EnterpriseX
Siebel Universal Agent
VERT CUT AddressX
VERT Cut Common
7. Import the Spectrum™ Technology Platform Siebel Objects.a) Select Tools > Import from Archive.b) Browse to the Spectrum™ Technology Platform installation package. In the Siebel Objects
folder, browse to the subfolder for your version of Siebel and select the SIF files.c) Select Merge the object definition in the repository and click Next.
8. Check in all locked projects:a) Select Tools > Check In.b) Select all the Projects to check in and click Check in.
9. (Open UI Only) Import the Spectrum™ Technology Platform Siebel Objects for Open UI:a) Select Tools > Import from Archive.b) Browse to the Spectrum™ Technology Platform installation package. In the Siebel Objects
folder, browse to the OPEN_UI subfolder for your version of Siebel and select the SIF files.
21Spectrum™ Technology Platform 12.0 Siebel Module User Guide
Integrating Siebel with Spectrum
c) Select Merge the object definition in the repository and click Next.
10. Compile all Projects:a) Select Tools > Compile Projects.b) Click All Projects.c) In the Siebel Repository File field, enter the path of your Siebel Web Client SRF file.d) Click Compile.
11. Deploy the Siebel objects in the client:
Note: Keep a backup of the old SRF in case old binaries need to be re-implemented.
a) Copy the generated SRF to your web client objects folder.
For example, on Windows the web client object folder may be C:\ProgramFiles\Siebel\8.0\web client\OBJECTS\ENU. On Unix or Linux the folder may be/disk2/sia78/webclient/OBJECTS/enu/.
b) Copy the contents of <Spectrum Package>\dll to your BIN folder.c) Copy the contents of <Spectrum Package>\cfg to your BIN/ENU folder.
12. Deploy the Siebel objects to the server:a) Stop the Siebel server.b) Copy the generated SRF file to your web client objects folder.
For example, the folder for Siebel Business on Windows may beC:\sea80\siebsrvr\OBJECTS\ENU. On Unix or Linux the folder may be/disk2/sea78/siebsrvr/OBJECTS/enu/.
c) Copy the libraries to your server.
• For Windows, copy the contents of <Spectrum Package>\lib\win to your BIN folder.• For Unix or Linux, copy the contents of <Spectrum Package>/lib/sol to your LIBfolder.
d) Copy the contents of <Spectrum Package>\cfg to your BIN\ENU folder.e) Start the Siebel server.
13. Install the options file.a) Click Site Map > Administration - Data > LOV Explorer.b) Click New.c) In the Type column, enter FILE_PATH.d) Click Query.e) In the Type column, enter FILE_PATH.f) Browse to the Values folder.g) In the Display Value column, enter the absolute path to the folder where you want to keep
the options file. You can specify any folder you want.h) Browse to the Spectrum™ Technology Platform installation package.
22Spectrum™ Technology Platform 12.0 Siebel Module User Guide
Integrating Siebel with Spectrum
i) In the Siebel Objects folder, browse to the cfg subfolder for your version of Siebel andselect the Group1Connector.opt file.
j) Copy this file to the folder you specified for FILE_PATH.
14. Activate the Spectrum™ Technology Platform workflows in the Siebel web client:a) Log in to the Siebel application, connecting to the server data source.b) Select Site Map > Administration - Business Process >Workflow Deployment.c) Query for all the GROUP 1* workflows.d) Click Activate for each workflow.e) Query for all the Promote* workflows.f) ClickActivate for the ff workflowsPromote Prospect (Single) andPromote Prospect (Many).
15. Verify the installation:a) Log in to Siebel Application.b) All applets should load properly without error.
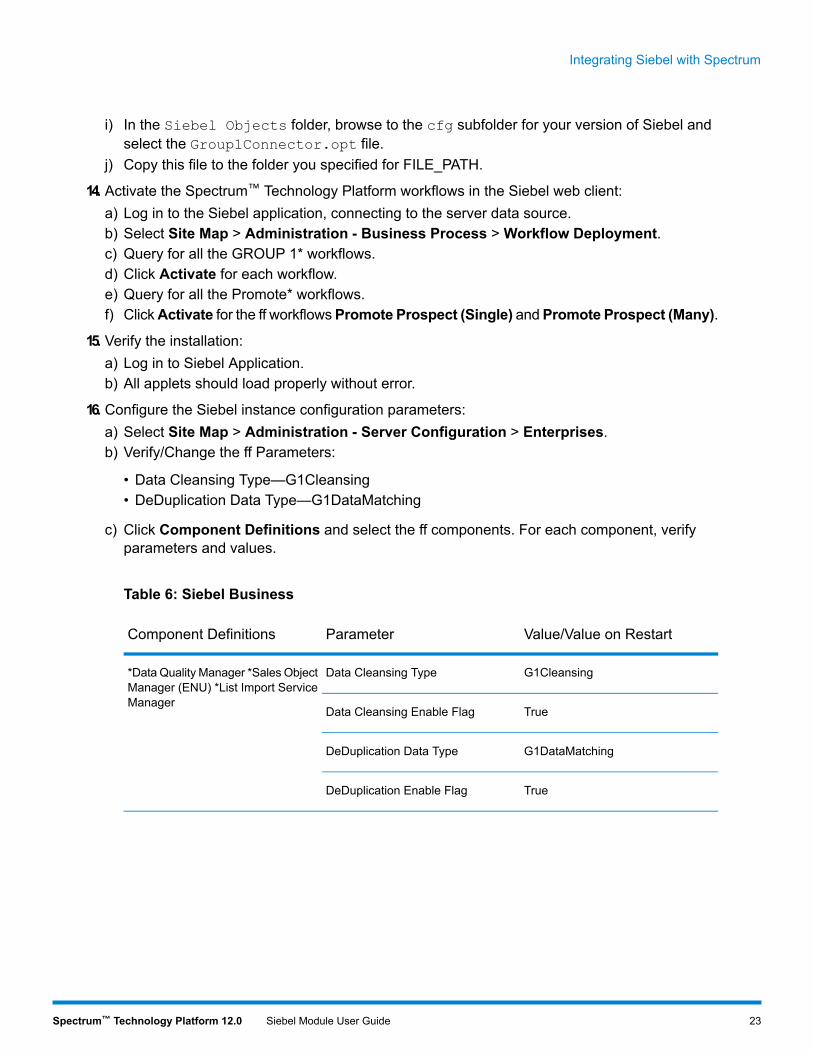
16. Configure the Siebel instance configuration parameters:a) Select Site Map > Administration - Server Configuration > Enterprises.b) Verify/Change the ff Parameters:
• Data Cleansing Type—G1Cleansing• DeDuplication Data Type—G1DataMatching
c) Click Component Definitions and select the ff components. For each component, verifyparameters and values.
Table 6: Siebel Business
Value/Value on RestartParameterComponent Definitions
G1CleansingData Cleansing Type*Data Quality Manager *Sales ObjectManager (ENU) *List Import ServiceManager
TrueData Cleansing Enable Flag
G1DataMatchingDeDuplication Data Type
TrueDeDuplication Enable Flag
23Spectrum™ Technology Platform 12.0 Siebel Module User Guide
Integrating Siebel with Spectrum

Table 7: Siebel Industry
Value/Value on RestartParameterComponent Definitions
G1CleansingData Cleansing Type*Data Quality Manager *eAutomotiveObject Manager (ENU) *List ImportService Manager
TrueData Cleansing Enable Flag
G1DataMatchingDeDuplication Data Type
TrueDeDuplication Enable Flag
d) Select Site Map > Server Configuration > Servers. Repeat steps b through c for serverconfiguration parameters.
e) Select Site Map > User Profile Preferences > Data Quality. Change the following settings:
ValueParameter
YesEnable DeDuplication
YesEnable Data Cleansing
f) Browse to <Siebel Installation>\bin\ENU and open the appropriate file:
• Siebel Business: siebel.cfg and uagent.cfg• Siebel Industry: auto.cfg
g) Under the area [DataCleansing] change the ff Parameters:
Enable = TRUEType = G1Cleansing
h) Under the area [DeDuplication] change the ff Parameters:
Enable = TRUEType = G1DataMatching
i) Select Site Map > Administration - Server Configuration. Click the Synchronize link andselect Synchronize after being redirected.
17. Configure data cleansing configuration parameters:a) Select Site Map > Administration > Data Quality > Third Party Administration. On the
Vendor Applet, include the ff value
24Spectrum™ Technology Platform 12.0 Siebel Module User Guide
Integrating Siebel with Spectrum

DLL NameName
Group1ConnectorG1Cleansing
b) Add the ff BC Vendor Field Mapping:
Table 8: Siebel Business
OperationBusiness Component
Data CleansingAccount
Data CleansingBusiness Address
Data CleansingContact
Data CleansingList Mgmt Prospective Contact
Data CleansingPersonal Address
Table 9: Siebel Industry
OperationBusiness Component
Data CleansingAccount
Data CleansingCUT Address
Data CleansingContact
Data CleansingList Mgmt Prospective Contact
Data CleansingPersonal Address
c) Under each BC operation, add the ff field mappings:
25Spectrum™ Technology Platform 12.0 Siebel Module User Guide
Integrating Siebel with Spectrum

Table 10: Siebel Business
Mapped FieldBusiness Component Field
Account
FirmNameName
Business Address
CityCity
CountryNameCountry
USCountyNameCounty
DisableDataCleansingDisable DataCleansing
DPVG1 Delivery Point Validation Indicator
LatitudeG1 Latitude
LocationCodeG1 Location Code
LongitudeG1 Longitude
MatchCodeG1 Match Code
RDIG1 Residential Delivery Indicator
PostalCodePostal Code
StateProvinceState
AddressLine1Street Address
AddressLine2Street Address 2
Contact
FirstNameFirst Name
26Spectrum™ Technology Platform 12.0 Siebel Module User Guide
Integrating Siebel with Spectrum

Mapped FieldBusiness Component Field
LastNameLast Name
TitleOfRespectM/M
MiddleNameMiddle Name
List Management Prospective Contact
CityCity
CountryNameCountry
USCountyNameCounty
DisableDataCleansingDisable DataCleansing
FirstNameFirst Name
DPVG1 Delivery Point Validation Indicator
LatitudeG1 Latitude
LocationCodeG1 Location Code
LongitudeG1 Longitude
MatchCodeG1 Match Code
RDIG1 Residential Delivery Indicator
LastNameLast Name
MiddleNameMiddle Name
PostalCodePostal Code
StateProvinceState
AddressLine1Street Address
27Spectrum™ Technology Platform 12.0 Siebel Module User Guide
Integrating Siebel with Spectrum

Mapped FieldBusiness Component Field
AddressLine2Street Address 2
Personal Address
CityCity
CountryNameCountry
USCountyNameCounty
DisableDataCleansingDisable DataCleansing
DPVG1 Delivery Point Validation Indicator
LatitudeG1 Latitude
LongitudeG1 Longitude
RDIG1 Residential Delivery Indicator
PostalCodePostal Code
StateProvinceState
AddressLine1Street Address
AddressLine2Street Address 2
Table 11: Siebel Industry
Mapped FieldBusiness Component Field
Account
FirmNameName
CUT Address
CityCity
28Spectrum™ Technology Platform 12.0 Siebel Module User Guide
Integrating Siebel with Spectrum

Mapped FieldBusiness Component Field
CountryNameCountry
USCountyNameCounty
DisableDataCleansingDisable Data Cleansing
DPVG1 Delivery Point Validation Indicator
LatitudeG1 Latitude
LocationCodeG1 Location Code
LongitudeG1 Longitude
MatchCodeG1 Match Code
RDIG1 Residential Delivery Indicator
PostalCodePostal Code
StateProvinceState
AddressLine1Street Address
AddressLine2Street Address 2
Contact
FirstNameFirst Name
LastNameLast Name
MiddleNameMiddle Name
TitleOfRespectM/M
List Management Prospective Contact
CityCity
29Spectrum™ Technology Platform 12.0 Siebel Module User Guide
Integrating Siebel with Spectrum

Mapped FieldBusiness Component Field
CountryNameCountry
USCountyNameCounty
DisableDataCleansingDisable DataCleansing
FirstNameFirst Name
DPVG1 Delivery Point Validation Indicator
LatitudeG1 Latitude
LocationCodeG1 Location Code
LongitudeG1 Longitude
MatchCodeG1 Match Code
RDIG1 Residential Delivery Indicator
LastNameLast Name
MiddleNameMiddle Name
PostalCodePostal Code
StateProvinceState
AddressLine1Street Address
AddressLine2Street Address 2
Personal Address
CityCity
CountryNameCountry
USCountyNameCounty
30Spectrum™ Technology Platform 12.0 Siebel Module User Guide
Integrating Siebel with Spectrum

Mapped FieldBusiness Component Field
DisableDataCleansingDisable DataCleansing
DPVG1 Delivery Point Validation Indicator
LatitudeG1 Latitude
LongitudeG1 Longitude
RDIG1 Residential Delivery Indicator
PostalCodePostal Code
StateProvinceState
AddressLine1Street Address
AddressLine2Street Address 2
d) Add the ff Vendor Parameters.
Table 12: Siebel Business
ValueName
AccountAccount DataCleanse Record Type
Business AddressBusiness Address DataCleanse Record Type
ContactContact DataCleanse Record Type
List Mgmt Prospective ContactList Mgmt Prospective Contact DataCleanse RecordType
Personal AddressPersonal Address DataCleanse Record Type
31Spectrum™ Technology Platform 12.0 Siebel Module User Guide
Integrating Siebel with Spectrum

Table 13: Siebel Industry:
ValueName
AccountAccount DataCleanse Record Type
CUT AddressCUT Address DataCleanse Record Type
ContactContact DataCleanse Record Type
List Mgmt Prospective ContactList Mgmt Prospective Contact DataCleanse RecordType
Personal AddressPersonal Address DataCleanse Record Type
e) Select Site Map > Administration - Data Quality > Third Party Administration > DataQuality Settings. Add the ff data for Data Quality Settings. These settings enable datacleansing for your Siebel Application
ValueName
YesEnable DataCleansing
18. Configure data matching configuration parameters:a) Select Site Map > Administration > Data Quality > Third Party Administration. On the
Vendor Applet, include the ff value
DLL NameName
Group1ConnectorG1DataMatching
b) Add the ff BC Vendor Field Mapping:
Table 14: Siebel Business Applications
OperationBusiness Component
DeDuplicationAccount
DeDuplicationBusiness Address
32Spectrum™ Technology Platform 12.0 Siebel Module User Guide
Integrating Siebel with Spectrum
OperationBusiness Component
DeDuplicationContact
DeDuplicationList Mgmt Prospective Contact
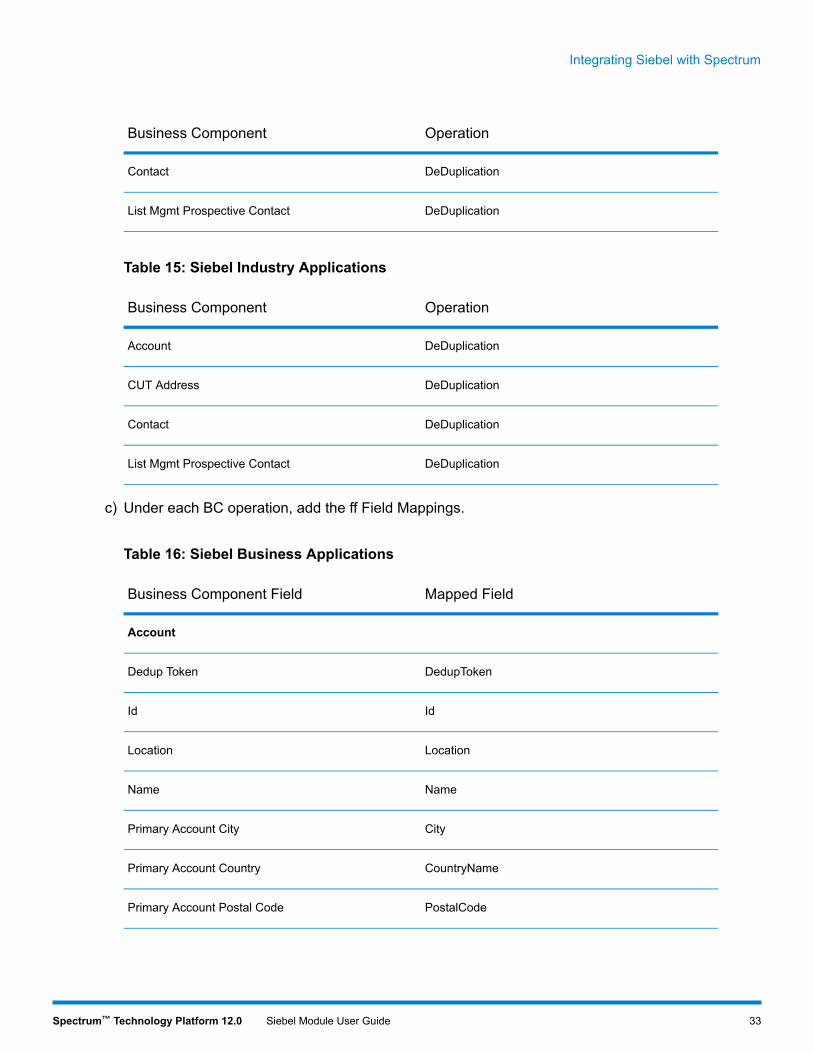
Table 15: Siebel Industry Applications
OperationBusiness Component
DeDuplicationAccount
DeDuplicationCUT Address
DeDuplicationContact
DeDuplicationList Mgmt Prospective Contact
c) Under each BC operation, add the ff Field Mappings.
Table 16: Siebel Business Applications
Mapped FieldBusiness Component Field
Account
DedupTokenDedup Token
IdId
LocationLocation
NameName
CityPrimary Account City
CountryNamePrimary Account Country
PostalCodePrimary Account Postal Code
33Spectrum™ Technology Platform 12.0 Siebel Module User Guide
Integrating Siebel with Spectrum

Mapped FieldBusiness Component Field
StateProvincePrimary Account State
AddressLine1Primary Account Street Address
Business Address
CityCity
CountryNameCountry
IdId
PostalCodePostal Code
StateProvinceState
AddressLine1Street Address
AddressLine2Street Address 2
Contact
FirstNameFirst Name
IdId
LastNameLast Name
MiddleNameMiddle Name
AccountNamePrimary Account Name
CityPrimary City
CountryNamePrimary Country
PostalCodePrimary Postal Code
StateProvincePrimary State
34Spectrum™ Technology Platform 12.0 Siebel Module User Guide
Integrating Siebel with Spectrum

Mapped FieldBusiness Component Field
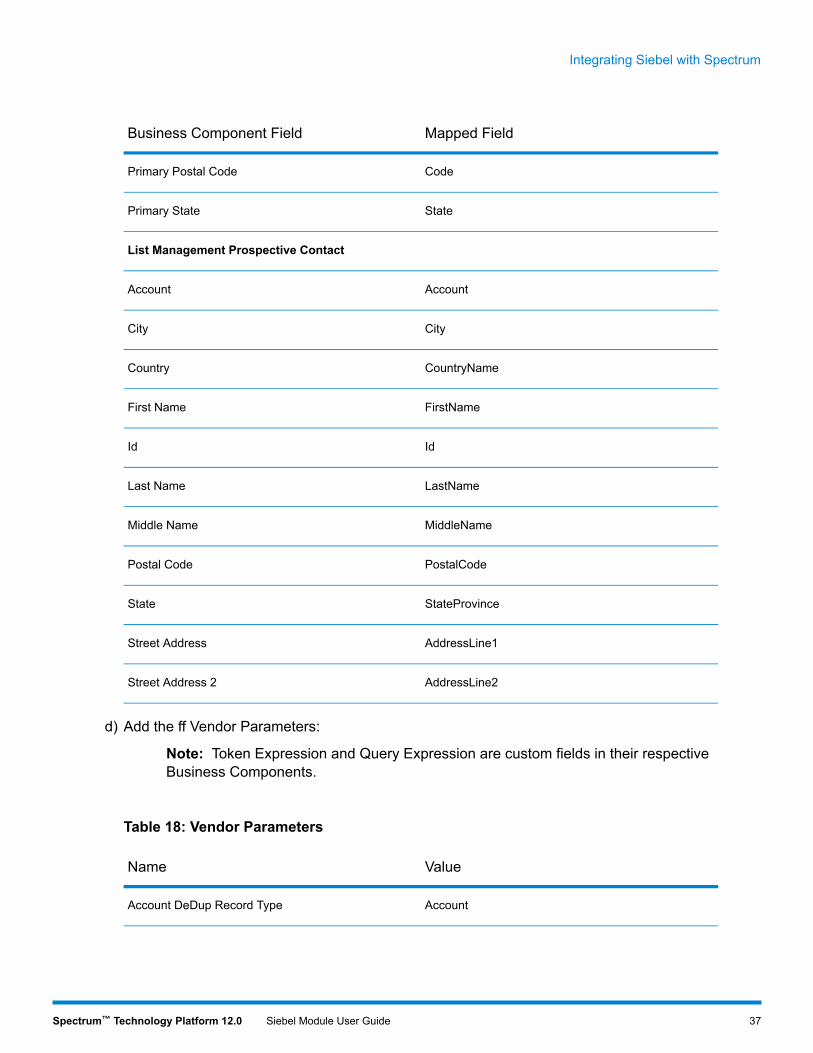
List Management Prospective Contact
AccountAccount
CityCity
CountryNameCountry
FirstNameFirst Name
IdId
LastNameLast Name
MiddleNameMiddle Name
PostalCodePostal Code
StateProvinceState
AddressLine1Street Address
AddressLine2Street Address 2
Table 17: Siebel Industry Applications
Mapped FieldBusiness Component Field
Account
DedupTokenDedup Token
IdId
LocationLocation
NameName
CityPrimary Account City
35Spectrum™ Technology Platform 12.0 Siebel Module User Guide
Integrating Siebel with Spectrum

Mapped FieldBusiness Component Field
CountryPrimary Account Country
PostalCodePrimary Account Postal Code
StatePrimary Account State
AddressLine1Primary Account Street Address
CUT Address
CityCity
CountryCountry
IdId
PostalCodePostal Code
StateState
AddressLine1Street Address
AddressLine2Street Address 2
Contact
FirstNameFirst Name
IdId
LastNameLast Name
MiddleNameMiddle Name
NamePrimary Account Name
CityPrimary City
CountryPrimary Country
36Spectrum™ Technology Platform 12.0 Siebel Module User Guide
Integrating Siebel with Spectrum
Mapped FieldBusiness Component Field
CodePrimary Postal Code
StatePrimary State
List Management Prospective Contact
AccountAccount
CityCity
CountryNameCountry
FirstNameFirst Name
IdId
LastNameLast Name
MiddleNameMiddle Name
PostalCodePostal Code
StateProvinceState
AddressLine1Street Address
AddressLine2Street Address 2
d) Add the ff Vendor Parameters:
Note: Token Expression and Query Expression are custom fields in their respectiveBusiness Components.
Table 18: Vendor Parameters
ValueName
AccountAccount DeDup Record Type
37Spectrum™ Technology Platform 12.0 Siebel Module User Guide
Integrating Siebel with Spectrum

ValueName
"|" + [Query Expression 1] + [Query Expression 2] +[Query Expression 3]
Account Query Expression
"|" + [Token Expression 1] + [Token Expression 2] +[Token Expression 3]
Account Token Expression
200Batch Max Num of Records
Business Address(Siebel Business Only)
Business Address DeDup Record Type
CUT Address(Siebel Industry Only)
CUT Address DeDup Record Type
ContactContact DeDup Record Type
"|" + [Query Expression 1] + [Query Expression 2] +[Query Expression 3]
Contact Query Expression
"|" + [Token Expression 1] + [Token Expression 2] +[Token Expression 3]
Contact Token Expression
List Mgmt Prospective ContactList Mgmt Prospective Contact DeDup Record Type
"|" + [Query Expression 1] + [Query Expression 2] +[Query Expression 3]
List Mgmt Prospective Contact Query Expression
"|" + [Token Expression 1] + [Token Expression 2] +[Token Expression 3]
List Mgmt Prospective Contact Token Expression
200Realtime Max Num of Records
e) Select Site Map > Administration - Data Quality > Third Party Administration > DataQuality Settings. Add the ff data for Data Quality Settings. These settings enable datamatchingfor your Siebel Application.
ValueName
YesEnable DeDuplication
38Spectrum™ Technology Platform 12.0 Siebel Module User Guide
Integrating Siebel with Spectrum
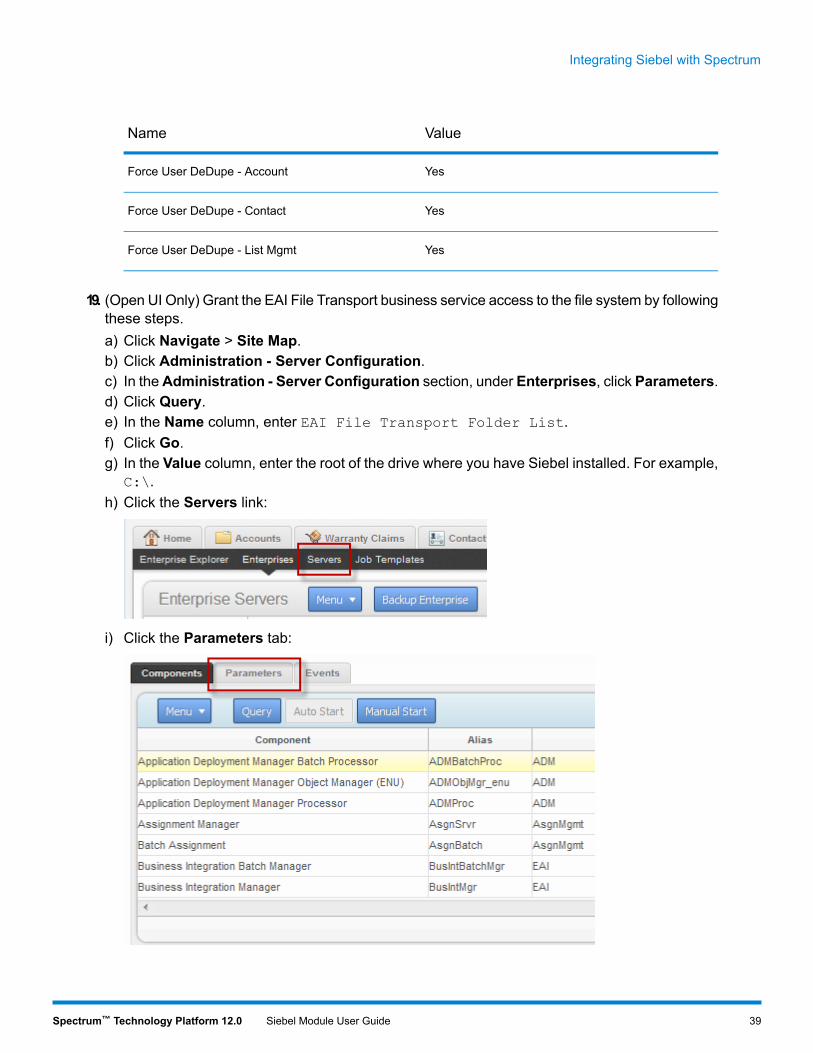
ValueName
YesForce User DeDupe - Account
YesForce User DeDupe - Contact
YesForce User DeDupe - List Mgmt
19. (Open UI Only) Grant the EAI File Transport business service access to the file system by followingthese steps.a) Click Navigate > Site Map.b) Click Administration - Server Configuration.c) In theAdministration - Server Configuration section, under Enterprises, click Parameters.d) Click Query.e) In the Name column, enter EAI File Transport Folder List.f) Click Go.g) In the Value column, enter the root of the drive where you have Siebel installed. For example,
C:\.h) Click the Servers link:
i) Click the Parameters tab:
39Spectrum™ Technology Platform 12.0 Siebel Module User Guide
Integrating Siebel with Spectrum

j) Click Query.k) In the Name column, enter EAI File Transport Folder List.l) Click Go.m) In the Value column, enter the root of the drive where you have Siebel installed. For example,
C:\.n) Add the following values to the .cfg file appropriate for your system (for example, auto.cfg,
tools.cfg, and so on).
[EAIFileTransportConfigSubsys]EAIFileTransportFolders=C:\
o) Restart the Siebel server and gateway.
20. Set the EditProfileAttr parameter:a) Click Navigate > Site Mapb) Click Administration - Server Configuration.c) In the Administration - Server Configuration section, under Servers, click Components.d) On the Components tab, click Query.e) In the Component column, enter the name of the Object Manager component. For example,
"eAutomotive Object Manager".f) Click Go.g) Click the Parameters tab at the bottom of the window.
40Spectrum™ Technology Platform 12.0 Siebel Module User Guide
Integrating Siebel with Spectrum
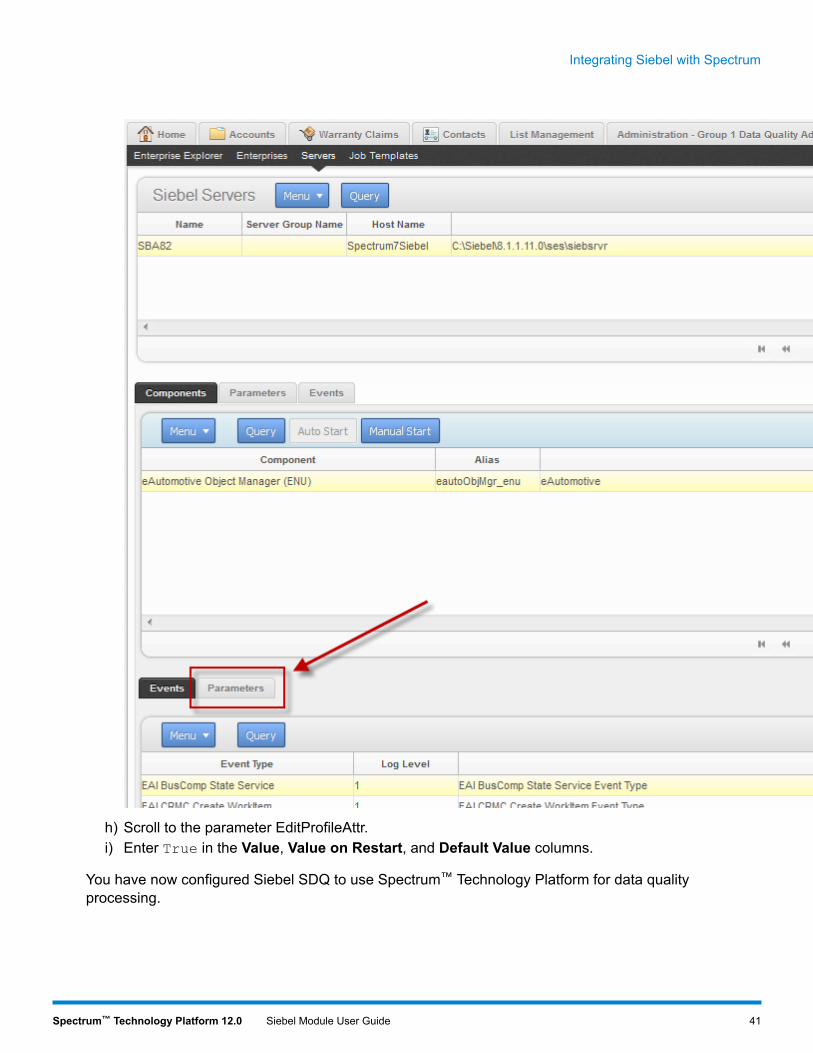
h) Scroll to the parameter EditProfileAttr.i) Enter True in the Value, Value on Restart, and Default Value columns.
You have now configured Siebel SDQ to use Spectrum™ Technology Platform for data qualityprocessing.
41Spectrum™ Technology Platform 12.0 Siebel Module User Guide
Integrating Siebel with Spectrum
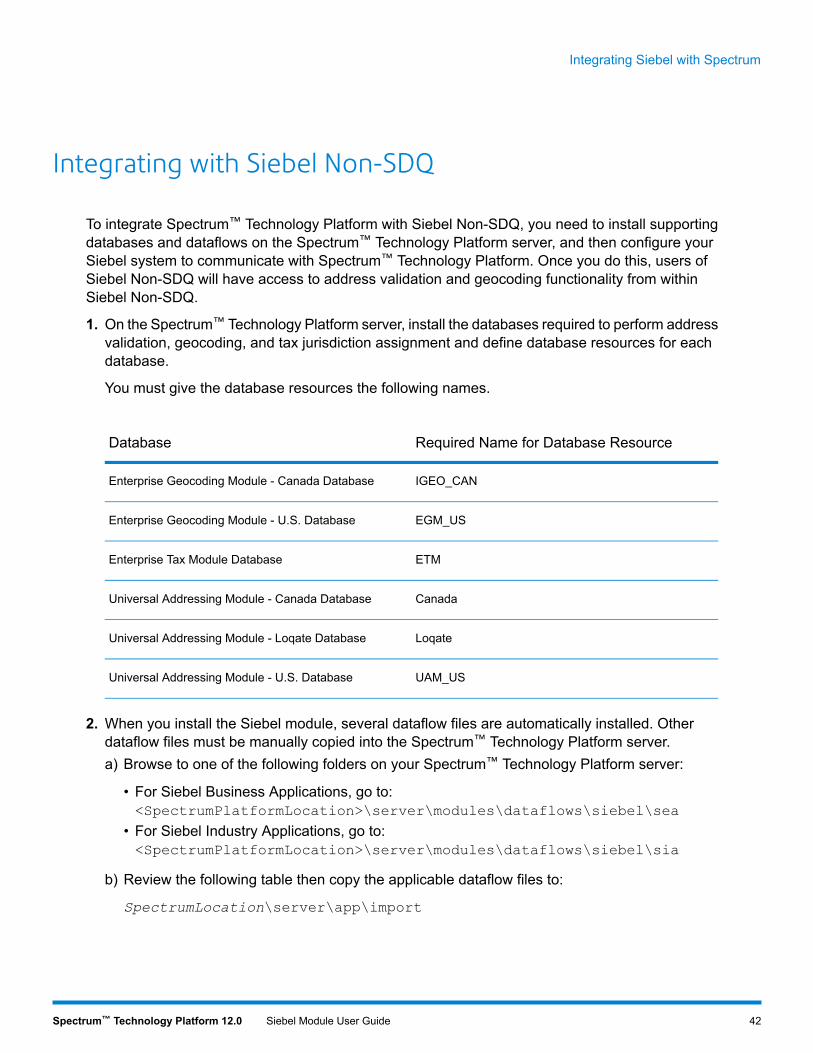
Integrating with Siebel Non-SDQ
To integrate Spectrum™ Technology Platform with Siebel Non-SDQ, you need to install supportingdatabases and dataflows on the Spectrum™ Technology Platform server, and then configure yourSiebel system to communicate with Spectrum™ Technology Platform. Once you do this, users ofSiebel Non-SDQ will have access to address validation and geocoding functionality from withinSiebel Non-SDQ.
1. On the Spectrum™ Technology Platform server, install the databases required to perform addressvalidation, geocoding, and tax jurisdiction assignment and define database resources for eachdatabase.
You must give the database resources the following names.
Required Name for Database ResourceDatabase
IGEO_CANEnterprise Geocoding Module - Canada Database
EGM_USEnterprise Geocoding Module - U.S. Database
ETMEnterprise Tax Module Database
CanadaUniversal Addressing Module - Canada Database
LoqateUniversal Addressing Module - Loqate Database
UAM_USUniversal Addressing Module - U.S. Database
2. When you install the Siebel module, several dataflow files are automatically installed. Otherdataflow files must be manually copied into the Spectrum™ Technology Platform server.a) Browse to one of the following folders on your Spectrum™ Technology Platform server:
• For Siebel Business Applications, go to:<SpectrumPlatformLocation>\server\modules\dataflows\siebel\sea
• For Siebel Industry Applications, go to:<SpectrumPlatformLocation>\server\modules\dataflows\siebel\sia
b) Review the following table then copy the applicable dataflow files to:
SpectrumLocation\server\app\import
42Spectrum™ Technology Platform 12.0 Siebel Module User Guide
Integrating Siebel with Spectrum

Table 19: Dataflow Files To Import
Copy these dataflow files to the import folderIf you are installing this set ofmodules
SiebelGetGlobalCandidateAddresses.dfValidateAddressWithCandidates.ADN.df
Address Now Module only
SiebelGetGlobalCandidateAddresses.dfValidateAddressWithCandidates.UAM_ADN.df
Address Now ModuleUniversal Addressing Module
GeocodeUSAddressWithCandidates.dfSiebelGetGlobalCandidateAddresses.dfValidateAddressWithCandidates.EGM_ADN.df
Address Now ModuleEnterprise Geocoding Module
GeocodeUSAddressWithCandidates.dfSiebelGetGlobalCandidateAddresses.dfValidateAddressWithCandidates.UAM_EGM_ADN.df
Address Now ModuleEnterprise Geocoding ModuleUniversal Addressing Module
ValidateAddressWithCandidates_UAM.dfUniversal Addressing Module only
GeocodeUSAddressWithCandidates.dfValidateAddressWithCandidates_UAM_EGM.df
Universal Addressing ModuleEnterprise Geocoding Module
GeocodeUSAddressWithCandidates.dfValidateAssignGeoTAXInfo.dfValidateAddressWithCandidates_UAM_ETM.df
Universal Addressing ModuleEnterprise Tax Module
ValidateAddressWithCandidates_UAM_Loqate.dfUniversal Address Module with Loqate
ValidateAddressWithCandidates_Loqate_EGM.dfUniversal Addressing Module withLoqateEnterprise Geocoding Module
43Spectrum™ Technology Platform 12.0 Siebel Module User Guide
Integrating Siebel with Spectrum

Copy these dataflow files to the import folderIf you are installing this set ofmodules
ValidateAddressWithCandidates_Loqate_EGM.dfUniversal Addressing Module, LoqateonlyEnterprise Geocoding Module
ValidateAddressWithCandidates_UAM_Loqate_ETM.dfUniversal Addressing Module withLoqateEnterprise Tax Module
ValidateAddressWithCandidates_UAM_Loqate_EGM_ETM.dfUniversal Addressing Module withLoqateEnterprise Geocoding ModuleEnterprise Tax Module
ValidateAddressWithCandidates_Loqate.dfUniversal Addressing Module, Loqateonly
ValidateAddressWithCandidates_EGM.dfEnterprise Geocoding Module
ValidateAssignGeoTAXInfo.dfEnterprise Tax Module
Note: If errors occur in Management Console or Enterprise Designer, delete the clientcache. To delete the client cache, go to Tools > Options in Management Console orEnterprise Designer, click the Advanced tab, then click Clear Cache. After you clearthe cache, restart Management Console or Enterprise Designer.
3. Optional: If you are using the Enterprise Geocoding Module, configure the geocoding dataflowto use the geocoding database resource name you have configured on your system:a) In Enterprise Designer, open the dataflow GeocodeUSAddressWithCandidates.b) In each dataflow, open the Geocode US Address stage.c) In the Database field, select the name of the geocoding database as defined in the
Management Console. The default name is KGDDatasource but if the geocoding databasehas a different name on your system, select the appropriate name.
Note: For more information about database resources, see the Spectrum™ TechnologyPlatform Administration Guide.
44Spectrum™ Technology Platform 12.0 Siebel Module User Guide
Integrating Siebel with Spectrum
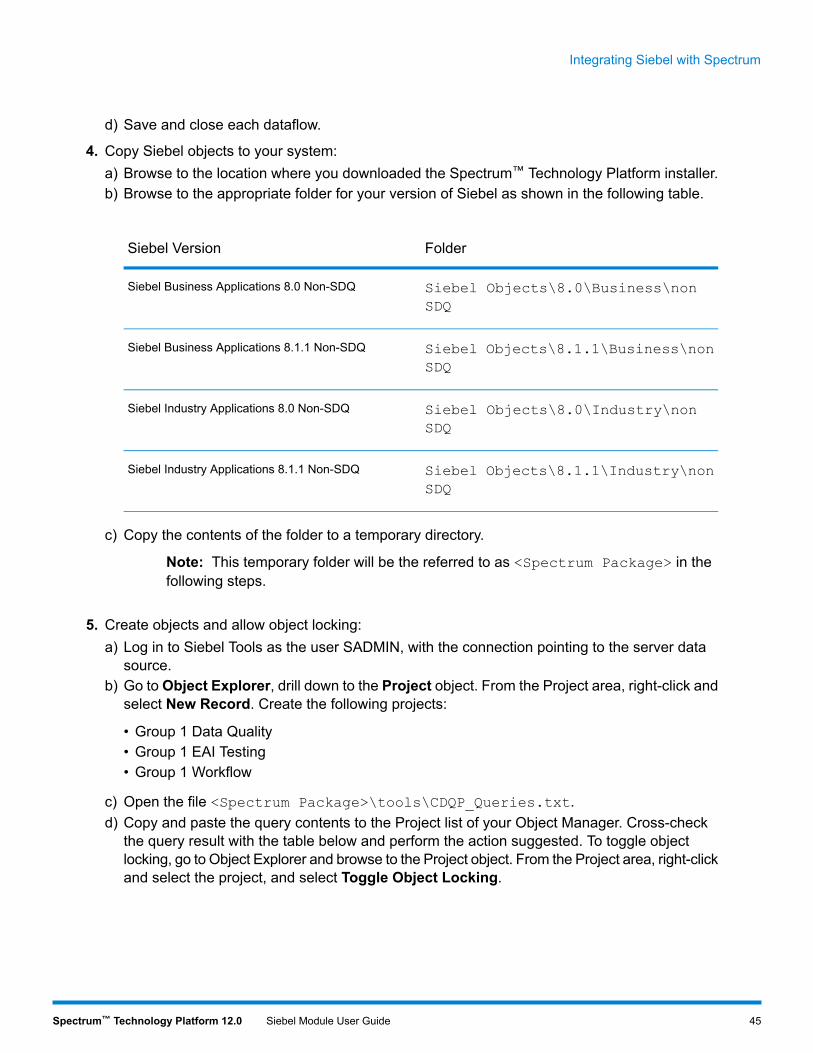
d) Save and close each dataflow.
4. Copy Siebel objects to your system:a) Browse to the location where you downloaded the Spectrum™ Technology Platform installer.b) Browse to the appropriate folder for your version of Siebel as shown in the following table.
FolderSiebel Version
Siebel Objects\8.0\Business\nonSDQ
Siebel Business Applications 8.0 Non-SDQ
Siebel Objects\8.1.1\Business\nonSDQ
Siebel Business Applications 8.1.1 Non-SDQ
Siebel Objects\8.0\Industry\nonSDQ
Siebel Industry Applications 8.0 Non-SDQ
Siebel Objects\8.1.1\Industry\nonSDQ
Siebel Industry Applications 8.1.1 Non-SDQ
c) Copy the contents of the folder to a temporary directory.
Note: This temporary folder will be the referred to as <Spectrum Package> in thefollowing steps.
5. Create objects and allow object locking:a) Log in to Siebel Tools as the user SADMIN, with the connection pointing to the server data
source.b) Go to Object Explorer, drill down to the Project object. From the Project area, right-click and
select New Record. Create the following projects:
• Group 1 Data Quality• Group 1 EAI Testing• Group 1 Workflow
c) Open the file <Spectrum Package>\tools\CDQP_Queries.txt.d) Copy and paste the query contents to the Project list of your Object Manager. Cross-check
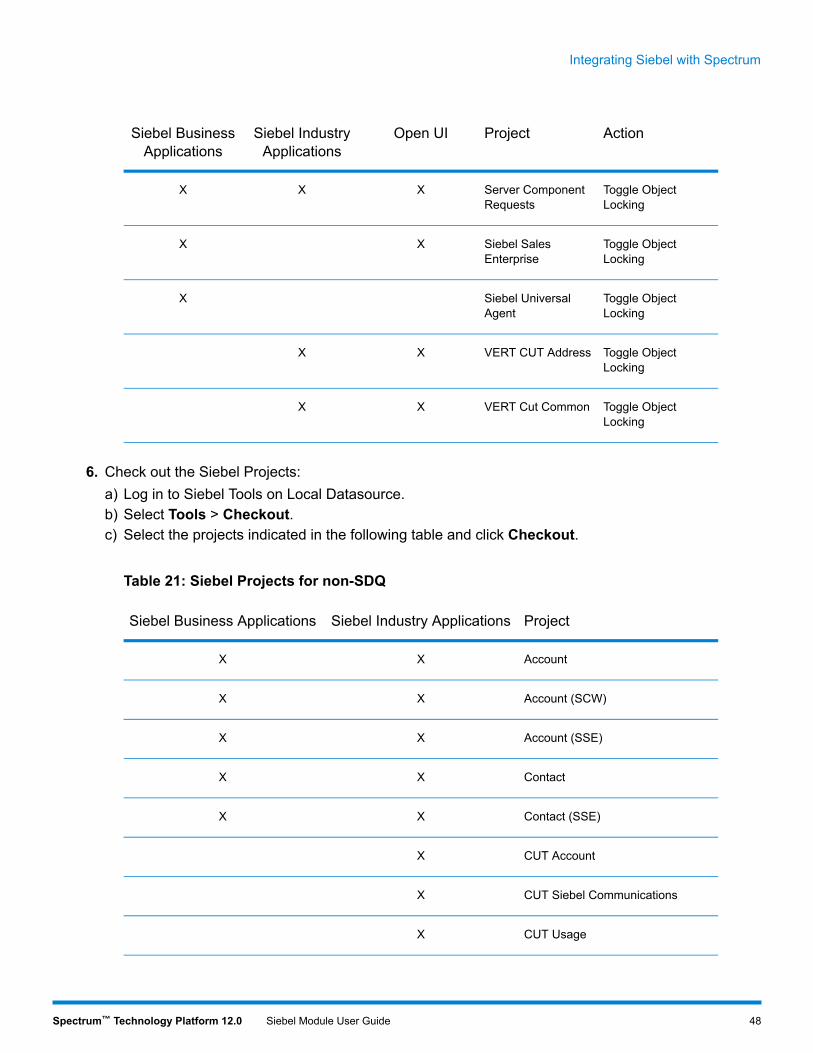
the query result with the table below and perform the action suggested. To toggle objectlocking, go to Object Explorer and browse to the Project object. From the Project area, right-clickand select the project, and select Toggle Object Locking.
45Spectrum™ Technology Platform 12.0 Siebel Module User Guide
Integrating Siebel with Spectrum

Table 20: Queries for Siebel non-SDQ
ActionProjectOpen UISiebel IndustryApplications
Siebel BusinessApplications
Toggle ObjectLocking
AccountXXX
Toggle ObjectLocking
Account (SCW)XXX
Toggle ObjectLocking
Account (SSE)XXX
Toggle ObjectLocking
ContactXXX
Toggle ObjectLocking
Contact (SSE)XXX
Toggle ObjectLocking
CUT AccountXX
Toggle ObjectLocking
CUT SiebelCommunications
XX
Toggle ObjectLocking
CUT UsageXX
Toggle ObjectLocking
DNB DataXXX
Toggle ObjectLocking
DeDuplicationXXX
Toggle ObjectLocking
eAutomotiveXX
Toggle ObjectLocking
EmployeeXXX
Toggle ObjectLocking
FINS ContractXX
46Spectrum™ Technology Platform 12.0 Siebel Module User Guide
Integrating Siebel with Spectrum

ActionProjectOpen UISiebel IndustryApplications
Siebel BusinessApplications
Toggle ObjectLocking
FINS Contract InfoXX
Toggle ObjectLocking
FINS DealCommercial
XX
Toggle ObjectLocking
FINS FinancialServices
XX
Toggle ObjectLocking
FINS OpportunityXX
Create and ToggleObject Locking
Group 1 Data QualityXXX
Create and ToggleObject Locking
Group 1 EAI TestingXXX
Create and ToggleObject Locking
Group 1 WorkflowXX
Toggle ObjectLocking
List Mgmt (Import)X
Toggle ObjectLocking
List Mgmt (UI)XXX
Toggle ObjectLocking
MvgX
Toggle ObjectLocking
OpptyXXX
Toggle ObjectLocking
Oppty (SSE)XXX
Toggle ObjectLocking
Personal ContactXXX
Toggle ObjectLocking
PicklistXXX
47Spectrum™ Technology Platform 12.0 Siebel Module User Guide
Integrating Siebel with Spectrum
ActionProjectOpen UISiebel IndustryApplications
Siebel BusinessApplications
Toggle ObjectLocking
Server ComponentRequests
XXX
Toggle ObjectLocking
Siebel SalesEnterprise
XX
Toggle ObjectLocking
Siebel UniversalAgent
X
Toggle ObjectLocking
VERT CUT AddressXX
Toggle ObjectLocking
VERT Cut CommonXX
6. Check out the Siebel Projects:a) Log in to Siebel Tools on Local Datasource.b) Select Tools > Checkout.c) Select the projects indicated in the following table and click Checkout.
Table 21: Siebel Projects for non-SDQ
ProjectSiebel Industry ApplicationsSiebel Business Applications
AccountXX
Account (SCW)XX
Account (SSE)XX
ContactXX
Contact (SSE)XX
CUT AccountX
CUT Siebel CommunicationsX
CUT UsageX
48Spectrum™ Technology Platform 12.0 Siebel Module User Guide
Integrating Siebel with Spectrum

ProjectSiebel Industry ApplicationsSiebel Business Applications
DNB DataXX
DeDuplicationXX
eAutomotiveX
EmployeeXX
FINS ContractX
FINS Contract InfoX
FINS Deal CommercialX
FINS Financial ServicesX
FINS OpportunityX
Group 1 Data QualityXX
Group 1 EAI TestingXX
Group 1 WorkflowX
List Mgmt (Import)X
List Mgmt (UI)XX
MvgX
OpptyXX
Oppty (SSE)XX
Personal ContactXX
PicklistXX
Server Component RequestsXX
49Spectrum™ Technology Platform 12.0 Siebel Module User Guide
Integrating Siebel with Spectrum

ProjectSiebel Industry ApplicationsSiebel Business Applications
Siebel Sales EnterpriseX
Siebel Universal AgentX
VERT CUT AddressX
VERT Cut CommonX
7. Import the Spectrum™ Technology Platform Siebel objects:a) Select Tools > Import from Archive.b) Import the Siebel SIF files located in <Spectrum Package>\sif. Select Overwrite the
object definition in the repository and click Next to proceed until the import process hasbeen completed.
• G1_NEW.sif• G1_APPLET.sif• G1_BO.sif• G1_LINK.sif• G1_BC.sif• G1_BC_SCRIPTS.sif• G1_EAI_TESTING.sif• G1_APPLICATION.sif• G1_PICKLIST.sif• G1_VIEW.sif• G1_WORKFLOW.sif• (8.1.1 only) Rebranding.sif• PB_SecToken.sif
Note: PB_SecToken.sif must be imported in the end.
c) (Open UI Only) Import the Siebel SIF files located in <Spectrum Package>\OPEN_UI.Select Overwrite the object definition in the repository and click Next to proceed until theimport process has been completed.
• FINS Personal Address List Applet.sif• G1 Common Browser Scripts Service.sif• Siebel Sales Enterprise.sif
8. Check in all locked projects:a) Select Tools > Check In.
50Spectrum™ Technology Platform 12.0 Siebel Module User Guide
Integrating Siebel with Spectrum
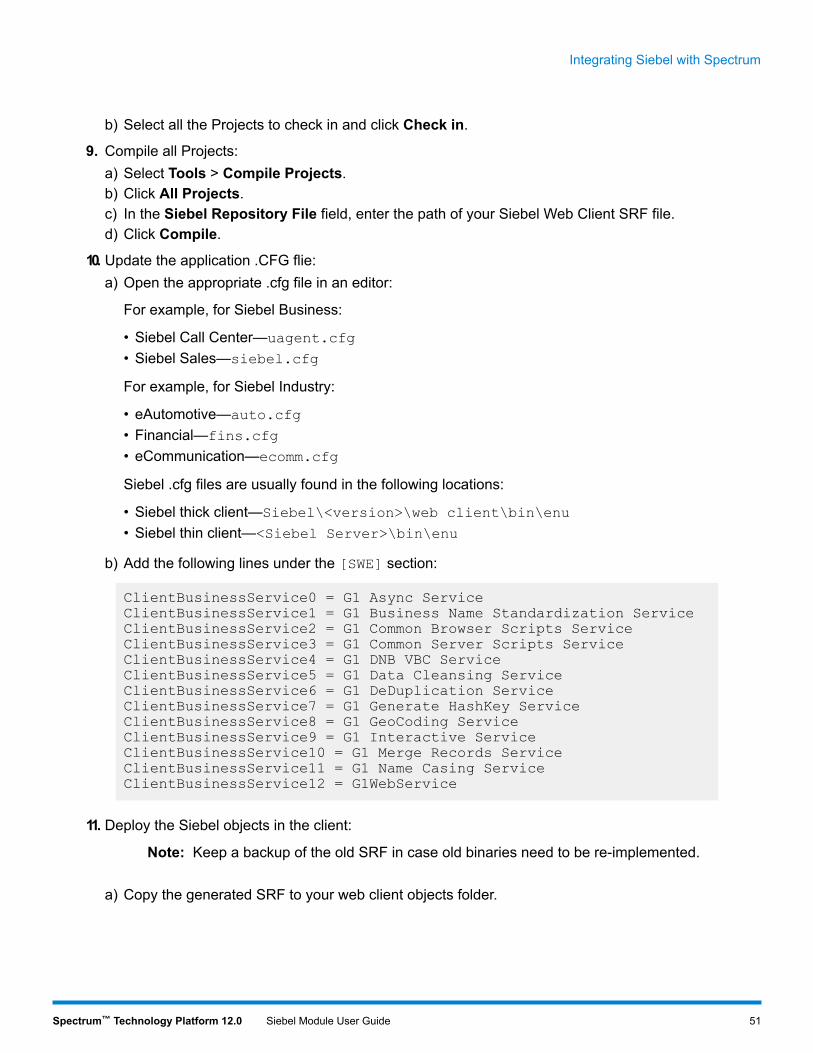
b) Select all the Projects to check in and click Check in.
9. Compile all Projects:a) Select Tools > Compile Projects.b) Click All Projects.c) In the Siebel Repository File field, enter the path of your Siebel Web Client SRF file.d) Click Compile.
10. Update the application .CFG flie:a) Open the appropriate .cfg file in an editor:
For example, for Siebel Business:
• Siebel Call Center—uagent.cfg
• Siebel Sales—siebel.cfg
For example, for Siebel Industry:
• eAutomotive—auto.cfg
• Financial—fins.cfg
• eCommunication—ecomm.cfg
Siebel .cfg files are usually found in the following locations:
• Siebel thick client—Siebel\<version>\web client\bin\enu
• Siebel thin client—<Siebel Server>\bin\enu
b) Add the following lines under the [SWE] section:
ClientBusinessService0 = G1 Async ServiceClientBusinessService1 = G1 Business Name Standardization ServiceClientBusinessService2 = G1 Common Browser Scripts ServiceClientBusinessService3 = G1 Common Server Scripts ServiceClientBusinessService4 = G1 DNB VBC ServiceClientBusinessService5 = G1 Data Cleansing ServiceClientBusinessService6 = G1 DeDuplication ServiceClientBusinessService7 = G1 Generate HashKey ServiceClientBusinessService8 = G1 GeoCoding ServiceClientBusinessService9 = G1 Interactive ServiceClientBusinessService10 = G1 Merge Records ServiceClientBusinessService11 = G1 Name Casing ServiceClientBusinessService12 = G1WebService
11. Deploy the Siebel objects in the client:
Note: Keep a backup of the old SRF in case old binaries need to be re-implemented.
a) Copy the generated SRF to your web client objects folder.
51Spectrum™ Technology Platform 12.0 Siebel Module User Guide
Integrating Siebel with Spectrum
For example, on Windows this folder may be C:\Program Files\Siebel\8.0\webclient\OBJECTS\ENU. On Unix or Linux this folder may be/disk2/sia78/webclient/OBJECTS/enu/.
b) Open a command prompt and go to the BIN folder of the web client.
For example, on Windows this folder may be C:\Program Files\Siebel\8.0\webclient\BIN. On Unix or Linux, this folder may be /disk2/sia80/webclient/BIN.
c) Generate browser scripts by issuing this command:
On Windows:
genbscript "ENU\siebel.cfg" "[public\enu folder]"
On Unix or Linux:
genbscript [location of .cfg] [public/enu folder]
For example, on Windows:
C:\Program Files\Siebel\8.0\web client\BIN>genbscript "enu\siebel.cfg""C:\Program Files\Siebel\8.0\web client\PUBLIC\enu"
On Unix or Linux:
genbscript /disk2/sia80/webclient/BIN/enu/siebel.cfgsia80/webclient/PUBLIC/enu
d) Copy g1_check.gif and g1_x.gif from the temporary folder to public\enu\images inthe Siebel web client.
e) Copy the contents of <Spectrum Package>\dll to your BIN folder.f) Copy the contents of <Spectrum Package>\cfg to your BIN/ENU folder.
12. Deploy the Siebel objects to the server:a) Stop the Siebel server.b) Copy the generated SRF file to your web client objects folder.
For example, the folder for Siebel Business on Windows may beC:\sea80\siebsrvr\OBJECTS\ENU. On Unix or Linux the folder may be/disk2/sea80/siebsrvr/OBJECTS/enu/.
c) Open a command prompt and go to the BIN drive of the web client.
For example, on Windows this folder may be C:\sia80\siebsrvr\BIN. On Unix or Linuxthis folder may be /disk2/sea80/siebsrvr/BIN.
d) Generate browser scripts by issuing this command:
On Windows:
genbscript "ENU\siebel.cfg" "[webmaster folder]"
On Unix or Linux:
52Spectrum™ Technology Platform 12.0 Siebel Module User Guide
Integrating Siebel with Spectrum

genbscript [location of Siebel.cfg] [webmaster folder]
For example, on Windows:
C:\sia80\siebsrvr\BIN>genbscript "enu\siebel.cfg""C:\sia80\siebsrvr\WEBMASTER"
For example, on Unix or Linux:
genbscript /disk2/sea80/siebsrvr/BIN/enu/siebel.cfg/disk2/sea80/siebsrvr/WEBMASTER/
e) Copy g1_check.gif and g1_x.gif from the temporary folder to the following folder on theSiebel sever.
On Windows:
public\enu\images
On Unix or Linux:
WEBMASTER/images/enu
Note: For Siebel Thin Client, copy g1_check.gif and g1_x.gif from the temporarydirectory to SWEApp/PUBLIC/enu/images.
f) Copy the generated browser scripts from /WEBMASTER to <SWEAppLocation>/public/ENU.
g) Start the Siebel server.
13. Activate the Spectrum™ Technology Platform workflows in the Siebel web client:a) Log in to the Siebel application, connecting to the server data source.b) Select Site Map > Administration - Business Process >Workflow Deployment.c) Query for all the GROUP 1* workflows.d) Click Activate for each workflow.e) Query for all the Promote* workflows.f) ClickActivate for the ff workflowsPromote Prospect (Single) andPromote Prospect (Many).g) Click Import Process in the Menu option in the Active Workflow Process screen. Specify
the file <Spectrum Package>\workflows\PB Token WS Workflow.xml.
14. Load the Group 1 configuration.a) Log in to the Siebel application connecting to the server data source.b) Go to Site Map > Administration - Business Service > Simulator.c) In the top applet, create a new record and set the following fields:
Workflow Process ManagerService Name
Run ProcessMethod Name
53Spectrum™ Technology Platform 12.0 Siebel Module User Guide
Integrating Siebel with Spectrum

Workflow Process ManagerService Name
1Iterations
d) In the Input Arguments applet, load:
<Spectrum Package>\tools\OptionsManagerLoadData.xml
Note: Delete the entry if previous GROUP 1 options already exist in the database.Run the following SQL Script: DELETE SIEBEL.S_LST_OF_VAL WHERE CODE ='G1'
e) Click Run in the top applet of the Simulator view. Delete the record.f) Repeat steps c. and d. for the ff files:
• ViewAccessLoadData.xml• AdminAccessLoadData.xml
g) Go to Site Map > Administration - Application > Responsibilities:h) Query for the responsibility Group 1 Responsibility.i) In the Users tab, add SADMIN or any Siebel administrator. This associates the Group 1
Administration Screen to the user.
Note: In order to see the changes you must log-in again.
j) Go to Site Map > Administration - Group 1 Data Quality > Options Manager > GeneralBehavior.
k) Change the server and port number where the Spectrum™ Technology Platform server islocated.
15. Verify the installation:a) Log in to Siebel Application.b) All applets should load properly without error.
16. Modify and apply web services.a) Go to Site Map > Administration - Web Services > Outbound Web Services.b) Click Import on the Outbound Web Services area and then specify the file <Spectrum
Package>\webservices\G1WebService.xml.c) Query on the Name field ValidateAddress, and modify its settings as follows:
On the Service Port applet, change the following fields:
• Transport: Local Business Service• Address: G1 WebService Filter Service
On the Operations applet, change the following fields:
• Response Filter Service Display: G1 WebService Filter Service
54Spectrum™ Technology Platform 12.0 Siebel Module User Guide
Integrating Siebel with Spectrum
• Response Filter Method Display: filter Response
d) Click Import on the Outbound Web Services area and then specify the file <SpectrumPackage>\webservices\TokenManagerServiceImplService.xml.
17. Encrypt and apply Spectrum™ Technology Platform user name and password.a) Run the following command on the command prompt:
java -version
Java Runtime Environment (JRE) 1.4.x is required. If none is installed, you can downloadfrom java.sun.com/j2se/1.4.2/download.html. Download the JRE of your target platform.
b) Acquire the file <Spectrum Package>\tools\Base64.class.c) On the command prompt, type the following command:
java Base64 -encode -s "<username>:<password>"
where <username> and <password> is to the login information of Spectrum™ TechnologyPlatform server. Copy the generated value.
Note: The default Spectrum™ Technology Platform password can be found in<Spectrum Package>\tools\Default Password.txt.
d) Go to Site Map > Administration - Group 1 Data Quality > Password Manager. Paste thevalue generated in step c. and click Save Changes.
18. Configure Siebel server configuration events.
The Siebel server must be configured so that the records created in the local database can besynchronized to the server.
a) Navigate to View > Administration - Server Configuration > Servers > Components >Event.
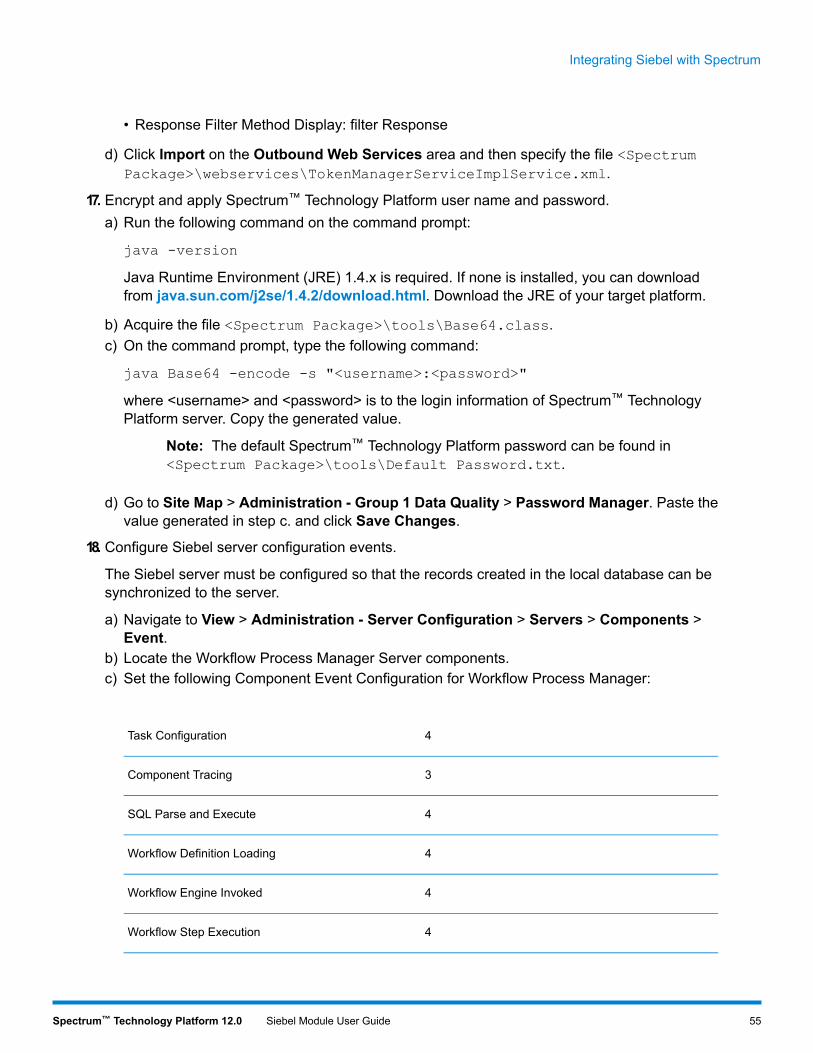
b) Locate the Workflow Process Manager Server components.c) Set the following Component Event Configuration for Workflow Process Manager:
4Task Configuration
3Component Tracing
4SQL Parse and Execute
4Workflow Definition Loading
4Workflow Engine Invoked
4Workflow Step Execution
55Spectrum™ Technology Platform 12.0 Siebel Module User Guide
Integrating Siebel with Spectrum

4Workflow Process Execution
4Object Manager Business Service Operation andSetErrorMsg Log
4Object Manager Business Component Operation andSetErrorMsg Log
4Object Manager SQL Log
d) Locate the Transaction Merger server components.e) Set the following Component Event Configuration for Transaction Merger:
4General Events
3Components Tracing
4SQL Parse and Execute
19. Enable marketing server components.
The Marketing Server Components must be enabled to import a list from the List Managementbusiness object.
a) Navigate to Administration - Server Configuration > Enterprises > Component Groups.b) In the Spectrum™ Technology Platform Server list, select the appropriate server.c) In the Enterprise Component Groups list, locate each of the required component groups using
the following table. If the Enable State field does not contain the value Enabled, select thecomponent groups, click the menu button, and choose Enable Component Group.
DescriptionComponentsGroup Name
Marketing Object Manager. Supportsthe user interface and businessobjects for the Marketing application.
• Marketing Obj Mgr• eMarketing Obj Mgr• eEvents Obj Mjr
MktgOM
Marketing Server. Used for listmanagement list import.
List Import Service ManagerMktg Srv
d) Click the Synchronize view tab and click Synchronize.
56Spectrum™ Technology Platform 12.0 Siebel Module User Guide
Integrating Siebel with Spectrum
e) Restart the Siebel server. The Siebel server must be restarted each time synchronizationoccurs.
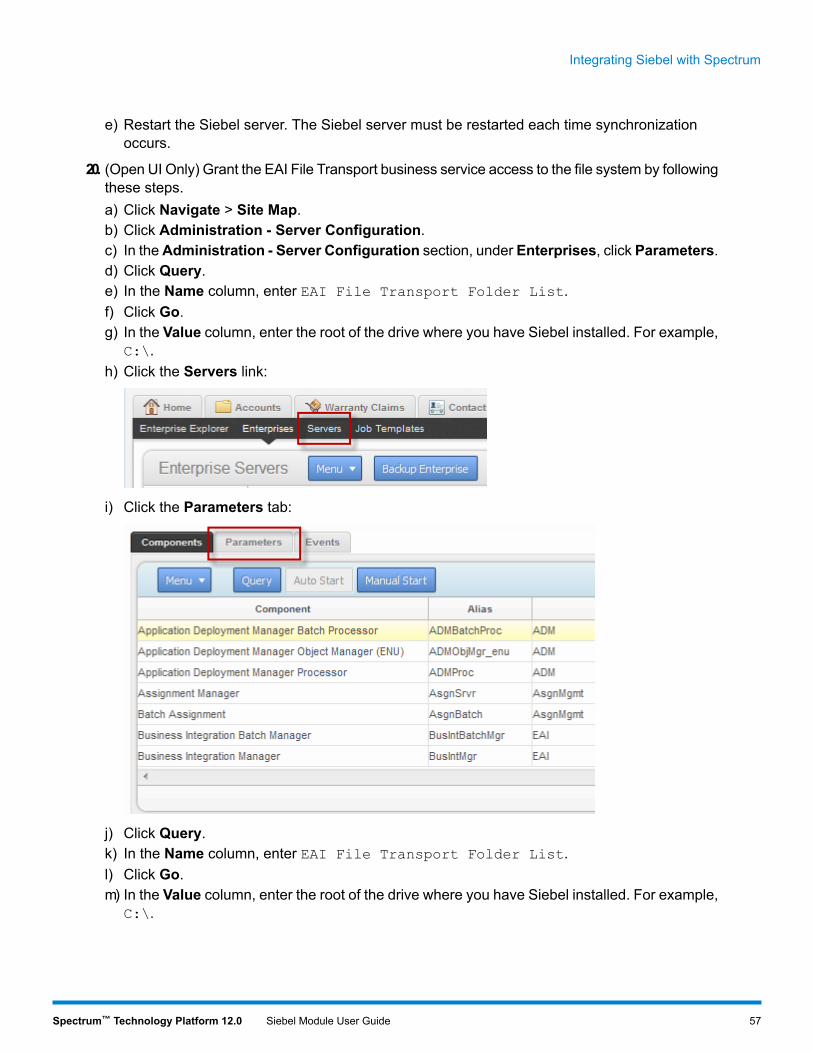
20. (Open UI Only) Grant the EAI File Transport business service access to the file system by followingthese steps.a) Click Navigate > Site Map.b) Click Administration - Server Configuration.c) In theAdministration - Server Configuration section, under Enterprises, click Parameters.d) Click Query.e) In the Name column, enter EAI File Transport Folder List.f) Click Go.g) In the Value column, enter the root of the drive where you have Siebel installed. For example,
C:\.h) Click the Servers link:
i) Click the Parameters tab:
j) Click Query.k) In the Name column, enter EAI File Transport Folder List.l) Click Go.m) In the Value column, enter the root of the drive where you have Siebel installed. For example,
C:\.
57Spectrum™ Technology Platform 12.0 Siebel Module User Guide
Integrating Siebel with Spectrum
n) Add the following values to the .cfg file appropriate for your system (for example, auto.cfg,tools.cfg, and so on).
[EAIFileTransportConfigSubsys]EAIFileTransportFolders=C:\
o) Restart the Siebel server and gateway.
21. Set the EditProfileAttr parameter:a) Click Navigate > Site Mapb) Click Administration - Server Configuration.c) In the Administration - Server Configuration section, under Servers, click Components.d) On the Components tab, click Query.e) In the Component column, enter the name of the Object Manager component. For example,
"eAutomotive Object Manager".f) Click Go.g) Click the Parameters tab at the bottom of the window.
58Spectrum™ Technology Platform 12.0 Siebel Module User Guide
Integrating Siebel with Spectrum

h) Scroll to the parameter EditProfileAttr.i) Enter True in the Value, Value on Restart, and Default Value columns.
You have now configured Siebel non-SDQ to use Spectrum™ Technology Platform for data qualityprocessing.
59Spectrum™ Technology Platform 12.0 Siebel Module User Guide
Integrating Siebel with Spectrum

3 - Configuring Siebel
In this section

4 - Using the SiebelModule with SiebelSDQ
In this section
Siebel Module OPT File Options 62Specifying Data Quality Settings 66Merging Duplicate Records 67Running a Batch Job 68Testing EAI 70
Siebel Module OPT File Options
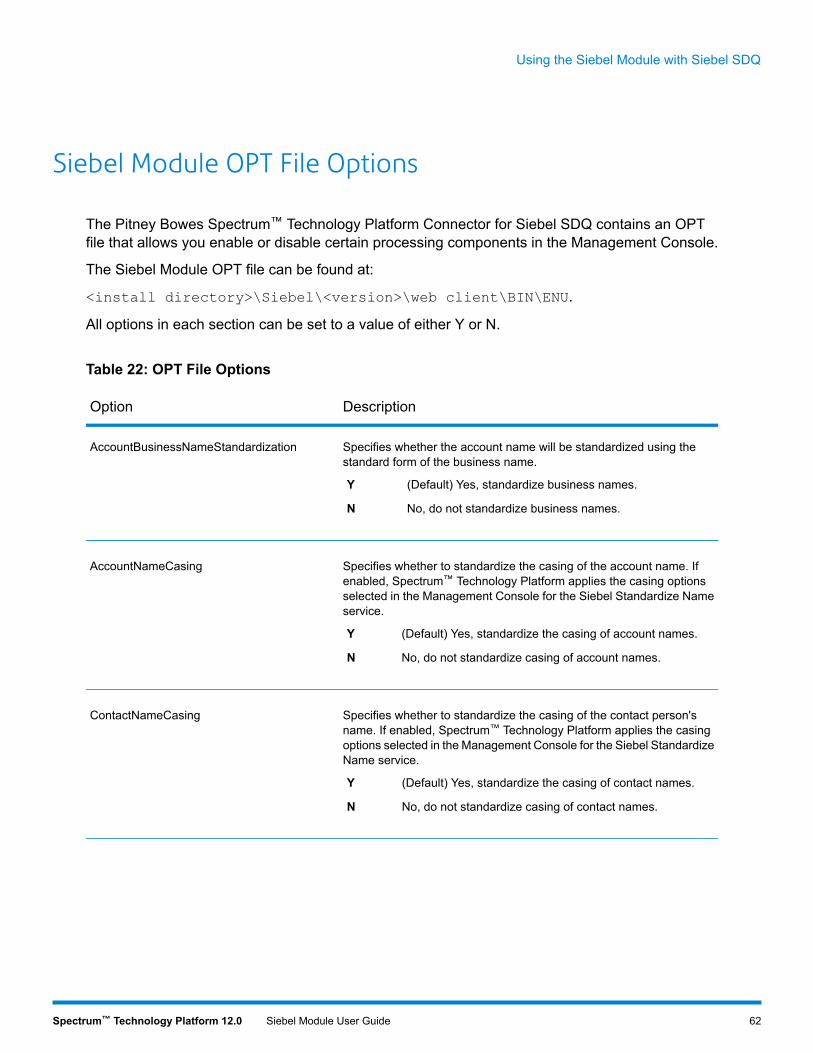
The Pitney Bowes Spectrum™ Technology Platform Connector for Siebel SDQ contains an OPTfile that allows you enable or disable certain processing components in the Management Console.
The Siebel Module OPT file can be found at:
<install directory>\Siebel\<version>\web client\BIN\ENU.
All options in each section can be set to a value of either Y or N.
Table 22: OPT File Options
DescriptionOption
Specifies whether the account name will be standardized using thestandard form of the business name.
(Default) Yes, standardize business names.Y
No, do not standardize business names.N
AccountBusinessNameStandardization
Specifies whether to standardize the casing of the account name. Ifenabled, Spectrum™ Technology Platform applies the casing optionsselected in the Management Console for the Siebel Standardize Nameservice.
(Default) Yes, standardize the casing of account names.Y
No, do not standardize casing of account names.N
AccountNameCasing
Specifies whether to standardize the casing of the contact person'sname. If enabled, Spectrum™ Technology Platform applies the casingoptions selected in the Management Console for the Siebel StandardizeName service.
(Default) Yes, standardize the casing of contact names.Y
No, do not standardize casing of contact names.N
ContactNameCasing
62Spectrum™ Technology Platform 12.0 Siebel Module User Guide
Using the Siebel Module with Siebel SDQ

DescriptionOption
Specifies whether to standardize the casing of a prospect's name. Ifenabled, Spectrum™ Technology Platform applies the casing optionsselected in the Management Console for the Siebel Standardize Nameservice.
(Default) Yes, standardize the casing of prospect names.Y
No, do not standardize casing of prospect names.N
ProspectNameCasing
Specifies whether to enable address validation for business addresses.
Note: Check the Disable Cleansing column of the businessaddress applet to deactivate the data cleansing for eachbusiness address.
(Default) Yes, validate and standardize business addresses.Y
Note: If you want to perform interactive addressvalidation, you must also setBatchAddressValidation to N.
No, do not standardize business addresses.N
BusinessAddressCleansing
Specifies whether to enable address validation for personal addresses.
Note: Check the Disable Cleansing column of the personaladdress applet to deactivate the data cleansing for eachpersonal address.
(Default) Yes, validate and standardize personal addresses.Y
Note: If you want to perform interactive addressvalidation, you must also setBatchAddressValidation to N.
No, do not standardize personal addresses.N
PersonalAddressCleansing
63Spectrum™ Technology Platform 12.0 Siebel Module User Guide
Using the Siebel Module with Siebel SDQ

DescriptionOption
Specifies whether to enable address validation for prospects' addresses.
Note: Check the Disable Cleansing column of the businessaddress applet to deactivate the data cleansing for eachbusiness address.
(Default) Yes, validate and standardize prospect addresses.Y
Note: If you want to perform interactive addressvalidation, you must also setBatchAddressValidation to N.
No, do not standardize business and prospect addresses.N
ProspectAddressCleansing
Specifies whether to determine the latitude/longitude coordinates ofbusiness addresses.
(Default) Yes, determine the latitude/longitude coordinates ofbusiness addresses.
Y
No, do not determine the latitude/longitude coordinates ofbusiness addresses.
N
BusinessAddressGeocoding
Specifies whether to determine the latitude/longitude coordinates ofpersonal addresses.
(Default) Yes, determine the latitude/longitude coordinates ofpersonal addresses.
Y
No, do not determine the latitude/longitude coordinates ofpersonal addresses.
N
PersonalAddressGeoCoding
Specifies whether to determine the latitude/longitude coordinates ofprospects' addresses.
(Default) Yes, determine the latitude/longitude coordinates ofprospect addresses.
Y
No, do not determine the latitude/longitude coordinates ofprospect addresses.
N
ProspectAddressGeocoding
64Spectrum™ Technology Platform 12.0 Siebel Module User Guide
Using the Siebel Module with Siebel SDQ

DescriptionOption
Specifies whether to perform Delivery Point Validation (DPV) on U.S.addresses. DPV is a United States Postal Service (USPS) technologythat validates the accuracy of address information down to the physicaldelivery point.
(Default) Yes, perform DPV on U.S. addresses.Y
No, do not perform DPV on U.S. addresses.N
PerformDPV
Specifies whether to perform Enhanced Street Matching (ESM) on U.S.addresses. Enhanced Street Matching (ESM) applies additional matchinglogic to correct misspelled or complex street names.
(Default) Yes, perform ESM on U.S. addresses.Y
No, do not perform ESM on U.S. addresses.N
PerformESM
Specifies whether to perform Residential Delivery Indicator (RDI)processing on U.S. addresses. RDI processing checks if an address isa residential address (not a business address).
(Default) Yes, perform RDI processing on U.S. addresses.Y
No, do not perform RDI processing on U.S. addresses.N
PerformRDI
Specifies theminimummatch score needed for a record to be considereda duplicate of another record. For example, if the threshold is 70, onlyrecords with a score of 70 or above are considered duplicates.
Specify a value between 50 and 100. The default is 50.
Threshold
Specifies whether to enable the use of batch address validation. If batchaddress validation is not enabled, you will not be able to submit batchaddress validation jobs.
Yes, enable the use of batch address validation.Y
Note: To enable batch address validation youmust alsoenable address cleansing for the types of addresses youwant to process (prospect, personal, or business). Todo this, set one or more of the following parameters toY: ProspectAddressCleansing,PersonalAddressCleansing, andBusinessAddressCleansing.
No, do not enable the use of batch address validation. You mustuse this setting if you want to perform interactive addressvalidation.
N
BatchAddressValidation
65Spectrum™ Technology Platform 12.0 Siebel Module User Guide
Using the Siebel Module with Siebel SDQ
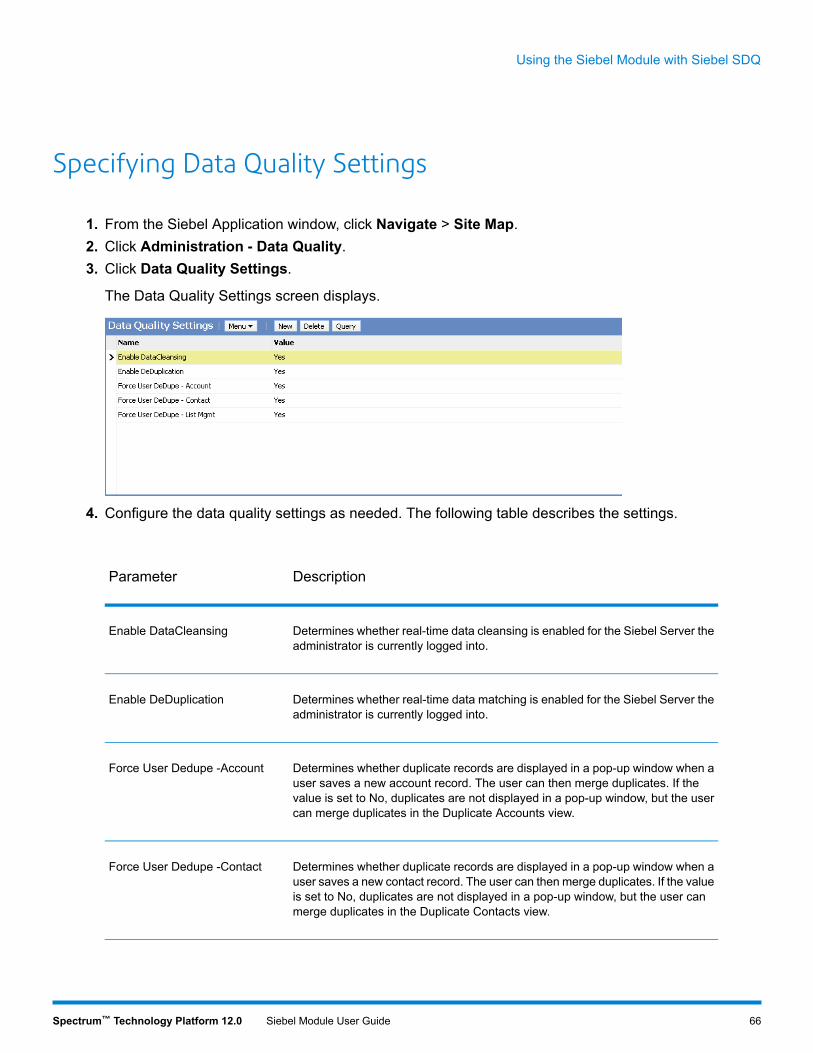
Specifying Data Quality Settings
1. From the Siebel Application window, click Navigate > Site Map.2. Click Administration - Data Quality.3. Click Data Quality Settings.
The Data Quality Settings screen displays.
4. Configure the data quality settings as needed. The following table describes the settings.
DescriptionParameter
Determines whether real-time data cleansing is enabled for the Siebel Server theadministrator is currently logged into.
Enable DataCleansing
Determines whether real-time data matching is enabled for the Siebel Server theadministrator is currently logged into.
Enable DeDuplication
Determines whether duplicate records are displayed in a pop-up window when auser saves a new account record. The user can then merge duplicates. If thevalue is set to No, duplicates are not displayed in a pop-up window, but the usercan merge duplicates in the Duplicate Accounts view.
Force User Dedupe -Account
Determines whether duplicate records are displayed in a pop-up window when auser saves a new contact record. The user can then merge duplicates. If the valueis set to No, duplicates are not displayed in a pop-up window, but the user canmerge duplicates in the Duplicate Contacts view.
Force User Dedupe -Contact
66Spectrum™ Technology Platform 12.0 Siebel Module User Guide
Using the Siebel Module with Siebel SDQ
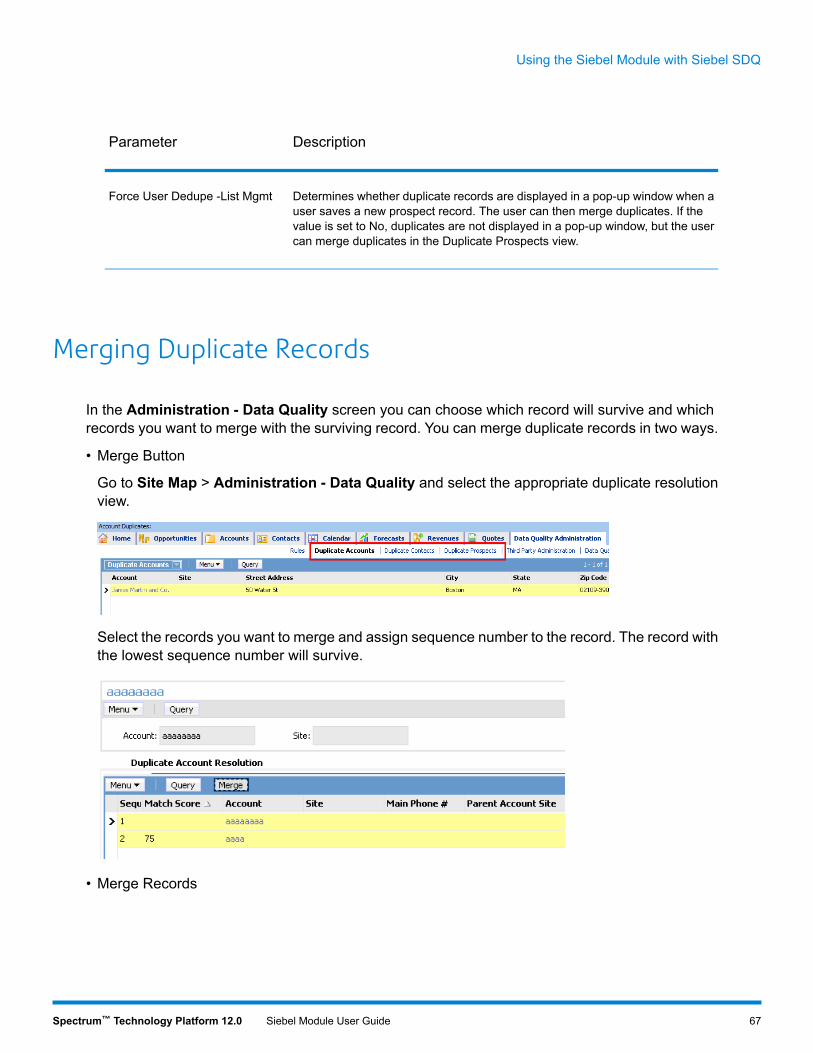
DescriptionParameter
Determines whether duplicate records are displayed in a pop-up window when auser saves a new prospect record. The user can then merge duplicates. If thevalue is set to No, duplicates are not displayed in a pop-up window, but the usercan merge duplicates in the Duplicate Prospects view.
Force User Dedupe -List Mgmt
Merging Duplicate Records
In the Administration - Data Quality screen you can choose which record will survive and whichrecords you want to merge with the surviving record. You can merge duplicate records in two ways.
• Merge Button
Go to Site Map > Administration - Data Quality and select the appropriate duplicate resolutionview.
Select the records you want to merge and assign sequence number to the record. The record withthe lowest sequence number will survive.
• Merge Records
67Spectrum™ Technology Platform 12.0 Siebel Module User Guide
Using the Siebel Module with Siebel SDQ

This action performs standard merging functionality in Siebel. Select the record you want to merge.The surviving record associates all child records from the non surviving record before deleting thenon surviving record.
Running a Batch Job
This procedure describes how to run batch processes for business name standardization, datacleansing, data deduplication, geocoding and name casing. In order to run a batch job, you mustenable batch processing in the OPT file. For more information, see Siebel Module OPT File Optionson page 62.
1. From the Siebel Application window, click Navigate > Site Map.2. A screen appears with numerous links in alphabetical order. Select Administration - Server
Administration > Jobs.3. Click the New button and enter Data Quality Manager in the Component/Job field.
4. On the same screen, set the job parameters by clickingNew and providing the necessary details.
68Spectrum™ Technology Platform 12.0 Siebel Module User Guide
Using the Siebel Module with Siebel SDQ

The following tables show the required and optional job parameters.
Table 23: Required Job Parameters
DescriptionJob Parameter
The name of the business component:
• Account• Contact• List Mgmt Prospective Contact• Business Address
Buscomp name
The name of the business object:
• Account• Contact• List Mgmt Prospective Contact• Business Address(Data Cleansing Only)
Business Object Name
Type of operation used:
• Data Cleansing: Does one or more of the following depending on the features youhave licensed: standardizes casing and business names, validates addresses, andgeocodes addresses.
• Key Generate: Generates hash keys for all records in the business component.• Key Refresh: Refreshes hash keys for all records in the business component.• DeDuplication: performs data matching to identify duplicate records
Operation Type
69Spectrum™ Technology Platform 12.0 Siebel Module User Guide
Using the Siebel Module with Siebel SDQ

Table 24: Optional Job Parameters
DescriptionJob Parameter
A clause that specifies how candidate records are sorted for optimal processing by thedata matching software. The default value is:
Dedup Token
Note: This parameter applies to Data Matching operations only.
Object Sorting Clause
A clause that limits the number of records processed by a data quality task. For example:
[DUNS Number] is NULL
Note: You should specify an object where clause when performingDeDuplication on Prospects (use with value "[DUNS Number] is NULL").
Object Where Clause
Specifies the name of a Business rule that you want to use while performing batchcleansing or deduplication. Use the rule names defined in the Administration - DataQuality > Rules view.
Rule Name
5. Click Submit Job.
Testing EAI
Enterprise Application Integration (EAI) is a means of cleansing data in Siebel as it is updated froman external system. EAI testing simulates this process.
1. Navigate to Site Map > Administration - Business Service > Simulator.
70Spectrum™ Technology Platform 12.0 Siebel Module User Guide
Using the Siebel Module with Siebel SDQ

2. Click on the button shown below or select New Record from the menu button.
3. Enter the following information:
• Service Name: Workflow Process Manager• Method Name: Run Process
4. In the Input Arguments applet, click New.
5. Click the icon under Property Name and add the following records.
ValueProperty Name
The name of the workflow to run:
• GROUP 1 ADMIN - EAI TEST (CONTACT with ACCOUNT) WORKFLOW• GROUP1ADMIN - EAI TEST (CONTACTwith ACCOUNT/PERSONALADDRESS)WORKFLOW
• GROUP 1 ADMIN - EAI TEST (CONTACT with PERSONAL ADDRESS)WORKFLOW
• GROUP 1 ADMIN - EAI TEST (PROSPECT) WORKFLOW• GROUP 1 EAI ACCOUNT TEST WORKFLOW
ProcessName
The location of the XML file that contains the input data you want to use to test EAI.XML File
71Spectrum™ Technology Platform 12.0 Siebel Module User Guide
Using the Siebel Module with Siebel SDQ

6. Click the Run button shown below.
72Spectrum™ Technology Platform 12.0 Siebel Module User Guide
Using the Siebel Module with Siebel SDQ
5 - Using the SiebelModule with SiebelNon-SDQ
In this section
Configuring Siebel non-SDQ 74Validating an Address 87Merging Duplicate Records 87Adding D&B Information to a Record 88Running a Batch Job 90

Configuring Siebel non-SDQ
Configuring Business Name Standardization
The Business Name Standardization options include parameters for Dunn & Bradstreet (D&B)Information and Automatic Business Name Standardization.
1. From the Siebel window, click Navigate > Site Map.2. Click Administration - PBBI Group 1 Data Quality Administration.3. Under the PBBI Group 1 Data Quality Administration heading at the top of the page, click
Options Manager.4. Configure the options. When you are done, click Save Changes. Use Clear Cache to reset the
options.
Table 25: Business Name Standardization Options
DescriptionValuesOption
Indicates if accounts will be updated with Dunn & Bradstreetinformation.
If enabled, created accounts will be updated with matchingD&B information.
Enable, DisableUpdate Accounts with D&BInformation
Specifies the minimum match score needed to identify apossible Dunn & Bradstreet account match duringinteractive processing. The higher the value, the closer thematch must be. The default is 50.
If the score produced by the comparison of the accountand D&B records is greater than the entered value (mustbe between 50 and 100), then the record will be identifiedas duplicate and a pop-up window will be displayed to theuser, allowing the user to choose the action to take. Thelower the match threshold, the more match candidates willbe displayed.
50 - 100D&B Interactive Threshold
74Spectrum™ Technology Platform 12.0 Siebel Module User Guide
Using the Siebel Module with Siebel Non-SDQ

DescriptionValuesOption
Specifies the minimum match score needed to identify apossible Dunn & Bradstreet account match during batchprocessing. The higher the value, the closer the matchmust be. The default is 50.
If the score produced by the comparison of the accountand D&B records is greater than the entered Value (mustbe between 0 and 100), then the D&B records are madeD&B candidates of the account record. The account recordis updated with the D&B record with the greatest score.
0 - 100D&B Batch Update Threshold
Specifies the minimum match score needed to identify apossible Dunn & Bradstreet account match during EAIprocessing.
If the score produced by the comparison of the accountand D&B records is greater than the entered Value (mustbe between 0 and 100), then the D&B records are madeD&B candidates of the account record. The account recordis updated with the D&B record with the greatest score.
0 - 100D&B Batch Import Threshold
Indicates if automatic business name standardization willbe performed.
If enabled, the account name will be replaced by thematching business name from DQC.
Enable, DisableAutomatic Business NameStandardization
Indicates if Account will use D&B Address as primary.
If enabled, the primary address of the account record willbe replaced by the physical address of the chosen D&Brecord (as the picked D&B account's primary address).
Enable, DisableUpdate Account Addresses usingFirm Name File
Configuring Data Cleansing
The data cleansing options control address validation. Address validation involves matching andstandardizing a U.S., Canadian, or International address against the Pitney Bowes addressdatabases.
Note: The Cleansing Status Flag (Succeeded , Failed , Not Yet Cleansed) areshown only in views where addresses can be added or modified.
75Spectrum™ Technology Platform 12.0 Siebel Module User Guide
Using the Siebel Module with Siebel Non-SDQ

1. From the Siebel window, click Navigate > Site Map.2. Click Administration - PBBI Group 1 Data Quality Administration.3. Under the PBBI Group 1 Data Quality Administration heading at the top of the page, click
Options Manager.4. Configure the options. When you are done, click Save Changes. Use Clear Cache to reset the
options.
Table 26: Data Cleansing Options
DescriptionValuesOption
Specifies whether cleansing is enabled for business address.A business address is one used for business purposes It isassociated with a contact's account.
If enabled, the selected options in the Management Consolefor ValidateAddress will be activated for processing forbusiness addresses.
Note: Check the Disable Cleansing column of thebusiness address applet to deactivate the datacleansing for each business address.
Enable, DisableBusiness AddressCleansing
Specifies whether cleansing is enabled for personal address.A personal address is associated with a contact.
If enabled, the selected options in the Management Consolefor ValidateAddress will be activated for processing for personaladdresses.
Note: Check the Disable Cleansing column of thepersonal address applet to deactivate the datacleansing for each personal address.
Enable, DisablePersonal AddressCleansing
Specifies whether cleansing is enabled for prospect address.Aprospect address is the personal address of a prospect.
If enabled, the selected options in the Management Consolefor ValidateAddress will be activated during processing forprospect addresses.
Enable, DisableProspect AddressCleansing
76Spectrum™ Technology Platform 12.0 Siebel Module User Guide
Using the Siebel Module with Siebel Non-SDQ

DescriptionValuesOption
Specifies whether Delivery Point Validation will be performed.Delivery Point Validation (DPV®) validates that a specificaddress exists, as opposed to validating that a specific addressis within a range of valid addresses.
Note: This option is only available if the DeliveryPoint Validation option is enabled in the ManagementConsole and if the DPV® database is installed.
Enable, DisableDPV
Specifies whether Residential Delivery Indicator process willbe performed. Residential Delivery Indicator (RDI™) processingchecks if an address is a residential address (not a businessaddress). To perform RDI™ processing, you must have theRDI™ database installed.
Note: This option is only available if the RDI™ optionis enabled in the Management Console and if theRDI™ database is installed.
The result of RDI™ processing is shown in a field added inAddress Information that contains one of the following:
• Residential - This value is returned by the Universal Coderin case the address entered by the user is a ResidentialAddress
• Business - This value is returned by the Universal Coderin case the address entered by the user is a BusinessAddress
• Mixed - This value is returned by the Universal Coder incase the address entered by the user is both a Residentialand Business Address.
Enable, DisableRDI
Specifies whether Enhanced Street Matching process will beperformed. Enhanced Street Matching (ESM) applies additionalmatching logic to correct misspelled or complex street namesand obtain a match. ESM produces more validated addressesbut reduces performance.
Note: This option is only available if the ESM optionis enabled in the Management Console.
Enable, DisableESM
77Spectrum™ Technology Platform 12.0 Siebel Module User Guide
Using the Siebel Module with Siebel Non-SDQ
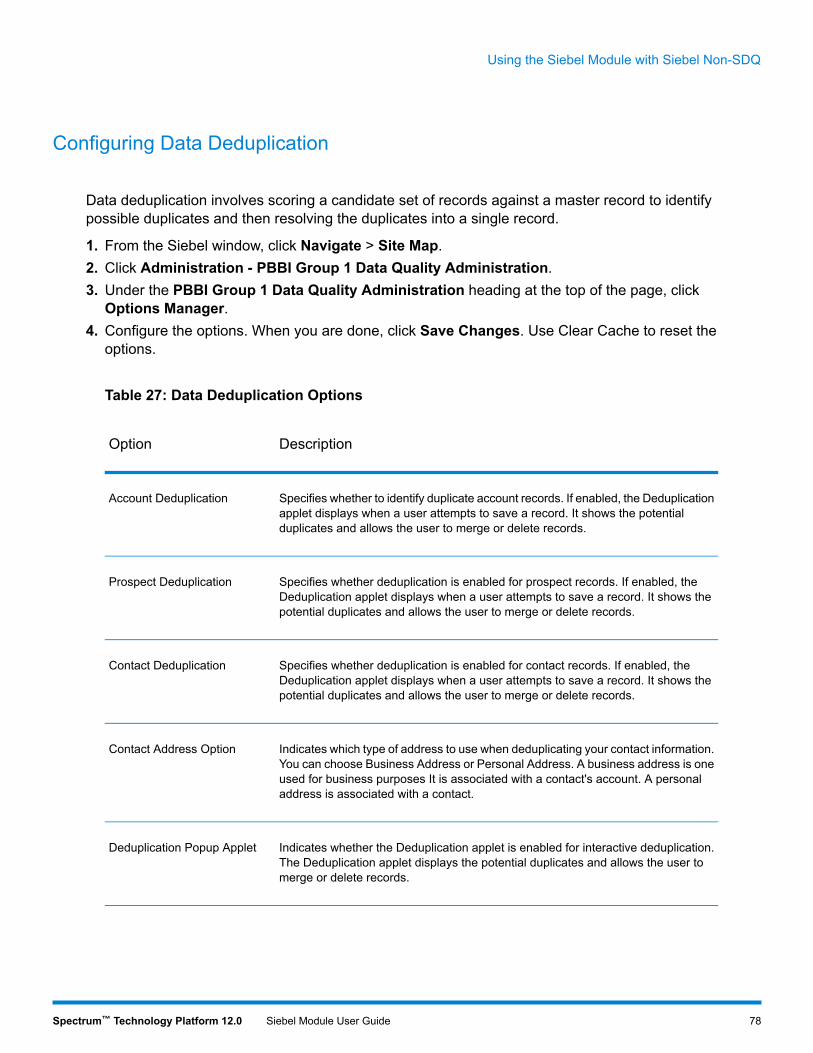
Configuring Data Deduplication
Data deduplication involves scoring a candidate set of records against a master record to identifypossible duplicates and then resolving the duplicates into a single record.
1. From the Siebel window, click Navigate > Site Map.2. Click Administration - PBBI Group 1 Data Quality Administration.3. Under the PBBI Group 1 Data Quality Administration heading at the top of the page, click
Options Manager.4. Configure the options. When you are done, click Save Changes. Use Clear Cache to reset the
options.
Table 27: Data Deduplication Options
DescriptionOption
Specifies whether to identify duplicate account records. If enabled, the Deduplicationapplet displays when a user attempts to save a record. It shows the potentialduplicates and allows the user to merge or delete records.
Account Deduplication
Specifies whether deduplication is enabled for prospect records. If enabled, theDeduplication applet displays when a user attempts to save a record. It shows thepotential duplicates and allows the user to merge or delete records.
Prospect Deduplication
Specifies whether deduplication is enabled for contact records. If enabled, theDeduplication applet displays when a user attempts to save a record. It shows thepotential duplicates and allows the user to merge or delete records.
Contact Deduplication
Indicates which type of address to use when deduplicating your contact information.You can choose Business Address or Personal Address. A business address is oneused for business purposes It is associated with a contact's account. A personaladdress is associated with a contact.
Contact Address Option
Indicates whether the Deduplication applet is enabled for interactive deduplication.The Deduplication applet displays the potential duplicates and allows the user tomerge or delete records.
Deduplication Popup Applet
78Spectrum™ Technology Platform 12.0 Siebel Module User Guide
Using the Siebel Module with Siebel Non-SDQ

DescriptionOption
Allows you to select how you wish to interact with Siebel to resolve duplicates. Youcan choose:
When you select this option, Spectrum™ Technology Platformautomatically merges a master record with a candidate duplicaterecord containing the highest score (probability) of being a duplicatewithout any interaction.
Automatic
When you select this option, you will see a list of possible duplicaterecords. Then you will have the choice to merge the duplicate recordwith the current record or to merge it with the other listed duplicates.
Manual
Note: To avoid encountering any error during automatic merging, the usermust press <CTRL-S> to save the record before navigating to anotherrecord.
Interactive Resolution
Specifies the minimum match score needed to identify a possible duplicate duringinteractive processing. The higher the value, the closer the match must be. Thedefault is 50.
If the score produced by the match attempt is greater than the entered value (mustbe between 0 and 100), then the record will be identified as duplicate and a pop-upwindow will be displayed to the user, allowing the user to choose the action to take.The lower the match threshold, the more match candidates will be displayed.
Interactive Threshold
Specifies how you want to interact with Siebel to resolve duplicates.
When you select this option, Spectrum™ Technology Platformautomatically merges a master record with a candidate duplicaterecord containing the highest score (probability) of being a duplicatewithout any interaction.
Automatic
When you select this option, you will see a list of possible duplicaterecords. Then you will have the choice to merge the duplicate recordwith the current record or to merge it with the other listed duplicates.
Manual
If you are using Batch Import Resolution or Batch Update Resolution, see Runninga Batch Job on page 90 for information.
Batch Import Resolution
Specifies how you want to interact with Siebel to resolve duplicates.
When you select this option, Spectrum™ Technology Platformautomatically merges a master record with a candidate duplicaterecord containing the highest score (probability) of being a duplicatewithout any interaction.
Automatic
When you select this option, you will see a list of possible duplicaterecords. Then you will have the choice to merge the duplicate recordwith the current record or to merge it with the other listed duplicates.
Manual
Batch Update Resolution
79Spectrum™ Technology Platform 12.0 Siebel Module User Guide
Using the Siebel Module with Siebel Non-SDQ

DescriptionOption
Specifies the minimum match score needed to identify a possible duplicate recordduring EAI processing.
If the score produced by the match attempt is greater than the value you specify(must be between 0 and 100), then the record is considered a match candidate. Therecord is updated with the candidate record that has the greatest score.
Batch Import Threshold
Specifies the minimum match score needed to identify a duplicate record duringbatch processing. The higher the value, the closer the match must be. The defaultis 50.
If the score produced by the comparison of the records is greater than the value youentered (must be between 0 and 100), then the records are considered duplicates.
Batch Update Threshold
Determines how the name parser should treat the account name. One of the following:
Assumes that all names are companies.Company
Assumes that all names are persons.Analyze
Analyzes the data to determine if it is the name of acompany or a person.
Name Parser
Account Name Treatment
Determines how the name parser should treat the contact name. One of the following:
Assumes that all names are companiesCompany
Assumes that all names are personsAnalyze
Analyzes the data to determine if it is the name of acompany or a person.
Name Parser
Contact Name Treatment
Determines how the name parser should treat the prospect name. One of thefollowing:
Assumes that all names are companies.Company
Assumes that all names are persons.Analyze
Analyzes the data to determine if it is the name of acompany or a person.
Name Parser
Prospect Name Treatment
80Spectrum™ Technology Platform 12.0 Siebel Module User Guide
Using the Siebel Module with Siebel Non-SDQ
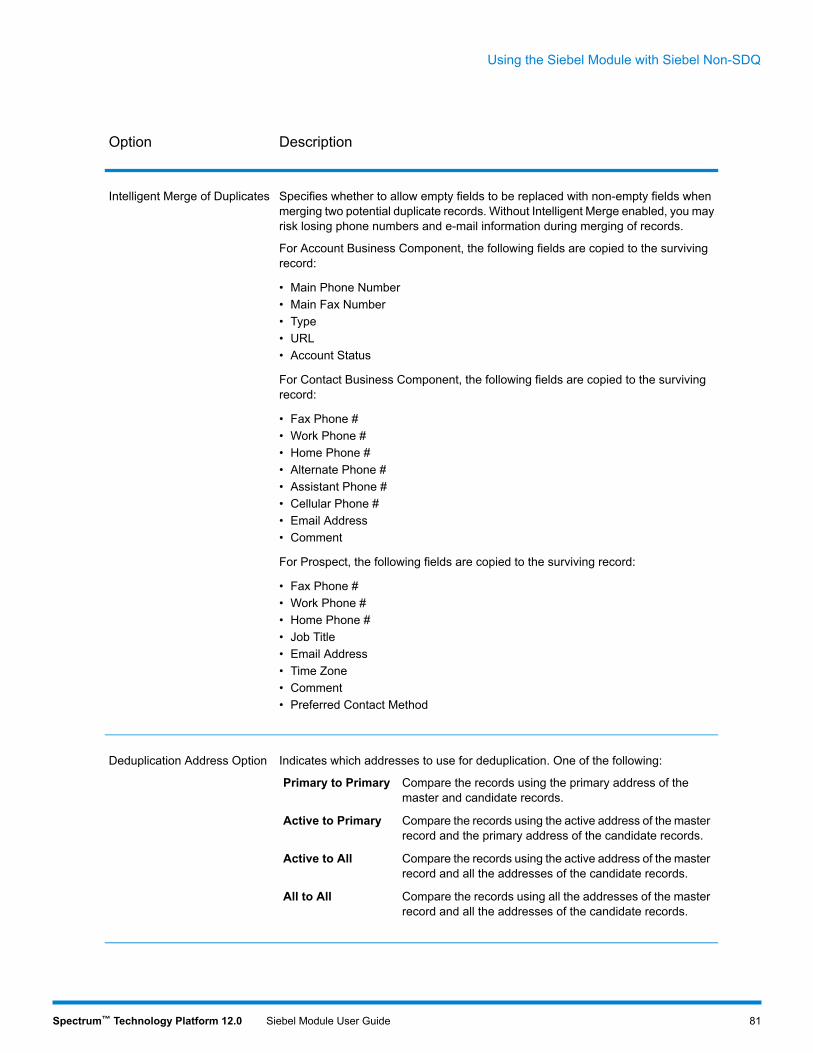
DescriptionOption
Specifies whether to allow empty fields to be replaced with non-empty fields whenmerging two potential duplicate records. Without Intelligent Merge enabled, you mayrisk losing phone numbers and e-mail information during merging of records.
For Account Business Component, the following fields are copied to the survivingrecord:
• Main Phone Number• Main Fax Number• Type• URL• Account Status
For Contact Business Component, the following fields are copied to the survivingrecord:
• Fax Phone #• Work Phone #• Home Phone #• Alternate Phone #• Assistant Phone #• Cellular Phone #• Email Address• Comment
For Prospect, the following fields are copied to the surviving record:
• Fax Phone #• Work Phone #• Home Phone #• Job Title• Email Address• Time Zone• Comment• Preferred Contact Method
Intelligent Merge of Duplicates
Indicates which addresses to use for deduplication. One of the following:
Compare the records using the primary address of themaster and candidate records.
Primary to Primary
Compare the records using the active address of the masterrecord and the primary address of the candidate records.
Active to Primary
Compare the records using the active address of the masterrecord and all the addresses of the candidate records.
Active to All
Compare the records using all the addresses of the masterrecord and all the addresses of the candidate records.
All to All
Deduplication Address Option
81Spectrum™ Technology Platform 12.0 Siebel Module User Guide
Using the Siebel Module with Siebel Non-SDQ

DescriptionOption
Indicates the order by which the records are merged with the survivor record.
The newest duplicate record is merged first.Newest
The oldest duplicate record is merged first.Oldest
Survivorship Date Criterion
If enabled, merging an Active record to an Inactive record is not allowed. Only thefollowing merging scenarios are allowed:
• Active to Active• Inactive to Inactive• Inactive to Active
Survivorship Status Criterion
Specifies which characters to use to generate the match key and search key.
Use the first few characters of the record to generate thematch key and search key.
Substring
Use just the consonants to generate the match key andsearch key.
Consonant
Generate Match and SearchKey Option
Configuring General Behavior
Under the General Behavior section of the Options Manager, you can activate pop-up applets, setup your log directories, and conduct other logging tasks.
1. From the Siebel window, click Navigate > Site Map.2. Click Administration - PBBI Group 1 Data Quality Administration.3. Under the PBBI Group 1 Data Quality Administration heading at the top of the page, click
Options Manager.4. Configure the options. When you are done, click Save Changes. Use Clear Cache to reset the
options.
82Spectrum™ Technology Platform 12.0 Siebel Module User Guide
Using the Siebel Module with Siebel Non-SDQ

Table 28: General Behavior Options
DescriptionOption
Specifies whether to display an error dialog when errors occur when performinginteractive data quality functions. If enabled, errors from the Siebel Module willbe displayed. Also, an error will appear if there is a connectivity problem betweenSpectrum™ Technology Platform and Siebel.
Error Popup Applet
Indicates the server name or IP address of the Spectrum™ Technology Platformserver.
Server Name
Indicates the port number of the Spectrum™ Technology Platform server.Port Number
Configuring Geocoding
Geocoding is the process of assigning a latitude/longitude coordinate to an address. Once alatitude/longitude coordinate is assigned, the address can be displayed on a map or used in a spatialsearch.
1. From the Siebel window, click Navigate > Site Map.2. Click Administration - PBBI Group 1 Data Quality Administration.3. Under the PBBI Group 1 Data Quality Administration heading at the top of the page, click
Options Manager.4. Configure the options. When you are done, click Save Changes. Use Clear Cache to reset the
options.
Table 29: Geocoding Options
DescriptionOption
Specifies whether to determine the latitude/longitude coordinates of businessaddress.
Business Address GeoCoding
Specifies whether to determine the latitude/longitude coordinates of personaladdresses.
Personal Address GeoCoding
83Spectrum™ Technology Platform 12.0 Siebel Module User Guide
Using the Siebel Module with Siebel Non-SDQ
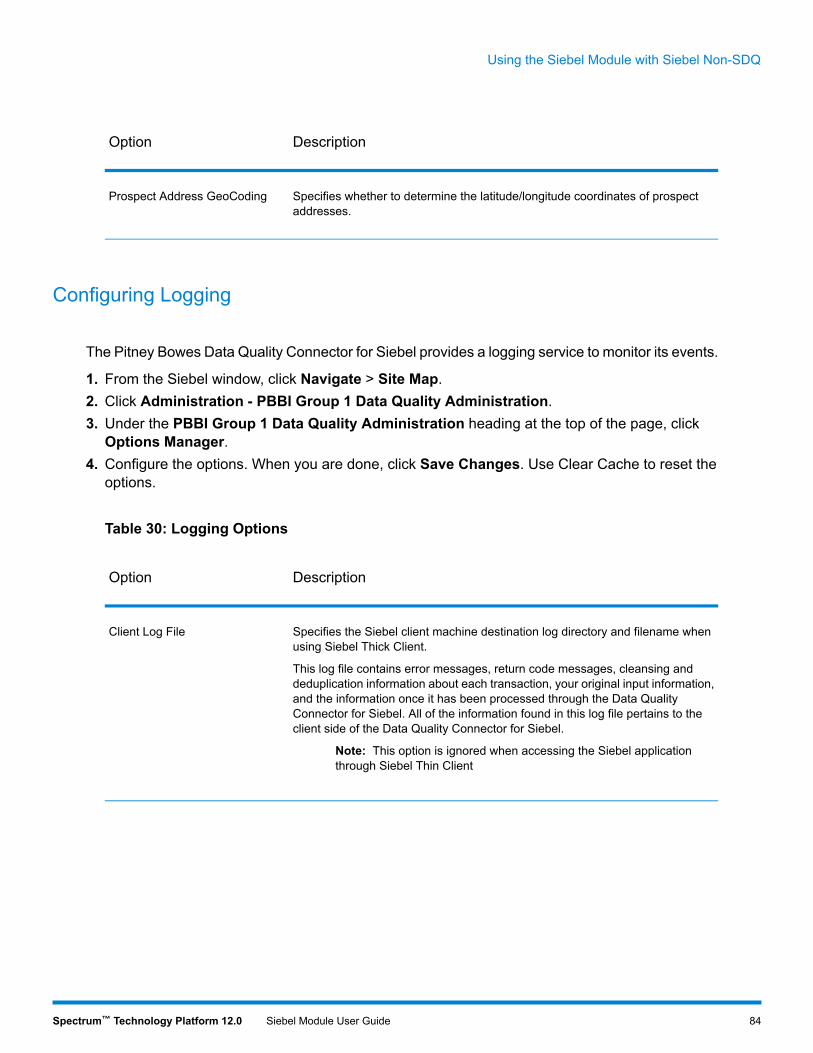
DescriptionOption
Specifies whether to determine the latitude/longitude coordinates of prospectaddresses.
Prospect Address GeoCoding
Configuring Logging
The Pitney Bowes Data Quality Connector for Siebel provides a logging service to monitor its events.
1. From the Siebel window, click Navigate > Site Map.2. Click Administration - PBBI Group 1 Data Quality Administration.3. Under the PBBI Group 1 Data Quality Administration heading at the top of the page, click
Options Manager.4. Configure the options. When you are done, click Save Changes. Use Clear Cache to reset the
options.
Table 30: Logging Options
DescriptionOption
Specifies the Siebel client machine destination log directory and filename whenusing Siebel Thick Client.
This log file contains error messages, return code messages, cleansing anddeduplication information about each transaction, your original input information,and the information once it has been processed through the Data QualityConnector for Siebel. All of the information found in this log file pertains to theclient side of the Data Quality Connector for Siebel.
Note: This option is ignored when accessing the Siebel applicationthrough Siebel Thin Client
Client Log File
84Spectrum™ Technology Platform 12.0 Siebel Module User Guide
Using the Siebel Module with Siebel Non-SDQ

DescriptionOption
Specifies the Siebel Server machine destination log directory and filename whenusing Siebel Thin Client.
This log file contains error messages, return code messages, cleansing anddeduplication information about each transaction, your original input information,and the information once it has been processed through the Data QualityConnector for Siebel. All of the information found in this log file pertains to theserver side of the Data Quality Connector for Siebel.
Note: This option is ignored when accessing the Siebel applicationthrough Siebel Thick Client.
Server Log File
Specifies whether logging is enabled. You can choose to enable or disable thisoption.
Logging
Specifies how data cleansing results are logged. One of the following:
Log nothing.0
Log errors when cleansing address function fails.1
Log cleansing input and output as well as errors when cleansingfunction fails.
2
Cleansing Logging Level
Specifies how data deduplication results are logged. One of the following:
Log nothing.0
Log errors when data deduplication fails.1
Log data deduplication input and output as well as errors when datadeduplication function fails.
2
Deduplication Logging Level
Specifies the logging level for merging. One of the following:
Log nothing.0
Log errors when data merging fails.1
Log data merging input and output as well as errors when datamerging function fails.
2
Merge Logging Level
85Spectrum™ Technology Platform 12.0 Siebel Module User Guide
Using the Siebel Module with Siebel Non-SDQ
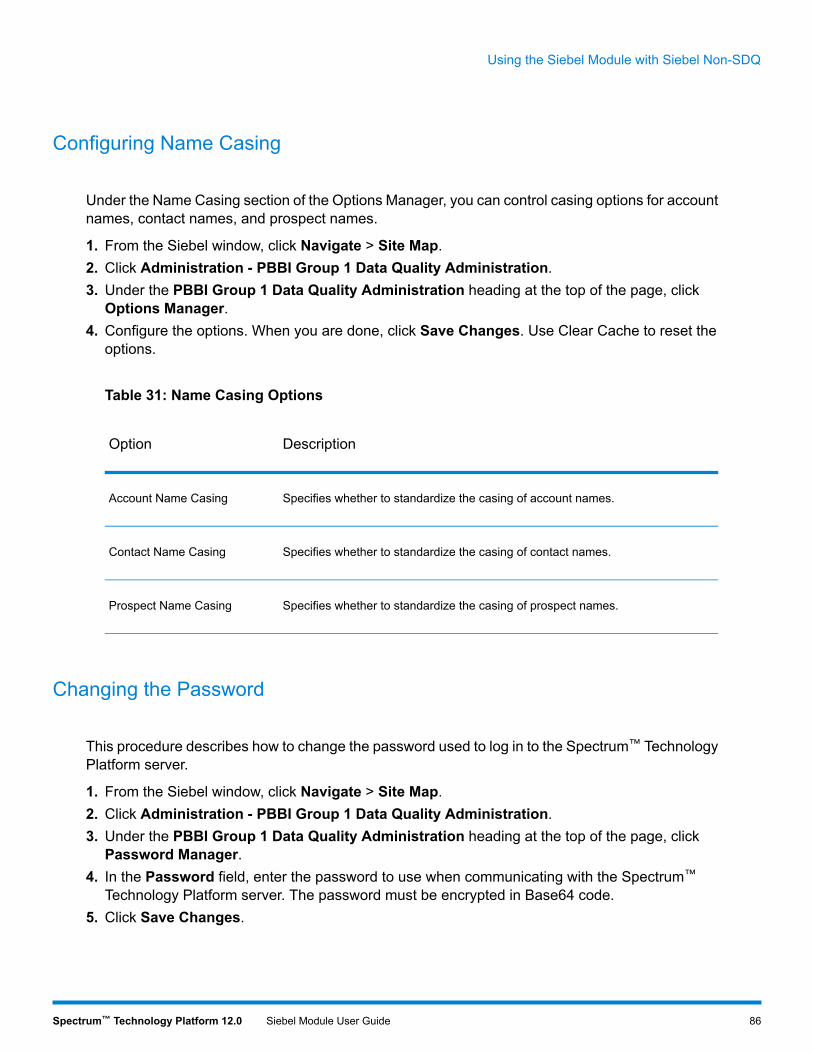
Configuring Name Casing
Under the Name Casing section of the Options Manager, you can control casing options for accountnames, contact names, and prospect names.
1. From the Siebel window, click Navigate > Site Map.2. Click Administration - PBBI Group 1 Data Quality Administration.3. Under the PBBI Group 1 Data Quality Administration heading at the top of the page, click
Options Manager.4. Configure the options. When you are done, click Save Changes. Use Clear Cache to reset the
options.
Table 31: Name Casing Options
DescriptionOption
Specifies whether to standardize the casing of account names.Account Name Casing
Specifies whether to standardize the casing of contact names.Contact Name Casing
Specifies whether to standardize the casing of prospect names.Prospect Name Casing
Changing the Password
This procedure describes how to change the password used to log in to the Spectrum™ TechnologyPlatform server.
1. From the Siebel window, click Navigate > Site Map.2. Click Administration - PBBI Group 1 Data Quality Administration.3. Under the PBBI Group 1 Data Quality Administration heading at the top of the page, click
Password Manager.4. In the Password field, enter the password to use when communicating with the Spectrum™
Technology Platform server. The password must be encrypted in Base64 code.5. Click Save Changes.
86Spectrum™ Technology Platform 12.0 Siebel Module User Guide
Using the Siebel Module with Siebel Non-SDQ
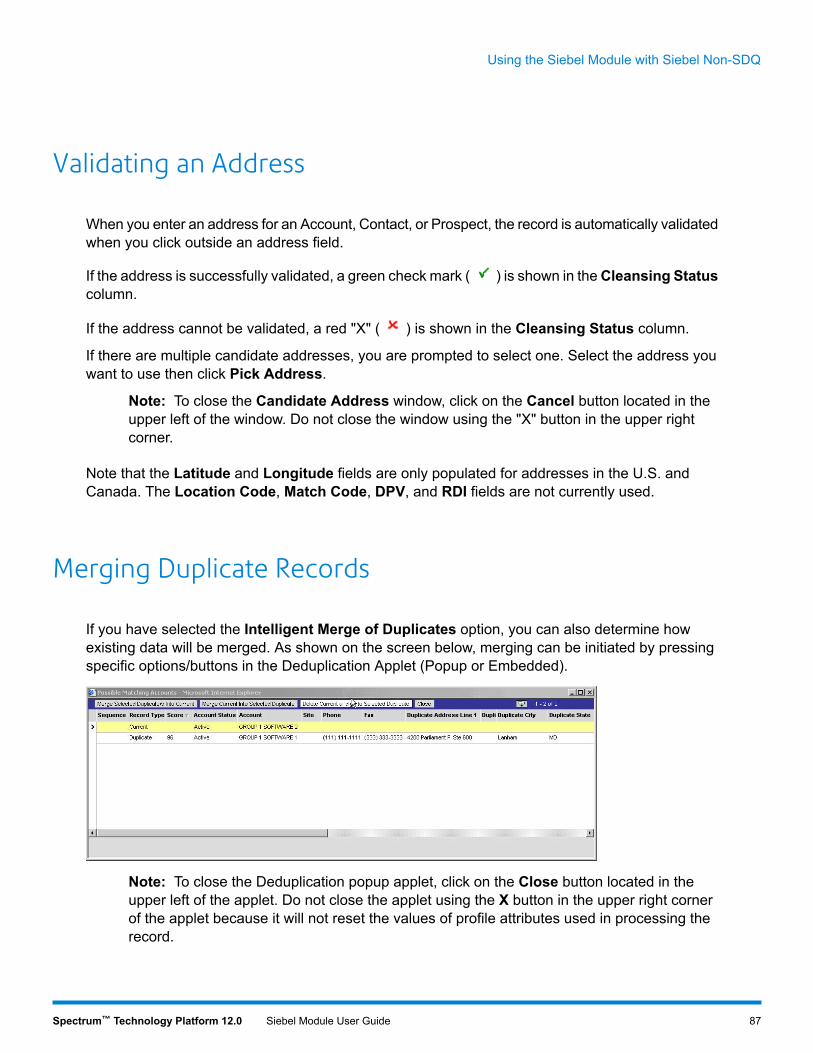
Validating an Address
When you enter an address for an Account, Contact, or Prospect, the record is automatically validatedwhen you click outside an address field.
If the address is successfully validated, a green check mark ( ) is shown in theCleansing Statuscolumn.
If the address cannot be validated, a red "X" ( ) is shown in the Cleansing Status column.
If there are multiple candidate addresses, you are prompted to select one. Select the address youwant to use then click Pick Address.
Note: To close the Candidate Address window, click on the Cancel button located in theupper left of the window. Do not close the window using the "X" button in the upper rightcorner.
Note that the Latitude and Longitude fields are only populated for addresses in the U.S. andCanada. The Location Code, Match Code, DPV, and RDI fields are not currently used.
Merging Duplicate Records
If you have selected the Intelligent Merge of Duplicates option, you can also determine howexisting data will be merged. As shown on the screen below, merging can be initiated by pressingspecific options/buttons in the Deduplication Applet (Popup or Embedded).
Note: To close the Deduplication popup applet, click on the Close button located in theupper left of the applet. Do not close the applet using the X button in the upper right cornerof the applet because it will not reset the values of profile attributes used in processing therecord.
87Spectrum™ Technology Platform 12.0 Siebel Module User Guide
Using the Siebel Module with Siebel Non-SDQ

For data merging you have the following configuration options:
Table 32: Data Merging Options
DescriptionOption
This option merges the duplicate records with the current record shown in theDeduplication applet. When using this option, you must select the duplicate recordsin the Deduplication applet.
The Sequence field can be used to determine the order of which the selectedduplicates will be merged. If there is no sequence number, the order will bedetermined by the survivorship date criterion in the Options Manager. If SurvivorshipStatus Criterion is set to Enable, the status of the duplicate records will be checkedagainst the surviving record. For more information, see Configuring DataDeduplication on page 78.
The current record will be the surviving record after a successful merge.
Merge Selected Duplicate intoCurrent
This option merges the current record with the duplicate record shown in theDeduplication applet. When using this option, you must select the duplicate recordin the Deduplication Applet.
If Survivorship Status Criterion is set to Enable, the status of the duplicate recordswill be checked against the surviving record. For more information, seeConfiguringData Deduplication on page 78.
The duplicate record will be the surviving record after a successful Merge.
Merge Current into SelectedDuplicate
This option deletes the current record as shown in the Deduplication applet. Whenusing this option, you must select the duplicate record in the Deduplication applet.
The duplicate record will be the surviving record after a successful deletion.
Delete Current Record and go toSelected Duplicate
Adding D&B Information to a Record
If theUpdate Accounts with D&B Information option is enabled, the account record will be matchedto a D&B record. There are two ways in which the account record can be matched to a D&B record.
Match the First Three Letters of the Business Name
The first three letters of the account name will be used to match the D&B record if the DUNSNumberis not provided or the DUNS Number provided is not matched to any D&B record. The D&B popupapplet will list all possible matches that are greater than the threshold set in D&B Interactive Threshold
88Spectrum™ Technology Platform 12.0 Siebel Module User Guide
Using the Siebel Module with Siebel Non-SDQ

of the Group 1 Options Manager. For more information about the D&B Interactive Threshold, pleaserefer to Configuring Business Name Standardization on page 74.
The Pick D&B option of the applet picks the D&B record as the match for the account record. Thefollowing D&B fields will be copied to their equivalent account fields:
Account FieldD&B Field
NameBusiness Name
DUNS NumberDUNS Number
Domestic Ultimate DUNSDomestic Ultimate DUNS
Global Ultimate DUNSGlobal Ultimate DUNS
Parent HQ DUNSParent HQ DUNS
LocationLocation Type + Physical City + DUNS Number
If the Update Account Addresses using Firm Name File option is enabled, the physical addressof the D&B record will be used as the primary business address of the account record.
Note: To close the D&B Popup Applet, click on the [Cancel] button located in the upper leftof the applet. Do not close the applet using the "X" button in the upper right corner of theapplet because it will not reset the values of profile attributes used in processing the record.
Match the DUNS Number
A D&B® D-U-N-S® number is a unique nine-digit sequence recognized as the universal standardfor identifying and keeping track of over 80 million businesses worldwide. The user will provide the
89Spectrum™ Technology Platform 12.0 Siebel Module User Guide
Using the Siebel Module with Siebel Non-SDQ
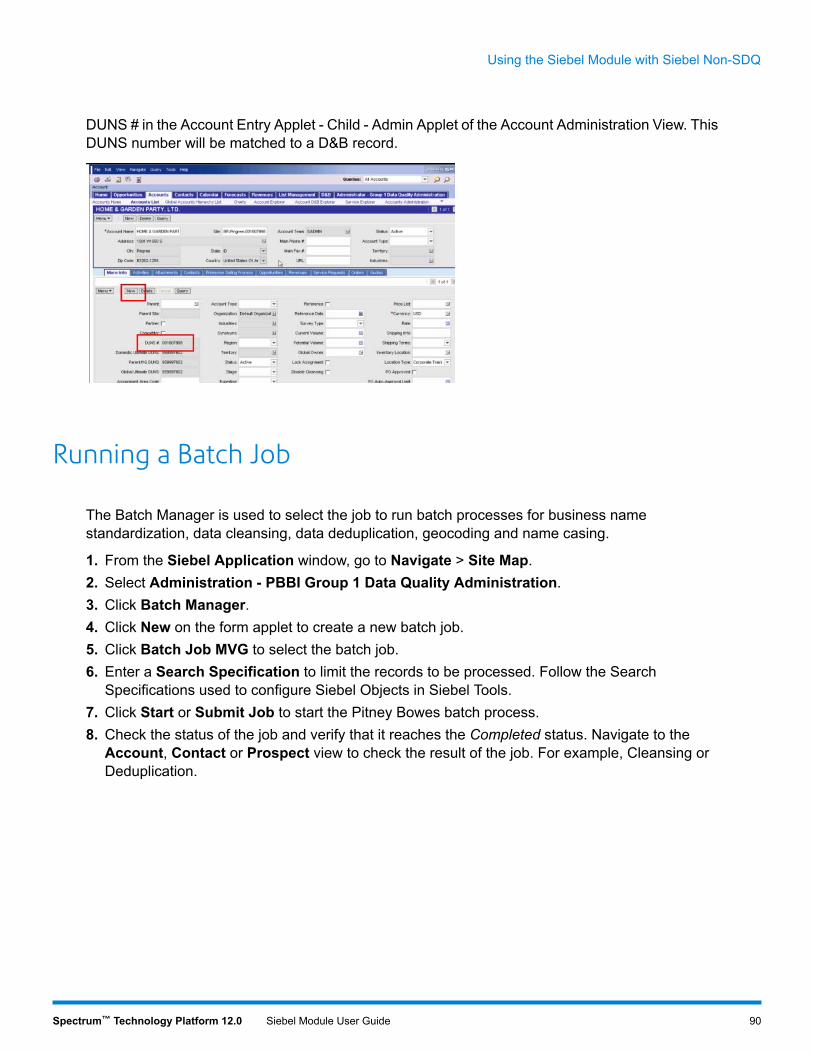
DUNS # in the Account Entry Applet - Child - Admin Applet of the Account Administration View. ThisDUNS number will be matched to a D&B record.
Running a Batch Job
The Batch Manager is used to select the job to run batch processes for business namestandardization, data cleansing, data deduplication, geocoding and name casing.
1. From the Siebel Application window, go to Navigate > Site Map.2. Select Administration - PBBI Group 1 Data Quality Administration.3. Click Batch Manager.4. Click New on the form applet to create a new batch job.5. Click Batch Job MVG to select the batch job.6. Enter a Search Specification to limit the records to be processed. Follow the Search
Specifications used to configure Siebel Objects in Siebel Tools.7. Click Start or Submit Job to start the Pitney Bowes batch process.8. Check the status of the job and verify that it reaches the Completed status. Navigate to the
Account, Contact or Prospect view to check the result of the job. For example, Cleansing orDeduplication.
90Spectrum™ Technology Platform 12.0 Siebel Module User Guide
Using the Siebel Module with Siebel Non-SDQ

6 - Services Reference
In this section
Siebel Business Name Standardization 92Siebel Generate Match Key 92Siebel Generate Match Score 92Siebel Generate Search Key 93Siebel Standardize Name 93Siebel Validate Address With No Candidates 93Validate Address With Candidates 93

Siebel Business Name Standardization
Siebel Business Name Standardization standardizes terms against a previously validated form ofthat term and applies the standard version. This evaluation is done by searching a table for the termto be standardized. If the term is found, the Standardization feature either replaces the term withthe corresponding standard version or it extracts the term from the field. Standardization can includechanging full words to abbreviations, changing abbreviations to full words, changing nick names tofull names or misspellings to corrected spellings.
Siebel Generate Match Key
Siebel Generate Match Key creates a non-unique key to identify potentially duplicate records. Matchkeys facilitate the matching process by only comparing records that contain the same match key.A match key is comprised of input fields. Each input field specified has an algorithm performed onit. The result of each field is then concatenated to create a single match key field.
For example, this input:
First Name - FredLast Name - MertzPostal Code - 21114-1687Gender Code - M
Might produce this match key:
211141687MertzFredM
Siebel Generate Match Score
Siebel Generate Match Score compares candidate records and generates a score that reflects theirsimilarity. The higher the score means the closer the match.
92Spectrum™ Technology Platform 12.0 Siebel Module User Guide
Services Reference

Siebel Generate Search Key
Siebel Generate Search Key is used for duplicate detection and error-tolerant searching. This servicegenerates keys that are used to when identifying duplicate records. When duplicate records arefound, the user is presented with the records and can choose to merge, delete, or ignore the duplicate.
Siebel Standardize Name
Siebel Standardize Name formats business and personal names by applying consistent casing and,optionally, adding the title of respect (Mr., Ms., and so on) and punctuation. Siebel StandardizeName can also determine the gender of a name.
Siebel Validate Address With No Candidates
Siebel Validate Address With No Candidates validates addresses. It returns the validated addressand, if you have licensed the Enterprise GeocodingModule, also determines the latitude and longitudecoordinates.
Validate Address With Candidates
Validate Address With Candidates validates and standardizes addresses. It returns the validatedaddress. If you have licensed the Enterprise Geocoding Module, it also returns the latitude andlongitude coordinates of the address. If the address cannot be validated, it returns candidateaddresses.
93Spectrum™ Technology Platform 12.0 Siebel Module User Guide
Services Reference
A - Validate AddressConfidence Algorithm
In this section
Introduction to the Validate Address Confidence Algorithm 95Confidence Algorithm for U.S. and Canadian Addresses 95Confidence Algorithm for International Addresses 96

Introduction to the Validate Address Confidence Algorithm
ValidateAddress computes a confidence score for each validated address. This score describeshow likely it is that the validated address is correct. Confidence code values range from 0 to 100,with a zero confidence level indicating no confidence and 100 indicating a very high level ofconfidence that the match results are correct. Confidence codes are calculated based on an algorithmthat takes into account the match results for individual output fields. The output fields involved inthis calculation include:
• Country• City• State• PostalCode• StreetName• HouseNumber• LeadingDirectional• TrailingDirectional• StreetSuffix• ApartmentNumber
Each field has its own Weight in the algorithm. Additionally, for each field the match result could belabeled as Success, Failure, or Changed. ("Changed" refers to cases where the contents of the fieldhave been corrected in order to get a match.) The match result—Success, Failure, orChanged—determines what the Factor is for that field. Thus, the calculation for the confidence codeis a product of Weight by Factor as follows:
Confidence = (Weight * Factor) for City+ (Weight * Factor) for Country+ (Weight * Factor) for State+ (Weight * Factor) for PostalCode+ (Weight * Factor) for StreetName+ (Weight * Factor) for HouseNumber+ (Weight * Factor) for Directionals+ (Weight * Factor) for Street Suffix+ (Weight * Factor) for ApartmentNumber
Confidence Algorithm for U.S. and Canadian Addresses
The following table details the scoring and logic behind the ValidateAddress confidence algorithmfor U.S. and Canadian addresses.
95Spectrum™ Technology Platform 12.0 Siebel Module User Guide
Validate Address Confidence Algorithm
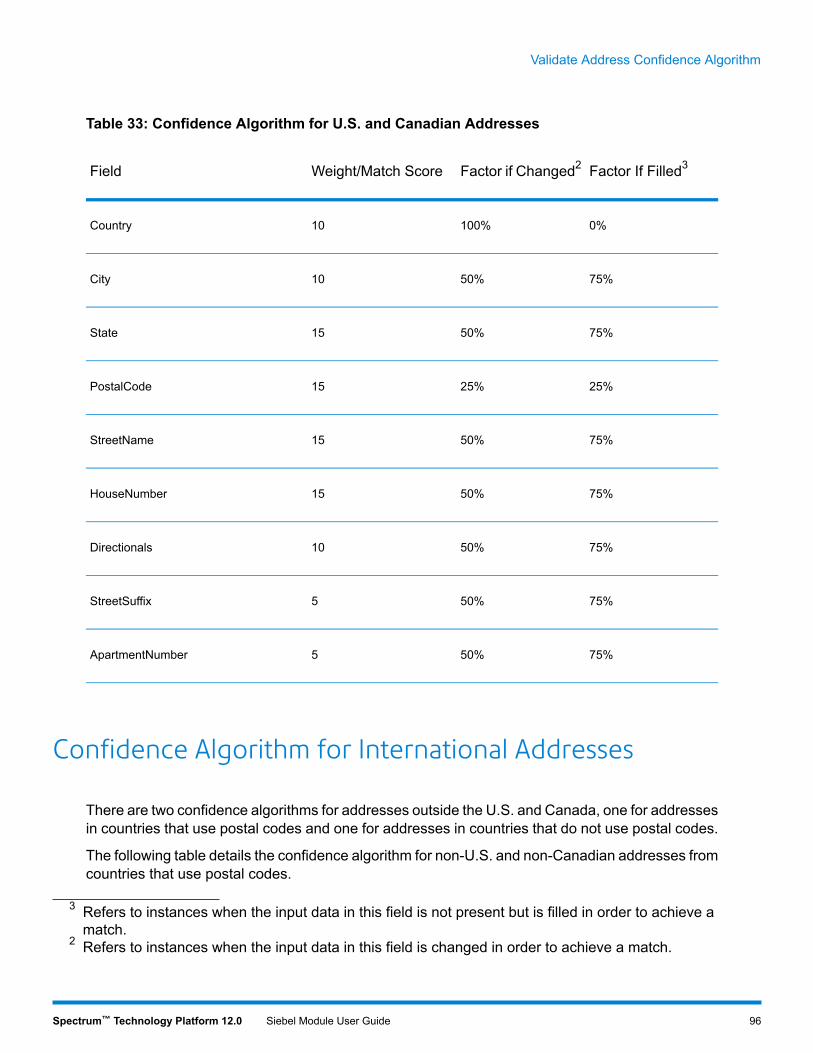
Table 33: Confidence Algorithm for U.S. and Canadian Addresses
Factor If Filled3Factor if Changed2Weight/Match ScoreField
0%100%10Country
75%50%10City
75%50%15State
25%25%15PostalCode
75%50%15StreetName
75%50%15HouseNumber
75%50%10Directionals
75%50%5StreetSuffix
75%50%5ApartmentNumber
Confidence Algorithm for International Addresses
There are two confidence algorithms for addresses outside the U.S. and Canada, one for addressesin countries that use postal codes and one for addresses in countries that do not use postal codes.
The following table details the confidence algorithm for non-U.S. and non-Canadian addresses fromcountries that use postal codes.
3 Refers to instances when the input data in this field is not present but is filled in order to achieve amatch.
2 Refers to instances when the input data in this field is changed in order to achieve a match.
96Spectrum™ Technology Platform 12.0 Siebel Module User Guide
Validate Address Confidence Algorithm

Table 34: Confidence Algorithm for Countries With Postal Codes
Factor if PostalDataUnavailable
Factor IfFilled5
Factor ifChanged4
Weight/Match ScoreField
0%0%100%11.1111111111111Country
0%75%650%11.1111111111111City
80%100100%16.6666666666667State
80%100%100%16.6666666666667PostalCode
50%75%50%16.6666666666667StreetName
50%75%50%16.6666666666667HouseNumber
0%75%50%0Directionals
50%75%50%5.55555555555556StreetSuffix
50%75%50%5.55555555555556ApartmentNumber
5 Refers to instances when the input data in this field is not present but is filled in order to achieve amatch.
4 Refers to instances when the input data in this field is changed in order to achieve a match.6 If the country is a Category C country, this value is 50%. Countries fall into one of these categories:
• Category A—Enables the validation and correction of an address's postal code, city name,state/county name, street address elements, and country name.
• Category B—Enables the validation and correction of an address's postal code, city name,state/county name, and country name. It does not support the validation or correction of streetaddress elements.
• Category C—Enables the validation and correction of the country name, and the validation of theformat of the postal code.
97Spectrum™ Technology Platform 12.0 Siebel Module User Guide
Validate Address Confidence Algorithm

The following table details confidence algorithm for countries that do not use postal codes.
Table 35: Confidence Algorithm for Countries Without Postal Codes
Factor if PostalDataUnavailable
Factor IfFilled8
Factor ifChanged7
Weight/Match ScoreField
0%0%100%13.3333333333333Country
0%75%950%13.3333333333333City
80%100100%20State
50%75%50%20StreetName
50%75%50%20HouseNumber
0%75%50%0Directionals
50%75%50%6.66666666666667StreetSuffix
50%75%50%6.66666666666667ApartmentNumber
8 Refers to instances when the input data in this field is not present but is filled in order to achieve amatch.
7 Refers to instances when the input data in this field is changed in order to achieve a match.9 If the country is a Category C country, this value is 50%. Countries fall into one of these categories:
• Category A—Enables the validation and correction of an address's postal code, city name,state/county name, street address elements, and country name.
• Category B—Enables the validation and correction of an address's postal code, city name,state/county name, and country name. It does not support the validation or correction of streetaddress elements.
• Category C—Enables the validation and correction of the country name, and the validation of theformat of the postal code.
98Spectrum™ Technology Platform 12.0 Siebel Module User Guide
Validate Address Confidence Algorithm
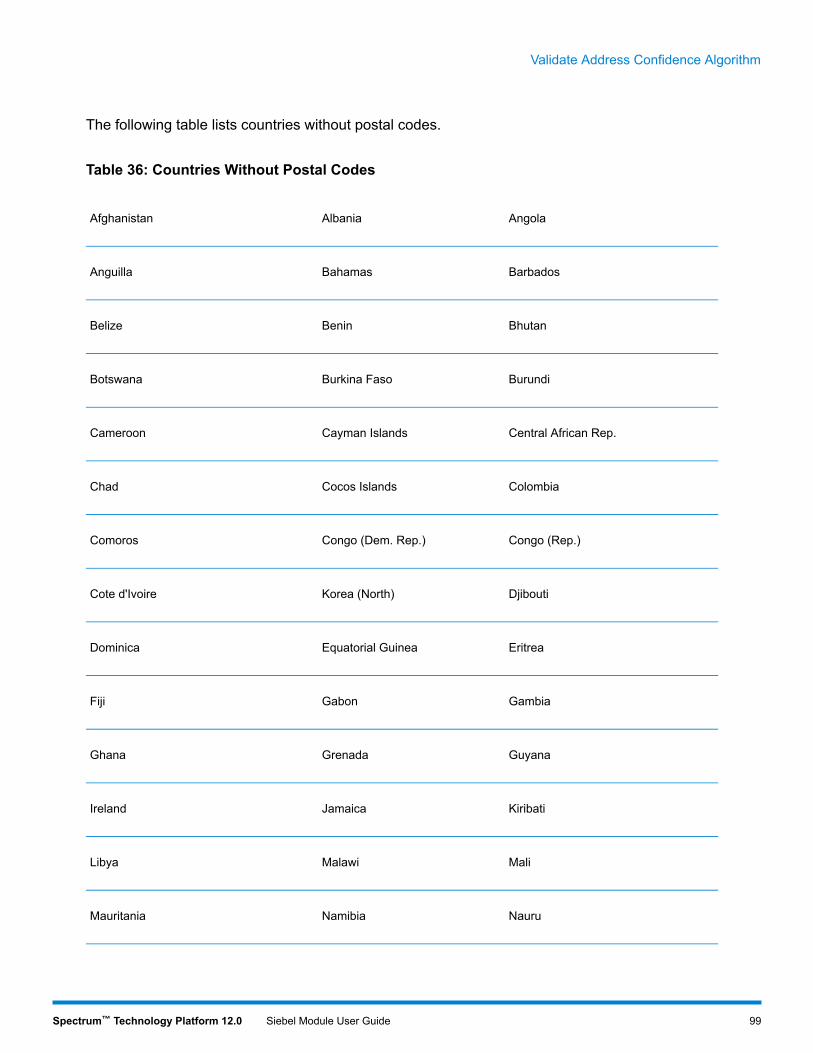
The following table lists countries without postal codes.
Table 36: Countries Without Postal Codes
AngolaAlbaniaAfghanistan
BarbadosBahamasAnguilla
BhutanBeninBelize
BurundiBurkina FasoBotswana
Central African Rep.Cayman IslandsCameroon
ColombiaCocos IslandsChad
Congo (Rep.)Congo (Dem. Rep.)Comoros
DjiboutiKorea (North)Cote d'Ivoire
EritreaEquatorial GuineaDominica
GambiaGabonFiji
GuyanaGrenadaGhana
KiribatiJamaicaIreland
MaliMalawiLibya
NauruNamibiaMauritania
99Spectrum™ Technology Platform 12.0 Siebel Module User Guide
Validate Address Confidence Algorithm
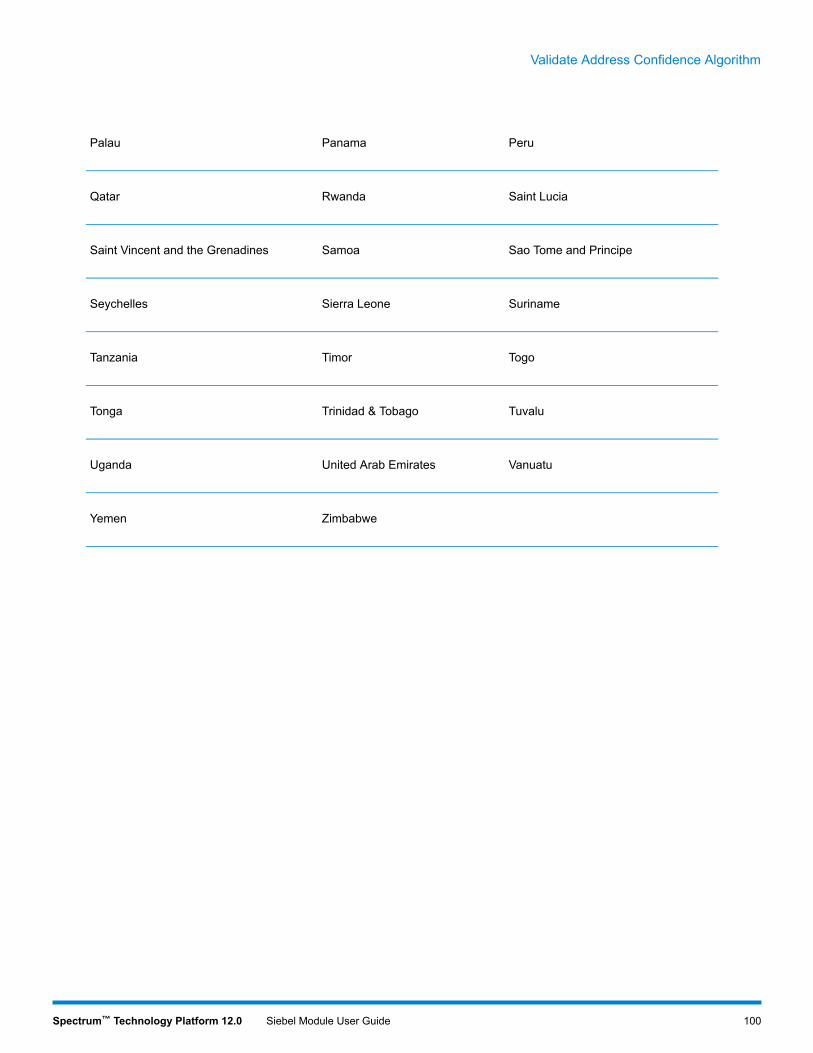
PeruPanamaPalau
Saint LuciaRwandaQatar
Sao Tome and PrincipeSamoaSaint Vincent and the Grenadines
SurinameSierra LeoneSeychelles
TogoTimorTanzania
TuvaluTrinidad & TobagoTonga
VanuatuUnited Arab EmiratesUganda
ZimbabweYemen
100Spectrum™ Technology Platform 12.0 Siebel Module User Guide
Validate Address Confidence Algorithm
B - Match and LocationCodes for U.S.Geocoding
In this section
Match Codes 102Location Codes 108

Match Codes
The geocoder returns match codes indicating the address portions that matched or did not matchto the database.
If the geocoder cannot make a match, the match code begins with E and the remaining digits indicatewhy the address did not match. For a description of the Ematch codes, see Table 39: Match Codesfor No Match on page 106. The digits do not specifically refer to which address elements did notmatch, but rather why the address did not match.
Match Codes
The following table contains the match code values. For a description of the hex digits for thedifference match codes, see Table 38: Description of Hex Digits on page 104.
Table 37: Match Codes
DescriptionCode
Same as Shh, but indicates match to an alias name recordor an alternate record.
Ahh
The street address did not match, but the geocoder locateda street segment based on the input ZIP Code or city
.
Chh
Matched to a small town with P.O. Box or General Deliveryonly.
D00
Matched to an auxiliary file.Gxx
The house number was changed.Hhh
Matched to a user-defined dictionary.Jhh
102Spectrum™ Technology Platform 12.0 Siebel Module User Guide
Match and Location Codes for U.S. Geocoding

DescriptionCode
Matched to the nearest address. Used with reversegeocoding. The following are the only values for N:
Nearest street center match (nearest streetsegment interpolated)
NS0
Nearest unranged street segmentNS1
Nearest point addressNP0
Nearest intersectionNX0
Nxx
Successful reverse APN lookup.P
Matched to USPS range records with unique ZIP Codes.CASS rules prohibit altering an input ZIP if it matches aunique ZIP Code value.
Qhh
Matched to a ranged address.Rhh
Matched to USPS data. This is considered the best addressmatch, because it matched directly against the USPS list ofaddresses. S is returned for a small number of addresseswhen the matched address has a blank ZIP + 4.
Shh
Matched to a street segment record. Street segment recordsdo not contain ZIP Code information. If you enter a ZIPCode, the application returns the ZIP Code you entered. Ifthe input city and state has only one ZIP Code, theapplication returns that ZIP Code.
Thh
Matched to USPS data but cannot resolve the ZIP + 4 codewithout the firm name or other information. CASS modereturns an E023 (multiple match) error code.
Uhh
103Spectrum™ Technology Platform 12.0 Siebel Module User Guide
Match and Location Codes for U.S. Geocoding

DescriptionCode
Matched to an intersection of two streets, for example, "ClaySt & Michigan Ave." The first hex digit refers to the last lineinformation, the second hex digit refers to the first street inthe intersection, and the third hex digit refers to the secondstreet in the intersection.
Note: The USPS does not allow intersections asa valid deliverable address.
Xhhh
Same as Xhhh, but an alias name record was used for oneor both streets.
Yhhh
No address given, but verified the provided ZIP Code .Z
The following table contains the description of the hex digits for the match code values.
Table 38: Description of Hex Digits
In second and third hex positionmeans:
In first hex position means:Code
No change in address line.No change in last line.0
Street type changed.ZIP Code changed.1
Predirectional changed.City changed.2
Street type and predirectional changed.City and ZIP Code changed.3
Postdirectional changed.State changed.4
Street type and postdirectionalchanged.
State and ZIP Code changed.5
104Spectrum™ Technology Platform 12.0 Siebel Module User Guide
Match and Location Codes for U.S. Geocoding

In second and third hex positionmeans:
In first hex position means:Code
Predirectional and postdirectionalchanged.
State and City changed.6
Street type, predirectional, andpostdirectional changed.
State, City, and ZIP Code changed.7
Street name changed.ZIP + 4 changed.8
Street name and street type changed.ZIP and ZIP + 4 changed.9
Street name and predirectionalchanged.
City and ZIP + 4 changed.A
Street name, street type, andpredirectional changed.
City, ZIP, and ZIP + 4 changed.B
Street name and postdirectionalchanged.
State and ZIP + 4 changed.C
Street name, street type, andpostdirectional changed.
State, ZIP, and ZIP + 4 changed.D
Street name, predirectional, andpostdirectional changed.
State, City, and ZIP + 4 changed.E
Street name, street type, predirectional,and postdirectional changed.
State, City, ZIP, and ZIP + 4 changed.F
The following table describes the values returned when the application cannot find a match.
105Spectrum™ Technology Platform 12.0 Siebel Module User Guide
Match and Location Codes for U.S. Geocoding
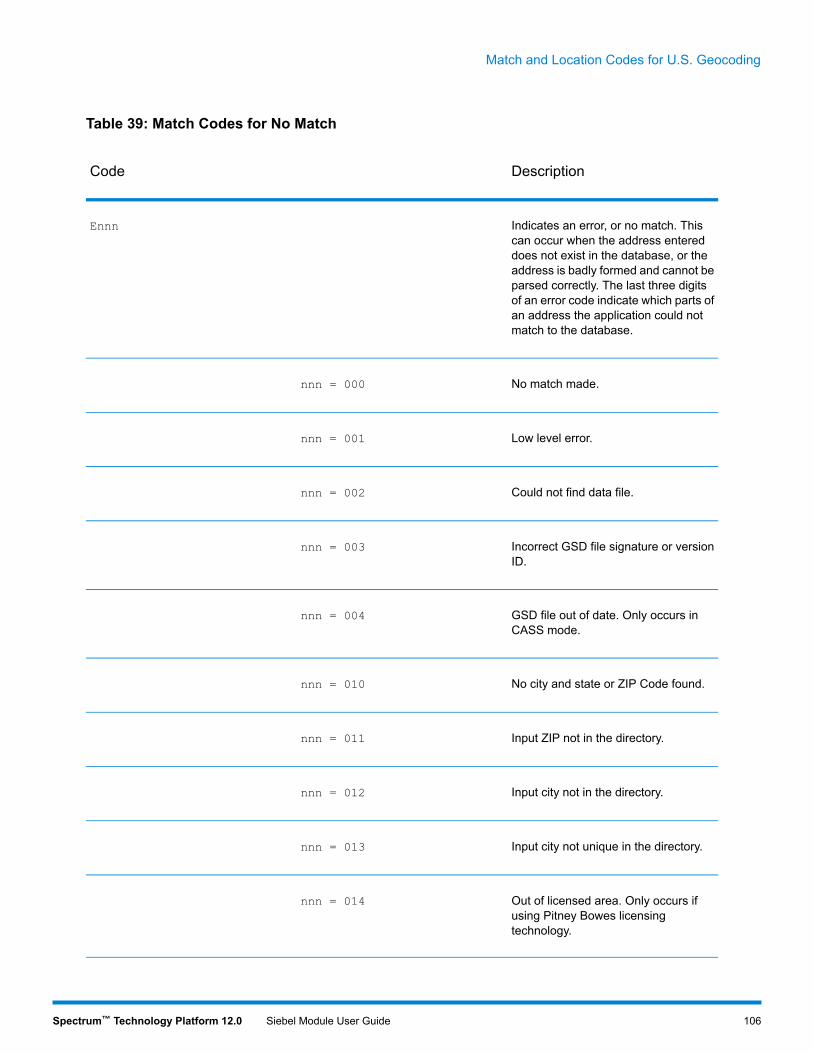
Table 39: Match Codes for No Match
DescriptionCode
Indicates an error, or no match. Thiscan occur when the address entereddoes not exist in the database, or theaddress is badly formed and cannot beparsed correctly. The last three digitsof an error code indicate which parts ofan address the application could notmatch to the database.
Ennn
No match made.nnn = 000
Low level error.nnn = 001
Could not find data file.nnn = 002
Incorrect GSD file signature or versionID.
nnn = 003
GSD file out of date. Only occurs inCASS mode.
nnn = 004
No city and state or ZIP Code found.nnn = 010
Input ZIP not in the directory.nnn = 011
Input city not in the directory.nnn = 012
Input city not unique in the directory.nnn = 013
Out of licensed area. Only occurs ifusing Pitney Bowes licensingtechnology.
nnn = 014
106Spectrum™ Technology Platform 12.0 Siebel Module User Guide
Match and Location Codes for U.S. Geocoding

DescriptionCode
Record count is depleted and licensehas expired.
nnn = 015
No matching streets found in directory.nnn = 020
No matching cross streets for anintersection match.
nnn = 021
No matching segments.nnn = 022
Unresolved match.nnn = 023
Nomatching segments. (Same as 022.)nnn = 024
Too many possible cross streets forintersection matching.
nnn = 025
No address found when attempting amultiline match.
nnn = 026
Invalid directional attempted.nnn = 027
Record also matched EWS data,therefore the application denied thematch.
nnn = 028
No matching range, single streetsegment found.
nnn = 029
No matching range, multiple streetsegments found.
nnn = 030
107Spectrum™ Technology Platform 12.0 Siebel Module User Guide
Match and Location Codes for U.S. Geocoding
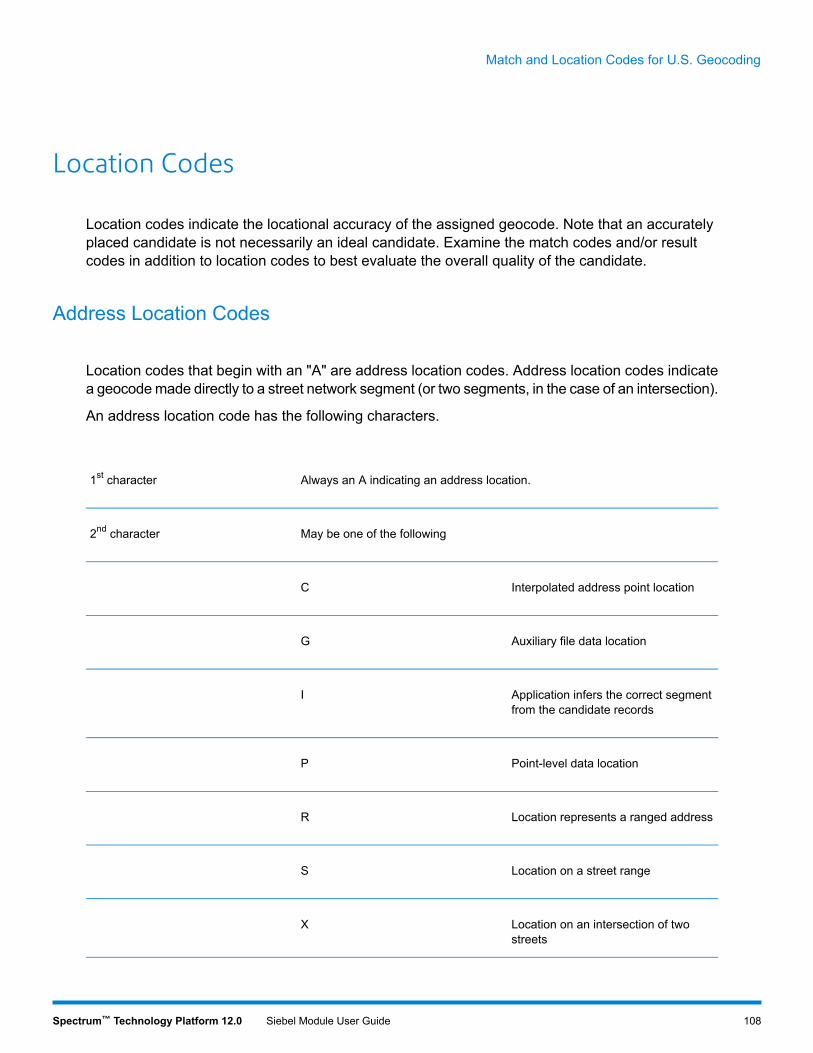
Location Codes
Location codes indicate the locational accuracy of the assigned geocode. Note that an accuratelyplaced candidate is not necessarily an ideal candidate. Examine the match codes and/or resultcodes in addition to location codes to best evaluate the overall quality of the candidate.
Address Location Codes
Location codes that begin with an "A" are address location codes. Address location codes indicatea geocodemade directly to a street network segment (or two segments, in the case of an intersection).
An address location code has the following characters.
Always an A indicating an address location.1st character
May be one of the following2nd character
Interpolated address point locationC
Auxiliary file data locationG
Application infers the correct segmentfrom the candidate records
I
Point-level data locationP
Location represents a ranged addressR
Location on a street rangeS
Location on an intersection of twostreets
X
108Spectrum™ Technology Platform 12.0 Siebel Module User Guide
Match and Location Codes for U.S. Geocoding

Digit indicating other qualities about the location.3rd and 4th character
Table 40: Address Location Codes
DescriptionCode
Indicates an auxiliary file for a geocode match wheren is one of the following values:
AGn
The geocode represents the center of a parcel orbuilding.
n = 0
The geocode is an interpolated address along asegment.
n = 1
The geocode is an interpolated address along asegment, and the side of the street cannot bedetermined from the data provided in the auxiliaryfile record.
n = 2
The geocode is the midpoint of the street segment.n = 3
Indicates a point-level geocode match representingthe center of a parcel or building, where nn is one ofthe following values:
APnn
Parcel centroid
Indicates the center of an accessor's parcel (tract orlot) polygon.When the center of an irregularly shapedparcel falls outside of its polygon, the centroid ismanually repositioned to fall inside the polygon asclosely as possible to the actual center.
nn = 02
Address points
Represents field-collected GPS points withfield-collected address data.
nn = 04
109Spectrum™ Technology Platform 12.0 Siebel Module User Guide
Match and Location Codes for U.S. Geocoding

DescriptionCode
Structure centroid
Indicates the center of a building footprint polygon,where the building receives mail or has telephoneservice.
Usually a residential address consists of a singlebuilding. For houses with outbuildings (detachedgarages, shed, barns, etc.), only the residences havea structure point. Condominiums and duplexes havemultiple points for each building. Larger buildings,such as apartment complexes, typically receive mailat one address for each building and thereforeindividual apartments are not represented as discretestructure points.
Shopping malls, industrial complexes, and academicor medical center campuses where one buildingaccepts mail for the entire complex are representedas one point. When addresses are assigned tomultiple buildings within one complex, eachaddressed structure is represented by a point.
If the center of a structure falls outside of its polygon,the center is manually repositioned to fall inside thepolygon.
nn = 05
Manually placed
Address points are manually placed to coincide withthe midpoint of a parcel's street frontage at a distancefrom the center line.
nn = 07
Front door point
Represents the designated primary entrance to abuilding. If a building hasmultiple entrances and thereis no designated primary entrance or the primaryentrance cannot readily be determined, the primaryentrance is chosen based on proximity to the mainaccess street and availability of parking.
nn = 08
Driveway offset point
Represents a point located on the primary accessroad (most commonly a driveway) at a perpendiculardistance of between 33-98 feet (10-30 meters) fromthe main roadway.
nn = 09
110Spectrum™ Technology Platform 12.0 Siebel Module User Guide
Match and Location Codes for U.S. Geocoding
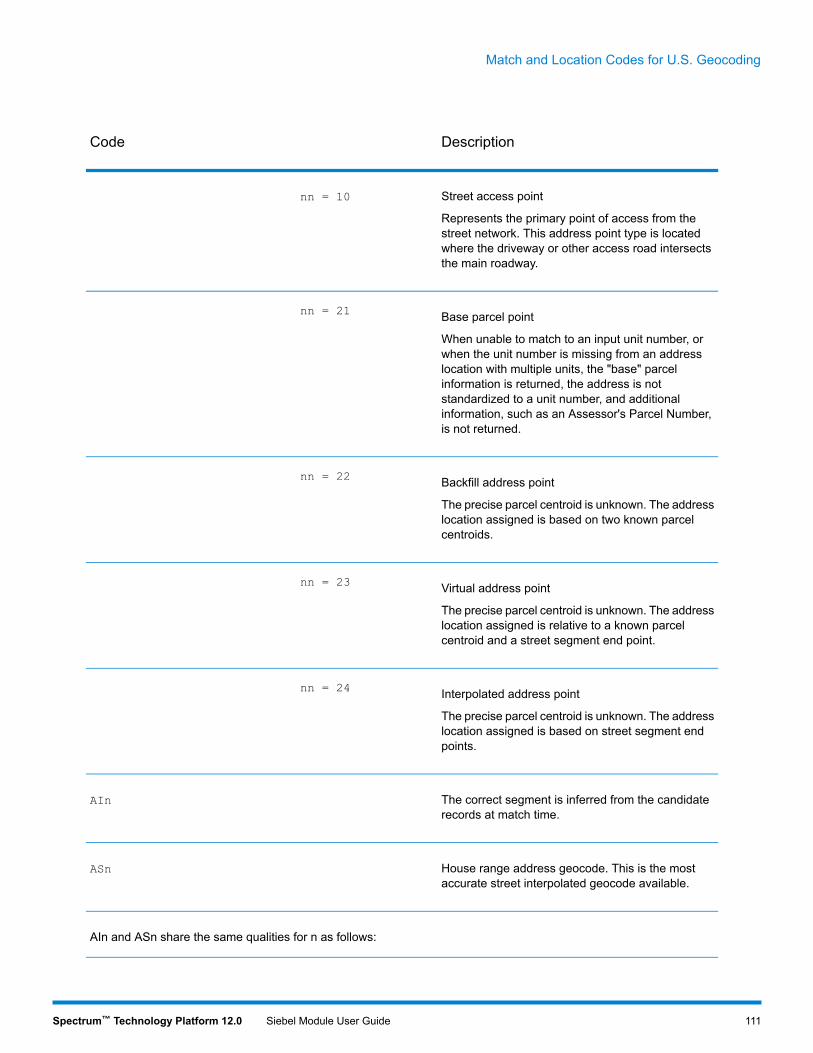
DescriptionCode
Street access point
Represents the primary point of access from thestreet network. This address point type is locatedwhere the driveway or other access road intersectsthe main roadway.
nn = 10
Base parcel point
When unable to match to an input unit number, orwhen the unit number is missing from an addresslocation with multiple units, the "base" parcelinformation is returned, the address is notstandardized to a unit number, and additionalinformation, such as an Assessor's Parcel Number,is not returned.
nn = 21
Backfill address point
The precise parcel centroid is unknown. The addresslocation assigned is based on two known parcelcentroids.
nn = 22
Virtual address point
The precise parcel centroid is unknown. The addresslocation assigned is relative to a known parcelcentroid and a street segment end point.
nn = 23
Interpolated address point
The precise parcel centroid is unknown. The addresslocation assigned is based on street segment endpoints.
nn = 24
The correct segment is inferred from the candidaterecords at match time.
AIn
House range address geocode. This is the mostaccurate street interpolated geocode available.
ASn
AIn and ASn share the same qualities for n as follows:
111Spectrum™ Technology Platform 12.0 Siebel Module User Guide
Match and Location Codes for U.S. Geocoding
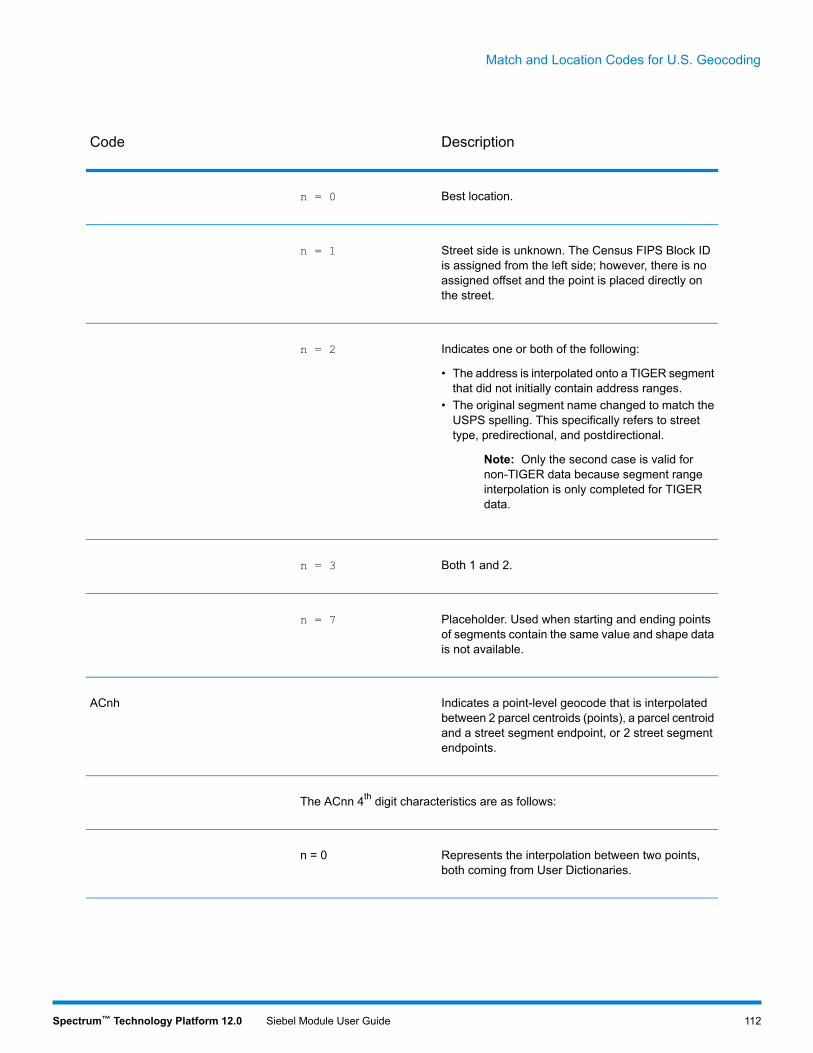
DescriptionCode
Best location.n = 0
Street side is unknown. The Census FIPS Block IDis assigned from the left side; however, there is noassigned offset and the point is placed directly onthe street.
n = 1
Indicates one or both of the following:
• The address is interpolated onto a TIGER segmentthat did not initially contain address ranges.
• The original segment name changed to match theUSPS spelling. This specifically refers to streettype, predirectional, and postdirectional.
Note: Only the second case is valid fornon-TIGER data because segment rangeinterpolation is only completed for TIGERdata.
n = 2
Both 1 and 2.n = 3
Placeholder. Used when starting and ending pointsof segments contain the same value and shape datais not available.
n = 7
Indicates a point-level geocode that is interpolatedbetween 2 parcel centroids (points), a parcel centroidand a street segment endpoint, or 2 street segmentendpoints.
ACnh
The ACnn 4th digit characteristics are as follows:
Represents the interpolation between two points,both coming from User Dictionaries.
n = 0
112Spectrum™ Technology Platform 12.0 Siebel Module User Guide
Match and Location Codes for U.S. Geocoding
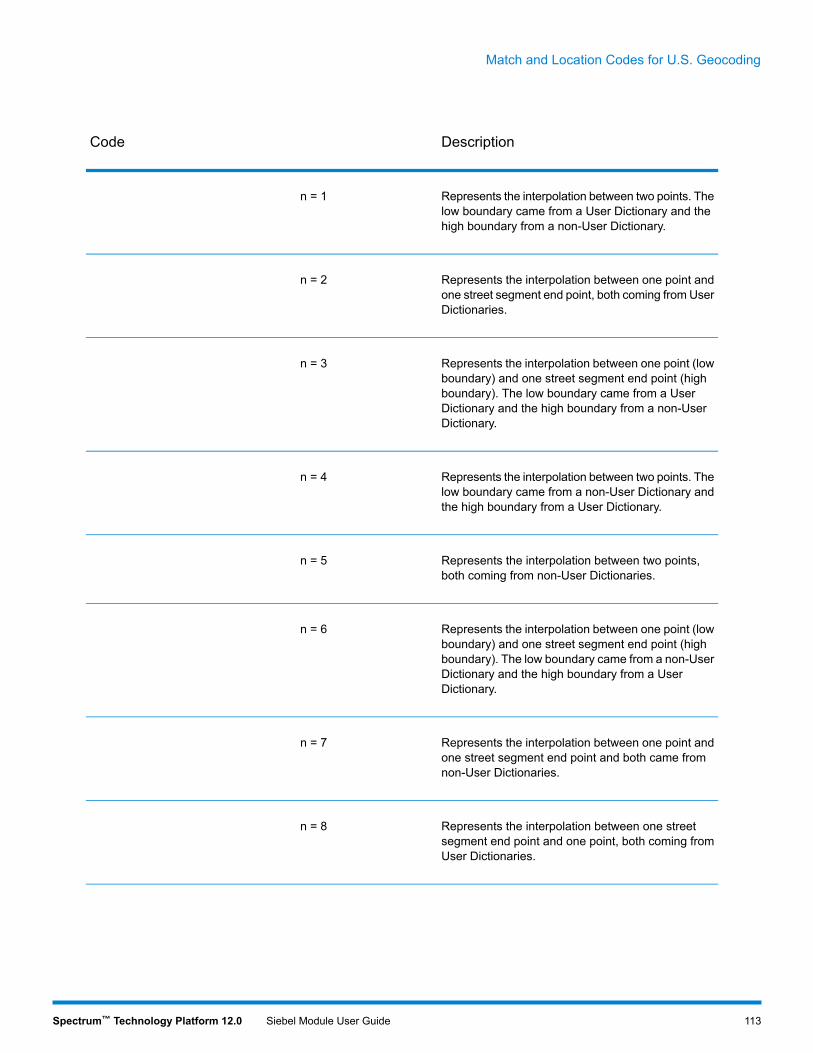
DescriptionCode
Represents the interpolation between two points. Thelow boundary came from a User Dictionary and thehigh boundary from a non-User Dictionary.
n = 1
Represents the interpolation between one point andone street segment end point, both coming fromUserDictionaries.
n = 2
Represents the interpolation between one point (lowboundary) and one street segment end point (highboundary). The low boundary came from a UserDictionary and the high boundary from a non-UserDictionary.
n = 3
Represents the interpolation between two points. Thelow boundary came from a non-User Dictionary andthe high boundary from a User Dictionary.
n = 4
Represents the interpolation between two points,both coming from non-User Dictionaries.
n = 5
Represents the interpolation between one point (lowboundary) and one street segment end point (highboundary). The low boundary came from a non-UserDictionary and the high boundary from a UserDictionary.
n = 6
Represents the interpolation between one point andone street segment end point and both came fromnon-User Dictionaries.
n = 7
Represents the interpolation between one streetsegment end point and one point, both coming fromUser Dictionaries.
n = 8
113Spectrum™ Technology Platform 12.0 Siebel Module User Guide
Match and Location Codes for U.S. Geocoding

DescriptionCode
Represents the interpolation between one streetsegment end point (low boundary) and one point(high boundary). The low boundary came from a UserDictionary and the high boundary from a non-UserDictionary.
n = 9
Represents the interpolation between two streetsegment end points, both coming from UserDictionaries.
n = A
Represents the interpolation between two streetsegment end points. The low boundary came from aUser Dictionary and the high boundary from anon-User Dictionary.
n = B
Represents the interpolation between one streetsegment end point (low boundary) and one point(high boundary). The low boundary came from anon-User Dictionary and the high boundary from aUser Dictionary.
n = C
Represents the interpolation between one streetsegment end point and one point, both coming fromnon-User Dictionary.
n = D
Represents the interpolation between two streetsegment end points. The low boundary came from anon-User Dictionary and the high boundary from aUser Dictionary.
n = E
Represents the interpolation between two streetsegment end points, both coming from non-UserDictionaries.
n = F
Ranged address geocode, where n is one of thefollowing:
ARn
114Spectrum™ Technology Platform 12.0 Siebel Module User Guide
Match and Location Codes for U.S. Geocoding

DescriptionCode
The geocode is placed along a single street segment,midway between the interpolated location of the firstand second input house numbers in the range.
n = 1
The geocode is placed along a single street segment,midway between the interpolated location of the firstand second input house numbers in the range, andthe side of the street is unknown. The Census FIPSBlock ID is assigned from the left side; however, thereis no assigned offset and the point is placed directlyon the street.
n = 2
The input range spansmultiple USPS segments. Thegeocode is placed on the endpoint of the segmentwhich corresponds to the first input house number,closest to the end nearest the second input housenumber.
n = 4
Placeholder. Used when the starting and endingpoints of the matched segment contain the samevalue and shape data is not available.
n = 7
Intersection geocode, where n is one of the following:AXn
Standard single-point intersection computed from thecenter lines of street segments.
n = 3
Interpolated (divided-road) intersection geocode.Attempts to return a centroid for the intersection.
n = 8
Street Centroid Location Codes
Location codes that begin with "C" are street centroid location codes. Street centroid location codesindicate the Census ID accuracy and the position of the geocode on the returned street segment.Street centroids may be returned if the street centroid fallback option is enabled and an address-levelgeocode could not be determined.
115Spectrum™ Technology Platform 12.0 Siebel Module User Guide
Match and Location Codes for U.S. Geocoding

A street centroid location code has the following characters.
Always C indicating a location derived from a streetsegment.
1st character
Census ID accuracy based on the search area used toobtain matching Street Segment.
2nd character
Location of geocode on the returned street segment.3rd character
The following table contains the values and descriptions for the location codes.
DescriptionCodeCharacter position
2nd Character
Block Group accuracy (most accurate).Based on input ZIP Code.
B
Census Tract accuracy. Based on inputZIP Code.
T
Unclassified Census accuracy.Normally accurate to at least the Countylevel. Based on input ZIP Code.
C
Unknown Census accuracy. Based onFinance area.
F
Unknown Census accuracy. Based oninput City.
P
3rd Character
116Spectrum™ Technology Platform 12.0 Siebel Module User Guide
Match and Location Codes for U.S. Geocoding

DescriptionCodeCharacter position
Segment Centroid.C
Segment low-range end point.L
Segment high-range end point.H
ZIP + 4 Centroid Location Codes
Location codes that begin with a "Z" are ZIP + 4 centroid location codes. ZIP + 4 centroids indicatea geocode could not be determined for the address, so the location of the center of the address'sZIP + 4 was returned instead. ZIP + 4 centroid location codes indicate the quality of two locationattributes: Census ID accuracy and positional accuracy.
A ZIP + 4 centroid location code has the following characters.
Always Z indicating a location derived from a ZIP centroid.1st character
Census ID accuracy.2nd character
Location type.3rd character
How the location and Census ID was defined. Provided forcompleteness, but may not be useful for most applications.
4th character
Table 41: ZIP + 4 Centroid Location Codes
DescriptionCodeCharacter Position
2nd Character
117Spectrum™ Technology Platform 12.0 Siebel Module User Guide
Match and Location Codes for U.S. Geocoding

DescriptionCodeCharacter Position
Block Group accuracy (most accurate).B
Census Tract accuracy.T
Unclassified Census accuracy.Normally accurate to at least the Countylevel.
C
3rd Character
Location of the Post Office that deliversmail to the address, a 5-digit ZIP Codecentroid, or a location based uponlocale (city). See the 4th character fora precise indication of locationalaccuracy.
5
Location based upon a ZIP + 2 centroid.These locations can represent amultiple block area in urban locations,or a slightly larger area in rural settings.
7
Location based upon a ZIP + 4 centroid.These are the most accurate centroidsand normally place the location on thecorrect block face. For a small numberof records, the location may be themiddle of the entire street on which theZIP + 4 falls. See the 4th character fora precise indication of locationalaccuracy.
9
4th Character
118Spectrum™ Technology Platform 12.0 Siebel Module User Guide
Match and Location Codes for U.S. Geocoding
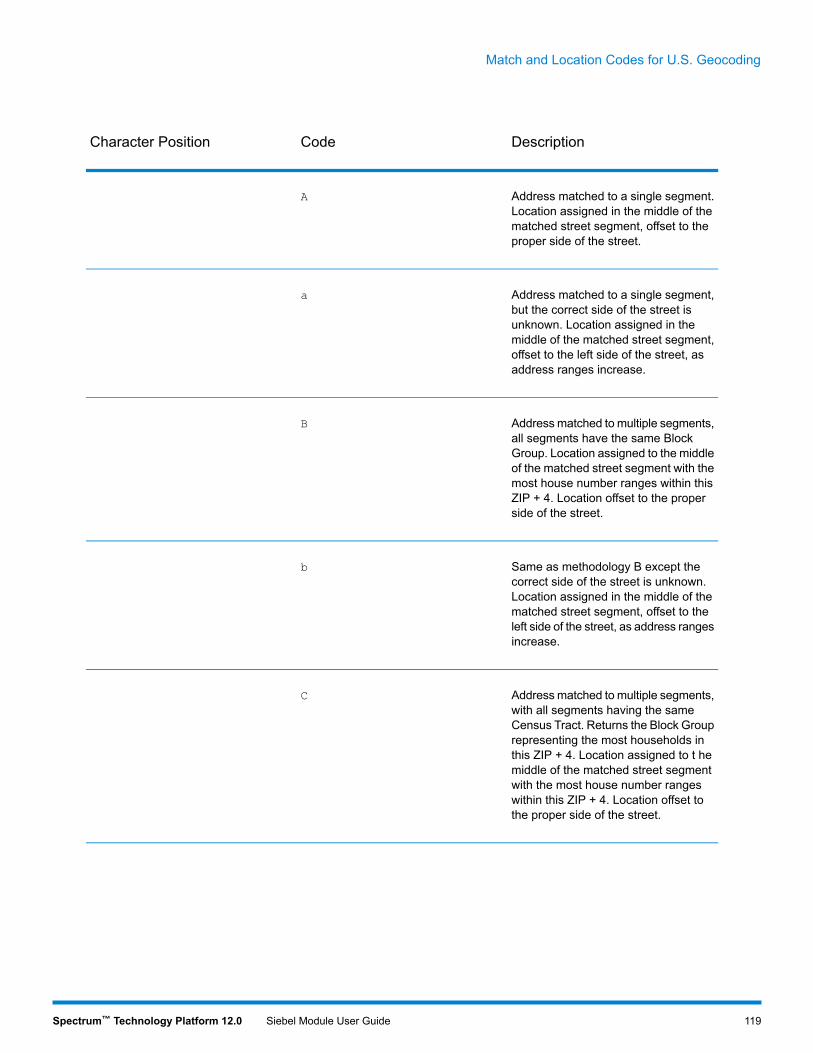
DescriptionCodeCharacter Position
Address matched to a single segment.Location assigned in the middle of thematched street segment, offset to theproper side of the street.
A
Address matched to a single segment,but the correct side of the street isunknown. Location assigned in themiddle of the matched street segment,offset to the left side of the street, asaddress ranges increase.
a
Addressmatched to multiple segments,all segments have the same BlockGroup. Location assigned to the middleof the matched street segment with themost house number ranges within thisZIP + 4. Location offset to the properside of the street.
B
Same as methodology B except thecorrect side of the street is unknown.Location assigned in the middle of thematched street segment, offset to theleft side of the street, as address rangesincrease.
b
Addressmatched to multiple segments,with all segments having the sameCensus Tract. Returns the Block Grouprepresenting the most households inthis ZIP + 4. Location assigned to t hemiddle of the matched street segmentwith the most house number rangeswithin this ZIP + 4. Location offset tothe proper side of the street.
C
119Spectrum™ Technology Platform 12.0 Siebel Module User Guide
Match and Location Codes for U.S. Geocoding
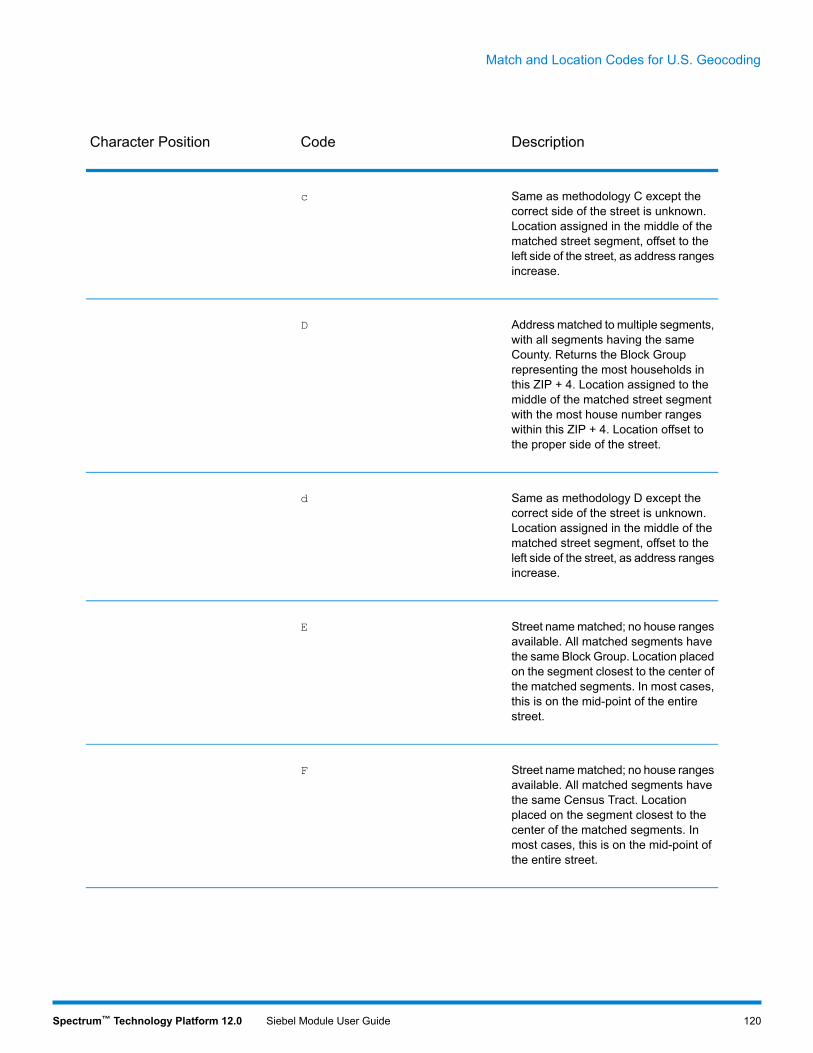
DescriptionCodeCharacter Position
Same as methodology C except thecorrect side of the street is unknown.Location assigned in the middle of thematched street segment, offset to theleft side of the street, as address rangesincrease.
c
Addressmatched to multiple segments,with all segments having the sameCounty. Returns the Block Grouprepresenting the most households inthis ZIP + 4. Location assigned to themiddle of the matched street segmentwith the most house number rangeswithin this ZIP + 4. Location offset tothe proper side of the street.
D
Same as methodology D except thecorrect side of the street is unknown.Location assigned in the middle of thematched street segment, offset to theleft side of the street, as address rangesincrease.
d
Street namematched; no house rangesavailable. All matched segments havethe same Block Group. Location placedon the segment closest to the center ofthe matched segments. In most cases,this is on the mid-point of the entirestreet.
E
Street namematched; no house rangesavailable. All matched segments havethe same Census Tract. Locationplaced on the segment closest to thecenter of the matched segments. Inmost cases, this is on the mid-point ofthe entire street.
F
120Spectrum™ Technology Platform 12.0 Siebel Module User Guide
Match and Location Codes for U.S. Geocoding

DescriptionCodeCharacter Position
Street namematched (no house rangesavailable). All matched segments havethe same County. Location placed onthe segment closest to the center of thematched segments. In most cases, thisis on the mid-point of the entire street.
G
Same as methodology G, but somesegments are not in the same County.Used for less than .05% of thecentroids.
H
Created ZIP + 2 cluster centroid asdefined by methodologies A, a, B, andb. All centroids in this ZIP + 2 clusterhave the same Block Group. Locationassigned to the ZIP + 2 centroid.
I
Created ZIP + 2 cluster centroid asdefined by methodologies A, a, B, b, C,and c. All centroids in this ZIP + 2cluster have the same Census Tract.Location assigned to the ZIP + 2centroid.
J
Created ZIP + 2 cluster centroid asdefined by methodologies A, a, B, b, C,c, D, and d. Location assigned to theZIP + 2 centroid.
K
Created ZIP + 2 cluster centroid asdefined by methodology E. All centroidsin this ZIP + 2 cluster have the sameBlock Group. Location assigned to theZIP + 2 centroid.
L
Created ZIP+2 cluster centroid asdefined by methodology E and F. Allcentroids in this ZIP + 2 cluster havethe same Census Tract. Locationassigned to the ZIP + 2 centroid.
M
121Spectrum™ Technology Platform 12.0 Siebel Module User Guide
Match and Location Codes for U.S. Geocoding

DescriptionCodeCharacter Position
Created ZIP + 2 cluster centroid asdefined by methodology E, F, G, andH. Location assigned to the ZIP + 2centroid.
N
ZIP Code is obsolete and not currentlyused by the USPS. Historic locationassigned.
O
Over 95% of addresses in this ZIPCode are in a single Census Tract.Location assigned to the ZIP Codecentroid.
V
Over 80% of addresses in this ZIPCode are in a single Census Tract.Reasonable Census Tract accuracy.Location assigned to the ZIP Codecentroid.
W
Less than 80% of addresses in this ZIPCode are in a single Census Tract.Census ID is uncertain. Locationassigned to the ZIP Code centroid.
X
Rural or sparsely populated area.Census code is uncertain. Locationbased upon the USGS places file.
Y
P.O. Box or General Deliveryaddresses. Census code is uncertain.Location based upon the Post Officelocation that delivers the mail to thataddress.
Z
122Spectrum™ Technology Platform 12.0 Siebel Module User Guide
Match and Location Codes for U.S. Geocoding

Geographic Centroid Location Codes
Location codes that begin with "G" are geographic centroid location codes. Geographic centroidsmay be returned if the street centroid fallback option is enabled and an address-level geocode couldnot be determined. Geographic centroid location codes indicate the quality a city, county, or statecentroid.
A geographic centroid location code has the following characters.
Always G indicating a location derived from a geographiccentroid.
1st character
Geographic area type. One of the following:
Municipality (for example, a city)M
CountyC
StateS
2nd character
Address Unavailable
Location codes that begin with "E" indicate that neither an address location nor a ZIP + 4 centroidcould be determined. This usually occurs when you have requested ZIP Code centroids of a highquality, and one is not available for that match.
An unavailable address code has the following characters.
Table 42: Location Codes for No Match
DescriptionCode
Indicates an error, or no match. Thiscan occur when the address entereddoes not exist in the database, or theaddress is badly formed and cannot beparsed correctly. The last three digitsof an error code indicate which parts ofan address the application could notmatch to the database.
Ennn
123Spectrum™ Technology Platform 12.0 Siebel Module User Guide
Match and Location Codes for U.S. Geocoding

DescriptionCode
No match made.nnn = 000
Low level error.nnn = 001
Could not find data file.nnn = 002
Incorrect GSD file signature or versionID.
nnn = 003
GSD file out of date. Only occurs inCASS mode.
nnn = 004
No city and state or ZIP Code found.nnn = 010
Input ZIP not in the directory.nnn = 011
Input city not in the directory.nnn = 012
Input city not unique in the directory.nnn = 013
Out of licensed area. Only occurs ifusing Pitney Bowes licensingtechnology.
nnn = 014
Record count is depleted and licensehas expired.
nnn = 015
No matching streets found in directory.nnn = 020
No matching cross streets for anintersection match.
nnn = 021
124Spectrum™ Technology Platform 12.0 Siebel Module User Guide
Match and Location Codes for U.S. Geocoding

DescriptionCode
No matching segments.nnn = 022
Unresolved match.nnn = 023
Nomatching segments. (Same as 022.)nnn = 024
Too many possible cross streets forintersection matching.
nnn = 025
No address found when attempting amultiline match.
nnn = 026
Invalid directional attempted.nnn = 027
Record also matched EWS data,therefore the application denied thematch.
nnn = 028
No matching range, single streetsegment found.
nnn = 029
No matching range, multiple streetsegments found.
nnn = 030
125Spectrum™ Technology Platform 12.0 Siebel Module User Guide
Match and Location Codes for U.S. Geocoding

C - Encountering FalsePositives
In this section
What is a False-Positive? 127Reporting DPV False-Positive Violations 127Reporting LACS/Link False-Positive Violations 130

What is a False-Positive?
To prevent the generation of address lists, the DPV and LACSLink databases include false-positiverecords. False-positive records are artificially manufactured addresses that reside in a false-positivetable. For each negative response that occurs in a DPV or LACSLink query, a query is made to thefalse-positive table. A match to this table (called a false-positive match) disables your DPV orLACSLink key. In batch processing the job that contains the violation will complete successfully butyou will not be able to run any subsequent jobs that use DPV or LACSLink until you report the violationand obtain a key to reactivate DPV or LACSLink.
Note: The term "seed record violation" is also used to refer to encountering false positiverecords. The two terms mean the same thing.
Reporting DPV False-Positive Violations
Spectrum™ Technology Platform indicates a false-positive match via messages in the server log.
During batch processing, if you encounter a false positive record the job will continue. After the jobcompletes you will not be able to run any other jobs using DPV because your DPV key is disabled.When a DPV false positive record violation occurs, the following text is displayed in the ExecutionHistory:
DPV Seed Record Violation. Seed Code S<ZIP, ZIP+4, Address, Unit>
You can report the violation and obtain a restart key by following these steps.
1. In your browser, go to http://<yourserver>:<port>/<product code>/dpv.jsp. For example,http://localhost:8080/unc/dpv.jsp for the Universal Addressing Module andhttp://localhost:8080/geostan/dpv.jsp for the Enterprise Geocoding Module.
2. Enter the mailer's information into each field. The number in parentheses after each field nameindicates the maximum length of the field.
3. Click Submit when you're done. A File Download dialog will appear.4. Click Save to save the file to your computer. A Save As dialog will appear.5. Specify a file name and location on your local hard drive (for example c:\DPVSeedFile.txt)
and click Save.6. Go to www.g1.com/support and log in.7. Click DPV & LACSLink False Positive.8. Follow the on-screen instructions to attach your seed file and obtain a restart key.
127Spectrum™ Technology Platform 12.0 Siebel Module User Guide
Encountering False Positives

DPV False Positive Header File Layout
The USPS® has determined the required layout of the DPV false-positive header file, which iscurrently defined as a fixed-length file containing two or more 180-byte records. The first recordmust always be the header record, whose layout is shown below.
Table 43: DPV False-Positive Header Record Layout
FormatDescriptionLengthPosition
AlphanumericMailer's company name401-40
AlphanumericMailer's address line5841-98
AlphanumericMailer's city name2899-126
AlphabeticMailer's state abbreviation2127-128
NumericMailer's 9-digit ZIP Code9129-137
NumericTotal Records Processed9138-146
NumericTotal Records DPV Matched9147-155
NumericPercent Match Rate to DSF9156-164
NumericPercent Match Rate to ZIP + 4®9165-173
NumericNumber of ZIP Codes on file5174-178
NumericNumber of False-Positives2179-180
128Spectrum™ Technology Platform 12.0 Siebel Module User Guide
Encountering False Positives
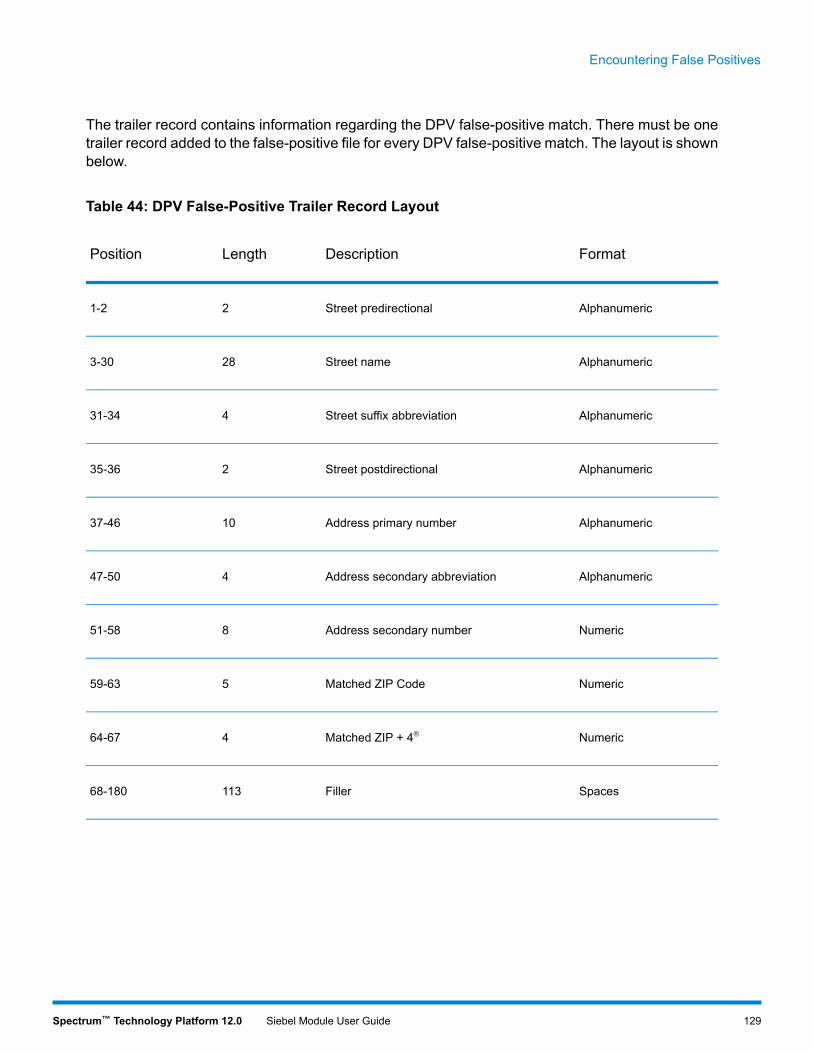
The trailer record contains information regarding the DPV false-positive match. There must be onetrailer record added to the false-positive file for every DPV false-positive match. The layout is shownbelow.
Table 44: DPV False-Positive Trailer Record Layout
FormatDescriptionLengthPosition
AlphanumericStreet predirectional21-2
AlphanumericStreet name283-30
AlphanumericStreet suffix abbreviation431-34
AlphanumericStreet postdirectional235-36
AlphanumericAddress primary number1037-46
AlphanumericAddress secondary abbreviation447-50
NumericAddress secondary number851-58
NumericMatched ZIP Code559-63
NumericMatched ZIP + 4®464-67
SpacesFiller11368-180
129Spectrum™ Technology Platform 12.0 Siebel Module User Guide
Encountering False Positives

Reporting LACS/Link False-Positive Violations
Spectrum™ Technology Platform indicates a false-positive match via messages in the server log.Batch jobs will fail if a false-positive match occurs and client/server calls will throw an exception.
Note: The term "seed record violation" is also used to refer to encountering false positiverecords. The two terms mean the same thing.
When a false positive record is encountered, the server log will say:
2005-05-19 09:40:10,758 WARN [com.g1.dcg.component.Log] Seed recordviolation for RR 1 R74039 29242005-05-19 09:40:10,774 ERROR [com.g1.dcg.component.Log] FeatureDisabled: LLB: LACS Seed Record Violation. Seed Code: R74039 29242005-05-19 09:40:10,867 ERROR[com.g1.dcg.job.server.stages.JobRunnerStages] Error executing jobcom.g1.dcg.stage.StageException: com.g1.dcg.component.ComponentException:Feature Disabled: LLB
1. In your browser, go to http://<ServerName>:<port>/<product code>/lacslink.jsp. For example,http://localhost:8080/unc/lacslink.jsp for the Universal Addressing Module andhttp://localhost:8080/geostan/lacslink.jsp for the Enterprise Geocoding Module.
2. Enter the mailer's information into each field. The number in parentheses after the field nameindicates the maximum length of the field. Click Submit when you're done. A File Downloaddialog will appear.
3. Click Save to save the file to your computer. A Save As dialog will appear.4. Specify a file name and location on your local hard drive (for example c:\lacslink.txt) and
click Save.5. Go to www.g1.com/support and log in.6. Click DPV & LACSLink False Positive.7. Follow the on-screen instructions to attach your seed file and obtain a restart key.
130Spectrum™ Technology Platform 12.0 Siebel Module User Guide
Encountering False Positives

Notices

© 2017 Pitney Bowes Software Inc. All rights reserved. MapInfo and Group 1 Software are trademarksof Pitney Bowes Software Inc. All other marks and trademarks are property of their respectiveholders.
USPS® Notices
Pitney Bowes Inc. holds a non-exclusive license to publish and sell ZIP + 4® databases on opticaland magnetic media. The following trademarks are owned by the United States Postal Service:CASS, CASS Certified, DPV, eLOT, FASTforward, First-Class Mail, Intelligent Mail, LACSLink,NCOALink, PAVE, PLANET Code, Postal Service, POSTNET, Post Office, RDI, SuiteLink , UnitedStates Postal Service, Standard Mail, United States Post Office, USPS, ZIP Code, and ZIP + 4.This list is not exhaustive of the trademarks belonging to the Postal Service.
Pitney Bowes Inc. is a non-exclusive licensee of USPS® for NCOALink® processing.
Prices for Pitney Bowes Software's products, options, and services are not established, controlled,or approved by USPS® or United States Government. When utilizing RDI™ data to determineparcel-shipping costs, the business decision on which parcel delivery company to use is not madeby the USPS® or United States Government.
Data Provider and Related Notices
Data Products contained on this media and used within Pitney Bowes Software applications areprotected by various trademarks and by one or more of the following copyrights:© Copyright United States Postal Service. All rights reserved.© 2014 TomTom. All rights reserved. TomTom and the TomTom logo are registered trademarks ofTomTom N.V.© 2016 HERE
Fuente: INEGI (Instituto Nacional de Estadística y Geografía)
Based upon electronic data © National Land Survey Sweden.© Copyright United States Census Bureau© Copyright Nova Marketing Group, Inc.
Portions of this program are © Copyright 1993-2007 by Nova Marketing Group Inc. All RightsReserved© Copyright Second Decimal, LLC© Copyright Canada Post Corporation
This CD-ROM contains data from a compilation in which Canada Post Corporation is the copyrightowner.© 2007 Claritas, Inc.
The Geocode Address World data set contains data licensed from the GeoNames Project(www.geonames.org) provided under the Creative Commons Attribution License ("Attribution
132Spectrum™ Technology Platform 12.0 Siebel Module User Guide
Copyright
License") located at http://creativecommons.org/licenses/by/3.0/legalcode. Your use of theGeoNames data (described in the Spectrum™ Technology Platform User Manual) is governed bythe terms of the Attribution License, and any conflict between your agreement with Pitney BowesSoftware, Inc. and the Attribution License will be resolved in favor of the Attribution License solelyas it relates to your use of the GeoNames data.
133Spectrum™ Technology Platform 12.0 Siebel Module User Guide
Copyright
3001 Summer Street
Stamford CT 06926-0700
USA
www.pitneybowes.com
© 2017 Pitney Bowes Software Inc.
All rights reserved
Top Related
Copyright © 2022 FDOKUMEN

