


Bahasa
Halaman
Hukum


Scripting

2Scripting
User Written “Code” in MWO
Equations
On Schematic or Global Definitions Page
- Also typically on Output Equations Page
To set a parameter
To pass measured data to a
parameter (an output equation)
Built in functions available
Note: Can also create a function by using scripting.

3Scripting
User Written “Code” in MWO - 2
Scripting
Scripts are written in Visual Basic.
• Built in editor with debugger.
Scripts can be run from menu
• Global > Use in all projects.
• Project > Goes with project.
Used for general operations in MWO and the file system.

4Scripting
User Written “Code” in MWO - 3
Custom Library (PDK) Code
Used for writing compiled models, PCells, and Bridge Code.
Note: This code is written in C++.
The parameters (W,L) change
layout and model.
Bridge code allows “smart”
connections.

5Scripting
Scripts
Accessing Scripts
Global Scripts – are saved on your
computer.
Project Scripts – are saved with the project.
Note: Global Scripts – are saved in:
• Scripts come with software. In install directory
C:\Program Files\AWR\AWR2008\scripts
• The Examples.bas file – has many scripts in it.
In any directory specifed in your user.ini file: Help
> Show Files/Directories > user.ini.
[File Locations]
Projects=C:\john\awr_projects\tmp
Scripts=$DEFAULT;C:\john\awr_projects\scripts;
C:\john\awr_projects\training\subversion\Training
Prior to version 8 – global scripts were saved in a global.mws file.

6Scripting
Information and Help
• MWO/AO Users Guide - Chapter 13 and Appendix A
– Brief discussion on equations, the scripting environment and functions. Section 13.5 has built-in functions and syntax.
• API Programming Guides –
– Scripting/API Guide: Details of VBScript as applied to MWOffice. (Not an intro to VBScript and programming.) On the CD.
– Reference Guide: The schema and listing of the various object classes and methods. On the CD.
– Sax Basic Reference Guide. On the CD.
– Scripting Functions Guide. On the CD.
– Adding Functions to the AWRDE through VB
• Info on VBScript on the Web
– Microsoft has a lot of training.
– http://msdn.microsoft.com/en-us/default.aspx
– Go to the learn Tab … and Visual Basic.

7Scripting
Information and Help - 2
API Documentation
Go to: www.awrcorp.com
- Go to downloads
It wants your email and
password.
- You can get a password by filling out the “I’m and
Existing Customer…” form.
Go to API
Documentation Tab
8Scripting
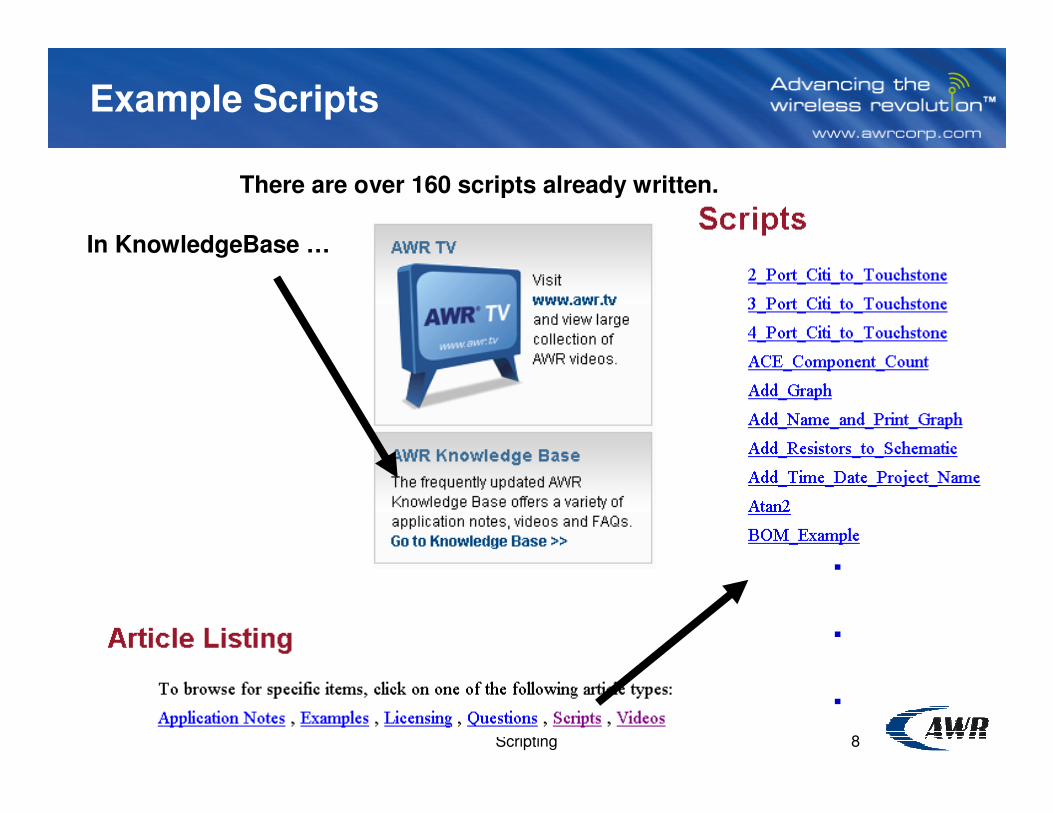
Example Scripts
There are over 160 scripts already written.
In KnowledgeBase …
.
.
.

9Scripting
List of things done in Scripts
• Circuit Synthesis
• Graph formatting
• Test XML Library Files – script places every element in
the XML Library onto a schematic for testing purposes.
• GUI Wizard
• Data Processing
• Project Documentation
• Layout Processing
• Clear Optimization/Yield/Tuning Variables

10Scripting
Acronyms and Glossary
• API - Application Programming Interface
– Environment to program MWO easily.
• COM - Component Object Model
– Allows programs to “talk” to each other...for example, MWO and Excel.
• Sax Basic
– The language we (normally) use for scripting in MWO.
• Schema
– Organization of the various objects that can be used in programming - for example: graph, schematic...
• AWRDE - The AWR Design Environment
– i.e. MWO!
• OOP - Object Oriented Programming
11Scripting
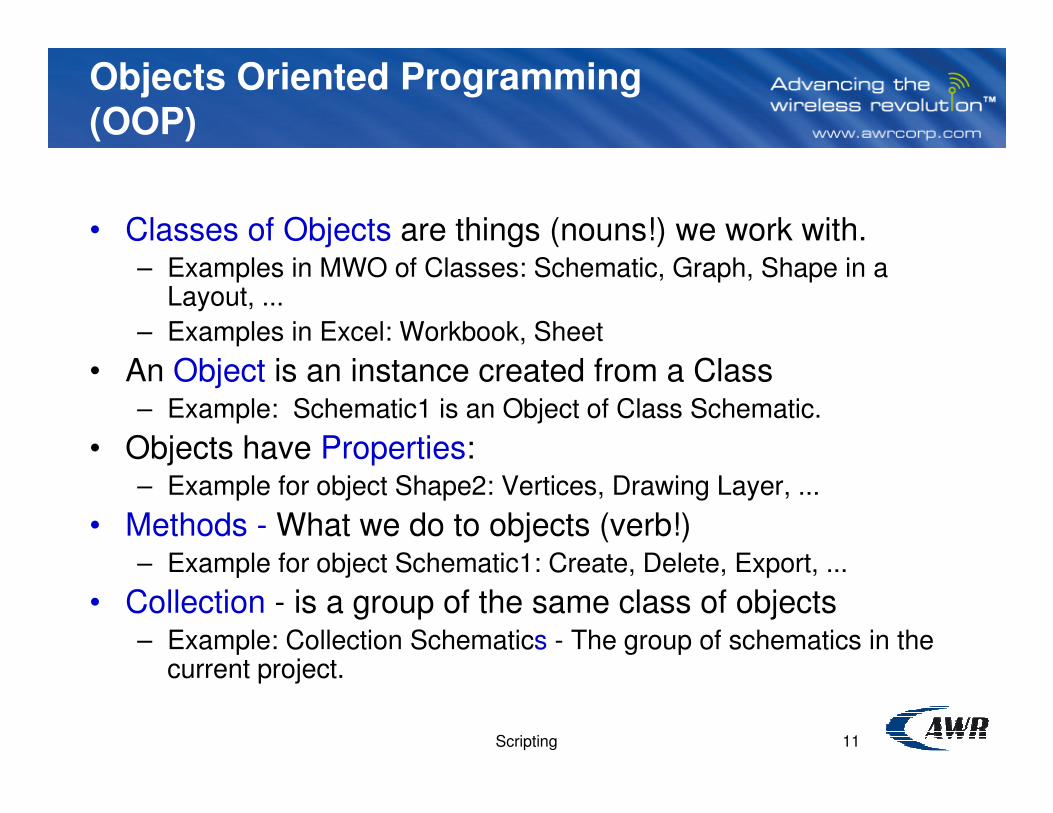
Objects Oriented Programming
(OOP)
• Classes of Objects are things (nouns!) we work with. – Examples in MWO of Classes: Schematic, Graph, Shape in a
Layout, ...
– Examples in Excel: Workbook, Sheet
• An Object is an instance created from a Class– Example: Schematic1 is an Object of Class Schematic.
• Objects have Properties:– Example for object Shape2: Vertices, Drawing Layer, ...
• Methods - What we do to objects (verb!) – Example for object Schematic1: Create, Delete, Export, ...
• Collection - is a group of the same class of objects– Example: Collection Schematics - The group of schematics in the
current project.
12Scripting
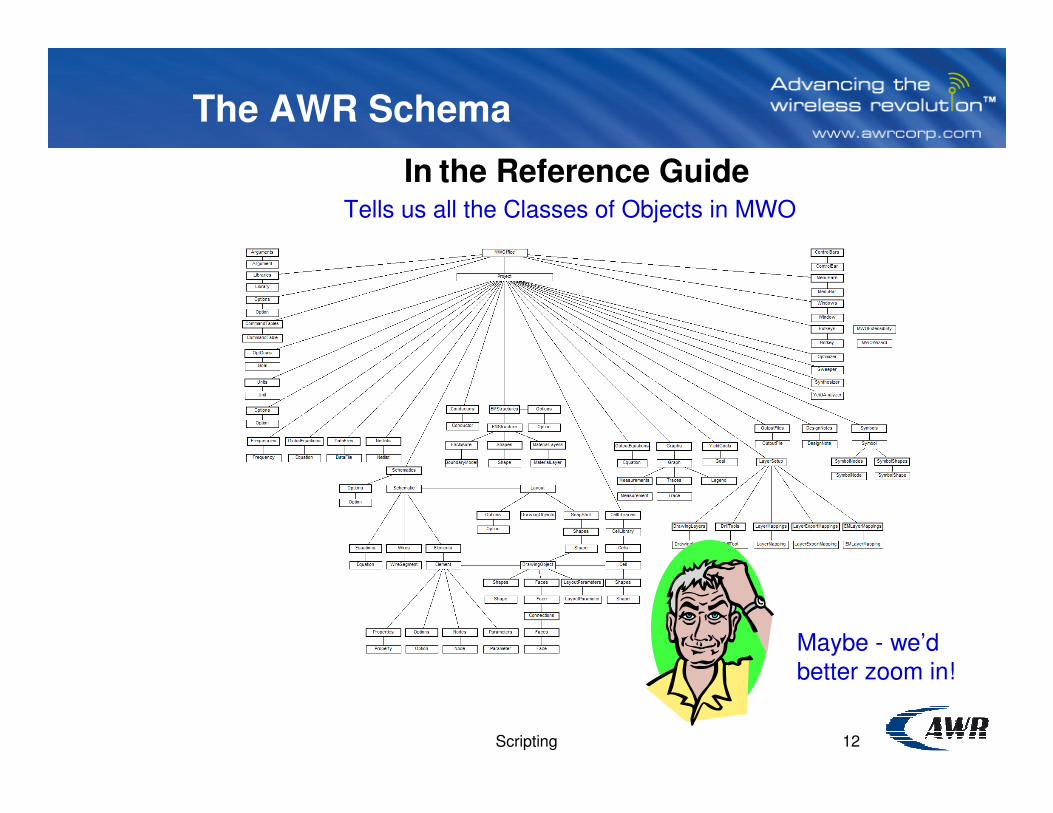
The AWR Schema
In the Reference Guide
Maybe - we’d
better zoom in!
Tells us all the Classes of Objects in MWO

13Scripting
The AWR Schema - 2
The Class of Objects - Project
Has a Collection - Schematics
Which contain one or more objects of
the Class Schematic

14Scripting
The AWR Schema - 3
In the Reference Guide
Lists all Collections and Classes of Objects
Tip: Collections end in an “s”.
Example:
•Schematic - Class
•Schematics - Collection of
Objects of Class Schematic

15Scripting
Scripting Install – Possible Issue
We are running version 8.
• If you never had version 7 on your computer … you have to carry out the
following procedure to fix the scripting editor ( … so Intellisense is
enabled).
1. Open up the command prompt
- Click Run … and type: cmd
2. Go to the 8.0 install directory – usually it’s:
C:\Program Files\AWR\AWR2008
So type: cd C:\Program Files\AWR\AWR2008
3. Type “regsvr32 sb6ent.ocx”
Tip – To type this easily … go to the
Windows Browser – and copy / paste
the path in the command window.

16Scripting
Scripting Help – Possible Vista Problem
If you are running Vista ….
• Typing F1 in the scripting editor – might not bring up the Help file.
Solution:
• You can get a download of WinHlp32.exe from Microsoft at:
http://support.microsoft.com/kb/917607
Problem:

17Scripting
Exercise: List the Schematics
• Write a Program to List the Schematics in a Project
Open up the project: “First_Program”.
Open up the Scripting Editor
To open up the Editor:
•Tools > Scripting Editor
•Alt-F11
•Use the icon:
Standard Toolbar
Tip: If you can’t see it - look
in Tools > Manage Addins.
Make sure AWR Scripting
IDE is checked.

18Scripting
The Scripting Editor
Create a new project script.
-Right Click (RC) on Object Modules > Insert Modules
-Rename it to Schematic_Names
Global Scripts go here.
Project Scripts go here.
Note: All Users See these
for every Project. They are
stored in global.mws
Note: These are stored in
this project only.
19Scripting
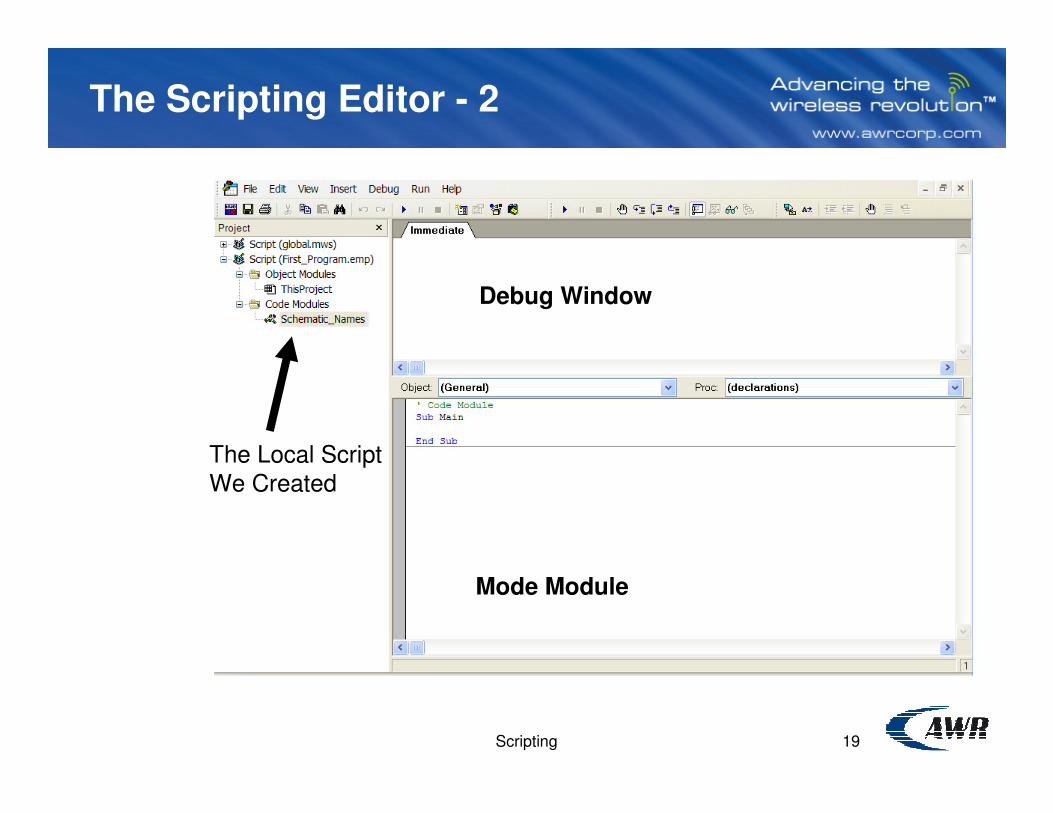
The Scripting Editor - 2
The Local Script
We Created
Debug Window
Mode Module

20Scripting
How to Run Scripts
Method 1: Right click on the name of the script and select Run Sub Main

21Scripting
How to Run Scripts - 2
Method 2: Have the code module open and put the blue Run button (looks
like a VCR play button)
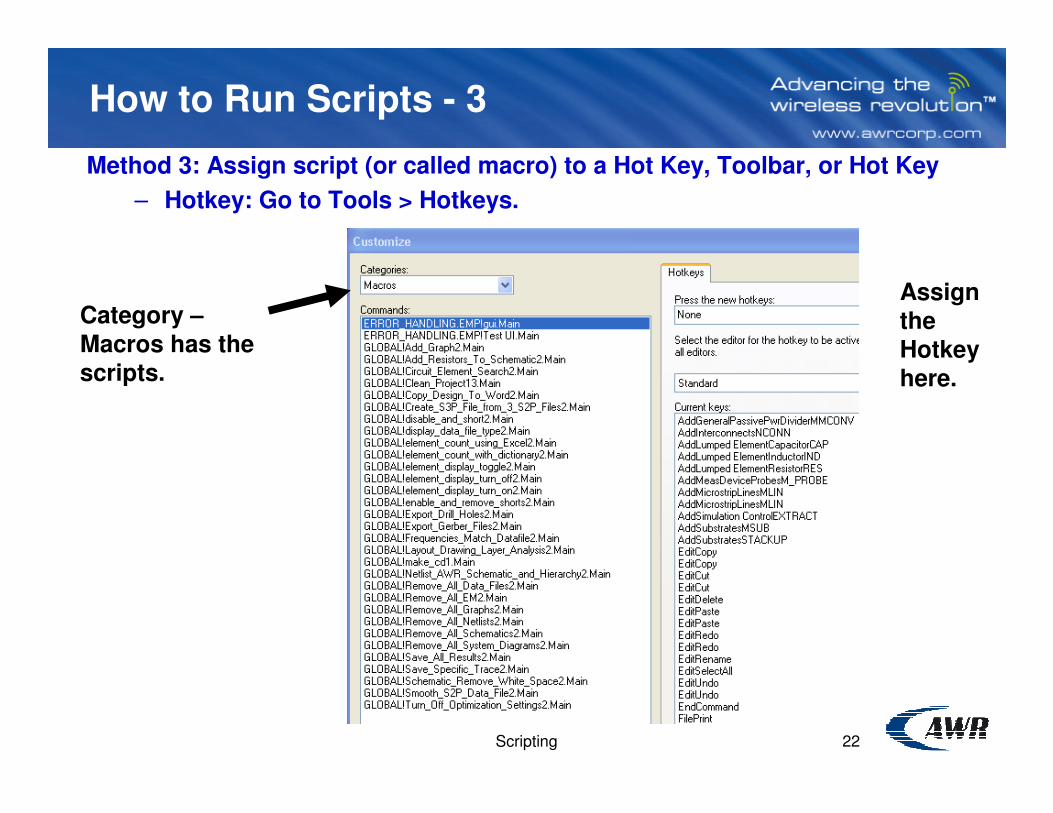
22Scripting
How to Run Scripts - 3
Method 3: Assign script (or called macro) to a Hot Key, Toolbar, or Hot Key
– Hotkey: Go to Tools > Hotkeys.
Category –
Macros has the
scripts.
Assign the
Hotkey
here.

23Scripting
Exercise: List the Schematics - 2
The Strategy for Our Code
1. Look at the Collection Schematics
2. For Each Object of Class Schematic in the Collection Schematics
- Find the Schematic’s Name (A Property)
- Print it to the Debug Window
Next Schematic
So ...
•How do we make an object from a class?
•How do we work with a collection of objects?
•How do we get the object’s properties?
•How do we print?

24Scripting
Miscellaneous SaX Basic Tips
• Comments Begin with ‘
• Use Option Explicit
– Reduces errors as forces StrongTyping.
• Pick names that are easy to understand.
Tip: Strong typing means the variable must be declared in a Dim statement….
• Dim foo As Long
• Dim bar As Schematic
This is done to prevent typos.
• Typing fo0 will give “Error: fo0 not declared”.
•If you don’t have Option Explicit – it will create a variable fo0.

25Scripting
Finding the Classes of Objects
• Each program (including MWO) using the COM interface has Classes
of Objects.
• The available Programs can be found in the References Browser.
Open it by:
•Edit > References
•or Icon
Note: You must have a module open to see the reference browser.
We only need AWRDE.
26Scripting
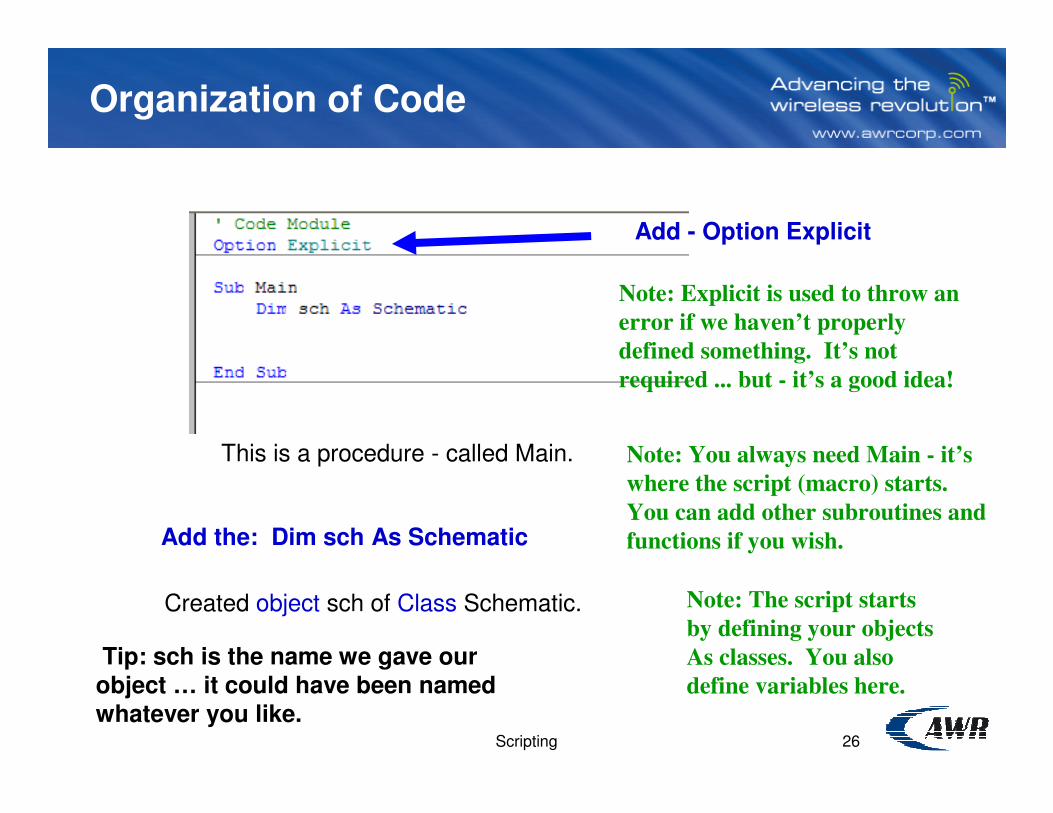
Organization of Code
Add - Option Explicit
Note: Explicit is used to throw an
error if we haven’t properly
defined something. It’s not
required ... but - it’s a good idea!
This is a procedure - called Main. Note: You always need Main - it’s
where the script (macro) starts.
You can add other subroutines and
functions if you wish.Add the: Dim sch As Schematic
Created object sch of Class Schematic. Note: The script starts
by defining your objects
As classes. You also
define variables here.
Tip: sch is the name we gave our object … it could have been named whatever you like.

27Scripting
Getting Help in the Editor
Object Browser
The Class or Data Type
The Methods and Properties
- Returns a variable of Type String
or F2 or View > Object Browser
28Scripting
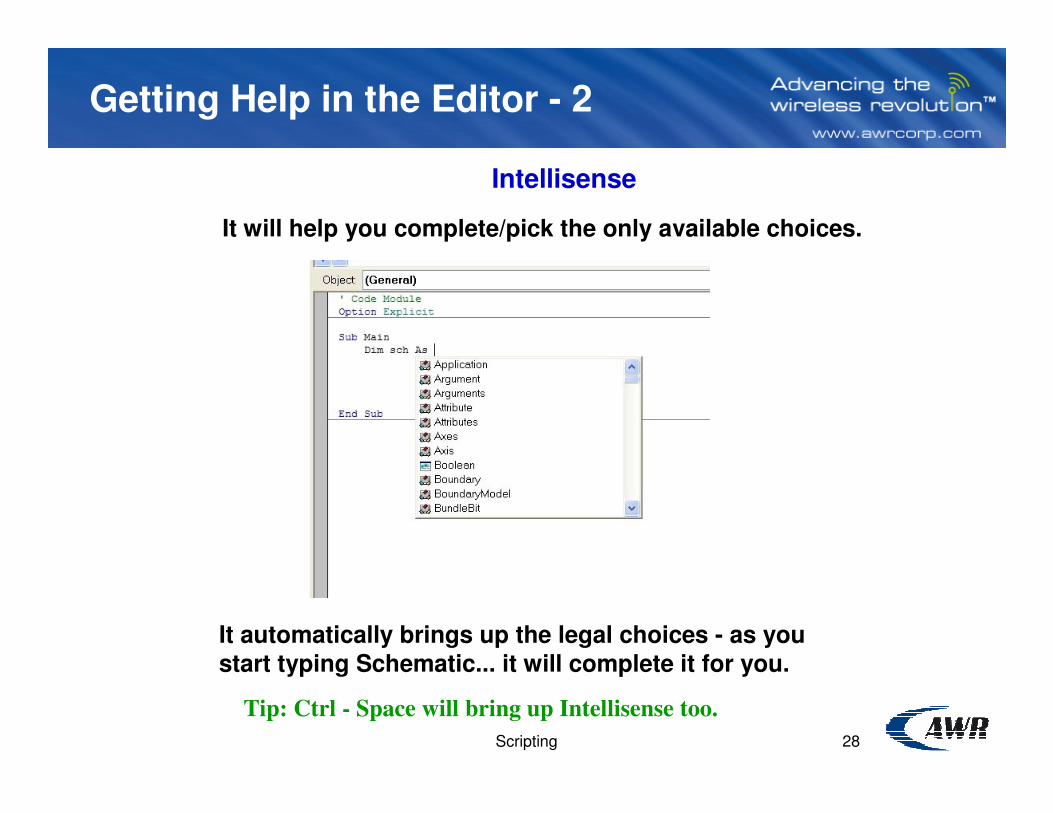
Getting Help in the Editor - 2
Intellisense
It will help you complete/pick the only available choices.
It automatically brings up the legal choices - as you
start typing Schematic... it will complete it for you.
Tip: Ctrl - Space will bring up Intellisense too.

29Scripting
Getting Help in the Editor - 3
• F1 for help.
• If cursor is over a recognized VB function name, help will go directly to that function.

30Scripting
The Schema and Objects
Start at the top and
work our way down...
For Our Schematic:
MWOffice
Project
Schematics
Schematic
Class
Class
Class
Collection
Tip: Normally we omit MWOffice
- in our definitions of objects and
collections. It’s assumed. But if
you had another NameSpace - like
Excel - you have to start explicitly
with Excel.
MWOffice.Project
We Type:
MWOffice.Project.Schematics
so ... Project.Schematics will work.

31Scripting
Collections
How do we get at the individual
schematics in the collection?
Schematics
SchematicClass
Collection
Count is a Property ... Number of objects.
Method 1:

32Scripting
Collections - 2
The Debug.Print will print the value numsch in the
debug window.
We have to define a
variable of type Long.
Note: Notice the path -
Project.Schematics ... and
Count is a property of the
Collection Schematics.
Note: Long is an integer.

33Scripting
Collections - 3
You Can get at an item of a collection - if you know which item it
is...
Here we are getting the second item in the
Collection of Schematics - which is a Schematic
Object.... then, Schematic has a property Name -
which we can print.
Tip: It is a pain to loop through all the Collection elements using
something like –
• For I = 1 to N …
Because you have to know number of elements in Collection.
Instead … use For … Each…

34Scripting
Collections - 4
A nice control statement for Collections is - For Each ... In ...
- It will loop through all the objects in the Collection ... and you
don’t have to know the number ahead of time!
This clears the debugger
window.
The loop assigns Object sch to each
schematc in turn ... and prints it.
Method 2:

35Scripting
Debugging
• Sax Basic has its own debugging tools.
– Debug.print statement will print data to the debug window
– Can set break points and then continue to next break points
– Can step into our around subroutines
• We used it already in our example.
Dimension variable as class schematic
Clear debug window
Loop through all schematics in project
Print schematic name in debug window

36Scripting
Debugging Continued
• When this script is run, all of the schematic names will show up in the
debug window.

37Scripting
Debugging – Break Point
• You can easily add break points, select the location and hit F9 or use the
Debug menu.
• Below shows a break point before the script is run set to stop at the beginning
of the FOR loop.

38Scripting
Debugging – Query Variables
• When a script is holding at break point you can query the value for variables.
• In this example, F8 is used to step into the FOR loop. Then type
“?sch.Name” in the debug window on the Immediate tab to query the value
for sch.Name. This value is then displayed.
Use the () to get
values of a vector
where you would type
the index of the vector
between ().
You can also put cursor over
the variable to see it’s current
value.
39Scripting
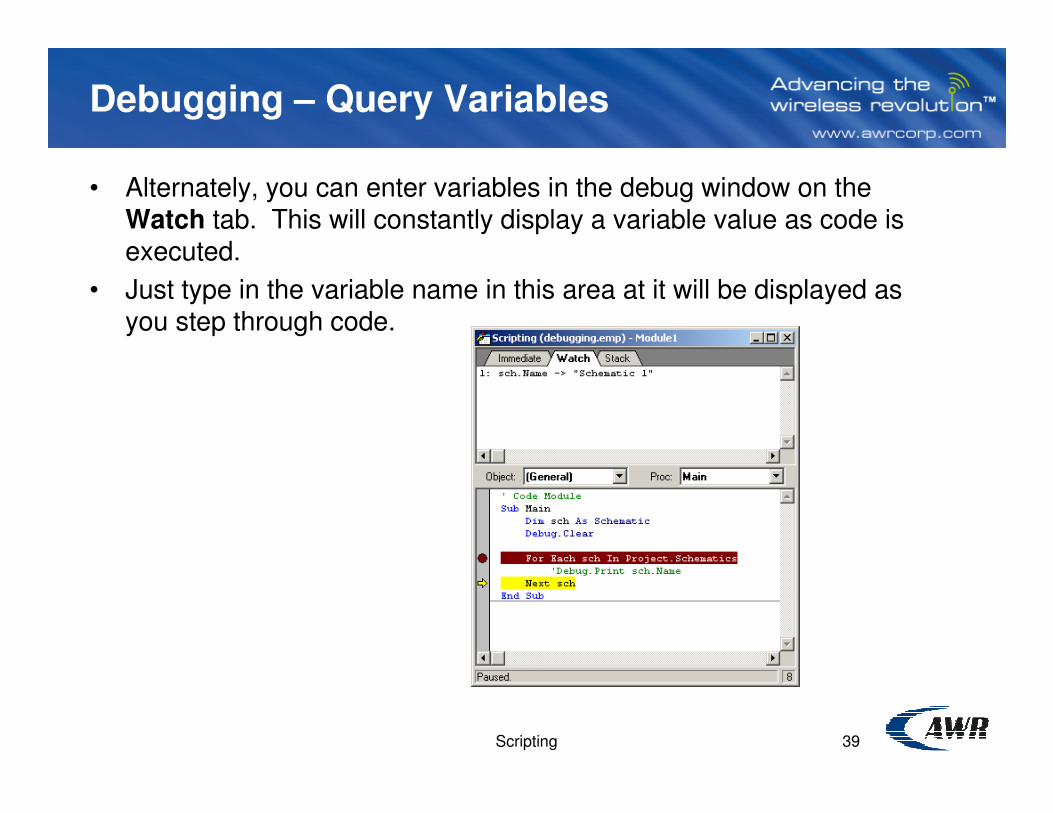
Debugging – Query Variables
• Alternately, you can enter variables in the debug window on the Watch tab. This will constantly display a variable value as code is executed.
• Just type in the variable name in this area at it will be displayed as you step through code.

40Scripting
Debugging – Break Point
• When the code runs it will stop at this point.
• You will see the break point turn yellow.
• Use the F8 key to then step through the code
41Scripting
Debugging - Printing
• Debug.Print
– Prints values to the debug window.
– Smart enough to figure out data type - so long as scalar or string.
• Normally, Debug throws in a line feed... ; suppresses
– Example: Debug.Print 3 ; 4; 5
• Debug.Clear
– Clears the Debug Window.
– Usually put near top of script.
42Scripting
Variables and Data Types
• We still often have need for traditional variables - esp.
when we work with functions.
• Must be defined with Dim statement (assuming you have
Option Explicit turned on).
• Most Commonly Used Types of Variables:
– Integer ( A 16 bit integer)
– Long (A 32 bit integer)
– Single and Double (16 bit and 32 bit floating)
– String (Type in “ “ to make a string. Can use & to concatenate.)
– Boolean
– Complex (This is defined in MWO’s Data Types.)
– and of course ... Object
Actually - We’re not telling the whole story here ...
(Variants in a few slides)

43Scripting
Arrays
• We can define arrays:
– Example: Dim mywire(5) As Trace ... An array of 5
elements... of class Trace.
– Example: Dim the_values(3,4) As String ... A two index array of dimensions 3 X 4 of type String.
• Later - we can access them as normal:
– Example: the_values(0,2) = “big value”
• Note - Arrays start with value 0 not 1.
– Dim myarray(1,1) is a 2 X 2 array, with each index 0
and 1.

44Scripting
Arrays - Redimensioning
• A common problem -
– I don’t know the size of the array until later in the script after I get some
user input.
• First - Define a dynamic array
– Example: ival() As Integer Number of elements not defined
• Later - Use ReDim
– ReDim ival(4) As Integer
• You can keep old data with the Preserve Statement
– ReDim Preserve ival(4) As Integer
– This keeps the ival(0) … ival(4) values if you later make the array bigger.
– Otherwise you lose all your data.
• Note: You will lose data if you downsize an array!
• Note: With Multidimensional arrays you can only resize the last index. (Can
add a column, not a row.)
• Example Script - ReDim_Array

45Scripting
Control Statements
• For ... Simple Loop (Note - Automatically steps)
For Num = First To Last
statements
Next Num
• For...Each Useful for Groups of ItemsFor Each var In Items
- statements
Next var
• Do ... Until Keep looping until condition met.Do
- statements
Loop Until conditional expression
Note: Can also use While instead of Until.
46Scripting
Control Statements - 2
• For ... Next Details Omitted
• If Then Else Details Omitted
• Select Case Picks choice according to
value of expression.
• And of course when all else fails ...
GoTo
Other Statements
But … it’s dangerous to use it – as you make
your code unreadable and difficult to
understand the logical flow.
And other scripters will scorn you!
47Scripting
Exercise - Number of Resistors in
Schematics
• Want number of resistors in each schematic, and total
number of resistors in project.
– Don’t need to include subcircuits, or netlists.
• User to be able to pick schematic in selection box.
• Number of resistors in schematic and project to appear in new box.
We Need to Figure out:
• How to get at elements in schematics.
• How to find out which are resistors.
• Create a selection box, and output text box.

48Scripting
Elements in Schematics
Answer the following questions by looking at the Schema and
Object descriptions.
• How do you get the number of Schematics?
•Hint: Look at the properties of the collection schematics.
•What is the path/hierarchy to get to a Class of type Schematic?
• How do you go from Schematic to Element?
•What Properties of an Element might help us find out if it is a
resistor?
•Hint: We are looking for something to decide if it is a resistor, so
we can sort on it.
49Scripting
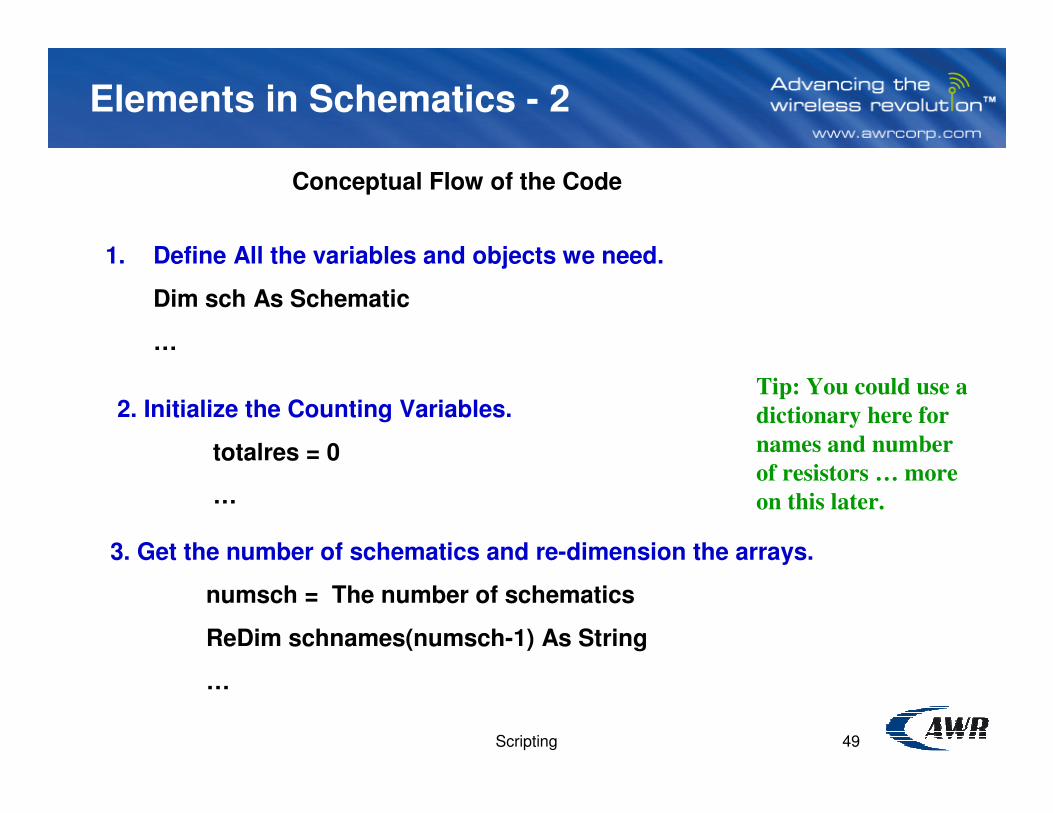
Elements in Schematics - 2
Conceptual Flow of the Code
1. Define All the variables and objects we need.
Dim sch As Schematic
…
2. Initialize the Counting Variables.
totalres = 0
…
3. Get the number of schematics and re-dimension the arrays.
numsch = The number of schematics
ReDim schnames(numsch-1) As String
…
Tip: You could use a
dictionary here for
names and number
of resistors … more
on this later.

50Scripting
Elements in Schematics - 3
4. Loop through the schematics…. Loop through each element in a
schematic … Look at Parameters in Each element … See if it’s a resistor …
For each schematic in the project
For Each element in Schematics
For Each parameter in the Element
If the parameter = “R”
increment numresistors
End If
Next parameter
Next element
Print out the resistors and schematic name
Next schematic
Collection of schematics
Collection of elements
Collection of
Elements
Schematics
Elements
Parameters

51Scripting
The Actual Code - 1
This is the code PartA_Res.bas
1. Define All the variables and objects we need.
Option Explicit
Sub Main
Dim schnames() As String ' The arrays and objectsDim resvalues() As IntegerDim sch As SchematicDim anelement As ElementDim aparameter As Parameter
Dim totalres As Integer ' VariablesDim totalelements As IntegerDim elementname As StringDim numsch As IntegerDim schindex As IntegerDim numres As Integer

52Scripting
The Actual Code - 2
2. Initialize the Counting Variables.
totalres = 0
totalelements = 0
schindex = 0
elementname = "R"
3. Get the number of schematics and re-dimension the arrays.
numsch = Project.Schematics.Count
ReDim schnames(numsch-1) As String
ReDim resvalues(numsch-1) As Integer

53Scripting
The Actual Code - 3
4. Loop through the schematics…. Loop through each element in a
schematic … Look at Parameters in Each element … See if it’s a resistor …
For Each sch In Project.Schematics
numres = 0
For Each anelement In sch.Elements
For Each aparameter In anelement.Parameters
If elementname = aparameter.Name Then
numres = numres + 1
End If
Next aparameter
Next anelement
schnames(schindex) = sch.Name
resvalues(schindex) = numres
Debug.Print schnames(schindex);" Number of Resistors is: "; numres
schindex = schindex + 1
Next sch

54Scripting
Elements in Schematics - 6
The finished code is module PartA_Res.
The results in the Debug Window.
Part B: Now let’s add a user interface (UI).
We are going to use the UI builder to help us.

55Scripting
UI Builder
We can graphically build the UI, and the code will be written
for us.
Insert > User Form to bring up a blank UI builder.
After making your UI, and exiting the builder, the code will
be inserted.

56Scripting
UI Builder - 2
Let’s start with a simple example first …
Create a new script: Code Modules > Insert Module.
Rename it to: “Test UI”.
Our script will ask the user to input text into a dialog box, and print it
out in debug window. There also is a cancel button and an OK
button.

57Scripting
UI Builder - 3
Start out by creating a string variable: usertext.
Put the cursor here …the user form will add
the graphics code
where the cursor is.
… then open up the UserForm dialog.

58Scripting
UI Builder - 4
We draw what we want the user to see.
The text is drawn in a box. Use the “A” to draw the box.
RC the box and
enter text in
Caption.
Note: This is used to put text on
the screen. It has nothing to do
with any input from the user.
59Scripting
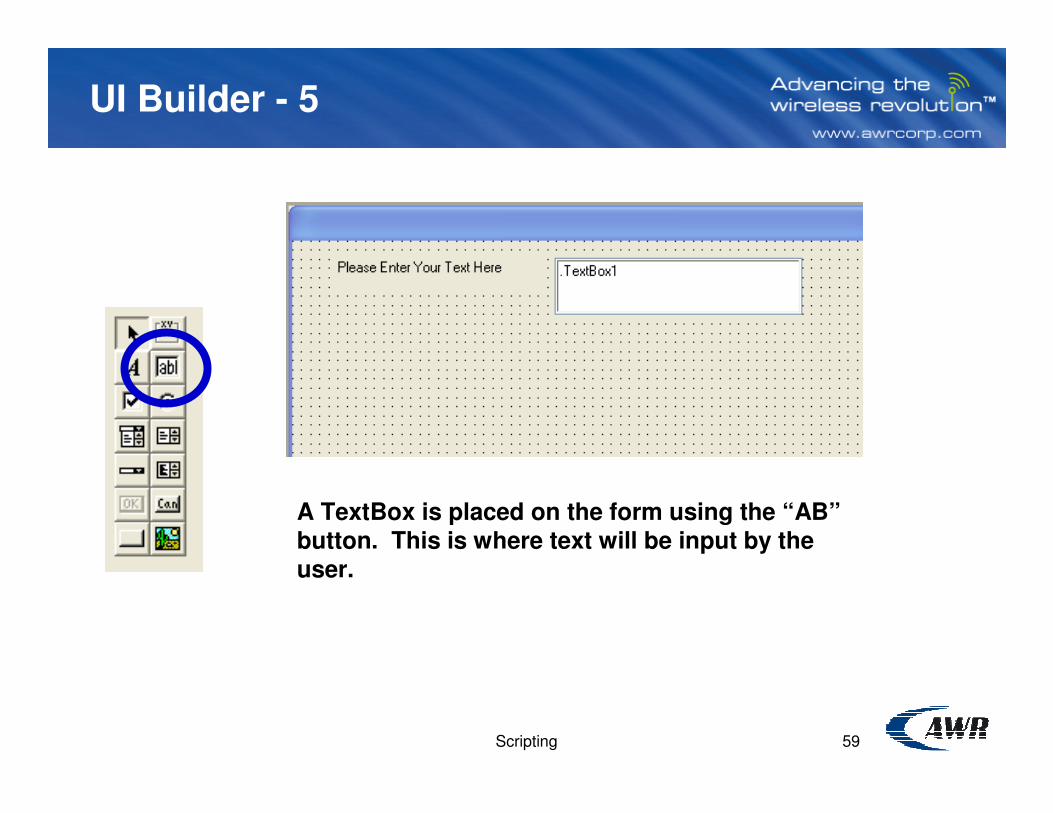
UI Builder - 5
A TextBox is placed on the form using the “AB”button. This is where text will be input by the
user.

60Scripting
UI Builder - 6
Add OK and Cancel Buttons.
OK – will close the dialog box and continue code execution.
Cancel – will close the dialog box and exit with an error.
Tip: We will be able to capture the error and use it.

61Scripting
UI Builder - 7
Close the UserDialog Editor…
Say Yes to the Save Changes.
And it inserts the
code where the
cursor was.
Tip: If you have the cursor
in this part of the code …
opening Insert > User Form
… allows you edit it.

62Scripting
UI Builder - 8
Can be thought of as a special class – UserDialog.
Dim dlg As UserDialog … creates an object (here dlg) of class
UserDialog.
Dialog dlg … the method Dialog working on object dlg … makes
the userform.
Dialog Form class defined.
dlg is an object of
this class. This creates (a method) the
form.

63Scripting
UI Builder - 9
Here … we change the message.
Here … an initial value is set for the TextBox.
Note: dlg has been created with Dim
before giving it the property
.TextBox1.
Note: You can change the property
name .TextBox1 to … whatever you
want (with a . in front of it).
Tip: .Text1, … etc.
are properties that
can be assigned to
the object.

64Scripting
UI Builder - 10
This prints the user input to the debug window.
Note: The method Dialog has
been used to create the form.
The user clicks the OK button, which closes the user form and continues
code execution.
Text typed in and OK button
clicked.
Shows up in Debug
window.

65Scripting
UI Builder - 11
Error Handling
If the user clicks the cancel button, an error is thrown.
Dialog(dlg) returns an
integer … 0 is an error
– i.e. they hit the Clear
button.
Note: Make sure
you define
errornumber as a
Long.
Note: Many methods return a value …besides
carrying out their action (making the dialog form).
Tip: End … ends the
program. Otherwise
it will keep executing.
66Scripting
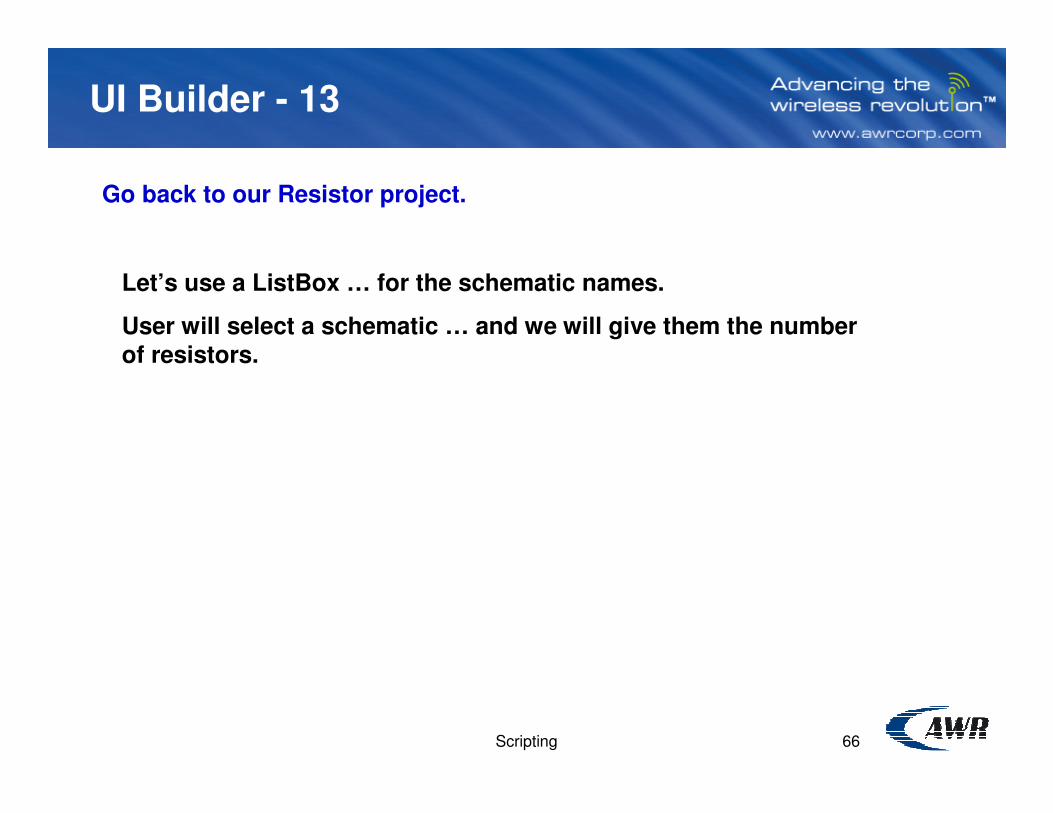
UI Builder - 13
Go back to our Resistor project.
Let’s use a ListBox … for the schematic names.
User will select a schematic … and we will give them the number of resistors.

67Scripting
UI Builder - 2
Add Text
Finished Dialog Box
Double Click on Text to Input
List Box
OK Button

68Scripting
UI Builder - 3
Begin Dialog UserDialog 400,203 ' %GRID:10,7,1,1
Text 30,7,310,70,"Please Select a Schematic",.Text1,2
ListBox 100,49,170,91,ListArray(),.ListBox1
OKButton 160,154,40,21
Text 50,182,310,14,"Select OK When Finished",.Text2,2
End Dialog
Dim dlg As UserDialog
Dialog dlg
Upon Closing - Will Place Code where cursor was in Module.
• ListArray() is a placeholder for a 1D String array
- Replace ListArray() with schname()
• .ListBox1 is a property of dlg which will give the element number
of the schname() selected.
Note: F1 gets you help on any keyword.
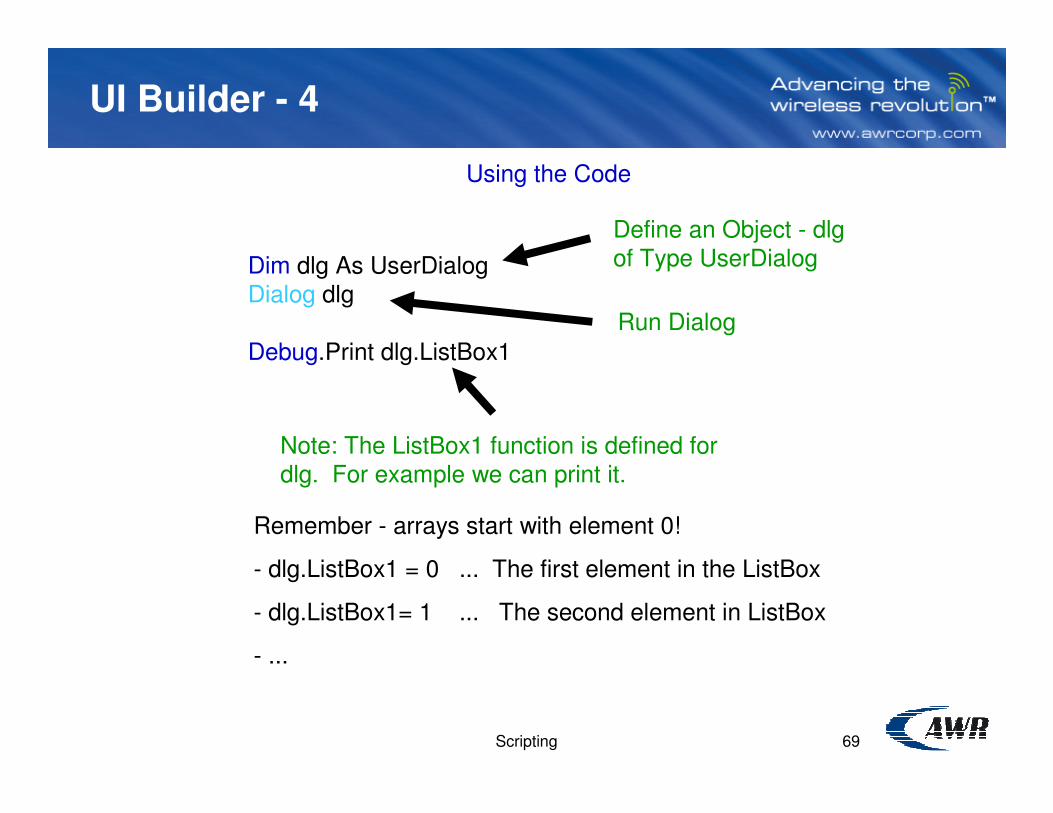
69Scripting
UI Builder - 4
Using the Code
Dim dlg As UserDialog
Dialog dlg
Debug.Print dlg.ListBox1
Define an Object - dlg
of Type UserDialog
Run Dialog
Note: The ListBox1 function is defined for
dlg. For example we can print it.
Remember - arrays start with element 0!
- dlg.ListBox1 = 0 ... The first element in the ListBox
- dlg.ListBox1= 1 ... The second element in ListBox
- ...

70Scripting
UI Builder - 5
Create a second User Box...
-Lists the total number of elements and resistors in the project.
-Lists the number of resistor in the chosen schematic.
TextBoxes

71Scripting
UI Builder - 6
Begin Dialog UserDialog 400,203 ' %GRID:10,7,1,1
Text 30,7,330,28,"The Total Number of Elements in
the Project: ",.Text1
TextBox 310,7,70,21,.TextBox1
TextBox 310,42,70,21,.TextBox2
Text 30,49,280,21,"The Number of Resistors in the
Project",.Text2
Text 80,91,210,28,"Number of Resistors in ",.Text3
TextBox 240,91,90,21,.TextBox3
TextBox 130,119,70,28,.TextBox4
OKButton 120,161,90,28
End Dialog
Dim answerbox As UserDialog
answerbox.TextBox1 = Str(totalelements)
answerbox.TextBox2 = Str(totalres)
answerbox.TextBox3 = schnames(dlg.ListBox1)
answerbox.TextBox4 = Str( resvalues(dlg.ListBox1))
One Way to Do It ...
Note: Use of Str()
function to convert
to String.

72Scripting
How to Share Scripts
• Export a Visual Basic module into a .bas file that can then
be imported into another project.
Exporting Our Script

73Scripting
Global vs Local Scripts
• Global scripts will be available in every AWR project you open… they live on your computer.
– They are saved in directories described in
Slide 5.
• Project scripts will only be available in the project they are loaded.
• Project scripts are saved per project.
Import Our Script in As a Global Script

74Scripting
Assigning HotKeys to Global Scripts
Tools > Customize
Pick Script in Category Macros
Give it a HotKey
Make sure you hit Apply!
Tip: Can use Ctrl, Shift, and Alt keys
in defining hotkey.
75Scripting
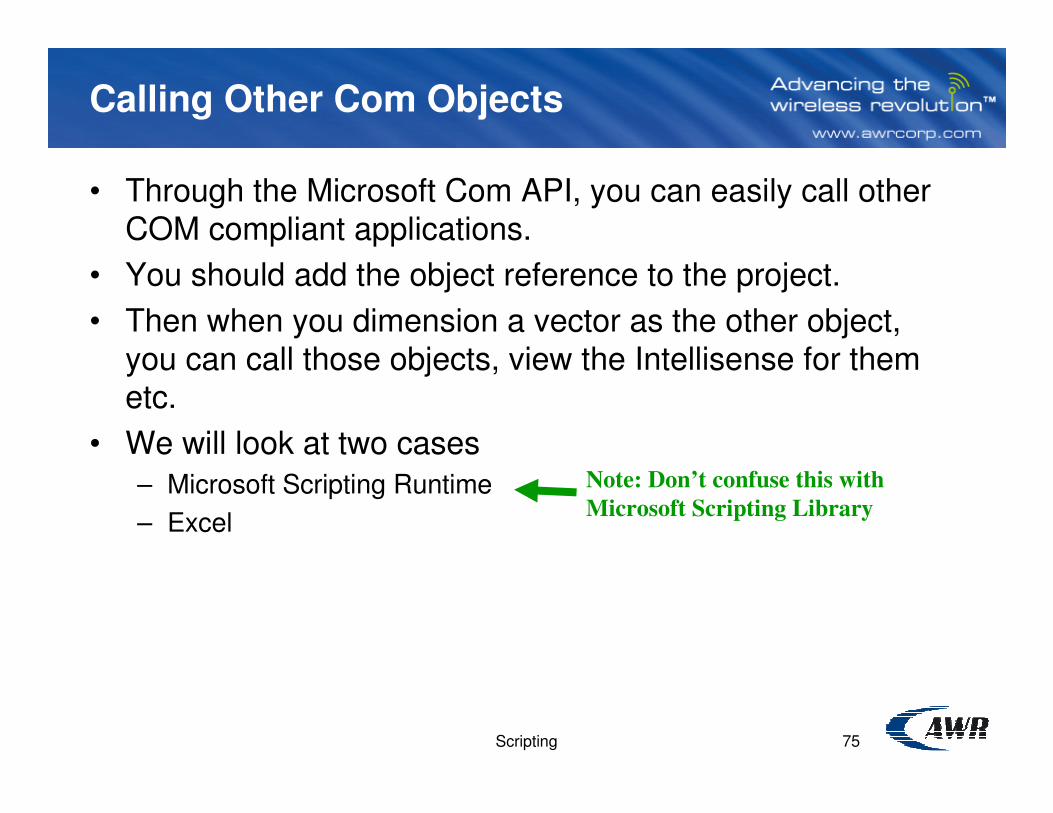
Calling Other Com Objects
• Through the Microsoft Com API, you can easily call other
COM compliant applications.
• You should add the object reference to the project.
• Then when you dimension a vector as the other object,
you can call those objects, view the Intellisense for them etc.
• We will look at two cases
– Microsoft Scripting Runtime
– Excel
Note: Don’t confuse this with
Microsoft Scripting Library

76Scripting
Dictionaries – A Handy Storage
Container
• Dictionaries are a great way to store data
- No need to dynamically resize anything
- Array is keyword and value pairs
Requires Microsoft Script Runtime Reference be added as an object reference
Note: This library gives access to Files, Folders, Drives, etc.
- It’s the critical library for working with anything in the file system!

77Scripting
The Variant Class
• All variables are of class Variant.
– Integer, Long, ... are sub-classes.
• Variant can be anything! - string, integer, float,...
– So - a Variant array can be a combination of different things.
– Of course ... there’s a danger you will get confused…
– So use Option Explicit to override this.
• Dictionary items and keys work with the Variant datatypes - for maximum flexibility.
78Scripting
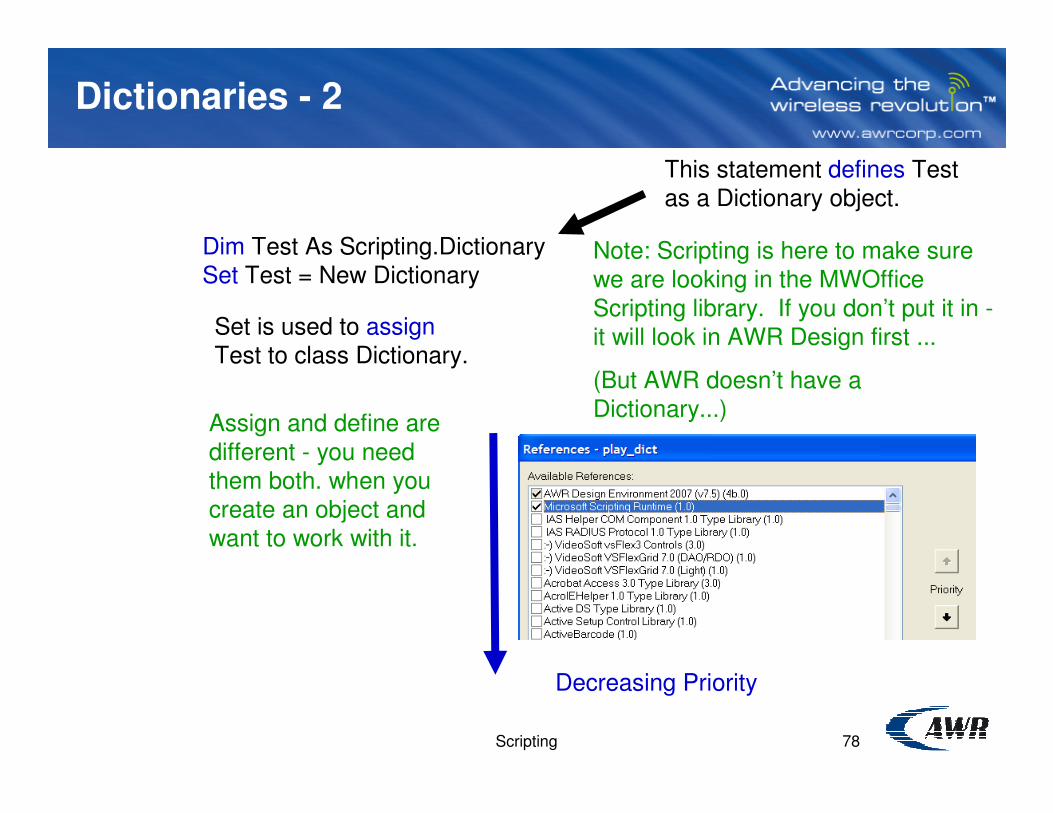
Dictionaries - 2
Dim Test As Scripting.Dictionary
Set Test = New Dictionary
This statement defines Test
as a Dictionary object.
Note: Scripting is here to make sure
we are looking in the MWOffice
Scripting library. If you don’t put it in -
it will look in AWR Design first ...
(But AWR doesn’t have a
Dictionary...)
Decreasing Priority
Set is used to assign
Test to class Dictionary.
Assign and define are
different - you need
them both. when you
create an object and
want to work with it.

79Scripting
Dictionaries - 3
• Provides ability to look up an ‘item’ based on a ‘key’
• Add and remove entries based on either the item or the key
Adding items
Test.Add("first","Resistor1")
Test.Add("second","My_project")
Test.Add("third",3.14)
Test.Add(4,7)
Test.Add("4","Pi")
_Object.Add(_Key,_Value)
Notice the Key and Value pairs
can be any scalar variable type:
Integer, String, Float,...
Note: These keys are different!
One is an integer 4, the other is a
string.

80Scripting
Dictionaries - 4
Methods and Properties for
Dictionaries
Debug.Print Test("third")
Prints item of Test with key “third”.
Test("third") = 6.7
Sets array element with key “third”
to 6.7.
myitems = Test.Items
myitems is a 1D Variant array with
elements of the Test items.
Other Examples

81Scripting
Dictionary Example
Work with the PartA_Res script.
We add a dictionary – where the keywords are the names of the
schematics, and the values are the number of resistors.
Dim dictRes As Scripting.Dictionary ' A dictonary from Microsoft
Scripting Namespace.
Set dictRes = New Dictionary The Dim statement defines the dictRes as an object of
type Dictionary … but ….
The Set … New statement is needed to
actually create the dictionary!

82Scripting
Dictionary Example - 2
schnames(schindex) = sch.Name
resvalues(schindex) = numres
dictRes(sch.Name) = numres
The dictionary is placed
in the loop with the
schematic names as
keywords … and numres as values.
Debug.Print dictRes("Moe")
.
.
.So later on we can find the
number of resistors for a
schematic.
The advantage of this … a user could just type in a string - to be used as the keyword in the dictionary …

83Scripting
Microsoft Scripting Runtime … and the file system
You can interact with the file system.
Here’s some snipets of a script written for recursively copying all the files from one directory to another.
Function RecCopy(strFromLoc,strToLoc) ' Recursively copies directories and
files from strFromLoc to strToLoc.
Note: A function can be used in the main program. For
example – we can use this one in the main program as:
RecCopy(“C:\foo”,”C:\bar”)
Functions have the form:
Function funcname(variables)
…
End Function
84Scripting
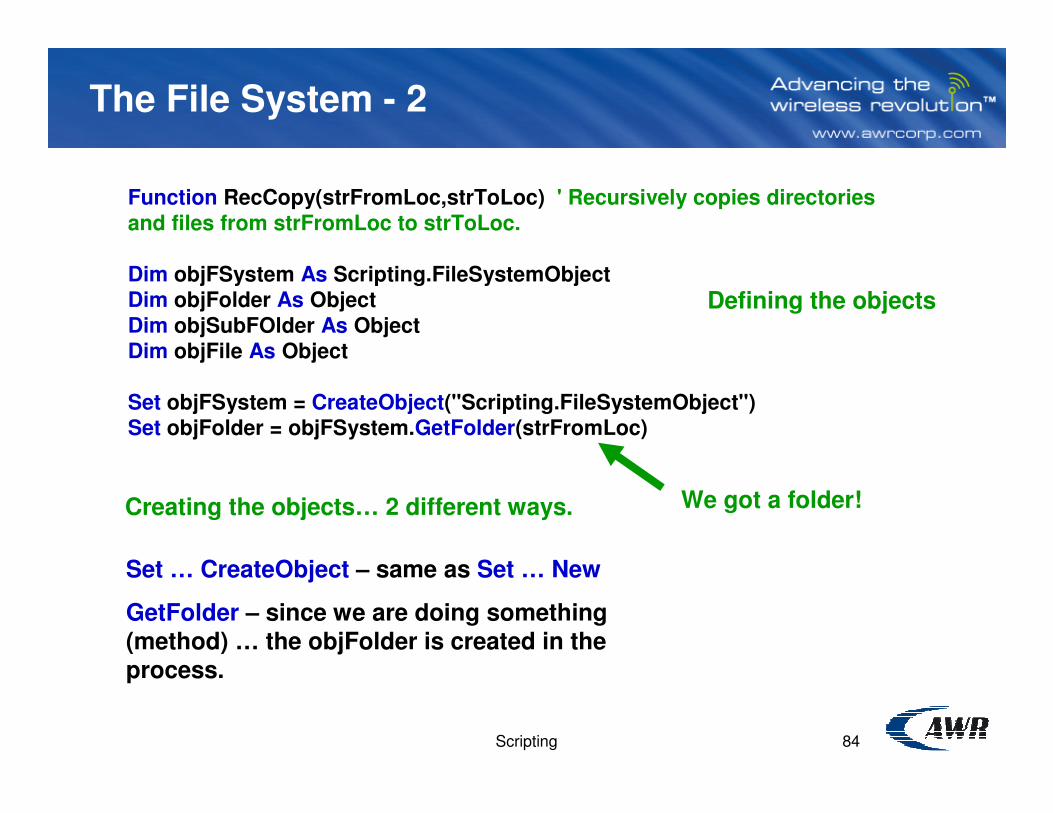
The File System - 2
Function RecCopy(strFromLoc,strToLoc) ' Recursively copies directories
and files from strFromLoc to strToLoc.
Dim objFSystem As Scripting.FileSystemObject
Dim objFolder As Object
Dim objSubFOlder As Object
Dim objFile As Object
Set objFSystem = CreateObject("Scripting.FileSystemObject")
Set objFolder = objFSystem.GetFolder(strFromLoc)
Defining the objects
Creating the objects… 2 different ways.
Set … CreateObject – same as Set … New
GetFolder – since we are doing something (method) … the objFolder is created in the
process.
We got a folder!

85Scripting
The File System - 3
objFSystem.CreateFolder(strToLoc) Create a folder.
objFSystem.CopyFile(strFilePath,strToLoc&strFileRel,True) Copy Files.
strFolderName = objSubFOlder.Name Find its name.
You can also delete … so – be careful!
It’s usually a good idea to check if a folder or directory exists before you do something…
If objFolder.SubFolders.Count > 0 Then …
The entire function is named … RecCopy.bas
Tip: http://msdn.microsoft.com/en-us/library/bstcxhf7(VS.85).aspx
for a lot of info on Script Runtime Library.

86Scripting
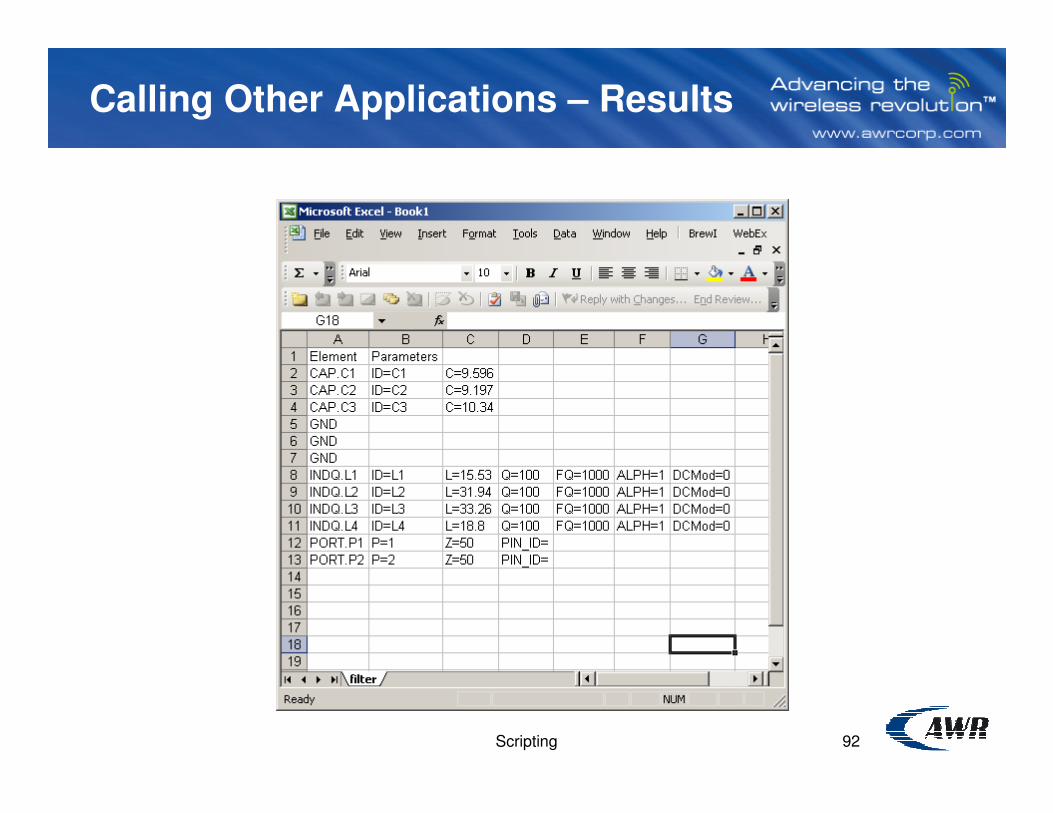
Example - An Excel Spreadsheet
• Example of putting all the parameters for elements in a
schematic in an Excel spreadsheet.
• Below is the schematic being used for this example -
Excel.emp.
CAPID=C 1C=9.596 pF
C APID =C2C =9.197 pF
C APID =C3C =10.34 pF
IN DQID =L1L=15.53 nHQ=100FQ=1000 GHzALPH=1
INDQID=L2L=31.94 nHQ=100FQ=1000 GH zALPH=1
IN DQID =L3L=33.26 nHQ=100FQ=1000 GHzALPH =1
IN DQID =L4L=18.8 nHQ=100FQ=1000 GHzALPH=1
PORTP=1Z=50 Ohm
PORTP=2Z=50 Ohm
87Scripting
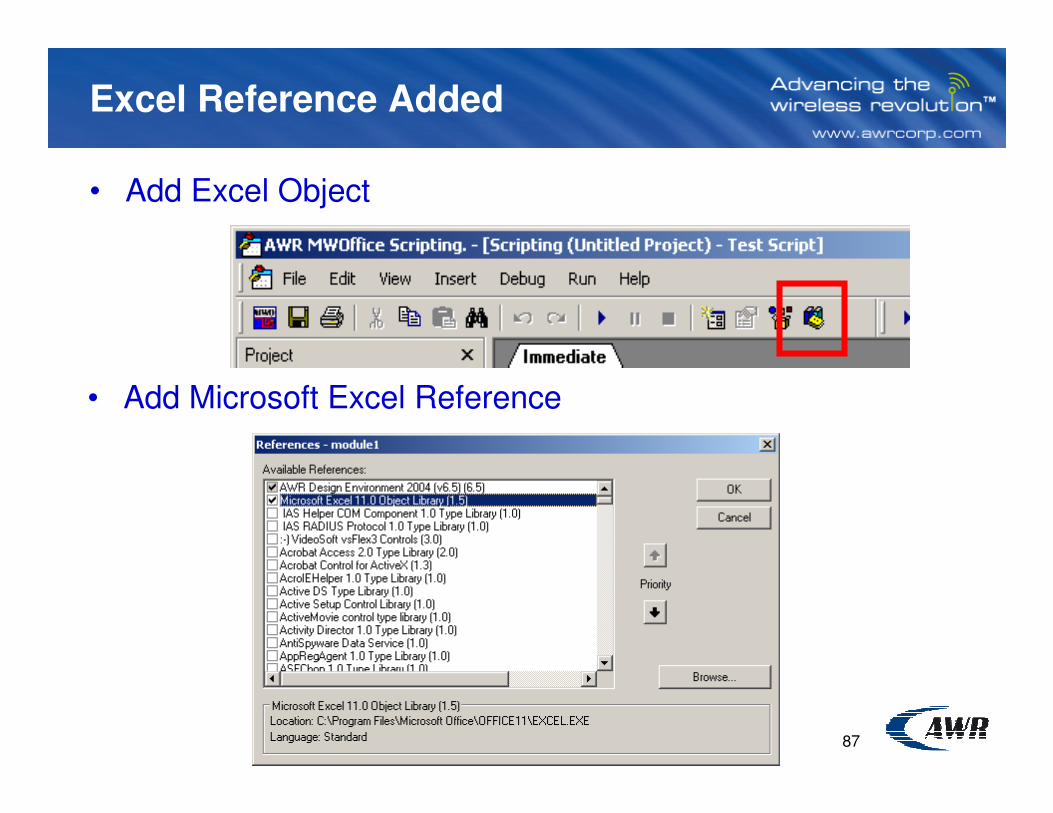
Excel Reference Added
• Add Excel Object
• Add Microsoft Excel Reference

88Scripting
Excel Code - 1
Dim sch As Schematic
Dim p As MWOffice.Parameter
Dim elem As Element
Dim Excel As Object
Dim Workbook As Object
Dim sheet As Object
Dim Ex As Excel.Application
Sub Main
' Create an instance of Excel
Set Ex = CreateObject("Excel.Application")
Defining these as generic
Objects right now... Can get
specific later.
Need to specifically refer to
Excel namespace as MWOffice
also has Application.
Ex is now assigned to an Excel
Application.

89Scripting
Excel Code - 2
If Ex = "" Then
MsgBox("Excel not found on this machine, program terminated")
Exit Sub
End If
Ex.Visible = True
Ex.Interactive = True
shts = Ex.SheetsInNewWorkbook 'stores users original default sheets per
workbook
Ex.SheetsInNewWorkbook = 1 'sets new workbooks to only have one
sheet, however, changes user default
Set Workbook = Ex.Workbooks.Add() 'adds new workbook
Ex.SheetsInNewWorkbook = shts 'reset sheets per workbook
default
shtcnt = 1 'stores number of sheets
Forces you out of the If Then
This code adds a new workbook with one sheet - after making
sure not to trash the user’s default number of sheets for new
workbooks.
90Scripting
Excel Code - 3
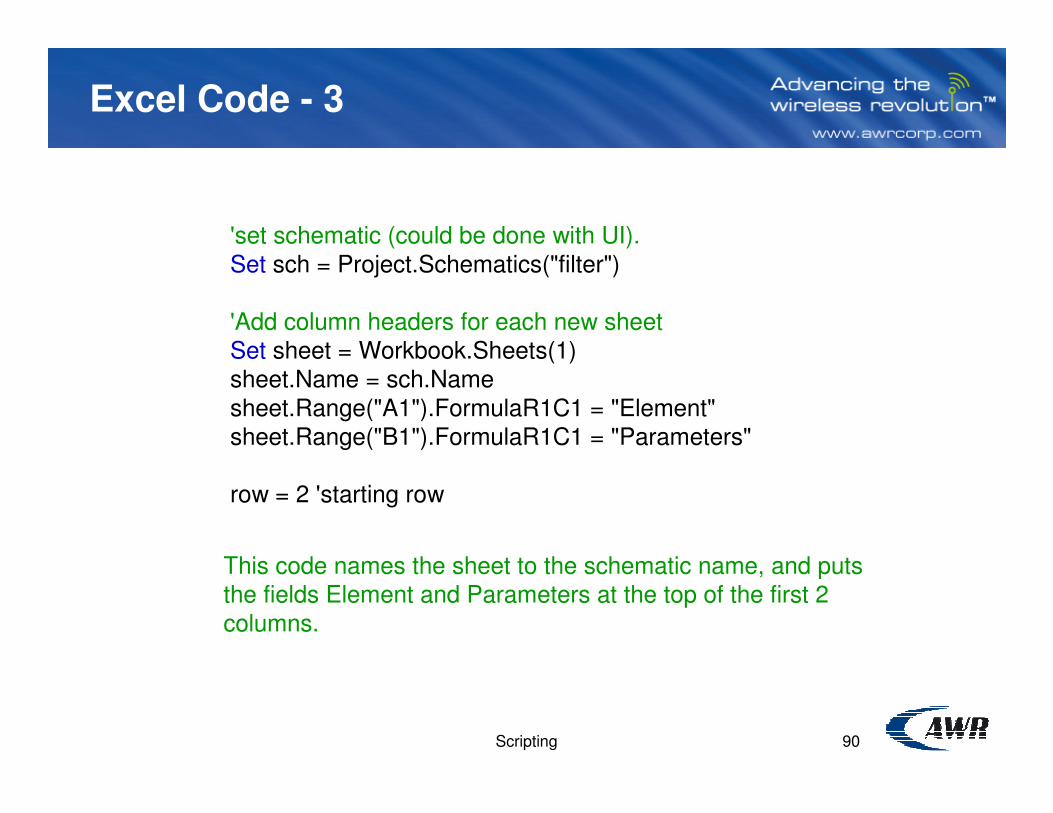
'set schematic (could be done with UI).
Set sch = Project.Schematics("filter")
'Add column headers for each new sheet
Set sheet = Workbook.Sheets(1)
sheet.Name = sch.Name
sheet.Range("A1").FormulaR1C1 = "Element"
sheet.Range("B1").FormulaR1C1 = "Parameters"
row = 2 'starting row
This code names the sheet to the schematic name, and puts
the fields Element and Parameters at the top of the first 2
columns.
91Scripting
Excel Code - 4
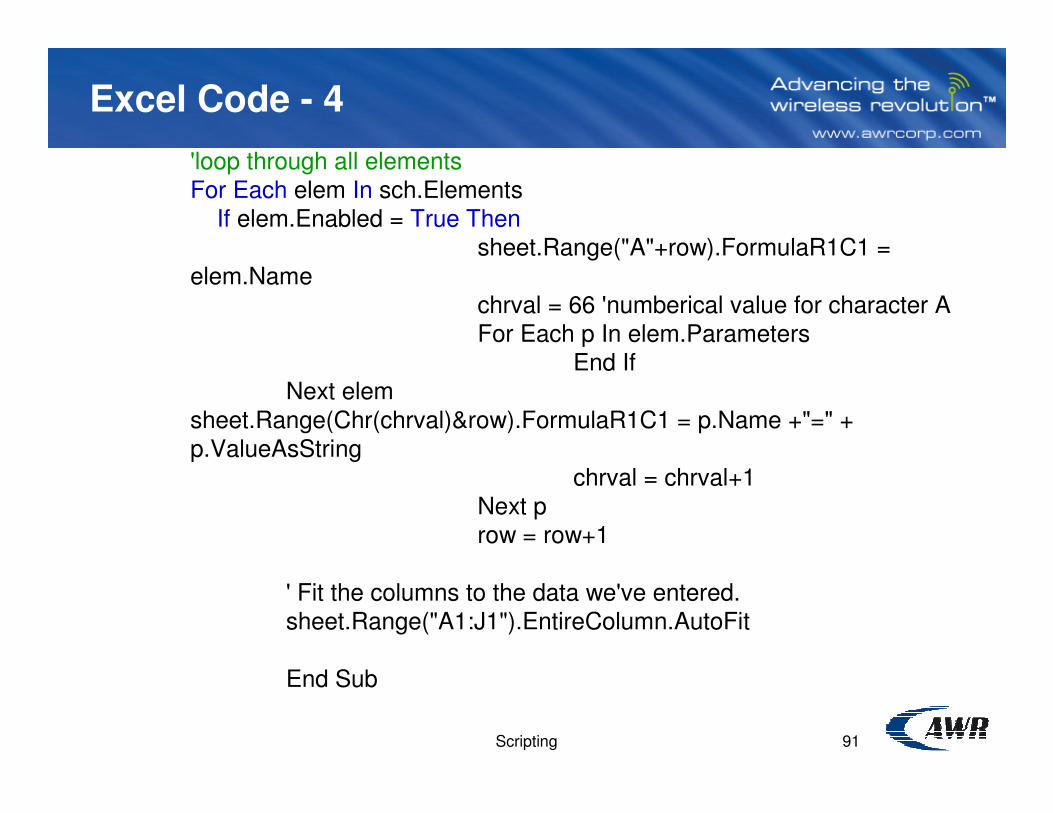
'loop through all elements
For Each elem In sch.Elements
If elem.Enabled = True Then
sheet.Range("A"+row).FormulaR1C1 =
elem.Name
chrval = 66 'numberical value for character A
For Each p In elem.Parameters
End If
Next elem
sheet.Range(Chr(chrval)&row).FormulaR1C1 = p.Name +"=" +
p.ValueAsString
chrval = chrval+1
Next p
row = row+1
' Fit the columns to the data we've entered.
sheet.Range("A1:J1").EntireColumn.AutoFit
End Sub
92Scripting
Calling Other Applications – Results

93Scripting
Event Handlers
• Scripting Code that runs when certain events happen with the software (simulation starts, simulation stops, place an element, etc).
• Can stop the simulation in each optimization iteration.
• Event handles are coded by opening up the ThisProject node under the Object Modules node.
• Select Project in the Object selection to have a list of all AWR event handles in the Proc: section.
• When you select an event handler a section of code is added.

94Scripting
Scope and Lifetime of Variables
• Scope is what part’s of the program can “see” a variable.
– Procedure Level Scope (or Local Scope): Within a procedure or variable - everything can see the variable.
– Note: So far, all are variables have been Local to Procedure Main.
– Script Level Scope (or Global Scope): When the whole script sees a variable.
– Note: For Classes - also something called Private and Public... We won’t
discuss it here.
• LifeTime of a variable is how long it “exists” in memory.
– Normally ... variables exist while the procedure / function is running.

95Scripting
Scope Example
foo is a global variable
longTry is local to the
Procedure Testexample.

96Scripting
Simulation Timer Example
Make Sure on Project not (General)
Globally Defined Variables

97Scripting
Simulation Timer - 2
These are the available
Procedures.
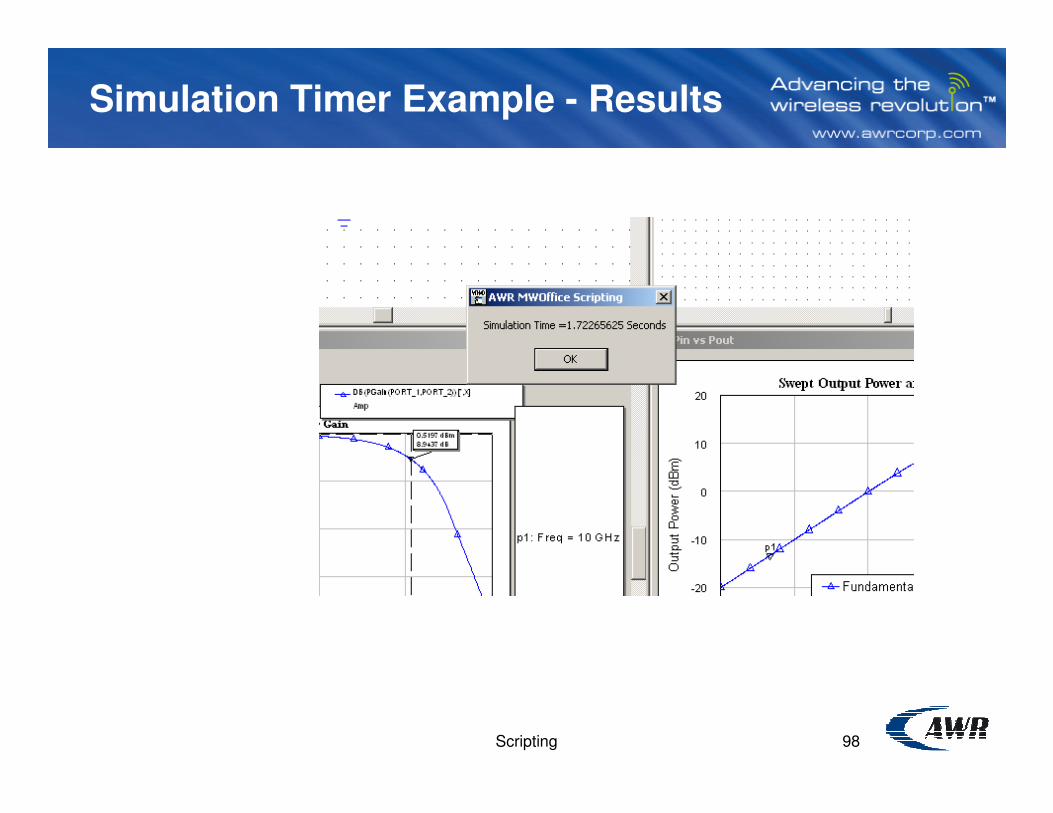
98Scripting
Simulation Timer Example - Results
99Scripting
User Defined Equations
• Methodology to extend Output Equations to do
anything you want.
• Allows users to use a power programming
environment that will proven and bug-free
• Done by writing “Function” blocks that live in a VB
Module called “Equations”.
• P1dB Example
– P1dB is not a built in measurement, so can be done
with a custom function.

100Scripting
P1dB Example - Project

101Scripting
P1dB Example - Equations
• First 4 equations are getting input and output power in
dBm.
• Fifth equation has a custom function called p1db, that
takes vector of input power, vector of output power, and
the compression point (1dB, 2dB, etc) and returns the compression point as a single number
pout = Am p:DB(|Pcomp(PORT_2,1)|)[*,X]
Rem ember, power returned in dBw, so must scale to dBm by adding 30
pout=pout+30
pcom p= p1db(pin,pout,1)pcom p: 9.814
pin = swpvals(pout)pin = pin+30
p1db function: compression point = p1db(power in, power out, dB compression point)
102Scripting
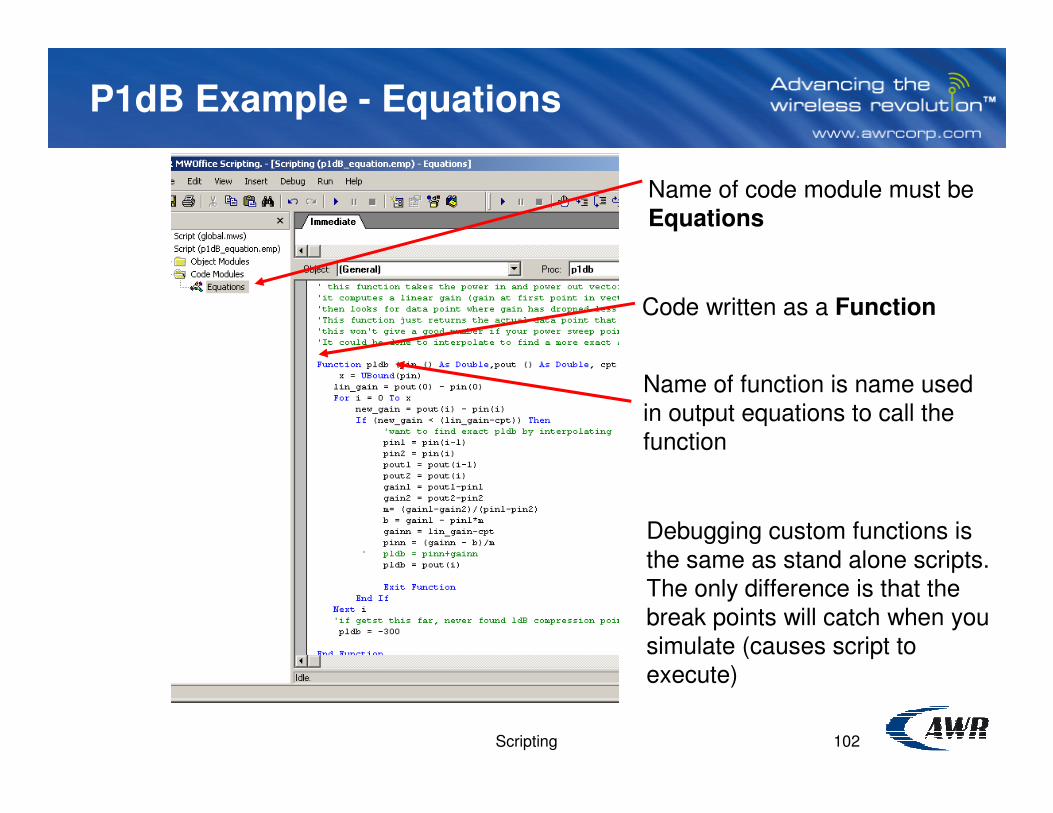
P1dB Example - Equations
Name of code module must be
Equations
Code written as a Function
Name of function is name used
in output equations to call the
function
Debugging custom functions is
the same as stand alone scripts.
The only difference is that the
break points will catch when you
simulate (causes script to
execute)
Top Related
Copyright © 2022 FDOKUMEN

