


Bahasa
Halaman
Hukum


SAP S/4HANA 1909 FPS00 Fully-Activated Appliance December 2019 (V1.0)
English
PUBLIC
SAP S/4HANA 1909 Fully-Activated Appliance:
Accounting, Financial Close & Financial Closing Cockpit
Demo Guide
2
Table of Contents
1 How Can This Script Be Used? 3
2 Demo Story: Accounting, Financial Close & Financial Closing Cockpit 4 2.1 Accounting and Financial Close 4
2.1.1 General Ledger Overview 4 2.1.2 Upload General Journal Entries 10 2.1.3 Verify General Journal Entries (Requester) 11 2.1.4 Reject Verify General Journal Entries (for Processor - Inbox) 15 2.1.5 Edit Rejected Verify General Journal Entries (Requester) 15 2.1.6 Approve Verify General Journal Entries (for Processor – Inbox) 16 2.1.7 Import Financial Plan Data 17 2.1.8 Balance Sheet/Income Statement 20 2.1.9 Financial Statement download and printing 21 2.1.10 Trial Balance 22 2.1.11 Display Journal Entries - in T-Account View 23
2.2 Financial Closing Cockpit 23 2.2.1 Manage Task Templates 24 2.2.2 Release Closing Cockpit Task List 30 2.2.3 Display the Task List Results 32 2.2.4 Check Task Output Log and Set Status Completed 33
Document History
Revision Date Change
1.0 <2019-12-02> Release for customer
3
1 How Can This Script Be Used?
This demo script has been written for usage with the SAP S/4HANA 1909 Fully-Activated Appliance (in short “appliance” in this
script), hence you will need such an appliance to make use of this guide.
The appliance can be brought up in two ways, and the demo scenario in this script is largely the same for both:
1. Via SAP Cloud Appliance Library (hosted on cloud providers)
You need a cloud provider account at AWS, MS Azure, or GCP. With this, you can deploy the appliance within 1-2 hours from
https://cal.sap.com > Solutions > SAP S/4HANA 1909 Fully-Activated Appliance.
2. Via installing it on your own on-premise hardware.
You need to provide your own hardware, and order & install the appliance as explained in SAP Note 2041140.
If you are new to the SAP S/4HANA Fully-Activated Appliance, introductory information can be found here:
https://blogs.sap.com/2018/12/12/sap-s4hana-fully-activated-appliance-create-your-sap-s4hana-1809-system-in-a-fraction-of-
the-usual-setup-time/
Important:
Before you start your demo, please read SAP S/4HANA Fully-Activated Appliance: Demo Scripts for information about necessary
preparations, especially any post-deployment steps to ensure the full functionality of your appliance. These steps are covered in
sections;
B) General Remarks
C) Post-deployment Steps
D) Log-on to the system
Besides this, you will also find links to all demo scripts on this page.
4
2 Demo Story: Accounting, Financial Close & Financial Closing Cockpit
2.1 Accounting and Financial Close
Background information:
This scenario describes General Ledger Accounting transactions associated with the closing process, providing a centralized, up-
to-date reference rendering of accounts. Individual transactions are reviewed with real-time processing, displaying the original
documents, line items, and transaction figures at various levels. It includes the following transactions:
• Upload General Journal Entries
• Verify General Journal Entries
• Reject/Approve Verify General Journal Entries (for Processor- Inbox)
• Import Financial Plan Data
• Display Financial Statement
• Trial Balance
2.1.1 General Ledger Overview
What to Do What You Will See
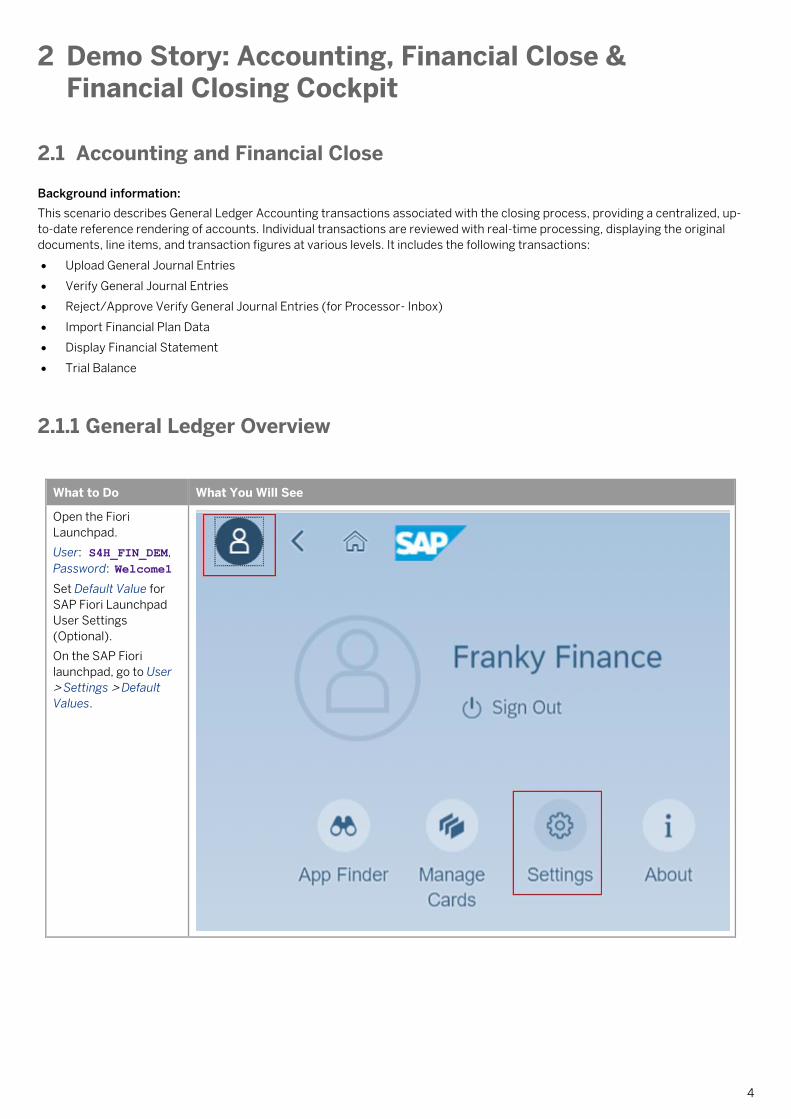
Open the Fiori
Launchpad.
User: S4H_FIN_DEM,
Password: Welcome1
Set Default Value for
SAP Fiori Launchpad
User Settings
(Optional).
On the SAP Fiori
launchpad, go to User
> Settings > Default
Values.
5
What to Do What You Will See
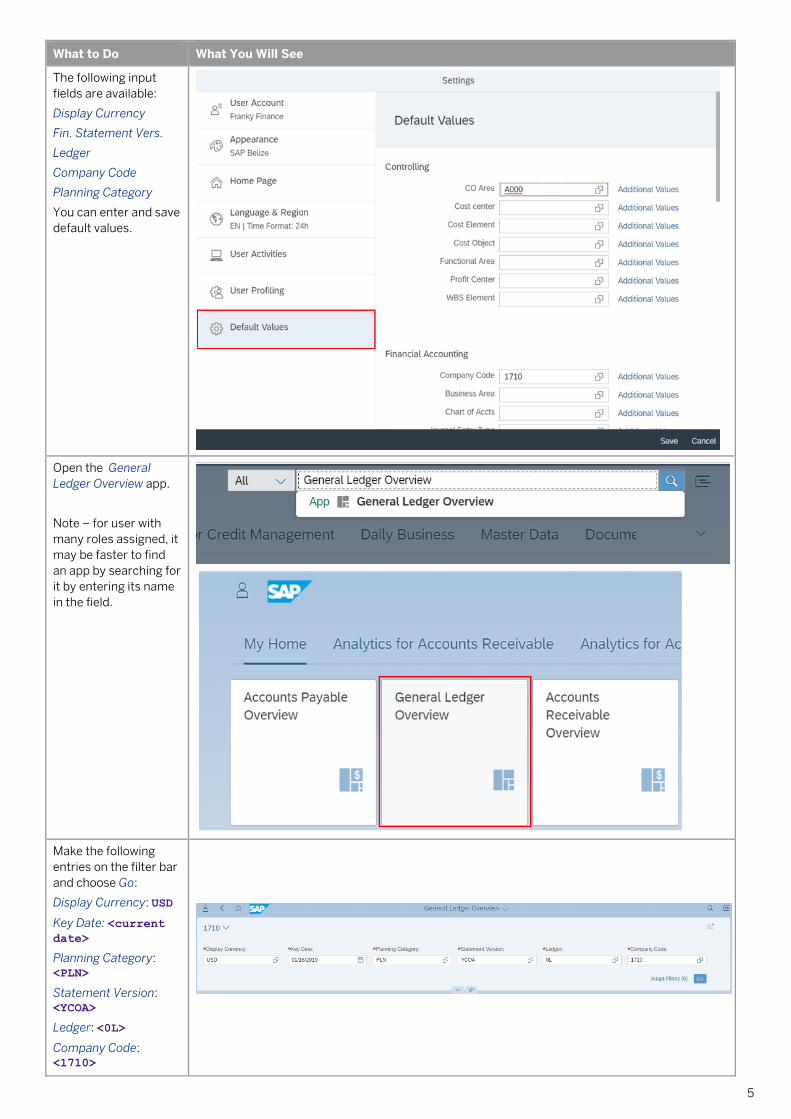
The following input
fields are available:
Display Currency
Fin. Statement Vers.
Ledger
Company Code
Planning Category
You can enter and save
default values.
Open the General
Ledger Overview app.
Note – for user with
many roles assigned, it
may be faster to find
an app by searching for
it by entering its name
in the field.
Make the following
entries on the filter bar
and choose Go:
Display Currency: USD
Key Date: <current date>
Planning Category: <PLN>
Statement Version: <YCOA>
Ledger: <0L>
Company Code: <1710>

6
What to Do What You Will See
To customize the cards
on the overview page,
choose the User Icon
and choose Manage
Cards.
Set your preferences
and choose OK.

7
What to Do What You Will See
Navigate to Journal
Entries to be Verified.
Choose the header (or
line point) of the card
to get further
information.
Navigate to G/L
Account Balance.
Choose the header (or
line point) of the card
to get further
information.
If you click on an item
line, you are directly
navigated to the
selected account
group.

8
What to Do What You Will See
Navigate to Quick
Links.
Choose the links below
in the card to get
further information:
Display G/L Account
Line Items
Manage Journal Entries
Post General Journal
Entries
Post Cash Journal
Entries
Clear G/L Accounts
Process Batch Input
Session
Navigate to Tax
Reconciliation Account
Balance.
Choose the line item of
the card to get further
information.
Navigate to G/L Items
Changes.
Choose the header (or
line point) of the card
to get further
information.
9
What to Do What You Will See
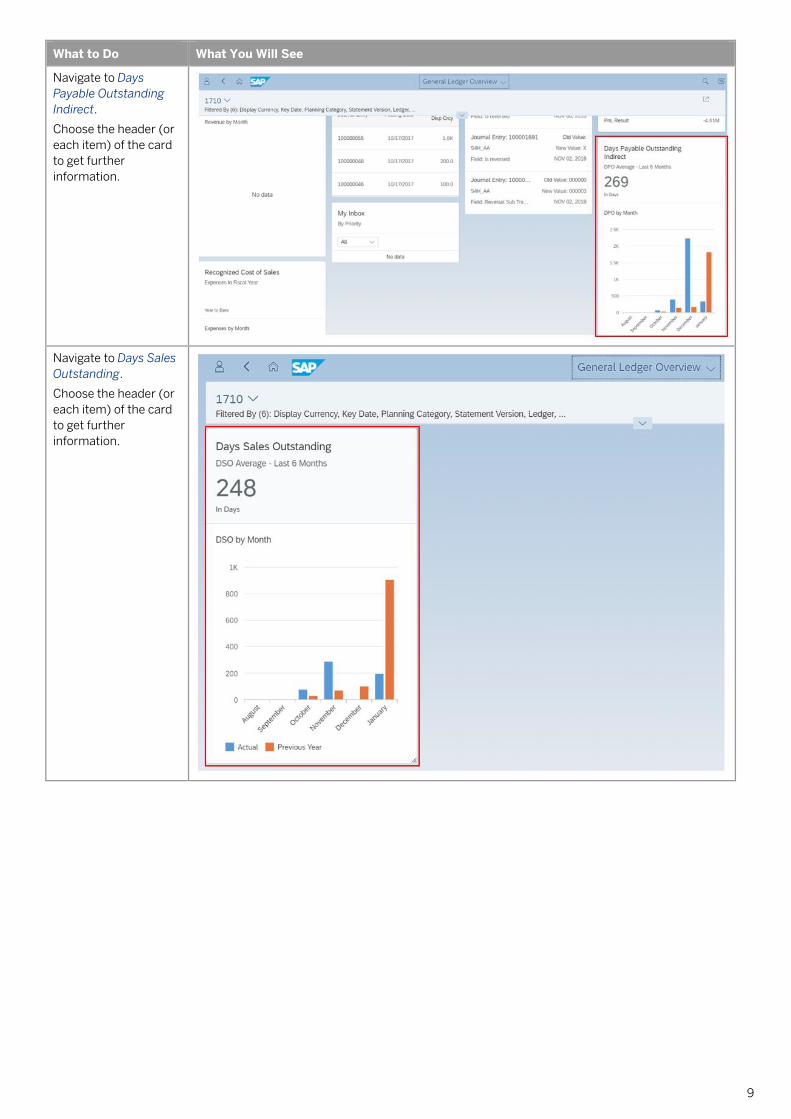
Navigate to Days
Payable Outstanding
Indirect.
Choose the header (or
each item) of the card
to get further
information.
Navigate to Days Sales
Outstanding.
Choose the header (or
each item) of the card
to get further
information.
10
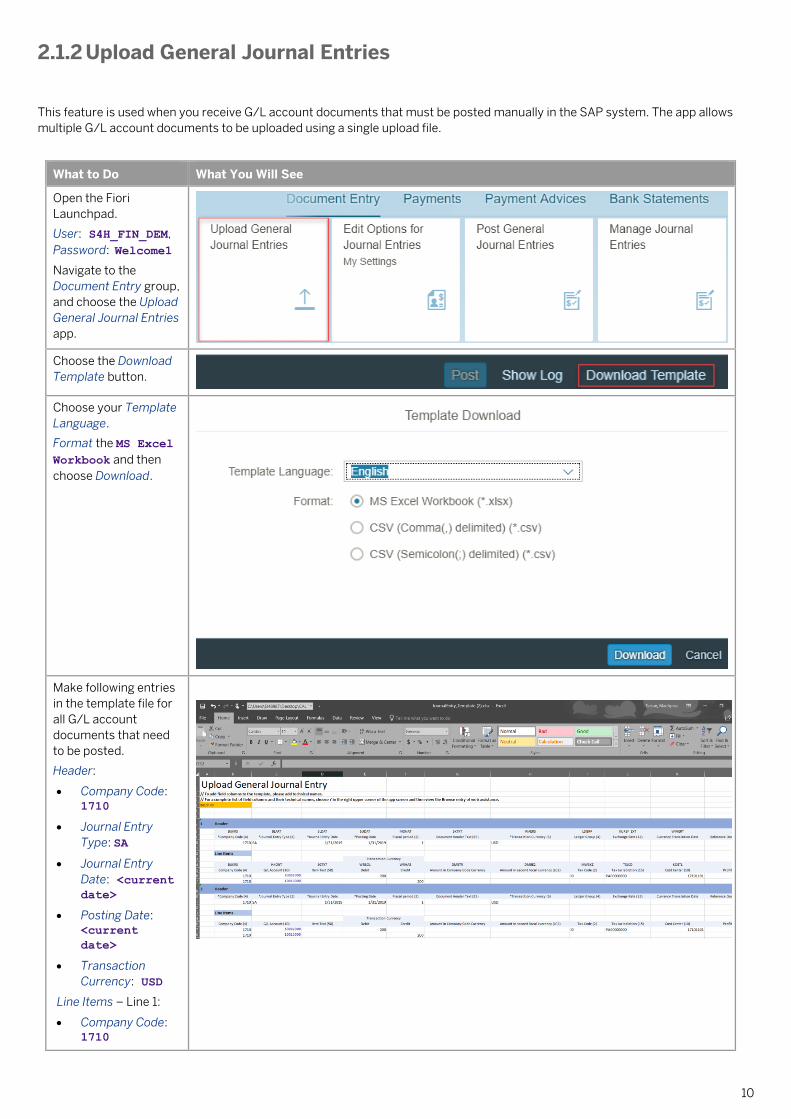
2.1.2 Upload General Journal Entries
This feature is used when you receive G/L account documents that must be posted manually in the SAP system. The app allows
multiple G/L account documents to be uploaded using a single upload file.
What to Do What You Will See
Open the Fiori
Launchpad.
User: S4H_FIN_DEM,
Password: Welcome1
Navigate to the
Document Entry group,
and choose the Upload
General Journal Entries
app.
Choose the Download
Template button.
Choose your Template
Language.
Format the MS Excel
Workbook and then
choose Download.
Make following entries
in the template file for
all G/L account
documents that need
to be posted.
Header:
• Company Code: 1710
• Journal Entry
Type: SA
• Journal Entry
Date: <current date>
• Posting Date: <current
date>
• Transaction
Currency: USD
Line Items – Line 1:
• Company Code: 1710

11
What to Do What You Will See
• G/L Account: 63002000
• Debit: <amount>
• Tax Code: I0
• Tax Jurisdiction: PA00000000
• Cost Center: 17101101
Line Items – Line 2:
• Company Code: 1710
• G/L Account: 10010000
• Credit: <amount>
Save the file locally.
Choose the Browse
button at top of your
view and select the
prepared Excel file.
Choose Open.
Select the item and
choose Post.
2.1.3 Verify General Journal Entries (Requester)
This app is used for entering a journal entry which needs to be checked before final posting. You check the status of the documents
submitted for verification in various tabs: All, Submitted, Rejected and Others. For those rejected, you edit and submit again for
approval to the Processor.
Documents with status Submitted will not be posted yet. Once approved by the processor, the document is posted automatically,
and it is seen in the SAP Fiori App Manage Journal Entries.
What to Do What You Will See
Open the Fiori
Launchpad.
User: S4H_FIN_DEM,
Password: Welcome1
Navigate to Current
Settings group and
choose the Manage
Workflows for General
Journal Entry
Verifications app.
Choose the Add
button.

12
What to Do What You Will See
Make the following
entries and choose
Save:
In the header tab:
Workflow name: Journal entry
verification
In the Properties tab:
Description: Company code = 1710
Amount >=100
Account Group =
FIN
In the Start Conditions
tab:
Company code:
1710
Amount:100
Account Group:
FIN
In the Step Sequence
tab:
Verify General
Journal Entry
Post General
Journal Entry
To activate the
workflow choose
Activate
Open the Fiori
Launchpad.
User: S4H_FIN_DEM,
Password: Welcome1.
Navigate to the Current
Settings group and
choose the Manage
Teams and
Responsibilities app..
13
What to Do What You Will See
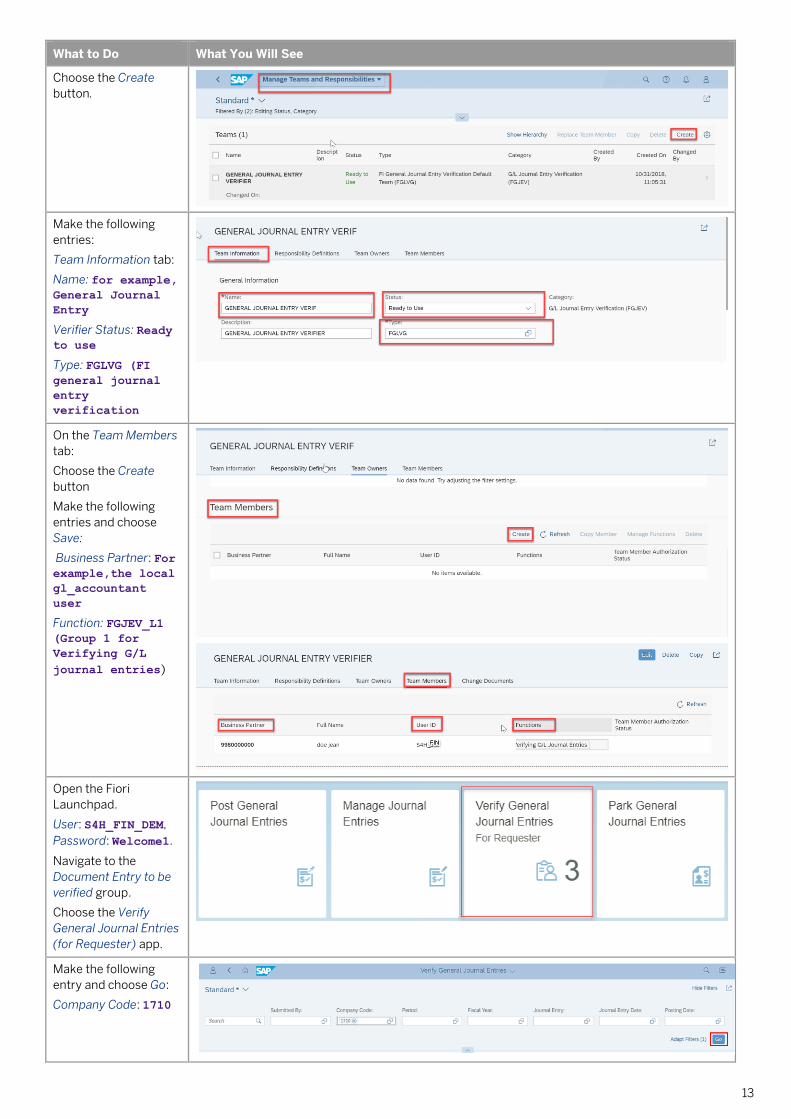
Choose the Create
button.
Make the following
entries:
Team Information tab:
Name: for example,
General Journal
Entry
Verifier Status: Ready to use
Type: FGLVG (FI
general journal
entry
verification
On the Team Members
tab:
Choose the Create
button
Make the following
entries and choose
Save:
Business Partner: For
example,the local
gl_accountant
user
Function: FGJEV_L1 (Group 1 for
Verifying G/L
journal entries)
Open the Fiori
Launchpad.
User: S4H_FIN_DEM,
Password: Welcome1.
Navigate to the
Document Entry to be
verified group.
Choose the Verify
General Journal Entries
(for Requester) app.
Make the following
entry and choose Go:
Company Code: 1710

14
What to Do What You Will See
Choose the Add
button.
The Post General
Journal Entry view
displays.
In the Header tab,
make the following
entries:
Journal Entry Date: <current date>
Posting Date: <current date>
Period: <period>
Journal Entry Type: SA
Company Code: 1710
Transaction Currency: USD
In the Line Items area,
make the following
entries.
Line item 1:
G/L Account: 63003000
Debit: <amount>
Tax Code: for example, I0
Tax Jurisdiction: PA00000000
Cost Center: 17101101
Line item 2:
G/L Account: 11002000
Credit: <amount>
Value Date: Today's date
Choose Submit.
As a result, a journal
entry is submitted for
verification.
15
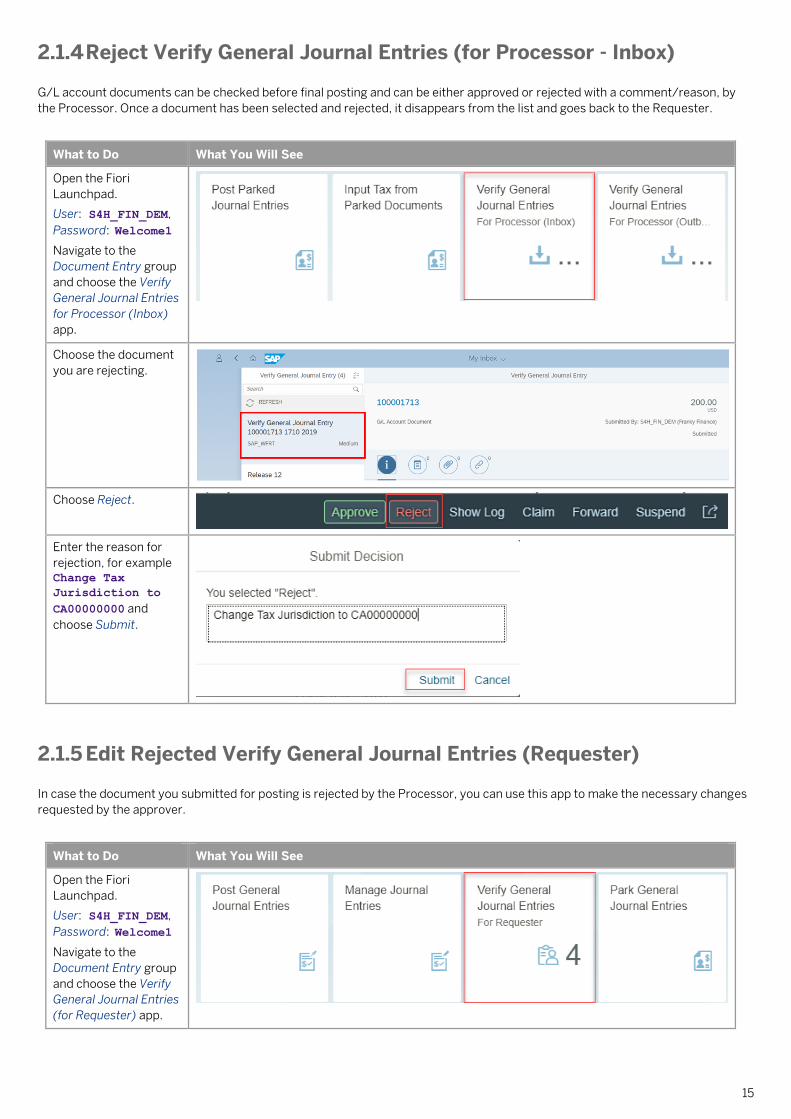
2.1.4 Reject Verify General Journal Entries (for Processor - Inbox)
G/L account documents can be checked before final posting and can be either approved or rejected with a comment/reason, by
the Processor. Once a document has been selected and rejected, it disappears from the list and goes back to the Requester.
What to Do What You Will See
Open the Fiori
Launchpad.
User: S4H_FIN_DEM,
Password: Welcome1
Navigate to the
Document Entry group
and choose the Verify
General Journal Entries
for Processor (Inbox)
app.
Choose the document
you are rejecting.
Choose Reject.
Enter the reason for
rejection, for example Change Tax
Jurisdiction to
CA00000000 and
choose Submit.
2.1.5 Edit Rejected Verify General Journal Entries (Requester)
In case the document you submitted for posting is rejected by the Processor, you can use this app to make the necessary changes
requested by the approver.
What to Do What You Will See
Open the Fiori
Launchpad.
User: S4H_FIN_DEM,
Password: Welcome1
Navigate to the
Document Entry group
and choose the Verify
General Journal Entries
(for Requester) app.
16
What to Do What You Will See
Make the following
entry and choose Go:
Company Code: 1710
Choose the Rejected
tab.
Select the document to
be edited.
The Display General
Journal Entries view
displays.
Choose Edit.
Change the document
based on the
comments entered.
Choose Submit.
The Journal Entry with
the required changes
is now submitted for
verification.
2.1.6 Approve Verify General Journal Entries (for Processor – Inbox)
As a Processor, you can either approve or reject the documents submitted.
In case you find the document suitable for posting or the required changes have been made, you can use this app to approve the
entries. Once a document has been selected and approved, it disappears from the list. If a document is approved, posting of FI
document is automatically triggered.

17
What to Do What You Will See
Open the Fiori
Launchpad.
User: S4H_FIN_DEM,
Password: Welcome1
Navigate to the
Document Entry group
and choose the Verify
General Journal Entry
for Processor (Inbox)
app.
Choose the document
to be approved.
Choose Approve and
choose Submit.
2.1.7 Import Financial Plan Data
Through this feature, you can plan the balance sheet and P&L accounts.
What to Do What You Will See
Open the Fiori
Launchpad.
User: S4H_FIN_DEM,
Password: Welcome1
Navigate to the
Planning group and
choose the Import
Financial Plan Data
app.
Choose Download
Templates.
Choose separator for
the .CSV file and the
template to be
downloaded, for
example P&L
Statement Planning.
Make the following
entries in the template:
Plan Category; PLN

18
What to Do What You Will See
Ledger in General
Ledger Accounting: 0L
General Ledger Fiscal
Year: <current
year>
Posting period: <current period>
Company code: 1710
G/L Account number: 63003000
Amount in Global
Currency: <amount>
Global Currency: USD
Choose the Browse
button at top of the
view.
Select the prepared
Excel files and choose
Open.
The Excel file is now
uploaded with the data
introduced in the file
and the new plan is
created.
Choose Import Source
File to import the plan.
Choose Check
Financial Plan Data.

19
What to Do What You Will See
The General Plan
displays with the plan
imported.
The view can be
customized by adding
various dimensions to
either columns or
rows.
20
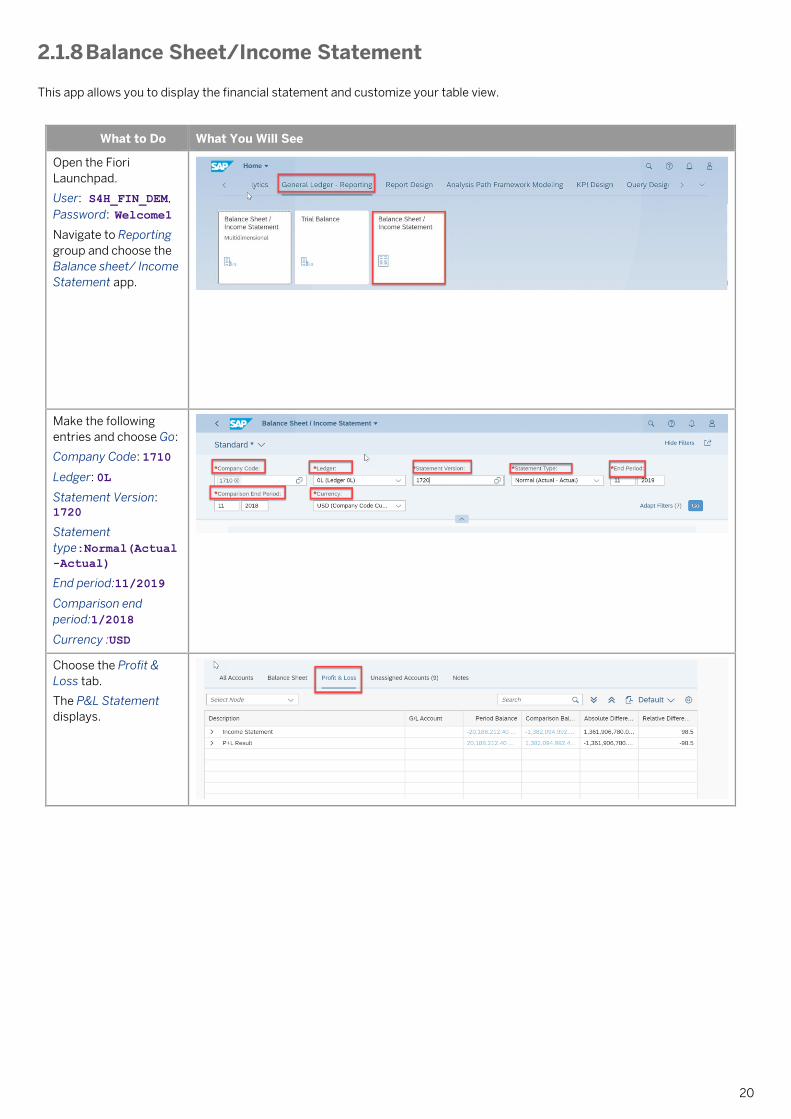
2.1.8 Balance Sheet/Income Statement
This app allows you to display the financial statement and customize your table view.
What to Do What You Will See
Open the Fiori
Launchpad.
User: S4H_FIN_DEM,
Password: Welcome1
Navigate to Reporting
group and choose the
Balance sheet/ Income
Statement app.
Make the following
entries and choose Go:
Company Code: 1710
Ledger: 0L
Statement Version: 1720
Statement
type:Normal(Actual
-Actual)
End period:11/2019
Comparison end
period:1/2018
Currency :USD
Choose the Profit &
Loss tab.
The P&L Statement
displays.

21
2.1.9 Financial Statement download and printing
This app allows you to display the financial statement and export it to Excel.
What to Do What You Will See
Open the Fiori
Launchpad.
User: S4H_FIN_DEM,
Password: Welcome1
Navigate to Reporting
group and choose the
Cash Flow Statement-
Indirect Method app.
Make the following
entries and choose OK:
Company Code: 1710
Ledger: 0L
Hierarchy ID: 1720
From period: 1
To period:11
Fiscal Year:2019
Comparison ledger:0L
Comp from period:1
Comp to period:11
Comp fiscal year:2019
Currency type:10
Plan category: ACT01
Export to Excel.
In the upper right
corner, choose Export
to MS Excel.
22
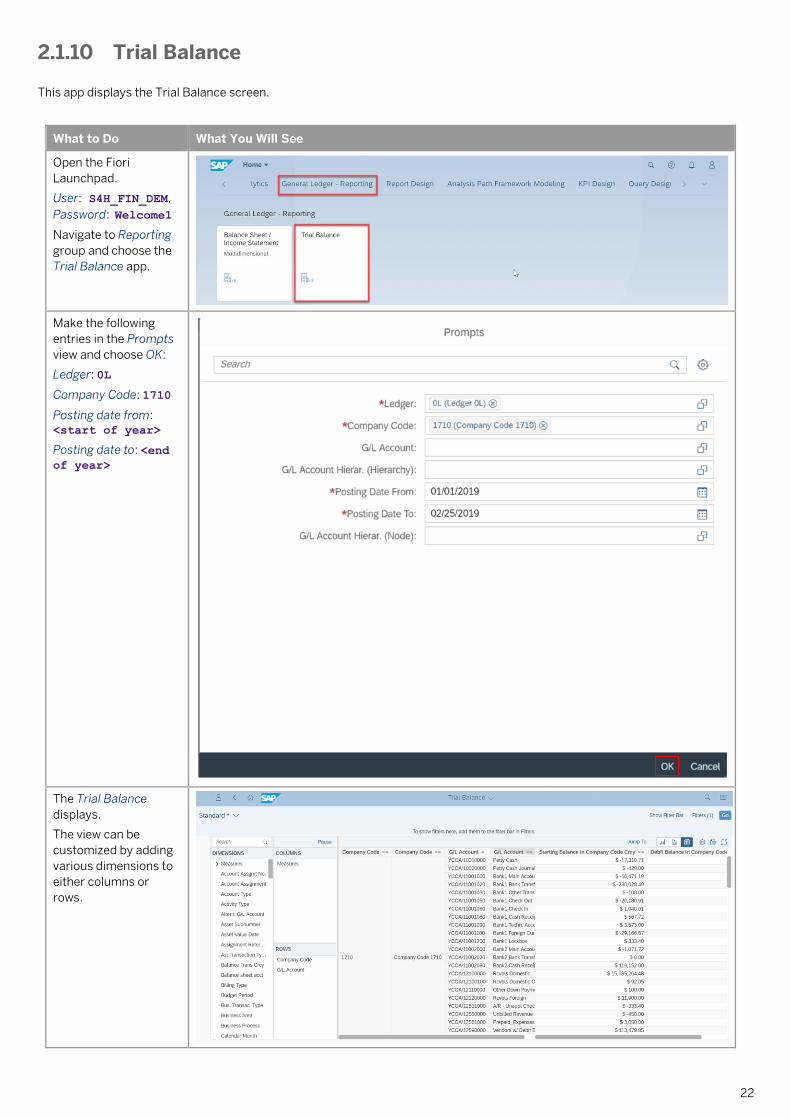
2.1.10 Trial Balance
This app displays the Trial Balance screen.
What to Do What You Will See
Open the Fiori
Launchpad.
User: S4H_FIN_DEM,
Password: Welcome1
Navigate to Reporting
group and choose the
Trial Balance app.
Make the following
entries in the Prompts
view and choose OK:
Ledger: 0L
Company Code: 1710
Posting date from: <start of year>
Posting date to: <end of year>
The Trial Balance
displays.
The view can be
customized by adding
various dimensions to
either columns or
rows.
23
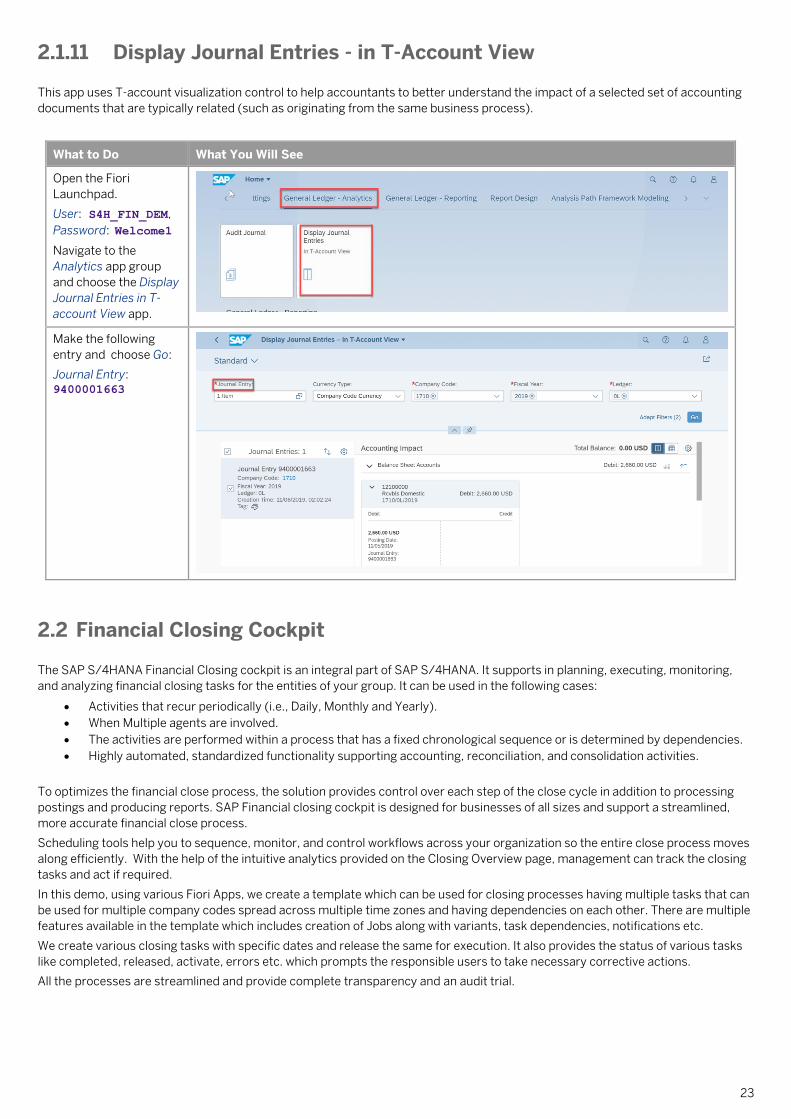
2.1.11 Display Journal Entries - in T-Account View
This app uses T-account visualization control to help accountants to better understand the impact of a selected set of accounting
documents that are typically related (such as originating from the same business process).
What to Do What You Will See
Open the Fiori
Launchpad.
User: S4H_FIN_DEM,
Password: Welcome1
Navigate to the
Analytics app group
and choose the Display
Journal Entries in T-
account View app.
Make the following
entry and choose Go:
Journal Entry: 9400001663
2.2 Financial Closing Cockpit
The SAP S/4HANA Financial Closing cockpit is an integral part of SAP S/4HANA. It supports in planning, executing, monitoring,
and analyzing financial closing tasks for the entities of your group. It can be used in the following cases:
• Activities that recur periodically (i.e., Daily, Monthly and Yearly).
• When Multiple agents are involved.
• The activities are performed within a process that has a fixed chronological sequence or is determined by dependencies.
• Highly automated, standardized functionality supporting accounting, reconciliation, and consolidation activities.
To optimizes the financial close process, the solution provides control over each step of the close cycle in addition to processing
postings and producing reports. SAP Financial closing cockpit is designed for businesses of all sizes and support a streamlined,
more accurate financial close process.
Scheduling tools help you to sequence, monitor, and control workflows across your organization so the entire close process moves
along efficiently. With the help of the intuitive analytics provided on the Closing Overview page, management can track the closing
tasks and act if required.
In this demo, using various Fiori Apps, we create a template which can be used for closing processes having multiple tasks that can
be used for multiple company codes spread across multiple time zones and having dependencies on each other. There are multiple
features available in the template which includes creation of Jobs along with variants, task dependencies, notifications etc.
We create various closing tasks with specific dates and release the same for execution. It also provides the status of various tasks
like completed, released, activate, errors etc. which prompts the responsible users to take necessary corrective actions.
All the processes are streamlined and provide complete transparency and an audit trial.

24
2.2.1 Manage Task Templates
What to Do What You Will See
Open the Fiori Launchpad.
User: S4H_FIN_DEM
Password: Welcome1
Search for the app Manage
Task Templates or as an
alternative, navigate to the
SAP S/4HANA Financial
Closing Cockpit and choose
the app.
The Customizing: Display
Financial Closing Cockpit
app displays.
To open a created task
template, choose the Open
button.
A list with existing
templates and task lists
displays.
Choose the template you
want to display and choose
Continue.
Select the 1st line on the
hierarchy tree and select
the button Expand Subtree.
The FCC Template
displays.
25
What to Do What You Will See
This template contains
multiple tasks grouped into
3 task groups:
TG-FIN-AC
TG-CO
TG-Report
All tasks were created into
the Task Groups and
assigned to the Template
Choose the Open button
and open the task group
TG-FIN-AC.
26
What to Do What You Will See
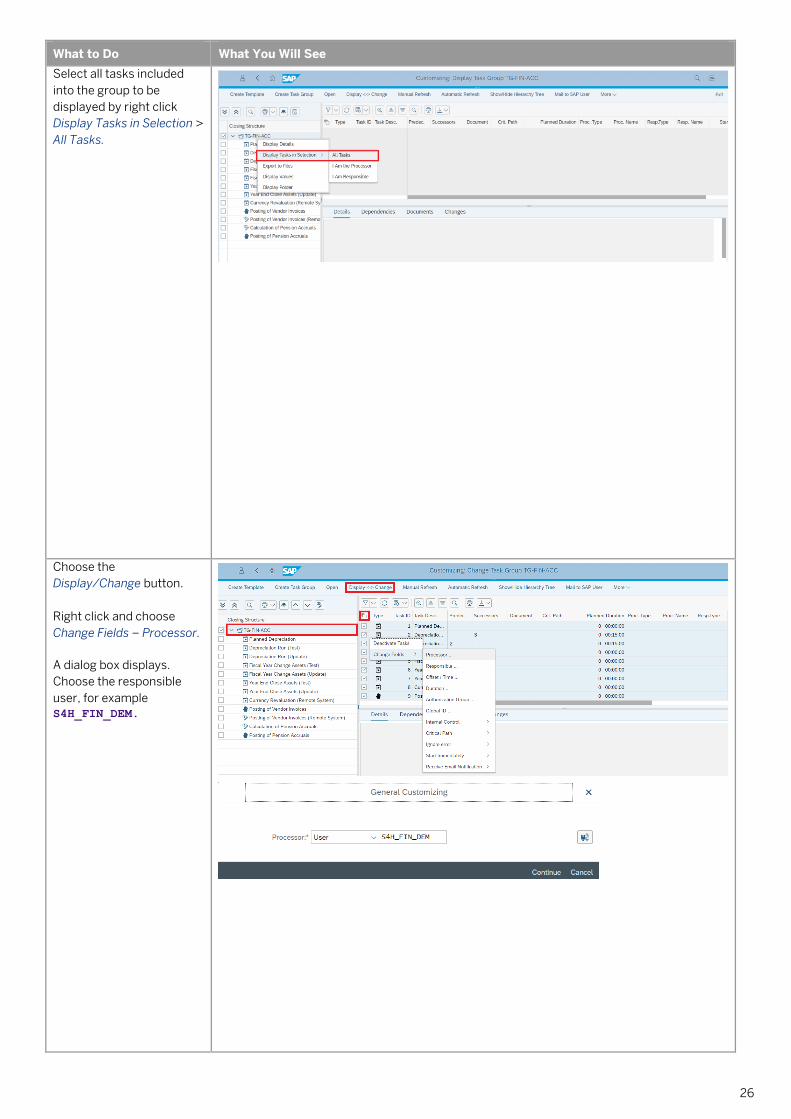
Select all tasks included
into the group to be
displayed by right click
Display Tasks in Selection >
All Tasks.
Choose the
Display/Change button.
Right click and choose
Change Fields – Processor.
A dialog box displays.
Choose the responsible
user, for example
S4H_FIN_DEM.
27
What to Do What You Will See
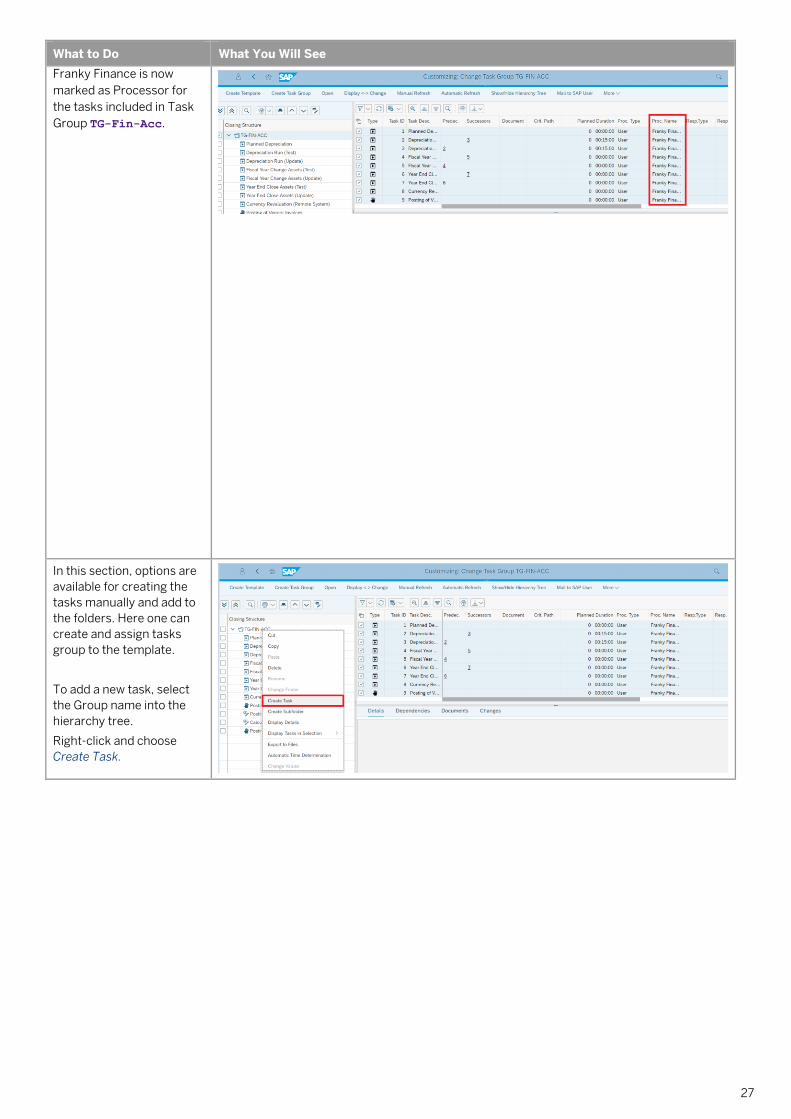
Franky Finance is now
marked as Processor for
the tasks included in Task
Group TG-Fin-Acc.
In this section, options are
available for creating the
tasks manually and add to
the folders. Here one can
create and assign tasks
group to the template.
To add a new task, select
the Group name into the
hierarchy tree.
Right-click and choose
Create Task.
28
What to Do What You Will See
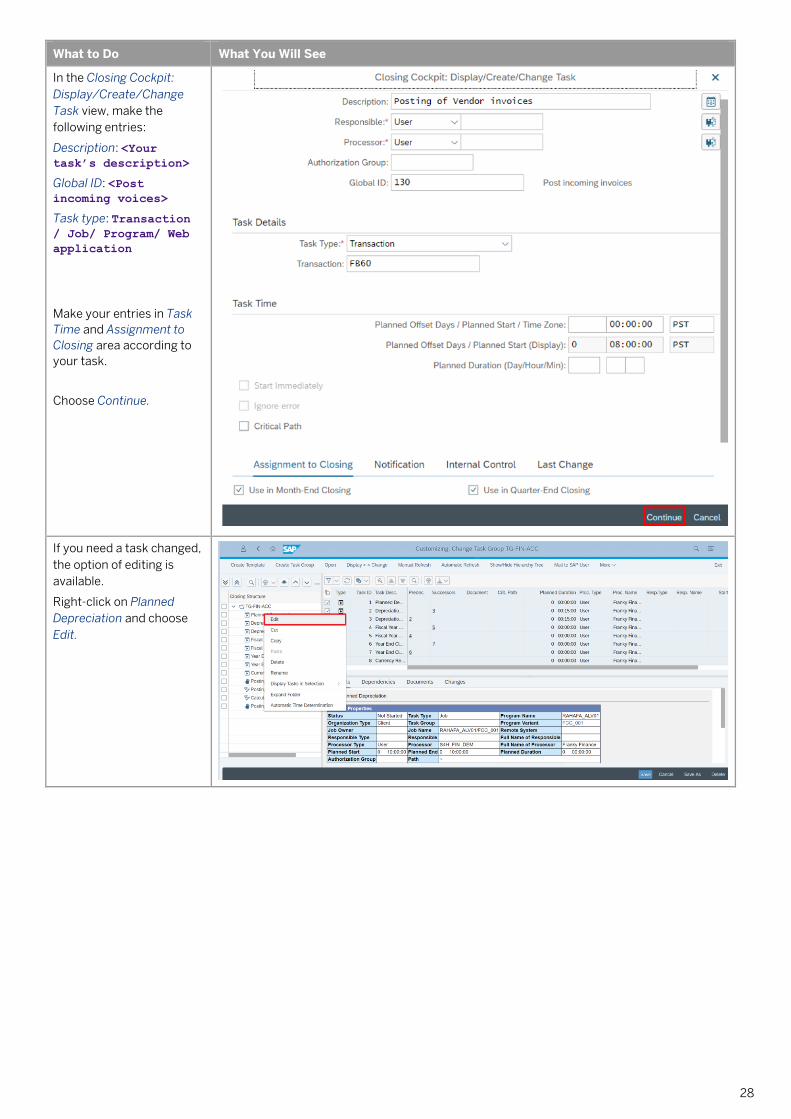
In the Closing Cockpit:
Display/Create/Change
Task view, make the
following entries:
Description: <Your task’s description>
Global ID: <Post incoming voices>
Task type: Transaction / Job/ Program/ Web
application
Make your entries in Task
Time and Assignment to
Closing area according to
your task.
Choose Continue.
If you need a task changed,
the option of editing is
available.
Right-click on Planned
Depreciation and choose
Edit.

29
What to Do What You Will See
There are different options to create / change the task types with the available choices.
After choosing a different
Task Type (if needed)
choose Continue.
After adding or editing a
task inside the task group,
the template must be
updated.
To update template with
the changes and updates
from Task group, select
Open and choose
template FCC.
Choose the
Display/Change button.
From the Menu tab, select
More - Utilities – Update
from Task Groups.
A list with changes to be
updated displays.
Select all changes and
Update.
30
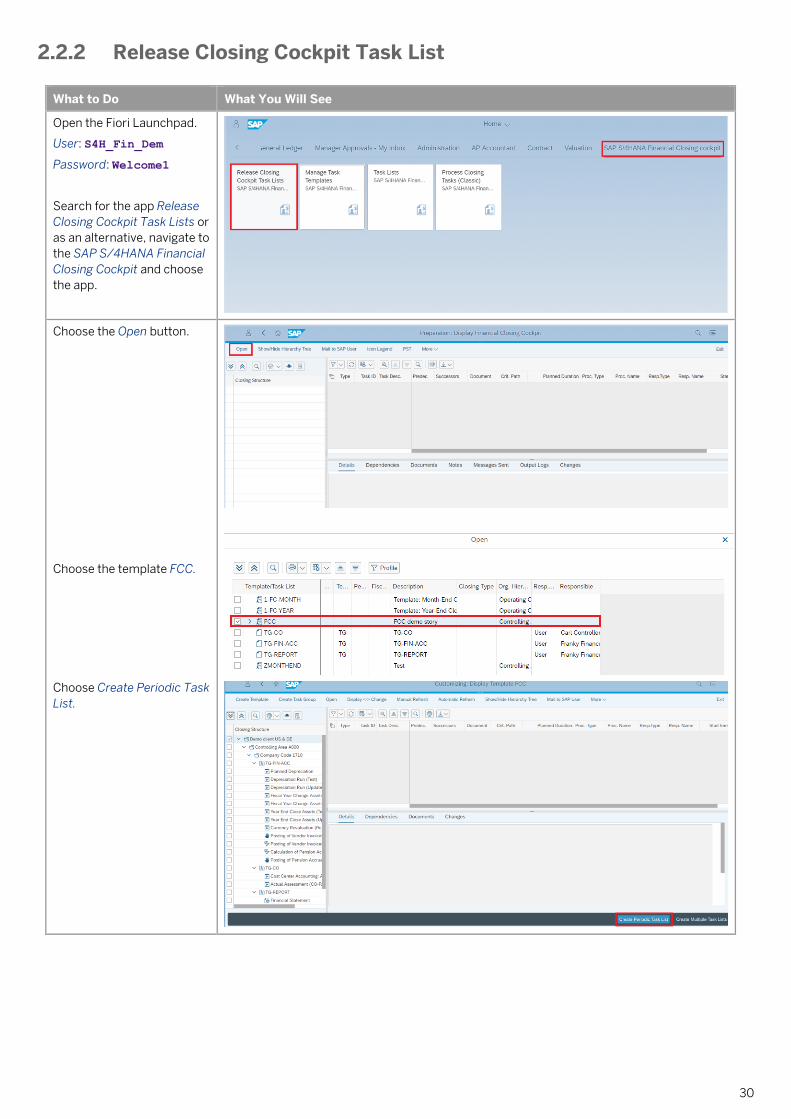
2.2.2 Release Closing Cockpit Task List
What to Do What You Will See
Open the Fiori Launchpad.
User: S4H_Fin_Dem
Password: Welcome1
Search for the app Release
Closing Cockpit Task Lists or
as an alternative, navigate to
the SAP S/4HANA Financial
Closing Cockpit and choose
the app.
Choose the Open button.
Choose the template FCC.
Choose Create Periodic Task
List.

31
What to Do What You Will See
In the Prompt window enter:
Key date: <Your task list date>
Closing Type: M (for
monthly)
Posting Period: 01
Fiscal Year: 2019
Notification: TR
Status: Released
Copy Logs: checked
Choose Continue.
Confirm the warning
message.
Confirm the schedule of the
tasks.
Confirm the next pop-up.

32
2.2.3 Display the Task List Results
What to Do What You Will See
Open the Fiori Launchpad.
User: S4H_Fin_Dem
Password: Welcome1
Search for the app Task
Lists – SAP S/4HANA
Financial Closing Cockpit or
as an alternative, navigate to
the SAP S/4HANA Financial
Closing Cockpit and choose
the app.
Closing Task Lists app
displays.
Choose one of the active
queries: for example,
Completed task list.
Choose Apply to search
completed task list based on
the selected criteria.
Double-click on the Task list
FCC
Details of Task List FCC
display.
33
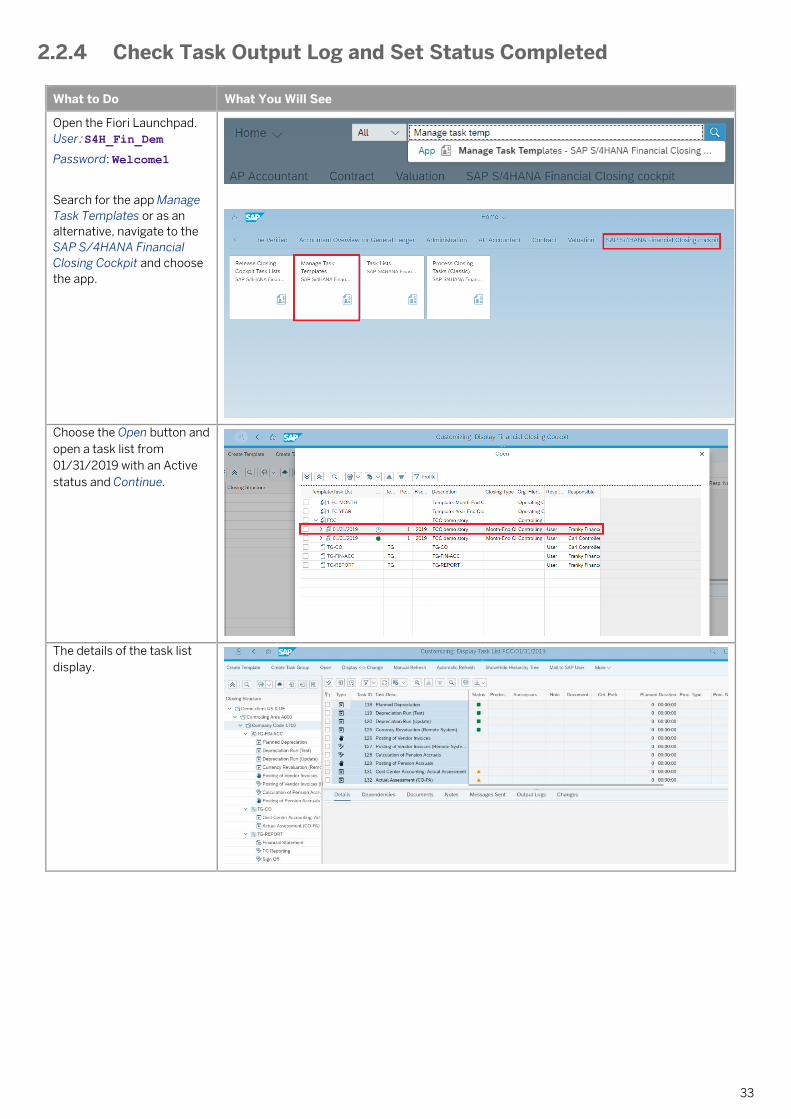
2.2.4 Check Task Output Log and Set Status Completed
What to Do What You Will See
Open the Fiori Launchpad.
User: S4H_Fin_Dem
Password: Welcome1
Search for the app Manage
Task Templates or as an
alternative, navigate to the
SAP S/4HANA Financial
Closing Cockpit and choose
the app.
Choose the Open button and
open a task list from
01/31/2019 with an Active
status and Continue.
The details of the task list
display.
34
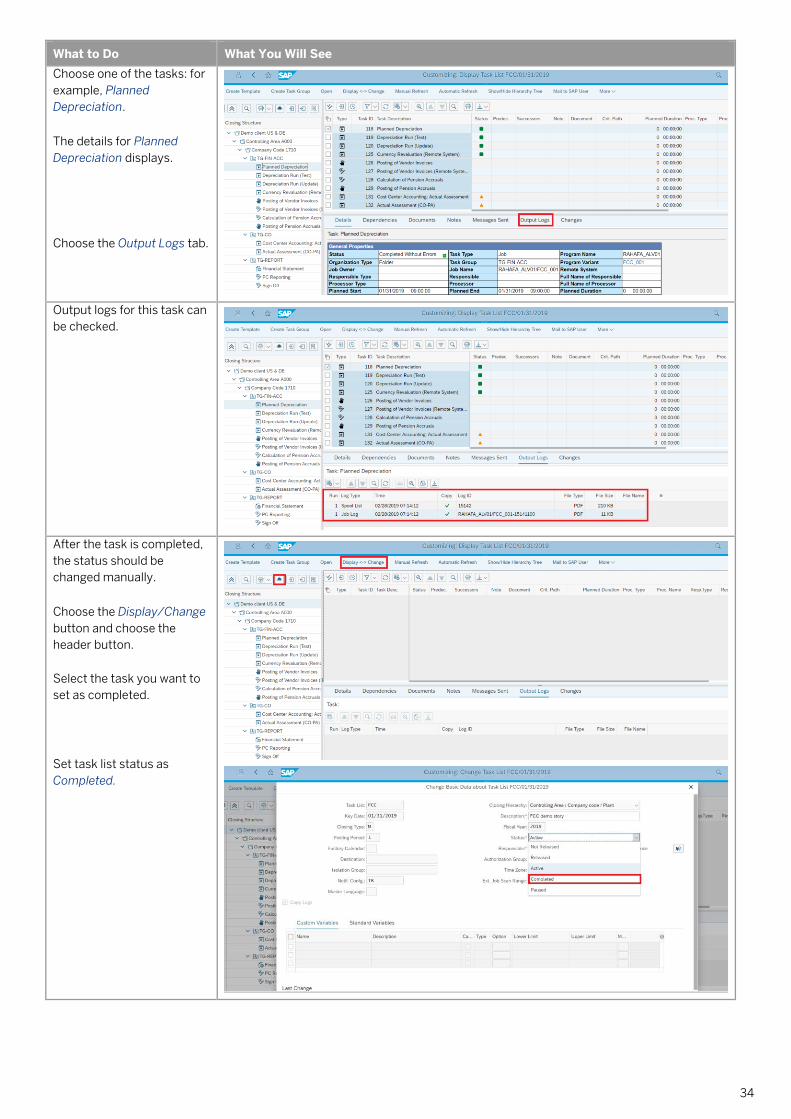
What to Do What You Will See
Choose one of the tasks: for
example, Planned
Depreciation.
The details for Planned
Depreciation displays.
Choose the Output Logs tab.
Output logs for this task can
be checked.
After the task is completed,
the status should be
changed manually.
Choose the Display/Change
button and choose the
header button.
Select the task you want to
set as completed.
Set task list status as
Completed.

35
What to Do What You Will See
After the status is changed
into Completed, the task
appears with a green
checkbox.

36
Top Related
Copyright © 2022 FDOKUMEN

