


Bahasa
Halaman
Hukum

Principles and Methods
Western Blotting
2
Western
Blo
tting
Han
db
oo
k 20
22
Contents
01
04
05
02
06
03
Glossary of terms and definitions in Western blotting 4
Introduction 7 The Western blotting workflow 8 Detection 8 Cytiva and Western blotting 8
Sample preparation 10 2.1 Introduction 11 2.2 Protein extraction options 12 2.2.1 Detergent-based lysis 12 2.2.2 Freeze/thaw lysis 12 2.2.3 Osmotic shock 12 2.2.4 Ultrasonication 12 2.2.5 Mechanical methods 12 2.2.6 Enzymatic digestion 12 2.2.7 Explosive decompression 13 2.2.8 Premade lysis buffers 13 2.2.9 Sample preparation kits 13 2.2.10 Protecting samples 13 2.3 Sample cleanup 14 2.3.1 Sample cleanup products 15 2.3.2 Depletion of high-abundance protein from serum or plasma samples 16 2.3.3 Desalting and concentrating samples 16 2.4 Determination of total protein concentration 16 2.4.1 Products for determining total protein concentration 17 2.5 References 17
Gel electrophoresis 18 3.1 Electrophoresis 19 3.1.1 Polyacrylamide gels 19 3.1.2 Buffer systems and pH 21 3.1.3 Denaturing gels: SDS-PAGE 21
3.1.4 Native gels: PAGE 22 3.1.5 Two-dimensional (2D) gel electrophoresis 22 3.1.6 Electrophoresis equipment from Cytiva 23 3.2.1 Rainbow molecular weight markers 24 3.2.2 Amersham ECL DualVue Western blotting Markers 24 3.2.3 Amersham ECL Plex fluorescent rainbow markers 25 3.2.5 Unlabeled protein molecular weight markers
25 3.3 Determining the molecular weight of unknown proteins from molecular weight markers 25 3.4 Total protein stains 26
Transfer 28 4.1 Protein transfer 29 4.1.1 Electrotransfer 29 4.1.2 Diffusion transfer 31 4.2 Transfer buffers and running conditions 31 4.2.1 Notes on transfer of large and small proteins
32 4.2.2 Current and transfer time 33 4.2.3 Monitoring and optimizing novel blotting protocols 33 4.3 Membranes 33 4.3.1 Amersham Protran™ Nitrocellulose membranes from Cytiva 34 4.3.2 Amersham Hybond™ PVDF membranes from Cytiva 34 4.3.3 Membrane selection guide 35 4.4 Confirmation of protein transfer to the membrane 36 4.4.1 Total protein stains and labels 36 4.5 References 37
Antibody probing 38 5.1 Blocking 39 5.1.1 Electrotransfer 39 5.1.2 Detergents as blocking agents 40 5.1.3 Buffers for blocking agents 40 5.1.4 Timing and temperature 40 5.2 Primary and secondary antibody probing 40 5.2.1 Primary antibodies 41 5.2.2 Secondary antibodies 42 5.3 Stripping and reprobing membranes 44 5.3.1 Stripping using heat and detergent 44 5.3.2 Strategies to optimize membrane stripping 44 5.3.3 Stripping using low pH 45 5.3.4 Stripping using high pH 45 5.3.5 Stripping using high salt solution 45 5.3.6 Hints and tips 45 5.4 References 45
Detection 46 6.1 Chemiluminescence 47 6.1.1 Amersham™ ECL™ start 49 6.1.2 Amersham ECL™ 49 6.1.3 Amersham™ ECL™ Prime 50 6.1.4 Amersham ECL Select™ 51 6.1.5 Chemiluminescence hints and tips 53 6.2 Fluorescence 53 6.2.1 Multiplexed detection 54 6.2.2 Normalization using fluorescent multiplexing 55 6.2.3 Fluorescence hints and tips 57
Imaging 59

3
Western
Blo
tting
Han
db
oo
k 20
22
07
08
09
7.1 Digital imaging 60 7.1.1 Charge-coupled device (CCD) camera-based imagers 60 7.1.2 Scanner systems 61 7.1.3 Fluorophores and filters 62 7.2 Chemiluminescence detection using film 63 7.3 Autoradiography 63 7.3.1 X-ray film autoradiography 63 7.3.2 Storage phosphor screen autoradiography 63 7.4 Detection system and imager compatibility 64
Analysis 65 8.1 Quantitative Western blotting 66 8.1.1 Sensitivity 66 8.1.2 Linear dynamic range 66 8.1.3 Signal stability 67 8.1.4 Normalization 67 8.1.5 Signal-to-noise ratio 69 8.1.6 SNOW imaging mode for reduced niose levels and exceptional image quality 70 8.2 Analysis software 71 8.2.1 Main features of ImageQuant™ TL software 71
Application examples 73 9.1 Chemiluminescent Western blotting 74 9.1.1 Purification of recombinteins 74 9.1.2 Detection of low-abundance proteins: Monitoring signaling pathway activation 74 9.1.3 Detection of protein interactions by co- immunoprecipitation and Western blotting 75 9.2 Fluorescent Western blotting 76 9.2.1 Multiplex detection for normalizing against total protein 76
9.2.2 Multiplexed detection for normalizing against a housekeeping protein 77 9.2.3 Multiplexed detection of proteins with similar molecular weights 77 9.2.4 Triplexed detection: The simultaneous detection of three proteins 78 9.2.5 Three-layer Western blotting for signal amplification 79 9.2.6 Two-dimensional (2D) Western blotting for detection of phosphorylated isoforms 80 9.3 Reference 81
Troubleshooting 82 10.1 General handling procedures 83 10.2 Problems associated with running buffer and membrane handling 92 10.3 Other tips to improve Western blotting productivity 92
Protocols and recipes 93 11.1 Western blotting standard procedure 94 11.2 Sample preparation 95 11.2.1 Extraction of proteins with Mammalian Protein Extraction Buffer 95 11.2.2 Sample cleanup 95 11.2.3 Concentration measurement \ using 2D Quant Kit 98 11.2.4 2× sample loading buffer 99 11.2.5 Prelabeling using Amersham™ Quickstain 100 11.3 Electrophoresis 100 11.3.1 Preparation of polyacrylamide gels containing SDS 100
11.4 Western blotting electrotransfer 102 11.4.1 Wet transfer 102 11.4.2 Semidry transfer 103 11.5 Western blotting buffers 105 11.6 Blocking 105 11.7 Antibody probing and detection 106 11.7.1 Chemiluminescence detection with Amersham™ ECL™, Amersham™ ECL™ and Amersham™ ECL™ Select™ 106 11.8 Stripping and reprobing 109 11.8.1 Stripping using high pH and high temperature 10911.9 Optimization protocols for finding optimal primary and secondary antibody concentrations 11011.10 Reference 111
Appendix optimization 112 A.1 Choice of membrane 113 A.2 Choice of blocking agent 113 A.3 Choice of washing buffer 113 A.4 Optimization of antibody concentrations using membrane strips 114
Ordering information 115
Contents
10
11
12
13

4
Western
Blo
tting
Han
db
oo
k 20
22
Glossary of terms and definitions in Western blottingThe following terms are defined according to their common usage in Western blotting applications.
Acrylamide C3H
5NO The monomeric unit which, when polymerized, forms the matrix of
polyacrylamide gels.
Affinity purification A chromatographic purification method based on a highly specific interaction, such as an antigen-antibody interaction, that immobilizes a target protein on a solid support. Researchers can use affinity purification to improve the specificity of monoclonal and polyclonal primary antibodies as Western blotting reagents.
Alkaline phosphatase (AP) A hydrolase enzyme that can be conjugated to secondary antibodies and used as part of the detection system in Western blotting.
Ammonium persulfate (APS)(NH
4)
2S
2O
8
The initiator of acrylamide polymerization. Used along with TEMED to catalyze the polymerization of acrylamide to polyacrylamide.
Analysis software Tools to enable the automated analysis, storage, and archiving of images collected on CCD camera-based imagers and/or scanners.
Anode The positively charged electrode in an electrophoresis or blotting apparatus.
Antigen Any structure that induces the generation of specific antibodies in a challenged animal.
Autoradiography The process of capture and analysis of an image on an X-ray film or phosphoscreen produced by the decay emissions of a radioactive substance.
Background Signals generated due to interactions of primary and/or secondary antibodies with the membrane itself, or impurities in the sample.
Biotin A vitamin used as a protein tag in many molecular biological contexts due to its extraordinarily strong affinity for streptavidin.
Bisacrylamide C
7H
10N
2O
2
A crosslinking agent used to polymerize acrylamide to polyacrylamide in the formation of gels.
Blocking The process of saturating a membrane with, for example, protein after blotting to prevent nonspecific binding of antibodies to areas of the membrane not occupied by the target protein.
Blotting The process of transferring proteins from a gel to membrane, usually in an electric field. Also known as immunoblotting.
β-mercaptoethanol HOCH
2CH
2SH
A reagent used to reduce disulfide bonds in proteins, resulting in unfolded proteins.
Bovine serum albumin (BSA) Protein with numerous applications, including use as a blocking agent and standard in total protein concentration assays.
Bromophenol blue C
19H
10Br
4O
5S
A blue-colored compound in sample loading buffer. Migrates at the front in PAGE and serves as a marker for progress of electrophoresis.
Butanol Used in its saturated form to temporarily overlay newly cast resolving gels before adding the stacking gel to prevent bubble formation and help form a perfectly smooth interface between the two phases.
Cathode The negatively charged electrode in an electrophoresis or blotting apparatus.
Charge-coupled device (CCD)
A device that converts electrical charge into a digital value. CCD cameras are integrated with imagers, producing high-quality image data.
Chemifluorescence Chemically and/or enzymatically induced generation of an active fluorophore that emits light after excitation with light of a specific wavelength.
Chemiluminescence The emission of light by a molecule as a result of a chemical reaction.
Comb A plastic manifold inserted into a stacking gel before polymerization to form the wells into which samples are injected.
Conjugate Any chemical stably attached to a carrier molecule of interest to serve as a marker. The conjugate must not interfere with the function of its carrier.
CyDye Fluorophores from Cytiva that emit red (Cy™5), green (Cy™3), blue (Cy™2), IR Short (CyDye™ 700), and IR Long (CyDye 800) light after excitation with light of the appropriate wavelengths.
Denaturing gel A polyacrylamide gel containing SDS.
Densitometry The quantitative measurement of optical density on film. Optical density is usually given as a relative value in a scale.
Detection limit (LOD) The smallest amount of protein that can be detected using given detection reagents and systems to compare with LOQ.
Detergent A surfactant added to buffers and solutions in Western blotting applications that helps to increase the solubility of proteins.
Discontinuous buffer system Electrophoresis using a gel comprised of a spacer gel and a larger resolving gel.

5
Western
Blo
tting
Han
db
oo
k 20
22
Dithiothreitol (DTT)C
4H10O
2S
2
A reducing reagent. In the context of electrophoresis and Western blotting, it is used to reduce disulfide bonds in proteins, disrupting tertiary structure.
Dot-blot A rapid method used to monitor the interaction of proteins with a membrane and their subsequent interactions with probes. By testing conditions using a dot-blot, there is no need to perform gel electrophoresis or gel-to-membrane blotting.
Dynamic range The range of blotted protein quantities on a blot that can be measured using a given system. The greater the linearity of the dynamic range, the more precisely proteins can be quantitated over that range.
Emission The release of light from a fluorophore when an electron in the molecule falls from an excited state to a lower energy state.
Enhanced chemiluminescence (ECL)
HRP-catalyzed conversion of an ECL substrate into a sensitized reagent, which on further oxidation by hydrogen peroxide, emits detectable light when it decays.
Electrophoresis (1-D) The process of the separation of a mixture of proteins on a gel in an electric field according to size, shape, and charge.
Electrophoresis (2-D) Separation of proteins in two dimensions, first according to isoelectric point (pI) and subsequently according to molecular weight.
Epitope The specific molecular region of an antigen recognized by an antibody.
Excitation Absorption of light energy by a fluorophore, during which an electron in the fluorophore molecule is boosted to a higher energy level.
Filter A component of an imager that allows light of a certain wavelength to pass while obstructing light of other wavelengths.
Fluorescence Light of a specific wavelength emitted by a fluorophore after excitation via a light source of shorter wavelength.
Fluorophore Any compound, which, when transformed to a temporary high-energy state, emits light as it returns to its ground state.
Glycerol A colorless and viscous liquid used in sample loading buffer to increase the density of the samples. Glycerol enables loading and helps anchor the sample in the sample wells until an electric field is applied to the gel.
Horseradish peroxidase (HRP)
An enzyme that catalyzes the conversion of an ECL reagent into a reactive, light-emitting compound.
Housekeeping protein Any intracellular protein that does not significantly change in expression level in response to external stimulation.
Imaging The process of converting the signals generated by a detection system into a format that enables visualization, analysis, and storage of data.
Immunoprecipitation The mechanical removal of a protein, or complex of proteins from a sample by incubation with an antibody coupled to a solid matrix, such as Sepharose beads.
Isoelectric focusing (IEF) The separation of proteins on a pH gradient according to isoelectric point (pI).
Isoelectric point (pI) The pH at which a protein has no net charge.
Isotype The class of an antibody, defined according to the heavy chain. The antibody isotype of most relevance to Western blotting is IgG.
Laemmli buffer The classic electrophoresis running buffer based on Tris-glycine.
Lysis The disruption of cells in sample preparation prior to electrophoresis. Lysis can be purely mechanical or mediated by the use of buffers containing detergents.
Membrane capacity The maximum amount of protein that can bind per unit area of a membrane.
Methanol An important component in transfer buffer, minimizing swelling and distortion of polyacrylamide gels at transfer. In addition, methanol counters the inhibitory effect of SDS on the contact between proteins and membranes. Note: Ethanol can also be used in transfer buffer instead of methanol.
Molecular weight markers A mixture of proteins of known molecular weights. Prestained molecular weight markers can be used in Western blotting to verify successful transfer.
Monoclonal antibodies Antibodies that only bind to one epitope and are typically highly specific, pure, and consistent in performance, and generally give rise to low background.
Multiplexing The practice of detecting several different proteins on a single blot, in a single experiment.
Native gel A gel that does not contain any denaturing reagents (e.g., SDS) or reducing reagents (e.g., β-mercaptoethanol).
Nitrocellulose A membrane material.
Nonspecific binding Interactions between antibodies used for detection and impurities on the membrane or the membrane itself.
Normalization The process of adjusting for variations in the amount of total protein from lane-to-lane in order to reliably quantitate protein levels.
Optimization A general term used to cover the preliminary steps that should be carried out to determine optimal conditions for a specific experimental system, for example, blocking reagent, antibody concentrations, as well as incubation times/temperatures.
Phosphatase inhibitors Agent that prevents dephosphorylation of phosphorylated proteins by phosphatases. Should be added to lysis buffers if the aim of the experiment is to detect transient phosphorylation of proteins.
Phosphate-buffered saline (PBS)
Common buffer solution in biological research, consisting of NaCl and sodium phosphate at physiological concentrations and pH conditions.
Photomultiplier tube (PMT)
A photoelectric device that converts light into electric current and amplifies the current.

6
Western
Blo
tting
Han
db
oo
k 20
22
Polyclonal antibodies Mixture of antibodies with affinities for different epitopes on a target molecule.
Polyvinylidine difluoride (PVDF)
A membrane material.
Post-translational modification (PTM)
Chemical modification of a protein after translation that regulates and changes the function of the protein. Typical PTMs include phosphorylated, glycosylated, and acetylated groups.
Primary antibody The first antibody, specific to a target protein, used as a probe on a blotted membrane. Primary antibodies are usually unlabeled.
Protease inhibitors A cocktail of chemicals inhibiting the activity of proteases, thereby preventing degradation of proteins.
Protein A/Protein G Proteins derived from the cell wall of bacteria that bind immunoglobulins, most notably to the Fc region of IgG.
Quantitation limit (LOQ) The smallest amount of protein that can be reliably quantitated using given detection reagents and systems (compare with LOD).
Radioisotope A radioactive isotope of an element, some of which have found use as labels for secondary antibodies in Western blotting.
Resolution The quality of separation of protein bands in a gel after electrophoresis of a sample.
Resolving gel (also known as separating gel)
The main body of a gel, in which proteins separate according to size.
Sample loading buffer A solution added to protein sample before loading into the wells of a spacer gel.
Secondary antibody A labeled antibody directed to the constant region of a primary antibody. Increases sensitivity of the assay by multiple binding of a labeled antibody to a primary antibody.
Semidry transfer Electrotransfer of proteins from a gel to a membrane, by placing a stack comprised of the gel and membrane sandwiched between blotting paper, and soaked in transfer buffer.
SDS-PAGE Electrophoresis in a polyacrylamide gel carried out in the presence of SDS (see sodium dodecyl sulfate).
Signal duration The time interval over which a signal can be detected.
Signal stability The quality of consistency of signal intensity over time.
Signal-to-noise ratio A measure of how well a true signal can be resolved from the noise. “Noise” is signals generated by the detection system.
Sodium azide A preservative added to antibody solutions and buffers to extend their shelf life. Azide inhibits HRP and AP activities.
Sodium dodecyl sulfate (SDS)C
12H
25SO
4Na
An anionic detergent used in SDS-PAGE to denature and coat proteins with a negative charge. Also known as sodium lauryl sulfate.
Stacking gel (also known as spacer gel)
The sample well-containing region of a gel in which proteins are concentrated before entering the resolving gel.
Streptavidin A bacterial protein with extraordinarily high affinity for biotin. Streptavidin/biotin systems are extensively used in molecular biology.
Stripping The physical removal of the molecular components of a detection system from a blotted membrane. After stripping the membrane is open to reprobing with a second primary antibody.
Tetramethylethylenediamine (TEMED) (CH
3)
2NCH
2CH
2N(CH
3)
2
Polymerization initiator. Used together with APS to catalyze the polymerization of acrylamide in the formation of polyacrylamide gels.
Tris/Tris-buffered saline (TBS)
Common buffer solution in biological research, with a buffering range of pH 7 to 9, the typical physiological pH of most living organisms.
Wet transfer The process of transferring proteins from a gel to a membrane, by total immersion of both gel and membrane in transfer buffer and the application of an electric field. The method is highly efficient and is recommended for the transfer of large proteins.
Zwitterionic (also known as amphoteric)
The quality of possessing both acidic and basic groups (positively and negatively charged amino acids at given pH) within the same molecule. All proteins are zwitterionic.

Western
Blo
tting
Han
db
oo
k 20
21
Introduction01
Western blotting is an established way to detect and analyze proteins. Since its first description in 1979, it has become one of the most widely used methods in life science research.The technique is based on an antibody-protein complex. With it, scientists can detect antibodies bound to membrane-immobilized proteins.
Whether you’re a beginner or an expert, this handbook is meant to guide and inspire. We share the latest expertise and technology to support your success from sample preparation to analysis. You can use this handbook to lead the way, or to optimize your results.
Chapters 2 through 8 outline the Western blotting workflow step-by-step. We describe the theoretical and practical aspects of the technique along with useful hints and tips. You can find examples of typical applications, and some new approaches to Western botting in Chapter 9. Chapter 10 reviews troubleshooting strategies and Chapter 11 provides protocols and recipes — including a standard procedure we recommend to help design and run experiments.
Over the past decade, improved detection methods and software have brought quantitative analysis to Western blotting. We give examples of protocols that can help you get even more quantitative data from your Western blots.
To find more of our methodology handbooks, head to cytiva.com/handbooks.
7

8
Western
Blo
tting
Han
db
oo
k 20
22
The Western blotting workflowYou might adapt a protocol depending on the protein you're using and the information you need. But while protocols might vary between applications, they all follow the same basic steps.
For example, you might need to apply a preliminary treatment to your sample before electrophoresis. A sample can be a complex protein mixture, like a cell or tissue extract. It can also be a sample of purified proteins, like a fraction from a purification procedure.
• Use gel electrophoresis to separate the proteins. Electrotransfer them from the gel and immobilize them on a membrane.
• Block areas of the membrane where the protein didn’t bind. This helps prevent nonspecific binding.
• Incubate the membrane with a primary antibody that specifically binds to the protein of interest. Wash to remove unbound antibodies.
• Detect using a secondary antibody conjugated to an enzyme, a fluorophore, or an isotope. The signal from the protein-antibody-antibody complex is proportional to the amount of protein on the membrane.
Detection
The most common detection method is chemiluminescence. Chemiluminescence uses secondary antibodies conjugated with horseradish peroxidase enzyme. When a peroxide-based reagent is added, the enzyme catalyzes the oxidation of luminol, and this reaction emits light. You can capture the light signal using X-ray film or a charge-coupled device (CCD) camera-based imager.
A newer detection method is fluorescence. Scientists label the secondary antibodies with a fluorophore such as CyDye™ fluorescent dye. Then scientists can detect the fluorescent light signal directly using a laser scanner or a CCD camera-based imager equipped with appropriate light sources and filters. Total Protein Normalization (TPN) is more reliable using fluorescence, because it enables multiplexing target and control signals on the same blot. Additionally, newer imaging systems like the Amersham™ ImageQuant™ 800 enable you to combine chemidetection of target proteins multiplexed with fluorescence stains to detect total protein.
Symbols
This symbol indicates general advice on how to improve procedures or recommends measures to take in specific situations
This symbol indicates where special care should be taken
Highlights chemicals, buffers, and equipment
Outline of experimental protocols
Reference
1. Towbin, H. et al. Electrophoretic transfer of proteins from polyacrylamide gels tonitrocellulose sheets: procedure and some applications. Proc. Natl. Acad. Sci. U S A. 76, 4350–4354 (1979).
SAMPLE PREPARATION ELECTROPHORESIS TRANSFER PROBING DETECTION IMAGING AND ANALYSIS
Cytiva and Western blotting Since the introduction of the first enhanced chemiluminescent (ECL™) detection reagent for Western blotting Amersham ECL™ — in 1990, the portfolio of products offered by Cytiva has been improved and optimized across all Western blotting requirements from electrophoresis and transfer equipment to highly sensitive detection systems and software. Select the optimal gels, membranes, markers, blockers, secondary antibodies, detection reagents, imaging systems and software from the portfolio of Cytiva products for Western blotting to easily achieve excellent results.

9
Western
Blo
tting
Han
db
oo
k 20
22
From start to finish, Cytiva supports your Western blot workflow
Products required
• Desalting columns• Spin columns• Extraction kits and buffers
• MW markers• Gel casting chemicals (PlusOne)• Electrophoresis equipment
• Amersham WB membranes• Blotting paper• Transfer equipment
• ECL™ secondary Ab• Fluorescent secondary Ab• Blocking reagents
• Amersham™ ECL™ WB detection reagents
• Amersham imagers
Sample products
• SDS-PAGE Clean-up Kit• HiTrap™ desalting column• PD MiniTrap™ G-25
• Pharmalyte™ 3 – 10• Amersham ECL Rainbow markers• Amersham Quickstain• Mini VE, SE 600 Ruby, SE250 &
SE260 electrophoresis units
• Amersham Hybond™ PVDF • Amersham Protran™ NC membranes• Whatman GB and 3MM CHR
blotting papers• TE70 transfer unit
• Amersham™ HRP and CyDye™• Conjugated secondary antibodies
(ECL plex, CyDye 700 and 800 nm)
• AmershamECL™ Prime• Amersham ECL™• Amersham ECL Select™• Amersham Start
• Amersham ImageQuant™ 800 • ImageQuant™ LAS 500• Amersham Typhoon™ laser scanner
SAMPLE PREPARATION ELECTROPHORESIS TRANSFER PROBING DETECTION IMAGING AND ANALYSIS
Western
Blo
tting
Han
db
oo
k 20
21
Sample preparation02
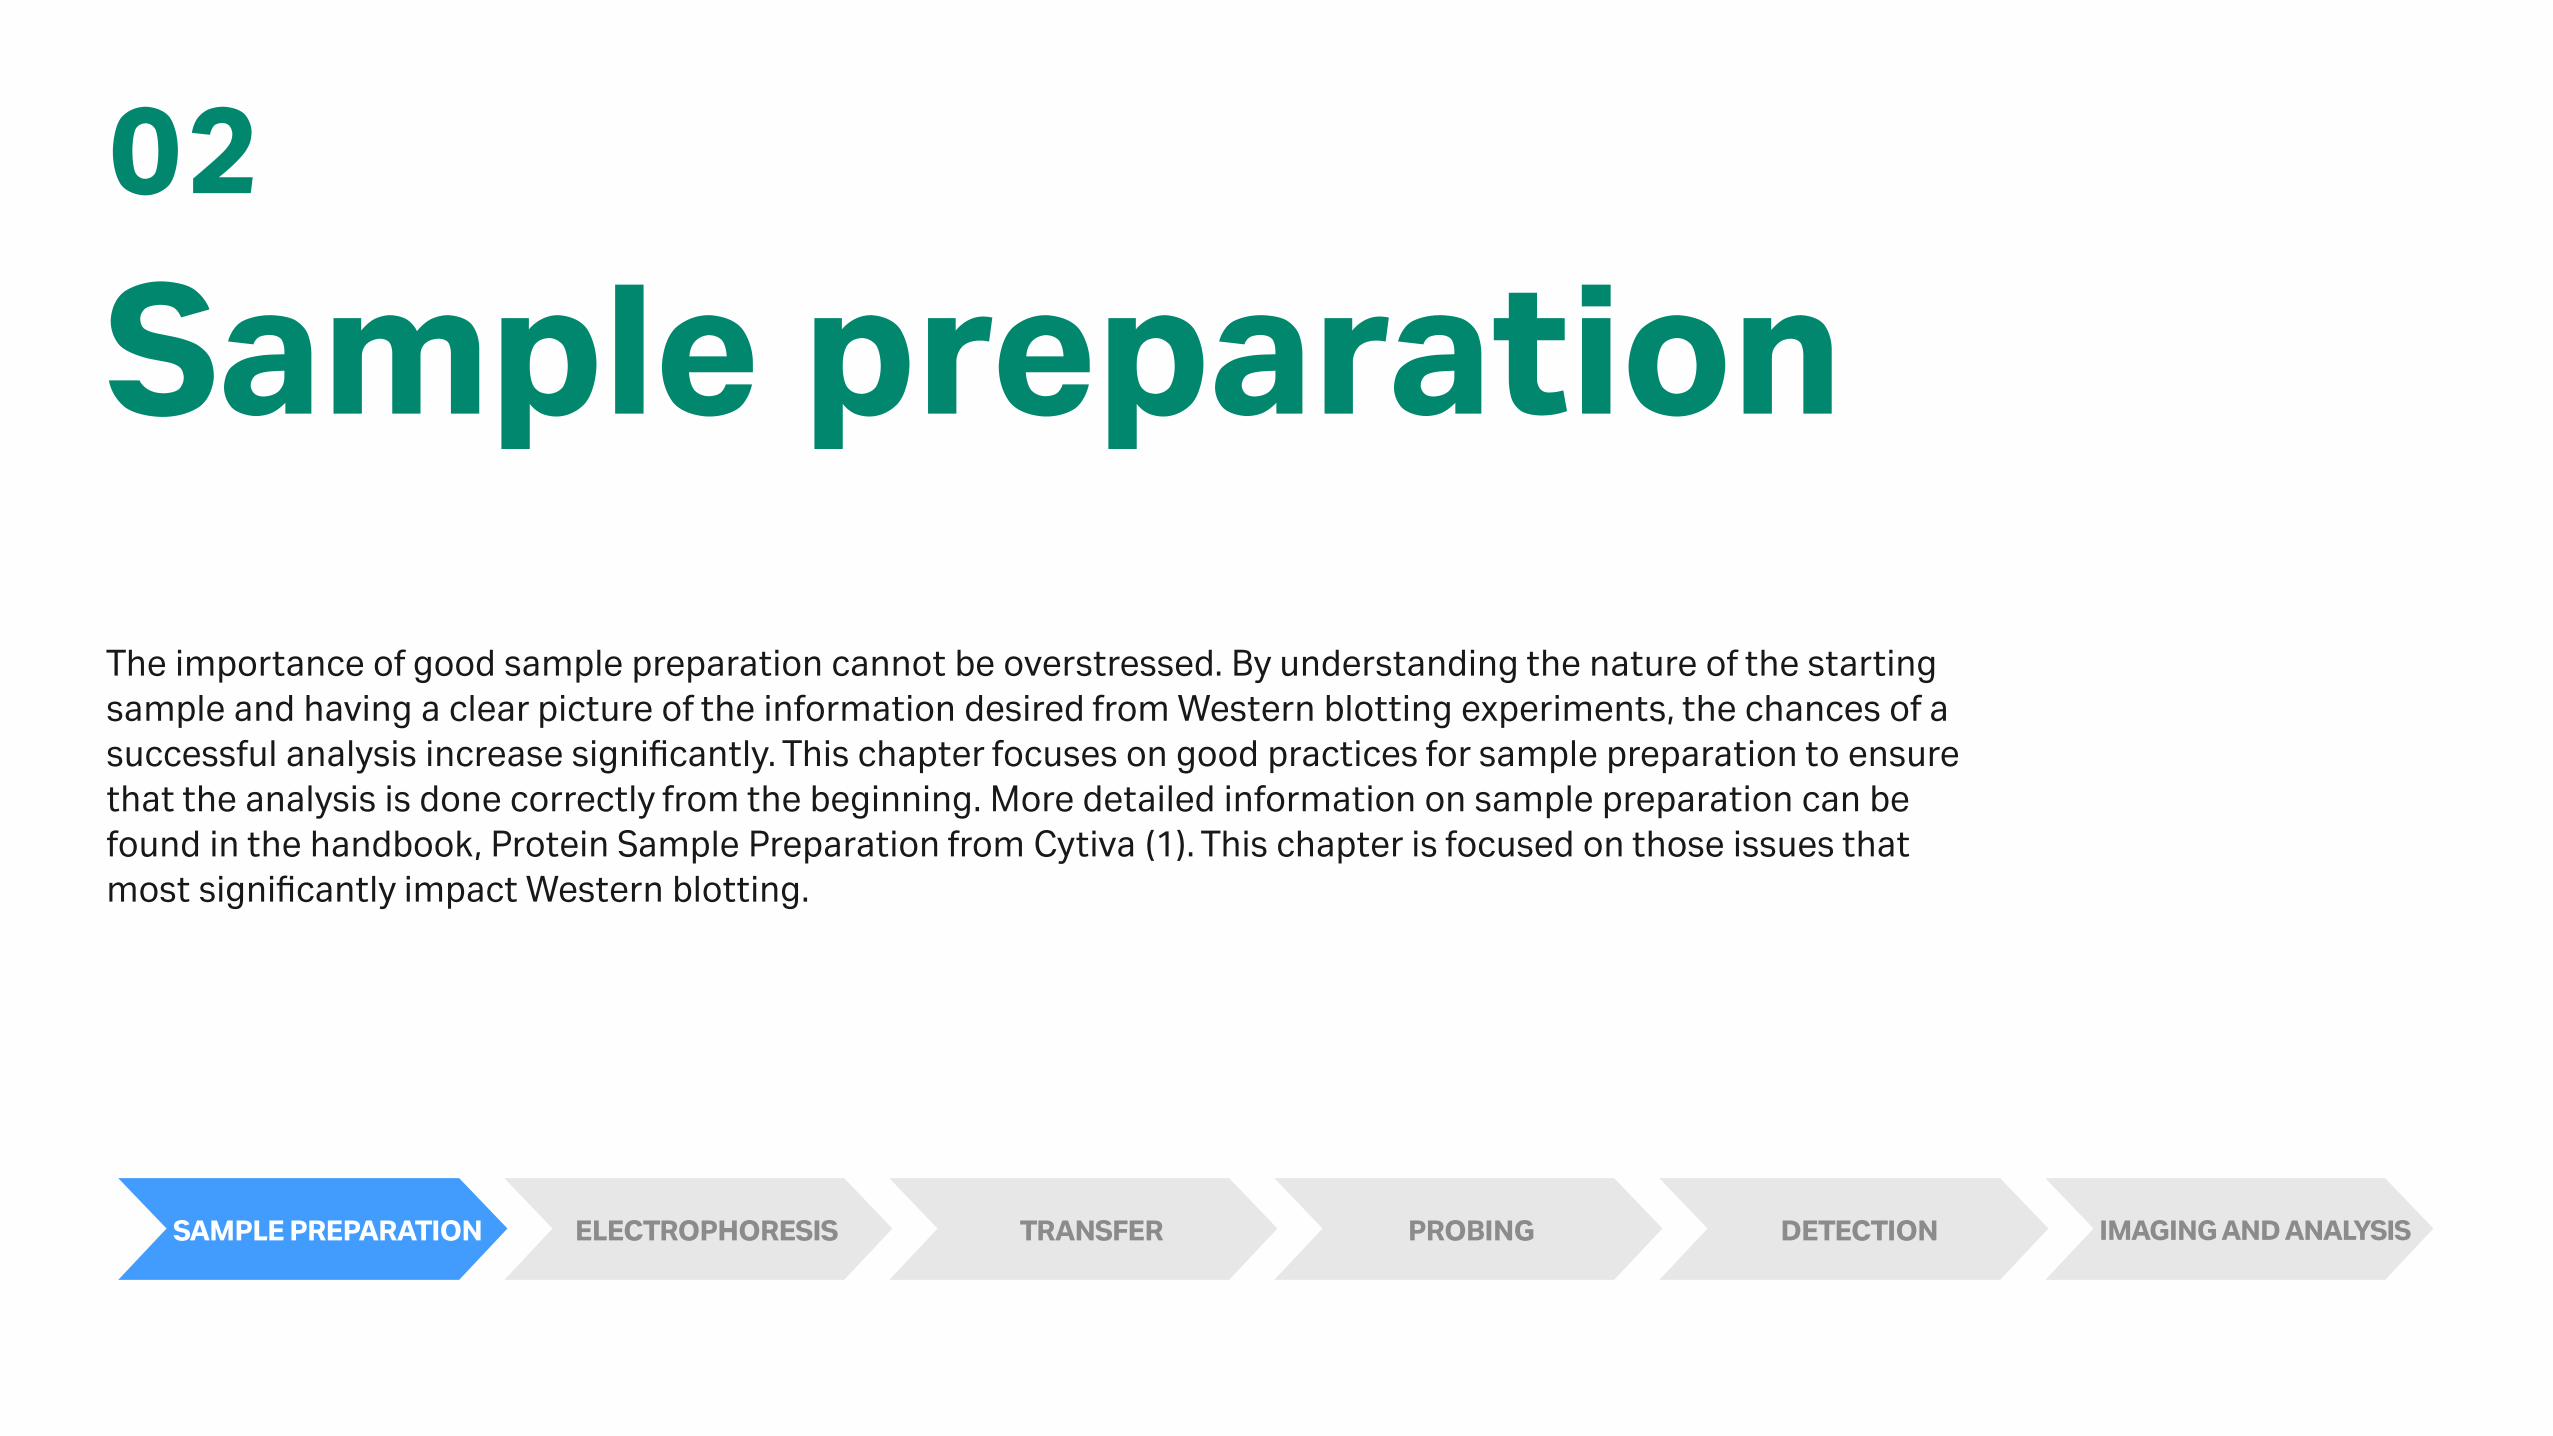
The importance of good sample preparation cannot be overstressed. By understanding the nature of the starting sample and having a clear picture of the information desired from Western blotting experiments, the chances of a successful analysis increase significantly. This chapter focuses on good practices for sample preparation to ensure that the analysis is done correctly from the beginning. More detailed information on sample preparation can be found in the handbook, Protein Sample Preparation from Cytiva (1). This chapter is focused on those issues that most significantly impact Western blotting.
SAMPLE PREPARATION ELECTROPHORESIS TRANSFER PROBING DETECTION IMAGING AND ANALYSIS
10

11
Western
Blo
tting
Han
db
oo
k 20
22
2.1 IntroductionIn principle, all sources of protein, from single cells to whole tissues as well as extracellular matrices, biological fluids, and proteins secreted in vitro, are open to analysis by Western blotting. Whereas sources such as mammalian cells in suspension are easily disrupted under mild conditions and readily release their proteins, it is more difficult to extract proteins from cells deeply embedded in intact tissues or within solid tumors. Extraction of the proteins from plants, bacteria, and fungi are further complicated by the presence of the rigid, carbohydrate-rich cell walls that surrounds and protects the living cells.
Regardless of the source and protein of interest, however, the aim must be to devise an extraction procedure aggressive enough to access and disrupt the cells without irreversibly altering the very proteins of interest. While at the same time, obtaining a sufficient yield of material at an acceptable level of purity.
Sample preparation — Be gentle! Stay cool!
• Use extraction procedures that are as mild as possible. Over-vigorous cell or tissue disruption might denature the target molecule, form permanent protein complexes, cause chemical modifications, or lead to the release of compartmentalized proteolytic enzymes.
• Extract proteins quickly, on ice if possible, in the presence of a suitable buffer to maintain pH, ionic strength, and stability in order to prevent protein degradation. Prechill equipment and keep samples on ice at all times.
Biological matrices are complex. The target protein is likely to be one among many thousands present in the sample, in addition to nucleic acids, polysaccharides, and lipids, all of which might interfere with the analysis. The efforts invested in extraction and purification depend on the end goal; if the aim is to detect a low-abundant protein, for example, it is advisable to affinity isolate that specific protein from the sample using a technique such as immunoprecipitation. On the other hand, the analysis of robust and abundant proteins can be satisfactorily accomplished using virtually native samples.
The choice of extraction method depends primarily on the sample and whether the analysis is targeting all the proteins in a cell or only a component from a particular subcellular fraction.
In addition, any endogenous proteases liberated upon cell disruption might degrade the target molecule. To avoid these uncontrolled protein losses, the sample should be protected during cell disruption and subsequent purification by the use of a cocktail of protease inhibitors.
Numerous methods are available for disrupting cells and preparing their contents for analysis by Western blotting. Table 2.1 lists some of the most popular extraction methods and indicates their applicability to the treatment of specific cell or tissue sources. In general, gentle methods are employed when the sample consists of easily lysed cultured cells or blood cells. More vigorous methods are employed for the disruption of more robust bacterial or plant cells, or mammalian cells embedded in connective tissue.
Table 2.1. Overview of extraction options for different cells and tissues
Sample Typical lysis options
Tissue culture Detergent lysis
Cell suspensions Ultrasonication
Most plant and animal tissues Mechanical homogenization (e.g., Waring™ blender or Polytron™)
Soft animal tissues and cells Dounce (manual) and/or Potter-Elvehjem (mechanical)homogenization
Bacterial and mammalian cells Freeze/thaw lysis
Bacteria, erythrocytes, cultured cells Osmotic shock lysis
Solid tissues and plant cells Manual grinding with mortar and pestle
Cell suspensions, yeast cells Grinding with abrasive component(e.g., sand, glass beads, alumina)
Bacteria, yeast, plant tissue, fungal cells Enzymatic digestion
Bacteria, yeast, plant cells Explosive decompression (nitrogen cavitation)
Microorganisms with cell walls French press
Plant tissues, fungal cells Glass-bead milling
12
Western
Blo
tting
Han
db
oo
k 20
22
2.2 Protein extraction options
2.2.1 Detergent-based lysis
Detergent lysis is most frequently the method of choice for the treatment of mammalian cells. Cell suspensions are gently centrifuged and resuspended in lysis solution containing detergent. The membranes are solubilized, thereby lysing cells and liberating their contents. Adherent cells such as fibroblasts may be directly solubilized on the tissue culture surface by addition of lysis solution, or alternatively may firstly be scraped from the surface in the presence of a nonlytic buffer using a rubber scalpel, centrifuged, and treated as cell suspensions. The use of a mild, nonionic detergent such as Tween™ 20, nonyl phenoxypolyethoxylethanol (NP40) or a zwitterionic detergent such as 3-([3-cholamidopropyl] dimethylammonio)-1-propanesulfonate (CHAPS), minimizes denaturation of target proteins.
2.2.2 Freeze/thaw lysis
This method is applicable to suspensions of mammalian or bacterial cells. The major attractions of freeze/thaw lysis are simplicity and low cost. Cells are disrupted by the repeated formation of ice crystals and the method is usually combined with enzymatic lysis. The cell suspension may be rapidly frozen using liquid nitrogen. The sample is then thawed, and resuspended by pipetting or gentle vortexing in lysis buffer at room temperature and the process is repeated several times. Between cycles, the sample is centrifuged, and the supernatant is retained.
2.2.3 Osmotic shock
This is a very gentle method that is sufficient for the lysis of suspended mammalian or bacterial cells without the use of a detergent. The method, often combined with mechanical disruption, relies on changing from high- to low-osmotic medium, and is well-suited to applications in which the lysate is to be subsequently fractionated into subcellular components.
2.2.4 Ultrasonication
This method of protein extraction is most frequently applied to cell suspensions. Cells are disrupted by high-frequency sound waves (typically 20 to 50 kHz) via a probe inserted in the sample. The sound waves generate a region of low pressure, causing disruption of the membranes of cells in the vicinity of the probe tip. Cell suspensions should be sonicated in short bursts to avoid heating and samples should be cooled on ice between bursts. This is suitable for small-scale sample preparation. Aggregates of proteins (inclusion bodies) must be resolubilized. Although relatively simple, ultrasonication is a stringent method of sample preparation, where generated heat must be continually kept under control and sensitive target molecules can be vulnerable to shearing forces.
For protein preparations, the release of DNA can lead to highly viscous samples that are difficult to process. Viscosity is reduced by adding DNase.
2.2.5 Mechanical methods
Proteins can be extracted from cells and tissues using a number of crude but effective crushing and grinding measures. For example, cell membranes can be disrupted by liquid shear forces as the sample is forced through a narrow gap; the tighter the gap, the greater the shearing force. Liquid shear forces can be achieved manually by Dounce homogenization or mechanically by Potter-Elvehjem homogenization. This mild method is excellent for small volumes and cultured cells.
Homogenization of tissues, prepared by chopping or mincing in chilled buffer, may be achieved using a Waring blender or Polytron. The Polytron differs from the Waring blender in that it draws the tissue into a long shaft that contains rotating blades. Different capacity shafts are available, allowing sample sizes as small as 1 mL.
Mortar and pestle: Tissues or cells are normally frozen in liquid nitrogen and ground to a fine powder. The addition of alumina or sand aids grinding. Cell walls are disrupted by mechanical force.
Glass bead milling: Rapid agitation of cells with fine glass beads disrupts cell walls. Bead milling will lyse most Gram positive and Gram negative bacteria, including mycobacteria.
2.2.6 Enzymatic digestion
Enzymatic methods are frequently used when extracting proteins from bacteria, yeast, or other organisms with cell membranes surrounded by a robust protective structure. The enzymes dissolve cell walls, coats, capsules, capsids, or other structures not easily sheared by mechanical methods alone. Enzymatic digestion is often followed by homogenization, sonication, or vigorous vortexing in a lysis buffer. Enzymatic methods are most commonly used for bacteria and yeast. Enzymatic methods are also used for the extraction of proteins from eukaryotic cells embedded in fibrous tissues, where, for example, collagenase can enhance the breakdown of fibrillar collagen. Table 2.2 provides a summary of enzymes and their uses.

13
Western
Blo
tting
Han
db
oo
k 20
22
Table 2.2. Enzymatic digestion of bacteria and yeast cells
Enzyme Description Comments
Lysozyme Also known as muramidase or N-Acetylmuramide glycanhydrolase. Lysozyme is one of a family of enzymes that damage bacterial cell walls by catalyzing hydrolysis of 1,4-β-linkages between N-Acetylmuramic acid and N-Acetyl-D-glucosamine residues in a peptidoglycan and between N-Acetyl-D-glucosamine residues in chitodextrins
Used primarily with bacterial cells
Zymolyase The main enzymatic activities are β-1,3 glucanase and β-1,3-glucan laminaripentaohydrolase, which hydrolyze glucose polymers at the β-1,3-glucan linkages releasing laminaripentaose as the principal product
Used primarily with yeast
Lysostaphin A Staphylococcus simulans metalloendopeptidase, specific for the cell wall peptidoglycan of staphylococci
Used primarily with Staphylococci
Can function as an extremely potent antistaphylococcal agent
2.2.7 Explosive decompression
This technique is usually applied to bacteria, yeast, plant cells, or other robust samples. Cells are equilibrated with an inert gas, such as nitrogen at high pressure (typically 5500 kPa/800 psi). Using a French press, this method works via a rapid pressure drop when the sample is transferred from a chamber at high pressure through an orifice into a chamber at low pressure. This is a fast and efficient method, suitable for large volumes.
2.2.8 Premade lysis buffers
Cytiva offers a range of products for protein extraction from mammalian cells, yeast, bacteria, and animal tissues.
Mammalian Protein Extraction Buffer is designed for the efficient and gentle extraction of biologically active, total soluble proteins from mammalian cultured cells. This buffer is based on organic buffering agents and can be used for cell suspensions as well as adherent cells.
Yeast Protein Extraction Buffer Kit is useful for the extraction of soluble proteins from yeast cells, and is a proprietary improvement on Zymolyase based spheroplast preparation and extraction of soluble proteins from yeast cells. This kit is provided with a protocol to make spheroplasts and remove the lytic enzyme, Zymolyase, prior to lysis and extraction of yeast proteins. The buffer is based on organic buffering agents containing mild nonionic detergents, and a proprietary combination of various salts and agents to enhance extraction and stability of proteins. A ready-to-use Zymolyase preparation is also provided. Depending on the application, additional agents such as reducing agents, chelating
agents, and protease inhibitors may be added. The Yeast Protein Extraction Buffer Kit eliminates the need for laborious glass-bead lysis of yeast cells.
2.2.9 Sample preparation kits
Sample Grinding Kit may be used to disrupt small tissue and cell samples for protein extraction. Up to 100 mg of sample per tube is treated in about 10 min. The kit consists of microcentrifuge tubes, each containing a small quantity of abrasive grinding resin suspended in water, and disposable pestles. The tube is first centrifuged to pellet the resin and water is removed. Then extraction solution of choice and the sample are added to the tube, and the pestle is used to grind the sample. After centrifugation, cellular debris and grinding resin are firmly lodged in the conical bottom of the tube, and the supernatant is easily removed.
illustra™ triplePrep™ Kit is designed for the rapid isolation and purification of high yield genomic DNA, total RNA, and total denatured proteins from undivided samples of animal tissues and mammalian cells. The workflow reduces the overall number of steps, enabling the preparation of all three analytes in less than 1 h. The buffer, columns, and protocol ensure high recovery from limited samples such as biopsies, archived tissues, and tumors. By extracting RNA, DNA, and proteins and proteins from the same source sample it is possible to compare RNA levels with proteins expressed, for example. This is useful in situations where sample is scarce.
2.2.10 Protecting samples
Protease inhibitors must be included in lysis buffers to prevent degradation of proteins following the release of endogenous proteases during the process of cell lysis.
Protease Inhibitor Mix: Sample preparation often requires the inhibition of protease activity. Cytiva offers this unique combination of competitive and noncompetitive protease inhibitors, which protect proteins from proteolysis during purification from animal tissues, plant tissues, yeast, and bacteria. The cocktail, containing inhibitors of serine, cysteine, and calpain proteases, effectively inhibits over 95% of the protease activity. Optionally, ethylenediaminetetraacetic acid (EDTA) may be added to inhibit metalloproteases.
While it is important to maintain proteases in an inactive state during protein extraction (Table 2.3), other potentially compromising contaminants should also be considered. For example, if the objective of the Western blot is to detect phosphorylated proteins, it is important to protect the sample from the dephosphorylating action of phosphatases liberated into the lysate during sample preparation. One way to protect the sample is by adding a phosphatase inhibitor, such as sodium vanadate to the lysis buffer. It may also be necessary to protect target proteins against unwanted modifications, such as acetylation, ubiquitinylation, or glycosylation.

14
Western
Blo
tting
Han
db
oo
k 20
22
Table 2.3. Protease inhibitors in lysis buffers
Inhibitor Target Notes
Aprotinin Serine proteases Also inhibits related proteolytic enzymes
Chymostatin Chymotrypsin, chymotrypsin-like serine proteinases, chymases, and lysosomal cysteine proteases
Common cocktail constituent for plant extracts
Leupeptin Cysteine, serine, and threonine proteases Common cocktail constituent
Pefabloc™ Serine proteases, such as chymotrypsin, kallikrein, plasmin, thrombin, and trypsin
Irreversible inhibitor. Specificity similar to phenylmethylsulfonyl fluoride (PMSF), but more stable at low pH
Pepstatin Aspartyl proteases Inhibits nearly all acid proteases with high potency
Common cocktail constituent
PMSF Serine and thiol proteases Very rapidly degraded in water. Stock solutions are usually made in a solvent, such as dimethylsulfoxide (DMSO)
Inactivated by reducing agents such as dithiothreitol (DTT) and β-mercaptoethanol
2.3 Sample cleanup
It is not usually necessary to treat samples prior to 1D gel electrophoresis. However, if there are problems with separation, such as blurred bands, sample cleanup improves performance by removing potentially interfering compounds such as nucleic acids, polysaccharides, and salts. The addition of DNase, for example, is used to counter problems with viscosity caused by the release of nucleic acids. Table 2.4 provides a list of common contaminants and options for removing them.
Table 2.4. Contaminants that affect downstream analyses
Contaminant Reason for removal Technique
Endogenous small ionic molecules, such as nucleotides, metabolites, phospholipids
These substances are often negatively charged and can disturb some downstream analyses
Trichloroacetic acid (TCA)/acetone precipitation
Precipitate the sample in TCA, ammonium sulfate1, or phenol/ammonium acetate, then centrifuge
Solubilize sample in sodium dodecylsulfate (SDS) or at high pH2
Insoluble material Insoluble material in the sample can block the pores of gels
Centrifugation or filtration
Ionic detergents Ionic detergents, such as SDS are often used during protein extraction and solubilization, but can strongly interfere with some downstream analyses
Dilute into a solution containing a zwitterionic or nonionic detergent, such as CHAPS, Tween-20, or NP40
Acetone precipitation of the protein will partially remove SDS, precipitation at room temperature will maximize removal of SDS, but protein precipitation is more complete at -20°C
Precipitate the sample in TCA, ammonium sulfate, or phenol/ammonium acetate, then centrifuge1
Solubilize at high pH2
Lipids Many proteins, particularly membrane proteins, are complexed with lipids, this reduces their solubility and can affect both the isoelectric point (pI) and molecular weight
Lipids form insoluble complexes with detergents, reducing the effectiveness of the detergent as a protein solubilizing agent
When extracts of lipid-rich tissues are centrifuged, there is often a lipid layer that can be difficult to remove
Strongly denaturing conditions and detergents minimize protein-lipid interactions, excess detergent may be necessary
Precipitation with acetone removes some lipids
Precipitate the sample in TCA, ammonium sulfate, or phenol/ammonium acetate, then centrifuge1
Solubilize sample in SDS or at high pH2

15
Western
Blo
tting
Han
db
oo
k 20
22
Contaminant Reason for removal Technique
Phenolic compounds Phenolic compounds are present in many plant tissues and can modify proteins through an enzyme-catalyzed oxidative reaction
The presence of a reducing agent, such as DTT or β-mercaptoethanol during extraction reduces phenolic oxidation
Rapidly separate proteins from phenolic compounds by precipitation
Inactivate polyphenol oxidase with inhibitors such as diethyldithiocarbamic acid or thiourea
Remove phenolic compounds by adsorption to polyvinylpyrrolidone (PVP) or polyvinylpolypyrrolidone (PVPP)
Polysaccharides Polysaccharides can block the pores of gels
Some polysaccharides are negatively charged and can complex with proteins by electrostatic interactions
Precipitate the sample in TCA, ammonium sulfate, or phenol/ammonium acetate, then centrifuge1
Ultracentrifugation will remove high molecular weight polysaccharides
Solubilize sample in SDS or at high pH2
Salts, residual buffers, and other charged small molecules carried over from sample preparation
Salts disturb some downstream analyses Dialysis
Spin dialysis
Gel filtration
Precipitation/resuspension
Nucleic acids Disturbs migration and clogs the wells Add DNase
1 The use of ammonium sulfate precipitation requires a subsequent desalting step. 2 For 2D gel electrophoresis, SDS must be removed.
2.3.1 Sample cleanup products
SDS-PAGE Clean-Up Kit is designed for the preparation of samples that are difficult to analyze due to the presence of salts or a low protein concentration (Fig 2.1). This kit uses a combination of a precipitant and coprecipitant to quantitatively precipitate the sample proteins while leaving interfering substances such as detergents, salts, lipids, phenolics, and nucleic acids in solution. Proteins are pelleted by centrifugation. The pellet is washed further to remove nonprotein contaminants and centrifuged again. The resultant pellet is resuspended, mixed with SDS sample buffer for polyacrylamide gel electrophoresis (PAGE), and heated. The sample is then ready for SDS-PAGE. The procedure can be completed in under 2 h.
A B C D
Fig 2.1. Comparison of SDS-PAGE Clean-Up Kit with ethanol precipitation. (A) Urinary protein precipitated with 10 volumes of ethanol. (B) Urinary protein precipitated with SDS-PAGE Clean-Up Kit. More and stronger bands are detected after use of SDS-PAGE Clean-Up Kit due to the efficient precipitation procedure the kit is based on. Gel: 8 × 9 cm, 12.5% acrylamide, 0.1% SDS, run on SE 260 Mini-Vertical Unit. Stain: Coomassie Blue R-250.
2-D Clean-Up Kit is designed to prepare samples for 2D gel electrophoresis (Fig 2.2), but can also be used in Western Blotting applications. The reagents quantitatively precipitate proteins while leaving interfering substances, such as detergents, salts, lipids, phenolics, and nucleic acids, in solution. Treatment of the sample with 2D Clean-Up Kit greatly improves the quality of 2D gel electrophoresis results, reducing streaking, background staining, and other artefacts. For more information on 2D Clean-Up Kit, see the 2D Electrophoresis, Principles and Methods Handbook from Cytiva (2).
A B
Untreated Treated with 2D Clean-Up Kit
Fig 2.2. 2D Clean-Up Kit eliminates most of the horizontal streaking caused by residual SDS. Sample: Rat liver extracted with 4% SDS, 40 mM Tris base. First dimension: Approximately 20 μg of rat liver protein, Immobiline™ DryStrip (pH 4–7, 7 cm). Ettan™ IPGphor™ 3 Isoelectric Focusing Unit unit 17.5 kVh. Second dimension: SDS-PAGE (12.5%), run on SE 260 Mini-Vertical Unit (8 × 9 cm gel). Stain: PlusOne Silver Staining Kit, Protein.

16
Western
Blo
tting
Han
db
oo
k 20
22
2.3.2 Depletion of high-abundance protein from serum or plasma samples
When investigating plasma or serum by Western blotting, abundant plasma proteins, such as albumin and IgG can obscure the signals of less abundant proteins. Prepacked columns, such as HiTrap™ Albumin and IgG Depletion are designed to deplete samples of these potentially problematic proteins, removing > 95% albumin and > 90% IgG, respectively.
HiTrap Albumin and IgG Depletion 1 mL column is designed for the depletion of albumin and IgG from sample volumes of approximately 150 μL of undiluted human plasma or serum, containing normal levels of albumin (~ 40 mg /mL) and IgG (~ 15 mg/mL). The depletion procedure takes approximately 35 min, and can be performed using a liquid chromatography system from the ÄKTA™ platform, a peristaltic pump, or manually with a syringe. When working with smaller volumes, Albumin and IgG Depletion SpinTrap™, designed for volumes of ~ 50 μL of human plasma or serum, is recommended.
2.3.3 Desalting and concentrating samples
Before applying sample to an electrophoresis gel, it is important that the solvent does not contain an excessive concentration of salts or other low molecular weight contaminants. High salt levels in samples cause the proteins to migrate in inconsistent and unpredictable patterns. Desalting is achieved in a single step based on gel filtration, and at the same time transferring the sample into the desired buffer. However, desalting and buffer exchange procedures often result in sample dilution. In electrophoresis applications, a relatively high sample concentration is needed for good results and sample concentration might be necessary. A sample can be concentrated efficiently and easily by membrane ultrafiltration.
Desalting and concentrating columns provided by Cytiva are summarized in Table 2.5.
Table 2.5. Desalting products from Cytiva
Product Sample volume (mL)
Desalting capacity (%)
Recovery (%)
Exclusion limit (M
r)
Chemical stability
Disposable PD-10 Desalting Columns
1.0 to 2.5 › 90 70 to › 95 5000 All commonly used buffers
PD MidiTrap™ G-25/G-10 0.5 to 1.0 (G-25) 0.4 to 1.0 (G-10)
› 90 70 to 90 5000 (G-25) 700 (G-10)
All commonly used buffers
PD MiniTrap™ G-25/G-10 0.1 to 0.5 (G-25) 0.1 to 0.3 (G-10)
› 90 70 to 90 5000 (G-25) 700 (G-10)
All commonly used buffers
HiTrap Desalting Column 0.25 to 1.5 › 99 95 5000 All commonly used buffers
Vivaspin™ 0.1 to 20 1 › 95 3000 to 100 000 All commonly used buffers
1 Vivaspin columns are designed for sample concentration but they may also be used for buffer exchange.
2.4 Determination of total protein concentration
When comparing the amount of protein from samples run in different lanes within the same gel or between gels, it is very important that all the lanes have been loaded with the same total amount of protein. If there is a significant difference of total protein between adjacent lanes, the actual difference in expression of protein of interest can be masked, and therefore misleading.
Several spectrophotometric methods are routinely used to determine the concentration of protein in a solution (3). These include measurement of the intrinsic ultraviolet (UV) absorbance of the protein as well as methods based on a protein-dependent color change, such as the classic, copper-based Lowry assay (4), the Smith copper/bicinchoninic assay (BCA) (5), and the Bradford dye assay (6). Although widely used, none of the these procedures are particularly convenient.
UV absorbance, for example, requires access to a pure protein of a known extinction coefficient, in a solution free of interfering (UV absorbing) substances. The approximate concentration of a protein in solution (assuming the use of a cuvette with a path length of 1 cm) can be estimated by using either of the following equations;
A280
= 1 A* (mL/cm mg) × [Conc.†] (mg/mL) × 1 (cm)
A205
= 31 A* (mL/cm mg) × [Conc.‡] (mg/mL) × 1 (cm)
* A280
represents light absorbed by proteins at 280 nm, primarily a result of the presence of ringed amino acids tyrosine and tryptophan. A
205 represents light absorbed by proteins at 205 nm, primarily the result of peptide bonds between amino acids.
† Protein concentration (mg/mL) = A280
/1 ‡ Protein concentration (mg/mL) A
205/31
Different proteins, however, have widely different extinction coefficients at both 280 and 205 nm, and concentration estimates obtained in this way are at best a rough estimate. UV absorbance requires that the protein solution is free of other UV-absorbing substances, such as nucleic acids, and that the measurements are carried out using a quartz cuvette.
Copper/BCA assays are based on reduction of Cu2+ to Cu+ by amides. Although quite accurate, these assays require freshly prepared reagent solutions, which must be carefully measured and mixed during the assay. This is followed by lengthy, precisely timed incubations at closely controlled, elevated temperatures, and then immediate absorbance measurements. Both assays can be affected by other substances frequently present in biochemical solutions, including detergents, lipids, buffers, and reducing agents (3). With copper/BCA assays, it is therefore advisable to include a series of standard solutions, each with a different, known concentration of protein, but otherwise having the same composition as the sample solutions.

17
Western
Blo
tting
Han
db
oo
k 20
22
The Bradford dye assay is based on the equilibrium between three forms of Coomassie Blue G dye. Under strongly acidic conditions, the dye is most stable in its double protonated form (red).Upon binding to protein, however, it is most stable in an unprotonated form (blue).
In comparison with the other assays described above, the Bradford dye assay is faster, involves fewer mixing steps, does not require heating, and gives a more stable colorimetric response. The assay is prone, however, to influence from nonprotein sources, particularly detergents, and becomes progressively less linear at the high end of its useful protein concentration range. The response also varies with the structure of the protein. These limitations make it necessary to use protein standard solutions in this assay.
The Bradford dye reagent reacts primarily with arginine residues and, to a lesser extent, with histidine, lysine, tyrosine, tryptophan, and phenylalanine residues. The assay is thus less accurate for basic or acidic proteins and is more sensitive to bovine serum albumin than ”average” proteins, by about a factor of two. IgG is the preferred protein standard for the Bradford dye assay.
2.4.1 Products for determining total protein concentration
2-D Quant Kit, despite its name, can be used in many different applications including the accurate determination of protein concentration in samples. The procedure works by quantitatively precipitating proteins while leaving interfering substances behind. The assay is based on the specific binding of cupric ions to the polypeptide backbone of any protein present. Precipitated proteins are resuspended in a copper-containing solution and unbound copper is measured with a colorimetric agent. The absorbance at 480 nm is inversely related to the protein concentration. The assay has a linear response to protein concentrations in the range of 0 to 50 μg/mL, using a recommended sample volume of 1 to 50 μL. In addition, 2D Quant Kit is compatible with most reagents employed in the many techniques described for sample preparation, such as SDS.
2.5 References1. Protein Sample Preparation: Principles and Methods, GE Healthcare, 28988741.
2. 2-D Electrophoresis: Principles and Methods, GE Healthcare, 80642960.
3. Stoscheck, C. Quantification of Protein. Methods in Enzymology Vol. 182 (Colowick, S. P. and Kaplan, N. O., eds.), Academic Press, New York (1990).
4. Lowry, O. et al. Protein measurement with the folin phenol reagent. J. Biol. Chem. 193, 265–275 (1951).
5. Smith, P. K. et al. Measurement of protein using bicinchoninic acid. Anal. Biochem. 150, 76–85 (1985).
6. Bradford, M. M. A rapid and sensitive method for the quantitation of microgram quantities of protein utilizing the principle of protein-dye binding. Anal. Biochem. 72, 248–254 (1976).

Western
Blo
tting
Han
db
oo
k 20
21
Gel electrophoresis03
Electrophoresis is a commonly used method for separating proteins on the basis of size, shape, and/or charge. The aim of this chapter is to help you select the correct conditions for your specific analysis.
This chapter will focus primarily on 1-D gel electrophoresis prior to transfer from gel to membrane for Western blotting.
We will consider some of the most important variables when planning electrophoretic separations, such as whether to use native or denaturing conditions, the choice of the most appropriate gel density (acrylamide percentage) as well as recommendations for the most appropriate buffer system.
SAMPLE PREPARATION ELECTROPHORESIS TRANSFER PROBING DETECTION IMAGING AND ANALYSIS
18
19
Western
Blo
tting
Han
db
oo
k 20
22
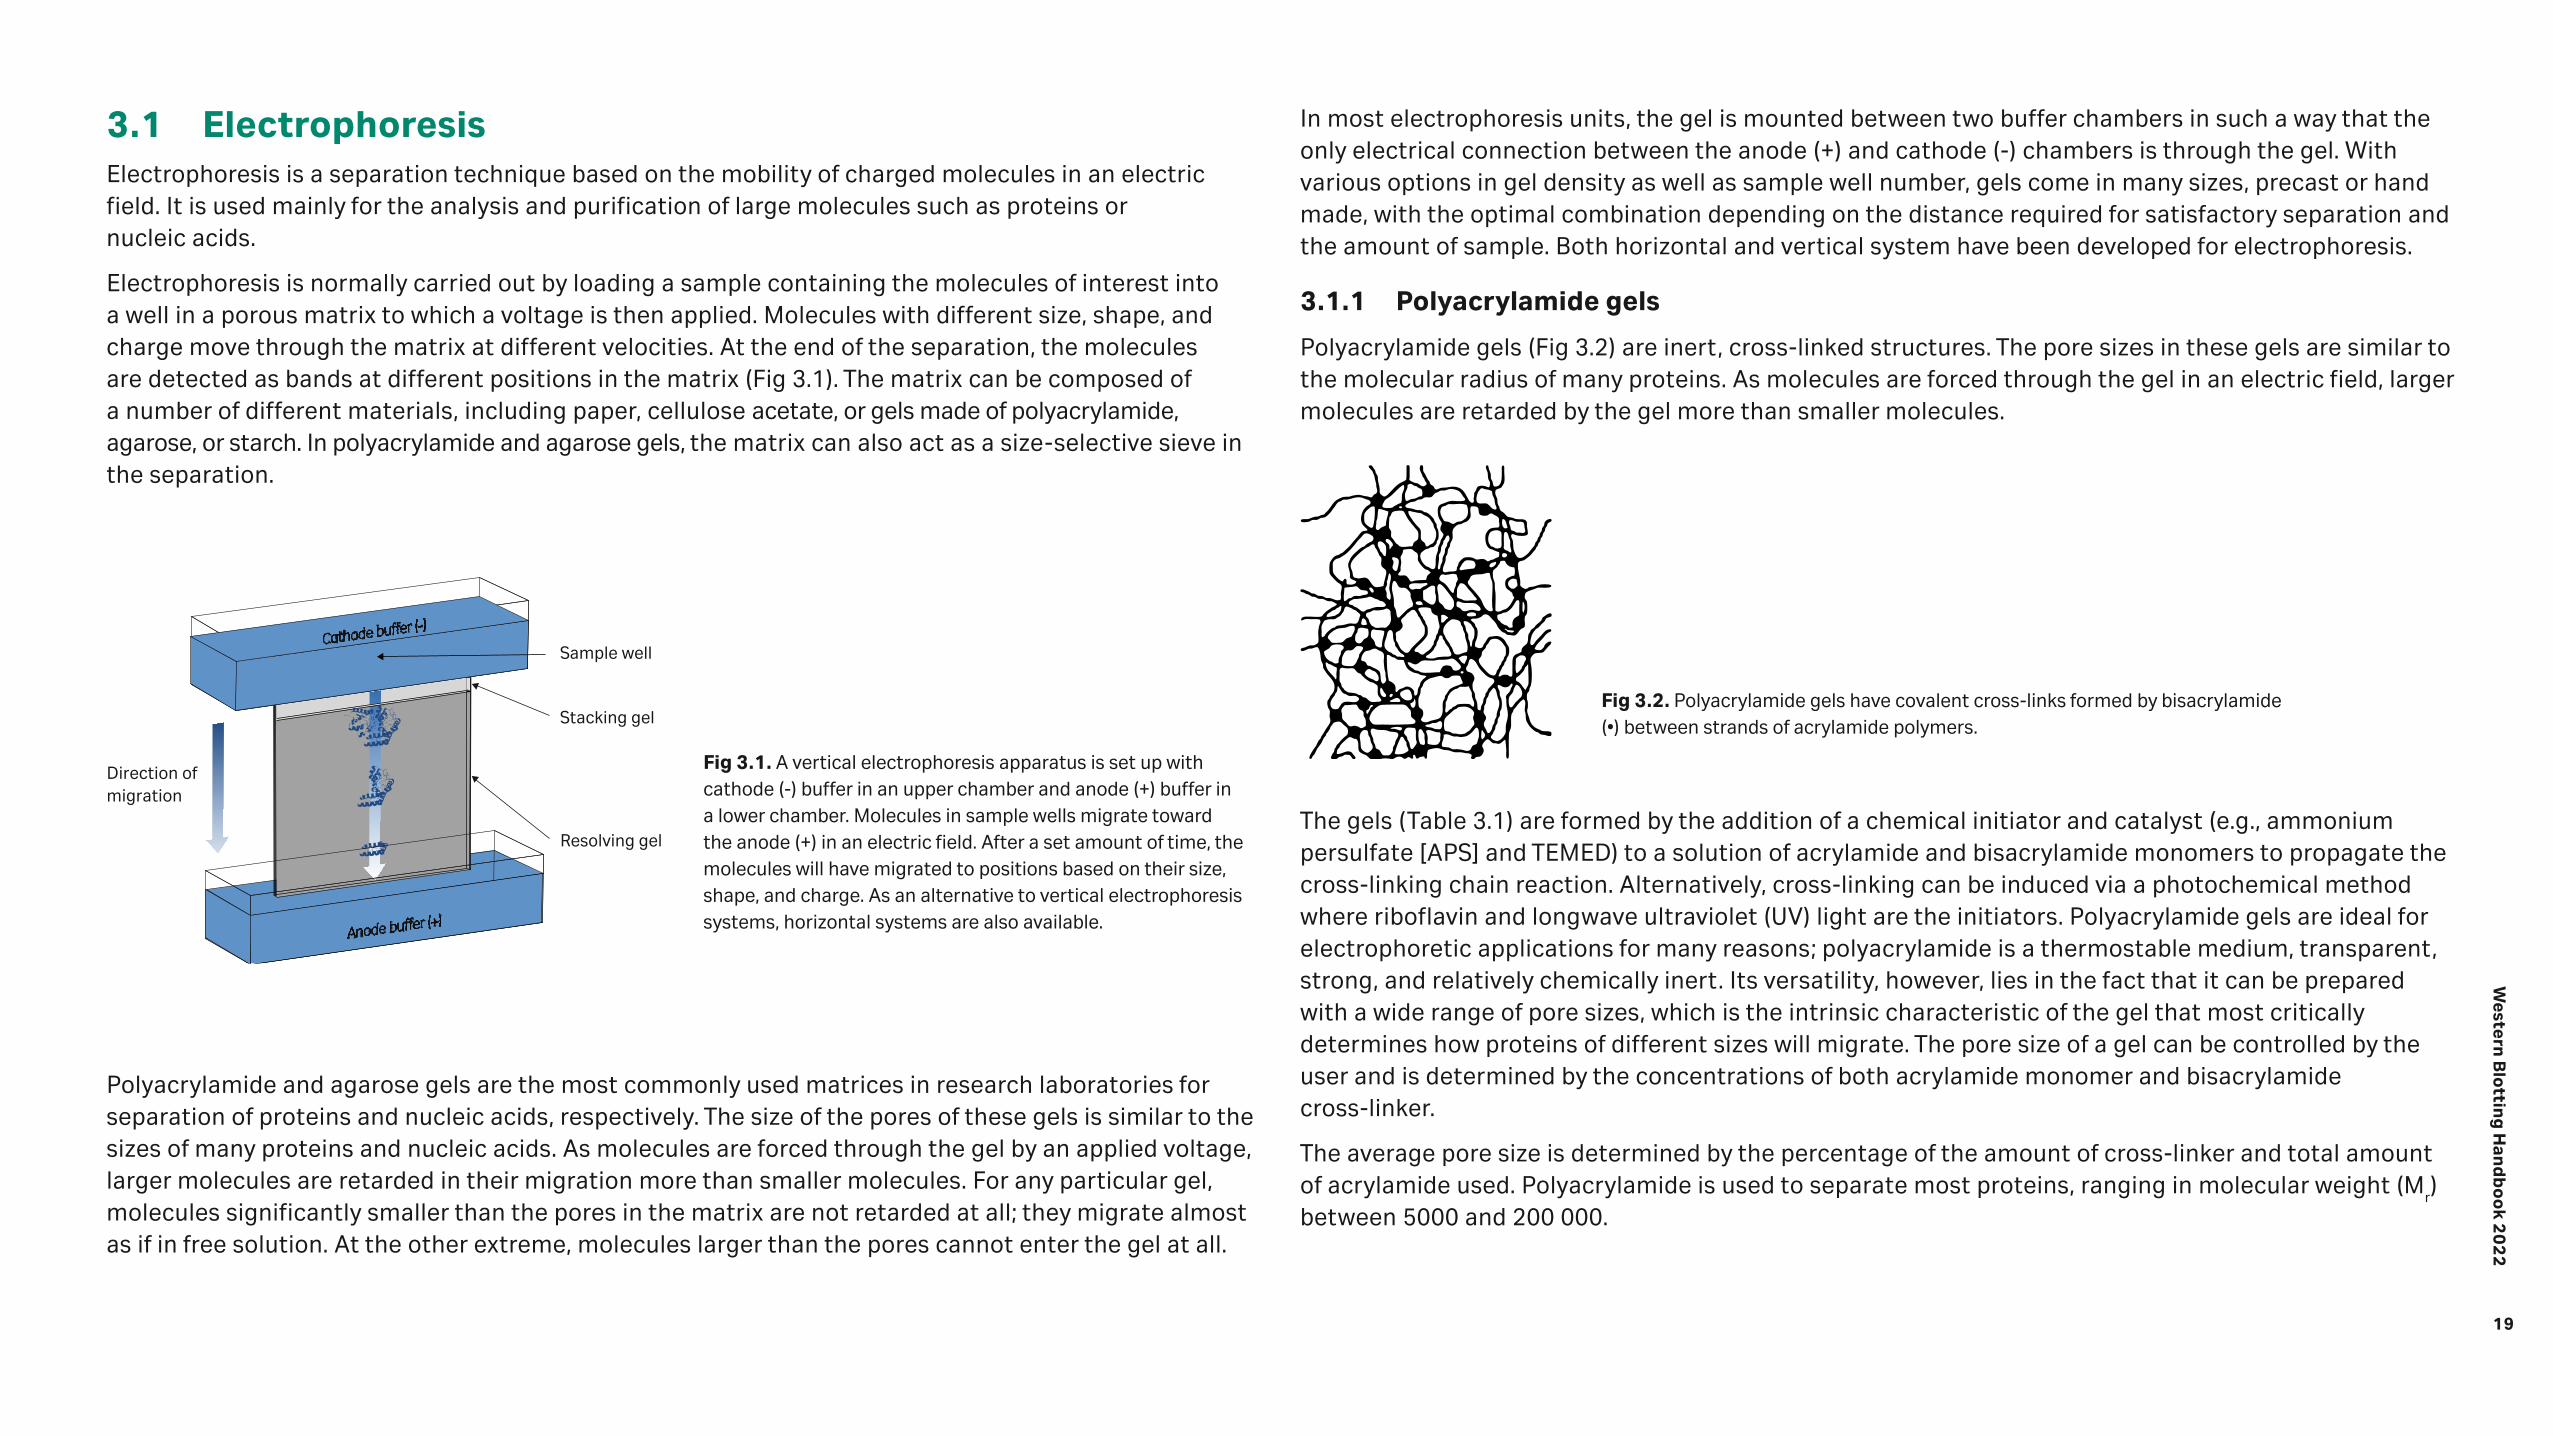
3.1 ElectrophoresisElectrophoresis is a separation technique based on the mobility of charged molecules in an electric field. It is used mainly for the analysis and purification of large molecules such as proteins or nucleic acids.
Electrophoresis is normally carried out by loading a sample containing the molecules of interest into a well in a porous matrix to which a voltage is then applied. Molecules with different size, shape, and charge move through the matrix at different velocities. At the end of the separation, the molecules are detected as bands at different positions in the matrix (Fig 3.1). The matrix can be composed of a number of different materials, including paper, cellulose acetate, or gels made of polyacrylamide, agarose, or starch. In polyacrylamide and agarose gels, the matrix can also act as a size-selective sieve in the separation.
Polyacrylamide and agarose gels are the most commonly used matrices in research laboratories for separation of proteins and nucleic acids, respectively. The size of the pores of these gels is similar to the sizes of many proteins and nucleic acids. As molecules are forced through the gel by an applied voltage, larger molecules are retarded in their migration more than smaller molecules. For any particular gel, molecules significantly smaller than the pores in the matrix are not retarded at all; they migrate almost as if in free solution. At the other extreme, molecules larger than the pores cannot enter the gel at all.
Fig 3.1. A vertical electrophoresis apparatus is set up with cathode (-) buffer in an upper chamber and anode (+) buffer in a lower chamber. Molecules in sample wells migrate toward the anode (+) in an electric field. After a set amount of time, the molecules will have migrated to positions based on their size, shape, and charge. As an alternative to vertical electrophoresis systems, horizontal systems are also available.
Direction ofmigration
Sample well
Stacking gel
Resolving gel
In most electrophoresis units, the gel is mounted between two buffer chambers in such a way that the only electrical connection between the anode (+) and cathode (-) chambers is through the gel. With various options in gel density as well as sample well number, gels come in many sizes, precast or hand made, with the optimal combination depending on the distance required for satisfactory separation and the amount of sample. Both horizontal and vertical system have been developed for electrophoresis.
3.1.1 Polyacrylamide gels
Polyacrylamide gels (Fig 3.2) are inert, cross-linked structures. The pore sizes in these gels are similar to the molecular radius of many proteins. As molecules are forced through the gel in an electric field, larger molecules are retarded by the gel more than smaller molecules.
The gels (Table 3.1) are formed by the addition of a chemical initiator and catalyst (e.g., ammonium persulfate [APS] and TEMED) to a solution of acrylamide and bisacrylamide monomers to propagate the cross-linking chain reaction. Alternatively, cross-linking can be induced via a photochemical method where riboflavin and longwave ultraviolet (UV) light are the initiators. Polyacrylamide gels are ideal for electrophoretic applications for many reasons; polyacrylamide is a thermostable medium, transparent, strong, and relatively chemically inert. Its versatility, however, lies in the fact that it can be prepared with a wide range of pore sizes, which is the intrinsic characteristic of the gel that most critically determines how proteins of different sizes will migrate. The pore size of a gel can be controlled by the user and is determined by the concentrations of both acrylamide monomer and bisacrylamide cross-linker.
The average pore size is determined by the percentage of the amount of cross-linker and total amount of acrylamide used. Polyacrylamide is used to separate most proteins, ranging in molecular weight (M
r)
between 5000 and 200 000.
Fig 3.2. Polyacrylamide gels have covalent cross-links formed by bisacrylamide (•) between strands of acrylamide polymers.

20
Western
Blo
tting
Han
db
oo
k 20
22
Table 3.1. Chemicals used in polyacrylamide gels
Chemical Function in polyacrylamide gel electrophoresis (PAGE)
Acrylamide The monomeric unit of the gel matrix
APS Polymerization initiator
Bisacrylamide (N,N'-methylenebisacrylamide) Cross-linking agent for the formation of polyacrylamide
TEMED (N, N, N', N'-tetramethylethylenediamine) Polymerization catalyst
Tris (C4H
11NO
3, molecular weight 121.14) Commonly used as the solvent when preparing gels. With pKa of 8.3
at ambient temperature, it has good buffering capacity in a pH range from 7 to 9
Butanol (water-saturated) or isopropanol Used to overlay the resolving gel immediately after casting but prior to polymerization, preventing the formation of an uneven upper edge
After polymerization, the butanol/isopropanol layer is decanted, leaving a flat surface
Glycine Source of trailing ions, with pKa of 9.7
A typical gel consists of two sections of different densities, cast between two glass plates. The first section to be cast, known as the resolving or separating gel, is prepared from a high-concentration solution of acrylamide and bisacrylamide. When this layer has set, a second gel known as the stacking or spacer gel, prepared from a lower concentration solution of acrylamide and bisacrylamide is cast above the resolving gel (Fig 3.1). The height of the stacking gel should be at least double that of the sample in each well. A comb is inserted between the glass plates into the unpolymerized stacking gel to create the wells into which the samples will be loaded. The comb is then carefully removed after the gel has set and the wells are rinsed by flushing with running buffer using a pipette or syringe.
By initially running the samples through a lower density stacking gel, proteins are concentrated in a matter of minutes into a thin starting zone by the time the sample contents reach the resolving gel; this process is known as isotachophoresis. The interface between the two gel densities can therefore be regarded as the starting line for all the proteins in each well and on entering the resolving gel, the proteins begin to separate according to size.
The density (pore size) of the gel is an important factor affecting the separation profile of proteins. In a gel of any given density, rapidly migrating small proteins will resolve into more discrete bands than slowly migrating larger proteins that barely penetrate the gel. Where separation is desired over a wide range of molecular weights, a gradient gel should be used, in which the polyacrylamide mesh increases in density toward the anode (+). In such a gel, over a given time, small proteins will reach dense regions of the gel while larger proteins will migrate within less dense regions (Table 3.2 and Fig 3.3). The resolution of band positions is thus sufficient to enable a precise measurement of protein sizes across a wide molecular weight range.
If the sizes of the proteins of interest in the sample are known, the density of the resolving gel may be chosen for optimal separation of proteins around specific molecular weights, with lower density matrices providing better resolution of larger proteins. If, on the other hand, the sizes of the proteins in a sample are not known, it may be necessary to test several acrylamide concentrations to optimize separation conditions. In Table 3.2, the acrylamide concentrations giving a linear separation of proteins within different molecular weight ranges are shown.
Although proteins of sizes outside the indicated ranges also migrate in the gels, their mobility will not conform to the linear migration pattern.
Table 3.2. Recommended acrylamide content in SDS-containing polyacrylamide gels for linear separation of target proteins within defined size ranges
Target protein size range (Mr) Recommended acrylamide concentration (%)
36 000 to 205 000 5
24 000 to 205 000 7.5
14 000 to 205 000 10
14 000 to 66 000 12.5
14 000 to 45 000 15

21
Western
Blo
tting
Han
db
oo
k 20
22
10%homogeneous
15%homogeneous
Gel concentration
4% to 20%gradient
8% to 16%gradient
4% to 12%gradient
Fig 3.3. When selecting a gel, it is important to use an acrylamide concentration that will allow optimal separation of the proteins in your sample. High molecular weight proteins will be optimally resolved in gels containing a lower acrylamide content, while smaller proteins should ideally be run in more acrylamide-dense gels. The image shows the separation pattern for nine different proteins for each acrylamide concentration.
Depending on the application, however, it is not necessarily important to achieve strictly linear separation of all proteins of interest. In a Western blotting application involving two target proteins, for example, it is more important to select a gel with a polyacrylamide concentration that most discretely resolves these two proteins. Figure 3.3 shows schematic migration patterns for proteins of different sizes in homogeneous (single percentage) and gradient gels.
3.1.2 Buffer systems and pH
Proteins are amphoteric (or zwitterionic) compounds. They are therefore either positively or negatively charged, because they contain both acidic and basic amino acid residues. Most of the charge on a protein comes from the pH-dependent ionization of carboxyl and amino groups on the amino acid side chains. As these groups can be titrated over normal electrophoresis pH ranges, the net charge of a protein is determined by the pH of the surrounding medium and the number and types of amino acids carrying amino or carboxyl groups. Post-translational modifications (PTMs), such as sulfhydryl cross-links, and blocking amino or carboxyl termini might also affect the overall charge on a protein.
For each type of protein, there is a pH at which the molecule has no net charge. At this pH, called the isoelectric point (pI), the weak acids and bases are titrated to the point that there is an equal number of positive and negative charges on the molecule. Each protein has a characteristic pI. In a solution of pH above the pI, a protein has a net negative charge and migrates toward the anode (+) in an electric field. When in a solution of pH below the pI, the protein has a net positive charge and migrates toward the cathode (-). For electrophoretic separation based on protein mobility, the pH of the solution must be kept constant to maintain the charge and, hence, the mobilities of the proteins. As the electrolysis of water at electrodes generates ions, e.g. H+, the solutions used in electrophoresis are buffered.
Two types of buffer systems — continuous and discontinuous — are used in protein gel electrophoresis. A continuous system uses the same buffer for both the tanks and the gel. In a discontinuous system, two gel layers are each made with a different buffer, and the tank buffers differ from the gel buffers. Continuous systems are easier to set up than discontinuous systems and suffer from fewer problems related to sample precipitation and aggregation. However, discontinuous systems provide improved resolution and are more widely used for protein electrophoresis in research applications.
Laemmli (Tris-glycine) discontinuous buffering systems are the most commonly used and are comprised of a stacking gel of pH 6.8 and a resolving gel of between pH 8.0 and 9.0. One potential drawback of this popular system is that disulfide bonds tend to form between cysteine residues at this relatively high pH, although this problem can be alleviated by the addition of a reducing agent to the sample. Alternatively, this problem can be solved by using a buffer that resolves proteins at a lower pH. For example, Tricine, a zwitterionic amino acid with a useful buffering range of pH 7.4 to 8.8, has been used as the trailing ion in a discontinuous system for the separation of polypeptides of M
r below 10 000 (1).
The inclusion of counterions in buffer systems has been shown to be advantageous to the electrophoretic separation of proteins of M
r 1000 to 100 000 (2). This buffer system uses bicine and
sulfate as trailing and leading ions, respectively, and Bis-tris and Tris as counter ions in the stacking and resolving phases, respectively. This counter ion principle enables the separation of a wider range of rapidly migrating proteins than would be possible using the more commonly used Laemmli system.
3.1.3 Denaturing gels: SDS-PAGE
Proteins naturally fold into a variety of shapes which affects their rate of migration through a sieving medium such as a gel. Denaturing proteins negates these structural effects and provides separation that reflects the mass/charge ratio of the protein. To denature proteins, gel electrophoresis is typically performed in the presence of the detergent sodium dodecyl sulfate (SDS). SDS is simply added to the sample and is a constituent of the gel and running buffer. 1.4 g of SDS will bind to each gram of protein, so that any inherent charge on the protein is masked by the coating of negatively charged detergent micelles.

22
Western
Blo
tting
Han
db
oo
k 20
22
Denaturing gels can be run under nonreducing conditions (no sample boiling and no added reducing agent) when it is important to maintain the native structure of proteins for further analysis. Alternatively, denaturing gels can be run under reducing conditions, where a reducing agent such as dithiothreitol (DTT) or β-mercaptoethanol is added to the sample buffer and heated. These reagents act by cleaving disulfide bonds between cysteine residues to disrupt the quaternary and tertiary structure of the proteins, creating linear chains of polypeptides. Proteins treated in this way migrate at rates that are a linear function of the logarithm of their molecular weights.
In addition, it is desirable to standardize proteins in terms of three-dimensional structure. Much of the function of proteins depends on how polypeptide chains are folded into specific shapes to form the clefts, pockets, and tunnels needed for recognition and interaction with binding partners. Differently folded proteins take up different volumes; it is possible that a short peptide, if folded in a particular way, will occupy more space than a larger, but tightly folded polypeptide. A short polypeptide, under these circumstances, migrates more slowly than a larger polypeptide through a gel, giving the incorrect impression of having the higher molecular weight of the two.
SDS and a disulfide reducing agent in the sample will thus ensure that proteins are separated solely on the basis of size and not on charge or three-dimensional structure. Before samples are added to the wells of a gel, they should be mixed with sample loading buffer containing bromophenol blue, which helps visualize the samples for loading and to enable the user to monitor protein migration during electrophoresis. Table 3.3 presents a summary of the chemicals commonly used in sample loading buffer.
Table 3.3. Supplementary chemicals used in sample loading buffer
Chemical Function
Bromophenol blue Enables the user to monitor the migration through the gel of the leading dye front (and hence the smallest proteins), indicating when it is appropriate to turn off the current and end the gel run
Glycerol Increases density of the samples, which enables loading and helps anchor the sample in the sample wells until an electric field is applied to the gel (this is critical; without glycerol the sample rapidly mixes with the running buffer and will be irretrievably lost)
Reducing agent Breaks any inter- and intrachain disulfide bonds, linearizing polypeptides and disrupting quaternary and tertiary protein structures
SDS Detergent that binds proteins so that any inherent charge is masked by the coating of negatively charged detergent micelles allowing proteins to migrate at a rate that is a linear function of the logarithm of their molecular weight.
3.1.4 Native gels: PAGE
Native or nondenaturing gel electrophoresis is run in the absence of SDS. Whereas in SDS-PAGE, the electrophoretic mobility of proteins depends primarily on molecular mass, mobility in native PAGE depends on both charge and hydrodynamic size.
The intrinsic charge of a protein at the pH of the running buffer depends on the amino acid composition of the protein as well as post-translation modifications (PTMs), such as addition of sialic acids. Since the protein retains its folded conformation when run under native conditions, its hydrodynamic size and mobility on the gel will also vary with the nature of this conformation (higher mobility for more compact conformations, lower for larger structures). If native PAGE is carried out near neutral pH to avoid acid or alkaline denaturation, then it can be used to study conformation, self-association or aggregation, and the binding of other proteins or compounds.
Native gels can thus be sensitive to any process that alters either the charge or the conformation of a protein, making them excellent tools for applications such as:
• Changes in charge due to chemical degradation (e.g., deamidation)
• Changes in conformation due to folding/unfolding
• Aggregation (both covalent and noncovalent)
• Binding events (protein-protein or protein-ligand)
Native gels are excellent for analyzing accelerated stability samples, demonstrating comparability of different lots or processes, or examining the effects of excipients. Another advantage of native gels is that it is possible to recover proteins in their native state after the separation. Recovery of active biological materials might, however, need to be performed prior to any fixing or staining.
3.1.5 Two-dimensional (2D) gel electrophoresis
In this handbook, we are primarily concerned with blotting following electrophoresis in one dimension, in which proteins are separated on the basis of size. The increasing power of analytical techniques in the field of proteomics, however, demands further resolution of proteins in the gel and to this end, 2D gel electrophoresis is widely used. It can also be used as the separation step prior to Western blotting.
Proteins are separated first by isoelectric focusing (IEF), which is an electrophoretic method that separates proteins according to isoelectric point (pI). Proteins are amphoteric molecules, meaning that they carry a positive, negative, or zero net charge depending on amino acid composition and the pH of the surrounding medium. The pI is the specific pH at which the net charge of the protein is zero. In IEF,

23
Western
Blo
tting
Han
db
oo
k 20
22
a pH gradient is used and under the influence of an electric field a protein will move to the position in the gradient where its net charge is zero. The resolution of separation is determined by the strength of the electric field, and IEF is therefore performed at high voltage (typically in excess of 1000 V). When proteins have reached their final positions in the pH gradient, there is very little ionic movement in the system, resulting in a very low final current (typically below 50 µA).
IEF can be run under either native or denaturing conditions in a matrix formed as a strip or a rod. Native conditions are preferred when proteins are required to be in their native states after separation, for example, if activity staining is to be employed. The use of native IEF, however, is often limited by the fact that many proteins are not soluble at low ionic strength or are only partially soluble at pH close to their pI. In these cases, denaturing IEF should be employed. Urea is the denaturing agent of choice, as this uncharged compound can solubilize many proteins that are otherwise insoluble under IEF conditions.
IEF is best performed using a horizontal electrophoresis apparatus, as this allows very efficient cooling, which is necessary to counter the effects of the high voltages.
After this first dimension separation, the resulting strip or rod is equilibrated in a solution of SDS and then applied to SDS-PAGE where the proteins are separated according to molecular weight. As the proteins are thus separated according to two distinct properties — pI and size — the power of separation in 2D gel electrophoresis is much greater than that of its one-dimensional counterpart.
The power of 2D gel electrophoresis as a biochemical separation technique has been recognized virtually since its introduction. Its application, however, has become increasingly significant as a result of rapid developments in the field of proteomics, due to its outstanding ability to separate thousands of proteins simultaneously. The technique also enables detection of PTMs and cotranslational modifications that cannot be predicted from the genome sequence.
Besides proteomics, applications of 2D gel electrophoresis include cell differentiation, detection of disease markers, therapy monitoring, drug discovery, cancer research, purity checks, and microscale protein purification. In addition, 2D Western blotting is a very useful technique for the study of (PTMs) and examples of this kind of application are given in Chapter 10.
Detailed information on 2D gel electrophoresis can be found in the handbook, 2-D Electrophoresis, Principles and Methods, from Cytiva (3).
3.1.6 Electrophoresis equipment from Cytiva
There are many equipment options available for running polyacrylamide gels, each with characteristics particularly adapted to a set of applications. Choices include gel size and thickness, vertical or horizontal orientation, precast or lab-cast gels, speed and resolution requirements, application target, and cost considerations. Table 3.4 lists the instruments available from Cytiva.
Separations are performed in either vertical or horizontal systems. Vertical systems are widely used and offer a great deal of flexibility with accessories. With simple casting units, gels can be poured with a choice of buffers in a variety of thicknesses to accommodate various sample types and sizes in both mini-gel and standard-gel formats.
Table 3.4. Vertical electrophoresis systems from Cytiva
Product Gel dimensions (cm)
Capacity Electrophoresis run time (h)
Notes
miniVE Vertical Electrophoresis System
8 × 7
8 × 9
1 or 2 gels/5 to 15 samples/gel
1 to 2 One piece to both cast and run gels
Blotting module can be used in the same unit
SE 250 and SE 260 Minivertical Unit
8 × 7
8 × 9.5
1 or 2 gels/5 to 15 samples/gel
1 to 2 Temperature control with built-in heat exchanger in conjunction with a recirculating water bath
SE 600 Vertical Unit 14 × 16 1 to 4 gels/10 to 3 to 5 Temperature control with built-in heat exchanger in conjunction with a recirculating water bath
SE 400 Vertical Unit 14 × 15 1 or 2 gels/10 to 28 samples/gel
3 to 5

24
Western
Blo
tting
Han
db
oo
k 20
22
3.2 Molecular weight markers
Molecular weight markers are used to define the size of proteins run in a gel. Markers are composed of different proteins of known size and the distances migrated over the time course of the run provide a logarithmic scale by which to estimate the size of unknown proteins. For most runs, it is convenient to reserve at least one separate lane on the gel to run the molecular weight markers. In addition to size estimation, the inclusion of visible molecular weight markers allows the progress of proteins to be monitored throughout electrophoresis as well as to assess the efficiency of transfer of proteins from gel to membrane.
A wide selection of prestained and unstained molecular weight markers from Cytiva allows you to estimate the molecular weight of blotted proteins from M
r 3500 to 669 000 (Table 3.5).
Table 3.5. Overview of molecular weight markers for PAGE and Western blotting
Product Feature
Full-, High-, and Low-Range Rainbow™ Molecular Weight Markers
Visible, colored bands in gels and on blots
Amersham ECL DualVue™ Western Blotting Markers
Combined marker for ECL applications; includes a prestained marker to monitor migration and transfer, and tagged proteins for detection via chemiluminescnce that can be detected on film or via a charge-coupled device (CCD) camera-based imager
Amersham ECL Plex Fluorescent Rainbow Markers
Visible, colored bands in gels and on blots. Fluorescence detected in Cy™5 and Cy3 channels in a fluorescence-based imager (laser scanner) such as Typhoon™
Protein Molecular Weight Markers Unlabeled protein markers with multiple staining options. Bands can be visualized using Coomassie Brilliant Blue, or silver staining
3.2.1 Rainbow molecular weight markers
Rainbow Molecular Weight Markers (Fig 3.8) enable fast and simple identification of proteins by SDS-PAGE. These ready-to-load markers provide sharp, intense bands on gels and blots and discrete band spacing enables accurate molecular weight determination. The bright, distinctive colors of the markers allow confirmation of transfer to blotting membranes and orientation. The markers comprise a mixture of individually colored proteins that are combined to produce bands of equal color intensity. Rainbow Molecular Weight Markers are available in three size ranges: Full-Range (10 proteins, M
r 12 000 to 225 000);
High-Range (eight proteins, Mr 12 000 to 225 000); or Low-Range (seven proteins, M
r 3500 to 38 000).
225 000 Blue
Mr Mr Mr
150 000 Red102 000 Green 76 000 Yellow
52 000 Purple
38 000 Blue
31 000 Orange
24 000 Green
17 000 Blue
12 000 Red
225 000 Blue
76 000 Yellow
52 000 Purple
38 000 Blue
31 000 Orange
24 000 Green
17 000 Blue
12 000 Red
38 000 Blue
31 000 Orange
24 000 Green
17 000 Blue
12 000 Red
8500 Yellow
3500 Blue
Fig 3.4. Rainbow Molecular Weight Markers are available in three size ranges for use with SDS-PAGE. Full-, High-, and Low-Range (left to right).
3.2.2 Amersham ECL DualVue Western blotting Markers
Amersham ECL™ DualVue Western Blotting Markers (Fig 3.9) perform two key functions. First, prestained marker proteins allow you to monitor electrophoresis and confirm protein transfer from gel to membrane, in addition to clearly defining blot orientation. Second, recombinant tagged proteins are detectable on film or using CCD camera-based imaging in conjunction with target proteins, enabling highly accurate molecular weight determination. The tagged markers are detected easily and specifically by means of a specific conjugate, which eliminates any cross-contamination between target proteins and markers.
The markers contain a mixture of three prestained colored markers of defined molecular weight (M
r 15 000, 16 000, and 100 000) and seven tagged recombinant proteins (M
r 15 000 to 150 000).
The product is compatible with any HRP substrate as well as polyvinylidene fluoride (PVDF) and nitrocellulose membranes. Amersham ECL™ DualVue Western Blotting Markers are recommended for chemiluminescence detection using reagents such as Amersham ECL, Amersham ECL Prime, and Amersham ECL™ Select.

25
Western
Blo
tting
Han
db
oo
k 20
22
Mr
Mr
A B
150 000100 000
75 000
100 000
15 000
Membrane Film
16 000
50 000
35 000
25 000
15 000
Fig 3.5. Amersham ECL™ DualVue Western Blotting Markers after electrophoresis on a 4% to 20% SDS gel and transfer onto an Amersham Hybond™ ECL™ nitrocellulose membrane (now replaced by Amersham Protran™ Premium 0.45 nitrocellulose blotting membrane). Prestained indicator proteins are shown as a photograph of the membrane (A), together with tagged recombinant proteins after detection with Amersham ECL as a photograph of the film, following 1 min exposure (B).
3.2.3 Amersham ECL Plex fluorescent rainbow markers
These protein molecular weight markers are optimized for use with the Amersham™ ECL™ Plex Western Blotting Detection System, providing visible marker bands on gels and membranes, as well as images using Cy3 and Cy5 channels of fluorescence-based imagers, such as Typhoon™.
Minimal volumes of 1.5 to 3 μL of Amersham ECL™ Plex Fluorescent Rainbow Markers (Fig 3.10) should be applied per lane of a 10 × 10 cm mini gel. Overloading can disturb the analysis of samples in the adjacent lane. If low-abundance proteins are to be detected, only 1.5 μL of the markers should be loaded, or alternatively, load one lane with sample loading buffer between sample and markers.
225 000
Mr A B C D
150 000102 000
76 000
52 000
38 000
31 000
24 000
17 000
12 000
Fig 3.6. Amersham ECL™ Plex Fluorescent Rainbow Markers imaged on a Typhoon™ scanner. From left to right: (A) Full-color Cy™3 and Cy™5; (B) Cy™3 channel; (C) Cy™5 channel; and (D) visible spectrum.
3.2.5 Unlabeled protein molecular weight markers
Unlabeled molecular weight markers can be visualized after electrophoresis by using total protein stains such as SYPRO™ Ruby, Coomassie Brilliant Blue, or silver staining. Markers are available as Low Molecular Weight (LMW)-SDS Marker Kit (Mr 14 000 to 97 000), High Molecular Weight (HMW)-SDS Marker Kit (Mr 53 000 to 220 000), and HMW Native Marker Kit (Mr 66 000 to 669 000).
3.3 Determining the molecular weight of unknown proteins from molecular weight markersAs SDS-treated proteins migrate through a polyacrylamide gel, there is a linear relationship between the logarithm of the molecular weight and distance travelled.
The molecular weight of an unknown protein can be calculated by plotting the relative distance of migration (R
f) of the markers against the logarithm of their molecular weights (Fig 3.11). From this
calibration plot, the Mr of proteins in the samples can be calculated.
200
100
60
40
20
10
Rf
Log
mol
ecul
ar w
eigh
t
0.1 0.3 0.5 0.7 0.9
Size determination can easily be performed automatically using ImageQuant™ TL software (see Chapter 8.3).
Fig 3.7. Plot showing the relationship between distance migrated and molecular size.

26
Western
Blo
tting
Han
db
oo
k 20
22
3.4 Total protein stains
As proteins are not directly visible in the gel, the gel must be stained. Proteins are usually stained with a dye such as Coomassie Blue or are silver stained. After staining the gel, a permanent record can be made by imaging the gel with a suitable instrument (see Chapter 7). The captured image can be used for image analysis with appropriate software programs.
Staining the gel post-transfer ensures that the proteins have successfully migrated from the gel to the membrane. Continuing to the blotting step will not be necessary if the proteins have not migrated onto the membrane. For some applications, it is sufficient to analyze the whole protein pattern in the gel directly after electrophoresis, for example, to check the quality of protein purification. An alternative to post-staining is to label the sample prior to electrophoresis with, for example, a fluorescent compound, as image capture may be done directly after separation.
Silver: Silver staining is the most sensitive method for permanent visible staining of proteins in polyacrylamide gels. In silver staining, the gel is impregnated with soluble silver ions and developed by treatment with formaldehyde, which reduces silver ions to form an insoluble brown precipitate of metallic silver. This reduction is promoted by protein. Silver-stained proteins can be imaged using systems such as Amersham ImageQuant™ 800.
Coomassie Blue: Coomassie Blue staining is based on the binding of the dye, Coomassie Brilliant Blue, which binds nonspecifically to virtually all proteins. Although less sensitive than silver staining, it is widely used due to its convenience; the gel is simply soaked in a solution of the dye and any unbound dye diffuses out of the gel during the destaining steps. Coomassie Blue-stained protein can be imaged using systems such as the Amersham Typhoon™ series and Amersham ImageQuant™ 800.
Fluorescent prelabeling: Fluorescence prelabeling involves the coupling of a fluorescent dye such as CyDye™ to the protein prior to electrophoresis (4). Amersham QuickStain Kit, which contains Cy™5 fluorophore and a labeling buffer, together enable direct detection of proteins after SDS-PAGE and eliminate the need for post-staining. Furthermore, excess Cy™5 fluorophore migrates through the gel faster than proteins to terminate at the bottom of the gel, which eliminates the need for gel destaining. For details, see protocol in 11.2.5.
Figure 3.12 shows a separation of cell lysate sample prelabeled with Cy™5 prior to transfer and subsequent Western blotting analysis. In addition to being a fast procedure, it is also more sensitive than silver staining and has the broadest dynamic range of all staining techniques (Fig 3.13). The total protin stined by Amersham Quickstain can also be transferred to the Western blot where it can be used for total protein normalization. Fluorescent labels may be analyzed using systems such as Amersham Typhoon™ 5 and Amersham ImageQuant™ 800.
Properties of some of the more common protein stains and labels are summarized in Table 3.6.
202.551020 1020 2.5 µg52.5510M
Fig 3.8. Cy™5 prelabeling reaction. Triplicate samples of 2.5, 5.0, 10.0, and 20.0 μg of CHO cell lysate were prelabeled with 1 µL of Cy™5 for 30 min at room temperature. Cy™5 reagent was diluted 1:20 in a total volume of 20 µL.
Sign
al in
tens
ity
(Cou
nts
× 10
-3)
Sign
al in
tens
ity
(Cou
nts
× 10
-3)
Sign
al in
tens
ity
(Cou
nts
× 10
-3)
0
10
20
30
40
50
0
10
20
30
40
50
0
10
15
5
Cy5 prelabel
SYPRO Ruby
Coomassie
Migration position 1 2 3 4 5 6 M
Fig 3.9. SDS PAGE analysis of the same protein mixture (300 ng) prelabeled with Cy5 (A) or post-stained with SYPRO Ruby (B) or Coomassie (C). Lane profiles compared after SDS PAGE and imaging show that Cy™5 prelabeling improved sensitivity, and reduced background and noise levels.
Table 3.6. Properties of common protein stains and labels
Protein stain or label Detection method Detection limit Dynamic range the range at which the level of staining is linear to the concentration
Silver Densitometry, fluorescence imager ~ 1 ng ~10
Coomassie Blue Densitometry, fluorescence imager ~ 10 ng ~102
SYPRO Ruby Fluorescence imager ~ 1 to 2 ng ~102.5
Amersham Quickstain Fluorescence imager 100pg ~104

27
Western
Blo
tting
Han
db
oo
k 20
22
3.5 References1. Schägger, H. and von Jagow, G. Tricine-sodium dodecyl sulfate polyacrylamide gel electrophoresis
for the separation of proteins in the range from 1-100 kDalton. Anal. Biochem. 166, 368–379 (1987).
2. Wiltfang, J. et al. A new multiphasic buffer system for sodium dodecyl sulfate-polyacrylamide gel electrophoresis of proteins and peptides with molecular masses 100,000-1000, and their detection with picomolar sensitivity. Electrophoresis 12, 352–366 (1991).
3. 2-D Electrophoresis, Principles and Methods, Cytiva, 80642960.
4. Bjerneld, E. et al. Prelabeling of diverse protein samples with a fixed amount of Cy5 for SDS-PAGE analysis, Anal. Biochem. 484, 51–57 (2015).

Western
Blo
tting
Han
db
oo
k 20
21
Transfer04
The method of immobilizing and detecting proteins on a solid support, following separation by electrophoresis on a gel, originated in the laboratory of George Stark at Stanford University (1).
The term, ”Western blotting”, was applied specifically to the transfer of proteins and their detection by antibodies (2) and was presumably coined to indicate its relationship to a similar technique used for the detection of DNA; this method was called Southern blotting and was named after its inventor. This family of related techniques has continually expanded to include Northern blotting (RNA), Eastern blotting (post-translational modifications), Far Western blotting (protein-protein interactions), and Far Eastern blotting (lipid detection). Here, we are concerned exclusively with Western blotting and will describe the different options used to transfer proteins from gels to membranes. The focus, however, is placed on electrotransfer, as this is the most commonly used contemporary method in Western blotting workflows.
SAMPLE PREPARATION ELECTROPHORESIS TRANSFER PROBING DETECTION IMAGING AND ANALYSIS
28
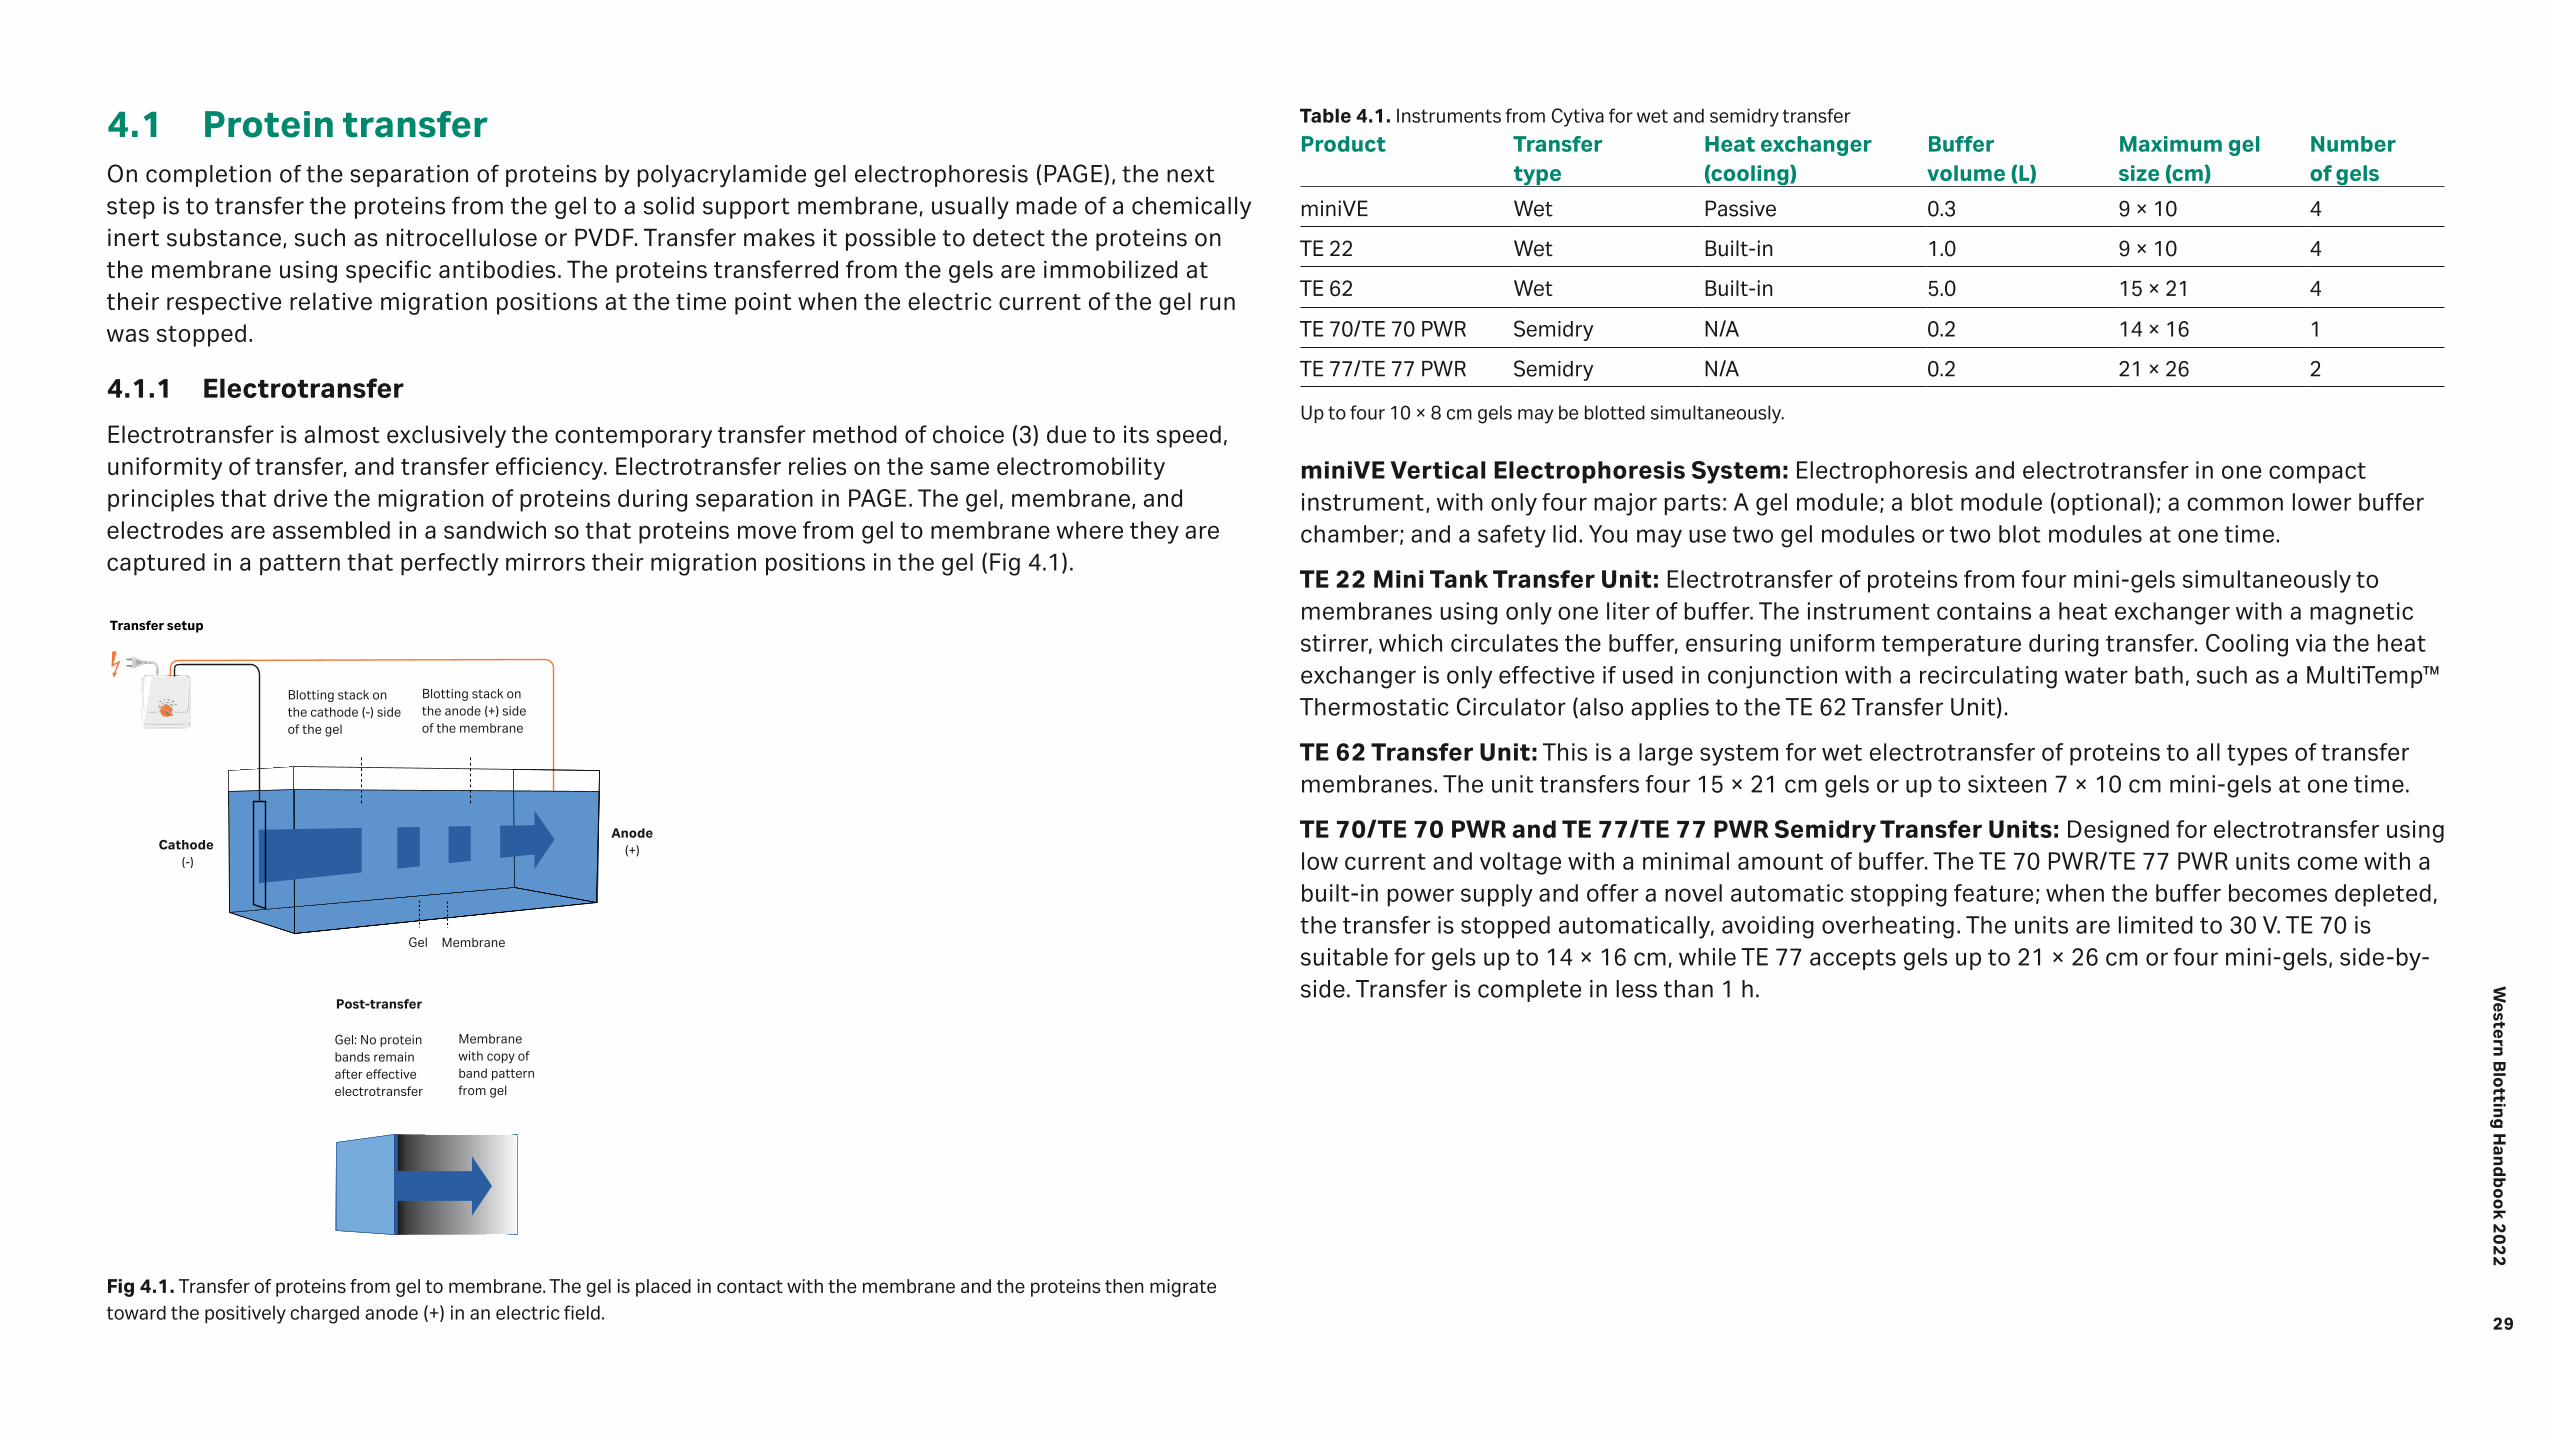
29
Western
Blo
tting
Han
db
oo
k 20
22
4.1 Protein transferOn completion of the separation of proteins by polyacrylamide gel electrophoresis (PAGE), the next step is to transfer the proteins from the gel to a solid support membrane, usually made of a chemically inert substance, such as nitrocellulose or PVDF. Transfer makes it possible to detect the proteins on the membrane using specific antibodies. The proteins transferred from the gels are immobilized at their respective relative migration positions at the time point when the electric current of the gel run was stopped.
4.1.1 Electrotransfer
Electrotransfer is almost exclusively the contemporary transfer method of choice (3) due to its speed, uniformity of transfer, and transfer efficiency. Electrotransfer relies on the same electromobility principles that drive the migration of proteins during separation in PAGE. The gel, membrane, and electrodes are assembled in a sandwich so that proteins move from gel to membrane where they are captured in a pattern that perfectly mirrors their migration positions in the gel (Fig 4.1).
Table 4.1. Instruments from Cytiva for wet and semidry transfer
Product Transfer type
Heat exchanger (cooling)
Buffer volume (L)
Maximum gel size (cm)
Number of gels
miniVE Wet Passive 0.3 9 × 10 4
TE 22 Wet Built-in 1.0 9 × 10 4
TE 62 Wet Built-in 5.0 15 × 21 4
TE 70/TE 70 PWR Semidry N/A 0.2 14 × 16 1
TE 77/TE 77 PWR Semidry N/A 0.2 21 × 26 2
Up to four 10 × 8 cm gels may be blotted simultaneously.
miniVE Vertical Electrophoresis System: Electrophoresis and electrotransfer in one compact instrument, with only four major parts: A gel module; a blot module (optional); a common lower buffer chamber; and a safety lid. You may use two gel modules or two blot modules at one time.
TE 22 Mini Tank Transfer Unit: Electrotransfer of proteins from four mini-gels simultaneously to membranes using only one liter of buffer. The instrument contains a heat exchanger with a magnetic stirrer, which circulates the buffer, ensuring uniform temperature during transfer. Cooling via the heat exchanger is only effective if used in conjunction with a recirculating water bath, such as a MultiTemp™ Thermostatic Circulator (also applies to the TE 62 Transfer Unit).
TE 62 Transfer Unit: This is a large system for wet electrotransfer of proteins to all types of transfer membranes. The unit transfers four 15 × 21 cm gels or up to sixteen 7 × 10 cm mini-gels at one time.
TE 70/TE 70 PWR and TE 77/TE 77 PWR Semidry Transfer Units: Designed for electrotransfer using low current and voltage with a minimal amount of buffer. The TE 70 PWR/TE 77 PWR units come with a built-in power supply and offer a novel automatic stopping feature; when the buffer becomes depleted, the transfer is stopped automatically, avoiding overheating. The units are limited to 30 V. TE 70 is suitable for gels up to 14 × 16 cm, while TE 77 accepts gels up to 21 × 26 cm or four mini-gels, side-by-side. Transfer is complete in less than 1 h.
Blotting stack on the cathode (-) side of the gel
Transfer setup
Post-transfer
Cathode (-)
Anode(+)
Blotting stack on the anode (+) side of the membrane
Membrane with copy of band pattern from gel
Gel: No proteinbands remain after effectiveelectrotransfer
Gel Membrane
Fig 4.1. Transfer of proteins from gel to membrane. The gel is placed in contact with the membrane and the proteins then migrate toward the positively charged anode (+) in an electric field.

30
Western
Blo
tting
Han
db
oo
k 20
22
4.1.1.1 Wet transfer
In this choice of transfer, the gel and membrane are both fully immersed in transfer buffer and a current is applied in the direction of the gel to the membrane. Generally, wet transfer requires cooling of the unit and internal recirculation of the transfer buffer by the presence of a stirring magnet. Wet transfer is recommended for large proteins, but it is a relatively slow technique, requiring large volumes of buffer. Wet transfer should be applied in preference to semidry transfer when it is important to obtain blots of the highest quality in terms of distinct, sharp bands and efficient transfer. During wet transfer, most buffers become heated, increasing in temperature to a point where proteins might be irreversibly damaged. It is therefore important to start the transfer process using cooled buffer and to maintain a low temperature. For this reason, many commercial wet transfer systems are fitted with enhanced designs to allow efficient cooling, such as cooling coils or ceramic heat exchange plates, when connected to an external temperature-controlled recirculating water bath. Another common procedure is to perform the entire wet transfer in a 4°C environment, such as a cold room.
The setup of a wet transfer is illustrated in Figure 4.2.
4.1.1.2 Semidry transfer
Semidry transfer is faster than wet transfer and consumes less buffer. The membrane is placed in direct contact with the gel and several layers of filter paper soaked in transfer buffer are placed above and below the gel and membrane. The filter paper:gel:membrane:filter paper layers are then sandwiched between two plates that form an anode (+) and a cathode (-) when an electric field is applied. Semidry transfer is usually less efficient than wet transfer, especially for large proteins (Fig 4.3). Heating is less of a problem with semidry transfer for normal transfer times, as the electrode plates adsorb heat, but semidry systems should be avoided for extended transfer times as this might lead to overheating and gel drying due to buffer depletion.
The filter papers and the membrane should be carefully cut to be a few millimeters smaller than the length and breadth of the gels. This ensures that the the papers and membranes do not overlap the gel, forming a potential short cut for the current, leading to inefficient or uneven transfer of proteins.
The use of a plastic manifold with an opening cut to exactly the same size as the gel may be used to limit the chance of current bypassing the stack.
Upper filter paper stackSponge
SpongeLower filter paper stack
Gel
Membrane
Fig 4.2. Wet transfer system. Assembly of the transfer sandwich is best performed in a tank filled with transfer buffer to a depth of at least 3 cm. The sandwich is built on the side of the transfer cassette facing the anode (+) and starts with a sponge, followed by two wetted filter papers, the membrane of choice, the gel, two additional wetted filter papers, and, finally a second sponge. Take care to avoid wrinkles, folds, or air bubbles between the different layers of the sandwich. This construct is then securely fixed in the transfer cassette and submerged in an electrotransfer tank containing transfer buffer. The orientation of the construct must be so that the membrane is on the anode (+) side of the gel.
Fig 4.3. Comparison of blots following wet and semidry transfer. A two-fold dilution series of transferrin starting at 5 µg was transferred to Amersham Hybond P (now replaced by Amersham Hybond P 0.45) membranes (PVDF). Semidry transfer is less efficient for this particular protein than wet transfer; less protein throughout the dilution series is transferred, leading to reduced sensitivity.
Wet transfer Semidry transfer

31
Western
Blo
tting
Han
db
oo
k 20
22
Upper filter paper stack
Lower filter paper stack
Gel
Membrane
Anode (+)
Cathode (-)
Fig 4.4. Semidry transfer system. The sandwich is built on the lower electrode (anode [+]). The first layer consists of at least three pieces of wetted filter papers, followed by the membrane, the gel and, finally, three additional wetted filter papers.As each layer is added, take care to avoid wrinkles, folds or trapped air bubbles. This construct is placed and compressed between two flat conduction plates that also serve as cathode (-) and anode (+). The orientation of the construct must be so that the membrane is on the anode (+) side of the gel.
The setup of a semidry transfer is illustrated in Figure 4.4.
When performing electrotransfer, ensure that no air bubbles form when applying the gel to the membrane. Bubbles will cause blank spots on the membrane where no protein transfer occurs.
Use precooled transfer buffer to counter the generation of potentially damaging heat.
Apply a membrane to both sides of your gel to avoid losing your proteins if you set up the stack incorrectly, or connect the power supply incorrectly. Colored markers will help you determine to which of the membranes the proteins have migrated!
Use two membranes if working with small proteins as they can transfer through the membrane.
4.1.2 Diffusion transfer
This method of transfer has been shown to lead to bands of high resolution when transferring DNA-binding proteins (4). Diffusion transfer is a nonelectrophoretic transfer technique and its main application, although markedly less efficient than electrotransfer, is to obtain multiple blots from a single gel. Up to 12 blots containing proteins from M
r 60 000 to 240 000 have been obtained using
diffusion transfer (5).
An additional benefit of diffusion transfer is that it is mild and can be considered where retention of protein function is critical. Diffusion transfer should also be considered if the process of electrotransfer is suspected of altering the antigenicity of the blotted proteins and render them less susceptible to detection with antibodies.
With diffusion blotting, it is possible to analyze only a limited proportion of the transferred proteins on the membrane as this type of transfer is at best 30% efficient. The advantage of the technique, however, is that only a small amount of protein needs to be present on the membrane to be detected by the very sensitive techniques used for blots. The protein remaining in the gel may then be used for detection using less sensitive staining techniques, or excised for manipulations such as analysis by mass spectrometry.
4.2 Transfer buffers and running conditionsSeveral alternative recipes for transfer buffers are described in the literature, and the optimal choice depends on the application. Transfer buffer should act as an electrically conducting medium in which proteins are soluble and it should not interfere with binding of the proteins to the membrane. Depending on the pH of the buffer, transfer may be directed either toward the cathode (-) or the anode (+). Further, the degree to which molecules bind to the membrane is affected by buffer characteristics such as salt type and concentration, methanol concentration, and the presence of detergents such as SDS.
If the transfer buffer and electrophoresis buffer systems differ, the gel should be equilibrated with transfer buffer before the act of transfer to ensure that any swelling or shrinking occurs before the gel contacts the membrane. The omission of this step might lead to band distortion or loss of band resolution.
Most transfer buffers contain methanol. The addition of methanol is necessary to achieve efficient binding to the membrane, particularly nitrocellulose membranes (6). The improved binding is partly a result of the removal of protein-bound SDS. However, methanol might cause a gel to shrink, resulting in a decreased rate of protein elution. This effect is more pronounced with the transfer of large proteins. A low methanol concentration, in combination with a longer equilibration period prior to transfer, is thus recommended for the transfer of large proteins.
32
Western
Blo
tting
Han
db
oo
k 20
22
Buffers containing methanol can deteriorate if stored for long periods, add methanol just prior to transfer.
Methanol should be analytical grade, low-grade methanol contains metallic contaminants, which can be deposited on the electrodes.
SDS is detrimental to the binding of proteins to membranes, and the general rule is that all excess SDS should be removed from the gel prior to transfer by equilibration for 15 to 30 min in transfer buffer. However, it might be necessary to include low amounts of SDS (0.02% to 0.1%) in the transfer buffer if the proteins are only partially insoluble due to high molecular weight or if they contain a surplus of hydrophobic amino acids.
If the sample elution rate is slow, a longer transfer period will be required. If sample binding is inadequate, try different buffer conditions.
Ethanol may be used in place of methanol, and is more environmentally friendly.
The most widely used buffer system for protein transfer is the classical Towbin buffer (192 mM glycine, 25 mM Tris, 20% methanol [V/V]). This low ionic strength buffer has a pH of 8.3, which is higher than the isoelectric point (pI) of most proteins, resulting in migration of the negatively charged proteins toward the anode (+). One alternative, recommended for sequencing applications, is a buffer containing N-Cyclohexyl-3-aminopropanesulfonic acid (CAPS) at pH 11. The use of this buffer reduces the problem of high background sometimes generated by the glycine in Towbin buffer when used in combination with the Edman chemistry of sequencing reactions (7).
A general guideline is to use Towbin buffer in a continuous buffer system, but as recommendations vary between manufacturers, the instructions provided with each system should be followed. A discontinuous buffer system used together with semidry transfer might improve results. One example of a discontinuous buffer system is based on the isotachophoresis theory (8). Here, two Tris buffers at different concentrations, but with identical pH, are used as the anode (+) buffer. The cathode (-) buffer has a lower pH and contains acid. The function of the anode (+) buffer is to neutralize excess protons generated on the surface of the anode (+) plate. The acid in the cathode (-) buffer migrates through the gel toward the anode (+) during transfer and serves as a trailing ion.
The pH of Towbin and Laemmli buffers, usually around pH 8.3, should never be adjusted with acid or base. This will lead to conductivity issues, which can seriously disrupt the experiment and severely damage the apparatus.
4.2.1 Notes on transfer of large and small proteins
The relative content of SDS and methanol in the transfer buffer, protein size, and the percentage of acrylamide in the gel can all affect transfer efficiency. The following steps may be taken to optimize transfer efficiency:
For large proteins (Mr > 100 000)
Use low acrylamide concentration in gels Transfer of proteins from gel to membrane can be slow, just as proteins can run slowly within the gel during separation. If blotting a large protein, be sure to run your samples in a gel with a low concentration of polyacrylamide. Low density gels are fragile, and must be handled carefully.
A little more SDS, a little less methanol Large proteins tend to precipitate in gels, hindering transfer. Adding SDS to a final concentration of 0.1% in the transfer buffer will discourage this. In addition, methanol weakens the interaction between SDS and proteins, so reducing methanol to 10% or less will reduce the risk of precipitation.
Choose wet transfer …and do it slowly, for example, by lowering the voltage or current, and running the transfer for longer. In addition, performing transfer at 4°C will help counter any unwanted effects of generated heat, such as gel distortion.
For small proteins (Mr < 100 000)
Remove SDS from transfer buffer All proteins are hindered from binding to membranes by SDS, but this is especially true for small proteins.
Keep the methanol content at 20% This will help remove as much SDS as possible and improve transfer efficiency.
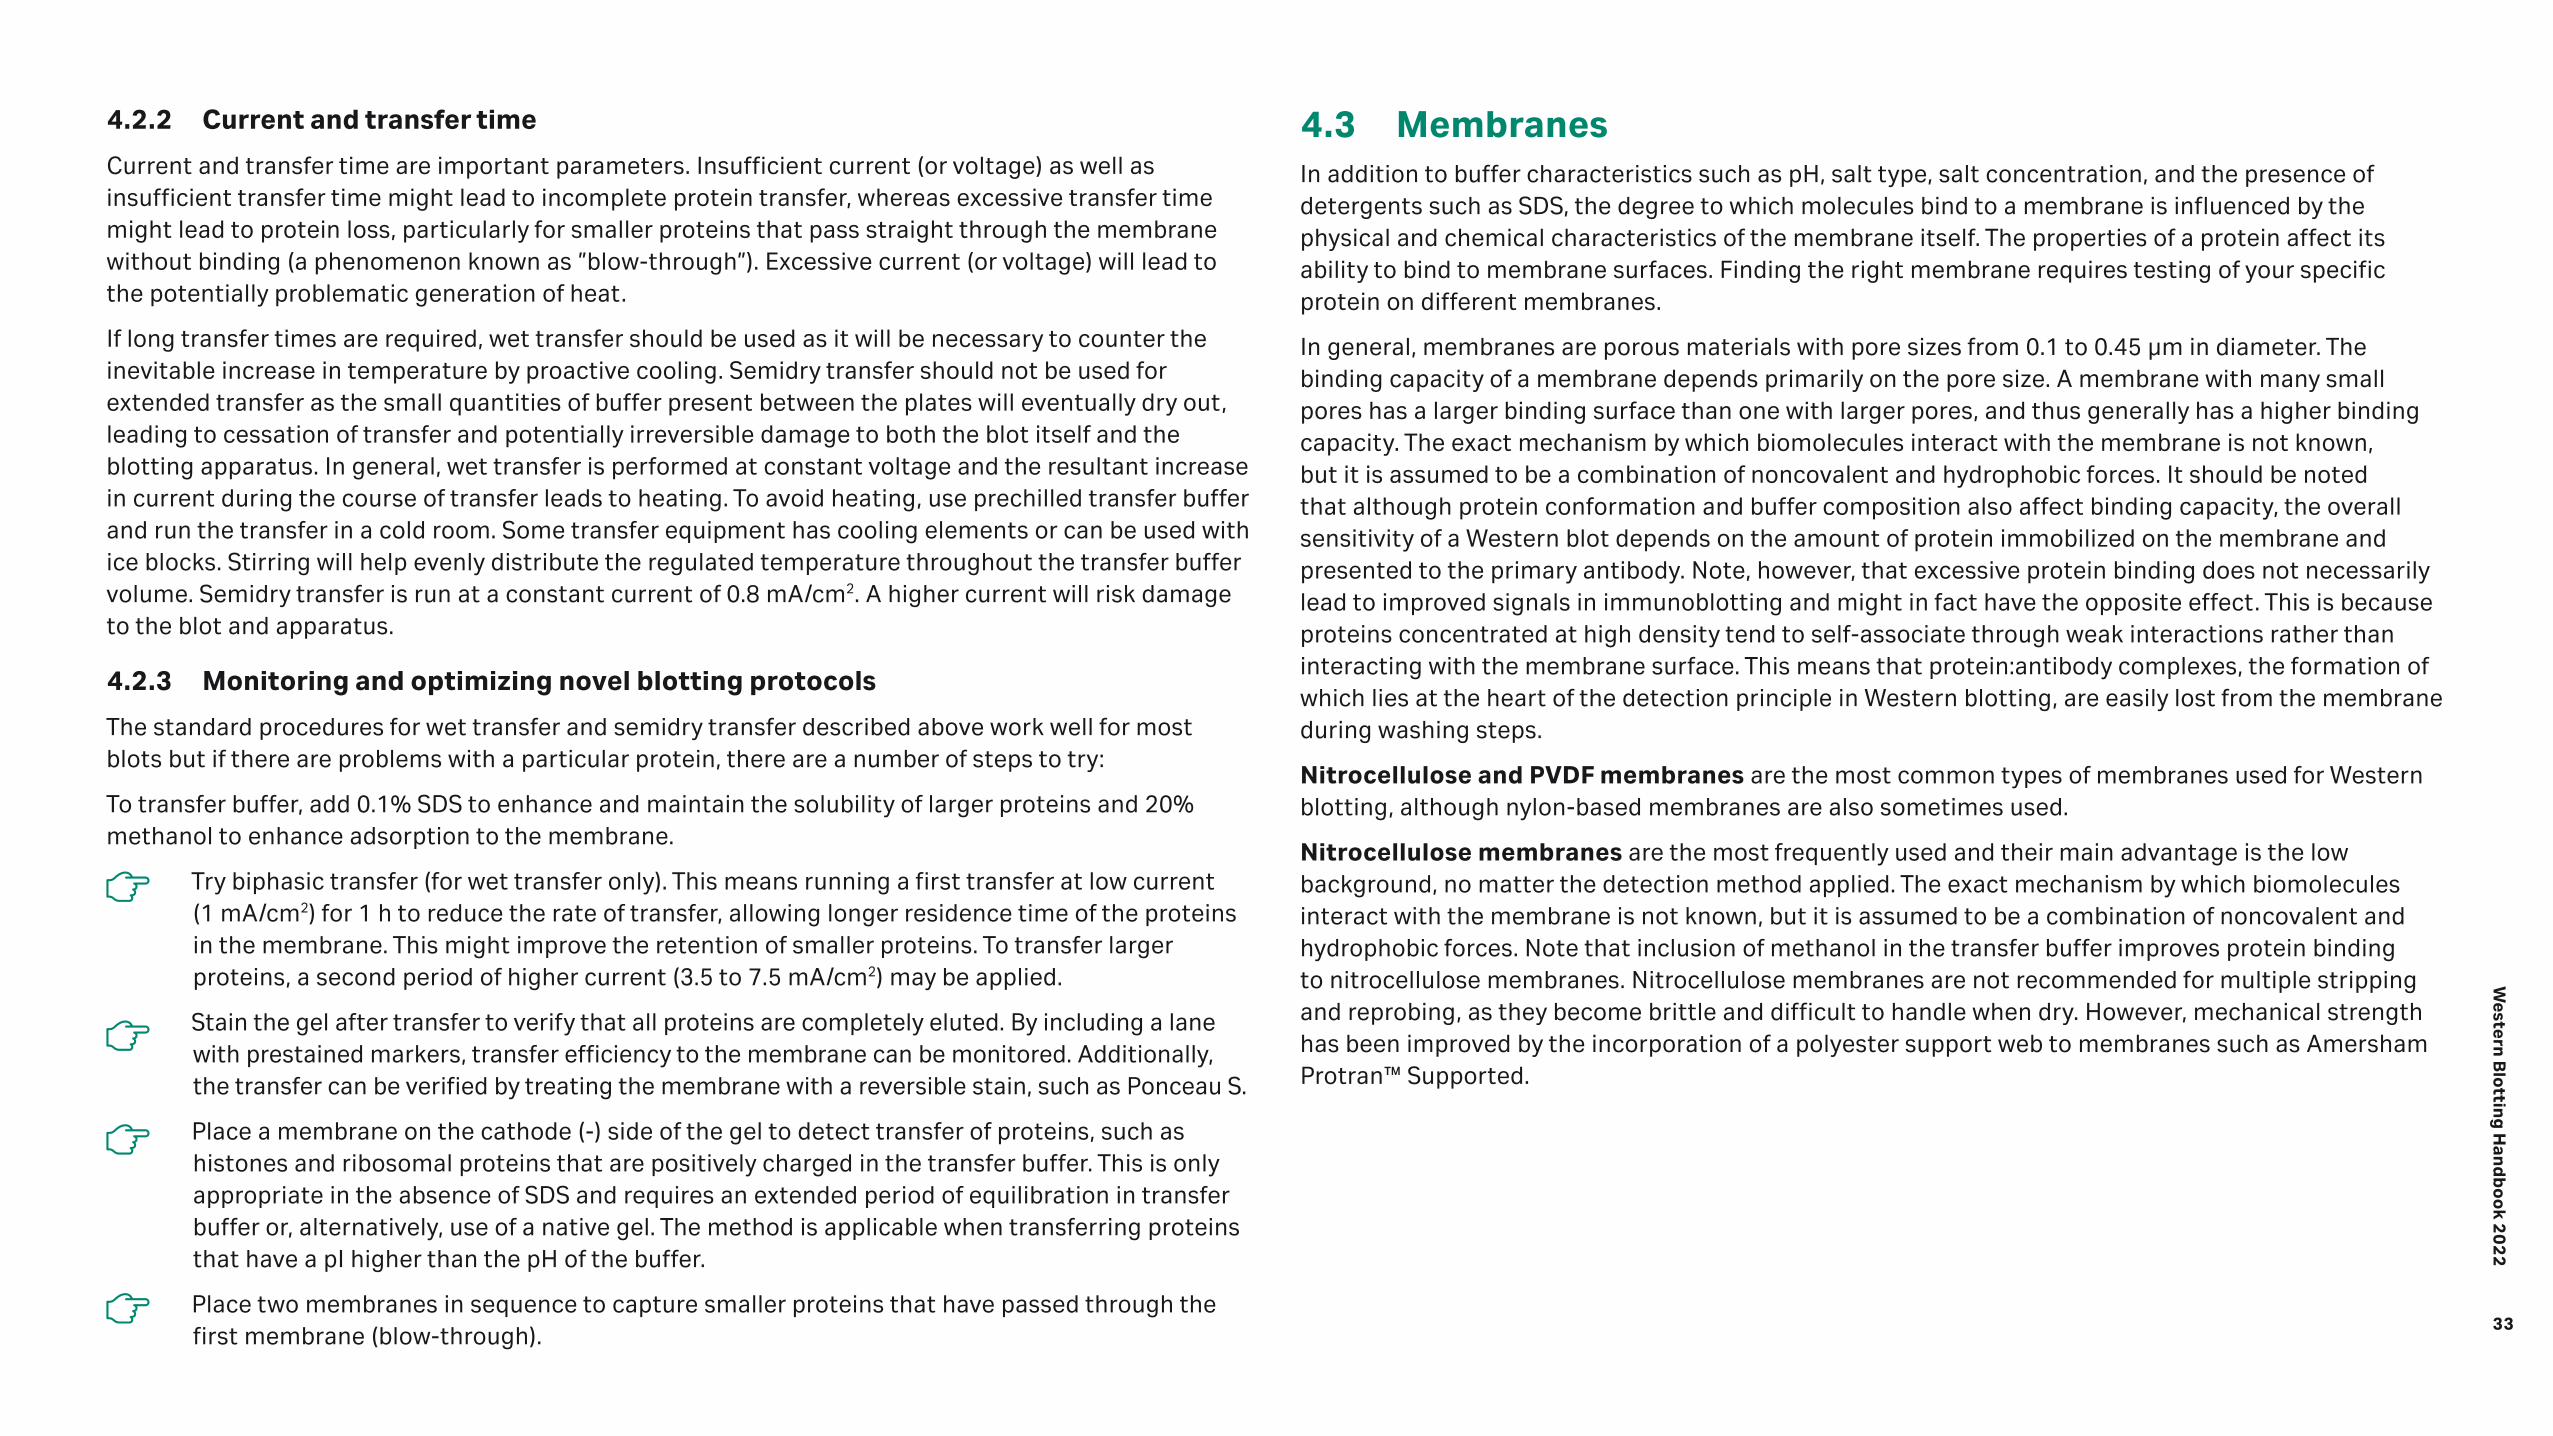
33
Western
Blo
tting
Han
db
oo
k 20
22
4.2.2 Current and transfer time
Current and transfer time are important parameters. Insufficient current (or voltage) as well as insufficient transfer time might lead to incomplete protein transfer, whereas excessive transfer time might lead to protein loss, particularly for smaller proteins that pass straight through the membrane without binding (a phenomenon known as ”blow-through”). Excessive current (or voltage) will lead to the potentially problematic generation of heat.
If long transfer times are required, wet transfer should be used as it will be necessary to counter the inevitable increase in temperature by proactive cooling. Semidry transfer should not be used for extended transfer as the small quantities of buffer present between the plates will eventually dry out, leading to cessation of transfer and potentially irreversible damage to both the blot itself and the blotting apparatus. In general, wet transfer is performed at constant voltage and the resultant increase in current during the course of transfer leads to heating. To avoid heating, use prechilled transfer buffer and run the transfer in a cold room. Some transfer equipment has cooling elements or can be used with ice blocks. Stirring will help evenly distribute the regulated temperature throughout the transfer buffer volume. Semidry transfer is run at a constant current of 0.8 mA/cm2. A higher current will risk damage to the blot and apparatus.
4.2.3 Monitoring and optimizing novel blotting protocols
The standard procedures for wet transfer and semidry transfer described above work well for most blots but if there are problems with a particular protein, there are a number of steps to try:
To transfer buffer, add 0.1% SDS to enhance and maintain the solubility of larger proteins and 20% methanol to enhance adsorption to the membrane.
Try biphasic transfer (for wet transfer only). This means running a first transfer at low current (1 mA/cm2) for 1 h to reduce the rate of transfer, allowing longer residence time of the proteins in the membrane. This might improve the retention of smaller proteins. To transfer larger proteins, a second period of higher current (3.5 to 7.5 mA/cm2) may be applied.
Stain the gel after transfer to verify that all proteins are completely eluted. By including a lane with prestained markers, transfer efficiency to the membrane can be monitored. Additionally, the transfer can be verified by treating the membrane with a reversible stain, such as Ponceau S.
Place a membrane on the cathode (-) side of the gel to detect transfer of proteins, such as histones and ribosomal proteins that are positively charged in the transfer buffer. This is only appropriate in the absence of SDS and requires an extended period of equilibration in transfer buffer or, alternatively, use of a native gel. The method is applicable when transferring proteins that have a pI higher than the pH of the buffer.
Place two membranes in sequence to capture smaller proteins that have passed through the first membrane (blow-through).
4.3 MembranesIn addition to buffer characteristics such as pH, salt type, salt concentration, and the presence of detergents such as SDS, the degree to which molecules bind to a membrane is influenced by the physical and chemical characteristics of the membrane itself. The properties of a protein affect its ability to bind to membrane surfaces. Finding the right membrane requires testing of your specific protein on different membranes.
In general, membranes are porous materials with pore sizes from 0.1 to 0.45 μm in diameter. The binding capacity of a membrane depends primarily on the pore size. A membrane with many small pores has a larger binding surface than one with larger pores, and thus generally has a higher binding capacity. The exact mechanism by which biomolecules interact with the membrane is not known, but it is assumed to be a combination of noncovalent and hydrophobic forces. It should be noted that although protein conformation and buffer composition also affect binding capacity, the overall sensitivity of a Western blot depends on the amount of protein immobilized on the membrane and presented to the primary antibody. Note, however, that excessive protein binding does not necessarily lead to improved signals in immunoblotting and might in fact have the opposite effect. This is because proteins concentrated at high density tend to self-associate through weak interactions rather than interacting with the membrane surface. This means that protein:antibody complexes, the formation of which lies at the heart of the detection principle in Western blotting, are easily lost from the membrane during washing steps.
Nitrocellulose and PVDF membranes are the most common types of membranes used for Western blotting, although nylon-based membranes are also sometimes used.
Nitrocellulose membranes are the most frequently used and their main advantage is the low background, no matter the detection method applied. The exact mechanism by which biomolecules interact with the membrane is not known, but it is assumed to be a combination of noncovalent and hydrophobic forces. Note that inclusion of methanol in the transfer buffer improves protein binding to nitrocellulose membranes. Nitrocellulose membranes are not recommended for multiple stripping and reprobing, as they become brittle and difficult to handle when dry. However, mechanical strength has been improved by the incorporation of a polyester support web to membranes such as Amersham Protran™ Supported.

34
Western
Blo
tting
Han
db
oo
k 20
22
PVDF membranes have higher protein binding capacity and mechanical strength and are an excellent choice for Western blotting applications where stripping and reprobing are needed. As PVDF membranes are highly hydrophobic, they need to be prewetted in either methanol or ethanol before use to be compatible with aqueous solutions. Proteins bind to PVDF membranes via a combination of dipole and hydrophobic interactions. PVDF membranes tend to have a higher background due to their higher protein binding capacity.
Always handle membranes with gloves or forceps to avoid contaminating the membrane with proteins from your fingers. The smearing and contamination caused by touching the membrane will interfere with the signal from the proteins of interest.
A summary of some of the most important features and benefits of nitrocellulose and PVDF membranes is shown in Table 4.2.
Table 4.2. Important characteristics of membranes commonly used in Western blotting
Membrane Interaction mode Optimal immobilization conditions
Staining options Advantages
Nitrocellulose Noncovalent or hydrophobic
High salt/low methanol Amido black
Aniline blue black
Ponceau S
Colloidal gold
Fast green
Toluidine blue
Highly versatile
Low background
PVDF Dipole and hydrophobic interactions
Prewet in methanol before using with aqueous buffers
Amido black
India ink
Silver
Coomassie Brilliant Blue
Ponceau S
Colloidal gold
Suitable for small proteins
High protein-binding capacity
Mechanical strength
Chemical stability
4.3.1 Amersham Protran™ Nitrocellulose membranes from Cytiva
Amersham Protran™ family membranes are composed of high-quality nitrocellulose, which is 100% pure. The sheets and rolls are available in three pore sizes with high surface area and excellent uniformity. Amersham Protran membranes have good binding properties for Western blot, dot-blot assays, and other protein or nucleic acid methods.
Amersham Protran™ nitrocellulose membranes are available in 0.1, 0.2, and 0.45 µm pore sizes in a variety of package sizes containing rolls, precut sheets, and sandwiches for most applications. Amersham Protran nitrocellulose membranes are a binding matrix for Western blotting with high affinity for proteins, blocking ability, and compatibility with a range of detection methods (e.g., chemiluminescence, chromogenic, fluorescence).
In general, binding affinity for small peptides increases with decreasing pore size. Consequently, both Amersham Protran™ 0.1 and Amersham Protran 0.2 are good choices for working with small proteins and peptides. The Amersham Protran 0.1 membrane has a minimal pore size of 0.1 μm, exhibits excellent binding affinity for small peptides (M
r < 10 000) and nucleic acids (< 300 bp), and produces
very low background in chemiluminescent Western blotting.
Amersham Protran™ Premium (0.2 and 0.45 µm pore size) membranes give high sensitivity, resolution, and low background for all labeling and detection systems (chemiluminescence, fluorescence, colorimetric, and radioactive). The low background enables a dynamic range for complex samples.
Amersham Protran™ Supported (0.2 and 0.45 µm pore size) membranes consist of nitrocellulose cast on both sides of an inert nonwoven support material (polyester). The support does not affect transfer conditions or results but gives the membrane exceptional handling characteristics when used for reprobing. Unsupported nitrocellulose becomes brittle during the reprobing procedure and is hence not recommended for such an application.
Amersham Protran membranes are compatible with several different staining methods such as Amido black, Aniline blue black, Ponceau S, Colloidal gold, Fast Green, and Toluidine blue.
4.3.2 Amersham Hybond™ PVDF membranes from Cytiva
Amersham Hybond™ (0.2 and 0.45 µm pore size) are robust and chemically stable membranes that are an excellent choice for stripping and reprobing. The small pore size of the 0.2 µm membrane eliminates blow-through and increases protein binding over a wide range of molecular weights. This membrane is compatible with a range of solvents used for rapid destaining. Amersham Hybond™ should be immersed in 100% methanol or ethanol, and then soaked in ultrapure water or transfer buffer before use.
Amersham Hybond™ 0.45 exhibits low fluorescent properties and is hence useful for a wide range of

35
Western
Blo
tting
Han
db
oo
k 20
22
fluorescent detection methods such as CyDye™, IR dyes, and stain-free gel technology.
Amersham Hybond™ LFP (0.2 µm pore size) membrane is a hydrophobic PVDF membrane specifically optimized for fluorescence detection in Western blotting applications. It has low background fluorescence, resulting in high sensitivity. This membrane must be activated with methanol and is particularly recommended in combination with detection using Amersham ECL™ Plex™.
Amersham Hybond™ SEQ (0.2 µm pore size) membrane is designed specifically for protein sequencing applications.
In most cases, it is possible to replace methanol with ethanol in the preparation of PVDF membranes.
A guide to selecting membranes is found in 4.3.3, Table 4.3 and Figure 4.5.
4.3.3 Membrane selection guideTable 4.3. Membranes for Western blotting
Material Pore size (µm)
Physical strength
Binding capacity (µg/cm2)
Minimum protein size (M
r)
Amersham Protran Nitrocellulose 0.1 0.2 0.45
- > 200 > 150 > 100
< 10 000 < 20 000 > 20 000
Amersham Protran Premium
Nitrocellulose 0.2 0.45
- > 170 > 160
< 20 000 > 20 000
Amersham Protran Supported
Supported nitrocellulose
0.2 0.45
+ > 120 > 100
< 20 000 > 20 000
Amersham Hybond P 0.2 PVDF 0.2 + > 300 < 20 000
Amersham Hybond P 0.45 PVDF 0.45 + > 200 > 20 000
Amersham Hybond LFP 0.2 PVDF 0.2 + > 200 < 20 000
Amersham Protran 0.1 NC< Mr 10 000
Amersham Protran 0.2 NC< Mr 20 000
Amersham Protran 0.45 NC> Mr 20 000
< Mr 20 000
< Mr 20 000
< Mr 20 000
High
High
High
< Mr 20 000
> Mr 20 000
> Mr 20 000
> Mr 20 000
Low
Low
Low
> Mr 20 000
> Mr 20 000
Amersham Protran Supported 0.2 NC
Amersham Hybond P 0.2 PVDF
Amersham Hybond P 0.2 PVDF
Amersham Protran Premium 0.45 NC
Amersham Protran Premium 0.2 NC
Amersham Protran Supported 0.45 NC
Amersham Hybond P 0.45 PVDF
Amersham Hybond P 0.45 PVDF
Amersham Hybond P 0.45 PVDF
Amersham Hybond LFP 0.2 PVDF
Verify presence/absence
of proteins with chemiluminescence
Stripping and reprobing with
chemiluminescence
Reproducible quantitation with
fluorescence
ApplicationProtein
abundance Protein size Recommended membrane
36
Western
Blo
tting
Han
db
oo
k 20
22
Amersham Hybond SEQ 0.2 PVDF 0.2 + > 300 < 20 000
4.4 Confirmation of protein transfer to the membraneAfter electrotransfer, it is necessary to confirm that all the proteins in the gel have been completely eluted and have not passed through or migrated in the opposite direction. This can be achieved by prelabeling the sample by Cy™5 as described in Chapter 3 or by staining the gel using a total protein stain after electrotransfer. The use of visible (prestained) molecular weight markers such as Rainbow Molecular Weight Markers or Amersham ECL™ DualVue™ Western Blotting Markers is a very simple and convenient way to check that all proteins across the range of molecular weights on the gel have transferred to the membrane, as high and low molecular weight proteins might migrate with different efficiencies under similar electrophoretic conditions. When using Amersham ECL™ DualVue™ markers that contain specially tagged proteins that only appear at chemiluminescent detection, the molecular weight of the protein of interest can be assigned.
4.4.1 Total protein stains and labels
In addition to checking for complete transfer, total protein stains or protein prelabeling may also be used to enable quantitative comparison between lanes of specific bands of interest (Table 4.4). Some commonly used stains are listed and briefly described below as well as protein prelabeling using fluorescent dye.
Colloidal gold A highly sensitive stain for blotted proteins, with a limit of detection (LOD) down to 1 ng of protein. Colloidal gold be used on both nitrocellulose and PVDF membranes. The low pH of the colloidal gold ensures that the particles bind selectively to proteins on membranes. Signals can be further enhanced using a silver enhancement reagent.
Coomassie Brilliant Blue Coomassie Brilliant Blue is generally applied to polyacrylamide gels but they are applicable to membranes also. The membranes are stained using 0.1% Coomassie dye dissolved in a mixture
of 45% methanol and 10% acetic acid. The background is then destained using a mixture of 25% methanol and 10% acetic acid.
Ponceau S Offers a quick and easy reversible staining method for Western blots, but sensitivity is poor with an LOD greater than 250 ng of protein. Ponceau S is compatible with both nitrocellulose and PVDF membranes. Ponceau S staining is a quick and easy way to visualize proteins transferred to membranes following PAGE. Ponceau S is easily removed with water and is regarded as a “gentle” treatment that does not interfere with subsequent immunological detection steps. Note that when using PVDF membranes in combination with SDS-PAGE, it is important to ensure that the membrane is washed in 100% methanol after transfer and before incubating in Ponceau S solution, as this stain is incompatible with SDS.
India Ink A cheap, sensitive staining method and does not interfere with subsequent binding of antibody to the antigen. Block the membrane in PBS-Tween (0.05%) before staining to avoid excessive background. Alternatively, dilute in PBS-Tween (0.05%) with 1% acetic acid as a staining solution.
Amido Black Designed for rapid staining of protein on membranes. The sensitivity of Amido Black is similar to that of Coomassie Blue, but it stains faster. It is the preferred stain for protein sequencing and in situ cleavage of proteins for the determination of internal sequences because the mild staining and destaining conditions minimize the likelihood that any protein will be extracted during treatment. Proteins may be easily destained using 25% isopropanol and 10% acetic acid.
Cy5 prelabeling with Amersham QuickStain By prelabeling the sample by Cy™5 prior to electrophoresis, the protein pattern may be detected both in the gel and after transfer to the membrane. When used for Western blotting, the Cy™5 reagent is diluted 10- to 20-times compared to when used for SDS-PAGE analysis. The dilution is performed to avoid saturated signals on the membrane as the sample is concentrated on the membrane surface. For more details, see 3.4.
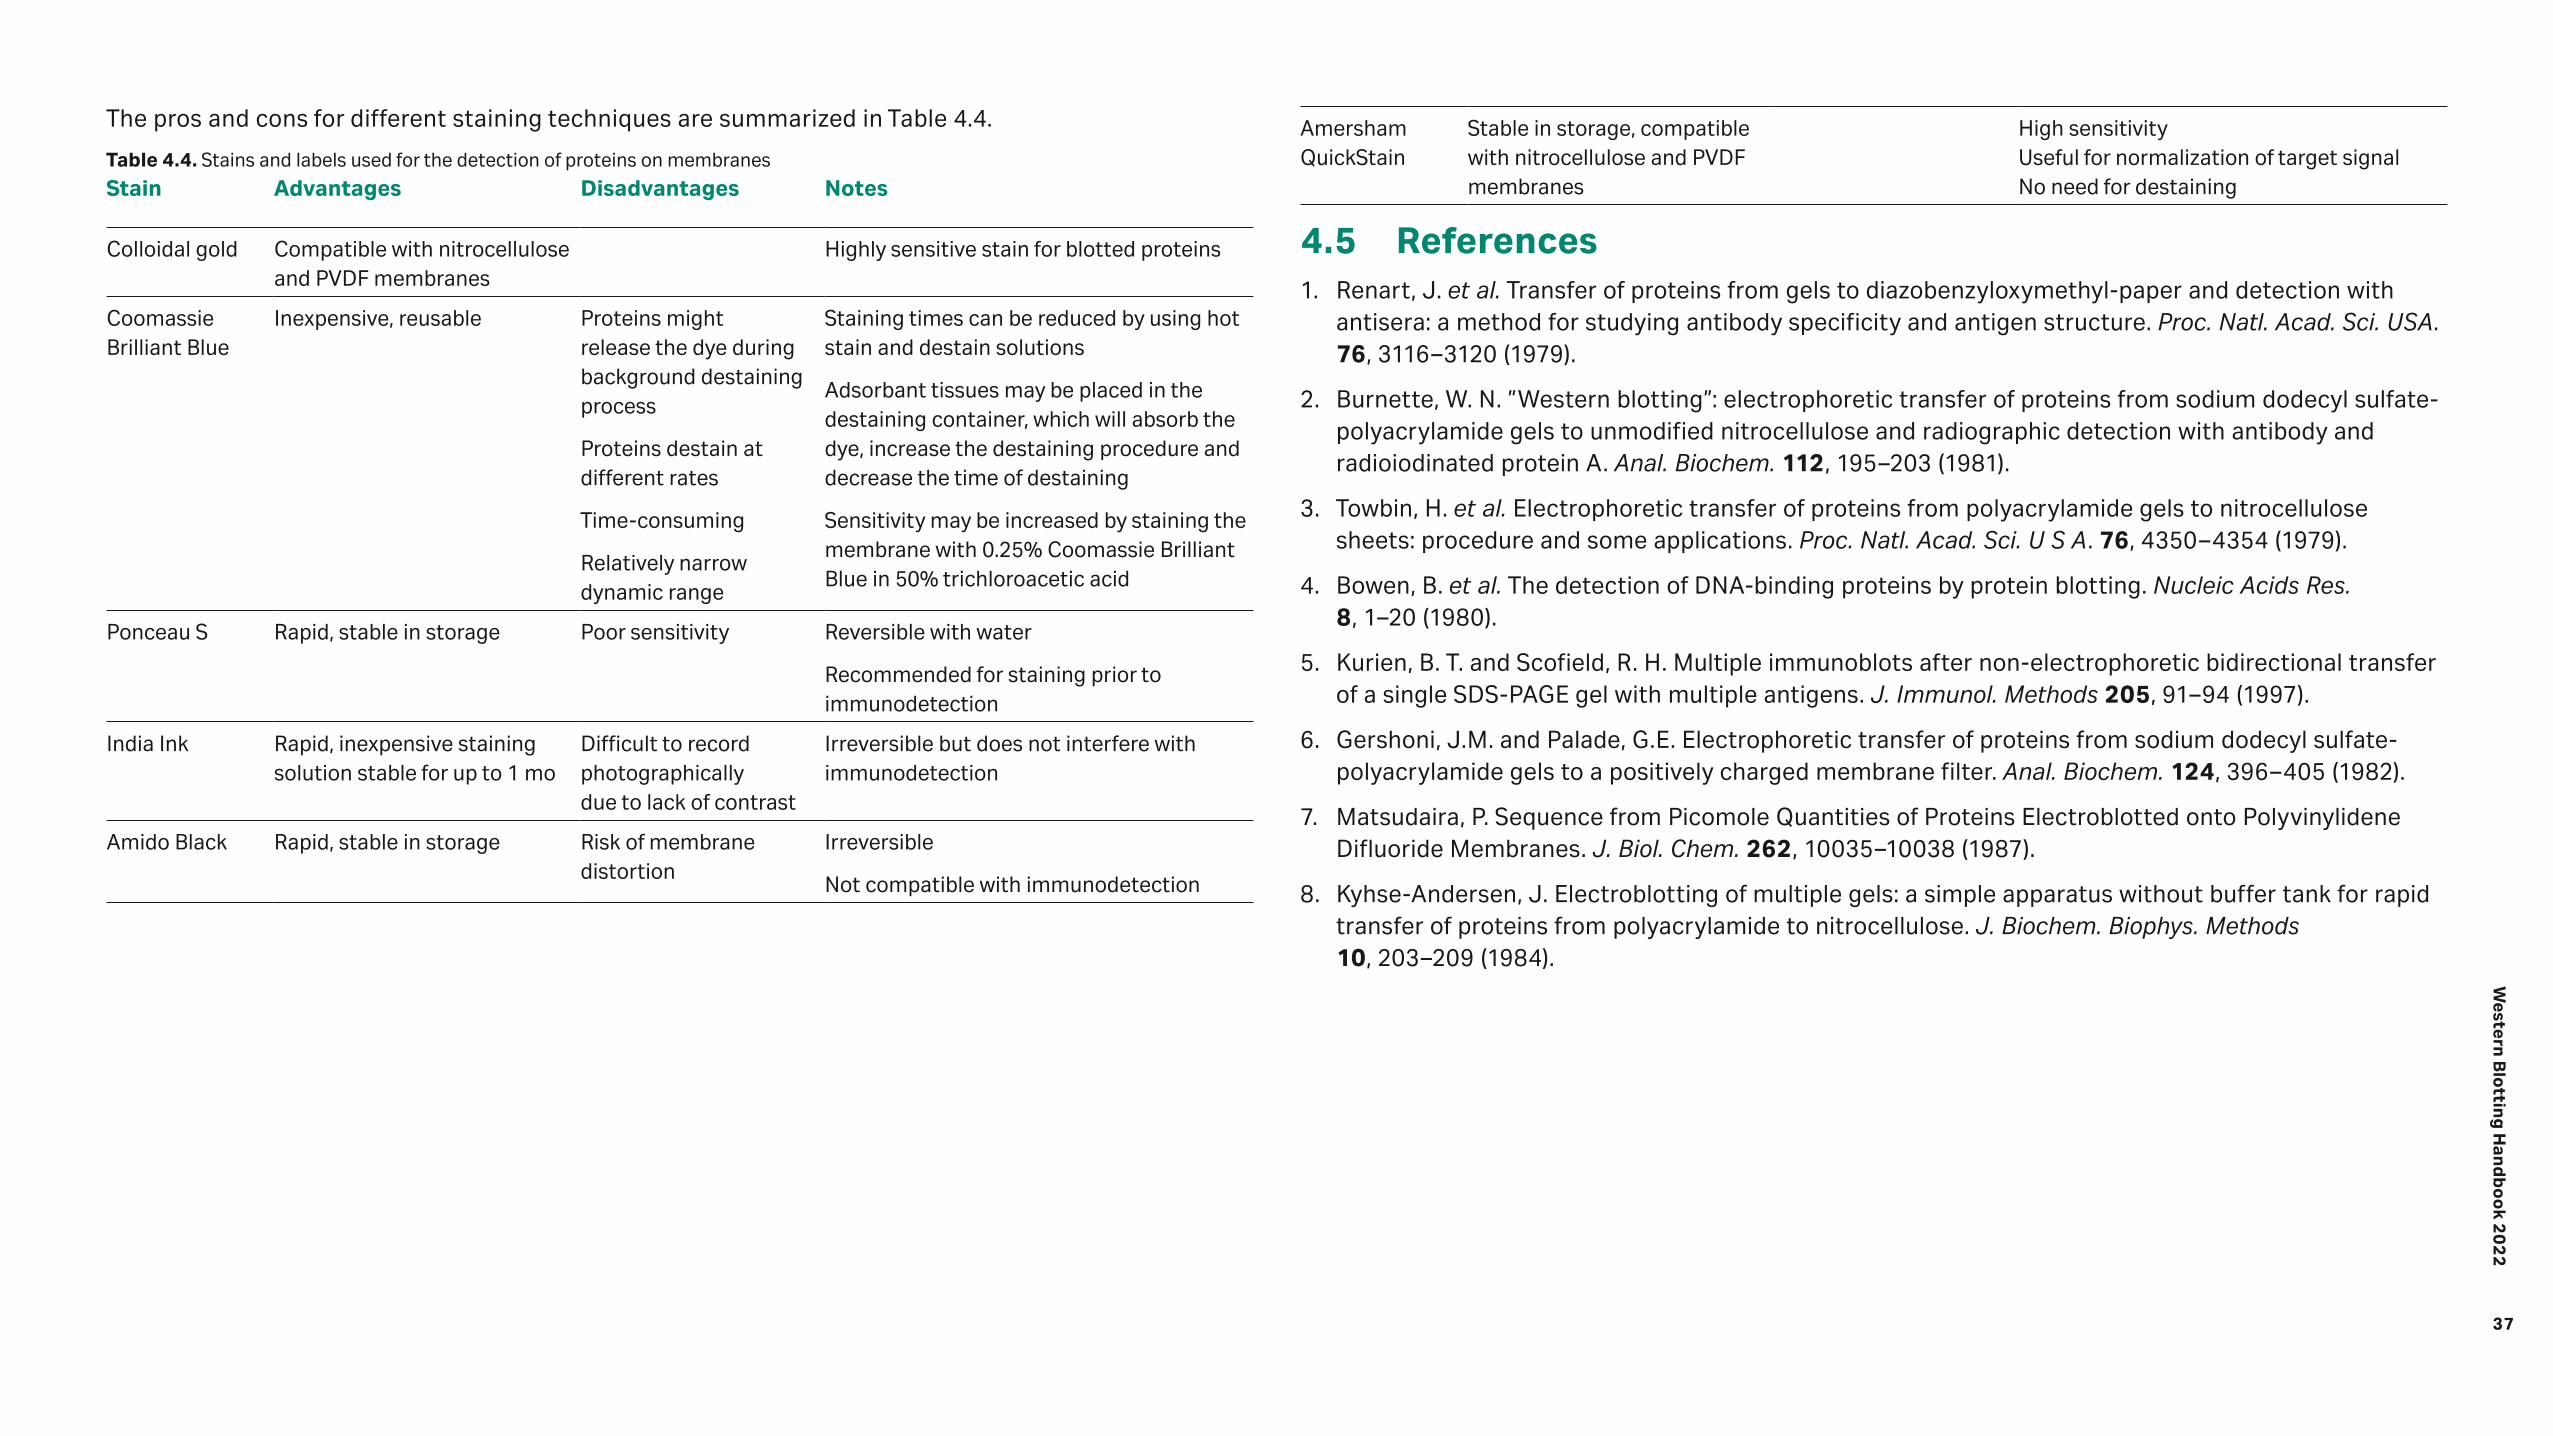
37
Western
Blo
tting
Han
db
oo
k 20
22
The pros and cons for different staining techniques are summarized in Table 4.4.
Table 4.4. Stains and labels used for the detection of proteins on membranes
Stain Advantages Disadvantages Notes
Colloidal gold Compatible with nitrocellulose and PVDF membranes
Highly sensitive stain for blotted proteins
Coomassie Brilliant Blue
Inexpensive, reusable Proteins might release the dye during background destaining process
Proteins destain at different rates
Time-consuming
Relatively narrow dynamic range
Staining times can be reduced by using hot stain and destain solutions
Adsorbant tissues may be placed in the destaining container, which will absorb the dye, increase the destaining procedure and decrease the time of destaining
Sensitivity may be increased by staining the membrane with 0.25% Coomassie Brilliant Blue in 50% trichloroacetic acid
Ponceau S Rapid, stable in storage Poor sensitivity Reversible with water
Recommended for staining prior to immunodetection
India Ink Rapid, inexpensive staining solution stable for up to 1 mo
Difficult to record photographically due to lack of contrast
Irreversible but does not interfere with immunodetection
Amido Black Rapid, stable in storage Risk of membrane distortion
Irreversible
Not compatible with immunodetection
Amersham QuickStain
Stable in storage, compatible with nitrocellulose and PVDF membranes
High sensitivity Useful for normalization of target signal No need for destaining
4.5 References1. Renart, J. et al. Transfer of proteins from gels to diazobenzyloxymethyl-paper and detection with
antisera: a method for studying antibody specificity and antigen structure. Proc. Natl. Acad. Sci. USA. 76, 3116–3120 (1979).
2. Burnette, W. N. ”Western blotting”: electrophoretic transfer of proteins from sodium dodecyl sulfate-polyacrylamide gels to unmodified nitrocellulose and radiographic detection with antibody and radioiodinated protein A. Anal. Biochem. 112, 195–203 (1981).
3. Towbin, H. et al. Electrophoretic transfer of proteins from polyacrylamide gels to nitrocellulose sheets: procedure and some applications. Proc. Natl. Acad. Sci. U S A. 76, 4350–4354 (1979).
4. Bowen, B. et al. The detection of DNA-binding proteins by protein blotting. Nucleic Acids Res. 8, 1–20 (1980).
5. Kurien, B. T. and Scofield, R. H. Multiple immunoblots after non-electrophoretic bidirectional transfer of a single SDS-PAGE gel with multiple antigens. J. Immunol. Methods 205, 91–94 (1997).
6. Gershoni, J.M. and Palade, G.E. Electrophoretic transfer of proteins from sodium dodecyl sulfate-polyacrylamide gels to a positively charged membrane filter. Anal. Biochem. 124, 396–405 (1982).
7. Matsudaira, P. Sequence from Picomole Quantities of Proteins Electroblotted onto Polyvinylidene Difluoride Membranes. J. Biol. Chem. 262, 10035–10038 (1987).
8. Kyhse-Andersen, J. Electroblotting of multiple gels: a simple apparatus without buffer tank for rapid transfer of proteins from polyacrylamide to nitrocellulose. J. Biochem. Biophys. Methods 10, 203–209 (1984).

Western
Blo
tting
Han
db
oo
k 20
21
Antibody probing05
Once protein samples are separated and transferred onto a membrane, the protein of interest can be detected and localized using a specific antibody. Usually, Western blotting protocols utilize an unlabeled primary antibody directed against the target protein and a species-specific, labeled secondary antibody directed against the constant region of the primary antibody. The secondary antibody serves not only as a carrier of the label but is also a mechanism to amplify the emitted signals, as many secondary antibodies can theoretically bind simultaneously to the primary antibody (Fig 5.1). This is one of the most effective ways to maximize the potential sensitivity of the assay. For this reason, secondary antibodies are most often polyclonal and can target epitopes on the framework regions of the primary antibody; specificity is thus limited to species and immunoglobulin isotype. The signal emitted by the labeled secondary antibody is then measured and is proportional to the quantity of protein of interest present on the membrane.
With this highly specific immunodetection process, it is possible to reveal the presence of a very low quantity of a specific protein in a complex sample.
SAMPLE PREPARATION ELECTROPHORESIS TRANSFER PROBING DETECTION IMAGING AND ANALYSIS
38

39
Western
Blo
tting
Han
db
oo
k 20
22
5.1 BlockingWestern blotting involves the immobilization of biomolecules on a membrane via hydrophobic interactions. As nonspecific binding of antibodies to the membrane is detrimental to the specificity and sensitivity of the assay, it is essential to ”block” parts of the membrane not already bound to proteins. The choice of blocking strategy will be guided by the samples and the antibodies used. Depending on the system, to optimize the blocking step several options for blocking agents and buffers should be considered. As a starting point for choosing blocking agents, buffers and optimal conditions, begin by using those recommended by the manufacturers of the detection reagents.
Proteins and nonionic detergents are the two main classes of blocking agents commonly used in Western blotting.
5.1.1 Electrotransfer
Electrotransfer is almost exclusively the contemporary transfer method of choice (3) due to its speed, uniformity of transfer, and transfer efficiency. Electrotransfer relies on the same electromobility principles that drive the migration of proteins during separation in PAGE. The gel, membrane, and electrodes are assembled in a sandwich so that proteins move from gel to membrane where they are captured in a pattern that perfectly mirrors their migration positions in the gel (Fig 4.1).
Table 5.1. Proteins used as blocking agents in Western blotting
Protein Recommended concentration
Buffers Membrane compatibility
BSA 0.2% to 5% (W/V) Tris-buffered saline (TBS)/phosphate-buffered saline (PBS)
Nitrocellulose PVDF
Nonfat milk 3% to 5% (W/V) TBS, PBS Nitrocellulose PVDF
Amersham ECL Prime Blocking Reagent (contains nonfat milk)
2% to 5% (W/V) TBS, PBS Nitrocellulose PVDF
Casein 5% (W/V) TBS, PBS Nitrocellulose PVDF
Fish gelatin 2% to 10% (W/V) TBS, PBS Nitrocellulose PVDF
Note that the content and quality of dried milk varies between vendors and also between batches.
As each antibody:antigen pair has unique characteristics, no single blocking agent is optimal for every Western blotting process. Determining the optimal blocking agent and concentration are key steps for the success of immunodetection and it is well worth the effort to spend some time developing this stage of the process in order to optimize the signal-to-noise ratio. This ratio is measured by comparing the signal obtained with a sample containing the target protein to that obtained with a sample containing no target protein. Low concentrations of blocking agent might result in high background and a reduced signal-to-noise ratio. On the other hand, excessive concentrations of blocking agent can mask antibody:antigen interactions, and lead to much the same effect.
If the most effective concentration of blocking agent for the application, has not been tested, begin with the concentration recommended by the manufacturer.
If using biotinylated or Concanavalin-conjugated antibodies, nonfat milk should not be used as a blocking agent as milk contains both glyocoproteins and biotin, leading to a decreased signal.
Note that crude protein preparations can contain phosphatases (which dephosphorylate proteins on specific amino acid residues), making them inappropriate as blocking agents when detecting phosphorylated proteins using phosphospecific antibodies. Where phosphorylated proteins are the targets of interest, phosphatase inhibitors should be added to the blocking solution (1). Additionally, TBS is recommended as a buffer to dilute the blocking agent, as phosphate in PBS can interfere with and therefore reduce phosphospecific antibody binding (see 5.1.3). Nonfat milk should not be used as a blocking agent in the detection of phosphorylated proteins as milk contains casein (and therefore phosphoepitopes), which can interfere with antiphosphotyrosine antibodies and lead to an increase in background signal.
Fig 5.1. As multiple secondary antibodies conjugated to an enzyme or a fluorophore can bind to a single, specific primary antibody, the signal can be greatly amplified, contributing to the sensitivity of Western blotting.
Multiple, labeled secondary antibodies bound to several epitopes on the primary antibody results in an amplification of signal
Single primary antibody bound to antigen on a membrane
Antigen

40
Western
Blo
tting
Han
db
oo
k 20
22
The following list of protein-based blocking solutions may be used as a guide for the optimization of enhanced chemiluminescence (ECL) based detection in Western blotting.
Amersham ECL™ Blocking Agent: This blocking agent works efficiently and yields high quality results so less time is spent blocking. It is intended for blocking Amersham Protran™ nitrocellulose and Amersham Hybond™ PVDF membranes used with Amersham ECL™ range of detection regaents. Immerse the membrane in a 5%(w/v) solution of the blocking agent in PBS or TBS Tween™ (0.1% is usually sufficient) for 1 hour at room temperature on an orbital shaker followed by washing. For protocol reference the website.
Dried milk powder with Tween-20: Combinations of dried milk and Tween-20 are inexpensive and are commonly prepared as 5% dried milk in PBS containing 0.1% Tween-20. Very clean backgrounds can be achieved but care must be taken to avoid masking some antigens. This preparation is a common blocking agent for ECL™ based detection in Western blotting.
Dried milk powder: A common blocking agent. Dried milk powder is inexpensive and often gives a very clean background. Dried milk solutions are usually prepared at a concentration of 5% in PBS or TBS. The solution deteriorates rapidly and it can disguise some antigens. Reduction to a concentration of 1% can improve the detected signal.
Fish gelatin: Fish gelatin has fewer hydrogen binding amino groups than gelatin from mammalian sources and hence tends to give lower backgrounds. Fish gelatin is usually used at a concentration of 2%, is easy to dissolve and can be used at 40˚C without gelling. It can mask some proteins, however, and contains some competitive reactants, such as biotin. Fish gelatin is also relatively expensive.
BSA: BSA is relatively inexpensive and can allow the generation of optimal signals from specific detected target proteins. It is usually used at a concentration of 0.3% to 3% in PBS or TBS with or without 0.1% Tween-20. A concentration of 2% BSA is recommended if probing with antibodies directed against phsophorlyated proteins.
Serum: Horse or fetal calf serum is frequently used at a concentration of 10% in a solution containing 0.02% sodium azide. This blocking solution is expensive and might contain potentially cross-reactive immunoglobulins.
Protein free blocking reagents: Polyvinylpyrrolidone (PVP) is a non-protein blocking buffer alternative that is useful for detecting small proteins. PVP is a water-soluble polymer that binds to nitrocellulose and PVDF membranes. PVP is generally used at 0.5-2% concentration and is commonly combined with purified casein or other blocking agents.
5.1.2 Detergents as blocking agents
Detergents inhibit nonspecific hydrophobic binding of proteins to membranes (Table 5.2). They are considered nonpermanent blocking agents since they do not attach to the membrane and can be removed in a simple washing step. A solution of Tween-20 is commonly used, but alternatives may be considered such as sodium dodecyl sulfate (SDS) or NP40, which are especially useful to counter strong background signals. Detergent blocking agents are usually used in conjunction with protein blocking agents.
Table 5.2. Detergents used as blocking agents in Western blotting
Detergent Recommended concentration Buffers Membrane compatibility
SDS 0.02% to 0.05% (W/V) TBS, PBS Nitrocellulose PVDF
Tween-20 0.05% to 0.1% (V/V) TBS, PBS Nitrocellulose PVDF
NP40 0.02% to 0.05% (V/V) TBS, PBS Nitrocellulose PVDF
5.1.3 Buffers for blocking agents
PBS or TBS are commonly used as buffers for blocking agents. Not all blocking buffers are compatible with every blocking agent. For example, for applications using a secondary antibody conjugated to alkaline phosphatase (AP), a blocking agent in TBS should be selected as PBS interferes with the activity of the enzyme. TBS buffers are also preferable to PBS for the detection of phosphorylated target proteins, as the primary antibody can compete for phosphate on the target protein and in the buffer.
5.1.4 Timing and temperature
Soak the blotted membrane in freshly prepared blocking agent for 10 min to 2 h at room temperature with constant agitation. Alternatively, soaking the membrane for 1 h at 37°C or overnight at 4°C can help solve persistent background issues. A blocking time of 2 h at room temperature should not be exceeded due to the risk of staining artifacts and high background. If longer blocking times are required, this should be performed at 4°C.
5.2 Primary and secondary antibody probingFollowing the blocking step, the protein of interest can be detected using antibodies. The primary antibody, which is specific for the target protein, can be labeled or unlabeled. To maximize sensitivity and signal-to-noise ratio, most Western blotting procedures use an unlabeled primary antibody that is specifically recognized by a labeled secondary antibody. Depending on the type of detection system used, the secondary antibody will generate a signal that is quantitated by chemiluminescent, chemifluorescent, chromogenic, fluorescent, or radiolabeling methods.

41
Western
Blo
tting
Han
db
oo
k 20
22
5.2.1 Primary antibodies
Although it is sometimes necessary to raise primary antibodies against a newly discovered or rare target, a vast range of antibodies are commercially available. There are probably several options specific to your protein of interest.
When selecting a primary antibody, several factors should be considered:
1. The choice of antibody depends on how the protein of interest is folded, as different epitopes will be exposed under different conditions.
2. An animal immunized with a denatured antigen can generate antibodies that recognize internal epitopes concealed within the structure of the protein. In a Western blotting system using denatured proteins, the most optimal results should be found with this type of antibody
3. If the protein of interest is in its native form, epitopes located on the surface of the protein must be recognized. In this type of application, excellent results are possible if a native antigen is used for immunization.
If a commercially available primary antibody is purchased, ensure that it has been validated for Western blotting applications according to the manufacturer.
Reuse the primary antibody solution to reduce consumption, but be sure to store it in conditions that retain its activity and prevent bacterial contamination. Use clean tubes and store refrigerated when not in use and use clean boxes when incubating the membrane.
Less primary antibody is consumed by incubating the membrane in a smaller box. If the protein of interest is well characterized, that is, if the molecular weight and where the protein is expected to migrate on the membrane are known, cut the membrane to the appropriate smaller size after transfer.
Blotting manifolds that allow incubation of individual lanes on a membrane (instead of cutting strips) are useful for screening antibodies, and require a smaller volume.
Both monoclonal and polyclonal antibodies may be used for Western blotting analysis (Fig 5.2). Both types possess advantages and disadvantages. While polyclonal antibodies tend to be more sensitive, they are less specific than monoclonal antibodies. Monoclonal antibodies, on the other hand, tend to be more specific but less sensitive. Polyclonal antibodies are usually chosen for their relatively lower price. Monoclonal antibodies bind to only one epitope and are typically highly specific, pure, and consistent in performance, generally giving rise to low backgrounds. Crude antibody preparations, such as serum (polyclonal antibodies) or ascitic fluid (monoclonal antibodies) are sometimes used for Western blotting, but impurities can increase background. For improving the signal-to-noise ratio, antibodies can be affinity-purified using immobilized antigen or immobilized protein A or protein G. The basis for antibody affinity purification is the high affinity and specificity of protein A and G for the Fc region
of IgG from a variety of species. Protein A and G have been immobilized to several different matrices resulting in an excellent means of isolating IgG and IgG subclasses from ascitic fluid, cell culture supernatants, and serum.
Cytiva provides chromatography resins for antibody purification, including ready-to-use HiTrap Protein A/HiTrap Protein G HP columns. The columns are prepacked with Protein A- or Protein G Sepharose™ High Performance chromatography resins, respectively. These resins are designed for rapid and convenient purification of antibodies from various sources using a syringe, pump, or chromatography system. Other formats such as spin columns and columns for gravity flow operation are also available. For information on antibody purification and a comprehensive list of products see Affinity Chromatography Handbook, Vol. 1: Antibodies, 18103746.
How specific does a primary antibody need to be? The appropriate level of specificity of the primary antibody is determined by the part of the protein one wishes to detect. The detection of growth factor-binding domains of a transmembrane receptor, for example, requires an antibody raised against the extracellular domain of that protein. On the other hand, the study of conformation-dependent signal transduction from receptors to secondary messengers demands an antibody directed against a specific sequence of the intracellular domain of the receptor. In addition, high specificity is critical in applications such as the detection of defined, phosphorylated amino acid residues and will probably demand a monoclonal primary antibody.
Purified or unpurified monoclonal antibodybinding to single epitope
Unpurified polyclonal antibodiesbinding to multiple epitopes
Fig 5.2. While monoclonal antibodies only bind to a single specific epitope on an antigen, polyclonal antibodies tend to be comprised of a mixture of specificities to several epitopes. The specificity of polyclonal antibodies can be improved by affinity purification against fragments of the target protein. Alternatively, the specificity of the antibody response can be influenced at the immunization stage via the use of engineered or truncated immunogens, where only the desired target epitopes are exposed.

42
Western
Blo
tting
Han
db
oo
k 20
22
Additionally, some knowledge of protein similarity across different species will help determine whether a primary antibody can be raised against proteins from species other than the one under study. Highly conserved proteins such as insulin are detected in human samples using antibodies directed against the same protein from other mammals. Moreover, many mouse and rat proteins are highly similar. In general, however, and wherever practically possible, primary antibodies should be raised against proteins from the same species as the one under study. In addition, pay attention to the species in which the antibody was produced. This is particularly important when another primary antibody is used on the same membrane to bind a different protein in multiplexed detection. In such a situation, the primary antibodies must be produced in different animal species in order to be recognized individually by species-specific secondary antibodies.
Primary antibodies should be raised in species as distinct as possible from the sample species. It is better to raise a primary antibody against a mouse protein in, for example, a rabbit rather than a rat.
When the primary antibody is selected, it is important to optimize the concentration caused due to aggregation to obtain the best results. High primary antibody concentration is a common reason for poor results, such as high background, nonspecific bands or excessive signal intensity. In general, highly sensitive chemiluminescence detection systems such as Amersham ECL™ Prime and Amersham ECL™ Select require a lower concentration of antibodies. Less consumption of primary antibodies reduces costs and is particularly advantageous if antibodies are scarce or expensive. A good starting point for primary antibody concentration is to follow the manufacturers’ recommendations. There is usually little significant variation in performance between different antibody batches, and it should normally be necessary to perform only one titration series. However, concentrations of polyclonal antibodies in sera can vary from animal to animal or from one blood sampling to the next. In these circumstances, or when a change in the results is observed, another titration series should be performed.
Another important factor is the incubation temperature of the primary antibody. Higher temperatures are associated with higher binding, both specific- (increasing the signal) and nonspecific (increasing the background). A general recommendation is 1 h at room temperature or at 4°C overnight. Antibody dilutions are typically made in washing buffer (PBS or TBS). If you experience high background problems, blocking agents such as BSA or nonfat milk and low concentrations of detergent, such as 0.05% to 0.1% V/V Tween-20 or 0.02 to 0.05 % w/v SDS may be included in the antibody solution. When selecting a solution to dilute antibodies, it is essential to select one that preserves the biological activity of the antibody: Follow manufacturers’ recommendations!
More guidelines on how to improve Western blotting are provided in the Appendix.
5.2.1.1 Washing steps
After primary antibody probing, it is necessary to wash the membrane in order to remove excess antibody that could cause high background and, consequently, a low signal-to-noise ratio. A low concentration detergent solution, such as 0.05% to 0.1% Tween-20 in PBS or TBS is commonly used, especially after incubation with highly concentrated antibody solutions or crude extracts. PBS-Tween is suitable for most washing applications. However, TBS-Tween is preferable where the target proteins are phosphorylated, as the phosphate in PBS might interfere with antibody binding.
Be aware that too much detergent can elute the protein of interest from the membrane, decreasing or obliterating the signal. For monoclonal or highly purified polyclonal antibodies, detergent-free washing buffer is preferable. The number of washes required to optimize the signal-to-noise ratio should be determined empirically. Insufficient washing will lead to excessive background, while excessive washing might elute the antibodies and reduce the signal.
Washing steps should be performed according to the recommendations of the manfacturer of the detection reagent used in the procedure. As a general guide, washing should be performed at least three times (5 min/wash) in a volume of approximately 4 mL of washing buffer/cm2 of membrane and with constant agitation.
5.2.2 Secondary antibodies
A wide variety of secondary antibodies are commercially available and the choice will depend firstly on the species in which the primary antibody was produced. If, for example, the primary antibody was of the IgG isotype and produced in goat, the secondary antibody must be an anti-goat IgG antibody produced in another species as it will bind to the Fc region of the primary antibody. Although there is no strict rule, secondary antibodies raised in certain host species can lead to high background levels. In such a situation, changing the species of origin of the secondary antibody might be necessary.
The procedures for incubation of the secondary antibody solution and the membrane are essentially similar to those described for the primary antibody.
It is important to follow manufacturers’ instructions for the dilutions, which can vary from 1:100 to 1:500 000. To achieve good quality results, optimization of secondary antibody concentrations is recommended. Highly sensitive chemiluminescence systems such as Amersham ECL™ Prime and Amersham ECL™ Select generally require less antibody compared to other detection systems (see Appendix).

43
Western
Blo
tting
Han
db
oo
k 20
22
5.2.2.1 Choice of labeled antibodies
The choice of the detection system that best fits the Western blotting application has to be considered when it comes to selecting the secondary antibody. Secondary antibodies may be labeled using a kit, which allows use of the antibody for different detection methods depending on the Western blotting system in use. Another solution is to use commercially available labeled secondary antibodies optimized to cover most applications.
Fab or F(ab’)2 fragments of antibodies are also available in labeled or unlabeled forms. These fragments are especially useful in assays where binding between the Fc portions of antibodies and Fc receptors present in the protein sample complex must be eliminated.
Enzymes: Alkaline phosphatase (AP) and horseradish peroxidase (HRP) are the two most commonly used enzymes for protein detection in Western blotting. Both can be used with either chemiluminescent, chemifluorescent, or chromogenic substrates. The advantage of AP is that its reaction rate remains linear, allowing sensitivity to be improved by prolonging incubation time with substrate. Increasing the incubation time, however, often leads to high background, resulting in a low signal-to-noise ratio. The background is generally lower with HRP due to very high substrate specificity. Of these two choices of enzymes, HRP is preferred, due to its high activity rate, stability, low price, and wider range of substrates (Table 5.3).
Table 5.3. Some key characteristics of AP and HRP as secondary antibody conjugates
AP HRP
Molecular weight (Mr) 140 000 40 000
Price High Low
Stability Unstable below 0°C Stable below 0°C
Number of substrates Few Many
Kinetics Slow Fast
Optimum pH 8 to 10 5 to 7
Fluorophores: Fluorescence detection has advantages such as high sensitivity, detection across a wide linear dynamic range of protein quantities, and signal stability over time, making it a suitable approach to quantitative detection.
Amersham ECL plex: Due to spectrally resolved fluorophores, detection using Amersham ECL™ Plex introduces possibilities of simultaneous detection of more than one protein (multiplexed detection or multiplexing). Multiplexing enables detection of the protein of interest at the same time as, for example, a housekeeping protein, without the need to strip and reprobe the membrane. This results in more reliable quantitation. In addition, the signal stability of up to 3 months enables larger experimental series and more scope for extensive and precise quantitative analysis. The multiplexing capacity of Amersham ECL™ Plex is particularly useful for detecting target proteins of similar molecular weight. An example is the detection of phosphorylated and nonphosphorylated isoforms of the same protein, where the signals can be quantified, regardless of relative intensities, due to minimal cross-talk between the detection channels (see 6.2.1). Another way of multiplexing is to prelabel the sample by one fluorophore (Cy5) and probe the target protein with a Cy3 labeled secondary antibody. This enables reliable normalization against the whole protein population and removes the uncertainty of expression bias that might occur for the housekeeping proteins in some cases.
Amersham CyDye™ 700 and 800: Amersham CyDye™ 700 and 800 secondary antibodies are labeled with near-infrared (NIR) fluorophores that emit light at wavelengths of 700 nm or 800 nm. Multiplex NIR fluorescent labels provide accurate identification and quantitation of proteins with similar molecular weights, which is useful for studying protein phosphorylation. Easy handling and a strong signal-to-noise ratio yield reproducible results when using NIR dyes conjugated Antibodies for detection.
Biotinylated secondary antibodies: By using biotinylated antibodies, a two-step biotin/streptavidin system may be used to increase the signal intensity in Western blotting, allowing detection of low-abundance targets. In this three-layer system, a biotin-labeled secondary antibody is applied. Subsequently, streptavidin/avidin labeled dyes, fluorophores, radioisotopes, or enzymes may be applied resulting in an irreversible interaction between biotin and streptavidin/avidin (Fig 5.3). In addition, multiple biotin molecules can be conjugated to antibodies, which in turn allows interactions with multiple streptavidin molecules, amplifying the signal and increasing the sensitivity of detection of the protein of interest. An example of fluorescent three-layer Western blotting for signal amplification is shown in 9.2.5.

44
Western
Blo
tting
Han
db
oo
k 20
22
Gold-conjugated antibodies: Gold particles can be attached to streptavidin or secondary antibodies. The gold particles are negatively charged and bind the membrane very weakly. The specific labeling of proteins occurs by hydrophobic and ionic interactions. The proteins stain dark red through the accumulation of gold particles. When used together with a silver intensification reagent, a further 10- to 100-fold enhancement can be achieved. AuroProbe is intended for use with negatively charged membranes, constructed of a material such as nitrocellulose or PVDF. Membranes should be handled with gloves and forceps to avoid smears.
Radioisotopes: Radioisotope-conjugated antibodies have been used extensively, but they are expensive, have a limited shelf-life, and require special waste handling and disposal, as well as demanding a safe, specialized working environment. For these reasons, labels such as enzymes and fluorophores are usually preferable.
Antigen on membrane
= biotin
= HRP
= streptavidin
Biotin-conjugated secondary antibody
HRP-conjugated streptavidin
Primary antibody
Strep
Strep
Stre
p
Strep
B BB
Strep
Strep
Stre
p
Strep
Strep
Stre
p
Strep
Strep
B
B
B
Fig 5.3. Streptavidin binds very strongly to biotin. This interaction can be exploited to detect membrane-immobilized antigens by conjugating the streptavidin to HRP. The amplification effect of multiple streptavidin molecules per biotin is further increased if multiple biotin molecules are attached to each secondary antibody.
5.3 Stripping and reprobing membranesIt is becoming common practice to use secondary antibodies labelled with fluorophores for simultaneous detection of more than one protein. A vast variety of flurophores such as CyDyes™ in RGB range and NIR range provide ample multiplexing opportunities. If performing a quantitative analysis without the possibility to utilize fluorescent multiplexing, then srtripping and reprobing is another method that can enable detection of more than one protein on the same membrane. However, it does carry the risk of loss of total protein from the membrane. Stripping and reprobing blots saves time and sample by enabling reprobing a single blot with different primary antibodies. However, the stripping conditions can cause the release of proteins from the membrane, resulting in decreased sensitivity. It is therefore critical to use conditions that release antibodies from antigen while minimizing the elution of protein sample bound to the membrane.
By using a combination of detergents, reducing agents, heat, and/or low pH, it is usually possible to find the conditions that lead to acceptable results. In the following sections, important points to consider to help choose the best method for your Western blotting system are addressed. Note that reblocking might be required prior to antibody incubation.
An alternative to stripping and reprobing is to use secondary antibodies labeled with fluorophores for simultaneous detection of more than one protein, see 5.2.2.1.
5.3.1 Stripping using heat and detergent
Stripping membranes using heat and detergent (2) has been successfully performed when using chemiluminescent based Western blotting detection reagents (for detailed procedure, see Chapter 11). Prewashed membranes are stripped with 2% SDS, 100 mM β-mercaptoethanol in 62.5 mM Tris-HCl, pH 6.8 for 30 min at 70°C. Lower temperatures (50°C to 70°C) might also work well, but should be determined empirically with the antibodies used (see 5.3.2).
5.3.2 Strategies to optimize membrane stripping
The first parameter to consider is temperature. Assuming sufficient amount of pure protein is available, the optimal stripping temperature may be determined by dot-blotting before proceeding further. However, if protein quantities are limited, perform Western blotting and cut the membrane into strips. Subsequently, perform the stripping at 50°C before checking the efficiency of the process by reprobing the membrane with secondary antibody (see 11.8). If stripping is found to be insufficient under these conditions, the procedure may be repeated at increasing temperature increments of 5°C. This optimization step should help determine the best conditions for stripping antibodies while minimizing target protein loss from the membrane.
Besides temperature, it is critical to consider antibody affinities and target protein abundance. Four strategies are described in Figure 5.4.

45
Western
Blo
tting
Han
db
oo
k 20
22
In the first strategy, if both the antibody affinities and the abundance of each protein are approximately equal, then it is not important which protein is detected first.
The second strategy highlights the importance of detecting proteins of similar abundance with the lowest affinity antibody first. This strategy ensures that less vigorous stripping is performed first and the chance of detecting both proteins before and after stripping is much improved.
The third strategy shows the importance of detecting the lowest abundance protein first if the primary antibodies used are of equal affinity.
The fourth strategy is harder to evaluate. In general, it is advisable to detect the protein of lowest abundance first as target loss is likely to have the greatest effect on the ability to detect protein.
5.3.3 Stripping using low pH
If stripping using heat and detergent do not lead to a satisfactory outcome, an alternative method is to strip your membrane using a solution of 25 mM glycine-HCl, pH 2.0, supplemented with 1% SDS (see 11.8.2). The membrane should be soaked in stripping solution for about 30 min under constant agitation. The efficiency of the technique should be confirmed in the same way as for stripping using heat and detergent. If stripping is not complete, increasing the incubation time in the stripping solution
may help to remove antibodies, at the risk of eluting the protein of interest. For this reason, it is recommended not to exceed 1 hour incubation time in acidic stripping solution.
For chemiluminescence applications, you may also try to strip your membrane (Amersham Protran Premium 0.2 and 0.45 nitrocellulose or Amersham Hybond 0.2 and 0.45 PVDF) using a mild protocol of incubation in 0.2 M glycine (pH 2.8) at room temperature for 30 min followed by two washes in TBS-Tween or PBS-Tween for 10 min each. You may then proceed with blocking and immunodetection.
5.3.4 Stripping using high pH
Stripping by soaking the membrane in a solution at high pH has been shown to be a potential remedy if a persistent signal endures after the first probing. Two incubations in 0.2 M NaOH for 5 min followed by a 5 min wash with water are usually sufficient. If any trace of signal still remains, raise the concentration of NaOH to as high as 2 M and the incubation time to 30 min. Reblocking is normally not necessary after stripping using NaOH. However, depending on NaOH concentration and soaking time, reblock the membrane before reprobing might be necessary.
5.3.5 Stripping using high salt solution
A high salt concentration has been shown to be another effective solution if there are problems in stripping your membrane. Soak the membrane in PBS or TBS buffer supplemented with 0.5 M NaCl and 0.2% SDS for between 30 min and 2 h. Then rinse the blot with water. Reblocking is normally not necessary after stripping using salt. However, depending on the soaking time reblocking your membrane maybe necessary before reprobing.
5.3.6 Hints and tips
As a time-saving alternative to stripping, sequential probing with ECL™ for quick detection of a second protein of interest on the membrane may be performed. After ECL™ detection of the first protein of interest, HRP is inactivated (quenched) using hydrogen peroxide (H
2O
2) and the membrane is washed.
Labeling and detection of a second protein of interest is then possible without interference from the first label. The concentration of H
2O
2 needed to quench a signal from an HRP-labeled protein will
depend on the amount of HRP present and the length of time the membrane is incubated. Usually, 30 min incubation with 15% H
2O
2 in PBS gives good results. The membrane is then washed three times
for 5 min in PBS and reprobed for the second run of protein detection.
For Western blotting protocols, see Chapter 11.
5.4 References1. Sharma. S. K. and Carew, T. J. Inclusion of phosphatase inhibitors during Western blotting enhances
signal detection with phospho-specific antibodies. Anal. Biochem. 307, 187–189 (2002).
2. Kaufmann, S. H. et al. The erasable Western blot. Anal. Biochem. 161, 89–95 (1987).
Strategy TwoTwo proteins of similar abundance, antibodies of unequal affinity.
Step 1
Detect either protein with lowest affinity antibody first
Step 2
Strip
Step 3
Detect protein with highest affinity antibody
Strategy ThreeTwo proteins, one high- and the other low-abundance, antibodies of equal affinity.
Step 1
Detect low-abundance protein first
Step 2
Strip
Step 3
Detect high-abundance protein
Strategy FourTwo proteins, one high- and the other low-abundance, antibodies of unequal affinity.
Step 1
Detect low-abundance protein first
Step 2
Strip
Step 3
Detect high-abundance protein
Strategy OneTwo proteins of similar abundance and two antibodies of similar affinity.
Step 1
Detect either protein first
Step 2
Strip
Step 3
Detect remaining protein
Fig 5.4. Strategies to optimize membrane stripping

Western
Blo
tting
Han
db
oo
k 20
21
Detection06
A variety of detection methods, based on chemiluminescence, chemifluorescence, fluorescence, chromogenic, or radioisotopic detection are available (Fig 6.1). Radioisotopic and chromogenic reagents have been widely used for many years, but have declined in popularity due to safety issues with handling radioactive isotopes and poor sensitivity with chromogenic reagents. As a result of these issues, enzyme-based chemiluminescent as well as direct fluorescence have been extensively developed and are now usually the methods of choice for detection due to their improved sensitivity and wider dynamic range.
Enzymatic based detection methods, such as chemiluminescence and chemifluorescence require the addition of a reagent that emits light when it reacts with an enzyme conjugated to a secondary antibody. Fluorescence-based detection, on the other hand, requires no additional reagents after binding of the labeled secondary antibody.
SAMPLE PREPARATION ELECTROPHORESIS TRANSFER PROBING DETECTION IMAGING AND ANALYSIS
46
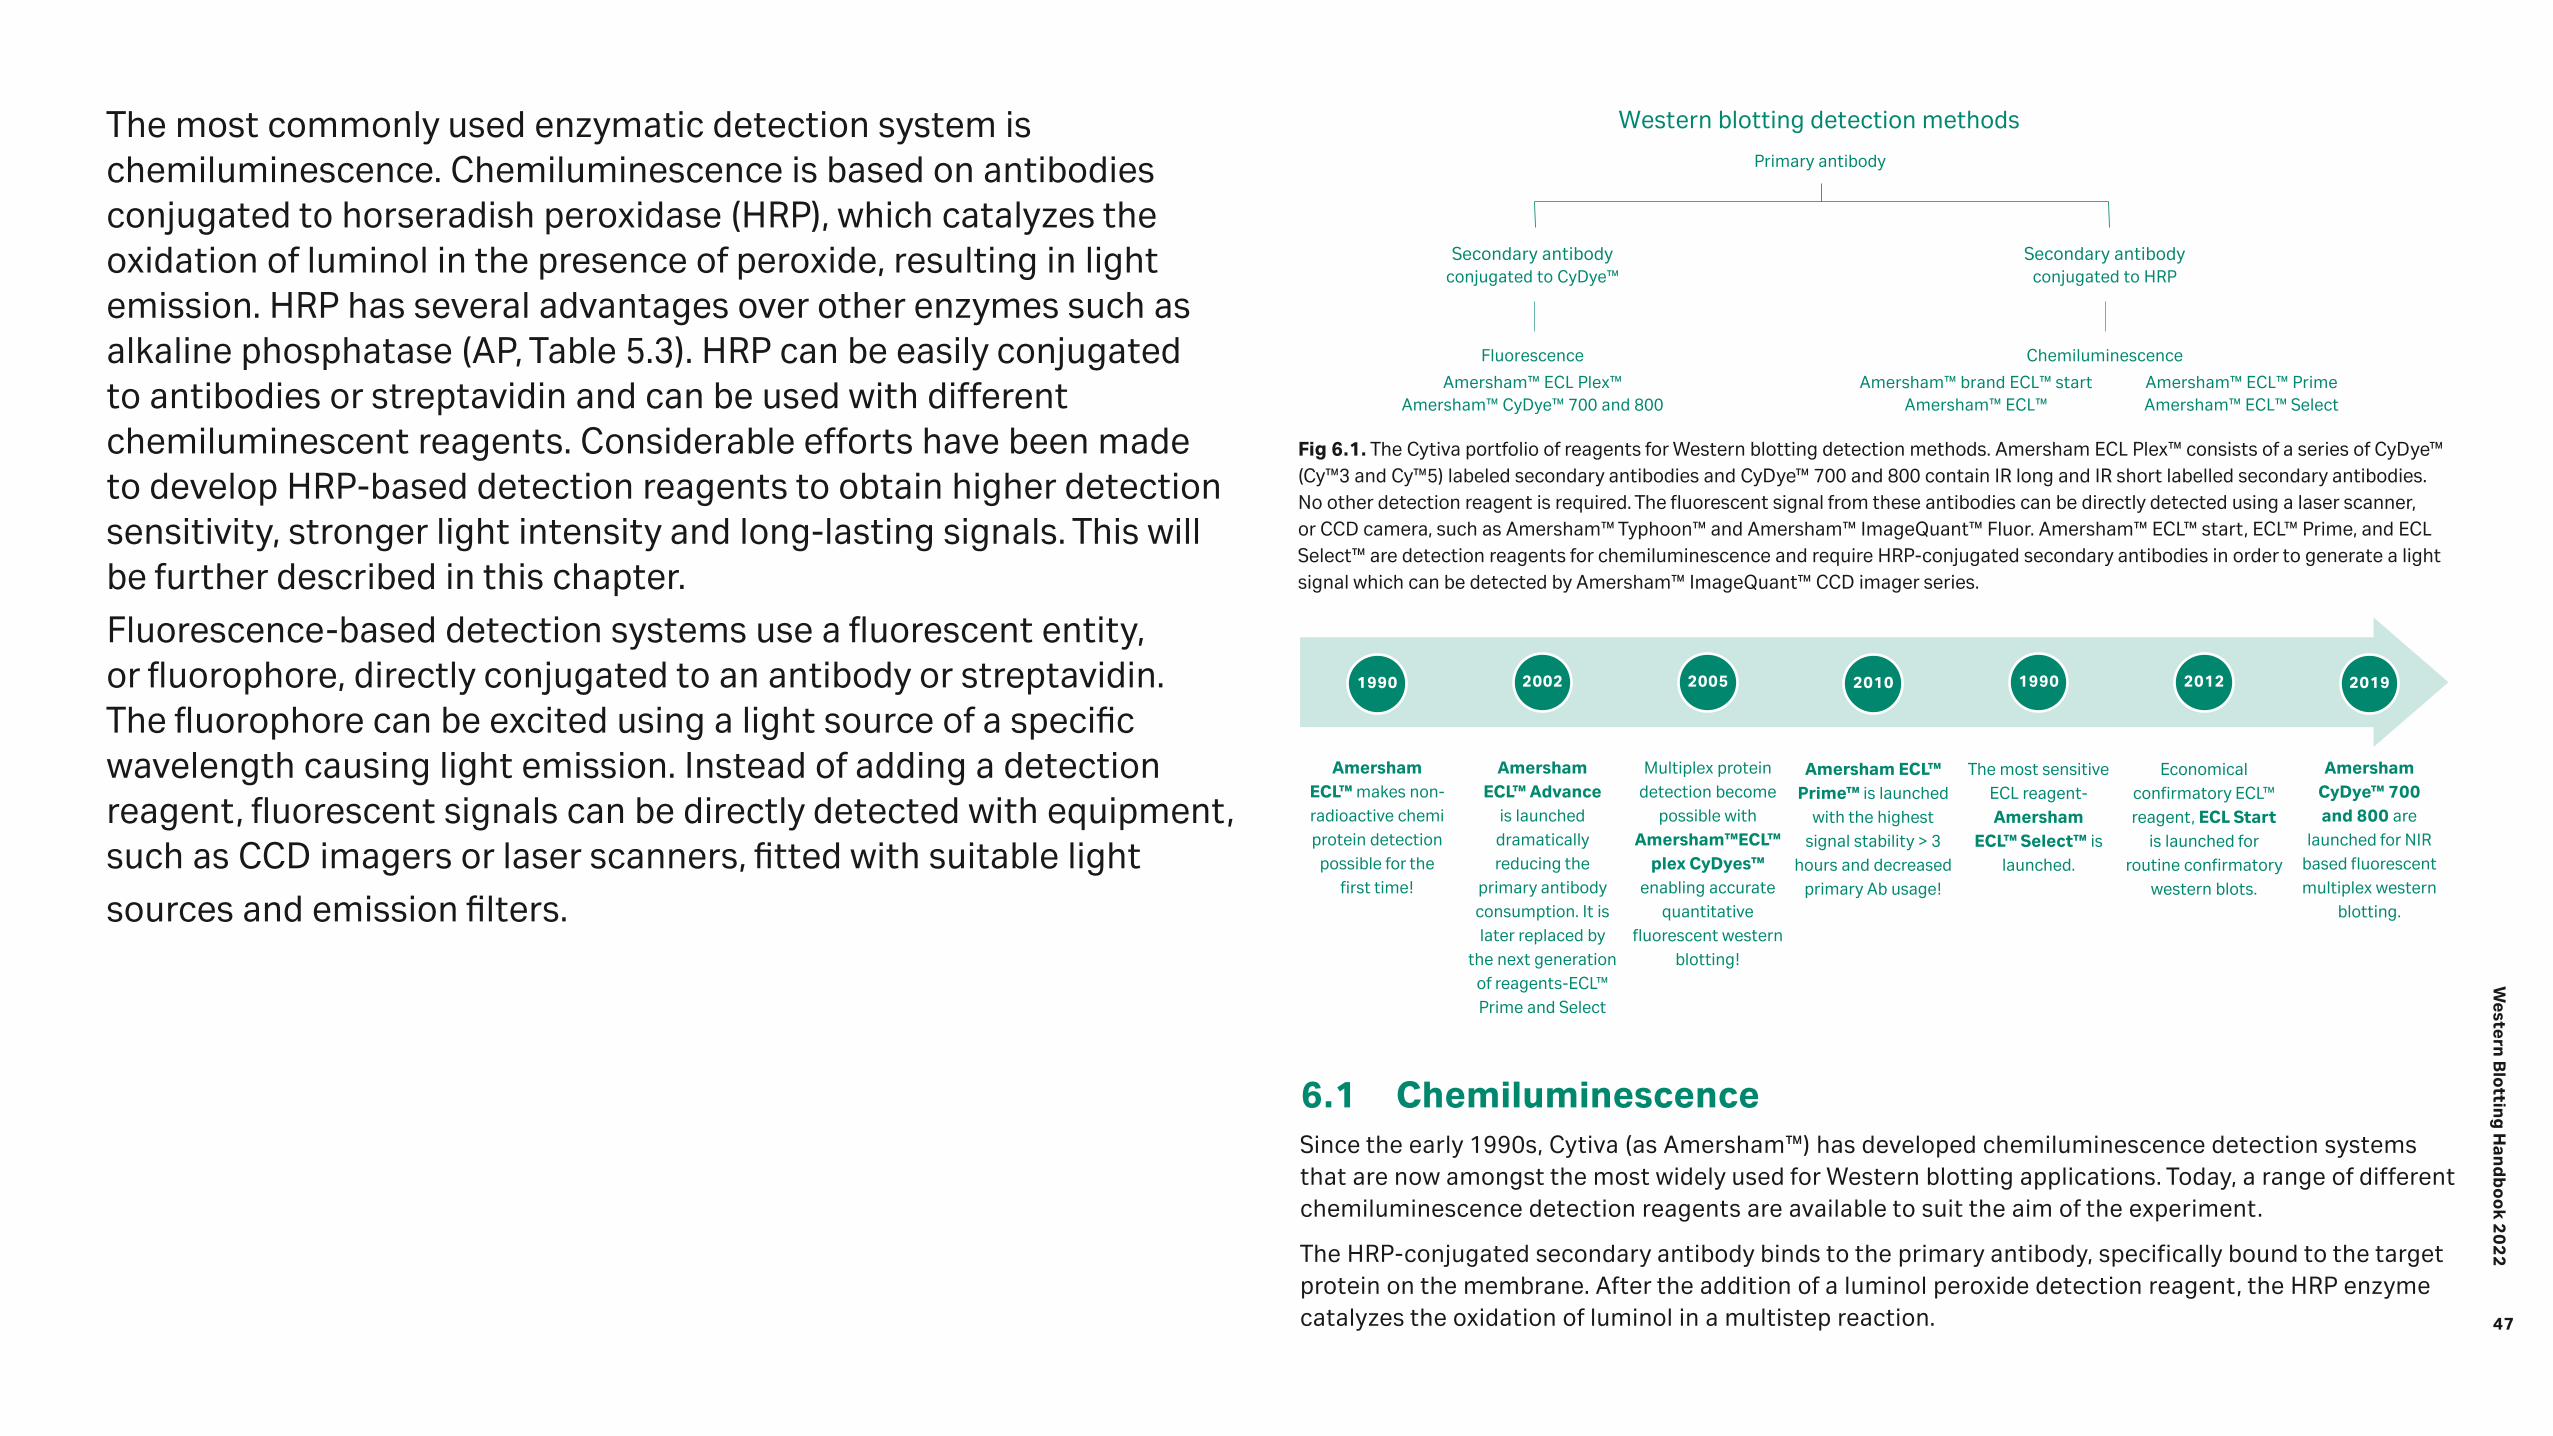
47
Western
Blo
tting
Han
db
oo
k 20
22
The most commonly used enzymatic detection system is chemiluminescence. Chemiluminescence is based on antibodies conjugated to horseradish peroxidase (HRP), which catalyzes the oxidation of luminol in the presence of peroxide, resulting in light emission. HRP has several advantages over other enzymes such as alkaline phosphatase (AP, Table 5.3). HRP can be easily conjugated to antibodies or streptavidin and can be used with different chemiluminescent reagents. Considerable efforts have been made to develop HRP-based detection reagents to obtain higher detection sensitivity, stronger light intensity and long-lasting signals. This will be further described in this chapter.
Fluorescence-based detection systems use a fluorescent entity, or fluorophore, directly conjugated to an antibody or streptavidin. The fluorophore can be excited using a light source of a specific wavelength causing light emission. Instead of adding a detection reagent, fluorescent signals can be directly detected with equipment, such as CCD imagers or laser scanners, fitted with suitable light
sources and emission filters.
6.1 ChemiluminescenceSince the early 1990s, Cytiva (as Amersham™) has developed chemiluminescence detection systems that are now amongst the most widely used for Western blotting applications. Today, a range of different chemiluminescence detection reagents are available to suit the aim of the experiment.
The HRP-conjugated secondary antibody binds to the primary antibody, specifically bound to the target protein on the membrane. After the addition of a luminol peroxide detection reagent, the HRP enzyme catalyzes the oxidation of luminol in a multistep reaction.
Fig 6.1. The Cytiva portfolio of reagents for Western blotting detection methods. Amersham ECL Plex™ consists of a series of CyDye™ (Cy™3 and Cy™5) labeled secondary antibodies and CyDye™ 700 and 800 contain IR long and IR short labelled secondary antibodies. No other detection reagent is required. The fluorescent signal from these antibodies can be directly detected using a laser scanner, or CCD camera, such as Amersham™ Typhoon™ and Amersham™ ImageQuant™ Fluor. Amersham™ ECL™ start, ECL™ Prime, and ECL Select™ are detection reagents for chemiluminescence and require HRP-conjugated secondary antibodies in order to generate a light signal which can be detected by Amersham™ ImageQuant™ CCD imager series.
Primary antibody
Secondary antibodyconjugated to HRP
Secondary antibodyconjugated to CyDye™
Fluorescence
Amersham™ ECL Plex™Amersham™ CyDye™ 700 and 800
Chemiluminescence
Amersham™ ECL™ PrimeAmersham™ ECL™ Select
Amersham™ brand ECL™ startAmersham™ ECL™
Western blotting detection methods
1990 2002 2005 2010 1990 2012 2019
Amersham ECL™ makes non- radioactive chemi protein detection
possible for the first time!
Amersham ECL™ Advance
is launched dramatically reducing the
primary antibody consumption. It is later replaced by
the next generation of reagents-ECL™ Prime and Select
Multiplex protein detection become
possible with Amersham™ECL™
plex CyDyes™ enabling accurate
quantitative fluorescent western
blotting!
Amersham ECL™ Prime™ is launched
with the highest signal stability > 3
hours and decreased primary Ab usage!
The most sensitive ECL reagent- Amersham
ECL™ Select™ is launched.
Economical confirmatory ECL™ reagent, ECL Start
is launched for routine confirmatory
western blots.
Amersham CyDye™ 700 and 800 are
launched for NIR based fluorescent multiplex western
blotting.

48
Western
Blo
tting
Han
db
oo
k 20
22
The reaction is accompanied by the emission of low intensity light at 428 nm. In the presence of certain chemicals, the emitted light is enhanced up to 1000-fold, making it easier to detect, and thus increasing the sensitivity of the reaction in a process known as enhanced chemiluminescence (ECL™). Several enhancers can be used, but the most effective are modified phenols, especially p-iodophenol, which increases HRP turnover rate and assists in the transfer of electrons from luminol to the enzyme. The intensity of signal is a result of the number of reacting enzyme molecules and is thus proportional to the amount of antibody, which is related in turn to the amount of protein on the blot (Fig 6.2).
The most appropriate choice of ECL™ reagent depends on the requirements of the experiment. High-abundance proteins, for example, can be detected quickly and easily with minimal investment in optimization using Amersham ECL™ start or Amersham ECL™ reagents.
Fig 6.2. The principle of enhanced chemiluminescence (ECL) detection in Western blotting.
HRP
Detection reagent reacts with HRP and generates light emission
ECL™ reagent
Primary antibody binds specifically to the target protein
Secondary antibodyconjugated with HRP recognizes the primary antibody
Proteins on membrane after transfer from gel
ECL™
If, on the other hand, high sensitivity or more accurate quantitation is important, Amersham ECL™ Prime and ECL Select™ are recommended. The signals emitted by Amersham ECL™ Prime and ECL™ Select are very intense, which makes it possible to detect very low levels of proteins as well as to carry out repeated exposures (Table 6.1).
When using antibody-based detection methods, the quality and source of the primary antibody, as well as its affinity for the protein of interest will play a large part in determining the LOD as well as the likelihood of cross-reactivity.
Antibodies should always be used at the concentrations recommended by manufacturers but guidelines for the Amersham ECL™ reagents are found in Table 6.1. Signals will generally increase with higher antibody concentrations but an excess of antibody might also lead to nonspecific binding to the membrane. It is well worth spending time to test different antibody concentrations (see Appendix).
Table 6.1. Amersham ECL™ start, ECL™, ECL™ Prime, and ECL Select™ are suited to different Western blotting applications depending on the required sensitivity and availability of primary antibody. For compatibility with different membranes, see Table 4.4
Amersham ECL™ start
Amersham ECL™ Amersham ECL™ Prime Amersham ECL Select™
Applications For confirmatory analysis and detection of high to medium levels of endogenous proteins
For confirmatory detection and analysis or other applications where the protein of interest is not limited
For high sensitivity and precise quantitation across a wide range of protein levels
For high sensitivity and precise quantitation of medium to very low protein levels
Primary antibody, working range dilution
1:500 to 1:3000 1:100 to 1:5000 1:1000 to 1:30 000 1:5000 to 1:30 000
Secondary antibody, working range dilution
1:5000 to 1:30000 1:1000 to 1:50 000 1:50 000 to 1:200 000 1:100 000 to 1:300 000

49
Western
Blo
tting
Han
db
oo
k 20
22
6.1.1 Amersham™ ECL™ start
Amersham ECL™ start Western blotting detection reagent is a chemiluminescent detection recommended for confirmatory analysis and detection of high to medium levels of endogenous proteins.
Amersham ECL™ start has good signal duration, which enables multiple exposures of the membrane, plus a convenient time window between experiment and analysis. The reagent is well suited for detection with X-ray film as well as by CCD camera, which is shown in Figure 6.3.
In a two-fold dilution series of recombinant β-galactosidase protein starting at 320 ng, 20 ng of protein was repeatedly detected at the lower end (Fig 6.3A). The low background produces high signal-to-noise, which clearly demonstrates the high compatibility between Amersham ECL™ start and X-ray film. In a 2-fold dilution series of NIH/3T3 cell lysate starting at 10 μg of total protein, ERK 1/2 was detected at levels as low as 0.31 μg (Fig 6.3B). The signal was easily detected with Amersham™ range of CCD imager with linear signal response (curve not shown). In addition, the overlay functionality allows fast verification of the molecular weight of the protein by simultaneous use of visible Amersham ECL™ start marker proteins during the Western blotting procedure.
The reagent can be used for detection on both nitrocellulose and PVDF membranes (Table 4.4). Antibodies should always be used at the concentrations recommended by manufacturers, but as a guideline for Amersham ECL™ start, primary and secondary antibodies can be diluted from 1:500 to 1:3000 and 1:5000 to 1:30 000, respectively.
An advantage of the Amersham ECL™ start reagent is very good stability of the working solution. When stored at 2°C to 8°C the solution can be used for up to 5 days and still achieve the same level of detection as initially was obtained. Another advantage is long shelf life. With 18 months shelf life from manufacturing, Amersham ECL™ start Western Blotting Detection Reagent is convenient for those who run Western blots infrequently.
6.1.2 Amersham ECL™
Amersham ECL™ was the world’s first commercially available chemiluminescence detection reagent, capable of detecting protein at quantities as low as 10 pg. This is a highly cited method, and is particularly suitable for applications such as:
• Verification of expression of recombinant proteins
• Verification of highly expressed proteins
• Studies with tagged proteins
• Confirmatory studies
When using antibody-based detection methods, the quality and source of the primary antibody, as well as its affinity for the protein of interest will play a large part in determining the LOD as well as the likelihood of cross-reactivity.
The performance of Amersham ECL™ in the detection of a dilution series of transferrin is illustrated in Figure 6.4. Amersham ECL™ is also applicable to quantitative Western blotting, but with less sensitivity than Amersham ECL™ Prime and Amersham ECL Select™.Sample: β-galactosidase protein in a 2-fold dilution series starting at 320 ng protein
Membrane: Amersham Protran™ Protran Premium 0.45 NC
Blocking: Skimmed milk powder (5% in PBS-T)
Primary Ab: Rabbit anti-β-galactosidase diluted 1:5000
Secondary Ab: HRP-conjugated anti-rabbit IgG diluted 1:50 000
Imaging: X-ray film
Exposure time: 5 min
Limit of detection: 20 ng (repeatedly)
Sample: NIH/3T3 cell lysate in a 2-fold dilution range from 10 µg total protein
Membrane: Amersham Hybond™ P 0.45 PVDF
Blocking: Amersham ECL™ Prime™ blocking agent (2% in PBS-T)
Primary Ab: Rabbit anti-ERK 1/2 diluted 1:5000
Secondary Ab: HRP-conjugated anti-rabbit IgG diluted 1:50 000
Imaging: Amersham Imager 600 (now replaced by Amersham Imager 680)
Exposure time: 5 min
(A) (B)20 ng320 ng
Fig 6.3. Western blotting detection using Amersham™ ECL™ start, showing resulting blots from β-galactosidase protein (A) and ERK 1/2 in NIH/3T3 lysate in (B). The data demonstrates compatibility between Amersham™ ECL™ start and X-ray film. The high signal intensity fully utilizes the advantages of CCD camera-based imaging.
Amersham™ brand ECL™
39 pg5 ng
Amersham™ brand ECL™
39 pg5 ng
Fig 6.4. Western blotting detection of transferrin in a two-fold dilution series using Amersham™ ECL™. The image was acquired using an ImageQuant™ CCD camera-based imager.

50
Western
Blo
tting
Han
db
oo
k 20
22
Optimal performance of Amersham ECL™ is achieved using Amersham Hybond™ and Protran™ Premium membranes. These membranes should be blocked using Amersham ECL™ or Amersham ECL™ Prime blocking agent to minimize background.
Antibodies should always be used at the concentrations recommended by manufacturers, but as a guideline for Amersham™ ECL™, primary and secondary antibodies may be diluted from 1:100 to 1:5000 and 1:1000 to 1:50 000, respectively (Table 6.1). The emitted signal peaks after 5 to 10 min and then decays slowly, with a half life of approximately 60 min, and can be detected either using Amersham Hyperfilm™ ECL™ or a CCD camera-based imager such as the Amersham ImageQuant™ 800 (see Chapter 7).
6.1.3 Amersham™ ECL™ Prime
Amersham ECL™ Prime is a highly sensitive chemiluminescent detection system and is characterized by extremely stable signal emission, allowing for the possibility of repeated exposures, and making it easier to process several blots in the same experimental run. In addition, the high intensity of the emitted signal means that Amersham ECL™ Prime is suitable for working with low-abundance proteins, or other applications that utilize the advantages of a highly sensitive CCD camera-based imager. Moreover, highly diluted primary and secondary antibodies can be used, reducing the total cost of experiments as well as minimizing the risk of high background.
The improved performance of Amersham ECL™ Prime compared with other chemiluminescent reagents is made possible due to the presence of a high-performance enhancer and a catalyst, increasing signal intensity, sensitivity, and duration. Amersham ECL™ Prime is particularly recommended for use in quantitative analyses such as:
• Applications where high sensitivity is needed
• Changes in protein abundance
• Protein:protein interactions
• Detection of protein isoforms
• Evaluation of protein degradation
• Post-translational modifications (PTM)
• Simultaneous detection of low- and high-abundance proteins
The performance of Amersham ECL™ Prime is illustrated in Figure 6.5, for the detection of pSTAT3 in a two-fold dilution series of IFNα-treated HeLa cell lysates, from 12.5 μg of total protein extract. Note that the level of sensitivity is dependent on a specific antibody:protein interaction.
6.1.3.1 Sensitivity and precision
The sensitivity and linear dynamic range of Amersham ECL™ Prime enables detection and precise quantitation of both low- and high-abundant proteins on the same blot after a single exposure if used in combination with a CCD camera-based imager, such as one of the Amersham ImageQuant™ 800 series (see Chapter 7). When a highly sensitive system is required, for example for the detection of transient protein phosphorylation (a PTM), it can be advantageous to use Amersham ECL™ Prime.
Another advantage of Amersham ECL™ Prime is that the strong signal intensity allows the use of highly diluted antibodies with sustained performance (Fig 6.6). This makes Amersham ECL™ Prime cost-effective if the antibodies used for detection are scarce.
Amersham ECL™ Prime
12.5 µg 98 ng– C
ontr
ol
Fig 6.5. Detection of pSTAT3 in IFNα-treated HeLa cells using Amersham ECL Prime. Note that protein quantities refer to the total amount of loaded protein extracted from cell lysate. pSTAT3 comprises only a fraction of that total quantity. The control lane contains 6.25 μg of total protein from untreated cells.
Fig 6.6. Amersham ECL™ Prime Western blotting detection of β-catenin in NIH 3T3 whole cell lysates in a two-fold dilution series using different dilutions of rabbit anti-β-catenin (primary antibody) and HRP-conjugated anti-rabbit IgG (secondary antibody). Note that the protein quantities refer to the total amount of loaded protein extracted from cell lysates. β-catenin comprises only a fraction of that total quantity.
Antibody dilution Total protein quantity
Primary Secondary1:3000 1:30 000
1:5000 1:30 000
1:7000 1:50 000
1:10 000 1:50 000
156 ng10 µg

51
Western
Blo
tting
Han
db
oo
k 20
22
6.1.3.2 Signal duration
Amersham ECL™ Prime emits a signal of long duration, with intense signals still being emitted, even for the lowest amounts of protein tested, 3 h after the addition of substrate (Fig 6.7 and Fig 6.8). This enables multiple exposures and a convenient time window between addition of reagent and signal detection.
Time (min) Transferrin quantity
0
30
60
90
120
150
180
2.5 ng 4.9 pg
Inte
grat
ed In
tesi
ty (x
10-4
)
Time (min)
Amersham ECL™ PrimeAmersham ECL™ Reagent
0
500
600
700
400
300
200
100
0
10 20 30 40 50 60 70 80 90 100 110 120
Fig 6.7. A two-fold dilution series of transferrin from 2.5 ng showing signal intensities at time points up to 3 h after the addition of Amersham ECL™ Prime reagent. Time 0 corresponds to 5 min post-reagent addition. The signals were detected for 3 min at each time point.
Fig 6.8. Signal stability over time. The signal duration of Amersham ECL™ Prime compared to an alternative chemiluminescent detection reagent. The high stability of Amersham ECL™ Prime provides a broader window of time in which higher sensitivity is maintained.
The performance of Amersham ECL™ Prime™ is optimal when used in combination with a CCD camera-based imager and by carrying out an optimization process similar to that applied to Amersham ECL™ (although blocking is best performed using Amersham ECL Prime™ blocking reagent). In addition, Amersham Hybond PVDF membranes are recommended due to the high sensitivity made possible by high protein binding capacity. Primary and secondary antibodies should be diluted from 1:1000 to 1:50 000 and 1:30000 to 1:200000, respectively. Amersham ECL™ Prime™ is also compatible with film, if this is the preferred method of detection.
Amersham ECL™ Prime emits a signal of long duration, with intense signals still being emitted, even for the lowest amounts of protein tested, 3 h after the addition of substrate (Fig 6.7 and Fig 6.8). This enables multiple exposures and a convenient time window between addition of reagent and signal detection.
6.1.4 Amersham ECL Select™
Amersham ECL™ Select™ is a highly sensitive reagent for chemiluminescent Western blotting detection. It is the most sensitive chemiluminescent detection reagent in the Amersham ECL™ product family. The dynamic range of Amersham ECL Select™ is complementary to that of Amersham ECL™ Prime. The outstanding signal intensity of Amersham ECL™ Select™ makes it suitable for the most demanding Western blotting applications including the detection of minute protein quantities. Since the light output is proportional to the amount of protein detected, this results in precise quantitation across a wide range of protein levels on a single blot.
Amersham ECL™ Select™ is typically used at the detection stage of the Western blotting workflow, but it also impacts on upstream procedures. The primary antibodies used as probes on the blotted membranes, for example, may be highly diluted if you use Amersham ECL™ Select™ for detection. This reduces cost and avoids levels of background signals that quench the weaker, specific interactions of interest.
Amersham ECL™ Select™ is particularly recommended for use in quantitative analyses such as:
• Applications where high sensitivity is needed
• Changes in protein abundance
• Protein:protein interactions
• Detection of protein isoforms
• Evaluation of protein degradation
• Post-translational modifications (PTMs)
• Simultaneous detection of low- and high-abundance proteins
The performance of Amersham ECL™ Select™ is illustrated in Figure 6.9. Endogenous TAB 1 was detected in a two-fold dilution series of 293 T-cell lysate, starting at 2 µg of total protein extract. Note that the level of sensitivity is dependent on a specific antibody:protein interaction.

52
Western
Blo
tting
Han
db
oo
k 20
22
6.1.4.1 Sensitivity and precision
The high sensitivity and signal intensity together with the broad linear dynamic range makes Amersham ECL™ Select™ suitable for qualitative as well as quantitative analysis. Amersham ECL™ Select™ produces very high light output and this allows you to use highly diluted antibodies in your experiments.
The Western blotting detection of PP2A in a two-fold-dilution series of NIH/T3T cell lysate shown in Figure 6.10 demonstrates that minute levels of protein can be detected using a wide range of primary antibody dilutions with Amersham ECL™ Select™.
2.0 1.0 0.50 0.25 μg
Fig 6.9. Western blotting detection of endogenous TAB 1 in 293 T-cell lysate. The high signal intensity of Amersham ECL™ Select™ gives bright bands and highly sensitive detection.
10.0 5.0 2.5 1.2 0.6 0.3 µgPrimary Ab dilution Secondary Ab dilution
1:3000 1:100 000
1:5000 1:100 000
1:10 000 1:100 000
1:15 000 1:100 000
Amersham ECL SelectTime (min)
0
30
60
120
Fig 6.10. Amersham ECL™ Select™ provides high sensitivity using a wide dilution range of primary antibodies.
Fig 6.11. The decline in signal output from Amersham ECL™ Select™ was monitored at different time points in a two-fold dilution series of ERK 1/2 starting at 5 µg total protein. The high signal intensity of Amersham ECL™ Select™ allows for sustained detection of very low protein levels for up to 2 h.
6.1.4.2 Signal duration
Signal duration of Amersham ECL™ Select™ was evaluated in a Western blotting model system detecting ERK 1/2 in HeLa cell lysate. A high signal output with sufficient signal remaining 2 hours after addition of the reagent was obtained, even for the lowest amount of protein tested (Fig 6.11). This results in a convenient time window between the end of an experiment and the beginning of detection thus allowing for multiple exposures.
1:3000
0
Primary Ab dilution
Time (min)
Secondary Ab dilution
Amersham ECL™ Select™
10.0 5.0 2.5 1.2 0.6 0.3 μg
1:5000
30
1:10 000
60
1:15 000
120
1:100 000
1:100 000
1:100 000
1:100 000
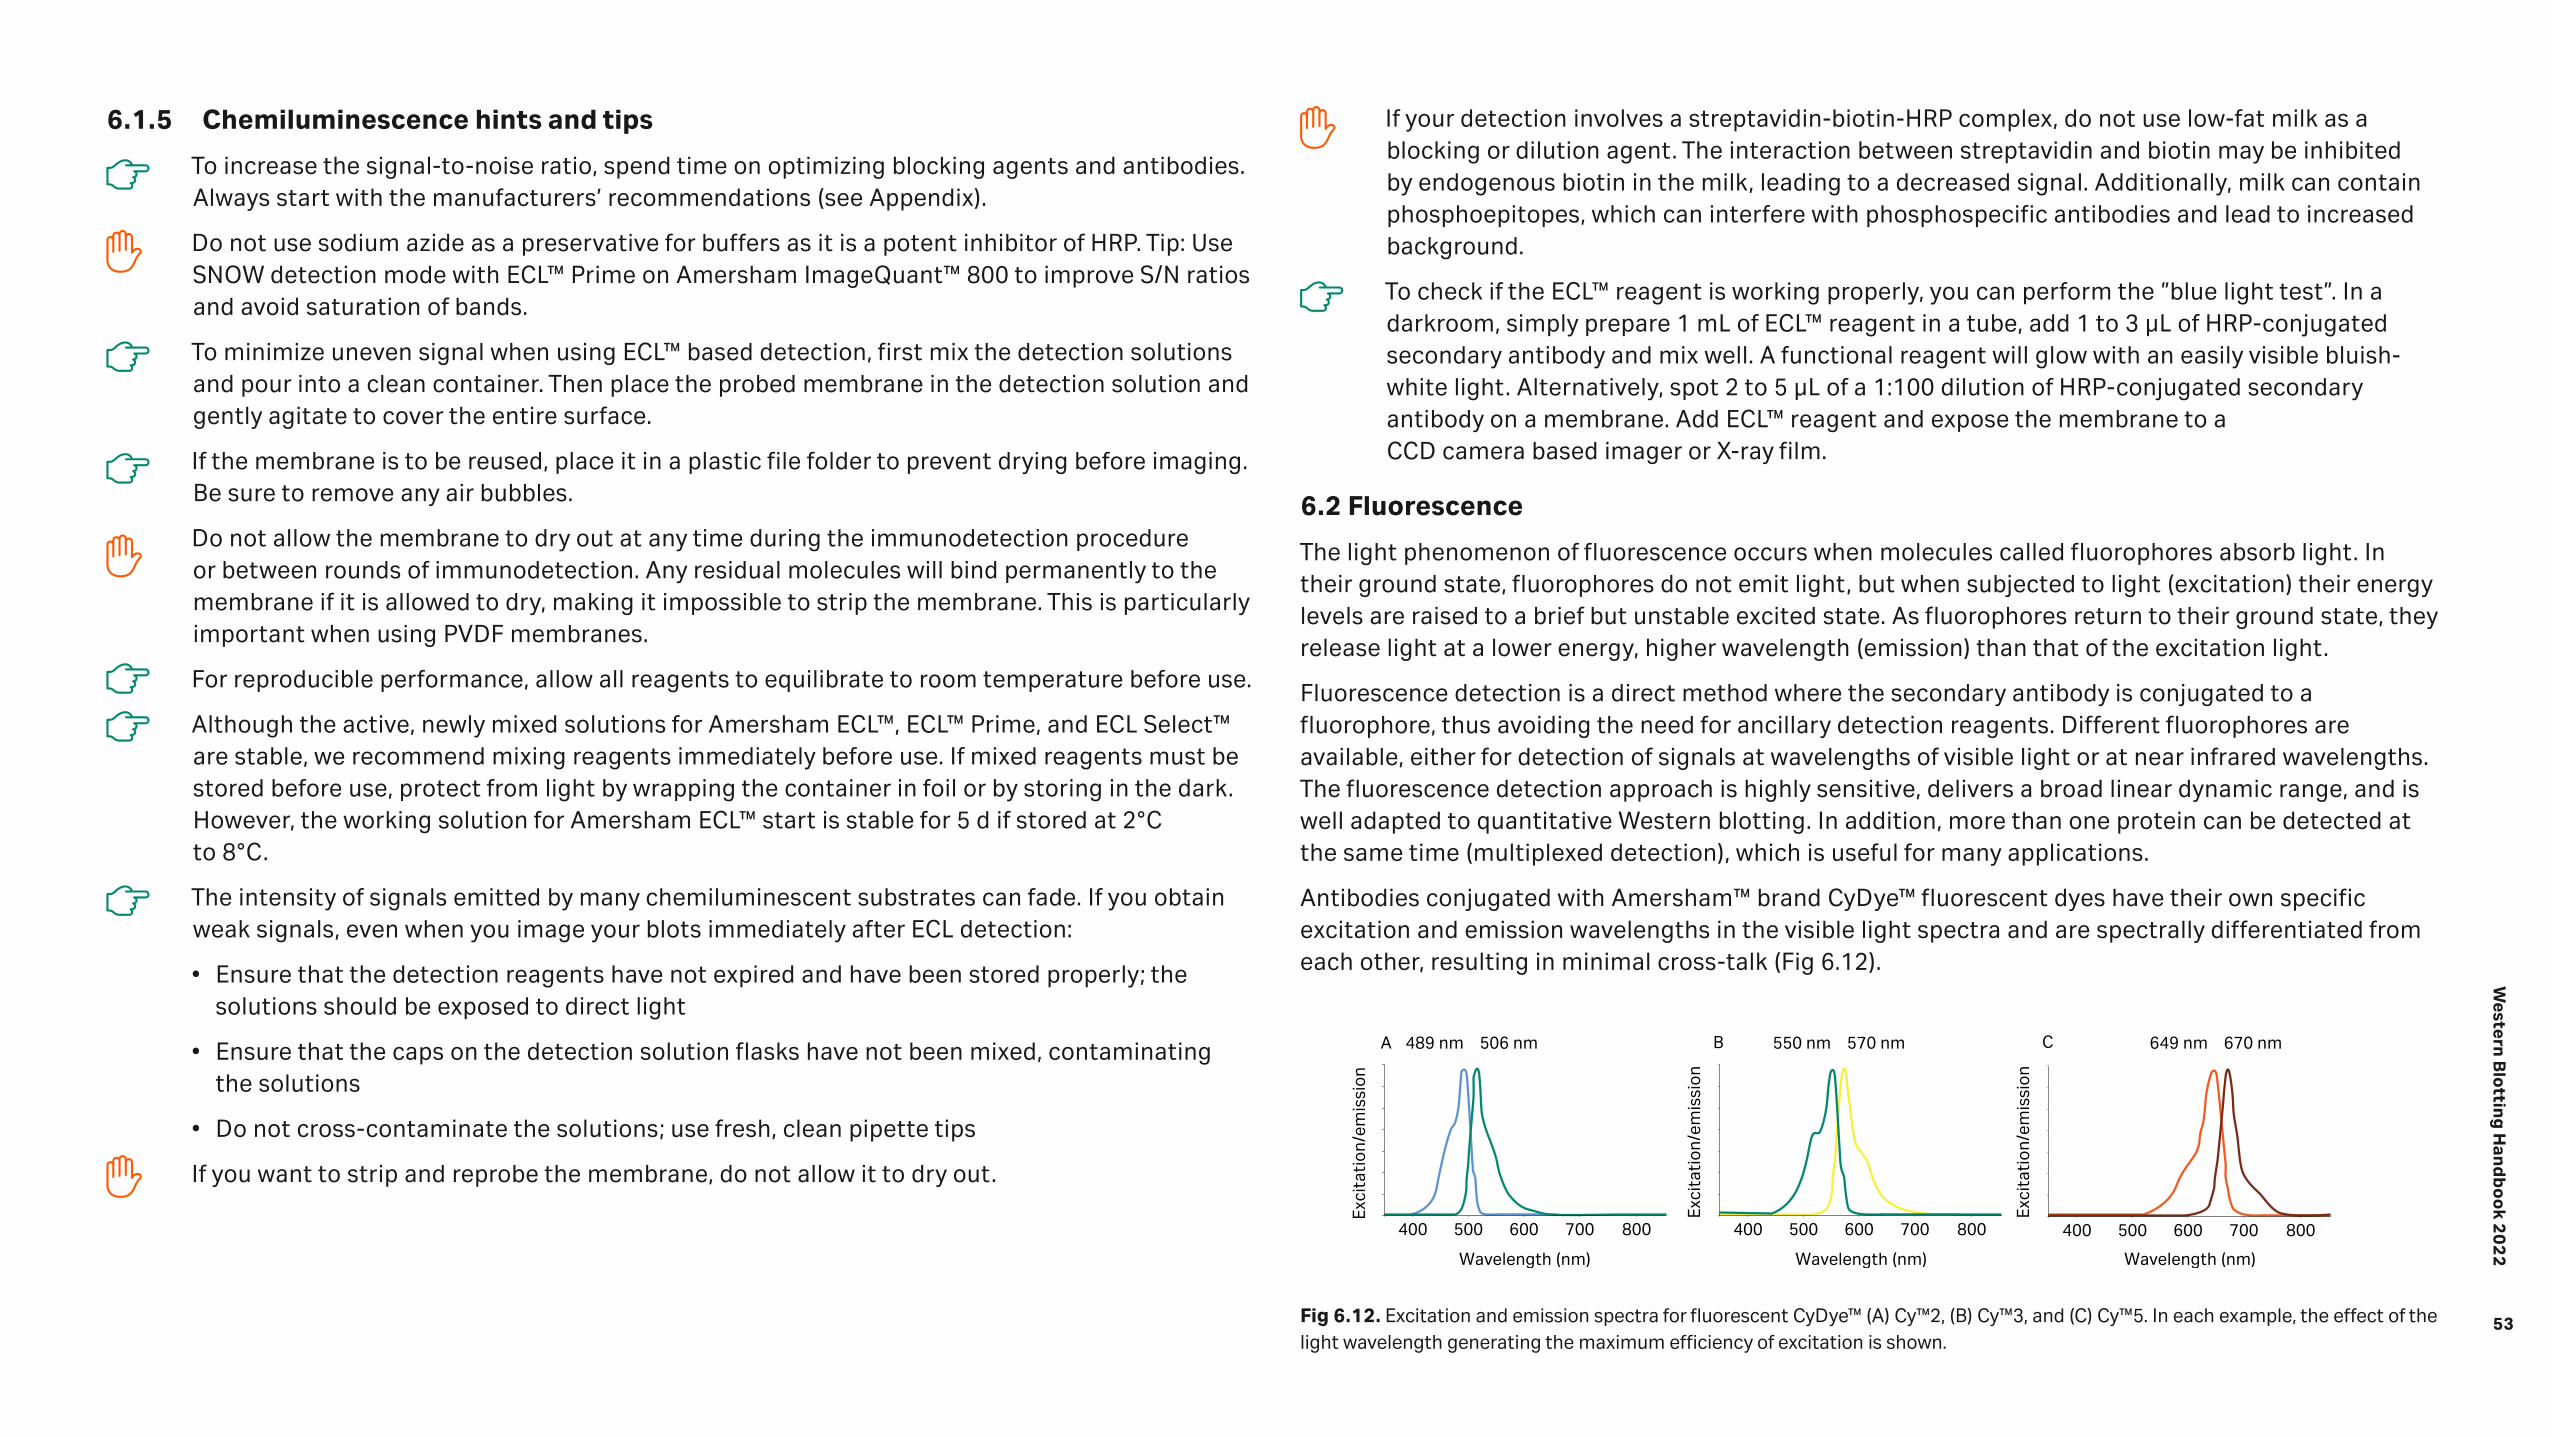
53
Western
Blo
tting
Han
db
oo
k 20
22
6.1.5 Chemiluminescence hints and tips
To increase the signal-to-noise ratio, spend time on optimizing blocking agents and antibodies. Always start with the manufacturers’ recommendations (see Appendix).
Do not use sodium azide as a preservative for buffers as it is a potent inhibitor of HRP. Tip: Use SNOW detection mode with ECL™ Prime on Amersham ImageQuant™ 800 to improve S/N ratios and avoid saturation of bands.
To minimize uneven signal when using ECL™ based detection, first mix the detection solutions and pour into a clean container. Then place the probed membrane in the detection solution and gently agitate to cover the entire surface.
If the membrane is to be reused, place it in a plastic file folder to prevent drying before imaging. Be sure to remove any air bubbles.
Do not allow the membrane to dry out at any time during the immunodetection procedure or between rounds of immunodetection. Any residual molecules will bind permanently to the membrane if it is allowed to dry, making it impossible to strip the membrane. This is particularly important when using PVDF membranes.
For reproducible performance, allow all reagents to equilibrate to room temperature before use.
Although the active, newly mixed solutions for Amersham ECL™, ECL™ Prime, and ECL Select™ are stable, we recommend mixing reagents immediately before use. If mixed reagents must be stored before use, protect from light by wrapping the container in foil or by storing in the dark. However, the working solution for Amersham ECL™ start is stable for 5 d if stored at 2°C to 8°C.
The intensity of signals emitted by many chemiluminescent substrates can fade. If you obtain weak signals, even when you image your blots immediately after ECL detection:
• Ensure that the detection reagents have not expired and have been stored properly; the solutions should be exposed to direct light
• Ensure that the caps on the detection solution flasks have not been mixed, contaminating the solutions
• Do not cross-contaminate the solutions; use fresh, clean pipette tips
If you want to strip and reprobe the membrane, do not allow it to dry out.
If your detection involves a streptavidin-biotin-HRP complex, do not use low-fat milk as a blocking or dilution agent. The interaction between streptavidin and biotin may be inhibited by endogenous biotin in the milk, leading to a decreased signal. Additionally, milk can contain phosphoepitopes, which can interfere with phosphospecific antibodies and lead to increased background.
To check if the ECL™ reagent is working properly, you can perform the ”blue light test”. In a darkroom, simply prepare 1 mL of ECL™ reagent in a tube, add 1 to 3 µL of HRP-conjugated secondary antibody and mix well. A functional reagent will glow with an easily visible bluish-white light. Alternatively, spot 2 to 5 µL of a 1:100 dilution of HRP-conjugated secondary antibody on a membrane. Add ECL™ reagent and expose the membrane to a CCD camera based imager or X-ray film.
6.2 Fluorescence
The light phenomenon of fluorescence occurs when molecules called fluorophores absorb light. In their ground state, fluorophores do not emit light, but when subjected to light (excitation) their energy levels are raised to a brief but unstable excited state. As fluorophores return to their ground state, they release light at a lower energy, higher wavelength (emission) than that of the excitation light.
Fluorescence detection is a direct method where the secondary antibody is conjugated to a fluorophore, thus avoiding the need for ancillary detection reagents. Different fluorophores are available, either for detection of signals at wavelengths of visible light or at near infrared wavelengths. The fluorescence detection approach is highly sensitive, delivers a broad linear dynamic range, and is well adapted to quantitative Western blotting. In addition, more than one protein can be detected at the same time (multiplexed detection), which is useful for many applications.
Antibodies conjugated with Amersham™ brand CyDye™ fluorescent dyes have their own specific excitation and emission wavelengths in the visible light spectra and are spectrally differentiated from each other, resulting in minimal cross-talk (Fig 6.12).
400 800500 600 700 400 800500 600 700400 800500 600 700
A CB
Exci
tati
on/e
mis
sion
Exci
tati
on/e
mis
sion
Exci
tati
on/e
mis
sion
Wavelength (nm)Wavelength (nm)Wavelength (nm)
489 nm 506 nm 550 nm 570 nm 649 nm 670 nm
Fig 6.12. Excitation and emission spectra for fluorescent CyDye™ (A) Cy™2, (B) Cy™3, and (C) Cy™5. In each example, the effect of the light wavelength generating the maximum efficiency of excitation is shown.

54
Western
Blo
tting
Han
db
oo
k 20
22
After excitation, the resulting fluorescent emission signals are captured using a multichannel fluorescent scanner such as Typhoon™, or a CCD camera-based imager, such as Amersham ImageQuant™ 800 Fluor equipped with appropriate light sources and emission filters (see Chapter 7).
One advantage of CyDye™ is their high photostability compared to other fluorophores, such as fluorescein. In addition, the wide pH tolerance (3 to 10) of CyDye™ makes them compatible with most Western blotting buffers. Further benefits include the need for only a few handling steps and signal longevity (> 3 mo), enabling comparison of data across many experiments.
Fluorescent detection is very sensitive and has a broad dynamic range as mentioned earlier. This is illustrated in Figure 6.13 where the detection of a dilution series of transferrin was performed with a Cy™3 labeled secondary antibody at a limit of detection of 1.2 pg.
Inte
grat
ed In
tens
ity
(× 1
05 )
0 1 2 3 4 5 6
Amount (ng)
5 ng
2.5
ng
1.25
ng
0.62
5 ng
0.31
3 ng
0.15
6 ng
78 p
g
39 p
g
19.5
pg
9.8
pg
4.9
pg
2.5
pg
1.2
pg
0.6
pg
0
50
100
150
200
250
300
Fig 6.13. Fluorescence detection gives a broad linear dynamic range, making it possible to detect and compare weak and strong bands on the same membrane. This is a two-fold dilution series of transferrin detected with Cy™3-labeled secondary antibodies (Amersham™ ECL Plex™ reagent). The dynamic range is 3.6 orders of magnitude and very linear with an LOD of 1.2 pg.
Fluorescence-based detection is recommended for:
• Simultaneous detection of more than one protein (multiplexing)
• Detection of different proteins of identical molecular weights
• Quantitative Western blotting applications
• Applications where high sensitivity is needed
• Changes in protein abundance
• Protein:protein interactions
• Detection of isoforms
• Evaluation of protein degradation
• PTMs
• When studying low- and high-abundance proteins at the same time
• Cytiva offers Amersham ECL Plex™ and CyDye™ 700 and 800 for fluorescent detection (see 6.2.2).
6.2.1 Multiplexed detection
Multiplexed detection requires that the primary antibodies are raised in different species. The technique is convenient for the study of proteins of similar size or for detecting PTMs, as these investigations can be performed without the need to strip and reprobe membranes (as discussed earlier, stripping and reprobing risks uneven loss of proteins from membranes). Multiplexed detection thus improves the quantitative potential of Western blotting. It is also useful for all types of quantitation, as stripping is not required to monitor levels of housekeeping protein. The benefits of fluorescence detection, such as high sensitivity, coverage of a broad linear dynamic range, and emission of a stable signal are all factors that contribute to the quantitative strengths of the technique.
A method for multiplexed detection for, for example, in the analysis of PTMs, is illustrated in Figure 6.14. Another approach to utilize the total protein amount for loading control is by prelabeling the sample by fluorescence (Cy™5, Amersham Quickstain labeling kit, see 3.4). As the dye is covalently attached to the proteins, it is transferred to the membrane and may be used as loading control for a specific target protein detected by Cy™3 or CyDye™ 800.

55
Western
Blo
tting
Han
db
oo
k 20
22
6.2.2 Normalization using fluorescent multiplexing
Amersham ECL Plex™ secondary antibodies are labeled with Cy™3 or Cy™5 CyDye™ fluorescent dyes and Amersham brand CyDye™ 700 and 800 are labeled with NIR short and long. They are available directed against both rabbit and mouse primary antibodies (Fig 6.15). In addition, it is possible to label a specific antibody of interest using Cy™2, Cy™3, or Cy™5 Ab labeling kits. By using any of these combination of CyDyes™ RGB and NIR labeled secondary antibodies, detection of three proteins on the same membrane (triplex detection) is possible.
Amersham ECL Plex™ Fluorescent Rainbow Markers are suitable for monitoring both the progress of electrophoresis, transfer efficiency and estimation of molecular weight on the blotted membrane as they show fluorescence in both Cy™5 and Cy™3 channels. Studies on very small changes in protein expression, for example in the analysis of the expression of intracellular signaling molecules after exposure to a growth factor, are only reliable if the protein load is carefully controlled. Although care should be taken to apply equal loads to lanes in a gel by measuring total protein levels, it is difficult to achieve accurate data due to pipetting errors or quantitation errors because of variations in total protein between samples or due to inefficient transfer.
For the highest possible precision, protein levels should be quantitated by comparison with a stable internal standard, housekeeping protein, or preferably the total protein such as Amersham™ from prelabeled sample. The expression level of housekeeping proteins, such as GAPDH or β-actin, is assumed to be constant regardless of external stimulation, but this needs to be validated for the experiment/sample type. When this is confirmed, housekeeping proteins may serve as good indicators of the total amount of protein loaded into each well (Fig 6.15). The multiplexed detection possibilities of Amersham CyDyes™ enables normalization of each measurement to compensate for loading variations, as well as eliminating the risk of error compounded by membrane stripping and reprobing.
Cy5 Cy3
Excitation Emission Excitation Emission
CyDye™ conjugated secondary antibodies
Primary antibodies
Protein 1 Protein 2 Protein 3
CyDye
Excitation Emission
Proteins on membrane
ERKGAPDH
Fig 6.16. Three-color overlay image of Western blot nitrocellulose membrane. Target ERK proteins were detected using an IR long (red) LED-filter combination and GAPDH detection used an IR short channel (green). Lysates were pre-labeled with Cy™3 (blue).
Sample: CHO cell lysate in the range 16–24 µg was loaded in each laneMembrane: nitrocellulose from Cytiva
Fig 6.14. The figure shows the principle of multiplexed detection. Primary antibodies against two proteins are recognized by species-specific secondary antibodies conjugated to fluorescent CyDye, Cy3 and Cy5. Detection by direct fluorescence reduces the number of processing and imaging steps, which saves time and reduces errors in quantitation.
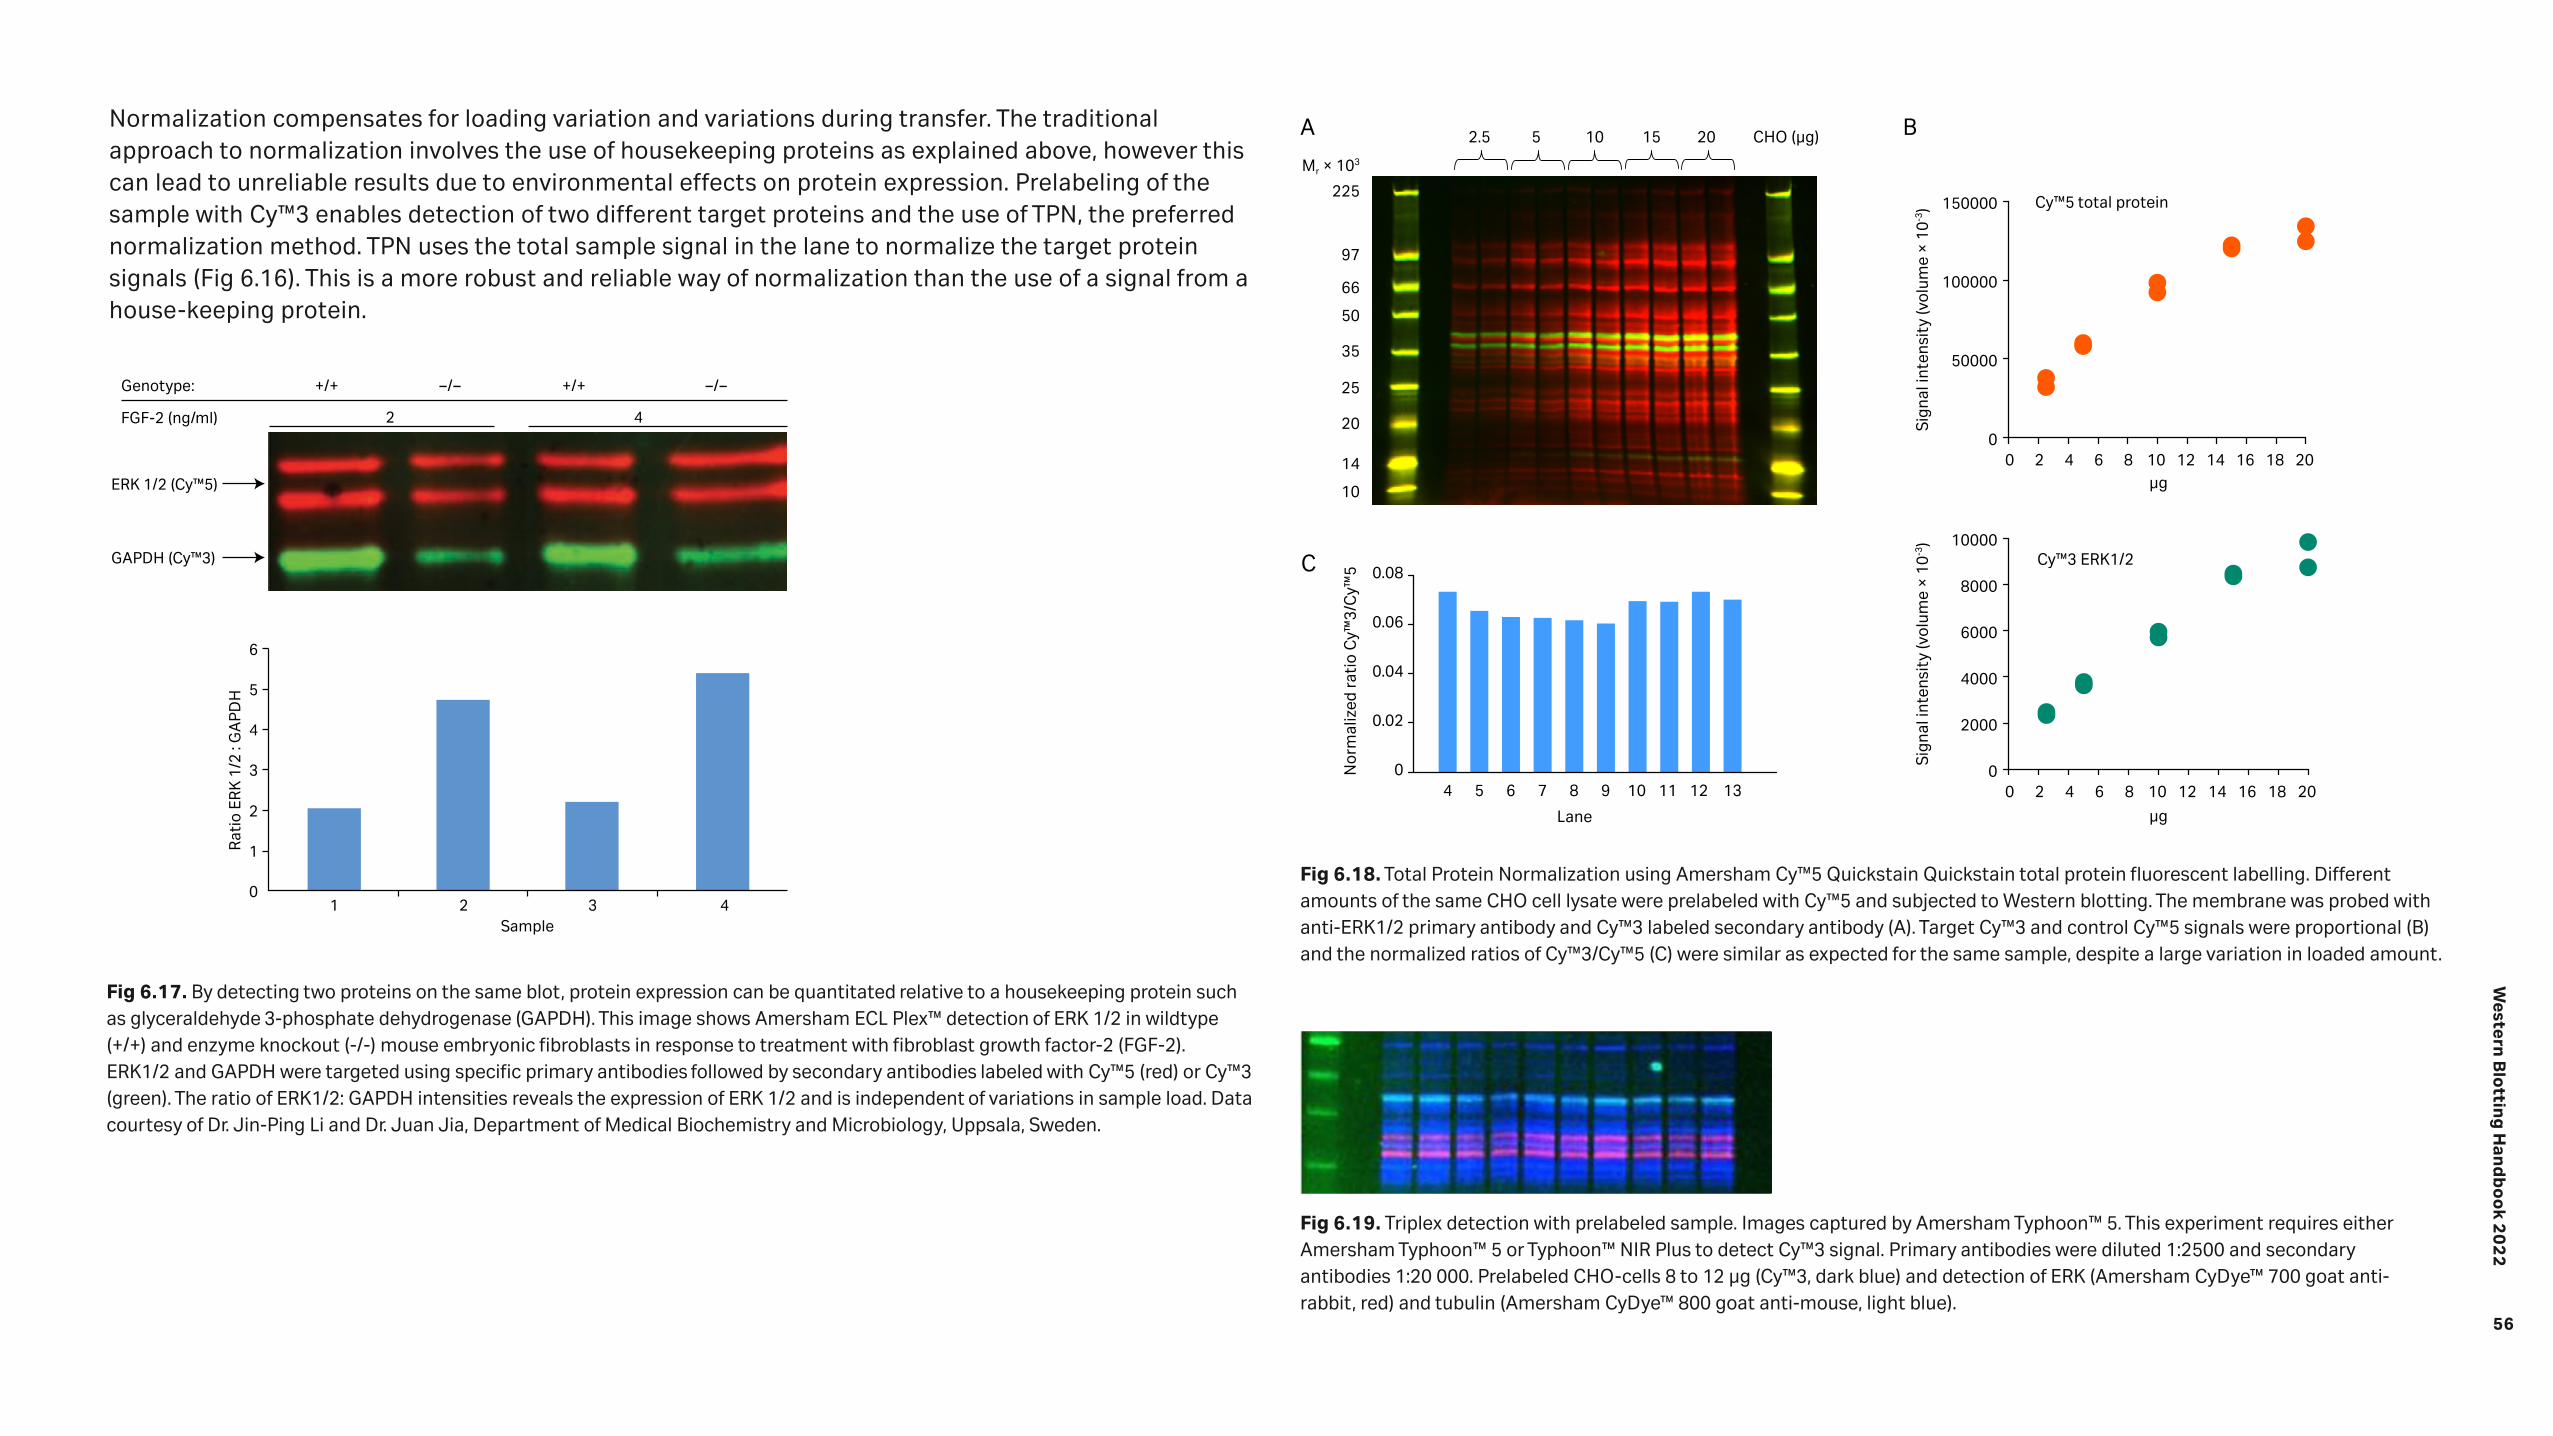
56
Western
Blo
tting
Han
db
oo
k 20
22
Normalization compensates for loading variation and variations during transfer. The traditional approach to normalization involves the use of housekeeping proteins as explained above, however this can lead to unreliable results due to environmental effects on protein expression. Prelabeling of the sample with Cy™3 enables detection of two different target proteins and the use of TPN, the preferred normalization method. TPN uses the total sample signal in the lane to normalize the target protein signals (Fig 6.16). This is a more robust and reliable way of normalization than the use of a signal from a house-keeping protein.
6
5
4
3
2
1
01 2 3 4
Sample
Rat
io E
RK
1/2
: G
AP
DH
ERK 1/2 (Cy™5)
Genotype:
FGF-2 (ng/ml)
+/+ –/– +/+ –/–
GAPDH (Cy™3)
2 4
04 5 6 7 8
Lane
9 10 11 12 13
0.02
0.04
0.06
0.08
µg
µg
Sign
al in
tens
ity
(vol
ume
× 10
-3)
Sign
al in
tens
ity
(vol
ume
× 10
-3)
0
2000
4000
6000
8000
10000
0 2 4 6 8 10 12 14 16 18 20
0
50000
100000
150000
0 2 4 6 8 10 12 14 16 18 20
CHO (µg)5 10 152.5 20
Cy™3 ERK1/2
Cy™5 total protein
Nor
mal
ized
rat
io C
y™3/
Cy™
5
225
97
66
50
35
25
20
14
10
Mr × 103
A B
C
Fig 6.17. By detecting two proteins on the same blot, protein expression can be quantitated relative to a housekeeping protein such as glyceraldehyde 3-phosphate dehydrogenase (GAPDH). This image shows Amersham ECL Plex™ detection of ERK 1/2 in wildtype (+/+) and enzyme knockout (-/-) mouse embryonic fibroblasts in response to treatment with fibroblast growth factor-2 (FGF-2). ERK1/2 and GAPDH were targeted using specific primary antibodies followed by secondary antibodies labeled with Cy™5 (red) or Cy™3 (green). The ratio of ERK1/2: GAPDH intensities reveals the expression of ERK 1/2 and is independent of variations in sample load. Data courtesy of Dr. Jin-Ping Li and Dr. Juan Jia, Department of Medical Biochemistry and Microbiology, Uppsala, Sweden.
Fig 6.18. Total Protein Normalization using Amersham Cy™5 Quickstain Quickstain total protein fluorescent labelling. Different amounts of the same CHO cell lysate were prelabeled with Cy™5 and subjected to Western blotting. The membrane was probed with anti-ERK1/2 primary antibody and Cy™3 labeled secondary antibody (A). Target Cy™3 and control Cy™5 signals were proportional (B) and the normalized ratios of Cy™3/Cy™5 (C) were similar as expected for the same sample, despite a large variation in loaded amount.
Fig 6.19. Triplex detection with prelabeled sample. Images captured by Amersham Typhoon™ 5. This experiment requires either Amersham Typhoon™ 5 or Typhoon™ NIR Plus to detect Cy™3 signal. Primary antibodies were diluted 1:2500 and secondary antibodies 1:20 000. Prelabeled CHO-cells 8 to 12 µg (Cy™3, dark blue) and detection of ERK (Amersham CyDye™ 700 goat anti-rabbit, red) and tubulin (Amersham CyDye™ 800 goat anti-mouse, light blue).

57
Western
Blo
tting
Han
db
oo
k 20
22
- 5 15 TGF-β stim. time: 30 60 120 24
min h
Total AktCy™5
Phosphorylated AktCy™3
- - - - - - - + LY (inhibitor):
Cy™3/Cy™5
Fig 6.20. Detection, using Amersham™ ECL™ Plex, of low-abundance phosphorylated Akt protein and total Akt protein in human prostate cancer cells after stimulation with transforming growth factor-β (TGF-β). Despite the minimal change in molecular weight as a result of phosphorylation, the duplex capability of Amersham™ ECL Plex enables a clear distinction between the two forms of the protein. Note the complete absence of signal in the Cy™3 channel for the sample treated with the kinase inhibitor, LY. Data courtesy of Marene Landström, Ludwig Institute for Cancer Research, Uppsala, Sweden.
PTMs that do not change the molecular weight of a protein can be very difficult to study by traditional Western blotting detection techniques. They often require the blot to be stripped and reprobed but this can lead to loss of protein and is therefore a risk when performing quantitative analysis. In this type of scenario, the potential of multiplexed detection provided by Amersham ECL Plex™ and CyDye™ 700 and 800 may be used to advantage as both the nonmodified and modified forms of the protein can be detected on the same membrane by using primary antibodies, raised in two different species and directed to the alternative forms of the protein (for example, phosphorylated and nonphosphorylated forms). Primary antibodies are then detected using species-specific secondary antibodies conjugated to different fluorophores such as Cy™3 and Cy™5 (Fig 6.17) or Amersham™ brand CyDye™ 700 and 800.
Optimal performance of Amersham ECL Plex is achieved using low-fluorescence PVDF Amersham Hybond™ LFP 0.2 or nitrocellulose Amersham™ brand Protran™ Premium 0.2 membranes. Hybond™ P 0.45 is compatible with fluorescent detection as well (Table 4.4). For blocking, Amersham ECL™ Prime Blocking Reagent or BSA (bovine serum albumin) is recommended to minimize background noise. Antibodies should always be diluted to the concentrations recommended by the manufacturer, but as a guideline for Amersham ECL™ Plex, primary and secondary antibodies should be diluted from 1:100 to 1:5000 and from 1:1250 to 1:4000, respectively. It is well worth spending time to optimize antibody concentrations (see Appendix).
6.2.3 Fluorescence hints and tips
In order to obtain high-quality Western blotting results, the following points should be useful to help solve problems related to low signal-to-noise ratios.
Use Amersham ECL Plex™ Cy™5-conjugated secondary antibodies for the protein at the suspected lowest concentration in the sample. The signals emitted by Cy™5 are slightly more intense than those emitted by Cy™3.
If there are excessively strong signals from the markers, which overwhelm signals from low-abundance proteins, it is better to use a smaller amount of Amersham ECL Plex™ Plex Rainbow Markers (1.5 μL). If possible, load sample loading buffer in one lane between the markers and the sample. Tip: The excitation and spectra of Cy™5 is close to that of CyDye™ 700. Multiplexing with these Cy™5 and CyDye™ 700 in the same blot is not recommended due to spectral overlap.
As both sensitivity and dynamic range are also functions of characteristics of the antibody:protein pair, it is critical to optimize the concentrations of both the primary and secondary antibodies (see Appendix).
Working with fluorescence detection carries certain risks of uneven background signal due to fluorescent contamination. Ensure that all material is perfectly clean.
• Remove any residual pieces of gel from membranes.
• The presence of bromophenol blue (BPB) on the membrane can generate unwanted fluorescent signals. Remove all traces of BPB from the bottom of SDS-PAGE gels before transfer to a membrane.
• Ensure that trays, forceps and containers are clean and free of Coomassie Blue stain, as this can also cause background problems.
• Avoid labeling the membrane with a ballpoint pen as this can generate contaminating signals. Cut one corner of the membrane and note which corner has been cut!
• Do not handle the membrane with fingers; use clean forceps.
• Wear powder-free gloves when handling membranes. The powder used in laboratory gloves can fluoresce and might also scatter light, complicating the interpretation of images.
If there are problems with the presence of many apparently nonspecific protein bands, try using Amersham ECL™ Prime Blocking Reagent. This problem is often related to the choice of primary antibody. In addition, the dilution of primary antibody can affect specificity — optimization is crucial (see Appendix)!

58
Western
Blo
tting
Han
db
oo
k 20
22
Incubation of the primary antibody in blocking solution helps reduce nonspecific binding and increase signal intensity. Some primary antibodies diluted in blocking solution result in a much stronger signal compared to dilution in washing buffer, even if used at a much lower concentration.
A concentration of Tween™-20 greater than 0.1% might significantly increase background on PVDF membranes.
If probing with fluorophore-conjugated antibodies:
• Aliquot the antibodies in light-protected tubes.
• Dilute the antibodies in light-protected containers.
• Perform secondary antibody probing protected from light.
For the final wash step rinse the membrane in PBS (or TBS) to remove Tween™-20 prior to imaging.

Western
Blo
tting
Han
db
oo
k 20
21
Imaging07
The last step in the Western blotting workflow before data analysis is image capture.
Enhanced chemiluminescence (ECL) is based on the reaction between an added luminol substrate and horseradish peroxidase (HRP)-labeled antibodies (see Chapter 6). In the presence of hydrogen peroxide, HRP catalyzes the oxidation of luminol, a reaction that results in the emission of light. The light signal can then be detected on X-ray film or by digital imaging with a charge-coupled device (CCD) camera-based imager.
When using fluorescence detection, a fluorophore is conjugated to the primary or secondary antibody. Light is emitted by the fluorophore after excitation via a specific wavelength of light. A photomultiplier tube (PMT) or a CCD can be used to collect and convert the emitted light to an electrical signal. The electrical signal is then digitized for image display and analysis.
SAMPLE PREPARATION ELECTROPHORESIS TRANSFER PROBING DETECTION IMAGING AND ANALYSIS
59

60
Western
Blo
tting
Han
db
oo
k 20
22
7.1 Digital imagingIn Western blotting applications, digital imaging is usually performed with a CCD camera-based imager or a scanner, depending on the characteristics of the light emitted from the detection system. In the following section, we will briefly describe these imaging systems and their suitability for capturing different kinds of emitted signals.
7.1.1 Charge-coupled device (CCD) camera-based imagers
Chemiluminescence is currently the most commonly used detection method in Western blotting although fluorescent applications have increased lately. Traditionally, signals have been detected using X-ray film, which provide high sensitivity but a limited linear dynamic range. CCD camera-based imagers, on the other hand, provide detection with high sensitivity and a broad linear dynamic range, enabling more precise quantitation. In addition, digital images allow for easier handling, archiving, and analysis. There is no chemical waste and no need for a dark room as no film is involved.
CCD camera-based imagers can also be used to document membranes, stained gels, or ultraviolet (UV) light/fluorescence applications, if the imager is equipped with the appropriate filter and excitation light sources. The photon signals from the imaging field are collected by a lens assembly (Fig 7.1). CCD cameras operate by collecting photons on a chip, and the collected charge is translated into a digital signal that correlates with signal strength.
Sample
Upper excitation Upper excitation
Emission filter wheel
Fixed or zoom lens
CCD
Forced air cooler
Multistage Peltier
Sample tray
Lower excitation
Fig 7.1. Components of a typical CCD camera-based imaging device. When the camera is used for chemiluminescence detection, the sample itself is the source of emitted light as the enzyme acts on the substrate. For fluorescence, on the other hand, light emission requires a source of excitation; the sample can be illuminated in a variety of ways depending on the nature of the label. Emission filters can be inserted in the light path to select specific wavelengths and reduce background. The camera includes focusing optics to maintain a clear image.
7.1.1.1 Excitation sources and light delivery
For visible light and fluorescence applications, illumination or excitation is provided by UV or white light gas discharge tubes, broad spectrum xenon arc lamps, or light-emitting diodes (LED).
7.1.1.2 Light collection
Lenses are used to collect emissions from the imaging field. The lens system is either fixed when used with an adjustable sample tray, or alternatively, has a zoom capacity, allowing capture of different sample sizes in a single view. Zoom objectives, however, decrease sensitivity and for this reason, height adjustable sample trays are preferable. Optimal systems are those in which the focus is preset for imaging of membranes, for different tray positions, and with the possibility to change focus for other sample types.
In fluorescence imaging, filters are used to remove unwanted emitted light of specific wavelengths. Although chemiluminescence detection requires no filters, good lenses will optimize the image quality. As the light source is very weak, a wide aperture will collect more light in less time. The diameter of the aperture is thus particularly important, the weaker the light source, the wider the aperture.
7.1.1.3 System performance
The performance of any CCD camera-based imager is measured in terms of resolution, sensitivity, and linear dynamic range. The resolution of a captured image is linked to the geometry of the CCD, the quality of the lens system, the number of pixels, and if pixels are combined (i.e., binning) to increase sensitivity.
CCD arrays are sensitive to light, temperature, and high energy radiation. Dark current from thermal energy, cosmic rays, and the preamplifier system cause noise that can affect instrument performance. Active cooling of the CCD significantly reduces noise levels and improves both sensitivity and linearity. This is only becomes an issue for capture of typically very low light levels emitted in detection systems such as chemiluminescence.
The dynamic range of a CCD camera, the signal range over which the instrument yields a linear response in relation to sample quantity, is dependent on the light collector and the detector.
7.1.1.4 Amersham ImageQuant™ 800 CCD camera-based imagers
Amersham ImageQuant™ 800 systems are a new generation of highly sensitive and robust CCD imagers for capture of high-quality images. Available in four different models (Table 1), it is ideal for chemiluminescence, fluorescence including RGB and NIR and colorimetric imaging of a wide variety of samples including gels, blots, petri-dishes, and multi-well plates. All Amersham™ ImageQuant™ 800 systems have improved optics along with the novel SNOW (Signal-to-Noise Optimization Watch) detection mode allows to increase both sensitivity and imaging quality.

61
Western
Blo
tting
Han
db
oo
k 20
22
Table 7.1. ImageQuant™ 800 system configurations and applications
Applications Light sources
ImageQuant™ 800
ImageQuant™ 800 UV
ImageQuant™ 800 OD
ImageQuant™ 800 Fluor
Chemiluminescence with color marker overlay
n/a √ √ √ √
Gel documentation Epi-white √ √ √ √
Stained gels Epi-UV √ √ √
Optical density (OD) measurements
Trans-white √ √
RGB fluorescence imaging of blots
Epi-RGB √
IR short and IR long fluorescence imaging of blots
Epi-IR short, Epi-IR long
√
7.1.1.5 SNOW imaging mode for reduced noise levels and exceptional image quality
ImageQuant™ 800 is equipped with the SNOW imaging option, a novel exposure mode which allows users to achieve high sensitivity and unmatched image quality. Before the SNOW imaging mode was developed, exposure times in imaging systems have been set to either avoid saturation (e.g., high expression proteins) or maximize faint signals, limiting the dynamic range. Additionally, the variance of chemiluminescence signals over time often requires time-consuming optimization and analysis of images.
7.1.1.6 How SNOW imaging mode works
SNOW detection mode captures several images at shorter exposure times, thereby avoiding saturation, and averages these images in real time to reduce noise. Users can follow the progress as the image updates continuously. The signal-to-noise ratio improvement for your selected region of interest is also updated in real time. Furthermore, the SNOW imaging mode can be set to stop when the maximum signal-to-noise ratio is achieved (Figs 7.2). This approach provides the sensitivity needed to detect faint bands that could not be visualized by conventional imaging without saturating stronger signals.
Fig 7.2. Observe how image quality improves in real time on the ImageQuant™ 800 system in SNOW exposure mode. The SNOW control window shows continuous image updates and the progression of signal-to-noise ratio improvement for your selected region of interest. The SNOW exposure mode can be set to stop automatically or by the user.
Key benefits of SNOW imaging mode include:
• Achieve high sensitivity without compromising on resolution
• Reduce noise to detect more weak bands without saturating other bands in the blot
• Extend the linear dynamic range by avoiding saturation
• Auto-stop when the best possible image is acquired
• Eliminate time spent optimizing exposure time or capture setting
7.1.2 Scanner systems
7.1.2.1 Excitation source
Scanner devices used for detecting fluorescence most commonly employ laser light for excitation. A laser source produces a narrow beam of highly monochromatic, coherent, and collimated light. A combination of focused energy and narrow beam width contributes to the excellent sensitivity and resolution of laser scanners. Alternative light sources used in CCD cameras are LEDs which are more compact and less expensive than lasers, but produce a wide band, low power output.

62
Western
Blo
tting
Han
db
oo
k 20
22
7.1.2.2 Light collection
The light collection optics in a scanner system must be designed to efficiently collect as much of the emitted fluorescent light as possible. In single-channel or single-label experiments, emission filters are designed to allow only a well-defined spectrum of emitted light to reach the detector. Any remaining stray excitation or scattered light (as well as autofluorescence) should be rejected.
In multiple experiments or multiplexed detection, the emitted light from each label has to be detected separately. The filter setup, in combination with the selection of labels, should be chosen to ensure that the different labels can be spectrally resolved, thus avoiding any cross- talk issues. After the fluorescent emission has been filtered, and only the desired wavelengths remain, the light is detected and quantitated. As the intensity of light at this stage is very small, a PMT must be used to amplify and detect it.
7.1.2.3 System performance
The performance of a laser scanner system can be measured in terms of system resolution, linear dynamic range, uniformity, and sensitivity.
Linear dynamic range is the signal range over which the instrument yields a linear response to sample quantity and is therefore an important parameter for accurate quantitation. A scanner with the ability to cover a wide linear dynamic range can detect and precisely quantitate signals from both very low and very high intensity targets in the same scan without reaching saturation. The linear dynamic range of most laser scanners is between 104 and 105 orders of magnitude.
Uniformity across the entire scan area is critical for reliable quantitation. A given fluorescent signal should yield the same measurement at any position within the imaging field.
Moving head scanners, in particular, deliver flat-field illumination and uniform collection of fluorescent emissions across the entire scan area and can also reduce the likelihood of photobleaching, as any single part of the sample is exposed to the excitation source for the minimal amount of time.
The limit of detection (LOD) is the minimum amount of sample that can be detected by an instrument at a known confidence level. Instruments with better LOD require less fluorescent sample for analysis and allow more precise detection of small variations between different samples.
7.1.3 Fluorophores and filters
To generate a fluorescent signal, the excitation light directed at a sample must be within the absorption spectrum of the fluorophore. Generally, the closer the excitation wavelength is to the peak absorption wavelength of the fluorophore, the greater the excitation efficiency. It is not essential that the major absorption peak of the fluorophore exactly matches the available excitation wavelength for efficient excitation (Fig 7.3).
Similarly, selecting a filter that transmits a band at or near the emission peak of the fluorochrome generally improves the sensitivity and linear dynamic range of the measurement (Fig 7.4).
Wavelength (nm)
Abs
orpt
ion
550
300 350 400 450 500 550 600
560 LP
Wavelength (nm)
Emis
sion
500 550 600 650 700
580 BP30
Fig 7.3. Excitation of Cy™3 using 532 nm laser light. The absorption spectrum of Cy™3 is overlaid with the 532 nm wavelength line of the laser.
Fig 7.4. Emission filtering of Cy™3 fluorescence using either a 580 BP30 filter (dark-gray area) or a 560 LP filter (light- and dark-grey areas). BP = band pass. LP = long pass.

63
Western
Blo
tting
Han
db
oo
k 20
22
Multicolor imaging allows the detection and resolution of multiple targets using fluorescent labels with different spectral properties. The process for multicolor image acquisition varies depending on the imaging system. An imager with a single detector acquires consecutive images using different emission filters and, in some cases, different excitation light. When two detectors are available, the combined or mixed fluorescence from two different labels is collected at the same time and is then resolved by filtering before the signal reaches the detectors.
Implementation of dual detection requires a beam splitter to spectrally split the mixed fluorescent signal, directing the resulting two emission beams to separate emission filters (optimal for each fluorophore), and finally to the detectors. However, some spectral overlap between emission profiles is almost unavoidable. To minimize cross-contamination, fluorophores with well-separated emission peaks should be chosen along with emission filters that allow reasonable spectral discrimination between the emission profiles of the fluorophores. For optimal results, fluorophores with emission peaks at least 30 nm apart should be chosen.
Two types of optical emission filters are in common use:
Long pass (LP) filters pass light longer than a specified wavelength and reject all shorter wavelengths.
Band pass (BP) filters allow a band of selected wavelengths to pass, while rejecting all shorter and longer wavelengths.
7.2 Chemiluminescence detection using filmWhen chemiluminescence is used as the detection system in Western blotting, X-ray films may be used to record emitted signals. X-ray films provide high sensitivity and flexible exposure times which might be needed for detection of very weak signals. However, X-ray film has limitations for quantitative analysis, as high-intensity signals tend to become saturated if both weak and strong signals are to be detected on the same film. This results in a significantly narrower linear dynamic range of measurable protein quantities compared to analysis with a CCD camera-based imager. Other disadvantages to consider when using X-ray film for detection include the need to handle the chemical waste generated, as well as the requirement for a dark room.
After X-ray film development, a digital image must be created for further computer analysis if required or if the image is to be published. This can be achieved by scanning the film with a densitometer or by taking a digital photo.
A variety of commercial products are available for signal detection in Western blotting, such as Amersham Hyperfilm™ ECL™ (Table 7.1).
Table 7.2. Recommended films from Cytiva for imaging in Western blotting analysis.
Film Detection
Amersham Hyperfilm™ ECL™ Chemiluminescence
Amersham Hyperfilm™ MP Radioisotopic
Amersham Hyperfilm™ ECL™ offers excellent sensitivity for low-concentration protein detection, excellent band resolution, and the detection of low-intensity bands. The film is also artefact-free due to an anti-static layer and produces publication-quality images due to a clear background. Amersham Hyperfilm™ ECL™ is suitable for use with Amersham ECL™, Amersham ECL™ Prime, and Amersham ECL Select™ and it can be processed in automatic processors or manually by using most common X-ray film developers and fixers.
7.3 AutoradiographyThe use of autoradiography as a detection method in Western blotting applications has greatly diminished due to cost and safety issues (i.e., working in a radioactive environment, extensive waste handling, etc.). Despite these issues, autoradiography is very sensitive and as it is compatible with most of the laser-based scanners available from Cytiva, it is briefly discussed here. Autoradiographic detection is either performed using an X-ray film or a storage phosphor screen.
7.3.1 X-ray film autoradiography
Ever since radioactive isotopes were first used to tag biomolecules, autoradiography on photographic film has remained a detection option. Most radioisotopes have limited sensitivity, but this can be overcome by converting the emitted radiation to light. The resulting gain in sensitivity, however, is partially offset by decreased resolution together with a nonlinear response on film, which might result in misinterpretation of data, particularly in quantitative analysis.
7.3.2 Storage phosphor screen autoradiography
If very high sensitivity is required for Western blotting, radioisotopes in combination with storage phosphor screens (also called imaging plates) are an excellent choice. Storage phosphor screens are reusable and are not degraded by repeated exposure to laboratory levels of radioactivity, unless you are using tritium with tritium screens. The sample is placed in contact with a storage phosphor screen (protected from light by using an exposure cassette). The location of the radioisotope is captured on the screen as the crystals of the screen are excited to a high energy state. This screen is then placed in an imager and exposed to a red light source, such as a laser, which destabilizes the crystals so they return to their ground state, releasing a shorter wavelength light that can be captured with the appropriate filter and detection system. This process is known as photostimulated luminescence (PSL).
64
Western
Blo
tting
Han
db
oo
k 20
22
7.4 Detection system and imager compatibilityTable 7.2 lists detection reagents available from Cytiva and recommended system for image capture.
Table 7.3. Summary of detection systems from Cytiva and compatibility with various imaging methods
Detection method Imager
Chemiluminescence Amersham ECL™ Amersham ECL™ Prime Amersham ECL™ Select™
X-ray film/CCD camera CCD camera/X-ray film CCD camera/X-ray film
Fluorescence Amersham ECL™ Plex™ CyDye™ Laser scanner/CCD camera1 Laser scanner/CCD camera1
Chromogenic Coomassie™ Blue stain Silver stain CCD camera CCD camera
Radioisotopic Autoradiography Laser scanner/X-ray film
1 Equipped with appropriate light sources and emission filters.

Western
Blo
tting
Han
db
oo
k 20
21
Analysis08
Detection of signals, using either X-ray film, scanners, or a charge-coupled device (CCD) camera- based imager, results in one or more visible protein bands on the membrane image. The molecular weight of the protein can be estimated by comparison with marker proteins and the amount of protein can be determined as this is related to band intensity (within the limits of the detection system). In some applications it is enough to confirm protein presence and roughly estimate the amount. However, many applications demand a quantitative analysis that defines protein levels in either relative or absolute terms. The aim of this chapter is to provide a guide to Western blotting analysis and how you can achieve precise quantitation in Western blotting experiments.
SAMPLE PREPARATION ELECTROPHORESIS TRANSFER PROBING DETECTION IMAGING AND ANALYSIS
65
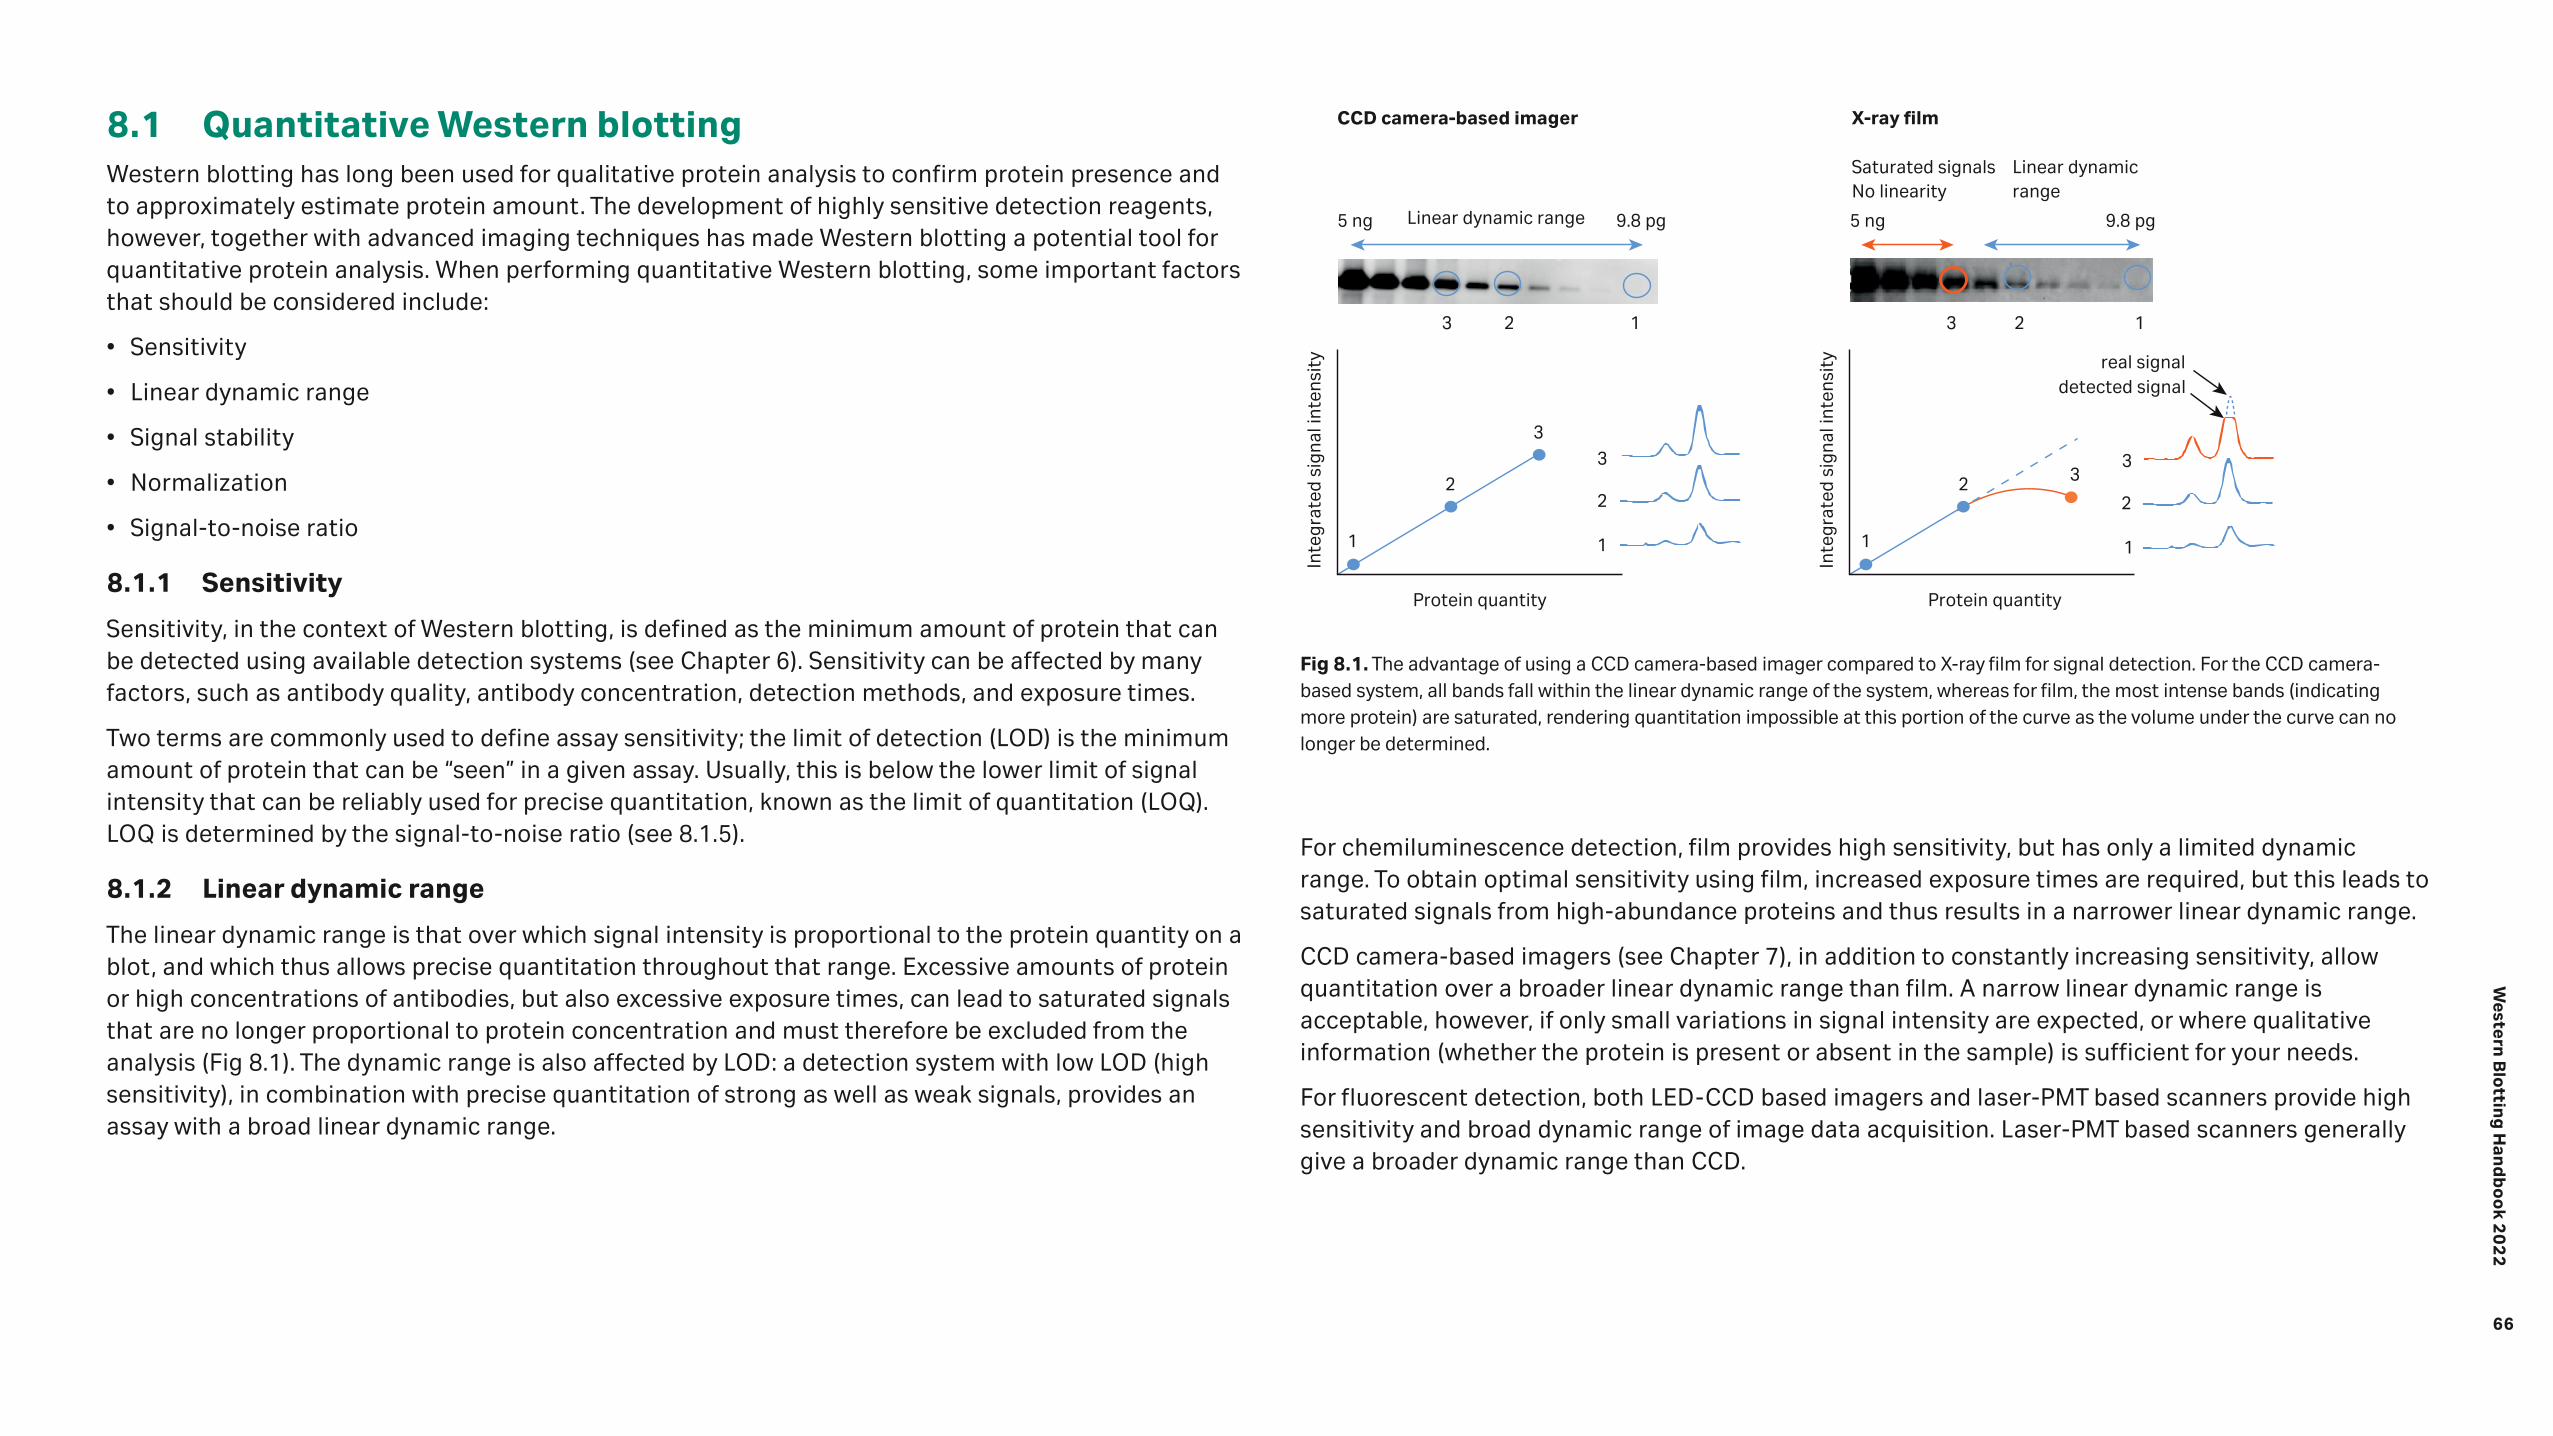
66
Western
Blo
tting
Han
db
oo
k 20
22
8.1 Quantitative Western blottingWestern blotting has long been used for qualitative protein analysis to confirm protein presence and to approximately estimate protein amount. The development of highly sensitive detection reagents, however, together with advanced imaging techniques has made Western blotting a potential tool for quantitative protein analysis. When performing quantitative Western blotting, some important factors that should be considered include:
• Sensitivity
• Linear dynamic range
• Signal stability
• Normalization
• Signal-to-noise ratio
8.1.1 Sensitivity
Sensitivity, in the context of Western blotting, is defined as the minimum amount of protein that can be detected using available detection systems (see Chapter 6). Sensitivity can be affected by many factors, such as antibody quality, antibody concentration, detection methods, and exposure times.
Two terms are commonly used to define assay sensitivity; the limit of detection (LOD) is the minimum amount of protein that can be “seen” in a given assay. Usually, this is below the lower limit of signal intensity that can be reliably used for precise quantitation, known as the limit of quantitation (LOQ). LOQ is determined by the signal-to-noise ratio (see 8.1.5).
8.1.2 Linear dynamic range
The linear dynamic range is that over which signal intensity is proportional to the protein quantity on a blot, and which thus allows precise quantitation throughout that range. Excessive amounts of protein or high concentrations of antibodies, but also excessive exposure times, can lead to saturated signals that are no longer proportional to protein concentration and must therefore be excluded from the analysis (Fig 8.1). The dynamic range is also affected by LOD: a detection system with low LOD (high sensitivity), in combination with precise quantitation of strong as well as weak signals, provides an assay with a broad linear dynamic range.
9.8 pg9.8 pg 5 ng5 ng
CCD camera-based imager
Linear dynamic range
Protein quantity Protein quantity
real signaldetected signal
1 1
22
3
3 2 1 3 2 1
1
2 33
1
2
3
Linear dynamic range
Saturated signalsNo linearity
X-ray film
Inte
grat
ed s
igna
l int
ensi
ty
Inte
grat
ed s
igna
l int
ensi
ty
Fig 8.1. The advantage of using a CCD camera-based imager compared to X-ray film for signal detection. For the CCD camera-based system, all bands fall within the linear dynamic range of the system, whereas for film, the most intense bands (indicating more protein) are saturated, rendering quantitation impossible at this portion of the curve as the volume under the curve can no longer be determined.
For chemiluminescence detection, film provides high sensitivity, but has only a limited dynamic range. To obtain optimal sensitivity using film, increased exposure times are required, but this leads to saturated signals from high-abundance proteins and thus results in a narrower linear dynamic range.
CCD camera-based imagers (see Chapter 7), in addition to constantly increasing sensitivity, allow quantitation over a broader linear dynamic range than film. A narrow linear dynamic range is acceptable, however, if only small variations in signal intensity are expected, or where qualitative information (whether the protein is present or absent in the sample) is sufficient for your needs.
For fluorescent detection, both LED-CCD based imagers and laser-PMT based scanners provide high sensitivity and broad dynamic range of image data acquisition. Laser-PMT based scanners generally give a broader dynamic range than CCD.

67
Western
Blo
tting
Han
db
oo
k 20
22
8.1.3 Signal stability
When performing quantitative Western blotting, it is an advantageous to use a detection system with high signal stability, as this will impact the linear dynamic range. With a stable signal detection reagent, the time window for reaching high sensitivity is longer. This allows multiple exposures and the possibility to detect weak bands that might be missed in a single, brief exposure.
It is important to distinguish between the terms signal “stability” and “duration.” Chemiluminescence detection systems, for example, are based on an enzymatic reaction and the signal intensity decreases over time. This means that the signal stability achieved with a fluorescence detection system such as Amersham ECL Plex™ (where the signal is stable over time and is highly reproducible) cannot be matched by chemiluminescence. However, the signal duration of chemiluminescent reagents, such as Amersham ECL Prime™ (Fig 8.2), allow multiple exposures without the risk of a significant reduction in signal, a prerequisite for many quantitative Western blotting applications.
Time (min) Series of diminishing protein quantities
0
30
60
90
120
150
180
2.5 ng 4.9 pg
Cy3
Cy5
Cy3
Control protein
Target protein
Cy5 total protein
Target protein
A B
Fig 8.2. Amersham ECL Prime™ signal duration is monitored for 3 h after the addition of reagent by capturing images every 30 min with the same exposure time of 3 min. The majority of the bands are still detectable and allow precise quantitation even after 3 h.
Fig 8.3. Normalizing a target protein to a loading control. Target signal is detected using fluorescence reporter (Cy™3) or ECL™ detection. The loading control can be the sum of total protein bands obtained by Cy™5 prelabeling, protein staining of membrane after transfer (A), or a housekeeping protein such as actin, tubulin, or GAPDH (B). Initially, the intensity of each signal is calculated using analysis software. Normalization is performed by relating the measured value for the target protein to the corresponding value of the loading control.
8.1.4 Normalization
To reliably quantitate protein levels by Western blotting analysis, levels of the protein of interest should be normalized to a loading control. This allows for variations in the amount of total protein from lane-to-lane due to errors such as inconsistent sample loading or, alternatively, different protein concentrations in the samples. If the sample is a cell lysate,
an endogenous and unregulated “housekeeping” protein is commonly used as an internal standard (Fig 8.3 and Fig 8.4). Another alternative is to relate the protein of interest to the amount of total protein detected per lane on the blot.

68
Western
Blo
tting
Han
db
oo
k 20
22
Enhanced chemiluminescence (ECL™) detection allows you to detect two proteins on the same blot in a single experiment, as long as their molecular weights are sufficiently different to be discretely resolved by electrophoresis (Fig 8.5). This approach requires preliminary screening of the primary antibodies to rule out any cross-reactivity issues. In the event of similar molecular weights or cross-reactivity, stripping and reprobing are necessary to detect both the housekeeping protein and the target protein. Stripping, however, carries a risk of the loss of an unknown amount of target protein from the membrane, leading to erroneous results (see Chapter 5 for more information).
04 5 6 7 8
Lane
9 10 11 12 13
0.02
0.04
0.06
0.08
µg
µg
Sign
al in
tens
ity
(vol
ume
× 10
-3)
Sign
al in
tens
ity
(vol
ume
× 10
-3)
0
2000
4000
6000
8000
10000
0 2 4 6 8 10 12 14 16 18 20
0
50000
100000
150000
0 2 4 6 8 10 12 14 16 18 20
CHO (µg)5 10 152.5 20
Cy3 ERK1/2
Cy5 total protein
Nor
mal
ized
rat
io C
y3/C
y5
225
97
66
50
35
25
20
14
10
Mr × 103
A B
C
Fig 8.4. Normalization using Cy™5 total protein fluorescent staining. Different amounts of the same CHO cell lysate were prelabeled with Cy™5 and subjected to Western blotting. The membrane was probed with anti-ERK1/2 primary antibody and Cy™3 labeled secondary antibody (A). Target Cy™3 and control Cy™5 signals were proportional (B) and the normalized ratios of Cy™3/Cy™5 (C) were similar as expected for the same sample, despite a large variation in loaded amount.
By performing multiplexed, fluorescent Western blotting using Amersham ECL Plex™ as the detection system, it is possible to simultaneously detect two target proteins on the same blot. Proteins can thus be easily quantitated, after normalization to a housekeeping protein (Fig 8.6). This system enables the detection of proteins with very similar or even identical molecular weights. In addition, Amersham ECL Plex™ is optimized for minimal cross-reactivity between different CyDye™ conjugated secondary antibodies.
0.4
0.8
1.2
0.2
0
0.6
1.0
1
pSTAT3
Actin (housekeeping protein)
Normalized quantity of pSTAT3
Sample
pSTA
T3:a
ctin
rat
io
2 3 4 5
Fig 8.5. Western blotting detection of Tyr 705-phosphorylated STAT3 (pSTAT3) in five different HeLa cell lysates. In each case, pSTAT3 levels were quantitated after normalization with actin as a housekeeping protein. Detection was performed using Amersham ECL Prime™ and ImageQuant™ LAS 4000 mini (now replaced by Amersham Image 600 series CCD-based imagers) and analysis was carried out using ImageQuant™ TL software.

69
Western
Blo
tting
Han
db
oo
k 20
22
8.1.5 Signal-to-noise ratio
During the imaging process (Chapter 7), the presence of a protein on a blot or gel gives rise to a signal of a certain intensity that is recorded and analyzed. To properly quantitate the protein, however, it is essential to consider the specific signal, as well as background (signals due to unwanted interactions). The background comprises primary antibodies binding to other proteins or the choice of membrane and blocking agent, as well as noise (system-generated signals).A signal peak corresponds generally to a protein band and the volume under that peak, but above the background level, is directly proportional to the quantity of protein (Fig 8.7).
Densitometric analysis of film is a sensitive way to quantitate ECL™ mediated detection. The high quantitative precision at very low levels, however, is offset by signal saturation at levels far below those at which CCD camera-based imagers continue to yield signals in proportion to protein quantity. The linear dynamic range offered by film, in other words, is significantly narrower than that of CCD camera-based imagers. In addition, the exposure time necessary to amplify weak signals to detectable levels tends to lead to high background signals that can mask the signals of the proteins of interest.
6
5
4
3
2
1
01 2 3 4
Sample
ERK
1/2
:GA
PD
H r
atio
ERK 1/2 (Cy5)
Genotype:
FGF-2 (ng/mL)
+/+ –/– –/–+/+
GAPDH (Cy3)
2 4
baseline
Scan progress
S
B
N
Sign
al in
tens
ity
LOD: 4.7 ngS/N: 104
LOD: 9.4 ngS/N: 27
150
ng
75 n
g
37.5
ng
18.8
ng
9.4
ng
4.7
ng
Low background
High background
Fig 8.6. In this multiplexed Western blot, primary antibodies to ERK 1/2 and the housekeeping protein GAPDH, were simultaneously used to probe a membrane. Relating the signals to GAPDH signals indicates the amount of protein applied to each lane of the gel, allowing the true effect of FGF-2 treatment on ERK 1/2 to be quantitated. +/+ indicates wildtype cells, -/- indicates knockout cells deficient in an enzyme potentially involved in the regulation of ERK 1/2. Data courtesy of Dr. Jin-Ping Li and Dr. Juan Jia, Department of Medical Biochemistry and Microbiology, Uppsala University, Sweden.
Fig 8.7. The basis of signal detection. B = background, N = noise, S = signal.
Fig 8.8. Fig 8.8. A two-fold serial dilution of actin detected on blots using Amersham ECL™. Some important consequences of elevated background levels on signal quantitation. The signals shown in the upper panel were obtained using optimized antibody concentrations. No optimization was performed for the signals shown in the lower panel. The consequence is a higher background, which affects LOD and the signal-to-noise ratio.
Background and noise reduce the signal-to-noise ratio and consequently decrease the sensitivity and the LOD of Western blots. High background will decrease the signal-to-noise ratio (Fig 8.8) and adversely alter linearity, leading to less precise quantitation.
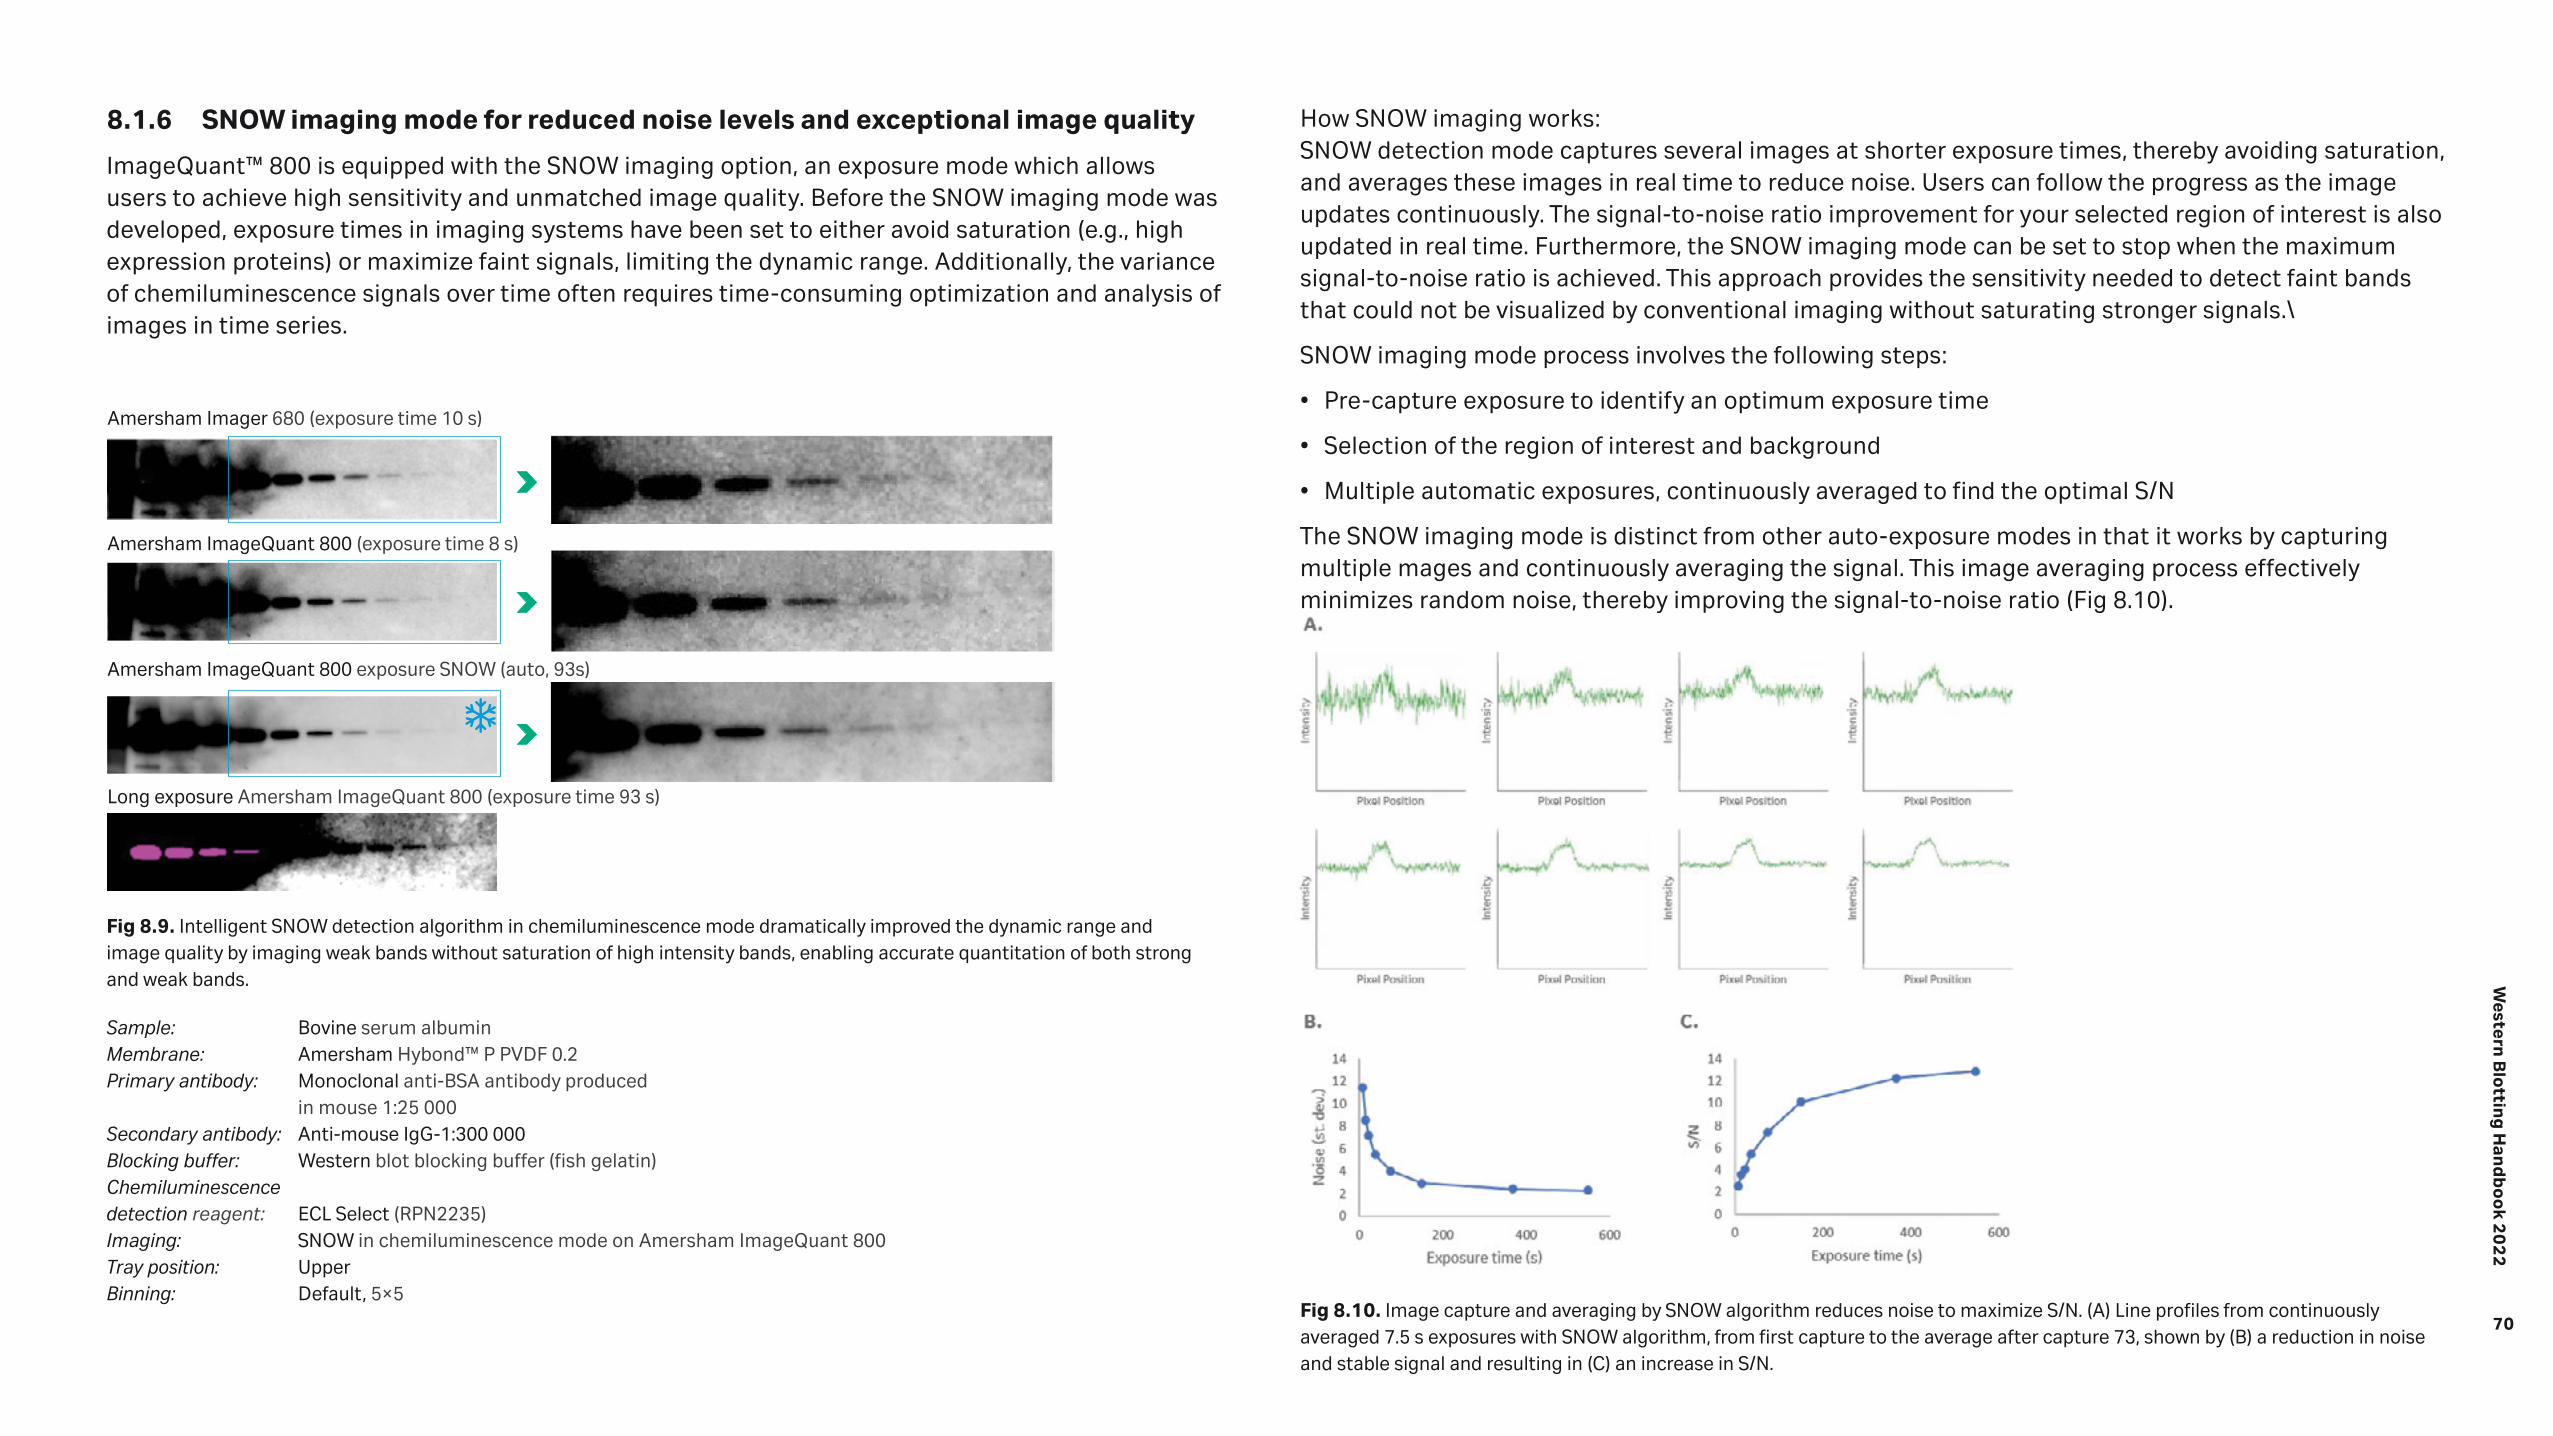
70
Western
Blo
tting
Han
db
oo
k 20
22
8.1.6 SNOW imaging mode for reduced noise levels and exceptional image quality
ImageQuant™ 800 is equipped with the SNOW imaging option, an exposure mode which allows users to achieve high sensitivity and unmatched image quality. Before the SNOW imaging mode was developed, exposure times in imaging systems have been set to either avoid saturation (e.g., high expression proteins) or maximize faint signals, limiting the dynamic range. Additionally, the variance of chemiluminescence signals over time often requires time-consuming optimization and analysis of images in time series.
How SNOW imaging works: SNOW detection mode captures several images at shorter exposure times, thereby avoiding saturation, and averages these images in real time to reduce noise. Users can follow the progress as the image updates continuously. The signal-to-noise ratio improvement for your selected region of interest is also updated in real time. Furthermore, the SNOW imaging mode can be set to stop when the maximum signal-to-noise ratio is achieved. This approach provides the sensitivity needed to detect faint bands that could not be visualized by conventional imaging without saturating stronger signals.\
SNOW imaging mode process involves the following steps:
• Pre-capture exposure to identify an optimum exposure time
• Selection of the region of interest and background
• Multiple automatic exposures, continuously averaged to find the optimal S/N
The SNOW imaging mode is distinct from other auto-exposure modes in that it works by capturing multiple mages and continuously averaging the signal. This image averaging process effectively minimizes random noise, thereby improving the signal-to-noise ratio (Fig 8.10).
8Fig 8.9. Intelligent SNOW detection algorithm in chemiluminescence mode dramatically improved the dynamic range and image quality by imaging weak bands without saturation of high intensity bands, enabling accurate quantitation of both strong and weak bands.
Fig 8.10. Image capture and averaging by SNOW algorithm reduces noise to maximize S/N. (A) Line profiles from continuously averaged 7.5 s exposures with SNOW algorithm, from first capture to the average after capture 73, shown by (B) a reduction in noise and stable signal and resulting in (C) an increase in S/N.
Amersham Imager 680 (exposure time 10 s)
Amersham ImageQuant 800 exposure SNOW (auto, 93s)
Amersham ImageQuant 800 (exposure time 8 s)
Long exposure Amersham ImageQuant 800 (exposure time 93 s)
Sample: Bovine serum albuminMembrane: Amersham Hybond™ P PVDF 0.2Primary antibody: Monoclonal anti-BSA antibody produced
in mouse 1:25 000Secondary antibody: Anti-mouse IgG-1:300 000Blocking buffer: Western blot blocking buffer (fish gelatin)Chemiluminescence detection reagent: ECL Select (RPN2235)Imaging: SNOW in chemiluminescence mode on Amersham ImageQuant 800Tray position: UpperBinning: Default, 5×5

71
Western
Blo
tting
Han
db
oo
k 20
22
8.2 Analysis softwareImage acquisition using imaging devices creates one or more data files for each sample analyzed. Several varieties of software are available that display the image, adjust contrast, annotate, and print the image. In addition, image analysis software allows fragment sizing, quantitation, matching, pattern analysis, and generation of analysis reports.
ImageQuant™ TL is a high-performance, easy-to-use image analysis software for the quantitative analysis of images from a wide range of biological samples. The program consists of four different modules for: 1D gel electrophoresis analysis, array analysis, colony counting/2D spot analysis, and a general image analysis toolbox. The software provides tools for quantitation through user-defined signal integration of regions (volume) or using lane profiles and peak analysis (area). Analysis reports are dynamically linked to Microsoft Excel®.
8.2.1 Main features of ImageQuant™ TL software
ImageQuant™ TL software can be used to manually quantitate Western blotting although it is also possible to detect bands automatically using one of several types of background calculations. One of the analysis modules is shown in Figure 8.11.
Phosphorylation of PDGF receptor following stimulation with PDGF-BB: Background
Background
Changes in phosphorylation of platelet-derived growth factor (PDGF) receptor following stimulation with PDGF-BB
Fig 8.11. The relative increase in phosphorylation of PDGF receptor over time after stimulation with PDGF-BB as calculated using ImageQuant™ TL software. This screenshot shows how you may calculate the total intensity of a band of interest in the toolbox module. You can select the band for which you want to determine intensity and automatically subtract the background. In this example, the total band intensity for the phosphorylation of the PDGF receptor at different time points after stimulation with PDGF was determined. The background is subtracted from all values and the data can easily be exported to Microsoft Excel® for further calculations.
Automatic analysis of 1D gel electrophoresis images
For the analysis of 1D gels, including multitiers. If the analysis requires subsequent refinement, it is possible to view each stage and make adjustments.
Accurate molecular weight determination
For the creation of a molecular weight curve and propagation by Rf to account for distorted gels.
Quantitation of bands
For the quantitation of data from 1D gels, comprising band detection, background subtraction, calibration, and normalization.
Image handling tools
For cropping, rotating, flipping, and filtering images across all channels.
1D analysis
1D analysis is performed using the tools provided in ImageQuant™ TL including:
• Multichannel analysis capability
• Fully automatic, single-click image analysis
• Instant access to refinement of any analysis step
• Alternative stepwise image analysis for each step
• User-defined preferences that can be saved and loaded for similar experiments
Lane creation is fully flexible and can be performed manually or automatically. Lane editing tools include options for:
• Multitier detection
• Selection of the area of interest
• Multibox adjustment
• Compensation for band distortions via "Grimace" tool
• Moving, resizing, and bending individual lanes
• Deleting and adding lanes
• Importing and exporting the lane template

72
Western
Blo
tting
Han
db
oo
k 20
22
Background subtraction
Background can be subtracted by three automatic methods (rubber band, minimum profile, or rolling ball) or by two manual methods (image rectangle or manual baseline).
Band detection
Bands can be automatically detected using three parameters (minimum slope, noise reduction, percentage maximum peak), with band edges automatically determined or set to a fixed width. Band editing and analysis tools include:
• Manual editing of peak and edge detection
• Option to view multiple lane profiles, stacked or overlaid
• Editing in Image Window and Lane Profile Window
• Band measurements automatically displayed in Measurement Tables
• Three types of Measurement Tables (Selected lane, All lanes, and Comparisons)
• Automatic update of tables
• Export of lane profile information
Molecular size/isoelectric point (pI) calibration
Molecular size/pl calibration allows users to select from (and edit) a library of 13 standards, or to create a new standard. Editing options include:
• Fully automatic or manual assignment of standard bands
• Propagation by Rf
• Six Curve Fitting Methods
• Molecular weights automatically displayed in Measurements Table
Quantity calibration
To account for nonlinear staining effects, one of five curve fitting methods is used for quantity calibration. A choice of 10 measurement units is available.
Normalization
The normalization protocol allows the use of known values, or the bands can be expressed as a percentage or a proportion of one or more selected bands. A choice of 10 measurement units is available.
Western
Blo
tting
Han
db
oo
k 20
21
Application examples09
In this chapter, we present a selection of applications in which Western blotting (and also in some instances, 1D gel electrophoresis analysis) has played a central role — from confirmation of the presence of target proteins in a chromatography fraction to quantitative multiplexed Western blotting.
Electrophoresis on mini-gels has been used, and standard transfer, blocking, and probing procedures have been applied unless otherwise stated. “Standard procedures” for various steps refer to the recommendations in this handbook (see Chapter 11). Wet transfer has been used in all cases. Optimal antibody concentrations were established according to our recommendations, as well as information provided by vendors. A set of Western blotting applications are described and information about sample types and products used are provided for each set of results. We hope that these examples will give ideas and show how Western blotting can contribute to solve the many challenges in research, production, and quality control.
73

74
Western
Blo
tting
Han
db
oo
k 20
22
9.1 Chemiluminescent Western blotting
9.1.1 Purification of recombinteins
The processes employed in the production of recombinant proteins in bacteria must deliver high purity and yield. In evaluating alternative production methods, it is usually more important to compare yields or confirm the presence of the protein of interest in chromatography fractions, rather than to know precise quantities. It is also important to be able to detect and monitor impurities and contaminants in different protein purification steps.
Before scale-up of a protein production process, for example, it is important to know how variations in certain parameters affect final yields. In the following example, researchers at Cytiva studied the effect of different induction temperatures on the yield of recombinant histidine-tagged green fluorescent protein (GFP) produced in E. coli. Following purification, the protein yields were determined with Western blotting using Amersham ECL™ detection to assess the effects of temperature variation on protein yield and batch consistency (Fig 9.1).
9.1.2 Detection of low-abundance proteins: Monitoring signaling pathway activation
In preclinical research, cultured cells are sometimes treated with potential drugs and biotherapeutics to study the activation of specific signaling pathways. The incidence of post-translational modifications (PTMs), such as protein phosphorylation, indicate the activation of such pathways. Phosphorylated forms of proteins, however, are often present at very low levels compared to the parent protein. For this reason, a very sensitive detection system that is nevertheless able to measure a wide range of protein quantities is needed. Western blotting followed by detection using chemiluminescent Amersham™ ECL™ Prime provides a practical means to work with applications where both high sensitivity and a broad linear dynamic range are important.
STAT3 is a transcription factor involved in host immunity. The activity of the protein is regulated by cytokines, such as interferon-α (IFN-α). Stimulation of cells with IFN-α leads to the phosphorylation of two specific tyrosine residues on STAT3, resulting in the formation of homodimers or heterodimers that translocate to the nucleus and initiate transcription.
In the following application example, phosphorylation of STAT3 is evaluated in HeLa cells after treatment with IFN-α. Samples of lysates from HeLa cells (IFN-α-treated and untreated controls), were applied to SDS-PAGE followed by Western blotting using a phosphorylated STAT3-specific antibody. Phosphorylated STAT3 (pSTAT3) was detected using Amersham™ ECL™ Prime (Fig 9.2) and imaged using ImageQuant™ LAS 4000 mini Amersham™ ImaegQuant™ 800 CCD Imager. The membrane was then stripped and reprobed for actin, a housekeeping protein. By monitoring the expression levels of actin, it was possible to compensate for uneven sample loads on the gel. Levels of pSTAT3 were normalized against corresponding actin levels.
37°C 20°C 37°C20°C
HisTrap™ HP HiTrap™ Capto™ Q
MaterialsSample: Purified recombinant histidine (His)-tagged GFPMarker: Full-Range Rainbow Molecular Weight MarkersMembrane: Amersham Hybond™ ECL™ (now replaced by Amersham Protran™ Premium™)Blocking solution: Amersham ECL™ Blocking AgentPrimary antibody: Mouse anti-histidine Secondary antibody: ECL Mouse IgG, HRP-Linked Whole Ab Detection: Amersham ECL™Imaging: Amersham Hyperfilm™ ECL™Analysis: ImageQuant™ TL 7.0 (now replaced by ImageQuant™ TL 8.2)
Fig 9.1. Detection of recombinant histidine-tagged GFP with Amersham ECL™ and Amersham Hyperfilm ECL, for comparison of protein yields after different induction temperatures (20°C or 37°C) and purification media (HisTrap HP, 1 mL or HiTrap Capto Q, 5 mL on ÄKTA™ explorer). A visual analysis of the results from this purification shows that the highest yield of histidine-tagged GFP was achieved using an induction temperature of 20°C and purification on HiTrap Capto Q.

75
Western
Blo
tting
Han
db
oo
k 20
22
0.4
0.8
1.2
B
A
0.2
0
0.6
1.0
1
pSTAT3
Actin (housekeeping protein)
Relative quantitation of pSTAT3
Lysate sample
pSTA
T3:a
ctin
rat
io
2 3 4 5
1 2 3 4 5
Materials Sample: Lysates from IFN-α-treated and untreated HeLa cellsMarker: Full-Range Rainbow Molecular Weight MarkersMembrane: Amersham Hybond™ P 0.45Blocking solution: Amersham ECL™ Prime Blocking ReagentPrimary antibody: Mouse anti-pSTAT3 (Tyr 705)Secondary antibody: ECL™ Mouse IgG, HRP-Linked Whole Ab
Stripping and reprobingPrimary antibody: Mouse anti-actin Secondary antibody: ECL™ Mouse IgG, HRP-Linked Whole Ab Detection: Amersham ECL™ PrimeImaging: ImageQuant™ LAS 4000 mini (now replaced by Amersham ImageQuant™ 800)Analysis: ImageQuant™ TL 7.0 (now replaced by ImageQuant™ TL 8.2)
Fig 9.2. Amersham ECL™ Prime Western blotting detection of pSTAT3 and actin in cell lysates from untreated- (1) and IFN-α-treated HeLa cells (2 to 5). The result shows IFN-α-induced phosphorylation of STAT3 (A). The levels of pSTAT3 (A) are normalized to the levels of a housekeeping protein, actin (B), to correct for variation in total sample amount loaded. The biological variation of pSTAT3 levels in the samples is relatively quantitated to monitor the changes in STAT3 phosphorylation as a response to IFN-α treatment.
9.1.3 Detection of protein interactions by co-immunoprecipitation and Western blotting
Immunoprecipitation of intact protein complexes is known as co-immunoprecipitation and is a powerful technique for the analysis of interactions between proteins. Co-immunoprecipitation works by selecting an antibody against the protein of interest. Subsequently, the antibody:protein complex is conjugated to a solid support, such as Protein G Mag Sepharose beads from Cytiva. The bead complex is captured and the protein of interest is eluted together with any interacting partners.
A typical application for co-immunoprecipitation is the analysis of cell-signaling proteins following growth factor receptor activation. TAK1, for example, is a serine/threonine protein kinase involved in signaling induced by the activation of transforming growth factor-β (TGF-β) receptors. When stimulated, TAK1 binds and forms a functional kinase complex with a second protein known as TAB1, further propagating signal transduction.
Co-immunoprecipitation was performed on cell lysates from untreated- and TGF-β-treated human prostate cancer cells (PCU3). TAK1 antibody was added to the cell lysate followed by Protein G Mag Sepharose. The beads bound the TAK1 antibody in the cell lysate, and allowed extraction of TAK1/TAB1 complexes. TAK1/TAB1 complex eluted from the beads, as well as total cell lysate, was applied to a gel. TAK1 and the interacting protein, TAB1, were detected in the samples eluted from the beads and in the total cell lysate (Fig 9.3).

76
Western
Blo
tting
Han
db
oo
k 20
22
Materials Sample: Cell lysates from untreated and TGF-β treated PCU3 cellsMarker: Full-Range Rainbow Molecular Weight Markers Membrane: Amersham™ Hybond™ P 0.45Blocking solution: Amersham™ ECL Prime Blocking Reagent
Primary antibodies: (A) Mouse anti-TAK1 (B) Rabbit anti-TAB1 Secondary antibodies: (A) ECL™ Mouse IgG, HRP-Linked Whole Ab (B) ECL™ Rabbit IgG, HRP-Linked Whole Ab
Primary antibodies: (C) Mouse anti-TAK1 (D) Mouse anti-GAPDH Secondary antibodies: (C, D) ECL™ Mouse IgG, HRP-Linked Whole Ab Detection: Amersham™ ECL™ PrimeImaging: ImageQuant™ LAS 4000 (now replaced by CCD-based Amersham™ Imager 680)Analysis: ImageQuant™ TL 7.0 (now replaced by ImageQuant™ TL 8.2)
IP: TAK1WB: TAK1
IP: TAK1WB: TAB1
LysateWB: TAK1
LysateWB: GAPDH
TGF-β+ -
A
B
C
D
Fig 9.3. TAB1 was co-immunoprecipitated with TAK1 in cell lysates from untreated (-) and TGF-β-treated (+) PCU3 cells. Although an endogenous interaction between TAK1 and TAB1 was observed in the PCU3 cells (panels A and B), no TGF-β-dependency was observed in this particular case. Levels of TAK1 expression and GAPDH, a housekeeping protein, were confirmed in the total cell lysate (panels C and D). Data courtesy of Professor Marene Landström, Umeå University, Sweden.
9.2 Fluorescent Western blotting
9.2.1 Multiplex detection for normalizing against total protein
This approach to normalization is more reliable than normalization to housekeeping proteins, since the total protein is minimally affected by cell treatments or culture conditions. The protocol for Cy™5 prelabeling used for total protein normalization is optimized for a linear response over a wide range of protein concentrations, independent of cell type.
In this example, the effect of UV treatment on the level of Bax protein in HeLa cells was studied by using Cy™5 total protein normalization (Fig 9.4). Samples were Cy™5 prelabeled for total protein signals on the membrane and Bax protein was targeted by primary antibody and Cy™3 labeled secondary antibody. The Cy™5 total protein signal showed an increased concentration of protein with increasing UV treatment of the cells. However, a decline in Bax levels was observed after normalization to the total protein.
MaterialsSample: Cy™5 prelabeled 15 µg A431 lysate control and UV treated Marker: Amersham WB molecular weight markersBlocking solution: 3% BSAPrimary antibodies: Rabbit anti-PP2A 1:750Secondary antibodies: Amersham Cy™3 labeled goat anti-rabbit 1:2500
03 4 5 6 7 8 9 10
500
1000
1500
2000
Targ
et v
olum
e
2500
3000
03 4 5 6 7 8 9 10
2
4
6
8
Con
trol
vol
ume
(×10
4 )
10
12
03 4 5 6 7 8 9 10
0.01
0.02
0.03
0.04
Nor
mal
ized
rat
io
0.05
Cy™3Bax target
Cy™5Total protein
Cy™3/Cy™5Normalized ratio
HeLa cell lysate,~ 20 µg per well
UV treatment
Fig 9.4. Changes in Bax levels in HeLa cells in response to UV treatment were investigated with Western blotting and total protein normalization. Samples were Cy™5 prelabeled for total protein signals on the membrane and Bax protein was targeted by primary antibody and Cy™3 labeled secondary antibody. A decline in Bax levels was observed after normalization to the total protein.

77
Western
Blo
tting
Han
db
oo
k 20
22
9.2.2 Multiplexed detection for normalizing against a housekeeping protein
When working with chemiluminescent Western blotting, it is often necessary to strip and reprobe the membrane if you want to normalize detected protein levels against a housekeeping protein. The stripping procedure, however, carries a risk of uneven loss of proteins. With Amersham™ ECL™ Plex™, stripping and reprobing are no longer required, due to the possibility of multiplexed detection — the detection of the target protein using one CyDye™ and the housekeeping protein with a different CyDye™.
In the following example, the activation of ERK1/2 was studied in the lysates of wildtype and knockout fibroblasts treated with fibroblast growth factor-2 (FGF-2). The lysates were run on a gel, and after blotting, the membrane was simultaneously probed with mouse anti-ERK1/2 and rabbit anti-GAPDH, followed by Amersham ECL™ Plex™ anti-mouse Cy™5 and Amersham™ ECL™ Plex anti-rabbit Cy™3. Although protein quantitation analysis indicated that a similar amount of total protein was loaded in each lane, the intensity of the signals emitted due to detection of the housekeeping protein, GAPDH, clearly showed that this was not the case (Fig 9.5). Without relating to the GAPDH levels, no significant pattern of ERK1/2 activation related to wildtype and knockout cells was seen. However, when normalized against GAPDH signals, ERK1/2 levels were shown to be increased in knockout cells after stimulation with 2 and 4 ng/mL of FGF-2.
Materials Sample: Cell lysates from FGF-2-treated wildtype (+/+) and knockout (-/-) mouse embryonic fibroblasts Marker: ECL™ Plex™ Fluorescent Rainbow MarkersMembrane: Amersham Hybond™ LFP 0.2Blocking solution: Amersham ECL™ Prime Blocking ReagentPrimary antibodies: Rabbit anti-MAP kinase ERK1/2 Mouse anti-GAPDHSecondary antibodies: ECL™ Plex™ goat anti-rabbit Cy™5 ECL™ Plex™ goat anti-mouse Cy™3 Detection: Amersham ECL™ PlexImaging: Typhoon™ laser scanner (now replaced by Amersham Typhoon™)Analysis: ImageQuant™ TL 7.0 (now replaced by ImageQuant™ TL 8.2)
6
5
4
3
2
1
01 2 3 4
Sample
Rat
io E
RK
1/2
: G
AP
DH
ERK 1/2 (Cy™5)
Genotype:
FGF-2 (ng/mL)
+/+ –/– +/+ –/–
GAPDH (Cy™3)
2 4
Fig 9.5. By detecting two proteins on the same blot, protein expression can be quantitated relative to a housekeeping protein such as GAPDH. This image shows Amersham ECL™ Plex™ detection of ERK 1/2 in wildtype (+/+) and knockout (-/-) mouse embryonic fibroblasts in response to treatment with FGF-2. ERK1/2 (Cy™5) and GAPDH (Cy™3) were targeted using specific primary antibodies followed by secondary ECL™ Plex™ Cy™5 and Cy™3 antibodies. The expression levels of ERK1/2 after FGF-2 stimulation is revealed after normalization to GAPDH, as illustrated in the diagram. Data courtesy of Dr. Jin-Ping Li and Dr. Juan Jia, Department of Medical Biochemistry and Microbiology, Uppsala University, Sweden.
Fig 9.6. Detection, using Amersham ECL™ Plex™, of low-abundance phosphorylated Akt protein and total Akt protein in PCU3 cells after stimulation with TGF-β. Despite the minimal change in molecular weight as a result of phosphorylation, the duplex capability of Amersham ECL™ Plex™ enables a clear distinction between the two forms of the protein. Note the complete absence of signal in the Cy™3 channel for the sample treated with kinase inhibitor, LY. Data courtesy of Marene Landström, Ludwig Institute for Cancer Research, Uppsala, Sweden.
9.2.3 Multiplexed detection of proteins with similar molecular weights
The multiplexing potential of Amersham ECL™ Plex™ is particularly powerful when it comes to visualizing proteins of similar size and PTMs, while simultaneously monitoring expression of the unmodified form of the protein. In addition, if the protein of interest is predicted to be expressed at very low levels, it is important to avoid the sample loss and reduction of protein activity inherent in the aggressive process of membrane stripping.
In the following example, the phosphorylation of tyrosine residues on Akt protein was analyzed after stimulation of cancer cells with TGF-β. PCU3 cell lysates were first separated on a Tris-glycine gel. Proteins were then transferred to an Amersham™ Hybond™-LFP membrane (now replaced by Amersham Hybond™ LFP 0.2). After blocking, the membrane was probed with mouse anti-Akt and rabbit anti-phosphoAkt primary antibodies, followed by secondary Amersham ECL™ Plex™ anti-mouse Cy™5 and Amersham™ ECL™ Plex™ anti-rabbit Cy™3.
An increase in tyrosine phosphorylation of Akt was seen after stimulation with TGF-β. The results demonstrate how multiplexed detection with Amersham ECL™ Plex™ enables two epitopes on a single protein to be identified and simultaneously quantitated on a single Western blot (Fig 9.6).
Materials Sample: PCU3 cell lysateMarker: ECL™ Plex™ Fluorescent Rainbow MarkersMembrane: Amersham Hybond™-LFP (now replaced by Amersham Hybond™ LFP 0.2)Blocking solution: Amersham ECL™ Prime Blocking ReagentPrimary antibodies: (1) Mouse anti-Akt (2) Rabbit anti-phosphoAktSecondary antibodies: (1) ECL™ Plex goat anti-mouse Cy™5 (2) ECL™ Plex goat anti-rabbit Cy™3 Detection: Amersham ECL™ Plex™Imaging: Typhoon™ laser scanner (now replaced by Amersham Typhoon™)Analysis: ImageQuant™ TL 7.0 (now replaced by ImageQuant™ TL 8.2)
5 - 15 TGF-β stimulation time: 30 60 120 24
min h
AktCy™5
Phosphorylated AktCy™3
- - - - - - - + LY (inhibitor):
Cy™3/Cy™5

78
Western
Blo
tting
Han
db
oo
k 20
22
9.2.4 Triplexed detection: The simultaneous detection of three proteins
Imagine you have to study the expression of two proteins of interest, for example, a protein with and without a PTM such as phosphorylation, normalized to a housekeeping protein on the same blot. This application demands the use of three fluorophores, for example Cy™2, Cy™3, and Cy™5. On excitation with light of the appropriate wavelength, each of these fluorophores will emit light at its own discrete, characteristic wavelength. In addition, it is necessary that the primary antibodies used to detect each of the three targets are raised in different species and that the secondary antibodies do not significantly cross-react between these species. Analysis using Amersham™ ECL™ Plex™ enables the simultaneous detection of two targets in a sample using different CyDye™ labeled goat anti-mouse and goat anti-rabbit secondary antibodies. The antibody directed against the third target, however, must be directly labeled with a third fluorophore by the user.
Triplexed detection is particularly suited for the detection of minute changes in PTMs. For example, as part of a study on the effect of irradiation on cells, three proteins, ERK, phosphorylated ERK, and the housekeeping protein GAPDH, were simultaneously detected using primary antibodies raised in three different species. Two of the conjugated secondary antibodies (ECL™ Plex™ anti-mouse Cy™3 and ECL™ Plex™ anti-rabbit Cy™2) are commercially available from Cytiva. Cy™5, on the other hand, was directly conjugated to anti-GAPDH primary antibody (Fig 9.7). For information on how to perform this labeling step, see Chapter 11.
Materials Sample: Cell lysates from non-irradiated (C) and irradiated (T) HeLa cellsMarker: ECL™ Plex™ Fluorescent Rainbow MarkersMembrane: Amersham Hybond™-LFP (now replaced by Hybond™ LFP 0.2)Blocking solution: Amersham ECL™ Prime Blocking ReagentPrimary antibodies: (1) Rabbit anti-MAP kinase (ERK1-ERK2) (2) Mouse anti-phospho-ERK (3) Cy™5-conjugated goat anti-GAPDH Secondary antibodies: (1) ECL™ Plex™ goat anti-rabbit Cy™2 (2) ECL™ Plex™ goat anti-mouse Cy™3 Detection: Amersham™ ECL™ PlexImaging: Typhoon™ laser scanner (now replaced by Amersham Typhoon™)Analysis: ImageQuant™ TL 7.0 (now replaced by ImageQuant™ TL 8.2)
C = Control (nonirridiated)
T = Treated (irradiated)
ERK
pERK
GAPDH
Overlay
C T
ECL™ Plex™ Cy™2
ECL™ Plex™ Cy™3
Cy™5 labeledprimary antibody
Cy™2/Cy™3/Cy™5
1
2
3
Fig 9.7. Quantitative triplex analysis of a cell lysate of HeLa cells labeled with antibodies to ERK, pERK and GAPDH. Ultraviolet irradiation is shown to induce only a small increase in native ERK, but a significant increase in phosphorylated ERK. In the same experiment, levels of the housekeeping protein, GAPDH, were monitored without the need to strip and reprobe the membrane. In a single experiment, three different parameters were thus simultaneously detected.
Triplex protein detection with total protein normalization. Different amounts of CHO cell lysate were loaded on an SDS-PAGE gel for Western blot detection. ERK and GAPDH were detected using the 532 nm and 785 nm lasers respectively. Amersham™ QuickStain™ labeled total protein for normalization was detected using the 685 nm laser.
Sample CHO cell lysateGel SDS-PAGE 8-18%Membrane Amersham Hybond™ P 0.45 PVDFDetection Primary antibodies Rabbit anti-ERK Mouse anti-GAPDH Secondary antibodies ECL™ Plex™ Cy3 GAR Alexa Plus 800 GAM Total protein stain Amersham™ QuickStain™Imaging Excitation Emission Filter 532 nm Cy™3 570BP20 (green) 685 nm IRshort 720BP20 (red) 785 nm IRlong 825BP30 (blue)

79
Western
Blo
tting
Han
db
oo
k 20
22
9.2.5 Three-layer Western blotting for signal amplification
For the detection of extremely low-abundant proteins and other weak signals, three-layer fluorescent Western blotting is a good option.
In this technique, primary antibodies are used to probe proteins on a membrane. Biotin-labeled, species-specific secondary antibodies are then applied, followed by a third layer, usually streptavidin conjugated with HRP or a fluorophore (Fig 9.8).
Antigen on membrane
HRP-conjugated streptavidin Fluorophore-conjugated streptavidin
Strep
Strep
Stre
p
Strep
B
Strep
Strep
Stre
p
Strep
BBiotin-conjugated secondary antibody
Primary antibody
Strep
Stre
p
Strep
Strep
B
Strep
Strep
Stre
p
Strep
B BB
Strep
Strep
Stre
p
Strep
Strep
Stre
p
Strep
Strep
B
B
= biotin
= HRP
= streptavidin
= fluorophore
B
Fig 9.8. The principle of three-layer fluorescent Western blotting, where the secondary antibody is labeled with biotin. A third layer of streptavidin conjugated with an enzyme, such as HRP (left) or a fluorophore, such as a CyDye™ (right) as the detection reagent leads to a significant increase in sensitivity compared with two-layer detection.
This approach is a particularly effective way to increase sensitivity over two-layer detection and is illustrated in the following example on the expression of ERK protein in cancer cells. ERKs are members of the mammalian MAP kinase family. They are known to activate many transcription factors, as well as other protein kinases. Disruption of the ERK signaling pathway is a common feature of many cancers. As they are expressed transiently and at very low concentrations, their detection thus requires a highly sensitive system.
The Western blotting analysis of a dilution series of 3T3 mouse fibroblast cell lysates was performed targeting ERK and the housekeeping protein, GAPDH (Fig 9.9). In this case, comparison of the differences in integrated signal intensity showed an approximately 15-fold increase in signal intensity when using three-layer detection with Cy™5-labeled streptavidin compared with two-layer detection. This increased sensitivity is expedient when detection of very low protein abundance is desired.
Fig 9.9. Western blotting analysis of a two-fold dilution series of 3T3 mouse fibroblast cell lysates. ERK1/2 (red) and GAPDH (green) were targeted by multiplexed fluorescent Western blotting. ERK1/2 was measured by using standard two-layer Amersham ECL™ Plex™ (left) and three-layer detection with Cy™5-labeled streptavidin (right). A comparison of the differences in integrated signal intensity showed an approximately 15-fold increase in signal intensity when using three-layer detection with Cy™5-labeled streptavidin compared with two-layer detection. Note that the GAPDH Cy™3 signal (green) is almost identical using both methods. The effect of introducing a third layer of detection was shown to improve sensitivity and is thus an option for the detection of very low- abundance proteins.
Materials Sample: 3T3 cell lysatesMarker: Full-Range Rainbow Molecular Weight MarkersMembrane: Amersham Hybond™ LFP 0.2 Blocking solution: 5% BSAPrimary antibody: Rabbit anti-ERK 1/2 Mouse anti-GAPDHSecondary antibodies: ECL™ Plex™ goat anti-rabbit IgG Cy™5, ECL™ Plex™ goat anti-mouse IgG Cy™3 Biotin-conjugated donkey anti-rabbit IgGThird layer reagents: Cy™5-conjugated streptavidinDetection: Amersham ECL™ PlexImaging: Typhoon™ laser scanner (now replaced by Amersham Typhoon™)Analysis: ImageQuant™ TL 7.0 (now replaced by ImageQuant™ TL 8.2)
Two-layer standard approach Three-layer approach
ERK 1/2 (Cy™5)
GAPDH (Cy™3)
Layer 1 Rabbit anti-ERK1/2 Rabbit anti-ERK1/2
Layer 2 ECL™ Plex™ goat anti-rabbit IgG Cy™5 Biotin conjugated donkey anti-rabbit IgG
Layer 2 Cy™5-conjugated streptavidin

80
Western
Blo
tting
Han
db
oo
k 20
22
9.2.6 Two-dimensional (2D) Western blotting for detection of phosphorylated isoforms
2D Western blotting analysis is particularly beneficial for complex analyses when high resolution is needed.
In this example, phosphorylation sites on glucogen synthase kinase 3β (GSK3β) were characterized by quantitative multiplexed analysis of PCU3 cells using Amersham™ ECL™ Plex™. Cell lysates were separated by isoelectric focusing (first-dimension separation according to charge) and then by SDS-PAGE (second-dimension separation according to size). Following blotting, the membranes were probed with mouse anti-GSK3β and a rabbit antibody to its phosphorylated counterpart, pGSK3β. The membranes were then probed using ECL™ Plex™ goat anti-mouse IgG-Cy™3 and ECL™ Plex™ goat anti-rabbit IgG-Cy5.
Each additional phosphate group on GSK3β induces a measurable change in migration. The 2D Western blotting experiment gave additional information on phosphorylation states compared to 1D Western blotting (Figs 9.10 and 9.11). The band corresponding to phosphorylated GSK3β (Mr 48 000) in the 1D experiments was resolved into at least five distinct protein isoforms, two of which were phosphorylated on serine 9. For more detailed information on methods, see reference 1.
Materials Sample: PCU3 cell lysateImmobilized pH gradient (IPG) strip: Immobiline Dry Strip pH 7–11 NL, 7 cm Membrane: Amersham Hybond™ P 0.45Blocking solution: Amersham ECL™ Prime Blocking ReagentPrimary antibodies: Mouse anti-GSK3β Rabbit anti-pGSK3βSecondary antibodies: ECL™ Plex™ anti mouse IgG-Cy3 ECL™ Plex™ anti rabbit IgG-Cy5Detection: Amersham ECL™ Plex™Imaging: Typhoon™ laser scanner (now replaced by Amersham Typhoon™)
A B C
pGSK3β (Ser9)
GSK3βpGSK3β
pGSK3α
GSK3β
GSK3α
A B C
Fig 9.12. Green/red-overlay image of a two-dimensional difference gel electrophoresis (2D-DIGE) gel with control and treated samples, and internal standard. The control and treated samples were labeled with Cy™3 and Cy™5 DIGE Fluors minimal dye labeling protocol. The internal standard sample was labeled with Cy™2 DIGE Fluor. The data sets were evaluated using the Melanie™ 2D analyis software, see Fig 15 and 16.
Fig 9.11. ImageQuant™ 800 system used for validating host cell protein (HCP) ELISAs with coverage assays, an essential part of biologics risk management. Coverage analysis by 2D differential in blot electrophoresis (DIBE™ technology) uses CyDye™ labeled HCPs and bound anti-HCP antibodies visualized through a CyDye™ secondary detection reagent. The HCPs and bound antibodies are detected in distinct channels on the same membrane, which reduces risk of misinterpretation and improves accuracy. Comparing the anti-HCP antibody signal to the total HCP present by identifying the matching spots provides an estimate of antibody-to-HCP coverage.
Sample: CHO cell lysate
Membrane: PVDF 0.45 µm pore size
Primary Ab: DIBE™ CHO K1 HCP antibody 1:2000
Blocking: DIBE™ blocking buffer
Detection reagents: DIBE™ detection reagent Cy™5 1:10 000
Imaging method: Fluorescence Cy™3 and Cy™5 manual mode
Binning: 1×1
Fig 9.11. 2-D Western blotting analysis of native and phosphorylated GSK3β detected using Amersham™ ECL™ Plex™. (A) Cy™3 image, (B) Cy™5 image, (C) Overlay of Cy™3 and Cy™5 images. Green image = ECL™ Plex™ Cy™3-conjugated secondary antibody to primary antibody targeted against GSK3β protein (green). Red image = ECL™ Plex™ Cy™5-conjugated secondary antibody to primary antibody targeted against phosphorylated GSK3β protein (pGSK3β).
Fig 9.10. 1D Western blotting scans of (A) ECL Plex Cy™3-conjugated secondary antibodies against primary antibodies to GSK3β. (B) ECL™ Plex™ Cy™5-conjugated secondary antibodies against primary antibodies to phosphorylated GSK3β, (C) Overlay of A and B.
Sample 1 - Cell lysate of E. coli 2 - Cell lysate of E. coli treated with benzoic acid
IPG strips 3 - 10 NL, 24 cmGel Precast low-fluorescent DIGE™ gelImaging Excitation Emission filter
488 nm Cy™2 525BP20532 nm Cy™3 570BP20635 nm Cy™5 670BP30
Sample 1 - Cell lysate of E. coli 2 - Cell lysate of E. coli treated with benzoic acid
IPG strips 3 - 10 NL, 24 cmGel Precast low-fluorescent DIGE™ gelImaging Excitation Emission filter
488 nm Cy™2 525BP20532 nm Cy™3 570BP20635 nm Cy™5 670BP30
More detail about the application content in this section is found in reference 1.

81
Western
Blo
tting
Han
db
oo
k 20
22
9.3 Reference1. Application note: Multiplex protein detection in 2D gel electrophoresis using the Amersham ECL Plex
fluorescent Western blotting system, GE Healthcare, 28904234.
Fig 9.13. Example of a DIGE experiment analyzed with Melanie™ 8 (version 8.0.1) software. The effect of benzoic acid treatment on the Escherichia coli proteome was examined. Four replicates each were prepared for the control (blue) and benzoic acid-treated (green) samples, for a total of 8 different samples run on 4 gels. A pooled internal standard was included as a third sample on each gel. The experimental design view (top left) indicates that dye was used as a blocking factor in the statistical analysis. The dye-corrected estimates of the ANOVA p-values further improve the ability to detect subtle but true differences in protein expression, even for overlapping spots. This is shown by the 3D views of the illustrated protein spot and the corresponding expression profile (middle left).

Western
Blo
tting
Han
db
oo
k 20
21
Troubleshooting10
82

83
Western
Blo
tting
Han
db
oo
k 20
22
10.1 General handling proceduresvery sensitive detection system that is nevertheless able to measure a wide range of protein quantitiesDo not handle membranes with fingers, use forceps
Set up blotting sandwich tight to avoid streaking/smearing
Do’s and Don’ts
DO DON’T
Use HQ filter paper during transfer to avoid artifacts Don’t forget sponges and filter paper
Clean blotting equipment after every usage Do not rip the gel

84
Western
Blo
tting
Han
db
oo
k 20
22
Do’s and Don’t’s: Fluorescence
DO DON’T
Use powder-free gloves Use clean containers, no Coomassie™
Do not write on the membrane with pen, use pencil/cut corners
No contaminations & autofluorescent substances• CoomassieTM• TritonTM X-100• BPB (better: Orange G)
• Low grade EtOH• Dry membrane before imaging

85
Western
Blo
tting
Han
db
oo
k 20
22
Table 10.1. Troubleshooting guide to common problems in Western blotting
Symptom Possible cause Remedy
Problems associated with transfer
Very little protein on membrane after transfer
Insufficient contact between gel and membrane
• Make sure the blotting unit is properly assembled, closed and sealed prior to transfer
• After transfer, stain the gel with total protein stain to determine transfer efficiency or work with prestained molecular weight markers to directly monitor successful transfer
• After transfer, stain a strip of membrane with a total protein dye (see 4.4.1), or alternatively use a reversible stain on the whole membrane
• Replace fiber pads in the blotting assembly as they can become compressed with time
• Use thicker filter papers in the blotting sandwich cassette
Wrong orientation of gel and membrane with respect to the anode (+)
• Place a membrane on both sides of the gel
• Check that electrical connections are properly connected and in correct sequence
• Be aware of the orientation when assembling the sandwich: the membrane should lie on the anode (+) side of the gel
Target masked by another protein, such as IgG or albumin
• Deplete these proteins
Protein band smeared across the membrane
Excessive heat generated during transfer For wet transfer:
• Make sure the tank contains sufficient buffer to cover the blotting cassette. This prevents temperature gradients across the gel
• Prechill the transfer buffer and carry out the transfer in a cold room
• Use a cooled recirculating water bath, if possible. Alternatively, you can reduce the current or voltage and perform transfer for a longer time
• For semidry transfer:
• Either shorten the run time, increase the number of filter papers in the stack, or reduce the current - never exceed the golden rule of 0.8 mA/cm2
Poor sample preparation leaving unwanted components, such as lipids, DNA, or excessive quantities of proteins, such as IgG or albumin that can mask the target protein
• Optimize the sample preparation procedure - there are different types of sample preparation products for cleanup, depletion, and removal of DNA (see Chapter 2 or refer to the Protein Sample Preparation Handbook from GE) (1)
Gel/membrane distortion or poor electrophoretic separation of proteins
• Increase equilibration time of the resolving gel in transfer buffer
• Avoid unnecessary movement of component parts during assembly and handling of the stack (filter paper, gel, membrane, sponges)
86
Western
Blo
tting
Han
db
oo
k 20
22
Symptom Possible cause Remedy
Poor transfer of small proteins Insufficient protein retention • Optimize transfer times using relevant molecular weight markers
• Use a polyvinylidene fluoride (PVDF) membrane, which has a higher protein binding capacity than nitrocellulose membranes
• Use a higher percentage or gradient polyacrylamide gel to help retain proteins during equilibration and transfer
• Use a membrane with pore size of 0.2 μm
• Use two membranes, one on top of the other, to avoid the risk that proteins pass all the way through without binding
Traces of sodium dodecyl sulfate (SDS) in the gel interfere with the binding of small molecular weight proteins to membranes
• Equilibrate the gel in transfer buffer for at least 15 min
• Do not use SDS in transfer buffer
Concentration of methanol in transfer buffer is too low to remove SDS
• Use a higher percentage of methanol (15% to 20%)
Insufficient protein binding time • A lower voltage might improve binding of small proteins to the membrane
Poor transfer of large proteins Methanol concentration is too high • Reducing the methanol concentration to 10% (V/V) or less should help in the transfer of high molecular weight proteins
Insufficient protein binding time • Increase transfer time to increase binding
• Use wet transfer as this is more efficient than semidry transfer for large proteins
Proteins are trapped in the gel as a result of high acrylamide concentration
• Reduce percentage of acrylamide in the gel to improve the resolution of large proteins
• Add 0.1% SDS to transfer buffer, although this will reduce the efficiency of binding to nitrocellulose membranes Note: Although SDS can improve transfer of large proteins, this sometimes results in deactivation of antigen-binding sites
Poor transfer of positively charged proteins The net charge of the proteins in the transfer buffer is positive; proteins migrate to the cathode (-)
• Reverse the transfer stack so that the membrane is on the cathode (-) side of the gel
Poor semidry transfer Current bypasses the gel • Make sure the membrane and the blotting paper are cut exactly to the gel size and that there are no overlaps
Incomplete hydration of membrane Poor transfer, uneven background, uneven transfer
• Ensure the entire membrane is thoroughly prewetted and equilibrated in transfer buffer before assembly in the blotting apparatus
• PVDF membranes should be prewetted in methanol before use with aqueous solutions (see 10.2) - the entire membrane should change uniformly from opaque to semitransparent Note: PVDF membranes must be kept wet at all times. If the membrane is allowed to dry out, repeat the entire wetting procedure
Uneven transfer results Air bubbles under the membrane or between layers in the stack
• To avoid air bubbles trapped in the interior of the membrane, prewet the membrane by carefully laying it on the surface of the methanol (see 10.1) - immersing the membrane can entrap air
• Use a clean pipette to roll out any air bubbles between the gel and the membrane to ensure close contact
Finger contamination • Avoid touching the membrane. Always wear gloves and use blunt-ended forceps (see 10.3)
Areas of the membrane might have dried • Avoid drying of the membrane

87
Western
Blo
tting
Han
db
oo
k 20
22
Symptom Possible cause Remedy
Problems associated with labeling and detection
Weak signal Wrong blocking agent, which might have strong affinity for the protein of interest
• Try a different blocking solution with lower blocking agent concentration
• Do not use a blocking agent with potential phosphatase activity, such as crude protein, if analyzing phosphorylated protein
• Check the compatibility between the blocking agent and detection reagents by using the dot-blotting method (see Chapter 5 and 11.9.1 and 11.9.2)
• Do not use a blocking agent that can interfere with the target protein or the antibodies used - be aware that milk contains many different proteins and the amounts can vary between batches
• Do not use milk as blocking agent when working with biotin/streptavidin
• Reduce the detergent concentration - usually, 0.05% to 0.1% Tween-20 or SDS are sufficient to reduce a high background without adversely affecting the specific signal
• For monoclonal or highly purified antibodies, detergent-free buffer is preferable
• Determine experimentally the number of washes required to optimize signal-to-noise ratio
• Do not use a phosphate-containing buffer, such as phosphate-buffered saline (PBS), if analyzing phosphorylated proteins
Antibody/antigen are masked by over-blocking
• Do not block for more than 1 h at room temperature. If longer blocking time is required, keep the membrane at 4°C
Short exposure time • Extend the exposure time if using a CCD camera-based imager or X-ray film. Some CCD camera-based imagers have auto exposure and/or increment exposure functions that can be useful if the optimal exposure time is unknown
Insufficient antibody reaction time and incorrect temperature
• Incubation at room temperature increases specific- as well as nonspecific signals, resulting in high background (see 10.1) if the reaction time is too long
• If incubation is carried out at 4°C, leave enough time (12 to 16 h) for the antibody to react with the blotted protein
Excessive or robust washing • Use a milder washing procedure
Inactive antibody • Ensure that your primary antibody is of sufficient specificity for your protein; perform a dot-blot test before the full Western blotting analysis (see Chapter 11)
Low antibody concentration • Optimize the antibody concentration (see Appendix)
Primary antibody not suitable for Western blotting
• Check manufacturers' instructions to ensure that the antibody has been approved for Western blotting
• Perform a dot-blot for testing the antibody
• If necessary, change the antibody
Weak signal Secondary antibody inhibited by sodium azide
• If using a horseradish peroxidase (HRP)-based detection system, make sure the antibody solution does not contain sodium azide, a common preservative
Outdated or incorrectly stored detection reagents
• Pay attention to manufacturers’ indications of expiry date for antibodies, other detection reagents, and storage conditions
Insufficient protein loaded or low amount of target protein in the sample
• Titrate your protein sample to make sure that you load enough protein onto the gel
• Before Western blotting analysis, perform a dot-blot with your protein sample to make sure that you see a signal (see Appendix)
• Check that the protein assay is compatible with the buffer to ensure that the correct amount of protein is measured
• Load more sample or enrich the target proteinNo signal Weak signal Faint bands after a long exposure
Uneven spotted background High background
White bands on film Excessive, diffuse signal
Air bubbles trapped between the blotting paper, gel, and membrane hinder protein transfer and cause“bald spots” (areas of nontransfer) to appear

88
Western
Blo
tting
Han
db
oo
k 20
22
Symptom Possible cause Remedy
No signal Low antibody concentration • Optimize antibody concentrations (see Appendix)
Wrong species of secondary antibody • Ensure the secondary antibody is directed against the species in which the primary antibody was raised
Inhibition of HRP • HRP can be inhibited by sodium azide in antibody solutions or water. If so, strip and reprobe using antibodies diluted in azide-free buffer
Antibody was raised against native protein • Ensure that the antibody you use is validated for Western blotting applications and recognizes the form of the protein present in your samples. For example, an antibody raised against a native protein might not bind the denatured form
• If necessary, strip the membrane (see 5.3) and reprobe using a suitable antibody (check using dot-blot see 11.9.1 and 11.9.2 or Western blotting, see 11.1)
Primary and secondary antibodies not compatible
• Make sure the secondary antibody is directed against the species in which the primary antibody was raised
Dysfunctional detection reagent • Detection reagents can be inactivated by cross-contamination - in the dark room, check the reagents by adding 1 μL of HRP-labeled antibody or similar reagent to a small quantity of prepared ECL detection reagents (blue light should be visible if functioning correctly, see Chapter 11)
Target protein not present at detectable levels
• Use a positive control to test the blotting procedure
White bands (ECL detection) Excessive signal generated • Reduce antibody or protein concentration as excessive quantities can cause extremely high levels of localized signal (usually at a single band), leading to rapid, complete consumption of substrate at this point. As no light can be generated after the completion of this reaction, white bands appear when exposed
High background Nonspecific protein binding to the membrane
• Increase the concentration of the blocking reagent and/or blocking time
• Ensure that equipment and components are clean and free of residues from previous transfers
• Use only high quality water for your buffers and reagents
Insufficient washes • Increase number of washing steps and volume of the washing buffer
• Add 0.1% (V/V) Tween-20 to washing buffer Note: Increasing concentration of Tween-20 might improve the background but can also affect the binding of the antibody
• Increase the times of the wash steps
• Ensure adequate movement of the washing buffer over membrane – use a tilting table or a suitably designed blot processor
Wrong detergent concentrations in buffers • 0.05% to 0.1% Tween-20 is commonly used in washing buffer
Insufficient blocking • Ensure appropriate blocking conditions are being used for the application and detection system in use
• Use another blocking agent
• Use freshly prepared blocking agent that is fully dissolved
• Increase the concentration of blocking agent in the working antibody solution
• Increase the blocking incubation time and/or temperature
• Between 1% and 10% of blocking agent is usually used for blocking but you can slightly increase the concentration to improve the signal-to-noise ratio
• Soaking the membrane for 1 h at 37°C can solve some persistent background issues - as a rule, a blocking time of 2 h should not be exceeded
No signal Weak signal Faint bands after a long exposure
Uneven spotted background High background
White bands on film Excessive, diffuse signal
Air bubbles trapped between the blotting paper, gel, and membrane hinder protein transfer and cause“bald spots” (areas of nontransfer) to appear
No signal Weak signal Faint bands after a long exposure
Uneven spotted background High background
White bands on film Excessive, diffuse signal
Air bubbles trapped between the blotting paper, gel, and membrane hinder protein transfer and cause“bald spots” (areas of nontransfer) to appear
No signal Weak signal Faint bands after a long exposure
Uneven spotted background High background
White bands on film Excessive, diffuse signal
Air bubbles trapped between the blotting paper, gel, and membrane hinder protein transfer and cause“bald spots” (areas of nontransfer) to appear

89
Western
Blo
tting
Han
db
oo
k 20
22
Symptom Possible cause Remedy
High background (see 10.1) High concentration of secondary antibody • It is important to follow manufacturers’ instructions for antibody dilutions, ranging usually from 1:100 to 1:500 000
• For improved results, optimize the antibody concentrations (Appendix)
Protein:protein interactions • Before starting Western blotting analysis, test for the occurrence of interactions between the target protein and proteins used for blocking on a dot-blot - store all reagents properly
Poor quality reagents • Follow manufacturers’ instructions, and take heed of the expiry date of antibodies - old antibodies can lead to high background
Cross-reactivity between blocking agent and antibodies
• Test cross-reactivity by performing a dot-blot on a blocked membrane free of blotted proteins - a signal indicates that you should change blocking agent
Poor quality antibodies • Use high quality, affinity purified antibodies (see Chapter 11)
Bad resolution Poor gel quality • Use fresh gels - do not used expired gels, gels that have dried out, or incorrectly stored gels
High background (see 10.1) Overexposure of detected blots • Expose the film for the minimum period of time.
• Use the autodetection feature if using a charge-coupled device (CCD) camera-based imager. Alternatively, expose initially for a short period of time and then select the optimal exposure time based on the signal intensity after the short exposure
• When using light-based detection, leave the blots for several minutes before re-exposing film to allow the signal to decay - an extended period might be required with alkaline phosphatase (AP)-based chemiluminescence systems
• Titrate the antibodies and/or reduce the protein load applied to the gel
Film expiry date exceeded • Ensure that films are stored according to the manufacturers’ recommendations and that the expiry date has not been exceeded - change the film if required
Darkroom not lightproof • In cases of persistent background, ensure that the darkroom is fully light-proof and use a suitable safe light
Nonspecific binding High primary antibody concentration • Optimize antibody concentrations (see Appendix)
High secondary antibody concentration • Optimize antibody concentrations (see Appendix)
High antigen concentration • Decrease amount of protein loaded on the gel
Unexpected low bands • In order to avoid protein degradation or proteolysis, minimize time between sample preparation and electrophoresis
• Use only fresh samples kept on ice to avoid degradation
• Use protease inhibitors to avoid the activation of proteases
• Use an alternative antibody to avoid cross-reactivity with other proteins sharing similar epitopes
• There are several splice variants of your protein
• Under SDS reducing conditions, protein subunits can be detected – if possible, check the structure of the protein from the literature – the unexpected bands might not be artifacts!
Unexpected high molecular weight bands • Use agents that remove post-translational modifications (PTMs) and cause a molecular weight shift of your target protein
Primary antibody is binding nonspecifically to other proteins
• Use more stringent washing, alter high salt and low salt concentration in wash buffer

90
Western
Blo
tting
Han
db
oo
k 20
22
Symptom Possible cause Remedy
Nonspecific binding Unexpected bands at very high molecular weights
• To avoid dimer interactions of proteins, use only fresh dithiothreitol (DTT) or β-mercaptoethanol
• Denature your protein sample by heating before loading on the gel
Multiple bands with different molecular weights
• Use high quality antibodies prepared for Western blotting, optimize antibody concentration (Appendix)
• Use a negative control to check for crossreactions
Distorted results Fingerprints, fold marks, or forcep imprints on the blot
• Avoid touching the membrane (always wear gloves and use blunt ended forceps) - this form of contamination can be a particular problem when using Amersham ECL Plex
• Use containers free of residual protein stains such as Coomassie Brilliant Blue
Air bubbles trapped between sample and film (see 10.1)
• Ensure the film is in close contact with sample - if necessary, expel air bubbles by rolling a pipette over the membrane wrapped in plastic wrap
• Firmly close the cassette for film exposure
Speckled background Aggregates in the blocking agent • Ensure the blocking agent is completely dissolved in the buffer - if necessary, warm the solution slightly and mix well
• Ensure the membrane is fully immersed throughout the incubations
Aggregates in HRP-conjugated secondary antibody
• Filter the conjugate through a 0.2 μm filter
• Use a new, high quality conjugate
Exposure equipment not clean or adequate • If local blackening occurs, ensure that the cassette is clean
• Avoid adhesive tape
• Keep the sample as dry as possible, avoid condensation
• If using autoradiography or fluorescence detection, allow the cassette to reach room temperature before removing the film after exposure at -70°C
No signal Weak signal Faint bands after a long exposure
Uneven spotted background High background
White bands on film Excessive, diffuse signal
Air bubbles trapped between the blotting paper, gel, and membrane hinder protein transfer and cause“bald spots” (areas of nontransfer) to appear

91
Western
Blo
tting
Han
db
oo
k 20
22
Symptom Possible cause Remedy
Problems associated with with fluorescence detection
High background High background fluorescence from the blotting membrane
• Use low fluorescence membranes such as Amersham Hybond LFP 0.2 (PVDF) or Amersham Protran and Protran Premium (nitrocellulose) for fluorescence-based detection techniques
• Make sure that the bromophenol blue front is cut from the gel before transfer as this dye is fluorescent
• Make sure to use clean incubation trays that have not previously contained stains, such as Coomassie Blue
• Use Tween-20 as other detergents might not compatible with the Cy3 channel
• The final washes should be in PBS or TBS without detergent
Multiplexing problems Experimental design • Ensure that the secondary antibodies can differentiate the species-specific primary antibodies
• The membrane should be properly dried before scanning
Speckled background Dust or powder particles on the surface of the blot
• Ensure that all material is perfectly clean and free of fluorescent contaminants
• Wipe the surface of the scanner with 70% ethanol followed by deionized water before imaging or, alternatively, follow manufacturers’ recommendations for cleaning the surface before and after use
• Do not handle the membranes with your fingers - use clean forceps and wear powder-free gloves
Polyacrylamide gel left on membrane • Carefully remove gel fragments
Ballpoint pen used on membrane (see 10.3) • Label your membrane by cutting the corners
Low signal Wet blot • Use a low-fluorescence membrane
• Skip the blocking step and instead dry the membrane directly after transfer for at least 2 h at ambient temperature - rewet the membrane in methanol, followed by washing in buffer
Blot photobleached • Some dyes are sensitive to photobleaching - protect the membrane from light during and after secondary antibody incubation
Wrong excitation wavelength or emission filter
• Always follow manufacturers’ instructions on excitation/emission wavelengths for fluorophores
Incorrect imager settings • Choose the correct exposure time if using a CCD camera-based imager. Choose correct voltage for the photomultiplier tube (PMT) if using a scanner
No signal Weak signal Faint bands after a long exposure
Uneven spotted background High background
White bands on film Excessive, diffuse signal
Air bubbles trapped between the blotting paper, gel, and membrane hinder protein transfer and cause“bald spots” (areas of nontransfer) to appear

92
Western
Blo
tting
Han
db
oo
k 20
22
10.2 Problems associated with running buffer and membrane handling
We recommend that membranes are dried before scanning (i.e. avoid partially dried or wet membranes as shown in Fig 10.2). Scanning dried membranes usually results in a more even background and a higher signal-to-noise ratio.
If SDS is absent from the running buffer during PAGE, sensitivity is reduced and the protein bands become more diffuse (Fig 10.3).
Amersham Hybond™ LFP 0.2 membranes must be prewetted in methanol (Fig 10.3 left) for efficient protein transfer from the gel to the membrane. The membrane on the right in Figure 10.3 has not been prewetted.
10.3 Other tips to improve Western blotting productivity
Figures 10.5 to 10.9 describe some of the important aspects of Western blotting preparation that are sometimes overlooked leading to suboptimal results.
Fig 10.2. An insufficiently dried membrane shown with very weak bands on the right.
Fig 10.5. Use flat-ended, clean forceps with a smooth surface.
Fig 10.6. Do not touch the membrane without gloves - use forceps!
Fig 10.3. SDS included in the running buffer (left) gives distinct bands on the membrane. Sensitivity is reduced and protein bands are more diffuse when SDS is absent as seen by the image on the right.
Fig 10.4. Amersham Hybond™ LFP 0.2 membranes must be prewetted in methanol (right) for efficient protein transfer from the gel to the membrane. The membrane on the left has not been prewetted.
Fig 10.7. When using Amersham ECL™ Plex, avoid marking the membrane with a ballpoint pen - mark your membrane by cutting a corner or by using a pencil.

Western
Blo
tting
Han
db
oo
k 20
21
Protocols and recipes11
93
94
Western
Blo
tting
Han
db
oo
k 20
22
Throughout this chapter, where water is included in the composition of buffers and solutions, distilled, or deionized water should be used.
11.1 Western blotting standard procedure1. Prepare your samples by adding sample loading buffer and heating at 95°C for 5 min.
2. Centrifuge all samples in a microcentrifuge tube at 12 000 × g for 2 to 5 min prior to loading to remove any aggregates.
3. Place the gel in the electrophoresis equipment and add the appropriate running buffer.
4. Remove the comb and rinse out the wells with running buffer.
5. Load your samples and molecular weight markers in the wells.
6. Place the safety lid on the unit and plug the color-coded leads into the jacks in the power supply (red to red, black to black).
7. Run the gel under appropriate conditions.
8. When the tracking dye reaches the bottom of the gel, turn off the power supply, disconnect the leads, and remove the safety lid.
9. Release the gel cassette from the electrophoresis apparatus.
10. Cut away the stacking gel and cut one corner from the lower part of the resolving gel. Note which corner you have cut. This will enable you to correctly orientate the gel if it “flips over” during equilibration.
Note: that the steps described from step 11 refer specifically to wet transfer.
11. Equilibrate the gel in transfer buffer for 10 to 15 min.
12. Prewet and equilibrate the membrane in transfer buffer for 5 min.
PVDF membranes need to be prewet in methanol and water before equilibration in transfer buffer.
13. Place the electrotransfer cassette in a tray filled to a depth of 3 cm with chilled transfer buffer. Assemble the transfer stack so that proteins migrate toward the membrane. For negatively charged proteins, build the stack on the half of the cassette that will face the anode (+).
14. Prewet a sponge and place it on the submerged part of the cassette. Press gently to remove any air bubbles.
15. Place two prewetted blotting papers on to the sponge.
16. Place the membrane on top of the blotting papers.
17. Place the gel on top of the membrane.
18. Place two additional prewetted blotting papers on the gel.
19. Finally place a prewetted sponge on top of the stack and close the cassette, after gently pressing to remove air bubbles.
20. Add prechilled transfer buffer to the transfer tank.
Optional! Add a stirring magnet to circulate the buffer during transfer.
21. Place the cassette in the transfer tank.
22. Connect the transfer tank to the power supply and run the transfer according to manufacturers’ recommendations.
23. After transfer, block the membrane in appropriate blocking solution for 1 h at room temperature.
24. Incubate with primary antibody, 1 h at room temperature or 4°C overnight.
25. Wash the membrane three to six times for 5 min (or 3 times x 1 min for fluorescence) per wash in phosphate-buffered saline (PBS) containing Tween-20 in (PBS-Tween) or Tris-buffered saline (TBS) containing Tween-20 (TBS-Tween).
26. Incubate with secondary antibody for 1 h at room temperature.
27. Wash the membrane three to six times for 5 min (or 3 times x 1 min for fluorescence) per wash in PBS-Tween or TBS-Tween.
28. Continue with protein detection according to instructions for the selected detection system.
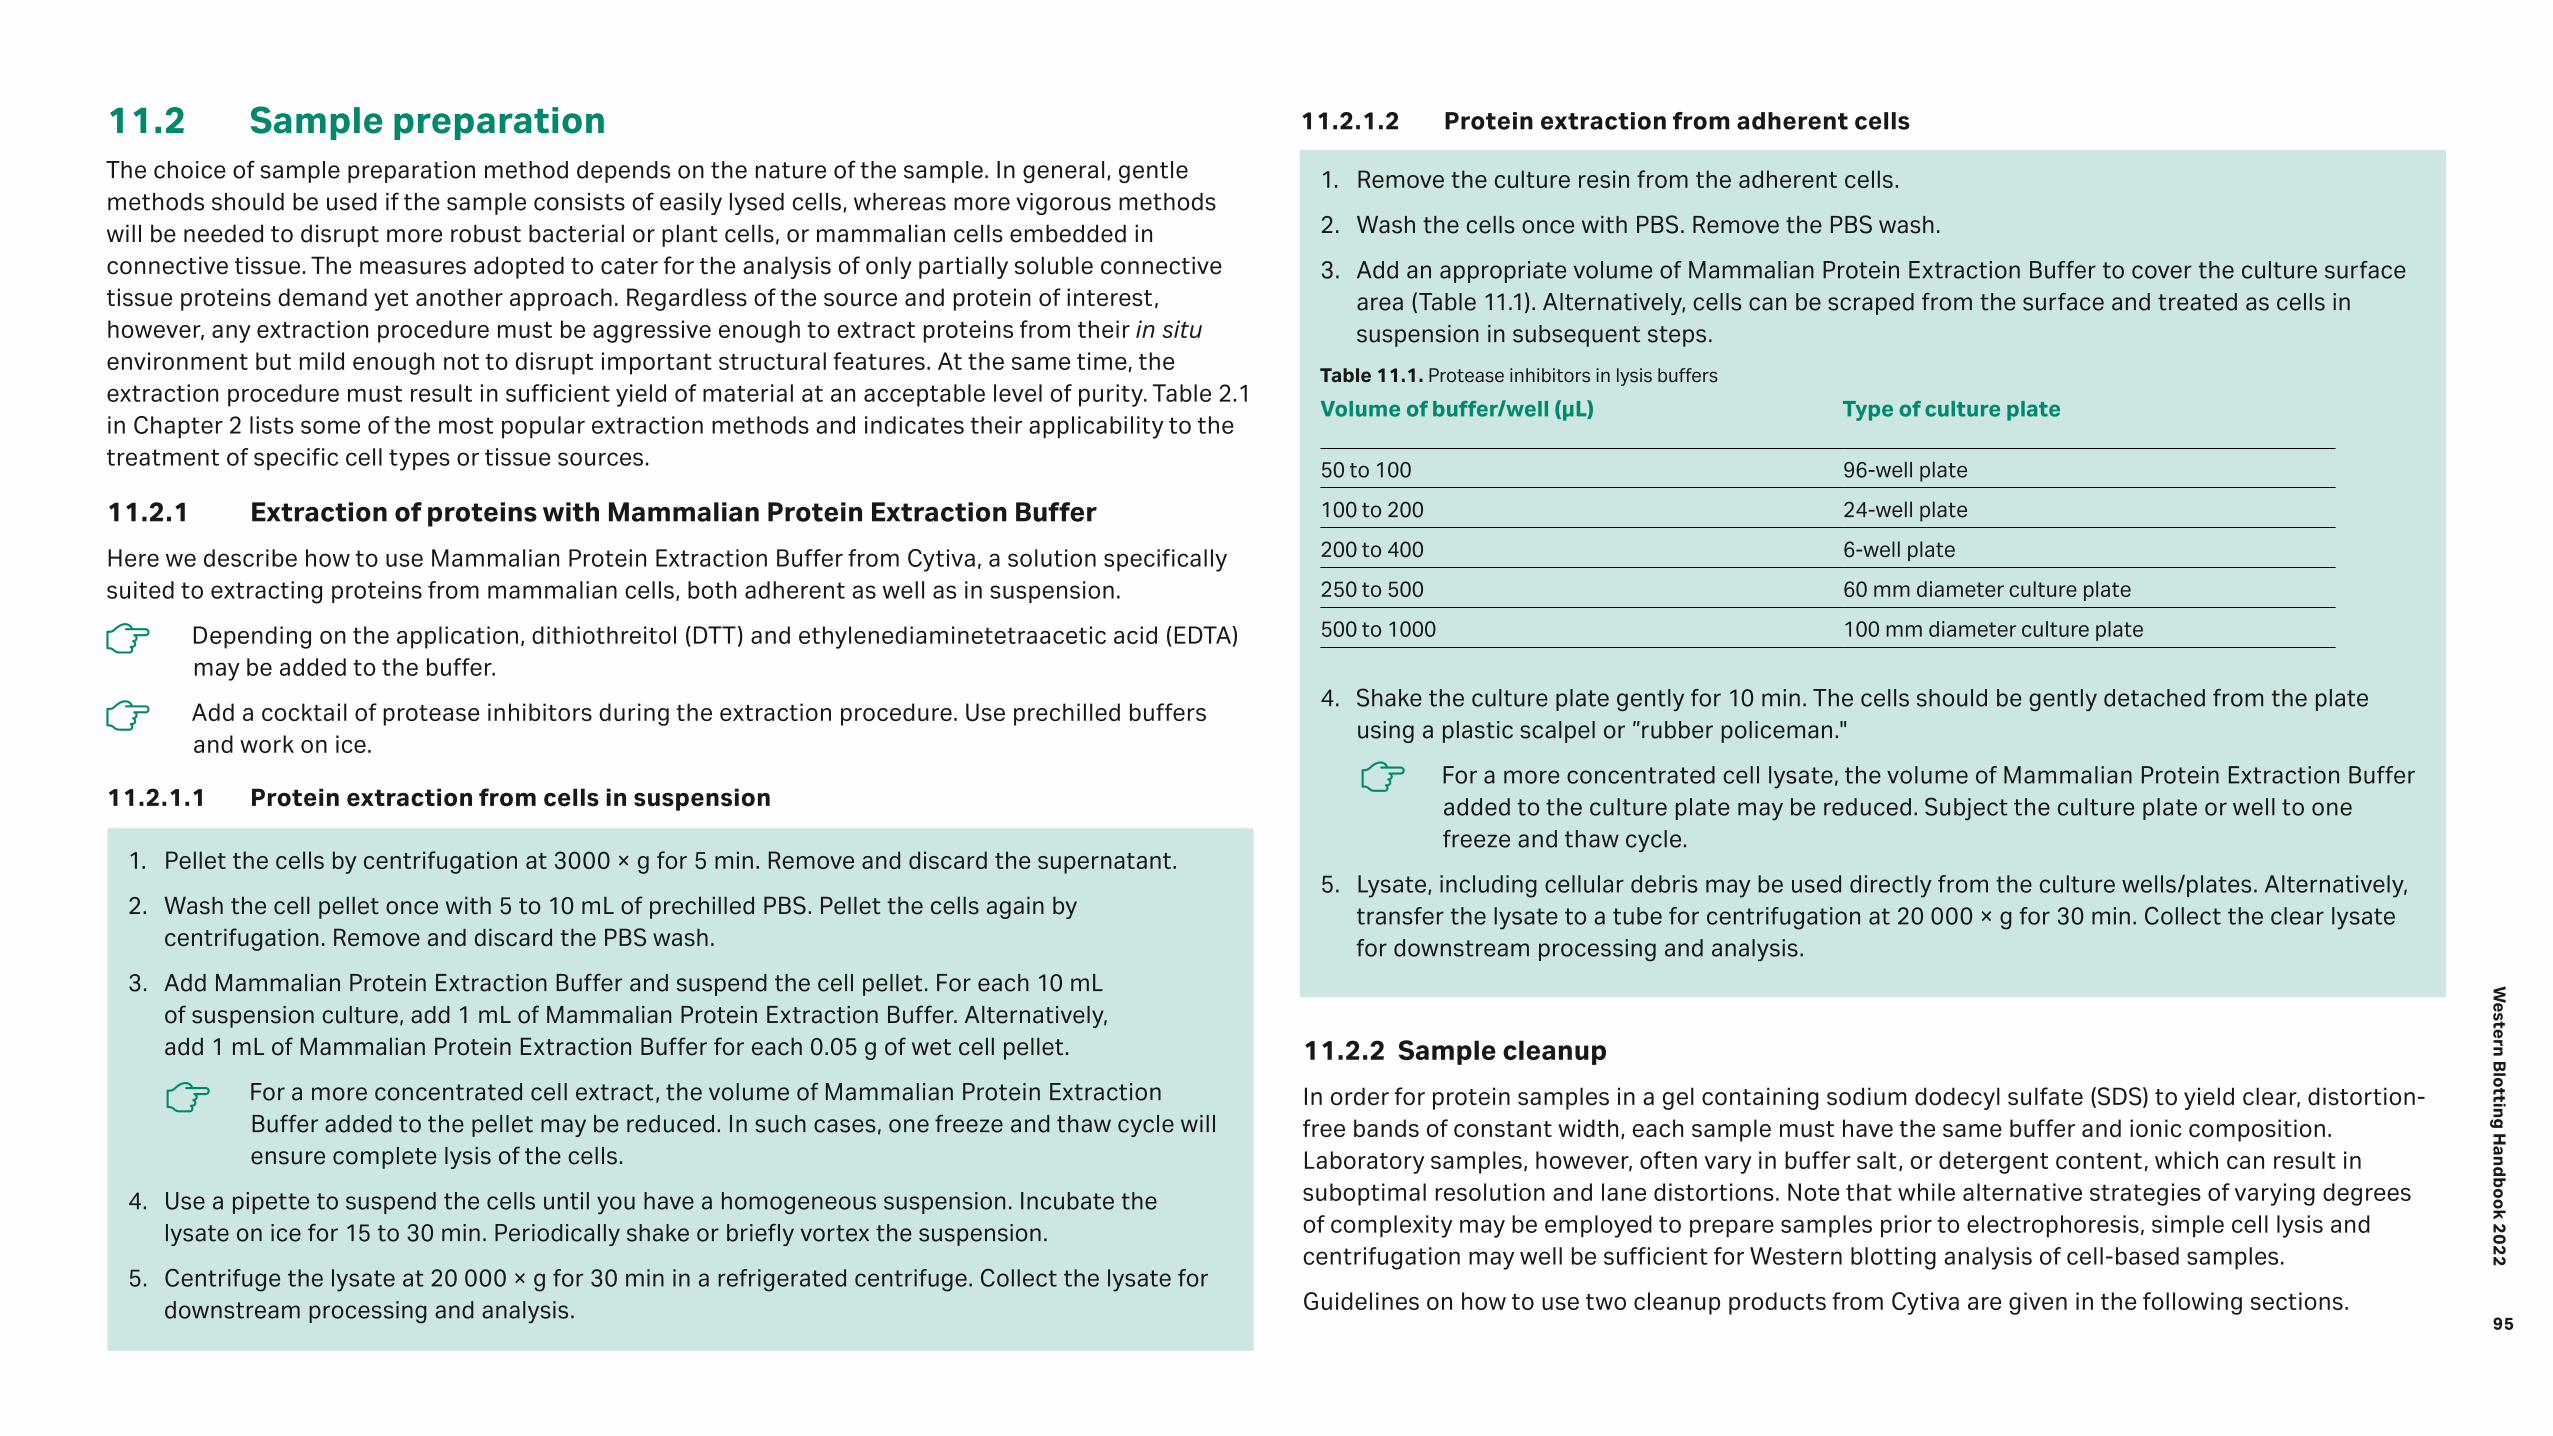
95
Western
Blo
tting
Han
db
oo
k 20
22
11.2 Sample preparationThe choice of sample preparation method depends on the nature of the sample. In general, gentle methods should be used if the sample consists of easily lysed cells, whereas more vigorous methods will be needed to disrupt more robust bacterial or plant cells, or mammalian cells embedded in connective tissue. The measures adopted to cater for the analysis of only partially soluble connective tissue proteins demand yet another approach. Regardless of the source and protein of interest, however, any extraction procedure must be aggressive enough to extract proteins from their in situ environment but mild enough not to disrupt important structural features. At the same time, the extraction procedure must result in sufficient yield of material at an acceptable level of purity. Table 2.1 in Chapter 2 lists some of the most popular extraction methods and indicates their applicability to the treatment of specific cell types or tissue sources.
11.2.1 Extraction of proteins with Mammalian Protein Extraction Buffer
Here we describe how to use Mammalian Protein Extraction Buffer from Cytiva, a solution specifically suited to extracting proteins from mammalian cells, both adherent as well as in suspension.
Depending on the application, dithiothreitol (DTT) and ethylenediaminetetraacetic acid (EDTA) may be added to the buffer.
Add a cocktail of protease inhibitors during the extraction procedure. Use prechilled buffers and work on ice.
11.2.1.1 Protein extraction from cells in suspension
11.2.2 Sample cleanup
In order for protein samples in a gel containing sodium dodecyl sulfate (SDS) to yield clear, distortion-free bands of constant width, each sample must have the same buffer and ionic composition. Laboratory samples, however, often vary in buffer salt, or detergent content, which can result in suboptimal resolution and lane distortions. Note that while alternative strategies of varying degrees of complexity may be employed to prepare samples prior to electrophoresis, simple cell lysis and centrifugation may well be sufficient for Western blotting analysis of cell-based samples.
Guidelines on how to use two cleanup products from Cytiva are given in the following sections.
11.2.1.2 Protein extraction from adherent cells
1. Pellet the cells by centrifugation at 3000 × g for 5 min. Remove and discard the supernatant.
2. Wash the cell pellet once with 5 to 10 mL of prechilled PBS. Pellet the cells again by centrifugation. Remove and discard the PBS wash.
3. Add Mammalian Protein Extraction Buffer and suspend the cell pellet. For each 10 mL of suspension culture, add 1 mL of Mammalian Protein Extraction Buffer. Alternatively, add 1 mL of Mammalian Protein Extraction Buffer for each 0.05 g of wet cell pellet.
For a more concentrated cell extract, the volume of Mammalian Protein Extraction Buffer added to the pellet may be reduced. In such cases, one freeze and thaw cycle will ensure complete lysis of the cells.
4. Use a pipette to suspend the cells until you have a homogeneous suspension. Incubate the lysate on ice for 15 to 30 min. Periodically shake or briefly vortex the suspension.
5. Centrifuge the lysate at 20 000 × g for 30 min in a refrigerated centrifuge. Collect the lysate for downstream processing and analysis.
1. Remove the culture resin from the adherent cells.
2. Wash the cells once with PBS. Remove the PBS wash.
3. Add an appropriate volume of Mammalian Protein Extraction Buffer to cover the culture surface area (Table 11.1). Alternatively, cells can be scraped from the surface and treated as cells in suspension in subsequent steps.
Table 11.1. Protease inhibitors in lysis buffers
Volume of buffer/well (μL) Type of culture plate
50 to 100 96-well plate
100 to 200 24-well plate
200 to 400 6-well plate
250 to 500 60 mm diameter culture plate
500 to 1000 100 mm diameter culture plate
4. Shake the culture plate gently for 10 min. The cells should be gently detached from the plate using a plastic scalpel or ”rubber policeman."
For a more concentrated cell lysate, the volume of Mammalian Protein Extraction Buffer added to the culture plate may be reduced. Subject the culture plate or well to one freeze and thaw cycle.
5. Lysate, including cellular debris may be used directly from the culture wells/plates. Alternatively, transfer the lysate to a tube for centrifugation at 20 000 × g for 30 min. Collect the clear lysate for downstream processing and analysis.
96
Western
Blo
tting
Han
db
oo
k 20
22
11.2.1.1 Protein extraction from cells in suspension (Cat No. 8064870)
SDS-PAGE Clean-Up Kit is designed to prepare samples for SDS-polyacrylamide gel electrophoresis (SDS-PAGE) that are otherwise difficult to analyze due to high conductivity or low protein concentration. The procedure works by quantitatively precipitating proteins while leaving behind in solution interfering substances such as detergents, salts, lipids, phenolics, and nucleic acids. The proteins are then resuspended and mixed with SDS-PAGE sample loading buffer. The procedure can be completed in under 2 h with quantitative yield. The kit contains sufficient reagents to process 50 samples of up to 100 μL each. The procedure can be scaled up for larger volumes or more dilute samples.
Always position the microcentrifuge tubes in the centrifuge rotor with the cap hinge facing outward. This way the pellet will always be on the same side of the tube so it can be left undisturbed, minimizing loss.
Materials required
• 1.5 mL microcentrifuge tubes
• Microcentrifuge capable of spinning tubes at 12 000 × g or more at 4°C
• Vortex mixer
• β-mercaptoethanol or DTT
• Boiling water bath or heat block set to 95°C
Proteases are generally inactive in the solutions employed in this procedure, but protease inhibitors can be added to the sample solution if desired.
Preliminary preparations
Stand the washing buffer at -20°C for at least 1 h before starting the procedure. The washing buffer may be stored in a -20°C freezer.
Add reducing agent to the sample loading buffer. The reducing agent can be either DTT or β-mercaptoethanol. If using DTT, add 3.1 mg per 100 µL of SDS-PAGE sample loading buffer. Make sure it is fully dissolved. If using β-mercaptoethanol, add 5 μL per 100 μL of sample loading buffer. Once the reducing agent has been added, the sample loading buffer should be used immediately, so reducing agent should only be added to the amount of sample loading buffer needed for a single experiment. Alternatively, reducing agent in sample loading buffer may be aliquoted and stored at –20°C.
The protein sample should be substantially free of particulate material. Clarify by centrifugation if necessary.
Process the protein samples in 1.5 mL microcentrifuge tubes. All steps should be carried out with the tubes on ice unless otherwise specified. Always position the microcentrifuge tubes in the centrifuge rotor with the cap hinge facing outward. This way the pellet will always be on the same side of the tube so it can be left undisturbed, minimizing loss.
1. Transfer 1 to 100 μL of protein sample (containing 1 μg to 1 mg of protein) into a 1.5 mL microcentrifuge tube.
2. Add 300 μL of precipitant (labeled “1” ) and mix well by vortexing or inversion. Incubate on ice for 15 min.
3. Add 300 μL of coprecipitant (labeled “2” ) to the mixture of protein and precipitant. Mix by vortexing briefly.
4. Centrifuge the tubes in a microcentrifuge set at maximum speed (at least 12 000 × g) for 5 min. Remove the tubes from the centrifuge as soon as centrifugation is complete. A small pellet should be visible. Proceed rapidly to the next step to avoid resuspension or dispersion of the pellet.
5. Remove as much of the supernatant as possible by decanting or careful pipetting. Do not disturb the pellet.
6. Carefully reposition the tubes in the microcentrifuge as before, with the cap hinge and pellet facing outward. Centrifuge the tubes again to bring any remaining liquid to the bottom of the tube. A brief pulse is sufficient. Use a micropipette tip to remove the remaining supernatant. There should be no visible liquid remaining in the tubes.
7. Pipette 25 μL of water on top of each pellet. Vortex each tube for 5 to 10 s. The pellets should disperse, but not dissolve in the water.
8. Add 1 mL of washing buffer (labeled “3” ), prechilled for at least 1 h at –20°C, and 5 μL of wash additive (labeled “4” ). Vortex until the pellet is fully dispersed.
The protein pellet will not dissolve in the washing buffer.
9. Incubate the tubes at –20°C for at least 30 min. Vortex for 20 to 30 s once every 10 min.
The tubes can be left at this stage at -20°C for up to 1 week with minimal protein degradation or modification.
10. Centrifuge the tubes in a microcentrifuge set at maximum speed (at least 12 000 × g) for 5 min.
11. Carefully remove and discard the supernatant. A white pellet should be visible. Allow the pellet to air dry briefly (no more than 5 min).
97
Western
Blo
tting
Han
db
oo
k 20
22
Do not dry the pellet for longer than 5 min. If it becomes too dry, it will be difficult to resuspend.
12. Resuspend the pellet in 5 to 40 μL of buffer I (labeled “5” ). Vortex briefly and incubate on ice for 5 min.
The appropriate resuspension volume for the sample depends on a number of factors, including the protein concentration of the original sample, the capacity of the gel system used for SDS-PAGE and the sensitivity of the detection method used to visualize the proteins in the gel. If the pellet is large or too dry, it might take time to resuspend fully. Sonication or treatment with the Sample Grinding Kit from Cytiva can speed resuspension.
13. Add 1 μL of buffer II (labeled “6” ) for each 5 μL of buffer I used in Step 12. Vortex briefly and incubate on ice for 5 to 10 min.
14. Add an equal volume (6 to 48 μL) of SDS-PAGE sample buffer (labeled “7” ) to which reducing agent (DTT or β-mercaptoethanol) has been added (see preliminary preparations). If the solution turns yellowish, add buffer I in increments of 0.5 μL until the solution turns blue.
15. Vortex the sample for 5 to 10 s and incubate at room temperature for 5 to 10 min. Place the sample tube in a boiling water bath or 95°C heat block for 3 min.
16. Centrifuge the tube briefly to bring the contents to the bottom of the tube. A brief pulse is sufficient. Gently tap the tube to ensure that the contents are mixed. The sample is now ready for loading. The protein concentration of the sample is determined using 2D Quant Kit from Cytiva, which can accurately quantitate protein in sample loading buffer.
1. Transfer 1 to 100 μL of protein sample (containing 1 to 100 μg of protein) into a 1.5 mL microcentrifuge tube.
2. Add 300 μL of precipitant and mix well by vortexing or inversion. Incubate on ice for 15 min.
3. Add 300 μL of coprecipitant to the mixture of protein and precipitant. Mix by vortexing briefly.
4. Centrifuge the tubes in a microcentrifuge set at maximum speed (at least 12 000 × g) for 5 min. Remove the tubes from the centrifuge as soon as centrifugation is complete. A small pellet should be visible. Proceed rapidly to the next step to avoid resuspension or dispersion of the pellet.
5. Remove as much of the supernatant as possible by decanting or careful pipetting. Do not disturb the pellet.
6. Carefully reposition the tubes in the microcentrifuge as before, with the cap hinge and pellet facing outward. Centrifuge the tubes again to bring any remaining liquid to the bottom of the tube. A brief pulse is sufficient. Use a pipette tip to remove the remaining supernatant. There should be no visible liquid remaining in the tubes.
7. Carefully add 40 μL of coprecipitant on top of the pellet. Let the tube sit on ice for 5 min.
8. Carefully reposition the tube in the centrifuge as before, with the cap hinge facing outward. Centrifuge the tube again for 5 min. Use a pipette tip to remove and discard the wash.
11.2.2.2 2D Clean-Up Kit
The 2D Clean-Up Kit is designed to prepare samples for 2D gel electrophoresis that otherwise produce poor results due to high conductivity, high levels of interfering substances, or low concentration. The procedure works by quantitatively precipitating proteins while leaving behind in solution interfering substances such as detergents, salts, lipids, phenolics, and nucleic acids. The proteins are then resuspended in a solution compatible with first-dimension isoelectric focusing (IEF). The procedure can be completed in 1 h and does not result in spot gain or loss. The kit contains sufficient reagents to process 50 samples of up to 100 μL each. The procedure can be scaled up for larger volumes or more dilute samples.
• 1.5 mL microcentrifuge tubes
• Microcentrifuge capable of spinning tubes at 12 000 × g or more at 4°C
• Rehydration or sample solution for resuspension
• Vortex mixer
Materials required
Preliminary preparations
Place the washing buffer at –20°C for at least 1 h before starting the procedure. The washing buffer may be stored in a –20°C freezer. The protein sample should be substantially free of particulate material. Clarify by centrifugation if necessary.
Process the protein samples in 1.5 mL microcentrifuge tubes. All steps should be carried out with the tubes in an ice bucket unless otherwise specified.

98
Western
Blo
tting
Han
db
oo
k 20
22
9. Pipette 25 μL of water on top of each pellet. Vortex each tube for 5 to 10 s. The pellet should disperse, but not dissolve in the water.
10. Add 1 mL of washing buffer (prechilled for at least 1 h at -20°C) and 5 μL of wash additive. Vortex until the pellet is fully dispersed.
The protein pellet will not dissolve in the washing buffer.
11. Incubate the tubes at –20°C for at least 30 min. Vortex for 20 to 30 s once every 10 min.
The tubes can be left at this stage at –20°C for up to 1 week with minimal protein degradation or modification.
12. Centrifuge the tubes in a microcentrifuge set at maximum speed (at least 12 000 × g) for 5 min.
13. Carefully remove and discard the supernatant. A white pellet should be visible. Allow the pellet to air dry briefly (for no more than 5 min).
Do not dry the pellet for longer than 5 min. If it becomes too dry, it will be difficult to resuspend.
14. Resuspend each pellet in an appropriate volume of rehydration or IEF sample loading solution for first dimension IEF. Vortex the tube for at least 30 s. Incubate at room temperature and either vortex or work up and down in a pipette to fully dissolve.
If the pellet is large or too dry, it might take time to resuspend fully. Sonication or treatment with the Sample Grinding Kit from Cytiva can speed resuspension.
15. Centrifuge the tubes in a microcentrifuge set at maximum speed (at least 12 000 × g) for 5 min to remove any insoluble material and to reduce any foam. The supernatant may be loaded directly onto first-dimension IEF or transferred to another tube and stored at –80°C for later analysis. Do not dry the pellet for longer than 5 min. If it becomes too dry, it will be difficult to resuspend.
11.2.3 Concentration measurement using 2D Quant Kit
The 2D Clean-Up Kit is designed to prepare samples for 2D gel electrophoresis that otherwise produce poor results due to high conductivity, high levels of interfering substances, or low concentration. The procedure works by quantitatively precipitating proteins while leaving behind in solution interfering substances such as detergents, salts, lipids, phenolics, and nucleic acids. The proteins are then resuspended in a solution compatible with first-dimension isoelectric focusing (IEF). The procedure can be completed in 1 h and does not result in spot gain or loss. The kit contains sufficient reagents to process 50 samples of up to 100 μL each.
1. Prepare an appropriate volume of working color reagent by mixing 100 parts of color reagent A with 1 part of color reagent B.
Each individual assay requires 1 mL of working color reagent. Working color reagent can be stored at 4°C to 8°C for up to 1 week or for as long as the optical density (OD) of the solution remains below 0.025 at 480 nm.
2. Prepare a standard curve with BSA standard solution (2 mg/mL) added to six tubes to the following final quantities: 0 (blank), 10, 20, 30, 40, and 50 µg.
The accuracy of the assay is unaffected by the volume of the sample as long as the sample volume is 50 µL or less. It is therefore unnecessary to dilute standard or sample solutions to a constant volume.
3. Prepare samples by adding 1 to 50 µL of the sample to be assayed in separate tubes. Adjust this volume to make sure that you add a quantity of protein within the working range of the assay (0.5 to 50 µg).
4. Add 500 µL of precipitant to each tube (including the standard curve tubes). Vortex briefly and incubate the tubes for 2 to 3 min at room temperature.
5. Add 500 µL of coprecipitant to each tube and mix briefly by vortexing or inversion.
6. Centrifuge the tubes at a minimum of 10 000 × g for 5 min. Discard the supernatants by using a pipette. It is recommended to apply a brief additional pulse and then to remove any remaining supernatant using a micropipette.
7. Add 100 µL of copper solution and 400 µL of water to each tube. Vortex briefly to dissolve the precipitated protein.
• Precipitant, coprecipitant, copper solution, color reagents A and B, and bovine serum
• Albumin (BSA) standard solution are (provided with the kit)
• 2 mL microcentrifuge tubes
• Vortex mixer
• Microcentrifuge
• Visible light spectrophotometer
Materials required

99
Western
Blo
tting
Han
db
oo
k 20
22
8. Add 100 μL of working color reagent to each tube. Ensure instantaneous mixing by introducing the reagent as rapidly as possible. Mix by inversion and incubate at room temperature for 15 to 20 min.
9. Read the absorbance of each sample and standard at 480 nm using water as the reference. The absorbance should be read within 40 min of the addition of working color reagent.
10. Generate a standard curve by plotting the absorbance of the standards against the quantity of protein. Use this standard curve to determine the protein concentration of the samples.
As this assay is extremely sensitive to time, all readings should be made as close as possible to each other. An automated cell changer is the optimal solution but if this is not available, the addition of reagent should be staggered every 30 s and readings should be taken after the same time interval has elapsed. Although this must be tested empirically, 20 min elapsed time is a good starting point.
Unlike most protein assays, the absorbance of the assay solution decreases with increasing protein concentration. Do not subtract the blank reading from the sample reading or use the assay blank as the reference.
11.2.4 2× sample loading buffer
Before loading samples on a gel, an equal volume of 2× sample loading buffer (Table 11.2) is added to each sample. Sample loading buffer increases the density of the sample to ease loading, gives the protein the right properties for optimal separation, and provides a color that functions as a leading, visible front during the run. Note that in order to minimize the dilution effect of adding sample to sample loading buffer, it is possible to use 5× sample loading buffer for the analysis of low-abundance target protein.
Table 11.2. 2× sample loading buffer
Final concentration Volume or mass
0.5 M Tris-HCl (pH 6.8) 0.125 M 2.5 mL
10% SDS 4% 4 mL
Glycerol 20% 2 mL
Glycerol 0.02% 2 mg
DTT1 200 mM 0.31 g
Water Added to make the final volume 10 mL
1. DTT should be freshly prepared and added to the sample loading buffer just before adding the sample loading buffer to the samples. β-mercaptoethanol (500 μL per 10 mL) can be used as an alternative to DTT.
1. Add 1 volume of 2× sample loading buffer to microtubes.
2. Add 1 volume of protein sample containing the desired quantity of protein.
3. Heat the microtubes at 95°C for 5 min.
4. Spin samples in a centrifuge.
If the samples are not going to be used at once they can be stored in a freezer. After storage in a freezer, the samples need to be heated before loading to dissolve precipitated SDS.
Quick protocol – for qualitative analysis
1. Dilute sample 10-fold with labeling buffer
2. Add Cy™ 5 to the sample
3. Heat sample at 95°C for 3 to 5 min
4. Add sample loading buffer containing lysine
5. Heat sample at 95°C for 3 min
6. Load sample on gel
Total time less than 15 min

100
Western
Blo
tting
Han
db
oo
k 20
22
11.3.1 Preparation of polyacrylamide gels containing SDS
Acrylamide and bisacrylamide are potent neurotoxins and should be handled with care. Follow local safety rules!
Always wear gloves and a lab coat. Use a fume hood!
Polyacrylamide gels for use in PAGE are cast in two steps. First, the resolving gel should be cast and after this gel has polymerized, the stacking gel is cast on top. The resolving gel is usually prepared in a Tris-based buffer at a higher concentration and with a higher pH than the stacking gel, as well as a higher concentration of acrylamide.
Acrylamide monomer stock solutions should be prepared by adding 30 g of acrylamide and 0.8 g of bisacrylamide to water and making the final volume 100 mL with water.
1. Prepare your samples by adding sample loading buffer and heating at 95°C for 5 min.
For PAGE under denaturing and reducing conditions: Add SDS and reducing agent to sample loading buffer.
For PAGE under denaturing conditions: Add SDS to sample loading buffer.
For PAGE under native conditions: No SDS, no reducing agent, no heating!
Samples may be boiled in sample loading buffer, aliquoted, and stored at –20°C for 3 to 4 weeks or at 4°C for 1 w. Warm the sample to 37°C for a few minutes before analysis to resolubilize precipitated SDS.
Always check the protein concentration before loading, as overloading might result in “vertical streaking."
2. Place the gel in the electrophoresis equipment and add the appropriate running buffer.
11.2.5 Prelabeling using Amersham™ Quickstain
1. Set the temperature of the heating block to 95°C.
2. Add 2 to 19 μL cell lysate or tissue extract sample and fill up to a volume of 19 μL using sample lysis buffer. For purified proteins, dilute 1:10 in labeling buffer.
3. Add 1 μL of Cy™5 dye reagent diluted 1:10 in ultrapure water.
The diluted dye must be freshly prepared and used within 30 min.
4. Briefly vortex to mix thoroughly. Incubate at room temperature for 30 min.
5. Add 20 μL of 2× loading buffer with freshly prepared DTT (final concentration 40 mM).
6. Heat the samples at 95°C for 3 min.
7. Centrifuge the samples.
8. Perform electrophoresis and Western blotting procedure according to the manufacturer´s recommendations.
11.3 ElectrophoresisA variety of precast gels are commercially available from different vendors. The attraction of using these gels includes the fact that you do not have to handle acrylamide, and they are simple and convenient to use.
General polyacrylamide gel electrophoresis (PAGE) protocol
3. Remove the comb and rinse out the wells with running buffer.
Washing removes unpolymerized acrylamide that can disturb sample loading.
4. Load your samples and molecular weight markers in the wells.
Centrifuge all samples in a microfuge tube at 12 000 × g for 2 to 5 min prior to loading to remove any aggregates.
To make it easier to load samples, use thin tips or, alternatively, a Hamilton syringe with a long thin needle.
Remember to load any empty wells (no sample or markers) with sample loading buffer.
If it is difficult to see the wells when using a vertical setup; hold a piece of paper behind the tank when you are loading your samples to improve the contrast.
5. Place the safety lid on the unit and plug the color-coded leads into the jacks in the power supply.
6. Run the gel under appropriate conditions.
7. When the tracking dye reaches the bottom of the gel, turn off the power supply, disconnect the leads, and remove the safety lid.
8. Release the gel cassette from the electrophoresis apparatus and proceed to the next step in your application.

101
Western
Blo
tting
Han
db
oo
k 20
22
• 4× resolving gel buffer (1.5 M Tris-Cl, pH 8.8): Add 36.3 g of Tris (relative molecular mass, Mr
121.1) to 150 mL of water. Adjust the pH to 8.8 using HCl and then make the final volume to 200 mL with water.
• 4× stacking gel buffer (0.5 M Tris-HCl, pH 6.8): Add 3 g of Tris (Mr 121.1) to 40 mL of water.
• Adjust the pH to 6.8 using HCl and then make the final volume 50 mL with water.
• 10% SDS: Add 10 g of SDS to 50 mL of water and then make the final volume 100 mL with water.
• 10% ammonium persulfate (APS): Add 100 mg of APS to 1 mL of water — this should be freshly prepared before use.
1. Assemble the vertical slab gel unit in the gel casting stand. Use an appropriate thickness of spacer to create the "sandwich."
2. In a 125 mL side-arm vacuum flask, mix the resolving gel solution (see Table 11.3), omitting APS and N, N, N', N'-tetramethylethylenediamine (TEMED).
3. Stopper the flask and apply a water vacuum for several minutes while swirling to degas the solution.
4. Add the TEMED and APS and gently swirl the flask to mix, being careful not to generate bubbles.
5. Pipette the solution between the spacers into each sandwich to a level about 4 cm from the top.
6. Gently add a top layer of approximately 0.6 mL of water-saturated n-butanol or isopropanol (or water) so that the entire surface of the resolving gel is covered with n-butanol. A very sharp liquid-gel interface will be visible when the gel has polymerized. The gel should be fully polymerized after approximately 1 h.
7. Prepare the stacking gel by mixing the reagents (see Table 11.4) in a 50 mL conical tube.
8. Degas under vacuum for 10 to 15 min.
9. Add 50 µL of 10% APS and 10 µL of TEMED. Swirl gently to mix.
Buffers used in gel casting
Preparation of resolving and stacking gels containing SDS: Mini-gel systems
10. After polymerization of the resolving gel, tilt the casting stand to pour off the n-butanol overlay.
Traces of n-butanol will affect polymerization of the stacking gel. Make sure that all n-butanol is decanted before addition of the stacking gel. This can be achieved by rinsing the surface of the resolving gel with water.
11. Pipette the stacking gel solution between the spacers.
12. Carefully place a comb into the unpolymerized gel, taking care not to trap any air bubbles. Allow the gel to polymerize for about 1 h.
Gels may be stored with the combs in place, tightly wrapped in plastic wrap inside a sealed bag at 4°C for 1 week Keep the gels moist. Do not store gels in the caster.
Table 11.3. Resolving gel solutions, 40 mL
Final gel concentration 5% 7.5% 10% 12.5% 15%
Acrylamide monomer stock solution 6.7 mL 10 mL 13.3 mL 16.7 mL 20 mL
4× resolving gel buffer 10 mL 10 mL 10 mL 10 mL 10 mL
10% SDS 0.4 mL 0.4 mL 0.4 mL 0.4 mL 0.4 mL
Water 22.7 mL 19.4 mL 16.1 mL 12.8 mL 9.5 mL
10% APS1 200 μL 200 μL 200 μL 200 μL 200 μL
TEMED1 13.3 μL 13.3 μL 13.3 μL 13.3 μL 13.3 μL
1. Added after degasing (step 3 above).
Table 11.4. Stacking gel solution, 10 mL
Final gel concentration 4%
Acrylamide solution 1.33 mL
4× Stacking gel buffer 2.5 mL
10% SDS 0.1 mL
Water 6 mL
10% APS1 50 μL
TEMED1 5 μL
Water
1. Added after degasing (step 8 above).

102
Western
Blo
tting
Han
db
oo
k 20
22
11.3.2 Electrophoresis running buffer for SDS-PAGE
Most Western blotting applications are performed following the separation of proteins by SDS-PAGE. A recipe for the frequently used Laemmli buffer, based on Tris-glycine, is therefore presented here. By excluding SDS, the buffer can also be used for native PAGE applications.
Materials required
Make a stock solution of 5× or 10× Tris-glycine buffer without SDS (according to recipe above). This can then be used as a stock solution for transfer buffer.
11.4 Western blotting electrotransferHere, we describe methods for the electrotransfer of proteins separated by PAGE onto a solid membrane, usually made of nitrocellulose or polyvinylidine difluoride (PVDF). Electrotransfer is by far the most frequently used technique in Western blotting. Two types of electrotransfer, wet transfer and semidry transfer are in common use.
11.4.1 Wet transfer
The following protocol is recommended for wet transfer (Fig 11.1). Manufacturers’ recommendations should always be followed due to system-specific rquirements.
Materials required
• 5× electrophoresis running buffer containing SDS
• 0.125 M Tris
• 0.96 M glycine
• 0.5% SDS
Dissolve 15.1 g of Tris base, 72 g of glycine, and 5 g of electrophoresis-grade SDS in water and make to a total volume of 1000 mL with water. Do not adjust the pH of the solution (this should be pH 8.3 when diluted). Store at room temperature. Add 1 part buffer to 4 parts water to make a working solution (25 mM Tris, 192 mM glycine, 0.1% SDS, pH 8.3).
• Polyacrylamide gel, post-electrophoresis
• PVDF or nitrocellulose membrane
• Four sheets of Whatman™ 3 mm filter paper or equivalent, cut to the same dimensions as the gel
• Two foam pads
• Tank transfer system, power supply
• 100% methanol (can be replaced with ethanol)
• Water
• Tris-glycine transfer buffer: 25 mM Tris base, 192 mM glycine, ≤ 20% (V/V) methanol, pH 8.3 (see Chapter 4)
Prepare 10× Tris-glycine buffer as a stock solution (this can also be used as running buffer to which SDS is added once the working dilution is prepared). Make 1× Tris-glycine containing 20% methanol as transfer buffer. Prechill prior use.
Prechill the transfer buffer before use.
1. Prepare sufficient transfer buffer to fill the transfer tank, plus an additional 200 mL to equilibrate the gel, membrane, and filter papers.
2. After electrophoresis, cut one corner of the gel with a clean sharp razor blade or scalpel to allow you to orientate the gel.
3. Equilibrate the gel in transfer buffer for 10 to 15 min. Bear in mind that incomplete equilibration of the gel might cause band smearing.
4. Cut, prewet, and equilibrate a membrane according to manufacturers’ recommendations.
Prewet PVDF membranes in methanol for 15 s and then rinse in water. Equilibrate in transfer buffer for at least 10 min.
Prewet nitrocellulose membranes in water and then equilibrate in transfer buffer for at least 5 min.
5. Soak the filter papers and foam pads in transfer buffer.
6. Place an electrotransfer cassette, anode (+) side facing down, in a tray filled to a depth of 3 cm with chilled transfer buffer.
7. Load the cassette, starting at the anode (+) side, with a foam sponge, followed by two filter papers, the prepared membrane, the gel, two more wet filter papers and, finally, a second foam sponge.
Blotting protocol: Wet transfer
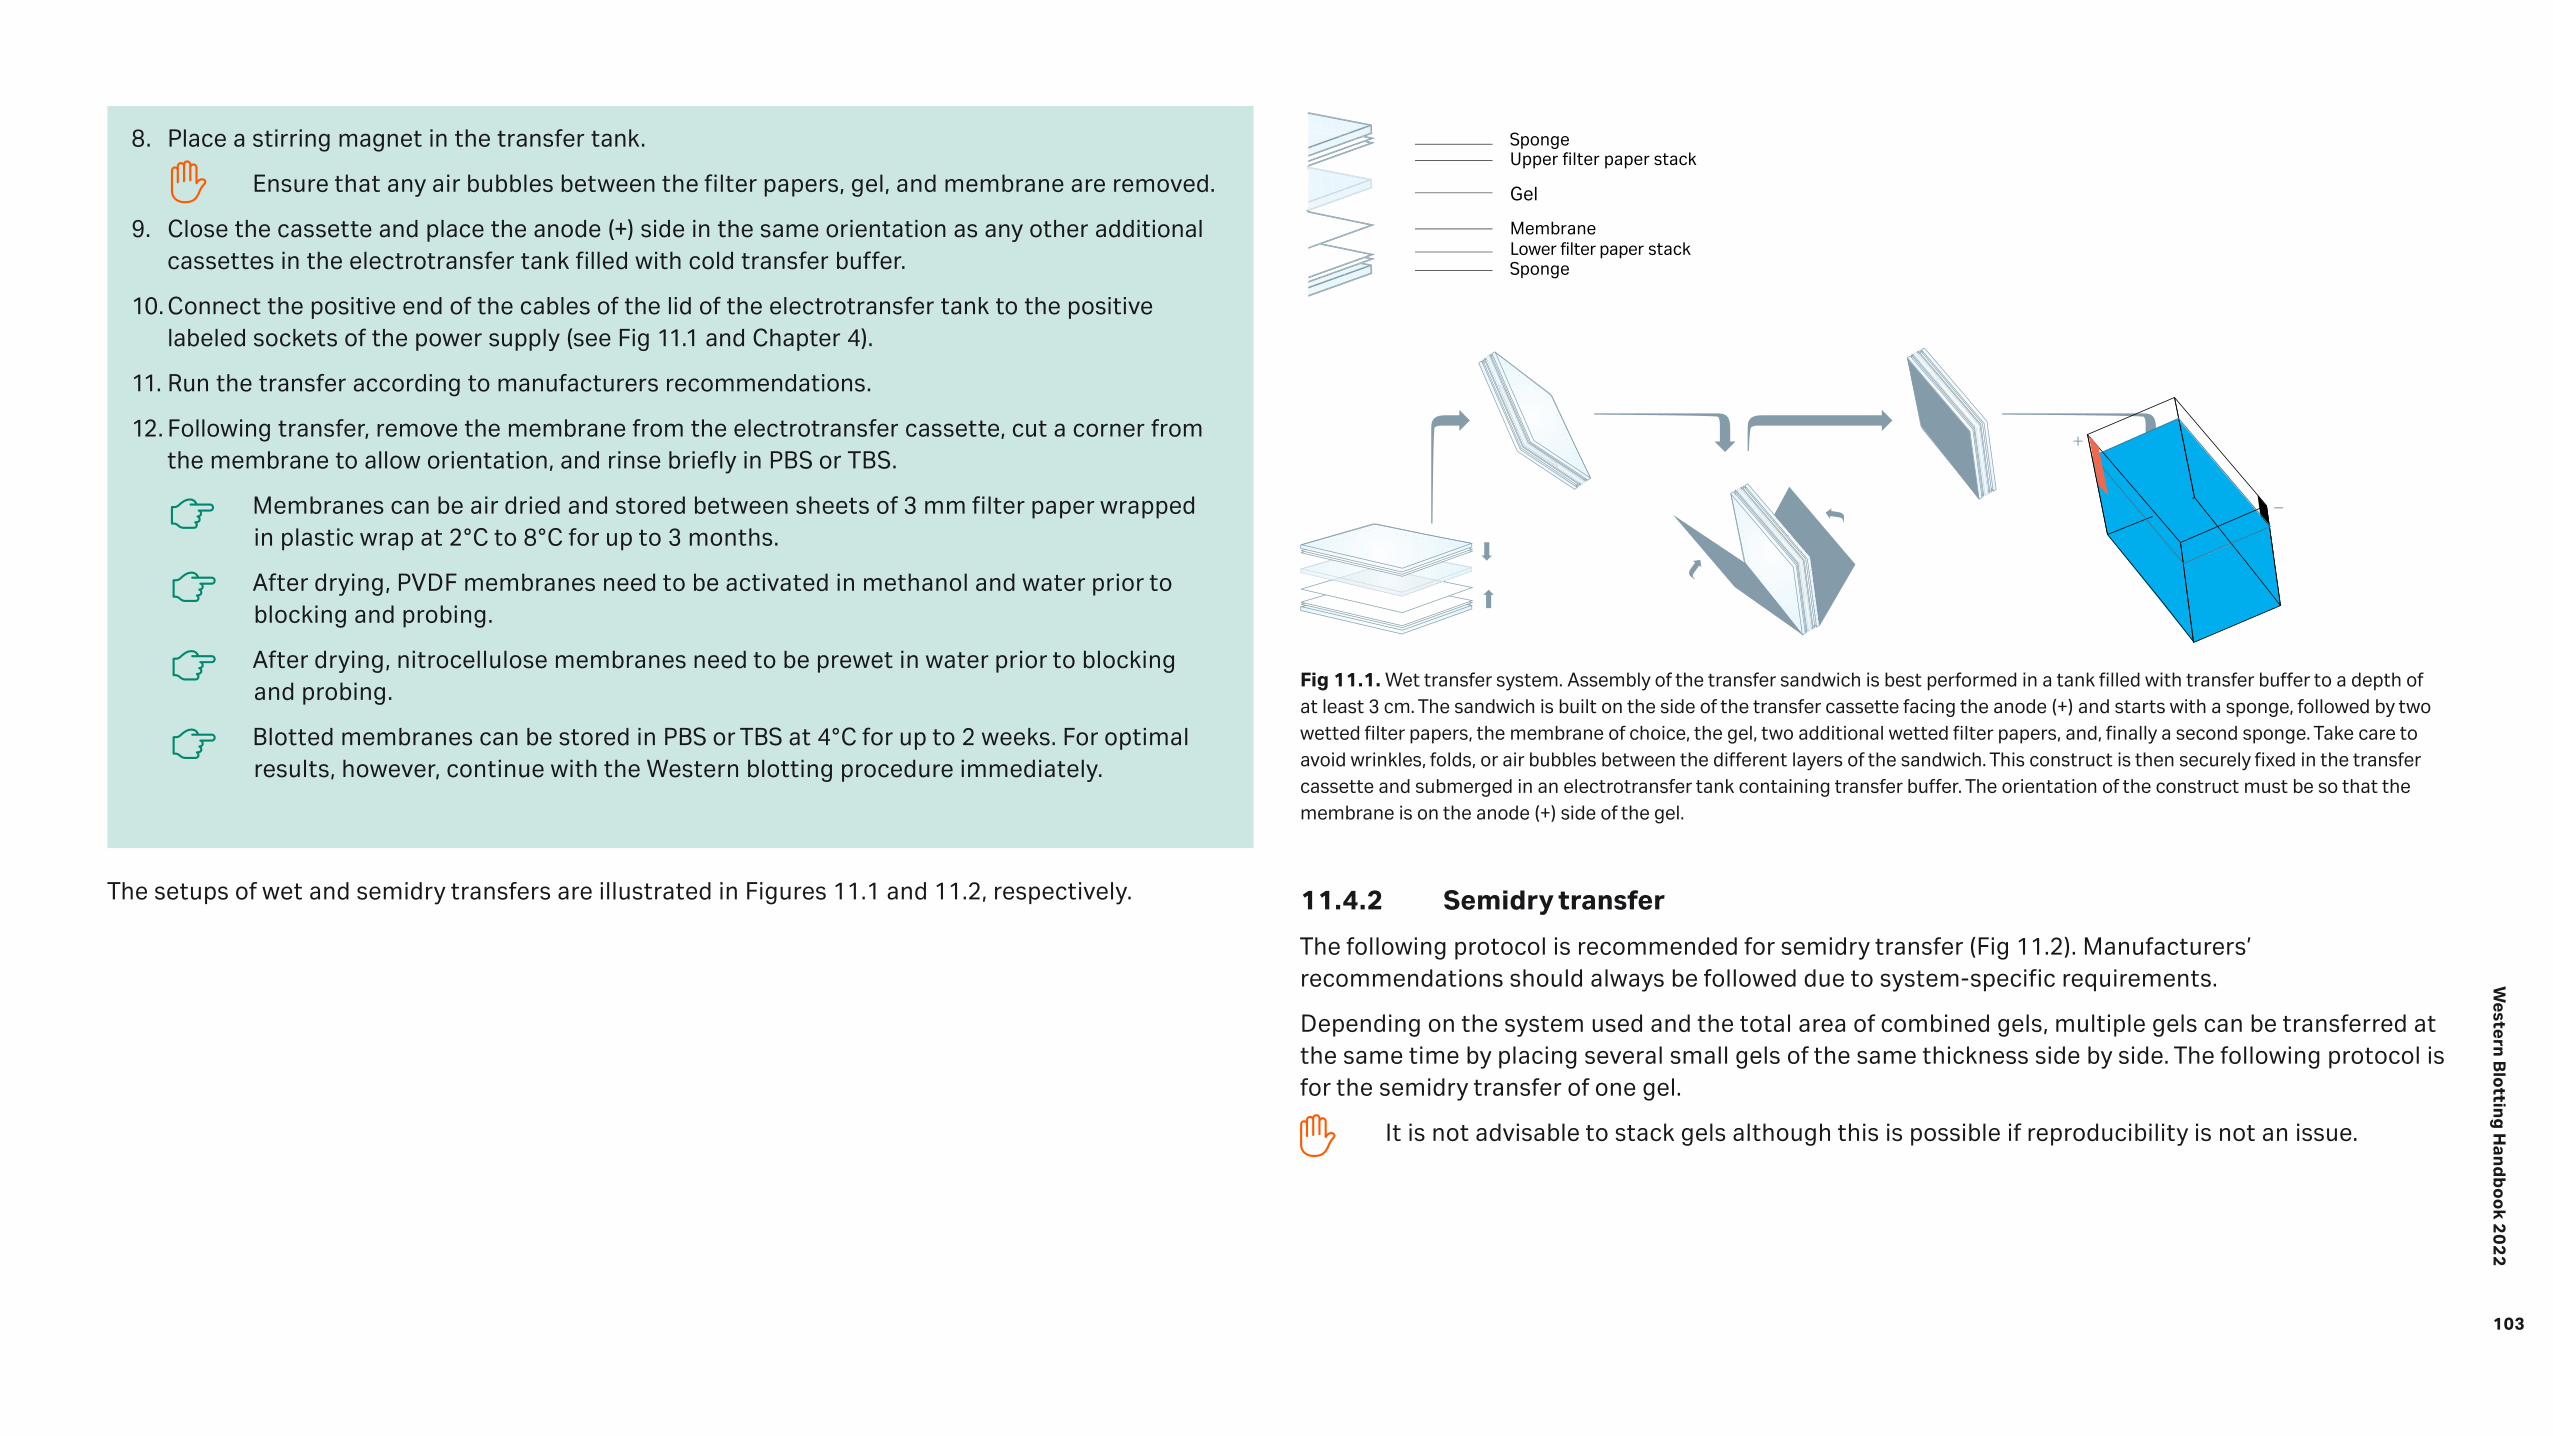
103
Western
Blo
tting
Han
db
oo
k 20
22
8. Place a stirring magnet in the transfer tank.
Ensure that any air bubbles between the filter papers, gel, and membrane are removed.
9. Close the cassette and place the anode (+) side in the same orientation as any other additional cassettes in the electrotransfer tank filled with cold transfer buffer.
10. Connect the positive end of the cables of the lid of the electrotransfer tank to the positive labeled sockets of the power supply (see Fig 11.1 and Chapter 4).
11. Run the transfer according to manufacturers recommendations.
12. Following transfer, remove the membrane from the electrotransfer cassette, cut a corner from the membrane to allow orientation, and rinse briefly in PBS or TBS.
Membranes can be air dried and stored between sheets of 3 mm filter paper wrapped in plastic wrap at 2°C to 8°C for up to 3 months.
After drying, PVDF membranes need to be activated in methanol and water prior to blocking and probing.
After drying, nitrocellulose membranes need to be prewet in water prior to blocking and probing.
Blotted membranes can be stored in PBS or TBS at 4°C for up to 2 weeks. For optimal results, however, continue with the Western blotting procedure immediately.
The setups of wet and semidry transfers are illustrated in Figures 11.1 and 11.2, respectively.
Upper filter paper stackSponge
SpongeLower filter paper stack
Gel
Membrane
Fig 11.1. Wet transfer system. Assembly of the transfer sandwich is best performed in a tank filled with transfer buffer to a depth of at least 3 cm. The sandwich is built on the side of the transfer cassette facing the anode (+) and starts with a sponge, followed by two wetted filter papers, the membrane of choice, the gel, two additional wetted filter papers, and, finally a second sponge. Take care to avoid wrinkles, folds, or air bubbles between the different layers of the sandwich. This construct is then securely fixed in the transfer cassette and submerged in an electrotransfer tank containing transfer buffer. The orientation of the construct must be so that the membrane is on the anode (+) side of the gel.
11.4.2 Semidry transfer
The following protocol is recommended for semidry transfer (Fig 11.2). Manufacturers’ recommendations should always be followed due to system-specific requirements.
Depending on the system used and the total area of combined gels, multiple gels can be transferred at the same time by placing several small gels of the same thickness side by side. The following protocol is for the semidry transfer of one gel.
It is not advisable to stack gels although this is possible if reproducibility is not an issue.

104
Western
Blo
tting
Han
db
oo
k 20
22
• Polyacrylamide gel, post-electrophoresis
• PVDF or nitrocellulose membrane
• At least six 3 mm filter papers or equivalent, cut to the same dimensions as the gel
• Semidry blotter instrument, power supply
• 100% methanol (can be replaced with ethanol)
• Water
• Tris-glycine transfer buffer: 25 mM Tris base, 192 mM glycine, ≤ 20% (V/V) methanol, pH 8.3 (see Chapter 4)
Prepare a 10× Tris-glycine buffer as stock solution (see 11.3.2). Prepare 1× Trisglycine buffer with up to 20% methanol as transfer buffer. Prechill prior to use.
Materials required
Blotting protocol: Semidry transfer
1. Prepare the electrotransfer by rinsing the anode (+) and the cathode (-) with water.
2. After electrophoresis, cut one corner of the resolving gel with a clean sharp razor blade or scalpel to allow you to orientate the gel.
3. Remove the stacking gel and dye front from the gel.
4. Equilibrate the gel in transfer buffer for 10 to 15 min. Bear in mind that incomplete equilibration of the resolving gel might cause band smearing.
5. Cut at least six pieces of filter paper to the same dimensions as the gel or slightly smaller.
Gauge the amount of buffer required according to the thickness or number of blotting paper layers.
6. Soak at least three pieces of blotting paper with transfer buffer. One-by-one, center each sheet on the lower electrode (anode [+]) and remove all trapped air by rolling a clean pipette or roller from the center toward the edges.
7. Cut a membrane to the same dimensions as the gel or slightly smaller. Prewet and equilibrate the membrane in transfer buffer for at least 10 min.
PVDF membranes must be prewetted in methanol and rinsed in water before equilibration in transfer buffer. Nitrocellulose membranes should be prewetted in water before equilibration. Always wear clean gloves when handling membranes to avoid fingerprints.
8. Place the prewetted membrane onto the stack of blotting paper.
The blotting paper and membrane must be the same size as the gel or 1 to 2 mm smaller. Larger sizes will provide an electrical path for current to bypass the gel, leading to poor transfer. This can be avoided by the use of a plastic gasket with a rectangular hole cut to the same size as the gel and placed between the upper and lower stacks of filter paper.
9. Place the gel on the membrane. Proteins bind to the membrane as soon as contact occurs, so it is important to place the gel correctly on the first try.
10. Cover the gel with three layers of wetted blotting paper. Stack each layer with care, with edges parallel. As each layer is added, remove all air pockets by rolling a clean pipette from the center to the edges.
The addition of a few drops of buffer to the blotting paper will help remove air pockets.
11. Connect the color-coded leads to the power supply. Before connecting, ensure that the power is switched off.
12. Set the current and the timer according to the manufacturer’s recommendations. Start the transfer. Semidry transfer is usually performed at a constant current.
Recommendations for most units suggest a limiting current of 0.8 mA/cm2. Transfer time is usually about 1 h.
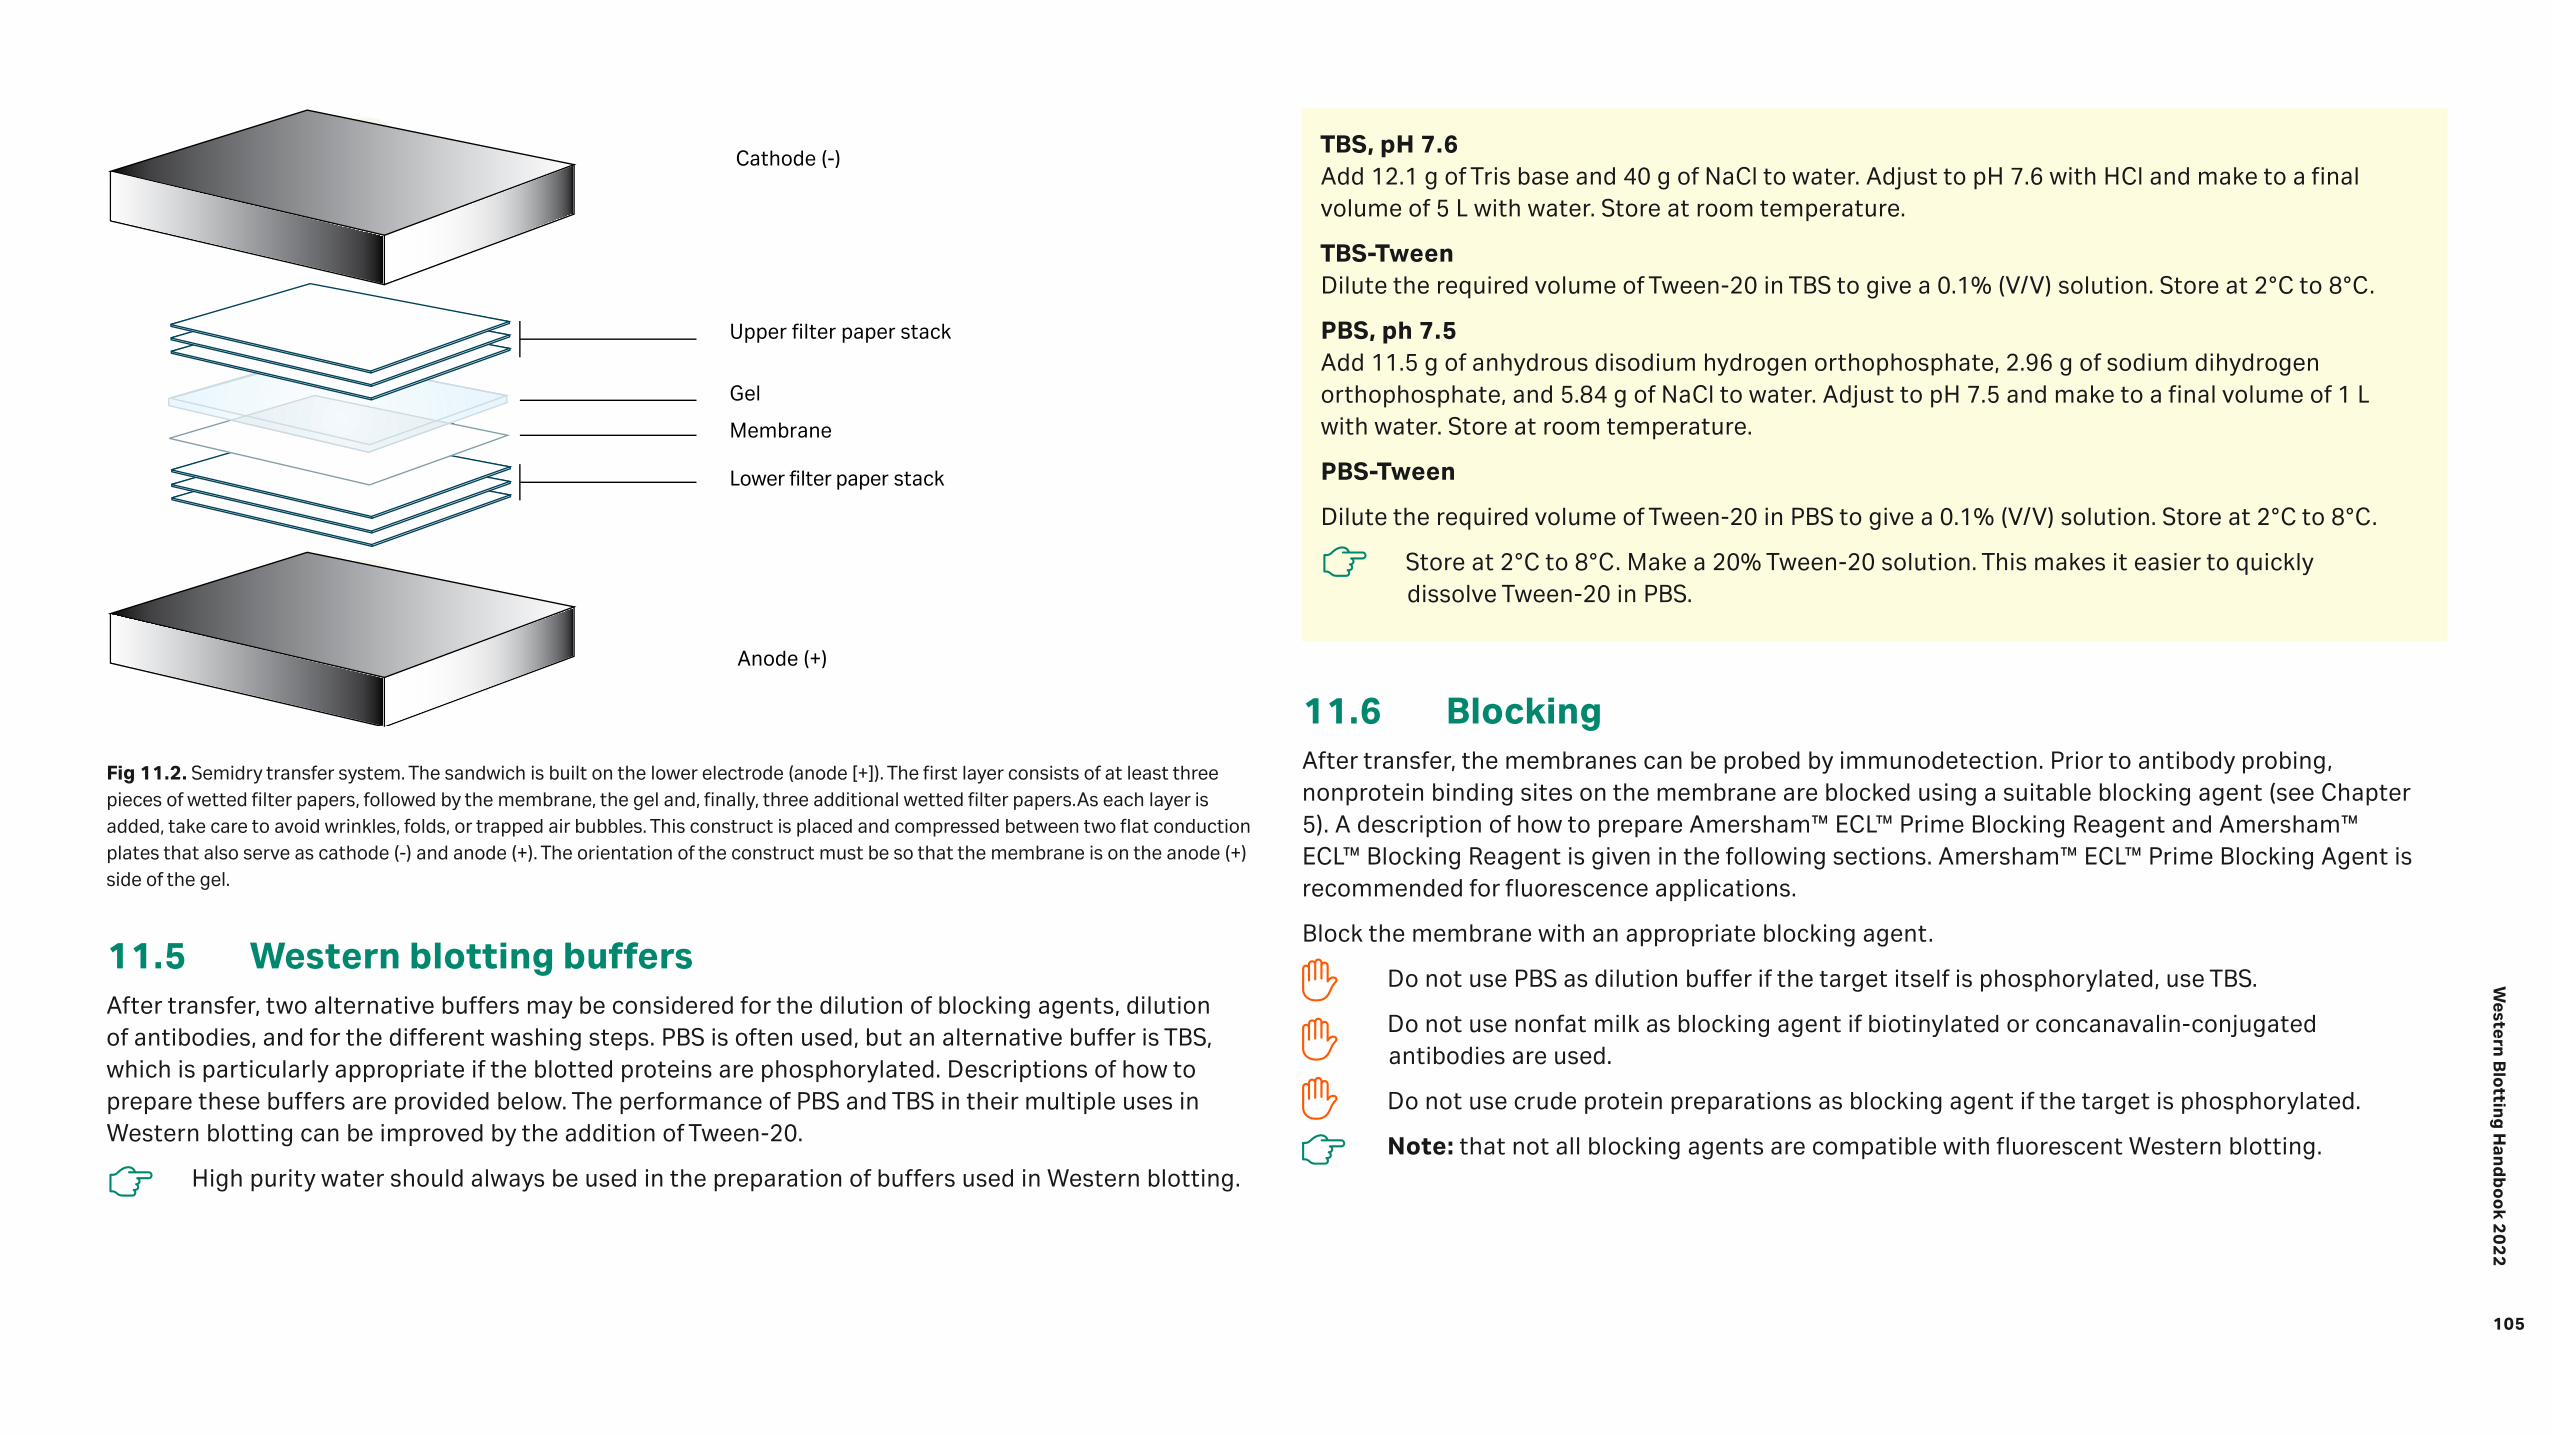
105
Western
Blo
tting
Han
db
oo
k 20
22
Upper filter paper stack
Lower filter paper stack
Gel
Membrane
Anode (+)
Cathode (-)
Fig 11.2. Semidry transfer system. The sandwich is built on the lower electrode (anode [+]). The first layer consists of at least three pieces of wetted filter papers, followed by the membrane, the gel and, finally, three additional wetted filter papers.As each layer is added, take care to avoid wrinkles, folds, or trapped air bubbles. This construct is placed and compressed between two flat conduction plates that also serve as cathode (-) and anode (+). The orientation of the construct must be so that the membrane is on the anode (+) side of the gel.
11.5 Western blotting buffersAfter transfer, two alternative buffers may be considered for the dilution of blocking agents, dilution of antibodies, and for the different washing steps. PBS is often used, but an alternative buffer is TBS, which is particularly appropriate if the blotted proteins are phosphorylated. Descriptions of how to prepare these buffers are provided below. The performance of PBS and TBS in their multiple uses in Western blotting can be improved by the addition of Tween-20.
High purity water should always be used in the preparation of buffers used in Western blotting.
TBS, pH 7.6 Add 12.1 g of Tris base and 40 g of NaCl to water. Adjust to pH 7.6 with HCl and make to a final volume of 5 L with water. Store at room temperature.
TBS-Tween Dilute the required volume of Tween-20 in TBS to give a 0.1% (V/V) solution. Store at 2°C to 8°C.
PBS, ph 7.5 Add 11.5 g of anhydrous disodium hydrogen orthophosphate, 2.96 g of sodium dihydrogen orthophosphate, and 5.84 g of NaCl to water. Adjust to pH 7.5 and make to a final volume of 1 L with water. Store at room temperature.
PBS-Tween
Dilute the required volume of Tween-20 in PBS to give a 0.1% (V/V) solution. Store at 2°C to 8°C.
Store at 2°C to 8°C. Make a 20% Tween-20 solution. This makes it easier to quickly dissolve Tween-20 in PBS.
11.6 BlockingAfter transfer, the membranes can be probed by immunodetection. Prior to antibody probing, nonprotein binding sites on the membrane are blocked using a suitable blocking agent (see Chapter 5). A description of how to prepare Amersham™ ECL™ Prime Blocking Reagent and Amersham™ ECL™ Blocking Reagent is given in the following sections. Amersham™ ECL™ Prime Blocking Agent is recommended for fluorescence applications.
Block the membrane with an appropriate blocking agent.
Do not use PBS as dilution buffer if the target itself is phosphorylated, use TBS.
Do not use nonfat milk as blocking agent if biotinylated or concanavalin-conjugated antibodies are used.
Do not use crude protein preparations as blocking agent if the target is phosphorylated.
Note: that not all blocking agents are compatible with fluorescent Western blotting.
106
Western
Blo
tting
Han
db
oo
k 20
22
1. Shake the powdered block to ensure even distribution of components.
2. Weigh out the appropriate amount of blocking agent for a 2% (W/V) solution (Amersham™ ECL™ Prime Blocking Reagent), or a 5% (W/V) solution (Amersham™ ECL™ Blocking Agent).
3. Add an appropriate volume of PBS-Tween or TBS-Tween, shake vigorously and stir for 15 min until all components are fully dissolved.
Prepared blocking solution can be stored at 2°C to 8°C but should be used within 24 h.
4. Place the membrane in blocking solution and incubate with agitation for 1 h at room temperature, or at 37°C if the background is persistently and unacceptably high. Alternatively, membranes may be left in the blocking solution overnight at 2°C to 8°C, if more convenient.
5. Briefly rinse the membrane in washing buffer.
1. Dilute the primary antibody in PBS-Tween/TBS-Tween.
2. Place the membrane (protein side up) in the primary antibody solution and incubate with agitation for 1 h at room temperature or overnight at 4°C. Always refer to manufacturers’ recommendations.
3. Wash the membrane three to six times in PBS-Tween or TBS-Tween for 5 min per wash or according to manufacturers’ recommendations.
1. Allow the detection solutions to equilibrate to room temperature before opening the vials.
2. Mix an equal volume of detection solutions A and B, allowing sufficient total volume to cover the membranes. A volume of 0.1 mL/cm2 of membrane is required.
3. Drain the excess washing solution from the washed membranes and place them, protein side up, on a sheet of plastic wrap or other suitable clean surface. Pipette the mixed detection reagent onto the membrane.
4. Incubate for 1 min (Amersham™ ECL™) or 5 min (Amersham™ ECL™ Prime and Amersham™ ECL™ Select™) at room temperature.
5. Drain excess detection reagent by holding the membrane gently with forceps and touching the edge against a tissue.
6. Place the membrane, protein side up, on the CCD camera sample tray.
7. Place the sample tray in the CCD-camera and operate according to instructions. Choose an exposure time and capture the image.
Choose exposure times according to expected signal intensity. A recommended starting point is to begin with 1 min and then adjust the time to find the optimal exposure. Alternatively, an increment function can be used, in which the camera captures images at predetermined time points during a given time.
11.7 Antibody probing and detectionUsually, membranes are first probed using an unlabeled primary antibody directed against the target protein, followed by a species-specific, labeled secondary antibody directed against the primary antibody. This technique maximizes the potential sensitivity of the assay, and is presented below.
All containers used to store antibody solutions must be rigorously clean and all solutions used to dilute the antibodies must be prepared using high quality water.
To achieve good quality results, optimize your antibody dilutions.
Select a primary antibody raised in a species as distinct as possible from the target species.
Ensure that the primary antibody has been validated for Western blotting applications.
11.7.1 Chemiluminescence detection with Amersham™ ECL™, Amersham™ ECL™ Prime, and Amersham™ ECL™ Select™
11.7.1.1 Charge-coupled device (CCD) camera-based imaging
4. Place the membrane in the secondary antibody diluted in PBS-Tween or TBS-Tween and incubate with agitation for 1 h at room temperature or overnight at 4°C.
5. Place the membrane in washing solution and wash four to six times for 5 min per wash.
6. Continue with detection as recommended for the selected detection reagent and imaging system.
107
Western
Blo
tting
Han
db
oo
k 20
22
1. Allow the detection solutions to equilibrate to room temperature before opening the vials.
2. Mix an equal volume of detection solutions A and B, allowing sufficient total volume to cover the membranes. A volume of 0.1 mL/cm2 of membrane is required.
3. Drain the excess washing solution from the washed membranes and place them, protein side up, on a sheet of plastic wrap or other suitable clean surface. Pipette the mixed detection reagent onto the membrane.
4. Incubate for 1 min (Amersham™ ECL™) or 5 min (Amersham™ ECL™ Prime and Amersham™ ECL™ Select™) at room temperature.
5. Drain off excess detection reagent by holding the membrane gently with forceps and touching the edge against a tissue. Place the blots, protein side down, on to a fresh piece of plastic wrap, wrap the blots and gently smooth out any air bubbles.
6. Place the wrapped blots, protein side up, in an X-ray film cassette.
7. Place a sheet of X-ray film (for example, Amersham™ Hyperfilm™ ECL™) on top of the membrane. Close the cassette and expose for 15 s.
Choose exposure times according to expected signal intensity. A good starting point is to begin with 1 min. Develop the film, and perform additional exposures if necessary. Adjust to optimal exposure time.
11.7.1.2 X-ray film detection
1. Dilute the primary antibody of mouse or rabbit origin to optimal concentration in washing solution or blocking solution.
2. Incubate a blocked membrane (protein side up) with the diluted primary antibody for 1.5 h at room temperature, or overnight at 4°C.
3. Rinse the membrane twice in washing solution, then wash the membrane twice for 5 min per wash in washing solution with shaking at room temperature.
4. Dilute the ECL™ Plex™ CyDye™ conjugated secondary antibody, (prepared at a concentration of 1 μg/mL) to optimal concentration.
5. Incubate the washed membrane in the secondary antibody solution with shaking for 1 h at room temperature. Ensure that the membrane is protected from light.
11.7.2 Fluorescence detection with Amersham™ ECL™ Plex™
6. Rinse the membrane three times in washing solution, followed by four washes in washing solution for 5 min per wash with shaking at room temperature. Protect the membrane from light.
When using antibodies labeled with fluorophores, incubation should be performed in the dark.
7. Rinse the membrane three times in PBS or TBS (without Tween-20).
8. Detect the secondary antibody signal by scanning the membrane using a laser scanner. For optimal results, dry the membrane before scanning by placing it on Hybond™ blotting paper and incubate at 37°C to 40˚C for 1 h, or at room temperature. Protect the membrane from light.
1. Perform standard gel electrophoresis and western blotting procedures (recommended membrane is NitroCellulose)
Always handle the membrane with the protein side up.
2. Block the membrane with 2% ECL™ Prime blocking reagent in PBS-Tween™ or TBS-Tween.
3. Dilute the primary antibody according to recommendations.
4. Wash the membrane, incubate with the primary antibody.
5. Reconstitute the appropriate Amersham CyDye NIR secondary antibody to cross react with the primary antibody species.
6. Dilute the Amersham CyDye NIR secondary antibodies to the optimised level for the application. We recommend dilution at 1:25000 but this is the responsibility of the user.
7. Wash the membrane and incubate with the Amersham CyDye NIR secondary antibodies.
8. Wash the membrane, the last wash should be carried out in the absence of Tween.
9. Scan the membrane on an appropriate system using filter settings for NIR at either 700 nm or 800 nm emission, using for example the Amersham Typhoon™ 5 / NIR or NIR Plus systems.
11.7.3 Quick Start protocol

108
Western
Blo
tting
Han
db
oo
k 20
22
1. Dilute the primary antibodies in PBS-Tween or TBS-Tween.
More than one antibody may be mixed in a single solution for multiplexed detection.
To prevent cross-talk, primary antibodies must be raised in different species. If using chemiluminescence detection, proteins of interest must be well separated following electrophoresis.
If primary antibodies are to be reused, it is possible to incubate the primary antibodies separately when multiplexing.
2. Place the membrane (protein side up) in the primary antibody solution and incubate with agitation for 1 h at room temperature or overnight at 4°C.
3. Rinse the membrane twice in washing solution, then wash the membrane twice for 5 min per wash in washing solution with shaking at room temperature.
4. Mix the secondary antibodies in a single solution.
5. Place the membrane in the mixed secondary antibody solution and incubate for 30 min to 1 h at room temperature. Protect the membrane from light.
When using antibodies labeled with fluorophores, incubation should be performed in the dark.
6. Rinse the membrane three times in washing solution, followed by three washes in washing solution for 1 min per wash with shaking at room temperature. Protect the membrane from light.
7. Rinse the membrane three times in PBS or TBS (without Tween-20).
8. Detect the secondary antibody signal by scanning the membrane using a fluorescent capable CCD imager or laser scanner. For optimal results, dry the membrane before scanning by placing it on Amersham™ Hybond™ blotting paper and incubate at 37°C to 40˚C for 1 h, or at room temperature. Protect the membrane from light.
1. Place the membrane in the primary antibody solution and incubate with agitation for 1 h at room temperature or overnight at 4°C.
2. Place the membrane in washing solution and wash three times for 5 min per wash.
3. Place the membrane in the biotinylated secondary antibody solution and incubate with agitation for 1 h at room temperature or 37°C.
4. Place the membrane in washing solution and wash three times for 5 min per wash.
5. Dilute the streptavidin-HRP conjugate (or streptavidin CyDye™ conjugate if using Amersham™ ECL™ Plex™ detection) in PBS-Tween or TBS-Tween.
We highly recommend that you optimize the concentration (see Appendix for optimization protocol).
6. Incubate the membrane in the solution for 45 to 60 min at room temperature on an orbital shaker.
7. Briefly rinse the membrane with two changes of washing solution.
8. Wash the membrane by suspending it in enough washing solution to cover the membrane and agitate for 5 min at room temperature. Repeat the procedure at least four to six times.
9. Continue with detection as recommended for the selected detection reagent and imaging system.
11.7.2.1 Protocol for multiplexed detection 11.7.2.2 Protocol for three-layer probing
11.7.2.3 Conjugation of CyDye™ to antibody
Amersham™ ECL™ Plex™ has been optimized for optimal signal performance and minimal cross-reactivity between secondary antibodies. Labeling your own primary antibodies by using the Cytiva CyDye™ labeling kits will enable triplexed detection but these antibodies will have a lower limit of detection (LOD) and can give rise to cross-reactivity issues. The performance of such reagents should therefore be tested before use.

109
Western
Blo
tting
Han
db
oo
k 20
22
1. Add the protein solution (1 mL) to the vial of coupling buffer and mix thoroughly by gentle vortexing or by manually inverting the capped tube 10 times.
2. Transfer the entire volume of protein and coupling buffer to the vial of reactive dye, cap the vial, and mix thoroughly.
Care should be taken to prevent foaming of the protein solution.
3. Incubate at room temperature in the dark for 30 min, with additional mixing approximately every 10 min.
4. While the labeling reaction is incubating, decant the buffer from the top of the column. Mount the column on a ring stand.
5. Add 13 mL of fresh elution buffer.
6. Remove the tip from the column to start the outflow of the column and allow all the buffer to run through the column into a collection tube or small beaker.
Flow will automatically stop when the meniscus reaches the disk at the top of the column packing. There is no need to worry about the column drying out.
7. Carefully transfer the antibody labeling mixture to the top of the column and allow the solution to enter the packing.
8. Add 2 mL of elution buffer. As this volume of buffer moves through the column, a faster moving colored band of labeled protein will separate from any unconjugated dye. These bands might be difficult to distinguish by color, but they can be readily visualized by fluorescence using a longwave ultraviolet (UV) lamp.
9. When the elution buffer has completely run into the column packing, the leading edge of the faster moving colored band should be near the bottom of the packing.
10. Add an additional 2.5 mL of elution buffer to the top of the column and collect the faster moving colored band in a clean tube as it elutes from the column. The labeled protein should be entirely eluted by the 2.5 mL of buffer and collected in a single tube.
11.8 Stripping and reprobingThe following protocol describes how to remove primary and secondary antibodies from membranes. The membranes may be stripped and reprobed several times. For further information on stripping and reprobing, see Chapter 5. If stripping and reprobing is planned, PVDF membranes are more robust than nitrocellulose and are therefore recommended for this process.
11.8.1 Stripping using high pH and high temperature
1. Submerge the membrane in stripping buffer (100 mM β-mercaptoethanol, 2% SDS, 62.5 mM Tris-HCl [pH 6.7]) and incubate at 70°C for 30 min, with agitation.
Lower temperatures (50°C to 70°C) might also work well, but this should be determined empirically with the antibodies used (see 5.3).
2. Wash the membrane twice for 10 min per wash in PBS-Tween or TBS-Tween at room temperature using large volumes of washing solution.
3. Block the membrane in a suitable blocking solution for 1 h at room temperature.
4. Repeat the probing and detection procedure.
1. Submerge the membrane in stripping buffer (100 mM β-mercaptoethanol, 1% SDS, 25 mM glycine-HCl [pH 2.0]) and incubate for 30 min, with agitation.
2. Wash the membrane twice for 10 min per wash in PBS-Tween or TBS-Tween at room temperature using large volumes of washing solution.
3. Block the membrane in a suitable blocking solution for 1 h at room temperature.
4. Repeat the probing and detection procedure.
11.8.2 Stripping using low pH

110
Western
Blo
tting
Han
db
oo
k 20
22
1. Submerge the membrane in 0.2 M NaOH and incubate for 5 min at room temperature, with agitation.
2. Remove and add fresh 0.2 M NaOH and incubate for an additional 5 min.
3. Wash for 5 min in water.
If any trace of signal still remains, increase the concentration of NaOH to as high as 2 M and the incubation time to 30 min.
4. Repeat the immunodetection protocol (without blocking).
Reblocking is normally not necessary after stripping using NaOH. However, depending on the NaOH concentration and soaking time, it might be necessary to reblock.
11.8.3 Stripping using high pH
1. Soak the membrane in PBS or TBS supplemented with 0.5 M NaCl and 0.2% SDS for between 30 min and 2 h.
2. Rinse the blot with water.
3. Repeat the immunodetection protocol (without blocking).
Reblocking is normally not necessary after stripping using salt. However, depending on the soaking time, it might be necessary to reblock.
11.8.4 Stripping using high salt solution
11.9 Optimization protocols for finding optimal primary and secondary antibody concentrationsIt is necessary to optimize primary and secondary antibody concentrations in order to achieve excellent sensitivity and specificity. The dot-blot method is frequently used but a more reliable method is to perform Western blotting and divide the membrane into strips (Fig 11.3). Two methods for antibody optimization are given below. These methods can also be used for optimizing additional parameters, such as blocking agents, species of primary antibody, and quality of primary antibody.
1. Perform electrophoresis and blotting. Use Rainbow Molecular Weight Markers between each loading series (M in Fig 11.3).
2. Cut the membranes into strips containing different quantities of sample (c1 to c3 in Fig 11.3). Label the different strips by cutting a different number of notches for each strip, as indicated in Figure 11.3.
3. Incubate the strips with different dilutions of primary and secondary antibodies.
It is convenient to use 15 or 50 mL tubes for the incubations to save primary antibody. Ensure that the whole strip is covered with antibody solution during incubation.
4. Proceed to detection as previously described.
1:1000 1:2500 1:5000 1:10 000
c1 c2 c3 M c1 c2 c3 M c1 c2 c3 M c1 c2 c3 M - - - - - - - - - - - - - - - -
Primary antibody
Secondary antibody 1:10 000
Cut membrane before antibody probing
1:1000 1:2500 1:5000 1:10 000
c1 c2 c3 M c1 c2 c3 M c1 c2 c3 M c1 c2 c3 M - - - - - - - - - - - - - - - -
Primary antibody
Secondary antibody 1:25 000
1:1000 1:2500 1:5000 1:10 000
c1 c2 c3 M c1 c2 c3 M c1 c2 c3 M c1 c2 c3 M - - - - - - - - - - - - - - - -
Primary antibody
Secondary antibody 1:50 000
Fig 11.3. Membrane strips are used to determine the optimal dilutions of primary and secondary antibody dilutions. c1, c2, and c3 = three alternative quantities of sample. M = Rainbow Molecular Weight Markers. Note that this example is only illustrative. Choose the antibody dilutions recommended for the detection system. Highly sensitive chemiluminescence detection reagents usually require lower antibody concentrations, especially if X-ray film is used, while fluorescence detection requires higher antibody concentrations.

111
Western
Blo
tting
Han
db
oo
k 20
22
1. Spot a two-fold dilution series of protein sample (five dilutions) on to a nitrocellulose membrane and allow to air dry. Prepare one blot for each primary antibody dilution to be tested.
2. Incubate in blocking solution for 1 h at room temperature, with agitation.
3. Rinse the membranes briefly with two changes of washing solution. Prepare a number of solutions within the recommended antibody dilution range. Incubate one blot in each solution for 1 h at room temperature, with agitation.
4. Briefly rinse the membrane with two changes of washing solution. Wash the membrane by suspending it in washing solution and agitate for 5 min at room temperature. Replace the washing solution three to four times.
5. Dilute the secondary antibody (using only one concentration) and incubate the membranes for 1 h at room temperature, with agitation.
6. Rinse the blots in two changes of washing solution, then wash three to six times for 5 min and then three times for 5 min per wash in fresh changes of washing solution.
7. Detect according to the protocol for the selected detection reagent. The antibody dilution that gives the strongest signal with the minimum background should be selected.
1. Spot a two-fold dilution series of protein sample (five dilutions) on to a nitrocellulose membrane and allow to air dry. Prepare one blot for each primary antibody dilution to be tested.
2. Incubate in blocking solution for 1 h at room temperature, with agitation.
3. Incubate in diluted primary antibody for 1 h at room temperature, with agitation.
4. Wash membranes three to six times for 5 min per wash or according to the protocol for the selected detection reagent.
5. Prepare a number of solutions within the recommended secondary antibody dilution range. Incubate one blot in each solution for 1 h at room temperature, with agitation.
6. Briefly rinse the membranes with two changes of washing solution.
11.9.1 Optimization of primary antibody concentration by dot-blotting
11.9.1 Optimization of primary antibody concentration by dot-blotting
7. Wash the membranes three to six times for 5 min per wash, or according to the protocol for the selected detection reagent.
8. Detect according to the protocol for the selected detection reagent. The antibody dilution that gives the strongest signal with the minimum background should be selected.
11.10 Reference1. Affinity Chromatography Handbook, Vol. 1: Antibodies, Cytiva, 18103746.

Western
Blo
tting
Han
db
oo
k 20
21
Appendix optimizationBefore precious samples run and expensive antibodies are used in a Western blotting experiment, it is well worth the effort to invest some time in selecting the optimal experimental design to help achieve the desired results. Optimization of Western blotting is desirable whether the main goal is sensitivity, precision of quantitation, or an assay of sufficient robustness and consistency for reliable day-to-day laboratory use. Once properly optimized, it should then be a simple matter to achieve results you can trust, making the time invested in optimization pay off in terms of both q optiuality and time saved further down the line.
The following sections provide some guidelines to help design your experiments correctly from the start. For detailed optimization protocols, see 11.9.
112

113
Western
Blo
tting
Han
db
oo
k 20
22
A.1 Choice of membraneThe choice of membrane depends on whether your experiment involves chemiluminescence or fluorescence detection. The choice also depends on whether you plan to strip and reprobe the membrane and if you want to post-stain the blot. Polyvinylidine difluoride (PVDF) membranes are recommended for experiments involving stripping and reprobing, as these membranes are stronger and more robust than nitrocellulose membranes. Nitrocellulose membranes are compatible with total protein post-stains. PVDF membranes can also be post-stained, but destaining might be less effective. Nitrocellulose membranes are therefore recommended when low background is important for the detection of weak total protein signals.
Membranes with low autofluorescence properties are critical for fluorescence detection, especially when detecting weak signals. Amersham Hybond™ LFP 0.2 and Amersham Protran™ Premium membranes are recommended for this mode of detection, and are particularly suitable in combination with the Amersham ECL Plex™ fluorescent Western blotting system.
For most applications, a membrane pore size of 0.45 µm is suitable, but if you are working with small target proteins (Mr 5000 to 25 000), membranes with a smaller pore size (0.2 µm) are recommended as they have higher binding capacity for smaller proteins during transfer from the gel and reduce sample loss.
Recommended membranes for each detection system from Cytiva are provided in Table A.1.
Table A.1. First-choice nitrocellulose and PVDF membranes for each Amersham ECL™ detection system
Detection system Nitrocellulose PVDF
Amersham ECL™ Amersham Protran™ Premium 0.2 or 0.45 Amersham Hybond™ 0.2 and 0.45 PVDF
Amersham ECL™ Prime Amersham Protran™ Premium 0.2 or 0.45 Amersham Hybond™ 0.2 and 0.45 PVDF
Amersham ECL Select™ Amersham Protran™ Premium 0.2 or 0.45 Amersham Hybond™ 0.2 and 0.45 PVDF
These Amersham Hybond™ and Amersham Protran™ Premium membranes are sensitive to their environment and should be stored at room temperature in a clean dry atmosphere away from excessive heat, light, and noxious fumes. To prevent contamination, handle membranes using gloves or blunt forceps. Correct storage achieves consistent protein binding capacity, solvent absorbance, and minimal handling problems.
A.2 Choice of blocking agentSelection of blocking agent is very important to achieve optimal results, especially for low-abundance proteins. Nonspecific binding and background levels, as well as signal intensity, can all be affected by the choice of blocking agent. The optimal blocking agent depends on compatibility with primary and secondary antibodies as well as the detection system used. Note that not all blocking agents are compatible with fluorescent Western blotting and background problems might arise if the blocking agent itself possesses fluorescent properties. One way to avoid these problems in applications using Amersham ECL™ Plex is by using Amersham ECL™ Prime Blocking Reagent.
Compatibility between the blocking agent and detection reagent should be tested by using the dot-blotting method described in Chapter 11. Briefly, the blocking solution is spotted onto a blank membrane. Detection reagents are then added to the blot, which is then incubated for 5 min and then imaged. The appearance of a signal indicates that the blocking agent is not compatible with the detection reagent. A more comprehensive method that mimics true experimental conditions is to prepare a Western blot and divide it into strips. This takes more time than dot-blotting, but more parameters can be monitored in a single experiment.
If you use milk-protein and have a problem with high background, this might be because the target protein is also found in milk. As milk contains a complex mixture of proteins (that can vary depending on where the cows have been feeding) blocking by milk-protein can lead to rather unpredictable results.
A.3 Choice of washing bufferPhosphate-buffered saline (PBS)-Tween is a suitable washing buffer for most applications. For phosphorylated target proteins, however, we recommend using Tris-buffered saline (TBS)-Tween as washing buffer, as the phosphate in PBS-Tween can interfere with antibody binding. Under these circumstances, remember to use TBS-Tween or TBS in all washing buffer-based solutions, as well as the blocking solution.
When a buffer solution is prepared, water quality is very important, as minute quantities of impurities can interfere at different levels. The enzymatic activity of horseradish peroxidase (HRP), for example, is inhibited by pyrogens commonly present in even high purity water.

114
Western
Blo
tting
Han
db
oo
k 20
22
A.4 Optimization of antibody concentrations using membrane stripsThe optimal antibody concentration is usually determined by testing a series of antibody dilutions around those recommended by the vendor. If the recommended dilution is 1:100, for example, an appropriate titration should span two-fold dilutions either side of this mark, that is, 1:25, 1:50, 1:100, 1:200, and 1:400. To further optimize the probing conditions, the same titration may be performed for extended or reduced times, such as 1, 2, and 3 h at room temperature or overnight at 4°C. This may be performed by dot-blotting, but it is more reliable to perform Western blotting and then divide the membrane into strips (Fig A.1). This takes more time than dot-blotting, but more parameters can be monitored in a single experiment. By using this method, information on specific signal intensity, background level, and levels of nonspecific detection is obtained. Furthermore, optimal dilutions of primary and secondary antibodies, optimal sample load, blocking agent, and species of primary antibody, as well as the highest quality of primary antibody may be selected using membrane strips.
Incubation of strips in different dilutions of primary antibody
1:50 0001:25 0001:10 000
a b c d a b c d a b c d
a bc
d
Incubation of strips in different dilutions of secondary antibody
1:1000 1:2500 1:5000 1:10 000
c1 c2 c3 M c1 c2 c3 M c1 c2 c3 M c1 c2 c3 M
- - - - - - - - - - - - - - - -
Primary antibody
Secondary antibody
A
A
B
B
C D
1: 1:10 000 2: 1:25 000 3: 1:50 000
A. B.
Fig A.1. In the optimization process, the steps of blocking, antibody incubation, and washing are similar to normal Western blotting procedures. (A) Suggested scheme for selecting optimal primary and secondary antibody concentrations in Western blotting. c1, c2, c3 = three concentrations of sample. M = Rainbow Molecular Weight Markers or Amersham ECL DualVue Western Blotting Markers. (B) For antibody evaluation, the membrane should first be cut into strips after transfer and incubated with different primary antibody dilutions (a = 1:1000, b = 1:2500, c = 1:5000, d = 1:10 000). The antibody dilutions here are only illustrative - you should choose the antibody dilution ranges appropriate for the detection system. It is convenient to use 15 or 50 mL tubes for this procedure. After washing, the strips that are to be incubated with the same dilution of secondary antibody can be combined and incubated in a single tray. The antibody dilutions giving the best signal with the minimum background should be selected for your Western blotting application.

115
Western
Blo
tting
Han
db
oo
k 20
22
Sample preparationProducts Quantity Product code
Mammalian Cell Lysis Buffer 1 × 500 mL 28941279
Yeast Protein 1 28944045
Extraction Buffer Kit
Vivaspin sample concentrators with 30 000 molecular weight cut off (MWCO)1
2-D Quant Kit 500 assays 80648356
Vivaspin 500 25 × 500 µL 28932235
Vivaspin 2 25 × 2 mL 28932248
Vivaspin 6 25 × 6 mL 28932317
Vivaspin 20 12 × 20 mL 28932361
SDS-PAGE Clean-Up Kit 50 samples 80648470
2-D Clean-Up Kit 50 samples 80648451
Gel electrophoresis, transfer, and blotting equipmentProducts Quantity Product code
Transfer units
TE 62 Transfer Unit 1 80620958
TE 22 Mini Tank Transfer Unit 1 80620426
TE 70 Semi-Dry Transfer Unit, 14 × 16 cm 1 80621034
TE 70 PWR Semi-Dry Transfer Unit with built-in power supply, 14 × 16 cm 1 11001341
TE 77 Semi-Dry Transfer Unit, 21 × 26 cm 1 80621186
TE 77 PWR Semi-Dry Transfer Unit with built-in power supply, 21 × 26 cm 1 11001342
1 Other MWCO (3000, 5000, 10 000, 50 000, and 100 000) are available for all Vivaspin column volumes.
Ordering informationProducts Quantity Product code
Vertical electrophoresis systems
miniVE Vertical Electrophoresis System 1 80641877
miniVE Blot Module 1 80641896
SE 600 Ruby Standard Dual Cooled Vertical Unit 1 80647957
Amersham™ molecular weight markersProducts Quantity Product code
Amersham ECL™ Rainbow Marker, Low Range, Mr 3500 to 38 000 250 μL RPN755E
Amersham ECL™ Rainbow Marker, High Range, Mr 12 000 to 225 000 250 μL RPN756E
Amersham ECL™ Rainbow Marker, Full Range, Mr 12 000 to 225 000 250 μL RPN800E
Amersham ECL™ DualVue Western Blotting Markers, Mr 15 000 to 150 000 1 pack (25 loadings)
RPN810
Amersham ECL™ Plex Fluorescent Blotting Markers, Mr 12 000 to 225 000 120 μL RPN850E
Amersham ECL™ Plex Fluorescent Blotting Markers, Mr 12 000 to 225 000 500 μL RPN851E
LMW SDS Marker Kit, Mr 14 000 to 97 000 10 vials 17044601
HMW SDS Marker Kit, Mr 53 000 to 220 000 10 vials 17061501
Amersham™ WB Molecular Weight Markers, Mr 10 000 to 225 000 5 vials 29030735
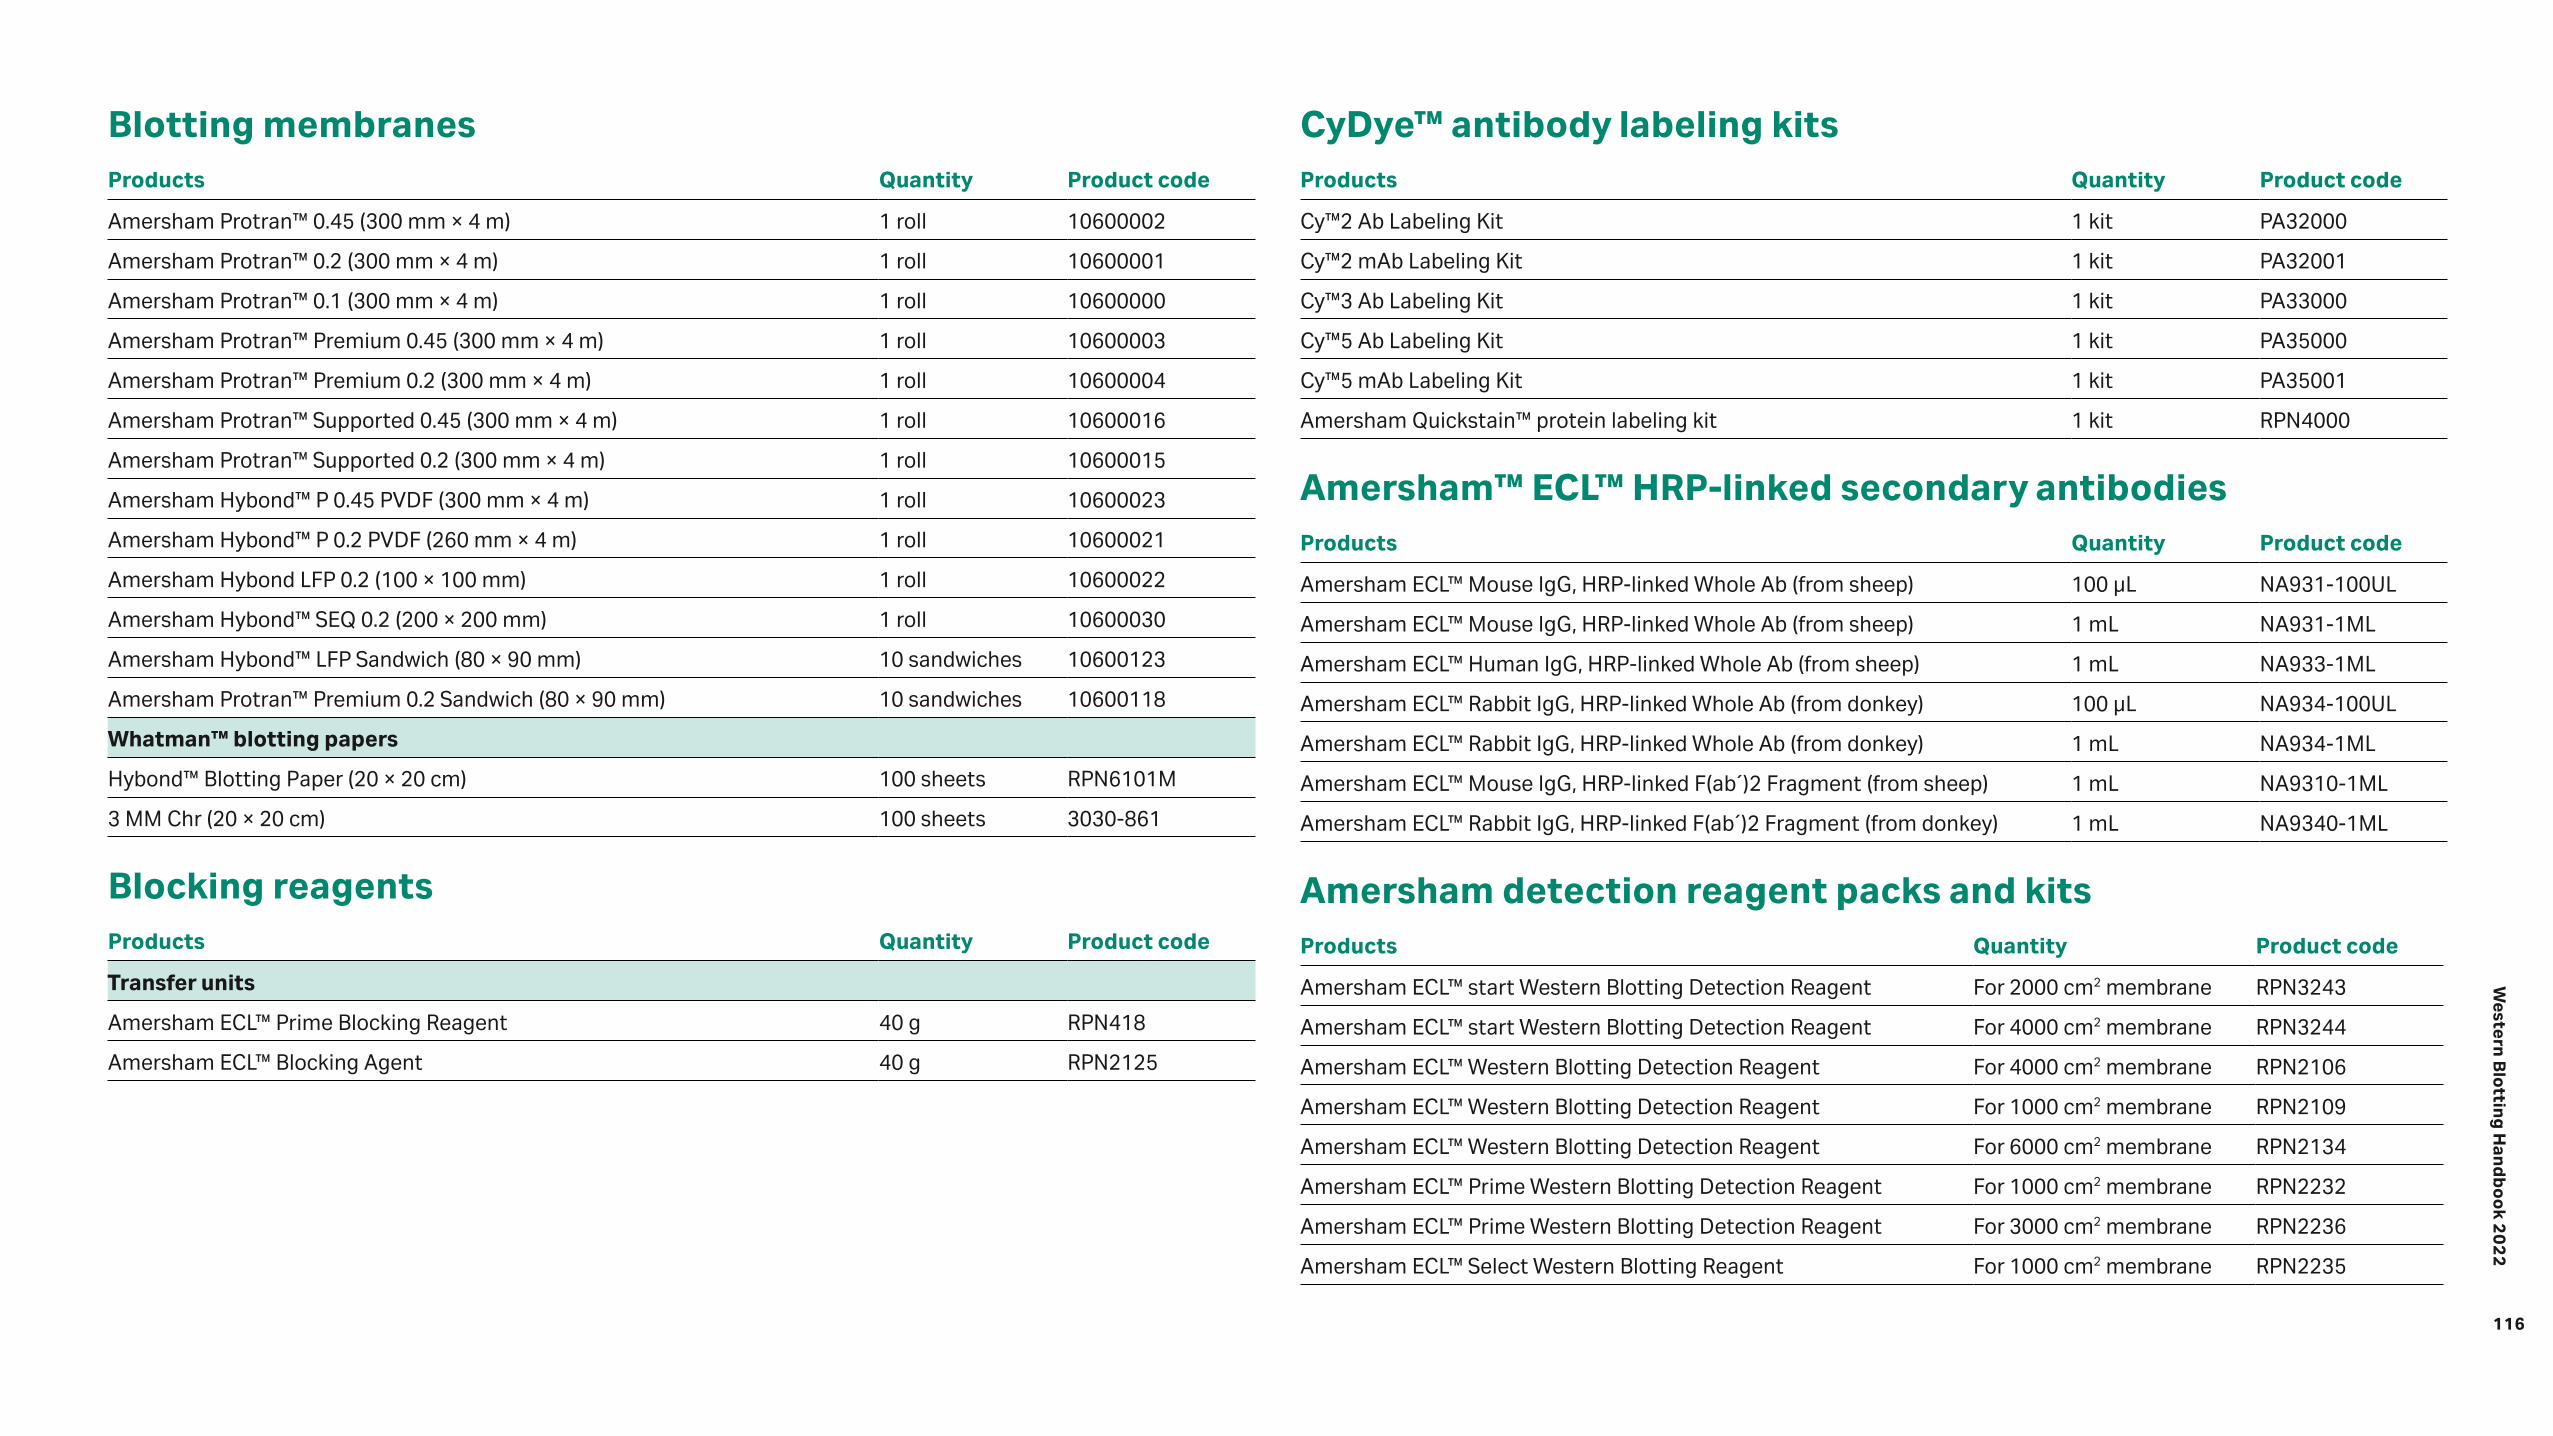
116
Western
Blo
tting
Han
db
oo
k 20
22
Blotting membranesProducts Quantity Product code
Amersham Protran™ 0.45 (300 mm × 4 m) 1 roll 10600002
Amersham Protran™ 0.2 (300 mm × 4 m) 1 roll 10600001
Amersham Protran™ 0.1 (300 mm × 4 m) 1 roll 10600000
Amersham Protran™ Premium 0.45 (300 mm × 4 m) 1 roll 10600003
Amersham Protran™ Premium 0.2 (300 mm × 4 m) 1 roll 10600004
Amersham Protran™ Supported 0.45 (300 mm × 4 m) 1 roll 10600016
Amersham Protran™ Supported 0.2 (300 mm × 4 m) 1 roll 10600015
Amersham Hybond™ P 0.45 PVDF (300 mm × 4 m) 1 roll 10600023
Amersham Hybond™ P 0.2 PVDF (260 mm × 4 m) 1 roll 10600021
Amersham Hybond LFP 0.2 (100 × 100 mm) 1 roll 10600022
Amersham Hybond™ SEQ 0.2 (200 × 200 mm) 1 roll 10600030
Amersham Hybond™ LFP Sandwich (80 × 90 mm) 10 sandwiches 10600123
Amersham Protran™ Premium 0.2 Sandwich (80 × 90 mm) 10 sandwiches 10600118
Whatman™ blotting papers
Hybond™ Blotting Paper (20 × 20 cm) 100 sheets RPN6101M
3 MM Chr (20 × 20 cm) 100 sheets 3030-861
Blocking reagentsProducts Quantity Product code
Transfer units
Amersham ECL™ Prime Blocking Reagent 40 g RPN418
Amersham ECL™ Blocking Agent 40 g RPN2125
CyDye™ antibody labeling kitsProducts Quantity Product code
Cy™2 Ab Labeling Kit 1 kit PA32000
Cy™2 mAb Labeling Kit 1 kit PA32001
Cy™3 Ab Labeling Kit 1 kit PA33000
Cy™5 Ab Labeling Kit 1 kit PA35000
Cy™5 mAb Labeling Kit 1 kit PA35001
Amersham Quickstain™ protein labeling kit 1 kit RPN4000
Amersham™ ECL™ HRP-linked secondary antibodiesProducts Quantity Product code
Amersham ECL™ Mouse IgG, HRP-linked Whole Ab (from sheep) 100 μL NA931-100UL
Amersham ECL™ Mouse IgG, HRP-linked Whole Ab (from sheep) 1 mL NA931-1ML
Amersham ECL™ Human IgG, HRP-linked Whole Ab (from sheep) 1 mL NA933-1ML
Amersham ECL™ Rabbit IgG, HRP-linked Whole Ab (from donkey) 100 μL NA934-100UL
Amersham ECL™ Rabbit IgG, HRP-linked Whole Ab (from donkey) 1 mL NA934-1ML
Amersham ECL™ Mouse IgG, HRP-linked F(ab´)2 Fragment (from sheep) 1 mL NA9310-1ML
Amersham ECL™ Rabbit IgG, HRP-linked F(ab´)2 Fragment (from donkey) 1 mL NA9340-1ML
Amersham detection reagent packs and kitsProducts Quantity Product code
Amersham ECL™ start Western Blotting Detection Reagent For 2000 cm2 membrane RPN3243
Amersham ECL™ start Western Blotting Detection Reagent For 4000 cm2 membrane RPN3244
Amersham ECL™ Western Blotting Detection Reagent For 4000 cm2 membrane RPN2106
Amersham ECL™ Western Blotting Detection Reagent For 1000 cm2 membrane RPN2109
Amersham ECL™ Western Blotting Detection Reagent For 6000 cm2 membrane RPN2134
Amersham ECL™ Prime Western Blotting Detection Reagent For 1000 cm2 membrane RPN2232
Amersham ECL™ Prime Western Blotting Detection Reagent For 3000 cm2 membrane RPN2236
Amersham ECL™ Select Western Blotting Reagent For 1000 cm2 membrane RPN2235

117
Western
Blo
tting
Han
db
oo
k 20
22
Amersham ECL™ Plex CyDye conjugated antibodiesProducts Quantity Product code
Amersham ECL™ Plex Western Blotting Combination Pack (Cy™3, Cy™5, Amersham Protran™ Premium 0.2)
1 RPN998
Amersham ECL™ Plex Western Blotting Combination Pack (Cy™3, Cy™5, Amersham Hybond™ LFP 0.2) for two slab gels
1 RPN999
Amersham ECL™ Plex goat-α-rabbit IgG-Cy™3, for 1000 cm2 membrane area 150 μg 28901106
Amersham ECL™ Plex goat-α-mouse IgG-Cy™3, for 1000 cm2 membrane area 150 μg PA43009
Amersham ECL™ Plex goat-α-mouse IgG-Cy™5, for 1000 cm2 membrane area 150 μg PA45009
Amersham ECL™ Plex goat-α-rabbit IgG-Cy™5, for 1000 cm2 membrane area 150 μg PA45011
Autoradiography filmsProducts Quantity Product code
Amersham Hyperfilm™ ECL™ (5 × 7 inches) 50 sheets 28906835
Amersham Hyperfilm™ ECL™ (18 × 24 cm) 50 sheets 28906836
Amersham Hyperfilm™ ECL™ (18 × 24 cm) 100 sheets 28906837
Amersham Hyperfilm™ ECL™ (8 × 10 inches) 50 sheets 28906838
Amersham Hyperfilm™ ECL™ (8 × 10 inches) 100 sheets 28906839
Imaging systemsProducts Quantity Product code
Amersham Typhoon™ laser-scanner platform
Amersham Typhoon™ NIR 1 29238583
Amersham Typhoon™ NIR Plus 1 29264463
Amersham Typhoon™ RGB 1 29187193
Amersham Typhoon™ IP 1 29187194
Amersham Typhoon™ 5 1 29187191
Products Quantity Product code
Amersham™ ImageQuant™ Imagers
Amersham ImageQuant™ 800 1 29399481
Amersham ImageQuant™ 800 UV 1 29399482
Amersham ImageQuant™ 800 OD 1 29399483
Amersham ImageQuant™ 800 Fluor 1 29399484
Amersham™ ImageQuant™ Imagers
ImageQuant™ 500 1 29005063
ImageQuant LAS 500Products Quantity Product code
CD and getting started:
ImageQuant™ TL SecurITy 8.2 Floating license 1 user 29291740
Licenses for ImageQuant TL only:
ImageQuant™ TL 8.2, node-locked license 1 user 29291749

Western
Blo
tting
Han
db
oo
k 20
21
cytiva.com
Cytiva and the Drop logo are trademarks of Life Sciences IP Holdings Corporation or an affiliate.
ÄKTA, Amersham, Capto, Cy, CyDye, ECL, ECL DualVue, ECL Plex, ECL Select, Ettan, ExcelGel, HisTrap, HiPrep, HisTrap, HiTrap, Hybond, Hyperfilm, illustra, ImageQuant, Immobiline, IPGphor, MidiTrap, MiniTrap, Multiphor, MultiTemp, PhastGel, PhastSystem, Protran, Rainbow, Sepharose, SpinTrap, triplePrep, Typhoon, and Whatman are trademarks of Global Life Sciences Solutions USA LLC or an affiliate.
Microsoft Excel is a registered trademark of Microsoft Corporation. Pefabloc is a trademark of Pentapharm Ltd. Polytron is a trademark of Kinematica AG Company. Triton is a trademark of Union Carbide Chemicals and Plastic Company Inc. Vivaspin is a trademark of Sartorius Stedim Biotech GmbH. Waring is a trademark of Dynamic Corp. of America. SYPRO is a trademark of Molecular Probes Inc.
CyDye: This product or portions thereof is manufactured under an exclusive license from Carnegie Mellon University under US patent number 5,268,486 and equivalent patents in the US and other countries.
The purchase of CyDye products includes a limited license to use the CyDye products for internal research and development but not for any commercial purposes. A license to use the CyDye products for commercial purposes is subject to a separate license agreement with GE Healthcare. Commercial use shall include:
1. Sale, lease, license or other transfer of the material or any material derived or produced from it.
2. Sale, lease, license or other grant of rights to use this material or any material derived or produced from it.
3. Use of this material to perform services for a fee for third parties, including contract research and drug screening.
If you require a commercial license to use this material and do not have one, return this material unopened to GE Healthcare Bio-Sciences AB, Bjorkgatan 30, SE-751 84 Uppsala, Sweden and any money paid for the material will be refunded.
ECL Prime: This product or portions thereof is manufactured and sold under license from Cyanagen Srl and is subject of US patent 7,855,287, US Patent 7,803,573, and US Patent 9,040,252, together with other equivalent granted patents and patent applications in other countries.
IMAC Sepharose, Ni Sepharose, and Fe Sepharose products: These products are sold under a license from Sigma-Aldrich under patent number EP 1276716 (Metal chelating compositions) and equivalent patents and patent applications in other countries.
© 2021 Cytiva
For local office contact information, visit cytiva.com/contact
CY13930-17Feb22-HB 118
Top Related
Copyright © 2022 FDOKUMEN

