


Bahasa
Halaman
Hukum

OregonProducts.com(800) 223-5168
Oregon
® Maintenance and Safety M
anual
© Copyright 2020, Blount Inc.F/N MMANUAL-EN • Rev AB • 03/20Printed in USA
Oregon® | Blount, Inc.4909 SE International WayPortland, Oregon 97222 USA
Oregon® Maintenanceand Safety Manual
Saw chain, Guide Bar and Drive Sprocket
Oregon is a registered trademark of Blount, Inc. All other marks are property of their respective owners.

Avoi
ding
Kic
kbac
k In
jury
• Be
ale
rt a
t all
times
to
guar
d ag
ains
t a p
ossi
ble
kick
back
reac
tion.
Alw
ays
be a
war
e of
the
posi
tion
of
your
gui
de b
ar’s
nos
e.
• D
iffer
ent m
odel
s of
saw
ch
ain
are
avai
labl
e fo
r mos
t cu
ttin
g ta
sks.
Use
the
saw
ch
ain,
sui
tabl
e fo
r you
r ty
pe o
f cut
ting,
with
the
low
est k
ickb
ack
pote
ntia
l.
• Sm
all r
adiu
s tip
gui
de b
ars
such
as
our C
ontr
olCu
t® g
uide
ba
rs a
re re
com
men
ded
for
max
imum
kic
kbac
k sa
fety
.
Four
Bas
ic S
aw c
hain
Rul
es
Rule
Num
ber 1
Ensu
re C
orre
ct T
ensi
on
Mor
e sa
w c
hain
and
gui
de b
ar
prob
lem
s ar
e ca
used
by
inco
rrec
t sa
w c
hain
tens
ion
than
by
any
othe
r sin
gle
fact
or.
Rule
Num
ber 2
Keep
You
r Saw
lubr
icat
ed
A c
onst
ant s
uppl
y of
oil
to y
our
chai
nsaw
’s g
uide
bar
, saw
cha
inan
d dr
ive
spro
cket
is v
ital.
With
out
it, e
xces
sive
fric
tion,
wea
r,an
d da
mag
e w
ill o
ccur
.
Rule
Num
ber 3
Keep
You
r Saw
Sha
rp
Whe
n yo
ur s
aw c
hain
is s
harp
, it
does
the
wor
k. W
hen
it’s
not,
you
do th
e w
ork
— y
our g
uide
bar
and
sp
rock
et w
ill w
ear m
ore
rapi
dly.
Rule
Num
ber 4
Set D
epth
Gau
ges
Corr
ectl
y
Dep
th g
auge
set
ting
and
dept
h ga
uge
shap
e ar
e cr
itica
l to
perf
orm
ance
and
saf
ety.
Pote
ntia
l ki
ckba
ck
situ
atio
n
You’ve got work to do, we’ve got you covered.
If you have questions about your saw or cutting system, our technical support team is ready to help.
Oregon [email protected]
800-223-5168

Safety & Maintenance Manual 1
Table of Contents
Chainsaw Safety & Tips
Chainsaw Safety . . . . . . . . . . . . . . . . . . . . . . . . . . . . . . . . . . . . . . 4–9Kickback Awareness . . . . . . . . . . . . . . . . . . . . . . . . . . . . . . . . . . . . . . . . . . . . 5ANSI Safety Rating . . . . . . . . . . . . . . . . . . . . . . . . . . . . . . . . . . . . . . . . . . . . . 6Recommended Personal Protective Equipment . . . . . . . . . . . . . . . . . . . 8Create a Safe Work Space . . . . . . . . . . . . . . . . . . . . . . . . . . . . . . . . . . . . . . . 9Body Positioning . . . . . . . . . . . . . . . . . . . . . . . . . . . . . . . . . . . . . . . . . . . . . . . 9Safe Operation . . . . . . . . . . . . . . . . . . . . . . . . . . . . . . . . . . . . . . . . . . . . . . . . . 9
Cutting Tips . . . . . . . . . . . . . . . . . . . . . . . . . . . . . . . . . . . . . . . . . 10–11
Saw Chain
Saw Chain Terms . . . . . . . . . . . . . . . . . . . . . . . . . . . . . . . . . . . 14–15Saw Chain Maintenance . . . . . . . . . . . . . . . . . . . . . . . . . . . . . 16–38
Four Basic Saw Chain Rules . . . . . . . . . . . . . . . . . . . . . . . . . . . . . . . . . . . 16Cutter Maintenance Terminology . . . . . . . . . . . . . . . . . . . . . . . . . . . . . . . . 18Filing Tools . . . . . . . . . . . . . . . . . . . . . . . . . . . . . . . . . . . . . . . . . . . . . . . . . . . 19Operation & Handling Care . . . . . . . . . . . . . . . . . . . . . . . . . . . . . . . . . . . . . 20How to Lubricate Your Saw Chain . . . . . . . . . . . . . . . . . . . . . . . . . . . . . . . 21How to Tension Your Saw Chain . . . . . . . . . . . . . . . . . . . . . . . . . . . . . . . . . 21How to Sharpen Cutters . . . . . . . . . . . . . . . . . . . . . . . . . . . . . . . . . . . . . . . . 23How to Set Depth Gauges . . . . . . . . . . . . . . . . . . . . . . . . . . . . . . . . . . . . . . 25Square Filing . . . . . . . . . . . . . . . . . . . . . . . . . . . . . . . . . . . . . . . . . . . . . . . . . . 27Filing Angles . . . . . . . . . . . . . . . . . . . . . . . . . . . . . . . . . . . . . . . . . . . . . . . . . . 30Grinding Angles . . . . . . . . . . . . . . . . . . . . . . . . . . . . . . . . . . . . . . . . . . . . . . . 32How to Install New Saw Chain Parts . . . . . . . . . . . . . . . . . . . . . . . . . . . . . 34How to Break Out Rivets . . . . . . . . . . . . . . . . . . . . . . . . . . . . . . . . . . . . . . . 36How to Break in a New Saw Chain . . . . . . . . . . . . . . . . . . . . . . . . . . . . . . 38
Saw Chain Troubleshooting . . . . . . . . . . . . . . . . . . . . . . . . . . 39–46Saw Chain Identification . . . . . . . . . . . . . . . . . . . . . . . . . . . . . 47–55High-Performance Saw Chain . . . . . . . . . . . . . . . . . . . . . . . . 56–78
PowerCut™ . . . . . . . . . . . . . . . . . . . . . . . . . . . . . . . . . . . . . . . . . . . . . . . . . . 56SpeedCut™ . . . . . . . . . . . . . . . . . . . . . . . . . . . . . . . . . . . . . . . . . . . . . . . . . . 65VersaCut™ . . . . . . . . . . . . . . . . . . . . . . . . . . . . . . . . . . . . . . . . . . . . . . . . . . . 67ControlCut™ . . . . . . . . . . . . . . . . . . . . . . . . . . . . . . . . . . . . . . . . . . . . . . . . . . 70DuraCut™ . . . . . . . . . . . . . . . . . . . . . . . . . . . . . . . . . . . . . . . . . . . . . . . . . . . . 73RipCut™ . . . . . . . . . . . . . . . . . . . . . . . . . . . . . . . . . . . . . . . . . . . . . . . . . . . . . . 76Sculptor™ . . . . . . . . . . . . . . . . . . . . . . . . . . . . . . . . . . . . . . . . . . . . . . . . . . . . 78
Reliable Performance Saw Chain: AdvanceCut™ . . . . . . . . 80–82Specialty: PowerSharp™ Saw Chain . . . . . . . . . . . . . . . . . . . . . . 83

2 Safety & Maintenance Manual
Table of Contents
Guide Bar
Guide Bar Terms . . . . . . . . . . . . . . . . . . . . . . . . . . . . . . . . . . . . . . . 86Guide Bar Maintenance Tools . . . . . . . . . . . . . . . . . . . . . . . . . . . 87Guide Bar Maintenance . . . . . . . . . . . . . . . . . . . . . . . . . . . . . . . . . 88Replacing PowerCut™ Guide Bar Noses . . . . . . . . . . . . . . . . . . 90Replacing Pro-Lite® Nose Sprockets . . . . . . . . . . . . . . . . . . . . . 92Guide Bar Troubleshooting . . . . . . . . . . . . . . . . . . . . . . . . . . . 94–98Guide Bar Families . . . . . . . . . . . . . . . . . . . . . . . . . . . . . . . . . . . . . .99Choose the Right Guide Bar . . . . . . . . . . . . . . . . . . . . . . . . . . . . 100Using the Guide Bar Number System . . . . . . . . . . . . . . . . . . . 102Guide Bars . . . . . . . . . . . . . . . . . . . . . . . . . . . . . . . . . . . . . . . 104–117
Light-Weight Professional . . . . . . . . . . . . . . . . . . . . . . . . . . . . . . . . . . . . .104Professional . . . . . . . . . . . . . . . . . . . . . . . . . . . . . . . . . . . . . . . . . . . . . . . . .108Occasional User . . . . . . . . . . . . . . . . . . . . . . . . . . . . . . . . . . . . . . . . . . . . . .112Carving . . . . . . . . . . . . . . . . . . . . . . . . . . . . . . . . . . . . . . . . . . . . . . . . . . . . . .116
Chainsaw Mounts . . . . . . . . . . . . . . . . . . . . . . . . . . . . . . . . 118–138
Drive Sprocket
Drive Sprocket Terms . . . . . . . . . . . . . . . . . . . . . . . . . . . . . . . . . 142Drive Sprocket Maintenance
Tools . . . . . . . . . . . . . . . . . . . . . . . . . . . . . . . . . . . . . . . . . . . . . . . . . . . . . . . 143Installing Drive Sprockets . . . . . . . . . . . . . . . . . . . . . . . . . . . . . . . . . . . . 143Basic Maintenance Tasks . . . . . . . . . . . . . . . . . . . . . . . . . . . . . . . . . . . . . .144
Drive Sprocket Troubleshooting . . . . . . . . . . . . . . . . . . . . . . . . 146
Quick Reference
Filing Angles . . . . . . . . . . . . . . . . . . . . . . . . . . . . . . . . . . . . . . . . . 148Avoiding Kickback Injury . . . . . . . . . . . . . . . . . . . . . . . . . . . . . . . 149Four Basic Saw Chain Rules . . . . . . . . . . . . . . . . . . . . . . . . . . . 149

Safety & Maintenance Manual
Page
- 3 -
Chainsaw Safety & Tips
4 Safety & Maintenance Manual
Chainsaw Safety
Your chainsaw is only as good as your cutting system — saw chain, guide bar, and drive sprocket . They function as a team while doing the actual work of cutting wood and therefore must be maintained as a complete system .
A properly maintained saw chain, guide bar, and drive sprocket will provide excellent cutting performance and prevent damage . Equipment that has not been maintained will cut poorly and may create safety hazards .
This manual addresses the maintenance of only Oregon® manufactured saw chains, guide bars, and drive sprockets . For information on maintenance and operation of your chainsaw, refer to your chainsaw’s operator’s manual or contact your local chainsaw dealer .
Important Safety Message
Safety Symbol
This safety symbol is used to highlight safety messages . When you see this symbol, read and follow the safety message to avoid severe personal injury .

Safety & Maintenance Manual 5
Chainsaw Safety
Kickback Awareness
WARNING: All saw chain can kickback, which can lead to dangerous loss of control of the chainsaw and result in serious injury to the chainsaw operator or bystanders . Follow all instructions in your chainsaw operator’s manual and in this booklet for proper use and maintenance of your chainsaw’s cutting chain, guide bar, and drive sprocket .
Guard Against Chainsaw Kickback• Know your personal level of chainsaw experience.
• Know your saw chain.
If you do not have experience and specialized training for dealing with chainsaw kickback, then Oregon® urges you to use only low kickback saw chains .
What is Kickback?Kickback is the violent backward and/or upward motion of the chainsaw guide bar occurring when the saw chain near the nose or tip of the guide bar contacts any object, such as another log or branch, or when the wood closes in and pinches the saw chain in the cut .
Avoiding Kickback Injury
• Be alert at all times to guard against a possible kickback reaction. Always be aware of the position of your guide bar’s nose.
• Different models of saw chain are available for most cutting tasks. Use the saw chain, suitable for your type of cutting, with the lowest kickback potential.
• Narrow-nose guide bars such as our ControlCut™ guide
Potential kickback situation
6 Safety & Maintenance Manual
Chainsaw Safety
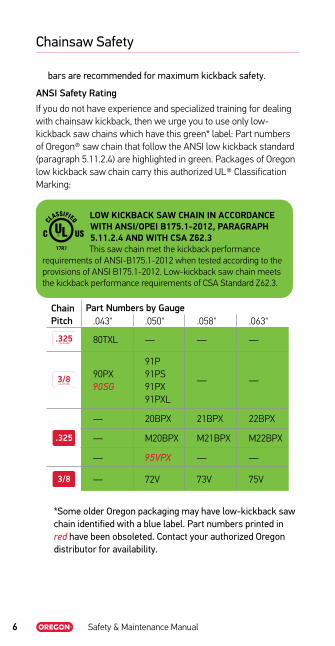
bars are recommended for maximum kickback safety.
ANSI Safety Rating
If you do not have experience and specialized training for dealing with chainsaw kickback, then we urge you to use only low-kickback saw chains which have this green* label: Part numbers of Oregon® saw chain that follow the ANSI low kickback standard (paragraph 5 .11 .2 .4) are highlighted in green . Packages of Oregon low kickback saw chain carry this authorized UL® Classification Marking:
*Some older Oregon packaging may have low-kickback saw chain identified with a blue label. Part numbers printed in red have been obsoleted. Contact your authorized Oregon distributor for availability.
LOW KICKBACK SAW CHAIN IN ACCORDANCE WITH ANSI/OPEI B175.1-2012, PARAGRAPH 5.11.2.4 AND WITH CSA Z62.3This saw chain met the kickback performance
requirements of ANSI-B175 .1-2012 when tested according to the provisions of ANSI B175 .1-2012 . Low-kickback saw chain meets the kickback performance requirements of CSA Standard Z62 .3 .
Chain Pitch
Part Numbers by Gauge .043" .050" .058" .063"
80TXL — — —
90PX 90SG
91P 91PS 91PX 91PXL
— —
— 20BPX 21BPX 22BPX
— M20BPX M21BPX M22BPX
— 95VPX — —
— 72V 73V 75V
.325Low Profile
3/8Low Profile
.325
3/8
Safety & Maintenance Manual 7
Chainsaw Safety
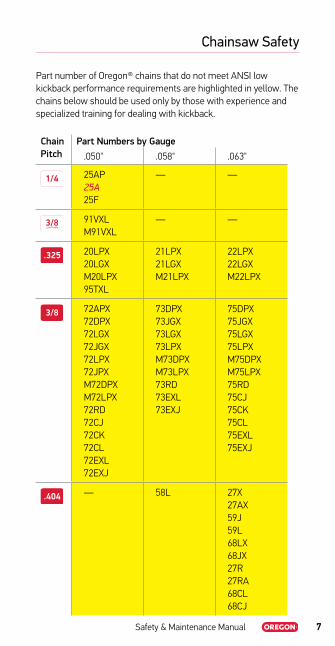
Part number of Oregon® chains that do not meet ANSI low kickback performance requirements are highlighted in yellow . The chains below should be used only by those with experience and specialized training for dealing with kickback .
Chain Pitch
Part Numbers by Gauge .050" .058" .063"
1/4 25AP 25A 25F
— —
3/8Low Profile
91VXL M91VXL
— —
.325 20LPX 20LGX M20LPX 95TXL
21LPX 21LGX M21LPX
22LPX 22LGX M22LPX
3/8 72APX 72DPX 72LGX 72JGX 72LPX 72JPX M72DPX M72LPX 72RD 72CJ 72CK 72CL 72EXL 72EXJ
73DPX 73JGX 73LGX 73LPX M73DPX M73LPX 73RD 73EXL 73EXJ
75DPX 75JGX 75LGX 75LPX M75DPX M75LPX 75RD 75CJ 75CK 75CL 75EXL 75EXJ
.404 — 58L 27X 27AX 59J 59L 68LX 68JX 27R 27RA 68CL 68CJ

8 Safety & Maintenance Manual
Chainsaw Safety
Recommended Personal Protective Equipment
HEAD• Hard hat• Safety goggles/
glasses• Ear plugs/muffs
HANDS Gloves add grip and general protection.
LEGS Chainsaw pants or chaps protect against saw strikes.
FEETSafety boots and gaiters protect against saw strikes and add support on unstable terrain.
Dress Properly: Avoid clothing that is too tight or too loose .
Safety & Maintenance Manual 9
Chainsaw Safety
Create a Safe Work Space
Caution
• Plan a clear escape route away from cutting zone.
• Scan worksite hazards: Check for limbs, power lines, dead trees, etc.
• Calculate how the object being cut will fall.
• Determine if the chainsaw may be thrown unexpectedly by the movement of the cut material.
Body Positioning• If possible, position yourself away from the
natural lead of the tree to avoid injury.
• Never cut above shoulder level.
• Never cut while in a tree or while on a ladder.
• Use only a right-hand grip to hold your chainsaw (right hand on the trigger, left hand on the front handle).
• Keep your left arm straight for better control.
• Hold chainsaw firmly with both hands. Keep thumb firmly wrapped around front handle.
• Stand to the side of the chainsaw, never behind it.
• Stand with feet well braced and your body balanced.
• Keep others a minimum of two tree lengths away from the cutting area.
• Do not allow others to hold wood during cutting.
Saw Operation • Run engine at full throttle.
• Use low-kickback saw chain and a reduced-kickback guide bar whenever possible.
• Keep the chainsaw, saw chain, guide bar and drive sprocket properly maintained.
• Cut only wood with your chainsaw. Do not cut any other material.

10 Safety & Maintenance Manual
Cutting Tips
TensionKeep your saw chain correctly tensioned . Check and adjust often .
CuttersKeep cutters sharp . Touch up the cutting edge with a file every hour, more often if needed . Do not force dull saw chain to cut .
Depth GaugesCheck and adjust your cutter’s depth gauges every 3 – 4 sharpenings or more often as needed .
Guide BarKeep the guide bar groove clean and the oil hole open . Turn symmetrical* guide bars over to equalize rail wear . *Do not turn Guard Tip® guide bars over .
Drive SprocketReplace the drive sprocket after every two saw chains, or sooner .
Cutting in Cold WeatherCutting frozen wood will cause rapid wear and possible breakage around the rear rivet hole of cutters . Follow the steps below to keep cold-weather wear to a minimum .
Oil in Cold Weather
Dilute guide bar chain oil 25 percent with clean kerosene or diesel oil . Use twice as much of this diluted oil during operation, and be certain your saw chain is receiving oil from the chainsaw .
0° C -32° F

Safety & Maintenance Manual 11
Cutting Tips
Best Practices1. Saw chain is made to cut only one thing: wood.
Do not use saw chain to cut other materials.
2. Never let your saw chain contact rocks or dirt during operation. Dirt may seem soft. In fact, dirt is extremely abrasive and will wear away your saw chain’s vital chrome plating in less than a second.
3. Never force dull saw chain to cut. When it is sharp, saw chain is designed to feed itself into the wood, and needs only light pressure to cut efficiently.
4. Cutting efficiency may be determined by the type of sawdust your chainsaw is producing. Dull saw chain produces fine wood dust, which can clog your chainsaw’s air filter. Sharp saw chain produces larger wood chips.


Safety & Maintenance Manual
Page
- 13 -
Saw Chain

14 Safety & Maintenance Manual
Saw Chain Terms
Saw
Cha
in
Parts of a Saw Chain
Saw Chain PitchSaw chain pitch is the distance between any three consecutive rivets, divided by two . Oregon® saw chain pitches are:
1/4" .325" Low Profile3/8" Low Profile .325"3/8" .404"
Saw Chain GaugeSaw chain gauge is the drive link’s thickness where it fits into the guide bar groove . The industry standard for saw chain gauges are:
.043" (1 .1 mm) .050" (1 .3 mm) .058" (1 .5 mm) .063" (1 .6 mm)
Kickback-Reducing Features
Bumper Drive Link
Ramped Depth Gauge
Wide-Track Depth Gauge
OREGONOREGON
Rivet
Drive link
Left-hand cutter
Depth gauge
Right-hand cutter Tie-strap
Safety & Maintenance Manual 15
Saw Chain Terms
Saw Chain
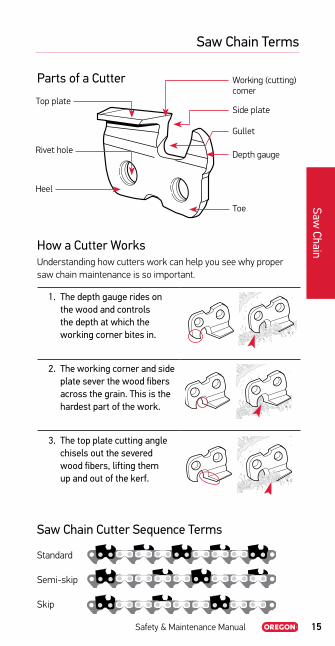
Parts of a Cutter
How a Cutter WorksUnderstanding how cutters work can help you see why proper saw chain maintenance is so important .
1. The depth gauge rides on the wood and controls the depth at which the working corner bites in.
2. The working corner and side plate sever the wood fibers across the grain. This is the hardest part of the work.
3. The top plate cutting angle chisels out the severed wood fibers, lifting them up and out of the kerf.
Saw Chain Cutter Sequence Terms
Standard
Semi-skip
Skip
Working (cutting) corner
Top plate
Rivet hole
Heel
Toe
Depth gauge
Gullet
Side plate

16 Safety & Maintenance Manual
Saw Chain Maintenance
Saw
Cha
in
Four Basic Saw Chain RulesOregon® urges you to become familiar with the four basic saw chain rules . Users who know and follow these rules can count on superior performance from their saw chain, guide bar, and drive sprocket — and reduce safety hazards at the same time .
Rule Number 1 Your saw chain must be correctly tensioned
More saw chain and guide bar problems are caused by incorrect saw chain tension than by any other single factor .
• See "How to Tension your Saw Chain" on page 22.
Rule Number 2 Your saw chain must be well lubricated
A constant supply of oil to your chainsaw’s guide bar, saw chain and drive sprocket is vital . Without it, excessive friction, wear, and damage will occur .
• See "How to Lubricate your Saw Chain" on page 21
Safety & Maintenance Manual 17
Saw Chain Maintenance
Saw Chain
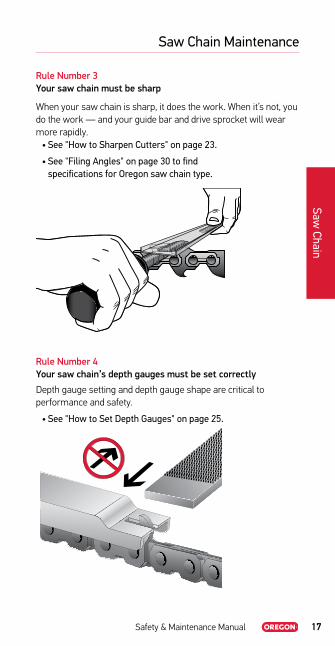
Rule Number 3 Your saw chain must be sharp
When your saw chain is sharp, it does the work . When it’s not, you do the work — and your guide bar and drive sprocket will wear more rapidly .
• See "How to Sharpen Cutters" on page 23.
• See "Filing Angles" on page 30 to find specifications for Oregon saw chain type.
Rule Number 4 Your saw chain’s depth gauges must be set correctly
Depth gauge setting and depth gauge shape are critical to performance and safety .
• See "How to Set Depth Gauges" on page 25.

18 Safety & Maintenance Manual
Saw Chain Maintenance
Saw
Cha
in
Cutter Maintenance Terminology
Filing Grinding
Top-Plate Angle
Down Angle
Side-Plate Angle
Depth Gauge Setting
Safety & Maintenance Manual 19
Saw Chain Maintenance
Saw Chain
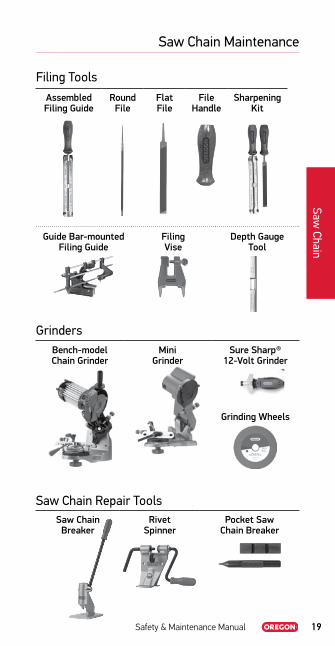
Filing ToolsAssembled Filing Guide
Round File
Flat File
File Handle
Sharpening Kit
Guide Bar-mounted Filing Guide
Filing Vise
Depth Gauge Tool
GrindersBench-model Chain Grinder
Mini Grinder
Sure Sharp® 12-Volt Grinder
Grinding Wheels
Saw Chain Repair ToolsSaw Chain
BreakerRivet
SpinnerPocket Saw
Chain Breaker

20 Safety & Maintenance Manual
Saw Chain Maintenance
Saw
Cha
in
Operation & Handling Care
ATTENTION: DEALERS, CHAINSAW USERS, AND ANYONE WHO SERVICES SAW CHAIN. IMPORTANT SAFETY INFORMATION.Oregon® urges you to become familiar with proper saw chain maintenance techniques, and the possible dangers which can result if saw chain is not properly maintained .
WARNING: Failure to follow the instructions below can result in severe injury to the chainsaw operator, bystanders, or the person performing maintenance .
Always turn off your chainsaw before performing any type of maintenance .
Any one of the following conditions can increase a saw chain’s potential kickback energy, increase the risk of a saw chain throwing itself off the guide bar, or increase the risk of other hazards associated with chainsaw use .
1. Incorrect sharpening of angles.
2. Dull cutter teeth.
3. Alteration of kickback-reducing features.
4. Excessive depth gauge settings.
5. Incorrect depth gauge shapes.
6. Loose saw chain tension.
7. Incorrectly installed parts.
8. Loose rivets, cracks or breaks in any saw chain component.
Safety & Maintenance Manual 21
Saw Chain Maintenance
Saw Chain
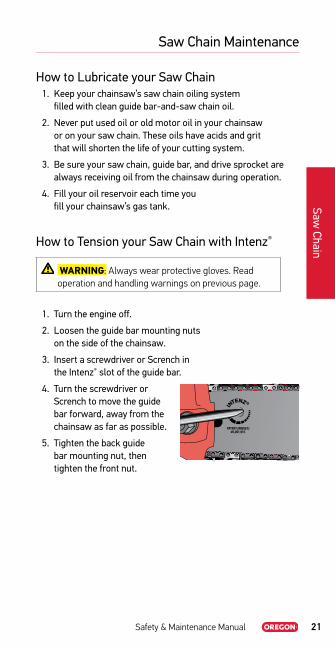
How to Lubricate your Saw Chain1. Keep your chainsaw’s saw chain oiling system
filled with clean guide bar-and-saw chain oil.
2. Never put used oil or old motor oil in your chainsaw or on your saw chain. These oils have acids and grit that will shorten the life of your cutting system.
3. Be sure your saw chain, guide bar, and drive sprocket are always receiving oil from the chainsaw during operation.
4. Fill your oil reservoir each time you fill your chainsaw’s gas tank.
How to Tension your Saw Chain with Intenz®
WARNING: Always wear protective gloves . Read operation and handling warnings on previous page .
1. Turn the engine off.
2. Loosen the guide bar mounting nuts on the side of the chainsaw.
3. Insert a screwdriver or Scrench in the Intenz® slot of the guide bar.
4. Turn the screwdriver or Scrench to move the guide bar forward, away from the chainsaw as far as possible.
5. Tighten the back guide bar mounting nut, then tighten the front nut.
INTENZ ®
PATENT (BREVET)#6,061,915

22 Safety & Maintenance Manual
Saw Chain Maintenance
Saw
Cha
in
How to Tension your Saw Chain (without Intenz®)
WARNING: Always wear protective gloves . Read "Operation & Handling Care" on page 20 .
1. Turn the engine off.
Note: Never tension your saw chain right after cutting when the saw chain has expanded in length from the heat. Saw chain tensioned while hot will contract when it cools, and can damage your guide bar and saw chain. ONLY TENSION SAW CHAIN WHEN THE SAW CHAIN HAS COOLED.
2. Loosen guide bar mounting nuts on the side of your chainsaw.
3. Pull the guide bar nose up, and keep it up as you adjust tension.
4. Adjust tension as follows:
For Solid-Nose Guide Bars
Turn your chainsaw’s tension-adjustment screw until the bottoms of the lowest tie-straps and cutters come up and just touch the bottom of the guide bar rail.
For Sprocket-Nose Guide Bar
Tension must be tighter than on a solid-nose guide bar. Turn your chainsaw’s tension adjustment screw until the bottoms of the lowest tie-straps and cutters come up and solidly contact the bottom of the guide bar rail.
Safety & Maintenance Manual 23
Saw Chain Maintenance
Saw Chain
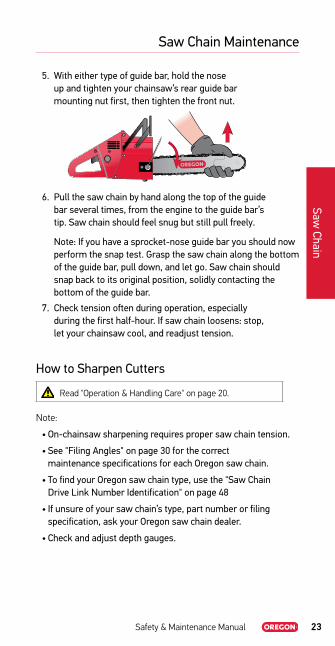
5. With either type of guide bar, hold the nose up and tighten your chainsaw’s rear guide bar mounting nut first, then tighten the front nut.
6. Pull the saw chain by hand along the top of the guide bar several times, from the engine to the guide bar’s tip. Saw chain should feel snug but still pull freely.
Note: If you have a sprocket-nose guide bar you should now perform the snap test. Grasp the saw chain along the bottom of the guide bar, pull down, and let go. Saw chain should snap back to its original position, solidly contacting the bottom of the guide bar.
7. Check tension often during operation, especially during the first half-hour. If saw chain loosens: stop, let your chainsaw cool, and readjust tension.
How to Sharpen Cutters
Read "Operation & Handling Care" on page 20 .
Note:
• On-chainsaw sharpening requires proper saw chain tension.
• See "Filing Angles" on page 30 for the correct maintenance specifications for each Oregon saw chain.
• To find your Oregon saw chain type, use the "Saw Chain Drive Link Number Identification" on page 48
• If unsure of your saw chain’s type, part number or filing specification, ask your Oregon saw chain dealer.
• Check and adjust depth gauges.

24 Safety & Maintenance Manual
Saw Chain Maintenance
Saw
Cha
in
Round-File Cutter Sharpening
1. Be sure 1/5th, or 20%, of the file’s diameter is always held above the cutter’s top plate. Using the correct file guide is the easiest way to hold the file in this position.
2. Keep the correct Top-Plate Filing Angle line on your file guide parallel with your saw chain.
3. Sharpen cutters on one side of the saw chain first. File from the inside of each cutter to the outside. Then turn your chainsaw around and repeat the process for cutters on the other side of the saw chain.
4. If damage is present on the chrome surface of top plates or side plates, file back until such damage is removed.
5. Keep all cutter lengths equal.
6. Recheck depth gauges. If resetting of the depth gauges is necessary. See "How to Set Depth Gauges" on page 25.
Note: Do not file or alter the tops of kickback-reducing bumper tie-straps or bumper drive links.
60 = 1/5th or 20% above top plate
File holder
Direction of stroke
inside
outside
OREGON OREGON
A A=B B

Safety & Maintenance Manual 25
Saw Chain Maintenance
Saw Chain
How to Set Depth Gauges
Read "Operation & Handling Care" on page 20 .
Note:
• On-chainsaw depth gauge setting requires proper saw chain tension ("How to Tension your Saw Chain" on page 22) prior to filing.
• "Filing Angles" on page 30 (column D) shows the correct depth gauge setting for each of the different saw chain types.
• To find your Oregon® saw chain type, use the Saw Chain Identification Chart on pages 47–55.
• If unsure of your saw chain’s type or part number, ask your Oregon saw chain dealer.
• Most Oregon saw chains have a number stamped on each depth gauge indicating the correct depth gauge setting.
1. Use a depth gauge tool with the correct built-in setting for your saw chain and check your depth gauges every three or four sharpenings.
2. Place the tool on top of your saw chain so one depth gauge protrudes through the slot in the tool.
3. If the depth gauge extends above the slot, file the depth gauge down level with the top of the tool using a flat file. Never file the depth gauge down enough to exceed the depth gauge setting specified in this manual for your Oregon saw chain.
Example: 025".025" (0.64 mm) Depth Gauge Setting

26 Safety & Maintenance Manual
Saw Chain Maintenance
Saw
Cha
in
Note: Do not file or alter the tops of kickback-reducing bumper tie-straps or bumper drive links.
4. File from the inside of the round ground saw chain cutters to the outside. (For square ground saw chain, file from the outside of the cutter to the inside.)
5. After lowering, always file off the front corner of each depth gauge parallel to its original rounded or ramped shape.
•
Note: On many saw chains, it may be helpful to tip the depth gauge tool on end and place it in front of the working corner in order to protect the cutting surfaces when reshaping depth gauges.
inside
outside
Wide track bent over depth gauge is only
filed from top down . No reshaping is necessary .

Safety & Maintenance Manual 27
Saw Chain Maintenance
Saw Chain
Square FilingWho Should Perform Square Filing?
Most chainsaw users will probably never need to use square saw chain, nor learn to perform square filing . But in areas where the timber is larger and the guide bars used are longer, the performance advantages of square saw chain can outweigh the fact that square filing is more difficult and much less forgiving of filing errors .
File Positioning
The file will sharpen the top plate, and the side plate, simultaneously . This creates a line, (A), where the top-plate cutting angle meets the side-plate angle . For best results, file so that the line intersects the cutting corner (B) .
CorrectlyFiled Corner
IncorrectTOO HIGH
IncorrectTOO LOW
To properly sharpen the cutter, use the correct filing position, as shown here from three different points of view:
45˚
45˚
Side View End View Top View
AB

28 Safety & Maintenance Manual
Saw Chain Maintenance
Saw
Cha
in
File Direction
We recommend that square saw chain be filed from the outside in (in a downward direction) . This leaves a better edge on the chromed cutting surfaces and makes it easier to keep the file’s position, and the resulting cutting edges, in correct alignment as shown in the preceding File Positioning section . However, filing from the outside in will wear out your file faster .
Some square saw chain users may prefer to file from the inside out (in an upward direction) . You should be aware that inside-out filing is much more difficult .
But whichever direction you choose, be sure your file and your cutting edges stay positioned as shown in the preceding File Positioning section . File all cutters on one side of the saw chain, then reverse the saw chain and repeat the process . Use the same file positions for cutters on the opposite side of the saw chain .
Tools
Only use files specially designed for square chisel cutters, available from your chainsaw dealer .
Double Bevel Hexagon “Goofy”
Safety & Maintenance Manual 29
Saw Chain Maintenance
Saw Chain
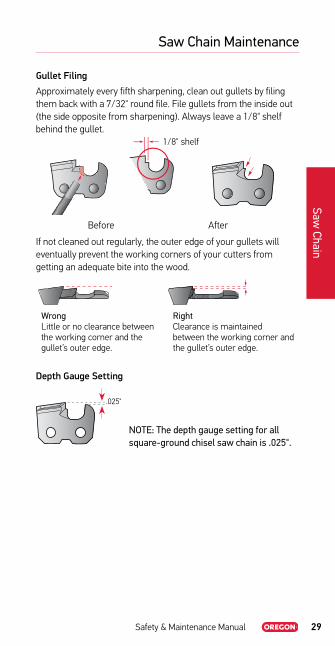
Gullet Filing
Approximately every fifth sharpening, clean out gullets by filing them back with a 7/32" round file . File gullets from the inside out (the side opposite from sharpening) . Always leave a 1/8" shelf behind the gullet .
Before After
If not cleaned out regularly, the outer edge of your gullets will eventually prevent the working corners of your cutters from getting an adequate bite into the wood .
WrongLittle or no clearance between the working corner and the gullet’s outer edge .
RightClearance is maintained between the working corner and the gullet’s outer edge .
Depth Gauge Setting
.025"
NOTE: The depth gauge setting for all square-ground chisel saw chain is .025".
1/8" shelf

30 Safety & Maintenance Manual
Saw Chain Maintenance
Saw
Cha
in
Filing Angles
File Diameter
Note: When using the Oregon® file guide, always hold the file perpendicular to the center line of the chain.

Safety & Maintenance Manual 31
Saw Chain Maintenance
Saw Chain
1/4" 25AP 30º 10º 85º .025" 5/32"
.325" Low Profile™
80TXL 25º 10º 70º .025" 5/32"
3/8" Low Profile™
90PX, 90SG30º 0º 75º .025"
4 .5 mm
91P, 91PX, 91PXL 30º 0º 80º .025" 5/32"
91VXL, M91VXL 30º 0º 80º .025" 5/32"
.325" 95VPX 30º 10º 70º .025" 3/16"
20, 21, 22BPX, M20, M21, M22BPX
30º 10º 70º .025" 3/16"
95TXL 30º 10º 70º .025" 3/16"
20, 21, 22LPX, LGX, M20, M21, M22LPX
25º 10º 60º .025" 3/16"
3/8" 72, 73, 75V 25º 10º 60º .025" 7/32"
72, 75CJ, CK, CL 45º 45º 90º .025" ⍟
72APX, 72, 73, 75DPX, M72, M73, M75DPX
30º 10º 80º .025" 7/32"
72, 73, 75EXL, EXJ, LGX, JGX, LPX, JPX
25º 10º 60º .025" 7/32"
M72, M73, M75LPX 25º 10º 60º .025" 7/32"
72, 73, 75RD 10º 10º 75º .025" 7/32"
.404" 27X, 27AX 30º 10º 65º .030" 7/32"
27R, RX, RA 10º 10º 75º .030" 7/32"
58CJ, CL, 59CJ, CK, CL
45º 45º 85º .025" ⍟
58, 59J, L 25º 10º 60º .025" 7/32"
68LX, JX 25º 10º 60º .030" 7/32"
68CJ, CL 45º 45º — .030" ⍟
⍟ Square-Ground Filing: A 15° cutting edge is the result when the file is held at 45° top-plate angle and 45° down angle .
Chains in red indicate items that are scheduled to be discontinued .
32 Safety & Maintenance Manual
Saw Chain Maintenance
Saw
Cha
in
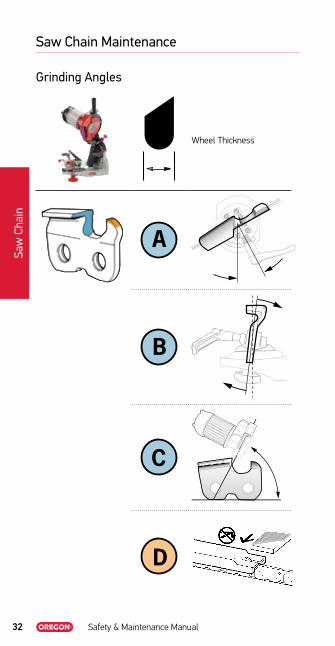
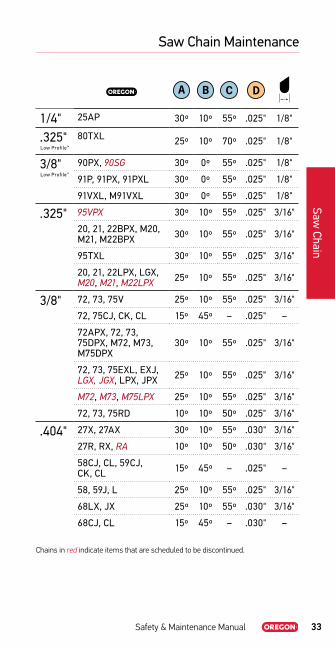
Grinding Angles
Wheel Thickness
Safety & Maintenance Manual 33
Saw Chain Maintenance
Saw Chain
1/4" 25AP 30º 10º 55º .025" 1/8"
.325" Low Profile™
80TXL 25º 10º 70º .025" 1/8"
3/8" Low Profile™
90PX, 90SG 30º 0º 55º .025" 1/8"
91P, 91PX, 91PXL 30º 0º 55º .025" 1/8"
91VXL, M91VXL 30º 0º 55º .025" 1/8"
.325" 95VPX 30º 10º 55º .025" 3/16"
20, 21, 22BPX, M20, M21, M22BPX 30º 10º 55º .025" 3/16"
95TXL 30º 10º 55º .025" 3/16"
20, 21, 22LPX, LGX, M20, M21, M22LPX 25º 10º 55º .025" 3/16"
3/8" 72, 73, 75V 25º 10º 55º .025" 3/16"
72, 75CJ, CK, CL 15º 45º – .025" –
72APX, 72, 73, 75DPX, M72, M73, M75DPX
30º 10º 55º .025" 3/16"
72, 73, 75EXL, EXJ, LGX, JGX, LPX, JPX 25º 10º 55º .025" 3/16"
M72, M73, M75LPX 25º 10º 55º .025" 3/16"
72, 73, 75RD 10º 10º 50º .025" 3/16"
.404" 27X, 27AX 30º 10º 55º .030" 3/16"
27R, RX, RA 10º 10º 50º .030" 3/16"
58CJ, CL, 59CJ, CK, CL 15º 45º – .025" –
58, 59J, L 25º 10º 55º .025" 3/16"
68LX, JX 25º 10º 55º .030" 3/16"
68CJ, CL 15º 45º – .030" –
Chains in red indicate items that are scheduled to be discontinued .
34 Safety & Maintenance Manual
Saw Chain Maintenance
Saw
Cha
in
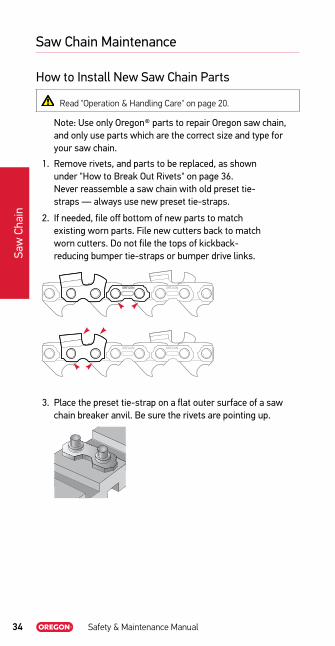
How to Install New Saw Chain Parts
Read "Operation & Handling Care" on page 20 .
Note: Use only Oregon® parts to repair Oregon saw chain, and only use parts which are the correct size and type for your saw chain.
1. Remove rivets, and parts to be replaced, as shown under "How to Break Out Rivets" on page 36. Never reassemble a saw chain with old preset tie-straps — always use new preset tie-straps.
2. If needed, file off bottom of new parts to match existing worn parts. File new cutters back to match worn cutters. Do not file the tops of kickback-reducing bumper tie-straps or bumper drive links.
3. Place the preset tie-strap on a flat outer surface of a saw chain breaker anvil. Be sure the rivets are pointing up.
OREGON OREGON
OREGON OREGON
Safety & Maintenance Manual 35
Saw Chain Maintenance
Saw Chain
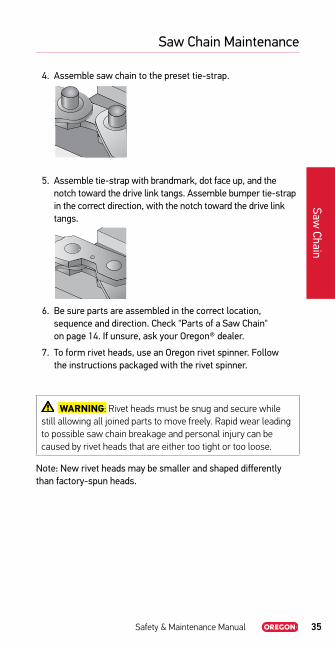
4. Assemble saw chain to the preset tie-strap.
5. Assemble tie-strap with brandmark, dot face up, and the notch toward the drive link tangs. Assemble bumper tie-strap in the correct direction, with the notch toward the drive link tangs.
6. Be sure parts are assembled in the correct location, sequence and direction. Check "Parts of a Saw Chain" on page 14. If unsure, ask your Oregon® dealer.
7. To form rivet heads, use an Oregon rivet spinner. Follow the instructions packaged with the rivet spinner.
WARNING: Rivet heads must be snug and secure while still allowing all joined parts to move freely . Rapid wear leading to possible saw chain breakage and personal injury can be caused by rivet heads that are either too tight or too loose .
Note: New rivet heads may be smaller and shaped differently than factory-spun heads.

36 Safety & Maintenance Manual
Saw Chain Maintenance
Saw
Cha
in
How to Break Out Rivets
WARNING: Always wear approved safety accessories for hands and face when breaking out rivets .
1. Select proper anvil slot number on saw chain breaker anvil which matches the drive link number on the saw chain to be broken (see "Saw Chain Drive Link Number Identification" on page 48).
2. Insert saw chain portion for breaking into the proper slot of the saw chain anvil and push saw chain forward until bottom tie-strap is flush with the far side of slot. (Drive link is then supported on both sides of slot.)
3. Position rivet head directly under punch. Pull handle down if using a bench saw chain breaker, or hammer out rivet if using a handheld punch. Do not use excessive force.
Note: Important — when breaking saw chain at cutter, make sure cutter is in the top position.
72
3/825
3/8

Safety & Maintenance Manual 37
Saw Chain Maintenance
Saw Chain
Removing Rivets from Broken Drive Links
1. When removing rivets from broken drive links, hold the two broken segments together in their original (unbroken) positions as you tighten the saw chain link in the adjustable anvil.
•
2. See steps 1 – 3 from “How to Break Out Rivets” on the previous page.
Saw Chain Drive Link Number Chart
Anvil Slot Number 1/4
.325" Low Profile™ .325"
3/8" Low Profile™ 3/8" .404"
Drive Link Number
25 80 95 90 72 27
20 91 73 58
21 75 59
22 68

38 Safety & Maintenance Manual
Saw Chain Maintenance
Saw
Cha
in
How to Break in a New Saw ChainThe life of your new saw chain can be extended by taking these few simple steps before using it .
1. Oil your saw chain prior to use.
2. Never run any saw chain on a worn drive sprocket rim or spur system, especially a new saw chain. Replace your rim or spur system after every two saw chains, or sooner.
•
3. Run new saw chain at half throttle for several minutes before doing any cutting in order to allow oil to reach all parts of the guide bar and saw chain. Allow the chainsaw and the cutting system to warm up fully.
Also recommended: Dipping the saw chain in guide bar oil or drizzling oil down the length of the saw chain on the guide before running it. This gives the saw chain maximum lubrication at the bearing surfaces and rivets.
4. Stop, check saw chain tension, let saw chain cool, and adjust tension often during operation, as shown on "How to Tension your Saw Chain" on page 22
5. Keep the first several cuts light. Keep extra oil on the cutting system during these first cuts, and do not apply heavy pressure.
oror
Safety & Maintenance Manual 39
Saw Chain Troubleshooting
Saw Chain
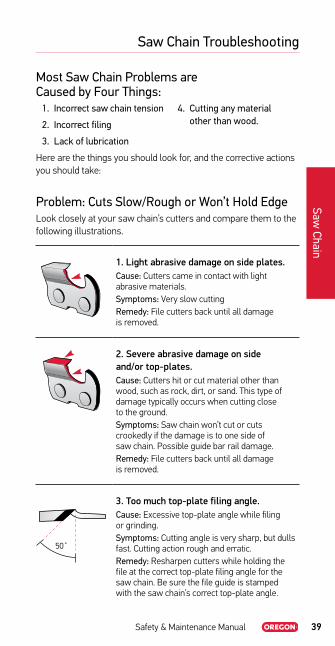
Most Saw Chain Problems are Caused by Four Things:
1. Incorrect saw chain tension
2. Incorrect filing
3. Lack of lubrication
4. Cutting any material other than wood.
Here are the things you should look for, and the corrective actions you should take:
Problem: Cuts Slow/Rough or Won’t Hold EdgeLook closely at your saw chain’s cutters and compare them to the following illustrations .
1. Light abrasive damage on side plates.Cause: Cutters came in contact with light abrasive materials .Symptoms: Very slow cuttingRemedy: File cutters back until all damage is removed .
2. Severe abrasive damage on side and/or top-plates.Cause: Cutters hit or cut material other than wood, such as rock, dirt, or sand . This type of damage typically occurs when cutting close to the ground .Symptoms: Saw chain won’t cut or cuts crookedly if the damage is to one side of saw chain . Possible guide bar rail damage .Remedy: File cutters back until all damage is removed .
50˚20˚
3. Too much top-plate filing angle.Cause: Excessive top-plate angle while filing or grinding .Symptoms: Cutting angle is very sharp, but dulls fast . Cutting action rough and erratic .Remedy: Resharpen cutters while holding the file at the correct top-plate filing angle for the saw chain . Be sure the file guide is stamped with the saw chain’s correct top-plate angle .
40 Safety & Maintenance Manual
Saw Chain Troubleshooting
Saw
Cha
in
50˚20˚
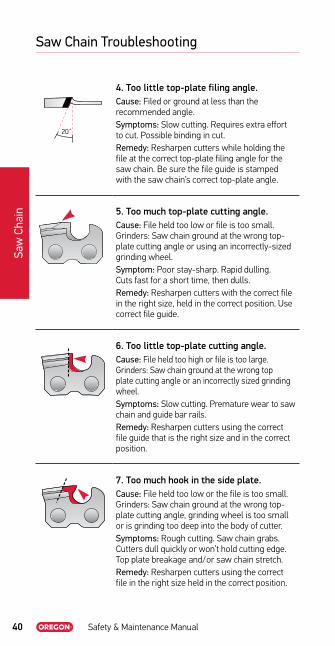
4. Too little top-plate filing angle.Cause: Filed or ground at less than the recommended angle .Symptoms: Slow cutting . Requires extra effort to cut . Possible binding in cut .Remedy: Resharpen cutters while holding the file at the correct top-plate filing angle for the saw chain . Be sure the file guide is stamped with the saw chain’s correct top-plate angle .
50˚20˚
5. Too much top-plate cutting angle.Cause: File held too low or file is too small . Grinders: Saw chain ground at the wrong top-plate cutting angle or using an incorrectly-sized grinding wheel .Symptom: Poor stay-sharp . Rapid dulling . Cuts fast for a short time, then dulls .Remedy: Resharpen cutters with the correct file in the right size, held in the correct position . Use correct file guide .
6. Too little top-plate cutting angle.Cause: File held too high or file is too large . Grinders: Saw chain ground at the wrong top plate cutting angle or an incorrectly sized grinding wheel .Symptoms: Slow cutting . Premature wear to saw chain and guide bar rails .Remedy: Resharpen cutters using the correct file guide that is the right size and in the correct position .
7. Too much hook in the side plate.Cause: File held too low or the file is too small . Grinders: Saw chain ground at the wrong top-plate cutting angle, grinding wheel is too small or is grinding too deep into the body of cutter .Symptoms: Rough cutting . Saw chain grabs . Cutters dull quickly or won’t hold cutting edge . Top plate breakage and/or saw chain stretch .Remedy: Resharpen cutters using the correct file in the right size held in the correct position .

Safety & Maintenance Manual 41
Saw Chain Troubleshooting
Saw Chain
8. Backslope on the side plate.Cause: File held too high or the file is too large . Grinders: Saw chain ground at the wrong top- plate cutting angle, grinding wheel is too large, or the grinding wheel is not grinding deep enough into the body of cutter .Symptoms: Slow cutting . Premature wear to saw chain and guide bar rails .Remedy: Resharpen cutters using the correct file guide in the right size held in the correct position .
9. Low depth gauges.Cause: Too much depth gauge removed; depth gauge damaged in use .Symptoms: Rough cutting . Saw chain grabs . Excessive wear to the heel of cutters, opposing tie-straps, guide bar rails . Top-plate breakage and/or saw chain stretch .Remedy: In most cases, cutters cannot be filed back enough to correct for depth gauges that are too low . Replace the saw chain .
10. High depth gauges.Cause: Depth gauge never lowered . Symptoms: Slow cutting . Excessive wear to the saw chain and guide bar rails .Remedy: File depth gauges down to their correct height .
NOTE: Refer to "How to Sharpen Cutters" on page 23 when performing the remedies above.

42 Safety & Maintenance Manual
Saw Chain Troubleshooting
Saw
Cha
in
Problem: Cutters & Tie-Straps Wear Heavily or Break
11. Excessive heel wear on cutters and opposite tie-straps; cracks under rear rivet holes.Cause: Forcing dull saw chain to cut . Low depth gauge settings . Lack of lubrication . Loose saw chain tension .Symptoms: Excessive heel wear on cutters . Saw chain breakage . Excessive saw chain stretch .Remedy: Replace worn or cracked cutters and/or tie-straps . NOTE: One or more of the following may be required to prevent future wear and / or cracks: (1) Refile cutters using the correct angles. (2) Keep more lubrication on the saw chain and guide bar. (3) Reduce the amount of depth gauge setting (may require replacement of the saw chain). (4) Do not force dull saw chain to cut. (5) Do not force saw chain through frozen wood. (6) Keep cutters sharp. (7) Always maintain proper tension.
12. Tie-straps or cutters, broken in the center.Cause: Incorrect field assembly of saw chain components .Symptoms: Broken tie-straps or cutters .Remedy: Replace broken components .
13. Bottoms of tie-straps and cutters worn out of square.Cause: Worn guide bar rails .Symptoms: Bottoms of tie-straps and cutters worn out of square .Remedy: Dress the tops of the guide bar’s rails square . If wear is minor, file the bottoms of tie-straps and cutters square . If wear is extensive, replace the saw chain .
Safety & Maintenance Manual 43
Saw Chain Troubleshooting
Saw Chain
Problem: Drive Links Wear Heavily or Break
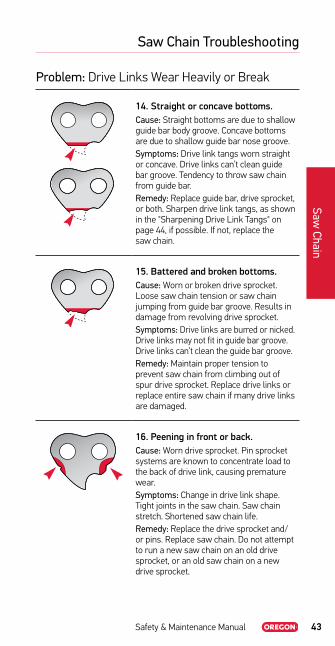
14. Straight or concave bottoms.Cause: Straight bottoms are due to shallow guide bar body groove . Concave bottoms are due to shallow guide bar nose groove .Symptoms: Drive link tangs worn straight or concave . Drive links can’t clean guide bar groove . Tendency to throw saw chain from guide bar .Remedy: Replace guide bar, drive sprocket, or both . Sharpen drive link tangs, as shown in the "Sharpening Drive Link Tangs" on page 44, if possible . If not, replace the saw chain .
15. Battered and broken bottoms.Cause: Worn or broken drive sprocket . Loose saw chain tension or saw chain jumping from guide bar groove . Results in damage from revolving drive sprocket .Symptoms: Drive links are burred or nicked . Drive links may not fit in guide bar groove . Drive links can’t clean the guide bar groove .Remedy: Maintain proper tension to prevent saw chain from climbing out of spur drive sprocket . Replace drive links or replace entire saw chain if many drive links are damaged .
16. Peening in front or back.Cause: Worn drive sprocket . Pin sprocket systems are known to concentrate load to the back of drive link, causing premature wear .Symptoms: Change in drive link shape . Tight joints in the saw chain . Saw chain stretch . Shortened saw chain life .Remedy: Replace the drive sprocket and/or pins . Replace saw chain . Do not attempt to run a new saw chain on an old drive sprocket, or an old saw chain on a new drive sprocket .

44 Safety & Maintenance Manual
Saw Chain Troubleshooting
Saw
Cha
in
17. Drive link tang turned up.Cause: Worn drive sprocket .Symptoms: Drive link tangs hit the bottom .Remedy: Replace drive sprocket . Sharpen drive link tangs as shown in the illustration below, if possible . If not, replace the saw chain .
18. Sides worn round or thin at bottoms.Cause: Guide bar rails have spread, or one rail has worn low, allowing saw chain to lean over . Symptoms: Saw chain cuts crookedly . Accelerated guide bar rail and saw chain wear .Remedy: Have guide bar rails serviced by a dealer, otherwise replace guide bar . Replace saw chain if wear is extensive or if problem persists .
NOTE: Also check bottoms of tie-straps and tops of guide bar rails for damage.
Sharpening Drive Link Tangs
Pointed drive link tangs help remove chips and debris from your guide bar groove . Sharpen damaged tangs back to their original shape with a round file .

Safety & Maintenance Manual 45
Saw Chain Troubleshooting
Saw Chain
Problem: Saw Chain Has Tight Joints
19. Peening on bottom or front of cutters and tie-straps.Cause: Improper saw chain tension or a worn out drive sprocket .Symptoms: Saw chain stretch or saw chain breakage .Remedy: Saw chain with tight joints cannot be repaired . Replace the saw chain and maintain proper tension . Replace the rim drive sprocket if worn .
20. Peening in notches of cutters and tie-straps.Cause: Worn spur drive sprocket .Symptoms: Saw chain stretch or saw chain breakage .Remedy: Replace the spur drive sprocket . Replace the saw chain . Always maintain proper tension and do not run saw chain on a worn drive sprocket .
46 Safety & Maintenance Manual
Saw Chain Troubleshooting
Saw
Cha
in
Problem: Cuts Crooked / Leans to One Side / Cuts Unevenly
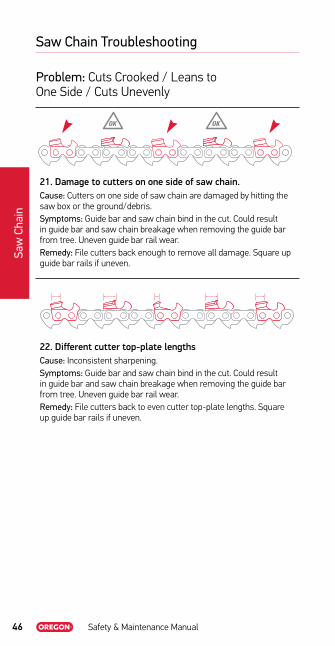
21. Damage to cutters on one side of saw chain.Cause: Cutters on one side of saw chain are damaged by hitting the saw box or the ground/debris .Symptoms: Guide bar and saw chain bind in the cut . Could result in guide bar and saw chain breakage when removing the guide bar from tree . Uneven guide bar rail wear .Remedy: File cutters back enough to remove all damage . Square up guide bar rails if uneven .
22. Different cutter top-plate lengthsCause: Inconsistent sharpening .Symptoms: Guide bar and saw chain bind in the cut . Could result in guide bar and saw chain breakage when removing the guide bar from tree . Uneven guide bar rail wear .Remedy: File cutters back to even cutter top-plate lengths . Square up guide bar rails if uneven .
Safety & Maintenance Manual 47
Saw Chain Identification
Saw Chain
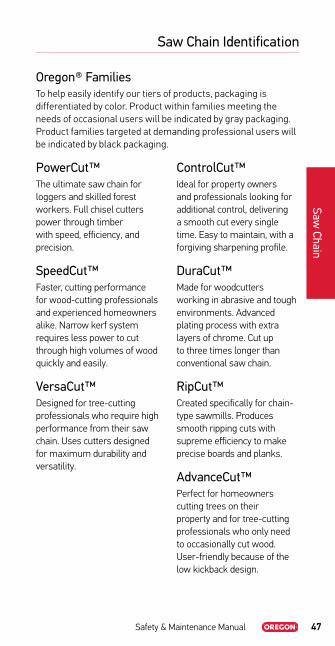
Oregon® FamiliesTo help easily identify our tiers of products, packaging is differentiated by color . Product within families meeting the needs of occasional users will be indicated by gray packaging . Product families targeted at demanding professional users will be indicated by black packaging .
PowerCut™The ultimate saw chain for loggers and skilled forest workers . Full chisel cutters power through timber with speed, efficiency, and precision .
SpeedCut™Faster, cutting performance for wood-cutting professionals and experienced homeowners alike . Narrow kerf system requires less power to cut through high volumes of wood quickly and easily .
VersaCut™Designed for tree-cutting professionals who require high performance from their saw chain . Uses cutters designed for maximum durability and versatility .
ControlCut™Ideal for property owners and professionals looking for additional control, delivering a smooth cut every single time . Easy to maintain, with a forgiving sharpening profile .
DuraCut™Made for woodcutters working in abrasive and tough environments . Advanced plating process with extra layers of chrome . Cut up to three times longer than conventional saw chain .
RipCut™Created specifically for chain-type sawmills . Produces smooth ripping cuts with supreme efficiency to make precise boards and planks .
AdvanceCut™Perfect for homeowners cutting trees on their property and for tree-cutting professionals who only need to occasionally cut wood . User-friendly because of the low kickback design .

48 Safety & Maintenance Manual
Saw Chain Identification
Saw
Cha
in
Saw Chain Drive Link Number IdentificationNearly all Oregon® saw chains are named by a part number made up of a number (see below), followed by one, two or three letters (see next page) . Part number Examples: 72LPX, 91PX
The Numbers: 72 LPX, 91 PX
The numbers are stamped on the saw chain’s drive links and indicate the physical size of the saw chain (pitch and gauge) .
72 7272
Chain Number Pitch Gaugein . mm
25 1/4" .050" 1 .3
80 .325" Low Profile™ .043" 1 .1
90 3/8" Low Profile™ .043" 1 .1
91 3/8" Low Profile™ .050" 1 .3
20 .325" .050" 1 .3
95 .325" .050" 1 .3
21 .325" .058" 1 .5
22 .325" .063" 1 .6
72 3/8" .050" 1 .3
73 3/8" .058" 1 .5
75 3/8" .063" 1 .6
26, 58 .404" .058" 1 .5
27, 59, 68 .404" .063" 1 .6
Safety & Maintenance Manual 49
Saw Chain Identification
Saw Chain
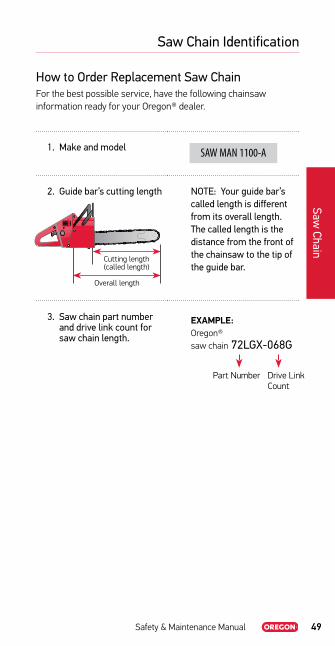
How to Order Replacement Saw ChainFor the best possible service, have the following chainsaw information ready for your Oregon® dealer .
1. Make and model SAW MAN 1100-A
2. Guide bar’s cutting length NOTE: Your guide bar’s called length is different from its overall length. The called length is the distance from the front of the chainsaw to the tip of the guide bar.
3. Saw chain part number and drive link count for saw chain length.
EXAMPLE:Oregon® saw chain 72LGX-068G
Overall length
Cutting length (called length)
Part Number Drive Link Count

50 Safety & Maintenance Manual
Saw Chain Identification
Saw
Cha
in
Round Ground
Part Type Gauge Cutter Type Cutter Sequence
Kickback-Reducing Features (if any)*
in. mm End View
Side View
1/4"
25AP ControlCut™ .050" 1.3
Micro Chisel®
Standard
.325" Low Profile™
80TXL SpeedCut™ .043" 1.1
Micro Chisel
Standard
3/8" Low Profile™
90PX AdvanceCut™ .043" 1.1
Chamfer Chisel®
Standard
91PX AdvanceCut .043" 1.3
Chamfer Chisel
Standard
91PXL ControlCut .043" 1.3
Semi-Chisel
Standard
91VXL VersaCut™ .050" 1.3
Semi-Chisel
Standard
M91VXL DuraCut™ .050" 1.3
Semi-Chisel
Standard
*Refer to the "Kickback-Reducing Features" on page 14 for all kickback icons.Chains in red indicate items that are scheduled to be discontinued .

Safety & Maintenance Manual 51
Saw Chain Identification
Saw Chain
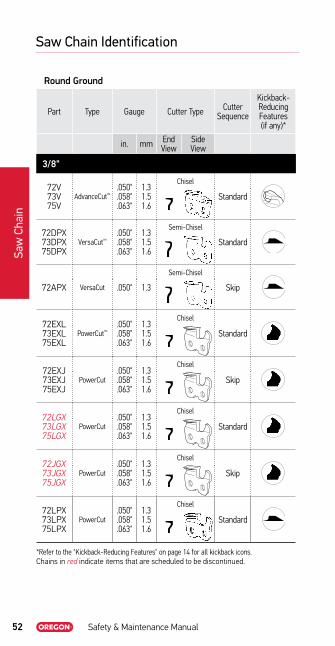
Round Ground
Part Type Gauge Cutter Type Cutter Sequence
Kickback-Reducing Features (if any)*
in. mm End View
Side View
.325"
20BPX21BPX22BPX
ControlCut™.050".058".063"
1.31.51.6
Micro Chisel®
Standard
95TXL 95VPX
SpeedCut™
.050" 1.3
Micro Chisel
Standard
20LPX21LPX22LPX
PowerCut™.050".058".063"
1.31.51.6
Chisel
Standard
20LGX21LGX22LGX
PowerCut.050".058".063"
1.31.51.6
Chisel
Standard
M20BPXM21BPXM22BPX
DuraCut™.050".058".063"
1.31.51.6
Micro Chisel
Standard
M20LPXM21LPXM22LPX
DuraCut.050".058".063"
1.31.51.6
Chisel
Standard
*Refer to the "Kickback-Reducing Features" on page 14 for all kickback icons.Chains in red indicate items that are scheduled to be discontinued .
52 Safety & Maintenance Manual
Saw Chain Identification
Saw
Cha
in
Round Ground
Part Type Gauge Cutter Type Cutter Sequence
Kickback-Reducing Features (if any)*
in. mm End View
Side View
3/8"
72V73V75V
AdvanceCut™.050".058".063"
1.31.51.6
Chisel
Standard
72DPX73DPX75DPX
VersaCut™.050".058".063"
1.31.51.6
Semi-Chisel
Standard
72APX VersaCut .050" 1.3
Semi-Chisel
Skip
72EXL73EXL75EXL
PowerCut™.050".058".063"
1.31.51.6
Chisel
Standard
72EXJ73EXJ75EXJ
PowerCut.050".058".063"
1.31.51.6
Chisel
Skip
72LGX73LGX75LGX
PowerCut .050".058".063"
1.31.51.6
Chisel
Standard
72JGX73JGX75JGX
PowerCut .050".058".063"
1.31.51.6
Chisel
Skip
72LPX73LPX75LPX
PowerCut .050".058".063"
1.31.51.6
Chisel
Standard
*Refer to the "Kickback-Reducing Features" on page 14 for all kickback icons.Chains in red indicate items that are scheduled to be discontinued .
Safety & Maintenance Manual 53
Saw Chain Identification
Saw Chain
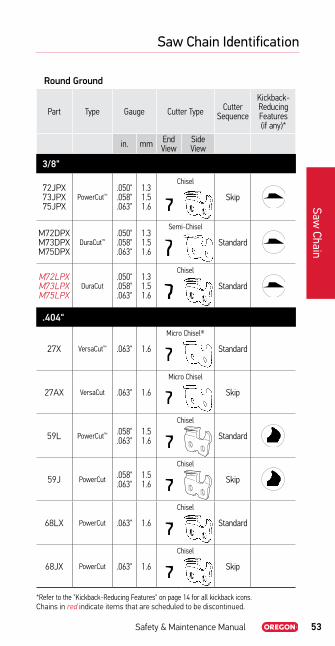
Round Ground
Part Type Gauge Cutter Type Cutter Sequence
Kickback-Reducing Features (if any)*
in. mm End View
Side View
3/8"
72JPX73JPX75JPX
PowerCut™.050".058".063"
1.31.51.6
Chisel
Skip
M72DPXM73DPXM75DPX
DuraCut™.050".058".063"
1.31.51.6
Semi-Chisel
Standard
M72LPXM73LPXM75LPX
DuraCut .050".058".063"
1.31.51.6
Chisel
Standard
.404"
27X VersaCut™ .063" 1.6
Micro Chisel®
Standard
27AX VersaCut .063" 1.6
Micro Chisel
Skip
59L PowerCut™ .058".063"
1.51.6
Chisel
Standard
59J PowerCut .058".063"
1.51.6
Chisel
Skip
68LX PowerCut .063" 1.6
Chisel
Standard
68JX PowerCut .063" 1.6
Chisel
Skip
*Refer to the "Kickback-Reducing Features" on page 14 for all kickback icons.Chains in red indicate items that are scheduled to be discontinued .

54 Safety & Maintenance Manual
Saw Chain Identification
Saw
Cha
in
Square Ground
Part Type Gauge Cutter Type Cutter Sequence
Kickback-Reducing Features (if any)*
in. mm End View
Side View
3/8"
72CL73CL75CL
PowerCut™.050".058".063"
1.31.51.6
Chisel
Standard
72CK73CK75CK
PowerCut .050".058".063"
1.31.51.6
ChiselSemi-Skip
72CJ75CJ PowerCut .050"
.063"1.31.6
Chisel
Skip
.404"
68CL PowerCut .063" 1.6
Chisel
Standard
68CJ PowerCut .063" 1.6
Chisel
Skip
*Refer to the "Kickback-Reducing Features" on page 14 for all kickback icons.Chains in red indicate items that are scheduled to be discontinued .
Safety & Maintenance Manual 55
Saw Chain Identification
Saw Chain
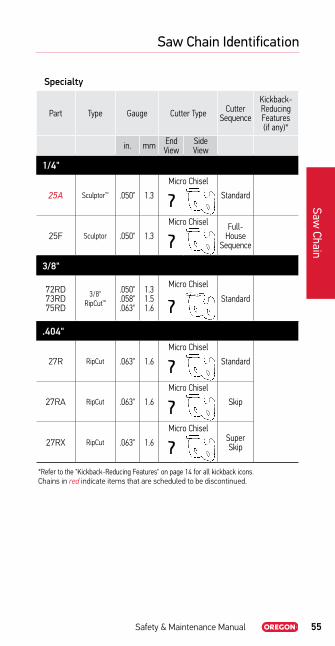
Specialty
Part Type Gauge Cutter Type Cutter Sequence
Kickback-Reducing Features (if any)*
in. mm End View
Side View
1/4"
25A Sculptor™ .050" 1.3
Micro Chisel
Standard
25F Sculptor .050" 1.3
Micro Chisel Full-House
Sequence
3/8"
72RD73RD75RD
3/8" RipCut™
.050"
.058"
.063"
1.31.51.6
Micro Chisel
Standard
.404"
27R RipCut .063" 1.6
Micro Chisel
Standard
27RA RipCut .063" 1.6
Micro Chisel
Skip
27RX RipCut .063" 1.6
Micro ChiselSuper Skip
*Refer to the "Kickback-Reducing Features" on page 14 for all kickback icons.Chains in red indicate items that are scheduled to be discontinued .
56 Safety & Maintenance Manual
High-Performance Chain
Saw
Cha
in
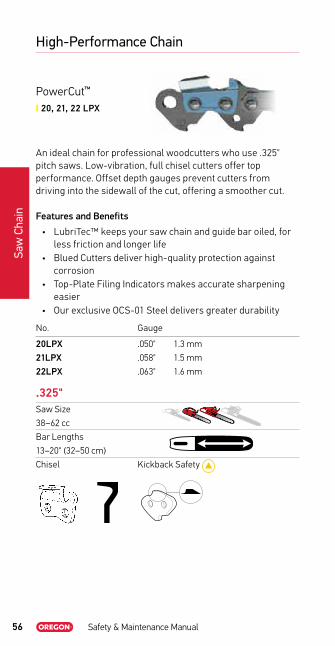
PowerCut™
❙ 20, 21, 22 LPX
An ideal chain for professional woodcutters who use .325" pitch saws . Low-vibration, full chisel cutters offer top performance . Offset depth gauges prevent cutters from driving into the sidewall of the cut, offering a smoother cut .
Features and Benefits
• LubriTec™ keeps your saw chain and guide bar oiled, for less friction and longer life
• Blued Cutters deliver high-quality protection against corrosion
• Top-Plate Filing Indicators makes accurate sharpening easier
• Our exclusive OCS-01 Steel delivers greater durability
No . Gauge
20LPX .050" 1 .3 mm
21LPX .058" 1 .5 mm
22LPX .063" 1 .6 mm
.325"Saw Size
38–62 cc
Bar Lengths
13–20" (32–50 cm)
Chisel Kickback Safety

Safety & Maintenance Manual 57
High-Performance Chain
Saw Chain
PowerCut™
❙ 20, 21, 22 LGX
The all-new 20-Series LGX has been engineered to harness the power of today’s high-performance saws . Blued, full-chisel cutters and advanced LubriTec™ oiling features mean this chain is ready to work as hard as you are .
Features and Benefits
• LubriTec keeps your saw chain and guide bar oiled, for less friction and longer life
• Blued Cutters deliver high-quality protection against corrosion
• Top-Plate Filing Indicators makes accurate sharpening easier
• Our exclusive OCS-01 Steel delivers greater durability
No . Gauge
20LGX .050" 1 .3 mm
21LGX .058" 1 .5 mm
22LGX .063" 1 .6 mm
.325"Saw Size
38–62 cc
Bar Lengths
13–20" (32–50 cm)
Chisel Kickback Safety

58 Safety & Maintenance Manual
High-Performance Chain
Saw
Cha
in
PowerCut™
❙ 72, 73, 75 EXL/EXJ
With a reshaped cutter and multi-axis grind technology for superior performance, sharpness and consistency; now the top option for professional woodcutters who use 3/8" pitch saws (replaces 72, 73, 75LGX & JPX) . This low-vibration, full chisel cutter chain is engineered to utilize the power of today’s professional saws and reduce the force applied by the operator . Designed to maximize every cut, our proprietary cutter technology gives users a sharper, more durable cutting edge that provides increased cutting performance with less effort .
Features and Benefits
• LubriTec™ keeps your saw chain and guide bar oiled, for less friction and longer life
• Blued Cutters deliver high-quality protection against corrosion
• Expanded Top-Plate Filing Indicators and depth gauge Filing Indicators area make accurate sharpening easier
• Gold Loop Start Indicator makes sharpening easier with start and stop identification
• Our exclusive OCS-01 Steel delivers greater durability
No . Gauge
72EXL/EXJ .050" 1 .3 mm
73EXL/EXJ .058" 1 .5 mm
75EXL/EXJ .063" 1 .6 mm
3/8"Saw Size
50–100 cc
Bar Lengths
16–36" (40–90 cm)
Chisel Kickback Safety

Safety & Maintenance Manual 59
High-Performance Chain
Saw Chain
PowerCut™
❙ 72, 73, 75 LGX/JGX
An ideal chain for professional woodcutters who use 3/8" pitch saws . Low-vibration, full chisel cutters offer top performance . Offset depth gauges prevent cutters from driving into the sidewall of the cut, offering a smoother cut .
Features and Benefits
• LubriTec™ keeps your saw chain and guide bar oiled, for less friction and longer life
• Blued Cutters deliver high-quality protection against corrosion
• Top-Plate Filing Indicators makes accurate sharpening easier
• Our exclusive OCS-01 Steel delivers greater durability
No . Gauge
72LGX/JGX .050" 1 .3 mm
73LGX/JGX .058" 1 .5 mm
75LGX/JGX .063" 1 .6 mm
3/8"Saw Size
50–100 cc
Bar Lengths
16–36" (40–90 cm)
Chisel Kickback Safety
60 Safety & Maintenance Manual
High-Performance Chain
Saw
Cha
in
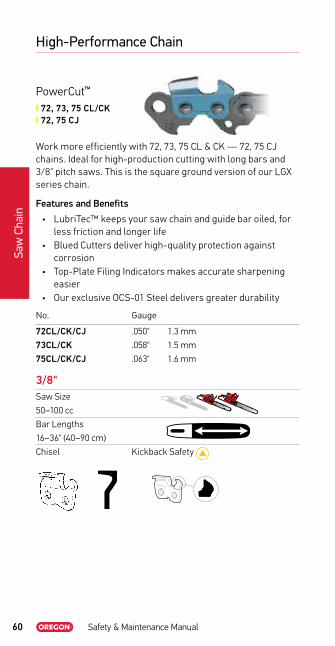
PowerCut™
❙ 72, 73, 75 CL/CK ❙ 72, 75 CJ
Work more efficiently with 72, 73, 75 CL & CK — 72, 75 CJ chains . Ideal for high-production cutting with long bars and 3/8" pitch saws . This is the square ground version of our LGX series chain .
Features and Benefits
• LubriTec™ keeps your saw chain and guide bar oiled, for less friction and longer life
• Blued Cutters deliver high-quality protection against corrosion
• Top-Plate Filing Indicators makes accurate sharpening easier
• Our exclusive OCS-01 Steel delivers greater durability
No . Gauge
72CL/CK/CJ .050" 1 .3 mm
73CL/CK .058" 1 .5 mm
75CL/CK/CJ .063" 1 .6 mm
3/8"Saw Size
50–100 cc
Bar Lengths
16–36" (40–90 cm)
Chisel Kickback Safety

Safety & Maintenance Manual 61
High-Performance Chain
Saw Chain
PowerCut™
❙ 72, 73, 75 LPX ❙ 72 JPX
An ideal chain for professional woodcutters who use 3/8" pitch saws . Low-vibration, full chisel cutters offer top performance . Offset depth gauges prevent cutters from driving into the sidewall of the cut, offering a smoother cut .
Features and Benefits
• LubriTec™ keeps your saw chain and guide bar oiled, for less friction and longer life
• Blued Cutters deliver high-quality protection against corrosion
• Top-Plate Filing Indicators makes accurate sharpening easier
• Our exclusive OCS-01 Steel delivers greater durability
No . Gauge
72LPX/JPX .050" 1 .3 mm
73LPX .058" 1 .5 mm
75LPX .063" 1 .6 mm
3/8"Saw Size
50–100 cc
Bar Lengths
16–36" (40–90 cm)
Semi-Chisel Kickback Safety
62 Safety & Maintenance Manual
High-Performance Chain
Saw
Cha
in
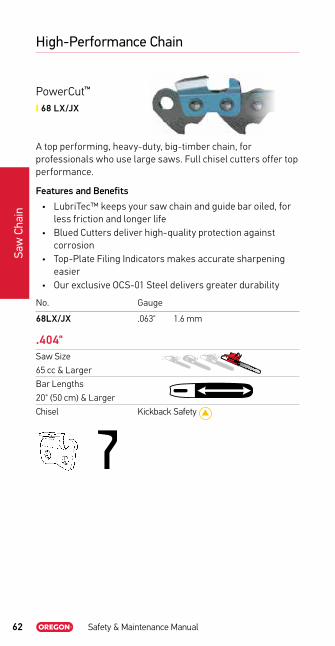
PowerCut™
❙ 68 LX/JX
A top performing, heavy-duty, big-timber chain, for professionals who use large saws . Full chisel cutters offer top performance .
Features and Benefits
• LubriTec™ keeps your saw chain and guide bar oiled, for less friction and longer life
• Blued Cutters deliver high-quality protection against corrosion
• Top-Plate Filing Indicators makes accurate sharpening easier
• Our exclusive OCS-01 Steel delivers greater durability
No . Gauge
68LX/JX .063" 1 .6 mm
.404"Saw Size
65 cc & Larger
Bar Lengths
20" (50 cm) & Larger
Chisel Kickback Safety

Safety & Maintenance Manual 63
High-Performance Chain
Saw Chain
PowerCut™
❙ 68 CL/CJ
68 CL & CJ helps you get more done . Ideal for high-production cutting with long bars and .404"- pitch saws . This is the square ground version of our 68LX .
Features and Benefits
• LubriTec™ keeps your saw chain and guide bar oiled, for less friction and longer life
• Blued Cutters deliver high-quality protection against corrosion
• Top-Plate Filing Indicators makes accurate sharpening easier
• Our exclusive OCS-01 Steel delivers greater durability
No . Gauge
68CL/CJ .063" 1 .6 mm
.404"Saw Size
65 cc & Larger
Bar Lengths
20" (50 cm) & Larger
Chisel Kickback Safety

64 Safety & Maintenance Manual
High-Performance Chain
Saw
Cha
in
PowerCut™
❙ 59 L/J
A big-timber, heavy-duty chain for professionals who use large saws . Full chisel cutters offer top performance . Get less kickback without the added weight or bulk of other methods because of the depth gauge design .
Features and Benefits
• LubriTec™ keeps your saw chain and guide bar oiled, for less friction and longer life
• Top-Plate Filing Indicators makes accurate sharpening easier
• Our exclusive OCS-01 Steel delivers greater durability
No . Gauge
59L/J .063" 1 .6 mm
.404"Saw Size
65 cc & Larger
Bar Lengths
20" (50 cm) & Larger
Chisel Kickback Safety

Safety & Maintenance Manual 65
High-Performance Chain
Saw Chain
SpeedCut™
❙ 95 TXL
Ideal for arborists and property owners who want top performance . 95TXL is for saws up to 55 cc . (Replaces 95VPX .) Oregon® SpeedCut 95TXL narrow kerf cutting systems are more efficient, needing less power from the saw than standard cutting systems . Low-vibration, Micro Chisel® cutters have small-radius working corners for excellent performance and easy maintenance .
Features and Benefits
• LubriTec™ keeps your saw chain and guide bar oiled, for less friction and longer life
• Blued Cutters deliver high-quality protection against corrosion
• Expanded Top-Plate Filing Indicators and depth gauge Filing Indicators area make accurate sharpening easier
• Our exclusive OCS-01 Steel delivers greater durabilityNo . Gauge
95TXL .050" 1 .3 mm
.325"Saw Size
38–55 cc
Bar Lengths
13–20" (32–50 cm)
Micro Chisel Kickback Safety
Always use SpeedCut narrow kerf chain in combination with SpeedCut or other narrow kerf bars .

66 Safety & Maintenance Manual
High-Performance Chain
Saw
Cha
in
SpeedCut™ Nano❙ 80 TXL
SpeedCut Nano has been engineered from the ground up with maximum efficiency in mind . Built to optimize saw performance, SpeedCut Nano meets the demands of tree care professionals like no other system on the market . SpeedCut Nano is the first ever .325" Low Profile™ cutting system . By sizing the chain to better match the specific power range of battery-powered and compact light-weight gas-powered saws, we’ve maximized the chain’s efficiency for improved performance .
Features and Benefits
• LubriTec™ keeps your saw chain and guide bar oiled, for less friction and longer life
• Blued Cutters deliver high-quality protection against corrosion
• Expanded Top-Plate Filing Indicators and depth gauge Filing Indicators area make accurate sharpening easier
• Gold Loop Start Indicator makes sharpening easier with start and stop identification
• Our exclusive OCS-01 Steel delivers greater durability
No . Gauge
80TXL .043" 1 .1 mm
.325" Low ProfileTM
Saw Size
20–38 cc
Bar Lengths
10–16" (25–40 cm)
Micro-Chisel Kickback Safety

Safety & Maintenance Manual 67
High-Performance Chain
Saw Chain
VersaCut™
❙ 91 VXL
91VXL is a high-performance, Low Profile™ chain . It’s ideal for professional arborists and orchardists who use light-weight chainsaws . Cutter top-plates are 33% longer than standard 91 cutters . Low vibration, semi-chisel cutters provide an aggressive cutting edge with a forgiving sharpening profile and good stay-sharp .
Features and Benefits
• LubriTec™ keeps your saw chain and guide bar oiled, for less friction and longer life
• Blued Cutters deliver high-quality protection against corrosion
No . Gauge
91VXL .050" 1 .3 mm
3/8" Low Profile
Saw Size
Up to 42 cc
Bar Lengths
Up to 18" (45cm)
Semi-Chisel Kickback Safety

68 Safety & Maintenance Manual
High-Performance Chain
Saw
Cha
in
VersaCut™
❙ 72, 73, 75 DPX
❙ 72 APX
An ideal choice for professional users who cut in a variety of conditions . Easy to maintain . Low-vibration, semi-chisel cutter designs work fast . This design is typically more tolerant of sharpening errors than chisel cutters .
Features and Benefits
• LubriTec™ keeps your saw chain and guide bar oiled, for less friction and longer life
• Blued Cutters deliver high-quality protection against corrosion
• Top-Plate Filing Indicators makes accurate sharpening easier
• Our exclusive OCS-01 Steel delivers greater durability
No . Gauge
72DPX .050" 1 .3 mm
73DPX .058" 1 .5 mm
75DPX .063" 1 .6 mm
72APX .050" 1 .3 mm
3/8"Saw Size
50–100 cc
Bar Lengths
16–36" (40–90 cm)
Semi-Chisel Kickback Safety
Note: DPX is standard sequence and APX is skip sequence .
Safety & Maintenance Manual 69
High-Performance Chain
Saw Chain
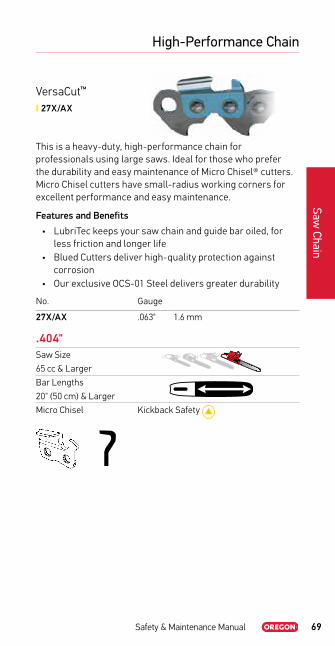
VersaCut™
❙ 27X/AX
This is a heavy-duty, high-performance chain for professionals using large saws . Ideal for those who prefer the durability and easy maintenance of Micro Chisel® cutters . Micro Chisel cutters have small-radius working corners for excellent performance and easy maintenance .
Features and Benefits
• LubriTec keeps your saw chain and guide bar oiled, for less friction and longer life
• Blued Cutters deliver high-quality protection against corrosion
• Our exclusive OCS-01 Steel delivers greater durability
No . Gauge
27X/AX .063" 1 .6 mm
.404"Saw Size
65 cc & Larger
Bar Lengths
20" (50 cm) & Larger
Micro Chisel Kickback Safety

70 Safety & Maintenance Manual
High-Performance Chain
Saw
Cha
in
ControlCut™
❙ 25 AP
25AP is light-weight, smooth chain, ideal for pruning — our Micro Chisel® cutters have small-radius working corners for excellent performance, and they are easy to maintain . The 25AP is small and light-weight, making it easy to use and maneuver .
• Available in Sculptor™ chain version — see page 78 .
No . Gauge
25AP .050" 1 .3 mm
1/4"Saw Size
Up to 38 cc
Bar Lengths
Up to 16" (40 cm)
Micro Chisel Kickback Safety
Safety & Maintenance Manual 71
High-Performance Chain
Saw Chain
ControlCut™
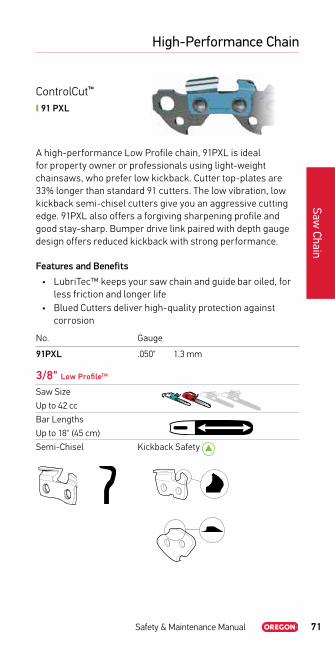
❙ 91 PXL
A high-performance Low Profile chain, 91PXL is ideal for property owner or professionals using light-weight chainsaws, who prefer low kickback . Cutter top-plates are 33% longer than standard 91 cutters . The low vibration, low kickback semi-chisel cutters give you an aggressive cutting edge . 91PXL also offers a forgiving sharpening profile and good stay-sharp . Bumper drive link paired with depth gauge design offers reduced kickback with strong performance .
Features and Benefits
• LubriTec™ keeps your saw chain and guide bar oiled, for less friction and longer life
• Blued Cutters deliver high-quality protection against corrosion
No . Gauge
91PXL .050" 1 .3 mm
3/8" Low ProfileTM
Saw Size
Up to 42 cc
Bar Lengths
Up to 18" (45 cm)
Semi-Chisel Kickback Safety

72 Safety & Maintenance Manual
High-Performance Chain
Saw
Cha
in
ControlCut™
❙ 20, 21, 22 BPX
An ideal choice for regular users of saws such as property owners and landscapers . The low-vibration, Micro Chisel® cutters have small-radius working corners for excellent performance and easy maintenance . Low kickback design .
Features and Benefits
• LubriTec™ keeps your saw chain and guide bar oiled, for less friction and longer life
• Blued Cutters deliver high-quality protection against corrosion
• Top-Plate Filing Indicators makes accurate sharpening easier
• Our exclusive OCS-01 Steel delivers greater durability
No . Gauge
20BPX .050" 1 .3 mm
21BPX .058" 1 .5 mm
22BPX .063" 1 .6 mm
.325" Saw Size
38–62 cc
Bar Lengths
13–20" (32–50 cm)
Micro Chisel Kickback Safety

Safety & Maintenance Manual 73
High-Performance Chain
Saw Chain
DuraCut™
❙ M91 VXL
Formerly named MultiCut™
Work longer in dirty conditions with this more durable version of our aggressive 91VXL chain; cuts up to 3 times longer . Maintain with standard maintenance tools .
Features and Benefits
• Multiple layers of chrome keeps chain sharp longer • LubriTec™ keeps your saw chain and guide bar oiled, for
less friction and longer life• Blued Cutters deliver high-quality protection against
corrosion
No . Gauge
M91VXL .050" 1 .3 mm
3/8" Low ProfileTM
Saw Size
Up to 42 cc
Bar Lengths
Up to 18" (32–50 cm)
Semi-Chisel Kickback Safety

74 Safety & Maintenance Manual
High-Performance Chain
Saw
Cha
in
DuraCut™
❙ M20, 21, 22 BPX
Formerly named MultiCut™
Cut effectively in dirty and abrasive conditions with this more durable version of our high performing .325” pitch BPX chain; cuts up to 3 times longer . The low-vibration, Micro Chisel® cutters have small-radius working corners for excellent performance and easy maintenance . Low kickback design . Maintain with standard maintenance tools .
Features and Benefits
• Multiple layers of chrome keeps chain sharp longer • LubriTec™ keeps your saw chain and guide bar oiled, for
less friction and longer life• Blued Cutters deliver high-quality protection against
corrosion• Top-Plate Filing Indicators makes accurate sharpening
easier• Our exclusive OCS-01 Steel delivers greater durability
No . Gauge
M20BPX .050" 1 .3 mm
M21BPX .058" 1 .5 mm
M22BPX .063" 1 .6 mm
.325" Saw Size
38–62 cc
Bar Lengths
13–20" (32–50 cm)
Micro-Chisel Kickback Safety

Safety & Maintenance Manual 75
High-Performance Chain
Saw Chain
DuraCut™
❙ M72, 73, 75 DPX
Formerly named MultiCut™
Cut more between sharpenings in the toughest, dirtiest, or most abrasive conditions with this more durable version of our high-performing 3/8” pitch DPX chain; cuts up to 3 times longer . Easy to maintain . Low-vibration, semi-chisel cutter designs work fast . Maintain with standard maintenance tools .
Features and Benefits
• Multiple layers of chrome keeps chain sharp longer • LubriTec™ keeps your saw chain and guide bar oiled, for
less friction and longer life• Blued Cutters deliver high-quality protection against
corrosion• Top-Plate Filing Indicators makes accurate sharpening
easier• Our exclusive OCS-01 Steel delivers greater durability
No . Gauge
M72DPX .050" 1 .3 mm
M73DPX .058" 1 .5 mm
M75DPX .063" 1 .6 mm
3/8" Saw Size
50–100 cc
Bar Lengths
16–36" (40–90 cm)
Semi-Chisel Kickback Safety

76 Safety & Maintenance Manual
High-Performance Chain
Saw
Cha
in
RipCut™
❙ 72, 72, 75 RD
Specially made for ripping — making cuts parallel to the wood grain . 72, 73, 75 RD has a special ripping application grind for making dimensional boards and planks from larger timbers . For use on chain-type sawmills . Not recommended for hand-held use .
Features and Benefits
• LubriTec™ keeps your saw chain and guide bar oiled, for less friction and longer life
• Our exclusive OCS-01 Steel delivers greater durability
No . Gauge
72RD .050" 1 .3 mm
73RD .058" 1 .5 mm
75RD .063" 1 .6 mm
3/8"Saw Size
For ripping cuts only . Do not use these chains for any type of cutting other than ripping .
Micro Chisel® Kickback Safety

Safety & Maintenance Manual 77
High-Performance Chain
Saw Chain
RipCut™
❙ 27 R/RX
Specially made for ripping — making cuts parallel to the wood grain . 27R, RX has a special ripping application grind for making dimensional boards and planks from larger timbers . The 27RX is a super-skip sequence to allow greater chip clearance when making extra wide cuts . For use on chain-type sawmills . Not recommended for hand-held use .
Features and Benefits
• LubriTec™ keeps your saw chain and guide bar oiled, for less friction and longer life
• Our exclusive OCS-01 Steel delivers greater durability
No . Gauge
27R/RX .063" 1 .6 mm
.404"Saw Size
For ripping cuts only . Do not use these chains for any type of cutting other than ripping .
Micro Chisel® Kickback Safety

78 Safety & Maintenance Manual
High-Performance Chain
Saw
Cha
in
Sculptor™
❙ 25 F
25F –For users with bars with a nose radius of 12 mm or less designed for carving . The “full-house” sequencing makes 25F the preferred chain of some carvers cutting fine detail and finishing work . Micro Chisel® cutters have small-radius working corners to give you excellent performance with easy maintenance . Small size and light weight make the 25F easy to use and maneuver .
No . Gauge
25F .050" 1 .3 mm
1/4"Saw Size
Up to 38 cc
Bar Lengths
Sculptor Bar Only .
Micro Chisel Kickback Safety
WARNING: Failure to use this chain on bars with nose radii of 12 mm or smaller can result in severe kickback

Safety & Maintenance Manual 79
Notes

80 Safety & Maintenance Manual
Reliable Performance Chain
Saw
Cha
in
AdvanceCut™
❙ 90 PX
90PX offers higher chain efficiency, ideal for small, low-powered saws great for homeowners and landscapers (replaces 90SG) . They need less power from the saw than standard cutting systems . The narrow .043" gauge reduces the weight of the bar and chain by roughly 15% . Low-vibration, low kickback Chamfer Chisel™ cutters’ twin cutting corners offer outstanding performance .
Features and Benefits
• LubriTec™ keeps your saw chain and guide bar oiled, for less friction and longer life
• Top-Plate Filing Indicators makes accurate sharpening easier
No . Gauge
90PX .043" 1 .1 mm
3/8" Low ProfileTM
Saw Size
Up to 42 cc
Bar Lengths
Up to 16" (40 cm)
Chamfer Chisel Kickback Safety
Always use with guide bars designed for narrow kerf saw chain .

Safety & Maintenance Manual 81
Reliable Performance Chain
Saw Chain
AdvanceCut™
❙ 91 PX
91PX is for homeowners and occasional users who want a low-vibration and low kickback saw chain . The Chamfer Chisel™ cutters’ twin cutting corners offer outstanding performance . They are durable, easy to maintain and forgiving, comparable to round-cornered chains . Bumper drive link paired with depth gauge design, offers reduced kickback with strong performance .
Features and Benefits
• LubriTec™ keeps your saw chain and guide bar oiled, for less friction and longer life
No . Gauge
91PX .050" 1 .3 mm
3/8" Low ProfileTM
Saw Size
Up to 42 cc
Bar Lengths
Up to 18" (45 cm)
Chamfer Chisel Kickback Safety
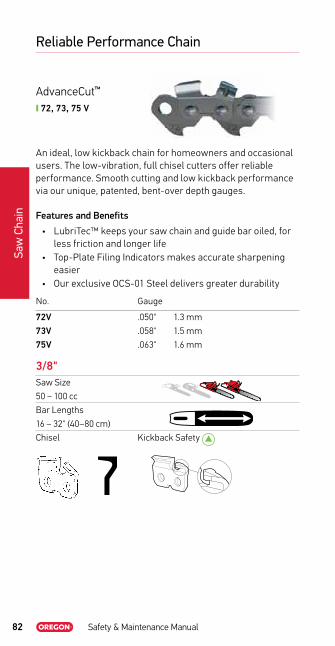
82 Safety & Maintenance Manual
Reliable Performance Chain
Saw
Cha
in
AdvanceCut™
❙ 72, 73, 75 V
An ideal, low kickback chain for homeowners and occasional users . The low-vibration, full chisel cutters offer reliable performance . Smooth cutting and low kickback performance via our unique, patented, bent-over depth gauges .
Features and Benefits
• LubriTec™ keeps your saw chain and guide bar oiled, for less friction and longer life
• Top-Plate Filing Indicators makes accurate sharpening easier
• Our exclusive OCS-01 Steel delivers greater durability
No . Gauge
72V .050" 1 .3 mm
73V .058" 1 .5 mm
75V .063" 1 .6 mm
3/8"Saw Size
50 – 100 cc
Bar Lengths
16 – 32" (40–80 cm)
Chisel Kickback Safety

Safety & Maintenance Manual 83
Specialty Chain
Saw Chain
PowerSharp®
❙ 91 PS
Now you can sharpen fast, easy, and on the saw with the PowerSharp system . Includes the 91PS PowerSharp saw chain; a guide bar designed for PowerSharp; and the PowerSharp bar-mount sharpener . Sharpen the 91PS chain in a flash . Go from dull to sharp in just three seconds with this easy-to-use, precision sharpening system . Stays sharp three times longer than 91PX saw chain .
Features and Benefits
• LubriTec™ keeps your saw chain and guide bar oiled, for less friction and longer life
No . Gauge
91PS .050" 1 .3 mm
3/8" Low ProfileTM
Saw Size
Up to 42 cc
Bar Lengths
Up to 18" (45 cm)
PowerSharp Kickback Safety

Safety & Maintenance Manual
Page
- 85 -
Guide Bar
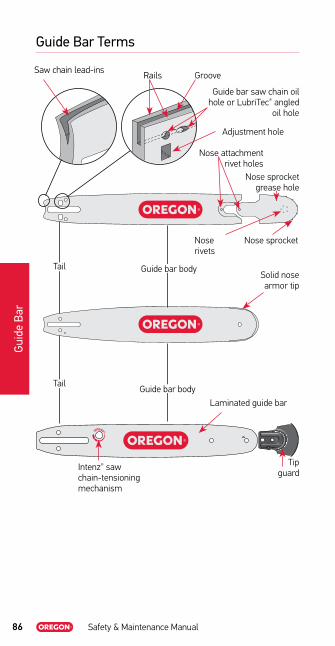
86 Safety & Maintenance Manual
Guide Bar Terms
Guid
e Ba
r
Saw chain lead-insRails Groove
Guide bar saw chain oil hole or LubriTec® angled
oil hole
Adjustment hole
Nose sprocket grease hole
Nose attachment rivet holes
Nose sprocketNose rivets
Solid nose armor tip
Tip guard
Laminated guide bar
Intenz® saw chain-tensioning mechanism
Guide bar body
Guide bar body
Tail
Tail

Safety & Maintenance Manual 87
Guide Bar Maintenance Tools
Guide Bar
Spanner Wrench “Scrench”
Flat File with Handle
Grease Gun
Guide Bar Groove Cleaner
Bar Rail Dresser
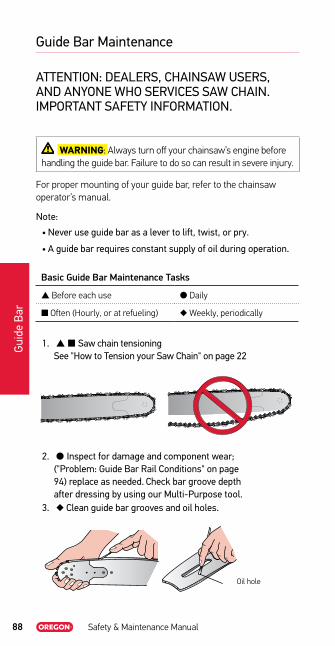
88 Safety & Maintenance Manual
Guide Bar Maintenance
Guid
e Ba
r
ATTENTION: DEALERS, CHAINSAW USERS, AND ANYONE WHO SERVICES SAW CHAIN. IMPORTANT SAFETY INFORMATION.
WARNING: Always turn off your chainsaw’s engine before handling the guide bar . Failure to do so can result in severe injury .
For proper mounting of your guide bar, refer to the chainsaw operator’s manual .
Note:
• Never use guide bar as a lever to lift, twist, or pry.
• A guide bar requires constant supply of oil during operation.
Basic Guide Bar Maintenance Tasks
s Before each use l Daily
n Often (Hourly, or at refueling) u Weekly, periodically
1. s n Saw chain tensioning See "How to Tension your Saw Chain" on page 22
2. l Inspect for damage and component wear; ("Problem: Guide Bar Rail Conditions" on page 94) replace as needed. Check bar groove depth after dressing by using our Multi-Purpose tool.
3. u Clean guide bar grooves and oil holes.
Oil hole

Safety & Maintenance Manual 89
Guide Bar Maintenance
Guide Bar
4. u Turn your guide bar over to equalize bar wear.
5. u Dress the rail, always dressing from the bar tip to the bar mount.
Note: If using a grinding wheel, direct debris towards tail, then clean out grooves. Grinding debris can cause the nose components to wear quickly or jam.
Bar Rail Dresser, p/n 111589 makes it easy to remove effects of normal wear and remove minor damage .
6. u On sprocket-nose guide bars, check for clearance around the guide bar’s tip between the tops of rails and the chassis. Replace nose sprockets before cutters or tie-straps contact the chassis.
1/32"( 0,8 mm )
1/32"
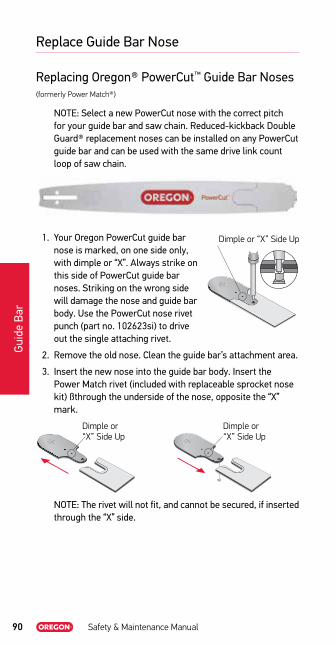
90 Safety & Maintenance Manual
Replace Guide Bar Nose
Guid
e Ba
r
Replacing Oregon® PowerCut™ Guide Bar Noses(formerly Power Match®)
NOTE: Select a new PowerCut nose with the correct pitch for your guide bar and saw chain. Reduced-kickback Double Guard® replacement noses can be installed on any PowerCut guide bar and can be used with the same drive link count loop of saw chain.
1. Your Oregon PowerCut guide bar nose is marked, on one side only, with dimple or “X”. Always strike on this side of PowerCut guide bar noses. Striking on the wrong side will damage the nose and guide bar body. Use the PowerCut nose rivet punch (part no. 102623si) to drive out the single attaching rivet.
2. Remove the old nose. Clean the guide bar’s attachment area.
3. Insert the new nose into the guide bar body. Insert the Power Match rivet (included with replaceable sprocket nose kit) ßthrough the underside of the nose, opposite the “X” mark.
NOTE: The rivet will not fit, and cannot be secured, if inserted through the “X” side.
Dimple or “X” Side Up
Dimple or “X” Side Up
Dimple or “X” Side Up
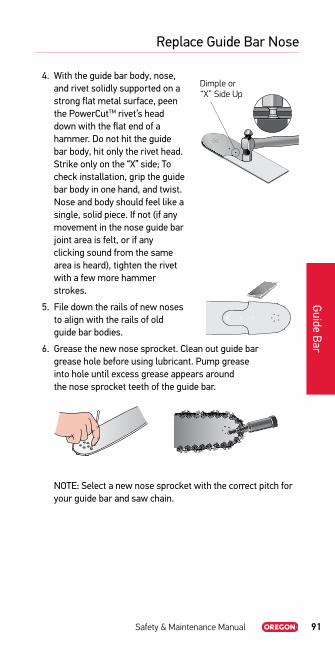
Safety & Maintenance Manual 91
Replace Guide Bar Nose
Guide Bar
4. With the guide bar body, nose, and rivet solidly supported on a strong flat metal surface, peen the PowerCutTM rivet’s head down with the flat end of a hammer. Do not hit the guide bar body, hit only the rivet head. Strike only on the “X” side; To check installation, grip the guide bar body in one hand, and twist. Nose and body should feel like a single, solid piece. If not (if any movement in the nose guide bar joint area is felt, or if any clicking sound from the same area is heard), tighten the rivet with a few more hammer strokes.
5. File down the rails of new noses to align with the rails of old guide bar bodies.
6. Grease the new nose sprocket. Clean out guide bar grease hole before using lubricant. Pump grease into hole until excess grease appears around the nose sprocket teeth of the guide bar.
NOTE: Select a new nose sprocket with the correct pitch for your guide bar and saw chain.
Dimple or “X” Side Up

92 Safety & Maintenance Manual
Replace Nose Sprocket
Guid
e Ba
r
Pro-Lite® (discontinued, no inventory available)
WARNING: Wear eye protection and gloves .
1. Using a 1/4" drill bit, drill out head from each of the nose sprocket rivets.
2. Punch out the remainder of the rivets. Use a punch narrow enough to keep from damaging the rivet holes in the nose of the guide bar.
3. Use a small screwdriver to spread the guide bar nose rails just enough to remove the old nose sprocket. Clean debris from the sprocket area.

Safety & Maintenance Manual 93
Replace Nose Sprocket
Guide Bar
4. Inside the nose sprocket package, you’ll find the new sprocket wrapped in a tissue. Be careful to keep the sprocket inside the tissue as you remove it from the package — bearings are easily lost. Slide the tissue and the new sprocket, together, into the guide bar’s nose.
5. Once fully inside the nose, hold the nose sprocket in place, then remove the tissue.
6. Align the sprocket’s inner race holes with the holes in the guide bar nose. Insert rivets into each hole through the guide bar. On used guide bars the nose rails could be spread apart. Use a small clamp to hold the nose rails together when inserting and securing the rivets.
7. With the guide bar and rivets solidly supported on a strong, flat metal surface, carefully peen the rivet heads down with the flat end of a hammer. Be careful to hit only the rivet head. Do not hit the guide bar body — this will pinch the nose sprocket. Rivet heads must be snug and secure while still allowing the drive sprocket to turn freely.

94 Safety & Maintenance Manual
Guide Bar Troubleshooting
Guid
e Ba
r
Most guide bar problems occur in the guide bar rails, and are caused by four things: lack of lubrication, incorrect saw chain tension, and accidents or irregular operating techniques which pinch the rails or push the drive links sideways against the guide bar rails .
Problem: Guide Bar Rail Conditions
1. Rails are worn down, groove becomes shallow.Cause: Normal wear on rails .Symptoms: Chain rides on groove bottom causing drive link damage, chain leans during cutting .Remedy: Guide bar is at end of life, replace guide bar . If wear occurs too quickly, check for proper lubrication, chain sharpness, guide bar feed load .
2. Outside edge of rails develop wire edges.Cause: Normal wear on rails .Symptoms: Left alone, wire edges can break off and chip away rail material .Remedy: Use flat file or grinder to square up guide bar’s rails and remove wire edges . If wire edges develop too quickly, check for proper lubrication, saw chain sharpness and guide bar feed load .Note: If using a grinding wheel, direct debris towards tail, then clean out grooves. Grinding debris can cause nose components to wear quickly or jam.
3. Rail on one side is worn thin.Cause: Damaged or dull cutters on one side (see saw chain section) . Saw chain leaning over in a worn groove or using a .063" gauge saw chain in a .080" gauge guide bar .Symptoms: Incomplete cuts, leading cuts, guide bar bound in the cut .Remedy: Replace guide bar, check for correct saw chain gauge, replace saw chain if it continues to cut crooked after sharpening (see "How to Sharpen Cutters" on page 23) .
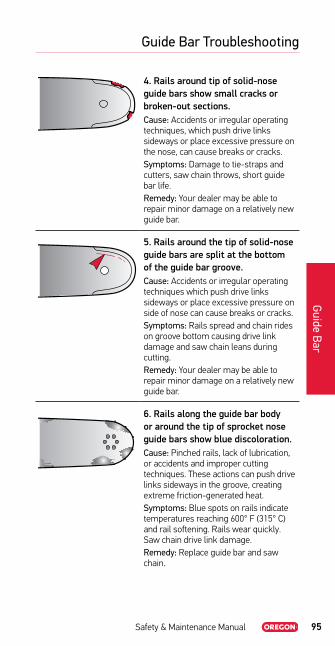
Safety & Maintenance Manual 95
Guide Bar Troubleshooting
Guide Bar
4. Rails around tip of solid-nose guide bars show small cracks or broken-out sections.Cause: Accidents or irregular operating techniques, which push drive links sideways or place excessive pressure on the nose, can cause breaks or cracks .Symptoms: Damage to tie-straps and cutters, saw chain throws, short guide bar life .Remedy: Your dealer may be able to repair minor damage on a relatively new guide bar .
5. Rails around the tip of solid-nose guide bars are split at the bottom of the guide bar groove.Cause: Accidents or irregular operating techniques which push drive links sideways or place excessive pressure on side of nose can cause breaks or cracks .Symptoms: Rails spread and chain rides on groove bottom causing drive link damage and saw chain leans during cutting .Remedy: Your dealer may be able to repair minor damage on a relatively new guide bar .
6. Rails along the guide bar body or around the tip of sprocket nose guide bars show blue discoloration.Cause: Pinched rails, lack of lubrication, or accidents and improper cutting techniques . These actions can push drive links sideways in the groove, creating extreme friction-generated heat .Symptoms: Blue spots on rails indicate temperatures reaching 600° F (315° C) and rail softening . Rails wear quickly . Saw chain drive link damage .Remedy: Replace guide bar and saw chain .

96 Safety & Maintenance Manual
Guide Bar Troubleshooting
Guid
e Ba
r
7. Spread rails.Cause: (1) Saw chain was struck broadside by tree, log, or branch stub . (2) Saw chain was pushed sideways, forcing drive links to pry guide bar rails apart .Symptoms: Guide bar will not enter log during cut or cannot make complete cut .Remedy: (1) Hammer rails together with a drive link in groove as spacer . Adjust saw return to allow guide bar to go farther into saw box . Sharpen delimbing knives . Avoid moving tree/log when guide bar and saw chain are out of saw box . (2) Reduce guide bar feed speed .
8. Rail on one side worn low.Cause: Damaged or dull cutters on one side, or saw chain leaning over in a worn groove, or using .063" saw chain in .080" guide bar . Most often one short rail is caused by cutters contacting rocks on one side of saw chain, usually the cutters closest to the ground .Symptoms: Incomplete cuts, leading cuts, guide bar bound in the cut .Remedy: Replace guide bar . Replace saw chainsaw continues to cut crookedly after sharpening (see "How to Sharpen Cutters" on page 23) .
9. Rail chipping in middle of guide bar.Cause: Excessive pressure on guide bar, excessive guide bar feed speed, cold conditions, lack of lubrication, aggressive saw chain cutting in frozen wood .Symptoms: Damage to saw chain and reduced guide bar life .Remedy: Replace guide bar if rail wear is extensive . Decreased guide bar feed force when cutting consists mostly of small-diameter trees . Increase lubrication, especially in cold conditions . Reduce aggressiveness of saw chain when cutting frozen wood .
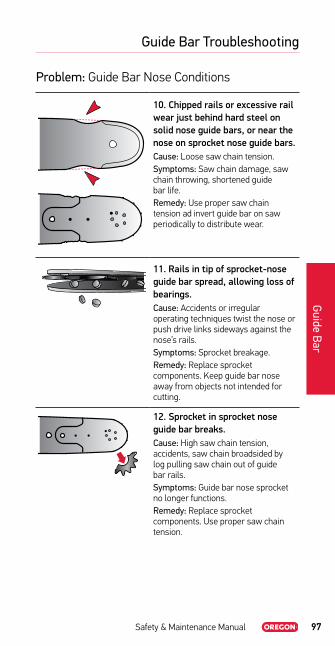
Safety & Maintenance Manual 97
Guide Bar Troubleshooting
Guide Bar
Problem: Guide Bar Nose Conditions
10. Chipped rails or excessive rail wear just behind hard steel on solid nose guide bars, or near the nose on sprocket nose guide bars.Cause: Loose saw chain tension .Symptoms: Saw chain damage, saw chain throwing, shortened guide bar life .Remedy: Use proper saw chain tension ad invert guide bar on saw periodically to distribute wear .
11. Rails in tip of sprocket-nose guide bar spread, allowing loss of bearings.Cause: Accidents or irregular operating techniques twist the nose or push drive links sideways against the nose’s rails .Symptoms: Sprocket breakage .Remedy: Replace sprocket components . Keep guide bar nose away from objects not intended for cutting .
12. Sprocket in sprocket nose guide bar breaks.Cause: High saw chain tension, accidents, saw chain broadsided by log pulling saw chain out of guide bar rails .Symptoms: Guide bar nose sprocket no longer functions .Remedy: Replace sprocket components . Use proper saw chain tension .

98 Safety & Maintenance Manual
Guide Bar Troubleshooting
Guid
e Ba
r
13. Nose burned at tip from saw chain sliding on rails of sprocket nose guide bar, or from the sprocket being recessed into the tip.Cause: High saw chain tension from automatic saw chain tensioners .Symptoms: Nose breakage from bearings wearing quickly and jamming .Remedy: Decrease the tension applied by automatic saw chain tensioner .
14. Loose or missing nose/attachment rivets.Cause: Guide bar tip flexing during operation from difficult cutting conditions or accidents .Symptoms: Rivets continue to loosen until laminates spread and bearings are lost .Remedy: Check rivets every 100 machine hours . Rehammer loose rivets and replace rivets if rivet head is missing . Always use new rivets .
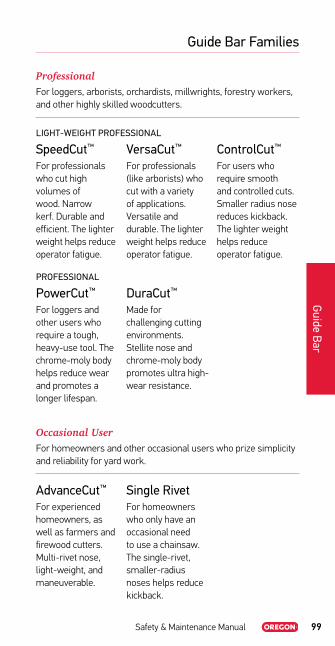
Safety & Maintenance Manual 99
Guide Bar Families
Guide Bar
ProfessionalFor loggers, arborists, orchardists, millwrights, forestry workers, and other highly skilled woodcutters .
LIGHT-WEIGHT PROFESSIONAL
SpeedCut™
For professionals who cut high volumes of wood . Narrow kerf . Durable and efficient . The lighter weight helps reduce operator fatigue .
VersaCut™
For professionals (like arborists) who cut with a variety of applications . Versatile and durable . The lighter weight helps reduce operator fatigue .
ControlCut™
For users who require smooth and controlled cuts . Smaller radius nose reduces kickback . The lighter weight helps reduce operator fatigue .
PROFESSIONAL
PowerCut™
For loggers and other users who require a tough, heavy-use tool . The chrome-moly body helps reduce wear and promotes a longer lifespan .
DuraCut™
Made for challenging cutting environments . Stellite nose and chrome-moly body promotes ultra high-wear resistance .
Occasional UserFor homeowners and other occasional users who prize simplicity and reliability for yard work .
AdvanceCut™
For experienced homeowners, as well as farmers and firewood cutters . Multi-rivet nose, light-weight, and maneuverable .
Single RivetFor homeowners who only have an occasional need to use a chainsaw . The single-rivet, smaller-radius noses helps reduce kickback .

100 Safety & Maintenance Manual
Choosing the Right Guide Bar
Guid
e Ba
r
For safety and performance, it’s essential that you choose the right guide bar . From electric and small gas to the largest professional powerheads, Oregon® has the bar you need - beginning with 8" up to 42" . Oregon offers you the broadest selection of guide bars in the industry . Use the chart below to help you choose the right guide bar for your saw .
4 0 8 3
.063" .050" .058" .043"
Electric 100 CC
GOOD
AdvanceCut™
PowerCut™
DuraCut™
ControlCut™
Aluminum Core
SpeedCut™
Aluminum Core
VersaCut™
Aluminum Core
90 25 91
Single Rivet
BETT
ER AdvanceCut™
PowerCut™
DuraCut™
ControlCut™
Aluminum Core
SpeedCut™
Aluminum Core
VersaCut™
Aluminum Core
91 95 20 72 21 73 22 75
AdvanceCut ™
BEST
Light-Weight Professional Guide Bars 80
SpeedCut™ Nano
SpeedCut ™ Nano
95 20 72 21 73 22 75
SpeedCut ™ / ControlCut ™ / VersaCut ™
AdvanceCut™
PowerCut™
DuraCut™
ControlCut™
Aluminum Core
SpeedCut™
Aluminum Core
VersaCut™
Aluminum Core
20 72 21 73 58 22 75 59 27 68
PowerCut ™
AdvanceCut™
PowerCut™
DuraCut™
ControlCut™
Aluminum Core
SpeedCut™
Aluminum Core
VersaCut™
Aluminum Core
72 73 58 75 59 27 68
DuraCut ™

Safety & Maintenance Manual 101
Choosing the Right Guide Bar
Guide Bar
For safety and performance, it’s essential that you choose the right guide bar . From electric and small gas to the largest professional powerheads, Oregon® has the bar you need - beginning with 8" up to 42" . Oregon offers you the broadest selection of guide bars in the industry . Use the chart below to help you choose the right guide bar for your saw .
4 0 8 3
.063" .050" .058" .043"
Electric 100 CC
GOOD
AdvanceCut™
PowerCut™
DuraCut™
ControlCut™
Aluminum Core
SpeedCut™
Aluminum Core
VersaCut™
Aluminum Core
90 25 91
Single Rivet
BETT
ER AdvanceCut™
PowerCut™
DuraCut™
ControlCut™
Aluminum Core
SpeedCut™
Aluminum Core
VersaCut™
Aluminum Core
91 95 20 72 21 73 22 75
AdvanceCut ™
BEST
Light-Weight Professional Guide Bars 80
SpeedCut™ Nano
SpeedCut ™ Nano
95 20 72 21 73 22 75
SpeedCut ™ / ControlCut ™ / VersaCut ™
AdvanceCut™
PowerCut™
DuraCut™
ControlCut™
Aluminum Core
SpeedCut™
Aluminum Core
VersaCut™
Aluminum Core
20 72 21 73 58 22 75 59 27 68
PowerCut ™
AdvanceCut™
PowerCut™
DuraCut™
ControlCut™
Aluminum Core
SpeedCut™
Aluminum Core
VersaCut™
Aluminum Core
72 73 58 75 59 27 68
DuraCut ™

102 Safety & Maintenance Manual
Using the Guide Bar Number System
Guid
e Ba
r
Our 10 or 11-digit guide bar part numbers are printed on the guide bar package and etched on the guide bar body . Here’s what each digit means:
In a few cases where two guide bars would have the same length in their part numbers but different drive link counts, the letter Z will be used in the guide bar mount description to distinguish between them (K095 and Z095 for example).
Chainsaws originally equipped with an Intenz® guide bar, and chainsaws adapted to take an Intenz guide bar, do not have a “guide bar-adjustment pin” for tensioning the saw chain. Use ONLY an Intenz guide bar when replacing the guide bar on these chainsaws. See page 21 for important information on Intenz guide bars.
Length Gauge Type
8"10"11"12"13"14"15"16"18"20"21"22"
24"25"26"27"28"30"32"33"34"36"37"42"
4 = .043"0 = .050"8 = .058"3 = .063"
SpeedCut™ NanoTXL SpeedCut Nano
SpeedCut™, ControlCut™, VersaCut™
TXL SpeedCutPXL ControlCutVXL VersaCut
PowerCut™
EXL Replaceable sprocket-noseRN Replaceable sprocket-nosePM Replaceable sprocket-noseRW Replaceable sprocket-nose
DuraCut™
DXL Solid nose, laser welded tip with wear-resistant alloy
AT Solid nose, laser welded tip with wear-resistant alloy
AdvanceCut™
SX Sprocket-nosePX Sprocket-noseGD Sprocket-nose with Guard Mate® holesML Narrow kerf sprocket-noseSF Sprocket-nose
Single RivetSD Sprocket-noseDG Sprocket-nose with Guard Mate holesML Narrow kerf sprocket-nose
18 0 EXL D K095

Safety & Maintenance Manual 103
Using the Guide Bar Number System
Guide Bar
Our 10 or 11-digit guide bar part numbers are printed on the guide bar package and etched on the guide bar body . Here’s what each digit means:
PowerCut™ solid body guide bars may be stamped with XXX, ZZZ or other letters as they can have different noses installed on the body, thereby changing the part number.
Guard Mate® holes are built into the noses of certain types of Oregon® guide bars and allow the attachment of a Guard Mate tip guard to help reduce the risk of kickback.
Oregon Sculptor™ carving bar part numbers do not follow the Oregon bar part numbering system.
Sprocket Nose
Pitch Tooth Count Bar Mount
A 1/4" 10 A041
B .325" 10 or 12 A061
D 3/8" 9 or 11 A074
E 3/8" 7 or 9 A089
F .404" 10 A095
G .325" 12 A218
H 3/8" 11 A318
N .325" D009
D024
Solid Nose Code D025
M Medium (1 .33") D033
D096
D176
D196
E031
K041
K095K216
Z095
Intenz®
T041
T095
T218
T318
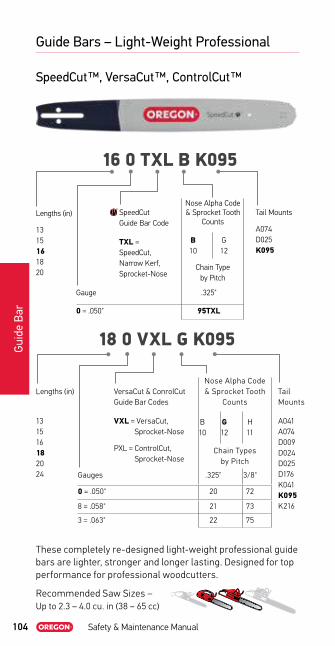
104 Safety & Maintenance Manual
Guide Bars – Light-Weight Professional
Guid
e Ba
r
SpeedCut ™, VersaCut ™, ControlCut ™
16 0 TXL B K095
Lengths (in) VersaCut & ConrolCut Guide Bar Codes
Nose Alpha Code & Sprocket Tooth
CountsTail Mounts
131516 182024
VXL = VersaCut, Sprocket-Nose
PXL = ControlCut, Sprocket-Nose
B 10
G 12
H 11
A041A074D009D024D025D176K041K095K216
Chain Types by Pitch
Gauges .325" 3/8"
0 = .050" 20 72
8 = .058" 21 73
3 = .063" 22 75
18 0 VXL G K095
Lengths (in)
1315161820
SpeedCut Guide Bar Code
Nose Alpha Code & Sprocket Tooth
CountsTail Mounts
A074D025K095
TXL = SpeedCut, Narrow Kerf, Sprocket-Nose
B 10
G12
Chain Type by Pitch
Gauge .325"
0 = .050" 95TXL
These completely re-designed light-weight professional guide bars are lighter, stronger and longer lasting . Designed for top performance for professional woodcutters .
Recommended Saw Sizes – Up to 2 .3 – 4 .0 cu . in (38 – 65 cc)
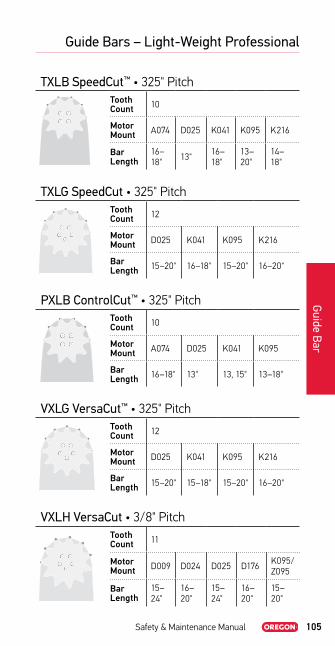
Safety & Maintenance Manual 105
Guide Bars – Light-Weight Professional
Guide Bar
TXLB SpeedCut™ • 325" PitchTooth Count 10
Motor Mount A074 D025 K041 K095 K216
Bar Length
16–18" 13" 16–
18"13–20"
14–18"
TXLG SpeedCut • 325" PitchTooth Count 12
Motor Mount D025 K041 K095 K216
Bar Length 15–20" 16–18" 15–20" 16–20"
PXLB ControlCut™ • 325" PitchTooth Count 10
Motor Mount A074 D025 K041 K095
Bar Length 16–18" 13" 13, 15" 13–18"
VXLG VersaCut™ • 325" PitchTooth Count 12
Motor Mount D025 K041 K095 K216
Bar Length 15–20" 15–18" 15–20" 16–20"
VXLH VersaCut • 3/8" PitchTooth Count 11
Motor Mount D009 D024 D025 D176 K095/
Z095
Bar Length
15–24"
16–20"
15–24"
16–20"
15–20"
SpeedCut ™, VersaCut ™, ControlCut ™
16 0 TXL B K095
Lengths (in) VersaCut & ConrolCut Guide Bar Codes
Nose Alpha Code & Sprocket Tooth
CountsTail Mounts
131516 182024
VXL = VersaCut, Sprocket-Nose
PXL = ControlCut, Sprocket-Nose
B 10
G 12
H 11
A041A074D009D024D025D176K041K095K216
Chain Types by Pitch
Gauges .325" 3/8"
0 = .050" 20 72
8 = .058" 21 73
3 = .063" 22 75
18 0 VXL G K095
Lengths (in)
1315161820
SpeedCut Guide Bar Code
Nose Alpha Code & Sprocket Tooth
CountsTail Mounts
A074D025K095
TXL = SpeedCut, Narrow Kerf, Sprocket-Nose
B 10
G12
Chain Type by Pitch
Gauge .325"
0 = .050" 95TXL
These completely re-designed light-weight professional guide bars are lighter, stronger and longer lasting . Designed for top performance for professional woodcutters .
Recommended Saw Sizes – Up to 2 .3 – 4 .0 cu . in (38 – 65 cc)

106 Safety & Maintenance Manual
Guide Bars – Light-Weight Professional
Guid
e Ba
r
SpeedCut™ Nano
16 4 TXL N A074
Lengths (in) SpeedCut Nano Guide Bar Codes
Nose Alpha Code & Sprocket Tooth
CountsTail Mounts
10121416
TXL = SpeedCut Nano, System Guide Bar
N 7
A074A095
Chain Types by Pitch
Gauges .325" Low Profile
4 = .043" 80
Power through the day with a guide bar engineered specifically for 80TXL saw chain . Designed for professionals, the high-strength body and performance-driven nose components are constructed to exacting tolerances . When the job demands accurate cuts with unmatched speed and endurance to run all-day without downtime, professionals choose SpeedCut Nano .
SpeedCut Nano guide bars must be used together with the corresponding 80TXL saw chain and sprocket and are not compatible with other existing cutting systems.
Recommended Saw Sizes – 2 .3 cu . in (38 cc) and larger
SpeedCut™ Nano

Safety & Maintenance Manual 107
Guide Bars – Light-Weight Professional
Guide Bar
SpeedCut™ Nano • 80TXL • Conversion Chart
Drive Links
Guide Bar Length & P/N
Sprocket 7T
Conversion Kit
Stihl®MS201T, 200, 193T, 192
46 10" 104TXLNA074 610725 614379
51 12" 124TXLNA074 610725 614380
59 14" 144TXLNA074 610725 614377
64 16" 164TXLNA074 610725 614381
MS180, 170, 17159 14" 144TXLNA074 610726 614384
64 16" 164TXLNA074 610726 614385
MS15051 12" 124TXLNA074 610727 614383
59 14" 144TXLNA074 610727 614382
Husqvarna®540
46 10" 104TXLNA095 610728 614387
51 12" 124TXLNA095 610728 614390
59 14" 144TXLNA095 610728 614393
64 16" 164TXLNA095 610728 614397
T43546 10" 104TXLNA095 610729 614388
51 12" 124TXLNA095 610729 614391
59 14" 144TXLNA095 610729 614395
64 16" 164TXLNA095 610729 614398
T536LiXP46 10" 104TXLNA095 610730 614389
51 12" 124TXLNA095 610730 614392
59 14" 144TXLNA095 610730 614396
64 16" 164TXLNA095 610730 614399
SpeedCut™ Nano
16 4 TXL N A074
Lengths (in) SpeedCut Nano Guide Bar Codes
Nose Alpha Code & Sprocket Tooth
CountsTail Mounts
10121416
TXL = SpeedCut Nano, System Guide Bar
N 7
A074A095
Chain Types by Pitch
Gauges .325" Low Profile
4 = .043" 80
Power through the day with a guide bar engineered specifically for 80TXL saw chain . Designed for professionals, the high-strength body and performance-driven nose components are constructed to exacting tolerances . When the job demands accurate cuts with unmatched speed and endurance to run all-day without downtime, professionals choose SpeedCut Nano .
SpeedCut™ Nano
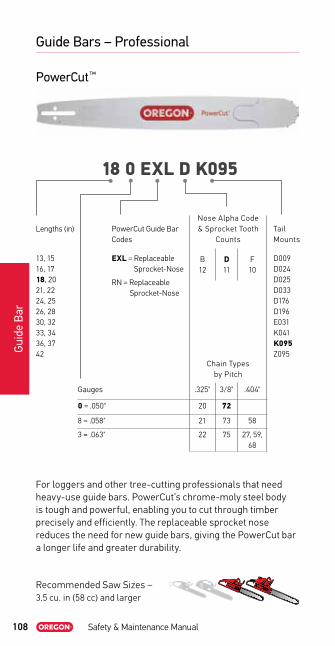
108 Safety & Maintenance Manual
Guide Bars – Professional
Guid
e Ba
r
PowerCut ™
18 0 EXL D K095
Lengths (in) PowerCut Guide Bar Codes
Nose Alpha Code & Sprocket Tooth
CountsTail Mounts
13, 1516, 1718, 2021, 2224, 2526, 2830, 3233, 3436, 3742
EXL = Replaceable Sprocket-Nose
RN = Replaceable Sprocket-Nose
B 12
D 11
F 10
D009D024D025D033D176D196E031K041K095Z095
Chain Types by Pitch
Gauges .325" 3/8" .404"
0 = .050" 20 72
8 = .058" 21 73 58
3 = .063" 22 75 27, 59, 68
For loggers and other tree-cutting professionals that need heavy-use guide bars . PowerCut’s chrome-moly steel body is tough and powerful, enabling you to cut through timber precisely and efficiently . The replaceable sprocket nose reduces the need for new guide bars, giving the PowerCut bar a longer life and greater durability .
Recommended Saw Sizes – 3 .5 cu . in (58 cc) and larger

Safety & Maintenance Manual 109
Guide Bars – Professional
Guide Bar
RNB • .325" PitchTooth Count 12
Motor Mount D025 K041 K095
Bar Length 16–18" 16–18" 15–20"
RND / RWD / PMD • 3/8" PitchTooth Count 11
Motor Mount D009 D025 D033 D176
K095 D196
Bar Length
13–42"
16–42" 20" 16–
28"16–24"
RNF / PMF • .404" PitchTooth Count 10
Motor Mount D009 D025 E031
Bar Length 16–18" 13" 13, 15"
Power Match®
PowerCut ™
18 0 EXL D K095
Lengths (in) PowerCut Guide Bar Codes
Nose Alpha Code & Sprocket Tooth
CountsTail Mounts
13, 1516, 1718, 2021, 2224, 2526, 2830, 3233, 3436, 3742
EXL = Replaceable Sprocket-Nose
RN = Replaceable Sprocket-Nose
B 12
D 11
F 10
D009D024D025D033D176D196E031K041K095Z095
Chain Types by Pitch
Gauges .325" 3/8" .404"
0 = .050" 20 72
8 = .058" 21 73 58
3 = .063" 22 75 27, 59, 68
For loggers and other tree-cutting professionals that need heavy-use guide bars . PowerCut’s chrome-moly steel body is tough and powerful, enabling you to cut through timber precisely and efficiently . The replaceable sprocket nose reduces the need for new guide bars, giving the PowerCut bar a longer life and greater durability .
Recommended Saw Sizes – 3 .5 cu . in (58 cc) and larger
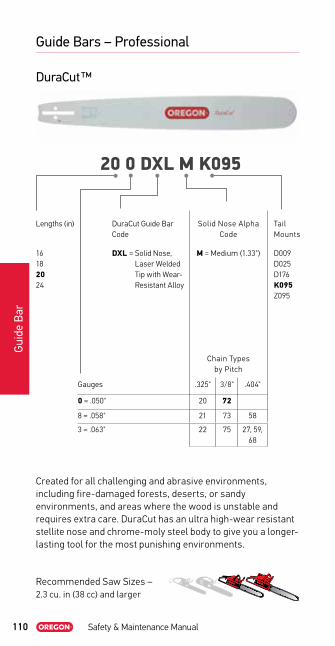
110 Safety & Maintenance Manual
Guide Bars – Professional
Guid
e Ba
r
DuraCut ™
20 0 DXL M K095
Lengths (in) DuraCut Guide Bar Code
Solid Nose Alpha Code
Tail Mounts
16182024
DXL = Solid Nose, Laser Welded Tip with Wear-Resistant Alloy
M = Medium (1 .33") D009D025D176K095Z095
Chain Types by Pitch
Gauges .325" 3/8" .404"
0 = .050" 20 72
8 = .058" 21 73 58
3 = .063" 22 75 27, 59, 68
Created for all challenging and abrasive environments, including fire-damaged forests, deserts, or sandy environments, and areas where the wood is unstable and requires extra care . DuraCut has an ultra high-wear resistant stellite nose and chrome-moly steel body to give you a longer-lasting tool for the most punishing environments .
Recommended Saw Sizes – 2 .3 cu . in (38 cc) and larger

Safety & Maintenance Manual 111
Guide Bars – Professional
Guide Bar
ATMTooth Count —
Motor Mount D009 D025 D176 K095/
Z095
Bar Length 16–24" 16–24" 20, 24" 16–20"
DuraCut ™
20 0 DXL M K095
Lengths (in) DuraCut Guide Bar Code
Solid Nose Alpha Code
Tail Mounts
16182024
DXL = Solid Nose, Laser Welded Tip with Wear-Resistant Alloy
M = Medium (1 .33") D009D025D176K095Z095
Chain Types by Pitch
Gauges .325" 3/8" .404"
0 = .050" 20 72
8 = .058" 21 73 58
3 = .063" 22 75 27, 59, 68
Created for all challenging and abrasive environments, including fire-damaged forests, deserts, or sandy environments, and areas where the wood is unstable and requires extra care . DuraCut has an ultra high-wear resistant stellite nose and chrome-moly steel body to give you a longer-lasting tool for the most punishing environments .
Recommended Saw Sizes – 2 .3 cu . in (38 cc) and larger

112 Safety & Maintenance Manual
Guide Bars – Occasional User
Guid
e Ba
r
AdvanceCut ™
15 0 ML B K095
Lengths (in) AdvanceCut Guide Bar Codes
Nose Alpha Code & Sprocket Tooth Counts Tail
Mounts
1213141516182024
SX = Sprocket-Nose
PS = Sprocket-Nose
GD = Sprocket-Nose with Guard Mate® Holes
ML = Narrow Kerf Sprocket-Nose
SF = Sprocket-Nose
E9
B10
G12
D9
H11
A041A074A095A318D009D025D096D176K041K095
IntenzT041
Chain Types by Pitch
Gauges 3/8 LP .325" 3/8"
0 = .050" 91 20,95 72
8 = .058" 21 73
3 = .063" 22 75
Exceptional tool for homeowners who regularly cut trees on their properties or yards, as well as farmers and firewood cutters . AdvanceCut is for experienced users who need power and reliability in challenging yard conditions . The multi-rivet nose gives you durability, and AdvanceCut’s maneuverability and light-weight help you get the job done quickly .
Recommended Saw Sizes – Up to 3 .5 cu . in (57 cc)
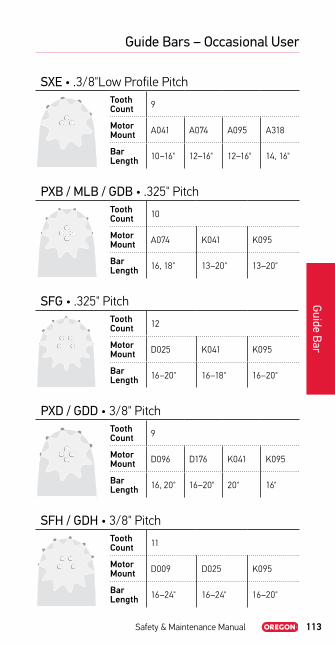
Safety & Maintenance Manual 113
Guide Bars – Occasional User
Guide Bar
SXE • .3/8"Low Profile PitchTooth Count 9
Motor Mount A041 A074 A095 A318
Bar Length 10–16" 12–16" 12–16" 14, 16"
PXB / MLB / GDB • .325" PitchTooth Count 10
Motor Mount A074 K041 K095
Bar Length 16, 18" 13–20" 13–20"
SFG • .325" PitchTooth Count 12
Motor Mount D025 K041 K095
Bar Length 16–20" 16–18" 16–20"
PXD / GDD • 3/8" PitchTooth Count 9
Motor Mount D096 D176 K041 K095
Bar Length 16, 20" 16–20" 20" 16"
SFH / GDH • 3/8" PitchTooth Count 11
Motor Mount D009 D025 K095
Bar Length 16–24" 16–24" 16–20"
Pro-Am®
Pro-Am®
Pro-Am®
Pro-Am®
Pro-Am®
AdvanceCut ™
15 0 ML B K095
Lengths (in) AdvanceCut Guide Bar Codes
Nose Alpha Code & Sprocket Tooth Counts Tail
Mounts
1213141516182024
SX = Sprocket-Nose
PS = Sprocket-Nose
GD = Sprocket-Nose with Guard Mate® Holes
ML = Narrow Kerf Sprocket-Nose
SF = Sprocket-Nose
E9
B10
G12
D9
H11
A041A074A095A318D009D025D096D176K041K095
IntenzT041
Chain Types by Pitch
Gauges 3/8 LP .325" 3/8"
0 = .050" 91 20,95 72
8 = .058" 21 73
3 = .063" 22 75
Exceptional tool for homeowners who regularly cut trees on their properties or yards, as well as farmers and firewood cutters . AdvanceCut is for experienced users who need power and reliability in challenging yard conditions . The multi-rivet nose gives you durability, and AdvanceCut’s maneuverability and light-weight help you get the job done quickly .
Recommended Saw Sizes – Up to 3 .5 cu . in (57 cc)

114 Safety & Maintenance Manual
Guide Bars – Occasional User
Guid
e Ba
r
Single Rivet
16 0 SD E A041
Lengths (in)
81012141618
Single Rivet Guide Bar Codes
Nose Alpha Code & Sprocket Tooth
CountsTail Mounts
A041A061A074A095A218A318Z041Z095
Intenz®T041T218
SD = Sprocket-NoseDG = Sprocket-Nose with Guard Mate® HolesML = Narrow Kerf Sprocket-Nose
A 10
E7
Chain Type by Pitch
Gauge 1/4" 3/8 LP
4 = .043" 90
0 = .050" 25 91
For homeowners who only have an occasional need to use a chainsaw . You value quality and reliability, and you’re willing to do the tougher yardwork yourself . Single rivet guide bars are safe and maneuverable, with less kickback . They make working on your property quick and easy .
Recommended Saw Sizes – Electric or gas up to 2 .5 cu . in (41 cc)
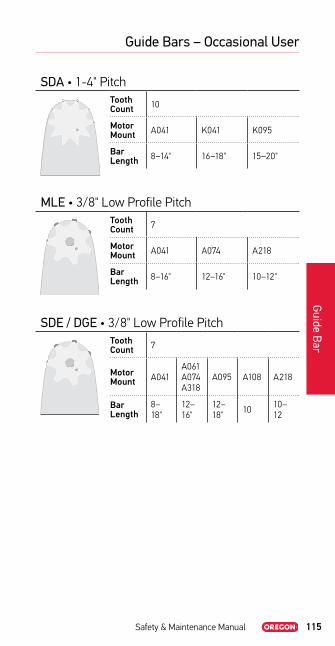
Safety & Maintenance Manual 115
Guide Bars – Occasional User
Guide Bar
SDA • 1-4" PitchTooth Count 10
Motor Mount A041 K041 K095
Bar Length 8–14" 16–18" 15–20"
MLE • 3/8" Low Profile PitchTooth Count 7
Motor Mount A041 A074 A218
Bar Length 8–16" 12–16" 10–12"
SDE / DGE • 3/8" Low Profile PitchTooth Count 7
Motor Mount A041
A061 A074 A318
A095 A108 A218
Bar Length
8– 18"
12–16"
12–18" 10 10–
12

116 Safety & Maintenance Manual
Guide Bars – Carving
Guid
e Ba
r
Sculptor™
An essential tool for chainsaw artists seeking long-lasting performance and versatility .
• Manufactured with high-quality steel• Precision gas-welded high cobalt/chrome alloy hard-
facing material for better nose performance and life• Clear-coated, brushed steel for distinctive and durable
appearance and finish
Recommended Saw Sizes – Up to 2 .3 – 4 .0 cu . in (38 – 65 cc)
Lengths (in)
101214
Solid Nose and Saw Chain
Dime Tip (10mm)Quarter Tip (12mm)
Tail Mounts
Multi-Mount:A041A074A095Chain Types
Gauge 1/4" 3/8 LP
0 = .050" 25A (25F) 91VXL

Safety & Maintenance Manual 117
Guide Bars – Carving
Guide Bar
Dime TipMotor Mount 041 / 095 074
Bar Length
10"25 cm
12"30 cm
14"35 cm
10"25 cm
12"30 cm
14"35 cm
Drive Link Count: 25A 25F 60 68 76 60 68 75
Quarter TipMotor Mount 041 / 095 074
Bar Length
12"30 cm
14"35 cm
12"30 cm
14"35 cm
Drive Link Count: 25A & 25F 68 76 68 75
91VXL 47 52 47 51
DIME TIP QUARTER TIP
DIME TIP QUARTER TIP

118 Safety & Maintenance Manual
Guide Bars – Chainsaw Mounts
Guid
e Ba
r
A041OEM Applications
Craftsman®, Cub Cadet®, Dolmar®, Homelite®, Husqvarna®, John Deere, Jonsered®, Makita®, McCulloch®, Poulan®/Poulan Pro®, Redmax®, Sears®, Shindaiwa®, Skil®, Snapper®, Tanaka®, Toro®, and others
A041
T041 Intenz® mount
• Carlton® mount – 10• Windsor® mount – PKU
.322 in 8,2 m
m

Safety & Maintenance Manual 119
Guide Bars – Chainsaw Mounts
Guide Bar
A061OEM Applications
Homelite®
A061
• Carlton® mount – 28• Windsor® mount – MXL
.250 in 6,4 m
m

120 Safety & Maintenance Manual
Guide Bars – Chainsaw Mounts
Guid
e Ba
r
A074OEM Applications
Stihl®, Olympyk (Oleo-Mac®)
A074
• Carlton® mount – 26• Windsor® mount – ST
.322 in 8,2 m
m

Safety & Maintenance Manual 121
Guide Bars – Chainsaw Mounts
Guide Bar
A089OEM Applications
Remington®
A089
• Carlton® mount – 39.250 in
6,4 mm

122 Safety & Maintenance Manual
Guide Bars – Chainsaw Mounts
Guid
e Ba
r
A095OEM Applications
Cub Cadet®, Dolmar®, Homelite®, Husqvarna®, John Deere, Jonsered,® Makita®, Maruyama pole saws, McCulloch®, Olympyk (Oleo-Mac®) Partner, Pioneer, Poulan®/Poulan Pro®, Redmax®, Sears®, Solo®, Stanley®, and others
A095
T095 Intenz® mount
• Carlton® mount – 01• Windsor® mount – CJL
.322 in 8,2 m
m

Safety & Maintenance Manual 123
Guide Bars – Chainsaw Mounts
Guide Bar
A218OEM Applications
Black+Decker®, Maruyama pole saws, Power Pruner/Echo® Power Pruner, Redmax® pole saws
A218
T218 Intenz® mount
• Carlton® mount – 29
.250 in 6,4 m
m
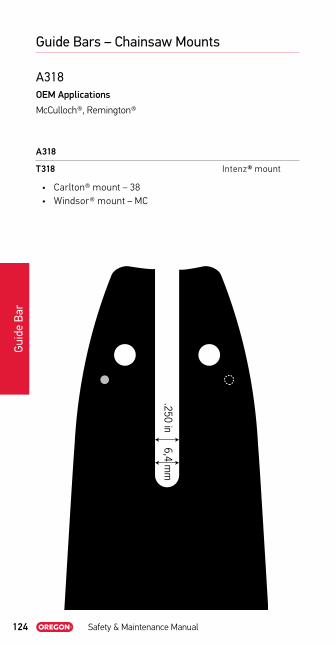
124 Safety & Maintenance Manual
Guide Bars – Chainsaw Mounts
Guid
e Ba
r
A318OEM Applications
McCulloch®, Remington®
A318
T318 Intenz® mount
• Carlton® mount – 38• Windsor® mount – MC
.250 in 6,4 m
m
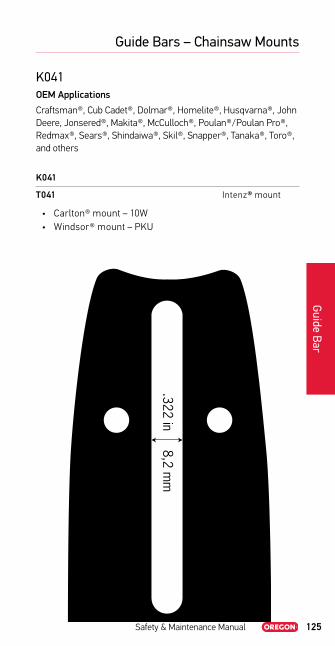
Safety & Maintenance Manual 125
Guide Bars – Chainsaw Mounts
Guide Bar
K041OEM Applications
Craftsman®, Cub Cadet®, Dolmar®, Homelite®, Husqvarna®, John Deere, Jonsered®, Makita®, McCulloch®, Poulan®/Poulan Pro®, Redmax®, Sears®, Shindaiwa®, Skil®, Snapper®, Tanaka®, Toro®, and others
K041
T041 Intenz® mount
• Carlton® mount – 10W• Windsor® mount – PKU
.322 in 8,2 m
m
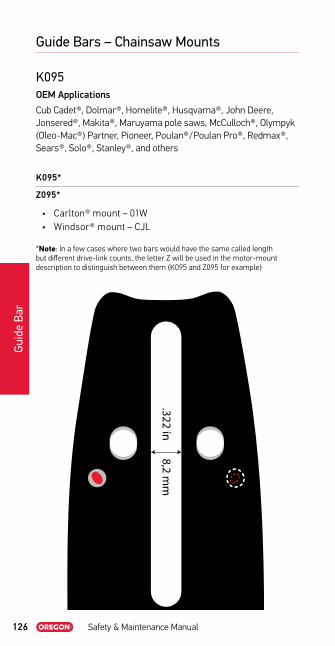
126 Safety & Maintenance Manual
Guide Bars – Chainsaw Mounts
Guid
e Ba
r
K095OEM Applications
Cub Cadet®, Dolmar®, Homelite®, Husqvarna®, John Deere, Jonsered®, Makita®, Maruyama pole saws, McCulloch®, Olympyk (Oleo-Mac®) Partner, Pioneer, Poulan®/Poulan Pro®, Redmax®, Sears®, Solo®, Stanley®, and others
K095*
Z095*
• Carlton® mount – 01W• Windsor® mount – CJL
*Note: In a few cases where two bars would have the same called length but different drive-link counts, the letter Z will be used in the motor-mount description to distinguish between them (K095 and Z095 for example)
.322 in 8,2 m
m

Safety & Maintenance Manual 127
Guide Bars – Chainsaw Mounts
Guide Bar
K216OEM Applications
Echo®
K216
.322 in 8,2 m
m
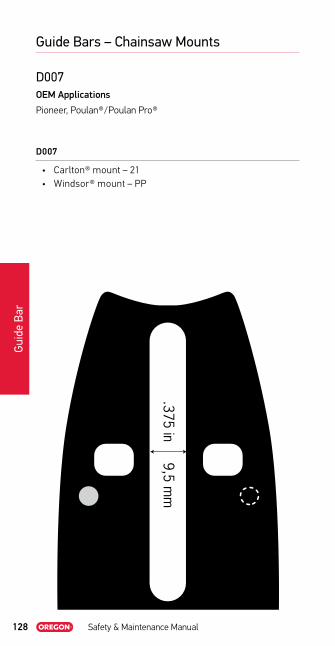
128 Safety & Maintenance Manual
Guide Bars – Chainsaw Mounts
Guid
e Ba
r
D007OEM Applications
Pioneer, Poulan®/Poulan Pro®
D007
• Carlton® mount – 21• Windsor® mount – PP
.375 in 9,5 m
m
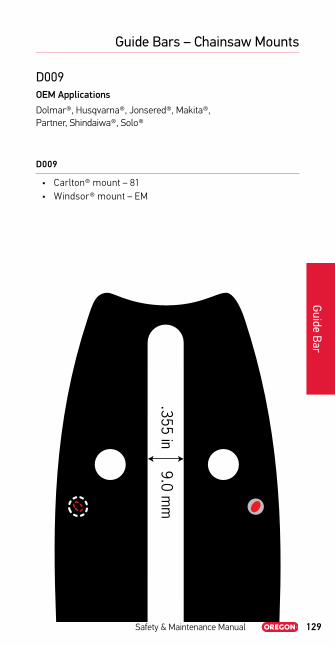
Safety & Maintenance Manual 129
Guide Bars – Chainsaw Mounts
Guide Bar
D009OEM Applications
Dolmar®, Husqvarna®, Jonsered®, Makita®, Partner, Shindaiwa®, Solo®
D009
• Carlton® mount – 81• Windsor® mount – EM
.355 in 9.0 m
m

130 Safety & Maintenance Manual
Guide Bars – Chainsaw Mounts
Guid
e Ba
r
D024OEM Applications
Jonsered®, Olympyk (Oleo-Mac®)
D024
• Carlton® mount – 71• Windsor® mount – JR
.395 in 10.0 m
m
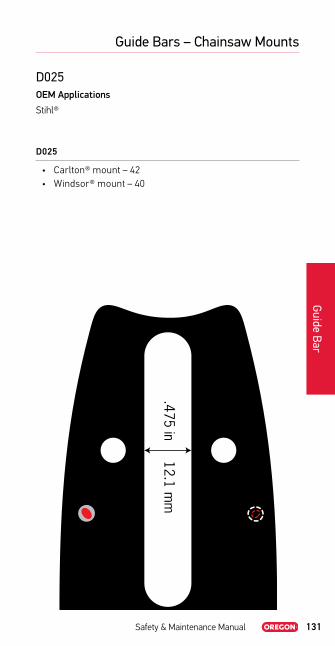
Safety & Maintenance Manual 131
Guide Bars – Chainsaw Mounts
Guide Bar
D025OEM Applications
Stihl®
D025
• Carlton® mount – 42• Windsor® mount – 40
.475 in 12.1 m
m
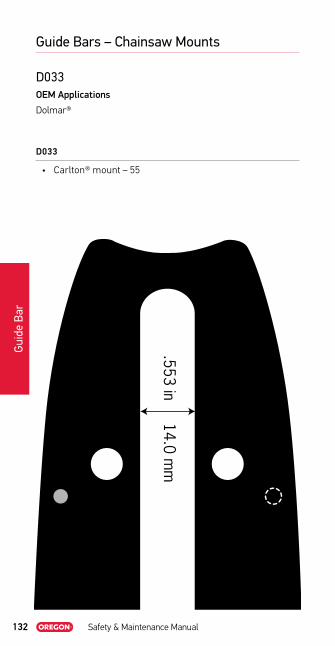
132 Safety & Maintenance Manual
Guide Bars – Chainsaw Mounts
Guid
e Ba
r
D033OEM Applications
Dolmar®
D033
• Carlton® mount – 55.553 in
14.0 mm
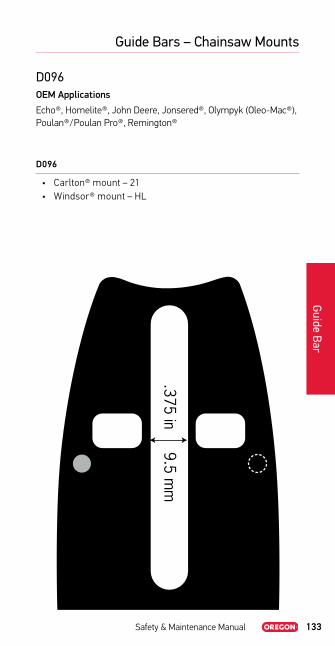
Safety & Maintenance Manual 133
Guide Bars – Chainsaw Mounts
Guide Bar
D096OEM Applications
Echo®, Homelite®, John Deere, Jonsered®, Olympyk (Oleo-Mac®), Poulan®/Poulan Pro®, Remington®
D096
• Carlton® mount – 21• Windsor® mount – HL
.375 in 9.5 m
m

134 Safety & Maintenance Manual
Guide Bars – Chainsaw Mounts
Guid
e Ba
r
D176OEM Applications
Echo®, Fairmont®, John Deere, McCulloch®, Poulan®/Poulan Pro®, Redmax®, Sears®, Skil®, Tanaka®
D176
• Carlton® mount – 41• Windsor® mount – UXL
.315 in 8.0 m
m
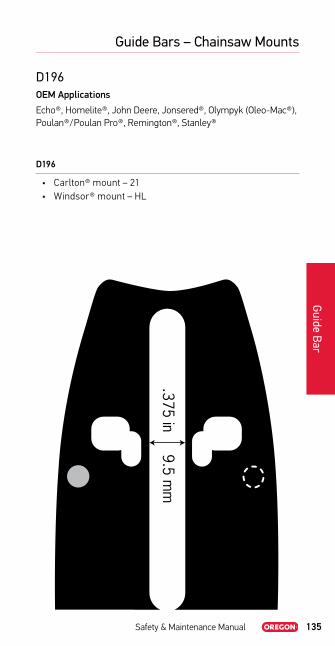
Safety & Maintenance Manual 135
Guide Bars – Chainsaw Mounts
Guide Bar
D196OEM Applications
Echo®, Homelite®, John Deere, Jonsered®, Olympyk (Oleo-Mac®), Poulan®/Poulan Pro®, Remington®, Stanley®
D196
• Carlton® mount – 21• Windsor® mount – HL
.375 in 9.5 m
m

136 Safety & Maintenance Manual
Guide Bars – Chainsaw Mounts
Guid
e Ba
r
E031OEM Applications
Stihl®
D176
• Carlton® mount – 55• Windsor® mount – 07
.553 in 14.0 m
m
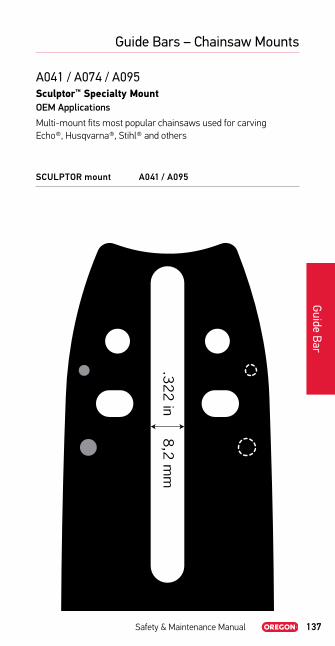
Safety & Maintenance Manual 137
Guide Bars – Chainsaw Mounts
Guide Bar
A041 / A074 / A095Sculptor™ Specialty MountOEM Applications
Multi-mount fits most popular chainsaws used for carvingEcho®, Husqvarna®, Stihl® and others
SCULPTOR mount A041 / A095 .3
22 in
8,2
mm

138 Safety & Maintenance Manual
Guide Bars – Chainsaw Mounts
Guid
e Ba
r
A108OEM Applications
Unitec and Cob Industry Hydraulic saws
.305 in 7,7 m
m

Safety & Maintenance Manual 139
Notes
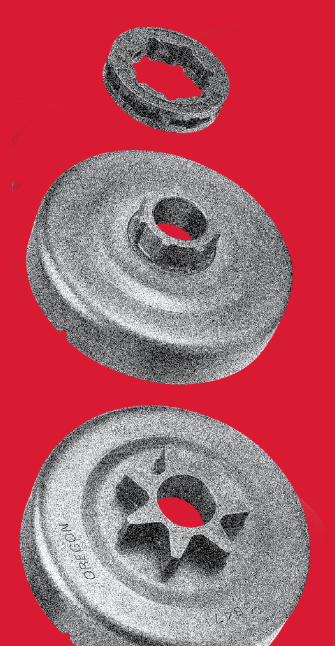

Safety & Maintenance Manual
Page
- 141 -
Drive Sprockets

142 Safety & Maintenance Manual
Drive Sprocket Terms
Driv
e Sp
rock
et
Rim Drive Sprocket
Clutch Drum
Clutch Skirt
BoreSplined Hub/Adaptor
Rim Drive Sprocket
Spur Drive Sprocket
Clutch Drum
Clutch Skirt
Bore
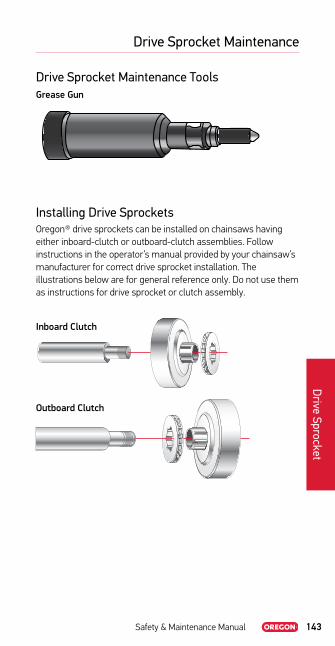
Safety & Maintenance Manual 143
Drive Sprocket Maintenance
Drive Sprocket
Drive Sprocket Maintenance ToolsGrease Gun
Installing Drive SprocketsOregon® drive sprockets can be installed on chainsaws having either inboard-clutch or outboard-clutch assemblies . Follow instructions in the operator’s manual provided by your chainsaw’s manufacturer for correct drive sprocket installation . The illustrations below are for general reference only . Do not use them as instructions for drive sprocket or clutch assembly .
Inboard Clutch
Outboard Clutch
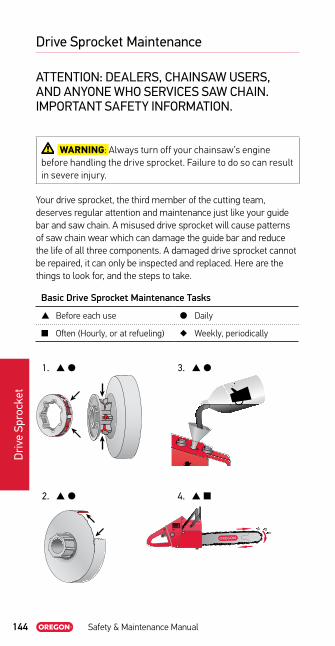
144 Safety & Maintenance Manual
Drive Sprocket Maintenance
Driv
e Sp
rock
et
ATTENTION: DEALERS, CHAINSAW USERS, AND ANYONE WHO SERVICES SAW CHAIN. IMPORTANT SAFETY INFORMATION.
WARNING: Always turn off your chainsaw’s engine before handling the drive sprocket . Failure to do so can result in severe injury .
Your drive sprocket, the third member of the cutting team, deserves regular attention and maintenance just like your guide bar and saw chain . A misused drive sprocket will cause patterns of saw chain wear which can damage the guide bar and reduce the life of all three components . A damaged drive sprocket cannot be repaired, it can only be inspected and replaced . Here are the things to look for, and the steps to take .
Basic Drive Sprocket Maintenance Tasks
s Before each use l Daily
n Often (Hourly, or at refueling) u Weekly, periodically
1. s l
2. s l
3. s l
4. s n
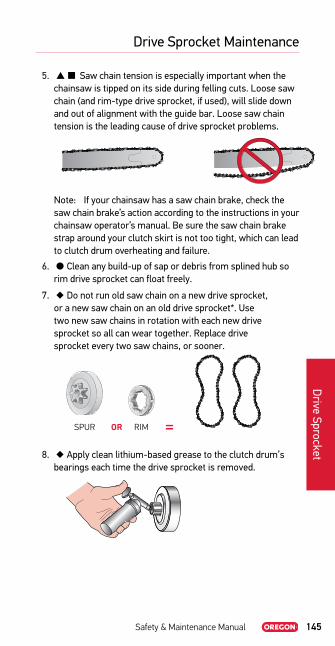
Safety & Maintenance Manual 145
Drive Sprocket Maintenance
Drive Sprocket
5. s n Saw chain tension is especially important when the chainsaw is tipped on its side during felling cuts. Loose saw chain (and rim-type drive sprocket, if used), will slide down and out of alignment with the guide bar. Loose saw chain tension is the leading cause of drive sprocket problems.
Note: If your chainsaw has a saw chain brake, check the saw chain brake’s action according to the instructions in your chainsaw operator’s manual. Be sure the saw chain brake strap around your clutch skirt is not too tight, which can lead to clutch drum overheating and failure.
6. l Clean any build-up of sap or debris from splined hub so rim drive sprocket can float freely.
7. u Do not run old saw chain on a new drive sprocket, or a new saw chain on an old drive sprocket*. Use two new saw chains in rotation with each new drive sprocket so all can wear together. Replace drive sprocket every two saw chains, or sooner.
8. u Apply clean lithium-based grease to the clutch drum’s bearings each time the drive sprocket is removed.
SPUR OR RIM =

146 Safety & Maintenance Manual
Drive Sprocket Troubleshooting
Driv
e Sp
rock
et
Worn outer surfaces on rim drive sprockets or spur drive sprockets.Remedy: Such outer surface wear is normal over time . Replace rim drive sprockets and spur drive sprockets when wear is 1/64" (0 .4 mm) deep . Never run saw chain on severely worn drive sprockets . Severely worn drive sprockets could break during operation .
Worn inner surface on rim drive sprockets or wear on the adaptor’s splines.Remedy: Such wear indicates that saw chain drive links are bottoming out on the adaptor’s splines . Replace the clutch drum . Replace the rim drive sprocket ..
Cracks or breakage on the clutch drum.Remedy: Do not attempt to repair cracked or broken clutch drums . Replace the drum .
Obvious wear or discoloration around the outer circumference of the drum skirt.Remedy: Replace the drum . Have your chainsaw dealer adjust the saw chain brake strap .
Excessive wear on the inside surface of the drum skirt.Remedy: Replace the drum . Have your chainsaw dealer service the chainsaw’s clutch .

Safety & Maintenance Manual 147
Notes
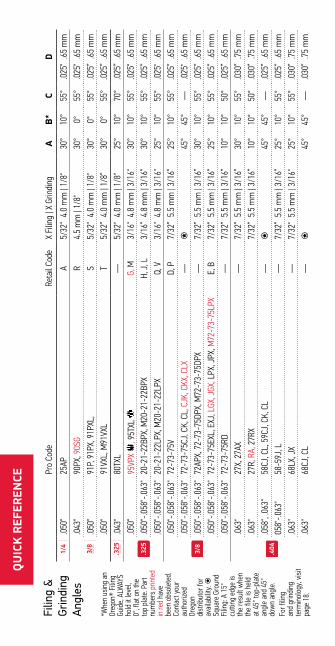
Filin
g &
Gr
indi
ng
Angl
es
*Whe
n us
ing
an
Oreg
on®
Filin
g Gu
ide,
ALW
AYS
hold
it le
vel,
0°, f
lat o
n th
e to
p pl
ate.
Par
t nu
mbe
rs p
rinte
d in
red
have
be
en o
bsol
eted
. Co
ntac
t you
r au
thor
ized
Oreg
on
dist
ribut
or fo
r av
aila
bilit
y. ⍟
Sq
uare
Gro
und
Filin
g: A
15°
cu
tting
edg
e is
th
e re
sult
whe
n th
e fil
e is
hel
d at
45°
top-
plat
e an
gle
and
45°
dow
n an
gle.
For f
iling
an
d gr
indi
ng
term
inol
ogy,
visit
page
18.
Pro
Code
Reta
il Co
deX
Filin
g | X
Grin
ding
AB*
CD
1/4
.050
"25
APA
5/32
" 4.
0 m
m |
1/8"
30°
10°
55°
.025
" .6
5 m
m
.043
"90
PX, 9
0SG
R4.
5 m
m |
1/8"
30°
0°55
°.0
25"
.65
mm
.050
"91
P, 9
1PX,
91P
XL,
S5/
32"
4.0
mm
| 1/
8"30
°0°
55°
.025
” .6
5 m
m
.050
"91
VXL,
M91
VXL
T5/
32”
4.0
mm
| 1/
8”30
°0°
55°
.025
” .6
5 m
m.3
25Lo
w P
rofil
e.0
43"
80TX
L—
5/32
" 4.
0 m
m |
1/8"
25°
10°
70°
.025
” .6
5 m
m
.050
"95
VPX
, 95T
XL
G, M
3/16
" 4.
8 m
m |
3/16
"30
°10
°55
°.0
25"
.65
mm
.050
"-.0
58"-
.063
"20
-21-
22BP
X, M
20-2
1-22
BPX
H, J
, L3/
16”
4.8
mm
| 3/
16”
30°
10°
55°
.025
” .6
5 m
m
.050
"-.0
58"-
.063
"20
-21-
22LP
X, M
20-2
1-22
LPX
Q, V
3/16
" 4.
8 m
m |
3/16
"25
°10
°55
°.0
25"
.65
mm
.050
"-.0
58"-
.063
"72
-73-
75V
D, P
7/32
” 5.
5 m
m |
3/16
”25
°10
°55
°.0
25”
.65
mm
.050
"-.0
58"-
.063
"72
-73-
75CJ
, CK,
CL,
CJK
, CKX
, CLX
—⍟
45°
45°
—.0
25"
.65
mm
.050
"-.0
58"-
.063
"72
APX,
72-
73-7
5DPX
, M72
-73-
75DP
X—
7/32
” 5.
5 m
m |
3/16
”30
°10
°55
°.0
25”
.65
mm
.050
"-.0
58"-
.063
"72
-73-
75EX
L, E
XJ, L
GX, J
GX, L
PX, J
PX, M
72-7
3-75
LPX
E, B
7/32
” 5.
5 m
m |
3/16
”25
°10
°55
°.0
25”
.65
mm
.050
"-.0
58"-
.063
"72
-73-
75RD
—7/
32”
5.5
mm
| 3/
16”
10°
10°
50°
.025
” .6
5 m
m
.063
"27
X, 2
7AX
—7/
32”
5.5
mm
| 3/
16”
30°
10°
55°
.030
” .7
5 m
m
.063
"27
R, R
A, 2
7RX
7/32
” 5.
5 m
m |
3/16
”10
°10
°50
°.0
30”
.75
mm
.058
", .0
63"
58CJ
, CL,
59C
J, C
K, C
L—
⍟45
°45
°—
.025
” .6
5 m
m
058"
-.063
"58
-59J
, L—
7/32
” 5.
5 m
m |
3/16
”25
°10
°55
°.0
25”
.65
mm
.063
"68
LX, J
X—
7/32
" 5.
5 m
m |
3/16
"25
°10
°55
°.0
30”
.75
mm
.063
"68
CJ, C
L—
⍟45
°45
°—
.030
” .7
5 m
m
3/8
Low
Pro
file
.325 3/8
.404
QU
ICK
REF
EREN
CE
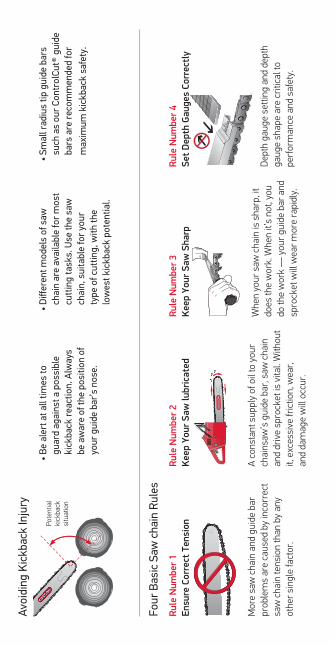
Avoi
ding
Kic
kbac
k In
jury
• Be
ale
rt a
t all
times
to
guar
d ag
ains
t a p
ossi
ble
kick
back
reac
tion.
Alw
ays
be a
war
e of
the
posi
tion
of
your
gui
de b
ar’s
nos
e.
• D
iffer
ent m
odel
s of
saw
ch
ain
are
avai
labl
e fo
r mos
t cu
ttin
g ta
sks.
Use
the
saw
ch
ain,
sui
tabl
e fo
r you
r ty
pe o
f cut
ting,
with
the
low
est k
ickb
ack
pote
ntia
l.
• Sm
all r
adiu
s tip
gui
de b
ars
such
as
our C
ontr
olCu
t® g
uide
ba
rs a
re re
com
men
ded
for
max
imum
kic
kbac
k sa
fety
.
Four
Bas
ic S
aw c
hain
Rul
es
Rule
Num
ber 1
Ensu
re C
orre
ct T
ensi
on
Mor
e sa
w c
hain
and
gui
de b
ar
prob
lem
s ar
e ca
used
by
inco
rrec
t sa
w c
hain
tens
ion
than
by
any
othe
r sin
gle
fact
or.
Rule
Num
ber 2
Keep
You
r Saw
lubr
icat
ed
A c
onst
ant s
uppl
y of
oil
to y
our
chai
nsaw
’s g
uide
bar
, saw
cha
inan
d dr
ive
spro
cket
is v
ital.
With
out
it, e
xces
sive
fric
tion,
wea
r,an
d da
mag
e w
ill o
ccur
.
Rule
Num
ber 3
Keep
You
r Saw
Sha
rp
Whe
n yo
ur s
aw c
hain
is s
harp
, it
does
the
wor
k. W
hen
it’s
not,
you
do th
e w
ork
— y
our g
uide
bar
and
sp
rock
et w
ill w
ear m
ore
rapi
dly.
Rule
Num
ber 4
Set D
epth
Gau
ges
Corr
ectl
y
Dep
th g
auge
set
ting
and
dept
h ga
uge
shap
e ar
e cr
itica
l to
perf
orm
ance
and
saf
ety.
Pote
ntia
l ki
ckba
ck
situ
atio
n
You’ve got work to do, we’ve got you covered.
If you have questions about your saw or cutting system, our technical support team is ready to help.
Oregon [email protected]
800-223-5168

OregonProducts.com(800) 223-5168
Oregon
® Maintenance and Safety M
anual
© Copyright 2020, Blount Inc.F/N MMANUAL-EN • Rev AB • 03/20Printed in USA
Oregon® | Blount, Inc.4909 SE International WayPortland, Oregon 97222 USA
Oregon® Maintenanceand Safety Manual
Saw chain, Guide Bar and Drive Sprocket
Oregon is a registered trademark of Blount, Inc. All other marks are property of their respective owners.
Top Related

Copyright © 2022 FDOKUMEN

