


Bahasa
Halaman
Hukum


Acknowledgments
This manual was initially developed by all staff of the neonatal care unit at the
National Maternal and Child Health Center (NMCHC) in Cambodia, with technical
supports from National Center for Global health and Medicine (NCGM), Japan.
Japan International Cooperation Agency (JICA) Project for Improving Continuum
of Care with focus on Intrapartum and Neonatal Care in Cambodia (IINeoC
Project) continuously supported to finalize it. The Ministry of Health also deeply
thanks technical comments and advise from relevant development partners,
especially Deutschen Gesellschaft für Internationale Zusammenarbeit (GIZ) and
USAID Quality Health Services/University Research Co., LLC (URC) in
Cambodia.

Nursing Care Contents
1. Hand Washing…………………………………………………………………………….1
2. Taking Vital Signs………………………………………………………………………..4
3. Newborn Resuscitation………………………………………………………………….9
4. Routine Procedure at Admission……………………………………………………...14
5. Temperature Management…………………………………………………………….17
6. Apnea Management…………………………………………………………………….21
7. CPAP care………………………………………………………………………………..23
8. Insertion of Nasogastric Tube…………………………………………………………26
9. Feeding…………………………………………………………………………………...28
10. Abdominal Care…………………………………………………………………………33
11. Intravenous (IV) Line Management …………………………………………………36
12. Administration of Intravenous (IV) Fluid…………………………………………...39
13. Intravenous(IV) Injection……………………………………………………………...41
14. Intramuscular (IM) Injection………………………………………………………….43
15. Taking Blood Samples………………………………………………………………….45
16. Sponge Bath………………………………………………………………………………49
17. Weighing the baby………………………………………………………………………51
18. Umbilical Cord Care……………………………………………………………………53
19. Care of Convulsion……………………………………………………………………...55
20. Care for the Infants under Phototherapy…………………………………………...57
21. Cleaning for Equipment……………………………………………………………….59
22. Family Support and Education……………………………………………………….63
23. Kangaroo Mother Care…………………………………………………………………66
Abbreviations
CPAP Continuous Positive Airway Pressure
HR Heart Rate
IM Intramuscular
IV Intravenous
KMC Kangaroo Mother Care
NCU Neonatal Care Unit
NEC Necrotizing Enterocolitis
NGT Nasogastric Tube
NMCHC National Maternal and Child Health Center
SpO2 Arterial hemoglobin oxygen saturation as measured by
pulse oximetry
STS Skin to Skin

1
1. Hand Washing
Hand hygiene is the single most important technique to prevent and
minimize the spread of infection within health facility environments. A
culture of hand hygiene should be encouraged not only among health care
staff but also in patient’s family.
When to wash hands in a health facility?
1.Before patient contact
2.Before aseptic task
3.After body fluid exposure risk
4.After patient contact
5.After contact with patient
surroundings
(Reference: Infection Prevention and Control Guidelines for Health care facilities, MOH, 2010)
Methods of Hand washing
<Routine hand washing>
Hands and wrists are washed for 40-60 seconds with soap and water. Hands
are dried with a paper towel or, if unavailable, a single-use hand towel or air-
dried. This type of hand hygiene is suitable for all routine procedures.

2
(Reference: Infection Prevention and Control Guidelines for Health care facilities, MOH, 2010)
<Hand rub using alcohol rub>
Remove bacteria from hands with a water-less, alcohol-based hand rub. Apply
enough hand rub to cover all areas of the hands. This is a standard procedure
and should be used by all health care workers routinely.

3
(Reference: Guidelines on Hand Hygiene in Health Care, WHO, 2009)
Note: If you can access the flowing water and soap with enough time, hand
washing is recommended than hand rub using alcohol rub.
Hand drying
Hands must be properly dried because microorganisms transfer more
effectively from wet surfaces. Cloth towels should not be used after they have
become damp because they can be a potential source of infection. It is
therefore recommended that single-use cloth towels or paper towels be used.
Note: If paper towels are not available, dry hands with a clean towel or airdry.
Shared towels quickly become contaminated and should not be used. Using
your own towel or handkerchief can help to avoid using dirty towels. If you
use your own towel, it should be washed every day.
References
1) Infection Prevention and Control Guidelines for Health care facilities, MOH,2010
2) Guidelines on Hand Hygiene in Health Care, WHO,2009

4
2. Taking Vital Signs
Vital signs are sign of life and an indicator of a baby’s general physical
condition. Nurses are in the best position to monitor the patient’s progress,
spot problems early and judge what care is needed to solve the problems.
When to take vital signs?
1) On admission
2) Routine schedule every 3 hour
(9am,12pm,3pm,6pm,9pm,12am,3am,6am)
3) Intensive schedule every 1 hour if any abnormal vital sign (e.g.
respiratory rate >60 per minutes, body temperature < 36.5℃ or >
38.0℃)
4) Before nursing interventions influencing vital signs (e.g. weighing a
baby, sponge bath)
5) Before treatment (e.g. insertion of IV lines)
6) Change in physical condition
7) On discharge
Note (1): Vital signs of routine schedule, admission and discharge, and before
nursing care be combined together, therefore only one time to take vital signs
at the time. (e.g. At 9am as routine schedule, before sponge bath and before
feeding)
Note (2): Vital signs should be taken with the patient at rest. It is better to
take vital signs in order of respiratory rate, heart rate and body temperature
to avoid baby crying.
Note (3): Before taking vital signs, clean hands with soap and water or alcohol
gel hand rub.
5
Measuring respiratory rate
<Method>
1) Keep baby warm with hat in draft-free room.
2) Measure respiratory rate for 60 seconds or 30seconds then multiply by
two. (inhale + exhale = 1 breath)
3) Check the abnormal signs (see the below).
4) Write down respiratory rate on a nursing record.
<Check points>
1) Normal range: 30-60 times/minute
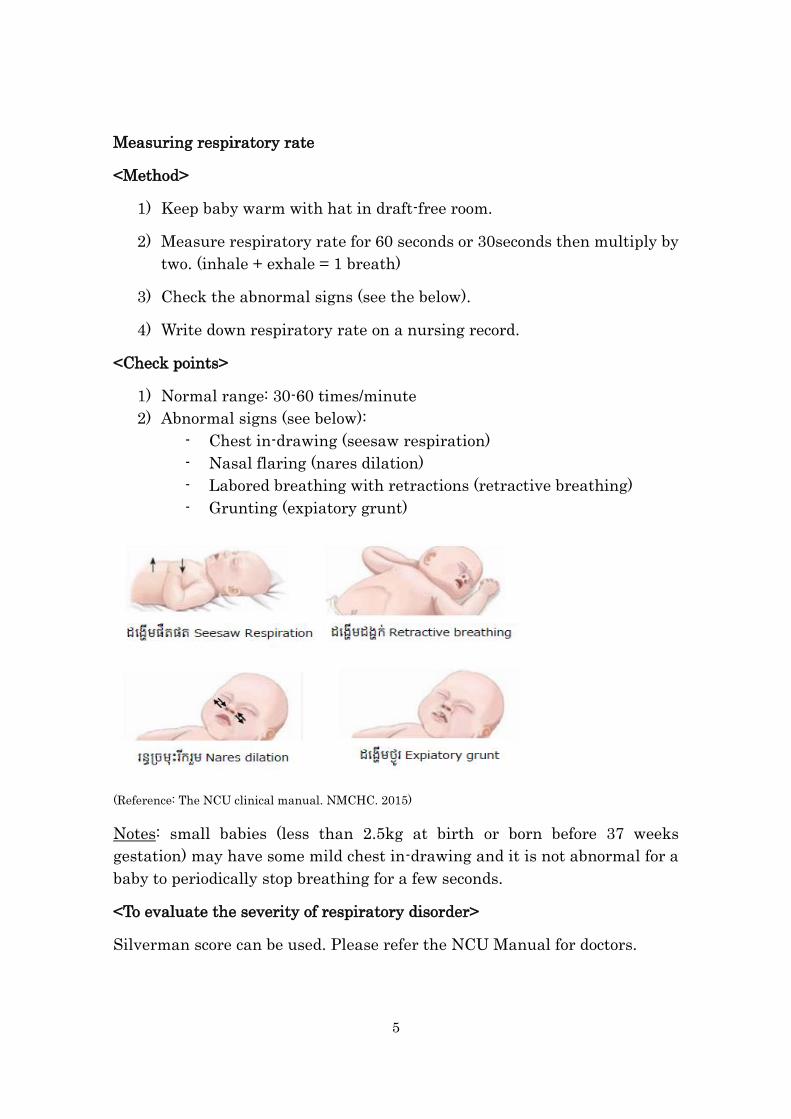
2) Abnormal signs (see below):
- Chest in-drawing (seesaw respiration)
- Nasal flaring (nares dilation)
- Labored breathing with retractions (retractive breathing)
- Grunting (expiatory grunt)
(Reference: The NCU clinical manual. NMCHC. 2015)
Notes: small babies (less than 2.5kg at birth or born before 37 weeks
gestation) may have some mild chest in-drawing and it is not abnormal for a
baby to periodically stop breathing for a few seconds.
<To evaluate the severity of respiratory disorder>
Silverman score can be used. Please refer the NCU Manual for doctors.

6
Measuring heart rate
<Method using stethoscope>
1) Clean a stethoscope with 70% ethyl alcohol on cotton wool and heat it
with hand after washing your hand according to guidelines.
2) Place the stethoscope softly on the left side of the infant’s chest it's just
slightly above the nipple.
3) Measure the heart rate for 60 seconds or 30seconds then multiply by
two.
4) Write down heart rate on a nursing record.
< Check point>
Normal range: 100-180 /minute
Notes: At NMCHC-NCU, we set the maximum alarm at 200 per minute .
Method using SpO2 monitor
Make sure the probe is attached correctly (1-3) and waveform is stable. because
the two measure points are opposite to each other (4).
(Reference: The NCU clinical manual. NMCHC. 2015)

7
Note: The American Academy of Pediatrics
recommends the sensor put on the right hand
to avoid the effect of patent ductus arteriosus
(PDA) during the first 48 hours after birth.
Measuring body temperature
Ensure the baby as warm as possible during the procedure (warmly wrapped
on a warm surface)
<Method using Glass thermometer>
Shake the thermometer until it is below 35°C.
1) Clean the thermometer with 70% alcohol on cotton wool.
2) Place the tip of the thermometer high in the apex of the baby’s axilla
and hold the arm continually against the baby for at least three
minutes.
3) Remove the thermometer and read the temperature.
4) Write down temperature on a nursing record.
(Reference: The NCU clinical manual. NMCHC. 2015)
<Method using Electronic thermometer>
1) Press the button to set the thermometer and make sure ’Lo(Low)’
appears in the display.
2) Place the tip of the thermometer high in the apex of the baby’s axilla
and hold the arm continually against the baby until the thermometer
beeps.

8
3) Remove the thermometer and read the temperature.
4) Write down temperature on a nursing record.
Note: One thermometer per one baby.
<Check points>
1) Normal range: 36.5-37.5℃
2) Incubator setting (At the admission)
Body weight < 1000g 1000-1500g 1500-2000g 2000-2500g
Incubator
temperature
35℃ 34℃ 33℃ 32℃
(Reference: The NCU clinical manual. NMCHC. 2015)
References
1) Early Essential Newborn Care, WHO,2014
2) Oxygen therapy for children, WHO, 2016
3) Safe Motherhood Clinical Management Protocols, Referral Hospital, MOH,2013
4) Kumiko Nakata; Method of measurement of vital signs, Neonatal care, vpl. 20
2007 (in Japanese)
5) The NCU Clinical manual, NMCHC, 2015
6) Managing newborn problems: a guide for doctors, nurses, and midwives. WHO,
2003
[]

9
3. Newborn Resuscitation
For all deliveries and NCU babies, ensure that the all the resuscitation
materials should be prepared at all time.
Materials
1) Infant warmer
2) Mask (size 0 and 1) and Ambu-bag (self-inflating bag with pressure
release valve and optional intake do oxygen tubing)
3) Oxygen, with air-oxygen blender, and oxygen tubing compatible with
bag valve mask
Note: if you cannot access oxygen, call help and start resuscitation
without oxygen immediately.
4) Suction tube
5) Suction machine (negative pressure less than 100mmHg) with one
bottle
6) Sterilized cup and clean water (to clean the suction tube)
7) Single-use suction bulb
8) Stethoscope
9) Clock with second hand
Procedure
1) Immediate newborn and thorough drying with quick check of breathing.
2) If baby breathing, skin-to-skin contact covered with blanket and bonnet.
3) If baby gasping or not breathing after thorough drying and stimulation (for as close as possible to 30 seconds).
4) Call for help and explain gently to the mother that her baby needs help to breath.
5) Clamp and cut the cord immediately to allow effective ventilation to be performed.
6) Transfer the baby to the resuscitation area (a dry, clean and warm surface).
7) Keep the baby wrapped or under a heart source, if available.
8) Consider immediate referral at any point, where feasible.
9) Position the head so it is slightly extended (neutral position).

10
10) Only if the mouth/nose are blocked, introduce the suction;
- first into the baby’s mouth 5cm from the lips and suck while withdrawing;
- second,3cm into each nostril and suck while withdrawing;
-repeat once, if necessary, taking no more than total 20 seconds
Note: DO NOT do routine suction of the mouse and nose of babies with:
- clear amniotic fluid and they are breathing on their own, - clear amniotic fluid prior to positive pressure ventilation and mouth
and nose are free of secretions - meconium staining but they have started breathing on their own
vigorously.
11) Start bag/mask ventilati1on within one minute after birth:
12) Place mask to cover chin, mouth and nose to achieve a seal (closely).
(Reference: Early Essential Newborn Care. WHO. 2014)
13) Squeeze bag attached to the mask with two fingers or whole hand,
according to bag size,2-3times.Observe rise of chest.
(1) If chest is not rising; first, re-position the baby’s head.
(2) If chest is still not rising; chest for adequate mask seal.
(3) If chest is still not rising; squeeze bag harder.
(4) If chest is rising; ventilate at 40 breasts per minute until baby
starts crying or breathing.
14) Check breathing; and check heart rate every 1-2minutes of ventilation.
Assess chest rise
Assess heart rate

11
if heart rate is <100/minute, take ventilation corrective steps (see the
algorithm).
(Reference: Early Essential Newborn Care. Clinical practice pocket guide. WHO. 2014)
12
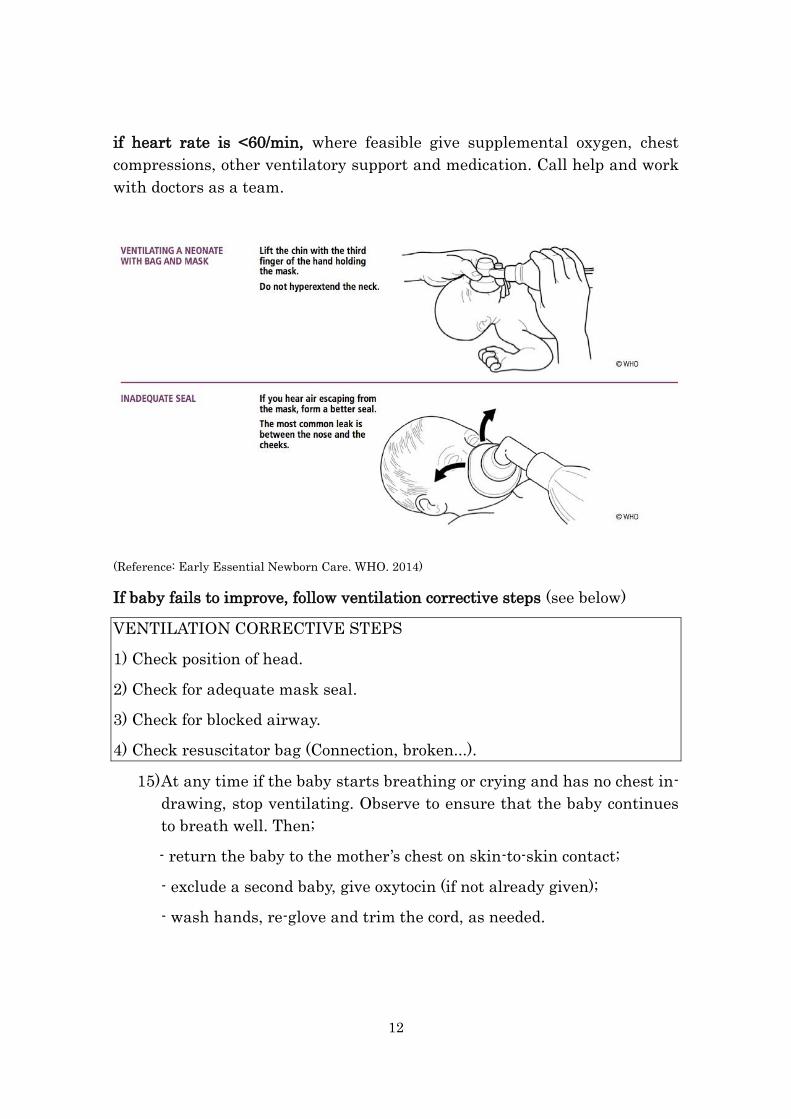
if heart rate is <60/min, where feasible give supplemental oxygen, chest
compressions, other ventilatory support and medication. Call help and work
with doctors as a team.
(Reference: Early Essential Newborn Care. WHO. 2014)
If baby fails to improve, follow ventilation corrective steps (see below)
VENTILATION CORRECTIVE STEPS
1) Check position of head.
2) Check for adequate mask seal.
3) Check for blocked airway.
4) Check resuscitator bag (Connection, broken...).
15) At any time if the baby starts breathing or crying and has no chest in-
drawing, stop ventilating. Observe to ensure that the baby continues
to breath well. Then;
- return the baby to the mother’s chest on skin-to-skin contact;
- exclude a second baby, give oxytocin (if not already given);
- wash hands, re-glove and trim the cord, as needed.

13
If the baby is gasping or not breathing, or has severe chest in-drawing:
- call a doctor;
- continue bag/mask ventilation;
- continue assessing at regular intervals while transitioning; and
- where feasible, consider supplemental oxygen, chest compressions,
other ventilatory support and medications with doctors.
If after 10 minutes of EFFECTIVE ventilation, the heart rate remains zero:
- call a doctor;
- STOP bag/mask ventilation by doctor
- explain to the mother in a kind and gentle tone that the baby is dead;
- give support care and record the event.
If after 20 minutes of effective ventilation, the baby does not start to breathe
or gasp and heart rate is <60/
- call a doctor;
- STOP bag/mask ventilation by doctor
- explain to the mother in a kind and gentle tone that despite all attempts
you were unable to help her baby to breathe;
- provide comfort care, including warmth and psychosocial support and
record the event.
Note (1): While ventilating, refer and explain to the mother what is happening, what you
are doing, and why.
Note (2): Continue to ventilate, if needed, during transport.
Note (3): Record the event on the referral form and labor record.
Reference
1) Early Essential Newborn Care, WHO, 2014
2) Early Essential Newborn Care Facilitator Guide for Strengthening
Immediate Newborn Care Practices, 2012
3) Technical specification of neonatal resuscitation devices, WHO, 2014

14
4. Routine Procedure at Admission
When baby has problems during the pregnancy, delivery or after delivery,
the baby need to be observed in NCU for few hours. Then it will be decided
where the baby admit according the admission criteria (see the NCU Clinical
Manual Chapter 2).
Observation in NCU
1) Check the vital sign
2) Give Vitamin K1 1mg IM (record in the VitK1 book ) Routine work
3) Give Yellow Card to the family
4) Give baby the Gentamicin* eye drops
* Safe Motherhood Protocol recommends tetracycline 1%
ophthalmic ointment for routine newborn care.
5) Check suck reflex with clean fingers to ensure a baby can breastfeed
Admission to NCU Admission to maternity No Admission
Ward
Admission to NCU
<Materials>
1) Infant warmer
2) Oxygen with air oxygen blender
3) Ambu-bag for newborn and Masks
4) Suction machine
5) Thermometer

15
6) Stethoscope
7) SpO2 monitor
8) Nasogastric tube (NGT)* (if needed)
* We use the size 5Fr. for all babies at NMCHC but ideally it is better
to choose adequate size (6Fr. if necessary) based on baby weight.
9) CPAP (if needed)
<Documents>
Prepare the sheets as shown below:
1) Admission sheet
2) Nursing record/daily follow up sheet
3) Doctor’s document
4) Ballad sheet
5) Midwife record (to check the record for admission to NCU)
6) Yellow card
<Routine work>
1) Check the vital signs, record on the nursing record.
2) If SpO2 is less than 90%*, start oxygen therapy** with SpO2 monitoring.
*WHO recommends 88% for preterm babies (normal range: 88-95%) because
of more oxygen toxicity, especially to prevent eye damage.
**Oxygen therapy:
[Indications]
(1) low SpO2 (less than 90%),
(2) central cyanosis,
(3) respiratory rate > more than 70/min,
(4) too sick to feed,
(5) apnea.
[Method] with nasal prongs Note: Pay attention to obstruction by mucus
.

16
3) Insert an intravenous(IV) catheter if needed.
4) Insert a nasogastric tube if needed.
<For the family>
1) Explain importance of hand washing and cut nail properly.
2) Ensure that NCU allowed to have one family member to prevent the
infection. It is not allowed to take children inside of NCU.
3) Give well explanation to take a temperature and change the nappy and
record it.
4) Tell the family to prepare/purchase nappies and a small container with
red rid (to keep the expressed breast milk).
5) Ensure that all materials have to be tidy up, it is not allowed to bring
foods inside of NCU.
Admission to the maternity ward (the patient with mild symptoms usually
stays with mother)
<Routine work>
1) Inform the care tacker to bring the baby to NCU 2 times/day*.
* We should avoid separation of mother and newborn babies so ideally
all care for babies who admitted to the maternity ward should be
provided at the maternity ward as much as possible.
2) Check the yellow card and baby’s ID.
3) Check the vital signs and record it on a patient chart.
4) Provide antibiotic injection 2 times/day (at 9AM and 9PM) for babies
at risk for sepsis.
Reference
1) The NCU Clinical manual, NMCHC,2015
2) National Clinical Practice Guideline, NEONATAL SEPSIS, MOH, 2013
3) Oxygen therapy for children, WHO, 2016

17
5. Temperature Management
Body temperature of newborn babies is very susceptible to instability due
to physical immaturity, illness and environmental factors. Temperature
control is very important for neonates to avoid severe adverse outcomes
(morbidity and mortality). If the body temperature is kept stale, it can
conserve the energy without unnecessary wasting of calories.
Definition
Normal body temperature range: 36.5°C – 37.5°C (axillary)
Hypothermia: < 36.5°(axillary)
Hyperthermia: > 37.5°C
Equipment
1) Incubator
All preterm neonates ≤1500 grams at the admission should be cared for in
an incubator wherever when it is available. The incubator needs to be
changed every 14days.
2) Infant Warmer
Use for short time observation or multiple procedure. Preterm infants
should only be nursed on an infant warmer in the event of multiple
procedures that are unable to be undertaken in an incubator without loss of
substantial heat.
3)Cot (cradle, open crib):
Preterm infants weighing >1500 grams with a stable temperature. Perspex
cots are preferential in the preterm infant to prevent heat loss due to their
enclosed design.
Assessment
1) Routine temperature assessment every 3 hour.
2) Need frequency of assessment following.
- At admission.
- Transfer to incubator, infant warmer, open cot.
- Commencement or cessation of photo-therapy.

18
Initiate incubator temperature
Note: Environmental humidity should be delivered via an incubator and commenced as
soon as possible. The water reservoir within the incubator should be filled with boiled
water to prevent bacterial colonization and change the water completely every 3days.
(mark the changing date on a tape on the drawer of humidity water container) Refill
boiled water as required. After discharge, the water must be removed. The container
should be disinfected and dried properly before new water for a new patient is inserted.
Temperature control
1) Incubator
Increase or decrease incubator temperature by 0.2-0.5°C hourly.
Check axillary boby temperature hourly until two-times consecutive
measurement in normal temperature range are recorded.
Note: Only alter incubator temperature by 0.5°C maximum at any one time
and allow at least one hour for the infant’s temperature to stabilize before
making further changes.
(1) If the patient’s body temperature is >38.0°C, initiate above procedure
andobserve patient for signs of infection, notify doctors when
temperature still high.
(2) If the patient’s body temperature is >39.0°C, initiate above procedure
- Sponge the baby for 10-15minutes with water that is about 4°C lower
than the baby’s current temperature.
- Measure the baby’s boby temperature every hour.
(3) Ensure the baby’s body temperature every hour.
(4) If the patient’s temperature is <34.9°C or prolonged hypothermia
- Warm the baby immediately using a pre-warmed infant warmer.
Notes (1) : newborn babies should not be faster than 0.5°C every hour
due to risk of brain bleeding and CO2 metabolites.
Body weight < 1000g 1000-1500g 1500-2000g 2000-2500g
Incubator
temperature
35℃ 34℃ 33℃ 32℃

19
Notes (2) : Don’t open the windows of incubator to reduce temperature.
NEVER switch the incubator off, as the fan does not work when the incubator
is switched off.
2) Infant warmer
Increase or decrease the manual heater setting little by little and check
axillary temperature hourly until two-times consecutive measurement
in normal temperature range.
3) Cot (cradle, open crib)
(1) Assess environment (proper room temperature is 25-28°C) and what
clothing baby wearing
(2) Correct any environmental factors
(e.g. turn off fan or air conditioning)
- Ensure patient appropriately dressed for environment, remove or add
layer of clothing or blankets if needed.
- Re-measure neonate’s temperature one hour after each intervention
- Covered warm bottles with cloth and put them around the neonate to
avoid hypothermia if needed.
(be careful for low temperature burn, leak out water from the bottle.
Be aware that no direct skin contact to the warm bottle!)
Note: If the patient’s temperature is >38.0°C or <34.9°C, follow the
procedure of temperature management.
Transfer neonate from incubator to cot (cradle, open crib)
(1) If the baby can keep body temperature adequately even with the
incubator setting 32°C, the baby can get out of the incubator (it is ideal
to keep incubator one day more in case of reuse).
(2) Start Kangaroo Mother Care at least 2 days before moving to the cot.

20
References
1)Safe Motherhood Clinical Management Protocol Referral Hospital, MOH,2013
2)The Royal Children’s Hospital Melbourne (clinical guidelines, nursing)
http://www.rch.org.au/rchcpg/hospital_clinical_guideline_index/Temperature_Mana
gement/
3)Kumiko Nakata; Method of measurement of vital signs, Neonatal Care, vpl 20 2007
(in Japanese)
4) National Protocol on Kangaroo Mother Care Training, MOH, 2017

21
6. Apnea Management
Apnea is a common problem in preterm neonates that may be due to an
underlying illness or most commonly apnea of prematurity. In term neonates,
apnea is almost always due to a pathological cause but they may rarely
experience apnea of prematurity as well.
Definition
Apnea of prematurity
1) Absence of breathing >20seconds
2) Any respiratory pause (<20 seconds) associated with bradycardia or
cyanosis (oxygen desaturation)
3) < 37weeks gestational age
Acute management
1) When the alarm of monitor is ringing, the neonate should
immediately be observed for signs of breathing and skin color.
2) If apneic, pale, cyanotic or bradycardic, then tactile stimulation needs
to be given. (Gentle rubbing stimulation of soles of feet or back is
usually, all that is required for episodes that are mild and
intermittent)
3) If the infant does not respond, bag and mask ventilation, along with
suctioning and airway positioning, may be needed and call for doctors.
General management
1) Monitoring: Keep the HR and SpO2 monitor on. (Setting SpO2 90-off,
HR100-200)
2) Body temperature: Keep in appropriate body temperature and avoid
hyperthermia.
3) Positioning: Ensure the position the head slightly extended to
maintain a patent airway.
4) Feeding: Ensure enough time for feeding.
5) Clear airway: Suction mouth and nostrils when needed.
Family education

22
1) Ensure the neonates of premature babies are aware that apnea of
pprematurity is a normal occurrence and will resolve by the time 37
weeks' gestation is reached.
2) Ensure the parents of premature babies are aware of monitor alarm
and able to stimulate then call nurses when needed.
3) Explain all interventions and why they are necessary (e.g. CPAP)
References
1) The NCU clinical guide manual, NMCHC,2015
2) Furuse Y, et al: Apnea of premature infants. Clinics in Perinatal Medicine
2010 the practical and essential 650-654, 2010 (in Japanese)

23
7. CPAP care
CPAP (Continuous positive airway pressure) aims to establish and
maintain lung volume and it is a relatively simple and effective therapy for
respiratory distress syndrome.
Indications
1) Management of Respiratory Distress Syndrome (RDS) (RDS clinical
signs: retraction, grunting, cyanosis, tachypnea, low SpO2)
2) Prevention for Apnea
3) Mild upper airway obstruction
Materials
1) Nasal cannula (Size 0,1,2)
2) Sponge (for preventing ulcer of nose)
3) CPAP machine
4) Monitor (HR and SpO2)
5) Suction machine
6) Suction catheters (Fr.8, Fr.6 for preterm babies <1,500g)
7) Towels (to keep baby in good position)
Application
1) Clean your hands with water and soap.
2) Assemble the CPAP machine and set it up according doctor’s
prescription.
-Fill 1st bottle with water until red line
-Fill 2nd bottle with water between both red line.
3) Put a pillow (towel) under the baby’s shoulder.
4) Choose the correct size of cannula. (The following can be used as guide;
Size 0: <1,500g, Size 1: 1,500 - 2,500g, Size 2: > 2,500g)
5) Clear nasal secretion before insert the nasal prongs.
24
6) Connect CPAP tube and cannula and place your hand close to nasal
prongs to ensure there is air flow present.
7) Place the prongs to nostrils after put small sponge between the
nostrils and cannula to prevent ulcer of nostrils.
8) Adjust the cannula but should not be too tighten.
9) Ensure ventilator tubing is well supported to prevent drag on the
nasal interface.
Ongoing Care
1) Take vital signs 3 hourly and fill in nursing record.
2) Ensure correct alarm settings (HR 100-200, Sp02 90-off*)
* To minimize the oxygen toxicity especially for preterm babies, the
oxygen saturation should not be more than 95% strictly.
3) Keep the naso-gastric tube (NGT) open to decompress swallowed air
into the stomach if necessary.
4) If the baby is being fed while on CPAP; close the tube for 30minutes
after feeding and keep it open until the next feeding.
5) Keep the body temperature in normal range (36.5 - 37.5°C)
6) Change baby’s position every 3hours or more frequently. (Supine with
head in midline, Side lying with head to side)
7) Check cannula and nostrils every 3 hour or more frequently as
necessary:
- Clear secretions as necessary.
- Assess nostrils for redness, erosion and bleeding and apply
Vaseline or
8) Put antibiotic ointment on nostrils if with inflammation sign.
9) Change CPAP machine and CPAP tube every 7 days if it is used more
than 1 week.
10) Check for presence of bubbling in bottles, temperature of circuit.
11) Check water level of bottles and fill boiled water as required.
12) Remove excess water from CPAP tube.

25
Reference
1) The Royal Children’s Hospital Melbourne (Clinical guidelines, nursing)
2)http://www.rch.org.au/rchcpg/hospital_clinical_guideline_index/Continuous_Positi
ve_Airway_Pressure_(CPAP)_-
_Care_in_the_Newborn_Intensive_Care_Unit_(Butterfly_Ward)/#FlexiTrunk©
3) Oxygen therapy for children, WHO, 2016

26
8. Insertion of Naso-gastric Tube (NGT)
Naso-gastric tube is used for checking gastric contents and for feeding the
baby. Incorrect placement possible to cause of vomiting, bleeding from a
stomach and risk of aspiration pneumonia. Therefore, it is essential to
confirm the tube is correctly placed every day.
Materials
1) Gastric tube (Size 5*)
* We use the size 5Fr. for all babies at NMCHC but ideally it is better
to choose adequate size based on baby weight.
2) Syringe (5ml)
3) Permanent pen (to record the date on the tape)
4) Adherence tape
5) Gloves
6) Stethoscope
Methods
1) Prepare materials and the baby’s position.
2) Clean your hands with water and soap
3) Wear gloves.
4) Estimate the required length of tube to insert: with the tube, measure the distance
from the the tip of the nostril to the lower tip of the ear lobe and the midpoint to the umbilicus, and place a mark on the tube with pen or a
piece of strapping.
5) Flex the baby’s neck slightly and gently pass the tube through the
mouth or through one nostril to the required distance.
6) In case of respiratory distress, abnormal crying or cyanosis, remove the
tube immediately and let the child recover before starting over.
Note: Never force the gastric tube into the nostril if resistance is
encountered.
27
7) Secure the tube in position with adhesive strapping.
Note: When you insert NGT, put into the nose or month gently, against
to avoid to injure to skin or mucous membrane.
8) To Confirm proper placement of gastric tube:
(1) Quickly inject air with the syringe (1-2ml) and check the sound with
the stethoscope on the patient's stomach (a characteristic gurgle should
be heard).
(2) Aspirate with the syringe - gastric juices should appear in the tube.
Note: Change every 5 days prevent infection. If NGT was removed,
insert a new NGT.
References
1) Safe Motherhood Clinical Management Protocols Referral Hospital,
MOH,2013
2) https://globalhealthmedia.org/portfolio-items/inserting-a-nasogastric-
tube/?portfolioID=5623

28
9. Feeding
Adequate nutrition during infancy is essential for lifelong health and
well-being. Infants should be exclusively breastfed to achieve optimal
growth, development and health. If nutrition is not enough,1) both
physiological and neurological development will be delayed, 2) The chance
of catching infection will be increased. Feeding for preterm infants have to
be very careful due to prematurity of them to digestive tract.
Oral feeding should not be started until the baby becomes more than
34weeks of gestational week and/or body weight >1500g*.
* Small for Gestational Age (SGA) babies may be exceptions after we can
check good sucking.
Colostrum, the yellowish, thick breast milk, which is produced at the end
of pregnancy, is recommended as the perfect food for the newborn, and
feeding should be initiated quickly after birth when the baby is clinical
stable. Even if the baby cannot directly drink at the breast due to the
illness, the colostrum can be expressed on a spoon and fed to the baby by
dripping into the mouth.
Keeping breastmilk
Type of breastmilk Preservation methods Should be used within
Fresh breastmilk
(just expressed from a
mother)
Room temperature 4 hours
(Room temp: 25-35℃)
Refrigerator 2-4 days
(should be put into refrigerator immediately after expression from a mother)
Freezer (≦ -20℃) 1 month
Defrost breastmilk Room temperature 4 hours
(Room temp: 25-35℃)
Refrigerator 24 hours
(Reference: Oyama M. Handbook of breastfeeding in NICU. 2010)

29
Methods
<Feeding via NGT>
1) Clean your hands with water and soap.
2) Verify the amount of breast milk according to the order.
3) Explain the procedure to the care taker*
* At NMCHC, the care taker feed the baby via NGT.
4) Place the patient in a semi-upright position.
5) Verify correct placement of the tube.
6) If there is any doubt about the tube's position, pull it out and insert
another new one.
7) Pull softly gastric residual using 5ml syringe.
< How to manage gastric remaining>
・Gastric residual : Under 10% of one time amount → Next milk: full milk
・Gastric residual : Over 10% of one time amount
→ Next milk: return the remaining back and subtract it from the full amount
(Ex.) If a baby is taken 10ml milk by NGT,
Gastric residual
: 0.5 ml
(Under 10%)
Gastric residual
: 4 ml
(Over 10%)
1) Verify the amount of breastmilk according to the order.
2) Explain the procedure to the caretaker.
3) Change a nappy before feeding and clean the hands with water and
soap.
4) Attach the syringe filled with required milk.
Return 0.5ml residual back
Next milk: 10ml
Return 4ml residual back
Next milk: 6ml

30
5) Push the syringe slowly. (more than 5 minutes)
6) Flush the tube with 0.5ml normal saline to prevent obstruction.
7) Record the quantity of milk administered on the nursing record.
8) Clean your hands with water and soap.
<Feeding via cup>
1) Verify the amount of breast milk according to the order.
2) Explain the procedure to the caretaker.
3) Change a nappy before feeding and clean the hands with water and
soap.
4) Hold the baby sitting upright or semi-upright on your lap, wrap the
baby with a cloth to provide some support and to stop his or her hands
from knocking the cup.
5) Hold the cup of milk resting on the lower lip so that the rim touches
the baby’s upper lip.
6) Tip the cup so that the milk just reaches the baby’s lips.
7) A small baby will start to take all the milk into his mouth with
his tongue. A term or big baby will suck the milk, spilling some
of it.
8) DO NOT POUR the milk into the baby’s mouth. Just hold the
cup to the baby’s lips and let him/her take it by him/herself.
9) Record the quantity of milk which the baby took on the nursing record.
(Reference: Early Essential Newborn Care. WHO. 2014)
Note: NEVER feed babies by bottles, for NEITHER breast milk NOR
formula.
<Breast feeding>
1) Explain to change a nappy before breast feeding and clean the
hands with water and soap.
2) Support mothers for good positioning and attachment for
breastfeeding. When the baby is ready, advise the mother to:

31
-make sure the baby’s neck is not flexed or twisted,
-make sure the baby is facing the breast with the baby’s nose opposite
her nipple and chin touching the breast,
-hold the baby’s body close to her body,
-support the baby’s whole body, not just the neck and shoulders,
-wait until her baby’s mouth is opened wide,
-move the baby onto her breast, aiming the lower lip well below the
nipple.
(3) Look for signs of good attachment and suckling, including:
-mouth wide open,
-lower lip turned outwards,
-baby’s chin touching breast,
-slow and deep suckling, with some pauses.
(Reference: Early Essential Newborn Care. WHO. 2014)

32
Note: Breastfeeding is a learned behavior for both baby and mother. Baby will
make several attempts to breastfeed before being successful. Health workers
needs well explanation but should avoid interfering with this process (e.g.
manipulating baby’s head and/or body).
All materials (syringes, cups) for feeding must be cleaned with boiled water
after cleaning with dish washing detergent and tab water.
References
1)The NCU clinical manual, NMCHC, 2015
2)Early Essential Newborn Care, WHO, 2014
3)Safe Motherhood Clinical Management Protocols Referral Hospital, MOH, 2013
4) Breastfeeding checklist, MCAT National Protocol, MOH,2016

33
10. Abdominal Care
Premature babies easily have abdominal distention. Abdominal
distention hinders baby's breathing. If the abdominal distention is improved
after stimulating rectal, performing enema or aspiration by NGT, that can be
physiological. If the abdominal distention is not improved after above
treatment, that can be abnormal abdominal distention such as neonatal
necrotizing enterocolitis (NEC), meconium disease, etc.
<Check points>
1) Regular stool excretion (after feeding, basically).
2) Good digestion of milk. (no gastric residual)
3) Good/audible bowel sound.
4) Good general condition. (stable vital signs)
5)
Rectal stimulation
<Indication>
1) abdominal distention
2) constipation (more than 72 hours)
<Materials>
1) Cotton swab
2) Vaseline® (glycerin gel)
3) Gloves
4) Nappy
5) Wet tissues
<Methods>
1) Clean your hands with water and soap.
2) Prepare all the materials as above.
3) Wear gloves.
4) Put the baby on supine position and hold both legs with your hand.
5) Apply Vaseline® to a tip of cotton swab, insert it into the anus (1₋2cm),
and twist gently back and forth.

34
6) Remove a cotton swab.
7) Observe defecation and gas exhaust, and improvement of abdominal
distention after the procedure.
8) Clean neonate buttocks and change a nappy.
9) Wash your hands carefully with water and soap.
Enema
<Indication>
Severe constipation with abdominal distention, which cannot be improved by
repeated rectal stimulation.
Note: MICROLAX® includes too much salt do it may induce the misbalance
of electrolytes in rectum especially for preterm babies. So, enema should not
be recommended for preterm babies (only for term babies).
<Materials>
1) MICROLAX® (sprbital-citrate)
2)~ 5): Same materials as rectum stimulation
<Methods>
1) ~ 4): Same as rectum stimulation.
5) Remove the cap of MICROLAX®, insert the tip of it into anus (1-2cm) and
push the contents into the rectum.
6) Remove the tube gently.
7) Put your finger with glove on the anus and hold after push MICROLAX®
tube to avoid content comes out immediately. (amount of MICROLAX®
depends on baby’s weight. Follow the doctor's prescription.)
8) Observe defecation and gas exhaust, and improvement of abdominal
distention after the procedure.
9) Clean neonate buttocks and change a nappy.
10) Wash your hands carefully with water and soap.

35
Aspiration by NGT
When gastric residual is;
1) large amount of milk was aspirated based on previous feeding;
➡ check abdominal distention and notify the doctor as soon as possible.
2) very few and/or old red color;
➡ it is not necessarily to stop feeding.
3) bloody red and/ or contain bile (greenish, strong yellowish);
➡ do not return it back. Notify the doctor as soon as possible to
consider to skip next feeding based on baby’s condition.
If aspiration is not obtained;
1) inject air (1-2ml) with the syringe and check the sound with
stethoscope,
2) move/adjust the NGT 0.5- 1.0cm (pull out or push in),
3) try to aspirate again.
References
1)Neonatal Care 2010 vol.23 no.6 (in Japanese)
2)Neonatal Care 2009 vol.22 no.2 (in Japanese)
3)Neonatal Care 2012 vol.25 no.4 (in Japanese)

36
11. Intravenous (IV) Line management
Notes: All procedure has to follow principles of infection prevention.
Materials
1) Sterile catheter (24,26G)
2) Alcohol cotton (70%)
3) Sterile infusion set
4) IV fluid
5) Adhesive tape
6) Rubber band
7) Tray
8) Splint
9) Gloves
10) Infusion pomp (syringe or bullet type)
Procedure
1) Ensure good light (Transfer infant to an infant warmer if needed, with
careful observation to keep the body temperature).
2) Prepare materials in a clean tray.
Note: Air embolism can occur easily in babies' body. It is essential to
ensure that all components of the IV infusion set are filled with fluid
that without air bubbles in the set before starting the infusion.
3) Clean your hands with water and soap.
4) Wear gloves.
5) Several parts of body can be used to establish an IV line. Common sites
used for a baby are:
» Peripheral vein on the back of the hand or top of the foot (most common
and preferred site),

37
»Veins on the forearm, the front of the elbow, or around the ankle or knee
(minimize use of the veins around the knee because there is a greater
risk of the needle coming on contact with the bone),
»Scalp vein.
6) Prepare the skin over the vein using an alcohol cotton and allow to dry.
Note: Do not touch the area which was cleaned! If you touch again to see
the vein, remember cleaning again!!
7) Use a rubber band to press on the skin near the vein.
8) Insert the needle at a 15-degree angle through the skin, with the level of
the needle facing upward:
»Once the blood fills the hub of the catheter, withdraw the needle
partially while continuing to push the catheter in,
»When the hub of catheter reaches the skin at the puncture site,
withdraw the needle completely,
»Dispose of the needle according to Infection Prevention Control guideline.
9) Remove a rubber band.
10) Connect the infusion set to the catheter:
» Check the natural drop smoothly,
»Ensure that there are no air bubbles in the infusion set,
»Infuse fluid when used a micro dropper, into the vein for a few seconds
to make sure, that the vein has been successfully inserted. The fluid
should run freely, and there should be no swelling around the site of the
catheter,
»If swelling developed around the site of infusion, withdraw the needle
from the vein and repeat the procedure using a different vein.
11) Secure the inserted catheter in position using strips of adhesive
strapping.

38
12) If using a vein in the hand, arm, foot or legs, immobilize the limb (e.g.
an arm splint) and adhesive tape to minimize movement;
»Tape loosely at the top and over the fingers,
» Fingers/toes must be visible,
(See below)
13) Inspect the infusion site every 2 hour:
»Look for redness and swelling around the insertion site of the catheter
with indicate that the catheter is not in the vein and fluid is leaking into
the subcutaneous tissue;
»If redness or swelling is seen at any time, stop the infusion, remove the
needle as soon as possible and establish a new IV line in a different vein;
Check the volume of fluid infused and compare to the prescribed volume.
14) Record the findings.
15) Change the IV infusion set every 5-7 days at maximum. (can be a major
sauce of infection)
Note: Solution containing glucose can cause tissue to die and should not be
allowed to leak into subcutaneous tissue.
Reference
1) Safe Mother Hood Clinical Management Protocol Referral Hospital,
MOH,2013

39
12.Administration of Intravenous(IV) Fluid
All procedure has to follow principles of infection prevention.
Materials
1) Verified medications
2) Syringes
3) Extension tube
4) Needles (18G)
5) Adherence Tape
6) Alcohol cotton (70%)
7) Clean tray
8) Syringe pump
9) Microdropper
Procedure for syringe pump
1) Verify the doctor's order.
2) Check 5R (1. Right Patient 2. Right Drug 3. Right Dose 4. Right Route 5.
Right Time) and expiry date.
3) Prepare materials in a clean tray.
4) Clean your hands with water and soap or alcohol glycerin.
5) Remove the cap or seal from the bottle and disinfect the tubing
insertion site with an alcohol cotton.
6) Insert 18G needle into rubber site.
7) Pull out fluid into syringe by needle and add the medications carefully
as doctor’s prescription.
8) Put tape on a syringe and write down patient name, date and time on
preparation.
9) Check 5R (1. Right Patient 2. Right Drug 3. Right Dose 4. Right Route 5. Right
Time) and apply to the patient.

40
10) Observe baby’s skin around the catheter inserted and amount of infusion every 3
hourly.
11) Prepare the IV fluid just before it is needed. If the IV fluid wouldn’t use
immediately, keep it with needles (use clean technique) in a
refrigerator.
Note: To move any fluid from the bottle to the syringe when you prepare the
IV fluid, use a needle to aspirate fluid. Never leave one needle inserted in the
vial cap for multiple uses. This provides a direct route for microorganisms to
enter the vial and contaminate the fluid between each use.
Microdropper
Microdropper (where 1ml=60 micro drops) allow slow administration of fluid
and ensure that babies receive the volume of fluid they need. Main purpose
of procedure is same as used a syringe pump.
1) Calculate the rate of administration and ensure that the microdropper
delivers the fluid at the required rate.
2) Change the IV infusion set and fluid every 5days.
References
1)Safe Motherhood Clinical Management Protocols Referral hospital, MOH,2013
2)Infection Prevention Control Guideline For health facilities, MOH,2010

41
13.Intravenous(IV) Injection
All procedure has to follow principles of infection prevention.
Materials
1) Verified medications
2) Syringes
3) Needles(18G)
4) Alcohol cotton (70%)
5) Clean tray
Procedure using syringe pump
1) Verify the doctor's order and the expiration dates.
2) Clean your hands with water and soap or alcohol glycerin.
3) Check 5R (1. Right Patient 2. Right Drug 3. Right Dose 4. Right Route 5. Right
Time) and expiry date.
4) Prepare the medicine using clean technique.
5) Prepare materials in a clean tray.
6) Choose the adequate place for injection in the IV line, where the
injection can be given as close as to the insertion site of the catheter (it
depends on the type of catheter;
»Catheter without IV injection part: disconnect between the IV fluid
syringe and extension line, inject with clean technique.
»Catheter with IV injection part: use the IV injection part, use clean
technique.
7) If the IV fluid was infused without problem:
»Inject the material slowly, carefully observing the area around the
catheter for swelling.

42
8) If there is any question as to whether the catheter is properly
positioned in the vein,
»Stop the IV infusion,
»Flush the IV line if possible (as small volume as possible, maximum
0.5ml), observing the area around the catheter carefully for swelling
that indicates that the catheter has come out of the vein,
»If the catheter is still in the vein, inject the material slowly, carefully
observing the area around the catheter for swelling.
9) Observe and check for side effect.
Note (1): DON’T mix antibiotics (Gentamicin and penicillin) before IV
injection.
Note (2): DON’T mix metronidazole into the IV fluid. Follow the doctor's
prescription.
Reference
1)Safe Motherhood Clinical Management Protocols Referral Hospital, MOH,2013

43
14. Intramuscular(IM) Injection
All procedure has to follow principles of infection prevention.
Materials
1) Vilified medication
2) Sterile syringe (1-5ml, the size available that has adequate markings
for proper dose)
3) Needle (25G)
4) Alcohol cotton (70%)
5) Gloves
6) Clean tray
7)
Methods
1) Verify the physician's order.
2) Check 5R (1. Right Patient 2. Right Drug 3. Right Dose 4. Right Route
5. Right Time)
3) Clean your hands with water and soap.
4) Prepare the materials in a clean tray.
5) Wear gloves (if without gloves, clean your hands with water and soap).
6) Choose the injection site. Upper, outer thigh. (Quadriceps muscle)
7) Clean the injection site with alcohol cotton and wait for 35-40 seconds.
8) Grasp the center of the target muscle between the thumb and
forefinger, if possible.
9) Insert the needle at a 90°angle through the skin with a single quick
motion.

44
10) Withdraw the plunger of the syringe slightly to ensure that the tip of
the needle is not in a vein (i.e.no blood should enter the needle):
If the needle is in a vein:
»withdraw the needle gently but quickly without injecting the material,
»apply gentle pressure to the site with a dry cotton-wool to prevent
internal bleeding,
»replace a new, sterile needle on the syringe,
»choose a new injection site in other leg,
»repeat the procedure described above.
After the needle reaches the muscle, inject the material with safety
pressure for 3-5 seconds.
11) After completion of the injection, withdraw the needle and apply gentle
pressure with a dry cotton wool.
12) Record the site of the injection on the nursing record and rotate the site
of subsequent injections.
Reference
1) Safe Motherhood Clinical Management Protocols Referral Hospital, MOH,2013
2) Safe Motherhood Clinical Management Protocols Health Centers, MOH,2016

45
15. Taking Blood Samples
Determine how much blood will be needed to perform all necessary
laboratory investigation and take enough blood at one time for all the tests,
as much as possible. If only a small volume of blood is needed (e.g. blood
glucose, bilirubin, etc.), use a capillary blood sample (heel prick). If a larger
volume of blood is needed such as more than 1ml, use vein puncture.
Vein puncture
<Materials>
1) Needles (23 or 24G)
2) Syringe
3) Appropriate blood tubes
4) Dry cotton wool
5) Alcohol cotton (70%)
6) Rubber band
7) Gloves
8) Adhesive tape
9) Clean tray
10) Safety box
<Procedure>
1. Needle without syringe
Using needles 23-24G without syring is easier to draw blood without
coagulation.
1) Clean your hands with water and soap
2) Prepare materials in a clean try.
3) Find a vein in baby’s hand.
4) Wear a glove on your dominant hand.
5) Make circle with your fingers of non-dominant hand or bind with
rubber band around the target vein.

46
6) Clean the baby’s skin over the vein using alcohol cotton and allow to
dry.
7) Stretch the skin and hold it firmly with your non-dominant hand.
8) Insert the needle (with shallow approach) though the skin, face it up.
9) Slightly move the needle until you see blood is coming.
10) Hold the tube under the needle. Just gently squeeze baby’s hand to
bring the blood.
Note: try not to touch the needle with the tube and keep free dripping,
to reduce the risk of infection.
11) Remove the needle and cover the cotton wool.
12) Dispose the needle into the safety box carefully, give gentle pressure
to the puncture site with a dry cotton wool for few minutes with
adhesive tape.
13) Remove gloves and wash your hands with water and soap.
2. Needle with syringe
1) Prepare materials in a clean tray.
2) Clean your hands with water and soap.
3) Wear gloves.
4) Find the vein and put the rubber band near the vein.
5) Clean baby’s skin over the vein using an alcohol cotton and wait for
dryness. Do not touch the area which has been cleaned!
Note: For blood culture, this procedure should be strictly complied with.
6) Insert the needle into the skin at an angle of about 15 degrees, with
the level of the needle's facing upwards.
7) Pull generally on the syringe plunger as the needle is advanced.
Once blood flows easily into the syringe, do not advance the needle
any further.
Note: Take minimum but enough blood to perform all necessary
laboratory investigation.
8) Remove the rubber band by your non-dominant hand.

47
9) Withdraw the needle from the vein, apply gentle pressure to the
puncture site with a dry cotton-wool for several minutes to prevent
internal hemorrhage.
10) Remove the needle to safety box and carefully transferring the blood
into the tube.
11) Dispose of the syringe to safety box.
12) Remove gloves and wash your hands with water and soap.
Capillary blood sample (Heel Prick)
<Materials>
1) Blood Lancets (28G)
2) Capillary tubes
3) Alcohol cotton (70%)
4) Dry cotton wall
5) Gloves
6) Adherence tape
7) Clean tray
8) Safety box
<Procedure>
1) Prepare materials in a clean try.
2) Clean your hands with water and soap.
3) Put on gloves.
4) Clean the baby’s skin of heel using an alcohol cotton and wait for
dryness.
5) Flex the foot up towards the legs and hold it in this position with your
non-dominant hand.
6) Squeeze the feel firmly enough to make it flush red (but not so much
that is turns white).
Note: Warming heel prior to procedure helps easy flush.

48
7) Puncture the skin firmly with a lancet and dispose it into the safety
box carefully: Aim towards the lancet;
»avoid the heel pad or toes, use the side,
»avoid using previously used sites, if possible.
Heel prick sites
8) Squeeze the heel gently and intermittently to enhance blood flow. Avoid
excessive squeezing and rubbing of the heel, as this will cause bruising
and dilution of blood with tissue fluid, giving an inaccurate result.
9) Collect blood into the tube, taking enough blood to perform all
necessary laboratory investigation.
10) After blood is collected, have an assistant apply gentle pressure to the
puncture site with a dry cotton-wall ball to prevent bruising.
11) Remove gloves and wash your hands with water and soap.
Note: A tiny or too shallow prick is more unpleasant for the baby because it
will take longer to collect the blood and requires prolonged squeezing of the
heel; in some cases, a second heel stick may be required. Excessively deep
heel stick, however, can cause cuts, infection, and scarring.
Reference
1)Safe Motherhood Clinical Management Protocol, MOH,2013

49
16. Sponge Bath
Protection and preservation of the skin of term newborn babies are
significantly important, because this organ acts as a barrier against infection
and also is a major contributor to temperature control. However, bed bath
requires high energy of babies due to evaporative heat loss. Therefore, it is
important to check baby’s condition before sponge bath and complete the
process in a short time.
Materials
1) Sterilized pot
2) Sterilized gauze
3) Sterilized cotton
4) Warm water
5) Nappy
6) Gloves
Methods
1) Check vital signs before bathing and make sure baby’s condition is good.
2) Prepare materials near the incubator (it is ideal for every material to
be set on a table).
3) Clean your hands with water and soap.
4) wear gloves
5) Pour warm water in a pot.
6) Put gauze into the pot, take it, and wring it out gently.
7) Clean eyes at first then in the following order; face, head, ears, neck,
chest, abdomen, arms, legs, back genital area and buttocks at last in
order with wet gauze. (squeeze well after soak warm water)
»baby’s eye from inside to outside with wet gauze. Don’t repeat cleaning
eyes using same side of gauze.
»to clean the umbilical cord area is important but when that area has any infectious

50
signs, do not use the same gauze.
»don’t forget cleaning the axilla.
»one hand holds the baby’s back to allow seating position then clean the
back. Pay attention to baby's chin and chest in the seating position to
avoid airway compromise!
»don’t force fully to remove the vernix.
8) Change the nappy.
9) Dispose the gauze and wash the pot after use with detergent.
10) Remove gloves and wash hands with water and saop.
11) Write down the time on a nursing record.
Note: DO NOT do sponge bath when the baby’s condition is unstable (e.g. hypothermia,
cyanosis)
Reference
1) Care of the High-Risk Neonate,6th Edition, Klaus& Fanaroff ’s

51
17. Weighing the Baby
After birth, babies lose weight (up to 20% usually), but most babies will
have regained their birthweight by 7-14 days. Proper weighing the baby is
important because it is used for the basis of clinical assessment and calculate
amount of medicine and feeding.
Materials
1) Weight scale
2) Spray ANIOS® (dodeclyldimethylammonium chloride)
3) Sterilized towels (to keep baby good position)
Procedure
1) Check the yesterday’s weight.
2) Clean your hands with soap and water.
3) Put the towel on a scale (to prevent heat conduction) and switch on the scale. (can use one of towel the baby has been using.)
4) Make sure '0' appears on the display (e.g. '0' for the scale with the towel).
5) Take off a nappy and remove a cap and socks if the baby wears.
6) Weight the baby quickly and make sure there are no big differences
between the weight today and yesterday (If there are big differences, it may be mistake).
Note: Don’t remove the SpO2 sensor to observe baby’s condition during
weight measurement.
7) Lift up the SpO2 sensor carefully.
8) Lift up the line carefully when baby who has IV line.
9) Ask assist changing the towels quickly to keep good position during
weighing the baby if necessary. Cover the baby with towel during waiting time. (You can use one of towel the baby has been using.)
10) Move the baby back to the original place.
11) Record the baby’s weight on the daily follow up chart.
12) Change the towel for next baby.
13) Spray ANIOS after you finish one babies weighing.

52
14) Clean your hands with water and soap or alcohol glycerin.
Note (1): Be careful the hypothermia specially to weigh the baby who are less
than 1,500g.
Note (2): Assess the baby’s condition before weighing and cancel it if baby is in severe condition and record the situation on the daily follow up chart.

53
18. Umbilical Cord Care
When there are no signs of infection, just keep the stump of cord (no need
to put anything of the stump).
When there are any signs of infection of umbilicus or nearby skin (redness,
swelling, draining of pus, foul-smelling, etc.), the baby needs appropriate care
mentioned below.
Care for infection of umbilicus
<Materials>
1) 0.5% Gentian violet
Note: when gentian violet is not available, you can tentatively use
Povidone-iodine 10%. But it is not recommended because of too much
iodine. Globally, chlorhexidine is recommended.
2) Sterilized Gauze
3) Gloves
<Procedures>
1) Clean your hands with water and soap.
2) Wear the gloves.
3) Clean the umbilicus and the surroundings with 0.5% gentian violet or
four times daily until there is no more pus coming from the umbilicus.
4) Check other infection signs and notify doctor.
<Family education before discharge>
If the umbilical cord has not fallen before discharge;
»explain to the family that keep drying umbilical cord especially after
sponge bath.

54
If the umbilicus or nearby skin is red and swollen, draining pus, or foul-
smelling,
»take a baby to the clinic/hospital.
Reference
1)Safe Motherhood Clinical Management Protocols Referral Hospital, MOH, 2013
2)Early Essential Newborn Care, WHO,2014

55
19. Care of convulsion
Convulsion of newborn babies are relatively common, with variable
clinical manifestations. Convulsion is often the first sign of neurologic
dysfunction, and it is powerful predictors of long-term cognitive and
developmental impairment. Neonatal convulsion can be difficult to be
diagnosed because it may be short and subtle. In addition, the symptoms of
neonatal conversion may mimic normal movements and behaviors seen even
in healthy babies. However most of these can be prevented with good care and
control.
<Causes of convulsions>
1) Perinatal asphyxia
2) Intracranial hemorrhage
3) Metabolic abnormalities (Hypoglycemia, Hypocalcemia)
4) Congenital Malformations
5) Infections
6) Miscellaneous disorders (Benign neonatal convulsion etc.)
<Symptoms>
1) Unusual bicycling or pedaling movements of the legs
2) Sucking, smacking, chewing and protruding tongue
3) Random or roving eye movements, eyelid blinking or fluttering, eyes
rolling up, eye opening, staring.
4) Stiffening or tightening of the muscles
5) Continuous extension or flexion of arms and legs, either synchronous
or asynchronous.
6) Apnea

56
<Patients care>
1) Observe the baby carefully. If possible, try to dampen the movement
with clean hand to differentiate between convulsion and physiological
tremor or others.
2) Call a doctor quickly when convulsion occurs.
3) Check vital signs and observe the movements of a baby.
4) Measure blood glucose. If the blood glucose is less than 50 mg/dl, notify
it to the doctor.
5) Keep airway properly and put baby in safe position.
6) If no breathing, give resuscitation with bag and mask and oxygen.
7) Give the adequate medicine according to the doctor's order.
8) Follow up the baby after giving medications. (vital signs and
movements.)
9) Record when the convulsion occurs on a nursing record.
<Family care>
1) Ask families to notify a nurse quickly when the baby has abnormal
movements.
2) Explain the families that they can tough the baby but avoid over
stimulation by noise and excessive handling.
3) Ask families to handle gently, support the baby’s entire body, especially
the head, to prevent injury when the baby’s muscle tone is low after
convulsion.
4) Explain to families that Phenobarbital (usually use NG tube for
administration) can make the baby very sleepy for several days.
References
1) Safe Motherhood Clinical Management Protocols Referral Hospital, MOH,2013
2) The NCU clinical manual, NMCHC,2015
3) WHO guidelines on Neonatal Seizures, WHO,2011

57
20.Care for the Infants under Phototherapy
Physiological Jaundice appears at 24-72 hours of age, maximum intensity at 3-5 days
old in term and 7 days in preterm baby after birth. It disappears without any treatment.
Some babies show non-physiological jaundice, which reaches dangerous levels of
bilirubin and does not disappear by itself. Such non-physiological hyperbilirubinemia
needs phototherapy. It is very important to observe neonatal jaundice regularly to
recognize hyperbilirubinemia early and treat with the phototherapy appropriately to
prevent severe brain damage.
Risk Factors for neonatal jaundice
1) ABO or Rh incompatibility
2) Bruising (including due to trauma)
3) Delayed passage of meconium
4) Prematurity
5) Dehydration/poor sucking
6) Neonatal sepsis
Materials
1) Phototherapy unit
2) Eye cover
3) Cover to incubator to avoid blue right for caregivers
4) Blood lancet 28G
5) Capillary tube
Methods
1) Clean your hands with water and soap
2) Commence photo therapy as the doctor’s prescription. Ensure eyes and
genital are covered with a cleaned mask and a nappy during the photo
therapy.
3) Confirm the 50cm distance between the phototherapy unit and the baby.

58
4) Ensure that phototherapy unit is turn off every 3hours for checking
vital signs and eyes (discharge/infection/damage) and document any
changes in a nursing record.
5) Ensure that phototherapy unit is turned off during the nursing
procedures. (e.g. weighing the baby, bed bath etc.) Also turn it off when
apnea occurs to check baby’s cyanosis.
6) Ensure that phototherapy unit is not turn off long time during
treatment.
7) Assess baby’s temperature (especially at the time for commencement
or cessation of the phototherapy) and manage it if baby’s temperature
is outside of normal range.
8) Covers around the phototherapy unit to avoid blue light outside of the
area.
Note: During the phototherapy, he baby need more water intake than
usual. Pay attention to the condition (urine and any sign of dehydration).
Family care
1) Explain to families why the baby needs phototherapy and importance
of covering of eyes and genital. Ask also the families to expose the
baby’s skin as possible during the phototherapy.
2) Encourage the mother to do the breastfeeding if condition allows.
Remove eye mask during the breastfeeding.
References
1) Safe Motherhood Clinical Management Protocols Referral Hospital, MOH,2013
2) The royal children’s hospital Melbourne, clinical guideline, nursing
http://www.rch.org.au/rchcpg/hospital_clinical_guideline_index/Phototherapy_for_n
eonatal_jaundice/

59
21. Cleaning Equipment
Dirty equipment can cause infection or transmit the infection to other. It
is important to clean equipment properly to prevent the infection.
Incubator and cot (cradle, open crib) which has been using
<Materials>
1) Spray ANIOS
2) Sterilized Towel
3) Gloves
<Procedure>
1) Clean your hands with water and soap.
2) Wear gloves.
3) Spray the ANIOS to a sterilized towel and wipe the incubator or cot
(cradle, open crib) from the top to the bottom.
Incubator after a baby discharge
<Materials>
1) 25ml ANIOS STERANIOS (glutaraldehyde solution (2%)) +5liters of
water
2) Spray ANIOS
3) Sterilized Towel
4) Water tank
5) Gloves
<Procedure>
1) Clean your hands with water and soup.
2) Wear the gloves.
3) Prepare necessary volume of material 1 in the big basin (total volume:
30 liters) that has been supplied with the part of incubator
4) Dismantle the incubator in order.
60
5) Soak all the dismantling parts in the solution for 30 minutes then rinse
with boiled or tap water.
6) Dry all the parts with sterilized towel.
7) Spray ANIOS to the frame, mattress and underside of incubator keep
them at least 5minues, then dry it with sterilized towel.
8) Assemble the incubator again in order.
9) Cover the incubator and keep it for the next patient.
10) Remove Gloves and wash hands with water and soap
Cot (cradle, open crib) after a baby discharge
1) Material and procedure is same as “cot has been using”.
2) Clean the mattress, underside of mattress and the space of under the
cot (cradle, open crib), which normally families keep their materials.
CPAP after a baby discharge
<Materials>
1) 25ml ANIOS +5liters of water
2) Alcohol glycerin (70%)
3) Sterilized towel
4) Washbasin
5) Gloves
<Procedure>
1) Wash your hands with water and soap.
2) Wear gloves.
3) Gently remove the heating element from the silicon tube and clean it
with alcohol glycerin (70%) then keep it until dry.
Note: This sensor is very sensitive, don’t hold or twist during the
process.
4) Wash bottles with dish washing detergent then rinse off the detergent
with water.

61
5) Wash the silicon tube with long blush.
6) Prepare necessary volume of material 1) in the washbasin (total
volume: 20 liters) that has been supplied with the CPAP machine.
7) Put the bottle set and the silicone tube inside the basin.
8) Connect the small clear tube with the bottle. Use plugs that are
hanging inside the basin to seal the bottles and tubing.
9) Turn the pump’s power switch on to run the pump.
10) When small amount of water to flow out of the top of one of the bottles,
turn this bottle as needed so the water flows back into the basin.
11) Keep the pump running for 1 hour.
12) Turn off the pump.
13) Disconnect all of the tubing, remove all of the caps, disconnect all of
the connectors, and turn the bottles upside down.
14) Fully submerge all of the parts in the disinfectant solution to disinfect
the parts that were not constantly contacting the solution previously.
Let sit for 1 hour.
15) Carefully remove all of the pieces from the washbasin and discard the
disinfectant solution.
16) Rinse all of the bottles, tubing, and connectors inside and out with
boiled water.
17) Allow all of the CPAP pieces to dry.
18) Remove the glove and wash your hands again.
19) Wipe the heating element with alcohol glycerin (70%) for the second
time.
20) Hold the tube-set vertically and ease the heating element back in.
Note: DO NOT under any circumstances forcibly push the heating element
into the tube because this can easily cause permanent damage to the
heating element.
21) Place the dried equipment in a clean plastic bag for storage for the
next patient.

62
Monitor and syringe pump after a baby discharge
<Materials>
1) Spray ANIOS
2) Sterilized Towel
3) Gloves
<Procedure>
1) Clean your hands with water and soup
2) Wear gloves.
3) Remove a tape from SpO2 sensor.
4) Spray the ANIOS on the sterilized towel and wipe the monitor and
sensor or syringe pump.
5) Keep it tidy for next patient.
6) Remove gloves and wash hands with water and soap
Note: After Spray ANIOS, you need 5 minutes at least ready to use.
References
1) CPAP Washbasin manual, MTTS www.mtts-asia.com
2) IPC guideline, MOH

63
22. Family Support and Education
It is not surprising that the birth of a fragile child, who is then cared for
in a NCU, can be particularly stressful for the parents. The parents of NCU
infants were more upset, anxious, and depressed compared with parents of
full-term or healthy infants. NCU staff needs to provide psychological support
for the parents. Provide the knowledge and skills to the parents (or family
members), make sure they are able to take care of the baby during the
admission then reduce the anxiety after the discharge.
We cannot rescue all the babies even with all the best treatment at our
NCU. It is also very important for the family (especially mother) to be taken
care by the staff when the baby die.
Psychological supports
1) Create comfortable environment for parents.
(e.g. self-introduction, tender voice, silent environment)
2) Show always respect and supportive attitude to the family.
3) Active listening.
4) Organize briefing to the parents (or care-taker) about a disease by
doctor when the baby's condition has changed.
5) Encourage the parents to ask if they have questions and respond them.
6) Encourage the parents to touch the baby as much as possible (in
adewuate way supported by staff).
Note: Do not forget that the parents (or care-takers) have never been to NCU,
all the procedure in NCU is the first time for them. For them, even small
things need explanation.
Ongoing care
1) At least one nurse should stay at nursing station to observe patients
and care takers and to provide easy access if family has any problems.
2) Check the baby’s temperature after care taker took it and apply best
solution when needed.

64
3) Stay together and explain all the steps when a baby starts the feeding
or change the feeding methods (e.g. from NGT to cup feeding, cup
feeding to breast feeding) until the care tacker feels enough confidence.
4) Explain about what to do when apnea occurs and stay closely until the
care taker is able to stimulate baby well. If baby is still not breathing,
the care taker needs to call staff.
Education before the discharge
<Warmth>
1) Kangaroo Mother Care (KMC) help maintain the body temperature of
baby and protect the newborn baby from every reason of hypothermia.
2) When KMC is impossible, dress baby or wrap in a soft dry cloth. For
all babies, cover the head with a hat, if needed.
3) DO NOT leave the baby in direct sun.
<Hygiene>
1) Careful hand-washing should be encouraged after using the toilet,
before feeding and changing the nappy.
2) Clean the baby with sponge bath with warm water and small towel
until baby become gestation 40 weeks or weight more than 2,500 g.
<Feeding>
1) Encourage breast feeding. Wash hands just before handling newborn
babies to position for breastfeeding.
2) Let the baby suck the breastmilk as long as he/she wants.
3) Small babies need breastfeeding frequently (every 2-3 hours, usually).
4) Frequent suck helps expression of breastmilk.
5) If the breast is engorged, encourage the mother to express a small
amount of breast milk before starting breastfeeding; this will soften
the nipple area and it will be easier for the baby to attach to the nipple.

65
6) If the mother has problems for breastfeeding, they need lactation
support. Refer them to the staff with enough skill.
<Danger signs>
Advise the mother to take the baby to the health facility as soon as
possible, for the following danger signs:
1) Difficulty feeding or feeding less than 8 times in 24 hours in the first
week of life
2) No spontaneous movement
3) Body temperature >37.5℃ or <35.5℃
4) Respiratory rate more than 60 per minutes or less than 30 per
minutes
5) Severe chest in-drawing
6) Wheezing or grunting
7) Floppy or stiff body
8) Convulsions
9) Pus from eyes
10) Skin pustules
11) Cord stump which is bleeding, red or draining pus
12) Jaundice (yellow skin) especially within 24 hours of birth or yellow on
pals and soles at any days
Miscellaneous:
1) DO NOT leave the baby by him/herself, always.
2) Keep baby away from sick children or adult (other than breastfeeding
mother).
References
1) STRESS EXPERIENCED BY PARENTS FROM THE NEONATAL INTENSIVE
CARE UNIT, University of Canterbury ,2007
2) Kangaroo Mother Care a practical guide, WHO,2004
3) Safe Motherhood Clinical Management Protocols Referral Hospital, MOH,2013
4) Safe Motherhood Clinical Management National Protocols Health Centers, MOH,2016

66
23. Kangaroo Mother Care
Kangaroo mother care (KMC) is care of preterm infants carried skin-to-
skin(STS) with the mother. It is powerful, easy-to-use method to promote the
health and well-being of infants born preterm as well as full-term.
Advantages of the KMC
1) increases the amount and duration of breastfeeding,
2) maintains body temperature and protect the newborn form all reasons
of hypothermia,
3) Newborn gains more weight.
4) Newborn gets natural immunization from the mother.
5) good relationship between newborn and mother,
6) Newborn doesn’t cry much but sleep well and there are less respiratory
problems.
7) Improves neurodevelopmental outcomes.
8) early discharge newborn form hospital but should continue KMC at
home.
When to start KMC
1) Baby’s condition must be stable.
2) The baby must be breathing spontaneously without additional oxygen.
Note: It is possible for the baby even with infusion or NGT to do KMC as far
as the condition is stable. In some facilities, KMC is possible even for
intubated babies but staff must be trained well.
Length of KMC
1) STS contact should start gradually, with a smooth transition from
conventional care to continuous KMC.
2) Sessions that last less than 60 minutes should, however, be avoided
because frequent changes are too stressful for the baby.

67
Duration of KMC
1) It tends to be used until the baby reaches term (gestational age around
40 weeks) or 2,500g.
Procedure
1) Ensure room is warm (25°C to 28°C)
2) Ensure all fans are turned off and windows and doors are shut to avoid
draught.
3) The baby is naked, except for the nappy, a warm hat and sock the cap.
When temperature drops below 22°C, baby should wear a sleeveless
cotton shirt, open at the front to allow STS contact with the mother’s
chest and abdomen. The mother then covers herself and the baby with
her usual dress.
4) The mother can wear whatever she finds comfortable and warm in the
ambient temperature.
5) Encourage the mother to clean her hands with water and soap before
KMC.
6) Place the baby between the mother's breasts in an upright, chest to
chest.
7) The head, turned to one side, is in a slightly extended position which
keeps the airway open and allows eye-to-eye contact between the
mother and the baby.
8) Avoid both forward flexion and hyperextension of the head.
9) The hips should be flexed and extended in a “frog” position; the arms
should also be flexed.
10) Secure the baby in this position with the support binder by cover the
clothes on the baby and make sure the top of the binder is just under
baby’s ear.
Positioning the baby for kangaroo

68
11) Ask the mother to sit in a comfortable position and support her to keep
the baby in a right position of feeding.
12) Explain the mother that she can keep her baby in this position for day
and night, if it is possible.
13) Mother should start breastfeeding every time her newborn wakes up
and has feeding cue
14) Explain to the mother that she can breastfeed in kangaroo position
and that KMC actually makes breastfeeding easier. Furthermore,
holding the baby near the breast stimulates milk production.
15) Explain to the mother how to observe the baby, what to look for.
16) Encourage her to ask for help if she is worried.
Information for mothers
1) Mother should clean her hands often and care the baby well.
2) Only breast milk for feeding baby, do not give other food, until 6months
of age.
3) Do not apply something on the newborn's umbilical and keep baby
away from sick child or adult.
4) Inform to mother carrying a baby in the KMC position can do whatever
she likes: she can walk, stand, sit, or engage in different recreational,
educational or income-generating activities, during the daytime. But
mothers should always take care of health conditions both for babies
and herself.
5) Sleep in STS contact in a comfortable position. Mother will best sleep
with the baby in kangaroo position in a reclined or semi-recumbent
position by using pillows under the back and shoulder.
6) All the adult family members can do KMC for allowing the mother to
take a rest.

69
Follow up baby’s condition during KMC
1) Assess newborn body temperature twice per day at health facility.
2) Educate the mother how to observe newborn respiratory condition. (see
17. Family Support and Education)
3) Inform the danger signs of the mother. (see 17. Family Support and
Education)
4) Support all the concerns of taking care newborn.
Note: Ensure that the mother will continue the KMC at home and give advice
to her that she must take the newborn back to the health facility twice per
week or anytime she finds danger signs such as, no suckling, hypothermia,
dyspnea, or skin infection.
Reference
1) National Guideline for Post-natal care, MOH,2012
2) Kangaroo Mother Care a practical guide, WHO,2004
3) National Protocol on Kangaroo Mother Care Training, MOH, 2017.
Top Related
Copyright © 2022 FDOKUMEN

