


Bahasa
Halaman
Hukum

0•1
MODE
TAPBA
DCEDIT / EXIT
TUNER
EXP 1
EXP 2
WAH
VOL
ACTION
PAGEPAGE
VIEW1
16C Two–Plus Decades
FeedbackTime Wow/Fluttr Scale Spread
ParticleVerb
TwinHarmony
HeirApparent
TransistorTape
Cali QGraphic
Stereo FXLoop
1.10 OWNER'S MANUAL40-00-0568 Rev A (For use with POD Go Firmware 1.10)©2020 Yamaha Guitar Group, Inc. All rights reserved.
®

2
ContentsWelcome to POD Go 3Common Terminology 3Updating POD Go to the Latest Firmware 3Top Panel 4Rear Panel 6
Quick Start 7Hooking It All Up 7Play View 8Edit View 9Selecting Blocks/Adjusting Parameters 9Choosing a Block's Model 10Moving Blocks 10Copying/Pasting a Block 10Preset List 11Saving/Naming a Preset 11TAP Tempo 12The Tuner 12
The Blocks 13Input and Output 13Amp/Preamp 13Cab/IR 15Effects� 17Looper 22Preset EQ 23Wah/Volume 24FX Loop 24U.S. Registered Trademarks 25
Snapshots 26Using Snapshots 26Saving Snapshots 27Tips for Creative Snapshot Use 27
Bypass/Control 28Quick Bypass Assign 28Quick Controller Assign 28Manual Bypass/Control Assignment 29Clearing a Block's Assignments 29Clearing All Assignments 30Swapping Stomp Footswitches 30
Global EQ 31Resetting Global EQ 31
Global Settings 32Restoring All Global Settings 32Global Settings > Ins/Outs 32Global Settings > Preferences 33Global Settings > Switches/Pedals 33Global Settings > MIDI/Tempo 34
USB Audio/MIDI 35Hardware Monitoring vs. DAW Software Monitoring 35DI Recording and Re-amping 35Core Audio Driver Settings (macOS only) 37ASIO Driver Settings (Windows only) 37Setlist and Preset Recall via MIDI 38Snapshot Recall via MIDI 38MIDI CC 39
Additional Resources 40
©2020 Yamaha Guitar Group, Inc. All rights reserved. Please Note:�Yamaha�Guitar�Group,�Line�6,�the�Line�6�logo,�Ampeg,�SVT,�Portaflex,�POD�Go,�Powercab,�DL4,�DM4,�MM4,�FM4,�M13,�M9,�M5,�Helix,�and�HX�are�trademarks�or�registered trademarks of Yamaha Guitar Group, Inc. in the U.S. and/or other jurisdictions. Apple, Mac, macOS, iPad, iPhone, and iTunes are trademarks of Apple, Inc., registered in the U.S. and other countries. Apple is not responsible for the operation of this product or its compliance with safety and regulatory standards. Windows is a registered trademark of Microsoft Corporation in the United States and/or other countries. YouTube is a trademark of Google, Inc.

3
Welcome to POD GoManual? I don't need no stinkin' manual!Perhaps, but you might miss out on some cool tips, tricks, and shortcuts that help you make better sounding tones and speed up the entire process. Fortunately, we've make a series of how-to videos for those of us who can't be bothered to, y'know, read.Go here: line6.com/meet-pod-go
Common TerminologyWhile reading this manual, you may encounter several unfamiliar terms. It’s important to know what they mean.
Block Blocks are objects that represent various elements of your tone, such as amps,�cabs,�effects,�loopers,�inputs,�outputs,�and�impulse�responses.�POD Go can accommodate one amp/preamp block, one cab/IR block, a Wah block, a Volume pedal block, a Preset EQ block, an FX Loop block,�and�up�to�four�additional�effects�blocks,�all�simultaneously.
Model Each block can accommodate one model. POD Go includes over 70 guitar and bass amp models, 37 cab models, 16 mic models, and over 200� effects�models.� See�page 13 for the complete lists of included models, and the gear they are based on.
Preset A preset is your tone. It consists of all blocks, parameter settings, snapshots, footswitch assignments, and controller assignments.
Send/Return
The stereo TRS Send and Return jacks are used to insert your favorite stompboxes� anywhere� in� the� signal� flow,� or� for� connecting� to� your�guitar amp via 4-Cable Method - see "FX Loop Settings" on page 24.
IR IRs (Impulse Responses) are mathematical functions representing the sonic measurements of audio systems and are most often used for cab tones. POD Go can store up to 128 custom or third-party IRs at a time.* See "Cab/IR" on page 15.
*NOTE: To import IRs into your POD Go hardware, you'll need to download and install the latest Line 6 POD Go Edit application. POD Go Edit is not only an indispensable librarian for managing and backing up all your presets and IRs, but also provides a full-size display for easy editing, right on your Mac or Windows® computer—and it's free! Visit line6.com/software to get it now.
Updating POD Go to the Latest FirmwareUpdating POD Go will ensure you always have the latest models, features, factory presets,�enhancements,�and�bug�fixes.
1. Download and install the latest version of POD Go Edit from line6.com/software.
2. Connect POD Go to your computer via the supplied USB cable and turn it on.
3. Launch POD Go Edit.If�there�is�a�newer�version�of�POD�Go�firmware,�POD Go Edit will walk you through the updating process. Also be sure to reference the POD Go Edit Pilot's Guide for full details—included with the POD Go Edit software, or available for download at Line 6 Product Manuals.

4
Top Panel
POD GO
MODE
TAPBA
DCEDIT / EXIT
TUNER
EXP 1
EXP 2
WAH
VOL
ACTION
PAGEPAGE
VIEW1
16C Two–Plus Decades
FeedbackTime Wow/Fluttr Scale Spread
ParticleVerb
TwinHarmony
HeirApparent
TransistorTape
Cali QGraphic
Stereo FXLoop
34
5
7
8 10
21
11
12
13
9
6

5
1. Main Display This color LCD is your window into the power of POD Go.
2. VIEW If you ever get lost, press this button to return home. Press againto toggle between the two main Home views—see "Play View" and "Edit View".
3. ACTION Press this button to open the action panel for the selected block ormenu. From Edit view, the action panel lets you move, copy, and paste blocks.Other�menus�may�have�unique�action�panels;� for�example,� the�Global�Settingsaction panel lets you reset all global settings at once.Press and ACTION together to open the Save menu for renaming and savingchanges to a preset. Press both buttons twice to quick save. See "Saving/Naminga Preset".
4. Upper Knob In Play view, turn this knob to select a preset. Press this knob toopen the preset list. In Edit view, turn this knob to select a block for editing. Pressthis knob to bypass/enable the selected block.
5. Lower Knob In Edit view, turn this knob to change the current block's model.Press this knob to open the model list. See "Choosing a Block's Model".
6. PAGE/PAGE Press to view more parameters for the selected block or menu. Press both PAGE and PAGE to dive deeper into POD Go, and you'll find�Bypass/Control,�Global�EQ,�and�Global�Settings�menus.
7. VOLUME Turn this knob to control the main output and headphones volume.
8. WAH/EXP 1, VOL/EXP 2 LEDs These tell you whether the built-inexpression�pedal�is�acting�as�EXP�1�(red)�or�EXP�2�(green).�By�default,�the�Wahblock is assigned to EXP 1 and the Volume Pedal block is assigned to EXP 2.
9. Knobs 1-5 Turn�one�of�the�five�knobs�below�the�main�display�to�adjust�theparameter's value; press the knob to reset the parameter's value. To assign theparameter to snapshot control, press and turn the knob; the value will appearwhite and in brackets. If a rectangular button appears above a knob, press theknob to engage its function.
SHORTCUT: For most time-based parameters such as delay time or modulation speed, press the knob to toggle between setting the value in ms or Hz and note divisions (1/4-note, dotted 1/8-note, etc.).
SHORTCUT: Controllers can be assigned to most parameters. Press and hold a parameter’s knob to quickly jump to the "Bypass/Control" page for that parameter.
10. Expression Pedal Move�the�expression�pedal�to�control�volume,�wah,�or�acustomized�combination�of�amp�and/or�effects�parameters.�Activate�the�hiddentoe switch to toggle between EXP 1 and EXP 2. (The LEDs tell you which one isactive.)�If�an�external�pedal�is�connected�to�the�rear�panel�EXP�2�jack,�the�built-inpedal becomes EXP 1 only. See "Bypass/Control" for more information.
11. Footswitches 1-6 The�six�footswitches�below�the�LCD�have�colored�LEDrings that tell you the current state of the assigned block or its function. See "PlayView" for more information.
SHORTCUT: While in Stomp footswitch mode, press and hold two switches to swap all assignments between them.
12. MODE/EDIT/EXIT Switch Press MODE to toggle between Stomp andPreset�footswitch�modes.�Press�MODE/EDIT/EXIT�to�exit�Snapshot�or�6�SwitchLooper modes.
13. TAP/TUNER Switch Press TAP two or more times to set the BPM (beats perminute)�of�any�tempo-based�effects,�such�as�delay�or�modulation.�Press�TAP�onceto�restart�any�LFO-based�modulation�effects.�Hold�TAP�for�one�second�to�openthe Tuner. See "The Tuner".
6
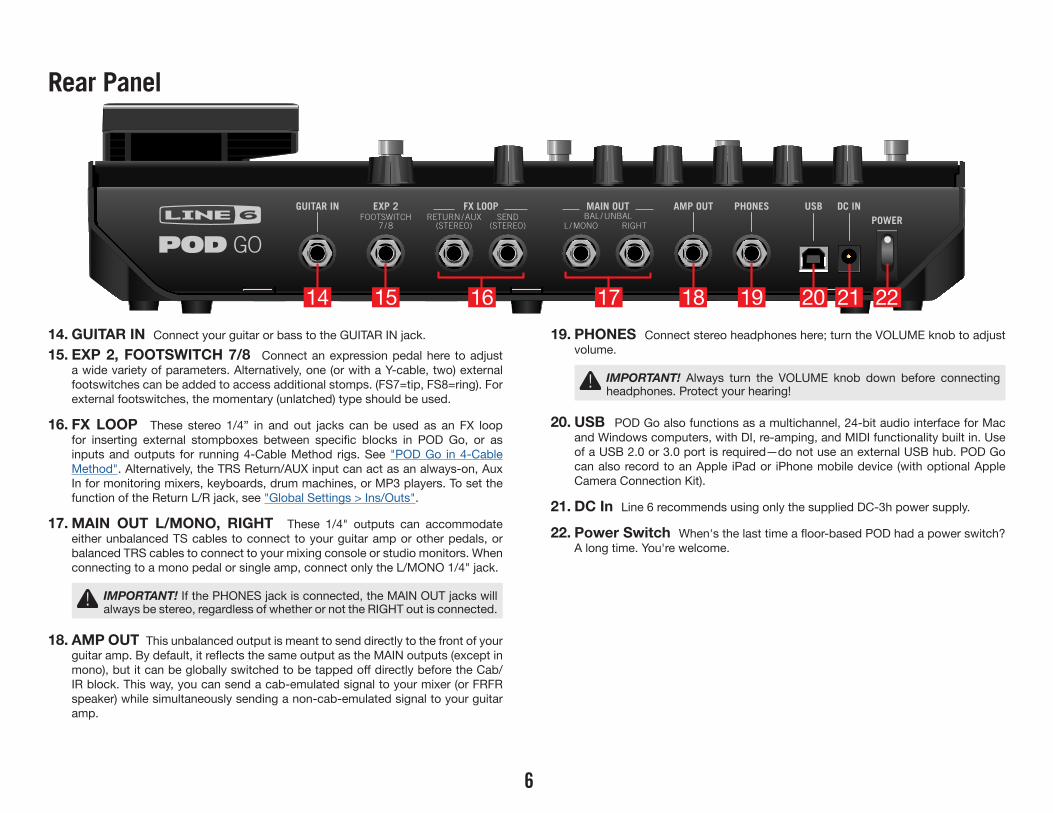
Rear Panel
RETURN / AUX(STEREO)
SEND(STEREO)
FOOTSWITCH7 / 8
USB DC INPOWER
FX LOOPGUITAR IN AMP OUT PHONESEXP 2
L / MONOBAL / UNBAL
RIGHT
MAIN OUT
14 15 16 18 19 20 21 2217
POD GO
14. GUITAR IN Connect your guitar or bass to the GUITAR IN jack.15. EXP 2, FOOTSWITCH 7/8 Connect�an�expression�pedal�here� to�adjust�
a�wide�variety�of�parameters.�Alternatively,�one�(or�with�a�Y-cable,�two)�external�footswitches can be added to access additional stomps. (FS7=tip, FS8=ring). For external�footswitches,�the�momentary�(unlatched)�type�should�be�used.
16. FX LOOP These stereo 1/4” in and out jacks can be used as an FX loop for� inserting� external� stompboxes� between� specific� blocks� in� POD� Go,� or� as�inputs and outputs for running 4-Cable Method rigs. See "POD Go in 4-Cable Method".�Alternatively,�the�TRS�Return/AUX�input�can�act�as�an�always-on,�Aux�In�for�monitoring�mixers,�keyboards,�drum�machines,�or�MP3�players.�To�set�the�function of the Return L/R jack, see "Global Settings > Ins/Outs".
17. MAIN OUT L/MONO, RIGHT These 1/4" outputs can accommodate either unbalanced TS cables to connect to your guitar amp or other pedals, or balanced�TRS�cables�to�connect�to�your�mixing�console�or�studio�monitors.�When�connecting to a mono pedal or single amp, connect only the L/MONO 1/4" jack.
IMPORTANT! If the PHONES jack is connected, the MAIN OUT jacks will always be stereo, regardless of whether or not the RIGHT out is connected.
18. AMP OUT This unbalanced output is meant to send directly to the front of your guitar�amp.�By�default,�it�reflects�the�same�output�as�the�MAIN�outputs�(except�in�mono),�but�it�can�be�globally�switched�to�be�tapped�off�directly�before�the�Cab/IR�block.�This�way,�you�can�send�a�cab-emulated�signal�to�your�mixer�(or�FRFR�speaker) while simultaneously sending a non-cab-emulated signal to your guitar amp.
19. PHONES Connect stereo headphones here; turn the VOLUME knob to adjust volume.
IMPORTANT! Always turn the VOLUME knob down before connecting headphones. Protect your hearing!
20. USB POD Go also functions as a multichannel, 24-bit audio interface for Mac and Windows computers, with DI, re-amping, and MIDI functionality built in. Use of�a�USB�2.0�or�3.0�port�is�required—do�not�use�an�external�USB�hub.�POD�Go�can also record to an Apple iPad or iPhone mobile device (with optional Apple Camera Connection Kit).
21. DC In Line 6 recommends using only the supplied DC-3h power supply.
22. Power Switch When's�the�last�time�a�floor-based�POD�had�a�power�switch?�A long time. You're welcome.
7
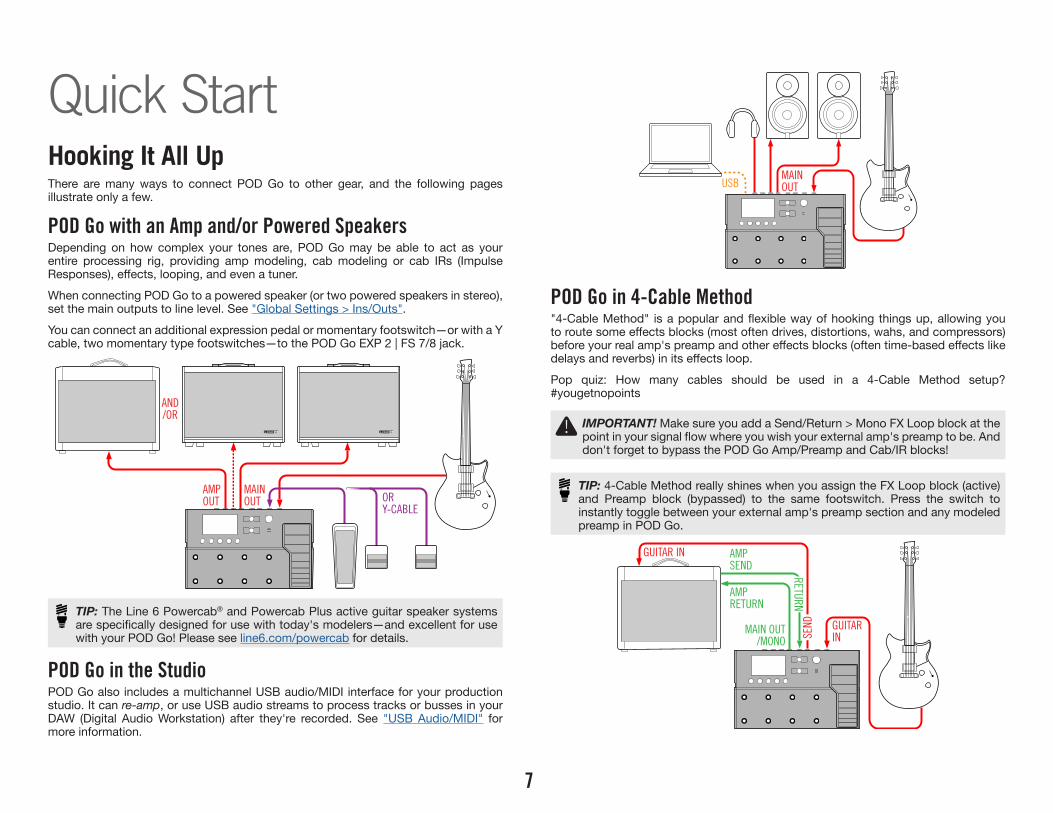
Quick StartHooking It All UpThere are many ways to connect POD Go to other gear, and the following pages illustrate only a few.
POD Go with an Amp and/or Powered SpeakersDepending� on� how� complex� your� tones� are,� POD�Go�may� be� able� to� act� as� your�entire processing rig, providing amp modeling, cab modeling or cab IRs (Impulse Responses),�effects,�looping,�and�even�a�tuner.When connecting POD Go to a powered speaker (or two powered speakers in stereo), set the main outputs to line level. See "Global Settings > Ins/Outs".You�can�connect�an�additional�expression�pedal�or�momentary�footswitch—or�with�a�Y�cable, two momentary type footswitches—to the POD Go EXP 2 | FS 7/8 jack.
AMP OUT OR
Y-CABLE
AND /OR
MAIN OUT
TIP: The Line 6 Powercab® and Powercab Plus active guitar speaker systems are�specifically�designed�for�use�with�today's�modelers�—and�excellent�for�use�with your POD Go! Please see line6.com/powercab for details.
POD Go in the StudioPOD Go also includes a multichannel USB audio/MIDI interface for your production studio. It can re-amp, or use USB audio streams to process tracks or busses in your DAW (Digital Audio Workstation) after they're recorded. See "USB Audio/MIDI" for more information.
MAIN OUTUSB
POD Go in 4-Cable Method"4-Cable�Method"� is�a�popular�and�flexible�way�of�hooking�things�up,�allowing�you�to�route�some�effects�blocks�(most�often�drives,�distortions,�wahs,�and�compressors)�before�your�real�amp's�preamp�and�other�effects�blocks�(often�time-based�effects�like�delays�and�reverbs)�in�its�effects�loop.Pop� quiz:� How� many� cables� should� be� used� in� a� 4-Cable� Method� setup?�#yougetnopoints
IMPORTANT! Make sure you add a Send/Return > Mono FX Loop block at the point�in�your�signal�flow�where�you�wish�your�external�amp's�preamp�to�be.�And�don't forget to bypass the POD Go Amp/Preamp and Cab/IR blocks!
TIP: 4-Cable Method really shines when you assign the FX Loop block (active) and Preamp block (bypassed) to the same footswitch. Press the switch to instantly�toggle�between�your�external�amp's�preamp�section�and�any�modeled�preamp in POD Go.
GUITAR IN
AMP SEND
AMP RETURN
MAIN OUT /MONO
RETURN
SEND
GUITAR IN
8
Play ViewPOD Go has two main views—Play view and Edit view. Play view is typically used when performing or jamming.
1. Press VIEW to select Play view.The current preset number and name appear along the top of the display and the current footswitch mode's assignments appear on the lower half:
2. Press the MODE footswitch to toggle between Stomp and Preset footswitch modes (see below).
While�in�Play�view,�turning�Knobs�1-5�briefly�replaces�the�bottom�row�of�footswitch�boxes�with�the�selected�block's�parameters:
FeedbackTime Wow/Fluttr Scale Spread
[37%]1/16 2.948%67%
Stereo FXLoopMinotaur Cali Q
Graphic
Stomp mode is where you'll spend most of your time, as it most closely resembles the feel and behavior of a traditional pedalboard.
Step on FS1-FS6 to bypass/enable the assigned block or toggle between two values of one or more parameters.
Preset mode is used to navigate presets in the current setlist.
Step on to queue the next bank of presets.Step on to queue the previous bank of presets.The� bank's� presets� flash,� indicating� they� are� ready� to�load.
Step on A, B, C, or D to load a preset.
Snapshots are almost like presets within a preset, as they instantly, and seamlessly, recall every block's bypass state and up to 64 simultaneous parameter settings. See "Snapshots" for more information.
1. Start from Preset Mode.
2. Press and together to enter Snapshot mode.
3. Step on A, B, C, or D to select Snapshot 1, 2, 3, or 4.
Snapshot Footswitch ModePreset Footswitch ModeStomp Footswitch Mode
BA
DC
1
16C Two–Plus Decades
FeedbackTime Wow/Fluttr Scale Spread
Minotaur
TwinHarmony
ParticleVerb
TransistorTape
Stereo FXLoop
Cali QGraphic
BA
DC
1
16C Two–Plus Decades
FeedbackTime Wow/Fluttr Scale Spread
BANKBANK
16DPastor of Muppets
16CTwo-Plus Decades
16BBel Haven, Yo!
16ATeam Zerokelvin
BA
DC
1
16C Two–Plus Decades
FeedbackTime Wow/Fluttr Scale Spread
BANKBANK
3
1
4
2
9
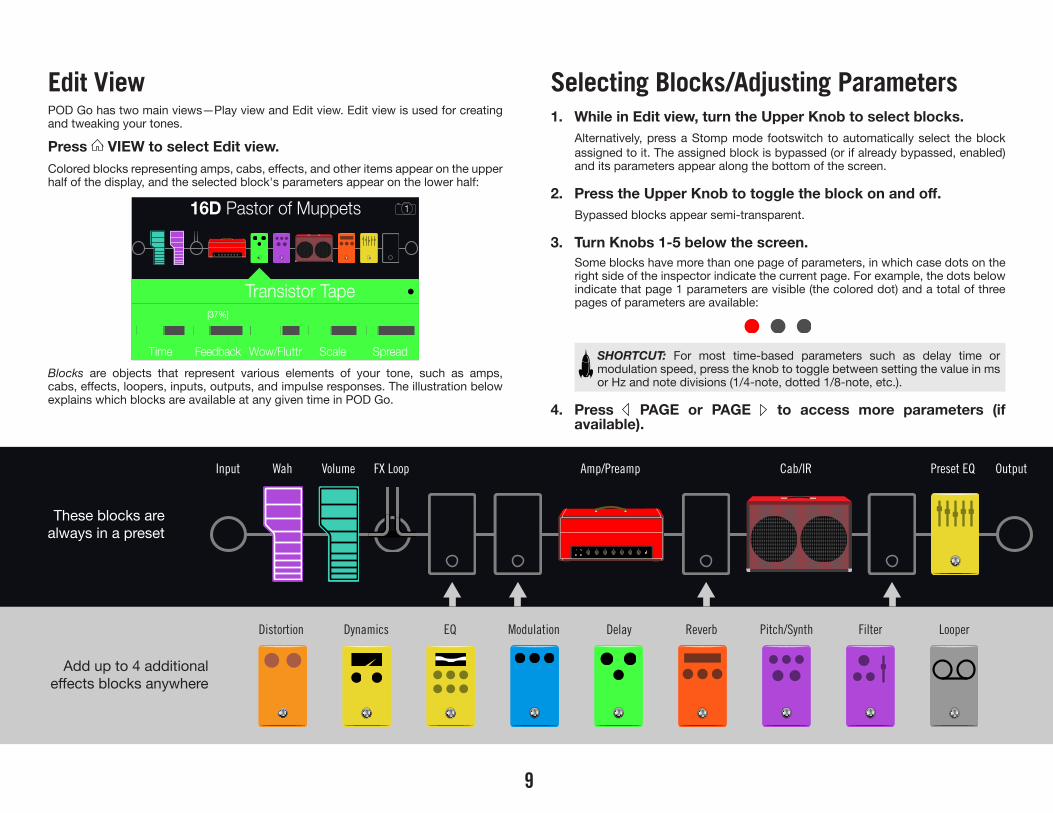
Edit ViewPOD Go has two main views—Play view and Edit view. Edit view is used for creating and tweaking your tones.
Press VIEW to select Edit view.Colored�blocks�representing�amps,�cabs,�effects,�and�other�items�appear�on�the�upper�half of the display, and the selected block's parameters appear on the lower half:
116D Pastor of Muppets
[37%]1/16
Delay Transistor Tape2.948%67%
FeedbackTime Wow/Fluttr Scale SpreadBlocks are objects that represent various elements of your tone, such as amps, cabs,�effects,�loopers,�inputs,�outputs,�and�impulse�responses.�The�illustration�below�explains�which�blocks�are�available�at�any�given�time�in�POD�Go.
Selecting Blocks/Adjusting Parameters1. While in Edit view, turn the Upper Knob to select blocks.
Alternatively, press a Stomp mode footswitch to automatically select the blockassigned to it. The assigned block is bypassed (or if already bypassed, enabled)and its parameters appear along the bottom of the screen.
2. Press the Upper Knob to toggle the block on and off.Bypassed blocks appear semi-transparent.
3. Turn Knobs 1-5 below the screen.Some blocks have more than one page of parameters, in which case dots on theright�side�of�the�inspector�indicate�the�current�page.�For�example,�the�dots�belowindicate that page 1 parameters are visible (the colored dot) and a total of threepages of parameters are available:
SHORTCUT: For most time-based parameters such as delay time or modulation speed, press the knob to toggle between setting the value in ms or Hz and note divisions (1/4-note, dotted 1/8-note, etc.).
4. Press PAGE or PAGE to access more parameters (if available).
These blocks are always in a preset
Add up to 4 additionaleffects�blocks�anywhere
Distortion
Input Wah Volume FX Loop Amp/Preamp Cab/IR Preset EQ Output
Dynamics EQ Modulation Delay Reverb Pitch/Synth Filter Looper

10
Choosing a Block's Model1. If not already there, press VIEW to select Edit view.
2. Turn the Upper Knob to select the desired block, then turn theLower Knob to change its model.Selecting models within the same category can be very quick. However, as PODGo has hundreds of items to choose from, using this method to, say, change aneffect�block�from�a�Distortion�(beginning�of�the�list)�into�a�Looper�(end�of�the�list)is very slow. Instead, you should open the model list:
3. Press the Lower Knob to open the model list:
Delay ReverbDistortNone Dyn EQ Pitch Filter LooperMod
Sweep EchoReverse Delay
Ducked Delay
Ping PongMultitap 6
Turn the Upper Knob to select model categories (if applicable).Effects�blocks�have�nine�categories�to�choose�from.�The�Amp/Preamp�and�Cab/IR�blocks�have�two.�The�Preset�EQ�block�lets�you�choose�from�up�to�seven�different�EQs.
Turn the Lower Knob to scroll items in the list.
IMPORTANT! If you encounter items in the list that are grayed out or unavailable, this means there isn't enough DSP to accommodate that category�or�model.�For�example,�if�you've�already�added�three�reverbs,�you probably won't be able to add a fourth.
4. To close the model list, press the Lower Knob again (or press to cancel).
Moving Blocks1. If not already there, press VIEW to select Edit view.
2. Turn the Upper Knob to select any block (other than Input orOutput) and press ACTION.The block appears "picked up" and the action panel appears.
1
BlockBlockCopy Paste
Delay Transistor Tape
Turn to move
On
SnapshotBypass
3. Turn the Upper Knob to move the block.
4. Press ACTION again (or ) to close the action panel.
Copying/Pasting a BlockBlocks can be copied and then pasted onto either another block location, or into an entirely�different�preset.
1. From Edit view, select the block you wish to copy and pressACTION.
2. Press Knob 1 (Copy Block).
3. Select the location you wish to paste the block—even in adifferent preset—and press ACTION.
4. Press Knob 2 (Paste Block).
11
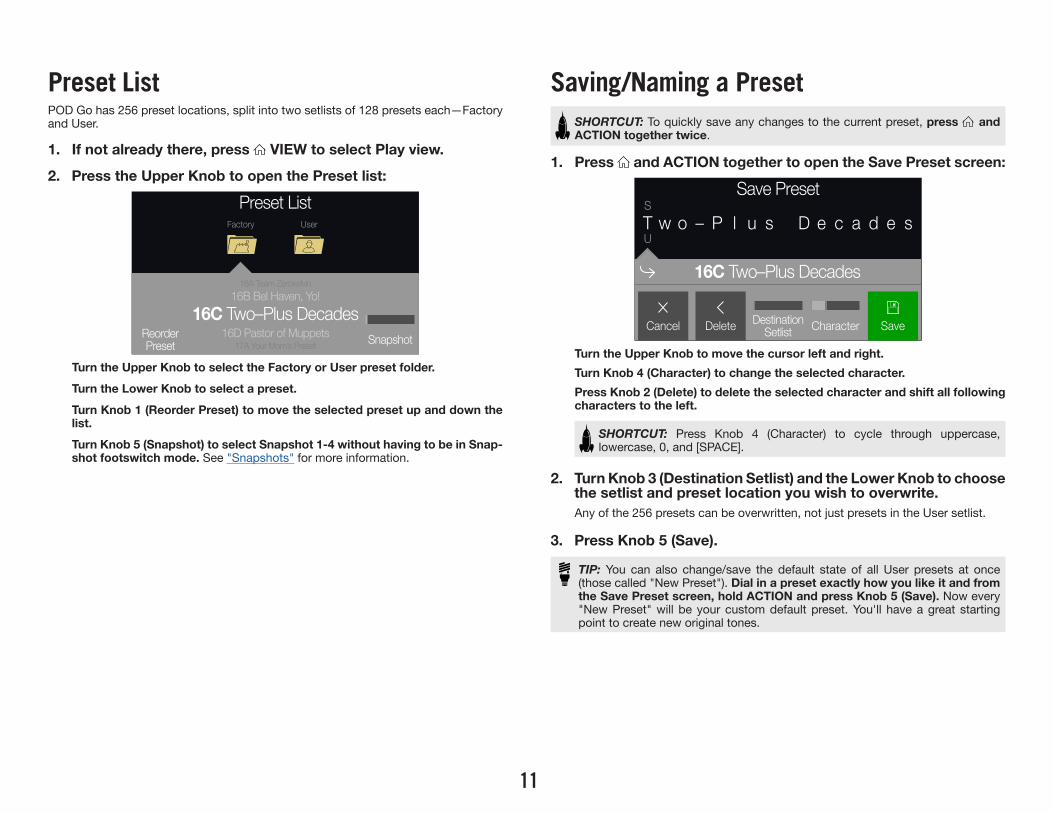
Preset ListPOD Go has 256 preset locations, split into two setlists of 128 presets each—Factory and User.
1. If not already there, press VIEW to select Play view.
2. Press the Upper Knob to open the Preset list:
Preset ListUserFactory
Reorder Snapshot
16C Two–Plus Decades17A Your Mom’s Preset
16D Pastor of Muppets
16B Bel Haven, Yo!16A Team Zerokelvin
Preset
1
Turn the Upper Knob to select the Factory or User preset folder.Turn the Lower Knob to select a preset.Turn Knob 1 (Reorder Preset) to move the selected preset up and down the list.Turn Knob 5 (Snapshot) to select Snapshot 1-4 without having to be in Snap-shot footswitch mode. See "Snapshots" for more information.
Saving/Naming a PresetSHORTCUT: To quickly save any changes to the current preset, press and ACTION together twice.
1. Press and ACTION together to open the Save Preset screen:
Save Preset
SetlistDestination
Factory T
Cancel SaveCharacterDelete
16C Two–Plus Decades
U
SeD c a d e sT w o – P ul s
Turn the Upper Knob to move the cursor left and right.Turn Knob 4 (Character) to change the selected character.Press Knob 2 (Delete) to delete the selected character and shift all following characters to the left.
SHORTCUT: Press Knob 4 (Character) to cycle through uppercase, lowercase, 0, and [SPACE].
2. Turn Knob 3 (Destination Setlist) and the Lower Knob to choose the setlist and preset location you wish to overwrite.Any of the 256 presets can be overwritten, not just presets in the User setlist.
3. Press Knob 5 (Save).
TIP: You can also change/save the default state of all User presets at once (those called "New Preset"). Dial in a preset exactly how you like it and from the Save Preset screen, hold ACTION and press Knob 5 (Save). Now every "New Preset" will be your custom default preset. You'll have a great starting point to create new original tones.

12
TAP TempoPress TAP/TUNER repeatedly to set the tempo in BPM (Beats Per Minute).Certain Delay and Modulation parameters, such as Time and Speed, can be represented with�fixed�numeric�values�(ms�or�Hz)�or�note�values�(1/4-note,�dotted�1/8-note,�etc.).�When set to note values, the parameter will follow Tap Tempo or incoming (USB) MIDI clock. Press the parameter knob to toggle between ms (or Hz) and note values.
[37%]1/16
Delay Tr
FeedbackTime W
[37%]507 ms
Delay Tr
FeedbackTime W
The current tempo can also be set from "Global Settings > MIDI/Tempo".
SHORTCUT: From Edit view, press TAP to briefly display Tempo parameters.
Tempo
Tempo BPM
120.0Per Preset
Knob Parameter Description
4 TempoChoose whether the tempo is stored and recalled with each snapshot, recalled with each preset, or is applied globally across all presets and snapshots.
5 BPM Depending on the Knob 4 (Tempo) setting, this Beats Per Minute value is saved per snapshot, per preset, or globally.
The Tuner1. Hold the TAP/TUNER switch until the Tuner screen appears:
Tuner
G
Output Reference
440 HzMute
Type
Fine
2. Pluck an individual string on your guitar.When�the�colored�box�is�left�of�center,�your�string�is�flat.�When�the�colored�box�is�right�of�center,�your�string�is�sharp.�When�the�colored�box�approaches�the�correct�tuning,�a�second�smaller�colored�box�can�be�used�for�more�precision.�When�both�arrows are illuminated, your string is perfectly in tune.
3. To exit the Tuner, step on any footswitch.All tuner settings are global.
Tuner SettingsKnob Parameter Description
1 Output Determines whether your guitar is muted completely ("Mute") or audible with no processing applied ("Bypass") while tuning
2 Reference If you'd like to tune to a reference other than standard 440 Hz, select from 425 to 455 Hz.
3 TypeChoose�from�"Fine"�(color-changing�needle�tuner�with�fine�tuning�bar),�"Coarse"�(color-changing�needle�tuner�with�no�fine�tuning bar), and "Strobe."
13
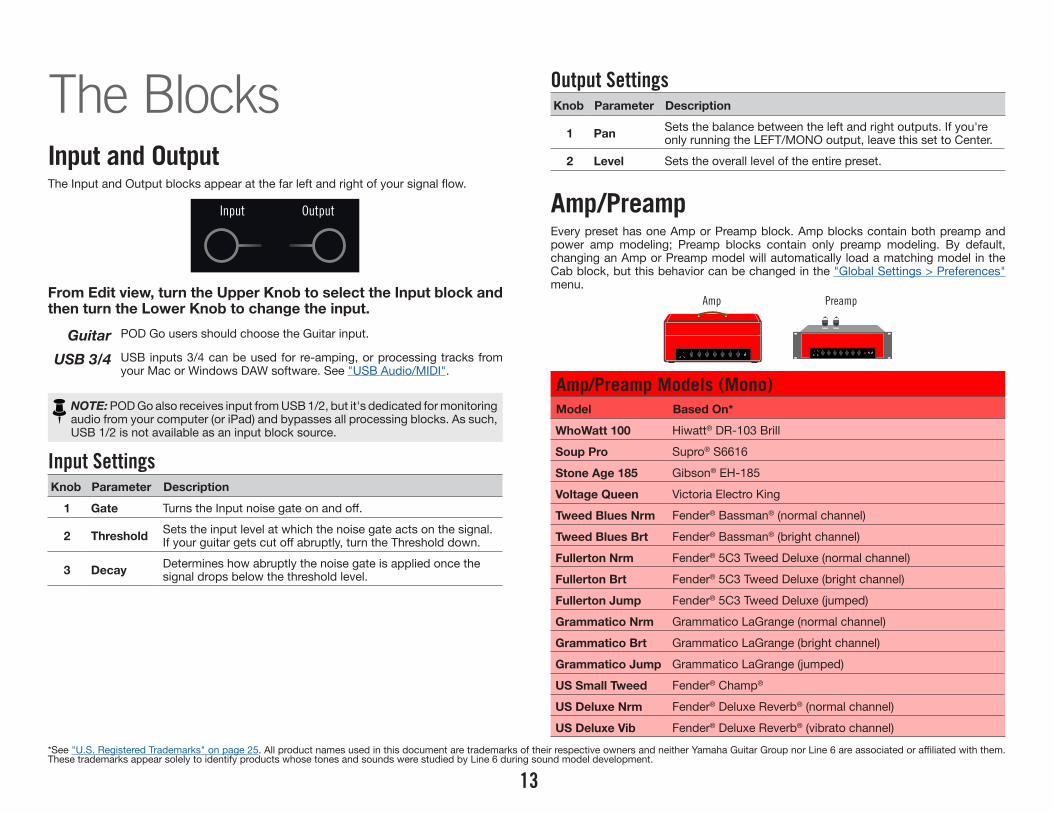
The BlocksInput and OutputThe�Input�and�Output�blocks�appear�at�the�far�left�and�right�of�your�signal�flow.
Input Output
From Edit view, turn the Upper Knob to select the Input block and then turn the Lower Knob to change the input.
Guitar POD Go users should choose the Guitar input.
USB 3/4 USB inputs 3/4 can be used for re-amping, or processing tracks fromyour Mac or Windows DAW software. See "USB Audio/MIDI".
NOTE: POD Go also receives input from USB 1/2, but it's dedicated for monitoring audio from your computer (or iPad) and bypasses all processing blocks. As such, USB 1/2 is not available as an input block source.
Input SettingsKnob Parameter Description
1 Gate Turns�the�Input�noise�gate�on�and�off.
2 Threshold Sets the input level at which the noise gate acts on the signal.If�your�guitar�gets�cut�off�abruptly,�turn�the�Threshold�down.
3 Decay Determines how abruptly the noise gate is applied once the signal drops below the threshold level.
Output SettingsKnob Parameter Description
1 Pan Sets the balance between the left and right outputs. If you're only running the LEFT/MONO output, leave this set to Center.
2 Level Sets the overall level of the entire preset.
Amp/PreampEvery preset has one Amp or Preamp block. Amp blocks contain both preamp and power amp modeling; Preamp blocks contain only preamp modeling. By default, changing an Amp or Preamp model will automatically load a matching model in the Cab block, but this behavior can be changed in the "Global Settings > Preferences" menu.
Amp Preamp
Amp/Preamp Models (Mono)Model Based On*
WhoWatt 100 Hiwatt® DR-103 Brill
Soup Pro Supro® S6616
Stone Age 185 Gibson® EH-185
Voltage Queen Victoria Electro King
Tweed Blues Nrm Fender® Bassman® (normal channel)
Tweed Blues Brt Fender® Bassman® (bright channel)
Fullerton Nrm Fender®�5C3�Tweed�Deluxe�(normal�channel)
Fullerton Brt Fender®�5C3�Tweed�Deluxe�(bright�channel)�
Fullerton Jump Fender®�5C3�Tweed�Deluxe�(jumped)�
Grammatico Nrm Grammatico LaGrange (normal channel)
Grammatico Brt Grammatico LaGrange (bright channel)
Grammatico Jump Grammatico LaGrange (jumped)
US Small Tweed Fender® Champ®
US Deluxe Nrm Fender®�Deluxe�Reverb® (normal channel)
US Deluxe Vib Fender®�Deluxe�Reverb® (vibrato channel)
*See "U.S. Registered Trademarks" on page 25.�All�product�names�used�in�this�document�are�trademarks�of�their�respective�owners�and�neither�Yamaha�Guitar�Group�nor�Line�6�are�associated�or�affiliated�with�them.These trademarks appear solely to identify products whose tones and sounds were studied by Line 6 during sound model development.

14
Amp/Preamp Models (Mono)Model Based On*
US Double Nrm Fender® Twin Reverb® (normal channel)
US Double Vib Fender® Twin Reverb® (vibrato channel)
Mail Order Twin Silvertone® 1484
Divided Duo ÷13 JRT 9/15
Interstate Zed Dr Z® Route 66
Derailed Ingrid Trainwreck®�Circuits�Express
Jazz Rivet 120 Roland® JC-120 Jazz Chorus
Essex A15 Vox® AC-15
Essex A30 Vox® AC-30 with top boost
A30 Fawn Nrm Vox® AC-30 Fawn (normal channel)
A30 Fawn Brt Vox® AC-30 Fawn (bright channel)
Matchstick Ch1 Matchless® DC30 (channel 1)
Matchstick Ch2 Matchless® DC30 (channel 2)
Matchstick Jump Matchless® DC30 (jumped)
Mandarin 80 Orange® OR80
Brit J45 Nrm Marshall® JTM-45 (normal channel)
Brit J45 Brt Marshall® JTM-45 (bright channel)
Brit Trem Nrm Marshall® JTM-50 (normal channel)
Brit Trem Brt Marshall® JTM-50 (bright channel)
Brit Trem Jump Marshall® JTM-50 (jumped)
Brit Plexi Nrm Marshall® Super Lead 100 (normal channel)
Brit Plexi Brt Marshall® Super Lead 100 (bright channel)
Brit Plexi Jump Marshall® Super Lead 100 (jumped)
Brit P75 Nrm Park® 75 (normal channel)
Brit P75 Brt Park® 75 (bright channel)
Brit 2204 Marshall® JCM-800
Placater Clean Friedman BE-100 (clean channel)
Placater Dirty Friedman BE-100 (BE/HBE channel)
Cartographer Ben Adrian Cartographer
Amp/Preamp Models (Mono)Model Based On*
German Mahadeva Bogner® Shiva
German Ubersonic Bogner® Überschall®
Cali Texas Ch 1 MESA/Boogie® Lone Star (clean channel)
Cali Texas Ch 2 MESA/Boogie® Lone Star (drive channel)
Cali IV Rhythm 1 MESA/Boogie® Mark IV (channel I)
Cali IV Rhythm 2 MESA/Boogie® Mark IV (channel II)
Cali IV Lead MESA/Boogie® Mark IV (lead channel)
Cali Rectifire MESA/Boogie®�Dual�Rectifier®
Archetype Clean Paul Reed Smith® Archon® (clean channel)
Archetype Lead Paul Reed Smith® Archon® (lead channel)
ANGL Meteor ENGL® Fireball 100
Solo Lead Clean Soldano SLO-100 (clean channel)
Solo Lead Crunch Soldano SLO-100 (crunch channel)
Solo Lead OD Soldano SLO-100 (overdrive channel)
PV Panama Peavey® 5150®
Revv Gen Purple Revv® Generator 120 (purple [gain 1] channel)
Revv Gen Red Revv® Generator 120 (red [gain 2] channel)
Line 6 Elektrik Line 6 Original
Line 6 Doom Line 6 Original
Line 6 Epic Line 6 Original
Line 6 2204 Mod Line 6 Original
Line 6 Fatality Line 6 Original
Line 6 Litigator Line 6 Original
Line 6 Badonk Line 6 Original
Ampeg B-15NF Ampeg®�B-15NF�Portaflex®
Ampeg SVT Nrm Ampeg® SVT® (normal channel)
Ampeg SVT Brt Ampeg® SVT® (bright channel)
Ampeg SVT-4 Ampeg® SVT-4 PRO
Woody Blue Acoustic® 360
*See "U.S. Registered Trademarks" on page 25.�All�product�names�used�in�this�document�are�trademarks�of�their�respective�owners�and�neither�Yamaha�Guitar�Group�nor�Line�6�are�associated�or�affiliated�with�them.These trademarks appear solely to identify products whose tones and sounds were studied by Line 6 during sound model development.

15
Amp/Preamp Models (Mono)Model Based On*
Agua 51 Aguilar® DB51
Cali Bass MESA/Boogie® M9 Carbine
Cali 400 Ch1 MESA/Boogie® Bass 400+ (channel 1)
Cali 400 Ch2 MESA/Boogie® Bass 400+ (channel 2)
G Cougar 800 Gallien-Krueger® GK 800RB
Del Sol 300 Sunn® Coliseum 300
Busy One Ch1 Pearce BC-1 preamp (channel 1)
Busy One Ch2 Pearce BC-1 preamp (channel 2)
Busy One Jump Pearce BC-1 preamp (jumped)
Studio Tube Pre Requisite Y7 mic preamp (Preamp list only)
Tonestack� and� deeper� amp� parameters� found� on� subsequent� pages� may� differ�depending on the amp model selected.
Common Amp SettingsParameter Description
MasterAdjusts the amount of overall amp output level, as well as power amp distortion. This parameter is highly interactive with all other power amp�parameters—the�lower�the�Master�is�set,�the�less�effect�the�other�controls will have.
SagLower�Sag�values�offer�a�"tighter"�responsiveness�for�faster�metal�performances; higher values provide more touch dynamics & sustain for�blues�and�classic�rock�riffs.
Hum Controls how much heater hum and AC ripple interacts with your tone. At higher settings, things get freaky.Ripple
Bias Changes the bias of the power tubes. Lower values achieve a "colder" Class�AB�biasing.�At�maximum,�the�amp�is�operating�in�Class�A.
Bias XDetermines how the power amp tubes' voicing reacts when pushed hard. Set low for a tighter feel. Set high for more tube compression. This parameter is highly reactive with the Drive and Master settings.
Cab/IRBy default, changing an Amp or Preamp model will automatically load a matching model in the Cab block, but this "Link Amp/Cab" behavior can be changed within the "Global Settings > Preferences" menu.Impulse Responses are mathematical functions representing the sonic measurements of�specific�audio�systems� (for�POD�Go,�acoustic�guitar�body�resonance�or�speaker�cabinet and microphone combinations). POD Go can load and store up to 128 custom or third-party IRs at a time.
Cab Impulse Response
Cab Models (Mono)Model Based On*Soup Pro Ellipse 1�x�6x9"�Supro® S66161x8 Small Tweed 1x8"�Fender® Champ1x12 Field Coil 1x12"�Gibson® EH1851x12 Fullerton 1x12"�Fender®�5C3�Tweed�Deluxe1x12 Grammatico 1x12"�Grammatico�LaGrange1x12 US Deluxe 1x12"�Fender®�Deluxe�Oxford1x12 Celest 12H 1x12"�÷13�JRT�9/15�G12�H301x12 Blue Bell 1x12"�Vox® AC-15 Blue1x12 Lead 80 1x12"�Bogner® Shiva CL801x12 Cali IV 1x12"�MESA/Boogie® Mk IV1x12 Cali EXT 1x12"�MESA/Boogie® EVM12L2x12 Double C12N 2x12"�Fender® Twin C12N2x12 Mail C12Q 2x12"�Silvertone® 14842x12 Interstate 2x12"�Dr�Z® Z Best V302x12 Jazz Rivet 2x12"�Roland® JC-1202x12 Silver Bell 2x12"�Vox® AC-30TB Silver2x12 Blue Bell 2x12"�Vox® AC-30 Fawn Blue2x12 Match H30 1x12"�Matchless® DC-30 G12H302x12 Match G25 1x12"�Matchless® DC-30 Greenback 25
*See "U.S. Registered Trademarks" on page 25.�All�product�names�used�in�this�document�are�trademarks�of�their�respective�owners�and�neither�Yamaha�Guitar�Group�nor�Line�6�are�associated�or�affiliated�with�them.��These trademarks appear solely to identify products whose tones and sounds were studied by Line 6 during sound model development.

16
Cab Models (Mono)Model Based On*4x10 Tweed P10R 4x10"�Fender® Bassman® P10R4x12 WhoWatt 100 4x12"�Hiwatt® AP Fane®
4x12 Mandarin EM 4x12"�Orange® Eminence4x12 Greenback25 4x12"�Marshall® Basketweave G12 M254x12 Greenback20 4x12"�Marshall® Basketweave G12 M204x12 Blackback30 4x12"�Park® 75 G12 H304x12 1960 T75 4x12"�Marshall® 1960 AT754x12 Uber V30 4x12"�Bogner® Uberkab V304x12 Uber T75 4x12"�Bogner® Uberkab T754x12 Cali V30 4x12"�MESA/Boogie® 4FB V304x12 XXL V30 4x12"�ENGL® XXL V304x12 SoloLead EM 4x12"�Soldano1x12 Del Sol 1x12"�Sunn® Coliseum1x15 Ampeg B-15 1x15"�Ampeg® B-151x18 Del Sol 1x18"�Sunn® Coliseum1x18 Woody Blue 1x18"�Acoustic® 3602x15 Brute 2x15"�MESA/Boogie®�2x15�EV4x10 Ampeg HLF 4x10"�Ampeg® SVT® 410HLF6x10 Cali Power 6x10"�MESA/Boogie® Power House8x10 Ampeg SVT E 8x10"�Ampeg® SVT®
Mic ModelsModel Based On*
57 Dynamic Shure® SM57
409 Dynamic Sennheiser® MD 409
421 Dynamic Sennheiser® MD 421-U
30 Dynamic Heil Sound® PR 30
20 Dynamic Electro-Voice® RE20
121 Ribbon Royer® R-121
160 Ribbon Beyerdynamic® M 160
4038 Ribbon Coles 4038
414 Cond AKG® C414 TLII
84 Cond Neumann® KM84
67 Cond Neumann® U67
87 Cond Neumann® U87
47 Cond Neumann® U47
112 Dynamic AKG® D112
12 Dynamic AKG® D12
7 Dynamic Shure® SM7
Cab SettingsKnob Parameter Description
1 Mic Selects one of the 16 available mic models.
2 Distance Sets the distance (1 inch to 12 inches) between the mic and the speaker grille.
3 Low Cut Filters a portion of the cab's bass and/or treble frequencies, which can help remove rumble and/or high-end harshness.4 High Cut
5 EarlyReflc Sets�the�amount�of�early�reflections.�Higher�values�add�more�reflective�room�sound�to�your�Amp�tone.
6 Level Adjusts the overall output level of the Cab.
*See "U.S. Registered Trademarks" on page 25.�All�product�names�used�in�this�document�are�trademarks�of�their�respective�owners�and�neither�Yamaha�Guitar�Group�nor�Line�6�are�associated�or�affiliated�with�them.��These trademarks appear solely to identify products whose tones and sounds were studied by Line 6 during sound model development.

17
Loading Custom IRsLoading custom impulse responses requires connecting to the POD Go Edit software in your Mac or Windows computer. The POD Go Edit application is available as a free download from line6.com/software.
1. Connect POD Go to your computer via USB and open the POD Go Edit application.
2. Click the Impulses folder.
Impulses
3. Drag one or more IR files from the desktop or any Finder window directly into the POD Go Edit app's Impulses list.POD Go Edit updates the POD Go hardware's IR list automatically.•� Go to the POD Go Edit app's Preferences to set the preferred behavior for
importing Stereo WAV IRs—there you can choose to import the left or right channel�data�of�the�file,�or�a�mix�of�both�channels�for�the�(mono)�IR.�
•� The imported IR is automatically shortened (or lengthened) to 1,024 samples.
Impulse Response SettingsKnob Parameter Description
1 IR SelectSelects one of the 128 available impulse responses. If a location contains an IR, its name appears in the inspector header.
2 Low Cut Filters a portion of the IR's bass and/or treble frequencies, which can help remove rumble and/or high-end harshness.3 High Cut
4 MixBlends the IR signal with the dry signal passed through the IR block. When set to 0%, the path bypasses the IR completely. When set to 100%, the entire path is fed through the IR, and no dry signal is heard.
5 Level Adjusts the overall output level of the IR block. -18.0dB is normal.
EffectsPOD�Go�has�nearly�all�the�effects�of�the�award-winning�HX�family�of�modelers,�as�well�as�selected�effects�from�the�classic�DL4™,�DM4™,�MM4™,�and�FM4™�stompboxes�and M13®, M9®, and M5® processors.Distortion Dynamics EQ Modulation Delay Reverb Pitch/Synth Filter Looper
IMPORTANT!�Distortion,�Dynamics,�and�Pitch/Synth�effects�are�all�mono.�EQ,�Modulation,�Delay,�Reverb,�and�Filter�effects�are�all�stereo.�The�Looper�can�be�selected as either mono or stereo. Because of this, if you place a distortion (mono only) after a delay or reverb (stereo only), your stereo signal will be collapsed to mono at the distortion block. (Note than Amp/Preamp and Cab/IR blocks are mono as well.)
From Edit view, turn the Upper Knob to select one of the four effects blocks and then turn the Lower Knob to change its model.
Distortion Models (Mono)Model Based On*Kinky Boost Xotic® EP BoosterDeranged Master Dallas Rangemaster Treble BoosterMinotaur Klon® CentaurTeemah! Paul Cochrane Timmy® OverdriveHeir Apparent Analogman Prince of ToneAlpaca Rouge Way Huge® Red LlamaCompulsive Drive Fulltone® OCDDhyana Drive Hermida ZendriveValve Driver Chandler Tube DriverTop Secret OD DOD® OD-250Scream 808 Ibanez® TS808 Tube Screamer®
Hedgehog D9 MAXON® SD9 Sonic DistortionStupor OD BOSS® SD-1 OverdriveDeez One Vintage BOSS® DS-1 Distortion (Made-in-Japan)Deez One Mod BOSS® DS-1 Distortion (Keeley modded)
*See "U.S. Registered Trademarks" on page 25.�All�product�names�used�in�this�document�are�trademarks�of�their�respective�owners�and�neither�Yamaha�Guitar�Group�nor�Line�6�are�associated�or�affiliated�with�them.��These trademarks appear solely to identify products whose tones and sounds were studied by Line 6 during sound model development.

18
Distortion Models (Mono)Model Based On*Vermin Dist Pro Co RATKWB Benadrian Kowloon Walled Bunny DistortionArbitrator Fuzz Arbiter® FuzzFace®
Triangle Fuzz Electro-Harmonix®�Big�Muff�Pi®
Industrial Fuzz Z.Vex�Fuzz�FactoryTycoctavia Fuzz Tycobrahe® OctaviaWringer Fuzz Garbage's modded BOSS® FZ-2Thrifter Fuzz Line 6 OriginalXenomorph Fuzz Subdecay Harmonic AntangonizerMegaphone MegaphoneBitcrusher Line 6 OriginalAmpeg Scrambler Ampeg® Scrambler Bass OverdriveZeroAmp Bass DI Tech 21® SansAmp Bass Driver DI V1Obsidian 7000 Darkglass® Electronics Microtubes® B7K UltraTube Drive Chandler Tube DriverScreamer Ibanez® Tube Screamer®
Overdrive DOD® Overdrive/Preamp 250Classic Dist ProCo RATHeavy Dist BOSS® Metal ZoneColordrive Colorsound® OverdriverBuzz Saw Maestro® Fuzz ToneFacial Fuzz Arbiter® Fuzz Face®
Jumbo Fuzz Vox® Tone BenderFuzz Pi Electro-Harmonix®�Big�Muff�Pi®
Jet Fuzz Roland® Jet PhaserL6 Drive Colorsound® Overdriver (modded)L6 Distortion Line 6 OriginalSub Oct Fuzz PAiA Roctave DividerOctave Fuzz Tycobrahe® Octavia
Dynamics Models (Mono)Model Based On*Deluxe Comp Line 6 OriginalRed Squeeze MXR® Dyna CompKinky Comp Xotic® SP CompressorRochester Comp Line 6 Original, created in conjunction with Billy SheehanLA Studio Comp Teletronix® LA-2A®
3-Band Comp Line 6 OriginalNoise Gate Line 6 OriginalHard Gate Line 6 OriginalAutoswell Line 6 OriginalTube Comp Teletronix® LA-2A®
Red Comp MXR® Dyna CompBlue Comp BOSS® CS-1Blue Comp Treb BOSS® CS-1 (Treble switch on)Vetta Comp Line 6 OriginalVetta Juice Line 6 OriginalBoost Comp MXR® Micro Amp
EQ Models (Stereo)Model Based On*Simple EQ Line 6 OriginalLow and High Cut Line 6 OriginalLow/High Shelf Line 6 OriginalParametric Line 6 OriginalTilt Line 6 Original10 Band Graphic MXR® 10-Band Graphic EQCali Q Graphic MESA/Boogie® Mark IV Graphic EQ
*See "U.S. Registered Trademarks" on page 25.�All�product�names�used�in�this�document�are�trademarks�of�their�respective�owners�and�neither�Yamaha�Guitar�Group�nor�Line�6�are�associated�or�affiliated�with�them.��These trademarks appear solely to identify products whose tones and sounds were studied by Line 6 during sound model development.

19
Modulation Models (Stereo)Model Based On*Optical Trem Fender® optical tremolo circuit60s Bias Trem Vox® AC-15 TremoloTremolo/Autopan BOSS® PN-2Harmonic Tremolo Line 6 OriginalBleat Chop Trem Lightfoot Labs GoatkeeperScript Mod Phase MXR® Phase 90Pebble Phaser Electro-Harmonix® Small Stone phaserUbiquitous Vibe Shin-ei Uni-Vibe®
Deluxe Phaser Line 6 OriginalGray Flanger MXR® 117 FlangerHarmonic Flanger A/DA FlangerCourtesan Flange Electro-Harmonix®�Deluxe�EMDynamix Flanger Line 6 OriginalChorus Line 6 Original70s Chorus BOSS® CE-1PlastiChorus Modded Arion SCH-Z chorusTrinity Chorus Dytronics® Tri-Stereo ChorusBubble Vibrato BOSS® VB-2 VibratoVibe Rotary Fender® Vibratone122 Rotary Leslie® 122145 Rotary Leslie® 145Double Take Line 6 OriginalAM Ring Mod Line 6 OriginalPitch Ring Mod Line 6 OriginalPattern Tremolo Line 6 OriginalPanner Line 6 OriginalBias Tremolo 1960�Vox® AC-15 TremoloOpto Tremolo 1964 Fender®�Deluxe�Reverb®
Script Phase MXR® Phase 90 (script logo version)Panned Phaser Ibanez® Flying Pan
Modulation Models (Stereo)Model Based On*Barberpole Line 6 OriginalDual Phaser Mu-Tron® Bi-PhaseU-Vibe Shin-ei Uni-Vibe®
Phaser MXR® Phase 90Pitch Vibrato BOSS® VB-2Dimension Roland® Dimension DAnalog Chorus BOSS® CE-1Tri Chorus Dytronics® Tri-Stereo ChorusAnalog Flanger MXR® FlangerJet Flanger A/DA FlangerAC Flanger MXR® Flanger80A Flanger A/DA FlangerFrequency Shift Line 6 OriginalRing Modulator Line 6 OriginalRotary Drum Fender® VibratoneRotary Drum/Horn Leslie® 145
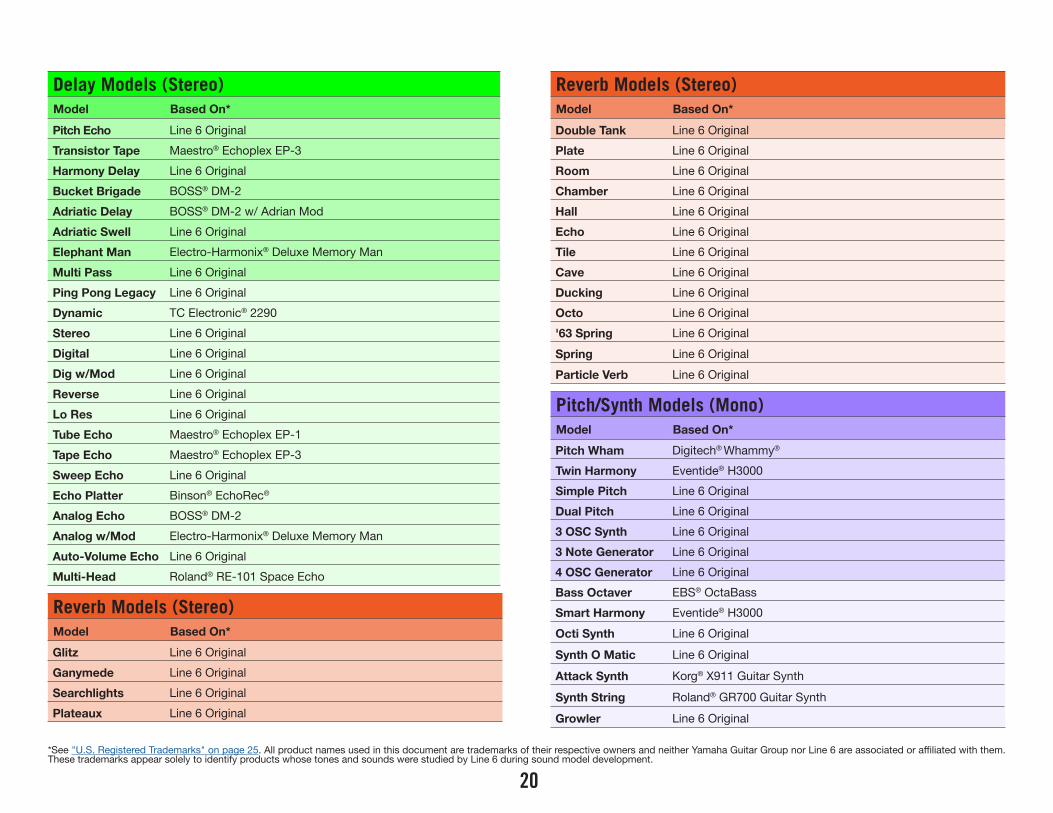
Delay Models (Stereo)Model Based On*Simple Delay Line 6 OriginalMod/Chorus Echo Line 6 OriginalDual Delay Line 6 OriginalMultitap 4 Line 6 OriginalMultitap 6 Line 6 OriginalPing Pong Line 6 OriginalSweep Echo Line 6 OriginalDucked Delay TC Electronic® 2290Reverse Delay Line 6 OriginalVintage Digital Line 6 OriginalVintage Swell Line 6 Original
*See "U.S. Registered Trademarks" on page 25.�All�product�names�used�in�this�document�are�trademarks�of�their�respective�owners�and�neither�Yamaha�Guitar�Group�nor�Line�6�are�associated�or�affiliated�with�them.��These trademarks appear solely to identify products whose tones and sounds were studied by Line 6 during sound model development.
20
Delay Models (Stereo)Model Based On*Pitch Echo Line 6 OriginalTransistor Tape Maestro®�Echoplex�EP-3Harmony Delay Line 6 OriginalBucket Brigade BOSS® DM-2Adriatic Delay BOSS® DM-2 w/ Adrian ModAdriatic Swell Line 6 OriginalElephant Man Electro-Harmonix®�Deluxe�Memory�ManMulti Pass Line 6 OriginalPing Pong Legacy Line 6 OriginalDynamic TC Electronic® 2290Stereo Line 6 OriginalDigital Line 6 OriginalDig w/Mod Line 6 OriginalReverse Line 6 OriginalLo Res Line 6 OriginalTube Echo Maestro®�Echoplex�EP-1Tape Echo Maestro®�Echoplex�EP-3Sweep Echo Line 6 OriginalEcho Platter Binson® EchoRec®
Analog Echo BOSS® DM-2Analog w/Mod Electro-Harmonix®�Deluxe�Memory�ManAuto-Volume Echo Line 6 OriginalMulti-Head Roland® RE-101 Space Echo
Reverb Models (Stereo)Model Based On*Glitz Line 6 OriginalGanymede Line 6 OriginalSearchlights Line 6 OriginalPlateaux Line 6 Original
Reverb Models (Stereo)Model Based On*Double Tank Line 6 OriginalPlate Line 6 OriginalRoom Line 6 OriginalChamber Line 6 OriginalHall Line 6 OriginalEcho Line 6 OriginalTile Line 6 OriginalCave Line 6 OriginalDucking Line 6 OriginalOcto Line 6 Original'63 Spring Line 6 OriginalSpring Line 6 OriginalParticle Verb Line 6 Original
Pitch/Synth Models (Mono)Model Based On*Pitch Wham Digitech® Whammy®
Twin Harmony Eventide® H3000Simple Pitch Line 6 OriginalDual Pitch Line 6 Original3 OSC Synth Line 6 Original3 Note Generator Line 6 Original4 OSC Generator Line 6 OriginalBass Octaver EBS® OctaBassSmart Harmony Eventide® H3000Octi Synth Line 6 Original
Synth O Matic Line 6 Original
Attack Synth Korg® X911 Guitar Synth
Synth String Roland® GR700 Guitar Synth
Growler Line 6 Original
*See "U.S. Registered Trademarks" on page 25.�All�product�names�used�in�this�document�are�trademarks�of�their�respective�owners�and�neither�Yamaha�Guitar�Group�nor�Line�6�are�associated�or�affiliated�with�them.��These trademarks appear solely to identify products whose tones and sounds were studied by Line 6 during sound model development.

21
Filter Models (Stereo)Model Based On*Mutant Filter Musitronics® Mu-Tron® IIIMystery Filter Korg® A3Autofilter Line 6 OriginalAsheville Pattrn Moog® Moogerfooger® MF-105M MuRF FilterVoice Box Line 6 Original
V Tron Musitronics® Mu-Tron® III
Q Filter Line 6 Original
Seeker Z�Vex�Seek�Wah
Obi Wah Oberheim®�voltage-controlled�S&H�filter
Tron Up Musitronics® Mu-Tron® III (up position)
Tron Down Musitronics® Mu-Tron® III (down position)
Throbber Electrix® Filter Factory
Slow Filter Line 6 Original
Spin Cycle Craig Anderton's Wah/Anti-Wah
Comet Trails Line 6 Original
Common FX SettingsParameter Description
Drive Adjusts the amount of overdrive, distortion, or fuzz.
Bass Adjusts the bass level.
Mid Adjusts the midrange level.
Treble Adjusts the treble level.
Speed
Adjusts�the�speed�of�the�effect,�with�higher�settings�providing�faster�rates. Press the knob to toggle between Hz and note values. Choosing�a�Hz�value�provides�a�specific�modulation�speed�in�cycles�per second; choosing a note value provides a time based on the current tempo. Not all Speed parameters can be synced to note values, as they may be non-linear and highly interactive.
RateAdjusts�the�rate�of�the�effect,�with�higher�settings�providing�faster�rates. Press the knob to toggle between numeric and note values. Not all Rate parameters can be synced to note values, as they may be non-linear and highly interactive.
Parameter Description
Time
Adjusts the delay/repeat time, with higher settings providing longer delays. Press the knob to toggle between ms and note values. Choosing�a�ms�value�provides�a�specific�time�in�milliseconds;�choosing a Note Division value provides a time based on the current tempo. With a note division value, this parameter’s value is retained when changing models.
Scale
Delay models with multiple taps have a Scale parameter for each tap, which�adjusts�its�time�relative�to�the�main�Time�value.�For�example,�if the Time parameter is set to 500ms, setting T1 Scale to "50%" will mean that tap will be at 250ms. If you then adjust the Time parameter, the timing of all the taps will scale accordingly.
Depth Adjusts the intensity of the modulation. Higher settings result in more extreme�pitch�bending,�wobble,�or�throb,�depending�on�the�effect.
Feedback Adjusts�the�amount�of�delayed�signal�fed�back�into�the�effect.�Higher�settings�can�provide�more�dramatic�textures.
Decay Sets�the�length�of�time�the�reverb�effect�sustains.
Predelay Determines�predelay—or�the�time�before�the�reverb�effect�is�heard.
Spread
Spread�differs�slightly�among�stereo�delay�effects.�For�most�delays,�it adjusts how widely the repeats bounce left and right. With the Ping Pong�Delay,�for�example,�0�is�in�the�middle�(mono),�and�10�is�full�left�to�right panning for the repeats.For�modulated�stereo�delays,�Spread�affects�the�LFOs'�(low�frequency�oscillators) stereo modulation behavior. At 0 the LFOs are in sync. At 10, the two LFOs are 180 degrees out of sync, so that when one side is modulating up, the other side is modulating down.
HeadroomSome�mod�and�delay�pedals'�internal�signal�paths�exhibit�a�bit�of�grit,�especially when placed after a high-gain distortion block. Negative values increase the perceived amount of grit; positive values clean things up a bit. At 0dB, the model behaves like the original pedal.
Low Cut Filters a portion of the block's bass and/or treble frequencies, which can help remove rumble and/or high-end harshness.High Cut
MixBlends�the�effected�"wet"�signal�vs.�the�"dry"�signal�passed�through�the�block.�When�set�to�0%,�the�path�bypasses�the�effect�completely.�When�set�to�100%,�the�entire�path�is�fed�through�the�effect,�and�no�dry thru signal is heard.
Level
Adjusts�the�overall�output�level�of�the�effects�block.�Be�careful�not�to�boost this parameter too high on multiple blocks, as digital clipping could occur. You should typically leave this at 0.0dB for most blocks. Where the original pedal's level or volume knob behavior doesn't really apply to dB values, 0.0-10 may be used.
*See "U.S. Registered Trademarks" on page 25.�All�product�names�used�in�this�document�are�trademarks�of�their�respective�owners�and�neither�Yamaha�Guitar�Group�nor�Line�6�are�associated�or�affiliated�with�them.��These trademarks appear solely to identify products whose tones and sounds were studied by Line 6 during sound model development.
22
Parameter Description
TrailsTrails Off: Any delay repeats or reverb decays are instantly muted when the block is bypassed. Trails On: Any delay repeats or reverb decays continue to decay naturally when the block is bypassed or a different�snapshot�is�selected.�
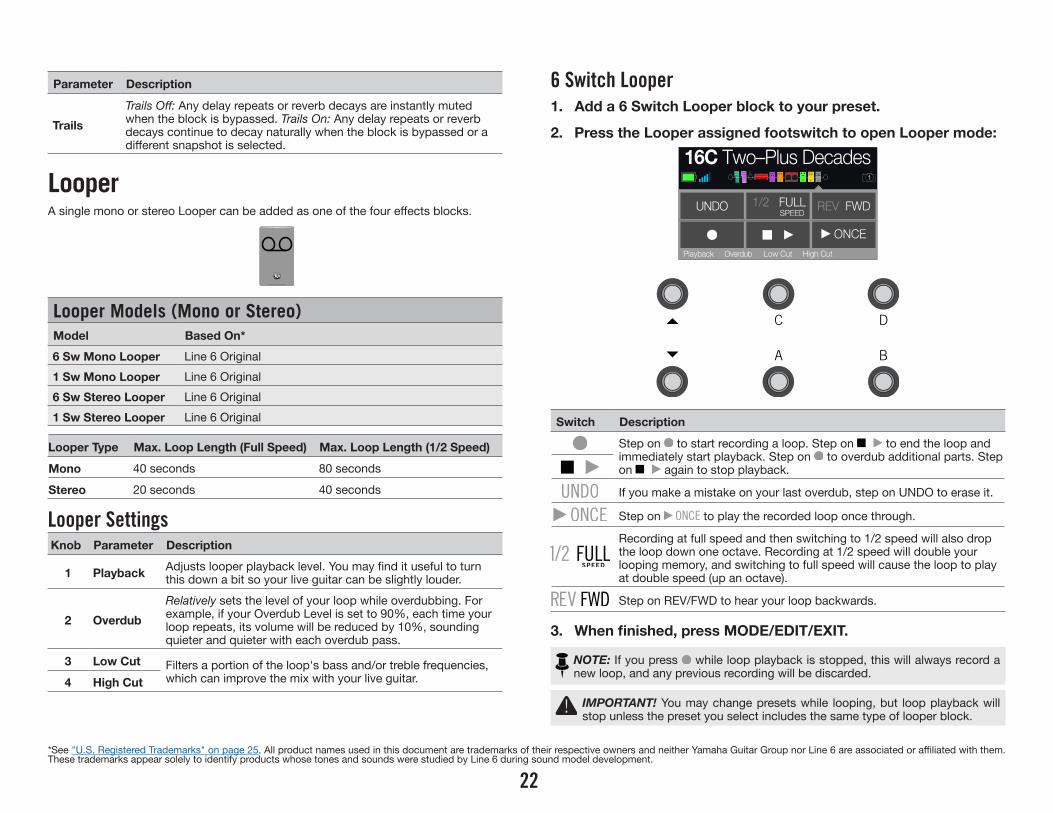
LooperA�single�mono�or�stereo�Looper�can�be�added�as�one�of�the�four�effects�blocks.
Looper Models (Mono or Stereo)Model Based On*6 Sw Mono Looper Line 6 Original1 Sw Mono Looper Line 6 Original6 Sw Stereo Looper Line 6 Original1 Sw Stereo Looper Line 6 Original
Looper Type Max. Loop Length (Full Speed) Max. Loop Length (1/2 Speed)
Mono 40 seconds 80 seconds
Stereo 20 seconds 40 seconds
Looper SettingsKnob Parameter Description
1 Playback Adjusts�looper�playback�level.�You�may�find�it�useful�to�turn�this down a bit so your live guitar can be slightly louder.
2 OverdubRelatively sets the level of your loop while overdubbing. For example,�if�your�Overdub�Level�is�set�to�90%,�each�time�your�loop repeats, its volume will be reduced by 10%, sounding quieter and quieter with each overdub pass.
3 Low Cut Filters a portion of the loop's bass and/or treble frequencies, which�can�improve�the�mix�with�your�live�guitar.4 High Cut
6 Switch Looper1. Add a 6 Switch Looper block to your preset.
2. Press the Looper assigned footswitch to open Looper mode:
BA
DC
1
16C Two–Plus Decades
OverdubPlayback Low Cut High Cut
UNDO 1/2 FULL REV FWD
ONCESPEED
Switch Description
Step on to start recording a loop. Step on to end the loop and immediately start playback. Step on to overdub additional parts. Step on again to stop playback.
If you make a mistake on your last overdub, step on UNDO to erase it.
Step on to play the recorded loop once through.
Recording at full speed and then switching to 1/2 speed will also drop the loop down one octave. Recording at 1/2 speed will double your looping memory, and switching to full speed will cause the loop to play at double speed (up an octave).
Step on REV/FWD to hear your loop backwards.
3. When finished, press MODE/EDIT/EXIT.
NOTE: If you press while loop playback is stopped, this will always record a new loop, and any previous recording will be discarded.
IMPORTANT! You may change presets while looping, but loop playback will stop unless the preset you select includes the same type of looper block.
*See "U.S. Registered Trademarks" on page 25.�All�product�names�used�in�this�document�are�trademarks�of�their�respective�owners�and�neither�Yamaha�Guitar�Group�nor�Line�6�are�associated�or�affiliated�with�them.��These trademarks appear solely to identify products whose tones and sounds were studied by Line 6 during sound model development.
23
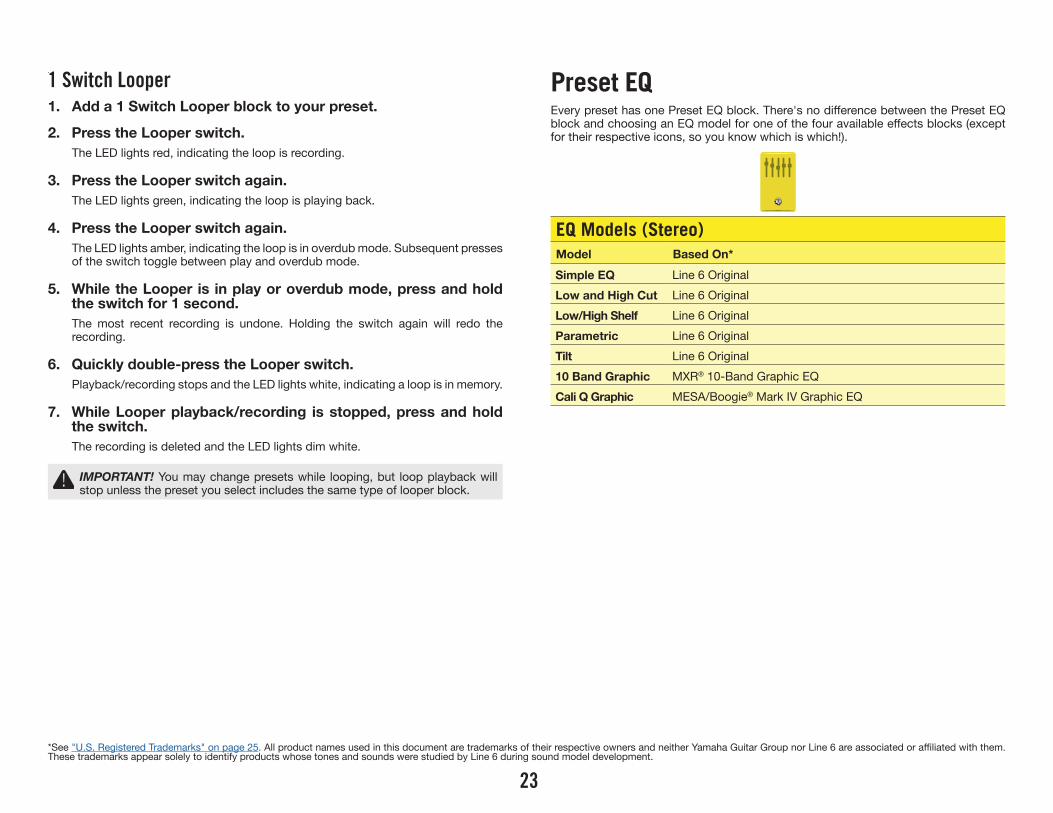
`1 Switch Looper1. Add a 1 Switch Looper block to your preset.
2. Press the Looper switch.The LED lights red, indicating the loop is recording.
3. Press the Looper switch again.The LED lights green, indicating the loop is playing back.
4. Press the Looper switch again.The LED lights amber, indicating the loop is in overdub mode. Subsequent presses of the switch toggle between play and overdub mode.
5. While the Looper is in play or overdub mode, press and hold the switch for 1 second.The most recent recording is undone. Holding the switch again will redo the recording.
6. Quickly double-press the Looper switch.Playback/recording stops and the LED lights white, indicating a loop is in memory.
7. While Looper playback/recording is stopped, press and hold the switch.The recording is deleted and the LED lights dim white.
IMPORTANT! You may change presets while looping, but loop playback will stop unless the preset you select includes the same type of looper block.
Preset EQEvery�preset�has�one�Preset�EQ�block.�There's�no�difference�between�the�Preset�EQ�block�and�choosing�an�EQ�model�for�one�of�the�four�available�effects�blocks�(except�for their respective icons, so you know which is which!).
EQ Models (Stereo)Model Based On*Simple EQ Line 6 OriginalLow and High Cut Line 6 OriginalLow/High Shelf Line 6 OriginalParametric Line 6 OriginalTilt Line 6 Original10 Band Graphic MXR® 10-Band Graphic EQCali Q Graphic MESA/Boogie® Mark IV Graphic EQ
*See "U.S. Registered Trademarks" on page 25.�All�product�names�used�in�this�document�are�trademarks�of�their�respective�owners�and�neither�Yamaha�Guitar�Group�nor�Line�6�are�associated�or�affiliated�with�them.��These trademarks appear solely to identify products whose tones and sounds were studied by Line 6 during sound model development.

24
Wah/VolumeEvery preset has one Wah block (automatically assigned to EXP 1) and one Volume block (automatically assigned to EXP 2).
EXP 1
EXP 2
WAH
VOL
EXP 1
EXP 2
WAH
VOL
Wah Volume
Move the expression pedal forward and press the hidden toe switch to toggle between EXP 1 (Wah) and EXP 2 (Volume).
Wah Models (Stereo)Model Based On*UK Wah 846 Vox® V846Teardrop 310 Dunlop® Cry Baby® Fasel model 310Fassel Dunlop® Cry Baby® Super
Weeper Arbiter® Cry Baby®
Chrome Vox® V847
Chrome Custom Modded�Vox® V847
Throaty RMC® Real McCoy 1
Vetta Wah Line 6 Original
Colorful Colorsound® Wah-fuzz
Conductor Maestro® Boomerang
Volume/Pan Models (Stereo)Model Based On*Volume Pedal Line 6 OriginalGain Line 6 OriginalPan Line 6 OriginalStereo Width Line 6 Original
FX LoopThe�FX�Loop�lets�you�dynamically� insert�your�favorite�external�stompboxes�(or�rack�effects)�into�any�location�in�your�preset.
FX Loop Enabled FX Loop Bypassed
NOTE: The�FX�Loop�can�be�set�for�instrument�(for�inserting�stompboxes)�or�line�level operation. See "Global Settings > Ins/Outs"
FX Loop SettingsPage Knob Parameter Description
1
1 Send Adjusts�the�level�sent�to�your�external�device.
2 Return Adjusts the level received at the Return jack.
3 Mix
Blends the FX loop signal vs. the dry signal passed through the FX Loop block. When set to 0%, the path bypasses the FX loop completely. When set to 100%, the entire path is fed through the FX loop, and no dry thru signal is heard.
2 1 Trails
Trails Off:�An�external�stompbox�would�be�instantly�muted when the FX Loop block is bypassed. Trails On: An�external�delay�or�reverb�stompbox�would�continue�to�decay naturally when the FX Loop block is bypassed or a�different�snapshot�is�selected.�
*See "U.S. Registered Trademarks" on page 25.�All�product�names�used�in�this�document�are�trademarks�of�their�respective�owners�and�neither�Yamaha�Guitar�Group�nor�Line�6�are�associated�or�affiliated�with�them.��These trademarks appear solely to identify products whose tones and sounds were studied by Line 6 during sound model development.
25
U.S. Registered TrademarksAll�product�names�used� in� this�document�are� trademarks�of� their� respective�owners�and�neither�Yamaha�Guitar�Group�nor�Line�6�are�associated�or�affiliated�with� them.�These�trademarks appear solely to identify products whose tones and sounds were studied by Line 6 during sound model development.
5150 is a registered trademark of ELVH Inc.Acoustic is a registered trademark of GTRC Services, Inc. Aguilar is a registered trademark David Boonshoft.AKG, DOD and Whammy are registered trademarks of Harman International Industries, Inc. Arbiter�is�a�registered�trademark�of�Sound�City�Amplification�LLC.Binson,� Dytronics,� LA-2A� and� Teletronix� are� registered� trademarks� of� Universal�Audio, Inc. Beyerdynamic is a registered trademark of Beyer Dynamic GmbH & Co. KG. Bogner�and�Überschall�are�registered�trademarks�of�Bogner�Amplification.�BOSS and Roland are registered trademarks of Roland Corporation U.S.Colorsound is a registered trademark of Sola Sound Limited Corporation, UK. Cry Baby, Dunlop, Fuzz Face, MXR and Uni-Vibe are registered trademarks of Dunlop Manufacturing, Inc. Darkglass and Microtubes are registered trademarks of Darkglass Electronics, TMI Douglas Castro.Digitech is a registered trademark of DOD Electronics Corporation.Dr. Z is a registered trademark of Dr. Z Amps, Inc.EBS is a registered trademark according of EBS Holding.EchoRec is a registered trademark of Nicholas Harris. Electro-Harmonix�and�Big�Muff�Pi�are�registered�trademarks�of�New�Sensor�Corp.�Electro-Voice is a registered trademark of Bosch Security Systems, Inc. Engl�is�a�registered�trademark�of�Beate�Ausflug�and�Edmund�Engl.�Eventide is a registered trademark of Eventide Inc. Fane is a trademark of Fane International Ltd. Fender,� Twin� Reverb,� Bassman,� Champ,� Deluxe� Reverb� and� Sunn� are� registered�trademarks of Fender Musical Instruments Corp. Fulltone is a registered trademark of Fulltone Musical Products, Inc. Gallien-Krueger is a registered trademark of Gallien Technology, Inc. Gibson and Maestro are registered trademarks of Gibson Guitar Corp. Heil Sound is a registered trademark of Heil Sound Ltd. Hiwatt is a registered trademark of Simon Giles and Justin Harrison. Ibanez is a registered trademark of Hoshino, Inc. Klon is a registered trademark of Klon, LLC. Korg is a registered trademark of Korg, Inc.
Leslie is a registered trademark of Suzuki Musical Instrument Manufacturing Co. Ltd. Lone Star is a registered trademark of Randall C. Smith.Marshall�is�a�registered�trademark�of�Marshall�Amplification�Plc.�Matchless is a registered trademark of Matchless, LLC. MAXON is a registered trademark of Nisshin Onpa Co., Ltd. Mesa/Boogie�and�Rectifier�are�registered�trademarks�of�Mesa/Boogie,�Ltd.�Moog and Moogerfooger are registered trademarks of Moog Music, Inc.Musitronics is a registered trademark of Mark S. Simonsen. Mu-Tron is a registered trademark of Henry Zajac. Neumann is a registered trademark of Georg Neumann GmbH.Orange is a registered trademark of Orange Brand Services Limited. Park is a registered trademark of AMP RX LLC. Paul Reed Smith and Archon are registered trademarks of Paul Reed Smith Guitars, LP. Peavey is a registered trademark of Peavey Electronics Corporation. Revv�is�a�registered�trademark�of�Revv�Amplification�Inc.RMC is a registered trademark of Richard McClish.Royer is a registered trademark of Bulldog Audio, Inc. DBA Rover Labs. Sennheiser is a registered trademark of Sennheiser Electronic GmbH & Co. KG. Shure is a registered trademark of Shure Inc. Silvertone is a registered trademark of Samick Music Corporation. Supro is a registered trademark of Absara Audio LLC. TC Electronic is a registered trademark of MUSIC Group IP Ltd. Tech21 is a registered trademark of Tech21 Licensing Ltd.Timmy is a registered trademark of Paul Cochrane AKA PAULCAUDIO. Trainwreck is a registered trademark of of Scott Alan Fischer and Mona Fischer. Tube Screamer is a registered trademark of Hoshino Gakki Co. Ltd. Tycobrahe is a registered trademark of Kurt Stier. Vox�is�a�registered�trademark�of�Vox�R&D�Limited.Way Huge is a registered trademark of Saucy Inc.Xotic is a registered trademark of Prosound Communications, Inc.

26
SnapshotsOn Play and Edit views, a small camera icon appears on the right side of the screen. Its number indicates the current snapshot.
1
What are Snapshots?Snapshots are presets within a preset.Imagine you have eight pet octopuses, all slithering around your amp and pedalboard. Instead of tap-dancing on your pedals (and accidentally stepping on a tentacle), you shout "Okay, gang—here's the verse... now!" and your octopuses switch some pedals on,� switch� other� pedals� off,� and� tweak� all� your� amps� and� pedals'� knobs� to�make�the best possible settings for your song's verse, all seamlessly with spillover delay and reverb trails. Then you shout "Ready for the chorus... now!" and your octopuses instantly tweak everything for your song's chorus. That's the power of snapshots.
The only thing your octopuses/snapshots can't do is rearrange your pedalboard or swap�out�an�effect�or�amp�for�a�different�one�(unless�both�effect�blocks�exist�in�the�same preset).
Each preset can have up to 64 parameters assigned to Snapshots; hence, eight octopuses with eight tentacles each. The octopuses can remember four separate groups�of�on/off�statuses�and�setting�tweaks�per�preset�(say,�for�your�verse,�chorus,�solo, and overindulgent noise segue); that is, POD Go has four snapshots per preset.Each of the four snapshots in POD Go stores and recalls the state of certain elements in the current preset, including:
•� Block Bypass—The� bypass� (on/off)� state� of� all� processing� blocks� (except�Loopers)
NOTE: The bypass state of blocks is automatically stored and recalled per snapshot.�Optionally,� you�can�exclude�a�block's�bypass�state� from�being�affected�by�snapshots�by�choosing�Off�for�the�Snapshot�Bypass�option—available for the selected block by pressing ACTION while in Edit view.
•� Parameter Control—The values of any parameters assigned to controllers (up to 64 per preset), including the Snapshot controller
• Tempo—The current system tempo, if "Global Settings > MIDI/Tempo" > Tempo Select is set to "Per Snapshot." (By default, it's set to "Per Preset")
Depending�on�how�you�configure�them,�snapshots�can�act�as�four�variations�of�the�same�tone,�four�drastically�different�tones,�or�any�combination�thereof—all�within�the�same preset. In many cases, a single preset's snapshots may accommodate all the various tones required for a song.
Using Snapshots1. From Preset footswitch mode, press and together to enter
Snapshot mode.
2. Step on A, B, C, or D to select a different Snapshot (1, 2, 3, or 4).
3. Adjust the preset by doing one or more of the following:• Turn one or more effects on or off by pressing stomp mode footswitches
or pressing the Upper Knob in "Edit View". Snapshots remember every block's�on/off�state.
• To adjust a parameter AND have it automatically update per snapshot, press and turn the knob.�Snapshots�remember�the�values�of�up�to�64�effects�parameters. The parameter's value appears white and in brackets, indicating a controller's assigned to it—in this case, the Snapshots controller:
[37%]1/16
Delay Transistor Tape2.948%67%
FeedbackTime Wow/Flutr Scale Spread
27
SHORTCUT: Hold ACTION and press a parameter knob to quickly remove any controller assignment (including the Snapshots controller). The value appears in color, indicating no controller is assigned to it.
NOTE: You can also manually assign the Snapshots controller. From the "Bypass/Control" page, select the desired block and parameter and turn Knob 2 (Controller) to select "Snapshot."
4. Switch back to the snapshot you started with.POD Go instantly and seamlessly returns to its previous state. Remember to save your preset to retain all your snapshot settings.*
*NOTE: If you've changed "Global Settings > Preferences" > Snapshot Edits to�"Discard,"�you�must�save�the�preset�before�selecting�a�different�snapshot;�otherwise any edits will be discarded!
Saving SnapshotsPress and ACTION together twice to save the preset.Saving a preset stores all of its 4 snapshots automatically.
NOTE: Selecting a preset recalls the snapshot that was active when the preset was saved.
Tips for Creative Snapshot Use•� The�obvious�use�case�for�snapshots�is�designating�them�to�specific�sections�
of�your�song.�For�example,�Snapshot�1�could�be�the�Intro,�Snapshot�2�might�be Verse 1, Snapshot 3 might be the Chorus, and so on.
•� Turn any Delay, Reverb, and/or FX Loops blocks' Trails parameter to "On" for seamless spillover between snapshots.
•� Worried� that� further� tweaking� might� make� your� tone� worse,� not� better?�Snapshots are a great way to compare minor changes between tones without having�to�take�your�hands�off�the�guitar.
•� Set�different� keys� in�Harmony�Delay�blocks�or� intervals� in�Pitch�blocks�per�snapshot.
•� Having�difficulty�maintaining�consistent�volume�throughout�a�song?�Set�one�of�the�effects'�Gain�or�Level�parameter�per�snapshot.
•� Exclude� a� block's� bypass� from� being� affected� by� snapshots� by� setting� its��Snapshot�Bypass�to�Off�(while�in�Edit�view,�select�the�block�and�press�ACTION).
•� Alternatively, you can change snapshots via USB MIDI. See "MIDI CC" on page 39.
28
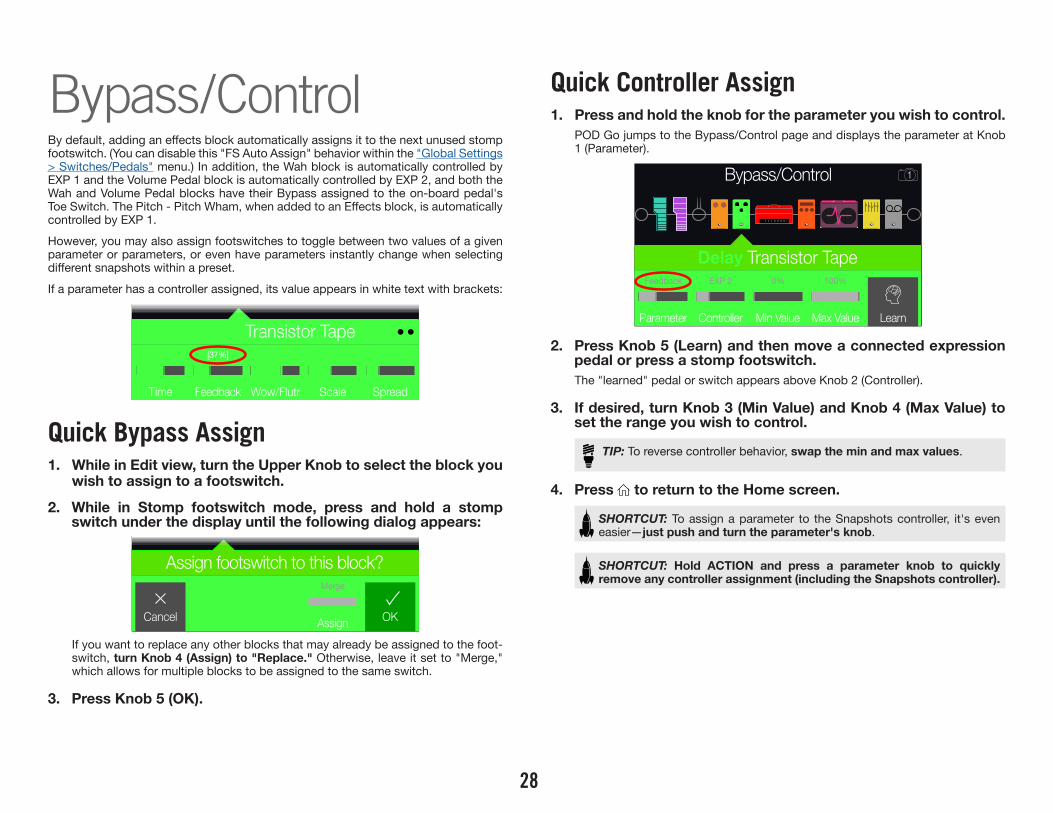
Bypass/ControlBy�default,�adding�an�effects�block�automatically�assigns�it�to�the�next�unused�stomp�footswitch. (You can disable this "FS Auto Assign" behavior within the "Global Settings > Switches/Pedals" menu.) In addition, the Wah block is automatically controlled by EXP 1 and the Volume Pedal block is automatically controlled by EXP 2, and both the Wah and Volume Pedal blocks have their Bypass assigned to the on-board pedal's Toe�Switch.�The�Pitch�-�Pitch�Wham,�when�added�to�an�Effects�block,�is�automatically�controlled by EXP 1.However, you may also assign footswitches to toggle between two values of a given parameter or parameters, or even have parameters instantly change when selecting different�snapshots�within�a�preset.If�a�parameter�has�a�controller�assigned,�its�value�appears�in�white�text�with�brackets:
[37%]1/16
Delay Transistor Tape2.948%67%
FeedbackTime Wow/Flutr Scale Spread
Quick Bypass Assign1. While in Edit view, turn the Upper Knob to select the block you
wish to assign to a footswitch.
2. While in Stomp footswitch mode, press and hold a stomp switch under the display until the following dialog appears:
Freq
110 Hz
Cancel OK
Assign footswitch to this block?Merge
AssignIf you want to replace any other blocks that may already be assigned to the foot- switch, turn Knob 4 (Assign) to "Replace." Otherwise, leave it set to "Merge," which allows for multiple blocks to be assigned to the same switch.
3. Press Knob 5 (OK).
Quick Controller Assign1. Press and hold the knob for the parameter you wish to control.
POD Go jumps to the Bypass/Control page and displays the parameter at Knob 1 (Parameter).
1Bypass/Control
Delay Transistor TapeFeedback
Parameter Learn
EXP 2 0% 100%
Controller Min Value Max Value
2. Press Knob 5 (Learn) and then move a connected expression pedal or press a stomp footswitch.The "learned" pedal or switch appears above Knob 2 (Controller).
3. If desired, turn Knob 3 (Min Value) and Knob 4 (Max Value) to set the range you wish to control.
TIP: To reverse controller behavior, swap the min and max values.
4. Press to return to the Home screen.
SHORTCUT: To assign a parameter to the Snapshots controller, it's even easier—just push and turn the parameter's knob.
SHORTCUT: Hold ACTION and press a parameter knob to quickly remove any controller assignment (including the Snapshots controller).
29
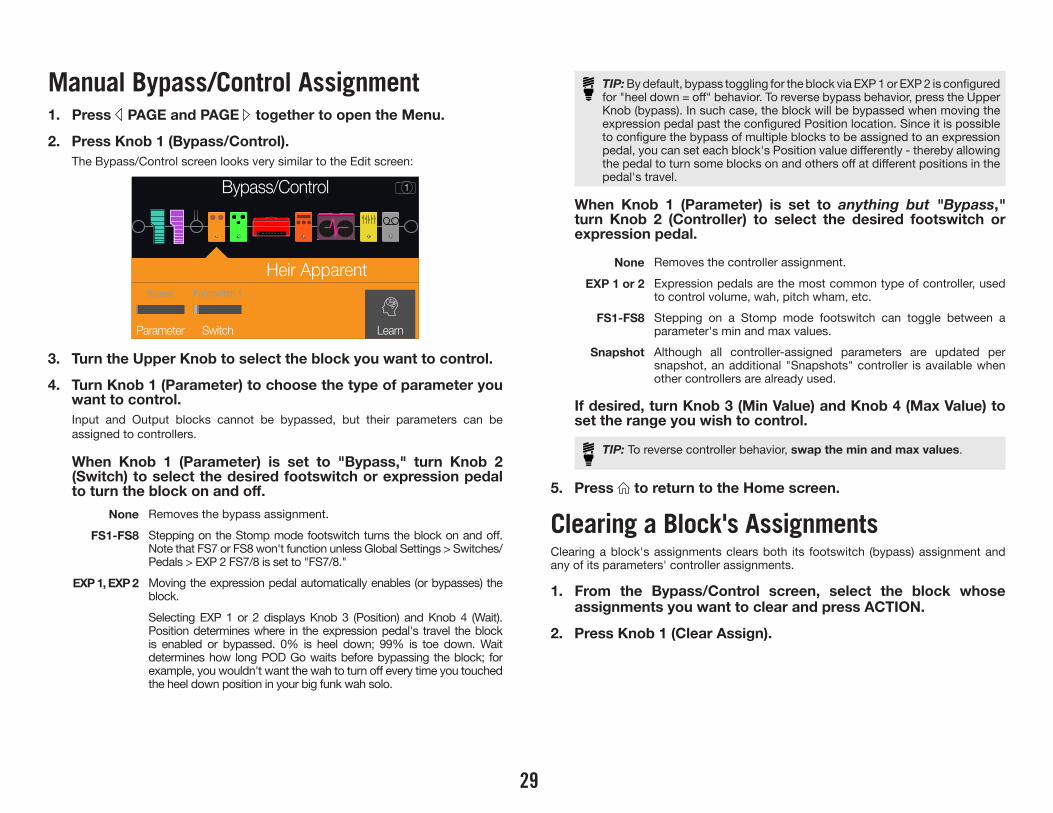
Manual Bypass/Control Assignment1. Press PAGE and PAGE together to open the Menu.
2. Press Knob 1 (Bypass/Control).The Bypass/Control screen looks very similar to the Edit screen:
1Bypass/Control
Distortion Heir ApparentBypass
Parameter Learn
Footswitch 1
Switch
3. Turn the Upper Knob to select the block you want to control.
4. Turn Knob 1 (Parameter) to choose the type of parameter you want to control.Input and Output blocks cannot be bypassed, but their parameters can be assigned to controllers.
When Knob 1 (Parameter) is set to "Bypass," turn Knob 2 (Switch) to select the desired footswitch or expression pedal to turn the block on and off.
None Removes the bypass assignment.
FS1-FS8 Stepping�on�the�Stomp�mode�footswitch�turns�the�block�on�and�off.�Note that FS7 or FS8 won't function unless Global Settings > Switches/Pedals > EXP 2 FS7/8 is set to "FS7/8."
EXP 1, EXP 2 Moving�the�expression�pedal�automatically�enables�(or�bypasses)�the�block.Selecting EXP 1 or 2 displays Knob 3 (Position) and Knob 4 (Wait). Position�determines�where� in� the�expression�pedal's� travel� the�block�is enabled or bypassed. 0% is heel down; 99% is toe down. Wait determines how long POD Go waits before bypassing the block; for example,�you�wouldn't�want�the�wah�to�turn�off�every�time�you�touched�the heel down position in your big funk wah solo.
TIP:�By�default,�bypass�toggling�for�the�block�via�EXP�1�or�EXP�2�is�configured�for�"heel�down�=�off"�behavior.�To�reverse�bypass�behavior,�press�the�Upper�Knob (bypass). In such case, the block will be bypassed when moving the expression�pedal�past�the�configured�Position�location.�Since�it�is�possible�to�configure�the�bypass�of�multiple�blocks�to�be�assigned�to�an�expression�pedal,�you�can�set�each�block's�Position�value�differently�-�thereby�allowing�the�pedal�to�turn�some�blocks�on�and�others�off�at�different�positions�in�the�pedal's travel.
When Knob 1 (Parameter) is set to anything but "Bypass," turn Knob 2 (Controller) to select the desired footswitch or expression pedal.
None Removes the controller assignment.
EXP 1 or 2 Expression�pedals�are�the�most�common�type�of�controller,�used�to control volume, wah, pitch wham, etc.
FS1-FS8 Stepping on a Stomp mode footswitch can toggle between a parameter's�min�and�max�values.
Snapshot Although all controller-assigned parameters are updated per snapshot, an additional "Snapshots" controller is available when other controllers are already used.
If desired, turn Knob 3 (Min Value) and Knob 4 (Max Value) to set the range you wish to control.
TIP: To reverse controller behavior, swap the min and max values.
5. Press to return to the Home screen.
Clearing a Block's AssignmentsClearing a block's assignments clears both its footswitch (bypass) assignment and any of its parameters' controller assignments.
1. From the Bypass/Control screen, select the block whose assignments you want to clear and press ACTION.
2. Press Knob 1 (Clear Assign).

30
Clearing All Assignments1. From the Bypass Assign screen, press ACTION.
2. Press Knob 2 (Clear All Assign) to clear all block assignments.The following dialog appears:
Freq
110 Hz
Cancel OK
Clear all assignments?
3. Press Knob 5 (OK).
IMPORTANT! Clearing All Controller Assignments also removes the Wah, Volume,�and�any�other�existing�controller�assignments�from�EXP�1�and�EXP�2.�Use this function with caution!
Swapping Stomp FootswitchesIf you want to change the location of Stomp mode footswitches (especially those with multiple items assigned), instead of manually reassigning everything, you can quickly swap all assignments between two stomp footswitches.
1. While in Stomp footswitch mode, press and hold any two Stomp footswitches until the following dialog appears:
Freq
110 Hz
Cancel OK
Swap footswitch assignments?
2. Press Knob 5 (OK).

31
Global EQThe Global EQ built into POD Go has three fully parametric bands plus variable low and�high�cut�filters,�and�is�used�for�compensating�for�the�wide�disparity�in�acoustic�environments on tour or when traveling from studio to studio.
NOTE: Global EQ is applied to all presets and is only heard from the MAIN OUT and PHONES outputs; it is never heard from the Amp Out or USB outputs.
1. Press PAGE and PAGE together to open the Menu.
2. Press Knob 4 (Global EQ).The Global EQ screen appears:
GLOBAL EQ OFF GLOBAL EQ ONGlobal EQ
Low
Freq Q Gain
0.7110 Hz 0.0dB
Global EQ
Low
Freq Q Gain
0.7110 Hz 0.0dB
3. Press the Upper Knob to turn Global EQ on and off.
4. Turn the Upper Knob to select the desired EQ band—Low Cut, Low, Mid, High, or High Cut.
5. Turn Knobs 1-3 to adjust the selected EQ band.
Resetting Global EQResetting�the�Global�EQ�returns�its�settings�to�factory�default�(flat).
1. From the Global EQ screen, press ACTION.
2. Press Knob 1 (Reset EQ).The following dialog appears:
Freq
110 Hz
Cancel OK
Reset Global EQ?
3. Press Knob 5 (OK).

32
Global SettingsThe Global Settings menu contains additional parameters that apply to all presets, such�as�input�and�output�levels,�footswitch�configurations,�etc.
1. Press PAGE and PAGE together to open the Menu.
2. Press Knob 5 (Global Settings).The Global Settings screen appears:
Global Settings
Ins/OutsReturnInstrumentMain OutOff Line
LevelPadGuitar In Main Out Amp Out Return
TypeSourceFX Loop
Level
Ins/Outs Switches/PedalsPreferences MIDI/Tempo
3. Turn the Upper Knob to select one of the submenus.If necessary, press PAGE to view more parameters.
Restoring All Global SettingsRestoring the Global Settings returns them to factory default. Performing this reset does�not�affect�any�presets�you�may�have�created.
1. From the Global Settings menu, press ACTION.
2. Press Knob 1 (Factory Settings).The following dialog appears:
Freq
110 Hz
Cancel OK
Restore all Global Settings?
3. Press Knob 5 (OK).
Global Settings > Ins/Outs Page Knob Parameter Description
1
1 Guitar In Pad If your guitar or bass has active or really loud pickups, you may want to turn this on. There's really no rule; use what sounds best.
2 Main Out Level Choose�"Line"�when�connecting�the�MAIN�OUT�jacks�to�powered�speakers�or�mixers;�choose�"Instrument"�when�connecting�to�stompboxes�or�the�front of guitar amps. When using a single speaker or amp, connect only the LEFT/MONO 1/4” jack.
3 Amp Out Source
Choose�"Main�Out"�if�you�want�the�POD�Go�AMP�OUT�jack�to�echo�the�MAIN�OUTS�(except�in�mono);�choose�"Pre�Cab/IR"�if�you�want�the�AMP�OUT�jack�to�be�tapped�off�directly�before�the�Cab/IR�block�(and�therefore,�would�not�include�the�Cab/IR�block�or�any�blocks�after�it). This way, you can�send�a�cab-emulated�signal�to�your�powered�speakers�(or�mixer)�while�simultaneously�sending�a�non-cab-emulated�signal�straight�into�your�guitar amp.
4 FX Loop Level Determines�whether�the�FX�LOOP�jacks�should�accommodate�stompboxes�("Instrument")�or�line�level�studio�rack�type�processors�("Line").
5 Return Type Determines whether the signal received at the stereo RETURN/AUX jack should be used for the FX Loop block—or—act as an always-on, stereo Aux�In�(no�processing)�for�jamming�along�with�MP3�players,�drum�machines,�DJ�mixers,�etc.
2 1 USB In 1/2 Trim Sets�the�level�of�incoming�audio�from�USB�1/2�for�jamming�along�with�YouTube™,�Spotify,�your�DAW,�etc.�Normally,�this�should�be�left�at�0.0dB.

33
Global Settings > Preferences Page Knob Parameter Description
1
1 Link Amp/Cab Determines whether or not changing the Amp/Preamp block's model will automatically change the Cab block's model to match.
2 Snapshot EditsDetermines�whether�or�not�any�edits�made�to�a�snapshot�(block�on/off,�parameter�control,�tempo)�are�remembered�when�returning�to�that�snapshot. When set to "Recall," any snapshot edits are recalled when jumping from snapshot to snapshot, and appear as you last left them. When set to "Discard," any snapshot edits are discarded when jumping from snapshot to snapshot, and appear as the preset was last saved. If you want to save changes made to a snapshot while Snapshot Edits is set to "Discard,” press and ACTION together twice before selecting another.
3 Tempo Pitch Determines�how�delay�repeats�sonically�behave�when�repeatedly�pressing�TAP.�"Authentic"�respects�the�natural�pitch�fluctuations�inherent�when�changing a real delay pedal's time knob; "Transparent" minimizes these artifacts.
Global Settings > Switches/Pedals Page Knob Parameter Description
1
1 Stomp Block Sel Determines whether pressing a Stomp mode footswitch automatically selects the assigned block for editing.
2 FS Auto Assign Determines�whether�newly�added�effects�blocks�are�automatically�assigned�to�unused�Stomp�mode�switches�for�block�bypass.�When�set�to�"Off,"�you�must�manually�assign�blocks�to�footswitches.
3 Stomp Mode By default, Stomp footswitch mode displays 6 stomps. You may also choose "4 Switches", which replaces FS1 and FS4 with and switches, so you can access preset banks and snapshots from without leaving Stomp mode.
4 Snapshot ModeWhen set to "Auto Return," POD Go returns to Preset mode after selecting a snapshot. When set to "Manual," POD Go stays in Snapshot mode until pressing MODE/EDIT/EXIT. When set to "Toggle," pressing and toggles between Preset and Snapshot footswitch modes and POD Go remembers this state even after switching to Stomp mode.
5 Up/Down SwitchesWhen set to "Presets" or "Snapshots," and change to PRESET / or SNAPSHOT / , where pressing either switch instantly selects�the�next/previous�preset�or�snapshot,�without�a�bank�queue.�This�is�useful�if�you've�programmed�a�fixed�set�list�for�your�show�and�just want to increment through presets or snapshots. SHORTCUT: At any time, press and hold both and to cycle through BANK / , PRESET / , and SNAPSHOT / .
2
1 EXP 2 FS7/8 Determines�whether�the�EXP�2�|�FOOTSWITCH�7/8�jack�acts�as�an�Expression�Pedal�2�input—or—a�dual�footswitch�input�for�adding�two�additional stomp switches.
2 EXP 1 Polarity lf�your�external�expression�pedal�appears�to�work�backwards—for�example,�a�Volume�pedal�block�is�loudest�with�the�heel�all�the�way�down—set this to "Inverted."3 EXP 2 Polarity
4 EXP 1 Position Determines�whether�the�POD�Go�expression�pedal�positions�are�recalled�per�snapshot,�per�preset,�or�applied�globally.�If�you�want�a�Volume�Pedal or Wah to maintain its position when switching presets, set this to "Global."5 EXP 2 Position
31 Switch LEDs Determines�whether�the�Stomp�mode�footswitches'�colored�LED�rings�appear�dim�when�bypassed�("Dim/Lit"),�or�off�when�bypassed�("Off/Lit").�
When�playing�in�bright�sunlight,�you�may�want�to�set�to�this�to�"Off/Lit"�to�increase�contrast.
2 Tap Display Determines�how�the�Tempo�is�displayed.�"LED�Flash"�flashes�the�red�TAP�LED,�"Tempo�Panel"�opens�the�Tempo�Panel�when�stepping�on�TAP�while in Edit View, and "LED+Panel" does both.
*For�connecting�an�external�footswitch�to�access�Stomps�7�and�8,�the�use�of�a�momentary�(unlatched)�type�footswitch�is�recommended.

34
Global Settings > MIDI/Tempo Knob Parameter Description
1 MIDI Channel Sets the system base MIDI channel that POD Go uses for both receiving and sending MIDI communication via USB.
2 Tx/Rx MIDI PC Determines whether POD Go transmits a Program Change (PC) message via USB when recalling presets. It also determines whether it responds to incoming PC messages via USB.
3 Rx MIDI Clock Determines whether POD Go responds to incoming MIDI beat clock via USB.
4 Tempo Select Choose whether the tempo is stored and recalled with each snapshot, recalled with each preset, or is applied globally across all presets and snapshots.
5 BPM Depending on the Knob 4 (Tempo Select) setting, this Beats Per Minute tempo value is saved per snapshot, per preset, or globally.

35
USB Audio/MIDIPOD Go functions as a USB 2.0, multichannel, 24-bit, low-latency audio interface for Windows and Mac computers, as well as for iPad and iPhone mobile devices (with optional Apple Camera Connection Kit adapter), and is compatible with all major DAW software. Refer to the illustration and tables below for a description of how audio is handled between POD Go and your computer.
NOTE:�For�USB�audio�operation�on�Windows�computers,�you�must�first�download�and install the Line 6 POD Go ASIO driver (see page 37). For Mac computers and Apple iPad or iPhone mobile devices, there is no Line 6 driver installation necessary—POD Go supports the class compliant driver, which operates at 24-bit/48kHz sample rate.For details on driver support with the latest Windows and Mac operating systems, please visit line6.com/support.
1/2 3/4 1 2 3 4
LEFT/MONO RIGHTMAIN OUT GUITAR IN
116C Two–Plus Decades
Off
Input Guitar
Input Gate
-48.0dB 500ms
Threshold Decay
Jamm
ing with YouTube, Spotify, etc.
USB OUTPUTS USB INPUTS
Input block set to USB 3/4
DI (D
ry) S
igna
l fo
r Re-
ampi
ng
Computer Input SourceUSB 1 and 2 Output of POD Go (with all processing)USB 3 and/or 4 POD Go's GUITAR IN (dry, no processing, for re-amping later)
Computer Output Destination
USB 1/2POD Go's Main and Phones outputs (direct, no processing) for monitoring your DAW's master output or jamming along with YouTube™,�Spotify,�etc.
USB 3/4 POD Go's Input block for re-amping (only active when Input block is set to USB 3/4)
Hardware Monitoring vs. DAW Software MonitoringPOD Go provides hardware monitoring, which lets you hear your live input signal at all times, independent of your DAW software's monitor settings. Hardware monitoring can be desirable since it allows you to hear your live guitar with processing added and essentially "latency-free," since the monitor signal is not routed through your DAW software.In some DAW recording scenarios, it may be preferable to utilize your recording application's "input monitoring" or "software monitoring" feature, which routes your live input signal through the armed recording track, thus allowing you to monitor the input�effected�by�any�plug-ins�you�may�have�inserted�on�the�track.�The�one�downside�of DAW software monitoring, however, is that your live input signal will be delayed slightly due to being routed through the software and back to POD Go's outputs, which is referred to as "latency." POD Go is designed to provide very low latency operation— see "ASIO Driver Settings (Windows only)" for info and settings.When a DAW track's software monitoring is active, you'll likely not want to simultaneously hear the POD Go hardware monitoring signal. To achieve this, it is best to use the POD Go USB 3/4 inputs as your DAW audio track’s input source, and to select the Main L/R Output block on POD Go and turn its Level all the way down. This configuration�allows�you�to�hear�and�record�only�the�dry,�DI�signal�from�POD�Go�into�your�audio�track.�(See�the�next�section�for�more�on�recording�a�DI�track.)
DI Recording and Re-ampingA common DAW recording technique is to record a dry DI (Direct Input) signal, such as the unprocessed signal from your guitar. This lets you process the DI track later with plug-ins (such as the Helix�Native�plug-in), and/or "re-amp" the DI track through an amp or other outboard gear. POD Go has handy options built right in for recording DI tracks,�as�well�as�for�easy�re-amplification�of�DI�tracks�back�through�your�own�POD�Go�tones,�all�without�extra�hardware�or�cabling!�POD�Go�offers�two�special�DI�outputs—USB�Outs�3�and�4,�which�are�fed�directly�from�the GUITAR IN.
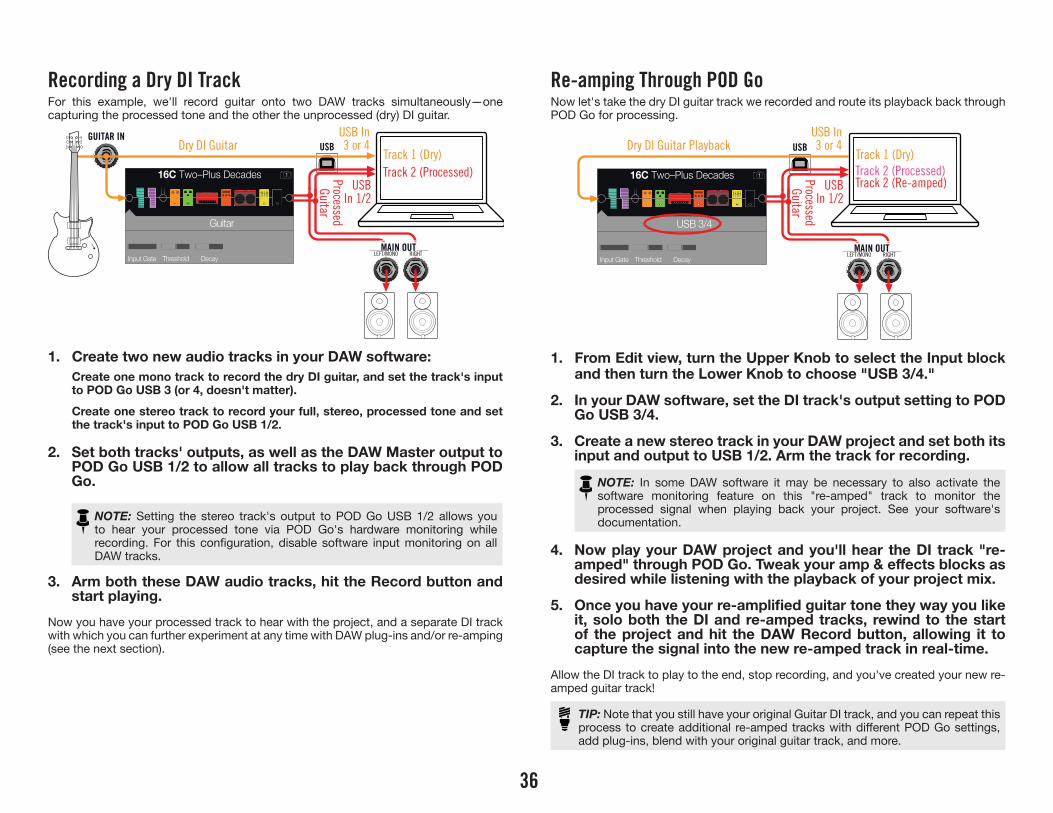
36
Recording a Dry DI TrackFor� this� example,� we'll� record� guitar� onto� two� DAW� tracks� simultaneously—one�capturing the processed tone and the other the unprocessed (dry) DI guitar.
116C Two–Plus Decades
Off
Input Guitar
Input Gate
-48.0dB 500ms
Threshold DecayLEFT/MONO RIGHT
MAIN OUT
USBGUITAR IN
Dry DI GuitarTrack 1 (Dry)
USB In 3 or 4
Processed Guitar
USB In 1/2
Track 2 (Processed)
1. Create two new audio tracks in your DAW software: Create one mono track to record the dry DI guitar, and set the track's input to POD Go USB 3 (or 4, doesn't matter).Create one stereo track to record your full, stereo, processed tone and set the track's input to POD Go USB 1/2.
2. Set both tracks' outputs, as well as the DAW Master output to POD Go USB 1/2 to allow all tracks to play back through POD Go.
NOTE: Setting the stereo track's output to POD Go USB 1/2 allows you to hear your processed tone via POD Go's hardware monitoring while recording.� For� this� configuration,� disable� software� input�monitoring�on�all�DAW tracks.
3. Arm both these DAW audio tracks, hit the Record button and start playing.
Now you have your processed track to hear with the project, and a separate DI track with�which�you�can�further�experiment�at�any�time�with�DAW�plug-ins�and/or�re-amping�(see�the�next�section).
Re-amping Through POD GoNow let's take the dry DI guitar track we recorded and route its playback back through POD Go for processing.
116C Two–Plus Decades
Off
Input USB 3/4
Input Gate
-48.0dB 500ms
Threshold DecayLEFT/MONO RIGHT
MAIN OUT
USBDry DI Guitar PlaybackTrack 1 (Dry)
USB In 3 or 4
Processed Guitar
USB In 1/2
Track 2 (Processed)Track 2 (Re-amped)
1. From Edit view, turn the Upper Knob to select the Input block and then turn the Lower Knob to choose "USB 3/4."
2. In your DAW software, set the DI track's output setting to POD Go USB 3/4.
3. Create a new stereo track in your DAW project and set both its input and output to USB 1/2. Arm the track for recording.
NOTE: In some DAW software it may be necessary to also activate the software monitoring feature on this "re-amped" track to monitor the processed signal when playing back your project. See your software's documentation.
4. Now play your DAW project and you'll hear the DI track "re-amped" through POD Go. Tweak your amp & effects blocks as desired while listening with the playback of your project mix.
5. Once you have your re-amplified guitar tone they way you like it, solo both the DI and re-amped tracks, rewind to the start of the project and hit the DAW Record button, allowing it to capture the signal into the new re-amped track in real-time.
Allow the DI track to play to the end, stop recording, and you've created your new re-amped guitar track!
TIP: Note that you still have your original Guitar DI track, and you can repeat this process�to�create�additional� re-amped�tracks�with�different�POD�Go�settings,�add plug-ins, blend with your original guitar track, and more.

37
Core Audio Driver Settings (macOS only)To use POD Go as an audio interface for Mac applications, it is not necessary to install any additional driver. POD Go will utilize the Mac computer's class compliant USB driver automatically simply by connecting to your USB port. POD Go will then appear as a selectable Core Audio device within the Mac Utilities > Audio MIDI Setup panel and/or directly within your DAW host and multimedia applications. Note that this Apple class�compliant�driver�offers�strictly�48kHz�native�sample�rate�operation.
ASIO Driver Settings (Windows only)When using POD Go as an audio interface for Windows DAW applications, it is highly recommended�to�configure�the�software�to�utilize�the�POD�Go�"ASIO"�driver.�The�Line�6�POD�Go�ASIO�driver�offers� the�superior,� low-latency�audio�performance� required�for DAW recording. This driver selection is typically found in your DAW software's Preferences or Options dialog - see your software's documentation.
NOTE: Download and install the latest Line 6 POD Go ASIO driver for Windows from line6.com/software.
Once the POD Go ASIO driver has been selected in your DAW software, you'll also see a button in the same dialog for "ASIO Settings" (or with a similar title). Press this button to launch the POD Go Control Panel, where you make the following driver settings.
Sound Control
Panel
This button launches the Windows Sound Control Panel, where you�can�optionally�configure�POD�Go�to�be�the�audio�playback�device for multi-media applications (such as Windows Media Player, iTunes, etc.) The settings within the Windows Sound Control Panel are not relevant for your DAW software, since standard multi-media applications utilize the standard Windows driver.
Default Bit Depth
Select the Bit Depth at which POD Go will operate for recording and playback with your DAW software. 24 bit or 32 bit are recommended for quality audio production.
ASIO Buffer Size
Your goal is to achieve the lowest latency possible in your DAW software,�but�with�glitch-free�audio�performance.�Smaller�buffer�size results in lower latency, however, also increases the demands on your computer, which can result in clicks, pops or other audio artifacts. Start with a lower slider setting here and, if you encounter audio performance issues, come back to this panel and move this slider to the right incrementally to remedy the problem.
Click the Apply and OK buttons when your POD Go Control Panel settings are complete to return to your DAW software. Please also refer to your DAW software's documentation� for� more� about� its� own� specific� audio� device,� buffer,� and� project�settings.
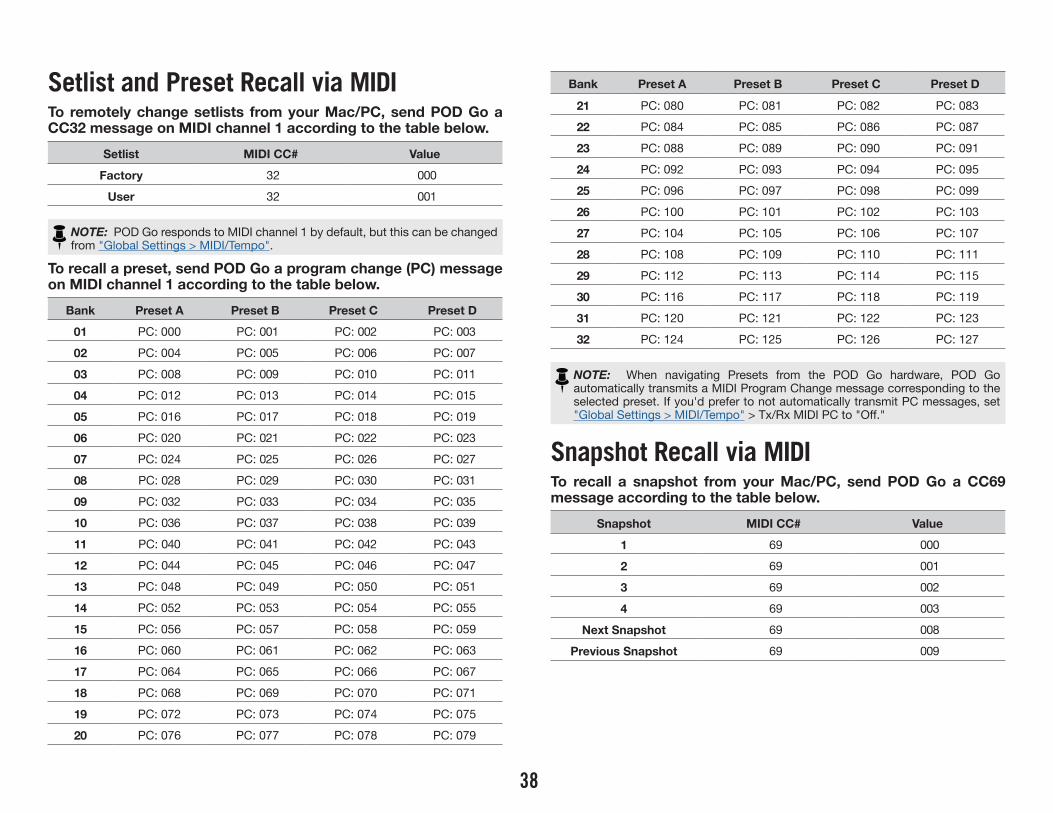
38
Setlist and Preset Recall via MIDITo remotely change setlists from your Mac/PC, send POD Go a CC32 message on MIDI channel 1 according to the table below.
Setlist MIDI CC# Value
Factory 32 000
User 32 001
NOTE: POD Go responds to MIDI channel 1 by default, but this can be changed from "Global Settings > MIDI/Tempo".
To recall a preset, send POD Go a program change (PC) message on MIDI channel 1 according to the table below.
Bank Preset A Preset B Preset C Preset D
01 PC: 000 PC: 001 PC: 002 PC: 003
02 PC: 004 PC: 005 PC: 006 PC: 007
03 PC: 008 PC: 009 PC: 010 PC: 011
04 PC: 012 PC: 013 PC: 014 PC: 015
05 PC: 016 PC: 017 PC: 018 PC: 019
06 PC: 020 PC: 021 PC: 022 PC: 023
07 PC: 024 PC: 025 PC: 026 PC: 027
08 PC: 028 PC: 029 PC: 030 PC: 031
09 PC: 032 PC: 033 PC: 034 PC: 035
10 PC: 036 PC: 037 PC: 038 PC: 039
11 PC: 040 PC: 041 PC: 042 PC: 043
12 PC: 044 PC: 045 PC: 046 PC: 047
13 PC: 048 PC: 049 PC: 050 PC: 051
14 PC: 052 PC: 053 PC: 054 PC: 055
15 PC: 056 PC: 057 PC: 058 PC: 059
16 PC: 060 PC: 061 PC: 062 PC: 063
17 PC: 064 PC: 065 PC: 066 PC: 067
18 PC: 068 PC: 069 PC: 070 PC: 071
19 PC: 072 PC: 073 PC: 074 PC: 075
20 PC: 076 PC: 077 PC: 078 PC: 079
Bank Preset A Preset B Preset C Preset D
21 PC: 080 PC: 081 PC: 082 PC: 083
22 PC: 084 PC: 085 PC: 086 PC: 087
23 PC: 088 PC: 089 PC: 090 PC: 091
24 PC: 092 PC: 093 PC: 094 PC: 095
25 PC: 096 PC: 097 PC: 098 PC: 099
26 PC: 100 PC: 101 PC: 102 PC: 103
27 PC: 104 PC: 105 PC: 106 PC: 107
28 PC: 108 PC: 109 PC: 110 PC: 111
29 PC: 112 PC: 113 PC: 114 PC: 115
30 PC: 116 PC: 117 PC: 118 PC: 119
31 PC: 120 PC: 121 PC: 122 PC: 123
32 PC: 124 PC: 125 PC: 126 PC: 127
NOTE: When navigating Presets from the POD Go hardware, POD Go automatically transmits a MIDI Program Change message corresponding to the selected preset. If you'd prefer to not automatically transmit PC messages, set "Global Settings > MIDI/Tempo"�>�Tx/Rx�MIDI�PC�to�"Off."
Snapshot Recall via MIDITo recall a snapshot from your Mac/PC, send POD Go a CC69 message according to the table below.
Snapshot MIDI CC# Value
1 69 000
2 69 001
3 69 002
4 69 003
Next Snapshot 69 008
Previous Snapshot 69 009
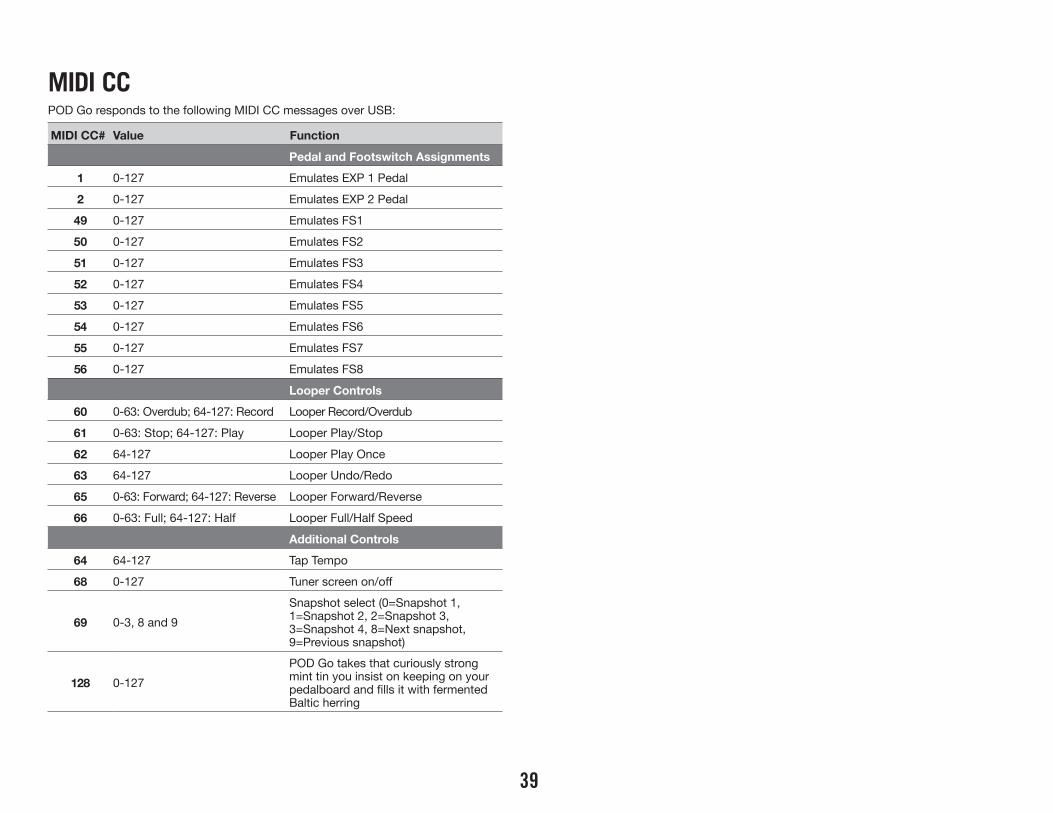
39
MIDI CCPOD Go responds to the following MIDI CC messages over USB:
MIDI CC# Value Function
Pedal and Footswitch Assignments1 0-127 Emulates EXP 1 Pedal
2 0-127 Emulates EXP 2 Pedal
49 0-127 Emulates FS1
50 0-127 Emulates FS2
51 0-127 Emulates FS3
52 0-127 Emulates FS4
53 0-127 Emulates FS5
54 0-127 Emulates FS6
55 0-127 Emulates FS7
56 0-127 Emulates FS8
Looper Controls60 0-63: Overdub; 64-127: Record Looper Record/Overdub
61 0-63: Stop; 64-127: Play Looper Play/Stop
62 64-127 Looper Play Once
63 64-127 Looper Undo/Redo
65 0-63: Forward; 64-127: Reverse Looper Forward/Reverse
66 0-63: Full; 64-127: Half Looper Full/Half Speed
Additional Controls64 64-127 Tap Tempo
68 0-127 Tuner�screen�on/off
69 0-3, 8 and 9Snapshot select (0=Snapshot 1, 1=Snapshot 2, 2=Snapshot 3, 3=Snapshot�4,�8=Next�snapshot,�9=Previous snapshot)
128 0-127POD Go takes that curiously strong mint tin you insist on keeping on your pedalboard�and�fills�it�with�fermented�Baltic herring
40
Additional ResourcesLooking�for�more�info?�We’ve�got�plenty�of�online�resources,�just�a�click�away.
•� Download additional Help documentation covering POD Go and software from the Line 6 website at Line 6 Product Manuals
•� Check out the Line 6 Support page for access to helpful tips, videos, discussion forums, or to contact Line 6 Technical Support
•� Stay up to date with the latest updated version of POD Go Edit and all your other Line 6 applications, available from the Line 6 Software Downloads page
•� Visit the Line 6 CustomTone site where you can share your POD Go presets with the world, and download free presets created by Line 6 and other users just like you
•� Check out the ever-growing selection of premium add-ons for Line 6 products available on Marketplace
•� Can’t�get�enough�Line�6�Gear�&�accessories?�Head�on�over�to�the�Line 6 Store

41
®
Copyright © 2022 FDOKUMEN

