


Bahasa
Halaman
Hukum


Eurex Repo Trading System F7
Eurex Repo F7 GUI - User Manual
Version: 2.3

Contents
1. Introduction 18
2. Getting Started 22
2.1 Logging On 22
2.2 Using the Eurex Repo F7 GUI 22
2.2.1 Using Menus and Toolbars 22
2.2.2 Basic Features 26
2.2.3 Basic Operations 30
2.3 Logging Out 34
3. Landing Page 35
3.1 F7 Header 36
3.1.1 Header 36
3.1.2 Custom Views 49
3.1.3 Menus 50
3.2 Market Watch screen 100
3.2.1 Filtering - Market Watch screen 101
3.2.2 Advanced Filtering 102
3.2.3 Watchlist Selection 102
3.2.4 Sorting Data - Market Watch screen 103
3.2.5 Grouping – Market Watch screen 105
3.2.6 Re-arranging Columns - Market Watch screen 105
3.2.7 Quick Action Utility 106
3.2.8 Manage Custom Views 116
3.2.9 Pagination 122
3.3 Trading Book 124
3.3.1 Quick Action Utility / Using Right-Click 126
3.4 Notifications 139
3.4.1 Sent - Notifications 139
3.4.2 Received - Notifications 144

3.5 Own Trades / Own Loans / Public Trades 152
3.6 Tools 154
3.6.1 Position Board 154
3.6.2 Managing Member Relationships 171
3.6.3 Managing Distribution Lists 176
3.6.4 Managing Automatic Trade Completion 182
3.6.5 Configure Trade Slip 189
3.6.6 Manage Watchlists 191
4. Managing Pre Trading Services 201
4.1 Managing Quotes 202
4.1.1 To Enter a Quote 202
4.1.2 To Maintain Quotes 208
4.1.3 To Respond to a Quote 232
4.2 Managing Addressed Offers 235
4.2.1 To Enter an Addressed Offer 235
4.2.2 To Maintain an Addressed Offer 240
4.2.3 To Respond to an Addressed Offer 242
4.3 Managing Indication of Interest 247
4.3.1 To Enter an Indication of Interest 247
4.3.2 To Maintain an Indication of Interest 249
4.3.3 To Respond to an Indication of Interest 251
4.4 Managing Broker Offer 253
4.4.1 To Enter a Broker Offer 253
4.4.2 To Maintain a Broker Offer 255
4.5 Managing Pre- Arranged Offer 257
4.5.1 To Enter a Pre-Arranged Offer 257
4.5.2 To Maintain a Pre-Arranged Offer 259
4.6 Managing Auctions 260
4.6.1 To Create an Auction 260
4.6.2 To Send an IOI 262
4.6.3 To Bid in an Auction 263
4.6.4 To Close the Auction 265
4.6.5 Allocate Amount to Bidders 266

4.6.6 Create Trade 269
5. Managing Post Trading Services 270
5.1 Manage Trade 270
5.1.1 To Modify a Trade 270
5.1.2 To Cancel a Trade 282
5.2 Trade Completion 290
5.3 Inquiring Cash Position 294
6. Entry screens 297
6.1 Enter Quote – REPO screen 297
6.2 Indication of Interest - REPO screen 302
6.3 Enter Request for Quote – REPO screen 305
6.4 Enter Offer - REPO screen 307
6.5 Pre-Arranged Offer screen 310
6.6 Broker Offer screen 311
6.7 Create New Auction overlay 315
6.8 Recipients – Repo overlay 318
6.9 Fast Entry-REPO 320
7. Trading screens 320
7.1 Trading Objects screens 320
7.1.1 Trading overlay 321
7.1.2 Trades overlay 323
7.1.3 Trade Modification Request – overlay 326
7.1.4 Trade Cancellation Request - overlay 328
7.1.5 Bulk Trade Modifications – overlay 332
7.1.6 Bulk Loan Modifications – overlay 335
7.1.7 Auction overlay 340
7.1.8 Auction Sent Manager overlay 343
7.1.9 Auction Received Manager overlay 346
7.1.10 Own Trades/Own Loans/Public Trades 349
8. Properties screens 350
8.1 Quote Properties overlay 350
8.2 Addressed Offer Properties overlay 351

8.3 Indication of Interest Properties (IOI) overlay 353
8.4 Broker Offer Properties overlay 355
8.5 Auction Properties overlay 356
8.6 Basket Properties 358
8.7 Security Properties 358
8.8 Index Properties 359
8.9 Product Properties 360
8.10 Trade Properties overlay 360
8.11 Trade Modification Properties overlay 361
8.12 Trade Cancellation Properties overlay 362
9. Seclend 364
9.1 Tools 364
9.1.1 Managing Member Relationship 364
9.1.2 Managing Distribution List 366
9.1.3 Configure Trade Slip 371
9.1.4 Position Board 372
9.1.5 Manage Watchlists 373
9.2 History 373
9.3 Pre Trade Manager 375
10. Managing Pre Trading Services 377
10.1 Managing Quotes 377
10.1.1 To Enter a Quote 377
10.1.2 To Maintain Quotes 386
10.1.3 To Respond to a Quote 406
10.2 Managing Addressed Offers 412
10.2.1 To Enter an Addressed Offer 412
10.2.2 To Maintain an Addressed Offer 419
10.2.3 To Respond to an Addressed Offer 421
10.3 Managing Indication of Interest 423
10.3.1 To Enter an Indication of Interest 423
10.3.2 To Maintain an Indication of Interest 426
10.3.3 To Respond to an Indication of Interest 427

11. Managing Post Trading Services 429
11.1 Manage Loan 429
11.1.1 To Modify a Loan 429
11.1.2 To Cancel a Loan 441
12. Entry screens 448
12.1 Enter Quote – SECLEND screen 448
12.2 Indication of Interest – SECLEND screen 451
12.3 Enter Addressed Offer – SECLEND screen 456
12.4 Enter Request for Quote-SECLEND screen 460
13. Properties overlays 461
13.1 Quote Properties overlay 461
13.2 Address Offer Properties overlay 462
13.3 Indication of Interest Properties overlay 464
13.4 Loan Properties overlay 465
13.5 Loan Modification Properties overlay 467
13.6 Loan Cancellation Properties overlay 468
14. Appendix A 471
List of Figures
Figure 1: Login Page ............................................................................................................................. 22 Figure 2: Landing Page ......................................................................................................................... 27 Figure 3: Selected row highlighted with Yellow Color ........................................................................... 29 Figure 4: Quick Action Utility ................................................................................................................. 30

Figure 5: Column Header with Sort Arrow ............................................................................................. 31 Figure 6: Search Bar.............................................................................................................................. 33 Figure 7: Filter ........................................................................................................................................ 33 Figure 8: Type Ahead ............................................................................................................................ 34 Figure 9: Landing Page ......................................................................................................................... 35 Figure 10: F7 Header............................................................................................................................. 36 Figure 11: Markets ................................................................................................................................. 36 Figure 12 : Trading Statistics ................................................................................................................. 37 Figure 13: Confirmation Message dialog box ........................................................................................ 38 Figure 14: Confirmation Message dialog box ........................................................................................ 38 Figure 15: News Board icon on the Landing Page ................................................................................ 39 Figure 16: News Board overlay ............................................................................................................. 39 Figure 17: News Board Message .......................................................................................................... 39 Figure 18: Options under User Name .................................................................................................... 40 Figure 19: Change Password Dialog Box.............................................................................................. 42 Figure 20: My Preferences - Generic Settings ...................................................................................... 43 Figure 21: My Preferences - Repo Rate Limits ..................................................................................... 44 Figure 22: My Preferences - Entry Defaults .......................................................................................... 45 Figure 23: My Preferences-Entry Defaults ............................................................................................ 46 Figure 24: My Preferences - Notifications ............................................................................................. 47 Figure 25: My Preferences - Alert Pop-ups ........................................................................................... 48 Figure 26: Market Timings ..................................................................................................................... 49 Figure 27: Basket overlay ...................................................................................................................... 51 Figure 28: View Securities overlay ........................................................................................................ 52 Figure 29: Security overlay .................................................................................................................... 53 Figure 30: View Baskets overlay ........................................................................................................... 54 Figure 31: Index overlay ........................................................................................................................ 55 Figure 32: Product overlay .................................................................................................................... 56 Figure 33: Select Product Term overlay ................................................................................................ 57 Figure 34: Select Currency overlay ....................................................................................................... 58 Figure 35: Pre Trade Manager .............................................................................................................. 58 Figure 36: Pre Trade Manager-Repo-screen ........................................................................................ 59 Figure 37: Quick Action Utility ............................................................................................................... 60 Figure 38: Respond Offer-Repo overlay................................................................................................ 61 Figure 39: Quick Action Utility ............................................................................................................... 62 Figure 40: Copy to new Quote-Quick Action Utility ............................................................................... 62 Figure 41: Quick Action Utility ............................................................................................................... 63 Figure 42: Copy to new IOI- Quick Action Utility ................................................................................... 64 Figure 43: Quick Action Utility ............................................................................................................... 65 Figure 44: Copy to new AO-Quick Action Utility .................................................................................... 65 Figure 45: Quick Action Utility ............................................................................................................... 66 Figure 46: Copy to new RFQ- Quick Action Utility ................................................................................ 67 Figure 47: Quick Action Utility for IOIs................................................................................................... 68 Figure 48: Offers Sent-overlay .............................................................................................................. 69 Figure 49: Offers Received-overlay ....................................................................................................... 70 Figure 50: Quick Action Utility for Pre-Arranged Offers ......................................................................... 71 Figure 51: Respond Pre- Arranged Offer- Repo- overlay...................................................................... 71 Figure 52: Quick Action Utility ............................................................................................................... 72 Figure 53: Respond Offer- Repo ........................................................................................................... 73 Figure 54: Pre Trade Manager- Quick Action Utility .............................................................................. 74 Figure 55: Request For Quote Properties ............................................................................................. 74 Figure 56: Fast Entry ............................................................................................................................. 76 Figure 57: Fast Entry-REPO screen ...................................................................................................... 76 Figure 58: Market Watch screen ........................................................................................................... 77 Figure 59: Fast Entry- REPO screen ..................................................................................................... 77 Figure 60: Fast Entry - REPO screen .................................................................................................... 78
Figure 61: Trading Book and Fast Entry-Repo screen after Docking ................................................... 79 Figure 62 : Fast Entry - Repo ................................................................................................................ 80 Figure 63: Fast Entry- REPO screen ..................................................................................................... 81 Figure 64: Fast Entry-REPO screen ...................................................................................................... 81 Figure 65: Fast Entry - REPO screen .................................................................................................... 82 Figure 66: Fast Entry- REPO screen ..................................................................................................... 83 Figure 67: Fast Entry- REPO screen ..................................................................................................... 83 Figure 68: Fast Entry- REPO screen ..................................................................................................... 84 Figure 69: Fast Entry-REPO screen ...................................................................................................... 84 Figure 70: Fast Entry- REPO screen ..................................................................................................... 85 Figure 71: Fast Entry-REPO screen ...................................................................................................... 85 Figure 72: Fast Entry- REPO screen ..................................................................................................... 86 Figure 73: Fast Entry-REPO screen ...................................................................................................... 86 Figure 74: Fast Entry-REPO screen ...................................................................................................... 87 Figure 75: Fast Entry-REPO screen ...................................................................................................... 87 Figure 76: Fast Entry- REPO screen ..................................................................................................... 88 Figure 77: Fast Entry-REPO screen ...................................................................................................... 88 Figure 78: Fast Entry-REPO screen ...................................................................................................... 89 Figure 79: Fast Entry-REPO screen ...................................................................................................... 89 Figure 80: Fast Entry-REPO Enter Quote screen ................................................................................. 90 Figure 81: Quote Book Menu ................................................................................................................ 91 Figure 82: Quote Book-REPO- screen .................................................................................................. 91 Figure 83: History menu on Landing Page ............................................................................................ 92 Figure 84: History Menu ........................................................................................................................ 92 Figure 85: History overlay ...................................................................................................................... 93 Figure 86: History-REPO-overlay .......................................................................................................... 95 Figure 87: Counter Offer Properties- overlay ........................................................................................ 96 Figure 88: History Menu ........................................................................................................................ 96 Figure 89: History-Public Trades-overlay .............................................................................................. 97 Figure 90: Public Trades History-overlay .............................................................................................. 98 Figure 91: Public Trade Properties ........................................................................................................ 98 Figure 92: Print Trade Slip Menu ........................................................................................................... 99 Figure 93: Print Trade Slip screen-REPO ............................................................................................. 99 Figure 94: Print Trade Slip screen-SECLEND ...................................................................................... 99 Figure 95: Market Watch screen ......................................................................................................... 100 Figure 96: Filter Icons .......................................................................................................................... 101 Figure 97: Choose Filters Dialog Box-Segment .................................................................................. 101 Figure 98: Choose Filters Dialog Box- CCY/ Collateral/ Security ....................................................... 102 Figure 99: Watchlist selection with 'Show All' option ........................................................................... 103 Figure 100: Arrows for Sorting Values in Column ............................................................................... 103 Figure 101: Multiple Sorting on column SEGMENT ............................................................................ 104 Figure 102: Multiple Sorting on column CCY/COLLATERAL ............................................................. 104 Figure 103: Grouping- Market Watch .................................................................................................. 105 Figure 104: Quick Action Utility ........................................................................................................... 106 Figure 105: Enter Quote-REPO ........................................................................................................... 107 Figure 106: Quick Action Utility ........................................................................................................... 108 Figure 107: Enter Offer-REPO screen................................................................................................. 108 Figure 108: Quick Action Utility ........................................................................................................... 109 Figure 109: Copy to New-Enter Quote-REPO screen ......................................................................... 110 Figure 110: Quick Action Utility-Hit a Quote ........................................................................................ 111 Figure 111: Hit a Quote-Address Offer-REPO overlay ........................................................................ 111 Figure 112: Modify Quote - Market Watch........................................................................................... 112 Figure 113: Modify Quote - Market Watch........................................................................................... 112 Figure 114: Delete Quote - Market Watch ........................................................................................... 113 Figure 115: Delete Quote - Market Watch ........................................................................................... 113 Figure 116: Hold Quote - Market Watch .............................................................................................. 114

Figure 117: Hold Quote - Market Watch .............................................................................................. 114 Figure 118: Release Quote - Market Watch ........................................................................................ 114 Figure 119: Release Quote - Market Watch ........................................................................................ 115 Figure 120: View Properties - Market Watch ....................................................................................... 115 Figure 121: Quote Properties - Market Watch ..................................................................................... 116 Figure 122: Manage View .................................................................................................................... 116 Figure 123 : Manage Custom View ..................................................................................................... 117 Figure 124: Manage Custom View - Select Custom View................................................................... 118 Figure 125: Manage Custom View - Select Template ......................................................................... 119 Figure 126: Manage Custom View- Select Segment .......................................................................... 120 Figure 127 : Product-Term overlay ...................................................................................................... 121 Figure 128: Trading Book .................................................................................................................... 125 Figure 129 : Trading Book Content-Buy .............................................................................................. 125 Figure 130: Trading Book Content-Sell ............................................................................................... 126 Figure 131 : Trading Book Content-FOK ............................................................................................. 126 Figure 132: Quick Action Utility-Trading Book ..................................................................................... 127 Figure 133: Hit Quote-Repo overlay .................................................................................................... 128 Figure 134: Quick Action Utility-Trading Book ..................................................................................... 128 Figure 135: Copy to New Quote-Enter Quote-REPO screen .............................................................. 129 Figure 136: Quick Action Utility-Trading Book ..................................................................................... 130 Figure 137: Modify Quote-REPO-Trading Book .................................................................................. 130 Figure 138 : Quick Action Utility-Trading Book .................................................................................... 131 Figure 139 : Hold Quote-REPO-Trading Book .................................................................................... 131 Figure 140: Quick Action Utility-Trading Book ..................................................................................... 132 Figure 141: Delete Quote-REPO-Trading Book .................................................................................. 132 Figure 142: Quick Action Utility-Trading Book ..................................................................................... 133 Figure 143: Respond Offer-REPO-Trading Book ................................................................................ 133 Figure 144: Quick Action Utility-Trading Book ..................................................................................... 134 Figure 145: Copy to Offer-REPO-Trading Book .................................................................................. 134 Figure 146: IOI Action Utility-Trading Book ......................................................................................... 135 Figure 147: Enter Addressed Offer-REPO .......................................................................................... 135 Figure 148: IOI Action Utility-Trading Book ......................................................................................... 136 Figure 149: Copy to New IOI-Enter IO-REPO screen ......................................................................... 136 Figure 150: Quick Action Utility- Trading Book .................................................................................... 137 Figure 151:Enter Addressed Offer-Repo ............................................................................................. 137 Figure 152: Quick Action Utility- Trading Book .................................................................................... 138 Figure 153: Enter Request For Quote- Repo ...................................................................................... 138 Figure 154: Notifications-Sent screen ................................................................................................. 140 Figure 155 : Notifications -Offers Sent screen .................................................................................... 140 Figure 156: Notifications -Pre-Arranged Offers Sent screen ............................................................... 141 Figure 157: Notifications-RFQ Sent screen ......................................................................................... 142 Figure 158 : Notifications - IOI Sent screen ........................................................................................ 142 Figure 159 : Notifications-Auction Sent screen ................................................................................... 143 Figure 160 : Notifications- Broker Offer Sent screen ........................................................................... 144 Figure 161: Notifications-Received screen .......................................................................................... 145 Figure 162: Respond to Offer – Respond Offer overlay ...................................................................... 146 Figure 163: Counter Offer-REPO overlay............................................................................................ 147 Figure 164: Pre-Arranged Offer Received - Notifications .................................................................... 147 Figure 165: Respond Pre-Arranged Offer - REPO .............................................................................. 148 Figure 166: Respond to IOI - Addressed Offer -REPO ....................................................................... 149 Figure 167: Auction Received- Notifications ....................................................................................... 149 Figure 168: TRD Mod/Cancel Received- Notifications ........................................................................ 150 Figure 169: Broker Offer Received - Notifications ............................................................................... 150 Figure 170: Respond to the Broker Offer -REPO ................................................................................ 151 Figure 171: Respond to RFQ - Addressed Offer -REPO .................................................................... 152 Figure 172: Own Trades / Public Trades/ Own Loans screen ............................................................ 153

Figure 173: Choose Columns for the Grid- overlay ............................................................................. 153 Figure 174: Own Trades/Own Loans/Public Trades-screen ............................................................... 154 Figure 175: Position Board .................................................................................................................. 155 Figure 176 : Position Board-REPO ...................................................................................................... 155 Figure 177: Choosing a Pre Trade Action-Qoute ................................................................................ 165 Figure 178: Position Board-REPO ....................................................................................................... 166 Figure 179: Position Board-REPO ....................................................................................................... 167 Figure 180: Position Board-REPO (business validation)..................................................................... 168 Figure 181: Position Board-REPO (Business Errors) .......................................................................... 168 Figure 182: Position Board-REPO(Successfully uploaded Quotes) ................................................... 170 Figure 183: Position Board-REPO(Uploaded Quote) .......................................................................... 171 Figure 184: Tools Menu ....................................................................................................................... 172 Figure 185: Member Relationship overlay ........................................................................................... 172 Figure 186 : View Product Term Combination .................................................................................... 174 Figure 187 : Select Product Term ........................................................................................................ 175 Figure 188 : Tools Menu ...................................................................................................................... 175 Figure 189 : Member Relationship overlay .......................................................................................... 176 Figure 190 :Tools Menu ....................................................................................................................... 177 Figure 191 : Distribution List Manager overlay .................................................................................... 177 Figure 192 : Create a New Distribution List screen ............................................................................. 178 Figure 193 : Tools Menu ...................................................................................................................... 179 Figure 194 : Distribution List Manager screen ..................................................................................... 179 Figure 195 : Available Distribution Lists Tab ....................................................................................... 180 Figure 196 : Edit Distribution List screen ............................................................................................. 180 Figure 197 : Tools Menu ...................................................................................................................... 181 Figure 198 : Distribution List Manager screen ..................................................................................... 181 Figure 199 : Available Distribution Lists Tab ....................................................................................... 182 Figure 200 : Tools Menu ...................................................................................................................... 183 Figure 201 : Automatic Trade Completion Defaults overlay ................................................................ 184 Figure 202 : New Trade Completion Default List ................................................................................ 184 Figure 203 : Trade Completion Default List overlay ............................................................................ 185 Figure 204 : Select Security overlay .................................................................................................... 186 Figure 205 : Tools Menu ...................................................................................................................... 187 Figure 206 : Automatic Trade Completion Defaults overlay ................................................................ 187 Figure 207 : Trade Completion Default List overlay ............................................................................ 188 Figure 208 : Tools Menu ...................................................................................................................... 188 Figure 209 : Automatic Trade Completion Defaults overlay ................................................................ 189 Figure 210 : Trade Slip Configuration -REPO ..................................................................................... 190 Figure 211: Manage Watchlisits- Tools Menu ..................................................................................... 191 Figure 212: Manage Watchlists Repo- overlay ................................................................................... 192 Figure 213: New Watchlist Repo-overlay ............................................................................................ 192 Figure 214: Add Basket-overlay .......................................................................................................... 193 Figure 215: Select Security-overlay ..................................................................................................... 194 Figure 216: Manage Watchlist Repo-overlay ...................................................................................... 194 Figure 217: Edit Watchlist Repo-overlay ............................................................................................. 195 Figure 218: Select Security - Overlay .................................................................................................. 195 Figure 219: Select Security-overlay ..................................................................................................... 196 Figure 220: Remove selection confirmation box ................................................................................. 197 Figure 221: Manage Watchlist REPO-overlay ..................................................................................... 198 Figure 222: Manage Watchlist Repo –overlay .................................................................................... 198 Figure 223: Manage Watchlist REPO - Overlay .................................................................................. 199 Figure 224: Manage Watchlist REPO - Overlay .................................................................................. 199 Figure 225: Manage Watchlist REPO - Overlay .................................................................................. 200 Figure 226: Manage Watchlist REPO - Overlay .................................................................................. 200 Figure 227: Manage Watchlist Repo-overlay ...................................................................................... 201 Figure 228: Manage Watchlist Repo-overlay ...................................................................................... 201

Figure 229: Trading Menu ................................................................................................................... 203 Figure 230: Enter Quote - REPO screen ............................................................................................. 203 Figure 231: Trading overlay ................................................................................................................. 205 Figure 232: Quick Action Utility ........................................................................................................... 205 Figure 233: Enter Quote - REPO screen ............................................................................................. 206 Figure 234: Copy to New Quote - Enter Quote – REPO screen ......................................................... 207 Figure 235: Trading overlay ................................................................................................................. 209 Figure 236: Maintain Quote - Quick Action Utility ................................................................................ 209 Figure 237: Modify Quote – REPO overlay ......................................................................................... 210 Figure 238: Modify Held Quote – REPO overlay ................................................................................. 211 Figure 239: Modify Held Quote – REPO overlay ................................................................................. 212 Figure 240: Quote Book - REPO screen ............................................................................................. 213 Figure 241: Hold Quote-REPO Alert ................................................................................................... 213 Figure 242: Release Quote – REPO overlayTo Delete a Quote ......................................................... 214 Figure 243: Quote Book - REPO ......................................................................................................... 215 Figure 244: Confirm Alert: Release Quotes ........................................................................................ 215 Figure 245: Delete Quote – REPO overlay ......................................................................................... 216 Figure 246: Enter Quote – REPO screen ............................................................................................ 217 Figure 247: Quote Properties overlay.................................................................................................. 218 Figure 248: Maintain Quote ................................................................................................................. 219 Figure 249: Confirmation Message Dialog Box - Hold All My Quotes ................................................. 220 Figure 250: Quotes held success message ........................................................................................ 220 Figure 251: Confirmation Message Dialog Box - Release All My Held Quotes .................................. 221 Figure 252: Quotes released success message ................................................................................. 221 Figure 253: Confirmation Message Dialog Box for Delete All Held Quotes ........................................ 221 Figure 254: Confirmation Message Dialog Box for Delete All My Quotes ........................................... 222 Figure 255: Modify Repo Rate of all My Active Quotes ....................................................................... 223 Figure 256: Modify Rate of all My Held Quotes ................................................................................... 224 Figure 257: Modify Rate of Member Active Quotes ............................................................................ 225 Figure 258: Modify Fee of All My Active Quote ................................................................................... 226 Figure 259: Modify Fee of all My Held Quotes .................................................................................... 227 Figure 260: Modify Fee of Member Active Quotes .............................................................................. 228 Figure 261: Modify Interest of all My Active Quotes ............................................................................ 229 Figure 262: Modify Interest of all My Held Quotes .............................................................................. 230 Figure 263: Modify Interest of Member Active Quotes ........................................................................ 231 Figure 264: Quote Book-REPO ........................................................................................................... 232 Figure 265: Quick Action Utility – Trading Repo ................................................................................. 233 Figure 266: Hit Quote – Repo screen .................................................................................................. 234 Figure 267: Quote Book - REPO ......................................................................................................... 234 Figure 268: Enter Addressed Offer – REPO screen ........................................................................... 236 Figure 269: Quick Action Utility - Trading overlay ............................................................................... 238 Figure 270: Hit Quote - Trading overlay .............................................................................................. 239 Figure 271: Trading overlay ................................................................................................................. 240 Figure 272: Maintain AO – Quick Action Utility ................................................................................... 241 Figure 273: Delete Offers - Notifications screen ................................................................................. 241 Figure 274: Trading REPO-Received tab ............................................................................................ 243 Figure 275: Respond to Offer – Repo overlay ..................................................................................... 244 Figure 276: Quick Action Utility – Trading Book .................................................................................. 245 Figure 277: Respond Offer overlay ..................................................................................................... 245 Figure 278: Pre Trade Manager - REPO ............................................................................................. 246 Figure 279: Respond Offer-REPO ....................................................................................................... 247 Figure 280 : Indication of Interest - Trading Menu .............................................................................. 248 Figure 281 : Indication of Interest – REPO screen .............................................................................. 248 Figure 282: Trading Repo .................................................................................................................... 249 Figure 283: Trading overlay ................................................................................................................. 250 Figure 284: Maintain IOI – Quick Action Utility .................................................................................... 250

Figure 285 : Quick Action Utility-Trading REPO .................................................................................. 252 Figure 286: Quick Action Utility-Trading Book ..................................................................................... 252 Figure 287: Broker Offer - Trading Menu ............................................................................................ 253 Figure 288: Broker Offer screen .......................................................................................................... 254 Figure 289: Trading overlay – Broker Offer ......................................................................................... 255 Figure 290: Quick Action Utility – Broker Offer .................................................................................... 255 Figure 291: Pre Trade Manager-REPO screen ................................................................................... 256 Figure 292: Confirm Alert .................................................................................................................... 256 Figure 293: Broker Offer Properties overlay ........................................................................................ 257 Figure 294: Pre-Arranged Offer - Repo screen ................................................................................... 258 Figure 295: Trading overlay – Pre-Arranged Offer .............................................................................. 259 Figure 296: Quick Action Utility – Pre-Arranged Offer ......................................................................... 259 Figure 297: Auction screen .................................................................................................................. 261 Figure 298: Create New Auction ......................................................................................................... 261 Figure 299: Manage Auctions - Quick Action Utility ............................................................................ 262 Figure 300: Auction Sent Manager screen .......................................................................................... 262 Figure 301: Auction Received Manager screen .................................................................................. 264 Figure 302: Hit IOI icon ........................................................................................................................ 264 Figure 303: Addressed Offer- Repo screen ........................................................................................ 265 Figure 304: Auction Sent Manager screen .......................................................................................... 267 Figure 305: Post Trade Menu .............................................................................................................. 270 Figure 306: Trades overlay .................................................................................................................. 271 Figure 307: Quick Action Utility - Trades ............................................................................................. 272 Figure 308: Trade Modification: Modify Repo Rate overlay ................................................................ 272 Figure 309: Pending Modifications overlay ......................................................................................... 273 Figure 310: Set Repurchase Date ....................................................................................................... 274 Figure 311: Set Repurchase Date ....................................................................................................... 274 Figure 312: Modify Repurchase Date .................................................................................................. 274 Figure 313: Quick Action Utility - Trades ............................................................................................. 275 Figure 314: Trade Modification: Partial Return .................................................................................... 275 Figure 315: Trade Modification Request Received – Notifications ..................................................... 276 Figure 316 : Trade Modification Request overlay ................................................................................ 277 Figure 317: Post Trade Menu .............................................................................................................. 277 Figure 318: Quick Action Utility – To Accept the Modification Request .............................................. 278 Figure 319: Trade Modification Request Received – Notifications ..................................................... 278 Figure 320: Trade Modification Request overlay ................................................................................. 279 Figure 321: Post Trade Menu .............................................................................................................. 279 Figure 322: Quick Action Utility – To Reject the Modification Request ............................................... 280 Figure 323: Trade Modification Request Received – Notifications ..................................................... 280 Figure 324: Trade Modification Request overlay ................................................................................. 281 Figure 325: Post Trade Menu .............................................................................................................. 281 Figure 326: Quick Action Utility – To Delete the Modification Request ............................................... 282 Figure 327: Post Trade Menu .............................................................................................................. 283 Figure 328: Trades overlay .................................................................................................................. 283 Figure 329: Quick Action Utility – Cancel Trade .................................................................................. 284 Figure 330: Cancel Trade overlay ....................................................................................................... 284 Figure 331: Trade Cancellation Request Received – Notifications ..................................................... 285 Figure 332: Trade Cancellation Request overlay ................................................................................ 285 Figure 333: Post Trade Menu .............................................................................................................. 286 Figure 334: Quick Action Utility – To Accept the Modification Request .............................................. 286 Figure 335: Trade Cancellation Request Received – Notifications ..................................................... 287 Figure 336: Trade Cancellation Request overlay ................................................................................ 287 Figure 337: Post Trade Menu .............................................................................................................. 288 Figure 338: Quick Action Utility – To Reject the Modification Request ............................................... 288 Figure 339: Trade Cancellation Request Sent – Notifications ............................................................ 289 Figure 340: Trade Modification Request overlay ................................................................................. 289

Figure 341: Post Trade Menu .............................................................................................................. 290 Figure 342: Quick Action Utility – To Delete the Modification Request ............................................... 290 Figure 343: Post Trade Menu .............................................................................................................. 291 Figure 344: Completable Trades overlay ............................................................................................ 292 Figure 345: Completable Trades – Quick Action Utility ....................................................................... 292 Figure 346: Trade Completion overlay ................................................................................................ 293 Figure 347: Select Security overlay ..................................................................................................... 294 Figure 348: Post Trade Menu .............................................................................................................. 295 Figure 349: Inquire Cash Position overlay .......................................................................................... 296 Figure 350: Cash Position Details ....................................................................................................... 296 Figure 351: Enter Quote – REPO screen ............................................................................................ 298 Figure 352: Indication of Interest– REPO screen ................................................................................ 302 Figure 353 : Request for Quote -Repo ................................................................................................ 306 Figure 354: Enter Offer– REPO screen ............................................................................................... 307 Figure 355: Pre-Arranged Offer ........................................................................................................... 310 Figure 356: Broker Offer– REPO screen ............................................................................................. 311 Figure 357: Create New Auction overlay ............................................................................................. 315 Figure 358: Recipients overlay ............................................................................................................ 318 Figure 359: Fast Entry-REPO screen .................................................................................................. 320 Figure 360: Trading Menu ................................................................................................................... 321 Figure 361: Trading overlay ................................................................................................................. 322 Figure 362: Post Trade Menu .............................................................................................................. 324 Figure 363: Trades overlay .................................................................................................................. 324 Figure 364: Trade Modification Request - Requested overlay ............................................................ 326 Figure 365: Trade Modification Request – Received overlay ............................................................. 328 Figure 366: Trade Cancellation Request - Requested overlay ........................................................... 329 Figure 367: Trade Cancellation Request - Received overlay .............................................................. 331 Figure 368: Post Trade Menu .............................................................................................................. 333 Figure 369: Bulk Modification-Repo Rate ............................................................................................ 333 Figure 370: Bulk Modification- Set Repurchase Date ......................................................................... 334 Figure 371: Bulk Modification-Partial Return/Recall ............................................................................ 335 Figure 372: Post Trade Menu .............................................................................................................. 335 Figure 373: Bulk Modification- Lending Fee ........................................................................................ 336 Figure 374: Bulk Modification-Partial Return/Recall ............................................................................ 337 Figure 375: Bulk Modification-Full Return/Recall ................................................................................ 338 Figure 376: Bulk Modification-Modify Interest ..................................................................................... 339 Figure 377: Bulk Modification-Modify Div/Coupon .............................................................................. 340 Figure 378: Trading Menu ................................................................................................................... 341 Figure 379: Auction overlay ................................................................................................................. 341 Figure 380: Quick Action Utility ........................................................................................................... 343 Figure 381: Auction Sent Manager screen .......................................................................................... 344 Figure 382: Quick Action Utility ........................................................................................................... 347 Figure 383: Auction Received Manager screen .................................................................................. 347 Figure 384: Quick Action Utility ........................................................................................................... 350 Figure 385: Quote Properties overlay.................................................................................................. 351 Figure 386: Quick Action Utility ........................................................................................................... 352 Figure 387: Address Offer Properties overlay ..................................................................................... 352 Figure 388: Trade Pre-Arranged Properties ........................................................................................ 353 Figure 389: Quick Action Utility ........................................................................................................... 354 Figure 390: IOI Properties overlay ....................................................................................................... 354 Figure 391: Quick Action Utility ........................................................................................................... 355 Figure 392: Broker Offer Properties overlay ........................................................................................ 356 Figure 393: Quick Action Utility ........................................................................................................... 357 Figure 394: Auction Properties overlay ............................................................................................... 357 Figure 395: Basket Properties overlay ................................................................................................ 358 Figure 396: Securities Properties overlay ........................................................................................... 359

Figure 397: Index Properties ............................................................................................................... 359 Figure 398: Product Properties overlay ............................................................................................... 360 Figure 399: Trade Properties overlay .................................................................................................. 361 Figure 400: Trade Modification Properties .......................................................................................... 362 Figure 401: Trade Cancellation Properties overlay ............................................................................. 363 Figure 402: Tools Menu Seclend ......................................................................................................... 364 Figure 403: Member Relationship Seclend ......................................................................................... 365 Figure 404: Tools Menu ....................................................................................................................... 366 Figure 405: Distribution List Manager screen ...................................................................................... 367 Figure 406: Create a New Distribution List screen .............................................................................. 368 Figure 407: Tools Menu ....................................................................................................................... 368 Figure 408: Available Distribution Lists Tab ........................................................................................ 369 Figure 409: Edit a Distribution List screen ........................................................................................... 369 Figure 410: Tools Menu ....................................................................................................................... 370 Figure 411: Distribution List Manager screen ...................................................................................... 370 Figure 412: Available Distribution Lists Tab ........................................................................................ 371 Figure 413: Trade Slip Configuration - Seclend .................................................................................. 372 Figure 414: Manage Watchlists ........................................................................................................... 373 Figure 415: History Menu .................................................................................................................... 373 Figure 416: History screen .................................................................................................................. 374 Figure 417: Pre Trade Manager .......................................................................................................... 375 Figure 418: Pre Trade Manager- Seclend ........................................................................................... 376 Figure 419: Trading Menu ................................................................................................................... 378 Figure 420: Enter Quote – SECLEND ................................................................................................. 378 Figure 421: Quick Action Utility ........................................................................................................... 379 Figure 422: Enter Quote - SECLEND .................................................................................................. 380 Figure 423: Trading – Seclend overlay................................................................................................ 381 Figure 424: Quick Action Utility ........................................................................................................... 382 Figure 425: Copy to New Quote - Enter Quote – SECLEND screen .................................................. 383 Figure 426: Quick Action Utility ........................................................................................................... 384 Figure 427: Enter Quote – SECLEND screen ..................................................................................... 384 Figure 428 : Quick Action Utility .......................................................................................................... 385 Figure 429: Enter Quote – Seclend screen ......................................................................................... 386 Figure 430: Trading – Seclend overlay................................................................................................ 386 Figure 431: Quick Action Utility ........................................................................................................... 387 Figure 432: Modify Quote overlay ....................................................................................................... 388 Figure 433: Hold Quote Alert ............................................................................................................... 388 Figure 434 : Delete Quote Alert ........................................................................................................... 389 Figure 435: Quote Properties overlay.................................................................................................. 390 Figure 436: Selecting Multiple Quotes................................................................................................. 390 Figure 437: Selecting Multiple Quotes - Trading-Seclend overlay ...................................................... 391 Figure 438: Maintain Quote ................................................................................................................. 392 Figure 439: Confirmation Message Dialog Box for Hold All My Quotes .............................................. 393 Figure 440: Confirmation Message Dialog Box for Release All My Held Quotes ............................... 393 Figure 441: Confirmation Message Dialog Box for Delete All Held Quotes ........................................ 394 Figure 442: Confirmation Message Dialog Box for Delete All My Quotes ........................................... 394 Figure 443: Modify Fee of All My Active Quotes – SECLEND overlay ............................................... 395 Figure 444: Modify Fee of All My Active Quotes - SECLEND overlay ................................................ 395 Figure 445: Modify Fee of All My Held Quotes – SECLEND overlay ................................................. 396 Figure 446: Modify Fee of All My Held Quotes - SECLEND overlay ................................................... 397 Figure 447: Modify Fee of Member Active Quotes – SECLEND overlay ............................................ 398 Figure 448: Modify Fee of Member Active Quotes - SECLEND overlay ............................................. 399 Figure 449: Modify Interest of All My Active Quotes – SECLEND overlay .......................................... 400 Figure 450: Modify Interest of All My Active Quotes - SECLEND overlay .......................................... 401 Figure 451: Modify Interest of All My Held Quotes – SECLEND overlay ............................................ 402 Figure 452: Modify Interest of All My Held Quotes - SECLEND overlay ............................................. 403

Figure 453: Modify Interest of Member Active Quotes – SECLEND overlay ...................................... 404 Figure 454: Modify Interest of Member Active Quotes - SECLEND overlay ....................................... 405 Figure 455: Hit a Quote – SECLEND overlay ..................................................................................... 406 Figure 456: Quick Action Utility - Hit a Quote ...................................................................................... 407 Figure 457 : Hit Quote overlay –Seclend (Market Watch) ................................................................... 408 Figure 458: Quick Action Utility – Trading Book .................................................................................. 409 Figure 459 : Hit Quote overlay- Seclend (Trading Book) .................................................................... 409 Figure 460: Quick Action Utility – Trading Seclend ............................................................................. 410 Figure 461 : Hit Quote overlay: Seclend (Trading) .............................................................................. 410 Figure 462: Hit Quote - Quote Book .................................................................................................... 411 Figure 463: Hit Quote overlay-Quote Book ......................................................................................... 411 Figure 464 : Enter Addressed Offer screen - SECLEND .................................................................... 413 Figure 465: Quick Action Utility ........................................................................................................... 414 Figure 466: Enter Addressed Offer screen - SECLEND ..................................................................... 414 Figure 467: Notifications-Received Tab ............................................................................................. 415 Figure 468 : Addressed Offer- SECLEND ........................................................................................... 416 Figure 469 : Quick Action Utility .......................................................................................................... 417 Figure 470 : Hit Quote - Quote Book ................................................................................................... 418 Figure 471 : Trading - Seclend ............................................................................................................ 419 Figure 472 : Quick Action Utility .......................................................................................................... 420 Figure 473 : Addressed Offer Properties overlay ................................................................................ 421 Figure 474 : To Respond to an Addressed Offer ................................................................................ 422 Figure 475 : Counter Offer – SECLEND overlay ................................................................................ 423 Figure 476 : Enter Indication of Interest - SECLEND .......................................................................... 424 Figure 477 : Indication of Interest - SECLEND .................................................................................... 425 Figure 478 : Trading - Seclend overlay ............................................................................................... 426 Figure 479 : Quick Action Utility .......................................................................................................... 426 Figure 480 : Hit an IOI - Address Offer - SECLEND overlay ............................................................... 428 Figure 481 : Post Trade Menu ............................................................................................................. 430 Figure 482 : Loans overlay .................................................................................................................. 430 Figure 483 : Quick Action Utility - Loans ............................................................................................. 431 Figure 484 : Loan Modification- Modify Lending Fee .......................................................................... 431 Figure 485 : Quick Action Utility - Loans ............................................................................................. 432 Figure 486 : Loan Modification-Modify Dividend/Coupon.................................................................... 432 Figure 487 : Quick Action Utility - Loans ............................................................................................. 433 Figure 488: Loan Modification- Partial Return/Recall .......................................................................... 433 Figure 489: Quick Action Utility - Loans .............................................................................................. 434 Figure 490: Loan Modification-Full Return/Recall. .............................................................................. 434 Figure 491: Loan Modification- Modify Interest ................................................................................... 435 Figure 492: Quick Action Utility ........................................................................................................... 436 Figure 493 : Loan Modification: Modify Fee Basis Amount (a) ........................................................... 436 Figure 494 : Loan Modification: Modify Fee Basis Amount (b) ........................................................... 436 Figure 495 : Post Trade Menu ............................................................................................................. 437 Figure 496 : Loan Modification Requests ............................................................................................ 438 Figure 497 : Post Trade Menu ............................................................................................................. 439 Figure 498 : Post Trade Menu ............................................................................................................. 440 Figure 499 : Loan Modification Request .............................................................................................. 440 Figure 500 : Post Trade Menu ............................................................................................................. 441 Figure 501 : Loans overlay .................................................................................................................. 442 Figure 502 : Quick Action Utility-Cancel Loan ..................................................................................... 442 Figure 503 : Cancel Loan overlay ........................................................................................................ 443 Figure 504 : Loan Cancellation Request overlay ................................................................................ 444 Figure 505 : Quick Action Utility .......................................................................................................... 444 Figure 506 : Loan Cancellation Request overlay ................................................................................ 445 Figure 507 : Quick Action Utility .......................................................................................................... 445 Figure 508 : Loan Cancellation Request overlay ................................................................................ 446

Figure 509 : Enter Quote-Seclend screen ........................................................................................... 448 Figure 510 : Enter Indication Of Interest -Seclend .............................................................................. 452 Figure 511 : Enter Addressed Offer - Seclend screen ........................................................................ 456 Figure 512: Request For Quote- Seclend............................................................................................ 460 Figure 513 : Quick Action Utility .......................................................................................................... 461 Figure 514 : Quote Properties ............................................................................................................. 462 Figure 515 : Quick Action Utility .......................................................................................................... 463 Figure 516 : Addressed Offer Properties overlay ................................................................................ 463 Figure 517 : Quick Action Utility .......................................................................................................... 464 Figure 518 : IOI Properties overlay ...................................................................................................... 465 Figure 519: Quick Action Utility ........................................................................................................... 466 Figure 520: Loan Properties overlay ................................................................................................... 466 Figure 521: Quick Action Utility ........................................................................................................... 467 Figure 522: Loan Modification Properties overlay ............................................................................... 468 Figure 523: Quick Action Utility ........................................................................................................... 469 Figure 524 : Loan Cancellation Properties overlay ............................................................................. 469

List of Abbreviations
Abbreviation Expanded Form
AO Addressed Offer
CBL Clearstream Banking
Luxembourg
CCP Central Counter Party
GCM General Clearing
Membership
GUI Graphical User Interface
IOI Indication of Interest
RFQ Request for Quote
F7 Eurex Repo’s new trading
system. The "7" denotes it is
part of the Deutsche Börse
Group "7" platform
technology suite, where “F”
stands for funding and
financing.

1. Introduction
Purpose of this document
This manual is a guide for using the Eurex Repo F7 GUI. It describes the functional and operational
details of the Eurex Repo application. In addition, this manual provides information on the system
requirements and installation.
This document also describes the Eurex Repo F7 Trading System. It provides market-specific
assistance for the users of F7. The Eurex Repo Markets & Segments are organized as illustrated in the
following figure.
Transactions are concluded anonymously with Eurex Clearing AG as a counter party (CCP); sent to
SIX Securities Services and settled through their Triparty service; or settled with Clearstream Banking
Luxembourg (CBL) for Triparty Repo.

Intended Audience
This manual is intended for the traders using Eurex Repo F7.
Organization of this Document
Information in this document has been organized as follows:
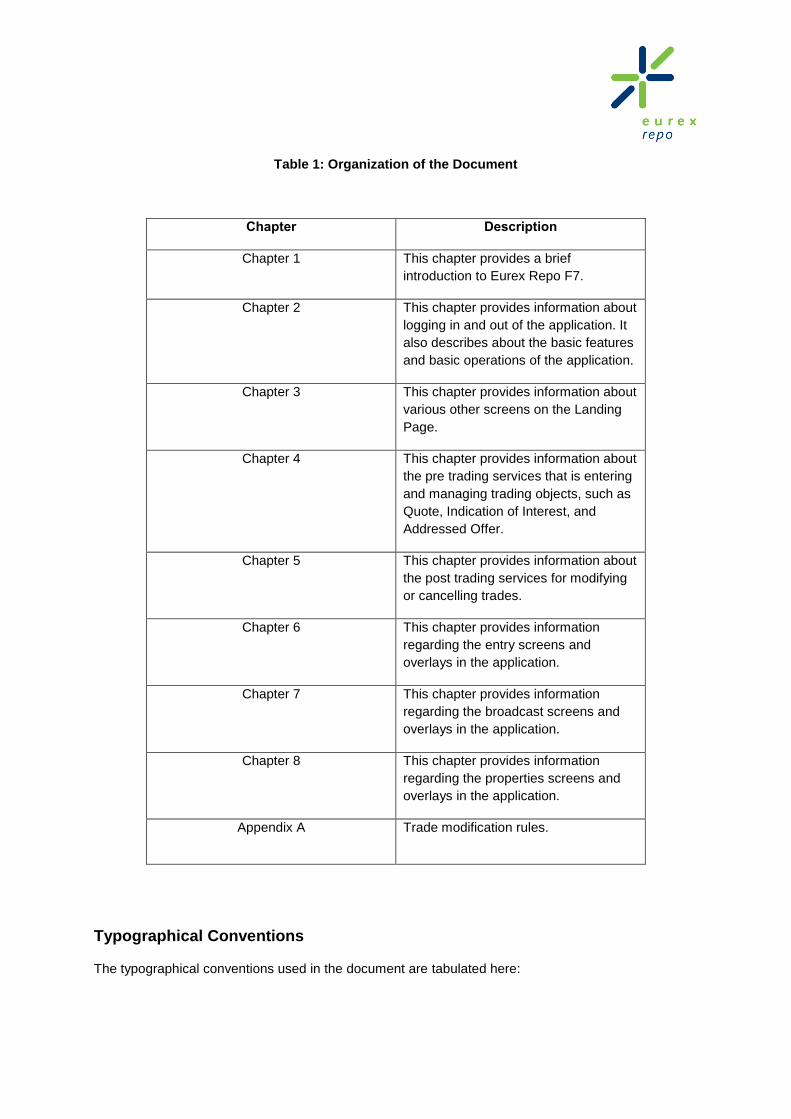
Table 1: Organization of the Document
Chapter Description
Chapter 1 This chapter provides a brief
introduction to Eurex Repo F7.
Chapter 2 This chapter provides information about
logging in and out of the application. It
also describes about the basic features
and basic operations of the application.
Chapter 3 This chapter provides information about
various other screens on the Landing
Page.
Chapter 4 This chapter provides information about
the pre trading services that is entering
and managing trading objects, such as
Quote, Indication of Interest, and
Addressed Offer.
Chapter 5 This chapter provides information about
the post trading services for modifying
or cancelling trades.
Chapter 6 This chapter provides information
regarding the entry screens and
overlays in the application.
Chapter 7 This chapter provides information
regarding the broadcast screens and
overlays in the application.
Chapter 8 This chapter provides information
regarding the properties screens and
overlays in the application.
Appendix A Trade modification rules.
Typographical Conventions
The typographical conventions used in the document are tabulated here:

Table 2: Typographical Conventions
Formatting Convention Type of Information
System Messages
System messages appear in bold and
italics with quotes. Example, “Quote
entered successfully”.
Commands and screen element
names
(excluding buttons)
screen elements such as checkboxes,
radio buttons, etc. Commands that you
choose from the menus or dialog
boxes appear in title case and are
bold-faced.
Example: Click Auction from the
Trading menu.
Buttons Buttons appear in upper case and are
bold-faced.
Example: SUBMIT

2. Getting Started
Access to Eurex Repo F7 GUI is limited to authorized users. To use it, you must first log on to the
application using your login ID and password. On logging in, Eurex Repo F7 GUI application enables
you to start any of the modules to which you have access rights.
2.1 Logging On
To log on to the Eurex Repo F7 GUI:
In the Login dialog box as displayed in following figure, enter your Login ID and Password and click
LOGIN. The Landing page (main page) appears.
Figure 1: Login Page
Note: Even if you choose "Remember Password" option while logging in, F7 will not use any stored
passwords. You must enter the password manually every time you want to login into the F7 application.
2.2 Using the Eurex Repo F7 GUI
This section introduces you to the Eurex Repo F7 GUI screen elements (navigation menu, common
icons and buttons) you can use to interact with Eurex Repo F7 GUI and perform various tasks and
operations.
2.2.1 Using Menus and Toolbars
You can use menus and toolbars to access F7 functionality.

A menu displays a list of commands. Most menus are located on the menu bar at the top of the
application screen. Shortcut menus are available when you right-click the selected row.

Table 3: Menus and commands

Menu Description
The Trading menu consists of options for all pre
trade activities. It enables you to indicate the
readiness to trade by sending Indications of Interest
(IOI), Quotes and Addressed Offer (AO) etc. to one
or multiple other market participants.
The Maintain Quote menu enables you to manage
all your Quotes. You can perform functions such as
hold all your Quotes, release all your held Quotes,
delete all your held Quotes, modify rates, etc.
The Post Trade menu enables you to manage post
trading services, such as modifying trade, cancelling
trade, etc.
The Master Data menu provides the details of the
available Securities, Baskets, Indices, Currencies
and product terms available in the selected segment.
The Pre Trade Manager menu invokes the Pre Trade Manager screen which displays all pre trade actions except for Quotes. You can monitor and act upon your various pre trade actions (IOIs, RFQs, Addressed Offers, etc.).Addressed OfferAddressed OfferAddressed Offer
The Fast Entry menu invokes the Fast Entry screen
which supports multiple Quote actions using one
screen and minimal clicks.
The Quote Book menu invokes the Quote Book
screen that provides details about all your Sent and
Received Quotes. You can maintain your Quotes as
well as hit received Quotes from this screen.
The History menu enables you to retrieve
information related to pre trade actions, trades and
trade requests.
The Print Trade Slip menu enables you to print
trade slips. Trade slips are available for the current
business day and the last five preceding business
days.
The Tools menu provides options for configuring the
system such as maintaining distribution lists,
creating participant relationships, configuring trade
slips, etc.

2.2.2 Basic Features
The basic features of the Eurex Repo F7 GUI include:
Resizing and Dragging screens
Saving of screen position and settings
Data Entering shortcuts
Keyboard shortcuts
Color Coding of the Quotes
Selecting Data
Using Quick Action Utility
Entering Free Text
2.2.2.1 Resizing and Dragging screens
On logging in, the Landing page appears as displayed in following figure. The screens
on Landing
Page are as follows:
Market Watch
Notifications
Trading Book
Own Trades, Own Loans, Public Trades.

Figure 2: Landing Page
Note: You can resize and drag the screens on the Landing page as per your convenience.
To resize the screen:
1. Move the cursor along the border of the screen until the cursor changes to
double arrow.
2. Press and hold the left mouse button and move the mouse in the direction you
want to increase or decrease the size of the screen. You can expand the screen
vertically as well as horizontally.
The screen size is adjusted accordingly.
To drag the screen:
1. Move the cursor over the title bar and press and hold the left mouse button.
2. Drag the cursor to the point where you want to place the screen.
3. Release the mouse.
2.2.2.2 Data Entering Shortcuts
The Eurex Repo F7 GUI provides the following shortcuts for entering large figures as
displayed in Table 4.
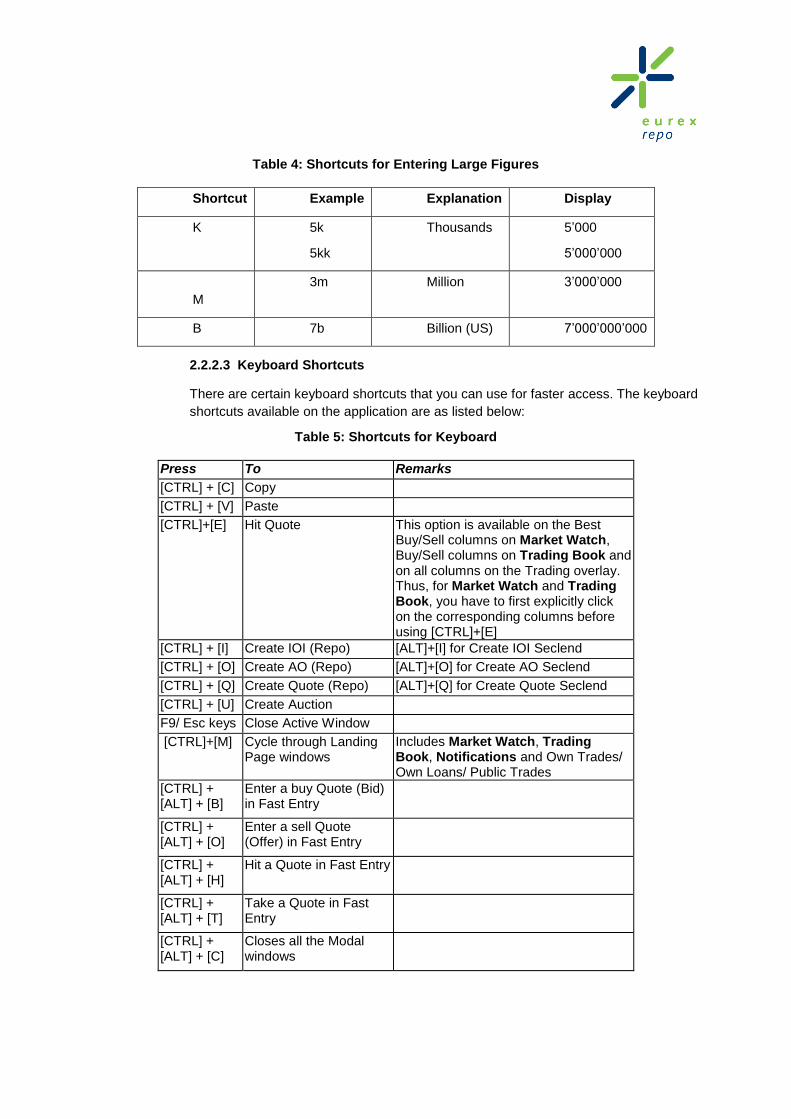
Table 4: Shortcuts for Entering Large Figures
Shortcut Example Explanation Display
K 5k
5kk
Thousands 5’000
5’000’000
M
3m Million 3’000’000
B 7b Billion (US) 7’000’000’000
2.2.2.3 Keyboard Shortcuts
There are certain keyboard shortcuts that you can use for faster access. The keyboard
shortcuts available on the application are as listed below:
Table 5: Shortcuts for Keyboard
Press To Remarks
[CTRL] + [C] Copy
[CTRL] + [V] Paste
[CTRL]+[E] Hit Quote This option is available on the Best Buy/Sell columns on Market Watch, Buy/Sell columns on Trading Book and on all columns on the Trading overlay. Thus, for Market Watch and Trading Book, you have to first explicitly click on the corresponding columns before using [CTRL]+[E]
[CTRL] + [I] Create IOI (Repo) [ALT]+[I] for Create IOI Seclend
[CTRL] + [O] Create AO (Repo) [ALT]+[O] for Create AO Seclend
[CTRL] + [Q] Create Quote (Repo) [ALT]+[Q] for Create Quote Seclend
[CTRL] + [U] Create Auction
F9/ Esc keys Close Active Window
[CTRL]+[M] Cycle through Landing Page windows
Includes Market Watch, Trading Book, Notifications and Own Trades/ Own Loans/ Public Trades
[CTRL] + [ALT] + [B]
Enter a buy Quote (Bid) in Fast Entry
[CTRL] + [ALT] + [O]
Enter a sell Quote (Offer) in Fast Entry
[CTRL] + [ALT] + [H]
Hit a Quote in Fast Entry
[CTRL] + [ALT] + [T]
Take a Quote in Fast Entry
[CTRL] + [ALT] + [C]
Closes all the Modal windows

2.2.2.4 Color Coding of the Quotes
You can quickly identify the key information about a Quote, as the Quotes are color
coded in Trading Book, Market Watch and Quote Book. Types of Quotes along with
their colors are as follows: Member name with asterisk sign is own Quote and without
asterisk sign is own member Quote.
Own Quote: Own Quotes are highlighted in green colour. Own Quotes have an
asterisk.
Held Quote: Held Quotes are highlighted in red colour. Own Quotes have an
asterisk.
Quote from other participant: Quotes received from other participants are
highlighted in black colour.
Quote from other participant which is best buy or best sell: Quote received
from other participant which is the best buy Quote or best sell Quote is highlighted
in blue color.
2.2.2.5 Selecting Data
When you select a row in a table, the selected row is indicated by a yellow
background color as displayed in following figure.
Figure 3: Selected row highlighted with Yellow Color
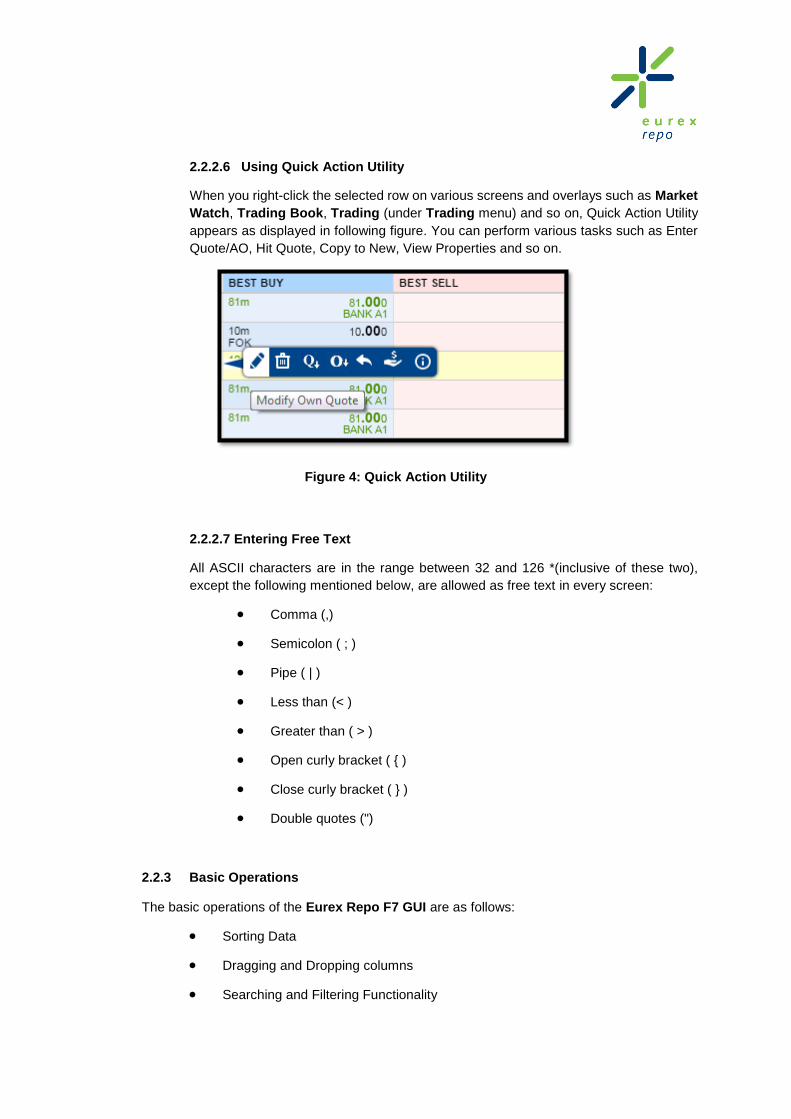
2.2.2.6 Using Quick Action Utility
When you right-click the selected row on various screens and overlays such as Market
Watch, Trading Book, Trading (under Trading menu) and so on, Quick Action Utility
appears as displayed in following figure. You can perform various tasks such as Enter
Quote/AO, Hit Quote, Copy to New, View Properties and so on.
Figure 4: Quick Action Utility
2.2.2.7 Entering Free Text
All ASCII characters are in the range between 32 and 126 *(inclusive of these two),
except the following mentioned below, are allowed as free text in every screen:
Comma (,)
Semicolon ( ; )
Pipe ( | )
Less than (< )
Greater than ( > )
Open curly bracket ( { )
Close curly bracket ( } )
Double quotes (")
2.2.3 Basic Operations
The basic operations of the Eurex Repo F7 GUI are as follows:
Sorting Data
Dragging and Dropping columns
Searching and Filtering Functionality
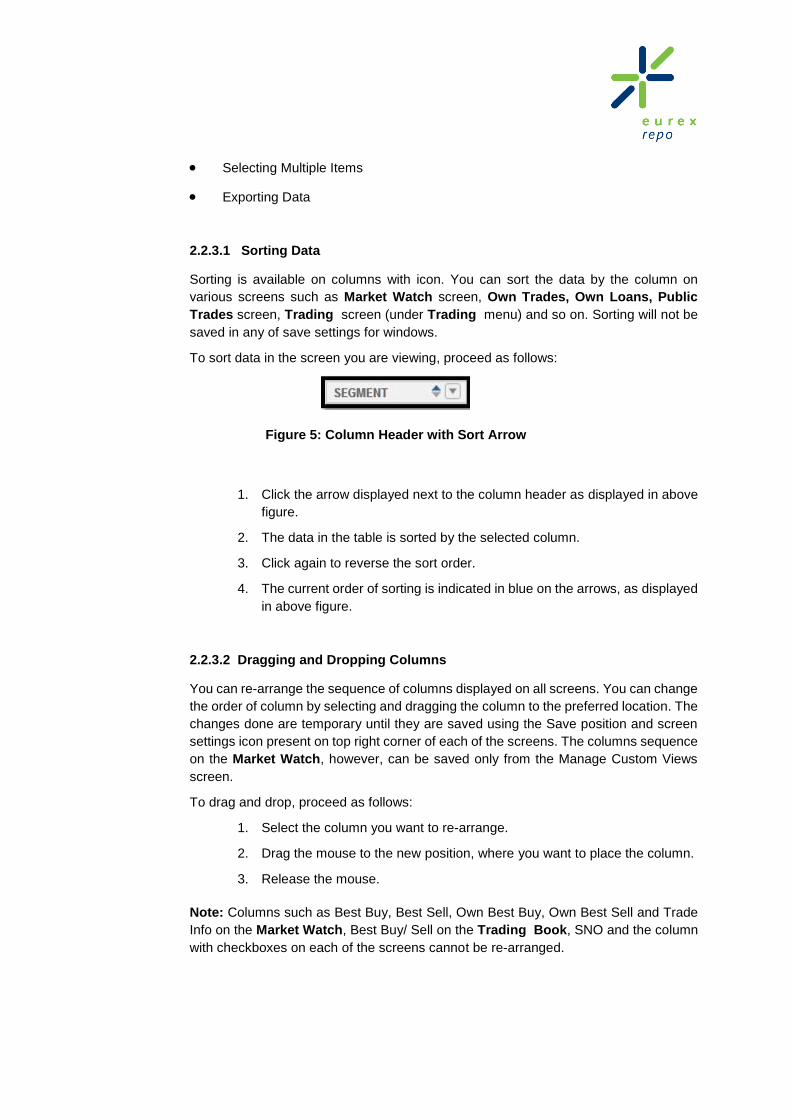
Selecting Multiple Items
Exporting Data
2.2.3.1 Sorting Data
Sorting is available on columns with icon. You can sort the data by the column on
various screens such as Market Watch screen, Own Trades, Own Loans, Public
Trades screen, Trading screen (under Trading menu) and so on. Sorting will not be
saved in any of save settings for windows.
To sort data in the screen you are viewing, proceed as follows:
Figure 5: Column Header with Sort Arrow
1. Click the arrow displayed next to the column header as displayed in above
figure.
2. The data in the table is sorted by the selected column.
3. Click again to reverse the sort order.
4. The current order of sorting is indicated in blue on the arrows, as displayed
in above figure.
2.2.3.2 Dragging and Dropping Columns
You can re-arrange the sequence of columns displayed on all screens. You can change
the order of column by selecting and dragging the column to the preferred location. The
changes done are temporary until they are saved using the Save position and screen
settings icon present on top right corner of each of the screens. The columns sequence
on the Market Watch, however, can be saved only from the Manage Custom Views
screen.
To drag and drop, proceed as follows:
1. Select the column you want to re-arrange.
2. Drag the mouse to the new position, where you want to place the column.
3. Release the mouse.
Note: Columns such as Best Buy, Best Sell, Own Best Buy, Own Best Sell and Trade
Info on the Market Watch, Best Buy/ Sell on the Trading Book, SNO and the column
with checkboxes on each of the screens cannot be re-arranged.

2.2.3.3 Selecting Multiple Items
On various screens, you can select multiple data items to perform various actions such as delete and modify. You can also select multiple Quotes, IOIs or AOs. For Quote, you can do multiple modification, delete, hold, release depend on conditions. For AO and IOI, only multiple deletion is possible.
2.2.3.4 Selecting Multiple Quotes
To perform action on the multiple Quotes, proceed as follows:
1. On the Trading menu, click Trading . Trading overlay with the Received
and Sent tabs is displayed.
2. On Sent tab, select the checkboxes of multiple Quotes on which you require
to perform any action.
3. Right-click on the selected Quotes, the Quick Action Utility appears. You
can perform the following functionalities on the selected Quotes:
o Hold Selected Quotes
o Delete Selected Quotes
o Modify Selected Quotes
Note: User of same trading member can hold multiple Quotes of another user, but
cannot release them.
Modification of multiple Quotes (entails modification of repo rate only) is possible only if
all the selected Quotes belong to the same segment.
2.2.3.5 Selecting Multiple IOIs or AOs
To perform action on the multiple IOIs and AOs, proceed as follows:
1. On the Trading menu, click Trading. Trading overlay with the Received
and Sent tabs is displayed
2. On Sent tab, select the checkboxes of multiple IOIs or AOs on which you
require to perform an action. Only delete operation can be performed on
the selected IOIs or AO. You can delete own AO and IOI and for other
user of same trading member.
3. Right-click on the selected items, the Quick Action Utility appears with
delete icon.
4. Click to delete the selected items. A conformation message appears.
5. Click OK to confirm or Cancel to discard the deletion.
2.2.3.4 Searching and Filtering Functionality
The Search features on various screens and overlays enables you to search the
contents of the column wise. The search is performed column wise and returns all items
/ rows for which the value of an attribute matches the search string.
To perform search, proceed as follows:

1. Click the icon to open the search option.
2. Enter a search string in the Search bar as displayed in following figure.
Please note that you are required to enter a minimum of two characters
before a search can be executed.
Figure 6: Search Bar
3. Click . The search will be performed only for the selected column and
will return all items / rows for which the value of an attribute matches the search
string. The column where a search has been executed will be indicated by a
blue highlight on the icon.
You can also Filter on columns on a screen for one or multiple values. Filters
can be invoked by clicking the symbol on the column headers.
For certain columns like Buy/ Sell Indicator, Pre Trade Action type and so on,
the filter values are prepopulated, while for Segments, the filter values appear
once the users start typing in the text box in the Filter Pop-up in following figure.
You can then select the filter values and click . This will return the rows
matching the filter criteria provided by the user. A column that has been filtered
on, is indicated by a blue highlight on the icon.
Figure 7: Filter

2.2.3.5 Type ahead functionality
There is Type ahead functionality provided in the application on Pre trade screens.
When you start entering values in a field, after entering three characters, they are
prompted with the probable values matching the value entered, as displayed in following
figure.
Figure 8: Type Ahead
2.2.3.6 Export Data
In most screens you can export data through the export icon. Click the icon to
export. You can export data in excel as well as in csv format by clicking on icon.
2.3 Logging Out
To log out from the Eurex Repo F7 GUI:
Click icon which appears at the upper right corner of the Landing Page. You are logged out from the
application and the Eurex Repo F7 GUI log-in screen appears.

3. Landing Page
The home page of the F7 application is known as the Landing Page as displayed in following figure.
This section describes the various screens on the Landing page. The F7 Landing Page contains the
following sections:
F7 Header
Market Watch
Trading Book
Notifications
Own Trades / Own Loans/ Public Trades
Figure 9: Landing Page

3.1 F7 Header
The F7 header contains the following as displayed in following figure.
Main Header
Custom Views
Menus
Figure 10: F7 Header
3.1.1 Header
3.1.1.1 Eurex Repo Logo: Eurex Repo Logo appears in the top left corner of the
screen.
3.1.1.2 About Icon: About icon appears just to the right of the Eurex Repo Logo. Clicking on this icon invokes a screen displaying the software version and copyright information for F7
3.1.1.3 Markets: Choose Market is provided just next to the Eurex Repo logo. The list
of available markets is displayed in the drop-down as displayed in following
figure.
Figure 11: Markets
Note: If a new market is added by Eurex Repo, it will be made available to the users
depending upon their configuration and entitlement.
3.1.1.4 Trading Statistics :

Trading Statistics are presented for each segment of the F7 System. The Repo and
Seclend markets statistics are partitioned into currency, security and basket views.
Product Term combination based:
1. Currency Overview and Details
2. Basket Overview and Details
Geographical Area based:
3. Security Overview and Details
4. Instrument Type Summary
Note:
Date selection is allowed for the last five business days
Figure 12 : Trading Statistics
3.1.1.5 Hold All Member Quotes :
Hold All Member Quotes is used to hold all Quotes of a trading member in case of
emergency. To perform this activity, click the icon. The Confirmation Message dialog
box appears on screen as displayed in following figure. Click OK to confirm or Cancel
to discard the activity.
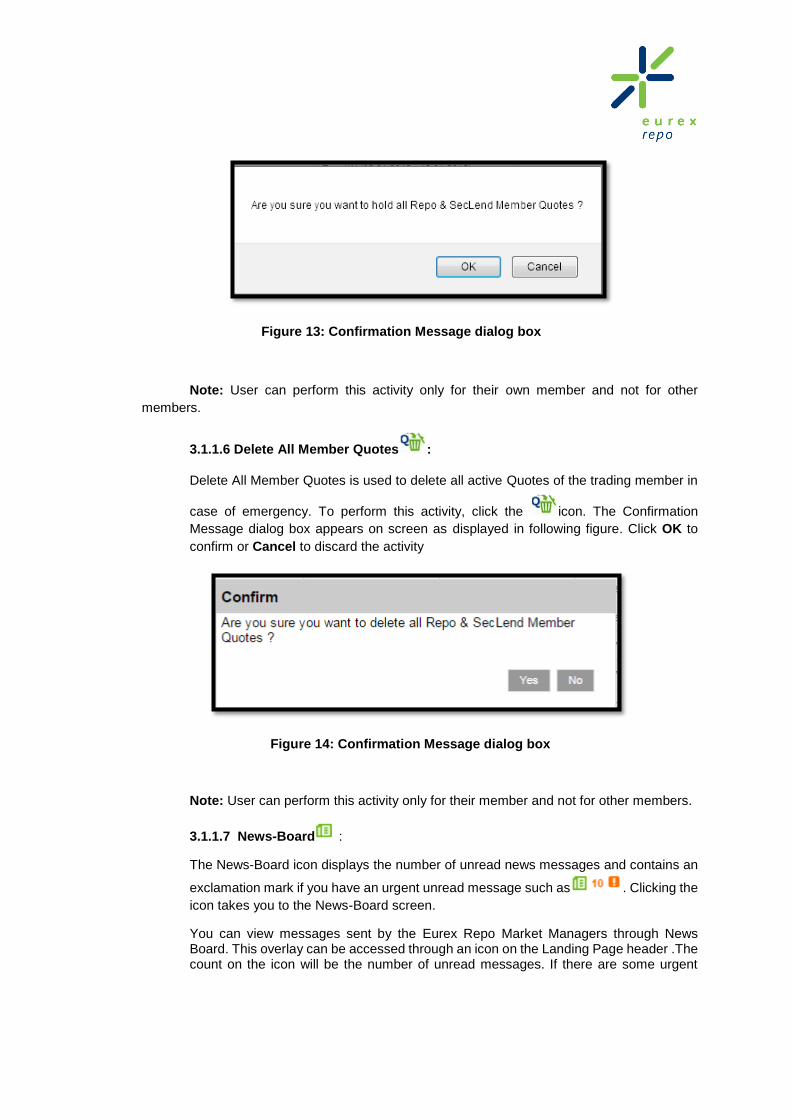
Figure 13: Confirmation Message dialog box
Note: User can perform this activity only for their own member and not for other
members.
3.1.1.6 Delete All Member Quotes :
Delete All Member Quotes is used to delete all active Quotes of the trading member in
case of emergency. To perform this activity, click the icon. The Confirmation
Message dialog box appears on screen as displayed in following figure. Click OK to
confirm or Cancel to discard the activity
Figure 14: Confirmation Message dialog box
Note: User can perform this activity only for their member and not for other members.
3.1.1.7 News-Board :
The News-Board icon displays the number of unread news messages and contains an
exclamation mark if you have an urgent unread message such as . Clicking the
icon takes you to the News-Board screen.
You can view messages sent by the Eurex Repo Market Managers through News Board. This overlay can be accessed through an icon on the Landing Page header .The count on the icon will be the number of unread messages. If there are some urgent

unread messages, an urgent indicator in the form of an exclamation mark will also be displayed to the user on the icon.
Figure 15: News Board icon on the Landing Page
Figure 16: News Board overlay
Month wise news messages are displayed on this overlay. The orange exclamation mark before the message is the urgent indicator and will be displayed when the message is urgent. You can select the Type of messages (Business/Technical), Urgency (Urgent/ Non urgent), markets and click on search, to filter on the relevant news messages. You can also choose the sorting order of the messages: Latest News first and Latest News last. The default order will be Latest News first.
You can click on the message hyperlink to view the entire message as displayed in following figure.
Figure 17: News Board Message

You can expand/collapse each of the months to view the relevant messages.
Wildcard search is available on this screen. You can also save the position of this screen using the save position icon available on the screen title bar.
3.1.1.8 Local Time:
Current Local Time is displayed in the right section on the top line of the screen.
3.1.1.9 Save Layout and screen settings:
You can save the relative positions and sizes of the screens: Market Watch, Trading
Book, Notifications, Own Trades/ Own Loans/ Public Trades and Fast Entry as well
as their screen level settings by clicking on icon. Quote Book can be configured to
keep always open or always closed by clicking on icon.
Note that the column sequence of Market Watch can be saved only from Manage
Custom Views screen and not through this option.
3.1.1.10 User Name:
Your User Name is provided at the top right corner of the screen. Pointing to User
Name displays two options (or sub menus), namely, Change Password and My
Preferences as displayed in following figure.
Figure 18: Options under User Name

3.1.1.11 Change Password:
To change your password, proceed as follows:
1. Click Change Password, under user name as displayed in the above
figure. The Change Password dialog box appears as displayed in following
figure.
2. Enter the current password in the Password field.
3. Enter the new password in the New Password field.
4. Re-enter the new password in Confirm New Password field.
5. Click Change Password. A message ‘Password changed successfully’
is displayed.
Note: Please refer to password policy document in the member section Of Eurex
Repo.

Figure 19: Change Password Dialog Box
3.1.1.12 My Preferences:
You can set the following categories of preferences from this screen:
Generic Settings: You can set preferences like the segments visible on the Landing
Page as well as on the entry screens, Font size on the application and behavioural
settings like closure of a screen on submitting an entry, from this tab

Figure 20: My Preferences - Generic Settings
Trading Limits: You can set trading limits for a group of Product Term Combinations,
CCY/Collateral and Collateral/CCY. If the entered Pre Trade actions breaches
these present limits, an appropriate warning would be displayed. The Upper and
Lower thresholds (in basis points) can be defined for a group and the reference rate
is taken from trades created during the past two business days. A default Reference
Rate can also be defined which is used if the last traded rate is not available for a
Product Term Combinations, CCY/Collateral and Collateral/CCY.
You can also define default thresholds and reference rate and these will be utilised
for Product Terms which are not part of any user defined groups in this section.
Note that these limits are applicable only on the Repo Rate while entering Pre Trade
actions for Repo Products.
Amount Limits: You can set amount limit for a specific segment. When you enter
the Pre Trade action where the amount leading instrument violates the Amount
Limits set for that segment, a warning is displayed. You can choose to ignore this
warning and proceed.

Figure 21: My Preferences - Repo Rate Limits
Entry Defaults: You can define entry defaults which will be prepopulated on the
Enter Quote and Enter Addressed Offer screen. Note that these defaults will be
populated on the entry overlays only if they fit in with respect to the fields already
selected in the entry screens.

Figure 22: My Preferences - Entry Defaults
A new option for Adjust Own Quotes default selection is introduced into My
Preferences —Entry Defaults—Hitting a Quote along with a radio button option
to choose between Best to Worst or Worst to Best. This setting will allow you to
have default select/unselect of Adjust Own Quotes flag on Fast Entry and Hit
Quote Repo, this selection can be changed/overwritten at the time of hitting
Quote as well. The default selection of the flag in My preference will be No
(unticked) and default selection of the radio button option will be Best to Worst.

Figure 23: My Preferences-Entry Defaults
Notifications: You can choose to have sound and/or message notifications for
certain events like IOI received, AO received and so on. The alert to be sounded
can be selected from a list of available sounds. You can select the audio to play
Every Time or Only Once. You can test the sounds using the Play button available.
The message displayed as a Notification with count pops up on the right
bottom corner of the application. Once you close the notification pop up and
next time the notification is received, the count is reset. Notification pop up
gets automatically close with the last EOBD.

Figure 24: My Preferences - Notifications
Clicking on the Save button will save the preferences you have set and they will be
applicable from your next login onwards. You can however, chose to apply these
settings from the current session itself by clicking on ‘Apply and Close’.
Alert Pop-ups: Alert Pop-ups tab is used to control if the pop up alerts will be displayed or
not. By default, all alerts are selected to be displayed. You can choose to not display alerts
from My Preferences or by selecting 'Do not show this alert again' option on the
corresponding alert message.

Figure 25: My Preferences - Alert Pop-ups

3.1.1.13 Logging out : To log out from the application, click the icon. You
will be logged out and the log-in screen will appear.
3.1.1.14 Market Timings: Market Timings display business hours, trading hours
and status for each segment as displayed in following figure. Point to the Market
list component to view the Market Timings.
3.1.1.15 Color coding: Open segment status is displayed in green and closed
in red. If an entire row is highlighted in red, it also indicates that the segment is
on hold.
Figure 26: Market Timings
3.1.2 Custom Views
Custom views are provided to help you create a customized view by defining the segments,
columns, order of columns and other advanced level filters that should be applicable on the

Market Watch. There are seven different views available and they can be accessed using the
seven tabs present on the header. Custom views are explained in detail in Section 3.2.6 ahead.
3.1.3 Menus
The menus on the Landing page are as follows:
Trading
Maintain Quotes
Post Trade
Master Data
Pre Trade Manager
Fast Entry
Quote Book
History
Print Trade Slip
Tools
3.1.3.1 Market Watch
The Market Watch screen gives you an overview of all the Quotes in the Market and
displays the best Quotes. You can also use the Market Watch screen to enter Quotes,
hit Quotes and so on. For more information on Market Watch, refer to the Section 3.2
3.1.3.2 Trading
The Trading menu displays all your pre trading activities. For more information, refer to
the chapter 4.
3.1.3.3 Maintain Quote
The Maintain Quote menu displays the operations that you can perform on all your
Quotes such as hold, delete and so on. For more information, refer to the Section
4.1.2.2.
3.1.3.4 Post Trade
The Post Trade menu displays activities which you perform after a trade is generated.
For more information, refer to the chapter 5.
3.1.3.5 Master Data
The Master Data menu displays the list of instruments that can be used for trading
activities. They are listed as follows:
3.1.3.5.1 Basket
Perform the following steps to view Basket:

1. Go to Master Data Basket, a Basket overlay appears as displayed
in following figure.
Figure 27: Basket overlay
2. Select the segment from the Select a Segment drop-down for which baskets
available for the user are displayed in the following grid.
View Securities
To view the securities for a particular basket:
1. Select a Basket.
2. Click VIEW SECURITIES, a View Securities overlay opens and displays
all securities belonging to the selected basket as shown in following figure.

Figure 28: View Securities overlay
The Apply Filter button displays the filtered list of Securities.
Note: To view the basket properties, click on the View Properties button. For more
information, refer to Section 8.6 Basket Properties.
3.1.3.5.2 Security
Perform the following steps to view Security:
1. Go to Master Data Security menu, a Select Security overlay
appears as displayed in following figure.

Figure 29: Security overlay
View Baskets
To view the baskets for a particular selected security:
1. Select the security checkbox.
2. Click View Baskets, a View Baskets overlay appears and displays all
baskets that contain the selected security as displayed in the following
figure.

Figure 30: View Baskets overlay
Note: To view the security properties, click View Properties. For more
information, refer to the Section 8.7 Securities Properties.
3.1.3.5.3 Index
Perform the following steps to view Index:
1. Go to Master Data Index menu, an Index overlay appears as
displayed in following figure.

Figure 31: Index overlay
2. Select the segment from ‘Select a Segment’ drop-down for which
you want the Indices.
Note: To view the index properties, click VIEW PROPERTIES. For more
information, refer to the Section 8.8 Index Properties.
3.1.3.5.4 Product
Perform the following steps to view product:
1. Go to Master Data Product menu, a Product overlay appears
as displayed in following figure.

Figure 32: Product overlay
2. Select the segment from ‘Select a Segment’ drop-down for which
you want the Product details.
Note: To view the Product properties, click the VIEW PROPERTIES. For more
information, refer to Section 8.9 Product Properties.
3.1.3.5.5 Product-Term
Perform the following steps to view Product-Term:
1. Go to Master Data Product-Term menu, a Select Product - Term
overlay opens as displayed in following figure.

Figure 33: Select Product Term overlay
2. Select the segment from the drop-down for which you want the
Product-Terms.
3.1.3.5.6 Currency
Perform the following steps to view Currency:
1. Go to Master Data Currency menu, a Select Currency overlay
opens as displayed in following figure.

Figure 34: Select Currency overlay
2. Select the segment from ‘Select a Segment’ drop-down for
which you want the Currency Code Description details.
3.1.3.6 Pre Trade Manager
The Pre Trade Manager is a resizable and movable screen with broadcast updates. You are
able to keep this window open and continue working on something else in parallel.
There are separate Pre Trade Manager screens for Repo and SecLend pre trade actions.
These screens can be invoked through a menu ‘Pre Trade Manager’ on the Landing Page
header as illustrated below:
Figure 35: Pre Trade Manager
The Pre Trade Manager screen will display all active (not expired) pre trade actions, except for
Quotes, as follows:
RFQs
IOIs
Pre-Arranged Offers

Addressed Offers, including clean as well as Addressed Offers against RFQs, IOIs and Quotes
Counter Offers
Broker Offers and Addressed Offers against RFQs, IOIs and Quotes.
The Pre Trade Manager screen has two tabs – Received and Sent – displaying received and sent pre trade actions respectively.
Figure 36: Pre Trade Manager-Repo-screen
3.1.3.6.1 Respond To Offer

You can respond to an Offer in the following way:
1. Right click on any received Offer in the received tab. A Quick Action Utility menu
will appear as follows:
Figure 37: Quick Action Utility

2. Now click on the icon and the “Respond Offer” overlay appears as follows.
Figure 38: Respond Offer-Repo overlay
3. You can modify editable fields in Respond Offer overlay.
4. Select the Instruction Ref. Description from the drop-down. In case of only one
valid Instruction Ref. Description is available then it is Auto populated on click
of ACCEPT button.
5. Click ACCEPT. A message ‘Trade generated successfully with trade Id:
XXXX’ is displayed, where XXXX a unique identification number for the trade
generated.
6. You can also choose to REJECT or COUNTER OFFER this Offer from the
respective buttons on the respond Offer screen as displayed in the above
figure.
3.1.3.6.1.1 Copy to new Quote
To copy to new Quote from Pre Trade Manager received tab menu, proceed as :
1. The Pre Trade Manager screen will appear as below. Right click on the Offer
and a utility menu will be displayed as follows:

Figure 39: Quick Action Utility
2. Click on icon and then click on as shown in the figure below :
Figure 40: Copy to new Quote-Quick Action Utility

3. Now for proceeding further, you will have to enter a Quote. For entering a
Quote refer to section 6.1 Enter Quote – REPO screen
3.1.3.6.1.2 Copy to new IOI
To copy to new IOI from Pre Trade Manager received tab menu, proceed as:
1. The Pre Trade Manager screen will appear as below. Right click on
the Offer and a utility menu will be displayed as follows:
Figure 41: Quick Action Utility
2. Click on icon and then click on as shown in the figure below :

Figure 42: Copy to new IOI- Quick Action Utility
3. Now to proceed further, you will have to enter IOI. Refer section 6.2
Indication of Interest - REPO overlay for the same.
3.1.3.6.1.3 Copy to new Addressed Offer
To copy to new AO from Pre Trade Manager received tab, proceed as:
1. The Pre Trade Manager screen will appear as below. Right click on
the Offer and a Quick Action Utility will be displayed as follows:

Figure 43: Quick Action Utility
2. Click on icon and then click on as shown in the figure below :
Figure 44: Copy to new AO-Quick Action Utility

3. Now to proceed further, you will have to enter an Addressed Offer.
Refer section 6.4 Enter Offer - REPO screen for the same.
3.1.3.6.1.4 Copy to new RFQ
To copy to new RFQ from Pre Trade Manager received tab menu,
proceed as:
1. The Pre Trade Manager screen will appear as below. Right click on
the Offer and a utility menu will be displayed as follows:
Figure 45: Quick Action Utility
2. Click on icon and then click on as shown in the figure below:

Figure 46: Copy to new RFQ- Quick Action Utility
3. Now to proceed further, you will have to enter a Request For Quote.
Refer section 6.3 Enter Request for Quote – REPO screen for the
same.
3.1.3.6.2 Respond To IOI

We can respond to an IOI in the following manner:
1. Right click on any received IOI in the received tab. A Quick Action Utility menu
will appear as follows:
Figure 47: Quick Action Utility for IOIs

2. Now, to respond to IOI or to perform operations such Copy to new Quote, AO,
RFQ the operation flow remains the same as it is shown in section Respond
To Offer
3.1.3.6.2.1 View Offers 1. You can view Offers you have sent has for a particular IOI which is present in
the received tab by clicking on the in the Quick Action Utility as shown in
Figure 177. Following overlay appears afterwards:
Figure 48: Offers Sent-overlay

2. You can view Offers you have recieved for a particular IOI which is present in
the sent tab by clicking on the as shown in Figure 176. Following overlay
appears:
Figure 49: Offers Received-overlay
3.1.3.6.3 Respond To Pre-Arranged Offer
You can respond to a Pre-Arranged Offer in the following way:
1. Right click on any received Offer in the received tab. A Quick Action Utility
menu will appear as follows:

Figure 50: Quick Action Utility for Pre-Arranged Offers
2. Now click on the icon and the “Respond Pre-Arranged Offer-Repo”
overlay appears as follows.
Figure 51: Respond Pre- Arranged Offer- Repo- overlay
3. You can modify editable fields in Respond Pre-Arranged Offer overlay.
4. Select the Instruction Ref. Description from the drop-down. In case of only one
valid Instruction Ref. Description is available then it is Auto populated on click
of ACCEPT.

5. Click ACCEPT. A message ‘Trade generated successfully with trade Id: XXXX’
is displayed, where XXXX a unique identification number for the trade
generated.
6. You can also choose to REJECT this Offer.
3.1.3.6.4 Respond To Counter Offer
You can respond to a Counter Offer in the following way:
1. Right click on any received Counter Offer in the received tab. A Quick Action
Utility menu will appear as follows:
Figure 52: Quick Action Utility

2. Now click on the icon and the “Respond Offer” overlay appears as follows.
Figure 53: Respond Offer- Repo
3. The behavior of respond to Counter Offer is same as of respond to Offer. Refer
section Respond To Offer
3.1.3.6.5 Respond To Request For Quote
The behaviour for Respond to RFQ is exactly identical to that of Respond to IOI.
Please see section Respond To IOI for reference.
3.1.3.6.6 View Properties of Pre Trades
The view properties feature is a common shared feature of all pre trade actions
displayed in pre trade manager that allows you to view properties of any
particular pre Trade. To view properties of a particular pre trade actions, proceed
as:
1. Right click on any pre trade action in the Pre Trade Manager screen and a
Quick Action Utility will appear as under :

Figure 54: Pre Trade Manager- Quick Action Utility
2. Click on the icon and the properties window of the subsequent pre trade
(in this case, Address Offer )will appear as below:
Figure 55: Request For Quote Properties

3. The procedure for viewing properties for every pre trade action is the same.
Components
Table 6: overlay – Components Description
S.No Components Description
1 Click the icon to export data to excel.
2 Click the icon to export data to CSV.
3
Choose the value(s) you wish to filter on and click
OK. This will return the rows in which this column
attribute matches the chosen filter criteria. You
can also choose to search this column by
entering the search criteria in the search box
provided and clicking OK. This will return all rows
for which the attribute in this column matched the
search criteria
Some columns do not have filter, just search
Enter the search string in the Search textbox.
The search will be performed within the chosen
column and return all the rows for which the value
of an attribute matches the search string.
4
Click CLOSE to close the overlay.
5 Click on this icon to refresh data on this overlay
6
Click on this icon to save the screen position, i.e.
the position in which the screen should open
and the following screen level settings:
i. Column Width
ii. Column Sequence
iii. Filter Settings
iv. Tab selection
v. Window Size

7
Reset All: Click this icon to reset user applied
sorting, filtering, search. It will not reset changed
order of columns.
3.1.3.7 Fast Entry
The Fast Entry screen has been created to enable users to copy/enter/modify/delete/hold/release
Quotes for the Repo segments using a single screen and with minimal clicks.
This screen can be invoked by a menu Fast Entry from the landing page as shown in the below figure:
Figure 56: Fast Entry
Figure 57: Fast Entry-REPO screen

Following are the steps to use the Fast Entry screen once invoked:-
1. Click on any suitable Quote on the Market Watch screen (or Trading Book) as shown
below.
Figure 58: Market Watch screen
2. The Fast Entry screen will be populated as shown below :-
Figure 59: Fast Entry- REPO screen
3. If you change the Quote selection in the Market Watch / Trading Book, the Fast Entry
window will be re-populated with the details of the selected Quote. Note: the following
columns must be present on the custom view for the selection to be populated: Segment,
CCY/Collateral and Collateral/CCY.
4. You can enter amounts in the Fast Entry screen using the quick amount feature. The
default is always the Amount field, but Total Amount and Min. Take Amount can also be
updated when clicked. When clicking on a quick amount icon the corresponding amount
gets entered in the Amount field as follows:

Figure 60: Fast Entry - REPO screen
5. You can click to dock the Fast Entry screen to Trading Book screen. The screens will be displayed as :-

Figure 61: Trading Book and Fast Entry-Repo screen after Docking
6. You can click to undock the Fast Entry screen from the Trading Book screen.
7. The weighted average of current business day trades of the combination selected from the Market Watch screen will be displayed on the Fast Entry screen as under :-

Figure 62 : Fast Entry - Repo
Table 7: Shortcuts for Keyboard
The Fast Entry screen will have the following keyboard shortcuts for buttons BID, OFFER, HIT and TAKE:
Shortcut To
[CTRL] + [ALT] + [B] Enter a buy Quote (bid)
[CTRL] + [ALT] + [O] Enter a sell Quote (Offer)
[CTRL] + [ALT] + [H] Hit a Quote
[CTRL] + [ALT] + [T] Take a Quote
Following are the various actions, F7 Eurex Repo F7 GUI users can perform, in a single click,
using the Fast Entry screen.
3.1.3.7.1 Hit
HIT will initiate a trade with the selected Buy Side Quote.

You can HIT a Quote from the Fast Entry screen in the following way:
1. Click on any suitable Buy Side Quote from the Market Watch or Trading Book
screen.
Figure 63: Fast Entry- REPO screen
2. Click HIT and a success message will appear at the bottom as shown in
below figure.
Figure 64: Fast Entry-REPO screen

3.1.3.7.1.1 Adjust Own Quotes Traders can choose to reduce their existing exposure (existing Quotes), when they hit a matching Quote on the opposite side, by selecting the Adjust Own Quotes option on Hit Quote/ Fast Entry screens. This is done by reducing the amount on their matching Quote(s) by the amount on the trade generated when the Quote is hit. Adjust own Quotes feature is available on the Fast Entry screen and the Hit Quote overlay, and it is possible to configure a general preference in My Preferences.
You must ensure that the Adjust Own Quotes checkbox is ticked while performing a HIT or a TAKE as shown below:
Figure 65: Fast Entry - REPO screen
3.1.3.7.2 Take
TAKE will initiate a trade with the selected SELL Side
Quote.

You can TAKE a Quote from the Fast Entry screen in the following way:
1. Click on any suitable SELL Side Quote in the Market Watch or Trading Book
screen.
Figure 66: Fast Entry- REPO screen
2. Enter suitable details and click TAKE and then a success message will appear
at the bottom as shown in below figure.
Figure 67: Fast Entry- REPO screen
3.1.3.7.3 Bid

You can enter a BUY Quote by clicking BID.
You can enter a BID from the Fast Entry screen in the following way:
1. Click on any suitable Quote in the Market Watch or Trading Book screen.
Figure 68: Fast Entry- REPO screen
2. Change details or simply click BID and then a success message will appear at
the bottom as shown in below figure.
Figure 69: Fast Entry-REPO screen
3.1.3.7.4 Offer

You can enter a SELL Quote by clicking OFFER.
You can enter a sell Quote from the Fast Entry screen in the following way:
1. Click on any suitable Quote in the Market Watch or Trading Book screen.
Figure 70: Fast Entry- REPO screen
2. Enter suitable details or click OFFER and a success message will appear at the
bottom as shown in below figure.
Figure 71: Fast Entry-REPO screen
3.1.3.7.5 Modify

You can MODIFY your own Quote by changing values you wish to modify
and then clicking MODIFY.
You can MODIFY your Quote from the Fast Entry screen in the following way:
1. Click on your own or your colleagues’ Quote in the Market Watch or Trading
Book screen.
Figure 72: Fast Entry- REPO screen
2. Enter suitable details and click MODIFY and then a success message will
appear at the bottom as shown in below figure.
Figure 73: Fast Entry-REPO screen

3.1.3.7.6 Hold
You can HOLD a Quote from the Fast Entry screen in the following way:
1. Click on your own or your colleagues’ Quote in the Market Watch or Trading
Book screen.
Figure 74: Fast Entry-REPO screen
2. Click HOLD and then a success message will appear at the bottom and the
HOLD button will change to RELEASE as shown in below figure.
Figure 75: Fast Entry-REPO screen

3.1.3.7.7 Release
You can RELEASE your HELD Quote from the Fast Entry screen in the
following way:
1. Click on your HELD Quote in the Market Watch or Trading Book screen.
Figure 76: Fast Entry- REPO screen
2. Click RELEASE and then a success message will appear at the bottom and the
RELEASE button will change to HOLD as shown in below figure.
Figure 77: Fast Entry-REPO screen
3.1.3.7.8 Delete

You can DELETE a Quote from the Fast Entry screen in the following way:
1. Click on your own or your colleagues’ Quote in the Market Watch or Trading
Book screen.
Figure 78: Fast Entry-REPO screen
2. Click DELETE and then a success message will appear at the bottom as shown
in below figure.
Figure 79: Fast Entry-REPO screen
3.1.3.7.9 New
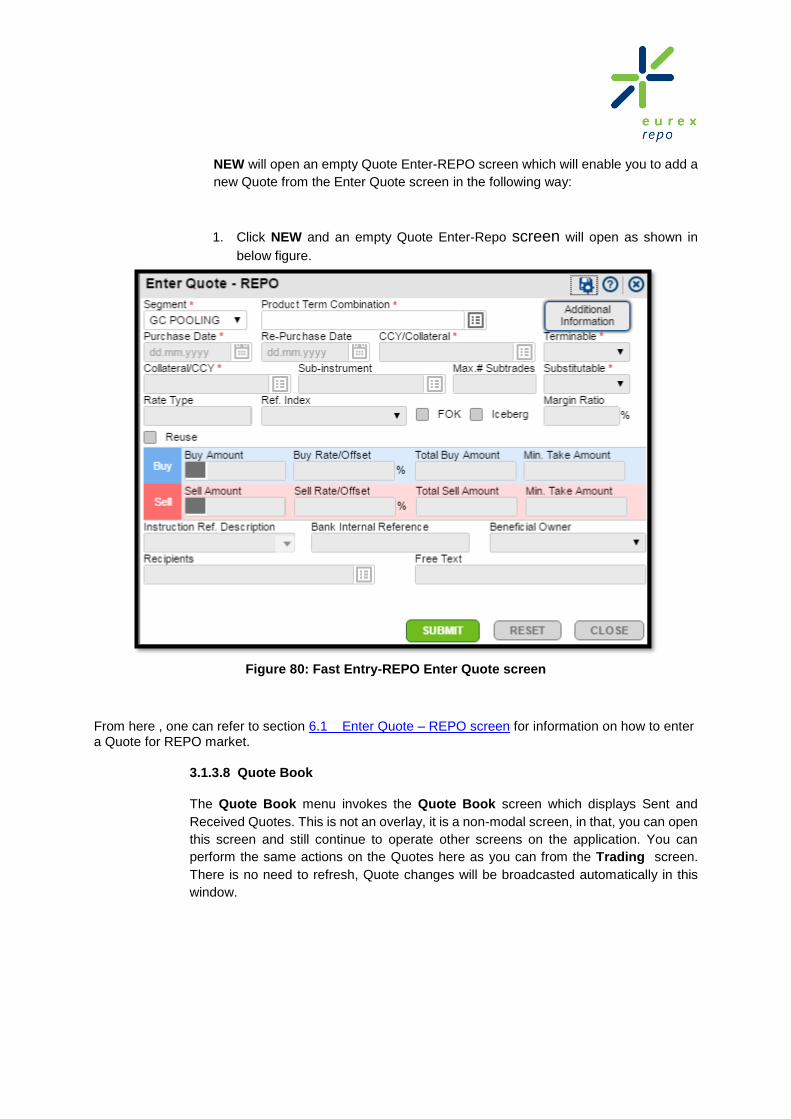
NEW will open an empty Quote Enter-REPO screen which will enable you to add a
new Quote from the Enter Quote screen in the following way:
1. Click NEW and an empty Quote Enter-Repo screen will open as shown in
below figure.
Figure 80: Fast Entry-REPO Enter Quote screen
From here , one can refer to section 6.1 Enter Quote – REPO screen for information on how to enter a Quote for REPO market.
3.1.3.8 Quote Book
The Quote Book menu invokes the Quote Book screen which displays Sent and
Received Quotes. This is not an overlay, it is a non-modal screen, in that, you can open
this screen and still continue to operate other screens on the application. You can
perform the same actions on the Quotes here as you can from the Trading screen.
There is no need to refresh, Quote changes will be broadcasted automatically in this
window.

Figure 81: Quote Book Menu
Figure 82: Quote Book-REPO- screen
3.1.3.9 History
The History menu provides all the information related to pre trades, trades and trade
requests of Repo and pre trades, loans and loans requests of Seclend Market. History
tab appears on the right corner of the Landing page screen as shown in following figure.
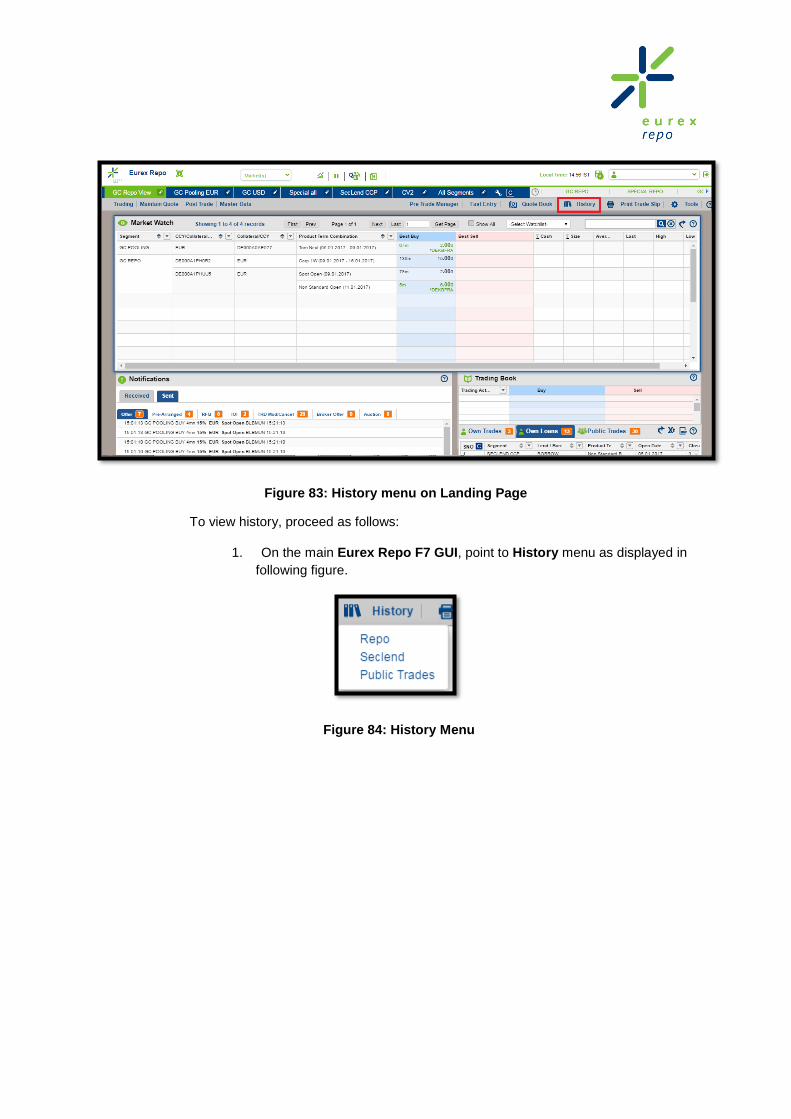
Figure 83: History menu on Landing Page
To view history, proceed as follows:
1. On the main Eurex Repo F7 GUI, point to History menu as displayed in
following figure.
Figure 84: History Menu

2. Click Repo. The History overlay appears as shown in following figure.
Figure 85: History overlay
3. In Choose a Period, select the From date and To date using the calendar
icon provided next to both the fields. Default value will be Today’s Calendar

Date as the To date value and Calendar Date minus 3 days as the From
date
Note: You can enter any date however the From Date must be less than or
equal to To Date.
4. Select the Trade Status from the drop-down. The values are ACTIVE,
INACTIVE, PENDING, FAILED and All.
Note: Trade Status dropdown will be enabled only when the user is on the
Trades tab.
5. Click SHOW. All the pre trades, trades and trade requests for the selected
dates (and status in case of Trades) are displayed in the respective tab.
Click the Trading tab to view all the pre trades (such as AO, IOI or
Quote) for the selected period. It has Sent and Received sub-tabs.
o Click Sent to view all the pre trades you have sent
o Click Received to view all the pre trades you have received.
Click the Trades tab to view all the trades for the selected period. By
default all trades will be displayed on the screen and you can filter the
trades further using the Trade Status drop-down.
Click the Trade Requests tab to view all the trade requests for the
selected period. It has two sub-tabs, namely Sent and Received.
o Click Sent to view all the trade requests you have sent.
o Click Received to view all the trades requests you have received.
To change the values of the Choose a period or Status field, click RESET. From date
and To date will become blank and status will change to ALL. Now you can select the
values again.
6. You can view properties of a particular trade by right clicking on a particular trade
and then by clicking on the show properties icon .

Figure 86: History-REPO-overlay
7. An overlay will appear which will showcase the properties of that trade in
the following manner:

Figure 87: Counter Offer Properties- overlay
3.1.3.9.1 Public Trades
The Public Trades Menu enables you to view all public trades.
To view, Public Trades, proceed as follows:
1. On the main Eurex Repo F7 GUI, point to History menu as displayed in
following figure.
Figure 88: History Menu

2. Click Public Trades. The History screen appears as displayed in
following figure.
Figure 89: History-Public Trades-overlay
3. In Choose a Period, select the From date and To date using the
calendar icon provided next to both the fields. Default value will be
Today’s Calendar Date as the To date value and Calendar Date minus 3
days as the From date
Note: You can enter any date but the From Date must be less than or
equal to the To Date.
4. Select the Trade Status from the drop-down. The values are ACTIVE,
INACTIVE and All.
5. Click SHOW. All the public trades whether REPO or SECLEND, would be
visible as shown in Figure 35.
6. You can view properties of a particular trade by right clicking on a
particular trade and then by clicking on the view properties icon .

Figure 90: Public Trades History-overlay
7. An overlay will appear which will showcase the properties of that public
trade in the following manner:
Figure 91: Public Trade Properties
3.1.3.8 Print Trade Slip
The Print Trade Slip menu enables you to print trade slips. Trade slips are available for up to 5 days.
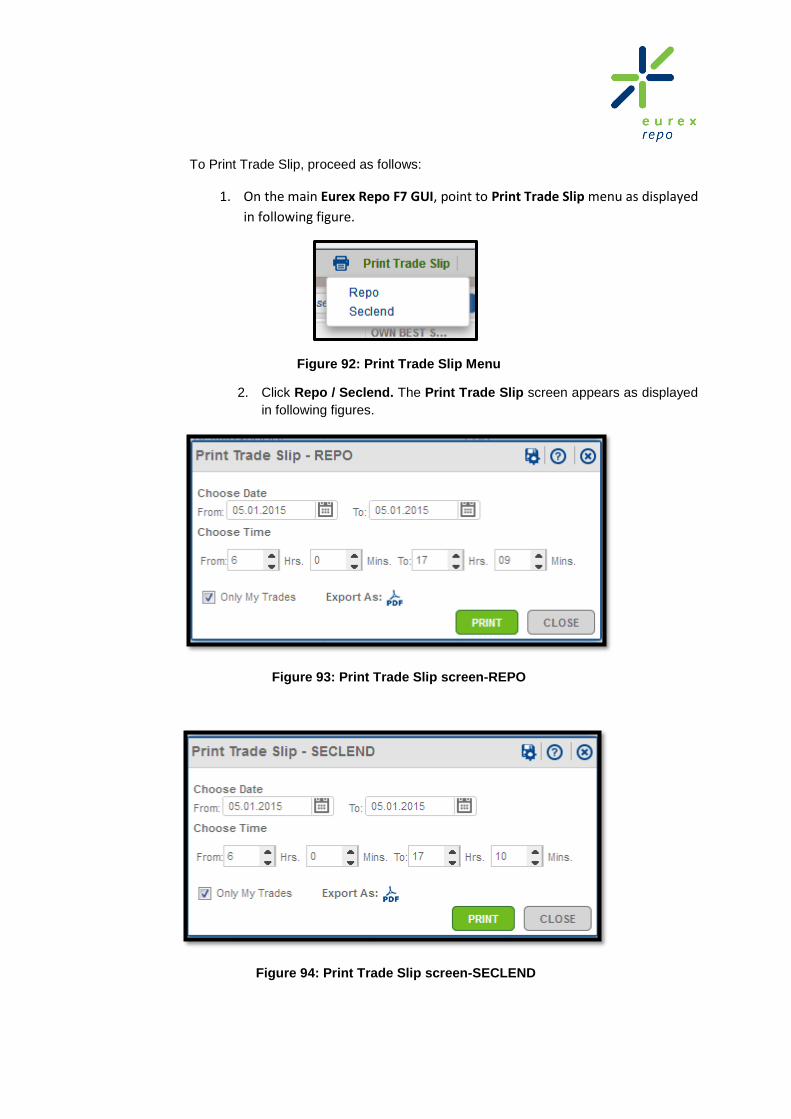
To Print Trade Slip, proceed as follows:
1. On the main Eurex Repo F7 GUI, point to Print Trade Slip menu as displayed
in following figure.
Figure 92: Print Trade Slip Menu
2. Click Repo / Seclend. The Print Trade Slip screen appears as displayed
in following figures.
Figure 93: Print Trade Slip screen-REPO
Figure 94: Print Trade Slip screen-SECLEND

3. In Choose a Date, select the From date and To date from calendar icon
provided next to both the fields.
4. In Choose a Time, select the From time (in Hrs and Mins) and To time (in
Hrs and Mins) from icon provided next to both the fields.
5. Click PRINT. Using this you can print all the trades created between the
selected date and time range, with every trade printed on a separate page
6. You can choose to print only your trades (that isto exclude the trades
created by your co-workers) by selecting the option Only My Trades. If this
option is not selected, it will print all the trades for your member (including
your co-worker’s trades)
7. You can also choose to extract a soft copy of the trade slips using the
Export as pdf option.
3.1.3.9 Tools
The Tools menu provides options for configuring the system such as maintaining
distribution lists, creating Member relationships, configuring trade slips and so on. For
more information, refer to the Section 3.6.
3.2 Market Watch screen
The Market Watch screen provides an overview of the market during the day and displays the Own
Best Buy, Best Buy, Best Sell and Own Best Sell depending on the combination of columns present.
The combination of columns can be customized using the Manage Custom Views screen described in
section 3.2.6
Note: Your own Quotes are marked with asterisk ‘*’
Figure 95: Market Watch screen

The key functionalities of the Market Watch are as follows:
Column level Filtering
Advanced Filtering
Column Level Sorting
Re-arranging Columns
Using Quick Action Utility
Pagination
3.2.1 Filtering - Market Watch screen
You can filter by clicking the icon next to each of them as displayed in following figure. Some
of the filters available here have been illustrated below
Figure 96: Filter Icons
Filtering Segment: To filter Segment, click the icon next to SEGMENT header, the
Choose filters dialog box appears as displayed in following figure.
Once you start typing in the Search text box in the Filter dialog box, matching filter values
appear in the list below and you can select or clear these filter values
Figure 97: Choose Filters Dialog Box-Segment
Filtering Product /Term: To filter Product /Term, click the icon next to PRODUCT /
TERM header, the Choose filters dialog box appears. Once you start typing in the Search

text box in the Filter dialog box, matching filter values appear in the list below and you select
or clear these filter values
Filtering CCY/Collateral/Security: To filter this field, click the icon next to the header.
The Choose filters dialog box appears as displayed in following figure.
If you want to filter on a Basket, select the Choose Baskets option in the dialog box. Once
you start typing in the adjacent Search text box matching filter values appear in the list below
and you can select or clear these filter values
Similarly, you can filter on Currencies and Securities as well as on Bond, Equity and
Derivative instruments through this filter. You can also choose to filter on All Baskets or All
Securities by selecting the corresponding options available
Figure 98: Choose Filters Dialog Box- CCY/ Collateral/ Security
Additionally, there is a general search is provided for the Market Watch. The search will be applied to all the columns of the Market Watch. All the rows matching the text in
search bar will be displayed to the user.
3.2.2 Advanced Filtering
There are advanced filters giving you a choice to display held Quotes on the Market Watch,
display only certain kind of instruments and so on. There have been discussed further under
Manage Custom Views in section 3.2.6 Manage Custom Views
3.2.3 Watchlist Selection
On selection of any watchlist, quotes belonging to securities/baskets defined in that watchlist
would be visible on the Market Watch.

'Show All' button is unchecked and greyed out by default. If you select a Watchlist, then the
“Show All” checkbox becomes active and unselected. When you check the Show All checkbox,
Market Watch will also display all possible combinations of instruments that are part of the
applied watchlist even if there are no quotes against them.
Note: “Show All” will be enabled only if Segment, CCY/Collateral & Collateral/CCY columns in
any form are present in the custom view.
Figure 99: Watchlist selection with 'Show All' option
3.2.4 Sorting Data - Market Watch screen
You can sort data in the particular column by selecting the sort feature provided in the
Market Watch screen. Click the arrow displayed next to the column header as displayed in
following figure to sort the values. Click the arrow again to reverse the sort order. The current
sort order is indicated by a blue highlight on the sort icon. (Upper arrow indicates ascending
order and Lower arrow indicates descending order). Sorting will not be saved in any of save
settings for windows.
Figure 100: Arrows for Sorting Values in Column
Sorting of data is possible based on multiple columns from left to right. The previously sorted
columns must be taken into account before applying a sort on a new column. By default, all
columns in the Market Watch will be sorted/ grouped from left to right.
If you perform sorting on SEGMENT column then it will sort data of that column according to its sorting order as displayed in following figure.

Figure 101: Multiple Sorting on column SEGMENT
If you perform sorting on CCY/COLLATERAL column then the sorting will be applied within Segment (as it is present to the Left) for CCY/Collateral in following figure.
Figure 102: Multiple Sorting on column CCY/COLLATERAL

3.2.5 Grouping – Market Watch screen
Cells in a column appear merged if they contain the same data on Market Watch This grouping
is done from Left to right. This means cells in second column will not be grouped together unless
the cells in first column are grouped.
Content in merged cells will be top justified. If the merged cell value is not visible anymore
because the user scrolled down, he can view the value by hovering the mouse over the merged
cell area.
Figure 103: Grouping- Market Watch
3.2.6 Re-arranging Columns - Market Watch screen
You can re-arrange the sequence of columns displayed in the Market Watch screen. For more
information, refer to the Section 2.2.3.3
Note: The columns such as Best Buy, Best Sell, Own Best Buy, Trade Info and Own Best Sell
cannot be re-arranged.
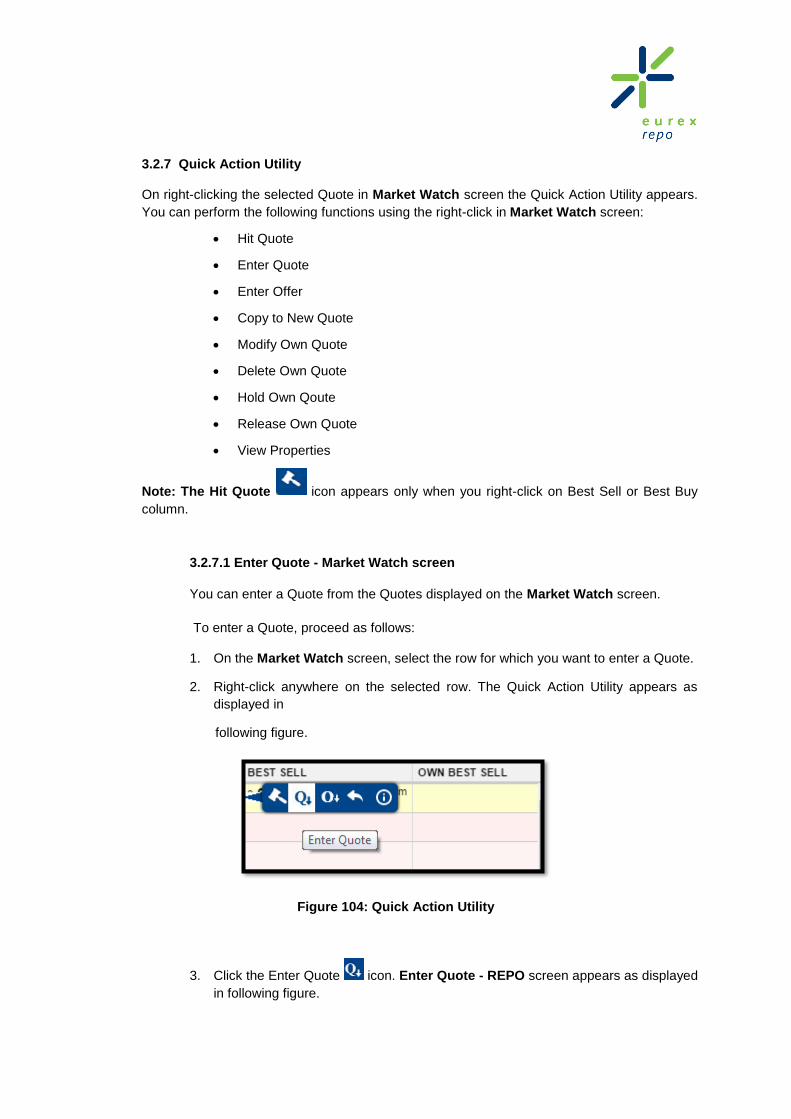
3.2.7 Quick Action Utility
On right-clicking the selected Quote in Market Watch screen the Quick Action Utility appears.
You can perform the following functions using the right-click in Market Watch screen:
Hit Quote
Enter Quote
Enter Offer
Copy to New Quote
Modify Own Quote
Delete Own Quote
Hold Own Qoute
Release Own Quote
View Properties
Note: The Hit Quote icon appears only when you right-click on Best Sell or Best Buy
column.
3.2.7.1 Enter Quote - Market Watch screen
You can enter a Quote from the Quotes displayed on the Market Watch screen.
To enter a Quote, proceed as follows:
1. On the Market Watch screen, select the row for which you want to enter a Quote.
2. Right-click anywhere on the selected row. The Quick Action Utility appears as
displayed in
following figure.
Figure 104: Quick Action Utility
3. Click the Enter Quote icon. Enter Quote - REPO screen appears as displayed
in following figure.

Figure 105: Enter Quote-REPO
4. Enter the field details in the Enter Quote - Repo. For more information about fields,
refer Enter Quote – REPO screen.
5. Click SUBMIT to submit the Quote. A message ‘Quote entered successfully’ with
unique Quote Id and Total Count of Quotes entered is displayed. Total count is the
total number of Quotes submitted before Enter Quote window is closed.
3.2.7.2 Enter Offer - Market Watch screen
You can enter an Offer for the Quote available on Market Watch screen.
To enter an Offer, proceed as follows:
1. Select the Quote (row) in the Market Watch screen, for which you want to enter an
Offer.
2. Right-click anywhere on the selected row. The Quick Action Utility appears as
displayed in following figure.

Figure 106: Quick Action Utility
Figure 107: Enter Offer-REPO screen
3. Click the Enter Offer icon. The Enter Offer – REPO screen appears as
displayed in following figure.
4. Enter the field details in the Enter Offer - Repo. For more information about fields,
refer Enter Offer - REPO screen.
5. Click SUBMIT to submit the Offer. A message ‘Offer entered successfully’ with
unique Offer Id and Total Offers entered is displayed.

3.2.7.3 Copy to New Quote - Market Watch screen
You can copy the existing Quote on the Market Watch screen to new Quote.
When invoked from the price information columns (Own Best Buy, Best Buy, Own Best
Sell and Best Sell), this option invokes the Enter Quote screen with ‘all’ the attributes of
that quite, including the rate and amount information
When invoked from any other column on the Market Watch, this invokes the Enter
Quote screen prepopulated with all the column values present in the Market Watch on
that particular row, provided both Product Term Combination and Segment columns are
present on the Market Watch. If even one of these two columns is not present, this
option will invoke a blank Enter Quote screen, similar to the one in described in section
3.2.5.1
To Copy to New Quote, proceed as follows:
1. Select the Quote (row) in the Market Watch screen, you want to copy.
2. Right-click anywhere on the selected row. The Quick Action Utility appears as
displayed in following figure.
Figure 108: Quick Action Utility
3. Click the Copy to New Quote icon. Enter Quote – Repo screen appears as
displayed in following figure.

Figure 109: Copy to New-Enter Quote-REPO screen
4. Enter values in the other fields as required. For more information about fields, refer
to the Section 6.1.
5. Click SUBMIT to submit the Quote. A message ‘Quote entered successfully’ with
unique Quote Id is displayed.
3.2.7.4 Hit a Quote - Market Watch screen
You can hit a Quote from the Market Watch screen.
To Hit a Quote, proceed as follows:
1. Select the row for which you want to hit a Quote and right-click on Best Buy or Best
Sell column. The Quick Action Utility appears as displayed in following figure.
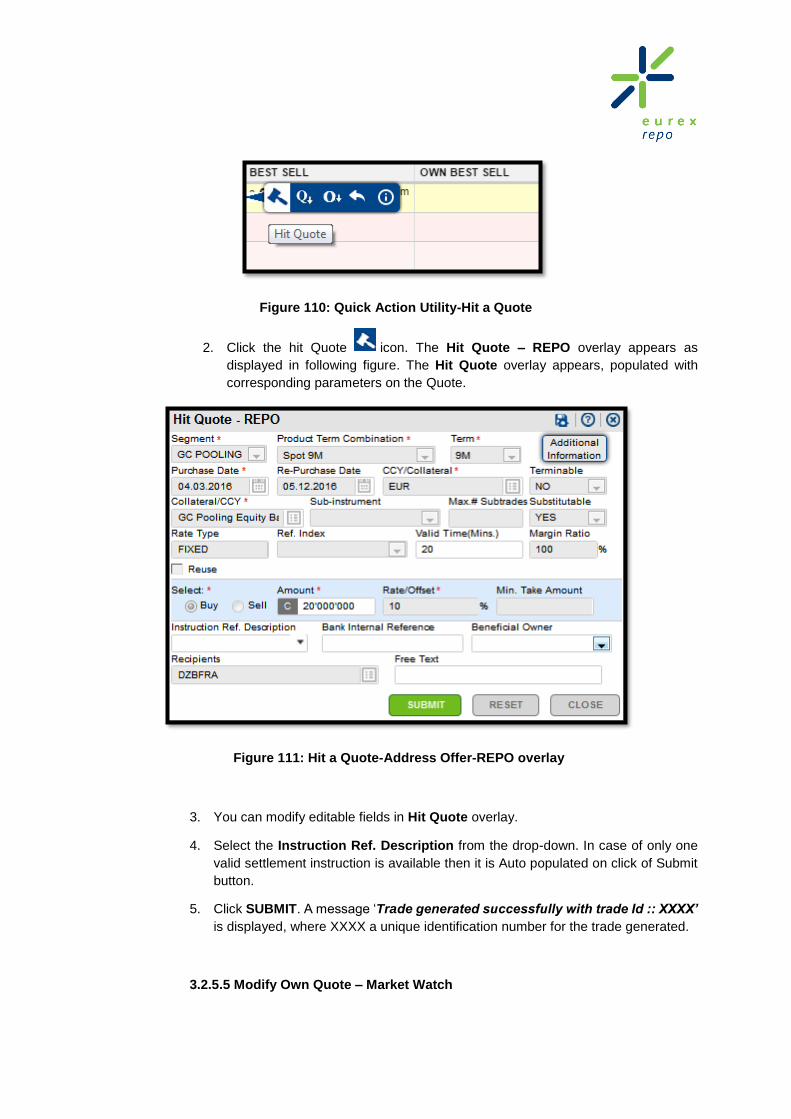
Figure 110: Quick Action Utility-Hit a Quote
2. Click the hit Quote icon. The Hit Quote – REPO overlay appears as
displayed in following figure. The Hit Quote overlay appears, populated with
corresponding parameters on the Quote.
Figure 111: Hit a Quote-Address Offer-REPO overlay
3. You can modify editable fields in Hit Quote overlay.
4. Select the Instruction Ref. Description from the drop-down. In case of only one
valid settlement instruction is available then it is Auto populated on click of Submit
button.
5. Click SUBMIT. A message ‘Trade generated successfully with trade Id :: XXXX’
is displayed, where XXXX a unique identification number for the trade generated.
3.2.5.5 Modify Own Quote – Market Watch

You can modify your own Quote from the Market Watch screen
To modify your Quote, proceed as follows:
1. Select your Quote that you want to modify and right-click on the corresponding price
information column. The Quick Action Utility appears as displayed in following
figure.
Figure 112: Modify Quote - Market Watch
2. Click the Modify Quote icon. The Modify Quote – REPO overlay appears as
displayed in following figure, populated with the corresponding parameters on the
Quote.
Figure 113: Modify Quote - Market Watch
3. You can modify the editable fields in Modify Quote overlay.
4. Click SUBMIT. A message ‘Quote modified successfully: XXXX’ would be
displayed on the screen.
3.2.5.6 Delete Own Quote - Market Watch

You can delete your member’s Quote from the Market Watch screen
To Delete Quote, proceed as follows:
1. Select your Quote that you want to delete and right-click on the corresponding price
information column. The Quick Action Utility appears as displayed in following
figure.
Figure 114: Delete Quote - Market Watch
2. Click the Delete Quote icon. The Delete Quote – REPO alert appears as
displayed in following figure.
Figure 115: Delete Quote - Market Watch
3. Click on the Yes button. A message ‘Quote deleted successfully: XXXX’ would
be displayed on the screen.
3.2.5.7 Hold/ Release Own Quote - Market Watch
You can hold your member’s Quote and release your own Quote from the Market
Watch screen.
To Hold your member’s Quote, proceed as follows:
1. Select your Quote that you want to hold and right-click on the corresponding price
information column. The Quick Action Utility appears as displayed in following
figure.

Figure 116: Hold Quote - Market Watch
2. Click the Hold Quote icon. The Hold Quote alert appears as displayed in
following figure.
Figure 117: Hold Quote - Market Watch
3. Click on the Yes button. A message ‘Quote held successfully: XXXX’ would be
displayed on the screen.
To Release your own Quote proceed as follows:
1. Select a held Quote that you want to release and right-click on the
corresponding price information column. The Quick Action Utility appears as
displayed in following figure.
Figure 118: Release Quote - Market Watch
2. Click the Release Quote icon. The Release Quote – REPO overlay appears
as displayed in following figure, populated with the corresponding parameters on
the Quote.

Figure 119: Release Quote - Market Watch
3. You can choose to enter Free Text and click RELEASE. A message ‘Quote
released successfully: XXXX’ would be displayed on the screen.
3.2.5.8 View Properties - Market Watch
You can view additional details of a Quote by choosing to view its properties.
To View Properties of a Quote, proceed as follows:
1. Select a Quote for which you want to view additional details and right-click on the
corresponding price information column. The Quick Action Utility appears as
displayed in following figure.
Figure 120: View Properties - Market Watch
2. Click the Show Properties icon. The Quote Properties overlay appears as
displayed in following figure, populated with the additional details about the Quote.

Figure 121: Quote Properties - Market Watch
3.2.8 Manage Custom Views
Custom Views help you to create customized views for the Market Watch, by configuring the columns and segments visible on each of these views. Custom View can be created from any of the existing Templates defined in system. Creation & modification of Custom View(s) will be possible by selecting the “Edit” option provided in individual Custom View or through Manage
View option available adjacent to the seven Custom View tabs.
You can select/de-select the custom views that must be displayed as tabs on the Landing
Page by clicking on the icon . Custom view selection drop down appears. By default all
views are selected. You can change the sequence of custom views from the Custom View
selection drop down by dragging and dropping them. To Configure a Custom View, proceed
as follows:
1. Select the Mange View option from the menu bar on the landing page as displayed in
following figure.
Figure 122: Manage View
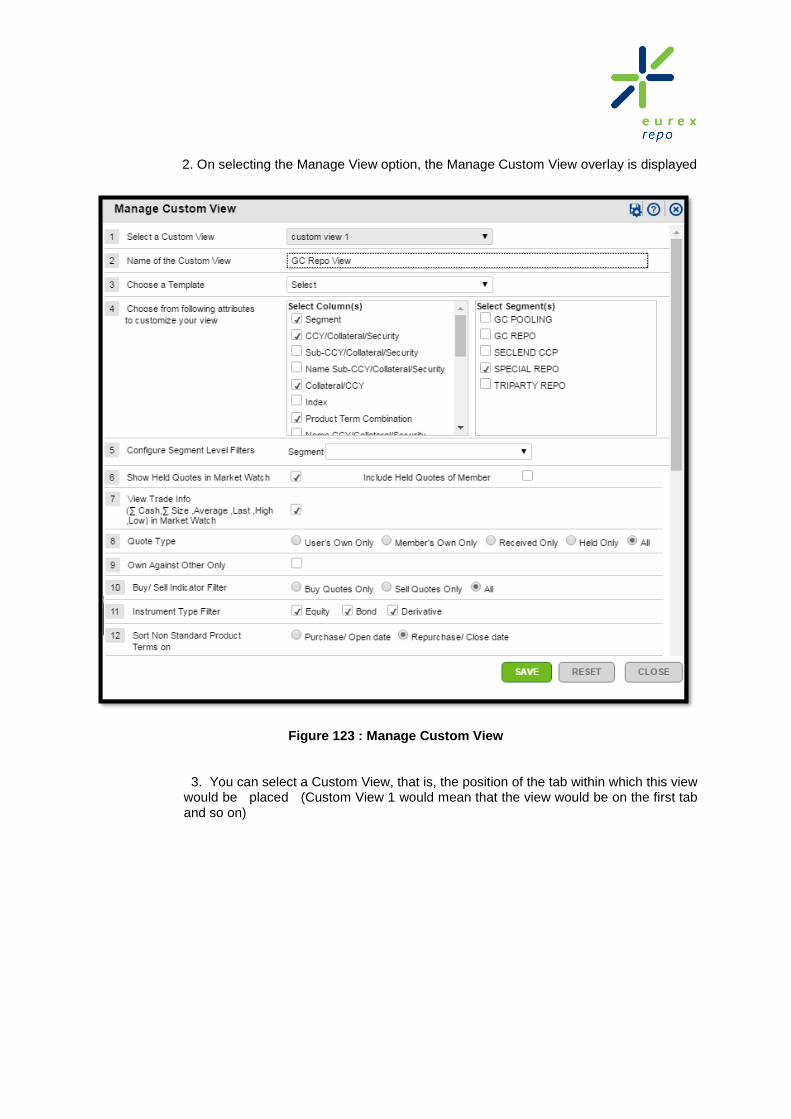
2. On selecting the Manage View option, the Manage Custom View overlay is displayed
Figure 123 : Manage Custom View
3. You can select a Custom View, that is, the position of the tab within which this view would be placed (Custom View 1 would mean that the view would be on the first tab and so on)

Figure 124: Manage Custom View - Select Custom View
4. Provide a name for the Custom View to be created in this screen. This name will be displayed on the View tab on Market Watch and cannot be reused for multiple views at
the same time.
5. You can select any of the existing Templates. Only single template can be selected by the user at a time

Figure 125: Manage Custom View - Select Template
6. Based on the template selected by the users, the list and order of columns and segments available is displayed. Only those segments that have you have access to will be available for selection as displayed in following figure.

Figure 126: Manage Custom View- Select Segment
7. You can choose to check/uncheck the columns and reorder them by dragging and dropping them vertically. You can also choose the segments to be visible on the view; however, there is no drag and drop here.
8. There are some additional settings that you can configure from here as well. These settings apply to the Market Watch and the Trading Book screens:
i. Configure Segment Level Filters: You can choose the segment for which
you want to configure Product Term, Security, Basket or Currency. You can
also specify (to override the default) if the selected instruments (Security/
Basket/ Currency) should belong to the Leading/ Secondary instrument of the
Quotes displayed on the view.
For example: If you want to configure Product Term for selected segment then
Click on displayed in front of the Product Term. Product-Term
overlay appears as displayed in following figure:

Figure 127 : Product-Term overlay
Here, you can select Product Term Combinations which you want to configure against the selected segment for specific custom view. You can remove already selected Product Term Combinations by clicking-on REMOVE SELECTION button or apply new selected product term combinations by clicking-on SAVE SELECTION
button.
ii. Show Held Quotes : You can choose if you want to view your held Quotes on
the Market Watch and the Trading Book
iii. View Trade Info: On selecting this option, Trade Info will appear as the last
column on the Market Watch screen. These columns will indicate the ∑ Cash,
∑ Size, Last, High, Low for the trades created today, on each combination on
Market Watch.
iv. Quote Type Filters: Following are the options available under Quote Type
Filter:
a. User's Own Only - Display only your own (not even your coworkers’)
Quotes on the Market Watch view.
b. Member's Own Only - Display your own quotes. Other members'
quotes will be displayed only if you have a corresponding quote on the same
combination.
c. Received Only – Display only received Quotes. The checkbox for Show
Held Quotes is unchecked and disabled when this option is selected
d. Held Only – Display only held Quotes. When this option is selected, the
checkbox for Show Held Quotes is checked and disabled
e. All - Filters on (a), (b) and (c) are removed. By default this is the option
selected.
v. Own Against Other Only: Display quotes only when you and other members
have opposite side's quotes on same combination.
vi. Buy/Sell Indicator Filter : -

Only Buy Quotes - All buy Quotes will be displayed & sell Quotes will
be displayed only if there exists a corresponding buy Quote on the
same combination.
Only Sell Quotes - All sell Quotes will be displayed & buy Quotes must
be displayed only if there exists a corresponding sell Quote on the
same combination
vii. Instrument Type Filter: This is the Leading Instrument Type filter. You can
choose if you want to view Bonds, Equity, Derivatives or a combination of these
on the Market Watch and Trading Book.
viii. Sort Non Standard Product Terms On: You can sort Product Terms with
swap type as NON_STANDARD or SPECIAL_NON_STANDARD on
Purchase/Open date or Repurchase/Close date.
9. On saving the changes the newly configured Custom View will be displayed.
Note:
Price specific columns such as Best Buy, Best Sell and Trade Info will not be
available for selection.
The location of Best Buy, Best Sell column will be (mandatory) fixed for all
Views and will be displayed on right side of Market Watch screen.
Own Best Buy and/or Own Best Sell are also fixed at the right hand side of the
screen and can be selected, either one or both, or none. The Own Best Buy is
placed automatically on the left side next to the Best Buy. The Own Best Sell
is placed automatically on the right side to the Best Sell. You will not be able
to change the sequence of Own Best Buy & Own Best Sell columns in Manage
View. You have on option to choose whether you want to display “Own Best
Quote”, “Own Sell Quote” on the Market Watch.
You will have a separate option to choose whether you want to view the
columns for Trade Info (High, ∑ Cash, ∑ Size, Last and Low). If you select this
option, Trade Info appears as the last column on the Market Watch screen.
You can choose to view Held Quotes on the view, by checking the option ‘Show
Held Quotes in Market Watch’.
Non Standard Product Terms will be sorted on Repurchase/Close Date.
3.2.9 Pagination
Number wise pagination is available on the Market Watch screen header. 'First', 'Prev', 'Next',
'Last' buttons are available on it. Also navigation can be done directly by providing a page

number in the text box and clicking 'Get Page' button to display the required page requested by
the user. Each page will display maximum 150 rows and there will be default sorting on Product
Term Combination column (For example: Sequence wise product term combination displayed
in screen Overnight, Tom Next, Spot Next, Corp Next, and so on).
Components
Table 8: Trading overlay – Components Description
S.No Components Description
1 Click the icon to export data to excel.
2 Click the icon to export data to CSV.
3
Choose the value(s) you wish to filter on and click
OK. This will return the rows in which this column
attribute matches the chosen filter criteria. You
can also choose to search this column by
entering the search criteria in the search box
provided and clicking OK. This will return all rows
for which the attribute in this column matched the
search criteria
Some columns do not have filter, just search
Enter the search string in the Search textbox.
The search will be performed within the chosen
column and return all the rows for which the value
of an attribute matches the search string.
4
Click CLOSE to close the overlay.
5 Click on this icon to refresh data on this overlay
6
Click on this icon to save the screen position, i.e.
the position in which the screen should open
and the following screen level settings:
i. Column Width
ii. Column Sequence
iii. Filter Settings
iv. Tab selection
v. Window Size
7
Reset All: Click this icon to reset user applied
sorting, filtering, search. It will not reset changed
order of columns.
Note* - Using the Reset All functionality on a Market Watch screen will only reset the filters of the current
custom view. All other custom views will remain unaffected.
3.3 Trading Book
The Trading Book screen displays all the pre trading activities of the user on a contextual basis, that
is, when you click on a particular (Quote) row in Market Watch screen, the Trading Book displays all
your relevant pre trading activities (such as Quotes sent and received, IOIs and Offers received) for the
combination of the attributes present in the left side of Market Watch (such as Segment, Product/Term,
Index and so on) you selected.
Initially, the Trading Book screen is blank. Based on the record selected by the user in the Market
Watch screen, values in the Trading Book screen are displayed.
The Quotes displayed in the Trading Book are color coded, so as to assist you in quickly identifying
key information about the Quote. Types of Quotes along with their colors are as follows:
Own Quote: Your member’s Quotes are highlighted in Green colour. If it is your own
Quote, it will be green with an asterisk
Held Quote: Held Quotes are highlighted in Red colour.
Quote from other member: Quotes received from other members are displayed in
Black colour. The member name is also displayed in Market Watch and Trading Book
in case of non-anonymous segments.

Figure 128: Trading Book
The entries in Trading Book will display following fields in given order:
Buy: User last name (displayed for Market Supervisor) and in case of Sent Quotes for
Own Member., Member, Max number of subtrades (only for GC REPO segment), FOK
(displayed only if it is true), Amount, Rate.
Figure 129 : Trading Book Content-Buy
Sell: Rate, Amount, FOK (displayed only if it is true), Max number of subtrades (only
for GC REPO segment), Member, User Last Name (displayed for Market Supervisor)
and in case of Sent Quotes for Own Member.

Figure 130: Trading Book Content-Sell
Figure 131 : Trading Book Content-FOK
3.3.1 Quick Action Utility / Using Right-Click
You can perform the following functions on the pre trade actions displayed in the Trading Book
(depending on pre trade action type and owner):
Hit a Quote
Copy to New Quote
Modify Own Quote
Hold/ Release a Quote
Delete a Quote
Respond to Offer
Respond to IOI
Respond to RFQ
Show Properties

3.3.1.1 Hit a Quote
You can hit a Quote available in Trading Book.
To hit a Quote, proceed as follows:
1. Select the Quote (row) in the Trading Book and right-click on the selected
row. The Quick Action Utility appears as displayed in following figure.
Figure 132: Quick Action Utility-Trading Book
2. Click hit Quote icon. The Hit Quote - Repo overlay appears as displayed
in following figure. The fields such as Term, Product-Term combination,
Segment, Purchase-Date, Re-Purchase Date, Principle, Collateral, Max. #
Sub trades, Rate Type, Enter Amount, Enter Rate and Min. Take Amount (if
applicable) fields are displayed automatically.
3. You can modify editable fields in Hit Quote overlay.
4. Select the Instruction Ref. Description from the drop-down. In case of only
one valid settlement instruction is available then it is Auto populated on click
of Submit button.
5. Click SUBMIT. A message ‘Trade generated successfully with trade Id ::
XXXX’ is displayed, where XXXX a unique identification number for the trade
generated.

Figure 133: Hit Quote-Repo overlay
3.3.1.2 Copy to New Quote
You can copy the existing Quote in the Trading Book to new Quote.
To copy to New Quote, proceed as follows:
1. Select the Quote (row) in the Trading Book and right-click. The Quick Action
Utility appears as displayed in following figure.
Figure 134: Quick Action Utility-Trading Book
2. Click Copy to New icon. Enter Quote – Repo screen appears as
displayed in following figure. The Term, Product Term Combination,

Segment, Purchase Date, Re-Purchase Date and Principle fields are
automatically displayed and cannot be changed.
3. Fields are prepopulated. When you copy from Own Best Buy/Sell then all fields
are pre populated. When you copy from Best Buy/Sell of other trading member
then Instruction Ref. Description, Recipients, Iceberg, Bank Internal
Reference, Beneficial Owner, Free Text and Total Amount will not be
populated. When you copy from Best Buy/Sell of same Trading member then
all fields are prepopulated. For more information on fields refer to Section 6.1
Enter Quote – REPO screen .
4. Click SUBMIT to submit the Quote. A message ‘Quote entered successfully’
and ‘Total Quote entered’ is displayed on screen.
Figure 135: Copy to New Quote-Enter Quote-REPO screen
Note: You can browse the information in the Trading Book using the scrolling bars.
The buy Pre Trade actions on the Trading Book are ordered from ‘worst to best’ and
the Sell Pre Trade Actions are ordered from ‘best to worst’, such the best on both sides
converge at the center.
3.3.1.3 Modify Own Quote
You can modify some fields of your own Quote using this option.

To modify your own Quote, proceed as follows:
1. Select the Quote (row) in the Trading Book and right-click on the selected row.
The Quick Action Utility appears as displayed in following figure.
Figure 136: Quick Action Utility-Trading Book
2. Click Modify Own Quote icon. Modify Quote – Repo overlay appears as
displayed in following figure.
Figure 137: Modify Quote-REPO-Trading Book
3. You can modify editable fields of entered Quote.

4. Click SUBMIT to submit the Quote. A message ‘Quote modified successfully’
message will be displayed.
Note: If you are modifying a Held Quote, an extra button of SUBMIT AND RELEASE
will be present. If you click this button, the Quote will be modified and then released in
the market.
3.3.1.4 Hold a Quote
You can hold yours as well as other users (belonging to same trading member and
having sufficient rights).
Held Quotes will appear Red in color.
To Hold a Quote, proceed as follows:
1. Select the Quote (row) in the Trading Book and right-click on the selected
row. The Quick Action Utility appears as displayed in following figure.
Figure 138 : Quick Action Utility-Trading Book
2. Click the Hold Quote icon. Hold Quote – Repo alert appears as
displayed in following figure.
Figure 139 : Hold Quote-REPO-Trading Book
3. Click Yes to hold the Quote. A message ‘Quote Held successfully’
message will be displayed.
3.3.1.5 Delete Quote
You can delete a single Quote at a time using this option.

To Delete a Quote, proceed as follows:
1. Select the Quote (row) in the Trading Book and right-click on the selected
row. The Quick Action Utility appears as displayed in following figure.
Figure 140: Quick Action Utility-Trading Book
2. Click the Delete Quote icon. Delete Quote alert appears as displayed
in following figure.
Figure 141: Delete Quote-REPO-Trading Book
3. Click Yes to delete the Quote. A message ‘Quote deleted successfully’ will
be displayed
3.3.1.6 Respond to Offer
You can respond to received pre trades with respond offer using this option.
To Respond an Offer, proceed as follows:
1. Select the Offer (row) in the Trading Book and right-click on the selected
row. The Quick Action Utility appears as displayed in following figure.

Figure 142: Quick Action Utility-Trading Book
2. Click the Respond Offer icon. Respond Offer – Repo overlay appears
las displayed in following figure.
Figure 143: Respond Offer-REPO-Trading Book
3. You can choose to Accept/ Reject/ Counter the Offer from here and the
corresponding screen will be displayed.
3.3.1.6.1 Copy to new Offer
All the details of selected pre trade will be copied into Enter Offer window. You can
then modify any details if required & submit the Offer. This will be treated as NEW
Offer.

To Copy an Offer, proceed as follows:
1. Select the Offer (row) in the Trading Book and right-click on the selected
row. The Quick Action Utility appears as displayed in following figure.
2. Click the copy to new Offer icon. Enter Addressed Offer – Repo screen
appears as displayed in following figure.
Figure 144: Quick Action Utility-Trading Book
Figure 145: Copy to Offer-REPO-Trading Book
3. Provide the required data in above screen and Click SUBMIT to enter
a new Offer.
3.3.1.7 Respond to IOI
You can respond to IOIs using this option.
To Respond to an IOI, proceed as follows:

1. Select the IOI (row) in the Trading Book and right-click on the selected
row. The Quick Action Utility appears as displayed in following figure.
Figure 146: IOI Action Utility-Trading Book
2. Click the Respond IOI icon. Addressed Offer – Repo screen appears as
displayed in following figure.
Figure 147: Enter Addressed Offer-REPO
3. After providing the required fields click SUBMIT to submit the Addressed
Offer. A message ‘Offer entered Successfully::XXXXX’ message will be displayed.
3.3.1.7.1 Copy to New IOI
You can copy the existing IOI in the Trading Book to new IOI.
To copy to New IOI, proceed as follows:

1 Select the IOI (row) in the Trading Book and right-click. The Quick
Action Utility appears as displayed in following figure.
Figure 148: IOI Action Utility-Trading Book
2. Click the Copy to New icon. Enter IOI – Repo screen appears
as displayed in following figure.
3. Fields are prepopulated. You can change the required fields.
4. Click SUBMIT to submit the IOI. A message ‘IOI entered
successfully::XXXXX’ is displayed on screen.
Figure 149: Copy to New IOI-Enter IO-REPO screen

3.3.1.8 Respond to RFQ
You can respond to Request For Quote (RFQ) in the Trading Book by
following these steps:
1. Right click on the RFQ in the Trading Quote Book and right-click on the
selected row. The Quick Action Utility appears as displayed in following figure.
Figure 150: Quick Action Utility- Trading Book
2.Click on the icon to respond to the RFQ. Enter Addressed Offer- Repo screen appears as displayed in the following figure:
Figure 151:Enter Addressed Offer-Repo
3. After providing the required fields click SUBMIT to submit the Addressed
Offer. A message ‘Offer entered Successfully::XXXXX’ message will be displayed.
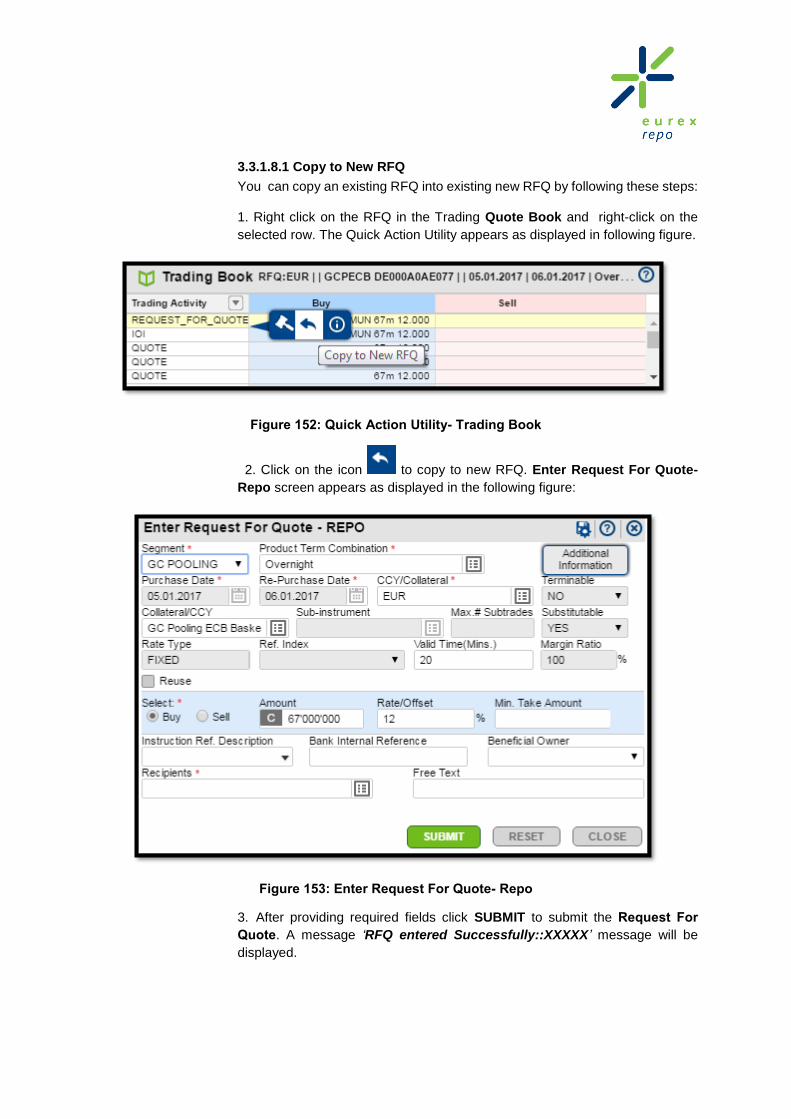
3.3.1.8.1 Copy to New RFQ
You can copy an existing RFQ into existing new RFQ by following these steps:
1. Right click on the RFQ in the Trading Quote Book and right-click on the
selected row. The Quick Action Utility appears as displayed in following figure.
Figure 152: Quick Action Utility- Trading Book
2. Click on the icon to copy to new RFQ. Enter Request For Quote-
Repo screen appears as displayed in the following figure:
Figure 153: Enter Request For Quote- Repo
3. After providing required fields click SUBMIT to submit the Request For
Quote. A message ‘RFQ entered Successfully::XXXXX’ message will be
displayed.

3.3.1.9 Show Properties
You can see properties of pre trade actions by clicking on Quick Action Utility for (Quote,
IOI and AO) in Trading Book.
For Quote properties, refer to the chapter 8.1
For Addressed Offer properties, refer to the chapter 8.2
For IOI properties, refer to the chapter 8.3
3.4 Notifications
In the Notifications screen, information is displayed automatically whenever an Offer, IOI, Auction or
any trade modification/ cancellation request is sent or received.
Under Notifications there are two tabs, Sent and Received. Within each of these there are several
sub-tabs as follows:
Offer
Pre-Arranged
RFQ
IOI
Trd Mod/ Cancel
Broker Offer
Auction
3.4.1 Sent - Notifications
You can find all the Offers, IOIs, Auctions, Trade modifications or cancellation requests sent
under this tab. It displays the count of notifications sent in the respective sub-tabs.

Figure 154: Notifications-Sent screen
3.4.1.1 Offers Sent
Click Offer tab to view all the Offers sent. Sent Offers are displayed in the following
format:
When you left-click on the Offer, Trading overlay appears, with this Offer on the overlay
highlighted in yellow. For more details, refer Trading overlay.
Figure 155 : Notifications -Offers Sent screen

When you right-click on Offer form sent tab, two different options are available, delete
and show properties.
3.4.1.2 Pre-Arranged Offers Sent
Click Pre-Arranged Sent tab to view all the sent Pre-Arranged Offers, displayed in the
following format:
When you left-click on the Pre-Arranged Offer, Trading overlay appears with this Offer
highlighted on the overlay in yellow. For more details, refer Trading overlay
Figure 156: Notifications -Pre-Arranged Offers Sent screen
When you right-click on the Pre-Arranged Offer form sent tab, two different options are
available delete and show properties.
3.4.1.3 RFQ Sent
Click RFQ sent tab to view the RFQs sent, they are displayed in the following format:
When you left-click on the RFQ, Trading overlay appears with this RFQ highlighted on
the overlay in yellow. For more details, refer Trading overlay.
When you right-click on the RFQ form sent tab, two different options are available delete
and show properties.

Figure 157: Notifications-RFQ Sent screen
3.4.1.4 IOI Sent
Click IOI Sent to view all the IOIs sent. Sent IOIs are displayed in the following format:
When you left-click on the IOI, Trading overlay appears with this IOI on the overlay
highlighted in yellow. For more details, refer Trading overlay.
When you right-click on the IOI from sent tab, two different options are available delete
and show properties.
Figure 158 : Notifications - IOI Sent screen

3.4.1.5 Auction Sent
Click Auction Sent to view all the Auctions sent. Sent Auctions are displayed in
following format:
When you left-click on the auction, Auction Sent Manager overlay appears. For more
details, refer Auction Sent Manager overlay.
When you right-click on the Auction from sent tab, three different options are available
close, delete and show properties.
Figure 159 : Notifications-Auction Sent screen
3.4.1.6 Broker Offers Sent
Click on the Broker Offers Sent tab to view Brokers Offers sent, they are displayed in
the following format:
When you left-click on the Broker Offer, Trading overlay appears with this Offer on the
overlay highlighted in yellow. For more details, refer Trading overlay
When you right-click on the Broker Offer from sent tab, two different options are
available delete and show properties.

Figure 160 : Notifications- Broker Offer Sent screen
3.4.1.7 TRD Mod/Cancel Sent
Click TRD Mod/Cancel Sent to view all the Modification or Cancelation requests sent.
All the modification and cancellation requests sent are displayed in the following format:
When you click on a Trade Mod/Cancel Request, Trade Modification Request or
Trade Cancellation Request – Requested overlay appears, with this particular
request highlighted in yellow. For more details, refer Trade Cancellation Request and
Trade Modification Requests - Requested overlays
3.4.2 Received - Notifications
You can view all the Offers, Pre-Arranged, RFQs, IOIs, Broker Offers, Auctions, Trade
Modifications or Cancellation requests received under Received tab. It displays the count of
notifications received in the respective sub-tabs, shown as follows:

Figure 161: Notifications-Received screen
3.4.2.1 Offer Received
Click Offer Received to view all the Offers received. All the received Offers are
displayed in the following format:
You can respond to the Offers received.
Respond to an Offer: To respond to the Offers received, proceed as follows:
1. Click the particular notification link of Offer Received. Respond Offer overlay
appears as displayed in following figure. The information in the overlay is
automatically displayed, as the AO you selected. You can accept, reject or send a
Counter Offer for the Offer received.

Figure 162: Respond to Offer – Respond Offer overlay
2. To accept an Addressed Offer received, click ACCEPT at the right bottom of the
overlay. The message ‘Trade generated successfully with Trade Id: XXXX’ is
displayed.
3. To reject an Addressed Offer, click REJECT at the right bottom of the overlay. The
message ‘Respond Offer rejected successfully’ is displayed.
4. To send a Counter Offer for the Addressed Offer received, proceed as follows:
Click COUNTER OFFER at the right bottom the overlay. A Counter
Offer – REPO overlay appears as displayed in following figure.

Figure 163: Counter Offer-REPO overlay
You can modify editable fields in Counter Offer overlay.
Click SUBMIT. A message ‘Counter Offer sent successfully’ is displayed.
Click CLOSE to close the overlay.
3.4.2.2 Pre-Arranged Offer Received;
Click Pre-Arranged Received tab to view all the Pre-Arranged Offers received, they
are displayed in the following format:
Figure 164: Pre-Arranged Offer Received - Notifications
Click the particular notification link of Offer Received. Respond Offer overlay appears
as displayed in following figure. The information in the overlay is automatically
displayed, as the AO you selected. You can accept, reject or send a Counter Offer for
the Offer received.
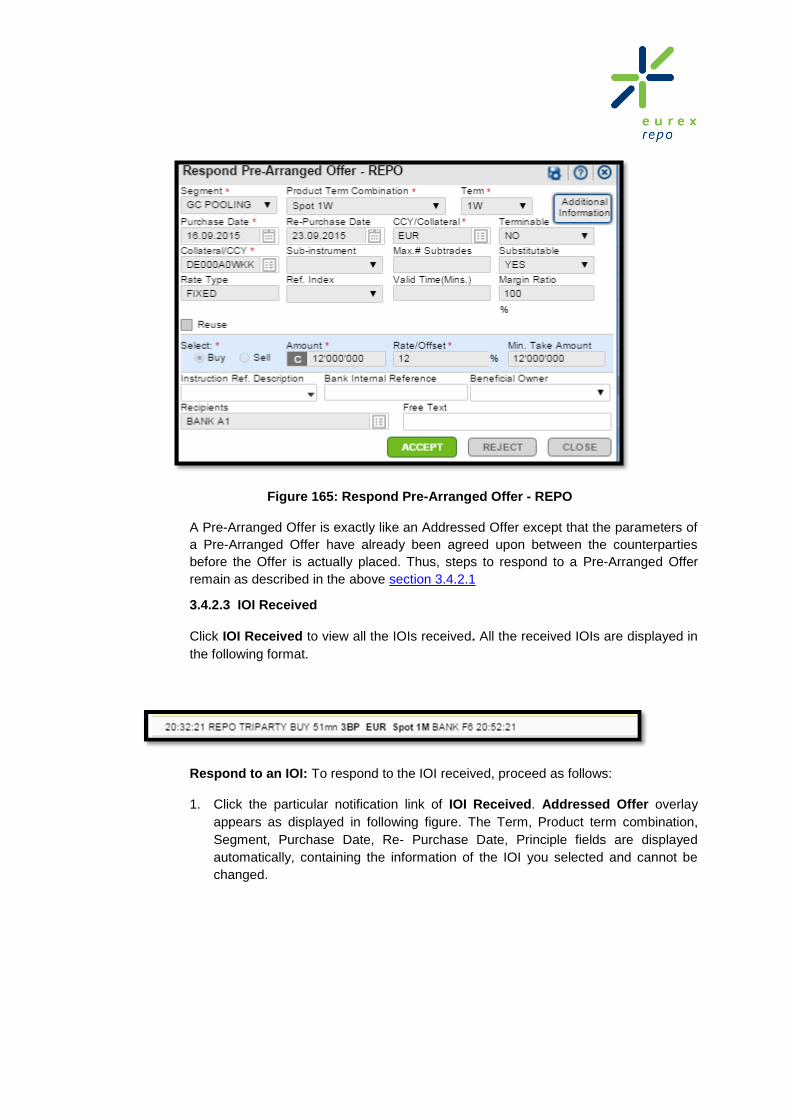
Figure 165: Respond Pre-Arranged Offer - REPO
A Pre-Arranged Offer is exactly like an Addressed Offer except that the parameters of
a Pre-Arranged Offer have already been agreed upon between the counterparties
before the Offer is actually placed. Thus, steps to respond to a Pre-Arranged Offer
remain as described in the above section 3.4.2.1
3.4.2.3 IOI Received
Click IOI Received to view all the IOIs received. All the received IOIs are displayed in
the following format.
Respond to an IOI: To respond to the IOI received, proceed as follows:
1. Click the particular notification link of IOI Received. Addressed Offer overlay
appears as displayed in following figure. The Term, Product term combination,
Segment, Purchase Date, Re- Purchase Date, Principle fields are displayed
automatically, containing the information of the IOI you selected and cannot be
changed.

Figure 166: Respond to IOI - Addressed Offer -REPO
2. Enter the amount in Amount if required.
3. Enter other fields as required. For more details on fields, refer Enter Offer - REPO
screen.
4. Click SUBMIT. The message ‘Offer entered successfully’ is displayed.
3.4.2.4 Auction Received
Click Auction Received to view all the Auctions received. All the received Auctions are
displayed in following format:
Figure 167: Auction Received- Notifications

Click on the auction link, Auction Received Manager overlay appears. For more
details, refer Auction Received Manager overlay.
3.4.2.5 TRD Mod/Cancel Received
Click TRD Mod/Cancel Received to view the Modification or Cancelation request
received. All the modification and cancellation requests received are displayed in
following format:
Figure 168: TRD Mod/Cancel Received- Notifications
Click on the TRD Mod/Cancel request link, Trade Modification Request or Trade
Cancellation Request - Received overlay appears depending on the request sent. For
more details, refer Trade Modification/Cancellation Request - Received overlay
3.4.2.6 Broker Offers Received
Click Broker Offer Received to view all the Broker Offers received. All the received
Broker Offers are displayed in the following format.
Figure 169: Broker Offer Received - Notifications
Respond to The Broker Offer: To respond to the Broker Offer received, proceed as
follows:
1. Click the particular notification link of Broker Offer Received. Respond
Broker Offer overlay appears as displayed in following figure. The Term,
Product term combination, Segment, Purchase Date, Re- Purchase Date,
Principle fields are displayed automatically, containing the information of
the Broker Offer you selected and cannot be changed.
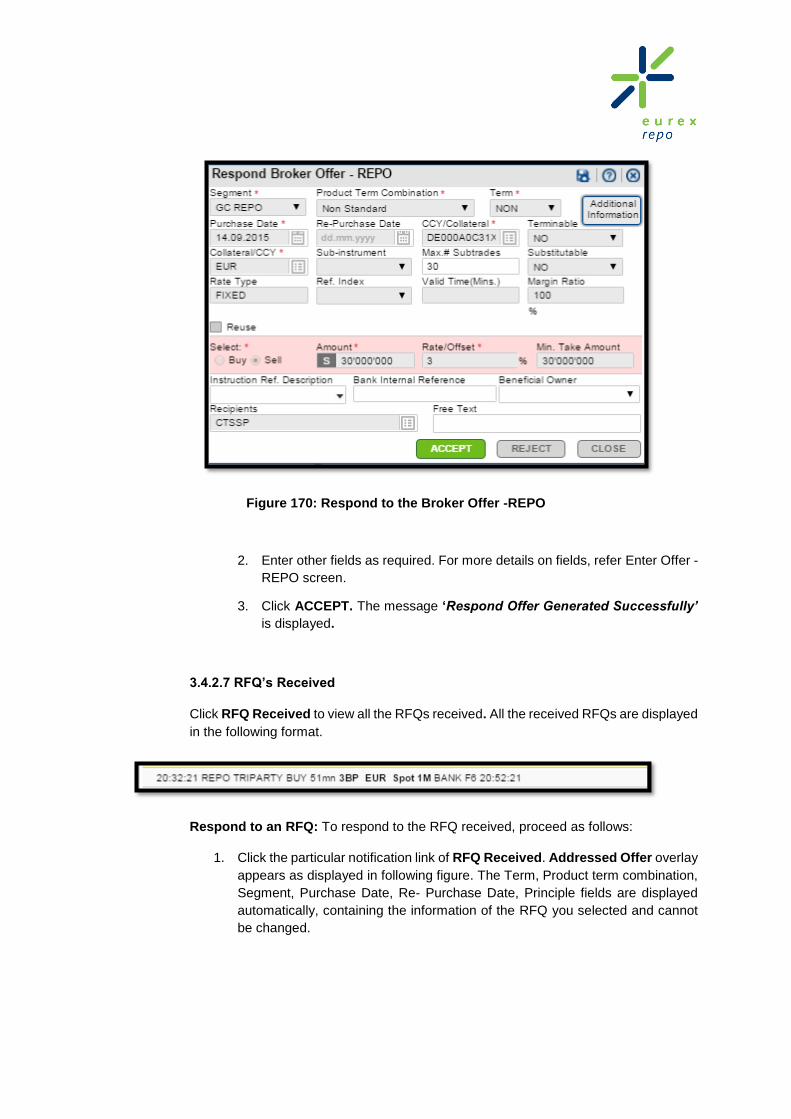
Figure 170: Respond to the Broker Offer -REPO
2. Enter other fields as required. For more details on fields, refer Enter Offer -
REPO screen.
3. Click ACCEPT. The message ‘Respond Offer Generated Successfully’
is displayed.
3.4.2.7 RFQ’s Received
Click RFQ Received to view all the RFQs received. All the received RFQs are displayed
in the following format.
Respond to an RFQ: To respond to the RFQ received, proceed as follows:
1. Click the particular notification link of RFQ Received. Addressed Offer overlay
appears as displayed in following figure. The Term, Product term combination,
Segment, Purchase Date, Re- Purchase Date, Principle fields are displayed
automatically, containing the information of the RFQ you selected and cannot
be changed.
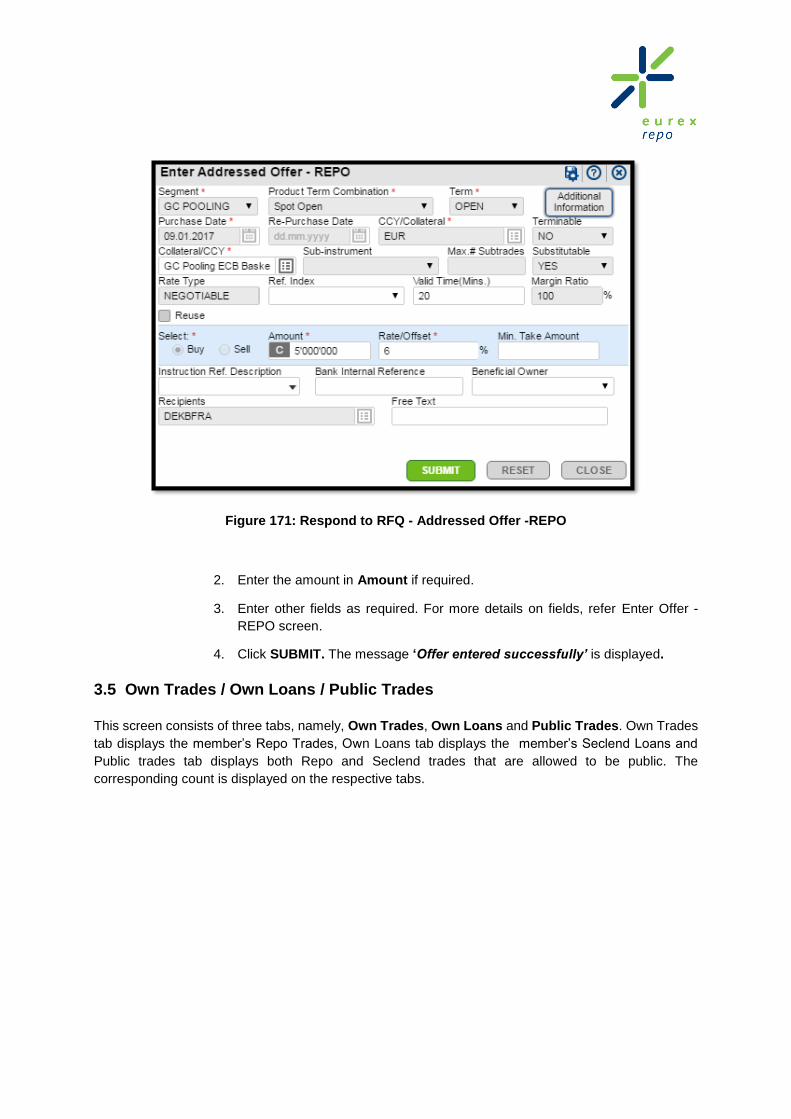
Figure 171: Respond to RFQ - Addressed Offer -REPO
2. Enter the amount in Amount if required.
3. Enter other fields as required. For more details on fields, refer Enter Offer -
REPO screen.
4. Click SUBMIT. The message ‘Offer entered successfully’ is displayed.
3.5 Own Trades / Own Loans / Public Trades
This screen consists of three tabs, namely, Own Trades, Own Loans and Public Trades. Own Trades
tab displays the member’s Repo Trades, Own Loans tab displays the member’s Seclend Loans and
Public trades tab displays both Repo and Seclend trades that are allowed to be public. The
corresponding count is displayed on the respective tabs.

Figure 172: Own Trades / Public Trades/ Own Loans screen
Click the Public Trades tab to view only the trades and loans that are public.
Click the Own Trades tab, to view all the trades belonging to your member.
Click the Own Loans tab, to view all the loans belonging to your member.
All the trades that have been created on the current business day and ACTIVE are displayed
on the Own Trades and Own Loans tabs.
Quick Action Utility: Right-click options on Own Trade/Loans are the same as Show
Trade/Loans and depend on the Trade status, segment and logged in user among others. Only
Today's trades are displayed in Own Trade/ Loans. On right-clicking the selected Trade (row)
on Own Trades and Own Loan screen. Refer section 5.1 and 5.2 for further details.
You can hide or unhide columns by clicking on icon. By clicking on this icon an overlay
appears as follows
Figure 173: Choose Columns for the Grid- overlay
You can select or unselect columns as per your convenience and click on OK. Only the
selected columns will be displayed as down under:

Figure 174: Own Trades/Own Loans/Public Trades-screen
This functionality has been applied for all the three tabs (Own Trades, Own Loans,
Public Trades).
3.6 Tools
In Tools menu following options are available:
Position Board
Member Relationship
Distribution List Manager
Auto. Trade Completion Defaults
Configure Trade Slip
Manage Watchlists
Each of the tools from Tools menu are available for REPO as well as SECLEND markets.
3.6.1 Position Board
This overlay provides for the bulk upload of Quotes, IOIs & RFQs into the market, rather than entering single pre trade actions from the Enter Quote / IOI / RFQ screen.
You can download a standard template from this overlay, fill it in with the Quote information, for example, and upload it back.
There are separate screens for Repo and Seclend which can be accessed through the corresponding sub menus under Tools Position board
The pre trade actions in the uploaded file are then subjected to certain validations. The pre trade actions that pass these validations can be released in the market. Those that fail at least one validation will not be released into the market.
When uploading Quotes, before new Quotes can be released into the market the value in the checkbox ‘Delete Active Quotes’ is considered. If it is checked then all your active Quotes in the market will be deleted, before uploading the new ones from the Position Board
GUI Navigation and process flow
1. Loads the Position Board overlay from Tools Position Board (Repo/Seclend)

Figure 175: Position Board
2. Choose the desired Pre Trade Action from the drop down and then Click on
Download Excel Template to download the standard template
Figure 176 : Position Board-REPO
The sequence of the columns in the template always has to be maintained. The sequence cannot be changed and no column can be removed or added. If you wish to leave a certain column blank, you may do so by leaving a blank placeholder for it, but you cannot skip it altogether. As long as these conditions are satisfied, the file can be uploaded.

3. Columns and their possible corresponding values for all templates:
The following columns and their possible values that should be contained in the
template for Quote:
For Repo:
Sr. No. Field Possible Values / Data Type
1 Product term* Product Name/Term
2 Segment* The Segment name
3 Purchase Date Date in mm/dd/yyyy format
Not required for Standard product terms
4 Repurchase date Date in mm/dd/yyyy format
Not required for Standard product terms
5 CCY/ Collateral* Instrument Identifier
6 Collateral/ CCY* Instrument Identifier
7 Sub Instrument Instrument Identifier
8 Max no. Of Subtrades Number
9 Terminable YES/ NO
10 Substitutable YES/ NO
11 Reuse YES/ NO
12 Reference Index
Instrument Identifier of the Index
You can choose to enter ‘None’ as well here. This would mean that in case of the Product’s Interest Fee Type being Negotiable, it would be set to FIXED. If you have however entered a valid Index name for a Product whose Interest Fee Type is Negotiable, it would be set to FLOATING. If the Product’s Interest Fee Type is however, FIXED/FLOATING already, then it cannot be changed
13 FoK BLANK/ON
14 Iceberg BLANK/ON
15 Buy Sell Indicator* B/S
16 Amount* Number

17 Rate* Number
18 Total Amount Number
19 Minimum Take Amount Number
20 Instruction Reference Settlement Instruction
21 Bank Internal Reference
22 Beneficial Owner Short name of the beneficial Owner
23 Recipients Comma separated names of Distribution list and/or Trading Members
24 Margin Ratio Number
25 Free Text
*These fields are mandatory
For Seclend:
Sr. No. Field Possible Values / Data Type
1 Product term* Product Name/Term
2 Segment* Name of the Service Placement
3 Open Date
Date in mm/dd/yyyy format
Not required for Standard product terms
4 Close date Date in mm/dd/yyyy format
Not required for Standard product terms
5 Lend/ Borrow* L/B
6 Underlying Loan Security/ Basket Instrument Identifier
7 Loan Security/ Basket Instrument Identifier
8 FoK BLANK/ON
9 Iceberg BLANK/ON
10 Quantity* Number
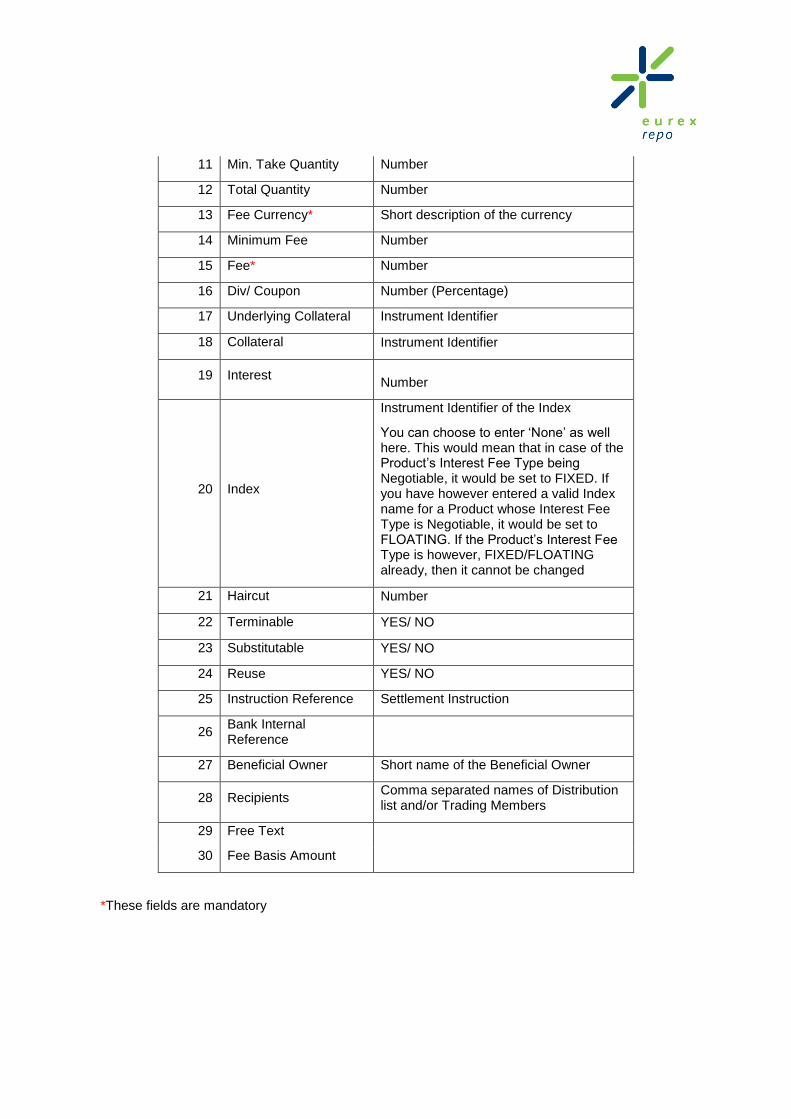
11 Min. Take Quantity Number
12 Total Quantity Number
13 Fee Currency* Short description of the currency
14 Minimum Fee Number
15 Fee* Number
16 Div/ Coupon Number (Percentage)
17 Underlying Collateral Instrument Identifier
18 Collateral Instrument Identifier
19 Interest Number
20 Index
Instrument Identifier of the Index
You can choose to enter ‘None’ as well here. This would mean that in case of the Product’s Interest Fee Type being Negotiable, it would be set to FIXED. If you have however entered a valid Index name for a Product whose Interest Fee Type is Negotiable, it would be set to FLOATING. If the Product’s Interest Fee Type is however, FIXED/FLOATING already, then it cannot be changed
21 Haircut Number
22 Terminable YES/ NO
23 Substitutable YES/ NO
24 Reuse YES/ NO
25 Instruction Reference Settlement Instruction
26 Bank Internal Reference
27 Beneficial Owner Short name of the Beneficial Owner
28 Recipients Comma separated names of Distribution list and/or Trading Members
29 Free Text
30 Fee Basis Amount
*These fields are mandatory
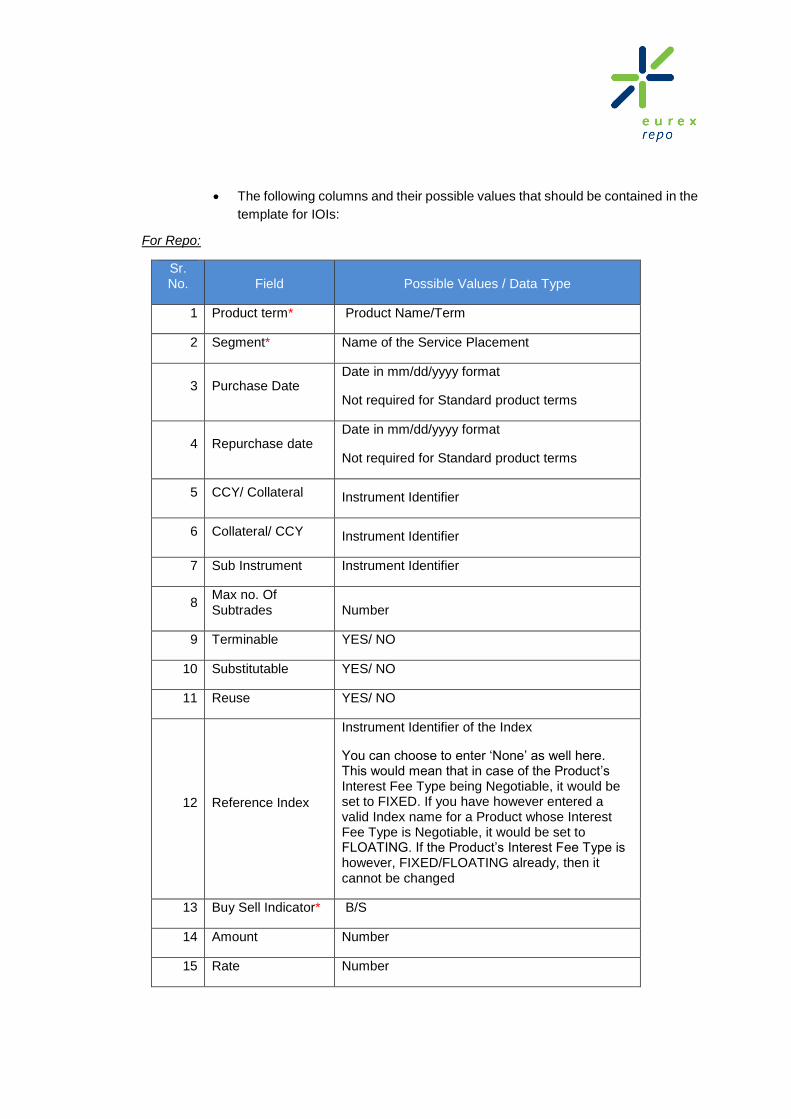
The following columns and their possible values that should be contained in the
template for IOIs:
For Repo:
Sr. No. Field Possible Values / Data Type
1 Product term* Product Name/Term
2 Segment* Name of the Service Placement
3 Purchase Date Date in mm/dd/yyyy format
Not required for Standard product terms
4 Repurchase date Date in mm/dd/yyyy format
Not required for Standard product terms
5 CCY/ Collateral Instrument Identifier
6 Collateral/ CCY Instrument Identifier
7 Sub Instrument Instrument Identifier
8 Max no. Of Subtrades Number
9 Terminable YES/ NO
10 Substitutable YES/ NO
11 Reuse YES/ NO
12 Reference Index
Instrument Identifier of the Index
You can choose to enter ‘None’ as well here. This would mean that in case of the Product’s Interest Fee Type being Negotiable, it would be set to FIXED. If you have however entered a valid Index name for a Product whose Interest Fee Type is Negotiable, it would be set to FLOATING. If the Product’s Interest Fee Type is however, FIXED/FLOATING already, then it cannot be changed
13 Buy Sell Indicator* B/S
14 Amount Number
15 Rate Number

16 Minimum Take Amount Number
17 Instruction Reference Settlement Instruction
18 Bank Internal Reference
19 Beneficial Owner Short name of the beneficial Owner
20 Recipients Comma separated names of Distribution lists and/or Trading Members
21 Margin Ratio Number
22 Free Text
23 Valid Time
*These fields are mandatory
For Seclend:
Sr. No. Field Possible Values / Data Type
1 Product term* Product Name/Term
2 Segment* Name of the Service Placement
3 Open Date
Date in mm/dd/yyyy format
Not required for Standard product terms
4 Close date Date in mm/dd/yyyy format
Not required for Standard product terms
5 Lend/ Borrow* L/B
6 Underlying Loan Security/ Basket Instrument Identifier
7 Loan Security/ Basket Instrument Identifier
8 Quantity Number
9 Min. Take Quantity Number
10 Fee Currency Short description of the currency
11 Minimum Fee Number
12 Fee Number

13 Div/ Coupon Number (Percentage)
14 Underlying Collateral Instrument Identifier
15 Collateral Instrument Identifier
16 Interest Number
17 Index
Instrument Identifier of the Index
You can choose to enter ‘None’ as well here. This would mean that in case of the Product’s Interest Fee Type being Negotiable, it would be set to FIXED. If you have however entered a valid Index name for a Product whose Interest Fee Type is Negotiable, it would be set to FLOATING. If the Product’s Interest Fee Type is however, FIXED/FLOATING already, then it cannot be changed
18 Haircut Number
19 Terminable YES/ NO
20 Substitutable YES/ NO
21 Reuse YES/ NO
22 Instruction Reference Settlement Instruction
23 Bank Internal Reference
24 Beneficial Owner Short name of the Beneficial Owner
25 Recipients Comma separated names of Distribution lists and/or Trading Members
26 Free Text
27 Valid Time
28 Fee Basis Amount
*These fields are mandatory
The following columns and their possible values that should be contained in the
template for RFQs:
For Repo:

Sr. No. Field Possible Values / Data Type
1 Product term* Product Name/Term
2 Segment* Name of the Service Placement
3 Purchase Date Date in mm/dd/yyyy format
Not required for Standard product terms
4 Repurchase date Date in mm/dd/yyyy format
Not required for Standard product terms
5 CCY/ Collateral Instrument Identifier
6 Collateral/ CCY Instrument Identifier
7 Sub Instrument Instrument Identifier
8 Max no. Of Subtrades Number
9 Terminable YES/ NO
10 Substitutable YES/ NO
11 Reuse YES/ NO
12 Reference Index
Instrument Identifier of the Index
You can choose to enter ‘None’ as well here. This would mean that in case of the Product’s Interest Fee Type being Negotiable, it would be set to FIXED. If you have however entered a valid Index name for a Product whose Interest Fee Type is Negotiable, it would be set to FLOATING. If the Product’s Interest Fee Type is however, FIXED/FLOATING already, then it cannot be changed
13 Buy Sell Indicator* B/S
14 Amount Number
15 Rate Number
16 Minimum Take Amount Number
17 Instruction Reference Settlement Instruction
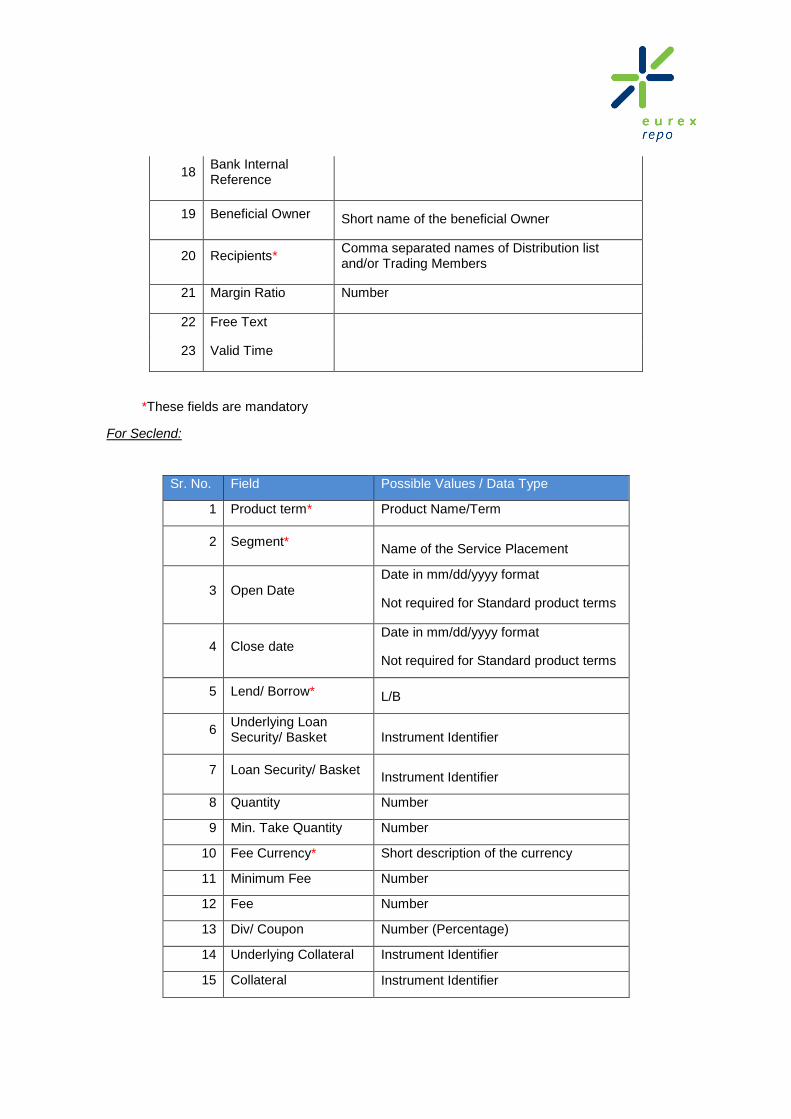
18 Bank Internal Reference
19 Beneficial Owner Short name of the beneficial Owner
20 Recipients* Comma separated names of Distribution list and/or Trading Members
21 Margin Ratio Number
22 Free Text
23 Valid Time
*These fields are mandatory
For Seclend:
Sr. No. Field Possible Values / Data Type
1 Product term* Product Name/Term
2 Segment* Name of the Service Placement
3 Open Date
Date in mm/dd/yyyy format
Not required for Standard product terms
4 Close date Date in mm/dd/yyyy format
Not required for Standard product terms
5 Lend/ Borrow* L/B
6 Underlying Loan Security/ Basket Instrument Identifier
7 Loan Security/ Basket Instrument Identifier
8 Quantity Number
9 Min. Take Quantity Number
10 Fee Currency* Short description of the currency
11 Minimum Fee Number
12 Fee Number
13 Div/ Coupon Number (Percentage)
14 Underlying Collateral Instrument Identifier
15 Collateral Instrument Identifier

16 Interest Number
17 Index
Instrument Identifier of the Index
You can choose to enter ‘None’ as well here. This would mean that in case of the Product’s Interest Fee Type being Negotiable, it would be set to FIXED. If you have however entered a valid Index name for a Product whose Interest Fee Type is Negotiable, it would be set to FLOATING. If the Product’s Interest Fee Type is however, FIXED/FLOATING already, then it cannot be changed
18 Haircut Number
19 Terminable YES/ NO
20 Substitutable YES/ NO
21 Reuse YES/ NO
22 Instruction Reference Settlement Instructions
23 Bank Internal Reference
24 Beneficial Owner Short name of the Beneficial Owner
25 Recipients* Comma separated names of Distribution list and/or Trading Members
26 Free Text
27 Valid Time
28 Fee Basis Amount
*These fields are mandatory

4. Choosing a Pre Trade Action
You can select a Pre Trade Action for example Quote, IOI , RFQ depending
upon your access rights.
You will be able to upload andr release Quotes, IOIs or RFQs into the market
after certain validations of the same, depending upon your access rights.
Figure 177: Choosing a Pre Trade Action-Qoute
1. Click on the Browse button to fetch the file to be uploaded.
Browse to the desired file location and click Open.
You can choose to delete currently active Quotes before uploading the new
ones from the file by checking the option for ‘Delete Active Quotes’.

Figure 178: Position Board-REPO
2. Click on the Upload button to upload the file fetched.
If the Checkbox for Delete Active Quotes is checked, then active Quotes in the market that
belong to you are deleted before the ones in the new file are uploaded.

Figure 179: Position Board-REPO
3. Pre in the uploaded file are subject to load validations. Any load errors in the file
uploaded are populated in the tab for “Load Errors”. These load errors then have to be
rectified in the uploaded file and the file has to be uploaded again.
4. All the records in the uploaded file that pass the load validations are then subjected to
business validations (same as if entered using the GUI or the F7 API).

Figure 180: Position Board-REPO (business validation)
5. Pre Trade actions that fail Business Validations are populated in the tab “Business
Validation Errors” and cannot be released into the market as they are. There is an
additional column in the grid ‘Business Errors’ to display the business error details.
Figure 181: Position Board-REPO (Business Errors)

6. You can rectify the Business validation errors from the grid itself. Once rectified, select
the checkbox next to the rectified record and click SAVE. If the saved Pre Trade actions
pass all business validations, zthey will be uploaded and and moved to the “Uploaded”

tab. If they still do not pass business validations, they will be retained in the tab
“Business Validation Errors”.
Figure 182: Position Board-REPO(Successfully uploaded Quotes)
7. Thus, all records that pass all load and business validations are populated in the tab
“Uploaded” as displayed in following figure and are ready to be released on the market.

Figure 183: Position Board-REPO(Uploaded Quote)
8. You can choose the Pre Trade actions to be released in the market by selecting the
checkbox against each of the records and click RELEASE to release them into the
market. You can release multiple Pre Trade actions at once by checking the
corresponding checkbox and clicking RELEASE.
9. Pre Trade actions that are successfully released in the market are available on the tab
“Released” . No further action is possible on the released Pre Trade actions from this
screen.
10. Thus the RELEASE button is available for the Uploaded tab and DELETE button is
available for Uploaded and Business Validation Errors tabs.
11. The SAVE button is only available for the Business Validation Errors tab
3.6.2 Managing Member Relationships
The Member Relationship overlay shows the counterparty agreements present between the
logged in member and other members. With a counterparty agreement a trading member
accepts another trading member as possible counterparty. It is possible to Create, Modify and
Delete Member relationships.

3.6.2.1 To Create a Member Relationship
Member Relationship can be created only for certain segments, not for all. To create
Member Relationships, proceed as follows:
1. On the main Eurex Repo F7 GUI, point to Tools.
Figure 184: Tools Menu
2. Click Member Relationship under Repo. Member Relationship, then the
overlay appears as displayed in following figure.
Figure 185: Member Relationship overlay

3. Select the segment from Choose a Segment drop-down.
4. Click SHOW. All the members which have access to that particular selected
segment are displayed.
5. Select the checkbox(s) of the member with whom you want to create a
relationship where Relationship column is None. Note that None here indicates
that there is no agreement present currently with that member.
Note: You can also select more than one relationship at a time.
6. Select the Relationship enable checkbox if you want to ACTIVATE the
relationship, otherwise relationship will be created with flag as INACTIVE.
7. Select the Auto-take checkbox to enable the auto take agreement for selected
relationship(s).
Note: Auto take agreement enables automatic acceptance of Quotes that are
hit by the specified counterparty for the configured product terms. Addressed
Offer
8. Click on to add the Product Term Combinations eligible for Auto-take for a
member applicable only for Repo Triparty segment.
9. Click on CREATE RELATIONSHIP
3.6.2.1.1 To Add New Product Term Combination
To add a new product term combination, proceed as follows:
1. On the main Eurex Repo F7 GUI, point to Tools.
2. Invoke the Member Relationships overlay from Tools
3. Choose a row and click on under the column Auto Take Product Term
Combinations. This will invoke the View Product Term Combination
screen as displayed in following figure.
4. Click on +Add New Product Term Combination on this screen.

Figure 186 : View Product Term Combination
5. A Product Term overlay opens as displayed in following figure.
6. You can select one or more than one product terms from the checkbox.
7. All selected product terms will be displayed in View Product Term
Combination window.
8. Click SAVE from View Product Term Combination and all selected
products will be displayed in Member Relationship – Auto take product Term
combination column.
9. To save changes click CREATE/UPDATE RELATIONSHIP.

Figure 187 : Select Product Term
3.6.2.2 To Delete Member Relationship(s)
To delete Member Relationships, proceed as follows:
1. On the main Eurex Repo F7 GUI, point to Tools.
Figure 188 : Tools Menu
2. Click the Member Relationship menu under Repo. Member Relationship
overlay appears as displayed in following figure.

Figure 189 : Member Relationship overlay
3. Select the checkbox(s) of the members you want to delete.
4. Click DELETE RELATIONSHIP.
3.6.2.3 To Modify Member Relationship(s)
To modify Member Relationships, proceed as follows:
1. On the main Eurex Repo F7 GUI, point to Tools.
2. Click the Member Relationship under Repo. Member Relationship
screen appears.
3. Select the checkbox(s) of the members you wish to modify (must have
Relationship = Created to be modifiable).
4. Make the desired changes (Relationship Enabled, Auto-take and
Product Terms).
5. Click CREATE/UPDATE RELATIONSHIP
3.6.3 Managing Distribution Lists
A distribution list contains a collection of addressees to allow you to send a trading object to
selected recipients only instead of the entire market.
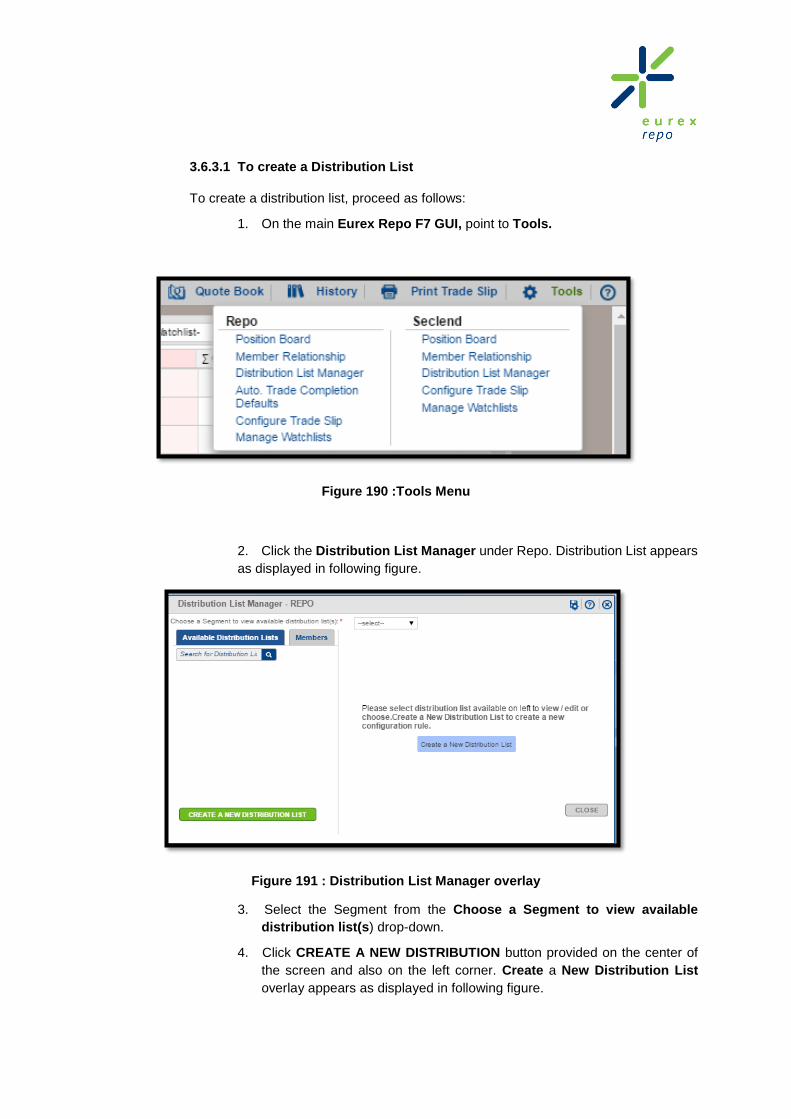
3.6.3.1 To create a Distribution List
To create a distribution list, proceed as follows:
1. On the main Eurex Repo F7 GUI, point to Tools.
Figure 190 :Tools Menu
2. Click the Distribution List Manager under Repo. Distribution List appears
as displayed in following figure.
Figure 191 : Distribution List Manager overlay
3. Select the Segment from the Choose a Segment to view available
distribution list(s) drop-down.
4. Click CREATE A NEW DISTRIBUTION button provided on the center of
the screen and also on the left corner. Create a New Distribution List
overlay appears as displayed in following figure.

5. Enter the name for the new distribution list in Provide a Distribution List
Name.
6. Select the checkboxes of the members you want to include in the
distribution list from Choose Members.
7. Click ADD SELECTED. The selected members move to Selected
Members list. You can click ADD ALL with or without selecting member to
move all members to selected member list.
8. Click SAVE DISTRIBUTION LIST. The distribution list you created is saved
and is available for selection in Recipients field (present on the entry
screen while entering a Pre Trade Action) for the segment in which it is
created.
Figure 192 : Create a New Distribution List screen
3.6.3.2 To Modify a Distribution List
To modify a distribution list, proceed as follows:
1. On the main Eurex Repo F7 GUI, point to Tools.

Figure 193 : Tools Menu
2. Click the Distribution List Manager under Repo. Distribution list appears
as displayed in following figure.
Figure 194 : Distribution List Manager screen
3. Select the Segment from the Choose a Segment to view available
distribution list(s) drop-down.
4. Click Available Distribution Lists tab present at the left of the screen as
displayed in following figure. The distribution lists appears.

Figure 195 : Available Distribution Lists Tab
5. Click the icon of the list you want to modify. Edit a Distribution
List screen appears as displayed in following figure.
Figure 196 : Edit Distribution List screen
6. You can do either of the following:
To remove the participants from the distribution list, select the
members from Selected Members list and click REMOVE
SELECTED. REMOVE ALL will remove all members from selected
list to choose member list.

To add participants to the distribution lists select the members from
Choose Members list and click ADD SELECTED.
7. Click SAVE DISTRIBUTION LIST. The changes made to the distribution
list are saved.
3.6.3.3 To Delete a Distribution List
To delete a distribution list, proceed as follows:
1. On the main Eurex Repo F7 GUI, point to Tools as displayed in
following figure.
Figure 197 : Tools Menu
2. Click the Distribution List Manager under Repo. Distribution list
appears as displayed in following figure.
Figure 198 : Distribution List Manager screen

3. Select the Segment from the Choose a Segment to view available
distribution list(s) drop-down.
4. Click Available Distribution Lists tab available at the left of the screen as
displayed in following figure. The distribution lists appears.
Figure 199 : Available Distribution Lists Tab
5. Click the icon displayed in front of the list you want to delete. A
confirmation message “Are you sure you want to delete this
distribution list” dialog box appears on screen.
6. Click Yes to confirm. The selected distribution list is deleted.
3.6.3.4 To View Members and Member details
You can view the list of Members present for each of the segments by clicking
on the Members tab as displayed in following figure. Clicking on any of the
members will in turn display further details about the member on the pane
adjacent to the member list.
3.6.4 Managing Automatic Trade Completion
The automatic trade completion is the automatic completion of a master trade to generate sub
trades, after its timer for manual trade completion has expired. For manual trade completion
refer to the Section 5.2.
You can create default completion lists from this screen, which will be utilized during Automatic
Trade Completion
Under automatic trade completion defaults you can perform the following actions on the list:

Create a List
Edit a List
Remove a List
3.6.4.1 To Create a List
You can create a list for defining the automatic completion defaults.
To create a list, proceed as follows:
1. On the main Eurex Repo F7 GUI, point to Tools as displayed in following
figure.
Figure 200 : Tools Menu
2. Click the Auto. Trade Completion Defaults under Repo. Automatic Trade Completion Defaults overlay appears as displayed in following figure.

Figure 201 : Automatic Trade Completion Defaults overlay
3. Click CREATE A NEW LIST. A New Trade Completion Default List overlay
appears as displayed in following figure.
Figure 202 : New Trade Completion Default List
4. Select the Basket from the drop-down.

5. Enter the remarks or provide additional information about the list in List
Description.
6. Click SUBMIT. A new Trade completion Default List overlay appears as
displayed in following figure.
Figure 203 : Trade Completion Default List overlay
7. Select the security by clicking the icon. Select Security overlay appears
as displayed in following figure.

Figure 204 : Select Security overlay
8. Select the Instrument Type that is.either BOND or EQUITY to filter and
select single or multiple checkbox of the security you want to add.
9. Click SELECT SECURITY.
10. Click SAVE CHANGES on Trade completion Default List overlay.
The list is created and saved. It is displayed in Automatic Trade Completion Defaults
overlay.
3.6.4.2 To Edit a List
To edit a list, proceed as follows:
1. On the main Eurex Repo F7 GUI, point to Tools as displayed in
following figure.

Figure 205 : Tools Menu
2. Click the Auto. Trade Completion under Repo. Automatic Trade
Completion Defaults overlay appears as displayed in following figure.
Figure 206 : Automatic Trade Completion Defaults overlay
3. Select the radio button of the default list you want to edit.
4. Click EDIT LIST. A Trade completion Default List appears as displayed
in following figure.
5. You can add or remove the Security from the list.
To remove a security, select the checkbox of the security and click
REMOVE.
To add a security, click the icon and select the security from
Select Security overlay.

Figure 207 : Trade Completion Default List overlay
6. Click SAVE CHANGE. The changes are saved.
3.6.4.3 Remove a List
To remove a list, proceed as follows:
1. On the main Eurex Repo F7 GUI, point to Tools as displayed in
following figure.
Figure 208 : Tools Menu

2. Click the Auto. Trade Completion under Repo. Automatic Trade
Completion Defaults overlay appears as displayed in following figure.
Figure 209 : Automatic Trade Completion Defaults overlay
3. Select the radio button of the list you want to remove.
4. Click REMOVE. A confirmation message “Are you sure you want to
delete” dialog box appears on screen.
5. Click Yes to confirm. The selected list is deleted.
The list is removed from the Default List.
3.6.5 Configure Trade Slip
To Configure Trade Slip, proceed as follows:
1. On the main Eurex Repo F7 GUI, point to Tools.
2. Click the Configure Trade Slip under REPO. Configure Trade Slip appears as
displayed in the following figure. By default all attributes fields are in Selected
Attribute(s).

Figure 210 : Trade Slip Configuration -REPO
3. You can add and remove attributes in Trade Slip configuration.
4. Select the attribute(s) by selecting the checkbox, Click ‘– REMOVE
ATTRIBUTES’ to remove attribute from selected list.
5. Select the attribute(s) by selecting the checkbox, Click ‘+ADD ATTRIBUTES’ to
add attribute in selected list. Click RESET to restore default value
6. Click SAVE to Configure the Trade Slip
7. Click CLOSE to close the Configure Trade Slip screen

3.6.6 Manage Watchlists
A 'watchlist' is a group of securities/baskets configured to be shown on the custom views. You can
create/maintain watchlists such that only the Quotes belonging to securities/baskets in the
watchlists will be available on the custom view. Watchlists can be defined per segment, from a
separate overlay 'Manage Watchlists' under 'Tools' menu or you can use default watchlist. Default
watchlists for a segment are created using leading/secondary instruments from the same or another
segment.
Figure 211: Manage Watchlisits- Tools Menu
3.6.6.1 Create a New List
To create a new Watchlist
1. Click Manage Watchlists in Tools. 2. Manage Watchlists overlay will appear as follows:

Figure 212: Manage Watchlists Repo- overlay
3. You can create a new watchlist by clicking on the CREATE button. The following overlay will appear.
Figure 213: New Watchlist Repo-overlay
4. You can add baskets by clicking on ADD BASKET button and by selecting suitable
baskets and saving your selections. To save your selections, click SAVE SELECTION.

Figure 214: Add Basket-overlay
5. You can also add securities by clicking on ADD SECURITY button and by selecting
and saving particular securities. Click on SAVE SELECTION to save your changes.
You can also upload security ISINs using excel or CSV file. To upload using excel you
need to provide list of ISINs in a column as per excel template.
For CSV upload, each ISIN has to be in separate line without any commas as:
<ISIN1>
<ISIN2>
.
.
<ISINn>.
Successfully uploaded records will be appear selected. Click on SAVE SELECTION to
save your changes

Figure 215: Select Security-overlay
3.6.6.2 Edit a Watchlist
You can edit a Watchlist as follows:
1. Click the EDIT LIST button.
Figure 216: Manage Watchlist Repo-overlay
2. Edit Watchlist overlay appears. You can click on EDIT BASKET/EDIT SECURITY to
edit basket or security.

Figure 217: Edit Watchlist Repo-overlay
3. You can click on EDIT SECURITY to edit the securities. Security overlay appears.
Figure 218: Select Security - Overlay
4. You can click on SHOW SELECTED to view all the saved securities and click on
SHOW ALL to view back all the securities.

Figure 219: Select Security-overlay
5. You can click on REMOVE SELECTION to remove all the securities.

Figure 220: Remove selection confirmation box
6. You can click Yes and confirm. All the securities will be removed.
7. Now you can edit baskets in the same manner explained in section 3.6.6.1 Create
a New List.
3.6.6.3 Save Sequence
1. You can use drag and drop to change the sequence of the Watchlists and then
save the sequence by clicking the SAVE button.

Figure 221: Manage Watchlist REPO-overlay
2. A success message appears on the lower side confirming that the watchlist is
saved successfully.
Figure 222: Manage Watchlist Repo –overlay
Similarly, sequence for default watchlist can be changed and saved.
3.6.6.4 Enable/Disable a List
1. You can Enable/Disable the watchlist by selecting/unselecting the ‘Enabled’
checkbox and then save by clicking the SAVE button. Note: Only enabled watchlist will appear in the watchlist dropdown of Market
Watch.

Figure 223: Manage Watchlist REPO - Overlay
2. A success message appears on the lower side confirming that the watchlist is
saved successfully.
Figure 224: Manage Watchlist REPO - Overlay
Similarly, default watchlist can be enabled/disabled.
3.6.6.5 Rename a List
1. You can rename the existing user defined watchlists by directly editing the
name under ‘Watchlist Name’ column and then clicking on SAVE button.

Figure 225: Manage Watchlist REPO - Overlay
2. A success message appears on the lower side confirming that the watchlist is
saved successfully.
Figure 226: Manage Watchlist REPO - Overlay
Note: Default watchlists cannot be renamed.
3.6.6.6 Remove a List
1. You can remove a watchlist by selecting it and then clicking REMOVE:

Figure 227: Manage Watchlist Repo-overlay
2. A success message is displayed to confirm that the list is removed.
Figure 228: Manage Watchlist Repo-overlay
4. Managing Pre Trading Services
Pre Trading Services enable market participants to indicate their readiness to trade by addressing
Indications of Interest (IOI), Quotes and Addressed Offers (AO) to one or multiple other market

participants. Additionally, this chapter provides information on how to execute a trade by accepting a
received AO.
All Pre trading services can be accessed simultaneously. All the screens have been made non modal
so they can be accessed at the same time. Pre trading services include the following tasks:
Managing Quote
Managing Addressed Offer (AO)
Managing Indication Of Interests (IOI)
Managing Broker Offer
Managing Pre- Arranged Offer
Managing Auctions
4.1 Managing Quotes
A Quote is a binding Offer generally sent to all the participants (trading members) in the market in order
to indicate willingness to buy or sell a specific instrument (basket, security or currency) for a certain price
and with certain conditions (such as rate, amount and term). Quotes are displayed in the Market Watch
screen, Trading Book, Quote Book and Trading screen.
4.1.1 To Enter a Quote
You can enter a Quote in the following ways:
To enter a Quote from scratch
To enter a Quote from existing trading objects
4.1.1.1 To Enter a Quote from Scratch
You can enter a Quote from scratch using the two methods which are as follows:
To enter a Quote from Trading menu
To enter a Quote from Market Watch screen
4.1.1.1.1 To Enter a Quote from Trading Menu

To enter a Quote from Trading menu, proceed as follows:
1. On the Trading menu, under Repo, click Quote as displayed in
following figure. The Enter Quote - REPO screen appears as
displayed in Enter Quote - REPO screen figure.
Figure 229: Trading Menu
Figure 230: Enter Quote - REPO screen

2. Enter the field details in the Enter Quote – REPO screen. For
information on the fields, refer to Section 6.1 Enter Quote – REPO
screen.
3. Click SUBMIT after filling all the fields. A message ‘Quote entered
successfully :: XXXXX Total Quote Entered :: 1 ’ is displayed where
XXXX is the unique identification number for the Quote submitted
Note: If you click SUBMIT more than once on the same Enter Quote screen then
multiple Quotes will be entered and the latest Quote identification number will be
displayed. For example, if you click SUBMIT three times, three Quotes are entered, and
a message ‘Quote entered successfully:: XXXX Total Quote Entered :: 3’ is
displayed.
4.1.1.1.2 To Enter a Quote from Market Watch screen
You can also enter a Quote from Market Watch screen. To enter a Quote from
Market Watch screen refer to Section 3.2.5.1 Enter Quote - Market Watch
screen
4.1.1.2 To Enter a Quote from Existing Trading Object (Quote)
You can also enter a Quote from the existing Quote. The options for creating a Quote
from existing Quotes are as follows:
Copy a Quote from Trading overlay
Copy a Quote from Market Watch screen
Copy a Quote from Trading Book screen
Copy a Quote from Quote Book screen
4.1.1.2.1 To Copy a Quote from Trading overlay
To copy a Quote from Trading menu, proceed as follows:

1. On the Trading menu, click Trading under REPO. The Trading
overlay appears as displayed in following figure. Copy a Quote can
be done from Trading Sent/Received tab.
Figure 231: Trading overlay
2. Select the checkbox of the Quote you want to copy and right-click
on the selected Quote from sent tab. The Quick Action Utility
appears as displayed in following figure.
Figure 232: Quick Action Utility

3. Click the Copy to New Quote icon, to copy the Quote to new
Quote. The Enter Quote – REPO screen appears as displayed in
Figure 233: Enter Quote - REPO screen

4. The Term, Product Term Combination, Segment, Purchase Date,
Re-Purchase Date and Principle fields are automatically displayed
and cannot be changed.
5. Enter the other fields as required. Refer to Enter a Quote in
Trading Menu.
6. Click SUBMIT to submit the Quote.
Figure 234: Copy to New Quote - Enter Quote – REPO screen
4.1.1.2.2 To Copy a Quote from Market Watch screen
The Market Watch screen displays all the Quotes entered by the trading
members. You can copy the Quote from the available Quote in the Market
Watch screen. To copy the Quote from Market Watch screen, refer to Section
3.2.5.3 Copy to New Quote - Market Watch screen
4.1.1.2.3 To Copy a Quote from Trading Book

Trading Book screen displays all your relevant pre trading activities (such as
Quotes sent and received, IOIs and Offers received) for the combination of the
attributes (such as Segment, Product/Term, Index etc.) you selected in Market
Watch screen.
You can copy to new Quote from the available Quotes in the Trading Book. To
copy the Quote from Trading Book, refer to Section 3.3.1.2 Copy to New Quote
4.1.1.2.4 To Copy a Quote from Quote Book
The Quote Book is similar to the Trading overlay with two tabs for Sent and
Received, but it will display Quotes only. You can copy a Quote on this screen
into a new Quote.
4.1.2 To Maintain Quotes
4.1.2.1 To Maintain a Quote from Trading Menu
You can maintain a Quote from the Trading menu available on the Landing page.

To maintain a Quote, proceed as follows:
1. On the Trading menu, click Trading under REPO. The Trading overlay
appears as displayed in Figure 235: Trading overlay. It has two tabs namely, Sent
and Received.
Figure 235: Trading overlay
2. Select the Quote checkbox and right-click on the selected Quote. The Quick Action
Utility appears as displayed in following figure from Trading Sent tab.
Figure 236: Maintain Quote - Quick Action Utility

3. You can perform the following functions on the selected Quote:
Modify Single/Multiple Quote
Hold Quote
Release Quote
Delete Quote
Copy to New
Show Properties
To Modify a Quote: To modify the Quote, proceed as follows:
1. Click the icon to modify the Quote. The Modify Quote – REPO overlay
appears as displayed in following figure.
Figure 237: Modify Quote – REPO overlay

2. You can modify editable fields in Modify Quote-REPO overlay.
3. After you have modified the fields, click SUBMIT. A message ‘Quote
modified successfully’ appears on the screen.
Note: If the Quote you modified is on hold, the following two options for submit will be
available as displayed in following figure.
SUBMIT: If you click SUBMIT, the Quote is modified but not released.
SUBMIT & RELEASE: If you click SUBMIT & RELEASE, the Quote is modified and
released.
Figure 238: Modify Held Quote – REPO overlay
Modifying multiple Quotes: You can choose to modify the Repo rate of multiple
Quotes, provided all of them belong to the same segment, by selecting multiple
Quotes and clicking on the modify Quote icon. This invokes a screen Quote

Modification - Repo Rate with the selected Quotes populated in the grid as displayed
in following figure.
Figure 239: Modify Held Quote – REPO overlay
You can choose to modify the rates of Quotes based on their currency by selecting the
desired currency from the Currency dropdown, else choose ALL from this dropdown.
Provide the rate in basis points by which you wish to adjust the rates for Buy and Sell
Quotes separately in the corresponding inputs and click APPLY . This will populate the
new rate (adjusted with the amount provided) in the column for New Rate. Click
SUBMIT to modify the rates to the values displayed in the new rate column. A success
message is displayed and the Quotes are modified to the new rates
To Hold / Release Quotes:
To Hold a Quote: To hold active Quote, proceed as follows:
1. Select one or more Quotes and click the icon, the Hold Quote –
REPO alert appears as displayed in following figure.

Figure 240: Quote Book - REPO screen
2. Click Yes to hold the Quote. When one Quote is put on hold, a message
‘Quote Held Successfully:: Quote ID – (Quote id)’ is displayed. When
multiple Quotes are put on held the message ‘Out of X Quotes, X are
held’
Figure 241: Hold Quote-REPO Alert
To Release a Quote: To release the hold Quote, proceed as follows:
1. Click the icon the Release Quote – REPO overlay appears as
displayed in following figure.
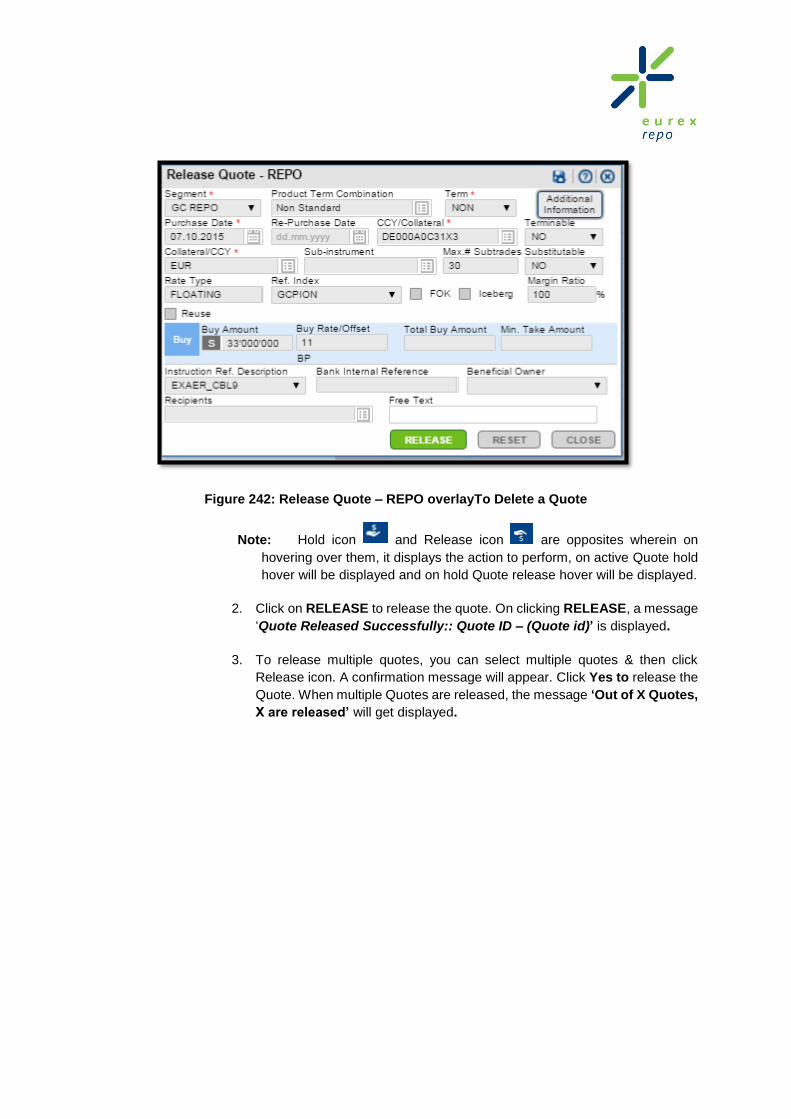
Figure 242: Release Quote – REPO overlayTo Delete a Quote
Note: Hold icon and Release icon are opposites wherein on
hovering over them, it displays the action to perform, on active Quote hold
hover will be displayed and on hold Quote release hover will be displayed.
2. Click on RELEASE to release the quote. On clicking RELEASE, a message
‘Quote Released Successfully:: Quote ID – (Quote id)’ is displayed.
3. To release multiple quotes, you can select multiple quotes & then click
Release icon. A confirmation message will appear. Click Yes to release the
Quote. When multiple Quotes are released, the message ‘Out of X Quotes,
X are released’ will get displayed.

Figure 243: Quote Book - REPO
Figure 244: Confirm Alert: Release Quotes

To delete a Quote, proceed as follows:
1. Click the icon. The Delete Quote – REPO alert appears as displayed
in following figure.
Figure 245: Delete Quote – REPO overlay
2. Click Yes. A message ‘Quote deleted successfully:: Quote ID - XXXX’
is displayed .
3. Click No to discard deletion.
To Copy to New Quote:
To copy the Quote to new Quote, proceed as follows:
1. At first ,Click the icon and then click the icon. The Enter Quote –
REPO screen appears as displayed as follows:

Figure 246: Enter Quote – REPO screen
2. The values from the existing Quote are copied on the new Enter Quote screen
3. Enter the other fields accordingly. For more details on fields, refer to Enter
Quote – REPO screen.
4. Click SUBMIT. A message ‘Quote entered successfully:: XXXX Total
Quote Entered :: 1’ is displayed.

To View Properties
To view the properties of the Quote, proceed as follows:
1. Click the icon. The Quote Properties overlay appears as displayed
in following figure.
Figure 247: Quote Properties overlay
4.1.2.2 To Maintain all Quotes from Maintain Quote Menu
Under Maintain Quote menu for REPO you can perform the following functions on all
your Quotes:
Hold all My Quotes
Release All My Held Quotes
Delete All My Held Quotes
Delete All My Quotes
Modify Rate of All My Active Quotes
Modify Rate of All My Held Quotes
Modify Rate of Member Active Quotes
Under Maintain Quote menu for SECLEND you can perform the following functions on
all your Quotes:
Hold all My Quotes

Release All My Held Quotes
Delete All My Held Quotes
Delete All My Quotes
Modify Fee of All My Active Quotes
Modify Fee of All My Held Quotes
Modify Fee of Member Active Quotes
Modify Interest of All My Active Quotes
Modify Interest of All My Held Quotes
Modify Interest of Member Active Quotes
Figure 248: Maintain Quote
4.1.2.2.1 Hold All My Quotes

To hold all your active personal Quotes, proceed as follows:
1. On the main Eurex Repo F7 GUI, point to Maintain Quote menu.
2. Click Hold All My Quotes. A confirmation message appears as
displayed in following figure.
3. Click Yes to confirm or No to discard.
Figure 249: Confirmation Message Dialog Box - Hold All My Quotes
4. If you click Yes, a message about the number of Quotes held is
displayed as displayed in following figure.
Figure 250: Quotes held success message
4.1.2.2.2 Release All My Held Quotes
To release all your personal held Quotes, proceed as follows:
1. On the main Eurex Repo F7 GUI, point to Maintain Quote menu.
2. Click Release All My Held Quotes. A confirmation message
appears as displayed in following figure.
3. Click Yes to confirm or No to discard.
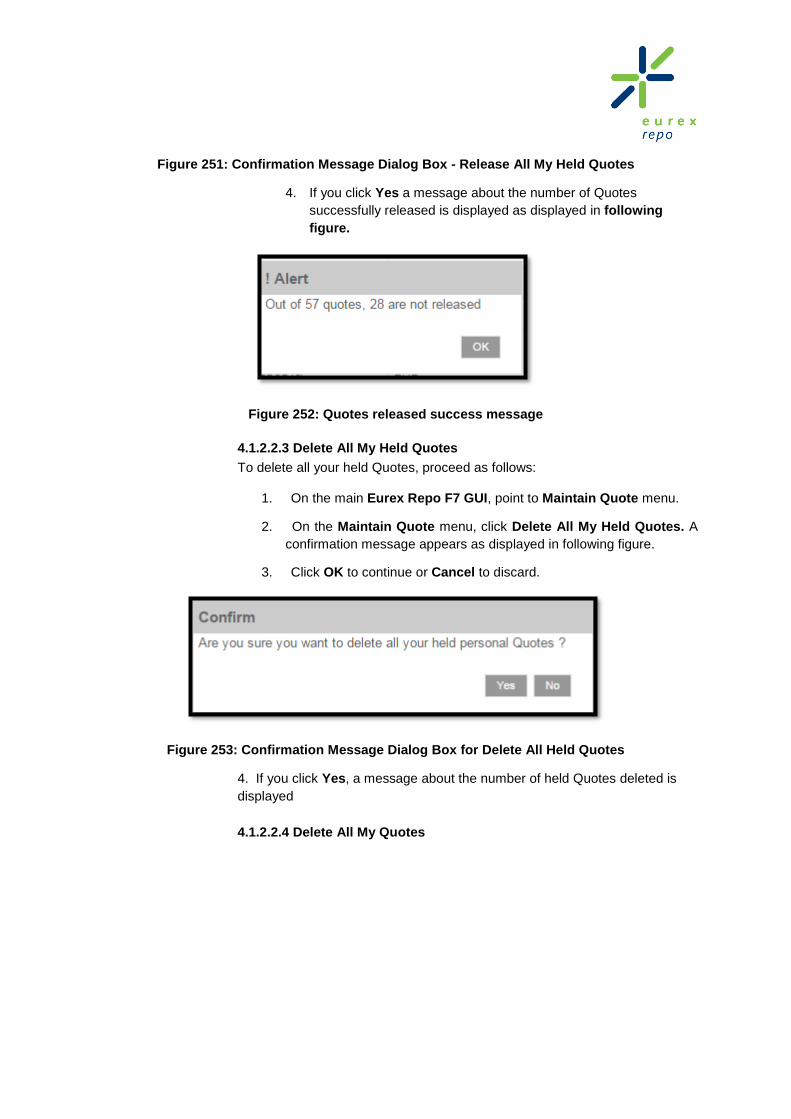
Figure 251: Confirmation Message Dialog Box - Release All My Held Quotes
4. If you click Yes a message about the number of Quotes
successfully released is displayed as displayed in following
figure.
Figure 252: Quotes released success message
4.1.2.2.3 Delete All My Held Quotes
To delete all your held Quotes, proceed as follows:
1. On the main Eurex Repo F7 GUI, point to Maintain Quote menu.
2. On the Maintain Quote menu, click Delete All My Held Quotes. A
confirmation message appears as displayed in following figure.
3. Click OK to continue or Cancel to discard.
Figure 253: Confirmation Message Dialog Box for Delete All Held Quotes
4. If you click Yes, a message about the number of held Quotes deleted is
displayed
4.1.2.2.4 Delete All My Quotes
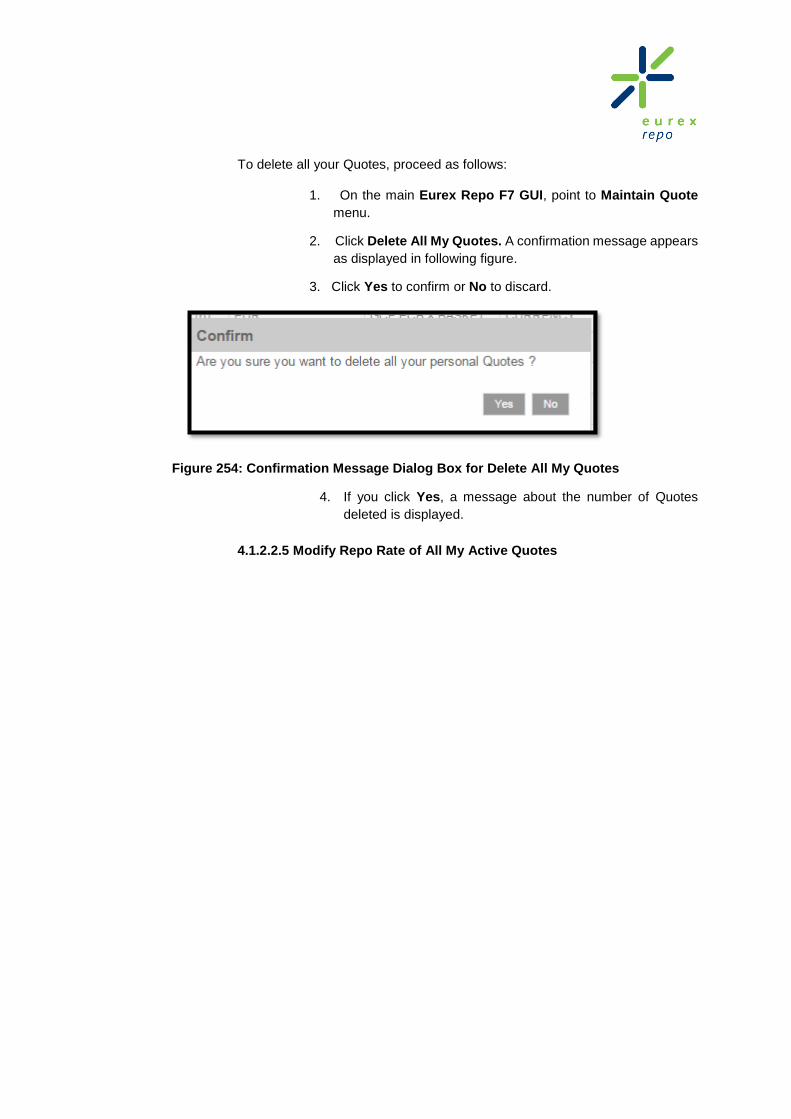
To delete all your Quotes, proceed as follows:
1. On the main Eurex Repo F7 GUI, point to Maintain Quote
menu.
2. Click Delete All My Quotes. A confirmation message appears
as displayed in following figure.
3. Click Yes to confirm or No to discard.
Figure 254: Confirmation Message Dialog Box for Delete All My Quotes
4. If you click Yes, a message about the number of Quotes
deleted is displayed.
4.1.2.2.5 Modify Repo Rate of All My Active Quotes

To Modify Repo Rate of all your Active Quotes, Proceed as follows:
1. On the main Eurex Repo F7 GUI, point to Maintain Quote menu.
2. Click Modify Rate of All My Active Quotes. An overlay is opened
as displayed in following figure.
3. Provide the buy sell value by which you want to increase or
decrease repo rate value. Click APPLY to check the new
calculated rate. Click SUBMIT to save the newly calculated rate.
Figure 255: Modify Repo Rate of all My Active Quotes
4.1.2.2.6 Modify Repo Rate of All My Held Quotes

To Modify Repo Rate of all your Held Quotes, Proceed as follows:
1. On the main Eurex Repo F7 GUI, point to Maintain Quote menu.
2. Click Modify Rate of All My Held Quotes. An overlay is opened
as displayed in following figure.
3. Provide the buy sell value by which you want to increase or
decrease repo rate value. Click APPLY to check the new
calculated rate. Click SUBMIT to save the newly calculated rate.
Figure 256: Modify Rate of all My Held Quotes
4.1.2.2.7 Modify Repo Rate of Member Active Quotes

To Modify Repo Rate of all Member Active Quotes, Proceed as follows:
1. On the main Eurex Repo F7 GUI, point to Maintain Quote menu.
2. Click Modify Repo of Member Active Quotes. An overlay is
opened as displayed in following figure.
3. Provide the buy sell value by which you want to increase or
decrease repo rate value. Click APPLY to check the new
calculated rate. Click SUBMIT to save the newly calculated rate.
Figure 257: Modify Rate of Member Active Quotes
4.1.2.2.8 Modify Fee of all My Active Quotes

To Modify Fee of all My Active Quotes, Proceed as follows:
1. On the main Eurex Repo F7 GUI, point to Maintain Quote menu.
2. Click Modify Fee of all My Active Quotes. A screens is open as
displayed in following figure.
3. Provide lend borrow value by which you have to increase or decrease
lending fee value. Click APPLY to check the new calculated lending
fee. Click SUBMIT to save the newly calculated lending fee.
Figure 258: Modify Fee of All My Active Quote
4.1.2.2.9 Modify Fee of all My Held Quotes

To Modify Fee of all My Held Quotes, Proceed as follows:
1. On the main Eurex Repo F7 GUI, point to Maintain Quote menu.
2. Click Modify Fee of all My Held Quotes. An overlay is opened as
displayed in following figure.
3. Provide lend borrow value by which you want to increase or decrease
lending fee value. Click APPLY to check the new calculated lending
fee. Click SUBMIT to save the newly calculated lending fee.
Figure 259: Modify Fee of all My Held Quotes
4.1.2.2.10 Modify Fee of Member Active Quotes
To Modify Fee of Member Active Quotes, Proceed as follows:
1. On the main Eurex Repo F7 GUI, point to Maintain Quote menu.
2. Click Modify Fee of Member Active Quotes. An overlay is opened
as displayed in following figure.
3. Provide lend borrow value by which you want to increase or
decrease lending fee value. Click APPLY to check the new

calculated lending fee. Click SUBMIT to save the newly calculated
lending fee.
Figure 260: Modify Fee of Member Active Quotes
4.1.2.2.11 Modify Interest of all My Active Quotes

To Modify Interest of all My Active Quotes, Proceed as follows:
1. On the main Eurex Repo F7 GUI, point to Maintain Quote menu.
2. Click Modify Interest of all My Active Quotes. An overlay is
opened as displayed in following figure.
3. Provide lend borrow value by which you want to increase or
decrease interest value. Click APPLY to check the new calculated
interest. Click SUBMIT to save the newly calculated interest.
Figure 261: Modify Interest of all My Active Quotes
4.1.2.2.12 Modify Interest of all My Held Quotes

To Modify Interest of all My Held Quotes, Proceed as follows:
1. On the main Eurex Repo F7 GUI, point to Maintain Quote menu.
2. Click Modify Interest of all My Held Quotes. An overlay is opened
as displayed in following figure.
3. Provide lend borrow value by which you want to increase or
decrease interest value. Click APPLY to check the new calculated
interest. Click SUBMIT to save the newly calculated interest.
Figure 262: Modify Interest of all My Held Quotes
4.1.2.2.13 Modify Interest of Member Active Quotes

To Modify Interest of Member Active Quotes, Proceed as follows:
1. On the main Eurex Repo F7 GUI, point to Maintain Quote menu.
2. Click Modify Interest of Member Active Quotes. An overlay is
opened as displayed in following figure.
3. Provide lend borrow value by you want to increase or decrease
interest value. Click APPLY to check the new calculated interest.
Click SUBMIT to save the newly calculated interest.
Figure 263: Modify Interest of Member Active Quotes
4.1.2.3 To Maintain a Quote from Quote Book
This screen is the same as the Trading overlay, except that it has only Quotes present on it. It is not
an overlay, it is a non-modal screen, in that, you can open this screen and still continue to operate other
screens on the application. The latest Quote information is broadcast on this screen. You can perform
the same actions on Quotes here as you can from the Trading overlay. For actions that can be
performed from the Trading overlay, refer to section 3.3.1 Quick Action Utility / Using Right-Click

Figure 264: Quote Book-REPO
4.1.3 To Respond to a Quote
You can respond to a Quote by sending an Addressed Offer to the sender of the Quote. Quotes
are displayed in the Market Watch and Trading Book screens. You can hit a Quote from both
of these screens.
To hit a Quote from Market Watch screen
To hit a Quote from Trading Book.
To hit a Quote from Trading Repo- Received tab.
To hit a Quote from Quote Book Repo – Received tab
To hit a Quote from Fast Entry screen.
4.1.3.1 To hit a Quote from Market Watch screen
To hit a Quote from Market Watch screen, refer to Section 3.2.5.4 Hit a Quote - Market
Watch screen
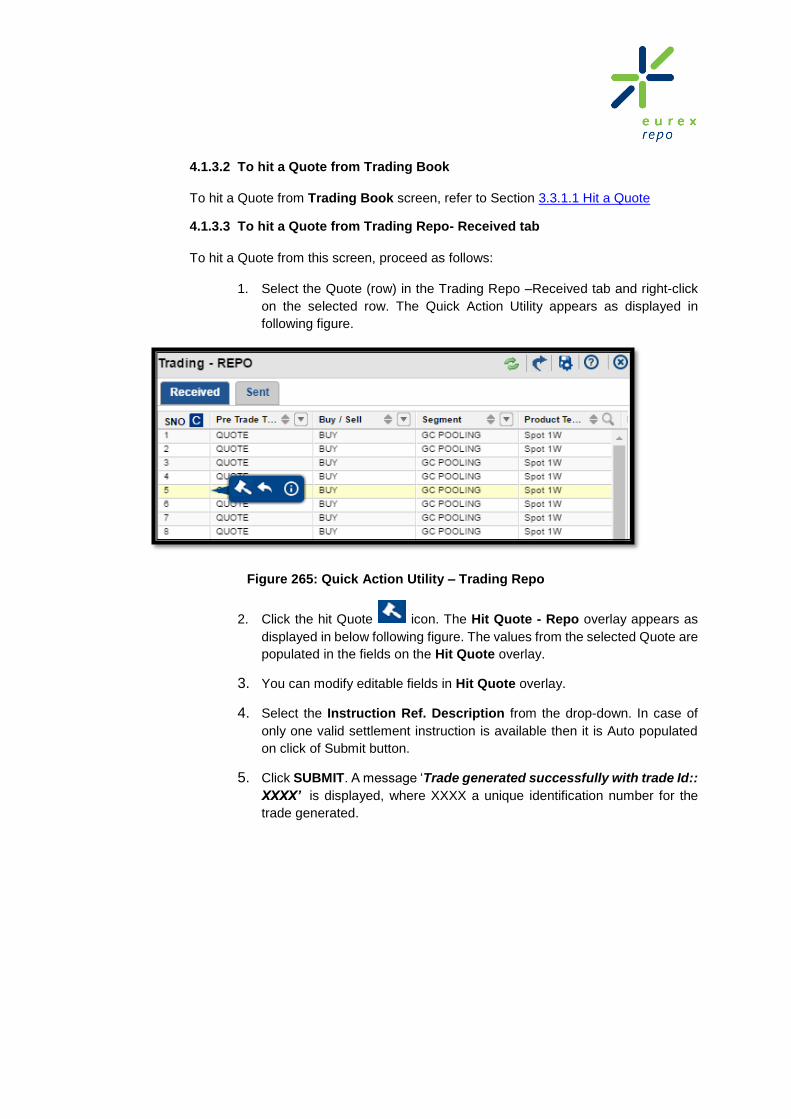
4.1.3.2 To hit a Quote from Trading Book
To hit a Quote from Trading Book screen, refer to Section 3.3.1.1 Hit a Quote
4.1.3.3 To hit a Quote from Trading Repo- Received tab
To hit a Quote from this screen, proceed as follows:
1. Select the Quote (row) in the Trading Repo –Received tab and right-click
on the selected row. The Quick Action Utility appears as displayed in
following figure.
Figure 265: Quick Action Utility – Trading Repo
2. Click the hit Quote icon. The Hit Quote - Repo overlay appears as
displayed in below following figure. The values from the selected Quote are
populated in the fields on the Hit Quote overlay.
3. You can modify editable fields in Hit Quote overlay.
4. Select the Instruction Ref. Description from the drop-down. In case of
only one valid settlement instruction is available then it is Auto populated
on click of Submit button.
5. Click SUBMIT. A message ‘Trade generated successfully with trade Id::
XXXX’ is displayed, where XXXX a unique identification number for the
trade generated.

Figure 266: Hit Quote – Repo screen
4.1.3.4 To Hit a Quote from the Quote Book Received tab
1. Select the Quote (row) in the Trading Repo –Received tab and right-click
on the selected row. The Quick Action Utility appears as displayed in
following figure.
Figure 267: Quote Book - REPO

2. Click the hit Quote icon. The Hit Quote - Repo overlay appears as
displayed in below following figure. The values from the selected Quote are
populated in the fields on the Hit Quote overlay.
3. You can modify editable fields in Hit Quote overlay.
4. Select the Instruction Ref. Description from the drop-down. In case of
only one valid settlement instruction is available then it is Auto populated
on click of Submit button.
5. Click SUBMIT. A message ‘Trade generated successfully with trade Id::
XXXX’ is displayed, where XXXX a unique identification number for the
trade generated.
4.1.3.5 To Hit a Quote from the Fast Entry screen
To hit a Quote from Fast Entry screen, refer to Section 3.8.1.
4.2 Managing Addressed Offers
An Addressed Offer (AO) is a binding Offer sent to a chosen trading member. Addressed Offers are
created to respond to a received Indication of Interests (IOI), to Quotes, or to initiate a trade directly with
a selected participant.
4.2.1 To Enter an Addressed Offer
You can enter an Addressed Offer in the following ways:
To enter an Addressed Offer from scratch (Clean Offer)
To enter an Addressed Offer from existing trading objects
4.2.1.1 To Enter a Clean Addressed Offer
You can enter a clean AO in the following two ways:
To enter an Addressed Offer from Trading menu
To enter an Addressed Offer from Market Watch screen
4.2.1.1.1 To Enter an Addressed Offer from Trading Menu
To enter an Addressed Offer from Trading menu, proceed as follows:
1. On the Trading menu, click Addressed Offer under REPO. The
Enter Addressed Offer - REPO screen appears as displayed in
following figure.

Figure 268: Enter Addressed Offer – REPO screen
2. Enter the field details in the Enter Offer – REPO screen. For
information on the fields, refer to the 6.3 Enter Request for Quote –
REPO screen
3. Click SUBMIT after filling all the fields. A message ‘Offer entered
successfully:: XXXXX Total Offer Entered :: 1 ’ is displayed where
XXXX is the unique identification number for the Offer submitted and 1
indicates the number of Offers submitted from the opened screen.
Note: If you click SUBMIT more than once on the same Enter Offer screen
then multiple Offers are entered and the latest Offer identification number will
be displayed. For example, if you click SUBMIT three times (by choosing to
modify some parameters on the screen or otherwise), three Offers are entered,
and a message ‘Offer entered successfully:: XXXX Total Offers Entered ::
3’ is displayed.
4.2.1.1.2 To Enter a Addressed Offer (AO) from Market Watch screen
You can also enter an Addressed Offer (AO) from Market Watch screen. To
enter an AO from Market Watch
screen, refer to Section 3.2.5.2 Enter Offer - Market Watch screen.

4.2.1.2 To Enter an Addressed Offer from Existing Trading Objects
To enter an AO based on existing trading objects following options are available:
Enter an AO based on an IOI/ RFQ
Enter an AO based on an AO
Enter an AO based on a Quote
Copy to new AO
4.2.1.2.1 To Enter an AO based on IOI
You can enter an AO for the IOI received. All the received IOIs are displayed in
Received IOI tab under Notifications, Trading and Pre Trade Manager. For
more details, refer to Section 3.4.2.3 IOI Received.
4.2.1.2.2 To Enter an AO based on AO
You can enter an AO based on AO received. All the received AOs are displayed
in Received Offer tab under Notifications, Trading and Pre Trade Manager.
For more details, refer to Section 3.4.2.1.
4.2.1.2.3 To Enter an AO based on Quote
You can enter an AO based on Quotes received (that is hitting a Quote) from
the following screens:
4.2.1.2.3.1 Market Watch screen
For more details, refer to Section,3.2.5.4 Hit a Quote -
Market Watch.
4.2.1.2.3.2 Trading Book screen
(For more details, refer to Section,3.3.1.1 Hit a Quote)
4.2.1.2.3.3 Trading-Received tab.
To hit a Quote from the Trading received tab:
1. Navigate to the Received tab on the Trading overlay under the
Trading menu and right-click on a selected Quote as displayed in
following figure.

Figure 269: Quick Action Utility - Trading overlay
2. Click on the hit Quote icon to open the Hit Quote –Repo
overlay as displayed in following figure. The values from the
selected Quote are populated in the fields on the Hit Quote
overlay.

Figure 270: Hit Quote - Trading overlay
3. You can modify editable fields in the Hit Quote overlay.
4. Select the Instruction Ref. Description from the drop-down.
In case of only one valid settlement instruction is available then
it is Auto populated on click of Submit button.
5. Click SUBMIT. A message ‘Trade generated successfully
with trade Id:: XXXX’ is displayed, where XXXX a unique
identification number for the trade generated.
4.2.1.2.3.4 Quote Book-Received tab
Navigate to the Received tab on the Quote Book screen and
then proceed as described in the above section
Copy to new AO
Copy to new AO based on Quote
Copy to new AO can be done from sent or received Quote from Trading Repo
and the Quote Book screen
Copy to new AO based on IOI
Copy to new AO can be done from sent or received IOI from Trading Repo and
the Quote Book screen
Copy to new AO based on AO

Copy to new AO can be done from sent or received AO from Trading Repo
and the Quote Book screen
4.2.2 To Maintain an Addressed Offer
You can delete an AO from Trading overlay or from the Notifications screen
4.2.2.1 To delete an AO from the Trading overlay
1. On the Trading menu, click Trading under REPO. The Trading overlay
appears as displayed in following figure. It has two tabs namely, Sent and
Received.
Figure 271: Trading overlay
2. Select the AO checkbox and right-click on the selected AO. The Quick Action
Utility appears as displayed in following figure.

Figure 272: Maintain AO – Quick Action Utility
3. Click the icon. The confirmation message “Delete Selected Items” appears
on screen.
4. Click Yes to proceed; a message ‘AO deleted successfully:: ID - xxxxxx’ is
displayed, or click No to discard the action.
4.2.2.2 To delete an AO from the Notifications screen
You can delete an AO you have sent, from the Notifications screen as well
1. Navigate to Offers Sent tab on the Notifications screen on the Landing
page. Choose an Offer to be deleted and right-click on it. A Quick Action
Utility as displayed in following figure.
Figure 273: Delete Offers - Notifications screen

2. Click on the delete icon and a confirmation message “Delete Selected
Items” appears on the screen
3. Click Yes to proceed; a message ‘AO deleted successfully:: ID - xxxxxx’
is displayed, or click No to discard the action.
4.2.3 To Respond to an Addressed Offer
When you receive an Address Offer, it is displayed in Offer Received under Notifications
screen, in Offer Received under Trading overlay and on the Trading Book if a Quote on a
similar combination exists in the Market Watch. You can Accept, Reject or Counter an Offer
received.
Note: If you do not respond to an Addressed Offer, it will automatically be deleted once the
expiry time defined by the sender of the Addressed Offer has elapsed.
You can respond to an Addressed Offer received from the following screens:
To Respond to an Addressed Offer from Notifications screen
To Respond to an Addressed Offer from Trading Repo – Received
tab
To Respond to an Addressed Offer from Trading Book
To Respond to an Addressed Offer from Pre Trade Manager
4.2.3.1 To Respond to an Addressed Offer – Notifications screen
All the Offers received are displayed in Offer Received tab under Notifications screen.
You can choose a particular Offer and respond to it from this screen. For more
information, refer to Section 3.4.2.1
4.2.3.2 To Respond to an Addressed Offer – Trading Repo Received tab
All received Offers are displayed in Trading Repo Received tab. To respond to an
Offer, right-click on particular Offer; Quick Action Utility will be displayed with an option
Respond Offer as displayed in following figure.

Figure 274: Trading REPO-Received tab

When you select this option, Respond Offer overlay appears as displayed in following
figure. The information in the overlay is automatically displayed, based on the AO you
selected. You can accept, reject or send a Counter Offer for the Offer received.
Figure 275: Respond to Offer – Repo overlay
To accept an Addressed Offer received, click ACCEPT. The message ‘Trade
generated successfully with Trade Id: XXXX’ is displayed.
To reject this Offer click REJECT
To counter the Offer click COUNTER OFFER which will open the Counter Offer overlay.
Here you can change editable parameters like Amount, Rate, Min Take Amount of the
received Offer and send a counter to it.
4.2.3.3 To Respond to an Addressed Offer from Trading Book
You can respond to a received Offer from Trading Book as well. Select an Offer in the
Trading Book and right-click on the selected row. The Quick Action Utility appears as
displayed in following figure.

Figure 276: Quick Action Utility – Trading Book
1. Click the Respond to Offer icon. The Respond Offer - Repo overlay appears
as displayed in following figure.
Figure 277: Respond Offer overlay

2. You can modify editable fields in Respond Offer overlay.
3. Select the Instruction Ref. Description from the drop-down. In case of only one valid
Instruction Ref. Description is available then it is Auto populated on click of
ACCEPT.
4. Click ACCEPT. A message ‘Trade generated successfully with trade Id: XXXX’
is displayed, where XXXX a unique identification number for the trade generated.
5. You can also choose to REJECT or COUNTER this Offer from the respective buttons
on the respond Offer screen.
4.2.3.4 To Respond to an Addressed Offer from Pre Trade Manager
1. You can respond to an Addressed Offer from Pre Trade Manager.
2. Addressed Offer is displayed as follows in the Pre Trade Manager received tab. On
right clicking the offer, a quick utility menu appears as shown in the following figure.
Figure 278: Pre Trade Manager - REPO
3. Now click on to open the Respond Offer –REPO overlay as shown in the figure.

Figure 279: Respond Offer-REPO
4. You can modify editable fields in Respond Offer-REPO overlay.
5. Select the Instruction Ref. Description from the drop-down. In case of only one
valid Instruction Ref. Description is available then it is Auto populated on click
of ACCEPT.
6. Click ACCEPT. A message ‘Trade generated successfully with trade Id: XXXX’
is displayed, where XXXX a unique identification number for the trade
generated.
7. You can also choose to REJECT or COUNTER this Offer from the respective
buttons on the respond Offer screen.
4.3 Managing Indication of Interest
An Indication of Interest (IOI) is a non-binding Offer sent to all or selected participants. IOI are the most
flexible instruments available to initiate trading activity. The recipients can respond to an IOI by sending
an AO.
4.3.1 To Enter an Indication of Interest
You can enter an IOI in the following ways:
To enter an IOI from scratch
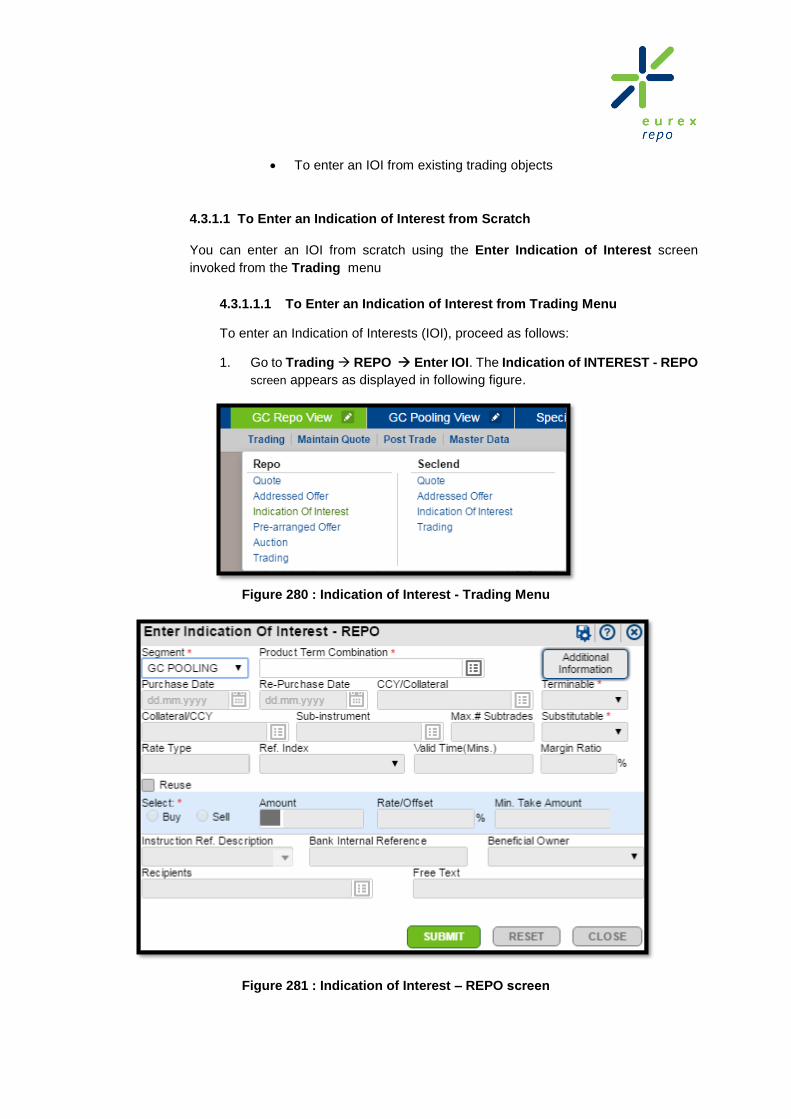
To enter an IOI from existing trading objects
4.3.1.1 To Enter an Indication of Interest from Scratch
You can enter an IOI from scratch using the Enter Indication of Interest screen
invoked from the Trading menu
4.3.1.1.1 To Enter an Indication of Interest from Trading Menu
To enter an Indication of Interests (IOI), proceed as follows:
1. Go to Trading REPO Enter IOI. The Indication of INTEREST - REPO
screen appears as displayed in following figure.
Figure 280 : Indication of Interest - Trading Menu
Figure 281 : Indication of Interest – REPO screen

2. Enter the respective field details in the Enter Indication of Interest – REPO
screen. For information on the fields, refer to Section 6.2.
3. Click SUBMIT after filling all the fields. A message ‘IOI entered
successfully:: XXXXX Total IOI Entered :: 1’ is displayed where XXXXX
is unique identification number for the IOI submitted and 1 indicates that 1
IOI has been submitted.
Note: If you click SUBMIT more than once on same Enter Indication of Interest
overlay, then multiple IOIs are entered and the latest IOI identification number will
be displayed. For example, if you click enter three IOIs from the same screen for
instance, a message ‘IOI entered successfully:: xxxxx Total IOI Entered :: 3’ is
displayed.
4.3.1.1.2 To Enter an Indication of Interest from Existing Trading Objects
You can use an existing Pre Trade Action and copy its contents into a new IOI in
the following way from the Trading screen
Copy to New IOI from Trading Sent, Trading Received
Figure 282: Trading Repo
4.3.2 To Maintain an Indication of Interest
To maintain an IOI, proceed as follows:
1. On the Trading menu, click Trading under REPO. The Trading overlay appears
as displayed in following figure. It has two tabs namely, Sent and Received.
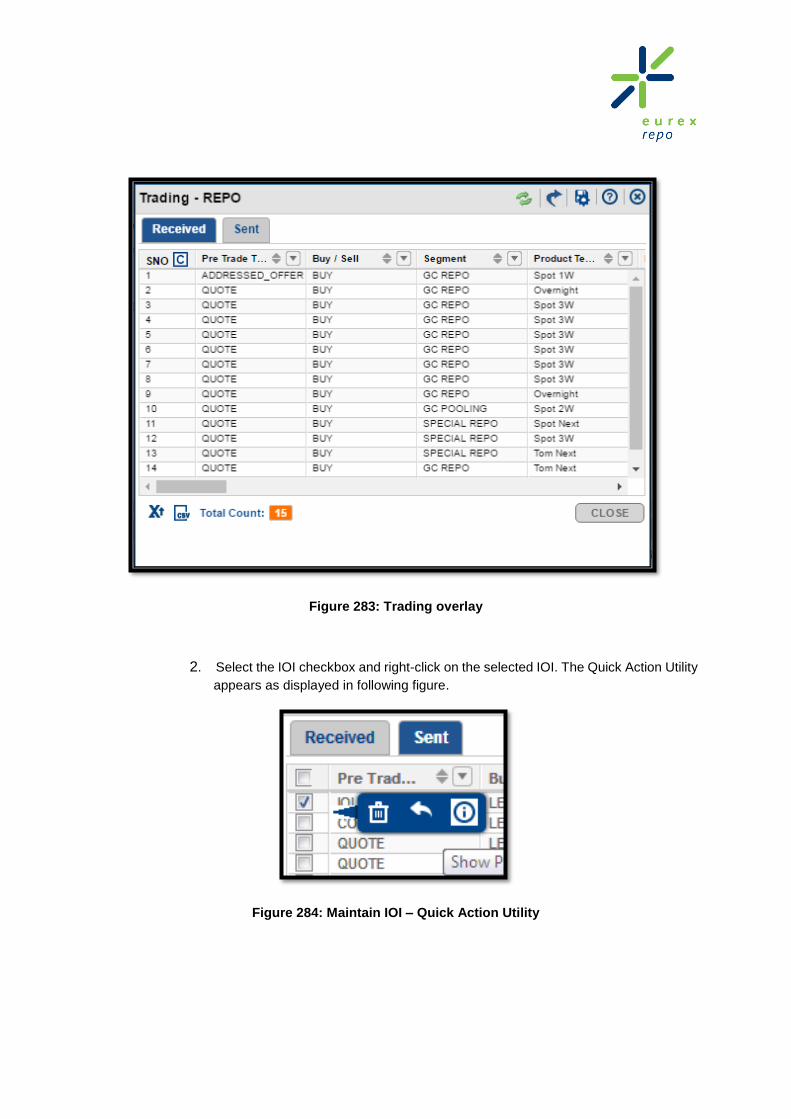
Figure 283: Trading overlay
2. Select the IOI checkbox and right-click on the selected IOI. The Quick Action Utility
appears as displayed in following figure.
Figure 284: Maintain IOI – Quick Action Utility

Quick Action Utility
To Delete an IOI
To delete an IOI, proceed as follows:
4. Click the icon. The confirmation message “Do you want to delete Selected
Items” appears on screen.
5. Click Yes to proceed, a message ‘IOI deleted successfully :: ID – xxxxxx’ is
displayed You can alternatively click No to cancel the action and go back to the
Trading overlay.
4.3.3 To Respond to an Indication of Interest
You can respond to an IOI received from the following screens:
To Respond to an IOI from Notifications screen
To respond to an IOI from Trading Repo-Received tab
To Respond to an IOI from Trading Book
To Respond to an IOI from Pre Trade Manager-Received Tab
4.3.3.1 To Respond to an Indication of Interest from Notifications screen
All received IOIs are displayed in Received IOI tab under Notifications screen. To
respond to an IOI click on the particular IOI, the Addressed Offer – REPO screen
appears. For more information refer to the Section 3.4.2.2
4.3.3.2 To Respond to an Indication of Interest from Trading Repo Received tab
All received IOIs are displayed in Trading Repo Received tab screen. To Respond to
an IOI right-click on the particular row. Addressed Offer – REPO screen appears. For
more information refer to the Section 3.4.2.2

Figure 285 : Quick Action Utility-Trading REPO
4.3.3.3 To Respond to an Indication of Interest from Trading Book
To Respond to IOI right-click on the particular row in Trading Book. Addressed Offer –
REPO screen appears. For more information refer to the Section 3.4.2.2
Figure 286: Quick Action Utility-Trading Book

4.3.3.4 To Respond to an Indication of Interest from Pre Trade Manager
You can respond to an IOI from Pre Trade Manager. Refer section 3.1.3.6.2 Respond To IOI.
4.4 Managing Broker Offer
A broker can facilitate a trade on behalf of two participants. Once the terms are agreed, the broker uses
the Eurex Repo F7 GUI to setup a trade.
Note: To enter a Broker Offer, you should have access rights to broker a trade.
4.4.1 To Enter a Broker Offer
Broker can enter a Broker Offer only from Trading menu.
To enter a Broker Offer, proceed as follows:
1. On the Trading menu, click Broker Offer under REPO as displayed in following
figure. The Enter Broker Offer screen appears as displayed in Figure Broker Offer
screen.
Figure 287: Broker Offer - Trading Menu

Figure 288: Broker Offer screen
2. Enter the field details in the Enter Broker Offer screen. For information on the fields,
refer to the Section 6.4.
3. Click SUBMIT, after filling all the fields. A message ‘Broker Offer entered
successfully:: XXXXX Total broker offer entered :: 1’ is displayed where XXXXX is
unique identification number for the Offer submitted and 1 indicates that the Broker Offer
is submitted only once.
The recipients can view the Offer in Offer Received tab under Notifications. The
Recipient can accept or reject the Offer.
Note: If you click SUBMIT more than once on same Broker Offer overlay, then multiple Broker
Offers are entered and the latest Broker Offer identification number is displayed. For example,
if you click SUBMIT three times, a message ‘Broker Offer entered successfully ::
XXXXX Total Broker Offer entered :: 3’ is displayed.
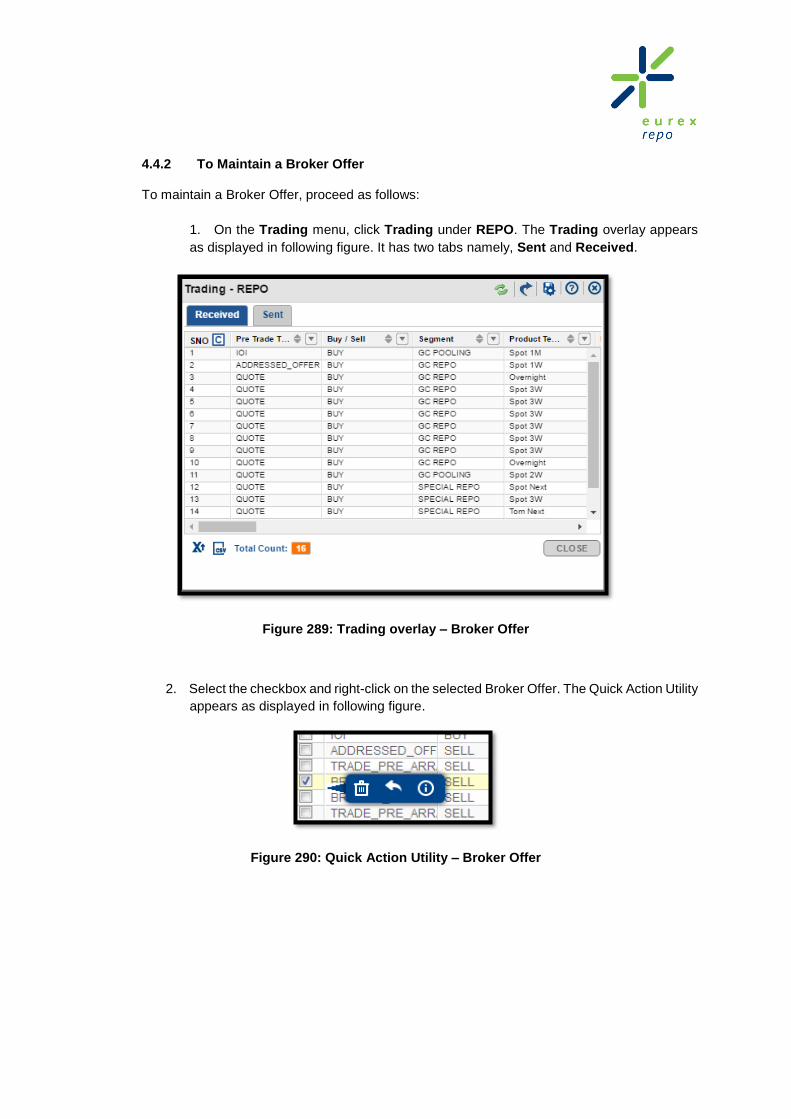
4.4.2 To Maintain a Broker Offer
To maintain a Broker Offer, proceed as follows:
1. On the Trading menu, click Trading under REPO. The Trading overlay appears
as displayed in following figure. It has two tabs namely, Sent and Received.
Figure 289: Trading overlay – Broker Offer
2. Select the checkbox and right-click on the selected Broker Offer. The Quick Action Utility
appears as displayed in following figure.
Figure 290: Quick Action Utility – Broker Offer

3. You can perform the following functionalities on the selected Broker Offer:
Delete Offer
Show Properties
To Delete a Broker Offer
To delete a Broker Offer, proceed as follows:
1. Select one or more Broker Offers as shown in the figure.
Figure 291: Pre Trade Manager-REPO screen
2. Click the icon. The confirmation message “Delete Selected Items” appears
on screen as displayed in figure below.
Figure 292: Confirm Alert

3 . Click YES to proceed, a message ‘Selected Item deleted successfully :: ID –
xxxxx’ is displayed if a single offer is deleted. If multiple offers are deleted then a
message ‘OUT of X, X are deleted’ is displayed. Click on No to discard the action.
To View Properties
To view the properties of a Broker Offer, proceed as follows:
1. Click the icon. The Broker Offer Properties overlay appears as displayed in
following figure.
Figure 293: Broker Offer Properties overlay
4.5 Managing Pre- Arranged Offer
A Pre - Arranged Offer is entered when both the parties have agreed on the trade, that is, on Term,
Product Term Combination, Segments, Rate and so on, earlier.
4.5.1 To Enter a Pre-Arranged Offer
To enter a Pre -Arranged Offer, proceed as follows:
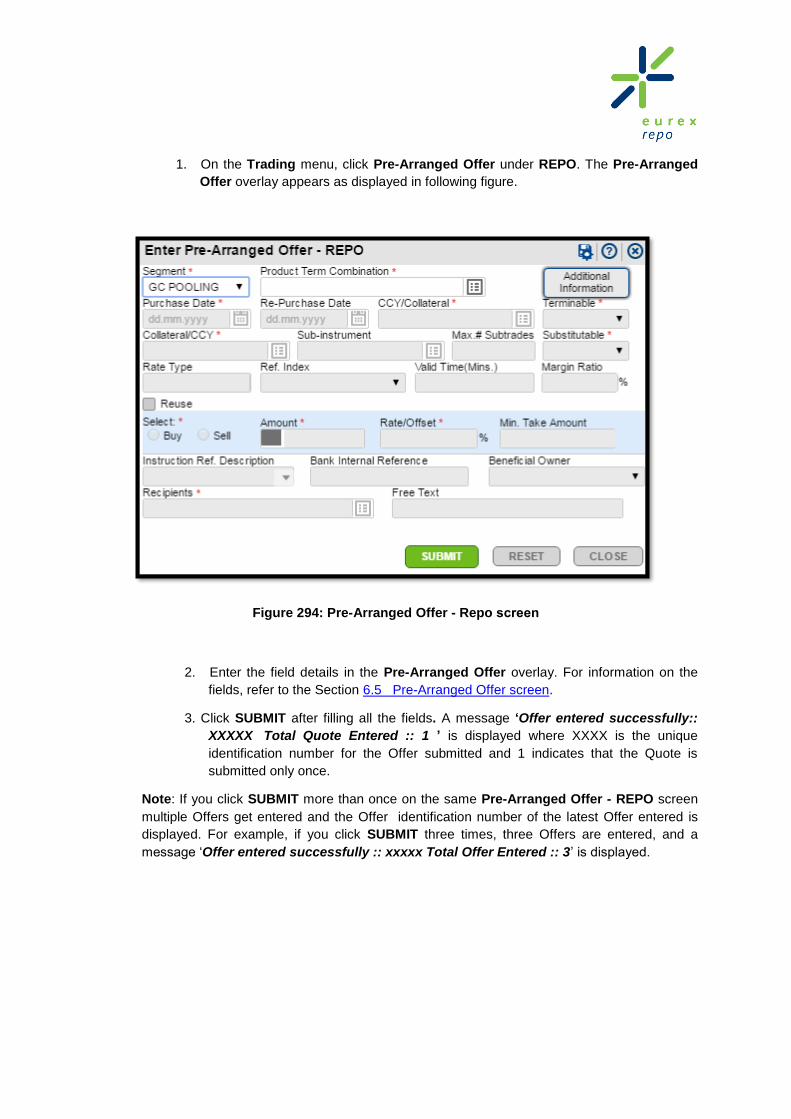
1. On the Trading menu, click Pre-Arranged Offer under REPO. The Pre-Arranged
Offer overlay appears as displayed in following figure.
Figure 294: Pre-Arranged Offer - Repo screen
2. Enter the field details in the Pre-Arranged Offer overlay. For information on the
fields, refer to the Section 6.5 Pre-Arranged Offer screen.
3. Click SUBMIT after filling all the fields. A message ‘Offer entered successfully::
XXXXX Total Quote Entered :: 1 ’ is displayed where XXXX is the unique
identification number for the Offer submitted and 1 indicates that the Quote is
submitted only once.
Note: If you click SUBMIT more than once on the same Pre-Arranged Offer - REPO screen
multiple Offers get entered and the Offer identification number of the latest Offer entered is
displayed. For example, if you click SUBMIT three times, three Offers are entered, and a
message ‘Offer entered successfully :: xxxxx Total Offer Entered :: 3’ is displayed.

4.5.2 To Maintain a Pre-Arranged Offer
To maintain a Pre - Arranged Offer, proceed as follows:
1. On the Trading menu, click Trading under REPO. The Trading overlay
appears as displayed in following figure. It has two tabs namely, Sent and
Received.
Figure 295: Trading overlay – Pre-Arranged Offer
2. Select the checkbox and right-click on the selected Offer. The Quick Action
Utility appears as displayed in following figure.
Figure 296: Quick Action Utility – Pre-Arranged Offer

You can perform the following functions on the selected Offer:
Delete Offer
4.6 Managing Auctions
Auctions may be created for any tradable product and instrument, that is. baskets, currency, or securities and can be either a buy or a sell auction. Auctions are used for finding market prices for large instrument volumes and/or to distribute these volumes among the trading members
There are majorly two categories of auctions:
Price Tender: The auctioneer indicates the volume available for trading, but may
not indicate the price. Participants can bid for their desired size at the desired repo
rate they are ready to pay.
Volume Tender: The auctioneer indicates the price, but may not indicate the volume
(security size). Participants can bid for their desired size at the repo rate set by the
auctioneer.
An auction proceeds in six phases:
Create the Auction
Send an Indication of Interest
Bid in Auction
Close the Auction
Allocate Amount to Bidders
Create Trades
4.6.1 To Create an Auction
To create an Auction, proceed as follows:
1. On the Trading menu, click Auction. The Auction screen appears as displayed
in following figure.

Figure 297: Auction screen
2. Click CREATE AUCTION available at the lower right corner of the screen. Create
Auction overlay appears as displayed in following figure.
Figure 298: Create New Auction
3. Enter values in the fields on the Create New Auction overlay. For information on
the fields, refer to the Section 6.7.
4. After filling all the fields, click CREATE AUCTION. A message “Auction created
successfully’ is displayed. The Auction you created will be displayed under Sent
tab of Auction screen.

4.6.2 To Send an IOI
Before the participants can start bidding, the auctioneer must send an Indication of Interest.
To Send an IOI, proceed as follows:
1. On the Trading menu, click Auction. Auction screen appears. There are two sub-
tabs, Sent and Received.
2. Select the Auction from sent tab for which you want to send an IOI and right-click the
selected Auction. Quick Action Utility appears as displayed in following figure.
Figure 299: Manage Auctions - Quick Action Utility
3. Click the Manage icon. Auction Sent Manager screen appears as displayed in
following figure.
Figure 300: Auction Sent Manager screen

4. Auction Sent Manager screen can be invoked from Notification screen through the
Auction Sent tab as well. All the Auctions sent are displayed here. Go to on an
Auction from Notification Auction sent tab it will redirect you to the Auction Sent
Manager as displayed in following figure.
5. Click +Create an IOI tab, to create an IOI for the Auction selected, which appears at
the top right corner of the Auction Sent Manager screen. The Enter IOI screen
appears. The Term, Product-Term combination, CCY/ Collateral, Buy/ Sell fields are
displayed automatically and are same as that you have entered in Auction. For more
information on fields refer to Section 6.2
Note: For Volume type Auction, it is mandatory to enter Repo Rate.
6. Click SUBMIT. A message ‘IOI submitted successfully’ is displayed.
The IOI sent is displayed in IOI sent tab on the Auction Sent Manager screen. Note that all
the IOIs and Offers within an auction would be displayed only on the Auction Manager screens
and not displayed on the Notifications or Trading screens. They would still be displayed on
the History screen
4.6.3 To Bid in an Auction
In the bidding phase, participants send one or more Addressed Offers in response to the
Indication of Interest they received in the Auction.
To bid in Auction, proceed as follows:
1. Navigate to the Notifications Auctions Received tab and click on the desired
auction
2. Auction Received Manager screen appears as displayed in following figure. The
screen has three tabs, namely IOI Received, Offer Sent and Own Trades.
Alternatively you could also navigate through the Auction screen under the
Trading menu, by right-clicking on the desired auction and selecting Manage.

Figure 301: Auction Received Manager screen
3. Under IOI Received tab, all IOIs belonging to that particular Auction appear. Select
the IOI for which you want to create an AO and right-click. Hit IOI icon appears as
displayed in following figure.
Figure 302: Hit IOI icon

4. Click the icon. The Addressed-Offer Repo screen appears as displayed in
following figure. All the values will be populated according to values on the IOI
received. You can enter remaining fields on the overlay.
5. Click SUBMIT. A message ’Offer submitted successfully’ is displayed on the
screen.
The Offers sent for the received IOIs, appear under the Offer Sent tab under
Auction Received Manager screen. If the auctioneer allocates amount to the Offer
and generates trade, the trade can be viewed under Own Trades tab. All the trades
related to the selected option will appear under Own Trades tab in Auction
Received Manager.
Figure 303: Addressed Offer- Repo screen
4.6.4 To Close the Auction
The auctioneer ends the bidding phase by closing the Auction.
To close an Auction, proceed as follows:
1. On the Trading menu, click Auction. Auction screen appears. There are two sub-
tabs, Sent and Received.
2. Click the Sent tab, under Auctions. All the Auctions sent are displayed.

3. Right-click on the selected Auction. Quick Action Utility appears.
4. Click the icon, to close an auction sent. A message ‘Auction closed
successfully’ is displayed. Alternatively you can also close the auction directly
using the CLOSE button on the Auction Sent Manager screen
Note: Members can send Offers even after Auction is closed. All Offers received
after closing the Auction, will be marked as ‘Out’ by default. Auctioneer will have
to manually mark those Offers ‘In’, in order to consider them for allocation.
4.6.5 Allocate Amount to Bidders
In the allocation phase, the auctioneer allocates an appropriate amount to each Offer based on
the bidder’s Addressed Offer.
The auctioneer may specify the following parameters for allocation:
Total allocation amount (spread amount)
Marginal allocation price
Allocation method
Minimum allocation amount (optional)
Maximum allocation amount (optional)
To allocate amount to the bidders, proceed as follows:

1. Navigate to the Auction Received Manager screen through Notifications Sent
Auctions
Figure 304: Auction Sent Manager screen
2. Depending upon the Auction type selected while creating the Auction, allocation
tabs would be enabled/ disabled. Simple, Amount and Total Min/ Max tabs would
be enabled for Volume type of tenders whereas Rate Tender tab would be enabled
for Rate Tenders.
The allocation method tabs available are as follows:
Simple: In Simple tab displayed at the bottom of the screen, there are
two algorithms for auction type Volume, which are as follows:
o Allocate a percentage of the total maximum amount (for each AO)
o Select an amount to be spread proportionately over participating
members
Select the desired radio button and proceed to fill in the corresponding
value.
Within the Amount tab displayed next to the Simple tab, there is one
input for the Maximum Amount that can be allocated
Within the Total/Min/Max tab, you need to enter the following values:
o Spread Amount
o Minimum per participants

o Maximum per participants
The Rate Tender tab is be used only for all Rate Tenders and includes
the following algorithms:
Rate Calculation methods:
American allocation - weighted average
The price is variable as defined by the participant. If a spread amount is
specified, then within a given group of Offers with the same price, the following
formula applies to calculate the take amount:
Take amount (amount allocated) = (spread amount / sum of all Offer amounts)*
Offer amount
American allocation - arithmetic average
The price is variable as defined by the participant. If a spread amount is
specified, then within a given group of Offers with the same price, the following
formula applies to calculate the take amount:
Take amount (amount allocated) = spread amount / number of Offers
American allocation - best price
This method applies if the auction bids include best price Offers, that is. Offers
without a specified price, and Offers are allocated by spread amount only
according to the American allocation method. The allocation procedure is the
same as for the American - arithmetic average allocation method.
Dutch allocation
The price is fixed. The reference price is the marginal allocation price specified
by the auctioneer. If no marginal allocation price has been specified, then the
worst Offer price is the reference price. If a spread amount is specified, then
within a given group of Offers with the same price, the following formula applies
to calculate the take amount:
Take amount (amount allocated) = (spread amount / sum of all Offer amounts)*
Offer amount. Perform the following steps below to proceed:
i. Select the Allocation Method.
ii. Enter the following values:
Spread Amount
Marginal Allocation. Rate / Offer
Min Allocation / Offer
Max Allocation / Offer
iii. Click ALLOCATE to allocate the selected method.

Note: Allocation amount computed by each algorithm can be changed by the user as required.
4.6.6 Create Trade
Once the Allocation process is complete, the auctioneer creates the trade.
Note: Trade cannot be generated unless Auction is closed.
To generate the Trade, proceed as follows:
1. Open the Auction Sent Manager screen. For more information on how to open
Auction Sent Manager screen refer to Section 7.1.8.
2. After running any of the chosen algorithms, click TRADE, in the Auction Sent
Manager screen. A message ‘Trade generated successfully’ appears on the
screen.
Note: Once the trade is created, it is displayed under Own Trade tab of auctioneer’s Auction
Sent Manager screen and bidder’s Auction Received Manager screen respectively as well as
on Own Trades screen on landing page and Show Trades screen under Post Trade.
Note: You can generate trade multiple times on the same Auction. Offers on which trade gets
generated will not appear in the screen again.

5. Managing Post Trading Services
This chapter explains how to manage post trading services in Eurex Repo F7 GUI. This involves
Manage Trade, Trade Completion and Inquiring Cash Position.
It describes how to:
Manage Trade
Trade Completion
Inquire Cash Position
5.1 Manage Trade
You can modify and cancel the trades generated, depending on your permissions/ access rights.
5.1.1 To Modify a Trade
In modifying a trade you can modify repo rate, re-purchase date and do a partial return / recall.
Trade Modifications can be unilateral or bilateral. Unilateral modifications are directly sent to the
settlement organization, whereas bilateral ones first require the approval of the counterparty by
way of a Trade Modification Request.
Within the context of bilateral trade modification, there are three possible actions.
To Send a Trade Modification Request
To Respond to Trade Modification Request
To Delete Trade Modification Request(s)
5.1.1.1 To Send a Trade Modification Request
A trade can be modified from the Show Trades screen under the Post Trade menu as
displayed in following figure or the Own Trades screen on the Landing Page
Figure 305: Post Trade Menu

Figure 306: Trades overlay
The parameters on a trade that can be modified vary depending upon the
segment and the settlement state of the trade. For more information on the
types of modifications allowed for each service and settlement state, refer
Appendix A
5.1.1.2 To Modify Repo Rate
To modify Repo rate, proceed as follows:
1. Select the trade you want to modify from Own Trades screen or Trades overlay.
2. Right-click the selected trade. Quick Action Utility appears as displayed in following
figure.

Figure 307: Quick Action Utility - Trades
3. Click the icon to modify the Repo rate. Trade Modification: Modify Repo
Rate overlay appears as displayed in following figure.
Any modifications that are not yet effective will show with a Pending Modifications
flag of ‘Yes’. The ‘Yes’ is a hyperlink leading to the Pending Modifications overlay
displaying all such Pending Modifications. The Pending Modifications overlay is
displayed in following figure.
Figure 308: Trade Modification: Modify Repo Rate overlay

Figure 309: Pending Modifications overlay
4. Enter the new rate in New Value.
5. Select the date from Effective Date calendar icon.
6. Click SUBMIT to submit the trade modification requests. A message ‘Modification
request created Successfully with Id: xxxxxx’ appears on the screen.
7. Click CLOSE to close the Trade Modification overlay.
5.1.1.3 To Set/ Modify a Repurchase Date
Repurchase Date can be set for open trades and modified for trades with an existing
Repurchase Date.
To Set/ Modify the Repurchase Date, proceed as follows:
1. Select the Trade to be modified from the Show Trades/ Own Trades screen
and right-click on it; the Quick Action Utility as displayed in following figure.

Figure 310: Set Repurchase Date
2. Click on the icon to open the Trade Modification – Repurchase Date as
displayed in following Figure Set Repurchase Date, if the trade is an open
trade. If the trade has an existing Repurchase Date, the Current Date is
populated on the Trade Modification overlay as displayed in following Figure
Modify Repurchase Date.
Figure 311: Set Repurchase Date
Figure 312: Modify Repurchase Date
3. Enter the Repurchase Date and click SUBMIT. A message ‘Modification
request created successfully with Id: xxxxxx’ appears on the screen.
4. Click CLOSE to close the Trade Modification overlay
5.1.1.4 To do a Partial Return Recall

A partial return/recall is a trade modification where either at the Seller/Lender requests
recall or at the Buyer/Borrower requests return of part of the original amount of the trade.
To send a request for partial return/recall on a trade, proceed as follows:
1. Select the trade you want to modify from Own Trades screen or
Trades overlay.
2. Right-click on the selected trade. Quick Action Utility appears as
displayed in following figure.
Figure 313: Quick Action Utility - Trades
3. Click the icon to do a partial return/recall. Trade Modification: Partial
Return or Partial Recall overlay appears as displayed in following figure.
(Partial Return when modification initiated by borrower/ buyer and Partial Recall
when modification initiated by lender/ seller)
Figure 314: Trade Modification: Partial Return
4. Enter the new reduced amount in Reduction.
Note: New reduced amount entered should be greater than or equal to
minimum instrument amount and must be less than or equal to current
value minus minimum instrument amount.

5. Select the effective date from the Effective Date calendar icon.
6. Click SUBMIT to submit the trade modification requests. A message
‘Modification request created Successfully with Id: xxxxxx’ appears on
screen.
7. Click CLOSE to close the Trade Modification overlay.
5.1.1.5 To Respond to Trade Modification Requests
Trade Modifications can be unilateral or bilateral. The counterparty has to approve
bilateral modifications before they are sent to the Settlement Organization.
In responding to trade modification requests, you can:
Accept a Trade Modification Request
Reject a Trade Modification Request
5.1.1.6 To Accept a Trade Modification Request
All the Trade Modification Requests received/sent are displayed under the
Notifications TRD Mod/ Cancel tab
To accept a trade modification request, proceed as follows:
1. On the Notifications screen, on the TRD Mod/ Cancel Received tab, click on the
desired modification request.
Figure 315: Trade Modification Request Received – Notifications

2. This will invoke the Trade Modification Request overlay, with the chosen request
highlighted, as displayed in following figure.
Figure 316 : Trade Modification Request overlay
You can alternatively open this same overlay from the Post Trade menu as
displayed in following figure.
Figure 317: Post Trade Menu

3. Right-click on the request and the Quick Action Utility appears as displayed in following
figure.
Figure 318: Quick Action Utility – To Accept the Modification Request
4. Click icon to accept the request.
The modification request is accepted and further sent to the settlement organisation.
5.1.1.7 To Reject a Trade Modification Request
All the Trade Modification Requests received/ sent are displayed under the
Notifications TRD Mod/ cancel tab
To reject a trade modification request, proceed as follows:
1. On the Notifications screen, on the TRD Mod/ Cancel Received tab, click on the
desired modification request.
Figure 319: Trade Modification Request Received – Notifications

2. This will invoke the Trade Modification Requests overlay, with the chosen request
highlighted, as displayed in following figure.
Figure 320: Trade Modification Request overlay
You can alternatively open this same screen from the Post Trade menu as
displayed in following figure.
Figure 321: Post Trade Menu

3. Right-click on the request and the Quick Action Utility appears as displayed in
following figure.
Figure 322: Quick Action Utility – To Reject the Modification Request
4. Click to reject the modification request. A confirmation message ‘Reject
modification request’ appears on the screen
5. Click OK to confirm
The modification request is rejected and is not sent further to the Settlement
Organization
5.1.1.8 To Delete a Trade Modification Request
To delete a trade modification request sent, proceed as follows:
1. On the Notifications screen, on the TRD Mod/ Cancel Received tab, click on the
desired modification request.
Figure 323: Trade Modification Request Received – Notifications

2. This will invoke the Trade Modification Requests overlay, with the chosen request
highlighted, as displayed in following figure.
Figure 324: Trade Modification Request overlay
You can alternatively open this same overlay from the Post Trade menu as
displayed in following figure.
Figure 325: Post Trade Menu

3. Right-click on the request and the Quick Action Utility appears as displayed in
following figure.
Figure 326: Quick Action Utility – To Delete the Modification Request
4. Click on the icon to delete the modification request sent. A confirmation message
‘Delete selected request’ appears on the screen.
5. Click OK to confirm.
The selected request is deleted from the senders Trade Modification Request -
Requested tab and recipient’s Trade Modification Request – Received tab.
5.1.2 To Cancel a Trade
Trade cancellations are always bilateral.
Within the context of a bilateral trade cancellation, there are three possible actions.
To Send a Trade Cancellation Request
To Respond to a Trade Cancellation Request
To Delete a Trade Cancellation Request(s)
5.1.2.1 To Send a Trade Cancellation Request
You can cancel a Trade when it is in Pre Open state..A trade can be cancelled from the
Show Trades screen under the Post Trade menu as displayed in following figure or the
Own Trades screen on the Landing Page.
.

Figure 327: Post Trade Menu
Figure 328: Trades overlay
To send a request for cancellation of trade, proceed as follows:
1. Select the trade you want to modify from Own Trades screen or Trades overlay.
2. Right-click the selected trade. Quick Action Utility appears as displayed in following
figure.

Figure 329: Quick Action Utility – Cancel Trade
3. Click the Cancel Trade icon. Cancel Trade overlay appears as displayed in
following figure.
Figure 330: Cancel Trade overlay
4. Enter the reason for cancellation of trade in Cancellation Reason. Providing
cancellation reason is mandatory.
5. Click SUBMIT. A message ‘Cancellation request created successfully with Id:
xxxxxxx’ appears on the screen.
6. Click CLOSE to close the overlay.
5.1.2.2 To Respond to Trade Cancellation Requests
In responding to trade cancellation requests, you can:
Accept a Trade Cancellation Request
Reject a Trade Cancellation Request
To Accept a Trade Cancellation Request

All the Trade Cancellation Requests received/ sent are displayed under the
Notifications TRD Mod/ cancel tab
To accept a trade cancellation request, proceed as follows:
1. On the Notifications screen, on the TRD Mod/ Cancel Received tab, click
on the desired modification request.
Figure 331: Trade Cancellation Request Received – Notifications
2. This will invoke the Trade Cancellation Request overlay, as displayed in
following figure.
Figure 332: Trade Cancellation Request overlay

You can alternatively open this same screen from the Post Trade menu as
displayed in following figure.
Figure 333: Post Trade Menu
3. Check the checkbox for the desired request and right-click on the row; the Quick
Action Utility appears as displayed in following figure.
Figure 334: Quick Action Utility – To Accept the Modification Request
4. Click icon to accept the request.
5. Click OK to confirm.
The cancellation request is accepted and the trade is sent to the Settlement
Organization for cancellation.
To Reject a Trade Cancellation Request

All the Trade Cancellation Requests received/ sent are displayed under the
Notifications TRD Mod/ cancel tab
To accept a trade cancellation request, proceed as follows:
1. On the Notifications screen, on the TRD Mod/ Cancel Received tab, click
on the desired modification request.
Figure 335: Trade Cancellation Request Received – Notifications
2. This will invoke the Trade Cancellation Request overlay, as displayed in
following figure.
Figure 336: Trade Cancellation Request overlay

You can alternatively open this same overlay from the Post Trade menu as
displayed in following figure.
Figure 337: Post Trade Menu
3. Check the checkbox for the desired request and right-click on the row; the
Quick Action Utility appears as displayed in following figure.
Figure 338: Quick Action Utility – To Reject the Modification Request
4. Click the icon to reject the request
5. Click OK to confirm.
The cancellation request is rejected and it disappears from the Trade Cancellation
Requested tab of the sender and Trade Cancellation received tab of the receiver.

5.1.2.3 To Delete a Trade Cancellation Requests
To delete a trade modification request sent, proceed as follows:
1. On the Notifications screen, on the TRD Mod/ Cancel Sent tab, click on
the desired cancellation request.
Figure 339: Trade Cancellation Request Sent – Notifications
2. This will invoke the Trade Cancellation Requests overlay, with the chosen
request highlighted, as displayed in following figure.
Figure 340: Trade Modification Request overlay

You can alternatively open this same overlay from the Post Trade menu as
displayed in following figure.
Figure 341: Post Trade Menu
3. Right-click on the request and the Quick Action Utility appears as displayed
in following figure.
Figure 342: Quick Action Utility – To Delete the Modification Request
4. Click on the icon to delete the modification request sent. A confirmation
message ‘Delete selected request’ appears on the screen.
5. Click OK to confirm.
The selected request is deleted from the senders Trade Cancellation Request
- Requested tab and recipient’s Trade cancellation Request – Received tab.
5.2 Trade Completion
Trade completion describes how the transaction of a master trade is handled. Trade can be completed
either manually or automatically. Trade Completion entails generating sub trades of the master trades.
The total allocated amount over all sub-trades must match the trade amount of the master trade. When
a GC Repo trade is generated, a notification to complete the trade is displayed as displayed in the
following figure:

This screen displays the number of completable trades and the time remaining to complete them. (If
there are more than one completable trade, the minimum time remaining before even one of them is
auto completed, is displayed).
You can complete the trade by clicking COMPLETE NOW or you could choose to ignore the notification
by clicking LATER.
To complete trade manually from the Completable screen under the Post Trade menu, proceed as
follows:
1. On the Eurex Repo F7 GUI, point to Post Trade menu and click Completable Trades
under Repo as displayed in following figure Post Trade Menu. Completable Trade overlay
appears as displayed in following figure Completable Trades overlay.
Figure 343: Post Trade Menu

Figure 344: Completable Trades overlay
2. Select the trade you want to complete and right-click the selected trade. Quick action Utility
appears as displayed in following figure.
Figure 345: Completable Trades – Quick Action Utility
3. Click the icon to complete the trade. Trade Completion overlay appears as displayed
in following figure.

Figure 346: Trade Completion overlay
Note: On the Trade Completion screen, column 'ISIN' and column 'Allocation Amount' on the
grid are editable, so that you can copy ISINs or Allocation amount from external files into this
column.

4. Select the Security by clicking the icon. Select Security overlay appears as displayed
in following figure.
Figure 347: Select Security overlay
5. Select the checkbox of the security you want to add and click SELECT SECURITY. The
security is added.
Note: You can also add more than one security. Follow the same procedure to add more
securities.
6. Select the checkbox appearing in the last column and allocate the amount to the selected
securities (security).
Note: The total allocated amount over all sub-trades must match the trade amount of the
master trade.
7. Click COMPLETE. Sub trades are generated successfully and it appears in Show Trade
overlay.
5.3 Inquiring Cash Position
Non-financial members can act as both cash providers and cash takers in Repo GC Pooling select. Non-
financial members can only become cash takers up to the amount of the cash they have provided. They

can verify their cash balance using Inquire Cash Position screen. This Cash balances are received from
the settlement organization and maintained in F7.
To inquire cash position, proceed as follows:
1. On the Eurex Repo F7 GUI, point to Post Trade menu and click Inquire Cash Position
under Repo as displayed in following figure.
Figure 348: Post Trade Menu
2. The Inquire Cash Position overlay appears as displayed in following figure:

Figure 349: Inquire Cash Position overlay
3. Inquire Cash Position overlay displays Currency wise position details. If any trades are held
back (not sent to the Settlement Organization) due to insufficient balance for a particular
currency, the held back trades are displayed in the Pending Trades grid. Click on any row in the
first grid to view the held back trades for that currency in the grid below.
Cash Position Details
1. On the Inquire Cash Position under Repo, right-click on a currency and click on the
and the Cash Position Details screen opens as displayed in following figure.
2. You can click on or to open the details into excel or CSV format.
Figure 350: Cash Position Details

6. Entry screens
This chapter describes all the entry screens in the Eurex Repo F7 GUI. The following are the entry
screens or the overlays in the application:
Enter Quote - REPO screen
Enter Indication of Interest - REPO screen
Enter Request for Quote – REPO screen
Enter Offer – REPO screen
Enter Pre-Arranged Offer – REPO screen
Enter Broker Offer – REPO screen
Create Auction overlay
Fast Entry-REPO screen
6.1 Enter Quote – REPO screen
Use the Enter Quote screen to create and send a Quote. Quotes are displayed in the Market Watch
screen, Trading Book, Quote Book screen and on the Trading overlay. The Enter Quote – REPO
screen is displayed in following figure. This overlay can be invoked from the Trading menu Enter
Quote or using a keyboard shortcut described in section 2.2.2.3

Figure 351: Enter Quote – REPO screen
Table 9: Enter Quote – REPO screen Components Description
S.No.
Field Name
Description
1 Product Term
Combination* Select Product-Term Combination by clicking the icon.
A Product - Term combination dialog box appears displaying
all the Product terms for the selected Term/ Segment.
Choose a Product - Term combination and click SELECT
2 Segment* You can choose the Segment in which you wish to trade.
The Segment dropdown is populated based on the Term/
Product term selected.
Note: You can choose to begin with any one of the two fields
(product term or Segment) and the available values in the
other two fields are filtered according to the values chosen
in the first field.

3 Purchase Date* The Purchase Date is displayed after Currency is selected
Note: Only for Non Standard term the date is editable and
you can select the date from calendar icon. But for standard
terms this field is automatically filled and is non editable.
4 Re-purchase Date The Re-Purchase Date is automatically displayed, after
Currency is selected
Note: Only for Non Standard term the date is editable and
you can select the date from calendar icon. But for standard
terms this field is automatically filled and is non editable.
5 CCY/Collateral* Select the CCY/Collateral by clicking the icon. This can
be Currency, Basket or Security based on Product Term
Combination.
6 Collateral/ CCY* Select the Collateral/ CCY by clicking the icon. This can
be Currency, Basket or Security based on Product Term
Combination.
7 Sub-instrument Select Sub-instrument by clicking the icon. Select
Security dialog box appears. Select the Security Name and
click SELECT SECURITY at the bottom of the dialog box.
You can also view the baskets and the properties by clicking
the VIEW BASKETS and VIEW PROPERTIES after you
select the Security Name.
8 Max.# Sub trades Enter the maximum number of sub trades in Max.# Sub
trades field if applicable. It should be a natural number and
not more than three digits.
Note: Max # of sub-trades will be enabled for GC REPO
only
9 Rate Type The Rate Type field is displayed automatically and depends
on Product Term Combination
10 Ref. Index Select Ref. Index from the drop-box if the Rate type is
floating or negotiable. If the Rate Type is Negotiable, there
an additional option ‘None’ available along with other valid
indices in the dropdown list. If you choose ‘None’, it would
imply that you want to set the Negotiable Rate Type as
Fixed.
11 FOK Select Fill or Kill (FOK) checkbox for trading restrictions.
This option makes sure, a full lot size is taken by the
aggressor (take it all or nothing). No partial amounts are
technically possible with this flag enabled.
12 Iceberg Select Iceberg checkbox to only disclose a reduced volume
of a Quote. The second volume figure entered represents a
maximum volume a participant wants to be hit. This figure is
hidden for the counterparties. The Quote remains in the book
after being hit, until the hidden amount has been filled.

13 Buy In the Buy field, enter the following details:
a. Buy Amount: Enter the Cash Amount or Security Size in this fields, depending upon the selected product term combination and CCY/ Collateral
b. Buy Rate/Offset: Enter the Repo rate in Buy Rate field. The Buy Rate entered is in % (Fixed Rate Type) or BP (Floating Rate Type)
c. Total Buy Amount: This field is enabled only in case of Iceberg Quotes. Enter the total amount on the Iceberg Quote in this field. This amount is hidden for the counterparties. The Quote remains in the book after being hit, until the Total Amount has been filled.
d. Min. Take Amount: Enter the minimum amount for Buy leg of Quote for trade in Min. Take Amount field.
In the Buy field indicator, 'C' will be displayed in case of 'Cash' and ‘S‘ will be displayed in case of ‘Size’.
Note: For entering numbers such as one million, one billion in amount field you can directly enter 1M, 1B, 1K or 1KK.
14 Sell In the Sell field, enter the following details:
a. Sell Amount: Enter the Cash Amount or Security Size in this fields, depending upon the selected product term combination and CCY/ Collateral
b. Sell Rate/Offset: Enter the Repo rate in Sell Rate field. The Sell Rate entered is in % (Fixed Rate Type) or BP (Floating Rate Type)
c. Total Sell Amount: This field is enabled only in case of Iceberg Quotes. Enter the total amount on the Iceberg Quote in this field. This amount is hidden for the counterparties. The Quote remains in the book after being hit, until the Total Amount has been filled.
d. Min. Take Amount: Enter the minimum amount for Sell leg of Quote for trade in Min. Take Amount field.
In the Sell field indicator, 'C' will be displayed in case of 'Cash' and ‘S‘ will be displayed in case of ‘Size’.
Note: For entering numbers such as one million, one billion
in amount field you can directly enter 1M, 1B and so on.
15 Instruction Ref
Description
Select the appropriate Settlement Instruction from the drop-
down list for Instruction Ref Description. This indicates
account details for settlement
16 Bank Internal
Reference
Enter your bank internal reference. It is not displayed to the
counter parties.

17 Beneficial Owner Select an appropriate Beneficial Owner from the drop down
list.
Note: Beneficial Owner is enabled only when you have the
role of an Agent. In case it is both agent and principal, then
beneficial owner is optional
18 Recipients Select the Recipients by clicking the icon .Recipients
dialog box is displayed. It has two boxes, namely,
Recipients and Selected Recipients. Recipients can be
selected only for non CCP services for certain pre trade
actions
In the Select List/Members box, a search option is
provided. You can search and select the list/member and
click + ADD TO SELECTION. Now, the list/member you
selected appears in Selected List/Members box.
To remove the list/member from the Selected List/Member
(s) box, select the list/member and click - REMOVE
SELECTED.
After adding the appropriate recipients click ACCEPT
PROCEED.
19 Terminable*
Substitutable*
Reuse
Agreement
Select the following options as applicable:
a. Terminable: It indicates whether the trade parties
can terminate the swap or not.
b. Substitutable: It indicates if the trading party can
substitute the collateral for different collateral of equal
value and credit quality.
c. Reuse Agreement: It indicates that collateral may be
used by the receiver during the trade
20
Free Text You can add comments in the Free Text for your reference.
21 Margin Ratio Margin ratio is the haircut/ mark up that would be applied to
the collateral. It would be a property of the chosen product
chosen, however, it can be entered if it is not present on the
product
22
To view the additional information about the selected
Product term Combination, point to Additional Information,
at the top right corner of the Enter Quote screen, the dialog
box appears. The information displayed is ‘read only’
information. Note that the information would be available
only after selecting the currency
23
Click SUBMIT, to submit the Quote.

6.2 Indication of Interest - REPO screen
Use the Indication of Interest – REPO screen to send an Indication of Interest to all or selected
participants.
Figure 352: Indication of Interest– REPO screen
24
Click RESET, to reset the all field values.
25
Click CLOSE, to close the overlay.
Note: Fields marked with red asterisk * are mandatory fields.

Components
The components in the Indication of Interest - REPO screen are as follows:
Table 10: Indication of Interest – REPO screen - Components Description
S.
No
Field Name Description
1 Product Term
Combination* Select Product-Term Combination by clicking the icon. A
Product - Term combination dialog box appears displaying all
the Product terms for the selected Term/ Segment. Choose a
Product - Term combination and click SELECT
2 Segment* You can choose the Segment that you wish to trade on. The
Segment dropdown is populated based on the Term/ Product
term selected.
Note: You can choose to begin with any one of the two fields
(product term or Segment) and the available values in the other
two fields are filtered according to the values chosen in the first
field.
3 Purchase Date* The Purchase Date is displayed after Currency is selected
Note: Only for Non Standard term the date is editable and you
can select the date from calendar icon. But for standard terms
this field is automatically filled and is non editable.
4 Re-purchase Date The Re-Purchase Date is automatically displayed, after
Currency is selected
Note: Only for Non Standard term the date is editable and you
can select the date from calendar icon. But for standard terms
this field is automatically filled and is non editable.
5 CCY/ Collateral Select the CCY/Collateral by clicking the icon. This can be
Currency, Basket or Security based on Product Term
Combination.
6 Collateral/ CCY Select the Collateral/ CCY by clicking the icon. This can be
Currency, Basket or Security based on Product Term
Combination.
7 Sub-instrument Select Sub-instrument by clicking the icon. Select
Security dialog box appears. Select the Security Name and
click SELECT SECURITY at the bottom of the dialog box. You
can also view the baskets and the properties by clicking the
VIEW BASKETS and VIEW PROPERTIES after you select the
Security Name.

8 Max.# Sub trades Enter the maximum number of sub trades in Max. # Sub trades
field if applicable. It must be an integer and not more than three
digits.
Note: Max # of sub-trades will be enabled for GC REPO only
9 Rate Type The Rate Type field is displayed automatically and depends on
Product Term Combination
10 Ref. Index Select Ref. Index from the drop-box if the Rate type is floating
or negotiable. If the Rate Type is Negotiable, there an additional
option ‘None’ available along with other valid indices in the
dropdown list. If you choose ‘None’, it would imply that you want
to set the Negotiable Rate Type as Fixed.
11 Valid Times
(Mins.)
The Valid Time field is displayed automatically with the default
value which depends on the segment. It indicates the time (in
mins) after which the IOI will expire. However, you can modify
the field if you choose.
12 Select *
Buy Sell
Select Buy or Sell and enter the following fields:
a. Amount: Enter the amount of Principle in Enter
Amount.
b. Rate/Offset: Enter the rate in Enter rate field. Rate
entered is in % (Fixed Rate Type) or BP (Floating
Rate Type).
c. Min. Take Amount: Enter the minimum amount
which can be traded in Min. Take Amount field.
Note: For entering numbers such as one million, one billion in
amount field you can directly enter 1M, 1B and so on.
13 Instruction Ref
Description
Select the appropriate Settlement Instruction from the drop-
down list for Instruction Ref Description. This indicates
account details for settlement
14 Bank Internal
Reference
Enter your bank internal reference. It is not displayed to the
counter parties.
15 Beneficial Owner Select an appropriate Beneficial Owner from the drop down list.
Note: Beneficial Owner is enabled only when you have the role
of an Agent. In case it is both agent and principal, then
beneficial owner is optional
16 Recipients Select the Recipients by clicking the icon .Recipients dialog
box is displayed. It has two boxes, namely, Recipients and
Selected Recipients.
In the Select List/Members box, a search option is provided. You
can search and select the list/member and click + ADD TO

SELECTION. Now, the list/member you selected appears in
Selected List/Members box.
To remove the list/member from the Selected List/Member (s)
box, select the list/member and click REMOVE SELECTED.
After adding the appropriate recipients click ACCEPT
PROCEED.
17 Terminable*
Substitutable*
Reuse
Agreement
Select the following options as applicable:
a. Terminable: It indicates whether the trade parties can
terminate the swap or not.
b. Substitutable: It indicates if the trading party can
substitute the collateral for different collateral of equal
value and credit quality.
c. Reuse Agreement: It indicates that collateral may be
used by the receiver during the trade
18
Free Text You can add comments in the Free Text for your reference.
19
Margin Ratio Margin ratio is the haircut/ mark up that would be applied to the
collateral. It would be a property of the chosen product chosen,
however, it can be entered if it is not present on the product
20
To view the additional information about the selected Product
term Combination, point to Additional Information, at the top
right corner of the Enter Quote screen, the dialog box appears.
The information displayed is ‘read only’ information. Note that the
information would be available only after selecting the currency
21
Click SUBMIT, to submit the Quote.
22
Click RESET, to reset the all field values.
23
Click CLOSE, to close the overlay.
Note: Fields marked with red asterisk * are Mandatory fields.
6.3 Enter Request for Quote – REPO screen
An RFQ has same contents and behavior as an IOI. The differentiating attribute for RFQ’S is that the Recipient list cannot be empty. Otherwise the behaviour of a RFQ is the same as that of an IOI described in section 6.2 above. The screen for entering an RFQ is as displayed in following Figure.
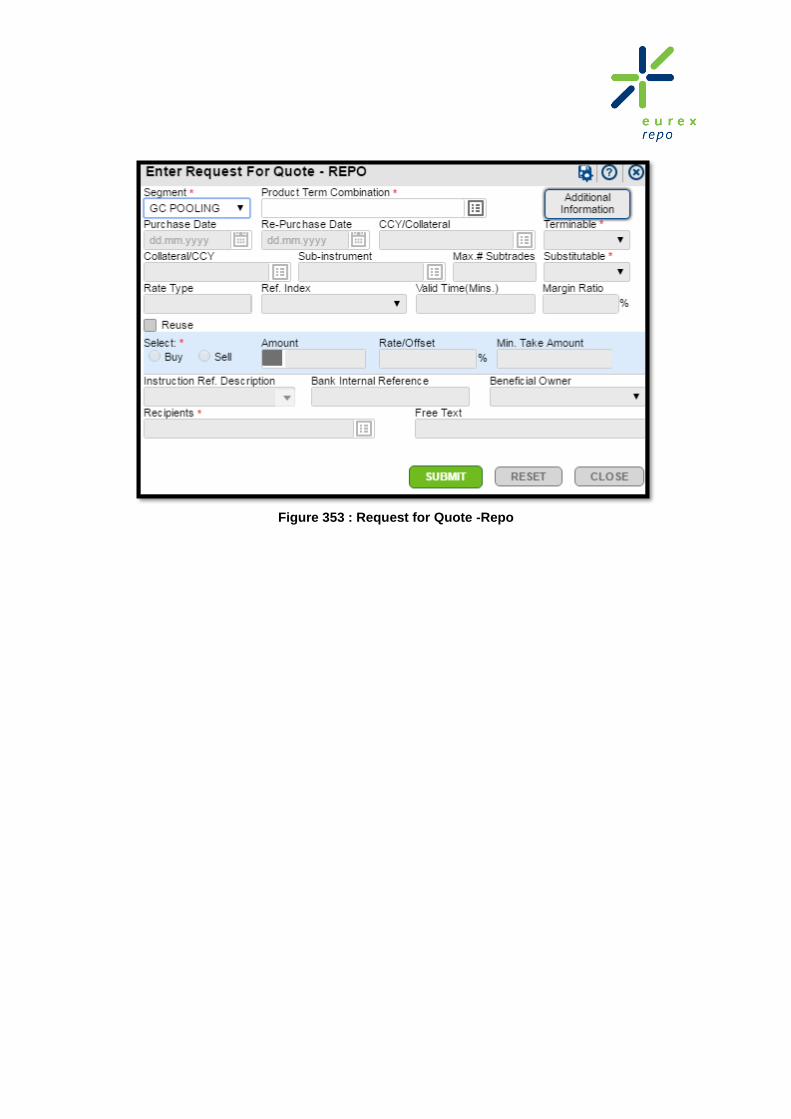
Figure 353 : Request for Quote -Repo

6.4 Enter Offer - REPO screen
Use the Enter Offer - REPO screen to send a binding Offer to another participant. To send an
Addressed Offer to a member, you must first have a counterparty agreement in place with the member
Figure 354: Enter Offer– REPO screen
Components
The components in the Enter Offer - REPO screen are as follows:
Table 11: Enter Offer – REPO screen - Component Description
S. No Field Name Description
1 Product Term
Combination* Select Product-Term Combination by clicking the icon. A
Product - Term combination dialog box appears displaying all the
Product terms for the selected Term/ Segment. Choose a Product
- Term combination and click SELECT .
2 Segment* You can choose the Segment that you wish to trade on. The
Segment dropdown is populated based on the Term/ Product term
selected.
Note: You can choose to begin with any one of the two fields
(product term or Segment) and the available values in the other
two fields are filtered according to the values chosen in the first
field.

3 Purchase Date* The Purchase Date is displayed after Currency is selected
Note: Only for Non Standard term the date is editable and you
can select the date from calendar icon. But for standard terms this
field is automatically filled and is non editable.
4 Re-purchase Date The Re-Purchase Date is automatically displayed, after Currency
is selected
Note: Only for Non Standard term the date is editable and you
can select the date from calendar icon. But for standard terms this
field is automatically filled and is non editable.
5 CCY/ Collateral Select the CCY/Collateral by clicking the icon. This can be
Currency, Basket or Security based on Product Term
Combination.
6 Collateral/ CCY Select the Collateral/ CCY by clicking the icon. This can be
Currency, Basket or Security based on Product Term
Combination.
7
Sub-instrument Select Sub-instrument by clicking the icon. Select Security
dialog box appears. Select the Security Name and click SELECT
SECURITY at the bottom of the dialog box. You can also view the
baskets and the properties by clicking the VIEW BASKETS and
VIEW PROPERTIES after you select the Security Name.
8 Max.# Sub trades Enter the maximum number of sub trades in Max. # Sub trades
field if applicable. It should be an integer and not more than three
digits.
Note: Max # of sub-trades will be enabled for GC REPO only
9 Rate Type The Rate Type field is displayed automatically and depends on
Product Term Combination
10 Ref. Index Select Ref. Index from the drop-box if the Rate type is floating or
negotiable. If the Rate Type is Negotiable, there an additional
option ‘None’ available along with other valid indices in the
dropdown list. If you choose ‘None’, it would imply that you want
to set the Negotiable Rate Type as Fixed.
11 Valid Times The Valid Time field is displayed automatically with the default
value which depends on the segment. It indicates the time (in
mins) after which the AO will expire. However, you can modify the
field if you choose.
12 Select *
Buy Sell
Select Buy or Sell and enter the following fields:
a. Amount: Enter the amount of Principle in Enter
Amount.
b. Rate/Offset: Enter the rate in rate field. Rate entered
is in % (Fixed Rate Type) or BP (Floating Rate Type).
c. Min. Take Amount: Enter the minimum amount which
can be traded in Min. Take Amount field.
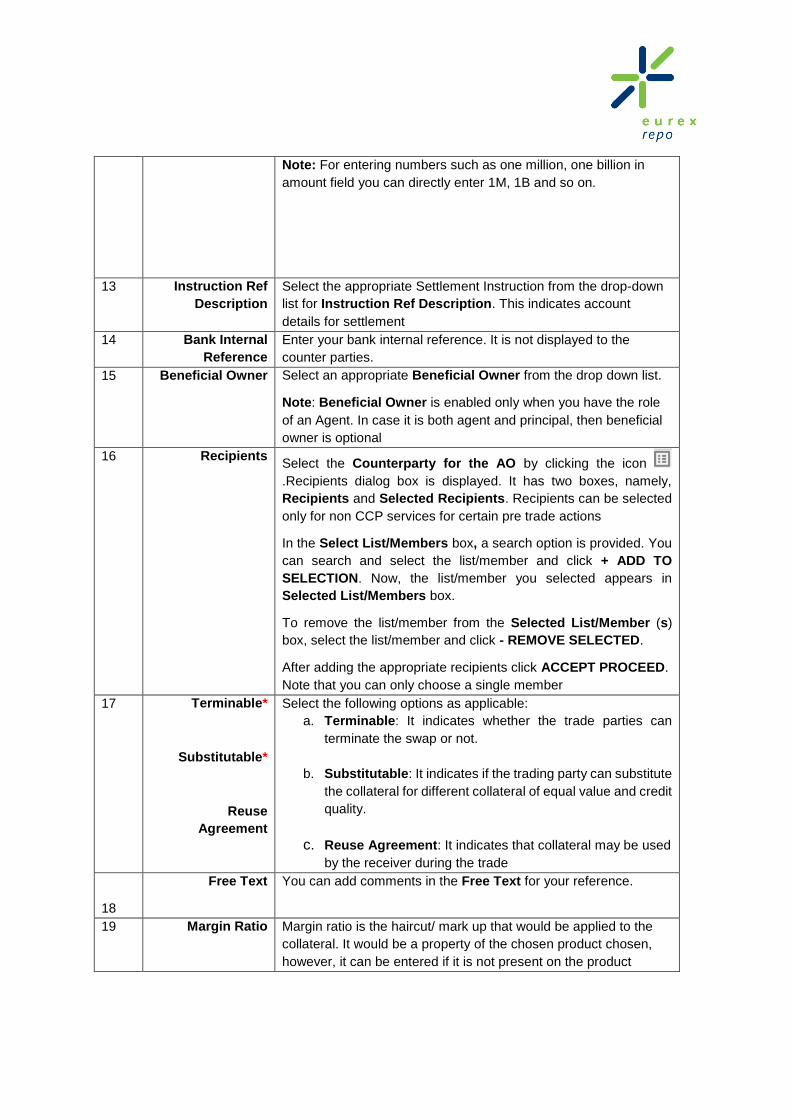
Note: For entering numbers such as one million, one billion in
amount field you can directly enter 1M, 1B and so on.
13 Instruction Ref
Description
Select the appropriate Settlement Instruction from the drop-down
list for Instruction Ref Description. This indicates account
details for settlement
14 Bank Internal
Reference
Enter your bank internal reference. It is not displayed to the
counter parties.
15 Beneficial Owner Select an appropriate Beneficial Owner from the drop down list.
Note: Beneficial Owner is enabled only when you have the role
of an Agent. In case it is both agent and principal, then beneficial
owner is optional
16 Recipients Select the Counterparty for the AO by clicking the icon
.Recipients dialog box is displayed. It has two boxes, namely,
Recipients and Selected Recipients. Recipients can be selected
only for non CCP services for certain pre trade actions
In the Select List/Members box, a search option is provided. You
can search and select the list/member and click + ADD TO
SELECTION. Now, the list/member you selected appears in
Selected List/Members box.
To remove the list/member from the Selected List/Member (s)
box, select the list/member and click - REMOVE SELECTED.
After adding the appropriate recipients click ACCEPT PROCEED.
Note that you can only choose a single member
17 Terminable*
Substitutable*
Reuse
Agreement
Select the following options as applicable:
a. Terminable: It indicates whether the trade parties can
terminate the swap or not.
b. Substitutable: It indicates if the trading party can substitute
the collateral for different collateral of equal value and credit
quality.
c. Reuse Agreement: It indicates that collateral may be used
by the receiver during the trade
18
Free Text You can add comments in the Free Text for your reference.
19 Margin Ratio Margin ratio is the haircut/ mark up that would be applied to the
collateral. It would be a property of the chosen product chosen,
however, it can be entered if it is not present on the product

6.5 Pre-Arranged Offer screen
Two trading members can arrange a transaction without entering an IOI or Quote. One trading member
creates a new Pre-Arranged Offer. The overlay for entering a Pre-Arranged Offer is as displayed in
following figure. A Pre-Arranged Offer is essentially the same as an Addressed Offer described in
section 6.3 above, except that the parameters of the Offer have already been arranged between the two
members.
Figure 355: Pre-Arranged Offer
20
To view the additional information about the selected Product
term Combination, point to Additional Information, at the top
right corner of the Enter Quote screen, the dialog box appears.
The information displayed is ‘read only’ information. Note that the
information will be available only after selecting the currency
21
Click SUBMIT, to submit the Quote.
22
Click RESET, to reset the all field values.
Note: Fields marked with red asterisk * are mandatory fields.

6.6 Broker Offer screen
A broker can facilitate a trade on behalf of two members. Once the terms of are agreed, the broker uses
the Eurex Repo F7 GUI to setup a trade.
Figure 356: Broker Offer– REPO screen
Components
The components in the Broker Offer overlay are as follows:
Table 12: Broker Offer overlay - Component Description
S. No Field Name Description
1 Product Term
Combination*
Select Product-Term Combination by clicking the
icon. A Product - Term combination dialog box
appears displaying all the Product terms for the
selected Term/ Segment. Choose a Product - Term
combination and click SELECT
2
Segment* You can choose the Segment that you wish to trade
on. The Segment dropdown is populated based on
the Term/ Product term selected.
Note: You can choose to begin with any one of the
two fields (product term or Segment) and the
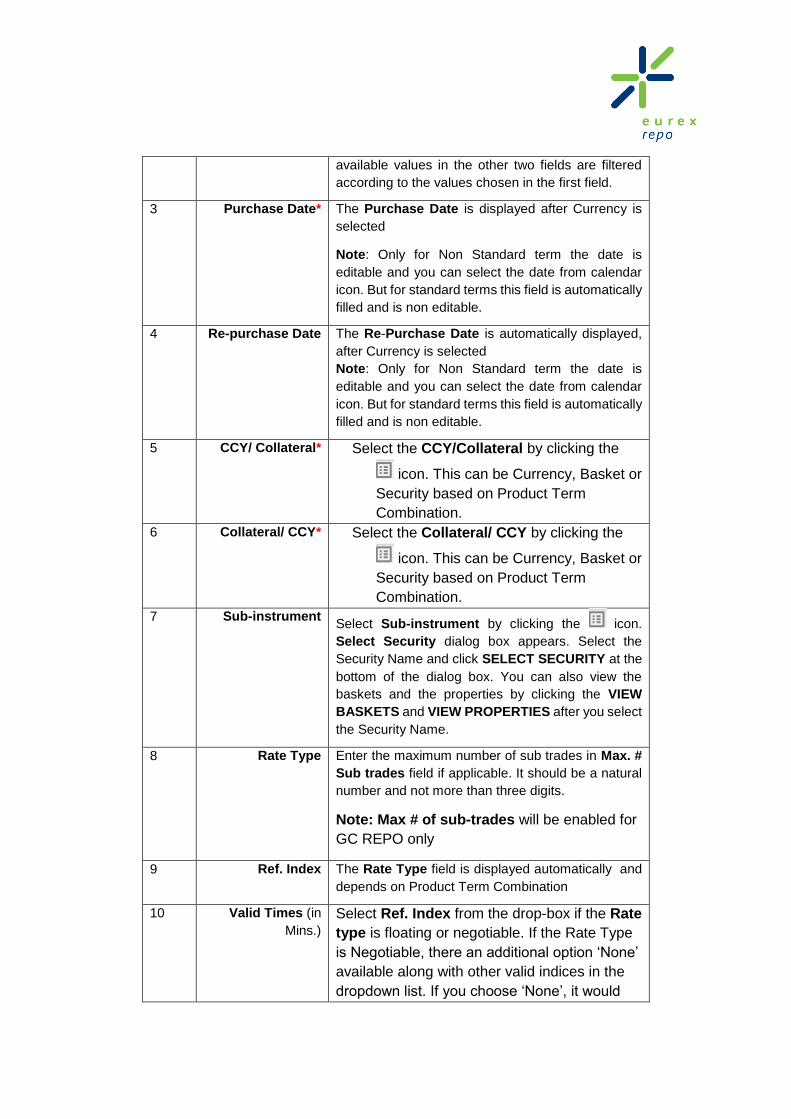
available values in the other two fields are filtered
according to the values chosen in the first field.
3 Purchase Date* The Purchase Date is displayed after Currency is
selected
Note: Only for Non Standard term the date is
editable and you can select the date from calendar
icon. But for standard terms this field is automatically
filled and is non editable.
4 Re-purchase Date The Re-Purchase Date is automatically displayed,
after Currency is selected
Note: Only for Non Standard term the date is
editable and you can select the date from calendar
icon. But for standard terms this field is automatically
filled and is non editable.
5 CCY/ Collateral* Select the CCY/Collateral by clicking the
icon. This can be Currency, Basket or
Security based on Product Term
Combination.
6 Collateral/ CCY* Select the Collateral/ CCY by clicking the
icon. This can be Currency, Basket or
Security based on Product Term
Combination.
7 Sub-instrument Select Sub-instrument by clicking the icon.
Select Security dialog box appears. Select the
Security Name and click SELECT SECURITY at the
bottom of the dialog box. You can also view the
baskets and the properties by clicking the VIEW
BASKETS and VIEW PROPERTIES after you select
the Security Name.
8 Rate Type Enter the maximum number of sub trades in Max. #
Sub trades field if applicable. It should be a natural
number and not more than three digits.
Note: Max # of sub-trades will be enabled for
GC REPO only
9 Ref. Index The Rate Type field is displayed automatically and
depends on Product Term Combination
10 Valid Times (in
Mins.)
Select Ref. Index from the drop-box if the Rate
type is floating or negotiable. If the Rate Type
is Negotiable, there an additional option ‘None’
available along with other valid indices in the
dropdown list. If you choose ‘None’, it would

imply that you want to set the Negotiable Rate
Type as Fixed.
11 Amount* Enter the amount of Cash Amount or Security Size
in this field
12 Rate/Offset* Enter the repo rate in the Rate field. Rate entered is
in % (Fixed Rate Type) or BP (Floating Rate Type)
13 Buyer* The member entered as the Buyer will received a
Sell Offer from the Broker
Select the Buyer by clicking the
icon. Recipients dialog box is displayed. It has
two boxes, namely, Recipients and Selected
Recipients.
In the Select List/Member (s) box, a search option
is provided, you can search the buyer by entering
the name here. To add the buyer, select the
checkbox and click + ADD TO SELECTION. Now,
the buyer you selected appears in Selected
List/Members box.
To remove the buyer from the Selected
List/Member (s) box, select the buyer and click –
REMOVE SELECTED.
After adding the appropriate buyer click ACCEPT
PROCEED.
Note that you choose only one member
14 Seller* The member entered as the Seller will received a
Buy Offer from the Broker
Select the Seller by clicking the
icon. Recipients dialog box is displayed. It has
two boxes, namely, Recipients and Selected
Recipients.
In the Select List/Member (s) box, a search option
is provided, you can search the seller by entering
the name here. To add the seller, select the seller
and click + ADD TO SELECTION. Now, the seller
you selected appears in Selected List/Members
box.
To remove the seller from the Selected
List/Member (s) box, select the seller and click –
REMOVE SELECTED.
After adding the appropriate click ACCEPT
PROCEED.

Note that you choose only one member
15 Instruction Ref
Description
Select the appropriate Settlement Instruction from
the drop-down list for Instruction Ref Description.
This indicates account details for settlement
16 Bank Internal
Reference
Enter your bank internal reference. It is not displayed
to the counter parties.
17
Terminable*
Substitutable*
Reuse
Agreement
Select the following options as applicable:
a. Terminable: It indicates whether the trade
parties can terminate the swap or not.
b. Substitutable: It indicates if the trading
party can substitute the collateral for
different collateral of equal value and credit
quality.
c. Reuse Agreement: It indicates that
collateral may be used by the receiver
during the trade
18
Free Text You can add comments in Free Text for your
reference.
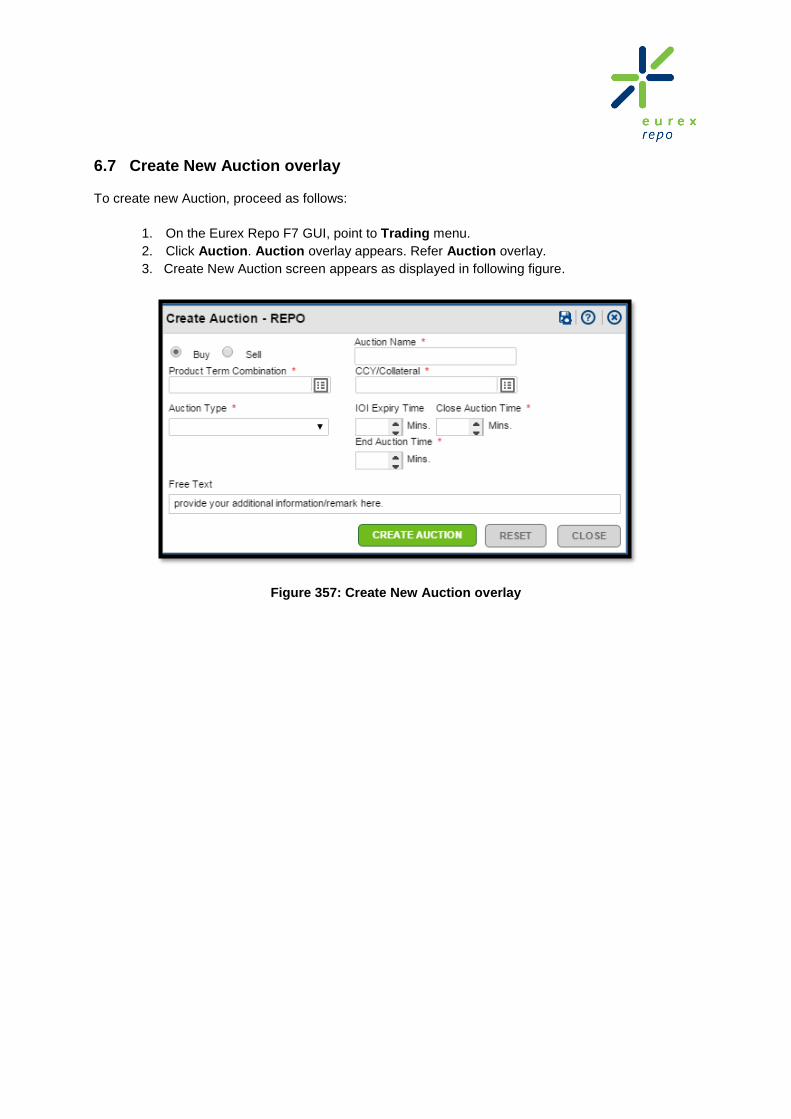
6.7 Create New Auction overlay
To create new Auction, proceed as follows:
1. On the Eurex Repo F7 GUI, point to Trading menu.
2. Click Auction. Auction overlay appears. Refer Auction overlay.
3. Create New Auction screen appears as displayed in following figure.
Figure 357: Create New Auction overlay

Components
The components in Create New Auction overlay are:
Table 13: Create New Auction overlay Components Description
S. No Field Name Description
1
Auction Name*
Enter the Auction name in the field.
Note: You cannot use special
characters in this field.
2 Product Term Combination* Select Product-Term Combination by
clicking the icon. A Product - Term
combination dialog box appears
displaying all the Product terms for the
selected Term/ Segment. Choose a
Product - Term combination and click
SELECT
3 CCY/Collateral* Select the CCY/Collateral by clicking the
icon.
4 Auction Type*
Select the Auction Type from the drop-
down list. The Auction Type available
are as follows:
a. AMERICAN_ARITHAVG: In this
type, the rate allocated is the
arithmetic average of the rates in all
the Offers received (where rate is
not empty).
b. AMERICAN_ BESTPRICE: In this
type, the rate allocated is the best
rate (lowest in case of a buy and
highest in case of a sell) of the rates
in all the Offers received (where rate
is not empty).
c. AMERICAN_WEIGHTEDAVG: In
this type, the rate allocated is the
weighted average of the rates in all
the Offers received (where rate is
not empty).
d. DUTCH: In this type, the rate
allocated is the worst rate (highest
in case of a buy and lowest in case
of a sell), of all the Offers received,
if no marginal interest rate was

defined.
e. VOLUME: In this type, the amount
allocated is the percentage of the
total offered amount.
5
Select *
o Buy
o Sell
Select Buy radio button to create a buy
auction.
Select Sell radio button to create a sell
auction.
6 Close Auction Time*
Select the Close Auction Time from
the scrolling bars in hours and minutes
or enter it using your keyboard. It
indicates the minutes (counted after
creation) post which the Auction will
Close
7 End Auction Time* Select the End Auction Time from the
scrolling bars in hours and minutes. It
indicates the minutes (counted after
creation) post which the Auction will End
8 IOI Expiry Time Select the IOI Expiry Time from the
scrolling bars in hours and minutes or
enter it using your keyboard. This is the
expiry time of all the IOIs within the
auction

8 Free Text You can add comments in Free Text for
your reference.
9
Click CREATE AUCTION, to create new
auction.
10
Click RESET, to reset the field values.
11
Click CLOSE, to close the auction
overlay.
Note: Fields marked with red asterisk * are mandatory fields.
6.8 Recipients – Repo overlay
Use the Recipients - REPO overlay to add a Recipient from the list.
Figure 358: Recipients overlay

1. Select the Recipients by clicking the icon .Recipients dialog box is displayed. It has two
boxes, namely, Select Recipients and Selected Recipients.
2. In the Select Recipients box, a search option is provided. You can search and select the
list/member and click + ADD TO SELECTION. Now, the list/member you selected appears
in Selected Recipients box.
3. To remove the list/member from the Selected Recipients box, select the list/member and
click - REMOVE SELECTED.
4. After adding the appropriate recipients click ACCEPT PROCEED.

6.9 Fast Entry-REPO
1. The Fast Entry screen has been created to enable users to
copy/enter/modify/delete/hold/release Quotes for the Repo segments using a single screen
and with minimal clicks.
Figure 359: Fast Entry-REPO screen
2. You can refer to section 3.1.3.7 Fast Entry for more information.
7. Trading screens
7.1 Trading Objects screens
The following are the overlays in the Eurex Repo F7 GUI:
Trading overlay
Trades overlay
Trade Modification Request overlay
Trade Cancellation Request overlay
Bulk Trade Modifications overlay
Bulk Loan Modifications overlay
Auction overlay
Auction Sent Manager overlay
Auction Received Manager overlay
Own Trades/Own Loans/Public Trades screen

7.1.1 Trading overlay
Trading overlay displays all the Quotes, IOI, AO, RFQ, Counter Offers, Broker Offers, Pre-
Arranged Offers in sent and received tab.
Access
To access the Trading overlay, proceed as follows:
1. On the Eurex Repo F7 GUI, point to Trading menu.
Figure 360: Trading Menu
2. Click Trading under REPO. The Trading overlay appears as displayed in following
figure. It has two tabs -Sent and Received.

Figure 361: Trading overlay
Components
Table 14: Trading overlay – Components Description
S.No Components Description
1 Click the icon to export data to excel.
2 Click the icon to export data to CSV.
3
Choose the value(s) you wish to filter on and click
OK. This will return the rows in which this column
attribute matches the chosen filter criteria. You
can also choose to search this column by
entering the search criteria in the search box
provided and clicking OK. This will return all rows
for which the attribute in this column matched the
search criteria
Some columns do not have filter, just search
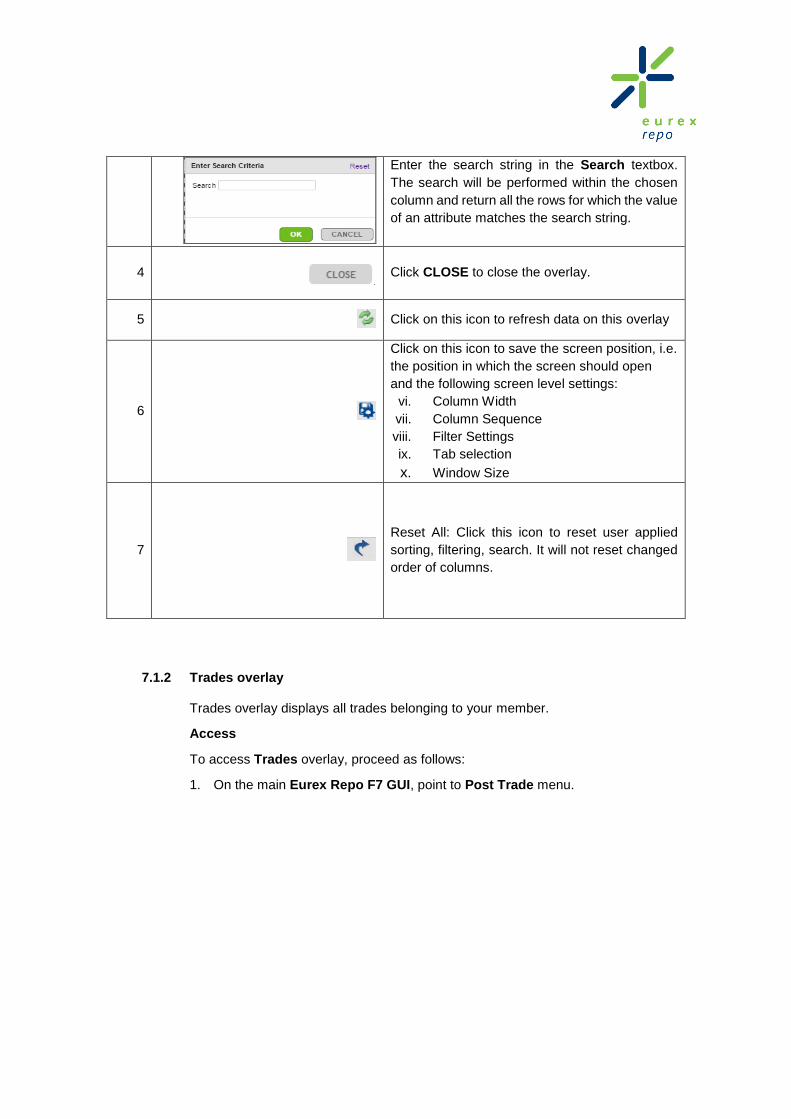
Enter the search string in the Search textbox.
The search will be performed within the chosen
column and return all the rows for which the value
of an attribute matches the search string.
4
Click CLOSE to close the overlay.
5 Click on this icon to refresh data on this overlay
6
Click on this icon to save the screen position, i.e.
the position in which the screen should open
and the following screen level settings:
vi. Column Width
vii. Column Sequence
viii. Filter Settings
ix. Tab selection
x. Window Size
7
Reset All: Click this icon to reset user applied
sorting, filtering, search. It will not reset changed
order of columns.
7.1.2 Trades overlay
Trades overlay displays all trades belonging to your member.
Access
To access Trades overlay, proceed as follows:
1. On the main Eurex Repo F7 GUI, point to Post Trade menu.

Figure 362: Post Trade Menu
2. Click Show Trades under Repo. The Trades overlay appears as displayed in
following figure.
Figure 363: Trades overlay
Components
The available components on the Trades overlay are:

Table 15: Trades overlay – Components Description
S.No
Components Description
1 Click the icon to export data to
excel.
2 Click the icon to export data to
CSV.
3
Choose the value(s) you wish to filter
on and click OK. This will return the
rows in which this column attribute
matches the chosen filter criteria. You
can also choose to search this column
by entering the search criteria in the
search box provided and clicking OK.
This will return all rows for which the
attribute in this column matched the
search criteria
Some columns do not have filter, just
search
Enter the search string in the Search
textbox. The search will be performed
within the chosen column and return
all the rows for which the value of an
attribute matches the search string.
4
Click CLOSE to close the overlay.
5 Click on this icon to refresh data on
this overlay
6
Click on this icon to save the screen
position, that is. the position in which
the screen should open and the
following screen level settings:
i. Column Width
ii. Column Sequence
iii. Filter Settings
iv. Tab selection
v. Window Size
7
Click on this icon to reset data.

7.1.3 Trade Modification Request – overlay
Trade Modification Request overlay displays all the modification requests sent to a counterparty
(Requested tab) and received from a counterparty (Received tab). It also displays modification
requests sent to the Settlement Organization and waiting for response.
In the requested tab all the trade modification request sent by you or your trading member
colleagues are displayed.
Access
To access Trade Modification Request overlay, proceed as follows:
1. On the Eurex Repo F7 GUI, point to Post Trade menu.
2. Click Modification Requests under Trade Requests in Repo. Trade Modification
Request overlay appears as displayed in following figure.
3. Click Requested tab. The modification requests sent are displayed here.
Note: Trade Modification Request overlay can also be invoked from Notification. Go to TRD
Mod/Cancel and select a Trade Modification request, it will then invoke respective screen Trade
Modification Request overlay to the corresponding Received or Requested tab.
Figure 364: Trade Modification Request - Requested overlay

Components
The available components on the Trade Modifications Request - Requested overlay are:
Table 16: Trade Modification Request – Requested – Components Description
S.No Components Description
1 Click the icon to export data to
excel.
2 Click the icon to export data to
CSV.
3
Choose the value(s) you wish to filter on
and click OK. This will return the rows in
which this column attribute matches the
chosen filter criteria. You can also
choose to search this column by entering
the search criteria in the search box
provided and clicking OK. This will return
all rows for which the attribute in this
column matched the search criteria
Some columns do not have filter, just
search
Enter the search string in the Search
textbox. The search will be performed
within the chosen column and return all
the rows for which the value of an
attribute matches the search string.
4
Click CLOSE to close the overlay.
5 Click on this icon to refresh data on this
overlay
6
Click on this icon to save the screen
position, that is. the position in which the
screen should open and the following
screen level settings:
i. Column Width
ii. Column Sequence
iii. Filter Settings
iv. Tab selection
v. Window Size
In the received tab, the trade modification requests received are displayed.

Access
To access Trade Modification Request overlay, proceed as follows:
1. On the Eurex Repo F7 GUI, point to Post Trade menu.
2. Click on Modification Requests under Trade Requests in Repo. Trade Modification
Request overlay appears as displayed in following figure.
3. Click Received tab. The modification requests received are displayed here.
Figure 365: Trade Modification Request – Received overlay
Components
The Components available remain the same in Table 15 above, except for an additional column
for checkboxes. You can select multiple checkboxes to delete multiple requests, however, only
a single request can be accepted at once.
7.1.4 Trade Cancellation Request - overlay
Trade Cancellation Request overlay displays all the cancellation requests sent to counterparty
(Requested tab) and received from counterparty (Received tab). It also displays cancellation
requests sent to the Settlement Organization and waiting for response.
Access
To access the Trade Cancellation Request overlay, proceed as follows:

1. On the Eurex Repo F7 GUI, point to Post Trade menu.
2. Click Cancellation Requests under Trade Requests in Repo. Trade
Cancellation Request overlay appears as displayed in following figure.
3. Click Requested tab. The cancellation requests sent are displayed.
Note: The Trade Cancellation Request overlay can also be invoked from Notification. Go to TRD
Mod/Cancel and select a Trade Cancellation request, it will then invoke respective Trade Cancellation
Request overlay to the corresponding Received or Requested tab.
Figure 366: Trade Cancellation Request - Requested overlay
Components
The available components on the Trade Cancellation Request - Requested overlay
are:
Table 17: Trade Cancellation Request – Received – Components Description
S.No Components Description
1 Click the icon to export data to
excel.
2 Click the icon to export data to
CSV.

S.No Components Description
3
Choose the value(s) you wish to filter
on and click OK. This will return the
rows in which this column attribute
matches the chosen filter criteria.
You can also choose to search this
column by entering the search
criteria in the search box provided
and clicking OK. This will return all
rows for which the attribute in this
column matched the search criteria
Some columns do not have filter, just
search
Enter the search string in the Search
textbox. The search will be
performed within the chosen column
and return all the rows for which the
value of an attribute matches the
search string.
4
Click CLOSE to close the overlay.
5 Click on this icon to refresh data on
this screen
6
Click on this icon to save the screen
position, that is. the position in
which the screen should open and
the following screen level settings:
i. Column Width
ii. Column Sequence
iii. Filter Settings
iv. Tab selection
v. Window Size
In the received tab, the trade cancellation requests received are displayed. You can
respond to the requests received by right-clicking on a chosen request. A Quick Action

Utility would be displayed and you can select the appropriate action, depending on the
desired action. Refer section 5.1.2.2 for further details
Access
To access Trade Cancellation Request overlay, proceed as follows:
1. On the Eurex Repo F7 GUI, point to Post Trade menu.
2. Click Cancellation Requests under Trade Requests in Repo. Trade
Cancellation Request overlay appears as displayed in following figure.
3. Click Received tab. The cancellation requests received are displayed.
Figure 367: Trade Cancellation Request - Received overlay
Components
The available components on the Trade Cancellation Request – Received overlay
are:
Table 18: Trade Cancellation Request – Received overlay – Components Description
S.No Components Description
1 Click the icon to export data to
excel.
2 Click the icon to export data to CSV.

3
Choose the value(s) you wish to filter on
and click OK. This will return the rows in
which this column attribute matches the
chosen filter criteria. You can also
choose to search this column by
entering the search criteria in the search
box provided and clicking OK. This will
return all rows for which the attribute in
this column matched the search criteria
Some columns do not have filter, just
search
Enter the search string in the Search
textbox. The search will be performed
within the chosen column and return all
the rows for which the value of an
attribute matches the search string.
4
Click CLOSE to close the overlay.
5 Click on this icon to refresh data on this
screen
6
Click on this icon to save the screen
position, that is. the position in which
the screen should open and the
following screen level settings:
i. Column Width
ii. Column Sequence
iii. Filter Settings
iv. Tab selection
v. Window Size
7.1.5 Bulk Trade Modifications – overlay
To access Bulk Trade Modifications overlay, proceed as follows:
1. On the Eurex Repo F7 GUI, point to Post Trade menu.

Figure 368: Post Trade Menu
7.1.5.1 Modify Repo Rate
You can able to modify the Repo rate of multiple trades at once, through this screen
and mandatorily provide the Effective Date. Click APPLY, and the new rate is
populated in the New rate column. Click SUBMITand then the corresponding trade
modification requests are generated.
Figure 369: Bulk Modification-Repo Rate
7.1.5.2 Set Repurchase Date
You can able to set the Repurchase Date of multiple trades at once, through this screen. You first select the segment from the Segment dropdown and then provide
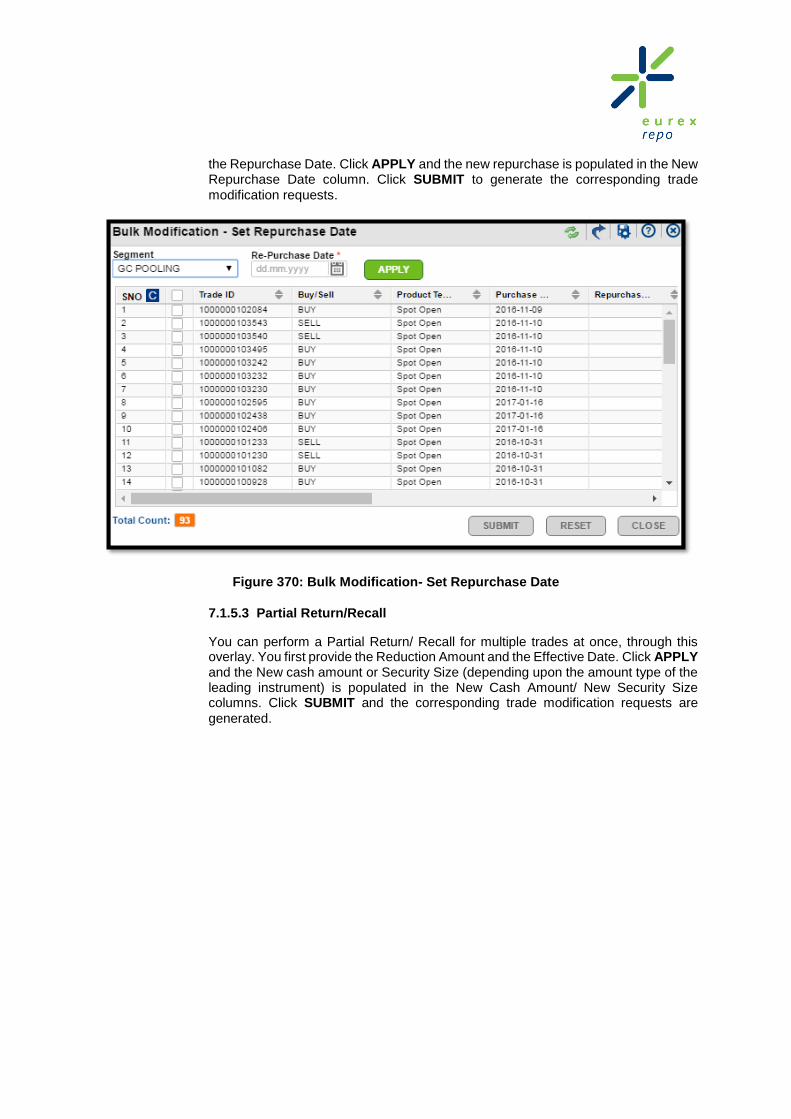
the Repurchase Date. Click APPLY and the new repurchase is populated in the New Repurchase Date column. Click SUBMIT to generate the corresponding trade
modification requests.
Figure 370: Bulk Modification- Set Repurchase Date
7.1.5.3 Partial Return/Recall
You can perform a Partial Return/ Recall for multiple trades at once, through this overlay. You first provide the Reduction Amount and the Effective Date. Click APPLY and the New cash amount or Security Size (depending upon the amount type of the leading instrument) is populated in the New Cash Amount/ New Security Size columns. Click SUBMIT and the corresponding trade modification requests are
generated.
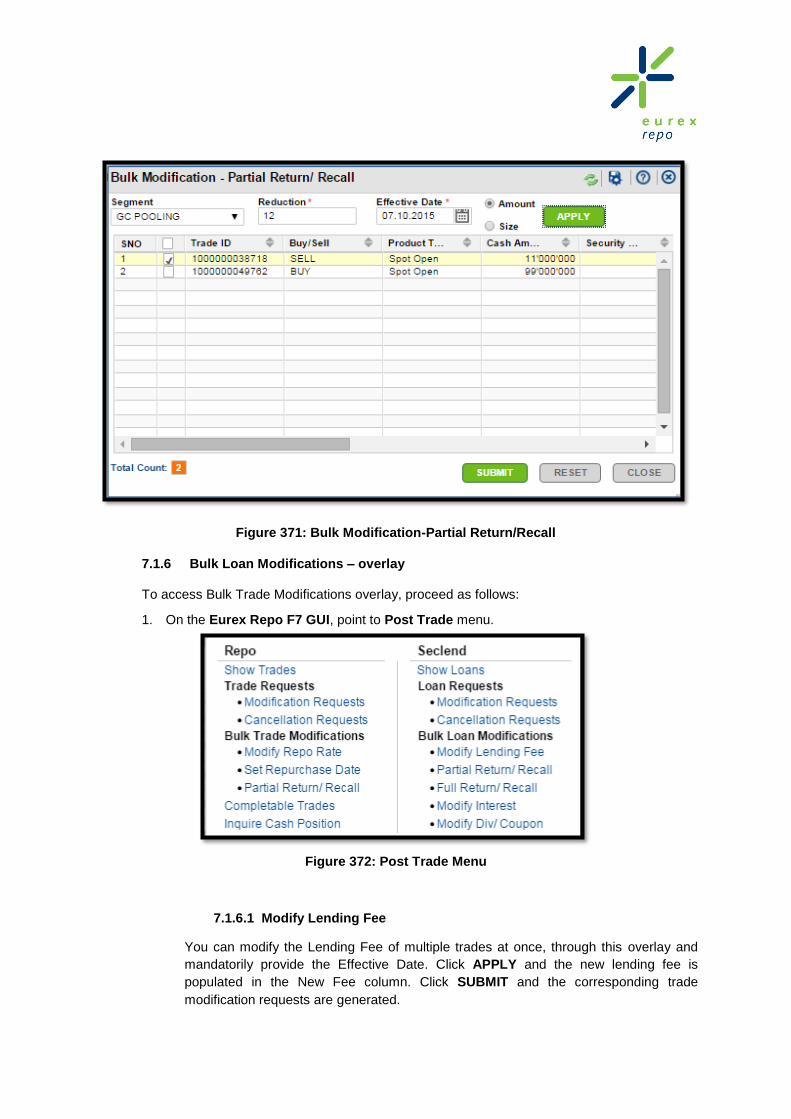
Figure 371: Bulk Modification-Partial Return/Recall
7.1.6 Bulk Loan Modifications – overlay
To access Bulk Trade Modifications overlay, proceed as follows:
1. On the Eurex Repo F7 GUI, point to Post Trade menu.
Figure 372: Post Trade Menu
7.1.6.1 Modify Lending Fee
You can modify the Lending Fee of multiple trades at once, through this overlay and
mandatorily provide the Effective Date. Click APPLY and the new lending fee is
populated in the New Fee column. Click SUBMIT and the corresponding trade
modification requests are generated.
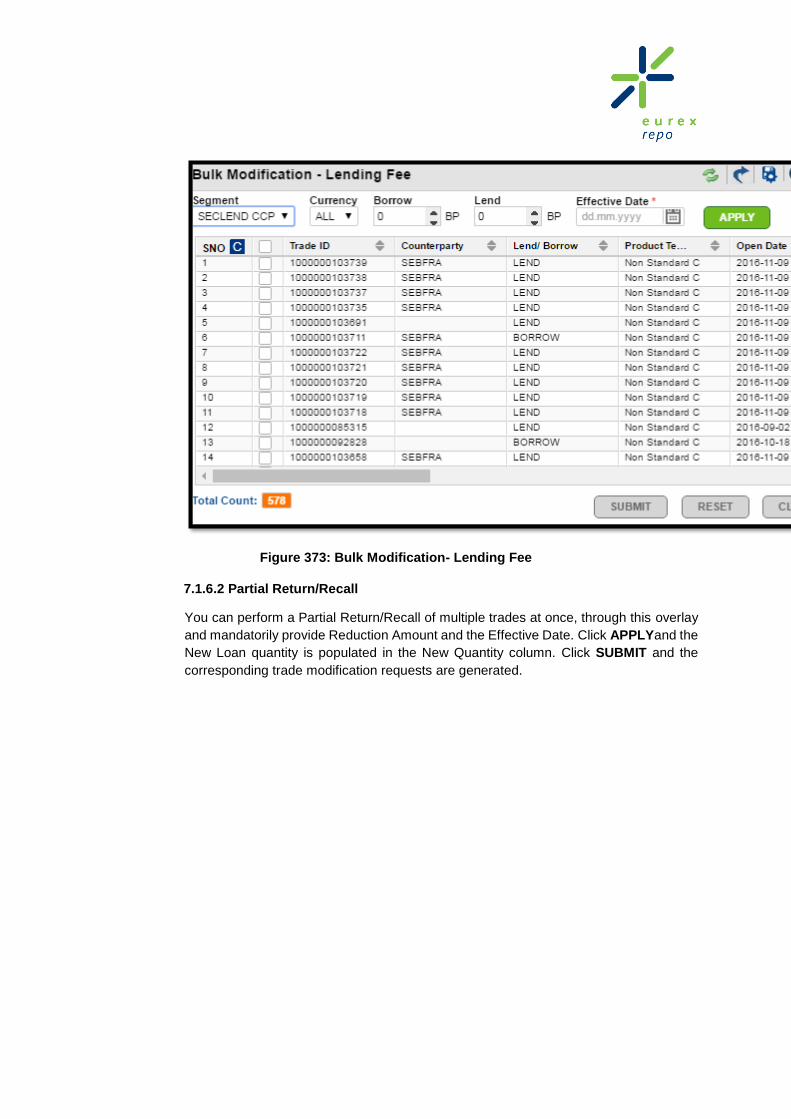
Figure 373: Bulk Modification- Lending Fee
7.1.6.2 Partial Return/Recall
You can perform a Partial Return/Recall of multiple trades at once, through this overlay
and mandatorily provide Reduction Amount and the Effective Date. Click APPLYand the
New Loan quantity is populated in the New Quantity column. Click SUBMIT and the
corresponding trade modification requests are generated.

Figure 374: Bulk Modification-Partial Return/Recall
7.1.6.3 Full Return/Recall
You can perform a Full Return/Recall of multiple trades at once, through this overlay and
mandatorily provide the New Close date and the Effective Date. Click APPLY and the
New close date is populated in the New Close Date column. Click SUBMIT and the
corresponding trade modification requests are generated.

Figure 375: Bulk Modification-Full Return/Recall
7.1.6.4 Modify Interest
You can modify the Interest of multiple trades at once, through this overlay and
mandatorily provide the Effective Date. Click APPLYand the new interest is populated in
the New Interest column. Click SUBMIT and the corresponding trade modification
requests are generated.

Figure 376: Bulk Modification-Modify Interest
7.1.6.5 Modify Div/Coupon
You can modify the Div/Coupon of multiple trades at once, through this overlay. You can
provide the basis point adjustment to be made to the Lend and Borrow Trades.
Div/Coupon in the respective spinner inputs for Lend and Borrow. Click APPLY and the

new Div/Coupon is populated in the New Div/Coupon column. Click SUBMIT and the
corresponding trade modification requests are generated.
Figure 377: Bulk Modification-Modify Div/Coupon
7.1.7 Auction overlay
Auction screen displays all the auctions sent and received. It has two tabs Sent and
Received.
In the Sent tab, the auctions sent are displayed.
Access
To access the auction overlay, proceed as follows:
1. On the Eurex Repo F7 GUI, point to Trading menu.

Figure 378: Trading Menu
2. Click Auction under REPO. The Auction overlay appears as displayed in following
figure.
Figure 379: Auction overlay

COMPONENTS
The available components on the Auction overlay are:
Table 19: Auction overlay – Components Description
S.No Components Description
1 Click the icon to export data to excel.
2 Click the icon to export data to CSV.
3
Choose the value(s) you wish to filter on and
click OK. This will return the rows in which this
column attribute matches the chosen filter
criteria. You can also choose to search this
column by entering the search criteria in the
search box provided and clicking OK. This will
return all rows for which the attribute in this
column matched the search criteria
Some columns do not have filter, just search
Enter the search string in the Search textbox.
The search will be performed within the
chosen column and return all the rows for
which the value of an attribute matches the
search string.
4
Click CREATE NEW AUCTION to create an
auction. This invokes the Create New Auction
screen described in section 6.7
5 Click on this icon to refresh data on this
overlay
6
Click on this icon to save the screen position,
that is. the position in which the screen should
open and the following screen level settings:
i. Column Width
ii. Column Sequence
iii. Filter Settings
iv. Tab selection
v. Window Size

7.1.8 Auction Sent Manager overlay
Access
You can access the Auction Sent Manager overlay in the following ways:
From Notification screen:
1. In the Notification screen, click Sent tab.
2. Click Auction Sent tab. Auction Sent Manager screen appears.
From Trading Menu:
1. On the Eurex Repo F7 GUI, point to Trading menu.
2. Click Auction. Auction overlay appears. Refer to Section 7.1.7 Auction overlay .
3. Click the Sent tab. All the sent Auctions are displayed.
4. Select the Auction you need to manage and right-click the selected Auction. The
Quick Action Utility appears as displayed in following figure.
Figure 380: Quick Action Utility
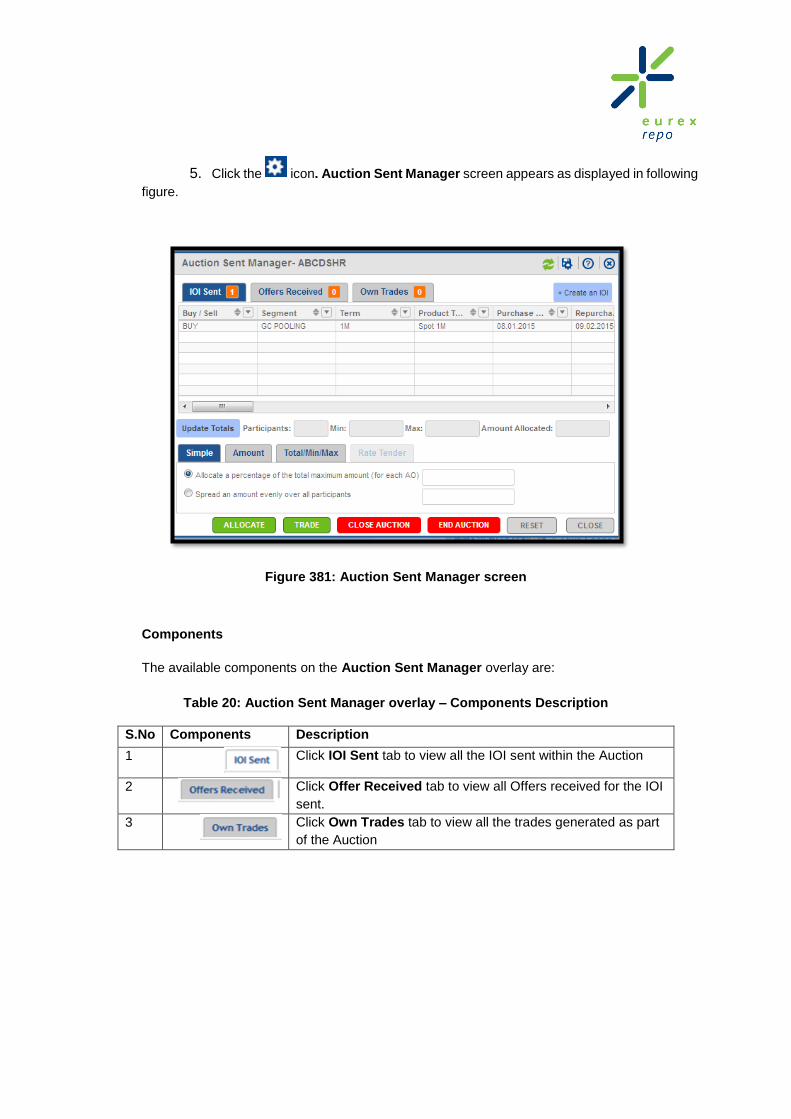
5. Click the icon. Auction Sent Manager screen appears as displayed in following
figure.
Figure 381: Auction Sent Manager screen
Components
The available components on the Auction Sent Manager overlay are:
Table 20: Auction Sent Manager overlay – Components Description
S.No Components Description
1
Click IOI Sent tab to view all the IOI sent within the Auction
2
Click Offer Received tab to view all Offers received for the IOI
sent.
3
Click Own Trades tab to view all the trades generated as part
of the Auction

4
Click +Create an IOI, to create an IOI for the Auction selected.
Refer section 4.6.2 for further details
5
In Simple tab displayed at the bottom of the screen, there are
two ways to allocate amounts using this algorithm, they are:
a. Allocate a percentage of the total maximum
amount (for each AO)
b. Select an amount evenly over all participants
c. Select the checkboxes as applicable.
Refer section 4.6.5 for further details
6
In Amount tab is placed next to the Simple tab, you need to
specify the total spread amount available for allocation with the
auction as part of this algorithm
Refer section 4.6.5 for further details
7
For allocating using the Total/Min/Max algorithm, following
values have to be provided:
a. Spread Amount
b. Minimum per participants
c. Maximum per participants
Refer section 4.6.5 for further details
8
Within Rate Tender, there are several algorithms that can be
used. Refer section 4.6.5 for further details. After selecting the
desired auction type, you have to provide the following inputs
before the executing the algorithm
a. Spread Amount
b. Marginal Alloc. Rate / Offer: Offers with rate
lesser than or equal to this marginal rate will
be considered, while Offers without any
interest rate get assigned this marginal
interest rate. Offers with rate greater than the
marginal rate will not be considered for the
allocation process
c. Min Allocation / Offer
d. Max Allocation / Offer
9
Click ALLOCATE to apply selected allocation method. This
will compute the amounts and/ or rate to be allocated to each
of the Offers received, and display them against these Offers
on the Offers Received tab

10
CLICK TRADE to generate trade based on allocation. This
essentially entails accepting the Offers received, by allocating
the corresponding amounts and/or rate to each of them.
11
Click CLOSE AUCTION to close the auction.
12
Click END AUCTION to end the auction.
13
Click RESET to reset the values.
14
Click CLOSE to close the screen.
15 Click on this icon to refresh data on this screen
16
Click on this icon to save the screen position, that is. the
position in which the screen should open and the following
screen level settings:
i. Column Width
ii. Column Sequence
iii. Filter Settings
iv. Tab selection
v. Window Size
7.1.9 Auction Received Manager overlay
Access
You can access the Auction Sent Manager overlay in the following ways:
From Notification screen:
1. In the Notification screen, click Received tab.
2. Choose an auction from the Auction Received tab. Auction Received Manager
screen appears.
From Trading Menu:
1. On the Eurex Repo F7 GUI, point to Trading menu.
2. Click Auction. Auction overlay appears. Refer Auction overlay.
3. Click the Received tab. All the received Auctions are displayed.

4. Select the Auction you need to manage and right-click the selected Auction. Quick
action utility appears as displayed in following figure.
Figure 382: Quick Action Utility
5. Click the icon. Auction Received Manager screen appears as displayed in
following figure.
Figure 383: Auction Received Manager screen

Components
The available components on the Auction Received Manager overlay are:
Table 21: Auction Received Manager overlay – Components Description
S.No Components Description
1
Click IOI Received tab to view all the IOI received within the
auction
2
Click Offer Sent tab to view all Offers sent for IOI received.
3
Click Own Trades tab to view all the trades generated as
part of the auction
4 Click on this icon to refresh data on this screen
5
Click on this icon to save the screen position, that is. the
position in which the screen should open and the following
screen level settings:
vi. Column Width
vii. Column Sequence
viii. Filter Settings
ix. Tab selection
x. Window Size

7.1.10 Own Trades/Own Loans/Public Trades
This screen consists of three tabs, namely, Own Trades, Own Loans and Public
Trades .Own Trades tab displays the member’s Repo Trades, Own Loans tab
displays the member’s SECLEND Loans and Public Trades tab displays both
REPO and SECLEND trades that are allowed to be public. The corresponding count
is displayed on the respective tabs.
For more information, refer to section 3.5.

8. Properties screens
The properties screens displays the properties of the trading objects. Properties contain further details
that are not displayed on the grid. The following are the properties overlays:
Quote Properties overlay
Address Offer Properties overlay
IOI Properties overlay
Auction Properties overlay
Basket Properties overlay
Security Properties overlay
Index Properties overlay
Product Properties overlay
Trade Properties overlay
Trade Modification Properties overlay
Trade Cancellation Properties overlay
8.1 Quote Properties overlay
The Quote Properties overlay shows the properties of the Quote such as Security Size, Business Date,
Modification Date Time, Instruction Reference, etc.
Access
To view the Quote properties, proceed as follows:
Right-click any selected Quote. Quick Action Utility appears as displayed following figure.
Figure 384: Quick Action Utility
5. Click the icon. The Quote Properties overlay for the Quote selected appears as displayed in
following figure.

Figure 385: Quote Properties overlay
Components:
The following are the Quote Properties overlay components:
Table 22: Quote Properties – Components Description
Components Descriptions
Click this icon to export data
to excel.
Click this icon to export data
to CSV.
Click this icon to export data
for print.
Click this icon to sort the
attributes alphabetically
8.2 Addressed Offer Properties overlay
The Addressed Offer Properties displays the properties of the AO such as Amount, Business Date,
Creation Date Time, Instruction Reference, etc.
Access
To view the Offer properties, proceed as follows:

Right-click any selected Offer. Quick Action Utility appears as displayed following figure.
Figure 386: Quick Action Utility
5. Click the icon. The Address Offer Properties overlay for the Offer selected appears
as displayed in following figure.
Figure 387: Address Offer Properties overlay

Figure 388: Trade Pre-Arranged Properties
Components:
The components on this screen remain the same as those under Table 22: Quote Properties within
Section 8.1
8.3 Indication of Interest Properties (IOI) overlay
The IOI Properties overlay displays the properties of the IOI such as Amount, Business Date, Creation
Date Time, and Instruction Reference and so on.
Access
To view the IOI properties, proceed as follows:
Right-click any selected IOI. Quick Action Utility appears as displayed following figure.

Figure 389: Quick Action Utility
5. Click the icon. The IOI Properties overlay for the Offer IOI selected appears as
displayed in following figure.
Figure 390: IOI Properties overlay
Components:
The components on this screen remain the same as those under Table 22: Quote Properties
within Section 8.1

8.4 Broker Offer Properties overlay
The Broker Offer Properties overlay displays the properties of the Offer such as Amount, Business
Date, Creation Date Time, Instruction Reference, etc..
Access
To view the Broker Offer properties, proceed as follows:
Select any Broker Offer for which you want to view the properties. Quick Action Utility appears
as displayed following figure.
Figure 391: Quick Action Utility
5. Click the icon. The Broker Offer Properties overlay for the Offer selected appears as
displayed in following figure.
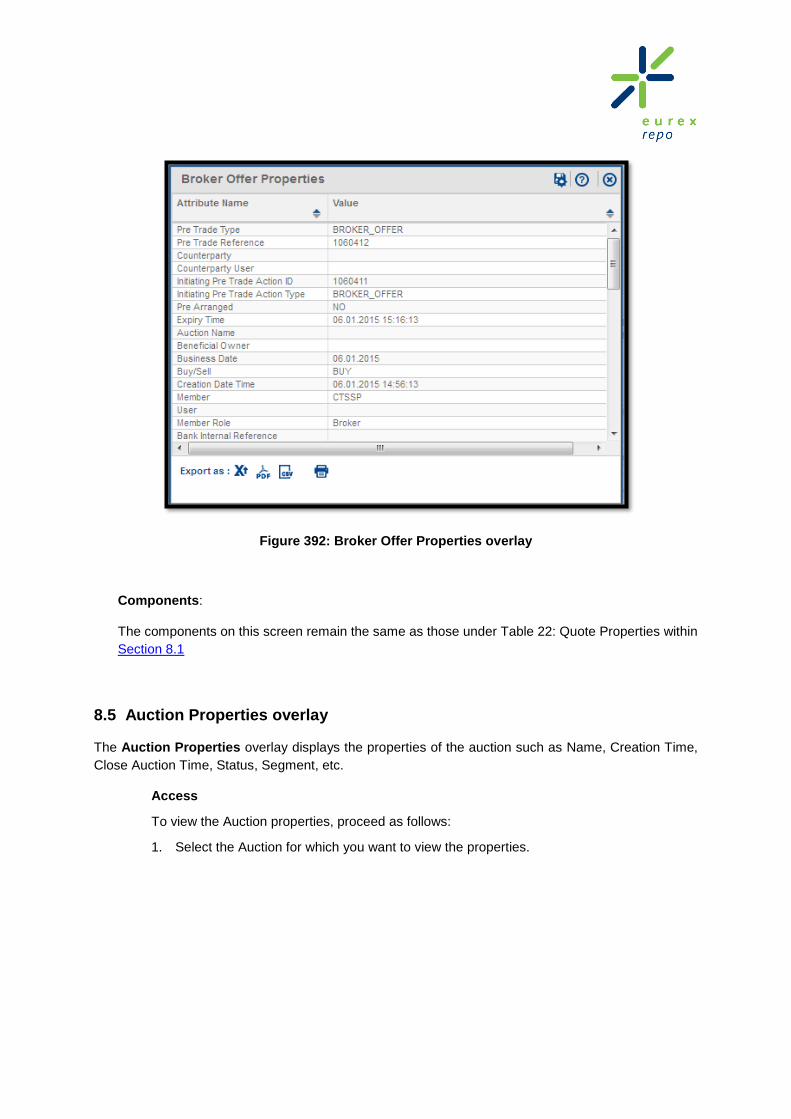
Figure 392: Broker Offer Properties overlay
Components:
The components on this screen remain the same as those under Table 22: Quote Properties within
Section 8.1
8.5 Auction Properties overlay
The Auction Properties overlay displays the properties of the auction such as Name, Creation Time,
Close Auction Time, Status, Segment, etc.
Access
To view the Auction properties, proceed as follows:
1. Select the Auction for which you want to view the properties.

2. Right-click the selected Auction. Quick action utility appears as displayed in following
figure.
Figure 393: Quick Action Utility
5. Click the icon, to view the properties of the selected Auction. The Auction Properties
screen appears as displayed in following figure.
Figure 394: Auction Properties overlay
Components:
The components on this screen remain the same as those under Table 22: Quote
Properties within Section 8.1

8.6 Basket Properties
The Basket Properties overlay displays the properties of the Basket as displayed in following figure.
This overlay can be invoked by clicking on the View Properties button on the Basket overlay under
Master Data.
Figure 395: Basket Properties overlay
8.7 Security Properties
The Security Properties overlay displays the properties of the securities as displayed in following figure.
This overlay can be invoked by clicking VIEW PROPERTIES on the Security overlay under Master
Data.

Figure 396: Securities Properties overlay
8.8 Index Properties
The Index Properties overlay displays the properties of index as displayed in following figure. This
overlay can be invoked by clicking VIEW PROPERTIES on the Index overlay under Master Data.
Figure 397: Index Properties

8.9 Product Properties
The Product Properties overlay displays the properties of Product as displayed in following figure. This
overlay can be invoked by clicking View Properties button on the Product overlay under Master Data.
Figure 398: Product Properties overlay
8.10 Trade Properties overlay
Product Properties displays the properties of Product as displayed in following figure. This overlay can
be invoked by right-clicking on the Show Trades or Won Trades screen and selecting the icon from
the Quick Action Utility.

Figure 399: Trade Properties overlay
8.11 Trade Modification Properties overlay
The Trade Modification Properties overlay displays the properties of Trade Modification as displayed
in following figure. This overlay can be invoked by right-clicking on the Trade Modification Request overlay and selecting
the icon from the Quick Action Utility.

Figure 400: Trade Modification Properties
8.12 Trade Cancellation Properties overlay
The Trade Cancellation Properties overlay displays the properties of Trade Cancellation as displayed
in following figure. This overlay can be invoked by right-clicking on the Trade Cancellation Request overlay and selecting
the icon from the Quick Action Utility.

Figure 401: Trade Cancellation Properties overlay

9. Seclend
Most of the screens and their behavior are similar for Securities Lending and Repo and have already been covered in this document in previous sections. screens which are different for Seclend are covered in the coming sections.
9.1 Tools
In Tools menu following options are available:
Position Board
Member Relationship
Distribution List Manager
Configure Trade Slip
Manage Watchlists
9.1.1 Managing Member Relationship
The Member Relationship overlay shows the counterparty agreements present between the logged in member and other members. It is possible to Create, Modify and Delete Member relationships, depending on the segment
9.1.1.1 To Create a Member Relationship
To create Member Relationships, proceed as follows:
1. On the main Eurex Repo F7 GUI, point to Tools.
Figure 402: Tools Menu Seclend
2. Click the Member Relationship under Seclend. Member Relationship screen
appears as displayed in following figure.

Figure 403: Member Relationship Seclend
3. Select the segment from Choose a Segment drop-down.
4. Click SHOW. All the members which have access to the selected segment are
displayed.
5. Select the checkbox(s) of the member with whom you want to create a relationship.
There are some segments for which already agreement is available in that scenario
you can only view that. You can also select more than one relationship at a time.
Note: You can manage a Counterparty Agreement only for certain services, for
others, only the Market manager can manage them and you can only view them
from this screen
6. Click CREATE RELATIONSHIP
9.1.1.2 Delete a Member Relationship(s)
To delete Member Relationships, proceed as follows:
1. On the main Eurex Repo F7 GUI, point to Tools.
2. Click the Member Relationship under Seclend. Member Relationship screen
appears as displayed in following figure.
3. Select the checkbox(s) of the members you want to delete.
4. Click DELETE RELATIONSHIP
9.1.1.3 To Modify a Member Relationship(s)
To modify Member Relationships, proceed as follows:
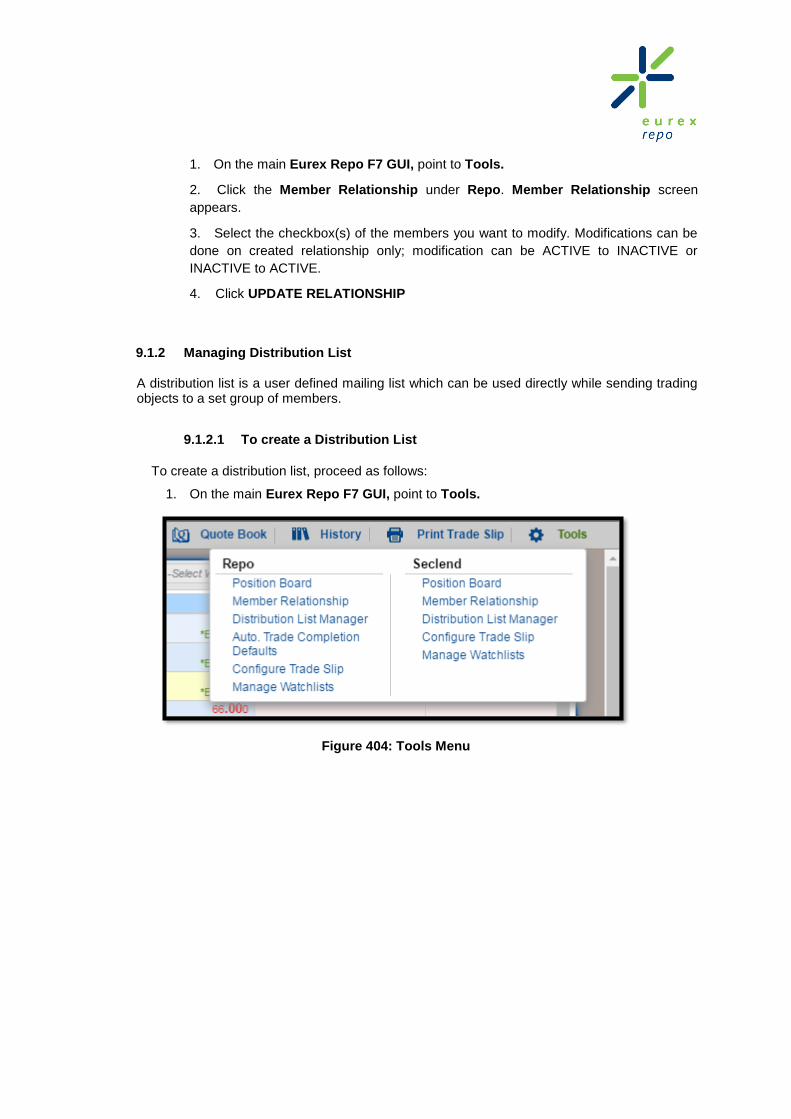
1. On the main Eurex Repo F7 GUI, point to Tools.
2. Click the Member Relationship under Repo. Member Relationship screen
appears.
3. Select the checkbox(s) of the members you want to modify. Modifications can be
done on created relationship only; modification can be ACTIVE to INACTIVE or
INACTIVE to ACTIVE.
4. Click UPDATE RELATIONSHIP
9.1.2 Managing Distribution List
A distribution list is a user defined mailing list which can be used directly while sending trading objects to a set group of members.
9.1.2.1 To create a Distribution List
To create a distribution list, proceed as follows:
1. On the main Eurex Repo F7 GUI, point to Tools.
Figure 404: Tools Menu

2. Click the Distribution List Manager under Seclend. Distribution List appears as
displayed in following figure.
Figure 405: Distribution List Manager screen
3. Select the Segment from the Choose a Segment to view available distribution list(s)
drop-down.
4. Click Create a New Distribution List and then Create a New Distribution List
appears as displayed in following figure.
5. Enter the name for the new distribution list in Provide a Distribution List Name.
6. Select the checkboxes of the members you want to include in the distribution list from
Choose Members. You can also choose all members by using Select All option.
7. Click on the Members tab, it will list down the available members for the chosen
segment.
8. Click ADD SELECTED. The selected members move to Selected Members list. Click
ADD ALL with or without selecting member all members will move to selected member
list.
9. Click SAVE DISTRIBUTION LIST. The distribution list you created is saved and is
available for selection in Recipients field while entering a Pre Trade Action.
10. You can also search for a distribution list or a member from the search option available
just below the Available Distribution Lists tab.

Figure 406: Create a New Distribution List screen
9.1.2.2 To Modify a Distribution List
To modify a distribution list, proceed as follows:
1. On the main Eurex Repo F7 GUI, point to Tools as displayed in following figure.
Figure 407: Tools Menu
2. Click the Distribution List Manager under Seclend. Distribution list appears as
displayed in following figure.
3. Select the Segment from the Choose a Segment to view available distribution list(s)
drop-down.
4. Click Available Distribution Lists tab available at the left of the screen as displayed in
following figure. The distribution lists appears.

Figure 408: Available Distribution Lists Tab
5. Click the icon of the list you want to modify. Edit a Distribution List screen
appears as displayed in following figure.
Figure 409: Edit a Distribution List screen
6. You can do either of the following while modifying a list:
To remove the participants from the distribution list, select the members from
Selected Members list and click REMOVE SELECTED. REMOVE ALL will remove
all members from selected list to choose member list.
To add participants to the distribution lists select the members from Choose
Members list and click ADD SELECTED.

Note: To add all the participants click SELECT ALL. There must be at least one
member in the list.
7. Click SAVE DISTRIBUTION LIST. The changes made to the distribution list are saved.
9.1.2.3 To Delete a Distribution List
To delete a distribution list, proceed as follows:
1. On the main Eurex Repo F7 GUI, point to Tools.
Figure 410: Tools Menu
2. Click the Distribution List Manager under Seclend. Distribution list manager appears
as displayed in following figure.
Figure 411: Distribution List Manager screen

3. Select the Segment from the Choose a Segment to view available distribution list(s)
drop-down.
4. Click Available Distribution Lists tab available at the left of the screen as displayed in
following figure. The distribution lists appears.
Figure 412: Available Distribution Lists Tab
5. Click the icon displayed in front of the list you want to delete. A confirmation
message “Are you sure you want to delete selected distribution list” dialog box
appears on screen.
6. Click Yes to confirm. The selected distribution list is deleted.
9.1.3 Configure Trade Slip
To Configure Trade Slip, proceed as follows:
1. On the main Eurex Repo F7 GUI, point to Tools.
2. Click the Configure Trade Slip under Seclend. Configure Trade Slip appears as
displayed in following figure. By default all fields are in Selected Attribute(s).

Figure 413: Trade Slip Configuration - Seclend
3. You can add and remove attributes in Trade Slip configuration. The selected attributes
would be printed in the Trade Slip
4. Select the attribute(s) by selecting the checkbox, Click ‘– REMOVE ATTRIBUTES’ to
remove attribute from selected list.
5. Select the attribute(s) by selecting the checkbox, Click ‘+ADD ATTRIBUTES’ to add
attribute in selected list.
6. Click SAVE to Configure the Trade Slip
7. Click RESET to restore default value
8. Click CLOSE to close the Configure Trade Slip screen
9.1.4 Position Board
You can upload bulk pre trade actions from the Position Board screen. The behavior remains the
same as described under section 3.6.5 for Repo.

9.1.5 Manage Watchlists
A watchlist is a group of securities configured to be visible on the custom views. You can
create/maintain watchlists such that only the Quotes belonging to securities in the watchlists are
shown on the custom view. Watchlists can be defined per segment, from a separate overlay
Manage Watchlists under Tools menu. The flow and process for Manage Watchlists-Seclend
remains same as under 3.6.6 Manage Watchlists.
Figure 414: Manage Watchlists
9.2 History
To view history, proceed as follows:
1. On the main Eurex Repo F7 GUI, point to History menu as displayed in following figure.
Figure 415: History Menu

2. Click Seclend. The History overlay appears as displayed in following figure.
Figure 416: History screen
3. In Choose a Period, select the From date and To date from calendar icons provided next
to the fields. The default value will be Today’s Calendar date in the To date value and
Today’s Calendar Date minus 3 days in the From date
Note: You can put any date however the From Date must be less than or equal to the To
Date.
4. Select the Status from the drop-down list. The values are ACTIVE, INACTIVE, FAILED,
PENDING and ALL.
5. Click SHOW. All the Trading, Loan and Loan requests are displayed in the respective tab.
Click the Trading tab to view all the pre trades (such as AO, IOI, Quote, RFQs and
so on) for the selected period. It has two sub-tabs, namely, Sent and Received.
o Click Sent to view all the pre trades sent. All the sent pre trades appear on the
screen.
o Click Received to view all the pre trades received. All the received pre trades
appear on the screen.
Click the Loan tab to view all the loans for the selected period. By default all Loans
will be displayed on the screen for which you can filter the loan by using status drop-

down. There an additional filter to search on loans based on their status by selecting
a value in the Trade Status dropdown
Click the Loan Requests to view all the loan requests- Loan modification and
cancellation for the selected period. It has two sub-tabs, namely Received and
Requested.
o Click Sent to view all the loan requests sent. All the sent trade requests appear
on the screen.
o Click Received to view all the loan requests received. All the received trade
requests appear on the screen.
To change the values of the Choose a period or Status field, click RESET. From date and To date
will be blank and status will change to ALL. Now you can select the values again. You can change
value directly through date picker.
9.3 Pre Trade Manager
To view Pre trade Manager, proceed as follows:
1. On the main Eurex Repo F7 GUI, point to Pre Trade Manager menu as displayed in
following figure.
Figure 417: Pre Trade Manager

2. Click Seclend. The Pre Trade Manager screen appears as displayed in following figure.
Figure 418: Pre Trade Manager- Seclend
3. The rest of the flow and behavior of Pre Trade Manager screen remains the same for
Seclend as well as Repo.

10. Managing Pre Trading Services
Pre Trading Services enable market participants to indicate their readiness to trade by addressing
Indications of Interest (IOI), Quotes and Addressed Offers (AO) to one or multiple other market
participants. Additionally, this chapter provides information on how to execute a trade by accepting a
received AO.
Pre trading services include the following tasks:
Managing Quote
Managing Address Offer (AO)
Managing Indication Of Interests (IOI)
10.1 Managing Quotes
Quotes are displayed in the Market Watch, Trading Book, Trading and Quote Book.
10.1.1 To Enter a Quote
You can enter a Quote in the following ways:
To enter a Quote from scratch
To enter a Quote from existing trading objects
10.1.1.1 To Enter a Quote from Scratch
You can enter a Quote from scratch using the two methods which are as follows:
To enter a Quote from Trading menu
To enter a Quote from Market Watch screen
10.1.1.1.1 To Enter a Quote from Trading Menu

To enter a Quote, proceed as follows:
1. On the Trading menu, under Seclend, click Quote as displayed in following
figure Trading Menu. The Enter Quote - SECLEND screen appears as
displayed in Figure Enter Quote – SECLEND.
Figure 419: Trading Menu
Figure 420: Enter Quote – SECLEND

2. Enter the field details in the Enter Quote – SECLEND screen. For more
information about fields, refer to the Section 12.1
3. Click SUBMIT after filling all the fields. A message ‘Quote entered
successfully :: XXXXX Total Quote Entered :: 1 ’ is displayed where XXXX
is the unique identification number for the Quote submitted.
Note: If you click SUBMIT more than once on the same Enter Quote screen
that multiple Quotes get entered and the Quote identification number of the
latest Quote is displayed. For example, if you click SUBMIT three times, three
Quotes are entered, and a message ‘Quote entered successfully:: XXXX
Total Quote Entered :: 3’ is displayed.
10.1.1.1.2 To Enter a Quote from Market Watch screen
You can also enter a Quote from the Market Watch screen.
To enter a Quote from the Market Watch screen, proceed as follows:
1. On the Market Watch screen, select the row for which you want to enter a
Quote.
2. Right-click anywhere on the selected row. The Quick Action Utility appears as
displayed in following figure.
Figure 421: Quick Action Utility
3. Click the Enter Quote icon. Enter Quote - SECLEND screen appears
as displayed following figure.

Figure 422: Enter Quote - SECLEND
4. Enter the field details in the Enter Quote - SECLEND. For more information
about fields, refer to Section Enter Quote – SECLEND screen.
5. Click SUBMIT after filling all the fields. A message ‘Quote entered
successfully :: XXXXX Total Quote Entered :: 1 ’ is displayed where
XXXX is the unique identification number for the Quote submitted and 1
indicates that the Quote is submitted only once.
Note: If you click SUBMIT more than once on the same Enter Quote -
SECLEND screen then multiple Quotes get entered and the Quote
identification number of the latest Quote entered is displayed. For example,
if you click SUBMIT three times, three Quotes are entered, and a message
‘Quote entered successfully:: xxxxx Total Quote Entered :: 3’ is
displayed.
10.1.1.2 To Enter a Quote from Existing Trading Object (Quote)
You can also copy a Quote from an existing Quote. The options for copying a Quote from existing Quotes are as follows:
Copy a Quote from Trading Menu

Copy a Quote from Market Watch screen
Copy a Quote from Trading Book
Copy a Quote from Quote Book
10.1.1.2.1 To Copy a Quote from Trading Menu
To copy a Quote from Trading menu, proceed as follows:
1. On the Trading menu, click Trading under Seclend. The Trading Seclend
overlay appears as displayed in following figure. Copy a Quote can be done from
Trading Sent/Received tab.
Figure 423: Trading – Seclend overlay
2. Select the checkbox of the Quote you want to copy and right-click on the selected
Quote from the Sent tab. The Quick Action Utility appears as displayed in
following figure.

Figure 424: Quick Action Utility
3. Click the Copy to New Quote icon, to copy the Quote to new Quote. The
Enter Quote – Seclend screen appears as displayed in following figure.
4. Enter the other fields as required. Refer Enter a Quote in Trading Menu.
5. Click SUBMIT to submit the Quote.
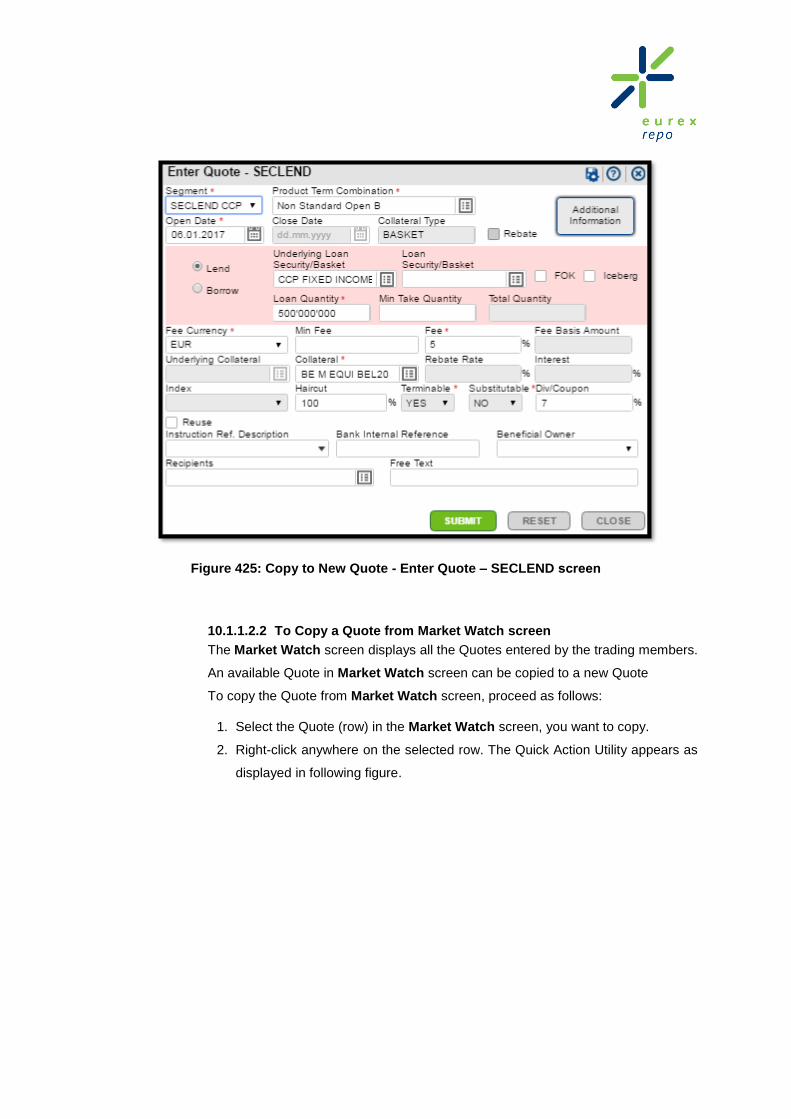
Figure 425: Copy to New Quote - Enter Quote – SECLEND screen
10.1.1.2.2 To Copy a Quote from Market Watch screen
The Market Watch screen displays all the Quotes entered by the trading members.
An available Quote in Market Watch screen can be copied to a new Quote
To copy the Quote from Market Watch screen, proceed as follows:
1. Select the Quote (row) in the Market Watch screen, you want to copy.
2. Right-click anywhere on the selected row. The Quick Action Utility appears as
displayed in following figure.

Figure 426: Quick Action Utility
Figure 427: Enter Quote – SECLEND screen
3. Click the Copy to New Quote icon. Enter Quote – Seclend screen appears as
displayed in following figure.
4. Click SUBMIT to submit the Quote. A message ‘Quote entered successfully’ with
unique Quote ID is displayed.
10.1.1.2.3 To Copy a Quote from Trading Book
Trading Book screen displays all your relevant pre trading activities (such as Quotes
sent and received, IOIs and Offers received) for the combination of the attributes

(such as Segment, Product/Term, Index etc.) you selected in Market Watch view.
You can copy the existing Quote in the Trading Book to new Quote.
To copy to new Quote, proceed as follows:
1. Select the Quote (row) in the Trading Book and right-click the selected
Quote. The Quick Action Utility appears as displayed in following figure.
Figure 428 : Quick Action Utility
2. Click the Copy to New icon. Enter Quote – Seclend screen appears
as displayed in following figure.

Figure 429: Enter Quote – Seclend screen
3. Enter the other fields as required. For more information on fields, refer to
Section 12.1
4. Click SUBMIT to submit the Quote. A message ‘Quote entered
successfully’ is displayed on the screen.
10.1.1.2.4 To Copy a Quote from Quote Book
The Quote Book is similar to the Trading overlay with two tabs for Sent and
Received, but it displays Quotes only. You can copy a Quote on this screen into a
new Quote, by right-clicking on a chosen Quote and selecting the icon.
10.1.2 To Maintain Quotes
10.1.2.1 To Maintain a Quote from Trading Menu
You can maintain a Quote from the Trading menu available on the Landing page.
To maintain a Quote, proceed as follows:
1. On the Trading menu, click Trading under SECLEND. The Trading-Seclend
overlay appears as displayed in following figure.
Figure 430: Trading – Seclend overlay

2. Select the Quote checkbox and right-click on the selected Quote. The Quick Action
Utility appears as displayed following figure from Trading sent tab.
Figure 431: Quick Action Utility
3. You can perform the following functionalities on the selected Quote:
Modify Quote
Hold
Release Quote
Delete Quote
Copy to New
Show Properties
To Modify a Quote: To modify the Quote, proceed as follows:
1. Click the icon to modify the Quote. The Modify Quote – SECLEND overlay
appears as displayed in following figure.

Figure 432: Modify Quote overlay
2. You can modify editable fields in Modify Quote overlay.
3. After you have modified the fields, click SUBMIT. A message ‘Quote modified
successfully’ appears on the screen.
To Hold / Release a Quote:. You can hold yours or your member’s active Quotes from
the market and also release your own held Quote when required.
To Hold a Quote: To hold an active Quote, proceed as follows:
1. Click the icon, the Hold Quote alert appears as displayed in following figure.
2. Click Yes to hold the Quote. A message ‘Quote Held Successfully:: Quote ID –
(Quote id)’ is displayed.
Figure 433: Hold Quote Alert

To Release a Quote: To release the hold Quote, proceed as follows:
1. Click the icon. The Release Quote overlay appears.
2. Click RELEASE to release the Quote. A message ‘Quote Released Successfully
:: Quote ID – XXXXX’ is displayed.
To Delete a Quote: To delete a Quote, proceed as follows:
1. Click the icon. The Delete Quote alert appears as displayed in following
figure.
Figure 434 : Delete Quote Alert
2. Click Yes. A message ‘Quote deleted successfully:: Quote ID - XXXXX’ is
displayed.
3. Click No to cancel delete.
To Copy to New Quote: To copy the Quote to new Quote, proceed as follows:
1. Click the icon. The Enter Quote – SECLEND screen appears.
2. Enter the fields accordingly. For more details on fields, refer to the Section 12.1.
3. Click SUBMIT. A message ‘Quote entered successfully :: XXXXX Total Quote
Entered :: 1’ is displayed.
To View Properties
To view the properties of the Quote, proceed as follows:
1. Click the icon. The Quote Properties overlay appears as displayed in
following figure.
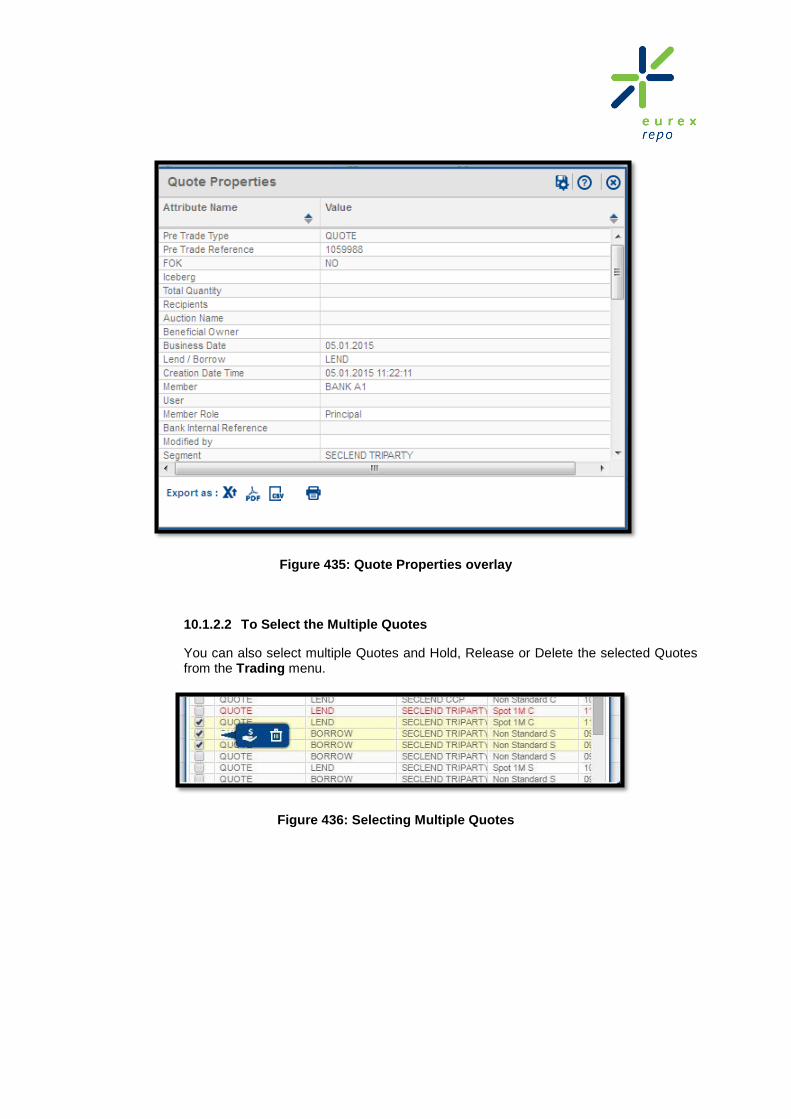
Figure 435: Quote Properties overlay
10.1.2.2 To Select the Multiple Quotes
You can also select multiple Quotes and Hold, Release or Delete the selected Quotes from the Trading menu.
Figure 436: Selecting Multiple Quotes

To perform actions on the multiple Quotes, proceed as follows:
1. On the Trading menu, click Trading under SECLEND. The Trading-Seclend
overlay appears as displayed in following figure.
2. Select the Quotes on which you want to perform any of the following actions:
Hold Qoute
Release Quote
Delete Quote
3. Right-click the selected Quotes. Quick Action Utility appears.
Figure 437: Selecting Multiple Quotes - Trading-Seclend overlay
4. Click one of the icons:
Click the icon to Hold the selected Quote(s). A confirmation
appears on the screen. Click Yes to continue.
Click the icon to Release the selected Quote(s). A confirmation
appears on the screen. Click Yes to continue.
Click the icon to delete the selected Quote(s). A confirmation
appears on the screen. Click Yes to continue.

10.1.2.3 To Maintain all Quotes from Maintain Quote Menu
Under Maintain Quote menu for SECLEND you can perform the following functionalities on all your Quotes:
Hold All My Quotes
Release All My Held Quotes
Delete All My Held Quotes
Delete All My Quotes
Modify Fee of All My Active Quotes
Modify Fee of All My Held Quotes
Modify Fee of Member Active Quotes
Modify Interest of All My Active Quotes
Modify Interest of All My Held Quotes
Modify Interest of Member Active Quotes
Figure 438: Maintain Quote
Hold All My Quotes:
To hold all your Quotes, proceed as follows:

1. On the main Eurex Repo F7 GUI, point to Maintain Quote menu.
2. Click Hold All My Quotes under Seclend. A confirmation message appears as
displayed in following figure.
3. Click Yes to confirm or No to discard.
Figure 439: Confirmation Message Dialog Box for Hold All My Quotes
Release All My Held Quotes:
To release all your Quotes, proceed as follows:
1. On the main Eurex Repo F7 GUI, point to Maintain Quote menu.
2. Click Release All My Held Quotes under Seclend. A confirmation message
appears as displayed in following figure.
3. Click Yes to confirm or No to discard.
Figure 440: Confirmation Message Dialog Box for Release All My Held Quotes
Delete All My Held Quotes:
To delete all your held Quotes, proceed as follows:

1. On the main Eurex Repo F7 GUI, point to Maintain Quote menu.
2. Click Delete All Held Quotes under Seclend. A confirmation message appears
as displayed in following figure.
3. Click Yes to continue or No to discard.
Figure 441: Confirmation Message Dialog Box for Delete All Held Quotes
Delete All My Quotes:
To delete all your Quotes, proceed as follows:
1. On the main Eurex Repo F7 GUI, point to Maintain Quote menu.
2. Click Delete All My Quotes under Seclend. A confirmation message appears as
displayed in following figure. Click Yes to confirm or No to discard.
Figure 442: Confirmation Message Dialog Box for Delete All My Quotes

Modify Fee of All My Active Quotes:
To modify fee of all of your active Quotes, proceed as follows:
2. On the main Eurex Repo F7 GUI, point to Maintain Quote menu.
3. Click Modify Fee of All My Active Quotes under Seclend.
4. Modify Fee of All My Active Quotes-Seclend overlay will open.
Figure 443: Modify Fee of All My Active Quotes – SECLEND overlay
5. Modify the fields Borrow or Lend by entering suitable values and then click
APPLY to apply the changes. The SUBMIT button will be enabled.
6. Now click SUBMIT.
Figure 444: Modify Fee of All My Active Quotes - SECLEND overlay

Modify Fee of All My Held Quotes:
To modify fee of all of your held Quotes, proceed as follows:
1. On the main Eurex Repo F7 GUI, point to Maintain Quote menu.
2. Click Modify Fee of All My Held Quotes under Seclend.
3. Modify Fee of All My Held Quotes -Seclend overlay will open.
Figure 445: Modify Fee of All My Held Quotes – SECLEND overlay

4. Modify the fields Borrow or Lend by entering suitable values and then click APPLY
to apply the changes. The SUBMIT button will be enabled.
5. Now click SUBMIT.
Figure 446: Modify Fee of All My Held Quotes - SECLEND overlay
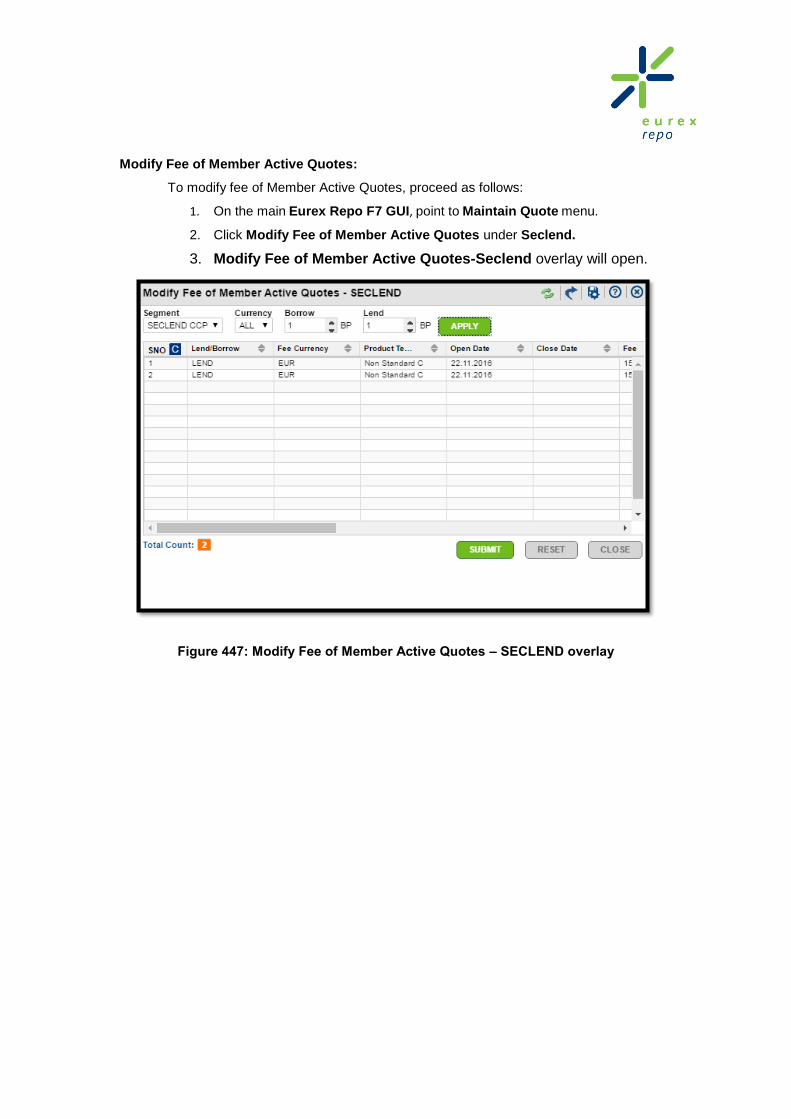
Modify Fee of Member Active Quotes:
To modify fee of Member Active Quotes, proceed as follows:
1. On the main Eurex Repo F7 GUI, point to Maintain Quote menu.
2. Click Modify Fee of Member Active Quotes under Seclend.
3. Modify Fee of Member Active Quotes-Seclend overlay will open.
Figure 447: Modify Fee of Member Active Quotes – SECLEND overlay

4. Modify the fields Borrow or Lend by entering suitable values and then click
APPLY to apply the changes. The SUBMIT button will be enabled.
5. Now click SUBMIT.
Figure 448: Modify Fee of Member Active Quotes - SECLEND overlay

Modify Interest of All My Active Quotes:
To modify interest of all of your active quotes proceed as follows:
1. On the main Eurex Repo F7 GUI, point to Maintain Quote menu.
2. Click Modify Interest of All My Active Quotes under Seclend.
3. Modify Interest of All My Active Quotes-Seclend overlay will open.
Figure 449: Modify Interest of All My Active Quotes – SECLEND overlay

4. Modify the fields Borrow or Lend by entering suitable values and then click
APPLY to apply the changes. The SUBMIT button will be enabled.
5. Now click SUBMIT.
Figure 450: Modify Interest of All My Active Quotes - SECLEND overlay

Modify Interest of All My Held Quotes:
To modify interest of all of your active quotes proceed as follows:
1. On the main Eurex Repo F7 GUI, point to Maintain Quote menu.
2. Click Modify Interest of All My Held Quotes under Seclend.
3. Modify Interest of All My Held Quotes-Seclend overlay will open.
Figure 451: Modify Interest of All My Held Quotes – SECLEND overlay

4. Modify the fields Borrow or Lend by entering suitable values and then click
APPLY to apply the changes. The SUBMIT button will be enabled.
5. Now click SUBMIT.
Figure 452: Modify Interest of All My Held Quotes - SECLEND overlay
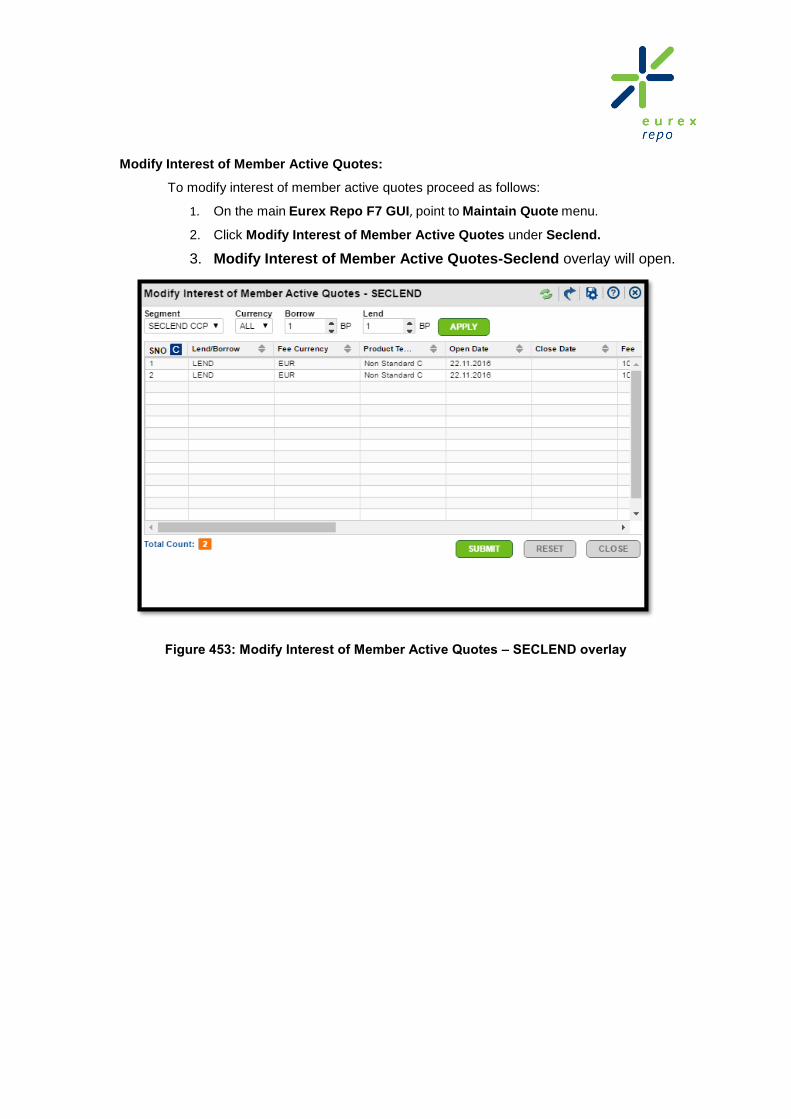
Modify Interest of Member Active Quotes:
To modify interest of member active quotes proceed as follows:
1. On the main Eurex Repo F7 GUI, point to Maintain Quote menu.
2. Click Modify Interest of Member Active Quotes under Seclend.
3. Modify Interest of Member Active Quotes-Seclend overlay will open.
Figure 453: Modify Interest of Member Active Quotes – SECLEND overlay

4. Modify the fields Borrow or Lend by entering suitable values and then click
APPLY to apply the changes. The SUBMIT button will be enabled.
5. Now click SUBMIT.
Figure 454: Modify Interest of Member Active Quotes - SECLEND overlay

10.1.3 To Respond to a Quote
When you hit a Quote, the Hit Quote - Seclend overlay appears as displayed in following figure.
Quotes are displayed in the Market Watch screen and Trading Book. You can hit a Quote in
following ways:
from Market Watch screen
from Trading Book
from Trading Seclend - Received tab
from Quote Book Seclend - Received tab
Figure 455: Hit a Quote – SECLEND overlay

10.1.3.1 To Hit a Quote from Market Watch screen
To hit a Quote from Market Watch screen, proceed as follows:
1. Select the row for which you want to hit a Quote and right-click Best Buy or Best Sell
column. The Quick Action Utility appears as displayed in following figure.
Figure 456: Quick Action Utility - Hit a Quote

2. Click the hit Quote icon. The Hit Quote overlay -Seclend overlay appears
containing the information from the Quote you wish to hit.
Figure 457 : Hit Quote overlay –Seclend (Market Watch)
3. You can modify editable fields in the Hit Quote overlay.
4. Select the Instruction Ref. Description from the drop-down. If only one valid
settlement instruction is available then it is Auto populated on click of SUBMIT.
5. Click SUBMIT. A message ‘Trade generated successfully with trade Id : XXXX’ or
‘Offer Sent Successfully with Offer ID:: XXXX’ is displayed (based on the service),
where XXXX a unique identification number for the trade/ Offer generated.
10.1.3.2 To Hit a Quote from Trading Book
To hit a Quote from Trading Book screen, proceed as follows:
1. Select the Quote (row) in the Trading Book and right-click the selected row. The
Quick Action Utility appears as displayed in following figure.

Figure 458: Quick Action Utility – Trading Book
2. Click the hit Quote icon. The Hit Quote - SECLEND overlay appears.
Figure 459 : Hit Quote overlay- Seclend (Trading Book)
3. You can modify editable fields in Hit Quote overlay.
4. Select the Instruction Ref. Description from the drop-down. If only one valid
settlement instruction is available then it is Auto populated on click of SUBMIT.
5. Click SUBMIT. A message ‘Trade generated successfully with trade Id:: XXXX’
or ‘Offer Sent Successfully with Offer ID:: XXXX’ is displayed (based on the
service), where XXXX a unique identification number for the trade/ Offer generated.

10.1.3.3 To hit a Quote from Trading Seclend - Received tab
Select the Quote to which you want to respond. Right-click and select "Hit" option. Hit
Quote overlay is opened.
Figure 460: Quick Action Utility – Trading Seclend
Figure 461 : Hit Quote overlay: Seclend (Trading)

10.1.3.4 To hit a Quote from Quote Book Seclend - Received tab
Select the Quote to which you want to respond. Right-click and click option. Hit
Quote overlay is opened.
Figure 462: Hit Quote - Quote Book
Figure 463: Hit Quote overlay-Quote Book

10.2 Managing Addressed Offers
An Addressed Offer (AO) is a binding Offer sent to selected participant. Addressed Offers are created
to respond to a received Indication of Interests (IOI), to trade on Quotes, or to initiate a trade directly
with a selected participant.
10.2.1 To Enter an Addressed Offer
You can enter an Addressed Offer in the following ways:
from scratch
from existing trading objects
10.2.1.1 To Enter an Addressed Offer from Scratch
You can enter an AO from scratch using the two methods which are as follows:
To enter an Addressed Offer from Trading menu
To enter an Addressed Offer from Market Watch screen
10.2.1.1.1 To Enter an Addressed Offer from Trading Menu
To enter an Addressed Offer from Trading menu, proceed as follows:
1. On the Trading menu, click Addressed Offer under SECLEND. The Enter
Addressed Offer - SECLEND screen appears as displayed in following figure.

Figure 464 : Enter Addressed Offer screen - SECLEND
2. Enter the field details in the Enter Addressed Offer - SECLEND screen. For more
information on fields, refer to Section 12.3.
3. Click SUBMIT after filling all the fields. A message ‘Offer entered successfully:: XXXXX
Total Offer Entered :: 1 ’ is displayed where XXXX is the unique identification number
for the Quote submitted.
Note: If you click SUBMIT more than once on the same Enter Offer screen that multiple
Offers get entered and the Offer identification number of the latest Offer entered is
displayed. For example, if you click SUBMIT three times, three Offer are entered, and
a message ‘Offer entered successfully:: XXXXX Total Offer Entered :: 3’ is
displayed.
10.2.1.1.2 To Enter a Addressed Offer (AO) from Market Watch screen
You can also enter an Addressed Offer (AO) from Market Watch screen.
To enter an AO from Market Watch screen, proceed as follows:
1. Select the Quote (row) in the Market Watch screen, on which you want to
enter a Clean Offer on that combination.

2. Right-click anywhere on the selected row. The Quick Action Utility appears
as displayed in following figure.
Figure 465: Quick Action Utility
3. Click the icon. The Enter Addressed Offer – SECLEND screen appears.
Figure 466: Enter Addressed Offer screen - SECLEND

4. Enter the field details in the Enter Addressed Offer - SECLEND. For more
information about fields refer to Section 12.3.
5. Click SUBMIT to submit the Offer. A message ‘Offer entered successfully’
with unique Offer Id is displayed.
10.2.1.1.3 To Enter an Addressed Offer from Existing Trading Objects
You can enter an AO based on existing trading objects. The options for entering an AO
based on existing trading objects are as follows:
Enter an AO based on an IOI
Enter an AO based on a Quote
10.2.1.1.4 To Enter an AO based on IOI
You can enter an AO for the IOI received. All the received IOIs are displayed in Received IOI tab under Notifications.
To enter an AO based on IOI, proceed as follows:
1. Click IOI Received under Notifications screen. All the received IOIs are
displayed in the following format.
Figure 467: Notifications-Received Tab

2. Click the particular notification link of IOI Received. Enter Addressed Offer
screen appears as displayed in following figure. The Term, Product Term
Combination, Segment, Purchase Date, Re- Purchase Date and Collateral
Type fields are displayed automatically, containing the information of the IOI (if
provided) you selected and cannot be changed.
Figure 468 : Addressed Offer- SECLEND
3. Enter the Quantity.
4. Enter other field. For more information on fields refer to Section 12.3.
5. Click SUBMIT. A message ‘Offer entered successfully’ with unique Offer Id
is displayed.
10.2.1.1.5 To Enter an AO based on Quote
You can enter an AO based on Quotes received (that is hitting a Quote). All the
Quotes are displayed on the Market Watch screen, on Trading Book and on Quote
Book.
You can hit a Quote from the following screens:

Market Watch
Trading Book
Trading Seclend – Received tab
Quote Book Seclend – Received tab
Market Watch screen
To hit a Quote from Market Watch screen, refer to section 10.1.3.1
Trading Book
To hit a Quote from the Trading Book screen, refer to section 10.1.3.2
Trading- Received Tab
To hit a Quote from Trading - Received screen:
Select the row for which you want to hit a Quote and right-click. The Quick
Action Utility appears as displayed in following figure.
Figure 469 : Quick Action Utility
Quote Book – Received Tab
To hit a Quote from Trading - Received screen:
Select the row for which you want to hit a Quote and right-click. The Quick
Action Utility appears as displayed in following figure.

Figure 470 : Hit Quote - Quote Book

10.2.2 To Maintain an Addressed Offer
You can maintain an Addressed Offer from Trading menu. To maintain an AO, proceed as follows:
1. On the Trading menu, click Trading under SECLEND. The Trading overlay appears as
displayed in following figure.
Figure 471 : Trading - Seclend
2. Select the AO checkbox and right-click on the selected AO. The Quick Action Utility appears
as displayed in following figure.

Figure 472 : Quick Action Utility
3. You can perform the following on the selected Offer:
Delete Quote
Show Properties
Copy to New Quote/ AO/ IOI
To Delete an AO
To delete an AO, proceed as follows:
1. Click the icon. The confirmation message “Delete Selected Items” appears on screen.
2. Click OK to proceed, a message ‘AO deleted successfully::ID - XXXXX’ is displayed, or
Cancel to discard the action.

To View Properties
To view the properties of an AO, Proceed as follows:
1. Click the icon. The Addressed Offer Properties overlay appears as displayed in
following figure.
Figure 473 : Addressed Offer Properties overlay
To Copy to New
An existing AO can be copied to a new Quote/ AO/ IOI. Click on the icon to open the corresponding screen for Quote/ AO/ IOI. You may change the parameters within this overlay before submitting the pre trade action
10.2.3 To Respond to an Addressed Offer
When you receive an Address Offer, it is displayed in Offer Received under Notifications
screen. To respond to an Addressed Offer, you can
Accept an Addressed Offer
Reject an Addressed Offer
Counter an Addressed Offer

Note: If you do not respond to an Addressed Offer, it will automatically be deleted at the latest
once the expiry time defined by the sender of the Addressed Offer has elapsed.
To respond to an Addressed Offer, proceed as follows:
1. Click Received Offer tab under Notifications. All the received Offers are displayed.
2. Click the particular notification link of Offer Received. Addressed Offer overlay appears
as displayed in following figure. You can accept, reject or send a Counter Offer for the
Offer received.
Figure 474 : To Respond to an Addressed Offer
3. To accept an Addressed Offer received, click ACCEPT. The message ‘Trade generated
successfully with Trade Id: XXXX’ is displayed.
4. To reject an Addressed Offer, click REJECT. The message ‘Offer rejected successfully’ is
displayed.
5. To send a Counter Offer for the Addressed Offer received, proceed as follows:
i. Click COUNTER OFFER. A Counter Offer – SECLEND overlay appears as displayed
in following figure.

Figure 475 : Counter Offer – SECLEND overlay
ii. All fields which can be modifiable are enabled in Enter Counter Offer screen.
iii. Click SUBMIT. A message ‘Offer sent successfully:: XXXXX’ is displayed.
10.3 Managing Indication of Interest
An Indication of Interest (IOI) is a non-binding Offer sent to all or selected participantsThe recipients can
respond to an IOI by sending an AO.
10.3.1 To Enter an Indication of Interest
You can enter an IOI in the following ways:
To enter an IOI from scratch
To enter an IOI from existing trading objects
10.3.1.1 To Enter an Indication of Interest from Scratch
You can enter an IOI from scratch using the following method:
To enter an Indication of Interest (IOI) from Trading menu
10.3.1.1.1 To Enter an Indication of Interest from Trading Menu

To enter an Indication of Interests (IOI), proceed as follows:
1. On the Trading menu, click Enter IOI under SECLEND. The Enter
Indication of INTEREST - SECLEND screen appears as displayed in
following figure.
Figure 476 : Enter Indication of Interest - SECLEND
2. Enter the field details in the Enter Indication of Interest – SECLEND
screen. For more information on fields refer to Section 12.2 .
3. Click SUBMIT after filling all the fields. A message ‘IOI entered
successfully:: XXXXX Total IOI Entered :: 1’ is displayed where XXXXX
is unique identification number for the IOI submitted.
Note: If you click SUBMIT more than once on same Enter Indication of Interest
screen, then multiple IOIs are entered and the latest IOI identification number is
displayed. For example, if you click SUBMIT three times, a message ‘Offer entered
successfully:: XXXXX Total IOI Entered :: 3’ is displayed.
10.3.1.1.2 To Enter an Indication of Interest from Existing Trading Objects

You can enter an IOI from the existing trading objects which are as follows:
Copy to New from Trading Sent, Trading Received, Trading Book and
Quote Book screens.
You can right-click on any pre trading object, point to Copy To New option,
and different copy to options will get displayed. Select IOI.
Figure 477 : Indication of Interest - SECLEND
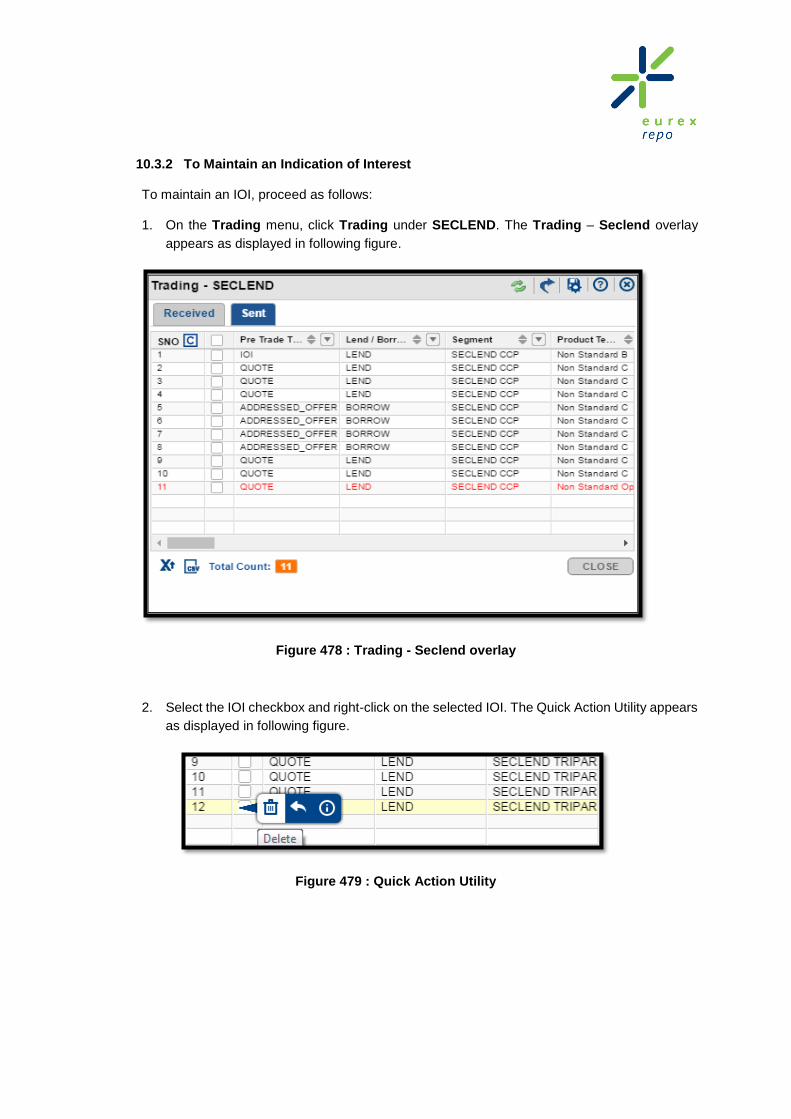
10.3.2 To Maintain an Indication of Interest
To maintain an IOI, proceed as follows:
1. On the Trading menu, click Trading under SECLEND. The Trading – Seclend overlay
appears as displayed in following figure.
Figure 478 : Trading - Seclend overlay
2. Select the IOI checkbox and right-click on the selected IOI. The Quick Action Utility appears
as displayed in following figure.
Figure 479 : Quick Action Utility

3. You can perform the following functionalities on the selected IOI:
Delete IOI
Show Properties
Copy to New Quote/ AO/ IOI / RFQ
To Delete an IOI
To delete an IOI, proceed as follows:
1. Click the icon. The confirmation message “Delete Selected Items” appears on screen.
2. Click Yes to proceed, a message ‘IOI deleted successfully :: ID - xxxxxx’ is displayed,
or No to discard the action.
To View Properties
To view the properties of an IOI, proceed as follows:
1. Click the icon. The IOI Properties overlay appears. Refer to point no 13.3
To Copy to New
An existing AO can be copied to a new Quote/ AO/ IOI / RFQ. Click on the icon to open the
corresponding screen for Quote/ AO/ IOI / RFQ. You may change the parameters within this
overlay before submitting the pre trade action
10.3.3 To Respond to an Indication of Interest
All the IOIs received are displayed in Received IOI tab under Notifications screen.
To respond to the IOI received, proceed as follows:
1. Click Received IOI tab under Notifications. All the received IOIs are displayed in following
format displayed under section 10.3.1.1.2 .
2. Click the particular notification link of IOI Received for which you want to respond. Enter
Addressed Offer – SECLEND screen appear as displayed in following figure.

Figure 480 : Hit an IOI - Address Offer - SECLEND overlay
3. Enter other fields as required (All mandatory fields need to be provided if not already present
in IOI).
4. Click SUBMIT. The message ‘Offer entered successfully’ is displayed.

11. Managing Post Trading Services
This chapter explains how to manage post trading services that is, managing loans in Eurex Repo F7
GUI.
11.1 Manage Loan
You can modify and delete the loan generated, depending on your permission rights. Thus, managing
loans includes the following:
To Modify a Loan
To Cancel a Loan
11.1.1 To Modify a Loan
While modifying a loan, the loan details you can modify are as follows:
Modify Lending fee
Modify Dividend/Coupon
Partial return / recall
Full return recall
Modify Interest
Modify Fee Basis Amount
Within the context of loan modification, there are three possible actions.
To Send a Loan Modification Request
To Respond to Loan Modification Request
To Delete Loan Modification Request(s)
11.1.1.1 To Send a Request to Modify a Loan
You can modify a loan from the Show Loans screen from the Post Trade menu or from the Own Loans screen on the Landing Page.
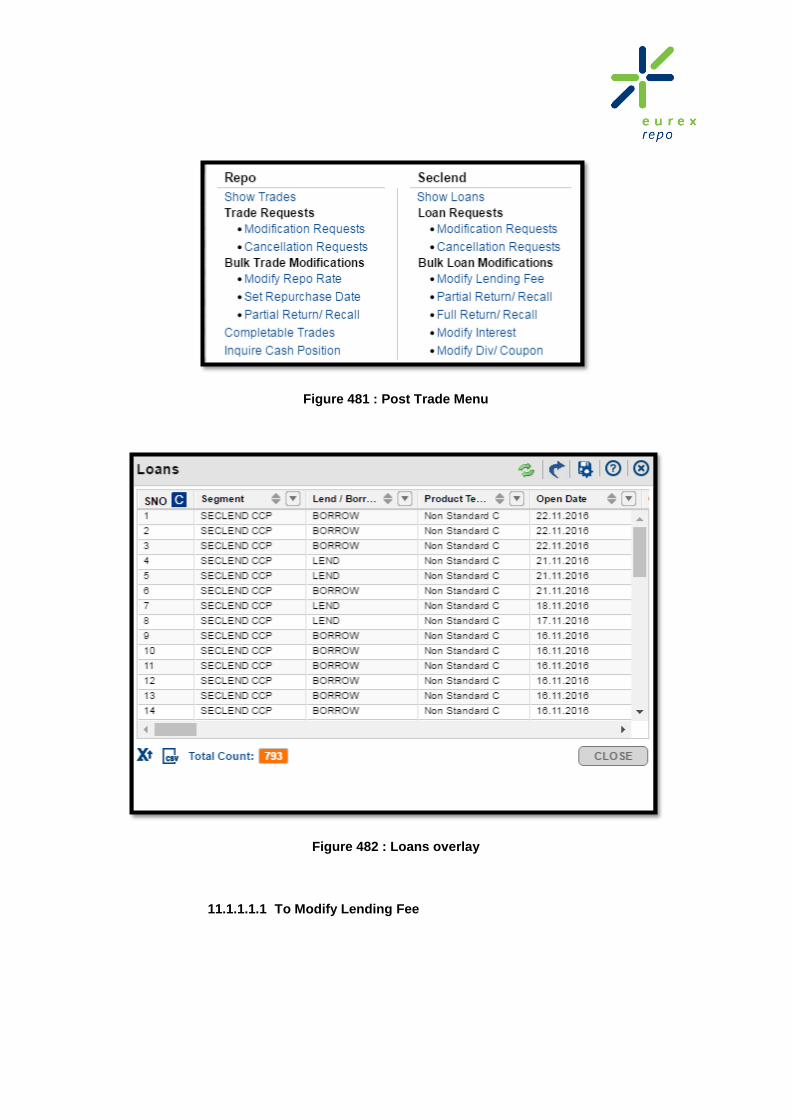
Figure 481 : Post Trade Menu
Figure 482 : Loans overlay
11.1.1.1.1 To Modify Lending Fee

You can modify lending fee of the loans generated.
To modify the lending fee, proceed as follows:
1. Select the loan you want to modify from Own Loans screen or Loans overlay.
2. Right-click the selected loan. Quick Action Utility appears as displayed in
following figure.
Figure 483 : Quick Action Utility - Loans
3. Click the icon to modify the lending fee. Loan Modification: Modify
Lending Fee overlay appears as displayed in following figure.
Figure 484 : Loan Modification- Modify Lending Fee
4. Current Value displays the existing value of the Lending Fee you are about to
modify. Enter the new Lending Fee in New Value.
5. Select the date from Effective Date calendar icon.
6. Click SUBMIT to submit the loan modification requests. A message
‘Modification request created Successfully with Id : xxxxxx’ appears on the
screen.
7. Click CLOSE to close the Trade Modification overlay.

11.1.1.1.2 To Modify Dividend/Coupon
To modify the dividend/coupon, proceed as follows:
1. Select the loan you want to modify from Own Loans screen or Loans overlay.
2. Right-click the selected loan. Quick Action Utility appears as displayed in
following figure.
Figure 485 : Quick Action Utility - Loans
3. Click the icon to modify the dividend/coupon. Loan Modification: Modify
Dividend/Coupon overlay appears as displayed in following figure.
Figure 486 : Loan Modification-Modify Dividend/Coupon
4. Current Value displays the existing value of the Div/ Coupon you are about to
modify Enter the new Div/ Coupon rate in New Value.
5. Click SUBMIT to submit the loan modification request. A message
‘Modification request created Successfully with Id : xxxxxx’ appears on the
screen.
6. Click CLOSE to close the Loan Modification overlay.
11.1.1.1.3 To do a Partial Return/Recall

To perform the partial return/recall, proceed as follows:
1. Select the loan you want to modify from Own Loans screen or Loans overlay.
2. Right-click the selected loan. Quick Action Utility appears as displayed in
following figure.
Figure 487 : Quick Action Utility - Loans
3. Click the icon to modify the partial return/recall. Loan Modification: Partial
Return/Recall overlay appears as displayed in following figure.
Figure 488: Loan Modification- Partial Return/Recall
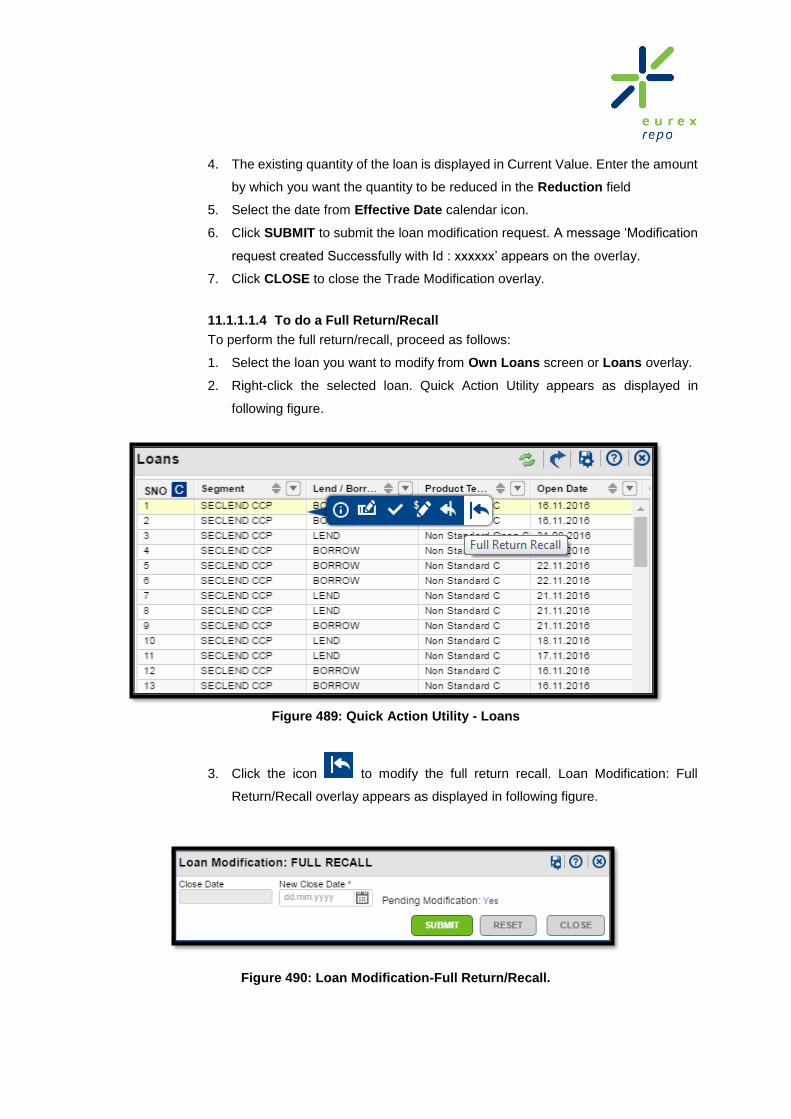
4. The existing quantity of the loan is displayed in Current Value. Enter the amount
by which you want the quantity to be reduced in the Reduction field
5. Select the date from Effective Date calendar icon.
6. Click SUBMIT to submit the loan modification request. A message ‘Modification
request created Successfully with Id : xxxxxx’ appears on the overlay.
7. Click CLOSE to close the Trade Modification overlay.
11.1.1.1.4 To do a Full Return/Recall
To perform the full return/recall, proceed as follows:
1. Select the loan you want to modify from Own Loans screen or Loans overlay.
2. Right-click the selected loan. Quick Action Utility appears as displayed in
following figure.
Figure 489: Quick Action Utility - Loans
3. Click the icon to modify the full return recall. Loan Modification: Full
Return/Recall overlay appears as displayed in following figure.
Figure 490: Loan Modification-Full Return/Recall.

4. Select the New Close Date from calendar icon.
5. Click SUBMIT to submit the loan modification request. A message ‘Modification
request created Successfully with Id : xxxxxx’ appears on the screen.
6. Click CLOSE to close the Loan Modification overlay.
11.1.1.1.5 To Modify Loan Interest
You can modify interest rate of the Loans generated as below:
1. Select the loan you want to modify from Own Loans screen or Loans overlay.
2. Right-click the selected loan. Quick Action Utility appears.
3. Click the icon to modify the Interest. Loan Modification: Interest rate overlay
appears as displayed in following figure.
Figure 491: Loan Modification- Modify Interest
4. The existing value of interest on the loan is displayed under Current Value. Enter
the new rate in New Value.
5. Select the date from Effective Date calendar icon.
6. Click SUBMIT to submit the trade modification requests. A message
‘Modification request created Successfully with Id: xxxxxx’ appears on the
screen.
7. Click CLOSE to close the Trade Modification overlay.
11.1.1.1.6 To Modify Fee Basis Amount

You can modify fee basis amount of the loans generated.
To modify fee basis amount, proceed as follows:
1. Select the loan you want to modify from Own Loans screen or Loans overlay.
2. Right click the selected loan. Quick Action Utility appears as displayed in Figure.
Figure 492: Quick Action Utility
3. Click on icon to modify fee basis amount. Loan Modification: Modify
Fee Basis Amount overlay appears as
Figure 493 : Loan Modification: Modify Fee Basis Amount (a)
4. The existing value of fee basis amount of the loan is displayed under Current
Value. Enter the new fee basis amount in New Value.
Figure 494 : Loan Modification: Modify Fee Basis Amount (b)

5. Click SUBMIT to submit the loan modification request. A message
‘Modification request created Successfully with Id: xxxxxx’ appears on the
screen.
6. Click CLOSE to close the Loan Modification overlay.
11.1.1.1.7 To Respond to Loan Modification Requests
In responding to loan modification requests, you can:
Accept a Loan Modification Request
Reject a Loan Modification Request
11.1.1.1.8 To Accept a Loan Modification Request
To accept a loan modification request, proceed as follows:
1. On the Eurex Repo F7 GUI, click Post Trade menu.
Figure 495 : Post Trade Menu
2. Click Modification Requests under Loan Requests in Seclend. Loan
Modification Request overlay appears as displayed in following figure.

Figure 496 : Loan Modification Requests
3. Select the checkbox of the modification request you want to accept from
the Received tab.
4. Click ACCEPT to accept the modification request. A confirmation message
‘Accept modification request’ appears on screen.
5. Click Yes to confirm.
The modification request is accepted.
11.1.1.1.9 To Reject a Loan Modification Request

To reject a loan modification request, proceed as follows:
1. On the Eurex Repo F7 GUI, click Post Trade menu.
Figure 497 : Post Trade Menu
2. Click Modification Requests under Loan Requests in Seclend. Loan
Modification Request overlay appears.
3. Click Received tab. All the modification requests received are displayed
here.
4. Select the checkbox of the modification request you want to reject.
5. Click REJECT to reject the modification request. A confirmation message
‘Reject modification request’ appears on the screen.
6. Click Yes to confirm.
The modification request is rejected.
11.1.1.1.10 To Delete a Loan Modification Request
To delete a loan modification request sent, proceed as follows:
Note: You can delete only the modification requests sent by you and not the ones sent by your co-workers.
1. On the Eurex Repo F7 GUI, click Post Trade menu.

Figure 498 : Post Trade Menu
2. Click Modification Requests under Loan Requests in Seclend. Loan
Modification Request overlay appears as displayed in following figure.
Figure 499 : Loan Modification Request
3. Under Requested tab, select the checkbox of one or more modification
requests you want to delete.
4. Right-click on the selected checkbox and click DELETE to delete the
modification request(s) received. A confirmation message ‘Delete
selected requests’ appears on the screen.
5. Click Yes to confirm.

The selected request(s) are deleted from the senders Loan Modification
Request - Requested tab and recipient’s Loan Modification Request –
Received tab.
11.1.2 To Cancel a Loan
Within the context of loan cancellation, following are the three possible actions:
To Send a Loan Cancellation Request
To Respond to a Loan Cancellation Request
To Delete Loan Cancellation Request(s)
11.1.2.1 To Send a Loan Cancellation Request
You can cancel a loan from the Show Loans screen under the Post Trade menu or
from the Own Loans screen on the Landing Page.
Figure 500 : Post Trade Menu

Figure 501 : Loans overlay
To send a request for cancellation of loan, proceed as follows:
1. Select the loan you want to modify from Own Loans screen or Loans overlay.
2. Right-click the selected loan. Quick Action Utility appears as displayed in
following figure.
Figure 502 : Quick Action Utility-Cancel Loan

3. Click the Cancel Loan icon. Cancel Loan overlay appears as displayed in
following figure.
Figure 503 : Cancel Loan overlay
4. Enter the reason for cancellation (which is mandatory) of loan in Cancellation
Reason.
5. Click SUBMIT. A message ‘Cancellation request created Successfully with
Id : xxxxxxx’ appears on the screen.
6. Click CLOSE to close the overlay.
11.1.2.2 To Respond to a Loan Cancellation Requests
In responding to loan cancellation requests, you can:
Accept a Loan Cancellation Request
Reject a Loan Cancellation Request
11.1.2.2.1 To Accept a Loan Cancellation Request
To accept a loan cancellation request, proceed as follows:
1. Navigate to the Notifications Received Trd Mod/ Cancel tab and click on
the desired request. This will invoke the Loan cancellation requests screen
as displayed in following figure, with the request highlighted. Right click on
the row to view the Quick Action Utility.

Figure 504 : Loan Cancellation Request overlay
Figure 505 : Quick Action Utility
2. Click icon to accept the cancellation request. A confirmation message
‘Accept selected request’ is displayed.
3. Click Yes to confirm.
The cancellation request is accepted and the loan is cancelled.
11.1.2.2.2 To Reject a Loan Cancellation Request
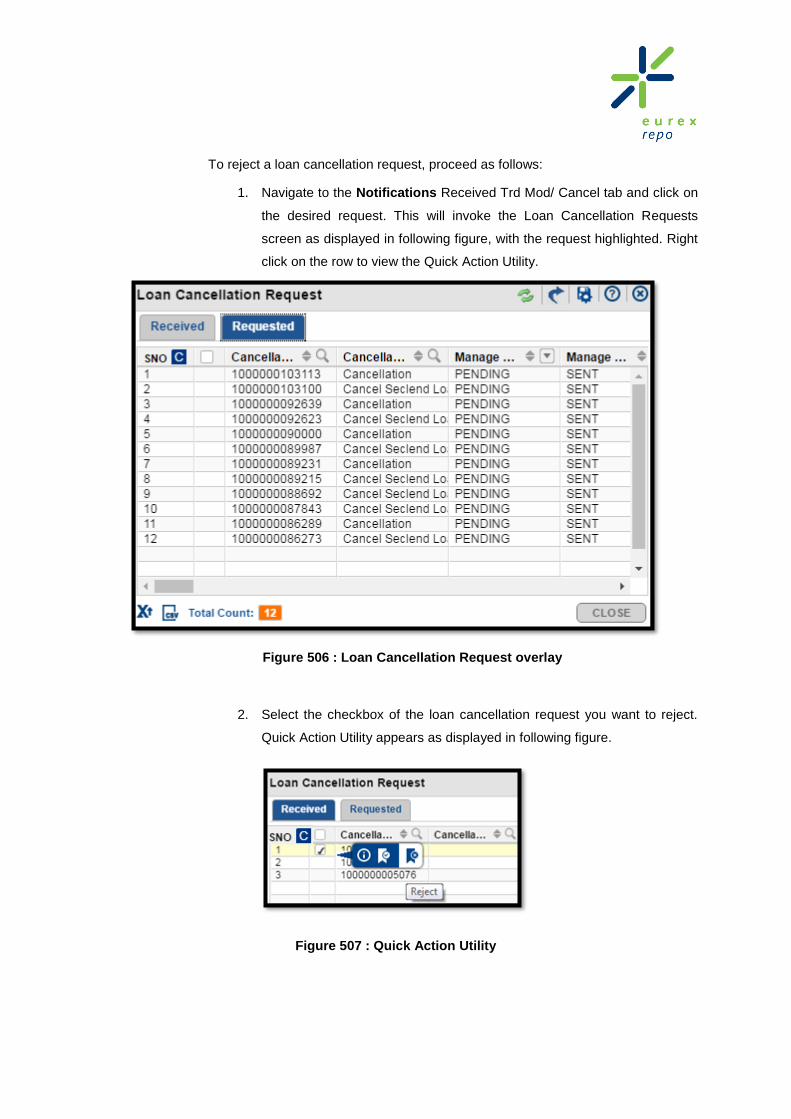
To reject a loan cancellation request, proceed as follows:
1. Navigate to the Notifications Received Trd Mod/ Cancel tab and click on
the desired request. This will invoke the Loan Cancellation Requests
screen as displayed in following figure, with the request highlighted. Right
click on the row to view the Quick Action Utility.
Figure 506 : Loan Cancellation Request overlay
2. Select the checkbox of the loan cancellation request you want to reject.
Quick Action Utility appears as displayed in following figure.
Figure 507 : Quick Action Utility

3. Click icon to reject the cancellation request. A confirmation message
‘Reject selected request’ is displayed.
4. Click Yes to confirm.
5. The cancellation request is rejected.
11.1.2.2.3 To Delete Loan Cancellation Request(s)
You can only delete the cancellation requests sent by you and not the ones sent by your
co-workers.
To delete a loan cancellation request sent, proceed as follows:
1. Navigate to the Notifications Sent Trd Mod/ Cancel tab and click on the
desired request. This will invoke the Loan cancellation requests screen as
displayed in following figure, with the request highlighted. Right click on the
row to view the Quick Action Utility.
Figure 508 : Loan Cancellation Request overlay
2. Right-click on the selected cancellation requests and click DELETE to delete
them. A confirmation message ‘Delete selected requests’ appears on the
screen.
3. Click Yes to confirm.

The selected request(s) are deleted from the senders Loan Cancellation Request -
Requested tab and recipient’s Loan Cancellation Request – Received tab.

12. Entry screens
This chapter describes all the entry screens in the Eurex Repo F7 GUI under the Seclend functionality.
The following are the entry screens or the overlays in the application:
Enter Quote - SECLEND screen
Enter Indication of Interest - SECLEND screen
Enter Offer – SECLEND screen
12.1 Enter Quote – SECLEND screen
Use the Enter Quote – SECLEND screen to create and send a Quote. Quotes are displayed in the
Market Watch screen, Trading Book, Quote Book and on the Trading overlay. The Enter Quote –
SECLEND screen is displayed in following figure.
Figure 509 : Enter Quote-Seclend screen
Components The components in the Enter Quote - SECLEND screen are as follows:
Table 21: Enter Quote – SECLEND Components Description

S. No Field
Name
Description
1 Product Term Combination*
Select Product-Term Combination by clicking the icon. A Product - Term
combination dialog box appears displaying all the Product terms for the selected Term/ Segment. Choose a Product - Term combination and click the SELECT
option at the lower right corner of the dialog box.
2 Segment* You can choose the Segment in which you wish to trade. The Segment dropdown
is populated based on the Term/ Product term selected.
Note: You can choose to begin with any one of the two fields (product term or Segment) and the available values in the other two fields are filtered according to the values chosen in the first field.
3 Open Date* The Open Date is automatically displayed for standard products. For Non Cash
collateral products, it is displayed after you select the product term. Whereas for
cash Collateral products it is displayed only after you select the currency
Note: Only for Non Standard term, the date is editable and you can select the date
from the calendar icon. However, for standard terms, this field is automatically filled
and is non-editable.
4 Close Date The Close Date is automatically displayed for standard products. For Non Cash
collateral products, it is displayed after you select the product term; whereas for
Cash Collateral products, it is displayed only after you select the currency.
Note: Only for Non Standard term, the date is editable and you can select the date
from the calendar icon. However, for standard terms, this field is automatically filled and is non-editable.
5 Collateral Type
The Collateral Type is displayed automatically. It can be Currency, Basket or
Security, depending upon the Product term selected.
6 Rebate Select Rebate checkbox if you want to create a rebate Quote.
Note: You can specify Rebate rate only in case of cash Collateral
7 Lend
Borrow
Select Lend if you want to lend a security or
Borrow if you want to borrow a security.
8 Underlying Loan Security/ Basket
Select Underlying Loan Security/ Basket by clicking the icon. Select Basket
overlay appears. Select the appropriate basket and click SELECT BASKET.
9 Loan Security/ Basket
Select Loan Security/ Basket by clicking the icon. Select Security overlay
appears. Select the appropriate security and click SELECT SECURITY.
10 Quantity* Enter the loan quantity in Quantity. This is a nominal value for bonds or a number of units for shares.
11 Min Take Quantity
Enter the minimum loan quantity in Min Take Quantity.

12 Total Quantity
Enter the total loan quantity in case of Iceberg Quotes, in Total Quantity.
Note: Total Quantity should be greater than Quantity entered.
13 Fee Currency*
Select the Fee Currency from the drop-down list. In case of Cash Collateral, Fee
Currency is the same as Collateral Currency
14 Min Fee Enter the minimum lending fee in Min Fee that will apply if the amount calculated
based on the fee percentage is lower.
15 Fee Enter the fee percentage in Fee to apply when calculating the lending fee.
Note: If you enter Rebate Rate and it is positive, Fee is equal to the rebate rate. If Rebate Rate is negative Fee is equal to zero.
16 Div/ Coupon Enter the dividend or coupon rate in Div/ Coupon to apply to the selected loan security.
17 Underlying Collateral
Select Underlying Collateral by clicking the icon. Select Basket overlay
appears. Select the appropriate basket and click SELECT BASKET.
Note: Underlying Collateral is enabled only if collateral type is Security.
18 Collateral* Select Collateral by clicking the icon. Select Basket overlay appears. Select
the appropriate basket and click SELECT BASKET.
19 Rebate Rate Enter the rebate rate in Rebate Rate. You can enter a positive value (equals the
netted lending fee the borrower pays the lender), negative value (equals the netted interest on the cash collateral the lender pays the borrower) or zero
Note: Rebate Rate is enabled only if you select Rebate checkbox. Fee and Interest fields are disabled in this case.
20 Interest The Interest is displayed automatically. .
Interest is the positive value of rebate rate, if the rebate rate is a negative
value.
Note: It is only enabled if the Collateral Type is Currency.
21 Index Select the Index from the drop-down list. You can select an Index if the Interest
Fee Type is Floating or Negotiable. In case of negotiable, there is an additional value ‘None’ populated along with the list of valid index values. If you select ‘None’ it would imply setting the Interest fee Type of the Quote as FIXED
22 Haircut/ Markup
Enter the Haircut/ Markup to apply to the collateral in Haircut/ Markup. If it is a
haircut or a markup will depend upon the values of margin ratio type in the product term selected.
23 Instruction Ref Description
Select the appropriate Instruction Ref Description from the drop-down list. It has
account details used in settlement
24 Bank Internal Reference
In Bank Internal Reference field, enter the necessary details of the bank through
which transactions related to the loan are done.

25 Beneficial Owner
Select an appropriate Beneficial Owner from the drop-down list.
Note: Beneficial Owner is a mandatory field for Agents. If you have both the roles
– Principal and agent, then the role used in entering the trading object is decided based on the whether you choose to enter a Beneficial Owner
26 Recipients Select the Recipients by clicking the icon. The recipients dialog box is
displayed. It has two boxes, namely, Recipients and Selected Recipients.
In the Recipients box, a search option is provided. You can search and select the
list/member and click + ADD TO SELECTION. Now, the list/member you selected
appears in Selected Recipients box.
To remove the list/member from the Selected Recipients box, select the
list/member and click - REMOVE SELECTED.
After adding the appropriate recipient, click ACCEPT PROCEED.
27 Free Text You can add comments in FREE TEXT for your reference.
28 Fee Basis Amount
Enter the Lending fee basis amount in Fee Basis Amount.
Note: Fields marked with red asterisk * are mandatory fields.
There are other attributes like FOK, Iceberg, Terminable, Substitutable, Reuse, Additional Information, but
they haven’t been described here again, as their behaviour is the same as described under section 6.1
12.2 Indication of Interest – SECLEND screen
Use the Indication of Interest – REPO screen to send a non-binding interest to all or selected trading
members.
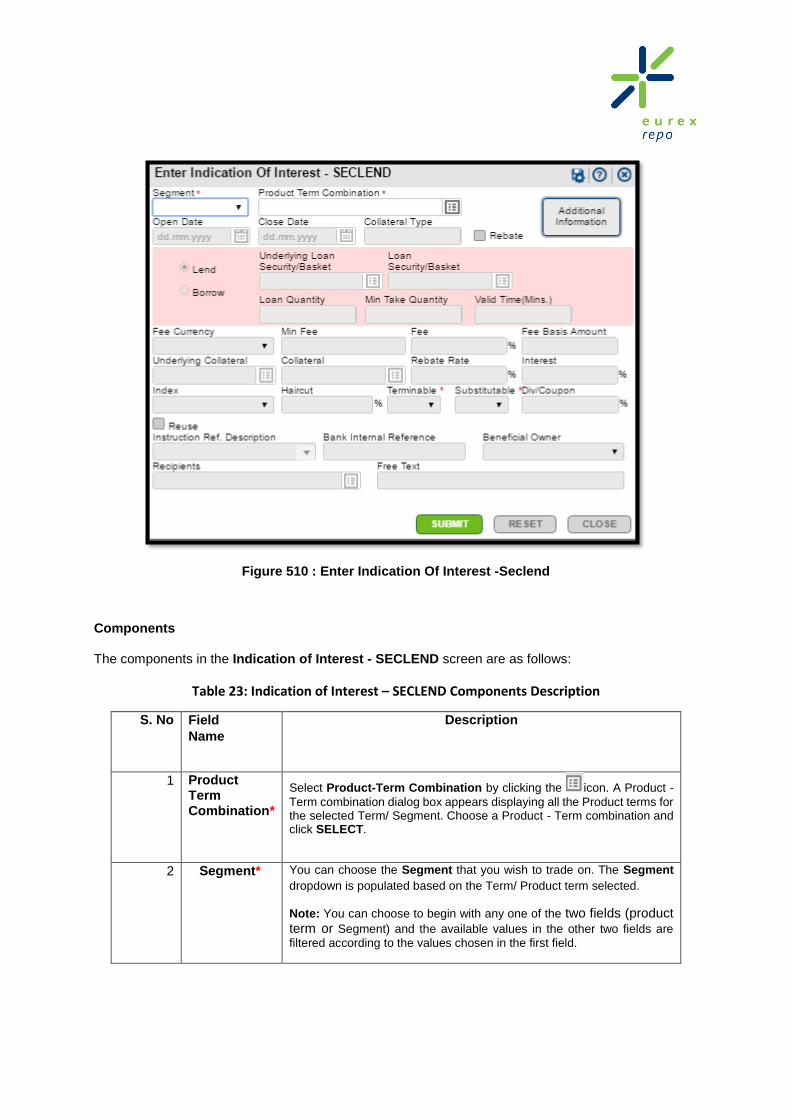
Figure 510 : Enter Indication Of Interest -Seclend
Components The components in the Indication of Interest - SECLEND screen are as follows:
Table 23: Indication of Interest – SECLEND Components Description
S. No Field
Name
Description
1 Product Term Combination*
Select Product-Term Combination by clicking the icon. A Product -
Term combination dialog box appears displaying all the Product terms for the selected Term/ Segment. Choose a Product - Term combination and click SELECT.
2 Segment* You can choose the Segment that you wish to trade on. The Segment
dropdown is populated based on the Term/ Product term selected.
Note: You can choose to begin with any one of the two fields (product term or Segment) and the available values in the other two fields are
filtered according to the values chosen in the first field.

3 Open Date The Open Date is automatically displayed for standard products. For Non
Cash collateral products, it is displayed after you select the product term.
Whereas for cash Collateral products it is displayed only after you select
the currency
Note: Only for Non Standard term the date is editable and you can select
the date from calendar icon. But for standard terms this field is
automatically filled and is non editable.
4 Close Date The Close Date is automatically displayed for standard products. For Non
Cash collateral products, it is displayed after you select the product term.
Whereas for cash Collateral products it is displayed only after you select
the currency
Note: Only for Non Standard term the date is editable and you can select
the date from calendar icon. But for standard terms this field is automatically filled and is non editable.
5 Collateral Type
The Collateral Type is displayed automatically. It can be Currency,
Basket or Security, depending upon the Product term selected
6 Rebate Select Rebate checkbox if you want to create a rebate Quote.
Note: You can specify Rebate rate only in case of cash Collateral
7 Lend
Borrow
Select Lend if you want to lend a security or
Borrow if you want to borrow a security.
8 Underlying Loan Security/ Basket
Select Underlying Loan Security/ Basket by clicking the icon.
Select Basket overlay appears. Select the appropriate basket and click
SELECT BASKET.
9 Loan Security/ Basket
Select Loan Security/ Basket by clicking the icon. Select Security overlay appears. Select the appropriate security and click SELECT SECURITY.
10 Quantity Enter the loan quantity in Quantity. This is a nominal value for bonds or a number of units for shares.
11 Min Take Quantity
Enter the minimum loan quantity in Min Take Quantity.
12 Valid Time (Mins.)
Enter the expiry time in minutes. The IOI will expire in that many minutes after it was created
13 Fee Currency Select the Fee Currency from the drop-down list. In case of Cash
Collateral, Fee Currency is the same as Collateral Currency
14 Min Fee Enter the minimum lending fee in Min Fee that will apply if the amount
calculated based on the fee percentage is lower.

15 Fee Enter the fee percentage in Fee to apply when calculating the lending fee.
Note: If you enter Rebate Rate and it is positive, Fee is equal to the rebate rate. If Rebate Rate is negative Fee is equal to zero.
16 Div/ Coupon Enter the dividend or coupon rate in Div/ Coupon to apply to the selected loan security.
17 Underlying Collateral
Select Underlying Collateral by clicking the icon. Select Basket
overlay appears. Select the appropriate basket and click SELECT
BASKET.
Note: Underlying Collateral is enabled only if collateral type is Security.
18 Collateral Select Collateral by clicking the icon. Select Basket overlay appears.
Select the appropriate basket and click SELECT BASKET.
19 Rebate Rate Enter the rebate rate in Rebate Rate. You can enter a positive value
(equals the netted lending fee the borrower pays the lender), negative value (equals the netted interest on the cash collateral the lender pays the borrower) or zero
Note: Rebate Rate is enabled only if you select Rebate checkbox. Fee and Interest fields are disabled in this case.
20 Interest The Interest is displayed automatically. .
Interest is the positive value of rebate rate, if the rebate rate is
a negative value.
Note: It is only enabled if the Collateral Type is Currency.
21 Index Select the Index from the drop-down list. You can select an Index if the
Interest Fee Type is Floating or Negotiable. In case of negotiable, there is an additional value ‘None’ populated along with the list of valid index values. If you select ‘None’ it would imply setting the Interest fee Type of the Quote as FIXED
22 Haircut/ Markup
Enter the Haircut/ Markup to apply to the collateral in Haircut/ Markup. If
it’s a haircut or a markup will depend upon the values of margin ratio type in the product term selected.
23 Instruction Ref Description
Select the appropriate Instruction Ref Description from the drop-down
list. It has account details used in settlement

24 Instruction Ref Description
Select the appropriate Instruction Ref Description from the drop-down
list. It has account details used in settlement
25 Bank Internal Reference
In Bank Internal Reference field, enter the necessary details of the bank
through which transactions related to the loan are done.
26 Beneficial Owner
Select an appropriate Beneficial Owner from the drop-down list.
Note: Beneficial Owner is a mandatory field for Agents. If you have both
the roles – Principal and Agent, then the role used in entering the trading
object is decided based on the whether you choose to enter a Beneficial
Owner
27 Recipients Select the Recipients by clicking the icon . Recipients dialog box is
displayed. It has two boxes, namely, Recipients and Selected
Recipients.
In the Recipients box, a search option is provided. You can search and
select the list/member and click + ADD TO SELECTION. Now, the
list/member you selected appears in Selected Recipients box.
To remove the list/member from the Selected Recipients box, select the
list/member and click - REMOVE SELECTED.
After adding the appropriate recipient, click ACCEPT PROCEED.
28 Fee Basis Amount
Enter the Lending fee basis amount in Fee Basis Amount.
Note: Fields marked with red asterisk * are mandatory fields.
There are other attributes like Terminable, Substitutable, Reuse, Additional Information, but
they have not been described here again, as their behaviour is the same as described in
section 6.1

12.3 Enter Addressed Offer – SECLEND screen
Use the Enter Addressed Offer – Seclend screen to send a binding Offer to the selected members.
To send an Addressed Offer, you must first have a counterparty agreement in place with the receiving
member
Figure 511 : Enter Addressed Offer - Seclend screen
Components The components in the Addressed Offer - SECLEND screen are as follows:
Table 24: Addressed Offer – SECLEND Components Description.

S. No Field
Name
Description
1 Product Term Combination*
Select Product-Term Combination by clicking the icon. A Product -
Term combination dialog box appears displaying all the Product terms for the selected Term/ Segment. Choose a Product - Term combination and click SELECT.
2 Segment* You can choose the Segment that you wish to trade on. The Segment
dropdown is populated based on the Term/ Product term selected.
Note: You can choose to begin with any one of the two fields (product term or Segment) and the available values in the other two fields are
filtered according to the values chosen in the first field.
3 Open Date The Open Date is automatically displayed for standard products. For Non
Cash collateral products, it is displayed after you select the product term.
Whereas for cash Collateral products it is displayed only after you select
the currency.
Note: Only for Non Standard term the date is editable and you can select
the date from calendar icon. But for standard terms this field is
automatically filled and is non editable.
4 Close Date The Close Date is automatically displayed for standard products. For
Non Cash collateral products, it is displayed after you select the product
term. Whereas for cash Collateral products it is displayed only after you
select the currency
Note: Only for Non Standard term the date is editable and you can select
the date from the calendar icon. But for standard terms this field is automatically filled and is non editable.
5 Collateral Type
The Collateral Type is displayed automatically. It can be Currency,
Basket or Security, depending upon the Product term selected
6 Rebate Select Rebate checkbox if you want to create a rebate Quote.
Note: You can specify Rebate rate only in case of Cash Collateral
7 Lend
Borrow
Select Lend if you want to lend a security or
Borrow if you want to borrow a security.
8 Underlying Loan Security/ Basket
Select Underlying Loan Security/ Basket by clicking the icon.
Select Basket overlay appears. Select the appropriate basket and click
SELECT BASKET.
9 Loan Security/ Basket*
Select Loan Security/ Basket by clicking the icon. Select Security overlay appears. Select the appropriate security and click SELECT SECURITY.

10 Quantity* Enter the loan quantity in Quantity. This is a nominal value for bonds or a number of units for shares.
11 Min Take Quantity
Enter the minimum loan quantity in Min Take Quantity.
12 Valid Time (Mins.)
Enter the expiry time in minutes. The IOI will expire in that many minutes after it was created
13 Fee Currency*
Select the Fee Currency from the drop-down list. In case of Cash
Collateral, Fee Currency is the same as Collateral Currency.
14 Min Fee Enter the minimum lending fee in Min Fee that will apply if the amount
calculated based on the fee percentage is lower.
15 Fee* Enter the fee percentage in Fee to apply when calculating the lending
fee.
Note: If you enter Rebate Rate and it is positive, Fee is equal to the rebate rate. If Rebate Rate is negative Fee is equal to zero.
16 Div/ Coupon Enter the dividend or coupon rate in Div/ Coupon to apply to the selected loan security.
17 Underlying Collateral
Select Underlying Collateral by clicking the icon. Select Basket
overlay appears. Select the appropriate basket and click SELECT
BASKET.
Note: Underlying Collateral is enabled only if collateral type is Security.
18 Collateral* Select Collateral by clicking the icon. Select Basket overlay
appears. Select the appropriate basket and click SELECT BASKET.
19 Rebate Rate Enter the rebate rate in Rebate Rate. You can enter a positive value
(equals the netted lending fee the borrower pays the lender), negative value (equals the netted interest on the cash collateral the lender pays the borrower) or zero
Note: Rebate Rate is enabled only if you select Rebate checkbox. Fee and Interest fields are disabled in this case.

20 Interest The Interest is displayed automatically. .
Interest is the positive value of rebate rate, if the rebate rate is
a negative value.
Note: It is only enabled if the Collateral Type is Currency.
21 Index Select the Index from the drop-down list. You can select an Index if the
Interest Fee Type is Floating or Negotiable. In case of negotiable, there is an additional value ‘None’ populated along with the list of valid index values. If you select ‘None’ it would imply setting the Interest fee Type of the Quote as FIXED.
22 Haircut/ Markup
Enter the Haircut/ Markup to apply to the collateral in Haircut/ Markup.
If it’s a haircut or a markup will depend upon the values of margin ratio type in the product term selected.
23 Instruction Ref Description
Select the appropriate Instruction Ref Description from the drop-down
list. It has account details used in settlement.
24 Instruction Ref Description
Select the appropriate Instruction Ref Description from the drop-down
list. It has account details used in settlement.
25 Bank Internal Reference
In Bank Internal Reference field, enter the necessary details of the bank
through which transactions related to the loan are done.
26 Beneficial Owner
Select an appropriate Beneficial Owner from the drop-down list.
Note: Beneficial Owner is a mandatory field for Agents. If you have both
the roles – Principal and agent, then the role used in entering the trading
object is decided based on the whether you choose to enter a Beneficial
Owner.
27 Recipients* Select the Counterparty for the AO by clicking the icon .Recipients
dialog box is displayed. It has two boxes, namely, Recipients and
Selected Recipients. Recipients can be selected only for non CCP
services for certain pre trade actions.
In the Select List/Members box, a search option is provided. You can
search and select the list/member and click + ADD TO SELECTION.
Now, the list/member you selected appears in Selected List/Members
box.
To remove the list/member from the Selected List/Member (s) box,
select the list/member and click - REMOVE SELECTED.
After adding the appropriate recipients click ACCEPT PROCEED.
Note that you can only choose a single member.

28 Fee Basis Amount
Enter the Lending fee basis amount in Fee Basis Amount.
Note: Fields marked with red asterisk * are mandatory fields.
There are other attributes like Terminable, Substitutable, Reuse, Additional Information, but they
have not been described here again, as their behaviour is the same as described in section 6.1
12.4 Enter Request for Quote-SECLEND screen
An RFQ has same contents and behavior as an IOI. The differentiating attribute is for RFQ’S the Recipient list cannot be empty. Otherwise the behaviour of a RFQ is the same as that of an IOI described in section 6.2 above. The screen for entering an RFQ is as displayed in following Figure.
Figure 512: Request For Quote- Seclend

13. Properties overlays
The Properties overlays display the properties of the trading objects. The following are the overlays:
Quote Properties overlay
Addressed Offer Properties overlay
IOI Properties overlay
Loan Properties overlay
Loan Modification Properties overlay
Loan Cancellation Properties overlay
13.1 Quote Properties overlay
The Quote Properties displays the properties of the Quote such as Security Size, Business Date,
Modification Date Time, Instruction Reference and so on.
To view the Quote properties, proceed as follows:
1. On the Eurex Repo F7 GUI, point to the Trading menu.
2. Click Trading under Seclend. Trading overlay appears. For more details, Refer Trading
overlay.
3. Select the Quote checkbox for which you want to view the properties from Trading overlay -
Sent tab.
4. Right-click the selected Quote. Quick Action Utility appears as displayed in the following
figure.
Figure 513 : Quick Action Utility
5. Click the icon. The Quote Properties overlay for the selected Quote appears as
displayed in following figure. You can also view of properties of received Quote in Trading
screen - Received tab.

Figure 514 : Quote Properties
Components:
The following are the Quote Properties overlay components:
Table 25: Quote Properties - Components
Components Descriptions
Click this icon to export data to excel.
Click this icon to export data to CSV.
Click this icon to export data for print.
13.2 Address Offer Properties overlay
The Addressed Offer Properties displays the properties of the AO such as Amount, Business Date,
Creation Date Time, Instruction Reference, Counterparty and so on.
Access
To view the Offer properties, proceed as follows:

1. On the Eurex Repo F7 GUI, point to the Trading menu.
2. Click Trading under Seclend. Trading overlay appears. It has two tabs, Sent and Received.
For more details, refer the Trading overlay.
3. Select the Offer checkbox for which you want to view the properties.
4. Right-click the selected Offer. Quick Action Utility appears as displayed following figure.
Figure 515 : Quick Action Utility
5. Click the icon. The Addressed Offer Properties overlay for the Offer selected appears
as displayed in following figure.
Figure 516 : Addressed Offer Properties overlay

Components:
The components on this screen remain the same as those under Table 24: Quote Properties within
Section 13.1
13.3 Indication of Interest Properties overlay
The Indication of Interest (IOI) Properties displays the properties of the IOI such as Amount, Business
Date, Creation Date Time, Instruction Reference and so on.
Access
To view the IOI properties, proceed as follows:
1. On the Eurex Repo F7 GUI, point to the Trading menu.
2. Click Trading under Seclend. Trading overlay appears. It has two tabs, Sent and Received.
For more details, refer Section 7.1.1.
3. Select the IOI checkbox for which you want to view the properties.
4. Right click the selected IOI. Quick Action Utility appears as displayed in following figure.
Figure 517 : Quick Action Utility
5. Click the icon. The IOI Properties overlay for the Offer IOI selected appears as displayed
in following figure.

Figure 518 : IOI Properties overlay
Components:
The components on this screen remain the same as those under Table 24: Quote Properties
within Section 13.1
13.4 Loan Properties overlay
The Loan Properties displays the properties of the Loan such as Offset, Fee Currency, Open Date, and
so on.
Access
To view the Loan properties, proceed as follows:
1. On the Eurex Repo Post Trade, point to the Post Trade menu.
2. Click Show Loans under Seclend. Loan overlay appears.
3. Select any Loan for which you want to view the properties.
4. Right-click the selected Loan. Quick Action Utility appears as displayed in following figure.

Figure 519: Quick Action Utility
5. Click the icon. The Loan Properties overlay for the selected trade appears as
displayed in following figure.
Figure 520: Loan Properties overlay
Components:
The components on this screen remain the same as those under Table 24: Quote Properties within
Section 13.1

13.5 Loan Modification Properties overlay
The Loan Properties displays the properties of the Loan such as Reason Code, Fee Currency, Open
Date, and so on.
Access
To view the Loan Modification properties, proceed as follows:
1. On the Eurex Repo Post Trade, point to the Post Trade menu.
2. Click Modifcation Requests under Seclend. Loan Modification Request overlay
appears.
3. Select any Modification Request for which you want to view the properties.
4. Right-click the selected trade. Quick Action Utility appears as displayed in following
figure.
Figure 521: Quick Action Utility
5. Click the icon. The Loan Modification Properties overlay for the selected trade
appears as displayed in following figure.

Figure 522: Loan Modification Properties overlay
Components:
The components on this screen remain the same as those under Table 24: Quote Properties
within Section 13.1
13.6 Loan Cancellation Properties overlay
The Loan Cancellation Properties displays the properties of the Loan Cancellation such as Reason
Code, Fee Currency, Open Date, and so on.
Access
To view the Loan Cancellation properties, proceed as follows:
1. Point to the Post Trade menu.
2. Click Cancellation Requests under Seclend. Loan Cancellation Request overlay
appears.
3. Select any Cancellation Request for which you want to view the properties.
4. Right-click the selected trade. Quick Action Utility appears as displayed in following
figure.

Figure 523: Quick Action Utility
5. Click the icon. The Loan Cancellation Properties overlay for the selected
cancellation trade as displayed in following figure.
Figure 524 : Loan Cancellation Properties overlay

Components:
The components on this screen remain the same as those under Table 25: Quote Properties
within Section 13.1

14. Appendix A
1 ‘CCP Repo’ includes following services: rdom::PROVIDED_SERVICE_TYPE:CENTRAL_COUNTERPARTY(GC and
Special), rdom::PROVIDED_SERVICE_TYPE:CENTRAL_CPARTY_POOLING and
rdom::PROVIDED_SERVICE_TYPE:GCPOOLING_SELECT
User Modifiable
Trade Attribute
Provided Service
Modification Type Remarks
Modification allowed in
Trade’s settlement
state
Interest
CCP REPO1
REPO_RATE
In CCP Repo, modification allowed only for FIXED interestFeeType and open trades i.e. termLegDate must not exist
PREOPEN or OPEN
CCP_BILATERAL
TRIPARTY
INTEREST TRIPARTY_DVD
Set term Leg date
(Open trade)
CCP REPO REPURCHASE_DATE
TRIPARTY
CCP_BILATERAL FULL_RECALL or FULL_RETURN
OPEN
TRIPARTY_DVD
Modify term Leg date (Closed Trade)
CCP Repo REPURCHASE_DATE
Modification allowed only if the trade’s terminableOnDemand flag is TRUE
PREOPEN or OPEN
CCP_BILATERAL FULL_RECALL or FULL_RETURN
TRIPARTY REPURCHASE_DATE
TRIPARTY_DVD FULL_RECALL or FULL_RETURN
Div/ Coupon
TRIPARTY_DVD
DIVIDEND_COUPON
Effective date is not an input, as the modification will be effective on the coupon date
CCP_BILATERAL
Lending Fee
TRIPARTY_DVD
LENDING_FEE
Modification not allowed if the collateral is currency and interestFeeType is FLOATING, lendingFee must remain empty
CCP_BILATERAL
Amount Leading
Instrument
CENTRAL_COUNTERPARTY(only Special) PARTIAL_RECALL
or PARTIAL_RETURN
Modification allowed only for Special Non-Standard Open
CENTRAL_CPARTY_POOLING
Modification allowed only for Euro GCP Spot Open
CCP_BILATERAL
PARTIAL_RECALL and PARTIAL_RETURN (linked)
OPEN
TRIPARTY_DVD PARTIAL_RECALL or

PARTIAL_RETURN
Not Applicable
TRIPARTY INTRADAY_ TERMINATION
Modification allowed only if the trade’s terminableOnDemand is TRUE
© Eurex 2016
Deutsche Börse AG (DBAG), Clearstream Banking AG (Clearstream), Eurex Frankfurt AG, Eurex Clearing AG (Eurex Clearing) as well as Eurex Bonds GmbH (Eurex Bonds) and Eurex Repo GmbH (Eurex Repo) are corporate entities and are registered under German law. Eurex Zürich AG is a corporate entity and is registered under Swiss law. Clearstream Banking S.A. is a corporate entity and is registered under Luxembourg law. U.S. Exchange Holdings, Inc. and International Securities Exchange Holdings, Inc. (ISE) are corporate entities and are registered under U.S. American law. Eurex Frankfurt AG (Eurex) is the administrating and operating institution of Eurex Deutschland. Eurex Deutschland and Eurex Zürich AG are in the following referred to as the “Eurex Exchanges”.
All intellectual property, proprietary and other rights and interests in this publication and the subject matter hereof (other than certain trademarks and service marks listed below) are owned by DBAG and its affiliates and subsidiaries including, without limitation, all patent, registered design, copyright, trademark and service mark rights. While reasonable care has been taken in the preparation of this publication to provide details that are accurate and not misleading at the time of publication DBAG, Clearstream, Eurex, Eurex Clearing, Eurex Bonds, Eurex Repo as well as the Eurex Exchanges and their respective servants and agents (a) do not make any representations or warranties regarding the information contained herein, whether express or implied, including without limitation any implied warranty of merchantability or fitness for a particular purpose or any warranty with respect to the accuracy, correctness, quality, completeness or timeliness of such information, and (b) shall not be responsible or liable for any third party’s use of any information contained herein under any circumstances, including, without limitation, in connection with ac tual trading or otherwise or for any errors or omissions contained in this publication.
This publication is published for information purposes only and shall not constitute investment advice respectively does not constitute an offer, solicitation or recommendation to acquire or dispose of any investment or to engage in any other transaction. This publication is not intended for solicitation purposes but only for use as general information. All descriptions, examples and calculations contained in this publication are for illustrative purposes only.
Eurex and Eurex Clearing offer services directly to members of the Eurex exchanges respectively to clearing members of Eurex Clearing. Those who desire to trade any products available on the Eurex market or who desire to offer and sell any such products to others or who desire to possess a clearing license of Eurex Clearing in order to participate in the clearing process provided by Eurex Clearing, should consider legal and regulatory requirements of those jurisdictions relevant to them, as well as the risks associated with such products, before doing so.
Eurex derivatives are currently not available for offer, sale or trading in the United States or by United States persons (other than EURO STOXX 50® Index Futures, EURO STOXX 50® ex Financials Index Futures, EURO STOXX® Select Dividend 30 Index Futures, EURO STOXX® Index Futures, EURO STOXX® Large/Mid/Small Index Futures, STOXX® Europe 50 Index Futures, STOXX® Europe 600 Index Futures, STOXX® Europe 600 Banks/Industrial Goods & Services/Insurance/Media/Travel & Leisure/Utilities Futures, STOXX® Europe Large/Mid/Small 200 Index Futures, Dow Jones Global Titans 50 IndexSM Futures (EUR & USD), DAX®/MDAX®/TecDAX® Futures, SMIM® Futures, SLI Swiss Leader Index® Futures, MSCI World/Europe/Japan/AC Asia Pacific ex Japan Index Futures and VSTOXX® Futures as well as Eurex inflation/commodity/weather/property and interest rate derivatives).
Trademarks and Service Marks
Buxl®, DAX®, DivDAX®, eb.rexx®, Eurex®, Eurex Bonds®, Eurex Repo®, Eurex Strategy WizardSM, Euro GC Pooling®, FDAX®, FWB®, GC Pooling®,,GCPI®, MDAX®, ODAX®, SDAX®, TecDAX®, USD GC Pooling®, VDAX®, VDAX-NEW® and Xetra® are registered trademarks of DBAG.
Phelix Base® and Phelix Peak® are registered trademarks of European Energy Exchange AG (EEX).
All MSCI indexes are service marks and the exclusive property of MSCI Barra. RDX® is a registered trademark of Vienna Stock Exchange AG.
IPD® UK Annual All Property Index is a registered trademark of Investment Property Databank Ltd. IPD and has been licensed for the use by Eurex for derivatives.
SLI®, SMI® and SMIM® are registered trademarks of SIX Swiss Exchange AG.
The STOXX® indexes, the data included therein and the trademarks used in the index names are the intellectual property of STOXX Limited and/or its licensors Eurex derivatives based on the STOXX® indexes are in no way sponsored, endorsed, sold or promoted by STOXX and its licensors and neither STOXX nor its licensors shall have any liability with respect thereto.
Dow Jones, Dow Jones Global Titans 50 IndexSM and Dow Jones Sector Titans IndexesSM are service marks of Dow Jones & Company, Inc. Dow Jones-UBS Commodity IndexSM and any related sub-indexes are service marks of Dow Jones & Company, Inc. and UBS AG. All derivatives based on these indexes are not sponsored, endorsed, sold or promoted by Dow Jones & Company, Inc. or UBS AG, and neither party makes any representation regarding the advisability of trading or of investing in such products.
All references to London Gold and Silver Fixing prices are used with the permission of The London Gold Market Fixing Limited as well as The London Silver Market Fixing Limited, which for the avoidance of doubt has no involvement with and accepts no responsibility whatsoever for the underlying product to which the Fixing prices may be referenced.
PCS® and Property Claim Services® are registered trademarks of ISO Services, Inc.
Korea Exchange, KRX, KOSPI and KOSPI 200 are registered trademarks of Korea Exchange Inc.
BSE and SENSEX are trademarks/service marks of Bombay Stock Exchange (BSE) and all rights accruing from the same, statutory or otherwise, wholly vest with BSE. Any violation of the above would constitute an offence under the laws of India and international treaties governing the same.
The names of other companies and third party products may be trademarks or service marks of their respective owners.

Copyright © 2022 FDOKUMEN

