


Bahasa
Halaman
Hukum


Sitecore EI 1.0 for CMS & DMS 6.5-6.6 Engagement Intelligence Datamart Installation Guide Rev: 2014-02-07
Sitecore® is a registered trademark. All other brand and product names are the property of their respective holders. The contents of this document are the property of Sitecore. Copyright © 2001-2014 Sitecore. All rights reserved.
Sitecore EI 1.0 for CMS & DMS 6.5-6.6
Engagement Intelligence Datamart Installation Guide Installation guide for administrators and developers

Sitecore EI 1.0 for CMS & DMS 6.5-6.6
Sitecore® is a registered trademark. All other brand and product names are the property of their respective holders. The contents of this document are the property of Sitecore. Copyright © 2001-2014 Sitecore. All rights reserved.
Page 2 of 23
Table of Contents
Chapter 1 Introduction .......................................................................................................................... 3 1.1 Architecture Overview ............................................................................................................. 4
Chapter 2 System Requirements ......................................................................................................... 6 2.1 Prerequisites ........................................................................................................................... 7
2.1.1 Hardware Requirements ..................................................................................................... 7 2.1.2 Software Requirements ....................................................................................................... 7 2.1.3 DMS Data Optimization Tool ............................................................................................... 7
Chapter 3 Datamart Installation Steps ................................................................................................. 9 3.1 The Installation Package ....................................................................................................... 10 3.2 SQL Server Configuration ..................................................................................................... 11
3.2.1 Security Accounts.............................................................................................................. 11 3.2.2 Collation Settings .............................................................................................................. 11
3.3 Creating Additional Views in the Analytics Database ........................................................... 14 3.4 Deploying the OLAP Cube .................................................................................................... 15 3.5 Configuring a Job to Process the Cube ................................................................................ 19 3.6 Testing the Cube Installation ................................................................................................. 20
Chapter 4 Troubleshooting................................................................................................................. 22 4.1 Setting the Maximum Number of Connections ..................................................................... 23

Engagement Intelligence Datamart Installation Guide
Sitecore® is a registered trademark. All other brand and product names are the property of their respective holders. The contents of this document are the property of Sitecore. Copyright © 2001-2014 Sitecore. All rights reserved.
Page 3 of 23
Chapter 1
Introduction
This document describes the steps required to install and configure the Engagement Intelligence Datamart on Sitecore CMS. It also provides an overview of the Engagement Intelligence architecture and explains how the Datamart fits into this structure.
This document contains the following chapters:
Chapter 1 — Introduction This section includes an introduction to the document and a brief overview of the Engagement Intelligence architecture.
Chapter 2 — System Requirements This section includes hardware and software requirements and some general guidelines.
Chapter 3 — Datamart Installation Steps This section includes all the steps required to install the Engagement Intelligence Datamart.
Chapter 4 — Troubleshooting This section includes tips and tricks to solve problems during installation.

Sitecore EI 1.0 for CMS & DMS 6.5-6.6
Sitecore® is a registered trademark. All other brand and product names are the property of their respective holders. The contents of this document are the property of Sitecore. Copyright © 2001-2014 Sitecore. All rights reserved.
Page 4 of 23
1.1 Architecture Overview
The Engagement Intelligence Datamart consists of two main components:
Additional SQL Views in the Sitecore Analytics database.
OLAP cube – deployed on a Microsoft SQL Server Analysis Services (MSAS) server.
The Datamart processes data from the Sitecore Analytics database for use with the TARGIT Analyzer. Depending on your system architecture you can create additional SQL Server Views in either the Sitecore reporting or analytics databases.
You should install the TARGIT BI Suite (ANT Server) on a separate server or MSAS. The ANT Server helps deliver the analytics data to a web browser or Windows front end where you can view the data in several TARGIT analyses.
Engagement Intelligence Datamart recommended configuration:
Server 1: CMS Database Server
Microsoft SQL Server Database Engine (2008 or higher).
o Core, Master and Web databases.
Server 2: DMS Database Server
Microsoft SQL Server Database Engine (2008 or higher).
o Sitecore DMS analytics or reporting database with modifications from
engagement_intelligence_schema.sql script.
o OLAP database processing job set up in SQL Server Agent.

Engagement Intelligence Datamart Installation Guide
Sitecore® is a registered trademark. All other brand and product names are the property of their respective holders. The contents of this document are the property of Sitecore. Copyright © 2001-2014 Sitecore. All rights reserved.
Page 5 of 23
Server 3: DMS OLAP Server
Microsoft SQL Server Analysis Services (2008 or higher).
o Sitecore DMS OLAP database.
Server 4: Content Management Server
Sitecore CMS instance with DMS enabled.

Sitecore EI 1.0 for CMS & DMS 6.5-6.6
Sitecore® is a registered trademark. All other brand and product names are the property of their respective holders. The contents of this document are the property of Sitecore. Copyright © 2001-2014 Sitecore. All rights reserved.
Page 6 of 23
Chapter 2
System Requirements
This section provides guidelines on the minimum hardware and software requirements that you need when you install the Engagement Intelligence Datamart with Sitecore CMS and DMS.
This chapter contains the following sections:
Prerequisites

Engagement Intelligence Datamart Installation Guide
Sitecore® is a registered trademark. All other brand and product names are the property of their respective holders. The contents of this document are the property of Sitecore. Copyright © 2001-2014 Sitecore. All rights reserved.
Page 7 of 23
2.1 Prerequisites
Before you install the Engagement Intelligence Datamart, use this section to ensure that you have the correct hardware and software configuration.
Note Check that you can log into SQL Server with a system administrator (sa) account and that you have the appropriate licenses installed for Sitecore Engagement Intelligence and TARGIT.
2.1.1 Hardware Requirements
The Datamart can consist of multiple severs each with their own hardware requirements. This section outlines the minimum requirements you need to install the Datamart.
Minimum 8 GB of RAM.
Hard disk space – Each server can have different requirements for hard disk space.
o Analytics database – you need to allow at least 20% more disk space for the Datamart Analytics database than you would normally allocate to your Analytics database.
o OLAP Cube database – the Datamart cube only requires about a third of the space you would normally allocate to your Analytics database.
2.1.2 Software Requirements
Windows Server 2008.
Microsoft SQL Server 2008 R2 Standard or Enterprise edition, including the following additional components:
o Database Engine Services
o Analysis Services
Note For best results, we recommend that you use a clean installation of SQL Server 2008.
Sitecore CMS 6.5 and DMS 2.0 or Sitecore CMS and DMS 6.6 running on Microsoft SQL Server.
For more detailed information on the exact hardware and software requirements for each of these components, refer to the relevant documentation for each product:
Sitecore CMS and DMS – Sitecore 6.5 – 6.6 Installation Guide on SDN.
SQL Server 2008 and OLAP Cube – SQL Server 2008 documentation on MSDN.
TARGIT – TARGIT documentation.
2.1.3 DMS Data Optimization Tool
After you have installed the OLAP cube, run the DMS Data Optimization Tool to ensure the consistency and integrity of all your Analytics reporting data.

Sitecore EI 1.0 for CMS & DMS 6.5-6.6
Sitecore® is a registered trademark. All other brand and product names are the property of their respective holders. The contents of this document are the property of Sitecore. Copyright © 2001-2014 Sitecore. All rights reserved.
Page 8 of 23
You can download the DMS Data Optimization Tool and instructions on how to use it from the Sitecore Developer Network (SDN).

Engagement Intelligence Datamart Installation Guide
Sitecore® is a registered trademark. All other brand and product names are the property of their respective holders. The contents of this document are the property of Sitecore. Copyright © 2001-2014 Sitecore. All rights reserved.
Page 9 of 23
Chapter 3
Datamart Installation Steps
Follow the steps in this chapter to install the Datamart with Sitecore CMS and DMS.
This chapter contains the following sections:
The Installation Package
SQL Server Configuration
Creating Additional Views in the Analytics Database
Deploying the OLAP Cube
Configuring a Job to Process the Cube
Testing the Cube Installation

Sitecore EI 1.0 for CMS & DMS 6.5-6.6
Sitecore® is a registered trademark. All other brand and product names are the property of their respective holders. The contents of this document are the property of Sitecore. Copyright © 2001-2014 Sitecore. All rights reserved.
Page 10 of 23
3.1 The Installation Package
The installation package is a zip archive that includes the following content:
SQL scripts:
engagement_intelligence_schema.sql – this script creates all the required database
objects (additional SQL Views).
engagement_intelligence_job.sql – this script creates a SQL Agent job for processing
the OLAP and Analytics databases.
OLAP Cube database schema:
Cube.asdatabase - schema for creating the Microsoft Analysis Service OLAP database
Extract the zip archive into a directory and verify that all files are free of errors. You will need to access these files during the installation process.
Perform all the installation steps in the same order as described in this document.
Engagement Intelligence Datamart Installation Guide
Sitecore® is a registered trademark. All other brand and product names are the property of their respective holders. The contents of this document are the property of Sitecore. Copyright © 2001-2014 Sitecore. All rights reserved.
Page 11 of 23
3.2 SQL Server Configuration
This section outlines some important SQL Server configuration settings to consider when installing the Engagement Intelligence Datamart. It is not possible to know every SQL Server system configuration, so for more information on a specific configuration, see the SQL Server 2008 documentation on MSDN.
3.2.1 Security Accounts
You can log in to SQL Server using Windows authentication or SQL Server authentication, depending on the configuration of your system architecture. However, we recommend that you use Windows authentication.
Microsoft SQL Server services should run under the following security accounts:
SQL Server Agent NT AUTHORITY\NETWORK SERVICE
SQL Server Database Engine NT AUTHORITY\NETWORK SERVICE
SQL Server Analysis Services NT AUTHORITY\NETWORK SERVICE
SQL Server Browser NT AUTHORITY\LOCAL SERVICE
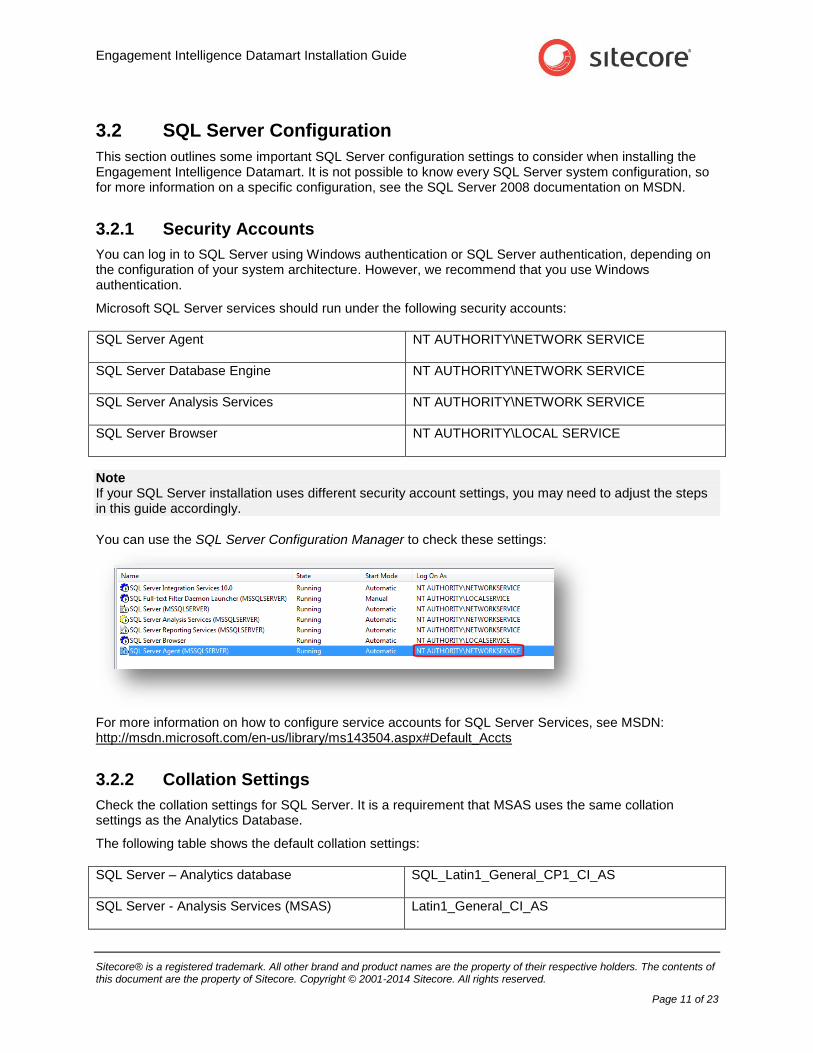
Note If your SQL Server installation uses different security account settings, you may need to adjust the steps in this guide accordingly.
You can use the SQL Server Configuration Manager to check these settings:
For more information on how to configure service accounts for SQL Server Services, see MSDN: http://msdn.microsoft.com/en-us/library/ms143504.aspx#Default_Accts
3.2.2 Collation Settings
Check the collation settings for SQL Server. It is a requirement that MSAS uses the same collation settings as the Analytics Database.
The following table shows the default collation settings:
SQL Server – Analytics database
SQL_Latin1_General_CP1_CI_AS
SQL Server - Analysis Services (MSAS) Latin1_General_CI_AS

Sitecore EI 1.0 for CMS & DMS 6.5-6.6
Sitecore® is a registered trademark. All other brand and product names are the property of their respective holders. The contents of this document are the property of Sitecore. Copyright © 2001-2014 Sitecore. All rights reserved.
Page 12 of 23
Checking the Collation Settings for the Analytics Database
To check the collation settings for the Analytics database:
1. Start Microsoft SQL Server 2008 R2 Management Studio and connect to the SQL Server instance running the Analytics database.
2. In the Object Explorer, locate your Analytics database, right click the Analytics database node and then click Properties.
3. In the Database Properties window, click Options.
4. The default collation settings appear in the Collation field.
Click the drop down to see other collation settings available.
Changing the Collation Settings for SQL Server Analysis Services
If your MSAS collation settings do not match your Analytics database then you should change the collation settings for MSAS and not for the Analytics database.
To configure or to verify the default collation used by MSAS:
1. Start Microsoft SQL Server 2008 R2 Management Studio and connect to Analysis Services.
2. In the Object Explorer, right-click the root node of the Analysis Services instance and then click Properties.

Engagement Intelligence Datamart Installation Guide
Sitecore® is a registered trademark. All other brand and product names are the property of their respective holders. The contents of this document are the property of Sitecore. Copyright © 2001-2014 Sitecore. All rights reserved.
Page 13 of 23
3. In the Analysis Server Properties window, select Language/Collation.
4. Collation and other related settings appear on the right hand side of the window.
5. Use the drop down to change the Analysis Services collation settings to match those of the Analytics database.
The SQL Server instances in this example display the following collation settings:
SQL Server Instance Setting
Analytics database SQL_Latin1_General_CP1_CI_AS
Analysis Services (MSAS) Latin_1_General
This is not an exact match but both settings are Latin_General which is close enough.
6. Click OK to save your changes.
You must restart Analysis Services before your changes take effect.

Sitecore EI 1.0 for CMS & DMS 6.5-6.6
Sitecore® is a registered trademark. All other brand and product names are the property of their respective holders. The contents of this document are the property of Sitecore. Copyright © 2001-2014 Sitecore. All rights reserved.
Page 14 of 23
3.3 Creating Additional Views in the Analytics Database
The first stage in the installation process is to create additional SQL Server views. Views are like virtual tables that the OLAP cube uses when processing the data in the Analytics or Reporting databases. You
need to run the engagement_intelligence_schema.sql script to create the additional views.
To create the additional views:
1. Start Microsoft SQL Server 2008 R2 Management Studio and connect to your Analytics database.
2. Open the engagement_intelligence_schema.sql file by double clicking or by browsing for
the file from the SQL Server main menu.
3. In the SQL Editor Toolbar, select your Analytics database as the current database.
4. Execute the script by pressing F5 or in the SQL Editor Toolbar, click Execute.
5. Once the script completes successfully, the database is ready for Engagement Intelligence.

Engagement Intelligence Datamart Installation Guide
Sitecore® is a registered trademark. All other brand and product names are the property of their respective holders. The contents of this document are the property of Sitecore. Copyright © 2001-2014 Sitecore. All rights reserved.
Page 15 of 23
3.4 Deploying the OLAP Cube
Follow the steps in this section to deploy the Analysis Services OLAP Cube database.
Deploying the OLAP Cube
Using the Microsoft Analysis Services Deployment Wizard run the Cube.asdatabase file. This creates
the OLAP Cube database.
To deploy the OLAP cube database:
1. Open the Microsoft Analysis Services Deployment Wizard using the Windows Start menu. Click Start, All Programs, Microsoft SQL Server 2008 R2, Analysis Services and then click Deployment Wizard.
In the Deployment Wizard, on the welcome page, click Next.

Sitecore EI 1.0 for CMS & DMS 6.5-6.6
Sitecore® is a registered trademark. All other brand and product names are the property of their respective holders. The contents of this document are the property of Sitecore. Copyright © 2001-2014 Sitecore. All rights reserved.
Page 16 of 23
2. On the Specify Source Analysis Services Database page, use the browse button (…) to locate
the OLAP cube database source file (cube.asdatabase) and then click Next.
3. On the Installation Target page, complete the Server and Database fields using the following table:
Field Description Value
Server Instance name or IP address of the target server. Localhost or 127.0.0.1
Database Name for the OLAP cube database. Sitecore
Click Next.
4. On the Specify Options for Partitions and Roles page, ensure that you select the following options:
Option Setting
Partitions Deploy partitions.

Engagement Intelligence Datamart Installation Guide
Sitecore® is a registered trademark. All other brand and product names are the property of their respective holders. The contents of this document are the property of Sitecore. Copyright © 2001-2014 Sitecore. All rights reserved.
Page 17 of 23
Option Setting
Roles and members Deploy roles and retain members.
Click Next.
5. On the Specify Configuration Properties page, in the Data Source Connection Strings group, select the Sitecore NET property.
Enter a valid connection string that points to your Analytics database. Either enter a connection string directly or click the browse button (…) to open the Connection Manager window.
In the Connection Manager window, you can configure and test a new connection. Leave all other settings unchanged.
Click Next.

Sitecore EI 1.0 for CMS & DMS 6.5-6.6
Sitecore® is a registered trademark. All other brand and product names are the property of their respective holders. The contents of this document are the property of Sitecore. Copyright © 2001-2014 Sitecore. All rights reserved.
Page 18 of 23
6. On the Select Processing Options page, under Processing method, select None and click Next.
7. On the Confirm Deployment page, verify that the server address is correct. Click Next to deploy the database.
8. The deployment takes only a few seconds. Click Next and then click Finish to complete the installation.

Engagement Intelligence Datamart Installation Guide
Sitecore® is a registered trademark. All other brand and product names are the property of their respective holders. The contents of this document are the property of Sitecore. Copyright © 2001-2014 Sitecore. All rights reserved.
Page 19 of 23
3.5 Configuring a Job to Process the Cube
Follow these steps to create and configure a SQL Server Agent job that processes the OLAP cube and Analytics database. You should create the job on the SQL Server instance that is running the Analytics database.
Before you start, ensure that you configure SQL Server Agent to start automatically. To do this, open Local Services, select SQL Server Agent (MSSQLSERVER), right click and select Properties. Change the Startup type from Manual to Automatic. You can also do this using SQL Server Configuration Manager.
In the SQL Server Agent, create a job for processing the data in the OLAP Cube database.
To create a SQL Server Agent job:
1. Start Microsoft SQL Server Management Studio and connect to the SQL Server instance running the Analytics database.
2. Open the engagement_intelligence_job.sql file by double clicking or by browsing for the
file from the SQL Server main menu.
3. Configure the engagement_intelligence_job.sql script by editing the following three
variables:
Setting Description
DECLARE
@sitecore_analytics_sql_database_name
SYSNAME =
The name of your Analytics database. For example: My_Analytics_Database
DECLARE
@sitecore_analytics_as_instance_name
SYSNAME =
The name of the MSAS instance onto which you deploy the OLAP database (this should be a separate server). For example, SVRNAME or SVRNAME\INSTANCENAME
DECLARE
@sitecore_analytics_as_database_name
SYSNAME =
The name of the MSAS OLAP database. For example: Sitecore
4. To run the engagement_intelligence_job.sql script, click Execute in the SQL Editor
Toolbar or press F5.
5. In the Object Explorer, expand the SQL Server Agent node and open the Jobs folder.
Verify that the Sitecore DMS BI Processing job appears. If it does not appear, refresh the Jobs folder.
6. Double click the job to open the Properties window where you can fine tune the job or change the default schedule, for example, to run every night.

Sitecore EI 1.0 for CMS & DMS 6.5-6.6
Sitecore® is a registered trademark. All other brand and product names are the property of their respective holders. The contents of this document are the property of Sitecore. Copyright © 2001-2014 Sitecore. All rights reserved.
Page 20 of 23
3.6 Testing the Cube Installation
To test the installation, you must run the job that you created in the last section (Configuring a Job to Process the Cube). However, before you run the job, you need to run the Engagement Intelligence license script and check that the SQL Server Agent is running in the correct security context.
License
To run the Engagement Intelligence license script:
1. In SQL Server, open the engagement_intelligence_license.sql script by double clicking or by browsing for the file from the SQL Server main menu.
2. In the SQL Editor Toolbar, click Execute.
This license script creates database objects required by Engagement Intelligence.
Note Your license for Sitecore Engagement Intelligence will be provided separately.
Security Context
The SQL Server Agent job should run under the NETWORK SERVICES security context (the same context as the SQL Server Database Engine). This enables the SQL Server Agent job to connect to the SQL Server Database Engine. If you do not already have a NETWORK SERVICE login, you need to create a new SQL Server user with this name.
To create a SQL Server user called NETWORK SERVICE:
1. In SQL Server (Database Engine), select Security then Logins.
2. Right click Logins and then click New Login.
3. In the Login – New window, General page, under Windows authentication, Login name click Search.
4. In the Select User or Group window, enter NETWORK SERVICE.
5. Click OK.
Running the Job
Note Running the SQL Server Agent job is a very resource intensive process, so execute this procedure with care.
To verify the datamart installation:
1. Start Microsoft SQL Server Management Studio and connect to the database server where you installed the Sitecore DMS BI Processing job.
2. In the Object Explorer, expand the SQL Server Agent node and then open the Jobs folder.
3. Right-click the Sitecore DMS BI Processing job and select Start Job at Step.
4. Select Step 1. and click OK.
5. The Start Jobs window appears showing that the job is executing.
It can take several hours to process the data depending on the hardware configuration of the server and the size of your Analytics database.

Engagement Intelligence Datamart Installation Guide
Sitecore® is a registered trademark. All other brand and product names are the property of their respective holders. The contents of this document are the property of Sitecore. Copyright © 2001-2014 Sitecore. All rights reserved.
Page 21 of 23
When the job has completed successfully, you see the following message:
Sitecore EI 1.0 for CMS & DMS 6.5-6.6
Sitecore® is a registered trademark. All other brand and product names are the property of their respective holders. The contents of this document are the property of Sitecore. Copyright © 2001-2014 Sitecore. All rights reserved.
Page 22 of 23
Chapter 4
Troubleshooting
This chapter includes some tips and tricks to solve common problems that you may encounter during the installation process.
Setting the Maximum Number of Connections
Engagement Intelligence Datamart Installation Guide
Sitecore® is a registered trademark. All other brand and product names are the property of their respective holders. The contents of this document are the property of Sitecore. Copyright © 2001-2014 Sitecore. All rights reserved.
Page 23 of 23
4.1 Setting the Maximum Number of Connections
If you are using a production database that is used by other processes, change the default setting in the Maximum number of connections setting to a lower number. This reduces the load on the server.
To change the default setting:
1. Connect to SQL Analysis Services.
2. Expand the Data Sources node and right click the Analytics.
3. Click Properties.
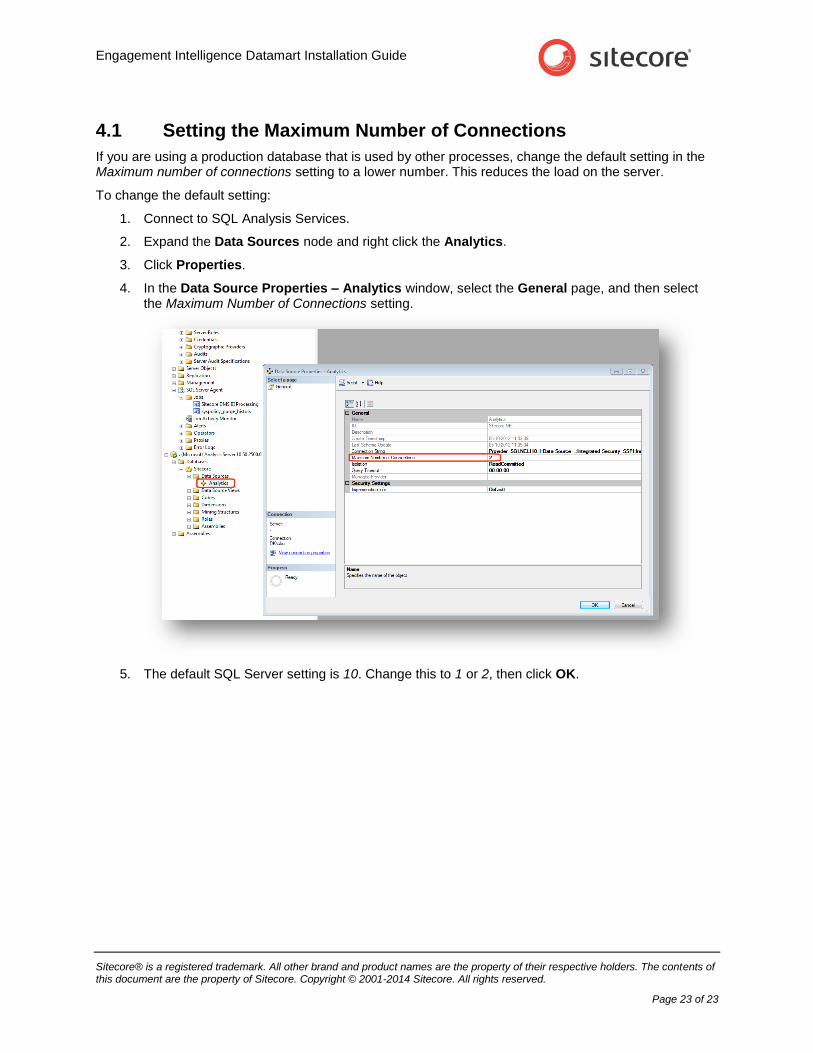
4. In the Data Source Properties – Analytics window, select the General page, and then select the Maximum Number of Connections setting.
5. The default SQL Server setting is 10. Change this to 1 or 2, then click OK.
Copyright © 2022 FDOKUMEN

