


![[5437]-101 M.Sc ENVIRONMENTAL SCIENCE EVSC 101](https://static.fdokumen.com/doc/165x107/631d8020ec7900c0c80d1eb7/5437-101-msc-environmental-science-evsc-101.jpg)

Bahasa
Halaman
Hukum


Brand Standards GuideMERCHANDISING 101: BEST PRACTICES
BRAND STANDARDS GUIDE – MERCHANDISINGVersion 2.0 – 2013

BRAND STANDARDS GUIDE – MERCHANDISINGVersion 2.0 – 2013 | Page 2
Dear Brand Managers,
Moroccanoil® is pleased to bring to you our new Brand Standards Guide or “Blue Book”—a review of
best practices around visual merchandising to assist you in the presentation of our products. This new
Brand Standards Guide will be updated periodically but will not be reissued with each Launch Update,
as these are the basic standards for the brand and should remain consistent.
When we launch a new product you will receive new Merchandising Guidelines that speak to the placement
of the new products. These updates will speak to schematics for the three different selling environments
we are currently in.
1. Salon Merchandising Guideline
2. Loyalty Merchandising Guideline
3. Loyalty with Body Merchandising Guideline
We hope you find this tool helpful and look out for future releases to help inspire and guide you even further.
Tami Brooks
Visual Merchandising Manager
+1 646 571 1456
CONTENTS
I. VISUAL MERCHANDISING....................................................... 3
What is Visual Merchandising and why is it so important?............... 3
Where do we merchandise?.......................................................... 3
General Rules.................................................................. 3
In-salon Merchandising Zones.......................................... 4
Merchandising Marketing Materials.................................. 5
II. MERCHANDISING HoW-To'S............................................... 6
Prop Usage................................................................................... 6
Riser Usage and Tips...................................................................... 7
Purchasing.................................................................................... 7
Merchandising for Inventory.......................................................... 8
Adjustments for Low vs. High Inventory............................... 8
Tips............................................................................................... 8
III. oUTPoSTS............................................................................ 9
Tips.............................................................................................. 9

®
®
®
®
®
®
I. VISUAL MERCHANDISING
What is Visual Merchandising?
Simply put—Visual Merchandising is the art of displaying merchandise in a manner that is appealing to the eyes
of the customer.
Why is Visual Merchandising so important?
Merchandising has such a profound impact on sales and public perception. The presentation of a salon’s
merchandise can either:
A. Serve to reinforce the customer’s confidence in the product choice.
B. Cause them to second-guess their need to buy.
In a split second, a sale is either realized or lost. Revisiting our salon’s current Visual Merchandising standards
can often make the product not only more appealing, but also lead to a growth in sales. Well-planned and
carefully executed presentations promote both shopability and impulse sales. Great merchandising can also:
• Guide how customers form an emotional connection to the brand.
• Engage customers and boost sales activity with the use of creative displays.
• Set our product in an aesthetically pleasing fashion and convert window shoppers into prospects
and ultimately, buyers.
Where do we merchandise?
GENERAL RULES
Most salons have 7 key merchandising areas outlined in detail on Page 4. Within all these spaces the following
general rules should be applied:
• First and most importantly, be sensitive to the salon staff and environment. Apply Brand Standards with
sensitivity to the overall DNA of the salon.
• Stocking and shelf maintenance should be everyday routines to ensure presentation remains fresh and powerful.
Sales staff must be trained and held accountable for maintaining merchandise presentations. To add
to the store’s buy-appeal, it should always appear well-stocked, but not bursting at the seams.
• The retail display area should be easily accessible and product prices should be clearly visible and easily found.
• Avoid “mass merchandising” commonly used in supermarkets and drugstores by not overstocking
and cramping products together.
• Keep merchandise presentation simple, “airy” and non-crowded.
• Create clear and clean divisions between product groupings. Use boxes to guide spacing between product
groupings. (Figure 1 – Product Spacing)
BRAND STANDARDS GUIDE – MERCHANDISING Version 2.0 – 2013 | Page 3
Figure 1 – Product Spacing
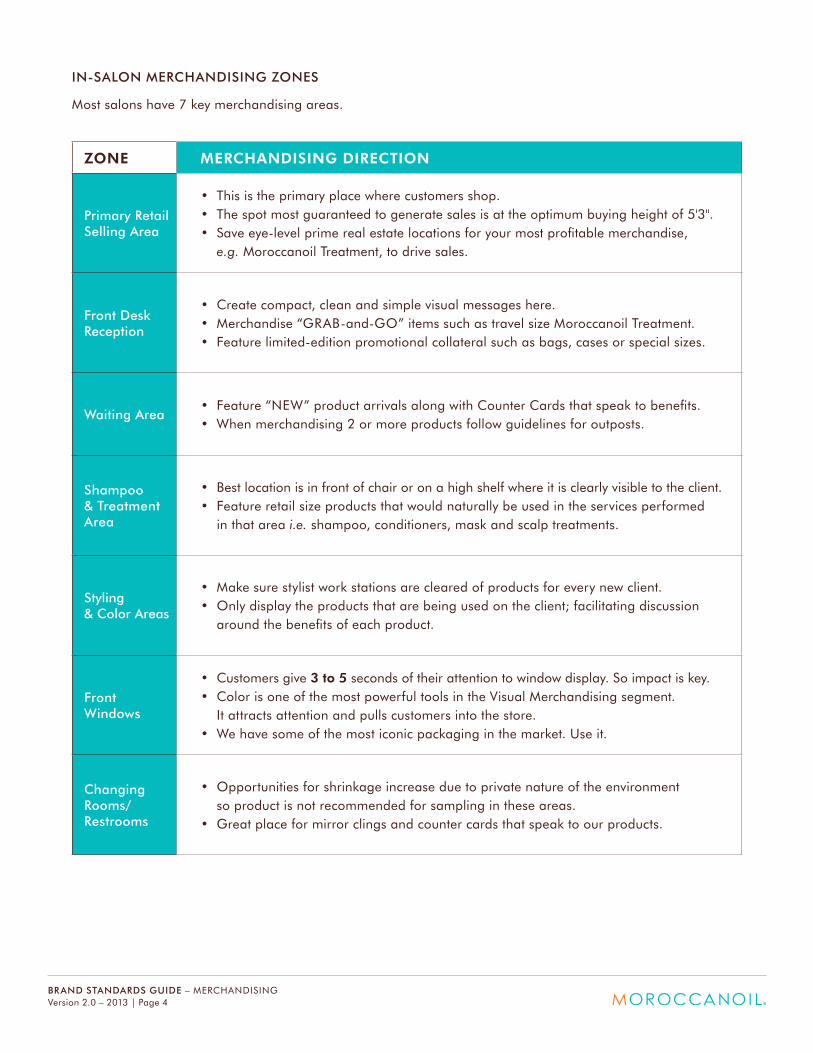
ZONE MERCHANDISING DIRECTION
Primary Retail Selling Area
• This is the primary place where customers shop.• The spot most guaranteed to generate sales is at the optimum buying height of 5'3".• Save eye-level prime real estate locations for your most profitable merchandise,
e.g. Moroccanoil Treatment, to drive sales.
Front Desk Reception
• Create compact, clean and simple visual messages here.• Merchandise “GRAB-and-GO” items such as travel size Moroccanoil Treatment.• Feature limited-edition promotional collateral such as bags, cases or special sizes.
Waiting Area• Feature “NEW” product arrivals along with Counter Cards that speak to benefits.• When merchandising 2 or more products follow guidelines for outposts.
Shampoo& Treatment Area
• Best location is in front of chair or on a high shelf where it is clearly visible to the client.• Feature retail size products that would naturally be used in the services performed
in that area i.e. shampoo, conditioners, mask and scalp treatments.
Styling & Color Areas
• Make sure stylist work stations are cleared of products for every new client. • Only display the products that are being used on the client; facilitating discussion
around the benefits of each product.
Front Windows
• Customers give 3 to 5 seconds of their attention to window display. So impact is key.• Color is one of the most powerful tools in the Visual Merchandising segment.
It attracts attention and pulls customers into the store. • We have some of the most iconic packaging in the market. Use it.
Changing Rooms/Restrooms
• Opportunities for shrinkage increase due to private nature of the environment so product is not recommended for sampling in these areas.
• Great place for mirror clings and counter cards that speak to our products.
IN-SALON MERChANDISING zONES
Most salons have 7 key merchandising areas.
BRAND STANDARDS GUIDE – MERCHANDISINGVersion 2.0 – 2013 | Page 4
BRAND STANDARDS GUIDE – MERCHANDISINGVersion 2.0 – 2013 | Page 5
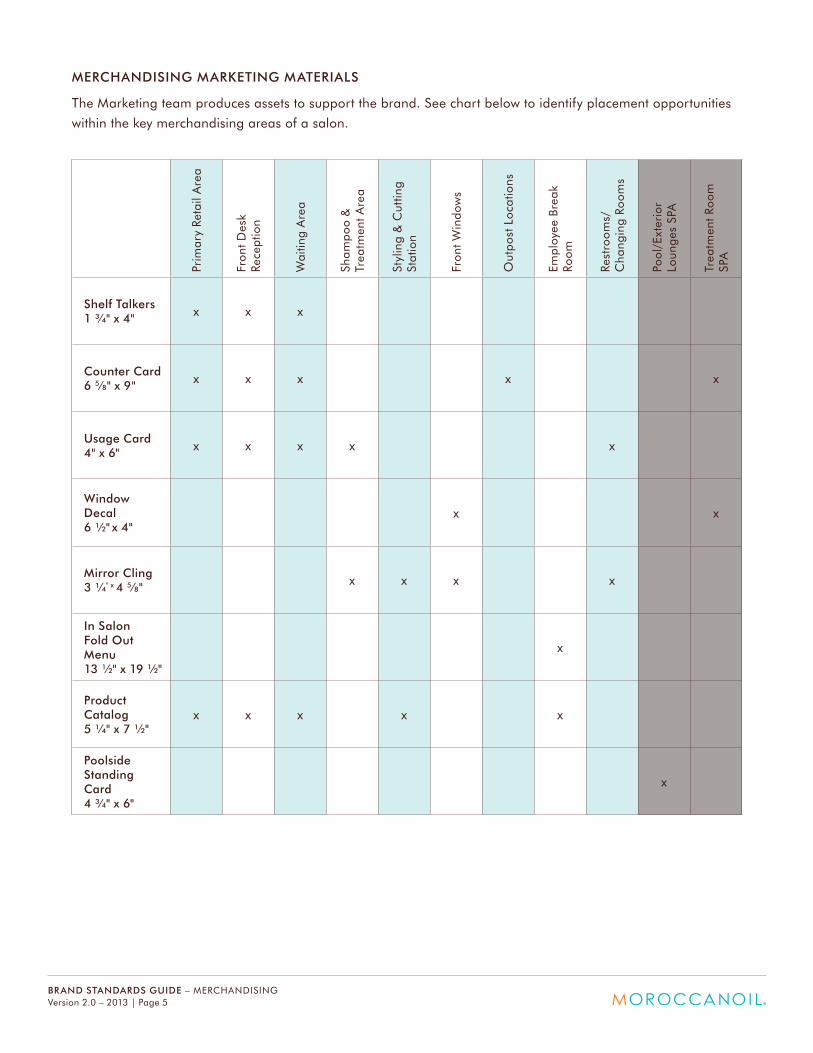
MERChANDISING MARkETING MATERIALS
The Marketing team produces assets to support the brand. See chart below to identify placement opportunities
within the key merchandising areas of a salon.
Prim
ary
Reta
il A
rea
Fron
t Des
k Re
cept
ion
Wai
ting
Are
a
Sham
poo
&
Trea
tmen
t Are
a
Styl
ing
& C
uttin
g St
atio
n
Fron
t Win
dow
s
out
post
Loc
atio
ns
Empl
oyee
Bre
ak
Room
Rest
room
s/C
hang
ing
Room
s
Pool
/Ext
erio
rLo
unge
s SP
A
Trea
tmen
t Roo
m
SPA
Shelf Talkers1 ¾" x 4" x x x
Counter Card 6 5⁄8" x 9" x x x x x
Usage Card 4" x 6" x x x x x
Window Decal 6 ½" x 4"
x x
Mirror Cling3 ¼" x 4 5⁄8" x x x x
In Salon Fold Out Menu 13 ½" x 19 ½"
x
Product Catalog 5 ¼" x 7 ½"
x x x x x
Poolside Standing Card 4 ¾" x 6"
x

II. MERCHANDISING HOw-TO'S
Prop Usage
Below is a listing of current approved props for Special Events and Merchandising in Salons/Spas.
These elements are best used in outposts, vitrenes and windows.
BODY HAIR SPECIAL EVENTS
Plexi Risers(Not provided at this time)
Plexi Risers (Not provided at this time)
Plexi Risers(Not provided at this time)
Hero Glorifier Counter Cards with Easel Back Retractable Banner with Stand
Tower Display White Poster Frames White Lanterns
Counter Display Hero Glorifier Glass & Metal Vitrene (By request only)
Banners Banners
BRAND STANDARDS GUIDE – MERCHANDISING Version 2.0 – 2013 | Page 6
Counter Card hero Glorifier Banner
Plexi Riser Counter Display

Riser Usage
Risers are great for setting up small vignettes in shelves, outpost spaces, waiting rooms and styling areas.
They can be used for displaying promotions, to highlight “NEW” or to call out specific products or stories.
To accommodate a variety of products and promotions along with adding more volume and visual interest,
a selection of sizes is recommended. From large risers to jewelry risers.
Some Tips Around Using Risers
• Utilize triangular compositions of varied heights to create optical balance and visual interest.
(Figure 2 – Triangle Setup)
• Create small vignettes combining counter cards, product and risers together. Choose appropriate riser
to accommodate bag sizes. Promotional bags should not hang over edges of risers.
• Use risers on small windows, designated outpost locations, promotional displays, receptionist desks,
waiting rooms and styling areas.
Purchasing
Should you decide to incorporate risers into your displays, use clear acrylic risers only.
1. www.jewelrydisplay.com
Product Code: 1050 - Acrylic 3 Riser Set. Price: $10.50 USD
2. www.storesupply.com
Product Code: Acrylic Riser U-Bend set of 3-55195. Price: $5.95 USD
3. www.containerstore.com
Product Code: Acrylic Risers 10017249, 10017250, 10017251, 10017252 (variety of sizes).
Price: $3.99 – $7.99 USD
4. www.amazon.com
Product Code: Gibson Holders GHPP1050E. Clear Acrylic Riser Set (3", 4", 5"). Price: $14.90 USD
BRAND STANDARDS GUIDE – MERCHANDISING Version 2.0 – 2013 | Page 7
Figure 2 – Triangle Setup

M
ÉÉ É
M M
Merchandising for Inventory
Adjusting product presentation in accordance to available space and inventory is an exercise that should
be performed daily.
ADJUSTMENTS FOR TOO LITTLE PRODUCT (Figure 3 – Low Inventory)
Empty or sparsely merchandised fi xtures give the impression that you do not have a complete assortment
or are in a state of transition.
• Faceout as much product as possible.
• Tighten up the presentation toward the center of shelf, leaving more room at either side.
ADJUSTMENTS FOR TOO MUCh PRODUCT
Conversely, over-stocked presentations are overwhelming to the customer and discourage product-handling.
• Create an outpost display to secure additional impressions throughout the salon.
• Create a window display to secure additional impressions throughout the salon.
• Move product to stock room.
• Double stack when you can.
General TipsProducts displayed outside the box can be placed in front of or tucked in between boxes.
Figure 3 – Low Inventory
Expand rear-most products to the front to fi ll the space until new inventory arrives.
BRAND STANDARDS GUIDE – MERCHANDISINGVersion 2.0 – 2013 | Page 8
in front in between
III. OUTPOSTS
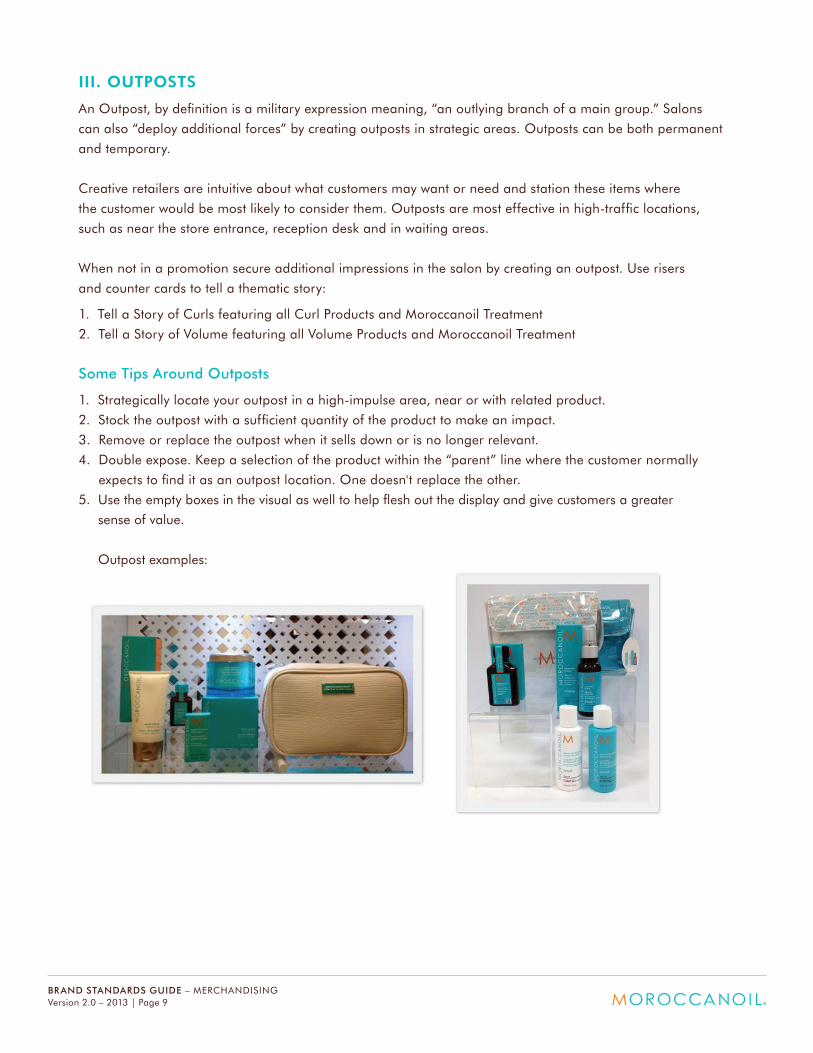
An outpost, by definition is a military expression meaning, “an outlying branch of a main group.” Salons
can also “deploy additional forces” by creating outposts in strategic areas. outposts can be both permanent
and temporary.
Creative retailers are intuitive about what customers may want or need and station these items where
the customer would be most likely to consider them. outposts are most effective in high-traffic locations,
such as near the store entrance, reception desk and in waiting areas.
When not in a promotion secure additional impressions in the salon by creating an outpost. Use risers
and counter cards to tell a thematic story:
1. Tell a Story of Curls featuring all Curl Products and Moroccanoil Treatment
2. Tell a Story of Volume featuring all Volume Products and Moroccanoil Treatment
Some Tips Around Outposts
1. Strategically locate your outpost in a high-impulse area, near or with related product.
2. Stock the outpost with a sufficient quantity of the product to make an impact.
3. Remove or replace the outpost when it sells down or is no longer relevant.
4. Double expose. Keep a selection of the product within the “parent” line where the customer normally
expects to find it as an outpost location. one doesn't replace the other.
5. Use the empty boxes in the visual as well to help flesh out the display and give customers a greater
sense of value.
outpost examples:
BRAND STANDARDS GUIDE – MERCHANDISING Version 2.0 – 2013 | Page 9
Top Related
Copyright © 2022 FDOKUMEN

