


Bahasa
Halaman
Hukum


Access™ 2007Programming by
Example with VBA,XML, and ASP
Julitta Korol
Wordware Publishing, Inc.
Library of Congress Cataloging-in-Publication Data
Korol, Julitta.Access 2007 programming by example with VBA, XML, and ASP / by Julitta Korol.
p. cm.Includes index.ISBN-13: 978-1-59822-042-1ISBN-10: 1-59822-042-X (pbk.)1. Microsoft Access. 2. Database management. 3. Microsoft Visual Basicfor applications 4. XML (Document markup language) 5. Active serverpages I. Title.QA76.9.D3K65733 2007005.75'65--dc22 2007044561
CIP
© 2008, Wordware Publishing, Inc.
All Rights Reserved
1100 Summit Avenue, Suite 102
Plano, Texas 75074
No part of this book may be reproduced in any form or by
any means without permission in writing from
Wordware Publishing, Inc.
Printed in the United States of America
ISBN-13: 978-1-59822-042-1
ISBN-10: 1-59822-042-X
10 9 8 7 6 5 4 3 2 1
0711
Microsoft is a registered trademark and Access is a trademark of Microsoft Corporation in the United States and/or othercountries.
Other brand names and product names mentioned in this book are trademarks or service marks of their respectivecompanies. Any omission or misuse (of any kind) of service marks or trademarks should not be regarded as intent to infringe onthe property of others. The publisher recognizes and respects all marks used by companies, manufacturers, and developers as ameans to distinguish their products.
This book is sold as is, without warranty of any kind, either express or implied, respecting the contents of this book and anydisks or programs that may accompany it, including but not limited to implied warranties for the book’s quality, performance,merchantability, or fitness for any particular purpose. Neither Wordware Publishing, Inc. nor its dealers or distributors shall beliable to the purchaser or any other person or entity with respect to any liability, loss, or damage caused or alleged to have beencaused directly or indirectly by this book.
All inquiries for volume purchases of this book should be addressed to Wordware Publishing, Inc.,
at the above address. Telephone inquiries may be made by calling:
(972) 423-0090

Contents
Acknowledgments . . . . . . . . . . . . . . . . . . . . . . . . . . . . . . . . . . . . xvi
Introduction . . . . . . . . . . . . . . . . . . . . . . . . . . . . . . . . . . . . . . . xvii
Part I — Introduction to Access 2007 VBA Programming
Chapter 1 Writing Procedures in Modules . . . . . . . . . . . . . . . . . . . . . 3Procedure Types . . . . . . . . . . . . . . . . . . . . . . . . . . . . . . . . . . . . . . 3
Module Types . . . . . . . . . . . . . . . . . . . . . . . . . . . . . . . . . . . . . . . 6
Standard Modules . . . . . . . . . . . . . . . . . . . . . . . . . . . . . . . . . . . 6
Writing Procedures in a Standard Module . . . . . . . . . . . . . . . . . . . . 6
Executing Your Procedures and Functions . . . . . . . . . . . . . . . . . . . . 9
Class Modules . . . . . . . . . . . . . . . . . . . . . . . . . . . . . . . . . . . . 11
Events, Event Properties, and Event Procedures . . . . . . . . . . . . . . . . . . . . . 13
Why Use Events? . . . . . . . . . . . . . . . . . . . . . . . . . . . . . . . . . . 14
Walking Through an Event Procedure . . . . . . . . . . . . . . . . . . . . . . . . 14
Compiling Your Procedures . . . . . . . . . . . . . . . . . . . . . . . . . . . . . 19
Placing a Database in a Trusted Location . . . . . . . . . . . . . . . . . . . . . . 19
Chapter Summary . . . . . . . . . . . . . . . . . . . . . . . . . . . . . . . . . . . . . 21
Chapter 2 The Visual Basic Editor (VBE) . . . . . . . . . . . . . . . . . . . . . . 22Understanding the Project Explorer Window . . . . . . . . . . . . . . . . . . . . . . . 22
Understanding the Properties Window . . . . . . . . . . . . . . . . . . . . . . . . . . 23
Understanding the Code Window . . . . . . . . . . . . . . . . . . . . . . . . . . . . . 25
Other Windows in the VBE . . . . . . . . . . . . . . . . . . . . . . . . . . . . . . . . 27
On-the-Fly Syntax and Programming Assistance . . . . . . . . . . . . . . . . . . . . . 28
List Properties/Methods . . . . . . . . . . . . . . . . . . . . . . . . . . . . . . . 28
Parameter Info . . . . . . . . . . . . . . . . . . . . . . . . . . . . . . . . . . . . 29
List Constants . . . . . . . . . . . . . . . . . . . . . . . . . . . . . . . . . . . . 30
Quick Info . . . . . . . . . . . . . . . . . . . . . . . . . . . . . . . . . . . . . . 31
Complete Word . . . . . . . . . . . . . . . . . . . . . . . . . . . . . . . . . . . 31
Indent/Outdent . . . . . . . . . . . . . . . . . . . . . . . . . . . . . . . . . . . . 31
Comment Block/Uncomment Block . . . . . . . . . . . . . . . . . . . . . . . . . 32
Using the Object Browser . . . . . . . . . . . . . . . . . . . . . . . . . . . . . . . . . 33
Using the VBA Object Library . . . . . . . . . . . . . . . . . . . . . . . . . . . . . . 35
Using the Immediate Window. . . . . . . . . . . . . . . . . . . . . . . . . . . . . . . 36
Chapter Summary . . . . . . . . . . . . . . . . . . . . . . . . . . . . . . . . . . . . . 39
Chapter 3 Variables, Data Types, and Constants . . . . . . . . . . . . . . . . . 40What Is a Variable? . . . . . . . . . . . . . . . . . . . . . . . . . . . . . . . . . . . . 40
What Are Data Types? . . . . . . . . . . . . . . . . . . . . . . . . . . . . . . . . . . 41
Creating Variables. . . . . . . . . . . . . . . . . . . . . . . . . . . . . . . . . . . . . 42
Declaring Variables . . . . . . . . . . . . . . . . . . . . . . . . . . . . . . . . . . . . 43
iii
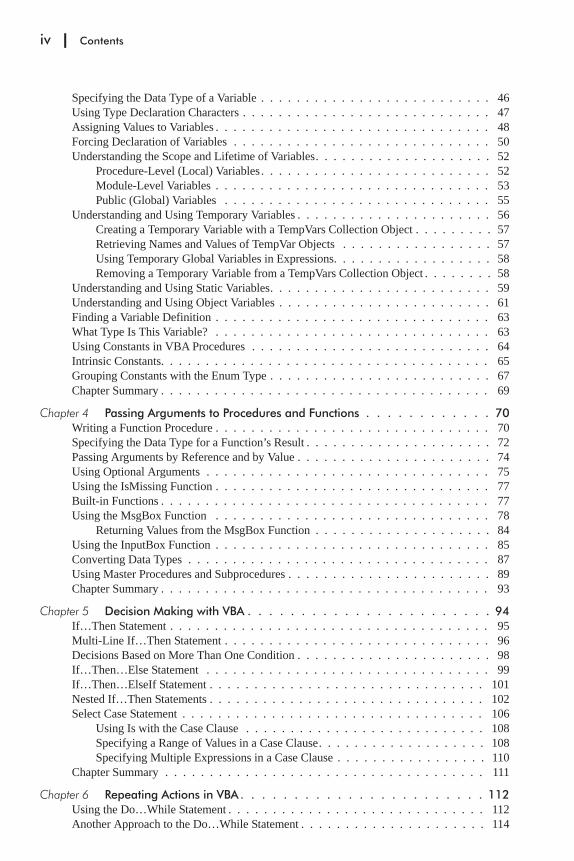
Specifying the Data Type of a Variable . . . . . . . . . . . . . . . . . . . . . . . . . . 46
Using Type Declaration Characters . . . . . . . . . . . . . . . . . . . . . . . . . . . . 47
Assigning Values to Variables . . . . . . . . . . . . . . . . . . . . . . . . . . . . . . . 48
Forcing Declaration of Variables . . . . . . . . . . . . . . . . . . . . . . . . . . . . . 50
Understanding the Scope and Lifetime of Variables. . . . . . . . . . . . . . . . . . . . 52
Procedure-Level (Local) Variables . . . . . . . . . . . . . . . . . . . . . . . . . . 52
Module-Level Variables . . . . . . . . . . . . . . . . . . . . . . . . . . . . . . . 53
Public (Global) Variables . . . . . . . . . . . . . . . . . . . . . . . . . . . . . . 55
Understanding and Using Temporary Variables . . . . . . . . . . . . . . . . . . . . . . 56
Creating a Temporary Variable with a TempVars Collection Object . . . . . . . . . 57
Retrieving Names and Values of TempVar Objects . . . . . . . . . . . . . . . . . 57
Using Temporary Global Variables in Expressions. . . . . . . . . . . . . . . . . . 58
Removing a Temporary Variable from a TempVars Collection Object . . . . . . . . 58
Understanding and Using Static Variables. . . . . . . . . . . . . . . . . . . . . . . . . 59
Understanding and Using Object Variables . . . . . . . . . . . . . . . . . . . . . . . . 61
Finding a Variable Definition . . . . . . . . . . . . . . . . . . . . . . . . . . . . . . . 63
What Type Is This Variable? . . . . . . . . . . . . . . . . . . . . . . . . . . . . . . . 63
Using Constants in VBA Procedures . . . . . . . . . . . . . . . . . . . . . . . . . . . 64
Intrinsic Constants. . . . . . . . . . . . . . . . . . . . . . . . . . . . . . . . . . . . . 65
Grouping Constants with the Enum Type . . . . . . . . . . . . . . . . . . . . . . . . . 67
Chapter Summary . . . . . . . . . . . . . . . . . . . . . . . . . . . . . . . . . . . . . 69
Chapter 4 Passing Arguments to Procedures and Functions . . . . . . . . . . . . 70Writing a Function Procedure . . . . . . . . . . . . . . . . . . . . . . . . . . . . . . . 70
Specifying the Data Type for a Function’s Result . . . . . . . . . . . . . . . . . . . . . 72
Passing Arguments by Reference and by Value . . . . . . . . . . . . . . . . . . . . . . 74
Using Optional Arguments . . . . . . . . . . . . . . . . . . . . . . . . . . . . . . . . 75
Using the IsMissing Function . . . . . . . . . . . . . . . . . . . . . . . . . . . . . . . 77
Built-in Functions . . . . . . . . . . . . . . . . . . . . . . . . . . . . . . . . . . . . . 77
Using the MsgBox Function . . . . . . . . . . . . . . . . . . . . . . . . . . . . . . . 78
Returning Values from the MsgBox Function . . . . . . . . . . . . . . . . . . . . 84
Using the InputBox Function . . . . . . . . . . . . . . . . . . . . . . . . . . . . . . . 85
Converting Data Types . . . . . . . . . . . . . . . . . . . . . . . . . . . . . . . . . . 87
Using Master Procedures and Subprocedures . . . . . . . . . . . . . . . . . . . . . . . 89
Chapter Summary . . . . . . . . . . . . . . . . . . . . . . . . . . . . . . . . . . . . . 93
Chapter 5 Decision Making with VBA . . . . . . . . . . . . . . . . . . . . . . . 94If…Then Statement . . . . . . . . . . . . . . . . . . . . . . . . . . . . . . . . . . . . 95
Multi-Line If…Then Statement . . . . . . . . . . . . . . . . . . . . . . . . . . . . . . 96
Decisions Based on More Than One Condition . . . . . . . . . . . . . . . . . . . . . . 98
If…Then…Else Statement . . . . . . . . . . . . . . . . . . . . . . . . . . . . . . . . 99
If…Then…ElseIf Statement . . . . . . . . . . . . . . . . . . . . . . . . . . . . . . . 101
Nested If…Then Statements . . . . . . . . . . . . . . . . . . . . . . . . . . . . . . . 102
Select Case Statement . . . . . . . . . . . . . . . . . . . . . . . . . . . . . . . . . . 106
Using Is with the Case Clause . . . . . . . . . . . . . . . . . . . . . . . . . . . 108
Specifying a Range of Values in a Case Clause. . . . . . . . . . . . . . . . . . . 108
Specifying Multiple Expressions in a Case Clause . . . . . . . . . . . . . . . . . 110
Chapter Summary . . . . . . . . . . . . . . . . . . . . . . . . . . . . . . . . . . . . 111
Chapter 6 Repeating Actions in VBA. . . . . . . . . . . . . . . . . . . . . . . 112Using the Do…While Statement . . . . . . . . . . . . . . . . . . . . . . . . . . . . . 112
Another Approach to the Do…While Statement . . . . . . . . . . . . . . . . . . . . . 114
iv | Contents
Using the Do…Until Statement . . . . . . . . . . . . . . . . . . . . . . . . . . . . . 115
Another Approach to the Do…Until Statement . . . . . . . . . . . . . . . . . . . . . 116
For…Next Statement. . . . . . . . . . . . . . . . . . . . . . . . . . . . . . . . . . . 117
For Each…Next Statement. . . . . . . . . . . . . . . . . . . . . . . . . . . . . . . . 120
Exiting Loops Early . . . . . . . . . . . . . . . . . . . . . . . . . . . . . . . . . . . 121
Nested Loops . . . . . . . . . . . . . . . . . . . . . . . . . . . . . . . . . . . . . . 122
Chapter Summary . . . . . . . . . . . . . . . . . . . . . . . . . . . . . . . . . . . . 123
Chapter 7 Working with Arrays . . . . . . . . . . . . . . . . . . . . . . . . . 124Declaring Arrays. . . . . . . . . . . . . . . . . . . . . . . . . . . . . . . . . . . . . 126
Array Upper and Lower Bounds . . . . . . . . . . . . . . . . . . . . . . . . . . . . . 127
Using Arrays in VBA Procedures . . . . . . . . . . . . . . . . . . . . . . . . . . . . 127
Arrays and Looping Statements . . . . . . . . . . . . . . . . . . . . . . . . . . . . . 129
Using a Two-Dimensional Array. . . . . . . . . . . . . . . . . . . . . . . . . . . . . 132
Static and Dynamic Arrays . . . . . . . . . . . . . . . . . . . . . . . . . . . . . . . 133
Array Functions . . . . . . . . . . . . . . . . . . . . . . . . . . . . . . . . . . . . . 135
The Array Function. . . . . . . . . . . . . . . . . . . . . . . . . . . . . . . . . 135
The IsArray Function . . . . . . . . . . . . . . . . . . . . . . . . . . . . . . . . 136
The Erase Function . . . . . . . . . . . . . . . . . . . . . . . . . . . . . . . . . 136
The LBound and UBound Functions . . . . . . . . . . . . . . . . . . . . . . . . 137
Errors in Arrays . . . . . . . . . . . . . . . . . . . . . . . . . . . . . . . . . . . . . 138
Parameter Arrays . . . . . . . . . . . . . . . . . . . . . . . . . . . . . . . . . . . . 140
Chapter Summary . . . . . . . . . . . . . . . . . . . . . . . . . . . . . . . . . . . . 141
Chapter 8 Custom Collections and Class Modules . . . . . . . . . . . . . . . . 142Terminology . . . . . . . . . . . . . . . . . . . . . . . . . . . . . . . . . . . . . . . 142
Working with Collections . . . . . . . . . . . . . . . . . . . . . . . . . . . . . . . . 143
Declaring a Custom Collection . . . . . . . . . . . . . . . . . . . . . . . . . . . 144
Adding Objects to a Custom Collection . . . . . . . . . . . . . . . . . . . . . . 144
Removing Objects from a Custom Collection . . . . . . . . . . . . . . . . . . . 146
Creating Custom Objects . . . . . . . . . . . . . . . . . . . . . . . . . . . . . . . . 146
Creating a Class . . . . . . . . . . . . . . . . . . . . . . . . . . . . . . . . . . 147
Variable Declarations . . . . . . . . . . . . . . . . . . . . . . . . . . . . . . . . 148
Defining the Properties for the Class . . . . . . . . . . . . . . . . . . . . . . . . 148
Creating the Property Get Procedures . . . . . . . . . . . . . . . . . . . . . 150
Creating the Property Let Procedures . . . . . . . . . . . . . . . . . . . . . 150
Creating the Class Methods. . . . . . . . . . . . . . . . . . . . . . . . . . . . . 152
Creating an Instance of a Class . . . . . . . . . . . . . . . . . . . . . . . . . . . 153
Event Procedures in the Class Module . . . . . . . . . . . . . . . . . . . . . . . 153
Creating the User Interface . . . . . . . . . . . . . . . . . . . . . . . . . . . . . . . 154
Running the Custom Application . . . . . . . . . . . . . . . . . . . . . . . . . . . . 163
Watching the Execution of Your VBA Procedures . . . . . . . . . . . . . . . . . . . . 164
Chapter Summary . . . . . . . . . . . . . . . . . . . . . . . . . . . . . . . . . . . . 166
Chapter 9 Debugging VBA Procedures and Handling Errors . . . . . . . . . . . 167Testing VBA Procedures . . . . . . . . . . . . . . . . . . . . . . . . . . . . . . . . . 168
Stopping a Procedure . . . . . . . . . . . . . . . . . . . . . . . . . . . . . . . . . . 168
Using Breakpoints . . . . . . . . . . . . . . . . . . . . . . . . . . . . . . . . . 169
Removing Breakpoints . . . . . . . . . . . . . . . . . . . . . . . . . . . . 174
Using the Immediate Window in Break Mode . . . . . . . . . . . . . . . . . . . 174
Using the Stop Statement . . . . . . . . . . . . . . . . . . . . . . . . . . . . . . 175
Adding Watch Expressions . . . . . . . . . . . . . . . . . . . . . . . . . . . . . 176
Contents | v
Removing Watch Expressions . . . . . . . . . . . . . . . . . . . . . . . . . 179
Using Quick Watch . . . . . . . . . . . . . . . . . . . . . . . . . . . . . . . . . 180
Using the Locals Window and the Call Stack Dialog Box . . . . . . . . . . . . . . . . 181
Stepping Through VBA Procedures . . . . . . . . . . . . . . . . . . . . . . . . . . . 182
Stepping Over a Procedure . . . . . . . . . . . . . . . . . . . . . . . . . . . . . 184
Stepping Out of a Procedure . . . . . . . . . . . . . . . . . . . . . . . . . . . . 185
Running a Procedure to Cursor . . . . . . . . . . . . . . . . . . . . . . . . . . . 185
Setting the Next Statement . . . . . . . . . . . . . . . . . . . . . . . . . . . . . . . . 185
Showing the Next Statement . . . . . . . . . . . . . . . . . . . . . . . . . . . . . . . 186
Stopping and Resetting VBA Procedures . . . . . . . . . . . . . . . . . . . . . . . . 186
Understanding and Using Conditional Compilation . . . . . . . . . . . . . . . . . . . 186
Navigating with Bookmarks . . . . . . . . . . . . . . . . . . . . . . . . . . . . . . . 188
Trapping Errors . . . . . . . . . . . . . . . . . . . . . . . . . . . . . . . . . . . . . 189
Generating Errors to Test Error Handling . . . . . . . . . . . . . . . . . . . . . . . . 193
Chapter Summary . . . . . . . . . . . . . . . . . . . . . . . . . . . . . . . . . . . . 193
Part II — Access VBA Programming with DAO and ADO
Chapter 10 Data Access Technologies in Microsoft Access . . . . . . . . . . . . 197Understanding Database Engines: Jet/ACE . . . . . . . . . . . . . . . . . . . . . . . 197
Understanding Access Versions and File Formats . . . . . . . . . . . . . . . . . . . . 198
Understanding Library References. . . . . . . . . . . . . . . . . . . . . . . . . . . . 201
Overview of Object Libraries in Microsoft Access . . . . . . . . . . . . . . . . . . . 203
The Visual Basic for Applications Object Library (VBA) . . . . . . . . . . . . . 203
The Microsoft Access 12.0 Object Library . . . . . . . . . . . . . . . . . . . . . 203
The Microsoft Office 12.0 Access Database Engine Object Library . . . . . . . . 203
The Microsoft Access DAO 3.6 Object Library . . . . . . . . . . . . . . . . . . 204
The Microsoft ActiveX Data Objects 2.8 Library (ADO) . . . . . . . . . . . . . 205
Creating a Reference to the ADO Library . . . . . . . . . . . . . . . . . . . . . . . . 206
Understanding Connection Strings . . . . . . . . . . . . . . . . . . . . . . . . . . . . 207
Using ODBC Connection Strings . . . . . . . . . . . . . . . . . . . . . . . . . . . . 209
Creating and Using ODBC DSN Connections . . . . . . . . . . . . . . . . . . . 209
Creating and Using DSN-less ODBC Connections . . . . . . . . . . . . . . . . . 213
Using OLE DB Connection Strings . . . . . . . . . . . . . . . . . . . . . . . . . . . 215
Connection String via a Data Link File . . . . . . . . . . . . . . . . . . . . . . . . . 215
Opening Microsoft Access Databases . . . . . . . . . . . . . . . . . . . . . . . . . . 218
Opening a Microsoft Jet Database in Read/Write Mode with DAO . . . . . . . . 218
Opening a Microsoft Jet Database in Read/Write Mode with ADO . . . . . . . . 220
Opening a Microsoft Access Database in Read-Only Mode with DAO . . . . . . 223
Opening a a Microsoft Jet Database in Read-Only Mode with ADO . . . . . . . . 224
Opening a Microsoft Jet Database Secured with a Password . . . . . . . . . . . . 224
Opening a Microsoft Jet Database with User-Level Security . . . . . . . . . . . . 228
Connecting to the Current Access Database . . . . . . . . . . . . . . . . . . . . . . . 230
Opening Other Databases, Spreadsheets, and Text Files from Access 2007 . . . . . . . 232
Connecting to an SQL Server Database. . . . . . . . . . . . . . . . . . . . . . . 232
Opening a Microsoft Excel Spreadsheet . . . . . . . . . . . . . . . . . . . . . . 233
Opening a Text File Using ADO . . . . . . . . . . . . . . . . . . . . . . . . . . 237
Creating a New Access Database . . . . . . . . . . . . . . . . . . . . . . . . . . . . 239
Creating a Database with DAO . . . . . . . . . . . . . . . . . . . . . . . . . . . 239
Creating a Database with ADO . . . . . . . . . . . . . . . . . . . . . . . . . . . 240
vi | Contents

Copying a Database . . . . . . . . . . . . . . . . . . . . . . . . . . . . . . . . . . . 241
Copying a Database with DAO . . . . . . . . . . . . . . . . . . . . . . . . . . . 241
Copying a Database with FileSystemObject . . . . . . . . . . . . . . . . . . . . 242
Database Errors . . . . . . . . . . . . . . . . . . . . . . . . . . . . . . . . . . . . . 243
Compacting a Database . . . . . . . . . . . . . . . . . . . . . . . . . . . . . . . . . 246
Chapter Summary . . . . . . . . . . . . . . . . . . . . . . . . . . . . . . . . . . . . 248
Chapter 11 Creating and Accessing Database Tables and Fields . . . . . . . . . 249Creating a Microsoft Access Table and Setting Field Properties (DAO Method) . . . . 249
Creating a Microsoft Access Table and Setting Field Properties (ADO Method) . . . . 254
Copying a Table . . . . . . . . . . . . . . . . . . . . . . . . . . . . . . . . . . . . . 258
Deleting a Database Table . . . . . . . . . . . . . . . . . . . . . . . . . . . . . . . . 259
Adding New Fields to an Existing Table . . . . . . . . . . . . . . . . . . . . . . . . . 260
Removing a Field from a Table . . . . . . . . . . . . . . . . . . . . . . . . . . . . . 262
Retrieving Table Properties . . . . . . . . . . . . . . . . . . . . . . . . . . . . . . . 263
Retrieving Field Properties. . . . . . . . . . . . . . . . . . . . . . . . . . . . . . . . 265
Linking a Microsoft Access Table . . . . . . . . . . . . . . . . . . . . . . . . . . . . 266
Linking a dBASE Table . . . . . . . . . . . . . . . . . . . . . . . . . . . . . . . . . 267
Linking a Microsoft Excel Spreadsheet . . . . . . . . . . . . . . . . . . . . . . . . . 268
Listing Database Tables . . . . . . . . . . . . . . . . . . . . . . . . . . . . . . . . . 270
Listing Tables and Fields. . . . . . . . . . . . . . . . . . . . . . . . . . . . . . . . . 271
Listing Data Types . . . . . . . . . . . . . . . . . . . . . . . . . . . . . . . . . . . . 272
Changing the AutoNumber . . . . . . . . . . . . . . . . . . . . . . . . . . . . . . . 273
Chapter Summary . . . . . . . . . . . . . . . . . . . . . . . . . . . . . . . . . . . . 274
Chapter 12 Setting Up Primary Keys, Indexes, and Table Relationships . . . . . . 275Creating a Primary Key Index . . . . . . . . . . . . . . . . . . . . . . . . . . . . . . 275
Creating a Single-Field Index . . . . . . . . . . . . . . . . . . . . . . . . . . . . . . 279
Adding a Multiple-Field Index to a Table . . . . . . . . . . . . . . . . . . . . . . . . 280
Listing Indexes in a Table . . . . . . . . . . . . . . . . . . . . . . . . . . . . . . . . 281
Deleting Table Indexes. . . . . . . . . . . . . . . . . . . . . . . . . . . . . . . . . . 283
Creating Table Relationships. . . . . . . . . . . . . . . . . . . . . . . . . . . . . . . 284
Chapter Summary . . . . . . . . . . . . . . . . . . . . . . . . . . . . . . . . . . . . 286
Chapter 13 Finding and Reading Records . . . . . . . . . . . . . . . . . . . . 287Introduction to DAO Recordsets . . . . . . . . . . . . . . . . . . . . . . . . . . . . . 287
Opening Various Types of Recordsets . . . . . . . . . . . . . . . . . . . . . . . 288
Opening a Snapshot and Counting Records. . . . . . . . . . . . . . . . . . . . . 290
Retrieving the Contents of a Specific Field in a Table . . . . . . . . . . . . . . . 292
Moving between Records in a Table . . . . . . . . . . . . . . . . . . . . . . . . 292
Finding Records in a Table-Type Recordset . . . . . . . . . . . . . . . . . . . . 293
Finding Records in Dynasets or Snapshots . . . . . . . . . . . . . . . . . . . . . 295
Finding the nth Record in a Snapshot. . . . . . . . . . . . . . . . . . . . . . . . 297
Introduction to ADO Recordsets . . . . . . . . . . . . . . . . . . . . . . . . . . . . . 298
Cursor Types . . . . . . . . . . . . . . . . . . . . . . . . . . . . . . . . . . . . 299
Lock Types . . . . . . . . . . . . . . . . . . . . . . . . . . . . . . . . . . . . . 300
Cursor Location. . . . . . . . . . . . . . . . . . . . . . . . . . . . . . . . . . . 301
The Options Parameter . . . . . . . . . . . . . . . . . . . . . . . . . . . . . . . 302
Opening a Recordset . . . . . . . . . . . . . . . . . . . . . . . . . . . . . . . . 305
Opening a Recordset Based on a Table or Query . . . . . . . . . . . . . . . 306
Opening a Recordset Based on an SQL Statement . . . . . . . . . . . . . . 310
Opening a Recordset Based on Criteria . . . . . . . . . . . . . . . . . . . . 311
Contents | vii

Opening a Recordset Directly . . . . . . . . . . . . . . . . . . . . . . . . . 312
Moving Around in a Recordset . . . . . . . . . . . . . . . . . . . . . . . . . . . 312
Finding the Record Position . . . . . . . . . . . . . . . . . . . . . . . . . . . . 313
Reading Data from a Field . . . . . . . . . . . . . . . . . . . . . . . . . . . . . 314
Returning a Recordset as a String. . . . . . . . . . . . . . . . . . . . . . . . . . 315
Finding Records Using the Find Method . . . . . . . . . . . . . . . . . . . . . . 317
Finding Records Using the Seek Method . . . . . . . . . . . . . . . . . . . . . . 318
Finding a Record Based on Multiple Conditions . . . . . . . . . . . . . . . . . . 320
Using Bookmarks. . . . . . . . . . . . . . . . . . . . . . . . . . . . . . . . . . 321
Using Bookmarks to Filter a Recordset . . . . . . . . . . . . . . . . . . . . . . . 323
Using the GetRows Method to Fill the Recordset . . . . . . . . . . . . . . . . . 324
Chapter Summary . . . . . . . . . . . . . . . . . . . . . . . . . . . . . . . . . . . . 325
Chapter 14 Working with Records . . . . . . . . . . . . . . . . . . . . . . . . 326Adding a New Record with DAO . . . . . . . . . . . . . . . . . . . . . . . . . . . . 326
Adding a New Record with ADO . . . . . . . . . . . . . . . . . . . . . . . . . . . . 328
Modifying a Record with DAO . . . . . . . . . . . . . . . . . . . . . . . . . . . . . 329
Modifying a Record with ADO . . . . . . . . . . . . . . . . . . . . . . . . . . . . . 331
Editing Multiple Records with ADO. . . . . . . . . . . . . . . . . . . . . . . . . . . 332
Deleting a Record with DAO . . . . . . . . . . . . . . . . . . . . . . . . . . . . . . 334
Deleting a Record with ADO . . . . . . . . . . . . . . . . . . . . . . . . . . . . . . 335
Copying Records to an Excel Spreadsheet . . . . . . . . . . . . . . . . . . . . . . . . 336
Copying Records to a Word Document . . . . . . . . . . . . . . . . . . . . . . . . . 339
Copying Records to a Text File . . . . . . . . . . . . . . . . . . . . . . . . . . . . . 342
Filtering Records Using the SQL WHERE Clause. . . . . . . . . . . . . . . . . . . . 344
Filtering Records Using the Filter Property . . . . . . . . . . . . . . . . . . . . . . . 346
Sorting Records . . . . . . . . . . . . . . . . . . . . . . . . . . . . . . . . . . . . . 348
Chapter Summary . . . . . . . . . . . . . . . . . . . . . . . . . . . . . . . . . . . . 349
Chapter 15 Creating and Running Queries with DAO/ADO . . . . . . . . . . . 350Creating a Select Query Manually . . . . . . . . . . . . . . . . . . . . . . . . . . . . 350
Creating a Select Query with DAO . . . . . . . . . . . . . . . . . . . . . . . . . . . 354
Creating a Select Query with ADO . . . . . . . . . . . . . . . . . . . . . . . . . . . 356
Executing an Existing Select Query with ADO . . . . . . . . . . . . . . . . . . . . . 358
Modifying an Existing Query with ADO . . . . . . . . . . . . . . . . . . . . . . . . 361
Creating and Running a Parameter Query with DAO . . . . . . . . . . . . . . . . . . 362
Creating and Running a Parameter Query with ADO . . . . . . . . . . . . . . . . . . 364
Creating and Running a Make-Table Query with DAO . . . . . . . . . . . . . . . . . 367
Creating and Running an Update Query with DAO . . . . . . . . . . . . . . . . . . . 369
Executing an Update Query with ADO . . . . . . . . . . . . . . . . . . . . . . . . . 370
Running an Append Query with DAO/ADO. . . . . . . . . . . . . . . . . . . . . . . 372
Running a Delete Query with DAO . . . . . . . . . . . . . . . . . . . . . . . . . . . 374
Creating and Running a Pass-Through Query with DAO . . . . . . . . . . . . . . . . 376
Creating and Executing a Pass-Through Query with ADO . . . . . . . . . . . . . . . 378
Performing Other Operations with Queries . . . . . . . . . . . . . . . . . . . . . . . 382
Retrieving Query Properties with DAO. . . . . . . . . . . . . . . . . . . . . . . 382
Listing All Queries in a Database with DAO/ADO. . . . . . . . . . . . . . . . . 383
Deleting a Query from a Database with DAO/ADO . . . . . . . . . . . . . . . . . . . 384
Determining if a Query Is Updatable . . . . . . . . . . . . . . . . . . . . . . . . . . 386
Chapter Summary . . . . . . . . . . . . . . . . . . . . . . . . . . . . . . . . . . . . 388
viii | Contents

Chapter 16 Using Advanced ADO/DAO Features . . . . . . . . . . . . . . . . 389Fabricating a Recordset . . . . . . . . . . . . . . . . . . . . . . . . . . . . . . . . . 389
Disconnected Recordsets. . . . . . . . . . . . . . . . . . . . . . . . . . . . . . . . . 392
Saving a Recordset to Disk . . . . . . . . . . . . . . . . . . . . . . . . . . . . . . . 394
Cloning a Recordset . . . . . . . . . . . . . . . . . . . . . . . . . . . . . . . . . . . 407
Introduction to Data Shaping . . . . . . . . . . . . . . . . . . . . . . . . . . . . . . 412
Writing a Simple SHAPE Statement . . . . . . . . . . . . . . . . . . . . . . . . 413
Working with Data Shaping . . . . . . . . . . . . . . . . . . . . . . . . . . . . 414
Writing a Complex SHAPE Statement . . . . . . . . . . . . . . . . . . . . . . . 418
Shaped Recordsets with Multiple Children . . . . . . . . . . . . . . . . . . 418
Shaped Recordsets with Grandchildren . . . . . . . . . . . . . . . . . . . . 421
Transaction Processing. . . . . . . . . . . . . . . . . . . . . . . . . . . . . . . . . . 430
Creating a Transaction with ADO . . . . . . . . . . . . . . . . . . . . . . . . . 431
Creating a Transaction with DAO . . . . . . . . . . . . . . . . . . . . . . . . . 433
Chapter Summary . . . . . . . . . . . . . . . . . . . . . . . . . . . . . . . . . . . . 436
Chapter 17 Implementing Database Security . . . . . . . . . . . . . . . . . . 437Two Types of Security in Microsoft Access . . . . . . . . . . . . . . . . . . . . . . . 437
Share-Level Security (in Access ACCDB and MDB File Formats) . . . . . . . . 438
User-Level Security . . . . . . . . . . . . . . . . . . . . . . . . . . . . . . . . 438
Understanding Workgroup Information Files . . . . . . . . . . . . . . . . . . . . . . 438
Creating and Joining Workgroup Information Files. . . . . . . . . . . . . . . . . 441
Creating and Managing Group and User Accounts . . . . . . . . . . . . . . . . . . . 449
Deleting User and Group Accounts. . . . . . . . . . . . . . . . . . . . . . . . . 452
Listing User and Group Accounts . . . . . . . . . . . . . . . . . . . . . . . . . 453
Listing Users in Groups. . . . . . . . . . . . . . . . . . . . . . . . . . . . . . . 455
Setting and Retrieving User and Group Permissions . . . . . . . . . . . . . . . . . . . 456
Determining the Object Owner . . . . . . . . . . . . . . . . . . . . . . . . . . . 456
Setting User Permissions for an Object . . . . . . . . . . . . . . . . . . . . . . . 458
Setting User Permissions for a Database . . . . . . . . . . . . . . . . . . . . . . 461
Setting User Permissions for Containers . . . . . . . . . . . . . . . . . . . . . . 462
Checking Permissions for Objects . . . . . . . . . . . . . . . . . . . . . . . . . 464
Setting a Database Password Using the CompactDatabase Method . . . . . . . . 466
Setting a Database Password Using the NewPassword Method . . . . . . . . . . 468
Changing a User Password . . . . . . . . . . . . . . . . . . . . . . . . . . . . . 469
Encrypting a Secured MDB Database . . . . . . . . . . . . . . . . . . . . . . . . . . 471
Chapter Summary . . . . . . . . . . . . . . . . . . . . . . . . . . . . . . . . . . . . 473
Chapter 18 Database Replication . . . . . . . . . . . . . . . . . . . . . . . . 474Creating a Design Master . . . . . . . . . . . . . . . . . . . . . . . . . . . . . . . . 475
Creating a Full Replica. . . . . . . . . . . . . . . . . . . . . . . . . . . . . . . . . . 477
Creating a Partial Replica . . . . . . . . . . . . . . . . . . . . . . . . . . . . . . . . 478
Replicating Objects . . . . . . . . . . . . . . . . . . . . . . . . . . . . . . . . . . . 481
Keeping Objects Local. . . . . . . . . . . . . . . . . . . . . . . . . . . . . . . . . . 483
Synchronizing Replicas . . . . . . . . . . . . . . . . . . . . . . . . . . . . . . . . . 484
Retrieving Replica Properties . . . . . . . . . . . . . . . . . . . . . . . . . . . . . . 486
Synchronization Conflicts . . . . . . . . . . . . . . . . . . . . . . . . . . . . . . . . 488
Chapter Summary . . . . . . . . . . . . . . . . . . . . . . . . . . . . . . . . . . . . 493
Contents | ix

Part III — Programming with the Jet Data Definition Language
Chapter 19 Creating, Modifying, and Deleting Tables and Fields . . . . . . . . . 497Creating Tables . . . . . . . . . . . . . . . . . . . . . . . . . . . . . . . . . . . . . 499
Deleting Tables . . . . . . . . . . . . . . . . . . . . . . . . . . . . . . . . . . . . . 504
Modifying Tables with DDL . . . . . . . . . . . . . . . . . . . . . . . . . . . . . . . 505
Adding New Fields to a Table . . . . . . . . . . . . . . . . . . . . . . . . . . . 506
Changing the Data Type of a Table Column . . . . . . . . . . . . . . . . . . . . 507
Changing the Size of a Text Column . . . . . . . . . . . . . . . . . . . . . . . . 508
Deleting a Column from a Table . . . . . . . . . . . . . . . . . . . . . . . . . . 509
Adding a Primary Key to a Table . . . . . . . . . . . . . . . . . . . . . . . . . . 509
Adding a Multiple-Field Index to a Table. . . . . . . . . . . . . . . . . . . . . . 510
Deleting an Indexed Column . . . . . . . . . . . . . . . . . . . . . . . . . . . . 511
Deleting an Index . . . . . . . . . . . . . . . . . . . . . . . . . . . . . . . . . . 512
Setting a Default Value for a Table Column . . . . . . . . . . . . . . . . . . . . 513
Changing the Seed and Increment Value of AutoNumber Columns . . . . . . . . 515
Chapter Summary . . . . . . . . . . . . . . . . . . . . . . . . . . . . . . . . . . . . 516
Chapter 20 Enforcing Data Integrity and Relationships between Tables . . . . . . 517Using CHECK Constraints. . . . . . . . . . . . . . . . . . . . . . . . . . . . . . . . 517
Establishing Relationships between Tables . . . . . . . . . . . . . . . . . . . . . . . 523
Using the Data Definition Query Window . . . . . . . . . . . . . . . . . . . . . . . . 525
Chapter Summary . . . . . . . . . . . . . . . . . . . . . . . . . . . . . . . . . . . . 527
Chapter 21 Defining Indexes and Primary Keys . . . . . . . . . . . . . . . . . 528Creating Tables with Indexes . . . . . . . . . . . . . . . . . . . . . . . . . . . . . . 528
Adding an Index to an Existing Table . . . . . . . . . . . . . . . . . . . . . . . . . . 529
Creating a Table with a Primary Key . . . . . . . . . . . . . . . . . . . . . . . . . . 531
Creating Indexes with Restrictions. . . . . . . . . . . . . . . . . . . . . . . . . . . . 532
Deleting Indexes . . . . . . . . . . . . . . . . . . . . . . . . . . . . . . . . . . . . . 535
Chapter Summary . . . . . . . . . . . . . . . . . . . . . . . . . . . . . . . . . . . . 536
Chapter 22 Database Security. . . . . . . . . . . . . . . . . . . . . . . . . . 537Setting the Database Password. . . . . . . . . . . . . . . . . . . . . . . . . . . . . . 537
Removing the Database Password . . . . . . . . . . . . . . . . . . . . . . . . . . . . 538
Creating a User Account . . . . . . . . . . . . . . . . . . . . . . . . . . . . . . . . . 539
Changing a User Password. . . . . . . . . . . . . . . . . . . . . . . . . . . . . . . . 541
Creating a Group Account . . . . . . . . . . . . . . . . . . . . . . . . . . . . . . . . 542
Adding Users to Groups . . . . . . . . . . . . . . . . . . . . . . . . . . . . . . . . . 542
Removing a User from a Group . . . . . . . . . . . . . . . . . . . . . . . . . . . . . 543
Deleting a User Account . . . . . . . . . . . . . . . . . . . . . . . . . . . . . . . . . 544
Granting Permissions for an Object . . . . . . . . . . . . . . . . . . . . . . . . . . . 545
Revoking Security Permissions . . . . . . . . . . . . . . . . . . . . . . . . . . . . . 546
Deleting a Group Account . . . . . . . . . . . . . . . . . . . . . . . . . . . . . . . . 547
Chapter Summary . . . . . . . . . . . . . . . . . . . . . . . . . . . . . . . . . . . . 548
Chapter 23 Views and Stored Procedures . . . . . . . . . . . . . . . . . . . . 549Creating a View . . . . . . . . . . . . . . . . . . . . . . . . . . . . . . . . . . . . . 549
Enumerating Views . . . . . . . . . . . . . . . . . . . . . . . . . . . . . . . . . . . 552
Deleting a View . . . . . . . . . . . . . . . . . . . . . . . . . . . . . . . . . . . . . 553
Creating a Stored Procedure . . . . . . . . . . . . . . . . . . . . . . . . . . . . . . . 553
Creating a Parameterized Stored Procedure . . . . . . . . . . . . . . . . . . . . . . . 555
x | Contents

Executing a Parameterized Stored Procedure . . . . . . . . . . . . . . . . . . . . . . 557
Deleting a Stored Procedure . . . . . . . . . . . . . . . . . . . . . . . . . . . . . . . 559
Changing Database Records with Stored Procedures . . . . . . . . . . . . . . . . . . 560
Chapter Summary . . . . . . . . . . . . . . . . . . . . . . . . . . . . . . . . . . . . 560
Part IV — Event Programming in Forms and Reports
Chapter 24 Using Form Events . . . . . . . . . . . . . . . . . . . . . . . . . 563Data Events . . . . . . . . . . . . . . . . . . . . . . . . . . . . . . . . . . . . . . . 564
Current . . . . . . . . . . . . . . . . . . . . . . . . . . . . . . . . . . . . . . . 564
BeforeInsert. . . . . . . . . . . . . . . . . . . . . . . . . . . . . . . . . . . . . 565
AfterInsert . . . . . . . . . . . . . . . . . . . . . . . . . . . . . . . . . . . . . 566
BeforeUpdate . . . . . . . . . . . . . . . . . . . . . . . . . . . . . . . . . . . . 567
AfterUpdate . . . . . . . . . . . . . . . . . . . . . . . . . . . . . . . . . . . . 568
Dirty . . . . . . . . . . . . . . . . . . . . . . . . . . . . . . . . . . . . . . . . 570
OnUndo. . . . . . . . . . . . . . . . . . . . . . . . . . . . . . . . . . . . . . . 571
Delete. . . . . . . . . . . . . . . . . . . . . . . . . . . . . . . . . . . . . . . . 571
BeforeDelConfirm . . . . . . . . . . . . . . . . . . . . . . . . . . . . . . . . . 572
AfterDelConfirm . . . . . . . . . . . . . . . . . . . . . . . . . . . . . . . . . . 573
Focus Events . . . . . . . . . . . . . . . . . . . . . . . . . . . . . . . . . . . . . . . 574
Activate. . . . . . . . . . . . . . . . . . . . . . . . . . . . . . . . . . . . . . . 574
Deactivate . . . . . . . . . . . . . . . . . . . . . . . . . . . . . . . . . . . . . 575
GotFocus . . . . . . . . . . . . . . . . . . . . . . . . . . . . . . . . . . . . . . 575
LostFocus. . . . . . . . . . . . . . . . . . . . . . . . . . . . . . . . . . . . . . 575
Mouse Events . . . . . . . . . . . . . . . . . . . . . . . . . . . . . . . . . . . . . . 576
Click . . . . . . . . . . . . . . . . . . . . . . . . . . . . . . . . . . . . . . . . 576
DblClick . . . . . . . . . . . . . . . . . . . . . . . . . . . . . . . . . . . . . . 576
MouseDown . . . . . . . . . . . . . . . . . . . . . . . . . . . . . . . . . . . . 577
MouseMove . . . . . . . . . . . . . . . . . . . . . . . . . . . . . . . . . . . . 578
MouseUp . . . . . . . . . . . . . . . . . . . . . . . . . . . . . . . . . . . . . . 578
MouseWheel . . . . . . . . . . . . . . . . . . . . . . . . . . . . . . . . . . . . 578
Keyboard Events. . . . . . . . . . . . . . . . . . . . . . . . . . . . . . . . . . . . . 579
KeyDown. . . . . . . . . . . . . . . . . . . . . . . . . . . . . . . . . . . . . . 579
KeyPress . . . . . . . . . . . . . . . . . . . . . . . . . . . . . . . . . . . . . . 580
KeyUp . . . . . . . . . . . . . . . . . . . . . . . . . . . . . . . . . . . . . . . 582
Error Events . . . . . . . . . . . . . . . . . . . . . . . . . . . . . . . . . . . . . . . 583
Error . . . . . . . . . . . . . . . . . . . . . . . . . . . . . . . . . . . . . . . . 583
Filter Events . . . . . . . . . . . . . . . . . . . . . . . . . . . . . . . . . . . . . . . 584
Filter . . . . . . . . . . . . . . . . . . . . . . . . . . . . . . . . . . . . . . . . 584
ApplyFilter . . . . . . . . . . . . . . . . . . . . . . . . . . . . . . . . . . . . . 585
Timing Events . . . . . . . . . . . . . . . . . . . . . . . . . . . . . . . . . . . . . . 587
Timer . . . . . . . . . . . . . . . . . . . . . . . . . . . . . . . . . . . . . . . . 587
PivotTable/PivotChart Events . . . . . . . . . . . . . . . . . . . . . . . . . . . . . . 588
Referencing the Microsoft Office Web Components Object Library . . . . . . . . 590
Data Source Events . . . . . . . . . . . . . . . . . . . . . . . . . . . . . . . . . 590
OnConnect . . . . . . . . . . . . . . . . . . . . . . . . . . . . . . . . . . 590
OnDisconnect . . . . . . . . . . . . . . . . . . . . . . . . . . . . . . . . . 593
BeforeQuery. . . . . . . . . . . . . . . . . . . . . . . . . . . . . . . . . . 593
Query . . . . . . . . . . . . . . . . . . . . . . . . . . . . . . . . . . . . . 593
Display Events . . . . . . . . . . . . . . . . . . . . . . . . . . . . . . . . . . . 595
BeforeScreenTip. . . . . . . . . . . . . . . . . . . . . . . . . . . . . . . . 596
Contents | xi
AfterLayout . . . . . . . . . . . . . . . . . . . . . . . . . . . . . . . . . . 596
BeforeRender . . . . . . . . . . . . . . . . . . . . . . . . . . . . . . . . . 598
AfterRender . . . . . . . . . . . . . . . . . . . . . . . . . . . . . . . . . . 600
AfterFinalRender . . . . . . . . . . . . . . . . . . . . . . . . . . . . . . . 601
Change Events . . . . . . . . . . . . . . . . . . . . . . . . . . . . . . . . . . . 602
DataChange . . . . . . . . . . . . . . . . . . . . . . . . . . . . . . . . . . 602
DataSetChange . . . . . . . . . . . . . . . . . . . . . . . . . . . . . . . . 603
PivotTableChange . . . . . . . . . . . . . . . . . . . . . . . . . . . . . . . 603
SelectionChange. . . . . . . . . . . . . . . . . . . . . . . . . . . . . . . . 604
ViewChange . . . . . . . . . . . . . . . . . . . . . . . . . . . . . . . . . . 605
Command Events . . . . . . . . . . . . . . . . . . . . . . . . . . . . . . . . . . 605
CommandEnabled . . . . . . . . . . . . . . . . . . . . . . . . . . . . . . . 605
CommandChecked . . . . . . . . . . . . . . . . . . . . . . . . . . . . . . 606
CommandBeforeExecute . . . . . . . . . . . . . . . . . . . . . . . . . . . 607
CommandExecute . . . . . . . . . . . . . . . . . . . . . . . . . . . . . . . 608
Keyboard and Mouse Events . . . . . . . . . . . . . . . . . . . . . . . . . . . . 608
Events Recognized by Form Sections . . . . . . . . . . . . . . . . . . . . . . . . . . 609
DblClick (Form Section Event). . . . . . . . . . . . . . . . . . . . . . . . . . . 609
Chapter Summary . . . . . . . . . . . . . . . . . . . . . . . . . . . . . . . . . . . . 610
Chapter 25 Using Report Events . . . . . . . . . . . . . . . . . . . . . . . . . 611Open . . . . . . . . . . . . . . . . . . . . . . . . . . . . . . . . . . . . . . . . . . . 611
Close . . . . . . . . . . . . . . . . . . . . . . . . . . . . . . . . . . . . . . . . . . . 613
Activate . . . . . . . . . . . . . . . . . . . . . . . . . . . . . . . . . . . . . . . . . 613
Deactivate . . . . . . . . . . . . . . . . . . . . . . . . . . . . . . . . . . . . . . . . 614
NoData. . . . . . . . . . . . . . . . . . . . . . . . . . . . . . . . . . . . . . . . . . 614
Page . . . . . . . . . . . . . . . . . . . . . . . . . . . . . . . . . . . . . . . . . . . 615
Error . . . . . . . . . . . . . . . . . . . . . . . . . . . . . . . . . . . . . . . . . . . 616
Events Recognized by Report Sections . . . . . . . . . . . . . . . . . . . . . . . . . 617
Format (Report Section Event) . . . . . . . . . . . . . . . . . . . . . . . . . . . 618
Print (Report Section Event) . . . . . . . . . . . . . . . . . . . . . . . . . . . . 620
Retreat . . . . . . . . . . . . . . . . . . . . . . . . . . . . . . . . . . . . . . . 623
Chapter Summary . . . . . . . . . . . . . . . . . . . . . . . . . . . . . . . . . . . . 624
Chapter 26 Events Recognized by Controls . . . . . . . . . . . . . . . . . . . 625Enter (Control) . . . . . . . . . . . . . . . . . . . . . . . . . . . . . . . . . . . . . . 626
BeforeUpdate (Control) . . . . . . . . . . . . . . . . . . . . . . . . . . . . . . . . . 627
AfterUpdate (Control) . . . . . . . . . . . . . . . . . . . . . . . . . . . . . . . . . . 628
NotInList (Control) . . . . . . . . . . . . . . . . . . . . . . . . . . . . . . . . . . . 630
Click (Control) . . . . . . . . . . . . . . . . . . . . . . . . . . . . . . . . . . . . . . 631
DblClick (Control) . . . . . . . . . . . . . . . . . . . . . . . . . . . . . . . . . . . . 635
Chapter Summary . . . . . . . . . . . . . . . . . . . . . . . . . . . . . . . . . . . . 637
Chapter 27 More about Event Programming. . . . . . . . . . . . . . . . . . . 638Sinking Events in Standalone Class Modules . . . . . . . . . . . . . . . . . . . . . . 639
Writing Event Procedure Code in Two Places . . . . . . . . . . . . . . . . . . . . . . 648
Responding to Control Events in a Class. . . . . . . . . . . . . . . . . . . . . . . . . 649
Declaring and Raising Events . . . . . . . . . . . . . . . . . . . . . . . . . . . . . . 652
Chapter Summary . . . . . . . . . . . . . . . . . . . . . . . . . . . . . . . . . . . . 656
xii | Contents

Part V — Taking Your VBA Programming Skills to the Web
Chapter 28 Access and Active Server Pages . . . . . . . . . . . . . . . . . . . 661Introduction to Active Server Pages . . . . . . . . . . . . . . . . . . . . . . . . . . . 661
The ASP Object Model . . . . . . . . . . . . . . . . . . . . . . . . . . . . . . . . . 668
Installing Internet Information Services (IIS) . . . . . . . . . . . . . . . . . . . . . . 668
Creating a Virtual Directory . . . . . . . . . . . . . . . . . . . . . . . . . . . . . . . 669
Retrieving Records. . . . . . . . . . . . . . . . . . . . . . . . . . . . . . . . . . . . 672
Breaking Up a Recordset When Retrieving Records . . . . . . . . . . . . . . . . 674
Retrieving Records with the GetRows Method . . . . . . . . . . . . . . . . . . . 681
Database Lookup Using Drop-Down Lists. . . . . . . . . . . . . . . . . . . . . . . . 684
Database Lookup Using a Multiple-Selection List Box . . . . . . . . . . . . . . . . . 688
Adding Data into a Table . . . . . . . . . . . . . . . . . . . . . . . . . . . . . . . . 694
Modifying a Record . . . . . . . . . . . . . . . . . . . . . . . . . . . . . . . . . . . 698
Deleting a Record . . . . . . . . . . . . . . . . . . . . . . . . . . . . . . . . . . . . 702
Creating a Web User Interface for Database Access . . . . . . . . . . . . . . . . . . . 706
Chapter Summary . . . . . . . . . . . . . . . . . . . . . . . . . . . . . . . . . . . . 711
Chapter 29 XML Features in Access 2007 . . . . . . . . . . . . . . . . . . . . 712What Is XML? . . . . . . . . . . . . . . . . . . . . . . . . . . . . . . . . . . . . . . 712
XML Support in Access 2007 . . . . . . . . . . . . . . . . . . . . . . . . . . . . . . 715
Exporting XML Data . . . . . . . . . . . . . . . . . . . . . . . . . . . . . . . . . . 715
Understanding the XML Data File . . . . . . . . . . . . . . . . . . . . . . . . . 717
Understanding the XML Schema File . . . . . . . . . . . . . . . . . . . . . . . 720
Understanding the XSL Transformation Files . . . . . . . . . . . . . . . . . . . 722
Viewing XML Documents Formatted with Stylesheets . . . . . . . . . . . . . . . 725
Advanced XML Export Options . . . . . . . . . . . . . . . . . . . . . . . . . . 726
Data Export Options. . . . . . . . . . . . . . . . . . . . . . . . . . . . . . 726
Schema Export Options . . . . . . . . . . . . . . . . . . . . . . . . . . . . 727
Presentation Export Options. . . . . . . . . . . . . . . . . . . . . . . . . . 728
Applying XSLT Transforms to Exported Data . . . . . . . . . . . . . . . . . . . . . . 729
Importing XML Data . . . . . . . . . . . . . . . . . . . . . . . . . . . . . . . . . . 735
Exporting to and Importing from XML Programmatically . . . . . . . . . . . . . . . . 740
Exporting to XML Using the ExportXML Method . . . . . . . . . . . . . . . . . 740
Transforming XML Data with the TransformXML Method . . . . . . . . . . . . 749
Importing to XML Using the ImportXML Method . . . . . . . . . . . . . . . . . 756
Manipulating XML Documents Programmatically. . . . . . . . . . . . . . . . . . . . 757
Loading and Retrieving the Contents of an XML File . . . . . . . . . . . . . . . 758
Working with XML Document Nodes . . . . . . . . . . . . . . . . . . . . . . . 760
Retrieving Information from Element Nodes . . . . . . . . . . . . . . . . . . . . 761
Retrieving Specific Information from Element Nodes . . . . . . . . . . . . . . . 762
Retrieving the First Matching Node . . . . . . . . . . . . . . . . . . . . . . . . 764
Using ActiveX Data Objects with XML . . . . . . . . . . . . . . . . . . . . . . . . . 764
Saving an ADO Recordset as XML to Disk . . . . . . . . . . . . . . . . . . . . 764
Attribute-Centric and Element-Centric XML. . . . . . . . . . . . . . . . . . . . 766
Changing the Type of an XML File. . . . . . . . . . . . . . . . . . . . . . . . . 767
Applying an XSL Stylesheet . . . . . . . . . . . . . . . . . . . . . . . . . . . . 768
Transforming Attribute-Centric XML Data into an HTML Table. . . . . . . . . . 770
Loading an XML Document in Excel. . . . . . . . . . . . . . . . . . . . . . . . 774
Chapter Summary . . . . . . . . . . . . . . . . . . . . . . . . . . . . . . . . . . . . 776
Contents | xiii

Part VI — Working with New Features in Access 2007
Chapter 30 Programming the User Interface. . . . . . . . . . . . . . . . . . . 779The Getting Started with Microsoft Office Access Window . . . . . . . . . . . . . . . 779
The Office Button . . . . . . . . . . . . . . . . . . . . . . . . . . . . . . . . . 780
The Quick Access Toolbar . . . . . . . . . . . . . . . . . . . . . . . . . . . . . 781
Customizing the Navigation Pane . . . . . . . . . . . . . . . . . . . . . . . . . . . . 782
Using VBA to Customize the Navigation Pane . . . . . . . . . . . . . . . . . . . . . 785
Locking the Navigation Pane . . . . . . . . . . . . . . . . . . . . . . . . . . . . 785
Controlling the Display of Database Objects . . . . . . . . . . . . . . . . . . . . 786
Setting Displayed Categories . . . . . . . . . . . . . . . . . . . . . . . . . . . . 788
Saving and Loading the Configuration of the Navigation Pane. . . . . . . . . . . 788
A Quick Overview of Access 2007 Ribbon Interface . . . . . . . . . . . . . . . . . . 790
Ribbon Programming with XML, VBA, and Macros . . . . . . . . . . . . . . . . . . 793
Creating the Ribbon Customization XML Markup . . . . . . . . . . . . . . . . . 794
Loading Ribbon Customizations from an External XML Document . . . . . . . . 797
Embedding Ribbon XML Markup in a VBA Procedure . . . . . . . . . . . . . . 804
Storing Ribbon Customization XML Markup in a Table . . . . . . . . . . . . . . 804
Assigning Ribbon Customizations to Forms and Reports. . . . . . . . . . . . . . 808
Using Images in Ribbon Customizations. . . . . . . . . . . . . . . . . . . . . . . . . 812
Requesting Images via the loadImage Callback . . . . . . . . . . . . . . . . . . 812
Requesting Images via the getImage Callback . . . . . . . . . . . . . . . . . . . 816
Understanding Attributes and Callbacks . . . . . . . . . . . . . . . . . . . . . . 822
Using Various Controls in Ribbon Customizations . . . . . . . . . . . . . . . . . . . 823
Creating Toggle Buttons . . . . . . . . . . . . . . . . . . . . . . . . . . . . . . 823
Creating Split Buttons, Menus, and Submenus . . . . . . . . . . . . . . . . . . . 824
Creating Check Boxes . . . . . . . . . . . . . . . . . . . . . . . . . . . . . . . 826
Creating Edit Boxes . . . . . . . . . . . . . . . . . . . . . . . . . . . . . . . . 828
Creating Combo Boxes and Drop Downs. . . . . . . . . . . . . . . . . . . . . . 828
Creating a Dialog Box Launcher . . . . . . . . . . . . . . . . . . . . . . . . . . 830
Disabling a Control . . . . . . . . . . . . . . . . . . . . . . . . . . . . . . . . . 832
Repurposing a Built-in Control . . . . . . . . . . . . . . . . . . . . . . . . . . . 833
Refreshing the Ribbon . . . . . . . . . . . . . . . . . . . . . . . . . . . . . . . 833
The CommandBars Object and the Ribbon . . . . . . . . . . . . . . . . . . . . . . . 836
Customizing the Office Button Menu . . . . . . . . . . . . . . . . . . . . . . . . . . 837
Chapter Summary . . . . . . . . . . . . . . . . . . . . . . . . . . . . . . . . . . . . 839
Chapter 31 Tables, Forms, and Reports . . . . . . . . . . . . . . . . . . . . . 840New Features in Tables . . . . . . . . . . . . . . . . . . . . . . . . . . . . . . . . . 840
Saving Tables as Queries . . . . . . . . . . . . . . . . . . . . . . . . . . . . . . 846
Working with Attachment Data Type Fields . . . . . . . . . . . . . . . . . . . . 846
Adding Attachments Using the Attachments Dialog Box . . . . . . . . . . . 848
Using an Access Query to Return Rows with Attachments . . . . . . . . . . 849
Working with Attachments Using VBA . . . . . . . . . . . . . . . . . . . . 850
Listing Attachments . . . . . . . . . . . . . . . . . . . . . . . . . . . . . . 851
Retrieving the Fields Defined by the Attachment Data Type . . . . . . . . . 853
Saving Attachments . . . . . . . . . . . . . . . . . . . . . . . . . . . . . . 854
Adding Attachments. . . . . . . . . . . . . . . . . . . . . . . . . . . . . . 855
Deleting Attachments . . . . . . . . . . . . . . . . . . . . . . . . . . . . . 857
Working with Multi-value Fields . . . . . . . . . . . . . . . . . . . . . . . . . . 859
Editing Values in a Multi-value Field . . . . . . . . . . . . . . . . . . . . . 861
xiv | Contents

Using an Access Query to Return Rows with Multi-value Fields . . . . . . . 862
Working with Multi-value Fields Using VBA . . . . . . . . . . . . . . . . . 864
Adding Values to Multi-value Lookup Fields . . . . . . . . . . . . . . . . . 865
Working with Append Only Memo Fields . . . . . . . . . . . . . . . . . . . . . 868
Working with Append Only Memo Fields Using VBA . . . . . . . . . . . . 869
Rich Text Memo Fields . . . . . . . . . . . . . . . . . . . . . . . . . . . . . . . 873
New Features in Forms . . . . . . . . . . . . . . . . . . . . . . . . . . . . . . . . . 874
Many Ways to Create Access Forms . . . . . . . . . . . . . . . . . . . . . . . . 875
Grouping Controls Using Layouts . . . . . . . . . . . . . . . . . . . . . . . . . 877
Rich Text Support in Forms . . . . . . . . . . . . . . . . . . . . . . . . . . . . 878
AutoFormats . . . . . . . . . . . . . . . . . . . . . . . . . . . . . . . . . . . . 878
Using Images in Access Forms . . . . . . . . . . . . . . . . . . . . . . . . . . . 879
Using the Attachments Control . . . . . . . . . . . . . . . . . . . . . . . . . . . 881
New Features in Reports . . . . . . . . . . . . . . . . . . . . . . . . . . . . . . . . . 884
Using the Report View . . . . . . . . . . . . . . . . . . . . . . . . . . . . . . . 884
Sorting and Grouping Data . . . . . . . . . . . . . . . . . . . . . . . . . . . . . 886
Saving Reports in the PDF or XPS File Format . . . . . . . . . . . . . . . . . . 886
Chapter Summary . . . . . . . . . . . . . . . . . . . . . . . . . . . . . . . . . . . . 887
Chapter 32 Macros and Templates . . . . . . . . . . . . . . . . . . . . . . . 888New Features in Macros . . . . . . . . . . . . . . . . . . . . . . . . . . . . . . . . . 888
Access 2007 Macro Security . . . . . . . . . . . . . . . . . . . . . . . . . . . . 889
Using the AutoExec Macro . . . . . . . . . . . . . . . . . . . . . . . . . . . . . 891
Understanding Macro Actions, Arguments, and Conditions . . . . . . . . . . . . 892
Creating Macros in Access 2007 . . . . . . . . . . . . . . . . . . . . . . . . . . 894
Creating and Using Standalone Macros . . . . . . . . . . . . . . . . . . . . 894
Using Macro Groups . . . . . . . . . . . . . . . . . . . . . . . . . . . . . 895
Running Standalone Macros. . . . . . . . . . . . . . . . . . . . . . . . . . 897
Creating and Using Embedded Macros . . . . . . . . . . . . . . . . . . . . 898
Copying Embedded Macros . . . . . . . . . . . . . . . . . . . . . . . . . . 899
Working in Sandbox Mode . . . . . . . . . . . . . . . . . . . . . . . . . . . . . 905
Error Handling in Macros. . . . . . . . . . . . . . . . . . . . . . . . . . . . . . 905
Using Temporary Variables in Macros . . . . . . . . . . . . . . . . . . . . . . . 907
Converting Macros to VBA Code . . . . . . . . . . . . . . . . . . . . . . . . . 908
Converting a Standalone Macro to VBA . . . . . . . . . . . . . . . . . . . 908
Converting Embedded Macros to VBA . . . . . . . . . . . . . . . . . . . . 910
New Features in Templates . . . . . . . . . . . . . . . . . . . . . . . . . . . . . . . 916
Creating a Custom Blank Template. . . . . . . . . . . . . . . . . . . . . . . . . 916
Understanding the ACCDT File Format . . . . . . . . . . . . . . . . . . . . . . 917
Chapter Summary . . . . . . . . . . . . . . . . . . . . . . . . . . . . . . . . . . . . 920
Index . . . . . . . . . . . . . . . . . . . . . . . . . . . . . . . . . . . . . . . . . . . 921
Contents | xv
Acknowledgments
Nobody works alone. In order for this book to become a reality, I had to enlist
the help of numerous individuals. For example, while I was sleeping, far away
in Hawaii Tana-Lee Rebhan was proofreading and testing all the hands-on
exercises and custom projects that had just been written. She was the first per-
son to see what went into this book, and her honest comments made me change
a number of things to make this book easier to understand from a reader’s
standpoint.
After several months of hard work by our Julittana team, the book was
finally finished, and the manuscript was sent over to the folks at Wordware
Publishing. Martha McCuller had her hands full doing the first edit and design-
ing hundreds of pages of not-so-easy technical stuff. Martha’s edits helped
make this book even friendlier. While Martha was busy editing and designing,
Denise McEvoy was setting up desktop publishing and Alan McCuller was
designing the book cover. These two people have used the best of their artistic
skills to make this book visually pleasing. And when the page proofs were
ready, Beth Kohler, senior editor, took over. I cannot begin to tell you how
important Beth’s final edits and comments were to the success of this book.
She checked spelling and punctuation, standardized grammar, made sure that
cross-references matched, and ensured the right placement of heading levels.
This entire book project was coordinated by Tim McEvoy. I appreciate very
much Tim’s dedication and hard work in getting this book published, as well as
his patience and understanding of all the obstacles that one faces in every
endeavor, not just writing a book. Thanks, everyone, for your contribution to
the book! I couldn’t have done it without your help.
xvi
Introduction
For many years now, Microsoft Access has allowed users to design and
develop Windows-based database applications, and Access continues to be the
world’s most popular database. This book is for people who have already mas-
tered the use of Microsoft Access databases and now are ready for the next
step — programming. Access 2007 Programming by Example with VBA, XML,
and ASP takes non-programmers through detailed steps of creating Access
databases from scratch and then shows them how to retrieve and manage their
data programmatically using various programming languages and techniques.
With this book in hand, users can quickly build the toolset required for devel-
oping their own database solutions. This book proves that, given the right
approach, programming an Access database from scratch and controlling it via
programming code can be as easy as designing and maintaining databases with
Access built-in tools. This book gives a practical overview of many program-
ming languages and techniques necessary in programming, maintaining, and
retrieving data from today’s Access databases.
PrerequisitesYou don’t need any programming experience to use Access 2007 Programming
by Example with VBA, XML, and ASP. The only prerequisite is that you already
know how to manually design an Access database and perform database tasks
by creating and running various types of queries. This book also assumes that
you know how to create more complex forms with embedded subforms, combo
boxes, and other built-in controls. If you don’t have these skills, there are
countless books on the market that can teach you step-by-step how to build
simple databases or use the sample Northwind database that comes with
Microsoft Access. If you do meet these criteria, this book will take you to the
Access programming level by example. You will gain working knowledge
immediately by performing concrete tasks and without having to read long
descriptions of concepts. True learning by example begins with the first step,
followed by the next step, and the next one, and so on. By the time you com-
plete all of the steps in a hands-on exercise or a custom project, you should be
able to effectively apply the same technique again and again in your own
database projects.
How This Book Is OrganizedThis book is divided into six parts (32 chapters) that progressively introduce
you to programming Microsoft Access databases.
Part I introduces you to Access 2007 VBA programming. Visual Basic for
Applications (VBA) is the programming language for Microsoft Office
xvii

Access. In this part of the book, you acquire the fundamentals of VBA that you
will use over and over again in building real-life Microsoft Access database
applications.
Part I consists of the following nine chapters:
Chapter 1 — Writing Procedures in Modules
In this chapter you learn about the types of Access procedures that you can
write and learn how and where they are written.
Chapter 2 — The Visual Basic Editor (VBE)
In this chapter you learn almost everything you need to know about work-
ing with the Visual Basic Editor window, commonly referred to as VBE.
Some of the programming tools that are not covered here are discussed and
put to use in Chapter 9.
Chapter 3 — Variables, Data Types, and Constants
This chapter introduces basic VBA concepts that allow you to store various
pieces of information for later use.
Chapter 4 — Passing Arguments to Procedures and Functions
In this chapter you find out how to provide additional information to your
procedures and functions before they are run.
Chapter 5 — Decision Making with VBA
Here you learn how to control your program flow with a number of differ-
ent decision-making statements.
Chapter 6 — Repeating Actions in VBA
Here you learn how to repeat the same actions by using looping structures.
Chapter 7 — Working with Arrays
In this chapter you learn about static and dynamic arrays and how to use
them for holding various values.
Chapter 8 — Custom Collections and Class Modules
This chapter shows how to create and use your own objects and collections
of objects.
Chapter 9 — Debugging VBA Procedures and Handling Errors
In this chapter you begin using built-in debugging tools to test your pro-
gramming code and trap errors.
The skills obtained in Part I of this book are fairly portable. They can be uti-
lized in programming other Microsoft Office applications that also use VBA as
their native programming language (Excel, Word, PowerPoint, and Outlook).
Part II introduces you to two sets of programming objects known as Data
Access Objects (DAO) and ActiveX Data Objects (ADO) that enable
Microsoft Office Access and other client applications to access and manipulate
data. In this part of the book, you learn how to use DAO and ADO objects in
your VBA code to connect to a data source; create, modify, and secure data-
base objects; and read, add, update, delete, and replicate data.
Part II consists of the following nine chapters:
Chapter 10 — Data Access Technologies in Microsoft Access
In this chapter you get acquainted with two database engines (Jet/ACE) that
xviii | Introduction
Office Access 2007 uses, as well as several object libraries that provide
objects, properties, and methods for your VBA procedures.
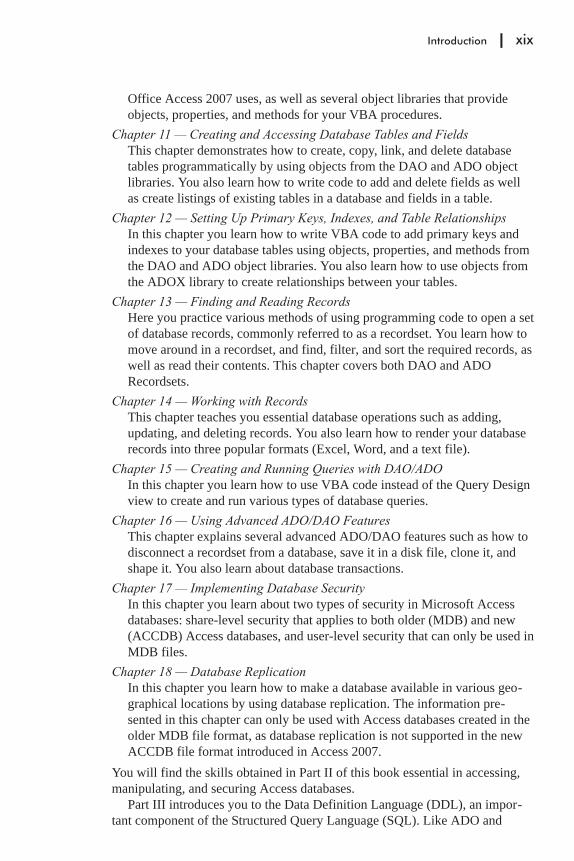
Chapter 11 — Creating and Accessing Database Tables and Fields
This chapter demonstrates how to create, copy, link, and delete database
tables programmatically by using objects from the DAO and ADO object
libraries. You also learn how to write code to add and delete fields as well
as create listings of existing tables in a database and fields in a table.
Chapter 12 — Setting Up Primary Keys, Indexes, and Table Relationships
In this chapter you learn how to write VBA code to add primary keys and
indexes to your database tables using objects, properties, and methods from
the DAO and ADO object libraries. You also learn how to use objects from
the ADOX library to create relationships between your tables.
Chapter 13 — Finding and Reading Records
Here you practice various methods of using programming code to open a set
of database records, commonly referred to as a recordset. You learn how to
move around in a recordset, and find, filter, and sort the required records, as
well as read their contents. This chapter covers both DAO and ADO
Recordsets.
Chapter 14 — Working with Records
This chapter teaches you essential database operations such as adding,
updating, and deleting records. You also learn how to render your database
records into three popular formats (Excel, Word, and a text file).
Chapter 15 — Creating and Running Queries with DAO/ADO
In this chapter you learn how to use VBA code instead of the Query Design
view to create and run various types of database queries.
Chapter 16 — Using Advanced ADO/DAO Features
This chapter explains several advanced ADO/DAO features such as how to
disconnect a recordset from a database, save it in a disk file, clone it, and
shape it. You also learn about database transactions.
Chapter 17 — Implementing Database Security
In this chapter you learn about two types of security in Microsoft Access
databases: share-level security that applies to both older (MDB) and new
(ACCDB) Access databases, and user-level security that can only be used in
MDB files.
Chapter 18 — Database Replication
In this chapter you learn how to make a database available in various geo-
graphical locations by using database replication. The information pre-
sented in this chapter can only be used with Access databases created in the
older MDB file format, as database replication is not supported in the new
ACCDB file format introduced in Access 2007.
You will find the skills obtained in Part II of this book essential in accessing,
manipulating, and securing Access databases.
Part III introduces you to the Data Definition Language (DDL), an impor-
tant component of the Structured Query Language (SQL). Like ADO and
Introduction | xix

DAO, which were introduced in Part II, DDL is used for defining database
objects (tables, views, stored procedures, primary keys, indexes, and con-
straints) and managing database security. In this part of the book, you learn
how to use DDL statements with Jet/ACE databases, ADO, and the Jet OLE
DB Provider.
Part III consists of the following five chapters:
Chapter 19 — Creating, Modifying, and Deleting Tables and Fields
In this chapter you learn special Data Definition Language commands for
creating a new Access database, as well as creating, modifying, and deleting
tables. You also learn commands for adding, modifying, and deleting fields
and indexes.
Chapter 20 — Enforcing Data Integrity and Relationships between Tables
Here you learn how to define rules regarding the values allowed in table
fields to enforce data integrity and relationships between tables.
Chapter 21 — Defining Indexes and Primary Keys
Here you learn DDL commands for creating indexes and primary keys.
Chapter 22 — Database Security
In this chapter you learn how to use DDL commands to manage security in
the Microsoft Access database. You learn how to quickly create, modify,
and remove a database password, and how to manage user-level accounts.
Chapter 23 — Views and Stored Procedures
This chapter shows you how to work with two powerful database objects
known as views and stored procedures. You learn how views are similar to
Select queries, and how stored procedures can perform various actions simi-
lar to Access Action queries and Select queries with parameters.
The skills you learn in Part III of this book will allow you to create, manipu-
late, and secure your Microsoft Access databases using SQL DDL statements.
Numerous Access SQL/DDL statements and concepts introduced here are
important in laying the groundwork for moving into the client/server environ-
ment (porting your Microsoft Access database to SQL Server).
Part IV introduces you to responding to events that occur in Access forms
and reports. The behavior of Microsoft Access objects such as forms, reports,
and controls can be modified by writing programming code known as an event
procedure or an event handler. In this part of the book, you learn how you can
make your forms, reports, and controls perform useful actions by writing event
procedures in class modules.
Part IV consists of the following four chapters:
Chapter 24 — Using Form Events
In this chapter you learn the types of events that can occur on a Microsoft
Access form and write event procedures to handle various form events.
Chapter 25 — Using Report Events
In this chapter you learn about many events that are triggered when the
Access report is run. You write your own event procedures to specify what
happens when the report is opened, activated/deactivated, or closed.
xx | Introduction

Chapter 26 — Events Recognized by Controls
In this chapter you work with a custom application and learn how to write
event procedures for various controls that are placed on an Access form.
Chapter 27 — More about Event Programming
This chapter teaches advanced concepts in event programming. You learn
how to respond to events in standalone class modules to make your code
more manageable and portable to other objects. You also learn how to cre-
ate and raise your own events.
The skills acquired in Part IV of this book will allow you to enhance and alter
the way users interact with your database application.
Part V introduces you to programming Microsoft Access databases for
Internet access. Gone are the times when working with Access required the
presence of the Microsoft Access application on a user’s desktop. Thanks to
the development of Internet technologies, you can now publish both static and
dynamic Access data to the web. In this part of the book, you learn how Active
Server Pages (ASP) and Extensible Markup Language (XML) are used with
Microsoft Access to develop database solutions for the World Wide Web.
Part V consists of the following two chapters:
Chapter 28 — Access and Active Server Pages
In this chapter you learn how to use the Microsoft developed Active Server
Pages (ASP) technology to view, insert, delete, and modify records stored in
a Microsoft Access database from a web browser. Before you go on to
explore numerous examples of database access presented in this chapter,
you are walked through the installation of the Internet Information Services
(IIS) for Windows 2000/XP. (See the downloadable files for installa-
tion/configuration steps in Windows Vista.)
Chapter 29 — XML Features in Access 2007
In this chapter you learn how to use the Extensible Markup Language
(XML) with Access. You learn how to manually and programmatically
export Access data to XML files as well as import an XML file to Access
and display its data in a table. You also learn how to use stylesheets and
transformations to present Access data to users in a desired format.
The skills acquired in Part V of the book will make your Access applications
Internet and intranet ready. You are now able to connect to, read from, and
write to Access databases from within a web browser using two important
Microsoft technologies.
Part VI introduces you to working with new features in Access 2007.
Whether you have used Access for years, or you are just starting to use Access
with this version, find out how you can put to use new features and enhance-
ments in areas such as the user interface, tables, forms, reports, templates, and
macros.
Part VI consists of the following three chapters:
Chapter 30 — Programming the User Interface
Here you learn how to use VBA, macros, and XML to customize the new
user interface in Access 2007. You learn about the features found in the
Introduction | xxi

initial Microsoft Office Access screen, Office Button menu, Quick Access
toolbar, Navigation pane, and the Ribbon.
Chapter 31 — Tables, Forms, and Reports
In this chapter you master new features and enhancements that Access 2007
added to tables, forms, and reports. For instance, you learn about using
complex data types (multi-value fields, the attachment field, and enhance-
ments to a memo field), form and report layouts, and new filtering and rich
text formatting features.
Chapter 32 — Macros and Templates
This chapter contains an easy-to-follow introduction to creating and work-
ing with macros in Access 2007. You learn about embedded macros,
temporary variables, macro actions, macro error handling, and debugging.
Additionally, you learn about the new ACCDT file format in Access 2007,
which is used in the creation of database templates. You also learn about
built-in and custom templates and examine the structure of a template file.
The skills acquired in Part VI of the book will allow you to customize database
applications according to the needs of your end users, store more types of data
in an Access database, design more effective and visually appealing forms and
reports, as well as take advantage of templates and macros.
How to Work with This BookThis book has been designed as a tutorial and should be followed chapter by
chapter.
As you read each chapter, perform the tasks you read about. Be an active
learner by getting totally involved in the book’s hands-on exercises and custom
projects. When you get totally involved, you learn things by doing rather than
studying, and you learn faster. Do not move on to new information until
you’ve fully grasped the current topic. Allow your brain to sort things out and
put them in proper perspective before you move on. Take frequent breaks
between your learning sessions, as some chapters in this book cover lots of
material. Do not try to do everything in one sitting. It’s always better to divide
the material into smaller units than attempt to master all there is to learn at
once. However, never stop in the middle of a hands-on exercise; finish it
before taking a break. Having learned a particular technique or command, try
to think of ways to apply it to your own work. As you work with this book,
create small sample procedures for yourself based on what you’ve learned up
to a particular point. These procedures will come in handy when you need to
review the subject in the future or simply need to steal some ready-made code.
Source FilesYou’ve probably noticed there is no companion CD with this book. All
source files for the exercises and projects can be downloaded from
www.wordware.com/files/access07.
xxii | Introduction

PART I
Introductionto Access2007 VBAProgramming
Chapter 1 Writing Procedures in Modules
Chapter 2 The Visual Basic Editor (VBE)
Chapter 3 Variables, Data Types, and Constants
Chapter 4 Passing Arguments to Procedures and Functions
Chapter 5 Decision Making with VBA
Chapter 6 Repeating Actions in VBA
Chapter 7 Working with Arrays
Chapter 8 Custom Collections and Class Modules
Chapter 9 Debugging VBA Procedures and Handling Errors
1
Visual Basic for Appli-
cations (VBA) is the
programming language
for Microsoft Office
Access.
In this part of the
book, you acquire the
fundamentals of VBA
that you will use over
and over again in build-
ing real-life Microsoft
Office Access database
applications.

Chapter 1
Writing Procedures inModules
This chapter’s objective is to introduce you to writing programming code using
the built-in language of Microsoft Access — Visual Basic for Applications
(commonly referred to as VBA). By writing your own code you can extend the
functionality of existing Microsoft Access database applications or create your
own applications from scratch. VBA is a language embedded in all the
Microsoft Office applications. Therefore, what you learn in this book about
Access programming can be utilized in writing programs that control Excel,
Word, Outlook, or Microsoft Project. Your job as a programmer (at least dur-
ing the course of this book) will boil down to writing various procedures. A
procedure is a group of instructions that allows you to accomplish specific
tasks when your program runs. When you place instructions (programming
code) in a procedure, you can call this procedure whenever you need to per-
form that particular task. Although many tasks can be automated in Office
Access 2007 by using macro actions, such as opening forms and reports, find-
ing records, and executing queries, you will need VBA skills to perform
advanced customizations.
Procedure TypesVBA has the following types of procedures: subroutine procedures, function
procedures, event procedures, and property procedures. You create and store
procedures in modules. Each procedure in the same module must have a
unique name; however, procedures in different modules can have the same
name. Let’s learn a bit about each procedure type so that you can quickly rec-
ognize them when you see them in books, magazine articles, or on the Internet.
� Subroutine procedures (also called subroutines or subprocedures)
Subroutine procedures perform useful tasks, but never return values. They
begin with the keyword Sub and end with the keywords End Sub. Keywords
are words that carry a special meaning in VBA. Let’s look at the simple sub-
routine ShowMessage that displays a message to the user:
Sub ShowMessage()MsgBox "This is a message box in VBA."
End Sub
3

Notice a pair of empty parentheses after the procedure name. The instruction
that we want the procedure to execute is placed on a separate line between the
Sub and End Sub keywords. This instruction will be executed when the proce-
dure is run. You may place one or more instructions and even complex control
structures within a subroutine procedure. Instructions are also called state-
ments. The above procedure will always display the same message when
executed. MsgBox is a built-in VBA function often used for programming user
interactions (see Chapter 4 for more information on this function). To execute
the above subroutine programmatically, you need to write the following line of
code:
Call ShowMessage()
If you’d like to write a more universal procedure that can display a different
message each time the procedure is executed, you will need to write a subrou-
tine that takes arguments. Arguments are values that are needed for a procedure
to do something. You place arguments within the parentheses after the proce-
dure name. Let’s look at the following procedure that also displays a message
to the user; however, this time we can pass any text string to display:
Sub ShowMessage2(strMessage)MsgBox strMessage
End Sub
The above subprocedure requires one text value before it can be run;
strMessage is the arbitrary argument name. It can represent any text you want.
Therefore, if you pass it the text “Today is Monday” that’s the text the user will
see when the procedure is executed. If you don’t pass the value to this proce-
dure, VBA will display an error.
If your subprocedure requires more than one argument, list the arguments
within the parentheses and separate them with commas. For example, let’s
improve the above procedure by passing it a text string containing a user name:
Sub ShowMessage3(strMessage, strUserName)MsgBox strUserName & ", your message is: " & strMessage
End Sub
Notice how the & operator is used for concatenating text strings inside the
VBA procedure. If we pass to the above subroutine the text “Keep on learn-
ing.” as the strMessage argument and “John” as the strUserName argument,
the procedure will display the following text in a message box:
John, your message is: Keep on learning.
To call the above subroutine in a program, you can write the following line of
code:
Call ShowMessage3("Keep on learning.", "John")
Notice that when calling a procedure with arguments, the arguments are
enclosed in parentheses. The arguments are listed in the same order in which
they are specified in the procedure definition. See exceptions to this rule and
4 | Chapter 1
Part I

discover more information about passing arguments to subprocedures and
functions in Chapter 4.
� Function procedures (functions)
Functions perform specific tasks and can return values. They begin with the
keyword Function and end with the keywords End Function. Let’s look at a
simple function that adds two numbers:
Function addTwoNumbers()Dim num1 As IntegerDim num2 As Integer
Num1 = 3Num2 = 2addTwoNumbers = Num1 + Num2
End Function
The above function procedure always returns the same result, which is the
value 5. The Dim statements inside this function procedure are used to declare
variables that the function will use. A variable is a name that is used to refer to
an item of data. Because we want the function to perform a calculation, we
specify that the variables will hold integer values. Variables and data types
used in Office Access 2007 are covered in detail in Chapter 3.
The variable definition is followed by the variable assignment in which we
assign specific numbers to the variables Num1 and Num2. Finally, we perform
the calculation by adding together the values held in both variables: Num1 +
Num2. To return the result of our calculation, we set the function name to the
value or the expression we want to return:
addTwoNumbers = Num1 + Num2
Although the above function example returns a value, not all functions have to
return values. Functions, like subroutines, can perform a number of actions
without returning any values.
Similar to procedures, functions can accept arguments. For example, to
make our addTwoNumbers function more versatile, we can rewrite it as
follows:
Function addTwoNumbers2(num1 As Integer, num2 As Integer)addTwoNumbers2 = Num1 + Num2
End Function
Now we can pass any two numbers to the above function to add them together.
For example, we can write the following statement to display the result of the
function in a message box:
msgBox("Total=" & addTwoNumbers2(34,80))
You will learn more about writing and calling functions in Chapter 4.
Writing Procedures in Modules | 5
Introduction to Access 2007 VBA Programming

� Event procedures
Event procedures are automatically executed in response to an event initiated
by the user or program code, or triggered by the system. Events, event proper-
ties, and event procedures are introduced later in this chapter. They are also
covered in Part IV of this book.
� Property procedures
Property procedures are used to get or set the values of custom properties for
forms, reports, and class modules. The three types of property procedures
(Property Get, Property Let, and Property Set) begin with the Property key-
word followed by the property type (Get, Let, or Set), the property name, and a
pair of empty parentheses, and end with the End Property keywords. Here’s an
example of a property procedure that retrieves the value of an author’s royalty:
Property Get Royalty()Royalty = (Sales * Percent) – Advance
End Property
Property procedures are covered in detail in Chapter 8.
Module TypesAs mentioned earlier, procedures are created and stored in modules. Similar to
the previous version, Office Access 2007 has two types of modules: standard
and class.
Standard ModulesStandard modules are used to hold subprocedures and function procedures that
can be run from anywhere in the application because they are not associated
with any particular form or report. In the previous section, we looked at the
types of procedures that may be entered in a standard module.
Writing Procedures in a Standard Module
Since we already have a couple of procedures to try out, let’s do a quick
hands-on exercise to learn how to open standard modules, write procedures,
and execute them.
�Hands-On 1-1: Working in a Standard Module
1. Create a folder on your hard drive named C:\Acc07_ByExample.
2. Open Office Access 2007 and click Blank Database (see Figure 1-1).
Name the file Chap01.accdb and change its location to the C:\Acc07_
ByExample folder. Click the Create button to create the specified
database.
6 | Chapter 1
Part I

3. To launch the programming environment in Office Access 2007, select the
Database Tools tab and click Visual Basic (see Figure 1-2). You can also
press Alt+F11 to activate Visual Basic from any Access 2007 database
view.
4. Insert a standard module by choosing Module from the Insert menu (see
Figure 1-3).
Writing Procedures in Modules | 7
Introduction to Access 2007 VBA Programming
Figure 1-2: Switching to a Visual Basic development environment.
Figure 1-1: Creating a blank Office Access 2007 database.
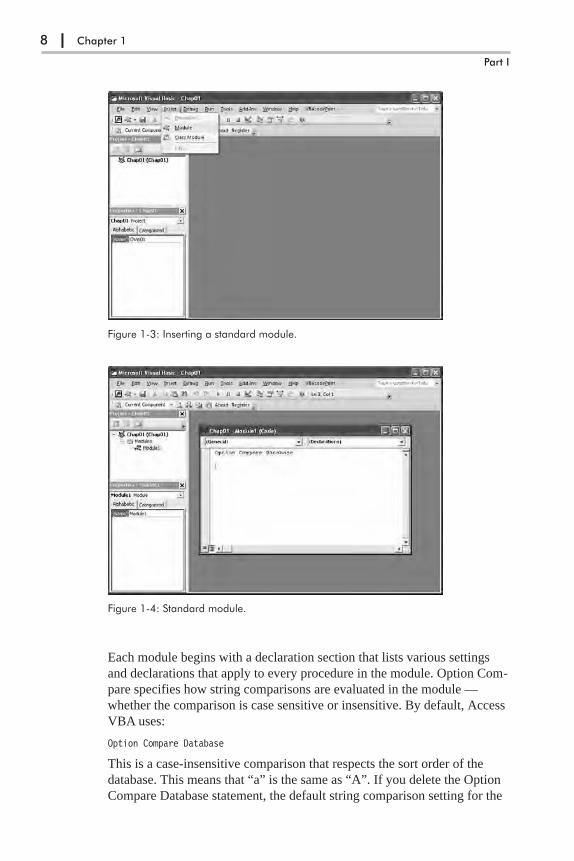
Each module begins with a declaration section that lists various settings
and declarations that apply to every procedure in the module. Option Com-
pare specifies how string comparisons are evaluated in the module —
whether the comparison is case sensitive or insensitive. By default, Access
VBA uses:
Option Compare Database
This is a case-insensitive comparison that respects the sort order of the
database. This means that “a” is the same as “A”. If you delete the Option
Compare Database statement, the default string comparison setting for the
8 | Chapter 1
Part I
Figure 1-3: Inserting a standard module.
Figure 1-4: Standard module.

module is Option Compare Binary (used for case-sensitive comparisons
where “a” is not the same as “A”).
Following the declaration section is the procedure section, which holds
the module’s procedures. You can begin writing your procedures at the cur-
sor position within the Module1 (Code) window.
5. In the Module1 (Code) window, enter the code of all subroutines and func-
tion procedures that we discussed earlier in this chapter (see Figure 1-5).
Notice that Access inserts a horizontal line after each End Sub or End
Function keyword to make it easier to identify each procedure. The Proce-
dure drop-down box at the top-right corner of the Module Code window
displays the name of the procedure in which the insertion point is currently
located.
Executing Your Procedures and Functions
Now that you’ve filled the standard module with these procedures and func-
tions, let’s see how you can run them. There are many ways of running your
code. In the next hands-on exercise, you will learn to run your code from the:
� Run menu (Run Sub/UserForm)
� Toolbar button (Run Sub/UserForm)
� Keyboard (F5)
� Immediate window
Writing Procedures in Modules | 9
Introduction to Access 2007 VBA Programming
Figure 1-5: Standard module with subprocedures andfunctions.
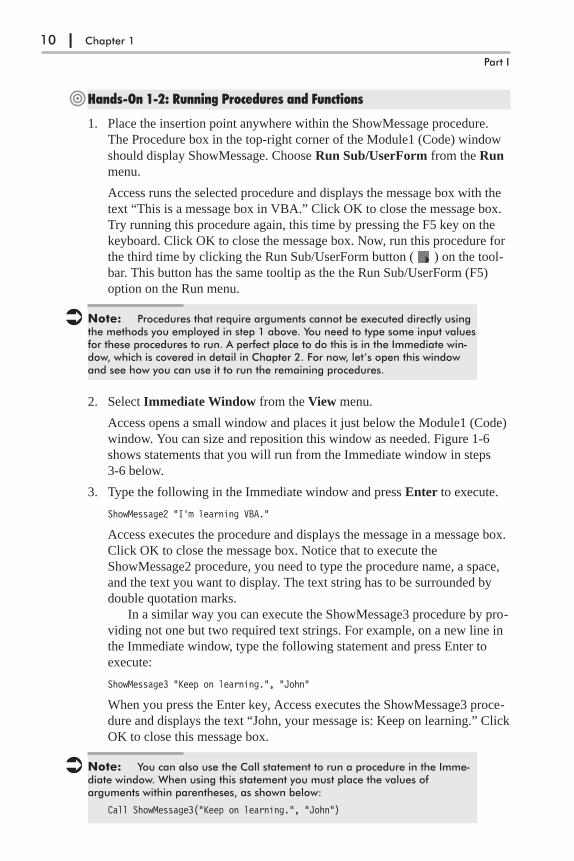
�Hands-On 1-2: Running Procedures and Functions
1. Place the insertion point anywhere within the ShowMessage procedure.
The Procedure box in the top-right corner of the Module1 (Code) window
should display ShowMessage. Choose Run Sub/UserForm from the Run
menu.
Access runs the selected procedure and displays the message box with the
text “This is a message box in VBA.” Click OK to close the message box.
Try running this procedure again, this time by pressing the F5 key on the
keyboard. Click OK to close the message box. Now, run this procedure for
the third time by clicking the Run Sub/UserForm button ( ) on the tool-
bar. This button has the same tooltip as the the Run Sub/UserForm (F5)
option on the Run menu.
� Note: Procedures that require arguments cannot be executed directly usingthe methods you employed in step 1 above. You need to type some input valuesfor these procedures to run. A perfect place to do this is in the Immediate win-dow, which is covered in detail in Chapter 2. For now, let’s open this windowand see how you can use it to run the remaining procedures.
2. Select Immediate Window from the View menu.
Access opens a small window and places it just below the Module1 (Code)
window. You can size and reposition this window as needed. Figure 1-6
shows statements that you will run from the Immediate window in steps
3-6 below.
3. Type the following in the Immediate window and press Enter to execute.
ShowMessage2 "I'm learning VBA."
Access executes the procedure and displays the message in a message box.
Click OK to close the message box. Notice that to execute the
ShowMessage2 procedure, you need to type the procedure name, a space,
and the text you want to display. The text string has to be surrounded by
double quotation marks.
In a similar way you can execute the ShowMessage3 procedure by pro-
viding not one but two required text strings. For example, on a new line in
the Immediate window, type the following statement and press Enter to
execute:
ShowMessage3 "Keep on learning.", "John"
When you press the Enter key, Access executes the ShowMessage3 proce-
dure and displays the text “John, your message is: Keep on learning.” Click
OK to close this message box.
� Note: You can also use the Call statement to run a procedure in the Imme-diate window. When using this statement you must place the values ofarguments within parentheses, as shown below:
Call ShowMessage3("Keep on learning.", "John")
10 | Chapter 1
Part I

Function procedures are executed using different methods. Step 4 below
demonstrates how to quickly call the addTwoNumbers function
4. On a new line in the Immediate window, type a question mark followed by
the name of the function procedure and press Enter:
?addTwoNumbers
Access should display the result of this function (the number 5) on the next
line in the Immediate window.
5. Now run the addTwoNumbers2 procedure. Type the following instruction
in the Immediate window and press Enter:
?addTwoNumbers2(56, 24)
Access displays the result of adding these two numbers on the next line.
6. If you’d rather see the function result in a message box, type the following
instruction in the Immediate window and press Enter:
msgBox("Total=" & addTwoNumbers2(34,80))
Access displays a message box with the text “Total = 114”.
� Note: See Chapter 2 for more information on running your procedures andfunctions from the Immediate window.
Now that you’ve familiarized yourself a bit with standard modules, let’s move
on to the class module that you can use in Access programming.
Class ModulesClass modules come in three varieties: standalone class modules, form mod-
ules, and report modules.
� Standalone class modules — These modules are used to create your
own custom objects with their own properties and methods. You create
a standalone class module by choosing Insert | Class Module in the
Microsoft Visual Basic window. Access will create a default class mod-
ule named Class1 and will list it in the Class modules folder in the Pro-
ject Explorer window. You will work with standalone class modules in
Chapter 8.
Writing Procedures in Modules | 11
Introduction to Access 2007 VBA Programming
Figure 1-6: Running procedures and functions in the Immediate win-dow.

� Form modules and report modules — Each Access form can contain
a form module, and each report can contain a report module. These
modules are special types of class modules that are saved automatically
whenever you save the form or report.
All newly created forms and reports are lightweight by design, because they
don’t have modules associated with them when they’re first created. Therefore,
they load and display faster than forms and reports with modules. These light-
weight forms and reports have their Has Module property set to No (see Figure
1-7). When you open a form or report in Design view and click the View Code
button in the Tools section of the Design tab, Access creates a form or report
module. The Has Module property of a form or report is automatically set to
Yes to indicate that the form or report now has a module associated with it.
Note that this happens even if you have not written a single line of VBA code.
Access opens a module window and assigns a name to the module that consists
of three parts: the name of the object (e.g., form or report), an underscore char-
acter, and the name of the form or report. For example, a newly created form
that has not been saved is named Form_Form1, a form module in the Custom-
ers form is named Form_Customers, and the report module in the Customers
report is named Report_Customers.
As with report modules, form modules store event procedures for events rec-
ognized by the form and its controls, as well as general function procedures
and subprocedures. You can also write Property Get, Property Let, and Prop-
erty Set procedures to create custom properties for the form or report.
The procedures stored in their class modules are available only while you
are using that particular form or report.
12 | Chapter 1
Part I
Figure 1-7: When you begin designing a new form in the Microsoft Office Access userinterface, the form does not have a module associated with it. Notice that the Has Moduleproperty on the form’s property sheet is set to No.

Events, Event Properties, and Event ProceduresIn order to customize your database applications
or to deliver products that fit your users’ specific
needs, you’ll be doing quite a bit of event-driven
programming. Access 2007 is an event-driven
application. This means that whatever happens in
an Access application is the result of an event that
Access has detected. Events are things that happen
to objects, and can be triggered by the user or by
the system, such as clicking a mouse button, press-
ing a key, selecting an item from a list, or
changing a list of items available in a list box. As
a programmer, you will often want to modify the
application’s built-in response to a particular
event. Before the application processes the user’s
mouse clicks and key presses in the usual way,
you can tell the application how to react to the
activity. For example, if a user clicks a Delete but-
ton on your form, you can display a custom delete
confirmation message to ensure that the user
selected the intended record for deletion.
For each event defined for a form, form con-
trol, or report, there is a corresponding event
property. If you open any Microsoft Access form
in Design view and choose Properties in the Tools
Writing Procedures in Modules | 13
Introduction to Access 2007 VBA Programming
Figure 1-8: Microsoft Office Access organizes database modules in fold-ers. Form and report modules are listed in the Microsoft Office AccessClass Objects folder. Standard modules can be found under the Mod-ules folder. The Class Modules folder organizes standalone classmodules.
Figure 1-9: Event properties foran Access form are listed on theEvent tab in the property sheet.
section of the Design tab, and then click the Event tab of the property sheet,
you will see a long list of events your form can respond to (see Figure 1-9).
Forms, reports, and the controls that appear on them have various event
properties you can use to trigger desired actions. For example, you can open or
close a form when a user clicks a command button, or you can enable or dis-
able controls when the form loads.
To specify how a form, report, or control should respond to events, you can
write event procedures. In your programming code, you may need to describe
what should happen if a user clicks on a particular command button or makes a
selection from a combo box. For example, when you design a custom form you
should anticipate and program events that can occur at run time (while the
form is being used). The most common event is the Click event. Every time a
command button is clicked, it triggers an event procedure to respond to the
Click event for that button.
When you assign your event procedure to an event property, you set an
event trap. Event trapping gives you considerable control in handling events
because you basically interrupt the default processing that Access would nor-
mally carry out in response to the user’s key press or mouse click. If a user
clicks a command button to save a form, whatever code you’ve written in the
Click event of that command button will run. The event programming code is
stored as a part of a form, report, or control and is triggered only when user
interaction with a form or report generates a specific event; therefore, it cannot
be used as a standalone procedure.
Why Use Events?By using events you can make your applications dynamic and interactive. To
handle a specific event, you need to select the appropriate event property on
the property sheet, and then write an event handling procedure. Access will
provide its own default response to those events you have not programmed.
Events cannot be defined for tables and queries.
Walking Through an Event ProcedureThe following hands-on exercise shows you how to get started with writing
event procedures. Your task is to change the background color of a text box
control on a form when the text box is selected, and return the default back-
ground color when you tab or click out of that text box.
�Hands-On 1-3: Writing an Event Procedure
1. Copy the HandsOn_01_3.accdb database from the downloaded
Acc07_HandsOn folder to your C:\Acc07_ByExample folder. This file
contains the Customers table and the Customers form from the Northwind
database that comes with Office Access 2007.
14 | Chapter 1
Part I
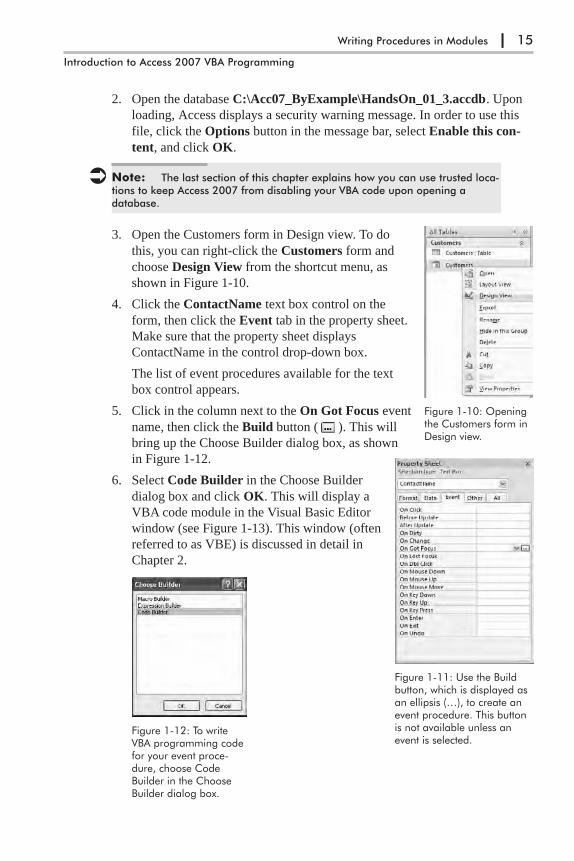
2. Open the database C:\Acc07_ByExample\HandsOn_01_3.accdb. Upon
loading, Access displays a security warning message. In order to use this
file, click the Options button in the message bar, select Enable this con-
tent, and click OK.
� Note: The last section of this chapter explains how you can use trusted loca-tions to keep Access 2007 from disabling your VBA code upon opening adatabase.
3. Open the Customers form in Design view. To do
this, you can right-click the Customers form and
choose Design View from the shortcut menu, as
shown in Figure 1-10.
4. Click the ContactName text box control on the
form, then click the Event tab in the property sheet.
Make sure that the property sheet displays
ContactName in the control drop-down box.
The list of event procedures available for the text
box control appears.
5. Click in the column next to the On Got Focus event
name, then click the Build button ( ). This will
bring up the Choose Builder dialog box, as shown
in Figure 1-12.
6. Select Code Builder in the Choose Builder
dialog box and click OK. This will display a
VBA code module in the Visual Basic Editor
window (see Figure 1-13). This window (often
referred to as VBE) is discussed in detail in
Chapter 2.
Writing Procedures in Modules | 15
Introduction to Access 2007 VBA Programming
Figure 1-10: Openingthe Customers form inDesign view.
Figure 1-11: Use the Buildbutton, which is displayed asan ellipsis (…), to create anevent procedure. This buttonis not available unless anevent is selected.
Figure 1-12: To writeVBA programming codefor your event proce-dure, choose CodeBuilder in the ChooseBuilder dialog box.
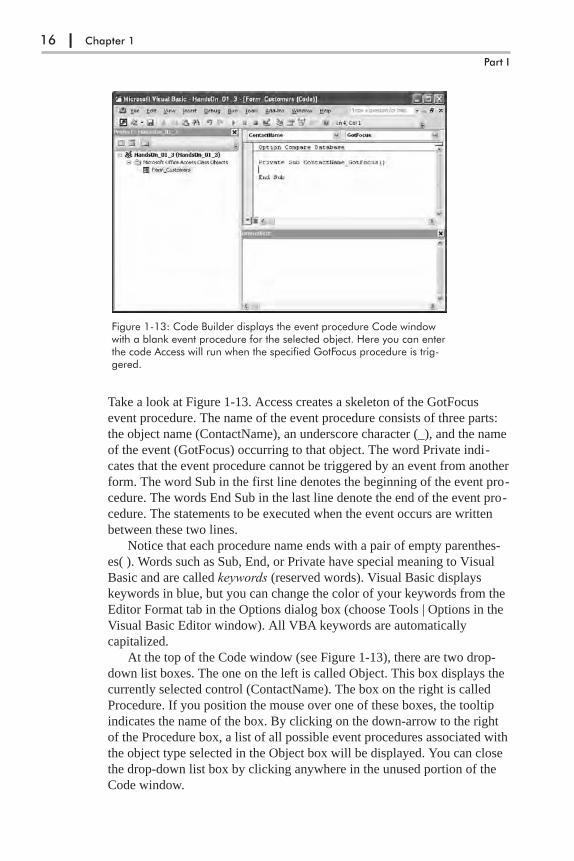
Take a look at Figure 1-13. Access creates a skeleton of the GotFocus
event procedure. The name of the event procedure consists of three parts:
the object name (ContactName), an underscore character (_), and the name
of the event (GotFocus) occurring to that object. The word Private indi-
cates that the event procedure cannot be triggered by an event from another
form. The word Sub in the first line denotes the beginning of the event pro-
cedure. The words End Sub in the last line denote the end of the event pro-
cedure. The statements to be executed when the event occurs are written
between these two lines.
Notice that each procedure name ends with a pair of empty parenthes-
es( ). Words such as Sub, End, or Private have special meaning to Visual
Basic and are called keywords (reserved words). Visual Basic displays
keywords in blue, but you can change the color of your keywords from the
Editor Format tab in the Options dialog box (choose Tools | Options in the
Visual Basic Editor window). All VBA keywords are automatically
capitalized.
At the top of the Code window (see Figure 1-13), there are two drop-
down list boxes. The one on the left is called Object. This box displays the
currently selected control (ContactName). The box on the right is called
Procedure. If you position the mouse over one of these boxes, the tooltip
indicates the name of the box. By clicking on the down-arrow to the right
of the Procedure box, a list of all possible event procedures associated with
the object type selected in the Object box will be displayed. You can close
the drop-down list box by clicking anywhere in the unused portion of the
Code window.
16 | Chapter 1
Part I
Figure 1-13: Code Builder displays the event procedure Code windowwith a blank event procedure for the selected object. Here you can enterthe code Access will run when the specified GotFocus procedure is trig-gered.
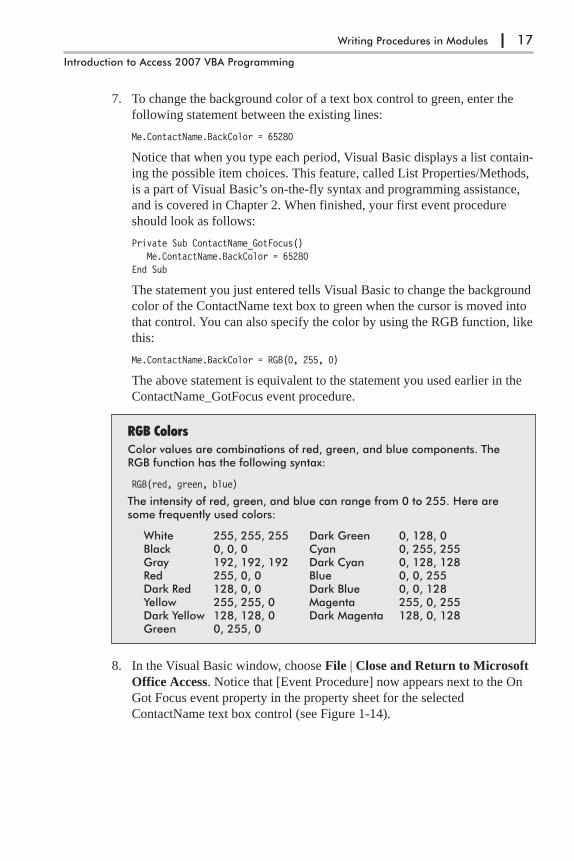
7. To change the background color of a text box control to green, enter the
following statement between the existing lines:
Me.ContactName.BackColor = 65280
Notice that when you type each period, Visual Basic displays a list contain-
ing the possible item choices. This feature, called List Properties/Methods,
is a part of Visual Basic’s on-the-fly syntax and programming assistance,
and is covered in Chapter 2. When finished, your first event procedure
should look as follows:
Private Sub ContactName_GotFocus()Me.ContactName.BackColor = 65280
End Sub
The statement you just entered tells Visual Basic to change the background
color of the ContactName text box to green when the cursor is moved into
that control. You can also specify the color by using the RGB function, like
this:
Me.ContactName.BackColor = RGB(0, 255, 0)
The above statement is equivalent to the statement you used earlier in the
ContactName_GotFocus event procedure.
RGB ColorsColor values are combinations of red, green, and blue components. TheRGB function has the following syntax:
RGB(red, green, blue)
The intensity of red, green, and blue can range from 0 to 255. Here aresome frequently used colors:
White 255, 255, 255 Dark Green 0, 128, 0Black 0, 0, 0 Cyan 0, 255, 255Gray 192, 192, 192 Dark Cyan 0, 128, 128Red 255, 0, 0 Blue 0, 0, 255Dark Red 128, 0, 0 Dark Blue 0, 0, 128Yellow 255, 255, 0 Magenta 255, 0, 255Dark Yellow 128, 128, 0 Dark Magenta 128, 0, 128Green 0, 255, 0
8. In the Visual Basic window, choose File | Close and Return to Microsoft
Office Access. Notice that [Event Procedure] now appears next to the On
Got Focus event property in the property sheet for the selected
ContactName text box control (see Figure 1-14).
Writing Procedures in Modules | 17
Introduction to Access 2007 VBA Programming
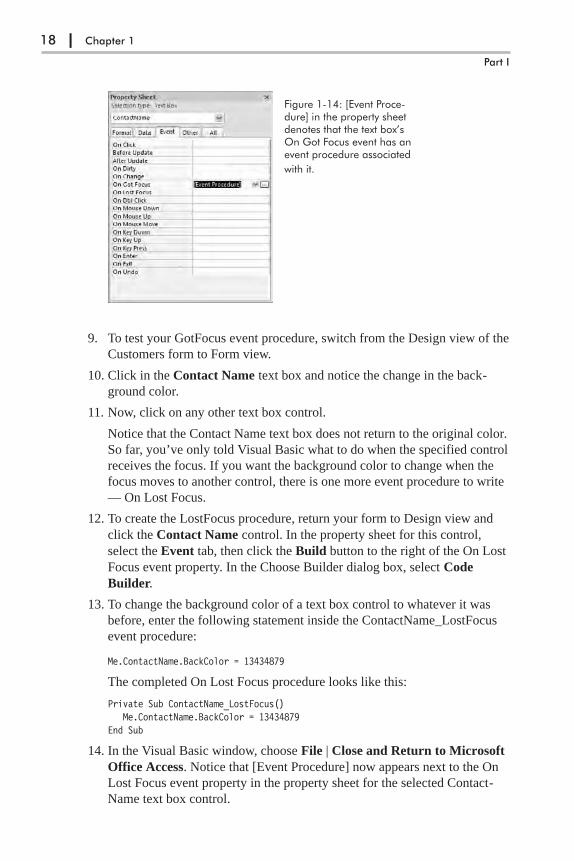
9. To test your GotFocus event procedure, switch from the Design view of the
Customers form to Form view.
10. Click in the Contact Name text box and notice the change in the back-
ground color.
11. Now, click on any other text box control.
Notice that the Contact Name text box does not return to the original color.
So far, you’ve only told Visual Basic what to do when the specified control
receives the focus. If you want the background color to change when the
focus moves to another control, there is one more event procedure to write
— On Lost Focus.
12. To create the LostFocus procedure, return your form to Design view and
click the Contact Name control. In the property sheet for this control,
select the Event tab, then click the Build button to the right of the On Lost
Focus event property. In the Choose Builder dialog box, select Code
Builder.
13. To change the background color of a text box control to whatever it was
before, enter the following statement inside the ContactName_LostFocus
event procedure:
Me.ContactName.BackColor = 13434879
The completed On Lost Focus procedure looks like this:
Private Sub ContactName_LostFocus()Me.ContactName.BackColor = 13434879
End Sub
14. In the Visual Basic window, choose File | Close and Return to Microsoft
Office Access. Notice that [Event Procedure] now appears next to the On
Lost Focus event property in the property sheet for the selected Contact-
Name text box control.
18 | Chapter 1
Part I
Figure 1-14: [Event Proce-dure] in the property sheetdenotes that the text box’sOn Got Focus event has anevent procedure associated
with it.

15. Repeat steps 9-11 to test both of the event procedures you have written.
16. When you are done, close the database files you have worked with in this
chapter.
� Note: Because objects recognize a sequence of events, it’s important tounderstand what actions fire the events and the order in which the events occur.In Part IV of this book, you’ll learn what events can be used for a particular taskto make your application smarter.
Compiling Your ProceduresThe VBA code you write in the Visual Basic Editor Code window is automati-
cally compiled by Microsoft Access before you run it. The syntax of your
VBA statements is first thoroughly checked for errors, and then your proce-
dures are converted into executable format. If an error is discovered during the
compilation process, Access stops compiling and displays an error message. It
also highlights the line of code that contains the error. The compiling process
can take from seconds to minutes or longer, depending on the number of pro-
cedures written and the number of modules used.
To ensure that your procedures have been compiled, you can explicitly
compile them after you are done programming. You can do this by choosing
Debug | Compile in the Visual Basic Editor window.
Microsoft Access saves all the code in your database in its compiled form.
Compiled code runs more quickly when you open it in the future. You should
always save your modules after you compile them. In Chapter 9 you will learn
how to test and troubleshoot your VBA procedures.
Placing a Database in a Trusted LocationThe new security features in Access 2007 make it more complicated for users
to work with databases that include VBA code and other executable content
such as Action queries that add, modify, or delete data, DDL (Data Definition
Language) queries that create and alter tables, SQL Pass-Through queries, and
ActiveX controls, as well as certain unsafe expressions and macro commands.
When an Access database is opened in Access 2007, by default, Access
turns off all potentially unsafe code or content and displays a security warning
message just under the Ribbon (Figure 1-15).
To use the disabled components of the database, a user must click the
Options button on the message bar. This will bring up the Security Alert dialog
box (Figure 1-16). By default, the “Help protect me from unknown content
(recommended)” option button is selected. To enable the disabled content only
for the current session, users need to select the “Enable this content” option
button and then click OK. These steps will need to be repeated each time the
database is opened. If users select not to trust the database — in other words,
they ignore the security warning message — they will still be able to view the
data in the database and use components that Access has not disabled.
Writing Procedures in Modules | 19
Introduction to Access 2007 VBA Programming

To make it easy to work with Access databases in this book, you will not want
to bother with enabling content each time you open a database. To trust your
databases permanently, you can place them in a trusted location — a folder on
your local or network drive that you mark as trusted.
Notice the Open the Trust Center hyperlink at the bottom of the Security
Alert dialog box. This hyperlink will open the Trust Center where you can set
up a trusted folder. You can also access the Trust Center from the Microsoft
Office button as demonstrated in Hands-On 1-4.
�Hands-On 1-4: Placing an Access Database in a Trusted Location
1. To start the Trust Center, in the Microsoft Access window, click the
Microsoft Office button, and then click the Access Options
button.
2. In the left pane of the Access Options dialog box, click Trust Center, and
then click Trust Center Settings in the right pane.
3. In the left pane of the Trust Center dialog box, click Trusted Locations.
4. Click the Add new location button.
20 | Chapter 1
Part I
Figure 1-15: The Security Warning message bar in Access 2007.
Figure 1-16: The Security Alert dialog box allows you totemporarily enable database content.

5. In the Path text box, type the path and folder name of the location on your
local drive that you want to set up as a trusted source for opening files.
Let’s enter C:\Acc07_ByExample to designate this folder as a trusted
location for this book’s database programming exercises (Figure 1-17).
6. Click OK to close the Trusted Location dialog box.
7. The Trusted Locations list in the Trust Center dialog box now includes the
C:\Acc07_ByExample folder as a trusted source. Files put in a trusted loca-
tion can be opened without being checked by the Trust Center security
feature. Click OK to close the Trust Center dialog box.
8. Click OK to close the Access Options dialog box.
Chapter SummaryIn this chapter, you got a hands-on introduction to writing VBA procedures in
Access 2007 standard and class modules. You learned about subroutine proce-
dures, function procedures, property procedures, and event procedures. You
also learned different ways of executing subroutines and functions. The main
hands-on exercise in this chapter walked you through writing two event proce-
dures in a form’s class module for a text control placed in an Access form. You
finished this chapter by setting up a trusted location to keep Access 2007 from
disabling your VBA code upon opening a database.
This chapter has given you a glimpse of the Microsoft Visual Basic pro-
gramming environment built into Access. The next chapter will take you
deeper into this interface, showing you various windows and shortcuts that you
can use to program faster and with fewer errors.
Writing Procedures in Modules | 21
Introduction to Access 2007 VBA Programming
Figure 1-17: Setting a Trusted Location folder for thisbook’s programming examples.
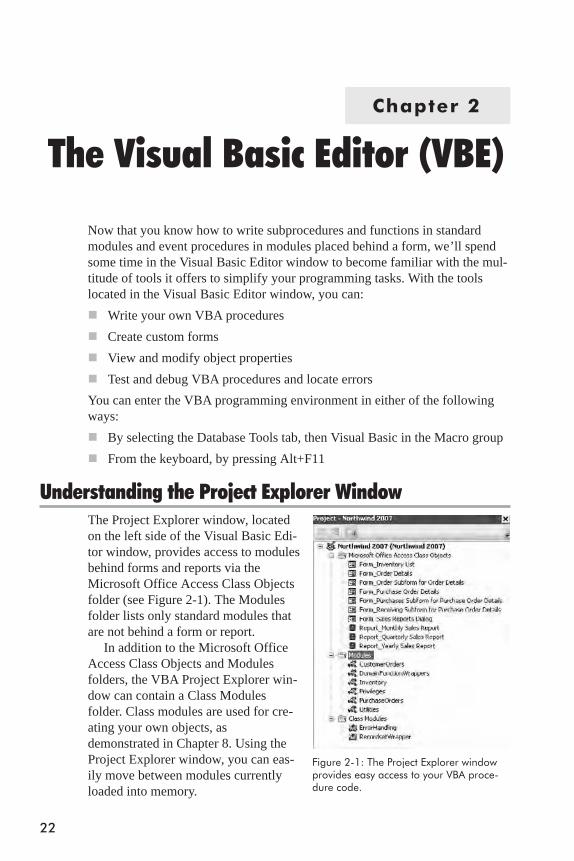
Chapter 2
The Visual Basic Editor (VBE)
Now that you know how to write subprocedures and functions in standard
modules and event procedures in modules placed behind a form, we’ll spend
some time in the Visual Basic Editor window to become familiar with the mul-
titude of tools it offers to simplify your programming tasks. With the tools
located in the Visual Basic Editor window, you can:
� Write your own VBA procedures
� Create custom forms
� View and modify object properties
� Test and debug VBA procedures and locate errors
You can enter the VBA programming environment in either of the following
ways:
� By selecting the Database Tools tab, then Visual Basic in the Macro group
� From the keyboard, by pressing Alt+F11
Understanding the Project Explorer WindowThe Project Explorer window, located
on the left side of the Visual Basic Edi-
tor window, provides access to modules
behind forms and reports via the
Microsoft Office Access Class Objects
folder (see Figure 2-1). The Modules
folder lists only standard modules that
are not behind a form or report.
In addition to the Microsoft Office
Access Class Objects and Modules
folders, the VBA Project Explorer win-
dow can contain a Class Modules
folder. Class modules are used for cre-
ating your own objects, as
demonstrated in Chapter 8. Using the
Project Explorer window, you can eas-
ily move between modules currently
loaded into memory.
22
Figure 2-1: The Project Explorer windowprovides easy access to your VBA proce-dure code.
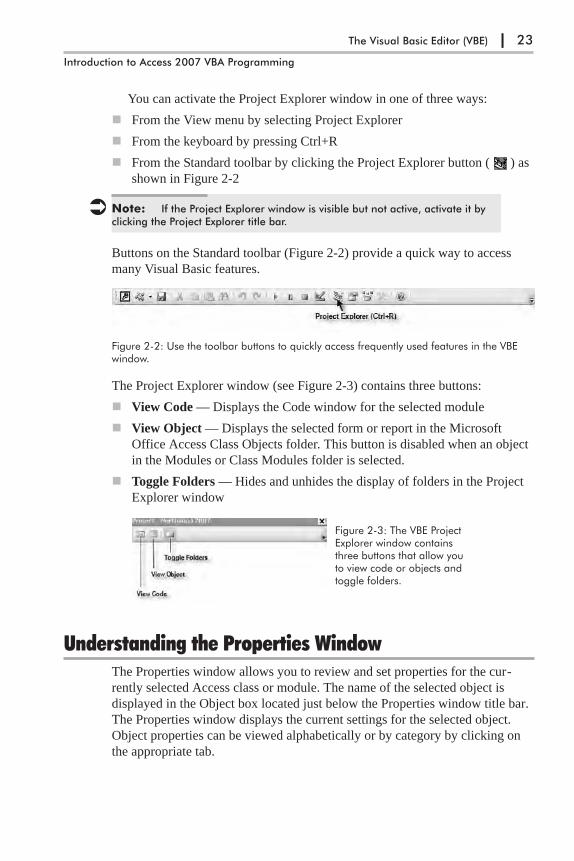
You can activate the Project Explorer window in one of three ways:
� From the View menu by selecting Project Explorer
� From the keyboard by pressing Ctrl+R
� From the Standard toolbar by clicking the Project Explorer button ( ) as
shown in Figure 2-2
� Note: If the Project Explorer window is visible but not active, activate it byclicking the Project Explorer title bar.
Buttons on the Standard toolbar (Figure 2-2) provide a quick way to access
many Visual Basic features.
The Project Explorer window (see Figure 2-3) contains three buttons:
� View Code — Displays the Code window for the selected module
� View Object — Displays the selected form or report in the Microsoft
Office Access Class Objects folder. This button is disabled when an object
in the Modules or Class Modules folder is selected.
� Toggle Folders — Hides and unhides the display of folders in the Project
Explorer window
Understanding the Properties WindowThe Properties window allows you to review and set properties for the cur-
rently selected Access class or module. The name of the selected object is
displayed in the Object box located just below the Properties window title bar.
The Properties window displays the current settings for the selected object.
Object properties can be viewed alphabetically or by category by clicking on
the appropriate tab.
The Visual Basic Editor (VBE) | 23
Introduction to Access 2007 VBA Programming
Figure 2-2: Use the toolbar buttons to quickly access frequently used features in the VBEwindow.
Figure 2-3: The VBE ProjectExplorer window containsthree buttons that allow youto view code or objects andtoggle folders.
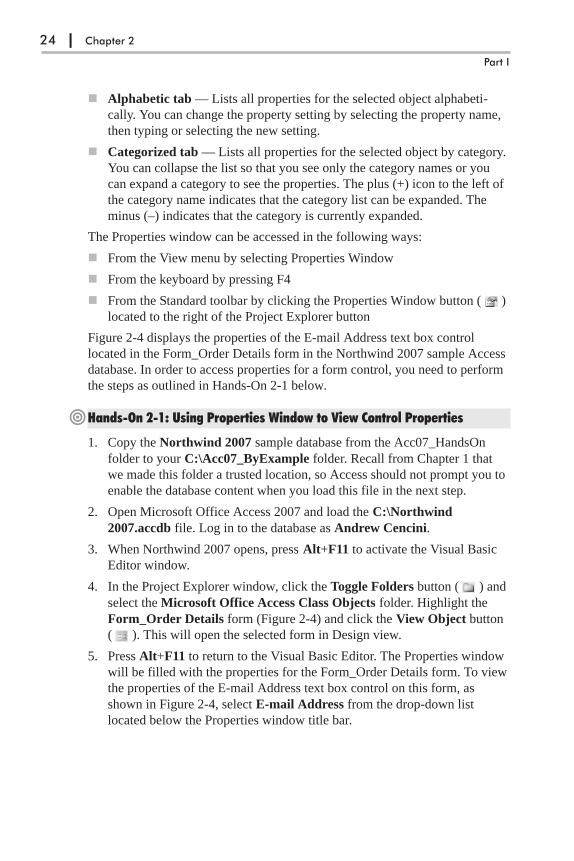
� Alphabetic tab — Lists all properties for the selected object alphabeti-
cally. You can change the property setting by selecting the property name,
then typing or selecting the new setting.
� Categorized tab — Lists all properties for the selected object by category.
You can collapse the list so that you see only the category names or you
can expand a category to see the properties. The plus (+) icon to the left of
the category name indicates that the category list can be expanded. The
minus (–) indicates that the category is currently expanded.
The Properties window can be accessed in the following ways:
� From the View menu by selecting Properties Window
� From the keyboard by pressing F4
� From the Standard toolbar by clicking the Properties Window button ( )
located to the right of the Project Explorer button
Figure 2-4 displays the properties of the E-mail Address text box control
located in the Form_Order Details form in the Northwind 2007 sample Access
database. In order to access properties for a form control, you need to perform
the steps as outlined in Hands-On 2-1 below.
�Hands-On 2-1: Using Properties Window to View Control Properties
1. Copy the Northwind 2007 sample database from the Acc07_HandsOn
folder to your C:\Acc07_ByExample folder. Recall from Chapter 1 that
we made this folder a trusted location, so Access should not prompt you to
enable the database content when you load this file in the next step.
2. Open Microsoft Office Access 2007 and load the C:\Northwind
2007.accdb file. Log in to the database as Andrew Cencini.
3. When Northwind 2007 opens, press Alt+F11 to activate the Visual Basic
Editor window.
4. In the Project Explorer window, click the Toggle Folders button ( ) and
select the Microsoft Office Access Class Objects folder. Highlight the
Form_Order Details form (Figure 2-4) and click the View Object button
( ). This will open the selected form in Design view.
5. Press Alt+F11 to return to the Visual Basic Editor. The Properties window
will be filled with the properties for the Form_Order Details form. To view
the properties of the E-mail Address text box control on this form, as
shown in Figure 2-4, select E-mail Address from the drop-down list
located below the Properties window title bar.
24 | Chapter 2
Part I

Understanding the Code WindowThe Code window is used for Visual Basic programming as well as for view-
ing and modifying the code of existing Visual Basic procedures. Each VBA
module can be opened in a separate Code window.
There are several ways of activating the Code window:
� From the Project Explorer window, choose the appropriate module and
then click the View Code button ( )
� From the Microsoft Visual Basic menu bar, choose View | Code
� From the keyboard, press F7
At the top of the Code window there are two drop-down list boxes that allow
you to move quickly within the Visual Basic code. In the Object box on the left
side of the Code window, you can select the object whose code you want to
view.
The Visual Basic Editor (VBE) | 25
Introduction to Access 2007 VBA Programming
Figure 2-4: You canedit object propertiesin the Properties win-dow, or you can editthem in the propertysheet when a form orreport is open inDesign view.
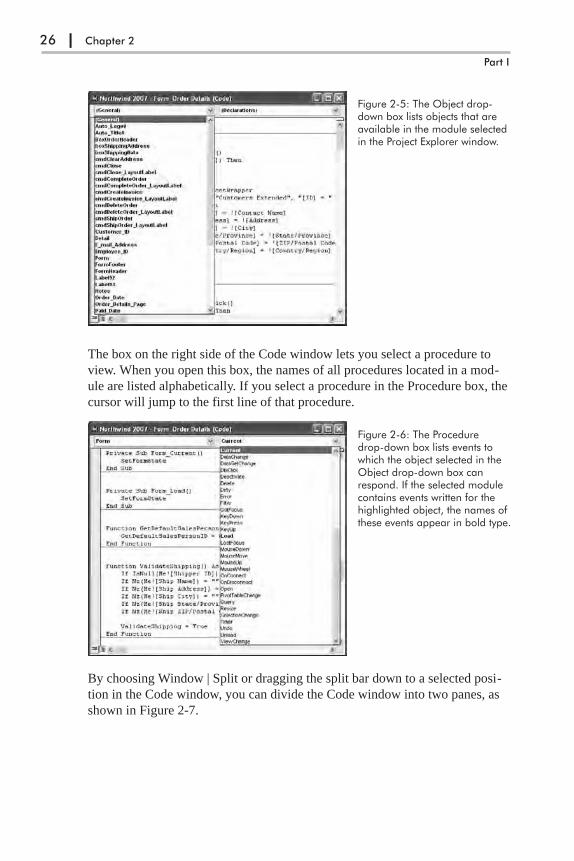
The box on the right side of the Code window lets you select a procedure to
view. When you open this box, the names of all procedures located in a mod-
ule are listed alphabetically. If you select a procedure in the Procedure box, the
cursor will jump to the first line of that procedure.
By choosing Window | Split or dragging the split bar down to a selected posi-
tion in the Code window, you can divide the Code window into two panes, as
shown in Figure 2-7.
26 | Chapter 2
Part I
Figure 2-5: The Object drop-down box lists objects that areavailable in the module selectedin the Project Explorer window.
Figure 2-6: The Proceduredrop-down box lists events towhich the object selected in theObject drop-down box canrespond. If the selected modulecontains events written for thehighlighted object, the names ofthese events appear in bold type.

Setting up the Code window for the two-pane display is useful for copying,
cutting, and pasting sections of code between procedures in the same module.
To return to a one-window display, drag the split bar all the way to the top of
the Code window or choose Window | Split again.
There are two icons at the bottom of the Code window (Figure 2-7). The
Procedure View icon changes the display to only one procedure at a time in the
Code window. To select another procedure, use the Procedure drop-down box.
The Full Module View icon changes the display to all the procedures in the
selected module. Use the vertical scroll bar in the Code window to scroll
through the module’s code. The Margin Indicator bar is used by the Visual
Basic Editor to display helpful indicators during editing and debugging.
Other Windows in the VBEIn addition to the Code window, there
are several other windows that are fre-
quently used in the Visual Basic
environment, such as the Immediate,
Locals, Watch, Project Explorer,
Properties, and Object Browser
windows. The Docking tab in the
Options dialog box (select Tools |
Options in the Visual Basic Editor
window) displays a list of available
windows and allows you to choose
which windows you want to be
dockable.
The Visual Basic Editor (VBE) | 27
Introduction to Access 2007 VBA Programming
Figure 2-7: By splittingthe Code window youcan view different sec-tions of a long proce-dure or a differentprocedure in each win-dow pane.
Figure 2-8: You can use the Docking tab inthe Options dialog box to control whichwindows are currently displayed in theVisual Basic programming environment.
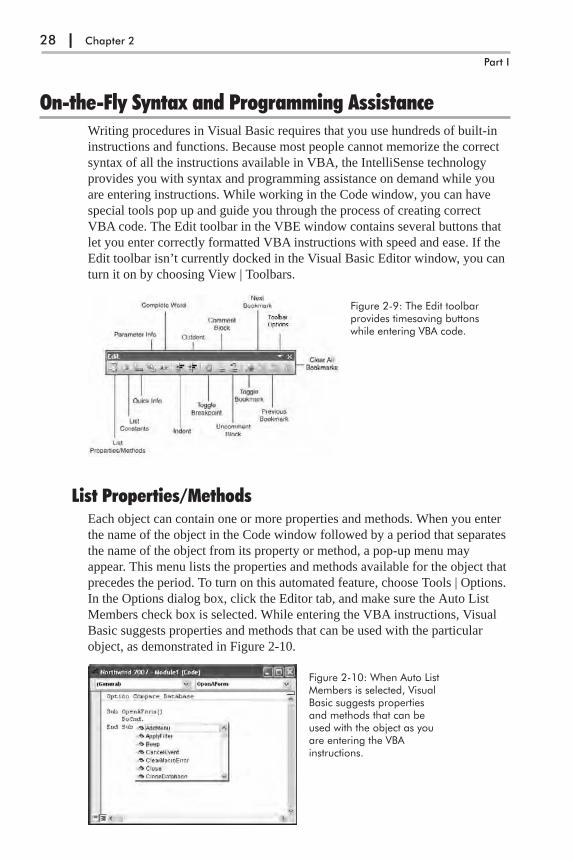
On-the-Fly Syntax and Programming AssistanceWriting procedures in Visual Basic requires that you use hundreds of built-in
instructions and functions. Because most people cannot memorize the correct
syntax of all the instructions available in VBA, the IntelliSense technology
provides you with syntax and programming assistance on demand while you
are entering instructions. While working in the Code window, you can have
special tools pop up and guide you through the process of creating correct
VBA code. The Edit toolbar in the VBE window contains several buttons that
let you enter correctly formatted VBA instructions with speed and ease. If the
Edit toolbar isn’t currently docked in the Visual Basic Editor window, you can
turn it on by choosing View | Toolbars.
List Properties/MethodsEach object can contain one or more properties and methods. When you enter
the name of the object in the Code window followed by a period that separates
the name of the object from its property or method, a pop-up menu may
appear. This menu lists the properties and methods available for the object that
precedes the period. To turn on this automated feature, choose Tools | Options.
In the Options dialog box, click the Editor tab, and make sure the Auto List
Members check box is selected. While entering the VBA instructions, Visual
Basic suggests properties and methods that can be used with the particular
object, as demonstrated in Figure 2-10.
28 | Chapter 2
Part I
Figure 2-10: When Auto ListMembers is selected, VisualBasic suggests propertiesand methods that can beused with the object as youare entering the VBAinstructions.
Figure 2-9: The Edit toolbarprovides timesaving buttonswhile entering VBA code.

To choose an item from the pop-up menu, start typing the name of the property
or method you want to use. When the correct item name is highlighted, press
Enter to insert the item into your code and start a new line, or press the Tab key
to insert the item and continue writing instructions on the same line. You can
also double-click the item to insert it in your code. To close the pop-up menu
without inserting an item, press Esc. When you press Esc to remove the pop-up
menu, Visual Basic will not display the menu for the same object again.
To display the Properties/Methods pop-up menu again, you can:
� Press Ctrl+J
� Use the Backspace key to delete the period, then type the period again
� Right-click in the Code window, and select List Properties/Methods from
the shortcut menu
� Choose Edit | List Properties/Methods
� Click the List Properties/Methods button ( ) on the Edit toolbar
Parameter InfoSome VBA functions and methods can take one or more arguments (or param-
eters). If a Visual Basic function or method requires an argument, you can see
the names of required and optional arguments in a tip box that appears just
below the cursor as soon as you type the open parenthesis or enter a space. The
Parameter Info feature (see Figure 2-11) makes it easy for you to supply cor-
rect arguments to a VBA function or method. In addition, it reminds you of
two other things that are very important for the function or method to work
correctly: the order of the arguments and the required data type of each argu-
ment. For example, if you enter in the Code window the instruction
DoCmd.OpenForm and type a space after the OpenForm method, a tip box
appears just below the cursor. Then as soon as you supply the first argument
and enter the comma, Visual Basic displays the next argument in bold.
Optional arguments are surrounded by square brackets [ ]. To close the Param-
eter Info window, all you need to do is press Esc.
To open the tip box using the keyboard, enter the instruction or function, fol-
lowed by the left parenthesis, then press Ctrl+Shift+I. You can also click the
The Visual Basic Editor (VBE) | 29
Introduction to Access 2007 VBA Programming
Figure 2-11: A tip window displays a list of arguments used by a VBA function ormethod.
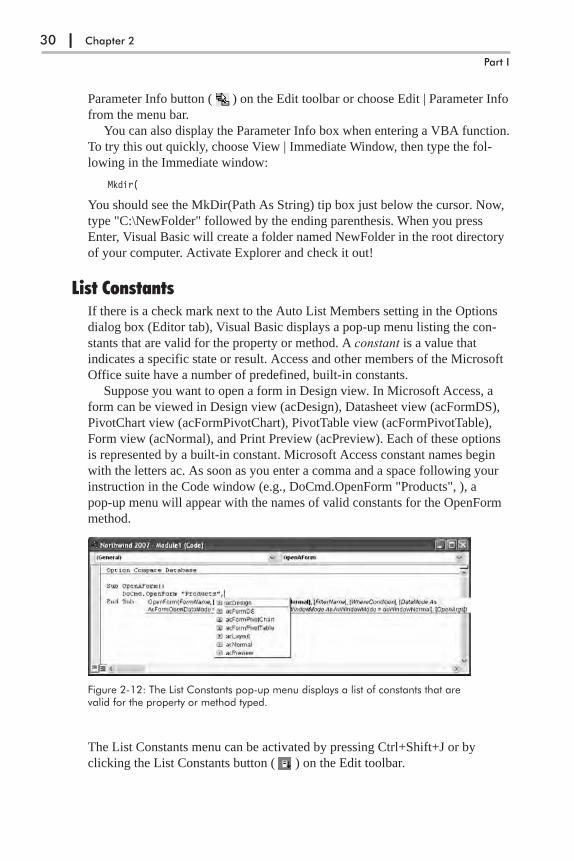
Parameter Info button ( ) on the Edit toolbar or choose Edit | Parameter Info
from the menu bar.
You can also display the Parameter Info box when entering a VBA function.
To try this out quickly, choose View | Immediate Window, then type the fol-
lowing in the Immediate window:
Mkdir(
You should see the MkDir(Path As String) tip box just below the cursor. Now,
type "C:\NewFolder" followed by the ending parenthesis. When you press
Enter, Visual Basic will create a folder named NewFolder in the root directory
of your computer. Activate Explorer and check it out!
List ConstantsIf there is a check mark next to the Auto List Members setting in the Options
dialog box (Editor tab), Visual Basic displays a pop-up menu listing the con-
stants that are valid for the property or method. A constant is a value that
indicates a specific state or result. Access and other members of the Microsoft
Office suite have a number of predefined, built-in constants.
Suppose you want to open a form in Design view. In Microsoft Access, a
form can be viewed in Design view (acDesign), Datasheet view (acFormDS),
PivotChart view (acFormPivotChart), PivotTable view (acFormPivotTable),
Form view (acNormal), and Print Preview (acPreview). Each of these options
is represented by a built-in constant. Microsoft Access constant names begin
with the letters ac. As soon as you enter a comma and a space following your
instruction in the Code window (e.g., DoCmd.OpenForm "Products", ), a
pop-up menu will appear with the names of valid constants for the OpenForm
method.
The List Constants menu can be activated by pressing Ctrl+Shift+J or by
clicking the List Constants button ( ) on the Edit toolbar.
30 | Chapter 2
Part I
Figure 2-12: The List Constants pop-up menu displays a list of constants that arevalid for the property or method typed.

Quick InfoWhen you select an instruction, function, method, procedure name, or constant
in the Code window and then click the Quick Info button ( ) on the Edit
toolbar (or press Ctrl+I), Visual Basic will display the syntax of the highlighted
item as well as the value of its constant. The Quick Info feature can be turned
on or off using the Options dialog box (Tools | Options). To use the feature,
click the Editor tab in the Options dialog box, and make sure there is a check
mark in the box next to Auto Quick Info.
Complete WordAnother way to increase the speed of writing VBA procedures in the Code
window is with the Complete Word feature. As you enter the first few letters of
a keyword and click the Complete Word button ( ) on the Edit toolbar,
Visual Basic will complete the keyword entry for you. For example, if you
enter the first three letters of the keyword DoCmd (DoC) in the Code window,
then click the Complete Word button on the Edit toolbar, Visual Basic will
complete the rest of the command. In the place of DoC you will see the entire
instruction, DoCmd.
If there are several VBA keywords that begin with the same letters, when
you click the Complete Word button on the Edit toolbar Visual Basic will dis-
play a pop-up menu listing all of them. To try this, enter only the first three
letters of the word Application (App), then press the Complete Word button on
the toolbar. You can then select the appropriate word from the pop-up menu.
Indent/OutdentThe Editor tab in the Options dialog box contains many settings you can turn
on to make automated features available in the Code window.
The Visual Basic Editor (VBE) | 31
Introduction to Access 2007 VBA Programming
Figure 2-13: The Quick Info feature provides a list of function parameters, as wellas constant values and VBA statement syntax.

When the Auto Indent option is turned on, Visual Basic automatically indents
the selected lines of code using the Tab Width value. The default entry for
Auto Indent is four characters (Figure 2-14). You can easily change the tab
width by typing a new value in the text box. Why would you want to use
indentation in your code? Indentation makes your VBA procedures more read-
able and easier to understand. Indenting is especially recommended for
entering lines of code that make decisions or repeat actions.
Let’s see how you can indent and outdent lines of code using the
Form_InventoryList form in the Northwind database that you opened in the
previous hands-on exercise.
�Hands-On 2-2: Using the Indent/Outdent Feature
1. In the Project Explorer window in the Microsoft Office Access Class
Objects folder, double-click on Form_Inventory List. The Code window
should now show the CmdPurchase_Click event procedure written for this
form.
2. In the Code window, select the block of code beginning with the keyword
If and ending with the keywords End If.
3. Click the Indent button ( ) on the Edit toolbar or press Tab on the key-
board. The selected block of code will move four spaces to the right. You
can adjust the number of spaces to indent by choosing Tools | Options and
entering the appropriate value in the Tab Width box on the Editor tab.
4. Now, click the Outdent button ( ) on the Edit toolbar or press
Shift+Tab to return the selected lines of code to the previous location in
the Code window. The Indent and Outdent options are also available from
Visual Basic Editor’s Edit menu.
Comment Block/Uncomment BlockThe apostrophe placed at the beginning of a line of code denotes a comment.
Besides the fact that comments make it easier to understand what the proce-
dure does, comments are also very useful in testing and troubleshooting VBA
32 | Chapter 2
Part I
Figure 2-14: The Options dialogbox lists features you can turn onand off to fit the VBA programmingenvironment to your needs.
procedures. For example, when you execute a procedure, it may not run as
expected. Instead of deleting the lines of code that may be responsible for the
problems encountered, you may want to skip the lines for now and return to
them later. By placing an apostrophe at the beginning of the line you want to
avoid, you can continue checking the other parts of your procedure. While
commenting one line of code by typing an apostrophe works fine for most peo-
ple, when it comes to turning entire blocks of code into comments, you’ll find
the Comment Block and Uncomment Block buttons on the Edit toolbar very
handy and easy to use.
To comment a few lines of code, select the lines and click the Comment
Block button ( ). To turn the commented code back into VBA instructions,
click the Uncomment Block button ( ). If you don’t select a block of text,
when you click the Comment Block button the apostrophe is added only to the
line of code where the cursor is currently located.
Using the Object BrowserIf you want to move easily through the myriad of VBA elements and features,
examine the capabilities of the Object Browser. This special built-in tool is
available in the Visual Basic Editor window.
To access the Object Browser, use any of the following methods:
� Press F2
� Choose View | Object Browser
� Click the Object Browser button ( ) on the toolbar
The Object Browser allows you to browse through the objects available to
your VBA procedures, as well as view their properties, methods, and events.
With the aid of the Object Browser, you can quickly move between procedures
in your database application, and search for objects and methods across vari-
ous type libraries.
The Object Browser window is divided into several sections. The top of the
window displays the Project/Library drop-down list box with the names of all
currently available libraries and projects.
A library is a special file that contains information about the objects in an
application. New libraries can be added via the References dialog box (select
Tools | References). The entry for <All Libraries> lists the objects of all librar-
ies installed on your computer. While the Access library contains objects
specific to using Microsoft Office Access, the VBA library provides access to
three objects (Debug, Err, and Collection) as well as a number of built-in func-
tions and constants that give you flexibility in programming. You can send
output to the Immediate window, get information about run-time errors, work
with the Collection object, manage files, deal with text strings, convert data
types, set date and time, and perform mathematical operations.
Below the Project/Library drop-down list box is a search box (Search Text)
that allows you to quickly find information in a particular library. This field
remembers the last four items you searched for. To find only whole words,
The Visual Basic Editor (VBE) | 33
Introduction to Access 2007 VBA Programming
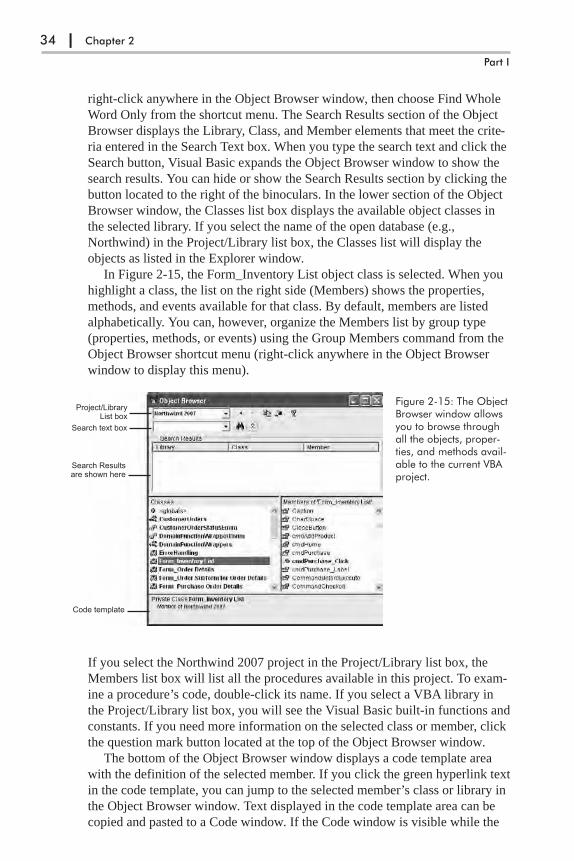
right-click anywhere in the Object Browser window, then choose Find Whole
Word Only from the shortcut menu. The Search Results section of the Object
Browser displays the Library, Class, and Member elements that meet the crite-
ria entered in the Search Text box. When you type the search text and click the
Search button, Visual Basic expands the Object Browser window to show the
search results. You can hide or show the Search Results section by clicking the
button located to the right of the binoculars. In the lower section of the Object
Browser window, the Classes list box displays the available object classes in
the selected library. If you select the name of the open database (e.g.,
Northwind) in the Project/Library list box, the Classes list will display the
objects as listed in the Explorer window.
In Figure 2-15, the Form_Inventory List object class is selected. When you
highlight a class, the list on the right side (Members) shows the properties,
methods, and events available for that class. By default, members are listed
alphabetically. You can, however, organize the Members list by group type
(properties, methods, or events) using the Group Members command from the
Object Browser shortcut menu (right-click anywhere in the Object Browser
window to display this menu).
If you select the Northwind 2007 project in the Project/Library list box, the
Members list box will list all the procedures available in this project. To exam-
ine a procedure’s code, double-click its name. If you select a VBA library in
the Project/Library list box, you will see the Visual Basic built-in functions and
constants. If you need more information on the selected class or member, click
the question mark button located at the top of the Object Browser window.
The bottom of the Object Browser window displays a code template area
with the definition of the selected member. If you click the green hyperlink text
in the code template, you can jump to the selected member’s class or library in
the Object Browser window. Text displayed in the code template area can be
copied and pasted to a Code window. If the Code window is visible while the
34 | Chapter 2
Part I
Figure 2-15: The ObjectBrowser window allowsyou to browse throughall the objects, proper-ties, and methods avail-able to the current VBAproject.

Object Browser window is open, you can save time by dragging the high-
lighted code template and dropping it into the Code window. You can easily
adjust the size of the various sections of the Object Browser window by drag-
ging the dividing horizontal and vertical lines.
Let’s put the Object Browser to use in VBA programming. Assume that you
want to write a VBA procedure to control a check box placed on a form and
would like to see the list of properties and methods that are available for work-
ing with check boxes.
�Hands-On 2-3: Using the Object Browser
1. In the Visual Basic Editor window, press F2 to display the Object Browser.
2. In the Project/Library list box (see Figure 2-15), click the drop-down arrow
and select the Access library.
3. Type checkbox in the Search Text box and click the Search button ( ).
Make sure you don’t enter a space in the search string.
Visual Basic begins to search the Access library and displays the search
results. By analyzing the search results in the Object Browser window, you
can find the appropriate VBA instructions for writing your VBA proce-
dures. Looking at the Members list, you can quickly determine that you can
enable or disable a check box by setting the Enabled property. To get
detailed information on any item found in the Object Browser, select the
item and press F1 to activate online help.
Using the VBA Object LibraryWhile the Access library contains objects specific to using Microsoft Access,
the VBA Object Library provides access to many built-in VBA functions
grouped by categories. These functions are general in nature. They allow you
to manage files, set the date and time, interact with users, convert data types,
deal with text strings, or perform mathematical calculations. In the following
exercise, you will see how to use one of the built-in VBA functions to create a
new subfolder without leaving Access.
�Hands-On 2-4: Using Built-in VBA Functions
1. In the Visual Basic Editor window with the open Northwind 2007 data-
base, choose Insert | Module to create a new standard module.
2. In the Code window, enter Sub NewFolder() as the name of the procedure
and press Enter. Visual Basic will enter the ending keywords: End Sub.
3. Press F2 to display the Object Browser.
4. Click the drop-down arrow in the Project/Library list box and select VBA.
5. Enter file in the Search Text box and press Enter.
6. Scroll down in the Members list box and highlight the MkDir method.
The Visual Basic Editor (VBE) | 35
Introduction to Access 2007 VBA Programming

7. Click the Copy button in the Object Browser window to copy the selected
method name to the Windows clipboard.
8. Close the Object Browser and return to the Code window. Paste the copied
instruction inside the NewFolder procedure.
9. Now, enter a space, followed by "C:\Study". Be sure to enter the name of
the entire path and the quotation marks. The NewFolder procedure is
shown below.
Sub NewFolder()MkDir "C:\Study"
End Sub
10. Choose Run | Run Sub/UserForm to run the NewFolder procedure.
After you run the NewFolder procedure, Visual Basic creates a new folder
on drive C called Study. To see the folder, activate Windows Explorer.
After creating a new folder, you may realize that you don’t need it after all.
Although you could easily delete the folder while in Windows Explorer,
how about getting rid of it programmatically?
The Object Browser contains many other methods that are useful for
working with folders and files. The RmDir method is just as simple to use
as the MkDir method. To remove the Study folder from your hard drive,
replace the MkDir method with the RmDir method and rerun the
NewFolder procedure. Or create a new procedure called RemoveFolder, as
shown below:
Sub RemoveFolder()RmDir "C:\Study"
End Sub
When writing procedures from scratch, it’s a good idea to consult the Object
Browser for names of the built-in VBA functions.
Using the Immediate WindowThe Immediate window is a sort of VBA programmer’s scratch pad. Here you
can test VBA instructions before putting them to work in your VBA proce-
dures. It is a great tool for experimenting with your new language. The
Immediate window allows you to type VBA statements and test their results
immediately without having to write a procedure. Use it to try out your state-
ments. If the statement produces the expected result, you can copy the
statement from the Immediate window into your procedure (or you can drag it
right onto the Code window, if it is visible).
To activate the Immediate window, choose View | Immediate Window in the
Visual Basic Editor.
The Immediate window can be moved anywhere on the Visual Basic Editor
window, or it can be docked so that it always appears in the same area of the
screen. The docking setting can be turned on and off from the Docking tab in
the Options dialog box (Tools | Options).
36 | Chapter 2
Part I
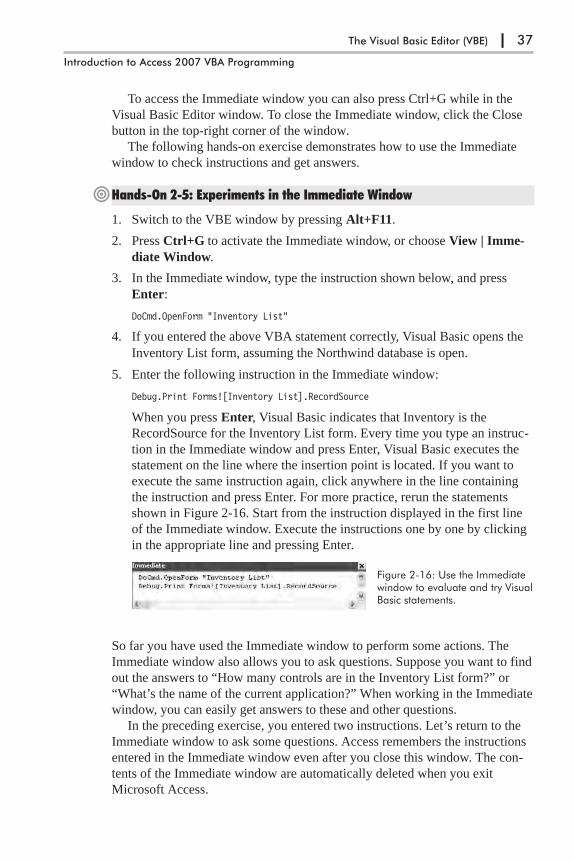
To access the Immediate window you can also press Ctrl+G while in the
Visual Basic Editor window. To close the Immediate window, click the Close
button in the top-right corner of the window.
The following hands-on exercise demonstrates how to use the Immediate
window to check instructions and get answers.
�Hands-On 2-5: Experiments in the Immediate Window
1. Switch to the VBE window by pressing Alt+F11.
2. Press Ctrl+G to activate the Immediate window, or choose View | Imme-
diate Window.
3. In the Immediate window, type the instruction shown below, and press
Enter:
DoCmd.OpenForm "Inventory List"
4. If you entered the above VBA statement correctly, Visual Basic opens the
Inventory List form, assuming the Northwind database is open.
5. Enter the following instruction in the Immediate window:
Debug.Print Forms![Inventory List].RecordSource
When you press Enter, Visual Basic indicates that Inventory is the
RecordSource for the Inventory List form. Every time you type an instruc-
tion in the Immediate window and press Enter, Visual Basic executes the
statement on the line where the insertion point is located. If you want to
execute the same instruction again, click anywhere in the line containing
the instruction and press Enter. For more practice, rerun the statements
shown in Figure 2-16. Start from the instruction displayed in the first line
of the Immediate window. Execute the instructions one by one by clicking
in the appropriate line and pressing Enter.
So far you have used the Immediate window to perform some actions. The
Immediate window also allows you to ask questions. Suppose you want to find
out the answers to “How many controls are in the Inventory List form?” or
“What’s the name of the current application?” When working in the Immediate
window, you can easily get answers to these and other questions.
In the preceding exercise, you entered two instructions. Let’s return to the
Immediate window to ask some questions. Access remembers the instructions
entered in the Immediate window even after you close this window. The con-
tents of the Immediate window are automatically deleted when you exit
Microsoft Access.
The Visual Basic Editor (VBE) | 37
Introduction to Access 2007 VBA Programming
Figure 2-16: Use the Immediatewindow to evaluate and try VisualBasic statements.

�Hands-On 2-6: Asking Questions in the Immediate Window
1. Click in a new line of the Immediate window and enter the following state-
ment to find out the number of controls in the Inventory List form:
?Forms![Inventory List].Controls.Count
When you press Enter, Visual Basic enters the number of controls on a
new line in the Immediate window.
2. Click in a new line of the Immediate window, and enter the following
statement:
?Application.Name
When you press Enter, Visual Basic enters the name of the active applica-
tion on a new line in the Immediate window.
3. In a new line in the Immediate window, enter the following instruction:
?12/3
When you press Enter, Visual Basic shows the result of the division on a
new line. But what if you want to know the result of 3 + 2 and 12 * 8 right
away? Instead of entering these instructions on separate lines, you can
enter them on one line as in the following example:
?3+2:?12*8
Notice the colon separating the two blocks of instructions. When you press
the Enter key, Visual Basic displays the results 5 and 96 on separate lines
in the Immediate window.
Here are a couple of other statements you may want to try out on your
own in the Immediate window:
?Application.GetOption("Default Database Directory")?Application.CodeProject.Name
Instead of using the question mark, you may precede the statement typed in
the Immediate window with the Print command, like this:
Print Application.CodeProject.Name
To delete the instructions from the Immediate window, highlight all the
lines and press Delete.
4. In the Visual Basic Editor window, choose File | Close and Return to
Microsoft Office Access.
5. Close the Northwind 2007.accdb database.
� Note: In Chapter 1 you learned how to run subprocedures and functionsfrom the Immediate window. You will find other examples of running proceduresand functions from this window in the subsequent chapters.
38 | Chapter 2
Part I
Chapter SummaryProgramming in Access 2007 requires a working knowledge of objects and
collections of objects. In this chapter you explored features of the Visual Basic
Editor window that can assist you in writing VBA code. Here are some impor-
tant points:
� When in doubt about objects, properties, or methods in an existing VBA
procedure, highlight the instruction in question and fire up the online help
by pressing F1.
� When you need on-the-fly programming assistance while typing your VBA
code, use the shortcut keys or buttons available on the Edit toolbar.
� If you need a quick listing of properties and methods for every available
object, or have trouble locating a hard-to-find procedure, go with the
Object Browser.
� If you want to experiment with VBA and see the results of VBA commands
immediately, use the Immediate window.
In the next chapter you will learn how you can remember values in your VBA
procedures by using various types of variables and constants.
The Visual Basic Editor (VBE) | 39
Introduction to Access 2007 VBA Programming

Chapter 3
Variables, Data Types, andConstants
In Chapter 2, you used the question mark to have Visual Basic return some
information in the Immediate window. Unfortunately, outside the Immediate
window, when you write Visual Basic procedures, you can’t use the question
mark. So how do you obtain answers to your questions in VBA procedures? To
find out what a particular VBA instruction (statement) has returned, you must
tell Visual Basic to memorize it. This is done by using variables. This chapter
introduces you to many types of variables, data types, and constants that you
can and should use in your VBA procedures.
What Is a Variable?A variable is a name used to refer to an item of data. Each time you want to
remember the result of a VBA instruction, think of a name that will represent
it. For example, if you want to keep track of the number of controls on a par-
ticular form, you can make up a name such as NumOfControls, TotalControls,
or FormsControlCount.
The names of variables can contain characters, numbers, and punctuation
marks except for the following:
, # $ % & @ !
The name of a variable cannot begin with a number or contain a space. If you
want the name of the variable to include more than one word, use the under-
score (_). Although a variable name can contain as many as 254 characters, it’s
best to use short and simple names. Using short names will save you typing
time when you need to reuse the variable in your Visual Basic procedure.
Visual Basic doesn’t care whether you use uppercase or lowercase letters in
variable names; however, most programmers use lowercase letters. When the
variable name is comprised of more than one word, most programmers
capitalize the first letter of each word, as in the following: NumOfControls,
First_Name.
40
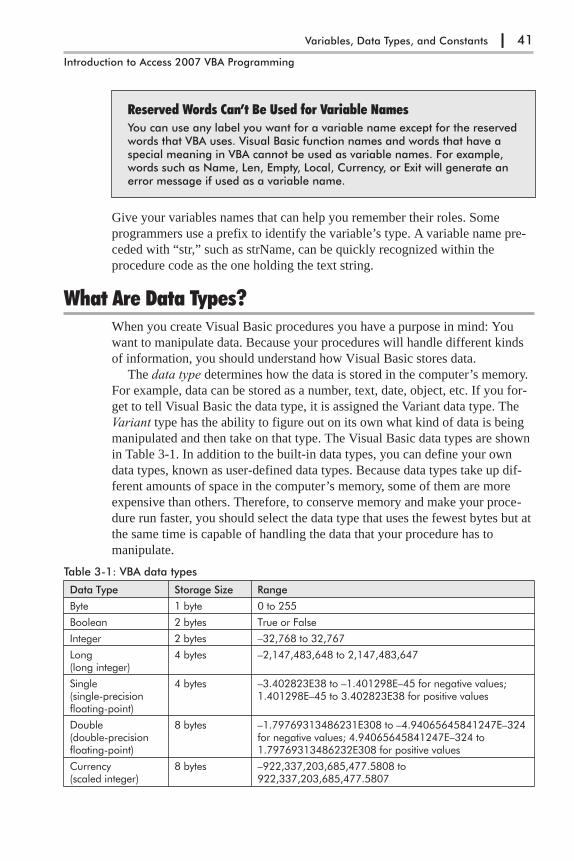
Reserved Words Can’t Be Used for Variable NamesYou can use any label you want for a variable name except for the reservedwords that VBA uses. Visual Basic function names and words that have aspecial meaning in VBA cannot be used as variable names. For example,words such as Name, Len, Empty, Local, Currency, or Exit will generate anerror message if used as a variable name.
Give your variables names that can help you remember their roles. Some
programmers use a prefix to identify the variable’s type. A variable name pre-
ceded with “str,” such as strName, can be quickly recognized within the
procedure code as the one holding the text string.
What Are Data Types?When you create Visual Basic procedures you have a purpose in mind: You
want to manipulate data. Because your procedures will handle different kinds
of information, you should understand how Visual Basic stores data.
The data type determines how the data is stored in the computer’s memory.
For example, data can be stored as a number, text, date, object, etc. If you for-
get to tell Visual Basic the data type, it is assigned the Variant data type. The
Variant type has the ability to figure out on its own what kind of data is being
manipulated and then take on that type. The Visual Basic data types are shown
in Table 3-1. In addition to the built-in data types, you can define your own
data types, known as user-defined data types. Because data types take up dif-
ferent amounts of space in the computer’s memory, some of them are more
expensive than others. Therefore, to conserve memory and make your proce-
dure run faster, you should select the data type that uses the fewest bytes but at
the same time is capable of handling the data that your procedure has to
manipulate.
Table 3-1: VBA data types
Data Type Storage Size Range
Byte 1 byte 0 to 255
Boolean 2 bytes True or False
Integer 2 bytes –32,768 to 32,767
Long(long integer)
4 bytes –2,147,483,648 to 2,147,483,647
Single(single-precisionfloating-point)
4 bytes –3.402823E38 to –1.401298E–45 for negative values;1.401298E–45 to 3.402823E38 for positive values
Double(double-precisionfloating-point)
8 bytes –1.79769313486231E308 to –4.94065645841247E–324for negative values; 4.94065645841247E–324 to1.79769313486232E308 for positive values
Currency(scaled integer)
8 bytes –922,337,203,685,477.5808 to922,337,203,685,477.5807
Variables, Data Types, and Constants | 41
Introduction to Access 2007 VBA Programming

Data Type Storage Size Range
Decimal 14 bytes +/–79,228,162,514,264,337,593,543,950,335 with nodecimal point; +/–7.9228162514264337593543950335with 28 places to the right of the decimal; smallest nonzeronumber is +/–0.0000000000000000000000000001
Date 8 bytes January 1, 100, to December 31, 9999
Object 4 bytes Any Object reference
String(variable-length)
10 bytes +string length
0 to approximately 2 billion
String(fixed-length)
Length of string 1 to approximately 65,400
Variant(with numbers)
16 bytes Any numeric value up to the range of a Double
Variant(with characters)
22 bytes +string length
Same range as for variable-length String
User-defined(using Type)
Numberrequired byelements
The range of each element is the same as the range of itsdata type.
Creating VariablesYou can create a variable by declaring it with a special command or by just
using it in a statement. When you declare your variable, you make Visual
Basic aware of the variable’s name and data type. This is called explicit vari-
able declaration.
Advantages of Explicit Variable DeclarationExplicit variable declaration:
• Speeds up the execution of your procedure. Since Visual Basic knows thedata type, it reserves only as much memory as is absolutely necessary tostore the data.
• Makes your code easier to read and understand because all the vari-ables are listed at the very beginning of the procedure.
• Helps prevent errors caused by misspelling a variable name. Visual Basicautomatically corrects the variable name based on the spelling used inthe variable declaration.
If you don’t let Visual Basic know about the variable prior to using it, you are
implicitly telling VBA that you want to create this variable. Implicit variables
are automatically assigned the Variant data type (see Table 3-1). Although
implicit variable declaration is convenient (it allows you to create variables on
the fly and assign values to them without knowing in advance the data type of
the values being assigned), it can cause several problems.
42 | Chapter 3
Part I
Disadvantages of Implicit Variable Declaration
• If you misspell a variable name in your procedure, Visual Basic may dis-play a run-time error or create a new variable. You are guaranteed towaste some time troubleshooting problems that could easily have beenavoided had you declared your variable at the beginning of theprocedure.
• Since Visual Basic does not know what type of data your variable willstore, it assigns it a Variant data type. This causes your procedure to runslower, because Visual Basic has to check the data type every time itdeals with your variable. And because Variant variables can store anytype of data, Visual Basic has to reserve more memory to store yourdata.
Declaring VariablesYou declare a variable with the Dim keyword. Dim stands for “dimension.”
The Dim keyword is followed by the variable’s name and type.
Suppose you want the procedure to display the age of an employee. Before
you can calculate the age, you must feed the procedure the employee’s date of
birth. To do this, you declare a variable called dateOfBirth, as follows:
Dim dateOfBirth As Date
Notice that the Dim keyword is followed by the name of the variable
(dateOfBirth). If you don’t like this name, you are free to replace it with
another word, as long as the word you are planning to use is not one of the
VBA keywords. You specify the data type the variable will hold by including
the As keyword followed by one of the data types from Table 3-1. The Date
data type tells Visual Basic that the variable dateOfBirth will store a date.
To store the employee’s age, you declare the variable as follows:
Dim intAge As Integer
The intAge variable will store the number of years between today’s date and
the employee’s date of birth. Since age is displayed as a whole number, the
intAge variable has been assigned the Integer data type. You may also want
your procedure to keep track of the employee’s name, so you declare another
variable to hold the employee’s first and last name:
Dim strFullName As String
Since the word Name is on the VBA list of reserved words, using it in your
VBA procedure would guarantee an error. To hold the employee’s full name,
we used the variable strFullName and declared it as the String data type
because the data it will hold is text. Declaring variables is regarded as good
programming practice because it makes programs easier to read and helps pre-
vent certain types of errors.
Variables, Data Types, and Constants | 43
Introduction to Access 2007 VBA Programming
Informal (Implicit) VariablesVariables that are not explicitly declared with Dim statements are said to beimplicitly declared. These variables are automatically assigned a data typecalled Variant. They can hold numbers, strings, and other types of informa-tion. You can create an informal variable by assigning some value to avariable name anywhere in your VBA procedure. For example, you implic-itly declare a variable in the following way: intDaysLeft = 100.
Now that you know how to declare your variables, let’s write a procedure that
uses them.
�Hands-On 3-1: Using Variables
The procedure code for this chapter’s hands-on exercises is located in the
C:\Acc07_HandsOn folder in a text file named HandsOn_03.txt. Instead of
typing in the programming code as instructed in each hands-on exercise, you
can save time by copying the required procedure from this text file.
1. Start Microsoft Office Access 2007 and create a new Microsoft Office
Access 2007 database named Chap03.accdb in your C:\Acc07_
ByExample folder.
2. Once your new database is opened, press Alt+F11 to switch to the Visual
Basic Editor window.
3. Choose Insert | Module to add a new standard module, and notice
Module1 under the Modules folder in the Project Explorer window.
4. In the Module1 (Code) window, enter the code of the AgeCalc procedure
shown below. (You may copy this procedure from the HandsOn_03.txt file
in the Acc07_HandsOn folder.)
Sub AgeCalc()' variable declarationDim strFullName As StringDim dateOfBirth As DateDim intAge As Integer
' assign values to variablesstrFullName = "John Smith"dateOfBirth = #1/3/1967#
' calculate ageIntAge = Year(Now()) - Year(dateOfBirth)
' print results to the Immediate windowDebug.Print strFullName & " is " & intAge & " years old."
End Sub
Notice that in the AgeCalc procedure the variables are declared on separate
lines at the beginning of the procedure. If you want, you can declare
44 | Chapter 3
Part I
several variables on the same line, separating each variable name with a
comma, as shown in the example below:
Dim strFullName As String, dateOfBirth As Date, intAge As Integer
When you list all your variables on one line, the Dim keyword appears
only once at the beginning of the variable declaration line.
5. If the Immediate window is not open, press Ctrl+G or choose View |
Immediate Window. Since the example procedure writes the results to the
Immediate window, you should ensure that this window is open prior to
executing step 6 below.
6. To run the AgeCalc procedure, click any line between the Sub and End Sub
keywords and press F5.
What Is the Variable Type?You can find out the type of a variable used in your procedure by right-clicking the variable name and selecting Quick Info from the shortcutmenu.
When Visual Basic executes the variable declaration statements, it creates the
variables with the specified names and reserves memory space to store their
values. Then specific values are assigned to these variables. To assign a value
to a variable, you begin with a variable name followed by an equal sign. The
value entered to the right of the equal sign is the data you want to store in the
variable. The data you enter here must be of the type stated in the variable dec-
laration. Text data should be surrounded by quotation marks and the date by #
characters.
Using the data supplied by the dateOfBirth variable, Visual Basic calculates
the age of an employee and stores the result of the calculation in the variable
called intAge. Then, the full name of the employee and the age are printed to
the Immediate window using the instruction Debug.Print.
ConcatenationYou can combine two or more strings to form a new string. The joiningoperation is called concatenation. You saw an example of concatenatedstrings in the AgeCalc procedure above. Concatenation is represented byan ampersand character (&). For instance, "His name is " & strFirstNamewill produce a string like: His name is John or His name is Michael. Thename of the person is determined by the contents of the strFirstName vari-able. Notice that there is an extra space between “is” and the endingquotation mark: "His name is ". Concatenation of strings can also be repre-sented by a plus sign (+); however, many programmers prefer to restrictthe plus sign to numerical operations to eliminate ambiguity.
Variables, Data Types, and Constants | 45
Introduction to Access 2007 VBA Programming
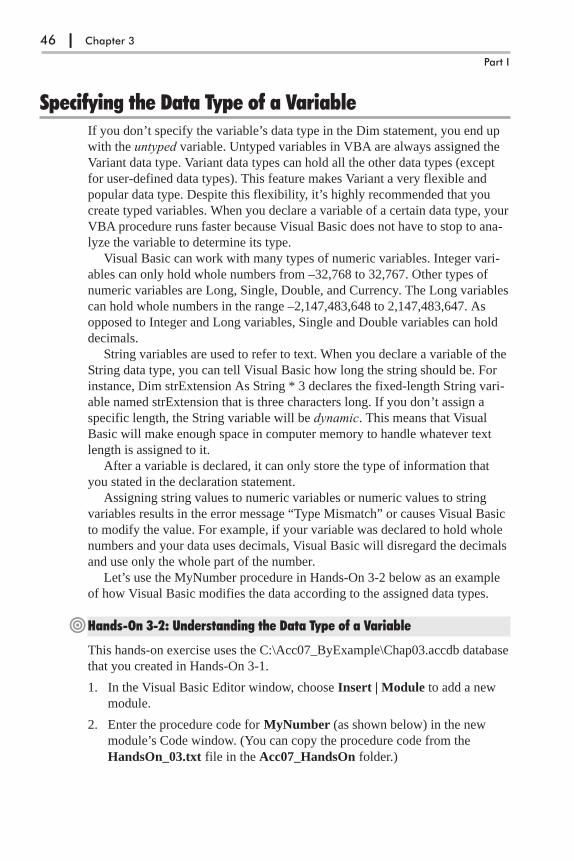
Specifying the Data Type of a VariableIf you don’t specify the variable’s data type in the Dim statement, you end up
with the untyped variable. Untyped variables in VBA are always assigned the
Variant data type. Variant data types can hold all the other data types (except
for user-defined data types). This feature makes Variant a very flexible and
popular data type. Despite this flexibility, it’s highly recommended that you
create typed variables. When you declare a variable of a certain data type, your
VBA procedure runs faster because Visual Basic does not have to stop to ana-
lyze the variable to determine its type.
Visual Basic can work with many types of numeric variables. Integer vari-
ables can only hold whole numbers from –32,768 to 32,767. Other types of
numeric variables are Long, Single, Double, and Currency. The Long variables
can hold whole numbers in the range –2,147,483,648 to 2,147,483,647. As
opposed to Integer and Long variables, Single and Double variables can hold
decimals.
String variables are used to refer to text. When you declare a variable of the
String data type, you can tell Visual Basic how long the string should be. For
instance, Dim strExtension As String * 3 declares the fixed-length String vari-
able named strExtension that is three characters long. If you don’t assign a
specific length, the String variable will be dynamic. This means that Visual
Basic will make enough space in computer memory to handle whatever text
length is assigned to it.
After a variable is declared, it can only store the type of information that
you stated in the declaration statement.
Assigning string values to numeric variables or numeric values to string
variables results in the error message “Type Mismatch” or causes Visual Basic
to modify the value. For example, if your variable was declared to hold whole
numbers and your data uses decimals, Visual Basic will disregard the decimals
and use only the whole part of the number.
Let’s use the MyNumber procedure in Hands-On 3-2 below as an example
of how Visual Basic modifies the data according to the assigned data types.
�Hands-On 3-2: Understanding the Data Type of a Variable
This hands-on exercise uses the C:\Acc07_ByExample\Chap03.accdb database
that you created in Hands-On 3-1.
1. In the Visual Basic Editor window, choose Insert | Module to add a new
module.
2. Enter the procedure code for MyNumber (as shown below) in the new
module’s Code window. (You can copy the procedure code from the
HandsOn_03.txt file in the Acc07_HandsOn folder.)
46 | Chapter 3
Part I
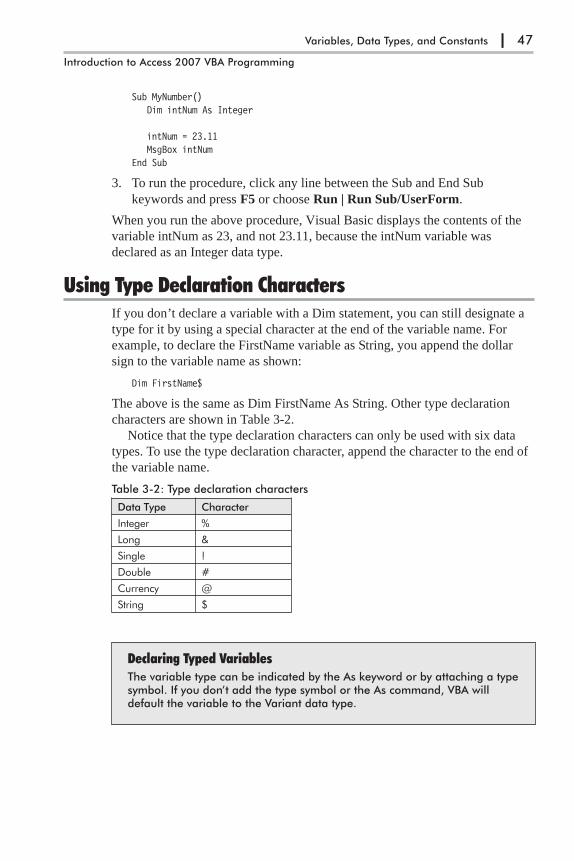
Sub MyNumber()Dim intNum As Integer
intNum = 23.11MsgBox intNum
End Sub
3. To run the procedure, click any line between the Sub and End Sub
keywords and press F5 or choose Run | Run Sub/UserForm.
When you run the above procedure, Visual Basic displays the contents of the
variable intNum as 23, and not 23.11, because the intNum variable was
declared as an Integer data type.
Using Type Declaration CharactersIf you don’t declare a variable with a Dim statement, you can still designate a
type for it by using a special character at the end of the variable name. For
example, to declare the FirstName variable as String, you append the dollar
sign to the variable name as shown:
Dim FirstName$
The above is the same as Dim FirstName As String. Other type declaration
characters are shown in Table 3-2.
Notice that the type declaration characters can only be used with six data
types. To use the type declaration character, append the character to the end of
the variable name.
Table 3-2: Type declaration characters
Data Type Character
Integer %
Long &
Single !
Double #
Currency @
String $
Declaring Typed VariablesThe variable type can be indicated by the As keyword or by attaching a typesymbol. If you don’t add the type symbol or the As command, VBA willdefault the variable to the Variant data type.
Variables, Data Types, and Constants | 47
Introduction to Access 2007 VBA Programming

�Hands-On 3-3: Using Type Declaration Characters in Variable Names
This hands-on exercise uses the Chap03.accdb database that you created in
Hands-On 3-1.
1. In the Visual Basic window, choose Insert | Module to add a new module.
2. Enter the AgeCalc2 procedure code in the new module’s Code window.
(You can copy the procedure code from the HandsOn_03.txt file in the
Acc07_HandsOn folder.)
Sub AgeCalc2()' variable declarationDim FullName$Dim DateOfBirth As DateDim age%
' assign values to variablesFullName$ = "John Smith"DateOfBirth = #1/3/1967#
' calculate ageage% = Year(Now()) - Year(DateOfBirth)
' print results to the Immediate windowDebug.Print FullName$ & " is " & age% & " years old."
End Sub
3. To run the procedure, click any line between the Sub and End Sub
keywords and press F5 or choose Run | Run Sub/UserForm.
Assigning Values to VariablesNow that you know how to correctly name and declare variables, it’s time to
start using them.
�Hands-On 3-4: Assigning Values to Variables
This hands-on exercise uses the C:\Acc07_ByExample\Chap03.accdb database
that you created in Hands-On 3-1.
1. In the Visual Basic window, choose Insert | Module to add a new module.
2. Enter the code of the CalcCost procedure in the new module’s Code win-
dow. (You can copy the procedure code from the HandsOn_03.txt file in
the Acc07_HandsOn folder.)
Sub CalcCost()slsPrice = 35slsTax = 0.085cost = slsPrice + (slsPrice * slsTax)strMsg = "The calculator total is " & "$" & cost & "."MsgBox strMsg
End Sub
48 | Chapter 3
Part I
3. To run the procedure, click any line between the Sub and End Sub
keywords and press F5 or choose Run | Run Sub/UserForm.
The CalcCost procedure uses four variables: slsPrice, slsTax, cost, and strMsg.
Because none of these variables have been explicitly declared, they all have
the same data type — Variant. The variables slsPrice and slsTax were created
by assigning some values to the variable names at the beginning of the proce-
dure. The cost variable was assigned the value resulting from the calculation
slsPrice + (slsPrice * slsTax). The cost calculation uses the values supplied by
the slsPrice and slsTax variables. The strMsg variable puts together a text mes-
sage to the user. This message is then displayed with the MsgBox function.
When you assign values to variables, you follow the name of the variable
with the equal sign. After the equal sign you enter the value of the variable.
This can be text surrounded by quotation marks, a number, or an expression.
While the values assigned to the variables slsPrice, slsTax, and cost are easily
understood, the value stored in the strMsg variable is a little more involved.
Let’s examine the content of the strMsg variable:
strMsg = "The calculator total is " & "$" & cost & "."
� The string "The calculator total is " begins and ends with quotation
marks. Notice the extra space before the ending quotation mark.
� The & symbol allows one string to be appended to another string or to
the contents of a variable and must be used every time you want to
append a new piece of information to the previous string.
� The $ character is used to denote the type of currency. Because it is a
character, it is surrounded by quotation marks.
� The & symbol attaches another string.
� The cost variable is a placeholder. The actual cost of the calculator will
be displayed here when the procedure runs.
� The & symbol attaches yet another string.
� The period (.) is a character and must be surrounded by quotation
marks. When you require a period at the end of the sentence, you must
attach it separately when it follows the name of a variable.
Variable InitializationVisual Basic automatically initializes a new variable to its default valuewhen it is created. Numerical variables are set to zero (0), Boolean vari-ables are initialized to False, string variables are set to the empty string (""),and Date variables are set to December 30, 1899.
Notice that the cost displayed in the message box has three decimal places. To
display the cost of a calculator with two decimal places you need to use a func-
tion. VBA has special functions that allow you to change the format of data. To
Variables, Data Types, and Constants | 49
Introduction to Access 2007 VBA Programming
change the format of the cost variable you should use the Format function.
This function has the following syntax:
Format(expression, format)
where expression is a value or variable you want to format and format is the
type of format you want to apply.
�Hands-On 3-4: (Continued)
4. Change the calculation of the cost variable in the CalcCost procedure, as
shown below:
cost = Format(slsPrice + (slsPrice * slsTax), "0.00")
5. To run the modified procedure, click any line between the Sub and End
Sub keywords and press F5 or choose Run | Run Sub/UserForm.
After having tried the CalcCost procedure, you may wonder why you should
bother declaring variables if Visual Basic can handle undeclared variables so
well. The CalcCost procedure is very short, so you don’t need to worry about
how many bytes of memory will be consumed each time Visual Basic uses the
Variant variable. In short procedures, however, it is not the memory that mat-
ters but the mistakes you are bound to make when typing variable names. What
will happen if the second time you use the cost variable you omit the “o” and
refer to it as cst?
strMsg = "The calculator total is " & "$" & cst & "."
And what will you end up with if, instead of slsTax, you use the word tax in
the formula?
cost = Format(slsPrice + (slsPrice * tax), "0.00")
When you run the procedure with the above errors introduced, Visual Basic
will not show the cost of the calculator because it does not find the assignment
statement for the cst variable. And because Visual Basic does not know the
sales tax, it displays the price of the calculator as the total cost. Visual Basic
does not guess. It simply does what you tell it to do. This brings us to the next
section, which explains how to make sure that errors of this sort don’t occur.
� Note: Before you continue with this chapter, be sure to replace the namesof the variables cst and tax with cost and slsTax.
Forcing Declaration of VariablesVisual Basic has an Option Explicit statement that you can use to automatically
remind you to formally declare all your variables. This statement has to be
entered at the top of each of your modules. The Option Explicit statement will
cause Visual Basic to generate an error message when you try to run a proce-
dure that contains undeclared variables.
50 | Chapter 3
Part I
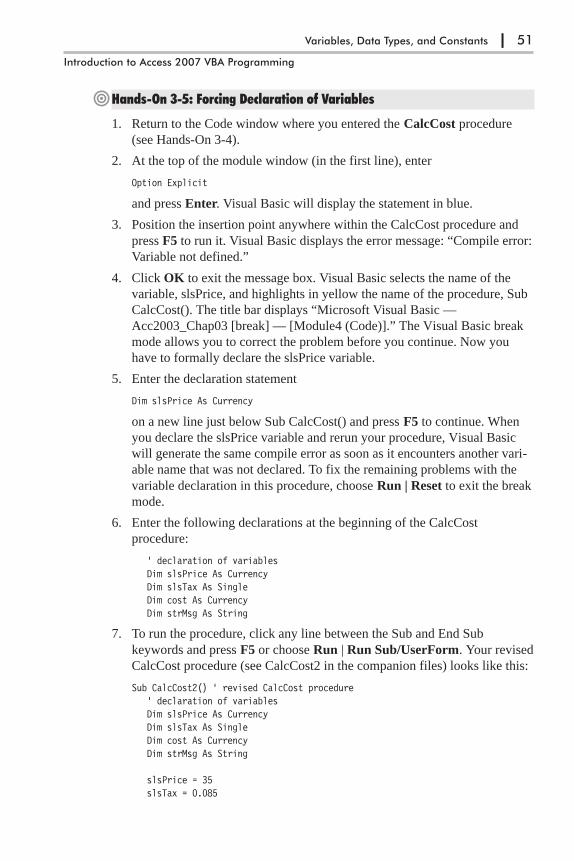
�Hands-On 3-5: Forcing Declaration of Variables
1. Return to the Code window where you entered the CalcCost procedure
(see Hands-On 3-4).
2. At the top of the module window (in the first line), enter
Option Explicit
and press Enter. Visual Basic will display the statement in blue.
3. Position the insertion point anywhere within the CalcCost procedure and
press F5 to run it. Visual Basic displays the error message: “Compile error:
Variable not defined.”
4. Click OK to exit the message box. Visual Basic selects the name of the
variable, slsPrice, and highlights in yellow the name of the procedure, Sub
CalcCost(). The title bar displays “Microsoft Visual Basic —
Acc2003_Chap03 [break] — [Module4 (Code)].” The Visual Basic break
mode allows you to correct the problem before you continue. Now you
have to formally declare the slsPrice variable.
5. Enter the declaration statement
Dim slsPrice As Currency
on a new line just below Sub CalcCost() and press F5 to continue. When
you declare the slsPrice variable and rerun your procedure, Visual Basic
will generate the same compile error as soon as it encounters another vari-
able name that was not declared. To fix the remaining problems with the
variable declaration in this procedure, choose Run | Reset to exit the break
mode.
6. Enter the following declarations at the beginning of the CalcCost
procedure:
' declaration of variablesDim slsPrice As CurrencyDim slsTax As SingleDim cost As CurrencyDim strMsg As String
7. To run the procedure, click any line between the Sub and End Sub
keywords and press F5 or choose Run | Run Sub/UserForm. Your revised
CalcCost procedure (see CalcCost2 in the companion files) looks like this:
Sub CalcCost2() ' revised CalcCost procedure' declaration of variablesDim slsPrice As CurrencyDim slsTax As SingleDim cost As CurrencyDim strMsg As String
slsPrice = 35slsTax = 0.085
Variables, Data Types, and Constants | 51
Introduction to Access 2007 VBA Programming

cost = Format(slsPrice + (slsPrice * slsTax), "0.00")strMsg = "The calculator total is " & "$" & cost & "."
MsgBox strMsgEnd Sub
The Option Explicit statement you entered at the top of the module (see step 2)
forced you to declare variables. Because you must include the Option Explicit
statement in each module where you want to require variable declaration, you
can have Visual Basic enter this statement for you each time you insert a new
module.
To automatically include Option Explicit in every new module you create,
follow these steps:
1. Choose Tools | Options.
2. Make sure the Require Variable Declaration check box is selected in the
Options dialog box (Editor tab).
3. Choose OK to close the Options dialog box.
From now on, every new module will be added with the Option Explicit state-
ment in line 1. If you want to require variables to be explicitly declared in a
module you created prior to enabling Require Variable Declaration in the
Options dialog box, you must enter the Option Explicit statement manually by
editing the module yourself.
More about Option ExplicitOption Explicit forces formal (explicit) declaration of all variables in a par-ticular module. One big advantage of using Option Explicit is thatmisspellings of variable names will be detected at compile time (whenVisual Basic attempts to translate the source code to executable code). TheOption Explicit statement must appear in a module before any procedures.
Understanding the Scope and Lifetime of VariablesVariables can have different ranges of influence in a VBA procedure. Scope
defines the availability of a particular variable to the same procedure or other
procedures. A variable’s scope can be procedure-level or module-level. In
addition to scope, variables have a lifetime. The lifetime of a variable deter-
mines how long a variable retains its value.
Procedure-Level (Local) VariablesFrom this chapter you already know how to declare a variable using the Dim
statement. The position of the Dim statement in the module determines the
scope of a variable. Variables declared with the Dim statement within a VBA
procedure have a procedure-level scope. Procedure-level variables can also be
declared by using the Static statement (see “Understanding and Using Static
Variables” later in this chapter).
52 | Chapter 3
Part I
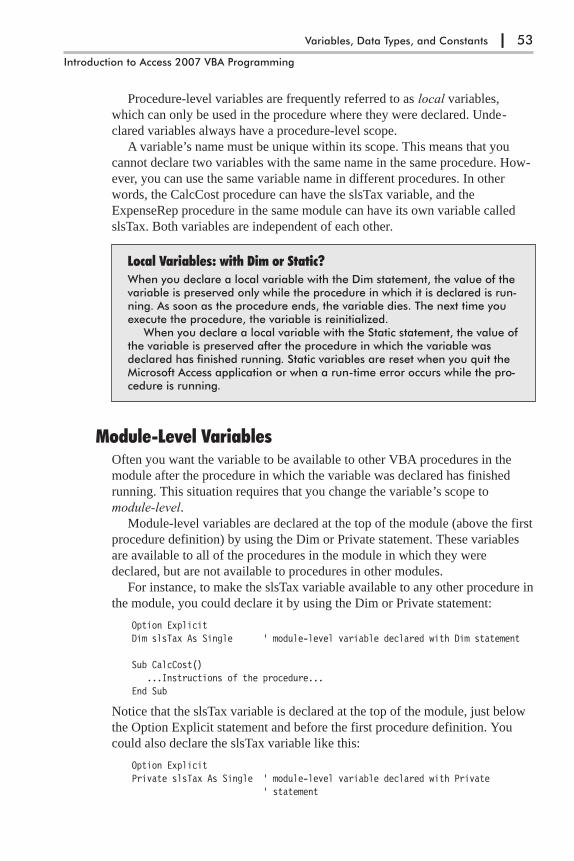
Procedure-level variables are frequently referred to as local variables,
which can only be used in the procedure where they were declared. Unde-
clared variables always have a procedure-level scope.
A variable’s name must be unique within its scope. This means that you
cannot declare two variables with the same name in the same procedure. How-
ever, you can use the same variable name in different procedures. In other
words, the CalcCost procedure can have the slsTax variable, and the
ExpenseRep procedure in the same module can have its own variable called
slsTax. Both variables are independent of each other.
Local Variables: with Dim or Static?When you declare a local variable with the Dim statement, the value of thevariable is preserved only while the procedure in which it is declared is run-ning. As soon as the procedure ends, the variable dies. The next time youexecute the procedure, the variable is reinitialized.
When you declare a local variable with the Static statement, the value ofthe variable is preserved after the procedure in which the variable wasdeclared has finished running. Static variables are reset when you quit theMicrosoft Access application or when a run-time error occurs while the pro-cedure is running.
Module-Level VariablesOften you want the variable to be available to other VBA procedures in the
module after the procedure in which the variable was declared has finished
running. This situation requires that you change the variable’s scope to
module-level.
Module-level variables are declared at the top of the module (above the first
procedure definition) by using the Dim or Private statement. These variables
are available to all of the procedures in the module in which they were
declared, but are not available to procedures in other modules.
For instance, to make the slsTax variable available to any other procedure in
the module, you could declare it by using the Dim or Private statement:
Option ExplicitDim slsTax As Single ' module-level variable declared with Dim statement
Sub CalcCost()...Instructions of the procedure...
End Sub
Notice that the slsTax variable is declared at the top of the module, just below
the Option Explicit statement and before the first procedure definition. You
could also declare the slsTax variable like this:
Option ExplicitPrivate slsTax As Single ' module-level variable declared with Private
' statement
Variables, Data Types, and Constants | 53
Introduction to Access 2007 VBA Programming

Sub CalcCost()...Instructions of the procedure...
End Sub
There is no difference between module-level variables declared with Dim or
Private statements.
Before you can see how module-level variables actually work, you need
another procedure that also uses the slsTax variable.
�Hands-On 3-6: Understanding Module-Level Variables
This hands-on exercise requires the prior completion of Hands-On 3-4 and 3-5.
1. In the Code window, in the same module where you entered the revised
CalcCost procedure (CalcCost2), cut the declaration line Dim slsTax As
Single and paste it at the top of the module sheet, below the Option
Explicit statement.
2. Enter the code of the ExpenseRep procedure shown below in the same
module where the CalcCost2 procedure is located. (You can copy the pro-
cedure code from the HandsOn_03.txt file in the Acc07_HandsOn
folder.)
Sub ExpenseRep()Dim slsPrice As CurrencyDim cost As Currency
slsPrice = 55.99cost = slsPrice + (slsPrice * slsTax)
MsgBox slsTaxMsgBox cost
End Sub
The ExpenseRep procedure declares two Currency type variables: slsPrice
and cost. The slsPrice variable is then assigned a value of 55.99. The
slsPrice variable is independent of the slsPrice variable declared within the
CalcCost2 procedure.
The ExpenseRep procedure calculates the cost of a purchase. The cost
includes the sales tax. Because the sales tax is the same as the one used in
the CalcCost2 procedure, the slsTax variable has been declared at the mod-
ule level. After Visual Basic executes the CalcCost2 procedure, the con-
tents of the slsTax variable equals 0.085. If slsTax were a local variable,
upon the termination of the CalcCost2 procedure, the contents of this vari-
able would be empty. The ExpenseRep procedure ends by displaying the
value of the slsTax and cost variables in two separate message boxes.
After running the CalcCost2 procedure, Visual Basic erases the con-
tents of all the variables except for the slsTax variable, which was declared
at a module level. As soon as you attempt to calculate the cost by running
the ExpenseRep procedure, Visual Basic retrieves the value of the slsTax
variable and uses it in the calculation.
54 | Chapter 3
Part I
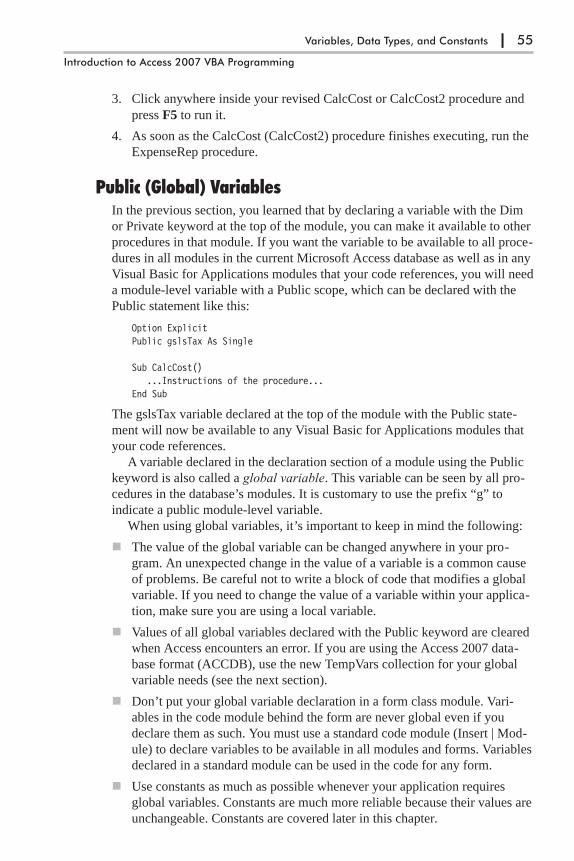
3. Click anywhere inside your revised CalcCost or CalcCost2 procedure and
press F5 to run it.
4. As soon as the CalcCost (CalcCost2) procedure finishes executing, run the
ExpenseRep procedure.
Public (Global) VariablesIn the previous section, you learned that by declaring a variable with the Dim
or Private keyword at the top of the module, you can make it available to other
procedures in that module. If you want the variable to be available to all proce-
dures in all modules in the current Microsoft Access database as well as in any
Visual Basic for Applications modules that your code references, you will need
a module-level variable with a Public scope, which can be declared with the
Public statement like this:
Option ExplicitPublic gslsTax As Single
Sub CalcCost()...Instructions of the procedure...
End Sub
The gslsTax variable declared at the top of the module with the Public state-
ment will now be available to any Visual Basic for Applications modules that
your code references.
A variable declared in the declaration section of a module using the Public
keyword is also called a global variable. This variable can be seen by all pro-
cedures in the database’s modules. It is customary to use the prefix “g” to
indicate a public module-level variable.
When using global variables, it’s important to keep in mind the following:
� The value of the global variable can be changed anywhere in your pro-
gram. An unexpected change in the value of a variable is a common cause
of problems. Be careful not to write a block of code that modifies a global
variable. If you need to change the value of a variable within your applica-
tion, make sure you are using a local variable.
� Values of all global variables declared with the Public keyword are cleared
when Access encounters an error. If you are using the Access 2007 data-
base format (ACCDB), use the new TempVars collection for your global
variable needs (see the next section).
� Don’t put your global variable declaration in a form class module. Vari-
ables in the code module behind the form are never global even if you
declare them as such. You must use a standard code module (Insert | Mod-
ule) to declare variables to be available in all modules and forms. Variables
declared in a standard module can be used in the code for any form.
� Use constants as much as possible whenever your application requires
global variables. Constants are much more reliable because their values are
unchangeable. Constants are covered later in this chapter.
Variables, Data Types, and Constants | 55
Introduction to Access 2007 VBA Programming

Public Variables and the Option Private Module StatementVariables declared using the Public keyword are available to all proceduresin all modules across all applications. To restrict a public module-level vari-able to the current database, include the Option Private Module statementin the declaration section of the standard or a class module in which thevariable is declared.
Understanding and Using Temporary VariablesIn the previous section you learned that you can declare a global variable with
the Public keyword and use it throughout your entire application. You also
learned that these variables can be quite problematic, especially when you or
another programmer accidentally changes the value of the variable or your
application encounters an error and the values of the variables you have ini-
tially set for your application to use are completely wiped out. To avoid such
problems, many programmers resort to using a separate global variables form
to hold their global variables. And if they need certain values to be available
the next time the application starts, they create a separate database table to
store these values. A global variables form is simply a blank Access form
where you can place both bound and unbound controls. Bound controls are
used to pull the data from the table where global variables have been stored.
You can use unbound controls on a form to store values of global variables that
are not stored in a separate table. Simply set the ControlSource property of the
unbound control by typing a value in it or use a VBA procedure to set the
value of the ControlSource. The form set up as a global variables form must be
open while the application is running for the values of the bound and unbound
controls to be available to other forms, reports, and queries in the database. A
global variables form can be hidden if the values of the global variables are
pulled from a database table or set using VBA procedures or macro actions.
In Microsoft Office Access 2007, if your database is in the new ACCDB
format, instead of using a database table or a global variables form, use the
new TempVars collection to store the Variant values you want to reuse.
TempVars stands for temporary variables. Temporary variables are global. You
can refer to them in VBA modules, event procedures, queries, expressions,
add-ins, and in any referenced databases. Access 2007 allows you to define up
to 255 temporary variables at one time. These variables remain in memory
until you close the database (unless you remove them when you are finished
working with them). Unlike the public variables, the temporary variable values
are not cleared when an error occurs.
56 | Chapter 3
Part I
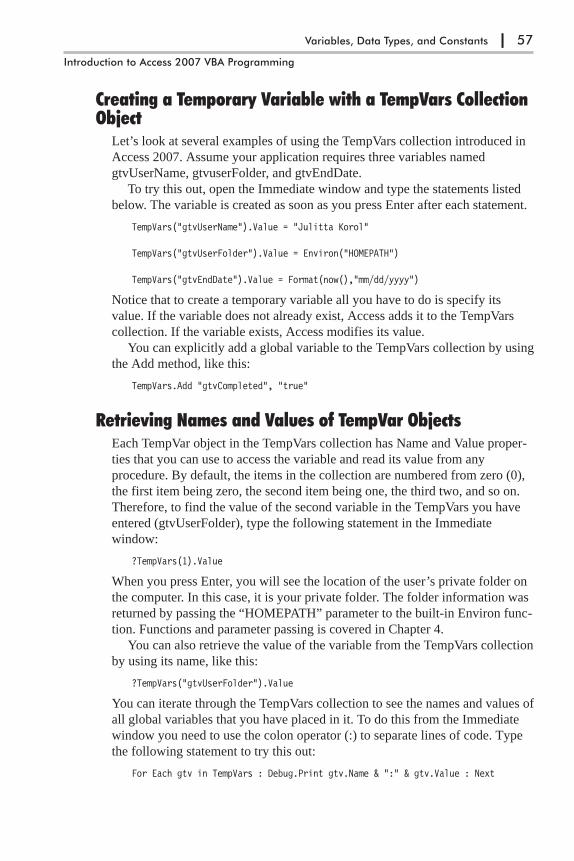
Creating a Temporary Variable with a TempVars CollectionObject
Let’s look at several examples of using the TempVars collection introduced in
Access 2007. Assume your application requires three variables named
gtvUserName, gtvuserFolder, and gtvEndDate.
To try this out, open the Immediate window and type the statements listed
below. The variable is created as soon as you press Enter after each statement.
TempVars("gtvUserName").Value = "Julitta Korol"
TempVars("gtvUserFolder").Value = Environ("HOMEPATH")
TempVars("gtvEndDate").Value = Format(now(),"mm/dd/yyyy")
Notice that to create a temporary variable all you have to do is specify its
value. If the variable does not already exist, Access adds it to the TempVars
collection. If the variable exists, Access modifies its value.
You can explicitly add a global variable to the TempVars collection by using
the Add method, like this:
TempVars.Add "gtvCompleted", "true"
Retrieving Names and Values of TempVar ObjectsEach TempVar object in the TempVars collection has Name and Value proper-
ties that you can use to access the variable and read its value from any
procedure. By default, the items in the collection are numbered from zero (0),
the first item being zero, the second item being one, the third two, and so on.
Therefore, to find the value of the second variable in the TempVars you have
entered (gtvUserFolder), type the following statement in the Immediate
window:
?TempVars(1).Value
When you press Enter, you will see the location of the user’s private folder on
the computer. In this case, it is your private folder. The folder information was
returned by passing the “HOMEPATH” parameter to the built-in Environ func-
tion. Functions and parameter passing is covered in Chapter 4.
You can also retrieve the value of the variable from the TempVars collection
by using its name, like this:
?TempVars("gtvUserFolder").Value
You can iterate through the TempVars collection to see the names and values of
all global variables that you have placed in it. To do this from the Immediate
window you need to use the colon operator (:) to separate lines of code. Type
the following statement to try this out:
For Each gtv in TempVars : Debug.Print gtv.Name & ":" & gtv.Value : Next
Variables, Data Types, and Constants | 57
Introduction to Access 2007 VBA Programming
When you press Enter, the Debug.Print statement will write to the Immediate
window a name and value for each variable that is currently stored in the
TempVars collection:
gtvUserName:Julitta KorolgtvUserFolder:\Documents and Settings\JulittagtvEndDate:03/17/2007gtvCompleted:true
The For Each…Next statement is covered in detail in Chapter 6. The “gtv” is
an object variable used as an iterator. You can use any variable name as an
iterator as long as it is not a VBA keyword. An iterator allows you to traverse
through all the elements of a collection. Object variables are discussed later in
this chapter. For more information on working with collections, see Chapter 8.
Using Temporary Global Variables in ExpressionsYou can use temporary global variables anywhere expressions can be used. For
example, you can set the value of the unbound text box control on a form to
display the value of your global variable by activating the property sheet and
typing the following in the ControlSource property of the text box:
=[TempVars]![gtvCompleted]
You can also use a temporary variable to pass selection criteria to queries:
SELECT * FROM Orders WHERE Order_Date = TempVars!gtvEndDate
Removing a Temporary Variable from a TempVarsCollection Object
When you are done using a variable, you can remove it from the TempVars
collection with the Remove method, like this:
TempVars.Remove "gtvUserFolder"
To check the number of the TempVar objects in the TempVars collection, use
the Count property in the Immediate window:
?TempVars.Count
Finally, to quickly remove all global variables (TempVar objects) from the
TempVars collection, simply use the RemoveAll method, like this:
TempVars.RemoveAll
58 | Chapter 3
Part I
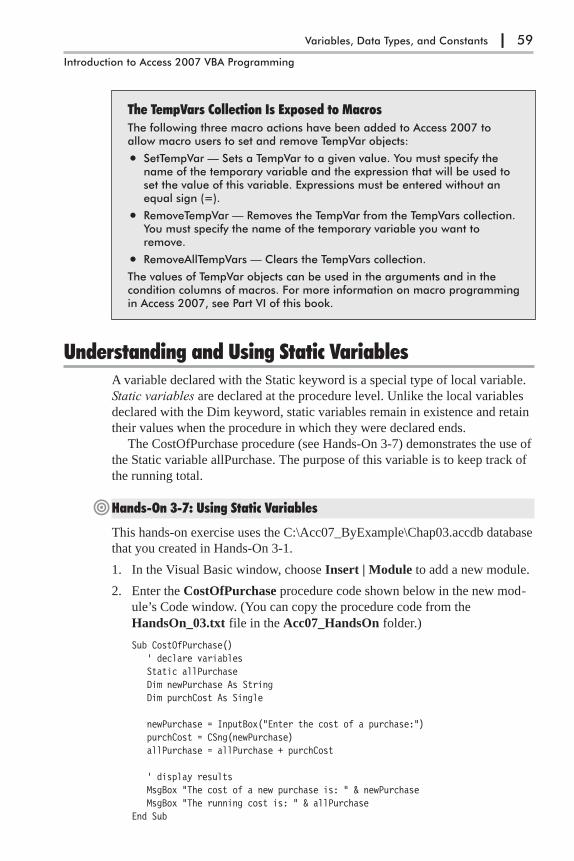
The TempVars Collection Is Exposed to MacrosThe following three macro actions have been added to Access 2007 toallow macro users to set and remove TempVar objects:
• SetTempVar — Sets a TempVar to a given value. You must specify thename of the temporary variable and the expression that will be used toset the value of this variable. Expressions must be entered without anequal sign (=).
• RemoveTempVar — Removes the TempVar from the TempVars collection.You must specify the name of the temporary variable you want toremove.
• RemoveAllTempVars — Clears the TempVars collection.
The values of TempVar objects can be used in the arguments and in thecondition columns of macros. For more information on macro programmingin Access 2007, see Part VI of this book.
Understanding and Using Static VariablesA variable declared with the Static keyword is a special type of local variable.
Static variables are declared at the procedure level. Unlike the local variables
declared with the Dim keyword, static variables remain in existence and retain
their values when the procedure in which they were declared ends.
The CostOfPurchase procedure (see Hands-On 3-7) demonstrates the use of
the Static variable allPurchase. The purpose of this variable is to keep track of
the running total.
�Hands-On 3-7: Using Static Variables
This hands-on exercise uses the C:\Acc07_ByExample\Chap03.accdb database
that you created in Hands-On 3-1.
1. In the Visual Basic window, choose Insert | Module to add a new module.
2. Enter the CostOfPurchase procedure code shown below in the new mod-
ule’s Code window. (You can copy the procedure code from the
HandsOn_03.txt file in the Acc07_HandsOn folder.)
Sub CostOfPurchase()' declare variablesStatic allPurchaseDim newPurchase As StringDim purchCost As Single
newPurchase = InputBox("Enter the cost of a purchase:")purchCost = CSng(newPurchase)allPurchase = allPurchase + purchCost
' display resultsMsgBox "The cost of a new purchase is: " & newPurchaseMsgBox "The running cost is: " & allPurchase
End Sub
Variables, Data Types, and Constants | 59
Introduction to Access 2007 VBA Programming
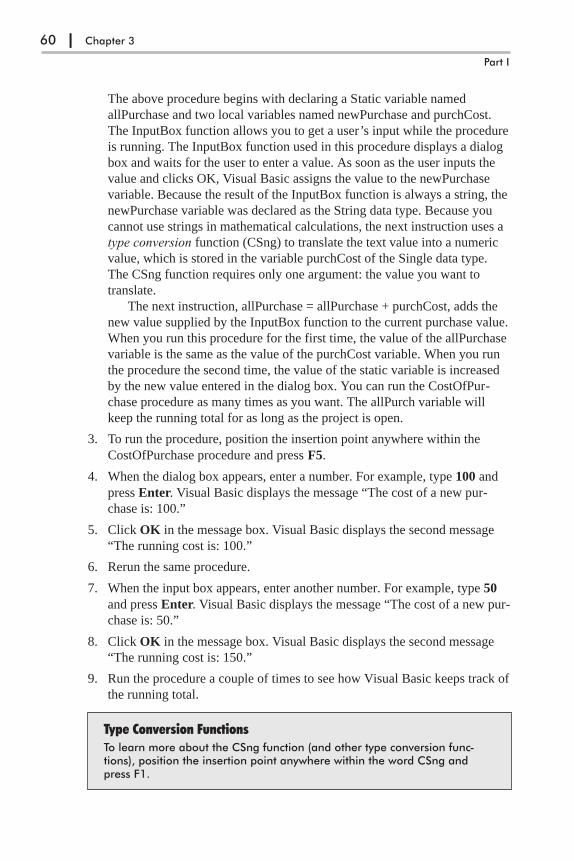
The above procedure begins with declaring a Static variable named
allPurchase and two local variables named newPurchase and purchCost.
The InputBox function allows you to get a user’s input while the procedure
is running. The InputBox function used in this procedure displays a dialog
box and waits for the user to enter a value. As soon as the user inputs the
value and clicks OK, Visual Basic assigns the value to the newPurchase
variable. Because the result of the InputBox function is always a string, the
newPurchase variable was declared as the String data type. Because you
cannot use strings in mathematical calculations, the next instruction uses a
type conversion function (CSng) to translate the text value into a numeric
value, which is stored in the variable purchCost of the Single data type.
The CSng function requires only one argument: the value you want to
translate.
The next instruction, allPurchase = allPurchase + purchCost, adds the
new value supplied by the InputBox function to the current purchase value.
When you run this procedure for the first time, the value of the allPurchase
variable is the same as the value of the purchCost variable. When you run
the procedure the second time, the value of the static variable is increased
by the new value entered in the dialog box. You can run the CostOfPur-
chase procedure as many times as you want. The allPurch variable will
keep the running total for as long as the project is open.
3. To run the procedure, position the insertion point anywhere within the
CostOfPurchase procedure and press F5.
4. When the dialog box appears, enter a number. For example, type 100 and
press Enter. Visual Basic displays the message “The cost of a new pur-
chase is: 100.”
5. Click OK in the message box. Visual Basic displays the second message
“The running cost is: 100.”
6. Rerun the same procedure.
7. When the input box appears, enter another number. For example, type 50
and press Enter. Visual Basic displays the message “The cost of a new pur-
chase is: 50.”
8. Click OK in the message box. Visual Basic displays the second message
“The running cost is: 150.”
9. Run the procedure a couple of times to see how Visual Basic keeps track of
the running total.
Type Conversion FunctionsTo learn more about the CSng function (and other type conversion func-tions), position the insertion point anywhere within the word CSng andpress F1.
60 | Chapter 3
Part I
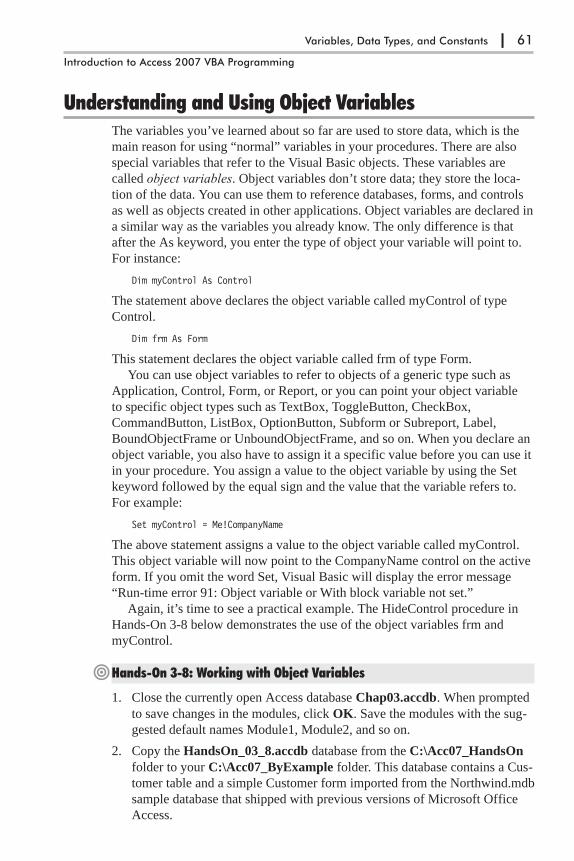
Understanding and Using Object VariablesThe variables you’ve learned about so far are used to store data, which is the
main reason for using “normal” variables in your procedures. There are also
special variables that refer to the Visual Basic objects. These variables are
called object variables. Object variables don’t store data; they store the loca-
tion of the data. You can use them to reference databases, forms, and controls
as well as objects created in other applications. Object variables are declared in
a similar way as the variables you already know. The only difference is that
after the As keyword, you enter the type of object your variable will point to.
For instance:
Dim myControl As Control
The statement above declares the object variable called myControl of type
Control.
Dim frm As Form
This statement declares the object variable called frm of type Form.
You can use object variables to refer to objects of a generic type such as
Application, Control, Form, or Report, or you can point your object variable
to specific object types such as TextBox, ToggleButton, CheckBox,
CommandButton, ListBox, OptionButton, Subform or Subreport, Label,
BoundObjectFrame or UnboundObjectFrame, and so on. When you declare an
object variable, you also have to assign it a specific value before you can use it
in your procedure. You assign a value to the object variable by using the Set
keyword followed by the equal sign and the value that the variable refers to.
For example:
Set myControl = Me!CompanyName
The above statement assigns a value to the object variable called myControl.
This object variable will now point to the CompanyName control on the active
form. If you omit the word Set, Visual Basic will display the error message
“Run-time error 91: Object variable or With block variable not set.”
Again, it’s time to see a practical example. The HideControl procedure in
Hands-On 3-8 below demonstrates the use of the object variables frm and
myControl.
�Hands-On 3-8: Working with Object Variables
1. Close the currently open Access database Chap03.accdb. When prompted
to save changes in the modules, click OK. Save the modules with the sug-
gested default names Module1, Module2, and so on.
2. Copy the HandsOn_03_8.accdb database from the C:\Acc07_HandsOn
folder to your C:\Acc07_ByExample folder. This database contains a Cus-
tomer table and a simple Customer form imported from the Northwind.mdb
sample database that shipped with previous versions of Microsoft Office
Access.
Variables, Data Types, and Constants | 61
Introduction to Access 2007 VBA Programming

3. Open Microsoft Office Access and load the C:\Acc07_ByExample\
HandsOn_03_8.accdb database file.
4. Open the Customers form in Form view.
5. Press Alt+F11 to switch to the Visual Basic Editor window.
6. Choose Insert | Module to add a new module.
7. Enter the HideControl procedure code shown below in the new module’s
Code window. (You can copy the procedure code from the C:\Acc07_
HandsOn\HandsOn_03.txt file.)
Sub HideControl()' this procedure is run against the open Customers formDim frm As FormDim myControl As ControlSet frm = Forms!CustomersSet myControl = frm.CompanyNamemyControl.Visible = False
End Sub
8. To run the procedure, click any line between the Sub and End Sub
keywords and press F5 or choose Run | Run Sub/UserForm.
The procedure begins with the declaration of two object variables called
frm and myControl. The object variable frm is set to reference the Custom-
ers form. For the procedure to work, the referenced form must be open.
Next, the myControl object variable is set to point to the CompanyName
control located on the Customers form.
Instead of using the object’s entire address, you can use the shortcut —
the name of the object variable. For example, the statement
Set myControl = frm.CompanyName
is the same as
Set myControl = Forms!Customers.CompanyName
The purpose of this procedure is to hide the control referenced by the
object variable myControl. After running the HideControl procedure,
switch to the Microsoft Access window containing the open Customers
form. The CompanyName control should not be visible on the form.
� Note: To make the CompanyName text box visible again, modify the lastline of this procedure by setting the Visible property of myControl to True andrerun the procedure.
Advantages of Using Object VariablesThe advantages of object variables are:
• They can be used instead of the actual object.
• They are shorter and easier to remember than the actual values theypoint to.
• You can change their meaning while your procedure is running.
62 | Chapter 3
Part I

When the object variable is no longer needed, you should assign Nothing to it.
This frees up memory and system resources:
Set frm = NothingSet myControl = Nothing
Finding a Variable DefinitionWhen you find an instruction that assigns a value to a variable in a VBA pro-
cedure, you can quickly locate the definition of the variable by selecting the
variable name and pressing Shift+F2. Alternately, you can choose View | Defi-
nition. Visual Basic will jump to the variable declaration line. To return your
mouse pointer to its previous position, press Ctrl+Shift+F2 or choose View |
Last Position. Let’s try it out.
�Hands-On 3-9: Finding a Variable Definition
This hands-on exercise requires prior completion of Hands-On 3-8.
1. Locate the code of the procedure HideControl you created in Hands-On
3-8.
2. Locate the statement myControl.Visible = .
3. Right-click the myControl variable name and choose Definition from the
shortcut menu.
4. Press Ctrl+Shift+F2 to return to the previous location in the procedure
code (myControl.Visible = ).
What Type Is This Variable?Visual Basic has a built-in VarType function that returns an integer indicating
the variable’s type. Let’s see how you can use this function in the Immediate
window.
�Hands-On 3-10: Asking Questions about the Variable Type
1. Open the Immediate window (View | Immediate Window) and type the
following statements that assign values to variables:
age = 28birthdate = #1/1/1981#firstName = "John"
2. Now, ask Visual Basic what type of data each variable holds:
?varType(age)
When you press Enter, Visual Basic returns 2. The number 2 represents the
Integer data type.
?varType(birthdate)
Variables, Data Types, and Constants | 63
Introduction to Access 2007 VBA Programming
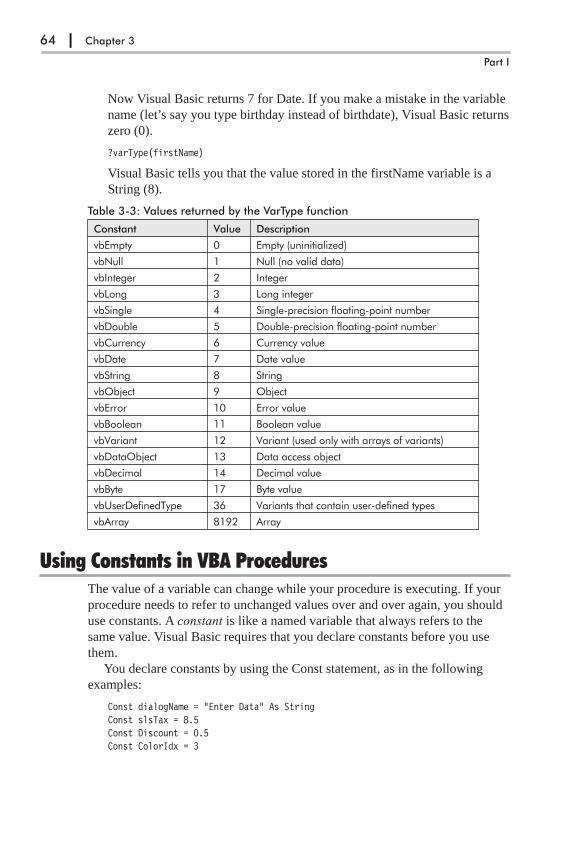
Now Visual Basic returns 7 for Date. If you make a mistake in the variable
name (let’s say you type birthday instead of birthdate), Visual Basic returns
zero (0).
?varType(firstName)
Visual Basic tells you that the value stored in the firstName variable is a
String (8).
Table 3-3: Values returned by the VarType function
Constant Value Description
vbEmpty 0 Empty (uninitialized)
vbNull 1 Null (no valid data)
vbInteger 2 Integer
vbLong 3 Long integer
vbSingle 4 Single-precision floating-point number
vbDouble 5 Double-precision floating-point number
vbCurrency 6 Currency value
vbDate 7 Date value
vbString 8 String
vbObject 9 Object
vbError 10 Error value
vbBoolean 11 Boolean value
vbVariant 12 Variant (used only with arrays of variants)
vbDataObject 13 Data access object
vbDecimal 14 Decimal value
vbByte 17 Byte value
vbUserDefinedType 36 Variants that contain user-defined types
vbArray 8192 Array
Using Constants in VBA ProceduresThe value of a variable can change while your procedure is executing. If your
procedure needs to refer to unchanged values over and over again, you should
use constants. A constant is like a named variable that always refers to the
same value. Visual Basic requires that you declare constants before you use
them.
You declare constants by using the Const statement, as in the following
examples:
Const dialogName = "Enter Data" As StringConst slsTax = 8.5Const Discount = 0.5Const ColorIdx = 3
64 | Chapter 3
Part I

A constant, like a variable, has a scope. To make a constant available within a
single procedure, you declare it at the procedure level, just below the name of
the procedure. For instance:
Sub WedAnniv()Const Age As Integer = 25...instructions...
End Sub
If you want to use a constant in all the procedures of a module, use the Private
keyword in front of the Const statement. For instance:
Private Const dsk = “B:” As String
The Private constant has to be declared at the top of the module, just before the
first Sub statement.
If you want to make a constant available to all modules in your application,
use the Public keyword in front of the Const statement. For instance:
Public Const NumOfChar = 255 As Integer
The Public constant has to be declared at the top of the module, just before the
first Sub statement.
When declaring a constant, you can use any one of the following data types:
Boolean, Byte, Integer, Long, Currency, Single, Double, Date, String, or
Variant.
Like variables, constants can be declared on one line if separated by com-
mas. For instance:
Const Age As Integer = 25, City As String = "Denver", PayCheck As Currency =350
Using constants makes your VBA procedures more readable and easier to
maintain. For example, if you refer to a certain value several times in your pro-
cedure, instead of using a value, use a constant. This way, if the value changes
(for example, the sales tax goes up), you can simply change the value in the
declaration of the Const statement instead of tracking down every occurrence
of the value.
Intrinsic ConstantsBoth Microsoft Access and Visual Basic for Applications have a long list of
predefined (intrinsic) constants that do not need to be declared. These built-in
constants can be looked up using the Object Browser window, which was dis-
cussed in detail in Chapter 2.
Let’s open the Object Browser to take a look at the list of constants in
Access.
Variables, Data Types, and Constants | 65
Introduction to Access 2007 VBA Programming

�Hands-On 3-11: Exploring Access’s Constants
1. In the Visual Basic Editor window, choose View | Object Browser.
2. In the Project/Library list box, click the drop-down arrow and select the
Access library.
3. Enter constants as the search text in the Search Text box and either press
Enter or click the Search button. Visual Basic shows the results of the
search in the Search Results area. The right side of the Object Browser
window displays a list of all built-in constants available in the Microsoft
Access Object Library. Notice that the names of all the constants begin
with the prefix “ac.”
4. To look up VBA constants, choose VBA in the Project/Library list box.
Notice that the names of the VBA built-in constants begin with the prefix
“vb.”
Hands-On 3-12 illustrates how to use the intrinsic constants acFilterByForm
and acFilterAdvanced to disable execution of filtering on a form.
�Hands-On 3-12: Using Intrinsic Constants in a VBA Procedure
This hands-on exercise uses the HandsOn_03_8.accdb database file used in
Hands-On 3-8.
1. Open the Customers form in Design view.
2. In the property sheet, click the Event tab. Make sure that Form is selected
in the drop-down box on the top of the property sheet.
3. Click to the right of the On Filter property and select the Build button
(…).
4. In the Choose Builder dialog box, select Code Builder and click OK.
66 | Chapter 3
Part I
Figure 3-1: Use the ObjectBrowser to look up any intrinsicconstant.

5. In the Code window, enter the Form_Filter event procedure code as
shown below. (You can copy the procedure code from the HandsOn_
03.txt file in the Acc07_HandsOn folder.)
Private Sub Form_Filter(Cancel As Integer, FilterType As Integer)If FilterType = acFilterByForm Or _
FilterType = acFilterAdvanced ThenMsgBox "You need authorization to filter records."Cancel = True
End IfEnd Sub
6. Press Alt+F11 to switch back to Design view in the Customers form.
7. Right-click the Customers form tab and choose Form View. You can also
use the Views section of the Design tab to activate the Form view.
8. Choose Home | Sort & Filter | Advanced Filter Options | Filter By
Form.
Access displays the message “You need authorization to filter records.”
The same message appears when you choose Advanced Filter/Sort from
the Advanced Filter Options.
Grouping Constants with the Enum TypeIf your application needs to use a set of related constants, consider declaring
them with an enumerated data type. VBA has an enumerated data type (Enum)
that you can use to define your constant values. The following code entered in
a standard module creates an Enum that defines various status types:
Public Enum StatusTypeRejected = 0MoreInfo = 1Approved = 2Completed = 3
End Enum
Notice that the Enum statement is always followed by the name of the enumer-
ation. Within the Enum statement you simply list the names of constants you
need to use. You can assign values to the constants using the equal sign (=). If
you don’t assign values, the first constant in the enumeration will be given the
value zero (0), the second constant the value 1, and so on. The values assigned
within the Enum statement are constant and can’t be changed at run time.
To end the enumeration, use the End Enum statement.
The StatusType enumeration will be visible throughout the entire VBA pro-
ject. Enum types are Public by default. To limit the visibility of the Enum type
to the module in which it was declared, use the Private keyword.
Once you have defined your custom Enum object, you can refer to the spe-
cific constant by typing the name of the enumeration followed by a dot
operator and the name of the constant. As soon as you enter the Enum name
followed by a period, Visual Basic will display a list of available constants, as
shown in Figure 3-2.
Variables, Data Types, and Constants | 67
Introduction to Access 2007 VBA Programming

The following VBA procedure shows how to use the constants listed in the
StatusType enumeration. You can enter this procedure in the same standard
module where you have defined the Enum StatusType.
Sub GetStatusType()Dim result As Integerresult = InputBox("Please enter a number from 0 to 3", "Status Type", 0)
If result = StatusType.MoreInfo ThenMsgBox ("Please provide more details on a separate form.")
ElseIf result = StatusType.Rejected ThenMsgBox ("Please apply again next year.")
ElseIf result >= StatusType.Approved ThenMsgBox ("Thank you for applying.")
End IfEnd Sub
The above VBA procedure uses two popular built-in functions (InputBox and
MsgBox) that allow interaction with the procedure’s end users. These func-
tions are covered in detail in the next chapter. The InputBox function prompts
the user to type a number for the status type. Zero (0) is specified as the default
value. When the user enters the value and clicks OK in the input box, the sup-
plied value will be stored in a local variable named result. The remaining code
of the GetStatusType procedure uses the If…Then…ElseIf conditional state-
ment (see Chapter 5) to determine which message text should be displayed to
the user. The MsgBox function used in this example specifies just a simple text
message. Before a specific message is displayed, the value in the result vari-
able is compared to the value of the enumerated constant.
By using enumerated data types instead of hard-coding values, you make
your programming code easier to understand and reduce the chance of acciden-
tal errors.
68 | Chapter 3
Part I
Figure 3-2: VBA providesa list of constants tochoose from after youtype your custom Enumname followed by a dotoperator.

Chapter SummaryThis chapter introduced several new VBA concepts. You found in it informa-
tion about data types, variables, and constants. You learned how to declare
various types of variables and constants. You also saw the difference between a
variable and a constant.
In the next chapter, you will expand your knowledge of Visual Basic for
Applications by using procedures and functions with arguments. In addition,
you will learn about functions that allow your VBA procedures to interact with
the user.
Variables, Data Types, and Constants | 69
Introduction to Access 2007 VBA Programming
Chapter 4
Passing Arguments toProcedures and Functions
As you already know from Chapter 1, VBA procedures (both subroutines and
functions) often require arguments to perform certain tasks. In this chapter, you
learn various methods of passing arguments to procedures and functions.
Writing a Function ProcedureFunction procedures can perform calculations based on data received through
arguments. When you declare a function procedure, you list the names of argu-
ments inside a set of parentheses, as shown in Hands-On 4-1.
�Hands-On 4-1: Writing a Function Procedure with Arguments
1. Start Microsoft Office Access 2007 and create a new database named
Chap04.accdb in your C:\Acc07_ByExample folder.
2. Once your new database is opened, press Alt+F11 to switch to the Visual
Basic Editor window.
3. Choose Insert | Module to add a new standard module and notice that
Module1 appears under the Modules folder in the Project Explorer
window.
4. In the Module1 (Code) window, enter the code of the JoinText function
procedure as shown below. (You may copy this procedure from the
C:\Acc07_HandsOn\HandsOn_04.txt file.)
Function JoinText(k, o)JoinText = k + “ “ + o
End Function
Note that there is a space character in quotation marks concatenated
between the two arguments of the JoinText function’s result: JoinText = k +
" " + o.
A better way of adding a space is by using one of the built-in functions
as shown below:
JoinText = k + Space(1) + o
or:
70

JoinText = k + Chr(32) + o
The Space function returns a string of spaces as indicated by the number in
the parentheses. The Chr function returns a string containing the character
associated with the specified character code.
Other control characters you may need to use when writing your VBA
procedures are listed below:
Tab Chr(9)
Line Feed Chr(10)
Carriage Return Chr(13)
You can execute a function procedure from the Immediate window, or you can
write a subroutine to call the function. See Hands-On 4-2 and 4-3 for instruc-
tions on how to run the JoinText function procedure using these two methods.
�Hands-On 4-2: Executing a Function Procedure from the Immediate Window
This hands-on exercise requires prior completion of Hands-On 4-1.
1. Choose View | Immediate Window or press Ctrl+G, and enter the follow-
ing statement:
?JoinText("function", " procedure")
Notice that as soon as you type the opening parenthesis, Visual Basic dis-
plays the arguments that the function expects. Type the value of the first
argument, enter the comma, and supply the value of the second argument.
Finish off by entering the closing parenthesis.
2. Press Enter to execute the above statement from the Immediate window.
When you press Enter, the string “function procedure” appears in the
Immediate window.
You can also execute a function procedure programmatically, as demonstrated
in Hands-On 4-3.
�Hands-On 4-3: Executing a Function Procedure from a Subroutine
This hands-on exercise requires prior completion of Hands-On 4-1.
1. In the same module where you entered the JoinText function procedure,
enter the following EnterText subroutine:
Sub EnterText()Dim strFirst As String, strLast As String, strFull As String
strFirst = InputBox("Enter your first name:")strLast = InputBox("Enter your last name:")strFull = JoinText(strFirst, strLast)
MsgBox strFullEnd Sub
Passing Arguments to Procedures and Functions | 71
Introduction to Access 2007 VBA Programming
2. Place the cursor anywhere inside the code of the EnterText procedure and
press F5 to run it.
As Visual Basic executes the statements of the EnterText procedure, it uses the
InputBox function to collect the data from the user, then stores the data (the
values of the first and last names) in the variables strFirst and strLast. Then
these values are passed to the JoinText function. Visual Basic substitutes the
variables’ contents for the arguments of the JoinText function and assigns the
result to the name of the function (JoinText). When Visual Basic returns to the
EnterText procedure it stores the function’s value in the strFull variable. The
MsgBox function then displays the contents of the strFull variable in a mes-
sage box. The result is the full name of the user (first and last name separated
by a space).
More about ArgumentsArgument names are like variables. Each argument name refers to what-ever value you provide at the time the function is called. You write asubroutine to call a function procedure. When a subroutine calls a functionprocedure, it passes it the required arguments as variables. Once the func-tion does something, the result is assigned to the function name. Noticethat the function procedure’s name is used as if it were a variable.
Specifying the Data Type for a Function’s ResultLike variables, functions can have types. The data type of your function’s
result can be a String, Integer, Long, etc. To specify the data type for your
function’s result, add the As keyword and the name of the desired data type to
the end of the function declaration line. For example:
Function MultiplyIt(num1, num2) As Integer
If you don’t specify the data type, Visual Basic assigns the default type (Vari-
ant) to your function’s result. When you specify the data type for your
function’s result, you get the same advantages as when you specify the data
type for your variables — your procedure uses memory more efficiently, and
therefore runs faster.
Let’s take a look at an example of a function that returns an integer,
although the arguments passed to it are declared as Single in a calling
subroutine.
�Hands-On 4-4: Calling a Function from a Procedure
1. In the Visual Basic Editor window, choose Insert | Module to add a new
module.
2. Enter the following HowMuch subroutine in the Code window:
72 | Chapter 4
Part I
Sub HowMuch()Dim num1 As SingleDim num2 As SingleDim result As Single
num1 = 45.33num2 = 19.24result = MultiplyIt(num1, num2)
MsgBox resultEnd Sub
3. Enter the following MultiplyIt function procedure in the Code window
below the HowMuch subroutine:
Function MultiplyIt(num1, num2) As Integer
MultiplyIt = num1 * num2
End Function
4. Click anywhere within the HowMuch procedure and press F5 to run it.
Because the values stored in the variables num1 and num2 are not whole
numbers, to ensure that the result of the multiplication is a whole number,
you may want to assign the Integer type to the result of the function. If you
don’t assign the data type to the MultiplyIt function’s result, the HowMuch
procedure will display the result in the data type specified in the declara-
tion line of the result variable. Instead of 872, the result of the multiplica-
tion will be 872.1492.
To make the MultiplyIt function more useful, instead of hard-coding
the values to be used in the multiplication, you can pass different values
each time you run the procedure by using the InputBox function.
5. Take a few minutes to modify the HowMuch procedure on your own, fol-
lowing the example of the EnterText subroutine that was created in
Hands-On 4-3.
6. To pass a specific value from a function to a subroutine, assign the value to
the function name. For example, the NumOfDays function shown below
passes the value of 7 to the subroutine DaysInAWeek.
Function NumOfDays()NumOfDays = 7
End Function
Sub DaysInAWeek()MsgBox "There are " & NumOfDays & " days in a week."
End Sub
Passing Arguments to Procedures and Functions | 73
Introduction to Access 2007 VBA Programming
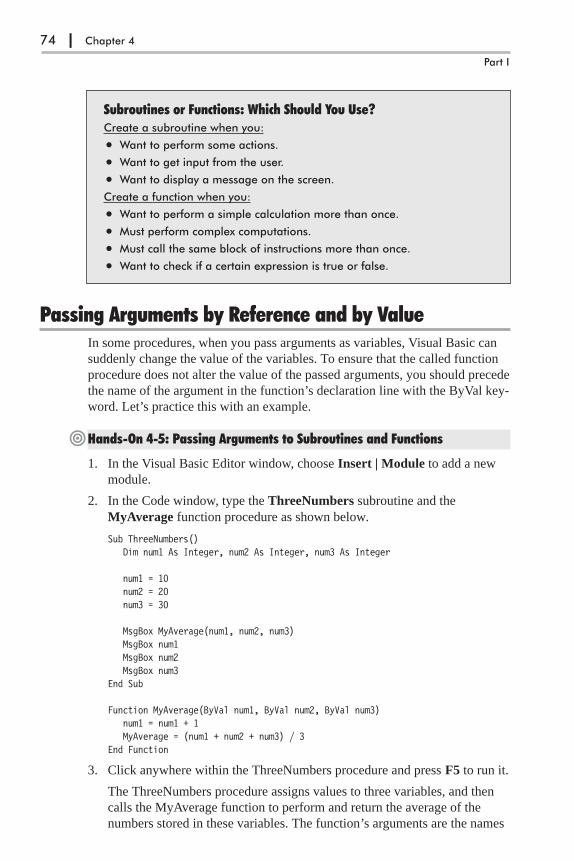
Subroutines or Functions: Which Should You Use?Create a subroutine when you:
• Want to perform some actions.
• Want to get input from the user.
• Want to display a message on the screen.
Create a function when you:
• Want to perform a simple calculation more than once.
• Must perform complex computations.
• Must call the same block of instructions more than once.
• Want to check if a certain expression is true or false.
Passing Arguments by Reference and by ValueIn some procedures, when you pass arguments as variables, Visual Basic can
suddenly change the value of the variables. To ensure that the called function
procedure does not alter the value of the passed arguments, you should precede
the name of the argument in the function’s declaration line with the ByVal key-
word. Let’s practice this with an example.
�Hands-On 4-5: Passing Arguments to Subroutines and Functions
1. In the Visual Basic Editor window, choose Insert | Module to add a new
module.
2. In the Code window, type the ThreeNumbers subroutine and the
MyAverage function procedure as shown below.
Sub ThreeNumbers()Dim num1 As Integer, num2 As Integer, num3 As Integer
num1 = 10num2 = 20num3 = 30
MsgBox MyAverage(num1, num2, num3)MsgBox num1MsgBox num2MsgBox num3
End Sub
Function MyAverage(ByVal num1, ByVal num2, ByVal num3)num1 = num1 + 1MyAverage = (num1 + num2 + num3) / 3
End Function
3. Click anywhere within the ThreeNumbers procedure and press F5 to run it.
The ThreeNumbers procedure assigns values to three variables, and then
calls the MyAverage function to perform and return the average of the
numbers stored in these variables. The function’s arguments are the names
74 | Chapter 4
Part I

of the variables: num1, num2, and num3. Notice that all variable names are
preceded with the ByVal keyword. Also, notice that prior to the calculation
of the average, the MyAverage function changes the value of the num1
variable. Inside the function procedure, the num1 variable equals 11 (10 +
1). Therefore, when the function passes the calculated average to the
ThreeNumbers procedure, the MsgBox function displays the result as
20.3333333333333 and not 20, as expected. The next three functions show
the contents of each of the variables. The values stored in these variables
are the same as the original values assigned to them: 10, 20, and 30.
What will happen if you omit the ByVal keyword in front of the num1
argument in the MyAverage function’s declaration line? The function’s
result will still be the same, but the content of the num1 variable displayed
by the MsgBox num1 is now 11. The MyAverage function has not only
returned an unexpected result (20.3333333333333 instead of 20), but also
has modified the original data stored in the num1 variable. To prevent
Visual Basic from permanently changing the values supplied to the
function, use the ByVal keyword.
Know Your Keywords: ByRef and ByValBecause any of the variables passed to a function procedure (or a subrou-tine) can be changed by the receiving procedure, it is important to knowhow to protect the original value of a variable. Visual Basic has twokeywords that give or deny the permission to change the contents of a vari-able: ByRef and ByVal.
By default, Visual Basic passes information to a function procedure (or asubroutine) by reference (ByRef keyword), referring to the original dataspecified in the function’s argument at the time the function is called. So, ifthe function alters the value of the argument, the original value is changed.You will get this result if you omit the ByVal keyword in front of the num1argument in the MyAverage function’s declaration line. If you want thefunction procedure to change the original value, you don’t need to explicitlyinsert the ByRef keyword, because passed variables default to ByRef.
When you use the ByVal keyword in front of an argument name, VisualBasic passes the argument by value, which means that Visual Basic makesa copy of the original data. This copy is then passed to a function. If thefunction changes the value of an argument passed by value, the originaldata does not change — only the copy changes. That’s why when theMyAverage function changed the value of the num1 argument, the originalvalue of the num1 variable remained the same.
Using Optional ArgumentsAt times, you may want to supply an additional value to a function. Let’s say
you have a function that calculates the price of a meal per person. Sometimes,
however, you’d like the function to perform the same calculation for a group of
two or more people. To indicate that a procedure argument isn’t always
required, you precede the name of the argument with the Optional keyword.
Arguments that are optional come at the end of the argument list, following the
Passing Arguments to Procedures and Functions | 75
Introduction to Access 2007 VBA Programming
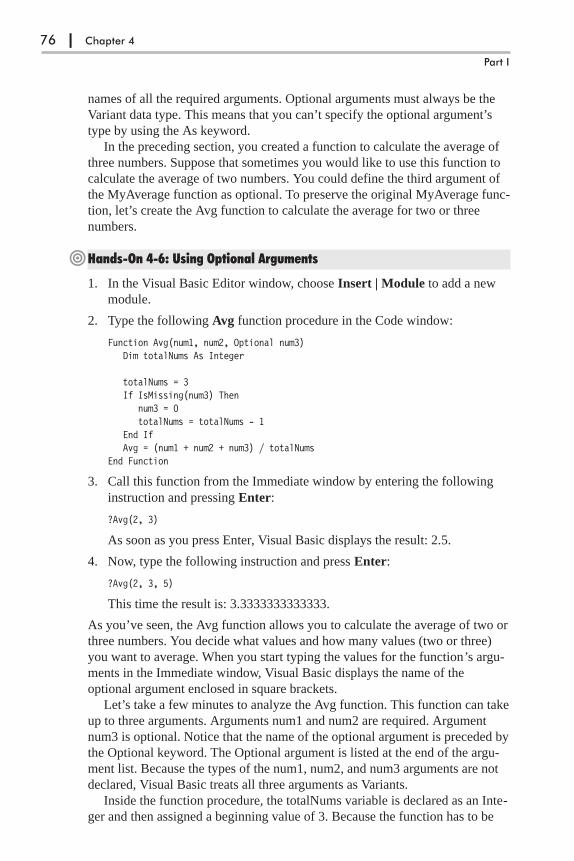
names of all the required arguments. Optional arguments must always be the
Variant data type. This means that you can’t specify the optional argument’s
type by using the As keyword.
In the preceding section, you created a function to calculate the average of
three numbers. Suppose that sometimes you would like to use this function to
calculate the average of two numbers. You could define the third argument of
the MyAverage function as optional. To preserve the original MyAverage func-
tion, let’s create the Avg function to calculate the average for two or three
numbers.
�Hands-On 4-6: Using Optional Arguments
1. In the Visual Basic Editor window, choose Insert | Module to add a new
module.
2. Type the following Avg function procedure in the Code window:
Function Avg(num1, num2, Optional num3)Dim totalNums As Integer
totalNums = 3If IsMissing(num3) Then
num3 = 0totalNums = totalNums - 1
End IfAvg = (num1 + num2 + num3) / totalNums
End Function
3. Call this function from the Immediate window by entering the following
instruction and pressing Enter:
?Avg(2, 3)
As soon as you press Enter, Visual Basic displays the result: 2.5.
4. Now, type the following instruction and press Enter:
?Avg(2, 3, 5)
This time the result is: 3.3333333333333.
As you’ve seen, the Avg function allows you to calculate the average of two or
three numbers. You decide what values and how many values (two or three)
you want to average. When you start typing the values for the function’s argu-
ments in the Immediate window, Visual Basic displays the name of the
optional argument enclosed in square brackets.
Let’s take a few minutes to analyze the Avg function. This function can take
up to three arguments. Arguments num1 and num2 are required. Argument
num3 is optional. Notice that the name of the optional argument is preceded by
the Optional keyword. The Optional argument is listed at the end of the argu-
ment list. Because the types of the num1, num2, and num3 arguments are not
declared, Visual Basic treats all three arguments as Variants.
Inside the function procedure, the totalNums variable is declared as an Inte-
ger and then assigned a beginning value of 3. Because the function has to be
76 | Chapter 4
Part I
capable of calculating an average of two or three numbers, the handy built-in
function IsMissing checks for the number of supplied arguments. If the third
(optional) argument is not supplied, the IsMissing function puts the value of
zero (0) in its place, and deducts the value of 1 from the value stored in the
totalNums variable. Hence, if the optional argument is missing, totalNums is 2.
The next statement calculates the average based on the supplied data, and the
result is assigned to the name of the function.
Using the IsMissing FunctionThe IsMissing function called from within Hands-On 4-6 allows you to deter-
mine whether or not the optional argument was supplied. This function returns
the logical value of True if the third argument is not supplied, and returns False
when the third argument is given. The IsMissing function is used here with the
decision-making statement If…Then (discussed in Chapter 5). If the num3
argument is missing (IsMissing), then Visual Basic supplies a zero (0) for the
value of the third argument (num3 = 0), and reduces the value stored in the
argument totalNums by 1 (totalNums = totalNums – 1).
Testing a Function ProcedureTo test whether a custom function does what it was designed to do, write asimple subroutine that will call the function and display its result. In addi-tion, the subroutine should show the original values of arguments. Thisway, you’ll be able to quickly determine when the argument value wasaltered. If the function procedure uses optional arguments, you’ll also needto check those situations in which the optional arguments may be missing.
Built-in FunctionsVBA comes with many built-in functions that can be looked up in the Visual
Basic online help. To access an alphabetical listing of all VBA functions,
choose Help | Microsoft Visual Basic Help in the Visual Basic Editor window.
In the Table of Contents, choose Visual Basic for Applications Language Ref-
erence | Visual Basic Language Reference | Functions.
One of the features of a good program is its interaction with the user. When
you work with Microsoft Access, you interact with the application by using
various dialog boxes such as message boxes and input boxes. When you write
your own procedures, you can use the MsgBox function to inform the users
about an unexpected error or the result of a specific calculation. So far you
have seen a simple implementation of this function. In the next section, you
will find out how to control the appearance of your message. Then you will
learn how to get information from the user with the InputBox function.
Passing Arguments to Procedures and Functions | 77
Introduction to Access 2007 VBA Programming

Using the MsgBox FunctionThe MsgBox function you have used thus far was limited to displaying a mes-
sage to the user in a simple, one-button dialog box. You closed the message
box by clicking the OK button or pressing the Enter key. You can create a sim-
ple message box by following the MsgBox function name with the text
enclosed in quotation marks. In other words, to display the message “The pro-
cedure is complete.” you use the following statement:
MsgBox "The procedure is complete."
You can try the above instruction by entering it in the Immediate window.
When you type this instruction and press Enter, Visual Basic displays the mes-
sage box shown in Figure 4-1.
The MsgBox function allows you to use other arguments that make it possible
to determine the number of buttons that should be available in the message box
or to change the title of the message box from the default. You can also assign
your own help topic. The syntax of the MsgBox function is shown below.
MsgBox (prompt [, buttons] [, title], [, helpfile, context])
Notice that while the MsgBox function has five arguments, only the first one,
prompt, is required. The arguments listed in square brackets are optional.
When you enter a long text string for the prompt argument, Visual Basic
decides how to break the text so it fits the message box. Let’s do some exer-
cises in the Immediate window to learn various text formatting techniques.
�Hands-On 4-7: Formatting the Message Box
1. In the Visual Basic Editor window, activate the Immediate window and
enter the following instruction. Be sure to enter the entire text string on one
line, and then press Enter.
MsgBox "All done. Now open ""Test.doc"" and place an empty CD in the CD-ROMdrive. The following procedure will copy this file to the CD."
As soon as you press Enter, Visual Basic shows the resulting dialog box. If
you get a compile error, click OK. Then, make sure that the name of the
file is surrounded by double quotation marks (""Test.doc"").
78 | Chapter 4
Part I
Figure 4-1: To display a messageto the user, place the text as theargument of the MsgBox function.
Figure 4-2: This long message will look more appealing to the user when you takethe text formatting into your own hands.

When the text of your message is particularly long, you can break it into
several lines using the VBA Chr function. The Chr function’s argument is a
number from 0 to 255, which returns a character represented by this num-
ber. For example, Chr(13) returns a carriage return character (this is the
same as pressing the Enter key), and Chr(10) returns a linefeed character
(this is useful for adding spacing between the text lines).
2. Modify the instruction entered in the previous step in the following way:
MsgBox "All done." & Chr(13) & "Now open ""Test.doc"" and place" & Chr(13) &"an empty CD in the CD-ROM drive." & Chr(13) & "The following procedure willcopy this file to the CD."
You must surround each text fragment by quotation marks. Quoted text
embedded in a text string requires an additional set of quotation marks, as
in ""Test.doc"". The Chr(13) function indicates a place where you’d like to
start a new line. The concatenate character (&) is used to combine the
strings. When you enter exceptionally long text messages on one line, it’s
easy to make a mistake. An underscore (_) is a special line continuation
character in VBA that allows you to break a long VBA statement into sev-
eral lines. Unfortunately, the line continuation character cannot be used in
the Immediate window.
3. Add a new module by choosing Insert | Module.
4. In the Code window, enter the MyMessage subroutine as shown below. Be
sure to precede each line continuation character with a space.
Sub MyMessage()MsgBox "All done." & Chr(13) _& "Now open ""Test.doc"" and place" & Chr(13) _& "an empty CD in the CD-ROM drive." & Chr(13) _& "The following procedure will copy this file to the CD."
End Sub
5. Position the insertion point within the code of the MyMessage procedure
and press F5 to run it.
When you run the MyMessage procedure, Visual Basic displays the same
message as the one illustrated in Figure 4-3.
As you can see, the text entered on several lines is more readable, and
the code is easier to maintain. To improve the readability of your message,
you may want to add more spacing between the text lines by including
blank lines. To do this, use two Chr(13) or two Chr(10) functions, as
shown in the following step.
Passing Arguments to Procedures and Functions | 79
Introduction to Access 2007 VBA Programming
Figure 4-3: You can break a longtext string into several lines by usingthe Chr(13) function.

6. Enter the following MyMessage2 procedure:
Sub MyMessage2()MsgBox "All done." & Chr(10) & Chr(10) _& "Now open ""Test.doc"" and place" & Chr(13) _& "an empty CD in the CD-ROM drive." & Chr(13) & Chr(13) _& "The following procedure will copy this file to the CD."
End Sub
7. Position the insertion point within the code of the MyMessage2 procedure
and press F5 to run it.
Now that you have mastered the text formatting techniques, let’s take a closer
look at the next argument of the MsgBox function. Although the buttons argu-
ment is optional, it’s frequently used. The buttons argument specifies how
many and what types of buttons you want to appear in the message box. This
argument can be a constant or a number (see Table 4-1). If you omit this argu-
ment, the resulting message box includes only the OK button, as you’ve seen
in the preceding examples.
Table 4-1: The MsgBox buttons argument settings
Constant Value Description
Button settings
vbOKOnly 0 Displays only an OK button. This is the default.
vbOKCancel 1 OK and Cancel buttons
vbAbortRetryIgnore 2 Abort, Retry, and Ignore buttons
vbYesNoCancel 3 Yes, No, and Cancel buttons
vbYesNo 4 Yes and No buttons
vbRetryCancel 5 Retry and Cancel buttons
Icon settings
vbCritical 16 Displays the Critical Message icon
vbQuestion 32 Displays the Question Message icon
vbExclamation 48 Displays the Warning Message icon
vbInformation 64 Displays the Information Message icon
Default button settings
vbDefaultButton1 0 The first button is default
vbDefaultButton2 256 The second button is default
vbDefaultButton3 512 The third button is default
vbDefaultButton4 768 The fourth button is default
80 | Chapter 4
Part I
Figure 4-4: You can increase thereadability of your message byincreasing spacing between selectedtext lines.

Constant Value Description
Message box modality
vbApplicationModal 0 The user must respond to the message before continuingto work in the current application.
vbSystemModal 4096 On Win16 systems, this constant is used to prevent theuser from interacting with any other window until he orshe dismisses the message box. On Win32 systems, thisconstant works like the vbApplicationModal constant (seeabove) with the following exception: The message boxalways remains on top of any other programs you mayhave running.
Other MsgBox display settings
vbMsgBoxHelpButton 16384 Adds the Help button to the message box
vbMsgBoxSetForeground 65536 Specifies the message box window as the foregroundwindow
vbMsgBoxRight 524288 Text is right aligned
vbMsgBoxRtlReading 1048576 Text appears as right-to-left reading on Hebrew andArabic systems
When should you use the buttons argument? Suppose you want the user of
your procedure to respond to a question with Yes or No. Your message box
may then require two buttons. If a message box includes more than one button,
one of them is considered a default button. When the user presses Enter, the
default button is selected automatically.
Because you can display various types of messages (critical, warning, infor-
mation), you can visually indicate the importance of the message by including
the graphical representation (icon). In addition to the type of message, the but-
tons argument can include a setting to determine if the message box must be
closed before the user switches to another application. It’s quite possible that
the user may want to switch to another program or perform another task before
he responds to the question posed in your message box. If the message box is
application modal (vbApplicationModal), then the user must close the message
box before continuing to use your application.
For example, consider the following message box:
MsgBox "How are you?", vbOKOnly + vbApplicationModal, "Application Modal"
If you type the above in the Immediate window and press Enter, a message box
will pop up and you won’t be able to work with your currently open Microsoft
Office Access application until you respond to the message box.
On the other hand, if you want to keep the message box visible while the
user works with other open applications, you must include the vbSystemModal
setting in the buttons argument, like this:
MsgBox "How are you?", vbOKOnly + vbSystemModal, "System Modal"
� Note: Use the vbSystemModal constant when you want to ensure that yourmessage box is always visible (not hidden behind other windows).
Passing Arguments to Procedures and Functions | 81
Introduction to Access 2007 VBA Programming

The buttons argument settings are divided into five groups: button settings,
icon settings, default button settings, message box modality, and other MsgBox
display settings (see Table 4-1). Only one setting from each group can be
included in the buttons argument. To create a buttons argument you can add up
the values for each setting you want to include. For example, to display a mes-
sage box with two buttons (Yes and No), the question mark icon, and the No
button as the default button, look up the corresponding values in Table 4-1,
and add them up. You should arrive at 292 (4 + 32 + 256).
To see the message box using the calculated message box argument, enter
the following statement in the Immediate window:
MsgBox "Do you want to proceed?", 292
The resulting message box is shown in Figure 4-5.
When you derive the buttons argument by adding up the constant values, your
procedure becomes less readable. There’s no reference table where you can
check the hidden meaning of 292. To improve the readability of your MsgBox
function, it’s better to use the constants instead of their values. For example,
enter the following revised statement in the Immediate window:
MsgBox "Do you want to proceed?", vbYesNo + vbQuestion + vbDefaultButton2
The above statement produces the result shown in Figure 4-5. The following
example shows how to use the buttons argument inside the Visual Basic
procedure.
�Hands-On 4-8: Using the MsgBox Function with Arguments
1. In the Visual Basic Editor window, choose Insert | Module to add a new
module.
2. In the Code window, enter the MsgYesNo subroutine as shown below.
Sub MsgYesNo()Dim question As StringDim myButtons As Integer
question = "Do you want to open a new report?"myButtons = vbYesNo + vbQuestion + vbDefaultButton2MsgBox question, myButtons
End Sub
3. Run the MsgYesNo procedure by pressing F5.
In the above subroutine, the question variable stores the text of your message.
The settings for the buttons argument are placed in the myButtons variable.
Instead of using the names of constants, you can use their values, as in the
following:
82 | Chapter 4
Part I
Figure 4-5: You can specify the number ofbuttons to include, their text, and an icon inthe message box by using the optional but-tons argument.

myButtons = 4 + 32 + 256
The question and myButtons variables are used as arguments for the MsgBox
function. When you run the procedure, you see a result similar to the one
shown in Figure 4-5. Note that the No button is selected, indicating that it’s the
default button for this dialog box. If you press Enter, Visual Basic removes the
message box from the screen. Nothing happens because your procedure does
not have any instructions following the MsgBox function. To change the
default button, use the vbDefaultButton1 setting instead.
The third argument of the MsgBox function is title. While this is also an
optional argument, it’s very handy because it allows you to create procedures
that don’t provide visual clues to the fact that you programmed them with
Microsoft Access. Using this argument, you can set the title bar of your mes-
sage box to any text you want.
Suppose you want the MsgYesNo procedure to display the text “New
report” in its title. The following MsgYesNo2 procedure demonstrates the use
of the title argument.
Sub MsgYesNo2()Dim question As StringDim myButtons As IntegerDim myTitle As String
question = "Do you want to open a new report?"myButtons = vbYesNo + vbQuestion + vbDefaultButton2myTitle = "New report"MsgBox question, myButtons, myTitle
End Sub
The text for the title argument is stored in the myTitle variable. If you don’t
specify the value for the title argument, Visual Basic displays the default text
“Microsoft Access.” Notice that the arguments are listed in the order deter-
mined by the MsgBox function.
If you would like to list the arguments in any order, you must precede the
value of each argument with its name, as shown below:
MsgBox title:=myTitle, prompt:=question, buttons:=myButtons
The last two MsgBox arguments, helpfile and context, are used by more
advanced programmers who are experienced with using help files in the Win-
dows environment. The helpfile argument indicates the name of a special help
file that contains additional information you may want to display to your VBA
application user. When you specify this argument, the Help button will be
added to your message box. When you use the helpfile argument, you must
also use the context argument. This argument indicates which help subject in
the specified help file you want to display. Suppose HelpX.hlp is the help file
you created and 55 is the context topic you want to use. To include this infor-
mation in your MsgBox function, you would use the following instruction:
MsgBox title:=myTitle, _prompt:=question, _buttons:=myButtons, _
Passing Arguments to Procedures and Functions | 83
Introduction to Access 2007 VBA Programming

helpfile:= "HelpX.hlp", _context:=55
The above is a single VBA statement broken down into several lines using the
line continuation character.
Returning Values from the MsgBox FunctionWhen you display a simple message box dialog with one button, clicking the
OK button or pressing the Enter key removes the message box from the screen.
However, when the message box has more than one button, your procedure
should detect which button was pressed. To do this, you must save the result of
the message box in a variable. Table 4-2 shows values that the MsgBox func-
tion returns.
Table 4-2: Values returned by the MsgBox function
Button Selected Constant Value
OK vbOK 1
Cancel vbCancel 2
Abort vbAbort 3
Retry vbRetry 4
Ignore vbIgnore 5
Yes vbYes 6
No vbNo 7
The MsgYesNo3 procedure is a revised version of MsgYesNo2. It shows how
you can find out which button the user chose.
�Hands-On 4-9: Returning Values from the MsgBox Function
1. In the Visual Basic Editor window, choose Insert | Module to add a new
module.
2. In the Code window, enter the code of the MsgYesNo3 procedure as shown
below:
Sub MsgYesNo3()Dim question As StringDim myButtons As IntegerDim myTitle As StringDim myChoice As Integer
question = "Do you want to open a new report?"myButtons = vbYesNo + vbQuestion + vbDefaultButton2myTitle = "New report"myChoice = MsgBox(question, myButtons, myTitle)MsgBox myChoice
End Sub
3. Position the insertion point within the MsgYesNo3 procedure and press F5
to run it.
84 | Chapter 4
Part I
In the above procedure, you assigned the result of the MsgBox function to the
variable myChoice. Notice that the arguments of the MsgBox function are now
listed in parentheses:
myChoice = MsgBox(question, myButtons, myTitle)
When you run the MsgYesNo3 procedure, a two-button message box is dis-
played. By clicking on the Yes button, the statement MsgBox myChoice
displays the number 6. When you click the No button, the number 7 is
displayed.
MsgBox Function — With or without Parentheses?Use parentheses around the MsgBox function argument list when you wantto use the result returned by the function. By listing the function’s argu-ments without parentheses, you tell Visual Basic that you want to ignore thefunction’s result. Most likely, you will want to use the function’s result whenthe message box contains more than one button.
Using the InputBox FunctionThe InputBox function displays a dialog box with a message that prompts the
user to enter data. This dialog box has two buttons: OK and Cancel. When you
click OK, the InputBox function returns the information entered in the text
box. When you select Cancel, the function returns the empty string (""). The
syntax of the InputBox function is as follows:
InputBox(prompt [, title] [, default] [, xpos] [, ypos] [, helpfile, context])
The first argument, prompt, is the text message you want to display in the dia-
log box. Long text strings can be entered on several lines by using the Chr(13)
or Chr(10) functions. (See examples of using the MsgBox function earlier in
this chapter.) All the remaining InputBox arguments are optional.
The second argument, title, allows you to change the default title of the dia-
log box. The default value is “Microsoft Access.”
The third argument of the InputBox function, default, allows the display of
a default value in the text box. If you omit this argument, the empty text box is
displayed.
The following two arguments, xpos and ypos, let you specify the exact posi-
tion where the dialog box should appear on the screen. If you omit these
arguments, the input box appears in the middle of the current window. The
xpos argument determines the horizontal position of the dialog box from the
left edge of the screen. When omitted, the dialog box is centered horizontally.
The ypos argument determines the vertical position from the top of the screen.
If you omit this argument, the dialog box is positioned vertically approxi-
mately one-third of the way down the screen. Both xpos and ypos are
measured in special units called twips. One twip is the equivalent of approxi-
mately 0.0007 inches.
Passing Arguments to Procedures and Functions | 85
Introduction to Access 2007 VBA Programming

The last two arguments, helpfile and context, are used in the same way as
the corresponding arguments of the MsgBox function discussed earlier in this
chapter.
Now that you know the meaning of the InputBox arguments, let’s see some
examples of using this function.
�Hands-On 4-10: Using the InputBox Function
1. In the Visual Basic Editor window, choose Insert | Module to add a new
module.
2. In the Code window, type the Informant subroutine shown below:
Sub Informant()InputBox prompt:="Enter your place of birth:" & Chr(13) _& " (e.g., Boston, Great Falls, etc.) "
End Sub
3. Position the insertion point within the Informant procedure and press F5 to
run it.
The above procedure displays a dialog box with two buttons. The input
prompt is displayed on two lines (see Figure 4-6). Similar to using the
MsgBox function, if you plan on using the data entered by the user in the
dialog box, you should store the result of the InputBox function in a
variable.
4. Now, in the same module, enter the code of the Informant2 procedure as
shown below:
Sub Informant2()Dim myPrompt As StringDim town As String
Const myTitle = "Enter data"myPrompt = "Enter your place of birth:" & Chr(13) _& "(e.g., Boston, Great Falls, etc.)"town = InputBox(myPrompt, myTitle)
MsgBox "You were born in " & town & ".", , "Your response"End Sub
5. Position the insertion point within the Informant2 procedure and press F5
to run it.
Notice that the Informant2 procedure assigns the result of the InputBox
function to the town variable.
86 | Chapter 4
Part I
Figure 4-6: A dialog box generatedby the Informant procedure.
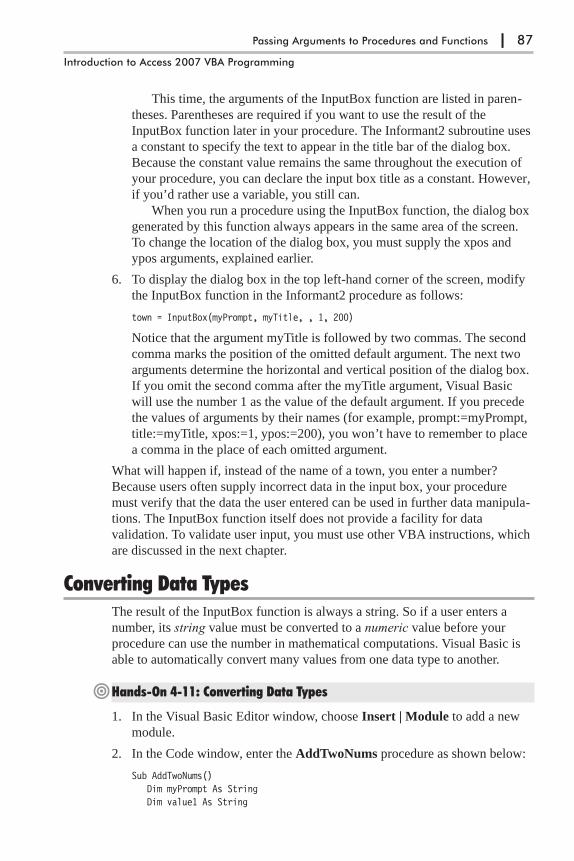
This time, the arguments of the InputBox function are listed in paren-
theses. Parentheses are required if you want to use the result of the
InputBox function later in your procedure. The Informant2 subroutine uses
a constant to specify the text to appear in the title bar of the dialog box.
Because the constant value remains the same throughout the execution of
your procedure, you can declare the input box title as a constant. However,
if you’d rather use a variable, you still can.
When you run a procedure using the InputBox function, the dialog box
generated by this function always appears in the same area of the screen.
To change the location of the dialog box, you must supply the xpos and
ypos arguments, explained earlier.
6. To display the dialog box in the top left-hand corner of the screen, modify
the InputBox function in the Informant2 procedure as follows:
town = InputBox(myPrompt, myTitle, , 1, 200)
Notice that the argument myTitle is followed by two commas. The second
comma marks the position of the omitted default argument. The next two
arguments determine the horizontal and vertical position of the dialog box.
If you omit the second comma after the myTitle argument, Visual Basic
will use the number 1 as the value of the default argument. If you precede
the values of arguments by their names (for example, prompt:=myPrompt,
title:=myTitle, xpos:=1, ypos:=200), you won’t have to remember to place
a comma in the place of each omitted argument.
What will happen if, instead of the name of a town, you enter a number?
Because users often supply incorrect data in the input box, your procedure
must verify that the data the user entered can be used in further data manipula-
tions. The InputBox function itself does not provide a facility for data
validation. To validate user input, you must use other VBA instructions, which
are discussed in the next chapter.
Converting Data TypesThe result of the InputBox function is always a string. So if a user enters a
number, its string value must be converted to a numeric value before your
procedure can use the number in mathematical computations. Visual Basic is
able to automatically convert many values from one data type to another.
�Hands-On 4-11: Converting Data Types
1. In the Visual Basic Editor window, choose Insert | Module to add a new
module.
2. In the Code window, enter the AddTwoNums procedure as shown below:
Sub AddTwoNums()Dim myPrompt As StringDim value1 As String
Passing Arguments to Procedures and Functions | 87
Introduction to Access 2007 VBA Programming

Dim mySum As Single
Const myTitle = "Enter data"
myPrompt = "Enter a number:"value1 = InputBox(myPrompt, myTitle, 0)mySum = value1 + 2
MsgBox mySum & " (" & value1 & " + 2)"End Sub
3. Place the cursor anywhere inside the code of the AddTwoNums procedure
and press F5 to run it.
The above procedure displays the dialog box shown in Figure 4-7. Notice
that this dialog box has two special features that are obtained by using the
InputBox function’s optional arguments: title and default value. Instead of
the default title “Microsoft Access,” the dialog box displays a text string as
defined by the contents of the myTitle constant. The zero (0) entered as the
default value in the edit box suggests that the user enter a number instead
of text. Once the user provides the data and clicks OK, the input is
assigned to the variable value1.
value1 = InputBox(myPrompt, myTitle, 0)
The data type of the variable value1 is String. You can check the data type eas-
ily if you follow the above instruction with this statement:
MsgBox varType(value1)
When Visual Basic runs the above line, it will display a message box with the
number 8. Recall that this number represents the String data type. The next
line,
mySum = value1 + 2
adds 2 to the user’s input and assigns the result of the calculation to the vari-
able mySum. And because the value1 variable’s data type is String, prior to
using this variable’s data in the computation, Visual Basic goes to work behind
the scenes to perform the data type conversion. Visual Basic has the brains to
understand the need for conversion. Without it, the two incompatible data
types (text and number) would generate a Type Mismatch error.
The procedure ends with the MsgBox function displaying the result of the
calculation and showing the user how the total was derived.
88 | Chapter 4
Part I
Figure 4-7: To suggest that the userenter a specific type of data, youmay want to provide a default valuein the edit box.

Define a ConstantTo ensure that all the title bars in a particular VBA procedure display thesame text, assign the title text to a constant. By following this tip, you willsave yourself the time of typing the title text in more than one place.
Avoid a Type Mismatch ErrorIf you attempt to run the AddTwoNums procedure in older versions ofMicrosoft Access (prior to version 2000), you will get a Type Mismatch errorwhen Visual Basic tries to execute the following line of code:
mysum = value1 + 2
To avoid the Type Mismatch error, use the built-in CSng function to convertthe string stored in the value1 variable to a Single type number. You wouldwrite the following statement:
mysum = CSng(value1) + 2
Using Master Procedures and SubproceduresWhen your VBA procedure gets larger, it may be difficult to maintain its many
lines of code. To make your program easier to write, understand, and change,
you should use a structured approach. When you create a structured program,
you break a large problem into small problems that can be solved one at a time.
In VBA, you do this by creating a master procedure and one or more subordi-
nate procedures. Because both master procedures and subordinate procedures
are subroutines, you declare them with the Sub keyword. The master procedure
can call the required subroutines and pass arguments to them. It may also call
functions.
The following hands-on exercise demonstrates the AboutUser procedure.
The procedure requests the user’s full name, then extracts the first and last
name from the fullName string. The last statement displays the user’s last
name followed by a comma and the first name. As you read further, this proce-
dure will be broken down into several tasks to demonstrate the concept of
using master procedures, subprocedures, and functions.
�Hands-On 4-12: Breaking Up Large Procedures
1. In the Visual Basic Editor window, choose Insert | Module to add a new
module.
2. In the Code window, enter the code of the AboutUser procedure as shown
below:
Sub AboutUser()Dim fullName As StringDim firstName As StringDim lastName As String
Passing Arguments to Procedures and Functions | 89
Introduction to Access 2007 VBA Programming

Dim space As Integer
' get input from userfullName = InputBox("Enter first and last name:")
' get first and last name stringsspace = InStr(fullName, " ")firstName = Left(fullName, space - 1)lastName = Right(fullName, Len(fullName) - space)
' display last name, first nameMsgBox lastName & ", " & firstName
End Sub
3. Position the insertion point within the code of the AboutUser procedure
and press F5 to run it.
The AboutUser procedure can be divided into smaller tasks. The first task
is obtaining the user’s full name. The next task requires that you divide the
user-supplied data into two strings: last name and first name. These tasks
can be delegated to separate functions (for example: GetLast and GetFirst).
The last task is displaying a message showing the reordered full name
string.
Now that you know what tasks you should focus on, let’s see how you
can accomplish each task.
4. In the Visual Basic Editor window, choose File | Save Chap04.
5. In the Save dialog box, click Yes to save changes to all the listed modules.
Click OK to confirm the default module name in each Save As prompt.
6. In the Visual Basic Editor window, choose Insert | Module to add a new
module.
7. Choose File | Save Chap04 and type the new module name,
MasterProcedures, in the Save As dialog box. Click OK when done.
8. Enter the following AboutUserMaster procedure in the MasterProcedures
module window:
Sub AboutUserMaster()Dim first As String, last As String, full As String
Call GetUserName(full)
first = GetFirst(full)last = GetLast(full)
Call DisplayLastFirst(first, last)End Sub
The master procedure shown above controls the general flow of your pro-
gram by calling appropriate subprocedures and functions. The master pro-
cedure begins with variable declarations. The first statement, Call
GetUserName(full), calls the GetUserName subroutine (see step 9 below),
and passes an argument to it — the contents of the full variable. Because
90 | Chapter 4
Part I

the variable full is not assigned any value prior to the execution of the Call
statement, it has the value of an empty string (""). Notice that the name of
the subprocedure is preceded by the Call statement. Although you are not
required to use the Call keyword when calling a procedure, you must use it
when the call to the procedure requires arguments. The argument list must
be enclosed in parentheses.
9. In the MasterProcedures module, enter the following GetUserName
subroutine:
Sub GetUserName(fullName As String)
fullName = InputBox("Enter first and last name:")
End Sub
The GetUserName procedure demonstrates two very important Visual
Basic programming concepts: how to pass arguments to a subprocedure
and how to pass values back from a subprocedure to a calling procedure.
In the master procedure in step 8, you called the GetUserName proce-
dure and passed one argument to it — the variable full. This variable is
received by a fullName parameter declared in the GetUserName
subprocedure’s Sub statement. Because the variable full contained an
empty string, when Visual Basic called the GetUserName subprocedure,
the fullName parameter received the same value — an empty string ("").
When Visual Basic displays the dialog box and gets the user’s full name,
the name is assigned to the fullName parameter. A value assigned to a
parameter is passed back to the matching argument after the subprocedure
is executed. Therefore, when Visual Basic returns to the master procedure,
the full variable will contain the user’s full name.
Arguments passed to a subprocedure are received by parameters.
Notice that the parameter name (fullName) is followed by the declaration
of the data type (As String). Although the parameter’s data type must agree
with the data type of the matching argument, different names may be used
for an argument and its corresponding parameter.
10. In the MasterProcedures module, enter the following GetFirst function
procedure:
Function GetFirst(fullName As String)Dim space As Integer
space = InStr(fullName, " ")GetFirst = Left(fullName, space - 1)
End Function
The second statement in the master procedure (see step 8), first =
GetFirst(full), passes the value of the full variable to the GetFirst function.
This value is received by the function’s parameter — fullName. To extract
the first name from the user-provided fullName string, you must find the
location of the space separating the first name and last name. Therefore, the
function begins with a declaration of a local variable — space. The next
Passing Arguments to Procedures and Functions | 91
Introduction to Access 2007 VBA Programming

statement uses the VBA built-in function InStr to return the position of a
space character (" ") in the fullName string. The obtained number is then
assigned to the variable space. Finally, the Left function is used to extract
the specified number of characters (space –1) from the left side of the
fullName string. The length of the first name is one character less than the
value stored in the variable space. The result of the function (user’s first
name) is then assigned to the function’s name. When Visual Basic returns
to the master procedure, it places the result in the variable first.
11. In the MasterProcedures module, enter the following GetLast function
procedure:
Function GetLast(fullName As String)Dim space As Integer
space = InStr(fullName, " ")GetLast = Right(fullName, Len(fullName) - space)
End Function
The third statement in the master procedure (see step 8), last =
GetLast(full), passes the value of the full variable to the GetLast function.
This function’s purpose is to extract the user’s last name from the user-sup-
plied fullName string. The GetLast function uses the built-in Len function
to calculate the total number of characters in the fullName string. The
Right function extracts the specified number of characters (Len(fullName)
– space) from the right side of the fullName string. The obtained string is
then assigned to the function name and is stored in the variable last upon
returning to the master procedure.
12. In the MasterProcedures module, enter the following DisplayLastFirst
subroutine:
Sub DisplayLastFirst(firstName As String, lastName As String)
MsgBox lastName & ", " & firstName
End Sub
The fourth statement in the master procedure (see step 8), Call
DisplayLastFirst(first, last), calls the DisplayLastFirst subroutine and
passes two arguments to it: first and last. To receive these arguments, the
DisplayLastFirst subprocedure is declared with two matching parameters:
firstName and lastName. Recall that different names can be used for argu-
ments and their corresponding parameters. The DisplayLastFirst
subprocedure then displays the message box showing the user’s last name
followed by a comma and the first name.
13. Position the insertion point within the code of the AboutUserMaster proce-
dure and press F5 to run it.
14. Choose File | Save Chap04 to save changes to the module.
15. Choose File | Close and Return to Microsoft Office Access.
92 | Chapter 4
Part I
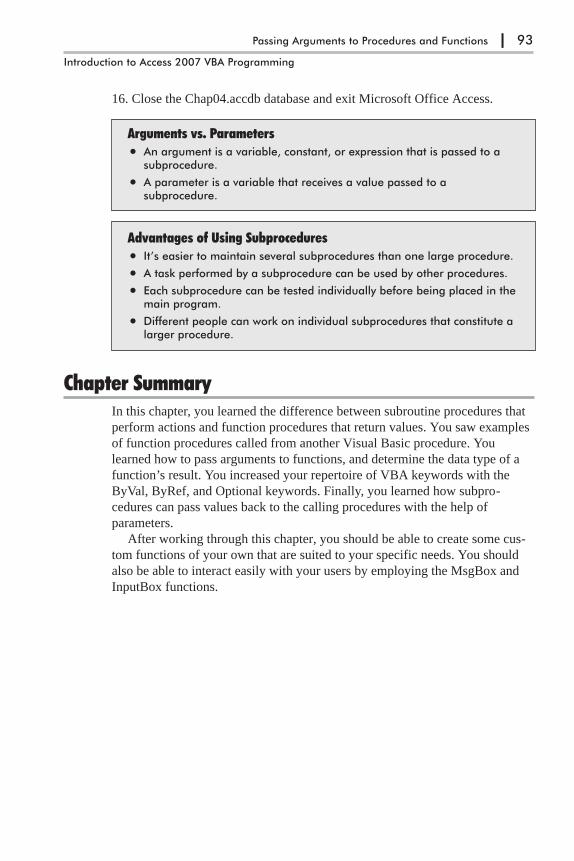
16. Close the Chap04.accdb database and exit Microsoft Office Access.
Arguments vs. Parameters
• An argument is a variable, constant, or expression that is passed to asubprocedure.
• A parameter is a variable that receives a value passed to asubprocedure.
Advantages of Using Subprocedures
• It’s easier to maintain several subprocedures than one large procedure.
• A task performed by a subprocedure can be used by other procedures.
• Each subprocedure can be tested individually before being placed in themain program.
• Different people can work on individual subprocedures that constitute alarger procedure.
Chapter SummaryIn this chapter, you learned the difference between subroutine procedures that
perform actions and function procedures that return values. You saw examples
of function procedures called from another Visual Basic procedure. You
learned how to pass arguments to functions, and determine the data type of a
function’s result. You increased your repertoire of VBA keywords with the
ByVal, ByRef, and Optional keywords. Finally, you learned how subpro-
cedures can pass values back to the calling procedures with the help of
parameters.
After working through this chapter, you should be able to create some cus-
tom functions of your own that are suited to your specific needs. You should
also be able to interact easily with your users by employing the MsgBox and
InputBox functions.
Passing Arguments to Procedures and Functions | 93
Introduction to Access 2007 VBA Programming

Chapter 5
Decision Making with VBA
You can make decisions in your VBA procedures by using conditional expres-
sions inside the special control structures. A conditional expression is an
expression that uses a relational operator (see Table 5-1), a logical operator
(see Table 5-2), or a combination of both. When Visual Basic encounters a
conditional expression in your program, it evaluates the expression to deter-
mine whether it is true or false.
Table 5-1: Relational operators in VBA
Operator Description
= Equal to
<> Not equal to
> Greater than
< Less than
>= Greater than or equal to
<= Less than or equal to
Table 5-2: Logical operators in VBA
Operator Description
AND All conditions must be true before an action can be taken.
OR At least one of the conditions must be true before an action can be taken.
NOT If a condition is true, NOT makes it false. If a condition is false, NOTmakes it true.
Boolean ExpressionsConditional expressions and logical operators are also known as Boolean.George Boole was a nineteenth-century British mathematician who madesignificant contributions to the evolution of computer programming.Boolean expressions can be evaluated as true or false.
For example:One meter equals 10 inches. FalseTwo is less than three. True
94

If…Then StatementThe simplest way to get some decision making into your VBA procedure is by
using the If…Then statement. Suppose you want to choose an action depend-
ing on a condition. You can use the following structure:
If condition Then statement
For example, a quiz procedure might ask the user to guess the number of
weeks in a year. If the user’s response is other than 52, the procedure should
display the message “Try Again.”
�Hands-On 5-1: Using the If…Then Statement
1. Start Microsoft Office Access 2007 and create a new Microsoft Office
Access 2007 database named Chap05.accdb in your C:\Acc07_
ByExample folder.
2. Once your new database is opened, press Alt+F11 to switch to the Visual
Basic Editor window.
3. Choose Insert | Module to add a new standard module.
4. In the Module1 Code window, enter the SimpleIfThen procedure shown
below. (You may copy this procedure from the C:\Acc07_HandsOn\
HandsOn_05.txt file.)
Sub SimpleIfThen()Dim weeks As String
weeks = InputBox("How many weeks are in a year:", "Quiz")If weeks<>52 Then MsgBox "Try Again"
End Sub
The SimpleIfThen procedure stores the user’s answer in the weeks vari-
able. The variable’s value is then compared with the number 52. If the
result of the comparison is true (that is, if the value stored in the variable
weeks is not equal to 52), Visual Basic will display the message “Try
Again.”
5. Run the SimpleIfThen procedure and enter a number other than 52.
6. Rerun the SimpleIfThen procedure and enter the number 52. When you
enter the correct number of weeks, Visual Basic does nothing. The proce-
dure ends. It would be nice to also display a message when the user
guesses right.
7. Enter the following instruction on a separate line before the End Sub
keywords:
If weeks = 52 Then MsgBox "Congratulations!"
8. Run the SimpleIfThen procedure again and enter the number 52. When you
enter the correct answer, Visual Basic does not execute the Try Again state-
ment. When the procedure is executed, the statement to the right of the
Decision Making with VBA | 95
Introduction to Access 2007 VBA Programming

Then keyword is ignored if the result from evaluating the supplied condi-
tion is false. As you recall, a VBA procedure can call another procedure.
Let’s see if it can also call itself.
9. Modify the first If statement in the SimpleIfThen procedure as follows:
If weeks <> 52 Then MsgBox "Try Again" : SimpleIfThen
We added a colon and the name of the SimpleIfThen procedure to the end
of the existing If…Then statement. If the user enters the incorrect answer,
he will see a message, and as soon as he clicks the OK button in the mes-
sage box, he will get another chance to supply the correct answer. The user
will be able to keep on guessing for a long time. In fact, he won’t be able to
exit the procedure gracefully until he supplies the correct answer. If he
clicks Cancel, he will have to deal with the unfriendly “Type Mismatch”
error message. For now, you may want to revise your SimpleIfThen proce-
dure as follows:
Sub SimpleIfThen2()Dim weeks As String
On Error GoTo VeryEndweeks = InputBox("How many weeks are in a year:", "Quiz")If weeks <> 52 Then MsgBox "Try Again" : SimpleIfThen2If weeks = 52 Then MsgBox "Congratulations!"
VeryEnd:End Sub
If Visual Basic encounters an error, it will jump to the VeryEnd label
placed at the end of the procedure. The statements placed between On
Error GoTo VeryEnd and the VeryEnd label are ignored. Later in this
chapter you will find other examples of trapping errors in your VBA
procedures.
10. Run the SimpleIfThen2 procedure a few times by supplying incorrect
answers. The error trap that you added to your procedure will allow you to
quit guessing without having to deal with the ugly error message.
Multi-Line If…Then StatementSometimes you may want to perform several actions when the condition is
true. Although you could add other statements on the same line by separating
them with colons, your code will look clearer if you use the multi-line version
of the If…Then statement, as shown below:
If condition Thenstatement1
statement2
statementN
End If
For example, you could modify the SimpleIfThen procedure to include addi-
tional statements.
96 | Chapter 5
Part I

�Hands-On 5-2: Using the Multi-Line If…Then Statement
1. Insert a new module and enter the SimpleIfThen3 procedure as shown
below:
Sub SimpleIfThen3()Dim weeks As StringDim response As String
On Error GoTo VeryEndweeks = InputBox("How many weeks are in a year?", "Quiz")If weeks <> 52 Then
response = MsgBox("This is incorrect. Would you like to try again?", _vbYesNo + vbInformation + vbDefaultButton1, _"Continue Quiz?")If response = vbYes Then
Call SimpleIfThen3End If
End IfVeryEnd:End Sub
2. Run the SimpleIfThen3 procedure and enter any number other than 52.
In the above example, the statements between the Then and the End If
keywords don’t get executed if the variable weeks is equal to 52. Notice
that the multi-line If…Then statement must end with the keywords End If.
How does Visual Basic make a decision? Simply put, it evaluates the con-
dition it finds between the If…Then keywords.
Two Formats of the If…Then Statement
The If…Then statement has two formats: a single-line format and amulti-line format. The short format is good for statements that fit on oneline, like:
If secretCode <> "01W01" Then MsgBox "Access denied"
or
If secretCode = "01W01" Then alpha = True : beta = False
In the above examples, secretCode, alpha, and beta are the names ofvariables. In the first example, Visual Basic displays the message “Accessdenied” if the value of the secretCode variable is not equal to 01W01. Inthe second example, Visual Basic will set the value of the variable alpha toTrue and the value of the variable beta to False when the secretCode valueis equal to 01W01. Notice that the second statement to be executed is sep-arated from the first one by a colon. The multi-line If…Then statement ismore clear when there are more statements to be executed when the con-dition is true, or when the statement to be executed is extremely long.
Decision Making with VBA | 97
Introduction to Access 2007 VBA Programming
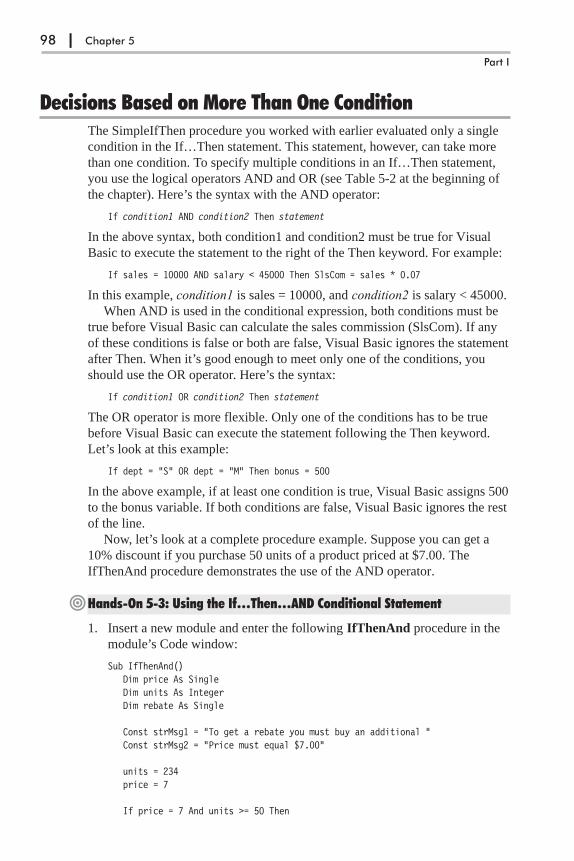
Decisions Based on More Than One ConditionThe SimpleIfThen procedure you worked with earlier evaluated only a single
condition in the If…Then statement. This statement, however, can take more
than one condition. To specify multiple conditions in an If…Then statement,
you use the logical operators AND and OR (see Table 5-2 at the beginning of
the chapter). Here’s the syntax with the AND operator:
If condition1 AND condition2 Then statement
In the above syntax, both condition1 and condition2 must be true for Visual
Basic to execute the statement to the right of the Then keyword. For example:
If sales = 10000 AND salary < 45000 Then SlsCom = sales * 0.07
In this example, condition1 is sales = 10000, and condition2 is salary < 45000.
When AND is used in the conditional expression, both conditions must be
true before Visual Basic can calculate the sales commission (SlsCom). If any
of these conditions is false or both are false, Visual Basic ignores the statement
after Then. When it’s good enough to meet only one of the conditions, you
should use the OR operator. Here’s the syntax:
If condition1 OR condition2 Then statement
The OR operator is more flexible. Only one of the conditions has to be true
before Visual Basic can execute the statement following the Then keyword.
Let’s look at this example:
If dept = "S" OR dept = "M" Then bonus = 500
In the above example, if at least one condition is true, Visual Basic assigns 500
to the bonus variable. If both conditions are false, Visual Basic ignores the rest
of the line.
Now, let’s look at a complete procedure example. Suppose you can get a
10% discount if you purchase 50 units of a product priced at $7.00. The
IfThenAnd procedure demonstrates the use of the AND operator.
�Hands-On 5-3: Using the If…Then…AND Conditional Statement
1. Insert a new module and enter the following IfThenAnd procedure in the
module’s Code window:
Sub IfThenAnd()Dim price As SingleDim units As IntegerDim rebate As Single
Const strMsg1 = "To get a rebate you must buy an additional "Const strMsg2 = "Price must equal $7.00"
units = 234price = 7
If price = 7 And units >= 50 Then
98 | Chapter 5
Part I
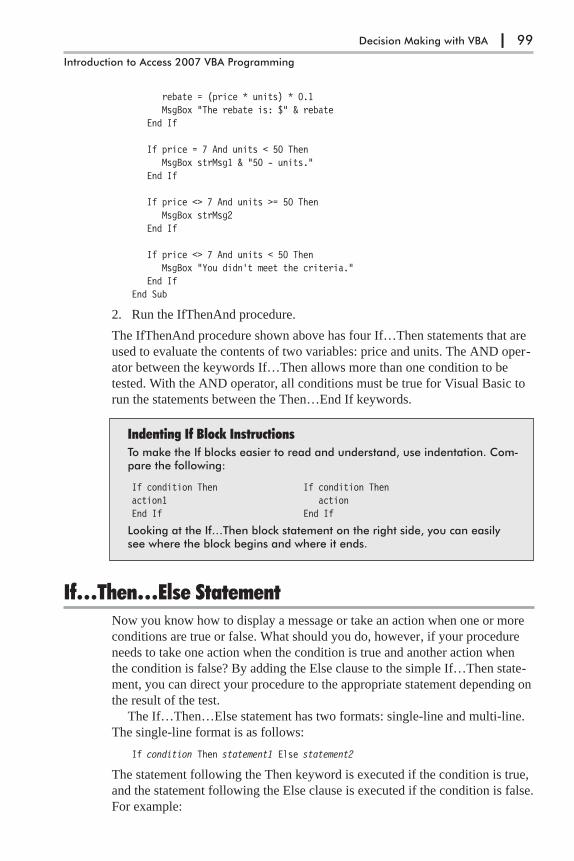
rebate = (price * units) * 0.1MsgBox "The rebate is: $" & rebate
End If
If price = 7 And units < 50 ThenMsgBox strMsg1 & "50 - units."
End If
If price <> 7 And units >= 50 ThenMsgBox strMsg2
End If
If price <> 7 And units < 50 ThenMsgBox "You didn't meet the criteria."
End IfEnd Sub
2. Run the IfThenAnd procedure.
The IfThenAnd procedure shown above has four If…Then statements that are
used to evaluate the contents of two variables: price and units. The AND oper-
ator between the keywords If…Then allows more than one condition to be
tested. With the AND operator, all conditions must be true for Visual Basic to
run the statements between the Then…End If keywords.
Indenting If Block InstructionsTo make the If blocks easier to read and understand, use indentation. Com-pare the following:
If condition Then If condition Thenaction1 actionEnd If End If
Looking at the If…Then block statement on the right side, you can easilysee where the block begins and where it ends.
If…Then…Else StatementNow you know how to display a message or take an action when one or more
conditions are true or false. What should you do, however, if your procedure
needs to take one action when the condition is true and another action when
the condition is false? By adding the Else clause to the simple If…Then state-
ment, you can direct your procedure to the appropriate statement depending on
the result of the test.
The If…Then…Else statement has two formats: single-line and multi-line.
The single-line format is as follows:
If condition Then statement1 Else statement2
The statement following the Then keyword is executed if the condition is true,
and the statement following the Else clause is executed if the condition is false.
For example:
Decision Making with VBA | 99
Introduction to Access 2007 VBA Programming
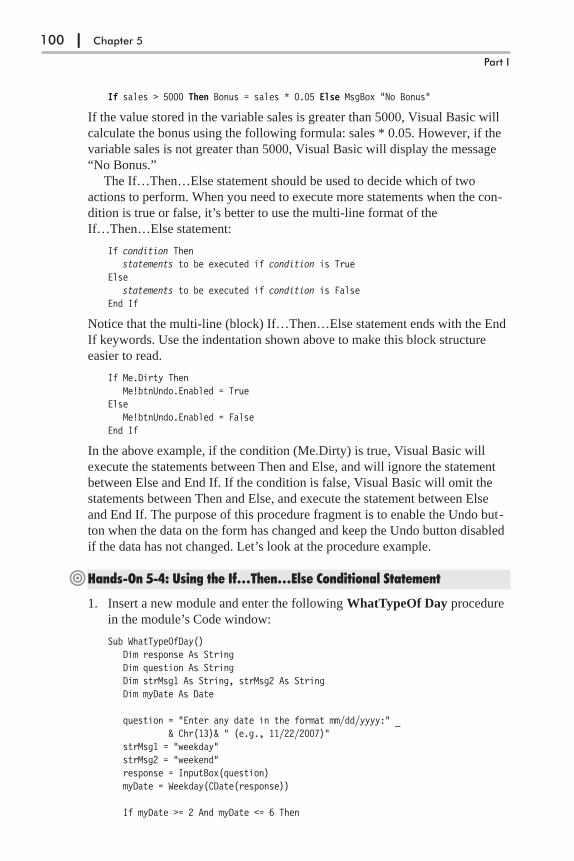
If sales > 5000 Then Bonus = sales * 0.05 Else MsgBox "No Bonus"
If the value stored in the variable sales is greater than 5000, Visual Basic will
calculate the bonus using the following formula: sales * 0.05. However, if the
variable sales is not greater than 5000, Visual Basic will display the message
“No Bonus.”
The If…Then…Else statement should be used to decide which of two
actions to perform. When you need to execute more statements when the con-
dition is true or false, it’s better to use the multi-line format of the
If…Then…Else statement:
If condition Thenstatements to be executed if condition is True
Elsestatements to be executed if condition is False
End If
Notice that the multi-line (block) If…Then…Else statement ends with the End
If keywords. Use the indentation shown above to make this block structure
easier to read.
If Me.Dirty ThenMe!btnUndo.Enabled = True
ElseMe!btnUndo.Enabled = False
End If
In the above example, if the condition (Me.Dirty) is true, Visual Basic will
execute the statements between Then and Else, and will ignore the statement
between Else and End If. If the condition is false, Visual Basic will omit the
statements between Then and Else, and execute the statement between Else
and End If. The purpose of this procedure fragment is to enable the Undo but-
ton when the data on the form has changed and keep the Undo button disabled
if the data has not changed. Let’s look at the procedure example.
�Hands-On 5-4: Using the If…Then…Else Conditional Statement
1. Insert a new module and enter the following WhatTypeOf Day procedure
in the module’s Code window:
Sub WhatTypeOfDay()Dim response As StringDim question As StringDim strMsg1 As String, strMsg2 As StringDim myDate As Date
question = "Enter any date in the format mm/dd/yyyy:" _& Chr(13)& " (e.g., 11/22/2007)"
strMsg1 = "weekday"strMsg2 = "weekend"response = InputBox(question)myDate = Weekday(CDate(response))
If myDate >= 2 And myDate <= 6 Then
100 | Chapter 5
Part I
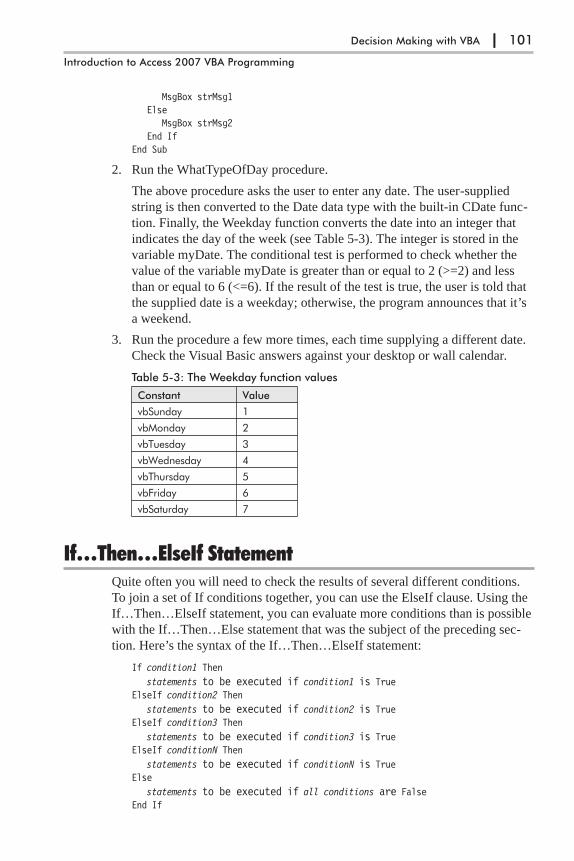
MsgBox strMsg1Else
MsgBox strMsg2End If
End Sub
2. Run the WhatTypeOfDay procedure.
The above procedure asks the user to enter any date. The user-supplied
string is then converted to the Date data type with the built-in CDate func-
tion. Finally, the Weekday function converts the date into an integer that
indicates the day of the week (see Table 5-3). The integer is stored in the
variable myDate. The conditional test is performed to check whether the
value of the variable myDate is greater than or equal to 2 (>=2) and less
than or equal to 6 (<=6). If the result of the test is true, the user is told that
the supplied date is a weekday; otherwise, the program announces that it’s
a weekend.
3. Run the procedure a few more times, each time supplying a different date.
Check the Visual Basic answers against your desktop or wall calendar.
Table 5-3: The Weekday function values
Constant Value
vbSunday 1
vbMonday 2
vbTuesday 3
vbWednesday 4
vbThursday 5
vbFriday 6
vbSaturday 7
If…Then…ElseIf StatementQuite often you will need to check the results of several different conditions.
To join a set of If conditions together, you can use the ElseIf clause. Using the
If…Then…ElseIf statement, you can evaluate more conditions than is possible
with the If…Then…Else statement that was the subject of the preceding sec-
tion. Here’s the syntax of the If…Then…ElseIf statement:
If condition1 Then
statements to be executed if condition1 is TrueElseIf condition2 Then
statements to be executed if condition2 is TrueElseIf condition3 Then
statements to be executed if condition3 is TrueElseIf conditionN Then
statements to be executed if conditionN is TrueElse
statements to be executed if all conditions are FalseEnd If
Decision Making with VBA | 101
Introduction to Access 2007 VBA Programming
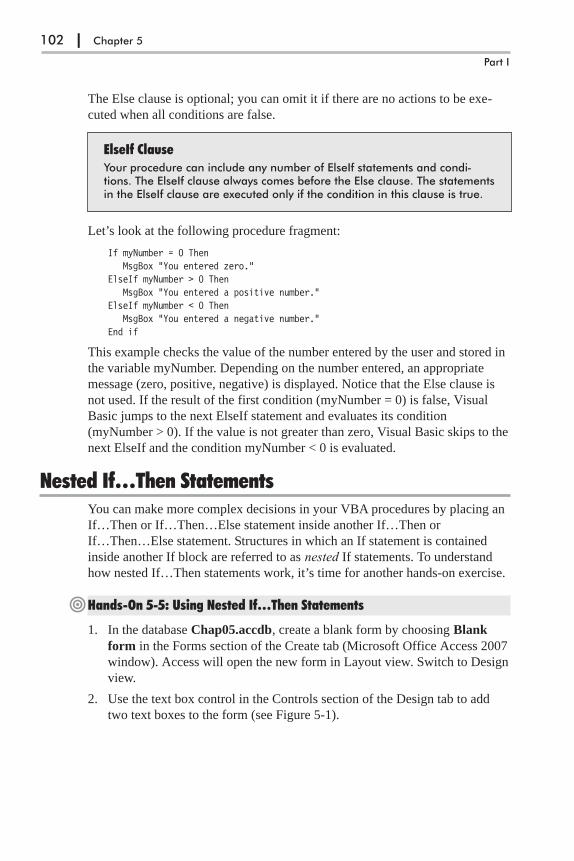
The Else clause is optional; you can omit it if there are no actions to be exe-
cuted when all conditions are false.
ElseIf ClauseYour procedure can include any number of ElseIf statements and condi-tions. The ElseIf clause always comes before the Else clause. The statementsin the ElseIf clause are executed only if the condition in this clause is true.
Let’s look at the following procedure fragment:
If myNumber = 0 ThenMsgBox "You entered zero."
ElseIf myNumber > 0 ThenMsgBox "You entered a positive number."
ElseIf myNumber < 0 ThenMsgBox "You entered a negative number."
End if
This example checks the value of the number entered by the user and stored in
the variable myNumber. Depending on the number entered, an appropriate
message (zero, positive, negative) is displayed. Notice that the Else clause is
not used. If the result of the first condition (myNumber = 0) is false, Visual
Basic jumps to the next ElseIf statement and evaluates its condition
(myNumber > 0). If the value is not greater than zero, Visual Basic skips to the
next ElseIf and the condition myNumber < 0 is evaluated.
Nested If…Then StatementsYou can make more complex decisions in your VBA procedures by placing an
If…Then or If…Then…Else statement inside another If…Then or
If…Then…Else statement. Structures in which an If statement is contained
inside another If block are referred to as nested If statements. To understand
how nested If…Then statements work, it’s time for another hands-on exercise.
�Hands-On 5-5: Using Nested If…Then Statements
1. In the database Chap05.accdb, create a blank form by choosing Blank
form in the Forms section of the Create tab (Microsoft Office Access 2007
window). Access will open the new form in Layout view. Switch to Design
view.
2. Use the text box control in the Controls section of the Design tab to add
two text boxes to the form (see Figure 5-1).
102 | Chapter 5
Part I

3. Change the label in front of the first text box to User, and the label in front
of the second text box to Password.
4. Click the Property Sheet button in the Tools section of the Design tab.
5. Click the Unbound text box to the right of the User label. In the property
sheet on the Other tab, set the Name property of this control to txtUser.
Click the Unbound text box to the right of the Password label. In the prop-
erty sheet on the All tab, set the Name property of this text box to txtPwd
(see Figure 5-2).
6. In the property sheet on the Data tab, type Password next to the Input
Mask property of the txtPwd text box control.
7. Click the Button (Form Control) in the Controls section of the Design tab,
and add a button to the form. When the Command Button Wizard dialog
box appears, click Cancel. With the Command button selected, set the
Caption and Name properties of this button by typing the following values
in the property sheet next to the shown property name (Figure 5-3):
Name property: cmdOK
Caption property: OK
Decision Making with VBA | 103
Introduction to Access 2007 VBA Programming
Figure 5-1: Placing text box controls on an Access form for Hands-On 5-5.

8. Right-click the OK button and choose Build Event from the shortcut
menu. In the Choose Builder dialog box, select Code Builder and click
OK.
9. Enter the code for the cmdOK_Click event procedure as shown below. To
make the cmdOK_Click procedure easier to understand, the conditional
statements are shown with different formatting (bold and underlined).
Private Sub cmdOK_Click()If txtPwd = "FOX" Then
MsgBox "You are not authorized to run this report."ElseIf txtPwd = "DOG" Then
If txtUser = "John" ThenMsgBox "You are logged on with restricted privileges."
ElseIf txtUser = "Mark" ThenMsgBox "Contact the Admin now."
ElseIf txtUser = "Anne" ThenMsgBox "Go home."
ElseMsgBox "Incorrect user name."
End IfElse
MsgBox "Incorrect password or user name"End If
Me.txtUser.SetFocusEnd Sub
104 | Chapter 5
Part I
Figure 5-2: Setting the Name property of the text box control for Hands-On 5-5.
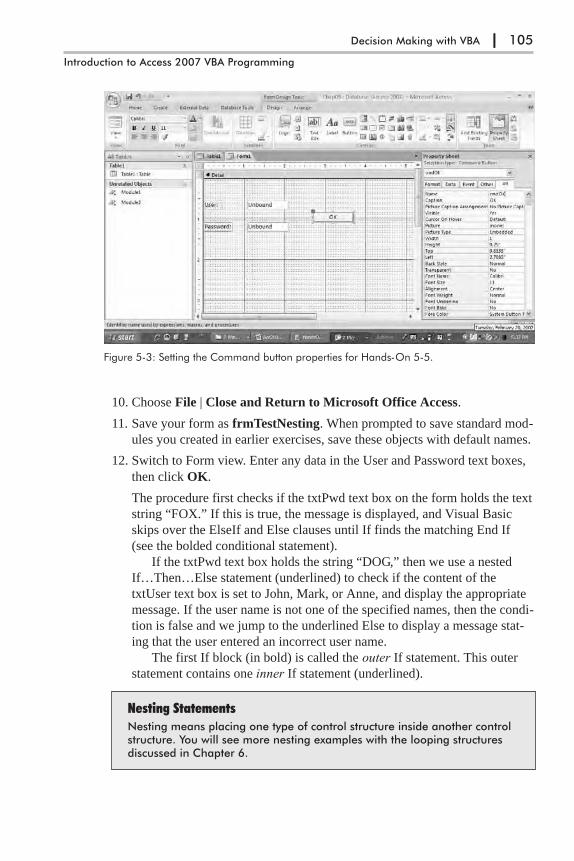
10. Choose File | Close and Return to Microsoft Office Access.
11. Save your form as frmTestNesting. When prompted to save standard mod-
ules you created in earlier exercises, save these objects with default names.
12. Switch to Form view. Enter any data in the User and Password text boxes,
then click OK.
The procedure first checks if the txtPwd text box on the form holds the text
string “FOX.” If this is true, the message is displayed, and Visual Basic
skips over the ElseIf and Else clauses until If finds the matching End If
(see the bolded conditional statement).
If the txtPwd text box holds the string “DOG,” then we use a nested
If…Then…Else statement (underlined) to check if the content of the
txtUser text box is set to John, Mark, or Anne, and display the appropriate
message. If the user name is not one of the specified names, then the condi-
tion is false and we jump to the underlined Else to display a message stat-
ing that the user entered an incorrect user name.
The first If block (in bold) is called the outer If statement. This outer
statement contains one inner If statement (underlined).
Nesting StatementsNesting means placing one type of control structure inside another controlstructure. You will see more nesting examples with the looping structuresdiscussed in Chapter 6.
Decision Making with VBA | 105
Introduction to Access 2007 VBA Programming
Figure 5-3: Setting the Command button properties for Hands-On 5-5.

Select Case StatementTo avoid complex nested If statements that are difficult to follow, you can use
the Select Case statement instead. The syntax of this statement is as follows:
Select Case testExpression
Case expressionList1statements if expressionList1 matches testExpression
Case expressionList2statements if expressionList2 matches testExpression
Case expressionListNstatements if expressionListN matches testExpression
Case Elsestatements to be executed if no values match testExpression
End Select
You can place any number of cases to test between the keywords Select Case
and End Select. The Case Else clause is optional. Use it when you expect that
there may be conditional expressions that return False. In the Select Case state-
ment, Visual Basic compares each expressionList with the value of
testExpression.
Here’s the logic behind the Select Case statement. When Visual Basic
encounters the Select Case clause, it makes note of the value of testExpression.
Then it proceeds to test the expression following the first Case clause. If the
value of this expression (expressionList1) matches the value stored in
testExpression, Visual Basic executes the statements until another Case clause
is encountered, and then jumps to the End Select statement. If, however, the
expression tested in the first Case clause does not match testExpression, Visual
Basic checks the value of each Case clause until it finds a match. If none of the
Case clauses contain the expression that matches the value stored in
testExpression, Visual Basic jumps to the Case Else clause and executes the
statements until it encounters the End Select keywords. Notice that the Case
Else clause is optional. If your procedure does not use Case Else, and none of
the Case clauses contain a value matching the value of testExpression, Visual
Basic jumps to the statements following End Select and continues executing
your procedure.
Let’s look at the example of a procedure that uses the Select Case statement.
As you already know, the MsgBox function allows you to display a message
with one or more buttons. The result of the MsgBox function can be assigned
to a variable. Using the Select Case statement you can decide which action to
take based on the button the user pressed in the message box.
�Hands-On 5-6: Using the Select Case Statement
1. Press Alt+F11 to switch to the Visual Basic Editor window.
2. Insert a new module and enter the following TestButtons procedure in the
module’s Code window:
Sub TestButtons()Dim question As String
106 | Chapter 5
Part I
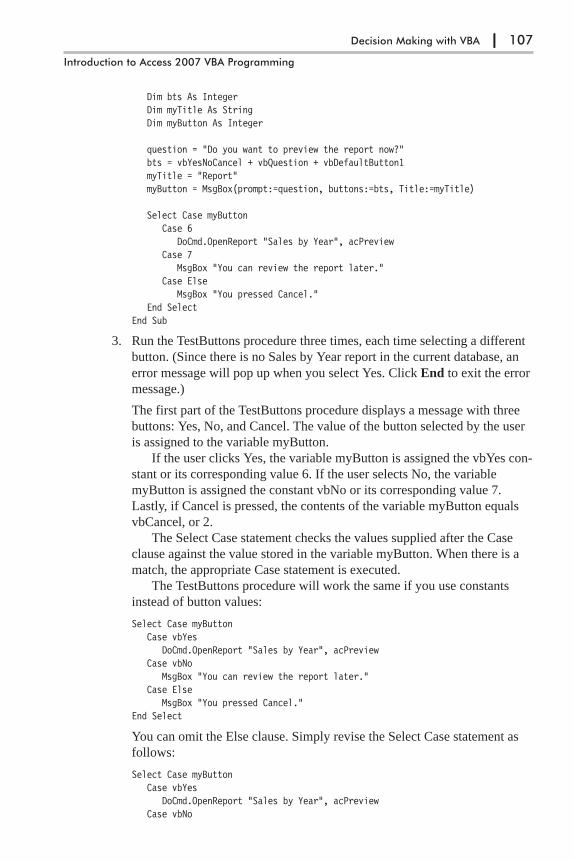
Dim bts As IntegerDim myTitle As StringDim myButton As Integer
question = "Do you want to preview the report now?"bts = vbYesNoCancel + vbQuestion + vbDefaultButton1myTitle = "Report"myButton = MsgBox(prompt:=question, buttons:=bts, Title:=myTitle)
Select Case myButtonCase 6
DoCmd.OpenReport "Sales by Year", acPreviewCase 7
MsgBox "You can review the report later."Case Else
MsgBox "You pressed Cancel."End Select
End Sub
3. Run the TestButtons procedure three times, each time selecting a different
button. (Since there is no Sales by Year report in the current database, an
error message will pop up when you select Yes. Click End to exit the error
message.)
The first part of the TestButtons procedure displays a message with three
buttons: Yes, No, and Cancel. The value of the button selected by the user
is assigned to the variable myButton.
If the user clicks Yes, the variable myButton is assigned the vbYes con-
stant or its corresponding value 6. If the user selects No, the variable
myButton is assigned the constant vbNo or its corresponding value 7.
Lastly, if Cancel is pressed, the contents of the variable myButton equals
vbCancel, or 2.
The Select Case statement checks the values supplied after the Case
clause against the value stored in the variable myButton. When there is a
match, the appropriate Case statement is executed.
The TestButtons procedure will work the same if you use constants
instead of button values:
Select Case myButtonCase vbYes
DoCmd.OpenReport "Sales by Year", acPreviewCase vbNo
MsgBox "You can review the report later."Case Else
MsgBox "You pressed Cancel."End Select
You can omit the Else clause. Simply revise the Select Case statement as
follows:
Select Case myButtonCase vbYes
DoCmd.OpenReport "Sales by Year", acPreviewCase vbNo
Decision Making with VBA | 107
Introduction to Access 2007 VBA Programming
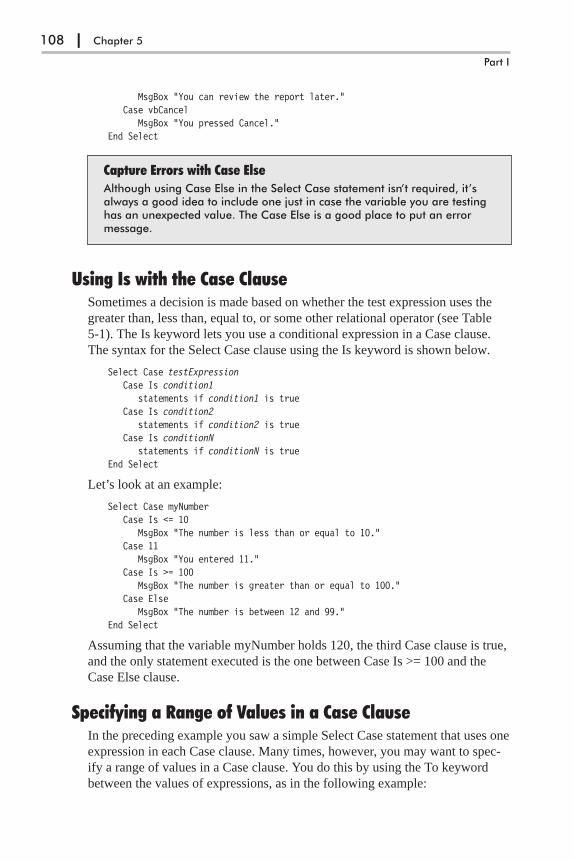
MsgBox "You can review the report later."Case vbCancel
MsgBox "You pressed Cancel."End Select
Capture Errors with Case ElseAlthough using Case Else in the Select Case statement isn’t required, it’salways a good idea to include one just in case the variable you are testinghas an unexpected value. The Case Else is a good place to put an errormessage.
Using Is with the Case ClauseSometimes a decision is made based on whether the test expression uses the
greater than, less than, equal to, or some other relational operator (see Table
5-1). The Is keyword lets you use a conditional expression in a Case clause.
The syntax for the Select Case clause using the Is keyword is shown below.
Select Case testExpression
Case Is condition1
statements if condition1 is trueCase Is condition2
statements if condition2 is trueCase Is conditionN
statements if conditionN is trueEnd Select
Let’s look at an example:
Select Case myNumberCase Is <= 10
MsgBox "The number is less than or equal to 10."Case 11
MsgBox "You entered 11."Case Is >= 100
MsgBox "The number is greater than or equal to 100."Case Else
MsgBox "The number is between 12 and 99."End Select
Assuming that the variable myNumber holds 120, the third Case clause is true,
and the only statement executed is the one between Case Is >= 100 and the
Case Else clause.
Specifying a Range of Values in a Case ClauseIn the preceding example you saw a simple Select Case statement that uses one
expression in each Case clause. Many times, however, you may want to spec-
ify a range of values in a Case clause. You do this by using the To keyword
between the values of expressions, as in the following example:
108 | Chapter 5
Part I
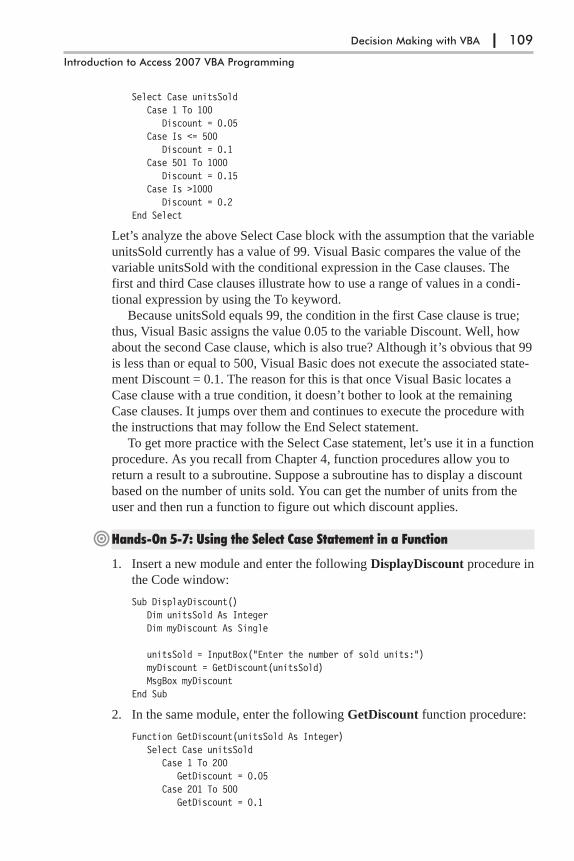
Select Case unitsSoldCase 1 To 100
Discount = 0.05Case Is <= 500
Discount = 0.1Case 501 To 1000
Discount = 0.15Case Is >1000
Discount = 0.2End Select
Let’s analyze the above Select Case block with the assumption that the variable
unitsSold currently has a value of 99. Visual Basic compares the value of the
variable unitsSold with the conditional expression in the Case clauses. The
first and third Case clauses illustrate how to use a range of values in a condi-
tional expression by using the To keyword.
Because unitsSold equals 99, the condition in the first Case clause is true;
thus, Visual Basic assigns the value 0.05 to the variable Discount. Well, how
about the second Case clause, which is also true? Although it’s obvious that 99
is less than or equal to 500, Visual Basic does not execute the associated state-
ment Discount = 0.1. The reason for this is that once Visual Basic locates a
Case clause with a true condition, it doesn’t bother to look at the remaining
Case clauses. It jumps over them and continues to execute the procedure with
the instructions that may follow the End Select statement.
To get more practice with the Select Case statement, let’s use it in a function
procedure. As you recall from Chapter 4, function procedures allow you to
return a result to a subroutine. Suppose a subroutine has to display a discount
based on the number of units sold. You can get the number of units from the
user and then run a function to figure out which discount applies.
�Hands-On 5-7: Using the Select Case Statement in a Function
1. Insert a new module and enter the following DisplayDiscount procedure in
the Code window:
Sub DisplayDiscount()Dim unitsSold As IntegerDim myDiscount As Single
unitsSold = InputBox("Enter the number of sold units:")myDiscount = GetDiscount(unitsSold)MsgBox myDiscount
End Sub
2. In the same module, enter the following GetDiscount function procedure:
Function GetDiscount(unitsSold As Integer)Select Case unitsSold
Case 1 To 200GetDiscount = 0.05
Case 201 To 500GetDiscount = 0.1
Decision Making with VBA | 109
Introduction to Access 2007 VBA Programming

Case 501 To 1000GetDiscount = 0.15
Case Is > 1000GetDiscount = 0.2
End SelectEnd Function
3. Place the insertion point anywhere within the code of the DisplayDiscount
procedure and press F5 to run it.
The DisplayDiscount procedure passes the value stored in the variable
unitsSold to the GetDiscount function. When Visual Basic encounters the
Select Case statement, it checks whether the value of the first Case clause
expression matches the value stored in the unitsSold parameter. If there is a
match, Visual Basic assigns a 5% discount (0.05) to the function name, and
then jumps to the End Select keywords. Because there are no more state-
ments to execute inside the function procedure, Visual Basic returns to the
calling procedure, DisplayDiscount. Here it assigns the function’s result to
the variable myDiscount. The last statement displays the value of the
retrieved discount in a message box.
4. Choose File | Save Chap05 to save changes to the modules.
5. Choose File | Close and Return to Microsoft Office Access.
6. Close the Chap05.accdb database and exit Microsoft Office Access.
� Note: You may want to delete Table1 prior to closing the Chap05.accdbdatabase.
Specifying Multiple Expressions in a Case ClauseYou may specify multiple conditions within a single Case clause by separating
each condition with a comma:
Select Case myMonthCase "January", "February", "March"
Debug.Print myMonth & ": 1st Qtr."Case "April", "May", "June"
Debug.Print myMonth & ": 2nd Qtr."Case "July", "August", "September"
Debug.Print myMonth & ": 3rd Qtr."Case "October", "November", "December"
Debug.Print myMonth & ": 4th Qtr."End Select
Multiple Conditions within a Case ClauseThe commas used to separate conditions within a Case clause have thesame meaning as the OR operator used in the If statement. The Caseclause is true if at least one of the conditions is true.
110 | Chapter 5
Part I
Chapter SummaryConditional statements, introduced in this chapter, let you control the flow of
your VBA procedure. By testing the truth of a condition, you can decide which
statements should be run and which should be skipped over. In other words,
instead of running your procedure from top to bottom, line by line, you can
execute only certain lines. Here are a few guidelines to help you determine
what kind of conditional statement you should use:
� If you want to supply only one condition, the simple If…Then statement is
the best choice.
� If you need to decide which of two actions to perform, use the
If…Then…Else statement.
� If your procedure requires two or more conditions, use the
If…Then…ElseIf or Select Case statements.
� If your procedure has many conditions, use the Select Case statement. This
statement is more flexible and easier to comprehend than the
If…Then…ElseIf statement.
Sometimes decisions have to be repeated. The next chapter teaches you how
your procedures can perform the same actions over and over again.
Decision Making with VBA | 111
Introduction to Access 2007 VBA Programming
Chapter 6
Repeating Actions in VBA
Now that you’ve learned how conditional statements can give your VBA pro-
cedures decision-making capabilities, it’s time to get more involved. Not all
decisions are easy. Sometimes you will need to perform a number of state-
ments several times to arrive at a certain condition. On other occasions,
however, after you’ve reached the decision, you may need to run the specified
statements as long as a condition is true or until a condition becomes true. In
programming, performing repetitive tasks is called looping. VBA has various
looping structures that allow you to repeat a sequence of statements a number
of times. In this chapter, you learn how to loop through your code.
Visual Basic has two types of Do loop statements that repeat a sequence of
statements either as long as or until a certain condition is true: Do...While and
Do...Until.
Using the Do…While StatementThe Do…While statement lets you repeat an action as long as a condition is
true. This statement has the following syntax:
Do While condition
statement1statement2statementN
Loop
When Visual Basic encounters this loop, it first checks the truth value of the
condition. If the condition is false, the statements inside the loop are not exe-
cuted, and Visual Basic will continue to execute the program with the first
statement after the Loop keyword or will exit the program if there are no more
statements to execute. If the condition is true, the statements inside the loop are
run one by one until the Loop statement is encountered. The Loop statement
tells Visual Basic to repeat the entire process again as long as the testing of the
condition in the Do…While statement is true.
Let’s see how you can put the Do…While loop to good use in Microsoft
Access. You will find out how to continuously display an input box until the
user enters the correct password. The following hands-on exercise demon-
strates this.
112
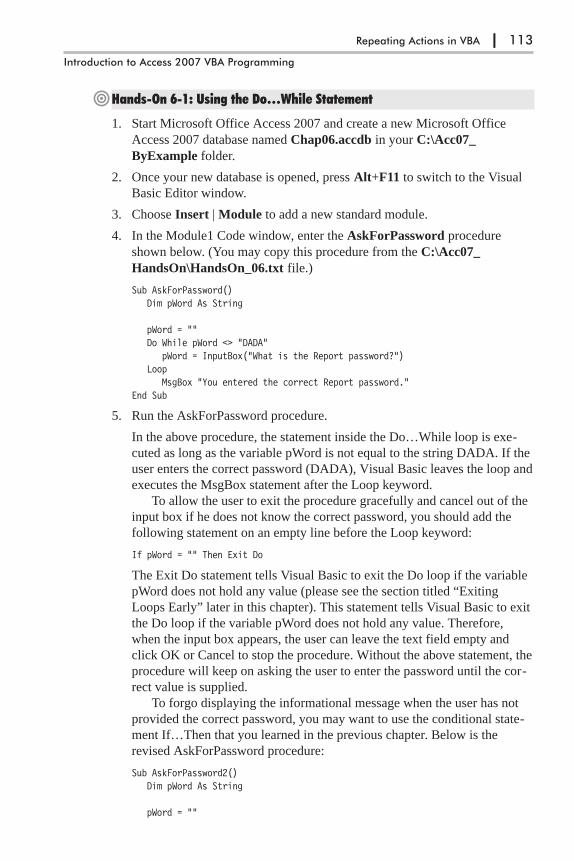
�Hands-On 6-1: Using the Do…While Statement
1. Start Microsoft Office Access 2007 and create a new Microsoft Office
Access 2007 database named Chap06.accdb in your C:\Acc07_
ByExample folder.
2. Once your new database is opened, press Alt+F11 to switch to the Visual
Basic Editor window.
3. Choose Insert | Module to add a new standard module.
4. In the Module1 Code window, enter the AskForPassword procedure
shown below. (You may copy this procedure from the C:\Acc07_
HandsOn\HandsOn_06.txt file.)
Sub AskForPassword()Dim pWord As String
pWord = ""Do While pWord <> "DADA"
pWord = InputBox("What is the Report password?")Loop
MsgBox "You entered the correct Report password."End Sub
5. Run the AskForPassword procedure.
In the above procedure, the statement inside the Do…While loop is exe-
cuted as long as the variable pWord is not equal to the string DADA. If the
user enters the correct password (DADA), Visual Basic leaves the loop and
executes the MsgBox statement after the Loop keyword.
To allow the user to exit the procedure gracefully and cancel out of the
input box if he does not know the correct password, you should add the
following statement on an empty line before the Loop keyword:
If pWord = "" Then Exit Do
The Exit Do statement tells Visual Basic to exit the Do loop if the variable
pWord does not hold any value (please see the section titled “Exiting
Loops Early” later in this chapter). This statement tells Visual Basic to exit
the Do loop if the variable pWord does not hold any value. Therefore,
when the input box appears, the user can leave the text field empty and
click OK or Cancel to stop the procedure. Without the above statement, the
procedure will keep on asking the user to enter the password until the cor-
rect value is supplied.
To forgo displaying the informational message when the user has not
provided the correct password, you may want to use the conditional state-
ment If…Then that you learned in the previous chapter. Below is the
revised AskForPassword procedure:
Sub AskForPassword2()Dim pWord As String
pWord = ""
Repeating Actions in VBA | 113
Introduction to Access 2007 VBA Programming

Do While pWord <> "DADA"pWord = InputBox("What is the Report password?")If pWord = "" Then
MsgBox "You did not enter a password."Exit Do
End IfLoop
If pWord <> "" ThenMsgBox "You entered the correct Report password."
End IfEnd Sub
What Is a Loop?A loop is a programming structure that causes a section of program code toexecute repeatedly. VBA provides several structures to implement loops inyour procedures: Do…While, Do…Until, For…Next, and For Each…Next.
Another Approach to the Do…While StatementThe Do…While statement has another syntax that lets you test the condition at
the bottom of the loop:
Dostatement1statement2statementN
Loop While condition
When you test the condition at the bottom of the loop, the statements inside the
loop are executed at least once. Let’s try this in the next hands-on exercise.
�Hands-On 6-2: Using the Do…While Statement with a Condition at theBottom of the Loop
1. In the Visual Basic Editor window, insert a new module and type the
SignIn procedure as shown below:
Sub SignIn()Dim secretCode As String
DosecretCode = InputBox("Enter your secret code:")If secretCode = "sp1045" Then Exit Do
Loop While secretCode <> "sp1045"End Sub
2. Run the SignIn procedure.
Notice that by the time the condition is evaluated, Visual Basic has already
executed the statements one time. In addition to placing the condition at the
end of the loop, the SignIn procedure shows again how to exit the loop
114 | Chapter 6
Part I

when a condition is reached. When the Exit Do statement is encountered,
the loop ends immediately.
To exit the loop in the SignIn procedure without entering the password,
you may revise it as follows:
Sub SignIn2()Dim secretCode As String
DosecretCode = InputBox("Enter your secret code:")If secretCode = "sp1045" Or secretCode = "" Then Exit Do
Loop While secretCode <> "sp1045"End Sub
Avoid Infinite LoopsIf you don’t design your loop correctly, you can get an infinite loop — aloop that never ends. You will not be able to stop the procedure by usingthe Escape key. The following procedure causes the loop to execute end-lessly because the programmer forgot to include the test condition:
Sub SayHello()Do
MsgBox "Hello."Loop
End Sub
To stop the execution of the infinite loop, you must press Ctrl+Break. WhenVisual Basic displays the message box “Code execution has been inter-rupted,” click End to end the procedure.
Using the Do…Until StatementAnother handy loop is Do…Until, which allows you to repeat one or more
statements until a condition becomes true. In other words, Do…Until repeats a
block of code as long as something is false. Here’s the syntax:
Do Until condition
statement1statement2statementN
Loop
Using the above syntax, you can now rewrite the previously written AskFor-
Password procedure as shown in the following hands-on exercise.
�Hands-On 6-3: Using the Do…Until Statement
1. In the Visual Basic Editor window, insert a new module and type the
AskForPassword3 procedure:
Sub AskForPassword3()Dim pWord As String
Repeating Actions in VBA | 115
Introduction to Access 2007 VBA Programming
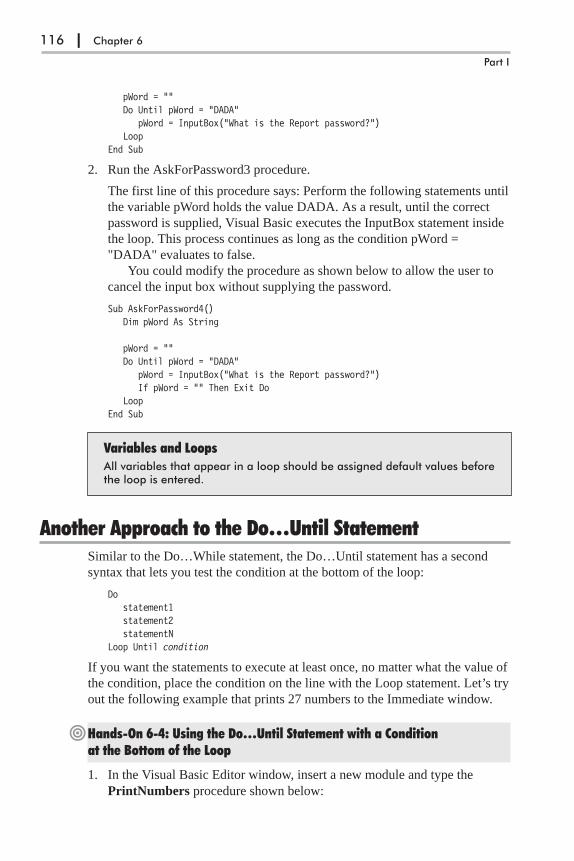
pWord = ""Do Until pWord = "DADA"
pWord = InputBox("What is the Report password?")Loop
End Sub
2. Run the AskForPassword3 procedure.
The first line of this procedure says: Perform the following statements until
the variable pWord holds the value DADA. As a result, until the correct
password is supplied, Visual Basic executes the InputBox statement inside
the loop. This process continues as long as the condition pWord =
"DADA" evaluates to false.
You could modify the procedure as shown below to allow the user to
cancel the input box without supplying the password.
Sub AskForPassword4()Dim pWord As String
pWord = ""Do Until pWord = "DADA"
pWord = InputBox("What is the Report password?")If pWord = "" Then Exit Do
LoopEnd Sub
Variables and LoopsAll variables that appear in a loop should be assigned default values beforethe loop is entered.
Another Approach to the Do…Until StatementSimilar to the Do…While statement, the Do…Until statement has a second
syntax that lets you test the condition at the bottom of the loop:
Dostatement1statement2statementN
Loop Until condition
If you want the statements to execute at least once, no matter what the value of
the condition, place the condition on the line with the Loop statement. Let’s try
out the following example that prints 27 numbers to the Immediate window.
�Hands-On 6-4: Using the Do…Until Statement with a Conditionat the Bottom of the Loop
1. In the Visual Basic Editor window, insert a new module and type the
PrintNumbers procedure shown below:
116 | Chapter 6
Part I

Sub PrintNumbers()Dim num As Integer
num = 0Do
num = num + 1Debug.Print num
Loop Until num = 27End Sub
2. Make sure the Immediate window is open in the Visual Basic Editor
window (choose View | Immediate Window).
3. Run the PrintNumbers procedure.
The variable num is initialized at the beginning of the procedure to zero
(0). When Visual Basic enters the loop, the content of the variable num is
increased by one, and the value is written to the Immediate window with
the Debug.Print statement. Next, the condition tells Visual Basic that it
should execute the statements inside the loop until the variable num equals
27.
CountersA counter is a numeric variable that keeps track of the number of items thathave been processed. The PrintNumbers procedure shown above declaresthe variable num to keep track of numbers that were printed. A countervariable should be initialized (assigned a value) at the beginning of theprogram. This ensures that you always know the exact value of the counterbefore you begin using it. A counter can be incremented or decrementedby a specified value.
For…Next StatementThe For…Next statement is used when you know how many times you want to
repeat a group of statements. The syntax of a For…Next statement looks like
this:
For counter = start To end [Step increment]statement1statement2statementN
Next [counter]
The code in the brackets is optional. Counter is a numeric variable that stores
the number of iterations. Start is the number at which you want to begin count-
ing. End indicates how many times the loop should be executed. For example,
if you want to repeat the statements inside the loop five times, use the follow-
ing For statement:
For counter = 1 To 5statements
Next
Repeating Actions in VBA | 117
Introduction to Access 2007 VBA Programming

When Visual Basic encounters the Next statement, it will go back to the begin-
ning of the loop and execute the statements inside the loop again, as long as
the counter hasn’t reached the end value. As soon as the value of counter is
greater than the number entered after the To keyword, Visual Basic exits the
loop. Because the variable counter automatically changes after each execution
of the loop, sooner or later the value stored in the counter exceeds the value
specified in end.
By default, every time Visual Basic executes the statements inside the loop,
the value of the variable counter is increased by one. You can change this
default setting by using the Step clause. For example, to increase the variable
counter by three, use the following statement:
For counter = 1 To 5 Step 3statements
Next counter
When Visual Basic encounters the above statement, it executes the statements
inside the loop twice. The first time the loop runs, the counter equals 1. The
second time the loop runs, the counter equals 4 (1+3). The loop does not run a
third time, because now the counter equals 7 (4+3), causing Visual Basic to
exit the loop.
Note that the Step increment is optional. Optional statements are always
shown in square brackets (see the syntax at the beginning of this section). The
Step increment isn’t specified unless it’s a value other than 1. You can place a
negative number after Step in order to decrement this value from the counter
each time it encounters the Next statement. The name of the variable (counter)
after the Next statement is also optional; however, it’s good programming
practice to make your Next statements explicit by including the counter vari-
able’s name.
How can you use the For…Next loop in Microsoft Access? Suppose you
want to get the names of the text boxes located on an active form. The proce-
dure in the next hands-on exercise demonstrates how to determine if a control
is a text box and how to display its name if a text box is found.
�Hands-On 6-5: Using the For…Next Statement
1. Import the Customers table from the Northwind 2007.accdb database
located in the Acc07_HandsOn folder. To do this, choose File | Close and
Return to Microsoft Office Access. Click Access in the Import section of
the External Data tab. In the File name text box of the Get External Data
dialog box, enter C:\Acc07_HandsOn\Northwind 2007.accdb and click
OK. In the Import Objects dialog box, select the Customers table and
click OK. Click Close to exit the Get External Data dialog box.
2. Now, create a simple Customers form based on the Customers table. To do
this, select the Customers table in the navigation pane by clicking on its
name. Next, click the Form button in the Forms section of the Create tab.
Access creates a form as shown in Figure 6-1.
118 | Chapter 6
Part I

3. Press Alt+F11 to switch to the Visual Basic Editor window and insert a
new module.
4. In the module’s Code window, enter the GetTextBoxNames procedure as
shown below:
Sub GetTextBoxNames()Dim myForm As FormDim myControl As ControlDim c As Integer
Set myForm = Screen.ActiveFormSet myControl = Screen.ActiveControl
For c = 0 To myForm.Count - 1If TypeOf myForm(c) Is TextBox Then
MsgBox myForm(c).NameEnd If
Next cEnd Sub
The conditional statement (If…Then) nested inside the For…Next loop
tells Visual Basic to display the name of the active control only if it is a
text box.
5. Run the GetTextBoxNames procedure.
Paired StatementsFor and Next must be paired. If one is missing, Visual Basic generates thefollowing error message: “For without Next.”
Repeating Actions in VBA | 119
Introduction to Access 2007 VBA Programming
Figure 6-1: Automatic data entry form created by Microsoft Access 2007.

For Each…Next StatementWhen your procedure needs to loop through all of the objects of a collection or
all of the elements in an array (arrays are the subject of the next chapter), the
For Each…Next statement should be used. This loop does not require a coun-
ter variable. Visual Basic can figure out on its own how many times the loop
should execute. The For Each...Next statement looks like this:
For Each element In Group
statement1statement2statementN
Next [element]
Element is a variable to which all the elements of an array or collection will be
assigned. This variable has to be of the Variant data type for an array and of the
Object data type for a collection. Group is the name of a collection or an array.
Let’s now see how to use the For Each…Next statement to print the names of
the controls in the Customers form to the Immediate window.
�Hands-On 6-6: Using the For Each…Next Statement
This hands-on exercise requires the completion of steps 1-2 of Hands-On 6-5.
1. Ensure that the Customers form you created in Hands-On 6-5 is still open
in Form view.
2. Switch to the Visual Basic Editor window and insert a new module.
3. In the Code window, enter the GetControls procedure as shown below:
Sub GetControls()Dim myControl As ControlDim myForm As Form
DoCmd.OpenForm "Customers"Set myForm = Screen.ActiveForm
For Each myControl In myFormDebug.Print myControl.Name
NextEnd Sub
4. Run the GetControls procedure.
5. To see the results of the procedure you just executed, press Ctrl+G in the
Visual Basic Editor window to open the Immediate window or choose
View | Immediate Window.
120 | Chapter 6
Part I

Exiting Loops EarlySometimes you might not want to wait until the loop ends on its own. It’s pos-
sible that a user will enter the wrong data, a procedure will encounter an error,
or perhaps the task will complete and there’s no need to do additional looping.
You can leave the loop early without reaching the condition that normally ter-
minates it. Visual Basic has two types of Exit statements:
� The Exit For statement is used to end either a For…Next or a For
Each…Next loop early.
� The Exit Do statement immediately exits any of the VBA Do loops.
The following hands-on exercise demonstrates how to use the Exit For state-
ment to leave the For Each…Next loop early.
�Hands-On 6-7: Early Exit from a Loop
1. In the Visual Basic Editor window, choose Insert | Module.
2. In the module’s Code window, enter the GetControls2 procedure as shown
below:
Sub GetControls2()Dim myControl As ControlDim myForm As Form
DoCmd.OpenForm "Customers"Set myForm = Screen.ActiveForm
For Each myControl In myFormDebug.Print myControl.NameIf myControl.Name = "Address" Then Exit For
NextEnd Sub
3. Run the GetControls2 procedure.
The GetControls2 procedure examines the names of the controls in the
open Customers form. If Visual Basic encounters the control named
“Address,” it exits the loop.
Exiting ProceduresIf you want to exit a subroutine earlier than normal, use the Exit Sub state-ment. If the procedure is a function, use the Exit Function statementinstead.
Repeating Actions in VBA | 121
Introduction to Access 2007 VBA Programming
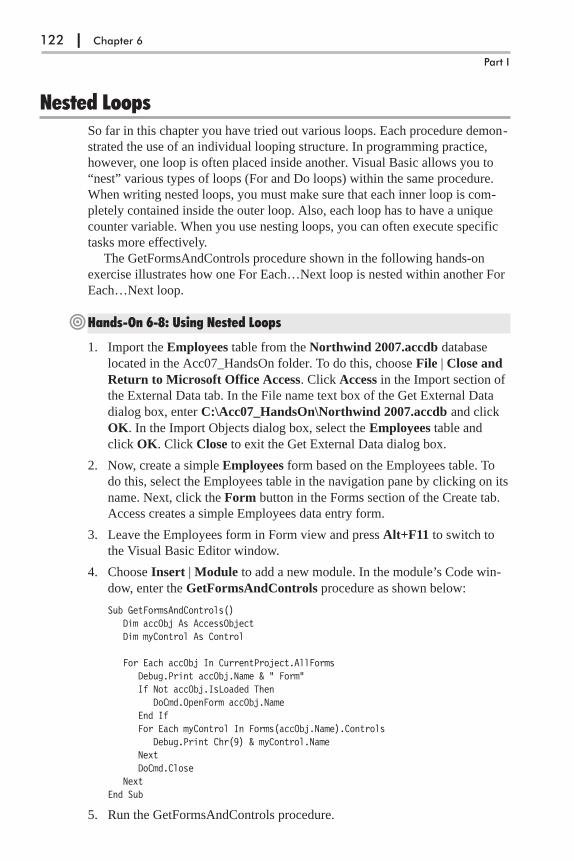
Nested LoopsSo far in this chapter you have tried out various loops. Each procedure demon-
strated the use of an individual looping structure. In programming practice,
however, one loop is often placed inside another. Visual Basic allows you to
“nest” various types of loops (For and Do loops) within the same procedure.
When writing nested loops, you must make sure that each inner loop is com-
pletely contained inside the outer loop. Also, each loop has to have a unique
counter variable. When you use nesting loops, you can often execute specific
tasks more effectively.
The GetFormsAndControls procedure shown in the following hands-on
exercise illustrates how one For Each…Next loop is nested within another For
Each…Next loop.
�Hands-On 6-8: Using Nested Loops
1. Import the Employees table from the Northwind 2007.accdb database
located in the Acc07_HandsOn folder. To do this, choose File | Close and
Return to Microsoft Office Access. Click Access in the Import section of
the External Data tab. In the File name text box of the Get External Data
dialog box, enter C:\Acc07_HandsOn\Northwind 2007.accdb and click
OK. In the Import Objects dialog box, select the Employees table and
click OK. Click Close to exit the Get External Data dialog box.
2. Now, create a simple Employees form based on the Employees table. To
do this, select the Employees table in the navigation pane by clicking on its
name. Next, click the Form button in the Forms section of the Create tab.
Access creates a simple Employees data entry form.
3. Leave the Employees form in Form view and press Alt+F11 to switch to
the Visual Basic Editor window.
4. Choose Insert | Module to add a new module. In the module’s Code win-
dow, enter the GetFormsAndControls procedure as shown below:
Sub GetFormsAndControls()Dim accObj As AccessObjectDim myControl As Control
For Each accObj In CurrentProject.AllFormsDebug.Print accObj.Name & " Form"If Not accObj.IsLoaded Then
DoCmd.OpenForm accObj.NameEnd IfFor Each myControl In Forms(accObj.Name).Controls
Debug.Print Chr(9) & myControl.NameNextDoCmd.Close
NextEnd Sub
5. Run the GetFormsAndControls procedure.
122 | Chapter 6
Part I
The GetFormsAndControls procedure shown above uses two For Each…
Next loops to print the name of each currently open form and its controls to
the Immediate window. To enumerate through the form’s controls, the form
must be open. Notice the use of the Access built-in function IsLoaded. The
procedure will only open the form if it is not yet loaded. The control names
are indented in the Immediate window using the Chr(9) function. This is
like pressing the Tab key once. To get the same result, you can replace
Chr(9) with a VBA constant: vbTab.
After reading the names of the controls, the form is closed and the next
form is processed in the same manner. The procedure ends when no more
forms are found in the AllForms collection of CurrentProject.
6. Choose File | Save Chap06 to save changes to the modules.
7. Choose File | Close and Return to Microsoft Office Access.
8. Close the Chap06.accdb database and exit Microsoft Office Access.
Chapter SummaryIn this chapter you learned how to repeat certain groups of statements in VBA
procedures by using loops. While working with several types of loops, you
saw how each loop performs repetitions in a slightly different way. As you
gain experience, you’ll find it easier to choose the appropriate flow control
structure for your task.
In the following chapters of this book, there are many additional examples
of using loops. In the next chapter, for instance, you will see how, by using
arrays and nested loops, you can create your own VBA procedure to pick your
lottery numbers. The next chapter also shows you how to code procedures that
require a large number of variables.
Repeating Actions in VBA | 123
Introduction to Access 2007 VBA Programming
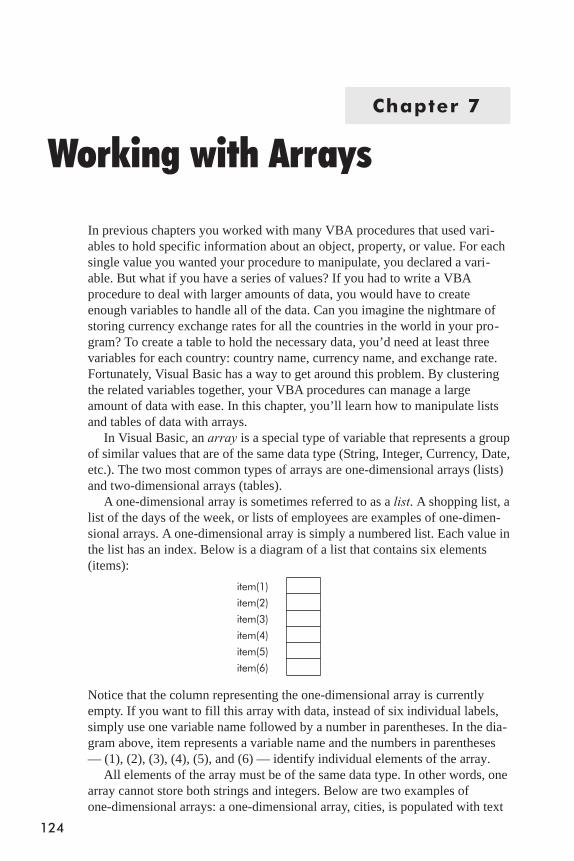
Chapter 7
Working with Arrays
In previous chapters you worked with many VBA procedures that used vari-
ables to hold specific information about an object, property, or value. For each
single value you wanted your procedure to manipulate, you declared a vari-
able. But what if you have a series of values? If you had to write a VBA
procedure to deal with larger amounts of data, you would have to create
enough variables to handle all of the data. Can you imagine the nightmare of
storing currency exchange rates for all the countries in the world in your pro-
gram? To create a table to hold the necessary data, you’d need at least three
variables for each country: country name, currency name, and exchange rate.
Fortunately, Visual Basic has a way to get around this problem. By clustering
the related variables together, your VBA procedures can manage a large
amount of data with ease. In this chapter, you’ll learn how to manipulate lists
and tables of data with arrays.
In Visual Basic, an array is a special type of variable that represents a group
of similar values that are of the same data type (String, Integer, Currency, Date,
etc.). The two most common types of arrays are one-dimensional arrays (lists)
and two-dimensional arrays (tables).
A one-dimensional array is sometimes referred to as a list. A shopping list, a
list of the days of the week, or lists of employees are examples of one-dimen-
sional arrays. A one-dimensional array is simply a numbered list. Each value in
the list has an index. Below is a diagram of a list that contains six elements
(items):
item(1)
item(2)
item(3)
item(4)
item(5)
item(6)
Notice that the column representing the one-dimensional array is currently
empty. If you want to fill this array with data, instead of six individual labels,
simply use one variable name followed by a number in parentheses. In the dia-
gram above, item represents a variable name and the numbers in parentheses
— (1), (2), (3), (4), (5), and (6) — identify individual elements of the array.
All elements of the array must be of the same data type. In other words, one
array cannot store both strings and integers. Below are two examples of
one-dimensional arrays: a one-dimensional array, cities, is populated with text
124

(String data type, $), and a one-dimensional array, lotto, contains six lottery
numbers (Integer data type, %).
One-dimensional arraynamed cities$
(of String data type)
One-dimensional arraynamed lotto%
(of Integer data type)
cities(1) Baltimore lotto(1) 25
cities(2) Atlanta lotto(2) 4
cities(3) Boston lotto(3) 31
cities(4) Washington lotto(4) 22
cities(5) New York lotto(5) 11
cities(6) Trenton lotto(6) 5
As you can see, the contents assigned to each array element match the variable
type. If you want to store values of different data types in the same array, you
must declare the array as Variant.
Two-dimensional arrays are tables of data represented in rows and columns.
The position of each element in a table is determined by its row and column
number. Below is a diagram of an empty two-dimensional array.
rows � 1 2 3 �columns
1 (1, 1) (1, 2) (1, 3)
2 (2, 1) (2, 2) (2, 3)
3 (3, 1) (3, 2) (3, 3)
4 (4, 1) (4, 2) (4, 3)
5 (5, 1) (5, 2) (5, 3)
Notice how items in a two-dimensional array are identified with row and col-
umn indexes. In this diagram, the first element of the array is located in the
first row and the first column (1, 1). The last element of the array is positioned
in the fifth row and the third column (5, 3).
Let’s now populate this array with some values. The two-dimensional array
below stores the name of a country or region, its currency, and the U.S. dollar
equivalent.
Two-dimensional array named exchange(of Variant data type)
Japan(1, 1)
Japanese Yen(1, 2)
118.87(1, 3)
Australia(2, 1)
Australian Dollar(2, 2)
1.1654(2, 3)
Canada(3, 1)
Canadian Dollar(3, 2)
1.0582(3, 3)
Norway(4, 1)
Norwegian Krone(4, 2)
5.8776(4, 3)
Europe(5, 1)
Euro(5, 2)
0.7323(5, 3)
Working with Arrays | 125
Introduction to Access 2007 VBA Programming

Although VBA arrays can have up to 60 dimensions, most people find it
difficult to picture dimensions beyond 3D. A three-dimensional array is a col-
lection of tables where each table has the same number of rows and columns.
Each element of a three-dimensional array is identified by three pieces of data:
row, column, and table.
What Is an Array Variable?An array is a group of variables that have a common name. While a typicalvariable can hold only one value, an array variable can store a large num-ber of individual values. You refer to a specific value in the array by usingthe array name and an index number.
Declaring ArraysBecause an array is a variable, you must declare it the same way you declare
other variables — by using the Dim statement. When you declare an array
variable you set aside the required memory space to hold its values.
Let’s take a look at some examples of array declarations:
Dim cities(6) As StringDim daysOfWeek(7) As StringDim lotto(6) As IntegerDim exchange(5, 3) As Variant
Notice that the names of variables are followed by numbers in parentheses.
One-dimensional arrays require one number between parentheses. This number
specifies the maximum number of elements that can be stored in a list. The
name of a two-dimensional array is always followed by two numbers; the first
number is the row index and the second number is the column index. In the
example above, the exchange array can hold a maximum of 15 values
(5 * 3 = 15).
The last part in the array declaration is the definition of the data type the
array will hold. An array can hold any of the following data types: Integer,
Long, Single, Double, Variant, Currency, String, Boolean, Byte, and Date.
When you declare an array, Visual Basic automatically reserves enough
memory space for it. The amount of memory allocated depends on the array’s
size and data type. When you declare a one-dimensional array named lotto
with six elements, Visual Basic sets aside 12 bytes — two bytes for each ele-
ment of the array (recall that the size of the Integer data type is 2, hence
12 = 2 * 6). The larger the array, the more memory space is required to store
the data. Because arrays can eat up a lot of memory and impact your com-
puter’s performance, it is recommended that you declare arrays with only as
many elements as you think you’ll use.
126 | Chapter 7
Part I

Array Upper and Lower BoundsBy default, Visual Basic assigns zero (0) to the first element of the array.
Therefore, the number 1 represents the second element of the array, number 2
the third, and so on. With numeric indexing starting at 0, the one-dimensional
array cities(6) contains seven elements numbered from 0 to 6. If you’d rather
start counting your array’s elements at 1, you can explicitly specify a lower
bound of the array by using an Option Base 1 statement. This instruction must
be placed in the declaration section at the top of the VBA module, before any
Sub statements. If you don’t specify Option Base 1 in a procedure that uses
arrays, Visual Basic assumes that the statement Option Base 0 is to be used,
and begins indexing your array’s elements at 0.
You can have the array indexing start at a number other than 0 or 1. To do
this, you must specify the bounds of an array when declaring the array vari-
able. The bounds of an array are its lowest and highest indexes. Let’s take a
look at the following example:
Dim cities(3 To 6) As Integer
The above statement declares a one-dimensional array with four elements. The
numbers enclosed in parentheses after the array name specify the lower (3) and
upper (6) bounds of the array. The first element of this array has the number 3,
the second 4, the third 5, and the fourth 6. Notice the keyword To between the
lower and upper index numbers.
The Range of the ArrayThe spread of the elements specified by the Dim statement is called therange of the array. For example: Dim mktgCodes(5 To 15).
Using Arrays in VBA ProceduresAfter you declare an array, you must assign values to its elements. Assigning
values to the array’s elements is often referred to as “filling an array” or “pop-
ulating an array.” Let’s try a VBA procedure that uses a one-dimensional array
to display a list of six American cities.
�Hands-On 7-1: Using a One-Dimensional Array
1. Start Microsoft Office Access 2007 and create a new Microsoft Office
Access 2007 database named Chap07.accdb in your C:\Acc07_
ByExample folder.
2. Once your new database is opened, press Alt+F11 to switch to the Visual
Basic Editor window.
3. Choose Insert | Module to add a new standard module.
4. In the Module1 Code window, enter the FavoriteCities procedure shown
below. (You may copy this procedure from the C:\Acc07_HandsOn\
Working with Arrays | 127
Introduction to Access 2007 VBA Programming
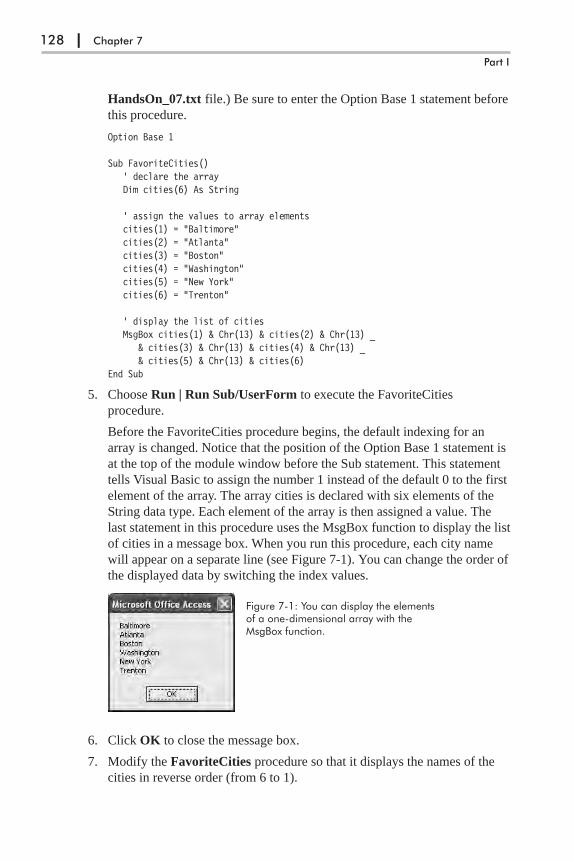
HandsOn_07.txt file.) Be sure to enter the Option Base 1 statement before
this procedure.
Option Base 1
Sub FavoriteCities()' declare the arrayDim cities(6) As String
' assign the values to array elementscities(1) = "Baltimore"cities(2) = "Atlanta"cities(3) = "Boston"cities(4) = "Washington"cities(5) = "New York"cities(6) = "Trenton"
' display the list of citiesMsgBox cities(1) & Chr(13) & cities(2) & Chr(13) _
& cities(3) & Chr(13) & cities(4) & Chr(13) _& cities(5) & Chr(13) & cities(6)
End Sub
5. Choose Run | Run Sub/UserForm to execute the FavoriteCities
procedure.
Before the FavoriteCities procedure begins, the default indexing for an
array is changed. Notice that the position of the Option Base 1 statement is
at the top of the module window before the Sub statement. This statement
tells Visual Basic to assign the number 1 instead of the default 0 to the first
element of the array. The array cities is declared with six elements of the
String data type. Each element of the array is then assigned a value. The
last statement in this procedure uses the MsgBox function to display the list
of cities in a message box. When you run this procedure, each city name
will appear on a separate line (see Figure 7-1). You can change the order of
the displayed data by switching the index values.
6. Click OK to close the message box.
7. Modify the FavoriteCities procedure so that it displays the names of the
cities in reverse order (from 6 to 1).
128 | Chapter 7
Part I
Figure 7-1: You can display the elementsof a one-dimensional array with theMsgBox function.
Initial Value of an Array ElementUntil a value is assigned to an element of an array, the element retains itsdefault value. Numeric variables have a default value of zero (0), andstring variables have a default value of empty string ("").
Arrays and Looping StatementsSeveral looping statements you learned earlier (For…Next and For
Each…Next) will come in handy now that you’re ready to perform such tasks
as populating an array or displaying the elements of an array. It’s time to com-
bine the skills you’ve learned so far.
How can you rewrite the FavoriteCities procedure so that it shows the name
of each city in a separate message box? The FavoriteCities2 procedure in the
following hands-on exercise replaces the last statement of the original proce-
dure with the For Each…Next loop.
�Hands-On 7-2: Using Arrays and Loops
1. In the Visual Basic Editor window, insert a new module.
2. Enter the following FavoriteCities2 procedure in the Code window:
Option Base 1
Sub FavoriteCities2()' declare the arrayDim cities(6) As StringDim city As Variant
' assign the values to array elementscities(1) = "Baltimore"cities(2) = "Atlanta"cities(3) = "Boston"cities(4) = "Washington"cities(5) = "New York"cities(6) = "Trenton"
' display the list of cities in separate messagesFor Each city In cities
MsgBox cityNext
End Sub
3. Choose Run | Run Sub/UserForm to execute the FavoriteCities2
procedure.
Notice that the For Each…Next loop uses the variable city of the Variant
data type. As you recall from Chapter 6, the For Each… Next loop allows
you to loop through all of the objects in a collection or all of the elements
of an array and perform the same action on each object or element. When
Working with Arrays | 129
Introduction to Access 2007 VBA Programming

you run the FavoriteCities2 procedure, the loop will execute as many times
as there are elements in the array.
In Chapter 4 you practiced passing arguments as variables to subroutines and
functions. The procedure CityOperator in the next hands-on exercise demon-
strates how you can pass elements of an array to another procedure.
�Hands-On 7-3: Passing Elements of an Array to Another Procedure
1. In the Visual Basic Editor window, insert a new module.
2. Enter the following two procedures (CityOperator and Hello) in the mod-
ule’s Code window:
Option Base 1
Sub CityOperator()' declare the arrayDim cities(6) As String
' assign the values to array elementscities(1) = "Baltimore"cities(2) = "Atlanta"cities(3) = "Boston"cities(4) = "Washington"cities(5) = "New York"cities(6) = "Trenton"
' call another procedure and pass' the array as argumentHello cities()
End Sub
Sub Hello(cities() As String)Dim counter As Integer
For counter = 1 To 6MsgBox "Hello, " & cities(counter) & "!"Next
End Sub
3. Execute the CityOperator procedure (choose Run | Run Sub/UserForm).
Notice that the declaration of the Hello procedure includes an array type
argument named cities(). Passing array elements from one subroutine to
another subroutine or function procedure allows you to reuse the same
array in many procedures without unnecessary duplication of the program
code.
130 | Chapter 7
Part I
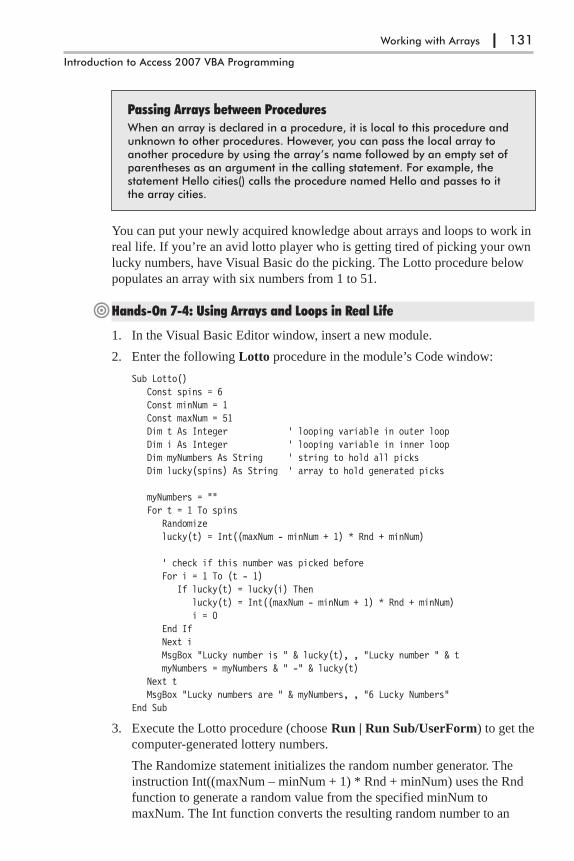
Passing Arrays between ProceduresWhen an array is declared in a procedure, it is local to this procedure andunknown to other procedures. However, you can pass the local array toanother procedure by using the array’s name followed by an empty set ofparentheses as an argument in the calling statement. For example, thestatement Hello cities() calls the procedure named Hello and passes to itthe array cities.
You can put your newly acquired knowledge about arrays and loops to work in
real life. If you’re an avid lotto player who is getting tired of picking your own
lucky numbers, have Visual Basic do the picking. The Lotto procedure below
populates an array with six numbers from 1 to 51.
�Hands-On 7-4: Using Arrays and Loops in Real Life
1. In the Visual Basic Editor window, insert a new module.
2. Enter the following Lotto procedure in the module’s Code window:
Sub Lotto()Const spins = 6Const minNum = 1Const maxNum = 51Dim t As Integer ' looping variable in outer loopDim i As Integer ' looping variable in inner loopDim myNumbers As String ' string to hold all picksDim lucky(spins) As String ' array to hold generated picks
myNumbers = ""For t = 1 To spins
Randomizelucky(t) = Int((maxNum - minNum + 1) * Rnd + minNum)
' check if this number was picked beforeFor i = 1 To (t - 1)
If lucky(t) = lucky(i) Thenlucky(t) = Int((maxNum - minNum + 1) * Rnd + minNum)i = 0
End IfNext iMsgBox "Lucky number is " & lucky(t), , "Lucky number " & tmyNumbers = myNumbers & " -" & lucky(t)
Next tMsgBox "Lucky numbers are " & myNumbers, , "6 Lucky Numbers"
End Sub
3. Execute the Lotto procedure (choose Run | Run Sub/UserForm) to get the
computer-generated lottery numbers.
The Randomize statement initializes the random number generator. The
instruction Int((maxNum – minNum + 1) * Rnd + minNum) uses the Rnd
function to generate a random value from the specified minNum to
maxNum. The Int function converts the resulting random number to an
Working with Arrays | 131
Introduction to Access 2007 VBA Programming

integer. Instead of assigning constant values for minNum and maxNum,
you can use the InputBox function to get these values from the user.
The inner For…Next loop ensures that each picked number is unique
— it may not be any one of the previously picked numbers. If you omit the
inner loop and run this procedure multiple times, you’ll likely see some
occurrences of duplicate numbers.
Using a Two-Dimensional ArrayNow that you know how to programmatically produce a list (a one-dimen-
sional array), it’s time to take a closer look at how you can work with tables of
data. The following hands-on exercise creates a two-dimensional array that
will hold three country or region names, currency names, and exchange rates.
�Hands-On 7-5: Using a Two-Dimensional Array
1. In the Visual Basic Editor window, insert a new module.
2. Enter the following Exchange procedure in the module’s Code window:
Sub Exchange()Dim t As StringDim r As StringDim Ex(3, 3) As Variant
t = Chr(9) ' Tabr = Chr(13) ' Enter
Ex(1, 1) = "Japan"Ex(1, 2) = "Japanese Yen"Ex(1, 3) = 102.76Ex(2, 1) = "Europe"Ex(2, 2) = "Euro"Ex(2, 3) = 0.744734Ex(3, 1) = "Canada"Ex(3, 2) = "Canadian Dollar"Ex(3, 3) = 1.20892
MsgBox "Country " & t & t & "Currency" & t & t & "Value per US$" _& r & r _& Ex(1, 1) & t & t & Ex(1, 2) & t & Ex(1, 3) & r _& Ex(2, 1) & t & t & Ex(2, 2) & t & t & Ex(2, 3) & r _& Ex(3, 1) & t & t & Ex(3, 2) & t & Ex(3, 3), , _"Exchange"
End Sub
3. Execute the Exchange procedure (choose Run | Run Sub/UserForm).
When you run the Exchange procedure, you will see a message box with
the information presented in three columns (see Figure 7-2).
132 | Chapter 7
Part I
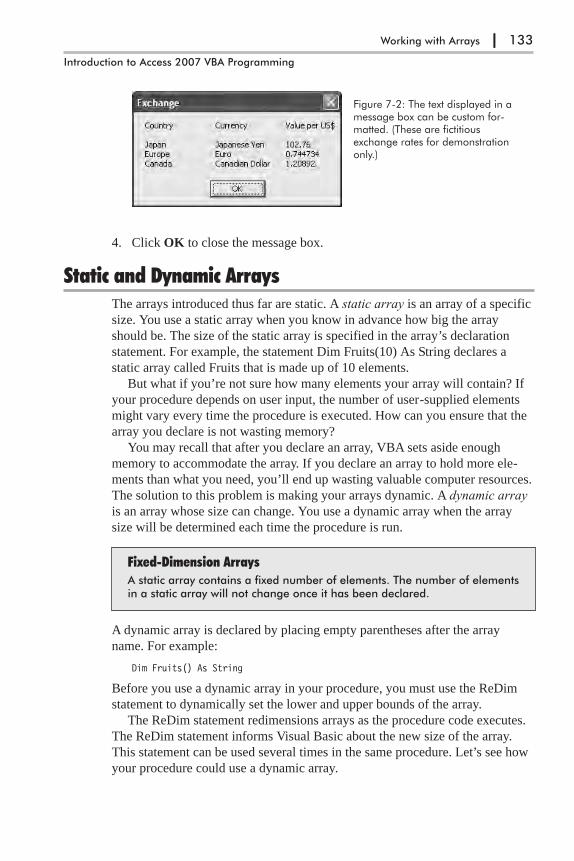
4. Click OK to close the message box.
Static and Dynamic ArraysThe arrays introduced thus far are static. A static array is an array of a specific
size. You use a static array when you know in advance how big the array
should be. The size of the static array is specified in the array’s declaration
statement. For example, the statement Dim Fruits(10) As String declares a
static array called Fruits that is made up of 10 elements.
But what if you’re not sure how many elements your array will contain? If
your procedure depends on user input, the number of user-supplied elements
might vary every time the procedure is executed. How can you ensure that the
array you declare is not wasting memory?
You may recall that after you declare an array, VBA sets aside enough
memory to accommodate the array. If you declare an array to hold more ele-
ments than what you need, you’ll end up wasting valuable computer resources.
The solution to this problem is making your arrays dynamic. A dynamic array
is an array whose size can change. You use a dynamic array when the array
size will be determined each time the procedure is run.
Fixed-Dimension ArraysA static array contains a fixed number of elements. The number of elementsin a static array will not change once it has been declared.
A dynamic array is declared by placing empty parentheses after the array
name. For example:
Dim Fruits() As String
Before you use a dynamic array in your procedure, you must use the ReDim
statement to dynamically set the lower and upper bounds of the array.
The ReDim statement redimensions arrays as the procedure code executes.
The ReDim statement informs Visual Basic about the new size of the array.
This statement can be used several times in the same procedure. Let’s see how
your procedure could use a dynamic array.
Working with Arrays | 133
Introduction to Access 2007 VBA Programming
Figure 7-2: The text displayed in amessage box can be custom for-matted. (These are fictitiousexchange rates for demonstrationonly.)
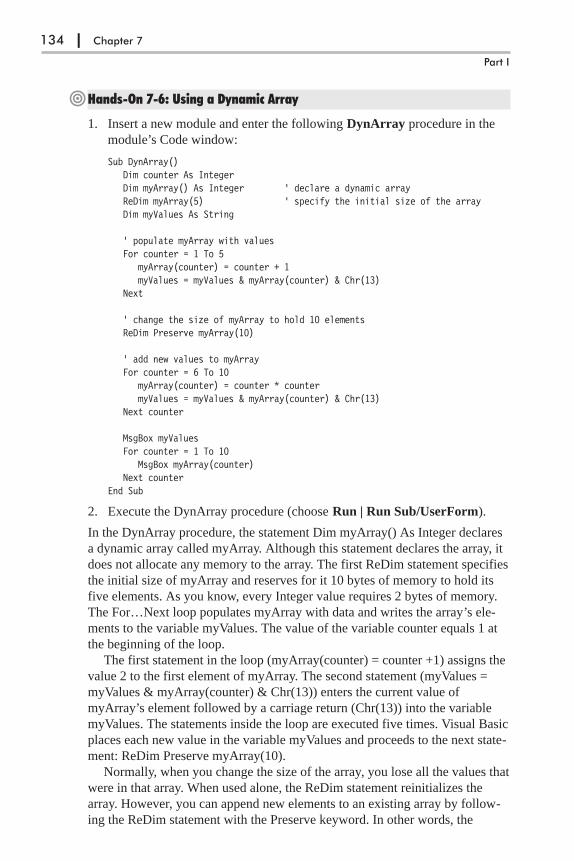
�Hands-On 7-6: Using a Dynamic Array
1. Insert a new module and enter the following DynArray procedure in the
module’s Code window:
Sub DynArray()Dim counter As IntegerDim myArray() As Integer ' declare a dynamic arrayReDim myArray(5) ' specify the initial size of the arrayDim myValues As String
' populate myArray with valuesFor counter = 1 To 5
myArray(counter) = counter + 1myValues = myValues & myArray(counter) & Chr(13)
Next
' change the size of myArray to hold 10 elementsReDim Preserve myArray(10)
' add new values to myArrayFor counter = 6 To 10
myArray(counter) = counter * countermyValues = myValues & myArray(counter) & Chr(13)
Next counter
MsgBox myValuesFor counter = 1 To 10
MsgBox myArray(counter)Next counter
End Sub
2. Execute the DynArray procedure (choose Run | Run Sub/UserForm).
In the DynArray procedure, the statement Dim myArray() As Integer declares
a dynamic array called myArray. Although this statement declares the array, it
does not allocate any memory to the array. The first ReDim statement specifies
the initial size of myArray and reserves for it 10 bytes of memory to hold its
five elements. As you know, every Integer value requires 2 bytes of memory.
The For…Next loop populates myArray with data and writes the array’s ele-
ments to the variable myValues. The value of the variable counter equals 1 at
the beginning of the loop.
The first statement in the loop (myArray(counter) = counter +1) assigns the
value 2 to the first element of myArray. The second statement (myValues =
myValues & myArray(counter) & Chr(13)) enters the current value of
myArray’s element followed by a carriage return (Chr(13)) into the variable
myValues. The statements inside the loop are executed five times. Visual Basic
places each new value in the variable myValues and proceeds to the next state-
ment: ReDim Preserve myArray(10).
Normally, when you change the size of the array, you lose all the values that
were in that array. When used alone, the ReDim statement reinitializes the
array. However, you can append new elements to an existing array by follow-
ing the ReDim statement with the Preserve keyword. In other words, the
134 | Chapter 7
Part I
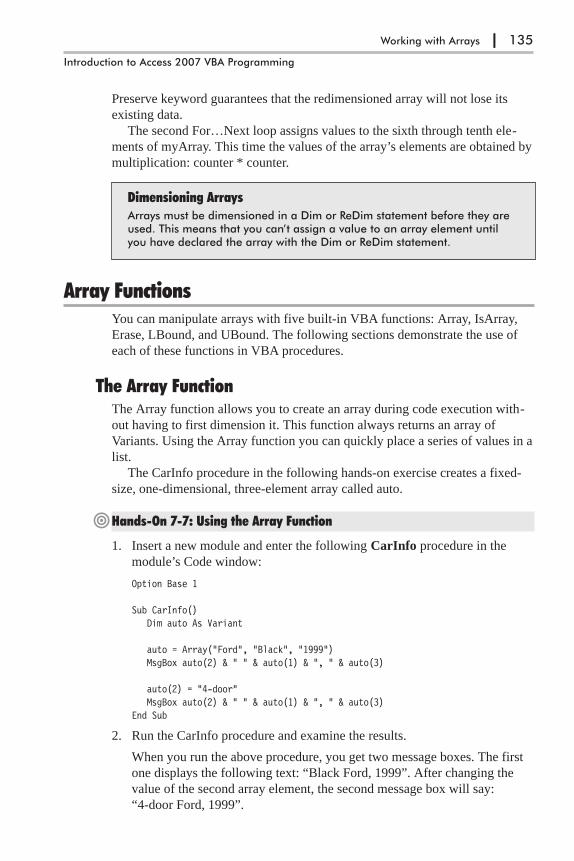
Preserve keyword guarantees that the redimensioned array will not lose its
existing data.
The second For…Next loop assigns values to the sixth through tenth ele-
ments of myArray. This time the values of the array’s elements are obtained by
multiplication: counter * counter.
Dimensioning ArraysArrays must be dimensioned in a Dim or ReDim statement before they areused. This means that you can’t assign a value to an array element untilyou have declared the array with the Dim or ReDim statement.
Array FunctionsYou can manipulate arrays with five built-in VBA functions: Array, IsArray,
Erase, LBound, and UBound. The following sections demonstrate the use of
each of these functions in VBA procedures.
The Array FunctionThe Array function allows you to create an array during code execution with-
out having to first dimension it. This function always returns an array of
Variants. Using the Array function you can quickly place a series of values in a
list.
The CarInfo procedure in the following hands-on exercise creates a fixed-
size, one-dimensional, three-element array called auto.
�Hands-On 7-7: Using the Array Function
1. Insert a new module and enter the following CarInfo procedure in the
module’s Code window:
Option Base 1
Sub CarInfo()Dim auto As Variant
auto = Array("Ford", "Black", "1999")MsgBox auto(2) & " " & auto(1) & ", " & auto(3)
auto(2) = "4-door"MsgBox auto(2) & " " & auto(1) & ", " & auto(3)
End Sub
2. Run the CarInfo procedure and examine the results.
When you run the above procedure, you get two message boxes. The first
one displays the following text: “Black Ford, 1999”. After changing the
value of the second array element, the second message box will say:
“4-door Ford, 1999”.
Working with Arrays | 135
Introduction to Access 2007 VBA Programming

� Note: Be sure to enter Option Base 1 at the top of the module before run-ning the CarInfo procedure. If this statement is missing in your module, VisualBasic will display run-time error 9 — “Subscript out of range.”
The IsArray FunctionThe IsArray function lets you test whether a variable is an array. The IsArray
function returns True if the variable is an array or False if it’s not an array.
Let’s do another hands-on exercise.
�Hands-On 7-8: Using the IsArray Function
1. Insert a new module and enter the code of the IsThisArray procedure in
the module’s Code window as shown below:
Sub IsThisArray()' declare a dynamic arrayDim tblNames() As StringDim totalTables As IntegerDim counter As IntegerDim db As Database
Set db = CurrentDb
' count the tables in the open databasetotalTables = db.TableDefs.Count
' specify the size of the arrayReDim tblNames(1 To totalTables)
' enter and show the names of tablesFor counter = 1 To totalTables - 1
tblNames(counter) = db.TableDefs(counter).NameDebug.Print tblNames(counter)
Next counter
' check if this is indeed an arrayIf IsArray(tblNames) Then
MsgBox "The tblNames is an array."End If
End Sub
2. Run the IsThisArray procedure to examine its results.
When you run the above procedure, the list of tables in the current database
is written to the Immediate window. A message box displays whether the
tblNames array is indeed an array.
The Erase FunctionWhen you want to remove the data from an array, you should use the Erase
function. This function deletes all the data held by static or dynamic arrays. In
addition, the Erase function reallocates all of the memory assigned to a
dynamic array. If a procedure has to use the dynamic array again, you must
136 | Chapter 7
Part I

use the ReDim statement to specify the size of the array. The next hands-on
exercise demonstrates how to erase the data from the array cities.
�Hands-On 7-9: Removing Data from an Array
1. Insert a new module and enter the code of the FunCities procedure in the
module’s Code window as shown below:
' start indexing array elements at 1Option Base 1
Sub FunCities()' declare the arrayDim cities(1 To 5) As String
' assign the values to array elementscities(1) = "Las Vegas"cities(2) = "Orlando"cities(3) = "Atlantic City"cities(4) = "New York"cities(5) = "San Francisco"
' display the list of citiesMsgBox cities(1) & Chr(13) & cities(2) & Chr(13) _
& cities(3) & Chr(13) & cities(4) & Chr(13) _& cities(5)
Erase cities
' show all that was erasedMsgBox cities(1) & Chr(13) & cities(2) & Chr(13) _
& cities(3) & Chr(13) & cities(4) & Chr(13) _& cities(5)
End Sub
2. Run the FunCities procedure to examine its results.
3. Click OK to close the message box.
Visual Basic should now display an empty message box, because all values
are deleted from the array by the Erase function.
4. Click OK to close the empty message box.
The LBound and UBound FunctionsThe LBound and UBound functions return whole numbers that indicate the
lower bound and upper bound indices of an array.
�Hands-On 7-10: Finding the Lower and Upper Bounds of an Array
1. Insert a new module and enter the code of the FunCities2 procedure in the
module’s Code window as shown below:
Sub FunCities2()' declare the array
Working with Arrays | 137
Introduction to Access 2007 VBA Programming

Dim cities(1 To 5) As String
' assign the values to array elementscities(1) = "Las Vegas"cities(2) = "Orlando"cities(3) = "Atlantic City"cities(4) = "New York"cities(5) = "San Francisco"
' display the list of citiesMsgBox cities(1) & Chr(13) & cities(2) & Chr(13) _
& cities(3) & Chr(13) & cities(4) & Chr(13) _& cities(5)
' display the array boundsMsgBox "The lower bound: " & LBound(cities) & Chr(13) _
& "The upper bound: " & UBound(cities)End Sub
2. Run the FunCities2 procedure.
When determining the lower and upper bound indices of a two-dimen-
sional array, you must specify the dimension number: 1 for the first dimen-
sion and 2 for the second dimension.
3. Click OK to close the message box that displays the favorite cities.
4. Click OK to close the message box that displays the lower and upper
bound indices.
To determine the upper and lower indices in a two-dimensional array, you may
want to add the following statements at the end of the Exchange procedure that
was prepared in Hands-On 7-5 (add these lines just before the End Sub
keywords):
MsgBox "The lower bound (first dimension) is " _& LBound(Ex, 1) & "."
MsgBox "The upper bound(first dimension) is " _& UBound(Ex, 1) & "."
MsgBox "The lower bound (second dimension) is " _& LBound(Ex, 2) & "."
MsgBox "The upper bound(second dimension) is " _& UBound(Ex, 2) & "."
Errors in ArraysWhen working with arrays, it’s easy
to make a mistake. If you try to
assign more values than there are
elements in the declared array,
Visual Basic will display the error
message “Subscript out of range”
(see Figure 7-3).
138 | Chapter 7
Part I
Figure 7-3: This error was caused by anattempt to access a nonexistent array element.

Suppose you declared a one-dimensional array that consists of three elements
and you are trying to assign a value to the fourth element. When you run the
procedure, Visual Basic can’t find the fourth element, so it displays the above
error message. If you click the Debug button, Visual Basic will highlight the
line of code that caused the error (see Figure 7-4).
The error “Subscript out of range” is often triggered in procedures using loops.
The procedure Zoo1 shown in Hands-On 7-11 serves as an example of such a
situation.
�Hands-On 7-11: Understanding Errors in Arrays
1. Insert a new module and enter the following Zoo1 and Zoo2 procedures in
the module’s Code window:
Sub Zoo1()' this procedure triggers an error "Subscript out of range"Dim zoo(3) As StringDim i As IntegerDim response As String
i = 0Do
i = i + 1response = InputBox("Enter a name of animal:")zoo(i) = response
Loop Until response = ""End Sub
Sub Zoo2()' this procedure avoids the error "Subscript out of range"Dim zoo(3) As StringDim i As IntegerDim response As String
i = 1Do While i >= LBound(zoo) And i <= UBound(zoo)
response = InputBox("Enter a name of animal:")If response = "" Then Exit Subzoo(i) = response
Working with Arrays | 139
Introduction to Access 2007 VBA Programming
Figure 7-4: Thestatement thattriggered theerror shown inFigure 7-3 ishighlighted.

Debug.Print zoo(i)i = i + 1
Loop
End Sub
2. Run the Zoo1 procedure and enter your favorite animal names when
prompted. Do not cancel the procedure until you see the error.
While executing this procedure, when the variable i equals 4, Visual Basic
will not be able to find the fourth element in a three-element array, so the
error message will appear.
3. Click the Debug button in the error message.
Visual Basic will highlight the code that caused the error.
4. Position the cursor over the variable (i) in the highlighted line of code to
view the variable’s value.
Visual Basic displays: i=4
Notice that at the top of the Zoo1 procedure zoo has been declared as
an array containing only three elements:
Dim zoo(3) As String
Since Visual Basic could not find the fourth element, it displayed the “Sub-
script out of range” error.
The Zoo2 procedure demonstrates how, by using the LBound and
UBound functions introduced in the preceding section, you can avoid
errors caused by an attempt to access a nonexistent array element.
5. Choose Run | Reset to terminate the debugging session and exit the proce-
dure. You will learn more about debugging procedures in Chapter 9.
Another frequent error you may encounter while working with arrays is a Type
Mismatch error. To avoid this error, keep in mind that each element of an array
must be of the same data type. Therefore, if you attempt to assign to an ele-
ment of an array a value that conflicts with the data type of the array, you will
get a Type Mismatch error during the code execution. If you need to hold val-
ues of different data types in an array, declare the array as Variant.
Parameter ArraysEarlier in this book you learned that values can be passed between subroutines
or functions as required or by optional arguments. If the passed argument is not
absolutely required for the procedure to execute, the argument’s name is pre-
ceded by the keyword Optional. Sometimes, however, you don’t know in
advance how many arguments you want to pass. A classic example is addition.
One time you may want to add two numbers together, another time you may
want to add three, ten, or fifteen numbers.
Using the keyword ParamArray, you can pass an array consisting of any
number of elements to your subroutines and function. The following hands-on
exercise uses the AddMultipleArgs function to add as many numbers as you
140 | Chapter 7
Part I

may require. This function begins with the declaration of an array myNumbers.
Notice the use of the ParamArray keyword.
The array must be declared as type Variant, and it must be the last argument
in the procedure definition.
�Hands-On 7-12: Working with Parameter Arrays
1. Insert a new module and enter the following AddMultipleArgs function
procedure in the module’s Code window:
Function AddMultipleArgs(ParamArray myNumbers() As Variant)Dim mySum As SingleDim myValue As Variant
For Each myValue In myNumbersmySum = mySum + myValue
NextAddMultipleArgs = mySum
End Function
2. Choose View | Immediate Window and type the following instruction,
then press Enter to execute it:
?AddMultipleArgs(1, 23.24, 3, 24, 8, 34)
When you press Enter, Visual Basic returns the total of all the numbers in
the parentheses: 93.24. You can supply an unlimited number of arguments.
To add more values, enter additional values in the parentheses after the
function name in the Immediate window and press Enter. Notice that each
function argument must be separated by a comma.
3. Choose File | Save Chap07 to save changes to the modules.
4. Choose File | Close and Return to Microsoft Office Access.
5. Close the Chap07.accdb database and exit Microsoft Office Access.
Chapter SummaryIn this chapter you learned how, by creating an array, you can write procedures
that require a large number of variables. You worked with examples of proce-
dures that demonstrated how to declare and use a one-dimensional array (list)
and a two-dimensional array (table). You also learned the difference between
static and dynamic arrays. This chapter ended by introducing you to five
built-in VBA functions that are frequently used with arrays (Array, IsArray,
Erase, LBound, and UBound), as well as the ParamArray keyword. You now
know all the control structures that can make your code more intelligent: con-
ditional statements, loops, and arrays.
In the next chapter you will learn how to use collections instead of arrays to
manipulate large amounts of data.
Working with Arrays | 141
Introduction to Access 2007 VBA Programming

Chapter 8
Custom Collections and ClassModules
You are not limited to using objects built into Microsoft Office Access. VBA
allows you to create your own objects and collections of objects, complete
with their own methods and properties. In this chapter, you learn how to work
with collections, including how to declare a custom Collection object. You also
learn how to use class modules to create user-defined objects.
TerminologyBefore diving into theory and the hands-on examples of this chapter, let’s start
by going over several terms that will be used throughout this chapter.
Collection — An object that contains a set of related objects.
Class — A definition of an object that includes its name, properties, methods,
and events. The class acts as a sort of object template from which an instance
of an object is created at run time.
Class module — A module that contains the definition of a class, including its
property and method definitions.
Event — An action recognized by an object, such as a mouse click or a key
press, for which you can define a response. Events can be triggered by a user
action, a VBA statement, or the system.
Event procedure — A procedure that is automatically executed in response to
an event triggered by the user, program code, or the system.
Form module — A module that contains the VBA code for all event proce-
dures triggered by events occurring in a user form or its controls. A form
module is a type of class module.
Instance — A specific object that belongs to a class is referred to as an
instance of the class. When you create an instance, you create a new object
that has the properties and methods defined by the class.
Module — A structure containing subroutine and function procedures that are
available to other VBA procedures and are not related to any object in
particular.
142
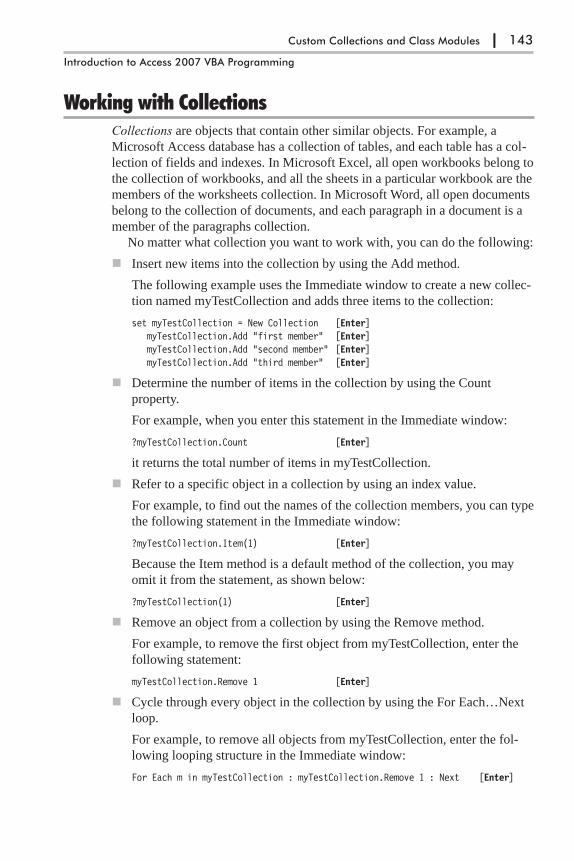
Working with CollectionsCollections are objects that contain other similar objects. For example, a
Microsoft Access database has a collection of tables, and each table has a col-
lection of fields and indexes. In Microsoft Excel, all open workbooks belong to
the collection of workbooks, and all the sheets in a particular workbook are the
members of the worksheets collection. In Microsoft Word, all open documents
belong to the collection of documents, and each paragraph in a document is a
member of the paragraphs collection.
No matter what collection you want to work with, you can do the following:
� Insert new items into the collection by using the Add method.
The following example uses the Immediate window to create a new collec-
tion named myTestCollection and adds three items to the collection:
set myTestCollection = New Collection [Enter]myTestCollection.Add "first member" [Enter]myTestCollection.Add "second member" [Enter]myTestCollection.Add "third member" [Enter]
� Determine the number of items in the collection by using the Count
property.
For example, when you enter this statement in the Immediate window:
?myTestCollection.Count [Enter]
it returns the total number of items in myTestCollection.
� Refer to a specific object in a collection by using an index value.
For example, to find out the names of the collection members, you can type
the following statement in the Immediate window:
?myTestCollection.Item(1) [Enter]
Because the Item method is a default method of the collection, you may
omit it from the statement, as shown below:
?myTestCollection(1) [Enter]
� Remove an object from a collection by using the Remove method.
For example, to remove the first object from myTestCollection, enter the
following statement:
myTestCollection.Remove 1 [Enter]
� Cycle through every object in the collection by using the For Each…Next
loop.
For example, to remove all objects from myTestCollection, enter the fol-
lowing looping structure in the Immediate window:
For Each m in myTestCollection : myTestCollection.Remove 1 : Next [Enter]
Custom Collections and Class Modules | 143
Introduction to Access 2007 VBA Programming

Note that a colon is used to separate one statement from the next. You can
write two or more statements on a single line by separating them with a
colon (:). This is very convenient when testing statements in the Immediate
window. Because collections are reindexed, the above statement will
remove the first member of the collection on each iteration. Upon pressing
Enter, myTestCollection should have zero objects. However, to be sure,
enter the following statement in the Immediate window:
?myTestCollection.Count [Enter]
While writing your own VBA procedures, you may come across a situation
where there’s no built-in collection to handle the task at hand. The solution is
to create a custom collection. From the previous chapter you already know
how to work with multiple items of data by using dynamic or static arrays.
Because collections have built-in properties and methods that allow you to
add, remove, and count their elements, you will find that it’s much easier to
work with collections than arrays.
Declaring a Custom CollectionTo create a user-defined collection, you should begin by declaring an object
variable of the Collection type. This variable is declared with the New key-
word in the Dim statement, as shown below:
Dim collection Fruits As New Collection
Adding Objects to a Custom CollectionAfter you’ve declared the Collection object, you can insert new items into the
collection by using the Add method. The objects with which you populate your
collection do not have to be of the same data type. The Add method looks as
follows:
object.Add item[, key, before, after]
For example, the following statement adds a new item to the previously
declared Fruits collection:
Fruits.Add "apples"
You are only required to specify object and item. Object is the collection name
(Fruits). This is the same name that was used in the declaration of the Collec-
tion object. Item (“apples”) is the object you want to add to the collection
(Fruits).
Although the other arguments are optional, they are quite useful. It’s impor-
tant to understand that the items in a collection are automatically assigned
numbers starting with 1. However, they can also be assigned a unique key
value. Instead of accessing a specific item with an index (1, 2, 3, and so on) at
the time an object is added to a collection, you can assign a key for that object.
For instance, to identify an individual in a collection of students or employees,
you could use Social Security numbers as a key. If you want to specify the
144 | Chapter 8
Part I
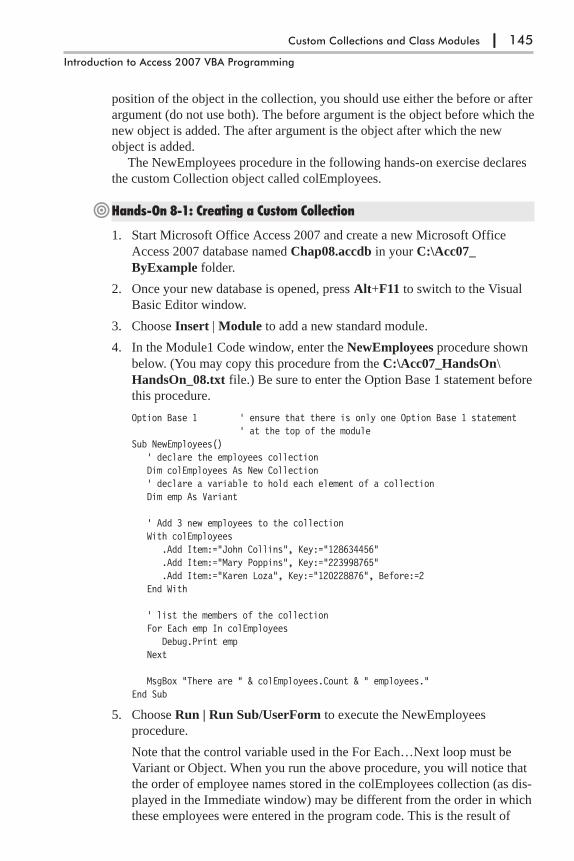
position of the object in the collection, you should use either the before or after
argument (do not use both). The before argument is the object before which the
new object is added. The after argument is the object after which the new
object is added.
The NewEmployees procedure in the following hands-on exercise declares
the custom Collection object called colEmployees.
�Hands-On 8-1: Creating a Custom Collection
1. Start Microsoft Office Access 2007 and create a new Microsoft Office
Access 2007 database named Chap08.accdb in your C:\Acc07_
ByExample folder.
2. Once your new database is opened, press Alt+F11 to switch to the Visual
Basic Editor window.
3. Choose Insert | Module to add a new standard module.
4. In the Module1 Code window, enter the NewEmployees procedure shown
below. (You may copy this procedure from the C:\Acc07_HandsOn\
HandsOn_08.txt file.) Be sure to enter the Option Base 1 statement before
this procedure.
Option Base 1 ' ensure that there is only one Option Base 1 statement' at the top of the module
Sub NewEmployees()' declare the employees collectionDim colEmployees As New Collection' declare a variable to hold each element of a collectionDim emp As Variant
' Add 3 new employees to the collectionWith colEmployees
.Add Item:="John Collins", Key:="128634456"
.Add Item:="Mary Poppins", Key:="223998765"
.Add Item:="Karen Loza", Key:="120228876", Before:=2End With
' list the members of the collectionFor Each emp In colEmployees
Debug.Print empNext
MsgBox "There are " & colEmployees.Count & " employees."End Sub
5. Choose Run | Run Sub/UserForm to execute the NewEmployees
procedure.
Note that the control variable used in the For Each…Next loop must be
Variant or Object. When you run the above procedure, you will notice that
the order of employee names stored in the colEmployees collection (as dis-
played in the Immediate window) may be different from the order in which
these employees were entered in the program code. This is the result of
Custom Collections and Class Modules | 145
Introduction to Access 2007 VBA Programming
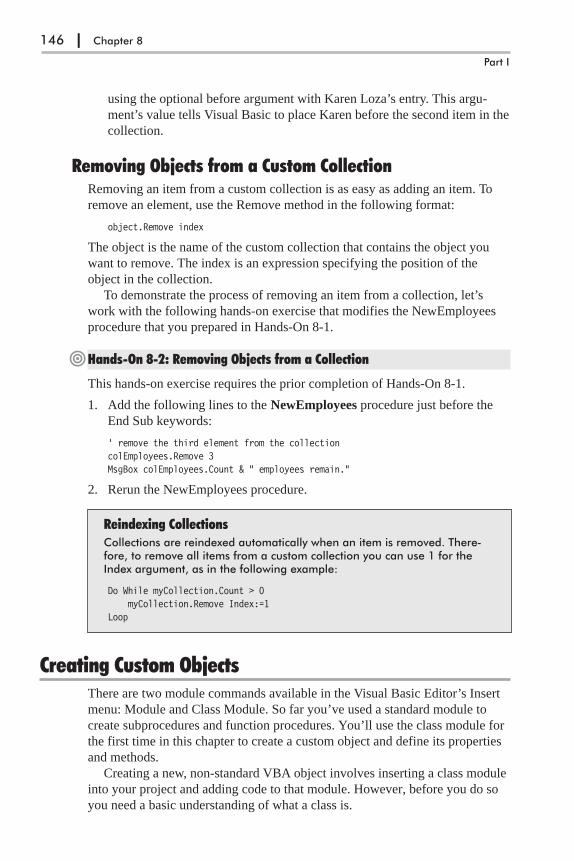
using the optional before argument with Karen Loza’s entry. This argu-
ment’s value tells Visual Basic to place Karen before the second item in the
collection.
Removing Objects from a Custom CollectionRemoving an item from a custom collection is as easy as adding an item. To
remove an element, use the Remove method in the following format:
object.Remove index
The object is the name of the custom collection that contains the object you
want to remove. The index is an expression specifying the position of the
object in the collection.
To demonstrate the process of removing an item from a collection, let’s
work with the following hands-on exercise that modifies the NewEmployees
procedure that you prepared in Hands-On 8-1.
�Hands-On 8-2: Removing Objects from a Collection
This hands-on exercise requires the prior completion of Hands-On 8-1.
1. Add the following lines to the NewEmployees procedure just before the
End Sub keywords:
' remove the third element from the collectioncolEmployees.Remove 3MsgBox colEmployees.Count & " employees remain."
2. Rerun the NewEmployees procedure.
Reindexing CollectionsCollections are reindexed automatically when an item is removed. There-fore, to remove all items from a custom collection you can use 1 for theIndex argument, as in the following example:
Do While myCollection.Count > 0myCollection.Remove Index:=1
Loop
Creating Custom ObjectsThere are two module commands available in the Visual Basic Editor’s Insert
menu: Module and Class Module. So far you’ve used a standard module to
create subprocedures and function procedures. You’ll use the class module for
the first time in this chapter to create a custom object and define its properties
and methods.
Creating a new, non-standard VBA object involves inserting a class module
into your project and adding code to that module. However, before you do so
you need a basic understanding of what a class is.
146 | Chapter 8
Part I

If you refer back to the terminology section earlier in this chapter, you will
find out that the class is a sort of object template. A frequently used analogy is
comparing an object class to a cookie cutter. Just like a cookie cutter defines
what a particular cookie will look like, the definition of the class determines
how a particular object should look and how it should behave. Before you can
actually use an object class, you must first create a new instance of that class.
Object instances are the cookies. Each object instance has the characteristics
(properties and methods) defined by its class. Just as you can cut out many
cookies using the same cookie cutter, you can create multiple instances of a
class. You can change the properties of each instance of a class independently
of any other instance of the same class.
A class module lets you define your own custom classes, complete with
custom properties and methods. A property is an attribute of an object that
defines one of its characteristics, such as shape, position, color, title, etc. A
method is an action that the object can perform. You can create the properties
for your custom objects by writing property procedures in a class module. The
object methods are also created in a class module by writing subprocedures or
function procedures.
After building your object in the class module, you can use it in the same
way you use other built-in objects. You can also export the object class outside
the VBA project to other VBA-capable applications.
Creating a ClassThe following sections of this chapter walk you through the process of creating
and working with a custom object called CEmployee. This object will repre-
sent an employee. It will have properties such as Id, FirstName, LastName, and
Salary. It will also have a method to modify the current salary.
�Custom Project 8-1 (Step 1): Creating a Class Module
1. In the Visual Basic Editor window, choose Insert | Class Module.
2. In the Project Explorer window, highlight the Class1 module and use the
Properties window to rename the class module CEmployee (Figure 1-8).
Custom Collections and Class Modules | 147
Introduction to Access 2007 VBA Programming
Figure 8-1: Use the Propertieswindow to rename the module.

Naming a Class ModuleEvery time you create a new class module, give it a meaningful name. Setthe name of the class module to the name you want to use in your VBAprocedures using the class. The name you choose for your class should beeasily understood and should identify the “thing” the object class repre-sents. As a rule, the object class name is prefaced with an uppercase “C.”
Variable DeclarationsAfter adding and renaming the class module, the next step is to declare the
variables that will hold the data you want to store in the object. Each item of
data you want to store in an object should be assigned a variable. Class vari-
ables are called data members and are declared with the Private statement.
Using the Private statement in a class module hides the data members and pre-
vents other parts of the application from referencing them. Only the procedures
within the class module in which the Private variables were defined can mod-
ify the value of these variables.
Because the name of a variable also serves as a property name, use mean-
ingful names for your object’s data members. It’s traditional to preface the
class variable names with m_ to indicate that they are data members of a class.
�Custom Project 8-1 (Step 2): Declaring Class Members
1. Type the following declaration lines at the top of the CEmployee class
module:
Option Explicit
' declarationsPrivate m_LastName As StringPrivate m_FirstName As StringPrivate m_Salary As CurrencyPrivate m_ID As String
Notice that the name of each data member variable begins with the prefix m_.
Defining the Properties for the ClassDeclaring the variables with the Private keyword guarantees that they cannot
be accessed directly from outside the object. This means that the VBA proce-
dures outside the class module will not be able to set or read data stored in
those variables. To enable other parts of your VBA application to set or
retrieve the employee data, you must add special property procedures to the
CEmployee class module. There are three types of property procedures:
� Property Let — This type of procedure allows other parts of the applica-
tion to set the value of a property.
� Property Get — This type of procedure allows other parts of the applica-
tion to get or read the value of a property.
148 | Chapter 8
Part I

� Property Set — This type of procedure is used instead of Property Let
when setting the reference to an object.
Property procedures are executed when an object property needs to be set or
retrieved. The Property Get procedure can have the same name as the Property
Let procedure. You should create property procedures for each property of the
object that can be accessed by another part of your VBA application.
The easiest of the three types of property statements to understand is the
Property Get procedure. Let’s examine the syntax of the property procedures
by taking a close look at the Property Get LastName procedure.
Property procedures contain the following parts:
� A procedure declaration line
� An assignment statement
� The End Property keywords
A procedure declaration line specifies the name of the property and the data
type:
Property Get LastName() As String
LastName is the name of the property and As String determines the data type
of the property’s return value.
An assignment statement is similar to the one used in a function procedure:
LastName = m_LastName
LastName is the name of the property and m_LastName is the data member
variable that holds the value of the property you want to retrieve or set. The
m_LastName variable should be defined with the Private keyword at the top of
the class module. Here’s the complete Property Get procedure:
Property Get LastName() As StringLastName = m_LastName
End Property
The Property Get procedure can return a result from a calculation, like this:
Property Get Royalty()Royalty = (Sales * Percent) - Advance
End Property
The End Property keywords specify the end of the property procedure.
Immediate Exit from Property ProceduresJust as the Exit Sub and Exit Function keywords allow you to exit early froma subroutine or a function procedure, the Exit Property keywords give you away to immediately exit from a property procedure. Program execution willcontinue with the statements following the statement that called the Prop-erty Get, Property Let, or Property Set procedure.
Custom Collections and Class Modules | 149
Introduction to Access 2007 VBA Programming
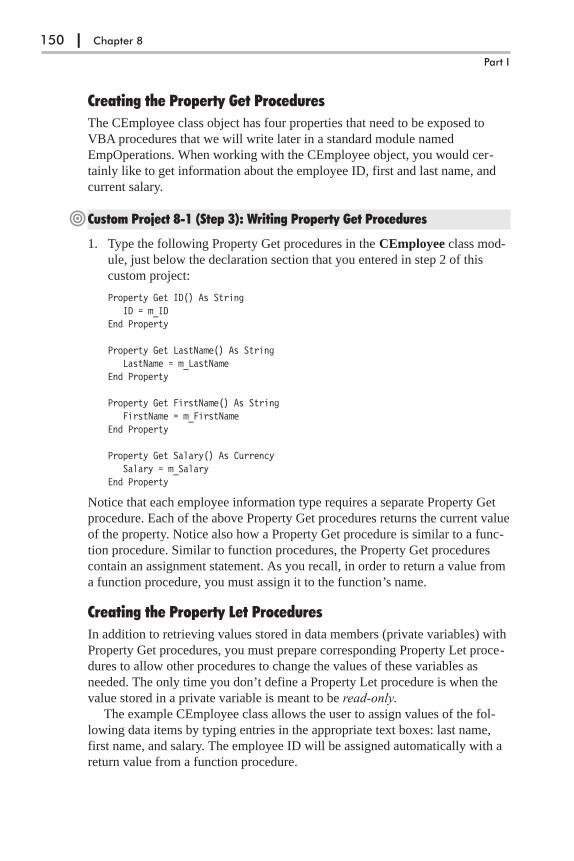
Creating the Property Get Procedures
The CEmployee class object has four properties that need to be exposed to
VBA procedures that we will write later in a standard module named
EmpOperations. When working with the CEmployee object, you would cer-
tainly like to get information about the employee ID, first and last name, and
current salary.
�Custom Project 8-1 (Step 3): Writing Property Get Procedures
1. Type the following Property Get procedures in the CEmployee class mod-
ule, just below the declaration section that you entered in step 2 of this
custom project:
Property Get ID() As StringID = m_ID
End Property
Property Get LastName() As StringLastName = m_LastName
End Property
Property Get FirstName() As StringFirstName = m_FirstName
End Property
Property Get Salary() As CurrencySalary = m_Salary
End Property
Notice that each employee information type requires a separate Property Get
procedure. Each of the above Property Get procedures returns the current value
of the property. Notice also how a Property Get procedure is similar to a func-
tion procedure. Similar to function procedures, the Property Get procedures
contain an assignment statement. As you recall, in order to return a value from
a function procedure, you must assign it to the function’s name.
Creating the Property Let Procedures
In addition to retrieving values stored in data members (private variables) with
Property Get procedures, you must prepare corresponding Property Let proce-
dures to allow other procedures to change the values of these variables as
needed. The only time you don’t define a Property Let procedure is when the
value stored in a private variable is meant to be read-only.
The example CEmployee class allows the user to assign values of the fol-
lowing data items by typing entries in the appropriate text boxes: last name,
first name, and salary. The employee ID will be assigned automatically with a
return value from a function procedure.
150 | Chapter 8
Part I

�Custom Project 8-1 (Step 4): Writing Property Let Procedures
1. Type the following Property Let procedures in the CEmployee class mod-
ule below the Property Get procedures:
Property Let ID(ref As String)m_ID = ref
End Property
Property Let LastName(L As String)m_LastName = L
End Property
Property Let FirstName(F As String)m_FirstName = F
End Property
Property Let Salary(ByVal dollar As Currency)m_Salary = dollar
End Property
The Property Let procedures require at least one parameter that specifies the
value you want to assign to the property. This parameter can be passed by
value (see the ByVal keyword in Property Let Salary above) or by reference
(ByRef is the default). If you need a refresher on the meaning of these
keywords, see the section titled “Passing Arguments by Reference and by
Value” in Chapter 4.
The data type of the parameter passed to the Property Let procedure must be
exactly the same data type as the value returned from the Property Get or Set
procedure with the same name. Notice that the Property Let procedures have
the same names as the Property Get procedures prepared in the preceding
section.
Defining the Scope of Property ProceduresYou can place the Public, Private, or Static keyword before the name of aproperty procedure to define its scope. To indicate that the Property Getprocedure is accessible to procedures in all modules, use the followingstatement format:
Public Property Get FirstName() As String
To make the Property Get procedure accessible only to other procedures inthe module where it is declared, use the following statement format:
Private Property Get FirstName() As String
To preserve the Property Get procedure’s local variables between procedurecalls, use the following statement format:
Static Property Get FirstName() As String
If not explicitly specified using either Public or Private, property proceduresare Public by default. Also, if the Static keyword is not used, the values oflocal variables are not preserved between procedure calls.
Custom Collections and Class Modules | 151
Introduction to Access 2007 VBA Programming

Creating the Class MethodsApart from properties, objects usually have one or more methods. A method is
an action that the object can perform. Methods allow you to manipulate the
data stored in a class object. Methods are created with subroutines or function
procedures. To make a method available outside the class module, use the Pub-
lic keyword in front of the Sub or Function definition. The CEmployee object
that you create in this chapter has one method that allows you to calculate the
new salary. Assume that the employee salary can be increased or decreased by
a specific percentage or amount.
�Custom Project 8-1 (Step 5): Writing Class Methods
1. Type the following CalcNewSalary function procedure in the CEmployee
class module:
Public Function CalcNewSalary(choice As Integer, curSalary As Currency, _amount As Long) As CurrencySelect Case choice
Case 1 ' by percentCalcNewSalary = curSalary + ((curSalary * amount) / 100)
Case 2 ' by amountCalcNewSalary = curSalary + amount
End SelectEnd Function
The CalcNewSalary function defined with the Public keyword in a class mod-
ule serves as a method for the CEmployee class. To calculate a new salary, a
VBA procedure from outside the class module must pass three arguments:
choice, CurSalary, and amount. The choice argument specifies the type of the
calculation. Suppose you want to increase the employee salary by 5% or by
$5.00. Choice 1 will increase the salary by the specified percent, and choice 2
will add the specified amount to the current salary. The curSalary argument is
the current salary figure for an employee, and the amount argument determines
the value by which the salary should be changed.
About Class Methods
• Only those methods that will be accessed from outside of the classshould be declared as Public. All others should be Private.
• Methods perform some operation on the data contained within theclass.
• If a method needs to return a value, write a function procedure. Other-wise, create a subprocedure.
152 | Chapter 8
Part I

Creating an Instance of a ClassAfter typing all the necessary Property Get, Property Let, or function proce-
dures for your VBA application in the class module, you are ready to create a
new instance of a class, called an object. Before an object can be created, an
object variable must be declared in a standard module to store the reference to
the object. If the name of the class module is CEmployee, then a new instance
of this class can be created with the following statement:
Dim emp As New CEmployee
The emp variable will represent a reference to an object of the CEmployee
class. When you declare the object variable with the New keyword, VBA cre-
ates the object and allocates memory for it. However, the object isn’t instanced
until you refer to it in your procedure code by assigning a value to its property
or by running one of its methods.
You can also create an instance of the object by declaring an object variable
with the data type defined to be the class of the object. For example:
Dim emp As CEmployeeSet emp = New CEmployee
If you don’t use the New keyword with the Dim statement (as shown above),
VBA does not allocate memory for your custom object until your procedure
actually needs it.
�Custom Project 8-1 (Step 6): Creating an Instance of a Class
1. Activate the Visual Basic Editor window and choose Insert | Module to
add a standard module to your application.
2. Use the Properties window to change the name of the new module to
EmpOperations.
3. Type the following declarations at the top of the EmpOperations module:
Option Explicit
Dim emp As New CEmployeeDim CEmployee As New Collection
The first declaration statement (Dim) declares the variable emp as a new
instance of the CEmployee class. The second statement declares a custom col-
lection. The CEmployee collection will be used to store all employees’ data.
Event Procedures in the Class ModuleAn event is basically an action recognized by an object. Custom classes recog-
nize only two events: Initialize and Terminate. These events are triggered when
an instance of the class is created (Initialize) and destroyed (Terminate). The
Initialize event is generated when an object is created from a class (see the
Custom Collections and Class Modules | 153
Introduction to Access 2007 VBA Programming

preceding section on creating an instance of a class). Because the statements
included inside the Initialize event are the first ones to be executed for the
object, before any properties are set or any methods are executed, the Initialize
event is a good place to perform initialization of the objects created from the
class.
The Class_Initialize procedure uses the following syntax:
Private Sub Class_Initialize()[code to perform tasks as the object is created goes here]
End Sub
The Terminate event occurs when all references to an object have been
released. This is a good place to perform any necessary cleanup tasks. The
Class_Terminate procedure uses the following syntax:
Private Sub Class_Terminate()[cleanup code goes here]
End Sub
To release an object variable from an object, use the following syntax:
Set objectVariable = Nothing
When you set the object variable to Nothing, the Terminate event is generated.
Any code in this event is executed then.
Creating the User InterfaceImplementing our custom CEmployee object requires that you design a form to
enter and manipulate employee data.
�Custom Project 8-1 (Step 7): Designing a User Form
1. Choose File | Close and Return to Microsoft Office Access.
2. Click the Blank form in the Forms section of the Create tab. Access will
display a blank form in the Form view.
3. Switch to the form’s Design view by choosing Design View from the
Views section.
4. Save the form as frmEmployeeSalaries.
5. Use the tools in the Controls section of the Design tab to place controls on
the form as shown in Figure 8-2.
154 | Chapter 8
Part I

6. Activate the property sheet and set the following properties for the form
controls. To set the specified property, first click the control on the form to
select it. Then, in the property sheet type the information as shown in the
Setting column next to the property indicated in the Property column.
Object Property Setting
Label1 Caption Last Name
Text box next to the Last Name label Name txtLastName
Label2 Caption First Name
Text box next to the First Name label Name txtFirstName
Label3 Caption Salary
Text box next to the Salary label Name txtSalary
Option group 1 NameCaption
frChangeSalarySalary Modification
Text box in the option group titled“Salary Modification”
Name txtRaise
Option button 1 NameCaption
optPercentPercent
Option button 2 NameCaption
optAmountAmount
Option group 2 NameCaption
frSalaryModChange the Salary for
Option button 3 NameCaption
optSelectedSelected Employee
Option button 4 NameCaption
optAllAll Employees
List box NameRow Source TypeColumn CountColumn Widths
lboxPeopleValue List40.5";0.9";0.7";0.5"
Custom Collections and Class Modules | 155
Introduction to Access 2007 VBA Programming
Figure 8-2: This form demonstrates the use of the CEmployee custom object.

Object Property Setting
Command Button 1 NameCaption
cmdAddAdd
Command Button 2 NameCaption
cmdCloseClose
Command Button 3 NameCaption
cmdUpdateUpdate Salary
Command Button 4 NameCaption
cmdDeleteDelete Employee
�Custom Project 8-1 (Step 8): Writing Event Procedures
Now that the form is ready, you need to write few event procedures to handle
various events, such as clicking a command button or loading the form.
1. Activate the Code window behind the form by choosing the View Code
button in the Tools section of the Design tab.
2. Enter the following variable declarations at the top of the form’s Code
window:
Option Explicit
' variable declarationsDim choice As IntegerDim amount As Long
3. Type the following UserForm_Initialize procedure to enable or disable
controls on the form:
Private Sub UserForm_Initialize()txtLastName.SetFocuscmdUpdate.Enabled = FalsecmdDelete.Enabled = FalselboxPeople.Enabled = FalsefrChangeSalary.Enabled = FalsefrChangeSalary.Value = 0frSalaryMod.Enabled = FalsefrSalaryMod.Value = 0txtRaise.Enabled = FalsetxtRaise.Value = ""
End Sub
4. Type the Form_Load event procedure as shown below:
Private Sub Form_Load()Call UserForm_Initialize
End Sub
On loading the user form the UserForm_Initialize procedure will run.
5. Enter the following cmdAdd_Click procedure to add the employee to the
collection:
156 | Chapter 8
Part I
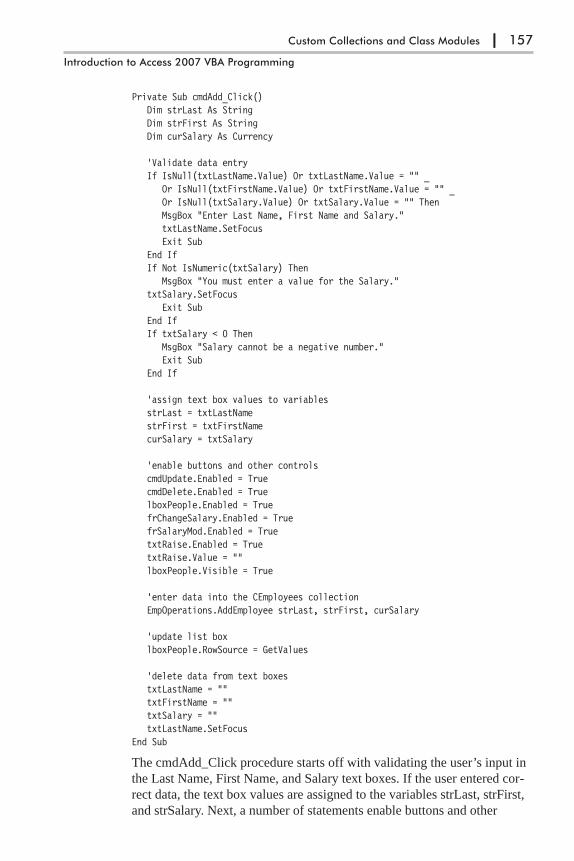
Private Sub cmdAdd_Click()Dim strLast As StringDim strFirst As StringDim curSalary As Currency
'Validate data entryIf IsNull(txtLastName.Value) Or txtLastName.Value = "" _
Or IsNull(txtFirstName.Value) Or txtFirstName.Value = "" _Or IsNull(txtSalary.Value) Or txtSalary.Value = "" ThenMsgBox "Enter Last Name, First Name and Salary."txtLastName.SetFocusExit Sub
End IfIf Not IsNumeric(txtSalary) Then
MsgBox "You must enter a value for the Salary."txtSalary.SetFocus
Exit SubEnd IfIf txtSalary < 0 Then
MsgBox "Salary cannot be a negative number."Exit Sub
End If
'assign text box values to variablesstrLast = txtLastNamestrFirst = txtFirstNamecurSalary = txtSalary
'enable buttons and other controlscmdUpdate.Enabled = TruecmdDelete.Enabled = TruelboxPeople.Enabled = TruefrChangeSalary.Enabled = TruefrSalaryMod.Enabled = TruetxtRaise.Enabled = TruetxtRaise.Value = ""lboxPeople.Visible = True
'enter data into the CEmployees collectionEmpOperations.AddEmployee strLast, strFirst, curSalary
'update list boxlboxPeople.RowSource = GetValues
'delete data from text boxestxtLastName = ""txtFirstName = ""txtSalary = ""txtLastName.SetFocus
End Sub
The cmdAdd_Click procedure starts off with validating the user’s input in
the Last Name, First Name, and Salary text boxes. If the user entered cor-
rect data, the text box values are assigned to the variables strLast, strFirst,
and strSalary. Next, a number of statements enable buttons and other
Custom Collections and Class Modules | 157
Introduction to Access 2007 VBA Programming

controls on the form so that the user can work with the employee data. The
following statement calls the AddEmployee procedure in the
EmpOperations standard module and passes the required parameters to it:
EmpOperations.AddEmployee strLast, strFirst, curSalary
Once the employee is entered into the collection, the employee data is
added to the list box with the following statement:
lboxPeople.RowSource = GetValues
GetValues is the name of a function procedure in the EmpOperations mod-
ule (see step 12 further on). This function cycles through the CEmployee
collection to create a string of values for the list box row source.
The cmdAdd_Click procedure ends by clearing the text boxes, then set-
ting the focus to the Last Name text box so the user can enter new
employee data.
6. Enter the following cmdClose_Click procedure to close the form:
Private Sub cmdClose_Click()DoCmd.Close
End Sub
7. Write the Click procedure for the cmdUpdate button as shown below:
Private Sub cmdUpdate_Click()Dim numOfPeople As IntegerDim colItem As Integer
' validate user selectionsIf frChangeSalary.Value = 0 Or frSalaryMod.Value = 0 Then
MsgBox "You must choose the appropriate option button in " & vbCr _& " the 'Salary Modification' and 'Change the Salary for' areas.", _vbOKOnly, "Insufficient selection"
Exit SubElseIf Not IsNumeric(txtRaise) Or txtRaise = "" Then
MsgBox "You must enter a number."txtRaise.SetFocus
158 | Chapter 8
Part I
Figure 8-3: The listbox control displaysemployee data asentered in the customcollection CEmployee.
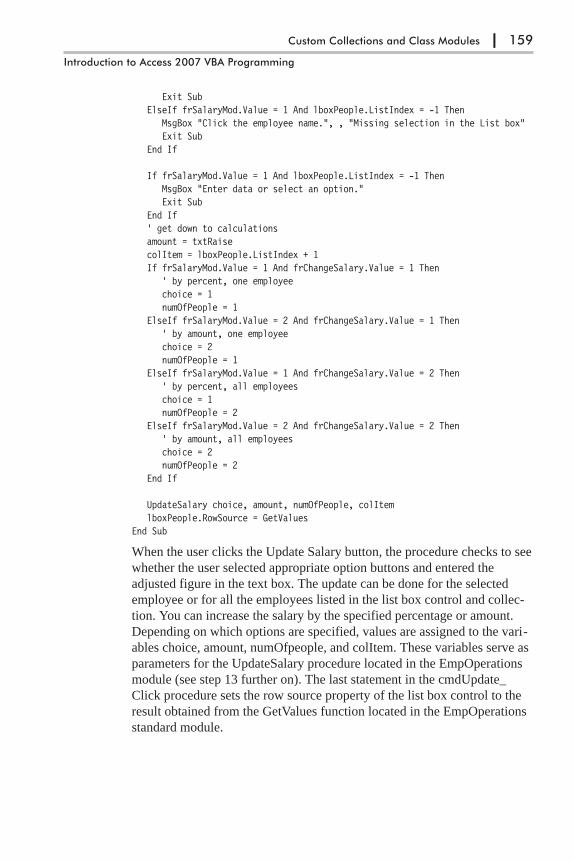
Exit SubElseIf frSalaryMod.Value = 1 And lboxPeople.ListIndex = -1 Then
MsgBox "Click the employee name.", , "Missing selection in the List box"Exit Sub
End If
If frSalaryMod.Value = 1 And lboxPeople.ListIndex = -1 ThenMsgBox "Enter data or select an option."Exit Sub
End If' get down to calculationsamount = txtRaisecolItem = lboxPeople.ListIndex + 1If frSalaryMod.Value = 1 And frChangeSalary.Value = 1 Then
' by percent, one employeechoice = 1numOfPeople = 1
ElseIf frSalaryMod.Value = 2 And frChangeSalary.Value = 1 Then' by amount, one employeechoice = 2numOfPeople = 1
ElseIf frSalaryMod.Value = 1 And frChangeSalary.Value = 2 Then' by percent, all employeeschoice = 1numOfPeople = 2
ElseIf frSalaryMod.Value = 2 And frChangeSalary.Value = 2 Then' by amount, all employeeschoice = 2numOfPeople = 2
End If
UpdateSalary choice, amount, numOfPeople, colItemlboxPeople.RowSource = GetValues
End Sub
When the user clicks the Update Salary button, the procedure checks to see
whether the user selected appropriate option buttons and entered the
adjusted figure in the text box. The update can be done for the selected
employee or for all the employees listed in the list box control and collec-
tion. You can increase the salary by the specified percentage or amount.
Depending on which options are specified, values are assigned to the vari-
ables choice, amount, numOfpeople, and colItem. These variables serve as
parameters for the UpdateSalary procedure located in the EmpOperations
module (see step 13 further on). The last statement in the cmdUpdate_
Click procedure sets the row source property of the list box control to the
result obtained from the GetValues function located in the EmpOperations
standard module.
Custom Collections and Class Modules | 159
Introduction to Access 2007 VBA Programming

8. Enter the following cmdDelete_Click procedure:
Private Sub cmdDelete_Click()' make sure an employee is highlighted in the list box controlIf lboxPeople.ListIndex > -1 Then
DeleteEmployee lboxPeople.ListIndex + 1If lboxPeople.ListCount = 1 Then
lboxPeople.RowSource = GetValuesUserForm_Initialize
ElselboxPeople.RowSource = GetValues
End IfElse
MsgBox "Click the item you want to remove."End If
End Sub
The cmdDelete_Click procedure lets you remove an employee from the
custom collection CEmployee. If you click an item in the list box and then
click the Delete Employee button, the DeleteEmployee procedure is called.
This procedure requires one argument that specifies the index number of
the item selected in the list box. After the employee is removed from the
collection, the row source of the list box control is reset to display the
remaining employees. After removing the last employee from the collec-
tion, the UserForm_Initialize procedure is called to tackle the task of dis-
abling controls that cannot be used until at least one employee is entered
into the CEmployee collection.
9. Activate the EmpOperations module that you created earlier by double-
clicking its name in the Project Explorer window. The top of the module
should contain the following declaration lines:
Option Compare DatabaseOption ExplicitDim emp As New CEmployeeDim CEmployee As New Collection
160 | Chapter 8
Part I
Figure 8-4: Theemployee salary canbe increased ordecreased by thespecified percentageor amount.
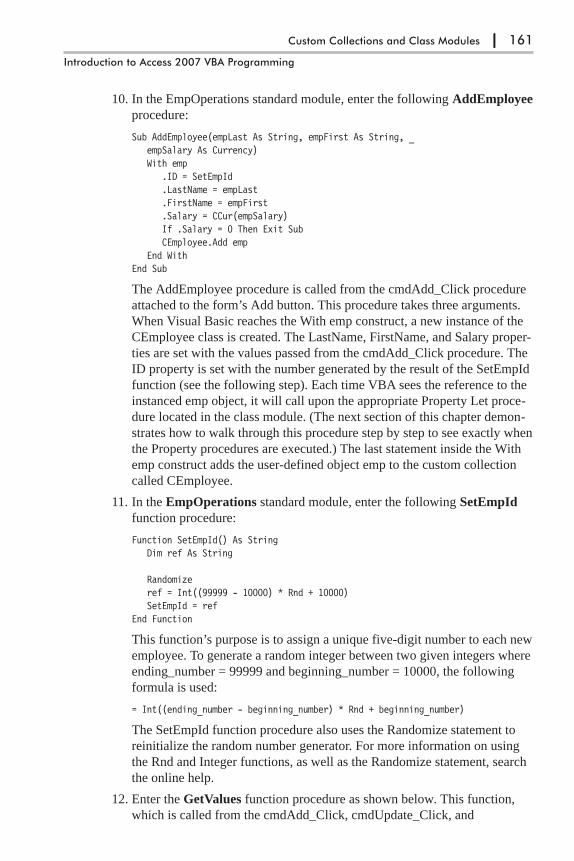
10. In the EmpOperations standard module, enter the following AddEmployee
procedure:
Sub AddEmployee(empLast As String, empFirst As String, _empSalary As Currency)With emp
.ID = SetEmpId
.LastName = empLast
.FirstName = empFirst
.Salary = CCur(empSalary)If .Salary = 0 Then Exit SubCEmployee.Add emp
End WithEnd Sub
The AddEmployee procedure is called from the cmdAdd_Click procedure
attached to the form’s Add button. This procedure takes three arguments.
When Visual Basic reaches the With emp construct, a new instance of the
CEmployee class is created. The LastName, FirstName, and Salary proper-
ties are set with the values passed from the cmdAdd_Click procedure. The
ID property is set with the number generated by the result of the SetEmpId
function (see the following step). Each time VBA sees the reference to the
instanced emp object, it will call upon the appropriate Property Let proce-
dure located in the class module. (The next section of this chapter demon-
strates how to walk through this procedure step by step to see exactly when
the Property procedures are executed.) The last statement inside the With
emp construct adds the user-defined object emp to the custom collection
called CEmployee.
11. In the EmpOperations standard module, enter the following SetEmpId
function procedure:
Function SetEmpId() As StringDim ref As String
Randomizeref = Int((99999 - 10000) * Rnd + 10000)SetEmpId = ref
End Function
This function’s purpose is to assign a unique five-digit number to each new
employee. To generate a random integer between two given integers where
ending_number = 99999 and beginning_number = 10000, the following
formula is used:
= Int((ending_number - beginning_number) * Rnd + beginning_number)
The SetEmpId function procedure also uses the Randomize statement to
reinitialize the random number generator. For more information on using
the Rnd and Integer functions, as well as the Randomize statement, search
the online help.
12. Enter the GetValues function procedure as shown below. This function,
which is called from the cmdAdd_Click, cmdUpdate_Click, and
Custom Collections and Class Modules | 161
Introduction to Access 2007 VBA Programming

cmdDelete_Click procedures, provides the values for the list box control to
synchronize it with the current values in the CEmployee collection.
Function GetValues()Dim myList As String
myList = ""For Each emp In CEmployee
myList = myList & emp.ID & ";" & _emp.LastName & ";" & _emp.FirstName & "; $" & _Format(emp.Salary, "0.00") & ";"
Next empGetValues = myList
End Function
13. Enter the following UpdateSalary procedure:
Sub UpdateSalary(choice As Integer, myValue As Long, _peopleCount As Integer, colItem As Integer)Set emp = New CEmployee
If choice = 1 And peopleCount = 1 ThenCEmployee.Item(colItem).Salary = _
emp.CalcNewSalary(1, CEmployee.Item(colItem).Salary, myValue)ElseIf choice = 1 And peopleCount = 2 Then
For Each emp In CEmployeeemp.Salary = emp.Salary + ((emp.Salary * myValue) / 100)
Next empElseIf choice = 2 And peopleCount = 1 Then
CEmployee.Item(colItem).Salary = _CEmployee.Item(colItem).Salary + myValue
ElseIf choice = 2 And peopleCount = 2 ThenFor Each emp In CEmployee
emp.Salary = emp.Salary + myValueNext emp
ElseMsgBox "Enter data or select an option."
End IfEnd Sub
The UpdateSalary procedure is called from the cmdUpdate_Click proce-
dure, which is assigned to the Update Salary button on the form. The click
procedure passes four parameters that the UpdateSalary procedure uses for
the salary calculations. When a salary for the selected employee needs to
be updated by a percentage or amount, the CalcNewSalary method residing
in the class module is called. For modification of salary figures for all the
employees, we iterate over the CEmployee collection to obtain the value of
the Salary property of each emp object, then perform the required calcula-
tion by using a formula. By entering a negative number in the form’s
txtRaise text box, you can decrease the salary by the specified percentage
or amount.
162 | Chapter 8
Part I
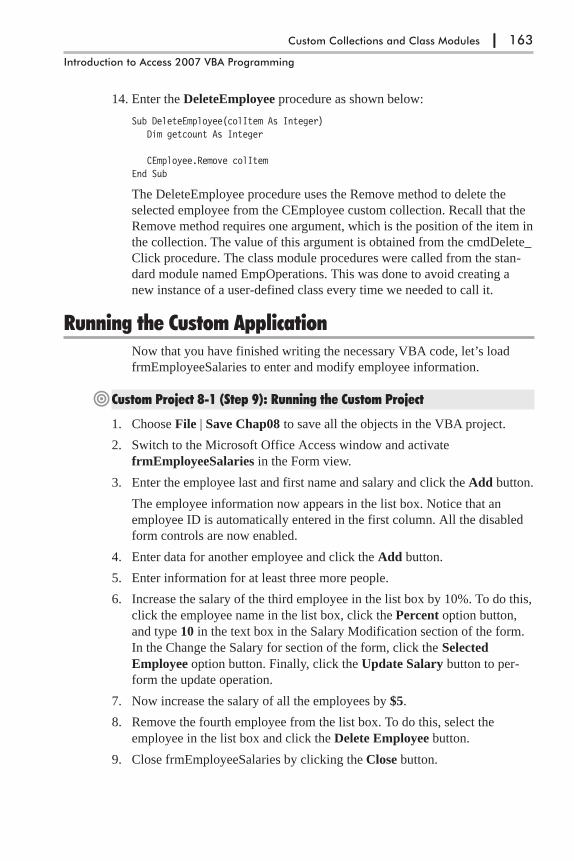
14. Enter the DeleteEmployee procedure as shown below:
Sub DeleteEmployee(colItem As Integer)Dim getcount As Integer
CEmployee.Remove colItemEnd Sub
The DeleteEmployee procedure uses the Remove method to delete the
selected employee from the CEmployee custom collection. Recall that the
Remove method requires one argument, which is the position of the item in
the collection. The value of this argument is obtained from the cmdDelete_
Click procedure. The class module procedures were called from the stan-
dard module named EmpOperations. This was done to avoid creating a
new instance of a user-defined class every time we needed to call it.
Running the Custom ApplicationNow that you have finished writing the necessary VBA code, let’s load
frmEmployeeSalaries to enter and modify employee information.
�Custom Project 8-1 (Step 9): Running the Custom Project
1. Choose File | Save Chap08 to save all the objects in the VBA project.
2. Switch to the Microsoft Office Access window and activate
frmEmployeeSalaries in the Form view.
3. Enter the employee last and first name and salary and click the Add button.
The employee information now appears in the list box. Notice that an
employee ID is automatically entered in the first column. All the disabled
form controls are now enabled.
4. Enter data for another employee and click the Add button.
5. Enter information for at least three more people.
6. Increase the salary of the third employee in the list box by 10%. To do this,
click the employee name in the list box, click the Percent option button,
and type 10 in the text box in the Salary Modification section of the form.
In the Change the Salary for section of the form, click the Selected
Employee option button. Finally, click the Update Salary button to per-
form the update operation.
7. Now increase the salary of all the employees by $5.
8. Remove the fourth employee from the list box. To do this, select the
employee in the list box and click the Delete Employee button.
9. Close frmEmployeeSalaries by clicking the Close button.
Custom Collections and Class Modules | 163
Introduction to Access 2007 VBA Programming
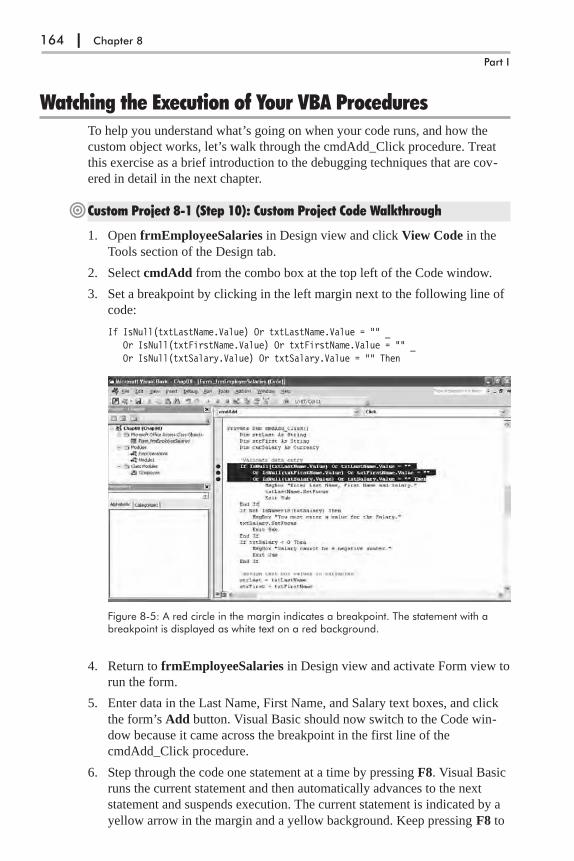
Watching the Execution of Your VBA ProceduresTo help you understand what’s going on when your code runs, and how the
custom object works, let’s walk through the cmdAdd_Click procedure. Treat
this exercise as a brief introduction to the debugging techniques that are cov-
ered in detail in the next chapter.
�Custom Project 8-1 (Step 10): Custom Project Code Walkthrough
1. Open frmEmployeeSalaries in Design view and click View Code in the
Tools section of the Design tab.
2. Select cmdAdd from the combo box at the top left of the Code window.
3. Set a breakpoint by clicking in the left margin next to the following line of
code:
If IsNull(txtLastName.Value) Or txtLastName.Value = "" _Or IsNull(txtFirstName.Value) Or txtFirstName.Value = "" _Or IsNull(txtSalary.Value) Or txtSalary.Value = "" Then
4. Return to frmEmployeeSalaries in Design view and activate Form view to
run the form.
5. Enter data in the Last Name, First Name, and Salary text boxes, and click
the form’s Add button. Visual Basic should now switch to the Code win-
dow because it came across the breakpoint in the first line of the
cmdAdd_Click procedure.
6. Step through the code one statement at a time by pressing F8. Visual Basic
runs the current statement and then automatically advances to the next
statement and suspends execution. The current statement is indicated by a
yellow arrow in the margin and a yellow background. Keep pressing F8 to
164 | Chapter 8
Part I
Figure 8-5: A red circle in the margin indicates a breakpoint. The statement with abreakpoint is displayed as white text on a red background.
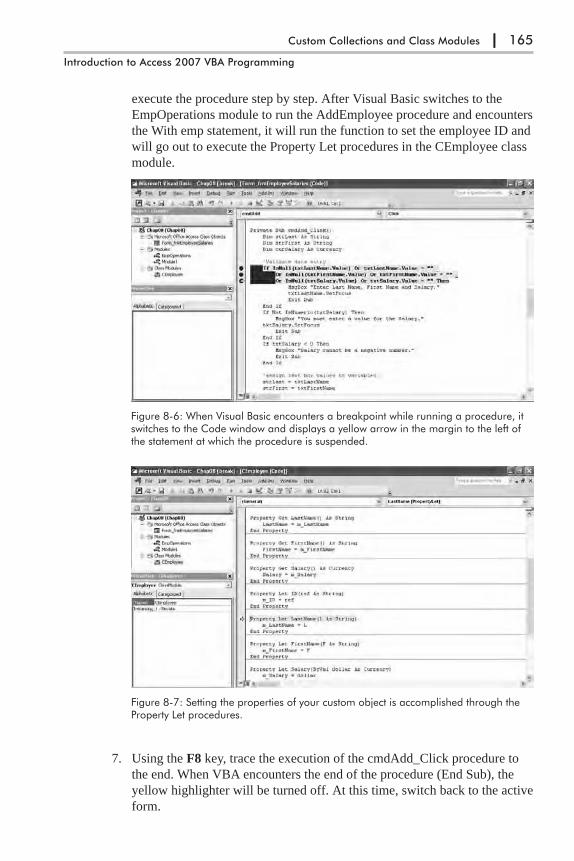
execute the procedure step by step. After Visual Basic switches to the
EmpOperations module to run the AddEmployee procedure and encounters
the With emp statement, it will run the function to set the employee ID and
will go out to execute the Property Let procedures in the CEmployee class
module.
7. Using the F8 key, trace the execution of the cmdAdd_Click procedure to
the end. When VBA encounters the end of the procedure (End Sub), the
yellow highlighter will be turned off. At this time, switch back to the active
form.
Custom Collections and Class Modules | 165
Introduction to Access 2007 VBA Programming
Figure 8-6: When Visual Basic encounters a breakpoint while running a procedure, itswitches to the Code window and displays a yellow arrow in the margin to the left ofthe statement at which the procedure is suspended.
Figure 8-7: Setting the properties of your custom object is accomplished through theProperty Let procedures.

� Note: To activate the form, you may need to first click the Table1 tab andthen reselect the Employee Operations tab.
8. Enter data for a new employee, then click the Add button. When Visual
Basic displays the Code window, choose Debug | Clear All Breakpoints.
Now press F5 to run the rest of the procedure without stepping through it.
9. In the Visual Basic Editor window, choose File | Save Chap08 to save
changes to the modules.
10. Choose File | Close and Return to Microsoft Office Access.
11. Close the Chap08.accdb database and exit Microsoft Office Access.
VBA Debugging ToolsVisual Basic provides a number of debugging tools to help you analyze howyour application operates, as well as to locate the source of errors in yourprocedures. See the next chapter for details on working with these tools.
Chapter SummaryIn this chapter you learned how to create and use your own objects and collec-
tions in VBA procedures. You used a class module to create a user-defined
(custom) object. You saw how to define your custom object’s properties using
the Property Get and Property Let procedures. You also learned how to write a
method for your custom object and saw how to make the class module avail-
able to the user with a custom form. Finally, you learned how to analyze your
VBA application by stepping through its code.
As your procedures become more complex, you will need to start using spe-
cial tools for tracing errors, which are covered in the next chapter.
166 | Chapter 8
Part I

Chapter 9
Debugging VBA Proceduresand Handling Errors
In the course of writing or editing VBA procedures, no matter how careful you
are, you’re likely to make some mistakes. For example, you may misspell a
word, misplace a comma or quotation mark, or forget a period or ending paren-
thesis. These kinds of mistakes are known as syntax errors. Fortunately, Visual
Basic is quite helpful in spotting these kinds of errors. To have Visual Basic
automatically check for correct syntax after you enter a line of code, choose
Tools | Options in the Visual Basic window. Make sure the Auto Syntax Check
setting is selected on the Editor tab.
When Visual Basic finds a syntax error, it displays an error message box and
changes the color of the incorrect line of code to red, or another color as indi-
cated on the Editor Format tab in the Options dialog box.
If the explanation of the error in the error message isn’t clear, you can click
the Help button for more help. If Visual Basic cannot point you in the right
direction, you must return to your procedure and carefully examine the offend-
ing instruction for missed letters, quotation marks, periods, colons, equal signs,
and beginning and ending parentheses. Finding syntax errors can be aggravat-
ing and time consuming. Certain syntax errors can be caught only during the
execution of the procedure. While attempting to run your procedure, Visual
Basic can find errors that were caused by using invalid arguments or omitting
167
Figure 9-1: The Auto SyntaxCheck setting on the Editor tabof the Options dialog box letsyou pick up a lot of typos inyour VBA procedures.

instructions that are used in pairs, such as If…End statements and looping
structures.
You’ve probably heard that computer programs are “full of bugs.” In pro-
gramming, errors are called bugs, and debugging is a process of eliminating
errors from your programs. Visual Basic provides a myriad of tools for track-
ing down and eliminating bugs. The first step in debugging a procedure is to
correct all syntax errors. In addition to syntax errors, there are two other types
of errors: run-time and logic. Run-time errors, which occur while the proce-
dure is running, are often caused by unexpected situations the programmer did
not think of while writing the code. For example, the program may be trying to
access a drive or a file that does not exist on the user’s computer. Or it may be
trying to copy a file to a floppy disk without first determining whether the user
had inserted a floppy disk and closed the drive door.
The third type of error, a logic error, often does not generate a specific error
message. Even though the procedure has no flaws in its syntax and runs with-
out errors, it produces incorrect results. Logic errors happen when your
procedure simply does not do what you want it to do. Logic errors are usually
very difficult to locate. Those that happen intermittently are sometimes so well
concealed that you can spend long hours, even days, trying to locate the source
of the error.
Testing VBA ProceduresWhen testing your VBA procedure, use the following guidelines:
� If you want to analyze your procedure, step through your code one line at a
time by pressing F8 or by choosing Debug | Step Into.
� If you suspect that an error may occur in a specific place in your procedure,
use a breakpoint.
� If you want to monitor the value of a particular variable or expression used
by your procedure, add a watch expression.
� If you are tired of scrolling through a long procedure to get to sections of
code that interest you, set up a bookmark to quickly jump to the desired
location.
Each of the above guidelines is demonstrated in a hands-on exercise in this
chapter.
Stopping a ProcedureVBA offers four methods of stopping your procedure and entering into a
so-called break mode:
� Pressing Ctrl+Break
� Setting one or more breakpoints
168 | Chapter 9
Part I

� Inserting the Stop statement
� Adding a watch expression
A break occurs when execution of your VBA procedure is temporarily sus-
pended. Visual Basic remembers the values of all variables and the statement
from which the execution of the procedure should resume when you decide to
continue. You can resume a suspended procedure in one of the following ways:
� Click the Run Sub/UserForm button on the toolbar
� Choose Run | Run Sub/UserForm from the menu bar
� Click the Continue button in the error message box (see Figure 9-2)
The error message box shown in Figure 9-2 informs you that the procedure
was halted. See the description of each button in Table 9-1.
Table 9-1: Error message box buttons
Button Name Description
Continue Click this button to resume code execution. This button will be grayedout if an error was encountered.
End Click this button if you do not want to troubleshoot the procedure atthis time. VBA will stop code execution.
Debug Click this button to enter break mode. The Code window will appear,and VBA will highlight the line at which the procedure execution wassuspended. You can examine, debug, or step through the code.
Help Click this button to view the online help that explains the cause of thiserror message.
Using BreakpointsIf you know more or less where there may be a problem in your procedure
code, you should suspend code execution at that location (on a given line). Set
a breakpoint by pressing F9 when the cursor is on the desired line of code.
When VBA gets to that line while running your procedure, it will display the
Code window immediately. At this point you can step through the procedure
code line by line by pressing F8 or choosing Debug | Step Into.
To see how this works, let’s look at the following scenario. Assume that
during the execution of the ListEndDates function procedure (see Custom Pro-
ject 9-1) the following line of code could get you into trouble:
ListEndDates = Format(((Now() + intOffset) - 35) + 7 * row, "MM/DD/YYYY")
Debugging VBA Procedures and Handling Errors | 169
Introduction to Access 2007 VBA Programming
Figure 9-2: This message appearswhen you press Ctrl+Break whileyour VBA procedure is running.
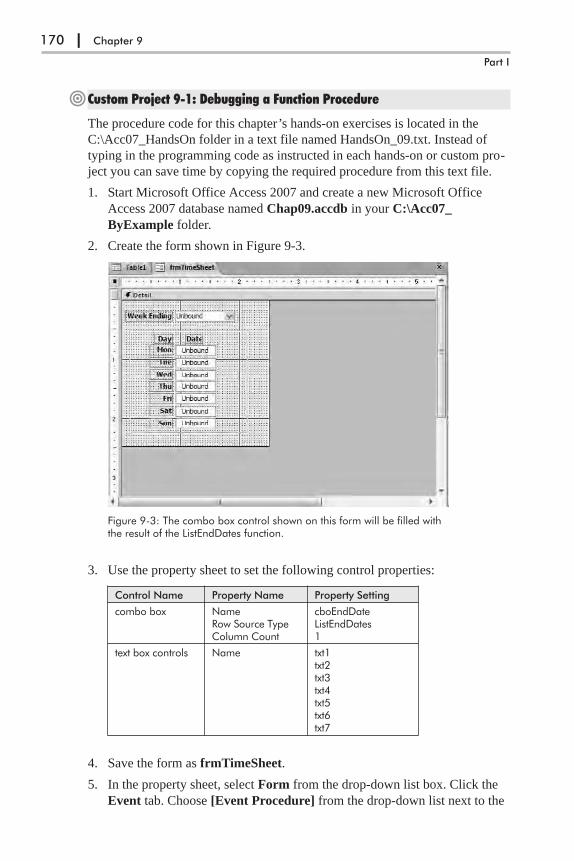
�Custom Project 9-1: Debugging a Function Procedure
The procedure code for this chapter’s hands-on exercises is located in the
C:\Acc07_HandsOn folder in a text file named HandsOn_09.txt. Instead of
typing in the programming code as instructed in each hands-on or custom pro-
ject you can save time by copying the required procedure from this text file.
1. Start Microsoft Office Access 2007 and create a new Microsoft Office
Access 2007 database named Chap09.accdb in your C:\Acc07_
ByExample folder.
2. Create the form shown in Figure 9-3.
3. Use the property sheet to set the following control properties:
Control Name Property Name Property Setting
combo box NameRow Source TypeColumn Count
cboEndDateListEndDates1
text box controls Name txt1txt2txt3txt4txt5txt6txt7
4. Save the form as frmTimeSheet.
5. In the property sheet, select Form from the drop-down list box. Click the
Event tab. Choose [Event Procedure] from the drop-down list next to the
170 | Chapter 9
Part I
Figure 9-3: The combo box control shown on this form will be filled withthe result of the ListEndDates function.
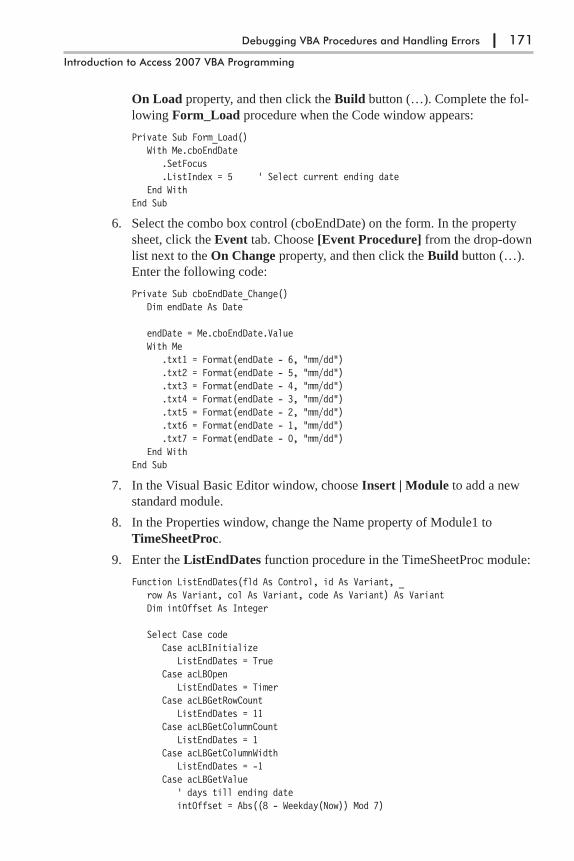
On Load property, and then click the Build button (…). Complete the fol-
lowing Form_Load procedure when the Code window appears:
Private Sub Form_Load()With Me.cboEndDate
.SetFocus
.ListIndex = 5 ' Select current ending dateEnd With
End Sub
6. Select the combo box control (cboEndDate) on the form. In the property
sheet, click the Event tab. Choose [Event Procedure] from the drop-down
list next to the On Change property, and then click the Build button (…).
Enter the following code:
Private Sub cboEndDate_Change()Dim endDate As Date
endDate = Me.cboEndDate.ValueWith Me
.txt1 = Format(endDate - 6, "mm/dd")
.txt2 = Format(endDate - 5, "mm/dd")
.txt3 = Format(endDate - 4, "mm/dd")
.txt4 = Format(endDate - 3, "mm/dd")
.txt5 = Format(endDate - 2, "mm/dd")
.txt6 = Format(endDate - 1, "mm/dd")
.txt7 = Format(endDate - 0, "mm/dd")End With
End Sub
7. In the Visual Basic Editor window, choose Insert | Module to add a new
standard module.
8. In the Properties window, change the Name property of Module1 to
TimeSheetProc.
9. Enter the ListEndDates function procedure in the TimeSheetProc module:
Function ListEndDates(fld As Control, id As Variant, _row As Variant, col As Variant, code As Variant) As VariantDim intOffset As Integer
Select Case codeCase acLBInitialize
ListEndDates = TrueCase acLBOpen
ListEndDates = TimerCase acLBGetRowCount
ListEndDates = 11Case acLBGetColumnCount
ListEndDates = 1Case acLBGetColumnWidth
ListEndDates = -1Case acLBGetValue
' days till ending dateintOffset = Abs((8 - Weekday(Now)) Mod 7)
Debugging VBA Procedures and Handling Errors | 171
Introduction to Access 2007 VBA Programming
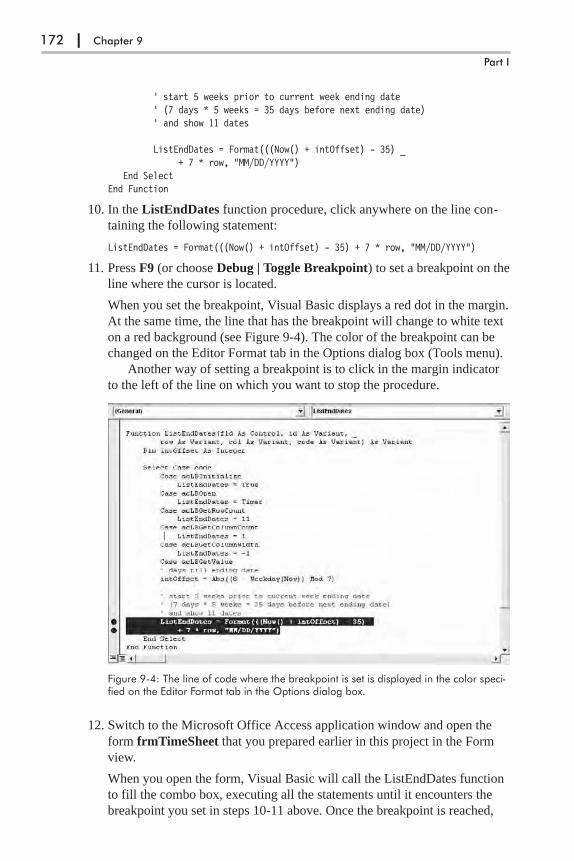
' start 5 weeks prior to current week ending date' (7 days * 5 weeks = 35 days before next ending date)' and show 11 dates
ListEndDates = Format(((Now() + intOffset) - 35) _+ 7 * row, "MM/DD/YYYY")
End SelectEnd Function
10. In the ListEndDates function procedure, click anywhere on the line con-
taining the following statement:
ListEndDates = Format(((Now() + intOffset) - 35) + 7 * row, "MM/DD/YYYY")
11. Press F9 (or choose Debug | Toggle Breakpoint) to set a breakpoint on the
line where the cursor is located.
When you set the breakpoint, Visual Basic displays a red dot in the margin.
At the same time, the line that has the breakpoint will change to white text
on a red background (see Figure 9-4). The color of the breakpoint can be
changed on the Editor Format tab in the Options dialog box (Tools menu).
Another way of setting a breakpoint is to click in the margin indicator
to the left of the line on which you want to stop the procedure.
12. Switch to the Microsoft Office Access application window and open the
form frmTimeSheet that you prepared earlier in this project in the Form
view.
When you open the form, Visual Basic will call the ListEndDates function
to fill the combo box, executing all the statements until it encounters the
breakpoint you set in steps 10-11 above. Once the breakpoint is reached,
172 | Chapter 9
Part I
Figure 9-4: The line of code where the breakpoint is set is displayed in the color speci-fied on the Editor Format tab in the Options dialog box.

the code is suspended and the screen displays the Code window (Figure
9-5) in break mode (notice the word “break” surrounded by square brack-
ets in the Code window’s title bar). Visual Basic displays a yellow arrow in
the margin to the left of the statement at which the procedure was sus-
pended. At the same time, the statement appears inside a box with a yellow
background. The arrow and the box indicate the current statement, or the
statement that is about to be executed. If the current statement also contains
a breakpoint, the margin displays both indicators overlapping one another
(the circle and the arrow).
13. Finish running the ListEndDates function procedure by pressing F5 to con-
tinue without stopping, or press F8 to execute the procedure line by line.
When you step through your procedure code line by line by pressing F8,
you can use the Immediate window to further test your procedure (see the
section titled “Using the Immediate Window in Break Mode”). To learn
more about stepping through a procedure, refer to the section titled “Step-
ping Through VBA Procedures” later in this chapter.
Visual Basic allows you to set any number of breakpoints in a procedure. This
way you can suspend and continue the execution of your procedure as you
please. You can press F5 to quickly move between the breakpoints. You can
analyze the code of your procedure and check the values of variables while
code execution is suspended. You can also perform various tests by typing
statements in the Immediate window. Consider setting a breakpoint if you sus-
pect that your procedure never executes a certain block of code.
Debugging VBA Procedures and Handling Errors | 173
Introduction to Access 2007 VBA Programming
Figure 9-5: When Visual Basic encounters a breakpoint, it displays the Code window.A yellow arrow appears in the margin to the left of the statement at which the proce-dure was suspended. Because the current statement also contains a breakpoint(indicated by a red circle), the margin displays both indicators overlapping oneanother (the circle and the arrow).
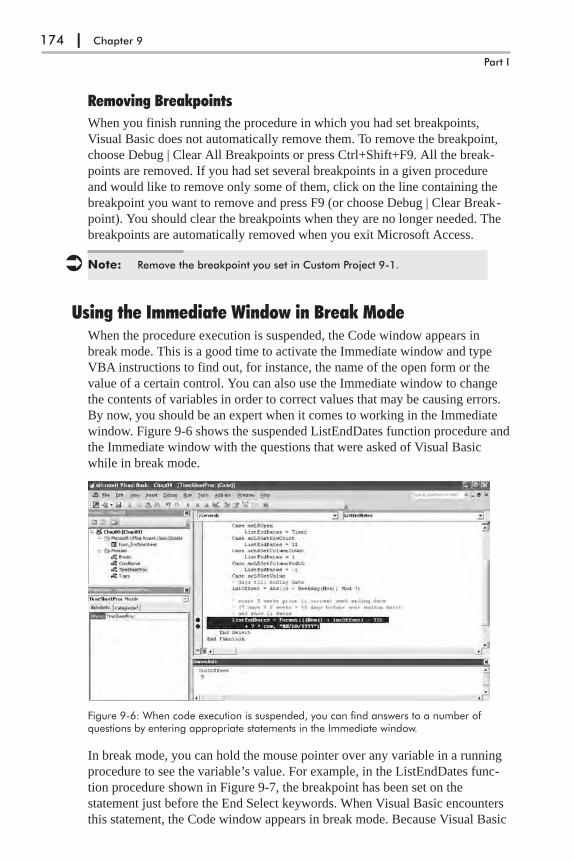
Removing Breakpoints
When you finish running the procedure in which you had set breakpoints,
Visual Basic does not automatically remove them. To remove the breakpoint,
choose Debug | Clear All Breakpoints or press Ctrl+Shift+F9. All the break-
points are removed. If you had set several breakpoints in a given procedure
and would like to remove only some of them, click on the line containing the
breakpoint you want to remove and press F9 (or choose Debug | Clear Break-
point). You should clear the breakpoints when they are no longer needed. The
breakpoints are automatically removed when you exit Microsoft Access.
� Note: Remove the breakpoint you set in Custom Project 9-1.
Using the Immediate Window in Break ModeWhen the procedure execution is suspended, the Code window appears in
break mode. This is a good time to activate the Immediate window and type
VBA instructions to find out, for instance, the name of the open form or the
value of a certain control. You can also use the Immediate window to change
the contents of variables in order to correct values that may be causing errors.
By now, you should be an expert when it comes to working in the Immediate
window. Figure 9-6 shows the suspended ListEndDates function procedure and
the Immediate window with the questions that were asked of Visual Basic
while in break mode.
In break mode, you can hold the mouse pointer over any variable in a running
procedure to see the variable’s value. For example, in the ListEndDates func-
tion procedure shown in Figure 9-7, the breakpoint has been set on the
statement just before the End Select keywords. When Visual Basic encounters
this statement, the Code window appears in break mode. Because Visual Basic
174 | Chapter 9
Part I
Figure 9-6: When code execution is suspended, you can find answers to a number ofquestions by entering appropriate statements in the Immediate window.

has already executed the statement that stores the value of the variable
intOffset, you can quickly find out the value of this variable by resting the
mouse pointer over its name. The name of the variable and its current value
appear in a floating frame. To show the values of several variables used in a
procedure at once, you should use the Locals window, which is discussed later
in this chapter.
Working in a Code Window in Break ModeWhile in break mode, you can change code, add new statements, executethe procedure one line at a time, skip lines, set the next statement, use theImmediate window, and more. When Visual Basic is in break mode, all ofthe options on the Debug menu are available. You can enter break modeby pressing Ctrl+Break or F8, or setting a breakpoint. In break mode, ifyou change a certain line of code, VBA will prompt you to reset the projectby displaying the message “This action will reset your project, proceed any-way?” Click OK to stop the program’s execution and proceed editing yourcode, or Cancel to delete the new changes and continue running the codefrom the point where it was suspended. For example, change the variabledeclaration. As you press F5 to resume code execution, VBA will promptyou to reset your project.
Using the Stop StatementSometimes you won’t be able to test your procedure right away. If you set up
your breakpoints and then close the database file, the breakpoints will be
removed; next time, when you are ready to test your procedure, you’ll have to
begin by setting up your breakpoints again. If you need to postpone the task of
testing your procedure until later, you can take a different approach. Insert a
Stop statement into your code wherever you want to halt a procedure.
Figure 9-8 shows the Stop statement before the With…End With construct.
Visual Basic will suspend the execution of the cboEndDate_Change event pro-
cedure when it encounters the Stop statement and the screen will display the
Code window in break mode. Although the Stop statement has exactly the
same effect as setting a breakpoint, it does have one disadvantage. All Stop
statements stay in the procedure until you remove them. When you no longer
need to stop your procedure, you must locate and remove all the Stops.
Debugging VBA Procedures and Handling Errors | 175
Introduction to Access 2007 VBA Programming
Figure 9-7: In break mode, you can find out the value of a vari-able by resting the mouse pointer on that variable.

Adding Watch ExpressionsMany errors in procedures are caused by variables that assume unexpected val-
ues. If a procedure uses a variable whose value changes in various locations,
you may want to stop the procedure and check the current value of that vari-
able. Visual Basic offers a special Watches window that allows you to keep an
eye on variables or expressions while your procedure is running. To add a
watch expression to your procedure, select the variable whose value you want
to monitor in the Code window, then choose Debug | Add Watch. The screen
will display the Add Watch dialog box, as shown in Figure 9-9.
The Add Watch dialog box contains three sections, which are described in
Table 9-2.
176 | Chapter 9
Part I
Figure 9-8: You can insert a Stop statement anywhere in your VBA procedure code.The procedure will halt when it gets to the Stop statement, and the Code window willappear with the code line highlighted.
Figure 9-9: The Add Watch dialog boxallows you to define conditions you want tomonitor while a VBA procedure is running.

Table 9-2: Add Watch dialog box sections
Section Description
Expression Displays the name of a variable you have highlighted in your procedure.If you opened the Add Watch dialog box without selecting a variablename, type the name of the variable you want to monitor in theExpression text box.
Context In this section, indicate the name of the procedure that contains thevariable and the name of the module where this procedure is located.
Watch Type Specifies how to monitor the variable. If you choose:
• The Watch Expression option button, you can read the value of thevariable in the Watch window while in break mode.
• Break When Value Is True, Visual Basic will automatically stop theprocedure when the variable evaluates to true (nonzero).
• Break When Value Changes, Visual Basic will automatically stop theprocedure each time the value of the variable or expression changes.
You can add a watch expression before running a procedure or after suspend-
ing the execution of your procedure.
The difference between a breakpoint and a watch expression is that the
breakpoint always stops a procedure in a specified location, but the watch
stops the procedure only when the specified condition (Break When Value Is
True or Break When Value Changes) is met. Watches are extremely useful
when you are not sure where the variable is being changed. Instead of stepping
through many lines of code to find the location where the variable assumes the
specified value, you can put a watch breakpoint on the variable and run your
procedure as normal. Let’s see how this works.
�Hands-On 9-1: Working with the Watches Window
1. In the Visual Editor window, choose Insert | Module to insert a new stan-
dard module.
2. Use the Properties window to change the name of the Module to Breaks.
3. In the Breaks Code window, type the following WhatDate procedure:
Sub WhatDate()Dim curDate As DateDim newDate As DateDim x As Integer
curDate = DateFor x = 1 To 365
newDate = Date + xNext x
End Sub
Debugging VBA Procedures and Handling Errors | 177
Introduction to Access 2007 VBA Programming

The WhatDate procedure uses the For…Next loop to calculate the date that
is x days in the future. You won’t see any result when you run this proce-
dure unless you insert the following instruction in the procedure code just
before the End Sub keywords:
MsgBox "In " & x & " days, it will be " & NewDate
This time, however, you don’t want to display the individual dates, day
after day. Suppose that you want to stop the program when the value of the
variable x reaches 211. In other words, you want to know what date will be
211 days from now. To get the answer, you could insert the following state-
ment into your procedure before the Next x statement:
If x = 211 Then MsgBox "In " & x & " days it will be " & NewDate
But this time, you want to get the answer without introducing any new
statements into your procedure. If you add watch expressions to the proce-
dure, Visual Basic will stop the For…Next loop when the specified condi-
tion is met, and you’ll be able to check the values of the desired variables.
4. Choose Debug | Add Watch.
5. In the Expression text box, enter the following expression: x = 211.
6. In the Context section, choose WhatDate from the Procedure combo box
and Breaks from the Module combo box.
7. In the Watch Type section, select the Break When Value Is True option
button.
8. Click OK to close the Add Watch dialog box. You have now added your
first watch expression.
9. In the Code window, position the insertion point anywhere within the name
of the curDate variable.
178 | Chapter 9
Part I
Figure 9-10: Using the Watches window.
10. Choose Debug | Add Watch and click OK to set up the default watch type
with the Watch Expression option.
11. In the Code window, position the insertion point anywhere within the name
of the newDate variable.
12. Choose Debug | Add Watch and click OK to set up the default watch type
with the Watch Expression option.
After performing the above steps, the WhatDate procedure contains the
following three watches:
x = 211 Break When Value Is True
curDate Watch Expression
newDate Watch Expression
13. Position the cursor anywhere inside the code of the WhatDate procedure
and press F5.
Visual Basic stops the procedure when x = 211 (see Figure 9-10 above).
Notice that the value of the variable x in the Watches window is the same
as the value you specified in the Add Watch dialog box. In addition, the
Watches window shows the value of the variables curDate and newDate.
The procedure is in break mode. You can press F5 to continue, or you can
ask another question: What date will be in 277 days? The next step shows
how to do this.
14. Choose Debug | Edit Watch and enter the following expression: x = 277.
15. Display the Edit Watch dialog box by double-clicking the expression in the
Watches window.
16. Click OK to close the Edit Watch dialog box. Notice that the Watches win-
dow now displays a new value of the expression. The x is now false.
17. Press F5. The procedure stops again when the value of x = 277. The value
of curDate is the same; however, the newDate variable now contains a new
value — a date that is 277 days from now. You can change the value of the
expression again or finish the procedure.
18. Press F5 to finish the procedure without stopping.
When your procedure is running and a watch expression has a value, the
Watches window displays the value of the Watch expression. If you open
the Watches window after the procedure has finished, you will see the error
“<out of context>” instead of the variable values. In other words, when the
watch expression is out of context, it does not have a value.
Removing Watch Expressions
To remove a watch expression, click on the expression you want to remove
from the Watches window and press Delete. Remove all the watch expressions
you defined in the preceding exercise.
Debugging VBA Procedures and Handling Errors | 179
Introduction to Access 2007 VBA Programming
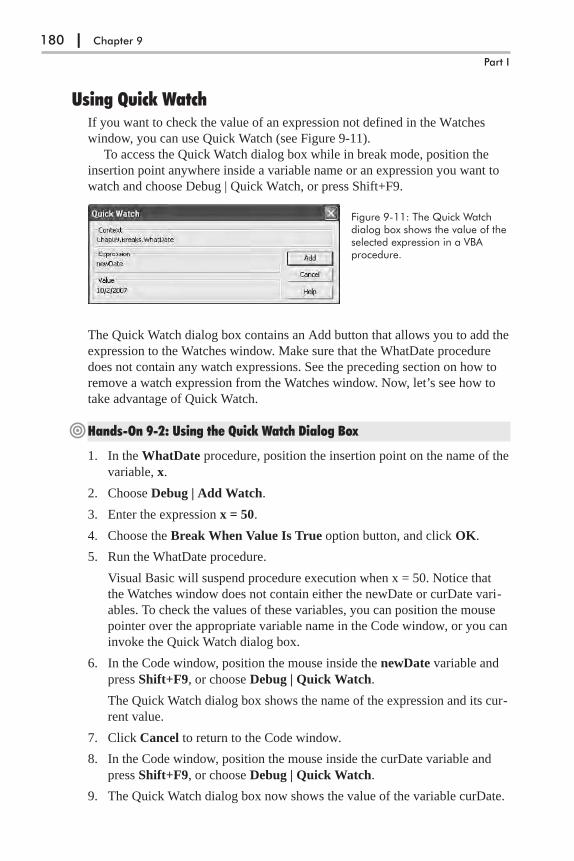
Using Quick WatchIf you want to check the value of an expression not defined in the Watches
window, you can use Quick Watch (see Figure 9-11).
To access the Quick Watch dialog box while in break mode, position the
insertion point anywhere inside a variable name or an expression you want to
watch and choose Debug | Quick Watch, or press Shift+F9.
The Quick Watch dialog box contains an Add button that allows you to add the
expression to the Watches window. Make sure that the WhatDate procedure
does not contain any watch expressions. See the preceding section on how to
remove a watch expression from the Watches window. Now, let’s see how to
take advantage of Quick Watch.
�Hands-On 9-2: Using the Quick Watch Dialog Box
1. In the WhatDate procedure, position the insertion point on the name of the
variable, x.
2. Choose Debug | Add Watch.
3. Enter the expression x = 50.
4. Choose the Break When Value Is True option button, and click OK.
5. Run the WhatDate procedure.
Visual Basic will suspend procedure execution when x = 50. Notice that
the Watches window does not contain either the newDate or curDate vari-
ables. To check the values of these variables, you can position the mouse
pointer over the appropriate variable name in the Code window, or you can
invoke the Quick Watch dialog box.
6. In the Code window, position the mouse inside the newDate variable and
press Shift+F9, or choose Debug | Quick Watch.
The Quick Watch dialog box shows the name of the expression and its cur-
rent value.
7. Click Cancel to return to the Code window.
8. In the Code window, position the mouse inside the curDate variable and
press Shift+F9, or choose Debug | Quick Watch.
9. The Quick Watch dialog box now shows the value of the variable curDate.
180 | Chapter 9
Part I
Figure 9-11: The Quick Watchdialog box shows the value of theselected expression in a VBAprocedure.
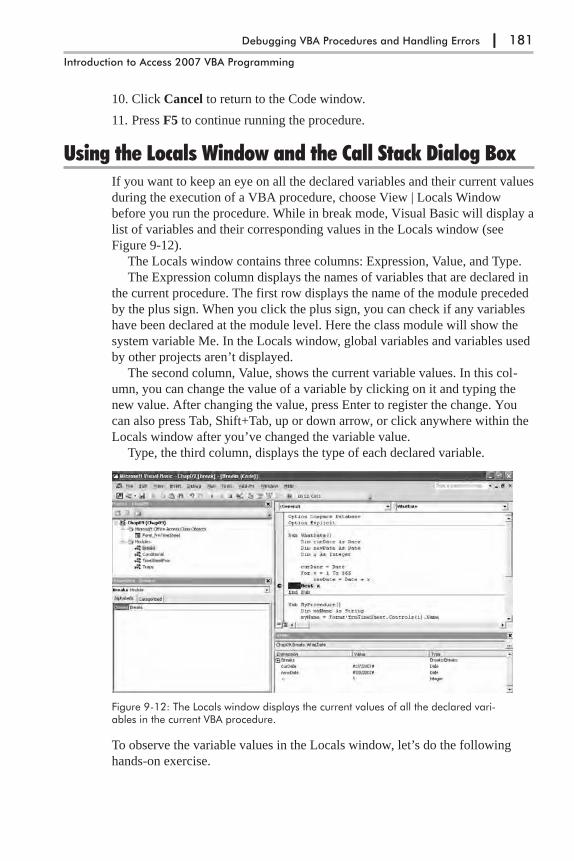
10. Click Cancel to return to the Code window.
11. Press F5 to continue running the procedure.
Using the Locals Window and the Call Stack Dialog BoxIf you want to keep an eye on all the declared variables and their current values
during the execution of a VBA procedure, choose View | Locals Window
before you run the procedure. While in break mode, Visual Basic will display a
list of variables and their corresponding values in the Locals window (see
Figure 9-12).
The Locals window contains three columns: Expression, Value, and Type.
The Expression column displays the names of variables that are declared in
the current procedure. The first row displays the name of the module preceded
by the plus sign. When you click the plus sign, you can check if any variables
have been declared at the module level. Here the class module will show the
system variable Me. In the Locals window, global variables and variables used
by other projects aren’t displayed.
The second column, Value, shows the current variable values. In this col-
umn, you can change the value of a variable by clicking on it and typing the
new value. After changing the value, press Enter to register the change. You
can also press Tab, Shift+Tab, up or down arrow, or click anywhere within the
Locals window after you’ve changed the variable value.
Type, the third column, displays the type of each declared variable.
To observe the variable values in the Locals window, let’s do the following
hands-on exercise.
Debugging VBA Procedures and Handling Errors | 181
Introduction to Access 2007 VBA Programming
Figure 9-12: The Locals window displays the current values of all the declared vari-ables in the current VBA procedure.
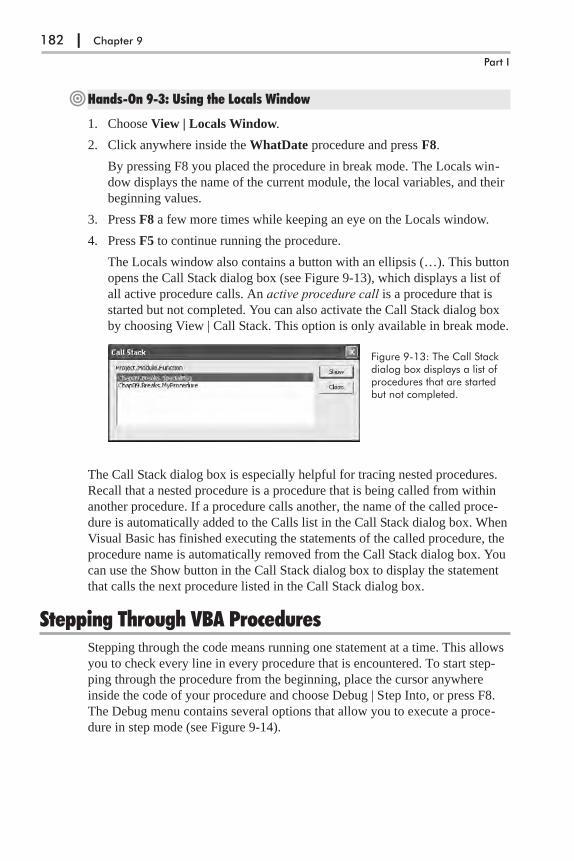
�Hands-On 9-3: Using the Locals Window
1. Choose View | Locals Window.
2. Click anywhere inside the WhatDate procedure and press F8.
By pressing F8 you placed the procedure in break mode. The Locals win-
dow displays the name of the current module, the local variables, and their
beginning values.
3. Press F8 a few more times while keeping an eye on the Locals window.
4. Press F5 to continue running the procedure.
The Locals window also contains a button with an ellipsis (…). This button
opens the Call Stack dialog box (see Figure 9-13), which displays a list of
all active procedure calls. An active procedure call is a procedure that is
started but not completed. You can also activate the Call Stack dialog box
by choosing View | Call Stack. This option is only available in break mode.
The Call Stack dialog box is especially helpful for tracing nested procedures.
Recall that a nested procedure is a procedure that is being called from within
another procedure. If a procedure calls another, the name of the called proce-
dure is automatically added to the Calls list in the Call Stack dialog box. When
Visual Basic has finished executing the statements of the called procedure, the
procedure name is automatically removed from the Call Stack dialog box. You
can use the Show button in the Call Stack dialog box to display the statement
that calls the next procedure listed in the Call Stack dialog box.
Stepping Through VBA ProceduresStepping through the code means running one statement at a time. This allows
you to check every line in every procedure that is encountered. To start step-
ping through the procedure from the beginning, place the cursor anywhere
inside the code of your procedure and choose Debug | Step Into, or press F8.
The Debug menu contains several options that allow you to execute a proce-
dure in step mode (see Figure 9-14).
182 | Chapter 9
Part I
Figure 9-13: The Call Stackdialog box displays a list ofprocedures that are startedbut not completed.
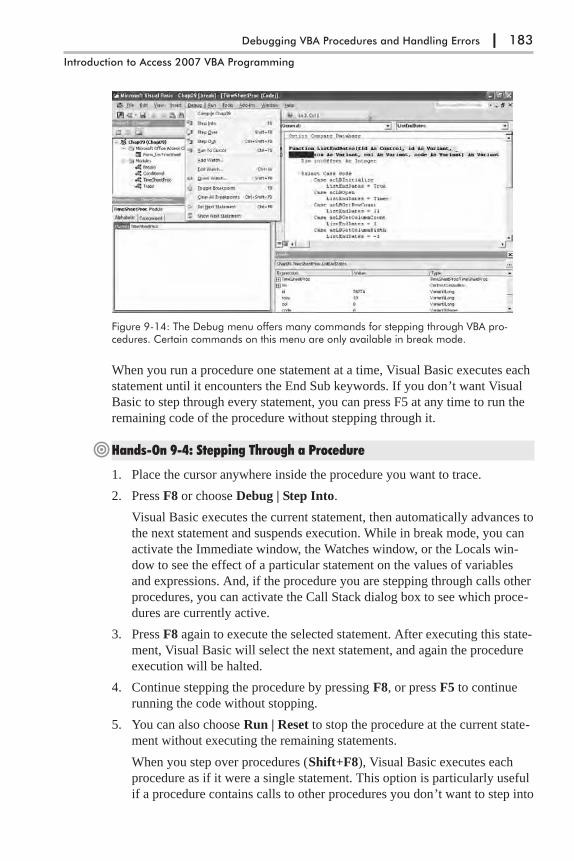
When you run a procedure one statement at a time, Visual Basic executes each
statement until it encounters the End Sub keywords. If you don’t want Visual
Basic to step through every statement, you can press F5 at any time to run the
remaining code of the procedure without stepping through it.
�Hands-On 9-4: Stepping Through a Procedure
1. Place the cursor anywhere inside the procedure you want to trace.
2. Press F8 or choose Debug | Step Into.
Visual Basic executes the current statement, then automatically advances to
the next statement and suspends execution. While in break mode, you can
activate the Immediate window, the Watches window, or the Locals win-
dow to see the effect of a particular statement on the values of variables
and expressions. And, if the procedure you are stepping through calls other
procedures, you can activate the Call Stack dialog box to see which proce-
dures are currently active.
3. Press F8 again to execute the selected statement. After executing this state-
ment, Visual Basic will select the next statement, and again the procedure
execution will be halted.
4. Continue stepping the procedure by pressing F8, or press F5 to continue
running the code without stopping.
5. You can also choose Run | Reset to stop the procedure at the current state-
ment without executing the remaining statements.
When you step over procedures (Shift+F8), Visual Basic executes each
procedure as if it were a single statement. This option is particularly useful
if a procedure contains calls to other procedures you don’t want to step into
Debugging VBA Procedures and Handling Errors | 183
Introduction to Access 2007 VBA Programming
Figure 9-14: The Debug menu offers many commands for stepping through VBA pro-cedures. Certain commands on this menu are only available in break mode.
because they have already been tested and debugged, or because you want
to concentrate only on the new code that has not been debugged yet.
Stepping Over a ProcedureSuppose that the current statement in MyProcedure calls the SpecialMsg pro-
cedure. If you choose Debug | Step Over (Shift+F8) instead of Debug | Step
Into (F8), Visual Basic will quickly execute all the statements inside the
SpecialMsg procedure and select the next statement in the calling procedure,
MyProcedure. All during the execution of the SpecialMsg procedure, Visual
Basic continues to display the current procedure in the Code window.
�Hands-On 9-5: Stepping Over a Procedure
This hands-on exercise refers to the Access form named frmTimeSheet that
you created in Custom Project 9-1 at the beginning of this chapter.
1. In the Visual Basic Editor window, choose Insert | Module to add a new
standard module.
2. In the module’s Code window, enter the MyProcedure and SpecialMsg
procedures as shown below:
Sub MyProcedure()Dim myName As String
myName = Forms!frmTimeSheet.Controls(1).Name
' choose Step Over to avoid stepping through the' lines of code in the called procedure - SpecialMsgSpecialMsg myName
End Sub
Sub SpecialMsg(n As String)If n = "Label1" Then
MsgBox "You must change the name."End If
End Sub
3. Add a breakpoint at the following statement:
SpecialMsg myName
4. Place the insertion point anywhere within the code of MyProcedure and
press F5 to run it.
Visual Basic halts execution when it reaches the breakpoint.
5. Press Shift+F8 or choose Debug | Step Over.
Visual Basic runs the SpecialMsg procedure, then execution advances to
the statement immediately after the call to the SpecialMsg procedure.
6. Press F5 to finish running the procedure without stepping through its code.
Now suppose you want to execute MyProcedure to the line that calls the
SpecialMsg procedure.
184 | Chapter 9
Part I

7. Click anywhere inside the statement SpecialMsg myName.
8. Choose Debug | Run to Cursor.
Visual Basic will stop the procedure when it reaches the specified line.
9. Press Shift+F8 to step over the SpecialMsg procedure.
10. Press F5 to execute the rest of the procedure without single stepping.
Stepping over a procedure is particularly useful when you don’t want to ana-
lyze individual statements inside the called procedure (SpecialMsg).
Stepping Out of a ProcedureAnother command on the Debug menu, Step Out (Ctrl+Shift+F8), is used
when you step into a procedure and then decide that you don’t want to step all
the way through it. When you choose this option, Visual Basic will execute the
remaining statements in this procedure in one step and proceed to activate the
next statement in the calling procedure.
In the process of stepping through a procedure you can switch between the
Step Into, Step Over, and Step Out options. The option you select depends on
which code fragment you wish to analyze at a given moment.
Running a Procedure to CursorThe Debug menu Run To Cursor (Ctrl+F8) command lets you run your proce-
dure until the line you have selected is encountered. This command is really
useful if you want to stop the execution before a large loop or you intend to
step over a called procedure.
Setting the Next StatementAt times, you may want to rerun previous lines of code in the procedure or
skip over a section of code that is causing trouble. In each of these situations,
you can use the Set Next Statement option on the Debug menu. When you halt
execution of a procedure, you can resume the procedure from any statement
you want. Visual Basic will skip execution of the statements between the
selected statement and the statement where execution was suspended.
Skipping Lines of CodeAlthough skipping lines of code can be very useful in the process of debug-ging your VBA procedures, it should be done with care. When you use theNext Statement option, you tell Visual Basic that this is the line you want toexecute next. All lines in between are ignored. This means that certainthings you may have expected to occur don’t happen, which can lead tounexpected errors.
Debugging VBA Procedures and Handling Errors | 185
Introduction to Access 2007 VBA Programming

Showing the Next StatementIf you are not sure where procedure execution will resume, you can choose
Debug | Show Next Statement, and Visual Basic will place the cursor on the
line that will run next. This is particularly useful when you have been looking
at other procedures and are not sure where execution will resume. The Show
Next Statement option is available only in break mode.
Stopping and Resetting VBA ProceduresAt any time while stepping through the code of a procedure in the Code win-
dow, you can press F5 to execute the remaining instructions without stepping
through them, or choose Run | Reset to finish the procedure without executing
the remaining statements. When you reset your procedure, all the variables
lose their current values. Numeric variables assume the initial value of zero,
variable-length strings are initialized to a zero-length string (""), and
fixed-length strings are filled with the character represented by the ASCII
character code 0, or Chr(0). Variant variables are initialized to Empty, and the
value of Object variables is set to Nothing.
Understanding and Using Conditional CompilationWhen you run a procedure for the first time, Visual Basic converts your VBA
statements into the machine code understood by the computer. This process is
called compiling. You can also perform the compilation of your entire VBA
project before you run the procedure by choosing Debug | Compile (name of
the current VBA project). You can tell Visual Basic to include or ignore certain
blocks of code when compiling and running by using conditional compilation.
Your procedure may behave differently depending on the condition you set.
For example, conditional compilation is used to compile an application that
will be run on different platforms (Windows or Macintosh, Win16 or Win32).
Conditional compilation is also useful in localizing an application for different
languages. The program code excluded during the conditional compilation is
omitted from the final file, and thus it has no effect on the size or performance
of the program.
Conditional compilation is enabled via special expressions called directives.
First, you need to declare a Boolean (True, False) constant by using the #Const
directive. Next, you check this constant inside the #If...Then... #Else directive.
The portion of code that you want to compile conditionally must be sur-
rounded by these directives. Notice that the If and Else keywords are preceded
by a pound sign (#). If a portion of code is to be run, the value of the condi-
tional constant has to be set to True (–1). Otherwise, the value of this constant
should be set to False (0). You declare the conditional constant in the declara-
tion section of the module. For example,
#Const User = True
declares the conditional constant named User.
186 | Chapter 9
Part I
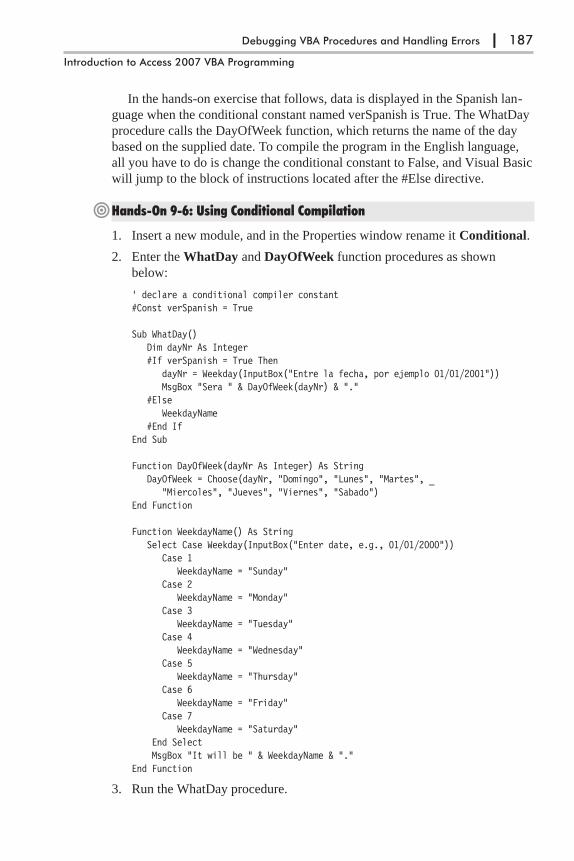
In the hands-on exercise that follows, data is displayed in the Spanish lan-
guage when the conditional constant named verSpanish is True. The WhatDay
procedure calls the DayOfWeek function, which returns the name of the day
based on the supplied date. To compile the program in the English language,
all you have to do is change the conditional constant to False, and Visual Basic
will jump to the block of instructions located after the #Else directive.
�Hands-On 9-6: Using Conditional Compilation
1. Insert a new module, and in the Properties window rename it Conditional.
2. Enter the WhatDay and DayOfWeek function procedures as shown
below:
' declare a conditional compiler constant#Const verSpanish = True
Sub WhatDay()Dim dayNr As Integer#If verSpanish = True Then
dayNr = Weekday(InputBox("Entre la fecha, por ejemplo 01/01/2001"))MsgBox "Sera " & DayOfWeek(dayNr) & "."
#ElseWeekdayName
#End IfEnd Sub
Function DayOfWeek(dayNr As Integer) As StringDayOfWeek = Choose(dayNr, "Domingo", "Lunes", "Martes", _
"Miercoles", "Jueves", "Viernes", "Sabado")End Function
Function WeekdayName() As StringSelect Case Weekday(InputBox("Enter date, e.g., 01/01/2000"))
Case 1WeekdayName = "Sunday"
Case 2WeekdayName = "Monday"
Case 3WeekdayName = "Tuesday"
Case 4WeekdayName = "Wednesday"
Case 5WeekdayName = "Thursday"
Case 6WeekdayName = "Friday"
Case 7WeekdayName = "Saturday"
End SelectMsgBox "It will be " & WeekdayName & "."
End Function
3. Run the WhatDay procedure.
Debugging VBA Procedures and Handling Errors | 187
Introduction to Access 2007 VBA Programming

Because the conditional compilation constant (verSpanish) is set to True
at the top of the module, Visual Basic runs the Spanish version of the
WhatDay procedure. It asks for the user’s input in Spanish and displays
the result in Spanish. To run the English version of the code, change the
verSpanish constant to False, and rerun the procedure.
Instead of declaring the conditional compiler constants at the top of a mod-
ule, you can choose Tools | (Debugging) Properties (see Figure 9-15).
When you use the Project Properties window, use the following syntax in
the Conditional Compilation Arguments text box to enable the English
version of the WhatDay procedure:
verSpanish = 0
If there are more conditional compilation constants, each of the constants
must be separated by a colon.
4. Comment out the #Const verSpanish directive at the top of the module,
and enter the conditional compilation constant in the Project Properties
window as shown in Figure 9-15. Then run the WhatDay procedure to
see how the Else branch of your program is now executed for English-
speaking users.
Navigating with BookmarksIn the process of analyzing or reviewing your VBA procedures you will often
find yourself jumping to certain code areas. Using the built-in bookmark fea-
ture, you can easily mark the spots you want to navigate between.
To set up a bookmark:
1. Click anywhere in the statement you want to define as a bookmark.
2. Choose Edit | Bookmarks | Toggle Bookmark (or click the Toggle Book-
mark button on the Edit toolbar).
Visual Basic will place a blue, rounded rectangle in the left margin beside
the statement (see Figure 9-16).
188 | Chapter 9
Part I
Figure 9-15: The conditionalcompilation constant can bedeclared either at the top ofthe module or in the ProjectProperties window, but neverin both places.

Once you’ve set up two or more bookmarks, you can jump between the
marked locations of your code by choosing Edit | Bookmarks | Next Bookmark
or simply click the Next Bookmark button on the Edit toolbar. You may also
right-click anywhere in the Code window and select Next Bookmark from the
shortcut menu. To go to the previous bookmark, select Previous Bookmark.
You can remove bookmarks at any time by choosing Edit | Bookmarks | Clear
All or by clicking the Clear All Bookmarks button on the Edit toolbar. To
remove a single bookmark, click anywhere in the bookmarked statement and
choose Edit | Bookmarks | Toggle Bookmark, or click the Toggle Bookmark
button on the Edit toolbar.
Trapping ErrorsNo one writes bug-free programs the first time. For this reason, when you cre-
ate VBA procedures you have to determine how your program will respond to
errors. Many unexpected errors happen at run time. For example, your proce-
dure may try to give a new file the same name as an open file.
Run-time errors are often discovered not by a programmer, but by the user
who attempts to do something that the programmer has not anticipated. If an
error occurs when the procedure is running, Visual Basic displays an error
message and the procedure is stopped. Most often the error message that VBA
displays is quite cryptic to the user.
You can keep users from seeing many run-time errors by including error-
handling code in your VBA procedures. This way, when Visual Basic encoun-
ters an error, instead of displaying a default error message, it will show a much
friendlier, more comprehensive error message, perhaps advising the user how
to correct the error.
Debugging VBA Procedures and Handling Errors | 189
Introduction to Access 2007 VBA Programming
Figure 9-16: Using bookmarks, you can quickly jump between often-used sections ofyour procedures.
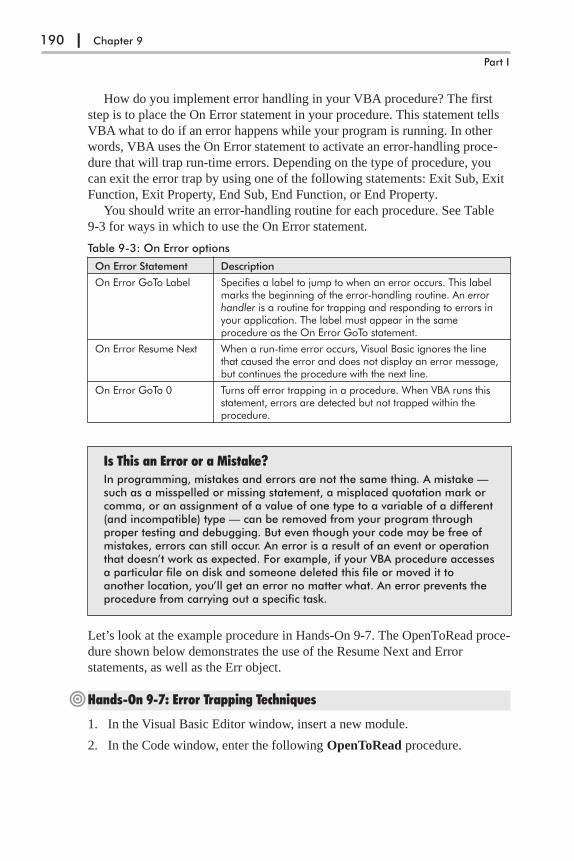
How do you implement error handling in your VBA procedure? The first
step is to place the On Error statement in your procedure. This statement tells
VBA what to do if an error happens while your program is running. In other
words, VBA uses the On Error statement to activate an error-handling proce-
dure that will trap run-time errors. Depending on the type of procedure, you
can exit the error trap by using one of the following statements: Exit Sub, Exit
Function, Exit Property, End Sub, End Function, or End Property.
You should write an error-handling routine for each procedure. See Table
9-3 for ways in which to use the On Error statement.
Table 9-3: On Error options
On Error Statement Description
On Error GoTo Label Specifies a label to jump to when an error occurs. This labelmarks the beginning of the error-handling routine. An errorhandler is a routine for trapping and responding to errors inyour application. The label must appear in the sameprocedure as the On Error GoTo statement.
On Error Resume Next When a run-time error occurs, Visual Basic ignores the linethat caused the error and does not display an error message,but continues the procedure with the next line.
On Error GoTo 0 Turns off error trapping in a procedure. When VBA runs thisstatement, errors are detected but not trapped within theprocedure.
Is This an Error or a Mistake?In programming, mistakes and errors are not the same thing. A mistake —such as a misspelled or missing statement, a misplaced quotation mark orcomma, or an assignment of a value of one type to a variable of a different(and incompatible) type — can be removed from your program throughproper testing and debugging. But even though your code may be free ofmistakes, errors can still occur. An error is a result of an event or operationthat doesn’t work as expected. For example, if your VBA procedure accessesa particular file on disk and someone deleted this file or moved it toanother location, you’ll get an error no matter what. An error prevents theprocedure from carrying out a specific task.
Let’s look at the example procedure in Hands-On 9-7. The OpenToRead proce-
dure shown below demonstrates the use of the Resume Next and Error
statements, as well as the Err object.
�Hands-On 9-7: Error Trapping Techniques
1. In the Visual Basic Editor window, insert a new module.
2. In the Code window, enter the following OpenToRead procedure.
190 | Chapter 9
Part I
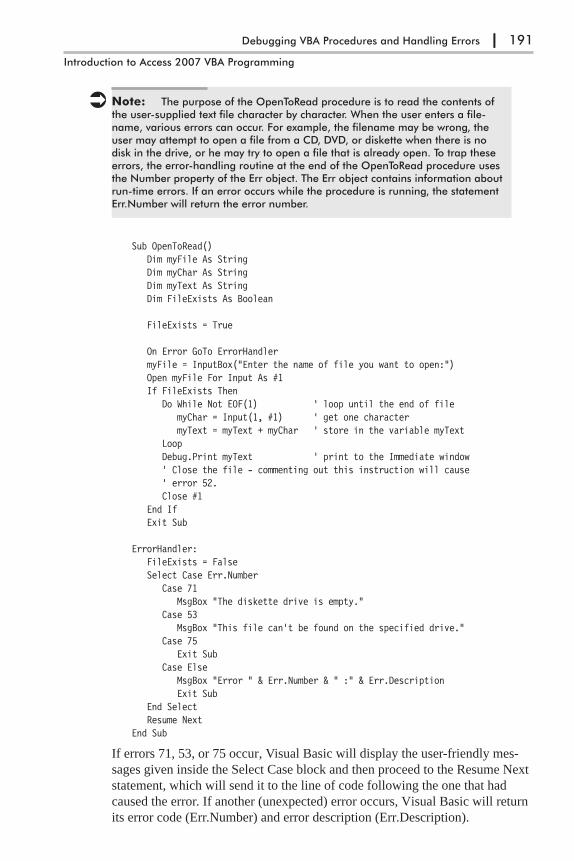
� Note: The purpose of the OpenToRead procedure is to read the contents ofthe user-supplied text file character by character. When the user enters a file-name, various errors can occur. For example, the filename may be wrong, theuser may attempt to open a file from a CD, DVD, or diskette when there is nodisk in the drive, or he may try to open a file that is already open. To trap theseerrors, the error-handling routine at the end of the OpenToRead procedure usesthe Number property of the Err object. The Err object contains information aboutrun-time errors. If an error occurs while the procedure is running, the statementErr.Number will return the error number.
Sub OpenToRead()Dim myFile As StringDim myChar As StringDim myText As StringDim FileExists As Boolean
FileExists = True
On Error GoTo ErrorHandlermyFile = InputBox("Enter the name of file you want to open:")Open myFile For Input As #1If FileExists Then
Do While Not EOF(1) ' loop until the end of filemyChar = Input(1, #1) ' get one charactermyText = myText + myChar ' store in the variable myText
LoopDebug.Print myText ' print to the Immediate window' Close the file - commenting out this instruction will cause' error 52.Close #1
End IfExit Sub
ErrorHandler:FileExists = FalseSelect Case Err.Number
Case 71MsgBox "The diskette drive is empty."
Case 53MsgBox "This file can't be found on the specified drive."
Case 75Exit Sub
Case ElseMsgBox "Error " & Err.Number & " :" & Err.DescriptionExit Sub
End SelectResume Next
End Sub
If errors 71, 53, or 75 occur, Visual Basic will display the user-friendly mes-
sages given inside the Select Case block and then proceed to the Resume Next
statement, which will send it to the line of code following the one that had
caused the error. If another (unexpected) error occurs, Visual Basic will return
its error code (Err.Number) and error description (Err.Description).
Debugging VBA Procedures and Handling Errors | 191
Introduction to Access 2007 VBA Programming

At the beginning of the procedure, the variable FileExists is set to True. If
the program doesn’t encounter an error, all the instructions inside the If
FileExists Then block will be executed. However, if VBA encounters an error,
the value of the FileExists variable will be set to False (see the first statement
in the error-handling routine just below the ErrorHandler label).
If you comment the statement Close #1, Visual Basic will encounter the
error on the next attempt to open the same file. Notice the Exit Sub statement
before the ErrorHandler. Put the Exit Sub statement just above the error-han-
dling routine. You don’t want Visual Basic to carry out the error handling if
there are no errors.
Procedure TestingYou are responsible for the code you produce. This means that before yougive your procedure to others to test, you should test it yourself. After all,you understand best how it is supposed to work. Some programmers thinktesting their own code is some sort of degrading activity, especially whenthey work in an organization that has a team devoted to testing. Don’tmake this mistake. The testing process at the programmer level is as impor-tant as the code development itself. After you’ve tested the procedureyourself, you should give it to the users to test. Users will provide you withanswers to questions such as: Does the procedure produce the expectedresults? Is it easy and fun to use? Does it follow the standard conventions?Also, it is a good idea to give the entire application to someone who knowsthe least about using this particular application, and ask them to playaround with it and try to break it.
To better understand error trapping, let’s perform another hands-on exercise.
�Hands-On 9-8: Understanding Error Trapping
This hands-on exercise requires prior completion of Hands-On 9-7.
1. Prepare a text file named C:\Acc07_ByExample\Vacation.txt using Win-
dows Notepad. Enter any text you want in this file, or copy the Vacation.txt
file from the C:\Acc07_HandsOn folder to your Acc07_ByExample folder.
2. Run the OpenToRead procedure three times in step mode, each time sup-
plying one of the following:
� The filename C:\Acc07_ByExample\Vacation.txt
� A filename that does not exist on drive C
� The name of any file that references your CD, DVD or diskette drive
(when the drive slot is empty)
3. Comment the Close #1 statement and enter C:\Acc07_ByExample\Vaca-
tion.txt as the filename. Run the procedure twice. The second run will
generate an error because the text file will be open.
192 | Chapter 9
Part I

Generating Errors to Test Error HandlingYou can test the ways your program responds to run-time errors by causing
them on purpose:
� Generate any built-in error by entering the following syntax:
Error error_number
For example, to display the error that occurs on an attempt to divide by
zero (0), type the following statement in the Immediate window:
Error 11
When you press Enter, Visual Basic will display the error message saying,
“Run-time error 11. Division by zero.”
� To check the meaning of the generated error, use the following syntax:
Error(error_number)
For example, to find out what error number 7 means, type the following in
the Immediate window:
?Error(7)
When you press Enter, Visual Basic returns the error description:
"Out of memory"
Chapter SummaryIn this chapter, you learned how to test your VBA procedures to make sure
they perform as planned. You debugged your code by stepping through it using
breakpoints and watches, learned how to work with the Immediate window in
break mode, found out how the Locals window can help you monitor the val-
ues of variables, and discovered how the Call Stack dialog box can be helpful
for keeping track of where you are in a complex program. You also learned
how to specify the parts of your procedure that you want to include or exclude
upon compilation. Finally, you learned how to trap errors with error-handling
routines. By using the built-in debugging tools, you can quickly pinpoint the
problem spots in your procedures. Try to spend more time getting acquainted
with these tools. Mastering the art of debugging can save you hours of trial and
error.
This chapter completes Part I of this book — Introduction to Access 2007
VBA Programming.
Debugging VBA Procedures and Handling Errors | 193
Introduction to Access 2007 VBA Programming

This page intentionally left blank.
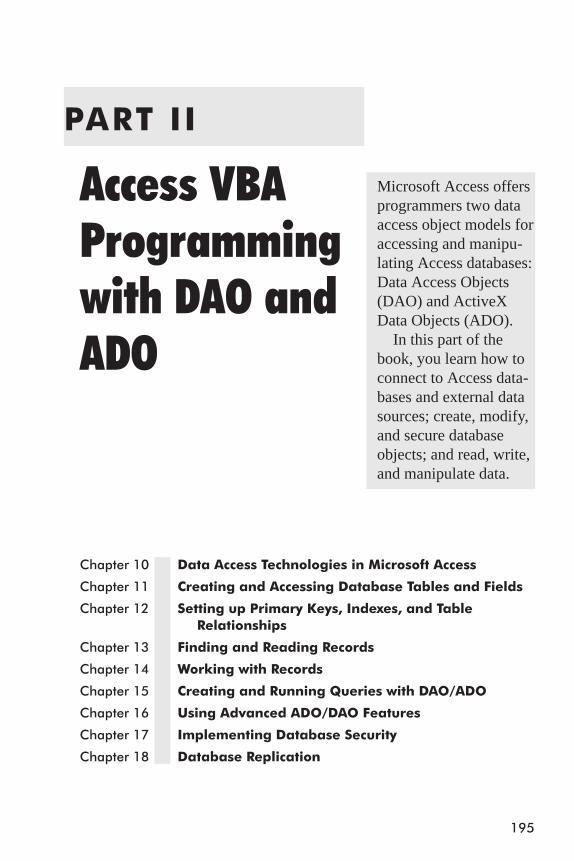
PART II
Access VBAProgrammingwith DAO andADO
Chapter 10 Data Access Technologies in Microsoft Access
Chapter 11 Creating and Accessing Database Tables and Fields
Chapter 12 Setting up Primary Keys, Indexes, and Table
Relationships
Chapter 13 Finding and Reading Records
Chapter 14 Working with Records
Chapter 15 Creating and Running Queries with DAO/ADO
Chapter 16 Using Advanced ADO/DAO Features
Chapter 17 Implementing Database Security
Chapter 18 Database Replication
195
Microsoft Access offers
programmers two data
access object models for
accessing and manipu-
lating Access databases:
Data Access Objects
(DAO) and ActiveX
Data Objects (ADO).
In this part of the
book, you learn how to
connect to Access data-
bases and external data
sources; create, modify,
and secure database
objects; and read, write,
and manipulate data.

196

Chapter 10
Data Access Technologies inMicrosoft Access
Microsoft Access has been effectively used by people all over the world for
organizing and accessing data. While each new software release brought
numerous changes in the design of the user interface and offered simpler ways
of performing common database tasks, database access has evolved at a little
slower pace.
This chapter begins with the introduction of the old (Jet) and the new
(ACE) database engines and proceeds to an overview of Access versions and
file formats supported by Microsoft Office Access 2007. This is followed by a
review of data access methods that programmers and database developers can
use to read, write, and manipulate data in Access databases (in MDB and the
new ACCDB file formats). In addition, this chapter demonstrates various ways
of opening both native Microsoft Jet databases as well as external data sources.
You will also learn how to establish a connection to the currently open data-
base, connect to an SQL Server, create a new database, set database properties,
and handle database errors.
Understanding Database Engines: Jet/ACESince version 1.0 (1992), an integrated part of Microsoft Access has been its
database engine, commonly referred to as Microsoft Jet (Joint Engine Technol-
ogy (JET)) or Jet database engine. Microsoft Jet is a multi-user, relational
database engine that provides support for the standard DBMS (Database Man-
agement System) functionality such as data definition, data manipulation,
querying, security, and maintenance, as well as remote data access.
Jet stores data in the Microsoft Access database (MDB) file format accord-
ing to the Indexed Sequential Access Method (ISAM). Queries are performed
by the Jet query engine. A Replication engine is used to create copies (replicas)
of database structures on multiple systems with periodic synchronization. Jet
provides password-protected security and different levels of access via the user
and group accounts. The user information is kept in a separate system database
(MDW). Security is also built into the database tables in the form of object
permissions.
The Microsoft Jet database engine enables you to access data that resides in
Microsoft Jet databases (MDB files), external data sources (FoxPro, Borland
197
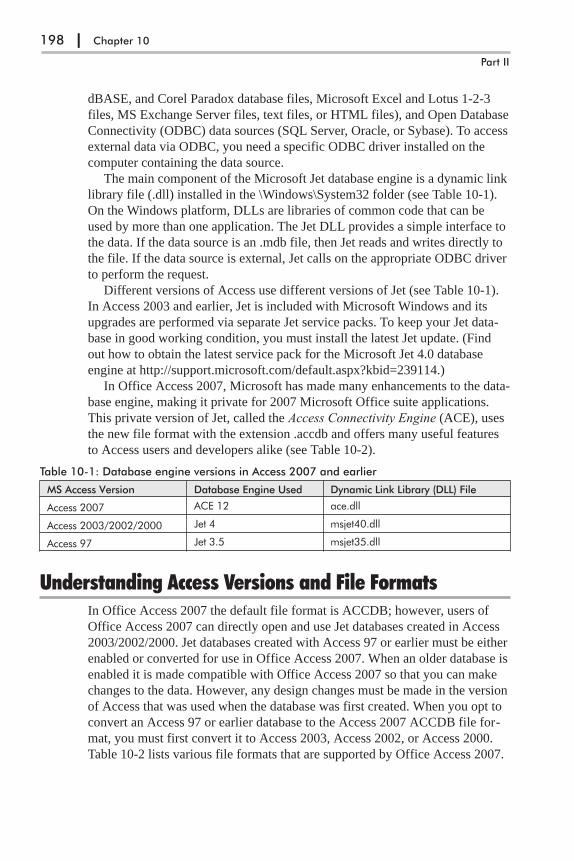
dBASE, and Corel Paradox database files, Microsoft Excel and Lotus 1-2-3
files, MS Exchange Server files, text files, or HTML files), and Open Database
Connectivity (ODBC) data sources (SQL Server, Oracle, or Sybase). To access
external data via ODBC, you need a specific ODBC driver installed on the
computer containing the data source.
The main component of the Microsoft Jet database engine is a dynamic link
library file (.dll) installed in the \Windows\System32 folder (see Table 10-1).
On the Windows platform, DLLs are libraries of common code that can be
used by more than one application. The Jet DLL provides a simple interface to
the data. If the data source is an .mdb file, then Jet reads and writes directly to
the file. If the data source is external, Jet calls on the appropriate ODBC driver
to perform the request.
Different versions of Access use different versions of Jet (see Table 10-1).
In Access 2003 and earlier, Jet is included with Microsoft Windows and its
upgrades are performed via separate Jet service packs. To keep your Jet data-
base in good working condition, you must install the latest Jet update. (Find
out how to obtain the latest service pack for the Microsoft Jet 4.0 database
engine at http://support.microsoft.com/default.aspx?kbid=239114.)
In Office Access 2007, Microsoft has made many enhancements to the data-
base engine, making it private for 2007 Microsoft Office suite applications.
This private version of Jet, called the Access Connectivity Engine (ACE), uses
the new file format with the extension .accdb and offers many useful features
to Access users and developers alike (see Table 10-2).
Table 10-1: Database engine versions in Access 2007 and earlier
MS Access Version Database Engine Used Dynamic Link Library (DLL) File
Access 2007 ACE 12 ace.dll
Access 2003/2002/2000 Jet 4 msjet40.dll
Access 97 Jet 3.5 msjet35.dll
Understanding Access Versions and File FormatsIn Office Access 2007 the default file format is ACCDB; however, users of
Office Access 2007 can directly open and use Jet databases created in Access
2003/2002/2000. Jet databases created with Access 97 or earlier must be either
enabled or converted for use in Office Access 2007. When an older database is
enabled it is made compatible with Office Access 2007 so that you can make
changes to the data. However, any design changes must be made in the version
of Access that was used when the database was first created. When you opt to
convert an Access 97 or earlier database to the Access 2007 ACCDB file for-
mat, you must first convert it to Access 2003, Access 2002, or Access 2000.
Table 10-2 lists various file formats that are supported by Office Access 2007.
198 | Chapter 10
Part II

Table 10-2: File formats supported in Access 2007
File Format Description Additional Notes
.accdb New Office Access 2007 file format(default).
This file format is not readable byAccess versions prior to 2007.
DO NOT use this file format if youneed to support:
� Replication
� User-level security
Note: You can use Access 2007 tocreate a replica of an .mdb databaseformatted in Access 2000 or Access
2002-2003 file format.
This file format can use the followingnew features:
� Multi-value fields(create fields that hold multiplevalues)
� Attachment data type(store pictures, graphics, and anytype of file)
� Rich text in memo fields
� Total row in datasheets
� Database and field templates
� Split forms
� Compatibility with WindowsSharePoint Services 3.0 and
Microsoft Office Outlook 2007
.accde File extension for Access 2007 .accdbfiles that are in execute only mode.These files have all VBA source coderemoved.
This file extension replaces the .mdefile extension used in earlier versions ofAccess.
Users can only execute VBA code; theycannot view or modify it. In addition,users do not have permissions to makedesign changes to forms or reports.
Note: You can make the .accde filefrom your Access database via theDatabase Tools group on theDatabase Tools tab.
.accdt This is an Access Database Templatefile. Office Access 2007 comes withprofessionally designed databasetemplates.
Templates provide you with predefinedtables/table relationships, forms,reports, queries, and macros.
.accdr This file extension denotes an OfficeAccess 2007 database functioning inrun-time mode.
To create a “locked-down” version ofyour Office Access 2007 database,simply change the file extension from.accdb to .accdr. To restore the fulldatabase functionality, do the reverse— change the file extension from.accdr to .accdb.
.mdb
(Access 2000,Access 2002,Access 2003,Access 97)
Access database file format used in allearlier versions of Access (prior to2007).
Note: Office Access 2007 allows youto create files in either the Access 2000format or the Access 2002-2003format. These files will have theextension .mdb.
Use the .mdb file format if you need tosupport:
� Replication
� User-level security
� Share the Access database withusers who have not yet upgradedto Office Access 2007
.mde
(Access 2000,Access 2002,Access 2003,Access 97)
An .mde file is a compiled version ofan .mdb database without any VBAcode. This change prevents a databaseuser from reading or changing yourVBA code. Users cannot edit thedesign of forms, reports, or modules.
An .accde file is the Office Access2007 version of the .mde file in earlierversions of Access.
Data Access Technologies in Microsoft Access | 199
Access VBA Programming with DAO and ADO

File Format Description Additional Notes
.adp This is a file extension for a MicrosoftAccess Data Project file that lets youconnect to an SQL Server database orthe Microsoft Data Engine (MSDE) onyour PC and create client/serverapplications.
A project file does not contain anydata or data definition objects such astables, views, stored procedures, oruser-defined functions. All databaseobjects are stored in the SQL Serverdatabase. An .adp file stores onlydatabase front end forms, reports, andother application objects (macros,modules).
Access 2007 offers full support for the.adp file format. You can open andedit an existing .adp database that wascreated in an earlier version of Accessor create a new .adp database.
To create a new .adp database inAccess 2007, select a blank databasein the Getting Started screen and clickthe Folder button next to the File namebox. Choose Microsoft Office AccessProjects (*.adp) in the Save as typedrop-down box and click OK.
.ade This is a file format for a MicrosoftAccess project (.adp) file with allmodules compiled and all editablesource code removed.
Similar to .mde files, projects stored in.ade file format prevent users frommaking design changes to the frontend and gaining access to your VBAsource code.
Access 2007 offers full support for the.ade file format. To create an .ade filefrom your Access Data Project (ADP),choose Database Tools | Make ADE.
.mdw
(Access 2000,Access 2002,Access 2003,Access 97)
This file format is used by a workgroupinformation file. The .mdw files storeinformation for secured .mdbdatabases.
There are no changes to the .mdw fileformat in Office Access 2007. The.mdw files created in earlier versions ofAccess (2000 through 2003) can beused by Office Access 2007databases. When an .mdb database isopened in Access 2007, you canchoose Database Tools | Users &Permissions | User-Level SecurityWizard to create a new workgroupinformation file (.mdw).
.ldb This is a locking file extension for the.mdb database. This file prevents usersfrom writing data to pages that havebeen locked by other users and letsyou determine which computer/userhas a file or record locked. The .ldbfile keeps track of user/computernames of the people who are currentlylogged into the .mdb.
Note: You can view the informationstored in this file by opening it withWindows Notepad.
A locking file is created automaticallywhen the database is opened and isdeleted automatically when the lastuser closes a shared database.
200 | Chapter 10
Part II
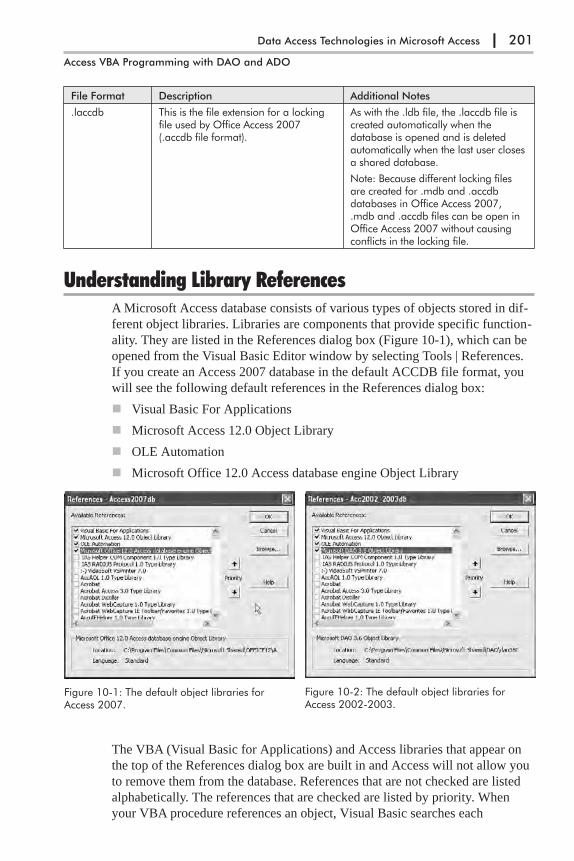
File Format Description Additional Notes
.laccdb This is the file extension for a lockingfile used by Office Access 2007(.accdb file format).
As with the .ldb file, the .laccdb file iscreated automatically when thedatabase is opened and is deletedautomatically when the last user closesa shared database.
Note: Because different locking filesare created for .mdb and .accdbdatabases in Office Access 2007,.mdb and .accdb files can be open inOffice Access 2007 without causingconflicts in the locking file.
Understanding Library ReferencesA Microsoft Access database consists of various types of objects stored in dif-
ferent object libraries. Libraries are components that provide specific function-
ality. They are listed in the References dialog box (Figure 10-1), which can be
opened from the Visual Basic Editor window by selecting Tools | References.
If you create an Access 2007 database in the default ACCDB file format, you
will see the following default references in the References dialog box:
� Visual Basic For Applications
� Microsoft Access 12.0 Object Library
� OLE Automation
� Microsoft Office 12.0 Access database engine Object Library
The VBA (Visual Basic for Applications) and Access libraries that appear on
the top of the References dialog box are built in and Access will not allow you
to remove them from the database. References that are not checked are listed
alphabetically. The references that are checked are listed by priority. When
your VBA procedure references an object, Visual Basic searches each
Data Access Technologies in Microsoft Access | 201
Access VBA Programming with DAO and ADO
Figure 10-1: The default object libraries forAccess 2007.
Figure 10-2: The default object libraries forAccess 2002-2003.
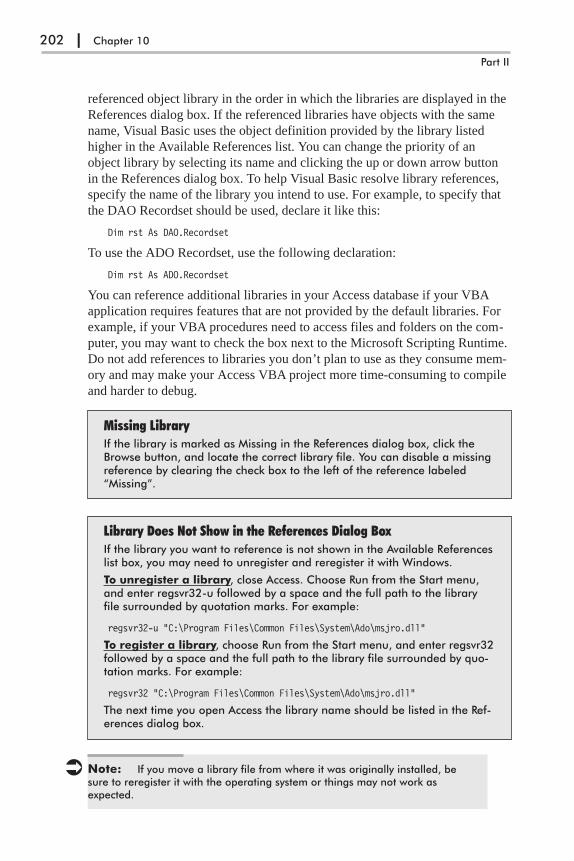
referenced object library in the order in which the libraries are displayed in the
References dialog box. If the referenced libraries have objects with the same
name, Visual Basic uses the object definition provided by the library listed
higher in the Available References list. You can change the priority of an
object library by selecting its name and clicking the up or down arrow button
in the References dialog box. To help Visual Basic resolve library references,
specify the name of the library you intend to use. For example, to specify that
the DAO Recordset should be used, declare it like this:
Dim rst As DAO.Recordset
To use the ADO Recordset, use the following declaration:
Dim rst As ADO.Recordset
You can reference additional libraries in your Access database if your VBA
application requires features that are not provided by the default libraries. For
example, if your VBA procedures need to access files and folders on the com-
puter, you may want to check the box next to the Microsoft Scripting Runtime.
Do not add references to libraries you don’t plan to use as they consume mem-
ory and may make your Access VBA project more time-consuming to compile
and harder to debug.
Missing LibraryIf the library is marked as Missing in the References dialog box, click theBrowse button, and locate the correct library file. You can disable a missingreference by clearing the check box to the left of the reference labeled“Missing”.
Library Does Not Show in the References Dialog BoxIf the library you want to reference is not shown in the Available Referenceslist box, you may need to unregister and reregister it with Windows.
To unregister a library, close Access. Choose Run from the Start menu,and enter regsvr32-u followed by a space and the full path to the libraryfile surrounded by quotation marks. For example:
regsvr32-u "C:\Program Files\Common Files\System\Ado\msjro.dll"
To register a library, choose Run from the Start menu, and enter regsvr32followed by a space and the full path to the library file surrounded by quo-tation marks. For example:
regsvr32 "C:\Program Files\Common Files\System\Ado\msjro.dll"
The next time you open Access the library name should be listed in the Ref-erences dialog box.
� Note: If you move a library file from where it was originally installed, besure to reregister it with the operating system or things may not work asexpected.
202 | Chapter 10
Part II
Because referencing a wrong library for the version of Access used can cause
data corruption, it is important to know which library files were designed for a
particular version of Access. The next section introduces you to library files
that you will find useful in creating and manipulating MDB and ACCDB data-
bases using VBA code.
Overview of Object Libraries in Microsoft AccessThe object library contains information about its objects, properties, and meth-
ods. To work with the VBA programming examples included in this book, you
will need to access objects from the libraries listed below.
The Visual Basic for Applications Object Library (VBA)Objects contained in this library allow you to access your computer’s file sys-
tem, work with date and time functions, perform mathematical and financial
computations, interact with users, convert data, and read text files. For Access
2000 through 2007, the VBA library is stored in the vbe6.dll file located in the
C:\Program Files\Common Files\Microsoft Shared\VBA\VBA6 folder. Access
97 uses the vba33.dll file located in the C:\Program Files\Common Files\
Microsoft Shared\VBA folder.
The Microsoft Access 12.0 Object LibraryThis library provides objects that are used to display data and work with the
Microsoft Access 2007 application. In Access 2007, the Access library is
stored in the msacc.olb file and can be found in the C:\Program Files\Microsoft
Office\Office12 folder. See the list below for the names and locations of
Access library files in earlier versions of Access.
Access 2003 C:\Program Files Microsoft Office\Office11\msacc.olb
Access 2002 C:\Program Files Microsoft Office\Office10\msacc.olb
Access 2000 C:\Program Files Microsoft Office\Office\msacc9.olb
Access 97 C:\Program Files Microsoft Office\Office\msacc8.olb
The Microsoft Office 12.0 Access Database Engine ObjectLibrary
This library is the enhanced version of the DAO Object Library, built specifi-
cally for working with the new ACE database engine in Access 2007. The
library is stored in the acedao.dll file in the C:\Program Files\Common
Files\Microsoft Shared\Office12 folder. This library is used when you open an
Access database in the default Access 2007 format (ACCDB). When you open
an MDB file in Access 2007, the Microsoft DAO 3.6 Object Library is used.
Both DAO and ACEDAO libraries are referenced with the “DAO” in object
declarations, and therefore your existing VBA code should work in both
versions.
Data Access Technologies in Microsoft Access | 203
Access VBA Programming with DAO and ADO

The Microsoft Access DAO 3.6 Object LibraryDAO provides programmatic access to Jet Access databases. It consists of a
hierarchy of objects that supply methods and properties for designing and
manipulating databases. The DBEngine object positioned at the top of the
DAO object hierarchy is often referred to as the Jet engine and is used to refer-
ence the database engine as a whole. All the other objects and collections in
the DAO object hierarchy fall under DBEngine. The DBEngine contains the
following two collections of objects:
� The Errors collection, which stores a list of errors that have occurred in the
DBEngine. These errors are represented by the Error objects and should
not be confused with the Err object, which stores run-time errors generated
in Visual Basic.
� The Workspaces collection (the default collection of the DBEngine object),
which contains the Workspace objects and is used for database security in
multi-user applications. The Workspace object is used in conjunction with
User and Group objects.
Each open database is represented by the Database object. The Database object
is used to reference a Microsoft Access database file (MDB) or another exter-
nal database represented by an ODBC data source. The Databases collection
contains all currently open databases. The Containers, QueryDefs, Relations,
and TableDefs collections contain objects that are used to reference various
components of the Database object. For example, the TableDef object repre-
sents a table or a linked table in a Microsoft Jet workspace. The QueryDef
object represents a query in DAO. If values are supplied to a query, they are
represented in DAO by a Parameter object. The Parameters collection contains
all of the Parameter objects defined for a QueryDef object. The Relation object
represents a relationship between fields in tables and queries. The Container
object is used to access collections of saved objects that represent databases,
tables, queries, and relationships.
The Recordsets collection contains all open Recordset objects. Each
Recordset object represents a set of records within a database. You will use
Recordset objects for retrieving, adding, editing, and deleting records from a
database.
The Field object represents a field in a table, query, index, relation, or
recordset. The Fields collection is the default collection of a TableDef,
QueryDef, Index, Relation, and Recordset object.
Some DAO objects have a Properties collection. The Properties collection
contains a separate object for each property of the DAO object that is refer-
enced. You can use an object’s Properties collection to enumerate its properties
or to return their settings. You can also define your own custom properties on
DAO objects.
204 | Chapter 10
Part II

The DAO Object Library is stored in the dao360.dll file located in the
C:\Program Files\Common Files\Microsoft Shared\DAO folder. This library
file can be used by Access MDB databases created in Access 2000 through
2007. Access 97 uses dao350.dll. In Access 2007, when you open an ACCDB
file, the Microsoft Office 12.0 Access database engine Object Library is used.
The Microsoft ActiveX Data Objects 2.8 Library (ADO)This library is stored in msado15.dll and can be found in the C:\Program
Files\Common Files\System\ADO folder. ActiveX Data Objects (ADO) that
are provided by this library allow you to access and manipulate data from a
variety of sources through an OLE DB provider. ADO works with the technol-
ogy known as OLE DB. This technology is object-based, but it is not limited to
relational databases. OLE DB can access both relational and non-relational
data sources such as directory services, mail stores, multimedia, and text files,
as well as mainframe data (VSAM and MVS). You do not need any specific
drivers installed on your computer to access external data with OLE DB
because OLE DB does not use drivers; it uses data providers to communicate
with data stores. Data providers are programs that enable access to data. OLE
DB has many providers, such as Microsoft OLE DB Provider for SQL Server
and Microsoft Jet 4.0 OLE DB Provider. There are also providers for Oracle,
NT 5 Active Directory, and even a provider for ODBC.
Similar to DAO, ADO objects make it possible to establish a connection
with a data source in order to read, insert, modify, and delete data. ADO offers
to programmers many advanced features that are not available in DAO. For
example, the ADO Connection object’s State property lets you determine
whether the connection is closed (adStateClosed), open and ready
(adStateOpen), still trying to connect (adStateConnecting), processing a com-
mand (adStateExecuting), or fetching data (adStateFetching). The ADO
Recordsets can be hierarchical, fabricated, disconnected, or persisted on disk.
ADO consists of three object models, each providing a different area of
functionality (see Table 10-3). Because of this, only the objects necessary for a
specific task need to be loaded at any given time.
Table 10-3: Components of ADO
Object Model What It’s Used For
ADODB — ActiveX DataObjects
Data manipulation
Access and manipulate data through an OLE DB provider. With ADOobjects you can connect to a data source and read, add, update, ordelete data.
Library Name: Microsoft ActiveX Data Objects 2.8 Library
Library File: msado15.dll
Library Folder: C:\Program Files\Common Files\System\ADO
Data Access Technologies in Microsoft Access | 205
Access VBA Programming with DAO and ADO
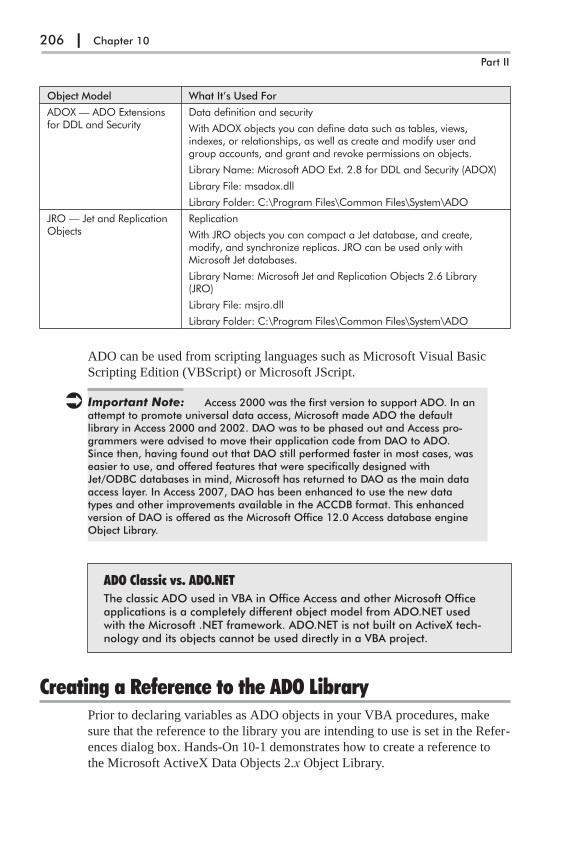
Object Model What It’s Used For
ADOX — ADO Extensionsfor DDL and Security
Data definition and security
With ADOX objects you can define data such as tables, views,indexes, or relationships, as well as create and modify user andgroup accounts, and grant and revoke permissions on objects.
Library Name: Microsoft ADO Ext. 2.8 for DDL and Security (ADOX)
Library File: msadox.dll
Library Folder: C:\Program Files\Common Files\System\ADO
JRO — Jet and ReplicationObjects
Replication
With JRO objects you can compact a Jet database, and create,modify, and synchronize replicas. JRO can be used only withMicrosoft Jet databases.
Library Name: Microsoft Jet and Replication Objects 2.6 Library(JRO)
Library File: msjro.dll
Library Folder: C:\Program Files\Common Files\System\ADO
ADO can be used from scripting languages such as Microsoft Visual Basic
Scripting Edition (VBScript) or Microsoft JScript.
� Important Note: Access 2000 was the first version to support ADO. In anattempt to promote universal data access, Microsoft made ADO the defaultlibrary in Access 2000 and 2002. DAO was to be phased out and Access pro-grammers were advised to move their application code from DAO to ADO.Since then, having found out that DAO still performed faster in most cases, waseasier to use, and offered features that were specifically designed withJet/ODBC databases in mind, Microsoft has returned to DAO as the main dataaccess layer. In Access 2007, DAO has been enhanced to use the new datatypes and other improvements available in the ACCDB format. This enhancedversion of DAO is offered as the Microsoft Office 12.0 Access database engineObject Library.
ADO Classic vs. ADO.NETThe classic ADO used in VBA in Office Access and other Microsoft Officeapplications is a completely different object model from ADO.NET usedwith the Microsoft .NET framework. ADO.NET is not built on ActiveX tech-nology and its objects cannot be used directly in a VBA project.
Creating a Reference to the ADO LibraryPrior to declaring variables as ADO objects in your VBA procedures, make
sure that the reference to the library you are intending to use is set in the Refer-
ences dialog box. Hands-On 10-1 demonstrates how to create a reference to
the Microsoft ActiveX Data Objects 2.x Object Library.
206 | Chapter 10
Part II

�Hands-On 10-1: Setting Up a Reference to ADO Object Libraries
1. Start Microsoft Office Access 2007 and create a new Microsoft Office
Access 2007 database named Chap10.accdb in your
C:\Acc07_ByExample folder.
2. Press Alt+F11 to switch to the Visual Basic Editor window, and then
choose Tools | References.
3. Scroll down the list of available references until you located the Microsoft
ActiveX Data Objects 2.8 (or earlier) Library. Click the check box to
the left of the name to select it.
4. Click OK to close the References dialog box.
All libraries that are checked in the References dialog box can be browsed
using the Object Browser. This is a good way to get to know the names of
objects that are available in a specific library and their various properties and
methods (Figure 10-3).
Understanding Connection StringsNeedless to say, to retrieve or write data to a database, you will need to open it.
There are many ways to connect to a database or an external data source from
Microsoft Access 2007. The first thing to know about establishing database
connections from your VBA procedures is how to prepare and use connection
strings.
A connection string is a string variable that tells your VBA application how
to establish a connection to a data source. There are two types of connection
strings:
� ODBC connection strings (used by ODBC drivers)
� OLE DB connection strings (used by the OLE DB provider)
Data Access Technologies in Microsoft Access | 207
Access VBA Programming with DAO and ADO
Figure 10-3: Use theObject Browser to findthe objects available ina specific library.
The syntax of ODBC and OLE DB connection strings is very similar. The con-
nection string consists of a series of keyword and value pairs separated by
semicolons:
Keyword1=value; Keyword2=value
Please note that the connection string does not contain spaces before or after
the equal sign (=). The parameters in the connection string may vary depend-
ing on the ODBC driver or OLE DB provider used and the data store that you
are connecting to (e.g., Microsoft Access, SQL Server, and so forth).
For example, the following connection string will create an ODBC connec-
tion to an Access database called Northwind.mdb:
"Driver={Microsoft Access Driver (*.mdb)};""DBQ=C:\Acc07_ByExample\Northwind.mdb;"
In the above connection string, Driver specifies what type of database you’re
using. DBQ is the physical path to the database. If the Northwind.mdb file is
protected with a password, you must provide additional information in the con-
nection string:
"Driver={Microsoft Access Driver (*.mdb)};""DBQ=C:\Acc07_ByExample\Northwind.mdb;UID=admin;PWD=secret;"
UID specifies the user name. PWD specifies the user password.
To create an OLE DB connection to the same Access MDB database using
standard security, the following connection string can be used:
"Provider=Microsoft.Jet.OLEDB.4.0;""Data Source=C:\Acc07_ByExample\Northwind.mdb;User Id=Admin;Password=;"
Provider identifies the OLE DB provider for your database; in this case, we
want to use the JET OLE DB Provider. Data Source specifies the full path and
filename of the MDB file.
To create an OLE DB connection to the SQL database called Northwind,
use the following connection string:
"Provider=SQLOLEDB; Data Source=(local); Integrated Security=SSPI; InitialCatalog=Northwind"
SQLOLEDB is the name of the OLE DB provider for SQL Server databases.
The Data Source parameter specifies the name or address of the SQL Server.
To connect with an SQL Server running on the same computer, use the key-
word (local) in the Data Source. For trusted connection (Microsoft Windows
NT integrated security), set the Integrated Security parameter to SSPI. Use the
Initial Catalog parameter to specify which database you want to connect to.
� Note: If no Provider keyword is in the connection string, the OLE DB providerfor ODBC (MSDASQL) is the default value. This provides backward compatibilitywith ODBC connection strings.
208 | Chapter 10
Part II
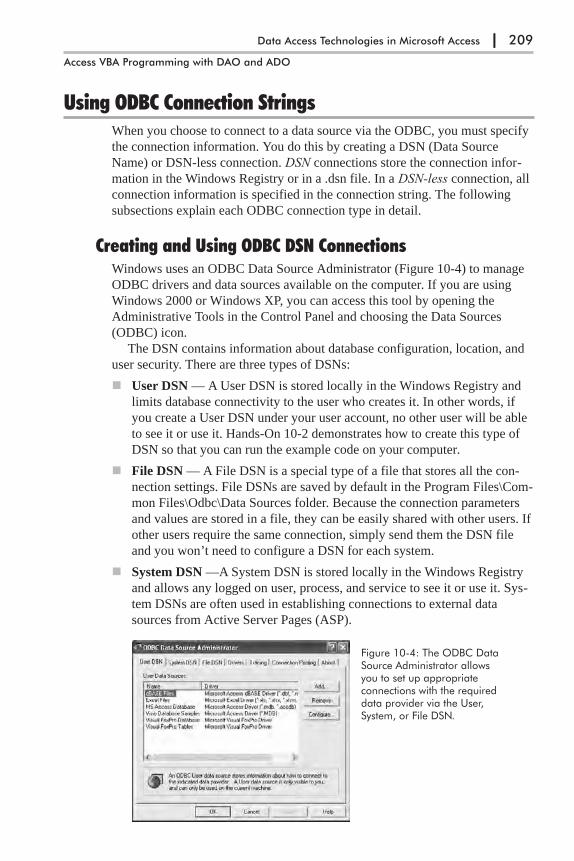
Using ODBC Connection StringsWhen you choose to connect to a data source via the ODBC, you must specify
the connection information. You do this by creating a DSN (Data Source
Name) or DSN-less connection. DSN connections store the connection infor-
mation in the Windows Registry or in a .dsn file. In a DSN-less connection, all
connection information is specified in the connection string. The following
subsections explain each ODBC connection type in detail.
Creating and Using ODBC DSN ConnectionsWindows uses an ODBC Data Source Administrator (Figure 10-4) to manage
ODBC drivers and data sources available on the computer. If you are using
Windows 2000 or Windows XP, you can access this tool by opening the
Administrative Tools in the Control Panel and choosing the Data Sources
(ODBC) icon.
The DSN contains information about database configuration, location, and
user security. There are three types of DSNs:
� User DSN — A User DSN is stored locally in the Windows Registry and
limits database connectivity to the user who creates it. In other words, if
you create a User DSN under your user account, no other user will be able
to see it or use it. Hands-On 10-2 demonstrates how to create this type of
DSN so that you can run the example code on your computer.
� File DSN — A File DSN is a special type of a file that stores all the con-
nection settings. File DSNs are saved by default in the Program Files\Com-
mon Files\Odbc\Data Sources folder. Because the connection parameters
and values are stored in a file, they can be easily shared with other users. If
other users require the same connection, simply send them the DSN file
and you won’t need to configure a DSN for each system.
� System DSN —A System DSN is stored locally in the Windows Registry
and allows any logged on user, process, and service to see it or use it. Sys-
tem DSNs are often used in establishing connections to external data
sources from Active Server Pages (ASP).
Data Access Technologies in Microsoft Access | 209
Access VBA Programming with DAO and ADO
Figure 10-4: The ODBC DataSource Administrator allowsyou to set up appropriateconnections with the requireddata provider via the User,System, or File DSN.
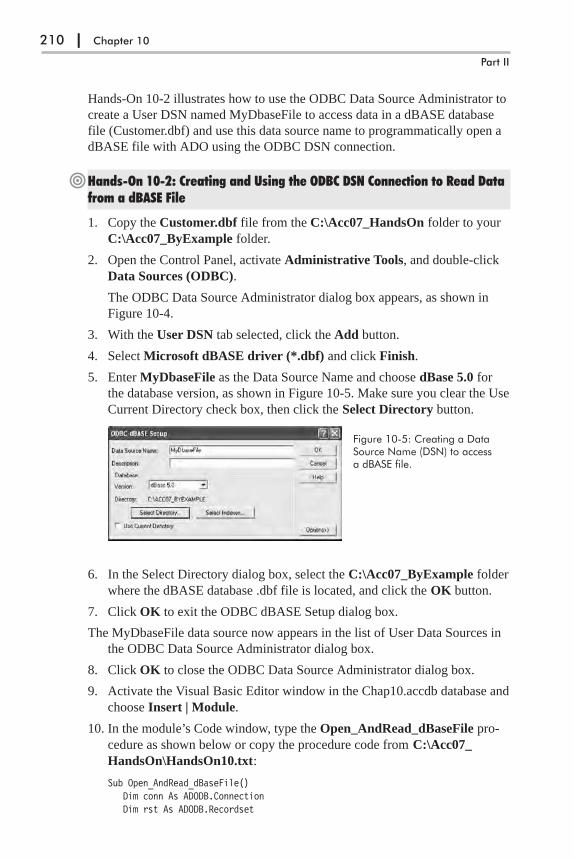
Hands-On 10-2 illustrates how to use the ODBC Data Source Administrator to
create a User DSN named MyDbaseFile to access data in a dBASE database
file (Customer.dbf) and use this data source name to programmatically open a
dBASE file with ADO using the ODBC DSN connection.
�Hands-On 10-2: Creating and Using the ODBC DSN Connection to Read Datafrom a dBASE File
1. Copy the Customer.dbf file from the C:\Acc07_HandsOn folder to your
C:\Acc07_ByExample folder.
2. Open the Control Panel, activate Administrative Tools, and double-click
Data Sources (ODBC).
The ODBC Data Source Administrator dialog box appears, as shown in
Figure 10-4.
3. With the User DSN tab selected, click the Add button.
4. Select Microsoft dBASE driver (*.dbf) and click Finish.
5. Enter MyDbaseFile as the Data Source Name and choose dBase 5.0 for
the database version, as shown in Figure 10-5. Make sure you clear the Use
Current Directory check box, then click the Select Directory button.
6. In the Select Directory dialog box, select the C:\Acc07_ByExample folder
where the dBASE database .dbf file is located, and click the OK button.
7. Click OK to exit the ODBC dBASE Setup dialog box.
The MyDbaseFile data source now appears in the list of User Data Sources in
the ODBC Data Source Administrator dialog box.
8. Click OK to close the ODBC Data Source Administrator dialog box.
9. Activate the Visual Basic Editor window in the Chap10.accdb database and
choose Insert | Module.
10. In the module’s Code window, type the Open_AndRead_dBaseFile pro-
cedure as shown below or copy the procedure code from C:\Acc07_
HandsOn\HandsOn10.txt:
Sub Open_AndRead_dBaseFile()Dim conn As ADODB.ConnectionDim rst As ADODB.Recordset
210 | Chapter 10
Part II
Figure 10-5: Creating a DataSource Name (DSN) to accessa dBASE file.

Set conn = New ADODB.Connectionconn.Open "Provider=MSDASQL;DSN =MyDbaseFile;"
Debug.Print conn.ConnectionString
Set rst = New ADODB.Recordsetrst.Open "Customer.dbf", conn
Do Until rst.EOFDebug.Print rst.Fields(1).Valuerst.MoveNext
Loop
rst.CloseSet rst = Nothingconn.CloseSet conn = Nothing
End Sub
11. Choose Run | Run Sub/UserForm to execute the procedure.
The Open_AndRead_dBaseFile procedure uses the ADO Connection object to
establish a connection with the data source. Prior to using ADO objects in your
VBA procedures, make sure that the References dialog box contains the refer-
ence to the ActiveX Data Objects Library (see Hands-On 10-1). The procedure
begins by declaring an object variable of Connection type, like this:
Dim conn As ADODB.Connection
� Note: The Connection object variable can be declared at procedure level orat module level. By declaring the variable at the top of the module, you canreuse it in multiple procedures in your module.
To handle data retrieval, an object variable of Recordset type is also declared:
Dim rst As ADODB.Recordset
Before you can use the declared ADO Connection object, you must initialize
the object variable by using the Set keyword:
Set conn = New ADODB.Connection
At this point you can proceed to opening the data source by using the ADO
Connection object’s Open method. The required database connection informa-
tion is passed to the Open method in the connection string, like this:
conn.Open "Provider=MSDASQL;DSN=MyDbaseFile;"
MSDASQL is the Microsoft OLE DB Provider for all ODBC data sources.
The names of common data providers used with ADO are listed in Table 10-4.
The Provider property of the ADO Connection object is used in the connection
string as the provider name. DSN is the name of the data source that you speci-
fied for your connection settings in the ODBC Data Source Administrator
dialog box. Since MSDASQL is the default provider for ODBC, it’s okay to
simply leave it off, like this:
Data Access Technologies in Microsoft Access | 211
Access VBA Programming with DAO and ADO

conn.Open "DSN=MyDbaseFile;"
Using the ConnectionString property of the ADO Connection object you can
obtain exact connection settings from the DSN. The following connection
string is written to the Immediate window:
Provider=MSDASQL.1;Extended Properties="DSN=MyDbaseFile;DefaultDir=C:\ACC07_BYEXAMPLE;DriverId=533;FIL=dBase 5.0;MaxBufferSize=2048;PageTimeout=600;"
Table 10-4: Common data providers used with ADO
Provider Name Provider Property Description
Microsoft ACE Microsoft.ACE.OLEDB.12.0 Used for Access 2007 databases in .accdb fileformat. By default, this provider opens databasesin Read/Write mode.
Microsoft Jet Microsoft.Jet.OLEDB.4.0 Used for Jet 4.0 databases (in .mdb file format).By default, this provider opens databases inRead/Write mode.
Microsoft SQLServer
SQLOLEDB Used to access SQL Server 6.5, 7.0, and 2000databases.
Oracle MSDAORA Used to access Oracle databases.
ODBC MSDASQL Used to access ODBC data sources without aspecific OLE DB provider. This is the defaultprovider for ADO.
Active DirectoryService
ADSDSOObject Used to access Windows NT 4.0 directoryservices, Novell directory services, andLDAP-compliant directory services.
Index Server MSIDXS Read-only access to web data.
Once the connection to the dBASE database is open, to gain access to its data,
the procedure initializes the rst object variable using the Set keyword:
Set rst = New ADODB.Recordset
ADO Recordsets are covered in detail in Chapter 13. The ADO Recordset
object’s Open method is used to open the Customer.dbf file, like this:
rst.Open "Customer.dbf", conn
When you open the recordset, you need to specify at the minimum the data you
want to retrieve (Customer.dbf) and how to connect to that data (conn). Once
the recordset is open, you can start reading its data. The Do Until loop will
iterate through the recordset until the EOF (End of File) is reached. Each time
in the loop, VBA will write to the Immediate window the value of the first
field. When the procedure ends you should see in the Immediate window the
names of all customers from the Customer.dbf file.
When you are done reading the records, the recordset uses the Close
method to close the recordset and destroy the rst object variable by setting it to
Nothing:
Set rst = Nothing
212 | Chapter 10
Part II
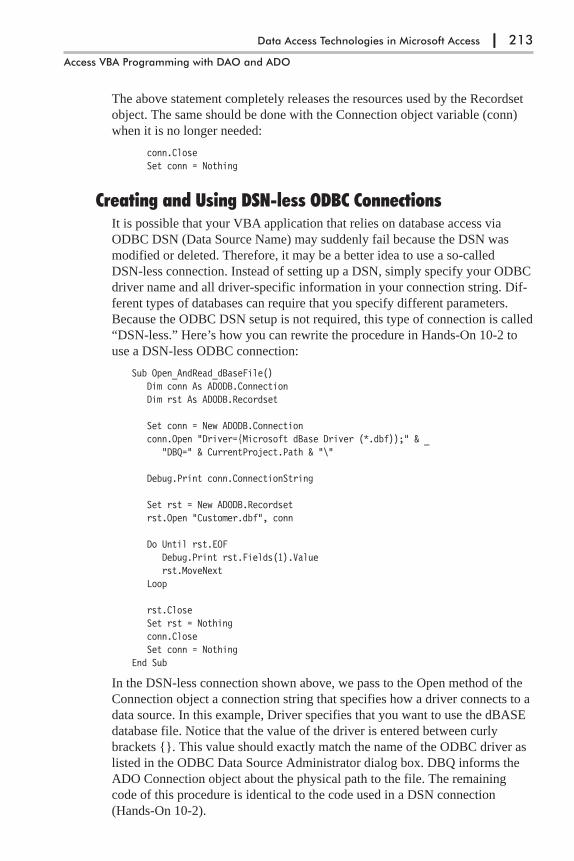
The above statement completely releases the resources used by the Recordset
object. The same should be done with the Connection object variable (conn)
when it is no longer needed:
conn.CloseSet conn = Nothing
Creating and Using DSN-less ODBC ConnectionsIt is possible that your VBA application that relies on database access via
ODBC DSN (Data Source Name) may suddenly fail because the DSN was
modified or deleted. Therefore, it may be a better idea to use a so-called
DSN-less connection. Instead of setting up a DSN, simply specify your ODBC
driver name and all driver-specific information in your connection string. Dif-
ferent types of databases can require that you specify different parameters.
Because the ODBC DSN setup is not required, this type of connection is called
“DSN-less.” Here’s how you can rewrite the procedure in Hands-On 10-2 to
use a DSN-less ODBC connection:
Sub Open_AndRead_dBaseFile()Dim conn As ADODB.ConnectionDim rst As ADODB.Recordset
Set conn = New ADODB.Connectionconn.Open "Driver={Microsoft dBase Driver (*.dbf));" & _
"DBQ=" & CurrentProject.Path & "\"
Debug.Print conn.ConnectionString
Set rst = New ADODB.Recordsetrst.Open "Customer.dbf", conn
Do Until rst.EOFDebug.Print rst.Fields(1).Valuerst.MoveNext
Loop
rst.CloseSet rst = Nothingconn.CloseSet conn = Nothing
End Sub
In the DSN-less connection shown above, we pass to the Open method of the
Connection object a connection string that specifies how a driver connects to a
data source. In this example, Driver specifies that you want to use the dBASE
database file. Notice that the value of the driver is entered between curly
brackets {}. This value should exactly match the name of the ODBC driver as
listed in the ODBC Data Source Administrator dialog box. DBQ informs the
ADO Connection object about the physical path to the file. The remaining
code of this procedure is identical to the code used in a DSN connection
(Hands-On 10-2).
Data Access Technologies in Microsoft Access | 213
Access VBA Programming with DAO and ADO

Table 10-5: ODBC connection strings for common data sources
Data Source Driver ODBC Connection String (used in DSN-less connections)
Microsoft Access 2007
(accessing .mdb or .accdbfiles from Access 2007)
"Driver={Microsoft Access Driver (*.mdb, *.accdb)};
DBQ=path to mdb/accdb file;UID=admin;PWD=;"
Microsoft Access
(accessing .mdb files fromAccess 2003/2002/2000/97)
Using standard security:
"Driver={Microsoft Access Driver (*.mdb)};
DBQ=C:\filepath\myDb.mdb;UID=admin;PWD=;"
Using user-level security (workgroup information file):
"Driver={Microsoft Access Driver (*.mdb)};
DBQ=C:\filepath\myDb.mdb;SystemDB=C:\filepath\myDb.mdw;UID=myUserName;PWD=myPassword;"
Microsoft Excel 2007
(accessing .xls, .xlsx, .xlsm,and .xlsb files from Excel2007)
"Driver={Microsoft Excel Driver (*.xls, *.xlsx, *.xlsm, *.xlsb)};
DBQ=path to xls/xlsx/xlsm/xlsb file;"
Microsoft Excel
(accessing .xls files from Excel2003/2002/2000/97)
"Driver={Microsoft Excel Driver (*.xls)};
DBQ=C:\filepath\Spreadsheet.xls;"
dBASE "Driver={Microsoft dBASE Driver (*.dbf)};
DBQ=C:\filepath;"
Text "Driver={Microsoft Text Driver (*.txt, *.csv)};
DefaultDir=C:\filepath\myText.txt;"
Microsoft SQL Server Using Trusted Connection security:
"Driver={SQL Server};
Server=myServerName;
Database=myDatabaseName;
UID=;PWD=;"
Using standard security:
"Driver={SQL Server};
Server=myServerName;
Trusted_Connection=no;
Database=myDatabaseName;
UID=myUserName;PWD=myPassword;"
Oracle "Driver={Microsoft ODBC for Oracle};
Server=OracleServer.World;
UID=myUserName;PWD=myPassword;"
214 | Chapter 10
Part II

Using OLE DB Connection StringsIn numerous VBA procedures in this chapter we’ll use an OLE DB provider to
communicate with a data source. See Table 10-4 earlier in this chapter for the
names of common OLE DB providers used with ADO. Table 10-6 below
shows OLE DB connection strings for common data sources.
Table 10-6: OLE DB connection strings for common data sources
Data Source OLE DB Connection String
Microsoft Access 2007 "Provider=Microsoft.ACE.OLEDB.12.0;
Data Source=C:\Acc07_ByExample\Northwind 2007.accdb"
Microsoft Access
(prior to 2007)
"Provider=Microsoft.Jet.OLEDB.4.0;
Data Source=C:\Acc07_ByExample\Northwind.mdb;"
Microsoft Excel 2007 "Provider=Microsoft.ACE.OLEDB.12.0;
Data Source=C:\Acc07_ByExample\Report2007.xlsx;
Extended Properties=""Excel 12.0;HDR=Yes"";"
Microsoft Excel
(prior to 2007)
"Provider=Microsoft.Jet.OLEDB.4.0;
Data Source=C:\Acc07_ByExample\Report.xls;
Extended Properties=""Excel 8.0;HDR=Yes"";"
Microsoft SQL Server "Provider=SQLOLEDB;Data Source=myServerName;NetworkLibrary=DBMSSOCN;Initial Catalog=Pubs;"
Oracle "Provider=MSDAORA;Data Source=myTable;"
Connection String via a Data Link FileIf you are using the Windows operating system and are looking for an easy
way to create and test a connection string that uses an ODBC driver or OLE
DB provider, you may want to use the Data Link Properties dialog box, which
is shown in Figure 10-6.
A universal data link file (.udl) is a text file containing the connection infor-
mation. Hands-On 10-3 demonstrates how to create the .udl file to connect to a
Microsoft Access 2007 database. You can use the same technique to create a
valid connection string to other external data sources as long as the ADO pro-
vider is installed on your computer.
�Hands-On 10-3: Creating and Using a Universal Data Link File
1. In Windows Explorer, select the C:\Acc07_ByExample folder. Choose
File | New and select Text document.
2. A new file named New Text Document.txt appears in the Acc07_
ByExample folder. Rename this file ConnectToAccdb.udl.
When changing the filename, be sure to type the new extension (.udl) as
indicated.
Data Access Technologies in Microsoft Access | 215
Access VBA Programming with DAO and ADO
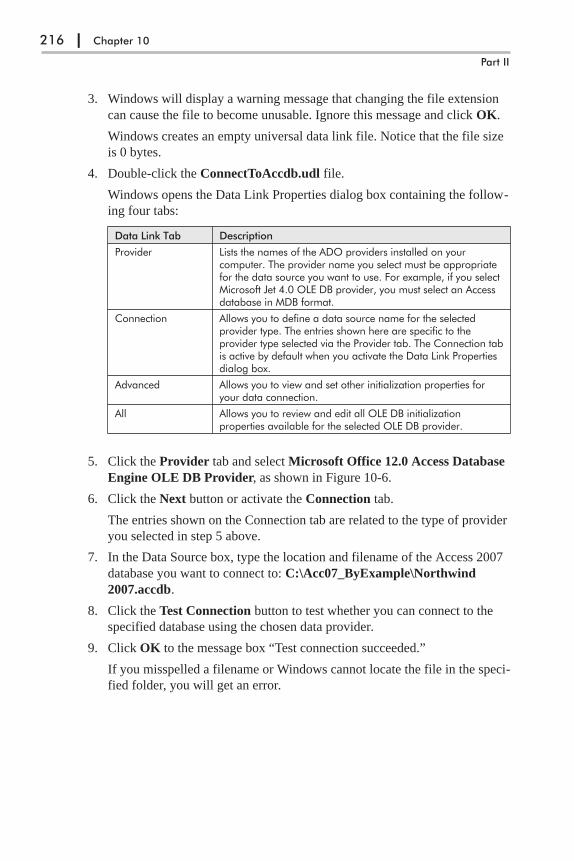
3. Windows will display a warning message that changing the file extension
can cause the file to become unusable. Ignore this message and click OK.
Windows creates an empty universal data link file. Notice that the file size
is 0 bytes.
4. Double-click the ConnectToAccdb.udl file.
Windows opens the Data Link Properties dialog box containing the follow-
ing four tabs:
Data Link Tab Description
Provider Lists the names of the ADO providers installed on yourcomputer. The provider name you select must be appropriatefor the data source you want to use. For example, if you selectMicrosoft Jet 4.0 OLE DB provider, you must select an Accessdatabase in MDB format.
Connection Allows you to define a data source name for the selectedprovider type. The entries shown here are specific to theprovider type selected via the Provider tab. The Connection tabis active by default when you activate the Data Link Propertiesdialog box.
Advanced Allows you to view and set other initialization properties foryour data connection.
All Allows you to review and edit all OLE DB initializationproperties available for the selected OLE DB provider.
5. Click the Provider tab and select Microsoft Office 12.0 Access Database
Engine OLE DB Provider, as shown in Figure 10-6.
6. Click the Next button or activate the Connection tab.
The entries shown on the Connection tab are related to the type of provider
you selected in step 5 above.
7. In the Data Source box, type the location and filename of the Access 2007
database you want to connect to: C:\Acc07_ByExample\Northwind
2007.accdb.
8. Click the Test Connection button to test whether you can connect to the
specified database using the chosen data provider.
9. Click OK to the message box “Test connection succeeded.”
If you misspelled a filename or Windows cannot locate the file in the speci-
fied folder, you will get an error.
216 | Chapter 10
Part II
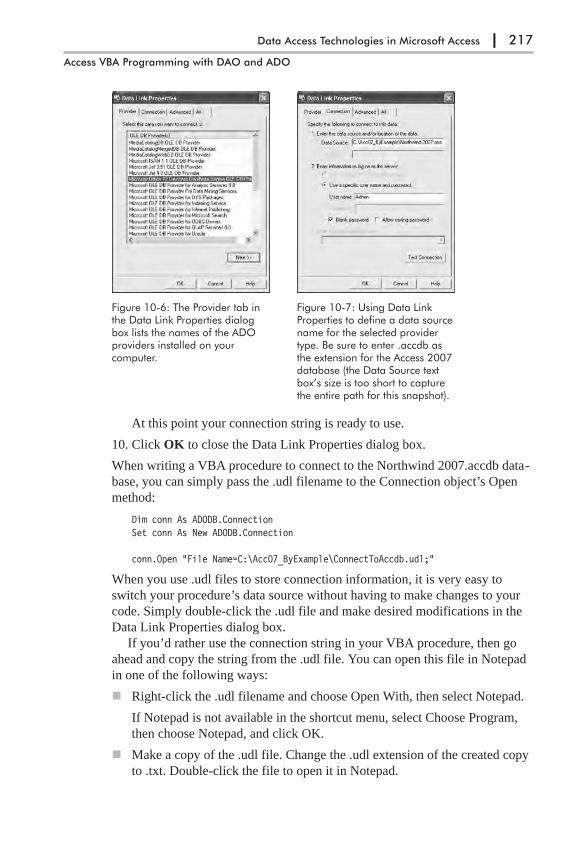
At this point your connection string is ready to use.
10. Click OK to close the Data Link Properties dialog box.
When writing a VBA procedure to connect to the Northwind 2007.accdb data-
base, you can simply pass the .udl filename to the Connection object’s Open
method:
Dim conn As ADODB.ConnectionSet conn As New ADODB.Connection
conn.Open "File Name=C:\Acc07_ByExample\ConnectToAccdb.udl;"
When you use .udl files to store connection information, it is very easy to
switch your procedure’s data source without having to make changes to your
code. Simply double-click the .udl file and make desired modifications in the
Data Link Properties dialog box.
If you’d rather use the connection string in your VBA procedure, then go
ahead and copy the string from the .udl file. You can open this file in Notepad
in one of the following ways:
� Right-click the .udl filename and choose Open With, then select Notepad.
If Notepad is not available in the shortcut menu, select Choose Program,
then choose Notepad, and click OK.
� Make a copy of the .udl file. Change the .udl extension of the created copy
to .txt. Double-click the file to open it in Notepad.
Data Access Technologies in Microsoft Access | 217
Access VBA Programming with DAO and ADO
Figure 10-6: The Provider tab inthe Data Link Properties dialogbox lists the names of the ADOproviders installed on yourcomputer.
Figure 10-7: Using Data LinkProperties to define a data sourcename for the selected providertype. Be sure to enter .accdb asthe extension for the Access 2007database (the Data Source textbox’s size is too short to capturethe entire path for this snapshot).

Opening Microsoft Access DatabasesIn this section you will learn how to use DAO and ADO to open Access
ACCDB and MDB databases in read/write mode and in read-only mode. You
will also learn how to open Access databases that have been protected with
database passwords or user-level security.
Opening a Microsoft Jet Database in Read/Write Modewith DAO
The easiest way to open an existing Microsoft Access database from a VBA
procedure is by using the Microsoft Access database engine’s OpenDatabase
method. This method requires that you provide at least one parameter — the
name of the existing database. When you open the database with the
OpenDatabase method, you should remember to close it. The Close method
removes the database from the Databases collection.
Hands-On 10-4 demonstrates how to open an Access database in ACCDB
or MDB format using the DAO’s OpenDatabase method. This example will list
containers and documents in the open database. Each Database object has a
Containers collection that consists of built-in Container objects. The Contain-
ers collection is used for storing Microsoft Access’s own objects. The Jet
engine creates the following Container objects: Databases, Tables, and Rela-
tions. Other Container objects are created by Microsoft Access (Forms,
Reports, Macros, and Modules).
The following table lists the Container objects and the type of information
they contain.
Table 10-7: Container objects
Container Name Type of Information Stored
Databases Saved databases
Tables Saved tables and queries
Relations Saved relationships
Forms Saved forms
Modules Saved modules
Reports Saved reports
Scripts Saved scripts
218 | Chapter 10
Part II
Figure 10-8: You can obtain the connection string from the universal data link (UDL) file byopening the file in Windows Notepad.

Each Container object contains a Documents collection. Each document in this
collection represents an object that can be found in an Access database. For
example, the Forms container stores a list of all saved forms in a database, and
each form is represented by a Document object. You cannot create new Con-
tainer and Document objects; you can only retrieve the information about
them.
�Hands-On 10-4: Opening a Database with DAO in Read/Write Mode
1. In the Chap10.accdb database that you created in Hands-On 10-1 (in the
Visual Basic Editor window), choose Insert | Module to add a new module
to the current VBA project.
2. In the module’s Code window, type the openDB_DAO procedure shown
below, or copy the procedure code from C:\Acc07_HandsOn\
HandsOn10.txt.
Sub openDB_DAO()Dim db As DAO.DatabaseDim dbName As StringDim c As ContainerDim doc As Document
dbName = InputBox("Enter a name of an existing database:", "Database Name")
If dbName = "" Then Exit SubIf Dir(dbName) = "" Then
MsgBox dbName & " was not found."Exit Sub
End If
Set db = OpenDatabase(dbName)With db
' list the names of the Container objectsFor Each c In .Containers
Debug.Print c.Name & " container:" & _c.Documents.Count
' list the document names in the specified ContainerIf c.Documents.Count > 0 Then
For Each doc In c.DocumentsDebug.Print vbTab & doc.Name
Next docEnd If
Next c.Close
End WithEnd Sub
3. Position the insertion point anywhere within the code of openDB_DAO
and press F5 or choose Run | Run Sub/UserForm to execute the
procedure.
When you run this procedure you are prompted to enter the name of the
Access database.
Data Access Technologies in Microsoft Access | 219
Access VBA Programming with DAO and ADO
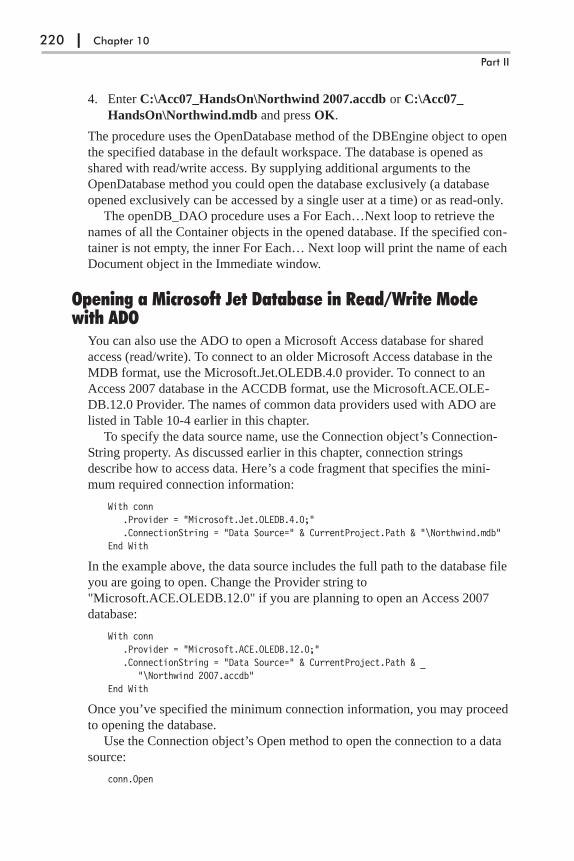
4. Enter C:\Acc07_HandsOn\Northwind 2007.accdb or C:\Acc07_
HandsOn\Northwind.mdb and press OK.
The procedure uses the OpenDatabase method of the DBEngine object to open
the specified database in the default workspace. The database is opened as
shared with read/write access. By supplying additional arguments to the
OpenDatabase method you could open the database exclusively (a database
opened exclusively can be accessed by a single user at a time) or as read-only.
The openDB_DAO procedure uses a For Each…Next loop to retrieve the
names of all the Container objects in the opened database. If the specified con-
tainer is not empty, the inner For Each… Next loop will print the name of each
Document object in the Immediate window.
Opening a Microsoft Jet Database in Read/Write Modewith ADO
You can also use the ADO to open a Microsoft Access database for shared
access (read/write). To connect to an older Microsoft Access database in the
MDB format, use the Microsoft.Jet.OLEDB.4.0 provider. To connect to an
Access 2007 database in the ACCDB format, use the Microsoft.ACE.OLE-
DB.12.0 Provider. The names of common data providers used with ADO are
listed in Table 10-4 earlier in this chapter.
To specify the data source name, use the Connection object’s Connection-
String property. As discussed earlier in this chapter, connection strings
describe how to access data. Here’s a code fragment that specifies the mini-
mum required connection information:
With conn.Provider = "Microsoft.Jet.OLEDB.4.0;".ConnectionString = "Data Source=" & CurrentProject.Path & "\Northwind.mdb"
End With
In the example above, the data source includes the full path to the database file
you are going to open. Change the Provider string to
"Microsoft.ACE.OLEDB.12.0" if you are planning to open an Access 2007
database:
With conn.Provider = "Microsoft.ACE.OLEDB.12.0;".ConnectionString = "Data Source=" & CurrentProject.Path & _
"\Northwind 2007.accdb"End With
Once you’ve specified the minimum connection information, you may proceed
to opening the database.
Use the Connection object’s Open method to open the connection to a data
source:
conn.Open
220 | Chapter 10
Part II
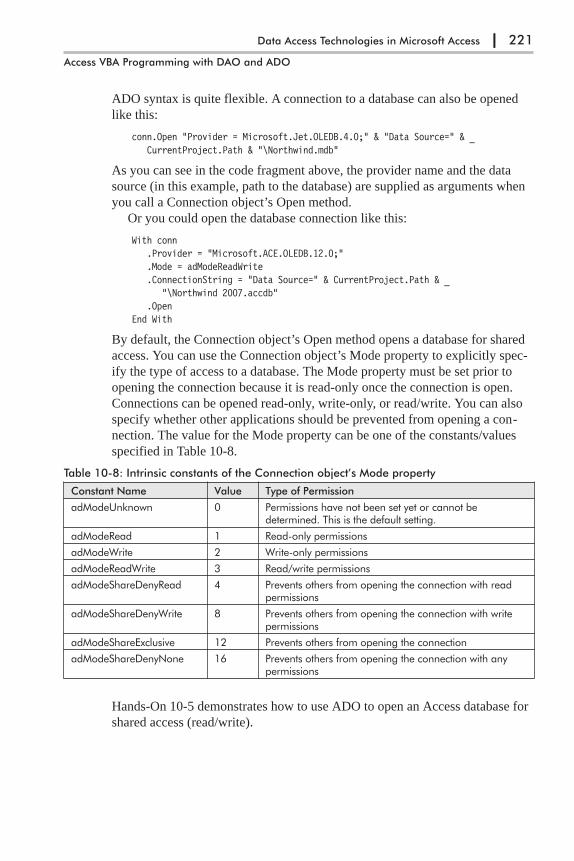
ADO syntax is quite flexible. A connection to a database can also be opened
like this:
conn.Open "Provider = Microsoft.Jet.OLEDB.4.0;" & "Data Source=" & _CurrentProject.Path & "\Northwind.mdb"
As you can see in the code fragment above, the provider name and the data
source (in this example, path to the database) are supplied as arguments when
you call a Connection object’s Open method.
Or you could open the database connection like this:
With conn.Provider = "Microsoft.ACE.OLEDB.12.0;".Mode = adModeReadWrite.ConnectionString = "Data Source=" & CurrentProject.Path & _
"\Northwind 2007.accdb".Open
End With
By default, the Connection object’s Open method opens a database for shared
access. You can use the Connection object’s Mode property to explicitly spec-
ify the type of access to a database. The Mode property must be set prior to
opening the connection because it is read-only once the connection is open.
Connections can be opened read-only, write-only, or read/write. You can also
specify whether other applications should be prevented from opening a con-
nection. The value for the Mode property can be one of the constants/values
specified in Table 10-8.
Table 10-8: Intrinsic constants of the Connection object’s Mode property
Constant Name Value Type of Permission
adModeUnknown 0 Permissions have not been set yet or cannot bedetermined. This is the default setting.
adModeRead 1 Read-only permissions
adModeWrite 2 Write-only permissions
adModeReadWrite 3 Read/write permissions
adModeShareDenyRead 4 Prevents others from opening the connection with readpermissions
adModeShareDenyWrite 8 Prevents others from opening the connection with writepermissions
adModeShareExclusive 12 Prevents others from opening the connection
adModeShareDenyNone 16 Prevents others from opening the connection with anypermissions
Hands-On 10-5 demonstrates how to use ADO to open an Access database for
shared access (read/write).
Data Access Technologies in Microsoft Access | 221
Access VBA Programming with DAO and ADO

�Hands-On 10-5: Opening a Database with ADO in Read/Write Mode
1. In the Visual Basic Editor window, choose Insert | Module to add a new
module to the currently open Chap10.accdb database.
2. In the module’s Code window, type the openDB_ADO procedure shown
below, or copy the procedure code from C:\Acc07_HandsOn\Hands-
On10.txt.
Sub openDB_ADO()Dim conn As ADODB.ConnectionDim strDb As String
On Error GoTo ErrorHandler
strDb = CurrentProject.Path & "\Northwind 2007.accdb"Set conn = New ADODB.Connection
With conn.Provider = "Microsoft.ACE.OLEDB.12.0;".Mode = adModeReadWrite.ConnectionString = "Data Source=" & strDb.Open
End With
If conn.State = adStateOpen ThenMsgBox "Connection was opened."
End If
conn.CloseSet conn = NothingMsgBox "Connection was closed."
Exit SubErrorHandler:
MsgBox Err.Number & ": " & Err.DescriptionEnd Sub
3. Position the insertion point anywhere within the code of the openDB_ADO
procedure and press F5 or choose Run | Run Sub/UserForm to execute
the procedure.
If conn.State = adStateOpen ThenMsgBox "Database connection was established."
End If
The ADO Connection object’s State property returns a value that describes if
the connection is open, closed, connecting, executing, or retrieving data (see
Table 10-9).
Table 10-9: Intrinsic constants of the Connection object’s State property
Constant Value Description
adStateClosed 0 Connection is closed.
adStateOpen 1 Connection is open.
adStateConnecting 2 Connection is connecting.
222 | Chapter 10
Part II
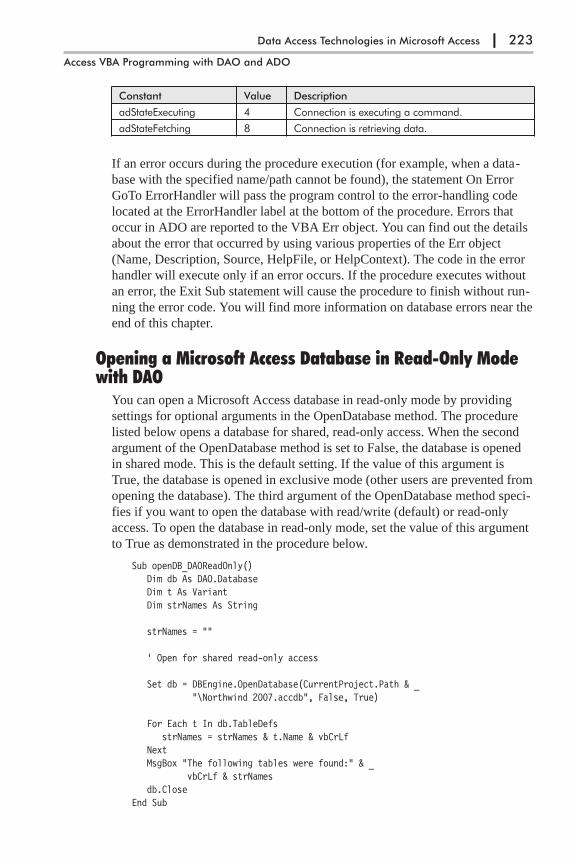
Constant Value Description
adStateExecuting 4 Connection is executing a command.
adStateFetching 8 Connection is retrieving data.
If an error occurs during the procedure execution (for example, when a data-
base with the specified name/path cannot be found), the statement On Error
GoTo ErrorHandler will pass the program control to the error-handling code
located at the ErrorHandler label at the bottom of the procedure. Errors that
occur in ADO are reported to the VBA Err object. You can find out the details
about the error that occurred by using various properties of the Err object
(Name, Description, Source, HelpFile, or HelpContext). The code in the error
handler will execute only if an error occurs. If the procedure executes without
an error, the Exit Sub statement will cause the procedure to finish without run-
ning the error code. You will find more information on database errors near the
end of this chapter.
Opening a Microsoft Access Database in Read-Only Modewith DAO
You can open a Microsoft Access database in read-only mode by providing
settings for optional arguments in the OpenDatabase method. The procedure
listed below opens a database for shared, read-only access. When the second
argument of the OpenDatabase method is set to False, the database is opened
in shared mode. This is the default setting. If the value of this argument is
True, the database is opened in exclusive mode (other users are prevented from
opening the database). The third argument of the OpenDatabase method speci-
fies if you want to open the database with read/write (default) or read-only
access. To open the database in read-only mode, set the value of this argument
to True as demonstrated in the procedure below.
Sub openDB_DAOReadOnly()Dim db As DAO.DatabaseDim t As VariantDim strNames As String
strNames = ""
' Open for shared read-only access
Set db = DBEngine.OpenDatabase(CurrentProject.Path & _"\Northwind 2007.accdb", False, True)
For Each t In db.TableDefsstrNames = strNames & t.Name & vbCrLf
NextMsgBox "The following tables were found:" & _
vbCrLf & strNamesdb.Close
End Sub
Data Access Technologies in Microsoft Access | 223
Access VBA Programming with DAO and ADO
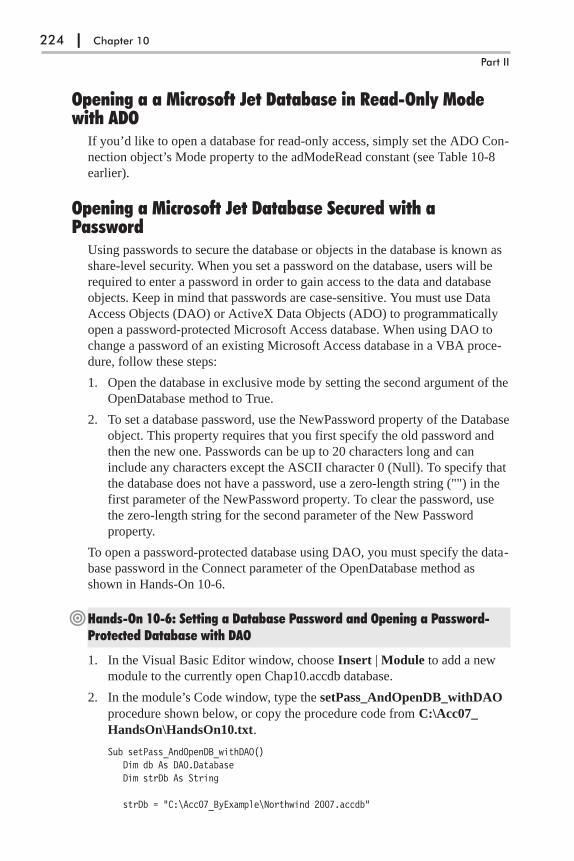
Opening a a Microsoft Jet Database in Read-Only Modewith ADO
If you’d like to open a database for read-only access, simply set the ADO Con-
nection object’s Mode property to the adModeRead constant (see Table 10-8
earlier).
Opening a Microsoft Jet Database Secured with aPassword
Using passwords to secure the database or objects in the database is known as
share-level security. When you set a password on the database, users will be
required to enter a password in order to gain access to the data and database
objects. Keep in mind that passwords are case-sensitive. You must use Data
Access Objects (DAO) or ActiveX Data Objects (ADO) to programmatically
open a password-protected Microsoft Access database. When using DAO to
change a password of an existing Microsoft Access database in a VBA proce-
dure, follow these steps:
1. Open the database in exclusive mode by setting the second argument of the
OpenDatabase method to True.
2. To set a database password, use the NewPassword property of the Database
object. This property requires that you first specify the old password and
then the new one. Passwords can be up to 20 characters long and can
include any characters except the ASCII character 0 (Null). To specify that
the database does not have a password, use a zero-length string ("") in the
first parameter of the NewPassword property. To clear the password, use
the zero-length string for the second parameter of the New Password
property.
To open a password-protected database using DAO, you must specify the data-
base password in the Connect parameter of the OpenDatabase method as
shown in Hands-On 10-6.
�Hands-On 10-6: Setting a Database Password and Opening a Password-Protected Database with DAO
1. In the Visual Basic Editor window, choose Insert | Module to add a new
module to the currently open Chap10.accdb database.
2. In the module’s Code window, type the setPass_AndOpenDB_withDAO
procedure shown below, or copy the procedure code from C:\Acc07_
HandsOn\HandsOn10.txt.
Sub setPass_AndOpenDB_withDAO()Dim db As DAO.DatabaseDim strDb As String
strDb = "C:\Acc07_ByExample\Northwind 2007.accdb"
224 | Chapter 10
Part II
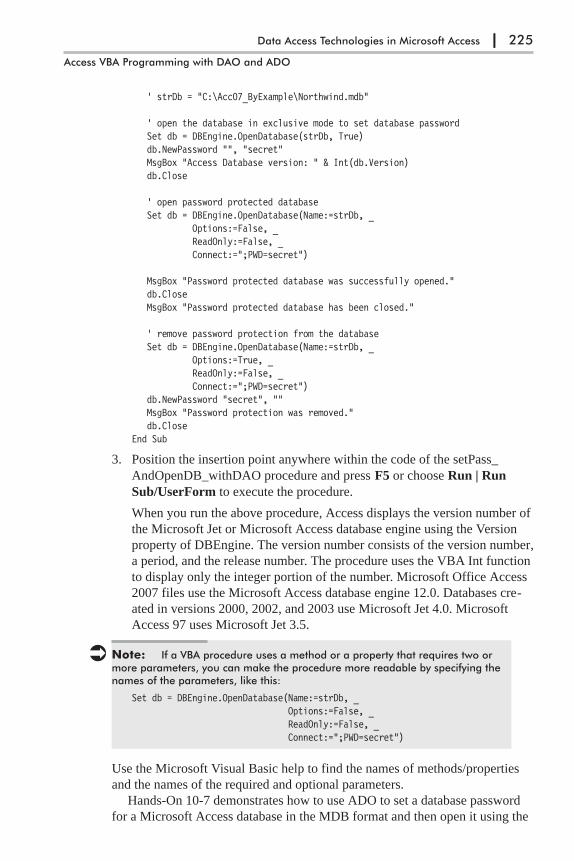
' strDb = "C:\Acc07_ByExample\Northwind.mdb"
' open the database in exclusive mode to set database passwordSet db = DBEngine.OpenDatabase(strDb, True)db.NewPassword "", "secret"MsgBox "Access Database version: " & Int(db.Version)db.Close
' open password protected databaseSet db = DBEngine.OpenDatabase(Name:=strDb, _
Options:=False, _ReadOnly:=False, _Connect:=";PWD=secret")
MsgBox "Password protected database was successfully opened."db.CloseMsgBox "Password protected database has been closed."
' remove password protection from the databaseSet db = DBEngine.OpenDatabase(Name:=strDb, _
Options:=True, _ReadOnly:=False, _Connect:=";PWD=secret")
db.NewPassword "secret", ""MsgBox "Password protection was removed."db.Close
End Sub
3. Position the insertion point anywhere within the code of the setPass_
AndOpenDB_withDAO procedure and press F5 or choose Run | Run
Sub/UserForm to execute the procedure.
When you run the above procedure, Access displays the version number of
the Microsoft Jet or Microsoft Access database engine using the Version
property of DBEngine. The version number consists of the version number,
a period, and the release number. The procedure uses the VBA Int function
to display only the integer portion of the number. Microsoft Office Access
2007 files use the Microsoft Access database engine 12.0. Databases cre-
ated in versions 2000, 2002, and 2003 use Microsoft Jet 4.0. Microsoft
Access 97 uses Microsoft Jet 3.5.
� Note: If a VBA procedure uses a method or a property that requires two ormore parameters, you can make the procedure more readable by specifying thenames of the parameters, like this:
Set db = DBEngine.OpenDatabase(Name:=strDb, _Options:=False, _ReadOnly:=False, _Connect:=";PWD=secret")
Use the Microsoft Visual Basic help to find the names of methods/properties
and the names of the required and optional parameters.
Hands-On 10-7 demonstrates how to use ADO to set a database password
for a Microsoft Access database in the MDB format and then open it using the
Data Access Technologies in Microsoft Access | 225
Access VBA Programming with DAO and ADO
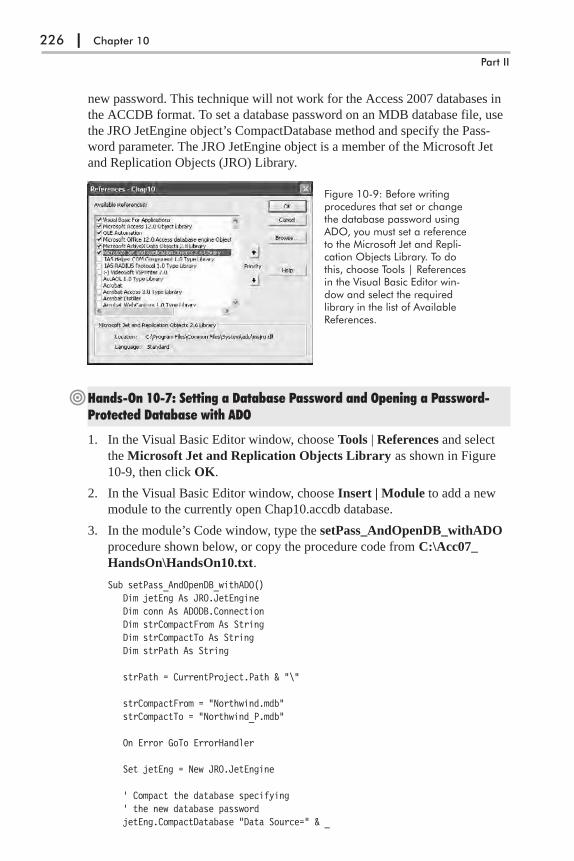
new password. This technique will not work for the Access 2007 databases in
the ACCDB format. To set a database password on an MDB database file, use
the JRO JetEngine object’s CompactDatabase method and specify the Pass-
word parameter. The JRO JetEngine object is a member of the Microsoft Jet
and Replication Objects (JRO) Library.
�Hands-On 10-7: Setting a Database Password and Opening a Password-Protected Database with ADO
1. In the Visual Basic Editor window, choose Tools | References and select
the Microsoft Jet and Replication Objects Library as shown in Figure
10-9, then click OK.
2. In the Visual Basic Editor window, choose Insert | Module to add a new
module to the currently open Chap10.accdb database.
3. In the module’s Code window, type the setPass_AndOpenDB_withADO
procedure shown below, or copy the procedure code from C:\Acc07_
HandsOn\HandsOn10.txt.
Sub setPass_AndOpenDB_withADO()Dim jetEng As JRO.JetEngineDim conn As ADODB.ConnectionDim strCompactFrom As StringDim strCompactTo As StringDim strPath As String
strPath = CurrentProject.Path & "\"
strCompactFrom = "Northwind.mdb"strCompactTo = "Northwind_P.mdb"
On Error GoTo ErrorHandler
Set jetEng = New JRO.JetEngine
' Compact the database specifying' the new database passwordjetEng.CompactDatabase "Data Source=" & _
226 | Chapter 10
Part II
Figure 10-9: Before writingprocedures that set or changethe database password usingADO, you must set a referenceto the Microsoft Jet and Repli-cation Objects Library. To dothis, choose Tools | Referencesin the Visual Basic Editor win-dow and select the requiredlibrary in the list of AvailableReferences.
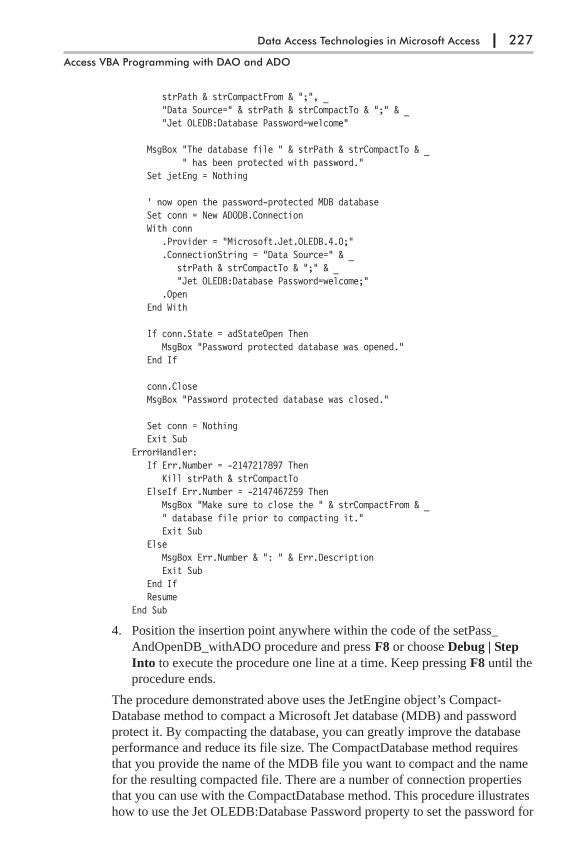
strPath & strCompactFrom & ";", _"Data Source=" & strPath & strCompactTo & ";" & _"Jet OLEDB:Database Password=welcome"
MsgBox "The database file " & strPath & strCompactTo & _" has been protected with password."
Set jetEng = Nothing
' now open the password-protected MDB databaseSet conn = New ADODB.ConnectionWith conn
.Provider = "Microsoft.Jet.OLEDB.4.0;"
.ConnectionString = "Data Source=" & _strPath & strCompactTo & ";" & _"Jet OLEDB:Database Password=welcome;"
.OpenEnd With
If conn.State = adStateOpen ThenMsgBox "Password protected database was opened."
End If
conn.CloseMsgBox "Password protected database was closed."
Set conn = NothingExit Sub
ErrorHandler:If Err.Number = -2147217897 Then
Kill strPath & strCompactToElseIf Err.Number = -2147467259 Then
MsgBox "Make sure to close the " & strCompactFrom & _" database file prior to compacting it."Exit Sub
ElseMsgBox Err.Number & ": " & Err.DescriptionExit Sub
End IfResume
End Sub
4. Position the insertion point anywhere within the code of the setPass_
AndOpenDB_withADO procedure and press F8 or choose Debug | Step
Into to execute the procedure one line at a time. Keep pressing F8 until the
procedure ends.
The procedure demonstrated above uses the JetEngine object’s Compact-
Database method to compact a Microsoft Jet database (MDB) and password
protect it. By compacting the database, you can greatly improve the database
performance and reduce its file size. The CompactDatabase method requires
that you provide the name of the MDB file you want to compact and the name
for the resulting compacted file. There are a number of connection properties
that you can use with the CompactDatabase method. This procedure illustrates
how to use the Jet OLEDB:Database Password property to set the password for
Data Access Technologies in Microsoft Access | 227
Access VBA Programming with DAO and ADO

the compacted database. The database password is set using the following
code:
jetEng.CompactDatabase "Data Source=" & _strPath & strCompactFrom & ";", _"Data Source=" & strPath & strCompactTo & ";" & _"Jet OLEDB:Database Password=welcome"
You must close the database before attempting to compact it or Visual Basic
will generate error -2147467259. The ErrorHandler code is used to trap errors
that may occur during the procedure execution. For example, if the specified
database file cannot be found in the specified path, Visual Basic will display
the error number and error description and will immediately exit the procedure.
If you run this procedure more than once, Visual Basic will encounter the error
-2147217897: database already exists. To allow the procedure to run again, use
the VBA Kill statement. This statement tells VBA to delete the file. The
Resume statement will pass the procedure execution back to the line of code
that caused the error and Visual Basic will proceed to execute this line and
other lines of code that follow.
Notice that to open a Microsoft Jet database (an MDB file) secured with a
password, you must specify the Jet OLEDB:Database Password property as
part of the Connection object’s ConnectionString property, like this:
With conn.Provider = "Microsoft.Jet.OLEDB.4.0;".ConnectionString = "Data Source=" & _
strPath & strCompactTo & ";" & _"Jet OLEDB:Database Password=welcome;"
.OpenEnd With
Opening a Microsoft Jet Database with User-Level SecurityOffice Access 2007 does not provide user-level security for databases that are
created in the new file format (ACCDB and ACCDE). The following discussion
and Hands-On 10-8 apply only to Access databases in the MDB file format.
User-level security secures the code and objects in your database so that
users can’t accidentally modify or change them. With this type of security you
can provide the most restrictive access over the database and objects it con-
tains. When you use the user-level security, the Microsoft Jet Engine uses a
workgroup information file named System.mdw to determine who can open a
database and to secure its objects.
The workgroup information file holds group and user information, includ-
ing passwords. The information contained in this file determines not only who
can open the database but also the permissions users/groups have on the
objects in the database. The workgroup information file contains built-in
groups (Admins and Users) and a generic user account (Admin) with unlimited
privileges on the database and the objects it contains. When an MDB file is
open in Access 2007, the Access user interface provides commands that allow
you to manually implement user-level security (see Figure 10-10).
228 | Chapter 10
Part II
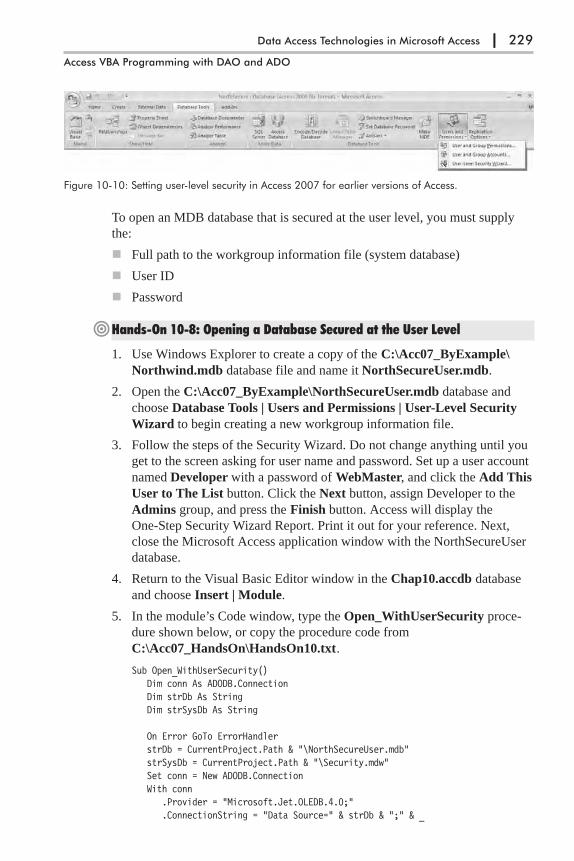
To open an MDB database that is secured at the user level, you must supply
the:
� Full path to the workgroup information file (system database)
� User ID
� Password
�Hands-On 10-8: Opening a Database Secured at the User Level
1. Use Windows Explorer to create a copy of the C:\Acc07_ByExample\
Northwind.mdb database file and name it NorthSecureUser.mdb.
2. Open the C:\Acc07_ByExample\NorthSecureUser.mdb database and
choose Database Tools | Users and Permissions | User-Level Security
Wizard to begin creating a new workgroup information file.
3. Follow the steps of the Security Wizard. Do not change anything until you
get to the screen asking for user name and password. Set up a user account
named Developer with a password of WebMaster, and click the Add This
User to The List button. Click the Next button, assign Developer to the
Admins group, and press the Finish button. Access will display the
One-Step Security Wizard Report. Print it out for your reference. Next,
close the Microsoft Access application window with the NorthSecureUser
database.
4. Return to the Visual Basic Editor window in the Chap10.accdb database
and choose Insert | Module.
5. In the module’s Code window, type the Open_WithUserSecurity proce-
dure shown below, or copy the procedure code from
C:\Acc07_HandsOn\HandsOn10.txt.
Sub Open_WithUserSecurity()Dim conn As ADODB.ConnectionDim strDb As StringDim strSysDb As String
On Error GoTo ErrorHandlerstrDb = CurrentProject.Path & "\NorthSecureUser.mdb"strSysDb = CurrentProject.Path & "\Security.mdw"Set conn = New ADODB.ConnectionWith conn
.Provider = "Microsoft.Jet.OLEDB.4.0;"
.ConnectionString = "Data Source=" & strDb & ";" & _
Data Access Technologies in Microsoft Access | 229
Access VBA Programming with DAO and ADO
Figure 10-10: Setting user-level security in Access 2007 for earlier versions of Access.
"Jet OLEDB:System Database=" & strSysDb.Open, "Developer", "WebMaster"
End WithMsgBox "Secured database was opened."conn.CloseSet conn = NothingMsgBox "Database was closed."Exit Sub
ErrorHandler:MsgBox Err.Number & ": " & Err.Description
End Sub
6. Position the insertion point anywhere within the procedure code and press
F5 or choose Run | Run Sub/UserForm to execute the procedure.
As mentioned earlier, ADO syntax is very flexible. You can use a variety of
ways to specify property settings. The code snippet below demonstrates how to
avoid formatting problems with long connection strings by using the ADO
Connection object’s Properties collection.
With conn.Provider = "Microsoft.Jet.OLEDB.4.0;".Properties("Jet OLEDB:System Database") = strSysDb.Open strDb, "Developer", "WebMaster"
End With
Notice that before you can reference provider-specific properties from the
Connection object’s Properties collection, you must indicate which provider
you are using.
� Note: The Security Wizard places a shortcut to the NorthSecureUser.mdb fileon your desktop to make it easy for you to start the secured database using thenew workgroup information file (Security.mdw). For more information on MDWfiles and implementing database security with ADOX and JRO, see Chapter 17.
Connecting to the Current Access DatabaseMicrosoft Access provides a quick way to access the current DAO database by
using the CurrentDb method. This method returns an object variable of type
Database that represents the database currently open in the Microsoft Access
window. In ADO, however, to access the currently open database, use the
CurrentProject.Connection statement. The CurrentProject object refers to the
project for the current Microsoft Access database. These statements work only
in VBA procedures created in Microsoft Access. If you’d like to reuse your
VBA procedures in other Microsoft Office or Visual Basic applications, you
will be better off by creating a connection via an appropriate OLE DB
provider.
The procedure in Hands-On 10-9 uses the CurrentProject.Connection state-
ment to return a reference to the current database. Once the connection to the
current database is established, the example procedure loops through the
230 | Chapter 10
Part II
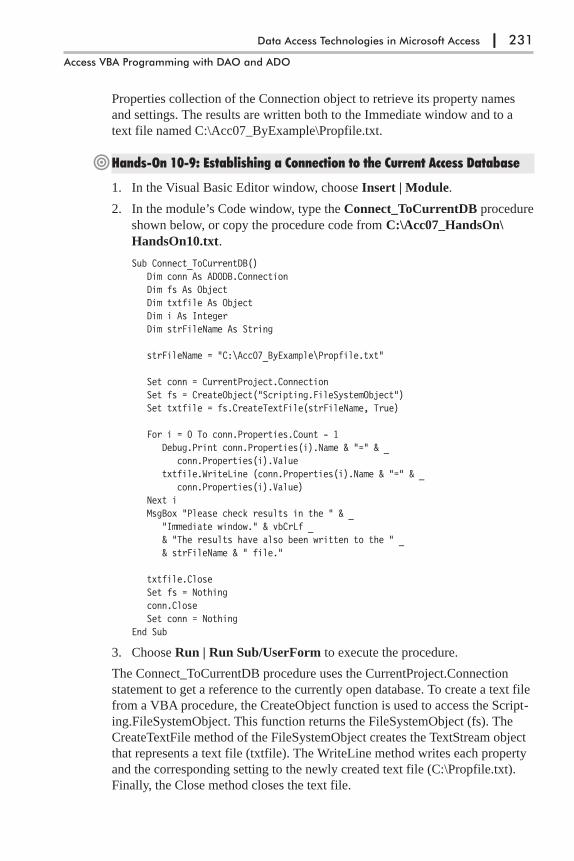
Properties collection of the Connection object to retrieve its property names
and settings. The results are written both to the Immediate window and to a
text file named C:\Acc07_ByExample\Propfile.txt.
�Hands-On 10-9: Establishing a Connection to the Current Access Database
1. In the Visual Basic Editor window, choose Insert | Module.
2. In the module’s Code window, type the Connect_ToCurrentDB procedure
shown below, or copy the procedure code from C:\Acc07_HandsOn\
HandsOn10.txt.
Sub Connect_ToCurrentDB()Dim conn As ADODB.ConnectionDim fs As ObjectDim txtfile As ObjectDim i As IntegerDim strFileName As String
strFileName = "C:\Acc07_ByExample\Propfile.txt"
Set conn = CurrentProject.ConnectionSet fs = CreateObject("Scripting.FileSystemObject")Set txtfile = fs.CreateTextFile(strFileName, True)
For i = 0 To conn.Properties.Count - 1Debug.Print conn.Properties(i).Name & "=" & _
conn.Properties(i).Valuetxtfile.WriteLine (conn.Properties(i).Name & "=" & _
conn.Properties(i).Value)Next iMsgBox "Please check results in the " & _
"Immediate window." & vbCrLf _& "The results have also been written to the " _& strFileName & " file."
txtfile.CloseSet fs = Nothingconn.CloseSet conn = Nothing
End Sub
3. Choose Run | Run Sub/UserForm to execute the procedure.
The Connect_ToCurrentDB procedure uses the CurrentProject.Connection
statement to get a reference to the currently open database. To create a text file
from a VBA procedure, the CreateObject function is used to access the Script-
ing.FileSystemObject. This function returns the FileSystemObject (fs). The
CreateTextFile method of the FileSystemObject creates the TextStream object
that represents a text file (txtfile). The WriteLine method writes each property
and the corresponding setting to the newly created text file (C:\Propfile.txt).
Finally, the Close method closes the text file.
Data Access Technologies in Microsoft Access | 231
Access VBA Programming with DAO and ADO

Opening Other Databases, Spreadsheets, and Text Filesfrom Access 2007
Microsoft Access Jet/ACE database engine can be used to access other data-
bases, spreadsheets, and text files. The following subsections of this chapter
demonstrate how to connect to SQL Server, Excel spreadsheets, and text files.
Connecting to an SQL Server DatabaseThe ADO provides a number of ways of connecting to an SQL Server data-
base. To access data residing on Microsoft SQL Server 6.5, 7.0, or 2000, use
SQLOLEDB, which is the native Microsoft OLE DB Provider for SQL.
You can also connect to an SQL database using the MSDASQL provider.
This provider allows you to access any existing ODBC data sources. You can
open a connection to the SQL Server by using an ODBC DSN (Data Source
Name) or ODBC DSN-less connection. Both of these connection types are dis-
cussed earlier in this chapter. For example, the code snippet below opens and
then closes a connection with the SQL Server database based on a DSN named
Pubs.
With conn.Open "Provider=MSDASQL; DSN=Pubs".Close
End With
Recall that you can skip setting the Provider property because MSDASQL is
the default provider for ODBC. All you really need to establish a connection in
this case is a DSN.
�Hands-On 10-10: Connecting to an SQL Server Database Using SQLOLEDBProvider
� Note: To try out this procedure, modify the connection information in theconnection string to connect to the SQL Server database you have access to.
1. In the Visual Basic Editor window, choose Insert | Module.
2. In the module’s Code window, type the ConnectToSQL_SQLOLEDB
procedure shown below, or copy the procedure code from C:\Acc07_
HandsOn\HandsOn10.txt.
Sub ConnectToSQL_SQLOLEDB()Dim conn As ADODB.Connection
Set conn = New ADODB.Connection' Modify the connection informationWith conn
.Provider = "SQLOLEDB"
.ConnectionString = "Data Source=Mozartv4;" & _"database=Musicians; UserId=sa; Password=;"
232 | Chapter 10
Part II
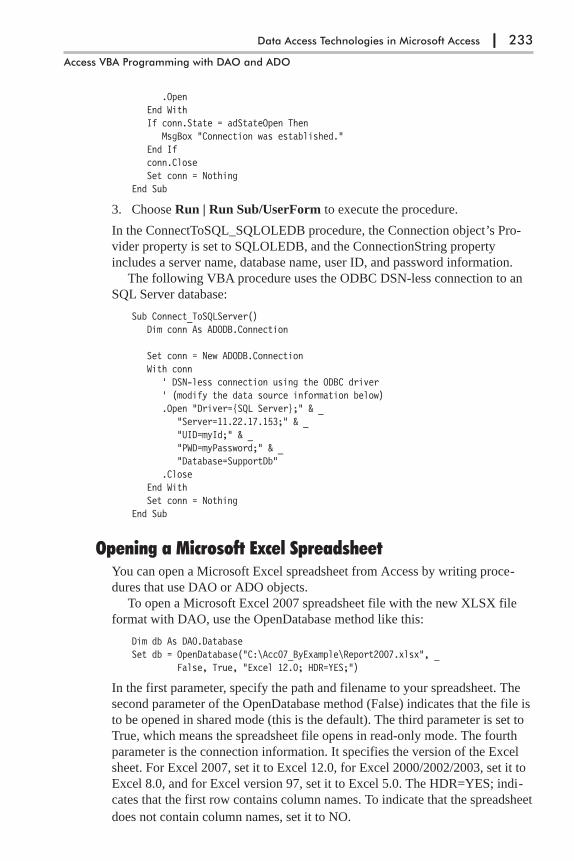
.OpenEnd WithIf conn.State = adStateOpen Then
MsgBox "Connection was established."End Ifconn.CloseSet conn = Nothing
End Sub
3. Choose Run | Run Sub/UserForm to execute the procedure.
In the ConnectToSQL_SQLOLEDB procedure, the Connection object’s Pro-
vider property is set to SQLOLEDB, and the ConnectionString property
includes a server name, database name, user ID, and password information.
The following VBA procedure uses the ODBC DSN-less connection to an
SQL Server database:
Sub Connect_ToSQLServer()Dim conn As ADODB.Connection
Set conn = New ADODB.ConnectionWith conn
' DSN-less connection using the ODBC driver' (modify the data source information below).Open "Driver={SQL Server};" & _
"Server=11.22.17.153;" & _"UID=myId;" & _"PWD=myPassword;" & _"Database=SupportDb"
.CloseEnd WithSet conn = Nothing
End Sub
Opening a Microsoft Excel SpreadsheetYou can open a Microsoft Excel spreadsheet from Access by writing proce-
dures that use DAO or ADO objects.
To open a Microsoft Excel 2007 spreadsheet file with the new XLSX file
format with DAO, use the OpenDatabase method like this:
Dim db As DAO.DatabaseSet db = OpenDatabase("C:\Acc07_ByExample\Report2007.xlsx", _
False, True, "Excel 12.0; HDR=YES;")
In the first parameter, specify the path and filename to your spreadsheet. The
second parameter of the OpenDatabase method (False) indicates that the file is
to be opened in shared mode (this is the default). The third parameter is set to
True, which means the spreadsheet file opens in read-only mode. The fourth
parameter is the connection information. It specifies the version of the Excel
sheet. For Excel 2007, set it to Excel 12.0, for Excel 2000/2002/2003, set it to
Excel 8.0, and for Excel version 97, set it to Excel 5.0. The HDR=YES; indi-
cates that the first row contains column names. To indicate that the spreadsheet
does not contain column names, set it to NO.
Data Access Technologies in Microsoft Access | 233
Access VBA Programming with DAO and ADO
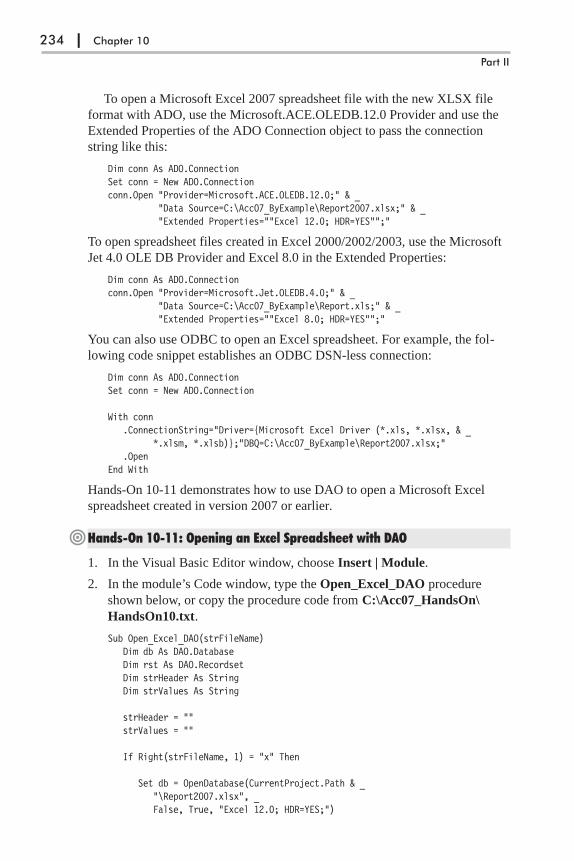
To open a Microsoft Excel 2007 spreadsheet file with the new XLSX file
format with ADO, use the Microsoft.ACE.OLEDB.12.0 Provider and use the
Extended Properties of the ADO Connection object to pass the connection
string like this:
Dim conn As ADO.ConnectionSet conn = New ADO.Connectionconn.Open "Provider=Microsoft.ACE.OLEDB.12.0;" & _
"Data Source=C:\Acc07_ByExample\Report2007.xlsx;" & _"Extended Properties=""Excel 12.0; HDR=YES"";"
To open spreadsheet files created in Excel 2000/2002/2003, use the Microsoft
Jet 4.0 OLE DB Provider and Excel 8.0 in the Extended Properties:
Dim conn As ADO.Connectionconn.Open "Provider=Microsoft.Jet.OLEDB.4.0;" & _
"Data Source=C:\Acc07_ByExample\Report.xls;" & _"Extended Properties=""Excel 8.0; HDR=YES"";"
You can also use ODBC to open an Excel spreadsheet. For example, the fol-
lowing code snippet establishes an ODBC DSN-less connection:
Dim conn As ADO.ConnectionSet conn = New ADO.Connection
With conn.ConnectionString="Driver={Microsoft Excel Driver (*.xls, *.xlsx, & _
*.xlsm, *.xlsb)};"DBQ=C:\Acc07_ByExample\Report2007.xlsx;".Open
End With
Hands-On 10-11 demonstrates how to use DAO to open a Microsoft Excel
spreadsheet created in version 2007 or earlier.
�Hands-On 10-11: Opening an Excel Spreadsheet with DAO
1. In the Visual Basic Editor window, choose Insert | Module.
2. In the module’s Code window, type the Open_Excel_DAO procedure
shown below, or copy the procedure code from C:\Acc07_HandsOn\
HandsOn10.txt.
Sub Open_Excel_DAO(strFileName)Dim db As DAO.DatabaseDim rst As DAO.RecordsetDim strHeader As StringDim strValues As String
strHeader = ""strValues = ""
If Right(strFileName, 1) = "x" Then
Set db = OpenDatabase(CurrentProject.Path & _"\Report2007.xlsx", _False, True, "Excel 12.0; HDR=YES;")
234 | Chapter 10
Part II

Else
Set db = OpenDatabase(CurrentProject.Path & _"\Report.xls", _False, True, "Excel 8.0; HDR=YES;")
End If
Set rst = db.OpenRecordset("Sheet1$")
'get names of columnsFor Each fld In rst.Fields
strHeader = strHeader & fld.Name & vbTabNext
Debug.Print strHeader
' get cell valuesDo Until rst.EOF
For Each f In rst.FieldsstrValues = strValues & f.Value & vbTab & vbTab
NextDebug.Print strValuesstrValues = ""rst.MoveNext
Loop
rst.CloseSet rst = Nothingdb.CloseSet db = Nothing
End Sub
3. In the Visual Basic Editor window, press Ctrl+G to open the Immediate
window or choose View | Immediate Window.
4. To run the Open_Excel_DAO procedure, type Open_Excel_DAO
"Report.xls" in the Immediate window and press Enter.
To run the Open_Excel_DAO procedure you must provide the name of the
spreadsheet file to open. If the last character in the file extension is “x” (this is
determined with the VBA Right function), then the procedure uses the connec-
tion string designed for opening Excel 2007 files. After making a connection
to Excel file, the procedure goes on to retrieve information stored in the
desired worksheet. Using the DAO’s OpenRecordset method we can access the
data on the Sheet1 worksheet. Notice a dollar sign ($) appended to the sheet
name. You must use the dollar sign syntax, Sheet1$, to refer to a sheet name.
The procedure uses the For Each…Next loop to obtain the names of all
worksheet columns. The heading string is then written to the Immediate win-
dow. Next, Do Until…Loop loops through the records until the end of file
(EOF) is reached. Cell values from each worksheet row are written to the
strValues variable and then to the Immediate window. Once the data retrieval is
completed, the Recordset is closed and its variable is destroyed. The same is
done with the Connection object.
Data Access Technologies in Microsoft Access | 235
Access VBA Programming with DAO and ADO

Hands-On 10-12 demonstrates how to open an Excel spreadsheet with ADO
and modify its data.
�Hands-On 10-12: Opening an Excel Spreadsheet with ADO
1. In the same module where you entered the procedure in Hands-On 10-11,
type the Open_Excel_ADO procedure shown below, or copy the proce-
dure code from C:\Acc07_HandsOn\HandsOn10.txt.
Sub Open_Excel_ADO(strFileName As String)Dim conn As ADODB.ConnectionDim rst As ADODB.RecordsetDim strFindWhat As String
Set conn = New ADODB.Connection
If Right(strFileName, 1) = "x" Then
With conn.Provider = "Microsoft.ACE.OLEDB.12.0;".ConnectionString = "Data Source=" & _
CurrentProject.Path & _"\" & strFileName & _"; Extended Properties=""Excel 12.0; HDR=Yes"";"
.OpenEnd With
Elseconn.Open "Provider=Microsoft.Jet.OLEDB.4.0;" & _
"Data Source=" & CurrentProject.Path & _"\" & strFileName & _";Extended Properties=""Excel 8.0; HDR=Yes;"";"
End If
Set rst = New ADODB.Recordsetrst.Open "SELECT * FROM [Sheet1$]", conn, adOpenStatic, adLockOptimistic
strFindWhat = "[Excel Version] = 'Excel 2000'"rst.Find strFindWhatrst(1).Value = "500"rst.Updaterst.CloseSet rst = NothingMsgBox "Excel spreadsheet was opened and updated."
conn.CloseSet conn = Nothing
End Sub
2. In the Visual Basic Editor window, press Ctrl+G to open the Immediate
window or choose View | Immediate Window.
3. To run the Open_Excel_ADO procedure, type Open_Excel_ADO
"Report2007.xlsx" in the Immediate window and press Enter.
236 | Chapter 10
Part II
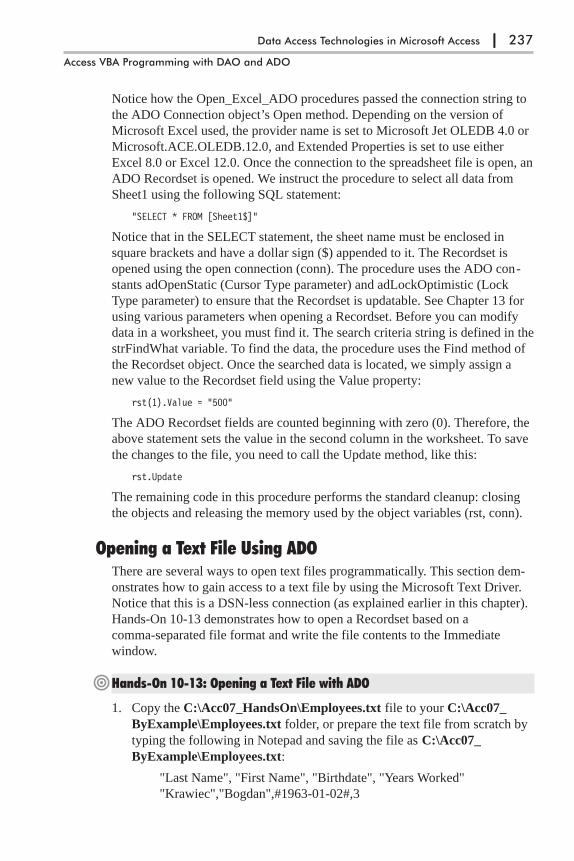
Notice how the Open_Excel_ADO procedures passed the connection string to
the ADO Connection object’s Open method. Depending on the version of
Microsoft Excel used, the provider name is set to Microsoft Jet OLEDB 4.0 or
Microsoft.ACE.OLEDB.12.0, and Extended Properties is set to use either
Excel 8.0 or Excel 12.0. Once the connection to the spreadsheet file is open, an
ADO Recordset is opened. We instruct the procedure to select all data from
Sheet1 using the following SQL statement:
"SELECT * FROM [Sheet1$]"
Notice that in the SELECT statement, the sheet name must be enclosed in
square brackets and have a dollar sign ($) appended to it. The Recordset is
opened using the open connection (conn). The procedure uses the ADO con-
stants adOpenStatic (Cursor Type parameter) and adLockOptimistic (Lock
Type parameter) to ensure that the Recordset is updatable. See Chapter 13 for
using various parameters when opening a Recordset. Before you can modify
data in a worksheet, you must find it. The search criteria string is defined in the
strFindWhat variable. To find the data, the procedure uses the Find method of
the Recordset object. Once the searched data is located, we simply assign a
new value to the Recordset field using the Value property:
rst(1).Value = "500"
The ADO Recordset fields are counted beginning with zero (0). Therefore, the
above statement sets the value in the second column in the worksheet. To save
the changes to the file, you need to call the Update method, like this:
rst.Update
The remaining code in this procedure performs the standard cleanup: closing
the objects and releasing the memory used by the object variables (rst, conn).
Opening a Text File Using ADOThere are several ways to open text files programmatically. This section dem-
onstrates how to gain access to a text file by using the Microsoft Text Driver.
Notice that this is a DSN-less connection (as explained earlier in this chapter).
Hands-On 10-13 demonstrates how to open a Recordset based on a
comma-separated file format and write the file contents to the Immediate
window.
�Hands-On 10-13: Opening a Text File with ADO
1. Copy the C:\Acc07_HandsOn\Employees.txt file to your C:\Acc07_
ByExample\Employees.txt folder, or prepare the text file from scratch by
typing the following in Notepad and saving the file as C:\Acc07_
ByExample\Employees.txt:
"Last Name", "First Name", "Birthdate", "Years Worked"
"Krawiec","Bogdan",#1963-01-02#,3
Data Access Technologies in Microsoft Access | 237
Access VBA Programming with DAO and ADO

"Górecka","Jadwiga",#1948-05-12#,1
"Olszewski","Stefan",#1957-04-07#,0
2. In the Visual Basic Editor window, choose Insert | Module.
3. In the module’s Code window, type the Open_TextFile procedure shown
below, or copy the procedure code from C:\Acc07_HandsOn\Hands-
On10.txt.
Sub Open_TextFile()Dim conn As ADODB.ConnectionDim rst As ADODB.RecordsetDim fld As ADODB.Field
Set conn = New ADODB.ConnectionDebug.Print conn.ConnectionStringconn.Open "DRIVER={Microsoft Text Driver (*.txt; *.csv)};" & _
"DBQ=" & CurrentProject.Path & "\"
Set rst = New ADODB.Recordsetrst.Open "SELECT * FROM [Employees.txt]", conn, adOpenStatic, _
adLockReadOnly, adCmdTextDo Until rst.EOF
For Each fld In rst.FieldsDebug.Print fld.Name & "=" & fld.Value
Next fldrst.MoveNext
Looprst.CloseSet rst = Nothingconn.CloseSet conn = NothingMsgBox "Open the Immediate window to view the data."
End Sub
4. Make sure that the C:\Acc07_ByExample\Employees.txt file is closed and
choose Run | Run Sub/UserForm to execute the procedure.
If you worked through the previous exercises in this chapter you should have
no problem following the code of the Open_TextFile procedure. Because you
are only reading the records, you can open the Recordset using the
adOpenStatic and adLockReadOnly ADO constants. Notice that ADO constant
adCmdText is used as the last parameter of the Recordset’s Open method (see
Chapter 15 for SQL examples):
rst.Open "SELECT * FROM [Employees.txt]", conn, adOpenStatic, _adLockReadOnly, adCmdText
The last parameter in the above statement can be any valid option. You can
indicate the type of source you are using with the adCmdText constant (for an
SQL statement), adCmdTable (to retrieve all the rows in a table), or
adCmdStoredProc (to get records via a stored procedure). If you do not specify
the type of source, then adCmdUnknown is used as the default.
238 | Chapter 10
Part II
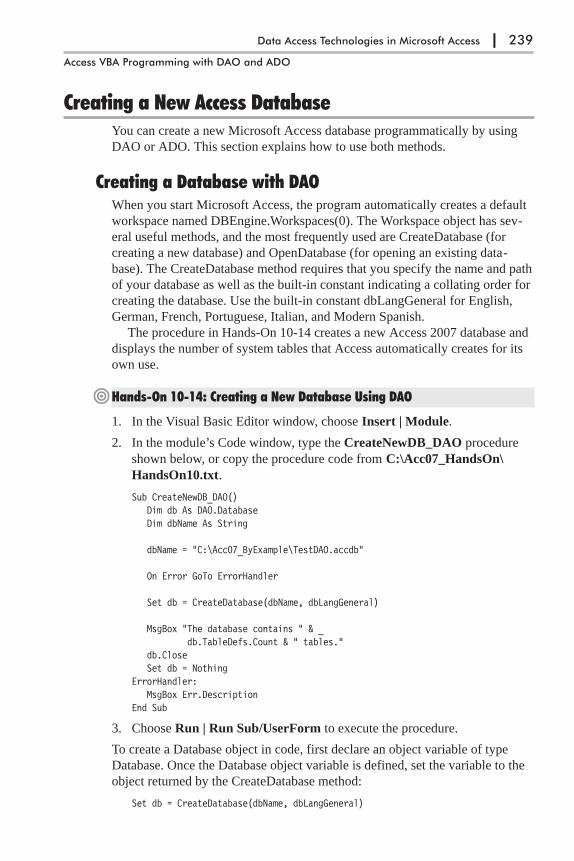
Creating a New Access DatabaseYou can create a new Microsoft Access database programmatically by using
DAO or ADO. This section explains how to use both methods.
Creating a Database with DAOWhen you start Microsoft Access, the program automatically creates a default
workspace named DBEngine.Workspaces(0). The Workspace object has sev-
eral useful methods, and the most frequently used are CreateDatabase (for
creating a new database) and OpenDatabase (for opening an existing data-
base). The CreateDatabase method requires that you specify the name and path
of your database as well as the built-in constant indicating a collating order for
creating the database. Use the built-in constant dbLangGeneral for English,
German, French, Portuguese, Italian, and Modern Spanish.
The procedure in Hands-On 10-14 creates a new Access 2007 database and
displays the number of system tables that Access automatically creates for its
own use.
�Hands-On 10-14: Creating a New Database Using DAO
1. In the Visual Basic Editor window, choose Insert | Module.
2. In the module’s Code window, type the CreateNewDB_DAO procedure
shown below, or copy the procedure code from C:\Acc07_HandsOn\
HandsOn10.txt.
Sub CreateNewDB_DAO()Dim db As DAO.DatabaseDim dbName As String
dbName = "C:\Acc07_ByExample\TestDAO.accdb"
On Error GoTo ErrorHandler
Set db = CreateDatabase(dbName, dbLangGeneral)
MsgBox "The database contains " & _db.TableDefs.Count & " tables."
db.CloseSet db = Nothing
ErrorHandler:MsgBox Err.Description
End Sub
3. Choose Run | Run Sub/UserForm to execute the procedure.
To create a Database object in code, first declare an object variable of type
Database. Once the Database object variable is defined, set the variable to the
object returned by the CreateDatabase method:
Set db = CreateDatabase(dbName, dbLangGeneral)
Data Access Technologies in Microsoft Access | 239
Access VBA Programming with DAO and ADO
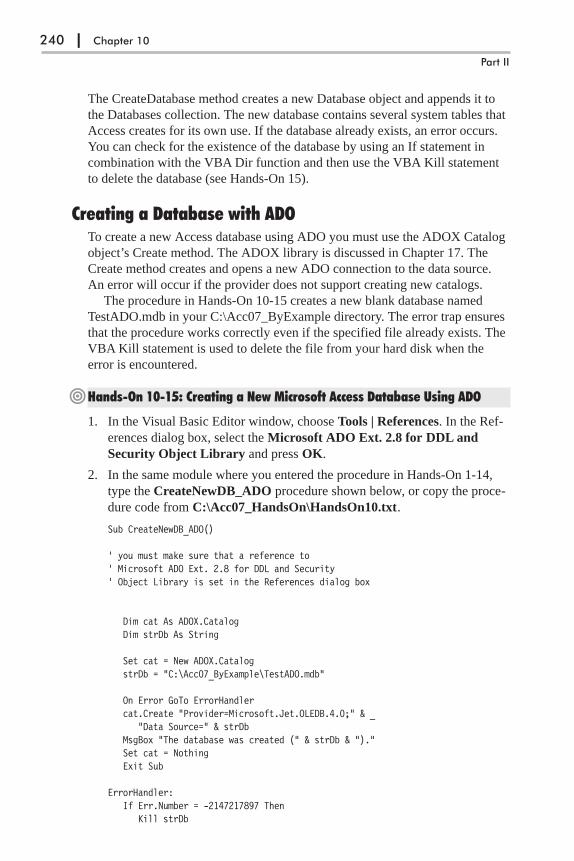
The CreateDatabase method creates a new Database object and appends it to
the Databases collection. The new database contains several system tables that
Access creates for its own use. If the database already exists, an error occurs.
You can check for the existence of the database by using an If statement in
combination with the VBA Dir function and then use the VBA Kill statement
to delete the database (see Hands-On 15).
Creating a Database with ADOTo create a new Access database using ADO you must use the ADOX Catalog
object’s Create method. The ADOX library is discussed in Chapter 17. The
Create method creates and opens a new ADO connection to the data source.
An error will occur if the provider does not support creating new catalogs.
The procedure in Hands-On 10-15 creates a new blank database named
TestADO.mdb in your C:\Acc07_ByExample directory. The error trap ensures
that the procedure works correctly even if the specified file already exists. The
VBA Kill statement is used to delete the file from your hard disk when the
error is encountered.
�Hands-On 10-15: Creating a New Microsoft Access Database Using ADO
1. In the Visual Basic Editor window, choose Tools | References. In the Ref-
erences dialog box, select the Microsoft ADO Ext. 2.8 for DDL and
Security Object Library and press OK.
2. In the same module where you entered the procedure in Hands-On 1-14,
type the CreateNewDB_ADO procedure shown below, or copy the proce-
dure code from C:\Acc07_HandsOn\HandsOn10.txt.
Sub CreateNewDB_ADO()
' you must make sure that a reference to' Microsoft ADO Ext. 2.8 for DDL and Security' Object Library is set in the References dialog box
Dim cat As ADOX.CatalogDim strDb As String
Set cat = New ADOX.CatalogstrDb = "C:\Acc07_ByExample\TestADO.mdb"
On Error GoTo ErrorHandlercat.Create "Provider=Microsoft.Jet.OLEDB.4.0;" & _
"Data Source=" & strDbMsgBox "The database was created (" & strDb & ")."Set cat = NothingExit Sub
ErrorHandler:If Err.Number = -2147217897 Then
Kill strDb
240 | Chapter 10
Part II
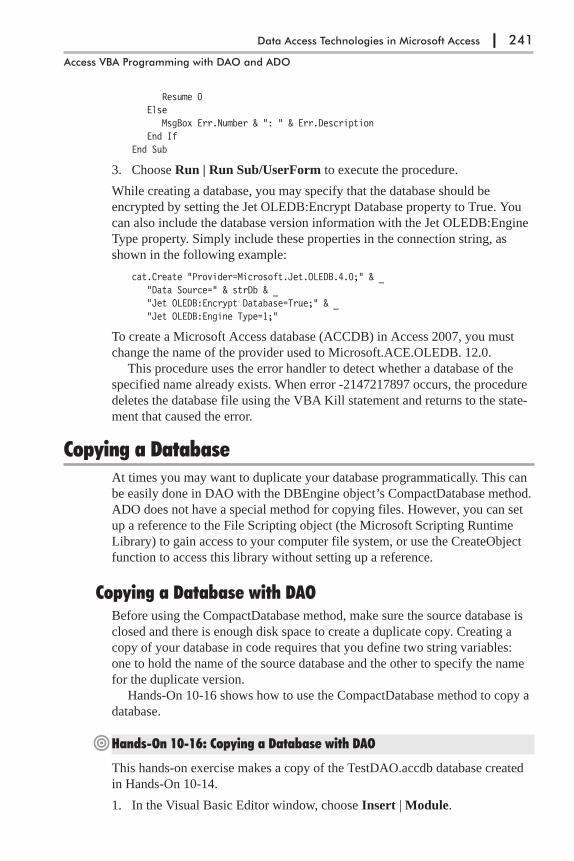
Resume 0Else
MsgBox Err.Number & ": " & Err.DescriptionEnd If
End Sub
3. Choose Run | Run Sub/UserForm to execute the procedure.
While creating a database, you may specify that the database should be
encrypted by setting the Jet OLEDB:Encrypt Database property to True. You
can also include the database version information with the Jet OLEDB:Engine
Type property. Simply include these properties in the connection string, as
shown in the following example:
cat.Create "Provider=Microsoft.Jet.OLEDB.4.0;" & _"Data Source=" & strDb & _"Jet OLEDB:Encrypt Database=True;" & _"Jet OLEDB:Engine Type=1;"
To create a Microsoft Access database (ACCDB) in Access 2007, you must
change the name of the provider used to Microsoft.ACE.OLEDB. 12.0.
This procedure uses the error handler to detect whether a database of the
specified name already exists. When error -2147217897 occurs, the procedure
deletes the database file using the VBA Kill statement and returns to the state-
ment that caused the error.
Copying a DatabaseAt times you may want to duplicate your database programmatically. This can
be easily done in DAO with the DBEngine object’s CompactDatabase method.
ADO does not have a special method for copying files. However, you can set
up a reference to the File Scripting object (the Microsoft Scripting Runtime
Library) to gain access to your computer file system, or use the CreateObject
function to access this library without setting up a reference.
Copying a Database with DAOBefore using the CompactDatabase method, make sure the source database is
closed and there is enough disk space to create a duplicate copy. Creating a
copy of your database in code requires that you define two string variables:
one to hold the name of the source database and the other to specify the name
for the duplicate version.
Hands-On 10-16 shows how to use the CompactDatabase method to copy a
database.
�Hands-On 10-16: Copying a Database with DAO
This hands-on exercise makes a copy of the TestDAO.accdb database created
in Hands-On 10-14.
1. In the Visual Basic Editor window, choose Insert | Module.
Data Access Technologies in Microsoft Access | 241
Access VBA Programming with DAO and ADO
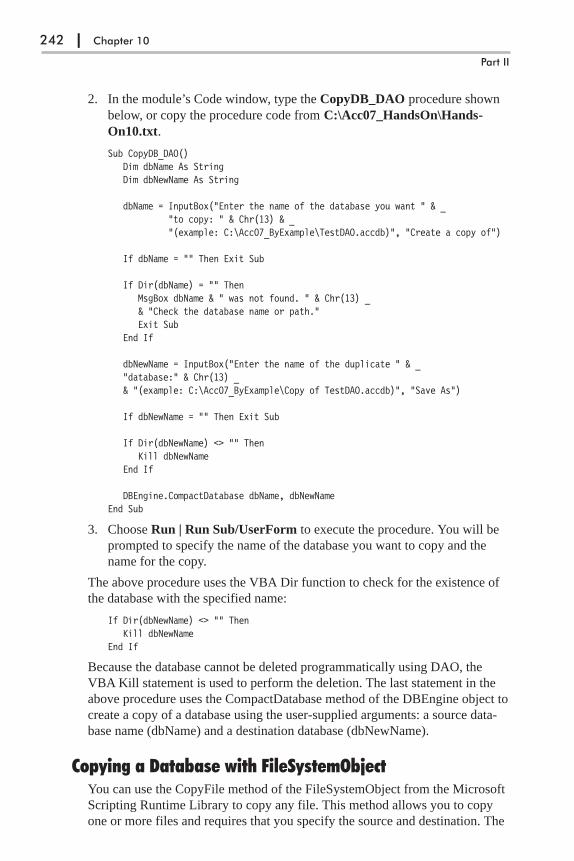
2. In the module’s Code window, type the CopyDB_DAO procedure shown
below, or copy the procedure code from C:\Acc07_HandsOn\Hands-
On10.txt.
Sub CopyDB_DAO()Dim dbName As StringDim dbNewName As String
dbName = InputBox("Enter the name of the database you want " & _"to copy: " & Chr(13) & _"(example: C:\Acc07_ByExample\TestDAO.accdb)", "Create a copy of")
If dbName = "" Then Exit Sub
If Dir(dbName) = "" ThenMsgBox dbName & " was not found. " & Chr(13) _& "Check the database name or path."Exit Sub
End If
dbNewName = InputBox("Enter the name of the duplicate " & _"database:" & Chr(13) _& "(example: C:\Acc07_ByExample\Copy of TestDAO.accdb)", "Save As")
If dbNewName = "" Then Exit Sub
If Dir(dbNewName) <> "" ThenKill dbNewName
End If
DBEngine.CompactDatabase dbName, dbNewNameEnd Sub
3. Choose Run | Run Sub/UserForm to execute the procedure. You will be
prompted to specify the name of the database you want to copy and the
name for the copy.
The above procedure uses the VBA Dir function to check for the existence of
the database with the specified name:
If Dir(dbNewName) <> "" ThenKill dbNewName
End If
Because the database cannot be deleted programmatically using DAO, the
VBA Kill statement is used to perform the deletion. The last statement in the
above procedure uses the CompactDatabase method of the DBEngine object to
create a copy of a database using the user-supplied arguments: a source data-
base name (dbName) and a destination database (dbNewName).
Copying a Database with FileSystemObjectYou can use the CopyFile method of the FileSystemObject from the Microsoft
Scripting Runtime Library to copy any file. This method allows you to copy
one or more files and requires that you specify the source and destination. The
242 | Chapter 10
Part II

source is the name of the file you want to copy or file specification. For exam-
ple, to copy all your MDB databases located in a specific directory, you can
include wildcard characters to specify the source like this: C:\Acc07_
ByExample\*.mdb. The destination is the string specifying where the file or
files are to be copied. You cannot use wildcard characters in the destination
string. The third argument of the CopyFile method is optional. It indicates if
existing files in the destination are to be overwritten. If True, files are over-
written; if False, they are not. The default is True.
Hands-On 10-17 demonstrates how to copy a file from one directory to
another.
�Hands-On 10-17: Copying a File
This hands-on exercise makes a copy of the TestADO.accdb database created
in Hands-On 10-15.
1. In the Visual Basic Editor window, choose Insert | Module.
2. In the module’s Code window, type the Copy_AnyFile procedure shown
below, or copy the procedure code from C:\Acc07_HandsOn\Hands-
On10.txt.
Sub Copy_AnyFile()Dim fso As ObjectDim strDb As String
On Error GoTo ErrorHandler
Set fso = CreateObject("Scripting.FileSystemObject")
strDb = "C:\Acc07_ByExample\TestADO.accdb"fso.CopyFile strDb, "C:\"
Set fso = NothingExit Sub
ErrorHandler:MsgBox Err.Number & ":" & Err.Description
End Sub
3. Choose Run | Run Sub/UserForm to execute the procedure.
The above procedure uses the CreateObject method to return a reference to a
FileSystemObject from the Microsoft Scripting Runtime Library. The
CopyFile method of the FileSystemObject is then used to copy the specified
database to the root directory of your computer.
Database ErrorsSo far in this book you’ve seen several procedures that incorporated simple
error handling. An error handler is a block of code that is executed when a
run-time error occurs. The procedure execution is transferred to error-handling
code via the On Error GoTo <Label> statement. There are three types of On
Error statements:
Data Access Technologies in Microsoft Access | 243
Access VBA Programming with DAO and ADO

� On Error GoTo <Label> — This statement tells VBA to jump to the spec-
ified label when an error occurs. A label is any unreserved word followed
by a colon and is placed on a separate line in the same procedure as the On
Error statement. The code between the line that caused the error and the
line label is simply ignored. The execution of the procedure continues from
the line following the line label. The error-handling code is placed at the
very bottom of the procedure. To ensure that the error handler is not exe-
cuted if there are no errors, place an Exit Sub or Exit Function statement
just before the line label.
If the procedure with error-handling code calls another procedure that does
not have its own error handler, an error that occurs in the called procedure
causes the execution to be transferred back to the calling procedure where
the error will be handled.
� On Error Resume Next — This statement tells VBA to resume the proce-
dure execution at the line following the statement that caused the error.
Place this statement in your code anywhere you think the error might
occur. The run-time error will be trapped and stored in the VBA Err object.
You should check the error number of the Err object immediately after that
statement to determine how to handle the error.
� On Error GoTo 0 — This statement disables the error handler in the cur-
rent procedure. When an error occurs, VBA will display its standard
run-time error message box in which you can click the End button to termi-
nate the procedure or press Debug to enter the break mode for
troubleshooting.
VBA has a built-in Err object that has several properties useful for determining
the type of error that occurred. Use the Err object’s Number property to deter-
mine the error number. The Description property of the Err object contains the
text description of the error. You can also find out the source of an error by
using the Err object’s Source property.
When using ADO to access data, you can get information about the errors
from both the VBA Err object and the ActiveX Data Objects (ADO) Error
object. When an error occurs in an application that uses the ADO Object
Model, an Error object is appended to the ADO Errors collection of the Con-
nection object and you are advised about the error via a message box.
While the VBA Err object holds information only about the most recent
error, the ADO Errors collection can contain several entries regarding the last
ADO error. You can count the errors caused by an invalid operation by using
the Count property of the Errors collection. By checking the contents of the
Errors collection you can learn more information about the nature of the error.
The Errors collection is available only from the Connection object. Errors that
occur in ADO itself are reported to the VBA Err object. Errors that are pro-
vider-specific are appended to the Errors collection of the ADO Connection
object. These errors are reported by the specific OLE DB provider when ADO
objects are being used to access data.
244 | Chapter 10
Part II
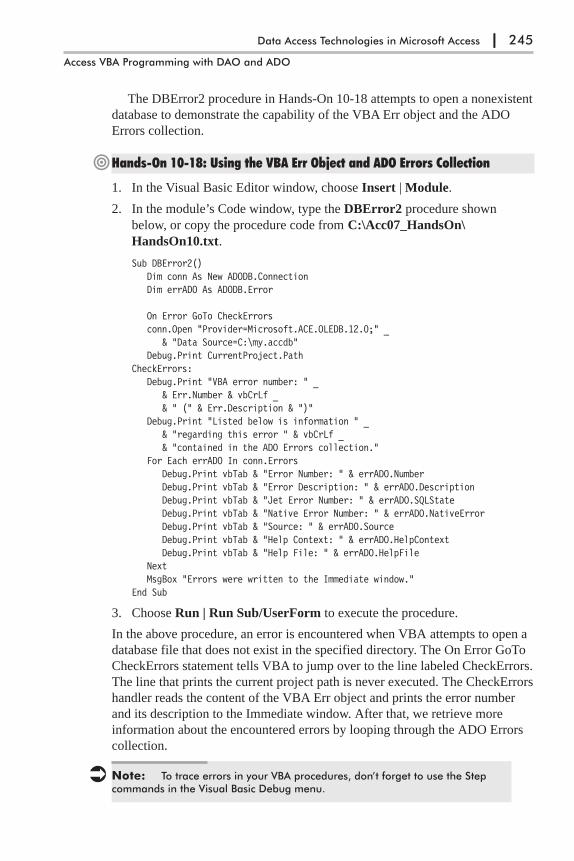
The DBError2 procedure in Hands-On 10-18 attempts to open a nonexistent
database to demonstrate the capability of the VBA Err object and the ADO
Errors collection.
�Hands-On 10-18: Using the VBA Err Object and ADO Errors Collection
1. In the Visual Basic Editor window, choose Insert | Module.
2. In the module’s Code window, type the DBError2 procedure shown
below, or copy the procedure code from C:\Acc07_HandsOn\
HandsOn10.txt.
Sub DBError2()Dim conn As New ADODB.ConnectionDim errADO As ADODB.Error
On Error GoTo CheckErrorsconn.Open "Provider=Microsoft.ACE.OLEDB.12.0;" _
& "Data Source=C:\my.accdb"Debug.Print CurrentProject.Path
CheckErrors:Debug.Print "VBA error number: " _
& Err.Number & vbCrLf _& " (" & Err.Description & ")"
Debug.Print "Listed below is information " _& "regarding this error " & vbCrLf _& "contained in the ADO Errors collection."
For Each errADO In conn.ErrorsDebug.Print vbTab & "Error Number: " & errADO.NumberDebug.Print vbTab & "Error Description: " & errADO.DescriptionDebug.Print vbTab & "Jet Error Number: " & errADO.SQLStateDebug.Print vbTab & "Native Error Number: " & errADO.NativeErrorDebug.Print vbTab & "Source: " & errADO.SourceDebug.Print vbTab & "Help Context: " & errADO.HelpContextDebug.Print vbTab & "Help File: " & errADO.HelpFile
NextMsgBox "Errors were written to the Immediate window."
End Sub
3. Choose Run | Run Sub/UserForm to execute the procedure.
In the above procedure, an error is encountered when VBA attempts to open a
database file that does not exist in the specified directory. The On Error GoTo
CheckErrors statement tells VBA to jump over to the line labeled CheckErrors.
The line that prints the current project path is never executed. The CheckErrors
handler reads the content of the VBA Err object and prints the error number
and its description to the Immediate window. After that, we retrieve more
information about the encountered errors by looping through the ADO Errors
collection.
� Note: To trace errors in your VBA procedures, don’t forget to use the Stepcommands in the Visual Basic Debug menu.
Data Access Technologies in Microsoft Access | 245
Access VBA Programming with DAO and ADO

Compacting a DatabaseWith frequent use over a period of time, the performance of your database may
deteriorate. When objects are deleted from a database but the space isn’t
reclaimed, fragmentation may occur. To improve database performance and
reduce the database file size, you can compact or repair Microsoft Office
Access databases. To compact a database, use one of the following methods:
� CompactDatabase (Microsoft Jet and Replication Objects (JRO) Library)
— To use the JRO library, choose Tools | References in the Visual Basic
application window and select Microsoft Jet and Replication Objects 2.6
Library. We will use this method to compact a database in Hands-On
10-19.
� CompactDatabase (DBEngine object) — This method requires that you
specify the full path and filename of the database you want to compact, and
the full path and filename of the compacted database.
DBEngine.CompactDatabase "C:\Acc07_ByExample\Northwind2007.accdb","C:\CompNorthwind.accdb"
� CompactRepair (Application object) — The Application object refers to
the active Microsoft Access application. This method requires that you
specify the full path and filename of the database you want to compact, and
the full path and filename of the compacted database. You may also specify
an optional argument to indicate whether a log file should be created. True
means that if corruption is detected in the source file, the log file will be
created in the destination directory. If you omit the third argument or set it
to False, no log file is created.
Application.CompactRepair("C:\Acc07_ByExample\Northwind.mdb","C:/NewNorthwind.mdb",true)
When compacting/repairing a database, keep in mind the following:
� You cannot compact/repair a database that is currently open.
� You cannot compact a database to the same filename. You must specify a
new name for the compacted database. After the compact/repair process is
complete, simply delete the original database file and rename the com-
pacted database using the original name.
� You cannot compact a database if it is secured and you don’t have appro-
priate permissions.
Hands-On 10-19 demonstrates how to compact the Northwind database using
JRO.
246 | Chapter 10
Part II

�Hands-On 10-19: Compacting a Database
1. In the Visual Basic Editor window, choose Insert | Module.
2. In the module’s Code window, type the CompactDb procedure shown
below, or copy the procedure code from C:\Acc07_HandsOn\Hands-
On10.txt.
' use the References dialog box to set up a reference to the' Microsoft Jet and Replication Objects Library
Sub CompactDb()Dim jetEng As JRO.JetEngineDim strCompactFrom As StringDim strCompactTo As StringDim strPath As String
strPath = CurrentProject.Path & "\"strCompactFrom = "Northwind.mdb"strCompactTo = "NorthwindComp.mdb"
' Make sure there isn't already a file with the' name of the compacted database.On Error GoTo HandleErr
' Compact the databaseSet jetEng = New JRO.JetEnginejetEng.CompactDatabase "Data Source=" & _
strPath & strCompactFrom & ";", _"Data Source=" & _strPath & strCompactTo & ";"
' Delete the original databaseKill strPath & strCompactFrom
' Rename the file back to the original nameName strPath & strCompactTo As strPath & strCompactFromExitHere:Set jetEng = NothingMsgBox "Compacting completed."Exit Sub
HandleErr:MsgBox Err.Number & ": " & Err.DescriptionResume ExitHere
End Sub
3. Choose Run | Run Sub/UserForm to execute the procedure.
Data Access Technologies in Microsoft Access | 247
Access VBA Programming with DAO and ADO
Chapter SummaryIn this chapter you were introduced to the two database engines that Office
Access 2007 uses (JET and ACE) as well as several object libraries that pro-
vide objects, properties, and methods for your VBA procedures. You mastered
the art of programmatically connecting to native Microsoft Access databases
and external databases and files using various connection strings and connec-
tion methods (ODBC/OLEDB, DSN, and DSN-less connections, UDL files).
You also learned how to write VBA code to create, open, copy, compact, and
delete a Microsoft Office Access database. Finally, you learned about state-
ments (On Error GoTo…) and objects (Err, Error) that are helpful in trapping/
troubleshooting database errors.
In the next chapter, you will learn the DAO and ADO techniques for creat-
ing and linking tables, adding and modifying fields, and setting up keys,
indexes, and relationships between tables. In other words, you will learn which
DAO/ADO objects can give you access to the structure of the database.
248 | Chapter 10
Part II
Chapter 11
Creating and AccessingDatabase Tables and Fields
Now that you know how to create a Microsoft Office Access database pro-
grammatically, it’s time to fill it with some useful objects. The first object you
will need to create is a table with a couple of fields. Typical types of operations
you may want to perform on database tables and fields are listed below:
� Creating a table and setting field properties
� Making a copy of a table
� Deleting a table
� Listing table properties
� Adding new fields to an existing table
� Changing field properties
� Deleting a field from a table
� Linking a table to a database
� Listing tables in a database
� Changing the AutoNumber
� Listing data types
In this chapter you will write VBA procedures that use both DAO and ADO
objects to perform the above-mentioned database tasks.
Creating a Microsoft Access Table and Setting FieldProperties (DAO Method)
Each saved table in an Access database is an object called a TableDef object.
The TableDef object has a number of properties that characterize it, such as
Name, RecordCount, DateCreated, and DateUpdated. The TableDef object also
has methods that act on the object. For example, the CreateField method cre-
ates a new field for the TableDef object and the OpenRecordset method creates
an object called Recordset that is used to manipulate the data in the table.
The procedure in Hands-On 11-1 illustrates how to create a table in the cur-
rent database using DAO.
249

�Hands-On 11-1: Creating a Table (DAO)
1. Start Microsoft Office Access 2007 and create a new Microsoft Office
Access 2007 database named Chap11.accdb in your C:\Acc07_
ByExample folder.
2. Press Alt+F11 to switch to the Visual Basic Editor window and choose
Insert | Module.
3. In the module’s Code window, type the CreateTableDAO procedure as
shown below, or copy the procedure code from the C:\Acc07_HandsOn\
Chap11.txt file.
Sub CreateTableDAO()Dim db As DAO.DatabaseDim tblNew As DAO.TableDefDim fld As DAO.FieldDim prp As DAO.Property
On Error GoTo ErrorHandlerSet db = CurrentDbSet tblNew = db.CreateTableDef("Agents")
Set fld = tblNew.CreateField("AgentID", dbText, 6)fld.ValidationRule = "Like 'A*'"fld.ValidationText = "Agent ID must begin with the letter 'A' " & _"and cannot contain more than 6 characters."tblNew.Fields.Append fld
Set fld = tblNew.CreateField("Country", dbText)fld.DefaultValue = "USA"tblNew.Fields.Append fld
Set fld = tblNew.CreateField("DateOfBirth", dbDate)fld.Required = TruetblNew.Fields.Append flddb.TableDefs.Append tblNew
' Create Caption property and set its value' add it to the collection of field propertiesSet prp = tblNew.Fields("DateOfBirth").CreateProperty("Caption")prp.Type = dbTextprp.Value = "Date of Birth"fld.Properties.Append prpMsgBox fld.Properties("Caption").Value
Set prp = tblNew.CreateProperty("Description")prp.Type = dbTextprp.Value = "Sample table created with DAO code"tblNew.Properties.Append prpExit Sub
ErrorHandler:MsgBox Err.Number & ": " & Err.Description
End Sub
250 | Chapter 11
Part II
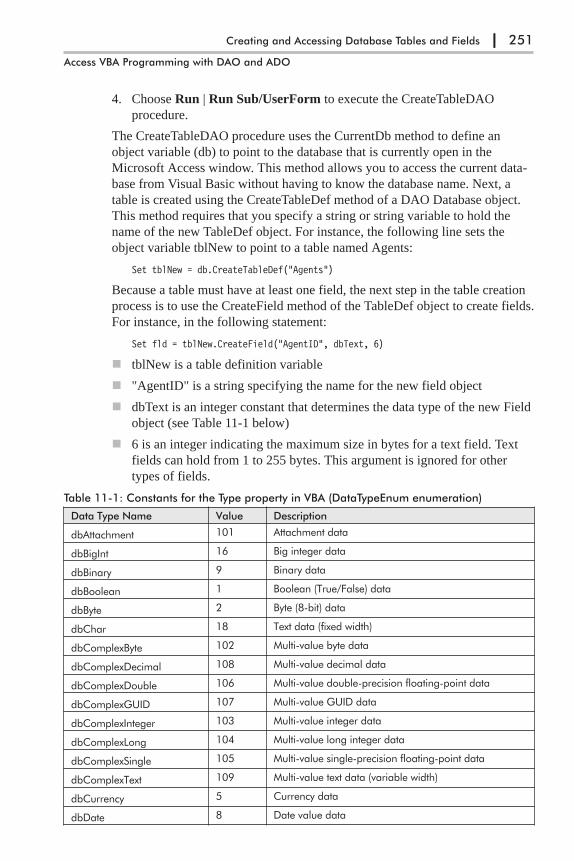
4. Choose Run | Run Sub/UserForm to execute the CreateTableDAO
procedure.
The CreateTableDAO procedure uses the CurrentDb method to define an
object variable (db) to point to the database that is currently open in the
Microsoft Access window. This method allows you to access the current data-
base from Visual Basic without having to know the database name. Next, a
table is created using the CreateTableDef method of a DAO Database object.
This method requires that you specify a string or string variable to hold the
name of the new TableDef object. For instance, the following line sets the
object variable tblNew to point to a table named Agents:
Set tblNew = db.CreateTableDef("Agents")
Because a table must have at least one field, the next step in the table creation
process is to use the CreateField method of the TableDef object to create fields.
For instance, in the following statement:
Set fld = tblNew.CreateField("AgentID", dbText, 6)
� tblNew is a table definition variable
� "AgentID" is a string specifying the name for the new field object
� dbText is an integer constant that determines the data type of the new Field
object (see Table 11-1 below)
� 6 is an integer indicating the maximum size in bytes for a text field. Text
fields can hold from 1 to 255 bytes. This argument is ignored for other
types of fields.
Table 11-1: Constants for the Type property in VBA (DataTypeEnum enumeration)
Data Type Name Value Description
dbAttachment 101 Attachment data
dbBigInt 16 Big integer data
dbBinary 9 Binary data
dbBoolean 1 Boolean (True/False) data
dbByte 2 Byte (8-bit) data
dbChar 18 Text data (fixed width)
dbComplexByte 102 Multi-value byte data
dbComplexDecimal 108 Multi-value decimal data
dbComplexDouble 106 Multi-value double-precision floating-point data
dbComplexGUID 107 Multi-value GUID data
dbComplexInteger 103 Multi-value integer data
dbComplexLong 104 Multi-value long integer data
dbComplexSingle 105 Multi-value single-precision floating-point data
dbComplexText 109 Multi-value text data (variable width)
dbCurrency 5 Currency data
dbDate 8 Date value data
Creating and Accessing Database Tables and Fields | 251
Access VBA Programming with DAO and ADO
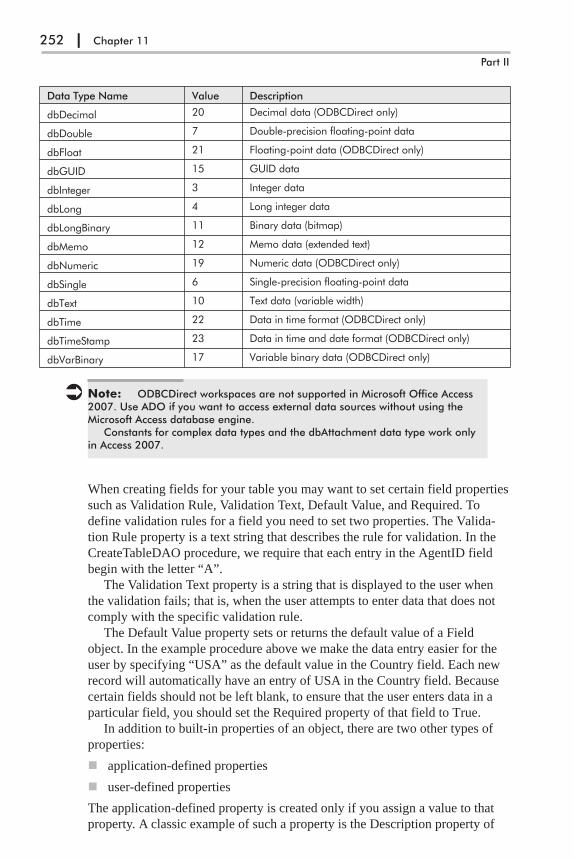
Data Type Name Value Description
dbDecimal 20 Decimal data (ODBCDirect only)
dbDouble 7 Double-precision floating-point data
dbFloat 21 Floating-point data (ODBCDirect only)
dbGUID 15 GUID data
dbInteger 3 Integer data
dbLong 4 Long integer data
dbLongBinary 11 Binary data (bitmap)
dbMemo 12 Memo data (extended text)
dbNumeric 19 Numeric data (ODBCDirect only)
dbSingle 6 Single-precision floating-point data
dbText 10 Text data (variable width)
dbTime 22 Data in time format (ODBCDirect only)
dbTimeStamp 23 Data in time and date format (ODBCDirect only)
dbVarBinary 17 Variable binary data (ODBCDirect only)
� Note: ODBCDirect workspaces are not supported in Microsoft Office Access2007. Use ADO if you want to access external data sources without using theMicrosoft Access database engine.
Constants for complex data types and the dbAttachment data type work onlyin Access 2007.
When creating fields for your table you may want to set certain field properties
such as Validation Rule, Validation Text, Default Value, and Required. To
define validation rules for a field you need to set two properties. The Valida-
tion Rule property is a text string that describes the rule for validation. In the
CreateTableDAO procedure, we require that each entry in the AgentID field
begin with the letter “A”.
The Validation Text property is a string that is displayed to the user when
the validation fails; that is, when the user attempts to enter data that does not
comply with the specific validation rule.
The Default Value property sets or returns the default value of a Field
object. In the example procedure above we make the data entry easier for the
user by specifying “USA” as the default value in the Country field. Each new
record will automatically have an entry of USA in the Country field. Because
certain fields should not be left blank, to ensure that the user enters data in a
particular field, you should set the Required property of that field to True.
In addition to built-in properties of an object, there are two other types of
properties:
� application-defined properties
� user-defined properties
The application-defined property is created only if you assign a value to that
property. A classic example of such a property is the Description property of
252 | Chapter 11
Part II
the TableDef object. To set the Description property of a table in the Access
user interface, simply right-click on the table name and choose Table Proper-
ties, then type the text you want in the Description field. Access will create a
Description property for the table and will append it automatically to the Prop-
erties collection for that TableDef object. If you do not type a description in the
Description field, Access will not create a Description property. Therefore, if
you use the Description property in your code, Access will display an error.
For this reason, it is a good idea to check beforehand whether a referenced
property exists. Users may create their own properties to hold additional
information about an object.
The CreateTableDAO procedure demonstrates how to use the Create-
Property method of the TableDef object to create application-defined or
user-defined properties. To create a property you will need to supply the name
for the property, the property type, and the property value. For example, here’s
how we use the CreateProperty method to create a Caption property for the
DateOfBirth field in the newly created table Agents:
Set prp = tblNew.Fields("DateOfBirth").CreateProperty("Caption")
Next, the data type of the Property object is defined:
prp.Type = dbText
See Table 11-1 above for the names of the Type property constants in VBA.
Finally, a value is assigned to our new property:
prp.Value = "Date of Birth"
Instead of writing three separate lines of code, you can create a new property
of an object with the following line:
Set prp = tblNew.Fields("DateOfBirth").CreateProperty("Caption", dbText, "Dateof Birth")
A user-defined property must be appended to the Properties collection of the
corresponding object. In the example procedure above, the Caption property is
appended to the Properties collection of the Field object, and the Description
property is appended to the Properties collection of the TableDef object:
fld.Properties.Append prptblNew.Properties.Append prp
After creating a field and setting its built-in, application-defined, or user-
defined properties, you should use the Append method to add the field to the
Fields collection, as in the following example:
tblNew.Fields.Append fld
Once all the fields have been created and appended to the Fields collection,
you must remember to append the new table to the TableDefs collection, as in
the following example:
db.TableDefs.Append tblNew
You can delete user-defined properties from the Properties collection, but you
can’t delete built-in properties. If you set a property in the user interface, you
Creating and Accessing Database Tables and Fields | 253
Access VBA Programming with DAO and ADO

don’t need to create and append the property in code because the property is
automatically included in the Properties collection.
After running the procedure code, a new table named Agents appears in the
Microsoft Access window. If you can’t see the table, press Ctrl+F5 to refresh
the window.
To check the value of the Description property for the Agents table that was
set as a result of running the example procedure, right-click the Agents table in
the database window, and choose Table Properties from the shortcut menu.
To check the properties that were set and defined in this procedure, activate
the Agents table in Design view, click the field name for which you set or cre-
ated a custom property in the code, and examine the corresponding field
properties. Figure 11-1 shows the current settings of the Validation Rule and
Validation Text properties for the AgentID field.
Creating a Microsoft Access Table and Setting FieldProperties (ADO Method)
You can also get going with your database design by using Access objects con-
tained in the ADOX library. The full name of this library is ActiveX Data
Object Extensions for DDL and Security. To use ADOX in your VBA proce-
dures, choose Tools | References from your Visual Basic Editor window and
select Microsoft ADO Ext. 2.8 for DDL and Security. The ADOX Object
Model is an extension of the ADODB library and is illustrated in Figure 11-2.
254 | Chapter 11
Part II
Figure 11-1: You can create a database table like this one using VBA code. You can alsoset appropriate field properties programmatically.
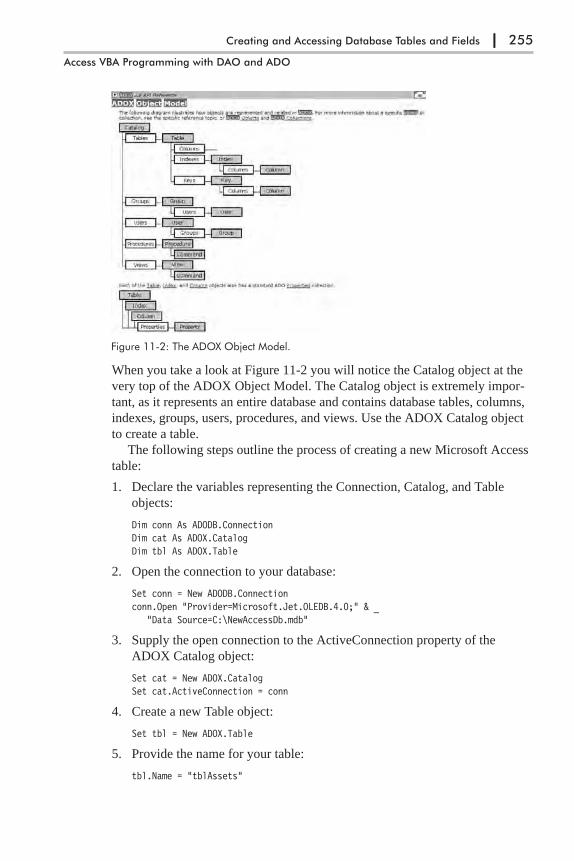
When you take a look at Figure 11-2 you will notice the Catalog object at the
very top of the ADOX Object Model. The Catalog object is extremely impor-
tant, as it represents an entire database and contains database tables, columns,
indexes, groups, users, procedures, and views. Use the ADOX Catalog object
to create a table.
The following steps outline the process of creating a new Microsoft Access
table:
1. Declare the variables representing the Connection, Catalog, and Table
objects:
Dim conn As ADODB.ConnectionDim cat As ADOX.CatalogDim tbl As ADOX.Table
2. Open the connection to your database:
Set conn = New ADODB.Connectionconn.Open "Provider=Microsoft.Jet.OLEDB.4.0;" & _
"Data Source=C:\NewAccessDb.mdb"
3. Supply the open connection to the ActiveConnection property of the
ADOX Catalog object:
Set cat = New ADOX.CatalogSet cat.ActiveConnection = conn
4. Create a new Table object:
Set tbl = New ADOX.Table
5. Provide the name for your table:
tbl.Name = "tblAssets"
Creating and Accessing Database Tables and Fields | 255
Access VBA Programming with DAO and ADO
Figure 11-2: The ADOX Object Model.
The Table object is a member of the Tables collection, which in turn is a
member of the Catalog object. Each Table object has a Name property and
a Type property. The Type property specifies whether a Table object is a
standard Microsoft Access table, a linked table, a system table, or a view.
To see an example of using the Type property, refer to the section called
“Listing Database Tables” later in this chapter.
6. Append the Table object to the Catalog object’s Tables collection:
cat.Tables.Append tbl
At this point your table is empty.
7. Add new fields (columns) to your new table:
With tbl.Columns.Append "SiteID", adVarWChar, 10.Append "Category", adSmallInt.Append "InstallDate", adDate
End With
The code fragment above creates three fields named SiteID, Category, and
InstallDate. You can create new fields in a table by passing the Column
object’s Name, Type, and DefinedSize properties as arguments of the Columns
collection’s Append method. Notice that ADOX uses different data types than
those used in the Access user interface (see Table 11-2 for a comparison of the
data types).
� Note: The Table object contains the Columns collection that contains Col-umn objects. To add a new field to a table, you could create a Column objectand write the code like this:
Dim col As ADOX.Columnset col = New ADOX.ColumnWith col
.Name = "SiteID"
.DefinedSize = 10End Withtbl.Columns.Append col
The last statement in the example above appends the new Column object (field)to the Columns collection of a table. The Name property specifies the name ofthe column. The DefinedSize property designates the maximum size of an entryin the column. To create another field, you would have to create a new Columnobject and set its properties. Creating fields in this manner takes longer and isless efficient than using the method demonstrated earlier.
The complete procedure is shown below:
' make sure to set up a reference to' the Microsoft ActiveX Data Objects 2.8 Library' and ADO Ext. 2.8 for DDL and Security
256 | Chapter 11
Part II
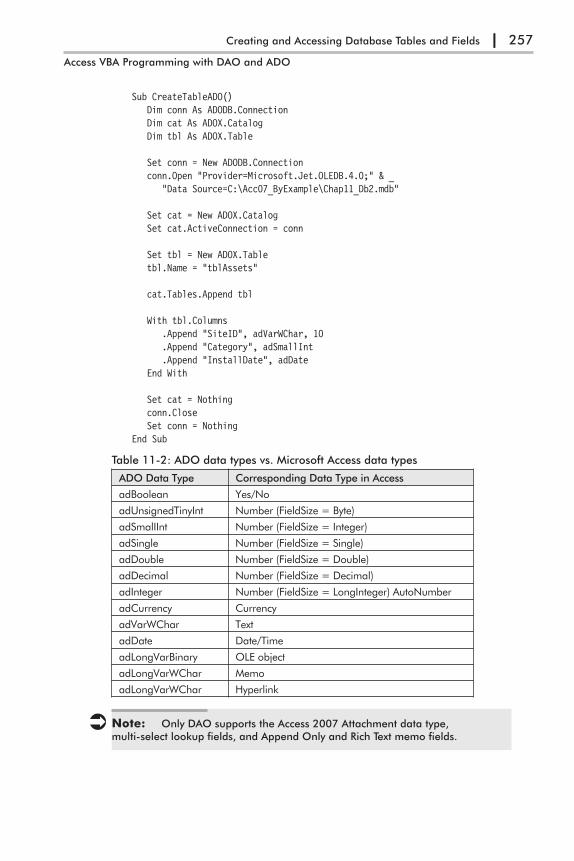
Sub CreateTableADO()Dim conn As ADODB.ConnectionDim cat As ADOX.CatalogDim tbl As ADOX.Table
Set conn = New ADODB.Connectionconn.Open "Provider=Microsoft.Jet.OLEDB.4.0;" & _
"Data Source=C:\Acc07_ByExample\Chap11_Db2.mdb"
Set cat = New ADOX.CatalogSet cat.ActiveConnection = conn
Set tbl = New ADOX.Tabletbl.Name = "tblAssets"
cat.Tables.Append tbl
With tbl.Columns.Append "SiteID", adVarWChar, 10.Append "Category", adSmallInt.Append "InstallDate", adDate
End With
Set cat = Nothingconn.CloseSet conn = Nothing
End Sub
Table 11-2: ADO data types vs. Microsoft Access data types
ADO Data Type Corresponding Data Type in Access
adBoolean Yes/No
adUnsignedTinyInt Number (FieldSize = Byte)
adSmalIInt Number (FieldSize = Integer)
adSingle Number (FieldSize = Single)
adDouble Number (FieldSize = Double)
adDecimal Number (FieldSize = Decimal)
adInteger Number (FieldSize = LongInteger) AutoNumber
adCurrency Currency
adVarWChar Text
adDate Date/Time
adLongVarBinary OLE object
adLongVarWChar Memo
adLongVarWChar Hyperlink
� Note: Only DAO supports the Access 2007 Attachment data type,multi-select lookup fields, and Append Only and Rich Text memo fields.
Creating and Accessing Database Tables and Fields | 257
Access VBA Programming with DAO and ADO
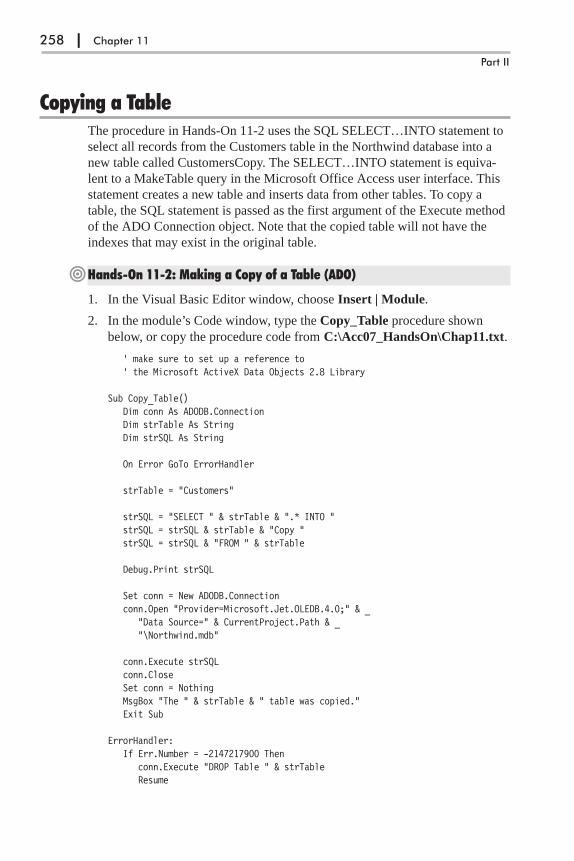
Copying a TableThe procedure in Hands-On 11-2 uses the SQL SELECT…INTO statement to
select all records from the Customers table in the Northwind database into a
new table called CustomersCopy. The SELECT…INTO statement is equiva-
lent to a MakeTable query in the Microsoft Office Access user interface. This
statement creates a new table and inserts data from other tables. To copy a
table, the SQL statement is passed as the first argument of the Execute method
of the ADO Connection object. Note that the copied table will not have the
indexes that may exist in the original table.
�Hands-On 11-2: Making a Copy of a Table (ADO)
1. In the Visual Basic Editor window, choose Insert | Module.
2. In the module’s Code window, type the Copy_Table procedure shown
below, or copy the procedure code from C:\Acc07_HandsOn\Chap11.txt.
' make sure to set up a reference to' the Microsoft ActiveX Data Objects 2.8 Library
Sub Copy_Table()Dim conn As ADODB.ConnectionDim strTable As StringDim strSQL As String
On Error GoTo ErrorHandler
strTable = "Customers"
strSQL = "SELECT " & strTable & ".* INTO "strSQL = strSQL & strTable & "Copy "strSQL = strSQL & "FROM " & strTable
Debug.Print strSQL
Set conn = New ADODB.Connectionconn.Open "Provider=Microsoft.Jet.OLEDB.4.0;" & _
"Data Source=" & CurrentProject.Path & _"\Northwind.mdb"
conn.Execute strSQLconn.CloseSet conn = NothingMsgBox "The " & strTable & " table was copied."Exit Sub
ErrorHandler:If Err.Number = -2147217900 Then
conn.Execute "DROP Table " & strTableResume
258 | Chapter 11
Part II

ElseMsgBox Err.Number & ": " & Err.Description
End IfEnd Sub
3. Choose Run | Run Sub/UserForm to execute the procedure.
When you run this procedure, Access creates a copy of the Customers table
named CustomersCopy.
Deleting a Database TableYou can use ADO to delete a table programmatically by opening the ADOX
Catalog object, accessing its Tables collection, and calling the Delete method.
The procedure in Hands-On 11-3 requires a parameter that specifies the name
of the table you want to delete.
�Hands-On 11-3: Deleting a Table from a Database (ADO)
1. In the Visual Basic Editor window, choose Insert | Module.
2. In the module’s Code window, type the Delete_Table procedure shown
below, or copy the procedure code from C:\Acc07_HandsOn\Chap11.txt.
Sub Delete_Table(strTblName As String)Dim conn As ADODB.ConnectionDim cat As ADOX.Catalog
On Error GoTo ErrorHandler
Set conn = New ADODB.Connectionconn.Open "Provider=Microsoft.Jet.OLEDB.4.0;" & _
"Data Source=" & CurrentProject.Path & _"\Northwind.mdb"
Set cat = New ADOX.Catalog
cat.ActiveConnection = conn
cat.Tables.Delete strTblNameSet cat = Nothingconn.CloseSet conn = Nothing
Exit Sub
ErrorHandler:MsgBox "Table '" & strTblName & _
"' cannot be deleted " & vbCrLf & _"because it does not exist."
Resume NextEnd Sub
Creating and Accessing Database Tables and Fields | 259
Access VBA Programming with DAO and ADO
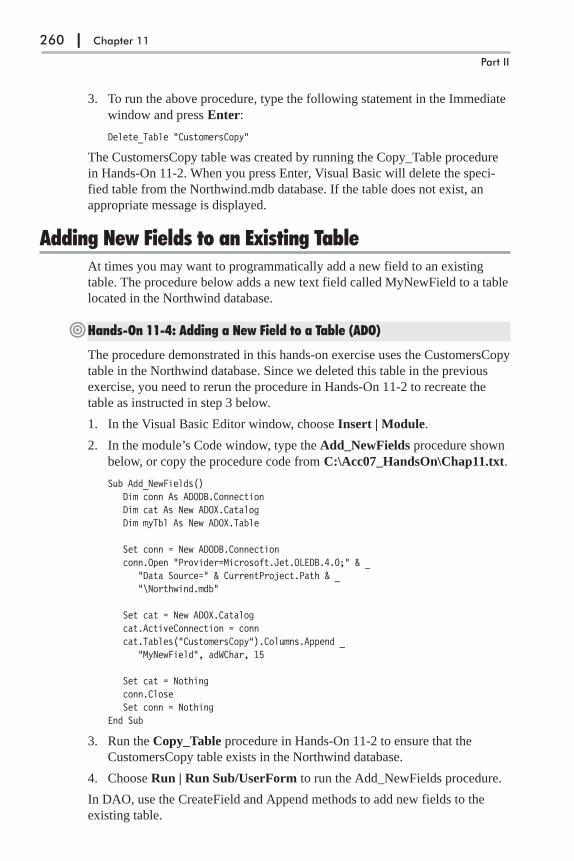
3. To run the above procedure, type the following statement in the Immediate
window and press Enter:
Delete_Table "CustomersCopy"
The CustomersCopy table was created by running the Copy_Table procedure
in Hands-On 11-2. When you press Enter, Visual Basic will delete the speci-
fied table from the Northwind.mdb database. If the table does not exist, an
appropriate message is displayed.
Adding New Fields to an Existing TableAt times you may want to programmatically add a new field to an existing
table. The procedure below adds a new text field called MyNewField to a table
located in the Northwind database.
�Hands-On 11-4: Adding a New Field to a Table (ADO)
The procedure demonstrated in this hands-on exercise uses the CustomersCopy
table in the Northwind database. Since we deleted this table in the previous
exercise, you need to rerun the procedure in Hands-On 11-2 to recreate the
table as instructed in step 3 below.
1. In the Visual Basic Editor window, choose Insert | Module.
2. In the module’s Code window, type the Add_NewFields procedure shown
below, or copy the procedure code from C:\Acc07_HandsOn\Chap11.txt.
Sub Add_NewFields()Dim conn As ADODB.ConnectionDim cat As New ADOX.CatalogDim myTbl As New ADOX.Table
Set conn = New ADODB.Connectionconn.Open "Provider=Microsoft.Jet.OLEDB.4.0;" & _
"Data Source=" & CurrentProject.Path & _"\Northwind.mdb"
Set cat = New ADOX.Catalogcat.ActiveConnection = conncat.Tables("CustomersCopy").Columns.Append _
"MyNewField", adWChar, 15
Set cat = Nothingconn.CloseSet conn = Nothing
End Sub
3. Run the Copy_Table procedure in Hands-On 11-2 to ensure that the
CustomersCopy table exists in the Northwind database.
4. Choose Run | Run Sub/UserForm to run the Add_NewFields procedure.
In DAO, use the CreateField and Append methods to add new fields to the
existing table.
260 | Chapter 11
Part II
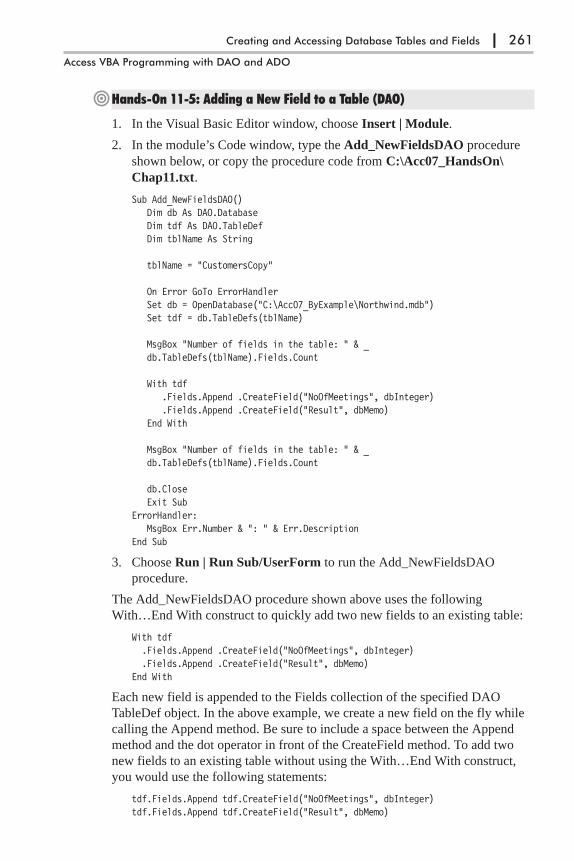
�Hands-On 11-5: Adding a New Field to a Table (DAO)
1. In the Visual Basic Editor window, choose Insert | Module.
2. In the module’s Code window, type the Add_NewFieldsDAO procedure
shown below, or copy the procedure code from C:\Acc07_HandsOn\
Chap11.txt.
Sub Add_NewFieldsDAO()Dim db As DAO.DatabaseDim tdf As DAO.TableDefDim tblName As String
tblName = "CustomersCopy"
On Error GoTo ErrorHandlerSet db = OpenDatabase("C:\Acc07_ByExample\Northwind.mdb")Set tdf = db.TableDefs(tblName)
MsgBox "Number of fields in the table: " & _db.TableDefs(tblName).Fields.Count
With tdf.Fields.Append .CreateField("NoOfMeetings", dbInteger).Fields.Append .CreateField("Result", dbMemo)
End With
MsgBox "Number of fields in the table: " & _db.TableDefs(tblName).Fields.Count
db.CloseExit Sub
ErrorHandler:MsgBox Err.Number & ": " & Err.Description
End Sub
3. Choose Run | Run Sub/UserForm to run the Add_NewFieldsDAO
procedure.
The Add_NewFieldsDAO procedure shown above uses the following
With…End With construct to quickly add two new fields to an existing table:
With tdf.Fields.Append .CreateField("NoOfMeetings", dbInteger).Fields.Append .CreateField("Result", dbMemo)
End With
Each new field is appended to the Fields collection of the specified DAO
TableDef object. In the above example, we create a new field on the fly while
calling the Append method. Be sure to include a space between the Append
method and the dot operator in front of the CreateField method. To add two
new fields to an existing table without using the With…End With construct,
you would use the following statements:
tdf.Fields.Append tdf.CreateField("NoOfMeetings", dbInteger)tdf.Fields.Append tdf.CreateField("Result", dbMemo)
Creating and Accessing Database Tables and Fields | 261
Access VBA Programming with DAO and ADO

However, using the With…End With construct makes the code both clearer
and faster to execute.
Removing a Field from a TableYou may remove any field from an existing table, whether or not this field con-
tains data. However, you can’t delete a field after you have created an index
that references that field. You must first delete the index.
The procedure in Hands-On 11-6 illustrates how to access the ADOX Col-
umns collection of a Table object and use the Columns collection’s Delete
method to remove a field from a table. This procedure will fail if the field you
want to delete is part of an index.
�Hands-On 11-6: Removing a Field from a Table (ADO)
This hands-on exercise requires that you created the procedure in Hands-On
11-4.
1. In the Visual Basic Editor window, choose Insert | Module.
2. In the module’s Code window, type the Delete_Field procedure shown
below, or copy the procedure code from C:\Acc07_HandsOn\Chap11.txt.
Sub Delete_Field()Dim conn As ADODB.ConnectionDim cat As New ADOX.Catalog
Set conn = New ADODB.Connectionconn.Open "Provider=Microsoft.Jet.OLEDB.4.0;" & _
"Data Source=" & CurrentProject.Path & _"\Northwind.mdb"
Set cat = New ADOX.Catalogcat.ActiveConnection = conncat.Tables("CustomersCopy").Columns.Delete "MyNewField"
Set cat = Nothingconn.CloseSet conn = Nothing
End Sub
3. Choose Run | Run Sub/UserForm to execute the procedure.
In DAO, you use the Delete method to remove a field from an existing table.
�Hands-On 11-7: Removing a Field from a Table (DAO)
The following procedure removes from the CustomersCopy table two fields
that were added by the procedure in Hands-On 11-5.
1. In the Visual Basic Editor window, choose Insert | Module.
2. In the module’s Code window, type the DeleteFields_DAO procedure
shown below, or copy the procedure code from C:\Acc07_HandsOn\
Chap11.txt.
262 | Chapter 11
Part II

Sub DeleteFields_DAO()Dim db As DAO.DatabaseDim tdf As DAO.TableDefOn Error GoTo ErrorHandler
Dim tblName As String
tblName = "CustomersCopy"
On Error GoTo ErrorHandler
Set db = OpenDatabase("C:\Acc07_ByExample\Northwind.mdb")Set tdf = db.TableDefs(tblName)
MsgBox "Number of fields in the table: " & _db.TableDefs(tblName).Fields.Count
With tdf.Fields.Delete "NoOfMeetings".Fields.Delete "Result"
End With
MsgBox "Number of fields in the table: " & _db.TableDefs(tblName).Fields.Count
db.CloseExit Sub
ErrorHandler:MsgBox Err.Number & ": " & Err.Description
End Sub
3. Choose Run | Run Sub/UserForm to execute the procedure.
Retrieving Table PropertiesUsing the Properties collection of an ADOX Table object you can set or
retrieve table properties. The Properties collection exposes standard ADO
properties as well as properties specific to the data provider. You can iterate
through all of the properties of an object using the For Each…Next program-
ming structure.
The following procedure accesses the table called CustomersCopy and lists
its properties and their values in the Immediate window.
�Hands-On 11-8: Listing Table Properties
1. In the Visual Basic Editor window, choose Insert | Module.
2. In the module’s Code window, type the List_TableProperties procedure
shown below, or copy the procedure code from C:\Acc07_HandsOn\
Chap11.txt.
Sub List_TableProperties()Dim conn As ADODB.ConnectionDim cat As ADOX.Catalog
Creating and Accessing Database Tables and Fields | 263
Access VBA Programming with DAO and ADO
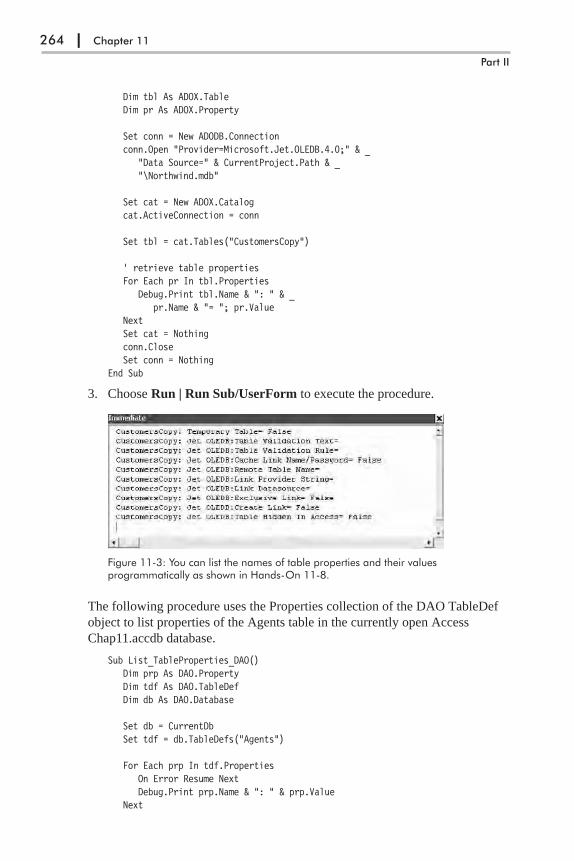
Dim tbl As ADOX.TableDim pr As ADOX.Property
Set conn = New ADODB.Connectionconn.Open "Provider=Microsoft.Jet.OLEDB.4.0;" & _
"Data Source=" & CurrentProject.Path & _"\Northwind.mdb"
Set cat = New ADOX.Catalogcat.ActiveConnection = conn
Set tbl = cat.Tables("CustomersCopy")
' retrieve table propertiesFor Each pr In tbl.Properties
Debug.Print tbl.Name & ": " & _pr.Name & "= "; pr.Value
NextSet cat = Nothingconn.CloseSet conn = Nothing
End Sub
3. Choose Run | Run Sub/UserForm to execute the procedure.
The following procedure uses the Properties collection of the DAO TableDef
object to list properties of the Agents table in the currently open Access
Chap11.accdb database.
Sub List_TableProperties_DAO()Dim prp As DAO.PropertyDim tdf As DAO.TableDefDim db As DAO.Database
Set db = CurrentDbSet tdf = db.TableDefs("Agents")
For Each prp In tdf.PropertiesOn Error Resume NextDebug.Print prp.Name & ": " & prp.Value
Next
264 | Chapter 11
Part II
Figure 11-3: You can list the names of table properties and their valuesprogrammatically as shown in Hands-On 11-8.

MsgBox "Finished processing."End Sub
Retrieving Field PropertiesThe procedure in Hands-On 11-9 retrieves the field properties of the field
named AgentID located in the Agents table in the current database.
�Hands-On 11-9: Listing Field Properties
1. In the Visual Basic Editor window, choose Insert | Module.
2. In the module’s Code window, type the List_FieldProperties procedure
shown below, or copy the procedure code from C:\Acc07_HandsOn\
Chap11.txt.
Sub List_FieldProperties()Dim cat As ADOX.CatalogDim col As ADOX.ColumnDim pr As ADOX.Property
Set cat = New ADOX.CatalogSet cat.ActiveConnection = CurrentProject.ConnectionSet col = New ADOX.ColumnSet col = cat.Tables("Agents").Columns("AgentID")
Debug.Print "Properties of the AgentID field " & _"(" & col.Properties.Count & ")"
' retrieve Field propertiesFor Each pr In col.Properties
Debug.Print pr.Name & "="; pr.ValueNext
Set cat = NothingEnd Sub
3. Choose Run | Run Sub/UserForm to execute the procedure.
Creating and Accessing Database Tables and Fields | 265
Access VBA Programming with DAO and ADO
Figure 11-4: Running the procedure in Hands-On 11-9 generates a list of field propertiesand their values in the Immediate window.
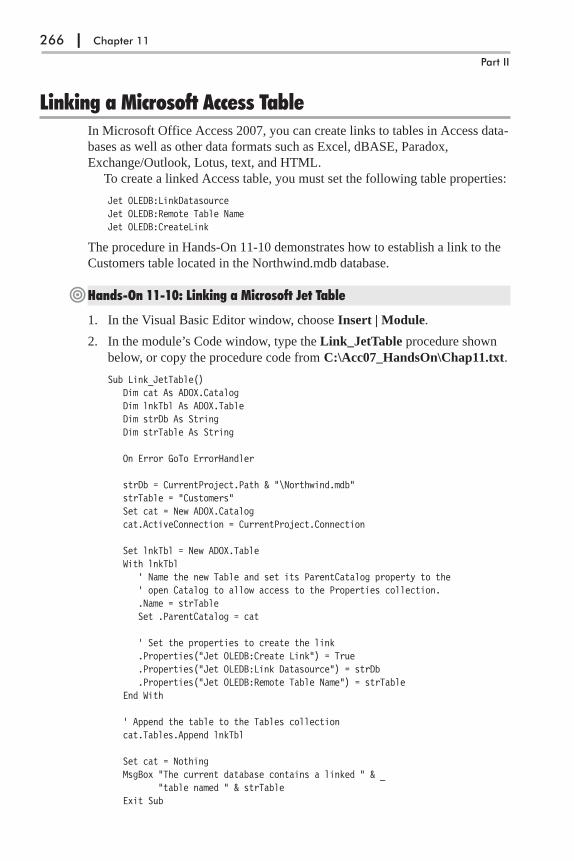
Linking a Microsoft Access TableIn Microsoft Office Access 2007, you can create links to tables in Access data-
bases as well as other data formats such as Excel, dBASE, Paradox,
Exchange/Outlook, Lotus, text, and HTML.
To create a linked Access table, you must set the following table properties:
Jet OLEDB:LinkDatasourceJet OLEDB:Remote Table NameJet OLEDB:CreateLink
The procedure in Hands-On 11-10 demonstrates how to establish a link to the
Customers table located in the Northwind.mdb database.
�Hands-On 11-10: Linking a Microsoft Jet Table
1. In the Visual Basic Editor window, choose Insert | Module.
2. In the module’s Code window, type the Link_JetTable procedure shown
below, or copy the procedure code from C:\Acc07_HandsOn\Chap11.txt.
Sub Link_JetTable()Dim cat As ADOX.CatalogDim lnkTbl As ADOX.TableDim strDb As StringDim strTable As String
On Error GoTo ErrorHandler
strDb = CurrentProject.Path & "\Northwind.mdb"strTable = "Customers"Set cat = New ADOX.Catalogcat.ActiveConnection = CurrentProject.Connection
Set lnkTbl = New ADOX.TableWith lnkTbl
' Name the new Table and set its ParentCatalog property to the' open Catalog to allow access to the Properties collection..Name = strTableSet .ParentCatalog = cat
' Set the properties to create the link.Properties("Jet OLEDB:Create Link") = True.Properties("Jet OLEDB:Link Datasource") = strDb.Properties("Jet OLEDB:Remote Table Name") = strTable
End With
' Append the table to the Tables collectioncat.Tables.Append lnkTbl
Set cat = NothingMsgBox "The current database contains a linked " & _
"table named " & strTableExit Sub
266 | Chapter 11
Part II
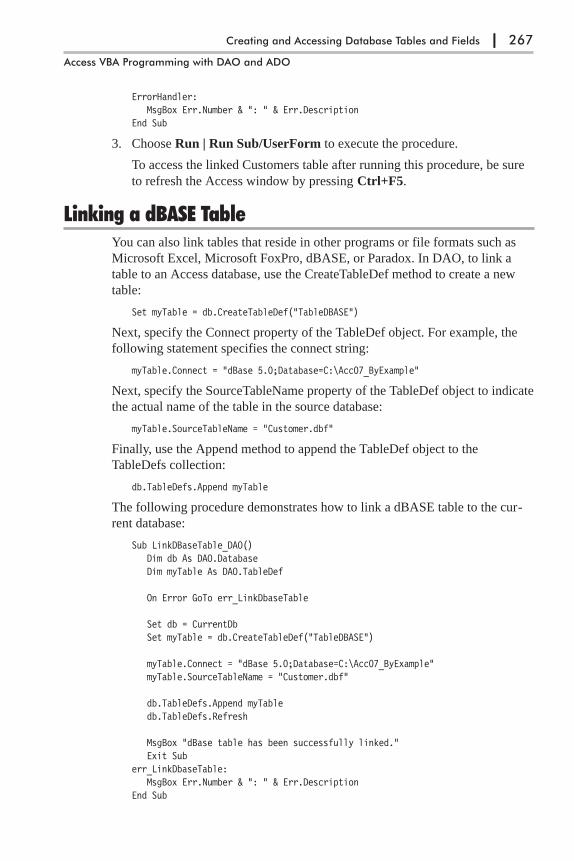
ErrorHandler:MsgBox Err.Number & ": " & Err.Description
End Sub
3. Choose Run | Run Sub/UserForm to execute the procedure.
To access the linked Customers table after running this procedure, be sure
to refresh the Access window by pressing Ctrl+F5.
Linking a dBASE TableYou can also link tables that reside in other programs or file formats such as
Microsoft Excel, Microsoft FoxPro, dBASE, or Paradox. In DAO, to link a
table to an Access database, use the CreateTableDef method to create a new
table:
Set myTable = db.CreateTableDef("TableDBASE")
Next, specify the Connect property of the TableDef object. For example, the
following statement specifies the connect string:
myTable.Connect = "dBase 5.0;Database=C:\Acc07_ByExample"
Next, specify the SourceTableName property of the TableDef object to indicate
the actual name of the table in the source database:
myTable.SourceTableName = "Customer.dbf"
Finally, use the Append method to append the TableDef object to the
TableDefs collection:
db.TableDefs.Append myTable
The following procedure demonstrates how to link a dBASE table to the cur-
rent database:
Sub LinkDBaseTable_DAO()Dim db As DAO.DatabaseDim myTable As DAO.TableDef
On Error GoTo err_LinkDbaseTable
Set db = CurrentDbSet myTable = db.CreateTableDef("TableDBASE")
myTable.Connect = "dBase 5.0;Database=C:\Acc07_ByExample"myTable.SourceTableName = "Customer.dbf"
db.TableDefs.Append myTabledb.TableDefs.Refresh
MsgBox "dBase table has been successfully linked."Exit Sub
err_LinkDbaseTable:MsgBox Err.Number & ": " & Err.Description
End Sub
Creating and Accessing Database Tables and Fields | 267
Access VBA Programming with DAO and ADO

Linking a Microsoft Excel SpreadsheetYou can link an Excel spreadsheet to a Microsoft Access database by using the
TransferSpreadsheet method of the DoCmd object, as shown in Hands-On
11-11. Note, however, that neither the DoCmd object nor its Transfer-
Spreadsheet method are members of the ADO Object Model. The DoCmd
object is built into the Microsoft Access library.
�Hands-On 11-11: Linking an Excel Spreadsheet
This hands-on exercise uses the Regions.xls spreadsheet file provided in the
book’s downloadable files. This spreadsheet has been created with Excel 2007.
You can revise the procedure code to use any spreadsheet file that you have
available; however, you must match the constant name with the Excel version.
The following table shows the constant names and values if you need a differ-
ent spreadsheet format.
Table 11-3: Spreadsheet constants
Constant Value Description
acSpreadsheetTypeExcel3 0 Microsoft Excel 3.0 format
acSpreadsheetTypeExcel4 6 Microsoft Excel 4.0 format
acSpreadsheetTypeExcel5 5 Microsoft Excel 5.0 format
acSpreadsheetTypeExcel7 5 Microsoft Excel 95 format
acSpreadsheetTypeExcel8 8 Microsoft Excel 97 format
acSpreadsheetTypeExcel9 8 Microsoft Excel 2000-2003 format
acSpreadsheetTypeExcel12 9 Microsoft Excel 2007 format (XLS)
acSpreadsheetTypeExcel12Xml 10 Microsoft Excel 2007 format (XML)
acSpreadsheetTypeLotusWK1 2 Lotus 1-2-3 WK1 format
acSpreadsheetTypeLotusWK3 3 Lotus 1-2-3 WK3 format
acSpreadsheetTypeLotusWK4 7 Lotus 1-2-3 WK4 format
1. In the Visual Basic Editor window, choose Insert | Module.
2. In the module’s Code window, type the Link_ExcelSheet procedure
shown below, or copy the procedure code from C:\Acc07_HandsOn\
Chap11.txt.
Sub Link_ExcelSheet()Dim rst As ADODB.Recordset
DoCmd.TransferSpreadsheet acLink, _acSpreadsheetTypeExcel12, _"mySheet", _CurrentProject.Path & "\Regions.xls", _-1, _"Regions!A1:B15"
Set rst = New ADODB.Recordset
268 | Chapter 11
Part II
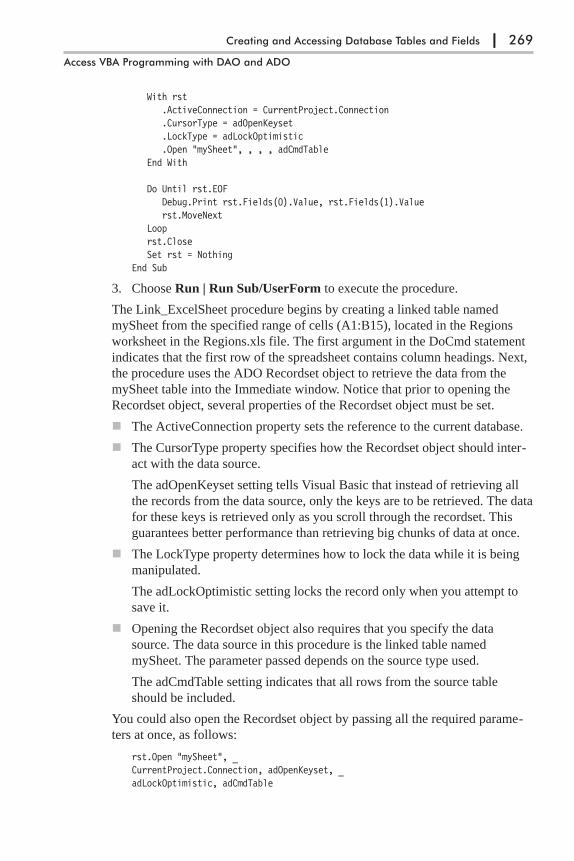
With rst.ActiveConnection = CurrentProject.Connection.CursorType = adOpenKeyset.LockType = adLockOptimistic.Open "mySheet", , , , adCmdTable
End With
Do Until rst.EOFDebug.Print rst.Fields(0).Value, rst.Fields(1).Valuerst.MoveNext
Looprst.CloseSet rst = Nothing
End Sub
3. Choose Run | Run Sub/UserForm to execute the procedure.
The Link_ExcelSheet procedure begins by creating a linked table named
mySheet from the specified range of cells (A1:B15), located in the Regions
worksheet in the Regions.xls file. The first argument in the DoCmd statement
indicates that the first row of the spreadsheet contains column headings. Next,
the procedure uses the ADO Recordset object to retrieve the data from the
mySheet table into the Immediate window. Notice that prior to opening the
Recordset object, several properties of the Recordset object must be set.
� The ActiveConnection property sets the reference to the current database.
� The CursorType property specifies how the Recordset object should inter-
act with the data source.
The adOpenKeyset setting tells Visual Basic that instead of retrieving all
the records from the data source, only the keys are to be retrieved. The data
for these keys is retrieved only as you scroll through the recordset. This
guarantees better performance than retrieving big chunks of data at once.
� The LockType property determines how to lock the data while it is being
manipulated.
The adLockOptimistic setting locks the record only when you attempt to
save it.
� Opening the Recordset object also requires that you specify the data
source. The data source in this procedure is the linked table named
mySheet. The parameter passed depends on the source type used.
The adCmdTable setting indicates that all rows from the source table
should be included.
You could also open the Recordset object by passing all the required parame-
ters at once, as follows:
rst.Open "mySheet", _CurrentProject.Connection, adOpenKeyset, _adLockOptimistic, adCmdTable
Creating and Accessing Database Tables and Fields | 269
Access VBA Programming with DAO and ADO

Listing Database TablesThe procedure in Hands-On 11-12 generates a list of tables in the Northwind
database. It uses the ADOX Catalog object to gain access to the database, then
iterates through the Tables collection to retrieve the names of Access tables,
system tables, and views. The ADOX Tables collection stores various types of
Table objects, as shown in Table 11-3.
Table 11-4: Types of tables in the ADOX Tables collection
Name Description
ACCESS TABLE An Access system table
LINK A linked table from a non-ODBC data source
PASS-THROUGH A linked table from an ODBC data source
SYSTEM TABLE A Microsoft Jet system table
TABLE A Microsoft Access table
VIEW A table from a row-returning, non-parameterized query
�Hands-On 11-12: Creating a List of Database Tables
1. In the Visual Basic Editor window, choose Insert | Module.
2. In the module’s Code window, type the ListTbls procedure shown below,
or copy the procedure code from C:\Acc07_HandsOn\Chap11.txt.
Sub ListTbls()Dim cat As ADOX.CatalogDim tbl As ADOX.Table
Set cat = New ADOX.Catalogcat.ActiveConnection = "Provider=Microsoft.Jet.OLEDB.4.0;" & _
"Data Source=" & CurrentProject.Path & _"\Northwind.mdb"
For Each tbl In cat.TablesIf tbl.Type <> "VIEW" And _
tbl.Type <> "SYSTEM TABLE" And _tbl.Type <> "ACCESS TABLE" Then Debug.Print tbl.Name
Next tblSet cat = NothingMsgBox "View the list of tables in the Immediate window."
End Sub
3. Choose Run | Run Sub/UserForm to execute the procedure.
To list tables in your database you can also use the OpenSchema method of the
ADO Connection object (see the next section, “Listing Tables and Fields”).
270 | Chapter 11
Part II
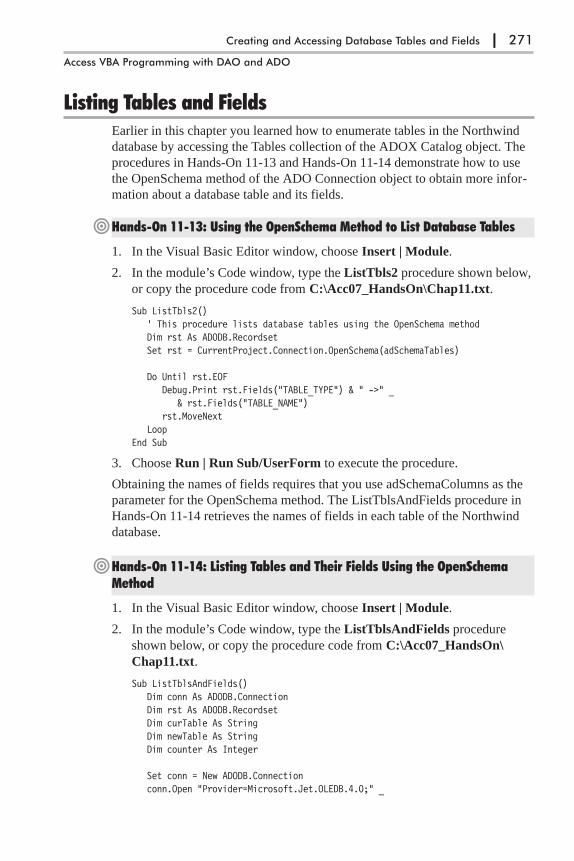
Listing Tables and FieldsEarlier in this chapter you learned how to enumerate tables in the Northwind
database by accessing the Tables collection of the ADOX Catalog object. The
procedures in Hands-On 11-13 and Hands-On 11-14 demonstrate how to use
the OpenSchema method of the ADO Connection object to obtain more infor-
mation about a database table and its fields.
�Hands-On 11-13: Using the OpenSchema Method to List Database Tables
1. In the Visual Basic Editor window, choose Insert | Module.
2. In the module’s Code window, type the ListTbls2 procedure shown below,
or copy the procedure code from C:\Acc07_HandsOn\Chap11.txt.
Sub ListTbls2()' This procedure lists database tables using the OpenSchema methodDim rst As ADODB.RecordsetSet rst = CurrentProject.Connection.OpenSchema(adSchemaTables)
Do Until rst.EOFDebug.Print rst.Fields("TABLE_TYPE") & " ->" _
& rst.Fields("TABLE_NAME")rst.MoveNext
LoopEnd Sub
3. Choose Run | Run Sub/UserForm to execute the procedure.
Obtaining the names of fields requires that you use adSchemaColumns as the
parameter for the OpenSchema method. The ListTblsAndFields procedure in
Hands-On 11-14 retrieves the names of fields in each table of the Northwind
database.
�Hands-On 11-14: Listing Tables and Their Fields Using the OpenSchemaMethod
1. In the Visual Basic Editor window, choose Insert | Module.
2. In the module’s Code window, type the ListTblsAndFields procedure
shown below, or copy the procedure code from C:\Acc07_HandsOn\
Chap11.txt.
Sub ListTblsAndFields()Dim conn As ADODB.ConnectionDim rst As ADODB.RecordsetDim curTable As StringDim newTable As StringDim counter As Integer
Set conn = New ADODB.Connectionconn.Open "Provider=Microsoft.Jet.OLEDB.4.0;" _
Creating and Accessing Database Tables and Fields | 271
Access VBA Programming with DAO and ADO

& "Data Source=" & CurrentProject.Path & _"\Northwind.mdb"
Set rst = conn.OpenSchema(adSchemaColumns)curTable = ""newTable = ""counter = 1Do Until rst.EOF
curTable = rst!table_NameIf (curTable <> newTable) Then
newTable = rst!table_NameDebug.Print "Table: " & rst!table_Namecounter = 1
End IfDebug.Print "Field" & counter & ": " & rst!Column_Namecounter = counter + 1rst.MoveNext
Looprst.Closeconn.CloseSet rst = NothingSet conn = Nothing
End Sub
3. Choose Run | Run Sub/UserForm to execute the procedure.
Listing Data TypesThe ListDataTypes procedure in Hands-On 11-15 uses the adSchemaProvider-
Types parameter of the ADO Connection object’s OpenSchema method to list
the data types supported by the Microsoft Jet OLE DB 4.0 provider.
�Hands-On 11-15: Listing Data Types
1. In the Visual Basic Editor window, choose Insert | Module.
2. In the module’s Code window, type the ListDataTypes procedure shown
below, or copy the procedure code from C:\Acc07_HandsOn\Chap11.txt.
Sub ListDataTypes()Dim conn As ADODB.ConnectionDim rst As ADODB.Recordset
Set conn=New ADODB.Connectionconn.Open "Provider=Microsoft.Jet.OLEDB.4.0;" _
& "Data Source=" & CurrentProject.Path & _"\Northwind.mdb"
Set rst=conn.OpenSchema(adSchemaProviderTypes)Do Until rst.EOF
Debug.Print rst!Type_Name & vbTab _& "Size: " & rst!Column_Size
rst.MoveNextLoop
272 | Chapter 11
Part II

rst.Closeconn.CloseSet rst = NothingSet conn = Nothing
End Sub
3. Choose Run | Run Sub/UserForm to execute the procedure.
Changing the AutoNumberWhen you create a table in a Microsoft Office Access 2007 database, you can
assign an AutoNumber data type to a primary key field manually using the
Access user interface. The AutoNumber is a unique sequential number (incre-
mented by 1) or a random number assigned by Microsoft Access whenever a
new record is added to a table. You can set the start and step value of auto-
increment fields programmatically by using Jet 4.0 SQL statements (see Chap-
ter 19 for more information).
The procedure in Hands-On 11-16 opens the ADO Recordset object based
on the Shippers table located in the Northwind database, retrieves the last used
AutoNumber value, and determines the current step (increment) value in
effect.
�Hands-On 11-16: Changing the Value of an AutoNumber
1. In the Visual Basic Editor window, choose Insert | Module.
2. In the module’s Code window, type the ChangeAutoNumber procedure
shown below, or copy the procedure code from C:\Acc07_HandsOn\
Chap11.txt.
Sub ChangeAutoNumber()Dim conn As ADODB.ConnectionDim rst As ADODB.RecordsetDim strSQL As StringDim beginNum As IntegerDim stepNum As Integer
Set conn = New ADODB.Connectionconn.Open "Provider = Microsoft.Jet.OLEDB.4.0;" & _
"Data Source=" & CurrentProject.Path & _"\Northwind.mdb"
Set rst = New ADODB.RecordsetWith rst
.CursorType = adOpenKeyset
.LockType = adLockReadOnly
.Open "Shippers", conn
.MoveLastEnd WithbeginNum = rst(0)rst.MovePreviousstepNum = beginNum - rst(0)
Creating and Accessing Database Tables and Fields | 273
Access VBA Programming with DAO and ADO
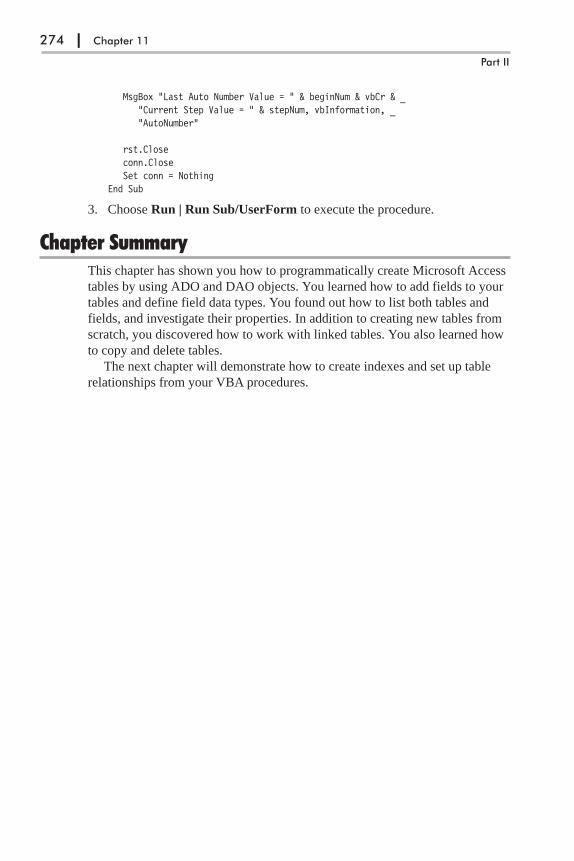
MsgBox "Last Auto Number Value = " & beginNum & vbCr & _"Current Step Value = " & stepNum, vbInformation, _"AutoNumber"
rst.Closeconn.CloseSet conn = Nothing
End Sub
3. Choose Run | Run Sub/UserForm to execute the procedure.
Chapter SummaryThis chapter has shown you how to programmatically create Microsoft Access
tables by using ADO and DAO objects. You learned how to add fields to your
tables and define field data types. You found out how to list both tables and
fields, and investigate their properties. In addition to creating new tables from
scratch, you discovered how to work with linked tables. You also learned how
to copy and delete tables.
The next chapter will demonstrate how to create indexes and set up table
relationships from your VBA procedures.
274 | Chapter 11
Part II
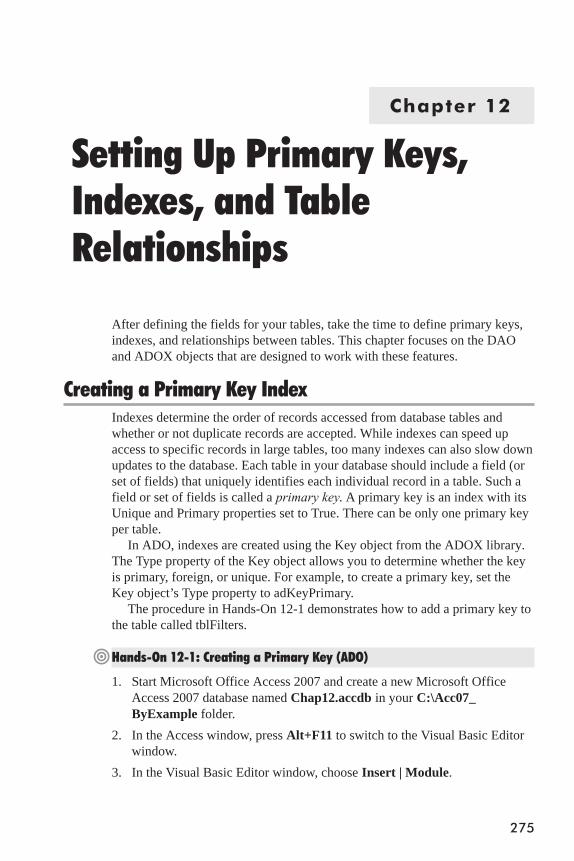
Chapter 12
Setting Up Primary Keys,Indexes, and TableRelationships
After defining the fields for your tables, take the time to define primary keys,
indexes, and relationships between tables. This chapter focuses on the DAO
and ADOX objects that are designed to work with these features.
Creating a Primary Key IndexIndexes determine the order of records accessed from database tables and
whether or not duplicate records are accepted. While indexes can speed up
access to specific records in large tables, too many indexes can also slow down
updates to the database. Each table in your database should include a field (or
set of fields) that uniquely identifies each individual record in a table. Such a
field or set of fields is called a primary key. A primary key is an index with its
Unique and Primary properties set to True. There can be only one primary key
per table.
In ADO, indexes are created using the Key object from the ADOX library.
The Type property of the Key object allows you to determine whether the key
is primary, foreign, or unique. For example, to create a primary key, set the
Key object’s Type property to adKeyPrimary.
The procedure in Hands-On 12-1 demonstrates how to add a primary key to
the table called tblFilters.
�Hands-On 12-1: Creating a Primary Key (ADO)
1. Start Microsoft Office Access 2007 and create a new Microsoft Office
Access 2007 database named Chap12.accdb in your C:\Acc07_
ByExample folder.
2. In the Access window, press Alt+F11 to switch to the Visual Basic Editor
window.
3. In the Visual Basic Editor window, choose Insert | Module.
275

4. In the module’s Code window, type the Create_PrimaryKey procedure
shown below, or copy the procedure code from C:\Acc07_HandsOn\
Chap12.txt.
' make sure to set up a reference to' the Microsoft ActiveX Data Objects 2.8 Library' and ADO Ext. 2.8 for DDL and Security
Sub Create_PrimaryKey()Dim cat As ADOX.CatalogDim tbl As ADOX.TableDim pKey As ADOX.Key
On Error GoTo ErrorHandler
Set cat = New ADOX.Catalogcat.ActiveConnection = CurrentProject.Connection
Set tbl = New ADOX.Tabletbl.Name = "tblFilters"
cat.Tables.Append tbl
With tbl.Columns.Append "ID", adVarWChar, 10.Append "Description", adVarWChar, 255.Append "Type", adInteger
End With
SetKey:Set pKey = New ADOX.KeyWith pKey
.Name = "PrimaryKey"
.Type = adKeyPrimaryEnd With
pKey.Columns.Append "ID"tbl.Keys.Append pKey
Set cat = NothingExit Sub
ErrorHandler:If Err.Number = -2147217856 Then
MsgBox "The " & tblName & " is open.", _vbCritical, "Please close the table"
ElseIf Err.Number = -2147217857 ThenMsgBox Err.DescriptionSet tbl = cat.Tables(tbl.Name)Resume SetKey
ElseIf Err.Number = -2147217767 Thentbl.Keys.Delete pKey.NameResume
ElseMsgBox Err.Number & ": " & Err.Description
276 | Chapter 12
Part II
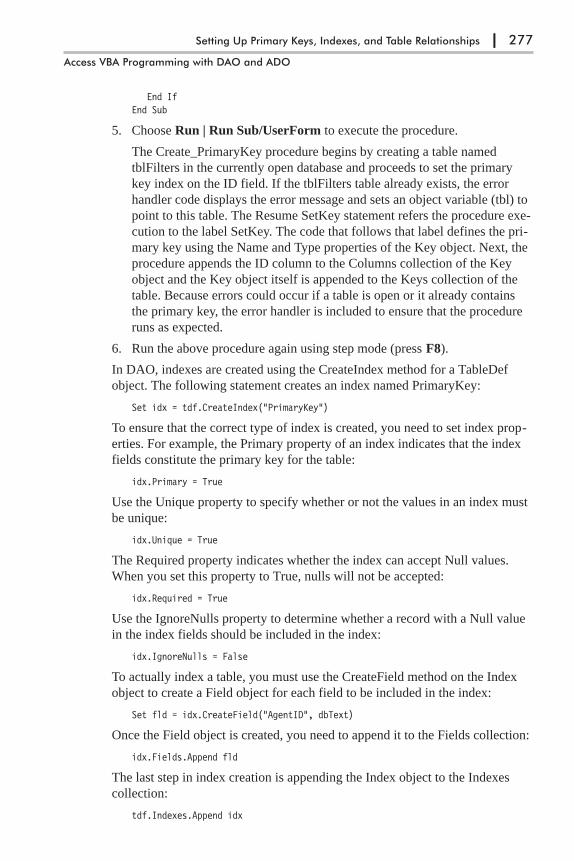
End IfEnd Sub
5. Choose Run | Run Sub/UserForm to execute the procedure.
The Create_PrimaryKey procedure begins by creating a table named
tblFilters in the currently open database and proceeds to set the primary
key index on the ID field. If the tblFilters table already exists, the error
handler code displays the error message and sets an object variable (tbl) to
point to this table. The Resume SetKey statement refers the procedure exe-
cution to the label SetKey. The code that follows that label defines the pri-
mary key using the Name and Type properties of the Key object. Next, the
procedure appends the ID column to the Columns collection of the Key
object and the Key object itself is appended to the Keys collection of the
table. Because errors could occur if a table is open or it already contains
the primary key, the error handler is included to ensure that the procedure
runs as expected.
6. Run the above procedure again using step mode (press F8).
In DAO, indexes are created using the CreateIndex method for a TableDef
object. The following statement creates an index named PrimaryKey:
Set idx = tdf.CreateIndex("PrimaryKey")
To ensure that the correct type of index is created, you need to set index prop-
erties. For example, the Primary property of an index indicates that the index
fields constitute the primary key for the table:
idx.Primary = True
Use the Unique property to specify whether or not the values in an index must
be unique:
idx.Unique = True
The Required property indicates whether the index can accept Null values.
When you set this property to True, nulls will not be accepted:
idx.Required = True
Use the IgnoreNulls property to determine whether a record with a Null value
in the index fields should be included in the index:
idx.IgnoreNulls = False
To actually index a table, you must use the CreateField method on the Index
object to create a Field object for each field to be included in the index:
Set fld = idx.CreateField("AgentID", dbText)
Once the Field object is created, you need to append it to the Fields collection:
idx.Fields.Append fld
The last step in index creation is appending the Index object to the Indexes
collection:
tdf.Indexes.Append idx
Setting Up Primary Keys, Indexes, and Table Relationships | 277
Access VBA Programming with DAO and ADO
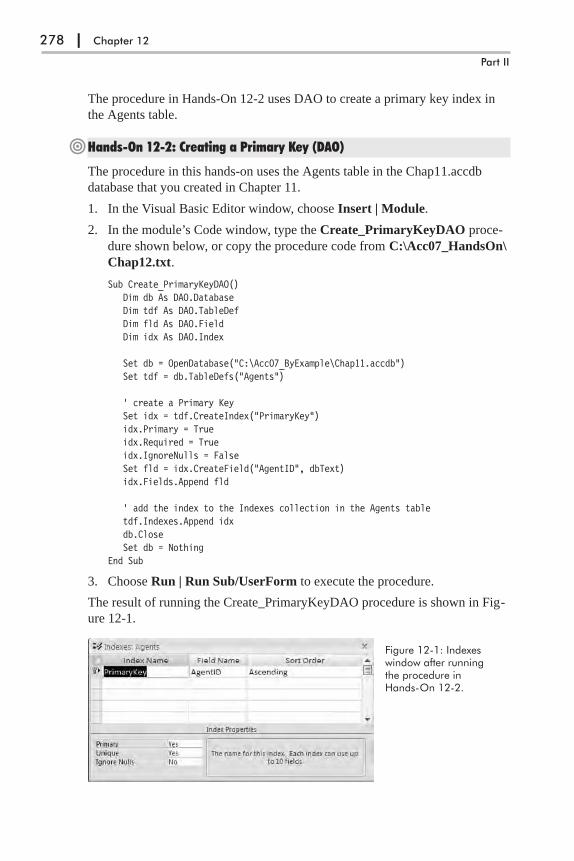
The procedure in Hands-On 12-2 uses DAO to create a primary key index in
the Agents table.
�Hands-On 12-2: Creating a Primary Key (DAO)
The procedure in this hands-on uses the Agents table in the Chap11.accdb
database that you created in Chapter 11.
1. In the Visual Basic Editor window, choose Insert | Module.
2. In the module’s Code window, type the Create_PrimaryKeyDAO proce-
dure shown below, or copy the procedure code from C:\Acc07_HandsOn\
Chap12.txt.
Sub Create_PrimaryKeyDAO()Dim db As DAO.DatabaseDim tdf As DAO.TableDefDim fld As DAO.FieldDim idx As DAO.Index
Set db = OpenDatabase("C:\Acc07_ByExample\Chap11.accdb")Set tdf = db.TableDefs("Agents")
' create a Primary KeySet idx = tdf.CreateIndex("PrimaryKey")idx.Primary = Trueidx.Required = Trueidx.IgnoreNulls = FalseSet fld = idx.CreateField("AgentID", dbText)idx.Fields.Append fld
' add the index to the Indexes collection in the Agents tabletdf.Indexes.Append idxdb.CloseSet db = Nothing
End Sub
3. Choose Run | Run Sub/UserForm to execute the procedure.
The result of running the Create_PrimaryKeyDAO procedure is shown in Fig-
ure 12-1.
278 | Chapter 12
Part II
Figure 12-1: Indexeswindow after runningthe procedure inHands-On 12-2.

Creating a Single-Field IndexIn ADO, you can add an index to a table by using the ADOX Index object.
Before creating an index, make sure the table is not open and that it does not
already contain an index with the same name.
To define an index, perform the following:
� Append one or more columns to the index by using the Append method.
� Set the Name property of the Index object and define other index proper-
ties, if necessary.
� Use the Append method to add the Index object to the table’s Indexes
collection.
You can use the Unique property of the Index object to specify whether the
index keys must be unique. The default value of the Unique property is False.
Another property, IndexNulls, lets you specify whether Null values are
allowed in the index. This property can have one of the constants shown in
Table 12-1.
Table 12-1: Intrinsic constants for the IndexNulls property of the ADOX Index object
Constant Name Description
adIndexNullsAllow You can create an index if there is a Null value in the index field (anerror will not occur).
adIndexNullsDisallow(This is the default value)
You cannot create an index if there is a Null in the index for thecolumn (an error will occur).
adIndexNullsIgnore You can create an index if there is a Null in the index field (an errorwill not occur). The Ignore Nulls property in the Indexes window inthe user interface will be set to Yes.
adIndexNullsIgnoreAny(This value is not supportedby the Microsoft Jet Provider)
You can create an index if there is a Null value in the index field. TheIgnore Nulls property in the Indexes window in the user interface willbe set to No.
The Add_SingleFieldIndex procedure in Hands-On 12-3 demonstrates how to
add a single-field index called idxDescription to the table tblFilters.
�Hands-On 12-3: Adding a Single-Field Index to an Existing Table (ADO)
This procedure uses the tblFilters table created in Hands-On 12-1.
1. In the Visual Basic Editor window, choose Insert | Module.
2. In the module’s Code window, type the Add_SingleFieldIndex procedure
shown below, or copy the procedure code from C:\Acc07_HandsOn\
Chap12.txt.
Sub Add_SingleFieldIndex()Dim cat As New ADOX.CatalogDim myTbl As New ADOX.TableDim myIdx As New ADOX.Index
On Error GoTo ErrorHandler
Setting Up Primary Keys, Indexes, and Table Relationships | 279
Access VBA Programming with DAO and ADO
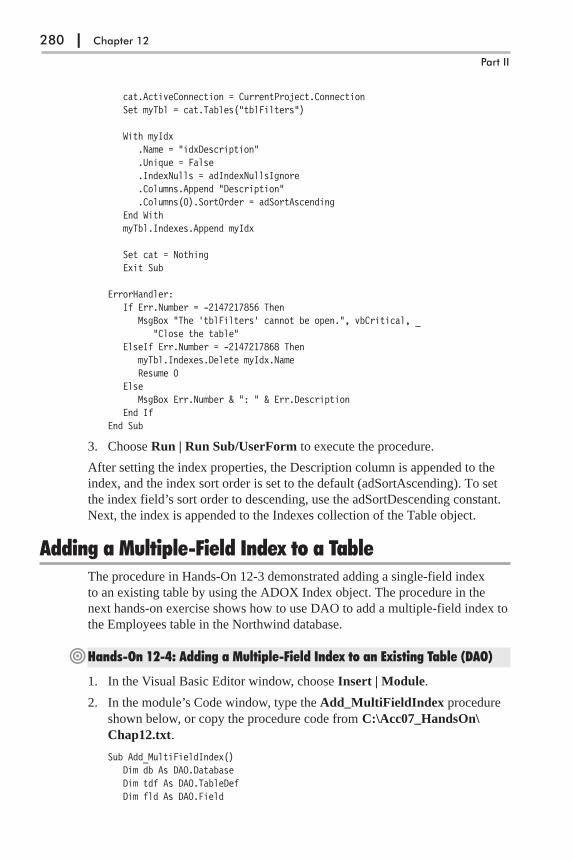
cat.ActiveConnection = CurrentProject.ConnectionSet myTbl = cat.Tables("tblFilters")
With myIdx.Name = "idxDescription".Unique = False.IndexNulls = adIndexNullsIgnore.Columns.Append "Description".Columns(0).SortOrder = adSortAscending
End WithmyTbl.Indexes.Append myIdx
Set cat = NothingExit Sub
ErrorHandler:If Err.Number = -2147217856 Then
MsgBox "The 'tblFilters' cannot be open.", vbCritical, _"Close the table"
ElseIf Err.Number = -2147217868 ThenmyTbl.Indexes.Delete myIdx.NameResume 0
ElseMsgBox Err.Number & ": " & Err.Description
End IfEnd Sub
3. Choose Run | Run Sub/UserForm to execute the procedure.
After setting the index properties, the Description column is appended to the
index, and the index sort order is set to the default (adSortAscending). To set
the index field’s sort order to descending, use the adSortDescending constant.
Next, the index is appended to the Indexes collection of the Table object.
Adding a Multiple-Field Index to a TableThe procedure in Hands-On 12-3 demonstrated adding a single-field index
to an existing table by using the ADOX Index object. The procedure in the
next hands-on exercise shows how to use DAO to add a multiple-field index to
the Employees table in the Northwind database.
�Hands-On 12-4: Adding a Multiple-Field Index to an Existing Table (DAO)
1. In the Visual Basic Editor window, choose Insert | Module.
2. In the module’s Code window, type the Add_MultiFieldIndex procedure
shown below, or copy the procedure code from C:\Acc07_HandsOn\
Chap12.txt.
Sub Add_MultiFieldIndex()Dim db As DAO.DatabaseDim tdf As DAO.TableDefDim fld As DAO.Field
280 | Chapter 12
Part II

Dim idx As DAO.Index
Set db = OpenDatabase("C:\Acc07_ByExample\Northwind.mdb")Set tdf = db.TableDefs("Employees")
Set idx = tdf.CreateIndex("Location")Set fld = idx.CreateField("City", dbText)idx.Fields.Append fld
Set fld = idx.CreateField("Region", dbText)idx.Fields.Append fldtdf.Indexes.Append idx
MsgBox "New index (Location) was created."db.CloseSet db = Nothing
End Sub
3. Choose Run | Run Sub/UserForm to execute the procedure.
The Add_MultiFieldIndex procedure creates a two-field index in the Employ-
ees table. To create an index, use the CreateIndex method on a TableDef
object. Next, use the CreateField method on the Index object to create the first
field to be included in the index, and then append this field to the Fields collec-
tion. Repeat the same two steps for the second field you want to include in the
index. It is important to remember that the order in which the fields are
appended has an effect on the index order. If you open the Indexes window in
the Employees table of the Northwind database after running the above proce-
dure, you should see the Location index consisting of two fields, as depicted in
Figure 12-2.
Listing Indexes in a TableThe ADO Indexes collection contains all Index objects of a table. You can
retrieve all the index names from the Indexes collection. The procedure in the
next hands-on exercise demonstrates how to list the names of indexes available
in the Northwind database’s Employees table in the Immediate window.
Setting Up Primary Keys, Indexes, and Table Relationships | 281
Access VBA Programming with DAO and ADO
Figure 12-2: TheLocation index wascreated by runningthe procedure inHands-On 12-4.

�Hands-On 12-5: Listing Indexes in a Table (ADO)
1. In the Visual Basic Editor window, choose Insert | Module.
2. In the module’s Code window, type the List_Indexes procedure shown
below, or copy the procedure code from C:\Acc07_HandsOn\Chap12.txt.
Sub List_Indexes()Dim conn As New ADODB.ConnectionDim cat As New ADOX.CatalogDim tbl As New ADOX.TableDim idx As New ADOX.Index
With conn.Provider = "Microsoft.Jet.OLEDB.4.0".Open "Data Source=" & CurrentProject.Path & _
"\Northwind.mdb"End Withcat.ActiveConnection = connSet tbl = cat.Tables("Employees")
For Each idx In tbl.IndexesDebug.Print idx.Name
Next idx
conn.CloseSet conn = NothingMsgBox "Indexes are listed in the Immediate window."
End Sub
3. Choose Run | Run Sub/UserForm to execute the procedure.
In DAO, you can use the For Each…Next VBA looping structure to retrieve
the names of indexes from the Indexes collection of the TableDef object as
illustrated in the following procedure:
Sub List_IndexesDAO()Dim db As DAO.DatabaseDim tdf As DAO.TableDefDim idx As DAO.Index
Set db = CurrentDbSet tdf = db.TableDefs("tblFilters")
For Each idx In tdf.IndexesDebug.Print idx.Name
Next' show Immediate windowSendKeys "^g"Set db = Nothing
End Sub
282 | Chapter 12
Part II

Deleting Table IndexesAlthough you can delete unwanted or obsolete indexes from the Indexes win-
dow in the Microsoft Office Access 2007 user interface, it is much faster to
remove them programmatically. The procedure in Hands-On 12-6 illustrates
how to delete all but the primary key index from the Employees table located
in the Northwind database.
�Hands-On 12-6: Deleting Indexes from a Table (ADO)
The procedure in this hands-on exercise will delete all but the primary key
index from the Employees table in the Northwind database. It is recommended
that you prepare a backup copy of the original Northwind.mdb database prior
to running this code.
1. In the Visual Basic Editor window, choose Insert | Module.
2. In the module’s Code window, type the Delete_Indexes procedure shown
below, or copy the procedure code from C:\Acc07_HandsOn\Chap12.txt.
Sub Delete_Indexes()' This procedure deletes all but the primary key index' from the Employees table in the Northwind database.' Prior to running this procedure make a backup copy of' the original Northwind.mdb database.
Dim conn As New ADODB.ConnectionDim cat As New ADOX.CatalogDim tbl As New ADOX.TableDim idx As New ADOX.IndexDim count As Integer
With conn.Provider = "Microsoft.Jet.OLEDB.4.0".Open "Data Source=" & CurrentProject.Path & _
"\Northwind.mdb"End With
cat.ActiveConnection = connSetup:Set tbl = cat.Tables("Employees")
Debug.Print tbl.Indexes.countFor Each idx In tbl.Indexes
If idx.PrimaryKey <> True Thentbl.Indexes.Delete (idx.Name)GoTo Setup
End IfNext idx
conn.CloseSet conn = NothingMsgBox "All Indexes but Primary Key were deleted."
End Sub
Setting Up Primary Keys, Indexes, and Table Relationships | 283
Access VBA Programming with DAO and ADO

3. Choose Run | Run Sub/UserForm to execute the procedure.
Notice that each time you delete an index from the table’s Indexes collection
you must set the reference to the table because current settings are lost when an
index is deleted. Hence, the GoTo Setup statement sends Visual Basic to the
Setup label to get the new reference to the Table object.
Creating Table RelationshipsIn ADO, to establish a one-to-many relationship between tables, perform the
following steps:
1. Use the ADOX Key object to create a foreign key and set the Type prop-
erty of the Key object to adKeyForeign. A foreign key consists of one or
more fields in a foreign table that uniquely identify all rows in a primary
table.
2. Use the RelatedTable property to specify the name of the related table.
3. Use the Append method to add appropriate columns in the foreign table to
the foreign key. A foreign table is usually located on the “many” side of a
one-to-many relationship and provides a foreign key to another table in a
database.
4. Set the RelatedColumn property to the name of the corresponding column
in the primary table.
5. Use the Append method to add the foreign key to the Keys collection of
the table containing the primary key.
The procedure in Hands-On 12-7 illustrates how to create a one-to-many rela-
tionship between two tables: Titles and Publishers.
�Hands-On 12-7: Creating a One-to-Many Relationship
1. In the current database (Chap12.accdb), create the Titles and Publishers
tables and add the fields as shown below:
Table Name FieldName
Data Type Size
Titles TitleID Text 8
Titles PubID Text 4
Titles Title Text 100
Titles Price Currency
Publishers PubID Text 4
Publishers PubName Text 40
Publishers City Text 25
Publishers Country Text 25
284 | Chapter 12
Part II

2. Make TitleID the primary key for Titles and PubID the primary key for
the Publishers table.
3. In the Visual Basic Editor window, choose Insert | Module.
4. In the module’s Code window, type the CreateTblRelation procedure
shown below, or copy the procedure code from C:\Acc07_HandsOn\
Chap12.txt.
Sub CreateTblRelation()Dim cat As New ADOX.CatalogDim fKey As New ADOX.Key
On Error GoTo ErrorHandle
cat.ActiveConnection = CurrentProject.Connection
With fKey.Name = "fkPubID".Type = adKeyForeign.RelatedTable = "Publishers".Columns.Append "PubID".Columns("PubID").RelatedColumn = "PubID"
End Withcat.Tables("Titles").Keys.Append fKeyMsgBox "Relationship was created."
Set cat = NothingExit Sub
ErrorHandle:cat.Tables("Titles").Keys.Delete "fkPubID"Resume
End Sub
5. Choose Run | Run Sub/UserForm to execute the procedure.
You can view the relationship between the Publishers and Titles tables that was
created by the above procedure in the Relationships window. To activate this
window, switch to the Access window and choose Database Tools | Relation-
ships. You should see the Publishers and Titles tables in the Relationships
window linked together with a one-to-many relationship (see Figure 12-3).
Setting Up Primary Keys, Indexes, and Table Relationships | 285
Access VBA Programming with DAO and ADO

Chapter SummaryIn this short chapter you acquired programming skills that enable you to create
keys (primary keys and indexes) in Microsoft Access tables. You also learned
how to establish a one-to-many relationship between tables.
In the next chapter, you will learn how to find and read database records.
286 | Chapter 12
Part II
Figure 12-3: Table relationships can be created programmatically by accessing objects in theADOX library (see the code in the CreateTblRelation procedure in Hands-On 12-7).
Chapter 13
Finding and Reading Records
In order to work with data, you need to learn how to use the Recordset object.
The Recordset object represents a set of records in a table, or a set of records
returned by executing a stored query or an SQL statement. Each column of a
Recordset represents a field, and each row represents a record. The Recordset
is a temporary object and is not saved in the database. All Recordset objects
cease to exist after the procedure ends. All open Recordset objects are con-
tained in the Recordsets collection. Creating and using the Recordset objects
depends on the type of the object library (DAO/ADO) that you’ve selected for
your programming task. In this chapter, you will learn various methods of
opening the Recordset object. You will also find out how to navigate in the
Recordset, and how to find, filter, read, and count the records. Both DAO and
ADO Recordsets will be covered.
Introduction to DAO RecordsetsIn DAO there are five types of Recordset objects: Table-type, Dynaset-type,
Snapshot-type, Forward-only-type, and Dynamic-type. Each of these
recordsets offers a different functionality (see Table 13-1). You create a
Recordset object using the OpenRecordset method. The type of the Recordset
is specified by the type argument of the OpenRecordset method. If the
Recordset’s type is not specified, DAO will attempt to create a Table-type
Recordset. If this type isn’t available, attempts are made to create a Dynaset,
Snapshot, or Forward-only-type Recordset object.
Table 13-1: Types of DAO Recordsets
Recordset Type Description
Table-type Used to access records in a table stored in a Microsoft Accessdatabase. You can retrieve, add, update, and delete records in asingle table.
Dynaset-type Used to retrieve, add, update, and delete records from one or moretables in a database as well as any table that is linked to the Accessdatabase.
Snapshot-type Used to access records from a local table stored in a MicrosoftAccess database as well as any linked table or a query. Snapshotrecordsets contain a copy of the records in RAM (random accessmemory) and provide no direct access to the underlying data. Theyare used for reading data only — you can’t use them to add,update, or delete records.
287
Recordset Type Description
Forward-only-type This is a special type of a Snapshot recordset that only allows you toscroll forward through the records. It provides the fastest accesswhen you want to make a single pass through the data.
Dynamic-type This recordset is generated by a query based on one or moretables. It allows you to add, change, or delete records from arow-returning query. In addition, it includes the records that otherusers may have added, modified, or deleted.
In order to find and read database records, you must understand how to navi-
gate through the recordset. When you open a Recordset object, the first record
is the current record. All recordsets have a current record.
� To move to subsequent records, use the MoveNext method.
� To move to the previous record, use the MovePrevious method.
� The MoveFirst and MoveLast methods move the cursor to the first and last
records.
� If you call the MoveNext method when the cursor is already pointing to the
last record, the cursor will move off the last record to the area known as
end of file (EOF), and the EOF property will be set to True.
� If you call the MoveNext method when the EOF property is True, an error
is generated because you cannot move past the end of the file. Similarly, by
calling the MovePrevious method when the cursor is pointing to the first
record, you will move the cursor to the area known as beginning of file
(BOF). This will set the BOF property to True. When the BOF property is
True and you call the MovePrevious method, an error will be generated.
When navigating through a recordset you may want to mark a specific record
in order to return to it at a later time. You can use the Bookmark property to
obtain a unique identification for a specific record.
The Recordset object has numerous properties and methods. We will dis-
cuss only those properties and methods that are required for performing a
specific task, as demonstrated in the example procedures.
Opening Various Types of RecordsetsUse the OpenRecordset method to create or open a Recordset. For example, to
open a Table-type recordset on a table named tblClients, use the following
statement:
Set rst = CurrentDb.OpenRecordset("tblClients", dbOpenTable)
Notice that the second argument in the OpenRecordset method specifies the
type of recordset. In this position, the RecordsetTypeEnum constants (see
Table 13-2) can be used.
288 | Chapter 13
Part II
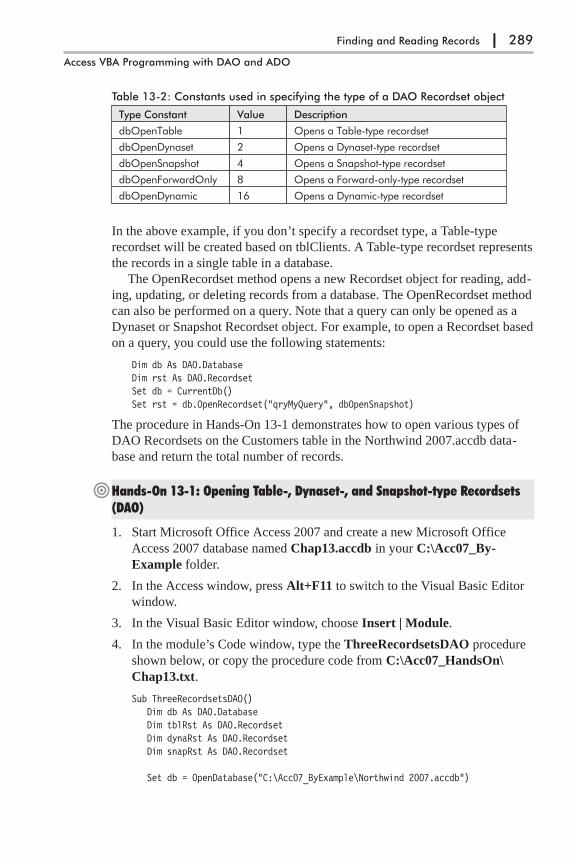
Table 13-2: Constants used in specifying the type of a DAO Recordset object
Type Constant Value Description
dbOpenTable 1 Opens a Table-type recordset
dbOpenDynaset 2 Opens a Dynaset-type recordset
dbOpenSnapshot 4 Opens a Snapshot-type recordset
dbOpenForwardOnly 8 Opens a Forward-only-type recordset
dbOpenDynamic 16 Opens a Dynamic-type recordset
In the above example, if you don’t specify a recordset type, a Table-type
recordset will be created based on tblClients. A Table-type recordset represents
the records in a single table in a database.
The OpenRecordset method opens a new Recordset object for reading, add-
ing, updating, or deleting records from a database. The OpenRecordset method
can also be performed on a query. Note that a query can only be opened as a
Dynaset or Snapshot Recordset object. For example, to open a Recordset based
on a query, you could use the following statements:
Dim db As DAO.DatabaseDim rst As DAO.RecordsetSet db = CurrentDb()Set rst = db.OpenRecordset("qryMyQuery", dbOpenSnapshot)
The procedure in Hands-On 13-1 demonstrates how to open various types of
DAO Recordsets on the Customers table in the Northwind 2007.accdb data-
base and return the total number of records.
�Hands-On 13-1: Opening Table-, Dynaset-, and Snapshot-type Recordsets(DAO)
1. Start Microsoft Office Access 2007 and create a new Microsoft Office
Access 2007 database named Chap13.accdb in your C:\Acc07_By-
Example folder.
2. In the Access window, press Alt+F11 to switch to the Visual Basic Editor
window.
3. In the Visual Basic Editor window, choose Insert | Module.
4. In the module’s Code window, type the ThreeRecordsetsDAO procedure
shown below, or copy the procedure code from C:\Acc07_HandsOn\
Chap13.txt.
Sub ThreeRecordsetsDAO()Dim db As DAO.DatabaseDim tblRst As DAO.RecordsetDim dynaRst As DAO.RecordsetDim snapRst As DAO.Recordset
Set db = OpenDatabase("C:\Acc07_ByExample\Northwind 2007.accdb")
Finding and Reading Records | 289
Access VBA Programming with DAO and ADO
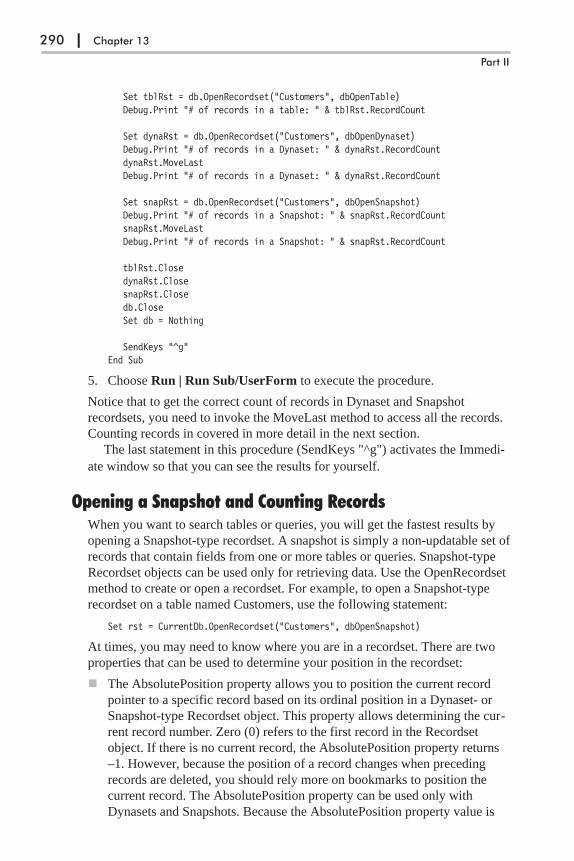
Set tblRst = db.OpenRecordset("Customers", dbOpenTable)Debug.Print "# of records in a table: " & tblRst.RecordCount
Set dynaRst = db.OpenRecordset("Customers", dbOpenDynaset)Debug.Print "# of records in a Dynaset: " & dynaRst.RecordCountdynaRst.MoveLastDebug.Print "# of records in a Dynaset: " & dynaRst.RecordCount
Set snapRst = db.OpenRecordset("Customers", dbOpenSnapshot)Debug.Print "# of records in a Snapshot: " & snapRst.RecordCountsnapRst.MoveLastDebug.Print "# of records in a Snapshot: " & snapRst.RecordCount
tblRst.ClosedynaRst.ClosesnapRst.Closedb.CloseSet db = Nothing
SendKeys "^g"End Sub
5. Choose Run | Run Sub/UserForm to execute the procedure.
Notice that to get the correct count of records in Dynaset and Snapshot
recordsets, you need to invoke the MoveLast method to access all the records.
Counting records in covered in more detail in the next section.
The last statement in this procedure (SendKeys "^g") activates the Immedi-
ate window so that you can see the results for yourself.
Opening a Snapshot and Counting RecordsWhen you want to search tables or queries, you will get the fastest results by
opening a Snapshot-type recordset. A snapshot is simply a non-updatable set of
records that contain fields from one or more tables or queries. Snapshot-type
Recordset objects can be used only for retrieving data. Use the OpenRecordset
method to create or open a recordset. For example, to open a Snapshot-type
recordset on a table named Customers, use the following statement:
Set rst = CurrentDb.OpenRecordset("Customers", dbOpenSnapshot)
At times, you may need to know where you are in a recordset. There are two
properties that can be used to determine your position in the recordset:
� The AbsolutePosition property allows you to position the current record
pointer to a specific record based on its ordinal position in a Dynaset- or
Snapshot-type Recordset object. This property allows determining the cur-
rent record number. Zero (0) refers to the first record in the Recordset
object. If there is no current record, the AbsolutePosition property returns
–1. However, because the position of a record changes when preceding
records are deleted, you should rely more on bookmarks to position the
current record. The AbsolutePosition property can be used only with
Dynasets and Snapshots. Because the AbsolutePosition property value is
290 | Chapter 13
Part II

zero-based, 1 is added to the AbsolutePosition value to display current
record information:
MsgBox "Current record: " & rst.AbsolutePosition + 1
� The PercentPosition property shows the current position relative to the
number of records that have been accessed. Both AbsolutePosition and
PercentPosition are not accurate until you move to the last record.
The procedure in Hands-On 13-2 attempts to get the total number of records in
the Snapshot-type recordset by using the RecordCount property.
�Hands-On 13-2: Opening a Snapshot-type Recordset and Retrieving theNumber of Records (DAO)
1. In the Visual Basic Editor window, choose Insert | Module.
2. In the module’s Code window, type the OpenSnapshot procedure shown
below, or copy the procedure code from C:\Acc07_HandsOn\Chap13.txt.
Sub OpenSnapshot()Dim db As DAO.DatabaseDim rst As DAO.Recordset
Set db = OpenDatabase("C:\Acc07_ByExample\Northwind 2007.accdb")Set rst = db.OpenRecordset("Customers", dbOpenSnapshot)
MsgBox "Current record: " & rst.AbsolutePosition + 1MsgBox "Number of records: " & rst.RecordCountrst.MoveLastMsgBox "Current record: " & rst.AbsolutePosition + 1MsgBox "Number of records: " & rst.RecordCountrst.CloseSet rst = Nothingdb.CloseSet db = Nothing
End Sub
3. Choose Run | Run Sub/UserForm to execute the procedure.
The RecordCount property of the Recordset object returns the number of
records that have been accessed.
Zero (0) is returned if there are no records in the recordset, and 1 is returned
if there are records in the recordset. If you open a Table-type recordset and
check the RecordCount property, it will return the total number of records in a
table. However, if you open a Dynaset- or Snapshot-type recordset, the
RecordCount property will return 1, indicating that the recordset contains
records. To find out the total number of records in a Dynaset or Snapshot, call
the MoveLast method prior to retrieving the RecordCount property value. The
record count becomes accurate after you’ve visited all the records in the
recordset.
Finding and Reading Records | 291
Access VBA Programming with DAO and ADO

Retrieving the Contents of a Specific Field in a TableTo retrieve the contents of any field, start by creating a recordset based on the
desired table or query, then loop through the recordset, printing the field’s con-
tents for each record to the Immediate window.
The procedure in Hands-On 13-3 generates a listing of all clients in the
Customers table. Customer names are retrieved starting from the last record
(see the MoveLast method). The BOF property of the Recordset object deter-
mines when the beginning of your recordset is reached.
�Hands-On 13-3: Retrieving Field Values (DAO)
1. In the Visual Basic Editor window, choose Insert | Module.
2. In the module’s Code window, type the ReadFromEnd procedure shown
below, or copy the procedure code from C:\Acc07_HandsOn\Chap13.txt.
Sub ReadFromEnd()Dim db As DAO.DatabaseDim rst As DAO.Recordset
Set db = OpenDatabase("C:\Acc07_ByExample\Northwind 2007.accdb")Set rst = db.OpenRecordset("Customers", dbOpenTable)rst.MoveLast
Do Until rst.BOFDebug.Print rst!Companyrst.MovePrevious
Loop
SendKeys "^g"rst.CloseSet rst = Nothingdb.CloseSet db = Nothing
End Sub
3. Choose Run | Run Sub/UserForm to execute the procedure.
Moving between Records in a TableAll recordsets have a current position and a current record. The current record
is usually the record at the current position. However, the current position can
be before the first record and after the last record. You can use one of the
Move methods in Table 13-3 to change the current position. The procedure in
Hands-On 13-4 demonstrates how to move between records in the Employees
table using the Table-type or Dynaset-type recordset.
292 | Chapter 13
Part II

Table 13-3: Move methods used with DAO Recordsets
MoveFirst Moves to the first record.
MoveLast Moves to the last record.
MoveNext Moves to the next record.
MovePrevious Moves to the previous record.
Move n Moves forward or backward n positions.
�Hands-On 13-4: Moving between Records in a Table (DAO)
1. In the Visual Basic Editor window, choose Insert | Module.
2. In the module’s Code window, type the NavigateRecords procedure
shown below, or copy the procedure code from C:\Acc07_HandsOn\
Chap13.txt.
Sub NavigateRecords()Dim db As DAO.DatabaseDim tblRst As DAO.RecordsetDim dynaRst As DAO.Recordset
Set db = OpenDatabase("C:\Acc07_ByExample\Northwind 2007.accdb")Set tblRst = db.OpenRecordset("Employees")tblRst.MoveFirst
Do While Not tblRst.EOFDebug.Print "Employee: " & tblRst![Last Name]tblRst.MoveNext
Loop
Set dynaRst = db.OpenRecordset("Employees", dbOpenDynaset)dynaRst.MoveFirst
Do While Not dynaRst.EOFDebug.Print "Hello " & dynaRst![Last Name]dynaRst.MoveNext
Loop
tblRst.ClosedynaRst.Close
Set tblRst = NothingSet dynaRst = Nothingdb.CloseSet db = NothingSendKeys "^g"
End Sub
3. Choose Run | Run Sub/UserForm to execute the procedure.
Finding Records in a Table-Type RecordsetWhile the Move methods are convenient for looping through records in a
Recordset object, you should use Seek or Find methods to look for specific
records. When you know exactly which record you want to find in a
Finding and Reading Records | 293
Access VBA Programming with DAO and ADO

Table-type recordset and the field you are searching is indexed, the quickest
way to find that record is by using the Seek method. One thing to remember
with the Seek method is that the table must contain an index. The Index prop-
erty must be set before the Seek method can be used. If you try to use the Seek
method on a Table-type recordset without first setting the current index, a
run-time error will occur. The Seek method searches through the recordset and
locates the first matching record. Once the record is found, it is made the cur-
rent record and the NoMatch property is set to False. If the record is not found,
the NoMatch property is set to True and the current record is undefined. Table
13-4 lists comparison operators that you can use with the Seek method.
Table 13-4: Comparison operators used with the Seek method
Operator Description
"=" Finds the first record whose indexed field is equal to the specified value.
">=" Finds the first record whose indexed field is greater than or equal to thespecified value.
">" Finds the first record whose indexed field is greater than the specified value.
"<=" Finds the first record whose indexed field is less than or equal to the specifiedvalue.
"<" Finds the first record whose indexed field is less than the specified value.
The comparison operator used with the Seek method must be enclosed in
quotes. If there are several records that match your criteria, the Seek method
returns the first record it finds. The Seek method cannot be used to search for
records in a linked table. You must use the Find methods (see the next section)
for locating specific records in linked tables, as well as Dynaset-type and
Snapshot-type recordsets. The procedure in Hands-On 13-5 searches for an
employee whose last name begins with the letter “K”.
�Hands-On 13-5: Finding Records in a Table-type Recordset (DAO)
1. In the Visual Basic Editor window, choose Insert | Module.
2. In the module’s Code window, type the FindRecordsInTable procedure
shown below, or copy the procedure code from C:\Acc07_HandsOn\
Chap13.txt.
Sub FindRecordsInTable()Dim db As DAO.DatabaseDim tblRst As DAO.Recordset
Set db = OpenDatabase("C:\Acc07_ByExample\Northwind 2007.accdb")
Set tblRst = db.OpenRecordset("Employees", dbOpenTable)' find the first employee in the table whose name' begins with the letter "K"
tblRst.Index = "Last Name"tblRst.Seek ">=", "K"
294 | Chapter 13
Part II
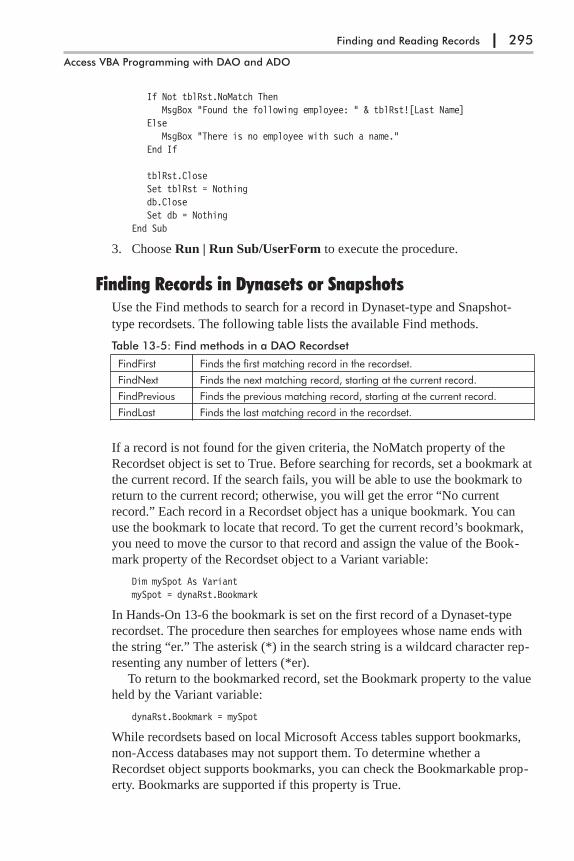
If Not tblRst.NoMatch ThenMsgBox "Found the following employee: " & tblRst![Last Name]
ElseMsgBox "There is no employee with such a name."
End If
tblRst.CloseSet tblRst = Nothingdb.CloseSet db = Nothing
End Sub
3. Choose Run | Run Sub/UserForm to execute the procedure.
Finding Records in Dynasets or SnapshotsUse the Find methods to search for a record in Dynaset-type and Snapshot-
type recordsets. The following table lists the available Find methods.
Table 13-5: Find methods in a DAO Recordset
FindFirst Finds the first matching record in the recordset.
FindNext Finds the next matching record, starting at the current record.
FindPrevious Finds the previous matching record, starting at the current record.
FindLast Finds the last matching record in the recordset.
If a record is not found for the given criteria, the NoMatch property of the
Recordset object is set to True. Before searching for records, set a bookmark at
the current record. If the search fails, you will be able to use the bookmark to
return to the current record; otherwise, you will get the error “No current
record.” Each record in a Recordset object has a unique bookmark. You can
use the bookmark to locate that record. To get the current record’s bookmark,
you need to move the cursor to that record and assign the value of the Book-
mark property of the Recordset object to a Variant variable:
Dim mySpot As VariantmySpot = dynaRst.Bookmark
In Hands-On 13-6 the bookmark is set on the first record of a Dynaset-type
recordset. The procedure then searches for employees whose name ends with
the string “er.” The asterisk (*) in the search string is a wildcard character rep-
resenting any number of letters (*er).
To return to the bookmarked record, set the Bookmark property to the value
held by the Variant variable:
dynaRst.Bookmark = mySpot
While recordsets based on local Microsoft Access tables support bookmarks,
non-Access databases may not support them. To determine whether a
Recordset object supports bookmarks, you can check the Bookmarkable prop-
erty. Bookmarks are supported if this property is True.
Finding and Reading Records | 295
Access VBA Programming with DAO and ADO
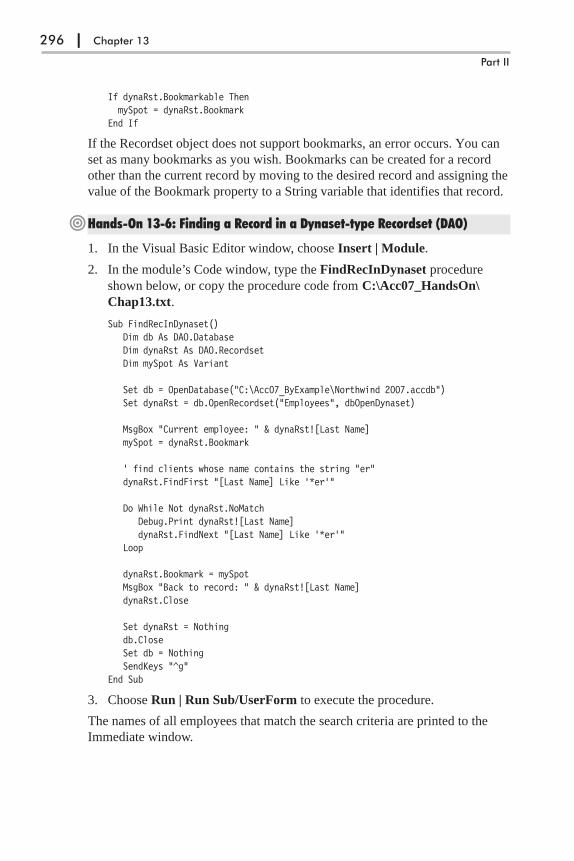
If dynaRst.Bookmarkable ThenmySpot = dynaRst.Bookmark
End If
If the Recordset object does not support bookmarks, an error occurs. You can
set as many bookmarks as you wish. Bookmarks can be created for a record
other than the current record by moving to the desired record and assigning the
value of the Bookmark property to a String variable that identifies that record.
�Hands-On 13-6: Finding a Record in a Dynaset-type Recordset (DAO)
1. In the Visual Basic Editor window, choose Insert | Module.
2. In the module’s Code window, type the FindRecInDynaset procedure
shown below, or copy the procedure code from C:\Acc07_HandsOn\
Chap13.txt.
Sub FindRecInDynaset()Dim db As DAO.DatabaseDim dynaRst As DAO.RecordsetDim mySpot As Variant
Set db = OpenDatabase("C:\Acc07_ByExample\Northwind 2007.accdb")Set dynaRst = db.OpenRecordset("Employees", dbOpenDynaset)
MsgBox "Current employee: " & dynaRst![Last Name]mySpot = dynaRst.Bookmark
' find clients whose name contains the string "er"dynaRst.FindFirst "[Last Name] Like '*er'"
Do While Not dynaRst.NoMatchDebug.Print dynaRst![Last Name]dynaRst.FindNext "[Last Name] Like '*er'"
Loop
dynaRst.Bookmark = mySpotMsgBox "Back to record: " & dynaRst![Last Name]dynaRst.Close
Set dynaRst = Nothingdb.CloseSet db = NothingSendKeys "^g"
End Sub
3. Choose Run | Run Sub/UserForm to execute the procedure.
The names of all employees that match the search criteria are printed to the
Immediate window.
296 | Chapter 13
Part II

Finding the nth Record in a SnapshotThe procedure in Hands-On 13-7 demonstrates how to locate the nth record in
a Snapshot-type recordset.
�Hands-On 13-7: Finding the nth Record in a Snapshot-type Recordset (DAO)
1. In the Visual Basic Editor window, choose Insert | Module.
2. In the module’s Code window, type the FindNthRecord procedure shown
below, or copy the procedure code from C:\Acc07_HandsOn\Chap13.txt.
Sub FindNthRecord()Dim rst As DAO.RecordsetDim fld As DAO.FieldDim totalRec As IntegerDim nth As String
Set db = OpenDatabase("C:\Acc07_ByExample\Northwind 2007.accdb")Set rst = db.OpenRecordset("Employees", dbOpenSnapshot)rst.MoveLast
totalRec = rst.RecordCountrst.MoveFirstnth = InputBox("Enter the number of positions to move forward:")
On Error Resume NextIf totalRec > nth Then
rst.Move nthFor Each fld In rst.Fields
Debug.Print fld.Name & ": " & fld.ValueNext fld
ElseMsgBox "You must enter a value that is less than " _
& totalRec & "."End If
rst.CloseSet rst = Nothingdb.CloseSet db = Nothing
End Sub
3. Choose Run | Run Sub/UserForm to execute the procedure.
Notice that immediately after opening the recordset, the MoveLast method is
used to ensure that all records have been visited. The total number of records is
then retrieved with the RecordCount property of the Recordset object and
stored in the totalRec variable. Next, the MoveFirst method is used to return to
the first record and the InputBox method is used to prompt the user for the
number of positions to move forward in the recordset. If the user-supplied
value is less than the total number of records, the cursor moves to the specified
record and the For…Each loop is used to print this record’s field names and
values to the Immediate window. An attempt to move beyond the end of the
Finding and Reading Records | 297
Access VBA Programming with DAO and ADO

recordset will cause an error. Therefore, the procedure displays a message if
the user-supplied position to move to is greater than the total number of
records.
Introduction to ADO RecordsetsThe Recordset object is one of the three most-used ADO objects (the other two
are Connection and Command). What you can do with a recordset depends
entirely on the built-in capabilities of its OLE DB provider. You can open an
ADO Recordset by using the Recordset object’s Open method. The informa-
tion needed to open a recordset can be provided by first setting properties and
then calling the Open method, or by using the Open method’s parameters like
this:
rst.Open [Source], [ActiveConnection], [CursorType], [LockType],[CursorLocation], [Options]
Notice that all the parameters are optional (they appear in square brackets). If
you decide that you don’t want to pass parameters, then you will need to use a
different syntax to open a recordset. For example, examine the following code
block:
With rst.Source = strSQL.ActiveConnection = strConnect.CursorType = adOpenStatic.LockType = adLockOptimistic.CursorLocation = adUseClient.Open Options := adCmdText
End with
The code segment above opens a recordset by first setting properties of the
Recordset object, then calling its Open method. Notice that the names of the
required Recordset properties are equivalent to the parameter names listed ear-
lier. The values assigned to each property are discussed later. You will become
familiar with both methods of opening a recordset as you work with the exam-
ple procedures that follow.
Let’s return to the syntax of the Recordset’s Open method, which specifies
the parameters. Needless to say, you need to know what each parameter is and
how it is used. The Source parameter determines where you want your records
to come from. The data source can be an SQL string, a table, a query, a stored
procedure or view, a saved file, or a reference to a Command object. Later in
this chapter you will learn how to open a recordset based on a table, a query,
and an SQL statement.
The ActiveConnection parameter can be an SQL string that specifies the
connection string or a reference to a Connection object. This parameter tells
where to find the database as well as what security credentials to use.
Before we discuss the next three parameters, you need to know that the
ADO Recordsets are controlled by a cursor. The cursor determines whether
you are permitted to scroll through the recordset backward and forward or
298 | Chapter 13
Part II
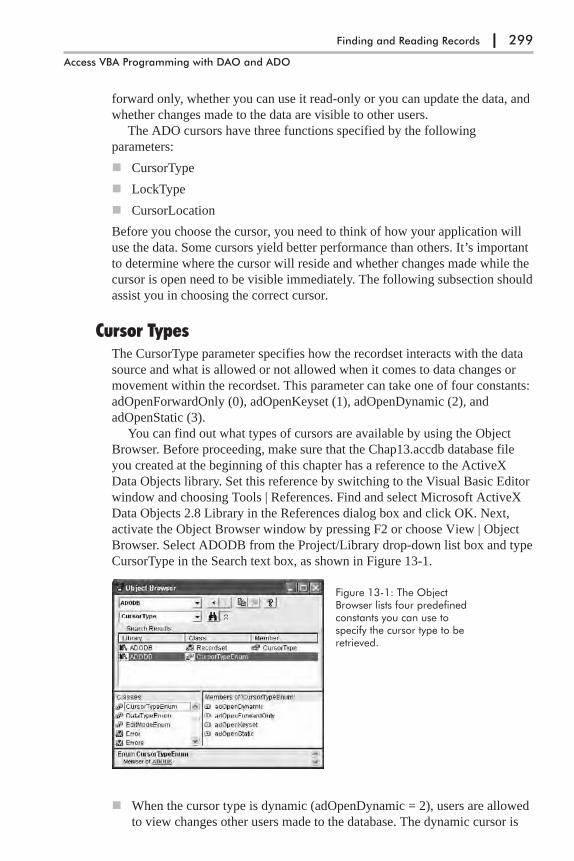
forward only, whether you can use it read-only or you can update the data, and
whether changes made to the data are visible to other users.
The ADO cursors have three functions specified by the following
parameters:
� CursorType
� LockType
� CursorLocation
Before you choose the cursor, you need to think of how your application will
use the data. Some cursors yield better performance than others. It’s important
to determine where the cursor will reside and whether changes made while the
cursor is open need to be visible immediately. The following subsection should
assist you in choosing the correct cursor.
Cursor TypesThe CursorType parameter specifies how the recordset interacts with the data
source and what is allowed or not allowed when it comes to data changes or
movement within the recordset. This parameter can take one of four constants:
adOpenForwardOnly (0), adOpenKeyset (1), adOpenDynamic (2), and
adOpenStatic (3).
You can find out what types of cursors are available by using the Object
Browser. Before proceeding, make sure that the Chap13.accdb database file
you created at the beginning of this chapter has a reference to the ActiveX
Data Objects library. Set this reference by switching to the Visual Basic Editor
window and choosing Tools | References. Find and select Microsoft ActiveX
Data Objects 2.8 Library in the References dialog box and click OK. Next,
activate the Object Browser window by pressing F2 or choose View | Object
Browser. Select ADODB from the Project/Library drop-down list box and type
CursorType in the Search text box, as shown in Figure 13-1.
� When the cursor type is dynamic (adOpenDynamic = 2), users are allowed
to view changes other users made to the database. The dynamic cursor is
Finding and Reading Records | 299
Access VBA Programming with DAO and ADO
Figure 13-1: The ObjectBrowser lists four predefinedconstants you can use tospecify the cursor type to beretrieved.
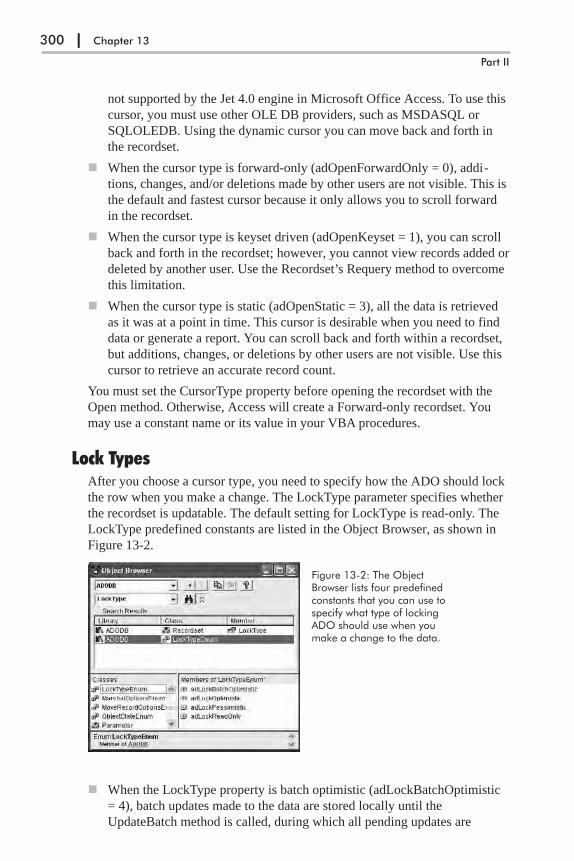
not supported by the Jet 4.0 engine in Microsoft Office Access. To use this
cursor, you must use other OLE DB providers, such as MSDASQL or
SQLOLEDB. Using the dynamic cursor you can move back and forth in
the recordset.
� When the cursor type is forward-only (adOpenForwardOnly = 0), addi-
tions, changes, and/or deletions made by other users are not visible. This is
the default and fastest cursor because it only allows you to scroll forward
in the recordset.
� When the cursor type is keyset driven (adOpenKeyset = 1), you can scroll
back and forth in the recordset; however, you cannot view records added or
deleted by another user. Use the Recordset’s Requery method to overcome
this limitation.
� When the cursor type is static (adOpenStatic = 3), all the data is retrieved
as it was at a point in time. This cursor is desirable when you need to find
data or generate a report. You can scroll back and forth within a recordset,
but additions, changes, or deletions by other users are not visible. Use this
cursor to retrieve an accurate record count.
You must set the CursorType property before opening the recordset with the
Open method. Otherwise, Access will create a Forward-only recordset. You
may use a constant name or its value in your VBA procedures.
Lock TypesAfter you choose a cursor type, you need to specify how the ADO should lock
the row when you make a change. The LockType parameter specifies whether
the recordset is updatable. The default setting for LockType is read-only. The
LockType predefined constants are listed in the Object Browser, as shown in
Figure 13-2.
� When the LockType property is batch optimistic (adLockBatchOptimistic
= 4), batch updates made to the data are stored locally until the
UpdateBatch method is called, during which all pending updates are
300 | Chapter 13
Part II
Figure 13-2: The ObjectBrowser lists four predefinedconstants that you can use tospecify what type of lockingADO should use when youmake a change to the data.

committed all at once. Until the UpdateBatch method is called, no locks are
placed on edited data. Batch optimistic locking eliminates network
roundtrips that normally occur with optimistic locking (adLockOptimistic)
when users make changes to one record and move to another. With batch
optimistic locking, a user can make all the changes to all the records and
then submit them as a single operation.
� When the LockType property is optimistic (adLockOptimistic = 3), no
locks are placed on the data until you attempt to save a row. Records are
locked only when you call the Update method, and the lock is released as
soon as the Save operation is completed. Two users are allowed to update a
record at the same time. Optimistic locking allows you to work with one
row at a time. If you need to make multiple updates, it’s better to save them
all at once by using batch optimistic locking.
� When the LockType property is pessimistic (adLockPessimistic = 2), all
the records are locked as soon as you begin editing a record. The record
remains locked until the edit is committed or canceled. This type of lock
guarantees that two users will not make changes to the same record. If you
use pessimistic locking, ensure that your code does not require any input
from the users. You certainly don’t want a scenario where a user opens a
record and makes a change, then leaves for lunch without saving the
record. In that case, the record is locked until the user comes back and
saves or discards the edit. In this situation, it is better to use optimistic
locking.
� When the LockType property is read-only (adLockReadOnly =1), you will
not be able to alter any data. This is the default setting.
Cursor LocationThe CursorLocation parameter determines whether ADO or the SQL Server
database engine manages the cursor. Cursors use temporary resources to hold
the data. These resources can be memory, a disk paging file, temporary disk
files, or even temporary storage in the database.
� When a cursor is created and managed by ADO, the recordset is said to be
using a client-side cursor (adUseClient). With the client-side cursor, all the
data is retrieved from the server in one operation and is placed on the client
computer. Because all the requested data is available locally, the connec-
tion to the database can be closed and reopened only when another set of
data is needed. Since the entire result set has been downloaded to the client
computer, browsing through the rows is very fast.
� When a cursor is managed by a database engine, the recordset is said to be
using a server-side cursor (adUseServer). With the server-side cursor, all
the data is stored on the server and only the requested data is sent over the
network to the user’s computer. This type of cursor can provide better per-
formance than the client-side cursor when excessive network traffic is an
issue. However, it’s important to point out that a server-side cursor
Finding and Reading Records | 301
Access VBA Programming with DAO and ADO

consumes server resources for every active client and, because it provides
only single-row access to the data, it can be quite slow.
It is recommended that you use the server-side cursor for working with
local Access databases, and the client-side cursor when working with
remote Access databases or SQL Server databases.
The CursorLocation predefined constants are listed in the Object
Browser, as shown in Figure 13-3.
The Options ParameterThe Options parameter specifies the data source type being used. Similar to the
parameters related to cursors, the Options parameter can take one of many val-
ues, as shown in Figure 13-4.
� When the Options parameter is set to adCmdFile (256), it tells the ADO
that the source of the recordset is a path or filename. ADO can open
recordsets based on files in different formats.
302 | Chapter 13
Part II
Figure 13-3: TheCursorLocation parameterof the Recordset’s Openmethod can be set byusing the adUseClient oradUseServer constant.
Figure 13-4: The Optionsparameter of theRecordset’s Open methodis supplied by the constantvalues listed under theCommandType property ofthe Command object.

� When the Options parameter is set to adCmdStoredProc (4), it tells the
ADO that the source of the recordset is a stored procedure or
parameterized query.
� When the Options parameter is set to adCmdTable (2), it tells the ADO that
the source of the recordset is a table or view. The adCmdTable constant
will cause the provider to generate an SQL query to return all rows from a
table or view by prepending SELECT * FROM in front of the specified
table or view name.
� When the Options parameter is set to adCmdTableDirect (512), it tells the
ADO that the Source argument should be evaluated as a table name. How
does this constant differ from adCmdTable? The adCmdTableDirect con-
stant is used by OLE DB providers that support opening tables directly by
name, using an interface called IOpenRowset, instead of an ADO Com-
mand object. Since the IOpenRowset method does not need to build and
execute a Command object, it results in increased performance and
functionality.
� When the Options parameter is set to adCmdText (1), it tells the ADO that
you are using an SQL statement to open the recordset.
� When the Options parameter is set to adCmdUnknown (8), it tells the ADO
that the command type in the Source argument is unknown. This is the
default, which is used if you don’t specify any other option. By using the
adCmdUnknown constant, or not specifying any constant at all for the
Options parameter, you force ADO to make an extra roundtrip to the server
to determine the source type. As you would expect, this will decrease your
VBA procedure’s performance; therefore, you should use adCmdUknown
only if you don’t know what type of information the Source parameter will
contain.
� Note: Not all options are supported by all data providers. For example, theMicrosoft Jet OLE DB Provider does not support the adCmdTableDirect cursors.
In addition to specifying the type of CommandType in the Options parameter
(see Figure 13-4), you can pass additional information in the Options parame-
ter. For example, you can tell ADO how to execute the command by specifying
whether ADO should wait while all the records are being retrieved or should
continue asynchronously.
Finding and Reading Records | 303
Access VBA Programming with DAO and ADO

Asynchronous Record FetchingAsynchronous fetching is an ADO feature that allows some records to bedownloaded to the client while the remaining records are still being fetchedfrom the database. As soon as the user sees some records, he or she canbegin paging through them. The user does not know that only a fewrecords have been returned. As he or she pages through the rows back-ward and forward, a new connection is made to the server and morerecords are fetched and passed to the client. Once all records have beenreturned, paging is very quick because all records are on the client. Asyn-chronous fetching makes it seem to the user that the data retrieval is prettyfast. The downside is that records cannot be sorted until they have all beendownloaded.
Additional Options parameters are listed and described below. Note that only
the first three constants (adAsyncExecute, adAsyncFetch, and adAsyncFetch-
NonBlocking) can be used with the Recordset’s Open method. Other constants
are used with the Command or Connection object’s Execute method.
� adAsyncExecute (16) — This tells ADO to execute the command
asynchronously, meaning that all requested rows are retrieved as soon as
they are available. Using adAsyncExecute enables the application to per-
form other tasks while waiting for the cursor to populate.
Note that the adAsyncExecute constant cannot be used with
adCmdTableDirect.
� adAsyncFetch (32) — Using this constant requires that you specify a value
greater than 1 for the Recordset’s CacheSize property. The CacheSize
property is used to determine the number of records ADO will hold in local
memory. For example, if the cache size is 100, the provider will retrieve
the first 100 records after first opening the Recordset object. The
adAsyncFetch constant tells ADO that the rows remaining after the initial
quantity specified in the CacheSize property should be retrieved
asynchronously.
� adAsyncFetchNonBlocking (64) — This option tells ADO that it should
never wait for a row to be fetched. The application will continue execution
while records are being continuously extracted from a very large data file.
If the requested recordset row has not been retrieved yet, the current row
automatically moves to the end of the file (causing the Recordset’s EOF
property to become True). In other words, the data retrieval process will
not block other processes.
Note that adAsynchFetchNonBlocking has no effect when the adCmd-
TableDirect option is used to open the recordset. Also, adAsyncFetchNon-
Blocking is not supported with a Server cursor (adUseServer) when you
use the ODBC provider (MSDASQL).
304 | Chapter 13
Part II
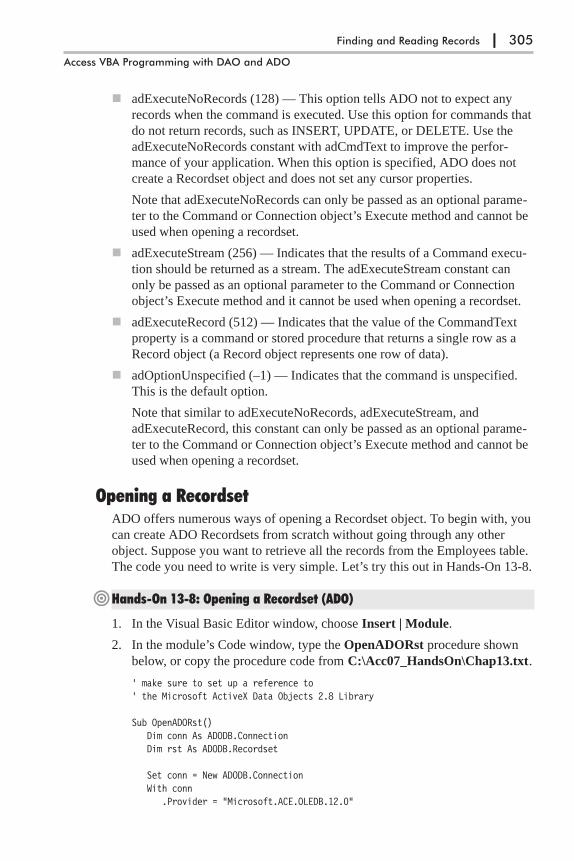
� adExecuteNoRecords (128) — This option tells ADO not to expect any
records when the command is executed. Use this option for commands that
do not return records, such as INSERT, UPDATE, or DELETE. Use the
adExecuteNoRecords constant with adCmdText to improve the perfor-
mance of your application. When this option is specified, ADO does not
create a Recordset object and does not set any cursor properties.
Note that adExecuteNoRecords can only be passed as an optional parame-
ter to the Command or Connection object’s Execute method and cannot be
used when opening a recordset.
� adExecuteStream (256) — Indicates that the results of a Command execu-
tion should be returned as a stream. The adExecuteStream constant can
only be passed as an optional parameter to the Command or Connection
object’s Execute method and it cannot be used when opening a recordset.
� adExecuteRecord (512) — Indicates that the value of the CommandText
property is a command or stored procedure that returns a single row as a
Record object (a Record object represents one row of data).
� adOptionUnspecified (–1) — Indicates that the command is unspecified.
This is the default option.
Note that similar to adExecuteNoRecords, adExecuteStream, and
adExecuteRecord, this constant can only be passed as an optional parame-
ter to the Command or Connection object’s Execute method and cannot be
used when opening a recordset.
Opening a RecordsetADO offers numerous ways of opening a Recordset object. To begin with, you
can create ADO Recordsets from scratch without going through any other
object. Suppose you want to retrieve all the records from the Employees table.
The code you need to write is very simple. Let’s try this out in Hands-On 13-8.
�Hands-On 13-8: Opening a Recordset (ADO)
1. In the Visual Basic Editor window, choose Insert | Module.
2. In the module’s Code window, type the OpenADORst procedure shown
below, or copy the procedure code from C:\Acc07_HandsOn\Chap13.txt.
' make sure to set up a reference to' the Microsoft ActiveX Data Objects 2.8 Library
Sub OpenADORst()Dim conn As ADODB.ConnectionDim rst As ADODB.Recordset
Set conn = New ADODB.ConnectionWith conn
.Provider = "Microsoft.ACE.OLEDB.12.0"
Finding and Reading Records | 305
Access VBA Programming with DAO and ADO

.Open "Data Source=" & CurrentProject.Path & _"\Northwind 2007.accdb"
End With
Set rst = New ADODB.RecordsetWith rst
.Source = "SELECT * FROM Employees"
.ActiveConnection = conn
.OpenDebug.Print rst.Fields.Count.Close
End With
Set rst = Nothingconn.CloseSet conn = Nothing
End Sub
3. Choose Run | Run Sub/UserForm to execute the procedure.
In the code example above, we first define and open a connection to the data-
base. Next, we declare a Recordset object and create a new instance of it. The
Recordset object’s Source property specifies the data you want to retrieve. The
source can be a table, query, stored procedure, view, saved file, or Command
object. The SQL SELECT statement tells VBA to select all the data from the
Employees table. Next, the ActiveConnection property specifies how to con-
nect to the data. We set the ActiveConnection property to the object variable
(conn) that holds the connection information. Finally, the Open method
retrieves the specified records into the recordset. Before we close the recordset
using the Recordset’s Close method, we retrieve the number of fields in the
open recordset by examining the Recordset’s Fields collection, and write the
result to the Immediate window.
Opening a Recordset Based on a Table or Query
A recordset can be based on a table, view, SQL statement, or command that
returns rows. It can be opened via a Connection or Command object’s Execute
method or a Recordset’s Open method (see the example procedures below).
� Using the Execute method of the Connection object
Sub ConnectAndExec()Dim conn As ADODB.ConnectionDim rst As ADODB.Recordset
Set conn = New ADODB.Connectionconn.Open "Provider=Microsoft.Jet.OLEDB.4.0;" & _
"Data Source=" & CurrentProject.Path & _"\Northwind.mdb"
Set rst = conn.Execute("SELECT * FROM Employees")Debug.Print rst.Sourcerst.CloseSet rst = Nothingconn.Close
306 | Chapter 13
Part II

Set conn = NothingEnd Sub
� Note: Once you open the recordset, you can perform the required operationon its data. In this example, we use the Recordset’s Source property to write tothe Immediate window the SQL command on which the recordset is based. Toopen the Northwind 2007.accdb database instead of the Northwind.mdb file,change the provider string to Microsoft.ACE.OLEDB.12.0 and the name of thedatabase to Northwind 2007.accdb:
conn.Open "Provider=Microsoft.ACE.OLEDB.12.0;" & _"Data Source=" & CurrentProject.Path & _"\Northwind 2007.accdb"
� Using the Execute method of the Command object
Sub CommandAndExec()Dim conn As ADODB.ConnectionDim cmd As ADODB.CommandDim rst As ADODB.Recordset
Set conn = New ADODB.ConnectionWith conn
.ConnectionString = "Provider=Microsoft.Jet.OLEDB.4.0;" & _"Data Source=" & CurrentProject.Path & "\Northwind.mdb".Open
End With
Set cmd = New ADODB.CommandWith cmd
.ActiveConnection = conn
.CommandText = "SELECT * FROM Customers"End With
Set rst = cmd.Execute
MsgBox rst.Fields(1).Value
rst.CloseSet rst = Nothingconn.CloseSet conn = Nothing
End Sub
� Note: Once you open the recordset, you can perform the required operationon its data. In this example, we display a message with the name of the firstcustomer.
� Using the Open method of the Recordset object
Sub RecSetOpen()Dim rst As ADODB.RecordsetDim strConnection As String
Finding and Reading Records | 307
Access VBA Programming with DAO and ADO

strConnection = "Provider=Microsoft.Jet.OLEDB.4.0;" & _"Data Source=" & CurrentProject.Path & _"\Northwind.mdb"
Set rst = New ADODB.RecordsetWith rst
.Open "SELECT * FROM Customers", _strConnection, adOpenForwardOnly
.Save CurrentProject.Path & "\MyRst.dat"
.CloseEnd WithSet rst = Nothing
End Sub
� Note: Once you open the recordset, you can perform the required operationon its data. In this example, we save the entire recordset to a disk file namedMyRst.data. In Chapter 16 you learn how to work with records that have beensaved in a file.
The procedure in Hands-On 13-9 illustrates how to open a recordset based on a
table or query.
�Hands-On 13-9: Opening a Recordset Based on a Table or Query (ADO)
1. In the Visual Basic Editor window, choose Insert | Module.
2. In the module’s Code window, type the OpenRst_TableOrQuery proce-
dure shown below, or copy the procedure code from C:\Acc07_HandsOn\
Chap13.txt.
Sub OpenRst_TableOrQuery()Dim conn As ADODB.ConnectionDim rst As ADODB.Recordset
Set conn = New ADODB.ConnectionWith conn
.Provider = "Microsoft.ACE.OLEDB.12.0"
.Open "Data Source=" & CurrentProject.Path & _"\Northwind 2007.accdb"
End With
Set rst = New ADODB.Recordset
rst.Open "Employees", conn
Debug.Print "CursorType: " & rst.CursorType & vbCr _& "LockType: " & rst.LockType & vbCr _& "Cursor Location: " & rst.CursorLocation
Do Until rst.EOFDebug.Print rst.Fields(2)rst.MoveNext
Loop
308 | Chapter 13
Part II

rst.CloseSet rst = Nothingconn.CloseSet conn = Nothing
End Sub
3. Choose Run | Run Sub/UserForm to execute the procedure.
After opening the recordset, it’s a good idea to check what type of recordset
was created. Notice that the procedure above uses the CursorType, LockType,
and CursorLocation properties to retrieve this information. After the procedure
is run, the Immediate window displays the following:
CursorType: 0LockType: 1Cursor Location: 2
Notice that because you did not specify any parameters in the Recordset’s
Open method, you obtained a default recordset. This recordset is forward-only
(0), read-only (1), and server-side (2). (For more information, refer to the sec-
tion titled “Introduction to ADO Recordsets” earlier in this chapter.)
To create a different type of recordset, pass the appropriate parameters to
the Recordset’s Open method. For example, if you open your recordset like
this:
rst.Open "Employees", conn, adUseClient, adLockReadOnly
you will get the static (3), read-only (1), and client-side (3) recordset. In this
recordset, you can easily find out the number of records by using the
Recordset’s RecordCount property:
Debug.Print rst.RecordCount
Next, the procedure above uses the MoveNext method to iterate through all the
records in the recordset until the end of file (EOF) is reached. The Recordset’s
EOF property combined with a looping structure allows you to iterate through
the recordset until the end of the file is reached.
Counting RecordsUse the Recordset object’s RecordCount property to determine the numberof records in a recordset. If the number of records cannot be determined,this property will return –1. The RecordCount property setting depends onthe cursor type and the capabilities of the provider. To get the actual countof records, open the recordset with the static (adOpenStatic) or dynamic(adOpenDynamic) cursor.
To quickly test the contents of the recordset, we write the employees’ last
names to the Immediate window. Since this recordset contains all the fields in
the Employees table, you can add extra code to list the remaining field values.
Finding and Reading Records | 309
Access VBA Programming with DAO and ADO

Is This Recordset Empty?A recordset may be empty. To check whether your recordset has any recordsin it, use the Recordset object’s BOF and EOF properties. The BOF propertystands for “beginning of file,” and EOF indicates “end of file.”
• If you open a Recordset object that contains no records, the BOF andEOF properties are both set to True.
• If you open a Recordset object that contains at least one record, the BOFand EOF properties are False and the first record is the current record.
You can use the following conditional statement to test whether there areany records:
If rst.BOF and rst.EOF ThenMsgBox "This recordset contains no records"
End If
To open a recordset based on a saved query, replace the table name with your
query name.
Opening a Recordset Based on an SQL Statement
The procedure in Hands-On 13-10 demonstrates how to use the Connection
object’s Execute method to open a recordset based on an SQL statement that
selects all the employees from the Employees table in the sample Northwind
2007.accdb database. Only the name of the first employee is written to the
Immediate window. As in the preceding example, the resulting recordset is
forward-only and read-only.
�Hands-On 13-10: Opening a Recordset Based on an SQL Statement (ADO)
1. In the Visual Basic Editor window, choose Insert | Module.
2. In the module’s Code window, type the CreateRst_WithSQL procedure
shown below, or copy the procedure code from C:\Acc07_HandsOn\
Chap13.txt.
Sub CreateRst_WithSQL()Dim conn As ADODB.ConnectionDim rst As ADODB.RecordsetDim strConn As String
strConn = "Provider = Microsoft.ACE.OLEDB.12.0;" & _"Data Source=" & CurrentProject.Path & _"\Northwind 2007.accdb"
Set conn = New ADODB.Connectionconn.Open strConn
Set rst = conn.Execute("SELECT * FROM Employees")Debug.Print rst("Last Name") & ", " & rst("First Name")
rst.CloseSet rst = Nothing
310 | Chapter 13
Part II
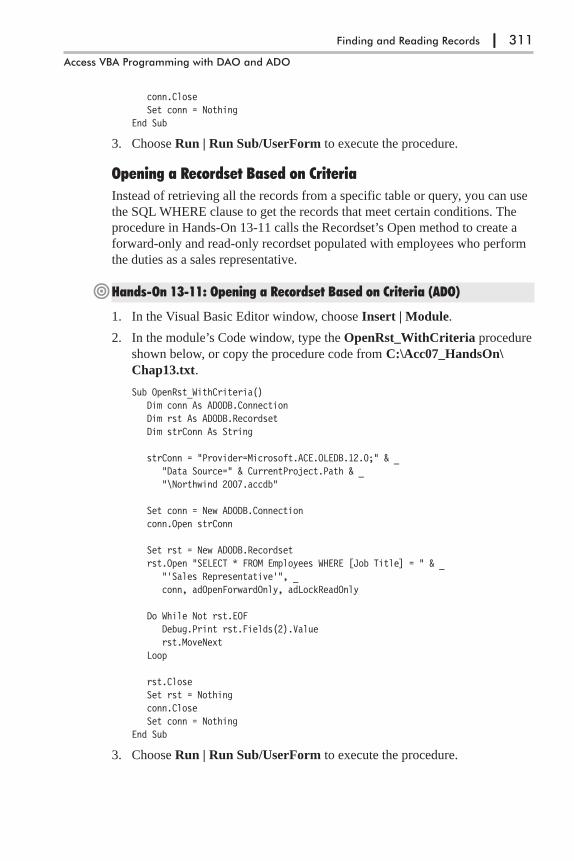
conn.CloseSet conn = Nothing
End Sub
3. Choose Run | Run Sub/UserForm to execute the procedure.
Opening a Recordset Based on Criteria
Instead of retrieving all the records from a specific table or query, you can use
the SQL WHERE clause to get the records that meet certain conditions. The
procedure in Hands-On 13-11 calls the Recordset’s Open method to create a
forward-only and read-only recordset populated with employees who perform
the duties as a sales representative.
�Hands-On 13-11: Opening a Recordset Based on Criteria (ADO)
1. In the Visual Basic Editor window, choose Insert | Module.
2. In the module’s Code window, type the OpenRst_WithCriteria procedure
shown below, or copy the procedure code from C:\Acc07_HandsOn\
Chap13.txt.
Sub OpenRst_WithCriteria()Dim conn As ADODB.ConnectionDim rst As ADODB.RecordsetDim strConn As String
strConn = "Provider=Microsoft.ACE.OLEDB.12.0;" & _"Data Source=" & CurrentProject.Path & _"\Northwind 2007.accdb"
Set conn = New ADODB.Connectionconn.Open strConn
Set rst = New ADODB.Recordsetrst.Open "SELECT * FROM Employees WHERE [Job Title] = " & _
"'Sales Representative'", _conn, adOpenForwardOnly, adLockReadOnly
Do While Not rst.EOFDebug.Print rst.Fields(2).Valuerst.MoveNext
Loop
rst.CloseSet rst = Nothingconn.CloseSet conn = Nothing
End Sub
3. Choose Run | Run Sub/UserForm to execute the procedure.
Finding and Reading Records | 311
Access VBA Programming with DAO and ADO
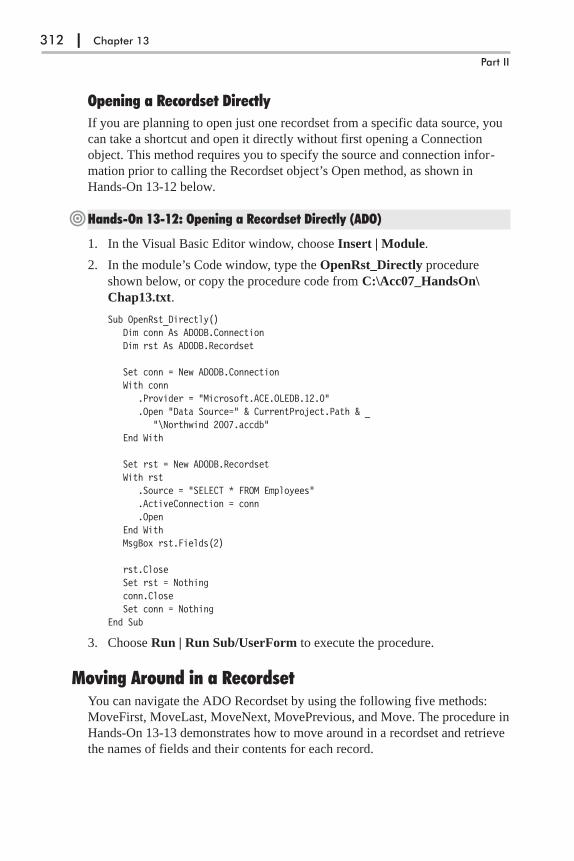
Opening a Recordset Directly
If you are planning to open just one recordset from a specific data source, you
can take a shortcut and open it directly without first opening a Connection
object. This method requires you to specify the source and connection infor-
mation prior to calling the Recordset object’s Open method, as shown in
Hands-On 13-12 below.
�Hands-On 13-12: Opening a Recordset Directly (ADO)
1. In the Visual Basic Editor window, choose Insert | Module.
2. In the module’s Code window, type the OpenRst_Directly procedure
shown below, or copy the procedure code from C:\Acc07_HandsOn\
Chap13.txt.
Sub OpenRst_Directly()Dim conn As ADODB.ConnectionDim rst As ADODB.Recordset
Set conn = New ADODB.ConnectionWith conn
.Provider = "Microsoft.ACE.OLEDB.12.0"
.Open "Data Source=" & CurrentProject.Path & _"\Northwind 2007.accdb"
End With
Set rst = New ADODB.RecordsetWith rst
.Source = "SELECT * FROM Employees"
.ActiveConnection = conn
.OpenEnd WithMsgBox rst.Fields(2)
rst.CloseSet rst = Nothingconn.CloseSet conn = Nothing
End Sub
3. Choose Run | Run Sub/UserForm to execute the procedure.
Moving Around in a RecordsetYou can navigate the ADO Recordset by using the following five methods:
MoveFirst, MoveLast, MoveNext, MovePrevious, and Move. The procedure in
Hands-On 13-13 demonstrates how to move around in a recordset and retrieve
the names of fields and their contents for each record.
312 | Chapter 13
Part II

�Hands-On 13-13: Moving Around in a Recordset (ADO)
1. In the Visual Basic Editor window, choose Insert | Module.
2. In the module’s Code window, type the MoveAround procedure shown
below, or copy the procedure code from C:\Acc07_HandsOn\Chap13.txt.
Sub MoveAround()Dim conn As ADODB.ConnectionDim rst As ADODB.RecordsetDim fld As ADODB.FieldDim strConn As String
strConn = "Provider=Microsoft.Jet.OLEDB.4.0;" & _"Data Source=" & CurrentProject.Path & _"\Northwind.mdb"
Set conn = New ADODB.Connectionconn.Open strConn
Set rst = New ADODB.Recordsetrst.Open "SELECT * FROM Customers WHERE ContactTitle = 'Owner'", _
conn, adOpenForwardOnly, adLockReadOnlyDo While Not rst.EOF
Debug.Print "New Record --------------"For Each fld In rst.Fields
Debug.Print fld.Name & " = " & fld.ValueNextrst.MoveNext
Loop
rst.CloseSet rst = Nothingconn.CloseSet conn = Nothing
End Sub
3. Choose Run | Run Sub/UserForm to execute the procedure.
Finding the Record PositionUse the AbosolutePosition property of the Recordset object to determine the
current record number. This property specifies the relative position of a record
in an ADO Recordset. The procedure in Hands-On 13-14 opens a recordset
filled with employee records from the Employees table in the Northwind data-
base and uses the AbsolutePosition property to return the record number three
times during the procedure execution.
�Hands-On 13-14: Finding the Record Position (ADO)
1. In the Visual Basic Editor window, choose Insert | Module.
2. In the module’s Code window, type the FindRecordPosition procedure
shown below, or copy the procedure code from C:\Acc07_HandsOn\
Chap13.txt.
Finding and Reading Records | 313
Access VBA Programming with DAO and ADO

Sub FindRecordPosition()Dim conn As ADODB.ConnectionDim rst As ADODB.RecordsetDim strConn As String
strConn = "Provider=Microsoft.Jet.OLEDB.4.0;" & _"Data Source=" & CurrentProject.Path & _"\Northwind.mdb"
Set conn = New ADODB.Connectionconn.Open strConn
Set rst = New ADODB.RecordsetWith rst
.Open "SELECT * FROM Employees", conn, adOpenKeyset, _adLockOptimistic, adCmdText
Debug.Print .AbsolutePosition.Move 3 ' move forward 3 recordsDebug.Print .AbsolutePosition.MoveLast ' move to the last recordDebug.Print .AbsolutePositionDebug.Print .RecordCount.Close
End With
Set rst = Nothingconn.CloseSet conn = Nothing
End Sub
3. Choose Run | Run Sub/UserForm to execute the procedure.
Notice that at the beginning of the recordset, the record number is 1. Next, the
FindRecordPosition procedure uses the Move method to move the cursor three
rows ahead, after which the AbsolutePosition property returns 4 (1 + 3) as the
current record position. Finally, the MoveLast method is used to move the cur-
sor to the end of the recordset. The AbsolutePosition property now determines
that this is the ninth record (9). The RecordCount property of the Recordset
object returns the total number of records (9).
Reading Data from a FieldUse the Fields collection of a Recordset object to retrieve the value of a spe-
cific field in an open recordset. The procedure in Hands-On 13-15 uses the
Do…While loop to iterate through the recordset and prints the names of all the
employees to the Immediate window.
�Hands-On 13-15: Retrieving Field Values (ADO)
1. In the Visual Basic Editor window, choose Insert | Module.
2. In the module’s Code window, type the ReadField procedure shown
below, or copy the procedure code from C:\Acc07_HandsOn\Chap13.txt.
314 | Chapter 13
Part II

Sub ReadField()Dim conn As ADODB.ConnectionDim rst As ADODB.Recordset
Set conn = New ADODB.ConnectionWith conn
.Provider = "Microsoft.ACE.OLEDB.12.0"
.Open "Data Source=" & CurrentProject.Path & _"\Northwind 2007.accdb"
End With
Set rst = New ADODB.Recordsetrst.Open "SELECT * FROM Employees", conn, adOpenStatic
Do While Not rst.EOFDebug.Print rst.Fields("Last Name").Valuerst.MoveNext
Loop
rst.CloseSet rst = Nothingconn.CloseSet conn = Nothing
End Sub
3. Choose Run | Run Sub/UserForm to execute the procedure.
Returning a Recordset as a StringInstead of using a loop to read the values of fields in all rows of the open
recordset, you can use the Recordset object’s GetString method to get the
desired data in one step. The GetString method returns a recordset as a
string-valued Variant. This method has the following syntax:
Variant = Recordset.GetString(StringFormat, NumRows, _ColumnDelimiter, RowDelimiter, NullExpr)
� The first argument (StringFormat) determines the format for representing
the recordset as a string. Use the adAddClipString constant as the value for
this argument.
� The second argument (NumRows) specifies the number of recordset rows
to return. If blank, GetString will return all the rows.
� The third argument (ColumnDelimiter) specifies the delimiter for the col-
umns within the row (the default column delimiter is tab (vbTab)).
� The fourth argument (RowDelimiter) specifies a row delimiter (the default
is carriage return (vbCrLf)).
� The fifth argument (NullExpr) specifies an expression to represent Null
values (the default is an empty string ("")).
Finding and Reading Records | 315
Access VBA Programming with DAO and ADO
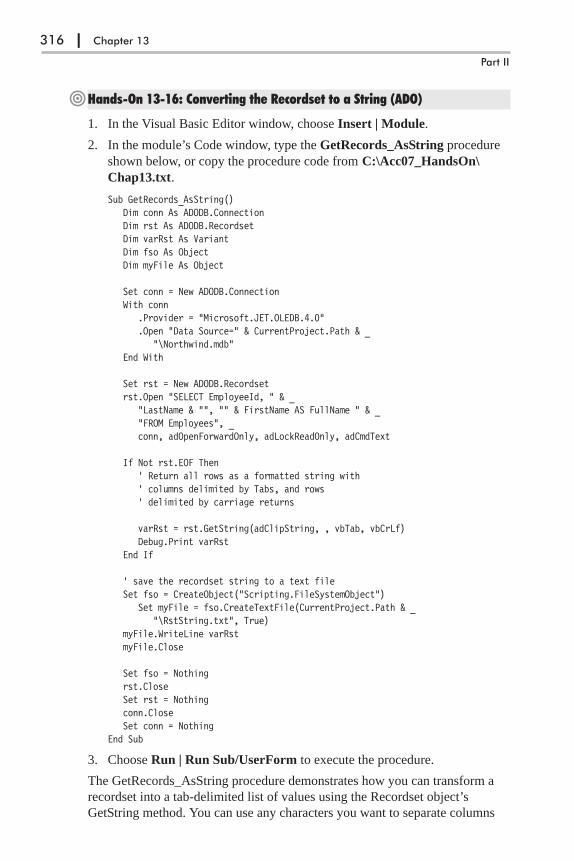
�Hands-On 13-16: Converting the Recordset to a String (ADO)
1. In the Visual Basic Editor window, choose Insert | Module.
2. In the module’s Code window, type the GetRecords_AsString procedure
shown below, or copy the procedure code from C:\Acc07_HandsOn\
Chap13.txt.
Sub GetRecords_AsString()Dim conn As ADODB.ConnectionDim rst As ADODB.RecordsetDim varRst As VariantDim fso As ObjectDim myFile As Object
Set conn = New ADODB.ConnectionWith conn
.Provider = "Microsoft.JET.OLEDB.4.0"
.Open "Data Source=" & CurrentProject.Path & _"\Northwind.mdb"
End With
Set rst = New ADODB.Recordsetrst.Open "SELECT EmployeeId, " & _
"LastName & "", "" & FirstName AS FullName " & _"FROM Employees", _conn, adOpenForwardOnly, adLockReadOnly, adCmdText
If Not rst.EOF Then' Return all rows as a formatted string with' columns delimited by Tabs, and rows' delimited by carriage returns
varRst = rst.GetString(adClipString, , vbTab, vbCrLf)Debug.Print varRst
End If
' save the recordset string to a text fileSet fso = CreateObject("Scripting.FileSystemObject")
Set myFile = fso.CreateTextFile(CurrentProject.Path & _"\RstString.txt", True)
myFile.WriteLine varRstmyFile.Close
Set fso = Nothingrst.CloseSet rst = Nothingconn.CloseSet conn = Nothing
End Sub
3. Choose Run | Run Sub/UserForm to execute the procedure.
The GetRecords_AsString procedure demonstrates how you can transform a
recordset into a tab-delimited list of values using the Recordset object’s
GetString method. You can use any characters you want to separate columns
316 | Chapter 13
Part II

and rows. This procedure uses the following statement to convert a recordset to
a string:
varRst = rst.GetString(adClipString, , vbTab, vbCrLf)
Notice that the second argument is omitted. This indicates that we want to
obtain all the records. To convert only three records to a string, you could write
the following line of code:
varRst = rst.GetString(adClipString, 3, vbTab, vbCrLf)
The vbTab and vbCrLf arguments are VBA constants that denote the Tab and
carriage return characters.
Because adClipString, vbTab, and vbCrLf are default values for the
GetString method’s arguments, you can skip them altogether. Therefore, to put
all of the records in this recordset into a string, you can simply use the
GetString method without arguments, like this:
varRst = rst.GetString
Sometimes you may want to save your recordset string to a file. To gain access
to a computer’s file system, the procedure uses the CreateObject function to
access the FileSystemObject from the Microsoft Scripting Runtime Library.
Using the CreateTextFile method of this object, you can easily create a File
object. Notice that the second argument of the CreateTextFile method (True)
indicates that the file should be overwritten if it already exists. Once you have
defined your file, you can use the WriteLine method of the File object to write
the text to the file. In this example, your text is the variable holding the con-
tents of a recordset converted to a string.
Finding Records Using the Find MethodThe ADO Object Model provides you with two methods for locating records:
Find and Seek. This section demonstrates how to use the ADO Find method to
locate all the employee records based on a condition. ADO has a single Find
method. The search always begins from the current record or an offset from it.
The search direction and the offset from the current record are passed as
parameters to the Find method. The SearchDirection parameter can have the
following values: adSearchForward and adSearchBackward.
�Hands-On 13-17: Finding Records Using the Find Method (ADO)
1. In the Visual Basic Editor window, choose Insert | Module.
2. In the module’s Code window, type the Find_WithFind procedure shown
below, or copy the procedure code from C:\Acc07_HandsOn\Chap13.txt.
Sub Find_WithFind()Dim conn As ADODB.ConnectionDim rst As ADODB.Recordset
Set conn = New ADODB.Connectionconn.Open "Provider=Microsoft.Jet.OLEDB.4.0;" & _
Finding and Reading Records | 317
Access VBA Programming with DAO and ADO

"Data Source=" & CurrentProject.Path & _"\Northwind.mdb"
Set rst = New ADODB.Recordsetrst.Open "Employees", conn, adOpenKeyset, adLockOptimistic
' find the first record matching the criteriarst.Find "TitleOfCourtesy ='Ms.'"Do Until rst.EOF
Debug.Print rst.Fields("LastName").Value' search forward starting from the next recordrst.Find "TitleOfCourtesy ='Ms.'", SkipRecords:=1, _
SearchDirection:=adSearchForwardLoop
rst.CloseSet rst = Nothingconn.CloseSet conn = Nothing
End Sub
3. Choose Run | Run Sub/UserForm to execute the procedure.
To find the last record, call the MoveLast method before using Find. If none of
the records meets the criteria, the current record is positioned before the begin-
ning of the recordset (if searching forward) or after the end of the recordset (if
searching backward). You can use the EOF or BOF properties of the Recordset
object to determine whether a matching record was found.
� Note: The ADO Find method does not support the Is operator. To locate therecord that has a Null value, use the equal sign (=). For example:
' find records that do not have an entry in the ReportsTo fieldrst.Find "ReportsTo = Null"
' find records that have data in the ReportsTo fieldrst.Find " ReportsTo <> Null"
To find records based on more than one condition, use the Filter property of
the Recordset object, as demonstrated in Hands-On 13-19 later in this chapter.
Finding Records Using the Seek MethodYou can use the Recordset object’s Seek method to locate a record based on an
index. If you don’t specify the index before searching, the primary key will be
used. If the record is found, the current row position is changed to that row.
The syntax of the Seek method looks like this:
recordset.Seek KeyValues, SeekOption
The first argument of the Seek method specifies the key values you want to
find. The second argument specifies the type of comparison to be made
between the columns of the index and the corresponding KeyValues.
318 | Chapter 13
Part II
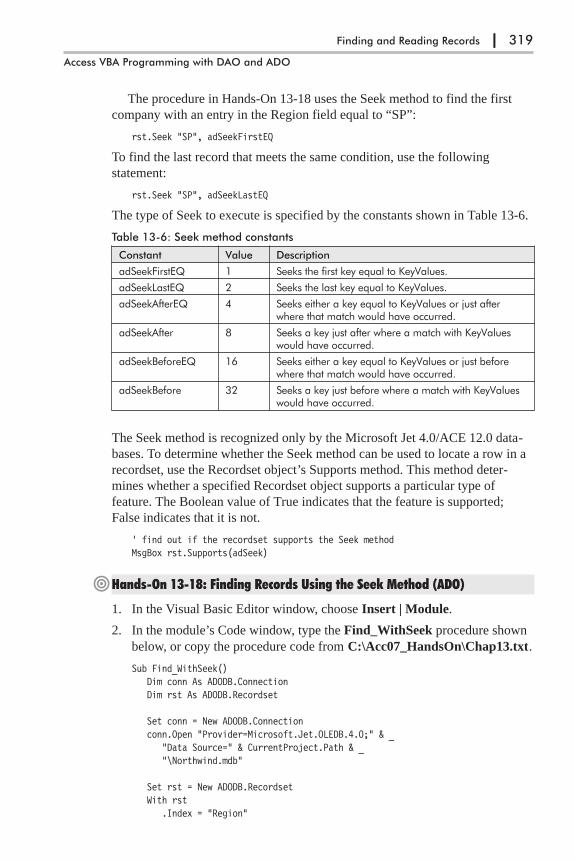
The procedure in Hands-On 13-18 uses the Seek method to find the first
company with an entry in the Region field equal to “SP”:
rst.Seek "SP", adSeekFirstEQ
To find the last record that meets the same condition, use the following
statement:
rst.Seek "SP", adSeekLastEQ
The type of Seek to execute is specified by the constants shown in Table 13-6.
Table 13-6: Seek method constants
Constant Value Description
adSeekFirstEQ 1 Seeks the first key equal to KeyValues.
adSeekLastEQ 2 Seeks the last key equal to KeyValues.
adSeekAfterEQ 4 Seeks either a key equal to KeyValues or just afterwhere that match would have occurred.
adSeekAfter 8 Seeks a key just after where a match with KeyValueswould have occurred.
adSeekBeforeEQ 16 Seeks either a key equal to KeyValues or just beforewhere that match would have occurred.
adSeekBefore 32 Seeks a key just before where a match with KeyValueswould have occurred.
The Seek method is recognized only by the Microsoft Jet 4.0/ACE 12.0 data-
bases. To determine whether the Seek method can be used to locate a row in a
recordset, use the Recordset object’s Supports method. This method deter-
mines whether a specified Recordset object supports a particular type of
feature. The Boolean value of True indicates that the feature is supported;
False indicates that it is not.
' find out if the recordset supports the Seek methodMsgBox rst.Supports(adSeek)
�Hands-On 13-18: Finding Records Using the Seek Method (ADO)
1. In the Visual Basic Editor window, choose Insert | Module.
2. In the module’s Code window, type the Find_WithSeek procedure shown
below, or copy the procedure code from C:\Acc07_HandsOn\Chap13.txt.
Sub Find_WithSeek()Dim conn As ADODB.ConnectionDim rst As ADODB.Recordset
Set conn = New ADODB.Connectionconn.Open "Provider=Microsoft.Jet.OLEDB.4.0;" & _
"Data Source=" & CurrentProject.Path & _"\Northwind.mdb"
Set rst = New ADODB.RecordsetWith rst
.Index = "Region"
Finding and Reading Records | 319
Access VBA Programming with DAO and ADO

.Open "Customers", conn, adOpenKeyset, adLockOptimistic, _adCmdTableDirect
' find out if this recordset supports the Seek methodMsgBox rst.Supports(adSeek).Seek "SP", adSeekFirstEQ
End With
If Not rst.EOF ThenDebug.Print rst.Fields("CompanyName").Value
End If
rst.CloseSet rst = Nothingconn.CloseSet conn = Nothing
End Sub
3. Choose Run | Run Sub/UserForm to execute the procedure.
If the Seek method is based on a multi-field index, use the VBA Array function
to specify values for the KeyValues parameter. For example, the Order Details
table in the Northwind.mdb database uses a multi-field index as the
PrimaryKey. This index is a combination of the OrderID and ProductID fields.
To find the order in which OrderID = 10295 and ProductID = 56, use the fol -
lowing statement:
rst.Seek Array(10295, 56), adSeekFirstEQ
Finding a Record Based on Multiple ConditionsADO’s Find method does not allow you to find records based on more than
one condition. The workaround is using the Recordset object’s Filter property
to create a view of the recordset that only contains records matching the speci-
fied criteria. The procedure in Hands-On 13-19 uses the Filter property to find
the female employees who live in the United States.
�Hands-On 13-19: Finding a Record Based on Multiple Criteria (ADO)
1. In the Visual Basic Editor window, choose Insert | Module.
2. In the module’s Code window, type the Find_WithFilter procedure shown
below, or copy the procedure code from C:\Acc07_HandsOn\Chap13.txt.
Sub Find_WithFilter()Dim conn As ADODB.ConnectionDim rst As ADODB.Recordset
Set conn = New ADODB.Connectionconn.Open "Provider=Microsoft.Jet.OLEDB.4.0;" & _
"Data Source=" & CurrentProject.Path & _"\Northwind.mdb"
320 | Chapter 13
Part II

Set rst = New ADODB.Recordsetrst.Open "Employees", conn, adOpenKeyset, adLockOptimisticrst.Filter = "TitleOfCourtesy ='Ms.' and Country ='USA'"Do Until rst.EOF
Debug.Print rst.Fields("LastName").Valuerst.MoveNext
Loop
rst.CloseSet rst = Nothingconn.CloseSet conn = Nothing
End Sub
3. Choose Run | Run Sub/UserForm to execute the procedure.
Using BookmarksWhen you work with database records you have to keep in mind that the actual
number of records in a recordset can change at any time as new records are
added or others are deleted. Therefore, you cannot save a record number to
return to it later. Because records change all the time, the record numbers can-
not be trusted. However, programmers often need to save the position of a
record after they’ve moved to it or found it based on certain criteria. Instead of
scrolling through every record in a recordset comparing the values, you can
move directly to a specific record by using a bookmark. A bookmark is a value
that uniquely identifies a row in a recordset.
Use the Bookmark property of the Recordset object to mark the record so
you can return to it later. The Bookmark property is read-write, which means
that you can get a bookmark for a record or set the current record in a
Recordset object to the record identified by a valid bookmark. The Recordset’s
Bookmark property always represents the current row. Therefore, if you need
to mark more than one row for later retrieval, you may want to use an array to
store multiple bookmarks (see Hands-On 13-20).
A single bookmark can be stored in a Variant variable. For example, when
you get to a particular row in a recordset and decide that you’d like to save its
location, store the recordset’s bookmark in a variable, like this:
varMyBkmrk = rst.Bookmark
The varMyBkmrk is the name of a Variant variable declared with the following
statement:
Dim varMyBkmrk As Variant
To retrieve the bookmark, move to another row, then use the saved bookmark
to move back to the original row, like this:
rst.Bookmark = varMyBkmrk
Because not all ADO Recordsets support the Bookmark property, you should
use the Supports method to determine if the recordset does. Here’s how:
Finding and Reading Records | 321
Access VBA Programming with DAO and ADO

If rst.Supports(adBookmark) thenMsgBox "Bookmarks are supported."
ElseMsgBox "Sorry, can't use bookmarks!"
End If
Recordsets defined with a Static or Keyset cursor always support bookmarks.
If you remove the adOpenKeyset intrinsic constant from the code used in the
next procedure (Hands-On 13-20), the default cursor (adOpenForwardOnly)
will be used, and you’ll get an error because this cursor does not support
bookmarks.
Another precaution to keep in mind is that there is no valid bookmark when
the current row is positioned at the new row in a recordset. For example, if you
add a new record with the following statement:
rst.AddNew
and then attempt to mark this record with a bookmark:
varMyBkmrk = rst.Book
you will get an error.
When you close the recordset, bookmarks you’ve saved become invalid.
Also, bookmarks are unique to the recordset in which they were created. This
means that you cannot use a bookmark created in one recordset to move to the
same record in another recordset. However, if you clone a recordset (that is,
you create a duplicate Recordset object), a Bookmark object from one
Recordset object will refer to the same record in its clone. (See the section
called “Cloning a Recordset” in Chapter 16.)
�Hands-On 13-20: Marking Records with a Bookmark (ADO)
1. In the Visual Basic Editor window, choose Insert | Module.
2. In the module’s Code window, type the TestBookmark procedure shown
below, or copy the procedure code from C:\Acc07_HandsOn\Chap13.txt.
Sub TestBookmark()Dim conn As ADODB.ConnectionDim rst As ADODB.RecordsetDim varMyBkmrk As Variant
Set conn = New ADODB.Connectionconn.Open "Provider=Microsoft.Jet.OLEDB.4.0;" & _
"Data Source=" & CurrentProject.Path & _"\Northwind.mdb"
Set rst = New ADODB.Recordsetrst.Open "Employees", conn, adOpenKeyset
If Not rst.Supports(adBookmark) ThenMsgBox "This recordset does not support bookmarks!"Exit Sub
End If
322 | Chapter 13
Part II

varMyBkmrk = rst.BookmarkDebug.Print rst.Fields(1).Value
' Move to the 7th rowrst.AbsolutePosition = 7Debug.Print rst.Fields(1).Value
' move back to the first row using bookmarkrst.Bookmark = varMyBkmrkDebug.Print rst.Fields(1).Valuerst.CloseSet rst = Nothing
End Sub
3. Choose Run | Run Sub/UserForm to execute the procedure.
Notice that the procedure above uses the AbsolutePosition property of the
Recordset object. The absolute position isn’t the same as the record number.
This property can change if a record with a lower number is deleted.
Using Bookmarks to Filter a RecordsetBookmarks provide the fastest way of moving through rows. You can also use
them to filter a recordset as shown in Hands-On 13-21.
�Hands-On 13-21: Using Bookmarks to Filter Records (ADO)
1. In the Visual Basic Editor window, choose Insert | Module.
2. In the module’s Code window, type the Filter_WithBookmark procedure
shown below, or copy the procedure code from C:\Acc07_HandsOn\
Chap13.txt.
Sub Filter_WithBookmark()Dim rst As ADODB.RecordsetDim varMyBkmrk() As VariantDim strConn As StringDim i As IntegerDim strCountry As StringDim strCity As String
i = 0strCountry = "France"strCity = "Paris"
strConn = "Provider=Microsoft.Jet.OLEDB.4.0;" & _"Data Source=" & CurrentProject.Path & _"\Northwind.mdb"
Set rst = New ADODB.Recordsetrst.Open "Customers", strConn, adOpenKeyset
If Not rst.Supports(adBookmark) ThenMsgBox "This recordset does not support bookmarks!"Exit Sub
Finding and Reading Records | 323
Access VBA Programming with DAO and ADO

End If
Do While Not rst.EOFIf rst.Fields("Country") = strCountry And _
rst.Fields("City") = strCity ThenReDim Preserve varMyBkmrk(i)varMyBkmrk(i) = rst.Bookmarki = i + 1
End Ifrst.MoveNext
Loop
rst.Filter = varMyBkmrk()
rst.MoveFirstDo While Not rst.EOF
Debug.Print rst("CustomerId") & _" - " & rst("CompanyName")
rst.MoveNextLooprst.CloseSet rst = Nothing
End Sub
3. Choose Run | Run Sub/UserForm to execute the procedure.
Using the GetRows Method to Fill the RecordsetTo retrieve multiple rows from a recordset, use the GetRows method, which
returns a two-dimensional array. To find out how many rows were retrieved,
use VBA’s UBound function, as illustrated in Hands-On 13-22 below. Because
arrays are zero-based by default, you must add one (1) to the result of the
UBound function to get the correct record count.
�Hands-On 13-22: Counting the Number of Returned Records (ADO)
1. In the Visual Basic Editor window, choose Insert | Module.
2. In the module’s Code window, type the CountRecords procedure shown
below, or copy the procedure code from C:\Acc07_HandsOn\Chap13.txt.
Sub CountRecords()Dim conn As ADODB.ConnectionDim rst As ADODB.RecordsetDim myarray As VariantDim returnedRows As IntegerDim r As Integer 'record counterDim f As Integer 'field counter
Set conn = New ADODB.Connectionconn.Open "Provider=Microsoft.Jet.OLEDB.4.0;" & _
"Data Source=" & CurrentProject.Path & _"\Northwind.mdb"
324 | Chapter 13
Part II
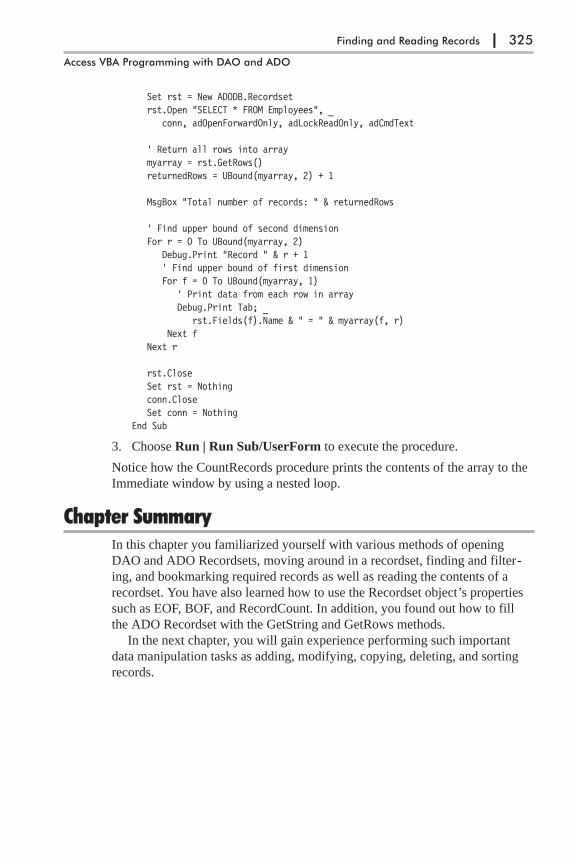
Set rst = New ADODB.Recordsetrst.Open "SELECT * FROM Employees", _
conn, adOpenForwardOnly, adLockReadOnly, adCmdText
' Return all rows into arraymyarray = rst.GetRows()returnedRows = UBound(myarray, 2) + 1
MsgBox "Total number of records: " & returnedRows
' Find upper bound of second dimensionFor r = 0 To UBound(myarray, 2)
Debug.Print "Record " & r + 1' Find upper bound of first dimensionFor f = 0 To UBound(myarray, 1)
' Print data from each row in arrayDebug.Print Tab; _
rst.Fields(f).Name & " = " & myarray(f, r)Next f
Next r
rst.CloseSet rst = Nothingconn.CloseSet conn = Nothing
End Sub
3. Choose Run | Run Sub/UserForm to execute the procedure.
Notice how the CountRecords procedure prints the contents of the array to the
Immediate window by using a nested loop.
Chapter SummaryIn this chapter you familiarized yourself with various methods of opening
DAO and ADO Recordsets, moving around in a recordset, finding and filter-
ing, and bookmarking required records as well as reading the contents of a
recordset. You have also learned how to use the Recordset object’s properties
such as EOF, BOF, and RecordCount. In addition, you found out how to fill
the ADO Recordset with the GetString and GetRows methods.
In the next chapter, you will gain experience performing such important
data manipulation tasks as adding, modifying, copying, deleting, and sorting
records.
Finding and Reading Records | 325
Access VBA Programming with DAO and ADO
Chapter 14
Working with Records
Now that you’ve familiarized yourself with various methods of opening, mov-
ing around in, and finding records, and reading the contents of a recordset,
let’s look at DAO and ADO techniques for adding, modifying, copying, delet-
ing, and sorting records.
Adding a New Record with DAOIn the Microsoft Access user interface, before you can add a new record to a
table you must first open the appropriate table. In code, you simply open the
Recordset object by calling the OpenRecordset method. For example, the fol-
lowing statements declare and open the Recordset object based on the
Employees table:
Dim tblRst As DAO.RecordsetSet tblRst = db.OpenRecordset("Employees")
Once the Recordset object is open, use the AddNew method to create a blank
record. For example:
tblRst.AddNew
Next, you may set values for all or some of the fields in the new record. You
must set the field’s value if the Required property of a field is set to True. In
the Microsoft Access user interface in Table Design view, there will be a Yes
entry next to the Required property if the entry in the selected field is required.
Here are some examples of setting field values in code:
tblRst.Fields(“Last Name”).Value = "Smith"tblRst.Fields(“Job Title”).Value = "Marketing Director"
Note that because Value is the default property of a Field object, the use of this
keyword is optional and it was omitted in the code of the example procedure in
Hands-On 14-1.
After filling in field values, you need to use the Update method on the
Recordset object to ensure that the newly added record is saved:
tblRst.Update
Hands-On 14-1 demonstrates how to add a new record to the Employees table
and populate some of its fields with values.
326
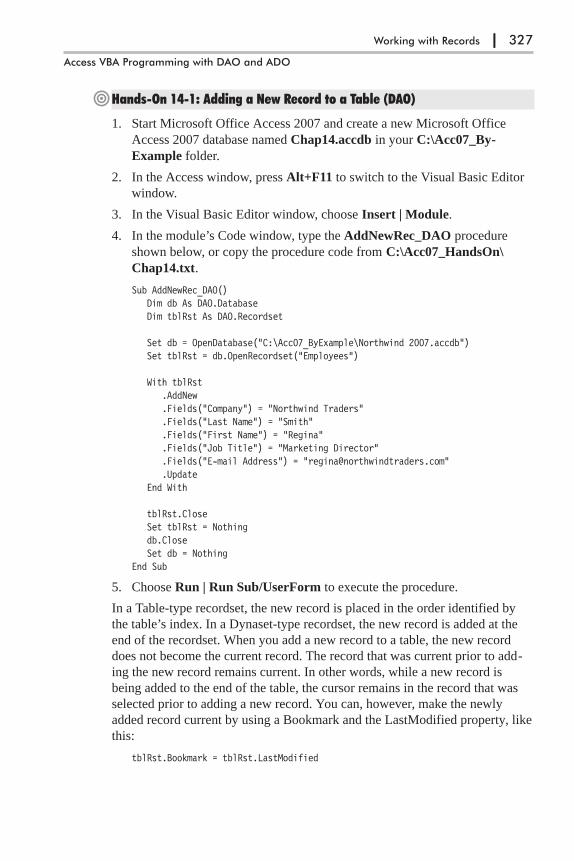
�Hands-On 14-1: Adding a New Record to a Table (DAO)
1. Start Microsoft Office Access 2007 and create a new Microsoft Office
Access 2007 database named Chap14.accdb in your C:\Acc07_By-
Example folder.
2. In the Access window, press Alt+F11 to switch to the Visual Basic Editor
window.
3. In the Visual Basic Editor window, choose Insert | Module.
4. In the module’s Code window, type the AddNewRec_DAO procedure
shown below, or copy the procedure code from C:\Acc07_HandsOn\
Chap14.txt.
Sub AddNewRec_DAO()Dim db As DAO.DatabaseDim tblRst As DAO.Recordset
Set db = OpenDatabase("C:\Acc07_ByExample\Northwind 2007.accdb")Set tblRst = db.OpenRecordset("Employees")
With tblRst.AddNew.Fields("Company") = "Northwind Traders".Fields("Last Name") = "Smith".Fields("First Name") = "Regina".Fields("Job Title") = "Marketing Director".Fields("E-mail Address") = "[email protected]".Update
End With
tblRst.CloseSet tblRst = Nothingdb.CloseSet db = Nothing
End Sub
5. Choose Run | Run Sub/UserForm to execute the procedure.
In a Table-type recordset, the new record is placed in the order identified by
the table’s index. In a Dynaset-type recordset, the new record is added at the
end of the recordset. When you add a new record to a table, the new record
does not become the current record. The record that was current prior to add-
ing the new record remains current. In other words, while a new record is
being added to the end of the table, the cursor remains in the record that was
selected prior to adding a new record. You can, however, make the newly
added record current by using a Bookmark and the LastModified property, like
this:
tblRst.Bookmark = tblRst.LastModified
Working with Records | 327
Access VBA Programming with DAO and ADO

Adding a New Record with ADOTo add a new record, use the ADO Recordset’s AddNew method. Use the
Update method if you are not going to add any more records. In ADO, it is not
necessary to call the Update method if you are moving to the next record. Call-
ing the Move method implicitly calls the Update method before moving to the
new record. For example, look at the following statements:
rst![Last Name] = "Roberts"rst.MoveNext
In the code fragment above, the Update method is automatically called when
you move to the next record.
The procedure in Hands-On 14-2 demonstrates how to add a new record to
the Employees table.
�Hands-On 14-2: Adding a New Record to a Table (ADO)
1. In the Visual Basic Editor window, choose Insert | Module.
2. In the module’s Code window, type the AddNewRec_ADO procedure
shown below, or copy the procedure code from C:\Acc07_HandsOn\
Chap14.txt.
' Use the References dialog box' to set up a reference to' the Microsoft ActiveX Data 2.8 Object Library
Sub AddNewRec_ADO()Dim conn As ADODB.ConnectionDim rst As ADODB.RecordsetDim strConn As String
strConn = "Provider=Microsoft.ACE.OLEDB.12.0;" & _"Data Source=" & CurrentProject.Path & _"\Northwind 2007.accdb"
Set rst = New ADODB.RecordsetWith rst
.Open "SELECT * FROM Employees", _strConn, adOpenKeyset, adLockOptimistic
' Add a record and specify some field values.AddNew![Company] = "Northwind Traders"![Last Name] = "Roberts"![First Name] = "Paul"![Job Title] = "Sales Representative"![E-mail Address] = "[email protected]"
' Retrieve the Employee ID for the current recordDebug.Print !ID.Value
' Move to the first record
328 | Chapter 14
Part II
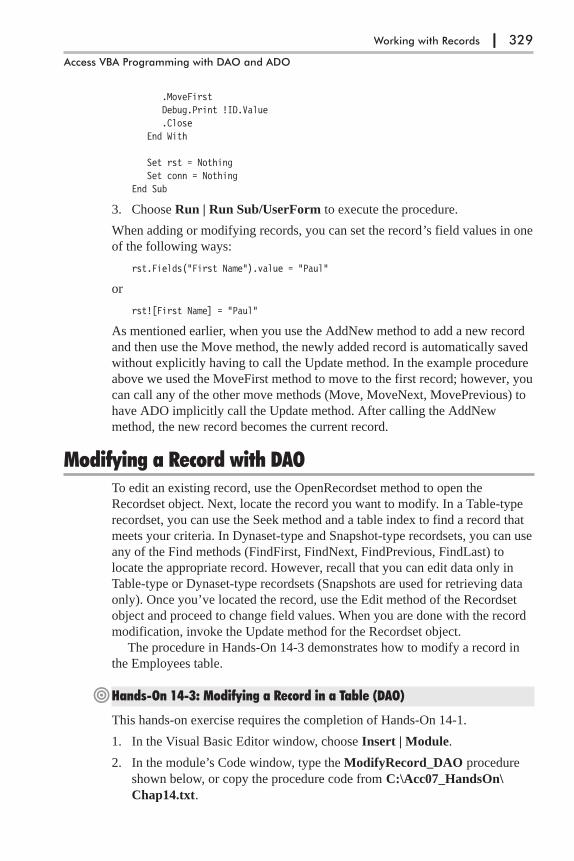
.MoveFirstDebug.Print !ID.Value.Close
End With
Set rst = NothingSet conn = Nothing
End Sub
3. Choose Run | Run Sub/UserForm to execute the procedure.
When adding or modifying records, you can set the record’s field values in one
of the following ways:
rst.Fields("First Name").value = "Paul"
or
rst![First Name] = "Paul"
As mentioned earlier, when you use the AddNew method to add a new record
and then use the Move method, the newly added record is automatically saved
without explicitly having to call the Update method. In the example procedure
above we used the MoveFirst method to move to the first record; however, you
can call any of the other move methods (Move, MoveNext, MovePrevious) to
have ADO implicitly call the Update method. After calling the AddNew
method, the new record becomes the current record.
Modifying a Record with DAOTo edit an existing record, use the OpenRecordset method to open the
Recordset object. Next, locate the record you want to modify. In a Table-type
recordset, you can use the Seek method and a table index to find a record that
meets your criteria. In Dynaset-type and Snapshot-type recordsets, you can use
any of the Find methods (FindFirst, FindNext, FindPrevious, FindLast) to
locate the appropriate record. However, recall that you can edit data only in
Table-type or Dynaset-type recordsets (Snapshots are used for retrieving data
only). Once you’ve located the record, use the Edit method of the Recordset
object and proceed to change field values. When you are done with the record
modification, invoke the Update method for the Recordset object.
The procedure in Hands-On 14-3 demonstrates how to modify a record in
the Employees table.
�Hands-On 14-3: Modifying a Record in a Table (DAO)
This hands-on exercise requires the completion of Hands-On 14-1.
1. In the Visual Basic Editor window, choose Insert | Module.
2. In the module’s Code window, type the ModifyRecord_DAO procedure
shown below, or copy the procedure code from C:\Acc07_HandsOn\
Chap14.txt.
Working with Records | 329
Access VBA Programming with DAO and ADO
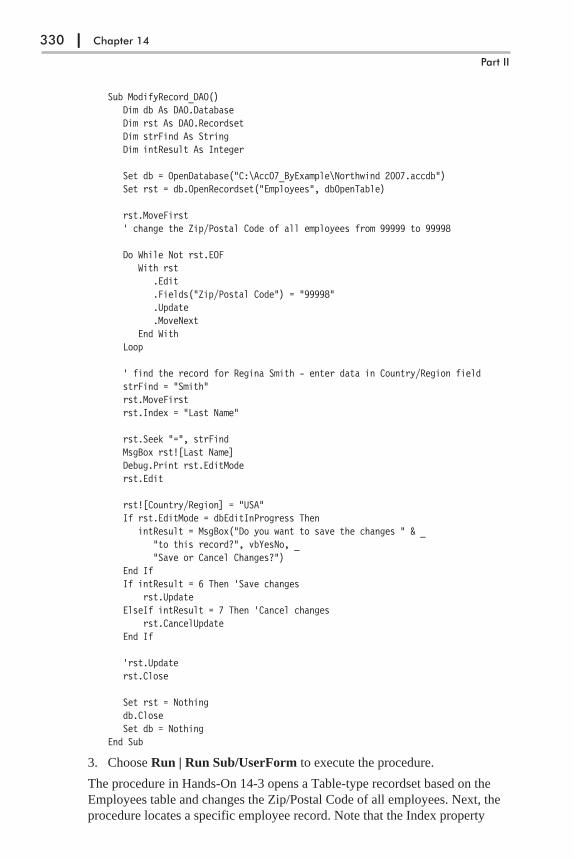
Sub ModifyRecord_DAO()Dim db As DAO.DatabaseDim rst As DAO.RecordsetDim strFind As StringDim intResult As Integer
Set db = OpenDatabase("C:\Acc07_ByExample\Northwind 2007.accdb")Set rst = db.OpenRecordset("Employees", dbOpenTable)
rst.MoveFirst' change the Zip/Postal Code of all employees from 99999 to 99998
Do While Not rst.EOFWith rst
.Edit
.Fields("Zip/Postal Code") = "99998"
.Update
.MoveNextEnd With
Loop
' find the record for Regina Smith - enter data in Country/Region fieldstrFind = "Smith"rst.MoveFirstrst.Index = "Last Name"
rst.Seek "=", strFindMsgBox rst![Last Name]Debug.Print rst.EditModerst.Edit
rst![Country/Region] = "USA"If rst.EditMode = dbEditInProgress Then
intResult = MsgBox("Do you want to save the changes " & _"to this record?", vbYesNo, _"Save or Cancel Changes?")
End IfIf intResult = 6 Then 'Save changes
rst.UpdateElseIf intResult = 7 Then 'Cancel changes
rst.CancelUpdateEnd If
'rst.Updaterst.Close
Set rst = Nothingdb.CloseSet db = Nothing
End Sub
3. Choose Run | Run Sub/UserForm to execute the procedure.
The procedure in Hands-On 14-3 opens a Table-type recordset based on the
Employees table and changes the Zip/Postal Code of all employees. Next, the
procedure locates a specific employee record. Note that the Index property
330 | Chapter 14
Part II
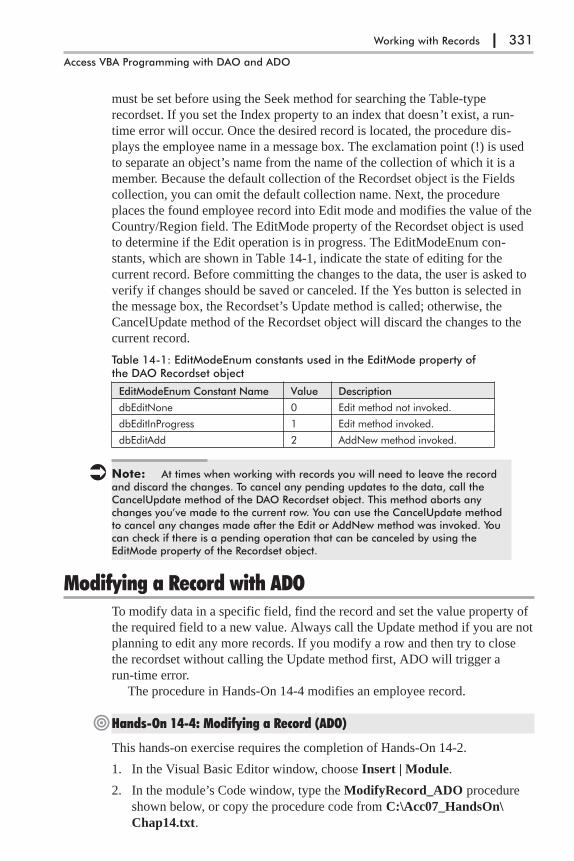
must be set before using the Seek method for searching the Table-type
recordset. If you set the Index property to an index that doesn’t exist, a run-
time error will occur. Once the desired record is located, the procedure dis-
plays the employee name in a message box. The exclamation point (!) is used
to separate an object’s name from the name of the collection of which it is a
member. Because the default collection of the Recordset object is the Fields
collection, you can omit the default collection name. Next, the procedure
places the found employee record into Edit mode and modifies the value of the
Country/Region field. The EditMode property of the Recordset object is used
to determine if the Edit operation is in progress. The EditModeEnum con-
stants, which are shown in Table 14-1, indicate the state of editing for the
current record. Before committing the changes to the data, the user is asked to
verify if changes should be saved or canceled. If the Yes button is selected in
the message box, the Recordset’s Update method is called; otherwise, the
CancelUpdate method of the Recordset object will discard the changes to the
current record.
Table 14-1: EditModeEnum constants used in the EditMode property ofthe DAO Recordset object
EditModeEnum Constant Name Value Description
dbEditNone 0 Edit method not invoked.
dbEditInProgress 1 Edit method invoked.
dbEditAdd 2 AddNew method invoked.
� Note: At times when working with records you will need to leave the recordand discard the changes. To cancel any pending updates to the data, call theCancelUpdate method of the DAO Recordset object. This method aborts anychanges you’ve made to the current row. You can use the CancelUpdate methodto cancel any changes made after the Edit or AddNew method was invoked. Youcan check if there is a pending operation that can be canceled by using theEditMode property of the Recordset object.
Modifying a Record with ADOTo modify data in a specific field, find the record and set the value property of
the required field to a new value. Always call the Update method if you are not
planning to edit any more records. If you modify a row and then try to close
the recordset without calling the Update method first, ADO will trigger a
run-time error.
The procedure in Hands-On 14-4 modifies an employee record.
�Hands-On 14-4: Modifying a Record (ADO)
This hands-on exercise requires the completion of Hands-On 14-2.
1. In the Visual Basic Editor window, choose Insert | Module.
2. In the module’s Code window, type the ModifyRecord_ADO procedure
shown below, or copy the procedure code from C:\Acc07_HandsOn\
Chap14.txt.
Working with Records | 331
Access VBA Programming with DAO and ADO
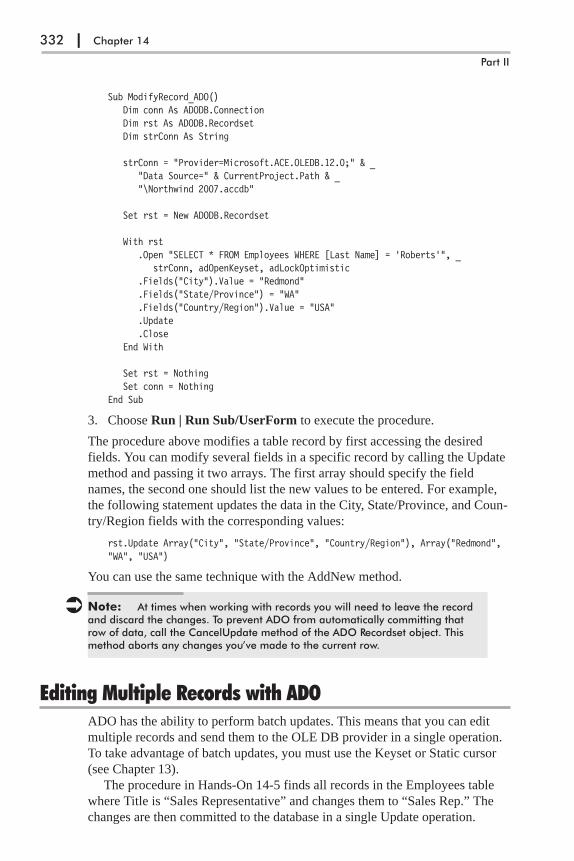
Sub ModifyRecord_ADO()Dim conn As ADODB.ConnectionDim rst As ADODB.RecordsetDim strConn As String
strConn = "Provider=Microsoft.ACE.OLEDB.12.0;" & _"Data Source=" & CurrentProject.Path & _"\Northwind 2007.accdb"
Set rst = New ADODB.Recordset
With rst.Open "SELECT * FROM Employees WHERE [Last Name] = 'Roberts'", _
strConn, adOpenKeyset, adLockOptimistic.Fields("City").Value = "Redmond".Fields("State/Province") = "WA".Fields("Country/Region").Value = "USA".Update.Close
End With
Set rst = NothingSet conn = Nothing
End Sub
3. Choose Run | Run Sub/UserForm to execute the procedure.
The procedure above modifies a table record by first accessing the desired
fields. You can modify several fields in a specific record by calling the Update
method and passing it two arrays. The first array should specify the field
names, the second one should list the new values to be entered. For example,
the following statement updates the data in the City, State/Province, and Coun-
try/Region fields with the corresponding values:
rst.Update Array("City", "State/Province", "Country/Region"), Array("Redmond","WA", "USA")
You can use the same technique with the AddNew method.
� Note: At times when working with records you will need to leave the recordand discard the changes. To prevent ADO from automatically committing thatrow of data, call the CancelUpdate method of the ADO Recordset object. Thismethod aborts any changes you’ve made to the current row.
Editing Multiple Records with ADOADO has the ability to perform batch updates. This means that you can edit
multiple records and send them to the OLE DB provider in a single operation.
To take advantage of batch updates, you must use the Keyset or Static cursor
(see Chapter 13).
The procedure in Hands-On 14-5 finds all records in the Employees table
where Title is “Sales Representative” and changes them to “Sales Rep.” The
changes are then committed to the database in a single Update operation.
332 | Chapter 14
Part II
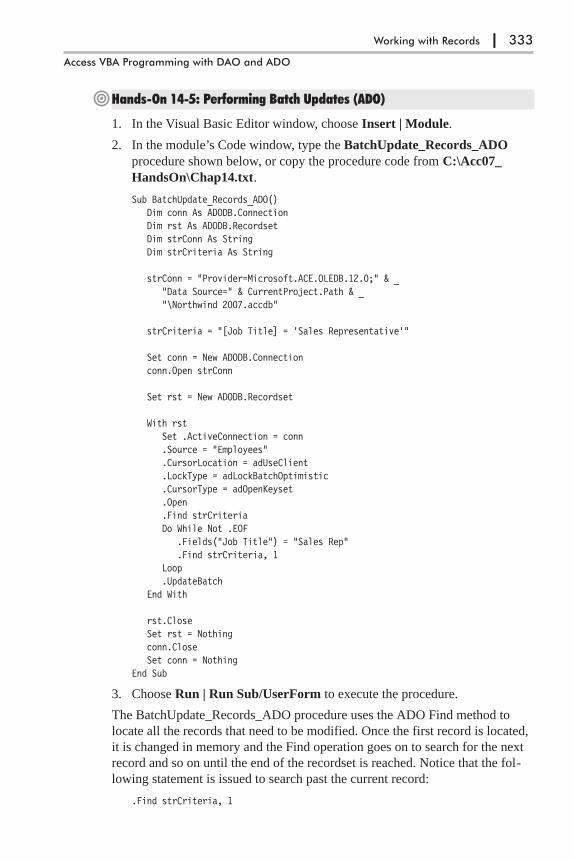
�Hands-On 14-5: Performing Batch Updates (ADO)
1. In the Visual Basic Editor window, choose Insert | Module.
2. In the module’s Code window, type the BatchUpdate_Records_ADO
procedure shown below, or copy the procedure code from C:\Acc07_
HandsOn\Chap14.txt.
Sub BatchUpdate_Records_ADO()Dim conn As ADODB.ConnectionDim rst As ADODB.RecordsetDim strConn As StringDim strCriteria As String
strConn = "Provider=Microsoft.ACE.OLEDB.12.0;" & _"Data Source=" & CurrentProject.Path & _"\Northwind 2007.accdb"
strCriteria = "[Job Title] = 'Sales Representative'"
Set conn = New ADODB.Connectionconn.Open strConn
Set rst = New ADODB.Recordset
With rstSet .ActiveConnection = conn.Source = "Employees".CursorLocation = adUseClient.LockType = adLockBatchOptimistic.CursorType = adOpenKeyset.Open.Find strCriteriaDo While Not .EOF
.Fields("Job Title") = "Sales Rep"
.Find strCriteria, 1Loop.UpdateBatch
End With
rst.CloseSet rst = Nothingconn.CloseSet conn = Nothing
End Sub
3. Choose Run | Run Sub/UserForm to execute the procedure.
The BatchUpdate_Records_ADO procedure uses the ADO Find method to
locate all the records that need to be modified. Once the first record is located,
it is changed in memory and the Find operation goes on to search for the next
record and so on until the end of the recordset is reached. Notice that the fol-
lowing statement is issued to search past the current record:
.Find strCriteria, 1
Working with Records | 333
Access VBA Programming with DAO and ADO
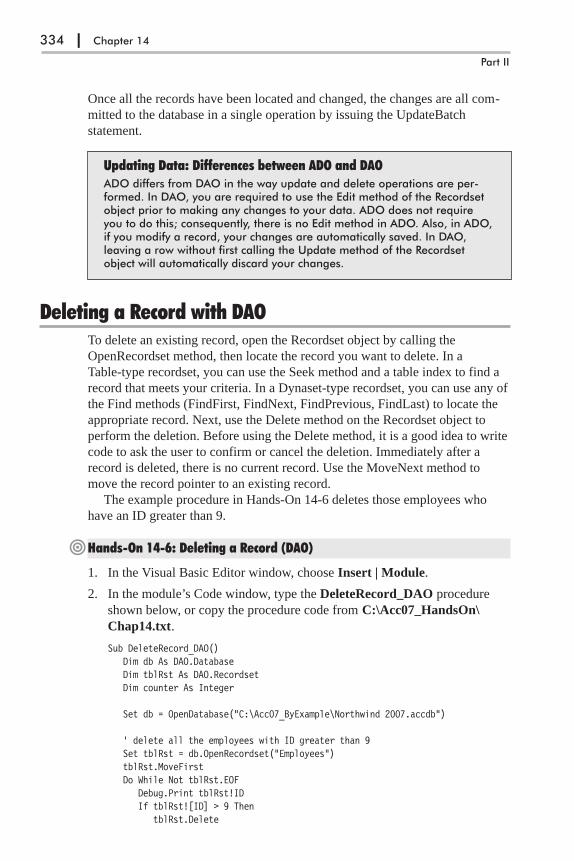
Once all the records have been located and changed, the changes are all com-
mitted to the database in a single operation by issuing the UpdateBatch
statement.
Updating Data: Differences between ADO and DAOADO differs from DAO in the way update and delete operations are per-formed. In DAO, you are required to use the Edit method of the Recordsetobject prior to making any changes to your data. ADO does not requireyou to do this; consequently, there is no Edit method in ADO. Also, in ADO,if you modify a record, your changes are automatically saved. In DAO,leaving a row without first calling the Update method of the Recordsetobject will automatically discard your changes.
Deleting a Record with DAOTo delete an existing record, open the Recordset object by calling the
OpenRecordset method, then locate the record you want to delete. In a
Table-type recordset, you can use the Seek method and a table index to find a
record that meets your criteria. In a Dynaset-type recordset, you can use any of
the Find methods (FindFirst, FindNext, FindPrevious, FindLast) to locate the
appropriate record. Next, use the Delete method on the Recordset object to
perform the deletion. Before using the Delete method, it is a good idea to write
code to ask the user to confirm or cancel the deletion. Immediately after a
record is deleted, there is no current record. Use the MoveNext method to
move the record pointer to an existing record.
The example procedure in Hands-On 14-6 deletes those employees who
have an ID greater than 9.
�Hands-On 14-6: Deleting a Record (DAO)
1. In the Visual Basic Editor window, choose Insert | Module.
2. In the module’s Code window, type the DeleteRecord_DAO procedure
shown below, or copy the procedure code from C:\Acc07_HandsOn\
Chap14.txt.
Sub DeleteRecord_DAO()Dim db As DAO.DatabaseDim tblRst As DAO.RecordsetDim counter As Integer
Set db = OpenDatabase("C:\Acc07_ByExample\Northwind 2007.accdb")
' delete all the employees with ID greater than 9Set tblRst = db.OpenRecordset("Employees")tblRst.MoveFirstDo While Not tblRst.EOF
Debug.Print tblRst!IDIf tblRst![ID] > 9 Then
tblRst.Delete
334 | Chapter 14
Part II

counter = counter + 1End IftblRst.MoveNext
Loop
MsgBox "Number of deleted records: " & countertblRst.CloseSet tblRst = Nothingdb.CloseSet db = Nothing
End Sub
3. Choose Run | Run Sub/UserForm to execute the procedure.
The statement Do While Not tblRst.EOF tells Visual Basic to execute the state-
ments inside the loop until the end of file (EOF) is reached. The conditional
statement inside the loop checks the value of the ID field, and deletes the cur-
rent record only if the specified condition is True. Every time a record is
deleted, the counter variable’s value is increased by 1. The counter variable
stores the total number of deleted records. After the record is deleted, the
MoveNext method is called to move the record pointer to the next existing
record as long as the end of file has not yet been reached. Even though you can
use the Delete method and the While loop to remove the required records as
shown in Hands-On 14-6, it is more efficient to delete records with a Delete
query.
Deleting a Record with ADOTo delete a record, find the record you want to delete and call the Delete
method. After you delete a record, it’s still the current record. You must use the
MoveNext method to move to the next row if you are planning to perform
additional operations with your records. An attempt to do anything with the
row that has just been deleted will generate a run-time error. The procedure in
Hands-On 14-7 deletes a record from the Employees table.
�Hands-On 14-7: Deleting a Record (ADO)
This hands-on requires the completion of Hands-On 14-2.
1. In the Visual Basic Editor window, choose Insert | Module.
2. In the module’s Code window, type the Delete_Record_ADO procedure
shown below, or copy the procedure code from C:\Acc07_HandsOn\
Chap14.txt.
Sub Delete_Record_ADO()Dim conn As ADODB.ConnectionDim rst As ADODB.RecordsetDim strConn As StringDim strCriteria As String
'call procedure from Hands-On 14-2 to ensure'that we have a record to delete
Working with Records | 335
Access VBA Programming with DAO and ADO
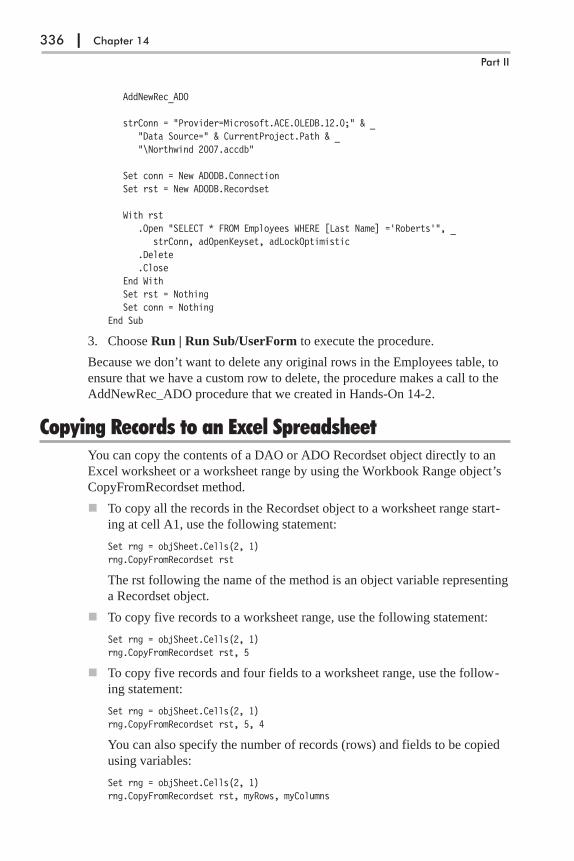
AddNewRec_ADO
strConn = "Provider=Microsoft.ACE.OLEDB.12.0;" & _"Data Source=" & CurrentProject.Path & _"\Northwind 2007.accdb"
Set conn = New ADODB.ConnectionSet rst = New ADODB.Recordset
With rst.Open "SELECT * FROM Employees WHERE [Last Name] ='Roberts'", _
strConn, adOpenKeyset, adLockOptimistic.Delete.Close
End WithSet rst = NothingSet conn = Nothing
End Sub
3. Choose Run | Run Sub/UserForm to execute the procedure.
Because we don’t want to delete any original rows in the Employees table, to
ensure that we have a custom row to delete, the procedure makes a call to the
AddNewRec_ADO procedure that we created in Hands-On 14-2.
Copying Records to an Excel SpreadsheetYou can copy the contents of a DAO or ADO Recordset object directly to an
Excel worksheet or a worksheet range by using the Workbook Range object’s
CopyFromRecordset method.
� To copy all the records in the Recordset object to a worksheet range start-
ing at cell A1, use the following statement:
Set rng = objSheet.Cells(2, 1)rng.CopyFromRecordset rst
The rst following the name of the method is an object variable representing
a Recordset object.
� To copy five records to a worksheet range, use the following statement:
Set rng = objSheet.Cells(2, 1)rng.CopyFromRecordset rst, 5
� To copy five records and four fields to a worksheet range, use the follow-
ing statement:
Set rng = objSheet.Cells(2, 1)rng.CopyFromRecordset rst, 5, 4
You can also specify the number of records (rows) and fields to be copied
using variables:
Set rng = objSheet.Cells(2, 1)rng.CopyFromRecordset rst, myRows, myColumns
336 | Chapter 14
Part II

The procedure in Hands-On 14-8 uses the CopyFromRecordset method to
copy data from the Employees table to an Excel worksheet.
�Hands-On 14-8: Copying Records to an Excel Worksheet (DAO)
1. In the Visual Basic Editor window, choose Insert | Module.
2. In the module’s Code window, type the ExportToExcel_DAO procedure
shown below, or copy the procedure code from C:\Acc07_HandsOn\
Chap14.txt.
Sub ExportToExcel_DAO()Dim db As DAO.DatabaseDim rst As DAO.RecordsetDim xlApp As ObjectDim wkb As ObjectDim rng As ObjectDim strExcelFile As StringDim strDB As StringDim strTable As StringDim count As IntegerDim iCol As IntegerDim rowsToReturn As Integer
strDB = "C:\Acc07_ByExample\Northwind 2007.accdb"strTable = "Employees"strExcelFile = CurrentProject.Path & "\ExcelFromAccess.xls"
'If Excel file already exists delete itIf Dir(strExcelFile) <> "" Then Kill strExcelFile
Set db = OpenDatabase(strDB)Set rst = db.OpenRecordset(strTable)
'get the number of records from the recordsetcount = rst.RecordCount
rowsToReturn = CInt(InputBox("How many records to copy?"))If rowsToReturn <= count Then
'set the reference to Excel and make Excel visibleSet xlApp = CreateObject("Excel.Application")xlApp.Application.Visible = True
'set references to the Excel workbook and worksheetSet wkb = xlApp.Workbooks.AddSet objSheet = xlApp.ActiveWorkbook.sheets(1)objSheet.Activate
'write column names to the first worksheet rowFor iCol = 0 To rst.Fields.count - 1
objSheet.Cells(1, iCol + 1).Value = rst.Fields(iCol).NameNext
'specify the cell range that will receive the data
Working with Records | 337
Access VBA Programming with DAO and ADO
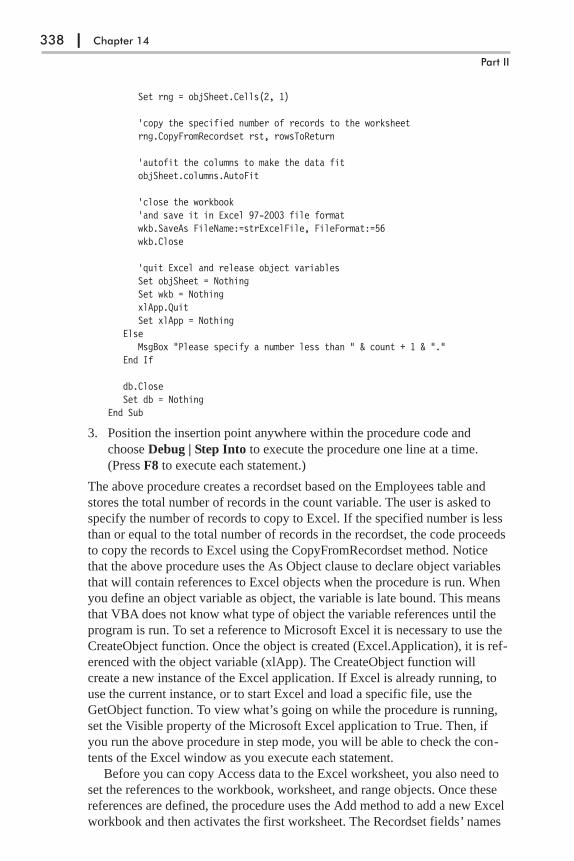
Set rng = objSheet.Cells(2, 1)
'copy the specified number of records to the worksheetrng.CopyFromRecordset rst, rowsToReturn
'autofit the columns to make the data fitobjSheet.columns.AutoFit
'close the workbook'and save it in Excel 97-2003 file formatwkb.SaveAs FileName:=strExcelFile, FileFormat:=56wkb.Close
'quit Excel and release object variablesSet objSheet = NothingSet wkb = NothingxlApp.QuitSet xlApp = Nothing
ElseMsgBox "Please specify a number less than " & count + 1 & "."
End If
db.CloseSet db = Nothing
End Sub
3. Position the insertion point anywhere within the procedure code and
choose Debug | Step Into to execute the procedure one line at a time.
(Press F8 to execute each statement.)
The above procedure creates a recordset based on the Employees table and
stores the total number of records in the count variable. The user is asked to
specify the number of records to copy to Excel. If the specified number is less
than or equal to the total number of records in the recordset, the code proceeds
to copy the records to Excel using the CopyFromRecordset method. Notice
that the above procedure uses the As Object clause to declare object variables
that will contain references to Excel objects when the procedure is run. When
you define an object variable as object, the variable is late bound. This means
that VBA does not know what type of object the variable references until the
program is run. To set a reference to Microsoft Excel it is necessary to use the
CreateObject function. Once the object is created (Excel.Application), it is ref-
erenced with the object variable (xlApp). The CreateObject function will
create a new instance of the Excel application. If Excel is already running, to
use the current instance, or to start Excel and load a specific file, use the
GetObject function. To view what’s going on while the procedure is running,
set the Visible property of the Microsoft Excel application to True. Then, if
you run the above procedure in step mode, you will be able to check the con-
tents of the Excel window as you execute each statement.
Before you can copy Access data to the Excel worksheet, you also need to
set the references to the workbook, worksheet, and range objects. Once these
references are defined, the procedure uses the Add method to add a new Excel
workbook and then activates the first worksheet. The Recordset fields’ names
338 | Chapter 14
Part II

are written as column names to the first worksheet row. Next, the reference is
set to the range object that will receive the data from the recordset. The
CopyFromRecordset method is used to copy the specified number of records to
the worksheet. Once data is placed in the worksheet it is fit into the columns
with the AutoFit property. The Excel spreadsheet is then saved in the file for-
mat compatible with Excel 97-2003. The Workbook’s SaveAs method requires
the FileFormat parameter that specifies the file format for the workbook. The
following file formats are used in Excel 2007:
� 50 (xlExcel12) — Excel binary workbook in 2007 with or without macros
(XLSB)
� 52 (xlOpenXMLWorkbookMacroEnabled) — XML file format 2007 with
or without macros (XLSM)
� 51 (xlOpenXMLWorkbook) — XML file format 2007 without macros
(XLSX)
� 56 (xlExcel8) — 97-2003 format (XLS)
After saving the workbook, the procedure uses the Workbook Close method to
close the Excel file. The Excel application object’s Quit method is used to
close the Excel application.
Copying Records to a Word DocumentThere are several techniques for placing Microsoft Access data in a Microsoft
Word document. The procedure in Hands-On 14-9 demonstrates how to use
the Recordset’s GetString method to insert data from the Invoice Data table
into a newly created Word document. Hands-On 14-10 shows how to insert
data from the Shippers table and format the output using Word’s Table object.
�Hands-On 14-9: Copying Records to a Word Document (Example 1)
1. In the Visual Basic Editor window, choose Insert | Module.
2. Choose Tools | References in the Visual Basic Editor window. Scroll down
to locate the Microsoft Word 12 Object Library, click the check box next to
it, and then click OK to exit.
3. In the module’s Code window, type the SendToWord_ADO procedure
shown below, or copy the procedure code from C:\Acc07_HandsOn\
Chap14.txt.
Option Compare DatabaseOption Explicit' be sure to select Microsoft Word 12 Object Library' in the References dialog box
Public myWord As Word.Application
Sub SendToWord_ADO()Dim conn As ADODB.Connection
Working with Records | 339
Access VBA Programming with DAO and ADO

Dim rst As ADODB.RecordsetDim doc As Word.DocumentDim strSQL As StringDim varRst As VariantDim f As VariantDim strHead As String
Set conn = New ADODB.ConnectionSet rst = New ADODB.Recordset
conn.Provider = "Microsoft.ACE.OLEDB.12.0;" & _"Data Source=" & CurrentProject.Path & _"\Northwind 2007.accdb"
strSQL = "SELECT [Order ID] AS OrderID,"strSQL = strSQL & "[Ship Name], "strSQL = strSQL & "[Ship City] FROM [Invoice Data]"
conn.Openrst.Open strSQL, conn, adOpenForwardOnly, _
adLockReadOnly, adCmdText
' retrieve data and table headings into variablesIf Not rst.EOF Then
varRst = rst.GetString(adClipString, , vbTab, vbCrLf)For Each f In rst.Fields
strHead = strHead & f.Name & vbTabNext
End If
' notice that Word application is declared' at the top of the moduleSet myWord = New Word.Application
' create a new Word documentSet doc = myWord.Documents.AddmyWord.Visible = True
' paste contents of variables into' Word documentdoc.Paragraphs(1).Range.Text = strHead & vbCrLfdoc.Paragraphs(2).Range.Text = varRst
On Error GoTo ErrorHandlerdoc.Close SaveChanges:=wdPromptToSaveChanges
EndProc:myWord.QuitSet myWord = NothingExit Sub
ErrorHandler:If Err = 4198 Then MsgBox "You refused to save this document."Resume EndProc
End Sub
4. Choose Run | Run Sub/UserForm to execute the procedure.
340 | Chapter 14
Part II

The above procedure uses the Recordset object’s GetString method to return
recordset data as a string-valued Variant (see “Returning a Recordset as a
String” in Chapter 13). Prior to running this procedure you must set a reference
to the Microsoft Word 12 Object Library. This reference allows the procedure
to access the Word application objects, properties, and methods via its own
library. The top of the module contains the declaration of the myWord object
variable that will point to the Word application. Notice that this variable is
declared with the Public scope; therefore it can be accessed by other proce-
dures in the current VBA project. (The next hands-on exercise also uses this
variable.) To launch Word and create a new document, we set the Application
object to a new instance of Word.Application using the New keyword:
Set myWord = New Word.Application
To work with a Word document, the Add method of the Word Documents col-
lection is used to create a blank document. We store the reference to this
document in the doc object variable. To enable the user to see what’s going on
while the procedure is running, the Visible property of the Word application is
set to True. Next, the contents of the Recordset and the field names that we
previously saved in the string variables are written to the Word document
using the Document object’s Paragraphs property. The procedure ends by
prompting the user to save changes to the Word document. If the user does not
opt to save the document, error 4198 is triggered.
�Hands-On 14-10: Copying Records to a Word Document (Example 2)
This procedure uses the myWord object variable that was declared in
Hands-On 14-9 at the top of the module.
1. In the Visual Basic Editor window, choose Insert | Module.
2. In the module’s Code window, type the SendToWord2 procedure shown
below, or copy the procedure code from C:\Acc07_HandsOn\Chap14.txt.
Sub SendToWord2()Dim db As DAO.DatabaseDim doc As Word.DocumentDim WordTbl As Word.TableDim f As VariantDim numRows As IntegerDim numFields As IntegerDim r As Integer ' row counterDim c As Integer ' column counter
Set db = OpenDatabase("C:\Acc07_ByExample\Northwind.mdb")Set rst = db.OpenRecordset("Shippers")
numRows = rst.RecordCountnumFields = rst.Fields.count
' notice that the Word application is declared' in the module where you entered the procedure
Working with Records | 341
Access VBA Programming with DAO and ADO

' from Hands-On 14-9
Set myWord = New Word.Application
' create a new Word documentSet doc = myWord.Documents.Add
' insert tableSet WordTbl = doc.Tables.Add _
(doc.Range, numRows + 1, numFields)
c = 1If numRows > 0 Then
' Create the column headings in table cellsFor Each f In rst.Fields
With WordTbl.Cell(1, c).Range.Text = f.Namec = c + 1
End WithNext f
End If
r = 2Do While Not rst.EOF
For c = 1 To numFieldsWordTbl.Cell(r, c).Range.Text = rst.Fields(c - 1).Value
Next cr = r + 1rst.MoveNext
Loop
myWord.Visible = True
rst.CloseSet rst = NothingSet myWord = Nothingdb.CloseSet db = Nothing
End Sub
3. Choose Run | Run Sub/UserForm to execute the procedure.
4. Close the Word document and exit the Word application after you’ve
looked at the resulting document.
Copying Records to a Text FileTo write records to a text file, save them as a string by using the Recordset
object’s GetString method. Next, create a text file with the CreateTextFile
method of the FileSystemObject from the Microsoft Scripting Runtime
Library.
The procedure in Hands-On 14-11 demonstrates how to write the records
from the Order Details table in the Northwind.mdb database to a text file
342 | Chapter 14
Part II

named TestFile. Figures 14-1 and 14-2 show the generated text file after it has
been opened in Notepad and in Microsoft Excel.
�Hands-On 14-11: Copy Records to a Text File (ADO)
1. In the Visual Basic Editor window, choose Insert | Module.
2. In the module’s Code window, type the WriteToFile procedure shown
below, or copy the procedure code from C:\Acc07_HandsOn\Chap14.txt.
Sub WriteToFile()Dim conn As ADODB.ConnectionDim rst As ADODB.RecordsetDim f As ADODB.FieldDim fso As ObjectDim txtfile As ObjectDim strFileName As String
Set conn = New ADODB.Connectionconn.Open "Provider=Microsoft.Jet.OLEDB.4.0;" & _
"Data Source=" & CurrentProject.Path & _"\Northwind.mdb"
strFileName = CurrentProject.Path & "\TestFile.txt"
Set fso = CreateObject("Scripting.FileSystemObject")Set txtfile = fso.CreateTextFile(strFileName, True)
Set rst = New ADODB.Recordsetrst.Open "[Order Details]", connWith rst
For Each f In .Fields' Write field name to the text filetxtfile.Write (f.Name)txtfile.Write Chr(9)
Next' move to a new linetxtfile.WriteLine' write out all the records to the text filetxtfile.Write rst.GetString(adClipString).Close
End With
txtfile.CloseSet rst = Nothingconn.CloseSet conn = Nothing
End Sub
3. Choose Run | Run Sub/UserForm to execute the procedure.
The above procedure uses the CreateObject function to access the
FileSystemObject. The File object is created using the FileSystemObject’s
CreateTextFile method. The first argument of this method specifies the name
of the file to create, and the second argument (True) indicates that the file
should be overwritten if it already exists. Next, the procedure iterates through
Working with Records | 343
Access VBA Programming with DAO and ADO
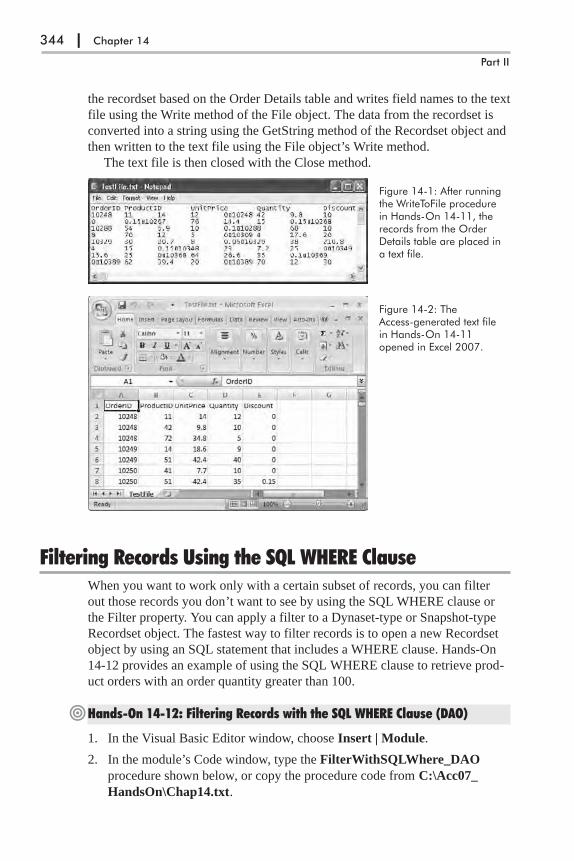
the recordset based on the Order Details table and writes field names to the text
file using the Write method of the File object. The data from the recordset is
converted into a string using the GetString method of the Recordset object and
then written to the text file using the File object’s Write method.
The text file is then closed with the Close method.
Filtering Records Using the SQL WHERE ClauseWhen you want to work only with a certain subset of records, you can filter
out those records you don’t want to see by using the SQL WHERE clause or
the Filter property. You can apply a filter to a Dynaset-type or Snapshot-type
Recordset object. The fastest way to filter records is to open a new Recordset
object by using an SQL statement that includes a WHERE clause. Hands-On
14-12 provides an example of using the SQL WHERE clause to retrieve prod-
uct orders with an order quantity greater than 100.
�Hands-On 14-12: Filtering Records with the SQL WHERE Clause (DAO)
1. In the Visual Basic Editor window, choose Insert | Module.
2. In the module’s Code window, type the FilterWithSQLWhere_DAO
procedure shown below, or copy the procedure code from C:\Acc07_
HandsOn\Chap14.txt.
344 | Chapter 14
Part II
Figure 14-1: After runningthe WriteToFile procedurein Hands-On 14-11, therecords from the OrderDetails table are placed ina text file.
Figure 14-2: TheAccess-generated text filein Hands-On 14-11opened in Excel 2007.

Sub FilterWithSQLWhere_DAO()Dim db As DAO.DatabaseDim rst As DAO.RecordsetDim qdf As DAO.QueryDefDim qryName As StringDim mySQL As String
Set db = OpenDatabase("C:\Acc07_ByExample\Northwind 2007.accdb")
qryName = "qryOrdersOver100"mySQL = "SELECT * FROM " _& "[Product Orders] WHERE Quantity > 100;"Set qdf = db.CreateQueryDef(qryName)qdf.SQL = mySQLSet rst = db.OpenRecordset(qryName)Debug.Print "There are " & rst.RecordCount & _
" orders with the order quantity greater than 100."
rst.CloseSet rst = NothingSet qdf = Nothingdb.CloseSet db = Nothing
End Sub
3. Choose Run | Run Sub/UserForm to execute the procedure.
The above procedure creates a simple Select query in the Northwind
2007.accdb database based on the Product Orders table. The SQL WHERE
clause in the SQL statement specifies that only orders with a quantity greater
than 100 should be returned. If the expression contained in the WHERE clause
is True, then the record is selected; otherwise, the record is excluded from the
opened set of records.
The procedure in Hands-On 14-13 opens a recordset that contains only
records having the value of Null in the Region field or an entry of “Mrs.” in
the TitleOfCourtesy field.
�Hands-On 14-13: Filtering Records with the SQL WHERE Clause (ADO)
1. In the Visual Basic Editor window, choose Insert | Module.
2. In the module’s Code window, type the FilterWithSQLWhere_ADO
procedure shown below, or copy the procedure code from C:\Acc07_
HandsOn\Chap14.txt.
Sub FilterWithSQLWhere_ADO()Dim conn As ADODB.ConnectionDim rst As ADODB.RecordsetDim strSQL As String
strSQL = "SELECT * FROM Employees WHERE IsNull(Region)" & _" or TitleOfCourtesy = 'Mrs.' "
Set conn = New ADODB.Connectionconn.Open "Provider=Microsoft.Jet.OLEDB.4.0;" & _
Working with Records | 345
Access VBA Programming with DAO and ADO
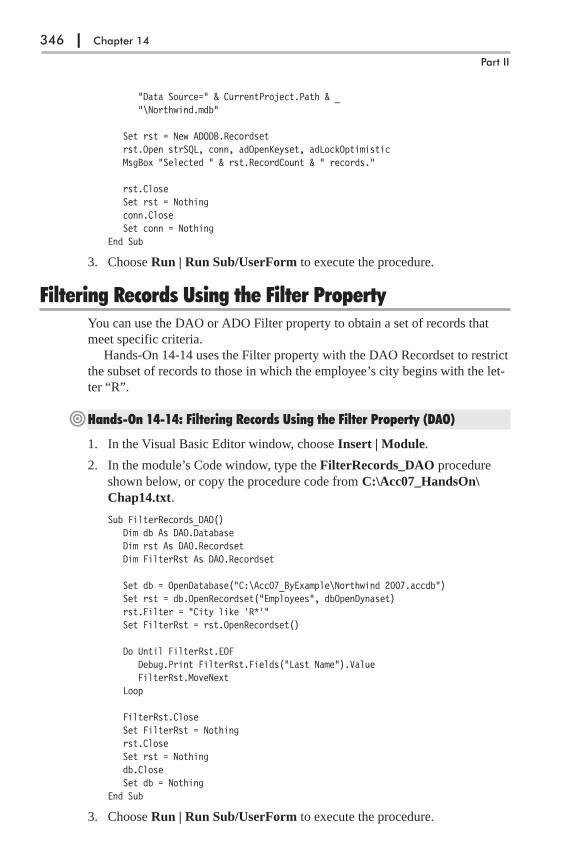
"Data Source=" & CurrentProject.Path & _"\Northwind.mdb"
Set rst = New ADODB.Recordsetrst.Open strSQL, conn, adOpenKeyset, adLockOptimisticMsgBox "Selected " & rst.RecordCount & " records."
rst.CloseSet rst = Nothingconn.CloseSet conn = Nothing
End Sub
3. Choose Run | Run Sub/UserForm to execute the procedure.
Filtering Records Using the Filter PropertyYou can use the DAO or ADO Filter property to obtain a set of records that
meet specific criteria.
Hands-On 14-14 uses the Filter property with the DAO Recordset to restrict
the subset of records to those in which the employee’s city begins with the let-
ter “R”.
�Hands-On 14-14: Filtering Records Using the Filter Property (DAO)
1. In the Visual Basic Editor window, choose Insert | Module.
2. In the module’s Code window, type the FilterRecords_DAO procedure
shown below, or copy the procedure code from C:\Acc07_HandsOn\
Chap14.txt.
Sub FilterRecords_DAO()Dim db As DAO.DatabaseDim rst As DAO.RecordsetDim FilterRst As DAO.Recordset
Set db = OpenDatabase("C:\Acc07_ByExample\Northwind 2007.accdb")Set rst = db.OpenRecordset("Employees", dbOpenDynaset)rst.Filter = "City like 'R*'"Set FilterRst = rst.OpenRecordset()
Do Until FilterRst.EOFDebug.Print FilterRst.Fields("Last Name").ValueFilterRst.MoveNext
Loop
FilterRst.CloseSet FilterRst = Nothingrst.CloseSet rst = Nothingdb.CloseSet db = Nothing
End Sub
3. Choose Run | Run Sub/UserForm to execute the procedure.
346 | Chapter 14
Part II

The above procedure begins by opening a Dynaset-type Recordset object
based on the Empoyees table and setting the Filter property on this recordset:
rst.Filter = "City like 'R*'"
For the filter to take effect after you set it, you must open a new recordset
based on the Recordset object to which the filter was applied:
Set FilterRst = rst.OpenRecordset()
Next, the procedure writes to the Immediate window the value of the Last
Name field for all of the records in the filtered recordset.
The procedure in Hands-On 14-15 creates a filtered view of customers
listed in the Northwind database who are located in Madrid, Spain.
�Hands-On 14-15: Filtering Records Using the Filter Property (ADO)
1. In the Visual Basic Editor window, choose Insert | Module.
2. In the module’s Code window, type the FilterRecords_ADO procedure
shown below, or copy the procedure code from C:\Acc07_HandsOn\
Chap14.txt.
Sub FilterRecords_ADO()Dim conn As ADODB.ConnectionDim rst As ADODB.Recordset
Set conn = New ADODB.Connectionconn.Open "Provider=Microsoft.Jet.OLEDB.4.0;" & _
"Data Source=" & CurrentProject.Path & _"\Northwind.mdb"
Set rst = New ADODB.RecordsetWith rst
.Open "Customers", conn, adOpenKeyset, adLockOptimistic
.Filter = "City='Madrid' and Country='Spain'"MsgBox .RecordCount & " records meet the criteria.", _
vbInformation, "Customers in Madrid (Spain)"End With
Do Until rst.EOFDebug.Print rst.Fields(1).Valuerst.MoveNext
Loop
rst.Filter = adFilterNoneMsgBox "Filter was removed. " & vbCr _
& "The table contains " & rst.RecordCount & " records."
rst.CloseSet rst = Nothingconn.CloseSet conn = Nothing
End Sub
3. Choose Run | Run Sub/UserForm to execute the procedure.
Working with Records | 347
Access VBA Programming with DAO and ADO
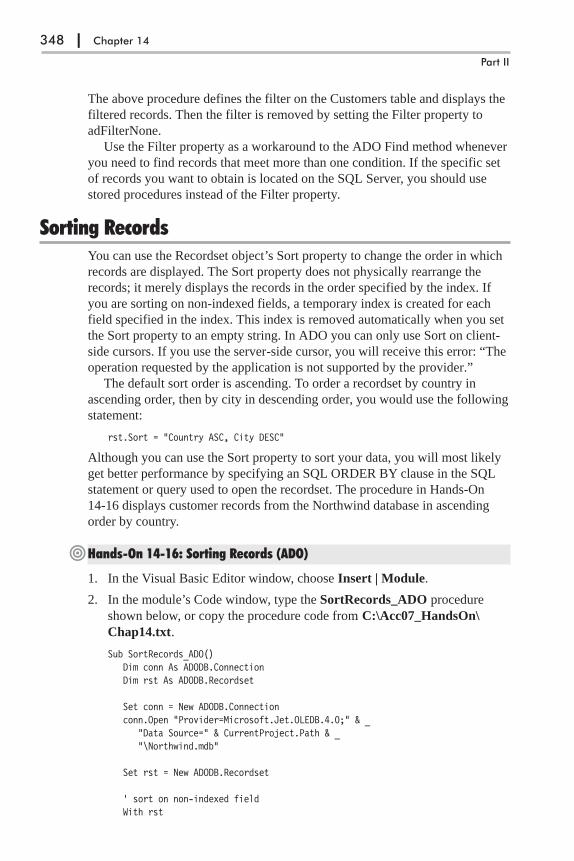
The above procedure defines the filter on the Customers table and displays the
filtered records. Then the filter is removed by setting the Filter property to
adFilterNone.
Use the Filter property as a workaround to the ADO Find method whenever
you need to find records that meet more than one condition. If the specific set
of records you want to obtain is located on the SQL Server, you should use
stored procedures instead of the Filter property.
Sorting RecordsYou can use the Recordset object’s Sort property to change the order in which
records are displayed. The Sort property does not physically rearrange the
records; it merely displays the records in the order specified by the index. If
you are sorting on non-indexed fields, a temporary index is created for each
field specified in the index. This index is removed automatically when you set
the Sort property to an empty string. In ADO you can only use Sort on client-
side cursors. If you use the server-side cursor, you will receive this error: “The
operation requested by the application is not supported by the provider.”
The default sort order is ascending. To order a recordset by country in
ascending order, then by city in descending order, you would use the following
statement:
rst.Sort = "Country ASC, City DESC"
Although you can use the Sort property to sort your data, you will most likely
get better performance by specifying an SQL ORDER BY clause in the SQL
statement or query used to open the recordset. The procedure in Hands-On
14-16 displays customer records from the Northwind database in ascending
order by country.
�Hands-On 14-16: Sorting Records (ADO)
1. In the Visual Basic Editor window, choose Insert | Module.
2. In the module’s Code window, type the SortRecords_ADO procedure
shown below, or copy the procedure code from C:\Acc07_HandsOn\
Chap14.txt.
Sub SortRecords_ADO()Dim conn As ADODB.ConnectionDim rst As ADODB.Recordset
Set conn = New ADODB.Connectionconn.Open "Provider=Microsoft.Jet.OLEDB.4.0;" & _
"Data Source=" & CurrentProject.Path & _"\Northwind.mdb"
Set rst = New ADODB.Recordset
' sort on non-indexed fieldWith rst
348 | Chapter 14
Part II

.CursorLocation = adUseClient
.Open "Customers", conn, adOpenKeyset, adLockOptimistic
.Sort = "Country"Do Until rst.EOF
Debug.Print rst.Fields("CompanyName").Value & ": " & _rst.Fields("Country").Value
.MoveNextLoopDebug.Print "------------original sort".Sort = ""Do Until .EOF
Debug.Print rst.Fields("CompanyName").Value & ": " & _rst.Fields("Country").Value
.MoveNextLoop.Close
End With
Set rst = Nothingconn.CloseSet conn = Nothing
End Sub
3. Choose Run | Run Sub/UserForm to execute the procedure.
In the procedure above, after sorting records in the specified order the Sort
property is set to an empty string and records are displayed in the order in
which they physically appear in the table.
Chapter SummaryThis chapter demonstrated several methods of the DAO and ADO Recordset
object you can use for working with records. You learned about the AddNew,
Update, and Delete methods for performing such common database tasks as
adding, modifying, and deleting records. These methods are suitable for han-
dling a small number of records. Better performance can be achieved by using
the SQL INSERT, UPDATE, and DELETE statements, as you will see in
Chapters 15 and 23.
This chapter also showed you how to render your database records into
three popular formats: an Excel spreadsheet, a Word document, and a text file.
Because working with large quantities of records can be difficult unless data is
properly organized, this chapter also covered methods for filtering and sorting
your records.
In the next chapter you will learn how to create and run Access queries
from your VBA procedures.
Working with Records | 349
Access VBA Programming with DAO and ADO

Chapter 15
Creating and RunningQueries with DAO/ADO
Having worked with Microsoft Access for a while, you already know that to
retrieve relevant information from your database and perform data-oriented
tasks you need to write queries. Queries are SQL statements that are saved in
the database and can be run at any time. Microsoft Office Access 2007 sup-
ports several types of queries.
The simplest queries allow you to select a set of records from a table. How-
ever, when you need to extract information from more than one table at a time,
you must write a more complex query by using an SQL JOIN statement. Other
queries perform specific actions on existing data, such as making a new table,
appending rows to a table, updating the values in a table, or deleting rows from
a table. Although Microsoft Office Access provides a friendly interface — the
Query Design view — for creating queries manually, this chapter teaches you
how to create and execute the same queries by using DAO and ADO objects as
well as SQL Data Manipulation Language (DML) statements in VBA code.
Creating a Select Query ManuallySelect queries retrieve a set of records from a database table. These queries are
easily recognized by the SELECT and FROM keywords in their syntax. Let’s
take a look at a couple of examples:
SELECT LastName FROM Employees Selects the LastName field from the Employeestable. If there is a space in the field name, enclosethe field name in square brackets: [Last Name].
SELECT FirstName, LastName,PhoneNoFROM Employees
Selects the FirstName, LastName, and PhoneNofields from the Employees table.
SELECT * FROM Employees Selects all fields for all records from the Employeestable. The asterisk (*) is used to represent all fields.
350
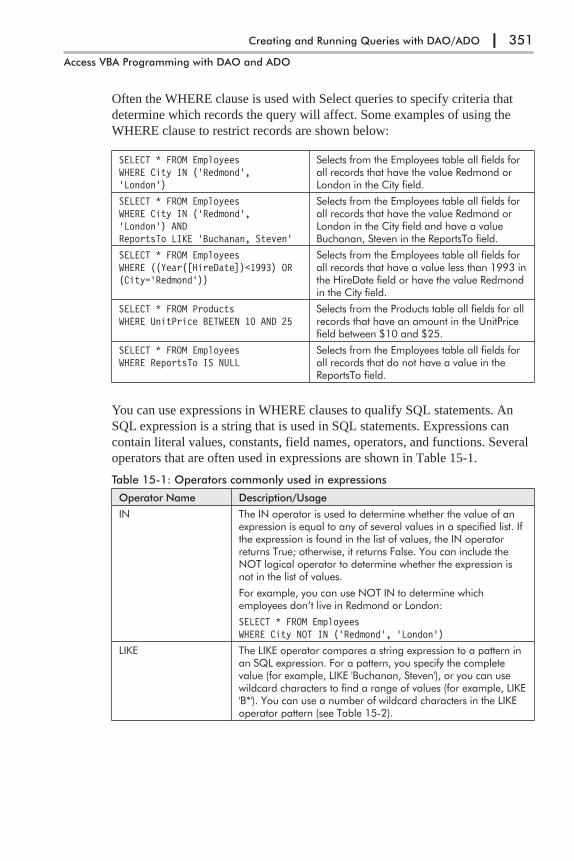
Often the WHERE clause is used with Select queries to specify criteria that
determine which records the query will affect. Some examples of using the
WHERE clause to restrict records are shown below:
SELECT * FROM EmployeesWHERE City IN ('Redmond','London')
Selects from the Employees table all fields forall records that have the value Redmond orLondon in the City field.
SELECT * FROM EmployeesWHERE City IN ('Redmond','London') ANDReportsTo LIKE 'Buchanan, Steven'
Selects from the Employees table all fields forall records that have the value Redmond orLondon in the City field and have a valueBuchanan, Steven in the ReportsTo field.
SELECT * FROM EmployeesWHERE ((Year([HireDate])<1993) OR(City='Redmond'))
Selects from the Employees table all fields forall records that have a value less than 1993 inthe HireDate field or have the value Redmondin the City field.
SELECT * FROM ProductsWHERE UnitPrice BETWEEN 10 AND 25
Selects from the Products table all fields for allrecords that have an amount in the UnitPricefield between $10 and $25.
SELECT * FROM EmployeesWHERE ReportsTo IS NULL
Selects from the Employees table all fields forall records that do not have a value in theReportsTo field.
You can use expressions in WHERE clauses to qualify SQL statements. An
SQL expression is a string that is used in SQL statements. Expressions can
contain literal values, constants, field names, operators, and functions. Several
operators that are often used in expressions are shown in Table 15-1.
Table 15-1: Operators commonly used in expressions
Operator Name Description/Usage
IN The IN operator is used to determine whether the value of anexpression is equal to any of several values in a specified list. Ifthe expression is found in the list of values, the IN operatorreturns True; otherwise, it returns False. You can include theNOT logical operator to determine whether the expression isnot in the list of values.
For example, you can use NOT IN to determine whichemployees don’t live in Redmond or London:
SELECT * FROM EmployeesWHERE City NOT IN ('Redmond', 'London')
LIKE The LIKE operator compares a string expression to a pattern inan SQL expression. For a pattern, you specify the completevalue (for example, LIKE 'Buchanan, Steven'), or you can usewildcard characters to find a range of values (for example, LIKE'B*'). You can use a number of wildcard characters in the LIKEoperator pattern (see Table 15-2).
Creating and Running Queries with DAO/ADO | 351
Access VBA Programming with DAO and ADO

Operator Name Description/Usage
BETWEEN…AND The BETWEEN…AND operator is used to determine whetherthe value of an expression falls within a specified range ofvalues. If the value of the expression is between value1 andvalue2 (inclusive), the BETWEEN…AND operator returns True;otherwise, it returns False. You can include the NOT logicaloperator to evaluate the opposite condition, that is, whether theexpression falls outside the range defined by value1 andvalue2.
For example, you can select all products with the amount in theUnitPrice field less than $10 and greater than $25:
SELECT * FROM ProductsWHERE UnitPrice NOT BETWEEN 10 AND 25
IS NULL The IS NULL operator is used to determine whether theexpression value is equal to the Null value. A Null valueindicates missing or unknown data. You can include the NOTlogical operator to return only records that have values in thespecified field.
For example, you can extract only the employee records thathave a value in the ReportsTo field. Records where theReportsTo field is blank will not be included:
SELECT * FROM EmployeesWHERE ReportsTo IS NOT NULL
Table 15-2: Wildcard characters used in the LIKE operator patterns
Wildcard Description
* (asterisk) Matches any number of characters.
? (question mark) Matches any single character.
% (percent sign) Matches any number of characters (used only with the ADOand Jet OLE DB Provider; not in the Access user interface).
_ (underscore) Matches any single character (used only with the ADO and JetOLE DB Provider; not in the Access user interface).
# (number sign) Matches any single digit.
[] (square brackets) Matches any single character within the list of charactersenclosed in brackets.
! (exclamation point) Matches any single character that is not found in the listenclosed in the square brackets.
- (hyphen) Matches any one of the range of characters enclosed in thesquare brackets.
In addition to the WHERE clause, you can use predicates to further restrict the
set of records to be retrieved. A predicate is an SQL statement that qualifies
the SELECT statement, similar to the WHERE clause; however, the predicate
must be placed before the column list. Several popular predicates are shown in
Table 15-3.
352 | Chapter 15
Part II
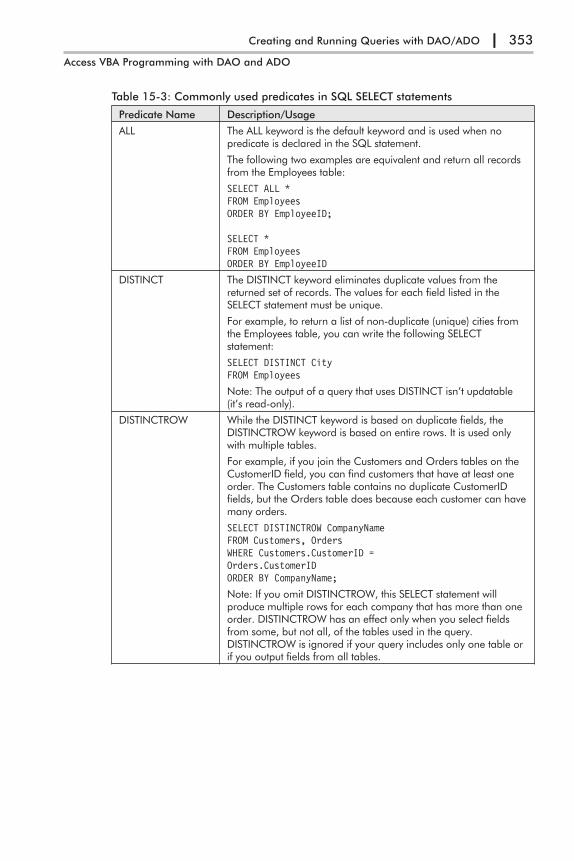
Table 15-3: Commonly used predicates in SQL SELECT statements
Predicate Name Description/Usage
ALL The ALL keyword is the default keyword and is used when nopredicate is declared in the SQL statement.
The following two examples are equivalent and return all recordsfrom the Employees table:
SELECT ALL *FROM EmployeesORDER BY EmployeeID;
SELECT *FROM EmployeesORDER BY EmployeeID
DISTINCT The DISTINCT keyword eliminates duplicate values from thereturned set of records. The values for each field listed in theSELECT statement must be unique.
For example, to return a list of non-duplicate (unique) cities fromthe Employees table, you can write the following SELECTstatement:
SELECT DISTINCT CityFROM Employees
Note: The output of a query that uses DISTINCT isn’t updatable(it’s read-only).
DISTINCTROW While the DISTINCT keyword is based on duplicate fields, theDISTINCTROW keyword is based on entire rows. It is used onlywith multiple tables.
For example, if you join the Customers and Orders tables on theCustomerID field, you can find customers that have at least oneorder. The Customers table contains no duplicate CustomerIDfields, but the Orders table does because each customer can havemany orders.
SELECT DISTINCTROW CompanyNameFROM Customers, OrdersWHERE Customers.CustomerID =Orders.CustomerIDORDER BY CompanyName;
Note: If you omit DISTINCTROW, this SELECT statement willproduce multiple rows for each company that has more than oneorder. DISTINCTROW has an effect only when you select fieldsfrom some, but not all, of the tables used in the query.DISTINCTROW is ignored if your query includes only one table orif you output fields from all tables.
Creating and Running Queries with DAO/ADO | 353
Access VBA Programming with DAO and ADO

Predicate Name Description/Usage
TOP or PERCENT The TOP keyword returns a certain number of records that fall atthe top or bottom of a range specified by an ORDER BY clause.
For example, suppose you want to select the five most expensiveproducts:
SELECT TOP 5 * FROM ProductsORDER BY UnitPrice DESC
The TOP predicate doesn’t choose between equal values. If thereare equal values present, the TOP keyword will return all rows thathave the equal value.
You can also use the PERCENT keyword to return a percentage ofrecords that fall at the top or the bottom of a range specified byan ORDER BY clause.
For example, to return the lowest 10 percent priced products, youcan write the following statement:
SELECT TOP 10 PERCENT *FROM ProductsORDER BY UnitPrice ASC;
Note: If you don’t include the ORDER BY clause, the SELECT TOPstatement will return a random set of rows.
If you’d like to sort records returned by the SELECT statement, use the
ORDER BY clause with the ASC (ascending sort) or DESC (descending sort)
keywords, as shown in the following example:
SELECT * FROM EmployeesORDER BY Country DESC
Select all records from the Employees table and arrangethem in descending order based on the Country field. Ifno order is specified, the order is ascending (ASC) bydefault.
By default, records are sorted in ascending order. The fields you want to sort
by do not need to be enumerated in the SELECT statement’s field list. Instead
of sorting by field name, you can sort by field position. For example, the
statement:
SELECT * FROM EMPLOYEESORDER BY 2
will sort the records in ascending order by the second field.
Creating a Select Query with DAOSelect queries retrieve a set of records from a database table. These queries are
easily recognized by the SELECT and FROM keywords in their syntax. In
DAO, the QueryDef object represents a saved query in a database. All
QueryDef objects are contained in the QueryDefs collection. You can read and
set the SQL definition of a Query object using the SQL property. To create a
query in code, use the CreateQueryDef method. For example, to create a Select
query named myQuery, the following statement is used:
Set qdf = db.CreateQueryDef("myQuery", strSQL)
354 | Chapter 15
Part II
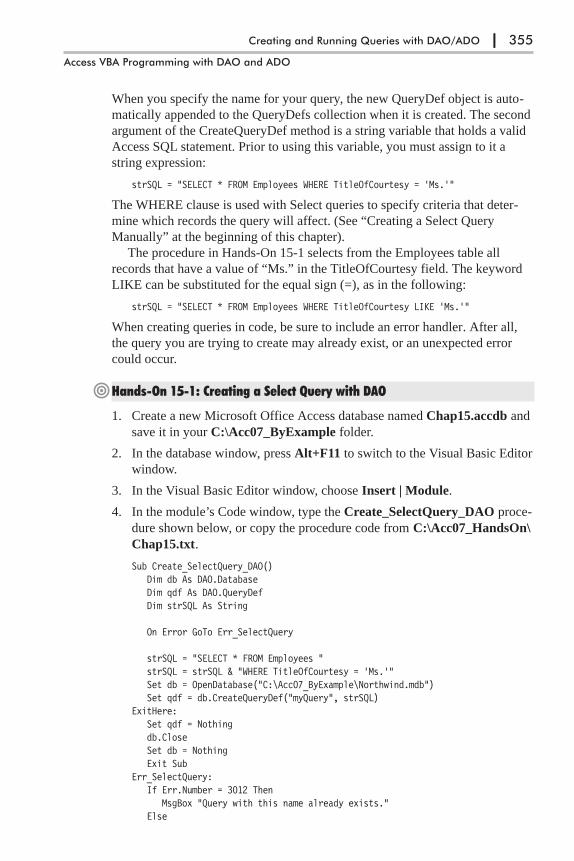
When you specify the name for your query, the new QueryDef object is auto-
matically appended to the QueryDefs collection when it is created. The second
argument of the CreateQueryDef method is a string variable that holds a valid
Access SQL statement. Prior to using this variable, you must assign to it a
string expression:
strSQL = "SELECT * FROM Employees WHERE TitleOfCourtesy = 'Ms.'"
The WHERE clause is used with Select queries to specify criteria that deter-
mine which records the query will affect. (See “Creating a Select Query
Manually” at the beginning of this chapter).
The procedure in Hands-On 15-1 selects from the Employees table all
records that have a value of “Ms.” in the TitleOfCourtesy field. The keyword
LIKE can be substituted for the equal sign (=), as in the following:
strSQL = "SELECT * FROM Employees WHERE TitleOfCourtesy LIKE 'Ms.'"
When creating queries in code, be sure to include an error handler. After all,
the query you are trying to create may already exist, or an unexpected error
could occur.
�Hands-On 15-1: Creating a Select Query with DAO
1. Create a new Microsoft Office Access database named Chap15.accdb and
save it in your C:\Acc07_ByExample folder.
2. In the database window, press Alt+F11 to switch to the Visual Basic Editor
window.
3. In the Visual Basic Editor window, choose Insert | Module.
4. In the module’s Code window, type the Create_SelectQuery_DAO proce-
dure shown below, or copy the procedure code from C:\Acc07_HandsOn\
Chap15.txt.
Sub Create_SelectQuery_DAO()Dim db As DAO.DatabaseDim qdf As DAO.QueryDefDim strSQL As String
On Error GoTo Err_SelectQuery
strSQL = "SELECT * FROM Employees "strSQL = strSQL & "WHERE TitleOfCourtesy = 'Ms.'"Set db = OpenDatabase("C:\Acc07_ByExample\Northwind.mdb")Set qdf = db.CreateQueryDef("myQuery", strSQL)
ExitHere:Set qdf = Nothingdb.CloseSet db = NothingExit Sub
Err_SelectQuery:If Err.Number = 3012 Then
MsgBox "Query with this name already exists."Else
Creating and Running Queries with DAO/ADO | 355
Access VBA Programming with DAO and ADO

MsgBox Err.DescriptionEnd IfResume ExitHere
End Sub
5. Choose Run | Run Sub/UserForm to execute the procedure.
If you run the Create_SelectQuery_DAO procedure in Hands-On 15-1, the
next time you open the Northwind.mdb database you should see the query
named myQuery in the list of stored queries in the Access window.
� Note: Instead of a query that is saved in the database for future use, it ispossible to create a temporary query by setting the QueryDefName property toa zero-length string (""), as in the following example:
Set qdf = db.CreateQueryDef("", strSQL)
The advantage of temporary queries is that they don’t clutter the Access window.
Creating a Select Query with ADOIn ADO, queries, SQL statements, views, and stored procedures are repre-
sented by the Command object. This object is part of the ADOX Object Model
(see Chapter 11, Figure 11-2). The Command object has many properties and
methods that will allow you to return records or execute changes to your data
(inserts, updates, and deletes). In this chapter you will get to know the proper-
ties of the Command object, including ActiveConnection, CommandText, and
CommandType. These properties will be discussed as they appear in the exam-
ple procedure code. You will also learn how to use the Command object’s
Execute method to run your queries.
The procedure in Hands-On 15-2 demonstrates how to create and save a
Select query using ActiveX Data Objects (ADO).
�Hands-On 15-2: Creating a Select Query with ADO
1. In the Visual Basic Editor window of the Chap15.accdb database, choose
Insert | Module.
2. Choose Tools | References and select the following object libraries:
Microsoft ADO Ext. 2.8 for DDL and Security Object Library and
Microsoft ActiveX Data Objects 2.8 Object Library.
3. In the module’s Code window, type the Create_SelectQuery_ADO proce-
dure shown below, or copy the procedure code from C:\Acc07_HandsOn\
Chap15.txt.
Sub Create_SelectQuery_ADO()Dim cat As ADOX.CatalogDim cmd As ADODB.CommandDim strPath As StringDim strSQL As StringDim strQryName As String
356 | Chapter 15
Part II

On Error GoTo ErrorHandler
' assign values to string variablesstrPath = CurrentProject.Path & "\Northwind 2007.accdb"strSQL = "SELECT Employees.* FROM Employees WHERE " _
& "Employees.City='Redmond';"
strQryName = "Redmond Employees"
' open the CatalogSet cat = New ADOX.Catalogcat.ActiveConnection = _
"Provider=Microsoft.ACE.OLEDB.12.0;" & _"Data Source=" & strPath
' create a query based on the specified' SELECT statementSet cmd = New ADODB.Commandcmd.CommandText = strSQL
' add the new query to the databasecat.Views.Append strQryName, cmd
MsgBox "The procedure completed successfully.", _vbInformation, "Create Select Query"
ExitHere:Set cmd = NothingSet cat = NothingExit Sub
ErrorHandler:If InStr(Err.Description, "already exists") Then
cat.Views.Delete strQryNameResume
ElseMsgBox Err.Number & ": " & Err.DescriptionResume ExitHere
End IfEnd Sub
4. Choose Run | Run Sub/UserForm to execute the procedure.
The Create_SelectQuery_ADO procedure opens the Catalog object and sets its
ActiveConnection property to the Northwind 2007.accdb database:
Set cat = New ADOX.Catalogcat.ActiveConnection="Provider=Microsoft.ACE.OLEDB.12.0;" & _
"Data Source=" & strPath
As you may recall from Chapter 11, the Catalog object represents an entire
database. It contains objects that represent all the elements of the database:
tables, stored procedures, views, columns of tables, and indexes. The
ActiveConnection property of the Catalog object indicates the ADO Connec-
tion object the Catalog belongs to. The value of this property can be a
reference to the Connection object or a connection string containing the
Creating and Running Queries with DAO/ADO | 357
Access VBA Programming with DAO and ADO
definition for a connection. Next, the procedure defines a Command object and
uses its CommandText property to set the SQL statement for the query:
Set cmd = New ADODB.Commandcmd.CommandText = strSQL
The CommandText property contains the text of a command you want to issue
against a provider. In this procedure, we assigned the string variable’s value
(strSQL) to the CommandText property.
The ADO Command object always creates a temporary query. So, to create
a stored (saved) query in a database, the procedure must append the Command
object to the ADOX Views collection, like this:
cat.Views.Append strQryName, cmd
If you open the sample Northwind 2007.accdb database after running the
above procedure, you will find the Redmond Employees query in the Access
window.
Row-returning, Non-parameterized QueriesQueries that return records, such as Select queries, are known as row-returning, non-parameterized queries.
In ADO, use the View object to work with queries that return recordsand do not take parameters. All View objects are contained in the Viewscollection of the ADOX Catalog object. To save these queries in a database,append the ADO Command object to the ADOX Views collection as shownin Hands-On 15-2.
Executing an Existing Select Query with ADOThere’s more than one way of executing a row-returning query with ADO.
This section demonstrates two procedures that run the Products by Category
query located in the Northwind.mdb database.
The procedure in Hands-On 15-3 uses the Command and Recordset objects
to perform this task.
�Hands-On 15-3: Executing a Select Query
1. In the Visual Basic Editor window, choose Insert | Module.
2. In the module’s Code window, type the Execute_SelectQuery_ADO
procedure shown below, or copy the procedure code from
C:\Acc07_HandsOn\Chap15.txt.
Sub Execute_SelectQuery_ADO()Dim cmd As ADODB.CommandDim rst As ADODB.RecordsetDim strPath As String
strPath = CurrentProject.Path & "\Northwind.mdb"
Set cmd = New ADODB.Command
358 | Chapter 15
Part II
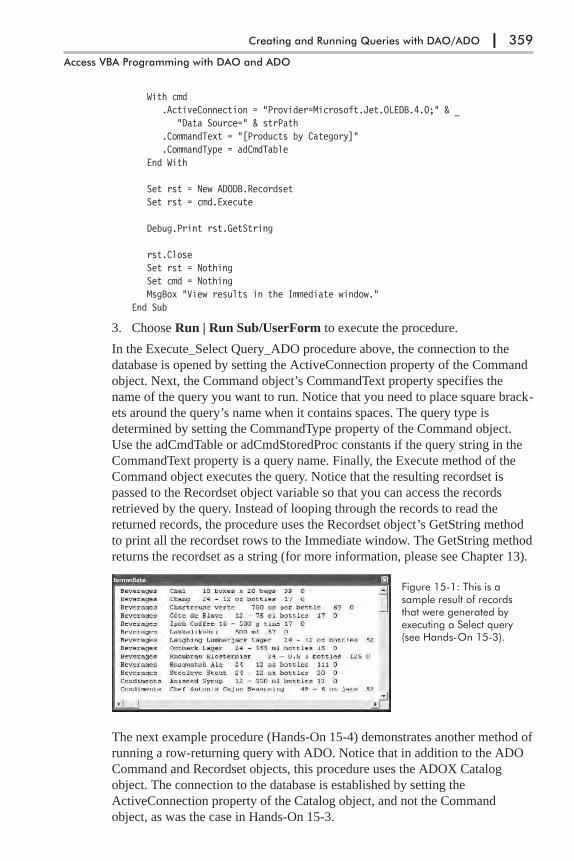
With cmd.ActiveConnection = "Provider=Microsoft.Jet.OLEDB.4.0;" & _
"Data Source=" & strPath.CommandText = "[Products by Category]".CommandType = adCmdTable
End With
Set rst = New ADODB.RecordsetSet rst = cmd.Execute
Debug.Print rst.GetString
rst.CloseSet rst = NothingSet cmd = NothingMsgBox "View results in the Immediate window."
End Sub
3. Choose Run | Run Sub/UserForm to execute the procedure.
In the Execute_Select Query_ADO procedure above, the connection to the
database is opened by setting the ActiveConnection property of the Command
object. Next, the Command object’s CommandText property specifies the
name of the query you want to run. Notice that you need to place square brack-
ets around the query’s name when it contains spaces. The query type is
determined by setting the CommandType property of the Command object.
Use the adCmdTable or adCmdStoredProc constants if the query string in the
CommandText property is a query name. Finally, the Execute method of the
Command object executes the query. Notice that the resulting recordset is
passed to the Recordset object variable so that you can access the records
retrieved by the query. Instead of looping through the records to read the
returned records, the procedure uses the Recordset object’s GetString method
to print all the recordset rows to the Immediate window. The GetString method
returns the recordset as a string (for more information, please see Chapter 13).
The next example procedure (Hands-On 15-4) demonstrates another method of
running a row-returning query with ADO. Notice that in addition to the ADO
Command and Recordset objects, this procedure uses the ADOX Catalog
object. The connection to the database is established by setting the
ActiveConnection property of the Catalog object, and not the Command
object, as was the case in Hands-On 15-3.
Creating and Running Queries with DAO/ADO | 359
Access VBA Programming with DAO and ADO
Figure 15-1: This is asample result of recordsthat were generated byexecuting a Select query(see Hands-On 15-3).

�Hands-On 15-4: Executing a Select Query with an ADO Catalog Object
1. In the Visual Basic Editor window, choose Insert | Module.
2. In the module’s Code window, type the Execute_SelectQuery2_ADO
procedure shown below, or copy the procedure code from C:\Acc07_
HandsOn\Chap15.txt.
Sub Execute_SelectQuery2_ADO()Dim cat As ADOX.CatalogDim cmd As ADODB.CommandDim rst As ADODB.RecordsetDim strPath As String
strPath = CurrentProject.Path & "\Northwind.mdb"
Set cat = New ADOX.Catalogcat.ActiveConnection = "Provider=Microsoft.Jet.OLEDB.4.0;" & _
"Data Source=" & strPath
Set cmd = New ADODB.CommandSet cmd = cat.Views("Products by Category").Command
Set rst = New ADODB.Recordsetrst.Open cmd, , adOpenStatic, adLockReadOnly, adCmdTable
Debug.Print rst.GetStringMsgBox "The query returned " & rst.RecordCount & vbCr & _
" records to the Immediate window."rst.CloseSet rst = NothingSet cmd = NothingSet cat = Nothing
End Sub
3. Choose Run | Run Sub/UserForm to execute the procedure.
In the above procedure, the following line of code is used to indicate the name
of the query to be executed:
Set cmd = cat.Views("Products by Category").Command
This statement sets the cmd object variable to the desired query stored in the
Views collection of the ADOX Catalog object. Next, the Open method of the
Recordset object is used to open the recordset based on the specified query:
rst.Open cmd, , adOpenStatic, adLockReadOnly, adCmdTable
Notice that several optional arguments of the Open method are used to specify
the data source: cmd, ActiveConnection (a comma appears in this spot because
the existing connection is being used), CursorType (adOpenStatic), LockType
(adLockReadOnly), and Options (adCmdTable). Refer to Chapter 13 for infor-
mation about using these ADO constants. Next, the procedure dumps the
contents of the records into the Immediate window (just as the procedure in
Hands-On 15-3 did) by using the Recordset’s GetString method. The MsgBox
function contains a string that includes the information about the number of
360 | Chapter 15
Part II

records retrieved. The RecordCount property of the Recordset object is used to
get the record count. To get the correct record count you must set the
CursorType argument of the Recordset’s Open method to adOpenStatic. If you
set this argument to adOpenDynamic or adOpenForwardOnly, the Record-
Count property will return –1. To learn more about these constants, refer to the
sections on working with Recordset objects in ADO in Chapter 13.
Modifying an Existing Query with ADOIf you’d like to modify an existing query, follow these steps:
1. Retrieve the query from the Views or Procedures collection of the Catalog
object.
2. Set the CommandText property of the Command object to the new SQL
statement.
3. Save the changes by setting the Procedure or View object’s Command
property to the modified Command object.
Earlier in this chapter you learned how to create a Select query named
Redmond Employees by using ADO (see Hands-On 15-2). The following
hands-on exercise modifies this query so that employee records are ordered by
last name.
�Hands-On 15-5: Modifying a Select Query with ADO
1. In the Visual Basic Editor window, choose Insert | Module.
2. In the module’s Code window, type the Modify_Query_ADO procedure
shown below, or copy the procedure code from C:\Acc07_HandsOn\
Chap15.txt.
Sub Modify_Query_ADO()Dim cat As ADOX.CatalogDim cmd As ADODB.CommandDim strPath As StringDim newStrSQL As StringDim oldStrSQL As StringDim strQryName As String
strPath = CurrentProject.Path & "\Northwind 2007.accdb"
newStrSQL = "SELECT Employees.* FROM Employees" & _" WHERE Employees.City='Redmond'" & _" ORDER BY [Last Name];"
strQryName = "Redmond Employees"
Set cat = New ADOX.Catalogcat.ActiveConnection = _
"Provider=Microsoft.ACE.OLEDB.12.0;" & _"Data Source=" & strPath
Creating and Running Queries with DAO/ADO | 361
Access VBA Programming with DAO and ADO
Set cmd = New ADODB.CommandSet cmd = cat.Views(strQryName).Command
' get the existing SQL statement for this queryoldStrSQL = cmd.CommandText
MsgBox oldStrSQL, vbInformation, _"Current SQL Statement"
' now update the query's SQL statementcmd.CommandText = newStrSQLMsgBox newStrSQL, vbInformation, _
"New SQL Statement"
' save the modified querySet cat.Views(strQryName).Command = cmd
Set cmd = NothingSet cat = Nothing
End Sub
3. Choose Run | Run Sub/UserForm to execute the procedure.
When you run the above procedure the “Redmond Employees” query created
in Hands-On 15-2 is modified from the following SQL statement:
SELECT Employees.*FROM EmployeesWHERE Employees.City='Redmond';
to:
SELECT Employees.*FROM EmployeesWHERE Employees.City='Redmond' ORDER BY [Last Name];
Creating and Running a Parameter Query with DAOA special type of a Select query is known as a Parameter query. Instead of
retrieving the same records each time a query is run, a user can enter the search
criteria in a special dialog box at run time. In DAO, the parameters of a Param-
eter query are represented by Parameter objects. The QueryDef object contains
a Parameters collection. Parameter objects represent existing parameters.
To create a Parameter query, create a query string that includes the
PARAMETERS keyword:
strSQL = "PARAMETERS [Enter Country] Text;"&_"SELECT * FROM CUSTOMERS WHERE Country = [Enter Country];"
Before executing an existing Parameter query, assign a value to the parameter,
as shown in Hands-On 15-6. Once the parameter value is specified, you need
to open a recordset based on the query.
The procedure in Hands-On 15-6 demonstrates how to create and run a
Parameter query to retrieve the names of the companies in the user-specified
country.
362 | Chapter 15
Part II

�Hands-On 15-6: Creating a Parameter Query with DAO
1. In the Visual Basic Editor window, choose Insert | Module.
2. In the module’s Code window, type the CreateRun_ParameterQuery_
DAO procedure shown below, or copy the procedure code from
C:\Acc07_HandsOn\Chap15.txt.
Sub CreateRun_ParameterQuery_DAO()Dim db As DAO.DatabaseDim qdf As DAO.QueryDefDim rst As DAO.RecordsetDim strQryName As StringDim strSQL As String
On Error GoTo Err_Handler
strQryName = "myParamQuery"strSQL = "PARAMETERS [Enter Country] Text; " & _
"SELECT * FROM Customers WHERE Country = [Enter Country];"
Set db = OpenDatabase("C:\Acc07_ByExample\Northwind.mdb")Set qdf = db.CreateQueryDef(strQryName, strSQL)
RunQuery:'specify the parameterqdf.Parameters("Enter Country") = _
InputBox("Enter the country name:", _"Which Country?", "Germany")
If IsNull(qdf.Parameters("Enter Country").Value) _Then GoTo ExitHere
'open a recordset based on the specified querySet rst = qdf.OpenRecordset(dbOpenDynaset)rst.MoveLastMsgBox "Number of records: " & rst.RecordCount
'write the contents of the second field'to the Immediate windowrst.MoveFirstDo Until rst.EOF
Debug.Print rst(1)rst.MoveNext
Loop
ExitHere:If Not rst Is Nothing Then
rst.CloseSet rst = Nothing
End IfSet qdf = Nothingdb.CloseSet db = NothingExit Sub
Creating and Running Queries with DAO/ADO | 363
Access VBA Programming with DAO and ADO
Err_Handler:If Err.Number = 3012 Then
MsgBox "This query already exists."Set qdf = db.QueryDefs(strQryName)Resume RunQuery
ElseMsgBox Err.Description
End IfResume ExitHere
End Sub
3. Choose Run | Run Sub/UserForm to execute the procedure.
The procedure in Hands-On 15-6 defines a Parameter query that contains one
parameter named Enter Country. Prior to running this query, the procedure
retrieves the name of the country from the user via the VBA InputBox method.
While the suggested default country name is Germany, the user can supply the
name of another country. The supplied value is then used as the value of the
Enter Country parameter. Next, the recordset is opened based on the specified
query and the number of records for the specified country is retrieved via the
RecordCount property of the Recordset object. In order to get the correct
record count we must move to the end of the recordset, using the MoveLast
method, to access all records. The procedure ends by retrieving to the Immedi-
ate window the names of all the companies in the specified country. The
procedure contains several labels such as RunQuery, ExitHere, and Err_Han-
dler, which are used in error trapping and ensuring that certain code lines are
run only when required. For example, when you execute this procedure again,
the statement that attempts to create a query will fail and VBA will generate
error 3012. At this point, we want to run the existing query, so we must set the
qdf object variable with the following statement:
Set qdf = db.QueryDefs(strQryName)
And then we can safely resume running the code from the label RunQuery.
Creating and Running a Parameter Query with ADOIn ADO, to create a row-returning, parameterized query, simply add the param-
eters to the query’s SQL string. The parameters must be defined by using the
PARAMETERS keyword, as in the following:
strSQL = "PARAMETERS [Country Name] Text;" & _"SELECT Customers.* FROM Customers WHERE " _& "Customers.Country=[Type Country Name];"
The above SQL statement begins by defining one parameter called Country
Name. This parameter will be able to accept text entries. The second part of the
SQL statement selects all the records from the Customers table that have an
entry in the Country field equal to the provided parameter value. The complete
procedure is shown in Hands-On 15-7.
364 | Chapter 15
Part II
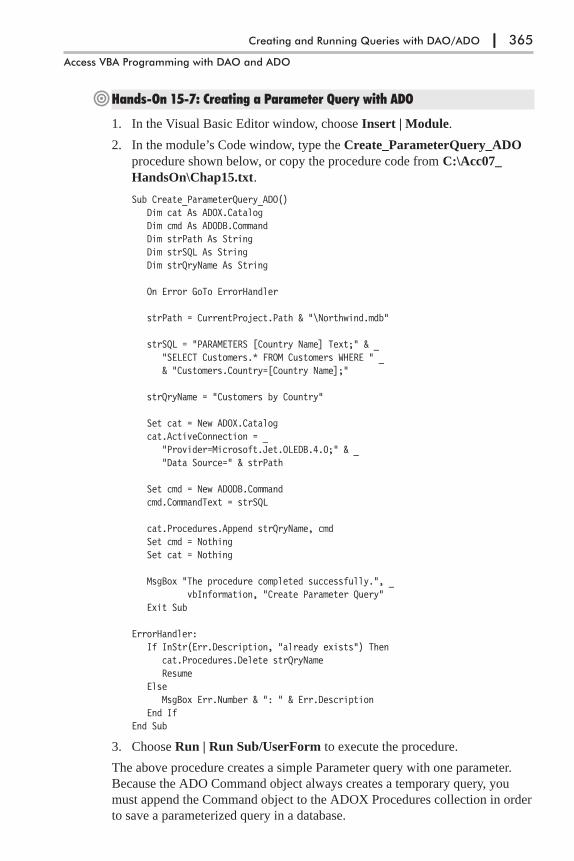
�Hands-On 15-7: Creating a Parameter Query with ADO
1. In the Visual Basic Editor window, choose Insert | Module.
2. In the module’s Code window, type the Create_ParameterQuery_ADO
procedure shown below, or copy the procedure code from C:\Acc07_
HandsOn\Chap15.txt.
Sub Create_ParameterQuery_ADO()Dim cat As ADOX.CatalogDim cmd As ADODB.CommandDim strPath As StringDim strSQL As StringDim strQryName As String
On Error GoTo ErrorHandler
strPath = CurrentProject.Path & "\Northwind.mdb"
strSQL = "PARAMETERS [Country Name] Text;" & _"SELECT Customers.* FROM Customers WHERE " _& "Customers.Country=[Country Name];"
strQryName = "Customers by Country"
Set cat = New ADOX.Catalogcat.ActiveConnection = _
"Provider=Microsoft.Jet.OLEDB.4.0;" & _"Data Source=" & strPath
Set cmd = New ADODB.Commandcmd.CommandText = strSQL
cat.Procedures.Append strQryName, cmdSet cmd = NothingSet cat = Nothing
MsgBox "The procedure completed successfully.", _vbInformation, "Create Parameter Query"
Exit Sub
ErrorHandler:If InStr(Err.Description, "already exists") Then
cat.Procedures.Delete strQryNameResume
ElseMsgBox Err.Number & ": " & Err.Description
End IfEnd Sub
3. Choose Run | Run Sub/UserForm to execute the procedure.
The above procedure creates a simple Parameter query with one parameter.
Because the ADO Command object always creates a temporary query, you
must append the Command object to the ADOX Procedures collection in order
to save a parameterized query in a database.
Creating and Running Queries with DAO/ADO | 365
Access VBA Programming with DAO and ADO
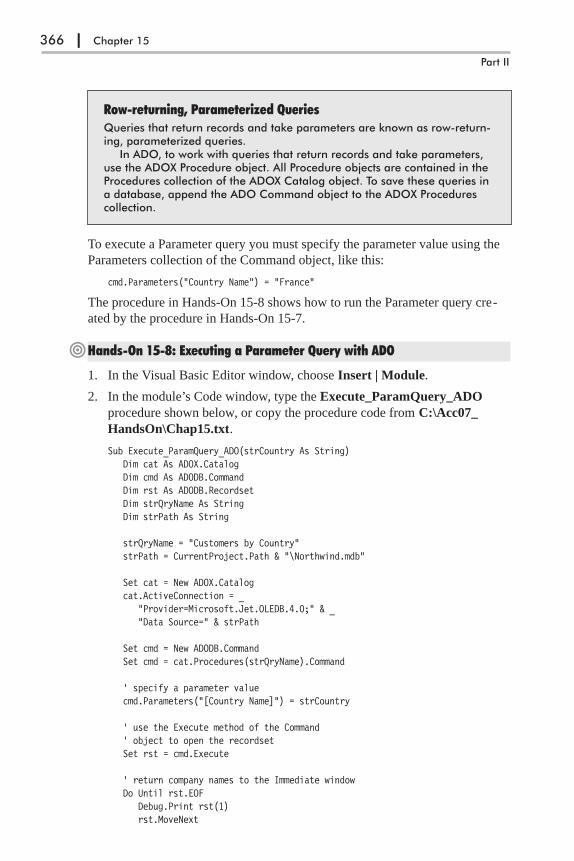
Row-returning, Parameterized QueriesQueries that return records and take parameters are known as row-return-ing, parameterized queries.
In ADO, to work with queries that return records and take parameters,use the ADOX Procedure object. All Procedure objects are contained in theProcedures collection of the ADOX Catalog object. To save these queries ina database, append the ADO Command object to the ADOX Procedurescollection.
To execute a Parameter query you must specify the parameter value using the
Parameters collection of the Command object, like this:
cmd.Parameters("Country Name") = "France"
The procedure in Hands-On 15-8 shows how to run the Parameter query cre-
ated by the procedure in Hands-On 15-7.
�Hands-On 15-8: Executing a Parameter Query with ADO
1. In the Visual Basic Editor window, choose Insert | Module.
2. In the module’s Code window, type the Execute_ParamQuery_ADO
procedure shown below, or copy the procedure code from C:\Acc07_
HandsOn\Chap15.txt.
Sub Execute_ParamQuery_ADO(strCountry As String)Dim cat As ADOX.CatalogDim cmd As ADODB.CommandDim rst As ADODB.RecordsetDim strQryName As StringDim strPath As String
strQryName = "Customers by Country"strPath = CurrentProject.Path & "\Northwind.mdb"
Set cat = New ADOX.Catalogcat.ActiveConnection = _
"Provider=Microsoft.Jet.OLEDB.4.0;" & _"Data Source=" & strPath
Set cmd = New ADODB.CommandSet cmd = cat.Procedures(strQryName).Command
' specify a parameter valuecmd.Parameters("[Country Name]") = strCountry
' use the Execute method of the Command' object to open the recordsetSet rst = cmd.Execute
' return company names to the Immediate windowDo Until rst.EOF
Debug.Print rst(1)rst.MoveNext
366 | Chapter 15
Part II

Loop
rst.CloseSet rst = NothingSet cmd = NothingSet cat = Nothing
End Sub
3. Execute the above procedure from the Immediate window by typing the
following statement and pressing Enter:
Execute_ParamQuery_ADO "Argentina"
The Execute_ParamQuery_ADO procedure shown above establishes the con-
nection to the Northwind database. Next, the name of the query is supplied in
the following statement:
Set cmd = cat.Procedures(strQryName).Command
Because this is a Parameter query, the parameter value is specified by using the
Parameters collection of the Command object, like this:
cmd.Parameters("[Country Name]") = strCountry
Then, the Recordset object is opened by using the Execute method of the Com-
mand object:
Set rst = cmd.Execute
Finally, the procedure loops through the recordset to retrieve the company
names and print them to the Immediate window. After running this procedure,
the following lines are returned to the Immediate window for the specified
country:
Cactus Comidas para llevarOcéano Atlántico Ltda.Rancho grande
� Note: Instead of specifying the parameter values before the recordset isopen, you can use the Parameters argument of the Command object’s Executemethod to pass the parameter value, as shown below:
Set rst = cmd.Execute(Parameters:=strCountry)
Creating and Running a Make-Table Query with DAOA Make-Table query creates a new table out of records from one or more tables
or queries. Make-Table queries are often used to preserve data as it existed at a
particular time or to create a backup copy of a table without backing up the
entire database. Use the SELECT INTO statement to create a Make-Table
query. This statement consists of the following parts:
Creating and Running Queries with DAO/ADO | 367
Access VBA Programming with DAO and ADO
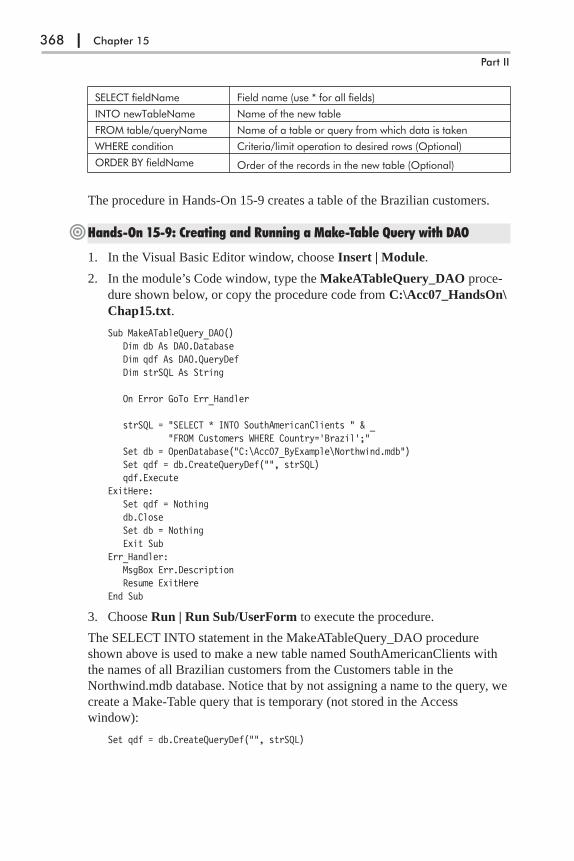
SELECT fieldName Field name (use * for all fields)
INTO newTableName Name of the new table
FROM table/queryName Name of a table or query from which data is taken
WHERE condition Criteria/limit operation to desired rows (Optional)
ORDER BY fieldName Order of the records in the new table (Optional)
The procedure in Hands-On 15-9 creates a table of the Brazilian customers.
�Hands-On 15-9: Creating and Running a Make-Table Query with DAO
1. In the Visual Basic Editor window, choose Insert | Module.
2. In the module’s Code window, type the MakeATableQuery_DAO proce-
dure shown below, or copy the procedure code from C:\Acc07_HandsOn\
Chap15.txt.
Sub MakeATableQuery_DAO()Dim db As DAO.DatabaseDim qdf As DAO.QueryDefDim strSQL As String
On Error GoTo Err_Handler
strSQL = "SELECT * INTO SouthAmericanClients " & _"FROM Customers WHERE Country='Brazil';"
Set db = OpenDatabase("C:\Acc07_ByExample\Northwind.mdb")Set qdf = db.CreateQueryDef("", strSQL)qdf.Execute
ExitHere:Set qdf = Nothingdb.CloseSet db = NothingExit Sub
Err_Handler:MsgBox Err.DescriptionResume ExitHere
End Sub
3. Choose Run | Run Sub/UserForm to execute the procedure.
The SELECT INTO statement in the MakeATableQuery_DAO procedure
shown above is used to make a new table named SouthAmericanClients with
the names of all Brazilian customers from the Customers table in the
Northwind.mdb database. Notice that by not assigning a name to the query, we
create a Make-Table query that is temporary (not stored in the Access
window):
Set qdf = db.CreateQueryDef("", strSQL)
368 | Chapter 15
Part II

Creating and Running an Update Query with DAOAn Update query is a type of Action query. Update queries are very convenient
to use when you want to change fields for a single record or for multiple
records in a table. The UPDATE statement consists of the following three
parts:
UPDATE TableName or QueryName
SET Expression/operation to perform
WHERE Criteria/limit operation to desired rows
For example, to mark product 10 as discontinued, you would use the following
UPDATE statement:
UPDATE Products SET Discontinued = True WHERE ProductID = 10
The criteria in the WHERE clause is used to determine which rows will be
updated. The Update query does not produce a result table. To avoid updating
the wrong records, always determine which rows you want to be updated by
creating and running a Select query first.
The Execute method of a QueryDef object is used to run any type of Action
query. The procedure in Hands-On 15-10 demonstrates how to create and run
an Update query with DAO.
�Hands-On 15-10: Creating and Running an Update Query with DAO
1. In the Visual Basic Editor window, choose Insert | Module.
2. In the module’s Code window, type the CreateRunUpdateQuery_DAO
procedure shown below, or copy the procedure code from C:\Acc07_
HandsOn\Chap15.txt.
Sub CreateRunUpdateQuery_DAO()Dim db As DAO.DatabaseDim qdf As DAO.QueryDefDim strSQL As String
On Error GoTo Err_Handler
strSQL = "UPDATE Suppliers INNER JOIN Products ON " & _"Suppliers.SupplierID = Products.SupplierID " & _"SET Products.UnitPrice = [UnitPrice]+2 " & _"WHERE (((Suppliers.CompanyName)='Tokyo Traders'));"
Set db = OpenDatabase("C:\Acc07_ByExample\Northwind.mdb")
Set qdf = db.CreateQueryDef("PriceIncrease", strSQL)qdf.Execute
ExitHere:Set db = NothingExit Sub
Err_Handler:If Err.Number = 3012 Then
Creating and Running Queries with DAO/ADO | 369
Access VBA Programming with DAO and ADO
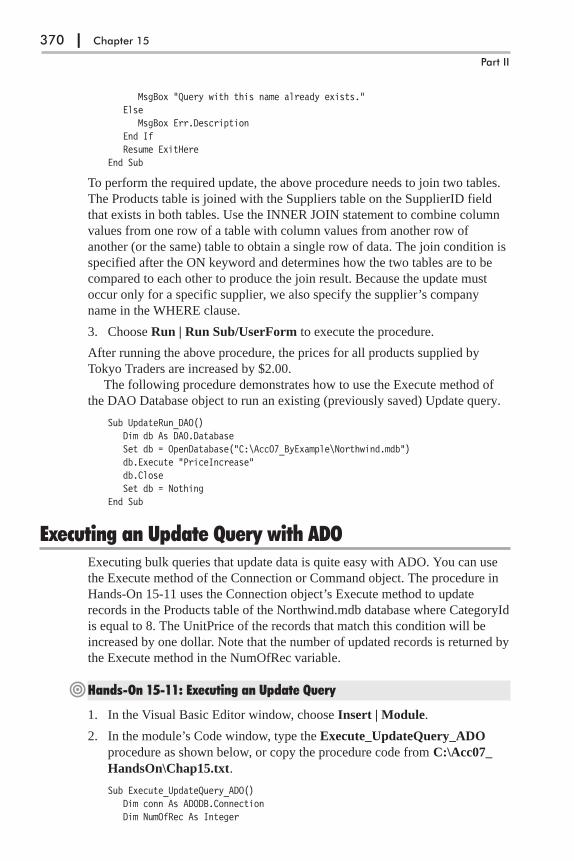
MsgBox "Query with this name already exists."Else
MsgBox Err.DescriptionEnd IfResume ExitHere
End Sub
To perform the required update, the above procedure needs to join two tables.
The Products table is joined with the Suppliers table on the SupplierID field
that exists in both tables. Use the INNER JOIN statement to combine column
values from one row of a table with column values from another row of
another (or the same) table to obtain a single row of data. The join condition is
specified after the ON keyword and determines how the two tables are to be
compared to each other to produce the join result. Because the update must
occur only for a specific supplier, we also specify the supplier’s company
name in the WHERE clause.
3. Choose Run | Run Sub/UserForm to execute the procedure.
After running the above procedure, the prices for all products supplied by
Tokyo Traders are increased by $2.00.
The following procedure demonstrates how to use the Execute method of
the DAO Database object to run an existing (previously saved) Update query.
Sub UpdateRun_DAO()Dim db As DAO.DatabaseSet db = OpenDatabase("C:\Acc07_ByExample\Northwind.mdb")db.Execute "PriceIncrease"db.CloseSet db = Nothing
End Sub
Executing an Update Query with ADOExecuting bulk queries that update data is quite easy with ADO. You can use
the Execute method of the Connection or Command object. The procedure in
Hands-On 15-11 uses the Connection object’s Execute method to update
records in the Products table of the Northwind.mdb database where CategoryId
is equal to 8. The UnitPrice of the records that match this condition will be
increased by one dollar. Note that the number of updated records is returned by
the Execute method in the NumOfRec variable.
�Hands-On 15-11: Executing an Update Query
1. In the Visual Basic Editor window, choose Insert | Module.
2. In the module’s Code window, type the Execute_UpdateQuery_ADO
procedure as shown below, or copy the procedure code from C:\Acc07_
HandsOn\Chap15.txt.
Sub Execute_UpdateQuery_ADO()Dim conn As ADODB.ConnectionDim NumOfRec As Integer
370 | Chapter 15
Part II

Dim strPath As String
strPath = CurrentProject.Path & "\Northwind.mdb"
Set conn = New ADODB.Connection
conn.Open "Provider=Microsoft.Jet.OLEDB.4.0;" & _"Data Source=" & strPath
conn.Execute "UPDATE Products " & _"SET UnitPrice = UnitPrice + 1" & _" WHERE CategoryId = 8", _NumOfRec, adExecuteNoRecords
MsgBox NumOfRec & " records were updated."conn.CloseSet conn = Nothing
End Sub
3. Choose Run | Run Sub/UserForm to execute the procedure.
The above procedure uses the Data Manipulation Language (DML) UPDATE
statement to make a change in the UnitPrice field of the Products table. The
Execute method of the Connection object allows the provider to return the
number of records that were affected via the RecordsAffected parameter. This
parameter applies only to Action queries or stored procedures. To get the num-
ber of records returned by a result-returning query or stored procedure, you
must use the RecordCount property. In the procedure shown above, we store
the number of records affected in the string variable NumOfRec. Note that
when a command does not return a recordset, you should include the constant
adExecuteNoRecords. The adExecuteNoRecords constant can only be passed
as an optional parameter to the Command or Connection object’s Execute
method.
The procedure in Hands-On 15-12 demonstrates how to execute an Update
query by using the ADO Command object instead of the Connection object
used in the preceding example. By running the following example, the
UnitPrice of all the records in the Products table will be increased by 10
percent.
�Hands-On 15-12: Executing an Update Query Using the Command Object
1. In the Visual Basic Editor window, choose Insert | Module.
2. In the module’s Code window, type the Execute_UpdateQuery2_ADO
procedure shown below, or copy the procedure code from
C:\Acc07_HandsOn\Chap15.txt.
Sub Execute_UpdateQuery2_ADO()Dim cmd As ADODB.CommandDim NumOfRec As IntegerDim strPath As String
Creating and Running Queries with DAO/ADO | 371
Access VBA Programming with DAO and ADO

strPath = CurrentProject.Path & "\Northwind.mdb"
Set cmd = New ADODB.CommandWith cmd
.ActiveConnection = _"Provider=Microsoft.Jet.OLEDB.4.0;" & _"Data Source=" & strPath
.CommandText = "Update Products " & _"Set UnitPrice = UnitPrice *1.1"
.Execute NumOfRec, adExecuteNoRecordsEnd WithMsgBox NumOfRecSet cmd = Nothing
End Sub
3. Choose Run | Run Sub/UserForm to execute the procedure.
Non-row-returning QueriesQueries that do not return records, such as Action queries or Data Defini-tion Language (DDL) queries, are known as non-row-returning queries.
• Action queries are Data Manipulation Language (DML) queries that per-form bulk operations on a set of records. They allow you to add, update,or delete records.
• The DDL queries are used for creating database objects and altering thestructure of a database.
• Use the ADOX Procedure object to work with queries that don’t returnrecords. All Procedure objects are contained in the Procedures collectionof the ADOX Catalog object. To save these types of queries in a data-base, append the ADO Command object to the ADOX Procedurescollection.
Running an Append Query with DAO/ADOAppend queries are used for adding records from one or more tables to other
tables. You can append records to a table in a current database or another
Access or non-Access database. An Append query is an Action query that adds
new records to the end of an existing table or query. Append queries don’t
return records. They are useful for archiving records. Before you can archive
the records, you need to create a new table structure to hold the records. To add
a record or multiple records to a table, use the INSERT INTO statement. This
statement has the following parts:
INSERT INTO target [(Field1, Field2)] The name of the table or query to which recordsare appended. You may indicate the names of
the fields to which data is appended.
SELECT fieldName(s) The names of fields from which data is obtained.
FROM tableName or expression The name of the table or tables from whichrecords are inserted, the name of a saved query,or a SELECT statement.
WHERE condition Criteria/limit operation to desired rows.
372 | Chapter 15
Part II
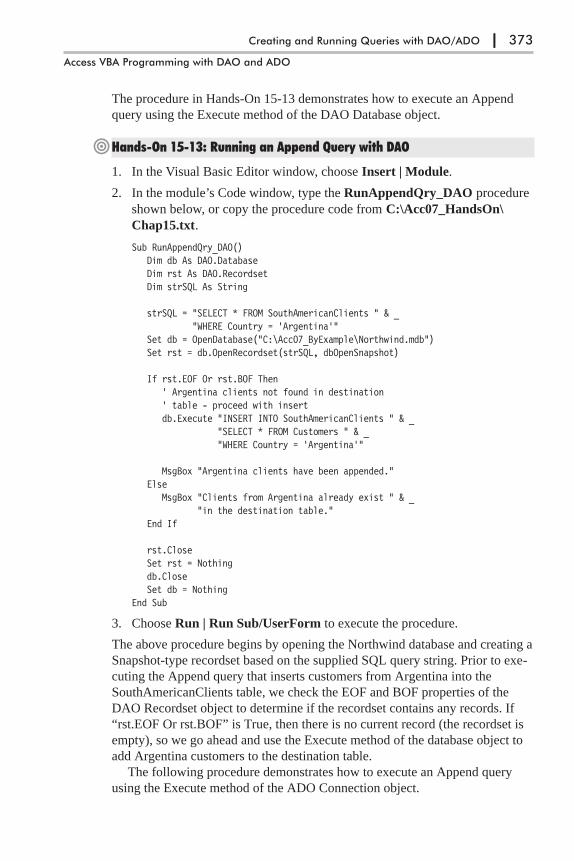
The procedure in Hands-On 15-13 demonstrates how to execute an Append
query using the Execute method of the DAO Database object.
�Hands-On 15-13: Running an Append Query with DAO
1. In the Visual Basic Editor window, choose Insert | Module.
2. In the module’s Code window, type the RunAppendQry_DAO procedure
shown below, or copy the procedure code from C:\Acc07_HandsOn\
Chap15.txt.
Sub RunAppendQry_DAO()Dim db As DAO.DatabaseDim rst As DAO.RecordsetDim strSQL As String
strSQL = "SELECT * FROM SouthAmericanClients " & _"WHERE Country = 'Argentina'"
Set db = OpenDatabase("C:\Acc07_ByExample\Northwind.mdb")Set rst = db.OpenRecordset(strSQL, dbOpenSnapshot)
If rst.EOF Or rst.BOF Then' Argentina clients not found in destination' table - proceed with insertdb.Execute "INSERT INTO SouthAmericanClients " & _
"SELECT * FROM Customers " & _"WHERE Country = 'Argentina'"
MsgBox "Argentina clients have been appended."Else
MsgBox "Clients from Argentina already exist " & _"in the destination table."
End If
rst.CloseSet rst = Nothingdb.CloseSet db = Nothing
End Sub
3. Choose Run | Run Sub/UserForm to execute the procedure.
The above procedure begins by opening the Northwind database and creating a
Snapshot-type recordset based on the supplied SQL query string. Prior to exe-
cuting the Append query that inserts customers from Argentina into the
SouthAmericanClients table, we check the EOF and BOF properties of the
DAO Recordset object to determine if the recordset contains any records. If
“rst.EOF Or rst.BOF” is True, then there is no current record (the recordset is
empty), so we go ahead and use the Execute method of the database object to
add Argentina customers to the destination table.
The following procedure demonstrates how to execute an Append query
using the Execute method of the ADO Connection object.
Creating and Running Queries with DAO/ADO | 373
Access VBA Programming with DAO and ADO

Sub RunAppendQry_ADO()Dim conn As ADODB.ConnectionDim strSQL As StringDim recAffected As Long
On Error Resume NextSet conn = New ADODB.Connection
conn.Provider = "Microsoft.Jet.OLEDB.4.0"conn.Open "C:\Acc07_ByExample\Northwind.mdb"strSQL = "INSERT INTO SouthAmericanClients " & _
"SELECT * FROM Customers " & _"WHERE Country = 'Venezuela'"
conn.Execute strSQL, recAffectedIf Err <> 0 Then
Debug.Print "Error Number: " & Err.NumberDebug.Print "Error Description: " & Err.Description
ElseDebug.Print recAffected & " records were inserted."
End Ifconn.CloseSet conn = Nothing
End Sub
The above procedure opens a connection to the Northwind.mdb database.
Once the database is open, the Execute method of the ADO Connection object
is used to execute the specified SQL INSERT INTO statement. You can use an
optional RecordsAffected parameter (see the recAffected variable in the above
procedure) with the Execute method to determine the number of records that
the Execute method affected. This parameter must be a variable of the Long
data type. If the Insert operation was successful, the VBA Err object will return
zero (0). The default property of the Err object is Number. Therefore, the
statement:
If Err <> 0
is equivalent to:
If Err.Number <> 0
If a run-time error occurs, for example, the destination table does not exist, the
procedure will print to the Immediate window the error number and its
description text. If there were no errors, the Immediate window will contain
the number of records that were affected by the Insert operation.
Running a Delete Query with DAOWith a Delete query you can delete a single record or multiple records from a
database. The DELETE statement used to delete rows from a table consists of
the following three parts:
374 | Chapter 15
Part II
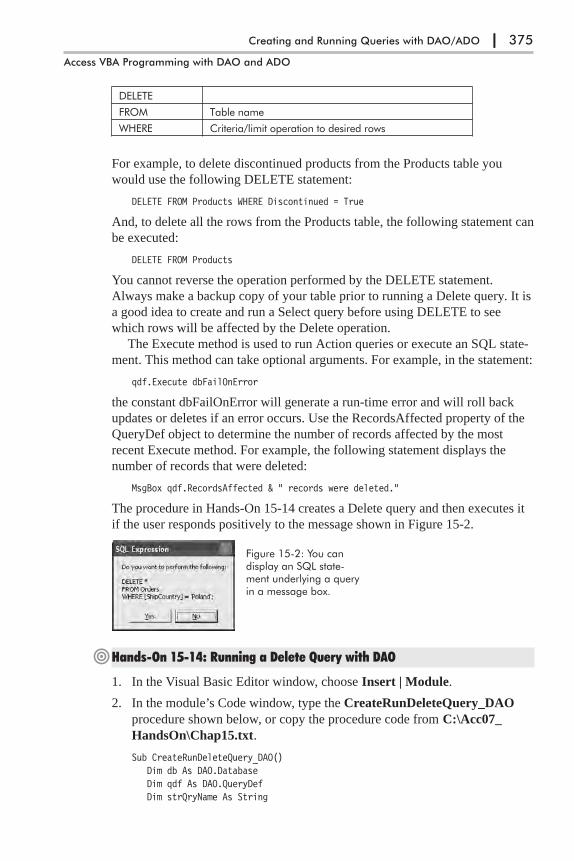
DELETE
FROM Table name
WHERE Criteria/limit operation to desired rows
For example, to delete discontinued products from the Products table you
would use the following DELETE statement:
DELETE FROM Products WHERE Discontinued = True
And, to delete all the rows from the Products table, the following statement can
be executed:
DELETE FROM Products
You cannot reverse the operation performed by the DELETE statement.
Always make a backup copy of your table prior to running a Delete query. It is
a good idea to create and run a Select query before using DELETE to see
which rows will be affected by the Delete operation.
The Execute method is used to run Action queries or execute an SQL state-
ment. This method can take optional arguments. For example, in the statement:
qdf.Execute dbFailOnError
the constant dbFailOnError will generate a run-time error and will roll back
updates or deletes if an error occurs. Use the RecordsAffected property of the
QueryDef object to determine the number of records affected by the most
recent Execute method. For example, the following statement displays the
number of records that were deleted:
MsgBox qdf.RecordsAffected & " records were deleted."
The procedure in Hands-On 15-14 creates a Delete query and then executes it
if the user responds positively to the message shown in Figure 15-2.
�Hands-On 15-14: Running a Delete Query with DAO
1. In the Visual Basic Editor window, choose Insert | Module.
2. In the module’s Code window, type the CreateRunDeleteQuery_DAO
procedure shown below, or copy the procedure code from C:\Acc07_
HandsOn\Chap15.txt.
Sub CreateRunDeleteQuery_DAO()Dim db As DAO.DatabaseDim qdf As DAO.QueryDefDim strQryName As String
Creating and Running Queries with DAO/ADO | 375
Access VBA Programming with DAO and ADO
Figure 15-2: You candisplay an SQL state-ment underlying a queryin a message box.
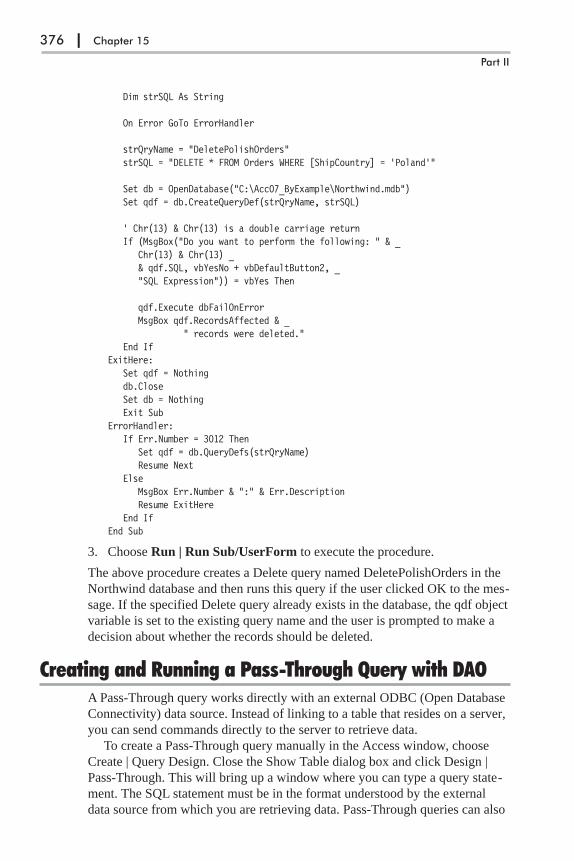
Dim strSQL As String
On Error GoTo ErrorHandler
strQryName = "DeletePolishOrders"strSQL = "DELETE * FROM Orders WHERE [ShipCountry] = 'Poland'"
Set db = OpenDatabase("C:\Acc07_ByExample\Northwind.mdb")Set qdf = db.CreateQueryDef(strQryName, strSQL)
' Chr(13) & Chr(13) is a double carriage returnIf (MsgBox("Do you want to perform the following: " & _
Chr(13) & Chr(13) _& qdf.SQL, vbYesNo + vbDefaultButton2, _"SQL Expression")) = vbYes Then
qdf.Execute dbFailOnErrorMsgBox qdf.RecordsAffected & _
" records were deleted."End If
ExitHere:Set qdf = Nothingdb.CloseSet db = NothingExit Sub
ErrorHandler:If Err.Number = 3012 Then
Set qdf = db.QueryDefs(strQryName)Resume Next
ElseMsgBox Err.Number & ":" & Err.DescriptionResume ExitHere
End IfEnd Sub
3. Choose Run | Run Sub/UserForm to execute the procedure.
The above procedure creates a Delete query named DeletePolishOrders in the
Northwind database and then runs this query if the user clicked OK to the mes-
sage. If the specified Delete query already exists in the database, the qdf object
variable is set to the existing query name and the user is prompted to make a
decision about whether the records should be deleted.
Creating and Running a Pass-Through Query with DAOA Pass-Through query works directly with an external ODBC (Open Database
Connectivity) data source. Instead of linking to a table that resides on a server,
you can send commands directly to the server to retrieve data.
To create a Pass-Through query manually in the Access window, choose
Create | Query Design. Close the Show Table dialog box and click Design |
Pass-Through. This will bring up a window where you can type a query state-
ment. The SQL statement must be in the format understood by the external
data source from which you are retrieving data. Pass-Through queries can also
376 | Chapter 15
Part II
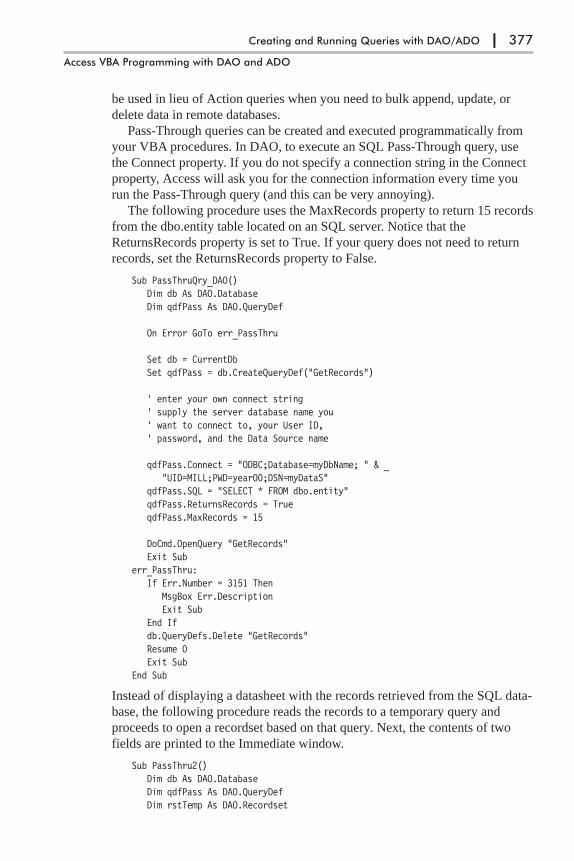
be used in lieu of Action queries when you need to bulk append, update, or
delete data in remote databases.
Pass-Through queries can be created and executed programmatically from
your VBA procedures. In DAO, to execute an SQL Pass-Through query, use
the Connect property. If you do not specify a connection string in the Connect
property, Access will ask you for the connection information every time you
run the Pass-Through query (and this can be very annoying).
The following procedure uses the MaxRecords property to return 15 records
from the dbo.entity table located on an SQL server. Notice that the
ReturnsRecords property is set to True. If your query does not need to return
records, set the ReturnsRecords property to False.
Sub PassThruQry_DAO()Dim db As DAO.DatabaseDim qdfPass As DAO.QueryDef
On Error GoTo err_PassThru
Set db = CurrentDbSet qdfPass = db.CreateQueryDef("GetRecords")
' enter your own connect string' supply the server database name you' want to connect to, your User ID,' password, and the Data Source name
qdfPass.Connect = "ODBC;Database=myDbName; " & _"UID=MILL;PWD=year00;DSN=myDataS"
qdfPass.SQL = "SELECT * FROM dbo.entity"qdfPass.ReturnsRecords = TrueqdfPass.MaxRecords = 15
DoCmd.OpenQuery "GetRecords"Exit Sub
err_PassThru:If Err.Number = 3151 Then
MsgBox Err.DescriptionExit Sub
End Ifdb.QueryDefs.Delete "GetRecords"Resume 0Exit Sub
End Sub
Instead of displaying a datasheet with the records retrieved from the SQL data-
base, the following procedure reads the records to a temporary query and
proceeds to open a recordset based on that query. Next, the contents of two
fields are printed to the Immediate window.
Sub PassThru2()Dim db As DAO.DatabaseDim qdfPass As DAO.QueryDefDim rstTemp As DAO.Recordset
Creating and Running Queries with DAO/ADO | 377
Access VBA Programming with DAO and ADO

On Error GoTo err_PassThru
Set db = CurrentDbSet qdfPass = db.CreateQueryDef("")
' enter your own connect string' supply the server database name you' want to connect to, your User ID,' password, and the Data Source name
qdfPass.Connect = "ODBC;Database=myDbName;UID=MILL;" & _"PWD=year00;DSN=myDataS"
qdfPass.SQL = "SELECT * FROM dbo.entity"qdfPass.ReturnsRecords = TrueqdfPass.MaxRecords = 15Set rstTemp = qdfPass.OpenRecordset()' print data from two fields to the Immediate windowWith rstTemp
Do While Not .EOFDebug.Print .Fields("entity_id"), .Fields("entity_name")
.Fields("entity_name").MoveNext
Loop.Close
End WithSendKeys "^g"
ExitHere:Set db = NothingExit Sub
err_PassThru:MsgBox Err.Number & ":" & Err.DescriptionResume ExitHere
End Sub
Creating and Executing a Pass-Through Query with ADOAs mentioned earlier, SQL Pass-Through queries are SQL statements that are
sent directly to the database server for processing. In earlier versions of
Microsoft Access, Pass-Through queries were used with Data Access Objects
(DAO) to increase performance when accessing external ODBC data sources.
In ADO, you can use the Microsoft OLE DB Provider for SQL Server to
directly access the SQL Server. For this reason, you do not need to create
Pass-Through queries. However, since it is possible to create a Pass-Through
query using ADOX and Microsoft Jet Provider, the next hands-on demon-
strates how to do this.
�Hands-On 15-15: Creating a Pass-Through Query with ADO
This hands-on exercise requires that you have access to an SQL Server
Northwind database.
1. In the Visual Basic Editor window, choose Insert | Module.
378 | Chapter 15
Part II
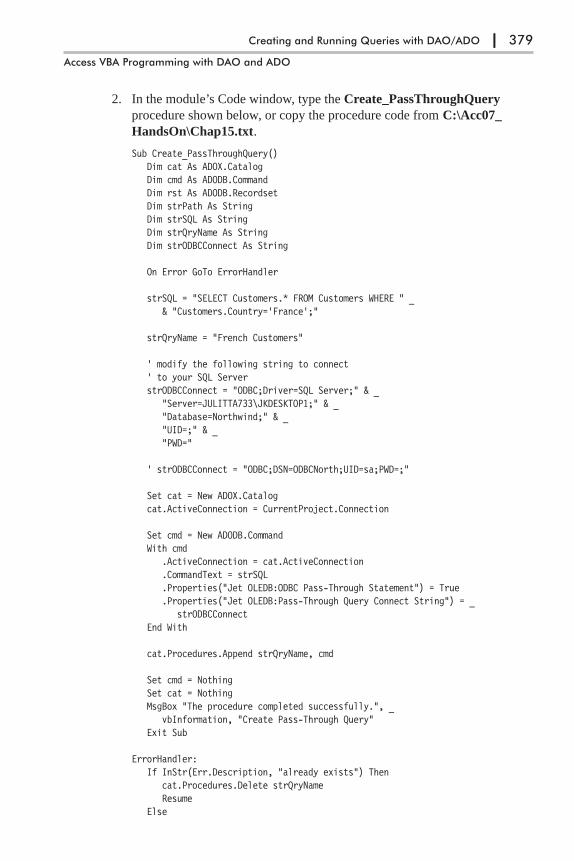
2. In the module’s Code window, type the Create_PassThroughQuery
procedure shown below, or copy the procedure code from C:\Acc07_
HandsOn\Chap15.txt.
Sub Create_PassThroughQuery()Dim cat As ADOX.CatalogDim cmd As ADODB.CommandDim rst As ADODB.RecordsetDim strPath As StringDim strSQL As StringDim strQryName As StringDim strODBCConnect As String
On Error GoTo ErrorHandler
strSQL = "SELECT Customers.* FROM Customers WHERE " _& "Customers.Country='France';"
strQryName = "French Customers"
' modify the following string to connect' to your SQL ServerstrODBCConnect = "ODBC;Driver=SQL Server;" & _
"Server=JULITTA733\JKDESKTOP1;" & _"Database=Northwind;" & _"UID=;" & _"PWD="
' strODBCConnect = "ODBC;DSN=ODBCNorth;UID=sa;PWD=;"
Set cat = New ADOX.Catalogcat.ActiveConnection = CurrentProject.Connection
Set cmd = New ADODB.CommandWith cmd
.ActiveConnection = cat.ActiveConnection
.CommandText = strSQL
.Properties("Jet OLEDB:ODBC Pass-Through Statement") = True
.Properties("Jet OLEDB:Pass-Through Query Connect String") = _strODBCConnect
End With
cat.Procedures.Append strQryName, cmd
Set cmd = NothingSet cat = NothingMsgBox "The procedure completed successfully.", _
vbInformation, "Create Pass-Through Query"Exit Sub
ErrorHandler:If InStr(Err.Description, "already exists") Then
cat.Procedures.Delete strQryNameResume
Else
Creating and Running Queries with DAO/ADO | 379
Access VBA Programming with DAO and ADO
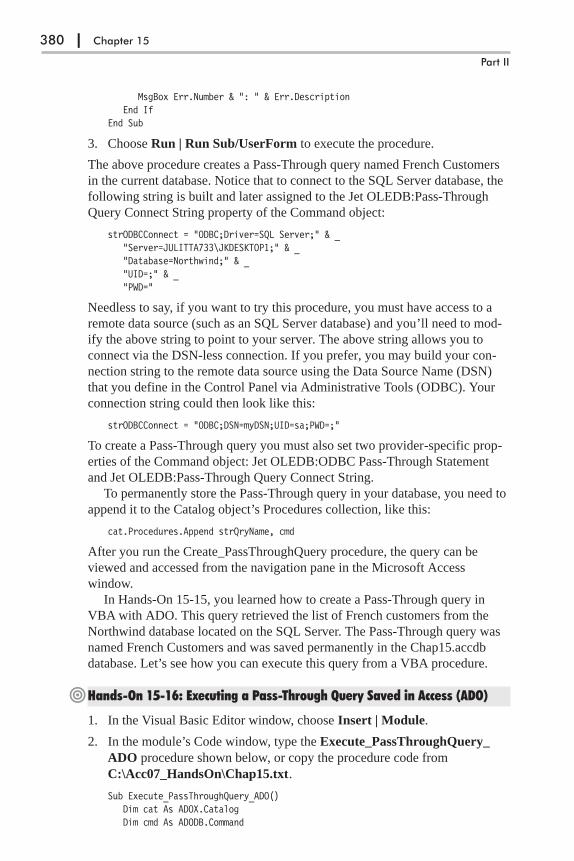
MsgBox Err.Number & ": " & Err.DescriptionEnd If
End Sub
3. Choose Run | Run Sub/UserForm to execute the procedure.
The above procedure creates a Pass-Through query named French Customers
in the current database. Notice that to connect to the SQL Server database, the
following string is built and later assigned to the Jet OLEDB:Pass-Through
Query Connect String property of the Command object:
strODBCConnect = "ODBC;Driver=SQL Server;" & _"Server=JULITTA733\JKDESKTOP1;" & _"Database=Northwind;" & _"UID=;" & _"PWD="
Needless to say, if you want to try this procedure, you must have access to a
remote data source (such as an SQL Server database) and you’ll need to mod-
ify the above string to point to your server. The above string allows you to
connect via the DSN-less connection. If you prefer, you may build your con-
nection string to the remote data source using the Data Source Name (DSN)
that you define in the Control Panel via Administrative Tools (ODBC). Your
connection string could then look like this:
strODBCConnect = "ODBC;DSN=myDSN;UID=sa;PWD=;"
To create a Pass-Through query you must also set two provider-specific prop-
erties of the Command object: Jet OLEDB:ODBC Pass-Through Statement
and Jet OLEDB:Pass-Through Query Connect String.
To permanently store the Pass-Through query in your database, you need to
append it to the Catalog object’s Procedures collection, like this:
cat.Procedures.Append strQryName, cmd
After you run the Create_PassThroughQuery procedure, the query can be
viewed and accessed from the navigation pane in the Microsoft Access
window.
In Hands-On 15-15, you learned how to create a Pass-Through query in
VBA with ADO. This query retrieved the list of French customers from the
Northwind database located on the SQL Server. The Pass-Through query was
named French Customers and was saved permanently in the Chap15.accdb
database. Let’s see how you can execute this query from a VBA procedure.
�Hands-On 15-16: Executing a Pass-Through Query Saved in Access (ADO)
1. In the Visual Basic Editor window, choose Insert | Module.
2. In the module’s Code window, type the Execute_PassThroughQuery_
ADO procedure shown below, or copy the procedure code from
C:\Acc07_HandsOn\Chap15.txt.
Sub Execute_PassThroughQuery_ADO()Dim cat As ADOX.CatalogDim cmd As ADODB.Command
380 | Chapter 15
Part II
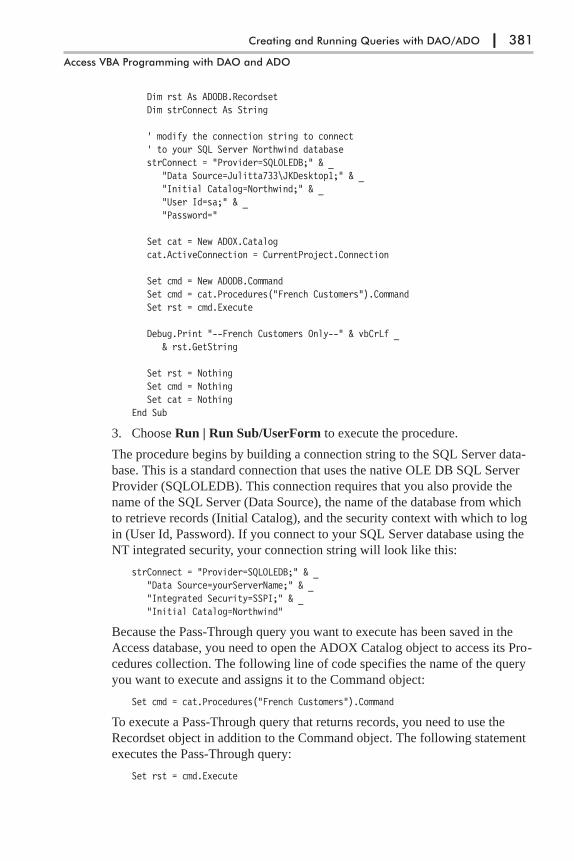
Dim rst As ADODB.RecordsetDim strConnect As String
' modify the connection string to connect' to your SQL Server Northwind databasestrConnect = "Provider=SQLOLEDB;" & _
"Data Source=Julitta733\JKDesktop1;" & _"Initial Catalog=Northwind;" & _"User Id=sa;" & _"Password="
Set cat = New ADOX.Catalogcat.ActiveConnection = CurrentProject.Connection
Set cmd = New ADODB.CommandSet cmd = cat.Procedures("French Customers").CommandSet rst = cmd.Execute
Debug.Print "--French Customers Only--" & vbCrLf _& rst.GetString
Set rst = NothingSet cmd = NothingSet cat = Nothing
End Sub
3. Choose Run | Run Sub/UserForm to execute the procedure.
The procedure begins by building a connection string to the SQL Server data-
base. This is a standard connection that uses the native OLE DB SQL Server
Provider (SQLOLEDB). This connection requires that you also provide the
name of the SQL Server (Data Source), the name of the database from which
to retrieve records (Initial Catalog), and the security context with which to log
in (User Id, Password). If you connect to your SQL Server database using the
NT integrated security, your connection string will look like this:
strConnect = "Provider=SQLOLEDB;" & _"Data Source=yourServerName;" & _"Integrated Security=SSPI;" & _"Initial Catalog=Northwind"
Because the Pass-Through query you want to execute has been saved in the
Access database, you need to open the ADOX Catalog object to access its Pro-
cedures collection. The following line of code specifies the name of the query
you want to execute and assigns it to the Command object:
Set cmd = cat.Procedures("French Customers").Command
To execute a Pass-Through query that returns records, you need to use the
Recordset object in addition to the Command object. The following statement
executes the Pass-Through query:
Set rst = cmd.Execute
Creating and Running Queries with DAO/ADO | 381
Access VBA Programming with DAO and ADO

The Pass-Through query executes on the server. To quickly view data on the
client machine, we retrieve the contents of the recordset by using the GetString
method:
Debug.Print "--French Customers Only--" & vbCrLf _& rst.GetString
Performing Other Operations with QueriesNow that you know how to programmatically create and run various queries
using DAO and ADO objects, you may be interested to find out how to use
Visual Basic to perform other operations related to queries, such as retrieving a
list of queries and their properties, deleting a query, and determining if a query
is updatable.
Retrieving Query Properties with DAOJust like tables and other database objects, queries have properties. To generate
a list of properties for a specific query, use the For Each…Next looping struc-
ture to iterate through the Properties collection of the DAO QueryDef object.
The procedure in Hands-On 15-17 demonstrates this.
�Hands-On 15-17: Listing Query Properties with DAO
1. In the Visual Basic Editor window, choose Insert | Module.
2. In the module’s Code window, type the List_QryProperties_DAO
procedure shown below, or copy the procedure code from C:\Acc07_
HandsOn\Chap15.txt.
Sub List_QryProperties_DAO()Dim db As DAO.DatabaseDim prp As DAO.PropertyDim strDBName As String
On Error Resume Next
strDBName = "C:\Acc07_ByExample\Northwind 2007.accdb"Set db = OpenDatabase(strDBName)For Each prp In db.QueryDefs("Invoice Data").Properties
Debug.Print prp.Name & "= " & prp.ValueNext prpSet db = Nothing
End Sub
3. Choose Run | Run Sub/UserForm to execute the procedure.
Below are some of the properties printed to the Immediate window by running
the code in the List_QryProperties_DAO procedure shown above.
Name= Invoice DataDateCreated= 12/28/2006 5:30:24 PMLastUpdated= 6/10/2007 6:03:43 PMType= 0
382 | Chapter 15
Part II
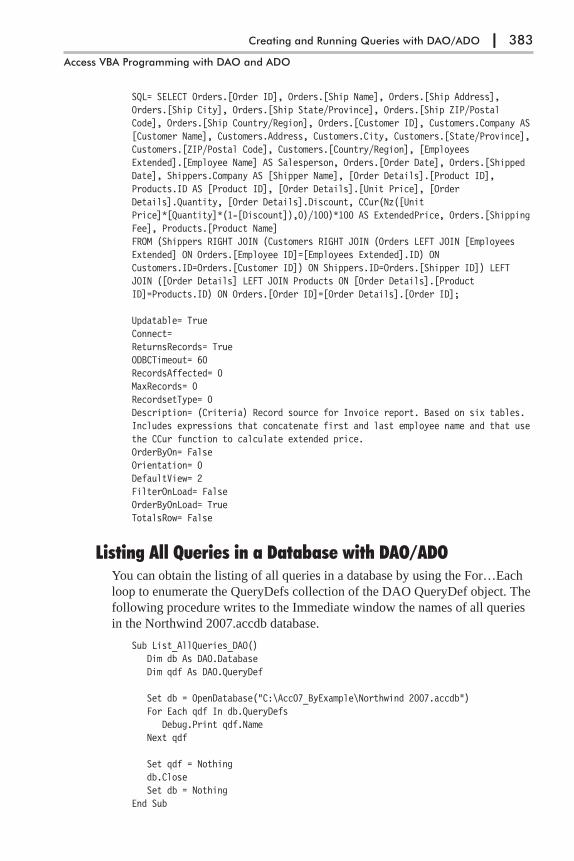
SQL= SELECT Orders.[Order ID], Orders.[Ship Name], Orders.[Ship Address],Orders.[Ship City], Orders.[Ship State/Province], Orders.[Ship ZIP/PostalCode], Orders.[Ship Country/Region], Orders.[Customer ID], Customers.Company AS[Customer Name], Customers.Address, Customers.City, Customers.[State/Province],Customers.[ZIP/Postal Code], Customers.[Country/Region], [EmployeesExtended].[Employee Name] AS Salesperson, Orders.[Order Date], Orders.[ShippedDate], Shippers.Company AS [Shipper Name], [Order Details].[Product ID],Products.ID AS [Product ID], [Order Details].[Unit Price], [OrderDetails].Quantity, [Order Details].Discount, CCur(Nz([UnitPrice]*[Quantity]*(1-[Discount]),0)/100)*100 AS ExtendedPrice, Orders.[ShippingFee], Products.[Product Name]FROM (Shippers RIGHT JOIN (Customers RIGHT JOIN (Orders LEFT JOIN [EmployeesExtended] ON Orders.[Employee ID]=[Employees Extended].ID) ONCustomers.ID=Orders.[Customer ID]) ON Shippers.ID=Orders.[Shipper ID]) LEFTJOIN ([Order Details] LEFT JOIN Products ON [Order Details].[ProductID]=Products.ID) ON Orders.[Order ID]=[Order Details].[Order ID];
Updatable= TrueConnect=ReturnsRecords= TrueODBCTimeout= 60RecordsAffected= 0MaxRecords= 0RecordsetType= 0Description= (Criteria) Record source for Invoice report. Based on six tables.Includes expressions that concatenate first and last employee name and that usethe CCur function to calculate extended price.OrderByOn= FalseOrientation= 0DefaultView= 2FilterOnLoad= FalseOrderByOnLoad= TrueTotalsRow= False
Listing All Queries in a Database with DAO/ADOYou can obtain the listing of all queries in a database by using the For…Each
loop to enumerate the QueryDefs collection of the DAO QueryDef object. The
following procedure writes to the Immediate window the names of all queries
in the Northwind 2007.accdb database.
Sub List_AllQueries_DAO()Dim db As DAO.DatabaseDim qdf As DAO.QueryDef
Set db = OpenDatabase("C:\Acc07_ByExample\Northwind 2007.accdb")For Each qdf In db.QueryDefs
Debug.Print qdf.NameNext qdf
Set qdf = Nothingdb.CloseSet db = Nothing
End Sub
Creating and Running Queries with DAO/ADO | 383
Access VBA Programming with DAO and ADO

The procedure in Hands-On 15-18 retrieves the names of all saved queries in
the Northwind.mdb database by iterating through the View objects stored in
the ADOX Catalog object’s Views collection.
�Hands-On 15-18: Listing Queries in a Database with ADO
1. In the Visual Basic Editor window, choose Insert | Module.
2. In the module’s Code window, type the List_AllQueries_ADO procedure
shown below, or copy the procedure code from C:\Acc07_HandsOn\
Chap15.txt.
Sub List_AllQueries_ADO()Dim cat As New ADOX.CatalogDim v As ADOX.ViewDim strPath As String
strPath = CurrentProject.Path & "\Northwind.mdb"cat.ActiveConnection = _
"Provider=Microsoft.Jet.OLEDB.4.0;" & _"Data Source= " & strPath
For Each v In cat.ViewsDebug.Print v.Name
Next
Set cat = NothingEnd Sub
3. Choose Run | Run Sub/UserForm to execute the procedure.
4. After running the above procedure, open the Immediate window to view
the list of all saved queries in the Northwind.mdb database.
Deleting a Query from a Database with DAO/ADOTo remove a DAO QueryDef object from a QueryDefs collection, use the
Delete method as shown in Hands-On 15-19. The DeleteAQuery_DAO proce-
dure deletes the query that was created in Hands-On 15-1.
�Hands-On 15-19: Deleting a Query from a Database (DAO)
1. In the Visual Basic Editor window, choose Insert | Module.
2. In the module’s Code window, type the DeleteAQuery_DAO procedure
shown below, or copy the procedure code from C:\Acc07_HandsOn\
Chap15.txt.
Sub DeleteAQuery_DAO()Dim db As DAO.DatabaseDim qdf As DAO.QueryDef
On Error GoTo ErrorHandler
384 | Chapter 15
Part II

Set db = OpenDatabase("C:\Acc07_ByExample\Northwind.mdb")db.QueryDefs.Delete "myQuery"
ExitHere:db.CloseSet db = NothingExit Sub
ErrorHandler:MsgBox Err.Number & ": " & Err.DescriptionResume ExitHere
End Sub
3. Choose Run | Run Sub/UserForm to execute the procedure.
After running the procedure in Hands-On 15-19, the query named myQuery is
removed from the Northwind.mdb database.
To delete a query in ADO, use the Procedures or Views collection’s Delete
method. By running the procedure in Hands-On 15-20, you can quickly delete
the Redmond Employees query created in Hands-On 15-2.
�Hands-On 15-20: Deleting a Query from a Database (ADO)
1. In the Visual Basic Editor window, choose Insert | Module.
2. In the module’s Code window, type the DeleteAQuery_ADO procedure
shown below, or copy the procedure code from C:\Acc07_HandsOn\
Chap15.txt.
Sub DeleteAQuery_ADO()Dim cat As New ADOX.CatalogDim strPath As String
On Error GoTo ErrorHandler
strPath = CurrentProject.Path & "\Northwind 2007.accdb"cat.ActiveConnection = _
"Provider=Microsoft.ACE.OLEDB.12.0;" & _"Data Source= " & strPath
cat.Views.Delete "Redmond Employees"
ExitHere:Set cat = NothingExit Sub
ErrorHandler:If Err.Number = 3265 Then
MsgBox "Query does not exist."Else
MsgBox Err.Number & ": " & Err.DescriptionEnd IfResume ExitHere
End Sub
3. Choose Run | Run Sub/UserForm to execute the procedure.
Creating and Running Queries with DAO/ADO | 385
Access VBA Programming with DAO and ADO
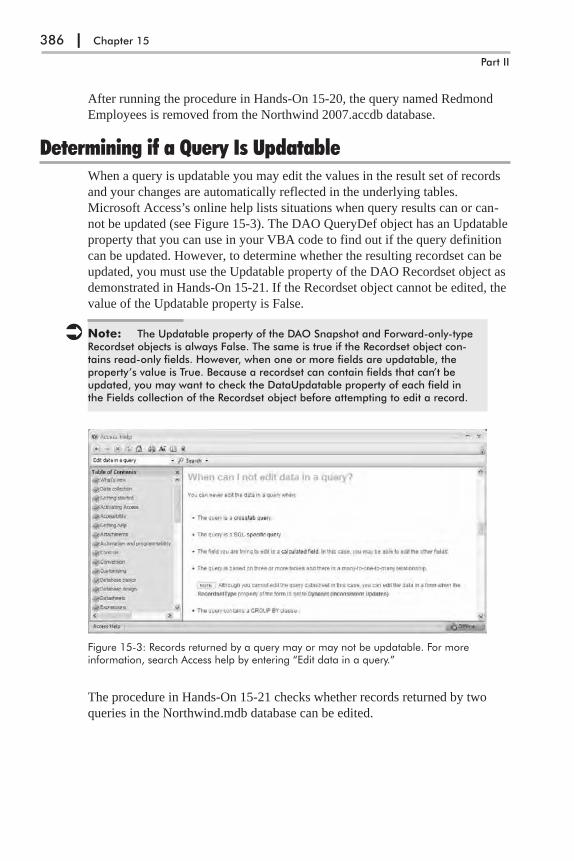
After running the procedure in Hands-On 15-20, the query named Redmond
Employees is removed from the Northwind 2007.accdb database.
Determining if a Query Is UpdatableWhen a query is updatable you may edit the values in the result set of records
and your changes are automatically reflected in the underlying tables.
Microsoft Access’s online help lists situations when query results can or can-
not be updated (see Figure 15-3). The DAO QueryDef object has an Updatable
property that you can use in your VBA code to find out if the query definition
can be updated. However, to determine whether the resulting recordset can be
updated, you must use the Updatable property of the DAO Recordset object as
demonstrated in Hands-On 15-21. If the Recordset object cannot be edited, the
value of the Updatable property is False.
� Note: The Updatable property of the DAO Snapshot and Forward-only-typeRecordset objects is always False. The same is true if the Recordset object con-tains read-only fields. However, when one or more fields are updatable, theproperty’s value is True. Because a recordset can contain fields that can’t beupdated, you may want to check the DataUpdatable property of each field inthe Fields collection of the Recordset object before attempting to edit a record.
The procedure in Hands-On 15-21 checks whether records returned by two
queries in the Northwind.mdb database can be edited.
386 | Chapter 15
Part II
Figure 15-3: Records returned by a query may or may not be updatable. For moreinformation, search Access help by entering “Edit data in a query.”
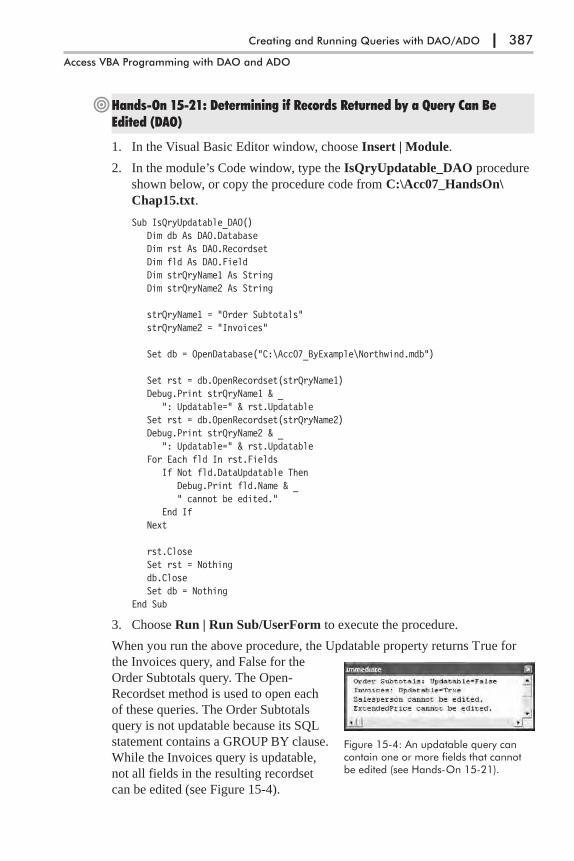
�Hands-On 15-21: Determining if Records Returned by a Query Can BeEdited (DAO)
1. In the Visual Basic Editor window, choose Insert | Module.
2. In the module’s Code window, type the IsQryUpdatable_DAO procedure
shown below, or copy the procedure code from C:\Acc07_HandsOn\
Chap15.txt.
Sub IsQryUpdatable_DAO()Dim db As DAO.DatabaseDim rst As DAO.RecordsetDim fld As DAO.FieldDim strQryName1 As StringDim strQryName2 As String
strQryName1 = "Order Subtotals"strQryName2 = "Invoices"
Set db = OpenDatabase("C:\Acc07_ByExample\Northwind.mdb")
Set rst = db.OpenRecordset(strQryName1)Debug.Print strQryName1 & _
": Updatable=" & rst.UpdatableSet rst = db.OpenRecordset(strQryName2)Debug.Print strQryName2 & _
": Updatable=" & rst.UpdatableFor Each fld In rst.Fields
If Not fld.DataUpdatable ThenDebug.Print fld.Name & _" cannot be edited."
End IfNext
rst.CloseSet rst = Nothingdb.CloseSet db = Nothing
End Sub
3. Choose Run | Run Sub/UserForm to execute the procedure.
When you run the above procedure, the Updatable property returns True for
the Invoices query, and False for the
Order Subtotals query. The Open-
Recordset method is used to open each
of these queries. The Order Subtotals
query is not updatable because its SQL
statement contains a GROUP BY clause.
While the Invoices query is updatable,
not all fields in the resulting recordset
can be edited (see Figure 15-4).
Creating and Running Queries with DAO/ADO | 387
Access VBA Programming with DAO and ADO
Figure 15-4: An updatable query cancontain one or more fields that cannotbe edited (see Hands-On 15-21).

Chapter SummaryCreating and executing queries are the most frequently performed database
operations. This chapter has shown you how to create, run, and modify various
types of queries using the DAO and ADO code.
In the next chapter, you will get to know more of the advanced features of
the ADO/DAO Object Model.
388 | Chapter 15
Part II

Chapter 16
Using Advanced ADO/DAOFeatures
So far you should feel pretty comfortable using ADO in most of your
Microsoft Office Access programming endeavors. What’s more, using the
knowledge acquired during the last few chapters, you can switch to any other
Office application (Excel, Word, PowerPoint, or Outlook) and start program-
ming. Because you already know the ADO methods of accessing databases
and manipulating records, all you need to learn is the object model that the
specific application is using. Learning a new type library is not very hard.
Recall that VBA offers the Object Browser that lists all the application’s
objects, properties, methods, and intrinsic constants that you may need for
writing code. However, if you’d like to accomplish more with ADO, this chap-
ter will introduce you to a couple of more advanced ADO features that will set
you apart from beginning programmers. You will learn about fabricating, per-
sisting, disconnecting, cloning, and shaping recordsets. You will also learn
how to process data modifications and additions by using ADO and DAO
transactions.
Fabricating a RecordsetIn previous chapters, you worked with recordsets that were created from data
that came from a Microsoft Access database, a text or dBASE file, an Excel
spreadsheet, or a Word document. You may have also practiced working with a
recordset generated from an SQL Server database. In each of these circum-
stances, to get the necessary data you needed to establish a connection to the
appropriate data source. In other words, you worked with recordsets that had a
live connection to the data source. These connected recordsets obtained their
structure and data from a query to a data source to which they were connected.
But what if you need to create a recordset with data that does not come from a
data source? As you may recall from Chapter 10, the ADO Object Model
allows you to work with both relational and non-relational data stores.
To store non-relational data in an ADO Recordset, you can create your
recordset from scratch. This recordset will be defined programmatically in
memory and will not be connected to any data source. For example, you can
easily fabricate a custom recordset that holds non-relational data, such as the
information about the files located in one of your hard drive’s directories.
389

When you create your own recordset from scratch, you define the types of
fields in the recordset and then populate the recordset with the information you
want. The fields are defined using the Fields collection’s Append method. You
must specify the field name, the data type, and the size. The syntax for the
Append method looks like this:
Fields.Append Name, DataType[, FieldSize], [Attribute]
Arguments in square brackets are optional. FieldSize specifies the size in char-
acters or bytes. Attribute specifies characteristics such as whether the field
enables Null values or whether it is a primary key or an identity column.
Once you have defined the structure of your recordset, simply open it and
populate it with the desired data. You can add data to your custom recordset in
the same way you add data to a connected recordset: by using the Recordset
object’s AddNew method.
The procedure in Hands-On 16-1 demonstrates how to create an empty
recordset containing three fields (Name, Size, and Modified) and then populate
it with files located in a user-specified file folder.
�Hands-On 16-1: Creating a Custom Recordset (ADO)
1. Start Microsoft Office Access 2007 and create a new Microsoft Office
Access 2007 database named Chap16.accdb in your C:\Acc07_
ByExample folder.
2. In the database window, press Alt+F11 to switch to the Visual Basic Editor
window.
3. In the Visual Basic Editor window, choose Tools | References. In the Ref-
erences dialog box, locate and select Microsoft ActiveX Data Objects 2.8
Library and then click OK to close this dialog box.
4. In the Visual Basic Editor window, choose Insert | Module.
5. In the module’s Code window, type the Custom_Recordset procedure
shown below, or copy the procedure code from C:\Acc07_HandsOn\
Chap16.txt.
Sub Custom_Recordset()Dim rst As ADODB.RecordsetDim strFile As StringDim strPath As StringDim strFolder As String
strPath = InputBox("Enter pathname, e.g., C:\My Folder")If Right(strPath, 1) <> "\" Then strPath = strPath & "\"
strFolder = strPathstrFile = Dir(strPath & "*.*")If strFile = "" Then
MsgBox "This folder does not contain files."Exit Sub
End If
390 | Chapter 16
Part II

Set rst = New ADODB.Recordset' Create an empty recordset with 3 fieldsWith rst
Set .ActiveConnection = Nothing.CursorLocation = adUseClientWith .Fields
.Append "Name", adVarChar, 255
.Append "Size", adDouble
.Append "Modified", adDBTimeStampEnd With.OpenDo While strFile <> ""
If strFile = "" Then Exit Do' Add a new record to the recordset.AddNew Array("Name", "Size", "Modified"), _
Array(strFile, FileLen(strFolder & strFile), _FileDateTime(strFolder & strFile))
strFile = DirLoop.MoveFirst
' Print the contents of the recordset to the Immediate windowDo Until .EOF
Debug.Print !Name & vbTab & !Size & vbTab & !Modified.MoveNext
Loop.Close
End WithSet rst = Nothing
End Sub
6. Choose Run | Run Sub/UserForm to execute the procedure.
In the Custom_Recordset procedure shown above, we start by creating a
Recordset object variable. To tell ADO that your recordset is not connected to
any database, we set the ActiveConnection property of the Recordset object to
Nothing. We also set the CursorLocation property to adUseClient to indicate
that the processing will occur on the client machine as opposed to the database
server. Next, we determine what columns the recordset should contain and add
these columns to the Recordset’s Fields collection by using the Append
method. Once the structure of your recordset is defined, you can call the Open
method to actually open your custom recordset. Now you can populate the
recordset with the data you want. We obtain the data by looping through the
folder the user specified in the input box and reading the information about
each file. The VBA FileLen function is used to retrieve the size of a file in
bytes. Another VBA function, FileDateTime, is used to retrieve the date and
time a file was last modified. To retrieve the date and time separately, use the
FileDateTime function as an argument of the DateValue or TimeValue
functions.
Check the following statements in the Immediate window while stepping
through the Custom_Recordset procedure:
? DateValue(FileDateTime(myFolder & myFile))? TimeValue(FileDateTime(myFolder & myFile))
Using Advanced ADO/DAO Features | 391
Access VBA Programming with DAO and ADO
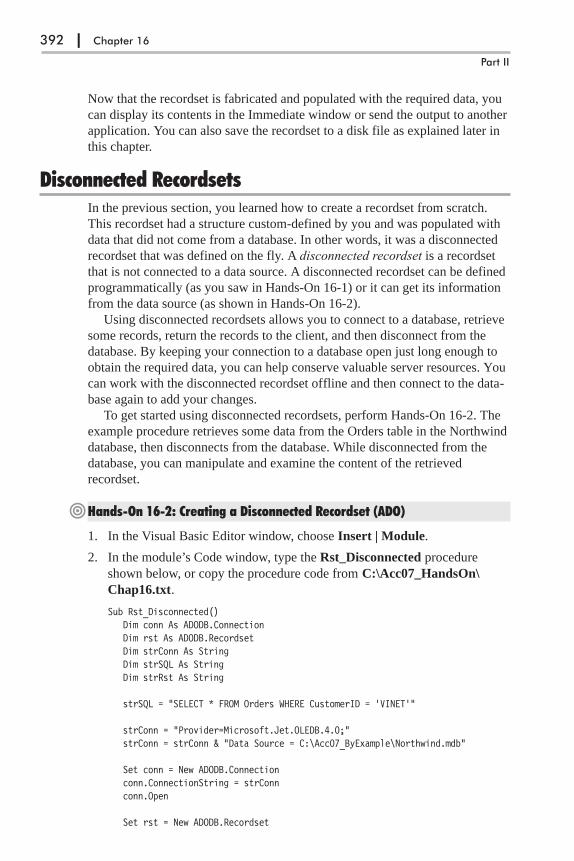
Now that the recordset is fabricated and populated with the required data, you
can display its contents in the Immediate window or send the output to another
application. You can also save the recordset to a disk file as explained later in
this chapter.
Disconnected RecordsetsIn the previous section, you learned how to create a recordset from scratch.
This recordset had a structure custom-defined by you and was populated with
data that did not come from a database. In other words, it was a disconnected
recordset that was defined on the fly. A disconnected recordset is a recordset
that is not connected to a data source. A disconnected recordset can be defined
programmatically (as you saw in Hands-On 16-1) or it can get its information
from the data source (as shown in Hands-On 16-2).
Using disconnected recordsets allows you to connect to a database, retrieve
some records, return the records to the client, and then disconnect from the
database. By keeping your connection to a database open just long enough to
obtain the required data, you can help conserve valuable server resources. You
can work with the disconnected recordset offline and then connect to the data-
base again to add your changes.
To get started using disconnected recordsets, perform Hands-On 16-2. The
example procedure retrieves some data from the Orders table in the Northwind
database, then disconnects from the database. While disconnected from the
database, you can manipulate and examine the content of the retrieved
recordset.
�Hands-On 16-2: Creating a Disconnected Recordset (ADO)
1. In the Visual Basic Editor window, choose Insert | Module.
2. In the module’s Code window, type the Rst_Disconnected procedure
shown below, or copy the procedure code from C:\Acc07_HandsOn\
Chap16.txt.
Sub Rst_Disconnected()Dim conn As ADODB.ConnectionDim rst As ADODB.RecordsetDim strConn As StringDim strSQL As StringDim strRst As String
strSQL = "SELECT * FROM Orders WHERE CustomerID = 'VINET'"
strConn = "Provider=Microsoft.Jet.OLEDB.4.0;"strConn = strConn & "Data Source = C:\Acc07_ByExample\Northwind.mdb"
Set conn = New ADODB.Connectionconn.ConnectionString = strConnconn.Open
Set rst = New ADODB.Recordset
392 | Chapter 16
Part II

Set rst.ActiveConnection = conn
' retrieve the datarst.CursorLocation = adUseClientrst.LockType = adLockBatchOptimisticrst.CursorType = adOpenStaticrst.Open strSQL, , , , adCmdText
' disconnect the recordsetSet rst.ActiveConnection = Nothing
' change the CustomerID in the first record to 'OCEAN'rst.MoveFirstDebug.Print rst.Fields(0) & " was " & rst.Fields(1) & " before."rst.Fields("CustomerID").Value = "OCEAN"rst.Update
' stream out the recordset as a comma-delimited stringstrRst = rst.GetString(adClipString, , ",")Debug.Print strRst
End Sub
3. Choose Run | Run Sub/UserForm to execute the procedure.
Notice that to create a disconnected recordset that gets its data from a data
source, you need to set the CursorLocation, LockType, and CursorType prop-
erties of the Recordset object. CursorLocation should be set to adUseClient.
This setting indicates that the cursor will reside on the client computer that is
creating the recordset. Set LockType to adLockBatchOptimistic to enable mul-
tiple records to be updated. Finally, set CursorType to adOpenStatic to retrieve
the snapshot of the data.
To disconnect a recordset, you must set the Recordset object’s Active-
Connection property to Nothing after you’ve called the Recordset’s Open
method.
When the recordset is disconnected from the database, you can freely
manipulate its data or pass it to another application or process. In the example
procedure above, we manipulate our recordset by changing the value of the
CustomerID field in the first retrieved record from VINET to OCEAN. Then
we create a comma-delimited string using the Recordset object’s GetString
method. The content of the disconnected recordset is then printed out to the
Immediate window, as shown here:
10274 was VINET before.10274,OCEAN,6,8/6/1996,9/3/1996,8/16/1996,1,6.01,Vins et alcools Chevalier,59rue de l'Abbaye,Reims,,51100,France10295,VINET,2,9/2/1996,9/30/1996,9/10/1996,2,1.15,Vins et alcools Chevalier,59rue de l'Abbaye,Reims,,51100,France10737,VINET,2,11/11/1997,12/9/1997,11/18/1997,2,7.79,Vins et alcoolsChevalier,59 rue de l'Abbaye,Reims,,51100,France10739,VINET,3,11/12/1997,12/10/1997,11/17/1997,3,11.08,Vins et alcoolsChevalier,59 rue de l'Abbaye,Reims,,51100,France
Using Advanced ADO/DAO Features | 393
Access VBA Programming with DAO and ADO

Saving a Recordset to DiskThe ADO has a Save method that allows you to save a recordset to disk and
work with it from your VBA application. This method takes two parameters.
You must specify a filename and one of the following two data formats:
� adPersistADTG — Advanced Data TableGram
� adPersistXML — Extensible Markup Language
A saved (or persisted) recordset is a recordset that is saved to a file. This file
can later be reopened without an active connection.
In this section, you will persist a recordset into a file using the
adPersistADTG format. You will work with the adPersistXML format in Part
V of this book.
To save a recordset in a file, you must first open it. When you have applied
a filter to a recordset and then decide to save this recordset, only the filtered
records will be saved. Using the Save method does not close the recordset. You
can continue to work with the recordset after it has been saved. However,
always remember to close the recordset when you are done working with it.
The procedure in Hands-On 16-3 opens the recordset based on the Custom-
ers table. Once the recordset is open, the Save method is called to persist the
customer records into a file.
�Hands-On 16-3: Saving Records to a Disk File (ADO)
1. In the Visual Basic Editor window, choose Insert | Module.
2. In the module’s Code window, type the SaveRecordsToDisk procedure
shown below, or copy the procedure code from C:\Acc07_HandsOn\
Chap16.txt.
Sub SaveRecordsToDisk()Dim conn As ADODB.ConnectionDim rst As ADODB.RecordsetDim strFileName As StringDim strNorthPath As String
strFileName = CurrentProject.Path & "\Companies.rst"strNorthPath = CurrentProject.Path & "\Northwind.mdb"
On Error GoTo ErrorHandler
Set conn = New ADODB.Connection
With conn.Provider = "Microsoft.Jet.OLEDB.4.0".ConnectionString = "Data Source = " & strNorthPath.Mode = adModeReadWrite.Open
End With
Set rst = New ADODB.Recordset
394 | Chapter 16
Part II

With rst.CursorLocation = adUseClient' Retrieve the data.Open "Customers", conn, _
adOpenKeyset, adLockBatchOptimistic, adCmdTable
' Disconnect the recordset.ActiveConnection = Nothing
' Save the recordset to disk.Save strFileName, adPersistADTG.Close
End With
MsgBox "Records were saved in " & strFileName & "."
ExitHere:' CleanupSet rst = NothingExit Sub
ErrorHandler:If Not IsEmpty(Dir(strFileName)) Then
Kill strFileNameResume
ElseMsgBox Err.Number & ": " & Err.DescriptionResume ExitHere
End IfEnd Sub
3. Choose Run | Run Sub/UserForm to execute the procedure.
The above procedure saves all the data located in the Customers table to a file
with an .rst extension. We named this file Companies.rst, but you are free to
choose any filename and extension while saving your recordset.
Persisted recordsets are very useful for populating combo boxes or list
boxes, especially when the data is located on a server and does not change too
often. You can update your data as needed by running a procedure that creates
a new dump of the required records and deletes the old disk file. This way,
your Access application can display the most recent data in its combo or list
boxes without having to connect to a database. Let’s look at how you can fill a
combo box with a saved recordset by working with Custom Project 16-1.
�Custom Project 16-1: Filling a Combo Box with a Disconnected Recordset(ADO)
This custom project requires that you complete Hands-On 16-2.
1. Create an Access form as shown in Figure 16-1. Place a combo box control
in the form. Change the Name property of this control to cboCompany.
Set the Caption property of the label control to Company:.
Using Advanced ADO/DAO Features | 395
Access VBA Programming with DAO and ADO

2. Set the form’s Caption property to Disconnected combo.
3. Save the form as frmFillCombo.
4. In the form’s property sheet, activate the Event tab and click the button
next to the On Load event name. In the Choose Builder dialog box, select
Code Builder and click OK.
5. Complete the Form_Load procedure as shown below, or copy the proce-
dure code from C:\Acc07_HandsOn\Chap16.txt.
Private Sub Form_Load()Dim rst As ADODB.RecordsetDim strRowSource As StringDim strName As String
strName = CurrentProject.Path & "\Companies.rst"
Set rst = New ADODB.RecordsetWith rst
.CursorLocation = adUseClient
.Open strName, , , , adCmdFileDo Until .EOF
strRowSource = strRowSource & rst!CompanyName & ";".MoveNext
LoopWith Me.cboCompany
.RowSourceType = "Value List"
.RowSource = strRowSourceEnd With
.CloseEnd With
Set rst = NothingEnd Sub
6. Open the frmFillCombo form in Form view.
To populate a combo box with values, the code in the Form_Load proce-
dure changes the RowSourceType property of the combo box control to
Value List and sets the RowSource property to the string obtained by
396 | Chapter 16
Part II
Figure 16-1: This custom form is used to demonstrate how you can fill the combo box con-trol with a disconnected recordset.

iterating though the recordset. When the form opens, its caption is changed
to Disconnected combo.
7. Close the Disconnected combo (frmFillCombo) form.
Persisted recordsets are especially handy when you need to support discon-
nected users or when you want to take data on the road with you. You can save
the required set of records to a disk file, send it to your users in remote loca-
tions, or take it with you. While disconnected from the database, you or your
users can view or modify the records. The next time you connect to the data-
base you can update the original data with your changes using the
BatchUpdate method. Custom Project 16-2 demonstrates this scenario.
�Custom Project 16-2: Taking Persisted Data on the Road
This custom project requires that you complete Hands-On 16-2.
Part 1: Saving a Recordset to Disk
Before you can take a recordset on the road with you, you must save the
records to a disk file. To create the data for this project, prepare and run the
procedure in Hands-On 16-2. You should have the Companies.rst file available
in your C:\Acc07_ByExample folder before you proceed to Part 2.
Part 2: Creating an Unbound Access Form to View and Modify Data
Once you’ve saved the recordset to a disk file, the recordset becomes portable.
You can take the file with you on the road or send it to someone else. But,
before either one of you can view the data and modify it, you need some sort
of a user interface. In this part, you will create an unbound Access form that
will enable you to work with the file that contains the saved recordset.
1. Create a form as shown in Figure 16-3. Notice that this form contains only
a couple of fields from the Customers table. This form serves only as an
example. You can use as many fields as you have saved in the disk file.
Using Advanced ADO/DAO Features | 397
Access VBA Programming with DAO and ADO
Figure 16-2: After opening theform prepared in Custom Pro-ject 16-1, the combo box isfilled with the names of com-panies obtained via a persistedrecordset.
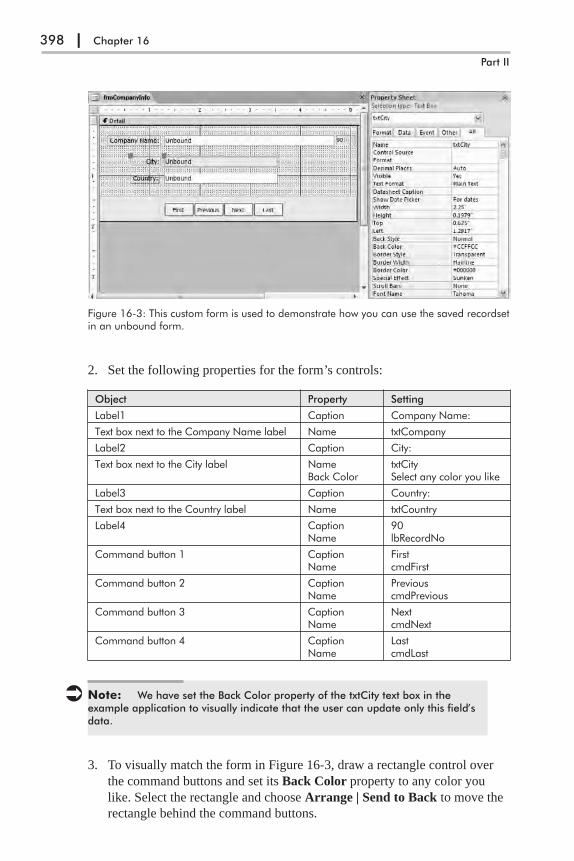
2. Set the following properties for the form’s controls:
Object Property Setting
Label1 Caption Company Name:
Text box next to the Company Name label Name txtCompany
Label2 Caption City:
Text box next to the City label NameBack Color
txtCitySelect any color you like
Label3 Caption Country:
Text box next to the Country label Name txtCountry
Label4 CaptionName
90lbRecordNo
Command button 1 CaptionName
FirstcmdFirst
Command button 2 CaptionName
PreviouscmdPrevious
Command button 3 CaptionName
NextcmdNext
Command button 4 CaptionName
LastcmdLast
� Note: We have set the Back Color property of the txtCity text box in theexample application to visually indicate that the user can update only this field’sdata.
3. To visually match the form in Figure 16-3, draw a rectangle control over
the command buttons and set its Back Color property to any color you
like. Select the rectangle and choose Arrange | Send to Back to move the
rectangle behind the command buttons.
398 | Chapter 16
Part II
Figure 16-3: This custom form is used to demonstrate how you can use the saved recordsetin an unbound form.
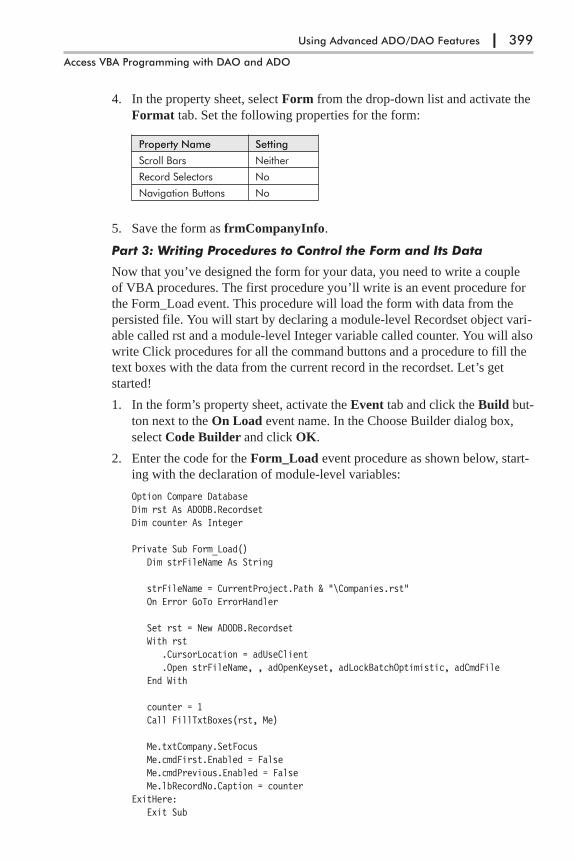
4. In the property sheet, select Form from the drop-down list and activate the
Format tab. Set the following properties for the form:
Property Name Setting
Scroll Bars Neither
Record Selectors No
Navigation Buttons No
5. Save the form as frmCompanyInfo.
Part 3: Writing Procedures to Control the Form and Its Data
Now that you’ve designed the form for your data, you need to write a couple
of VBA procedures. The first procedure you’ll write is an event procedure for
the Form_Load event. This procedure will load the form with data from the
persisted file. You will start by declaring a module-level Recordset object vari-
able called rst and a module-level Integer variable called counter. You will also
write Click procedures for all the command buttons and a procedure to fill the
text boxes with the data from the current record in the recordset. Let’s get
started!
1. In the form’s property sheet, activate the Event tab and click the Build but-
ton next to the On Load event name. In the Choose Builder dialog box,
select Code Builder and click OK.
2. Enter the code for the Form_Load event procedure as shown below, start-
ing with the declaration of module-level variables:
Option Compare DatabaseDim rst As ADODB.RecordsetDim counter As Integer
Private Sub Form_Load()Dim strFileName As String
strFileName = CurrentProject.Path & "\Companies.rst"On Error GoTo ErrorHandler
Set rst = New ADODB.RecordsetWith rst
.CursorLocation = adUseClient
.Open strFileName, , adOpenKeyset, adLockBatchOptimistic, adCmdFileEnd With
counter = 1Call FillTxtBoxes(rst, Me)
Me.txtCompany.SetFocusMe.cmdFirst.Enabled = FalseMe.cmdPrevious.Enabled = FalseMe.lbRecordNo.Caption = counter
ExitHere:Exit Sub
Using Advanced ADO/DAO Features | 399
Access VBA Programming with DAO and ADO

ErrorHandler:MsgBox Err.Number & ": " & Err.DescriptionResume ExitHere
End Sub
The Form_Load event procedure loads Companies.rst from a disk file. To
fill the text boxes with the data from the current record in the recordset,
you need to write the following code:
Me.txtCompany = rst!CompanyNameMe.txtCity = rst!CityMe.txtCountry = rst!Country
Because the above code will need to be entered in several procedures in
this application, you can save yourself a great deal of typing by placing this
code in a subroutine and calling it like this:
Call FillTxtBoxes(rst, Me)
The above statement calls the subroutine named FillTxtBoxes and passes it
two arguments: the Recordset object variable and the reference to the cur-
rent form. The FillTxtBoxes procedure (see step 3 below) is entered in a
standard module and contains the code shown in the next step.
The counter variable, which was declared at the module level, is initial-
ized to the value of 1. We will use this variable to control the display of
command buttons on the form. The Form_Load event procedure ends by
setting the focus to the first text box (txtCompanyName) and disabling the
first two command buttons. These buttons will not be required when the
form first opens on the first record.
3. In the Visual Basic Editor Code window, choose Insert | Module and type
the code of the FillTxtBoxes procedure as shown below:
Sub FillTxtBoxes(ByVal rst As ADODB.Recordset, frm As Form)With frm
.txtCompany = rst!CompanyName
.txtCity = rst!City
.txtCountry = rst!CountryEnd With
End Sub
The procedure above fills the three text boxes placed on the form with the
data from the current record in the recordset. This procedure is called from
the Form_Load event procedure and the Click event procedures for each
command button.
4. Write the following Click event procedure for the First command button:
Private Sub cmdFirst_Click()On Error GoTo Err_cmdFirst_Click
rst.Update "City", Me.txtCityrst.MoveFirst
Call FillTxtBoxes(rst, Me)
400 | Chapter 16
Part II

Me.txtCompany.SetFocusMe.cmdFirst.Enabled = FalseMe.cmdLast.Enabled = TrueMe.cmdPrevious.Enabled = FalseMe.cmdNext.Enabled = True
counter = 1Me.lbRecordNo.Caption = counter
Exit_cmdFirst_Click:Exit Sub
Err_cmdFirst_Click:MsgBox Err.DescriptionResume Exit_cmdFirst_Click
End Sub
5. Write the following Click event procedure for the Next command button:
Private Sub cmdNext_Click()On Error GoTo Err_cmdNext_Click
rst.Update "City", Me.txtCityrst.MoveNextcounter = counter + 1
Me.cmdFirst.Enabled = True
Call FillTxtBoxes(rst, Me)
Me.cmdPrevious.Enabled = TrueMe.lbRecordNo.Caption = counterMe.txtCompany.SetFocusIf counter = rst.RecordCount Then
Me.cmdNext.Enabled = FalseMe.cmdLast.Enabled = False
End If
Exit_cmdNext_Click:Exit Sub
Err_cmdNext_Click:MsgBox Err.DescriptionResume Exit_cmdNext_Click
End Sub
6. Write the following Click event procedure for the Previous command
button:
Private Sub cmdPrevious_Click()On Error GoTo Err_cmdPrevious_Click
rst.Update "City", Me.txtCityrst.MovePreviouscounter = counter - 1
Using Advanced ADO/DAO Features | 401
Access VBA Programming with DAO and ADO
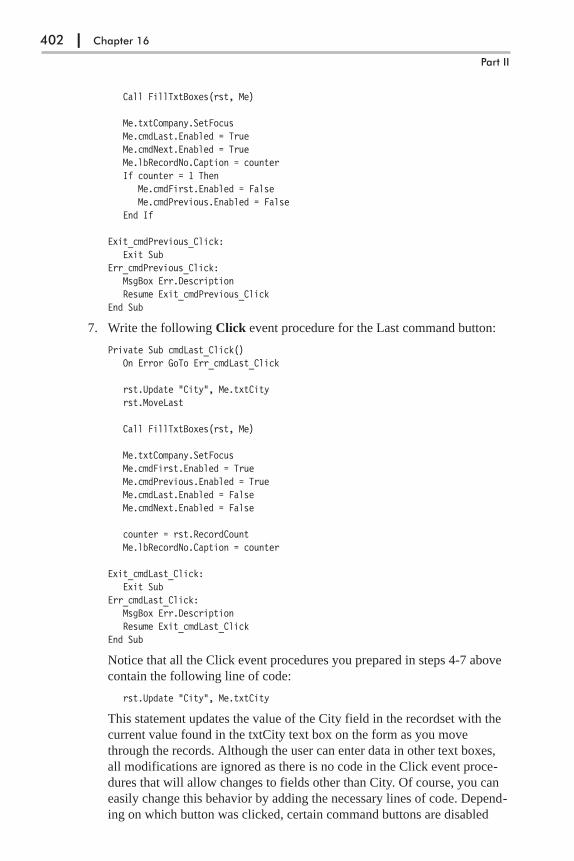
Call FillTxtBoxes(rst, Me)
Me.txtCompany.SetFocusMe.cmdLast.Enabled = TrueMe.cmdNext.Enabled = TrueMe.lbRecordNo.Caption = counterIf counter = 1 Then
Me.cmdFirst.Enabled = FalseMe.cmdPrevious.Enabled = False
End If
Exit_cmdPrevious_Click:Exit Sub
Err_cmdPrevious_Click:MsgBox Err.DescriptionResume Exit_cmdPrevious_Click
End Sub
7. Write the following Click event procedure for the Last command button:
Private Sub cmdLast_Click()On Error GoTo Err_cmdLast_Click
rst.Update "City", Me.txtCityrst.MoveLast
Call FillTxtBoxes(rst, Me)
Me.txtCompany.SetFocusMe.cmdFirst.Enabled = TrueMe.cmdPrevious.Enabled = TrueMe.cmdLast.Enabled = FalseMe.cmdNext.Enabled = False
counter = rst.RecordCountMe.lbRecordNo.Caption = counter
Exit_cmdLast_Click:Exit Sub
Err_cmdLast_Click:MsgBox Err.DescriptionResume Exit_cmdLast_Click
End Sub
Notice that all the Click event procedures you prepared in steps 4-7 above
contain the following line of code:
rst.Update "City", Me.txtCity
This statement updates the value of the City field in the recordset with the
current value found in the txtCity text box on the form as you move
through the records. Although the user can enter data in other text boxes,
all modifications are ignored as there is no code in the Click event proce-
dures that will allow changes to fields other than City. Of course, you can
easily change this behavior by adding the necessary lines of code. Depend-
ing on which button was clicked, certain command buttons are disabled
402 | Chapter 16
Part II
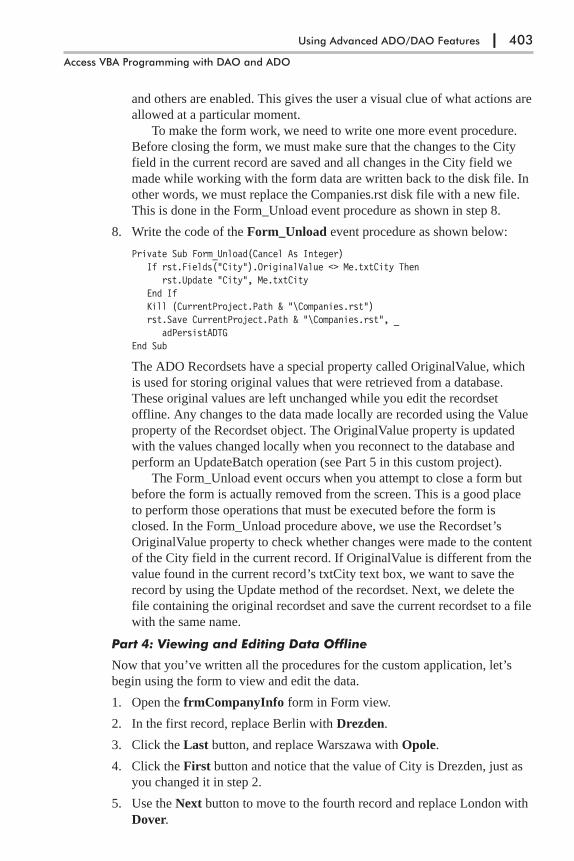
and others are enabled. This gives the user a visual clue of what actions are
allowed at a particular moment.
To make the form work, we need to write one more event procedure.
Before closing the form, we must make sure that the changes to the City
field in the current record are saved and all changes in the City field we
made while working with the form data are written back to the disk file. In
other words, we must replace the Companies.rst disk file with a new file.
This is done in the Form_Unload event procedure as shown in step 8.
8. Write the code of the Form_Unload event procedure as shown below:
Private Sub Form_Unload(Cancel As Integer)If rst.Fields("City").OriginalValue <> Me.txtCity Then
rst.Update "City", Me.txtCityEnd IfKill (CurrentProject.Path & "\Companies.rst")rst.Save CurrentProject.Path & "\Companies.rst", _
adPersistADTGEnd Sub
The ADO Recordsets have a special property called OriginalValue, which
is used for storing original values that were retrieved from a database.
These original values are left unchanged while you edit the recordset
offline. Any changes to the data made locally are recorded using the Value
property of the Recordset object. The OriginalValue property is updated
with the values changed locally when you reconnect to the database and
perform an UpdateBatch operation (see Part 5 in this custom project).
The Form_Unload event occurs when you attempt to close a form but
before the form is actually removed from the screen. This is a good place
to perform those operations that must be executed before the form is
closed. In the Form_Unload procedure above, we use the Recordset’s
OriginalValue property to check whether changes were made to the content
of the City field in the current record. If OriginalValue is different from the
value found in the current record’s txtCity text box, we want to save the
record by using the Update method of the recordset. Next, we delete the
file containing the original recordset and save the current recordset to a file
with the same name.
Part 4: Viewing and Editing Data Offline
Now that you’ve written all the procedures for the custom application, let’s
begin using the form to view and edit the data.
1. Open the frmCompanyInfo form in Form view.
2. In the first record, replace Berlin with Drezden.
3. Click the Last button, and replace Warszawa with Opole.
4. Click the First button and notice that the value of City is Drezden, just as
you changed it in step 2.
5. Use the Next button to move to the fourth record and replace London with
Dover.
Using Advanced ADO/DAO Features | 403
Access VBA Programming with DAO and ADO

6. Close the form and then reopen it. Check the values in the City text box in
the first, fourth, and last records. You should see Drezden, Dover, and
Opole.
7. Close the frmCompanyInfo form.
Part 5: Connecting to a Database to Update the Original Data
After you’ve made changes to the data by using the custom form, you can send
the file with the modified recordset to your database administrator so that he or
she can update the underlying database with your changes. Let’s write a proce-
dure that will take care of this task.
� Note: The procedure that you are about to write will modify the Customerstable in the Northwind database. I recommend that you take a few minutes nowand create a copy of this database so that you can restore the original data laterif necessary.
1. In the Visual Basic Editor window, choose Insert | Module.
2. In the module’s Code window, type the UpdateDb procedure as shown
below, or copy the procedure code from C:\Acc07_HandsOn\Chap16.txt.
Sub UpdateDb()Dim conn As ADODB.ConnectionDim rst As ADODB.RecordsetDim strNorthPath As StringDim strRecStat As String
On Error GoTo ErrorHandlerstrNorthPath = CurrentProject.Path & "\Northwind.mdb"
' Open the connection to the databaseSet conn = New ADODB.ConnectionWith conn
.Provider = "Microsoft.Jet.OLEDB.4.0"
.ConnectionString = "Data Source = " & strNorthPath
.Mode = adModeReadWrite
.OpenEnd With
' Open the recordset from the local file' that was persisted to the hard drive' and update the data source with the changesSet rst = New ADODB.RecordsetWith rst
.CursorLocation = adUseClient
.Open CurrentProject.Path & "\Companies.rst", conn, _adOpenKeyset, adLockBatchOptimistic, adCmdFile
.UpdateBatch adAffectAll
' Check if there were records with conflicts' during the update.Filter = adFilterAffectedRecords
404 | Chapter 16
Part II
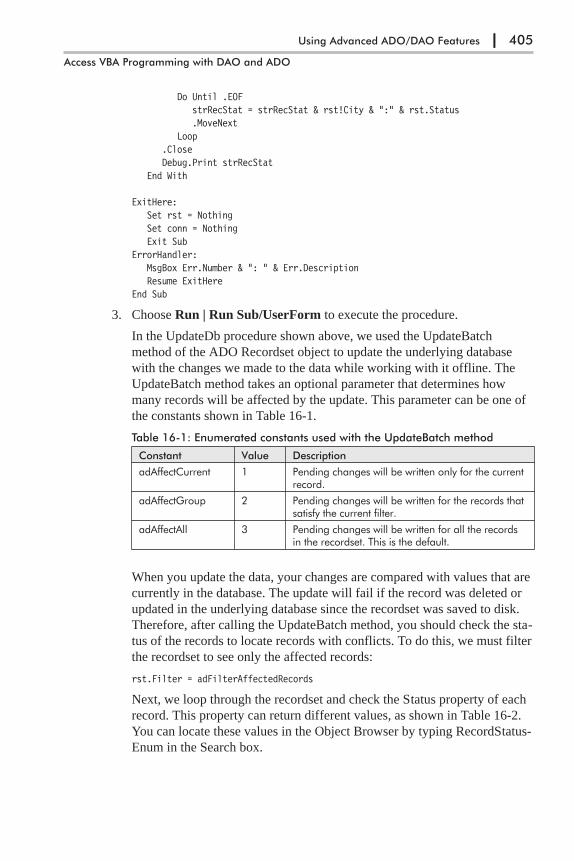
Do Until .EOFstrRecStat = strRecStat & rst!City & ":" & rst.Status.MoveNext
Loop.CloseDebug.Print strRecStat
End With
ExitHere:Set rst = NothingSet conn = NothingExit Sub
ErrorHandler:MsgBox Err.Number & ": " & Err.DescriptionResume ExitHere
End Sub
3. Choose Run | Run Sub/UserForm to execute the procedure.
In the UpdateDb procedure shown above, we used the UpdateBatch
method of the ADO Recordset object to update the underlying database
with the changes we made to the data while working with it offline. The
UpdateBatch method takes an optional parameter that determines how
many records will be affected by the update. This parameter can be one of
the constants shown in Table 16-1.
Table 16-1: Enumerated constants used with the UpdateBatch method
Constant Value Description
adAffectCurrent 1 Pending changes will be written only for the currentrecord.
adAffectGroup 2 Pending changes will be written for the records thatsatisfy the current filter.
adAffectAll 3 Pending changes will be written for all the recordsin the recordset. This is the default.
When you update the data, your changes are compared with values that are
currently in the database. The update will fail if the record was deleted or
updated in the underlying database since the recordset was saved to disk.
Therefore, after calling the UpdateBatch method, you should check the sta-
tus of the records to locate records with conflicts. To do this, we must filter
the recordset to see only the affected records:
rst.Filter = adFilterAffectedRecords
Next, we loop through the recordset and check the Status property of each
record. This property can return different values, as shown in Table 16-2.
You can locate these values in the Object Browser by typing RecordStatus-
Enum in the Search box.
Using Advanced ADO/DAO Features | 405
Access VBA Programming with DAO and ADO
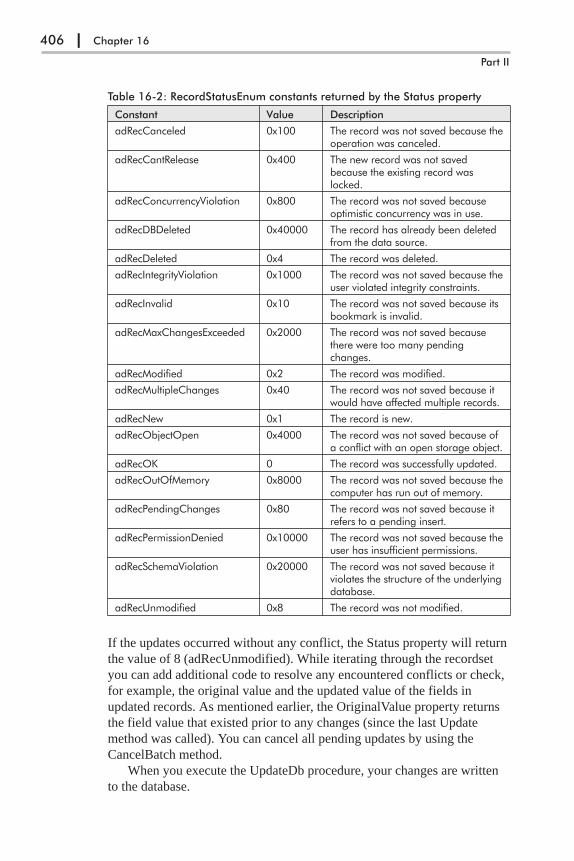
Table 16-2: RecordStatusEnum constants returned by the Status property
Constant Value Description
adRecCanceled 0x100 The record was not saved because theoperation was canceled.
adRecCantRelease 0x400 The new record was not savedbecause the existing record waslocked.
adRecConcurrencyViolation 0x800 The record was not saved becauseoptimistic concurrency was in use.
adRecDBDeleted 0x40000 The record has already been deletedfrom the data source.
adRecDeleted 0x4 The record was deleted.
adRecIntegrityViolation 0x1000 The record was not saved because theuser violated integrity constraints.
adRecInvalid 0x10 The record was not saved because itsbookmark is invalid.
adRecMaxChangesExceeded 0x2000 The record was not saved becausethere were too many pendingchanges.
adRecModified 0x2 The record was modified.
adRecMultipleChanges 0x40 The record was not saved because itwould have affected multiple records.
adRecNew 0x1 The record is new.
adRecObjectOpen 0x4000 The record was not saved because ofa conflict with an open storage object.
adRecOK 0 The record was successfully updated.
adRecOutOfMemory 0x8000 The record was not saved because thecomputer has run out of memory.
adRecPendingChanges 0x80 The record was not saved because itrefers to a pending insert.
adRecPermissionDenied 0x10000 The record was not saved because theuser has insufficient permissions.
adRecSchemaViolation 0x20000 The record was not saved because itviolates the structure of the underlyingdatabase.
adRecUnmodified 0x8 The record was not modified.
If the updates occurred without any conflict, the Status property will return
the value of 8 (adRecUnmodified). While iterating through the recordset
you can add additional code to resolve any encountered conflicts or check,
for example, the original value and the updated value of the fields in
updated records. As mentioned earlier, the OriginalValue property returns
the field value that existed prior to any changes (since the last Update
method was called). You can cancel all pending updates by using the
CancelBatch method.
When you execute the UpdateDb procedure, your changes are written
to the database.
406 | Chapter 16
Part II

4. Open the Northwind database and review the content of the City field in
the Customers table. You should see Drezden, Dover, and Opole in the
first, fourth, and last records.
5. Close the Northwind database and the Access window in which it was dis-
played. Do not close the Chap16.accdb database.
This completes Custom Project 16-2 in which you learned how to:
� Save the recordset to disk with the Save method
� Create a custom form to view and edit the recordset data in the disk file
� Open the recordset from disk with the Open method
� Work with the recordset offline (view and edit data)
� Reopen the connection to the original database and write your changes
with the UpdateBatch method
� Note: Refer to Part V of this book to find out how you can save a recordset inXML format using the adPersistXML format.
Cloning a RecordsetSometimes you may want to manipulate a recordset without losing the current
position in the recordset. You can do this by cloning your original recordset.
Use the ADO Clone method to create a recordset that is a copy of another
recordset. You can create a recordset clone like this:
Dim rstOrg As ADODB.Recordset ' your original recordsetDim rstClone As ADODB.Recordset ' cloned recordset
Set rstClone = rstOrg.Clone
As you can see from the assignment statement above, the rstClone object vari-
able contains a reference to the original recordset. After you’ve used the Clone
method, you end up with two copies of the recordset that contain the same
records but can be filtered and manipulated separately. You can create more
than one clone of the original recordset.
Use the Clone method when you want to perform an operation on a
recordset that requires multiple current records. The Clone object and the orig-
inal Recordset object each have their own current records; therefore, the record
pointers in the original and cloned recordsets can move independently of one
another. And, because the clone points to the same set of data as the original,
any changes made using either the original recordset or any of its clones will
be visible in the original and its clones. However, the original recordset and its
clones can get out of sync if you requery the original recordset against the
database. When you close the original recordset, the clones remain open until
you close them. Closing any of the clones does not close the original recordset.
Because the Clone method does not create another copy of the data (it only
points to the data), cloning a recordset is faster and more efficient than opening
Using Advanced ADO/DAO Features | 407
Access VBA Programming with DAO and ADO

a second recordset based on the same criteria. A recordset created by a method
other than cloning will have a different set of bookmarks than the original
recordset, even when it is based on the same SQL statement.
You can make a clone read-only by using an optional parameter like this:
Set rstClone = rstOrg.Clone(adLockReadOnly)
It’s worth mentioning that you can only clone bookmarkable recordsets. Use
the Recordset object’s Supports method to find out if the recordset supports
bookmarks (see the section called “Using Bookmarks” in Chapter 13). If you
try to clone a non-bookmarkable recordset, you will receive a run-time error.
The clone and the original recordset have the same bookmarks, which you can
share. A bookmark reference from one Recordset object refers to the same
record in any of its clones.
Custom Project 16-3 demonstrates how the Clone method can be used to
create a single form for displaying the current and previous records side by
side (see Figure 16-4).
�Custom Project 16-3: Displaying the Contents of the Current and PreviousRecord by Using the Clone Method
1. In the Microsoft Access window of the Chap16.accdb database, choose
External Data | Access. In the File name box of the Get External Data dia-
log box, enter C:\Acc07_ByExample\Northwind.mdb, and then click
OK. In the Import Objects window, select the Customers table and click
OK. Click Close to exit the Get External Data dialog box.
2. Choose Create | Form Design and create a form like the one depicted in
Figure 16-4. Follow the steps below to set up the form and its control
properties.
408 | Chapter 16
Part II
Figure 16-4: This custom form is used to demonstrate how you can use recordset cloning toread the contents of the previous record.
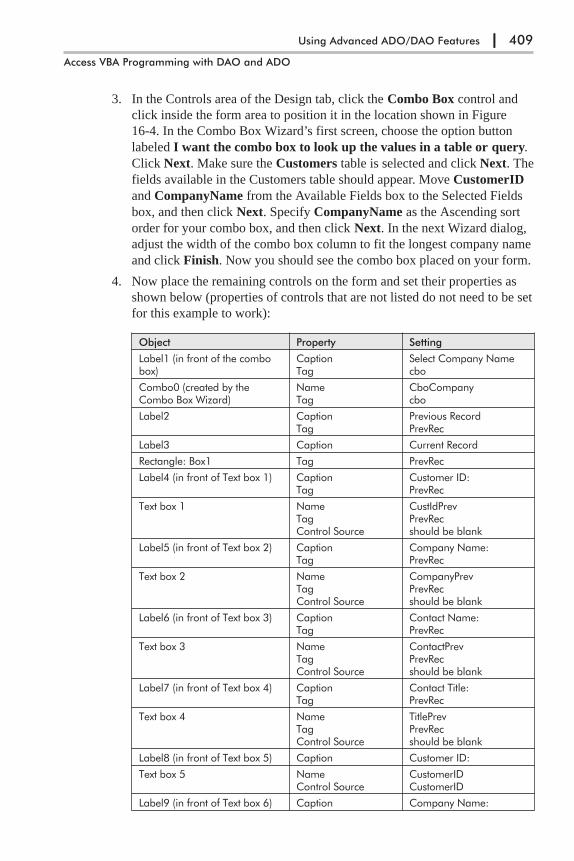
3. In the Controls area of the Design tab, click the Combo Box control and
click inside the form area to position it in the location shown in Figure
16-4. In the Combo Box Wizard’s first screen, choose the option button
labeled I want the combo box to look up the values in a table or query.
Click Next. Make sure the Customers table is selected and click Next. The
fields available in the Customers table should appear. Move CustomerID
and CompanyName from the Available Fields box to the Selected Fields
box, and then click Next. Specify CompanyName as the Ascending sort
order for your combo box, and then click Next. In the next Wizard dialog,
adjust the width of the combo box column to fit the longest company name
and click Finish. Now you should see the combo box placed on your form.
4. Now place the remaining controls on the form and set their properties as
shown below (properties of controls that are not listed do not need to be set
for this example to work):
Object Property Setting
Label1 (in front of the combobox)
CaptionTag
Select Company Namecbo
Combo0 (created by theCombo Box Wizard)
NameTag
CboCompanycbo
Label2 CaptionTag
Previous RecordPrevRec
Label3 Caption Current Record
Rectangle: Box1 Tag PrevRec
Label4 (in front of Text box 1) CaptionTag
Customer ID:PrevRec
Text box 1 NameTagControl Source
CustIdPrevPrevRecshould be blank
Label5 (in front of Text box 2) CaptionTag
Company Name:PrevRec
Text box 2 NameTagControl Source
CompanyPrevPrevRecshould be blank
Label6 (in front of Text box 3) CaptionTag
Contact Name:PrevRec
Text box 3 NameTagControl Source
ContactPrevPrevRecshould be blank
Label7 (in front of Text box 4) CaptionTag
Contact Title:PrevRec
Text box 4 NameTagControl Source
TitlePrevPrevRecshould be blank
Label8 (in front of Text box 5) Caption Customer ID:
Text box 5 NameControl Source
CustomerIDCustomerID
Label9 (in front of Text box 6) Caption Company Name:
Using Advanced ADO/DAO Features | 409
Access VBA Programming with DAO and ADO
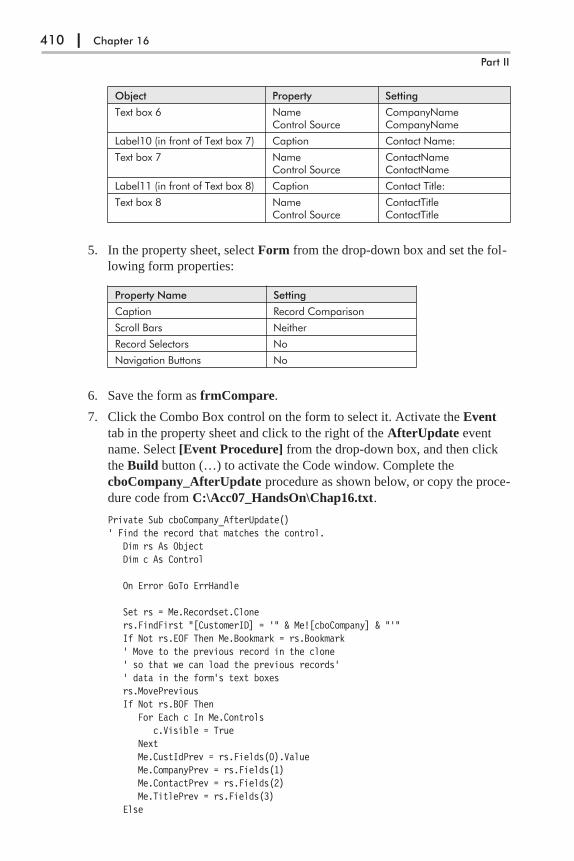
Object Property Setting
Text box 6 NameControl Source
CompanyNameCompanyName
Label10 (in front of Text box 7) Caption Contact Name:
Text box 7 NameControl Source
ContactNameContactName
Label11 (in front of Text box 8) Caption Contact Title:
Text box 8 NameControl Source
ContactTitleContactTitle
5. In the property sheet, select Form from the drop-down box and set the fol-
lowing form properties:
Property Name Setting
Caption Record Comparison
Scroll Bars Neither
Record Selectors No
Navigation Buttons No
6. Save the form as frmCompare.
7. Click the Combo Box control on the form to select it. Activate the Event
tab in the property sheet and click to the right of the AfterUpdate event
name. Select [Event Procedure] from the drop-down box, and then click
the Build button (…) to activate the Code window. Complete the
cboCompany_AfterUpdate procedure as shown below, or copy the proce-
dure code from C:\Acc07_HandsOn\Chap16.txt.
Private Sub cboCompany_AfterUpdate()' Find the record that matches the control.
Dim rs As ObjectDim c As Control
On Error GoTo ErrHandle
Set rs = Me.Recordset.Cloners.FindFirst "[CustomerID] = '" & Me![cboCompany] & "'"If Not rs.EOF Then Me.Bookmark = rs.Bookmark' Move to the previous record in the clone' so that we can load the previous records'' data in the form's text boxesrs.MovePreviousIf Not rs.BOF Then
For Each c In Me.Controlsc.Visible = True
NextMe.CustIdPrev = rs.Fields(0).ValueMe.CompanyPrev = rs.Fields(1)Me.ContactPrev = rs.Fields(2)Me.TitlePrev = rs.Fields(3)
Else
410 | Chapter 16
Part II
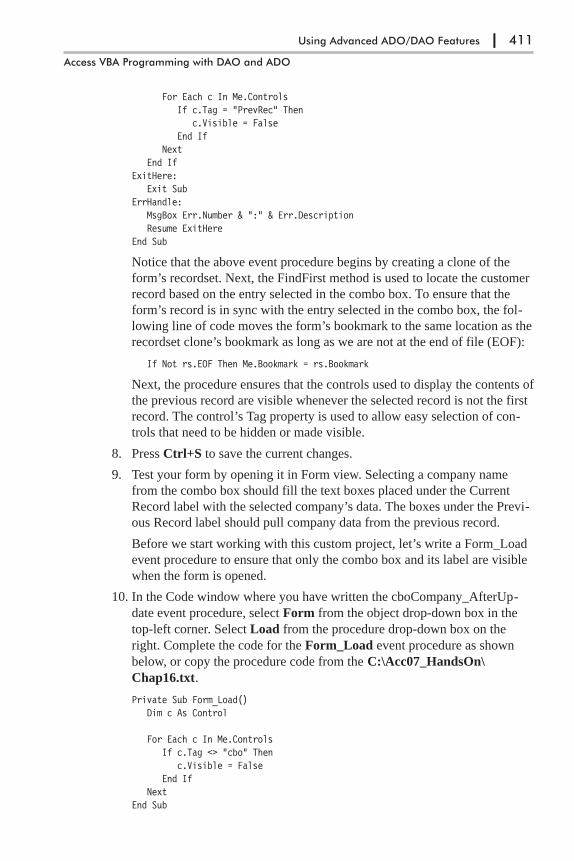
For Each c In Me.ControlsIf c.Tag = "PrevRec" Then
c.Visible = FalseEnd If
NextEnd If
ExitHere:Exit Sub
ErrHandle:MsgBox Err.Number & ":" & Err.DescriptionResume ExitHere
End Sub
Notice that the above event procedure begins by creating a clone of the
form’s recordset. Next, the FindFirst method is used to locate the customer
record based on the entry selected in the combo box. To ensure that the
form’s record is in sync with the entry selected in the combo box, the fol-
lowing line of code moves the form’s bookmark to the same location as the
recordset clone’s bookmark as long as we are not at the end of file (EOF):
If Not rs.EOF Then Me.Bookmark = rs.Bookmark
Next, the procedure ensures that the controls used to display the contents of
the previous record are visible whenever the selected record is not the first
record. The control’s Tag property is used to allow easy selection of con-
trols that need to be hidden or made visible.
8. Press Ctrl+S to save the current changes.
9. Test your form by opening it in Form view. Selecting a company name
from the combo box should fill the text boxes placed under the Current
Record label with the selected company’s data. The boxes under the Previ-
ous Record label should pull company data from the previous record.
Before we start working with this custom project, let’s write a Form_Load
event procedure to ensure that only the combo box and its label are visible
when the form is opened.
10. In the Code window where you have written the cboCompany_AfterUp-
date event procedure, select Form from the object drop-down box in the
top-left corner. Select Load from the procedure drop-down box on the
right. Complete the code for the Form_Load event procedure as shown
below, or copy the procedure code from the C:\Acc07_HandsOn\
Chap16.txt.
Private Sub Form_Load()Dim c As Control
For Each c In Me.ControlsIf c.Tag <> "cbo" Then
c.Visible = FalseEnd If
NextEnd Sub
Using Advanced ADO/DAO Features | 411
Access VBA Programming with DAO and ADO
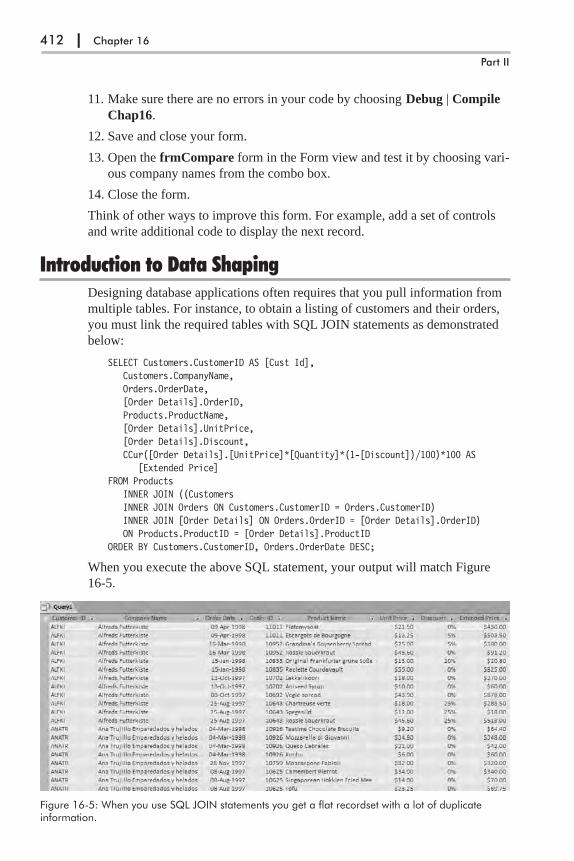
11. Make sure there are no errors in your code by choosing Debug | Compile
Chap16.
12. Save and close your form.
13. Open the frmCompare form in the Form view and test it by choosing vari-
ous company names from the combo box.
14. Close the form.
Think of other ways to improve this form. For example, add a set of controls
and write additional code to display the next record.
Introduction to Data ShapingDesigning database applications often requires that you pull information from
multiple tables. For instance, to obtain a listing of customers and their orders,
you must link the required tables with SQL JOIN statements as demonstrated
below:
SELECT Customers.CustomerID AS [Cust Id],Customers.CompanyName,Orders.OrderDate,[Order Details].OrderID,Products.ProductName,[Order Details].UnitPrice,[Order Details].Discount,CCur([Order Details].[UnitPrice]*[Quantity]*(1-[Discount])/100)*100 AS
[Extended Price]FROM Products
INNER JOIN ((CustomersINNER JOIN Orders ON Customers.CustomerID = Orders.CustomerID)INNER JOIN [Order Details] ON Orders.OrderID = [Order Details].OrderID)ON Products.ProductID = [Order Details].ProductID
ORDER BY Customers.CustomerID, Orders.OrderDate DESC;
When you execute the above SQL statement, your output will match Figure
16-5.
412 | Chapter 16
Part II
Figure 16-5: When you use SQL JOIN statements you get a flat recordset with a lot of duplicateinformation.

When you output your data in a standard way by using the SQL JOIN syntax,
you get a lot of duplicate information. You can eliminate this redundant infor-
mation by using an advanced feature of ADO known as a shaped (or
hierarchical) recordset.
Data shaping allows you to create recordsets within recordsets with a single
ADO object. This sort of hierarchical data arrangement is often seen as a par-
ent-child relationship. The parent recordset contains the child recordset. A
child recordset can contain another child recordset, a grandchild of the original
recordset. A parent-child relationship can be placed in an easy-to-read tree
structure. You will produce such a structure in Custom Project 16-4 later in this
chapter. For now, let’s focus on learning a couple of new concepts that will
enable you to present your data in a format that’s easy to view and navigate.
Writing a Simple SHAPE StatementYou can easily create a hierarchy of data by using a data shaping language. All
you need to know is how to use the following three commands: SHAPE,
APPEND, and RELATE. The basic syntax looks like this:
SHAPE {parent-command}APPEND ({child-command} [[AS] table-alias]RELATE (parent-column TO child-column)
The parent-command and child-command are often SQL SELECT statements
that pull the data from the required tables. Let’s look at the following example
that uses the above syntax:
SHAPE {SELECT CustomerID AS [Cust Id], CompanyName AS [Company] FROMCustomers}APPEND ({SELECT CustomerId, OrderDate, OrderId, Freight FROM Orders} AScustOrdersRELATE (CustomerID TO CustomerID)
The statement above is a shaped recordset. This statement selects two fields
from the Customers table and four fields from the Orders table. By using this
SHAPE statement, you can list all orders for each of the customers in the Cus-
tomers table without returning any redundant information.
Notice that there are two SELECT statements in this recordset:
� The first SELECT statement is the parent recordset. This recordset
retrieves the data from the Customers table. Notice this SELECT statement
is surrounded by curly braces and preceded by the SHAPE command,
which defines a recordset.
� The second SELECT statement is the child recordset. It gets the data from
the Orders table. Notice that this SELECT statement is also surrounded by
curly braces; however, it is preceded by the APPEND clause and an open-
ing parenthesis. The APPEND clause will add the child recordset to the
parent.
Using Advanced ADO/DAO Features | 413
Access VBA Programming with DAO and ADO

� Note: When you append a child recordset to the parent recordset, a newfield (column) is created in a parent recordset. This field is called a chapter col-umn and has a data type called adChapter. You can use the AS clause to assigna name to the chapter column. If the appended column has no chapter-alias, aname will be generated for it automatically. In our example, the chapter columnis called custOrders. Always specify an alias for your child recordset if you areplanning to refer to it later in your code.
After specifying the SELECT statement for the child recordset, you must also
indicate how you want the two recordsets to be linked. You do this with the
RELATE clause. The column (CustomerID) from the parent recordset is
related to the column (CustomerID) of the child recordset. Notice that you
don’t have to specify table names in the RELATE clause. Always specify the
name of the parent column first.
� Note: The fields you use to relate parent and child recordsets must be inboth recordsets. For example, you could not relate both recordsets if you did notselect CustomerID from the Orders table.
Finally, remember to place a closing parenthesis at the end of the statement.
Working with Data ShapingTo work with data shaping in your VBA procedure, you need two providers:
one for the data shaping functionality and the other one for the data itself.
Therefore, before you can create shaped (hierarchical) recordsets in your pro-
grams, you will need to specify:
� The name of a service provider
The data shaping functionality is provided by the data shaping service for
OLE DB. The name of this service provider is MSDataShape and it is
specified as the value of the Connection object’s Provider property like
this:
conn.Provider = "MSDataShape"
or it can be a connection string like this:
"Provider=MSDataShape"
� The name of a data provider
Because a shaped recordset needs to be populated with rows of data, you
must specify the name of a data provider as the value of the DataProvider
property of the Connection object:
conn.DataProvider = "Microsoft.Jet.OLEDB.4.0;"
or in the connection string like this:
"Data Provider=Microsoft.Jet.OLEDB.4.0;"
414 | Chapter 16
Part II
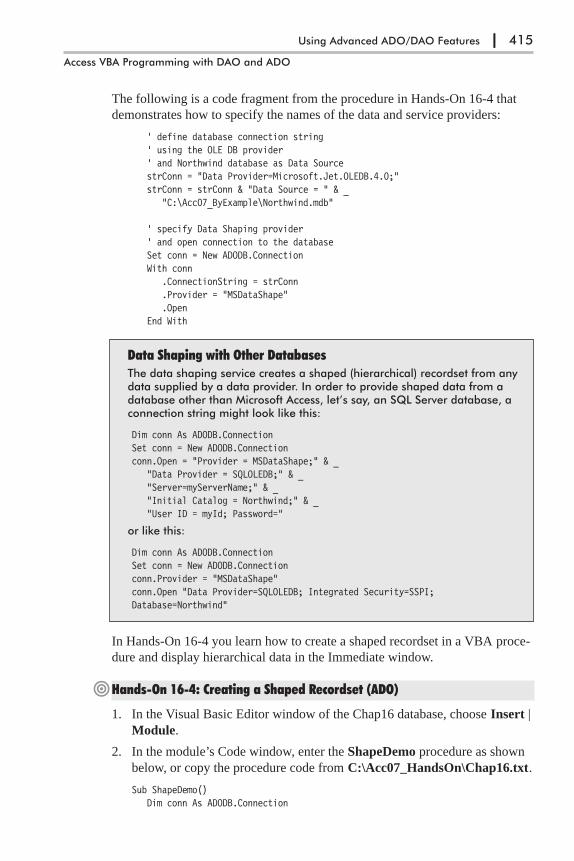
The following is a code fragment from the procedure in Hands-On 16-4 that
demonstrates how to specify the names of the data and service providers:
' define database connection string' using the OLE DB provider' and Northwind database as Data SourcestrConn = "Data Provider=Microsoft.Jet.OLEDB.4.0;"strConn = strConn & "Data Source = " & _
"C:\Acc07_ByExample\Northwind.mdb"
' specify Data Shaping provider' and open connection to the databaseSet conn = New ADODB.ConnectionWith conn
.ConnectionString = strConn
.Provider = "MSDataShape"
.OpenEnd With
Data Shaping with Other DatabasesThe data shaping service creates a shaped (hierarchical) recordset from anydata supplied by a data provider. In order to provide shaped data from adatabase other than Microsoft Access, let’s say, an SQL Server database, aconnection string might look like this:
Dim conn As ADODB.ConnectionSet conn = New ADODB.Connectionconn.Open = "Provider = MSDataShape;" & _
"Data Provider = SQLOLEDB;" & _"Server=myServerName;" & _"Initial Catalog = Northwind;" & _"User ID = myId; Password="
or like this:
Dim conn As ADODB.ConnectionSet conn = New ADODB.Connectionconn.Provider = "MSDataShape"conn.Open "Data Provider=SQLOLEDB; Integrated Security=SSPI;Database=Northwind"
In Hands-On 16-4 you learn how to create a shaped recordset in a VBA proce-
dure and display hierarchical data in the Immediate window.
�Hands-On 16-4: Creating a Shaped Recordset (ADO)
1. In the Visual Basic Editor window of the Chap16 database, choose Insert |
Module.
2. In the module’s Code window, enter the ShapeDemo procedure as shown
below, or copy the procedure code from C:\Acc07_HandsOn\Chap16.txt.
Sub ShapeDemo()Dim conn As ADODB.Connection
Using Advanced ADO/DAO Features | 415
Access VBA Programming with DAO and ADO
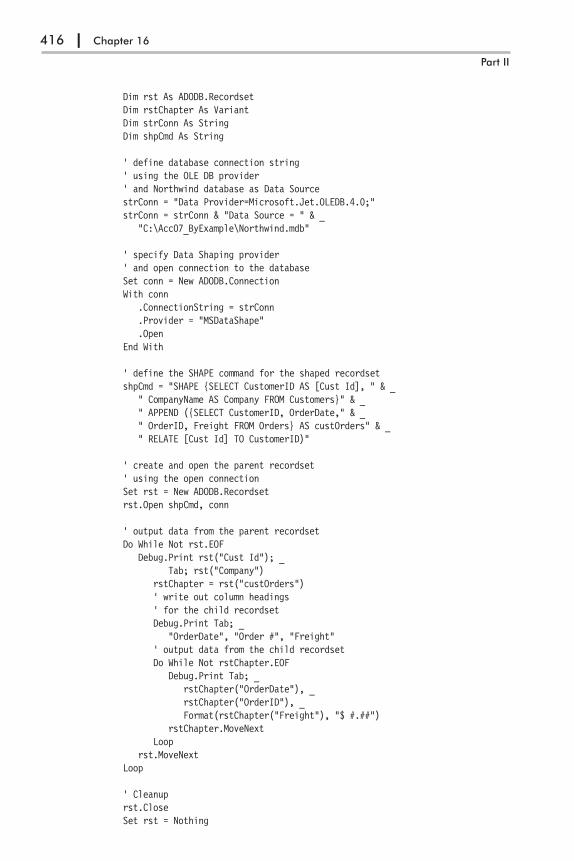
Dim rst As ADODB.RecordsetDim rstChapter As VariantDim strConn As StringDim shpCmd As String
' define database connection string' using the OLE DB provider' and Northwind database as Data SourcestrConn = "Data Provider=Microsoft.Jet.OLEDB.4.0;"strConn = strConn & "Data Source = " & _
"C:\Acc07_ByExample\Northwind.mdb"
' specify Data Shaping provider' and open connection to the databaseSet conn = New ADODB.ConnectionWith conn
.ConnectionString = strConn
.Provider = "MSDataShape"
.OpenEnd With
' define the SHAPE command for the shaped recordsetshpCmd = "SHAPE {SELECT CustomerID AS [Cust Id], " & _
" CompanyName AS Company FROM Customers}" & _" APPEND ({SELECT CustomerID, OrderDate," & _" OrderID, Freight FROM Orders} AS custOrders" & _" RELATE [Cust Id] TO CustomerID)"
' create and open the parent recordset' using the open connectionSet rst = New ADODB.Recordsetrst.Open shpCmd, conn
' output data from the parent recordsetDo While Not rst.EOF
Debug.Print rst("Cust Id"); _Tab; rst("Company")
rstChapter = rst("custOrders")' write out column headings' for the child recordsetDebug.Print Tab; _
"OrderDate", "Order #", "Freight"' output data from the child recordsetDo While Not rstChapter.EOF
Debug.Print Tab; _rstChapter("OrderDate"), _rstChapter("OrderID"), _Format(rstChapter("Freight"), "$ #.##")
rstChapter.MoveNextLoop
rst.MoveNextLoop
' Cleanuprst.CloseSet rst = Nothing
416 | Chapter 16
Part II

Set conn = NothingEnd Sub
3. Choose Run | Run Sub/UserForm to execute the procedure.
The above procedure begins by specifying the data provider and data source
name in the strConn variable. Next, we define a new ADO Connection object
and set the ConnectionString property of this object to the strConn variable.
Now that we have the data provider name and also know which database we
need to pull the data from, we go on to specify the data shaping service pro-
vider. This is done by using the Provider property of the Connection object.
We set this property to MSDataShape, which is the name of the service pro-
vider for the hierarchical recordsets. Now we are ready to actually open a
connection to the database. Before we can pull the required data from the data-
base, we define the shaped recordset statement and store it in the shpCmd
String variable. Next, we create a new Recordset object and open it using the
open database connection. Then, we populate it with the content of the
shpCmd variable like this:
Set rst = New ADODB.Recordsetrst.Open shpCmd, conn
Now that we have filled the hierarchical recordset, we begin to loop through
the parent recordset. The first statement in the loop:
Debug.Print rst("Cust Id"); Tab; rst("Company")
will write out the customer ID (Cust Id) and the company name (Company) to
the Immediate window.
In the second statement in the loop:
rstChapter = rst("custOrders")
we create a Recordset object variable based on the value of the custOrders
field. As you recall from an earlier discussion, custOrders is an alias for the
child recordset. The object variable (rstChapter) can be any name you like as
long as it’s not a VBA keyword.
� Note: Because a child recordset is simply a field in a parent recordset, whenyou retrieve the value of that field you will get the entire recordset filtered toinclude only the related records.
Before iterating through the child recordset, the column headings are output to
the Immediate window for the fields we want to display. This way it is much
easier to understand the meaning of the data in the child recordset. The next
block of code loops through the child recordset and dumps the data to the
Immediate window under the appropriate column heading. Once the data is
retrieved for each parent record, we can close the recordset and release the
memory.
Using Advanced ADO/DAO Features | 417
Access VBA Programming with DAO and ADO

How to Determine If a Recordset Contains a Field Pointing to AnotherRecordsetTo find out if a certain recordset contains another recordset, you can usethe following conditional statement:
Dim rst as New ADODB.Recordset
If rst.Fields("custOrders").Type = adChapter thenDebug.Print "This is a child recordset"
End If
� Note: custOrders is the chapter column alias you created with the AS clausewhile appending a child recordset to the parent.
Writing a Complex SHAPE StatementIn the previous section, you worked with a simple SHAPE statement that dis-
played order information for each customer in the Northwind.mdb database in
the Immediate window. You learned how to nest a child recordset within a par-
ent recordset and access the fields in both. In the following sections, you will
learn how to write more complex SHAPE statements that include multiple
child and grandchild recordsets.
Shaped Recordsets with Multiple Children
Data shaping does not limit you to having just one child recordset within a par-
ent recordset. You can specify as many children as you want. For example, to
display a parent with two children, use the following syntax:
SHAPE {SELECT * FROM Parent}APPEND ({SELECT * FROM Child1}
RELATE parent-column TO child1-column) AS child1-alias,({SELECT * FROM Child2}
RELATE parent-column TO child2-column) AS child2-alias
Notice that additional children (siblings) are added to the end of the APPEND
clause.
418 | Chapter 16
Part II
Figure 16-6: After running theShapeDemo procedure inHands-On 16-4, you can seethe contents of the hierarchicalrecordset in the Immediatewindow.
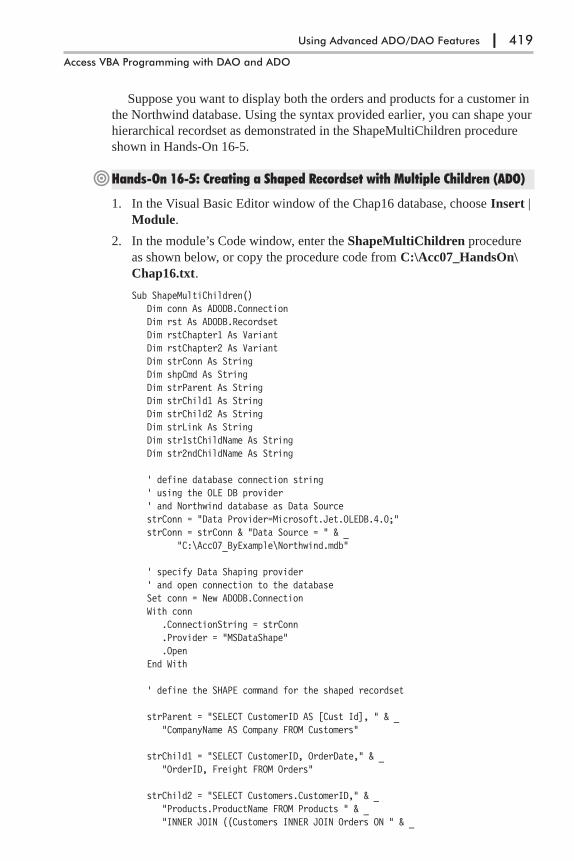
Suppose you want to display both the orders and products for a customer in
the Northwind database. Using the syntax provided earlier, you can shape your
hierarchical recordset as demonstrated in the ShapeMultiChildren procedure
shown in Hands-On 16-5.
�Hands-On 16-5: Creating a Shaped Recordset with Multiple Children (ADO)
1. In the Visual Basic Editor window of the Chap16 database, choose Insert |
Module.
2. In the module’s Code window, enter the ShapeMultiChildren procedure
as shown below, or copy the procedure code from C:\Acc07_HandsOn\
Chap16.txt.
Sub ShapeMultiChildren()Dim conn As ADODB.ConnectionDim rst As ADODB.RecordsetDim rstChapter1 As VariantDim rstChapter2 As VariantDim strConn As StringDim shpCmd As StringDim strParent As StringDim strChild1 As StringDim strChild2 As StringDim strLink As StringDim str1stChildName As StringDim str2ndChildName As String
' define database connection string' using the OLE DB provider' and Northwind database as Data SourcestrConn = "Data Provider=Microsoft.Jet.OLEDB.4.0;"strConn = strConn & "Data Source = " & _
"C:\Acc07_ByExample\Northwind.mdb"
' specify Data Shaping provider' and open connection to the databaseSet conn = New ADODB.ConnectionWith conn
.ConnectionString = strConn
.Provider = "MSDataShape"
.OpenEnd With
' define the SHAPE command for the shaped recordset
strParent = "SELECT CustomerID AS [Cust Id], " & _"CompanyName AS Company FROM Customers"
strChild1 = "SELECT CustomerID, OrderDate," & _"OrderID, Freight FROM Orders"
strChild2 = "SELECT Customers.CustomerID," & _"Products.ProductName FROM Products " & _"INNER JOIN ((Customers INNER JOIN Orders ON " & _
Using Advanced ADO/DAO Features | 419
Access VBA Programming with DAO and ADO
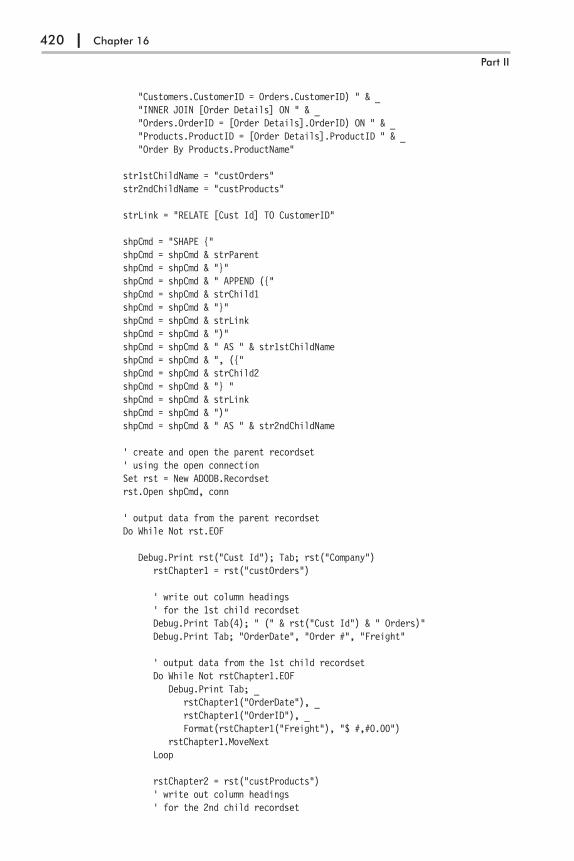
"Customers.CustomerID = Orders.CustomerID) " & _"INNER JOIN [Order Details] ON " & _"Orders.OrderID = [Order Details].OrderID) ON " & _"Products.ProductID = [Order Details].ProductID " & _"Order By Products.ProductName"
str1stChildName = "custOrders"str2ndChildName = "custProducts"
strLink = "RELATE [Cust Id] TO CustomerID"
shpCmd = "SHAPE {"shpCmd = shpCmd & strParentshpCmd = shpCmd & "}"shpCmd = shpCmd & " APPEND ({"shpCmd = shpCmd & strChild1shpCmd = shpCmd & "}"shpCmd = shpCmd & strLinkshpCmd = shpCmd & ")"shpCmd = shpCmd & " AS " & str1stChildNameshpCmd = shpCmd & ", ({"shpCmd = shpCmd & strChild2shpCmd = shpCmd & "} "shpCmd = shpCmd & strLinkshpCmd = shpCmd & ")"shpCmd = shpCmd & " AS " & str2ndChildName
' create and open the parent recordset' using the open connectionSet rst = New ADODB.Recordsetrst.Open shpCmd, conn
' output data from the parent recordsetDo While Not rst.EOF
Debug.Print rst("Cust Id"); Tab; rst("Company")rstChapter1 = rst("custOrders")
' write out column headings' for the 1st child recordsetDebug.Print Tab(4); " (" & rst("Cust Id") & " Orders)"Debug.Print Tab; "OrderDate", "Order #", "Freight"
' output data from the 1st child recordsetDo While Not rstChapter1.EOF
Debug.Print Tab; _rstChapter1("OrderDate"), _rstChapter1("OrderID"), _Format(rstChapter1("Freight"), "$ #,#0.00")
rstChapter1.MoveNextLoop
rstChapter2 = rst("custProducts")' write out column headings' for the 2nd child recordset
420 | Chapter 16
Part II
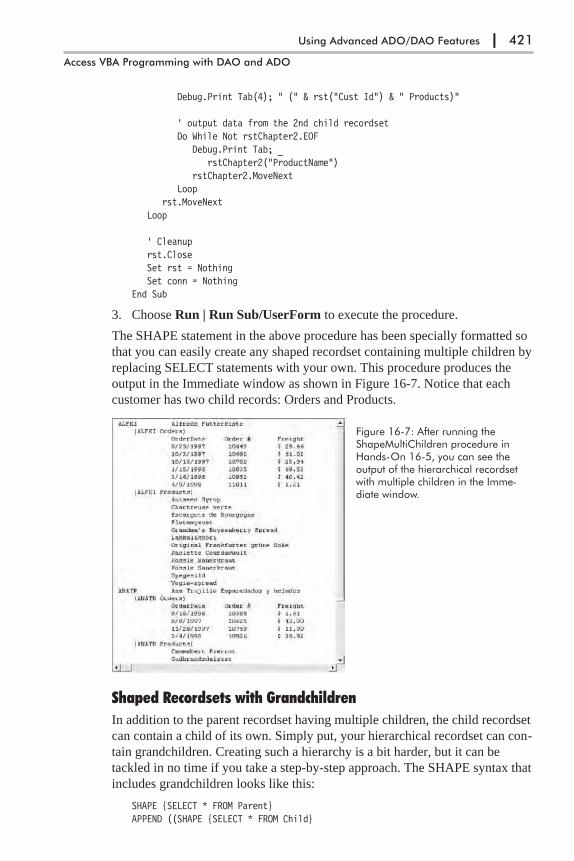
Debug.Print Tab(4); " (" & rst("Cust Id") & " Products)"
' output data from the 2nd child recordsetDo While Not rstChapter2.EOF
Debug.Print Tab; _rstChapter2("ProductName")
rstChapter2.MoveNextLoop
rst.MoveNextLoop
' Cleanuprst.CloseSet rst = NothingSet conn = Nothing
End Sub
3. Choose Run | Run Sub/UserForm to execute the procedure.
The SHAPE statement in the above procedure has been specially formatted so
that you can easily create any shaped recordset containing multiple children by
replacing SELECT statements with your own. This procedure produces the
output in the Immediate window as shown in Figure 16-7. Notice that each
customer has two child records: Orders and Products.
Shaped Recordsets with Grandchildren
In addition to the parent recordset having multiple children, the child recordset
can contain a child of its own. Simply put, your hierarchical recordset can con-
tain grandchildren. Creating such a hierarchy is a bit harder, but it can be
tackled in no time if you take a step-by-step approach. The SHAPE syntax that
includes grandchildren looks like this:
SHAPE {SELECT * FROM Parent}APPEND ((SHAPE {SELECT * FROM Child}
Using Advanced ADO/DAO Features | 421
Access VBA Programming with DAO and ADO
Figure 16-7: After running theShapeMultiChildren procedure inHands-On 16-5, you can see theoutput of the hierarchical recordsetwith multiple children in the Imme-diate window.

APPEND ({SELECT * FROM Grandchild}RELATE child-column TO grandchild-column) AS grandchild-alias)
RELATE parent-column TO child-column) as child-alias
Notice that when grandchildren are present, the child recordset is appended
with another SHAPE command.
Although you can have as many children or grandchildren as you want, it
will be more difficult to write a SHAPE statement that uses more than three or
four levels.
Quickly Generate SHAPE CommandsIf you happen to have a copy of Visual Basic 6.0, you can use the DataEnvironment Designer to visually create SHAPE commands. Using this toolcan save you time, especially when you need to create complex shapescontaining grandchildren and aggregations. You can also use the hierarchi-cal FlexGrid ActiveX control to quickly display your shaped recordset.
In Custom Project 16-4 you create a shaped recordset that contains both chil-
dren and grandchildren. Next, you display this recordset on the Access form in
the ActiveX TreeView control (see Figure 16-11 for the final output). This pro-
ject will also introduce you to using aggregate functions within your shaped
recordsets.
�Custom Project 16-4: Using Hierarchical Recordsets
Part 1: Creating a Form with a TreeView Control
1. In the Access window of the Chap16.accdb database, choose Create |
Form Design. The Form design window opens.
2. In the Controls area of the Design tab, click the Insert ActiveX Control
button.
3. In the Insert ActiveX Control window, choose Microsoft TreeView Con-
trol, version 6.0 as shown in Figure 16-8, and click OK to place a
TreeView control on the form.
422 | Chapter 16
Part II
Figure 16-8: TheMicrosoft TreeView con-trol provides an excel-lent way to displayshaped recordsets in anAccess form.
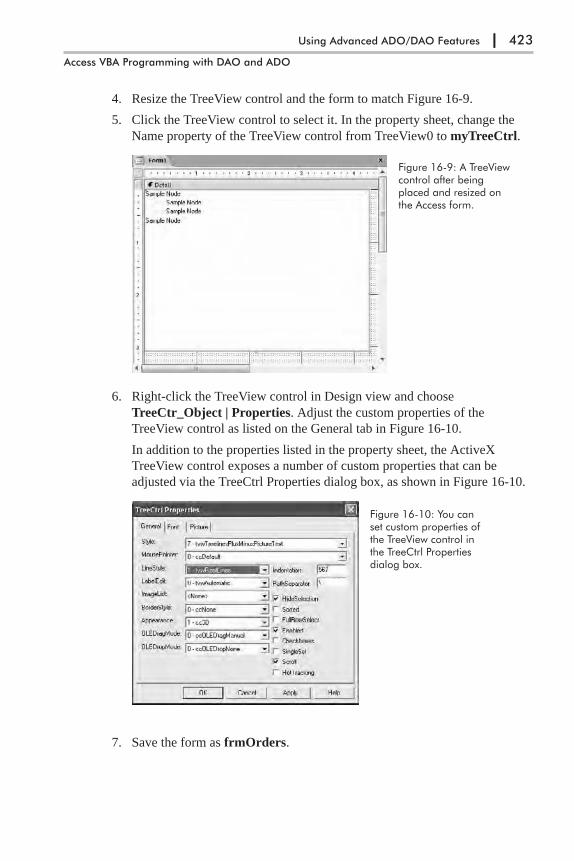
4. Resize the TreeView control and the form to match Figure 16-9.
5. Click the TreeView control to select it. In the property sheet, change the
Name property of the TreeView control from TreeView0 to myTreeCtrl.
6. Right-click the TreeView control in Design view and choose
TreeCtr_Object | Properties. Adjust the custom properties of the
TreeView control as listed on the General tab in Figure 16-10.
In addition to the properties listed in the property sheet, the ActiveX
TreeView control exposes a number of custom properties that can be
adjusted via the TreeCtrl Properties dialog box, as shown in Figure 16-10.
7. Save the form as frmOrders.
Using Advanced ADO/DAO Features | 423
Access VBA Programming with DAO and ADO
Figure 16-9: A TreeViewcontrol after beingplaced and resized onthe Access form.
Figure 16-10: You canset custom properties ofthe TreeView control inthe TreeCtrl Propertiesdialog box.
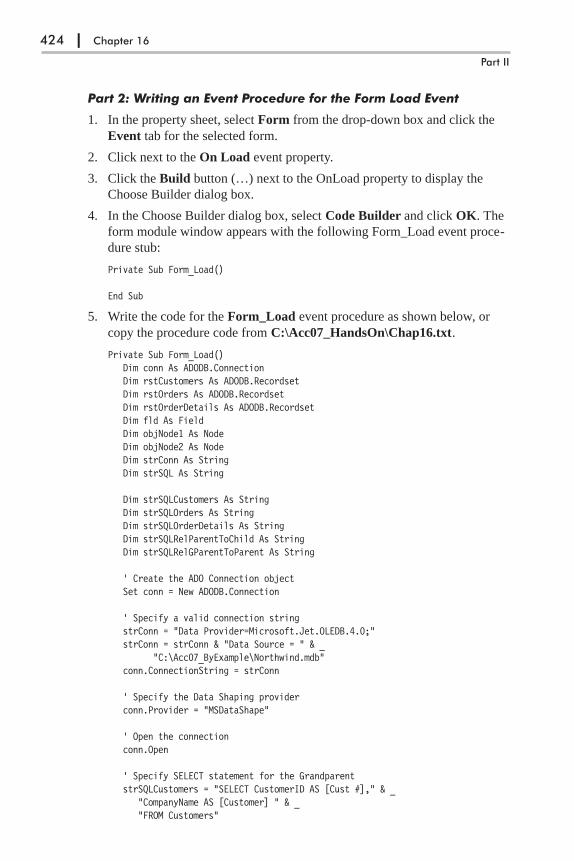
Part 2: Writing an Event Procedure for the Form Load Event
1. In the property sheet, select Form from the drop-down box and click the
Event tab for the selected form.
2. Click next to the On Load event property.
3. Click the Build button (…) next to the OnLoad property to display the
Choose Builder dialog box.
4. In the Choose Builder dialog box, select Code Builder and click OK. The
form module window appears with the following Form_Load event proce-
dure stub:
Private Sub Form_Load()
End Sub
5. Write the code for the Form_Load event procedure as shown below, or
copy the procedure code from C:\Acc07_HandsOn\Chap16.txt.
Private Sub Form_Load()Dim conn As ADODB.ConnectionDim rstCustomers As ADODB.RecordsetDim rstOrders As ADODB.RecordsetDim rstOrderDetails As ADODB.RecordsetDim fld As FieldDim objNode1 As NodeDim objNode2 As NodeDim strConn As StringDim strSQL As String
Dim strSQLCustomers As StringDim strSQLOrders As StringDim strSQLOrderDetails As StringDim strSQLRelParentToChild As StringDim strSQLRelGParentToParent As String
' Create the ADO Connection objectSet conn = New ADODB.Connection
' Specify a valid connection stringstrConn = "Data Provider=Microsoft.Jet.OLEDB.4.0;"strConn = strConn & "Data Source = " & _
"C:\Acc07_ByExample\Northwind.mdb"conn.ConnectionString = strConn
' Specify the Data Shaping providerconn.Provider = "MSDataShape"
' Open the connectionconn.Open
' Specify SELECT statement for the GrandparentstrSQLCustomers = "SELECT CustomerID AS [Cust #]," & _
"CompanyName AS [Customer] " & _"FROM Customers"
424 | Chapter 16
Part II

' Specify SELECT statement for the ParentstrSQLOrders = "SELECT OrderID AS [Order #]," & _
"OrderDate AS [Order Date]," & _"Orders.CustomerID AS [Cust #] " & _"FROM Orders ORDER BY OrderDate DESC"
' Specify SELECT statement for the ChildstrSQLOrderDetails = "SELECT od.OrderID AS [Order #]," & _
"p.CategoryId AS [Category]," & _"p.ProductName AS [Product]," & _"od.Quantity," & _"od.ProductId," & _"od.UnitPrice AS [Unit Price]," & _"(od.UnitPrice * od.Quantity) " & _"AS [Extended Price] " & _"FROM [Order Details] od " & _"INNER JOIN Products p " & _"ON od.ProductID = p.ProductID " & _"ORDER BY p.CategoryId, p.ProductName"
' Specify RELATE clause to link Parent to ChildstrSQLRelParentToChild = "RELATE [Order #] TO [Order #]"
' Specify RELATE clause to link Grandparent to ParentstrSQLRelGParentToParent = "RELATE [Cust #] TO [Cust #]"
' Build complete SQL statement for the shaped recordset' adding aggregate functions for the Grandparent and ParentstrSQL = "SHAPE(SHAPE{" & strSQLCustomers & "}"strSQL = strSQL & "APPEND((SHAPE{" & strSQLOrders & "} "strSQL = strSQL & "APPEND({" & strSQLOrderDetails & "} "strSQL = strSQL & strSQLRelParentToChild & ") AS rstOrderDetails,"strSQL = strSQL & "COUNT(rstOrderDetails.Product) "strSQL = strSQL & " AS [Items On Order],"strSQL = strSQL & "SUM(rstOrderDetails.[Extended Price]) "strSQL = strSQL & " AS [Order Total])"strSQL = strSQL & strSQLRelGParentToParent & ") AS [rstOrders],"strSQL = strSQL & "SUM(rstOrders.[Order Total]) "strSQL = strSQL & " AS [Cust Grand Total]"strSQL = strSQL & ") AS rstCustomers"
' Create and open the Grandparent recordsetSet rstCustomers = New ADODB.RecordsetrstCustomers.Open strSQL, conn
' Fill the TreeView controlDo While Not rstCustomers.EOF
Set objNode1 = myTreeCtrl.Nodes.Add _(Text:=rstCustomers.Fields(0) & _" " & rstCustomers.Fields(1) & _" ($ " & rstCustomers.Fields(3) & ")")
Set rstOrders = rstCustomers.Fields("rstOrders").ValueDo While Not rstOrders.EOF
Set objNode2 = myTreeCtrl.Nodes.Add _(relative:=objNode1.Index, _relationship:=tvwChild, _
Using Advanced ADO/DAO Features | 425
Access VBA Programming with DAO and ADO

Text:=rstOrders.Fields(0) & _" " & rstOrders.Fields(1) & _" " & rstOrders.Fields(4) & " (items)" & _" $" & rstOrders.Fields(5) & _" (Order Total)")
Set rstOrderDetails = _rstOrders.Fields("rstOrderDetails").Value
Do While Not rstOrderDetails.EOFmyTreeCtrl.Nodes.Add _
relative:=objNode2.Index, _relationship:=tvwChild, _Text:=rstOrderDetails.Fields(3) & _" " & rstOrderDetails.Fields(2) & _" $" & rstOrderDetails.Fields(6) & _" (" & rstOrderDetails.Fields(3) & _" x $" & rstOrderDetails.Fields(5) & ")"
rstOrderDetails.MoveNextLoop
rstOrders.MoveNextLooprstCustomers.MoveNext
Loop
' CleanuprstCustomers.CloseSet rstCustomers = NothingSet conn = Nothing
End Sub
6. In the Access window, open frmOrders in Form view.
When you open the frmOrders form, the Form_Load procedure populates the
TreeView control with the data from the Northwind.mdb database. As you can
see from Figure 16-11, the results are quite impressive. Clicking on the nodes
in the TreeView control expands and collapses the details underneath the node.
Prior to populating the TreeView control with the data, we connect to the data-
base and enlist the services of the Data Shaping provider:
conn.Provider = "MSDataShape"
426 | Chapter 16
Part II
Figure 16-11: TheTreeView control is filledwith the data from theNorthwind databasewhen the user opensthe form.

Because a TreeView control displays data as a hierarchy, we need to build a
complex SQL statement using the SHAPE syntax we learned in preceding sec-
tions. To make things easier for ourselves, we start by defining SQL statements
with fields we want to display for parent, child, and grandchild recordsets.
Notice that we renamed some fields using the AS clause. We also defined sep-
arate statements to allow us to link grandparent to parent and parent to child.
The structure we need to create can be illustrated like this:
GrandparentParent
Child
Now that we’ve defined the relationship and the fields for our data hierarchy,
we use the SHAPE commands to build the complete SHAPE statement:
strSQL = "SHAPE(SHAPE{" & strSQLCustomers & "}"strSQL = strSQL & "APPEND((SHAPE{" & strSQLOrders & "} "strSQL = strSQL & "APPEND({" & strSQLOrderDetails & "} "strSQL = strSQL & strSQLRelParentToChild & ") AS rstOrderDetails,"strSQL = strSQL & "COUNT(rstOrderDetails.Product) "strSQL = strSQL & " AS [Items On Order],"strSQL = strSQL & "SUM(rstOrderDetails.[Extended Price]) "strSQL = strSQL & " AS [Order Total])"strSQL = strSQL & strSQLRelGParentToParent & ") AS [rstOrders],"strSQL = strSQL & "SUM(rstOrders.[Order Total]) "strSQL = strSQL & " AS [Cust Grand Total]"strSQL = strSQL & ") AS rstCustomers"
While creating the SHAPE statement, we added additional calculated fields
using the aggregate functions. For instance, in the parent recordset (rstOrders)
we calculated the number of items ordered using the COUNT function:
COUNT(rstOrderDetails.Product) AS [Items On Order]
And used the SUM function to obtain the total amount of the order:
SUM(rstOrderDetails.[Extended Price]) AS [Order Total]
In the grandparent recordset (rstCustomers), we used the SUM function to cal-
culate the total amount owed by a customer.
When expanded, the complete SHAPE statement will look as follows:
strSQL = "SHAPE(SHAPE{"strSQL = strSQL & "SELECT CustomerID AS [Cust #],"strSQL = strSQL & "CompanyName AS [Customer]"strSQL = strSQL & "FROM Customers"strSQL = strSQL & "}"strSQL = strSQL & "APPEND((SHAPE{"strSQL = strSQL & "SELECT OrderID AS [Order #],"strSQL = strSQL & "OrderDate AS [Order Date],"strSQL = strSQL & "Orders.CustomerID AS [Cust #]"strSQL = strSQL & "FROM Orders "strSQL = strSQL & "ORDER BY OrderDate DESC"strSQL = strSQL & "}"strSQL = strSQL & "APPEND({"strSQL = strSQL & "SELECT od.OrderID AS [Order #],"strSQL = strSQL & "p.CategoryId AS [Category],"
Using Advanced ADO/DAO Features | 427
Access VBA Programming with DAO and ADO
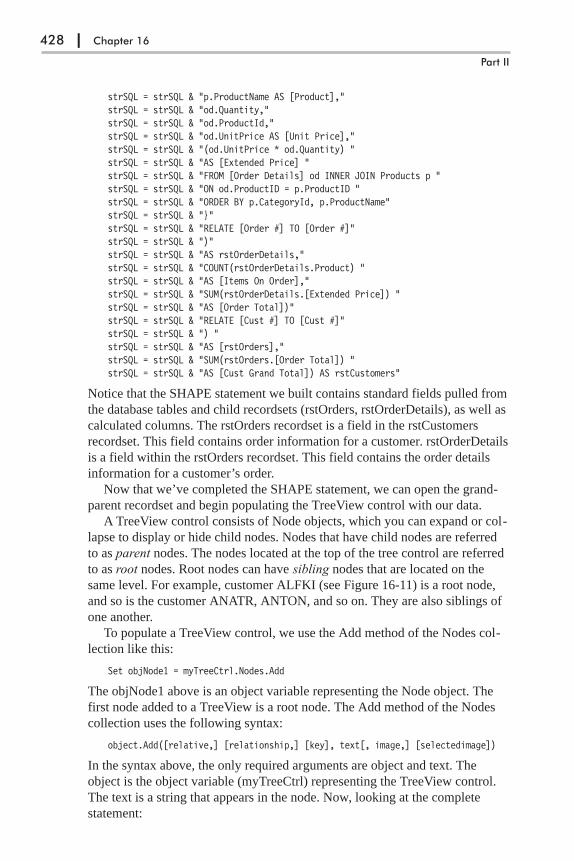
strSQL = strSQL & "p.ProductName AS [Product],"strSQL = strSQL & "od.Quantity,"strSQL = strSQL & "od.ProductId,"strSQL = strSQL & "od.UnitPrice AS [Unit Price],"strSQL = strSQL & "(od.UnitPrice * od.Quantity) "strSQL = strSQL & "AS [Extended Price] "strSQL = strSQL & "FROM [Order Details] od INNER JOIN Products p "strSQL = strSQL & "ON od.ProductID = p.ProductID "strSQL = strSQL & "ORDER BY p.CategoryId, p.ProductName"strSQL = strSQL & "}"strSQL = strSQL & "RELATE [Order #] TO [Order #]"strSQL = strSQL & ")"strSQL = strSQL & "AS rstOrderDetails,"strSQL = strSQL & "COUNT(rstOrderDetails.Product) "strSQL = strSQL & "AS [Items On Order],"strSQL = strSQL & "SUM(rstOrderDetails.[Extended Price]) "strSQL = strSQL & "AS [Order Total])"strSQL = strSQL & "RELATE [Cust #] TO [Cust #]"strSQL = strSQL & ") "strSQL = strSQL & "AS [rstOrders],"strSQL = strSQL & "SUM(rstOrders.[Order Total]) "strSQL = strSQL & "AS [Cust Grand Total]) AS rstCustomers"
Notice that the SHAPE statement we built contains standard fields pulled from
the database tables and child recordsets (rstOrders, rstOrderDetails), as well as
calculated columns. The rstOrders recordset is a field in the rstCustomers
recordset. This field contains order information for a customer. rstOrderDetails
is a field within the rstOrders recordset. This field contains the order details
information for a customer’s order.
Now that we’ve completed the SHAPE statement, we can open the grand-
parent recordset and begin populating the TreeView control with our data.
A TreeView control consists of Node objects, which you can expand or col-
lapse to display or hide child nodes. Nodes that have child nodes are referred
to as parent nodes. The nodes located at the top of the tree control are referred
to as root nodes. Root nodes can have sibling nodes that are located on the
same level. For example, customer ALFKI (see Figure 16-11) is a root node,
and so is the customer ANATR, ANTON, and so on. They are also siblings of
one another.
To populate a TreeView control, we use the Add method of the Nodes col-
lection like this:
Set objNode1 = myTreeCtrl.Nodes.Add
The objNode1 above is an object variable representing the Node object. The
first node added to a TreeView is a root node. The Add method of the Nodes
collection uses the following syntax:
object.Add([relative,] [relationship,] [key], text[, image,] [selectedimage])
In the syntax above, the only required arguments are object and text. The
object is the object variable (myTreeCtrl) representing the TreeView control.
The text is a string that appears in the node. Now, looking at the complete
statement:
428 | Chapter 16
Part II
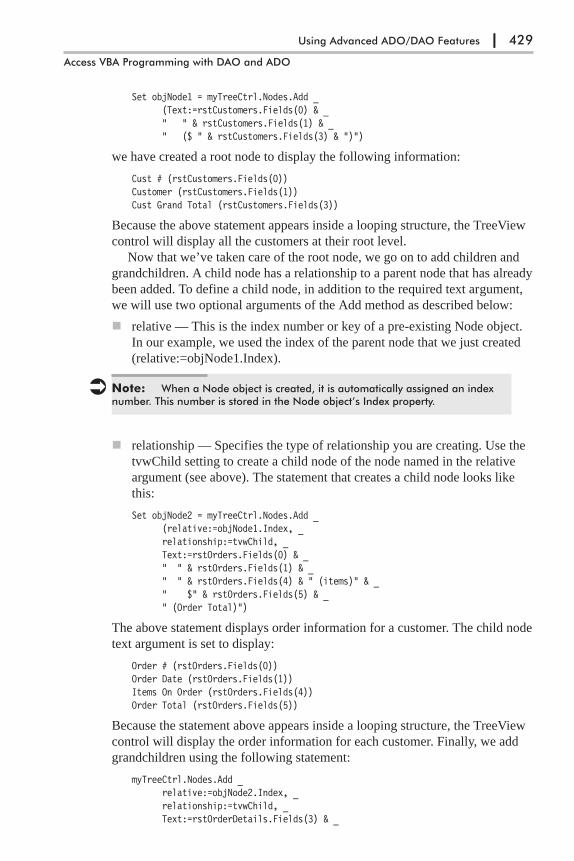
Set objNode1 = myTreeCtrl.Nodes.Add _(Text:=rstCustomers.Fields(0) & _" " & rstCustomers.Fields(1) & _" ($ " & rstCustomers.Fields(3) & ")")
we have created a root node to display the following information:
Cust # (rstCustomers.Fields(0))Customer (rstCustomers.Fields(1))Cust Grand Total (rstCustomers.Fields(3))
Because the above statement appears inside a looping structure, the TreeView
control will display all the customers at their root level.
Now that we’ve taken care of the root node, we go on to add children and
grandchildren. A child node has a relationship to a parent node that has already
been added. To define a child node, in addition to the required text argument,
we will use two optional arguments of the Add method as described below:
� relative — This is the index number or key of a pre-existing Node object.
In our example, we used the index of the parent node that we just created
(relative:=objNode1.Index).
� Note: When a Node object is created, it is automatically assigned an indexnumber. This number is stored in the Node object’s Index property.
� relationship — Specifies the type of relationship you are creating. Use the
tvwChild setting to create a child node of the node named in the relative
argument (see above). The statement that creates a child node looks like
this:
Set objNode2 = myTreeCtrl.Nodes.Add _(relative:=objNode1.Index, _relationship:=tvwChild, _Text:=rstOrders.Fields(0) & _" " & rstOrders.Fields(1) & _" " & rstOrders.Fields(4) & " (items)" & _" $" & rstOrders.Fields(5) & _" (Order Total)")
The above statement displays order information for a customer. The child node
text argument is set to display:
Order # (rstOrders.Fields(0))Order Date (rstOrders.Fields(1))Items On Order (rstOrders.Fields(4))Order Total (rstOrders.Fields(5))
Because the statement above appears inside a looping structure, the TreeView
control will display the order information for each customer. Finally, we add
grandchildren using the following statement:
myTreeCtrl.Nodes.Add _relative:=objNode2.Index, _relationship:=tvwChild, _Text:=rstOrderDetails.Fields(3) & _
Using Advanced ADO/DAO Features | 429
Access VBA Programming with DAO and ADO
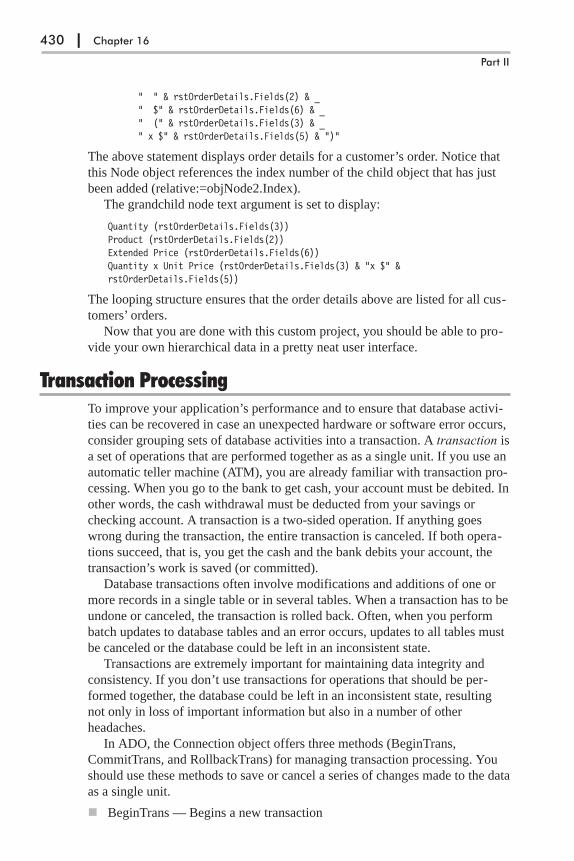
" " & rstOrderDetails.Fields(2) & _" $" & rstOrderDetails.Fields(6) & _" (" & rstOrderDetails.Fields(3) & _" x $" & rstOrderDetails.Fields(5) & ")"
The above statement displays order details for a customer’s order. Notice that
this Node object references the index number of the child object that has just
been added (relative:=objNode2.Index).
The grandchild node text argument is set to display:
Quantity (rstOrderDetails.Fields(3))Product (rstOrderDetails.Fields(2))Extended Price (rstOrderDetails.Fields(6))Quantity x Unit Price (rstOrderDetails.Fields(3) & "x $" &rstOrderDetails.Fields(5))
The looping structure ensures that the order details above are listed for all cus-
tomers’ orders.
Now that you are done with this custom project, you should be able to pro-
vide your own hierarchical data in a pretty neat user interface.
Transaction ProcessingTo improve your application’s performance and to ensure that database activi-
ties can be recovered in case an unexpected hardware or software error occurs,
consider grouping sets of database activities into a transaction. A transaction is
a set of operations that are performed together as as a single unit. If you use an
automatic teller machine (ATM), you are already familiar with transaction pro-
cessing. When you go to the bank to get cash, your account must be debited. In
other words, the cash withdrawal must be deducted from your savings or
checking account. A transaction is a two-sided operation. If anything goes
wrong during the transaction, the entire transaction is canceled. If both opera-
tions succeed, that is, you get the cash and the bank debits your account, the
transaction’s work is saved (or committed).
Database transactions often involve modifications and additions of one or
more records in a single table or in several tables. When a transaction has to be
undone or canceled, the transaction is rolled back. Often, when you perform
batch updates to database tables and an error occurs, updates to all tables must
be canceled or the database could be left in an inconsistent state.
Transactions are extremely important for maintaining data integrity and
consistency. If you don’t use transactions for operations that should be per-
formed together, the database could be left in an inconsistent state, resulting
not only in loss of important information but also in a number of other
headaches.
In ADO, the Connection object offers three methods (BeginTrans,
CommitTrans, and RollbackTrans) for managing transaction processing. You
should use these methods to save or cancel a series of changes made to the data
as a single unit.
� BeginTrans — Begins a new transaction
430 | Chapter 16
Part II

� CommitTrans — Saves any changes and ends the current transaction
� RollbackTrans — Cancels any changes made during the current transaction
and ends the transaction
Please note that in ADO a transaction is limited to one database because the
Connection object can only point to one database.
To work with transaction processing in DAO, use the transaction methods
of the Workspace or DBEngine object: BeginTrans, CommitTrans, and Roll-
back. Within a Workspace transaction you can perform operations on more
than one connection or database.
Creating a Transaction with ADOUse the BeginTrans method to specify the beginning of a transaction. Use the
CommitTrans method to save the changes. BeginTrans and CommitTrans are
used in pairs. The data-modifying instructions you place between these
keywords are stored in memory until Visual Basic encounters the
CommitTrans statement. After reaching CommitTrans, Access writes the
changes that have occurred since the BeginTrans statement to the disk; there-
fore, any changes you’ve made in the tables become permanent.
If an error is generated during the transaction process, the RollbackTrans
statement placed further down in your procedure will undo all changes made
since the BeginTrans statement. The rollback ensures that the data is returned
to the state it was in before you started the transaction.
Using transaction processing helps improve database performance since the
operations carried out during a transaction are run in memory. If the transac-
tion succeeds, the results are written to the disk in a single operation. If any
operation included in a transaction fails, the transaction is simply aborted and
no changes are written to the database. If you don’t use transactions, the results
of each operation must be written to the disk separately — a process that
consumes more database resources.
The procedure in Hands-On 16-6 assumes that you want to enter an order
for a new customer. Because this customer does not exist in the database, you
will use a transaction to ensure that the new order is entered only after the cus-
tomer record has been created in the Customers table.
�Hands-On 16-6: Using a Database Transaction to Insert Records (ADO)
1. In the Visual Basic Editor window of the Chap16 database, choose Insert |
Module.
2. In the module’s Code window, enter the Create_Transaction_ADO proce-
dure as shown below, or copy the procedure code from C:\Acc07_
HandsOn\Chap16.txt.
Sub Create_Transaction_ADO()Dim conn As ADODB.Connection
Using Advanced ADO/DAO Features | 431
Access VBA Programming with DAO and ADO
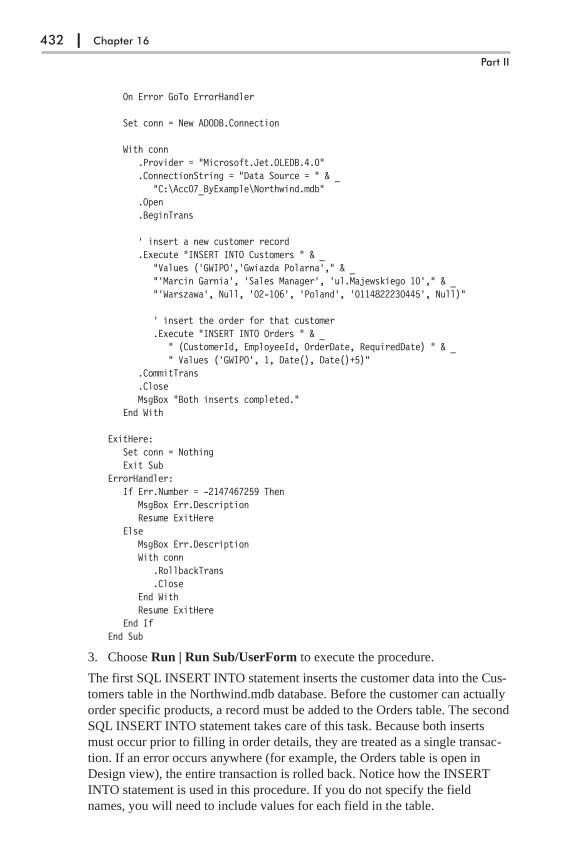
On Error GoTo ErrorHandler
Set conn = New ADODB.Connection
With conn.Provider = "Microsoft.Jet.OLEDB.4.0".ConnectionString = "Data Source = " & _
"C:\Acc07_ByExample\Northwind.mdb".Open.BeginTrans
' insert a new customer record.Execute "INSERT INTO Customers " & _
"Values ('GWIPO','Gwiazda Polarna'," & _"'Marcin Garnia', 'Sales Manager', 'ul.Majewskiego 10'," & _"'Warszawa', Null, '02-106', 'Poland', '0114822230445', Null)"
' insert the order for that customer.Execute "INSERT INTO Orders " & _
" (CustomerId, EmployeeId, OrderDate, RequiredDate) " & _" Values ('GWIPO', 1, Date(), Date()+5)"
.CommitTrans
.CloseMsgBox "Both inserts completed."
End With
ExitHere:Set conn = NothingExit Sub
ErrorHandler:If Err.Number = -2147467259 Then
MsgBox Err.DescriptionResume ExitHere
ElseMsgBox Err.DescriptionWith conn
.RollbackTrans
.CloseEnd WithResume ExitHere
End IfEnd Sub
3. Choose Run | Run Sub/UserForm to execute the procedure.
The first SQL INSERT INTO statement inserts the customer data into the Cus-
tomers table in the Northwind.mdb database. Before the customer can actually
order specific products, a record must be added to the Orders table. The second
SQL INSERT INTO statement takes care of this task. Because both inserts
must occur prior to filling in order details, they are treated as a single transac-
tion. If an error occurs anywhere (for example, the Orders table is open in
Design view), the entire transaction is rolled back. Notice how the INSERT
INTO statement is used in this procedure. If you do not specify the field
names, you will need to include values for each field in the table.
432 | Chapter 16
Part II

Creating a Transaction with DAOThe DAO Object Model supports transactions through the BeginTrans,
CommitTrans, and Rollback methods of Workspace and DBEngine objects.
When you use these methods with the DBEngine object, the transaction is
applied to the default workspace — DBEngine.Workspaces(0). If you need to
manage transactions or connections to multiple databases, use the Workspace
object. A Workspace object represents a user’s session. A transaction on a
workspace will affect all data modifications made within the workspace. You
can manage transactions independently across Database objects by creating
additional Workspace objects.
As in ADO, use the BeginTrans method to specify the beginning of a trans-
action, the CommitTrans method to save the changes, and Rollback to cancel
the transaction. BeginTrans and CommitTrans are used in pairs. The data-mod-
ifying instructions you place between these keywords are stored in memory
until Visual Basic encounters the CommitTrans statement. After reaching
CommitTrans, Access writes the changes that have occurred since the
BeginTrans statement to the disk; therefore, any changes you’ve done in the
tables become permanent.
If an error is generated during the transaction process, the Rollback state-
ment placed further down in your procedure will undo all changes made since
the BeginTrans statement, which ensures that the data is returned to the state it
was in before you started the transaction.
Transaction processing should be used for archiving historical data. For
instance, the procedure in Hands-On 16-7 selects all orders placed in 1996 and
appends them to an archive table in another database (Chap11.accdb). Then,
the records are deleted from the source table.
�Hands-On 16-7: Using a Database Transaction to Archive Records (DAO)
1. In the Microsoft Access window of the Chap16.accdb database, choose
External Data | Access. In the File name box of the Get External Data
dialog box, enter C:\Acc07_ByExample\Northwind.mdb, and then click
Using Advanced ADO/DAO Features | 433
Access VBA Programming with DAO and ADO
Figure 16-12: After running the procedure in Hands-On 16-6, a record for a new cus-tomer, “GWIPO,” is added to the Customers and Orders tables.
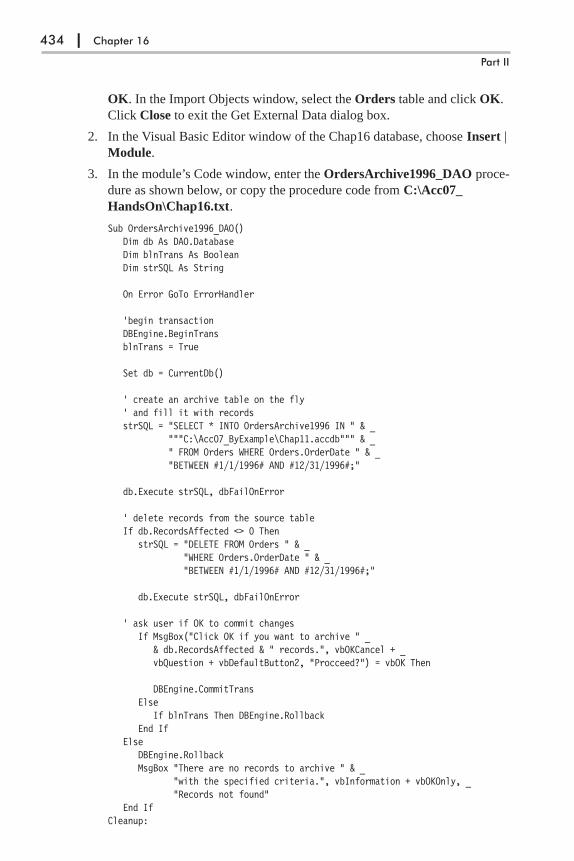
OK. In the Import Objects window, select the Orders table and click OK.
Click Close to exit the Get External Data dialog box.
2. In the Visual Basic Editor window of the Chap16 database, choose Insert |
Module.
3. In the module’s Code window, enter the OrdersArchive1996_DAO proce-
dure as shown below, or copy the procedure code from C:\Acc07_
HandsOn\Chap16.txt.
Sub OrdersArchive1996_DAO()Dim db As DAO.DatabaseDim blnTrans As BooleanDim strSQL As String
On Error GoTo ErrorHandler
'begin transactionDBEngine.BeginTransblnTrans = True
Set db = CurrentDb()
' create an archive table on the fly' and fill it with recordsstrSQL = "SELECT * INTO OrdersArchive1996 IN " & _
"""C:\Acc07_ByExample\Chap11.accdb""" & _" FROM Orders WHERE Orders.OrderDate " & _"BETWEEN #1/1/1996# AND #12/31/1996#;"
db.Execute strSQL, dbFailOnError
' delete records from the source tableIf db.RecordsAffected <> 0 Then
strSQL = "DELETE FROM Orders " & _"WHERE Orders.OrderDate " & _"BETWEEN #1/1/1996# AND #12/31/1996#;"
db.Execute strSQL, dbFailOnError
' ask user if OK to commit changesIf MsgBox("Click OK if you want to archive " _
& db.RecordsAffected & " records.", vbOKCancel + _vbQuestion + vbDefaultButton2, "Procceed?") = vbOK Then
DBEngine.CommitTransElse
If blnTrans Then DBEngine.RollbackEnd If
ElseDBEngine.RollbackMsgBox "There are no records to archive " & _
"with the specified criteria.", vbInformation + vbOKOnly, _"Records not found"
End IfCleanup:
434 | Chapter 16
Part II
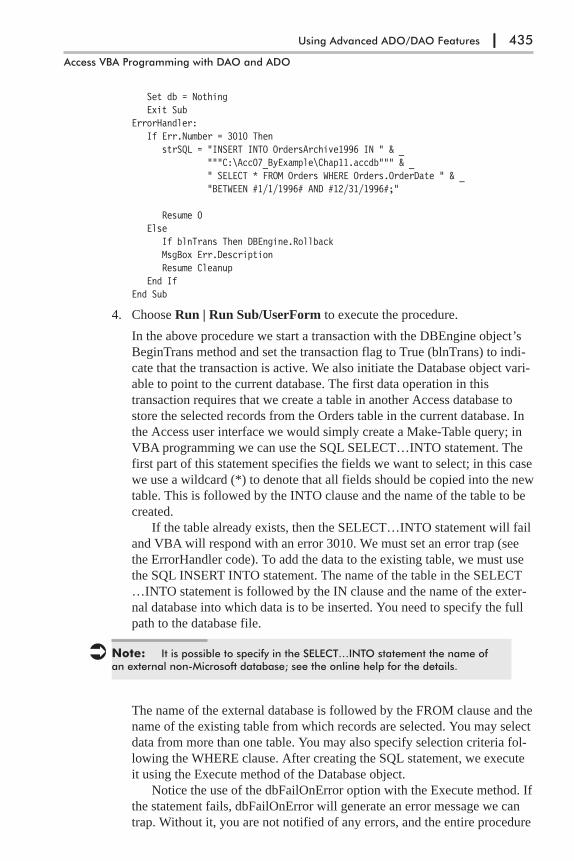
Set db = NothingExit Sub
ErrorHandler:If Err.Number = 3010 Then
strSQL = "INSERT INTO OrdersArchive1996 IN " & _"""C:\Acc07_ByExample\Chap11.accdb""" & _" SELECT * FROM Orders WHERE Orders.OrderDate " & _"BETWEEN #1/1/1996# AND #12/31/1996#;"
Resume 0Else
If blnTrans Then DBEngine.RollbackMsgBox Err.DescriptionResume Cleanup
End IfEnd Sub
4. Choose Run | Run Sub/UserForm to execute the procedure.
In the above procedure we start a transaction with the DBEngine object’s
BeginTrans method and set the transaction flag to True (blnTrans) to indi-
cate that the transaction is active. We also initiate the Database object vari-
able to point to the current database. The first data operation in this
transaction requires that we create a table in another Access database to
store the selected records from the Orders table in the current database. In
the Access user interface we would simply create a Make-Table query; in
VBA programming we can use the SQL SELECT…INTO statement. The
first part of this statement specifies the fields we want to select; in this case
we use a wildcard (*) to denote that all fields should be copied into the new
table. This is followed by the INTO clause and the name of the table to be
created.
If the table already exists, then the SELECT…INTO statement will fail
and VBA will respond with an error 3010. We must set an error trap (see
the ErrorHandler code). To add the data to the existing table, we must use
the SQL INSERT INTO statement. The name of the table in the SELECT
…INTO statement is followed by the IN clause and the name of the exter-
nal database into which data is to be inserted. You need to specify the full
path to the database file.
� Note: It is possible to specify in the SELECT…INTO statement the name ofan external non-Microsoft database; see the online help for the details.
The name of the external database is followed by the FROM clause and the
name of the existing table from which records are selected. You may select
data from more than one table. You may also specify selection criteria fol-
lowing the WHERE clause. After creating the SQL statement, we execute
it using the Execute method of the Database object.
Notice the use of the dbFailOnError option with the Execute method. If
the statement fails, dbFailOnError will generate an error message we can
trap. Without it, you are not notified of any errors, and the entire procedure
Using Advanced ADO/DAO Features | 435
Access VBA Programming with DAO and ADO
may not produce the intended results. You can see how the error trap works
by running the procedure more than once. If the Execute statement suc-
ceeds, we proceed to delete records from the source table. However, we
don’t want to execute the delete code if the SELECT statement returned no
records. After the Execute command is run, we use the RecordsAffected
property of the Database object to obtain the number of records affected by
the most recent Execute command.
If we have more than one record, we specify the records to delete using
the SQL DELETE statement, and then carry out the delete operation by
calling the Execute method of the Database object. If dbFailOnError did
not notify us of any errors, we assume that the Execute statement suc-
ceeded and we can commit the transaction. Before carrying out this opera-
tion, we ask the user to confirm or cancel the transaction. If the user
chooses not to go ahead with the changes, we roll back the transaction. We
also withdraw changes to the records if there were no records to archive.
It is important to keep in mind that in case of an error you must roll
back the transaction. Always check if the transaction is still active by using
a flag. Rolling back the transaction will ensure that the transaction doesn’t
stay active after your VBA procedure has ended.
5. Run the procedure once again in step mode (using F8) to walk through the
error code.
Chapter SummaryThis chapter covered quite a bit of advanced ADO and DAO material you will
find useful in developing professional applications in Microsoft Access. You
started by creating your own recordset from scratch and using it for storing
non-relational data. Next, you learned how to disconnect a recordset from a
database and work with it offline. You also learned that a recordset can be
saved to a disk file and later reopened without an active connection to the data-
base. Next, you discovered how you can use the Clone method of the
Recordset object to create a recordset that is a copy of another recordset.
Finally, you familiarized yourself with the concepts of data shaping and
learned statements that make it possible to create impressive, hierarchical
views of your data. You also learned how transactions are used to ensure that
certain database operations are always performed as a single unit.
In the next chapter, you will learn how to write VBA procedures that handle
database security.
436 | Chapter 16
Part II
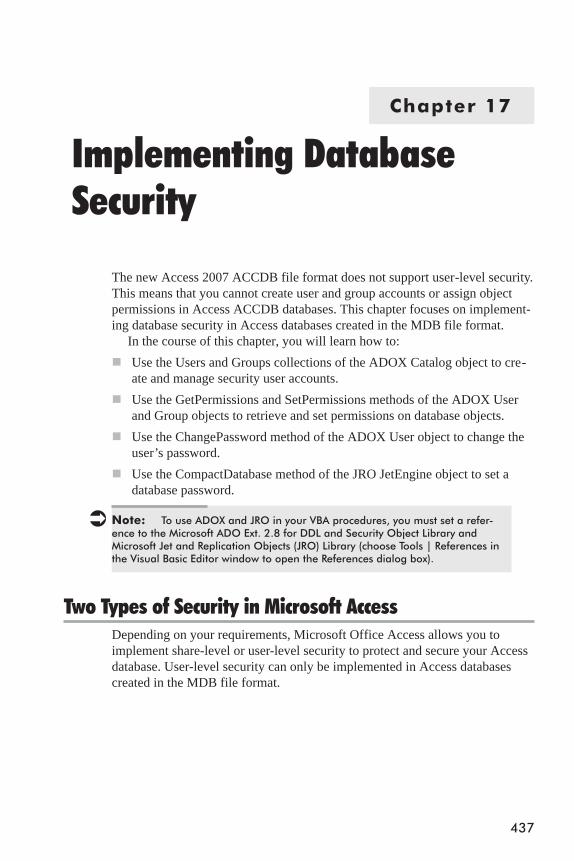
Chapter 17
Implementing DatabaseSecurity
The new Access 2007 ACCDB file format does not support user-level security.
This means that you cannot create user and group accounts or assign object
permissions in Access ACCDB databases. This chapter focuses on implement-
ing database security in Access databases created in the MDB file format.
In the course of this chapter, you will learn how to:
� Use the Users and Groups collections of the ADOX Catalog object to cre-
ate and manage security user accounts.
� Use the GetPermissions and SetPermissions methods of the ADOX User
and Group objects to retrieve and set permissions on database objects.
� Use the ChangePassword method of the ADOX User object to change the
user’s password.
� Use the CompactDatabase method of the JRO JetEngine object to set a
database password.
� Note: To use ADOX and JRO in your VBA procedures, you must set a refer-ence to the Microsoft ADO Ext. 2.8 for DDL and Security Object Library andMicrosoft Jet and Replication Objects (JRO) Library (choose Tools | References inthe Visual Basic Editor window to open the References dialog box).
Two Types of Security in Microsoft AccessDepending on your requirements, Microsoft Office Access allows you to
implement share-level or user-level security to protect and secure your Access
database. User-level security can only be implemented in Access databases
created in the MDB file format.
437
Share-Level Security (in Access ACCDB and MDB FileFormats)
Using passwords to secure the database or objects in the database is known as
share-level security. When you set a password on the database, users are
required to enter a password in order to gain access to the data and database
objects. Anyone with the password has unrestricted access to all Access data
and database objects.
To manually change the database password:
� For an Access database in the ACCDB file format, choose Database Tools |
Encrypt with Password.
� For an Access database in the MDB file format, choose Database Tools |
Set Database Password.
� Note: Refer to the sections titled “Setting a Database Password Using theCompactDatabase Method” and ”Setting a Database Password Using theNewPassword Method” later in this chapter to set a database password fromwithin a VBA procedure for Access databases.
User-Level SecurityUser-level security is a relatively complex process that secures the code and
objects in your database so that users can’t accidentally modify or change
them. With this type of security you can provide the most restrictive access
over the database and the objects it contains. When you use user-level security,
a workgroup information file is used to determine who can open a database and
what objects are available to them.
The workgroup information file holds group and user information, includ-
ing passwords. The information contained in this file determines not only who
can open the database, but also the permissions users/groups have on the
objects in the database. The workgroup information file contains built-in
groups (Admins and Users) and a generic user account (Admin) with unlimited
privileges on the database and the objects it contains.
When an Access MDB database file is open in Access 2007, you can manu-
ally implement user-level security by choosing Database Tools | Users and
Permissions. You can also define user and group accounts and their passwords
from your VBA procedures by using ADO code, as demonstrated later in this
chapter.
Understanding Workgroup Information FilesTo successfully run the procedures demonstrated in this chapter, you need to
know the location of the workgroup information file on your computer. This
file, also known as system database (System.mdw), is created automatically on
your computer (see Table 17-1).
438 | Chapter 17
Part II

Please note that the Application Data folder (used for storing System.mdw
file for an Access 2002-2003 database) is a hidden folder. To browse this
folder, switch to Microsoft Windows Explorer and choose Tools | Folder
Options. In the Folder Options window, click the View tab, click the option
button next to Show hidden files and folders, and click OK. Now you should
be able to access the path, where <user name> is the name of your user profile.
Take a few minutes right now to locate the System.mdw file on your machine.
Table 17-1: The workgroup information file in different versions of Access
Access Version Default WorkgroupInformation Filename
Workgroup Information File Location
2.0 System.mda C:\Access
95 System.mdw C:\MSOffice\Access
97 System.mdw C:\Windows\System
2000 System.mdw C:\Program Files\Common Files\System
2002/2003 System.mdw C:\Documents and Settings\<username>\Application Data\Microsoft\Access
You can also find the location and name of the workgroup information file by
starting Microsoft Access 2007 and opening any MDB database. Switch to the
Visual Basic Editor window and activate the Immediate window. Type the fol-
lowing statement beginning with a question mark and press Enter to execute:
? CurrentProject.Connection.Properties("Jet OLEDB:System Database").Value
When you press Enter, Access displays the full path of the workgroup informa-
tion file that the currently open database uses for its security information. Jet
OLEDB:System Database is a provider-specific property of the Microsoft OLE
DB Provider for Jet in the ADO Properties collection of the Connection object.
Access uses the workgroup information file to store the following
information:
� The name of each user and group
� The list of users who belong to each group
� The encrypted logon password for each workgroup user
� The Security Identifier (SID) of each user and group in a binary format
Once you add user and group accounts to your database, the workgroup infor-
mation file will contain vital security information. YOU DON’T WANT TO
LOSE THIS INFORMATION. Always take time to make a backup copy of the
System.mdw file and store it in a safe location. This way, if the original file
gets corrupted, you’ll be able to quickly restore your backup file and avoid
having to recreate user and group accounts.
The workgroup information file is like any other Access database except
that it contains hidden system tables with information regarding user and group
accounts and their actual permissions. However, you cannot change the secu-
rity information by opening this file directly. All the security data stored in
Implementing Database Security | 439
Access VBA Programming with DAO and ADO
hidden system tables is encrypted and protected. Changes to the workgroup
information file are done automatically by the Jet Engine when you use the
built-in Access commands to manage security or execute ADO/JRO code in
your VBA procedures.
You can use the same workgroup information file for more than one data-
base or you can create a separate workgroup information file for each database
you are securing. You can also give this file a name other than the default Sys-
tem.mdw. I find it best to use the same name as the database file. For example,
if my secured database file is named Assets.mdb, I would create a workgroup
information file called Assets.mdw and put it in the same folder as the database
file. This way I know right away that these two files are associated with one
another even after many weeks or months have passed since I created them.
Keeping track of which workgroup information file goes with which database
can be quite challenging, especially if you are managing more than a couple of
secured Access databases.
� Note: If you try to open a secured database while another workgroup infor-mation file is active, Access displays the following message:
You do not have the necessary permissions to use the <name> object. Haveyour system administrator or the person who created this object establish theappropriate permissions for you.
If you receive the above message while opening an Access database in the MDBfile format, you should look for the accompanying workgroup information fileand perform one of the following:
Set Up a Shortcut
Set up a shortcut to the database file that uses the /WRKGRP command-lineswitch to load the specified workgroup information file when the database isopened (see Part 3 in Custom Project 17-1).
Use the Workgroup Administrator Tool in Microsoft Office Access 2007
1. Start Access and open any Access database.
2. Press Alt+F11 to switch to the Visual Basic Editor window.
3. Choose View | Immediate Window.
4. In the Immediate window, type the following statement and press Enter toexecute:
DoCmd.RunCommand acCmdWorkgroupAdministrator
5. In the Workgroup Administrator dialog box, click Join, then click Browse.
6. Locate the workgroup information file and then click Open. See Table 17-1for the .mdw filenames used with various versions of Access.
7. In the Workgroup Administrator dialog box, click OK, then click Exit.
440 | Chapter 17
Part II

Creating and Joining Workgroup Information FilesWhen you open a database, Microsoft Access reads the workgroup information
file to find out who is allowed to access the database. If security was put into
place, you will be prompted for the user ID and password. Custom Project
17-1 walks you through the steps required to create and join a new workgroup
information file. Once you join the workgroup, you create a new Access data-
base and set up a password for the Admin user. This information is saved in
the workgroup information file that you just joined. The workgroup informa-
tion file is created using the User-Level Security Wizard. This option is
available by choosing Database Tools | Users and Permissions.
Securing a database boils down to creating a new workgroup information
file, adding a new member to the Admins group, and removing the default
Admin user from that group. You also need to remove permissions from the
Admin user and from the Users group, and assign permissions to your own
groups that you create. Don’t be discouraged if you need to go over the secu-
rity steps more than once. Access security is complex and can be approached
from many different angles. Books of several hundred pages have been written
to explain its inner workings. The approach presented here simply provides us
with a secured Access database file we use to perform the programming exer-
cises in this chapter. Although you could learn how to use the ADOX
commands for managing security using the currently open unsecured Access
database, I think this particular approach gives you a better set of skills to
begin with. So let’s begin.
�Custom Project 17-1: Securing a Microsoft Access MDB Database
You must complete this custom project in order to work with the hands-on
exercises in this chapter.
Part 1: Creating a New Access Database in the MDB File Format
1. Start Microsoft Office Access 2007 and create a new blank database called
SpecialDb.mdb in your C:\Acc07_ByExample folder. Keep this database
open and proceed to Part 2 below.
Part 2: Establishing User-Level Security
We use the built-in User-Level Security Wizard to secure the blank Access
database (SpecialDb.mdb) we created in Part 1.
1. Choose Database Tools | User and Group Permissions | User-Level
Security Wizard.
2. Click Yes in response to the message that the database should be opened in
the shared mode to run the Security Wizard. Microsoft Access closes the
database and reopens it in the shared mode.
Implementing Database Security | 441
Access VBA Programming with DAO and ADO

3. Microsoft Access then automatically activates the Security Wizard (see
Figure 17-1). Click Next to continue.
4. Another Security Wizard window appears (see Figure 17-2). Do not make
any changes in this screen. Click Next to continue.
5. The Security Wizard window now shows an empty tabbed screen that nor-
mally displays database objects (Figure 17-3). Because our database does
not contain any tables, queries, reports, etc., there’s nothing you can do in
this screen. Click Next to continue.
442 | Chapter 17
Part II
Figure 17-1: SecurityWizard (screen 1)
Figure 17-2: SecurityWizard (screen 2) Theworkgroup informa-tion file namedSecurity1.mdb storesuser and groupaccount informationfor the SpecialDbdatabase.
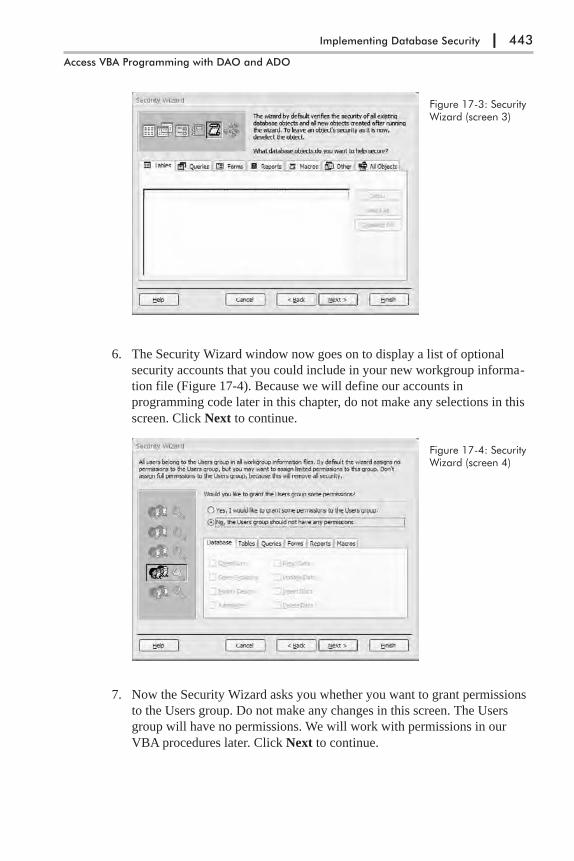
6. The Security Wizard window now goes on to display a list of optional
security accounts that you could include in your new workgroup informa-
tion file (Figure 17-4). Because we will define our accounts in
programming code later in this chapter, do not make any selections in this
screen. Click Next to continue.
7. Now the Security Wizard asks you whether you want to grant permissions
to the Users group. Do not make any changes in this screen. The Users
group will have no permissions. We will work with permissions in our
VBA procedures later. Click Next to continue.
Implementing Database Security | 443
Access VBA Programming with DAO and ADO
Figure 17-3: SecurityWizard (screen 3)
Figure 17-4: SecurityWizard (screen 4)
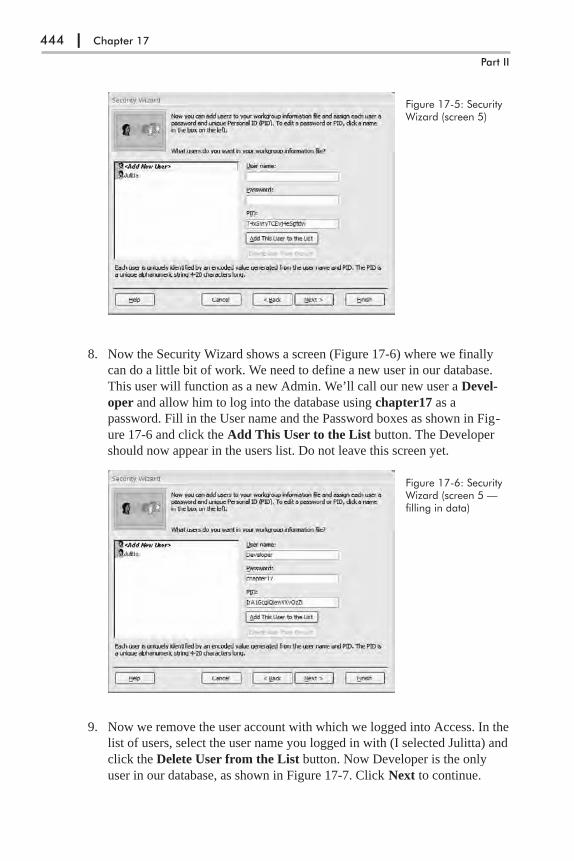
8. Now the Security Wizard shows a screen (Figure 17-6) where we finally
can do a little bit of work. We need to define a new user in our database.
This user will function as a new Admin. We’ll call our new user a Devel-
oper and allow him to log into the database using chapter17 as a
password. Fill in the User name and the Password boxes as shown in Fig-
ure 17-6 and click the Add This User to the List button. The Developer
should now appear in the users list. Do not leave this screen yet.
9. Now we remove the user account with which we logged into Access. In the
list of users, select the user name you logged in with (I selected Julitta) and
click the Delete User from the List button. Now Developer is the only
user in our database, as shown in Figure 17-7. Click Next to continue.
444 | Chapter 17
Part II
Figure 17-5: SecurityWizard (screen 5)
Figure 17-6: SecurityWizard (screen 5 —filling in data)
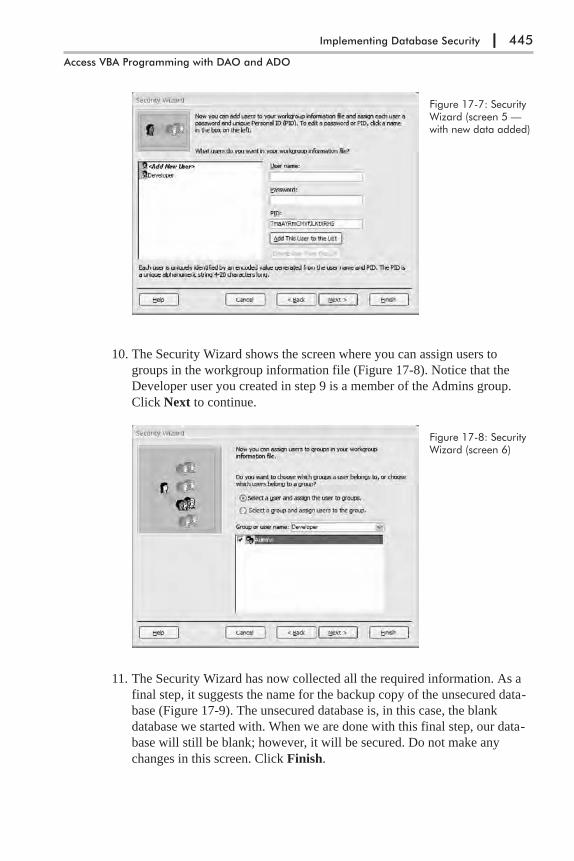
10. The Security Wizard shows the screen where you can assign users to
groups in the workgroup information file (Figure 17-8). Notice that the
Developer user you created in step 9 is a member of the Admins group.
Click Next to continue.
11. The Security Wizard has now collected all the required information. As a
final step, it suggests the name for the backup copy of the unsecured data-
base (Figure 17-9). The unsecured database is, in this case, the blank
database we started with. When we are done with this final step, our data-
base will still be blank; however, it will be secured. Do not make any
changes in this screen. Click Finish.
Implementing Database Security | 445
Access VBA Programming with DAO and ADO
Figure 17-7: SecurityWizard (screen 5 —with new data added)
Figure 17-8: SecurityWizard (screen 6)
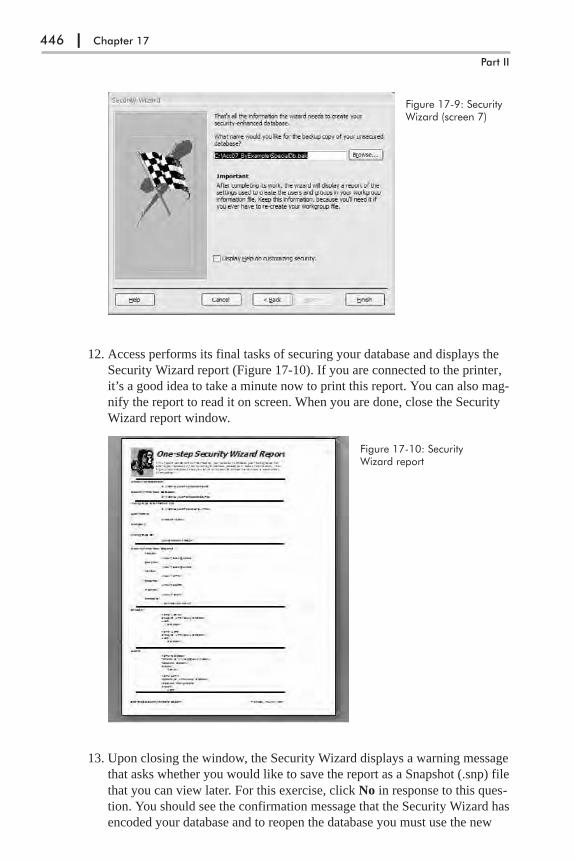
12. Access performs its final tasks of securing your database and displays the
Security Wizard report (Figure 17-10). If you are connected to the printer,
it’s a good idea to take a minute now to print this report. You can also mag-
nify the report to read it on screen. When you are done, close the Security
Wizard report window.
13. Upon closing the window, the Security Wizard displays a warning message
that asks whether you would like to save the report as a Snapshot (.snp) file
that you can view later. For this exercise, click No in response to this ques-
tion. You should see the confirmation message that the Security Wizard has
encoded your database and to reopen the database you must use the new
446 | Chapter 17
Part II
Figure 17-9: SecurityWizard (screen 7)
Figure 17-10: SecurityWizard report
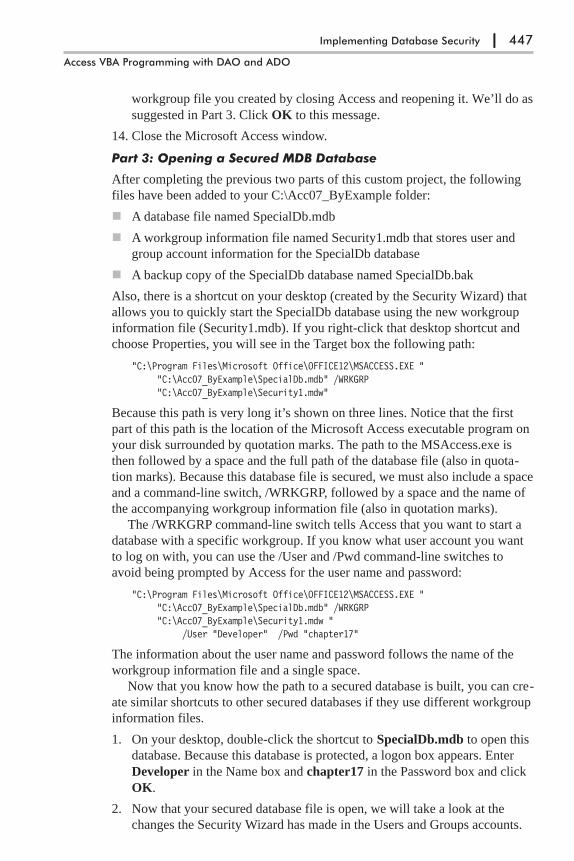
workgroup file you created by closing Access and reopening it. We’ll do as
suggested in Part 3. Click OK to this message.
14. Close the Microsoft Access window.
Part 3: Opening a Secured MDB Database
After completing the previous two parts of this custom project, the following
files have been added to your C:\Acc07_ByExample folder:
� A database file named SpecialDb.mdb
� A workgroup information file named Security1.mdb that stores user and
group account information for the SpecialDb database
� A backup copy of the SpecialDb database named SpecialDb.bak
Also, there is a shortcut on your desktop (created by the Security Wizard) that
allows you to quickly start the SpecialDb database using the new workgroup
information file (Security1.mdb). If you right-click that desktop shortcut and
choose Properties, you will see in the Target box the following path:
"C:\Program Files\Microsoft Office\OFFICE12\MSACCESS.EXE ""C:\Acc07_ByExample\SpecialDb.mdb" /WRKGRP"C:\Acc07_ByExample\Security1.mdw"
Because this path is very long it’s shown on three lines. Notice that the first
part of this path is the location of the Microsoft Access executable program on
your disk surrounded by quotation marks. The path to the MSAccess.exe is
then followed by a space and the full path of the database file (also in quota-
tion marks). Because this database file is secured, we must also include a space
and a command-line switch, /WRKGRP, followed by a space and the name of
the accompanying workgroup information file (also in quotation marks).
The /WRKGRP command-line switch tells Access that you want to start a
database with a specific workgroup. If you know what user account you want
to log on with, you can use the /User and /Pwd command-line switches to
avoid being prompted by Access for the user name and password:
"C:\Program Files\Microsoft Office\OFFICE12\MSACCESS.EXE ""C:\Acc07_ByExample\SpecialDb.mdb" /WRKGRP"C:\Acc07_ByExample\Security1.mdw "
/User "Developer" /Pwd "chapter17"
The information about the user name and password follows the name of the
workgroup information file and a single space.
Now that you know how the path to a secured database is built, you can cre-
ate similar shortcuts to other secured databases if they use different workgroup
information files.
1. On your desktop, double-click the shortcut to SpecialDb.mdb to open this
database. Because this database is protected, a logon box appears. Enter
Developer in the Name box and chapter17 in the Password box and click
OK.
2. Now that your secured database file is open, we will take a look at the
changes the Security Wizard has made in the Users and Groups accounts.
Implementing Database Security | 447
Access VBA Programming with DAO and ADO

Choose Database Tools | Users and Permissions | User and Group
Accounts. Notice that the Admin user is a member of the Users group (see
Figure 17-11). The Security Wizard removed the Admin account from the
Admins group. If you open the Name drop-down list in the User area of
this screen and select Developer, you will see that Developer is a member
of two groups: Admins and Users. Click Cancel to exit the User and Group
Accounts window.
3. Having checked the Users and Groups accounts, you can also examine the
changes made by the Security Wizard in the group permissions. Choose
Database Tools | Users and Permissions | User and Group Permissions.
The Developer and Admin users don’t have permissions on any new
objects (see Figure 17-12). To view group permissions, click the Groups
option button. The Admins group has all the necessary permissions to
administer the database while the Users group has no permissions at all.
We will learn how to grant and revoke permissions to database objects in
the example procedures in this chapter. Now click Cancel to exit the User
and Group Permissions window.
448 | Chapter 17
Part II
Figure 17-11: In CustomProject 17-1, we removedthe default Admin userfrom the Admins groupwhile running the built-inUser-Level SecurityWizard.
Figure 17-12: Use theUser and Group Permis-sions window to checkcurrent permissions for theAdmin and Developerusers after running theUser-Level Security Wizardin Custom Project 17-1.

4. Now let’s import a couple of objects into this database. Later in this chap-
ter when we learn to handle permissions to database objects we will need
them for our tests. In the Access window, choose External Data | Access.
In the Get External Data dialog box, enter C:\Acc07_ByExample\
Northwind.mdb in the File name box and click OK.
5. In the Import Objects window, click Select All to select all the tables. Click
the Queries tab, and then choose Select All to select all the queries.
Finally, click OK to begin importing. When the import operation is com-
pleted, click the Close button.
6. The objects you selected in step 5 have now been added to your database.
Close the SpecialDb database and close the Access application. This step
concludes the special project of creating a secured Access database. Now,
let’s proceed to the programming part.
Creating and Managing Group and User AccountsTo create a new group account from a VBA procedure using ADO, open the
ADOX Catalog object by specifying the connection to the appropriate database
and use the Append method of the Catalog object’s Groups collection to add a
new group account.
To create a new user account, pass the name and password to the Append
method of the Users collection. Specifying a password at this time is optional.
You can assign a password later with the ChangePassword method for the User
object.
The procedure in Hands-On 17-1 illustrates how to create two group
accounts and a user account in the secured database (SpecialDb.mdb) that you
created in Custom Project 17-1.
�Hands-On 17-1: Creating User and Group Accounts (ADO)
This hands-on exercise requires that you have completed Custom Project 17-1.
1. Start Microsoft Office Access 2007 and create a new database named
Chap17.mdb in your C:\Acc07_ByExample folder. Make sure you type
.mdb as the file extension.
2. Press Alt+F11 to switch to the Visual Basic Editor window and choose
Insert | Module.
3. Choose Tools | References and click the check box next to the following
three object libraries: Microsoft ActiveX Data Objects 2.8 Library,
Microsoft ADO Ext. 2.8 for DDL and Security Object Library, and
Microsoft Jet and Replication Objects 2.6 Library. After making these
selections, click OK to exit the References dialog box.
4. Activate the Immediate window by choosing View | Immediate Window.
Type the following statement in the Immediate window and press Enter:
DoCmd.RunCommand acCmdWorkgroupAdministrator
Implementing Database Security | 449
Access VBA Programming with DAO and ADO

When you press Enter, Access loads the Workgroup Administrator tool,
which lets you check the path to the workgroup information file that is cur-
rently used. Note: In Access 2007 there is no command in the user inter-
face to access this tool. You must use the above code to use the Workgroup
Administrator tool.
Perform one of the following steps:
a. If System.mdw appears in the Workgroup path, click OK to exit the
Workgroup Administrator dialog box and proceed with step 5 below.
b. If the Workgroup path includes the Security1.mdw file that was created
in Custom Project 17-1, click the Join button to join another work-
group. Use the Browse button in the Workgroup Information File
dialog box to select and open System.mdw. Refer to the beginning of
this chapter for information on the default location of this file. Once
you select the correct file, the dialog box should display its full path.
Click OK to exit this dialog box. Access will display a message box
saying you successfully joined the workgroup defined by the selected
information file. Click OK to the message and click OK in the
Workgroup Administrator dialog box to exit. Proceed to step 5.
5. In the module’s Code window, enter the Create_UserAndGroup_ADO
procedure as shown below, or copy the procedure code from C:\Acc07_
HandsOn\Chap17.txt.
Sub Create_UserAndGroup_ADO()Dim cat As ADOX.CatalogDim conn As ADODB.ConnectionDim strDB As StringDim strSysDB As StringDim strGrpName1 As StringDim strGrpName2 As StringDim strUsrName As String
On Error GoTo ErrorHandler
strDB = "C:\Acc07_ByExample\SpecialDb.mdb"strSysDB = "C:\Acc07_ByExample\Security1.mdw"strGrpName1 = "Masters"strGrpName2 = "Elite"strUsrName = "PowerUser"' open connection to the database' using the specified system databaseSet conn = New ADODB.Connection
With conn.Provider = "Microsoft.Jet.OLEDB.4.0".Properties("Jet OLEDB:System Database") = strSysDB.Properties("User ID") = "Developer".Properties("Password") = "chapter17".Open strDB
End With
' Open the catalog
450 | Chapter 17
Part II
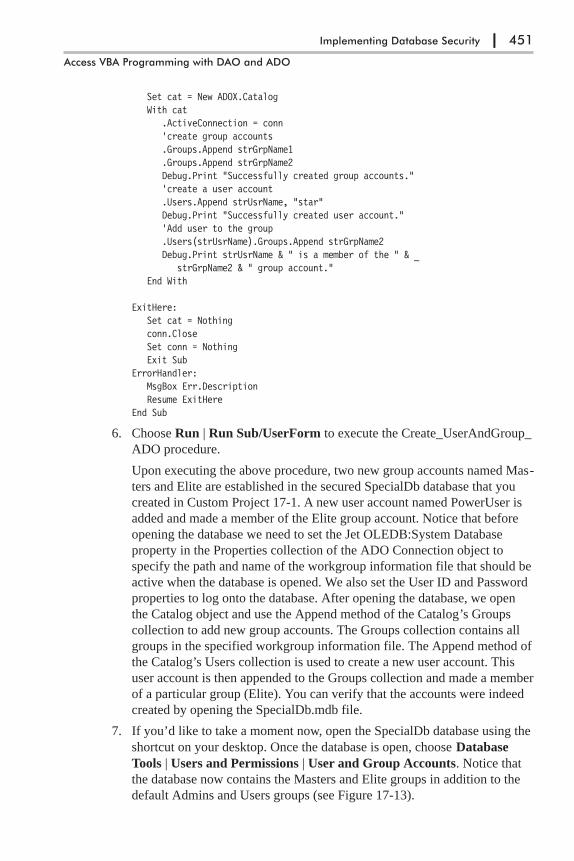
Set cat = New ADOX.CatalogWith cat
.ActiveConnection = conn'create group accounts.Groups.Append strGrpName1.Groups.Append strGrpName2Debug.Print "Successfully created group accounts."'create a user account.Users.Append strUsrName, "star"Debug.Print "Successfully created user account."'Add user to the group.Users(strUsrName).Groups.Append strGrpName2Debug.Print strUsrName & " is a member of the " & _
strGrpName2 & " group account."End With
ExitHere:Set cat = Nothingconn.CloseSet conn = NothingExit Sub
ErrorHandler:MsgBox Err.DescriptionResume ExitHere
End Sub
6. Choose Run | Run Sub/UserForm to execute the Create_UserAndGroup_
ADO procedure.
Upon executing the above procedure, two new group accounts named Mas-
ters and Elite are established in the secured SpecialDb database that you
created in Custom Project 17-1. A new user account named PowerUser is
added and made a member of the Elite group account. Notice that before
opening the database we need to set the Jet OLEDB:System Database
property in the Properties collection of the ADO Connection object to
specify the path and name of the workgroup information file that should be
active when the database is opened. We also set the User ID and Password
properties to log onto the database. After opening the database, we open
the Catalog object and use the Append method of the Catalog’s Groups
collection to add new group accounts. The Groups collection contains all
groups in the specified workgroup information file. The Append method of
the Catalog’s Users collection is used to create a new user account. This
user account is then appended to the Groups collection and made a member
of a particular group (Elite). You can verify that the accounts were indeed
created by opening the SpecialDb.mdb file.
7. If you’d like to take a moment now, open the SpecialDb database using the
shortcut on your desktop. Once the database is open, choose Database
Tools | Users and Permissions | User and Group Accounts. Notice that
the database now contains the Masters and Elite groups in addition to the
default Admins and Users groups (see Figure 17-13).
Implementing Database Security | 451
Access VBA Programming with DAO and ADO

8. Close the SpecialDb database and the Access window in which it was dis-
played. Be careful not to close the Chap17.mdb database you are working
with.
Deleting User and Group AccountsUse the Delete method of the Catalog object’s Users collection to delete a user
account. Use the Delete method of the Catalog object’s Groups collection to
delete a group account.
The procedure in Hands-On 17-2 deletes the user account named
PowerUser and the group account named Masters created in Hands-On 17-1.
�Hands-On 17-2: Deleting User and Group Accounts (ADO)
This hands-on exercise requires the prior completion of Custom Project 17-1
and Hands-On 17-1.
1. In the Visual Basic Editor window of Chap17.mdb, choose Insert |
Module.
2. In the module’s Code window, enter the Delete_UserAndGroup proce-
dure as shown below, or copy the procedure code from C:\Acc07_
HandsOn\Chap17.txt.
Sub Delete_UserAndGroup(UserName As String, _GroupName As String)
Dim cat As ADOX.CatalogDim conn As ADODB.ConnectionDim strDB As StringDim strSysDB As String
On Error GoTo ErrorHandler
strDB = "C:\Acc07_ByExample\SpecialDb.mdb"strSysDB = "C:\Acc07_ByExample\Security1.mdw"
' Open connection to the database using' the specified system database
452 | Chapter 17
Part II
Figure 17-13: The Eliteand Masters groupaccounts are created byrunning the procedure inHands-On 17-1.
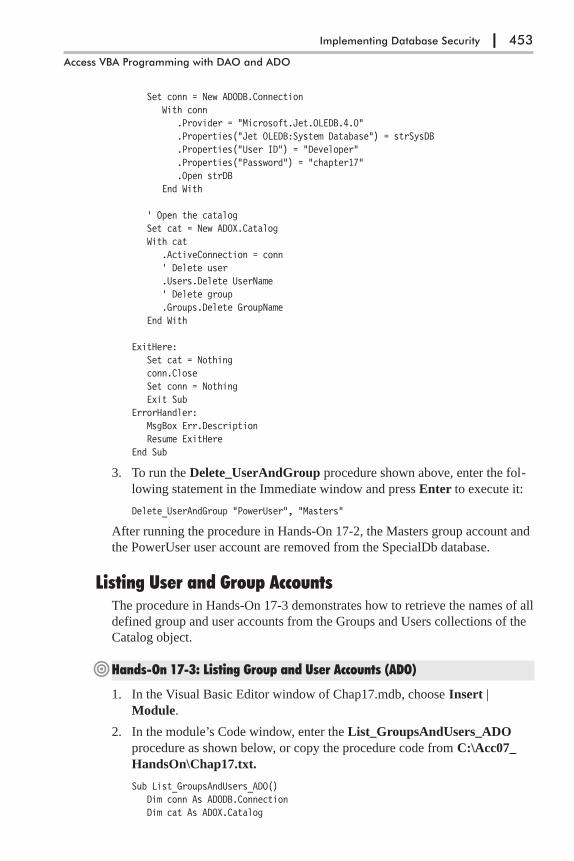
Set conn = New ADODB.ConnectionWith conn
.Provider = "Microsoft.Jet.OLEDB.4.0"
.Properties("Jet OLEDB:System Database") = strSysDB
.Properties("User ID") = "Developer"
.Properties("Password") = "chapter17"
.Open strDBEnd With
' Open the catalogSet cat = New ADOX.CatalogWith cat
.ActiveConnection = conn' Delete user.Users.Delete UserName' Delete group.Groups.Delete GroupName
End With
ExitHere:Set cat = Nothingconn.CloseSet conn = NothingExit Sub
ErrorHandler:MsgBox Err.DescriptionResume ExitHere
End Sub
3. To run the Delete_UserAndGroup procedure shown above, enter the fol-
lowing statement in the Immediate window and press Enter to execute it:
Delete_UserAndGroup "PowerUser", "Masters"
After running the procedure in Hands-On 17-2, the Masters group account and
the PowerUser user account are removed from the SpecialDb database.
Listing User and Group AccountsThe procedure in Hands-On 17-3 demonstrates how to retrieve the names of all
defined group and user accounts from the Groups and Users collections of the
Catalog object.
�Hands-On 17-3: Listing Group and User Accounts (ADO)
1. In the Visual Basic Editor window of Chap17.mdb, choose Insert |
Module.
2. In the module’s Code window, enter the List_GroupsAndUsers_ADO
procedure as shown below, or copy the procedure code from C:\Acc07_
HandsOn\Chap17.txt.
Sub List_GroupsAndUsers_ADO()Dim conn As ADODB.ConnectionDim cat As ADOX.Catalog
Implementing Database Security | 453
Access VBA Programming with DAO and ADO
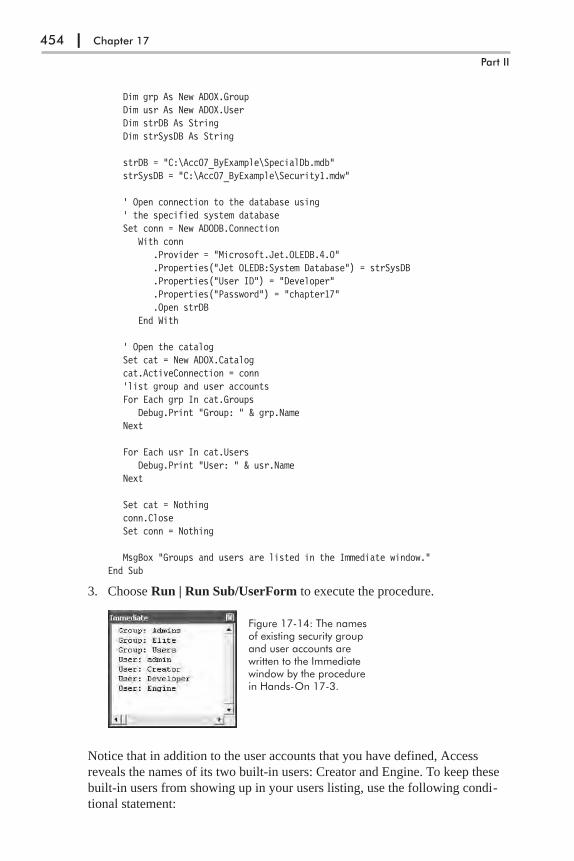
Dim grp As New ADOX.GroupDim usr As New ADOX.UserDim strDB As StringDim strSysDB As String
strDB = "C:\Acc07_ByExample\SpecialDb.mdb"strSysDB = "C:\Acc07_ByExample\Security1.mdw"
' Open connection to the database using' the specified system databaseSet conn = New ADODB.Connection
With conn.Provider = "Microsoft.Jet.OLEDB.4.0".Properties("Jet OLEDB:System Database") = strSysDB.Properties("User ID") = "Developer".Properties("Password") = "chapter17".Open strDB
End With
' Open the catalogSet cat = New ADOX.Catalogcat.ActiveConnection = conn'list group and user accountsFor Each grp In cat.Groups
Debug.Print "Group: " & grp.NameNext
For Each usr In cat.UsersDebug.Print "User: " & usr.Name
Next
Set cat = Nothingconn.CloseSet conn = Nothing
MsgBox "Groups and users are listed in the Immediate window."End Sub
3. Choose Run | Run Sub/UserForm to execute the procedure.
Notice that in addition to the user accounts that you have defined, Access
reveals the names of its two built-in users: Creator and Engine. To keep these
built-in users from showing up in your users listing, use the following condi-
tional statement:
454 | Chapter 17
Part II
Figure 17-14: The namesof existing security groupand user accounts arewritten to the Immediatewindow by the procedurein Hands-On 17-3.

If usr.Name <>"Creator" And usr.Name <> "Engine" ThenDebug.Print "User:" & usr.Name
End If
Listing Users in GroupsSometimes you will need to know what users belong to what groups. The pro-
cedure in Hands-On 17-4 demonstrates how to obtain such a list.
�Hands-On 17-4: Listing Users in Groups (ADO)
1. In the Visual Basic Editor window of Chap17.mdb, choose Insert |
Module.
2. In the module’s Code window, enter the List_UsersInGroups procedure as
shown below, or copy the procedure code from C:\Acc07_HandsOn\
Chap17.txt.
Sub List_UsersInGroups()Dim conn As ADODB.ConnectionDim cat As ADOX.CatalogDim grp As New ADOX.GroupDim usr As New ADOX.UserDim strDB As StringDim strSysDB As String
strDB = "C:\Acc07_ByExample\SpecialDb.mdb"strSysDB = "C:\Acc07_ByExample\Security1.mdw"
' Open connection to the database using' the specified system databaseSet conn = New ADODB.Connection
With conn.Provider = "Microsoft.Jet.OLEDB.4.0".Properties("Jet OLEDB:System Database") = strSysDB.Properties("User ID") = "Developer".Properties("Password") = "chapter17".Open strDB
End With
' Open the catalogSet cat = New ADOX.Catalogcat.ActiveConnection = connFor Each grp In cat.Groups
Debug.Print "Group: " & grp.NameIf cat.Groups(grp.Name).Users.Count = 0 Then
Debug.Print vbTab & "There are no users in the " & _grp & " group."
End IfFor Each usr In cat.Groups(grp.Name).Users
Debug.Print vbTab & "User: " & usr.NameNext usr
Next grp
Implementing Database Security | 455
Access VBA Programming with DAO and ADO
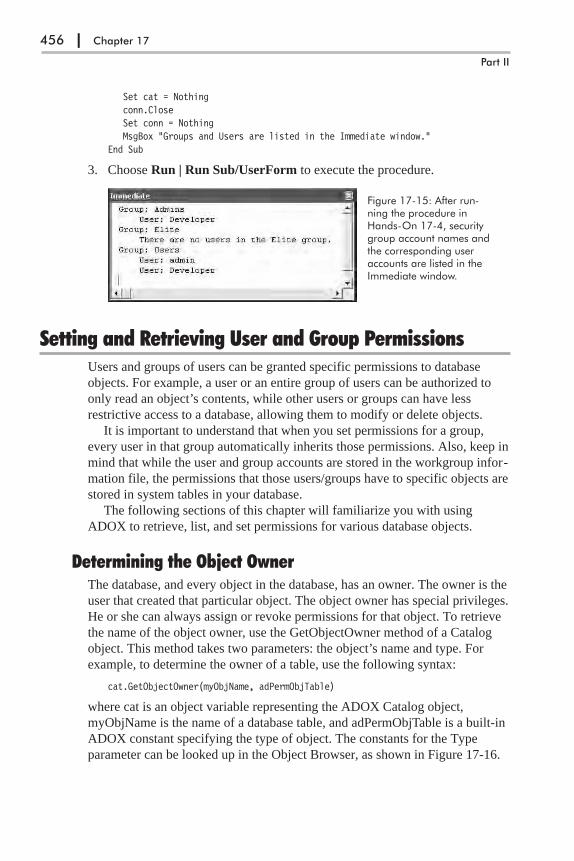
Set cat = Nothingconn.CloseSet conn = NothingMsgBox "Groups and Users are listed in the Immediate window."
End Sub
3. Choose Run | Run Sub/UserForm to execute the procedure.
Setting and Retrieving User and Group PermissionsUsers and groups of users can be granted specific permissions to database
objects. For example, a user or an entire group of users can be authorized to
only read an object’s contents, while other users or groups can have less
restrictive access to a database, allowing them to modify or delete objects.
It is important to understand that when you set permissions for a group,
every user in that group automatically inherits those permissions. Also, keep in
mind that while the user and group accounts are stored in the workgroup infor-
mation file, the permissions that those users/groups have to specific objects are
stored in system tables in your database.
The following sections of this chapter will familiarize you with using
ADOX to retrieve, list, and set permissions for various database objects.
Determining the Object OwnerThe database, and every object in the database, has an owner. The owner is the
user that created that particular object. The object owner has special privileges.
He or she can always assign or revoke permissions for that object. To retrieve
the name of the object owner, use the GetObjectOwner method of a Catalog
object. This method takes two parameters: the object’s name and type. For
example, to determine the owner of a table, use the following syntax:
cat.GetObjectOwner(myObjName, adPermObjTable)
where cat is an object variable representing the ADOX Catalog object,
myObjName is the name of a database table, and adPermObjTable is a built-in
ADOX constant specifying the type of object. The constants for the Type
parameter can be looked up in the Object Browser, as shown in Figure 17-16.
456 | Chapter 17
Part II
Figure 17-15: After run-ning the procedure inHands-On 17-4, securitygroup account names andthe corresponding useraccounts are listed in theImmediate window.

�Hands-On 17-5: Retrieving the Name of the Object Owner (ADO)
1. In the Visual Basic Editor window of Chap17.mdb, choose Insert |
Module.
2. In the module’s Code window, enter the Get_ObjectOwner procedure as
shown below, or copy the procedure code from C:\Acc07_HandsOn\
Chap17.txt.
Sub Get_ObjectOwner()Dim conn As ADODB.ConnectionDim cat As ADOX.CatalogDim strObjName As VariantDim strDB As StringDim strSysDB As String
strDB = "C:\Acc07_ByExample\SpecialDb.mdb"strSysDB = "C:\Acc07_ByExample\Security1.mdw"strObjName = "Customers"
' Open connection to the database using' the specified system databaseSet conn = New ADODB.Connection
With conn.Provider = "Microsoft.Jet.OLEDB.4.0".Properties("Jet OLEDB:System Database") = strSysDB.Properties("User ID") = "Developer".Properties("Password") = "chapter17".Open strDB
End With
' Open the catalogSet cat = New ADOX.Catalogcat.ActiveConnection = conn
Implementing Database Security | 457
Access VBA Programming with DAO and ADO
Figure 17-16: The ObjectBrowser displays therequired constants for theType parameter of theGetObjectOwner method.

' Display the name of the table ownerMsgBox "The owner of the " & strObjName & _
" table is " & vbCr _& cat.GetObjectOwner(strObjName, adPermObjTable) & "."
Set cat = Nothingconn.CloseSet conn = Nothing
End Sub
3. Choose Run | Run Sub/UserForm to execute the procedure.
To set the ownership of an object by using ADOX, use the SetObjectOwner
method of the Catalog object like this:
cat.SetObjectOwner("Customers", adPermObjTable, "PowerUser")
The above statement says that the ownership of the Customers table is to be
transferred to the user named PowerUser. Note that currently there is no such
user in the SpecialDb database. We created the PowerUser user account in
Hands-On 17-1 and deleted it in Hands-On 17-2. If you want to experiment
with changing object ownership, you need to make appropriate changes in the
example procedure using the information you have already learned.
Setting User Permissions for an ObjectWith ADOX, you set permissions on an object by using the SetPermissions
method. User-level security can be easier to manage if you set permissions
only for groups, and then assign users to the appropriate groups. Recall that
permissions set for the group are automatically inherited by all users in that
group. The SetPermissions method, which can be used for setting both user
and group permissions, has the following syntax:
GroupOrUser.SetPermissions(Name, ObjectType, Action, Rights[, Inherit][,ObjectTypeId])
� Name — The name of the object to set permissions on.
� ObjectType — The type of object the permissions are set for. (See Figure
17-16 for the names of the ADOX built-in constants that can be used to
specify the Type parameter.)
� Action — The type of action to perform when setting permissions. Use the
adAccessSet constant for Microsoft Access databases to specify that the
group of users will have exactly the requested permissions.
� Rights —A Long value containing a bitmask indicating the permissions to
set. The Rights argument can consist of a single permissions constant or
several constants combined by using the OR operator. See Figure 17-17 for
the names of the ADOX built-in constants that can be used in the Rights
argument to specify the type of permissions to set.
458 | Chapter 17
Part II
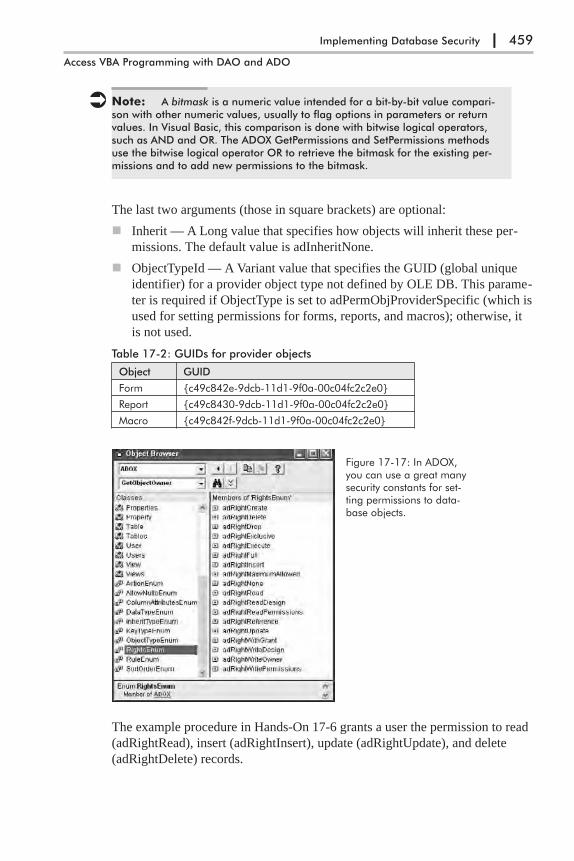
� Note: A bitmask is a numeric value intended for a bit-by-bit value compari-son with other numeric values, usually to flag options in parameters or returnvalues. In Visual Basic, this comparison is done with bitwise logical operators,such as AND and OR. The ADOX GetPermissions and SetPermissions methodsuse the bitwise logical operator OR to retrieve the bitmask for the existing per-missions and to add new permissions to the bitmask.
The last two arguments (those in square brackets) are optional:
� Inherit — A Long value that specifies how objects will inherit these per-
missions. The default value is adInheritNone.
� ObjectTypeId — A Variant value that specifies the GUID (global unique
identifier) for a provider object type not defined by OLE DB. This parame-
ter is required if ObjectType is set to adPermObjProviderSpecific (which is
used for setting permissions for forms, reports, and macros); otherwise, it
is not used.
Table 17-2: GUIDs for provider objects
Object GUID
Form {c49c842e-9dcb-11d1-9f0a-00c04fc2c2e0}
Report {c49c8430-9dcb-11d1-9f0a-00c04fc2c2e0}
Macro {c49c842f-9dcb-11d1-9f0a-00c04fc2c2e0}
The example procedure in Hands-On 17-6 grants a user the permission to read
(adRightRead), insert (adRightInsert), update (adRightUpdate), and delete
(adRightDelete) records.
Implementing Database Security | 459
Access VBA Programming with DAO and ADO
Figure 17-17: In ADOX,you can use a great manysecurity constants for set-ting permissions to data-base objects.

�Hands-On 17-6: Setting User Permissions for an Object (ADO)
1. In the Visual Basic Editor window of Chap17.mdb, choose Insert |
Module.
2. In the module’s Code window, enter the Set_UserObjectPermissions pro-
cedure as shown below, or copy the procedure code from C:\Acc07_
HandsOn\Chap17.txt.
Sub Set_UserObjectPermissions()Dim conn As ADODB.ConnectionDim cat As ADOX.CatalogDim strDB As StringDim strSysDB As String
On Error GoTo ErrorHandler
strDB = "C:\Acc07_ByExample\SpecialDb.mdb"strSysDB = "C:\Acc07_ByExample\Security1.mdw"
' Open connection to the database using' the specified system databaseSet conn = New ADODB.Connection
With conn.Provider = "Microsoft.Jet.OLEDB.4.0".Properties("Jet OLEDB:System Database") = strSysDB.Properties("User ID") = "Developer".Properties("Password") = "chapter17".Open strDB
End With
' Open the catalogSet cat = New ADOX.Catalogcat.ActiveConnection = conn' add a user accountcat.Users.Append "PowerUser", "star"
' Set permissions for PowerUser on the Customers tablecat.Users("PowerUser").SetPermissions "Customers", _
adPermObjTable, _adAccessSet, _adRightRead Or _adRightInsert Or _adRightUpdate Or _adRightDelete
MsgBox "Read, Insert, Update and Delete permissions " & _vbCrLf & " were set on Customers table " & _"for PowerUser."
ExitHere:Set cat = Nothingconn.CloseSet conn = NothingExit Sub
ErrorHandler:
460 | Chapter 17
Part II

If Err.Number = -2147467259 ThenMsgBox "PowerUser user already exists."Resume Next
ElseMsgBox Err.DescriptionResume ExitHere
End IfEnd Sub
3. Choose Run | Run Sub/UserForm to execute the procedure.
Setting User Permissions for a DatabaseTo specify permissions for the database, specify an empty string ("") as the
name of the database:
cat.Users("PowerUser").SetPermissions "", _adPermObjDatabase, _adAccessSet, adRightExclusive
The above statement gives the user named PowerUser the right to open the
database exclusively.
�Hands-On 17-7: Setting User Permissions for a Database (ADO)
1. In the Visual Basic Editor window of Chap17.mdb, choose Insert |
Module.
2. In the module’s Code window, enter the Set_UserDbPermissions_ADO
procedure as shown below, or copy the procedure code from C:\Acc07_
HandsOn\Chap17.txt.
Sub Set_UserDbPermissions_ADO()Dim conn As ADODB.ConnectionDim cat As ADOX.CatalogDim strDB As StringDim strSysDB As String
On Error GoTo ErrorHandler
strDB = "C:\Acc07_ByExample\SpecialDb.mdb"strSysDB = "C:\Acc07_ByExample\Security1.mdw"
' Open connection to the database using' the specified system databaseSet conn = New ADODB.Connection
With conn.Provider = "Microsoft.Jet.OLEDB.4.0".Properties("Jet OLEDB:System Database") = strSysDB.Properties("User ID") = "Developer".Properties("Password") = "chapter17".Open strDB
End With
' Open the catalogSet cat = New ADOX.Catalog
Implementing Database Security | 461
Access VBA Programming with DAO and ADO
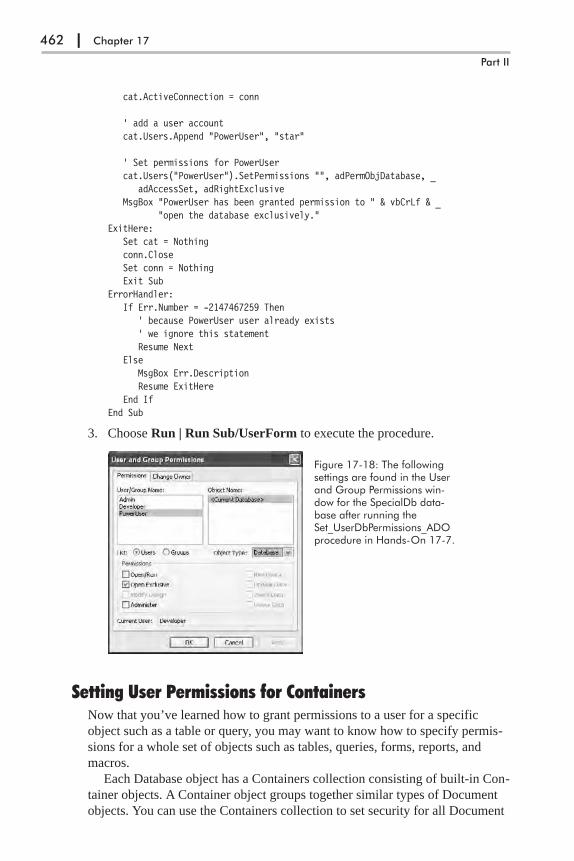
cat.ActiveConnection = conn
' add a user accountcat.Users.Append "PowerUser", "star"
' Set permissions for PowerUsercat.Users("PowerUser").SetPermissions "", adPermObjDatabase, _
adAccessSet, adRightExclusiveMsgBox "PowerUser has been granted permission to " & vbCrLf & _
"open the database exclusively."ExitHere:
Set cat = Nothingconn.CloseSet conn = NothingExit Sub
ErrorHandler:If Err.Number = -2147467259 Then
' because PowerUser user already exists' we ignore this statementResume Next
ElseMsgBox Err.DescriptionResume ExitHere
End IfEnd Sub
3. Choose Run | Run Sub/UserForm to execute the procedure.
Setting User Permissions for ContainersNow that you’ve learned how to grant permissions to a user for a specific
object such as a table or query, you may want to know how to specify permis-
sions for a whole set of objects such as tables, queries, forms, reports, and
macros.
Each Database object has a Containers collection consisting of built-in Con-
tainer objects. A Container object groups together similar types of Document
objects. You can use the Containers collection to set security for all Document
462 | Chapter 17
Part II
Figure 17-18: The followingsettings are found in the Userand Group Permissions win-dow for the SpecialDb data-base after running theSet_UserDbPermissions_ADOprocedure in Hands-On 17-7.
objects of a given type. You can set the permissions that users and groups will
receive by default on all newly created objects in a database by passing in Null
for the object name argument of the ADOX SetPermissions method, as shown
in the example procedure in Hands-On 17-8.
�Hands-On 17-8: Setting User Permissions for Containers (ADO)
1. In the Visual Basic Editor window of Chap17.mdb, choose Insert |
Module.
2. In the module’s Code window, enter the Set_UserContainerPermissions_
ADO procedure as shown below, or copy the procedure code from
C:\Acc07_HandsOn\Chap17.txt.
Sub Set_UserContainerPermissions_ADO()Dim conn As ADODB.ConnectionDim cat As ADOX.CatalogDim strDB As StringDim strSysDB As String
On Error GoTo ErrorHandler
strDB = "C:\Acc07_ByExample\SpecialDb.mdb"strSysDB = "C:\Acc07_ByExample\Security1.mdw"
' Open connection to the database using' the specified system databaseSet conn = New ADODB.Connection
With conn.Provider = "Microsoft.Jet.OLEDB.4.0".Properties("Jet OLEDB:System Database") = strSysDB.Properties("User ID") = "Developer".Properties("Password") = "chapter17".Open strDB
End With
' Open the catalogSet cat = New ADOX.Catalogcat.ActiveConnection = conn
' add a user accountcat.Users.Append "PowerUser", "star"
' Set permissions for PowerUser on the Tables Containercat.Users("PowerUser").SetPermissions Null, _
adPermObjTable, _adAccessSet, _adRightRead Or _adRightInsert Or _adRightUpdate Or _adRightDelete, adInheritNone
MsgBox "You have successfully granted permissions " & vbCrLf & _"to PowerUser on the Tables Container."
ExitHere:Set cat = Nothing
Implementing Database Security | 463
Access VBA Programming with DAO and ADO

conn.CloseSet conn = NothingExit Sub
ErrorHandler:If Err.Number = -2147467259 Then
' because PowerUser user already exists' we ignore this statementResume Next
ElseMsgBox Err.DescriptionResume ExitHere
End IfEnd Sub
3. Choose Run | Run Sub/UserForm to execute the procedure.
The above procedure gives the PowerUser account the permission to design,
read, update, insert, and delete data for all newly created tables and queries.
Notice that Null is passed as the first argument of the SetPermissions method
to indicate that permissions are to be set only on new objects of the type speci-
fied by the second argument of this method.
After executing the procedure above, the user account PowerUser has the
permissions listed in Figure 17-19 on all newly created Table and Query
objects.
Checking Permissions for ObjectsYou can retrieve the permissions for a particular user or group on a particular
object with the ADOX GetPermissions method. Because this method returns a
numeric permission value for the specified object, if you want to display the
names of constants representing permissions, you must write more code to
decipher the returned value. The procedure in Hands-On 17-9 demonstrates
how to retrieve the permissions set for PowerUser on the Customers table in a
sample database.
464 | Chapter 17
Part II
Figure 17-19: The following settingsare found in the User and Group Per-missions window after running theSet_UserContainerPermissions_ADOprocedure in Hands-On 17-8.

�Hands-On 17-9: Checking Permissions for a Specific Object (ADO)
1. In the Visual Basic Editor window of Chap17.mdb, choose Insert |
Module.
2. In the module’s Code window, enter the GetObjectPermissions_ADO
procedure as shown below, or copy the procedure code from C:\Acc07_
HandsOn\Chap17.txt.
Sub GetObjectPermissions_ADO(strUserName As String, _varObjName As Variant, _lngObjType As ADOX.ObjectTypeEnum)
Dim conn As ADODB.ConnectionDim cat As ADOX.CatalogDim strDB As StringDim strSysDB As StringDim listPerms As LongDim strPermsTypes As String
On Error GoTo ErrorHandler
strDB = "C:\Acc07_ByExample\SpecialDb.mdb"strSysDB = "C:\Acc07_ByExample\Security1.mdw"
' Open connection to the database using' the specified system databaseSet conn = New ADODB.Connection
With conn.Provider = "Microsoft.Jet.OLEDB.4.0".Properties("Jet OLEDB:System Database") = strSysDB.Properties("User ID") = "Developer".Properties("Password") = "chapter17".Open strDB
End With
' Open the catalogSet cat = New ADOX.Catalogcat.ActiveConnection = conn' add a user accountcat.Users.Append "PowerUser", "star"
listPerms = cat.Users(strUserName) _.GetPermissions(varObjName, lngObjType)
Debug.Print listPerms
If (listPerms And ADOX.RightsEnum.adRightCreate) = adRightCreate ThenstrPermsTypes = strPermsTypes & "adRightCreate" & vbCr
End IfIf (listPerms And RightsEnum.adRightRead) = adRightRead Then
strPermsTypes = strPermsTypes & "adRightRead" & vbCrEnd IfIf (listPerms And RightsEnum.adRightUpdate) = adRightUpdate Then
strPermsTypes = strPermsTypes & "adRightUpdate" & vbCrEnd IfIf (listPerms And RightsEnum.adRightDelete) = adRightDelete Then
Implementing Database Security | 465
Access VBA Programming with DAO and ADO
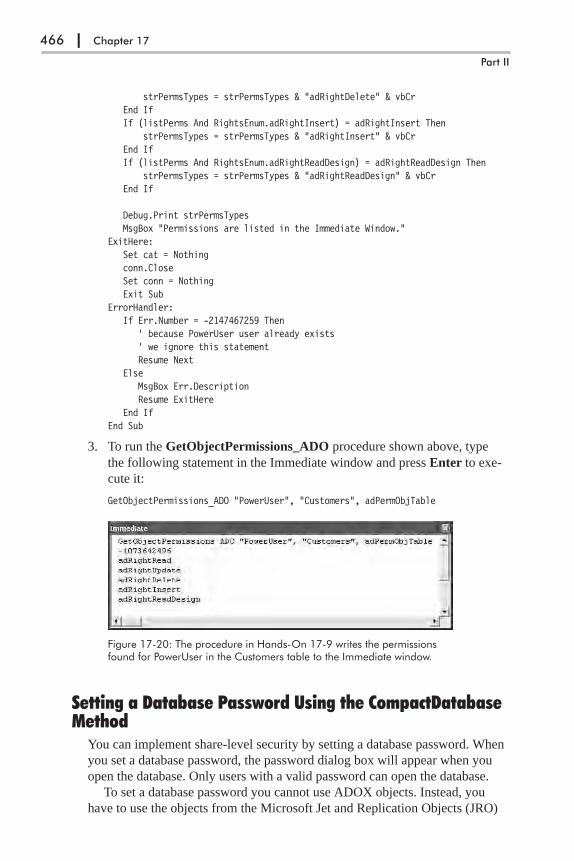
strPermsTypes = strPermsTypes & "adRightDelete" & vbCrEnd IfIf (listPerms And RightsEnum.adRightInsert) = adRightInsert Then
strPermsTypes = strPermsTypes & "adRightInsert" & vbCrEnd IfIf (listPerms And RightsEnum.adRightReadDesign) = adRightReadDesign Then
strPermsTypes = strPermsTypes & "adRightReadDesign" & vbCrEnd If
Debug.Print strPermsTypesMsgBox "Permissions are listed in the Immediate Window."
ExitHere:Set cat = Nothingconn.CloseSet conn = NothingExit Sub
ErrorHandler:If Err.Number = -2147467259 Then
' because PowerUser user already exists' we ignore this statementResume Next
ElseMsgBox Err.DescriptionResume ExitHere
End IfEnd Sub
3. To run the GetObjectPermissions_ADO procedure shown above, type
the following statement in the Immediate window and press Enter to exe-
cute it:
GetObjectPermissions_ADO "PowerUser", "Customers", adPermObjTable
Setting a Database Password Using the CompactDatabaseMethod
You can implement share-level security by setting a database password. When
you set a database password, the password dialog box will appear when you
open the database. Only users with a valid password can open the database.
To set a database password you cannot use ADOX objects. Instead, you
have to use the objects from the Microsoft Jet and Replication Objects (JRO)
466 | Chapter 17
Part II
Figure 17-20: The procedure in Hands-On 17-9 writes the permissionsfound for PowerUser in the Customers table to the Immediate window.
Library. Use the CompactDatabase method of the JRO JetEngine object and
specify the Password parameter. Remember that passwords are case sensitive.
The procedure in Hands-On 17-10 sets the sample database password to
“welcome.” Prior to running the procedure in Hands-On 17-10, you must set a
reference to the Microsoft Jet and Replication Objects Library. To do this,
choose Tools | References in the Visual Basic Editor window and select the
required library in the list of Available References.
�Hands-On 17-10: Setting a Database Password (JRO)
1. Create a new Access database named PasswordTest.mdb in your
C:\Acc07_ByExample folder. Close this database before proceeding to
step 2.
2. In the Visual Basic Editor window of Chap17.mdb, choose Insert |
Module.
3. In the module’s Code window, enter the Change_DBPassword procedure
as shown below, or copy the procedure code from C:\Acc07_HandsOn\
Chap17.txt.
Sub Change_DBPassword()Dim jetEng As JRO.JetEngineDim strCompactFrom As StringDim strCompactTo As StringDim strPath As String
On Error GoTo ErrHandlerstrPath = CurrentProject.Path & "\"
strCompactFrom = "PasswordTest.mdb"strCompactTo = "PasswordTest_Compact.mdb"
Set jetEng = New JRO.JetEngine' Compact the database specifying the new database passwordjetEng.CompactDatabase "Data Source=" & strPath & strCompactFrom & ";", _
"Data Source=" & strPath & strCompactTo & ";" & _"Jet OLEDB:Database Password=welcome"
ExitHere:Set jetEng = NothingExit Sub
ErrHandler:If Err.Number = -2147217897 Then
Kill strPath & strCompactToResume
ElseMsgBox Err.Number & ": " & Err.DescriptionResume ExitHere
End IfEnd Sub
4. Choose Run | Run Sub/UserForm to execute the procedure.
Implementing Database Security | 467
Access VBA Programming with DAO and ADO
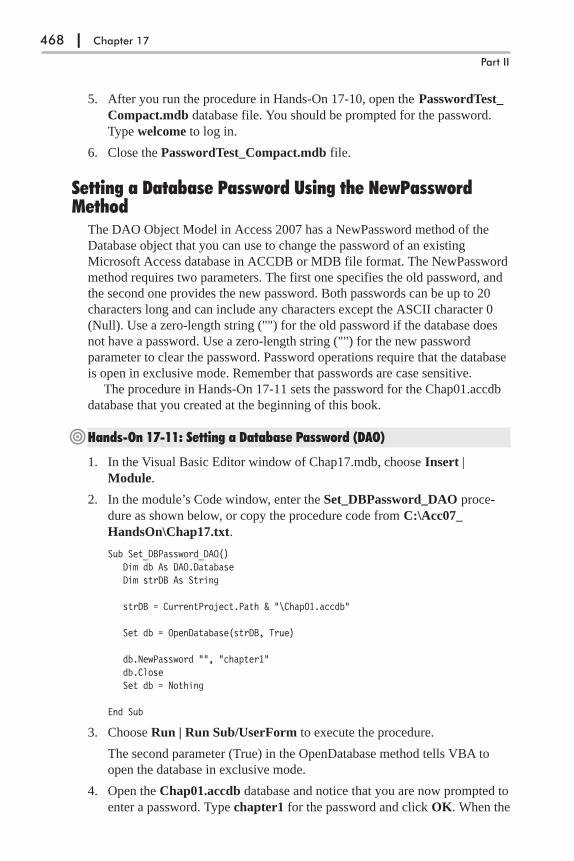
5. After you run the procedure in Hands-On 17-10, open the PasswordTest_
Compact.mdb database file. You should be prompted for the password.
Type welcome to log in.
6. Close the PasswordTest_Compact.mdb file.
Setting a Database Password Using the NewPasswordMethod
The DAO Object Model in Access 2007 has a NewPassword method of the
Database object that you can use to change the password of an existing
Microsoft Access database in ACCDB or MDB file format. The NewPassword
method requires two parameters. The first one specifies the old password, and
the second one provides the new password. Both passwords can be up to 20
characters long and can include any characters except the ASCII character 0
(Null). Use a zero-length string ("") for the old password if the database does
not have a password. Use a zero-length string ("") for the new password
parameter to clear the password. Password operations require that the database
is open in exclusive mode. Remember that passwords are case sensitive.
The procedure in Hands-On 17-11 sets the password for the Chap01.accdb
database that you created at the beginning of this book.
�Hands-On 17-11: Setting a Database Password (DAO)
1. In the Visual Basic Editor window of Chap17.mdb, choose Insert |
Module.
2. In the module’s Code window, enter the Set_DBPassword_DAO proce-
dure as shown below, or copy the procedure code from C:\Acc07_
HandsOn\Chap17.txt.
Sub Set_DBPassword_DAO()Dim db As DAO.DatabaseDim strDB As String
strDB = CurrentProject.Path & "\Chap01.accdb"
Set db = OpenDatabase(strDB, True)
db.NewPassword "", "chapter1"db.CloseSet db = Nothing
End Sub
3. Choose Run | Run Sub/UserForm to execute the procedure.
The second parameter (True) in the OpenDatabase method tells VBA to
open the database in exclusive mode.
4. Open the Chap01.accdb database and notice that you are now prompted to
enter a password. Type chapter1 for the password and click OK. When the
468 | Chapter 17
Part II

database opens, close it and close the Access window in which it was
opened. Do not close the Chap17.mdb file.
You can unset the password on the Chap01.accdb database by running the fol-
lowing procedure:
Sub Unset_DBPassword_DAO()Dim db As DAO.DatabaseDim strDB As String
strDB = CurrentProject.Path & "\Chap01.accdb"Set db = OpenDatabase(strDB, True, False, ";pwd=chapter1")
db.NewPassword "chapter1", ""db.CloseSet db = Nothing
End Sub
Notice the parameters of the OpenDatabase method. True specifies that the
database is to be opened in exclusive mode. False indicates that the database
should be opened in read/write mode. Because the Chap01.accdb database has
been protected with a password by the Set_DBPassword_DAO procedure in
Hands-On 17-11, we also had to specify the password in the connect parame-
ter. After you run the above procedure, you will not be prompted for a
password on opening the Chap01.accdb database.
Changing a User PasswordUser passwords are stored in the workgroup information file. To change a
user’s password from your VBA code, use the ADOX User object’s
ChangePassword method. This method takes as parameters the user’s current
password and the new password. If a user does not yet have a password, use an
empty string ("") for the user’s current password.
The procedure in Hands-On 17-12 demonstrates how to change a password
for the Admin user. Recall that Admin is the default user account that has a
blank password. In an unsecured Access database, all users are automatically
logged on using the Admin account. When establishing user-level security you
should start by changing the password for the Admin user. Changing an Admin
password activates the Logon dialog box the next time you start Microsoft
Access. Only users with a valid user name and password will be able to log
onto the database. Although users are permitted to change their own pass-
words, only a user that belongs to the Admins account can clear a password
that another user has forgotten.
�Hands-On 17-12: Changing a User Password (ADO)
1. Create a new Access database named AdminPwd.mdb in your C:\Acc07_
ByExample folder. Close this database before proceeding to step 2.
2. In the Visual Basic Editor window of Chap17.mdb, choose Insert |
Module.
Implementing Database Security | 469
Access VBA Programming with DAO and ADO

3. In the module’s Code window, enter the Change_UserPassword_ADO
procedure as shown below, or copy the procedure code from C:\Acc07_
HandsOn\Chap17.txt.
Sub Change_UserPassword_ADO()Dim cat As ADOX.CatalogDim strDB As StringDim strSysDB As String
On Error GoTo ErrorHandler
strDB = CurrentProject.Path & "\AdminPwd.mdb"' change the path to use the default workgroup information file' on your computerstrSysDB = "C:\Documents and Settings\Julitta\" & _
"Application Data\Microsoft\Access\System.mdw"
'strSysDB = "C:\Acc07_ByExample\Security1.mdw"
' Open the catalog, specifying the system database to useSet cat = New ADOX.CatalogWith cat
.ActiveConnection = "Provider='Microsoft.Jet.OLEDB.4.0';" & _"Data Source='" & strDB & "';" & _"Jet OLEDB:System Database='" & strSysDB & "';" & _"User Id=Admin;Password=;"
' Change the password for the Admin user.Users("Admin").ChangePassword "", "secret"
End With
ExitHere:Set cat = NothingExit Sub
ErrorHandler:MsgBox Err.DescriptionGoTo ExitHere
End Sub
4. Choose Run | Run Sub/UserForm to execute the procedure.
5. Remove the Admin password by choosing Database Tools | Users and
Permissions | User and Group Accounts. Click the Change Logon Pass-
word tab and type the old password (secret). Click the Apply button, and
click OK to exit the User and Group Accounts window (Figure 17-22).
470 | Chapter 17
Part II
Figure 17-21: When you open theAdminPwd.mdb database after running theprocedure in Hands-On 17-12, a Logondialog will appear. Enter Admin in the Nametext box and secret for the Admin password.

6. After removing the Admin password, reopen the AdminPwd.mdb file.
The database should now open without prompting you to enter a password.
7. Close the AdminPwd.mdb database and exit the Access window in which
the file was opened.
Encrypting a Secured MDB DatabaseTo achieve a higher level of security and protect your database from unautho-
rized access, you can encrypt it. Prior to encrypting, secure your database by
setting user and group permissions on database objects. To encrypt a database
you must be the owner or the creator of the database, or a member of the
Admins group in the workgroup information file (System.mdw) that was in use
when the database was created.
Use the CompactDatabase method of the Microsoft Jet and Replication
Objects (JRO) JetEngine object to encrypt or decrypt a database. To use the
JRO JetEngine object, you must set a reference to the Microsoft Jet and Repli-
cation Objects Library. To encrypt the database, set the Jet OLEDB:Encrypt
Database property to True in the connection string destination argument of the
CompactDatabase method.
After a database has been encrypted, it cannot be read or written to directly
by using any utility program or word processor. The procedure in Hands-On
17-13 creates an encrypted version of the SpecialDb.mdb database that you
created in Custom Project 17-1.
�Hands-On 17-13: Encrypting a Database (JRO)
The procedure in this hands-on should be run after you have initially secured
your database by creating the necessary user and group accounts and assigned
user and group permissions on database objects.
1. In the Visual Basic Editor window of Chap17.mdb, choose Insert |
Module.
Implementing Database Security | 471
Access VBA Programming with DAO and ADO
Figure 17-22: You canremove the Admin passwordmanually via the ChangeLogon Password tab in theUser and Group Accountswindow, or by modifying theVBA code shown inHands-On 17-12.

2. In the module’s Code window, enter the EncryptDb procedure as shown
below, or copy the procedure code from C:\Acc07_HandsOn\Chap17.txt.
Sub EncryptDb()Dim jetEng As JRO.JetEngineDim strCompactFrom As StringDim strCompactTo As StringDim strSource As StringDim strDest As StringDim strSysDB As String
strCompactFrom = CurrentProject.Path & "\SpecialDb.mdb"strCompactTo = CurrentProject.Path & "\SpecialDb_Enc.mdb"strSysDB = CurrentProject.Path & "\Security1.mdw"
On Error GoTo HandleErr
' Use the CompactDatabase method to create' a new, encrypted version of the databaseSet jetEng = New JRO.JetEngine
strSource = "Data Source=" & strCompactFrom & ";" & _"Jet OLEDB:System Database=" & strSysDB & ";" & _"User ID=Developer" & ";" & _"Password=chapter17"
strDest = "Data Source=" & strCompactTo & ";" & _"Jet OLEDB:Engine Type=5;" & _"Jet OLEDB:Encrypt Database=True"
jetEng.CompactDatabase strSource, strDest
ExitHere:Set jetEng = NothingExit Sub
HandleErr:MsgBox Err.Number & ": " & Err.DescriptionResume ExitHere
End Sub
3. Choose Run | Run Sub/UserForm to execute the procedure.
472 | Chapter 17
Part II
Figure 17-23: After running the procedure in Hands-On 17-13, your C:\Acc07_ByExample folder will contain an encrypted database named SpecialDb_Enc.mdb. You cannot open this database by simply double-clicking the filenamein Windows Explorer. If you do so, Access will display this message.

To open the secured SpecialDb_Enc database file, you must provide the name
of the workgroup information file as shown below:
"C:\Program Files\Microsoft Office\Office12\MSACCESS.EXE""C:\Acc07_ByExample\SpecialDb_Enc.mdb" /WRKGRP"C:\Acc07_ByExample\Security1.mdw"
Use the above command to set up a shortcut on your desktop similar to the one
that was set up by the Access Security Wizard when you completed Custom
Project 17-1.
Chapter SummaryIn this chapter, you worked with VBA procedures that implemented share-level
and user-level security in Microsoft Access databases. You found out that in
Access 2007 user-level security can only be used in Access databases created
in the MDB file format. You practiced creating and modifying user and group
accounts, and setting user permissions to a database and its objects. You also
learned how to set a database password on Access databases in the MDB and
ACCDB file formats, and wrote a procedure that encrypts a secured MDB file.
In the next chapter, you discover how you can make a database in the MDB
file format available to users in remote locations via database replication.
Implementing Database Security | 473
Access VBA Programming with DAO and ADO
Chapter 18
Database Replication
To make your database available to users in various geographical locations,
you can provide them with a full or partial copy of the database. Mobile or
remote users can maintain a local copy of a database, make changes to data
offline, and synchronize with the main database on a regular basis. All this can
be achieved via the technology known as database replication. When you rep-
licate a database you simply create multiple copies (replicas) of your
application and distribute them to users in remote locations so that they can
easily share the changes they are making to a database. Database replication
also offers other advantages, such as:
� Convenient distribution of updates to existing applications — Changes
made to queries, forms, reports, and other application components can be
automatically updated in remote copies of the database during the next
synchronization.
� Reduction of network traffic — Database replicas can be placed on differ-
ent servers serving different groups of users, thus reducing the network
load.
� Data backup — There is no need to make a separate backup copy of your
database as each member of the replica set can serve as a backup. If the
Design Master is corrupted, you can always make another member of the
replica set the Design Master. You learn about creating the Design Master
and replicas later in this chapter.
Although you can create a replica of your database via the Microsoft Office
Access 2007 user interface (see the Database Tools | Replication Options), in
the following sections of this chapter, you will learn how to perform the repli-
cation tasks from your VBA procedures.
� Note: The information presented in this chapter can only be used withAccess MDB database files. The replication functionality is not supported in theAccess 2007 default file format (ACCDB). Before beginning your experimentswith database replication by writing code, it is necessary to set a reference tothe Microsoft Jet and Replication Objects 2.6 Library by choosing Tools | Refer-ences in the Microsoft Visual Basic Editor window.
474

The Replica object has methods for determining if an object is replicable
(GetObjectReplicability method), creating a replica (CreateReplica method),
converting a database to a Design Master (MakeReplicable method), populat-
ing a partial replica (PopulatePartial method), setting an object’s replicability
(SetObjectReplicability method), and synchronizing replicas (Synchronize
method). In addition to methods, there are quite a few Replica properties that
allow you to set or retrieve various characteristics such as DesignMasterId,
ReplicaId, Visibility, RetentionPeriod, and ConflictTables. The VBA proce-
dures in this chapter will give you a head start in database replication.
� Note: This chapter requires that you complete all hands-on exercises inorder.
Creating a Design MasterA replica is a copy of a database. There are three types of replicas: Design
Master, full replica, and partial replica. To work with replication, start by creat-
ing a backup copy of your database. You will need it in case there is a problem
with the replicated database. Next, create a replica of your database by using
the Replica object’s MakeReplicable method. This method requires that you
provide a full path to your database and indicate whether you want column-
level tracking. With column-level tracking, changing different columns in the
same row of a table in two replicas doesn’t cause a conflict. The Make-
Replicable method converts a normal Access database into a Design Master.
This is a master replica from which you can create additional replicas with the
CreateReplica method.
The Design Master is the first member of a replica set. When you create a
Design Master, new system tables are added to a database and new fields are
added to the existing tables. Only the Design Master can accept changes to the
database structure. If the Design Master is damaged, you can promote one of
the replicas to become the Design Master.
Database Replication | 475
Access VBA Programming with DAO and ADO
Figure 18-1: After setting thereference to the Microsoft Jetand Replication Objects (JRO)Library you can use theObject Browser to view avail-able objects, properties, andmethods.
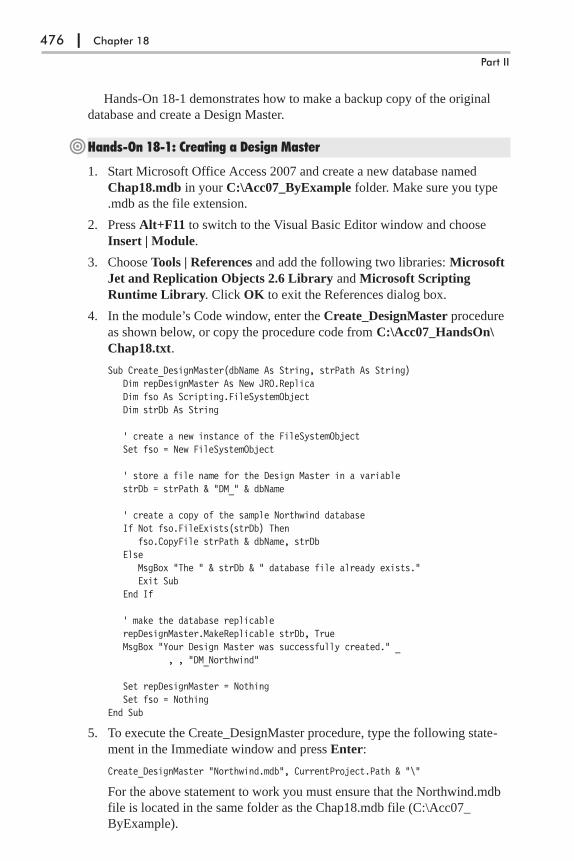
Hands-On 18-1 demonstrates how to make a backup copy of the original
database and create a Design Master.
�Hands-On 18-1: Creating a Design Master
1. Start Microsoft Office Access 2007 and create a new database named
Chap18.mdb in your C:\Acc07_ByExample folder. Make sure you type
.mdb as the file extension.
2. Press Alt+F11 to switch to the Visual Basic Editor window and choose
Insert | Module.
3. Choose Tools | References and add the following two libraries: Microsoft
Jet and Replication Objects 2.6 Library and Microsoft Scripting
Runtime Library. Click OK to exit the References dialog box.
4. In the module’s Code window, enter the Create_DesignMaster procedure
as shown below, or copy the procedure code from C:\Acc07_HandsOn\
Chap18.txt.
Sub Create_DesignMaster(dbName As String, strPath As String)Dim repDesignMaster As New JRO.ReplicaDim fso As Scripting.FileSystemObjectDim strDb As String
' create a new instance of the FileSystemObjectSet fso = New FileSystemObject
' store a file name for the Design Master in a variablestrDb = strPath & "DM_" & dbName
' create a copy of the sample Northwind databaseIf Not fso.FileExists(strDb) Then
fso.CopyFile strPath & dbName, strDbElse
MsgBox "The " & strDb & " database file already exists."Exit Sub
End If
' make the database replicablerepDesignMaster.MakeReplicable strDb, TrueMsgBox "Your Design Master was successfully created." _
, , "DM_Northwind"
Set repDesignMaster = NothingSet fso = Nothing
End Sub
5. To execute the Create_DesignMaster procedure, type the following state-
ment in the Immediate window and press Enter:
Create_DesignMaster "Northwind.mdb", CurrentProject.Path & "\"
For the above statement to work you must ensure that the Northwind.mdb
file is located in the same folder as the Chap18.mdb file (C:\Acc07_
ByExample).
476 | Chapter 18
Part II

To access your computer’s file system, the above procedure uses the
FileSystemObject from the Microsoft Scripting Runtime Library. The
FileSystemObject gives you access to numerous methods and properties for
working with drives, folders, and files. Notice how the procedure uses the
FileExists method of FileSystemObject to find out if a file named
DM_Northwind.mdb already exists in the specified folder. If the file does not
exist, another method (CopyFile) of the FileSystemObject is used to create a
copy of the Northwind database and name it DM_Northwind.mdb. Next, the
MakeReplicable method of the JRO Replica object is used to create a master
replica (Design Master). After running the Create_DesignMaster procedure,
the current folder should contain a database file named DM_Northwind.mdb,
which is a Design Master. This file is necessary for working with this chapter’s
hands-on exercises.
Creating a Full ReplicaAfter you’ve created your Design Master, you can create additional replicas
from it by using the CreateReplica method. This method takes two required
arguments. The first argument is replicaName, which specifies the name and
path of the full or partial replica to be created. The second argument is descrip-
tion, a string value describing the replica to be created. The CreateReplica
method can also take several optional arguments that let you specify the type
of replica and its visibility, priority, and updatability. By omitting additional
arguments, a full replica is created. This replica will have global visibility and
be fully updatable.
Hands-On 18-2 demonstrates how to create a full replica without optional
arguments.
�Hands-On 18-2: Creating a Full Replica
1. Switch to the Visual Basic Editor window and choose Insert | Module.
2. In the module’s Code window, enter the Make_FullReplica procedure as
shown below, or copy the procedure code from C:\Acc07_HandsOn\
Chap18.txt.
Sub Make_FullReplica(DesignMasterName As String, _NewRepName As String)
Dim repDesignMaster As New JRO.Replica
On Error GoTo ErrorHandler
With repDesignMaster.ActiveConnection = DesignMasterName.CreateReplica CurrentProject.Path & "\" & NewRepName, _
"Replica of " & DesignMasterNameEnd With
MsgBox "Full replica named " & NewRepName & " was created."
Database Replication | 477
Access VBA Programming with DAO and ADO

ExitHere:Set repDesignMaster = NothingExit Sub
ErrorHandler:If Err.Number = -2147217897 Then
Kill CurrentProject.Path & "\" & NewRepNameResume
ElseMsgBox Err.Number & ": " & Err.DescriptionResume ExitHere
End IfEnd Sub
3. Execute the Make_FullReplica procedure by typing the following state-
ment in the Immediate window and pressing Enter:
Make_FullReplica CurrentProject.Path & "\DM_Northwind.mdb", "Replica_North.mdb"
When you run the Make_FullReplica procedure, a new file named
Replica_North.mdb is created. This file is a full replica of the
DM_Northwind.mdb database.
� Note: You can create as many replicas of the original database (DesignMaster) as you want. All replicas created from the same Design Master belongto the same replica set, and only replicas from the same set can synchronizeand exchange data with each other.
Creating a Partial ReplicaA partial replica is a replica that does not contain all the data of the original
object. This type of replica is useful for those who only need to see or work
with certain data. A partial replica is created by setting an expression-based or
relationship-based filter on tables or queries. A partial replica contains all the
tables that exist in the full replica; however, the user only sees the data as
allowed by the specified filter. Therefore, some of the tables in a partial replica
are empty. Because partial replicas have fewer records, they can synchronize
quicker than full replicas.
You can create a partial replica by using the CreateReplica method and
specifying two required arguments (the partial replica’s name and description)
and an enumeration constant of jrRepTypePartial for the optional argument.
For instance, in Hands-On 18-3 you use the following statement to create a
partial replica to display records for only Spanish customers:
repDesignMaster.CreateReplica repPartialName, _"Partial Replica (Spanish Customers)", _jrRepTypePartial
The above statement creates a partial replica. Next, you must specify which
records the partial replica will contain by defining filters. Each replica can
have one or more filters.
478 | Chapter 18
Part II
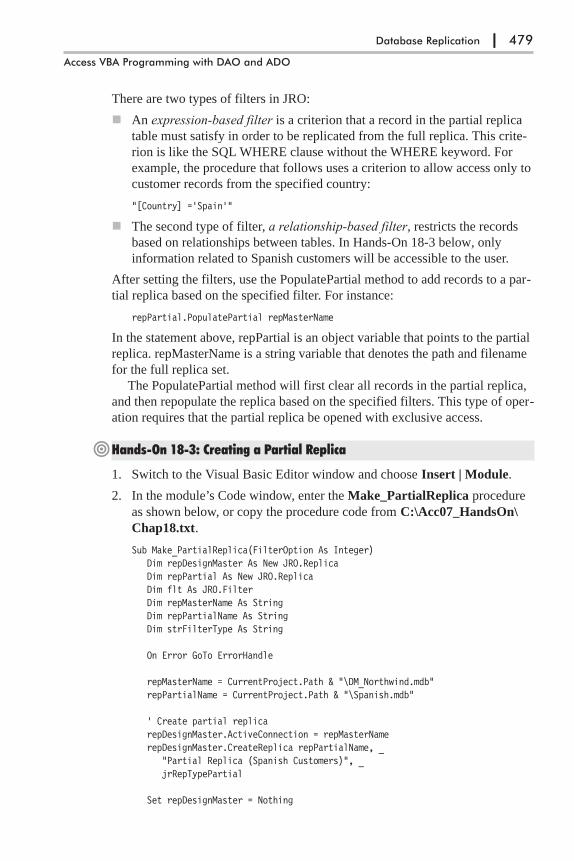
There are two types of filters in JRO:
� An expression-based filter is a criterion that a record in the partial replica
table must satisfy in order to be replicated from the full replica. This crite-
rion is like the SQL WHERE clause without the WHERE keyword. For
example, the procedure that follows uses a criterion to allow access only to
customer records from the specified country:
"[Country] ='Spain'"
� The second type of filter, a relationship-based filter, restricts the records
based on relationships between tables. In Hands-On 18-3 below, only
information related to Spanish customers will be accessible to the user.
After setting the filters, use the PopulatePartial method to add records to a par-
tial replica based on the specified filter. For instance:
repPartial.PopulatePartial repMasterName
In the statement above, repPartial is an object variable that points to the partial
replica. repMasterName is a string variable that denotes the path and filename
for the full replica set.
The PopulatePartial method will first clear all records in the partial replica,
and then repopulate the replica based on the specified filters. This type of oper-
ation requires that the partial replica be opened with exclusive access.
�Hands-On 18-3: Creating a Partial Replica
1. Switch to the Visual Basic Editor window and choose Insert | Module.
2. In the module’s Code window, enter the Make_PartialReplica procedure
as shown below, or copy the procedure code from C:\Acc07_HandsOn\
Chap18.txt.
Sub Make_PartialReplica(FilterOption As Integer)Dim repDesignMaster As New JRO.ReplicaDim repPartial As New JRO.ReplicaDim flt As JRO.FilterDim repMasterName As StringDim repPartialName As StringDim strFilterType As String
On Error GoTo ErrorHandle
repMasterName = CurrentProject.Path & "\DM_Northwind.mdb"repPartialName = CurrentProject.Path & "\Spanish.mdb"
' Create partial replicarepDesignMaster.ActiveConnection = repMasterNamerepDesignMaster.CreateReplica repPartialName, _
"Partial Replica (Spanish Customers)", _jrRepTypePartial
Set repDesignMaster = Nothing
Database Replication | 479
Access VBA Programming with DAO and ADO
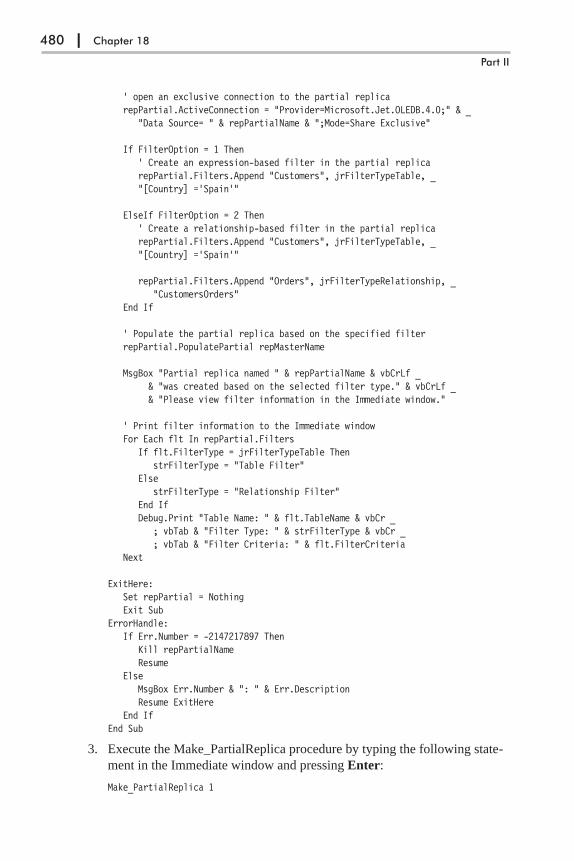
' open an exclusive connection to the partial replicarepPartial.ActiveConnection = "Provider=Microsoft.Jet.OLEDB.4.0;" & _
"Data Source= " & repPartialName & ";Mode=Share Exclusive"
If FilterOption = 1 Then' Create an expression-based filter in the partial replicarepPartial.Filters.Append "Customers", jrFilterTypeTable, _"[Country] ='Spain'"
ElseIf FilterOption = 2 Then' Create a relationship-based filter in the partial replicarepPartial.Filters.Append "Customers", jrFilterTypeTable, _"[Country] ='Spain'"
repPartial.Filters.Append "Orders", jrFilterTypeRelationship, _"CustomersOrders"
End If
' Populate the partial replica based on the specified filterrepPartial.PopulatePartial repMasterName
MsgBox "Partial replica named " & repPartialName & vbCrLf _& "was created based on the selected filter type." & vbCrLf _& "Please view filter information in the Immediate window."
' Print filter information to the Immediate windowFor Each flt In repPartial.Filters
If flt.FilterType = jrFilterTypeTable ThenstrFilterType = "Table Filter"
ElsestrFilterType = "Relationship Filter"
End IfDebug.Print "Table Name: " & flt.TableName & vbCr _
; vbTab & "Filter Type: " & strFilterType & vbCr _; vbTab & "Filter Criteria: " & flt.FilterCriteria
Next
ExitHere:Set repPartial = NothingExit Sub
ErrorHandle:If Err.Number = -2147217897 Then
Kill repPartialNameResume
ElseMsgBox Err.Number & ": " & Err.DescriptionResume ExitHere
End IfEnd Sub
3. Execute the Make_PartialReplica procedure by typing the following state-
ment in the Immediate window and pressing Enter:
Make_PartialReplica 1
480 | Chapter 18
Part II

The above statement specifies that the Make_PartialReplica procedure
should use the expression-based filter (1) when repopulating the partial
replica. The filter information is printed to the Immediate window:
Table Name: MSysCmdbarsFilter Type: Table FilterFilter Criteria: TRUE
Table Name: MSysIMEXColumnsFilter Type: Table FilterFilter Criteria: TRUE
Table Name: MSysIMEXSpecsFilter Type: Table FilterFilter Criteria: TRUE
Table Name: MSysAccessObjectsFilter Type: Table FilterFilter Criteria: TRUE
Table Name: CustomersFilter Type: Table FilterFilter Criteria: [Country] ='Spain'
4. Execute the Make_PartialReplica procedure again by typing the following
statement in the Immediate window and pressing Enter:
Make_PartialReplica 2
The above statement specifies that the Make_PartialReplica procedure should
use the relationship-based filter (2) when repopulating the partial replica.
Replicating ObjectsWhen you create additional replicas from your Design Master you may choose
to replicate all objects or keep some objects local and prevent them from being
replicated. You can set object replicability with the SetObjectReplicability
method. This method requires three arguments: a string indicating the name of
a table or query, the string “Tables,” and a Boolean value of True if the object
is to be replicable, or False otherwise.
�Hands-On 18-4: Checking If an Object Is Replicable
1. Open the Design Master file named DM_Northwind.mdb located in the
C:\Acc07_ByExample folder. Recall that this Design Master file was
created by running the procedure in Hands-On 18-1.
2. In the DM_Northwind Design Master database, create a new query named
SampleQuery based on any available tables. For example, you can use the
following SQL statement to create the sample for this hands-on exercise:
SELECT Employees.LastName,Employees.FirstName,Orders.OrderDate,Orders.ShipCity,Orders.ShipCountry
FROM EmployeesINNER JOIN Orders ON Employees.EmployeeID = Orders.EmployeeID;
Database Replication | 481
Access VBA Programming with DAO and ADO

3. Upon creation, the SampleQuery object is local to your database. To con-
firm this, right-click the query name in the Access window and choose
Object Properties from the shortcut menu. Notice that the Replicable
check box is not checked.
If at this time you create an additional replica from the Design Master or
try to synchronize with an existing replica, this new Query object will not
be replicated. To ensure the new object is replicated, you can check the
Replicable property in the Properties box (see Figure 18-3) or set the
object’s replicability in VBA code by using the SetObjectReplicability
method. We will set the replicability of the SampleQuery object in the pro-
cedure code in Hands-On 18-5.
4. Close the SampleQuery Properties dialog box without making any
changes in this window.
5. Close the DM_Northwind.mdb database file.
482 | Chapter 18
Part II
Figure 18-2: When you open the Design Master file you will notice different icons infront of object names that are replicable. The local query you created in step 2 is high-lighted in this screen shot.
Figure 18-3: You can deter-mine whether a certain data-base object is replicable ornot by looking at the object’sproperties. The Replicablecheck box is not checked forlocal objects.

�Hands-On 18-5: Making an Object Replicable
1. Switch to the Visual Basic Editor window and choose Insert | Module.
2. In the module’s Code window, enter the MakeObject_Replicable proce-
dure as shown below.
Sub MakeObject_Replicable(repName As String, objName As String)Dim repDesignMaster As New JRO.ReplicaWith repDesignMaster
.ActiveConnection = repName
.SetObjectReplicability objName, "Tables", TrueEnd WithSet repDesignMaster = NothingMsgBox objName & " is now replicable."
End Sub
3. Run the MakeObject_Replicable procedure from the Immediate window of
the Chap18.mdb file by typing the following statement and pressing Enter:
MakeObject_Replicable CurrentProject.Path & "\DM_Northwind.mdb", "SampleQuery"
The procedure in Hands-On 18-5 takes two arguments: the full path of
your Design Master and the object name you want to make replicable.
4. Open the Design Master DM_Northwind.mdb file and switch to the Que-
ries pane. Notice that SampleQuery is now replicable.
5. Close the DM_Northwind.mdb database file.
Keeping Objects LocalWhen your database contains confidential information that most users do not
need to see, you may want to prevent specific objects (like a payroll table)
from being replicated by setting the object’s replicability to False. A newly cre-
ated object in a Design Master is local by default. If you want this object to be
seen by another replica, you must set the object’s Replicable property to True
(see the preceding section). If you want to make a previously replicated object
local, be sure to synchronize first to avoid losing any changes that could have
been made to this object in another replica. When you make a replicated object
local in the Design Master and then synchronize, the object will be deleted
from the replica.
The next hands-on exercise prevents a previously replicated object from
being replicated by setting its Replicable property to False using the SetObject-
Replicability method that was introduced in the preceding section.
�Hands-On 18-6: Preventing an Object from Being Replicated
1. Switch to the Visual Basic Editor window and choose Insert | Module.
2. In the module’s Code window, enter the MakeObjectLocal_InDesign-
Master procedure as shown below, or copy the procedure code from
C:\Acc07_HandsOn\Chap18.txt.
Database Replication | 483
Access VBA Programming with DAO and ADO

Sub MakeObjectLocal_InDesignMaster(myDb As String, _objName As String, _objType As String)
Dim repDesignMaster As New JRO.Replica
With repDesignMaster.ActiveConnection = myDb.SetObjectReplicability objName, objType, False
End With
Set repDesignMaster = Nothing
MsgBox "The object named " & objName & _" in the collection of " & _objType & vbCr & "will not be replicated. " & _"It has been set as local.", vbInformation, _"Operation Completed"
End Sub
3. Run the MakeObjectLocal_InDesignMaster procedure from the Immediate
window by typing the following statement and pressing Enter:
MakeObjectLocal_InDesignMaster CurrentProject.Path & "\DM_Northwind.mdb","Current Product List", "Tables"
� Note: You must type the above statement on one line in the Immediatewindow.
Notice that the above procedure takes three arguments: the full path of your
Design Master, the object name, and the object type.
After running the above procedure, the Current Product List table will no lon-
ger be replicable. You can confirm this by opening your Design Master
(DM_Northwind.mdb).
Synchronizing ReplicasSynchronization allows reconciliation of all changes between replicas. This
means that any changes, additions, or deletions can be exchanged between rep-
licas, thus keeping all the copies current and up to date. In JRO, there are three
types of synchronization, as shown in Table 18-1.
Table 18-1: Replica synchronization types
Synchronization Type Constant Description
Bidirectional,import/export
jrSyncTypeImpExp Updates are mutual; they flow from the targetreplica to the source replica and from the sourcereplica to the target replica.
Import only jrSyncTypeImport Updates will flow only from the target replica to thesource replica.
Export only jrSyncTypeExport Updates will flow only from the source replica tothe target replica.
484 | Chapter 18
Part II
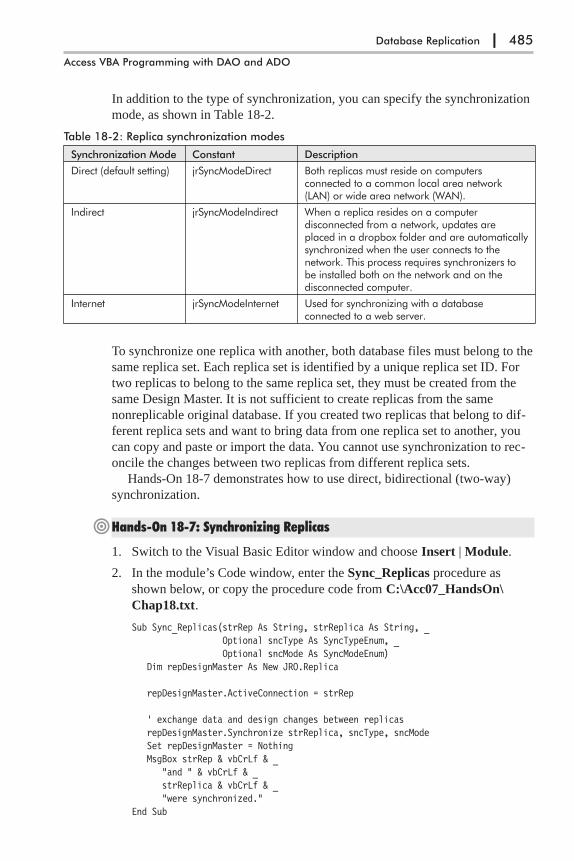
In addition to the type of synchronization, you can specify the synchronization
mode, as shown in Table 18-2.
Table 18-2: Replica synchronization modes
Synchronization Mode Constant Description
Direct (default setting) jrSyncModeDirect Both replicas must reside on computersconnected to a common local area network(LAN) or wide area network (WAN).
Indirect jrSyncModeIndirect When a replica resides on a computerdisconnected from a network, updates areplaced in a dropbox folder and are automaticallysynchronized when the user connects to thenetwork. This process requires synchronizers tobe installed both on the network and on thedisconnected computer.
Internet jrSyncModeInternet Used for synchronizing with a databaseconnected to a web server.
To synchronize one replica with another, both database files must belong to the
same replica set. Each replica set is identified by a unique replica set ID. For
two replicas to belong to the same replica set, they must be created from the
same Design Master. It is not sufficient to create replicas from the same
nonreplicable original database. If you created two replicas that belong to dif-
ferent replica sets and want to bring data from one replica set to another, you
can copy and paste or import the data. You cannot use synchronization to rec-
oncile the changes between two replicas from different replica sets.
Hands-On 18-7 demonstrates how to use direct, bidirectional (two-way)
synchronization.
�Hands-On 18-7: Synchronizing Replicas
1. Switch to the Visual Basic Editor window and choose Insert | Module.
2. In the module’s Code window, enter the Sync_Replicas procedure as
shown below, or copy the procedure code from C:\Acc07_HandsOn\
Chap18.txt.
Sub Sync_Replicas(strRep As String, strReplica As String, _Optional sncType As SyncTypeEnum, _Optional sncMode As SyncModeEnum)
Dim repDesignMaster As New JRO.Replica
repDesignMaster.ActiveConnection = strRep
' exchange data and design changes between replicasrepDesignMaster.Synchronize strReplica, sncType, sncModeSet repDesignMaster = NothingMsgBox strRep & vbCrLf & _
"and " & vbCrLf & _strReplica & vbCrLf & _"were synchronized."
End Sub
Database Replication | 485
Access VBA Programming with DAO and ADO
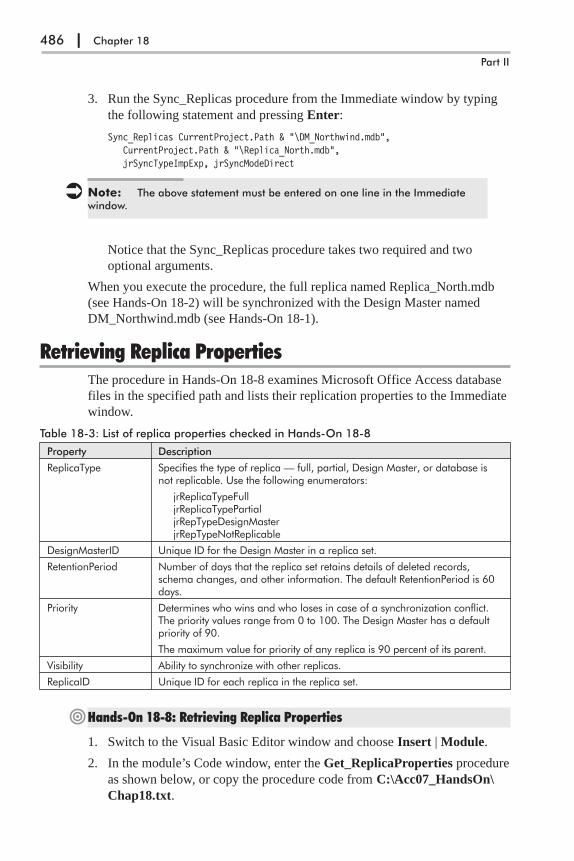
3. Run the Sync_Replicas procedure from the Immediate window by typing
the following statement and pressing Enter:
Sync_Replicas CurrentProject.Path & "\DM_Northwind.mdb",CurrentProject.Path & "\Replica_North.mdb",jrSyncTypeImpExp, jrSyncModeDirect
� Note: The above statement must be entered on one line in the Immediatewindow.
Notice that the Sync_Replicas procedure takes two required and two
optional arguments.
When you execute the procedure, the full replica named Replica_North.mdb
(see Hands-On 18-2) will be synchronized with the Design Master named
DM_Northwind.mdb (see Hands-On 18-1).
Retrieving Replica PropertiesThe procedure in Hands-On 18-8 examines Microsoft Office Access database
files in the specified path and lists their replication properties to the Immediate
window.
Table 18-3: List of replica properties checked in Hands-On 18-8
Property Description
ReplicaType Specifies the type of replica — full, partial, Design Master, or database isnot replicable. Use the following enumerators:
jrReplicaTypeFulljrReplicaTypePartialjrRepTypeDesignMasterjrRepTypeNotReplicable
DesignMasterID Unique ID for the Design Master in a replica set.
RetentionPeriod Number of days that the replica set retains details of deleted records,schema changes, and other information. The default RetentionPeriod is 60days.
Priority Determines who wins and who loses in case of a synchronization conflict.The priority values range from 0 to 100. The Design Master has a defaultpriority of 90.
The maximum value for priority of any replica is 90 percent of its parent.
Visibility Ability to synchronize with other replicas.
ReplicaID Unique ID for each replica in the replica set.
�Hands-On 18-8: Retrieving Replica Properties
1. Switch to the Visual Basic Editor window and choose Insert | Module.
2. In the module’s Code window, enter the Get_ReplicaProperties procedure
as shown below, or copy the procedure code from C:\Acc07_HandsOn\
Chap18.txt.
486 | Chapter 18
Part II

Sub Get_ReplicaProperties(strPath As String)Dim fso As ObjectDim mdbFile As ObjectDim myFolder As ObjectDim typeNum As IntegerDim repName As StringDim repMaster As New JRO.Replica
On Error Resume Next
Set fso = CreateObject("Scripting.FileSystemObject")Set myFolder = fso.GetFolder(strPath)
For Each mdbFile In myFolder.FilesIf InStr(mdbFile.Name, ".mdb") Then
repName = strPath & mdbFile.NamerepMaster.ActiveConnection = repName
Select Case repMaster.ReplicaTypeCase jrRepTypeNotReplicable
Debug.Print repName & " is not replicable."Case jrRepTypeDesignMaster
Debug.Print repName & " is a Design Master."Debug.Print "Design Master Id: " & _
repMaster.DesignMasterIDDebug.Print "Retention Period: " & _
repMaster.RetentionPeriodDebug.Print "Priority: " & repMaster.PriorityDebug.Print "Visibility: " & repMaster.Visibility
Case jrRepTypeFullDebug.Print repName & " is a Full Replica."Debug.Print "Replica Id: " & repMaster.ReplicaIDDebug.Print "Retention Period: " & _
repMaster.RetentionPeriodDebug.Print "Priority: " & repMaster.PriorityDebug.Print "Visibility: " & repMaster.Visibility
Case jrRepTypePartialDebug.Print repName & " is a Partial Replica."Debug.Print "Retention Period: " & _
repMaster.RetentionPeriodDebug.Print "Priority: " & repMaster.PriorityDebug.Print "Visibility: " & repMaster.Visibility
End SelectEnd If
Next mdbFileMsgBox "View Replica Properties in the Immediate window."
End Sub
3. Run the Get_ReplicaProperties procedure from the Immediate window by
typing the following statement and pressing Enter:
Get_ReplicaProperties currentProject.Path & "\"
To retrieve replica properties, the above procedure must be able to access
your computer’s file system. This is done by using the FileSystemObject
from the Microsoft Scripting Runtime Library (see Hands-On 18-1). We
use the GetFolder method of the FileSystemObject object to return a Folder
Database Replication | 487
Access VBA Programming with DAO and ADO
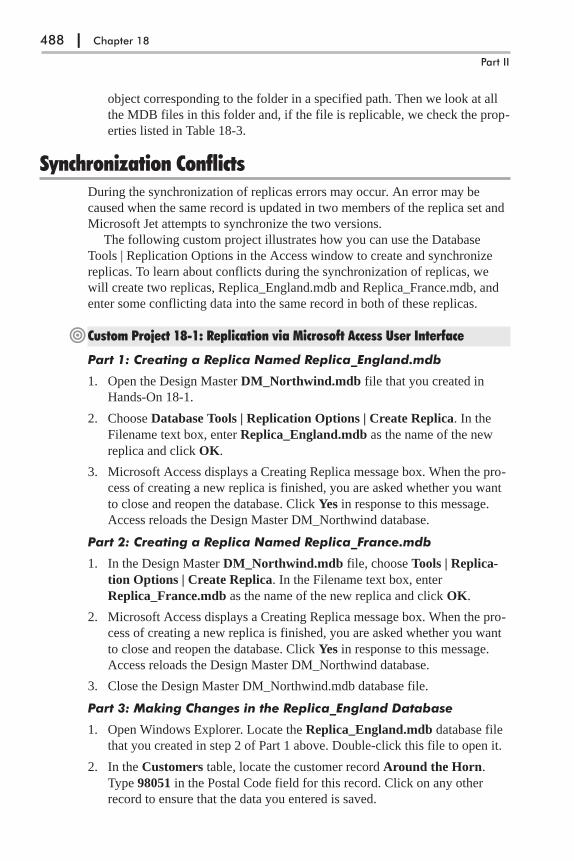
object corresponding to the folder in a specified path. Then we look at all
the MDB files in this folder and, if the file is replicable, we check the prop-
erties listed in Table 18-3.
Synchronization ConflictsDuring the synchronization of replicas errors may occur. An error may be
caused when the same record is updated in two members of the replica set and
Microsoft Jet attempts to synchronize the two versions.
The following custom project illustrates how you can use the Database
Tools | Replication Options in the Access window to create and synchronize
replicas. To learn about conflicts during the synchronization of replicas, we
will create two replicas, Replica_England.mdb and Replica_France.mdb, and
enter some conflicting data into the same record in both of these replicas.
�Custom Project 18-1: Replication via Microsoft Access User Interface
Part 1: Creating a Replica Named Replica_England.mdb
1. Open the Design Master DM_Northwind.mdb file that you created in
Hands-On 18-1.
2. Choose Database Tools | Replication Options | Create Replica. In the
Filename text box, enter Replica_England.mdb as the name of the new
replica and click OK.
3. Microsoft Access displays a Creating Replica message box. When the pro-
cess of creating a new replica is finished, you are asked whether you want
to close and reopen the database. Click Yes in response to this message.
Access reloads the Design Master DM_Northwind database.
Part 2: Creating a Replica Named Replica_France.mdb
1. In the Design Master DM_Northwind.mdb file, choose Tools | Replica-
tion Options | Create Replica. In the Filename text box, enter
Replica_France.mdb as the name of the new replica and click OK.
2. Microsoft Access displays a Creating Replica message box. When the pro-
cess of creating a new replica is finished, you are asked whether you want
to close and reopen the database. Click Yes in response to this message.
Access reloads the Design Master DM_Northwind database.
3. Close the Design Master DM_Northwind.mdb database file.
Part 3: Making Changes in the Replica_England Database
1. Open Windows Explorer. Locate the Replica_England.mdb database file
that you created in step 2 of Part 1 above. Double-click this file to open it.
2. In the Customers table, locate the customer record Around the Horn.
Type 98051 in the Postal Code field for this record. Click on any other
record to ensure that the data you entered is saved.
488 | Chapter 18
Part II
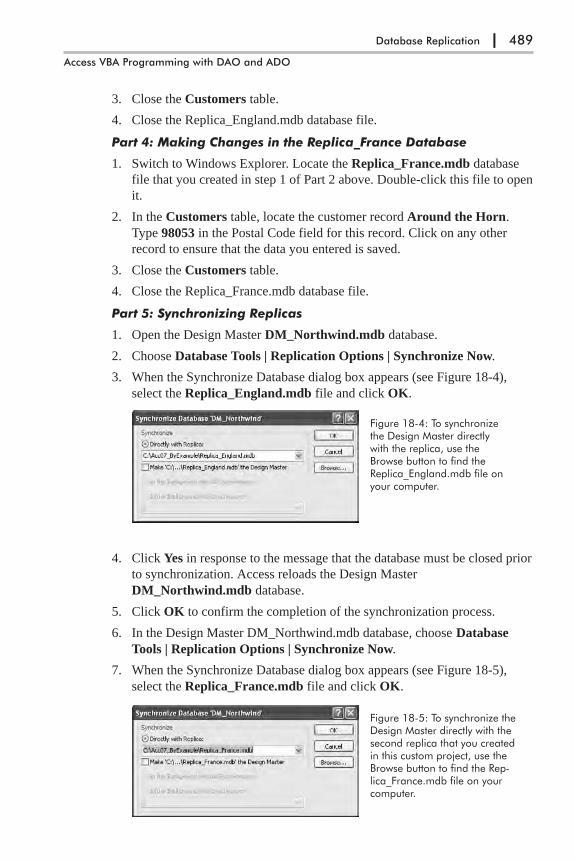
3. Close the Customers table.
4. Close the Replica_England.mdb database file.
Part 4: Making Changes in the Replica_France Database
1. Switch to Windows Explorer. Locate the Replica_France.mdb database
file that you created in step 1 of Part 2 above. Double-click this file to open
it.
2. In the Customers table, locate the customer record Around the Horn.
Type 98053 in the Postal Code field for this record. Click on any other
record to ensure that the data you entered is saved.
3. Close the Customers table.
4. Close the Replica_France.mdb database file.
Part 5: Synchronizing Replicas
1. Open the Design Master DM_Northwind.mdb database.
2. Choose Database Tools | Replication Options | Synchronize Now.
3. When the Synchronize Database dialog box appears (see Figure 18-4),
select the Replica_England.mdb file and click OK.
4. Click Yes in response to the message that the database must be closed prior
to synchronization. Access reloads the Design Master
DM_Northwind.mdb database.
5. Click OK to confirm the completion of the synchronization process.
6. In the Design Master DM_Northwind.mdb database, choose Database
Tools | Replication Options | Synchronize Now.
7. When the Synchronize Database dialog box appears (see Figure 18-5),
select the Replica_France.mdb file and click OK.
Database Replication | 489
Access VBA Programming with DAO and ADO
Figure 18-4: To synchronizethe Design Master directlywith the replica, use theBrowse button to find theReplica_England.mdb file onyour computer.
Figure 18-5: To synchronize theDesign Master directly with thesecond replica that you createdin this custom project, use theBrowse button to find the Rep-lica_France.mdb file on yourcomputer.
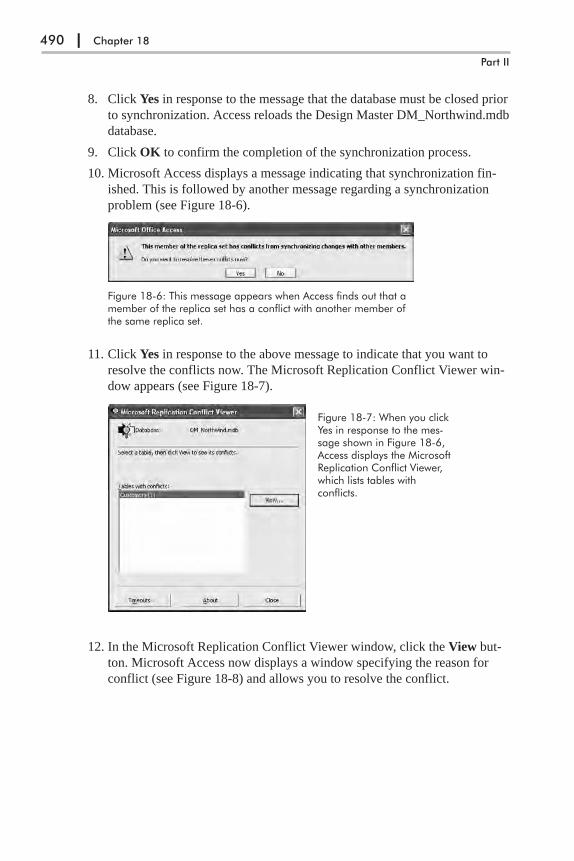
8. Click Yes in response to the message that the database must be closed prior
to synchronization. Access reloads the Design Master DM_Northwind.mdb
database.
9. Click OK to confirm the completion of the synchronization process.
10. Microsoft Access displays a message indicating that synchronization fin-
ished. This is followed by another message regarding a synchronization
problem (see Figure 18-6).
11. Click Yes in response to the above message to indicate that you want to
resolve the conflicts now. The Microsoft Replication Conflict Viewer win-
dow appears (see Figure 18-7).
12. In the Microsoft Replication Conflict Viewer window, click the View but-
ton. Microsoft Access now displays a window specifying the reason for
conflict (see Figure 18-8) and allows you to resolve the conflict.
490 | Chapter 18
Part II
Figure 18-6: This message appears when Access finds out that amember of the replica set has a conflict with another member ofthe same replica set.
Figure 18-7: When you clickYes in response to the mes-sage shown in Figure 18-6,Access displays the MicrosoftReplication Conflict Viewer,which lists tables withconflicts.

13. For this example, click Close to exit the Microsoft Replication Conflict
Viewer for DM_Northwind.mdb -- Customers (1) window without making
any changes. Click Close again to close the Microsoft Replication Conflict
Viewer (shown in Figure 18-7).
14. Close the Design Master DM_Northwind.mdb database file.
The steps you’ve just completed demonstrate how to create and synchronize
replicas using the Microsoft Access user interface. By entering conflicting data
in the same field of the same record you were able to see how Access can
locate the problem area during the synchronization process and how you can
resolve the data conflict using the Microsoft Replication Conflict Viewer
window.
Hands-On 18-9 illustrates how you can use the ConflictTables property to
find out whether any conflicts occurred during the synchronization of replicas.
This property returns the name of the conflict table that contains the database
records that conflicted during synchronization.
The conflict table has two columns. The first column contains the names of
the tables where conflicts occurred and the second one lists the associated con-
flict table names. If there is no conflict table (or the database is nonreplicable),
the ConflictTables property returns a zero-length string (""). If you find out
that the conflict occurred during synchronization, you should write a custom
conflict-resolution procedure to handle the conflicts depending on your needs.
Database Replication | 491
Access VBA Programming with DAO and ADO
Figure 18-8: This window with conflict details appears when youclick the View button in the Microsoft Replication Conflict Viewerwindow (see Figure 18-7).
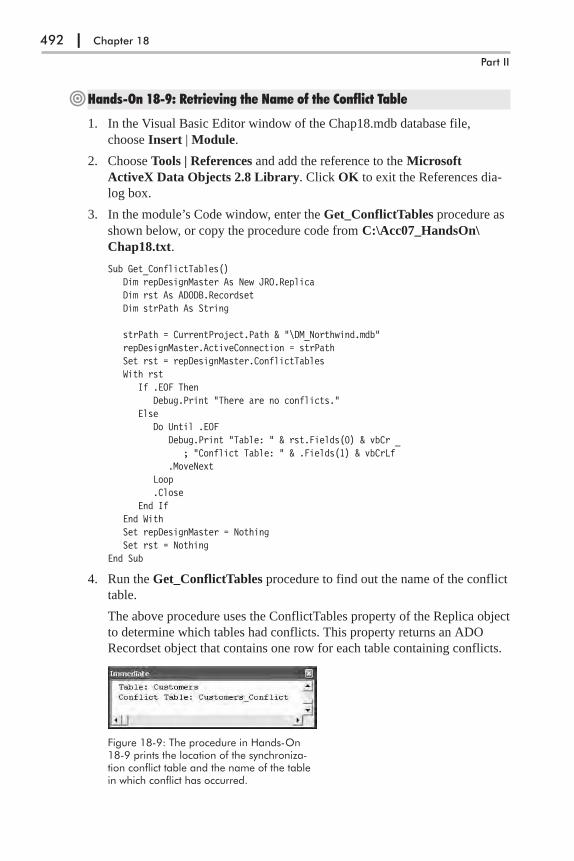
�Hands-On 18-9: Retrieving the Name of the Conflict Table
1. In the Visual Basic Editor window of the Chap18.mdb database file,
choose Insert | Module.
2. Choose Tools | References and add the reference to the Microsoft
ActiveX Data Objects 2.8 Library. Click OK to exit the References dia-
log box.
3. In the module’s Code window, enter the Get_ConflictTables procedure as
shown below, or copy the procedure code from C:\Acc07_HandsOn\
Chap18.txt.
Sub Get_ConflictTables()Dim repDesignMaster As New JRO.ReplicaDim rst As ADODB.RecordsetDim strPath As String
strPath = CurrentProject.Path & "\DM_Northwind.mdb"repDesignMaster.ActiveConnection = strPathSet rst = repDesignMaster.ConflictTablesWith rst
If .EOF ThenDebug.Print "There are no conflicts."
ElseDo Until .EOF
Debug.Print "Table: " & rst.Fields(0) & vbCr _; "Conflict Table: " & .Fields(1) & vbCrLf
.MoveNextLoop.Close
End IfEnd WithSet repDesignMaster = NothingSet rst = Nothing
End Sub
4. Run the Get_ConflictTables procedure to find out the name of the conflict
table.
The above procedure uses the ConflictTables property of the Replica object
to determine which tables had conflicts. This property returns an ADO
Recordset object that contains one row for each table containing conflicts.
492 | Chapter 18
Part II
Figure 18-9: The procedure in Hands-On18-9 prints the location of the synchroniza-tion conflict table and the name of the tablein which conflict has occurred.
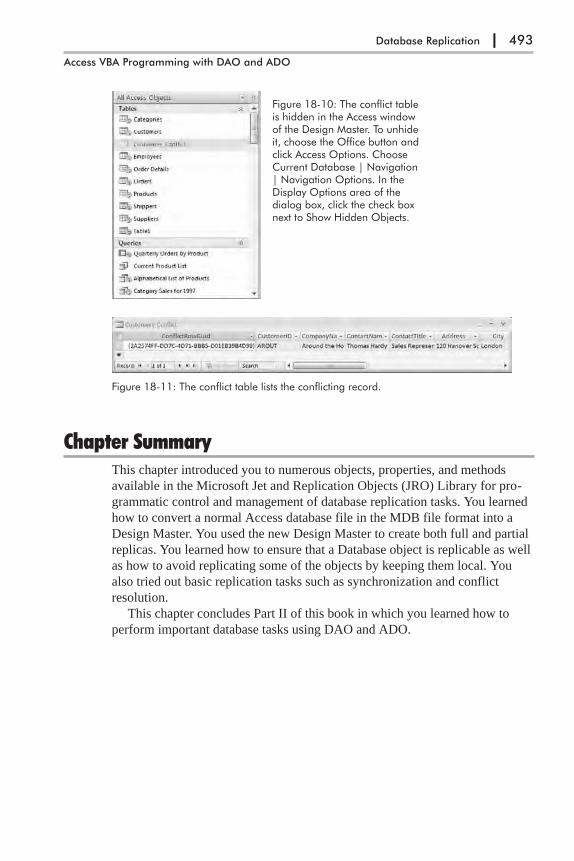
Chapter SummaryThis chapter introduced you to numerous objects, properties, and methods
available in the Microsoft Jet and Replication Objects (JRO) Library for pro-
grammatic control and management of database replication tasks. You learned
how to convert a normal Access database file in the MDB file format into a
Design Master. You used the new Design Master to create both full and partial
replicas. You learned how to ensure that a Database object is replicable as well
as how to avoid replicating some of the objects by keeping them local. You
also tried out basic replication tasks such as synchronization and conflict
resolution.
This chapter concludes Part II of this book in which you learned how to
perform important database tasks using DAO and ADO.
Database Replication | 493
Access VBA Programming with DAO and ADO
Figure 18-10: The conflict tableis hidden in the Access windowof the Design Master. To unhideit, choose the Office button andclick Access Options. ChooseCurrent Database | Navigation| Navigation Options. In theDisplay Options area of thedialog box, click the check boxnext to Show Hidden Objects.
Figure 18-11: The conflict table lists the conflicting record.

This page intentionally left blank.

PART III
Programmingwith the JetDataDefinitionLanguage
Chapter 19 Creating, Modifying, and Deleting Tables
and Fields
Chapter 20 Enforcing Data Integrity and Relationships
between Tables
Chapter 21 Defining Indexes and Primary Keys
Chapter 22 Database Security
Chapter 23 Views and Stored Procedures
495
The Data Definition
Language (DDL) is a
component of the Struc-
tured Query Language
(SQL), which is used
for defining database
objects (tables, views,
stored procedures, pri-
mary keys, indexes, and
constraints) and manag-
ing database security.
In this part of the
book, you learn how to
use the DDL language
with Jet databases,
ADO, and the Jet 4.0/
ACE OLE DB Provider.

Chapter 19
Creating, Modifying, andDeleting Tables and Fields
In Part II of this book you tried out different methods that are available in
Microsoft Office Access 2007 for creating and manipulating databases via
VBA programming code using the DAO and ADO object models. In particu-
lar, you learned how to create new databases from scratch, add tables and
indexes, set up relationships between tables, secure a database with a pass-
word, define user and group security accounts, and handle object permissions.
In addition to using DAO and ADO, you can perform many of the mentioned
database tasks by using the Data Definition Language (DDL), which is a com-
ponent of the Structured Query Language (SQL).
SQL is a widely used language for data retrieval and manipulation in data-
bases. The SQL specification (known as ANSI SQL-89) was first published in
1989 by the American National Standards Institute (ANSI). The ANSI SQL
standard was revised in 1992 and this version is referred to as ANSI SQL-92
or SQL-2. This revised specification is supported by the major database ven-
dors, many of whom have created their own extensions of the SQL language.
Microsoft Office Access 2007 supports both SQL specifications and refers to
them as ANSI SQL query modes.
While the ANSI-89 SQL query mode (also called Microsoft Jet SQL and
ANSI SQL) uses the traditional Jet SQL syntax, the ANSI-92 SQL mode uses
syntax that is more compliant with SQL-92 and Microsoft SQL Server. For
example, ANSI-92 uses the percent sign (%) and the underscore character (_)
for its wildcards instead of the asterisk (*) and the question mark (?), which
are commonly used in VBA. Microsoft Access Jet Engine does not implement
the complete ANSI SQL-92 standard and provides its own Jet 4.0 ANSI
SQL-92 extensions to support new features of Access. For more information
about syntax differences, see the topic “Comparison of Microsoft Access SQL
and ANSI SQL” in the Microsoft Office Access help files.
You can use the ANSI-92 syntax in your VBA procedures with the
Microsoft OLE DB Provider for Jet or with the Data Definition Language,
which we cover in this part of the book. ANSI-89 is the default setting for a
new Microsoft Access database in Access 2002-2003 and 2000 file format.
Because the two ANSI SQL query modes are not compatible, you must decide
which query mode you are going to use for the current database. This can
497
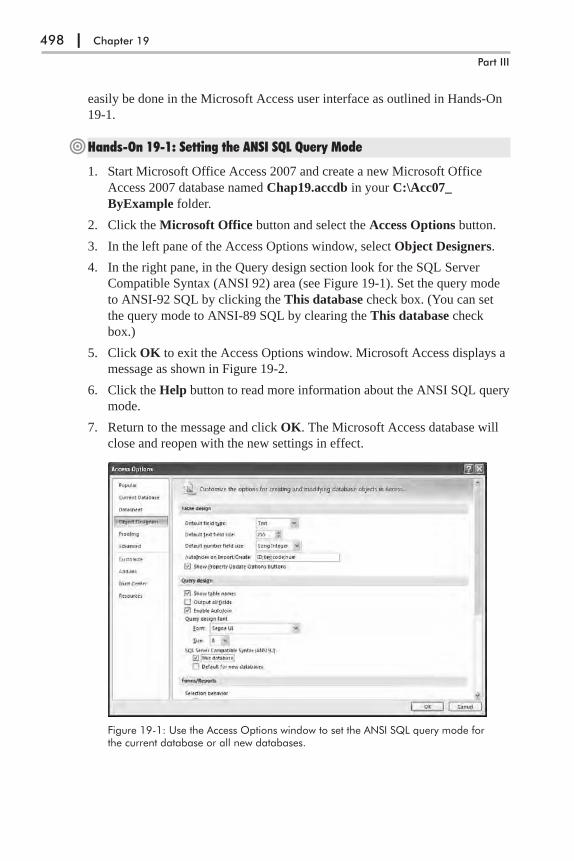
easily be done in the Microsoft Access user interface as outlined in Hands-On
19-1.
�Hands-On 19-1: Setting the ANSI SQL Query Mode
1. Start Microsoft Office Access 2007 and create a new Microsoft Office
Access 2007 database named Chap19.accdb in your C:\Acc07_
ByExample folder.
2. Click the Microsoft Office button and select the Access Options button.
3. In the left pane of the Access Options window, select Object Designers.
4. In the right pane, in the Query design section look for the SQL Server
Compatible Syntax (ANSI 92) area (see Figure 19-1). Set the query mode
to ANSI-92 SQL by clicking the This database check box. (You can set
the query mode to ANSI-89 SQL by clearing the This database check
box.)
5. Click OK to exit the Access Options window. Microsoft Access displays a
message as shown in Figure 19-2.
6. Click the Help button to read more information about the ANSI SQL query
mode.
7. Return to the message and click OK. The Microsoft Access database will
close and reopen with the new settings in effect.
498 | Chapter 19
Part III
Figure 19-1: Use the Access Options window to set the ANSI SQL query mode forthe current database or all new databases.

There are two areas of Microsoft Access SQL:
� Data Definition Language (DDL) offers a number of SQL statements to
manage database security and to create and alter database components
(such as tables, indexes, relationships, views, and stored procedures).
These statements are: CREATE TABLE, DROP TABLE, ALTER TABLE,
CREATE INDEX, DROP INDEX, CHECK CONSTRAINT, CREATE
VIEW, DROP VIEW, CREATE PROCEDURE, DROP PROCEDURE,
EXECUTE, ALTER DATABASE, ADD USER, ALTER USER, CREATE
USER, CREATE GROUP, DROP GROUP, DROP USER, GRANT, and
REVOKE.
� Data Manipulation Language (DML) offers SQL statements that allow you
to retrieve and manipulate data contained in the database tables as well as
perform transactions. These statements are: SELECT, UNION, UPDATE,
DELETE, INSERT INTO, SELECT INTO, INNER JOIN, LEFT JOIN,
RIGHT JOIN, TRANSFORM, PARAMETERS, BEGIN TRANSACTION,
COMMIT, and ROLLBACK.
This chapter and the remaining chapters of Part III focus on using the DDL
language for creating and changing the underlying structure of a database. To
get the most out of these chapters, you should be familiar with using DAO and
ADO, which was discussed in Part II.
Creating TablesUsing the Microsoft Access SQL CREATE TABLE statement and the DAO
Database object’s Execute method or the ADO Connection object’s Execute
method, you can define a new table, its fields, and field constraints. The
CREATE TABLE statement can only be used with Microsoft Jet and Microsoft
Access engine databases. The two examples that follow illustrate how to create
a table named tblSchools in the currently open database and in a new database
using ADO.
Creating, Modifying, and Deleting Tables and Fields | 499
Programming with the Jet Data Definition Language
Figure 19-2: When you change the query mode to ANSI-92, MicrosoftAccess displays an informational message alerting you to possibleproblems.
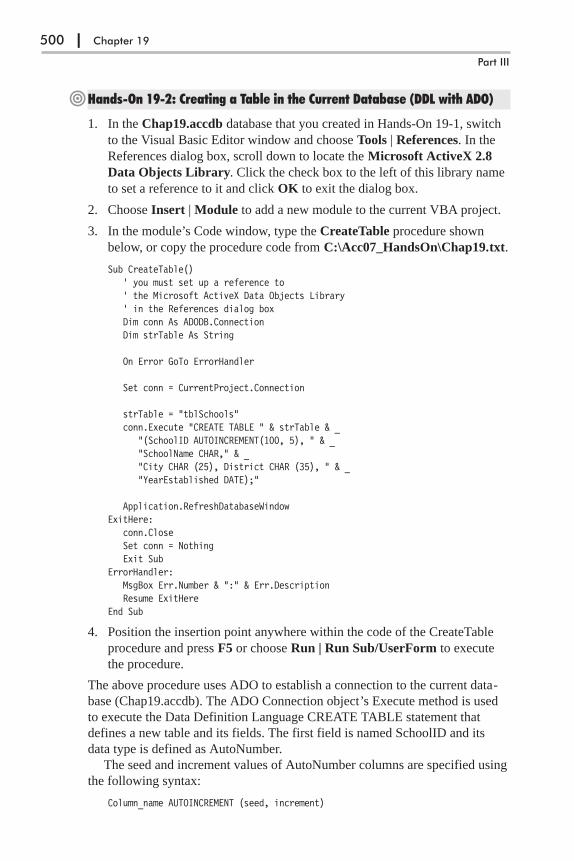
�Hands-On 19-2: Creating a Table in the Current Database (DDL with ADO)
1. In the Chap19.accdb database that you created in Hands-On 19-1, switch
to the Visual Basic Editor window and choose Tools | References. In the
References dialog box, scroll down to locate the Microsoft ActiveX 2.8
Data Objects Library. Click the check box to the left of this library name
to set a reference to it and click OK to exit the dialog box.
2. Choose Insert | Module to add a new module to the current VBA project.
3. In the module’s Code window, type the CreateTable procedure shown
below, or copy the procedure code from C:\Acc07_HandsOn\Chap19.txt.
Sub CreateTable()' you must set up a reference to' the Microsoft ActiveX Data Objects Library' in the References dialog boxDim conn As ADODB.ConnectionDim strTable As String
On Error GoTo ErrorHandler
Set conn = CurrentProject.Connection
strTable = "tblSchools"conn.Execute "CREATE TABLE " & strTable & _
"(SchoolID AUTOINCREMENT(100, 5), " & _"SchoolName CHAR," & _"City CHAR (25), District CHAR (35), " & _"YearEstablished DATE);"
Application.RefreshDatabaseWindowExitHere:
conn.CloseSet conn = NothingExit Sub
ErrorHandler:MsgBox Err.Number & ":" & Err.DescriptionResume ExitHere
End Sub
4. Position the insertion point anywhere within the code of the CreateTable
procedure and press F5 or choose Run | Run Sub/UserForm to execute
the procedure.
The above procedure uses ADO to establish a connection to the current data-
base (Chap19.accdb). The ADO Connection object’s Execute method is used
to execute the Data Definition Language CREATE TABLE statement that
defines a new table and its fields. The first field is named SchoolID and its
data type is defined as AutoNumber.
The seed and increment values of AutoNumber columns are specified using
the following syntax:
Column_name AUTOINCREMENT (seed, increment)
500 | Chapter 19
Part III

The table, tblSchools, has an AutoNumber column with a seed of 100 and an
increment of 5:
SchoolID AUTOINCREMENT(100, 5)
When you switch to the database window and open this table in Datasheet
view, the SchoolID for the first record will be 100, the second will be 105, the
third 110, and so on.
Three fields are defined as Text fields and one field as a Date/Time field.
The Text fields are defined using the CHAR data type (see Table 19-1). To
specify the size of the Text field, put the appropriate value between parenthe-
ses. If the size of the Text field is not specified, it is assumed to be 255
characters long.
When you examine the code of the CreateTable procedure and compare the
resultant table in Figure 19-3, you will notice that Access SQL uses different
data types than those available in the Table Design window. Table 19-1 shows
the equivalent SQL data types.
Table 19-1: Table design data types and their Access SQL equivalents
Table Design Data Types Access SQL Data Types
Text TEXT, ALPHANUMERIC, CHAR, CHARACTER,STRING, or VARCHAR
Memo LONGTEXT, MEMO, LONGCHAR, or NOTE
Number (Field Size = Byte) BYTE or INTEGER1
Number (Field Size = Integer) SHORT, INTEGER2, or SMALLINT
Number (Field Size = Long Integer) COUNTER, INTEGER, INT, or AUTOINCREMENT
Number (Field Size = Single) SINGLE, FLOAT4, or REAL
Creating, Modifying, and Deleting Tables and Fields | 501
Programming with the Jet Data Definition Language
Figure 19-3: The tblSchools table was generated by the CreateTable pro-cedure in Hands-On 19-2 using the Microsoft Access SQL statementCREATE TABLE.
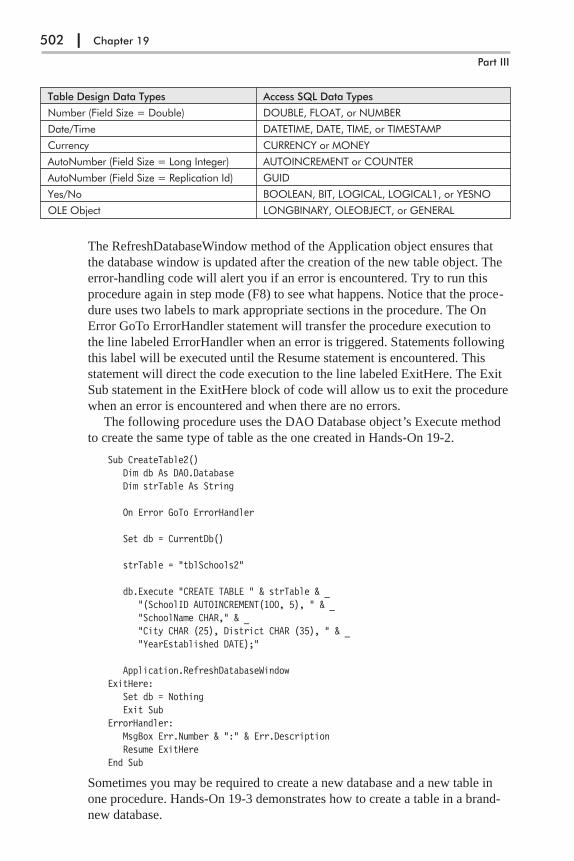
Table Design Data Types Access SQL Data Types
Number (Field Size = Double) DOUBLE, FLOAT, or NUMBER
Date/Time DATETIME, DATE, TIME, or TIMESTAMP
Currency CURRENCY or MONEY
AutoNumber (Field Size = Long Integer) AUTOINCREMENT or COUNTER
AutoNumber (Field Size = Replication Id) GUID
Yes/No BOOLEAN, BIT, LOGICAL, LOGICAL1, or YESNO
OLE Object LONGBINARY, OLEOBJECT, or GENERAL
The RefreshDatabaseWindow method of the Application object ensures that
the database window is updated after the creation of the new table object. The
error-handling code will alert you if an error is encountered. Try to run this
procedure again in step mode (F8) to see what happens. Notice that the proce-
dure uses two labels to mark appropriate sections in the procedure. The On
Error GoTo ErrorHandler statement will transfer the procedure execution to
the line labeled ErrorHandler when an error is triggered. Statements following
this label will be executed until the Resume statement is encountered. This
statement will direct the code execution to the line labeled ExitHere. The Exit
Sub statement in the ExitHere block of code will allow us to exit the procedure
when an error is encountered and when there are no errors.
The following procedure uses the DAO Database object’s Execute method
to create the same type of table as the one created in Hands-On 19-2.
Sub CreateTable2()Dim db As DAO.DatabaseDim strTable As String
On Error GoTo ErrorHandler
Set db = CurrentDb()
strTable = "tblSchools2"
db.Execute "CREATE TABLE " & strTable & _"(SchoolID AUTOINCREMENT(100, 5), " & _"SchoolName CHAR," & _"City CHAR (25), District CHAR (35), " & _"YearEstablished DATE);"
Application.RefreshDatabaseWindowExitHere:
Set db = NothingExit Sub
ErrorHandler:MsgBox Err.Number & ":" & Err.DescriptionResume ExitHere
End Sub
Sometimes you may be required to create a new database and a new table in
one procedure. Hands-On 19-3 demonstrates how to create a table in a brand-
new database.
502 | Chapter 19
Part III
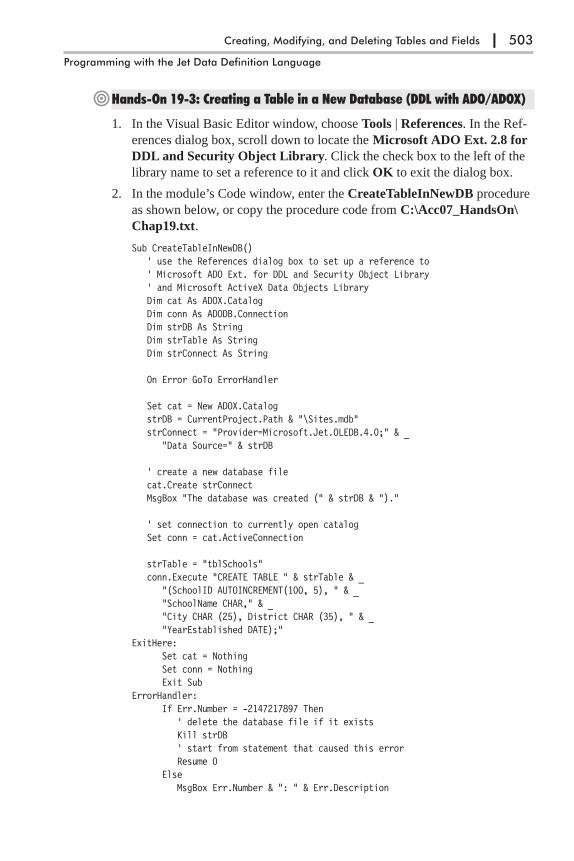
�Hands-On 19-3: Creating a Table in a New Database (DDL with ADO/ADOX)
1. In the Visual Basic Editor window, choose Tools | References. In the Ref-
erences dialog box, scroll down to locate the Microsoft ADO Ext. 2.8 for
DDL and Security Object Library. Click the check box to the left of the
library name to set a reference to it and click OK to exit the dialog box.
2. In the module’s Code window, enter the CreateTableInNewDB procedure
as shown below, or copy the procedure code from C:\Acc07_HandsOn\
Chap19.txt.
Sub CreateTableInNewDB()' use the References dialog box to set up a reference to' Microsoft ADO Ext. for DDL and Security Object Library' and Microsoft ActiveX Data Objects LibraryDim cat As ADOX.CatalogDim conn As ADODB.ConnectionDim strDB As StringDim strTable As StringDim strConnect As String
On Error GoTo ErrorHandler
Set cat = New ADOX.CatalogstrDB = CurrentProject.Path & "\Sites.mdb"strConnect = "Provider=Microsoft.Jet.OLEDB.4.0;" & _
"Data Source=" & strDB
' create a new database filecat.Create strConnectMsgBox "The database was created (" & strDB & ")."
' set connection to currently open catalogSet conn = cat.ActiveConnection
strTable = "tblSchools"conn.Execute "CREATE TABLE " & strTable & _
"(SchoolID AUTOINCREMENT(100, 5), " & _"SchoolName CHAR," & _"City CHAR (25), District CHAR (35), " & _"YearEstablished DATE);"
ExitHere:Set cat = NothingSet conn = NothingExit Sub
ErrorHandler:If Err.Number = -2147217897 Then
' delete the database file if it existsKill strDB' start from statement that caused this errorResume 0
ElseMsgBox Err.Number & ": " & Err.Description
Creating, Modifying, and Deleting Tables and Fields | 503
Programming with the Jet Data Definition Language

GoTo ExitHereEnd If
End Sub
3. Position the insertion point anywhere within the code of the
CreateTableInNewDB procedure and press F5 or choose Run | Run
Sub/UserForm to execute the procedure.
The CreateTableInNewDB procedure shown above creates a new database
named Sites.mdb in the current folder. As you may recall from Chapter 10, you
can create a new Microsoft Access database by using the Create method of the
ADOX Catalog object. Before creating a table in the new database, set the
conn object variable to the currently open Catalog, like this:
Set conn = cat.ActiveConnection
Use the Connection object’s Execute method to create a new table named
tblSchools in the Sites.mdb file. Like other procedure examples in this section,
this table contains an AutoNumber field with a sequence starting at 100 that
will be incremented by 5 as new columns are added. Notice that the error-
handling code demonstrated in this procedure is slightly different from previ-
ous examples. If you know the type of error that is most likely to occur, you
can check for the error number in the error handler and execute the appropriate
statement when the condition is met. If the database already exists it will be
deleted using the VBA Kill statement (don’t do this in the production environ-
ment unless you are absolutely certain this is what you want to do). The
statement Resume 0 in the error-handling code will return the code execution
to the line that caused the error. If other errors are encountered, error informa-
tion will appear in a message box and the code execution will continue from
the line following the ExitHere label.
Deleting TablesIt’s time to remove some of our test data by using the DROP TABLE statement
to delete an existing table from a database. Note that a table must be closed
before it can be deleted. The procedure in Hands-On 19-4 will delete the
tblSchool table that was created in Hands-On 19-2.
�Hands-On 19-4: Deleting a Table
This hands-on exercise requires the prior completion of Hands-On 19-2.
1. In the Visual Basic Editor window, choose Insert | Module.
2. In the module’s Code window, enter the DeleteTable procedure as shown
below, or copy the procedure code from C:\Acc07_HandsOn\Chap19.txt.
Sub DeleteTable()Dim conn As ADODB.ConnectionDim strTable As String
On Error GoTo ErrorHandler
504 | Chapter 19
Part III

Set conn = CurrentProject.Connection
strTable = "tblSchools"conn.Execute "DROP TABLE " & strTableApplication.RefreshDatabaseWindow
ExitHere:conn.CloseSet conn = NothingExit Sub
ErrorHandler:If Err.Number = -2147217900 Then
DoCmd.Close acTable, strTable, acSavePromptResume 0
ElseMsgBox Err.Number & ":" & Err.DescriptionResume ExitHere
End IfEnd Sub
3. Position the insertion point anywhere within the code of the DeleteTable
procedure and press F5 or choose Run | Run Sub/UserForm to execute
the procedure.
You can also execute the DROP TABLE statement directly in the Microsoft
Office Access user interface’s Data Definition Query window by following
these steps:
1. Choose Create | QueryDesign.
2. Click the Close button in the Show Table dialog box.
3. Choose Design | SQL | Data Definition.
4. Enter the following statement in the Query window:
Drop Table tblSchools2;
5. Choose Design | Run.
Modifying Tables with DDLYou can modify a table definition by altering, adding, or dropping columns and
constraints. Constraints allow you to enforce integrity by creating rules for a
table. The procedures in the following sections illustrate how to use Microsoft
Access SQL DDL statements to:
� Add new columns to a table
� Change the column’s data type
� Change the size of a Text column
� Delete a field from a table
� Add a primary key to an existing table
� Add a unique, multiple-field index to an existing table
� Delete an index
Creating, Modifying, and Deleting Tables and Fields | 505
Programming with the Jet Data Definition Language
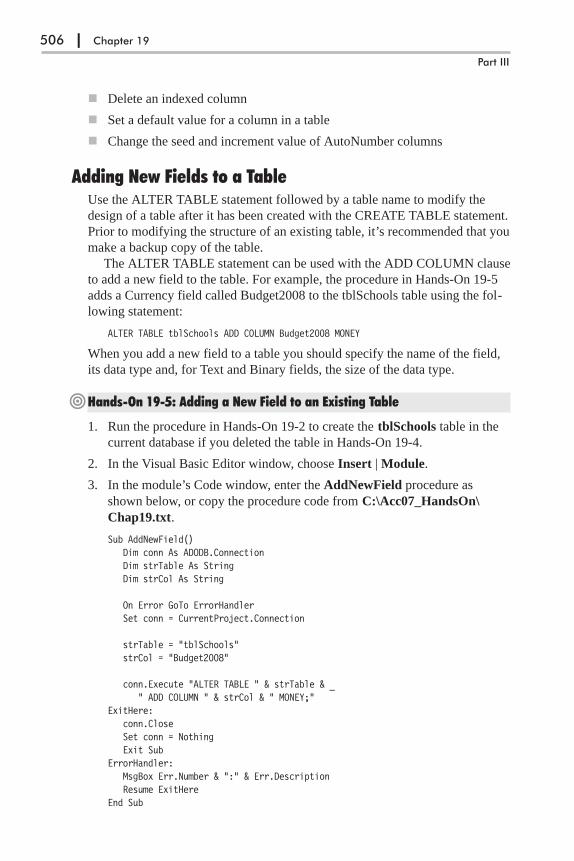
� Delete an indexed column
� Set a default value for a column in a table
� Change the seed and increment value of AutoNumber columns
Adding New Fields to a TableUse the ALTER TABLE statement followed by a table name to modify the
design of a table after it has been created with the CREATE TABLE statement.
Prior to modifying the structure of an existing table, it’s recommended that you
make a backup copy of the table.
The ALTER TABLE statement can be used with the ADD COLUMN clause
to add a new field to the table. For example, the procedure in Hands-On 19-5
adds a Currency field called Budget2008 to the tblSchools table using the fol-
lowing statement:
ALTER TABLE tblSchools ADD COLUMN Budget2008 MONEY
When you add a new field to a table you should specify the name of the field,
its data type and, for Text and Binary fields, the size of the data type.
�Hands-On 19-5: Adding a New Field to an Existing Table
1. Run the procedure in Hands-On 19-2 to create the tblSchools table in the
current database if you deleted the table in Hands-On 19-4.
2. In the Visual Basic Editor window, choose Insert | Module.
3. In the module’s Code window, enter the AddNewField procedure as
shown below, or copy the procedure code from C:\Acc07_HandsOn\
Chap19.txt.
Sub AddNewField()Dim conn As ADODB.ConnectionDim strTable As StringDim strCol As String
On Error GoTo ErrorHandlerSet conn = CurrentProject.Connection
strTable = "tblSchools"strCol = "Budget2008"
conn.Execute "ALTER TABLE " & strTable & _" ADD COLUMN " & strCol & " MONEY;"
ExitHere:conn.CloseSet conn = NothingExit Sub
ErrorHandler:MsgBox Err.Number & ":" & Err.DescriptionResume ExitHere
End Sub
506 | Chapter 19
Part III
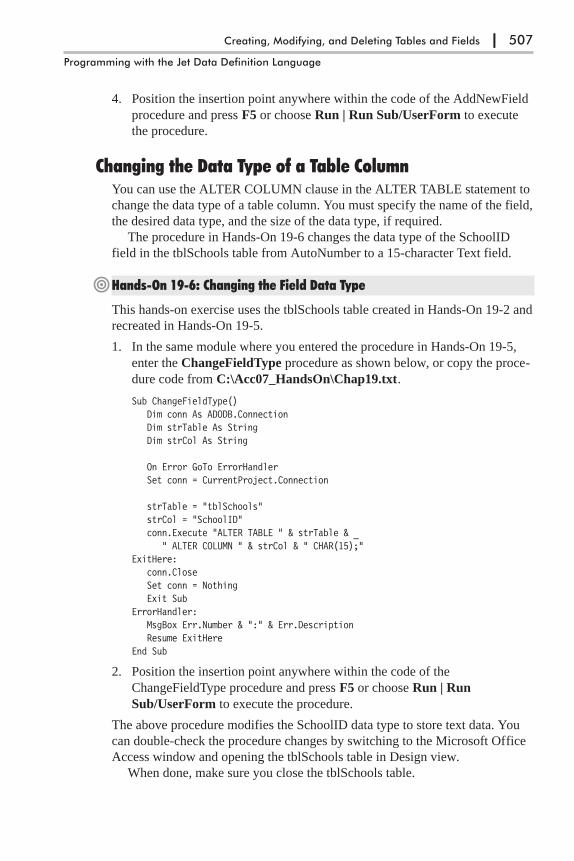
4. Position the insertion point anywhere within the code of the AddNewField
procedure and press F5 or choose Run | Run Sub/UserForm to execute
the procedure.
Changing the Data Type of a Table ColumnYou can use the ALTER COLUMN clause in the ALTER TABLE statement to
change the data type of a table column. You must specify the name of the field,
the desired data type, and the size of the data type, if required.
The procedure in Hands-On 19-6 changes the data type of the SchoolID
field in the tblSchools table from AutoNumber to a 15-character Text field.
�Hands-On 19-6: Changing the Field Data Type
This hands-on exercise uses the tblSchools table created in Hands-On 19-2 and
recreated in Hands-On 19-5.
1. In the same module where you entered the procedure in Hands-On 19-5,
enter the ChangeFieldType procedure as shown below, or copy the proce-
dure code from C:\Acc07_HandsOn\Chap19.txt.
Sub ChangeFieldType()Dim conn As ADODB.ConnectionDim strTable As StringDim strCol As String
On Error GoTo ErrorHandlerSet conn = CurrentProject.Connection
strTable = "tblSchools"strCol = "SchoolID"conn.Execute "ALTER TABLE " & strTable & _
" ALTER COLUMN " & strCol & " CHAR(15);"ExitHere:
conn.CloseSet conn = NothingExit Sub
ErrorHandler:MsgBox Err.Number & ":" & Err.DescriptionResume ExitHere
End Sub
2. Position the insertion point anywhere within the code of the
ChangeFieldType procedure and press F5 or choose Run | Run
Sub/UserForm to execute the procedure.
The above procedure modifies the SchoolID data type to store text data. You
can double-check the procedure changes by switching to the Microsoft Office
Access window and opening the tblSchools table in Design view.
When done, make sure you close the tblSchools table.
Creating, Modifying, and Deleting Tables and Fields | 507
Programming with the Jet Data Definition Language
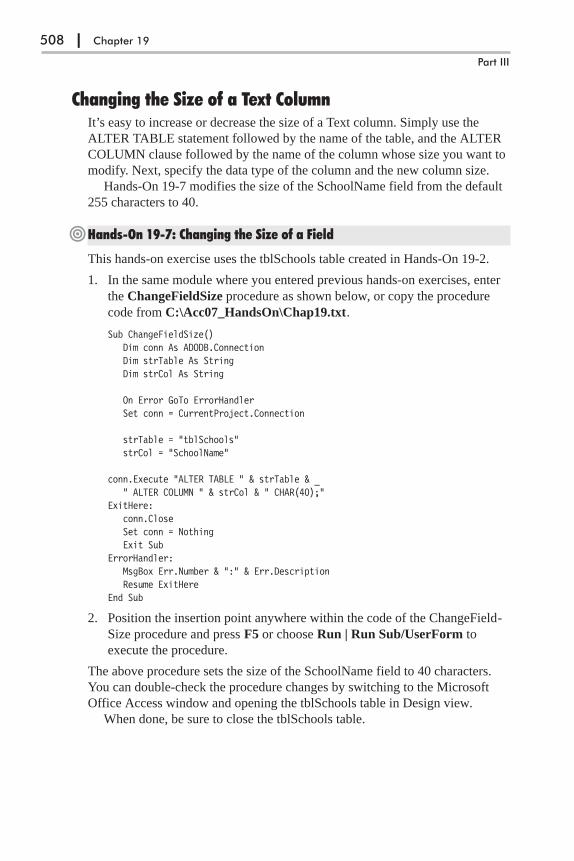
Changing the Size of a Text ColumnIt’s easy to increase or decrease the size of a Text column. Simply use the
ALTER TABLE statement followed by the name of the table, and the ALTER
COLUMN clause followed by the name of the column whose size you want to
modify. Next, specify the data type of the column and the new column size.
Hands-On 19-7 modifies the size of the SchoolName field from the default
255 characters to 40.
�Hands-On 19-7: Changing the Size of a Field
This hands-on exercise uses the tblSchools table created in Hands-On 19-2.
1. In the same module where you entered previous hands-on exercises, enter
the ChangeFieldSize procedure as shown below, or copy the procedure
code from C:\Acc07_HandsOn\Chap19.txt.
Sub ChangeFieldSize()Dim conn As ADODB.ConnectionDim strTable As StringDim strCol As String
On Error GoTo ErrorHandlerSet conn = CurrentProject.Connection
strTable = "tblSchools"strCol = "SchoolName"
conn.Execute "ALTER TABLE " & strTable & _" ALTER COLUMN " & strCol & " CHAR(40);"
ExitHere:conn.CloseSet conn = NothingExit Sub
ErrorHandler:MsgBox Err.Number & ":" & Err.DescriptionResume ExitHere
End Sub
2. Position the insertion point anywhere within the code of the ChangeField-
Size procedure and press F5 or choose Run | Run Sub/UserForm to
execute the procedure.
The above procedure sets the size of the SchoolName field to 40 characters.
You can double-check the procedure changes by switching to the Microsoft
Office Access window and opening the tblSchools table in Design view.
When done, be sure to close the tblSchools table.
508 | Chapter 19
Part III
Deleting a Column from a TableUse the DROP COLUMN clause in the ALTER TABLE statement to delete a
column from a table. You only need to specify the name of the field you want
to remove.
The example procedure in Hands-On 19-8 deletes the Budget2008 column
from the tblSchools table.
�Hands-On 19-8: Deleting a Field from a Table
This hands-on exercise uses the tblSchools table created in Hands-On 19-2.
Make sure this table contains the Budget2008 column, which was added in
Hands-On 19-5.
1. In the same module where you entered previous hands-on exercises, enter
the DeleteField procedure as shown below, or copy the procedure code
from C:\Acc07_HandsOn\Chap19.txt.
Sub DeleteField()Dim conn As ADODB.ConnectionDim strTable As StringDim strCol As String
On Error GoTo ErrorHandlerSet conn = CurrentProject.Connection
strTable = "tblSchools"strCol = "Budget2008"
conn.Execute "ALTER TABLE " & strTable & _" DROP COLUMN " & strCol & ";"
ExitHere:conn.CloseSet conn = NothingExit Sub
ErrorHandler:MsgBox Err.Number & ":" & Err.DescriptionResume ExitHere
End Sub
2. Position the insertion point anywhere within the code of the DeleteField
procedure and press F5 or choose Run | Run Sub/UserForm to execute
the procedure.
The above procedure removes the Budget2008 field from the tblSchools table.
Adding a Primary Key to a TableYou can use the ADD CONSTRAINT clause in the ALTER TABLE statement
to define one or more columns as a primary key. The primary key is defined
using the PRIMARY KEY keywords.
Hands-On 19-9 defines a primary key for the tblSchools table created in
Hands-On 19-2.
Creating, Modifying, and Deleting Tables and Fields | 509
Programming with the Jet Data Definition Language
�Hands-On 19-9: Adding a Primary Key to a Table
This hands-on exercise uses the tblSchools table created in Hands-On 19-2.
1. In the same module where you entered previous hands-on exercises, enter
the AddPrimaryKey procedure as shown below, or copy the procedure
code from C:\Acc07_HandsOn\Chap19.txt.
Sub AddPrimaryKey()Dim conn As ADODB.ConnectionDim strTable As StringDim strCol As String
On Error GoTo ErrorHandlerSet conn = CurrentProject.Connection
strTable = "tblSchools"strCol = "SchoolID"
conn.Execute "ALTER TABLE " & strTable & _" ADD CONSTRAINT pKey PRIMARY KEY " & _"(" & strCol & ");"
ExitHere:conn.CloseSet conn = NothingExit Sub
ErrorHandler:MsgBox Err.Number & ":" & Err.DescriptionResume ExitHere
End Sub
2. Position the insertion point anywhere within the code of the AddPrimary-
Key procedure and press F5 or choose Run | Run Sub/UserForm to
execute the procedure.
Adding a Multiple-Field Index to a TableUse the ADD CONSTRAINT clause and the UNIQUE keyword in the ALTER
TABLE statement to add a multiple-field index. The UNIQUE keyword pre-
vents duplicate values in the index.
�Hands-On 19-10: Adding a Unique Index Based on Two Fields to anExisting Table
This hands-on exercise uses the tblSchools table created in Hands-On 19-2.
1. In the same module where you entered previous hands-on exercises, enter
the AddMulti_UniqueIndex procedure as shown below, or copy the pro-
cedure code from C:\Acc07_HandsOn\Chap19.txt.
Sub AddMulti_UniqueIndex()Dim conn As ADODB.ConnectionDim strTable As StringDim strCol As String
510 | Chapter 19
Part III
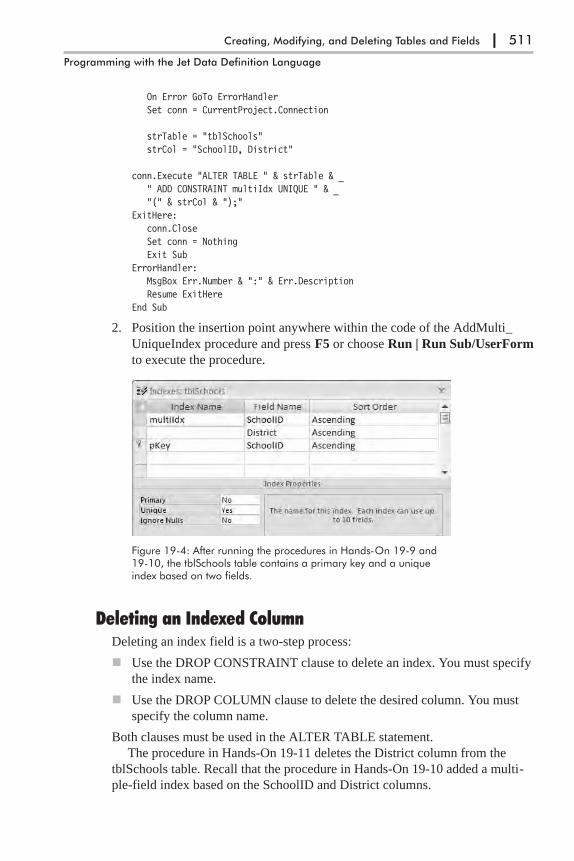
On Error GoTo ErrorHandlerSet conn = CurrentProject.Connection
strTable = "tblSchools"strCol = "SchoolID, District"
conn.Execute "ALTER TABLE " & strTable & _" ADD CONSTRAINT multiIdx UNIQUE " & _"(" & strCol & ");"
ExitHere:conn.CloseSet conn = NothingExit Sub
ErrorHandler:MsgBox Err.Number & ":" & Err.DescriptionResume ExitHere
End Sub
2. Position the insertion point anywhere within the code of the AddMulti_
UniqueIndex procedure and press F5 or choose Run | Run Sub/UserForm
to execute the procedure.
Deleting an Indexed ColumnDeleting an index field is a two-step process:
� Use the DROP CONSTRAINT clause to delete an index. You must specify
the index name.
� Use the DROP COLUMN clause to delete the desired column. You must
specify the column name.
Both clauses must be used in the ALTER TABLE statement.
The procedure in Hands-On 19-11 deletes the District column from the
tblSchools table. Recall that the procedure in Hands-On 19-10 added a multi-
ple-field index based on the SchoolID and District columns.
Creating, Modifying, and Deleting Tables and Fields | 511
Programming with the Jet Data Definition Language
Figure 19-4: After running the procedures in Hands-On 19-9 and19-10, the tblSchools table contains a primary key and a uniqueindex based on two fields.

�Hands-On 19-11: Deleting a Field that Is a Part of an Index
This hands-on exercise uses the tblSchools table created in Hands-On 19-2.
You must perform Hands-On 19-10 prior to running this procedure.
1. In the same module where you entered previous hands-on exercises, enter
the DeleteIdxField procedure as shown below, or copy the procedure code
from C:\Acc07_HandsOn\Chap19.txt.
Sub DeleteIdxField()Dim conn As ADODB.ConnectionDim strTable As StringDim strCol As StringDim strIdx As String
On Error GoTo ErrorHandlerSet conn = CurrentProject.Connection
strTable = "tblSchools"strCol = "District"strIdx = "multiIdx"
conn.Execute "ALTER TABLE " & strTable & _" DROP CONSTRAINT " & strIdx & ";"
conn.Execute "ALTER TABLE " & strTable & _" DROP COLUMN " & strCol & ";"
ExitHere:conn.CloseSet conn = NothingExit Sub
ErrorHandler:MsgBox Err.Number & ":" & Err.DescriptionResume ExitHere
End Sub
2. Position the insertion point anywhere within the code of the DeleteIdxField
procedure and press F5 or choose Run | Run Sub/UserForm to execute
the procedure.
Deleting an IndexUse the DROP CONSTRAINT clause to delete an index. You must specify the
index name.
The procedure in Hands-On 19-12 deletes a primary key index from the
tblSchools table.
�Hands-On 19-12: Deleting an Index
This hands-on exercise uses the tblSchools table created in Hands-On 19-2.
You must perform Hands-On 19-10 prior to running this procedure.
512 | Chapter 19
Part III

1. In the same module where you entered previous hands-on exercises, enter
the RemovePrimaryKeyIndex procedure as shown below, or copy the
procedure code from C:\Acc07_HandsOn\Chap19.txt.
Sub RemovePrimaryKeyIndex()Dim conn As ADODB.ConnectionDim strTable As StringDim strIdx As String
On Error GoTo ErrorHandlerSet conn = CurrentProject.Connection
strTable = "tblSchools"strIdx = "pKey"
conn.Execute "ALTER TABLE " & strTable & _" DROP CONSTRAINT " & strIdx & ";"
ExitHere:conn.CloseSet conn = NothingExit Sub
ErrorHandler:MsgBox Err.Number & ":" & Err.DescriptionResume ExitHere
End Sub
2. Position the insertion point anywhere within the code of the Remove-
PrimaryKeyIndex procedure and press F5 or choose Run | Run
Sub/UserForm to execute the procedure.
After running the procedures in Hands-On 19-11 and 19-12, the Indexes win-
dow (see Figure 19-4 earlier) should be empty.
Setting a Default Value for a Table ColumnSpecifying a default value for a field automatically enters that value in the field
each time a new record is added to a table unless the user provides a value for
the field. Using DDL, you can add a default value for an existing column with
the SET DEFAULT clause. The required syntax is as follows:
ALTER TABLE table_name ALTER [COLUMN] column_name SET DEFAULT default-value;
The [COLUMN] in the above syntax is optional.
�Hands-On 19-13: Setting a Default Value for a Field
This hands-on exercise uses the tblSchools table created in Hands-On 19-2.
1. In the same module where you entered previous hands-on exercises, enter
the SetDefaultFieldValue procedure as shown below, or copy the proce-
dure code from C:\Acc07_HandsOn\Chap19.txt.
Sub SetDefaultFieldValue()Dim conn As ADODB.Connection
Creating, Modifying, and Deleting Tables and Fields | 513
Programming with the Jet Data Definition Language

Dim strTable As StringDim strCol As StringDim strDefVal As StringDim strSQL As String
On Error GoTo ErrorHandlerSet conn = CurrentProject.Connection
strTable = "tblSchools"strCol = "City"strDefVal = "Boston"strSQL = "ALTER TABLE " & strTable & _
" ALTER " & strCol & " SET DEFAULT " & strDefVal
conn.Execute strSQL
ExitHere:conn.CloseSet conn = NothingExit Sub
ErrorHandler:MsgBox Err.Number & ":" & Err.DescriptionResume ExitHere
End Sub
2. Position the insertion point anywhere within the code of the SetDefault-
FieldValue procedure and press F5 or choose Run | Run Sub/UserForm
to execute the procedure.
514 | Chapter 19
Part III
Figure 19-5: After running the procedure in Hands-On 19-13, the DefaultValue property of the City field is set to Boston.
Changing the Seed and Increment Value of AutoNumberColumns
When a table contains a field with an AutoNumber data type, you can set a
seed value and an increment value. The seed value is the initial value for the
column, and the increment value is the number added to the seed value to
obtain a new counter value for the next record. If not specified, both seed and
increment values default to 1. You can use the DDL to change the seed and
increment values of AutoNumber columns by using one of the following three
statements:
ALTER TABLE Table_name ALTER COLUMN Column_name AUTOINCREMENT (seed, increment)
ALTER TABLE Table_name ALTER COLUMN Column_name COUNTER (seed, increment)
ALTER TABLE Table_name ALTER COLUMN Column_name IDENTITY (seed, increment)
The example procedure in Hands-On 19-15 modifies the seed value of the
existing AutoNumber column in the SchoolID column to start at 1000.
Because we changed the SchoolID column’s data type to the Text data type in
one of the earlier hands-on exercises, you will modify the SchoolID column in
the Sites.mdb file you created in Hands-On 19-3 at the beginning of this
chapter.
�Hands-On 19-14: Changing the Start (Seed) Value of the AutoNumber Field
This hands-on exercise uses the Sites.mdb database file and tblSchools table
created in Hands-On 19-3.
1. In the same module where you entered previous hands-on exercises, enter
the ChangeAutoNumber procedure as shown below, or copy the proce-
dure code from C:\Acc07_HandsOn\Chap19.txt.
Sub ChangeAutoNumber()Dim conn As ADODB.ConnectionDim strDb As StringDim strConnect As StringDim strTable As StringDim strCol As StringDim intSeed As Integer
On Error GoTo ErrorHandler
strDb = CurrentProject.Path & "\" & "Sites.mdb"strConnect = "Provider=Microsoft.Jet.OLEDB.4.0;" & _
"Data Source=" & strDb
strTable = "tblSchools"strCol = "SchoolID"intSeed = 1000
Creating, Modifying, and Deleting Tables and Fields | 515
Programming with the Jet Data Definition Language
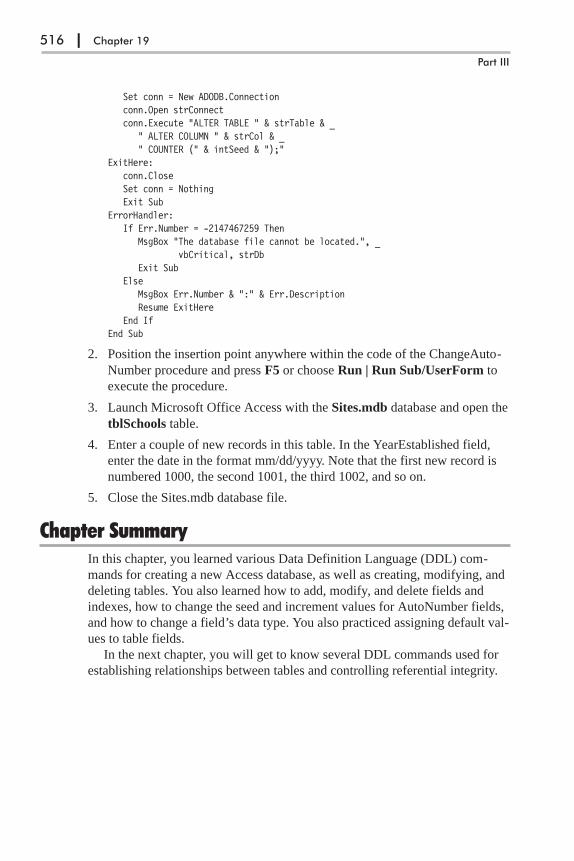
Set conn = New ADODB.Connectionconn.Open strConnectconn.Execute "ALTER TABLE " & strTable & _
" ALTER COLUMN " & strCol & _" COUNTER (" & intSeed & ");"
ExitHere:conn.CloseSet conn = NothingExit Sub
ErrorHandler:If Err.Number = -2147467259 Then
MsgBox "The database file cannot be located.", _vbCritical, strDb
Exit SubElse
MsgBox Err.Number & ":" & Err.DescriptionResume ExitHere
End IfEnd Sub
2. Position the insertion point anywhere within the code of the ChangeAuto-
Number procedure and press F5 or choose Run | Run Sub/UserForm to
execute the procedure.
3. Launch Microsoft Office Access with the Sites.mdb database and open the
tblSchools table.
4. Enter a couple of new records in this table. In the YearEstablished field,
enter the date in the format mm/dd/yyyy. Note that the first new record is
numbered 1000, the second 1001, the third 1002, and so on.
5. Close the Sites.mdb database file.
Chapter SummaryIn this chapter, you learned various Data Definition Language (DDL) com-
mands for creating a new Access database, as well as creating, modifying, and
deleting tables. You also learned how to add, modify, and delete fields and
indexes, how to change the seed and increment values for AutoNumber fields,
and how to change a field’s data type. You also practiced assigning default val-
ues to table fields.
In the next chapter, you will get to know several DDL commands used for
establishing relationships between tables and controlling referential integrity.
516 | Chapter 19
Part III
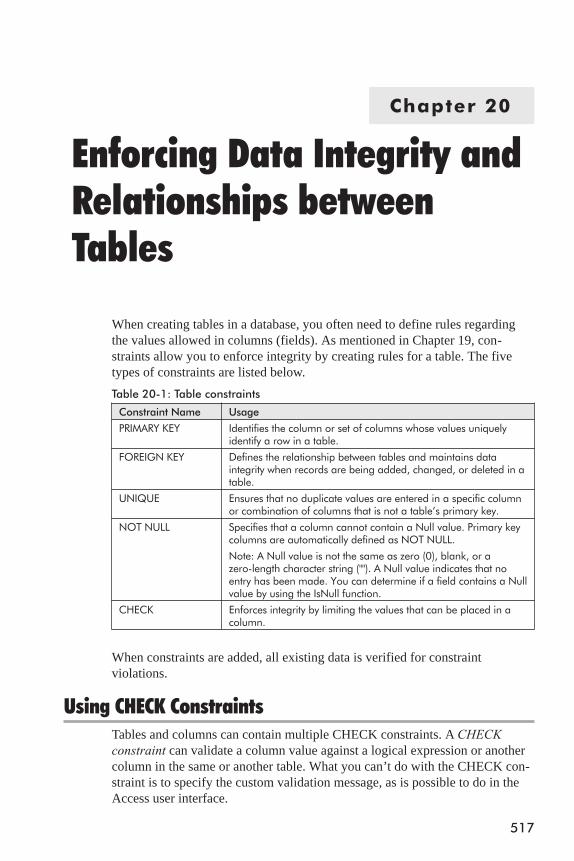
Chapter 20
Enforcing Data Integrity andRelationships betweenTables
When creating tables in a database, you often need to define rules regarding
the values allowed in columns (fields). As mentioned in Chapter 19, con-
straints allow you to enforce integrity by creating rules for a table. The five
types of constraints are listed below.
Table 20-1: Table constraints
Constraint Name Usage
PRIMARY KEY Identifies the column or set of columns whose values uniquelyidentify a row in a table.
FOREIGN KEY Defines the relationship between tables and maintains dataintegrity when records are being added, changed, or deleted in atable.
UNIQUE Ensures that no duplicate values are entered in a specific columnor combination of columns that is not a table’s primary key.
NOT NULL Specifies that a column cannot contain a Null value. Primary keycolumns are automatically defined as NOT NULL.
Note: A Null value is not the same as zero (0), blank, or azero-length character string (""). A Null value indicates that noentry has been made. You can determine if a field contains a Nullvalue by using the IsNull function.
CHECK Enforces integrity by limiting the values that can be placed in acolumn.
When constraints are added, all existing data is verified for constraint
violations.
Using CHECK ConstraintsTables and columns can contain multiple CHECK constraints. A CHECK
constraint can validate a column value against a logical expression or another
column in the same or another table. What you can’t do with the CHECK con-
straint is to specify the custom validation message, as is possible to do in the
Access user interface.
517

The procedure in Hands-On 20-1 uses a PRIMARY KEY constraint explic-
itly named PrimaryKey to identify the ID column as a primary key. The
CHECK constraint used in this procedure ensures that only numbers within the
specified range are entered in the YearsWorked table column. You can apply
CHECK constraints to a single column or to multiple columns. When a table is
deleted, CHECK constraints are also dropped.
�Hands-On 20-1: Using a CHECK Constraint to Specify a Condition for AllValues Entered for the Column
1. Start Microsoft Office Access 2007 and create a new Microsoft Office
Access 2007 database named Chap20.accdb in your C:\Acc07_
ByExample folder.
2. Switch to the Visual Basic Editor window and choose Tools | References.
In the References dialog box, scroll down to locate the Microsoft ActiveX
2.8 Data Objects Library. Click the check box to the left of this library
name to set a reference to it and click OK to exit the dialog box.
3. Choose Insert | Module to add a new module to the current VBA project.
4. In the module’s Code window, type the CheckColumnValue procedure
shown below, or copy the procedure code from C:\Acc07_HandsOn\
Chap20.txt.
Sub CheckColumnValue()' you must set up a reference to' the Microsoft ActiveX Data Objects Library' in the References dialog box
Dim conn As ADODB.ConnectionDim strTable As String
On Error GoTo ErrorHandler
Set conn = CurrentProject.ConnectionstrTable = "tblAwards"conn.Execute "CREATE TABLE " & strTable & _
"(ID AUTOINCREMENT CONSTRAINT PrimaryKey PRIMARY KEY," & _"YearsWorked INT, CONSTRAINT FromTo " & _"CHECK (YearsWorked BETWEEN 1 AND 30));"
ExitHere:conn.CloseSet conn = NothingExit Sub
ErrorHandler:MsgBox Err.Number & ":" & Err.DescriptionResume ExitHere
End Sub
5. Position the insertion point anywhere within the code of the Check-
ColumnValue procedure and press F5 or choose Run | Run Sub/
UserForm to execute the procedure.
518 | Chapter 20
Part III
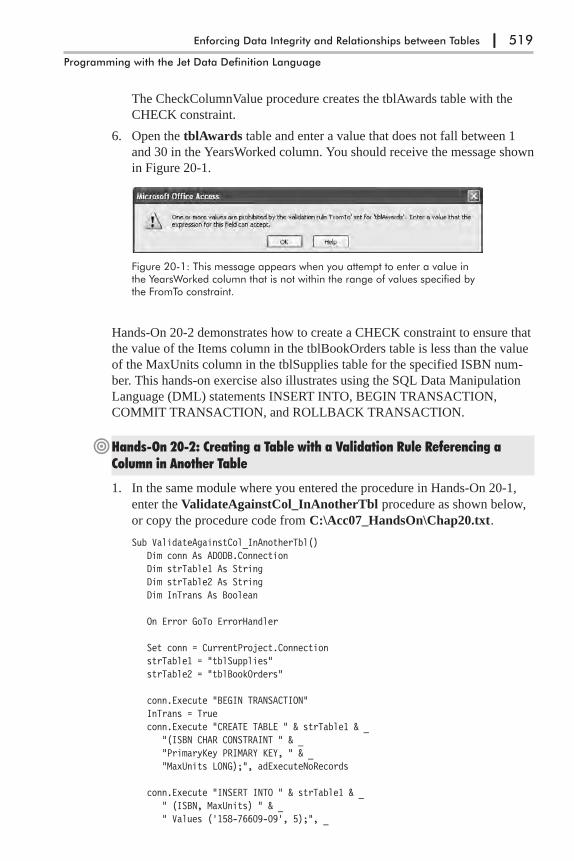
The CheckColumnValue procedure creates the tblAwards table with the
CHECK constraint.
6. Open the tblAwards table and enter a value that does not fall between 1
and 30 in the YearsWorked column. You should receive the message shown
in Figure 20-1.
Hands-On 20-2 demonstrates how to create a CHECK constraint to ensure that
the value of the Items column in the tblBookOrders table is less than the value
of the MaxUnits column in the tblSupplies table for the specified ISBN num-
ber. This hands-on exercise also illustrates using the SQL Data Manipulation
Language (DML) statements INSERT INTO, BEGIN TRANSACTION,
COMMIT TRANSACTION, and ROLLBACK TRANSACTION.
�Hands-On 20-2: Creating a Table with a Validation Rule Referencing aColumn in Another Table
1. In the same module where you entered the procedure in Hands-On 20-1,
enter the ValidateAgainstCol_InAnotherTbl procedure as shown below,
or copy the procedure code from C:\Acc07_HandsOn\Chap20.txt.
Sub ValidateAgainstCol_InAnotherTbl()Dim conn As ADODB.ConnectionDim strTable1 As StringDim strTable2 As StringDim InTrans As Boolean
On Error GoTo ErrorHandler
Set conn = CurrentProject.ConnectionstrTable1 = "tblSupplies"strTable2 = "tblBookOrders"
conn.Execute "BEGIN TRANSACTION"InTrans = Trueconn.Execute "CREATE TABLE " & strTable1 & _
"(ISBN CHAR CONSTRAINT " & _"PrimaryKey PRIMARY KEY, " & _"MaxUnits LONG);", adExecuteNoRecords
conn.Execute "INSERT INTO " & strTable1 & _" (ISBN, MaxUnits) " & _" Values ('158-76609-09', 5);", _
Enforcing Data Integrity and Relationships between Tables | 519
Programming with the Jet Data Definition Language
Figure 20-1: This message appears when you attempt to enter a value inthe YearsWorked column that is not within the range of values specified bythe FromTo constraint.

adExecuteNoRecords
conn.Execute "INSERT INTO " & strTable1 & _" (ISBN, MaxUnits) " & _" Values ('167-23455-69', 7);", _adExecuteNoRecords
conn.Execute "CREATE TABLE " & strTable2 & _"(OrderNo AUTOINCREMENT CONSTRAINT " & _"PrimaryKey PRIMARY KEY, " & _"ISBN CHAR, Items LONG, " & _"CONSTRAINT OnHandConstr CHECK " & _"(Items <(SELECT MaxUnits FROM " & strTable1 & _" WHERE ISBN = " & strTable2 & ".ISBN)));", _adExecuteNoRecords
conn.Execute "COMMIT TRANSACTION"InTrans = FalseApplication.RefreshDatabaseWindow
ExitHere:conn.CloseSet conn = NothingExit Sub
ErrorHandler:If InTrans Then
conn.Execute "ROLLBACK TRANSACTION"Resume ExitHere
ElseMsgBox Err.Number & ":" & Err.DescriptionExit Sub
End IfEnd Sub
2. Position the insertion point anywhere within the code of the Validate-
AgainstCol_InAnotherTbl procedure and press F5 or choose Run | Run
Sub/UserForm to execute the procedure.
The above procedure creates two tables. Because the Items column in the
tblBookOrders table needs to be validated against the contents of the
MaxUnits column in the tblSupplies table, we wrapped the process of cre-
ating these tables and entering data in the tblSupplies table into a transac-
tion. To trap errors that could occur during the procedure execution, we
declared a Boolean variable named InTrans to help us determine whether
an error occurred during the transaction. Therefore, if the value of the
InTrans variable is True, we will cancel the transaction. Notice that in
Access SQL syntax we use the BEGIN TRANSACTION statement to start
the transaction, the COMMIT TRANSACTION statement to save the
results of the transaction, and the ROLLBACK TRANSACTION statement
to cancel any changes. These transaction statements can only be used
through the Jet OLE DB Provider and ADO. They will cause an error when
used with the Access user interface or DAO (Data Access Objects).
In this example procedure we used the adExecuteNoRecords option to
specify that no rows should be returned. You can use this setting with the
Connection or Command object’s Execute method to improve performance
520 | Chapter 20
Part III
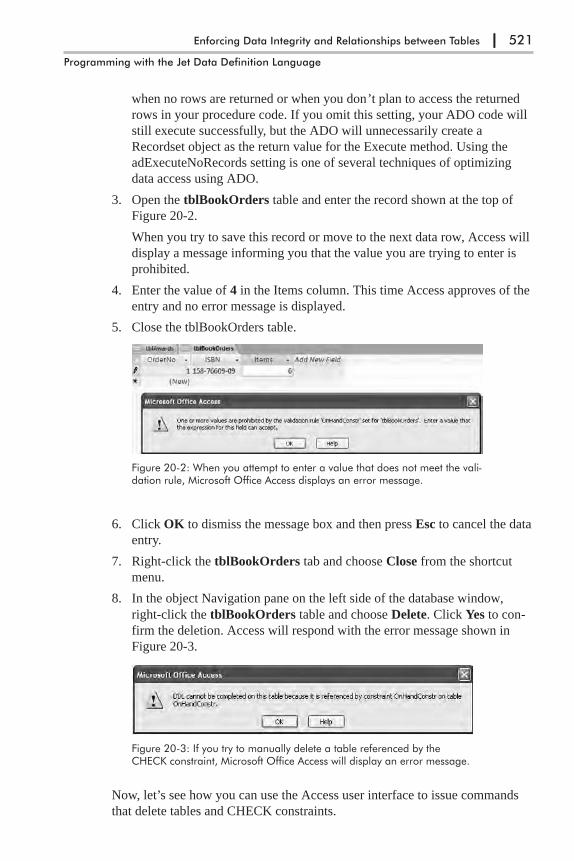
when no rows are returned or when you don’t plan to access the returned
rows in your procedure code. If you omit this setting, your ADO code will
still execute successfully, but the ADO will unnecessarily create a
Recordset object as the return value for the Execute method. Using the
adExecuteNoRecords setting is one of several techniques of optimizing
data access using ADO.
3. Open the tblBookOrders table and enter the record shown at the top of
Figure 20-2.
When you try to save this record or move to the next data row, Access will
display a message informing you that the value you are trying to enter is
prohibited.
4. Enter the value of 4 in the Items column. This time Access approves of the
entry and no error message is displayed.
5. Close the tblBookOrders table.
6. Click OK to dismiss the message box and then press Esc to cancel the data
entry.
7. Right-click the tblBookOrders tab and choose Close from the shortcut
menu.
8. In the object Navigation pane on the left side of the database window,
right-click the tblBookOrders table and choose Delete. Click Yes to con-
firm the deletion. Access will respond with the error message shown in
Figure 20-3.
Now, let’s see how you can use the Access user interface to issue commands
that delete tables and CHECK constraints.
Enforcing Data Integrity and Relationships between Tables | 521
Programming with the Jet Data Definition Language
Figure 20-2: When you attempt to enter a value that does not meet the vali-dation rule, Microsoft Office Access displays an error message.
Figure 20-3: If you try to manually delete a table referenced by theCHECK constraint, Microsoft Office Access will display an error message.
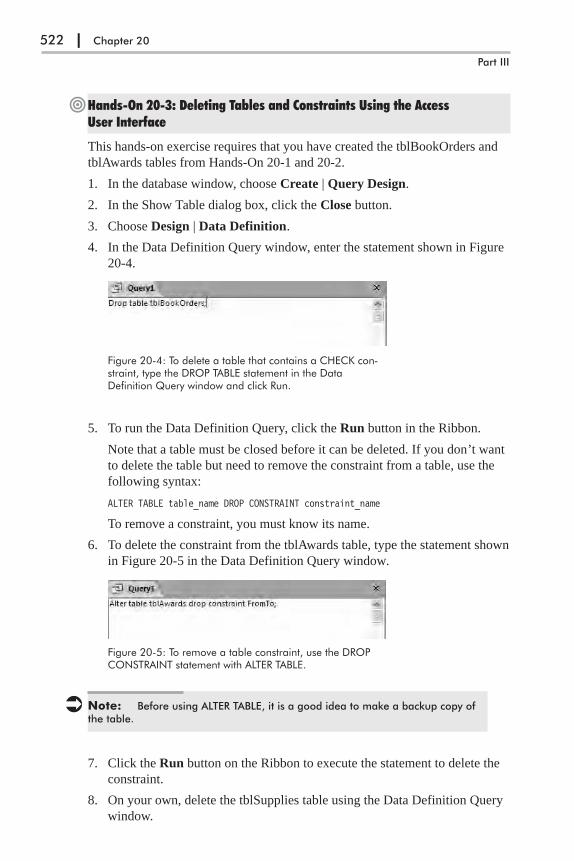
�Hands-On 20-3: Deleting Tables and Constraints Using the AccessUser Interface
This hands-on exercise requires that you have created the tblBookOrders and
tblAwards tables from Hands-On 20-1 and 20-2.
1. In the database window, choose Create | Query Design.
2. In the Show Table dialog box, click the Close button.
3. Choose Design | Data Definition.
4. In the Data Definition Query window, enter the statement shown in Figure
20-4.
5. To run the Data Definition Query, click the Run button in the Ribbon.
Note that a table must be closed before it can be deleted. If you don’t want
to delete the table but need to remove the constraint from a table, use the
following syntax:
ALTER TABLE table_name DROP CONSTRAINT constraint_name
To remove a constraint, you must know its name.
6. To delete the constraint from the tblAwards table, type the statement shown
in Figure 20-5 in the Data Definition Query window.
� Note: Before using ALTER TABLE, it is a good idea to make a backup copy ofthe table.
7. Click the Run button on the Ribbon to execute the statement to delete the
constraint.
8. On your own, delete the tblSupplies table using the Data Definition Query
window.
522 | Chapter 20
Part III
Figure 20-4: To delete a table that contains a CHECK con-straint, type the DROP TABLE statement in the DataDefinition Query window and click Run.
Figure 20-5: To remove a table constraint, use the DROPCONSTRAINT statement with ALTER TABLE.
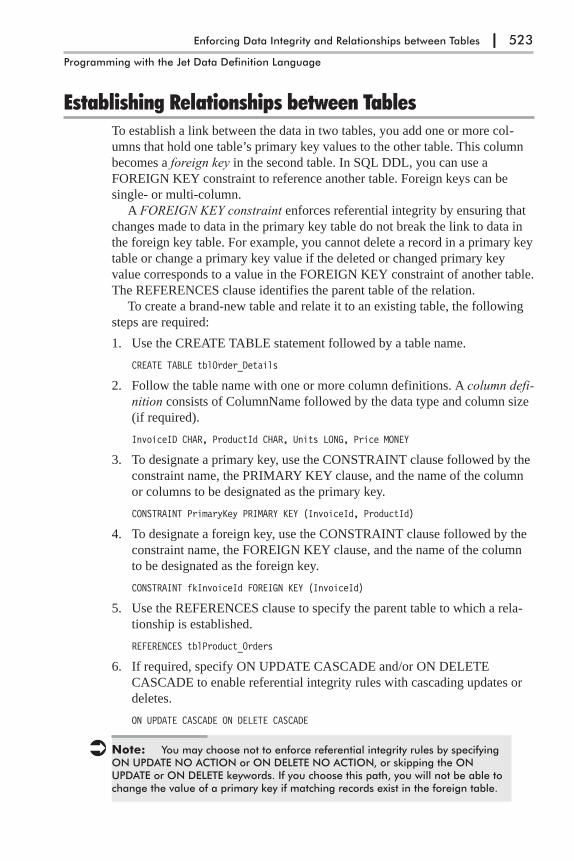
Establishing Relationships between TablesTo establish a link between the data in two tables, you add one or more col-
umns that hold one table’s primary key values to the other table. This column
becomes a foreign key in the second table. In SQL DDL, you can use a
FOREIGN KEY constraint to reference another table. Foreign keys can be
single- or multi-column.
A FOREIGN KEY constraint enforces referential integrity by ensuring that
changes made to data in the primary key table do not break the link to data in
the foreign key table. For example, you cannot delete a record in a primary key
table or change a primary key value if the deleted or changed primary key
value corresponds to a value in the FOREIGN KEY constraint of another table.
The REFERENCES clause identifies the parent table of the relation.
To create a brand-new table and relate it to an existing table, the following
steps are required:
1. Use the CREATE TABLE statement followed by a table name.
CREATE TABLE tblOrder_Details
2. Follow the table name with one or more column definitions. A column defi-
nition consists of ColumnName followed by the data type and column size
(if required).
InvoiceID CHAR, ProductId CHAR, Units LONG, Price MONEY
3. To designate a primary key, use the CONSTRAINT clause followed by the
constraint name, the PRIMARY KEY clause, and the name of the column
or columns to be designated as the primary key.
CONSTRAINT PrimaryKey PRIMARY KEY (InvoiceId, ProductId)
4. To designate a foreign key, use the CONSTRAINT clause followed by the
constraint name, the FOREIGN KEY clause, and the name of the column
to be designated as the foreign key.
CONSTRAINT fkInvoiceId FOREIGN KEY (InvoiceId)
5. Use the REFERENCES clause to specify the parent table to which a rela-
tionship is established.
REFERENCES tblProduct_Orders
6. If required, specify ON UPDATE CASCADE and/or ON DELETE
CASCADE to enable referential integrity rules with cascading updates or
deletes.
ON UPDATE CASCADE ON DELETE CASCADE
� Note: You may choose not to enforce referential integrity rules by specifyingON UPDATE NO ACTION or ON DELETE NO ACTION, or skipping the ONUPDATE or ON DELETE keywords. If you choose this path, you will not be able tochange the value of a primary key if matching records exist in the foreign table.
Enforcing Data Integrity and Relationships between Tables | 523
Programming with the Jet Data Definition Language

Refer to the procedure in Hands-On 20-4 to find out how to correctly combine
the above example statements into a single SQL statement.
�Hands-On 20-4: Relating Two Tables and Setting up Cascading ReferentialIntegrity Rules
1. In the Visual Basic Editor window, choose Insert | Module.
2. In the module’s Code window, enter the RelateTables procedure as shown
below, or copy the procedure code from C:\Acc07_HandsOn\Chap20.txt.
Sub RelateTables()Dim conn As ADODB.ConnectionDim strPrimaryTbl As StringDim strForeignTbl As String
On Error GoTo ErrorHandler
Set conn = CurrentProject.ConnectionstrPrimaryTbl = "tblProduct_Orders"strForeignTbl = "tblOrder_Details"
conn.Execute "CREATE TABLE " & strPrimaryTbl & _"(InvoiceID CHAR(15), PaymentType CHAR(20), " & _" PaymentTerms CHAR(25), Discount LONG, " & _" CONSTRAINT PrimaryKey PRIMARY KEY (InvoiceID));", _adExecuteNoRecords
conn.Execute "CREATE TABLE " & strForeignTbl & _"(InvoiceID CHAR(15), ProductID CHAR(15), " & _" Units LONG, Price MONEY, " & _"CONSTRAINT PrimaryKey PRIMARY KEY (InvoiceID, ProductID), " & _"CONSTRAINT fkInvoiceID FOREIGN KEY (InvoiceID) " & _"REFERENCES " & strPrimaryTbl & _" ON UPDATE CASCADE ON DELETE CASCADE);", _adExecuteNoRecords
Application.RefreshDatabaseWindowExitHere:
conn.CloseSet conn = NothingExit Sub
ErrorHandler:MsgBox Err.Number & ":" & Err.DescriptionResume ExitHere
End Sub
3. Position the insertion point anywhere within the code of the RelateTables
procedure and press F5 or choose Run | Run Sub/UserForm to execute
the procedure.
The RelateTables procedure creates and joins two tables. A primary key table
named tblProduct _Orders is created with a primary key on the InvoiceID
field. The foreign key table named tblOrder_Details is created with a multi-
field primary key index based on the ProductID and InvoiceID fields. The
524 | Chapter 20
Part III

REFERENCES clause specifies the tblProduct_Orders table as the parent
table. The created relationship has the referential integrity rules enforced via
the ON UPDATE CASCADE and ON DELETE CASCADE statements.
The outcome of the RelateTables procedure is illustrated in the following
figures. Figure 20-6 displays the one-to-many relationship between
tblProduct_Orders and tblOrder_Details. Figure 20-7 presents the Edit Rela-
tionships window in which both cascading updates and deletes are selected.
Using the Data Definition Query WindowTo enhance your understanding about creating tables and relationships with the
Data Definition Language, perform Hands-On 20-5 using the Data Definition
Query window.
�Hands-On 20-5: Running Data Definition Statements in the Microsoft AccessUser Interface
Each of the statements in this hands-on exercise can be executed by choosing
Design | Run.
1. In the database window, choose Create | Query Design.
2. In the Show Table dialog box, click the Close button.
3. Choose Design | Data Definition.
Enforcing Data Integrity and Relationships between Tables | 525
Programming with the Jet Data Definition Language
Figure 20-6: To accessthe Relationships win-dow, choose DatabaseTools | Relationships.
Figure 20-7: To accessthe Edit Relationshipswindow, choose Design| Edit Relationship.
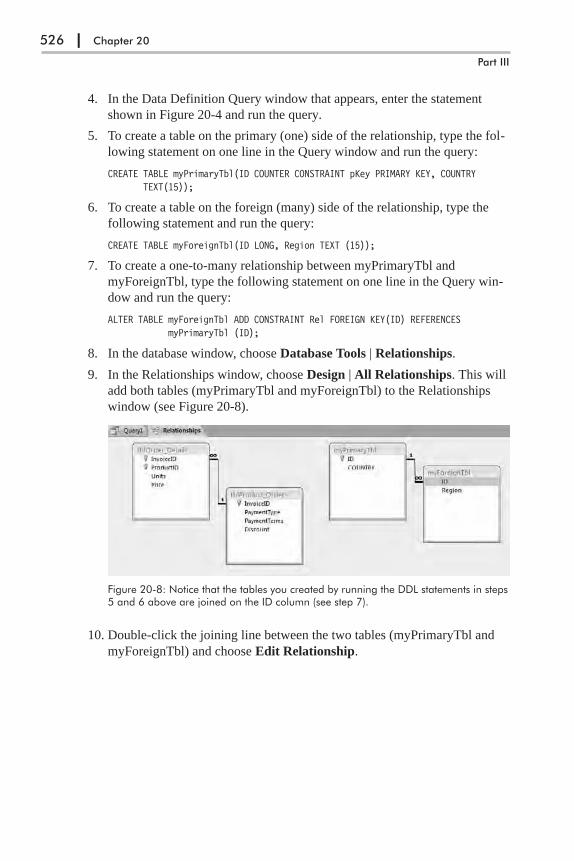
4. In the Data Definition Query window that appears, enter the statement
shown in Figure 20-4 and run the query.
5. To create a table on the primary (one) side of the relationship, type the fol-
lowing statement on one line in the Query window and run the query:
CREATE TABLE myPrimaryTbl(ID COUNTER CONSTRAINT pKey PRIMARY KEY, COUNTRYTEXT(15));
6. To create a table on the foreign (many) side of the relationship, type the
following statement and run the query:
CREATE TABLE myForeignTbl(ID LONG, Region TEXT (15));
7. To create a one-to-many relationship between myPrimaryTbl and
myForeignTbl, type the following statement on one line in the Query win-
dow and run the query:
ALTER TABLE myForeignTbl ADD CONSTRAINT Rel FOREIGN KEY(ID) REFERENCESmyPrimaryTbl (ID);
8. In the database window, choose Database Tools | Relationships.
9. In the Relationships window, choose Design | All Relationships. This will
add both tables (myPrimaryTbl and myForeignTbl) to the Relationships
window (see Figure 20-8).
10. Double-click the joining line between the two tables (myPrimaryTbl and
myForeignTbl) and choose Edit Relationship.
526 | Chapter 20
Part III
Figure 20-8: Notice that the tables you created by running the DDL statements in steps5 and 6 above are joined on the ID column (see step 7).

11. To delete the relationship between the tables, type the following statement
and run the query:
ALTER TABLE myForeignTbl DROP CONSTRAINT Rel;
12. To delete the table on the one side (myPrimaryTbl), type the following
statement and run the query:
DROP TABLE myPrimaryTbl;
13. To delete the table on the many side (myForeignTbl), type the following
statement and run the query:
DROP TABLE myForeignTbl;
Chapter SummaryIn this chapter, you learned how to enforce data integrity by creating rules for
tables with constraints. You learned how to validate data against another col-
umn in the same table or a column located in another table. You also learned
how to use the Access Data Definition Query window to delete tables that have
constraints and remove constraints from a table. Finally, you saw how you can
establish relationships between tables using the DDL commands inside your
VBA procedures. In addition, one of the procedures in this chapter introduced
you to a couple of advanced Data Manipulation Language (DML) statements
used for inserting data into tables and executing transactions.
The next chapter focuses on ways to use DDL for defining and removing
indexes and primary keys.
Enforcing Data Integrity and Relationships between Tables | 527
Programming with the Jet Data Definition Language
Figure 20-9: You canedit relationshipsbetween tables via theEdit Relationshipswindow.
Chapter 21
Defining Indexes andPrimary Keys
Indexes speed the processes of finding and sorting records. You should create
indexes for fields that are frequently used in searches and in sorting. You can
create an index on a new or existing table. An index can be made of one or
more fields. This chapter presents a number of procedures that use Data Defi-
nition Language statements to define indexes and primary keys.
Creating Tables with IndexesYou can create an index while creating a table by using the CONSTRAINT
clause with the CREATE TABLE statement. The procedure in Hands-On 21-1
creates a new table called Supplier1 with a unique index called idxSupplier-
Name based on the SupplierName field.
�Hands-On 21-1: Creating a Table with a Single-Field Index
1. Start Microsoft Office Access 2007 and create a new Microsoft Office
Access 2007 database named Chap21.accdb in your C:\Acc07_
ByExample folder.
2. Switch to the Visual Basic Editor window and choose Tools | References.
In the References dialog box, scroll down to locate the Microsoft ActiveX
2.8 Data Objects Library. Click the check box to the left of this library
name to set a reference to it and click OK to exit the dialog box.
3. Choose Insert | Module to add a new module to the current VBA project.
4. In the module’s Code window, type the SingleField_Index procedure
shown below, or copy the procedure code from C:\Acc07_HandsOn\
Chap21.txt.
Sub SingleField_Index()Dim conn As ADODB.ConnectionDim strTable As String
On Error GoTo ErrorHandler
Set conn = CurrentProject.Connection
528

strTable = "Supplier1"
conn.Execute "CREATE TABLE " & strTable _& "(SupplierID INTEGER, " _& "SupplierName CHAR (30), " _& "SupplierPhone CHAR (12), " _& "SupplierCity CHAR (19), " _& "CONSTRAINT idxSupplierName UNIQUE " _& "(SupplierName));"
Application.RefreshDatabaseWindowExitHere:
conn.CloseSet conn = NothingExit Sub
ErrorHandler:MsgBox Err.Number & ":" & Err.DescriptionResume ExitHere
End Sub
5. Position the insertion point anywhere within the code of the SingleField_
Index procedure and press F5 or choose Run | Run Sub/UserForm to exe-
cute the procedure.
When you run this procedure and then switch to the Access database win-
dow, you will notice a table named Supplier1. This table contains four
fields. There is a unique index on the SupplierName field as shown in Fig-
ure 21-1.
Adding an Index to an Existing TableTo add an index to an existing table, use the CREATE INDEX statement. You
can add an index based on one or more fields. The procedure in Hands-On
21-2 demonstrates how to add an index to the Supplier1 table that you created
in Hands-On 21-1.
�Hands-On 21-2: Adding a Single-Field Index to an Existing Table
1. In the same module where you entered the procedure in Hands-On 21-1,
enter the SingleField_Index2 procedure as shown below, or copy the pro-
cedure code from C:\Acc07_HandsOn\Chap21.txt.
Defining Indexes and Primary Keys | 529
Programming with the Jet Data Definition Language
Figure 21-1: TheidxSupplierName indexwas created by runningthe procedure inHands-On 21-1.
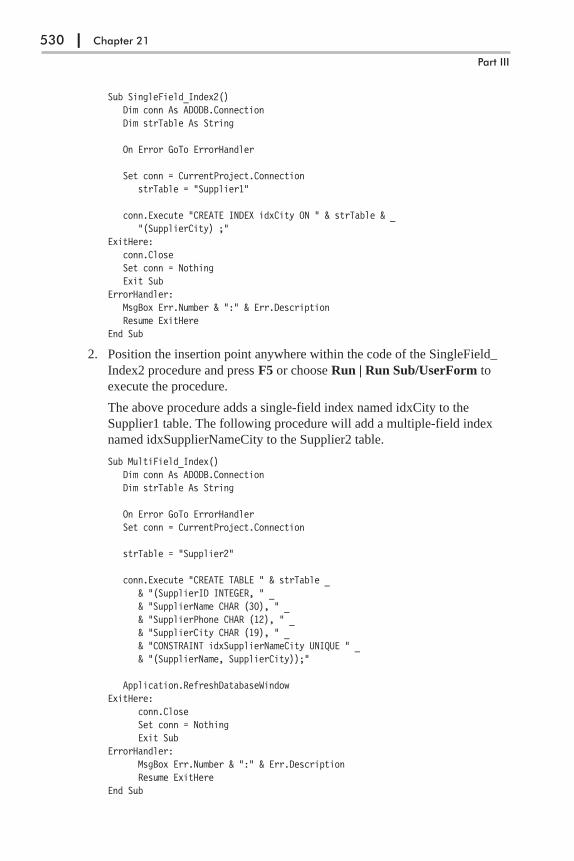
Sub SingleField_Index2()Dim conn As ADODB.ConnectionDim strTable As String
On Error GoTo ErrorHandler
Set conn = CurrentProject.ConnectionstrTable = "Supplier1"
conn.Execute "CREATE INDEX idxCity ON " & strTable & _"(SupplierCity) ;"
ExitHere:conn.CloseSet conn = NothingExit Sub
ErrorHandler:MsgBox Err.Number & ":" & Err.DescriptionResume ExitHere
End Sub
2. Position the insertion point anywhere within the code of the SingleField_
Index2 procedure and press F5 or choose Run | Run Sub/UserForm to
execute the procedure.
The above procedure adds a single-field index named idxCity to the
Supplier1 table. The following procedure will add a multiple-field index
named idxSupplierNameCity to the Supplier2 table.
Sub MultiField_Index()Dim conn As ADODB.ConnectionDim strTable As String
On Error GoTo ErrorHandlerSet conn = CurrentProject.Connection
strTable = "Supplier2"
conn.Execute "CREATE TABLE " & strTable _& "(SupplierID INTEGER, " _& "SupplierName CHAR (30), " _& "SupplierPhone CHAR (12), " _& "SupplierCity CHAR (19), " _& "CONSTRAINT idxSupplierNameCity UNIQUE " _& "(SupplierName, SupplierCity));"
Application.RefreshDatabaseWindowExitHere:
conn.CloseSet conn = NothingExit Sub
ErrorHandler:MsgBox Err.Number & ":" & Err.DescriptionResume ExitHere
End Sub
530 | Chapter 21
Part III

Creating a Table with a Primary KeyWhen you create a database table you should define a primary key to uniquely
identify rows within the table. A primary key allows you to relate a particular
table with other tables in the database (for procedure examples, refer to the
previous chapter). A table can have only one primary key; however, a primary
key can consist of more than one column.
To create a table with a primary key, use the CONSTRAINT clause with the
CREATE TABLE statement. The procedure in Hands-On 21-3 uses the follow-
ing CONSTRAINT clause to create a single-field primary key based on the
SupplierID field:
CONSTRAINT idxPrimary PRIMARY KEY(SupplierID)
To create a table with a primary key based on two or more columns, specify
column names in parentheses following the PRIMARY KEY keywords. For
example, the following CONSTRAINT clause will create a primary key based
on the SupplierID and SupplierName columns:
CONSTRAINT idxPrimary PRIMARY KEY (SupplierID, SupplierName)
�Hands-On 21-3: Creating a Single-Field Primary Key
1. Switch to the Visual Basic Editor window and insert a new module.
2. In the module’s Code window, enter the SingleField_PKey procedure as
shown below, or copy the procedure code from C:\Acc07_HandsOn\
Chap21.txt.
Sub SingleField_PKey()Dim conn As ADODB.ConnectionDim strTable As String
On Error GoTo ErrorHandler
Set conn = CurrentProject.ConnectionstrTable = "Supplier3"
conn.Execute "CREATE TABLE " & strTable _& "(SupplierID INTEGER, " _& "SupplierName CHAR (30), " _& "SupplierPhone CHAR (12), " _& "SupplierCity CHAR (19), " _& "CONSTRAINT idxPrimary PRIMARY KEY " _& "(SupplierID));"
Application.RefreshDatabaseWindowExitHere:
conn.CloseSet conn = NothingExit Sub
ErrorHandler:MsgBox Err.Number & ":" & Err.DescriptionResume ExitHere
End Sub
Defining Indexes and Primary Keys | 531
Programming with the Jet Data Definition Language
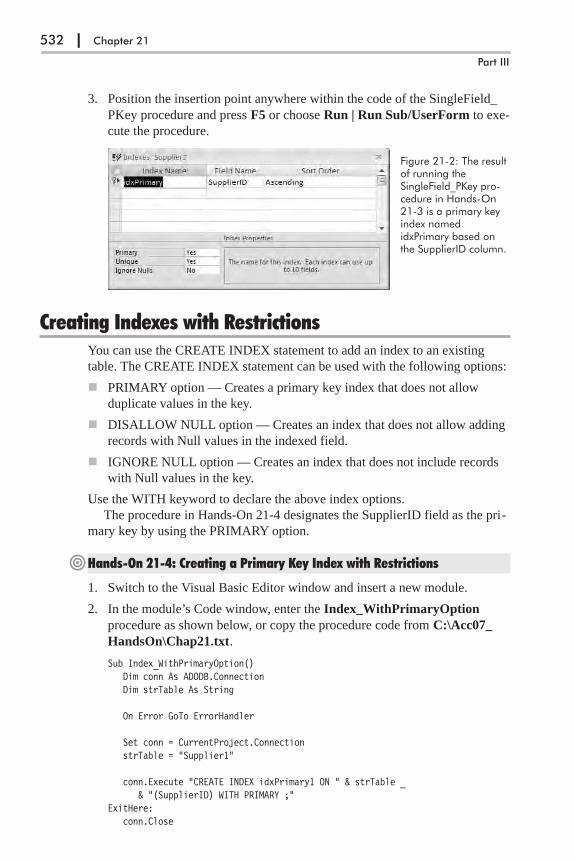
3. Position the insertion point anywhere within the code of the SingleField_
PKey procedure and press F5 or choose Run | Run Sub/UserForm to exe-
cute the procedure.
Creating Indexes with RestrictionsYou can use the CREATE INDEX statement to add an index to an existing
table. The CREATE INDEX statement can be used with the following options:
� PRIMARY option — Creates a primary key index that does not allow
duplicate values in the key.
� DISALLOW NULL option — Creates an index that does not allow adding
records with Null values in the indexed field.
� IGNORE NULL option — Creates an index that does not include records
with Null values in the key.
Use the WITH keyword to declare the above index options.
The procedure in Hands-On 21-4 designates the SupplierID field as the pri-
mary key by using the PRIMARY option.
�Hands-On 21-4: Creating a Primary Key Index with Restrictions
1. Switch to the Visual Basic Editor window and insert a new module.
2. In the module’s Code window, enter the Index_WithPrimaryOption
procedure as shown below, or copy the procedure code from C:\Acc07_
HandsOn\Chap21.txt.
Sub Index_WithPrimaryOption()Dim conn As ADODB.ConnectionDim strTable As String
On Error GoTo ErrorHandler
Set conn = CurrentProject.ConnectionstrTable = "Supplier1"
conn.Execute "CREATE INDEX idxPrimary1 ON " & strTable _& "(SupplierID) WITH PRIMARY ;"
ExitHere:conn.Close
532 | Chapter 21
Part III
Figure 21-2: The resultof running theSingleField_PKey pro-cedure in Hands-On21-3 is a primary keyindex namedidxPrimary based onthe SupplierID column.
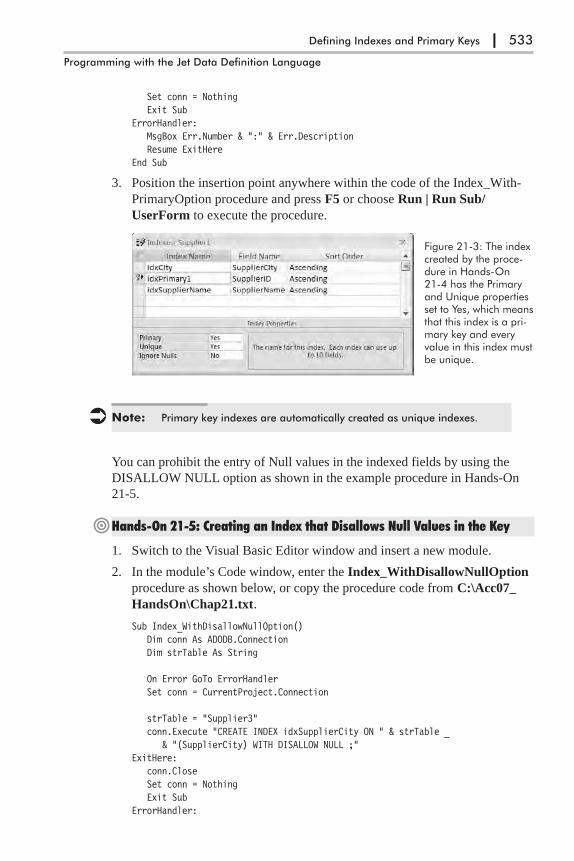
Set conn = NothingExit Sub
ErrorHandler:MsgBox Err.Number & ":" & Err.DescriptionResume ExitHere
End Sub
3. Position the insertion point anywhere within the code of the Index_With-
PrimaryOption procedure and press F5 or choose Run | Run Sub/
UserForm to execute the procedure.
� Note: Primary key indexes are automatically created as unique indexes.
You can prohibit the entry of Null values in the indexed fields by using the
DISALLOW NULL option as shown in the example procedure in Hands-On
21-5.
�Hands-On 21-5: Creating an Index that Disallows Null Values in the Key
1. Switch to the Visual Basic Editor window and insert a new module.
2. In the module’s Code window, enter the Index_WithDisallowNullOption
procedure as shown below, or copy the procedure code from C:\Acc07_
HandsOn\Chap21.txt.
Sub Index_WithDisallowNullOption()Dim conn As ADODB.ConnectionDim strTable As String
On Error GoTo ErrorHandlerSet conn = CurrentProject.Connection
strTable = "Supplier3"conn.Execute "CREATE INDEX idxSupplierCity ON " & strTable _
& "(SupplierCity) WITH DISALLOW NULL ;"ExitHere:
conn.CloseSet conn = NothingExit Sub
ErrorHandler:
Defining Indexes and Primary Keys | 533
Programming with the Jet Data Definition Language
Figure 21-3: The indexcreated by the proce-dure in Hands-On21-4 has the Primaryand Unique propertiesset to Yes, which meansthat this index is a pri-mary key and everyvalue in this index mustbe unique.

MsgBox Err.Number & ":" & Err.DescriptionResume ExitHere
End Sub
3. Position the insertion point anywhere within the code of the Index_With-
DisallowNullOption procedure and press F5 or choose Run | Run
Sub/UserForm to execute the procedure.
You can prevent records with Null values in the indexed fields from being
included in the index by using the IGNORE NULL option, as illustrated in
Hands-On 21-6.
�Hands-On 21-6: Creating an Index with the Ignore Null Option
1. Switch to the Visual Basic Editor window and insert a new module.
2. In the module’s Code window, enter the Index_WithIgnoreNullOption
procedure as shown below, or copy the procedure code from C:\Acc07_
HandsOn\Chap21.txt.
Sub Index_WithIgnoreNullOption()Dim conn As ADODB.ConnectionDim strTable As String
On Error GoTo ErrorHandler
Set conn = CurrentProject.Connection
strTable = "Supplier3"
conn.Execute "CREATE INDEX idxSupplierPhone ON " & strTable _& "(SupplierPhone) WITH IGNORE NULL ;"
ExitHere:conn.CloseSet conn = NothingExit Sub
ErrorHandler:MsgBox Err.Number & ":" & Err.DescriptionResume ExitHere
End Sub
534 | Chapter 21
Part III
Figure 21-4: The resultof running the proce-dure in Hands-On21-5 is an index calledidxSupplierCity thatdoes not allow Nullvalues.
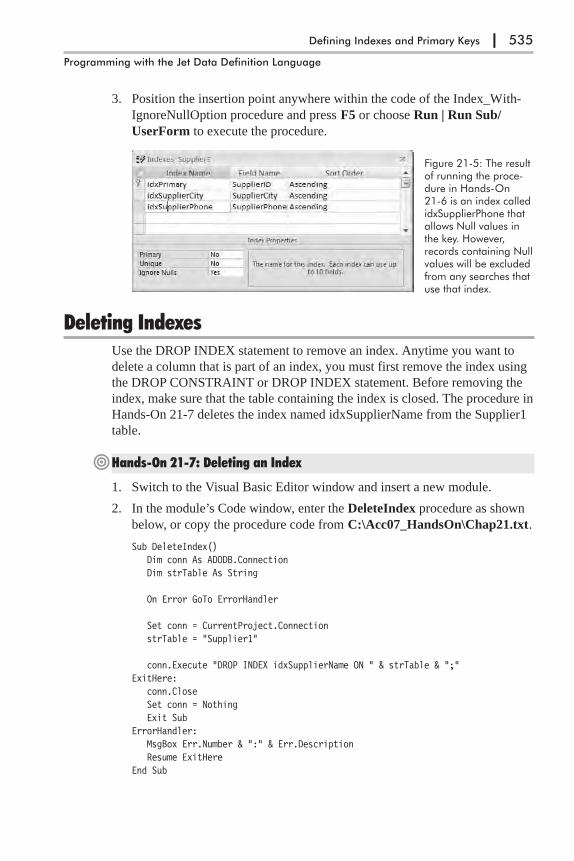
3. Position the insertion point anywhere within the code of the Index_With-
IgnoreNullOption procedure and press F5 or choose Run | Run Sub/
UserForm to execute the procedure.
Deleting IndexesUse the DROP INDEX statement to remove an index. Anytime you want to
delete a column that is part of an index, you must first remove the index using
the DROP CONSTRAINT or DROP INDEX statement. Before removing the
index, make sure that the table containing the index is closed. The procedure in
Hands-On 21-7 deletes the index named idxSupplierName from the Supplier1
table.
�Hands-On 21-7: Deleting an Index
1. Switch to the Visual Basic Editor window and insert a new module.
2. In the module’s Code window, enter the DeleteIndex procedure as shown
below, or copy the procedure code from C:\Acc07_HandsOn\Chap21.txt.
Sub DeleteIndex()Dim conn As ADODB.ConnectionDim strTable As String
On Error GoTo ErrorHandler
Set conn = CurrentProject.ConnectionstrTable = "Supplier1"
conn.Execute "DROP INDEX idxSupplierName ON " & strTable & ";"ExitHere:
conn.CloseSet conn = NothingExit Sub
ErrorHandler:MsgBox Err.Number & ":" & Err.DescriptionResume ExitHere
End Sub
Defining Indexes and Primary Keys | 535
Programming with the Jet Data Definition Language
Figure 21-5: The resultof running the proce-dure in Hands-On21-6 is an index calledidxSupplierPhone thatallows Null values inthe key. However,records containing Nullvalues will be excludedfrom any searches thatuse that index.
3. Position the insertion point anywhere within the code of the DeleteIndex
procedure and press F5 or choose Run | Run Sub/UserForm to execute
the procedure.
4. On your own, write a procedure to remove other indexes created in this
chapter’s procedures.
Chapter SummaryThis chapter introduced you to using DDL statements for creating indexes.
Columns that are frequently used in database queries should be indexed to
allow for faster access to the information. However, if you frequently add,
delete, and update rows, you might want to limit the number of indexes, as
they take up disk space and slow data operations. You also learned that a pri-
mary key is a special type of index that allows you to uniquely identify rows in
a table as well as create a relationship between two tables, as demonstrated in
the previous chapter.
The next chapter introduces you to the DDL statements that are used to
manage database security.
536 | Chapter 21
Part III

Chapter 22
Database Security
The procedures in this chapter demonstrate how to use simple Data Definition
Language statements to easily manage database and user passwords, create or
delete user and group accounts, and grant or delete permissions for database
objects.
Setting the Database PasswordDatabase security can be handled at share level or user level. Share-level secu-
rity is the easiest to implement, as it only requires that you set a password on
the database. As mentioned earlier in this book, user-level security can only be
used with Access databases created in the MDB file format.
To set a new database password or change an existing password, use the
ALTER DATABASE PASSWORD statement in the following format:
ALTER DATABASE PASSWORD newPassword oldPassword
When setting the password for the first time, use Null for the old password
(see the example procedure in Hands-On 22-1). The Access database must be
opened in exclusive mode to perform password operations. Therefore, when
using ADO, set the ADO Connection object’s Mode property to
adModeShareExclusive before opening a database.
�Hands-On 22-1: Setting a Database Password
This hands-on exercise sets a database password on the Chap21.accdb data-
base file.
1. Start Microsoft Office Access 2007 and create a new Microsoft Office
Access 2007 database named Chap22.accdb in your C:\Acc07_
ByExample folder.
2. Switch to the Visual Basic Editor window and choose Tools | References.
In the References dialog box, scroll down to locate the Microsoft ActiveX
2.8 Data Objects Library. Click the check box to the left of this library
name to set a reference to it and click OK to exit the dialog box.
3. Choose Insert | Module to add a new module to the current VBA project.
4. In the module’s Code window, type the SetDBPassword function shown
below, or copy the procedure code from C:\Acc07_HandsOn\Chap22.txt.
537

Function SetDBPassword(strFullFilePath)Dim conn As ADODB.ConnectionOn Error GoTo ErrorHandlerSet conn = New ADODB.ConnectionWith conn
.Mode = adModeShareExclusive
.Open "Provider = Microsoft.ACE.OLEDB.12.0;" & _"Data Source=" & strFullFilePath & ";"
.Execute "ALTER DATABASE PASSWORD secret null "End With
ExitHere:If Not conn Is Nothing Then
If conn.State = adStateOpen Then conn.CloseEnd IfSet conn = NothingExit Function
ErrorHandler:MsgBox Err.Number & ":" & Err.DescriptionResume ExitHere
End Function
5. Execute the SetDBPassword function from the Immediate window by typ-
ing the following statement and pressing Enter:
SetDBPassword "C:\Acc07_ByExample\Chap21.accdb"
While you may supply the name of a different Access database to the
SetDBPassword function, the database must be in the new ACCDB file format
because the function opens a connection to the database file using the ACE
OLE DB Provider.
After opening a database in exclusive mode, the above function procedure
changes the database password from Null to “secret.” Notice that the new pass-
word is listed first, followed by the old password. Notice also how the above
function uses the State property of the ADO Connection object to determine
whether the connection to the database is open. State returns adStateOpen if
the Connection object is open and adStateClosed if it is not.
Removing the Database PasswordTo remove a database password, replace the existing password with Null. The
password can be removed by using the ALTER DATABASE PASSWORD
statement, as illustrated in the preceding section. When the database is secured
with a password, you will need to use the Jet/ACE OLEDB:Database Pass-
word property to specify the password to open the database. This is a
Microsoft Jet 4.0/ACE OLE DB provider-specific property of the Connection
object. The following procedure shows how to remove the password “secret”
from the Chap21.accdb database that was set by the SetDBPassword function
in Hands-On 22-1.
538 | Chapter 22
Part III

�Hands-On 22-2: Deleting a Database Password
This procedure requires prior completion of Hands-On 22-1.
1. In the same module where you entered the SetDBPassword function
(Hands-On 22-1), enter the ResetDBPassword function as shown below,
or copy the procedure code from C:\Acc07_HandsOn\Chap22.txt.
Function ResetDBPassword(strFullFilePath, _strNewPwd, strOldPwd)
Dim conn As ADODB.ConnectionOn Error GoTo ErrorHandlerSet conn = New ADODB.Connection
With conn.Mode = adModeShareExclusive.Open "Provider = Microsoft.ACE.OLEDB.12.0;" & _
"Data Source=" & strFullFilePath & _"; Jet OLEDB:Database Password=" & strOldPwd & ";"
.Execute "ALTER DATABASE PASSWORD " & strNewPwd & " " & _strOldPwd
End WithExitHere:
If Not conn Is Nothing ThenIf conn.State = adStateOpen Then conn.Close
End IfSet conn = NothingExit Function
ErrorHandler:MsgBox Err.Number & ":" & Err.DescriptionResume ExitHere
End Function
2. Execute the ResetDBPassword function from the Immediate window by
typing the following statement and pressing Enter:
ResetDBPassword "C:\Acc07_ByExample\Chap21.accdb", "null", "secret"
3. Close the Chap22.accdb database file.
Creating a User AccountEstablishing database security at a user level is more involved than setting a
database password. It requires that you create group and user accounts and
assign permissions to groups and users to perform operations on various data-
base objects. Use the CREATE USER statement to create a new user account.
Specify the user name to log in to the account followed by the required pass-
word and a personal identifier (PID) to make the account unique. The syntax
of creating a user account looks like this:
CREATE USER userLoginName password PID
You can create more than one user account at a time by separating the user
names with a comma.
Database Security | 539
Programming with the Jet Data Definition Language
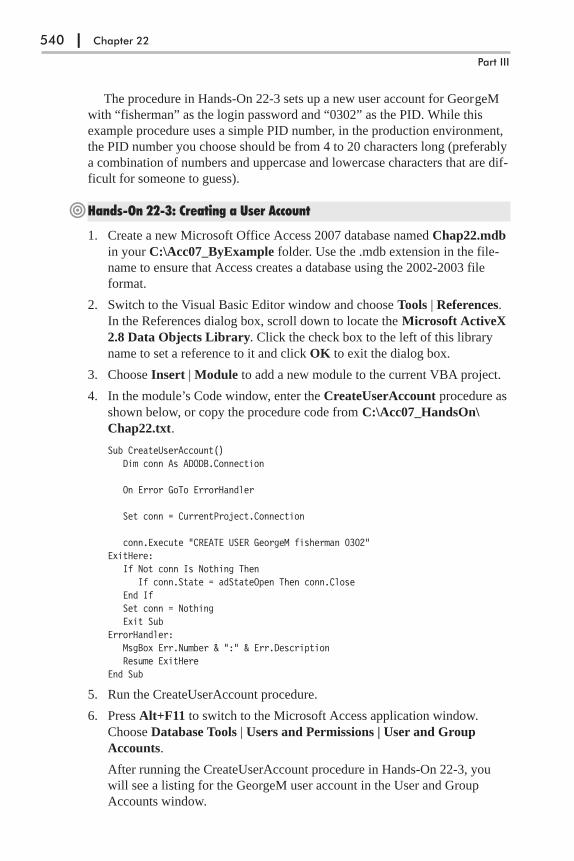
The procedure in Hands-On 22-3 sets up a new user account for GeorgeM
with “fisherman” as the login password and “0302” as the PID. While this
example procedure uses a simple PID number, in the production environment,
the PID number you choose should be from 4 to 20 characters long (preferably
a combination of numbers and uppercase and lowercase characters that are dif-
ficult for someone to guess).
�Hands-On 22-3: Creating a User Account
1. Create a new Microsoft Office Access 2007 database named Chap22.mdb
in your C:\Acc07_ByExample folder. Use the .mdb extension in the file-
name to ensure that Access creates a database using the 2002-2003 file
format.
2. Switch to the Visual Basic Editor window and choose Tools | References.
In the References dialog box, scroll down to locate the Microsoft ActiveX
2.8 Data Objects Library. Click the check box to the left of this library
name to set a reference to it and click OK to exit the dialog box.
3. Choose Insert | Module to add a new module to the current VBA project.
4. In the module’s Code window, enter the CreateUserAccount procedure as
shown below, or copy the procedure code from C:\Acc07_HandsOn\
Chap22.txt.
Sub CreateUserAccount()Dim conn As ADODB.Connection
On Error GoTo ErrorHandler
Set conn = CurrentProject.Connection
conn.Execute "CREATE USER GeorgeM fisherman 0302"ExitHere:
If Not conn Is Nothing ThenIf conn.State = adStateOpen Then conn.Close
End IfSet conn = NothingExit Sub
ErrorHandler:MsgBox Err.Number & ":" & Err.DescriptionResume ExitHere
End Sub
5. Run the CreateUserAccount procedure.
6. Press Alt+F11 to switch to the Microsoft Access application window.
Choose Database Tools | Users and Permissions | User and Group
Accounts.
After running the CreateUserAccount procedure in Hands-On 22-3, you
will see a listing for the GeorgeM user account in the User and Group
Accounts window.
540 | Chapter 22
Part III
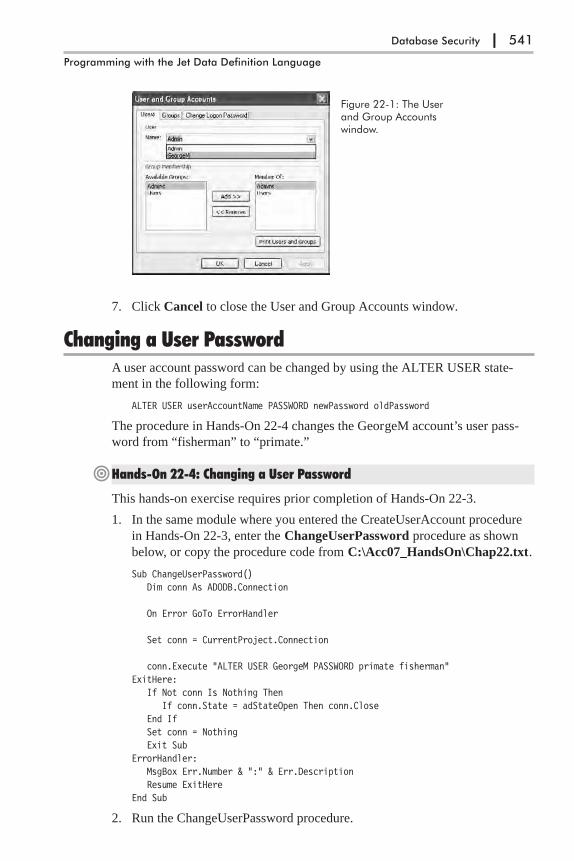
7. Click Cancel to close the User and Group Accounts window.
Changing a User PasswordA user account password can be changed by using the ALTER USER state-
ment in the following form:
ALTER USER userAccountName PASSWORD newPassword oldPassword
The procedure in Hands-On 22-4 changes the GeorgeM account’s user pass-
word from “fisherman” to “primate.”
�Hands-On 22-4: Changing a User Password
This hands-on exercise requires prior completion of Hands-On 22-3.
1. In the same module where you entered the CreateUserAccount procedure
in Hands-On 22-3, enter the ChangeUserPassword procedure as shown
below, or copy the procedure code from C:\Acc07_HandsOn\Chap22.txt.
Sub ChangeUserPassword()Dim conn As ADODB.Connection
On Error GoTo ErrorHandler
Set conn = CurrentProject.Connection
conn.Execute "ALTER USER GeorgeM PASSWORD primate fisherman"ExitHere:
If Not conn Is Nothing ThenIf conn.State = adStateOpen Then conn.Close
End IfSet conn = NothingExit Sub
ErrorHandler:MsgBox Err.Number & ":" & Err.DescriptionResume ExitHere
End Sub
2. Run the ChangeUserPassword procedure.
Database Security | 541
Programming with the Jet Data Definition Language
Figure 22-1: The Userand Group Accountswindow.
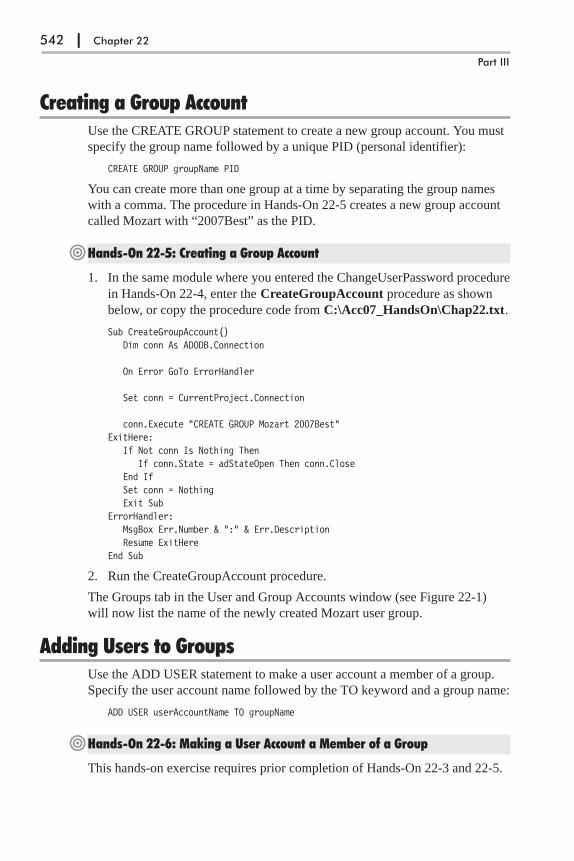
Creating a Group AccountUse the CREATE GROUP statement to create a new group account. You must
specify the group name followed by a unique PID (personal identifier):
CREATE GROUP groupName PID
You can create more than one group at a time by separating the group names
with a comma. The procedure in Hands-On 22-5 creates a new group account
called Mozart with “2007Best” as the PID.
�Hands-On 22-5: Creating a Group Account
1. In the same module where you entered the ChangeUserPassword procedure
in Hands-On 22-4, enter the CreateGroupAccount procedure as shown
below, or copy the procedure code from C:\Acc07_HandsOn\Chap22.txt.
Sub CreateGroupAccount()Dim conn As ADODB.Connection
On Error GoTo ErrorHandler
Set conn = CurrentProject.Connection
conn.Execute "CREATE GROUP Mozart 2007Best"ExitHere:
If Not conn Is Nothing ThenIf conn.State = adStateOpen Then conn.Close
End IfSet conn = NothingExit Sub
ErrorHandler:MsgBox Err.Number & ":" & Err.DescriptionResume ExitHere
End Sub
2. Run the CreateGroupAccount procedure.
The Groups tab in the User and Group Accounts window (see Figure 22-1)
will now list the name of the newly created Mozart user group.
Adding Users to GroupsUse the ADD USER statement to make a user account a member of a group.
Specify the user account name followed by the TO keyword and a group name:
ADD USER userAccountName TO groupName
�Hands-On 22-6: Making a User Account a Member of a Group
This hands-on exercise requires prior completion of Hands-On 22-3 and 22-5.
542 | Chapter 22
Part III
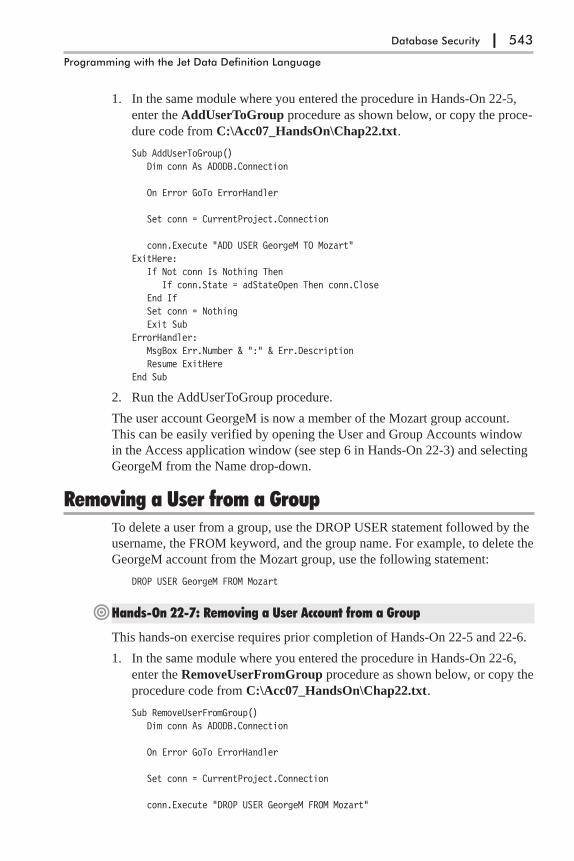
1. In the same module where you entered the procedure in Hands-On 22-5,
enter the AddUserToGroup procedure as shown below, or copy the proce-
dure code from C:\Acc07_HandsOn\Chap22.txt.
Sub AddUserToGroup()Dim conn As ADODB.Connection
On Error GoTo ErrorHandler
Set conn = CurrentProject.Connection
conn.Execute "ADD USER GeorgeM TO Mozart"ExitHere:
If Not conn Is Nothing ThenIf conn.State = adStateOpen Then conn.Close
End IfSet conn = NothingExit Sub
ErrorHandler:MsgBox Err.Number & ":" & Err.DescriptionResume ExitHere
End Sub
2. Run the AddUserToGroup procedure.
The user account GeorgeM is now a member of the Mozart group account.
This can be easily verified by opening the User and Group Accounts window
in the Access application window (see step 6 in Hands-On 22-3) and selecting
GeorgeM from the Name drop-down.
Removing a User from a GroupTo delete a user from a group, use the DROP USER statement followed by the
username, the FROM keyword, and the group name. For example, to delete the
GeorgeM account from the Mozart group, use the following statement:
DROP USER GeorgeM FROM Mozart
�Hands-On 22-7: Removing a User Account from a Group
This hands-on exercise requires prior completion of Hands-On 22-5 and 22-6.
1. In the same module where you entered the procedure in Hands-On 22-6,
enter the RemoveUserFromGroup procedure as shown below, or copy the
procedure code from C:\Acc07_HandsOn\Chap22.txt.
Sub RemoveUserFromGroup()Dim conn As ADODB.Connection
On Error GoTo ErrorHandler
Set conn = CurrentProject.Connection
conn.Execute "DROP USER GeorgeM FROM Mozart"
Database Security | 543
Programming with the Jet Data Definition Language

ExitHere:If Not conn Is Nothing Then
If conn.State = adStateOpen Then conn.CloseEnd IfSet conn = NothingExit Sub
ErrorHandler:MsgBox Err.Number & ":" & Err.DescriptionResume ExitHere
End Sub
2. Run the RemoveUserFromGroup procedure to remove the GeorgeM user
account from the Mozart group.
Deleting a User AccountTo delete a user account, use the DROP USER statement followed by the user
account name, as demonstrated by the DeleteUserAccount procedure in
Hands-On 22-8.
�Hands-On 22-8: Deleting a User Account
This procedure requires prior completion of Hands-On 22-3.
1. In the same module where you entered the procedures in the previous
hands-on exercises, enter the DeleteUserAccount procedure as shown
below, or copy the procedure code from C:\Acc07_HandsOn\Chap22.txt.
Sub DeleteUserAccount()Dim conn As ADODB.Connection
On Error GoTo ErrorHandler
Set conn = CurrentProject.Connection
conn.Execute "DROP USER GeorgeM"ExitHere:
If Not conn Is Nothing ThenIf conn.State = adStateOpen Then conn.Close
End IfSet conn = NothingExit Sub
ErrorHandler:MsgBox Err.Number & ":" & Err.DescriptionResume ExitHere
End Sub
2. Run the DeleteUserAccount procedure to delete the user account named
GeorgeM.
544 | Chapter 22
Part III
Granting Permissions for an ObjectUse the GRANT statement to assign security permissions for an object in a
database to an existing user or group account. The procedure in Hands-On
22-9 grants the SELECT, DELETE, INSERT, and UPDATE permissions on all
tables to the Mozart group.
The GRANT statement requires the following:
� A list of privileges to be granted
� The keyword ON followed by the name of a table, a non-table object, or an
object container (e.g., Tables, Forms, Reports, Modules, Scripts)
� The keyword TO followed by the user or group name
GRANT listOfPermissions ON tableName | objectName | containerName TOaccountName
Please note that in addition to tables, the Tables container contains queries,
views, and procedures, and the Scripts container includes macros.
�Hands-On 22-9: Granting Permissions for Tables to an Existing Group
This hands-on exercise requires prior completion of Hands-On 22-5.
1. In the same module where you entered the procedure in Hands-On 22-8,
enter the SetTblPermissions procedure as shown below, or copy the pro-
cedure code from C:\Acc07_HandsOn\Chap22.txt.
Sub SetTblPermissions()Dim conn As ADODB.Connection
On Error GoTo ErrorHandler
Set conn = CurrentProject.Connection
conn.Execute "GRANT SELECT, DELETE, INSERT, " _& "UPDATE ON CONTAINER TABLES TO Mozart"
ExitHere:If Not conn Is Nothing Then
If conn.State = adStateOpen Then conn.CloseEnd IfSet conn = NothingExit Sub
ErrorHandler:MsgBox Err.Number & ":" & Err.DescriptionResume ExitHere
End Sub
2. Run the SetTblPermissions procedure.
After running the SetTblPermissions procedure, you can open the User and
Group Permissions window (choose Database Tools | Users and Permis-
sions | User and Group Permissions) to check out the privileges granted to
the members of the Mozart group.
Database Security | 545
Programming with the Jet Data Definition Language
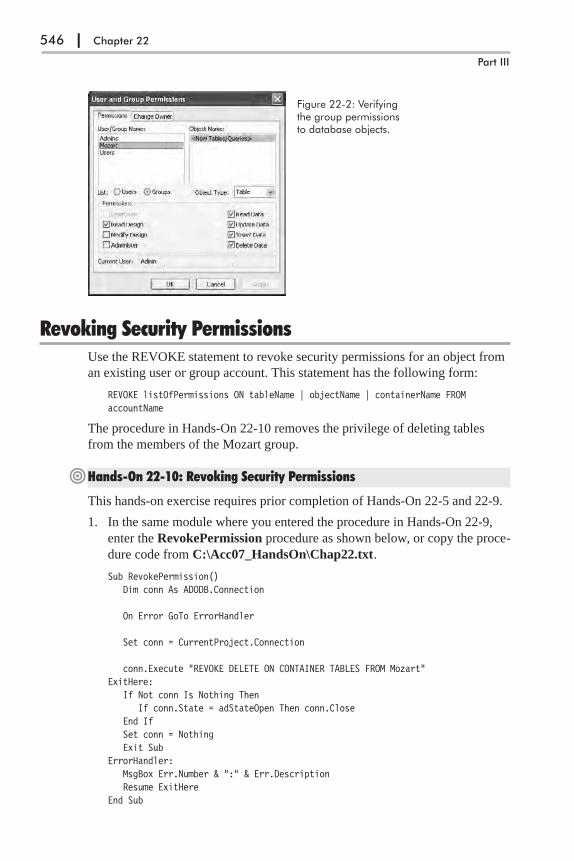
Revoking Security PermissionsUse the REVOKE statement to revoke security permissions for an object from
an existing user or group account. This statement has the following form:
REVOKE listOfPermissions ON tableName | objectName | containerName FROMaccountName
The procedure in Hands-On 22-10 removes the privilege of deleting tables
from the members of the Mozart group.
�Hands-On 22-10: Revoking Security Permissions
This hands-on exercise requires prior completion of Hands-On 22-5 and 22-9.
1. In the same module where you entered the procedure in Hands-On 22-9,
enter the RevokePermission procedure as shown below, or copy the proce-
dure code from C:\Acc07_HandsOn\Chap22.txt.
Sub RevokePermission()Dim conn As ADODB.Connection
On Error GoTo ErrorHandler
Set conn = CurrentProject.Connection
conn.Execute "REVOKE DELETE ON CONTAINER TABLES FROM Mozart"ExitHere:
If Not conn Is Nothing ThenIf conn.State = adStateOpen Then conn.Close
End IfSet conn = NothingExit Sub
ErrorHandler:MsgBox Err.Number & ":" & Err.DescriptionResume ExitHere
End Sub
546 | Chapter 22
Part III
Figure 22-2: Verifyingthe group permissionsto database objects.

2. Run the RevokePermission procedure.
Deleting a Group AccountUse the DROP GROUP statement to delete a group account. You only need to
specify the name of the group account you want to delete. If you’d like to
delete more than one account, separate each group name with a comma.
�Hands-On 22-11: Deleting a Group Account
This hands-on exercise requires prior completion of Hands-On 22-5.
1. In the same module where you entered the procedure in Hands-On 22-9,
enter the DeleteGroupAccount procedure as shown below, or copy the
procedure code from C:\Acc07_HandsOn\Chap22.txt.
Sub DeleteGroupAccount()Dim conn As ADODB.Connection
On Error GoTo ErrorHandler
Set conn = CurrentProject.Connection
conn.Execute "DROP GROUP Mozart"ExitHere:
If Not conn Is Nothing ThenIf conn.State = adStateOpen Then conn.Close
End IfSet conn = NothingExit Sub
ErrorHandler:MsgBox Err.Number & ":" & Err.DescriptionResume ExitHere
End Sub
2. Run the DeleteGroupAccount procedure to delete the Mozart group
account.
Database Security | 547
Programming with the Jet Data Definition Language
Figure 22-3: After run-ning the procedure inHands-On 22-10, theDelete Data permissionon new tables and que-ries for the members ofthe Mozart group isturned off.
Chapter SummaryThis chapter demonstrated the use of the Data Definition Language (DDL)
statements in VBA procedures for managing security in a Microsoft Access
database. You used the ALTER DATABASE statement to create, modify, and
remove the database password. You managed the user-level accounts with the
CREATE, ADD, ALTER, and DROP statements. You learned how to use the
GRANT and REVOKE statements to establish and remove permissions on
database objects for user and group accounts in an Access MDB database
created in the 2002-2003 file format.
In the next chapter, you learn how to organize your data using structures
known as views, and how to use stored procedures in lieu of Access Action
and Parameter queries.
548 | Chapter 22
Part III

Chapter 23
Views and StoredProcedures
In this chapter, we will work with advanced Data Definition Language state-
ments that are used for creating, altering, and deleting two special database
objects known as views and stored procedures. These objects are used to per-
form various query operations. Views are like Access Select queries; however,
you can’t use the ORDER BY clause to sort your data or use parameters to fil-
ter records. Stored procedures perform the same operations as Access Action
and Parameter queries. They can also be used for creating sorted Select que-
ries. Stored procedures are saved precompiled so that at run time the procedure
executes much faster than a standard SQL statement. Learning how to create
and use views and stored procedures will give you more control over your
database.
Creating a ViewIf you want users to view and update data in a table or set of tables, but you do
not want them to open the underlying tables directly, you can create a view. An
SQL view is like a virtual table. Similar to an Access Select query, a view can
display data from one or more tables. Instead of providing all the available data
in your tables, you decide exactly what fields you’d like to include for
viewing.
To create a view, use a SELECT statement to select the columns you want
to include in a view and the FROM keyword to specify the table. Next, associ-
ate the SELECT statement with a CREATE VIEW statement. The syntax looks
like this:
CREATE VIEW viewName [(columnNames)]AS
SELECT (columnNames)FROM tableName;
Views must have unique names in the database. The name of the view cannot
be the same as the name of an existing table. Specifying the names of columns
following the name of the view is optional (note the square brackets in the syn-
tax above). Column names must be specified in the SELECT statement. Use
the asterisk (*) to select all columns.
549
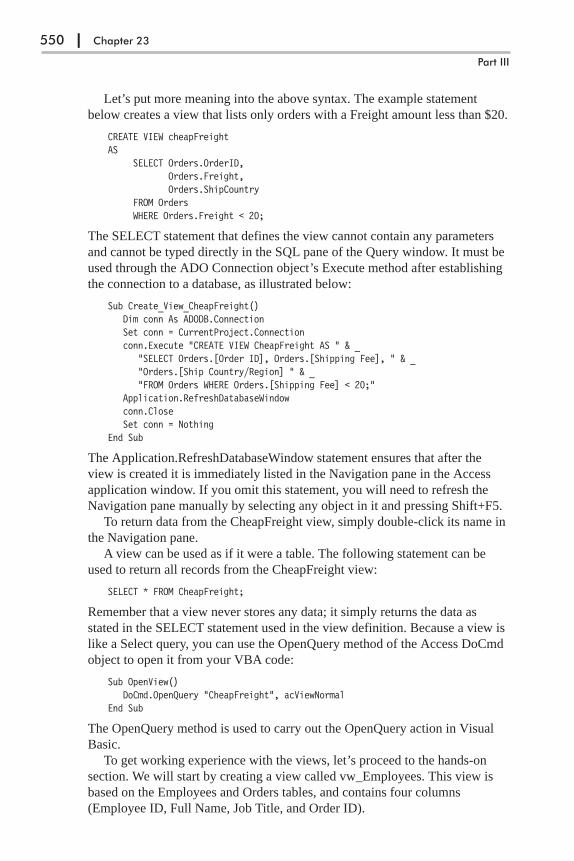
Let’s put more meaning into the above syntax. The example statement
below creates a view that lists only orders with a Freight amount less than $20.
CREATE VIEW cheapFreightAS
SELECT Orders.OrderID,Orders.Freight,Orders.ShipCountry
FROM OrdersWHERE Orders.Freight < 20;
The SELECT statement that defines the view cannot contain any parameters
and cannot be typed directly in the SQL pane of the Query window. It must be
used through the ADO Connection object’s Execute method after establishing
the connection to a database, as illustrated below:
Sub Create_View_CheapFreight()Dim conn As ADODB.ConnectionSet conn = CurrentProject.Connectionconn.Execute "CREATE VIEW CheapFreight AS " & _
"SELECT Orders.[Order ID], Orders.[Shipping Fee], " & _"Orders.[Ship Country/Region] " & _"FROM Orders WHERE Orders.[Shipping Fee] < 20;"
Application.RefreshDatabaseWindowconn.CloseSet conn = Nothing
End Sub
The Application.RefreshDatabaseWindow statement ensures that after the
view is created it is immediately listed in the Navigation pane in the Access
application window. If you omit this statement, you will need to refresh the
Navigation pane manually by selecting any object in it and pressing Shift+F5.
To return data from the CheapFreight view, simply double-click its name in
the Navigation pane.
A view can be used as if it were a table. The following statement can be
used to return all records from the CheapFreight view:
SELECT * FROM CheapFreight;
Remember that a view never stores any data; it simply returns the data as
stated in the SELECT statement used in the view definition. Because a view is
like a Select query, you can use the OpenQuery method of the Access DoCmd
object to open it from your VBA code:
Sub OpenView()DoCmd.OpenQuery "CheapFreight", acViewNormal
End Sub
The OpenQuery method is used to carry out the OpenQuery action in Visual
Basic.
To get working experience with the views, let’s proceed to the hands-on
section. We will start by creating a view called vw_Employees. This view is
based on the Employees and Orders tables, and contains four columns
(Employee ID, Full Name, Job Title, and Order ID).
550 | Chapter 23
Part III
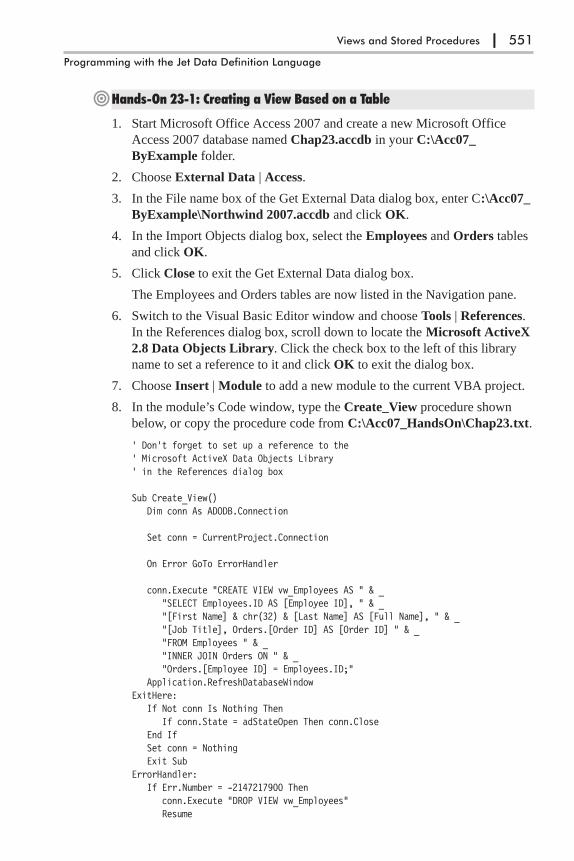
�Hands-On 23-1: Creating a View Based on a Table
1. Start Microsoft Office Access 2007 and create a new Microsoft Office
Access 2007 database named Chap23.accdb in your C:\Acc07_
ByExample folder.
2. Choose External Data | Access.
3. In the File name box of the Get External Data dialog box, enter C:\Acc07_
ByExample\Northwind 2007.accdb and click OK.
4. In the Import Objects dialog box, select the Employees and Orders tables
and click OK.
5. Click Close to exit the Get External Data dialog box.
The Employees and Orders tables are now listed in the Navigation pane.
6. Switch to the Visual Basic Editor window and choose Tools | References.
In the References dialog box, scroll down to locate the Microsoft ActiveX
2.8 Data Objects Library. Click the check box to the left of this library
name to set a reference to it and click OK to exit the dialog box.
7. Choose Insert | Module to add a new module to the current VBA project.
8. In the module’s Code window, type the Create_View procedure shown
below, or copy the procedure code from C:\Acc07_HandsOn\Chap23.txt.
' Don't forget to set up a reference to the' Microsoft ActiveX Data Objects Library' in the References dialog box
Sub Create_View()Dim conn As ADODB.Connection
Set conn = CurrentProject.Connection
On Error GoTo ErrorHandler
conn.Execute "CREATE VIEW vw_Employees AS " & _"SELECT Employees.ID AS [Employee ID], " & _"[First Name] & chr(32) & [Last Name] AS [Full Name], " & _"[Job Title], Orders.[Order ID] AS [Order ID] " & _"FROM Employees " & _"INNER JOIN Orders ON " & _"Orders.[Employee ID] = Employees.ID;"
Application.RefreshDatabaseWindowExitHere:
If Not conn Is Nothing ThenIf conn.State = adStateOpen Then conn.Close
End IfSet conn = NothingExit Sub
ErrorHandler:If Err.Number = -2147217900 Then
conn.Execute "DROP VIEW vw_Employees"Resume
Views and Stored Procedures | 551
Programming with the Jet Data Definition Language

ElseMsgBox Err.Number & ":" & Err.DescriptionResume ExitHere
End IfEnd Sub
9. Run the Create_View procedure.
The procedure above creates a view named vw_Employees. If the view already
exists, it will be deleted using the DROP VIEW statement. The chr(32) state-
ment will insert a space between the first and last name.
Notice that views don’t differ much from saved queries. When you open the
view created by the Create_View procedure in Design view, you will notice
that this view is simply a Select query. Because the query defined by the
SELECT statement is updatable, the vw_Employees view is also updatable. If
the query was not updatable, the view would be read-only.
Views cannot contain the ORDER BY clause. To return the records in a spe-
cific order, you might want to use the view in a stored procedure, as discussed
later in this chapter.
Enumerating ViewsYou can find out the names of the views by iterating through the Views collec-
tion of the ADOX Catalog object, as illustrated in Hands-On 23-2.
�Hands-On 23-2: Generating a List of Saved Views
1. In the Visual Basic Editor window, choose Tools | References. In the Ref-
erences dialog box, scroll down to locate the Microsoft ADO Ext. 2.8 for
DDL and Security Object Library. Click the check box to the left of this
library name to set a reference to it and click OK to exit the dialog box.
2. Choose Insert | Module to add a new module to the current VBA project.
3. In the module’s Code window, enter the List_Views procedure as shown
below, or copy the procedure code from C:\Acc07_HandsOn\Chap23.txt.
' Don't forget to set up a reference to the' Microsoft ADO Ext. 2.8 for DDL and Security
Sub List_Views()Dim cat As New ADOX.CatalogDim myView As ADOX.View
cat.ActiveConnection = CurrentProject.Connection
For Each myView In cat.ViewsDebug.Print myView.Name
Next myViewEnd Sub
4. Run the List_Views procedure.
552 | Chapter 23
Part III
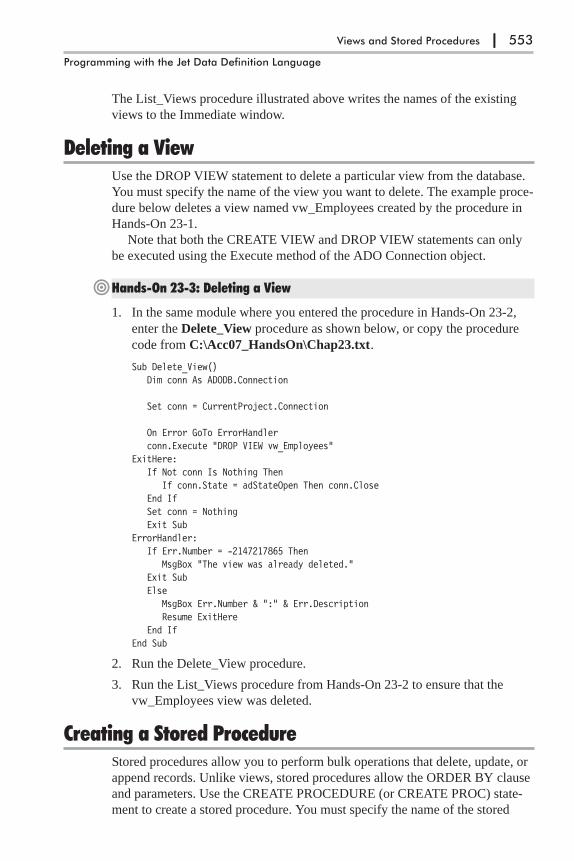
The List_Views procedure illustrated above writes the names of the existing
views to the Immediate window.
Deleting a ViewUse the DROP VIEW statement to delete a particular view from the database.
You must specify the name of the view you want to delete. The example proce-
dure below deletes a view named vw_Employees created by the procedure in
Hands-On 23-1.
Note that both the CREATE VIEW and DROP VIEW statements can only
be executed using the Execute method of the ADO Connection object.
�Hands-On 23-3: Deleting a View
1. In the same module where you entered the procedure in Hands-On 23-2,
enter the Delete_View procedure as shown below, or copy the procedure
code from C:\Acc07_HandsOn\Chap23.txt.
Sub Delete_View()Dim conn As ADODB.Connection
Set conn = CurrentProject.Connection
On Error GoTo ErrorHandlerconn.Execute "DROP VIEW vw_Employees"
ExitHere:If Not conn Is Nothing Then
If conn.State = adStateOpen Then conn.CloseEnd IfSet conn = NothingExit Sub
ErrorHandler:If Err.Number = -2147217865 Then
MsgBox "The view was already deleted."Exit SubElse
MsgBox Err.Number & ":" & Err.DescriptionResume ExitHere
End IfEnd Sub
2. Run the Delete_View procedure.
3. Run the List_Views procedure from Hands-On 23-2 to ensure that the
vw_Employees view was deleted.
Creating a Stored ProcedureStored procedures allow you to perform bulk operations that delete, update, or
append records. Unlike views, stored procedures allow the ORDER BY clause
and parameters. Use the CREATE PROCEDURE (or CREATE PROC) state-
ment to create a stored procedure. You must specify the name of the stored
Views and Stored Procedures | 553
Programming with the Jet Data Definition Language

procedure and the AS keyword followed by the desired SQL statement that
performs the required database operation. The syntax is as follows:
CREATE PROC[EDURE] procName[(param1 datatype1 [, param2 datatype2 [, ...] ])]ASsqlStatement;
The name of the stored procedure must be different from the name of an exist-
ing table. To pass values to a stored procedure, include parameters after the
procedure name. Parameter names are followed by a data type and are sepa-
rated by commas. The parameters are listed in parentheses (see Hands-On 23-4
in the next section). Up to 255 parameters can be specified in the parameter
list. If the stored procedure does not require parameters, the AS keyword
immediately follows the name of the stored procedure.
The SQL statement for the stored procedure can be prepared in the Access
Query Design and then copied to the VBA procedure from the SQL view and
appropriately formatted.
To return the employee records from the vw_Employees view (see
Hands-On 23-1) ordered by Full Name, the following stored procedure can be
written:
CREATE PROCEDURE usp_EmpByFullNameASSELECT * FROM vw_EmployeesORDER BY [Full Name];
The stored procedure above selects all columns that exist in the vw_Employees
view and orders the returned data by the Full Name field. Notice that this pro-
cedure does not require any parameters. You might want to precede the stored
procedure name with a prefix indicating the type of stored procedure. The
“usp” prefix is often used to indicate a user-defined stored procedure.
Like views, stored procedures are created via the ADO Connection object’s
Execute method after establishing a connection to the database. Therefore, you
can use the following VBA code to create the usp_EmpByFullName stored
procedure:
Sub Create_StoredProc()Dim conn As ADODB.Connection
Set conn = CurrentProject.Connectionconn.Execute "CREATE PROCEDURE usp_EmpByFullName AS " & _
"SELECT * FROM vw_Employees " & _"ORDER BY [Full Name];"
Application.RefreshDatabaseWindowconn.CloseSet conn = Nothing
End Sub
Once created, stored procedures can be executed in the Access user interface
by double-clicking the stored procedure name in the Navigation pane, or from
VBA code by calling the EXECUTE statement with the ADO Connection
object’s Execute method (see Hands-On 23-5).
554 | Chapter 23
Part III
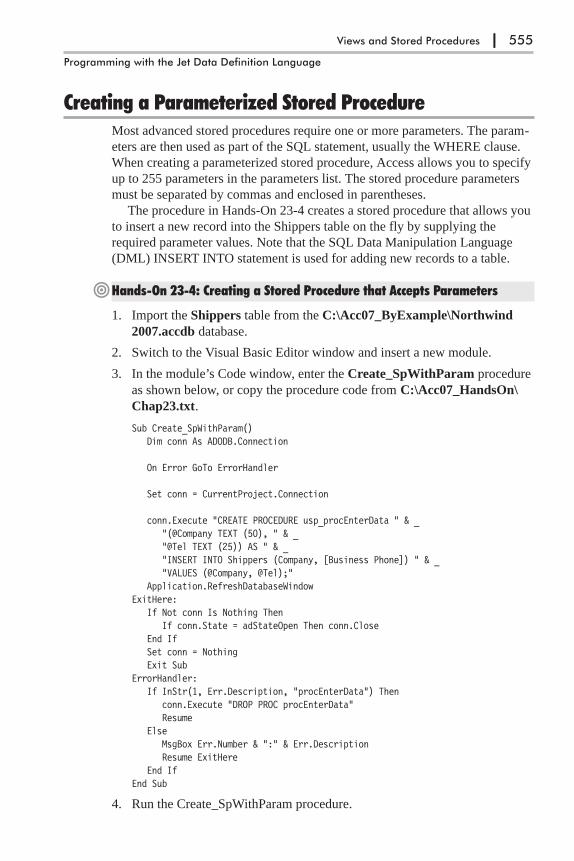
Creating a Parameterized Stored ProcedureMost advanced stored procedures require one or more parameters. The param-
eters are then used as part of the SQL statement, usually the WHERE clause.
When creating a parameterized stored procedure, Access allows you to specify
up to 255 parameters in the parameters list. The stored procedure parameters
must be separated by commas and enclosed in parentheses.
The procedure in Hands-On 23-4 creates a stored procedure that allows you
to insert a new record into the Shippers table on the fly by supplying the
required parameter values. Note that the SQL Data Manipulation Language
(DML) INSERT INTO statement is used for adding new records to a table.
�Hands-On 23-4: Creating a Stored Procedure that Accepts Parameters
1. Import the Shippers table from the C:\Acc07_ByExample\Northwind
2007.accdb database.
2. Switch to the Visual Basic Editor window and insert a new module.
3. In the module’s Code window, enter the Create_SpWithParam procedure
as shown below, or copy the procedure code from C:\Acc07_HandsOn\
Chap23.txt.
Sub Create_SpWithParam()Dim conn As ADODB.Connection
On Error GoTo ErrorHandler
Set conn = CurrentProject.Connection
conn.Execute "CREATE PROCEDURE usp_procEnterData " & _"(@Company TEXT (50), " & _"@Tel TEXT (25)) AS " & _"INSERT INTO Shippers (Company, [Business Phone]) " & _"VALUES (@Company, @Tel);"
Application.RefreshDatabaseWindowExitHere:
If Not conn Is Nothing ThenIf conn.State = adStateOpen Then conn.Close
End IfSet conn = NothingExit Sub
ErrorHandler:If InStr(1, Err.Description, "procEnterData") Then
conn.Execute "DROP PROC procEnterData"Resume
ElseMsgBox Err.Number & ":" & Err.DescriptionResume ExitHere
End IfEnd Sub
4. Run the Create_SpWithParam procedure.
Views and Stored Procedures | 555
Programming with the Jet Data Definition Language

The stored procedure above will require two values to be entered at run
time. The first value is passed by the @Company parameter and the second
one by the parameter named @Tel. In this example, the names of the
parameters have been preceded with the @ sign for easy migration of the
stored procedure into the SQL Server environment. If you omit the @ sign,
the procedure will still execute correctly in Microsoft Access. If the proce-
dure already exists, it will be dropped using the DROP PROC statement.
Similar to views, stored procedures appear in the Navigation pane in
the Access application window. Because we used the SQL INSERT INTO
statement, Microsoft Office Access is treating this stored procedure as a
parameterized Append query.
5. Run the stored procedure named usp_procEnterData by double-clicking
its name in the Navigation pane of the Access application window. Figures
23-1 through 23-6 outline the process of running this stored procedure.
556 | Chapter 23
Part III
Figure 23-1: When you double-click a stored procedurename in the Navigation pane of the Access database win-dow, Access displays this message when the storedprocedure expects parameters and its SQL statementattempts to insert data into a table.
Figure 23-4: Once all input has been gathered via theparameters, Access informs you about the action that is tobe performed. Click Yes to execute the stored procedure orNo to cancel.
Figure 23-2: Since the storedprocedure expects someinput, you are beingprompted for the firstparameter value.
Figure 23-3: Here you arebeing prompted to enter thephone number for the sec-ond stored procedureparameter.

Executing a Parameterized Stored ProcedureIn the preceding section, you learned how to run a parameterized stored proce-
dure from the Access user interface. To execute an existing stored procedure
from VBA code, use the Execute method of the ADO Connection or Command
object. Here’s how:
� With the Execute method of the Connection object:
conn.Execute "usp_procEnterData"
� With the Execute method of the Command object:
cmd.CommandText = "usp_procEnterData"cmd.CommandType = adCmdStoredProc
Views and Stored Procedures | 557
Programming with the Jet Data Definition Language
Figure 23-5: Once you click Yes, Access runs the Append query. To view the result of thisoperation, double-click the Shippers table in the Navigation pane. Notice that a newrecord (Orient Express) was added to the Shippers table.
Figure 23-6: You can examine the contents of the stored procedure byright-clicking on the usp_procEnterData procedure in the Navigation paneand choosing Design View. This example displays the Design view of theAppend query. Other stored procedures that you create may be presentedas different Action queries.
Figure 23-7: You can examine the SQL state-ments used by Access to execute your storedprocedure by switching to the SQL view (clickDesign | View and select SQL View).
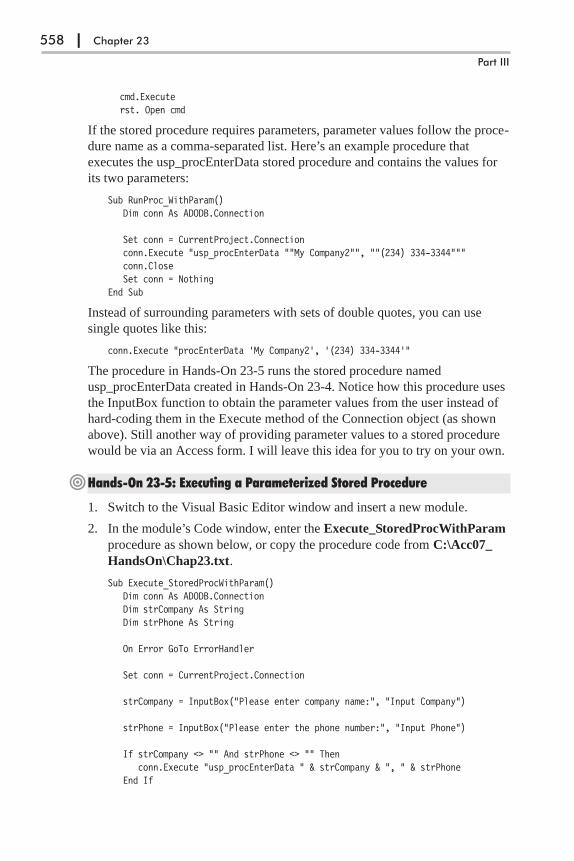
cmd.Executerst. Open cmd
If the stored procedure requires parameters, parameter values follow the proce-
dure name as a comma-separated list. Here’s an example procedure that
executes the usp_procEnterData stored procedure and contains the values for
its two parameters:
Sub RunProc_WithParam()Dim conn As ADODB.Connection
Set conn = CurrentProject.Connectionconn.Execute "usp_procEnterData ""My Company2"", ""(234) 334-3344"""conn.CloseSet conn = Nothing
End Sub
Instead of surrounding parameters with sets of double quotes, you can use
single quotes like this:
conn.Execute "procEnterData 'My Company2', '(234) 334-3344'"
The procedure in Hands-On 23-5 runs the stored procedure named
usp_procEnterData created in Hands-On 23-4. Notice how this procedure uses
the InputBox function to obtain the parameter values from the user instead of
hard-coding them in the Execute method of the Connection object (as shown
above). Still another way of providing parameter values to a stored procedure
would be via an Access form. I will leave this idea for you to try on your own.
�Hands-On 23-5: Executing a Parameterized Stored Procedure
1. Switch to the Visual Basic Editor window and insert a new module.
2. In the module’s Code window, enter the Execute_StoredProcWithParam
procedure as shown below, or copy the procedure code from C:\Acc07_
HandsOn\Chap23.txt.
Sub Execute_StoredProcWithParam()Dim conn As ADODB.ConnectionDim strCompany As StringDim strPhone As String
On Error GoTo ErrorHandler
Set conn = CurrentProject.Connection
strCompany = InputBox("Please enter company name:", "Input Company")
strPhone = InputBox("Please enter the phone number:", "Input Phone")
If strCompany <> "" And strPhone <> "" Thenconn.Execute "usp_procEnterData " & strCompany & ", " & strPhone
End If
558 | Chapter 23
Part III

ExitHere:If Not conn Is Nothing Then
If conn.State = adStateOpen Then conn.CloseEnd IfSet conn = NothingExit Sub
ErrorHandler:MsgBox Err.Number & ":" & Err.DescriptionResume ExitHere
End Sub
3. Run the Execute_StoredProcWithParam procedure.
When you run the parameterized stored procedure in Hands-On 23-5, Access
displays an input box for each parameter. After you have supplied values for
both required parameters, a new record is entered into the Shippers table.
Deleting a Stored ProcedureUse the DROP PROCEDURE (or DROP PROC) statement to delete a stored
procedure. The syntax looks like this:
DROP PROCEDURE procedureName
The example procedure below deletes the stored procedure named
usp_procEnterData from the current database.
�Hands-On 23-6: Deleting a Stored Procedure
1. Switch to the Visual Basic Editor window and insert a new module.
2. In the module’s Code window, enter the Delete_StoredProc procedure as
shown below, or copy the procedure code from C:\Acc07_HandsOn\
Chap23.txt.
Sub Delete_StoredProc()Dim conn As ADODB.Connection
On Error GoTo ErrorHandler
Set conn = CurrentProject.Connection
conn.Execute "DROP PROCEDURE usp_procEnterData; "ExitHere:
If Not conn Is Nothing ThenIf conn.State = adStateOpen Then conn.Close
End IfSet conn = NothingExit Sub
ErrorHandler:If InStr(1, Err.Description, "cannot find") Then
MsgBox "The procedure you want to delete " & _"does not exist.", _vbDefaultButton1 + vbInformation, "Request failed"
Views and Stored Procedures | 559
Programming with the Jet Data Definition Language
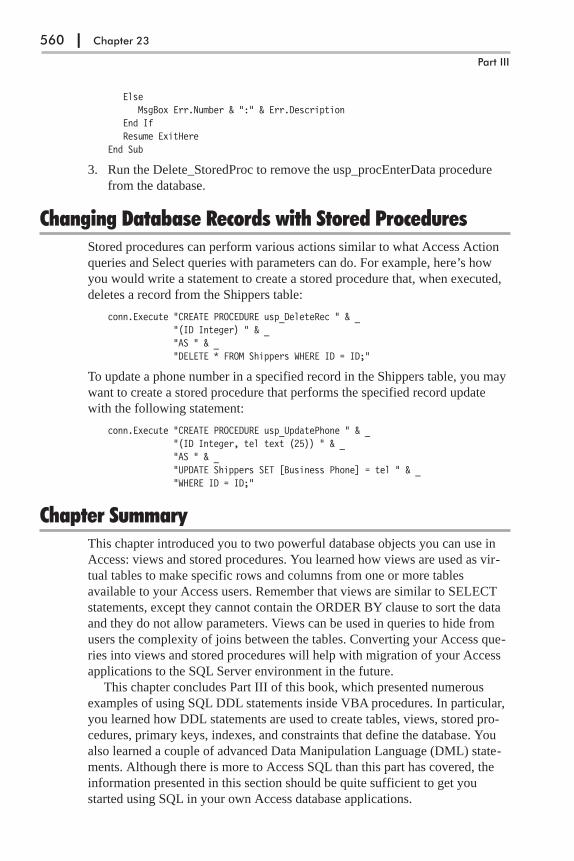
ElseMsgBox Err.Number & ":" & Err.Description
End IfResume ExitHere
End Sub
3. Run the Delete_StoredProc to remove the usp_procEnterData procedure
from the database.
Changing Database Records with Stored ProceduresStored procedures can perform various actions similar to what Access Action
queries and Select queries with parameters can do. For example, here’s how
you would write a statement to create a stored procedure that, when executed,
deletes a record from the Shippers table:
conn.Execute "CREATE PROCEDURE usp_DeleteRec " & _"(ID Integer) " & _"AS " & _"DELETE * FROM Shippers WHERE ID = ID;"
To update a phone number in a specified record in the Shippers table, you may
want to create a stored procedure that performs the specified record update
with the following statement:
conn.Execute "CREATE PROCEDURE usp_UpdatePhone " & _"(ID Integer, tel text (25)) " & _"AS " & _"UPDATE Shippers SET [Business Phone] = tel " & _"WHERE ID = ID;"
Chapter SummaryThis chapter introduced you to two powerful database objects you can use in
Access: views and stored procedures. You learned how views are used as vir-
tual tables to make specific rows and columns from one or more tables
available to your Access users. Remember that views are similar to SELECT
statements, except they cannot contain the ORDER BY clause to sort the data
and they do not allow parameters. Views can be used in queries to hide from
users the complexity of joins between the tables. Converting your Access que-
ries into views and stored procedures will help with migration of your Access
applications to the SQL Server environment in the future.
This chapter concludes Part III of this book, which presented numerous
examples of using SQL DDL statements inside VBA procedures. In particular,
you learned how DDL statements are used to create tables, views, stored pro-
cedures, primary keys, indexes, and constraints that define the database. You
also learned a couple of advanced Data Manipulation Language (DML) state-
ments. Although there is more to Access SQL than this part has covered, the
information presented in this section should be quite sufficient to get you
started using SQL in your own Access database applications.
560 | Chapter 23
Part III
PART IV
EventProgrammingin Forms andReports
Chapter 24 Using Form Events
Chapter 25 Using Report Events
Chapter 26 Events Recognized by Controls
Chapter 27 More about Event Programming
561
The behavior of
Microsoft Access
objects such as forms,
reports, and controls
can be modified by
writing programming
code known as an
event procedure or an
event handler.
In this part of the
book, you learn how
you can make your
forms, reports, and
controls do useful
things by writing event
procedures in class
modules.


Chapter 24
Using Form Events
In Chapter 1, you got a quick introduction to events, event properties, and
event procedures. I walked you through an event procedure that changed the
background color of a text box control placed on a form. Now is a good time
to go back to the beginning of this book and review these topics. Here’s a run-
down of the terms you need to be familiar with:
� Event — Events are things that happen to an object. Events occur when
you move a mouse, press a key, make changes to data, open a form, or add,
modify, or delete a record, etc. An event can be triggered by the user or by
the operating system.
� Event property — Forms, reports, and controls have various event proper-
ties you can use to trigger desired actions. When an event occurs,
Microsoft Access runs a procedure assigned to an event property. Event
properties are listed in the Event tab of the object’s property sheet. The
name of the event property begins with the word On followed by the
event’s name. Therefore, the On Click event property corresponds to the
Click event, and the On Got Focus event property is used for responding to
the GotFocus event.
� Event procedure — This is a programming code you write to specify how
a form, report, or control should respond to a particular event. By writing
event procedures you can modify the application’s built-in response to an
event.
� Event trapping — When you assign a program to an event property, you
set an event trap. When you trap an event you interrupt the default process-
ing that Access would normally carry out in response to the user’s key
press or mouse click.
� Sequence of events — Events occur in a predefined order. For example,
the Click event occurs before the DoubleClick event. When you perform
an action, several events occur, one after the other. For instance, the fol-
lowing form and control events occur when you open a form:
Open - Load - Resize - Activate - Current - Enter (control) - GotFocus
(control)
Closing the form triggers the following control and form events:
Exit (control) - LostFocus (control) - Unload - Deactivate - Close
563

To find out whether a particular event is triggered in response to a user action,
you may want to place the MsgBox statement inside the event procedure for
the event you want to test. Microsoft Access forms, reports, and controls rec-
ognize various events.
Events can be organized by object (form, report, control) or by cause (what
caused the event to happen). This chapter is filled with numerous examples of
event procedures you can write to make your forms and reports dynamic. You
can also experiment with various events in the data entry/lookup application
located in the downloadable AssetsDataEntry.mdb file. You will find several
examples from this application discussed in Chapter 26.
Microsoft Access forms can respond to a variety of events. These events
allow you to manage entire records and respond to changes in the data. You
can determine what happens when records are added, changed, or deleted, or
when a different record becomes current. You can decide how the form appears
to the user when it is first displayed on the screen and what happens when the
form is closed. You can also manage problems that occur when the data is
unavailable. As you design your custom forms, you will find that some form
events are used more frequently than others. The following sections show
hands-on examples of event procedures you can write for Access forms.
Data EventsData events occur when you change the data in a control or record placed on a
form, or when you move the focus from one record to another.
CurrentThe Current event occurs when the form is opened or requeried and when the
focus moves to a different record. Use the Current event to synchronize data
among forms or move focus to a specific control.
The event procedure in Hands-On 24-1 sets the BackColor property of the
form’s header (Section 1) to red (255) for each discontinued product. The
Form_Current event will occur each time you move to a new record if the
specified condition is true.
�Hands-On 24-1: Writing the Form_Current Event Procedure
1. Start Microsoft Office Access 2007 and create a new Microsoft Office
Access 2007 database named Chap24.accdb in your C:\Acc07_
ByExample folder.
2. Import all the tables, queries, forms, reports, macros, and modules from the
Northwind.mdb sample database to your Chap24.accdb database. To do
this, in the Access window, choose External Data | Access. In the File
name box, type C:\Acc07_ByExample\Northwind.mdb and click OK. In
the Import Objects window, select the Tables tab and click the Select All
button. This will highlight all the tables. Select the Queries tab and click
the Select All button. Select the Forms tab and click the Select All button.
564 | Chapter 24
Part IV

Select the Reports tab and click the Select All button. Do the same for
macros and modules. After selecting all the objects on the specified tabs,
click OK to begin importing. Click the Close button when done.
3. In the Access window of the Chap24.accdb database, right-click on the
Products form and choose Design View. Make sure the form’s property
sheet is visible. To activate the property sheet, choose Property Sheet in
the Tools section of the Design tab.
4. In the form’s property sheet, click the Event tab. Click next to the On
Current event property and choose [Event Procedure] from the
drop-down box. Click the Build button (…).
Access opens the Visual Basic Editor window and writes the stub of the
Form_Current event procedure.
5. Complete the code of the Form_Current event procedure as shown below,
or copy and paste the code from C:\Acc07_HandsOn\Chap24.txt.
Private Sub Form_Current()If Discontinued = True Then
Me.Section(1).BackColor = 255Me.Picture = ""
ElseMe.Picture = "C:\Program Files\" & _
"Microsoft Office\Office12\" & _"Bitmaps\Styles\Stone.bmp"
End IfEnd Sub
6. To test the above event procedure, activate the Products form that is cur-
rently open in Design view. You can quickly switch to the selected form
from Visual Basic by clicking the View Object button in the Project
Explorer window. Next, in the Access window, click the View button on
the Ribbon to display the form in Form view. Use the record selectors to
move to record 5. Because this record is marked as Discontinued, the code
in the Form_Current event will change the form header section’s color to
red.
7. Close the Products form and save all the changes when prompted.
BeforeInsertThis event occurs when the first character is typed in a new record but before
the new record is created. Use the BeforeInsert event to verify that the data is
valid or to display information about data being added. This event is quite use-
ful for placing default values in the fields at run time. The BeforeInsert event
can be canceled if the data being added does not meet specific criteria. The
event procedure in Hands-On 24-2 demonstrates how to enter a default value
in the Country field when a user begins to enter data in the form.
Using Form Events | 565
Event Programming in Forms and Reports

�Hands-On 24-2: Writing the Form_BeforeInsert Event Procedure
For this hands-on exercise we will create a new form based on the Customers
table.
1. Highlight the Customers table in the left pane of the Access window.
Choose Create | More Forms | Form Wizard.
2. Select the following fields: CustomerID, CompanyName, Address, City,
Region, PostalCode, and Country. Step through the Form Wizard screens,
pressing the Next button until you get to the screen where you are asked
for the form’s title. Type New Customers for the form’s title, select the
Modify the form’s design option button, and click Finish.
Access opens the New Customers form in Design View.
3. In the property sheet, select Form from the drop-down box, and click the
Data tab. Set the Data Entry property to Yes.
4. In the form’s property sheet, click the Event tab. Click next to the Before
Insert event property and choose [Event Procedure] from the drop-down
box. Click the Build button (…).
Access opens the Visual Basic Editor window and writes the stub of the
Form_BeforeInsert event procedure.
5. Complete the code of the Form_BeforeInsert event procedure as shown
below, or copy and paste the code from C:\Acc07_HandsOn\Chap24.txt.
Private Sub Form_BeforeInsert(Cancel As Integer)Me.Country = "USA"
End Sub
6. To test this event procedure, activate the New Customers form that is
currently open in the Design view. You can quickly switch to the selected
form from Visual Basic by clicking the View Object button in the Project
Explorer window. In the Access window, click the View button on the
Ribbon to display the New Customers form in Form view.
7. Type JANIT in the CustomerID field. Notice that as soon as you start fill-
ing in the form’s text boxes, the text “USA” appears in the Country field.
8. Click the Esc key twice to undo the changes to the form.
9. Close the New Customers form and save all the changes when prompted.
AfterInsertThe AfterInsert event occurs when a new record has been inserted. Use this
event to requery the recordset when a new record is added or to display other
information. The event procedure in Hands-On 24-3 retrieves the total number
of records in the Customers table after a new record has been inserted.
566 | Chapter 24
Part IV

�Hands-On 24-3: Writing the Form_AfterInsert Event Procedure
This hands-on exercise uses the New Customers form created in Hands-On
24-2.
1. In the Visual Basic Editor’s Project Explorer window, double-click
Form_New Customers.
2. In the Code window, you will see the Form_BeforeInsert event procedure
prepared in Hands-On 24-2. Below this procedure code, enter the
Form_AfterInsert event procedure as shown below, or copy and paste the
code from C:\Acc07_HandsOn\Chap24.txt.
Private Sub Form_AfterInsert()Dim db As DAO.DatabaseDim rst As DAO.Recordset
Set db = CurrentDb()Set rst = db.OpenRecordset("Customers")
MsgBox "Added " & rst.RecordCount & _"th customer."
rst.CloseSet rst = NothingSet db = Nothing
End Sub
3. To test the above event procedure, open the New Customers form in Form
view. Type TRYIT in the Customer ID text box. Type Test Events in the
Company Name text box. Now use the record selector to move to the next
record. Access executes the code in the Form_AfterInsert event procedure
and displays the total number of records.
4. Close the New Customers form and save all the changes when prompted.
BeforeUpdateThis event occurs after a record has been edited but before it is written to the
table. This event is triggered by moving to another record or attempting to save
the current record. The BeforeUpdate event takes place after the BeforeInsert
event. Use this event to validate the entire record and display a message to
confirm the change. The BeforeUpdate event can be canceled if the record can-
not be accepted. The event procedure in Hands-On 24-4 will supply the value
for the EmployeeID field before the newly entered record is saved.
�Hands-On 24-4: Writing the Form_BeforeUpdate Event Procedure
This hands-on exercise uses the New Customers form created in Hands-On
24-2.
1. In the Visual Basic Editor’s Project Explorer window, double-click
Form_New Customers.
Using Form Events | 567
Event Programming in Forms and Reports

2. In the Code window, other event procedures prepared in Hands-On 24-2
and 24-3 will be listed. Enter the following Form_BeforeUpdate event
procedure below the last procedure code, or copy and paste the code from
C:\Acc07_HandsOn\Chap24.txt.
Private Sub Form_BeforeUpdate(Cancel As Integer)If Not IsNull(Me.CompanyName) Then
Me.CustomerID = Left(CompanyName, 3) & _Right(CompanyName, 2)
MsgBox "You just added Customer ID: " & _Me.CustomerID
ElseMsgBox "Please enter Company Name.", _
vbOKOnly, "Missing Data"Me.CompanyName.SetFocusCancel = True
End IfEnd Sub
3. To test the above event procedure, open the New Customers form in Form
view. Type Event Enterprises in the Company Name box. Click the record
selector to move to the next record. The BeforeUpdate event procedure
code will run at this point and you will see a message box with the custom-
generated Customer ID. Click OK to the message. Another message will
appear with the number of total records. This message box is generated by
the AfterInsert event procedure that was prepared in Hands-On 24-3. Click
OK to this message.
4. Close the New Customers form and save changes to the form when
prompted.
AfterUpdateThis event occurs after the record changes have been saved in the database. It
is also invoked when a control loses focus and after the data in the control has
changed. Use the AfterUpdate event to update data in other controls on the
form or to move the focus to a different record or a control. The event proce-
dure in Hands-On 24-5 creates an audit trail for all newly added records, as
illustrated in Figure 24-1.
�Hands-On 24-5: Writing the Form_AfterUpdate Event Procedure
This hands-on requires the New Customers form that was created in Hands-On
24-2.
568 | Chapter 24
Part IV
Figure 24-1: The Form_AfterUpdate eventprocedure is used here to store informationabout newly added records in a text file.
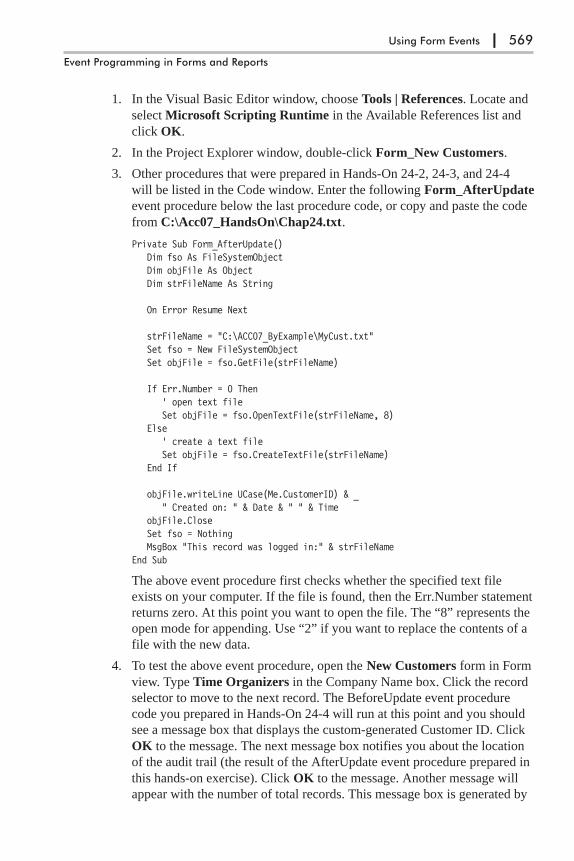
1. In the Visual Basic Editor window, choose Tools | References. Locate and
select Microsoft Scripting Runtime in the Available References list and
click OK.
2. In the Project Explorer window, double-click Form_New Customers.
3. Other procedures that were prepared in Hands-On 24-2, 24-3, and 24-4
will be listed in the Code window. Enter the following Form_AfterUpdate
event procedure below the last procedure code, or copy and paste the code
from C:\Acc07_HandsOn\Chap24.txt.
Private Sub Form_AfterUpdate()Dim fso As FileSystemObjectDim objFile As ObjectDim strFileName As String
On Error Resume Next
strFileName = "C:\ACC07_ByExample\MyCust.txt"Set fso = New FileSystemObjectSet objFile = fso.GetFile(strFileName)
If Err.Number = 0 Then' open text fileSet objFile = fso.OpenTextFile(strFileName, 8)
Else' create a text fileSet objFile = fso.CreateTextFile(strFileName)
End If
objFile.writeLine UCase(Me.CustomerID) & _" Created on: " & Date & " " & Time
objFile.CloseSet fso = NothingMsgBox "This record was logged in:" & strFileName
End Sub
The above event procedure first checks whether the specified text file
exists on your computer. If the file is found, then the Err.Number statement
returns zero. At this point you want to open the file. The “8” represents the
open mode for appending. Use “2” if you want to replace the contents of a
file with the new data.
4. To test the above event procedure, open the New Customers form in Form
view. Type Time Organizers in the Company Name box. Click the record
selector to move to the next record. The BeforeUpdate event procedure
code you prepared in Hands-On 24-4 will run at this point and you should
see a message box that displays the custom-generated Customer ID. Click
OK to the message. The next message box notifies you about the location
of the audit trail (the result of the AfterUpdate event procedure prepared in
this hands-on exercise). Click OK to the message. Another message will
appear with the number of total records. This message box is generated by
Using Form Events | 569
Event Programming in Forms and Reports

the AfterInsert event procedure that was prepared in Hands-On 24-3. Click
OK to this message.
As you enter more customer records using the New Customers form,
events are executed in the following order:
BeforeInsert (Hands-On 24-2)
BeforeUpdate (Hands-On 24-4)
AfterUpdate (Hands-On 24-5)
AfterInsert (Hands-On 24-3)
5. Close the New Customers form and save changes to the form when
prompted.
DirtyThe Dirty event occurs when the contents of a form or the text portion of a
combo box changes. This event will be triggered by an attempt to enter a char-
acter directly in the form’s text box or combo box. Use this event to determine
if the record can be changed. The event procedure in Hands-On 24-6 disallows
changes to form data when the CategoryID is less than or equal to 4.
�Hands-On 24-6: Writing the Form_Dirty Event Procedure
1. Highlight the Categories table in the left pane of the Access window.
Choose Create | More Forms | Form Wizard.
2. Add all the fields as listed in the Categories table. Step through the Form
Wizard screens, clicking the Next button until you get to the screen where
you are asked for the form’s title. Type Product Categories for the form’s
title, select the Modify the form’s design option button, and click Finish.
Access opens the Product Categories form in Design view.
3. In the property sheet, select Form from the drop-down box, and click the
Event tab. Click next to the On Dirty event property and choose [Event
Procedure] from the drop-down box. Click the Build button (…).
Access opens the Visual Basic Editor window and writes the stub of the
Form_Dirty event procedure.
4. Complete the code of the Form_Dirty event procedure as shown below, or
copy and paste the code from C:\Acc07_HandsOn\Chap24.txt.
Private Sub Form_Dirty(Cancel As Integer)If CategoryID <= 4 Then
MsgBox "You cannot make changes in this record."Cancel = True
End IfEnd Sub
5. To test the above event procedure, open the Product Categories form in
Form view. Try to make any changes to the original records. You will not
570 | Chapter 24
Part IV

be able to make changes to the data if the product’s CategoryID is less than
or equal to 4.
6. Close the Product Categories form and save changes to the form when
prompted.
OnUndoThe OnUndo event occurs when the user undoes a change to a combo box con-
trol, form, or text box control. By setting the Cancel argument to True, you can
cancel the undo operation and leave the control or form in its edited state. The
Undo event for forms is triggered when the user clicks the Undo button,
presses the Esc key, or calls the Undo method.
DeleteThe Delete event occurs when you select one or more records for deletion and
before the records are actually removed from the table. Use this event to place
restrictions on the data that can be deleted. When deleting multiple records, the
Delete event occurs for each record. This enables you to confirm or cancel
each deletion in your event procedure code. You can cancel the deletion in the
Delete or BeforeDelConfirm events by setting the Cancel argument to True.
After the record is deleted, the focus moves to the next record and the current
event for that record occurs.
The event procedure in Hands-On 24-7 demonstrates how to disallow dele-
tion of records when CategoryID is less than or equal to 8 and ask the user to
confirm the deletion for other records.
�Hands-On 24-7: Writing the Form_Delete Event Procedure
This hands-on exercise uses the Product Categories form created in Hands-On
24-6.
1. In the Visual Basic Editor’s Project Explorer window, double-click
Form_Product Categories, which was created in Hands-On 24-6.
2. In the Code window, you will see the Form_Dirty event procedure that was
prepared in Hands-On 24-6. Below this procedure code, enter the Form_
Delete event procedure as shown below, or copy and paste the code from
C:\Acc07_HandsOn\Chap24.txt.
Private Sub Form_Delete(Cancel As Integer)If CategoryID <= 8 Then
MsgBox "You can't delete the original categories."Cancel = True
ElseIf MsgBox("Do you really want to delete " & _
"this record?", vbOKCancel, _"Delete Verification") = vbCancel Then
Cancel = TrueEnd If
Using Form Events | 571
Event Programming in Forms and Reports
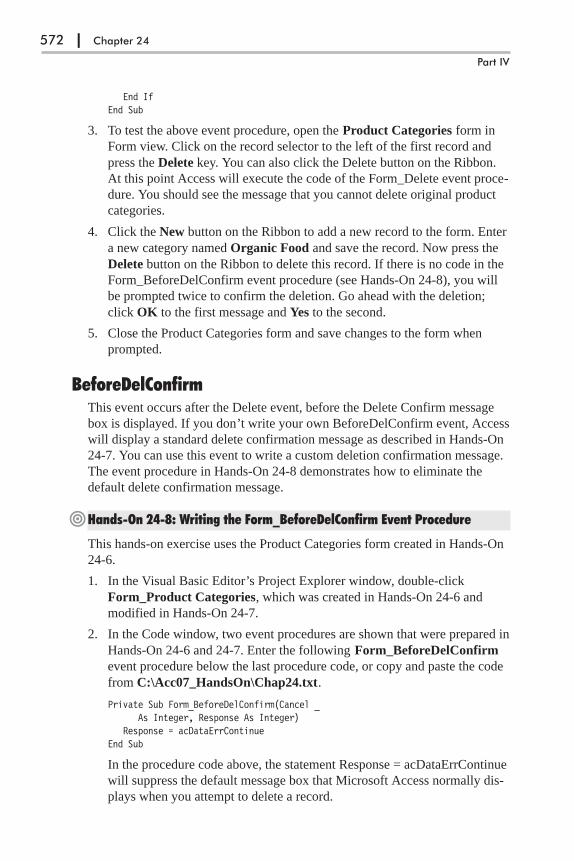
End IfEnd Sub
3. To test the above event procedure, open the Product Categories form in
Form view. Click on the record selector to the left of the first record and
press the Delete key. You can also click the Delete button on the Ribbon.
At this point Access will execute the code of the Form_Delete event proce-
dure. You should see the message that you cannot delete original product
categories.
4. Click the New button on the Ribbon to add a new record to the form. Enter
a new category named Organic Food and save the record. Now press the
Delete button on the Ribbon to delete this record. If there is no code in the
Form_BeforeDelConfirm event procedure (see Hands-On 24-8), you will
be prompted twice to confirm the deletion. Go ahead with the deletion;
click OK to the first message and Yes to the second.
5. Close the Product Categories form and save changes to the form when
prompted.
BeforeDelConfirmThis event occurs after the Delete event, before the Delete Confirm message
box is displayed. If you don’t write your own BeforeDelConfirm event, Access
will display a standard delete confirmation message as described in Hands-On
24-7. You can use this event to write a custom deletion confirmation message.
The event procedure in Hands-On 24-8 demonstrates how to eliminate the
default delete confirmation message.
�Hands-On 24-8: Writing the Form_BeforeDelConfirm Event Procedure
This hands-on exercise uses the Product Categories form created in Hands-On
24-6.
1. In the Visual Basic Editor’s Project Explorer window, double-click
Form_Product Categories, which was created in Hands-On 24-6 and
modified in Hands-On 24-7.
2. In the Code window, two event procedures are shown that were prepared in
Hands-On 24-6 and 24-7. Enter the following Form_BeforeDelConfirm
event procedure below the last procedure code, or copy and paste the code
from C:\Acc07_HandsOn\Chap24.txt.
Private Sub Form_BeforeDelConfirm(Cancel _As Integer, Response As Integer)
Response = acDataErrContinueEnd Sub
In the procedure code above, the statement Response = acDataErrContinue
will suppress the default message box that Microsoft Access normally dis-
plays when you attempt to delete a record.
572 | Chapter 24
Part IV
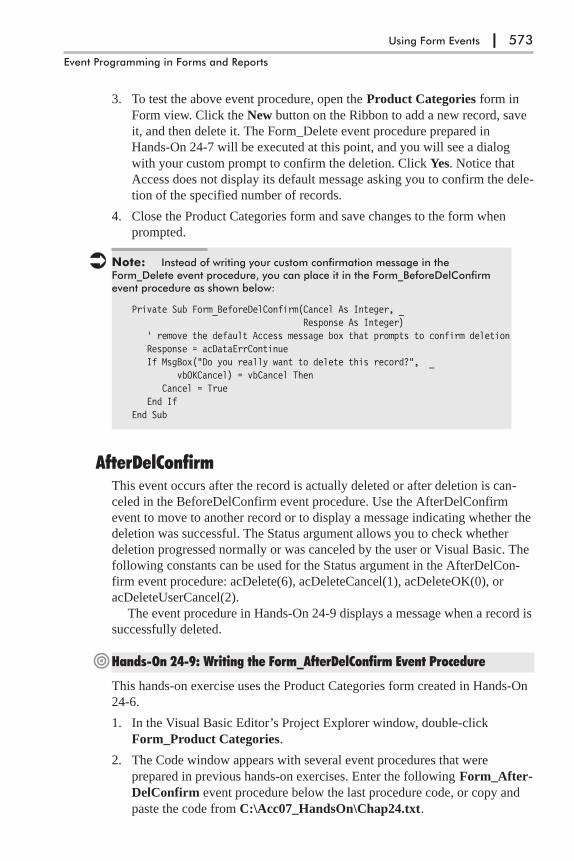
3. To test the above event procedure, open the Product Categories form in
Form view. Click the New button on the Ribbon to add a new record, save
it, and then delete it. The Form_Delete event procedure prepared in
Hands-On 24-7 will be executed at this point, and you will see a dialog
with your custom prompt to confirm the deletion. Click Yes. Notice that
Access does not display its default message asking you to confirm the dele-
tion of the specified number of records.
4. Close the Product Categories form and save changes to the form when
prompted.
� Note: Instead of writing your custom confirmation message in theForm_Delete event procedure, you can place it in the Form_BeforeDelConfirmevent procedure as shown below:
Private Sub Form_BeforeDelConfirm(Cancel As Integer, _Response As Integer)
' remove the default Access message box that prompts to confirm deletionResponse = acDataErrContinueIf MsgBox("Do you really want to delete this record?", _
vbOKCancel) = vbCancel ThenCancel = True
End IfEnd Sub
AfterDelConfirmThis event occurs after the record is actually deleted or after deletion is can-
celed in the BeforeDelConfirm event procedure. Use the AfterDelConfirm
event to move to another record or to display a message indicating whether the
deletion was successful. The Status argument allows you to check whether
deletion progressed normally or was canceled by the user or Visual Basic. The
following constants can be used for the Status argument in the AfterDelCon-
firm event procedure: acDelete(6), acDeleteCancel(1), acDeleteOK(0), or
acDeleteUserCancel(2).
The event procedure in Hands-On 24-9 displays a message when a record is
successfully deleted.
�Hands-On 24-9: Writing the Form_AfterDelConfirm Event Procedure
This hands-on exercise uses the Product Categories form created in Hands-On
24-6.
1. In the Visual Basic Editor’s Project Explorer window, double-click
Form_Product Categories.
2. The Code window appears with several event procedures that were
prepared in previous hands-on exercises. Enter the following Form_After-
DelConfirm event procedure below the last procedure code, or copy and
paste the code from C:\Acc07_HandsOn\Chap24.txt.
Using Form Events | 573
Event Programming in Forms and Reports
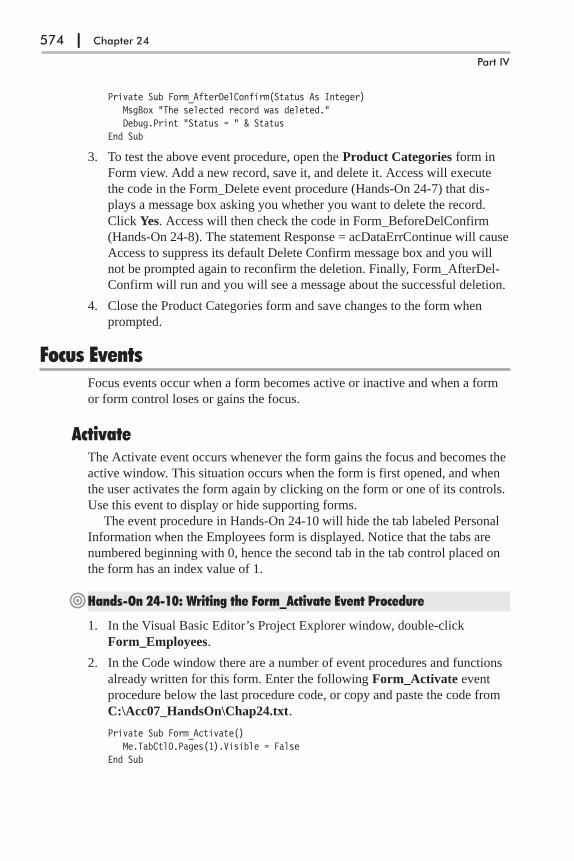
Private Sub Form_AfterDelConfirm(Status As Integer)MsgBox "The selected record was deleted."Debug.Print "Status = " & Status
End Sub
3. To test the above event procedure, open the Product Categories form in
Form view. Add a new record, save it, and delete it. Access will execute
the code in the Form_Delete event procedure (Hands-On 24-7) that dis-
plays a message box asking you whether you want to delete the record.
Click Yes. Access will then check the code in Form_BeforeDelConfirm
(Hands-On 24-8). The statement Response = acDataErrContinue will cause
Access to suppress its default Delete Confirm message box and you will
not be prompted again to reconfirm the deletion. Finally, Form_AfterDel-
Confirm will run and you will see a message about the successful deletion.
4. Close the Product Categories form and save changes to the form when
prompted.
Focus EventsFocus events occur when a form becomes active or inactive and when a form
or form control loses or gains the focus.
ActivateThe Activate event occurs whenever the form gains the focus and becomes the
active window. This situation occurs when the form is first opened, and when
the user activates the form again by clicking on the form or one of its controls.
Use this event to display or hide supporting forms.
The event procedure in Hands-On 24-10 will hide the tab labeled Personal
Information when the Employees form is displayed. Notice that the tabs are
numbered beginning with 0, hence the second tab in the tab control placed on
the form has an index value of 1.
�Hands-On 24-10: Writing the Form_Activate Event Procedure
1. In the Visual Basic Editor’s Project Explorer window, double-click
Form_Employees.
2. In the Code window there are a number of event procedures and functions
already written for this form. Enter the following Form_Activate event
procedure below the last procedure code, or copy and paste the code from
C:\Acc07_HandsOn\Chap24.txt.
Private Sub Form_Activate()Me.TabCtl0.Pages(1).Visible = False
End Sub
574 | Chapter 24
Part IV
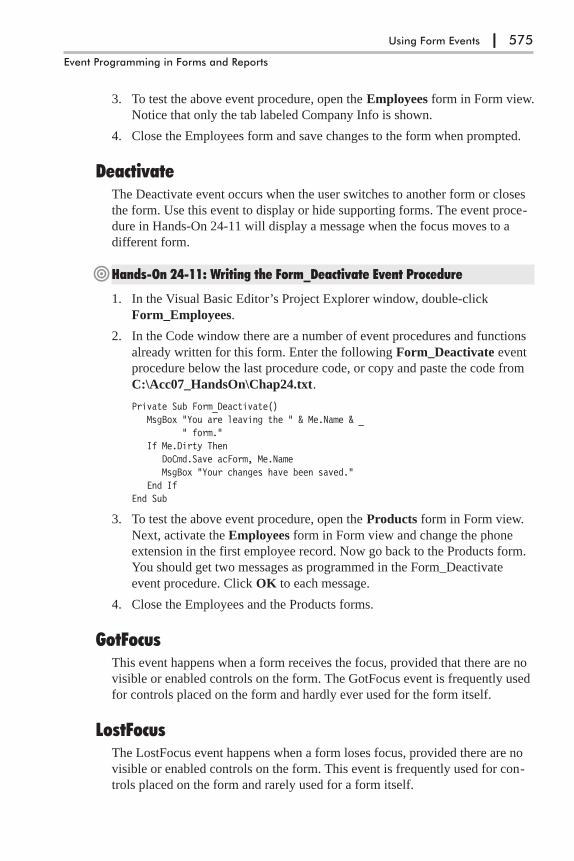
3. To test the above event procedure, open the Employees form in Form view.
Notice that only the tab labeled Company Info is shown.
4. Close the Employees form and save changes to the form when prompted.
DeactivateThe Deactivate event occurs when the user switches to another form or closes
the form. Use this event to display or hide supporting forms. The event proce-
dure in Hands-On 24-11 will display a message when the focus moves to a
different form.
�Hands-On 24-11: Writing the Form_Deactivate Event Procedure
1. In the Visual Basic Editor’s Project Explorer window, double-click
Form_Employees.
2. In the Code window there are a number of event procedures and functions
already written for this form. Enter the following Form_Deactivate event
procedure below the last procedure code, or copy and paste the code from
C:\Acc07_HandsOn\Chap24.txt.
Private Sub Form_Deactivate()MsgBox "You are leaving the " & Me.Name & _
" form."If Me.Dirty Then
DoCmd.Save acForm, Me.NameMsgBox "Your changes have been saved."
End IfEnd Sub
3. To test the above event procedure, open the Products form in Form view.
Next, activate the Employees form in Form view and change the phone
extension in the first employee record. Now go back to the Products form.
You should get two messages as programmed in the Form_Deactivate
event procedure. Click OK to each message.
4. Close the Employees and the Products forms.
GotFocusThis event happens when a form receives the focus, provided that there are no
visible or enabled controls on the form. The GotFocus event is frequently used
for controls placed on the form and hardly ever used for the form itself.
LostFocusThe LostFocus event happens when a form loses focus, provided there are no
visible or enabled controls on the form. This event is frequently used for con-
trols placed on the form and rarely used for a form itself.
Using Form Events | 575
Event Programming in Forms and Reports

Mouse EventsMouse events occur when you move a mouse or click any of the available
mouse buttons.
ClickThe Click event occurs when you click a mouse button on a blank area of a
form, a form’s record selector, or a control placed on the form.
The event procedure in Hands-On 24-12 will cause a text box control to
move one inch to the right when you click the record selector.
�Hands-On 24-12: Writing the Form_Click Event Procedure
1. Create a new form with two text boxes. Position both text boxes starting at
1 inch on the horizontal ruler. Save the form as Mouse Test.
2. In the form’s property sheet, make sure Form is selected and click the
Event tab. Click next to the On Click event property and choose [Event
Procedure] from the drop-down box. Click the Build button (…).
Access opens the Visual Basic Editor window and writes the stub of the
Form_Click event procedure.
3. Complete the code of the Form_Click event procedure as shown below, or
copy and paste the code from C:\Acc07_HandsOn\Chap24.txt.
Private Sub Form_Click()MsgBox "Form Click Event Occurred."Me.Text0.Left = Text0.Left + 1440
End Sub
The first text box control placed on the form is automatically named Text0.
The Left property is used to specify an object’s location on a form or
report. The above procedure moves a text box control one inch to the right.
Screen measurements are expressed in units called twips and there are
1440 twips per inch. Thus, to calculate the new position of the text box,
you must add 1440 to the current position.
4. To test the above event procedure, open the Mouse Test form in Form
view. Click on the record selector (a bar to the left of a record). This will
cause the Form_Click event procedure code to execute and you will see a
message box. After clicking OK in response to the message, the first text
box control will move one inch to the right.
5. Close the Mouse Test form and save changes to the form when prompted.
DblClickThe DblClick event occurs when you double-click on a blank area of the form,
the form’s record selector, or a control placed on the form.
576 | Chapter 24
Part IV
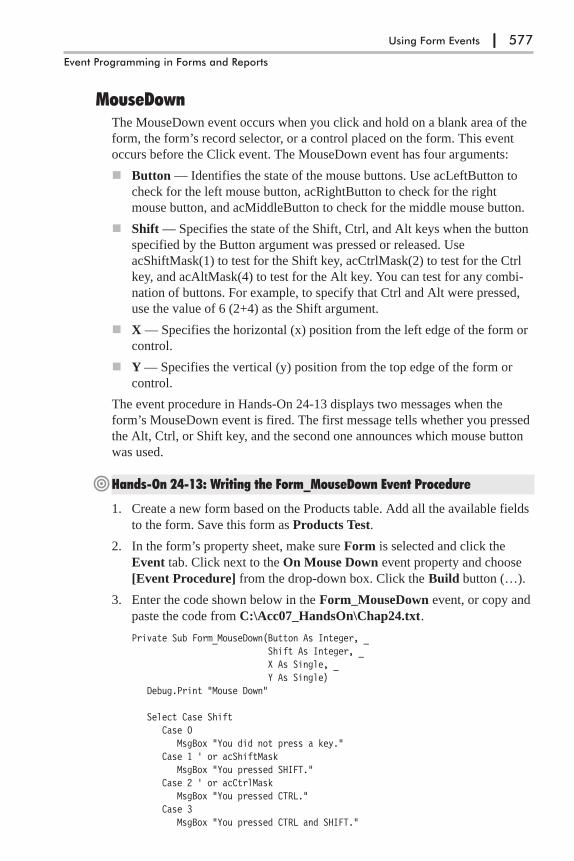
MouseDownThe MouseDown event occurs when you click and hold on a blank area of the
form, the form’s record selector, or a control placed on the form. This event
occurs before the Click event. The MouseDown event has four arguments:
� Button — Identifies the state of the mouse buttons. Use acLeftButton to
check for the left mouse button, acRightButton to check for the right
mouse button, and acMiddleButton to check for the middle mouse button.
� Shift — Specifies the state of the Shift, Ctrl, and Alt keys when the button
specified by the Button argument was pressed or released. Use
acShiftMask(1) to test for the Shift key, acCtrlMask(2) to test for the Ctrl
key, and acAltMask(4) to test for the Alt key. You can test for any combi-
nation of buttons. For example, to specify that Ctrl and Alt were pressed,
use the value of 6 (2+4) as the Shift argument.
� X — Specifies the horizontal (x) position from the left edge of the form or
control.
� Y — Specifies the vertical (y) position from the top edge of the form or
control.
The event procedure in Hands-On 24-13 displays two messages when the
form’s MouseDown event is fired. The first message tells whether you pressed
the Alt, Ctrl, or Shift key, and the second one announces which mouse button
was used.
�Hands-On 24-13: Writing the Form_MouseDown Event Procedure
1. Create a new form based on the Products table. Add all the available fields
to the form. Save this form as Products Test.
2. In the form’s property sheet, make sure Form is selected and click the
Event tab. Click next to the On Mouse Down event property and choose
[Event Procedure] from the drop-down box. Click the Build button (…).
3. Enter the code shown below in the Form_MouseDown event, or copy and
paste the code from C:\Acc07_HandsOn\Chap24.txt.
Private Sub Form_MouseDown(Button As Integer, _Shift As Integer, _X As Single, _Y As Single)
Debug.Print "Mouse Down"
Select Case ShiftCase 0
MsgBox "You did not press a key."Case 1 ' or acShiftMask
MsgBox "You pressed SHIFT."Case 2 ' or acCtrlMask
MsgBox "You pressed CTRL."Case 3
MsgBox "You pressed CTRL and SHIFT."
Using Form Events | 577
Event Programming in Forms and Reports
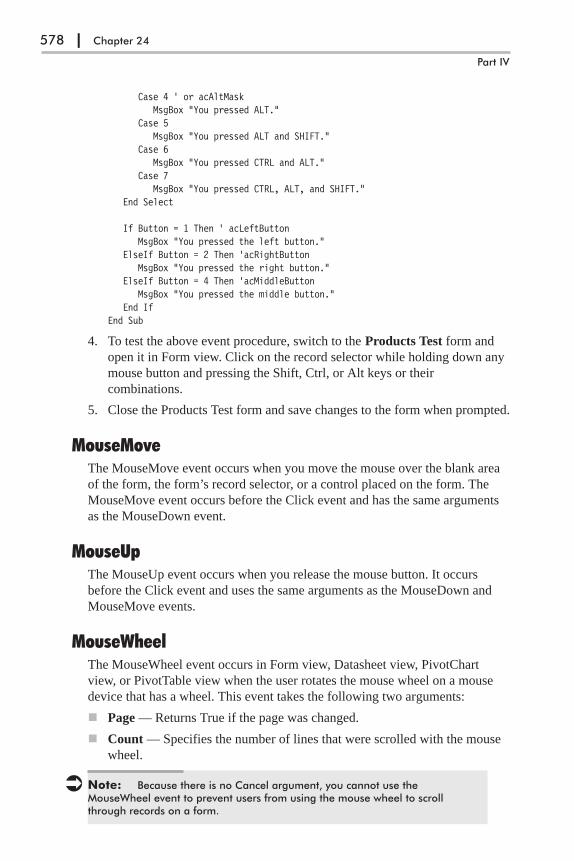
Case 4 ' or acAltMaskMsgBox "You pressed ALT."
Case 5MsgBox "You pressed ALT and SHIFT."
Case 6MsgBox "You pressed CTRL and ALT."
Case 7MsgBox "You pressed CTRL, ALT, and SHIFT."
End Select
If Button = 1 Then ' acLeftButtonMsgBox "You pressed the left button."
ElseIf Button = 2 Then 'acRightButtonMsgBox "You pressed the right button."
ElseIf Button = 4 Then 'acMiddleButtonMsgBox "You pressed the middle button."
End IfEnd Sub
4. To test the above event procedure, switch to the Products Test form and
open it in Form view. Click on the record selector while holding down any
mouse button and pressing the Shift, Ctrl, or Alt keys or their
combinations.
5. Close the Products Test form and save changes to the form when prompted.
MouseMoveThe MouseMove event occurs when you move the mouse over the blank area
of the form, the form’s record selector, or a control placed on the form. The
MouseMove event occurs before the Click event and has the same arguments
as the MouseDown event.
MouseUpThe MouseUp event occurs when you release the mouse button. It occurs
before the Click event and uses the same arguments as the MouseDown and
MouseMove events.
MouseWheelThe MouseWheel event occurs in Form view, Datasheet view, PivotChart
view, or PivotTable view when the user rotates the mouse wheel on a mouse
device that has a wheel. This event takes the following two arguments:
� Page — Returns True if the page was changed.
� Count — Specifies the number of lines that were scrolled with the mouse
wheel.
� Note: Because there is no Cancel argument, you cannot use theMouseWheel event to prevent users from using the mouse wheel to scrollthrough records on a form.
578 | Chapter 24
Part IV

Keyboard EventsKeyboard events occur when you hold down, press, or release a key on the
keyboard or send a keystroke by using the SendKeys statement in Visual Basic
or the SendKeys action in a macro.
The keyboard events occur in the following sequence:
KeyDown � KeyPress � KeyUp
If the form’s KeyPreview property is set to Yes, all keyboard events occur first
for the form, and then for the control that has the focus. When you press and
hold down the key, the KeyDown and KeyPress events occur repeatedly. When
you release the key, the KeyUp event occurs.
KeyDownThe KeyDown event occurs when you press a key while a form or control has
the focus. This event is also triggered by using the SendKeys statement in
Visual Basic or the SendKeys action in a macro. If the form’s KeyPreview
property is set to Yes, all keyboard events occur first for the form, and then for
the control that has the focus.
The KeyDown event takes the following two arguments:
� KeyCode — Determines which key was pressed. To specify key codes, use
members of the KeyCodeConstants class in the VBA Object Library in the
Object Browser. To prevent an object from receiving the keystroke, set
KeyCode to zero (0).
� Shift — Determines if the Shift, Ctrl, or Alt key was pressed. Use
acShiftMask(1) to test for the Shift key, acCtrlMask(2) to test for the Ctrl
key, and acAltMask(4) to test for the Alt key. You can test for any combi-
nation of buttons. For example, to specify that Ctrl and Alt were pressed,
use the value of 6 (2+4) as the Shift argument.
The event procedure in Hands-On 24-14 displays a message when you press
one of the following keys: F1, Home, Tab, Shift, Ctrl, Alt, or Delete.
�Hands-On 24-14: Writing the Form_KeyDown Event Procedure
1. Open the Products form in Design view. In the form’s property sheet,
make sure Form is selected and click the Event tab. Set the Key Preview
property to Yes.
2. Save the Products form.
3. Click next to the On Key Down event property and choose [Event Proce-
dure] from the drop-down box. Click the Build button (…).
In the Code window there are a couple of event procedures already written
for this form.
Using Form Events | 579
Event Programming in Forms and Reports

4. Enter the following Form_KeyDown event procedure below the last pro-
cedure code, or copy and paste the code from C:\Acc07_HandsOn\
Chap24.txt.
Private Sub Form_KeyDown _(KeyCode As Integer, Shift As Integer)
Select Case KeyCodeCase vbKeyF1
MsgBox "You pressed the F1 key."Case vbKeyHome
MsgBox "You pressed the Home key."Case vbKeyTab
MsgBox "You pressed the Tab key."End SelectSelect Case Shift
Case acShiftMaskMsgBox "You pressed the SHIFT key."
Case acCtrlMaskMsgBox "You pressed the CTRL key."
Case acAltMaskMsgBox "You pressed the ALT key."
End SelectIf KeyCode = vbKeyDelete Then
MsgBox "Delete Key is not allowed."KeyCode = 0
End IfEnd Sub
5. To test the above event procedure, open the Products form in Form view.
Press one of the following keys: F1, Home, Tab, Shift, Ctrl, Alt, or
Delete. Click OK to the message.
6. Close the Products form and save changes to the form when prompted.
KeyPressThe KeyPress event occurs when you press and release a key or a key combi-
nation. This event is also triggered by using the SendKeys statement in Visual
Basic or the SendKeys action in a macro. If the form’s KeyPreview property is
set to Yes, all keyboard events occur first for the form, and then for the control
that has the focus.
The KeyPress event responds only to the ANSI characters generated by the
keyboard, the Ctrl key combined with a character from the standard alphabet
or a special character, and the Enter or Backspace key. Other keystrokes are
handled by the KeyDown and KeyUp event procedures. KeyAscii is a read/
write argument that specifies which ANSI key was pressed. To cancel the key-
stroke in the KeyPress event, set the KeyAscii argument to 0. The KeyPress
event treats uppercase and lowercase letters as separate characters.
The event procedure in Hands-On 24-15 prints the ASCII code and the
value of the pressed key to the Immediate window. Upon pressing the Escape
580 | Chapter 24
Part IV
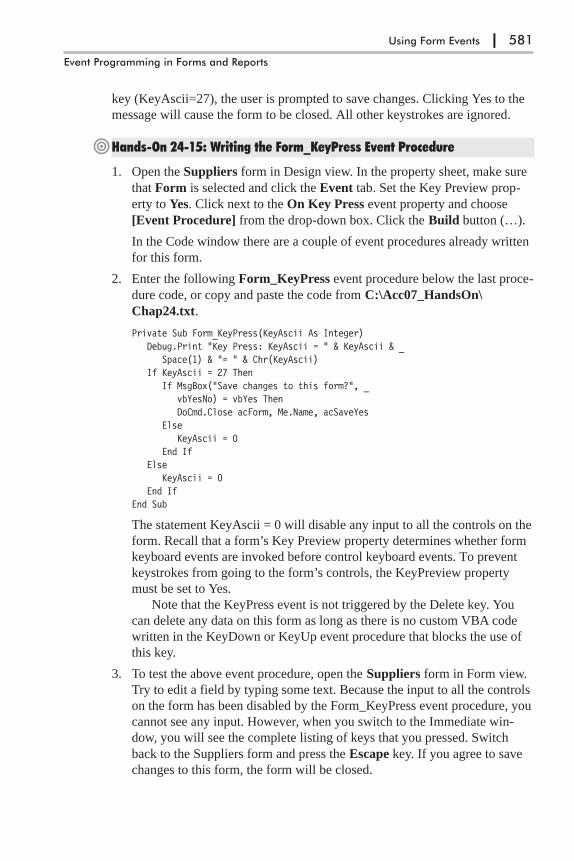
key (KeyAscii=27), the user is prompted to save changes. Clicking Yes to the
message will cause the form to be closed. All other keystrokes are ignored.
�Hands-On 24-15: Writing the Form_KeyPress Event Procedure
1. Open the Suppliers form in Design view. In the property sheet, make sure
that Form is selected and click the Event tab. Set the Key Preview prop-
erty to Yes. Click next to the On Key Press event property and choose
[Event Procedure] from the drop-down box. Click the Build button (…).
In the Code window there are a couple of event procedures already written
for this form.
2. Enter the following Form_KeyPress event procedure below the last proce-
dure code, or copy and paste the code from C:\Acc07_HandsOn\
Chap24.txt.
Private Sub Form_KeyPress(KeyAscii As Integer)Debug.Print "Key Press: KeyAscii = " & KeyAscii & _
Space(1) & "= " & Chr(KeyAscii)If KeyAscii = 27 Then
If MsgBox("Save changes to this form?", _vbYesNo) = vbYes ThenDoCmd.Close acForm, Me.Name, acSaveYes
ElseKeyAscii = 0
End IfElse
KeyAscii = 0End If
End Sub
The statement KeyAscii = 0 will disable any input to all the controls on the
form. Recall that a form’s Key Preview property determines whether form
keyboard events are invoked before control keyboard events. To prevent
keystrokes from going to the form’s controls, the KeyPreview property
must be set to Yes.
Note that the KeyPress event is not triggered by the Delete key. You
can delete any data on this form as long as there is no custom VBA code
written in the KeyDown or KeyUp event procedure that blocks the use of
this key.
3. To test the above event procedure, open the Suppliers form in Form view.
Try to edit a field by typing some text. Because the input to all the controls
on the form has been disabled by the Form_KeyPress event procedure, you
cannot see any input. However, when you switch to the Immediate win-
dow, you will see the complete listing of keys that you pressed. Switch
back to the Suppliers form and press the Escape key. If you agree to save
changes to this form, the form will be closed.
Using Form Events | 581
Event Programming in Forms and Reports
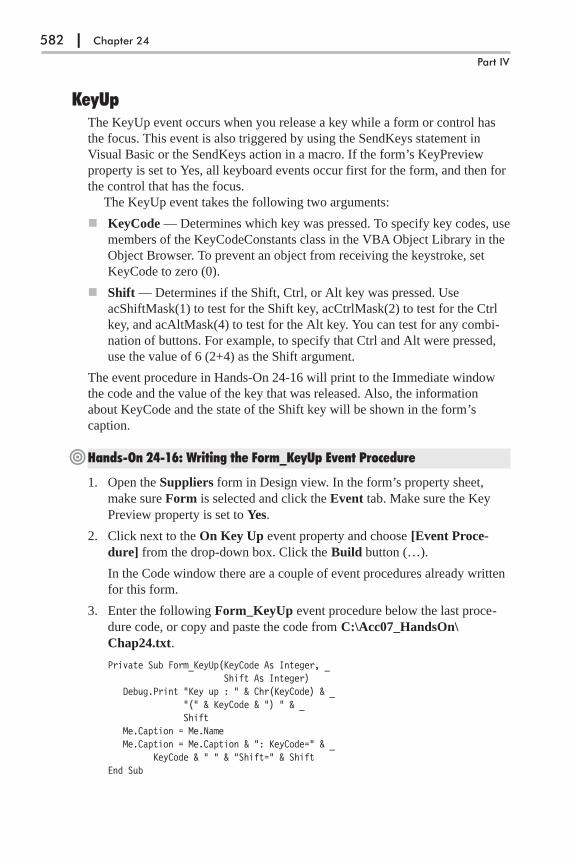
KeyUpThe KeyUp event occurs when you release a key while a form or control has
the focus. This event is also triggered by using the SendKeys statement in
Visual Basic or the SendKeys action in a macro. If the form’s KeyPreview
property is set to Yes, all keyboard events occur first for the form, and then for
the control that has the focus.
The KeyUp event takes the following two arguments:
� KeyCode — Determines which key was pressed. To specify key codes, use
members of the KeyCodeConstants class in the VBA Object Library in the
Object Browser. To prevent an object from receiving the keystroke, set
KeyCode to zero (0).
� Shift — Determines if the Shift, Ctrl, or Alt key was pressed. Use
acShiftMask(1) to test for the Shift key, acCtrlMask(2) to test for the Ctrl
key, and acAltMask(4) to test for the Alt key. You can test for any combi-
nation of buttons. For example, to specify that Ctrl and Alt were pressed,
use the value of 6 (2+4) as the Shift argument.
The event procedure in Hands-On 24-16 will print to the Immediate window
the code and the value of the key that was released. Also, the information
about KeyCode and the state of the Shift key will be shown in the form’s
caption.
�Hands-On 24-16: Writing the Form_KeyUp Event Procedure
1. Open the Suppliers form in Design view. In the form’s property sheet,
make sure Form is selected and click the Event tab. Make sure the Key
Preview property is set to Yes.
2. Click next to the On Key Up event property and choose [Event Proce-
dure] from the drop-down box. Click the Build button (…).
In the Code window there are a couple of event procedures already written
for this form.
3. Enter the following Form_KeyUp event procedure below the last proce-
dure code, or copy and paste the code from C:\Acc07_HandsOn\
Chap24.txt.
Private Sub Form_KeyUp(KeyCode As Integer, _Shift As Integer)
Debug.Print "Key up : " & Chr(KeyCode) & _"(" & KeyCode & ") " & _Shift
Me.Caption = Me.NameMe.Caption = Me.Caption & ": KeyCode=" & _
KeyCode & " " & "Shift=" & ShiftEnd Sub
582 | Chapter 24
Part IV

4. To test the above event procedure, open the Suppliers form in Form view.
Press various keys on the keyboard and notice the key information in the
form’s caption.
5. Switch to the Visual Basic Editor window and activate the Immediate
window.
You should see a listing of the keys that were pressed and released while
performing step 4 above.
6. Close the Suppliers form and save changes to the form when prompted.
Error EventsThe Error event is triggered by run-time errors generated either in the
Microsoft Access interface or by the Microsoft Jet/ACE database engine. The
Error event does not trap VBA errors.
ErrorThe Error event occurs when there is a problem accessing data for the form.
Use this event to suppress the standard error messages and display a custom
error message instead.
The Error event takes the following two arguments:
� DataErr — Contains the number of the Microsoft Access error that
occurred.
� Response — Determines whether or not error messages should be dis-
played. It may be one of the following constants:
� acDataErrContinue — Ignore the error and continue without display-
ing the default Microsoft Access error message.
� acDataErrDisplay — Display the default Microsoft Access error mes-
sage. This is the default.
The event procedure in Hands-On 24-17 displays a custom message when an
attempt is made to add a new record with a customer ID that already exists.
The standard Microsoft Access error message is not displayed.
�Hands-On 24-17: Writing the Form_Error Event Procedure
1. Create a new form based on the Customers table. Add all the fields from
the Customers table and save the new form as Customers Data Entry.
2. Activate the Customers Data Entry form in Design view. In the property
sheet, make sure Form is selected and click the Data tab. Set the form’s
DataEntry property to Yes.
3. Click the Event tab, set the On Error property to [Event Procedure], and
press the Build button (…).
Access will create the event procedure stub.
Using Form Events | 583
Event Programming in Forms and Reports
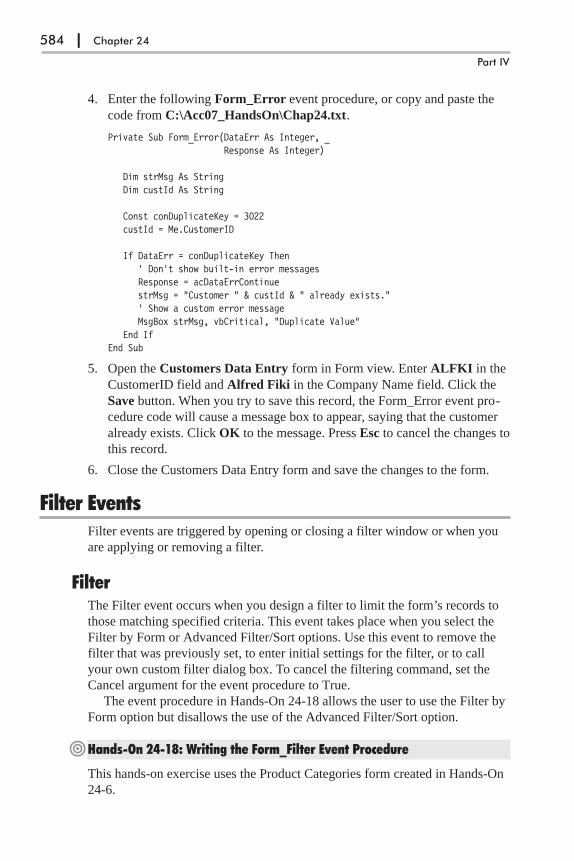
4. Enter the following Form_Error event procedure, or copy and paste the
code from C:\Acc07_HandsOn\Chap24.txt.
Private Sub Form_Error(DataErr As Integer, _Response As Integer)
Dim strMsg As StringDim custId As String
Const conDuplicateKey = 3022custId = Me.CustomerID
If DataErr = conDuplicateKey Then' Don't show built-in error messagesResponse = acDataErrContinuestrMsg = "Customer " & custId & " already exists."' Show a custom error messageMsgBox strMsg, vbCritical, "Duplicate Value"
End IfEnd Sub
5. Open the Customers Data Entry form in Form view. Enter ALFKI in the
CustomerID field and Alfred Fiki in the Company Name field. Click the
Save button. When you try to save this record, the Form_Error event pro-
cedure code will cause a message box to appear, saying that the customer
already exists. Click OK to the message. Press Esc to cancel the changes to
this record.
6. Close the Customers Data Entry form and save the changes to the form.
Filter EventsFilter events are triggered by opening or closing a filter window or when you
are applying or removing a filter.
FilterThe Filter event occurs when you design a filter to limit the form’s records to
those matching specified criteria. This event takes place when you select the
Filter by Form or Advanced Filter/Sort options. Use this event to remove the
filter that was previously set, to enter initial settings for the filter, or to call
your own custom filter dialog box. To cancel the filtering command, set the
Cancel argument for the event procedure to True.
The event procedure in Hands-On 24-18 allows the user to use the Filter by
Form option but disallows the use of the Advanced Filter/Sort option.
�Hands-On 24-18: Writing the Form_Filter Event Procedure
This hands-on exercise uses the Product Categories form created in Hands-On
24-6.
584 | Chapter 24
Part IV

1. In the Visual Basic Editor’s Project Explorer window, double-click
Form_Product Categories.
2. The Code window shows other event procedures already written for this
form. Enter the following Form_Filter event procedure below the last pro-
cedure code, or copy and paste the code from C:\Acc07_HandsOn\
Chap24.txt.
Private Sub Form_Filter(Cancel As Integer, _FilterType As Integer)
Select Case FilterTypeCase acFilterByForm
MsgBox "You selected to filter records " & _"by form.", vbOKOnly + vbInformation, _"Filter By Form"
Me.CategoryName.SetFocusMe.CategoryID.Enabled = False
Case acFilterAdvancedMsgBox "You are not authorized to use " & _
" Advanced Filter/Sort.", _vbOKOnly + vbInformation, _"Advanced Filter By Form"
Cancel = TrueEnd Select
End Sub
3. To test the above event procedure, open the Product Categories form in
Form view.
4. In the Sort & Filter area of the Ribbon, choose Advanced | Filter by
Form. The code in the Form_Filter event procedure runs and you will see
a message box. Click OK. The Filter by Form dialog box appears with the
Category ID text box disabled. You can disable certain controls on the form
if you don’t want the user to filter by them.
5. Filter the form to display only records for Seafood and Meat/Poultry. Be
sure to click Toggle Filter in the Sort & Filter area of the Ribbon after set-
ting up filter criteria.
6. Now, remove the filter by clicking Toggle Filter again.
7. Choose Advanced | Advanced Filter/Sort. You will not be able to use the
advanced filter for this form because the form’s Filter event has disabled
this action.
8. Close the Product Categories form and save changes to the form when
prompted.
ApplyFilterThe ApplyFilter event occurs when you apply the filter to restrict the records.
This event takes place when you select the Apply Filter/Sort, Filter by Selec-
tion, or Remove Filter/Sort options. Use this event to change the form display
Using Form Events | 585
Event Programming in Forms and Reports
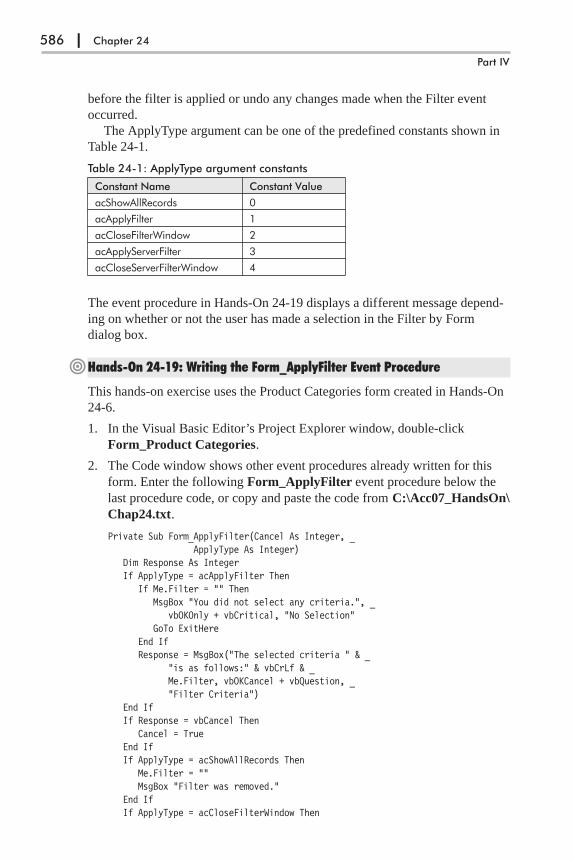
before the filter is applied or undo any changes made when the Filter event
occurred.
The ApplyType argument can be one of the predefined constants shown in
Table 24-1.
Table 24-1: ApplyType argument constants
Constant Name Constant Value
acShowAllRecords 0
acApplyFilter 1
acCloseFilterWindow 2
acApplyServerFilter 3
acCloseServerFilterWindow 4
The event procedure in Hands-On 24-19 displays a different message depend-
ing on whether or not the user has made a selection in the Filter by Form
dialog box.
�Hands-On 24-19: Writing the Form_ApplyFilter Event Procedure
This hands-on exercise uses the Product Categories form created in Hands-On
24-6.
1. In the Visual Basic Editor’s Project Explorer window, double-click
Form_Product Categories.
2. The Code window shows other event procedures already written for this
form. Enter the following Form_ApplyFilter event procedure below the
last procedure code, or copy and paste the code from C:\Acc07_HandsOn\
Chap24.txt.
Private Sub Form_ApplyFilter(Cancel As Integer, _ApplyType As Integer)
Dim Response As IntegerIf ApplyType = acApplyFilter Then
If Me.Filter = "" ThenMsgBox "You did not select any criteria.", _
vbOKOnly + vbCritical, "No Selection"GoTo ExitHere
End IfResponse = MsgBox("The selected criteria " & _
"is as follows:" & vbCrLf & _Me.Filter, vbOKCancel + vbQuestion, _"Filter Criteria")
End IfIf Response = vbCancel Then
Cancel = TrueEnd IfIf ApplyType = acShowAllRecords Then
Me.Filter = ""MsgBox "Filter was removed."
End IfIf ApplyType = acCloseFilterWindow Then
586 | Chapter 24
Part IV

Response = MsgBox("Are you sure you " & _"want to close the Filter window?", vbYesNo)
If Response = vbNo ThenCancel = True
End IfEnd If
ExitHere:With Me.CategoryID
.Enabled = True
.SetFocusEnd With
End Sub
3. To test the above event procedure, open the Product Categories form in
Form view.
4. From the Sort & Filter area of the Ribbon, choose Advanced | Filter by
Form. The Form_Filter event will be triggered (see Hands-On 24-18).
Click OK to the message box.
5. Select a category from the Category Name combo box and click Toggle
Filter on the Ribbon. This action will trigger the Form_ApplyFilter event
procedure. Experiment with the form filter, testing other situations such as
clicking Toggle Filter when the filtering criteria were not specified or clos-
ing the Filter by Form dialog box.
6. To test the condition that removes the filter, choose the filtering criteria and
press OK to limit the records. Next, click Toggle Filter. Notice that the
name of this button changes to Remove Filter or Apply Filter depending on
the situation.
7. Close the Product Categories form and save changes to the form when
prompted.
Timing EventsTiming events occur in response to a specified amount of time passing.
TimerThe Timer event occurs when the form is opened. The duration of this event is
determined by the value (milliseconds) entered in the TimerInterval property
located on the Event tab of the form’s property sheet. Use this event to display
a splash screen when the database is opened. The Timer event is helpful in
limiting the time the record remains locked in multi-user applications.
The event procedure in Hands-On 24-20 will flash the button’s text,
“Preview Product List” (or the entire button if you use the commented code
instead). For the code to work you must start the timer by changing the
TimerInterval property from 0 (stopped) to the desired interval. A timer inter-
val of 1,000 will invoke a timer event every second. The form’s Load event
procedure sets the form’s TimerInterval property to 250, so the button text (or
the entire button) is toggled once every quarter second. You may change the
Using Form Events | 587
Event Programming in Forms and Reports
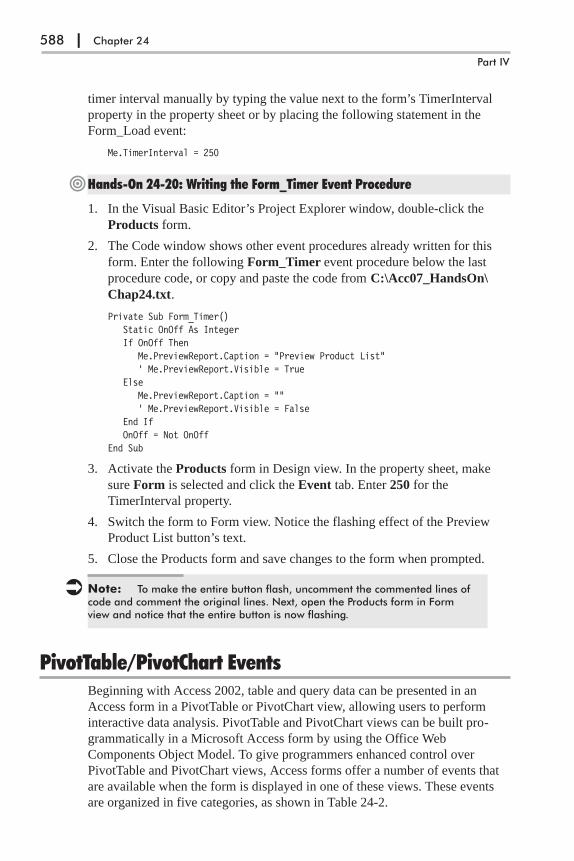
timer interval manually by typing the value next to the form’s TimerInterval
property in the property sheet or by placing the following statement in the
Form_Load event:
Me.TimerInterval = 250
�Hands-On 24-20: Writing the Form_Timer Event Procedure
1. In the Visual Basic Editor’s Project Explorer window, double-click the
Products form.
2. The Code window shows other event procedures already written for this
form. Enter the following Form_Timer event procedure below the last
procedure code, or copy and paste the code from C:\Acc07_HandsOn\
Chap24.txt.
Private Sub Form_Timer()Static OnOff As IntegerIf OnOff Then
Me.PreviewReport.Caption = "Preview Product List"' Me.PreviewReport.Visible = True
ElseMe.PreviewReport.Caption = ""' Me.PreviewReport.Visible = False
End IfOnOff = Not OnOff
End Sub
3. Activate the Products form in Design view. In the property sheet, make
sure Form is selected and click the Event tab. Enter 250 for the
TimerInterval property.
4. Switch the form to Form view. Notice the flashing effect of the Preview
Product List button’s text.
5. Close the Products form and save changes to the form when prompted.
� Note: To make the entire button flash, uncomment the commented lines ofcode and comment the original lines. Next, open the Products form in Formview and notice that the entire button is now flashing.
PivotTable/PivotChart EventsBeginning with Access 2002, table and query data can be presented in an
Access form in a PivotTable or PivotChart view, allowing users to perform
interactive data analysis. PivotTable and PivotChart views can be built pro-
grammatically in a Microsoft Access form by using the Office Web
Components Object Model. To give programmers enhanced control over
PivotTable and PivotChart views, Access forms offer a number of events that
are available when the form is displayed in one of these views. These events
are organized in five categories, as shown in Table 24-2.
588 | Chapter 24
Part IV
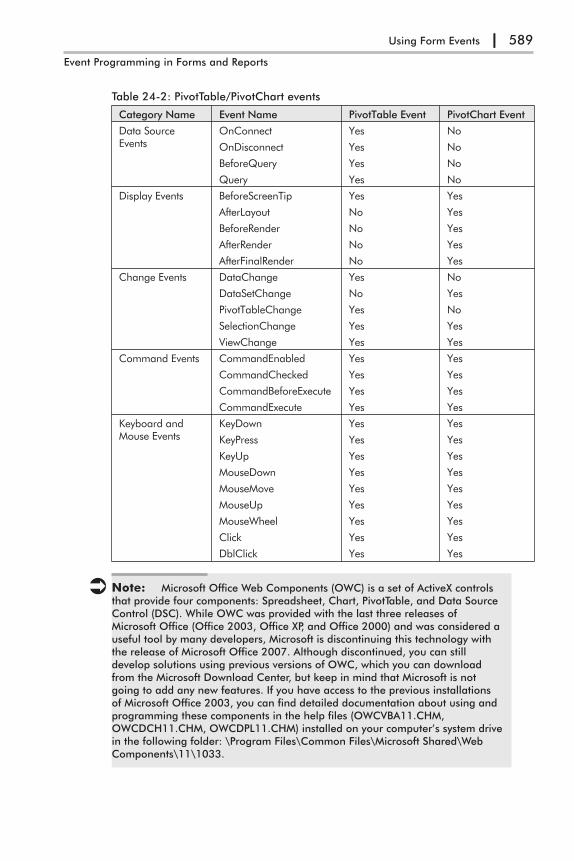
Table 24-2: PivotTable/PivotChart events
Category Name Event Name PivotTable Event PivotChart Event
Data SourceEvents
OnConnect
OnDisconnect
BeforeQuery
Query
Yes
Yes
Yes
Yes
No
No
No
No
Display Events BeforeScreenTip
AfterLayout
BeforeRender
AfterRender
AfterFinalRender
Yes
No
No
No
No
Yes
Yes
Yes
Yes
Yes
Change Events DataChange
DataSetChange
PivotTableChange
SelectionChange
ViewChange
Yes
No
Yes
Yes
Yes
No
Yes
No
Yes
Yes
Command Events CommandEnabled
CommandChecked
CommandBeforeExecute
CommandExecute
Yes
Yes
Yes
Yes
Yes
Yes
Yes
Yes
Keyboard andMouse Events
KeyDown
KeyPress
KeyUp
MouseDown
MouseMove
MouseUp
MouseWheel
Click
DblClick
Yes
Yes
Yes
Yes
Yes
Yes
Yes
Yes
Yes
Yes
Yes
Yes
Yes
Yes
Yes
Yes
Yes
Yes
� Note: Microsoft Office Web Components (OWC) is a set of ActiveX controlsthat provide four components: Spreadsheet, Chart, PivotTable, and Data SourceControl (DSC). While OWC was provided with the last three releases ofMicrosoft Office (Office 2003, Office XP, and Office 2000) and was considered auseful tool by many developers, Microsoft is discontinuing this technology withthe release of Microsoft Office 2007. Although discontinued, you can stilldevelop solutions using previous versions of OWC, which you can downloadfrom the Microsoft Download Center, but keep in mind that Microsoft is notgoing to add any new features. If you have access to the previous installationsof Microsoft Office 2003, you can find detailed documentation about using andprogramming these components in the help files (OWCVBA11.CHM,OWCDCH11.CHM, OWCDPL11.CHM) installed on your computer’s system drivein the following folder: \Program Files\Common Files\Microsoft Shared\WebComponents\11\1033.
Using Form Events | 589
Event Programming in Forms and Reports

Referencing the Microsoft Office Web Components ObjectLibrary
The next several sections of this chapter demonstrate event procedures for
PivotTable and PivotChart views. To successfully work with these events,
download the Microsoft Office Web Components from the Microsoft Down-
load Center. Once they are installed on your computer, follow the steps below
to add a reference to the Microsoft Office Web Components 11 Object Library:
1. In the Microsoft Access database window, choose Tools | Macro | Visual
Basic Editor.
2. In the Visual Basic Editor window, choose Tools | References.
3. Click the Browse button and locate the following file:
C:\Program Files\Common Files\Microsoft Shared\WebComponents\
11\1033\OWCI11.DLL
4. Click the OWCI11.DLL file, and then click Open. A reference to
Microsoft Office Web Components 11.0 should appear in the Available
References list.
5. Click OK to close the References dialog box.
After you add a reference to the Microsoft Office Web Components Object
Library, you can use the Object Browser to view the properties, methods,
events, and constants for each class of a web component. To see the available
classes of a web component, select OWC11 in the Project/Library box in the
Object Browser.
Data Source EventsData source events occur when the PivotTable connects to or disconnects from
its data source or when the data source is queried.
OnConnect
The OnConnect event occurs when the PivotTable report connects to its data
source. Use this event to perform the required operations once the PivotTable
has connected to the data source.
The procedure in Hands-On 24-21 notifies the user that the connection to
the data source has been established and displays the SELECT statement that
provides the dataset for the PivotTable view.
590 | Chapter 24
Part IV
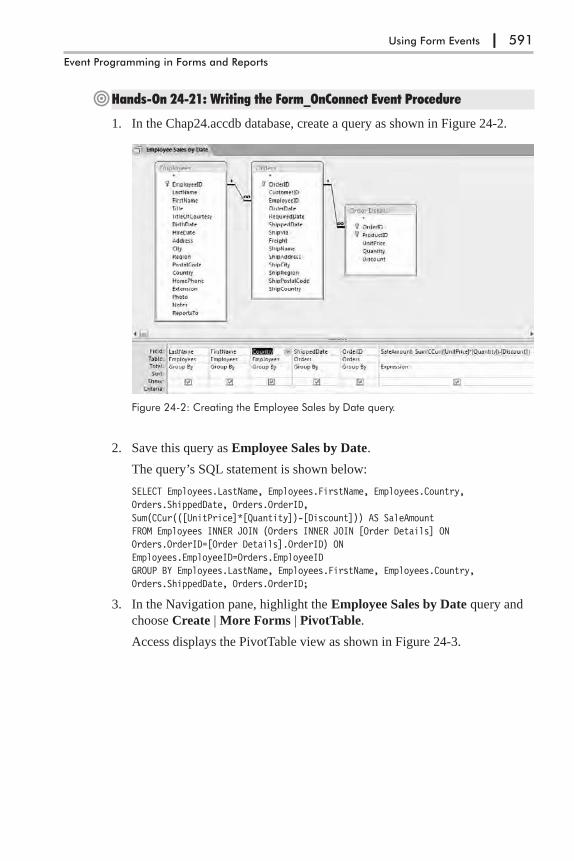
�Hands-On 24-21: Writing the Form_OnConnect Event Procedure
1. In the Chap24.accdb database, create a query as shown in Figure 24-2.
2. Save this query as Employee Sales by Date.
The query’s SQL statement is shown below:
SELECT Employees.LastName, Employees.FirstName, Employees.Country,Orders.ShippedDate, Orders.OrderID,Sum(CCur(([UnitPrice]*[Quantity])-[Discount])) AS SaleAmountFROM Employees INNER JOIN (Orders INNER JOIN [Order Details] ONOrders.OrderID=[Order Details].OrderID) ONEmployees.EmployeeID=Orders.EmployeeIDGROUP BY Employees.LastName, Employees.FirstName, Employees.Country,Orders.ShippedDate, Orders.OrderID;
3. In the Navigation pane, highlight the Employee Sales by Date query and
choose Create | More Forms | PivotTable.
Access displays the PivotTable view as shown in Figure 24-3.
Using Form Events | 591
Event Programming in Forms and Reports
Figure 24-2: Creating the Employee Sales by Date query.

4. Click in the white area of the PivotTable view to display the PivotTable
Field List window. Drag the Country field from the PivotTable Field List
to the Filter Fields area at the left-top corner of the form. Drag and drop the
Years and Quarters fields into the Drop Row Fields area. Drag and drop
Last Name field to the Drop Column Fields area. Finally, drag and drop
the Sale Amount to the Drop Totals or Detail Fields area. The completed
PivotTable is shown in Figure 24-4.
592 | Chapter 24
Part IV
Figure 24-3: PivotTable view in Microsoft Access 2007.
Figure 24-4: Creating a PivotTable form (PivotTable view).

5. Save the form as Employee Sales Pivot.
6. Switch the Employee Sales Pivot form from PivotTable view to Design
view.
7. In the property sheet, ensure that Form is selected and click the Event tab.
Set the On Connect property to [Event Procedure], and press the Build
button (…).
8. Access will create the event procedure stub. Enter the following Form_
OnConnect event procedure, or copy and paste the code from C:\Acc07_
HandsOn\Chap24.txt.
Private Sub Form_OnConnect()MsgBox "You have connected to the data source." & vbCrLf _
& "This PivotTable is based on: " & Me.RecordSourceEnd Sub
9. Switch to the Employee Sales Pivot form and close it. Click Yes when
asked to save the design changes.
10. In the Navigation pane, double-click the Employee Sales Pivot form. The
Form_OnConnect event procedure will run and you should see the mes-
sage as coded in step 8 above. Click OK to the message to open the form.
11. Close the Employee Sales Pivot form.
OnDisconnect
The OnDisconnect event occurs when the PivotTable report disconnects from
its data source or the connection to the data source is changed. Use this event
to notify the user that the connection to the data source has been lost. This
event does not occur when you close the form.
BeforeQuery
The BeforeQuery event occurs before the PivotTable queries its data source.
Actions such as adding new fields to the PivotTable report, moving fields, and
sorting and filtering data will trigger this event. Because running a complex
query could take longer than expected, you may want to let the user know that
a query is in progress by changing the mouse pointer to an hourglass and turn-
ing it off during the Query event (see Hands-On 24-22). There is no way to
determine what type of query is going to be performed.
Query
The Query event occurs after a PivotTable view sends a query to its data
source. Actions such as adding new fields to the PivotTable report, moving
fields, and sorting and filtering data will trigger this event. There is no way to
determine what type of query has been performed.
The procedure in Hands-On 24-22 demonstrates how to change the mouse
pointer to an hourglass before the query is sent to the data source and how to
Using Form Events | 593
Event Programming in Forms and Reports
turn off the hourglass pointer after the query has run. Prior to sending the
query, we also ask the user to specify the background color of the detail rows.
�Hands-On 24-22: Writing the Form_BeforeQuery and Form_Query EventProcedures
1. In the Visual Basic Editor’s Project Explorer window, double-click
Form_Employee Sales Pivot.
2. The Code window shows the Form_OnConnect event procedure you pre-
pared in Hands-On 24-21. Enter the following Form_BeforeQuery and
Form_Query event procedures below the last procedure code, or copy and
paste the code from C:\Acc07_HandsOn\Chap24.txt.
Private Sub Form_BeforeQuery()Dim strColor As StringstrColor = InputBox("Type 1 for Red, 2 for Yellow, " & _
"or 3 for Green", "Specify Background Color for " & _"Detail Rows")
Select Case strColorCase 1
strColor = "Red"Case 2
strColor = "Yellow"Case 3
strColor = "Green"Case Else
strColor = "White"End Select
DoCmd.Hourglass TrueMe.PivotTable.ActiveView.DataAxis.FieldSets(0). _
Fields(0).DetailBackColor = strColorDebug.Print "Executing the BeforeQuery event"Debug.Print "(Changed detail color to: " & strColor & ")"
End Sub
Private Sub Form_Query()Debug.Print "Executing the Query event"DoCmd.Hourglass FalseDebug.Print "(Turned off the hourglass mouse pointer)"
End Sub
Let’s look at the two event procedures that you wrote in this hands-on
exercise. Notice that to display the hourglass pointer, we used the statement
DoCmd.Hourglass True in the Form_BeforeQuery event procedure. To
turn off the hourglass, we put the statement DoCmd.Hourglass False in the
Form_Query event procedure.
594 | Chapter 24
Part IV
Also, notice the following statement that sets the background color for
the PivotTable detail rows in the Form_BeforeQuery event procedure:
Me.PivotTable.ActiveView.DataAxis.FieldSets(0).Fields(0).DetailBackColor= strColor
In the above statement, the PivotTable property is used to access the
PivotTable object exposed by a form. The ActiveView property represents
the layout of the PivotTable report. The DataAxis property refers to one of
the four areas of the PivotTable where you can drop fields of data. The
DataAxis property contains the Totals and Details fields, which are dis-
played at the intersection of each row and column. Other areas of a
PivotTable are used to display row fields (RowAxis), column fields
(ColumnAxis), and filter fields (FilterAxis).
In addition to axes, a PivotTable contains a field list that shows which
fields are available for use in the PivotTable report based on the form’s
RecordSource. The field list displays expandable nodes listing fields avail-
able on the form (see Figure 24-4 earlier).
To manipulate a particular PivotField object in the PivotTable report
via VBA code, you need to access the Fieldset object in the Fieldsets col-
lection of the ActiveView object. Each Fieldset object (a top-level node in
the field list) contains a Fields collection, which contains PivotField
objects. If you look at the expanded nodes in Figure 24-4 you will notice
the Country Fieldset with one PivotField (Country), the Last Name Fieldset
with a LastName PivotField, and the Shipped Date By Week Fieldset with
six PivotField objects representing different time intervals (Years, Weeks,
Days, Hours, Minutes, and Seconds).
3. To test the above event procedures, switch to the Access application win-
dow and double-click the Employee Sales Pivot form in the Navigation
pane.
4. You should first see the message as coded in the Form_OnConnect event
procedure (see Hands-On 24-21). Click OK to the message to open the
form. You should then be prompted for the color of the detail rows as
coded in the Form_BeforeQuery event procedure. Type your selection and
click OK. The hourglass should disappear when the form loading process
is completed.
5. Open the Visual Basic Editor window and check out the results in the
Immediate window.
6. Close the Employee Sales Pivot form and save the changes to the form
when prompted.
Display EventsDisplay events are used to draw custom lines, text, and drawings in a
PivotChart view before or after a PivotChart has been rendered.
Using Form Events | 595
Event Programming in Forms and Reports
BeforeScreenTip
The BeforeScreenTip event occurs before a ScreenTip is displayed for an ele-
ment in a PivotChart view or PivotTable view. This event takes the following
two arguments:
� TipText — Specifies the default text of the ScreenTip. By setting this argu-
ment to an empty string (TipText = "") you can hide the ScreenTip. Set this
argument to any other text to display the required text in the ScreenTip.
� SourceObject — Specifies the object that generates the ScreenTip.
AfterLayout
The AfterLayout event occurs after the chart in the PivotChart view has been
laid out but before the chart elements have been drawn on screen. Use this
event to draw custom lines, text, and various drawings on the chart.
The drawObject parameter in the AfterLayout event represents a
chChartDraw object. The DrawEllipse, DrawLine, DrawPolyLine, and
DrawPolygon methods of the chChartDraw object can be used to add drawing
objects to a chart. The DrawText method can be used to add text to a chart.
The Border, Font, Interior, and Line properties can be used to format each
drawing object before it is added to the chart.
The AfterLayout event can also be used to reposition the chTitle, chLegend,
chChart, and chAxis objects of each PivotChart view by changing their Left
and Top properties. You can reposition the chPlotArea object by changing its
Left, Top, Right, and Bottom properties.
The event procedure in Hands-On 24-23 changes the chart legend and Last
Name Drop Zone button position on the screen.
�Hands-On 24-23: Writing the Form_AfterLayout Event Procedure
This hands-on exercise requires completion of Hands-On 24-21 and 24-22.
1. In the Navigation pane of Chap24.accdb, open the Employee Sales Pivot
form in Design view.
2. In the property sheet, make sure that Form is selected and click the All tab.
Set Allow PivotChart View to Yes.
3. Choose Home | View | PivotChart View.
Access displays the PivotChart layout as shown in Figure 24-5.
596 | Chapter 24
Part IV
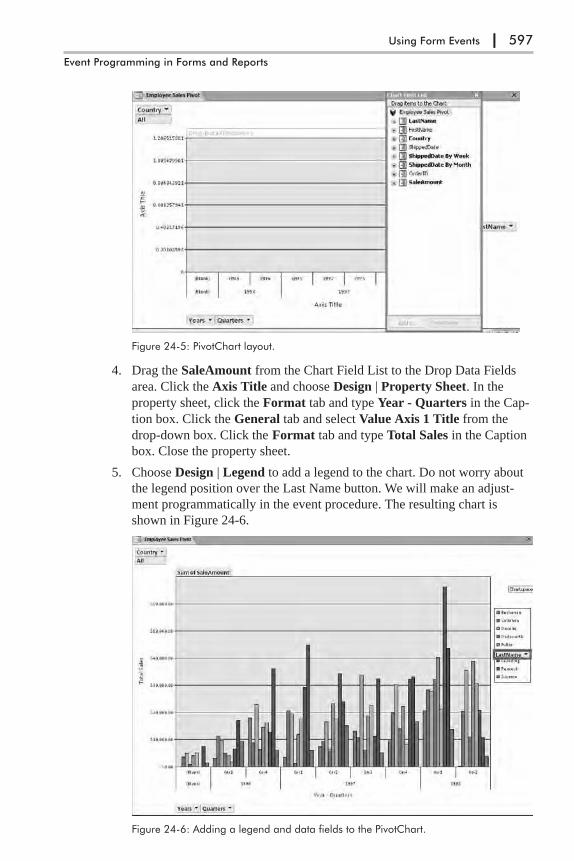
4. Drag the SaleAmount from the Chart Field List to the Drop Data Fields
area. Click the Axis Title and choose Design | Property Sheet. In the
property sheet, click the Format tab and type Year - Quarters in the Cap-
tion box. Click the General tab and select Value Axis 1 Title from the
drop-down box. Click the Format tab and type Total Sales in the Caption
box. Close the property sheet.
5. Choose Design | Legend to add a legend to the chart. Do not worry about
the legend position over the Last Name button. We will make an adjust-
ment programmatically in the event procedure. The resulting chart is
shown in Figure 24-6.
Using Form Events | 597
Event Programming in Forms and Reports
Figure 24-5: PivotChart layout.
Figure 24-6: Adding a legend and data fields to the PivotChart.
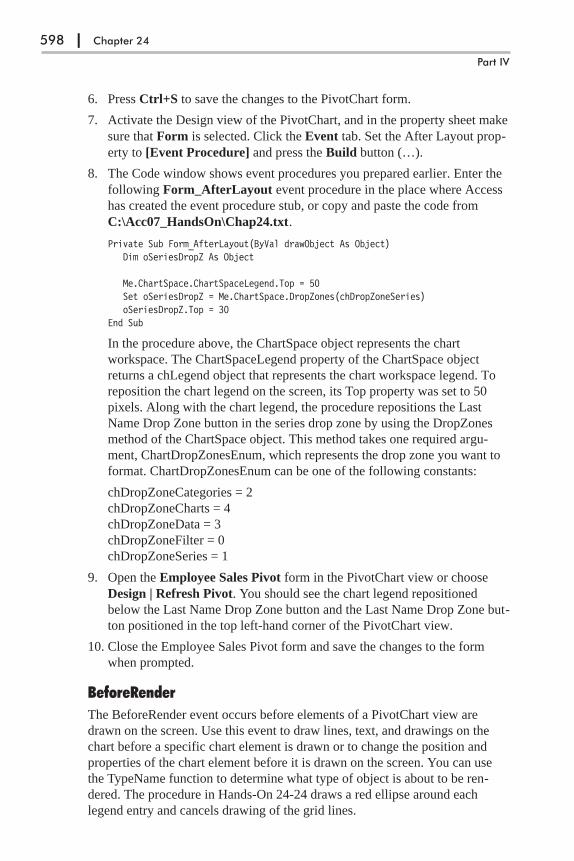
6. Press Ctrl+S to save the changes to the PivotChart form.
7. Activate the Design view of the PivotChart, and in the property sheet make
sure that Form is selected. Click the Event tab. Set the After Layout prop-
erty to [Event Procedure] and press the Build button (…).
8. The Code window shows event procedures you prepared earlier. Enter the
following Form_AfterLayout event procedure in the place where Access
has created the event procedure stub, or copy and paste the code from
C:\Acc07_HandsOn\Chap24.txt.
Private Sub Form_AfterLayout(ByVal drawObject As Object)Dim oSeriesDropZ As Object
Me.ChartSpace.ChartSpaceLegend.Top = 50Set oSeriesDropZ = Me.ChartSpace.DropZones(chDropZoneSeries)oSeriesDropZ.Top = 30
End Sub
In the procedure above, the ChartSpace object represents the chart
workspace. The ChartSpaceLegend property of the ChartSpace object
returns a chLegend object that represents the chart workspace legend. To
reposition the chart legend on the screen, its Top property was set to 50
pixels. Along with the chart legend, the procedure repositions the Last
Name Drop Zone button in the series drop zone by using the DropZones
method of the ChartSpace object. This method takes one required argu-
ment, ChartDropZonesEnum, which represents the drop zone you want to
format. ChartDropZonesEnum can be one of the following constants:
chDropZoneCategories = 2
chDropZoneCharts = 4
chDropZoneData = 3
chDropZoneFilter = 0
chDropZoneSeries = 1
9. Open the Employee Sales Pivot form in the PivotChart view or choose
Design | Refresh Pivot. You should see the chart legend repositioned
below the Last Name Drop Zone button and the Last Name Drop Zone but-
ton positioned in the top left-hand corner of the PivotChart view.
10. Close the Employee Sales Pivot form and save the changes to the form
when prompted.
BeforeRender
The BeforeRender event occurs before elements of a PivotChart view are
drawn on the screen. Use this event to draw lines, text, and drawings on the
chart before a specific chart element is drawn or to change the position and
properties of the chart element before it is drawn on the screen. You can use
the TypeName function to determine what type of object is about to be ren-
dered. The procedure in Hands-On 24-24 draws a red ellipse around each
legend entry and cancels drawing of the grid lines.
598 | Chapter 24
Part IV
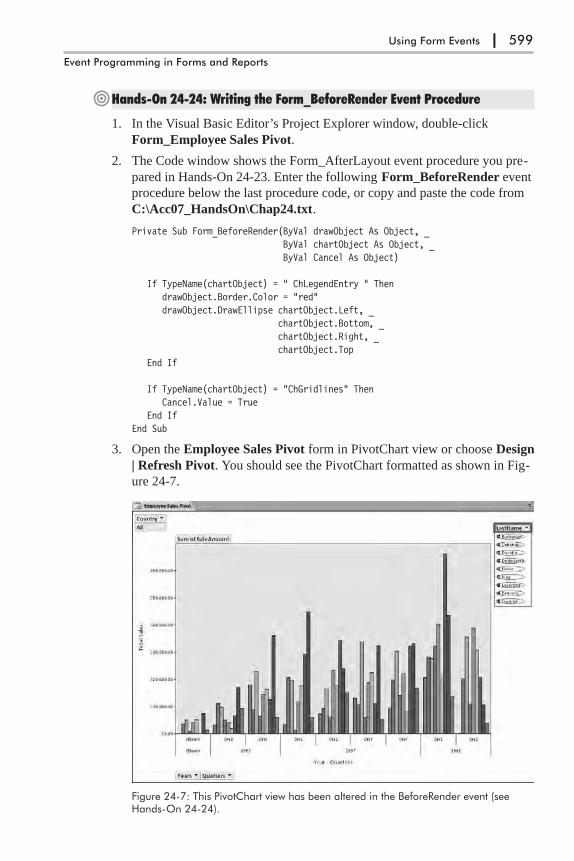
�Hands-On 24-24: Writing the Form_BeforeRender Event Procedure
1. In the Visual Basic Editor’s Project Explorer window, double-click
Form_Employee Sales Pivot.
2. The Code window shows the Form_AfterLayout event procedure you pre-
pared in Hands-On 24-23. Enter the following Form_BeforeRender event
procedure below the last procedure code, or copy and paste the code from
C:\Acc07_HandsOn\Chap24.txt.
Private Sub Form_BeforeRender(ByVal drawObject As Object, _ByVal chartObject As Object, _ByVal Cancel As Object)
If TypeName(chartObject) = " ChLegendEntry " ThendrawObject.Border.Color = "red"drawObject.DrawEllipse chartObject.Left, _
chartObject.Bottom, _chartObject.Right, _chartObject.Top
End If
If TypeName(chartObject) = "ChGridlines" ThenCancel.Value = True
End IfEnd Sub
3. Open the Employee Sales Pivot form in PivotChart view or choose Design
| Refresh Pivot. You should see the PivotChart formatted as shown in Fig-
ure 24-7.
Using Form Events | 599
Event Programming in Forms and Reports
Figure 24-7: This PivotChart view has been altered in the BeforeRender event (seeHands-On 24-24).

4. Save and close the Employee Sales Pivot form.
AfterRender
The AfterRender event occurs after elements of a PivotChart view have been
drawn on the screen. Use this event to draw custom lines, text, and various
shapes/drawings on the chart after a specific chart element is drawn. You can
use the TypeName function to determine what type of object has just been ren-
dered. The procedure in Hands-On 24-25 adds text in the chart’s plot area after
the chart legend (chLegend) object has been rendered on the screen.
�Hands-On 24-25: Writing the Form_AfterRender Event Procedure
1. In the Visual Basic Editor’s Project Explorer window, double-click
Form_Employee Sales Pivot.
2. The Code window shows the procedures created in the previous hands-on
exercises for this chapter. Enter the following Form_AfterRender event
procedure below the last procedure code, or copy and paste the code from
C:\Acc07_HandsOn\Chap24.txt.
Private Sub Form_AfterRender(ByVal drawObject As Object, _ByVal chartObject As Object)
Dim oChart As ObjectSet oChart = Me.ChartSpace.Charts.Item(0)
If TypeName(chartObject) = "ChLegend" Then
drawObject.DrawText "Chart legend has been rendered", _oChart.PlotArea.Left + 15, _oChart.PlotArea.Top
End IfEnd Sub
The DrawText method is used to draw a text string on a chart. This method
uses the following syntax:
expression.DrawText(bstrText, Left, Top)
The expression returns a chChartDraw object. All arguments are required.
The bstrText argument is a string specifying the text to draw on the chart.
Left is a pixel coordinate of the left edge of the text. Top is a pixel coordi-
nate of the top edge of the text.
3. Open the Employee Sales Pivot form in PivotChart view or choose Design
| Refresh Pivot. You should see the text “Chart legend has been rendered”
in the chart’s plot area.
4. Save and close the form.
600 | Chapter 24
Part IV

AfterFinalRender
The AfterFinalRender event occurs after all elements of a PivotChart view
have been drawn on the screen. Use this event to draw custom lines, text, and
drawings on the topmost layer of the chart after all the chart elements have
been drawn. The procedure in Hands-On 24-26 adds a text message to the
chart space, specifying the total number of data points used in the chart.
�Hands-On 24-26: Writing the Form_AfterFinalRender Event Procedure
1. In the Visual Basic Editor’s Project Explorer window, double-click
Form_Employee Sales Pivot.
2. The Code window shows the procedures created in the previous hands-on
exercises for this chapter. Enter the following Form_AfterFinalRender
event procedure below the last procedure code, or copy and paste the code
from C:\Acc07_HandsOn\Chap24.txt.
Private Sub Form_AfterFinalRender(ByVal drawObject As Object)Dim oChart As ObjectDim s As ObjectDim p As ObjectDim strText As StringDim num As Integer
Set oChart = Me.ChartSpace.Charts(0)
For Each s In oChart.SeriesCollectionFor Each p In s.Points
num = num + 1Debug.Print num
NextNext
strText = "This chart contains " & num & " data points."
With drawObject.Font.Size = 9.Color = "blue".Italic = True
End WithdrawObject.DrawText strText, 200, 20
End Sub
3. Open the Employee Sales Pivot form in the PivotChart view or choose
Design | Refresh Pivot. You should see the PivotChart formatted as shown
in Figure 24-8.
Using Form Events | 601
Event Programming in Forms and Reports

4. Save and close the form.
Change EventsWhen the user views and manipulates the data in the PivotTable and
PivotChart views, various events are bound to happen. For example, data
underlying a PivotChart view may have changed, or the user may have
selected, added, removed, or filtered data in the PivotTable or PivotChart view.
You can determine specific changes that occurred and take appropriate action
by using one of the events discussed below.
DataChange
The DataChange event occurs when certain properties of the PivotTable view
are changed or when certain methods are executed from a PivotTable view.
You can find out what sort of change occurred by evaluating the Reason argu-
ment. This argument contains a value from the PivotDataReasonEnum
enumeration. For example, you can use Reason to determine if the user added
or removed columns from the PivotTable view.
The event procedure in Hands-On 24-27 evaluates whether a change
occurred in the PivotTable Last Name drop-down list. For all other changes in
the PivotTable view, the procedure writes the Reason code to the Immediate
window. To find out the meaning of the returned Reason codes, search for the
PivotDataReasonEnum constant in the Object Browser.
602 | Chapter 24
Part IV
Figure 24-8: After all the elements of the PivotChart have been drawn on the screen,the procedure in Hands-On 24-26 calculates the total number of data points in thechart and places this information in the text message in the PivotChart view.

�Hands-On 24-27: Writing the Form_DataChange Event Procedure
1. In the Visual Basic Editor’s Project Explorer window, double-click
Form_Employee Sales Pivot.
2. The Code window shows the procedures created in the previous hands-on
exercises for this chapter. Enter the following Form_Data Change event
procedure below the last procedure code, or copy and paste the code from
C:\Acc07_HandsOn\Chap24.txt.
Private Sub Form_DataChange(ByVal Reason As Long)Select Case Reason
Case OWC11.plDataReasonAllIncludeExcludeChangeDebug.Print "Change in the included/excluded members."
Case OWC11.plDataReasonIncludedMembersChangeDebug.Print "Included Members Change"
Case OWC11.plDataReasonExcludedMembersChangeDebug.Print "Excluded Members Change"
Case ElseDebug.Print "Reason code: " & Reason
End SelectEnd Sub
3. To test the above event procedure, open the Employee Sales Pivot form in
PivotTable view. Because you’ve already created several event procedures
for this form, various events will be triggered as the form is being loaded.
Respond to all the prompts and, once the form opens, click the drop-down
arrow next to the Last Name button and choose to add or remove an
employee. Then switch to the Immediate window in the Visual Basic
screen to see the captured Reason codes and changes in the
included/excluded members.
4. Save and close the form.
DataSetChange
The DataSetChange event occurs whenever the dataset for a PivotChart view
changes. This happens when a query supplying the underlying data for the
PivotChart has changed or the data displayed in the current PivotChart view
has been changed by the addition or removal of a data series. You cannot use
this event to find out the reason for a change to the dataset. You must use the
display events introduced earlier to trap for specific changes to the PivotChart
view.
PivotTableChange
The PivotTableChange event occurs when you add or delete a field, fieldset, or
total from the PivotTable field list. Use the Reason argument to determine
which operation type has occurred. This argument contains a value from the
PivotDataReasonEnum enumeration. The event procedure in Hands-On 24-28
evaluates the Reason argument to determine if the Total was added in the
Totals area in the field list.
Using Form Events | 603
Event Programming in Forms and Reports
�Hands-On 24-28: Writing the Form_PivotTableChange Event Procedure
1. In the Visual Basic Editor’s Project Explorer window, double-click
Form_Employee Sales Pivot.
2. The Code window shows the procedures created in the previous hands-on
exercises for this chapter. Enter the following Form_PivotTableChange
event procedure below the last procedure code, or copy and paste the code
from C:\Acc07_HandsOn\Chap24.txt.
Private Sub Form_PivotTableChange(ByVal Reason As Long)If Reason = OWC11.plPivotTableReasonTotalAdded ThenMsgBox "Just added a Total."End If
End Sub
3. To test the above event procedure, open the Employee Sales Pivot form in
PivotTable view. Because you’ve already created several event procedures
for this form, various events will be triggered. Respond appropriately to the
prompts. During the course of events, you should see the message inform-
ing you that a Total field has just been added.
4. Save and close the form.
SelectionChange
The SelectionChange event occurs whenever the user makes a new selection
within the PivotTable or PivotChart object. Use the SelectionType property to
determine the object type of the current selection. The event procedure in
Hands-On 24-29 prints the name of the selected object to the Immediate
window.
�Hands-On 24-29: Writing the Form_SelectionChange Event Procedure
1. In the Visual Basic Editor’s Project Explorer window, double-click
Form_Employee Sales Pivot.
2. The Code window shows the procedures created in the previous hands-on
exercises for this chapter. Enter the following Form_SelectionChange
event procedure below the last procedure code, or copy and paste the code
from C:\Acc07_HandsOn\Chap24.txt.
Private Sub Form_SelectionChange()Debug.Print "Selection Type: " & Me.PivotTable.SelectionType
End Sub
3. To test the above event procedure, open the Employee Sales Pivot form in
PivotTable view. Because you’ve already created several event procedures
for this form, various events will be triggered. Respond appropriately to the
prompts. Once the form opens in the PivotTable view, click on various
areas of the PivotTable and open the Immediate window to see the names
of the selected objects. Notice that the SelectionType values are always
returned in plural:
604 | Chapter 24
Part IV

Selection Type: PivotFieldsSelection Type: PivotDetailRangeSelection Type: PivotColumnMembersSelection Type: PivotRowMembersSelection Type: PivotAggregates
4. Save and close the form.
ViewChange
The ViewChange event occurs whenever the PivotTable or PivotChart objects
are redrawn. This event may occur multiple times for a single operation. For
PivotTable views, you can use the Reason argument to determine how the view
was changed. This argument contains a value from the PivotDataReasonEnum
enumeration. Do not use the Reason argument with a PivotChart. The event
procedure in Hands-On 24-30 displays a message when the user clicks the
Show/Hide Details button in PivotTable view.
�Hands-On 24-30: Writing the Form_ViewChange Event Procedure
1. In the Visual Basic Editor’s Project Explorer window, double-click
Form_Employee Sales Pivot.
2. The Code window shows the procedures created in the previous hands-on
exercises for this chapter. Enter the following Form_ViewChange event
procedure below the last procedure code, or copy and paste the code from
C:\Acc07_HandsOn\Chap24.txt.
Private Sub Form_ViewChange(ByVal Reason As Long)Select Case Reason
Case OWC11.plViewReasonHideDetailsMsgBox "You selected to hide the details."
Case OWC11.plViewReasonShowDetailsMsgBox "You selected to show the details."
End SelectEnd Sub
3. To test the above event procedure, open the Employee Sales Pivot form in
PivotTable view. Because you’ve already created several event procedures
for this form, various events will be triggered. Respond appropriately to the
prompts. Once the form opens in the PivotTable view, click the Show/Hide
Details (+ /–) button below any employee name.
4. Save and close the form.
Command Events
CommandEnabled
The CommandEnabled event occurs whenever the enabled state of a menu bar
or toolbar command changes. This event takes two arguments:
Using Form Events | 605
Event Programming in Forms and Reports

� Command — Returns a PivotCommandId constant and allows you to
determine which command has been enabled or disabled. You can use the
Object Browser to view the list of available commands for this constant.
� Enabled — An object whose Value property indicates whether the
command is enabled or disabled.
The event procedure in Hands-On 24-31 checks whether the Copy command
(plCommandCopy) is enabled or disabled.
�Hands-On 24-31: Writing the Form_CommandEnabled Event Procedure
1. In the Visual Basic Editor’s Project Explorer window, double-click
Form_Employee Sales Pivot.
2. The Code window shows the procedures created in the previous hands-on
exercises for this chapter. Enter the following Form_CommandEnabled
event procedure below the last procedure code, or copy and paste the code
from C:\Acc07_HandsOn\Chap24.txt.
Private Sub Form_CommandEnabled(ByVal Command As Variant, _ByVal Enabled As Object)
If Command = OWC11.plCommandCopy ThenIf Enabled.Value = True Then
Debug.Print "Copy command enabled."Else
Debug.Print "Copy command disabled."End If
End IfEnd Sub
3. To test the above event procedure, open the Employee Sales Pivot in
PivotTable view. Because you’ve already created several event procedures
for this form, various events will be triggered. Respond appropriately to the
prompts. Once the form opens, switch to the Immediate window and exam-
ine the results of the events that were executed.
4. Save and close the form.
CommandChecked
The CommandChecked event occurs whenever a menu bar command becomes
checked or unchecked or a toolbar command’s state changes from pressed to
not pressed and vice versa. The CommandChecked event takes the following
two arguments:
� Command — Returns a PivotCommandId constant and allows you to
determine which command has been checked or unchecked. You can use
the Object Browser to view the list of available commands for this
constant.
� Checked — An object whose Value property indicates whether the com-
mand is checked or unchecked. For example, the Sort Ascending command
606 | Chapter 24
Part IV
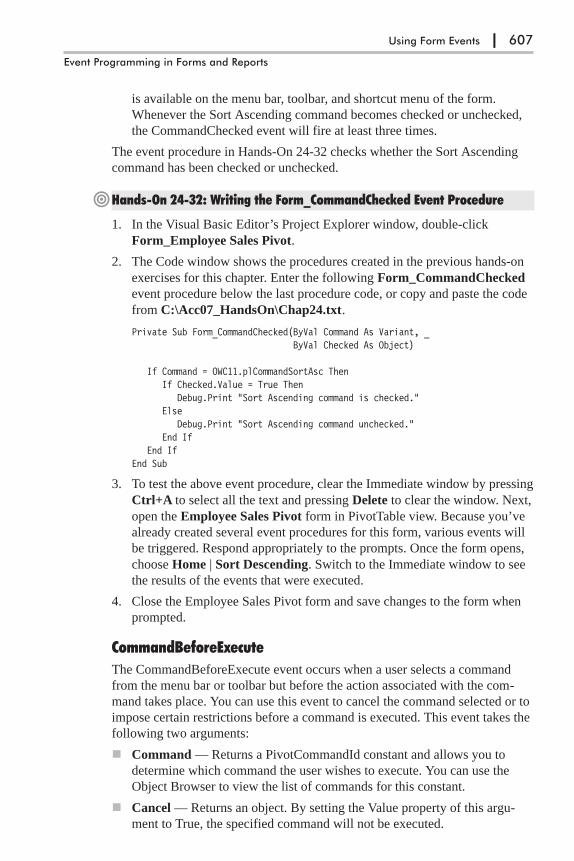
is available on the menu bar, toolbar, and shortcut menu of the form.
Whenever the Sort Ascending command becomes checked or unchecked,
the CommandChecked event will fire at least three times.
The event procedure in Hands-On 24-32 checks whether the Sort Ascending
command has been checked or unchecked.
�Hands-On 24-32: Writing the Form_CommandChecked Event Procedure
1. In the Visual Basic Editor’s Project Explorer window, double-click
Form_Employee Sales Pivot.
2. The Code window shows the procedures created in the previous hands-on
exercises for this chapter. Enter the following Form_CommandChecked
event procedure below the last procedure code, or copy and paste the code
from C:\Acc07_HandsOn\Chap24.txt.
Private Sub Form_CommandChecked(ByVal Command As Variant, _ByVal Checked As Object)
If Command = OWC11.plCommandSortAsc ThenIf Checked.Value = True Then
Debug.Print "Sort Ascending command is checked."Else
Debug.Print "Sort Ascending command unchecked."End If
End IfEnd Sub
3. To test the above event procedure, clear the Immediate window by pressing
Ctrl+A to select all the text and pressing Delete to clear the window. Next,
open the Employee Sales Pivot form in PivotTable view. Because you’ve
already created several event procedures for this form, various events will
be triggered. Respond appropriately to the prompts. Once the form opens,
choose Home | Sort Descending. Switch to the Immediate window to see
the results of the events that were executed.
4. Close the Employee Sales Pivot form and save changes to the form when
prompted.
CommandBeforeExecute
The CommandBeforeExecute event occurs when a user selects a command
from the menu bar or toolbar but before the action associated with the com-
mand takes place. You can use this event to cancel the command selected or to
impose certain restrictions before a command is executed. This event takes the
following two arguments:
� Command — Returns a PivotCommandId constant and allows you to
determine which command the user wishes to execute. You can use the
Object Browser to view the list of commands for this constant.
� Cancel — Returns an object. By setting the Value property of this argu-
ment to True, the specified command will not be executed.
Using Form Events | 607
Event Programming in Forms and Reports

CommandExecute
The CommandExecute event occurs after a user selects a command from the
menu bar or toolbar. You can use this event when you want to execute a set of
commands after a particular command is executed. This event takes the Com-
mand argument that returns a PivotCommandId constant, which allows you to
determine which command the user executed. You can use the Object Browser
to view the list of commands for this constant.
The event procedure in Hands-On 24-33 checks whether the user used the
Copy command. If the Copy command was executed, the procedure displays a
message.
�Hands-On 24-33: Writing the Form_CommandExecute Event Procedure
1. In the Visual Basic Editor’s Project Explorer window, double-click
Form_Employee Sales Pivot.
2. The Code window shows the procedures created in the previous hands-on
exercises for this chapter. Enter the following Form_CommandExecute
event procedure below the last procedure code, or copy and paste the code
from C:\Acc07_HandsOn\Chap24.txt.
Private Sub Form_CommandExecute(ByVal Command As Variant)If Command = OWC11.plCommandCopy Then
MsgBox "You just copied some data to the clipboard."End If
End Sub
3. To test the above event procedure, open the Employee Sales Pivot form in
PivotTable view. Because you’ve already created several event procedures
for this form, various events will be triggered. Respond appropriately to the
prompts. Once the form is opened, right-click any amount in the detail
rows in the PivotTable and choose Copy from the shortcut menu. After
choosing the Copy command you should see the message informing you
that the text was copied to the clipboard.
4. Close the Employee Sales Pivot form and save changes to the form when
prompted.
Keyboard and Mouse EventsPivotTable and PivotChart views in Access can also respond to the following
events: KeyDown, KeyPress, KeyUp, MouseDown, MouseMove, MouseUp,
MouseWheel, Click, and DblClick. These events are the same as the form’s
keyboard and mouse events discussed earlier in this chapter.
608 | Chapter 24
Part IV
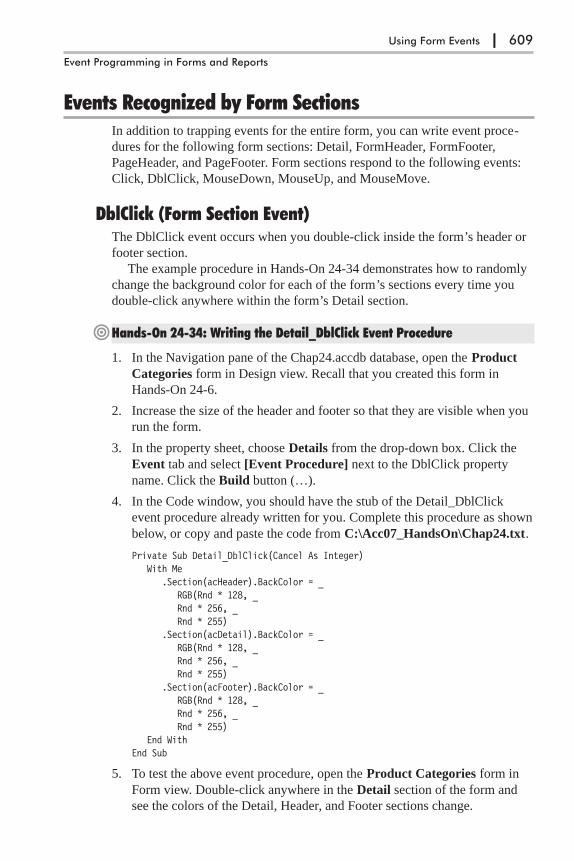
Events Recognized by Form SectionsIn addition to trapping events for the entire form, you can write event proce-
dures for the following form sections: Detail, FormHeader, FormFooter,
PageHeader, and PageFooter. Form sections respond to the following events:
Click, DblClick, MouseDown, MouseUp, and MouseMove.
DblClick (Form Section Event)The DblClick event occurs when you double-click inside the form’s header or
footer section.
The example procedure in Hands-On 24-34 demonstrates how to randomly
change the background color for each of the form’s sections every time you
double-click anywhere within the form’s Detail section.
�Hands-On 24-34: Writing the Detail_DblClick Event Procedure
1. In the Navigation pane of the Chap24.accdb database, open the Product
Categories form in Design view. Recall that you created this form in
Hands-On 24-6.
2. Increase the size of the header and footer so that they are visible when you
run the form.
3. In the property sheet, choose Details from the drop-down box. Click the
Event tab and select [Event Procedure] next to the DblClick property
name. Click the Build button (…).
4. In the Code window, you should have the stub of the Detail_DblClick
event procedure already written for you. Complete this procedure as shown
below, or copy and paste the code from C:\Acc07_HandsOn\Chap24.txt.
Private Sub Detail_DblClick(Cancel As Integer)With Me
.Section(acHeader).BackColor = _RGB(Rnd * 128, _Rnd * 256, _Rnd * 255)
.Section(acDetail).BackColor = _RGB(Rnd * 128, _Rnd * 256, _Rnd * 255)
.Section(acFooter).BackColor = _RGB(Rnd * 128, _Rnd * 256, _Rnd * 255)
End WithEnd Sub
5. To test the above event procedure, open the Product Categories form in
Form view. Double-click anywhere in the Detail section of the form and
see the colors of the Detail, Header, and Footer sections change.
Using Form Events | 609
Event Programming in Forms and Reports

Chapter SummaryIn this chapter, you learned that numerous events can occur on a Microsoft
Access form and that you can react to a specific form event by writing an event
procedure. If you don’t write your own code to handle a particular form event,
Access will handle this event in its default way.
After trying out the 34 hands-on exercises presented in this chapter, you
should have a good understanding of how to write event procedures for an
Access form. You should also be able to recognize the importance of form
events in an Access application. You will find more examples of using form
events in a custom application introduced in Chapter 26.
For more hands-on experience with event programming, proceed to the next
chapter, which discusses the events recognized by an Access report and its
sections.
610 | Chapter 24
Part IV
Chapter 25
Using Report Events
When an Access report is run, a number of events can occur. The following
examples demonstrate how to control what happens not only when the report is
opened, activated, deactivated, or closed, but also when there are no records
for the report to display or the report record source simply does not exist.
OpenThe Open event for a report occurs when the report is opened. Use this event
to display support forms or custom buttons, or to change the record source for
the report. The event procedure in Hands-On 25-1 demonstrates how to change
a report’s record source on the fly.
�Hands-On 25-1: Writing the Report_Open Event Procedure
1. Start Microsoft Office Access 2007 and create a new Microsoft Office
Access 2007 database named Chap25.accdb in your C:\Acc07_
ByExample folder.
2. Import all the tables, queries, forms, reports, macros, and modules from the
Northwind.mdb sample database to your Chap25.accdb database. To do
this, in the Access window, choose External Data | Access. In the File
name box, type C:\Acc07_ByExample\Northwind.mdb and click OK. In
the Import Objects window, select the Tables tab and click the Select All
button. This will highlight all the tables. Select the Queries tab and click
the Select All button. Select the Forms tab and click the Select All button.
Select the Reports tab and click the Select All button. Do the same for
macros and modules. After selecting all the objects on the specified tabs,
click OK to begin importing. Click the Close button when done.
3. In the Access window’s Navigation pane, select the Customers table and
choose Create | Report Wizard. Select all the fields for the report and
click the Next button. Continue clicking Next until you get to the Report
Wizard screen where you can specify the title for your report. Type
rptCustomers for the title and click Finish.
4. Choose Home | View | Design View to switch to the Design view of the
rptCustomers report.
611

5. In the Report Header area, click the report title (label control) to select it.
In the property sheet for the selected label control, click the All tab and
type lblCustomers as the Name property and enter Customers as the Cap-
tion property.
6. In the property sheet, select Report from the drop-down box and click the
Event tab. Click next to the On Open event property and choose [Event
Procedure] from the drop-down box. Click the Build button (…).
7. Access opens the Visual Basic Editor window and writes the stub of the
Report_Open event procedure. Complete the code of the Report_Open
event procedure as shown below, or copy and paste the code from
C:\Acc07_HandsOn\Chap25.txt.
Private Sub Report_Open(Cancel As Integer)Dim strCustName As StringDim strSQL As StringDim strWHERE As String
On Error GoTo ErrHandlerstrSQL = "SELECT * FROM Customers"
strCustName = InputBox("Type the first letter of " & _" the Company Name or type an asterisk (*) to view" & _" all companies.", "Show All /Or Filter")
If strCustName = "" ThenCancel = True
ElseIf strCustName = "*" ThenMe.RecordSource = strSQLMe.lblCustomers.Caption = "All Customers"
ElsestrCustName = "'" & Trim(strCustName) & "*" & "'"strWHERE = " WHERE CompanyName Like " _
& strCustName & ""Debug.Print strSQLDebug.Print strWHEREMe.RecordSource = strSQL & strWHEREMe.lblCustomers.Caption = "Selected Customers" & _
" (" & UCase(strCustName) & ")"End IfExit Sub
ErrHandler:MsgBox Err.Description
End Sub
8. Switch to the rptCustomers report’s Design view and choose Home | View
| Print Preview. A message box will appear where you can enter an aster-
isk (*) to view all customers or the first letter of a company name if you’d
like to limit your records. To cancel the report, click Cancel or press the
Esc key.
612 | Chapter 25
Part IV

CloseThe Close event occurs when you close the report. Use this event to close sup-
porting forms or to perform other cleanup operations. You cannot cancel the
Close event. Figure 25-1 shows the Report_Close event procedure for the
Sales by Year report in the Northwind.mdb database. This report opens via the
Sales by Year Dialog form where the user can specify the report beginning and
ending dates. This form remains open while the report is open and is closed
during the Report_Close event.
ActivateThe Activate event occurs when the report is opened right after the Open event
but before the event for the first section of the report. The procedure in
Hands-On 25-2 displays a message when the report is open in Print Preview
and returns the name of the default printer to the Immediate window.
�Hands-On 25-2: Writing the Report_Activate Event Procedure
This hands-on exercise uses the rptCustomers report created in Hands-On
25-1.
1. In the Visual Basic Editor’s Project Explorer window, double-click the
rptCustomers report. In the Code window, enter the following
Report_Activate event procedure, or copy and paste the code from
C:\Acc07_HandsOn\Chap25.txt.
Private Sub Report_Activate()If Me.CurrentView = acCurViewPreview Then
MsgBox "Activating Print Preview of " _& Me.Name & " report."
Debug.Print "Default Printer: " & _Application.Printer.DeviceName
End IfEnd Sub
Notice how the CurrentView property is used to determine the current view
of an object. The following table lists the CurrentView property constants.
Using Report Events | 613
Event Programming in Forms and Reports
Figure 25-1: TheReport_Close eventprocedure is oftenused to close sup-porting forms.

Table 25-1: CurrentView property names and values
CurrentView Property Name Value Description
acCurViewDesign 0 The object is in Design view.
acCurViewFormBrowse 1 The object is in Form view.
acCurViewDatasheet 2 The object is in Datasheet view.
acCurViewPivotTable 3 The object is in PivotTable view.
acCurViewPivotChart 4 The object is in PivotChart view.
acCurViewPreview 5 The object is in Print Preview.
acCurViewReportBrowse 6 The object is in Report view.
acCurViewLayout 7 The object is in Layout view.
2. In the Navigation pane of the Access window, right-click the rptCus-
tomers report and choose Print Preview. Enter your report criteria when
prompted. Upon activation of the report, the Report_Activate event will
fire and you should see a message. Click OK to the message, then switch
to the Immediate window to check out the name of the default printer.
3. Close the rptCustomers report and save changes to the report when
prompted.
DeactivateThe Deactivate event occurs when a report loses the focus to a table, query,
form, report, macro, module, or database window. This event occurs before the
Close event for the report.
NoDataThe NoData event occurs when the record source for the report contains no
records. This event allows you to cancel the report when no records are avail-
able. The event procedure in Hands-On 25-3 displays a message when the user
enters criteria that are not met.
�Hands-On 25-3: Writing the Report_NoData Event Procedure
This hands-on exercise uses the rptCustomers report created in Hands-On
25-1.
1. In the Visual Basic Editor’s Project Explorer window, double-click the
Report_ rptCustomers report. In the Code window, enter the following
Report_NoData event procedure, or copy and paste the code from
C:\Acc07_HandsOn\Chap25.txt.
Private Sub Report_NoData(Cancel As Integer)MsgBox "There is no data for the criteria " & _
"you entered."Cancel = True
End Sub
614 | Chapter 25
Part IV

2. Switch to the Access window and open the rptCustomers report. Request
to see customers with a company name starting with the letter “X.”
Because there aren’t any company names beginning with “X,” a message
box will be displayed, saying that there is no data for the criteria entered,
and the report will be canceled.
PageThe Page event occurs after a page is formatted but before it is printed. Use the
Page event to customize the appearance of your printed reports by adding
lines, circles, and graphics. The event procedure in Hands-On 25-4 will draw a
red border around the report pages.
�Hands-On 25-4: Writing the Report_Page Event Procedure
This hands-on exercise uses the rptCustomers report created in Hands-On
25-1.
1. In the Visual Basic Editor’s Project Explorer window, double-click the
rptCustomers report. In the Code window, enter the following Report_
Page event procedure, or copy and paste the code from C:\Acc07_
HandsOn\Chap25.txt.
Private Sub Report_Page()Me.DrawWidth = 15 ' pixelsMe.Line (0, 0)-(Me.ScaleWidth, _
Me.ScaleHeight), vbRed, BEnd Sub
Notice that the DrawWidth method specifies the thickness of the line and
the Line method draws a line with an upper-left corner at (0, 0) and the
lower-right corner at (Me.ScaleWidth, MeScaleHeight). The ScaleWidth
and ScaleHeight properties specify the width and height of the report.
2. Switch to the Access window and open the rptCustomers report in the
Print Preview. Notice that when the report appears on the screen, a red bor-
der surrounds the pages (see Figure 25-2).
Using Report Events | 615
Event Programming in Forms and Reports
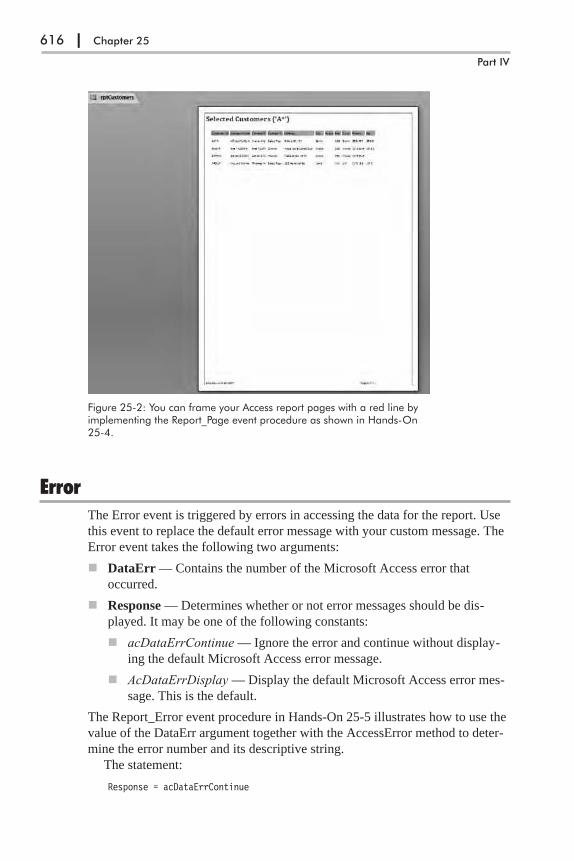
ErrorThe Error event is triggered by errors in accessing the data for the report. Use
this event to replace the default error message with your custom message. The
Error event takes the following two arguments:
� DataErr — Contains the number of the Microsoft Access error that
occurred.
� Response — Determines whether or not error messages should be dis-
played. It may be one of the following constants:
� acDataErrContinue — Ignore the error and continue without display-
ing the default Microsoft Access error message.
� AcDataErrDisplay — Display the default Microsoft Access error mes-
sage. This is the default.
The Report_Error event procedure in Hands-On 25-5 illustrates how to use the
value of the DataErr argument together with the AccessError method to deter-
mine the error number and its descriptive string.
The statement:
Response = acDataErrContinue
616 | Chapter 25
Part IV
Figure 25-2: You can frame your Access report pages with a red line byimplementing the Report_Page event procedure as shown in Hands-On25-4.
will prevent the standard Microsoft Access error message from appearing. The
Error event for reports works the same as the Error event for forms — but only
the Microsoft Access ACE or the Jet Engine errors can be trapped here.
To trap errors in your VBA code, use the On Error GoTo statement to direct
the procedure flow to the location of the error-handling statements within your
procedure.
�Hands-On 25-5: Writing the Report_Error Event Procedure
1. In the Navigation pane, rename the Customers table to Customers2.
2. In the Visual Basic Editor’s Project Explorer window, double-click the
rptCustomers report. In the Code window, enter the following
Report_Error event procedure, or copy and paste the code from
C:\Acc07_HandsOn\Chap25.txt.
Private Sub Report_Error(DataErr As Integer, _Response As Integer)
' obtain information about the error' MsgBox Application.AccessError(DataErr), _
vbOKOnly, "Error Number: " & DataErrIf DataErr = 3078 ThenResponse = acDataErrContinue
MsgBox "Your custom error message goes here."End If
End Sub
3. Switch to the Access window and open the rptCustomers report. When
the input box appears prompting you for the criteria, type any letter and
press OK. At this point the Report_Error event will fire because the under-
lying data for the rptCustomers report does not exist. Because you renamed
the Customers table that this report uses for its data source, Microsoft
Access cannot locate the data, which generates the error.
4. In the Navigation pane, change the Customers2 table’s name back to Cus-
tomers and open the rptCustomers report to ensure that it does not
produce unexpected errors.
5. Close the report when finished and save the changes when prompted.
Events Recognized by Report SectionsA Microsoft Access report can contain various sections such as Report
Header/Footer, Page Header/Footer, the Detail section, and Group Head-
ers/Footers. All report sections can respond to the Format and Print events.
These events occur when you print or preview a report. In addition, the Report
Header/Footer and the Detail section recognize the Retreat event that occurs
when Access returns to a previous section during report formatting.
Using Report Events | 617
Event Programming in Forms and Reports
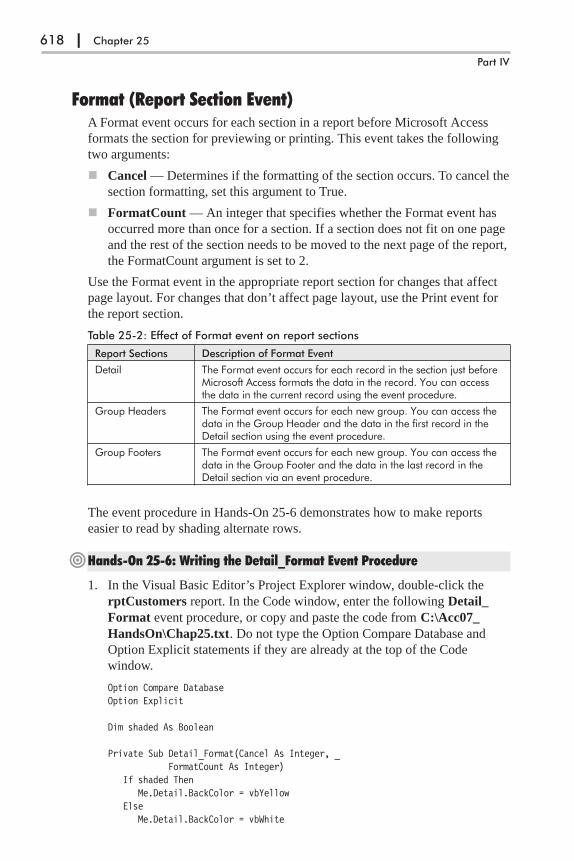
Format (Report Section Event)A Format event occurs for each section in a report before Microsoft Access
formats the section for previewing or printing. This event takes the following
two arguments:
� Cancel — Determines if the formatting of the section occurs. To cancel the
section formatting, set this argument to True.
� FormatCount — An integer that specifies whether the Format event has
occurred more than once for a section. If a section does not fit on one page
and the rest of the section needs to be moved to the next page of the report,
the FormatCount argument is set to 2.
Use the Format event in the appropriate report section for changes that affect
page layout. For changes that don’t affect page layout, use the Print event for
the report section.
Table 25-2: Effect of Format event on report sections
Report Sections Description of Format Event
Detail The Format event occurs for each record in the section just beforeMicrosoft Access formats the data in the record. You can accessthe data in the current record using the event procedure.
Group Headers The Format event occurs for each new group. You can access thedata in the Group Header and the data in the first record in theDetail section using the event procedure.
Group Footers The Format event occurs for each new group. You can access thedata in the Group Footer and the data in the last record in theDetail section via an event procedure.
The event procedure in Hands-On 25-6 demonstrates how to make reports
easier to read by shading alternate rows.
�Hands-On 25-6: Writing the Detail_Format Event Procedure
1. In the Visual Basic Editor’s Project Explorer window, double-click the
rptCustomers report. In the Code window, enter the following Detail_
Format event procedure, or copy and paste the code from C:\Acc07_
HandsOn\Chap25.txt. Do not type the Option Compare Database and
Option Explicit statements if they are already at the top of the Code
window.
Option Compare DatabaseOption Explicit
Dim shaded As Boolean
Private Sub Detail_Format(Cancel As Integer, _FormatCount As Integer)
If shaded ThenMe.Detail.BackColor = vbYellow
ElseMe.Detail.BackColor = vbWhite
618 | Chapter 25
Part IV
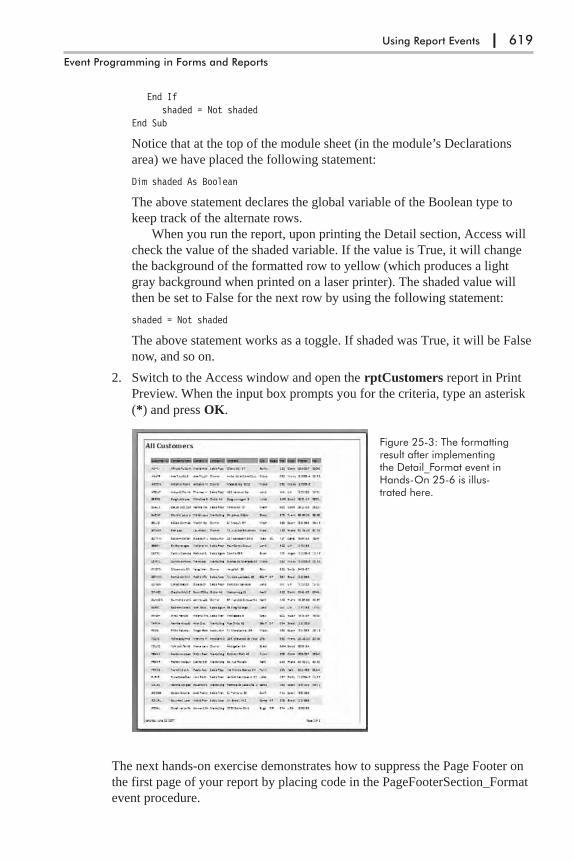
End Ifshaded = Not shaded
End Sub
Notice that at the top of the module sheet (in the module’s Declarations
area) we have placed the following statement:
Dim shaded As Boolean
The above statement declares the global variable of the Boolean type to
keep track of the alternate rows.
When you run the report, upon printing the Detail section, Access will
check the value of the shaded variable. If the value is True, it will change
the background of the formatted row to yellow (which produces a light
gray background when printed on a laser printer). The shaded value will
then be set to False for the next row by using the following statement:
shaded = Not shaded
The above statement works as a toggle. If shaded was True, it will be False
now, and so on.
2. Switch to the Access window and open the rptCustomers report in Print
Preview. When the input box prompts you for the criteria, type an asterisk
(*) and press OK.
The next hands-on exercise demonstrates how to suppress the Page Footer on
the first page of your report by placing code in the PageFooterSection_Format
event procedure.
Using Report Events | 619
Event Programming in Forms and Reports
Figure 25-3: The formattingresult after implementingthe Detail_Format event inHands-On 25-6 is illus-trated here.
�Hands-On 25-7: Writing the PageFooterSection_Format Event Procedure
1. Using the Report Wizard, create a report called rptProducts based on the
Products table. Choose the following fields for this report: ProductID,
ProductName, UnitPrice, and UnitsInStock.
2. In the Design view of the rptProducts report, select PageFooterSection in
the property sheet. Click the Event tab. Click next to the On Format prop-
erty and select [Event Procedure] from the drop-down list. Click the
Build button (…) to activate the Code window.
3. In the Code window for rptProducts, enter the following PageFooter-
Section_Format event procedure, or copy and paste the code from
C:\Acc07_HandsOn\Chap25.txt.
Private Sub PageFooterSection_Format(Cancel As Integer, _FormatCount As Integer)Dim ctrl As Control
For Each ctrl In Me.PageFooterSection.ControlsIf Me.Page = 1 Then
ctrl.Visible = FalseElse
ctrl.Visible = TrueEnd If
Next ctrlEnd Sub
4. Switch to the Access window and open the rptProducts report in Print Pre-
view. Notice that the Footer section does not appear on the first page of the
report.
5. Close the rptProducts report and save changes to the report when
prompted.
Print (Report Section Event)The Print event occurs after the data in a report section has been formatted but
before the data is printed. The Print event occurs only for sections that are
actually printed. To access data from sections that are not printed, use the For-
mat event.
You can use the PrintCount argument to check whether the Print event has
occurred more than once for a record. If part of a record is printed on one page
and the rest is printed on the next page, the Print event will occur twice, and
the PrintCount argument will be set to 2. You can use the Cancel argument to
cancel the printing of a section.
620 | Chapter 25
Part IV

Table 25-3: Effect of Print event on report sections
Report Section Description of Event
Detail The Print event occurs for each record in the Detail section justbefore Microsoft Access prints the data in the record.
Group Headers The Print event occurs for each new group.
Group Footers The Print event occurs for each new group.
The event procedure in Hands-On 25-8 demonstrates how to print a record
range indicator in the report’s Footer. This indicator will display the range of
records printed on each page. You can easily modify this example procedure to
print the first and last customer ID on the page (see the discussion before Fig-
ure 25-5).
�Hands-On 25-8: Writing the Detail_Print Event Procedure
This hands-on exercise uses the rptCustomers report you created in Hands-On
25-1.
1. Open the rptCustomers report in the Design view and place two unbound
text boxes in the report’s Page Footer section.
2. Change the Name property of the first box to txtPage and set its Visible
property to No. Delete the label control in front of this text box.
3. Name the second text box txtRange and set the Caption property of its
label control to Records:.
4. In the property sheet, select Detail from the drop-down box and click the
Event tab. Set the On Print property of the Detail section to [Event Proce-
dure] and write the code for the Detail_Print event as shown below, or
copy and paste the code from C:\Acc07_HandsOn\Chap25.txt.
Private Sub Detail_Print(Cancel As Integer, _PrintCount As Integer)
Static rCount As IntegerStatic start As IntegerStatic firstId As StringStatic lastId As String
If Me.Page <> Me.txtPage Thenstart = Me.CurrentRecordfirstId = CustomerIDMe.txtPage = Me.PagerCount = 0
End IfrCount = rCount + 1lastId = CustomerID
If start <= rCount ThenMe.txtRange = start & "-" & rCount' Me.txtRange = UCase(firstId) & "-" & UCase(lastId)
ElserCount = Me.CurrentRecordlastId = CustomerID
Using Report Events | 621
Event Programming in Forms and Reports
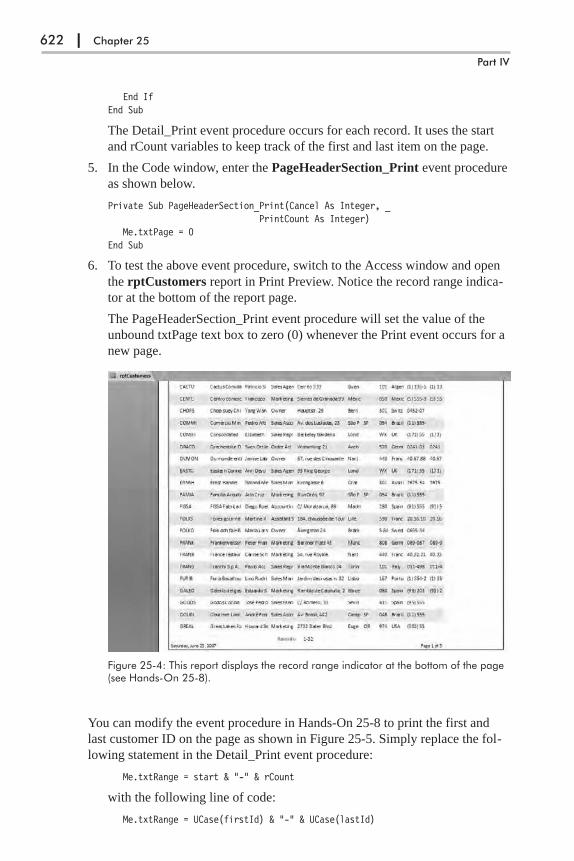
End IfEnd Sub
The Detail_Print event procedure occurs for each record. It uses the start
and rCount variables to keep track of the first and last item on the page.
5. In the Code window, enter the PageHeaderSection_Print event procedure
as shown below.
Private Sub PageHeaderSection_Print(Cancel As Integer, _PrintCount As Integer)
Me.txtPage = 0End Sub
6. To test the above event procedure, switch to the Access window and open
the rptCustomers report in Print Preview. Notice the record range indica-
tor at the bottom of the report page.
The PageHeaderSection_Print event procedure will set the value of the
unbound txtPage text box to zero (0) whenever the Print event occurs for a
new page.
You can modify the event procedure in Hands-On 25-8 to print the first and
last customer ID on the page as shown in Figure 25-5. Simply replace the fol-
lowing statement in the Detail_Print event procedure:
Me.txtRange = start & "-" & rCount
with the following line of code:
Me.txtRange = UCase(firstId) & "-" & UCase(lastId)
622 | Chapter 25
Part IV
Figure 25-4: This report displays the record range indicator at the bottom of the page(see Hands-On 25-8).
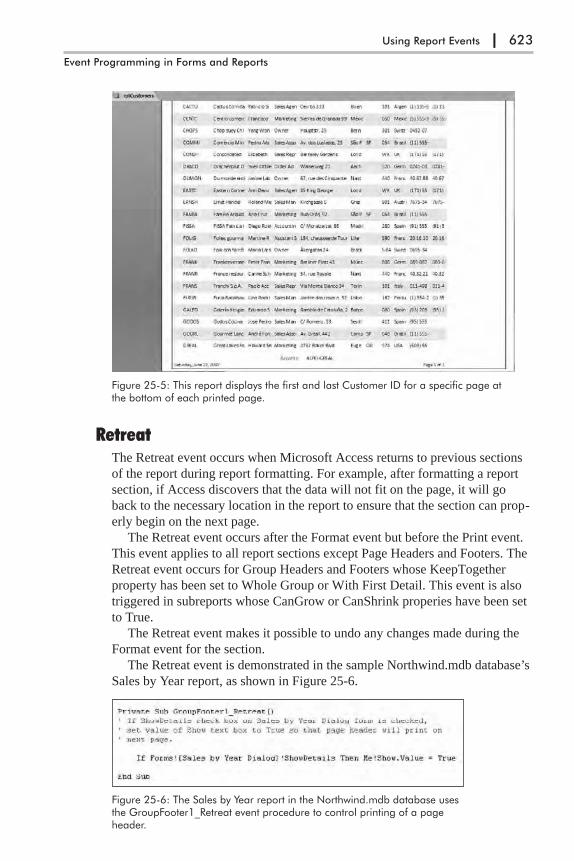
RetreatThe Retreat event occurs when Microsoft Access returns to previous sections
of the report during report formatting. For example, after formatting a report
section, if Access discovers that the data will not fit on the page, it will go
back to the necessary location in the report to ensure that the section can prop-
erly begin on the next page.
The Retreat event occurs after the Format event but before the Print event.
This event applies to all report sections except Page Headers and Footers. The
Retreat event occurs for Group Headers and Footers whose KeepTogether
property has been set to Whole Group or With First Detail. This event is also
triggered in subreports whose CanGrow or CanShrink properies have been set
to True.
The Retreat event makes it possible to undo any changes made during the
Format event for the section.
The Retreat event is demonstrated in the sample Northwind.mdb database’s
Sales by Year report, as shown in Figure 25-6.
Using Report Events | 623
Event Programming in Forms and Reports
Figure 25-5: This report displays the first and last Customer ID for a specific page atthe bottom of each printed page.
Figure 25-6: The Sales by Year report in the Northwind.mdb database usesthe GroupFooter1_Retreat event procedure to control printing of a pageheader.
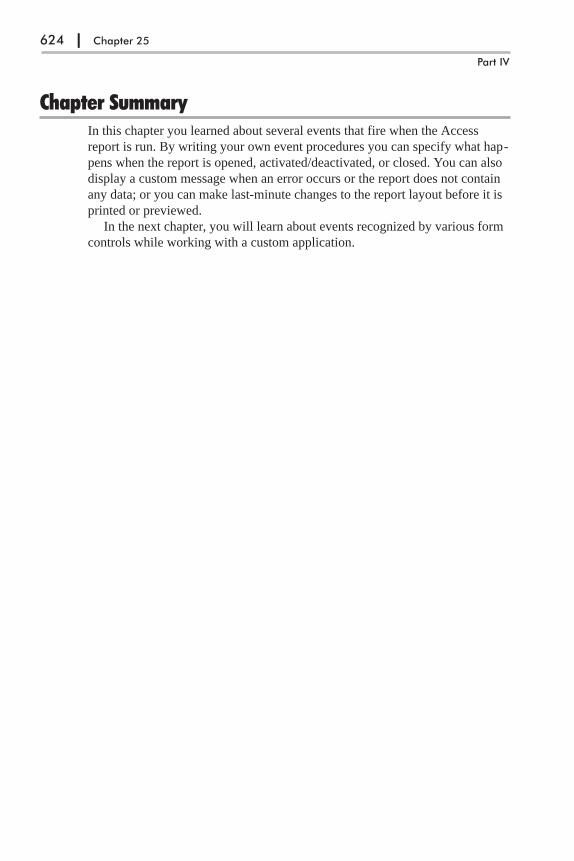
Chapter SummaryIn this chapter you learned about several events that fire when the Access
report is run. By writing your own event procedures you can specify what hap-
pens when the report is opened, activated/deactivated, or closed. You can also
display a custom message when an error occurs or the report does not contain
any data; or you can make last-minute changes to the report layout before it is
printed or previewed.
In the next chapter, you will learn about events recognized by various form
controls while working with a custom application.
624 | Chapter 25
Part IV

Chapter 26
Events Recognized byControls
In addition to the events for forms and reports introduced in Chapters 24 and
25, you can control a great many events that occur for labels, text boxes,
combo and list boxes, option buttons, check boxes, and other controls installed
by default with an Access application. These events make it possible to man-
age what happens on a field level.
The best way to learn about events that a form, report, and/or control can
respond to is to develop an application that addresses specific needs. For
example, the AssetsDataEntry.mdb database keeps track of computer assets in
various companies. We will use this database to further experiment with event
programming. The main data entry form is divided into four easy-to-maintain
sections as illustrated in Figure 26-1.
625
Figure 26-1: Custom data entry form.
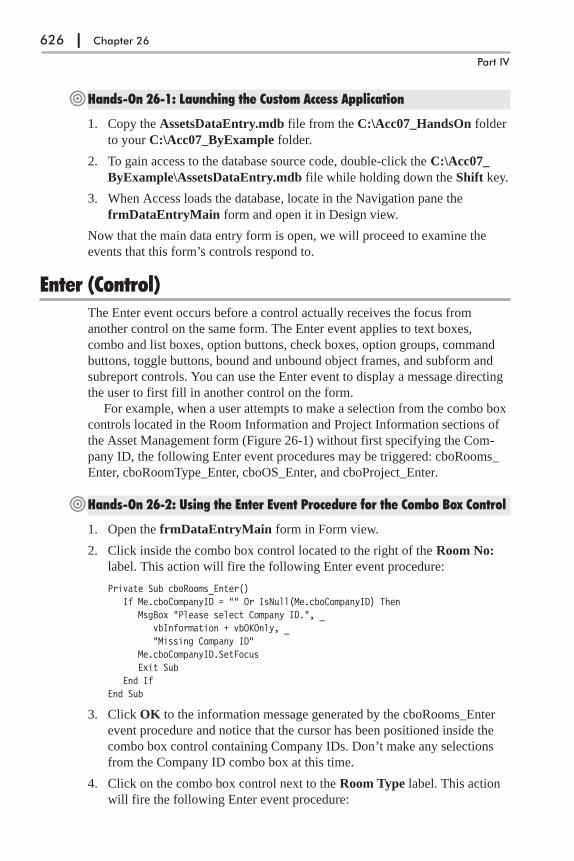
�Hands-On 26-1: Launching the Custom Access Application
1. Copy the AssetsDataEntry.mdb file from the C:\Acc07_HandsOn folder
to your C:\Acc07_ByExample folder.
2. To gain access to the database source code, double-click the C:\Acc07_
ByExample\AssetsDataEntry.mdb file while holding down the Shift key.
3. When Access loads the database, locate in the Navigation pane the
frmDataEntryMain form and open it in Design view.
Now that the main data entry form is open, we will proceed to examine the
events that this form’s controls respond to.
Enter (Control)The Enter event occurs before a control actually receives the focus from
another control on the same form. The Enter event applies to text boxes,
combo and list boxes, option buttons, check boxes, option groups, command
buttons, toggle buttons, bound and unbound object frames, and subform and
subreport controls. You can use the Enter event to display a message directing
the user to first fill in another control on the form.
For example, when a user attempts to make a selection from the combo box
controls located in the Room Information and Project Information sections of
the Asset Management form (Figure 26-1) without first specifying the Com-
pany ID, the following Enter event procedures may be triggered: cboRooms_
Enter, cboRoomType_Enter, cboOS_Enter, and cboProject_Enter.
�Hands-On 26-2: Using the Enter Event Procedure for the Combo Box Control
1. Open the frmDataEntryMain form in Form view.
2. Click inside the combo box control located to the right of the Room No:
label. This action will fire the following Enter event procedure:
Private Sub cboRooms_Enter()If Me.cboCompanyID = "" Or IsNull(Me.cboCompanyID) Then
MsgBox "Please select Company ID.", _vbInformation + vbOKOnly, _"Missing Company ID"
Me.cboCompanyID.SetFocusExit Sub
End IfEnd Sub
3. Click OK to the information message generated by the cboRooms_Enter
event procedure and notice that the cursor has been positioned inside the
combo box control containing Company IDs. Don’t make any selections
from the Company ID combo box at this time.
4. Click on the combo box control next to the Room Type label. This action
will fire the following Enter event procedure:
626 | Chapter 26
Part IV
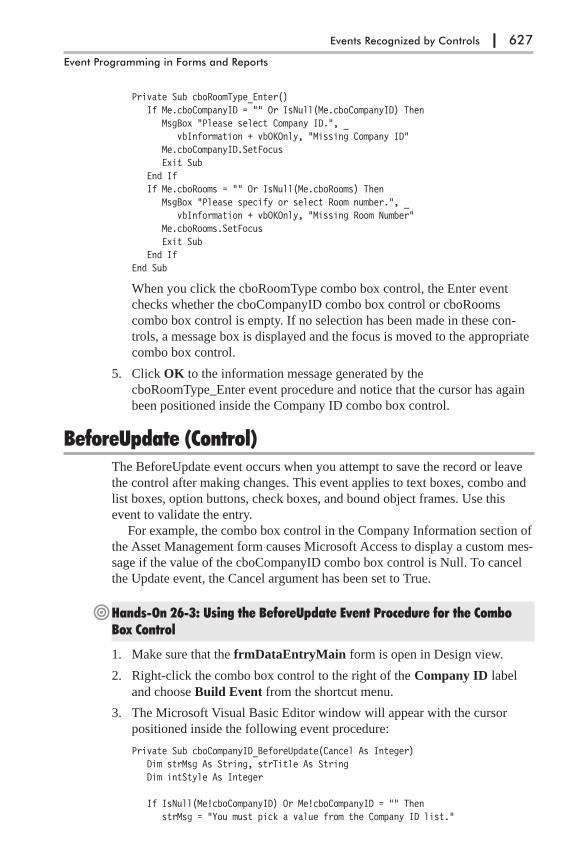
Private Sub cboRoomType_Enter()If Me.cboCompanyID = "" Or IsNull(Me.cboCompanyID) Then
MsgBox "Please select Company ID.", _vbInformation + vbOKOnly, "Missing Company ID"
Me.cboCompanyID.SetFocusExit Sub
End IfIf Me.cboRooms = "" Or IsNull(Me.cboRooms) Then
MsgBox "Please specify or select Room number.", _vbInformation + vbOKOnly, "Missing Room Number"
Me.cboRooms.SetFocusExit Sub
End IfEnd Sub
When you click the cboRoomType combo box control, the Enter event
checks whether the cboCompanyID combo box control or cboRooms
combo box control is empty. If no selection has been made in these con-
trols, a message box is displayed and the focus is moved to the appropriate
combo box control.
5. Click OK to the information message generated by the
cboRoomType_Enter event procedure and notice that the cursor has again
been positioned inside the Company ID combo box control.
BeforeUpdate (Control)The BeforeUpdate event occurs when you attempt to save the record or leave
the control after making changes. This event applies to text boxes, combo and
list boxes, option buttons, check boxes, and bound object frames. Use this
event to validate the entry.
For example, the combo box control in the Company Information section of
the Asset Management form causes Microsoft Access to display a custom mes-
sage if the value of the cboCompanyID combo box control is Null. To cancel
the Update event, the Cancel argument has been set to True.
�Hands-On 26-3: Using the BeforeUpdate Event Procedure for the ComboBox Control
1. Make sure that the frmDataEntryMain form is open in Design view.
2. Right-click the combo box control to the right of the Company ID label
and choose Build Event from the shortcut menu.
3. The Microsoft Visual Basic Editor window will appear with the cursor
positioned inside the following event procedure:
Private Sub cboCompanyID_BeforeUpdate(Cancel As Integer)Dim strMsg As String, strTitle As StringDim intStyle As Integer
If IsNull(Me!cboCompanyID) Or Me!cboCompanyID = "" ThenstrMsg = "You must pick a value from the Company ID list."
Events Recognized by Controls | 627
Event Programming in Forms and Reports

strTitle = "Company ID Required"intStyle = vbOKOnlyMsgBox strMsg, intStyle, strTitleCancel = True
End IfEnd Sub
4. Position the cursor inside the If statement, then press F9 or choose Debug |
Toggle Breakpoint.
5. Activate the frmDataEntryMain form in Form view and make a selection
from the Company ID combo box.
When you make your selection, the BeforeUpdate event procedure is fired
and the Code window appears in break mode. Press F8 to step through the
code line by line. Because you have not set up more breakpoints, you can-
not see that two other events (cboCompanyID_AfterUpdate and
cboRooms_Enter) were triggered when you made a selection from the
Company ID combo box.
6. When the procedure finishes executing, activate the frmDataEntryMain
form. You should see the text boxes filled with a company name and
address and the cursor positioned inside the Room No combo box and
ready for the next selection or data entry.
AfterUpdate (Control)The AfterUpdate event occurs after the data in the control has been modified.
It applies to text boxes, combo and list boxes, option buttons, check boxes, and
bound object frames. Unlike the BeforeUpdate event, the AfterUpdate event
cannot be canceled. Use this event to fill in other controls on the form based on
the newly entered or selected value.
For example, after updating the cboCompanyID combo box in the Company
Information section of the Asset Management form, the following event proce-
dure is executed:
Private Sub cboCompanyID_AfterUpdate()With Me
.txtCompanyName = Me.[cboCompanyID].Column(1)
.txtAddress = Me.cboCompanyID.Column(2)
.txtCity = Me.cboCompanyID.Column(3)
.txtRegion = Me.cboCompanyID.Column(4)
.txtPostalCode = Me.cboCompanyID.Column(5)
.txtCountry = Me.cboCompanyID.Column(6)
.cboRooms.Value = vbNullString
.cboRooms.Requery
.txtRoomDescription = vbNullString
.cboRoomType = vbNullString
.cboOS = vbNullString
.txtOperatingSystem = vbNullString
.cboProject = vbNullString
.txtPID = vbNullStringEnd With
628 | Chapter 26
Part IV

If Me.cboRooms.ListCount = 0 Then'do not display column headingsMe.cboRooms.ColumnHeads = False
ElseMe.cboRooms.ColumnHeads = True
End IfMe.cboRooms.SetFocus
End Sub
In the procedure shown above, the company address information is filled in
based on the contents of the cboCompanyID columns. For example, to fill in
the street address, you can read the value of the Columns() property of the
cboCompanyID control, even though this column is not visible when you view
the combo box:
Me.txtStreet = Me.cboCompanyID.Column(2)
Note that because the combo box column numbering begins with zero (0), the
above statement actually reads the contents of the third column. Next, the
combo box labeled “Room No” is requeried and a number of other controls on
the form are cleared.
Also, note how the intrinsic constant named vbNullString is used here
instead of an empty string ("") to clear text boxes or combo boxes on a form.
The final code segment above contains the If…Then…Else statement that sets
the ColumnHeads property of the cboRooms control to False if there are no
rooms associated with the selected Company ID.
The last line of the code:
Me.cboRooms.SetFocus
moves the focus to the combo box control with the room numbers. When this
code is executed, the cboRooms_Enter event procedure will be triggered.
�Hands-On 26-4: Using the AfterUpdate Event Procedure for the Combo BoxControl
1. Make sure that the frmDataEntryMain form is open in Design view.
2. Right-click the list box control to the right of the Company ID label and
choose Build Event from the shortcut menu.
3. In the Code window, choose the AfterUpdate event from the Procedure
drop-down box and set a breakpoint on the first line of this procedure.
4. Switch to Form view of the frmDataEntryMain form and make another
selection from the Company ID combo box. When the Code window
appears in break mode, step through the code line by line by pressing F8.
Notice that the following three event procedures are run:
cboCompanyID_BeforeUpdatecboCompanyID_AfterUpdatecboRooms_Enter
5. When the procedure finishes executing, activate the frmDataEntryMain
form.
Events Recognized by Controls | 629
Event Programming in Forms and Reports
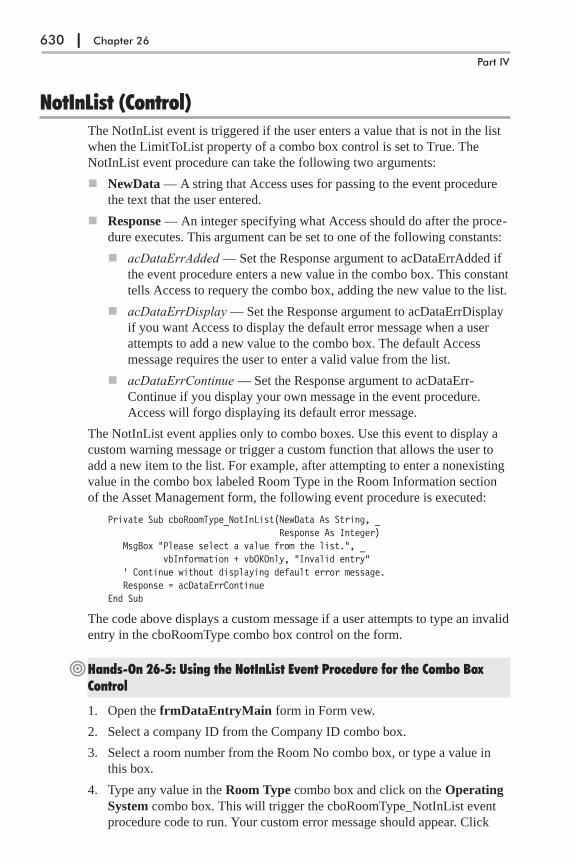
NotInList (Control)The NotInList event is triggered if the user enters a value that is not in the list
when the LimitToList property of a combo box control is set to True. The
NotInList event procedure can take the following two arguments:
� NewData — A string that Access uses for passing to the event procedure
the text that the user entered.
� Response — An integer specifying what Access should do after the proce-
dure executes. This argument can be set to one of the following constants:
� acDataErrAdded — Set the Response argument to acDataErrAdded if
the event procedure enters a new value in the combo box. This constant
tells Access to requery the combo box, adding the new value to the list.
� acDataErrDisplay — Set the Response argument to acDataErrDisplay
if you want Access to display the default error message when a user
attempts to add a new value to the combo box. The default Access
message requires the user to enter a valid value from the list.
� acDataErrContinue — Set the Response argument to acDataErr-
Continue if you display your own message in the event procedure.
Access will forgo displaying its default error message.
The NotInList event applies only to combo boxes. Use this event to display a
custom warning message or trigger a custom function that allows the user to
add a new item to the list. For example, after attempting to enter a nonexisting
value in the combo box labeled Room Type in the Room Information section
of the Asset Management form, the following event procedure is executed:
Private Sub cboRoomType_NotInList(NewData As String, _Response As Integer)
MsgBox "Please select a value from the list.", _vbInformation + vbOKOnly, "Invalid entry"
' Continue without displaying default error message.Response = acDataErrContinue
End Sub
The code above displays a custom message if a user attempts to type an invalid
entry in the cboRoomType combo box control on the form.
�Hands-On 26-5: Using the NotInList Event Procedure for the Combo BoxControl
1. Open the frmDataEntryMain form in Form vew.
2. Select a company ID from the Company ID combo box.
3. Select a room number from the Room No combo box, or type a value in
this box.
4. Type any value in the Room Type combo box and click on the Operating
System combo box. This will trigger the cboRoomType_NotInList event
procedure code to run. Your custom error message should appear. Click
630 | Chapter 26
Part IV
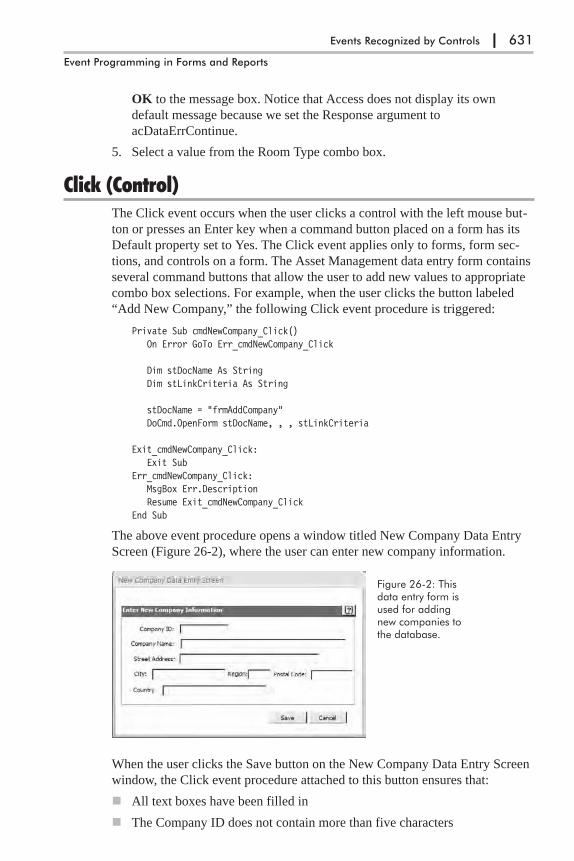
OK to the message box. Notice that Access does not display its own
default message because we set the Response argument to
acDataErrContinue.
5. Select a value from the Room Type combo box.
Click (Control)The Click event occurs when the user clicks a control with the left mouse but-
ton or presses an Enter key when a command button placed on a form has its
Default property set to Yes. The Click event applies only to forms, form sec-
tions, and controls on a form. The Asset Management data entry form contains
several command buttons that allow the user to add new values to appropriate
combo box selections. For example, when the user clicks the button labeled
“Add New Company,” the following Click event procedure is triggered:
Private Sub cmdNewCompany_Click()On Error GoTo Err_cmdNewCompany_Click
Dim stDocName As StringDim stLinkCriteria As String
stDocName = "frmAddCompany"DoCmd.OpenForm stDocName, , , stLinkCriteria
Exit_cmdNewCompany_Click:Exit Sub
Err_cmdNewCompany_Click:MsgBox Err.DescriptionResume Exit_cmdNewCompany_Click
End Sub
The above event procedure opens a window titled New Company Data Entry
Screen (Figure 26-2), where the user can enter new company information.
When the user clicks the Save button on the New Company Data Entry Screen
window, the Click event procedure attached to this button ensures that:
� All text boxes have been filled in
� The Company ID does not contain more than five characters
Events Recognized by Controls | 631
Event Programming in Forms and Reports
Figure 26-2: Thisdata entry form isused for addingnew companies tothe database.

� The Zip Code text box contains a five-digit zip code for the United States
� The Company ID does not already exist in the table
Notice that the New Company Data Entry form is unbound (it isn’t connected
to a record source such as a table, query, or SQL statement). After successful
data validation, the procedure uses the AddNew method of the ADO Recordset
object to create a new record. This record is added to the tblCompanies table
that provides the record source for the Company ID combo box control on the
Asset Management data entry form. Next, the cboCompanyID combo box con-
trol on the Asset Management form is requeried so that the new Company ID
can be accessed from the drop-down list when the user returns to the form.
Private Sub cmdSaveCompanyInfo_Click()Dim conn As ADODB.ConnectionDim rst As New ADODB.RecordsetDim ctrl As ControlDim count As Integer
On Error GoTo Err_cmdSaveCompanyInfo_Click
'validate data prior to save
For Each ctrl In Me.ControlsIf ctrl.ControlType = acTextBox And IsNull(ctrl) _
Or IsEmpty(ctrl) Thencount = count + 1If count > 0 Then
MsgBox "All text fields must be filled in.", _vbInformation + vbOKOnly, _"Missing Data"
ctrl.SetFocusExit Sub
End IfEnd If
Next
If Len(Me.txtAddCompanyID) <> 5 ThenMsgBox "There must be 5 characters in the Company ID field."Me.txtAddCompanyID.SetFocusExit Sub
End If
'check the zipcode fieldIf Len(Me.txtAddPostalCode) <> 5 And _
UCase(Me.txtAddCountry) = "USA" ThenMsgBox "Please enter a five-digit zip code " & _
"for the United States.", _vbInformation + vbOKOnly, "Invalid Zip Code"
Me.txtAddPostalCode.SetFocusExit Sub
End If
632 | Chapter 26
Part IV
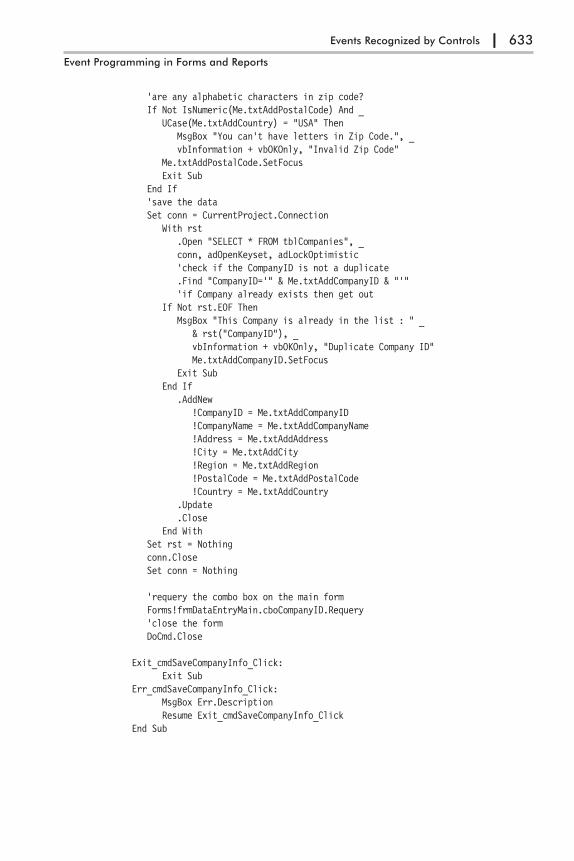
'are any alphabetic characters in zip code?If Not IsNumeric(Me.txtAddPostalCode) And _
UCase(Me.txtAddCountry) = "USA" ThenMsgBox "You can't have letters in Zip Code.", _vbInformation + vbOKOnly, "Invalid Zip Code"
Me.txtAddPostalCode.SetFocusExit Sub
End If'save the dataSet conn = CurrentProject.Connection
With rst.Open "SELECT * FROM tblCompanies", _conn, adOpenKeyset, adLockOptimistic'check if the CompanyID is not a duplicate.Find "CompanyID='" & Me.txtAddCompanyID & "'"'if Company already exists then get out
If Not rst.EOF ThenMsgBox "This Company is already in the list : " _
& rst("CompanyID"), _vbInformation + vbOKOnly, "Duplicate Company ID"Me.txtAddCompanyID.SetFocus
Exit SubEnd If
.AddNew!CompanyID = Me.txtAddCompanyID!CompanyName = Me.txtAddCompanyName!Address = Me.txtAddAddress!City = Me.txtAddCity!Region = Me.txtAddRegion!PostalCode = Me.txtAddPostalCode!Country = Me.txtAddCountry
.Update
.CloseEnd With
Set rst = Nothingconn.CloseSet conn = Nothing
'requery the combo box on the main formForms!frmDataEntryMain.cboCompanyID.Requery'close the formDoCmd.Close
Exit_cmdSaveCompanyInfo_Click:Exit Sub
Err_cmdSaveCompanyInfo_Click:MsgBox Err.DescriptionResume Exit_cmdSaveCompanyInfo_Click
End Sub
Events Recognized by Controls | 633
Event Programming in Forms and Reports

�Hands-On 26-6: Using the Click Event Procedure for the Command ButtonControl
1. Open the frmDataEntryMain form in Form view.
2. Click the Add New Company command button.
3. When the New Company Data Entry Screen window appears, enter the
information shown in Figure 26-3.
4. Click the Save button to save the company information. Access will run
the cmdSaveCompanyInfo_Click event procedure, as shown earlier. If you
have not entered data according to the criteria listed inside this event pro-
cedure, Access will not allow you to save data until you correct the
problem.
5. Back on the main form, select the newly added company (GOSPO) from
the Company ID combo box.
The Asset Management data entry form also displays a number of icons with a
question mark. Each icon is actually a command button with a Click event
attached to it. When you click on the question mark button, you will get a sim-
ple form with help information pertaining to the form’s section or the data
entry screen.
For example, the following Click event procedure is executed upon clicking
the question mark button in the Room Information section on the Asset Man-
agement data entry form:
Private Sub cmdRoomInfoSec_Click()Dim stDocName As StringDim stLinkCriteria As String
On Error GoTo Err_cmdRoomInfoSec_Click
stDocName = "frmHelpMe"stLinkCriteria = "HelpId = 2"DoCmd.OpenForm stDocName, , , stLinkCriteria
Exit_cmdRoomInfoSec_Click:Exit Sub
634 | Chapter 26
Part IV
Figure 26-3: After savingthe new company infor-mation, the Company IDwill appear in the Com-pany ID combo box onthe main form.
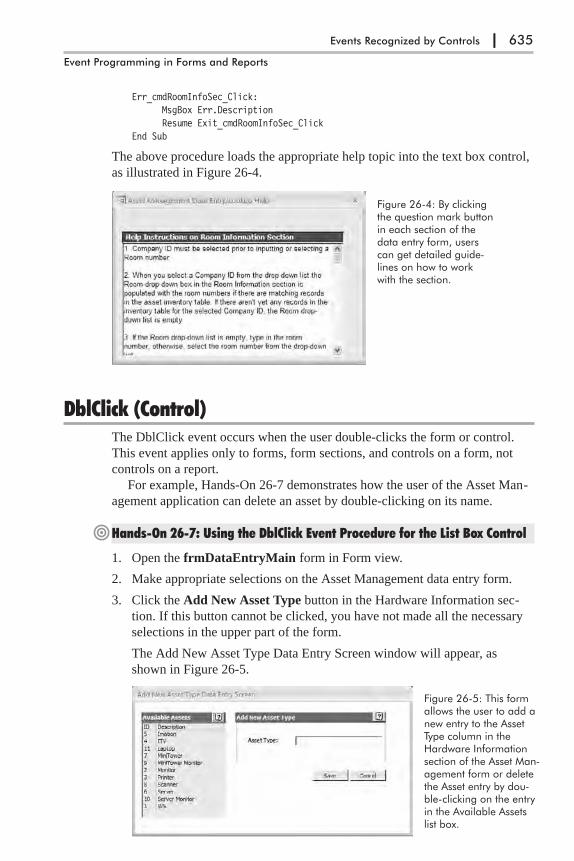
Err_cmdRoomInfoSec_Click:MsgBox Err.DescriptionResume Exit_cmdRoomInfoSec_Click
End Sub
The above procedure loads the appropriate help topic into the text box control,
as illustrated in Figure 26-4.
DblClick (Control)The DblClick event occurs when the user double-clicks the form or control.
This event applies only to forms, form sections, and controls on a form, not
controls on a report.
For example, Hands-On 26-7 demonstrates how the user of the Asset Man-
agement application can delete an asset by double-clicking on its name.
�Hands-On 26-7: Using the DblClick Event Procedure for the List Box Control
1. Open the frmDataEntryMain form in Form view.
2. Make appropriate selections on the Asset Management data entry form.
3. Click the Add New Asset Type button in the Hardware Information sec-
tion. If this button cannot be clicked, you have not made all the necessary
selections in the upper part of the form.
The Add New Asset Type Data Entry Screen window will appear, as
shown in Figure 26-5.
Events Recognized by Controls | 635
Event Programming in Forms and Reports
Figure 26-4: By clickingthe question mark buttonin each section of thedata entry form, userscan get detailed guide-lines on how to workwith the section.
Figure 26-5: This formallows the user to add anew entry to the AssetType column in theHardware Informationsection of the Asset Man-agement form or deletethe Asset entry by dou-ble-clicking on the entryin the Available Assetslist box.

4. In the Add New Asset Type Data Entry Screen window, enter Zip Drive in
the Asset Type text box and click the Save button.
5. In the main form, open the combo box in the Asset Type column and scroll
down to view the newly added asset type — Zip Drive. Do not make any
selection in this combo box.
6. Click the Add New Asset Type button in the Hardware Information sec-
tion to return to the Add New Asset Type Data Entry Screen window.
The left-hand side of the data entry screen (see Figure 26-5) displays a list
box with the currently available assets. The user can double-click any item
in the list and the DblClick event procedure shown below will determine
whether or not the item can be deleted.
Private Sub lboxCategories_DblClick(Cancel As Integer)Dim conn As ADODB.ConnectionDim myAsset As StringDim myAssetDesc As StringDim Response As StringDim strSQL As String
myAsset = Me.lboxCategories.ValuemyAssetDesc = Me.lboxCategories.Column(1)
If myAsset >= 1 And myAsset <= 11 ThenMsgBox "Cannot Delete - This item is being used.", _
vbOKOnly + vbCritical, "Asset Type: " & myAssetExit Sub
End If
If (Not IsNull(DLookup("[AssetType]", "tblProjectDetails", _"[AssetType] = " & myAsset))) Or _Not IsNull(DLookup("[EquipCategoryID]", "tblEquipInventory", _"[EquipCategoryID] = " & myAsset)) Then
MsgBox "This item cannot be deleted.", _vbOKOnly + vbCritical, "Asset Type: " & myAsset
ElseResponse = MsgBox("Do you want to delete this Asset?", _vbYesNo, "Delete - " & myAssetDesc & " ?")
If Response = 6 ThenSet conn = CurrentProject.ConnectionstrSQL = "DELETE * FROM tblEquipCategories Where EquipCategoryID = "conn.Execute (strSQL & myAsset)conn.CloseSet conn = NothingMe.lboxCategories.Requery
End IfEnd IfDoCmd.Close
' requery the combo box on the subformForms!frmDataEntryMain.frmSubProjectDetails.Form.EquipCatId.Requery
End Sub
636 | Chapter 26
Part IV
7. Double-click on Zip Drive in the Available Assets list box. The DblClick
event procedure attached to the list box will ask you whether you want to
delete this asset. Click Yes to the message.
Notice that the Zip Drive entry disappears from the Available Assets list
box.
8. Click the Cancel button to exit the Add New Asset Type Data Entry
Screen window.
Chapter SummaryIn this chapter you worked with a custom Microsoft Access application and
examined event procedures for various controls placed on an Access form.
There are a number of other event procedures not discussed here that control
how the Asset Management form and its controls respond to the user’s actions.
As you explore this application on your own you will start noticing the areas
where writing additional event handlers would prove beneficial to the applica-
tion’s users. So get to it. Tear this sample application apart. Rebuild it. Add
new features. Change the user interface if you want. Learn how to handle
whatever event may come your way. And be prepared, because events happen
frequently in an Access application, and sooner or later you’ll need to respond
to them.
In the next chapter you learn how to handle an object’s events from classes
other than the form classes, as well as how to program and raise your own
events.
Events Recognized by Controls | 637
Event Programming in Forms and Reports
Chapter 27
More about EventProgramming
So far in this book you’ve worked with event procedures that executed from
the form or report class module when a certain event occurred for a form,
report, or a control. You probably noticed that event programming, as you’ve
seen it implemented in the form and report class modules, requires that you
copy and paste your existing event code into new form or report events in
order to obtain exactly the same functionality. For instance, say you added cer-
tain features to a text box on one form and now you’d like to have a text box
on other forms behave in the same way. You could react to the text box’s
events in the same way on all your forms by entering the same event procedure
code in a form class module for each form, or you could save keystrokes by
learning how to centralize and reuse your event code.
You can avoid typing the same event procedure code again and again by
using classes. Recall that we’ve already used classes in this book — in Chapter
8 you learned how you can design your own objects in VBA by writing code in
a standalone class module. You worked with property procedures that allowed
data to be read or written to the object. You also learned how to create func-
tions in a class module that worked as object methods. In this chapter you learn
how to react to an object’s events from a standalone class module.
The following new VBA terms will be introduced:
� Event sink — A class that implements an event. Only classes can sink
events.
� Event source — An object that raises events. An event source can have
multiple event sinks. Note: Source and sink terminology is derived from
electronics. A device that outputs current when active is said to be sourcing
current. A device that draws current into it when active is said to be sinking
current.
� WithEvents — A keyword that allows you to handle an object’s events
inside classes other than form or report classes. The variable that you
declare for the WithEvents keyword is used to handle an object’s events.
� Event — A statement used to declare a user-defined event. The Event dec-
laration must appear in a class module.
638
� RaiseEvent — A statement used to call a custom event. The custom event
must first be declared using the Event statement.
Sinking Events in Standalone Class ModulesInstead of writing your event procedures in the form and report class modules,
you can make the maintenance of your Microsoft Access applications much
simpler by writing the event code in standalone class modules.
Recall that a standalone class module is a special type of a class module
that is not associated with any particular form or report. This class module can
be inserted in the Visual Basic Editor window by choosing Insert | Class Mod-
ule. In addition to creating custom objects (see examples in Chapter 8),
standalone class modules can implement object events.
The process of listening to an object’s events is called sinking the event. To
sink (handle) events in a standalone class module you must use the WithEvents
keyword. This keyword will tell the class that you want to sink some or all of
the object’s events in the class module. You determine which events you want
to sink by writing appropriate event code (see Custom Project 27-1). Only
classes can sink events. Therefore, the WithEvents keyword can only be used
in classes. You can use the WithEvents keyword to declare as many individual
variables as you need; however, you cannot create arrays using WithEvents.
An object that generates events is called an event source. The process of
broadcasting an event is called sourcing the event. To handle events raised by
an event source you must declare an object variable using the WithEvents key-
word. For example, to react to form events in a standalone class module, you
would need to enter the following module-level variable declaration in the
class module:
Private WithEvents m_frm As Access.Form
In the above statement, m_frm is the name of the object variable that refer-
ences the Form object. While you can use any variable name you want, this
variable cannot be a generic object. That means you cannot declare it as
Object. If the variable were declared as Object, Visual Basic wouldn’t know
what type library should be used. Therefore, it would not be able to provide
you with the names of events that you can write code for.
Now, let’s walk through these new concepts step by step. Custom Project
27-1 demonstrates how to create a record logger class that handles a form’s
AfterUpdate event. Each time the AfterUpdate event occurs, this class will
enter information about the newly created record into a text file. With minor
modifications, this class will use the same event code that was introduced in
Hands-On 24-5 (see Chapter 24).
More about Event Programming | 639
Event Programming in Forms and Reports
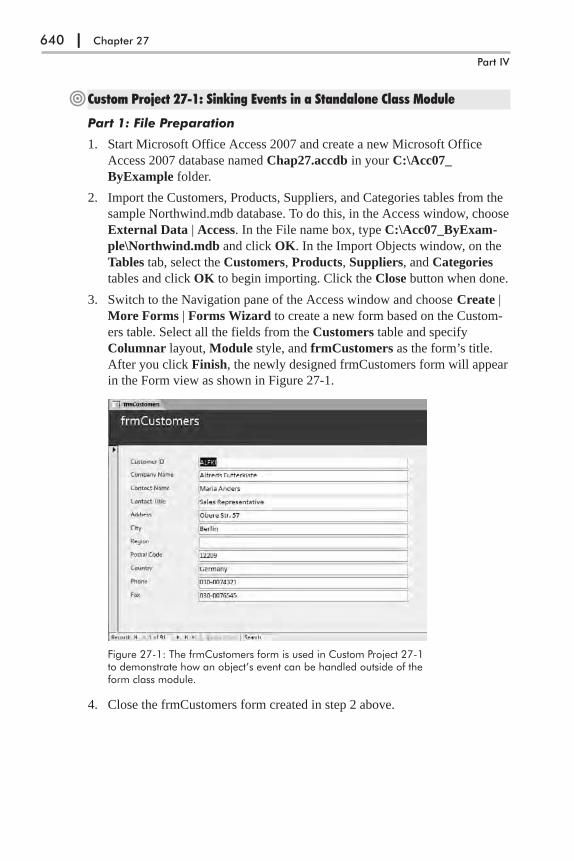
�Custom Project 27-1: Sinking Events in a Standalone Class Module
Part 1: File Preparation
1. Start Microsoft Office Access 2007 and create a new Microsoft Office
Access 2007 database named Chap27.accdb in your C:\Acc07_
ByExample folder.
2. Import the Customers, Products, Suppliers, and Categories tables from the
sample Northwind.mdb database. To do this, in the Access window, choose
External Data | Access. In the File name box, type C:\Acc07_ByExam-
ple\Northwind.mdb and click OK. In the Import Objects window, on the
Tables tab, select the Customers, Products, Suppliers, and Categories
tables and click OK to begin importing. Click the Close button when done.
3. Switch to the Navigation pane of the Access window and choose Create |
More Forms | Forms Wizard to create a new form based on the Custom-
ers table. Select all the fields from the Customers table and specify
Columnar layout, Module style, and frmCustomers as the form’s title.
After you click Finish, the newly designed frmCustomers form will appear
in the Form view as shown in Figure 27-1.
4. Close the frmCustomers form created in step 2 above.
640 | Chapter 27
Part IV
Figure 27-1: The frmCustomers form is used in Custom Project 27-1to demonstrate how an object’s event can be handled outside of theform class module.

Part 2: Creating the cRecordLogger Class
1. Press Alt+F11 to activate the Visual Basic Editor window.
2. In the Project Explorer window, select Chap27(Chap27) and choose
Insert | Class Module. A new class called Class1 will appear in the Project
Explorer window. Use the Name property in the Properties window to
change the name of the class to cRecordLogger (see Figure 27-2) or press
Ctrl+S to assign the name to the class module during the save operation.
3. In the cRecordLogger class module’s Code window, enter the following
module-level variable declaration just below the Option Compare Database
and Option Explicit statements:
Private WithEvents m_frm As Access.Form
After declaring the object variable using WithEvents, the variable name
m_frm appears in the Object box in your class module (see Figure 27-3).
When you select this variable from the drop-down list, the valid events for
that object will appear in the Procedure box (see Figure 27-4). By choosing
an event from the Procedure drop-down list, an empty procedure stub will
be added to the class module where you can write your code for handling
the selected event. By default, Access adds the Load event procedure stub
after selecting an object from the Object drop-down list.
More about Event Programming | 641
Event Programming in Forms and Reports
Figure 27-2: Use the Name property in the Properties window tochange the name of the class module.
Figure 27-3: The Object drop-down list in the cRecord-Logger’s Code window lists the m_frm object variablethat was declared using the WithEvents keyword.

4. In the cRecordLogger class module’s Code window, enter the following
Property procedure just below the variable declaration, or copy and paste
the procedure code from C:\Acc07_HandsOn\Chap27.txt.
Public Property Set Form(cur_frm As Form)Set m_frm = cur_frmm_frm.AfterUpdate = "[Event Procedure]"
End Property
In order to sink events in the class module, you must tell the class which
specific form’s events the class should be responding to. You do this by
writing the Property Set procedure. Recall from Chapter 8 that Property Set
procedures are used to assign a reference to an object. Therefore, the
statement:
Set m_frm = cur_frm
will assign the current form (passed in the cur_frm variable) to the m_frm
object variable declared in step 3 above. Pointing the object variable
(m_frm) at the object (cur_frm) isn’t enough. Access will not raise the
event unless the object’s Event property is set to [Event Procedure]. There-
fore, the second statement in the procedure above:
m_frm.AfterUpdate = "[Event Procedure]"
will ensure that Access knows that it must raise the form’s AfterUpdate
event.
5. Choose Tools | References and add the Microsoft Scripting Runtime
Library to the class module. You will need this library to gain access to
the FileSystemObject in the next step.
6. In the cRecordLogger class module’s Code window, enter the following
m_frm_AfterUpdate event procedure, or copy and paste the procedure
code from C:\Acc07_HandsOn\Chap27.txt.
642 | Chapter 27
Part IV
Figure 27-4: The Proce-dure drop-down list in thecRecordLogger’s Codewindow lists the validevents for the objectdeclared with theWithEvents keyword.

Private Sub m_frm_AfterUpdate()Dim fso As FileSystemObjectDim myFile As ObjectDim strFileN As StringDim ctrl As Control
On Error Resume Next
Set fso = New FileSystemObjectstrFileN = "C:\Acc07_ByExample\MyCust.txt"Set myFile = fso.GetFile(strFileN)
If Err.Number = 0 ThenSet myFile = fso.OpenTextFile(strFileN, 8) ' open text file
ElseSet myFile = fso.CreateTextFile(strFileN) ' create a text file
End If
For Each ctrl In m_frm.ControlsIf ctrl.ControlType = acTextBox And _
InStr(1, ctrl.Name, "ID") ThenmyFile.WriteLine "ID:" & ctrl.Value & _
" Created on: " & Date & " " & Time & _" (Form: " & m_frm.Name & ")"
MsgBox "See the audit trail in " & strFileN & "."Exit For
End IfNextmyFile.CloseSet fso = Nothing
End Sub
The code inside the m_frm_AfterUpdate event procedure will be executed
after Access finds that the form’s AfterUpdate property is set to [Event
Procedure]. This code tells Access to open or create a text file named
C:\Acc07_ByExample\MyCust.txt and write a line consisting of the value
of the ID control on the form, the date and time the record was inserted or
modified, and the name of the form. Notice how the InStr function is used
to locate the control whose name contains the “ID” string. The first argu-
ment of the InStr function determines the character position where the
search should begin, the second argument is the string being searched, and
the third argument is the string expression being sought within the string
specified in the second argument.
More about Event Programming | 643
Event Programming in Forms and Reports

7. Save the code that you wrote in the class module by clicking the Save but-
ton on the toolbar or choosing File | Save. When the Save As dialog box
appears with cRecordLogger in the text box, click OK.
For the events to actually fire now that you’ve written the code to handle the
event in the standalone class module, you need to instantiate the class and pass
it the object whose events you want to track. This requires that you write a
couple of lines of code in your form’s class module.
Part 3: Creating an Instance of the Custom Class in the Form’s ClassModule
1. Switch to the Access window by pressing Alt+F11. In the Navigation
pane, right-click the frmCustomers form you created in step 2 of Part 1.
Select Design View from the shortcut menu.
2. In the property sheet, make sure Form is selected in the drop-down list,
and activate the Event tab. Click next to the On Open property and select
[Event Procedure]. Click the Build button. Access activates the Code
window and writes the procedure stub for the Form_Open event. Complete
the code of this event procedure as shown below or copy and paste the
code from C:\Acc07_HandsOn\Chap27.txt.
644 | Chapter 27
Part IV
Figure 27-5: A custom cRecordLogger class is used to handle a form’sAfterUpdate event.

Private clsRecordLogger As cRecordLogger
Private Sub Form_Open(Cancel As Integer)Set clsRecordLogger = New cRecordLoggerSet clsRecordLogger.Form = Me
End Sub
Private Sub Form_Close()Set clsRecordLogger = Nothing
End Sub
To instantiate a custom class module, we begin by declaring a module-level
object variable, clsRecordLogger, as the name of our custom class,
cRecordLogger. You can choose any name you wish for your variable
name.
Next, we instantiate the class in the Form_Open event procedure by
using the following Set statement:
Set clsRecordLogger = New cRecordLogger
Notice that you must use the New keyword to create a new object of a par-
ticular class. By setting the reference to an actual instance of the object
when the form first opens, we ensure that the object refers to an actual
object by the time the event is first fired. The second statement in the
Form_Open event procedure:
Set clsRecordLogger.Form = Me
sets the Form property defined by the Property procedure in the class mod-
ule (see step 4 of Part 2) to the Form object whose events we want to sink.
The Me keyword represents the current instance of the Form class.
When you are done pointing the object variable to the instance of the cus-
tom class, it is a good idea to release the variable reference. We’ve done
this by setting the object variable clsRecordLogger to Nothing in the
Form_Close event procedure. The complete code entered in the
frmCustomers form class module is shown in Figure 27-6.
3. Save the code you entered in step 2 above by pressing Ctrl+S or clicking
the Save button on the toolbar.
4. Close the frmCustomers form.
More about Event Programming | 645
Event Programming in Forms and Reports
Figure 27-6: To sink formevents in a custom classmodule, you must entersome code in the formclass module.
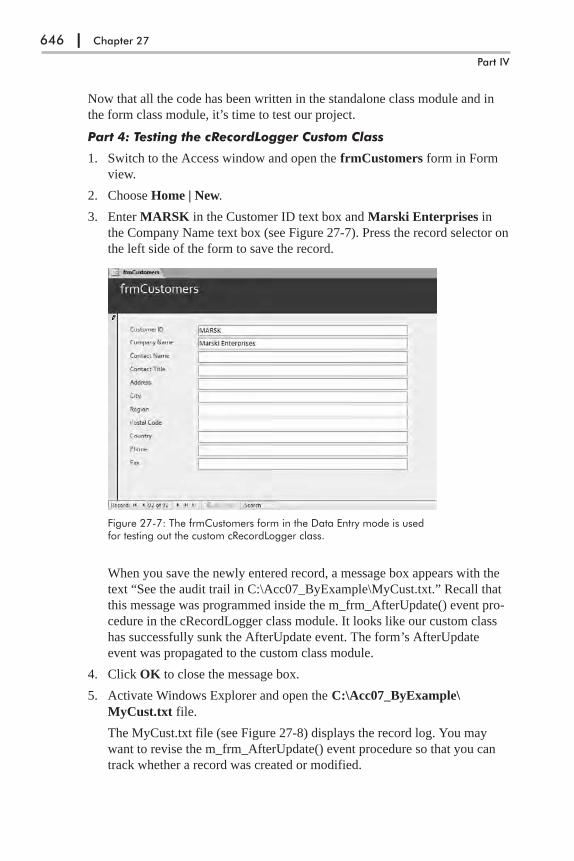
Now that all the code has been written in the standalone class module and in
the form class module, it’s time to test our project.
Part 4: Testing the cRecordLogger Custom Class
1. Switch to the Access window and open the frmCustomers form in Form
view.
2. Choose Home | New.
3. Enter MARSK in the Customer ID text box and Marski Enterprises in
the Company Name text box (see Figure 27-7). Press the record selector on
the left side of the form to save the record.
When you save the newly entered record, a message box appears with the
text “See the audit trail in C:\Acc07_ByExample\MyCust.txt.” Recall that
this message was programmed inside the m_frm_AfterUpdate() event pro-
cedure in the cRecordLogger class module. It looks like our custom class
has successfully sunk the AfterUpdate event. The form’s AfterUpdate
event was propagated to the custom class module.
4. Click OK to close the message box.
5. Activate Windows Explorer and open the C:\Acc07_ByExample\
MyCust.txt file.
The MyCust.txt file (see Figure 27-8) displays the record log. You may
want to revise the m_frm_AfterUpdate() event procedure so that you can
track whether a record was created or modified.
646 | Chapter 27
Part IV
Figure 27-7: The frmCustomers form in the Data Entry mode is usedfor testing out the custom cRecordLogger class.

6. Close the C:\Acc07_ByExample\MyCust.txt file.
7. Add a few more records to the frmCustomers form and check out the
C:\Acc07_ByExample\MyCust.txt file.
8. Close the frmCustomers form.
Now that you know how to sink the form’s AfterUpdate event outside the form
class module, you can use the same idea to sink other form events in a class
module and make your code easier to implement and maintenance free. Just
remember that if you want to sink events in a standalone class module, you
must write code in two places: in your class module and in your form or report
class module. The class module must contain a module-level WithEvents vari-
able declaration and you must set the reference to an actual instance of the
object in the form or report module.
Part 5: Using the cRecordLogger Custom Class with another Form
The code you’ve written so far in this project is ready for reuse in another
Microsoft Access form. In the remaining steps, we will hook it up to the
frmProducts form. Let’s begin by creating this form.
1. In the Navigation pane of the Access window, select the Products table
and choose Create | Form. Access creates a form and displays it in the
Form Layout view.
2. Press Ctrl+S or click the Save button on the toolbar to save the form. In
the Save As dialog box, type frmProducts for the form name and click
OK.
3. Activate the frmProducts form in Design view. In the property sheet,
make sure Form is selected from the drop-down box and click the Other
tab. Set the Has Module property of the form to Yes. Save the changes to
the form by pressing Ctrl+S.
4. Switch to the Visual Basic Editor window, and double-click the Form_
frmProducts object in the Project Explorer window. Access opens the
Code module for the form.
5. Copy the code from the frmCustomers Code window to the frmProducts
Code window. The code in the frmProducts Code window should match
Figure 27-6 shown earlier.
6. In the frmProducts Code window, replace all the references to the object
variable clsRecordLogger with clsRecordLogger2.
More about Event Programming | 647
Event Programming in Forms and Reports
Figure 27-8: The MyCust.txt file is used by the cRecordLogger cus-tom class for tracking record additions.
� Note: To quickly perform this operation, position the cursor inside the firstclsRecordLogger variable name and choose Edit | Replace. The Find What textbox should automatically display the name of the variable you want to replace.Type clsRecordLogger2 in the Replace With text box and click the Replace Allbutton. Click OK to confirm the replacement of four variable names. Click Can-cel to exit the Replace dialog box.
7. Save and close the frmProducts form.
8. Open the frmProducts form in Form view and choose Home | New.
9. Enter Delicious Raisins in the Product Name text box and press the record
selector on the left side of the form to save the record.
At this point you should receive the custom message about the audit trail
that you defined in the AfterUpdate event procedure within the custom
cRecordLogger class module. This indicates that the AfterUpdate event
that was raised by the form when you saved the newly entered record was
successfully propagated to the custom class module.
10. Click OK to close the message box.
11. Close the frmProducts form.
12. Open the C:\Acc07_ByExample\MyCust.txt file to view the record log.
Close this file when you are finished.
You may want to choose a more generic name for your record log text file if it
will be used for tracking various types of information.
Writing Event Procedure Code in Two PlacesIf you write event procedure code for the same event both in the form module
and the class module, the code defined in the form class module will run first,
followed by the code in the custom class module. You can easily test this by
entering the following Form_AfterUpdate event procedure code in the form
class module of the frmCustomers or frmProducts forms prepared in Custom
Project 27-1:
Private Sub Form_AfterUpdate()MsgBox "Transferring control to the custom class."' when you click OK to this message, the code' inside the AfterUpdate procedure in the custom' class module will run
End Sub
When you open the form and add and save a new record, the Form_After-
Update event will fire and you will see the message about transferring control
to the custom class. Next, the AfterUpdate event procedure will run in the cus-
tom class, and you will see a message informing you that you can view the
audit trail in the specified text file.
648 | Chapter 27
Part IV

Responding to Control Events in a ClassEveryone designing Microsoft Access forms sooner or later realizes that it
takes a long time to customize some of the controls placed on the form. It’s no
wonder then that once the control is working correctly, there is a tendency
toward copying the control and its event procedures to a new form that
requires a control with the same functionality. If you followed this chapter
carefully, you already know a better (and a neater) solution. By using the
WithEvents keyword you can create an object variable that points to the con-
trol raising the events. Instead of responding to control events in the form
module, you will react to these events in a different location: a standalone class
module. This lets you write centralized code that is easy to implement in other
form controls of the same type.
Suppose you need a text box that converts lowercase letters to uppercase
and disallows numbers. Hands-On 27-1 demonstrates how to create a text box
with these features and hook it up with any Microsoft Access form.
�Hands-On 27-1: Responding to Control Events in a Class
This hands-on exercise requires prior completion of Custom Project 27-1.
1. Activate the Visual Basic Editor window and choose Insert | Class Mod-
ule. A new class named Class1 will appear in the Project Explorer window.
2. In the Properties window, click the (Name) property and type UCaseBox
as the new name of Class1. Click again on the (Name) property to save the
new name. You should see the UCaseBox entry under the Class Modules
folder in the Project Explorer.
3. In the UCaseBox class module’s Code window, enter the following code:
Private WithEvents txtBox As Access.TextBox
Public Function InitializeMe(myTxt As TextBox)Set txtBox = myTxttxtBox.OnKeyPress = "[Event Procedure]"
End Function
Private Sub txtBox_KeyPress(KeyAscii As Integer)Select Case KeyAscii
Case 48 To 57MsgBox "Numbers are not allowed!"KeyAscii = 0
Case Else' convert to uppercase
KeyAscii = Asc(UCase(Chr(KeyAscii)))End Select
txtBox.FontBold = TruetxtBox.FontItalic = TruetxtBox.BackColor = vbYellow
End Sub
More about Event Programming | 649
Event Programming in Forms and Reports
Notice that to respond to a control’s events in a class module you start by
declaring a module-level object variable using the WithEvents keyword. In
our text box example, we declared the object variable txtBox as an Access
text box control.
Because the form can contain more than one text box control, we
should tell the class which text box it needs to respond to. We do this by
creating a Property Set procedure (similar to the one created in Custom
Project 27-1) or a function procedure like the one shown above. We called
this function InitializeMe, but you can use any name you wish. Recall from
Chapter 8 that a function entered in a class module serves as an object’s
method. We will call the InitializeMe method later from a form class mod-
ule and pass it the actual control we want it to respond to (see step 7). The
InitializeMe method will assign the passed control to the WithEvents
object variable like this:
Set txtBox = myTxt
Next, we set the text box KeyPress property to [Event Procedure] to tell the
class that we are interested in tracking this particular event.
Finally, we write the event procedure code for the text box control’s
KeyPress event. This code begins by checking the value of the key that
was pressed by the user. If a number was entered, the user is advised that
numbers aren’t allowed and the digit is removed from the text box by set-
ting the value of KeyAscii to zero (0). Otherwise, if the user typed a lower-
case letter, the character is converted to uppercase using the following
statement:
KeyAscii = Asc(UCase(Chr(KeyAscii)))
KeyAscii is an integer that returns a numerical ANSI key code. To convert
the KeyAscii argument into a character, we use the Chr function:
Chr(KeyAscii)
Once we’ve converted a key into a character, we use the UCase function to
convert it to uppercase:
UCase(Chr(KeyAscii))
Finally, we translate the character back to an ANSI number by using the
Asc function:
Asc(UCase(Chr(KeyAscii)))
The txtBox_KeyPress event procedure ends by adding some visual
enhancements to the text box. The text entered in it will appear in italics
and bold type on a yellow background.
4. Save the code you entered in the UCaseBox class module’s Code window
by pressing the Save button on the toolbar.
650 | Chapter 27
Part IV
5. In the Project Explorer window, double-click the Form_frmProducts. The
Form_frmProducts class module’s Code window should already contain
code you entered while working with Part 3 of Custom Project 27-1 earlier
in this chapter. To connect the UCaseBox class module with the actual text
box on any Access form, you would need to enter the code as shown below
in a form’s class module (do not enter it yet):
' module-level variable declarationPrivate clsTextBox1 As UCaseBox
Private Sub Form_Open(Cancel As Integer)Set clsTextBox1 = New UCaseBoxclsTextBox1.InitializeMe Me.Controls("ProductName")
End Sub
Private Sub Form_Close()Set clsTextBox1 = Nothing
End Sub
Since the frmProducts form already contains a call to the cRecordLogger
class created earlier, all of the procedures we need are already in place;
therefore, we will simply add the appropriate lines of code to the existing
procedures. So let’s proceed.
6. In the Form_frmProducts Code window, enter the following module-level
variable declaration just above the Form_Open event procedure (see Figure
27-9):
Private clsTextBox1 As UCaseBox
The above statement declares the clsTextBox1 class variable. This variable
is used in instantiating the UCaseBox object and connecting it with the
actual text box control on the form (see step 7 below).
7. Enter the following lines of code before the End Sub statement of the
Form_Open event procedure (see Figure 27-9):
Set clsTextBox1 = New UCaseBoxclsTextBox1.InitializeMe Me.Controls("ProductName")
Before our UCaseBox class can respond to a text box’s events you need
these two lines of code; the first one sets the class variable clsTxtBox1 to a
new instance of the UCaseBox class, and the second one calls the class
InitializeMe method and supplies it with the name of the text box control.
8. Enter the following line of code before the End Sub statement of the
Form_Close event procedure (see Figure 27-9):
Set clsTextBox1 = Nothing
When we are done with the object variable, we set it to Nothing to release
the resources that have been assigned to it.
More about Event Programming | 651
Event Programming in Forms and Reports

9. Save the changes made in the Code window by clicking the Save button on
the toolbar.
10. Open the frmProducts form in Form view and choose Home | New.
11. Enter prune butter in the Product Name text box. Notice that as you type,
the characters you enter are converted to uppercase. They are also made
bold and italic, and appear on a yellow background. If you happen to press
a number key, which is disallowed by your custom KeyPress event, you
receive an error message. Click on the record selector to save the record.
Because this form also responds to the AfterUpdate event that we pro-
grammed in Custom Project 27-1, you should see two message boxes when
you save this form.
12. Close the frmProducts form.
Declaring and Raising EventsStandalone class modules automatically support two events: Initialize and Ter-
minate. Use the Initialize event to give the variables in your classes initial
values. The Initialize event is called when you make a new instance of a class.
The Terminate event is called when you set the instance to Nothing. In addition
to these default events, you can define custom events for your class module.
To create a custom event, use the Event statement in the declaration section
of a class module. For example, the following statement declares an event
named SendFlowers that requires two arguments:
Public Event SendFlowers(ByVal strName As String, cancel As Boolean)
The Event statement declares a user-defined event. This statement is followed
by the name of the event and any arguments that will be passed to the event
procedure. Arguments are separated by commas. An event can have ByVal and
ByRef arguments. Recall that when passing the variable ByRef, you are
652 | Chapter 27
Part IV
Figure 27-9: The form classmodule shows code thatinstantiates and hooks upobjects created in thecRecordLogger andUCaseBox class moduleswith the form and text boxcontrol.
actually passing the memory location of the variable. If you pass a variable
ByVal, you are sending the copy of the variable.
When declaring events with arguments, bear in mind that events cannot
have named arguments, optional arguments, or ParamArray arguments. The
Public keyword is optional as events are public by default.
Use the RaiseEvent statement to fire the event. This is usually done by cre-
ating a method in a class module. For example, here’s how you could trigger
the SendFlowers event:
Public Sub Dispatch(ByVal toWhom As String, cancel As Boolean)RaiseEvent SendFlowers(toWhom, True)
End Sub
Events can only be raised in the module in which they are declared using the
Event statement. After declaring the event and writing the method that will be
used for raising the event, you need to switch to the form class module and
perform the following tasks:
� Declare a module-level variable of the class type using the WithEvents
keyword
� Assign an instance of the class containing the event to the object defined
using the WithEvents statement
� Write a procedure that calls the class method
� Write the event handler code
The next hands-on exercise demonstrates how a user-defined event can be used
in a class. We will learn how to raise the SendFlowers event from a Microsoft
Access form.
�Hands-On 27-2: Declaring and Raising Events
1. Activate the Visual Basic Editor window and choose Insert | Class Mod-
ule. A new class named Class1 will appear in the Project Explorer window.
2. In the Properties window, click the (Name) property and type cDispatch as
the new name of Class1. Click again on the (Name) property to save the
new name. You should see the cDispatch entry under the Class Modules
folder in the Project Explorer.
3. In the cDispatch class module’s Code window, enter the following code:
Public Event SendFlowers(ByVal strName As String, _cancel As Boolean)
Sub Dispatch(ByVal ToWhom As String, cancel As Boolean)If ToWhom = "Julitta" Then
cancel = TrueMsgBox "Dispatch to " & ToWhom & " was cancelled.", _
vbInformation + vbOKOnly, "Reason Unknown"Else
RaiseEvent SendFlowers(ToWhom, True)
More about Event Programming | 653
Event Programming in Forms and Reports

End IfEnd Sub
The first statement in the code above declares a custom event called
SendFlowers. This event will accept two arguments: the name of the per-
son to whom flowers should be sent and a Boolean value of True or False
that will allow you to cancel the event if necessary.
Next, the Dispatch procedure is used as a class method. The code states
that the flowers should be sent to the person whose name is passed in the
ToWhom argument as long as the person’s name is not “Julitta.” The
RaiseEvent statement will call the event handler that we will write in a
form module in a later step.
4. Create a new form as shown in Figure 27-10. This form isn’t bound to any
data source. Use the property sheet to set the Name property of the text box
control to Recipient and the Caption property of the accompanying label
control to Recipient Name:. Set the Name property of the command but-
ton to cmdFlowers and its Caption property to Send Flowers. Save this
form as frmFlowers.
5. While the frmFlowers form is in Design view, click the View Code button
in the Tools area of the Design tab.
6. Enter the following code in the Form_frmFlowers Code window, or copy
and paste the procedure code from C:\Acc07_HandsOn\Chap27.txt.
Private WithEvents clsDispatch As cDispatch
Private Sub Form_Load()Set clsDispatch = New cDispatch
End Sub
Private Sub Form_Close()Set clsDispatch = Nothing
End Sub
Our form class can only respond to events from an object if it has a refer-
ence to that object. Therefore, at the top of the form class module we
declare the object variable clsDispatch by using the WithEvents keyword.
654 | Chapter 27
Part IV
Figure 27-10: The frmFlowers form is used in Hands-On 27-2 to demon-strate the process of raising and handling custom events.
This means that from now on the instance of the cDispatch class is associ-
ated with events.
The next step involves setting the object variable to an object. In the
Form_Load event procedure we create a class object with the Set statement
and the New keyword. When the object variable is no longer needed, we
release the reference to the object by setting the object variable to Nothing
(see the Form_Close event procedure above).
Now that we are done with declaring, setting, and resetting the object
variable, let’s proceed to write some code that will allow us to raise the
SendFlowers event when we click on the Send Flowers button.
7. In the Form_frmFlowers Code window, enter the following Click event
procedure for the cmdFlowers command button that you placed on the
frmFlowers form:
Private Sub cmdFlowers_Click()If Len(Me.Recipient) > 0 Then
clsDispatch.Dispatch Me.Recipient, FalseElse
MsgBox "Please specify the recipient name."Me.Recipient.SetFocusExit Sub
End IfEnd Sub
Notice that the above event procedure begins by checking whether the user
has entered data in the Recipient text box. If the data exists, the Dispatch
method is called; otherwise, the user is asked to enter data in the text box.
When calling the Dispatch method we must provide two arguments that
this method expects: the name of the recipient and the value for the
Boolean variable Cancel. Recall that the Dispatch method has the neces-
sary code that raises the SendFlowers event (see step 3 earlier). Now
what’s left to do is to write an event handler for the SendFlowers event.
8. Select the clsDispatch variable from the object drop-down list in the
upper-left corner of the Form_frmFlowers Code window. As you make this
selection, a template of the event procedure will be inserted into the Code
window as shown below:
Private Sub clsDispatch_SendFlowers(ByVal strName As String, cancel As Boolean)
End Sub
The code that you write within the above procedure stub will be executed
when the event is generated by the object.
9. Enter the following statement inside the clsDispatch_SendFlowers proce-
dure stub:
MsgBox "Flowers will be sent to " & strName & ".", , "Order taken"
Our custom event is not overly exciting but should give you an understand-
ing of how custom events are declared and raised in a standalone class
module and how they are consumed in a client application (form class
More about Event Programming | 655
Event Programming in Forms and Reports
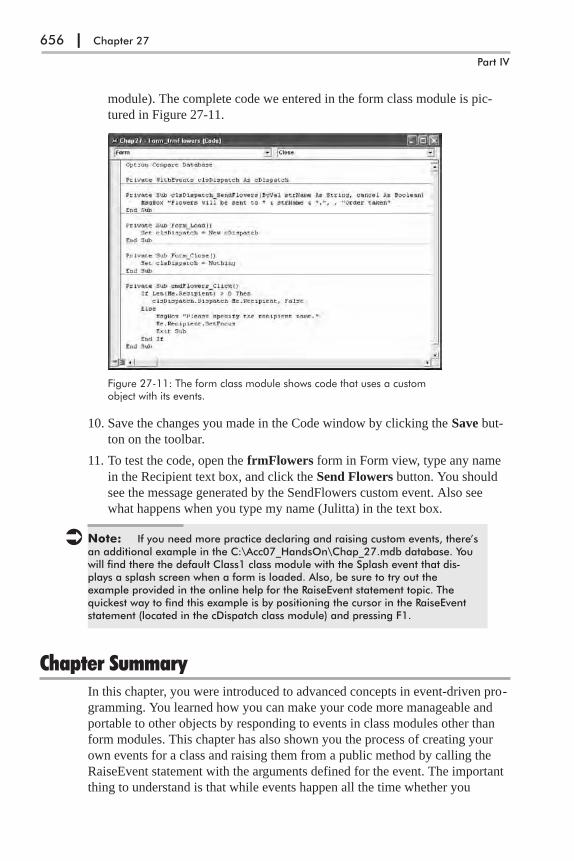
module). The complete code we entered in the form class module is pic-
tured in Figure 27-11.
10. Save the changes you made in the Code window by clicking the Save but-
ton on the toolbar.
11. To test the code, open the frmFlowers form in Form view, type any name
in the Recipient text box, and click the Send Flowers button. You should
see the message generated by the SendFlowers custom event. Also see
what happens when you type my name (Julitta) in the text box.
� Note: If you need more practice declaring and raising custom events, there’san additional example in the C:\Acc07_HandsOn\Chap_27.mdb database. Youwill find there the default Class1 class module with the Splash event that dis-plays a splash screen when a form is loaded. Also, be sure to try out theexample provided in the online help for the RaiseEvent statement topic. Thequickest way to find this example is by positioning the cursor in the RaiseEventstatement (located in the cDispatch class module) and pressing F1.
Chapter SummaryIn this chapter, you were introduced to advanced concepts in event-driven pro-
gramming. You learned how you can make your code more manageable and
portable to other objects by responding to events in class modules other than
form modules. This chapter has also shown you the process of creating your
own events for a class and raising them from a public method by calling the
RaiseEvent statement with the arguments defined for the event. The important
thing to understand is that while events happen all the time whether you
656 | Chapter 27
Part IV
Figure 27-11: The form class module shows code that uses a customobject with its events.

respond to them or not, you are the one to decide where to respond to the
built-in events. And, if you ever find yourself short of an event, with the
knowledge acquired in this chapter, you can always create one that does
exactly what you need. Now that you know the power tools, it’s up to you to
use them.
This chapter concludes Part IV of this book, which focused on writing event
procedures for forms, reports, and controls. In the next chapter, you learn how
to use your Access VBA skills to build Internet applications.
More about Event Programming | 657
Event Programming in Forms and Reports

This page intentionally left blank.
PART V
Taking YourVBAProgrammingSkills to theWeb
Chapter 28 Access and Active Server Pages
Chapter 29 XML Features in Access 2007
659
Gone are the times
when working with
Access required the
presence of the Micro-
soft Access application
on a user’s desktop.
Thanks to the develop-
ment of Internet
technologies, you can
publish both static and
dynamic Access data to
the web.
In this part of the
book, you learn how
Active Server Pages
(ASP) and Extensible
Markup Language
(XML) are used with
Microsoft Access to
develop database solu-
tions for the World
Wide Web.

Chapter 28
Access and Active ServerPages
In today’s world, everyone wants to be able to access data via the company
intranet or the World Wide Web. This book would not be complete without
showing you how to take your skills where the demand is. So, how can you
make the information stored in your Access database available for others to
view or query in a web browser? By adding some HyperText Markup Lan-
guage (HTML) and Microsoft Visual Basic Scripting Edition (VBScript) to
your current VBA skill set, you can start making your applications web-ready.
Microsoft Access 2007 allows you to save tables, queries, and forms to the
web as HTML or XML documents; however, the Microsoft Active Server
Pages file format (*.asp) that is used to create dynamic web content off the
database data is no longer offered in this version of Access. But never mind
this omission. This chapter focuses on showing you how you can create your
own ASP files from scratch so that you will feel comfortable when displaying,
querying, inserting, updating, and deleting data stored in a Microsoft Access
database from a web browser.
Introduction to Active Server PagesWith Active Server Pages (ASP), a technology developed by Microsoft, you
can design and program powerful and dynamic web applications. The current
version of ASP is 3.0, and it is available with Internet Information Services
(IIS) 5.0 or higher. Active Server Pages are text files with the .asp extension.
These files contain standard HTML formatting tags and embedded scripting
statements. Because the default scripting language for ASP is VBScript, a sub-
set of Visual Basic and Visual Basic for Applications, you already have many
of the skills required to web-enable your Access applications. In addition, the
tools you need to make Access work with the intranet or Internet are within
your reach. Although most of the examples in this chapter have been prepared
using Microsoft Visual InterDev 6.0, you can use Windows Notepad or any
other text editor to write your code. So, where do you start? You can start by
acquiring some working knowledge of the HyperText Markup Language
(HTML). A good place to start is the Internet. For easy, step-by-step tutorials,
check out the htmlgoodies.com web site. Because Active Server Pages are a
661
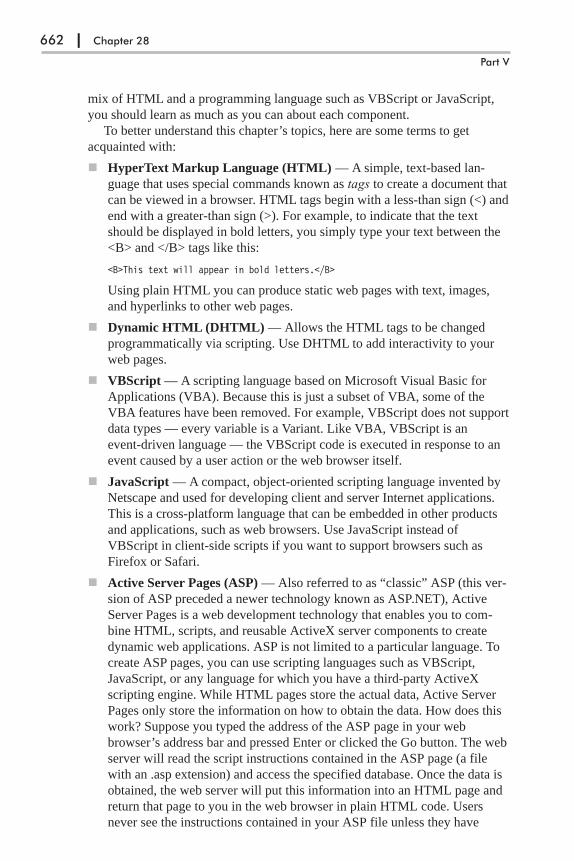
mix of HTML and a programming language such as VBScript or JavaScript,
you should learn as much as you can about each component.
To better understand this chapter’s topics, here are some terms to get
acquainted with:
� HyperText Markup Language (HTML) — A simple, text-based lan-
guage that uses special commands known as tags to create a document that
can be viewed in a browser. HTML tags begin with a less-than sign (<) and
end with a greater-than sign (>). For example, to indicate that the text
should be displayed in bold letters, you simply type your text between the
<B> and </B> tags like this:
<B>This text will appear in bold letters.</B>
Using plain HTML you can produce static web pages with text, images,
and hyperlinks to other web pages.
� Dynamic HTML (DHTML) — Allows the HTML tags to be changed
programmatically via scripting. Use DHTML to add interactivity to your
web pages.
� VBScript — A scripting language based on Microsoft Visual Basic for
Applications (VBA). Because this is just a subset of VBA, some of the
VBA features have been removed. For example, VBScript does not support
data types — every variable is a Variant. Like VBA, VBScript is an
event-driven language — the VBScript code is executed in response to an
event caused by a user action or the web browser itself.
� JavaScript — A compact, object-oriented scripting language invented by
Netscape and used for developing client and server Internet applications.
This is a cross-platform language that can be embedded in other products
and applications, such as web browsers. Use JavaScript instead of
VBScript in client-side scripts if you want to support browsers such as
Firefox or Safari.
� Active Server Pages (ASP) — Also referred to as “classic” ASP (this ver-
sion of ASP preceded a newer technology known as ASP.NET), Active
Server Pages is a web development technology that enables you to com-
bine HTML, scripts, and reusable ActiveX server components to create
dynamic web applications. ASP is not limited to a particular language. To
create ASP pages, you can use scripting languages such as VBScript,
JavaScript, or any language for which you have a third-party ActiveX
scripting engine. While HTML pages store the actual data, Active Server
Pages only store the information on how to obtain the data. How does this
work? Suppose you typed the address of the ASP page in your web
browser’s address bar and pressed Enter or clicked the Go button. The web
server will read the script instructions contained in the ASP page (a file
with an .asp extension) and access the specified database. Once the data is
obtained, the web server will put this information into an HTML page and
return that page to you in the web browser in plain HTML code. Users
never see the instructions contained in your ASP file unless they have
662 | Chapter 28
Part V

access to the web server and have been given the appropriate permissions
to open these files. Because the web server reads and processes the instruc-
tions in the ASP page every time your browser requests the page, the infor-
mation you receive is highly dynamic. ASP allows the page to be built or
customized on the fly before the page is returned to the browser. ASP is
platform independent. This means that you can view ASP pages in any
browser (Internet Explorer, Netscape Navigator, Firefox, Safari, Opera, and
others).
� ASP.NET — (pronounced ASP DOT NET) A newer, more advanced, and
feature rich web development technology from Microsoft that requires the
Microsoft .NET Framework installed on users’ computers. Unlike Active
Server Pages (ASP), which is limited to scripting languages, .NET technol-
ogy provides cross-language support (you can write and share code in
many different .NET languages such as Visual Basic .NET, C#, Managed
C++, JScript .NET, J#). ASP files prepared in .NET end in .aspx, .ascx, or
.asmx. ASP.NET is not an upgrade to the classic ASP; it is an entirely new
infrastructure for web development that requires learning new concepts
behind building web applications and “unlearning” the concepts learned
and utilized in programming classic ASP applications. Because program-
ming in .NET languages is quite different from writing programs in Visual
Basic for Applications language, it is not covered here. Instead, this chap-
ter concentrates on ASP classic programming, which is more related to
Visual Basic via its subset, VBScript.
Hands-On 28-1 creates an ASP page that retrieves data from the Employees
table in the Northwind.mdb database.
�Hands-On 28-1: Creating an Active Server Page from a Microsoft AccessTable
1. Create a new folder named C:\Learn_ASP_Classic for this chapter’s files.
2. Copy the C:\Acc07_HandsOn\Northwind.mdb database to the
C:\Learn_ASP_Classic folder.
3. Click the Start menu button and choose Run. In the Run dialog box, type
notepad and click OK.
4. When the text editor opens, type the following code, or copy and paste this
code from C:\Acc07_HandsOn\Employees.txt.
<% @Language=VBSCRIPT %><%
' declare variablesDim accessDBDim connDim rstDim sql
Access and Active Server Pages | 663
Taking Your VBA Programming Skills to the Web
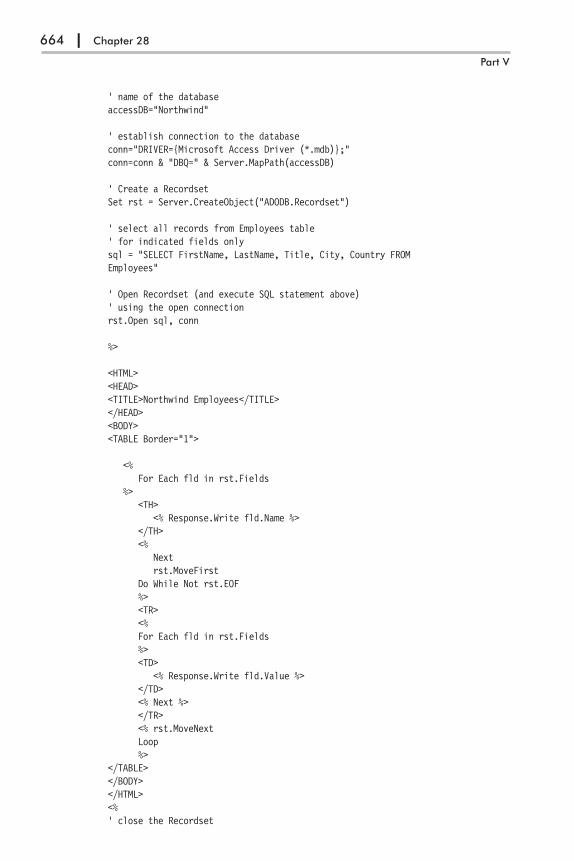
' name of the databaseaccessDB="Northwind"
' establish connection to the databaseconn="DRIVER={Microsoft Access Driver (*.mdb)};"conn=conn & "DBQ=" & Server.MapPath(accessDB)
' Create a RecordsetSet rst = Server.CreateObject("ADODB.Recordset")
' select all records from Employees table' for indicated fields onlysql = "SELECT FirstName, LastName, Title, City, Country FROMEmployees"
' Open Recordset (and execute SQL statement above)' using the open connectionrst.Open sql, conn
%>
<HTML><HEAD><TITLE>Northwind Employees</TITLE></HEAD><BODY><TABLE Border="1">
<%For Each fld in rst.Fields
%><TH>
<% Response.Write fld.Name %></TH><%
Nextrst.MoveFirst
Do While Not rst.EOF%><TR><%For Each fld in rst.Fields%><TD>
<% Response.Write fld.Value %></TD><% Next %></TR><% rst.MoveNextLoop%>
</TABLE></BODY></HTML><%' close the Recordset
664 | Chapter 28
Part V

rst.CloseSet rst=Nothing%>
The code shown above begins by specifying a scripting language for the
page by using the Active Server Pages directive <% @Language=
VBScript %>.
The script contained between the <% and %> delimiters is Visual Basic
script code that gets executed on the web server. The <% says that what
follows is a server-side script, not HTML. The %> indicates the end of a
script segment. The script code between the <% and %> delimiters is exe-
cuted on the web server as the page is processed. Any values you want
returned by the script are placed between the <% and %> delimiters.
Similar to VBA procedures, the first step in scripting is the declaration
of variables. Because in VBScript all variables are of the Variant type, you
don’t need to use the As keyword to specify the type of variable. To
declare a variable, simply precede its name with the Dim keyword:
Dim accessDBDim connDim rstDim sql
Similar to VBA, you can declare all your variables on one line, like this:
Dim accessDB, conn, rst, sql
To connect with the Access database, we specify a connection string like
this:
conn="DRIVER={Microsoft Access Driver (*.mdb)};"conn=conn & "DBQ=" & Server.MapPath(accessDB)
The DRIVER parameter specifies the name of the driver that you are plan-
ning to use for this connection (Microsoft Access Driver (*.mdb)). The
DBQ parameter indicates the database path. The exact path will be sup-
plied by the MapPath method of the Server object:
Server.MapPath(accessDB)
You can also connect to your Access MDB database by using the OLEDB
data provider as follows:
Set conn = Server.CreateObject("OLEDB.Connection")conn.Open "Provider=Microsoft.Jet.OLEDB.4.0; Data Source=" _
& Server.MapPath(accessDB)
To connect to an SQL server database, use the following format:
Set conn = Server.CreateObject("OLEDB.Connection")conn.Open "Provider="SQLOLEDB;" & _"Data Source=YourServerName;" & _"Initial Catalog=accessDB;" & _"UID=yourId; Password=yourPassword;"
To gain access to database records, we create the Recordset object using
the CreateObject method of the Server object:
Access and Active Server Pages | 665
Taking Your VBA Programming Skills to the Web

Set rst = Server.CreateObject("ADODB.Recordset")
After creating the recordset, we open it using the Open method, like this:
rst.Open sql, conn
The above statement opens a set of records. The sql variable is set to select
all the records from the Employees table for the indicated fields. The conn
variable indicates how you will connect with the database.
The %> delimiter indicates the end of the server-side script.
Server-side and Client-side Scripting
• A server-side script is the script code that runs on the web server beforethe page comes down to the client (the user’s machine). This scriptbegins to run when a browser requests an ASP file from your web server.The web server then calls the ASP interpreter (ASP.dll), which processesthe blocks of code between the <% and %> delimiter tags. After thescript commands are executed, the web page is sent to the browser.Server-side scripts cannot be readily copied because only the result ofthe script is returned to the browser. Users cannot view the script com-mands that created the page they are viewing. All they can see is theHTML source code for the page.
• In addition to server-side scripts, an ASP file can contain client scripts. Aclient script is the script code that is processed by a browser on theuser’s machine while the page is viewed. Client scripts are enclosedbetween <SCRIPT> and </SCRIPT> tags. When a browser encounters a<SCRIPT> tag, it sends the script that follows this tag to a scriptingengine. A scripting engine is the part of the web browser that processesthe scripts. Because not all browsers can process client scripts, commenttags (<!-- and -->) are often used to make browsers that do not recog-nize the <SCRIPT> tag ignore it.
Notice the many tags between the angle brackets: <HTML>, </HTML>,
<HEAD>, </HEAD>, <TITLE>, </TITLE>, <BODY>, </BODY>, <B>,
</B>, <TR>, and so on (see Table 28-1). The tags tell the browser how to
display the file. For example, the <HTML> tag tells the browser that what
follows is an HTML document. The closing </HTML> tag at the end of the
file tells the browser that the HTML document is completed. The closing
tags are denoted by placing a forward slash before the tag name (for exam-
ple, </TITLE>, </BODY>, </HTML>). Closing tags cancel the effect of
the tag.
The next part of the ASP page contains HTML formatting tags that pre-
pare a table. These tags are summarized in Table 28-1.
The table headings are read from the Fields collection of the Recordset
object using the For... Each...Next loop. Notice that all instructions that
need to be executed on the server are enclosed by the <% and %> delimit-
ers. To enter the data returned by the server in the appropriate table cell,
use the Write method of the ASP Response object:
Response.Write fld.Name
666 | Chapter 28
Part V

The above statement will return the name of a table field. Because this
instruction appears in the file between the <TH> and </TH> HTML for-
matting tags, the names of the table fields will be written as headings in
bold type.
After reading the headings, the next loop reads the values of the fields
in each record:
Response.Write fld.Value
Because the above statement is located between the <TD> and </TD> for-
matting tags, the values retrieved from each field in a particular record will
be written to table cells.
The script ends by closing the recordset and releasing the memory used
by it:
rst.Closeset rst = Nothing
Because the web server reads and processes the instructions in the ASP
page every time your browser requests the page, the information you
receive is highly dynamic. ASP allows the page to be built or customized
on the fly before the page is returned to the browser.
5. Save the file as C:\Learn_ASP_Classic\Employees.asp and exit Notepad.
Table 28-1: Frequently used script delimiters and HTML tags
<% and %> Beginning and end of the ASP script fragment. Thescript code between the <% and %> delimiters will beexecuted on the server before the page is delivered tothe user browser.
<HTML> and </HTML> You should place the <HTML> tag at the beginningof each web page. To indicate the end of a web page,use the closing tag: </HTML>. The HTML documenthas two main sections: <HEAD> and <BODY>.
<HEAD> and </HEAD> The <HEAD> section contains information about thedocument such as its title, keywords, description, andstylesheet. Often Java scripts are placed in the<HEAD> section.
<TITLE> and </TITLE> Place the text you want to display in the window titlebar between these HTML tags. The <TITLE> tagalways appears within the <HEAD> section.
<BODY> and </BODY> The text you want to display on the web page shouldbe placed between these tags.
<TABLE> and </TABLE> Beginning and end of a table.
<TABLE Border = "1"> The Border parameter specifies the width of the tableborder.
<TH> and </TH> Place table headings between <TH> and </TH>tags. They will be automatically displayed in bold font.
<TR> and </TR> <TR> tag begins a new row in a table. Each tablerow ends with the </TR> tag.
<TD> and </TD> Each table data item starts with the <TD> tag andends with the </TD> tag.
Access and Active Server Pages | 667
Taking Your VBA Programming Skills to the Web
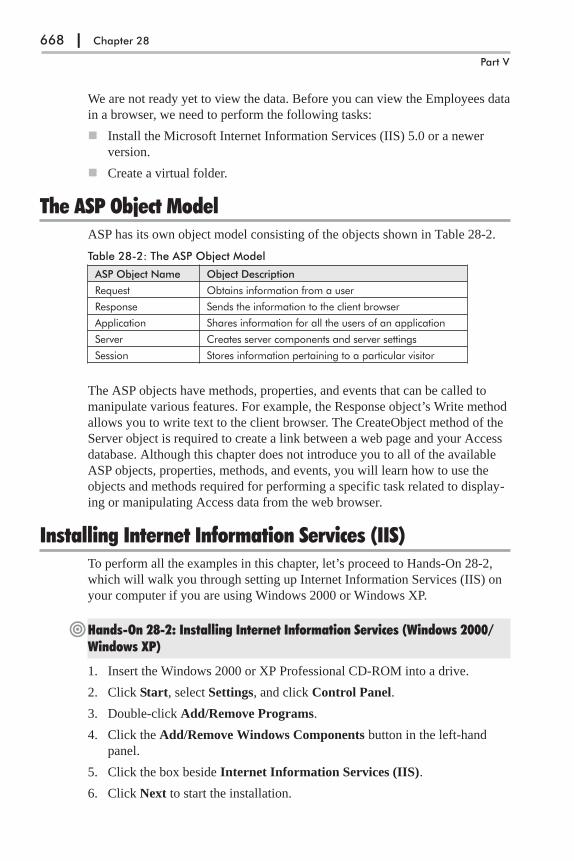
We are not ready yet to view the data. Before you can view the Employees data
in a browser, we need to perform the following tasks:
� Install the Microsoft Internet Information Services (IIS) 5.0 or a newer
version.
� Create a virtual folder.
The ASP Object ModelASP has its own object model consisting of the objects shown in Table 28-2.
Table 28-2: The ASP Object Model
ASP Object Name Object Description
Request Obtains information from a user
Response Sends the information to the client browser
Application Shares information for all the users of an application
Server Creates server components and server settings
Session Stores information pertaining to a particular visitor
The ASP objects have methods, properties, and events that can be called to
manipulate various features. For example, the Response object’s Write method
allows you to write text to the client browser. The CreateObject method of the
Server object is required to create a link between a web page and your Access
database. Although this chapter does not introduce you to all of the available
ASP objects, properties, methods, and events, you will learn how to use the
objects and methods required for performing a specific task related to display-
ing or manipulating Access data from the web browser.
Installing Internet Information Services (IIS)To perform all the examples in this chapter, let’s proceed to Hands-On 28-2,
which will walk you through setting up Internet Information Services (IIS) on
your computer if you are using Windows 2000 or Windows XP.
�Hands-On 28-2: Installing Internet Information Services (Windows 2000/Windows XP)
1. Insert the Windows 2000 or XP Professional CD-ROM into a drive.
2. Click Start, select Settings, and click Control Panel.
3. Double-click Add/Remove Programs.
4. Click the Add/Remove Windows Components button in the left-hand
panel.
5. Click the box beside Internet Information Services (IIS).
6. Click Next to start the installation.
668 | Chapter 28
Part V

7. When the installation is complete, click Finish to close the wizard.
Creating a Virtual DirectoryThe default home directory for the World Wide Web service is \Inetpub\
wwwroot. Files located in the home directory and its subdirectories are auto-
matically available to visitors to your site. You can create virtual directories to
make web pages that are not stored in the home directory or its subdirectories
available for viewing. A virtual directory appears to client browsers as if it
were physically contained in the home directory.
For the purposes of this chapter, you created a directory called Learn_
ASP_Classic on your computer (see Hands-On 28-1). In Hands-On 28-3 we
will set up the Learn_ASP_Classic folder as a virtual directory.
�Hands-On 28-3: Creating a Virtual Directory
1. Open Windows Explorer and right-
click the Learn_ASP_Classic folder
you created in Hands-On 28-1. Select
Properties from the shortcut menu.
2. In the Learn_ASP_Classic Properties
window, click the Web Sharing tab
(Figure 28-2). This window may look
slightly different if you are using Win-
dows 2000.
3. Click the Share this folder option but-
ton. The Edit Alias window will
appear, as shown in Figure 28-3.
Access and Active Server Pages | 669
Taking Your VBA Programming Skills to the Web
Figure 28-1: After completing the Internet Information Services installation steps inHands-On 28-2, you should see the Inetpub folder on your computer. The\Inetpub\wwwroot folder is automatically set as the home directory for IIS.
Figure 28-2: You can use the Properties window to quickly set upan alias users will use to access pages in the specified directory.
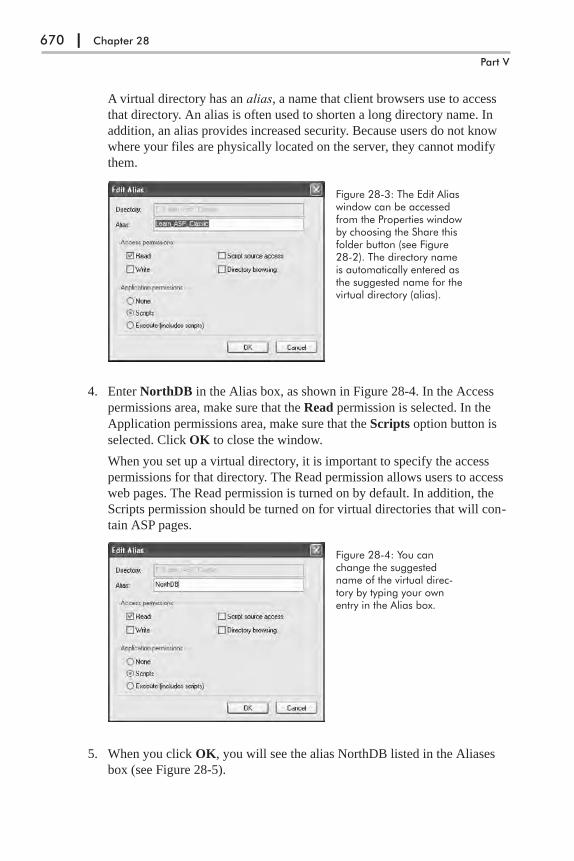
A virtual directory has an alias, a name that client browsers use to access
that directory. An alias is often used to shorten a long directory name. In
addition, an alias provides increased security. Because users do not know
where your files are physically located on the server, they cannot modify
them.
4. Enter NorthDB in the Alias box, as shown in Figure 28-4. In the Access
permissions area, make sure that the Read permission is selected. In the
Application permissions area, make sure that the Scripts option button is
selected. Click OK to close the window.
When you set up a virtual directory, it is important to specify the access
permissions for that directory. The Read permission allows users to access
web pages. The Read permission is turned on by default. In addition, the
Scripts permission should be turned on for virtual directories that will con-
tain ASP pages.
5. When you click OK, you will see the alias NorthDB listed in the Aliases
box (see Figure 28-5).
670 | Chapter 28
Part V
Figure 28-3: The Edit Aliaswindow can be accessedfrom the Properties windowby choosing the Share thisfolder button (see Figure28-2). The directory nameis automatically entered asthe suggested name for thevirtual directory (alias).
Figure 28-4: You canchange the suggestedname of the virtual direc-tory by typing your ownentry in the Alias box.

6. Click OK to close the Learn_ASP_Classic Properties window.
Now let’s proceed to the next section where we access the employee data from
a web browser by requesting in a browser the Active Server Page (Employ-
ees.asp) that we prepared in Hands-On 28-1.
�Hands-On 28-4: Requesting an ASP Page
This hands-on exercise requires completion of Hands-On 28-1 through 28-3.
1. Launch Internet Explorer and type http://localhost/NorthDB/Employ-
ees.asp in the address box. Press Enter to execute the Active Server Pages
(ASP) file or click the Go button. The contents of the Employees table
should appear in your browser as shown in Figure 28-6.
� Important Note: If you are using Windows XP and you receive an errorpage with the “access denied” message, be sure to give permissions to youruser account on the Learn_ASP_Classic folder. Follow these steps:
1. Click Start, and then click My Computer.
2. Choose Tools | Folder Options and click the View tab.
3. In the Advanced Settings section, clear the Use simple file sharing(Recommended) check box.
4. Click OK.
5. Right-click the Learn_ASP_Classic folder and select Properties.
6. Click the Security tab and select your user account. Give yourself full
control to the folder and click OK.
Access and Active Server Pages | 671
Taking Your VBA Programming Skills to the Web
Figure 28-5: NorthDB isthe name your browser willuse to access files in theLearn_ASP_Classic folderwhile working with thischapter.

2. Right-click anywhere in the browser window and select View Source to
view the source code.
The View Source command uses Windows Notepad to display a source
file. Because the script commands contained in the ASP file are evaluated
on the server before the browser receives the page, the resulting page in the
browser is 100% pure HTML code. Notice that the browser does not dis-
play any of your ASP code that was surrounded by the <% and %> delimit-
ers. The scripting code is evaluated on the server and only the resulting
HTML is passed to the browser!
3. Close Notepad and exit Internet Explorer.
Retrieving RecordsIn the preceding sections of this chapter we worked with the ASP page that
retrieved records from the Employees table. Let’s get more practice in data
retrieval by creating another ASP page. The example ASP code in Hands-On
28-5 retrieves only customer names from the Customers table.
�Hands-On 28-5: Creating an ASP File to Retrieve Records
This hands-on exercise requires completion of Hands-On 28-1.
1. Start Windows Notepad and enter the ASP code as shown below, or copy
and paste this code from the C:\Acc07_HandsOn\GetCustomers.txt file.
<%@ Language=VBScript %><HTML><HEAD><TITLE>Retrieving a Recordset</TITLE></HEAD><BODY><%Set conn = Server.CreateObject("ADODB.Connection")
672 | Chapter 28
Part V
Figure 28-6: Youcan request theASP page by typ-ing its URL in theweb browser’saddress bar.

conn.Open "DRIVER=Microsoft Access Driver (*.mdb);DBQ=" & _"C:\Learn_ASP_Classic\Northwind.mdb"
Set rst = conn.Execute("SELECT CompanyName FROM Customers")Do While Not rst.EOF
Response.Write rst("CompanyName") & "<BR>"rst.MoveNext
Loop%></BODY></HTML>
The code shown above begins by specifying a scripting language for the
page by using the ASP directive <%@ Language= VBScript %>. Recall
that the script contained in the <% and %> is Visual Basic script. This
script performs the following actions:
� Creates an instance of the ADO Connection object
� Opens the connection to the Northwind.mdb database using the
Microsoft Access driver (this is the DSN-less connection)
The SQL SELECT statement retrieves the values in the CompanyName
field from the table named Customers into a Recordset object named rst.
The SELECT statement is executed with the Execute method of the Server
Connection object. Notice that the instance of the Recordset object is cre-
ated implicitly when the SQL statement is executed.
The Do While loop is used to output all the rows from the recordset to
the browser. The Write method of the Response object outputs the value of
a specific string or expression to the browser. The HTML <BR> tag is used
to produce a carriage return after the value of the CompanyName field is
output to the browser. Thanks to this tag, all company names are displayed
on separate lines. Here, the value of the CompanyName field and a line
break (<BR> tag) is written to the browser with the Response.Write state-
ment like this:
Response.Write rst("CompanyName") & "<BR>"
The rst("CompanyName") retrieves the value of the CompanyName field
from the Recordset object. You can output the values from the Recordset
object by using any of the following statements:
Response.Write rst.Fields("CompanyName")Response.Write rst.Fields("CompanyName").ValueResponse.Write rst.Fields(1)Response.Write rst.Fields(1).ValueResponse.Write rst(1)Response.Write rst("CompanyName")
Because the Fields collection is the default collection of the Recordset
object, you can omit the word Fields. The MoveNext method moves to the
next record in the recordset.
2. Save the file as C:\Learn_ASP_Classic\GetCustomers.asp.
3. Close Notepad.
Access and Active Server Pages | 673
Taking Your VBA Programming Skills to the Web
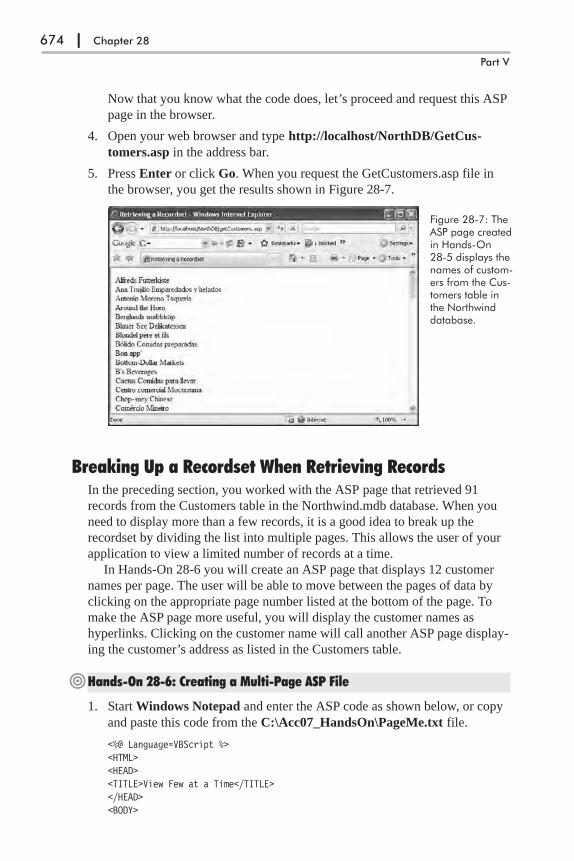
Now that you know what the code does, let’s proceed and request this ASP
page in the browser.
4. Open your web browser and type http://localhost/NorthDB/GetCus-
tomers.asp in the address bar.
5. Press Enter or click Go. When you request the GetCustomers.asp file in
the browser, you get the results shown in Figure 28-7.
Breaking Up a Recordset When Retrieving RecordsIn the preceding section, you worked with the ASP page that retrieved 91
records from the Customers table in the Northwind.mdb database. When you
need to display more than a few records, it is a good idea to break up the
recordset by dividing the list into multiple pages. This allows the user of your
application to view a limited number of records at a time.
In Hands-On 28-6 you will create an ASP page that displays 12 customer
names per page. The user will be able to move between the pages of data by
clicking on the appropriate page number listed at the bottom of the page. To
make the ASP page more useful, you will display the customer names as
hyperlinks. Clicking on the customer name will call another ASP page display-
ing the customer’s address as listed in the Customers table.
�Hands-On 28-6: Creating a Multi-Page ASP File
1. Start Windows Notepad and enter the ASP code as shown below, or copy
and paste this code from the C:\Acc07_HandsOn\PageMe.txt file.
<%@ Language=VBScript %><HTML><HEAD><TITLE>View Few at a Time</TITLE></HEAD><BODY>
674 | Chapter 28
Part V
Figure 28-7: TheASP page createdin Hands-On28-5 displays thenames of custom-ers from the Cus-tomers table inthe Northwinddatabase.

<%Dim conn, rst, mySQL, currPage, rows, counterSet conn = Server.CreateObject("ADODB.Connection")conn.Open "DRIVER=Microsoft Access Driver (*.mdb);DBQ=" & _
"c:\Learn_ASP_Classic\Northwind.mdb"Set rst = Server.CreateObject("ADODB.Recordset")
rst.CursorType = 3 'adOpenStaticrst.PageSize = 12
mySQL= "SELECT * FROM Customers ORDER BY CompanyName"rst.Open mySQL, connIf Request.QueryString("currPage")="" Then
currPage=1Else
currPage=Request.QueryString("currPage")End If
rst.AbsolutePage=currPagerows = 0
Response.Write "<H2>Northwind Customers</H2>"Response.Write "<I>Displaying page" & currPage & " of "Response.Write rst.PageCount & "</I>"Response.Write "<HR>"
Do While Not rst.EOF And rows < rst.PageSizeResponse.Write "<A HREF=""Address.asp?CustomerID=" & _
rst("CustomerID") & """>"Response.Write rst("CompanyName") & "</A><BR>"rows = rows + 1rst.MoveNext
Loop
Response.Write "<HR>"Response.Write "<B>Result Pages: </B>"
For counter = 1 To rst.PageCountResponse.Write "<A HREF=""PageMe.asp?currPage=" & counter & """>"Response.Write counter & "</A>"Response.Write Chr(32)
Nextrst.closeSet rst = Nothingconn.CloseSet conn = Nothing%></BODY></HTML>
The scripting section begins with the declaration of variables. Because all
variables are Variants in Active Server Pages, it is convenient to list them
on one line:
Dim conn, rst, mySQL, currPage, rows, counter
Access and Active Server Pages | 675
Taking Your VBA Programming Skills to the Web
Following the declaration of variables, the Connection object is created and
the connection to the Northwind database is opened using the Microsoft
Access driver.
Next, the Recordset object is created. For Recordset paging to work
properly, the CursorType must be set to adOpenStatic. Notice that the script
uses the literal value (3) instead of the constant name adOpenStatic. By
default, ADO enumerated constants are not defined in VBScript. However,
a list of constants used with ADO is defined in the Adovbs.inc file (for
VBScript) or in the Adojavas.inc file (for JScript). These files are installed
in the \Program Files\Common Files\System\ado folder. To use constant
names instead of their values, you can add a reference to the Adovbs.inc
file at the top of your ASP page by using the #INCLUDE FILE directive,
as shown below:
<%@ Language=VBScript %><!-- #INCLUDE FILE="adovbs.inc" --><HTML>
For the #INCLUDE FILE directive to work, you must copy the Adovbs.inc
file to the Learn_ASP_Classic folder. When you add the above directive,
you will be able to use the ADO constants instead of literal values in your
VBScript. Using the enumerated constants will make your code easier to
understand.
Use the PageSize property of the Recordset object to specify how many
records are to be displayed on a page. The page is set to display 12 records:
rst.PageSize = 12
The SQL SELECT statement retrieves all the records in the Customers
table into the recordset. We store this statement in the mySQL variable and
proceed to open the recordset using the connection that we set up earlier:
rst.Open mySQL, conn
Next, the script retrieves the page you are currently on. If the contents of
the currPage variable is an empty string (""), then you are on the first page.
The AbsolutePage property of the Recordset object is used to move to a
particular page after opening the recordset. The AbsolutePage property
identifies the page number on which the current record is located.
AbsolutePage equals 1 when the current record is the first record in the
recordset.
Next, the rows variable is initialized to zero (0). This variable limits the
number of records that are displayed on a particular page.
Next, we use the Write method of the Response object to write a little
HTML code that formats the page. For example, to format the page title we
use the HTML second-level heading tag <H2> and its ending companion
tag </H2> like this:
Response.Write "<H2>Northwind Customers</H2>"
676 | Chapter 28
Part V
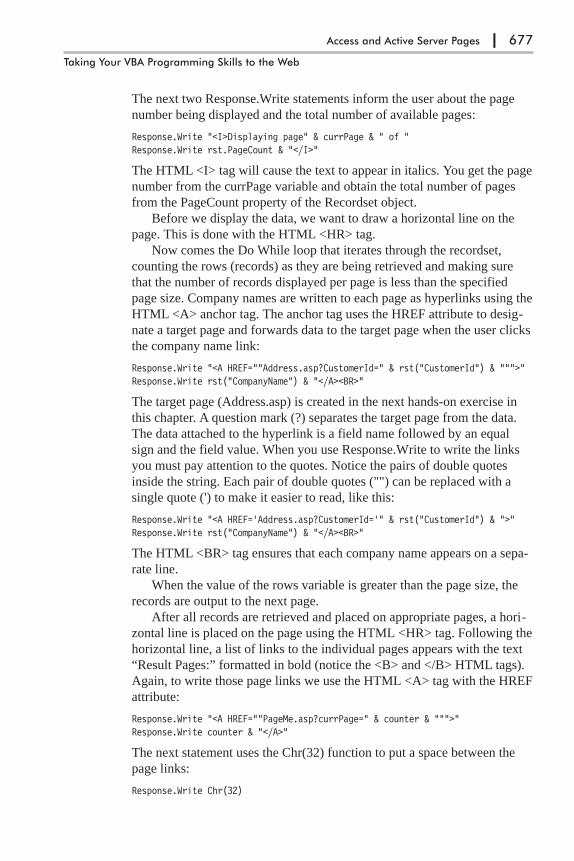
The next two Response.Write statements inform the user about the page
number being displayed and the total number of available pages:
Response.Write "<I>Displaying page" & currPage & " of "Response.Write rst.PageCount & "</I>"
The HTML <I> tag will cause the text to appear in italics. You get the page
number from the currPage variable and obtain the total number of pages
from the PageCount property of the Recordset object.
Before we display the data, we want to draw a horizontal line on the
page. This is done with the HTML <HR> tag.
Now comes the Do While loop that iterates through the recordset,
counting the rows (records) as they are being retrieved and making sure
that the number of records displayed per page is less than the specified
page size. Company names are written to each page as hyperlinks using the
HTML <A> anchor tag. The anchor tag uses the HREF attribute to desig-
nate a target page and forwards data to the target page when the user clicks
the company name link:
Response.Write "<A HREF=""Address.asp?CustomerId=" & rst("CustomerId") & """>"Response.Write rst("CompanyName") & "</A><BR>"
The target page (Address.asp) is created in the next hands-on exercise in
this chapter. A question mark (?) separates the target page from the data.
The data attached to the hyperlink is a field name followed by an equal
sign and the field value. When you use Response.Write to write the links
you must pay attention to the quotes. Notice the pairs of double quotes
inside the string. Each pair of double quotes ("") can be replaced with a
single quote (') to make it easier to read, like this:
Response.Write "<A HREF='Address.asp?CustomerId='" & rst("CustomerId") & ">"Response.Write rst("CompanyName") & "</A><BR>"
The HTML <BR> tag ensures that each company name appears on a sepa-
rate line.
When the value of the rows variable is greater than the page size, the
records are output to the next page.
After all records are retrieved and placed on appropriate pages, a hori-
zontal line is placed on the page using the HTML <HR> tag. Following the
horizontal line, a list of links to the individual pages appears with the text
“Result Pages:” formatted in bold (notice the <B> and </B> HTML tags).
Again, to write those page links we use the HTML <A> tag with the HREF
attribute:
Response.Write "<A HREF=""PageMe.asp?currPage=" & counter & """>"Response.Write counter & "</A>"
The next statement uses the Chr(32) function to put a space between the
page links:
Response.Write Chr(32)
Access and Active Server Pages | 677
Taking Your VBA Programming Skills to the Web

Finally, the script segment ends by closing all objects and releasing the
memory used. We announce the end of the file by writing two ending
HTML tags:
</BODY></HTML>
Now that you know what the code does, let’s proceed to request this page
in the browser.
2. Save the file as C:\Learn_ASP_Classic\PageMe.asp.
3. Close Notepad.
4. Open your browser and type http://localhost/NorthDB/PageMe.asp in the
address bar. Press Enter or click Go. You should see the listing of
Northwind customers spanning multiple pages (Figure 28-8).
5. Navigate to different pages by clicking on the page links.
� Note: Clicking on the company name does not work yet. You must createanother ASP page to display the selected customer’s address (see Hands-On28-7).
678 | Chapter 28
Part V
Figure 28-8: The result of running the ASP page titled PageMe.asp is alist of Northwind customers that is both easy to examine and use.

�Hands-On 28-7: Creating an ASP File for Loading from a Hyperlink
This hands-on exercise is required for using the company name hyperlinks in
the PageMe.asp file created in Hands-On 28-6.
1. Start Windows Notepad and enter the ASP code as shown below, or copy
and paste this code from the C:\Acc07_HandsOn\Address.txt file.
<%@ Language=VBScript %><HTML><HEAD><TITLE>Lookup Results</TITLE></HEAD><BODY><%
Dim mySQL, myPathCustomerID = TRIM(Request.QueryString("CustomerID"))myPath = "C:\Learn_ASP_Classic\Northwind.mdb"Set conn = Server.CreateObject("ADODB.Connection")conn.Open "Provider=Microsoft.Jet.OLEDB.4.0;Data Source=" & myPathSet rst = Server.CreateObject("ADODB.Recordset")rst.CursorType = 3 'adOpenStaticmySQL= "SELECT * FROM Customers WHERE CustomerID='" & CustomerID & "'"rst.Open mySQL,conn
%><H1>Address Lookup</H1><I>Displaying address for <B><%=rst("CompanyName")%></B></I><HR><TABLE colspan=2 align="Center"><TR>
<TD>Customer Id:</TD><TD><input type="text" name="CustomerID"
value="<%=rst("CustomerID")%>" size="5"></TD>
</TR><TR>
<TD>Street:</TD><TD><input type="text" name="Address"
value="<%=rst("Address")%>" size="60"></TD>
</TR><TR>
<TD>City:</TD><TD><input type="text" name="City"
value="<%=rst("City")%>" size="15"></TD>
</TR><TR>
<TD>Region:</TD><TD><input type="text" name="Region"
value="<%=rst("Region")%>" size="15"></TD>
</TR><TR>
<TD>Country:</TD><TD><input type="text" name="Country"value="<%=rst("Country")%>" size="15">
</TD>
Access and Active Server Pages | 679
Taking Your VBA Programming Skills to the Web
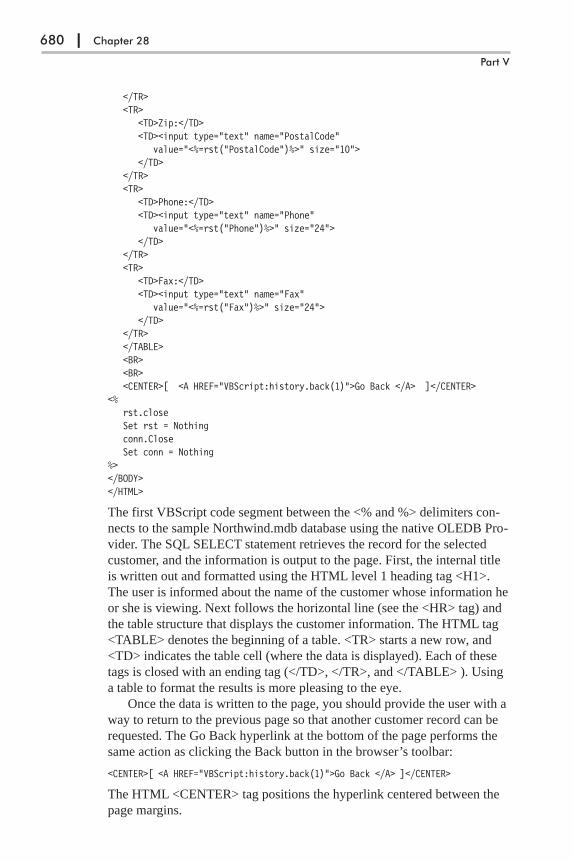
</TR><TR>
<TD>Zip:</TD><TD><input type="text" name="PostalCode"
value="<%=rst("PostalCode")%>" size="10"></TD>
</TR><TR>
<TD>Phone:</TD><TD><input type="text" name="Phone"
value="<%=rst("Phone")%>" size="24"></TD>
</TR><TR>
<TD>Fax:</TD><TD><input type="text" name="Fax"
value="<%=rst("Fax")%>" size="24"></TD>
</TR></TABLE><BR><BR><CENTER>[ <A HREF="VBScript:history.back(1)">Go Back </A> ]</CENTER>
<%rst.closeSet rst = Nothingconn.CloseSet conn = Nothing
%></BODY></HTML>
The first VBScript code segment between the <% and %> delimiters con-
nects to the sample Northwind.mdb database using the native OLEDB Pro-
vider. The SQL SELECT statement retrieves the record for the selected
customer, and the information is output to the page. First, the internal title
is written out and formatted using the HTML level 1 heading tag <H1>.
The user is informed about the name of the customer whose information he
or she is viewing. Next follows the horizontal line (see the <HR> tag) and
the table structure that displays the customer information. The HTML tag
<TABLE> denotes the beginning of a table. <TR> starts a new row, and
<TD> indicates the table cell (where the data is displayed). Each of these
tags is closed with an ending tag (</TD>, </TR>, and </TABLE> ). Using
a table to format the results is more pleasing to the eye.
Once the data is written to the page, you should provide the user with a
way to return to the previous page so that another customer record can be
requested. The Go Back hyperlink at the bottom of the page performs the
same action as clicking the Back button in the browser’s toolbar:
<CENTER>[ <A HREF="VBScript:history.back(1)">Go Back </A> ]</CENTER>
The HTML <CENTER> tag positions the hyperlink centered between the
page margins.
680 | Chapter 28
Part V

Now that you know what the code does, let’s proceed to request this
page in the browser.
2. Save the file as C:\Learn_ASP_Classic\Address.asp.
3. Close Notepad.
4. In your browser’s address bar, type http://localhost/NorthDB/
PageMe.asp and Press Enter or click Go. You should see the listing of
Northwind customers spanning multiple pages.
5. Click a company name of your choice to view its address information.
When you click a company name in the browser, the Address Lookup
screen appears as illustrated in Figure 28-9.
Retrieving Records with the GetRows MethodInstead of looping through a recordset to retrieve records, you can use the
GetRows method of the Recordset object to retrieve records into a two-dimen-
sional array. You’ve already seen examples of using the GetRows method
earlier in this book. Hands-On 28-8 uses the GetRows method to move the
records from the Shippers table into an array. Once in the array, the records are
written out to a table and displayed in a client browser. When you place
records into an array, you can free up the Recordset and Connection objects
earlier than in a loop, thus releasing valuable server resources.
Access and Active Server Pages | 681
Taking Your VBA Programming Skills to the Web
Figure 28-9: When you click the company name on the PageMe.asppage (see Figure 28-8), you are presented with the web page that dis-plays the selected company’s address.
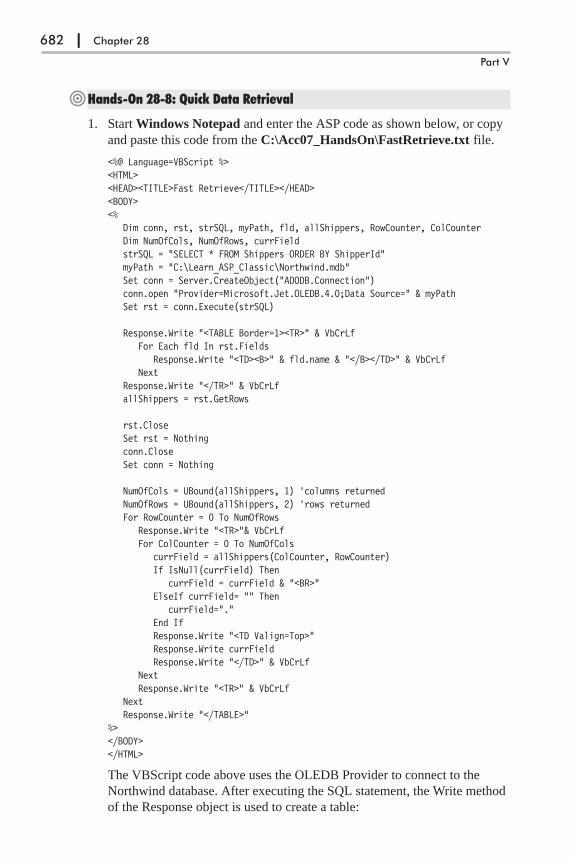
�Hands-On 28-8: Quick Data Retrieval
1. Start Windows Notepad and enter the ASP code as shown below, or copy
and paste this code from the C:\Acc07_HandsOn\FastRetrieve.txt file.
<%@ Language=VBScript %><HTML><HEAD><TITLE>Fast Retrieve</TITLE></HEAD><BODY><%
Dim conn, rst, strSQL, myPath, fld, allShippers, RowCounter, ColCounterDim NumOfCols, NumOfRows, currFieldstrSQL = "SELECT * FROM Shippers ORDER BY ShipperId"myPath = "C:\Learn_ASP_Classic\Northwind.mdb"Set conn = Server.CreateObject("ADODB.Connection")conn.open "Provider=Microsoft.Jet.OLEDB.4.0;Data Source=" & myPathSet rst = conn.Execute(strSQL)
Response.Write "<TABLE Border=1><TR>" & VbCrLfFor Each fld In rst.Fields
Response.Write "<TD><B>" & fld.name & "</B></TD>" & VbCrLfNext
Response.Write "</TR>" & VbCrLfallShippers = rst.GetRows
rst.CloseSet rst = Nothingconn.CloseSet conn = Nothing
NumOfCols = UBound(allShippers, 1) 'columns returnedNumOfRows = UBound(allShippers, 2) 'rows returnedFor RowCounter = 0 To NumOfRows
Response.Write "<TR>"& VbCrLfFor ColCounter = 0 To NumOfCols
currField = allShippers(ColCounter, RowCounter)If IsNull(currField) Then
currField = currField & "<BR>"ElseIf currField= "" Then
currField="."End IfResponse.Write "<TD Valign=Top>"Response.Write currFieldResponse.Write "</TD>" & VbCrLf
NextResponse.Write "<TR>" & VbCrLf
NextResponse.Write "</TABLE>"
%></BODY></HTML>
The VBScript code above uses the OLEDB Provider to connect to the
Northwind database. After executing the SQL statement, the Write method
of the Response object is used to create a table:
682 | Chapter 28
Part V
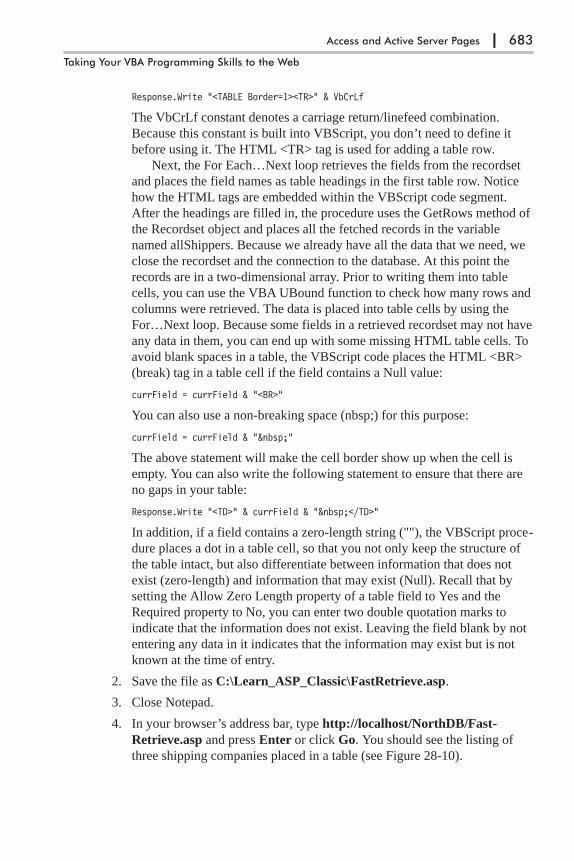
Response.Write "<TABLE Border=1><TR>" & VbCrLf
The VbCrLf constant denotes a carriage return/linefeed combination.
Because this constant is built into VBScript, you don’t need to define it
before using it. The HTML <TR> tag is used for adding a table row.
Next, the For Each…Next loop retrieves the fields from the recordset
and places the field names as table headings in the first table row. Notice
how the HTML tags are embedded within the VBScript code segment.
After the headings are filled in, the procedure uses the GetRows method of
the Recordset object and places all the fetched records in the variable
named allShippers. Because we already have all the data that we need, we
close the recordset and the connection to the database. At this point the
records are in a two-dimensional array. Prior to writing them into table
cells, you can use the VBA UBound function to check how many rows and
columns were retrieved. The data is placed into table cells by using the
For…Next loop. Because some fields in a retrieved recordset may not have
any data in them, you can end up with some missing HTML table cells. To
avoid blank spaces in a table, the VBScript code places the HTML <BR>
(break) tag in a table cell if the field contains a Null value:
currField = currField & "<BR>"
You can also use a non-breaking space (nbsp;) for this purpose:
currField = currField & " "
The above statement will make the cell border show up when the cell is
empty. You can also write the following statement to ensure that there are
no gaps in your table:
Response.Write "<TD>" & currField & " </TD>"
In addition, if a field contains a zero-length string (""), the VBScript proce-
dure places a dot in a table cell, so that you not only keep the structure of
the table intact, but also differentiate between information that does not
exist (zero-length) and information that may exist (Null). Recall that by
setting the Allow Zero Length property of a table field to Yes and the
Required property to No, you can enter two double quotation marks to
indicate that the information does not exist. Leaving the field blank by not
entering any data in it indicates that the information may exist but is not
known at the time of entry.
2. Save the file as C:\Learn_ASP_Classic\FastRetrieve.asp.
3. Close Notepad.
4. In your browser’s address bar, type http://localhost/NorthDB/Fast-
Retrieve.asp and press Enter or click Go. You should see the listing of
three shipping companies placed in a table (see Figure 28-10).
Access and Active Server Pages | 683
Taking Your VBA Programming Skills to the Web
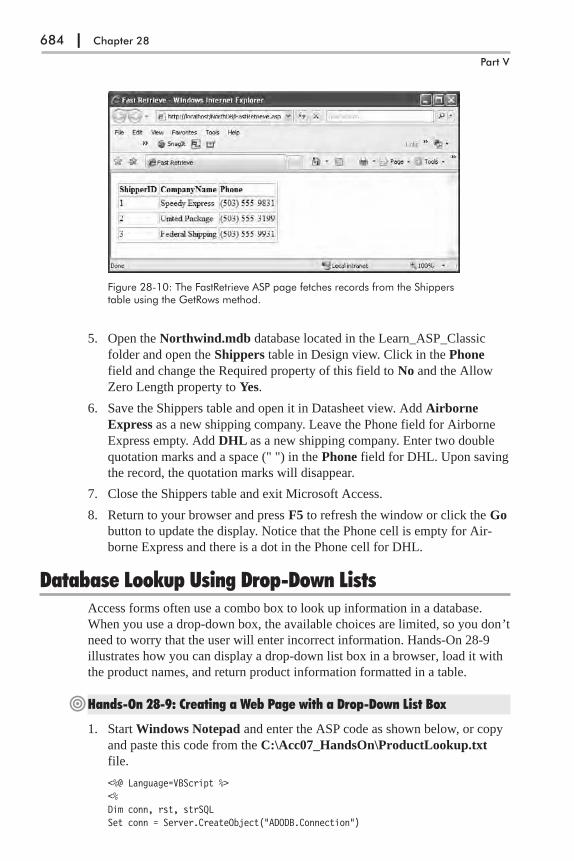
5. Open the Northwind.mdb database located in the Learn_ASP_Classic
folder and open the Shippers table in Design view. Click in the Phone
field and change the Required property of this field to No and the Allow
Zero Length property to Yes.
6. Save the Shippers table and open it in Datasheet view. Add Airborne
Express as a new shipping company. Leave the Phone field for Airborne
Express empty. Add DHL as a new shipping company. Enter two double
quotation marks and a space (" ") in the Phone field for DHL. Upon saving
the record, the quotation marks will disappear.
7. Close the Shippers table and exit Microsoft Access.
8. Return to your browser and press F5 to refresh the window or click the Go
button to update the display. Notice that the Phone cell is empty for Air-
borne Express and there is a dot in the Phone cell for DHL.
Database Lookup Using Drop-Down ListsAccess forms often use a combo box to look up information in a database.
When you use a drop-down box, the available choices are limited, so you don’t
need to worry that the user will enter incorrect information. Hands-On 28-9
illustrates how you can display a drop-down list box in a browser, load it with
the product names, and return product information formatted in a table.
�Hands-On 28-9: Creating a Web Page with a Drop-Down List Box
1. Start Windows Notepad and enter the ASP code as shown below, or copy
and paste this code from the C:\Acc07_HandsOn\ProductLookup.txt
file.
<%@ Language=VBScript %><%Dim conn, rst, strSQLSet conn = Server.CreateObject("ADODB.Connection")
684 | Chapter 28
Part V
Figure 28-10: The FastRetrieve ASP page fetches records from the Shipperstable using the GetRows method.

conn.ConnectionTimeout = 15conn.CommandTimeout = 30conn.Open "Driver={Microsoft Access Driver (*.mdb)}; DBQ=" & _
Server.MapPath("Northwind.mdb") & ";"Set rst = Server.CreateObject("ADODB.Recordset")If Len(Request.QueryString("ProductID")) <> 0 Then
strSQL="SELECT * FROM Products WHERE ProductID="rst.Open(strSQL & Request.QueryString("ProductID")), conn, 0, 1If Not rst.EOF Then
rst.MoveFirstResponse.Write "<TABLE Border=1>"Response.Write "<TR>"Response.Write "<TD><B>Product ID</B></TD>"Response.Write "<TD><B>Product Name</B></TD>"Response.Write "<TD><B>Quantity Per Unit</B></TD>"Response.Write "<TD><B>Units in Stock</B></TD>"Response.Write "<TD><B>Unit Price</B></TD>"Response.Write "</TR>"Response.Write "<TR>"Response.Write "<TD Align='Center'>"Response.Write rst.Fields("ProductID") & "</TD>"Response.Write "<TD Align='Left'>"Response.Write rst.Fields("ProductName") & "</TD>"Response.Write "<TD Align='Left'>"Response.Write rst.Fields("QuantityPerUnit") & "</TD>"Response.Write "<TD Align='Center'>"Response.Write rst.Fields("UnitsInStock") & "</TD>"Response.Write "<TD Align='Right'>"Response.Write FormatCurrency(rst.Fields("UnitPrice"),2) & "</TD>"Response.Write "</TR>"Response.Write "</TABLE>"
End Ifrst.Close
End Ifrst.Open "Products", conn, 0, 1If Not rst.EOF Then
rst.MoveFirstResponse.Write "<FORM Action='./ProductLookup.asp' Method='GET'>"Response.Write "<B>Select a Product:</B><BR>"Response.Write "<SELECT Name='ProductID'>"Response.Write "<OPTION></OPTION>"Do While Not rst.EOF
Response.Write "<OPTION value=" & rst.Fields("ProductID") & ">"Response.Write rst.Fields("ProductName") & "</OPTION>"rst.MoveNext
LoopResponse.Write "</SELECT>"Response.Write "<INPUT Type='Submit' Value='Get Product Details'>"Response.Write "</FORM>"
End Ifrst.CloseSet rst = Nothingconn.CloseSet conn = Nothing%>
Access and Active Server Pages | 685
Taking Your VBA Programming Skills to the Web

The VBScript code segment above begins with establishing a connection
with the data source. Instead of using a fully qualified path to the
Northwind database, the code shows you how to use the MapPath method
of the ASP Server object to retrieve the path to the database. The statement
Server.MapPath("Northwind.mdb") will return the following path:
Learn_ASP_Classic\Northwind.mdb. In fact, if you add the statement:
Response.Write Server.MapPath("Northwind")
to the code above, the filename with its path will appear in the browser. It
is not difficult to guess that using Server.MapPath generates an additional
request for the server to process. Therefore, when deploying your web site,
you should replace Server.MapPath with a fully qualified path to get a
better performance (see the previous hands-on examples for how this is
done).
Notice that before the connection to the database is opened, the follow-
ing statements are used:
conn.ConnectionTimeout = 15conn.CommandTimeout = 30
The first statement instructs the Connection object’s ConnectionTimeout
property to wait 15 seconds before abandoning a connection attempt and
issuing an error message. In the second statement above, the Command-
Timeout property of the Connection object specifies how long to wait
while executing a command before terminating the attempt and generating
an error. The default for the ConnectionTimeout and CommandTimeout
properties is 30 seconds. Using ConnectionTimeout and CommandTimeout
in this example procedure is optional. Before utilizing these properties in
your own database applications, make sure that the data source and the pro-
vider you are using support them.
Next, the script instantiates a Recordset object and opens it using the
open connection. The recordset is opened as forward-only (0 = adOpen-
ForwardOnly) and read-only (1 = adLockReadOnly). As mentioned earlier
in this chapter, to use enumerated ADO constants, you need to add the
#INCLUDE FILE directive at the beginning of the Active Server Pages
file.
The SQL SELECT statement contains the WHERE clause that will
only pull the record for a selected product ID if the user makes a selection
from the drop-down box. The data available for the selected record is then
placed in a table. In this example, the table headings are hard-coded. If you
don’t want to hard-code the headings, you could loop through the recordset
to read the field names (see the FastRetrieve.asp file created earlier for an
example). After writing out the table headings, the procedure fills the table
cells with data. The table will contain only one row of data because the
recordset is limited to one product selected from the drop-down list. After
the data is presented in a table, the Recordset object is closed.
686 | Chapter 28
Part V
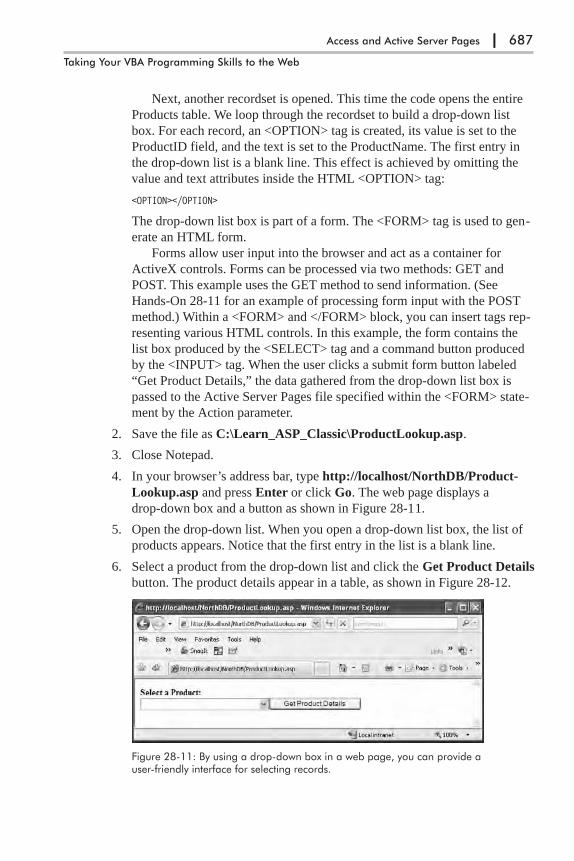
Next, another recordset is opened. This time the code opens the entire
Products table. We loop through the recordset to build a drop-down list
box. For each record, an <OPTION> tag is created, its value is set to the
ProductID field, and the text is set to the ProductName. The first entry in
the drop-down list is a blank line. This effect is achieved by omitting the
value and text attributes inside the HTML <OPTION> tag:
<OPTION></OPTION>
The drop-down list box is part of a form. The <FORM> tag is used to gen-
erate an HTML form.
Forms allow user input into the browser and act as a container for
ActiveX controls. Forms can be processed via two methods: GET and
POST. This example uses the GET method to send information. (See
Hands-On 28-11 for an example of processing form input with the POST
method.) Within a <FORM> and </FORM> block, you can insert tags rep-
resenting various HTML controls. In this example, the form contains the
list box produced by the <SELECT> tag and a command button produced
by the <INPUT> tag. When the user clicks a submit form button labeled
“Get Product Details,” the data gathered from the drop-down list box is
passed to the Active Server Pages file specified within the <FORM> state-
ment by the Action parameter.
2. Save the file as C:\Learn_ASP_Classic\ProductLookup.asp.
3. Close Notepad.
4. In your browser’s address bar, type http://localhost/NorthDB/Product-
Lookup.asp and press Enter or click Go. The web page displays a
drop-down box and a button as shown in Figure 28-11.
5. Open the drop-down list. When you open a drop-down list box, the list of
products appears. Notice that the first entry in the list is a blank line.
6. Select a product from the drop-down list and click the Get Product Details
button. The product details appear in a table, as shown in Figure 28-12.
Access and Active Server Pages | 687
Taking Your VBA Programming Skills to the Web
Figure 28-11: By using a drop-down box in a web page, you can provide auser-friendly interface for selecting records.

When you use the form with the GET method to send the information, the data
is appended to the request for the processing page. The data being passed is
visible in the address bar in your browser (see the figure above). Because the
data is visible, you can easily troubleshoot any problems by looking at the
address bar. The drawback of using the GET method for sending information is
that the data is not secure and it is limited in size to the maximum length of the
request string.
Database Lookup Using a Multiple-Selection List BoxIn the previous section, you saw an example of looking up product information
by selecting a product name from a drop-down list. At times, however, a user
may want to view several products at once. To meet this requirement, you will
need to create a multiple-selection list box and process the user’s selections.
Hands-On 28-10 illustrates how you can display a multiple-selection list
box in a browser, load it with the product names, and return product informa-
tion formatted in a table.
�Hands-On 28-10: Creating a Web Page with a Multiple-Selection List Box
1. Start Windows Notepad and enter the ASP code as shown below, or copy
and paste this code from the C:\Acc07_HandsOn\MultiProduct-
Lookup.txt file.
<%@ Language=VBScript %><HTML><HEAD><TITLE>Select Multiple Products</TITLE></HEAD><BODY><%
Dim conn, rst, strSelect, strWhere, strSQL, totalItems, fld
Set conn = Server.CreateObject("ADODB.Connection")conn.ConnectionTimeout = 15conn.CommandTimeout = 30
688 | Chapter 28
Part V
Figure 28-12: When you select a product from the drop-down list and clickthe Get Product Details button, the selected product information is presentedat the top of the web page.
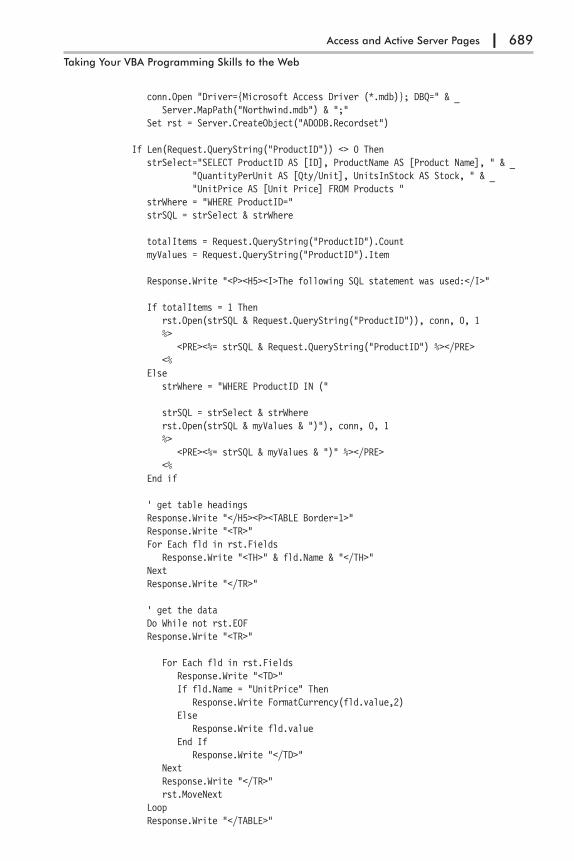
conn.Open "Driver={Microsoft Access Driver (*.mdb)}; DBQ=" & _Server.MapPath("Northwind.mdb") & ";"
Set rst = Server.CreateObject("ADODB.Recordset")
If Len(Request.QueryString("ProductID")) <> 0 ThenstrSelect="SELECT ProductID AS [ID], ProductName AS [Product Name], " & _
"QuantityPerUnit AS [Qty/Unit], UnitsInStock AS Stock, " & _"UnitPrice AS [Unit Price] FROM Products "
strWhere = "WHERE ProductID="strSQL = strSelect & strWhere
totalItems = Request.QueryString("ProductID").CountmyValues = Request.QueryString("ProductID").Item
Response.Write "<P><H5><I>The following SQL statement was used:</I>"
If totalItems = 1 Thenrst.Open(strSQL & Request.QueryString("ProductID")), conn, 0, 1%>
<PRE><%= strSQL & Request.QueryString("ProductID") %></PRE><%
ElsestrWhere = "WHERE ProductID IN ("
strSQL = strSelect & strWhererst.Open(strSQL & myValues & ")"), conn, 0, 1%>
<PRE><%= strSQL & myValues & ")" %></PRE><%
End if
' get table headingsResponse.Write "</H5><P><TABLE Border=1>"Response.Write "<TR>"For Each fld in rst.Fields
Response.Write "<TH>" & fld.Name & "</TH>"NextResponse.Write "</TR>"
' get the dataDo While not rst.EOFResponse.Write "<TR>"
For Each fld in rst.FieldsResponse.Write "<TD>"If fld.Name = "UnitPrice" Then
Response.Write FormatCurrency(fld.value,2)Else
Response.Write fld.valueEnd If
Response.Write "</TD>"NextResponse.Write "</TR>"rst.MoveNext
LoopResponse.Write "</TABLE>"
Access and Active Server Pages | 689
Taking Your VBA Programming Skills to the Web

rst.CloseEnd If
rst.Open "Products", conn, 0, 1If Not rst.EOF Then
rst.MoveFirst%>
<FORM Action="MultiProductLookup.asp" Method="GET"><B><I><FONT Size=2 Face=Tahoma>Hold down CTRL or SHIFT <BR>
to select multiple products:</FONT></I></B><BR><SELECT Name="ProductID" MULTIPLE Size=8>
<%Do While Not rst.EOF
%><OPTION Value="<%=rst.Fields("ProductID")%>"><%=rst.Fields("ProductName")%></OPTION>
<%rst.MoveNextLoop
%></SELECT><INPUT Type="Submit" Value="Get Product(s) Details"></FORM>
<%End Ifrst.CloseSet rst = Nothingconn.CloseSet conn = Nothing%></BODY></HTML>
The VBScript code segment above establishes a DSN-less connection to
the Northwind database by using the Microsoft Access driver and
instantiates a Recordset object. Refer to the previous hands-on exercise for
an explanation of the Connection object’s ConnectionTimeout and
CommandTimeout properties and the Server object’s MapPath method.
The code proceeds to check whether the user has selected any items in
the list box. If at least one product was picked from the list, the procedure
defines the SQL SELECT statement and uses the QueryString method of
the Request object to retrieve the total number of selected products. This
number is then stored in the totalItems variable. The next Request.Query-
String statement retrieves the IDs of the selected items and places them in
the myValues variable. The next statement announces that the line that fol-
lows is the SQL statement the user has selected. This statement is formatted
with the HTML <H5> and <I> tags. This will make the enclosed text an
italicized heading of size 5 (the largest heading is 1 and the smallest is 6).
The <P> tag designates the text as a plain paragraph. The ending </P> tag
is optional.
690 | Chapter 28
Part V

If one product was selected in the list box, a recordset is opened using
the following statement:
rst.Open(strSQL & Request.QueryString("ProductID")), conn, 0, 1
Recall that 0 and 1 at the end of this statement indicate a forward-only and
read-only recordset.
The statement:
<PRE><%=strSQL & Request.QueryString("ProductID") %></PRE>
will write the complete SQL statement to the browser for the user to see.
When you use the HTML <PRE> and </PRE> tags, the text between these
tags is formatted exactly as it is typed. Spaces and carriage returns are pre-
served. If more than one product was selected in the list box, we need to
change the contents of the strWhere variable to include the IN keyword in
the WHERE clause. The IN keyword restricts the rows being selected to
those rows where the column values are in the list presented in the SQL
statement. Assuming that the user selected products with IDs of 1, 3, and 6
in the list box, the following SQL statement will be generated:
SELECT ProductID AS [ID], ProductName AS [Product Name], QuantityPerUnit AS[Qty/Unit], UnitsInStock AS Stock, UnitPrice AS [Unit Price] FROM ProductsWHERE ProductID IN (1, 3, 6)
The remaining code segment in the code above creates a table in a browser.
We use the For Each…Next loop to write out the column names to the
browser:
For Each fld in rst.FieldsResponse.Write "<TH>" & fld.Name & "</TH>"
Next
The <TH> tag makes a cell a table heading. This automatically makes the
text bold. After populating the table with the headings, we use the Do
While loop to write out the table rows until the end of the recordset is
encountered. We must obtain field values for each column in a row. This is
done with the For Each… Next loop like this:
For Each fld in rst.FieldsResponse.Write "<TD>"If fld.Name = "UnitPrice" Then
Response.Write FormatCurrency(fld.value,2)Else
Response.Write fld.valueEnd If
Response.Write "</TD>"Next
Notice the conditional statement within the above code segment. We use it
to perform an additional operation on the UnitPrice field. We format this
field as currency using the FormatCurrency function. When all the table
rows are written to the browser, the table is closed with the HTML table
close tag </TABLE>, and the recordset itself is closed.
Access and Active Server Pages | 691
Taking Your VBA Programming Skills to the Web
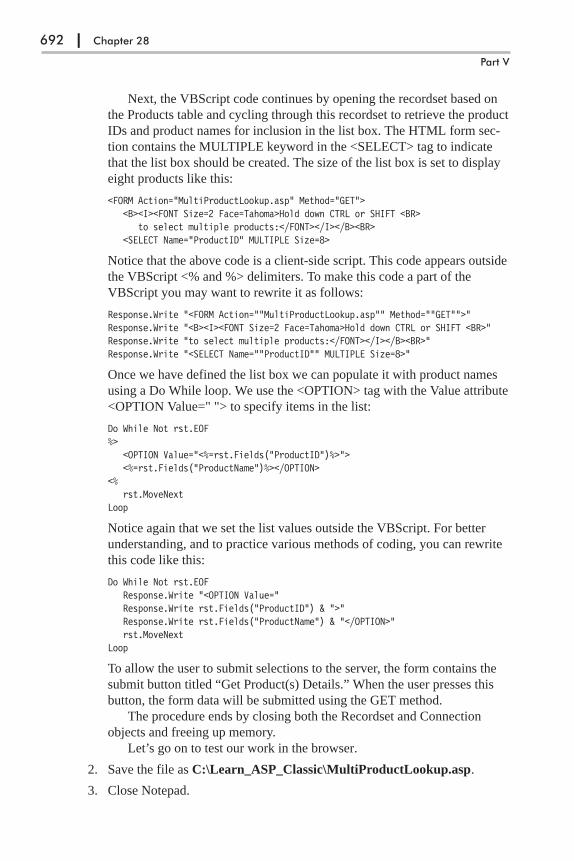
Next, the VBScript code continues by opening the recordset based on
the Products table and cycling through this recordset to retrieve the product
IDs and product names for inclusion in the list box. The HTML form sec-
tion contains the MULTIPLE keyword in the <SELECT> tag to indicate
that the list box should be created. The size of the list box is set to display
eight products like this:
<FORM Action="MultiProductLookup.asp" Method="GET"><B><I><FONT Size=2 Face=Tahoma>Hold down CTRL or SHIFT <BR>
to select multiple products:</FONT></I></B><BR><SELECT Name="ProductID" MULTIPLE Size=8>
Notice that the above code is a client-side script. This code appears outside
the VBScript <% and %> delimiters. To make this code a part of the
VBScript you may want to rewrite it as follows:
Response.Write "<FORM Action=""MultiProductLookup.asp"" Method=""GET"">"Response.Write "<B><I><FONT Size=2 Face=Tahoma>Hold down CTRL or SHIFT <BR>"Response.Write "to select multiple products:</FONT></I></B><BR>"Response.Write "<SELECT Name=""ProductID"" MULTIPLE Size=8>"
Once we have defined the list box we can populate it with product names
using a Do While loop. We use the <OPTION> tag with the Value attribute
<OPTION Value=" "> to specify items in the list:
Do While Not rst.EOF%>
<OPTION Value="<%=rst.Fields("ProductID")%>"><%=rst.Fields("ProductName")%></OPTION>
<%rst.MoveNext
Loop
Notice again that we set the list values outside the VBScript. For better
understanding, and to practice various methods of coding, you can rewrite
this code like this:
Do While Not rst.EOFResponse.Write "<OPTION Value="Response.Write rst.Fields("ProductID") & ">"Response.Write rst.Fields("ProductName") & "</OPTION>"rst.MoveNext
Loop
To allow the user to submit selections to the server, the form contains the
submit button titled “Get Product(s) Details.” When the user presses this
button, the form data will be submitted using the GET method.
The procedure ends by closing both the Recordset and Connection
objects and freeing up memory.
Let’s go on to test our work in the browser.
2. Save the file as C:\Learn_ASP_Classic\MultiProductLookup.asp.
3. Close Notepad.
692 | Chapter 28
Part V

4. In your browser’s address bar, type http://localhost/NorthDB/MultiPro-
ductLookup.asp and press Enter or click Go.
5. The browser will display a list box. Select the items as shown in Figure
28-13 and press the Get Product(s) Details button.
Access and Active Server Pages | 693
Taking Your VBA Programming Skills to the Web
Figure 28-13: You can allow users to filter the data by using a multiple-selection list box.
Figure 28-14: After selecting the products in the list box (see Figure 28-13) and click-ing on the Get Product(s) Details button, your browser displays data as shown here.

Adding Data into a TableYou may want to use a web page to collect data from a user and save it in
Microsoft Access. The following hands-on exercise creates a simple data entry
form that contains two fields. The purpose of this form is to allow users to
enter new shippers into the Northwind database Shippers table.
�Hands-On 28-11: Creating a Data Input Page
1. Start Windows Notepad and enter the ASP code as shown below, or copy
and paste this code from the C:\Acc07_HandsOn\NWDataEntry.txt file.
<%@ Language=VBScript %><%Dim conn, strConn, strSQL, name, phone, goAheadname=Request("txtCompanyName")phone=Request("txtPhone")
For Each key In Request.FormIf Request.Form(key) = "" ThenIf key = "txtCompanyName" Then
Response.Write "<FONT Color = 'Blue'>Please enter the Shipper name.</FONT>"
ElseResponse.Write "<FONT Color = 'Red'>Please enter the Phone number.
</FONT>"End IfgoAhead = FalseExit ForEnd IfGoAhead=True
NextIf goAhead = True Then
name=Replace(Request("txtCompanyName"),"'","''")If Len(name) <> 0 Or _
Len(phone) <> 0 ThenSet conn = Server.CreateObject("ADODB.Connection")strConn="Provider=Microsoft.Jet.OLEDB.4.0;Data Source="strConn=strConn & server.MapPath("Northwind.mdb") & ";"strConn=strConn & "User ID=; Password=;"
strSQL = "INSERT INTO Shippers (CompanyName, Phone)"strSQL = strSQL & "Values ('" & name & "'"strSQL = strSQL & ",'" & phone & "')"With conn.Mode = 3.Open strConn.Execute(strSQL)
End WithResponse.Write "<I><FONT Color = 'Green'>" & _
"Successfully added the following data:</I></FONT><HR>"
' get the ShipperID (the autonumber field in the Shippers table)
694 | Chapter 28
Part V
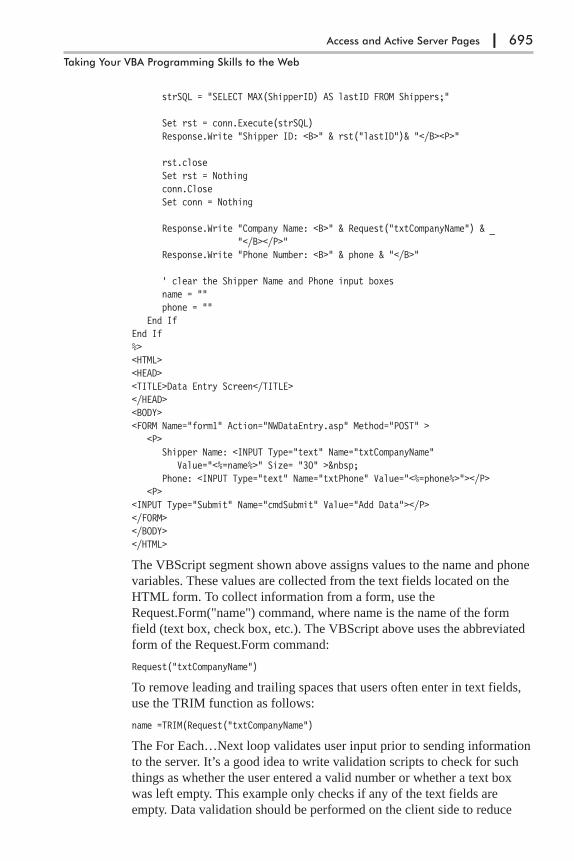
strSQL = "SELECT MAX(ShipperID) AS lastID FROM Shippers;"
Set rst = conn.Execute(strSQL)Response.Write "Shipper ID: <B>" & rst("lastID")& "</B><P>"
rst.closeSet rst = Nothingconn.CloseSet conn = Nothing
Response.Write "Company Name: <B>" & Request("txtCompanyName") & _"</B></P>"
Response.Write "Phone Number: <B>" & phone & "</B>"
' clear the Shipper Name and Phone input boxesname = ""phone = ""
End IfEnd If%><HTML><HEAD><TITLE>Data Entry Screen</TITLE></HEAD><BODY><FORM Name="form1" Action="NWDataEntry.asp" Method="POST" >
<P>Shipper Name: <INPUT Type="text" Name="txtCompanyName"
Value="<%=name%>" Size= "30" > Phone: <INPUT Type="text" Name="txtPhone" Value="<%=phone%>"></P>
<P><INPUT Type="Submit" Name="cmdSubmit" Value="Add Data"></P></FORM></BODY></HTML>
The VBScript segment shown above assigns values to the name and phone
variables. These values are collected from the text fields located on the
HTML form. To collect information from a form, use the
Request.Form("name") command, where name is the name of the form
field (text box, check box, etc.). The VBScript above uses the abbreviated
form of the Request.Form command:
Request("txtCompanyName")
To remove leading and trailing spaces that users often enter in text fields,
use the TRIM function as follows:
name =TRIM(Request("txtCompanyName")
The For Each…Next loop validates user input prior to sending information
to the server. It’s a good idea to write validation scripts to check for such
things as whether the user entered a valid number or whether a text box
was left empty. This example only checks if any of the text fields are
empty. Data validation should be performed on the client side to reduce
Access and Active Server Pages | 695
Taking Your VBA Programming Skills to the Web
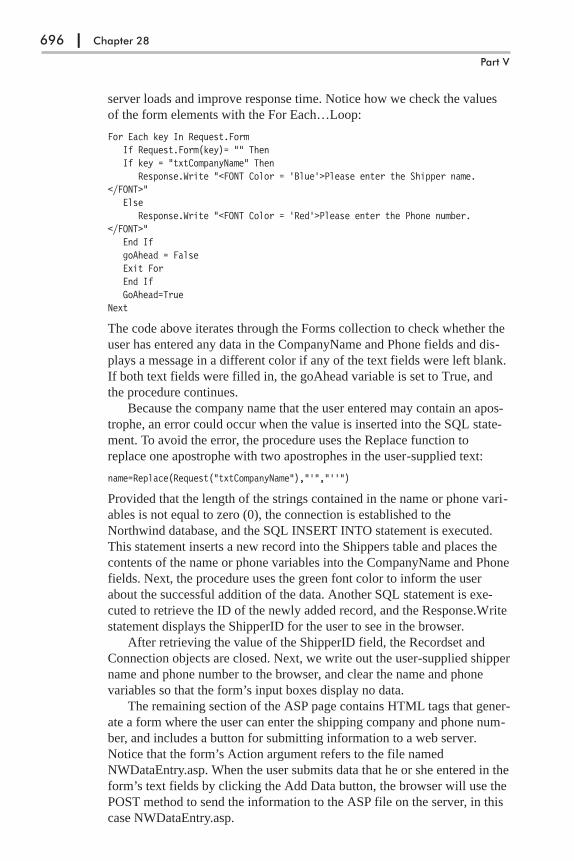
server loads and improve response time. Notice how we check the values
of the form elements with the For Each…Loop:
For Each key In Request.FormIf Request.Form(key)= "" ThenIf key = "txtCompanyName" Then
Response.Write "<FONT Color = 'Blue'>Please enter the Shipper name.</FONT>"
ElseResponse.Write "<FONT Color = 'Red'>Please enter the Phone number.
</FONT>"End IfgoAhead = FalseExit ForEnd IfGoAhead=True
Next
The code above iterates through the Forms collection to check whether the
user has entered any data in the CompanyName and Phone fields and dis-
plays a message in a different color if any of the text fields were left blank.
If both text fields were filled in, the goAhead variable is set to True, and
the procedure continues.
Because the company name that the user entered may contain an apos-
trophe, an error could occur when the value is inserted into the SQL state-
ment. To avoid the error, the procedure uses the Replace function to
replace one apostrophe with two apostrophes in the user-supplied text:
name=Replace(Request("txtCompanyName"),"'","''")
Provided that the length of the strings contained in the name or phone vari-
ables is not equal to zero (0), the connection is established to the
Northwind database, and the SQL INSERT INTO statement is executed.
This statement inserts a new record into the Shippers table and places the
contents of the name or phone variables into the CompanyName and Phone
fields. Next, the procedure uses the green font color to inform the user
about the successful addition of the data. Another SQL statement is exe-
cuted to retrieve the ID of the newly added record, and the Response.Write
statement displays the ShipperID for the user to see in the browser.
After retrieving the value of the ShipperID field, the Recordset and
Connection objects are closed. Next, we write out the user-supplied shipper
name and phone number to the browser, and clear the name and phone
variables so that the form’s input boxes display no data.
The remaining section of the ASP page contains HTML tags that gener-
ate a form where the user can enter the shipping company and phone num-
ber, and includes a button for submitting information to a web server.
Notice that the form’s Action argument refers to the file named
NWDataEntry.asp. When the user submits data that he or she entered in the
form’s text fields by clicking the Add Data button, the browser will use the
POST method to send the information to the ASP file on the server, in this
case NWDataEntry.asp.
696 | Chapter 28
Part V

An ASP file can create a form that posts information to itself (as shown
in this example) or to another ASP file. By using the POST method, you
can send an almost unlimited number of characters to the web server. The
POST method is also more secure than the GET method because the infor-
mation passed to the server does not appear in the browser’s address bar.
(Refer to the previous hands-on exercise for an example of processing form
input with the GET method.) Notice how the values of the name and phone
variables are retrieved:
Value = "<%=name%">Value = "<%=phone%">
2. Save the file as C:\Learn_ASP_Classic\NWDataEntry.asp.
3. Close Notepad.
4. In your browser’s address bar, type http://localhost/NorthDB/NWData-
Entry.asp and press Enter or click Go.
5. Enter the data as shown in Figure 28-15 and press the Add Data button.
When you enter data in the Shipper Name text box and click the Add Data
button, the browser displays the data that was inserted into the Shippers
table and allows you to make more additions by clearing out previous val-
ues from input boxes (Figure 28-16).
Access and Active Server Pages | 697
Taking Your VBA Programming Skills to the Web
Figure 28-15: When you request the ASP page prepared in Hands-On28-11, you are presented with the data entry screen for the Northwinddatabase Shippers table.
Figure 28-16: Noticethat the browser dis-plays the Shipper ID ofthe newly added recordas well as the dataentered in the textboxes prior to pressingthe Add Data button(see Figure 28-15). Youcan continue addingnew data by typing newvalues into the textboxes and clicking theAdd Data button.

Modifying a RecordYou can display a record in a browser and allow the user to edit the data.
Changes made to the data can then be submitted to the server for processing.
The easiest and quickest way to modify a record is by executing the SQL
UPDATE statement.
The following hands-on exercise creates an ASP page where the user can
select a product to update from a drop-down list. After clicking on the Retrieve
Data button, the selected product’s current price and units in stock are retrieved
from the Products table. The retrieved data is placed in text boxes inside a
table structure. The user can edit the data in the retrieved fields and insert the
changes to the database table by clicking the Update Data button.
�Hands-On 28-12: Creating a Page for Data Modification
1. Start Windows Notepad and enter the ASP code as shown below, or copy
and paste this code from the C:\Acc07_HandsOn\UpdateProduct.txt file.
<%@ Language=VBScript %><HTML><HEAD><TITLE>Update Product Information</TITLE></HEAD><%Set conn = Server.CreateObject("ADODB.Connection")
conn.Open "DRIVER=Microsoft Access Driver (*.mdb);DBQ=" & _"C:\Learn_ASP_Classic\Northwind.mdb"
set rst = Server.CreateObject("ADODB.Recordset")If Len(Request.QueryString("ProductID")) <> 0 Then
strSQL="SELECT * FROM Products WHERE ProductID="rst.Open(strSQL & Request.QueryString("ProductID")), conn, 0, 1If Not rst.EOF Then
rst.MoveFirst%><BODY><FORM ACTION="UpdateProduct.asp" METHOD="POST" id=form2 name=form2><INPUT Type=hidden Name=txtProductID Value="<% =rst("ProductID") %>"><INPUT Type=hidden Name=txtProductName Value="<% =rst("ProductName") %>">
<CENTER><H4><% =rst("ProductName") %> (Product ID=<%=rst("ProductID")%>)</H></CENTER><P>
<TABLE BORDER=0 CELLSPACING=4 CELLPADDING=4><TR>
<TD WIDTH=200 COLSPAN="2"><FONT COLOR=Blue>Unit Price ($):</FONT></TD><TD BGCOLOR="#00FF00"><INPUT TYPE="text" NAME="UnitPrice" VALUE="<% =rst("UnitPrice") %>"</TD>
</TR><TR>
<TD COLSPAN="2"><FONT COLOR=Blue>Units In Stock:</FONT></TD><TD BGCOLOR=#00FF00"><INPUT TYPE="text" NAME="UnitsInStock" VALUE="<%=rst("UnitsInStock")
%>"</TD></TR><TR>
<TD COLSPAN="2"></TD>
698 | Chapter 28
Part V

<TD><INPUT type="submit" value="Update Data" id=submit2name=submit2></TD>
</TR></TABLE><HR></FORM><%
End Ifrst.Close
End IfIf Not IsEmpty(Request.Form("submit2")) Then
If Request.Form("UnitPrice")= "" or _Request.Form("UnitsInStock") = "" ThenResponse.Write "<B><Font Color=Red>You cannot leave any fields blank." _
& "Please Try Again</B></FONT>"Else
strSQL = "UPDATE Products SET " _& "UnitPrice = '" & Request.Form("UnitPrice")& "', " _& "UnitsInStock = '" & Request.Form("UnitsInStock")& "' " _& "WHERE ProductID = " & Request.Form("txtProductID")
conn.Execute strSQLResponse.Write "The following Update statement was executed for <B>" _
& Request.Form("txtProductName") &"</B><BR>"Response.Write "<PRE>" & strSQL & "</PRE><BR>"End If
End IfstrSql = "SELECT * FROM [Products] ORDER BY [ProductName]"Set rst = conn.Execute (strSql)If Not rst.EOF Then
rst.MoveFirst%><FORM ACTION="UpdateProduct.asp" METHOD="GET" ><TABLE><TR>
<TD><B>Select a Product to Update</B></TD><TD><SELECT Name="ProductID"><OPTION></OPTION>
<%Do While Not rst.EOFResponse.Write "<OPTION Value='" & rst("ProductID") & "'> " & _
rst("ProductName") & "</OPTION>"rst.MoveNextLoopEnd Ifrst.Closeset rst = Nothingconn.Closeset conn = Nothing
%><TD><INPUT type="submit" value="Retrieve Data" id=submit1 name=submit1></TD></SELECT></TD></TR></TABLE><HR></FORM></BODY></HTML>
Access and Active Server Pages | 699
Taking Your VBA Programming Skills to the Web
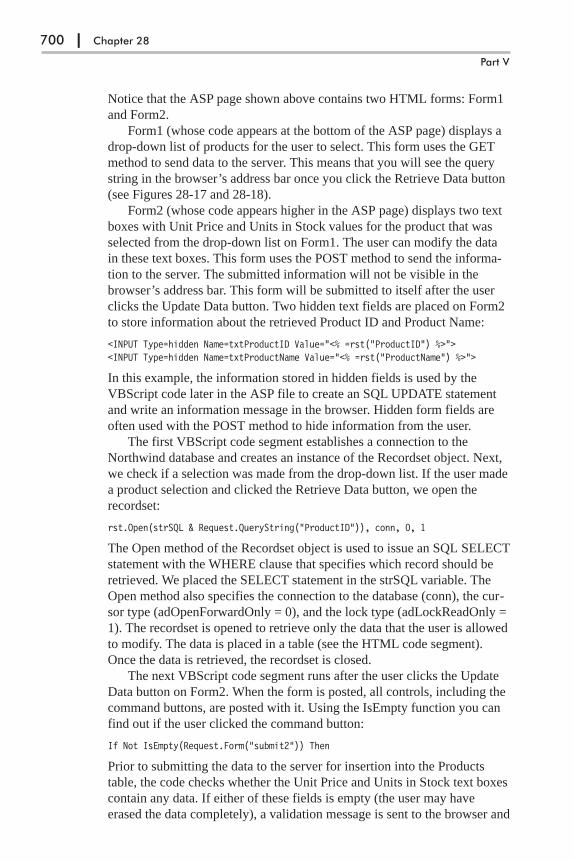
Notice that the ASP page shown above contains two HTML forms: Form1
and Form2.
Form1 (whose code appears at the bottom of the ASP page) displays a
drop-down list of products for the user to select. This form uses the GET
method to send data to the server. This means that you will see the query
string in the browser’s address bar once you click the Retrieve Data button
(see Figures 28-17 and 28-18).
Form2 (whose code appears higher in the ASP page) displays two text
boxes with Unit Price and Units in Stock values for the product that was
selected from the drop-down list on Form1. The user can modify the data
in these text boxes. This form uses the POST method to send the informa-
tion to the server. The submitted information will not be visible in the
browser’s address bar. This form will be submitted to itself after the user
clicks the Update Data button. Two hidden text fields are placed on Form2
to store information about the retrieved Product ID and Product Name:
<INPUT Type=hidden Name=txtProductID Value="<% =rst("ProductID") %>"><INPUT Type=hidden Name=txtProductName Value="<% =rst("ProductName") %>">
In this example, the information stored in hidden fields is used by the
VBScript code later in the ASP file to create an SQL UPDATE statement
and write an information message in the browser. Hidden form fields are
often used with the POST method to hide information from the user.
The first VBScript code segment establishes a connection to the
Northwind database and creates an instance of the Recordset object. Next,
we check if a selection was made from the drop-down list. If the user made
a product selection and clicked the Retrieve Data button, we open the
recordset:
rst.Open(strSQL & Request.QueryString("ProductID")), conn, 0, 1
The Open method of the Recordset object is used to issue an SQL SELECT
statement with the WHERE clause that specifies which record should be
retrieved. We placed the SELECT statement in the strSQL variable. The
Open method also specifies the connection to the database (conn), the cur-
sor type (adOpenForwardOnly = 0), and the lock type (adLockReadOnly =
1). The recordset is opened to retrieve only the data that the user is allowed
to modify. The data is placed in a table (see the HTML code segment).
Once the data is retrieved, the recordset is closed.
The next VBScript code segment runs after the user clicks the Update
Data button on Form2. When the form is posted, all controls, including the
command buttons, are posted with it. Using the IsEmpty function you can
find out if the user clicked the command button:
If Not IsEmpty(Request.Form("submit2")) Then
Prior to submitting the data to the server for insertion into the Products
table, the code checks whether the Unit Price and Units in Stock text boxes
contain any data. If either of these fields is empty (the user may have
erased the data completely), a validation message is sent to the browser and
700 | Chapter 28
Part V

the user must request the product again from the drop-down list if he or she
wants to continue. On the other hand, if there is data in both text fields
(even if the user has not made any changes to the original data), clicking
the Update button on the form will send the SQL UPDATE statement to the
server. As a result, the user will see the name of the product he or she
updated together with the SQL UPDATE statement that was executed.
The last code segment creates a recordset to populate a drop-down list
with product names. You should already be familiar with this code as it
was demonstrated in the previous hands-on exercise.
2. Save the file as C:\Learn_ASP_Classic\UpdateProduct.asp.
3. Close Notepad.
4. In your browser’s address bar, type http://localhost/NorthDB/UpdatePro-
duct.asp and press Enter or click Go.
5. Select the product as shown in Figure 28-17 and click the Retrieve Data
button.
Access and Active Server Pages | 701
Taking Your VBA Programming Skills to the Web
Figure 28-17: When you request the UpdateProduct.asp file in yourbrowser, a screen appears with a drop-down list where you can select aproduct you want to update.
Figure 28-18: When you select a product from the drop-down list and click theRetrieve Data button, the selected product’s unit price and units in stock dataare retrieved from the Products table and placed at the top of the page.

The user can modify the original data in the text boxes and click the Update
Data button. If the user clicks the Update Data button when information is
missing in the Unit Price or Units In Stock text boxes, he is advised to enter
the data and try again. If the user clicks the Update Data button while the Unit
Price and Units In Stock text boxes are not empty, the UPDATE statement is
executed on the server and the submitted changes are inserted in the Products
table. The user sees the page shown in Figure 28-19 in confirmation of the
update request.
Deleting a RecordWhen you need to delete a record, you can use the SQL DELETE statement.
When writing a VBScript to handle the delete request, it’s always a good idea
to check for the following conditions:
� Did the user specify a record to delete? The user may have pressed the sub-
mit button without typing the record ID in the provided text box.
� Does the provided record ID exist in the table? This question is particularly
important when the user is expected to type the record ID in a text box
instead of selecting it from the drop-down list.
� What happens when the record the user wants to delete has related records
in other tables? As you know, Microsoft Access will not allow you to
delete records when the referential integrity rules are enforced.
The next hands-on exercise demonstrates how to delete a shipper from the
Shippers table.
�Hands-On 28-13: Creating Pages that Allow Record Deletions
This hands-on exercise uses two files for performing the delete operation. The
first file is the HTML form that will submit the data to the second file, which is
the ASP page.
702 | Chapter 28
Part V
Figure 28-19: After submitting the product modification, the user sees the con-firmation page with the UPDATE statement that was executed and is given anopportunity to continue by retrieving other products for modification.

1. Start Windows Notepad and enter the ASP code as shown below, or copy
and paste this code from the C:\Acc07_HandsOn\DeleteShipper.txt file.
<HTML><HEAD><TITLE>DELETE DEMO</TITLE></HEAD><BODY><FORM Name=DeleteShipperForm Method=GET Action="DeleteShipper.asp"<INPUT Type="Hidden" Name="Action" Value="Delete">Please enter the Shipper ID you want to delete<INPUT Type="Text" Size="6" Name="ShipperID"><INPUT Type="Submit" Name="Delete" Value="Submit"></FORM></BODY></HTML>
In the above HTML page, the form’s Action argument will call the ASP
page named DeleteShipper.asp when the user clicks the Submit button (see
Figure 28-20).
2. Save the file as C:\Learn_ASP_Classic\DeleteShipper.html.
3. Close Notepad.
4. Start Windows Notepad and enter the ASP code shown below, or copy
and paste this code from C:\Acc07_HandsOn\DeleteShipper2.txt.
<%@ Language=VBScript %><%
Set conn = Server.CreateObject("ADODB.Connection")mydbFile=Server.MapPath("Northwind.mdb")conn.Open "Driver={Microsoft Access Driver (*.mdb)}; DBQ=" & mydbFile & ";"myShipper = Cstr(Request.QueryString("ShipperID"))If myShipper <>"" Then
Set rst = Server.CreateObject("ADODB.Recordset")rst.Open "Shippers", conn, 3rst.Find "ShipperID = " & myShipperIf rst.EOF Then
Response.Write "The Shipper ID" & myShipper & " does not exist."Else
On Error Resume Nextconn.Execute "DELETE * FROM Shippers WHERE ShipperID = " & _
myShipperIf conn.Errors.Count > 0 ThenResponse.Write "Error Number: " & err.Number & "<P>"Response.Write "Error Description: " & err.Description _
& "<P>"ElseResponse.Write "<H2>The Shipper ID " & myShipper & _
" was deleted.</H2>"End Ifrst.closeSet rst = Nothing
End IfElse
Response.Write "The Shipper ID was not supplied. Cannot Delete."
Access and Active Server Pages | 703
Taking Your VBA Programming Skills to the Web
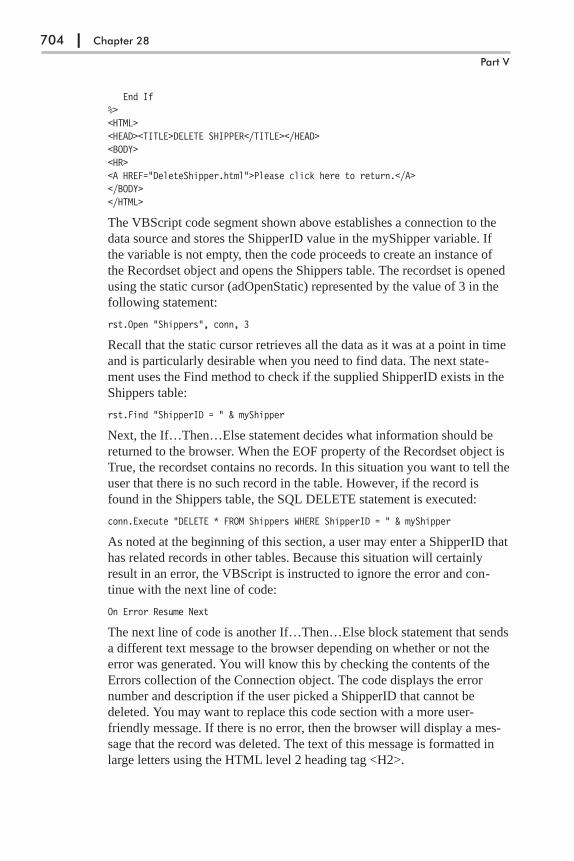
End If%><HTML><HEAD><TITLE>DELETE SHIPPER</TITLE></HEAD><BODY><HR><A HREF="DeleteShipper.html">Please click here to return.</A></BODY></HTML>
The VBScript code segment shown above establishes a connection to the
data source and stores the ShipperID value in the myShipper variable. If
the variable is not empty, then the code proceeds to create an instance of
the Recordset object and opens the Shippers table. The recordset is opened
using the static cursor (adOpenStatic) represented by the value of 3 in the
following statement:
rst.Open "Shippers", conn, 3
Recall that the static cursor retrieves all the data as it was at a point in time
and is particularly desirable when you need to find data. The next state-
ment uses the Find method to check if the supplied ShipperID exists in the
Shippers table:
rst.Find "ShipperID = " & myShipper
Next, the If…Then…Else statement decides what information should be
returned to the browser. When the EOF property of the Recordset object is
True, the recordset contains no records. In this situation you want to tell the
user that there is no such record in the table. However, if the record is
found in the Shippers table, the SQL DELETE statement is executed:
conn.Execute "DELETE * FROM Shippers WHERE ShipperID = " & myShipper
As noted at the beginning of this section, a user may enter a ShipperID that
has related records in other tables. Because this situation will certainly
result in an error, the VBScript is instructed to ignore the error and con-
tinue with the next line of code:
On Error Resume Next
The next line of code is another If…Then…Else block statement that sends
a different text message to the browser depending on whether or not the
error was generated. You will know this by checking the contents of the
Errors collection of the Connection object. The code displays the error
number and description if the user picked a ShipperID that cannot be
deleted. You may want to replace this code section with a more user-
friendly message. If there is no error, then the browser will display a mes-
sage that the record was deleted. The text of this message is formatted in
large letters using the HTML level 2 heading tag <H2>.
704 | Chapter 28
Part V
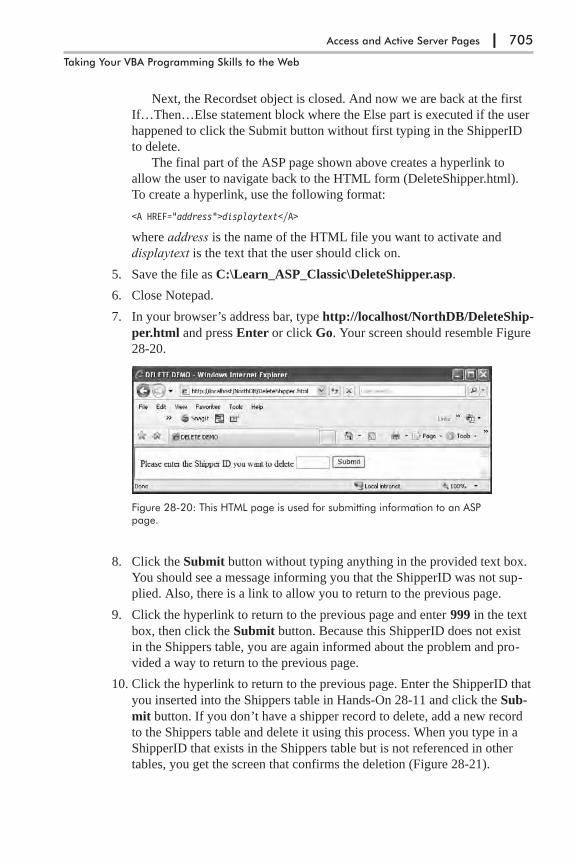
Next, the Recordset object is closed. And now we are back at the first
If…Then…Else statement block where the Else part is executed if the user
happened to click the Submit button without first typing in the ShipperID
to delete.
The final part of the ASP page shown above creates a hyperlink to
allow the user to navigate back to the HTML form (DeleteShipper.html).
To create a hyperlink, use the following format:
<A HREF="address">displaytext</A>
where address is the name of the HTML file you want to activate and
displaytext is the text that the user should click on.
5. Save the file as C:\Learn_ASP_Classic\DeleteShipper.asp.
6. Close Notepad.
7. In your browser’s address bar, type http://localhost/NorthDB/DeleteShip-
per.html and press Enter or click Go. Your screen should resemble Figure
28-20.
8. Click the Submit button without typing anything in the provided text box.
You should see a message informing you that the ShipperID was not sup-
plied. Also, there is a link to allow you to return to the previous page.
9. Click the hyperlink to return to the previous page and enter 999 in the text
box, then click the Submit button. Because this ShipperID does not exist
in the Shippers table, you are again informed about the problem and pro-
vided a way to return to the previous page.
10. Click the hyperlink to return to the previous page. Enter the ShipperID that
you inserted into the Shippers table in Hands-On 28-11 and click the Sub-
mit button. If you don’t have a shipper record to delete, add a new record
to the Shippers table and delete it using this process. When you type in a
ShipperID that exists in the Shippers table but is not referenced in other
tables, you get the screen that confirms the deletion (Figure 28-21).
Access and Active Server Pages | 705
Taking Your VBA Programming Skills to the Web
Figure 28-20: This HTML page is used for submitting information to an ASPpage.
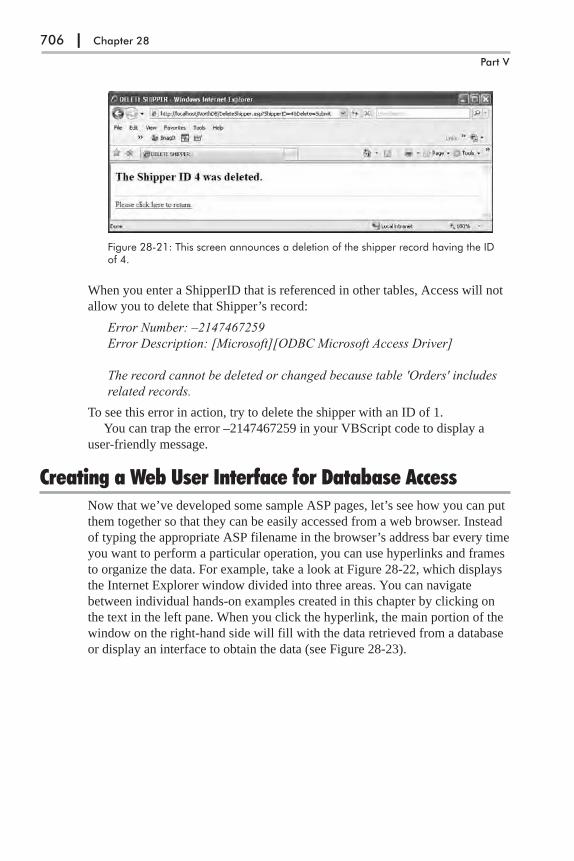
When you enter a ShipperID that is referenced in other tables, Access will not
allow you to delete that Shipper’s record:
Error Number: –2147467259
Error Description: [Microsoft][ODBC Microsoft Access Driver]
The record cannot be deleted or changed because table 'Orders' includes
related records.
To see this error in action, try to delete the shipper with an ID of 1.
You can trap the error –2147467259 in your VBScript code to display a
user-friendly message.
Creating a Web User Interface for Database AccessNow that we’ve developed some sample ASP pages, let’s see how you can put
them together so that they can be easily accessed from a web browser. Instead
of typing the appropriate ASP filename in the browser’s address bar every time
you want to perform a particular operation, you can use hyperlinks and frames
to organize the data. For example, take a look at Figure 28-22, which displays
the Internet Explorer window divided into three areas. You can navigate
between individual hands-on examples created in this chapter by clicking on
the text in the left pane. When you click the hyperlink, the main portion of the
window on the right-hand side will fill with the data retrieved from a database
or display an interface to obtain the data (see Figure 28-23).
706 | Chapter 28
Part V
Figure 28-21: This screen announces a deletion of the shipper record having the IDof 4.
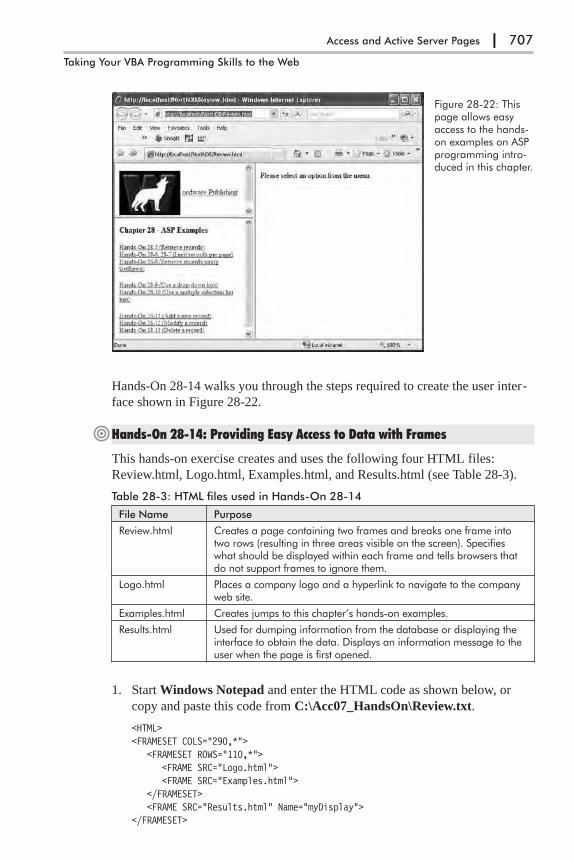
Hands-On 28-14 walks you through the steps required to create the user inter-
face shown in Figure 28-22.
�Hands-On 28-14: Providing Easy Access to Data with Frames
This hands-on exercise creates and uses the following four HTML files:
Review.html, Logo.html, Examples.html, and Results.html (see Table 28-3).
Table 28-3: HTML files used in Hands-On 28-14
File Name Purpose
Review.html Creates a page containing two frames and breaks one frame intotwo rows (resulting in three areas visible on the screen). Specifieswhat should be displayed within each frame and tells browsers thatdo not support frames to ignore them.
Logo.html Places a company logo and a hyperlink to navigate to the companyweb site.
Examples.html Creates jumps to this chapter’s hands-on examples.
Results.html Used for dumping information from the database or displaying theinterface to obtain the data. Displays an information message to theuser when the page is first opened.
1. Start Windows Notepad and enter the HTML code as shown below, or
copy and paste this code from C:\Acc07_HandsOn\Review.txt.
<HTML><FRAMESET COLS="290,*">
<FRAMESET ROWS="110,*"><FRAME SRC="Logo.html"><FRAME SRC="Examples.html">
</FRAMESET><FRAME SRC="Results.html" Name="myDisplay">
</FRAMESET>
Access and Active Server Pages | 707
Taking Your VBA Programming Skills to the Web
Figure 28-22: Thispage allows easyaccess to the hands-on examples on ASPprogramming intro-duced in this chapter.
<NOFRAMES>This page requires frames to be viewed.</NOFRAMES></HTML>
The HTML code shown above demonstrates how to divide a page into sev-
eral areas by using frames. Each frame is controlled by its own HTML file.
You create a frame by using the HTML <FRAMESET> and
<FRAME> tags with various parameters. A frame can contain other
frames. The page shown in Figure 28-22 has two frames. The left frame is
broken into two rows.
The statement:
<FRAMESET COLS="290",*">
divides the page into two columns. The left-hand column is 290 pixels
wide, and the right-hand column occupies the remainder of the screen
(denoted by the asterisk). A frameset can contain both frames and other
framesets.
Next, the left-hand column is divided into two rows, like this:
<FRAMESET ROWS="110",*">
The top row is 110 pixels high, and the bottom row occupies the remaining
portion of the frame. The top frame points to the Logo.html file. The
source file for the lower frame is Examples.html:
<FRAME SRC="Logo.html"><FRAME SRC="Examples.html">
The two <FRAME> tags provide the information about each frame. The
SRC attribute defines the source data for the frame.
Next, we define the source data for the frame on the right-hand side:
<FRAME SRC="Results.html" Name="myDisplay">
The Results.html file is created later in this hands-on exercise. We use the
Name attribute to define the frame’s name so that we can refer to this frame
later.
Each frameset ends with the </FRAMESET> tag. Browsers that do not
support frames will display an information message located between the
<NOFRAMES> and </NOFRAMES> tags:
<NOFRAMES>This page requires frames to be viewed.
</NOFRAMES>
2. Save the file as C:\Learn_ASP_Classic\Review.html.
3. Choose File | New to create a new document in Notepad.
4. Enter the HTML code as shown below, or copy and paste this code from
the C:\Acc07_HandsOn\Logo.txt file.
<HTML><BODY>
708 | Chapter 28
Part V
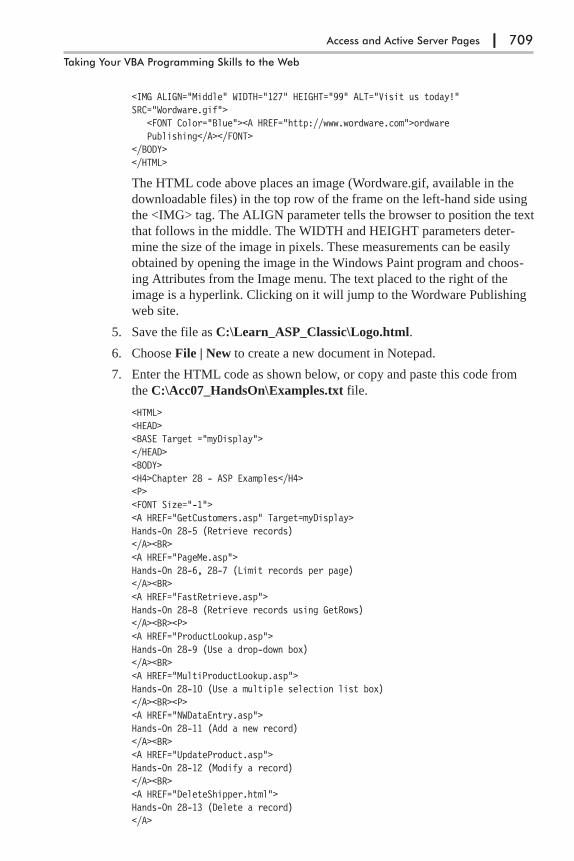
<IMG ALIGN="Middle" WIDTH="127" HEIGHT="99" ALT="Visit us today!"SRC="Wordware.gif">
<FONT Color="Blue"><A HREF="http://www.wordware.com">ordwarePublishing</A></FONT>
</BODY></HTML>
The HTML code above places an image (Wordware.gif, available in the
downloadable files) in the top row of the frame on the left-hand side using
the <IMG> tag. The ALIGN parameter tells the browser to position the text
that follows in the middle. The WIDTH and HEIGHT parameters deter-
mine the size of the image in pixels. These measurements can be easily
obtained by opening the image in the Windows Paint program and choos-
ing Attributes from the Image menu. The text placed to the right of the
image is a hyperlink. Clicking on it will jump to the Wordware Publishing
web site.
5. Save the file as C:\Learn_ASP_Classic\Logo.html.
6. Choose File | New to create a new document in Notepad.
7. Enter the HTML code as shown below, or copy and paste this code from
the C:\Acc07_HandsOn\Examples.txt file.
<HTML><HEAD><BASE Target ="myDisplay"></HEAD><BODY><H4>Chapter 28 - ASP Examples</H4><P><FONT Size="-1"><A HREF="GetCustomers.asp" Target=myDisplay>Hands-On 28-5 (Retrieve records)</A><BR><A HREF="PageMe.asp">Hands-On 28-6, 28-7 (Limit records per page)</A><BR><A HREF="FastRetrieve.asp">Hands-On 28-8 (Retrieve records using GetRows)</A><BR><P><A HREF="ProductLookup.asp">Hands-On 28-9 (Use a drop-down box)</A><BR><A HREF="MultiProductLookup.asp">Hands-On 28-10 (Use a multiple selection list box)</A><BR><P><A HREF="NWDataEntry.asp">Hands-On 28-11 (Add a new record)</A><BR><A HREF="UpdateProduct.asp">Hands-On 28-12 (Modify a record)</A><BR><A HREF="DeleteShipper.html">Hands-On 28-13 (Delete a record)</A>
Access and Active Server Pages | 709
Taking Your VBA Programming Skills to the Web

</FONT></P></BODY></HTML>
The code in the Examples.txt file is straightforward. It contains a set of
jumps to different hands-on examples. Each of these examples has a corre-
sponding ASP file in the Learn_ASP_Classic folder. To control where the
requested information should be displayed, use the <BASE> tag:
<BASE Target="myDisplay">
The Target attribute is set to the name of the frame where the information
should appear. When you place the <BASE Target> tag at the beginning of
the file, all of the links will display in the same frame.
Here’s how we create the first hyperlink:
<A HREF="GetCustomers.asp" Target=myDisplay>Hands-On 28-5 (Retrieve records)
</A><BR>
The <A> tag defines a hypertext link. The HREF attribute specifies the
associated URL. In other words, when the user clicks on the “Hands-On
28-5 (Retrieve records)” hyperlink, the GetCustomers.asp file will be
requested and its output will be placed in the specified target (right-hand
frame).
8. Save the file as C:\Learn_ASP_Classic\Examples.html.
9. Choose File | New to create a new document in Notepad.
10. Enter the HTML code as shown below, or copy and paste this code from
the C:\Acc07_HandsOn\Results.txt file.
<HTML>Please select an option from the menu.
</HTML>
11. Save the file as C:\Learn_ASP_Classic\Results.html. The Results.html
file will display the information text when the Review.html file is first
opened in the browser (refer to Figure 28-22 at the beginning of this
section).
12. Close Notepad.
You now should have four HTML files as outlined at the beginning of this
hands-on exercise. Let’s test out our user interface.
13. In your browser’s address bar, type http://localhost/NorthDB/
Review.html and press Enter or click Go. Your screen should resemble
Figure 28-22, shown earlier in this chapter.
14. Verify the results of each hands-on exercise by clicking on its link.
710 | Chapter 28
Part V
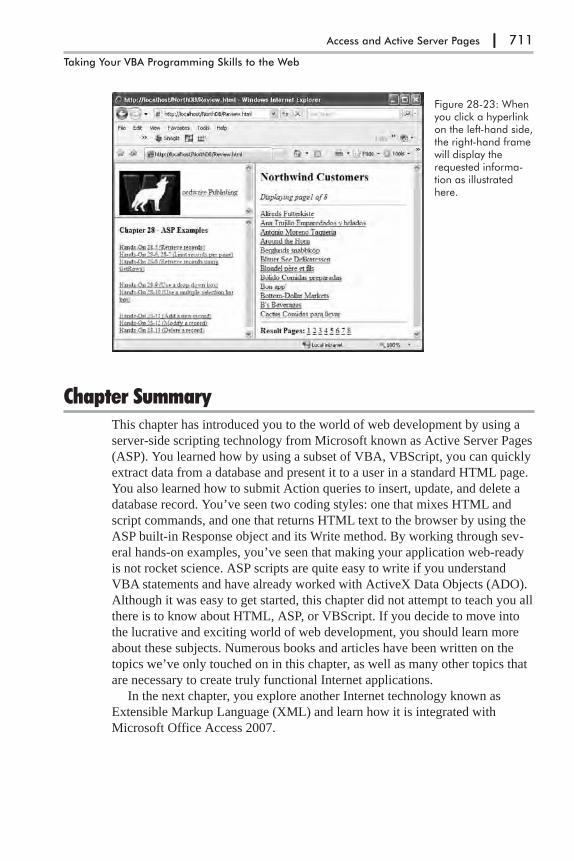
Chapter SummaryThis chapter has introduced you to the world of web development by using a
server-side scripting technology from Microsoft known as Active Server Pages
(ASP). You learned how by using a subset of VBA, VBScript, you can quickly
extract data from a database and present it to a user in a standard HTML page.
You also learned how to submit Action queries to insert, update, and delete a
database record. You’ve seen two coding styles: one that mixes HTML and
script commands, and one that returns HTML text to the browser by using the
ASP built-in Response object and its Write method. By working through sev-
eral hands-on examples, you’ve seen that making your application web-ready
is not rocket science. ASP scripts are quite easy to write if you understand
VBA statements and have already worked with ActiveX Data Objects (ADO).
Although it was easy to get started, this chapter did not attempt to teach you all
there is to know about HTML, ASP, or VBScript. If you decide to move into
the lucrative and exciting world of web development, you should learn more
about these subjects. Numerous books and articles have been written on the
topics we’ve only touched on in this chapter, as well as many other topics that
are necessary to create truly functional Internet applications.
In the next chapter, you explore another Internet technology known as
Extensible Markup Language (XML) and learn how it is integrated with
Microsoft Office Access 2007.
Access and Active Server Pages | 711
Taking Your VBA Programming Skills to the Web
Figure 28-23: Whenyou click a hyperlinkon the left-hand side,the right-hand framewill display therequested informa-tion as illustratedhere.
Chapter 29
XML Features in Access 2007
If you need to deliver information over the web or you want to store, share,
and exchange data between different applications regardless of the operating
system or programming language used, you need to become familiar with
Extensible Markup Language (XML). Imagine these two scenarios where your
combined knowledge of Access and XML will come in handy:
� You have just received a file in XML format and you need to merge its data
with an existing Access table, or perhaps create a new table.
� You have been asked to provide a data dump from your Access database in
XML format.
XML is a complex language that cannot be covered within the pages of one
chapter; however, this single chapter will get you started using XML with
Access 2007.
What Is XML?In the previous chapter you learned how HTML (HyperText Markup Lan-
guage) uses tags to format data on a web page. Like HTML, Extensible
Markup Language uses markup tags; however, its tags serve a different pur-
pose — they are used to describe data content. HTML uses fixed,
non-customizable tags to provide formatting instructions that should be applied
to the data. XML is extensible, which means that it is not restricted to a set of
predefined tags. XML allows you to invent your own tags in order to define
and describe data stored in a wide range of documents. The XML parser does
not care what tags you use; it only needs to be able to find the tags and confirm
that the XML document is well formed. When a document is well formed, it
follows the formatting rules for XML (see “What Is a Well-Formed XML
Document?” below).
712
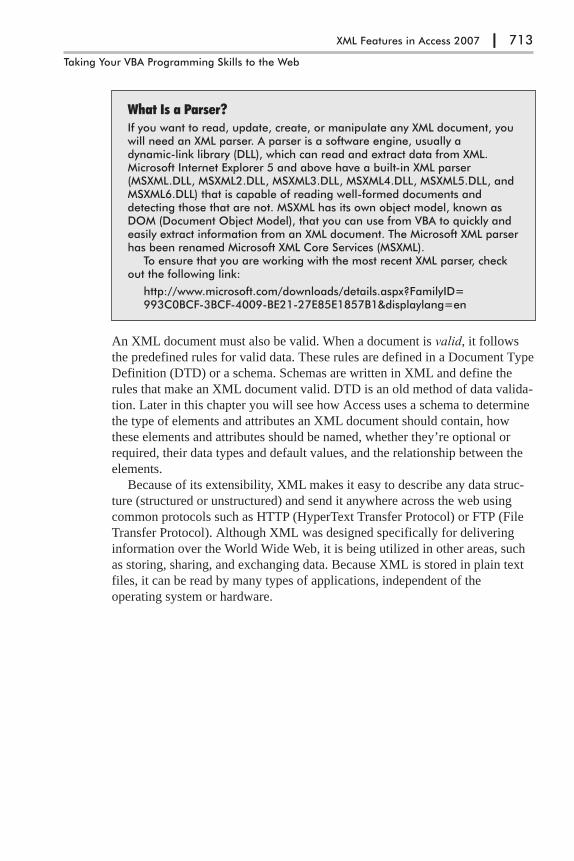
What Is a Parser?If you want to read, update, create, or manipulate any XML document, youwill need an XML parser. A parser is a software engine, usually adynamic-link library (DLL), which can read and extract data from XML.Microsoft Internet Explorer 5 and above have a built-in XML parser(MSXML.DLL, MSXML2.DLL, MSXML3.DLL, MSXML4.DLL, MSXML5.DLL, andMSXML6.DLL) that is capable of reading well-formed documents anddetecting those that are not. MSXML has its own object model, known asDOM (Document Object Model), that you can use from VBA to quickly andeasily extract information from an XML document. The Microsoft XML parserhas been renamed Microsoft XML Core Services (MSXML).
To ensure that you are working with the most recent XML parser, checkout the following link:
http://www.microsoft.com/downloads/details.aspx?FamilyID=993C0BCF-3BCF-4009-BE21-27E85E1857B1&displaylang=en
An XML document must also be valid. When a document is valid, it follows
the predefined rules for valid data. These rules are defined in a Document Type
Definition (DTD) or a schema. Schemas are written in XML and define the
rules that make an XML document valid. DTD is an old method of data valida-
tion. Later in this chapter you will see how Access uses a schema to determine
the type of elements and attributes an XML document should contain, how
these elements and attributes should be named, whether they’re optional or
required, their data types and default values, and the relationship between the
elements.
Because of its extensibility, XML makes it easy to describe any data struc-
ture (structured or unstructured) and send it anywhere across the web using
common protocols such as HTTP (HyperText Transfer Protocol) or FTP (File
Transfer Protocol). Although XML was designed specifically for delivering
information over the World Wide Web, it is being utilized in other areas, such
as storing, sharing, and exchanging data. Because XML is stored in plain text
files, it can be read by many types of applications, independent of the
operating system or hardware.
XML Features in Access 2007 | 713
Taking Your VBA Programming Skills to the Web
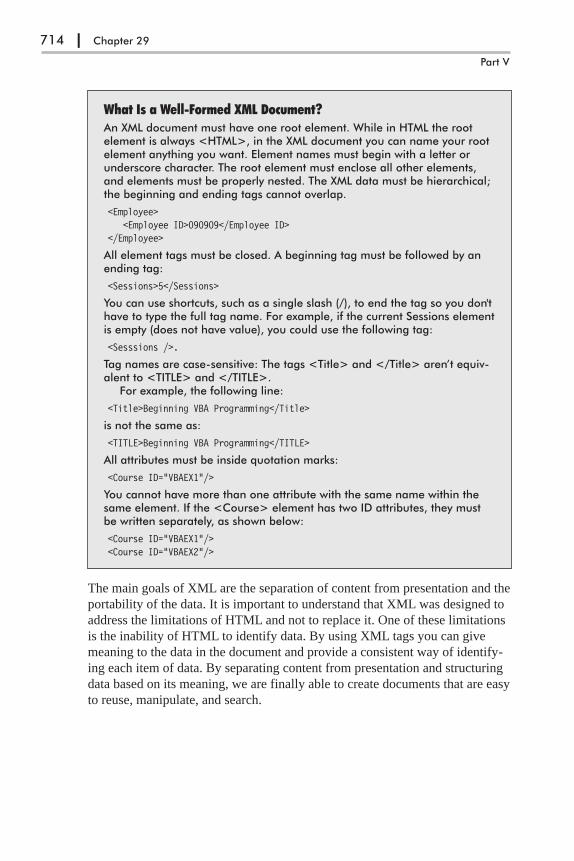
What Is a Well-Formed XML Document?An XML document must have one root element. While in HTML the rootelement is always <HTML>, in the XML document you can name your rootelement anything you want. Element names must begin with a letter orunderscore character. The root element must enclose all other elements,and elements must be properly nested. The XML data must be hierarchical;the beginning and ending tags cannot overlap.
<Employee><Employee ID>090909</Employee ID>
</Employee>
All element tags must be closed. A beginning tag must be followed by anending tag:
<Sessions>5</Sessions>
You can use shortcuts, such as a single slash (/), to end the tag so you don'thave to type the full tag name. For example, if the current Sessions elementis empty (does not have value), you could use the following tag:
<Sesssions />.
Tag names are case-sensitive: The tags <Title> and </Title> aren’t equiv-alent to <TITLE> and </TITLE>.
For example, the following line:
<Title>Beginning VBA Programming</Title>
is not the same as:
<TITLE>Beginning VBA Programming</TITLE>
All attributes must be inside quotation marks:
<Course ID="VBAEX1"/>
You cannot have more than one attribute with the same name within thesame element. If the <Course> element has two ID attributes, they mustbe written separately, as shown below:
<Course ID="VBAEX1"/><Course ID="VBAEX2"/>
The main goals of XML are the separation of content from presentation and the
portability of the data. It is important to understand that XML was designed to
address the limitations of HTML and not to replace it. One of these limitations
is the inability of HTML to identify data. By using XML tags you can give
meaning to the data in the document and provide a consistent way of identify-
ing each item of data. By separating content from presentation and structuring
data based on its meaning, we are finally able to create documents that are easy
to reuse, manipulate, and search.
714 | Chapter 29
Part V
XML Support in Access 2007Microsoft Access has supported XML since its 2002 version. In Access 2007
you can export and import XML data by using buttons available in the Import
and Export areas on the External Data tab or you can do this programmatically
with VBA. Additionally, Access 2007 has the capability to export related
tables to a single XML file. When importing XML data, you can create multi-
ple tables from a single XML document and schema. Unfortunately, the
parent-child relationships between the tables are not maintained; you must
create them yourself. You can also specify a custom schema during the export
or import of XML data.
Exporting XML DataYou can export tables, queries, forms, and/or reports to XML files from an
Access database (MDB or ACCDB) file or an Access project (ADP) file.
There is no XML support for macros and modules. When you export a form or
report, you actually export the data from the form or report’s underlying table
or query.
Access uses a special XML vocabulary known as ReportML for represent-
ing its objects as XML data. ReportML is an XML file that contains tags
describing properties, methods, events, and attributes of the Access object
being exported. This file is generated automatically by Access when you begin
the export process and is used by Access to generate the final output files.
To allow XML data to be viewed in browsers in a user-friendly format,
ReportML relies on the RPT2HTML4.xsl file, which is located in the \Program
Files\Microsoft Office\Office12\AccessWeb folder. This file is a rather compli-
cated stylesheet that contains formatting instructions. We examine stylesheets
later in this chapter.
After the formatting instructions contained in the stylesheet have been
applied to the XML file, the ReportML file is automatically deleted.
� Note: If you’d like to take a look at the content of the ReportML file, youmust tell Access not to delete it by default. This requires that you add the follow-ing entry to the Windows Registry:
HKEY_CURRENT_USER\Software\Microsoft\Office\12.0\Access\ReportML
Unless you are very familiar with using RegEdit to edit registry settings, do notattempt this task on your own. Once you make the Registry setting and completethe export to XML, you can open the ReportML file and look at its contents. Thisfile should have the name of the Access object you exported, followed by anunderscore and the word “report.” For example, if you exported the Shipperstable to an XML file, the ReportML name is Shippers_report.xml.
XML Features in Access 2007 | 715
Taking Your VBA Programming Skills to the Web
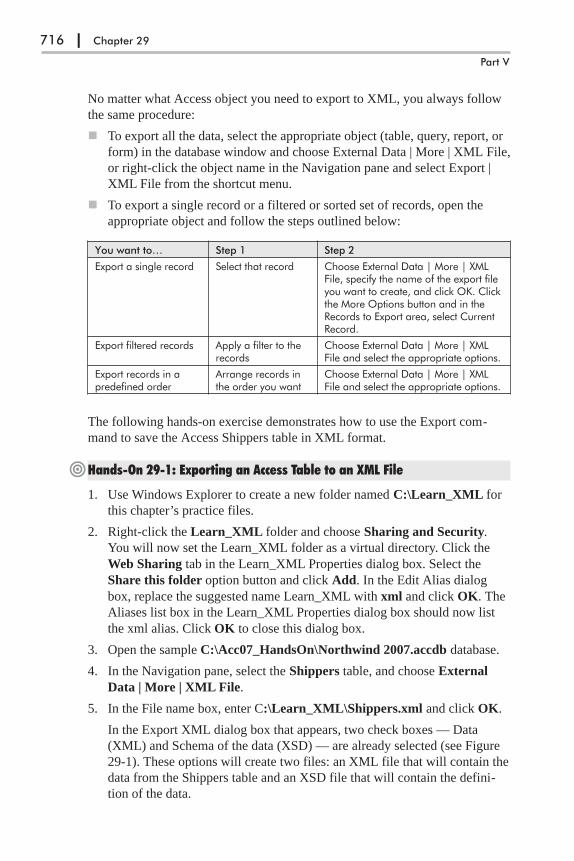
No matter what Access object you need to export to XML, you always follow
the same procedure:
� To export all the data, select the appropriate object (table, query, report, or
form) in the database window and choose External Data | More | XML File,
or right-click the object name in the Navigation pane and select Export |
XML File from the shortcut menu.
� To export a single record or a filtered or sorted set of records, open the
appropriate object and follow the steps outlined below:
You want to… Step 1 Step 2
Export a single record Select that record Choose External Data | More | XMLFile, specify the name of the export fileyou want to create, and click OK. Clickthe More Options button and in theRecords to Export area, select CurrentRecord.
Export filtered records Apply a filter to therecords
Choose External Data | More | XMLFile and select the appropriate options.
Export records in apredefined order
Arrange records inthe order you want
Choose External Data | More | XMLFile and select the appropriate options.
The following hands-on exercise demonstrates how to use the Export com-
mand to save the Access Shippers table in XML format.
�Hands-On 29-1: Exporting an Access Table to an XML File
1. Use Windows Explorer to create a new folder named C:\Learn_XML for
this chapter’s practice files.
2. Right-click the Learn_XML folder and choose Sharing and Security.
You will now set the Learn_XML folder as a virtual directory. Click the
Web Sharing tab in the Learn_XML Properties dialog box. Select the
Share this folder option button and click Add. In the Edit Alias dialog
box, replace the suggested name Learn_XML with xml and click OK. The
Aliases list box in the Learn_XML Properties dialog box should now list
the xml alias. Click OK to close this dialog box.
3. Open the sample C:\Acc07_HandsOn\Northwind 2007.accdb database.
4. In the Navigation pane, select the Shippers table, and choose External
Data | More | XML File.
5. In the File name box, enter C:\Learn_XML\Shippers.xml and click OK.
In the Export XML dialog box that appears, two check boxes — Data
(XML) and Schema of the data (XSD) — are already selected (see Figure
29-1). These options will create two files: an XML file that will contain the
data from the Shippers table and an XSD file that will contain the defini-
tion of the data.
716 | Chapter 29
Part V
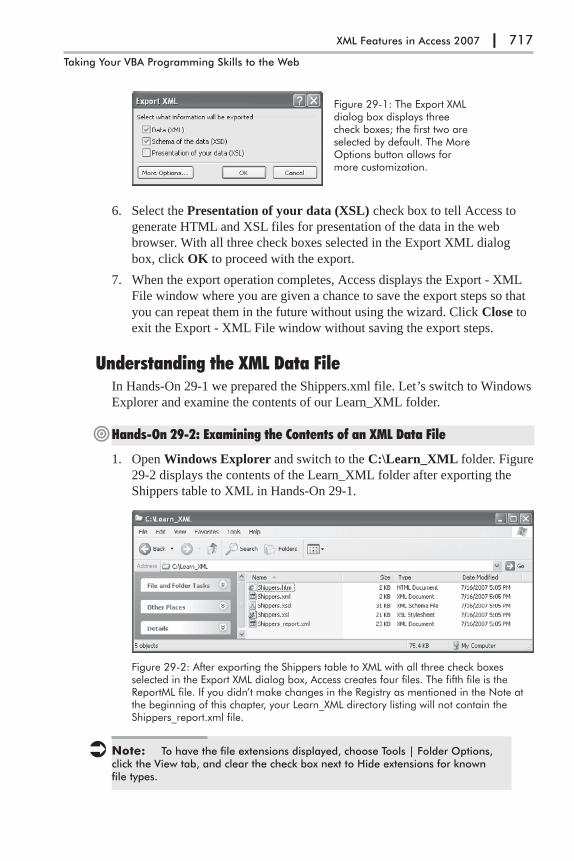
6. Select the Presentation of your data (XSL) check box to tell Access to
generate HTML and XSL files for presentation of the data in the web
browser. With all three check boxes selected in the Export XML dialog
box, click OK to proceed with the export.
7. When the export operation completes, Access displays the Export - XML
File window where you are given a chance to save the export steps so that
you can repeat them in the future without using the wizard. Click Close to
exit the Export - XML File window without saving the export steps.
Understanding the XML Data FileIn Hands-On 29-1 we prepared the Shippers.xml file. Let’s switch to Windows
Explorer and examine the contents of our Learn_XML folder.
�Hands-On 29-2: Examining the Contents of an XML Data File
1. Open Windows Explorer and switch to the C:\Learn_XML folder. Figure
29-2 displays the contents of the Learn_XML folder after exporting the
Shippers table to XML in Hands-On 29-1.
� Note: To have the file extensions displayed, choose Tools | Folder Options,click the View tab, and clear the check box next to Hide extensions for knownfile types.
XML Features in Access 2007 | 717
Taking Your VBA Programming Skills to the Web
Figure 29-1: The Export XMLdialog box displays threecheck boxes; the first two areselected by default. The MoreOptions button allows formore customization.
Figure 29-2: After exporting the Shippers table to XML with all three check boxesselected in the Export XML dialog box, Access creates four files. The fifth file is theReportML file. If you didn’t make changes in the Registry as mentioned in the Note atthe beginning of this chapter, your Learn_XML directory listing will not contain theShippers_report.xml file.
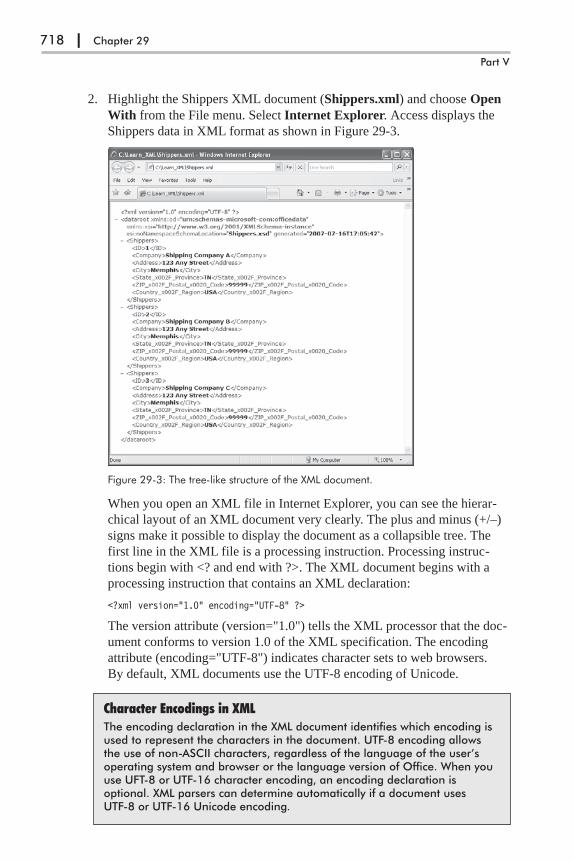
2. Highlight the Shippers XML document (Shippers.xml) and choose Open
With from the File menu. Select Internet Explorer. Access displays the
Shippers data in XML format as shown in Figure 29-3.
When you open an XML file in Internet Explorer, you can see the hierar-
chical layout of an XML document very clearly. The plus and minus (+/–)
signs make it possible to display the document as a collapsible tree. The
first line in the XML file is a processing instruction. Processing instruc-
tions begin with <? and end with ?>. The XML document begins with a
processing instruction that contains an XML declaration:
<?xml version="1.0" encoding="UTF-8" ?>
The version attribute (version="1.0") tells the XML processor that the doc-
ument conforms to version 1.0 of the XML specification. The encoding
attribute (encoding="UTF-8") indicates character sets to web browsers.
By default, XML documents use the UTF-8 encoding of Unicode.
Character Encodings in XMLThe encoding declaration in the XML document identifies which encoding isused to represent the characters in the document. UTF-8 encoding allowsthe use of non-ASCII characters, regardless of the language of the user’soperating system and browser or the language version of Office. When youuse UFT-8 or UTF-16 character encoding, an encoding declaration isoptional. XML parsers can determine automatically if a document usesUTF-8 or UTF-16 Unicode encoding.
718 | Chapter 29
Part V
Figure 29-3: The tree-like structure of the XML document.
The second line in the XML document is a dataroot element:
<dataroot xmlns:od="urn:schemas-microsoft-com:officedata"xmlns:xsi="http://www.w3.org/2001/XMLSchema-instance"xsi:noNamespaceSchemaLocation="Shippers.xsd" generated="2007-07-16T17:05:42">
The dataroot element tag defines two namespaces:
xmlns:od="urn:schemas-microsoft-com:officedata"xmlns:xsi="http://www.w3.org/2001/XMLSchema-instance"
A namespace is a collection of names in which each name is unique. The
XML namespaces are used in XML documents to ensure that element
names do not conflict with one another and are unique within a particular
set of names (a namespace).
For example, the <TITLE> tag will certainly have a different meaning
and content in an XML document generated from the Books table than the
<TITLE> element used to describe the courtesy titles of your customers. If
the two XML documents containing the <TITLE> tag were to be merged,
there would be an element name conflict. Therefore, in order to distinguish
between tags that have the same names but need to be processed differ-
ently, namespaces are used.
The attribute “xmlns” is an XML keyword for a namespace declaration.
The namespace is identified by a Uniform Resource Identifier (URI) —
either a Uniform Resource Locator (URL) or a Uniform Resource Name
(URN). The URI used as an XML namespace name is simply an identifier;
it is not guaranteed to point to anything. Most namespaces use URIs for the
namespace names because URIs are guaranteed to be unique. The use of a
namespace is identified via a name prefix. The prefix is mapped to a URI
to select a namespace.
For example, in the context of the Shippers.xml document, the od pre-
fix is associated with the urn:schemas-microsoft-com:officedata namespace
and the xsi prefix identifies the http://www.w3.org/2001/XMLSchema-
instance namespace. These prefixes may be associated with other
namespaces outside of this particular XML document. Notice that the pre-
fix is separated from the xmlns attribute with a colon and the URI is used
as the value of the attribute.
In addition to namespaces, the dataroot element specifies where to find
the schema. This is done by using two attributes: the location of a schema
file that defines the rules of an XML document and the date the file was
generated.
xsi:noNamespaceSchemaLocation="Shippers.xsd" generated="2007-07-16T17:05:42"
An XML document’s data is contained in elements. An element consists of
the following three parts:
� Start tag — Contains the element’s name (e.g., <ID>)
� Element data — The representation of actual data (e.g., 1)
� End tag — Contains the element’s name preceded by a slash (e.g.,
</ID>)
XML Features in Access 2007 | 719
Taking Your VBA Programming Skills to the Web
If you click on the minus sign in front of the dataroot element, you will
notice that the dataroot element encloses all the elements in the Access
XML file. Each element in a tree structure is called a node.
The dataroot node contains child nodes for each row of the Shippers
table. Notice that the table name is used for each element representing a
row. You can expand or collapse any row element by clicking on the plus
or minus sign (+/–) in front of the element tag name.
Within row elements, there is a separate element for each column (ID,
Company, and so on). Notice that each XML element contains a start tag,
the element data, and the end tag:
<Shippers><ID>1</ID><Company>Shipping Company A</Company><Address>123 Any Street</Address><City>Memphis</City><State_x002F_Province>TN</State_x002F_Province><ZIP_x002F_Postal_x0020_Code>99999</ZIP_x002F_Postal_x0020_Code><Country_x002F_Region>USA</Country_x002F_Region>
</Shippers>
The ID, Company, Address, City, State_x002F_Province, Zip_x002F_
Postal_x0020_Code, and Country_x002F_Region elements are children of
the Shippers element. In turn, each Shippers element is a child of the
dataroot element. XML documents can be nested to any depth as long as
each inner node is entirely contained within the outer node.
3. Close the browser containing the Shippers.xml file.
Understanding the XML Schema FileNow that you have familiarized yourself with the structure of an XML docu-
ment, let’s look at another type of XML file that was created by Access during
the export to XML process — the XML schema file (XSD).
Schema files describe XML data using the XML Schema Definition (XSD)
language and allow the XML parser to validate the XML document. An XML
document that conforms to the structure of the schema is said to be valid.
Here are some examples of the type of information that can be found in an
XML schema file:
� Elements that are allowed in a given XML document
� Data types of allowed elements
� Number of allowed occurrences of a given element
� Attributes that can be associated with a given element
� Default values for attributes
� Child elements of other elements
� The sequence and number of child elements
720 | Chapter 29
Part V
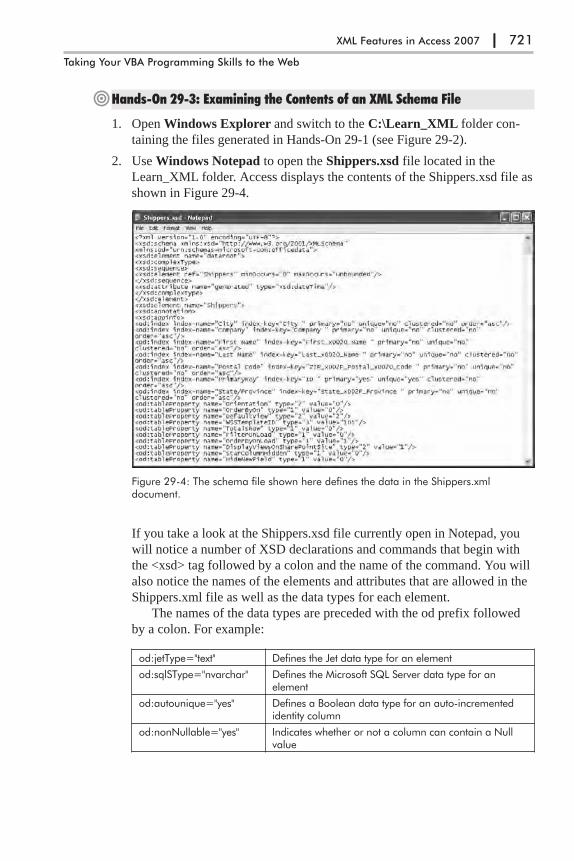
�Hands-On 29-3: Examining the Contents of an XML Schema File
1. Open Windows Explorer and switch to the C:\Learn_XML folder con-
taining the files generated in Hands-On 29-1 (see Figure 29-2).
2. Use Windows Notepad to open the Shippers.xsd file located in the
Learn_XML folder. Access displays the contents of the Shippers.xsd file as
shown in Figure 29-4.
If you take a look at the Shippers.xsd file currently open in Notepad, you
will notice a number of XSD declarations and commands that begin with
the <xsd> tag followed by a colon and the name of the command. You will
also notice the names of the elements and attributes that are allowed in the
Shippers.xml file as well as the data types for each element.
The names of the data types are preceded with the od prefix followed
by a colon. For example:
od:jetType="text" Defines the Jet data type for an element
od:sqlSType="nvarchar" Defines the Microsoft SQL Server data type for anelement
od:autounique="yes" Defines a Boolean data type for an auto-incrementedidentity column
od:nonNullable="yes" Indicates whether or not a column can contain a Nullvalue
XML Features in Access 2007 | 721
Taking Your VBA Programming Skills to the Web
Figure 29-4: The schema file shown here defines the data in the Shippers.xmldocument.

The schema file also specifies the number of times an element can be used
in a document based on the schema. This is done via the minOccurs and
maxOccurs attributes.
3. Close Notepad and the Shippers.xsd file.
� Note: To find out more about XML schemas, check out the following links:
http://www.w3.org/TR/xmlschema-0/http://www.w3.org/TR/xmlschema-1/http://www.w3.org/TR/xmlschema-2/
Understanding the XSL Transformation FilesWhen you examined the contents of the Shippers.xml document earlier in this
chapter you may have noticed that the file did not contain any formatting
instructions. Although it is easy to display the XML file in the browser, end
users expect to see documents nicely formatted. To meet their expectations, the
raw XML data is formatted with the Extensible Stylesheet Language (XSL).
When you exported the Shippers table to XML and selected the Presenta-
tion of your data (XSL) check box in the Export XML dialog box (see step 5 in
Hands-On 29-1), Access generated an XSL file. Extensible Stylesheet Lan-
guage is a transformation style language that uses XSL Transformations
(XSLT) to create templates that are applied to the source document data to cre-
ate the target document. The target document can be another XML document,
an HTML page, or even a text-based file.
XSL files include all the XSLT transforms that are needed to define how the
data is to be presented. Transformations allow you to change the order of ele-
ments and selectively process elements. Later in this chapter you will learn
how to create XSL files with XSLT transforms to display only selected fields
from the Access-generated XML documents. There is no limit to the number of
stylesheets that can be used with a particular XML document. By creating
more than one XSL file, you can present different formats of the same XML
document to various users.
�Hands-On 29-4: Examining the Contents of an XSL File
1. Double-click the Shippers.xsl file located in the C:\Learn_XML folder.
Access displays the contents of the Shippers.xsl file as shown in Figure
29-5.
722 | Chapter 29
Part V

When you scroll down through the contents of the Shippers.xsl file you
will notice a number of XSLT formatting elements such as <xsl:template>,
<xsl:for-each>, and <xsl:value-of>. You will also find in it many HTML
formatting instructions such as <head>, <title>, <body>, <table>,
<colgroup>, <col>, <tbody>, <tr>, <td>, <div>, and <strong>.
The first line of the stylesheet code declares that this is an XML docu-
ment that follows the XML 1.0 standard (version). An XSL document is a
type of XML document. While XML documents store data, XSL docu-
ments specify how the data should be displayed.
The second line declares the namespace to be used to identify the tags
in the XSL document. (See the “Understanding the XML Data File” section
earlier in this chapter for more information about namespaces.) The third
line specifies that HTML should be used to display the data.
The next line is the beginning of the formatting section. Before we look
at the XSLT tags, you need to know that XSL documents use templates to
perform transformations of XML documents. The XSL stylesheet can con-
tain one or more XSLT templates. You can think of templates as special
blocks of code that apply to one or more XML tags. Templates contain
rules for displaying a particular branch of elements in the XML document.
The use of templates is made possible via special formatting tags.
Notice that the Shippers.xsl file contains the <xsl:template> tag to
define a template for the entire document. The <xsl:template> element has
a match attribute. The value of the match attribute indicates the nodes (ele-
ments) for which this template is appropriate.
XML Features in Access 2007 | 723
Taking Your VBA Programming Skills to the Web
Figure 29-5: The XSL stylesheet document is just another XML documentthat contains HTML formatting instructions and XSLT formatting elementsfor transforming raw XML data into HTML.
For example, the special pattern “//” in the match attribute tells the XSL
processor that this is the template for the document root:
<xsl:template match="//dataroot"xmlns:xsl="http://www.w3.org/1999/XSL/Transform">
The template ends with the </xsl:template> closing tag. Following the defi-
nition of the template, standard HTML tags are used to format the docu-
ment. Next, the XSLT formatting instruction <xsl:for-each> tells the XSL
processor to do something every time it finds a pattern. The pattern follows
the select attribute.
For example:
<xsl:for-each select="Shippers">
tells the XML processor to loop through the <Shippers> elements. The
loop is closed with a closing loop tag:
</xsl:for-each>
The XSLT formatting instruction <xsl:value-of> tells the XSL processor to
retrieve the value of the tag specified in the select attribute. For example:
<xsl:value-of select="ID">
tells the XML processor to select the ID column. Because this formatting
instruction is located below the <xsl:for-each> tag, the XSL processor will
retrieve the value of the ID column for each Shippers element. The select
attribute uses the XML Path language (XPath) expression to locate the
child elements to be processed.
If you scroll down the Shippers.xsl file, you will also notice that
Access has generated a number of VBScript functions to evaluate expres-
sions. To prevent the XSL processor from parsing these functions, the
function section is placed within the CDATA directive.
2. Close the browser containing the Shippers.xsl file.
What Exactly Is XPath?XPath is a query language used to create expressions for finding data in theXML data file. These expressions can manipulate strings, numbers, andBoolean values. They can also be used to navigate an XML tree structureand process its elements with XSLT instructions. XPath is designed to beused by XSL Transformations (XSLT). With XPath expressions, you can easilyidentify and extract from the XML document specific elements (nodes)based on their type, name, values, or the relationship of a node to othernodes. When preparing stylesheets for transforming your XML documentsinto HTML, you will often use various XPath expressions in the selectattribute.
� Note: For more information about Extensible Stylesheet Language (XSL), visitthe following link: http://www.w3.org/TR/xsl/.
724 | Chapter 29
Part V

Viewing XML Documents Formatted with StylesheetsWhen you exported the Shippers table to XML format, Access applied XSLT
transforms to turn the XML data into an HTML file so that you can view for-
matted data in the browser (see Figure 29-6). To display the Access-generated
Shippers.htm file in your browser, simply type http://localhost/xml/Ship-
pers.htm and press Enter.
To display only the fields containing the data, export data to the XML file
based on a query. For example, the following SQL statement can be used to
create the Shippers query:
SELECT Shippers.[ID], Shippers.[Company], Shippers.[Address],Shippers.[State/Province], Shippers.[ZIP/Postal Code],Shippers.[Country/Region]FROM Shippers;
You can then right-click the Shippers query in the Navigation pane and choose
Export | XML File.
The resulting HTML file based on the Shippers query is shown in Figure
29-7.
XML Features in Access 2007 | 725
Taking Your VBA Programming Skills to the Web
Figure 29-6: This HTML file was created from XML data by using XSLT.
Figure 29-7: This HTML file was created from XML data by using XSLT.

Advanced XML Export OptionsWhen you exported the Shippers table to XML format, you may have noticed
the More Options button in the Export XML dialog box (see Figure 29-1 at the
beginning of this chapter). Pressing this button opens a window with three tabs
as shown in Figure 29-8. Each tab groups options for the types of XML objects
that you can export. The Data tab contains options for the XML document, the
Schema tab list options for the XSD document, and the Presentation tab pro-
vides options for generating the XSL document.
Data Export Options
The options shown on the Data tab (see Figure 29-8) control the data that is
exported to the XML documents. These options are grouped into three main
areas.
The Export Data section displays data that you may want to export. In this
particular scenario I requested to export the Customers table. Because this
table is directly related to the Orders table in the Northwind 2007 database, the
Orders table is displayed as a child node of Customers. The Orders table is
related to the Order Details table and so on. If you click on the plus sign in
front of the [Lookup Data] node, you will see the names of tables that provide
lookup information for the main tables. By clicking on the check box you may
export just the table that you originally requested or you can export the cus-
tomers’ data along with all the orders, and perhaps include lookup information.
Below the Export Data section is the Export Location area that shows the
filename for the XML document that will be created when you click the OK
button. You can change the location of this document by using the Browse but-
ton. Simply navigate to the folder where you want to save the XML file. You
can also change the name of the document by replacing the name shown in the
text box with another name.
The area to the right of the Export Data section allows you to specify which
records you want to export. This area contains three option buttons that allow
you to export all records, filtered records, or the current record. Notice that
only one option is enabled in Figure 29-8.
726 | Chapter 29
Part V
Figure 29-8: Use theData tab in the ExportXML window to setadvanced dataoptions.
If you highlight the table to export in the database window and then choose the
Export command on the File menu, only the All Records option button will be
enabled in the Records To Export section. Opening the table prior to choosing
the Export command tells Access to enable the All Records and Current record
option buttons. And if you open the table and apply a filter to the data, then
select the Export command, Access will enable the Apply existing filter option
button in addition to the other two buttons.
The other options on the Data tab are Apply Existing Sort, Transforms, and
Encoding. The Apply Existing Sort check box is enabled if the exported object
is open and a sort is applied. Access will export the data in the specified order.
By clicking on the Transforms button you can select a custom XSL transform
file to apply to the data during export. You can choose from the transforms you
have written or received with the XML data. Use the Encoding drop-down list
to select UTF-8 or UTF-16 encoding for the exported XML. The default is
UTF-8.
When you export an object from an Access database file, Access exports
static data. This means that the exported object is not automatically updated
when the data changes. If the data in the Access database has changed since
you exported an Access object to an XML data file, you will need to re-export
the object so the new data is available to the client application.
Exporting live data is supported by Access data projects. If the underlying
data in the database changes, the client application will receive the updated
data automatically when it connects to the SQL Server database. If you are
exporting an object from an Access Data Project (ADP) file that connects to
the SQL Server database, the Data tab will contain the Live Data check box
and the Virtual Directory text box above the Export Location section. The Vir-
tual Directory text box holds the URL of the folder on the server that the
export process should use. When exporting live data you must export the entire
Access object (you cannot select individual records). The Live Data option
also does not allow you to apply a transform during the export.
Schema Export Options
The options shown on the Schema tab (see Figure 29-9) control the way the
schema file for the object is exported. Advanced schema options are presented
in two sections: Export Schema and Export Location.
The Export Schema section has two check boxes. By selecting the Export
Schema check box you indicate that you want to export the object’s schema as
an XSD file. This selection is the same as choosing the Schema of the data
(XSD) option in the first Export XML dialog box (see Figure 29-1). The check
boxes under Export Schema allows you to specify whether you want to include
or ignore primary key and index information in the XSD schema file, and
whether to export all table and field properties (this is a new feature in Access
2007).
The Export Location section has two option buttons that allow you to spec-
ify whether you want the schema information to be embedded in the exported
XML data document or stored in a separate schema file. You can enter the
XML Features in Access 2007 | 727
Taking Your VBA Programming Skills to the Web

filename in the provided text box and specify the location of the schema file by
clicking the Browse button.
Presentation Export Options
The selections on the Presentation tab (see Figure 29-10) specify available
options for the XSL files. The Export Presentation (HTML 4.0 Sample XSL)
check box allows you to indicate whether you want to export the object’s pre-
sentation. Choose the Client (HTML) option in the Run from section if you
want the presentation to run on the client. Access will create an HTML file
with the script necessary to perform the transform. The script will be executed
on the client machine. While this selection reduces the load on the server, a cli-
ent application will need to download a couple of files (HTML document,
XML data file, and XSD schema file) to present the data in the browser. If the
XSL file is going to be placed on the web server and called from an ASP page,
choose the Server (ASP) option. By choosing this option, only the final HTML
is downloaded to the client.
If the exported presentation includes pictures, you can indicate whether to
include them in the output by clicking the appropriate option button in the
728 | Chapter 29
Part V
Figure 29-9: Use theSchema tab in theExport XML dialog boxto set advancedschema options.
Figure 29-10: Use thePresentation tab in theExport XML dialog boxto set advanced pre-sentation options.

Include report images section. If you choose to include the images, Access will
create separate image files and link them with the HTML file. By default, the
image files are stored in the Images folder of the main export folder. To place
them in another location, click the Browse button to specify the folder name.
The Export Location section allows you to specify the name and location of
the export files. When you export a presentation file, Access creates two files:
an XSL file that includes all the XSLT transforms needed to define how the
data is presented, and a simple HTML file that contains properly formatted
data from the exported object and not the raw data with XML tags. The HTML
file contains a snapshot of the data as it existed during the export process.
Applying XSLT Transforms to Exported DataWhen exporting Access data to XML format, you can use custom transforma-
tion files (XSL) to modify the data after you export it. Hands-On 29-5
demonstrates how to create a custom stylesheet for use after export. This
stylesheet assumes that for each customer in the Customers table we want to
display only selected columns from the Orders table. You learn how to apply
this custom stylesheet in Hands-On 29-6. Take a quick look at Figure 29-13
later in this chapter to see the final outcome.
�Hands-On 29-5: Creating a Custom Transformation File
1. Open Notepad and enter the statements as shown below, or copy and paste
this code from C:\Acc07_HandsOn\ListCustOrders.txt.
<?xml version="1.0" encoding="UTF-8"?><xsl:stylesheet version="1.0" xmlns:xsl="http://www.w3.org/1999/XSL/Transform"><xsl:output method="html" version="4.0" indent="yes"/>
<xsl:template match="dataroot"><html><body>
<h2><font name="Verdana">Orders by Customer</font></h2><p></p>
<xsl:apply-templates select="Customers"/></body></html>
</xsl:template>
<xsl:template match="Customers"><table>
<tr><td BgColor="#FFCC33">
<font color="#000000"><xsl:value-of select="CustomerID"/>
</font></td><td><b>
<xsl:value-of select="CompanyName"/></b></td>
XML Features in Access 2007 | 729
Taking Your VBA Programming Skills to the Web

</tr></table><table cellpadding="5" cellspacing="5">
<tr BgColor="black"><td bgcolor="black" width="10px"></td><td><font color="white" size="1">Order ID</font></td><td><font color="white" size="1">Order Date</font></td><td><font color="white" size="1">Shipped Date</font></td><td><font color="white" size="1">Required Date</font></td><td><font color="white" size="1">Freight</font></td>
</tr><xsl:apply-templates select="Orders"/>
</table></xsl:template>
<xsl:template match="Orders"><tr>
<td bgcolor="black" width="10px"></td><td><xsl:value-of select="OrderID"/></td><td><xsl:value-of select="substring(OrderDate, 1, 10)"/></td><td><xsl:value-of select="substring(ShippedDate, 1, 10)"/></td><td><xsl:value-of select="substring(RequiredDate, 1, 10)"/></td><td>$<xsl:value-of select="format-number(Freight,'####0.00')"/></td>
</tr></xsl:template>
</xsl:stylesheet>
2. Save the file as C:\Learn_XML\ListCustOrders.xsl. You must type the
file extension to ensure that the file is not saved as text.
3. Close Notepad.
Let’s now proceed to analyze the contents of the ListCustOrders.xsl file that
will be used to transform XML to HTML in our next hands-on exercise. Notice
that because the XSLT stylesheet is an XML document, we started out with a
standard XML declaration:
<?xml version="1.0" encoding="UTF-8"?>
Next, we defined the namespace for the stylesheet and declared its prefix like
this:
<xsl:stylesheet version="1.0" xmlns:xsl="http://www.w3.org/1999/XSL/Transform">
On the third line we indicated that XSLT should transform the XML into
HTML by using the <xsl:output> tag as follows:
<xsl:output method="html" version="4.0" indent="yes"/>
In the above XML, the <xsl:output> tag has three attributes: method, version,
and indent. The method attribute specifies the format of the output. This can be
XML, HTML, or text. The version attribute sets the version number for the
output format. The indent attribute, which is set to “yes” in this example, indi-
cates that the XML should be indented. This will make the final XML
document more readable when viewed in the browser.
730 | Chapter 29
Part V

The remaining part of the XSL file contains transformation instructions for
the XML document element nodes. We begin by creating the root template.
The <xsl:template> tag initiates a template within a stylesheet. Because a tem-
plate must indicate which nodes you want to use, we supplied the node
information by using the tag’s match attribute, like this:
<xsl:template match="dataroot">
This tells the XSLT processor to extract the XML document’s root node. The
root node provides a base node upon which we will build our web page. Notice
that in the root template we included the <html> and <body> tags to create the
structure of the final document and used HTML tags such as <h2>, <font>, and
<p> to add the required formatting to our web page. In the root template we
are also telling the XSLT processor that it should apply the template rules
found in the Customers template (defined further down):
<xsl:apply-templates select="Customers"/>
When the XSLT processor encounters the <xsl:apply-templates> instruction, it
will proceed to the following line:
<xsl:template match="Customers">
This line marks the beginning of the Customers template rule. Within it there
are HTML tags as well as other XSLT processing instructions. For example, to
output the CustomerID we use the <xsl:value-of> tag with the select attribute
like this:
<xsl:value-of select="CustomerID"/>
Because the <xsl:value-of> tag does not have any content, you must end it
with the forward slash (/). Notice that we placed the value of the CustomerID
field in a table cell. Using the same approach we output the CompanyName:
<xsl:value-of select="CompanyName"/>
Next, we defined the column headings for the Orders table. For a special
effect, we added to the output a 10-pixel-wide dummy column with a black
background:
<td bgcolor="black" width="10px"></td>
We also told the XSLT processor to apply the Orders template:
<xsl:apply-templates select="Orders"/>
The Orders template rules indicate how to extract values for each of the
defined column headings. This is done by using the <xsl:value-of> tag with the
select attribute, like this:
<td><xsl:value-of select="OrderID"/></td><td><xsl:value-of select="substring(OrderDate, 1, 10)"/></td><td><xsl:value-of select="substring(ShippedDate, 1, 10)"/></td><td><xsl:value-of select="substring(RequiredDate, 1, 10)"/></td><td>$<xsl:value-of select="format-number(Freight,'####0.00')"/></td>
XML Features in Access 2007 | 731
Taking Your VBA Programming Skills to the Web
To obtain only the date portion from the OrderDate, ShippedDate, and
RequiredDate columns, we use the XPath substring function in the select
attribute. This function has the same syntax as the VBA Mid function, allow-
ing you to extract a specified number of characters from a string starting at a
specific position. The format of the substring function is shown below:
substring(string, startpos, length)
startpos is the position of the first character to extract, and length represents
the number of characters to be returned from string. Therefore, the expression
<xsl:value-of select="substring(OrderDate, 1, 10)"/>
tells the XSLT processor to retrieve only the first 10 characters from the value
found in the OrderDate column.
Notice also that to correctly format the Freight column we used the format-
number XPath expression like this:
<xsl:value-of select="format-number(Freight,'####0.00')"/>
This tells the XSLT processor to format the value found in the Freight column
as a number using two decimal places. Notice that the dollar sign cannot be a
part of the XPath expression. It is appended to the final output as shown
below:
<td>$<xsl:value-of select="format-number(Freight,'####0.00')"/></td>
Notice that each of the defined template rules ends with the </xsl:template>
ending tag and the stylesheet itself ends with the </xsl:stylesheet> tag.
This concludes our hands-on example of how you can make your own cus-
tom stylesheets. While this is a basic stylesheet to get you started, in real life
you will probably want to create stylesheets that allow:
� Batch-processing nodes (<xsl:for-each> tag with the select attribute)
� Conditional processing of nodes (<xsl:if> tag with the test attribute)
� Decisions based on conditions (<xsl:choose> tag and <xsl:when> tag with
the test attribute)
� Sorting nodes before processing (<xsl:sort> tag with the select attribute)
� Note: For more information about XSL Transformations (XSLT), visit the fol-lowing link: http://www.w3.org/TR/xslt#section-Applying-Template-Rules.
Now that you have a custom stylesheet, what do you do with it? Hands-On
29-6 demonstrates how to export data from an Access table directly to an
HTML file and apply a custom transform so that only certain columns are dis-
played in the browser.
732 | Chapter 29
Part V

�Hands-On 29-6: Exporting Data and Applying a Custom XSL File
1. Open the Northwind.mdb database.
2. In the Navigation pane, right-click the Customers table and choose
Export | XML File.
3. In the File name box, enter C:\Learn_XML\ListCustOrders.xml, and
click OK.
4. In the Export XML dialog box, the first two check boxes should be
selected. Click the More Options button.
5. In the Data to Export area, the Customers table is automatically selected.
Click the check box next to the Orders table to include it in the export.
6. Click the Transforms button.
7. In the Export Transforms window that appears, click the Add button.
8. Access displays the Add New Transform window. Switch to the
C:\Learn_XML folder and select the ListCustOrders.xsl file that you
created in the previous hands-on exercise. Click the Add button to add this
file to the list of transforms. The transformation file appears in the list as
shown in Figure 29-11.
9. In the Export Transforms window, click OK.
10. Back in the Export XML dialog box, change the file extension from xml to
html as shown in Figure 29-12.
XML Features in Access 2007 | 733
Taking Your VBA Programming Skills to the Web
Figure 29-11: Use thiswindow to indicate atransformation file(stylesheet) to be usedafter export.
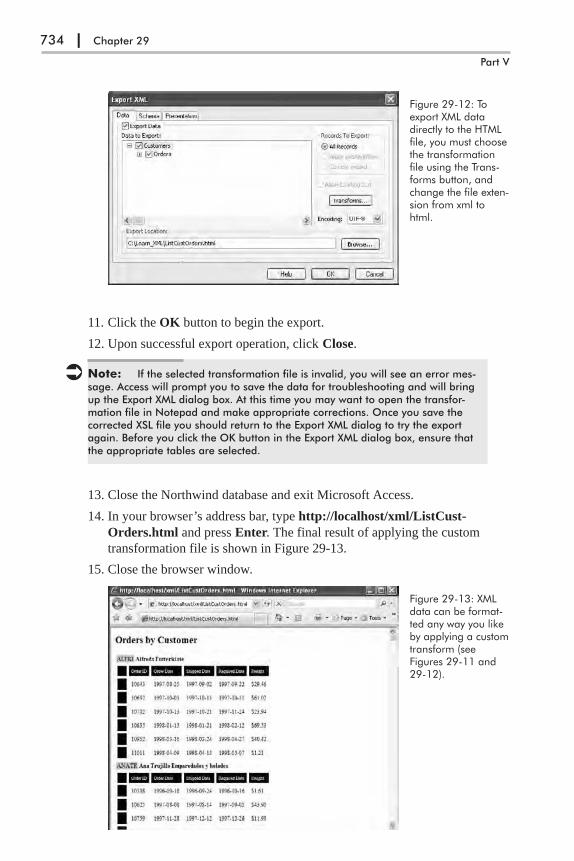
11. Click the OK button to begin the export.
12. Upon successful export operation, click Close.
� Note: If the selected transformation file is invalid, you will see an error mes-sage. Access will prompt you to save the data for troubleshooting and will bringup the Export XML dialog box. At this time you may want to open the transfor-mation file in Notepad and make appropriate corrections. Once you save thecorrected XSL file you should return to the Export XML dialog to try the exportagain. Before you click the OK button in the Export XML dialog box, ensure thatthe appropriate tables are selected.
13. Close the Northwind database and exit Microsoft Access.
14. In your browser’s address bar, type http://localhost/xml/ListCust-
Orders.html and press Enter. The final result of applying the custom
transformation file is shown in Figure 29-13.
15. Close the browser window.
734 | Chapter 29
Part V
Figure 29-12: Toexport XML datadirectly to the HTMLfile, you must choosethe transformationfile using the Trans-forms button, andchange the file exten-sion from xml tohtml.
Figure 29-13: XMLdata can be format-ted any way you likeby applying a customtransform (seeFigures 29-11 and29-12).
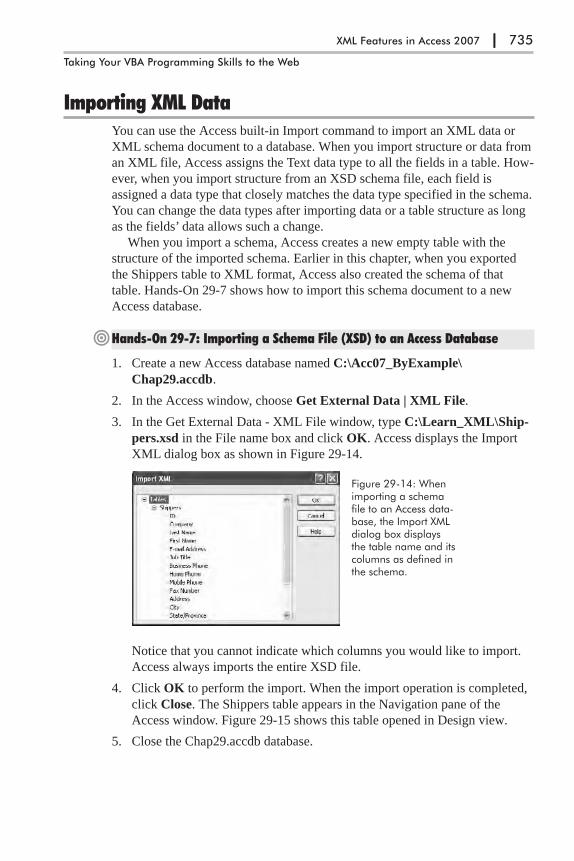
Importing XML DataYou can use the Access built-in Import command to import an XML data or
XML schema document to a database. When you import structure or data from
an XML file, Access assigns the Text data type to all the fields in a table. How-
ever, when you import structure from an XSD schema file, each field is
assigned a data type that closely matches the data type specified in the schema.
You can change the data types after importing data or a table structure as long
as the fields’ data allows such a change.
When you import a schema, Access creates a new empty table with the
structure of the imported schema. Earlier in this chapter, when you exported
the Shippers table to XML format, Access also created the schema of that
table. Hands-On 29-7 shows how to import this schema document to a new
Access database.
�Hands-On 29-7: Importing a Schema File (XSD) to an Access Database
1. Create a new Access database named C:\Acc07_ByExample\
Chap29.accdb.
2. In the Access window, choose Get External Data | XML File.
3. In the Get External Data - XML File window, type C:\Learn_XML\Ship-
pers.xsd in the File name box and click OK. Access displays the Import
XML dialog box as shown in Figure 29-14.
Notice that you cannot indicate which columns you would like to import.
Access always imports the entire XSD file.
4. Click OK to perform the import. When the import operation is completed,
click Close. The Shippers table appears in the Navigation pane of the
Access window. Figure 29-15 shows this table opened in Design view.
5. Close the Chap29.accdb database.
XML Features in Access 2007 | 735
Taking Your VBA Programming Skills to the Web
Figure 29-14: Whenimporting a schemafile to an Access data-base, the Import XMLdialog box displaysthe table name and itscolumns as defined inthe schema.
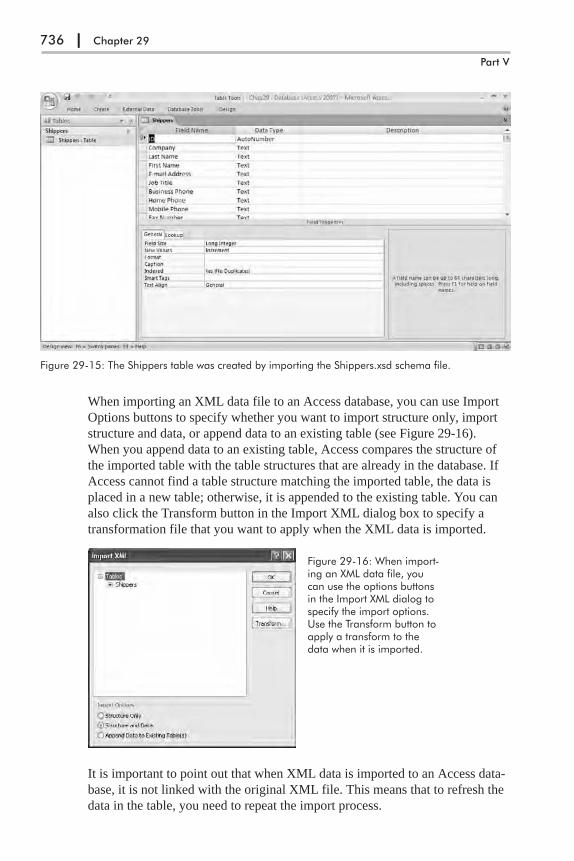
When importing an XML data file to an Access database, you can use Import
Options buttons to specify whether you want to import structure only, import
structure and data, or append data to an existing table (see Figure 29-16).
When you append data to an existing table, Access compares the structure of
the imported table with the table structures that are already in the database. If
Access cannot find a table structure matching the imported table, the data is
placed in a new table; otherwise, it is appended to the existing table. You can
also click the Transform button in the Import XML dialog box to specify a
transformation file that you want to apply when the XML data is imported.
It is important to point out that when XML data is imported to an Access data-
base, it is not linked with the original XML file. This means that to refresh the
data in the table, you need to repeat the import process.
736 | Chapter 29
Part V
Figure 29-15: The Shippers table was created by importing the Shippers.xsd schema file.
Figure 29-16: When import-ing an XML data file, youcan use the options buttonsin the Import XML dialog tospecify the import options.Use the Transform button toapply a transform to thedata when it is imported.

The following project demonstrates how to import XML data to an Access
database and modify the data before import using a transformation file. We
will perform the tasks as outlined below:
� Create a custom transformation file to be used after the XML data import
� Export the Customers table and the related Orders table to an XML file
� Import to an Access database only two columns from the Customers table
and five columns from the Orders table
�Custom Project 29-1: Importing XML Data to an Access Databaseand Applying a Transform
Part 1: Create a Custom Transformation File to Be Used after theXML Data Import
1. Open Notepad and enter the statements as shown below, or copy and paste
the code from C:\Acc07_HandsOn\CustomerOrders.txt.
<?xml version="1.0" encoding="UTF-8"?><xsl:stylesheet version="1.0" xmlns:xsl="http://www.w3.org/1999/XSL/Transform"><xsl:output method="html" version="4.0" indent="yes"/>
<xsl:template match="dataroot"><html>
<body><table>
<xsl:apply-templates select="Customers"/></table><table>
<xsl:apply-templates select="Customers/Orders"/></table>
</body></html>
</xsl:template><xsl:template match="Customers">
<Customer><CustomerID>
<xsl:value-of select="CustomerID"/></CustomerID><CompanyName>
<xsl:value-of select="CompanyName"/></CompanyName>
</Customer></xsl:template>
<xsl:template match="Customers/Orders"><Order>
<OrderID><xsl:value-of select="OrderID"/>
</OrderID><OrderDate>
<xsl:value-of select="substring(OrderDate, 1, 10)"/>
XML Features in Access 2007 | 737
Taking Your VBA Programming Skills to the Web

</OrderDate><ShippedDate>
<xsl:value-of select="substring(ShippedDate, 1, 10)"/></ShippedDate><RequiredDate>
<xsl:value-of select="substring(RequiredDate, 1, 10)"/></RequiredDate><Freight>
<xsl:value-of select="format-number(Freight,'####0.00')"/></Freight>
</Order></xsl:template>
</xsl:stylesheet>
2. Save the file as C:\Learn_XML\CustomerOrders.xsl. You must type the
file extension to ensure that the file is not saved as text.
3. Close Notepad.
Since you’ve already created a similar stylesheet in Hands-On 29-5, the con-
tents of the CustomerOrders.xsl file should be recognizable. All that’s different
here are the <Customer> and <Order> tags that specify the names of Access
tables where we want to place our XML data. When importing data, tables are
named according to the name of the XML element being imported. If the
Access database already has a table with the specified name, a number is
appended to the name.
Part 2: Export the Customers and Related Orders Tables to an XMLFile
1. Open the C:\Acc07_HandsOn\Northwind.mdb database. In the Naviga-
tion pane, right-click the Customers table and choose Export | XML File.
2. In the Export - XML File window, type C:\Learn_XML\Customer-
Orders.xml in the File name box and click OK.
3. Access displays the Export XML dialog box with three check boxes; the
first two check boxes should be selected. Click the More Options button.
4. In the Data to Export area of the Export XML dialog, select the check box
next to the Orders table. The Customers and Orders tables should both be
selected.
5. Click OK to perform the export of all the records in the selected tables.
When the export operation is completed, click Close.
6. Close the Northwind.mdb database file.
738 | Chapter 29
Part V
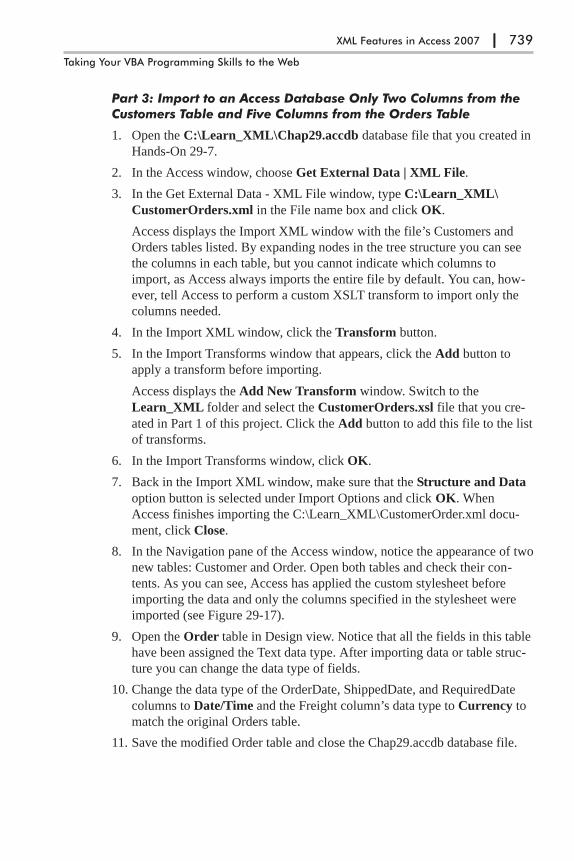
Part 3: Import to an Access Database Only Two Columns from theCustomers Table and Five Columns from the Orders Table
1. Open the C:\Learn_XML\Chap29.accdb database file that you created in
Hands-On 29-7.
2. In the Access window, choose Get External Data | XML File.
3. In the Get External Data - XML File window, type C:\Learn_XML\
CustomerOrders.xml in the File name box and click OK.
Access displays the Import XML window with the file’s Customers and
Orders tables listed. By expanding nodes in the tree structure you can see
the columns in each table, but you cannot indicate which columns to
import, as Access always imports the entire file by default. You can, how-
ever, tell Access to perform a custom XSLT transform to import only the
columns needed.
4. In the Import XML window, click the Transform button.
5. In the Import Transforms window that appears, click the Add button to
apply a transform before importing.
Access displays the Add New Transform window. Switch to the
Learn_XML folder and select the CustomerOrders.xsl file that you cre-
ated in Part 1 of this project. Click the Add button to add this file to the list
of transforms.
6. In the Import Transforms window, click OK.
7. Back in the Import XML window, make sure that the Structure and Data
option button is selected under Import Options and click OK. When
Access finishes importing the C:\Learn_XML\CustomerOrder.xml docu-
ment, click Close.
8. In the Navigation pane of the Access window, notice the appearance of two
new tables: Customer and Order. Open both tables and check their con-
tents. As you can see, Access has applied the custom stylesheet before
importing the data and only the columns specified in the stylesheet were
imported (see Figure 29-17).
9. Open the Order table in Design view. Notice that all the fields in this table
have been assigned the Text data type. After importing data or table struc-
ture you can change the data type of fields.
10. Change the data type of the OrderDate, ShippedDate, and RequiredDate
columns to Date/Time and the Freight column’s data type to Currency to
match the original Orders table.
11. Save the modified Order table and close the Chap29.accdb database file.
XML Features in Access 2007 | 739
Taking Your VBA Programming Skills to the Web

Exporting to and Importing from XML ProgrammaticallyNow that you’ve mastered the use of Microsoft Office Access 2007 built-in
commands for exporting and importing XML data, let’s look at what tools are
available for programmers who want to perform these XML operations via
code. In the following sections of this chapter you will learn how to work with
XML using:
� The ExportXML and ImportXML methods from the Microsoft Office
Access 12.0 Object Library
� The TransformXML method
Exporting to XML Using the ExportXML MethodUse the Microsoft Office Access 12.0 Object Library ExportXML method of
the Application object to export XML data, schemas (XSD), and presentation
information (XSL) from a Microsoft Access database, Microsoft SQL Server
2000 Desktop Engine (MSDE 2000), or Microsoft SQL Server 6.5 or later.
The ExportXML method takes a number of arguments, which are shown in
Table 29-1.
740 | Chapter 29
Part V
Figure 29-17: Applying a custom transformation file before XML data import to limit the number ofcolumns of data imported to Access database tables.

Table 29-1: Arguments of the ExportXML method (in order of appearance)
Argument Type Data Type Description
ObjectType
(required)
AcExportXMLObjectType
Use one of the following constants:
Constant ValueacExportDataAccessPage 6acExportForm 2acExportFunction 10acExportQuery 1acExportReport 3acExportServerView 7acExportStoredProcedure 9acExportTable 0
Specifies the type of Access objectto export.
The constant values 10, 7, and 9are only used with MicrosoftAccess projects.
DataSource
(required)
String Indicates the name of the Accessobject specified in the ObjectTypeargument.
DataTarget
(optional)
String Specifies the path and filenamefor the exported data. Omit thisargument only if you don’t wantthe data to be exported.
SchemaTarget
(optional)
String Specifies the path and filenamefor the exported schemainformation. Omit this argumentonly if you don’t want the schemato be exported to a separate file.
PresentationTarget
(optional)
String Specifies the path and filenamefor the exported presentationinformation. Omit this argumentonly if you don’t want thepresentation information to beexported.
ImageTarget
(optional)
String Specifies the path for the exportedimages. Omit this argument ifyou don’t want to export images.
Encoding
(optional)
AcExportXMLEncoding
Use one of the following constants:
Constant ValueacUTF16 1acUTF8 0
The default is acUTF8.
Specifies the text encoding for theexported data.
XML Features in Access 2007 | 741
Taking Your VBA Programming Skills to the Web

Argument Type Data Type Description
OtherFlags
(optional)
AcExportXMLOtherFlags
Use one or more of the followingconstants:
Constant ValueacEmbedSchema 1acExcludePrimaryKeyAndIndexes 2acExportAllTableAndFieldProperties 32acLiveReportSource 8acPersistReportML 16acRunFromServer 4
Specifies behaviors associatedwith exporting to XML. Values canbe added to specify acombination of behaviors. Here isthe meaning of the constants:
(1) Write schema information intoa separate document specified bythe DataTarget argument. Thisvalue takes precedence over theSchemaTarget argument.
(2) Does not export primary keyand index schema properties.
(32) The exported schemacontains properties of the tableand its fields.
(8) Used only when exportingreports bound to SQL Server2000. Will create a live link to aMicrosoft SQL Server database.
(16) Persists the exported object’sReportML file.
(4) Used only when exportingreports. Creates an Active ServerPages (ASP) or HTML wrapper.The default is HTML.
WhereCondition
(optional)
String Specifies subset of records toexport.
AdditionalData
(optional)
AdditionalData
AdditionalData is an Access object thatrepresents the collection of tables andqueries that will be included with theparent table that is exported by theExportXML method (see Hands-On29-8).
Specifies additional tables toexport. This argument is ignoredif the OtherFlags argument is setto acLiveReportSource (8).
In its simplest form, the ExportXML method looks like this:
Application.ExportXML ObjectType:=acExportTable, _DataSource:="Customers", _DataTarget:= "C:\Learn_XML\North_Customers.xml"
The above statement, when typed on a single line (without the underscore
characters) in the Visual Basic Editor’s Immediate window or inside a VBA
procedure stub in a Visual Basic module, will render the Customers table in the
XML format in the North_Customers.xml file.
Using the arguments described in Table 29-1, you can easily write the com-
mand to export the XML Products table with its schema and presentation
information placed in separate files:
742 | Chapter 29
Part V
Application.ExportXML ObjectType:=acExportTable, _DataSource:="Products", _DataTarget:= "C:\Learn_XML\North_Products.xml", _SchemaTarget:= "C:\Learn_XML\North_ProdSchema.xsd", _PresentationTarget:= "C:\Learn_XML\North_ProdReport.xsl"
To export a specific customer’s data to an XML data file, use the following
statement:
Application.ExportXML ObjectType:=acExportTable, _DataSource:="Customers", _DataTarget:="C:\Learn_XML\OneCustomer.xml", _WhereCondition:="CustomerID = 'GROSR'"
� Note: To try the above statements, open the Northwind.mdb database,switch to the Visual Basic Editor window, type each statement in the Immediatewindow, and press Enter to execute. Recall that you must not type the under-score characters (type the entire statement on one line with argumentsseparated by commas). After the export, locate the newly created XML files inyour C:\Learn_XML folder.
Hands-On 29-8 demonstrates how to export to XML three tables: Customers,
Orders, and Order Details.
�Hands-On 29-8: Exporting Multiple Tables to an XML Data File
1. Open the C:\Acc07_ByExample\Chap29.accdb database and switch to
the Visual Basic Editor window.
2. In the Visual Basic Editor window, choose Insert | Module to add a stan-
dard module to the current VBA project.
3. In the module’s Code window, enter the Export_CustomerOrderDetails
procedure as shown below, or copy the procedure code from C:\Acc07_
HandsOn\Chap29.txt.
Sub Export_CustomerOrderDetails()Dim objAppl As New Access.ApplicationDim objOtherTbls As AdditionalDataDim strDBName As String
strDBName = "C:\Acc07_HandsOn\Northwind.mdb"
On Error GoTo ErrorHandlerobjAppl.OpenCurrentDatabase (strDBName)
Set objOtherTbls = objAppl.CreateAdditionalData
' include the Orders and OrderDetails tables in exportobjOtherTbls.Add "Orders"objOtherTbls.Add "Order Details"
XML Features in Access 2007 | 743
Taking Your VBA Programming Skills to the Web

' export Customers, Orders, and Order Details table into' one XML data file
objAppl.ExportXML ObjectType:=acExportTable, _DataSource:="Customers", _DataTarget:="C:\Learn_XML\CustomerOrdersDetails.xml", _AdditionalData:=objOtherTbls
MsgBox "Export operation completed successfully."
Exit_Here:On Error Resume NextobjAppl.CloseCurrentDatabaseSet objAppl = NothingExit Sub
ErrorHandler:MsgBox Err.Number & ": " & Err.DescriptionResume Exit_Here
End Sub
The Application object refers to the active Microsoft Access application,
which in this case is the Chap29.accdb database where you wrote the proce-
dure code shown above. Because this database does not contain the tables we
want to export, we used the New keyword to create a new instance of the
Microsoft Access Application object and then opened another Access database
(Northwind.mdb) using the OpenCurrentDatabase method. You can use the
OpenCurrentDatabase method to open an existing Microsoft Access database
as the current database.
Using the AdditionalData object, you can export any set of Access tables to
an XML data file. To use this object, perform the following:
� Declare an object variable as AdditionalData:
Dim objOtherTbls As AdditionalData
� Create the AdditionalData object using the CreateAdditionalData method
of the Application object and set the object variable to the newly created
object:
Set objOtherTbls = objAppl.CreateAdditionalData
� Use the AdditionalData object’s Add method to add table names to the
object:
objOtherTbls.Add "Orders"objOtherTbls.Add "Order Details"
� Pass the AdditionalData object to the ExportXML method:
objAppl.ExportXML ObjectType:=acExportTable, _DataSource:="Customers", _DataTarget:="C:\Learn_XML\CustomerOrdersDetails.xml", _AdditionalData:=objOtherTbls
4. Place the insertion point anywhere within the Export_CustomerOrder-
Details procedure code and choose Run | Run Sub/UserForm. Access
executes the procedure code and displays a message.
744 | Chapter 29
Part V
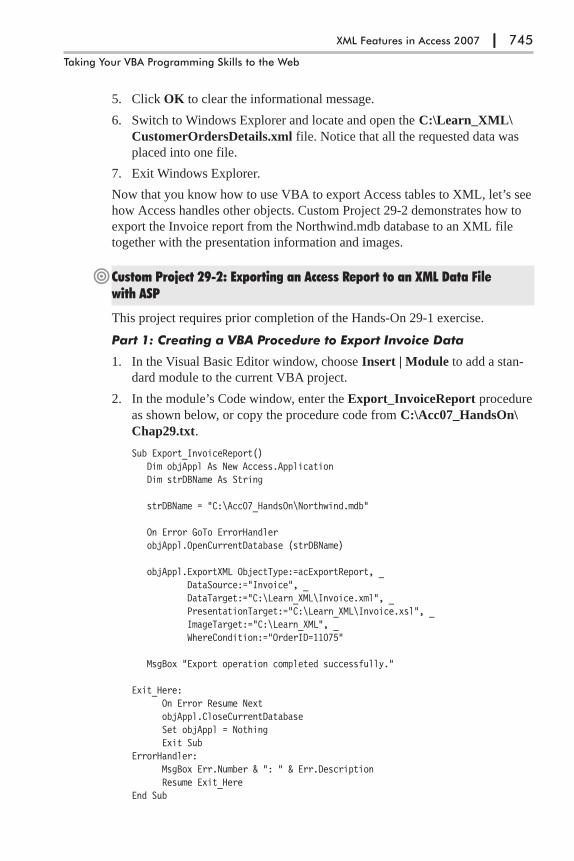
5. Click OK to clear the informational message.
6. Switch to Windows Explorer and locate and open the C:\Learn_XML\
CustomerOrdersDetails.xml file. Notice that all the requested data was
placed into one file.
7. Exit Windows Explorer.
Now that you know how to use VBA to export Access tables to XML, let’s see
how Access handles other objects. Custom Project 29-2 demonstrates how to
export the Invoice report from the Northwind.mdb database to an XML file
together with the presentation information and images.
�Custom Project 29-2: Exporting an Access Report to an XML Data Filewith ASP
This project requires prior completion of the Hands-On 29-1 exercise.
Part 1: Creating a VBA Procedure to Export Invoice Data
1. In the Visual Basic Editor window, choose Insert | Module to add a stan-
dard module to the current VBA project.
2. In the module’s Code window, enter the Export_InvoiceReport procedure
as shown below, or copy the procedure code from C:\Acc07_HandsOn\
Chap29.txt.
Sub Export_InvoiceReport()Dim objAppl As New Access.ApplicationDim strDBName As String
strDBName = "C:\Acc07_HandsOn\Northwind.mdb"
On Error GoTo ErrorHandlerobjAppl.OpenCurrentDatabase (strDBName)
objAppl.ExportXML ObjectType:=acExportReport, _DataSource:="Invoice", _DataTarget:="C:\Learn_XML\Invoice.xml", _PresentationTarget:="C:\Learn_XML\Invoice.xsl", _ImageTarget:="C:\Learn_XML", _WhereCondition:="OrderID=11075"
MsgBox "Export operation completed successfully."
Exit_Here:On Error Resume NextobjAppl.CloseCurrentDatabaseSet objAppl = NothingExit Sub
ErrorHandler:MsgBox Err.Number & ": " & Err.DescriptionResume Exit_Here
End Sub
XML Features in Access 2007 | 745
Taking Your VBA Programming Skills to the Web

Take a look at the last two arguments of the ExportXML method used in the
procedure above. ImageTarget specifies that images displayed on the Invoice
report are to be placed in the Learn_XML folder. The WhereCondition argu-
ment specifies that we want only the data for Order 11075.
Part 2: Executing the VBA Code to Export Data
1. Place the insertion point anywhere within the Export_InvoiceReport proce-
dure code and choose Run | Run Sub/UserForm. Access executes the
procedure code and displays a message.
2. Click OK to clear the informational message.
3. Switch to Windows Explorer and open the C:\Learn_XML folder.
4. Notice that Access has created a number of files: Invoice.xsl (stylesheet),
Invoice.xml (XML document), Invoice.htm (HTML document), and two
image files (PictureLogo.bmp and NameLogo.bmp).
Part 3: Viewing the Invoice Page in the Browser
1. In the browser’s address bar, type http://localhost/xml/Invoice.htm and
press Enter.
2. If you are using Internet Explorer, the file opens up as shown in Figure
29-18. When you compare this output with the original Access invoice
report, you will notice that the invoice displayed in the browser is an exact
image of the report displayed in the Access user interface.
3. Close the browser.
746 | Chapter 29
Part V
Figure 29-18:Viewing theexported invoicereport in InternetExplorer.
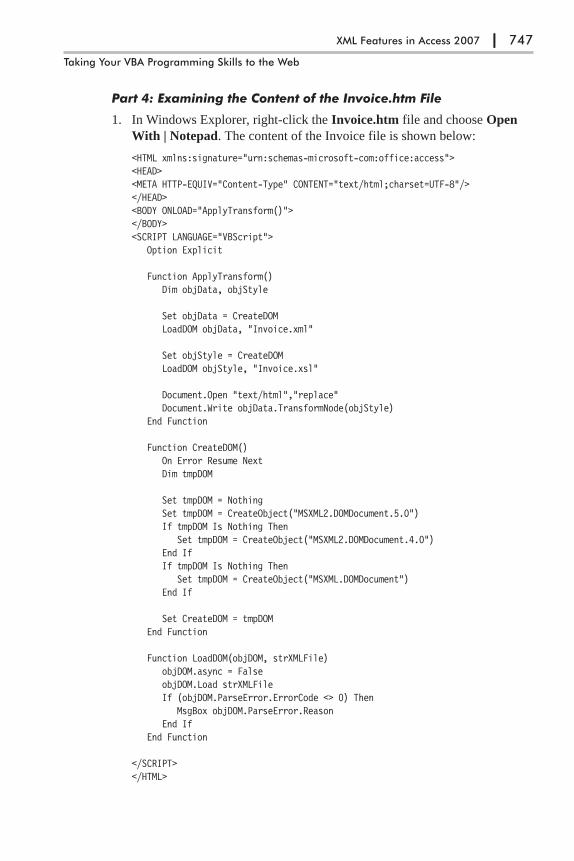
Part 4: Examining the Content of the Invoice.htm File
1. In Windows Explorer, right-click the Invoice.htm file and choose Open
With | Notepad. The content of the Invoice file is shown below:
<HTML xmlns:signature="urn:schemas-microsoft-com:office:access"><HEAD><META HTTP-EQUIV="Content-Type" CONTENT="text/html;charset=UTF-8"/></HEAD><BODY ONLOAD="ApplyTransform()"></BODY><SCRIPT LANGUAGE="VBScript">
Option Explicit
Function ApplyTransform()Dim objData, objStyle
Set objData = CreateDOMLoadDOM objData, "Invoice.xml"
Set objStyle = CreateDOMLoadDOM objStyle, "Invoice.xsl"
Document.Open "text/html","replace"Document.Write objData.TransformNode(objStyle)
End Function
Function CreateDOM()On Error Resume NextDim tmpDOM
Set tmpDOM = NothingSet tmpDOM = CreateObject("MSXML2.DOMDocument.5.0")If tmpDOM Is Nothing Then
Set tmpDOM = CreateObject("MSXML2.DOMDocument.4.0")End IfIf tmpDOM Is Nothing Then
Set tmpDOM = CreateObject("MSXML.DOMDocument")End If
Set CreateDOM = tmpDOMEnd Function
Function LoadDOM(objDOM, strXMLFile)objDOM.async = FalseobjDOM.Load strXMLFileIf (objDOM.ParseError.ErrorCode <> 0) Then
MsgBox objDOM.ParseError.ReasonEnd If
End Function
</SCRIPT></HTML>
XML Features in Access 2007 | 747
Taking Your VBA Programming Skills to the Web
Notice that when the HTML page loads, it executes the VBScript
ApplyTransform function:
<BODY ONLOAD="ApplyTransform()">
The VBScript code uses a software component called the XML Document
Object Model (DOM). The DOM offers methods and properties for work-
ing with XML programmatically, allowing you to output and transform the
XML data. The XML DOM is automatically installed by Internet Explorer,
as well as by Windows 2000/XP and Internet Information Services (IIS)
5.0 or higher.
The DOMDocument object is the top level of the XML DOM hierarchy
and represents a tree structure composed of nodes. You can navigate
through this tree structure and manipulate the data contained in the nodes
by using various methods and properties. Because every XML object is
created and accessed from the DOMDocument, you must first create the
DOMDocument object in order to work with an XML document.
The ApplyTransform function above begins by setting an object vari-
able (objData) to an instance of the DOMDocument that’s returned by a
custom CreateDOM function:
Set objData = CreateDOM
If you take a look at the CreateDOM function that appears at the bottom of
the VBScript code, you will notice that a reference to the DOMDocument
is set via the CreateObject method of the Server object. Because different
versions of the MSXML parser may be installed on a client machine
(DOMDocument5, DOMDocument4, DOMDocument, etc.), the function
attempts to instantiate the DOMDocument object using the most recent
version. If such a version is not found, it looks for older versions of the
MSXML parser that may exist. It is extremely important that only one ver-
sion of the DOMDocument is used, since mixing DOMDocument objects
from different versions of the MSXML parser can cause ugly errors.
Once the DOMDocument object has been instantiated, the LoadDOM
function listed at the bottom of the page is called. This function expects
two parameters: objectDOM, which is the objData variable referencing the
DOMDocument, and strXMLFile, which is the name of the file to load into
the DOMDocument object. To ensure that Internet Explorer waits until all
the data is loaded before rendering the rest of the page, the Async property
of the DOMDocument is set to False:
objDOM.async = FalseobjDOM.Load strXMLFile
The Load method is used to load the supplied file into the objData object
variable. This method returns True if it successfully loaded the data and
False otherwise. If there is a problem with loading, a description of the
error is returned in a message box.
748 | Chapter 29
Part V
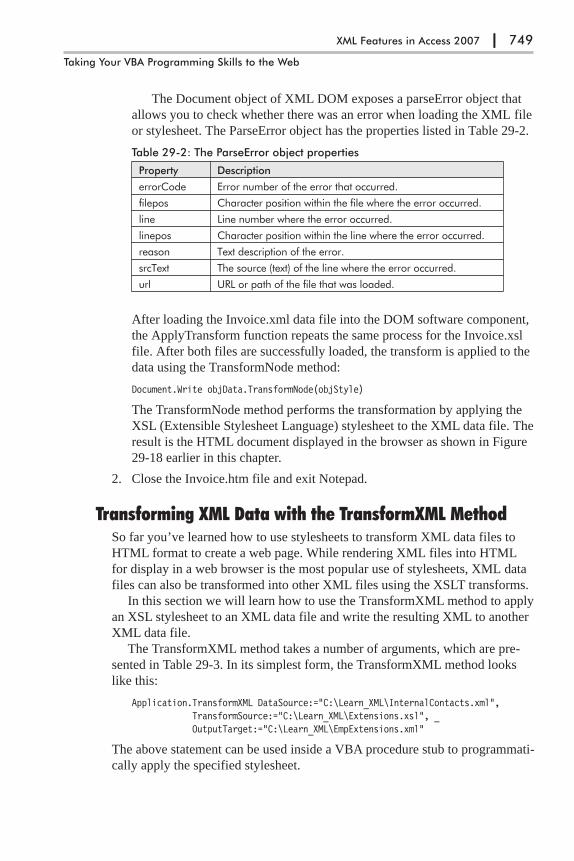
The Document object of XML DOM exposes a parseError object that
allows you to check whether there was an error when loading the XML file
or stylesheet. The ParseError object has the properties listed in Table 29-2.
Table 29-2: The ParseError object properties
Property Description
errorCode Error number of the error that occurred.
filepos Character position within the file where the error occurred.
line Line number where the error occurred.
linepos Character position within the line where the error occurred.
reason Text description of the error.
srcText The source (text) of the line where the error occurred.
url URL or path of the file that was loaded.
After loading the Invoice.xml data file into the DOM software component,
the ApplyTransform function repeats the same process for the Invoice.xsl
file. After both files are successfully loaded, the transform is applied to the
data using the TransformNode method:
Document.Write objData.TransformNode(objStyle)
The TransformNode method performs the transformation by applying the
XSL (Extensible Stylesheet Language) stylesheet to the XML data file. The
result is the HTML document displayed in the browser as shown in Figure
29-18 earlier in this chapter.
2. Close the Invoice.htm file and exit Notepad.
Transforming XML Data with the TransformXML MethodSo far you’ve learned how to use stylesheets to transform XML data files to
HTML format to create a web page. While rendering XML files into HTML
for display in a web browser is the most popular use of stylesheets, XML data
files can also be transformed into other XML files using the XSLT transforms.
In this section we will learn how to use the TransformXML method to apply
an XSL stylesheet to an XML data file and write the resulting XML to another
XML data file.
The TransformXML method takes a number of arguments, which are pre-
sented in Table 29-3. In its simplest form, the TransformXML method looks
like this:
Application.TransformXML DataSource:="C:\Learn_XML\InternalContacts.xml",TransformSource:="C:\Learn_XML\Extensions.xsl", _OutputTarget:="C:\Learn_XML\EmpExtensions.xml"
The above statement can be used inside a VBA procedure stub to programmati-
cally apply the specified stylesheet.
XML Features in Access 2007 | 749
Taking Your VBA Programming Skills to the Web

Table 29-3: Arguments of the TransformXML method (in order of appearance)
Argument Type Data Type Description
DataSource
(required)
String Specifies the full path of the XMLdata file that will be transformed.
TransformSource
(required)
String Specifies the full path of the XSLstylesheet to apply to the XMLdata file specified in theDataSource argument.
OutputTarget
(required)
String Specifies the full path of theresulting XML data file afterapplying the XSL stylesheet.
WellFormedXMLOutput
(optional)
Boolean Set this argument to True tocreate a well-formed XMLdocument. Set this argument toFalse to encode the resulting XMLfile in UTF-16 format. The defaultis False.
ScriptOption
(optional)
AcTransformXMLScriptOption
Use one of the following constants:
Constant ValueacDisableScript 2acEnableScript 0acPromptScript 1
Use this argument to specify theaction that should be taken if theXSL file contains scripting code.acPromptScript is the default.
Custom Project 29-3 demonstrates how to transform an XML data file into
another XML file. We will start by creating a custom stylesheet named Exten-
sions.xsl that will transform the InternalContacts.xml file (generated from the
Northwind.mdb database Employees table) into an XML file named
EmpExtensions.xml. Next, we will write a VBA procedure that exports the
XML source file and performs the transformation. Finally, we will import the
resulting XML data file into Access.
�Custom Project 29-3: Applying a Stylesheet to an XML Data File with theTransformXML Method
Part 1: Creating a Custom Stylesheet for Transforming an XMLSource File into Another XML Data File
1. Open Notepad and enter the statements as shown below, or copy the code
from C:\Acc07_HandsOn\Extensions.txt.
<?xml version="1.0"?><xsl:stylesheet version="1.0" xmlns:xsl="http://www.w3.org/1999/XSL/Transform"><xsl:output method="xml" indent="yes"/><xsl:template match="/"><dataroot><xsl:for-each select="//Employees"><Extensions>
<LastName>
750 | Chapter 29
Part V
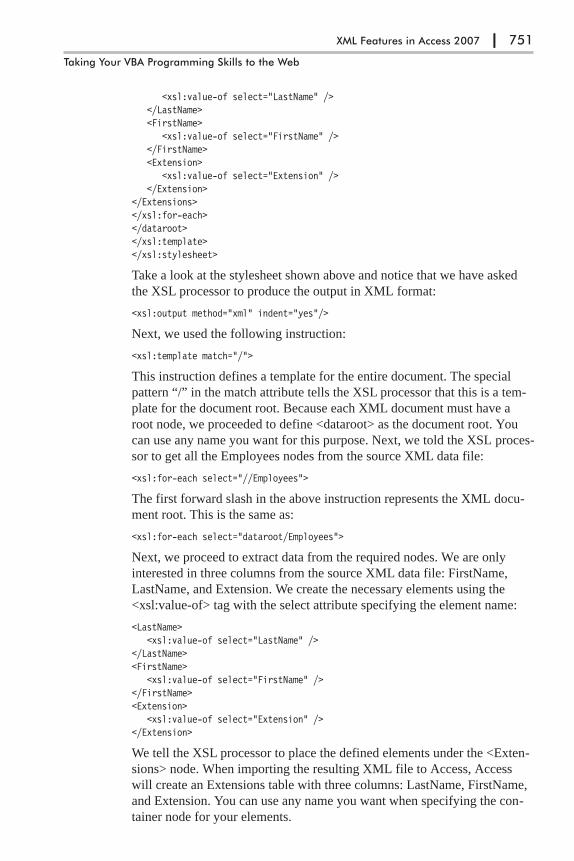
<xsl:value-of select="LastName" /></LastName><FirstName>
<xsl:value-of select="FirstName" /></FirstName><Extension>
<xsl:value-of select="Extension" /></Extension>
</Extensions></xsl:for-each></dataroot></xsl:template></xsl:stylesheet>
Take a look at the stylesheet shown above and notice that we have asked
the XSL processor to produce the output in XML format:
<xsl:output method="xml" indent="yes"/>
Next, we used the following instruction:
<xsl:template match="/">
This instruction defines a template for the entire document. The special
pattern “/” in the match attribute tells the XSL processor that this is a tem-
plate for the document root. Because each XML document must have a
root node, we proceeded to define <dataroot> as the document root. You
can use any name you want for this purpose. Next, we told the XSL proces-
sor to get all the Employees nodes from the source XML data file:
<xsl:for-each select="//Employees">
The first forward slash in the above instruction represents the XML docu-
ment root. This is the same as:
<xsl:for-each select="dataroot/Employees">
Next, we proceed to extract data from the required nodes. We are only
interested in three columns from the source XML data file: FirstName,
LastName, and Extension. We create the necessary elements using the
<xsl:value-of> tag with the select attribute specifying the element name:
<LastName><xsl:value-of select="LastName" />
</LastName><FirstName>
<xsl:value-of select="FirstName" /></FirstName><Extension>
<xsl:value-of select="Extension" /></Extension>
We tell the XSL processor to place the defined elements under the <Exten-
sions> node. When importing the resulting XML file to Access, Access
will create an Extensions table with three columns: LastName, FirstName,
and Extension. You can use any name you want when specifying the con-
tainer node for your elements.
XML Features in Access 2007 | 751
Taking Your VBA Programming Skills to the Web

To finish off the stylesheet, we must write the necessary closing tags:
</xsl:for-each></dataroot></xsl:template></xsl:stylesheet>
2. Save the file as C:\Learn_XML\Extensions.xsl. You must type the .xsl
file extension to ensure that the file is not saved as text.
3. Close Notepad.
Now that we’ve got the stylesheet for our transformation, you can write a VBA
procedure to actually export the source data and perform the transformation.
Part 2: Writing a VBA Procedure to Export and Transform Data
1. In the Visual Basic Editor window of the Chap29.accdb database, choose
Insert | Module to add a standard module to the current VBA project.
2. In the module’s Code window, enter the Transform_Employees procedure
as shown below, or copy the procedure code from C:\Acc07_HandsOn\
Chap29.txt.
Sub Transform_Employees()' use the ExportXML method to create a source XML data file
Application.ExportXML ObjectType:=acExportTable, _DataSource:="Employees", _DataTarget:="C:\Learn_XML\InternalContacts.xml"
MsgBox "The export operation completed successfully."
' use the TransformXML method to apply the stylesheet that transforms' the source XML data file into another XML data fileApplication.TransformXML DataSource:="C:\Learn_XML\InternalContacts.xml", _
TransformSource:="C:\Learn_XML\Extensions.xsl", _OutputTarget:="C:\Learn_XML\EmpExtensions.xml", _WellFormedXMLOutput:=False
MsgBox "The transform operation completed successfully."End Sub
The first part of the above procedure exports the Employees table from the
Northwind database to an XML file named InternalContacts.xml. The sec-
ond part of this procedure applies the Extensions.xsl stylesheet prepared in
Part 1 of this custom project to the InternalContacts.xml data file. The
resulting XML document after the transformation is named
EmpExtensions.xml. A portion of this file is shown in Figure 29-19.
3. Run the Transform_Employees procedure.
752 | Chapter 29
Part V
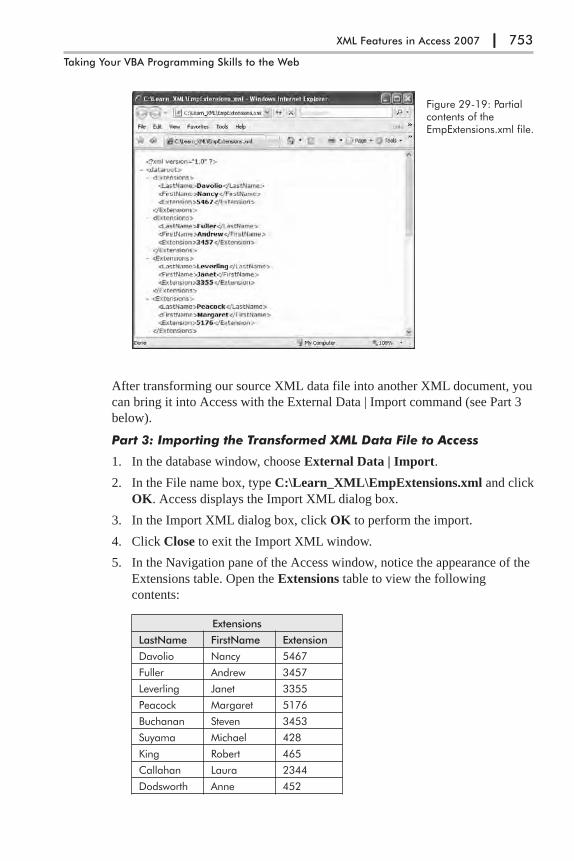
After transforming our source XML data file into another XML document, you
can bring it into Access with the External Data | Import command (see Part 3
below).
Part 3: Importing the Transformed XML Data File to Access
1. In the database window, choose External Data | Import.
2. In the File name box, type C:\Learn_XML\EmpExtensions.xml and click
OK. Access displays the Import XML dialog box.
3. In the Import XML dialog box, click OK to perform the import.
4. Click Close to exit the Import XML window.
5. In the Navigation pane of the Access window, notice the appearance of the
Extensions table. Open the Extensions table to view the following
contents:
Extensions
LastName FirstName Extension
Davolio Nancy 5467
Fuller Andrew 3457
Leverling Janet 3355
Peacock Margaret 5176
Buchanan Steven 3453
Suyama Michael 428
King Robert 465
Callahan Laura 2344
Dodsworth Anne 452
XML Features in Access 2007 | 753
Taking Your VBA Programming Skills to the Web
Figure 29-19: Partialcontents of theEmpExtensions.xml file.

6. Close the Extensions table.
A nice thing about XSLT transformations is that you can apply different
stylesheets to the same XML data file to create and view the resulting docu-
ment in different formats.
For example, let’s assume that in the Extensions table you’d like to combine
the LastName and FirstName columns into one column and sort the data by
last name. You could create and apply the following Extensions_SortBy-
Emp.xsl stylesheet to the InternalContacts.xml file to get the desired XML
output:
<?xml version="1.0"?><xsl:stylesheet version="1.0" xmlns:xsl="http://www.w3.org/1999/XSL/Transform"><xsl:output method="xml" indent="yes"/><xsl:template match="/"><dataroot><xsl:apply-templates select="dataroot/Employees"><xsl:sort select="LastName" order="ascending" />
</xsl:apply-templates></dataroot></xsl:template>
<xsl:template match="//Employees"><Extensions><FullName><xsl:value-of select="LastName" /><xsl:text>, </xsl:text><xsl:value-of select="FirstName" />
</FullName><Extension><xsl:value-of select="Extension" />
</Extension></Extensions></xsl:template>
</xsl:stylesheet>
The above stylesheet uses the <xsl:apply-templates> tag to tell the XSL pro-
cessor to select the child elements of the dataroot/Employees node and, for
each child element, find in the stylesheet the matching template rule and pro-
cess it:
<xsl:apply-templates select="dataroot/Employees"><xsl:sort select="LastName" order="ascending" />
</xsl:apply-templates>
The <xsl:sort> tag specifies how the resulting XML document should be
sorted. The select attribute of this tag is set to LastName, indicating that the
file should be sorted by the LastName element. The order attribute defines the
sort order as ascending.
Next, in this stylesheet you can see the template rule that begins with the
<xsl:template> tag. Its match attribute specifies which nodes in the document
tree the template rule should process:
754 | Chapter 29
Part V
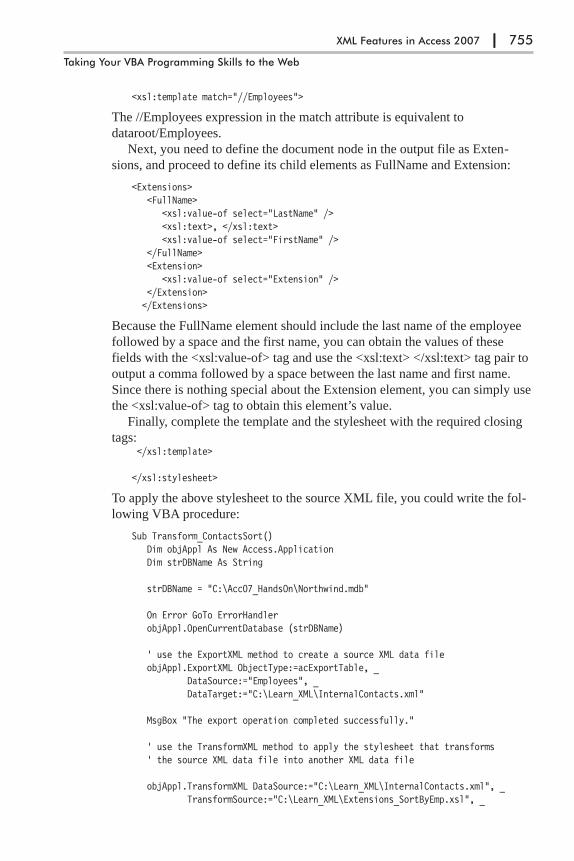
<xsl:template match="//Employees">
The //Employees expression in the match attribute is equivalent to
dataroot/Employees.
Next, you need to define the document node in the output file as Exten-
sions, and proceed to define its child elements as FullName and Extension:
<Extensions><FullName>
<xsl:value-of select="LastName" /><xsl:text>, </xsl:text><xsl:value-of select="FirstName" />
</FullName><Extension>
<xsl:value-of select="Extension" /></Extension></Extensions>
Because the FullName element should include the last name of the employee
followed by a space and the first name, you can obtain the values of these
fields with the <xsl:value-of> tag and use the <xsl:text> </xsl:text> tag pair to
output a comma followed by a space between the last name and first name.
Since there is nothing special about the Extension element, you can simply use
the <xsl:value-of> tag to obtain this element’s value.
Finally, complete the template and the stylesheet with the required closing
tags:</xsl:template>
</xsl:stylesheet>
To apply the above stylesheet to the source XML file, you could write the fol-
lowing VBA procedure:
Sub Transform_ContactsSort()Dim objAppl As New Access.ApplicationDim strDBName As String
strDBName = "C:\Acc07_HandsOn\Northwind.mdb"
On Error GoTo ErrorHandlerobjAppl.OpenCurrentDatabase (strDBName)
' use the ExportXML method to create a source XML data fileobjAppl.ExportXML ObjectType:=acExportTable, _
DataSource:="Employees", _DataTarget:="C:\Learn_XML\InternalContacts.xml"
MsgBox "The export operation completed successfully."
' use the TransformXML method to apply the stylesheet that transforms' the source XML data file into another XML data file
objAppl.TransformXML DataSource:="C:\Learn_XML\InternalContacts.xml", _TransformSource:="C:\Learn_XML\Extensions_SortByEmp.xsl", _
XML Features in Access 2007 | 755
Taking Your VBA Programming Skills to the Web
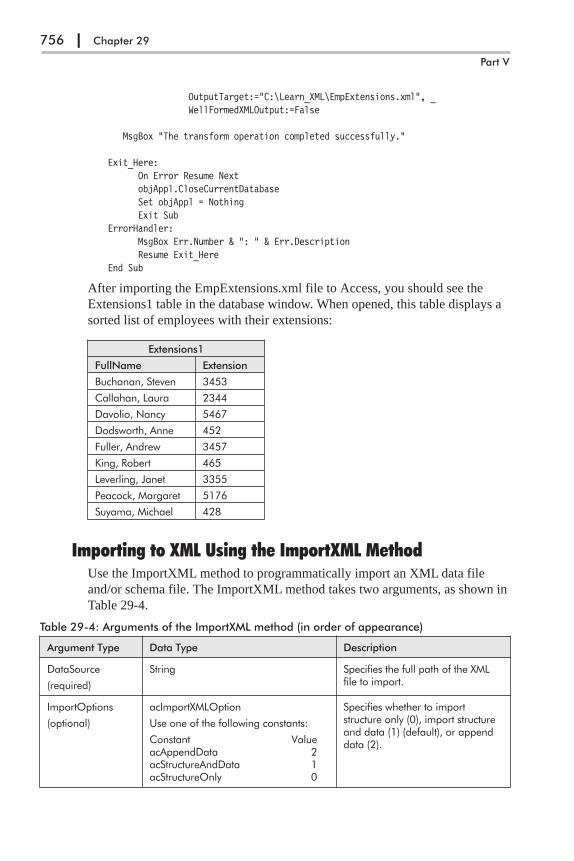
OutputTarget:="C:\Learn_XML\EmpExtensions.xml", _WellFormedXMLOutput:=False
MsgBox "The transform operation completed successfully."
Exit_Here:On Error Resume NextobjAppl.CloseCurrentDatabaseSet objAppl = NothingExit Sub
ErrorHandler:MsgBox Err.Number & ": " & Err.DescriptionResume Exit_Here
End Sub
After importing the EmpExtensions.xml file to Access, you should see the
Extensions1 table in the database window. When opened, this table displays a
sorted list of employees with their extensions:
Extensions1
FullName Extension
Buchanan, Steven 3453
Callahan, Laura 2344
Davolio, Nancy 5467
Dodsworth, Anne 452
Fuller, Andrew 3457
King, Robert 465
Leverling, Janet 3355
Peacock, Margaret 5176
Suyama, Michael 428
Importing to XML Using the ImportXML MethodUse the ImportXML method to programmatically import an XML data file
and/or schema file. The ImportXML method takes two arguments, as shown in
Table 29-4.
Table 29-4: Arguments of the ImportXML method (in order of appearance)
Argument Type Data Type Description
DataSource
(required)
String Specifies the full path of the XMLfile to import.
ImportOptions
(optional)
acImportXMLOption
Use one of the following constants:
Constant ValueacAppendData 2acStructureAndData 1acStructureOnly 0
Specifies whether to importstructure only (0), import structureand data (1) (default), or appenddata (2).
756 | Chapter 29
Part V
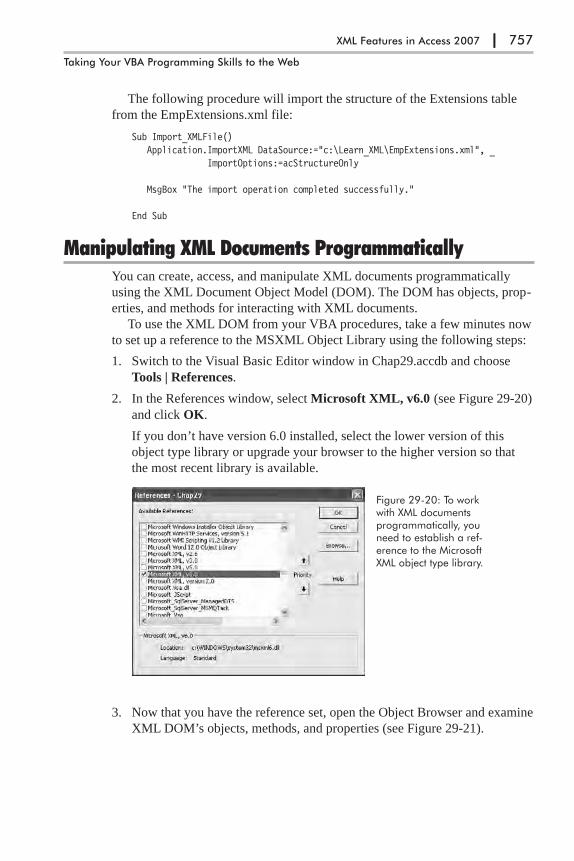
The following procedure will import the structure of the Extensions table
from the EmpExtensions.xml file:
Sub Import_XMLFile()Application.ImportXML DataSource:="c:\Learn_XML\EmpExtensions.xml", _
ImportOptions:=acStructureOnly
MsgBox "The import operation completed successfully."
End Sub
Manipulating XML Documents ProgrammaticallyYou can create, access, and manipulate XML documents programmatically
using the XML Document Object Model (DOM). The DOM has objects, prop-
erties, and methods for interacting with XML documents.
To use the XML DOM from your VBA procedures, take a few minutes now
to set up a reference to the MSXML Object Library using the following steps:
1. Switch to the Visual Basic Editor window in Chap29.accdb and choose
Tools | References.
2. In the References window, select Microsoft XML, v6.0 (see Figure 29-20)
and click OK.
If you don’t have version 6.0 installed, select the lower version of this
object type library or upgrade your browser to the higher version so that
the most recent library is available.
3. Now that you have the reference set, open the Object Browser and examine
XML DOM’s objects, methods, and properties (see Figure 29-21).
XML Features in Access 2007 | 757
Taking Your VBA Programming Skills to the Web
Figure 29-20: To workwith XML documentsprogrammatically, youneed to establish a ref-erence to the MicrosoftXML object type library.
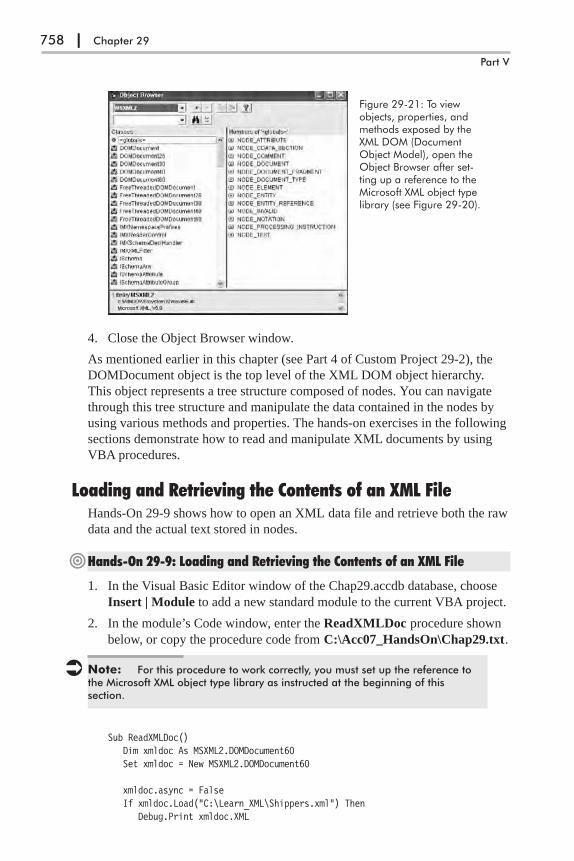
4. Close the Object Browser window.
As mentioned earlier in this chapter (see Part 4 of Custom Project 29-2), the
DOMDocument object is the top level of the XML DOM object hierarchy.
This object represents a tree structure composed of nodes. You can navigate
through this tree structure and manipulate the data contained in the nodes by
using various methods and properties. The hands-on exercises in the following
sections demonstrate how to read and manipulate XML documents by using
VBA procedures.
Loading and Retrieving the Contents of an XML FileHands-On 29-9 shows how to open an XML data file and retrieve both the raw
data and the actual text stored in nodes.
�Hands-On 29-9: Loading and Retrieving the Contents of an XML File
1. In the Visual Basic Editor window of the Chap29.accdb database, choose
Insert | Module to add a new standard module to the current VBA project.
2. In the module’s Code window, enter the ReadXMLDoc procedure shown
below, or copy the procedure code from C:\Acc07_HandsOn\Chap29.txt.
� Note: For this procedure to work correctly, you must set up the reference tothe Microsoft XML object type library as instructed at the beginning of thissection.
Sub ReadXMLDoc()Dim xmldoc As MSXML2.DOMDocument60Set xmldoc = New MSXML2.DOMDocument60
xmldoc.async = FalseIf xmldoc.Load("C:\Learn_XML\Shippers.xml") Then
Debug.Print xmldoc.XML
758 | Chapter 29
Part V
Figure 29-21: To viewobjects, properties, andmethods exposed by theXML DOM (DocumentObject Model), open theObject Browser after set-ting up a reference to theMicrosoft XML object typelibrary (see Figure 29-20).

' Debug.Print xmldoc.TextEnd If
End Sub
To work with an XML document, we begin by creating an instance of the
DOMDocument object as follows:
Dim xmldoc As MSXML2.DOMDocument60Set xmldoc = New MSXML2.DOMDocument60
MSXML uses an asynchronous loading mechanism by default for working
with documents. Asynchronous loading allows you to perform other tasks
during long database operations, such as providing feedback to the user as
MSXML parses the XML file or giving the user the chance to cancel the
operation. Before calling the Load method, however, it’s a good idea to set
the Async property of the DOMDocument object to False to ensure that the
XML file is fully loaded before other statements are executed. The Load
method returns True if it successfully loaded the data and False otherwise.
Having loaded the XML data into a DOMDocument object, you can use
the XML property to retrieve the raw data or use the Text property to
obtain the text stored in document nodes.
3. Position the insertion point anywhere within the code of the ReadXMLDoc
procedure and choose Run | Run Sub/UserForm. The procedure executes
and writes the contents of the XML file into the Immediate window as
shown in Figure 29-22.
4. In the code of the ReadXMLDoc procedure, comment the first Debug.Print
statement and uncomment the second statement that reads Debug.Print
xmldoc.Text.
XML Features in Access 2007 | 759
Taking Your VBA Programming Skills to the Web
Figure 29-22: By using the XML property of the DOMDocument object you canretrieve the raw data from an XML file.

5. Run the ReadXMLDoc procedure again. This time the Immediate window
shows the entry as one long line of text:
1 Shipping Company A 123 Any Street Memphis TN 99999 USA 2 Shipping Company B123 Any Street Memphis TN 99999 USA 3 Shipping Company C 123 Any Street MemphisTN 99999 USA
Working with XML Document NodesAs you already know, the XML DOM represents a tree-based hierarchy of
nodes. An XML document can contain nodes of different types. For example,
an XML document can include a document node that provides access to the
entire XML document or one or more element nodes representing individual
elements. Some nodes represent comments and processing instructions in the
XML document, and others hold the text content of a tag. To determine the
type of node, use the nodeType property of the IXMLDOMNode object. Node
types are identified either by a text string or a constant.
For example, the node representing an element can be referred to as
NODE_ELEMENT or 1, while the node representing the comment is named
NODE_COMMENT or 8. See the MSXML2 Library in the Object Browser
for the names of other node types.
In addition to node types, nodes can have parent, child, and sibling nodes.
The hasChildNodes method lets you determine if a DOMDocument object has
child nodes. There’s also a childNodes property, which simplifies retrieving a
collection of child nodes. Before you start looping through the collection of
child nodes, it’s a good idea to use the length property of the IXMLDOMNode
object to determine how many elements the collection contains.
The following hands-on exercise uses the Shippers.xml file to demonstrate
how to work with XML document nodes.
�Hands-On 29-10: Working with XML Document Nodes
1. In the same module of the Visual Basic Editor window where you entered
the ReadXMLDoc procedure in the previous hands-on exercise, enter the
LearnAboutNodes procedure as shown below, or copy the procedure code
from C:\Acc07_HandsOn\Chap29.txt.
Sub LearnAboutNodes()Dim xmldoc As MSXML2.DOMDocument60Dim xmlNode As MSXML2.IXMLDOMNode
Set xmldoc = New MSXML2.DOMDocument60xmldoc.async = False
xmldoc.Load ("C:\Learn_XML\Shippers.xml")If xmldoc.hasChildNodes Then
Debug.Print "Number of child Nodes: " & xmldoc.childNodes.lengthFor Each xmlNode In xmldoc.childNodes
Debug.Print "Node name:" & xmlNode.nodeNameDebug.Print vbTab & "Type:" & xmlNode.nodeTypeString _
& "(" & xmlNode.nodeType & ")"
760 | Chapter 29
Part V

Debug.Print vbTab & "Text: " & xmlNode.TextNext xmlNode
End IfSet xmlDoc = Nothing
End Sub
Notice that the above procedure uses the hasChildNodes property of the
DOMDocument object to check whether there are any child nodes in the
loaded XML file. If child nodes are found, the length property of the
childNodes collection returns the total number of child nodes found. Next,
the procedure loops through the childNodes collection and retrieves the
node name using the nodeName property of the IXMLDOMNode object.
The nodeTypeString property returns the string version of the node
type (for example, processing instruction, element, text, etc.) and the
nodeType property is used to return the enumeration value. Finally, the
Text property of the IXMLDOMNode object retrieves the node text.
2. Position the insertion point anywhere within the code of the
LearnAboutNodes procedure and choose Run | Run Sub/UserForm. The
result of running the LearnAboutNodes procedure is shown below:
Number of child Nodes: 2Node name:xml
Type:processinginstruction(7)Text: version="1.0" encoding="UTF-8"
Node name:datarootType:element(1)Text: 1 Shipping Company A 123 Any Street Memphis TN 99999 USA 2 Shipping
Company B 123 Any Street Memphis TN 99999 USA 3 Shipping Company C 123 AnyStreet Memphis TN 99999 USA
Retrieving Information from Element NodesLet’s assume that you want to read the information from only the text element
nodes. Use the getElementsByTagName method of the DOMDocument object
to retrieve an IXMLDOMNodeList object containing all the element nodes.
This method takes one argument specifying the tag name for which to search.
To search for all the element nodes, use “*” as the tag to search for.
The following hands-on exercise demonstrates how to obtain data from
XML document element nodes.
�Hands-On 29-11: Retrieving Information from Element Nodes
1. In the Visual Basic Editor Code window, enter the following IterateThru-
Elements procedure below the last procedure code you entered in
Hands-On 29-10, or copy the procedure code from C:\Acc07_HandsOn\
Chap29.txt.
Sub IterateThruElements()Dim xmldoc As MSXML2.DOMDocument60Dim xmlNode As MSXML2.IXMLDOMNodeDim xmlNodeList As MSXML2.IXMLDOMNodeList
XML Features in Access 2007 | 761
Taking Your VBA Programming Skills to the Web

Dim myNode As MSXML2.IXMLDOMNode
Set xmldoc = New MSXML2.DOMDocument60xmldoc.async = Falsexmldoc.Load ("C:\Learn_XML\Shippers.xml")Set xmlNodeList = xmldoc.getElementsByTagName("*")For Each xmlNode In xmlNodeList
For Each myNode In xmlNode.childNodesIf myNode.nodeType = NODE_TEXT Then
Debug.Print xmlNode.nodeName & "=" & xmlNode.TextEnd If
Next myNodeNext xmlNodeSet xmlDoc = Nothing
End Sub
The IterateThruElements procedure retrieves the XML document name and
the corresponding text for all the text elements in the Shippers.xml file.
Notice that this procedure uses two For Each…Next loops. The first one
(the outer loop) iterates through the entire collection of element nodes. The
second one (the inner loop) uses the nodeType property to find only those
element nodes that contain a single text node.
2. Position the insertion point anywhere within the code of the IterateThru-
Elements procedure and choose Run | Run Sub/UserForm. The result of
running the IterateThruElements procedure is shown below:
ID=1Company=Shipping Company AAddress=123 Any StreetCity=MemphisState_x002F_Province=TNZIP_x002F_Postal_x0020_Code=99999Country_x002F_Region=USAID=2Company=Shipping Company BAddress=123 Any StreetCity=MemphisState_x002F_Province=TNZIP_x002F_Postal_x0020_Code=99999Country_x002F_Region=USAID=3Company=Shipping Company CAddress=123 Any StreetCity=MemphisState_x002F_Province=TNZIP_x002F_Postal_x0020_Code=99999Country_x002F_Region=USA
Retrieving Specific Information from Element NodesYou can list all the nodes that match a specified criterion by using the
selectNodes method. The following hands-on exercise prints to the Immediate
window the text for all Company nodes that exist in the Shippers.xml file. The
762 | Chapter 29
Part V

//Company criterion of the selectNodes method looks for the element named
Company at any level within the tree structure of the nodes.
�Hands-On 29-12: Retrieving Specific Information from Element Nodes
1. In the Visual Basic Editor Code window, in the same module where you
entered previous procedures, enter the SelectNodesByCriteria procedure
as shown below, or copy the procedure code from C:\Acc07_HandsOn\
Chap29.txt.
Sub SelectNodesByCriteria()Dim xmldoc As MSXML2.DOMDocument60Dim xmlNodeList As MSXML2.IXMLDOMNodeListDim myNode As MSXML2.IXMLDOMNode
Set xmldoc = New MSXML2.DOMDocument60xmldoc.async = Falsexmldoc.Load ("C:\Learn_XML\Shippers.xml")Set xmlNodeList = xmldoc.selectNodes("//Company")If Not (xmlNodeList Is Nothing) Then
For Each myNode In xmlNodeListDebug.Print myNode.TextIf myNode.Text = "Shipping Company A" Then
myNode.Text = "Airborne Express"xmldoc.Save "C:\Learn_XML\Shippers.xml"
End IfNext myNode
End IfSet xmldoc = Nothing
End Sub
The SelectNodesByCriteria procedure creates the IXMLDOMNodeList
object that represents a collection of child nodes. The selectNodes method
applies the specified pattern to this node’s context and returns the list of
matching nodes as IXMLDOMNodeList. The expression used by the
selectNodes method specifies that all the CompanyName element nodes
should be included in the node list.
You can use the Is Nothing conditional expression to find out whether a
matching element was found in the loaded XML file. If the matching ele-
ments were found in the IXMLDOMNodeList, the procedure iterates
through the node list and prints each element node text to the Immediate
window. In addition, if the node element’s text value is Shipping Company
A, the procedure replaces this value with Airborne Express. The Save
method of the DOMDocument is used to save the changes in the
Shippers.xml file.
2. Position the insertion point anywhere within the code of the SelectNodes-
ByCriteria procedure and choose Run | Run Sub/UserForm. The result of
running the SelectNodesByCriteria procedure is shown below:
Shipping Company AShipping Company BShipping Company C
XML Features in Access 2007 | 763
Taking Your VBA Programming Skills to the Web

� Note: When you run this procedure again, you should see the followingoutput:
Airborne ExpressShipping Company BShipping Company C
Retrieving the First Matching NodeIf all you want to do is retrieve the first node that meets the specified criterion,
use the SelectSingleNode method of the DOMDocument object. As the argu-
ment of this method, specify the string representing the node you’d like to find.
For example, the following procedure finds the first node that matches the cri-
terion //Company in the Shippers.xml file:
Sub SelectSingleNode()Dim xmldoc As MSXML2.DOMDocument60Dim xmlSingleNode As MSXML2.IXMLDOMNode
Set xmldoc = New MSXML2.DOMDocument60xmldoc.async = Falsexmldoc.Load ("C:\Learn_XML\Shippers.xml")Set xmlSingleNode = xmldoc.SelectSingleNode("//Company")If xmlSingleNode Is Nothing Then
Debug.Print "No nodes selected."Else
Debug.Print xmlSingleNode.TextEnd IfSet xmlDoc = Nothing
End Sub
The XML DOM provides a number of other methods that make it possible to
programmatically add or delete elements in the XML document tree structure.
Covering all of the details of the XML DOM Object Model is beyond the
scope of this chapter. When you are ready for more information on this sub-
ject, visit the following web link: http://www.w3.org/DOM/.
Using ActiveX Data Objects with XMLIn Chapter 16 you learned how to save ADO Recordsets to disk using the
Advanced Data TableGram (adPersistADTG) format. This section expands on
what you already know about the ADO Recordsets by showing you how to use
ADO with XML. Since the release of ADO version 2.5 (in 2000), you can save
all types of recordsets to disk as XML using the Extensible Markup Language
(adPersistXML) format.
Saving an ADO Recordset as XML to DiskTo save an ADO Recordset to a disk file as XML, use the Save method of the
Recordset object with the adPersistXML constant. Hands-On 29-13 demon-
strates how to create an XML file from ADO.
764 | Chapter 29
Part V
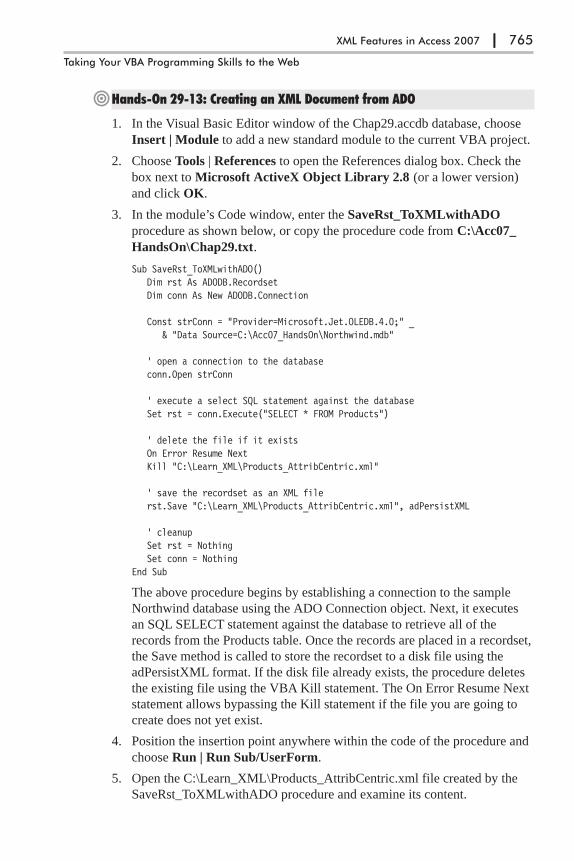
�Hands-On 29-13: Creating an XML Document from ADO
1. In the Visual Basic Editor window of the Chap29.accdb database, choose
Insert | Module to add a new standard module to the current VBA project.
2. Choose Tools | References to open the References dialog box. Check the
box next to Microsoft ActiveX Object Library 2.8 (or a lower version)
and click OK.
3. In the module’s Code window, enter the SaveRst_ToXMLwithADO
procedure as shown below, or copy the procedure code from C:\Acc07_
HandsOn\Chap29.txt.
Sub SaveRst_ToXMLwithADO()Dim rst As ADODB.RecordsetDim conn As New ADODB.Connection
Const strConn = "Provider=Microsoft.Jet.OLEDB.4.0;" _& "Data Source=C:\Acc07_HandsOn\Northwind.mdb"
' open a connection to the databaseconn.Open strConn
' execute a select SQL statement against the databaseSet rst = conn.Execute("SELECT * FROM Products")
' delete the file if it existsOn Error Resume NextKill "C:\Learn_XML\Products_AttribCentric.xml"
' save the recordset as an XML filerst.Save "C:\Learn_XML\Products_AttribCentric.xml", adPersistXML
' cleanupSet rst = NothingSet conn = Nothing
End Sub
The above procedure begins by establishing a connection to the sample
Northwind database using the ADO Connection object. Next, it executes
an SQL SELECT statement against the database to retrieve all of the
records from the Products table. Once the records are placed in a recordset,
the Save method is called to store the recordset to a disk file using the
adPersistXML format. If the disk file already exists, the procedure deletes
the existing file using the VBA Kill statement. The On Error Resume Next
statement allows bypassing the Kill statement if the file you are going to
create does not yet exist.
4. Position the insertion point anywhere within the code of the procedure and
choose Run | Run Sub/UserForm.
5. Open the C:\Learn_XML\Products_AttribCentric.xml file created by the
SaveRst_ToXMLwithADO procedure and examine its content.
XML Features in Access 2007 | 765
Taking Your VBA Programming Skills to the Web
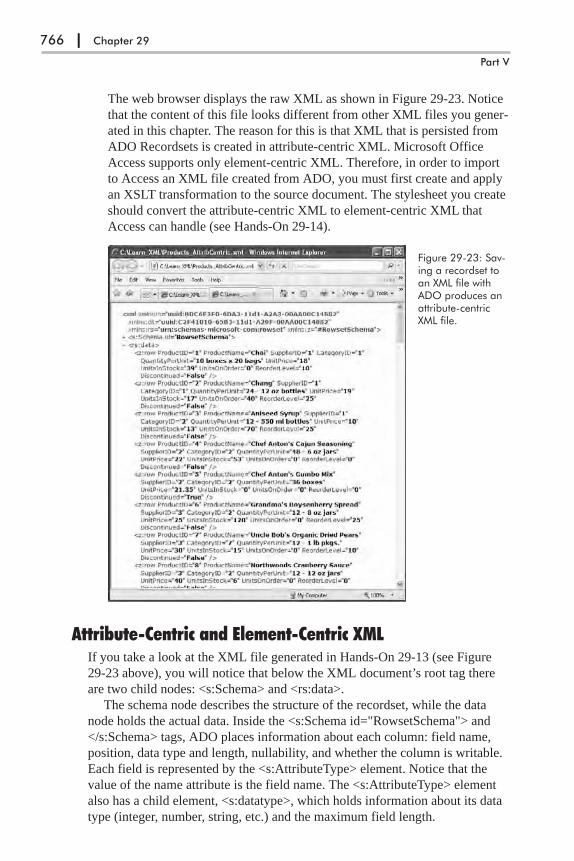
The web browser displays the raw XML as shown in Figure 29-23. Notice
that the content of this file looks different from other XML files you gener-
ated in this chapter. The reason for this is that XML that is persisted from
ADO Recordsets is created in attribute-centric XML. Microsoft Office
Access supports only element-centric XML. Therefore, in order to import
to Access an XML file created from ADO, you must first create and apply
an XSLT transformation to the source document. The stylesheet you create
should convert the attribute-centric XML to element-centric XML that
Access can handle (see Hands-On 29-14).
Attribute-Centric and Element-Centric XMLIf you take a look at the XML file generated in Hands-On 29-13 (see Figure
29-23 above), you will notice that below the XML document’s root tag there
are two child nodes: <s:Schema> and <rs:data>.
The schema node describes the structure of the recordset, while the data
node holds the actual data. Inside the <s:Schema id="RowsetSchema"> and
</s:Schema> tags, ADO places information about each column: field name,
position, data type and length, nullability, and whether the column is writable.
Each field is represented by the <s:AttributeType> element. Notice that the
value of the name attribute is the field name. The <s:AttributeType> element
also has a child element, <s:datatype>, which holds information about its data
type (integer, number, string, etc.) and the maximum field length.
766 | Chapter 29
Part V
Figure 29-23: Sav-ing a recordset toan XML file withADO produces anattribute-centricXML file.
Below the schema definition, you can find the actual data. The ADO
schema represents each record using the <z:row> tag. The fields in a record are
expressed as attributes of the <z:row> element. Every XML attribute is
assigned a value that is enclosed in a pair of single or double quotation marks;
however, if the value of a field in a record is Null, the attribute on the <z:row>
is not created. Notice that each record is written out in the following format:
<z:row ProductID='1' ProductName='Chai' SupplierID='1' CategoryID='1'QuantityPerUnit='10 boxes x 20 bags' UnitPrice='18' UnitsInStock='39'UnitsOnOrder='0' ReorderLevel='10' Discontinued='False'/>
The code fragment above is attribute-centric XML that Access cannot import.
To make the XML file compatible with Access, you should have each record
written out as follows:
<Product><ProductID>1</ProductID><ProductName>Chai</ProductName><SupplierID>1</SupplierID><CategoryID>1</CategoryID><QuantityPerUnit>10 boxes x 20 bags</QuantityPerUnit><UnitPrice>18</UnitPrice><UnitsInStock>39</UnitsInStock><UnitsOnOrder>0</UnitsOnOrder><ReorderLevel>10</ReorderLevel><Discontinued>False</Discontinued>
</Product>
The code fragment above represents element-centric XML. Each record is
wrapped in a <Product> tag, and each field is an element under the <Product>
tag.
Changing the Type of an XML FileBecause it is much easier to work with element-centric XML files (and
Microsoft Access does not support attribute-centric XML), you must write an
XSL stylesheet to transform the attribute-centric XML file to an element-
centric XML file before you can import an XML file created from an ADO
Recordset to Access.
The following hands-on exercise demonstrates how to write a stylesheet to
convert an XML document from attribute-centric to element-centric.
�Hands-On 29-14: Creating a Stylesheet to Convert Attribute-Centric XML toElement-Centric XML
1. Open Notepad and type the stylesheet code as shown below, or copy the
code from C:\Acc07_HandsOn\AttribToElem.txt.
<xsl:stylesheet version="1.0"xmlns:xsl="http://www.w3.org/1999/XSL/Transform"xmlns:rs="urn:schemas-microsoft-com:rowset">
<xsl:output method="xml" encoding="UTF-8" />
XML Features in Access 2007 | 767
Taking Your VBA Programming Skills to the Web
<xsl:template match="/">
<!-- root element for the XML output --><Products xmlns:z="#RowsetSchema">
<xsl:for-each select="/xml/rs:data/z:row"><Product>
<xsl:for-each select="@*"><xsl:element name="{name()}">
<xsl:value-of select="."/></xsl:element>
</xsl:for-each></Product>
</xsl:for-each></Products>
</xsl:template></xsl:stylesheet>
2. Save the above stylesheet as C:\Learn_XML\AttribToElem.xsl. Make
sure to type the .xsl extension so the file is not saved as text. We will use
this stylesheet for the transformation in the next hands-on exercise.
Notice that in the above stylesheet, the “@*” wildcard matches all attribute
nodes. Each time the <z:row> tag is encountered, an element named <Product>
will be created. And for each attribute, the attribute name will be converted to
the element name using the built-in XPath name( ) function. Expressions in
curly braces are evaluated and converted to strings. The select="." returns the
current value of the attribute being read.
See the next section on how to apply this stylesheet to the XML document.
Applying an XSL StylesheetNow that you’ve created the stylesheet that can be used to transform an
attribute-centric XML file into an element-centric file, you can use the
transformNodeToObject method of the DOMDocument object to apply the
stylesheet to the Products_AttribCentric.xml file created in Hands-On 29-13.
The hands-on exercise that follows demonstrates how to do this. In addition,
the procedure in this exercise will import the converted ADO XML file to
Access.
�Hands-On 29-15: Applying a Stylesheet to an ADO XML Document andImporting It to Access
1. Enter the following procedure below the procedure code you created in
Hands-On 29-13, or copy the procedure code from C:\Acc07_Hands-
On\Chap29.txt.
Sub ApplyStyleSheetAndImport()Dim myXMLDoc As New MSXML2.DOMDocument60Dim myXSLDoc As New MSXML2.DOMDocument60
768 | Chapter 29
Part V
Dim newXMLDoc As New MSXML2.DOMDocument60
myXMLDoc.async = FalseIf myXMLDoc.Load("C:\Learn_XML\Products_AttribCentric.xml") Then
myXSLDoc.Load "C:\Learn_XML\AttribToElem.xsl"
' apply the transformationIf Not myXSLDoc Is Nothing Then
myXMLDoc.transformNodeToObject myXSLDoc, newXMLDoc
' save the output in a new filenewXMLDoc.Save "C:\Learn_XML\Products_Converted.xml"
' import to AccessApplication.ImportXML "C:\Learn_XML\Products_Converted.xml"
End IfEnd If
' cleanupSet myXMLDoc = NothingSet myXSLDoc = NothingSet newXMLDoc = Nothing
End Sub
The above procedure begins by loading both the Products_AttribCen-
tric.xml file (created in Hands-On 29-13) and the AttribToElem.xsl
stylesheet (created in Hands-On 29-14) into the DOMDocument object.
Next, the stylesheet is applied to the source file by using the transform-
NodeToObject method. This method is applied to a node in the source
XML document’s tree and takes two arguments. The first argument is a
stylesheet in the form of a DOMDocument node. The second argument is
another DOMDocument node that will hold the result of the transforma-
tion. Next, the result of the transformation is saved to a file (Products_
Converted.xml) and the file is imported to Access using the ImportXML
method, which was introduced earlier in this chapter.
2. Run the ApplyStyleSheetAndImport procedure.
3. Open the C:\Learn_XML\Products_Converted.xml file. Notice that the
Products_Converted.xml file content is now element-centric XML (see
Figure 29-24).
4. In the Access window, locate and open the table named Product.
The Product table was created by the ImportXML method in the
ApplyStyleSheetAndImport procedure.
XML Features in Access 2007 | 769
Taking Your VBA Programming Skills to the Web

The original XML file is shown in Figure 29-23, and the stylesheet used in the
transformation can be found in Hands-On 29-14.
Transforming Attribute-Centric XML Data into an HTMLTable
As you’ve seen in earlier examples, after creating an XML file from an ADO
Recordset, the generated output contains attribute-centric XML. To import this
type of output to Access you had to create a special stylesheet and apply the
transformation to convert the attribute-centric XML to the element-centric
XML that Access supports. But what if you simply want to display the XML
file created from an ADO Recordset in a web browser? You can create a
generic XSL stylesheet that draws a simple HTML table for the users when
they open the XML attribute-centric file in their browser.
Hands-On 29-16 demonstrates how to create a stylesheet to transform the
attribute-centric XML file that we created in Hands-On 29-13 into HTML. The
hands-on exercise that immediately follows performs the transformation by
inserting a reference to the XSL stylesheet into the XML document.
770 | Chapter 29
Part V
Figure 29-24: This element-centric XML file is a result of applying astylesheet to the attribute-centric ADO Recordset that was saved to anXML file.

�Hands-On 29-16: Creating a Generic Stylesheet to Transform anAttribute-Centric XML File into HTML
1. Open Notepad and type the stylesheet code as shown below, or copy the
code from C:\Acc07_HandsOn\AttribToHTML.txt.
<?xml version="1.0"?><xsl:stylesheet version="1.0"xmlns:xsl="http://www.w3.org/1999/XSL/Transform"xmlns:s='uuid:BDC6E3F0-6DA3-11d1-A2A3-00AA00C14882'xmlns:dt='uuid:C2F41010-65B3-11d1-A29F-00AA00C14882'xmlns:rs='urn:schemas-microsoft-com:rowset'xmlns:z='#RowsetSchema'xmlns:html="http://www.w3.org/TR/REC-html40">
<xsl:template match="/"><html><head><title>Using Stylesheet to convert attribute based XML to HTML</title><style type="text/css">.myHSet { font-Family:verdana; font-Size:9px; color:blue; }.myBSet { font-Family:Garamond; font-Size:8px; }</style></head>
<body><table width="100%" border="1">
<xsl:for-each select="xml/s:Schema/s:ElementType/s:AttributeType"><th class="myHSet">
<xsl:value-of select="@name" /></th>
</xsl:for-each>
<xsl:for-each select="xml/rs:data/z:row"><tr>
<xsl:for-each select="@*"><td class="myBSet" valign="top">
<xsl:value-of select="."/></td>
</xsl:for-each></tr></xsl:for-each></table></body></html></xsl:template></xsl:stylesheet>
The above stylesheet uses the feature known as Cascading Stylesheets
(CSS) to format the HTML table. A style comprises different properties —
bold, italic, font size and font weight, color, etc. — that you want to apply
to particular text (titles, headers, body, etc.) and assigns a common name to
these properties. Thus, in the above stylesheet, two styles are defined. A
XML Features in Access 2007 | 771
Taking Your VBA Programming Skills to the Web

style named myHSet is applied to the table headings, and a style named
myBSet is used for formatting the text in the body of the table. Using styles
is very convenient. If you don’t like the formatting, you can simply change
the style definition and get a new look in no time. Notice that to define a
style, you must type a period and a class name. Using letters and numbers,
you can define any name for your style class. After the class name, you
need to type the definition for the class between curly brackets { }.
<style type="text/css">.myHSet { font-Family:Verdana; font-Size:9px; color:blue; }.myBSet { font-Family:Garamond; font-Size:8px; }
</style>
Notice that the definition of the class includes the name of the property fol-
lowed by a colon and the property value. Properties are separated by a
semicolon. A semicolon is also placed before the ending curly bracket (}).
A style class can be applied to any HTML tag.
The example stylesheet shown above uses template-based processing.
The following instruction defines a template for the entire document:
<xsl:template match="/">
The code between the initial and closing tags will be processed for all tags
whose names match the value of the attribute “match.” In other words, you
want the pattern matching that follows to be applied to the entire document
(/).
Next, a loop is used to write out the column headings. To do this, you
must move through all the AttributeType elements of the root element, out-
putting the name attribute’s value like this:
<xsl:for-each select="xml/s:Schema/s:ElementType/s:AttributeType"><th class="myHSet"><xsl:value-of select="@name" /></th></xsl:for-each>
An attribute’s name is always preceded by @.
Next, another loop runs through all the <z:row> elements representing
actual records:
<xsl:for-each select="xml/rs:data/z:row">
All the attributes of any <z:row> element are enumerated:
<xsl:for-each select="@*"><td class="myBSet" valign="top">
<xsl:value-of match="." /></td>
</xsl:for-each>
The string “@*” denotes any attribute. For each attribute found under the
<z:row> element, you need to match the attribute name with its corre-
sponding value. Notice the period in the <xsl:value-of> tag. The period
represents the node that XSLT is currently working with. In summary, the
772 | Chapter 29
Part V
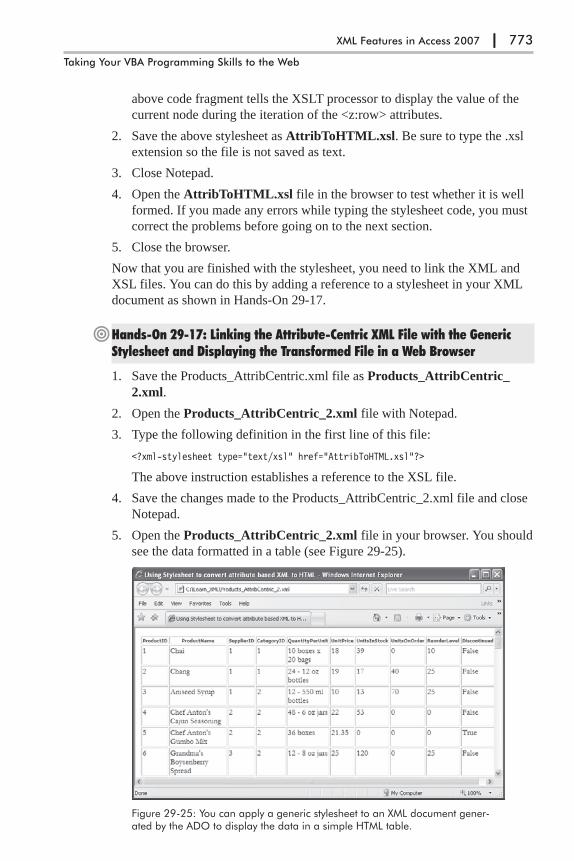
above code fragment tells the XSLT processor to display the value of the
current node during the iteration of the <z:row> attributes.
2. Save the above stylesheet as AttribToHTML.xsl. Be sure to type the .xsl
extension so the file is not saved as text.
3. Close Notepad.
4. Open the AttribToHTML.xsl file in the browser to test whether it is well
formed. If you made any errors while typing the stylesheet code, you must
correct the problems before going on to the next section.
5. Close the browser.
Now that you are finished with the stylesheet, you need to link the XML and
XSL files. You can do this by adding a reference to a stylesheet in your XML
document as shown in Hands-On 29-17.
�Hands-On 29-17: Linking the Attribute-Centric XML File with the GenericStylesheet and Displaying the Transformed File in a Web Browser
1. Save the Products_AttribCentric.xml file as Products_AttribCentric_
2.xml.
2. Open the Products_AttribCentric_2.xml file with Notepad.
3. Type the following definition in the first line of this file:
<?xml-stylesheet type="text/xsl" href="AttribToHTML.xsl"?>
The above instruction establishes a reference to the XSL file.
4. Save the changes made to the Products_AttribCentric_2.xml file and close
Notepad.
5. Open the Products_AttribCentric_2.xml file in your browser. You should
see the data formatted in a table (see Figure 29-25).
XML Features in Access 2007 | 773
Taking Your VBA Programming Skills to the Web
Figure 29-25: You can apply a generic stylesheet to an XML document gener-ated by the ADO to display the data in a simple HTML table.
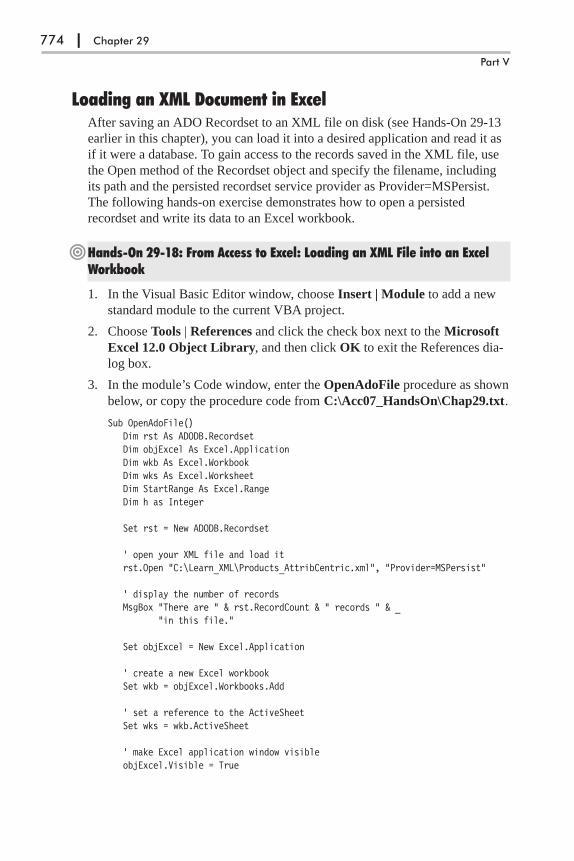
Loading an XML Document in ExcelAfter saving an ADO Recordset to an XML file on disk (see Hands-On 29-13
earlier in this chapter), you can load it into a desired application and read it as
if it were a database. To gain access to the records saved in the XML file, use
the Open method of the Recordset object and specify the filename, including
its path and the persisted recordset service provider as Provider=MSPersist.
The following hands-on exercise demonstrates how to open a persisted
recordset and write its data to an Excel workbook.
�Hands-On 29-18: From Access to Excel: Loading an XML File into an ExcelWorkbook
1. In the Visual Basic Editor window, choose Insert | Module to add a new
standard module to the current VBA project.
2. Choose Tools | References and click the check box next to the Microsoft
Excel 12.0 Object Library, and then click OK to exit the References dia-
log box.
3. In the module’s Code window, enter the OpenAdoFile procedure as shown
below, or copy the procedure code from C:\Acc07_HandsOn\Chap29.txt.
Sub OpenAdoFile()Dim rst As ADODB.RecordsetDim objExcel As Excel.ApplicationDim wkb As Excel.WorkbookDim wks As Excel.WorksheetDim StartRange As Excel.RangeDim h as Integer
Set rst = New ADODB.Recordset
' open your XML file and load itrst.Open "C:\Learn_XML\Products_AttribCentric.xml", "Provider=MSPersist"
' display the number of recordsMsgBox "There are " & rst.RecordCount & " records " & _
"in this file."
Set objExcel = New Excel.Application
' create a new Excel workbookSet wkb = objExcel.Workbooks.Add
' set a reference to the ActiveSheetSet wks = wkb.ActiveSheet
' make Excel application window visibleobjExcel.Visible = True
774 | Chapter 29
Part V
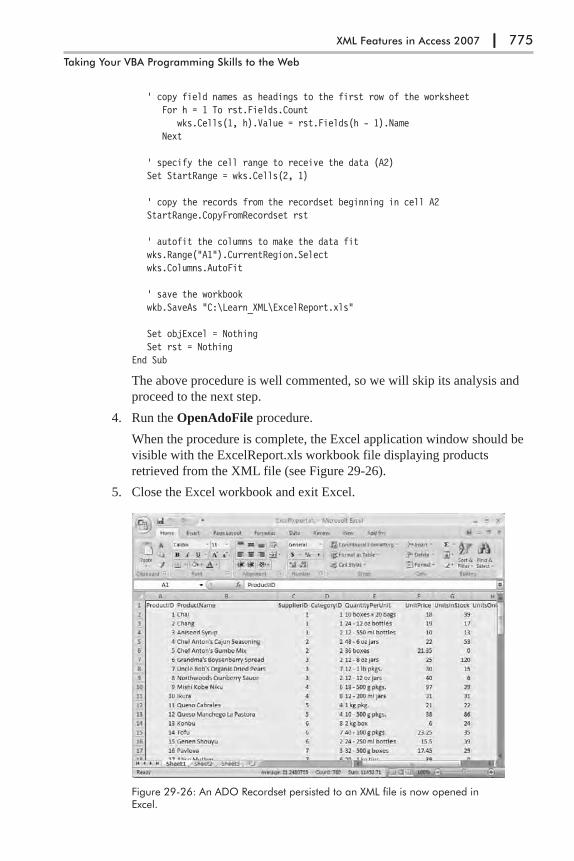
' copy field names as headings to the first row of the worksheetFor h = 1 To rst.Fields.Count
wks.Cells(1, h).Value = rst.Fields(h - 1).NameNext
' specify the cell range to receive the data (A2)Set StartRange = wks.Cells(2, 1)
' copy the records from the recordset beginning in cell A2StartRange.CopyFromRecordset rst
' autofit the columns to make the data fitwks.Range("A1").CurrentRegion.Selectwks.Columns.AutoFit
' save the workbookwkb.SaveAs "C:\Learn_XML\ExcelReport.xls"
Set objExcel = NothingSet rst = Nothing
End Sub
The above procedure is well commented, so we will skip its analysis and
proceed to the next step.
4. Run the OpenAdoFile procedure.
When the procedure is complete, the Excel application window should be
visible with the ExcelReport.xls workbook file displaying products
retrieved from the XML file (see Figure 29-26).
5. Close the Excel workbook and exit Excel.
XML Features in Access 2007 | 775
Taking Your VBA Programming Skills to the Web
Figure 29-26: An ADO Recordset persisted to an XML file is now opened inExcel.

Chapter SummaryThis chapter has shown you that Microsoft Access 2007 makes it easy to work
with XML files. Using Access built-in commands or programming code, you
can both export Access data to an XML file and import an XML file and dis-
play the file as an Access table. You learned here what XML is and how it is
structured. After working through the examples in this chapter, it’s easy to see
that XML supplies you with numerous ways to accomplish a specific task.
Because XML is stored in plain text files, it can be read by many types of
applications, independent of the operating system or hardware. You learned
how to transform data from XML to HTML and from one XML format to
another. You explored the ADO Recordset methods suitable for working with
XML programmatically. You were introduced to XSL stylesheets and XSLT
transformations. All of these new methods and techniques you’ve studied here
will need time to sink in. XML is not like VBA. It is not very independent. It
needs many supporting technologies to assist it in its work. So don’t despair if
you don’t understand something right away. Learning XML requires learning
many other new concepts (like XSLT, XPath, schemas, etc.) at the same time.
Take XML step by step by experimenting with it. The time that you invest
studying this technology will not be wasted. XML is here to stay. Here are
three main reasons why you should really consider XML:
� XML separates content from presentation.
This means that if you are planning to design web pages, you no longer
need to make changes to your HTML files when the data changes. Because
the data is kept in separate files, it’s easy to make modifications.
� XML is perfect for sharing and exchanging data.
This means that you no longer have to worry if your data needs to be pro-
cessed by a system that’s not compatible with yours. Because all systems
can work with text files (and XML documents are simply text files), you
can share and exchange your data without a headache.
� XML can be used as a database.
This means that you no longer need a database system to have a database.
What a great value!
This chapter concludes Part V of this book, which focused on working with an
Access database over the Internet by writing Active Server Pages and XML
files. In the next chapter, you learn how to work with and customize the new
user interface introduced in Access 2007.
776 | Chapter 29
Part V
PART VI
Working withNew Featuresin Access 2007
Chapter 30 Programming the User Interface
Chapter 31 Tables, Forms, and Reports
Chapter 32 Macros and Templates
777
Whether you have used
Access for years, or you
are just starting to use
Access with this ver-
sion, this part of the
book introduces you to
what’s new in Access
2007 in areas such as
the user interface,
tables, forms, reports,
templates, and macros.


Chapter 30
Programming the UserInterface
The user interface (UI) in Microsoft Office Access 2007 has been designed
from the ground up to improve user interaction with the product. The menu bar
and toolbars in previous versions have been replaced with new components
that allow easier access to and grouping of related commands. This chapter
provides an overview of the new interface elements in Office Access 2007 and
shows you how you can customize the UI in your Access database
applications.
The Getting Started with Microsoft Office Access WindowWhen you launch Access from the Start menu or a desktop shortcut, you are
greeted with the Getting Started with Microsoft Office Access window (Figure
30-1).
779
Figure 30-1: Office Access 2007 startup screen.

The middle part of the window provides a button to create a new blank Access
database and offers you a selection of prebuilt templates so that you can get a
head start on your Access database project. These templates come with
ready-to-use tables, forms, reports, queries, relationships, and macros and can
be modified as needed. You can organize the templates by category by using
category listings in the left pane. The lower part of the window provides quick
access to many Office Access 2007 resources such as training, user guides, and
downloads. The right pane of the getting started window offers quick access to
Access databases that were recently opened and the More hyperlink to browse
for a database on your computer or on the network.
The Office ButtonIn the top left-hand corner of the window you will notice the big, round Office
button ( ). This button opens the Office menu, which provides many options
(see Figure 30-2) that were found on the File menu and Database Utilities
submenu of Access 2003. When the button is clicked while the getting started
window is open, the only available options are for creating a new blank data-
base, opening an existing database, and managing your database by
compacting and repairing it. While the Office button itself cannot be custom-
ized, you can change the contents of the Office menu as described in the last
section of this chapter (see “Customizing the Office Button Menu”).
When you install the Access Developer Extensions (ADE) add-in you will
gain access to additional tools via the Developer option (see Figure 30-3). The
Microsoft Office Access 2007 Developer Extensions are used for easy deploy-
ment and management of Microsoft Access database solutions. You can
download the ADE free of charge from http://www.microsoft.com/down-
loads/details.aspx?familyid=d96a8358-ece4-4bee-a844-f81856dceb67&
displaylang=en.
780 | Chapter 30
Part VI
Figure 30-2: Use theOffice button to openthe Office menu.

The Office button also provides access to two command buttons: Access
Options and Exit Access. Many options previously set via the Options com-
mand on the Tools menu can now be accessed and managed from the Access
Options command.
The Quick Access ToolbarTo the right of the Office button is a special tool area known as the Quick
Access toolbar. From here you can quickly access the most frequently used
commands. You can add other Access built-in commands to the Quick Access
toolbar by using any of the following methods:
� Click on the drop-down arrow in the Quick Access toolbar and select a
command you want to add or click More commands.
� Right-click on the Quick Access toolbar and choose Customize Quick
Access Toolbar.
� Click the Access Options button at the bottom of the window (after click-
ing the Office button) and choose Customize.
The Quick Access toolbar will expand to accommodate as many commands as
you wish to add. Together with the title bar and the Office button, the Quick
Access toolbar belongs to a large rectangular area called the Ribbon. This area
is positioned at the top of the UI window. The Quick Access toolbar was
designed for the convenience of end users, and developers should not alter this
toolbar. However, if you have a valid reason to hide the contents of this toolbar
or add other buttons to it, you can do this by customizing the Ribbon, which is
covered in detail later in this chapter.
Programming the User Interface | 781
Working with New Features in Access 2007
Figure 30-3: The Devel-oper option in the Officemenu is available afterinstalling the ADE add-in.

Customizing the Navigation PaneWhen an Access database is opened, you can easily access all of your objects
via the Navigation pane on the left side of the window (see Figure 30-4). The
Navigation pane replaces the database window from earlier versions of Access.
If you need more screen real estate, you can hide the Navigation pane by click-
ing on the Shutter Bar Open/Close button (the double arrow at the top of the
pane) or by pressing F11.
Use the Navigation pane to organize your objects by type, date created or mod-
ified, or related table, or create your own custom groups of objects. By
clicking on the down arrow button at the top of the Navigation pane, you can
define how you view and manage database objects (see Figure 30-5).
To sort and filter your database objects, activate the Search Bar, or gain
access to the navigation options, right-click the top bar of the Navigation pane
(Figure 30-6).
782 | Chapter 30
Part VI
Figure 30-4: The Navigation pane in Office Access 2007.

The Navigation Options dialog (see Figure 30-7)
allows you to create any number of custom groups
for organizing your objects according to specific
database needs. The exercise in Hands-On 30-1
will walk you through the process of creating a
custom group to track your development efforts.
�Hands-On 30-1: Adding a Custom Group to the Navigation Pane
1. Open the C:\Acc07_ByExample\Northwind 2007.accdb database. Make
sure you cancel the login box.
2. Right-click the top bar of the Navigation pane and choose Navigation
Options.
3. Click the Add Item button and type a new name for the category: Objects
in Development.
4. While the new Objects in Development category is selected, click the Add
Group button and enter Dev Tables for the new group name.
5. Click the Add Group button again to add another group named Dev
Queries.
6. Add two more groups under Objects in Development named Dev Forms
and Dev Reports. See Figure 30-7 for the final output.
7. Click OK to close the Navigation Options dialog.
8. Click on the down arrow button at the top of the Navigation pane and
choose Objects in Development (Figure 30-8).
Programming the User Interface | 783
Working with New Features in Access 2007
Figure 30-5: Groupingoptions in the Navigationpane.
Figure 30-6: Objects in the Navigation panecan be easily categorized, sorted, and filtered.You can also locate a hard-to-find object viathe Search Bar. Use the Navigation Optionstool to create custom groups of objects.
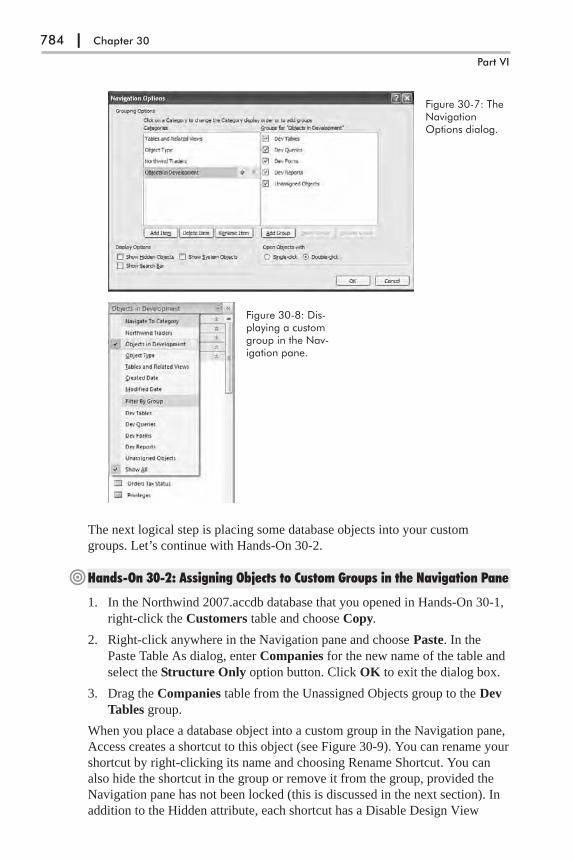
The next logical step is placing some database objects into your custom
groups. Let’s continue with Hands-On 30-2.
�Hands-On 30-2: Assigning Objects to Custom Groups in the Navigation Pane
1. In the Northwind 2007.accdb database that you opened in Hands-On 30-1,
right-click the Customers table and choose Copy.
2. Right-click anywhere in the Navigation pane and choose Paste. In the
Paste Table As dialog, enter Companies for the new name of the table and
select the Structure Only option button. Click OK to exit the dialog box.
3. Drag the Companies table from the Unassigned Objects group to the Dev
Tables group.
When you place a database object into a custom group in the Navigation pane,
Access creates a shortcut to this object (see Figure 30-9). You can rename your
shortcut by right-clicking its name and choosing Rename Shortcut. You can
also hide the shortcut in the group or remove it from the group, provided the
Navigation pane has not been locked (this is discussed in the next section). In
addition to the Hidden attribute, each shortcut has a Disable Design View
784 | Chapter 30
Part VI
Figure 30-7: TheNavigationOptions dialog.
Figure 30-8: Dis-playing a customgroup in the Nav-igation pane.
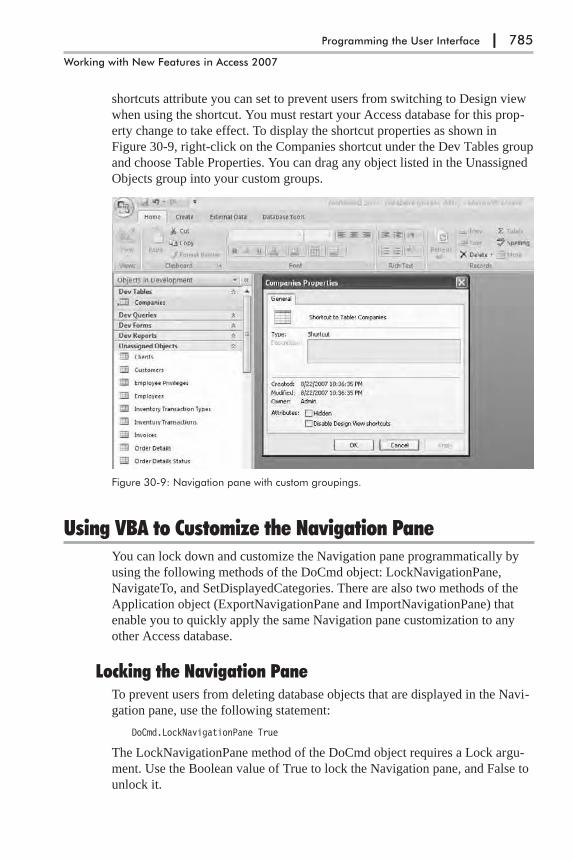
shortcuts attribute you can set to prevent users from switching to Design view
when using the shortcut. You must restart your Access database for this prop-
erty change to take effect. To display the shortcut properties as shown in
Figure 30-9, right-click on the Companies shortcut under the Dev Tables group
and choose Table Properties. You can drag any object listed in the Unassigned
Objects group into your custom groups.
Using VBA to Customize the Navigation PaneYou can lock down and customize the Navigation pane programmatically by
using the following methods of the DoCmd object: LockNavigationPane,
NavigateTo, and SetDisplayedCategories. There are also two methods of the
Application object (ExportNavigationPane and ImportNavigationPane) that
enable you to quickly apply the same Navigation pane customization to any
other Access database.
Locking the Navigation PaneTo prevent users from deleting database objects that are displayed in the Navi-
gation pane, use the following statement:
DoCmd.LockNavigationPane True
The LockNavigationPane method of the DoCmd object requires a Lock argu-
ment. Use the Boolean value of True to lock the Navigation pane, and False to
unlock it.
Programming the User Interface | 785
Working with New Features in Access 2007
Figure 30-9: Navigation pane with custom groupings.

Controlling the Display of Database ObjectsTo automatically navigate to a specific category in the Navigation pane upon
startup of your Access database or to display only certain objects in the cate-
gory, use the NavigateTo method of the DoCmd object. This method takes two
arguments: Category (required) and Group (optional). The Category argument
specifies the category you want to navigate to. The Category argument can be
the name of your custom category, such as the Objects in Development cate-
gory that you created in Hands-On 30-1, or a constant representation of the
Object Type, Tables and Views, Created Date, and Modified Date categories
(see Table 30-1). The Group argument is optional. If you omit it, the Naviga-
tion pane will display all database objects arranged by the criteria specified in
the Category argument. See Table 30-1 for valid Group arguments for the
various Category arguments.
Table 30-1: Category and Group arguments used in the NavigateTo method
CategoryArgument
Category Argument Constant GroupArgument
Group Argument Constant
ObjectType
acNavigationCategoryObjectType Tables
Forms
Reports
Queries
Pages
Macros
Modules
acNavigationGroupTables
acNavigationGroupForms
acNavigationGroupReports
acNavigationGroupQueries
acNavigationGroupPages
acNavigationGroupMacros
acNavigationGroupModules
Tablesand Views
acNavigationCategoryTablesAndViews Name of a specific table or view in yourdatabase.
ModifiedDate
acNavigationCategoryModifiedDate Today
Yesterday
Last Month
Older
acNavigationGroupToday
acNavigationGroupYesterday
acNavigationGroupLastMonth
acNavigationGroupOlder
CreatedDate
acNavigationCategoryCreatedDate Today
Yesterday
Last Month
Older
acNavigationGroupToday
acNavigationGroupYesterday
acNavigationGroupLastMonth
acNavigationGroupOlder
Custom Name of your custom category Name of one of the custom groups you havecreated for the specified custom category.
Let’s get some practice with the NavigateTo method.
786 | Chapter 30
Part VI
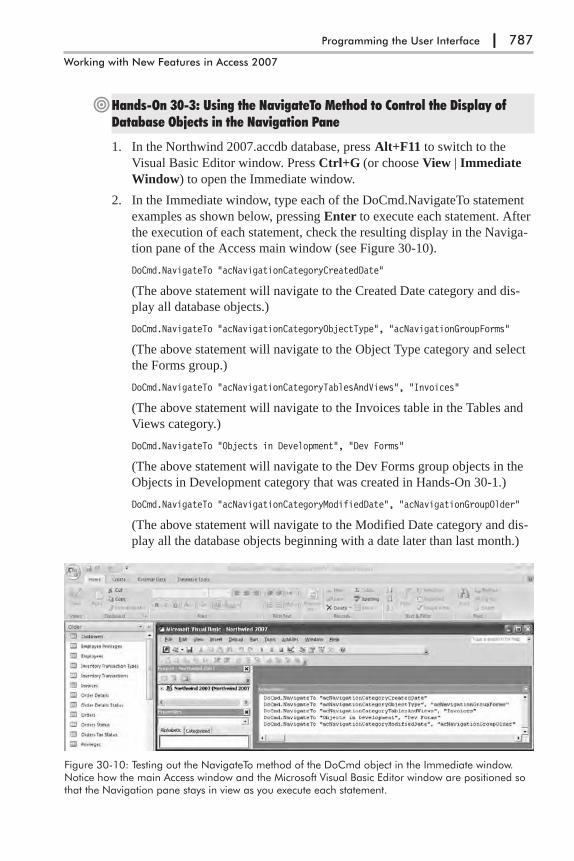
�Hands-On 30-3: Using the NavigateTo Method to Control the Display ofDatabase Objects in the Navigation Pane
1. In the Northwind 2007.accdb database, press Alt+F11 to switch to the
Visual Basic Editor window. Press Ctrl+G (or choose View | Immediate
Window) to open the Immediate window.
2. In the Immediate window, type each of the DoCmd.NavigateTo statement
examples as shown below, pressing Enter to execute each statement. After
the execution of each statement, check the resulting display in the Naviga-
tion pane of the Access main window (see Figure 30-10).
DoCmd.NavigateTo "acNavigationCategoryCreatedDate"
(The above statement will navigate to the Created Date category and dis-
play all database objects.)
DoCmd.NavigateTo "acNavigationCategoryObjectType", "acNavigationGroupForms"
(The above statement will navigate to the Object Type category and select
the Forms group.)
DoCmd.NavigateTo "acNavigationCategoryTablesAndViews", "Invoices"
(The above statement will navigate to the Invoices table in the Tables and
Views category.)
DoCmd.NavigateTo "Objects in Development", "Dev Forms"
(The above statement will navigate to the Dev Forms group objects in the
Objects in Development category that was created in Hands-On 30-1.)
DoCmd.NavigateTo "acNavigationCategoryModifiedDate", "acNavigationGroupOlder"
(The above statement will navigate to the Modified Date category and dis-
play all the database objects beginning with a date later than last month.)
Programming the User Interface | 787
Working with New Features in Access 2007
Figure 30-10: Testing out the NavigateTo method of the DoCmd object in the Immediate window.Notice how the main Access window and the Microsoft Visual Basic Editor window are positioned sothat the Navigation pane stays in view as you execute each statement.
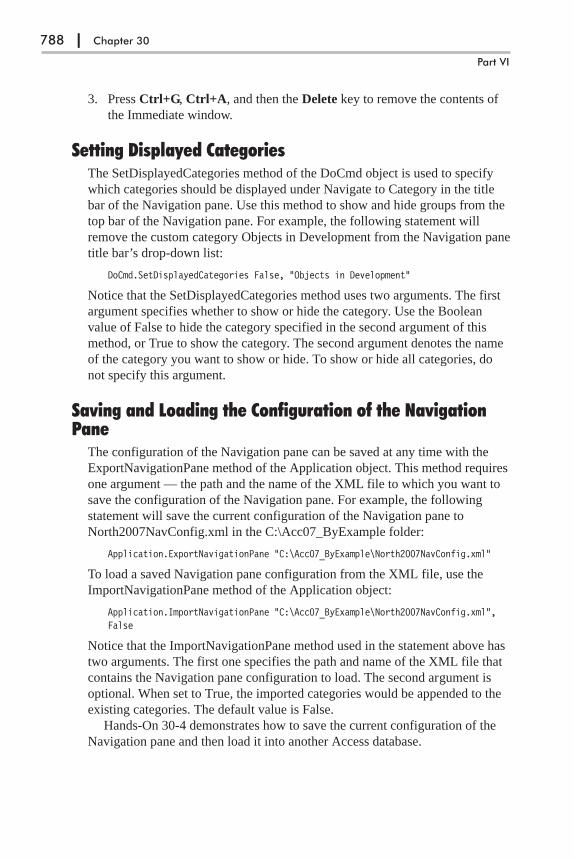
3. Press Ctrl+G, Ctrl+A, and then the Delete key to remove the contents of
the Immediate window.
Setting Displayed CategoriesThe SetDisplayedCategories method of the DoCmd object is used to specify
which categories should be displayed under Navigate to Category in the title
bar of the Navigation pane. Use this method to show and hide groups from the
top bar of the Navigation pane. For example, the following statement will
remove the custom category Objects in Development from the Navigation pane
title bar’s drop-down list:
DoCmd.SetDisplayedCategories False, "Objects in Development"
Notice that the SetDisplayedCategories method uses two arguments. The first
argument specifies whether to show or hide the category. Use the Boolean
value of False to hide the category specified in the second argument of this
method, or True to show the category. The second argument denotes the name
of the category you want to show or hide. To show or hide all categories, do
not specify this argument.
Saving and Loading the Configuration of the NavigationPane
The configuration of the Navigation pane can be saved at any time with the
ExportNavigationPane method of the Application object. This method requires
one argument — the path and the name of the XML file to which you want to
save the configuration of the Navigation pane. For example, the following
statement will save the current configuration of the Navigation pane to
North2007NavConfig.xml in the C:\Acc07_ByExample folder:
Application.ExportNavigationPane "C:\Acc07_ByExample\North2007NavConfig.xml"
To load a saved Navigation pane configuration from the XML file, use the
ImportNavigationPane method of the Application object:
Application.ImportNavigationPane "C:\Acc07_ByExample\North2007NavConfig.xml",False
Notice that the ImportNavigationPane method used in the statement above has
two arguments. The first one specifies the path and name of the XML file that
contains the Navigation pane configuration to load. The second argument is
optional. When set to True, the imported categories would be appended to the
existing categories. The default value is False.
Hands-On 30-4 demonstrates how to save the current configuration of the
Navigation pane and then load it into another Access database.
788 | Chapter 30
Part VI
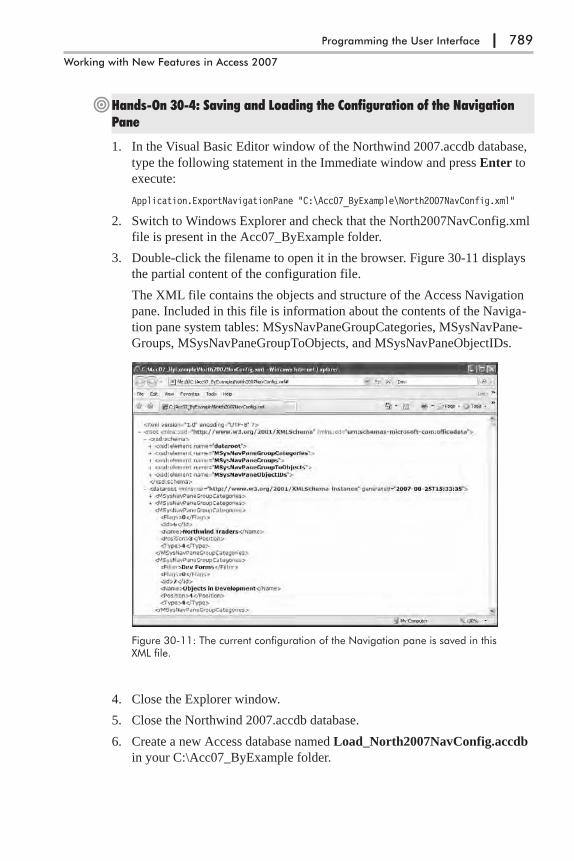
�Hands-On 30-4: Saving and Loading the Configuration of the NavigationPane
1. In the Visual Basic Editor window of the Northwind 2007.accdb database,
type the following statement in the Immediate window and press Enter to
execute:
Application.ExportNavigationPane "C:\Acc07_ByExample\North2007NavConfig.xml"
2. Switch to Windows Explorer and check that the North2007NavConfig.xml
file is present in the Acc07_ByExample folder.
3. Double-click the filename to open it in the browser. Figure 30-11 displays
the partial content of the configuration file.
The XML file contains the objects and structure of the Access Navigation
pane. Included in this file is information about the contents of the Naviga-
tion pane system tables: MSysNavPaneGroupCategories, MSysNavPane-
Groups, MSysNavPaneGroupToObjects, and MSysNavPaneObjectIDs.
4. Close the Explorer window.
5. Close the Northwind 2007.accdb database.
6. Create a new Access database named Load_North2007NavConfig.accdb
in your C:\Acc07_ByExample folder.
Programming the User Interface | 789
Working with New Features in Access 2007
Figure 30-11: The current configuration of the Navigation pane is saved in thisXML file.

7. Click the top bar of the Navigation pane and view the Navigation pane title
bar’s drop-down list before we proceed to import the saved configuration
file.
8. Press Alt+F11, and then press Ctrl+G to activate the Immediate window.
Type the following statement and press Enter to execute:
Application.ImportNavigationPane "C:\Acc07_ByExample\North2007NavConfig.xml",False
9. Press Alt+F11 to switch back to the Access application window.
10. Click the top bar of the Navigation pane and display the Navigation pane
title bar’s drop-down list again (see Figure 30-12).
Notice the presence of the additional entries in the drop-down list: Northwind
Traders and Objects in Development.
Now that you know how to manually and programmatically control the Navi-
gation pane, you should find it easy to provide users with the needed
customization of this new Access database navigation system. The next section
will expand your knowledge of the Access user interface by introducing you to
the Ribbon, which is new to Office 2007.
A Quick Overview of Access 2007 Ribbon InterfaceAll Office Access 2007 program commands can be accessed from the Ribbon
(see Figure 30-13). The Ribbon replaces the system of menus and toolbars
found in earlier versions of Access. The Ribbon contains the title bar, the
Office button, the Quick Access toolbar, and the tabs. Each tab on the Ribbon
provides access to features and commands related to a particular database task.
For example, you can use the Create tab to quickly create new tables, forms,
reports, queries, macros, modules, and Microsoft Windows SharePoint Ser-
vices lists (see Figure 30-14). Related commands within a tab are organized
790 | Chapter 30
Part VI
Figure 30-12: The Navigation pane can be easily modified using the external XML file con-taining the custom configuration settings.
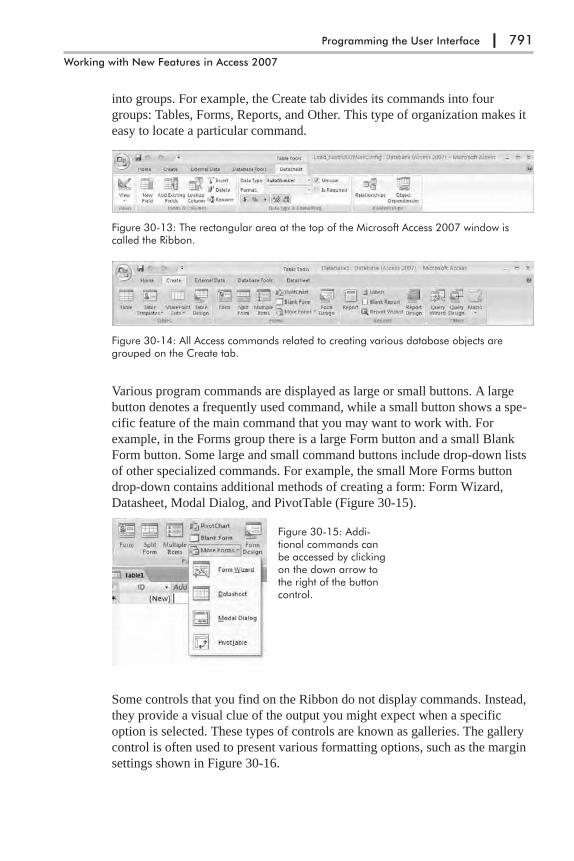
into groups. For example, the Create tab divides its commands into four
groups: Tables, Forms, Reports, and Other. This type of organization makes it
easy to locate a particular command.
Various program commands are displayed as large or small buttons. A large
button denotes a frequently used command, while a small button shows a spe-
cific feature of the main command that you may want to work with. For
example, in the Forms group there is a large Form button and a small Blank
Form button. Some large and small command buttons include drop-down lists
of other specialized commands. For example, the small More Forms button
drop-down contains additional methods of creating a form: Form Wizard,
Datasheet, Modal Dialog, and PivotTable (Figure 30-15).
Some controls that you find on the Ribbon do not display commands. Instead,
they provide a visual clue of the output you might expect when a specific
option is selected. These types of controls are known as galleries. The gallery
control is often used to present various formatting options, such as the margin
settings shown in Figure 30-16.
Programming the User Interface | 791
Working with New Features in Access 2007
Figure 30-13: The rectangular area at the top of the Microsoft Access 2007 window iscalled the Ribbon.
Figure 30-14: All Access commands related to creating various database objects aregrouped on the Create tab.
Figure 30-15: Addi-tional commands canbe accessed by clickingon the down arrow tothe right of the buttoncontrol.

As mentioned earlier, the commands on the Ribbon tabs are organized into
groups for easy browsing. Some tab groups have dialog box launchers in the
right-hand corner (see Figure 30-17) that display a dialog box where you can
set several advanced options at once.
In addition to main Ribbon tabs, there are also contextual tabs that contain
commands that apply to what you are doing. When a particular object is
selected, the Ribbon displays a contextual tab that provides commands for
working with that object. For example, when a table is opened in Datasheet
view, the Ribbon displays a contextual tab called Table Tools (see Figure
30-12 earlier). Clicking on the Table Tools tab activates the Datasheet tab that
has commands for dealing with a Datasheet object. The contextual tab disap-
pears when you cancel the selection of the object. In other words, close the
datasheet and the Table Tools tab will be gone.
When you open an earlier version database that contains menu or toolbar
customizations, the changes made in the user interface appear on an Add-Ins
tab in the Ribbon (see Figures 30-18 and 30-19). Only toolbars that are visible
in the legacy database will appear on the Add-Ins tab. The tooltips of the con-
trols display the name of the control, the control keyboard shortcut, and the
name of the legacy toolbar in which they are located (Figure 30-19). The but-
tons on the Add-Ins tab behave in the same way as they were programmed in
the legacy database.
792 | Chapter 30
Part VI
Figure 30-16: Clicking on the Margins button on the Print Preview tab displays a gallery ofdifferent margin settings.
Figure 30-17: The dia-log box launcher buttonin the bottom corner ofthe Font group on theHome tab will displaythe Datasheet Format-ting dialog box.

Now that you’ve reviewed the main features of the new Ribbon interface, let’s
look at how you can extend it with your own tabs and controls. The next sec-
tion introduces you to Ribbon programming with XML. The XML skills you
acquired in the previous chapter should come in handy here.
Ribbon Programming with XML, VBA, and MacrosThe components of the Ribbon user interface in the Microsoft Office 2007 sys-
tem can be manipulated programmatically using Extensible Markup Language
(XML) or other programming languages. All Office 2007 applications that use
Ribbons rely on the new programming model known as Ribbon extensibility,
or RibbonX.
This section introduces you to customizing Access 2007 Ribbons by using
XML markup. No special tools are required to perform these customizations.
XML is plain text; therefore, you can use any text editor to create your custom-
ization files. In the examples that follow we’ll be using the simple Windows
Notepad.
Programming the User Interface | 793
Working with New Features in Access 2007
Figure 30-18: AMicrosoft Access 2003database with a customtoolbar named MainTools.
Figure 30-19: In Access 2007, the Add-Ins tab shows the Custom Toolbars group with cus-tom controls that were added to the custom Main Tools toolbar in Access 2003.

In Access 2007 your Ribbon customizations can be stored in a special
Access table, in a VBA procedure, or in another Access database, or they can
be linked to from an Excel spreadsheet. When storing your customizations in a
location other than the Access table, you must call the LoadCustomUI method
of the Application object to load your XML markup manually and then set the
Ribbon name in your program at run time. In Access 2007, Ribbon
customizations can be applied to the entire application or to specific forms and
reports.
� Note: Simple text editors such as Notepad do not provide tools for validatingyour XML markup. You must be extra careful to write well-formed XML or yourcode will fail (see Chapter 29 for an introduction to XML terms and markup). Ifyou have access to a copy of Visual Studio 2005, you can use its editor to per-form the XML validation based on the XSD schema file. You can download thisfile (customUI.xsd) from the following web site: http://msdn.microsoft.com/office/tool/ribbon. And, if you’d like to work with the XML in a tree-based for-mat, you may want to download free of charge the Microsoft XML Notepad2006 at: http://microsoft.com/downloads/. None of these advanced tools arenecessary for the completion of this chapter’s Ribbon customizations. Each newtool, especially an advanced one, requires that you first familiarize yourself withits interface. To get started with XML programming without further delays,Notepad will do.
Creating the Ribbon Customization XML MarkupTo make custom changes to the Ribbon user interface in Access 2007 you need
to prepare an XML markup file that specifies all your customizations. The
XML markup file that we will use in the hands-on exercise in this section is
shown in Figure 30-20 and the resulting output in Figure 30-21.
794 | Chapter 30
Part VI
Figure 30-20: This XML file defines a new tab with two groups for theexisting Access 2007 Ribbon. See the output this file produces in Figure30-21.
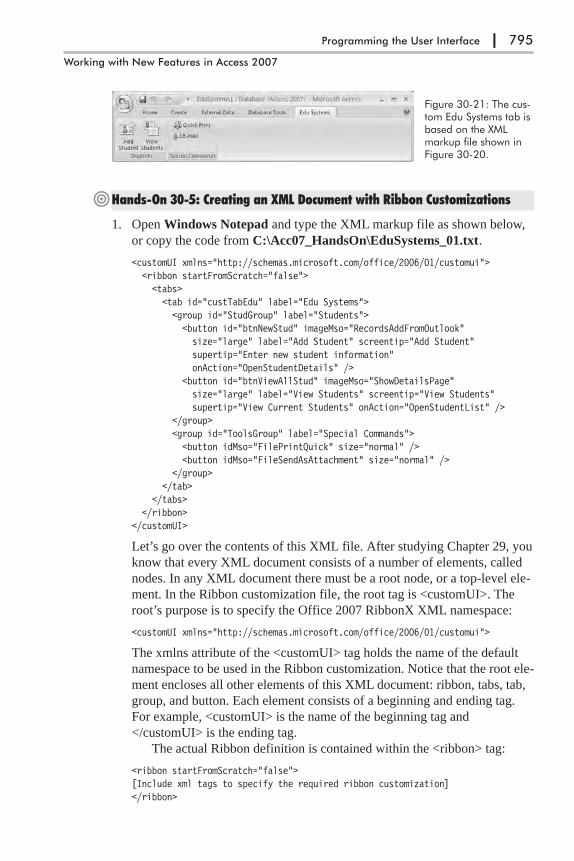
�Hands-On 30-5: Creating an XML Document with Ribbon Customizations
1. Open Windows Notepad and type the XML markup file as shown below,
or copy the code from C:\Acc07_HandsOn\EduSystems_01.txt.
<customUI xmlns="http://schemas.microsoft.com/office/2006/01/customui"><ribbon startFromScratch="false"><tabs><tab id="custTabEdu" label="Edu Systems"><group id="StudGroup" label="Students"><button id="btnNewStud" imageMso="RecordsAddFromOutlook"size="large" label="Add Student" screentip="Add Student"supertip="Enter new student information"onAction="OpenStudentDetails" />
<button id="btnViewAllStud" imageMso="ShowDetailsPage"size="large" label="View Students" screentip="View Students"supertip="View Current Students" onAction="OpenStudentList" />
</group><group id="ToolsGroup" label="Special Commands"><button idMso="FilePrintQuick" size="normal" /><button idMso="FileSendAsAttachment" size="normal" />
</group></tab>
</tabs></ribbon>
</customUI>
Let’s go over the contents of this XML file. After studying Chapter 29, you
know that every XML document consists of a number of elements, called
nodes. In any XML document there must be a root node, or a top-level ele-
ment. In the Ribbon customization file, the root tag is <customUI>. The
root’s purpose is to specify the Office 2007 RibbonX XML namespace:
<customUI xmlns="http://schemas.microsoft.com/office/2006/01/customui">
The xmlns attribute of the <customUI> tag holds the name of the default
namespace to be used in the Ribbon customization. Notice that the root ele-
ment encloses all other elements of this XML document: ribbon, tabs, tab,
group, and button. Each element consists of a beginning and ending tag.
For example, <customUI> is the name of the beginning tag and
</customUI> is the ending tag.
The actual Ribbon definition is contained within the <ribbon> tag:
<ribbon startFromScratch="false">[Include xml tags to specify the required ribbon customization]</ribbon>
Programming the User Interface | 795
Working with New Features in Access 2007
Figure 30-21: The cus-tom Edu Systems tab isbased on the XMLmarkup file shown inFigure 30-20.
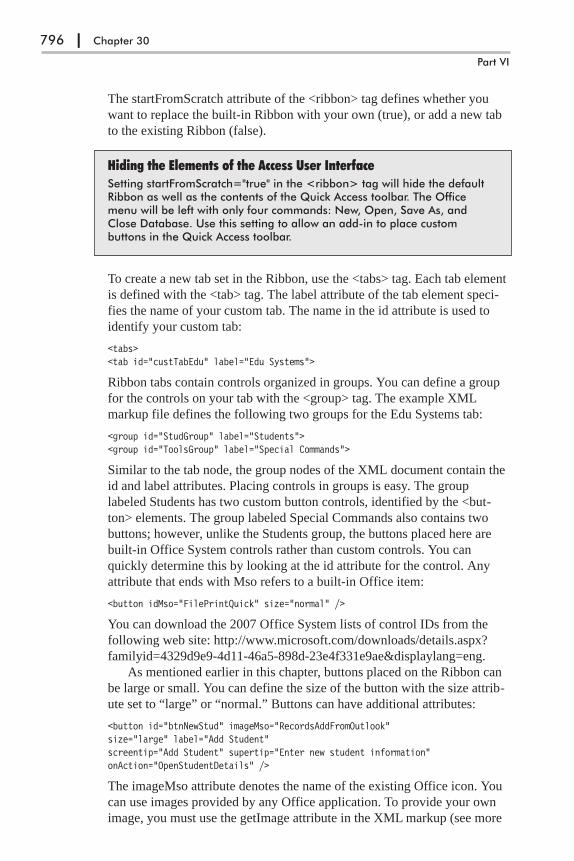
The startFromScratch attribute of the <ribbon> tag defines whether you
want to replace the built-in Ribbon with your own (true), or add a new tab
to the existing Ribbon (false).
Hiding the Elements of the Access User InterfaceSetting startFromScratch="true" in the <ribbon> tag will hide the defaultRibbon as well as the contents of the Quick Access toolbar. The Officemenu will be left with only four commands: New, Open, Save As, andClose Database. Use this setting to allow an add-in to place custombuttons in the Quick Access toolbar.
To create a new tab set in the Ribbon, use the <tabs> tag. Each tab element
is defined with the <tab> tag. The label attribute of the tab element speci-
fies the name of your custom tab. The name in the id attribute is used to
identify your custom tab:
<tabs><tab id="custTabEdu" label="Edu Systems">
Ribbon tabs contain controls organized in groups. You can define a group
for the controls on your tab with the <group> tag. The example XML
markup file defines the following two groups for the Edu Systems tab:
<group id="StudGroup" label="Students"><group id="ToolsGroup" label="Special Commands">
Similar to the tab node, the group nodes of the XML document contain the
id and label attributes. Placing controls in groups is easy. The group
labeled Students has two custom button controls, identified by the <but-
ton> elements. The group labeled Special Commands also contains two
buttons; however, unlike the Students group, the buttons placed here are
built-in Office System controls rather than custom controls. You can
quickly determine this by looking at the id attribute for the control. Any
attribute that ends with Mso refers to a built-in Office item:
<button idMso="FilePrintQuick" size="normal" />
You can download the 2007 Office System lists of control IDs from the
following web site: http://www.microsoft.com/downloads/details.aspx?
familyid=4329d9e9-4d11-46a5-898d-23e4f331e9ae&displaylang=eng.
As mentioned earlier in this chapter, buttons placed on the Ribbon can
be large or small. You can define the size of the button with the size attrib-
ute set to “large” or “normal.” Buttons can have additional attributes:
<button id="btnNewStud" imageMso="RecordsAddFromOutlook"size="large" label="Add Student"screentip="Add Student" supertip="Enter new student information"onAction="OpenStudentDetails" />
The imageMso attribute denotes the name of the existing Office icon. You
can use images provided by any Office application. To provide your own
image, you must use the getImage attribute in the XML markup (see more
796 | Chapter 30
Part VI
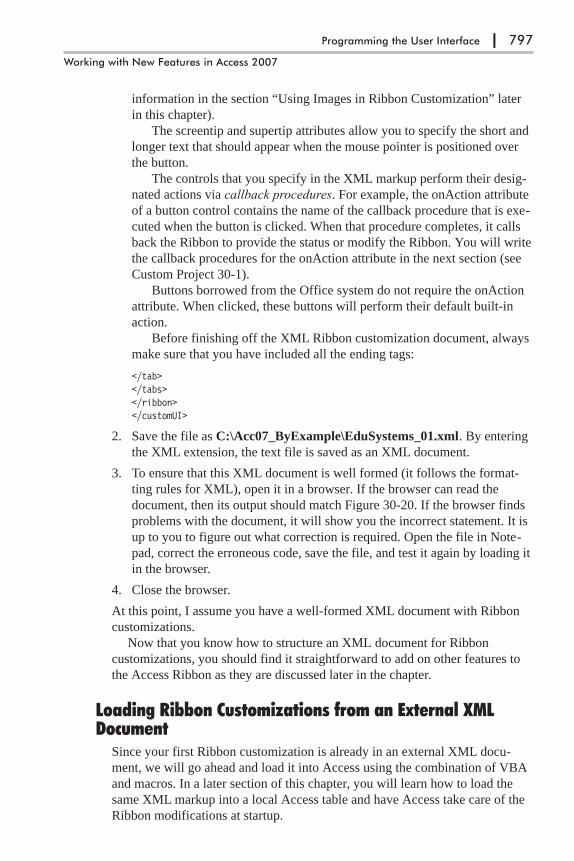
information in the section “Using Images in Ribbon Customization” later
in this chapter).
The screentip and supertip attributes allow you to specify the short and
longer text that should appear when the mouse pointer is positioned over
the button.
The controls that you specify in the XML markup perform their desig-
nated actions via callback procedures. For example, the onAction attribute
of a button control contains the name of the callback procedure that is exe-
cuted when the button is clicked. When that procedure completes, it calls
back the Ribbon to provide the status or modify the Ribbon. You will write
the callback procedures for the onAction attribute in the next section (see
Custom Project 30-1).
Buttons borrowed from the Office system do not require the onAction
attribute. When clicked, these buttons will perform their default built-in
action.
Before finishing off the XML Ribbon customization document, always
make sure that you have included all the ending tags:
</tab></tabs></ribbon></customUI>
2. Save the file as C:\Acc07_ByExample\EduSystems_01.xml. By entering
the XML extension, the text file is saved as an XML document.
3. To ensure that this XML document is well formed (it follows the format-
ting rules for XML), open it in a browser. If the browser can read the
document, then its output should match Figure 30-20. If the browser finds
problems with the document, it will show you the incorrect statement. It is
up to you to figure out what correction is required. Open the file in Note-
pad, correct the erroneous code, save the file, and test it again by loading it
in the browser.
4. Close the browser.
At this point, I assume you have a well-formed XML document with Ribbon
customizations.
Now that you know how to structure an XML document for Ribbon
customizations, you should find it straightforward to add on other features to
the Access Ribbon as they are discussed later in the chapter.
Loading Ribbon Customizations from an External XMLDocument
Since your first Ribbon customization is already in an external XML docu-
ment, we will go ahead and load it into Access using the combination of VBA
and macros. In a later section of this chapter, you will learn how to load the
same XML markup into a local Access table and have Access take care of the
Ribbon modifications at startup.
Programming the User Interface | 797
Working with New Features in Access 2007
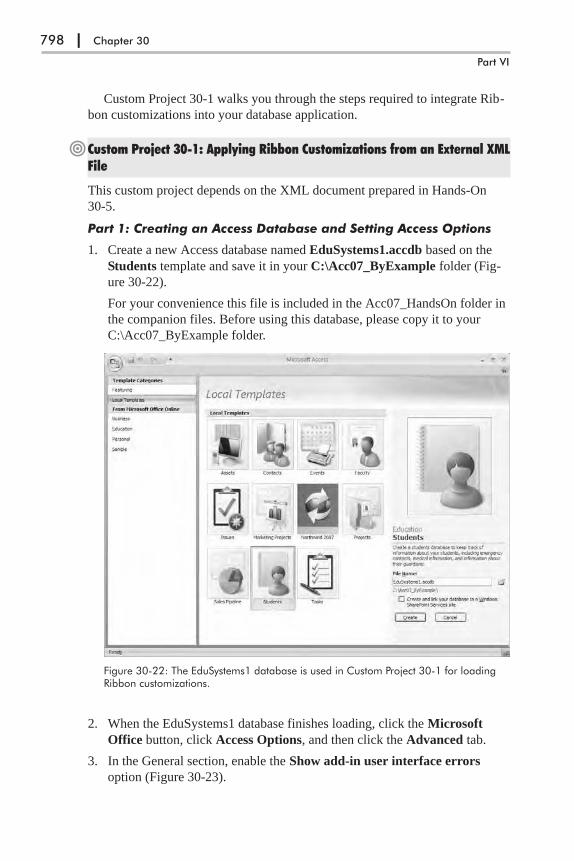
Custom Project 30-1 walks you through the steps required to integrate Rib-
bon customizations into your database application.
�Custom Project 30-1: Applying Ribbon Customizations from an External XMLFile
This custom project depends on the XML document prepared in Hands-On
30-5.
Part 1: Creating an Access Database and Setting Access Options
1. Create a new Access database named EduSystems1.accdb based on the
Students template and save it in your C:\Acc07_ByExample folder (Fig-
ure 30-22).
For your convenience this file is included in the Acc07_HandsOn folder in
the companion files. Before using this database, please copy it to your
C:\Acc07_ByExample folder.
2. When the EduSystems1 database finishes loading, click the Microsoft
Office button, click Access Options, and then click the Advanced tab.
3. In the General section, enable the Show add-in user interface errors
option (Figure 30-23).
798 | Chapter 30
Part VI
Figure 30-22: The EduSystems1 database is used in Custom Project 30-1 for loadingRibbon customizations.

When you enable this option, you will be able to see error messages if
errors are encountered when you load your Ribbon customizations.
4. Click OK to close the Access Options dialog.
Part 2: Setting Up the Programming Environment
1. Press Alt+F11 to switch to the Visual Basic Editor window.
2. Choose Tools | References. In the References dialog box, add the reference
to the following two libraries: Microsoft Office 12.0 Object Library and
Microsoft Scripting Runtime (Figure 30-24).
3. Click OK to close the References dialog box.
4. Choose Insert | Module.
5. In the Properties window, change the Name property of the module to
RibbonModification.
Programming the User Interface | 799
Working with New Features in Access 2007
Figure 30-23: Whenyou check Show add-inuser interface errors,Access will notify youabout any problems inthe Ribbon XML.
Figure 30-24: To avoidcompile errors, youmust set library refer-ences as shown here.

Part 3: Writing VBA Code
1. In the RibbonModification Code window, enter the following VBA proce-
dures, or copy and paste the VBA code from C:\Acc07_HandsOn\
RibbonVBA.txt.
Sub OpenStudentDetails(ByVal control As IRibbonControl)DoCmd.OpenForm "Student Details", acNormal, , , acFormAdd
End Sub
Sub OpenStudentList(ByVal control As IRibbonControl)DoCmd.OpenForm "Student List", acNormal
End Sub
Notice that both procedures shown above open the specified Access forms.
In addition, the OpenStudentDetails procedure opens the Student Details
form in Add mode. You may recall that these procedures (OpenStudent-
Details and OpenStudentList) are the names of the callback procedures that
were specified in the onAction attribute of the button XML:
<button id="btnNewStud" imageMso="RecordsAddFromOutlook"size="large" label="Add Student"screentip="Add Student" supertip="Enter new student information"onAction="OpenStudentDetails" />
<button id="btnViewAllStud" imageMso="ShowDetailsPage"size="large" label="View Students"screentip="View Students"supertip="View Current Students"onAction="OpenStudentList" />
As mentioned earlier, a callback procedure executes some action and then
notifies the Ribbon that the task has been completed. In Access 2007, the
onAction callback can be handled by a VBA procedure, a macro, or an
expression. When using VBA, the callback must include the IRibbon-
Control parameter and return type, as shown below:
Sub OpenStudentDetails(ByVal control As IRibbonControl)Sub OpenStudentList(ByVal control As IRibbonControl)
The IRibbonControl parameter is the control that was clicked. This control
is passed to your VBA code by the Ribbon. For VBA to recognize this
parameter, we added a reference to the Microsoft Office 12.0 Object
Library in Part 2 of this custom project.
800 | Chapter 30
Part VI

The IRibbonControl PropertiesYou can view the properties (Context, Id, and Tag) of the IRibbonControlobject in the Object Browser. The Context property returns the active win-dow that contains the Ribbon interface, in this case Microsoft Access. The Idproperty contains the ID of the control that was clicked. The Tag propertycan be used to store additional information with the control. To use thisproperty, you need to add the tag attribute to the XML markup. Using theTag property you can write a more generic procedure to handle thecallbacks. For example, instead of writing a separate procedure to open theStudent Details and Student List forms as we did in Custom Project 30-1,you could write a single procedure like this:
Sub OpenFrm(ByVal control AS IRibbonControl)Select Case control.Id
Case "btnNewStud"DoCmd.OpenForm "Student Details", acNormal, , , acFormAdd
Case "btnViewAllStud"DoCmd.OpenForm "Student List", acNormal
End SelectEnd Sub
Next, you would need to add the tag attribute to the XML markup andchange the onAction callback to the OpenFrm procedure name:
<button id="btnNewStud" imageMso="RecordsAddFromOutlook"size="large" label="Add Student"screentip="Add Student" supertip="Enter new student information"onAction="OpenFrm" tag="Student Details" />
<button id="btnViewAllStud" imageMso="ShowDetailsPage"size="large" label="View Students"screentip="View Students"supertip="View Current Students"onAction="OpenFrm" tag="Student List" />
You can see the implementation of the above technique in the EduSys-tems2.accdb database and EduSystems_02.xml document located in theAcc07_HandsOn folder. Be sure to copy these files to your C:\Acc07_ByExample folder prior to opening them.
2. In the RibbonModification Code module, enter the LoadRibbon function
procedure as shown below, or copy and paste the procedure code from
C:\Acc07_HandsOn\RibbonVBA.txt.
Public Function LoadRibbon()Dim strXML As StringDim oFso As New FileSystemObjectDim oTStream As TextStream
' Open the file containing the Ribbon customizations' and return a TextStream object that will be used' for reading from the fileSet oTStream = oFso.OpenTextFile("C:\Acc07_ByExample" & _
"\EduSystems_01.XML", ForReading)
Programming the User Interface | 801
Working with New Features in Access 2007
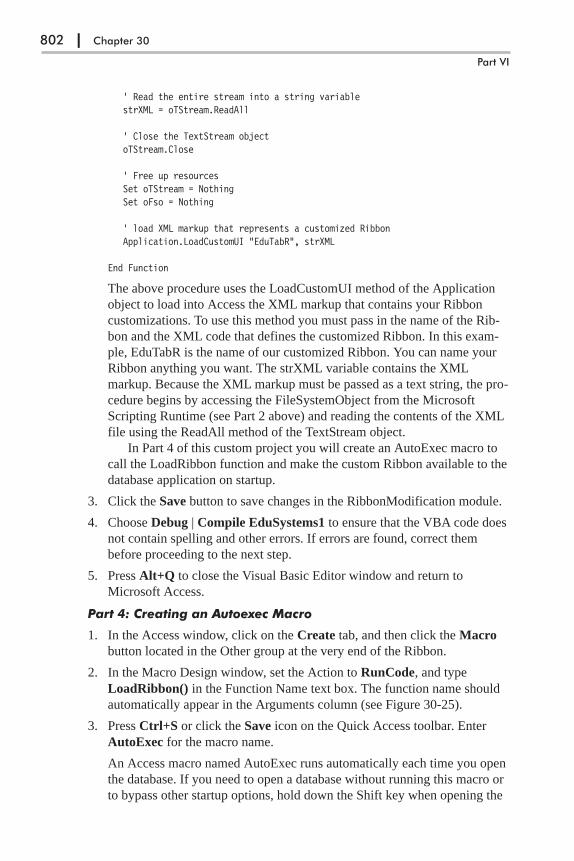
' Read the entire stream into a string variablestrXML = oTStream.ReadAll
' Close the TextStream objectoTStream.Close
' Free up resourcesSet oTStream = NothingSet oFso = Nothing
' load XML markup that represents a customized RibbonApplication.LoadCustomUI "EduTabR", strXML
End Function
The above procedure uses the LoadCustomUI method of the Application
object to load into Access the XML markup that contains your Ribbon
customizations. To use this method you must pass in the name of the Rib-
bon and the XML code that defines the customized Ribbon. In this exam-
ple, EduTabR is the name of our customized Ribbon. You can name your
Ribbon anything you want. The strXML variable contains the XML
markup. Because the XML markup must be passed as a text string, the pro-
cedure begins by accessing the FileSystemObject from the Microsoft
Scripting Runtime (see Part 2 above) and reading the contents of the XML
file using the ReadAll method of the TextStream object.
In Part 4 of this custom project you will create an AutoExec macro to
call the LoadRibbon function and make the custom Ribbon available to the
database application on startup.
3. Click the Save button to save changes in the RibbonModification module.
4. Choose Debug | Compile EduSystems1 to ensure that the VBA code does
not contain spelling and other errors. If errors are found, correct them
before proceeding to the next step.
5. Press Alt+Q to close the Visual Basic Editor window and return to
Microsoft Access.
Part 4: Creating an Autoexec Macro
1. In the Access window, click on the Create tab, and then click the Macro
button located in the Other group at the very end of the Ribbon.
2. In the Macro Design window, set the Action to RunCode, and type
LoadRibbon() in the Function Name text box. The function name should
automatically appear in the Arguments column (see Figure 30-25).
3. Press Ctrl+S or click the Save icon on the Quick Access toolbar. Enter
AutoExec for the macro name.
An Access macro named AutoExec runs automatically each time you open
the database. If you need to open a database without running this macro or
to bypass other startup options, hold down the Shift key when opening the
802 | Chapter 30
Part VI

database. For more information about using macros in Access 2007, refer
to Chapter 33.
4. To run the AutoExec macro right now, click on the Design tab, and then
click the Run button.
If you clicked the Run button and received no error, the macro has run suc-
cessfully and your Ribbon customization (EduTabR) has been loaded. For
the changes in the Ribbon to become visible, you must complete the steps
in Part 5 of this custom project.
5. Close the Macro Design window.
Part 5: Applying the Customized Ribbon
1. Click the Microsoft Office button, and then click Access Options.
2. Click the Current Database option. In the Ribbon and Toolbar Options
section, choose EduTabR from the Ribbon Name list (Figure 30-26).
3. Click OK to close the Access Options window.
Microsoft Access displays a message informing you that you must close
and reopen the current database for the specified option to take effect.
4. Click OK to the message. Then close and restart the EduSystems1
database.
When the database reopens, you should see in the default database Ribbon
your custom tab named Edu Systems (see Figure 30-21 earlier in this chap-
ter). Before going on to the next section, allow some time for testing the
controls placed in this custom tab.
5. Close the EduSystems1.accdb database.
Programming the User Interface | 803
Working with New Features in Access 2007
Figure 30-25:Creating anAutoExec macrofor loading Ribboncustomizations viathe LoadRibbon()function.
Figure 30-26: Enablinga customized Ribbon inthe current database.
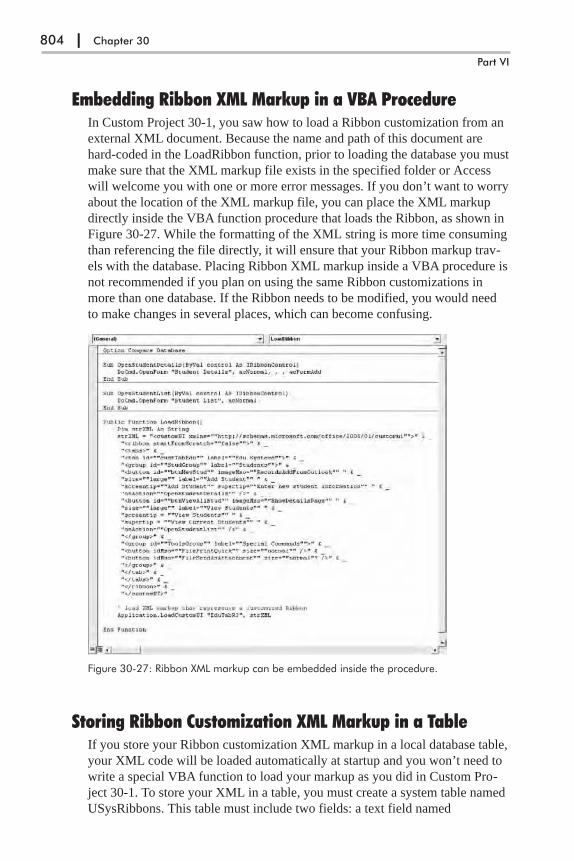
Embedding Ribbon XML Markup in a VBA ProcedureIn Custom Project 30-1, you saw how to load a Ribbon customization from an
external XML document. Because the name and path of this document are
hard-coded in the LoadRibbon function, prior to loading the database you must
make sure that the XML markup file exists in the specified folder or Access
will welcome you with one or more error messages. If you don’t want to worry
about the location of the XML markup file, you can place the XML markup
directly inside the VBA function procedure that loads the Ribbon, as shown in
Figure 30-27. While the formatting of the XML string is more time consuming
than referencing the file directly, it will ensure that your Ribbon markup trav-
els with the database. Placing Ribbon XML markup inside a VBA procedure is
not recommended if you plan on using the same Ribbon customizations in
more than one database. If the Ribbon needs to be modified, you would need
to make changes in several places, which can become confusing.
Storing Ribbon Customization XML Markup in a TableIf you store your Ribbon customization XML markup in a local database table,
your XML code will be loaded automatically at startup and you won’t need to
write a special VBA function to load your markup as you did in Custom Pro-
ject 30-1. To store your XML in a table, you must create a system table named
USysRibbons. This table must include two fields: a text field named
804 | Chapter 30
Part VI
Figure 30-27: Ribbon XML markup can be embedded inside the procedure.
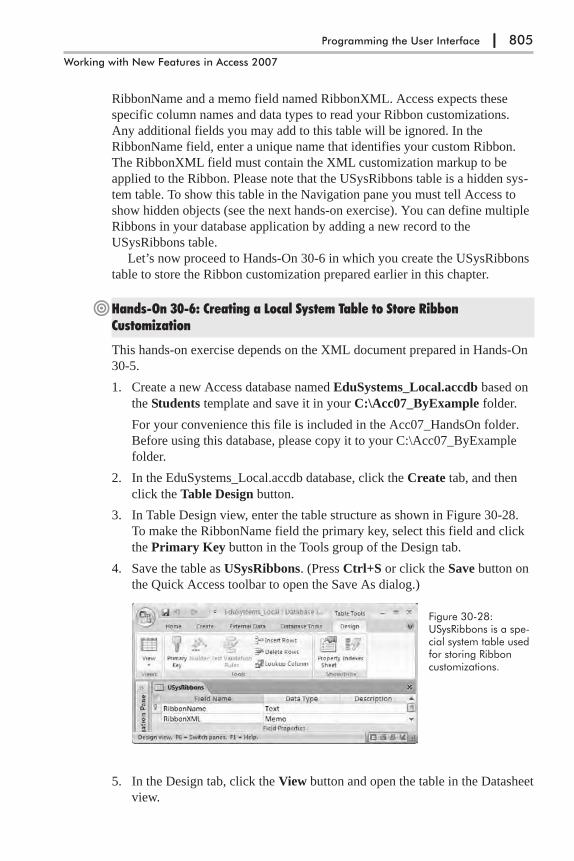
RibbonName and a memo field named RibbonXML. Access expects these
specific column names and data types to read your Ribbon customizations.
Any additional fields you may add to this table will be ignored. In the
RibbonName field, enter a unique name that identifies your custom Ribbon.
The RibbonXML field must contain the XML customization markup to be
applied to the Ribbon. Please note that the USysRibbons table is a hidden sys-
tem table. To show this table in the Navigation pane you must tell Access to
show hidden objects (see the next hands-on exercise). You can define multiple
Ribbons in your database application by adding a new record to the
USysRibbons table.
Let’s now proceed to Hands-On 30-6 in which you create the USysRibbons
table to store the Ribbon customization prepared earlier in this chapter.
�Hands-On 30-6: Creating a Local System Table to Store RibbonCustomization
This hands-on exercise depends on the XML document prepared in Hands-On
30-5.
1. Create a new Access database named EduSystems_Local.accdb based on
the Students template and save it in your C:\Acc07_ByExample folder.
For your convenience this file is included in the Acc07_HandsOn folder.
Before using this database, please copy it to your C:\Acc07_ByExample
folder.
2. In the EduSystems_Local.accdb database, click the Create tab, and then
click the Table Design button.
3. In Table Design view, enter the table structure as shown in Figure 30-28.
To make the RibbonName field the primary key, select this field and click
the Primary Key button in the Tools group of the Design tab.
4. Save the table as USysRibbons. (Press Ctrl+S or click the Save button on
the Quick Access toolbar to open the Save As dialog.)
5. In the Design tab, click the View button and open the table in the Datasheet
view.
Programming the User Interface | 805
Working with New Features in Access 2007
Figure 30-28:USysRibbons is a spe-cial system table usedfor storing Ribboncustomizations.

6. In the RibbonName field, enter TestRibbonTab. Paste the entire contents
of the C:\Acc07_ByExample\EduSystems_01.xml document into the
RibbonXML field. Make changes in the onAction attribute of the buttons
as shown in Figure 30-29. In the onAction attribute for btnNewStud, enter
RibbonLib.OpenStudentDetails. In the onAction attribute for
btnViewAllStud, enter RibbonLib.OpenStudentList.
7. Save and close the USysRibbons table.
Showing System Objects in the Navigation PaneBy default, system tables do not show in the Navigation pane. If you needto open the USysRibbons table to correct any errors or add a new record,you must enable the system objects in the Navigation Options dialog box.
1. Click the Microsoft Office button, and then click Access Options.
2. Click Current Database, and then in the Navigation section click theNavigation Options button.
3. Select Show System Objects and click OK to close the NavigationOptions dialog box.
4. Click OK to exit the Access Options dialog.
The next step is to enter the callbacks that are needed for the button
actions. In Custom Project 30-1 you wrote VBA callback procedures for
the btnNewStud and btnViewAllStud buttons. Instead of a VBA callback,
the onAction attribute of the button control can invoke a macro. Macro
callbacks do not require that you return a value to the Ribbon. Also, your
806 | Chapter 30
Part VI
Figure 30-29: The USysRibbons table with a record defining Ribbon custom-ization. To define multiple Ribbons in your application, simply add a newrecord to this table.

Ribbon customization can be functional even in safe mode (when code is
not enabled for the database). It is up to you to decide whether to write
VBA callbacks or create simple macro actions for your custom Ribbon
controls. This hands-on exercise demonstrates the implementation of mac-
ros in the onAction attribute for controls.
8. In the database window, click the Create tab, and in the Other group, click
the Macro button.
9. In the Macro Design window, click the Design tab, and then click the
Macro Names button to add a column for a macro name.
10. Add actions for the buttons as shown below and compare with Figure
30-30:
Macro Name: OpenStudentDetails
Action: OpenForm
Arguments: Student Details, Form, , , Add, Normal
Macro Name: OpenStudentList
Action: OpenForm
Arguments: Student List, Form, , , , Normal
11. Press Ctrl+S to invoke a Save As dialog box. Enter RibbonLib for your
macro name.
12. Close the Macro Design window.
Now that your macro callbacks are ready, you must tell Access to read your
Ribbon definition from the USysRibbons system table. To do this, you
must close and then restart the application.
13. Close and then reload the EduSystems_Local.accdb database.
When the application starts, Access looks for the USysRibbons system
table. If the table exists, Access proceeds to read the data. If any errors are
encountered in the Ribbon definition and you have set the option to Show
add-in user interface errors (see Figure 30-23 earlier), you will see error
messages similar to the one shown in Figure 30-31. Needless to say, you
must correct all the errors before Access can display your customization in
the Ribbon.
Programming the User Interface | 807
Working with New Features in Access 2007
Figure 30-30: Macro callbacks to be used by your Ribbon customizationmarkup.
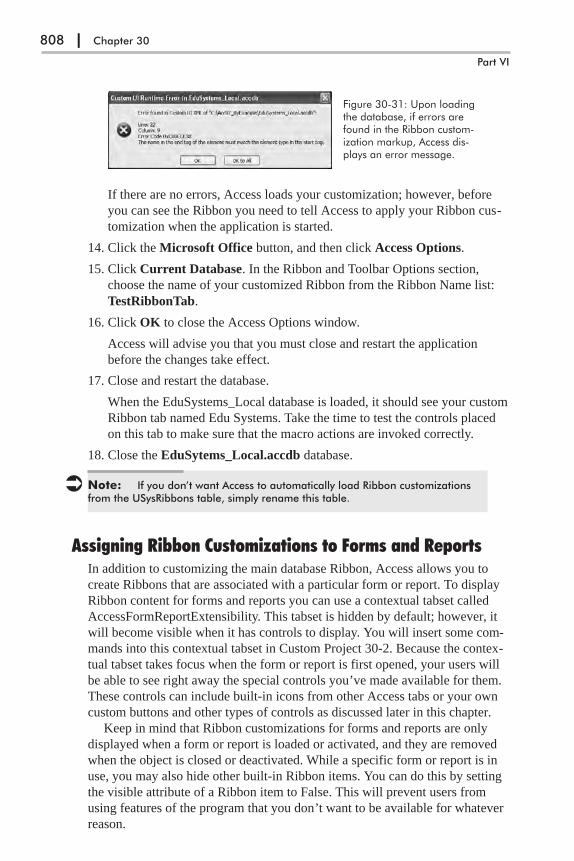
If there are no errors, Access loads your customization; however, before
you can see the Ribbon you need to tell Access to apply your Ribbon cus-
tomization when the application is started.
14. Click the Microsoft Office button, and then click Access Options.
15. Click Current Database. In the Ribbon and Toolbar Options section,
choose the name of your customized Ribbon from the Ribbon Name list:
TestRibbonTab.
16. Click OK to close the Access Options window.
Access will advise you that you must close and restart the application
before the changes take effect.
17. Close and restart the database.
When the EduSystems_Local database is loaded, it should see your custom
Ribbon tab named Edu Systems. Take the time to test the controls placed
on this tab to make sure that the macro actions are invoked correctly.
18. Close the EduSytems_Local.accdb database.
� Note: If you don’t want Access to automatically load Ribbon customizationsfrom the USysRibbons table, simply rename this table.
Assigning Ribbon Customizations to Forms and ReportsIn addition to customizing the main database Ribbon, Access allows you to
create Ribbons that are associated with a particular form or report. To display
Ribbon content for forms and reports you can use a contextual tabset called
AccessFormReportExtensibility. This tabset is hidden by default; however, it
will become visible when it has controls to display. You will insert some com-
mands into this contextual tabset in Custom Project 30-2. Because the contex-
tual tabset takes focus when the form or report is first opened, your users will
be able to see right away the special controls you’ve made available for them.
These controls can include built-in icons from other Access tabs or your own
custom buttons and other types of controls as discussed later in this chapter.
Keep in mind that Ribbon customizations for forms and reports are only
displayed when a form or report is loaded or activated, and they are removed
when the object is closed or deactivated. While a specific form or report is in
use, you may also hide other built-in Ribbon items. You can do this by setting
the visible attribute of a Ribbon item to False. This will prevent users from
using features of the program that you don’t want to be available for whatever
reason.
808 | Chapter 30
Part VI
Figure 30-31: Upon loadingthe database, if errors arefound in the Ribbon custom-ization markup, Access dis-plays an error message.

To assign a custom Ribbon to a form or report, you need to open a form or
report in Design or Layout view, and on the Other tab of the property sheet,
choose the Ribbon you want to apply from the Ribbon Name list.
�Custom Project 30-2: Creating and Assigning Ribbon Customization to aReport
This custom project requires access to the EduSystems_Local.accdb database
and the USysRibbons table that was created in Hands-On 30-6.
Part 1: Creating Ribbon Customization for a Report Using a LocalSystem Table
1. Open the C:\Acc07_ByExample\EduSystems_Local.accdb database.
This database will display a custom tab named Edu Systems. Recall from
the previous hands-on exercise that the XML markup for this customiz-
ation is stored in the local system table named USysRibbons. In this exer-
cise, you will add another record to this table to specify a Ribbon
customization for an Access report. Before you proceed to the next step,
make sure that the USysRibbons table is displayed in the Navigation pane.
To unhide the table, follow the steps outlined in the sidebar “Showing Sys-
tem Objects in the Navigation Pane” in the previous section.
2. Open the USysRibbons table and enter a new record for the Ribbon named
AlergMedRpt as shown in Figure 30-32. You can copy the XML markup
file from C:\Acc07_HandsOn\ EduSystems_04.xml.
The RibbonXML field contains the XML markup you want to apply to a
report. The RibbonName can be any name you want to use to identify this
customization. To have Access use the special contextual tabset that is
Programming the User Interface | 809
Working with New Features in Access 2007
Figure 30-32: Entering Ribbon customization for a report.
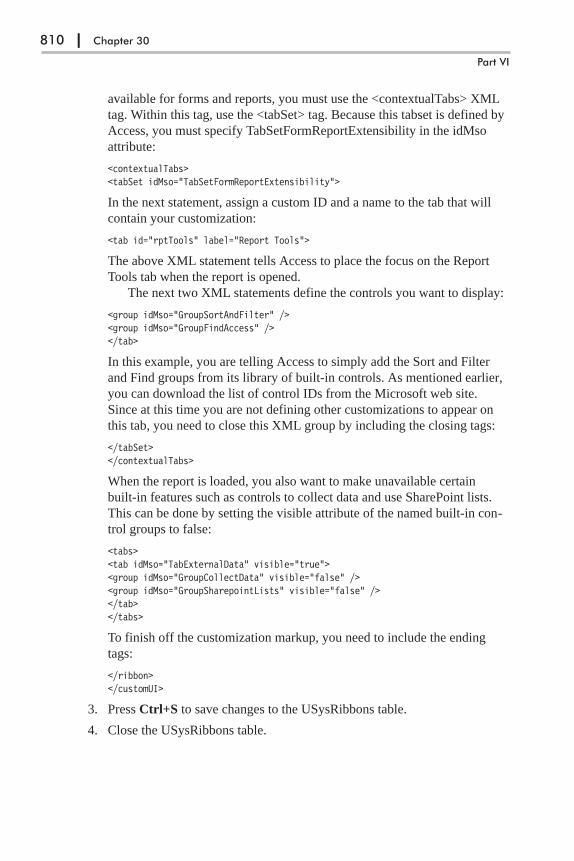
available for forms and reports, you must use the <contextualTabs> XML
tag. Within this tag, use the <tabSet> tag. Because this tabset is defined by
Access, you must specify TabSetFormReportExtensibility in the idMso
attribute:
<contextualTabs><tabSet idMso="TabSetFormReportExtensibility">
In the next statement, assign a custom ID and a name to the tab that will
contain your customization:
<tab id="rptTools" label="Report Tools">
The above XML statement tells Access to place the focus on the Report
Tools tab when the report is opened.
The next two XML statements define the controls you want to display:
<group idMso="GroupSortAndFilter" /><group idMso="GroupFindAccess" /></tab>
In this example, you are telling Access to simply add the Sort and Filter
and Find groups from its library of built-in controls. As mentioned earlier,
you can download the list of control IDs from the Microsoft web site.
Since at this time you are not defining other customizations to appear on
this tab, you need to close this XML group by including the closing tags:
</tabSet></contextualTabs>
When the report is loaded, you also want to make unavailable certain
built-in features such as controls to collect data and use SharePoint lists.
This can be done by setting the visible attribute of the named built-in con-
trol groups to false:
<tabs><tab idMso="TabExternalData" visible="true"><group idMso="GroupCollectData" visible="false" /><group idMso="GroupSharepointLists" visible="false" /></tab></tabs>
To finish off the customization markup, you need to include the ending
tags:
</ribbon></customUI>
3. Press Ctrl+S to save changes to the USysRibbons table.
4. Close the USysRibbons table.
810 | Chapter 30
Part VI

Part 2: Making Access Aware of the New Customization
Remember that the Ribbon customization cannot be displayed until you close
and reopen the database.
1. Close and reopen the EduSystems_Local.accdb database.
When Access loads, it will read the Ribbon customizations from the
USysRibbons table. Now is the time to tell Access to load the customized
Ribbon for a specific report.
� Note: You should follow the same steps for creating and assigning Ribboncustomizations for a form. Of course, your XML markup for a form ought toinclude the features related to forms and not reports.
Part 3: Assigning a Ribbon Customization to a Report
1. In the Navigation pane, right-click the Allergies and Medications report
and then choose Design View.
2. If the property sheet is not displayed, press Alt+Enter to display it. Make
sure Report is selected in the selection list at the top of the property sheet.
3. In the property sheet, click the Other tab, click the down arrow next to the
Ribbon Name property, and choose AlergMedRpt from the drop-down
list (see Figure 30-33).
4. Press Ctrl+S to save the changes.
5. Close the Allergies and Medications report and then reopen it.
Notice that when the report opens, the focus is on your custom Ribbon tab
named Report Tools (Figure 30-34).
Programming the User Interface | 811
Working with New Features in Access 2007
Figure 30-33: Use the Ribbon Name property of the report to assign your Rib-bon customization to the active report.
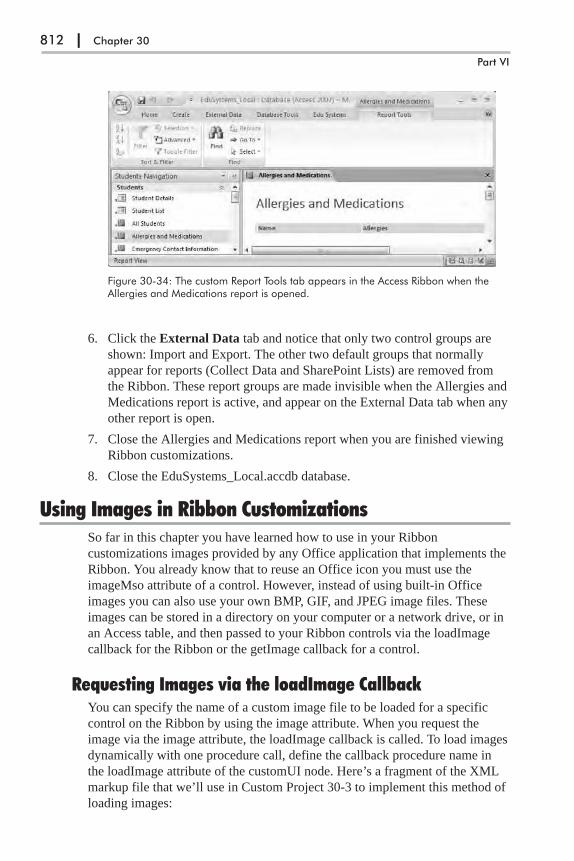
6. Click the External Data tab and notice that only two control groups are
shown: Import and Export. The other two default groups that normally
appear for reports (Collect Data and SharePoint Lists) are removed from
the Ribbon. These report groups are made invisible when the Allergies and
Medications report is active, and appear on the External Data tab when any
other report is open.
7. Close the Allergies and Medications report when you are finished viewing
Ribbon customizations.
8. Close the EduSystems_Local.accdb database.
Using Images in Ribbon CustomizationsSo far in this chapter you have learned how to use in your Ribbon
customizations images provided by any Office application that implements the
Ribbon. You already know that to reuse an Office icon you must use the
imageMso attribute of a control. However, instead of using built-in Office
images you can also use your own BMP, GIF, and JPEG image files. These
images can be stored in a directory on your computer or a network drive, or in
an Access table, and then passed to your Ribbon controls via the loadImage
callback for the Ribbon or the getImage callback for a control.
Requesting Images via the loadImage CallbackYou can specify the name of a custom image file to be loaded for a specific
control on the Ribbon by using the image attribute. When you request the
image via the image attribute, the loadImage callback is called. To load images
dynamically with one procedure call, define the callback procedure name in
the loadImage attribute of the customUI node. Here’s a fragment of the XML
markup file that we’ll use in Custom Project 30-3 to implement this method of
loading images:
812 | Chapter 30
Part VI
Figure 30-34: The custom Report Tools tab appears in the Access Ribbon when theAllergies and Medications report is opened.

1. In the first line of your Ribbon customization markup (inside the
<customUI> tag), use the loadImage attribute and specify the name of the
callback procedure:
<customUI xmlns="http://schemas.microsoft.com/office/2006/01/customui"loadImage="OnLoadImage">
2. When defining your Ribbon controls, use the image attribute and specify
the name of the image file:
<group id="ImagesGroup" label ="Special Features"><button id="btnNotes" label="Open Notepad"image="Note.gif" size="large" onAction="OpenNotepad" /><button id="btnComputer" label="Computer folder"image="MyFolder.gif" size="normal" /></group>
3. Write the loadImage callback procedure (OnLoadImage) in a VBA module:
Public Sub OnLoadImage(imgName As String, ByRef image)Dim strImgFileName As StringstrImgFileName = "C:\Acc07_ByExample\images\" & imgName
Set image = LoadPicture(strImgFileName)End Sub
Notice that to load a picture from a file, you need to use the LoadPicture
function. This function is a member of the stdole.StdFunctions library. The
library file, which is called stdole2.tlb, is installed in the System or
System32 folder on your computer and is available to your VBA proce-
dures without setting additional references. The LoadPicture function
returns an object of type IPictureDisp that represents the image. You can
view objects, methods, and properties available in the stdole library by
activating the Object Browser in the Visual Basic Editor window.
4. Write the callback procedure for the button labeled Open Notepad:
Public Sub OpenNotepad(ctl As IRibbonControl)Shell "Notepad.exe", vbNormalFocus
End Sub
The OpenNotepad procedure tells Access to use the Shell function to open
Windows Notepad. Notice that the name of the program’s executable file is
in double quotes. The second argument of the Shell function is optional.
This argument specifies the window style, that is, how the program will
appear once it is launched. The vbNormalFocus constant will open Note-
pad in a normal size window with focus. If the window style is not speci-
fied, the program will be minimized with focus (vbMinimizedFocus).
Let’s now proceed to Custom Project 30-3, which adds two new buttons with
custom images to the Ribbon.
Programming the User Interface | 813
Working with New Features in Access 2007
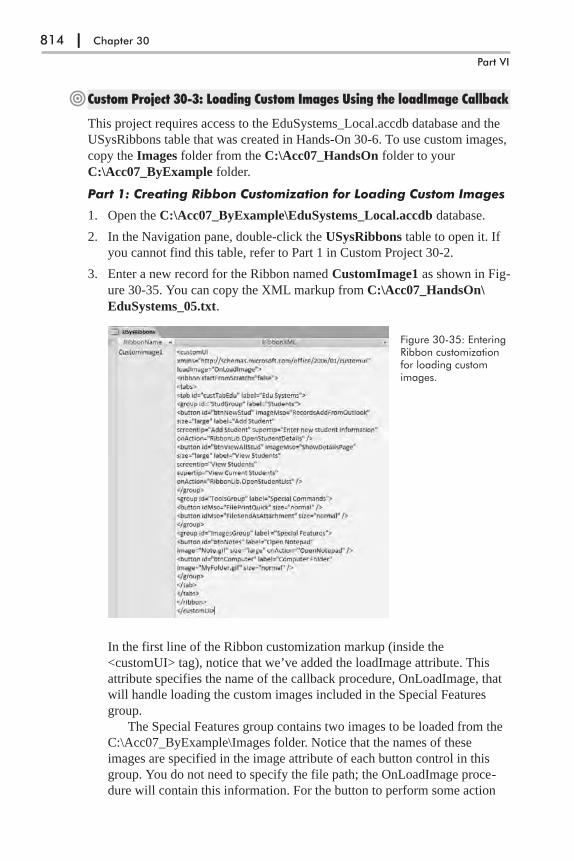
�Custom Project 30-3: Loading Custom Images Using the loadImage Callback
This project requires access to the EduSystems_Local.accdb database and the
USysRibbons table that was created in Hands-On 30-6. To use custom images,
copy the Images folder from the C:\Acc07_HandsOn folder to your
C:\Acc07_ByExample folder.
Part 1: Creating Ribbon Customization for Loading Custom Images
1. Open the C:\Acc07_ByExample\EduSystems_Local.accdb database.
2. In the Navigation pane, double-click the USysRibbons table to open it. If
you cannot find this table, refer to Part 1 in Custom Project 30-2.
3. Enter a new record for the Ribbon named CustomImage1 as shown in Fig-
ure 30-35. You can copy the XML markup from C:\Acc07_HandsOn\
EduSystems_05.txt.
In the first line of the Ribbon customization markup (inside the
<customUI> tag), notice that we’ve added the loadImage attribute. This
attribute specifies the name of the callback procedure, OnLoadImage, that
will handle loading the custom images included in the Special Features
group.
The Special Features group contains two images to be loaded from the
C:\Acc07_ByExample\Images folder. Notice that the names of these
images are specified in the image attribute of each button control in this
group. You do not need to specify the file path; the OnLoadImage proce-
dure will contain this information. For the button to perform some action
814 | Chapter 30
Part VI
Figure 30-35: EnteringRibbon customizationfor loading customimages.
you need to include the onAction attribute with the name of the macro,
VBA procedure, or expression to be executed. This example does not
define the onAction callback for the button named Computer Folder. To
test your skills, you can add your own action for this button when you have
completed this project.
4. Press Ctrl+S to save changes to the USysRibbons table.
5. Close the USysRibbons table.
Part 2: Setting Up the Programming Environment
1. Press Alt+F11 to switch to the Visual Basic Editor window.
2. Choose Tools | References. In the References dialog box, add the reference
to the following library: Microsoft Office 12.0 Object Library.
3. Click OK to close the References dialog box.
Part 3: Writing the VBA Callback Procedures
1. Choose Insert | Module.
2. In the module Code window, enter the following VBA procedures, or copy
and paste the VBA code from C:\Acc07_HandsOn\Chap30.txt.
Public Sub OnLoadImage(imgName As String, ByRef image)Dim strImgFileName As StringstrImgFileName = "C:\Acc07_ByExample\images\" & imgName
Set image = LoadPicture(strImgFileName)End Sub
Public Sub OpenNotepad(ctl As IRibbonControl)Shell "Notepad.exe", vbNormalFocus
End Sub
� Note: For the explanations of these procedures, please refer to the begin-ning of this section.
3. Press Ctrl+S to save changes in the Code module window. When asked to
name your module, enter any name you want.
4. Choose File | Close and Return to Microsoft Office Access.
Part 4: Making Access Aware of the New Customization
Remember that the Ribbon customization cannot be displayed until you close
and reopen the database.
1. Close and reopen the EduSystems_Local.accdb database.
When Access loads, it will read the Ribbon customizations from the
USysRibbons table.
2. Click the Microsoft Office button, and then click Access Options.
Programming the User Interface | 815
Working with New Features in Access 2007
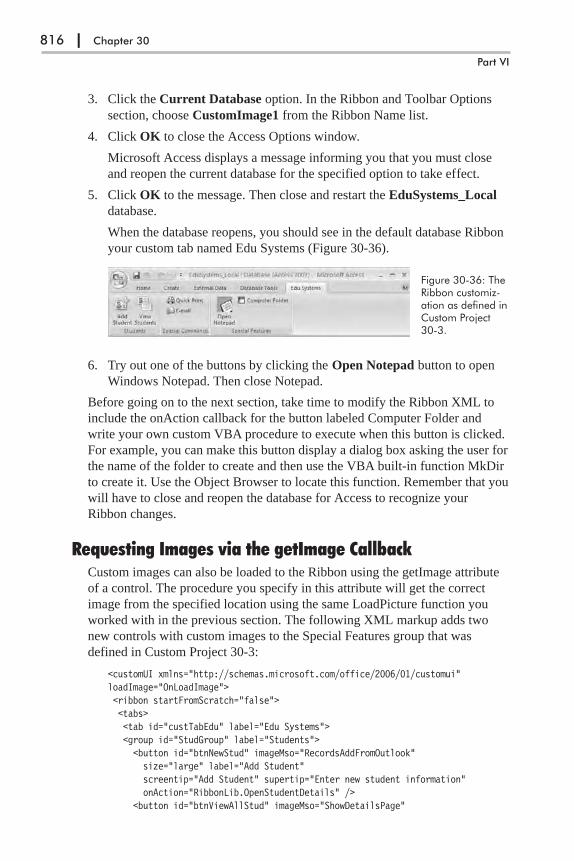
3. Click the Current Database option. In the Ribbon and Toolbar Options
section, choose CustomImage1 from the Ribbon Name list.
4. Click OK to close the Access Options window.
Microsoft Access displays a message informing you that you must close
and reopen the current database for the specified option to take effect.
5. Click OK to the message. Then close and restart the EduSystems_Local
database.
When the database reopens, you should see in the default database Ribbon
your custom tab named Edu Systems (Figure 30-36).
6. Try out one of the buttons by clicking the Open Notepad button to open
Windows Notepad. Then close Notepad.
Before going on to the next section, take time to modify the Ribbon XML to
include the onAction callback for the button labeled Computer Folder and
write your own custom VBA procedure to execute when this button is clicked.
For example, you can make this button display a dialog box asking the user for
the name of the folder to create and then use the VBA built-in function MkDir
to create it. Use the Object Browser to locate this function. Remember that you
will have to close and reopen the database for Access to recognize your
Ribbon changes.
Requesting Images via the getImage CallbackCustom images can also be loaded to the Ribbon using the getImage attribute
of a control. The procedure you specify in this attribute will get the correct
image from the specified location using the same LoadPicture function you
worked with in the previous section. The following XML markup adds two
new controls with custom images to the Special Features group that was
defined in Custom Project 30-3:
<customUI xmlns="http://schemas.microsoft.com/office/2006/01/customui"loadImage="OnLoadImage"><ribbon startFromScratch="false"><tabs><tab id="custTabEdu" label="Edu Systems"><group id="StudGroup" label="Students"><button id="btnNewStud" imageMso="RecordsAddFromOutlook"size="large" label="Add Student"screentip="Add Student" supertip="Enter new student information"onAction="RibbonLib.OpenStudentDetails" />
<button id="btnViewAllStud" imageMso="ShowDetailsPage"
816 | Chapter 30
Part VI
Figure 30-36: TheRibbon customiz-ation as defined inCustom Project30-3.
size="large" label="View Students"screentip="View Students"supertip="View Current Students"onAction="RibbonLib.OpenStudentList" />
</group><group id="ToolsGroup" label="Special Commands"><button idMso="FilePrintQuick" size="normal" /><button idMso="FileSendAsAttachment" size="normal" />
</group><group id="ImagesGroup" label="Special Features"><button id="btnNotes" label="Open Notepad"image="Note.gif" size="large"onAction="OpenNotepad" />
<button id="btnComputer" label="Computer Folder"image="MyFolder.gif" size="normal" />
<button id="btnRedStar" label="Honor Student"getImage="OnGetImage" size="large" />
<gallery id="glHolidays" label="Holidays" columns="3" rows="4"getImage="OnGetImage" getItemCount="OnGetItemCount"getItemLabel="OnGetItemLabel" getItemImage="OnGetItemImage"getItemID="onGetItemID" onAction="onSelectedItem" />
</group></tab></tabs></ribbon></customUI>
In the above Ribbon customization markup, we are using all the controls that
were added thus far in this chapter’s hands-on exercises and projects. In addi-
tion, the Special Features group now includes a new button labeled Honor
Student and a gallery control labeled Holidays:
<button id="btnRedStar" label="Honor Student"getImage="OnGetImage" size="large" />
<gallery id="glHolidays" label="Holidays" columns="3" rows="4"getImage="OnGetImage" getItemCount="OnGetItemCount"getItemLabel="OnGetItemLabel" getItemImage="OnGetItemImage"getItemID="onGetItemID" onAction="onSelectedItem" />
In the above XML markup, the gallery control will perform the action speci-
fied in the onSelectedItem callback procedure. To specify your own callback
procedure for the Honor Student button, you must add the onAction attribute to
this button, and then write the appropriate VBA code. Notice that the gallery
control has many attributes that contain static text or define callbacks. We will
discuss them later. Right now, let’s focus on the image loading process. Both
the button and the gallery controls use the getImage attribute with the
OnGetImage callback procedure. This procedure will tell Access to load the
appropriate image to the Ribbon for each of these controls:
Public Sub OnGetImage(ctl As IRibbonControl, ByRef image)Select Case ctl.idCase "btnRedStar"Set image = LoadPicture("C:\Acc07_ByExample\images\redstar.gif")
Case "glHolidays"Set image = LoadPicture("C:\Acc07_ByExample\images\Square0.gif")
Programming the User Interface | 817
Working with New Features in Access 2007
End SelectEnd Sub
Notice that the decision as to which image should be loaded is based on the ID
of the control in the Select Case statement. The gallery control also uses the
OnGetItemImage callback procedure (defined in the getItemImage attribute) to
load custom images for its drop-down selection list (see Figure 30-37).
Use the columns and rows attributes to specify the number of columns and
rows in the gallery when it is opened. If you need to define the height and
width of images in the gallery, use the itemHeight and itemWidth attributes
(not used in this example due to the simplicity of the utilized images). The
getItemCount and getItemLabel attributes contain callback procedures that
provide information to the Ribbon on how many items should appear in the
drop-down list and the names of those items. The getItemImage attribute con-
tains a callback procedure that specifies the images to be displayed next to
each gallery item. The getItemID attribute specifies the onGetItemID callback
procedure that will provide a unique ID for each of the gallery items.
Now that we’ve discussed the Ribbon customization markup, let’s go over
the VBA callbacks that are referenced in it. The following procedures need to
be added to the VBA module for the above XML markup to work:
Public Sub OnGetItemCount(ctl As IRibbonControl, ByRef count)count = 12
End Sub
In the above procedure we use the count parameter to return to the Ribbon the
number of items we want to have in the gallery control.
Public Sub OnGetItemLabel(ctl As IRibbonControl, _index As Integer, _ByRef label)
label = MonthName(index + 1)End Sub
The above procedure will label each of the gallery items. The VBA
MonthName function is used to retrieve the name of the month based on the
value of the index. The initial value of the index is zero (0). Therefore, index +
1 will return January. To display the month’s name abbreviated (Jan, Feb, etc.),
specify True as the second parameter to this function:
label = MonthName(index + 1, True)
If you are using a localized version of Microsoft Office (French, Spanish, etc.),
the MonthName function will return the name of the month in the specified
interface language.
The next callback procedure shows how to load images for each gallery
item:
Public Sub OnGetItemImage(ctl As IRibbonControl, _index As Integer, _ByRef image)
818 | Chapter 30
Part VI
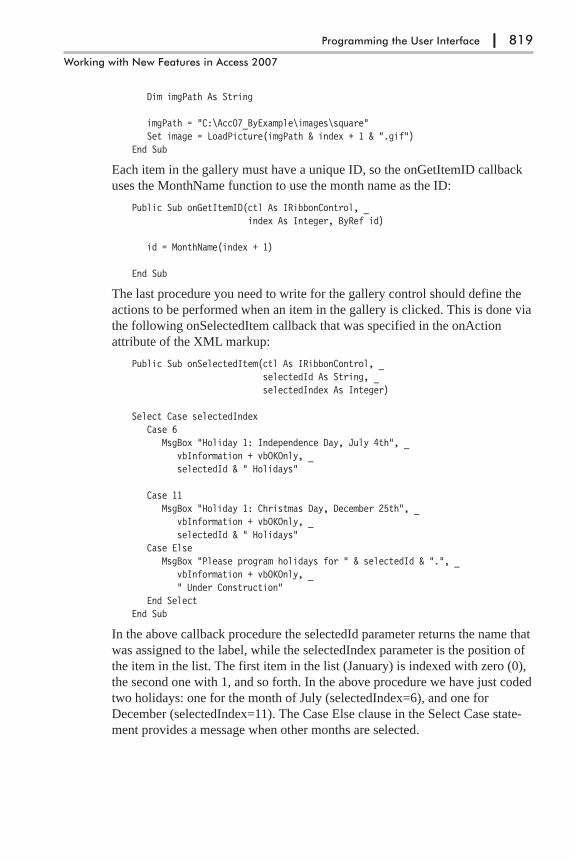
Dim imgPath As String
imgPath = "C:\Acc07_ByExample\images\square"Set image = LoadPicture(imgPath & index + 1 & ".gif")
End Sub
Each item in the gallery must have a unique ID, so the onGetItemID callback
uses the MonthName function to use the month name as the ID:
Public Sub onGetItemID(ctl As IRibbonControl, _index As Integer, ByRef id)
id = MonthName(index + 1)
End Sub
The last procedure you need to write for the gallery control should define the
actions to be performed when an item in the gallery is clicked. This is done via
the following onSelectedItem callback that was specified in the onAction
attribute of the XML markup:
Public Sub onSelectedItem(ctl As IRibbonControl, _selectedId As String, _selectedIndex As Integer)
Select Case selectedIndexCase 6
MsgBox "Holiday 1: Independence Day, July 4th", _vbInformation + vbOKOnly, _selectedId & " Holidays"
Case 11MsgBox "Holiday 1: Christmas Day, December 25th", _
vbInformation + vbOKOnly, _selectedId & " Holidays"
Case ElseMsgBox "Please program holidays for " & selectedId & ".", _
vbInformation + vbOKOnly, _" Under Construction"
End SelectEnd Sub
In the above callback procedure the selectedId parameter returns the name that
was assigned to the label, while the selectedIndex parameter is the position of
the item in the list. The first item in the list (January) is indexed with zero (0),
the second one with 1, and so forth. In the above procedure we have just coded
two holidays: one for the month of July (selectedIndex=6), and one for
December (selectedIndex=11). The Case Else clause in the Select Case state-
ment provides a message when other months are selected.
Programming the User Interface | 819
Working with New Features in Access 2007

To implement the above Ribbon customization, follow the steps as outlined in
Hands-On 30-7.
�Hands-On 30-7: Loading Custom Images Using the getImage Callback
This hands-on exercise requires access to the EduSystems_Local.accdb data-
base and the USysRibbons table that was created in Hands-On 30-6. This
exercise assumes that you have also completed Custom Project 30-3, which
presented a method of loading images via the loadImage callback. Because by
now you should be very familiar with the Ribbon customization process, this
exercise outlines only the main steps you need to take to complete it.
For a detailed explanation process, refer to the previous exercises and
projects. The images used in this example are located in the C:\Acc07_
ByExample\Images folder.
1. In the USysRibbons table of the EduSystems_Local database, add a new
record. In the RibbonName field, enter CustomImage2 for the name of the
new Ribbon customization. In the RibbonXML field, enter the following
Ribbon XML markup (also shown at the beginning of this section), or copy
and paste the XML from C:\Acc07_HandsOn\EduSystems_05.txt. Press
Ctrl+S to save the changes, and then close the USysRibbons table.
<customUI xmlns="http://schemas.microsoft.com/office/2006/01/customui"loadImage="OnLoadImage"><ribbon startFromScratch="false"><tabs><tab id="custTabEdu" label="Edu Systems"><group id="StudGroup" label="Students"><button id="btnNewStud" imageMso="RecordsAddFromOutlook"size="large" label="Add Student"screentip="Add Student" supertip="Enter new student information"onAction="RibbonLib.OpenStudentDetails" />
<button id="btnViewAllStud" imageMso="ShowDetailsPage"size="large" label="View Students"screentip="View Students"supertip="View Current Students"onAction="RibbonLib.OpenStudentList" />
</group><group id="ToolsGroup" label="Special Commands"><button idMso="FilePrintQuick" size="normal" /><button idMso="FileSendAsAttachment" size="normal" />
820 | Chapter 30
Part VI
Figure 30-37: Customized Ribbon with the gallery control.
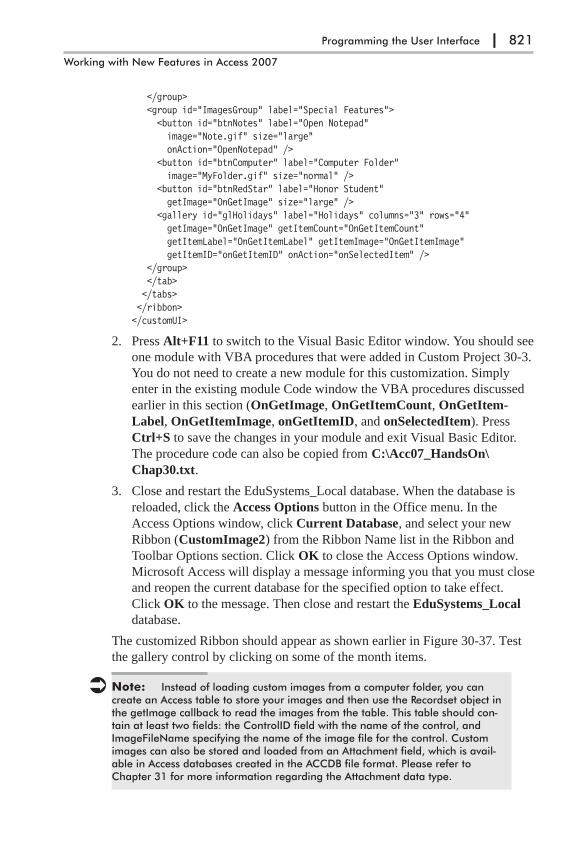
</group><group id="ImagesGroup" label="Special Features"><button id="btnNotes" label="Open Notepad"image="Note.gif" size="large"onAction="OpenNotepad" />
<button id="btnComputer" label="Computer Folder"image="MyFolder.gif" size="normal" />
<button id="btnRedStar" label="Honor Student"getImage="OnGetImage" size="large" />
<gallery id="glHolidays" label="Holidays" columns="3" rows="4"getImage="OnGetImage" getItemCount="OnGetItemCount"getItemLabel="OnGetItemLabel" getItemImage="OnGetItemImage"getItemID="onGetItemID" onAction="onSelectedItem" />
</group></tab></tabs></ribbon></customUI>
2. Press Alt+F11 to switch to the Visual Basic Editor window. You should see
one module with VBA procedures that were added in Custom Project 30-3.
You do not need to create a new module for this customization. Simply
enter in the existing module Code window the VBA procedures discussed
earlier in this section (OnGetImage, OnGetItemCount, OnGetItem-
Label, OnGetItemImage, onGetItemID, and onSelectedItem). Press
Ctrl+S to save the changes in your module and exit Visual Basic Editor.
The procedure code can also be copied from C:\Acc07_HandsOn\
Chap30.txt.
3. Close and restart the EduSystems_Local database. When the database is
reloaded, click the Access Options button in the Office menu. In the
Access Options window, click Current Database, and select your new
Ribbon (CustomImage2) from the Ribbon Name list in the Ribbon and
Toolbar Options section. Click OK to close the Access Options window.
Microsoft Access will display a message informing you that you must close
and reopen the current database for the specified option to take effect.
Click OK to the message. Then close and restart the EduSystems_Local
database.
The customized Ribbon should appear as shown earlier in Figure 30-37. Test
the gallery control by clicking on some of the month items.
� Note: Instead of loading custom images from a computer folder, you cancreate an Access table to store your images and then use the Recordset object inthe getImage callback to read the images from the table. This table should con-tain at least two fields: the ControlID field with the name of the control, andImageFileName specifying the name of the image file for the control. Customimages can also be stored and loaded from an Attachment field, which is avail-able in Access databases created in the ACCDB file format. Please refer toChapter 31 for more information regarding the Attachment data type.
Programming the User Interface | 821
Working with New Features in Access 2007

Understanding Attributes and CallbacksRibbon controls have properties defined by attributes, such as id, label,
enabled, screen tip, and so on. By using a specific attribute you can modify the
appearance of a control either at design time or at run time. To define a control
attribute at run time, simply set it to the allowable value right in the Ribbon
customization XML markup. For example, you can provide the name for your
control in the label attribute. The control label can contain as many as 1,024
characters.
If the attribute value is unknown at design time, add the prefix “get” to the
design-time attribute name and specify the name of the callback procedure or
macro as the attribute value. For example, if the control’s label needs to be
defined at run time, use the getLabel attribute and specify the name of the call-
back procedure:
<group id="Today’s Events" getLabel="getEventDate">
When the Ribbon is loaded, the procedure in the getLabel attribute will run
and provide the actual value of the attribute:
Public Sub getEventDate(ctl As IRibbonControl, _ByRef ReturnValue As Variant)
ReturnValue = "Events for " & Format(Now(), "mm/dd/yyyy")End Sub
The above procedure will display the current date in the name of the group
label. Although many times you will see the callback procedure name prefixed
by “get” or “onGet”, keep in mind that you do not have to name the callback
procedure as the attribute it is used with. Use any name that makes sense to
you. The only requirement is that the callback procedure matches a particular
signature, which is the declaration of the procedure, the parameters, and return
types. For example, the callback for the onAction attribute of a button control
has the following signature:
Public Sub NameOfCallback(control As IRibbonControl)
As mentioned in Hands-On 30-6, IRibbonControl is the control that was
clicked. This control is passed to your procedure by the Ribbon. You can spec-
ify your own name for the control parameter. For example:
Public Sub NameOfCallback(ctl As IRibbonControl)
Prior to using the IRibbonControl you need to add a reference to the Microsoft
Office 12.0 Object Library in your VBA project. The onAction attribute is a
special type of attribute that does not need to be prefixed by the word “get” to
point to a callback procedure.
822 | Chapter 30
Part VI

Using Various Controls in Ribbon CustomizationsNow that you know how to go about creating the XML markup for your Rib-
bon customizations and loading and applying the custom Ribbon to a database,
form, or report, let’s look at other types of controls you can show in the Rib-
bon to give your database application a more polished and professional look.
You can reuse the EduSystems_Local database used in the earlier examples to
create additional Ribbon customizations that utilize the controls discussed in
this section.
Creating Toggle ButtonsA toggle button is a button that alternates between two states. Many formatting
features such as Bold, Italic, or Format Painter are implemented as toggle but-
tons. When you click a toggle button, the button stays down until you click it
again. To create a toggle button, use the <toggleButton> XML tag as shown
below:
<toggleButton id="tglNewStudent" label="New Student Questionnaire"size="normal" getPressed="OnGetPressed" onAction="ShowHideQ" />
You can add a built-in image to the toggle button with the imageMso attribute,
or use a custom image as discussed earlier in this chapter. To find out whether
or not the toggle button is pressed, include the getPressed attribute in your
XML markup. The getPressed callback procedure provides two arguments: the
control that was clicked and the pressed state of the toggle button:
Sub OnGetPressed(control As IRibbonControl, _ByRef pressed)
If control.id="tglNewStudent" thenpressed = False
End ifEnd Sub
The above callback routine will ensure that the specified toggle button is not
pressed when the Ribbon is loaded.
To perform an action when the toggle button is clicked, set the onAction
attribute to the name of your custom callback procedure. This callback also
provides two arguments: the control that was clicked and the state of the toggle
button:
Sub ShowHideQ(control As IRibbonControl, pressed As Boolean)If pressed Then
MsgBox "The toggle button is pressed."Else
MsgBox "The toggle button is not pressed."End If
End Sub
If the toggle button is pressed, the value of the pressed argument will be True;
otherwise, it will be False.
Programming the User Interface | 823
Working with New Features in Access 2007

Creating Split Buttons, Menus, and SubmenusA split button is a combination of a button or toggle button and a menu. Click-
ing the button performs one default action, and clicking the drop-down arrow
opens a menu with a list of related options to select from. To create the split
button, use the <splitButton> tag. Within this tag, you need to define a <but-
ton> or a <toggleButton> control and the <menu> control, as shown in the
following XML markup:
<group id="OtherControlsGroup" label="Other Controls" ><splitButton id="btnSplit1" size="large" imageMso="ImportAccess" ><button id="btnImport" label="Import More" /><menu id="mnuImport" label="More Import Formats" itemSize="normal" ><menuSeparator id="mnuDiv1" title="Other Databases" /><button id="btnImportODBC" label="ODBC database" imageMso=
"ImportOdbcDatabase" /><button id="btnImportDbase" label="Dbase file" imageMso="ImportDBase" /><button id="btnImportParadox" label="Paradox file" imageMso=
"ImportParadox" /><menuSeparator id="mnuDiv2" title="Spreadsheet Files" /><button id="btnImportExcel" label="Excel file" imageMso="ImportExcel" /><button id="btnImportLotus" label="&Lotus 1-2-3 file" imageMso=
"ImportLotus" /><menuSeparator id="mnuDiv3" title="Other Files" /><button id="btnText" label="Text file" imageMso="ImportTextFile" /><button id="btnXML" label="XML file" imageMso="ImportXmlFile" /><button id="btnHTML" label="HTML file" imageMso="ImportHtmlDocument" /><button id="btnOutlook" label="Outlook folder" imageMso="ImportOutlook" /><button id="btnSharepoint" label="SharePoint List" imageMso=
"ImportSharePointList" /></menu>
</splitButton></group>
You can specify the size of the items in the menu using the itemSize attribute.
To display a description for each menu item below the item label, set the
itemSize attribute to large (itemSize="large") and use the description attribute
to specify the text. The <menuSeparator> tag can be used inside the menu
node to break the menu into sections. Each menu segment can then be titled
using the title attribute, as shown in the above example. You can add the
onAction attribute to each menu button to specify the callback procedure or
macro to execute when the menu item is clicked. In addition to button controls,
menus can contain toggle buttons, check boxes, gallery controls, split buttons,
other menus, and dynamic menus. Figure 30-39 displays a split button control
with a menu and a submenu consisting of check boxes.
824 | Chapter 30
Part VI

The XML markup for the split button displayed in Figure 30-39 is shown
below:
<group id="OtherControlsGroup" label="Other Controls" ><splitButton id="btnSplit1" size="large" imageMso="ImportAccess" ><button id="btnImport" label="Import More" /><menu id="mnuImport" label="More Import Formats" itemSize="normal" ><menuSeparator id="mnuDiv1" title="Other Databases" /><button id="btnImportODBC" label="ODBC database" imageMso=
"ImportOdbcDatabase" /><button id="btnImportDBase" label="Dbase file" imageMso="ImportDBase" /><button id="btnImportParadox" label="Paradox file" imageMso=
"ImportParadox" /><menuSeparator id="mnuDiv2" title="Spreadsheet Files" /><menu id="mnuExcel" label="Excel File Formats" imageMso="ImportExcel"
itemSize="normal" ><checkBox id="xlsFormat" label="xls file" /><checkBox id="xlsxFormat" label="xlsx file" />
</menu>
Programming the User Interface | 825
Working with New Features in Access 2007
Figure 30-38: This custom split button control uses the built-in Office images.
Figure 30-39: A cus-tom split button con-trol with a menu anda submenu consistingof check boxes.

<button id="btnImportLotus" label="&Lotus 1-2-3 file" imageMso="ImportLotus" />
<menuSeparator id="mnuDiv3" title="Other Files" /><button id="btnText" label="Text file" imageMso="ImportTextFile" /><button id="btnXML" label="XML file" imageMso="ImportXmlFile" /><button id="btnHTML" label="HTML file" imageMso="ImportHtmlDocument" /><button id="btnOutlook" label="Outlook folder" imageMso="ImportOutlook" /><button id="btnSharepoint" label="SharePoint List" imageMso=
"ImportSharePointList" /></menu>
</splitButton></group>
� Note: The <checkBox> tag used in the above example XML is discussed indetail in the next section.
Creating Check BoxesThe check box control is used to show the state true (on) or false (off). It can
be included inside of a menu control as you’ve seen demonstrated in the previ-
ous section, or used as a separate control on the Ribbon. To create a check box,
use the <checkBox> tag, as shown in the following XML:
<separator id="OtherControlsDiv1" /><labelControl id="TitleForBox1" label="Areas of Interest (please
check below)" /><box id="boxLayout1"><checkBox id="chkSafety" label="School Safety"enabled="true" visible="true"onAction="DoSomething" />
<checkBox id="chkHealth" label="Health" enabled="false" /><checkBox id="chkSportsMusic" getLabel="onGetLabel" /></box>
In the above XML markup, the <separator> tag will produce the vertical bar
that visually separates controls within the same Ribbon group (see Figure
30-40). The <labelControl> tag can be used to display static text anywhere in
the Ribbon. In this example, we use it to place a header over a set of controls.
To control the layout of various controls (to display them horizontally instead
of vertically), use the <box> tag. You can define whether a check box should
be visible or hidden by setting the visible attribute to true or false. To disable a
check box, set the enabled attribute to false; this will cause the check box to
appear grayed out. Notice that the check box labeled Health is not active (it is
grayed out).
826 | Chapter 30
Part VI
Figure 30-40: These check box controls are laid out horizontally.

Similar to other controls, labels for check boxes can contain static text in the
label attribute, or they can be assigned dynamically using the callback proce-
dure in the getLabel attribute:
<checkBox id="chkSportsMusic" getLabel="onGetLabel" />
The getLabel attribute points to the onGetLabel callback procedure, which
needs to be added to your VBA module:
Public Sub onGetLabel(ctl As IRibbonControl, ByRef label)If ctl.id = "chkSportsMusic" And _
Weekday(Now(), vbWednesday) Thenlabel = "Sports"
Elselabel = "Music"
End IfEnd Sub
The above procedure will run automatically upon loading of the Ribbon. If
today happens to be Wednesday, you will see a check box for Sports; other-
wise, it will be Music.
The action of the check box control is handled by the callback procedure in
the onAction attribute:
<checkBox id="chkSafety" label="School Safety"enabled="true" visible="true"onAction="DoSomething" />
The DoSomething procedure needs to be added to the VBA module for the
School Safety check box to respond to a user’s click:
Public Sub DoSomething(ctl As IRibbonControl, _pressed As Boolean)
If ctl.id = "chkSafety" And pressed ThenMsgBox "Safety is our number one concern."
ElseMsgBox "Sorry to hear that safety is not your concern."
End IfEnd Sub
To get the checked state for a check box, point to your callback procedure in
the getPressed attribute, similar to what we’ve done earlier with the toggle but-
ton. The default VBA syntax for this callback is shown below:
Sub GetPressed(control As IRibbonControl, ByRef return)
� Note: As mentioned earlier, callback procedures don’t need to be namedthe same as the attribute they are used with. Also, you may change the call-back’s argument names as desired.
Programming the User Interface | 827
Working with New Features in Access 2007
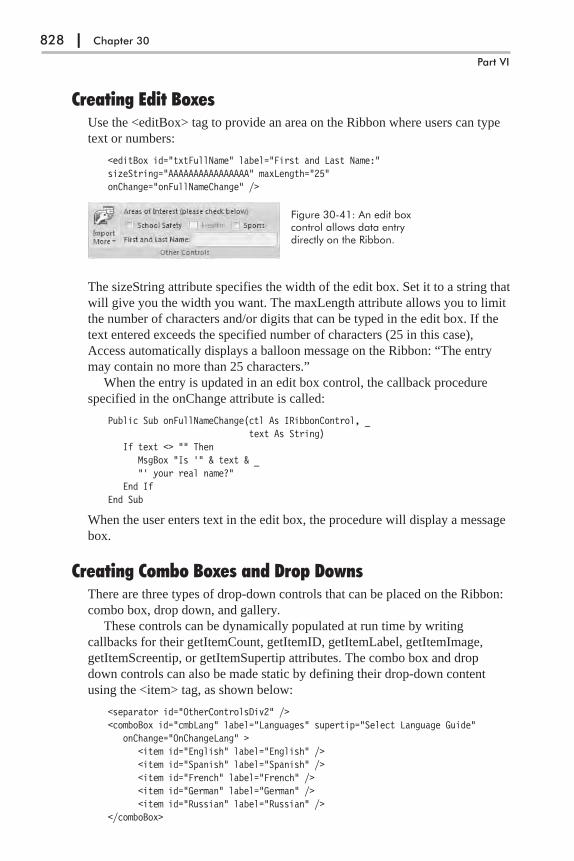
Creating Edit BoxesUse the <editBox> tag to provide an area on the Ribbon where users can type
text or numbers:
<editBox id="txtFullName" label="First and Last Name:"sizeString="AAAAAAAAAAAAAAAA" maxLength="25"onChange="onFullNameChange" />
The sizeString attribute specifies the width of the edit box. Set it to a string that
will give you the width you want. The maxLength attribute allows you to limit
the number of characters and/or digits that can be typed in the edit box. If the
text entered exceeds the specified number of characters (25 in this case),
Access automatically displays a balloon message on the Ribbon: “The entry
may contain no more than 25 characters.”
When the entry is updated in an edit box control, the callback procedure
specified in the onChange attribute is called:
Public Sub onFullNameChange(ctl As IRibbonControl, _text As String)
If text <> "" ThenMsgBox "Is '" & text & _"' your real name?"
End IfEnd Sub
When the user enters text in the edit box, the procedure will display a message
box.
Creating Combo Boxes and Drop DownsThere are three types of drop-down controls that can be placed on the Ribbon:
combo box, drop down, and gallery.
These controls can be dynamically populated at run time by writing
callbacks for their getItemCount, getItemID, getItemLabel, getItemImage,
getItemScreentip, or getItemSupertip attributes. The combo box and drop
down controls can also be made static by defining their drop-down content
using the <item> tag, as shown below:
<separator id="OtherControlsDiv2" /><comboBox id="cmbLang" label="Languages" supertip="Select Language Guide"
onChange="OnChangeLang" ><item id="English" label="English" /><item id="Spanish" label="Spanish" /><item id="French" label="French" /><item id="German" label="German" /><item id="Russian" label="Russian" />
</comboBox>
828 | Chapter 30
Part VI
Figure 30-41: An edit boxcontrol allows data entrydirectly on the Ribbon.
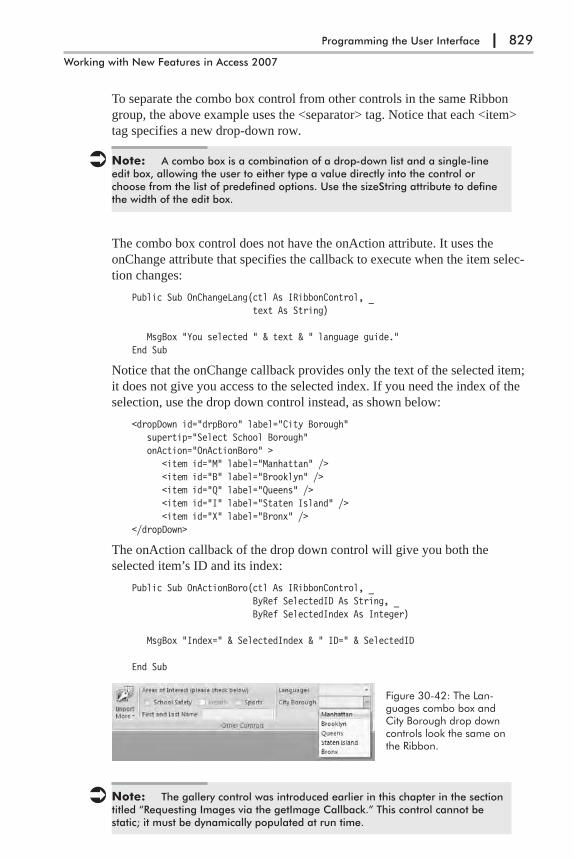
To separate the combo box control from other controls in the same Ribbon
group, the above example uses the <separator> tag. Notice that each <item>
tag specifies a new drop-down row.
� Note: A combo box is a combination of a drop-down list and a single-lineedit box, allowing the user to either type a value directly into the control orchoose from the list of predefined options. Use the sizeString attribute to definethe width of the edit box.
The combo box control does not have the onAction attribute. It uses the
onChange attribute that specifies the callback to execute when the item selec-
tion changes:
Public Sub OnChangeLang(ctl As IRibbonControl, _text As String)
MsgBox "You selected " & text & " language guide."End Sub
Notice that the onChange callback provides only the text of the selected item;
it does not give you access to the selected index. If you need the index of the
selection, use the drop down control instead, as shown below:
<dropDown id="drpBoro" label="City Borough"supertip="Select School Borough"onAction="OnActionBoro" >
<item id="M" label="Manhattan" /><item id="B" label="Brooklyn" /><item id="Q" label="Queens" /><item id="I" label="Staten Island" /><item id="X" label="Bronx" />
</dropDown>
The onAction callback of the drop down control will give you both the
selected item’s ID and its index:
Public Sub OnActionBoro(ctl As IRibbonControl, _ByRef SelectedID As String, _ByRef SelectedIndex As Integer)
MsgBox "Index=" & SelectedIndex & " ID=" & SelectedID
End Sub
� Note: The gallery control was introduced earlier in this chapter in the sectiontitled “Requesting Images via the getImage Callback.” This control cannot bestatic; it must be dynamically populated at run time.
Programming the User Interface | 829
Working with New Features in Access 2007
Figure 30-42: The Lan-guages combo box andCity Borough drop downcontrols look the same onthe Ribbon.
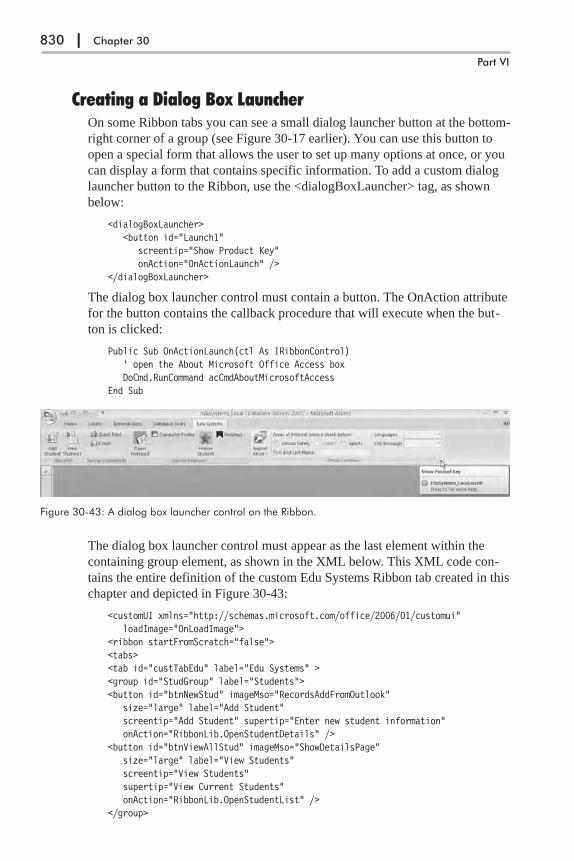
Creating a Dialog Box LauncherOn some Ribbon tabs you can see a small dialog launcher button at the bottom-
right corner of a group (see Figure 30-17 earlier). You can use this button to
open a special form that allows the user to set up many options at once, or you
can display a form that contains specific information. To add a custom dialog
launcher button to the Ribbon, use the <dialogBoxLauncher> tag, as shown
below:
<dialogBoxLauncher><button id="Launch1"
screentip="Show Product Key"onAction="OnActionLaunch" />
</dialogBoxLauncher>
The dialog box launcher control must contain a button. The OnAction attribute
for the button contains the callback procedure that will execute when the but-
ton is clicked:
Public Sub OnActionLaunch(ctl As IRibbonControl)' open the About Microsoft Office Access boxDoCmd.RunCommand acCmdAboutMicrosoftAccess
End Sub
The dialog box launcher control must appear as the last element within the
containing group element, as shown in the XML below. This XML code con-
tains the entire definition of the custom Edu Systems Ribbon tab created in this
chapter and depicted in Figure 30-43:
<customUI xmlns="http://schemas.microsoft.com/office/2006/01/customui"loadImage="OnLoadImage">
<ribbon startFromScratch="false"><tabs><tab id="custTabEdu" label="Edu Systems" ><group id="StudGroup" label="Students"><button id="btnNewStud" imageMso="RecordsAddFromOutlook"
size="large" label="Add Student"screentip="Add Student" supertip="Enter new student information"onAction="RibbonLib.OpenStudentDetails" />
<button id="btnViewAllStud" imageMso="ShowDetailsPage"size="large" label="View Students"screentip="View Students"supertip="View Current Students"onAction="RibbonLib.OpenStudentList" />
</group>
830 | Chapter 30
Part VI
Figure 30-43: A dialog box launcher control on the Ribbon.
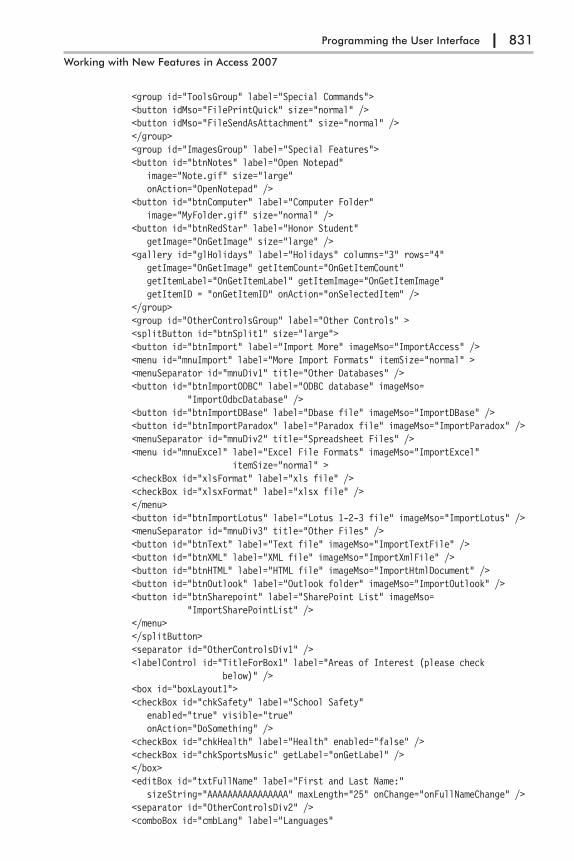
<group id="ToolsGroup" label="Special Commands"><button idMso="FilePrintQuick" size="normal" /><button idMso="FileSendAsAttachment" size="normal" /></group><group id="ImagesGroup" label="Special Features"><button id="btnNotes" label="Open Notepad"
image="Note.gif" size="large"onAction="OpenNotepad" />
<button id="btnComputer" label="Computer Folder"image="MyFolder.gif" size="normal" />
<button id="btnRedStar" label="Honor Student"getImage="OnGetImage" size="large" />
<gallery id="glHolidays" label="Holidays" columns="3" rows="4"getImage="OnGetImage" getItemCount="OnGetItemCount"getItemLabel="OnGetItemLabel" getItemImage="OnGetItemImage"getItemID = "onGetItemID" onAction="onSelectedItem" />
</group><group id="OtherControlsGroup" label="Other Controls" ><splitButton id="btnSplit1" size="large"><button id="btnImport" label="Import More" imageMso="ImportAccess" /><menu id="mnuImport" label="More Import Formats" itemSize="normal" ><menuSeparator id="mnuDiv1" title="Other Databases" /><button id="btnImportODBC" label="ODBC database" imageMso=
"ImportOdbcDatabase" /><button id="btnImportDBase" label="Dbase file" imageMso="ImportDBase" /><button id="btnImportParadox" label="Paradox file" imageMso="ImportParadox" /><menuSeparator id="mnuDiv2" title="Spreadsheet Files" /><menu id="mnuExcel" label="Excel File Formats" imageMso="ImportExcel"
itemSize="normal" ><checkBox id="xlsFormat" label="xls file" /><checkBox id="xlsxFormat" label="xlsx file" /></menu><button id="btnImportLotus" label="Lotus 1-2-3 file" imageMso="ImportLotus" /><menuSeparator id="mnuDiv3" title="Other Files" /><button id="btnText" label="Text file" imageMso="ImportTextFile" /><button id="btnXML" label="XML file" imageMso="ImportXmlFile" /><button id="btnHTML" label="HTML file" imageMso="ImportHtmlDocument" /><button id="btnOutlook" label="Outlook folder" imageMso="ImportOutlook" /><button id="btnSharepoint" label="SharePoint List" imageMso=
"ImportSharePointList" /></menu></splitButton><separator id="OtherControlsDiv1" /><labelControl id="TitleForBox1" label="Areas of Interest (please check
below)" /><box id="boxLayout1"><checkBox id="chkSafety" label="School Safety"
enabled="true" visible="true"onAction="DoSomething" />
<checkBox id="chkHealth" label="Health" enabled="false" /><checkBox id="chkSportsMusic" getLabel="onGetLabel" /></box><editBox id="txtFullName" label="First and Last Name:"
sizeString="AAAAAAAAAAAAAAAA" maxLength="25" onChange="onFullNameChange" /><separator id="OtherControlsDiv2" /><comboBox id="cmbLang" label="Languages"
Programming the User Interface | 831
Working with New Features in Access 2007

supertip="Select Language Guide"onChange="OnChangeLang" >
<item id="English" label="English" /><item id="Spanish" label="Spanish" /><item id="French" label="French" /><item id="German" label="German" /><item id="Russian" label="Russian" /></comboBox><dropDown id="drpBoro" label="City Borough"
supertip="Select School Borough"onAction="OnActionBoro" >
<item id="M" label="Manhattan" /><item id="B" label="Brooklyn" /><item id="Q" label="Queens" /><item id="I" label="Staten Island" /><item id="X" label="Bronx" />
</dropDown><dialogBoxLauncher><button id="Launch1"
screentip="Show Product Key"onAction="OnActionLaunch" />
</dialogBoxLauncher></group></tab></tabs></ribbon></customUI>
� Note: The above XML code can be copied from the C:\Acc07_HandsOn\FinalRibbon.txt file to the RibbonXML field in the USysRibbons table in yourC:\Acc07_ByExample\EduSystems_Local.accdb database. In the RibbonNamefield, enter any name you want to use. The VBA callback procedures for this XMLcode can be entered in the same VBA module. This VBA code can also be copiedfrom the C:\Acc07_HandsOn\FinalRibbonVBA.txt file. Refer to Hands-On 30-6earlier in this chapter for creating a local system table to store Ribbon customiz-ation and using macro callbacks.
Disabling a ControlYou can disable a built-in or custom Ribbon control by using the enabled or
getEnabled attribute. Here’s how we disabled our custom check box control
earlier by using the enabled attribute:
<checkBox id="chkHealth" label="Health" enabled="false" />
Use the getEnabled attribute to disable a control based on some conditions or
simply display a “not authorized” message. The following XML code shows
how to disable the built-in Relationships button on the Ribbon’s Database
Tools tab:
<!-- Built-in commands section --><commands>
<command idMso="DatabaseRelationships" onAction="DisableRelations" /></commands>
832 | Chapter 30
Part VI
To make your XML code more readable, you can include comments between
the <!-- and --> characters. The <command> tag can be used to refer to any
built-in command. This tag must appear in the <commands> section of the
XML code. To see how this works, simply add the code fragment above the
XML code shown in the previous section just before the line:
<ribbon startFromScratch="false">
The onAction attribute contains the following callback procedure that will dis-
play a message when the Relationships button is clicked:
Sub DisableRelations(ctl As IRibbonControl, _ByRef cancelDefault)
MsgBox "You are not authorized to use this function."cancelDefault = True
End Sub
You can add more code to the above procedure if you need to cancel the con-
trol’s default behavior only when certain conditions have been satisfied.
Repurposing a Built-in ControlIt is possible to change the purpose of a built-in Ribbon button. For example,
when the user clicks the DatabaseDocumentor button while the Student List
form is open you could display a Database Properties dialog box instead of the
default Documentor dialog:
<command idMso="DatabaseDocumentor" onAction="ShowDbProperties" />
Public Sub ShowDbProperties(ctl As IRibbonControl, _ByRef cancelDefault)
If CurrentProject.AllForms("Student List").IsLoaded Then' display Database Properties dialog box insteadDoCmd.RunCommand acCmdDatabaseProperties
ElsecancelDefault = False
End IfEnd Sub
Only simple buttons that perform an action when clicked can be repurposed.
You cannot repurpose advanced controls such as combo boxes, drop downs, or
galleries.
Refreshing the RibbonSo far in this chapter you’ve seen how to use callback procedures to specify
the values of control attributes at run time. But what if you need to update your
custom Ribbon or the controls placed in the Ribbon based on what the user is
doing in your application? The good news is that you can change the attribute
values at any time by using the InvalidateControl method of the IRibbonUI
object. To use this object, start by adding the onLoad attribute to the customUI
element in your Ribbon customization XML:
Programming the User Interface | 833
Working with New Features in Access 2007

<customUI xmlns="http://schemas.microsoft.com/office/2006/01/customui"loadImage="OnLoadImage" onLoad="RefreshMe">
The onLoad attribute points to the callback procedure that will give you a copy
of the Ribbon that you can use to refresh anytime you want. In this example,
the onLoad callback procedure name is RefreshMe.
Let’s say you have a check box that is disabled when the Ribbon is first
loaded and you would like to enable it when the user enters text in an edit box.
Also, upon entry you want the text of the edit box to appear in uppercase. To
implement the onLoad callback, start by declaring a Public module-level vari-
able of type IRibbonUI;
Public objRibbon As IRibbonUI
The above statement should appear in the declaration section at the top of the
VBA module. To keep track of the state of the two Ribbon controls we are
interested in, declare two Private module-level variables:
Private strUserTxt As StringPrivate isCtlEnabled As Boolean
Next, enter the callback procedure that will store a copy of the Ribbon in the
objRibbon variable and assign an initial value to the isCtlEnable variable:
' callback for the onLoad attribute of customUIPublic Sub RefreshMe(ribbon As IRibbonUI)
Set objRibbon = ribbonisCtlEnabled = False
End Sub
When the Ribbon loads, the check box control will be disabled. You will also
have a copy of the IRibbonUI object saved for later use. Now, let’s take a look
at the XML markup used in this scenario:
<checkBox id="chkHealth" label="Health" getEnabled="onGetEnabled_Health" /><editBox id="txtFullName" label="First and Last Name:"
sizeString="AAAAAAAAAAAAAAAAAA" maxLength="25"getText="getEditBoxText" onChange="onFullNameChangeToUcase" />
These check box and edit box controls were introduced earlier in this chapter
(see Figure 30-41). In order to change the enabled state of the check box con-
trol based on the user action, the getEnabled attribute must be used. The
callback procedure for this attribute is shown below:
Public Sub onGetEnabled_Health(control As IRibbonControl, _ByRef enabled)
enabled = isCtlEnabledEnd Sub
When the Ribbon is loaded, the onGetEnabled_Health procedure will provide
the value for the getEnabled attribute. The Health check box will be displayed
in the Ribbon in its disabled mode because we have set the value of the
isCtlEnabled variable to False in the RefreshMe procedure.
The edit box control contains two attributes that require callback proce-
dures. The getText attribute points to the following callback:
834 | Chapter 30
Part VI

Public Sub getEditBoxText(control As IRibbonControl, _ByRef text)
text = UCase(strUserTxt)End Sub
The above callback uses the VBA built-in UCase function to change the text
that the user entered in the edit box to uppercase letters. When text is updated
in the edit box, the procedure in the onChange attribute is called:
Public Sub onFullNameChangeToUcase(ByVal control As IRibbonControl, _text As String)
If text <> "" ThenstrUserTxt = textobjRibbon.InvalidateControl "txtFullName"isCtlEnabled = True
ElseisCtlEnabled = False
End IfobjRibbon.InvalidateControl "chkHealth"
End Sub
The above callback begins by checking the value of the text parameter pro-
vided by the Ribbon. If this parameter contains a value other than an empty
string (""), the text the user entered is stored in the strUserTxt variable. Before
a change can occur in the Ribbon control, you need to mark the control as
invalid. This is done by calling the InvalidateControl method of the IRibbonUI
object that we have stored in the objRibbon variable:
objRibbon.InvalidateControl "txtFullName"
The above statement will tell the txtFullName control to refresh itself next time
it is displayed. When the control is invalidated, it will automatically call its
callback functions. The getEditBoxText callback procedure in the onChange
attribute will execute, causing the text entered in the txtFullName edit box con-
trol to appear in uppercase letters.
The second action that we want to perform is to enable the chkHealth check
box control when the user enters text in the edit box control and keep this but-
ton disabled when the edit box control is empty. This is done by setting the
isCtlEnabled Boolean variable to True or False, and invalidating the chkHealth
check box control. When the chkHealth control is marked as invalid, it will
call its callback functions. The onGetEnabled_Health callback procedure in the
getEnabled attribute will execute, causing the control to appear in the enabled
state if the txtFullName edit box control contains any text.
Programming the User Interface | 835
Working with New Features in Access 2007
Figure 30-44: The Ribbon controls are shown here after the Ribbon refresh. The Health check box isenabled upon entry of any text in the First and Last Name edit box, and disabled when the entry inthe edit box is deleted. The XML markup for this Ribbon customization is contained in theC:\Acc07_HandsOn\FinalRibbon_WithRefresh.txt file.

� Note: The IRibbonUI object has only two methods: InvalidateControl andInvalidate. Use the InvalidateControl method to refresh an individual control.Use the Invalidate method to refresh all controls in the Ribbon.
The CommandBars Object and the RibbonYou can make your custom Ribbon button match any built-in button by using
the CommandBars object. In Office 2007, this object has been extended with
several get methods that expose the state information for the built-in controls:
GetEnabledMso, GetImageMso, GetLabelMso, GetPressedMso, GetScreen-
tipMso, GetSupertipMso, and GetVisibleMso. Use these methods in your
callbacks to check the built-in control’s properties. For example, the following
statement will return False if the Ribbon’s built-in Cut button is currently dis-
abled (grayed out), and True if it is enabled (ready to use):
MsgBox Application.CommandBars.GetEnabledMso("Cut")
Notice that the GetEnabledMso method requires that you provide the name of
the built-in control. To see the result of the above statement, simply type it in
the Immediate window and press Enter.
The GetImageMso method is very useful if you’d like to reuse any of the
built-in button images in your own controls. This method allows you to get the
bitmap for any imageMso tag. For example, to retrieve the bitmap associated
with the Cut button on the Ribbon, enter the following statement in the Imme-
diate window:
MsgBox Application.CommandBars.GetImageMso("Cut", 16, 16)
The GetImageMso method above uses three arguments: the name of the built-
in control, and the width and height of the bitmap image in pixels. Because this
method returns the IPictureDisp object, it is very easy to place the retrieved
bitmap onto your own custom Ribbon control by writing a simple VBA call-
back for your control’s getImage attribute.
In addition to the methods that provide information about the properties of
the built-in controls, the CommandBars object also includes a handy Execute-
Mso method that can be used to trigger the built-in control’s default action.
This method is quite useful when you want to perform a click operation for the
user from within a VBA procedure or want to conditionally run a built-in
feature.
Let’s take a look at the example implementation of the GetImageMso and
ExecuteMso methods. Here’s the XML definition for a custom Ribbon button:
<button id="btnRptWizard" label="Use Report Wizard" size="normal"getImage="onGetBitmap" onAction="DoDefaultPlus" />
The above XML code can be added to any of the custom Ribbon definitions
you’ve already defined in the USysRibbons table. Now let’s look at the VBA
part. You want the button to use the same image as the built-in button labeled
Report Wizard. When the button is clicked, you’d like to display the built-in
836 | Chapter 30
Part VI
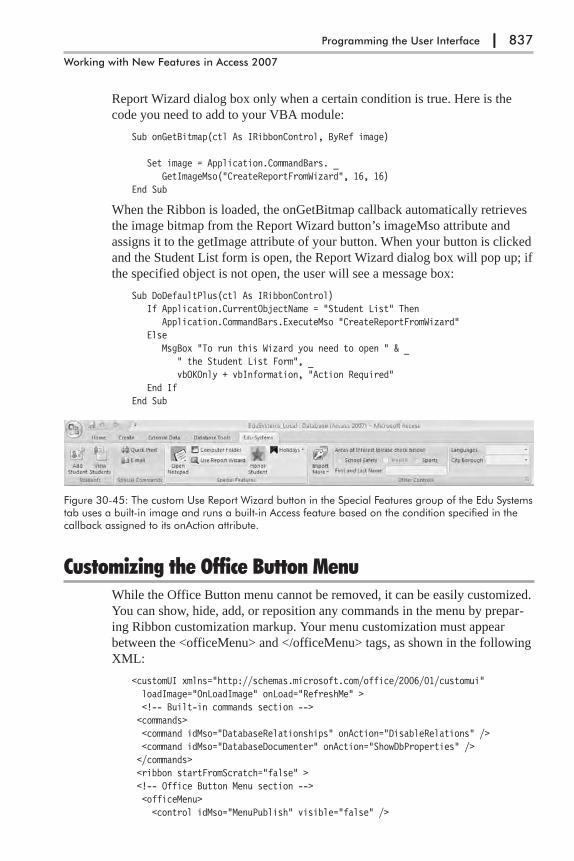
Report Wizard dialog box only when a certain condition is true. Here is the
code you need to add to your VBA module:
Sub onGetBitmap(ctl As IRibbonControl, ByRef image)
Set image = Application.CommandBars. _GetImageMso("CreateReportFromWizard", 16, 16)
End Sub
When the Ribbon is loaded, the onGetBitmap callback automatically retrieves
the image bitmap from the Report Wizard button’s imageMso attribute and
assigns it to the getImage attribute of your button. When your button is clicked
and the Student List form is open, the Report Wizard dialog box will pop up; if
the specified object is not open, the user will see a message box:
Sub DoDefaultPlus(ctl As IRibbonControl)If Application.CurrentObjectName = "Student List" Then
Application.CommandBars.ExecuteMso "CreateReportFromWizard"Else
MsgBox "To run this Wizard you need to open " & _" the Student List Form", _vbOKOnly + vbInformation, "Action Required"
End IfEnd Sub
Customizing the Office Button MenuWhile the Office Button menu cannot be removed, it can be easily customized.
You can show, hide, add, or reposition any commands in the menu by prepar-
ing Ribbon customization markup. Your menu customization must appear
between the <officeMenu> and </officeMenu> tags, as shown in the following
XML:
<customUI xmlns="http://schemas.microsoft.com/office/2006/01/customui"loadImage="OnLoadImage" onLoad="RefreshMe" ><!-- Built-in commands section --><commands><command idMso="DatabaseRelationships" onAction="DisableRelations" /><command idMso="DatabaseDocumenter" onAction="ShowDbProperties" /></commands><ribbon startFromScratch="false" ><!-- Office Button Menu section --><officeMenu><control idMso="MenuPublish" visible="false" />
Programming the User Interface | 837
Working with New Features in Access 2007
Figure 30-45: The custom Use Report Wizard button in the Special Features group of the Edu Systemstab uses a built-in image and runs a built-in Access feature based on the condition specified in thecallback assigned to its onAction attribute.
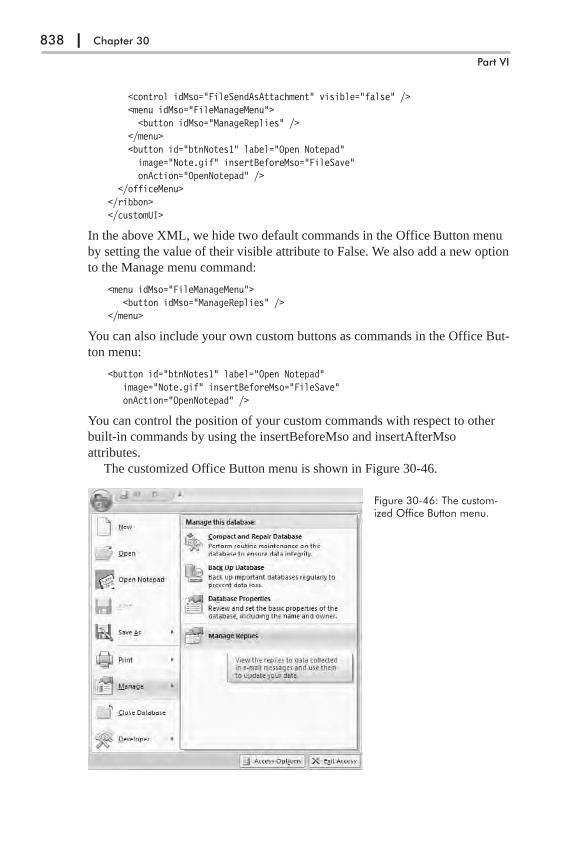
<control idMso="FileSendAsAttachment" visible="false" /><menu idMso="FileManageMenu"><button idMso="ManageReplies" />
</menu><button id="btnNotes1" label="Open Notepad"image="Note.gif" insertBeforeMso="FileSave"onAction="OpenNotepad" />
</officeMenu></ribbon></customUI>
In the above XML, we hide two default commands in the Office Button menu
by setting the value of their visible attribute to False. We also add a new option
to the Manage menu command:
<menu idMso="FileManageMenu"><button idMso="ManageReplies" />
</menu>
You can also include your own custom buttons as commands in the Office But-
ton menu:
<button id="btnNotes1" label="Open Notepad"image="Note.gif" insertBeforeMso="FileSave"onAction="OpenNotepad" />
You can control the position of your custom commands with respect to other
built-in commands by using the insertBeforeMso and insertAfterMso
attributes.
The customized Office Button menu is shown in Figure 30-46.
838 | Chapter 30
Part VI
Figure 30-46: The custom-ized Office Button menu.
Chapter SummaryThis chapter introduced you to using and customizing the new user interface in
Access 2007. After a short overview of the initial Microsoft Office Access
screen, Office button, and Quick Access toolbar, we looked at numerous fea-
tures of the Access Navigation pane. You learned how to use the Navigation
pane to access and organize your database objects by using both manual tech-
niques and VBA code. Next, we briefly covered the Ribbon interface to get
you warmed up and ready for the Ribbon customization exercises. You learned
how to create XML Ribbon customization markup and load it in your database
by using the LoadCustomUI method of the Application object or via a special
Access system table called USysRibbons. You also learned how Ribbon
customizations can be assigned to forms or reports. You spent quite a bit of
time in this chapter familiarizing yourself with various controls that can be
added to the Ribbon and writing callback procedures in order to set your con-
trols’ attributes at run time. In addition to Ribbon customizations, you learned
how to modify the Office Button menu.
While this chapter covered many controls and features of the Ribbon, it did
not attempt to cover all there is to know about this interface. After all, this
book is about VBA programming in Access in general, not just the Ribbon.
The knowledge and experience you gained in this chapter can be applied to
customizing the Ribbon and the Office Button menu in all of the Microsoft
Office 2007 applications.
In the next chapter, we focus on working with the new features introduced
in Access 2007 tables, forms, and reports.
Programming the User Interface | 839
Working with New Features in Access 2007
Chapter 31
Tables, Forms, and Reports
If you are creating an Access database in the ACCDB file format, then you can
take advantage of all the new features introduced in Access 2007 by using the
provided built-in tools or programmatically by writing code. This chapter
focuses on important new features and enhancements that apply to Access
tables, forms, and reports. A number of new features were introduced to make
it easier for beginner end users to get started designing and working with
Access databases; others were added with the purpose of making Access com-
patible with the Windows SharePoint Server lists. As an Access programmer,
you need to know what is possible with all the new features, regardless of their
intended audience.
New Features in TablesOne of the first things everyone notices when creating a new Access database
or opening an existing database is how easy it is to create tables. Access 2007
comes with a much improved Datasheet view that allows creating tables on the
fly. Simply use the new Add New Field column in this view and start typing in
your data (Figure 31-1). Access will automatically recognize whether it’s Text,
Date, Currency, or another data type. If you’d like to change the field’s data
type, you can do this easily with buttons provided on the Ribbon. You can
rename the default field names (Field1, Field2, and so on) by double-clicking
the column heading and typing the new name for the column. While creating
table columns in this fashion can be useful for someone who just needs a quick
structure to collect data and may not have an understanding of what a data type
is, you will be more in control of Access by performing table design in the
Design view or writing code using any of the methods introduced earlier in this
book.
840
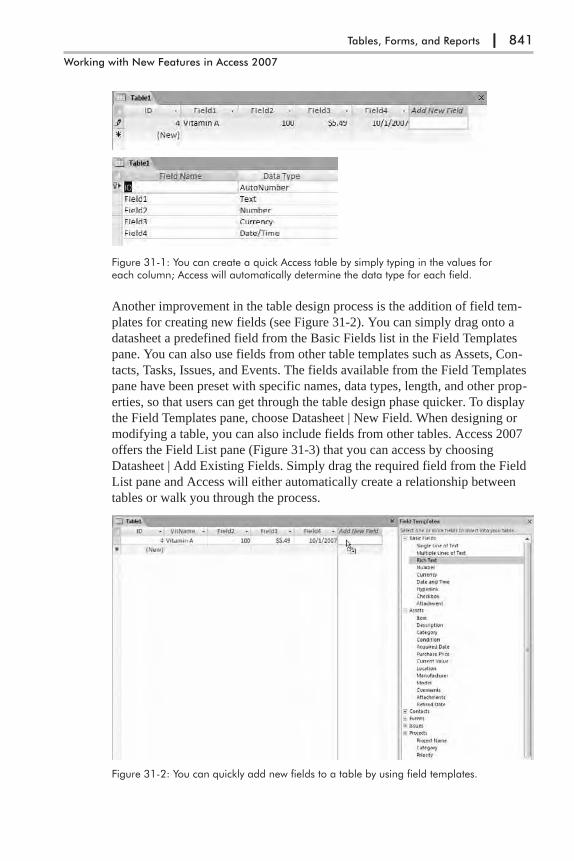
Another improvement in the table design process is the addition of field tem-
plates for creating new fields (see Figure 31-2). You can simply drag onto a
datasheet a predefined field from the Basic Fields list in the Field Templates
pane. You can also use fields from other table templates such as Assets, Con-
tacts, Tasks, Issues, and Events. The fields available from the Field Templates
pane have been preset with specific names, data types, length, and other prop-
erties, so that users can get through the table design phase quicker. To display
the Field Templates pane, choose Datasheet | New Field. When designing or
modifying a table, you can also include fields from other tables. Access 2007
offers the Field List pane (Figure 31-3) that you can access by choosing
Datasheet | Add Existing Fields. Simply drag the required field from the Field
List pane and Access will either automatically create a relationship between
tables or walk you through the process.
Tables, Forms, and Reports | 841
Working with New Features in Access 2007
Figure 31-1: You can create a quick Access table by simply typing in the values foreach column; Access will automatically determine the data type for each field.
Figure 31-2: You can quickly add new fields to a table by using field templates.

When designing tables in Access 2007, you will notice the addition of new
field data types (see Figure 31-4). The Access ACCDB file format enables new
field types such as attachments and multi-value fields. By using the Attach-
ment data type, it is now possible to attach one or more documents,
spreadsheets, images, or other files to a table record. Multi-value fields allow
you to store more than one value in a field. For example, if you want to assign
a task to more than one person, you can use the Lookup Wizard to create a
field that contains a drop-down list from which you can select multiple values.
You will learn about these new data types later in this chapter.
The following table describes 10 different field data types that are supported in
Access 2007 when creating tables.
842 | Chapter 31
Part VI
Figure 31-3: Use theField List pane to quicklyadd to datasheet fieldsfrom other tables in yourdatabase. This is the FieldList pane as it appears inthe Northwind 2007database.
Figure 31-4: Rich Textfields are memo fieldsthat have the Text Formatproperty set to Rich Text inthe table design. They arediscussed in detail later.The Data Type drop-down list includes twonew data types intro-duced in Access 2007that can be created viathe Attachment andLookup Wizard options.
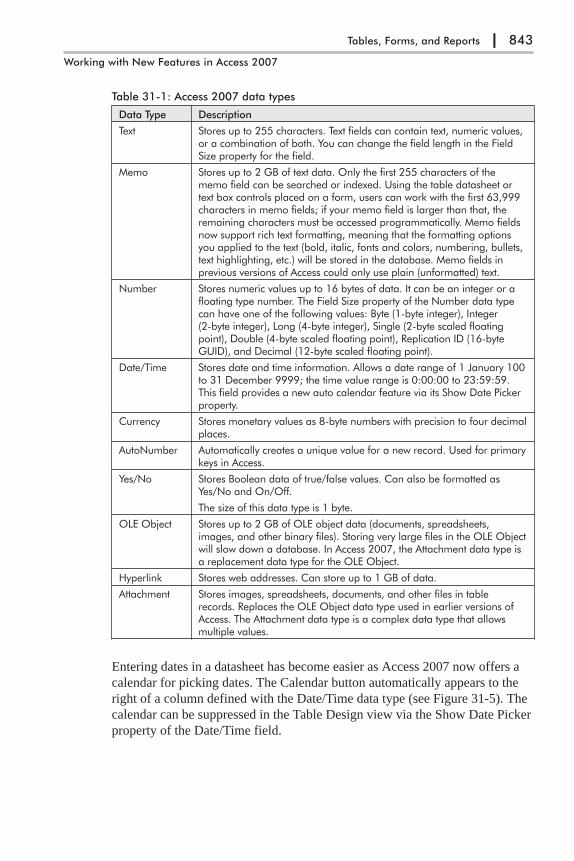
Table 31-1: Access 2007 data types
Data Type Description
Text Stores up to 255 characters. Text fields can contain text, numeric values,or a combination of both. You can change the field length in the FieldSize property for the field.
Memo Stores up to 2 GB of text data. Only the first 255 characters of thememo field can be searched or indexed. Using the table datasheet ortext box controls placed on a form, users can work with the first 63,999characters in memo fields; if your memo field is larger than that, theremaining characters must be accessed programmatically. Memo fieldsnow support rich text formatting, meaning that the formatting optionsyou applied to the text (bold, italic, fonts and colors, numbering, bullets,text highlighting, etc.) will be stored in the database. Memo fields inprevious versions of Access could only use plain (unformatted) text.
Number Stores numeric values up to 16 bytes of data. It can be an integer or afloating type number. The Field Size property of the Number data typecan have one of the following values: Byte (1-byte integer), Integer(2-byte integer), Long (4-byte integer), Single (2-byte scaled floatingpoint), Double (4-byte scaled floating point), Replication ID (16-byteGUID), and Decimal (12-byte scaled floating point).
Date/Time Stores date and time information. Allows a date range of 1 January 100to 31 December 9999; the time value range is 0:00:00 to 23:59:59.This field provides a new auto calendar feature via its Show Date Pickerproperty.
Currency Stores monetary values as 8-byte numbers with precision to four decimalplaces.
AutoNumber Automatically creates a unique value for a new record. Used for primarykeys in Access.
Yes/No Stores Boolean data of true/false values. Can also be formatted asYes/No and On/Off.
The size of this data type is 1 byte.
OLE Object Stores up to 2 GB of OLE object data (documents, spreadsheets,images, and other binary files). Storing very large files in the OLE Objectwill slow down a database. In Access 2007, the Attachment data type isa replacement data type for the OLE Object.
Hyperlink Stores web addresses. Can store up to 1 GB of data.
Attachment Stores images, spreadsheets, documents, and other files in tablerecords. Replaces the OLE Object data type used in earlier versions ofAccess. The Attachment data type is a complex data type that allowsmultiple values.
Entering dates in a datasheet has become easier as Access 2007 now offers a
calendar for picking dates. The Calendar button automatically appears to the
right of a column defined with the Date/Time data type (see Figure 31-5). The
calendar can be suppressed in the Table Design view via the Show Date Picker
property of the Date/Time field.
Tables, Forms, and Reports | 843
Working with New Features in Access 2007
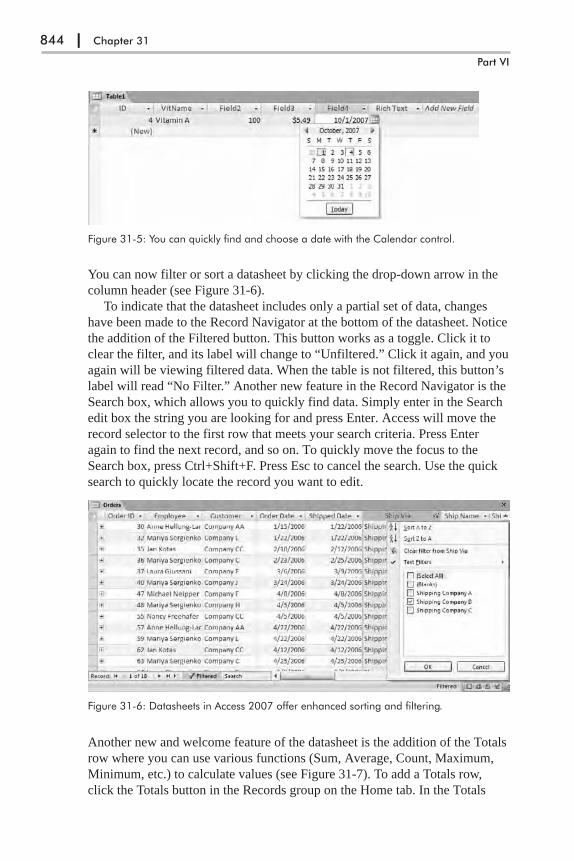
You can now filter or sort a datasheet by clicking the drop-down arrow in the
column header (see Figure 31-6).
To indicate that the datasheet includes only a partial set of data, changes
have been made to the Record Navigator at the bottom of the datasheet. Notice
the addition of the Filtered button. This button works as a toggle. Click it to
clear the filter, and its label will change to “Unfiltered.” Click it again, and you
again will be viewing filtered data. When the table is not filtered, this button’s
label will read “No Filter.” Another new feature in the Record Navigator is the
Search box, which allows you to quickly find data. Simply enter in the Search
edit box the string you are looking for and press Enter. Access will move the
record selector to the first row that meets your search criteria. Press Enter
again to find the next record, and so on. To quickly move the focus to the
Search box, press Ctrl+Shift+F. Press Esc to cancel the search. Use the quick
search to quickly locate the record you want to edit.
Another new and welcome feature of the datasheet is the addition of the Totals
row where you can use various functions (Sum, Average, Count, Maximum,
Minimum, etc.) to calculate values (see Figure 31-7). To add a Totals row,
click the Totals button in the Records group on the Home tab. In the Totals
844 | Chapter 31
Part VI
Figure 31-5: You can quickly find and choose a date with the Calendar control.
Figure 31-6: Datasheets in Access 2007 offer enhanced sorting and filtering.

row, click the field you want to add the calculation to, and select one of the
aggregate functions from the drop-down list. If the field is too narrow to dis-
play all the digits, Access 2007 will display pound signs (#) to indicate that the
size of the column should be increased. This new behavior is controlled via the
Check for truncated number fields check box in the Application Options sec-
tion of the current database in the Access Options dialog box (click the Office
menu button and choose Access Options).
Datasheet rows can now be shaded with alternating colors. This feature is
available by clicking the Alternate Fill/Back Color button in the Font group on
the Home tab.
Tables, Forms, and Reports | 845
Working with New Features in Access 2007
Figure 31-7: BeforeAccess 2007, youcould calculate totalsin a query, form, orreport view. Now youcan also add a Totalsrow to datasheets.
Figure 31-8: Applying alternating colors to datasheet rows.

Saving Tables as QueriesA nice enhancement to Access 2007 datasheets is the ability to save all your
customizations as a query. Say you opened an Employee table in Datasheet
view and filtered it to display only employees who live in Redmond. You also
hid certain fields that you didn’t care to see. To have Access create a query
based on this modified dataset, click the Office menu button, and choose Save
As. Type a name for your query and choose Query from the drop-down in the
Save As dialog box. Access will recognize that you have made changes to the
datasheet and will advise you that you must save the table before you can cre-
ate an object based on it. Click Yes to the message. Access saves the table and
creates a query in which the filter you applied is preserved and the hidden col-
umns are not included:
SELECT Employees.ID, Employees.[Last Name], Employees.[First Name],Employees.[E-mail Address], Employees.[Job Title],Employees.[Business Phone], Employees.City
FROM EmployeesWHERE (((Employees.City)="Redmond"));
In earlier versions of Access, any customizations of the datasheet would be
lost; Access would create a query based on the entire table and not the modi-
fied dataset.
Working with Attachment Data Type FieldsThe Access 2007 Attachment data type makes it possible to store various types
of external files directly in the database. This new data type is only available in
Access databases created in the ACCDB file format. Prior versions of Access
used the OLE Object data type for embedding external files within MDB data-
bases, and this format continues to be available in Access 2007 for backward
compatibility. The new Attachment data type eliminates the bloating issues that
plagued Access MDB databases whenever the OLE Object data type was used.
To keep ACCDB files as small as possible, Access 2007 compresses the
uncompressed files in the attachments before storing them in a database.
� Note: To avoid the bloating issue in Access 2003 and earlier, do not embedexternal files directly in the Access MDB database. Simply store the external file-name in a table using the Text data type. Store your files in the same folder asthe database and write VBA code to retrieve the files as needed. The sampleNorthwind.mdb file included with Access 2003 and earlier has VBA code in theEmployee form’s Current event to display an employee picture as the usermoves through the form.
The Attachment data type allows you to add multiple attachments to a single
record; however, keep in mind that the maximum size of an attached data file
cannot exceed 256 megabytes. You can store as many external files as you
want as long as you stay within 2 gigabytes of data, which is the maximum
size of an Access database. You cannot restrict how many attachments are
846 | Chapter 31
Part VI
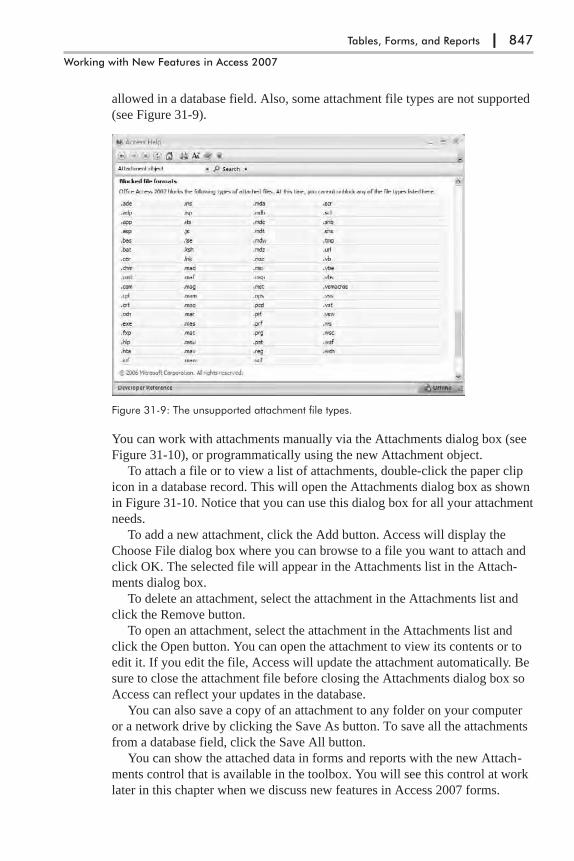
allowed in a database field. Also, some attachment file types are not supported
(see Figure 31-9).
You can work with attachments manually via the Attachments dialog box (see
Figure 31-10), or programmatically using the new Attachment object.
To attach a file or to view a list of attachments, double-click the paper clip
icon in a database record. This will open the Attachments dialog box as shown
in Figure 31-10. Notice that you can use this dialog box for all your attachment
needs.
To add a new attachment, click the Add button. Access will display the
Choose File dialog box where you can browse to a file you want to attach and
click OK. The selected file will appear in the Attachments list in the Attach-
ments dialog box.
To delete an attachment, select the attachment in the Attachments list and
click the Remove button.
To open an attachment, select the attachment in the Attachments list and
click the Open button. You can open the attachment to view its contents or to
edit it. If you edit the file, Access will update the attachment automatically. Be
sure to close the attachment file before closing the Attachments dialog box so
Access can reflect your updates in the database.
You can also save a copy of an attachment to any folder on your computer
or a network drive by clicking the Save As button. To save all the attachments
from a database field, click the Save All button.
You can show the attached data in forms and reports with the new Attach-
ments control that is available in the toolbox. You will see this control at work
later in this chapter when we discuss new features in Access 2007 forms.
Tables, Forms, and Reports | 847
Working with New Features in Access 2007
Figure 31-9: The unsupported attachment file types.

Adding Attachments Using the Attachments Dialog Box
Let’s start out by adding some attachments to the Attachments column in the
Customers table in the Northwind 2007.accdb database. Hands-On 31-1 shows
how to store attachments in a database without writing VBA code. Further
hands-on exercises will manipulate these attachments programmatically.
�Hands-On 31-1: Adding Attachments to Database Records
1. Open the C:\AccBy_Example\Northwind 2007.accdb database. Click
Cancel in the Login dialog box.
2. In the Navigation pane, double-click the Customers table.
3. Double-click on the paper clip icon for the third record, as shown in Figure
31-10 earlier. You should see an empty Attachments dialog box. To add the
files listed in Figure 31-10 (California1.jpg and California2.jpg), click
the Add button. Switch to the C:\Acc07_HandsOn\External Docs folder,
select the two California JPG images and click Open. The names of the
selected files are now listed in the Attachments dialog box. Click OK to
close the dialog box and press Ctrl+S to save the record. Notice that the
paper clip column now displays the number of attached files in parentheses
next to the paper clip icon for the record.
4. Double-click the paper clip icon for the 11th record (FL) and add the
Florida1.jpg and Florida2.jpg files from the C:\Acc07_HandsOn\Exter-
nal Docs folder. Close the Attachments dialog box when finished and be
sure to save the record.
5. Add the C:\Acc07_HandsOn\External Docs\Mass1.jpg image file as an
attachment to the 18th record. Close the Attachments dialog box when fin-
ished and be sure to save the record.
848 | Chapter 31
Part VI
Figure 31-10: Working with attachments in Access 2007.

Using an Access Query to Return Rows with Attachments
After completing the Hands-On 31-1 exercise, the Customers table should con-
tain five attachment files in three different records. You can find out what
records contain attachments by running a query, as shown in the next hands-on
exercise. The files attached to database records are stored in a hidden complex
data table. While this table is not available for Access users to see, the query
designer reveals three columns that are stored in that table: FileData, File-
Name, and FileType (see Figure 31-12). FileData is the attachment file itself
stored as binary data, FileName is the name of the attachment file, and
FileType is the file extension.
� Note: When you define a complex data type such as an attachment, Accessstores this information in the MSysComplexColumns system table. Figure 31-11shows the contents of this table for the Northwind 2007 database.
ColumnName is the name of the complex column. ComplexID is a primary keyfor the system table. ComplexTypeObjectID stores the ID of the complex datatype; 39 is the ID for attachments, 619 is the ID for memo fields with theenabled version history, and 27 is the ID for multi-value fields based on a tableor query. The two last columns in the MSysComplexColumns table (Conceptual-TableID and FlatTableID) refer to a hidden system table that is not exposed foranyone to see.
�Hands-On 31-2: Using an Access Query to Return Rows with Attachments
This hands-on exercise requires the completion of Hands-On 31-1.
1. Click the Query Design button in the Other group of the Create tab.
2. In the Show Table dialog box, select Customers and click Add. Click
Close to dismiss the Show Table dialog.
3. Drag ID, Last Name, First Name, and Attachments.FileName to the
Query grid. In the Criteria row of the Attachments.FileName column, enter
Is not Null to ensure that only records with attachments are shown (see
Figure 31-12).
Tables, Forms, and Reports | 849
Working with New Features in Access 2007
Figure 31-11: The MSysComplexColumns system table stores information aboutthe complex data types you have defined in an Access database. The table shownhere refers to the data in the Northwind 2007 database.

4. To run the query, click the Run button in the Results section of the Design
tab. Access shows the records that meet the criteria.
5. Press Ctrl+S to save the query. In the Save As dialog box, type
qryGetCust_Attachments for the query name, and click OK.
6. Close the qryGetCust_Attachments window.
Working with Attachments Using VBA
To work with Attachment fields in VBA, you need two recordsets: a table
recordset that represents the main table data and a child recordset used for
accessing and manipulating the Attachment data type. Both recordsets should
be declared as Recordset2 objects.
The Recordset2 object represents the records in the main (base) table and
the records obtained by running a query. The Recordset2 object was added to
the Access 2007 DAO Object Library to support multi-value lookup fields and
attachments. If you open the Object Browser and search for the Recordset and
Recordset2 objects, you will notice that the Recordset2 object contains the
same methods and properties as the Recordset object. The only difference is
that the Recordset2 object has a ParentRecordset property, which is very handy
in determining if the specified recordset represents a multi-value field.
850 | Chapter 31
Part VI
Figure 31-12: Creating a query to retrieve a list of records withattachments.
Figure 31-13: Results of running the query in Hands-On 31-2.

Similar to the Recordset2 object, the Field2 object has been added to
Access 2007 to support multi-value fields and attachments. In DAO, both Field
and Field2 objects represent a column of data. The Field2 object exposes
special methods and properties for dealing with multi-value fields and attach-
ments. For example, you can use the Field2 object’s LoadFromFile and
SaveToFile methods to programmatically add and save attachments, and you
can use the IsComplex property of the Field2 object to determine whether the
specified field is a multi-value lookup or attachment field.
Listing Attachments
Hands-On 31-3 demonstrates how to use new DAO objects (Recordset2,
Field2) to retrieve filenames that are attached to records in the Customers
table.
�Hands-On 31-3: Using DAO to Retrieve the List of Attachments
This hands-on exercise requires the completion of Hands-On 31-1.
1. Press Alt+F11 to switch to the Visual Basic Editor window.
2. Choose Insert | Module to add a new module to the current VBA project.
3. In the module’s Code window, enter the following GetAttachmentNames
procedure, or copy the procedure code from C:\Acc07_HandsOn\
Chap31.txt.
Sub GetAttachmentNames()Dim db As DAO.DatabaseDim rst As DAO.Recordset2Dim rstChild As DAO.Recordset2Dim fldAttach As DAO.Field2
Dim strCustName As String
Set db = CurrentDbSet rst = db.OpenRecordset("Customers")rst.MoveFirst
Do Until rst.EOFstrCustName = rst("Last Name").Value
'open a recordset for the attachment fieldSet rstChild = rst!Attachments.Value
Do Until rstChild.EOFrstChild.MoveFirstSet fldAttach = rstChild.Fields("FileName")
Do Until rstChild.EOFDebug.Print strCustName & Chr(0) & _
Chr(45) & Chr(0) & fldAttach.ValuerstChild.MoveNext
LoopLoop
Tables, Forms, and Reports | 851
Working with New Features in Access 2007

rst.MoveNextLoop
rst.Closedb.ClosefldAttach = NothingSet rstChild = NothingSet rst = NothingSet db = Nothing
End Sub
In the above procedure, we open the recordset to access data in the Cus-
tomers table. For each record in this recordset, we store the customer’s last
name in the strCustName variable. As we move through each record of the
main recordset (rst), we open the child recordset using the following
statement:
Set rstChild = rst!Attachments.Value
In the above statement, Attachments is the name of the attachment field.
This statement, which instantiates the child recordset, can also be written
as follows:
Set rstChild = rst.Fields("Attachments").Value
Because a record could contain one or more attached files, we need to iter-
ate through the child recordset to find out whether it contains any attach-
ments. We can get the Attachment field values by accessing the Value
property of the Field2 object. We instantiate the field object with the fol-
lowing statement:
Set fldAttach = rstChild.Fields("FileName")
Recall from the earlier discussion that FileName is the name of the
attached file. If the field in the child recordset contains at least one attach-
ment, the procedure writes the customer’s last name and the attachment’s
filename to the Immediate window. Chr(0) will generate a space and
Chr(45) a dash; these will separate the customer’s last name from the file-
name, as in the following:
Axen - California1.jpgAxen - California2.jpgKrschne - Florida1.jpgKrschne - Florida2.jpgAutier Miconi - Mass1.jpg
After the data is retrieved, we perform the usual resource cleanup:
rst.Closedb.CloseSet fldAttach = NothingSet rstChild = NothingSet rst = NothingSet db = Nothing
4. Position the insertion point anywhere within the GetAttachmentNames pro-
cedure and press F5 to run it.
852 | Chapter 31
Part VI
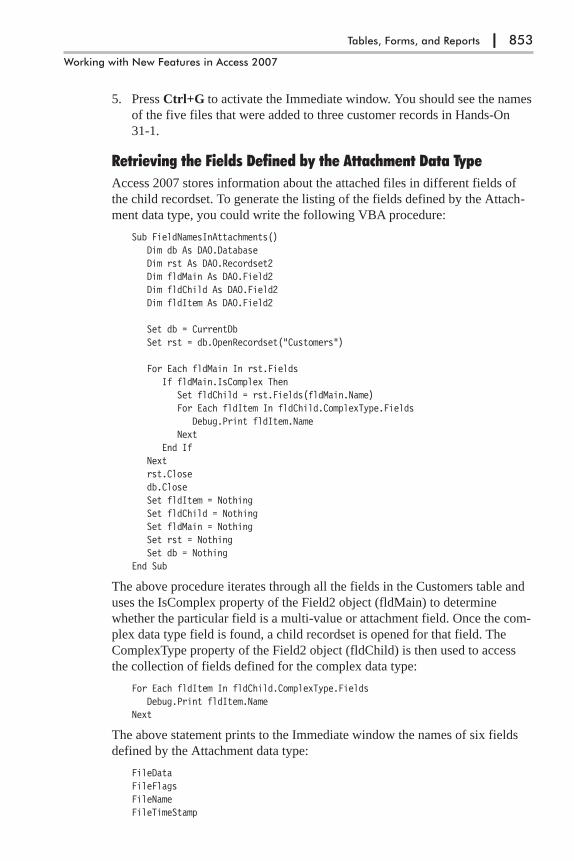
5. Press Ctrl+G to activate the Immediate window. You should see the names
of the five files that were added to three customer records in Hands-On
31-1.
Retrieving the Fields Defined by the Attachment Data Type
Access 2007 stores information about the attached files in different fields of
the child recordset. To generate the listing of the fields defined by the Attach-
ment data type, you could write the following VBA procedure:
Sub FieldNamesInAttachments()Dim db As DAO.DatabaseDim rst As DAO.Recordset2Dim fldMain As DAO.Field2Dim fldChild As DAO.Field2Dim fldItem As DAO.Field2
Set db = CurrentDbSet rst = db.OpenRecordset("Customers")
For Each fldMain In rst.FieldsIf fldMain.IsComplex Then
Set fldChild = rst.Fields(fldMain.Name)For Each fldItem In fldChild.ComplexType.Fields
Debug.Print fldItem.NameNext
End IfNextrst.Closedb.CloseSet fldItem = NothingSet fldChild = NothingSet fldMain = NothingSet rst = NothingSet db = Nothing
End Sub
The above procedure iterates through all the fields in the Customers table and
uses the IsComplex property of the Field2 object (fldMain) to determine
whether the particular field is a multi-value or attachment field. Once the com-
plex data type field is found, a child recordset is opened for that field. The
ComplexType property of the Field2 object (fldChild) is then used to access
the collection of fields defined for the complex data type:
For Each fldItem In fldChild.ComplexType.FieldsDebug.Print fldItem.Name
Next
The above statement prints to the Immediate window the names of six fields
defined by the Attachment data type:
FileDataFileFlagsFileNameFileTimeStamp
Tables, Forms, and Reports | 853
Working with New Features in Access 2007

FileTypeFileURL
Three of these fields (FileData, FileName, and FileType) were mentioned ear-
lier in this chapter.
The FileFlags and FileTimeStamp fields are reserved for future use. The
FileURL field stores the URL for a linked SharePoint list. The value of this
field is Null for Access tables.
Saving Attachments
Files attached to database records can be stored in any location on disk using
the SaveToFile method of the Recordset2 object.
Hands-On 31-4 creates a new folder named Collect Attachments on your
disk drive and saves to this folder all attachments found in the Customers table.
�Hands-On 31-4: Using DAO to Save Attachments to Disk
This hands-on exercise requires the completion of Hands-On 31-1.
1. In a Visual Basic module, enter the following SaveAttachmentsToDisk
procedure, or copy the procedure code from the C:\Acc07_HandsOn\
Chap31.txt file. You can enter the code in the same module where you
entered the procedure in Hands-On 31-3, or you can create a new module
for this code.
Sub SaveAttachmentsToDisk()Dim db As DAO.DatabaseDim rst As DAO.Recordset2Dim rstChild As DAO.RecordsetDim fldAttach As DAO.Field2Dim strFile As String
Const dirName = "C:\CollectAttachments"Set db = CurrentDb
' Open the recordset for the Customers tableSet rst = db.OpenRecordset("Customers")rst.MoveFirst
Do Until rst.EOF'open a recordset for the attachment fieldSet rstChild = rst!Attachments.Value
Do Until rstChild.EOFIf Dir(dirName, vbDirectory) = "" Then MkDir dirNamerstChild.MoveFirst' get the binary data of the attachment fileSet fldAttach = rstChild.Fields("FileData")
Do Until rstChild.EOFstrFile = dirName & "\" & rstChild.Fields("FileName").ValueIf Dir(strFile) = "" Then
fldAttach.SaveToFile strFileEnd If
854 | Chapter 31
Part VI

rstChild.MoveNextLoop
Looprst.MoveNext
Loop
Set rstChild = Nothingrst.CloseSet rst = NothingSet db = Nothing
End Sub
The above procedure iterates through all the records in the Customers table
and copies all found attachment files to the directory specified in the con-
stant dirName. Notice that the procedure uses the VBA Dir function to
determine if the specified directory already exists on the computer. If the
directory does not exist, the VBA MkDir function is used to create a new
folder with the specified name:
If Dir(dirName, vbDirectory) = "" Then MkDir dirName
The Dir function is also used to find out if the attachment file already exists
in the specified directory. If the file does not exist, then we pass the name
of the file to the SaveToFile method of the fldAttach object variable. The
SavetoFile method is exposed in DAO by the new Field2 object. Notice
that to save the attachment you need to get the binary data of the attached
file. This is done by accessing the FileData field in the child recordset:
Set fldAttach = rstChild.Fields("FileData")
2. Run the SaveAttachmentsToDisk procedure.
3. Check the contents of the C:\CollectAttachments folder. You should see the
five image files that you added to the Customers table via the Attachments
dialog box in Hands-On 31-1.
Adding Attachments
In Hands-On 31-1, you used the Attachments dialog box to add external files
to records in the Customers table. Hands-On 31-5 demonstrates how to add
attachment files programmatically.
�Hands-On 31-5: Using DAO to Add an Attachment to a Table Record
1. In a Visual Basic module, enter the following AddAttachmentToRecord
procedure, or copy the procedure code from the C:\Acc07_HandsOn\
Chap31.txt file. You can enter the code in the same module where you
entered the procedure in Hands-On 31-4, or you can create a new module
for this code.
Tables, Forms, and Reports | 855
Working with New Features in Access 2007

Sub AddAttachmentToRecord()Dim db As DAO.DatabaseDim rst As DAO.Recordset2Dim rstChild As DAO.Recordset2Dim addFlag As Boolean
Const dirName = "C:\Acc07_HandsOn\External Docs\"Const fileN = "California3.jpg"
Set db = CurrentDb
' Open the recordset for the Customers tableSet rst = db.OpenRecordset("Customers")
'move to the 16th customer (count records from 0)rst.Move 15
' initialize child recordsetSet rstChild = rst.Fields("Attachments").Value
If rstChild.RecordCount > 0 Then'check if the specified file is already attached
Do Until rstChild.EOFIf rstChild.Fields("FileName").Value = fileN Then
addFlag = TrueExit Do
End IfLoop
End IfIf addFlag Then MsgBox "The specified file " & fileN & _
" is already attached to this record."If Not addFlag Then
' put the parent recordset in Edit moderst.Edit' add a new record to the child recordsetrstChild.AddNew' load the attchment filerstChild.Fields("FileData").LoadFromFile dirName & fileN' update both the child and parent recordsetsrstChild.Updaterst.Update
MsgBox "Successfully attached " & fileN & " to " & _rst.Fields(1).Value & " record."
End If
rstChild.CloseSet rstChild = Nothingrst.CloseSet rst = NothingSet db = Nothing
End Sub
The above procedure adds an attachment to the 16th record in the Custom-
ers table. This is a record for Company P. Prior to adding a record to the
child recordset that holds the records for the Attachment field, the
856 | Chapter 31
Part VI
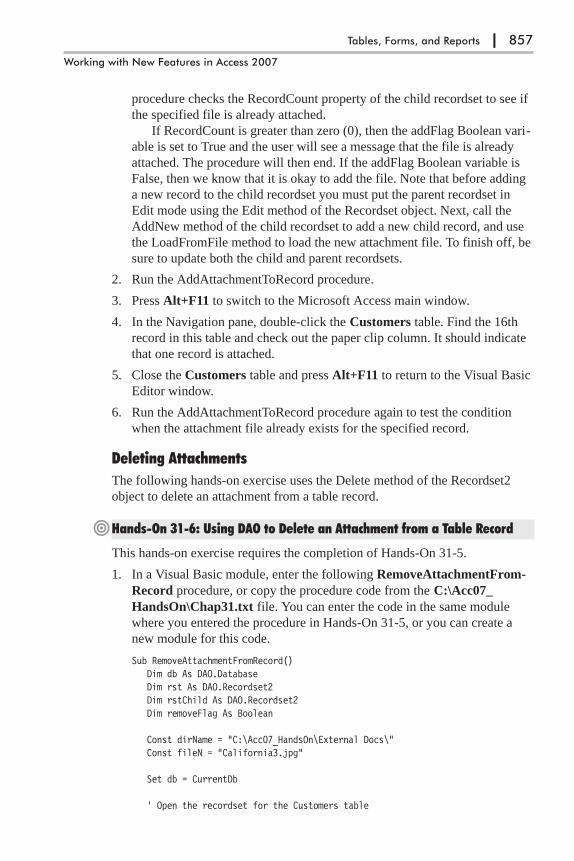
procedure checks the RecordCount property of the child recordset to see if
the specified file is already attached.
If RecordCount is greater than zero (0), then the addFlag Boolean vari-
able is set to True and the user will see a message that the file is already
attached. The procedure will then end. If the addFlag Boolean variable is
False, then we know that it is okay to add the file. Note that before adding
a new record to the child recordset you must put the parent recordset in
Edit mode using the Edit method of the Recordset object. Next, call the
AddNew method of the child recordset to add a new child record, and use
the LoadFromFile method to load the new attachment file. To finish off, be
sure to update both the child and parent recordsets.
2. Run the AddAttachmentToRecord procedure.
3. Press Alt+F11 to switch to the Microsoft Access main window.
4. In the Navigation pane, double-click the Customers table. Find the 16th
record in this table and check out the paper clip column. It should indicate
that one record is attached.
5. Close the Customers table and press Alt+F11 to return to the Visual Basic
Editor window.
6. Run the AddAttachmentToRecord procedure again to test the condition
when the attachment file already exists for the specified record.
Deleting Attachments
The following hands-on exercise uses the Delete method of the Recordset2
object to delete an attachment from a table record.
�Hands-On 31-6: Using DAO to Delete an Attachment from a Table Record
This hands-on exercise requires the completion of Hands-On 31-5.
1. In a Visual Basic module, enter the following RemoveAttachmentFrom-
Record procedure, or copy the procedure code from the C:\Acc07_
HandsOn\Chap31.txt file. You can enter the code in the same module
where you entered the procedure in Hands-On 31-5, or you can create a
new module for this code.
Sub RemoveAttachmentFromRecord()Dim db As DAO.DatabaseDim rst As DAO.Recordset2Dim rstChild As DAO.Recordset2Dim removeFlag As Boolean
Const dirName = "C:\Acc07_HandsOn\External Docs\"Const fileN = "California3.jpg"
Set db = CurrentDb
' Open the recordset for the Customers table
Tables, Forms, and Reports | 857
Working with New Features in Access 2007

Set rst = db.OpenRecordset("Customers")
'move to the 16th customerrst.Move 15
' get the child recordset for the Attachment fieldSet rstChild = rst.Fields("Attachments").Value
' search for the attachment file and remove it if foundDo Until rstChild.EOF
If rstChild.Fields("FileName").Value = fileN ThenrstChild.DeleteremoveFlag = True
End IfrstChild.MoveNext
Loop' display a messageIf Not removeFlag Then
MsgBox "The specified file " & fileN & _" is not attached to this record.", _vbOKOnly + vbInformation, "Nothing to Remove"
ElseMsgBox "The specified file " & fileN & _
" was deleted from this record.", _vbOKOnly + vbInformation, "Attachment Removed"
End If
' cleanup coderstChild.CloseSet rstChild = Nothingrst.CloseSet rst = NothingSet db = Nothing
End Sub
2. Run the RemoveAttachmentFromRecord procedure.
3. Press Alt+F11 to switch to the Microsoft Access main window.
4. In the Navigation pane, double-click the Customers table. Find the 16th
record in this table and check out the Attachment field. It should indicate
that there are no attachments.
5. Close the Customers table and press Alt+F11 to return to the Visual Basic
Editor window.
6. Run the RemoveAttachmentFromRecord procedure again to test the condi-
tion when the attachment file for the specified record does not exist.
Now that you’ve learned about using and programming the Attachment data
type, let’s proceed to the next complex data type that the new Access 2007
ACCDB format provides — multi-value fields.
858 | Chapter 31
Part VI

Working with Multi-value FieldsThanks to the introduction of the complex multi-value data type in the ACCDB
file format, table columns can store more than one value. This makes it easy
for any Access user to create a lookup field without knowing much about set-
ting table relationships. Access will automatically store the values entered in
multi-value fields in hidden system tables and create proper table relationships
if necessary. The source data for a multi-value field can be one of the follow-
ing: Value List, Field List, or Table/Query. To have Access guide you in the
creation of a multi-value field, choose Lookup Wizard in the Data Type col-
umn of the table’s Design view.
The following hands-on exercise demonstrates how to use the Access user
interface to add a multi-value field named Literature Sent to the Northwind
2007 database’s Customers table.
�Hands-On 31-7: Creating a Multi-value Lookup Field
1. Open the Customers table in the Northwind 2007.accdb database in
Design view.
2. Type Literature Sent in the Field Name column of the first empty row. In
the Data Type column, select Lookup Wizard from the drop-down list.
3. Access will display the first screen of the Lookup Wizard. Click the second
option button, which is labeled “I will type in the values that I want.” Then
click Next to continue.
4. Access displays the second Lookup Wizard screen, where you specify the
values you want to store. Type the values shown in Figure 31-14 and press
Next when done.
5. Access displays the next Lookup Wizard screen (Figure 31-15). Make sure
that the Allow Multiple Values check box is selected, and click Finish.
Tables, Forms, and Reports | 859
Working with New Features in Access 2007
Figure 31-14: Values entered in each column cell will appearin the lookup list.
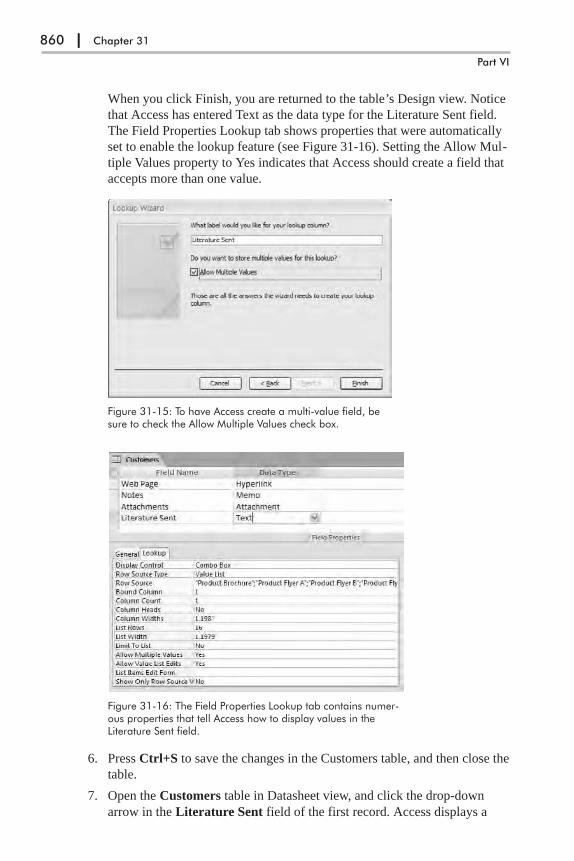
When you click Finish, you are returned to the table’s Design view. Notice
that Access has entered Text as the data type for the Literature Sent field.
The Field Properties Lookup tab shows properties that were automatically
set to enable the lookup feature (see Figure 31-16). Setting the Allow Mul-
tiple Values property to Yes indicates that Access should create a field that
accepts more than one value.
6. Press Ctrl+S to save the changes in the Customers table, and then close the
table.
7. Open the Customers table in Datasheet view, and click the drop-down
arrow in the Literature Sent field of the first record. Access displays a
860 | Chapter 31
Part VI
Figure 31-15: To have Access create a multi-value field, besure to check the Allow Multiple Values check box.
Figure 31-16: The Field Properties Lookup tab contains numer-ous properties that tell Access how to display values in theLiterature Sent field.
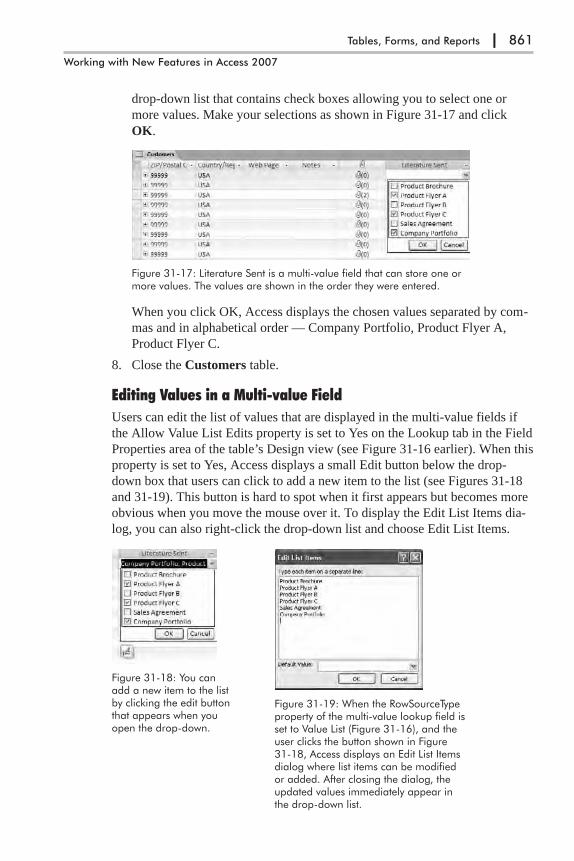
drop-down list that contains check boxes allowing you to select one or
more values. Make your selections as shown in Figure 31-17 and click
OK.
When you click OK, Access displays the chosen values separated by com-
mas and in alphabetical order — Company Portfolio, Product Flyer A,
Product Flyer C.
8. Close the Customers table.
Editing Values in a Multi-value Field
Users can edit the list of values that are displayed in the multi-value fields if
the Allow Value List Edits property is set to Yes on the Lookup tab in the Field
Properties area of the table’s Design view (see Figure 31-16 earlier). When this
property is set to Yes, Access displays a small Edit button below the drop-
down box that users can click to add a new item to the list (see Figures 31-18
and 31-19). This button is hard to spot when it first appears but becomes more
obvious when you move the mouse over it. To display the Edit List Items dia-
log, you can also right-click the drop-down list and choose Edit List Items.
Tables, Forms, and Reports | 861
Working with New Features in Access 2007
Figure 31-17: Literature Sent is a multi-value field that can store one ormore values. The values are shown in the order they were entered.
Figure 31-18: You canadd a new item to the listby clicking the edit buttonthat appears when youopen the drop-down.
Figure 31-19: When the RowSourceTypeproperty of the multi-value lookup field isset to Value List (Figure 31-16), and theuser clicks the button shown in Figure31-18, Access displays an Edit List Itemsdialog where list items can be modifiedor added. After closing the dialog, theupdated values immediately appear inthe drop-down list.
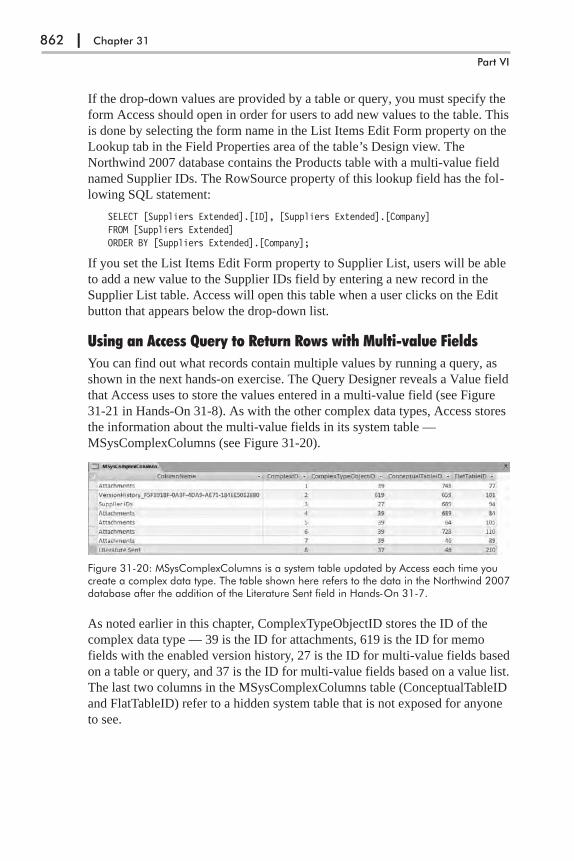
If the drop-down values are provided by a table or query, you must specify the
form Access should open in order for users to add new values to the table. This
is done by selecting the form name in the List Items Edit Form property on the
Lookup tab in the Field Properties area of the table’s Design view. The
Northwind 2007 database contains the Products table with a multi-value field
named Supplier IDs. The RowSource property of this lookup field has the fol-
lowing SQL statement:
SELECT [Suppliers Extended].[ID], [Suppliers Extended].[Company]FROM [Suppliers Extended]ORDER BY [Suppliers Extended].[Company];
If you set the List Items Edit Form property to Supplier List, users will be able
to add a new value to the Supplier IDs field by entering a new record in the
Supplier List table. Access will open this table when a user clicks on the Edit
button that appears below the drop-down list.
Using an Access Query to Return Rows with Multi-value Fields
You can find out what records contain multiple values by running a query, as
shown in the next hands-on exercise. The Query Designer reveals a Value field
that Access uses to store the values entered in a multi-value field (see Figure
31-21 in Hands-On 31-8). As with the other complex data types, Access stores
the information about the multi-value fields in its system table —
MSysComplexColumns (see Figure 31-20).
As noted earlier in this chapter, ComplexTypeObjectID stores the ID of the
complex data type — 39 is the ID for attachments, 619 is the ID for memo
fields with the enabled version history, 27 is the ID for multi-value fields based
on a table or query, and 37 is the ID for multi-value fields based on a value list.
The last two columns in the MSysComplexColumns table (ConceptualTableID
and FlatTableID) refer to a hidden system table that is not exposed for anyone
to see.
862 | Chapter 31
Part VI
Figure 31-20: MSysComplexColumns is a system table updated by Access each time youcreate a complex data type. The table shown here refers to the data in the Northwind 2007database after the addition of the Literature Sent field in Hands-On 31-7.

�Hands-On 31-8: Using an Access Query to Return Rows with Multi-valueFields
This hands-on exercise requires the completion of Hands-On 31-7.
1. Click the Query Design button in the Other group of the Create tab.
2. In the Show Table dialog box, select Customers and click Add. Click
Close to dismiss the Show Table dialog.
3. Drag ID, Company, Last Name, and Literature Sent.Value to the Query
grid. In the Criteria row of the Literature Sent.Value column, enter Is Not
Null to ensure that only records with multiple values are shown (Figure
31-21).
4. To run the query, click the Run button in the Results section of the Design
tab. Access shows the records that meet the criteria.
5. Press Ctrl+S to save the query. In the Save As dialog box, type
qryGetCust_MultiValues for the query name, and click OK.
6. Close the qryGetCust_MultiValues window.
Tables, Forms, and Reports | 863
Working with New Features in Access 2007
Figure 31-21: Creating a query to retrieve a list of records withmulti-value fields.
Figure 31-22: Results of running the query in this hands-on exercise.
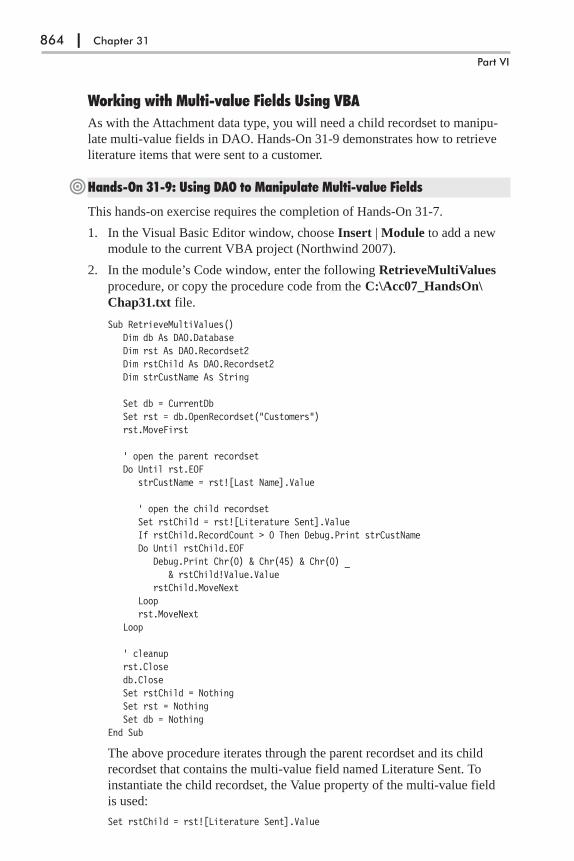
Working with Multi-value Fields Using VBA
As with the Attachment data type, you will need a child recordset to manipu-
late multi-value fields in DAO. Hands-On 31-9 demonstrates how to retrieve
literature items that were sent to a customer.
�Hands-On 31-9: Using DAO to Manipulate Multi-value Fields
This hands-on exercise requires the completion of Hands-On 31-7.
1. In the Visual Basic Editor window, choose Insert | Module to add a new
module to the current VBA project (Northwind 2007).
2. In the module’s Code window, enter the following RetrieveMultiValues
procedure, or copy the procedure code from the C:\Acc07_HandsOn\
Chap31.txt file.
Sub RetrieveMultiValues()Dim db As DAO.DatabaseDim rst As DAO.Recordset2Dim rstChild As DAO.Recordset2Dim strCustName As String
Set db = CurrentDbSet rst = db.OpenRecordset("Customers")rst.MoveFirst
' open the parent recordsetDo Until rst.EOF
strCustName = rst![Last Name].Value
' open the child recordsetSet rstChild = rst![Literature Sent].ValueIf rstChild.RecordCount > 0 Then Debug.Print strCustNameDo Until rstChild.EOF
Debug.Print Chr(0) & Chr(45) & Chr(0) _& rstChild!Value.Value
rstChild.MoveNextLooprst.MoveNext
Loop
' cleanuprst.Closedb.CloseSet rstChild = NothingSet rst = NothingSet db = Nothing
End Sub
The above procedure iterates through the parent recordset and its child
recordset that contains the multi-value field named Literature Sent. To
instantiate the child recordset, the Value property of the multi-value field
is used:
Set rstChild = rst![Literature Sent].Value
864 | Chapter 31
Part VI

If a customer record contains at least one value in the Literature Sent
column, the customer name will be printed to the Immediate window. To
retrieve the field values, the procedure iterates through the child recordset.
3. Run the RetrieveMultiValues procedure.
Afer you run the procedure, you should see the following output in the
Immediate window:
Bedecs- Company Portfolio- Product Flyer A- Product Flyer C
Adding Values to Multi-value Lookup Fields
You can add a new value to a multi-value field by modifying its RowSource
propery when the RowSourceType property is set to Value List. The function
procedure in the next hands-on exercise adds a new value named “Dinner Invi-
tation” to the Literature Sent multi-value field in the Customers table
�Hands-On 31-10: Using DAO to Add Values to a Multi-value Field
1. In the Visual Basic Editor window, in the same module where you entered
the procedure in Hands-On 31-9, enter the following AddToMulti-
ValueList function procedure, or copy the procedure code from the
C:\Acc07_HandsOn\Chap31.txt file.
Function AddToMultiValueList(strTblName As String, _strMultiFldName As String, _strNewVal As String)
Dim db As DAO.DatabaseDim tdf As DAO.TableDefDim fld As DAO.Field2Dim prp As DAO.Property
On Error GoTo ErrorHandler
Set db = CurrentDbSet tdf = db.TableDefs(strTblName)Set fld = tdf.Fields(strMultiFldName)
If fld.Properties("RowSourceType").Value = "Value List" ThenSet prp = fld.Properties("RowSource")Debug.Print prp.Value
If InStr(1, prp.Value, strNewVal) = 0 Thenprp.Value = prp.Value & Chr(59) & Chr(34) _
& strNewVal & Chr(34)Debug.Print prp.Value
End IfEnd If
ExitHere:Set prp = Nothing
Tables, Forms, and Reports | 865
Working with New Features in Access 2007
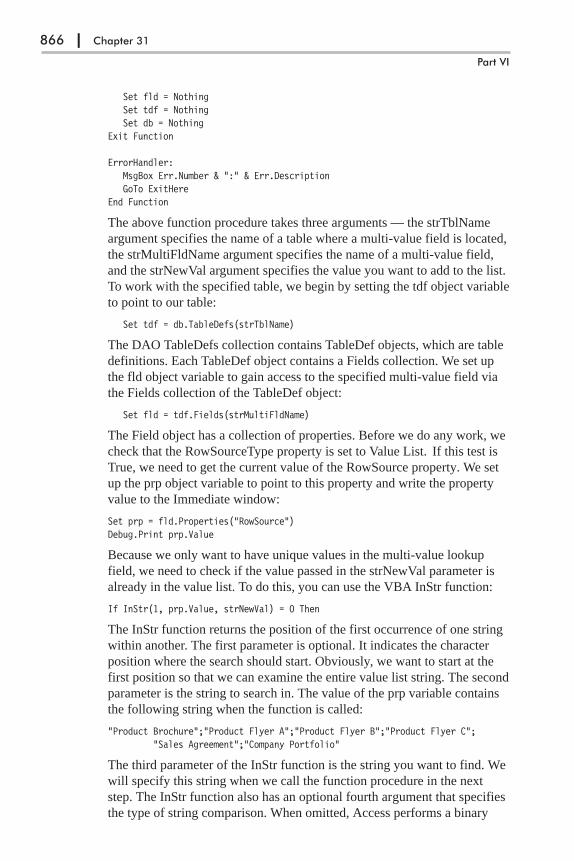
Set fld = NothingSet tdf = NothingSet db = Nothing
Exit Function
ErrorHandler:MsgBox Err.Number & ":" & Err.DescriptionGoTo ExitHere
End Function
The above function procedure takes three arguments — the strTblName
argument specifies the name of a table where a multi-value field is located,
the strMultiFldName argument specifies the name of a multi-value field,
and the strNewVal argument specifies the value you want to add to the list.
To work with the specified table, we begin by setting the tdf object variable
to point to our table:
Set tdf = db.TableDefs(strTblName)
The DAO TableDefs collection contains TableDef objects, which are table
definitions. Each TableDef object contains a Fields collection. We set up
the fld object variable to gain access to the specified multi-value field via
the Fields collection of the TableDef object:
Set fld = tdf.Fields(strMultiFldName)
The Field object has a collection of properties. Before we do any work, we
check that the RowSourceType property is set to Value List. If this test is
True, we need to get the current value of the RowSource property. We set
up the prp object variable to point to this property and write the property
value to the Immediate window:
Set prp = fld.Properties("RowSource")Debug.Print prp.Value
Because we only want to have unique values in the multi-value lookup
field, we need to check if the value passed in the strNewVal parameter is
already in the value list. To do this, you can use the VBA InStr function:
If InStr(1, prp.Value, strNewVal) = 0 Then
The InStr function returns the position of the first occurrence of one string
within another. The first parameter is optional. It indicates the character
position where the search should start. Obviously, we want to start at the
first position so that we can examine the entire value list string. The second
parameter is the string to search in. The value of the prp variable contains
the following string when the function is called:
"Product Brochure";"Product Flyer A";"Product Flyer B";"Product Flyer C";"Sales Agreement";"Company Portfolio"
The third parameter of the InStr function is the string you want to find. We
will specify this string when we call the function procedure in the next
step. The InStr function also has an optional fourth argument that specifies
the type of string comparison. When omitted, Access performs a binary
866 | Chapter 31
Part VI
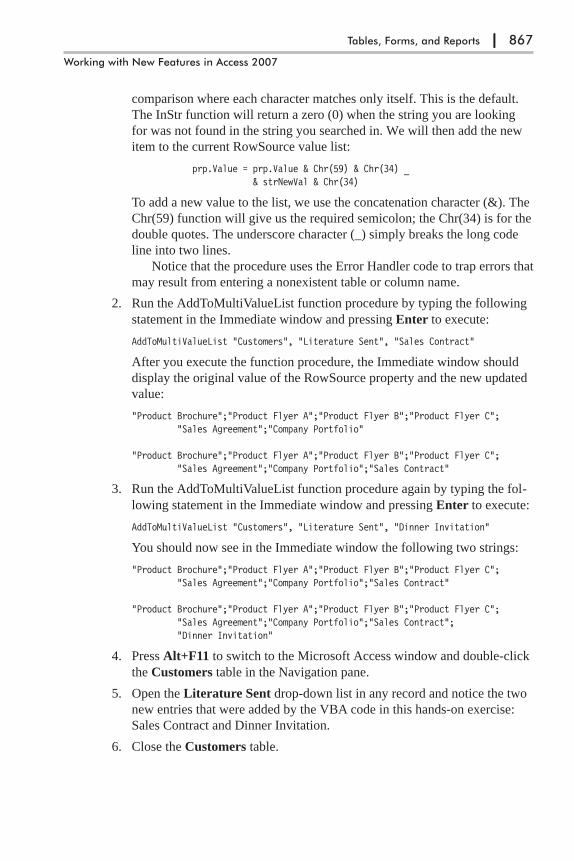
comparison where each character matches only itself. This is the default.
The InStr function will return a zero (0) when the string you are looking
for was not found in the string you searched in. We will then add the new
item to the current RowSource value list:
prp.Value = prp.Value & Chr(59) & Chr(34) _& strNewVal & Chr(34)
To add a new value to the list, we use the concatenation character (&). The
Chr(59) function will give us the required semicolon; the Chr(34) is for the
double quotes. The underscore character (_) simply breaks the long code
line into two lines.
Notice that the procedure uses the Error Handler code to trap errors that
may result from entering a nonexistent table or column name.
2. Run the AddToMultiValueList function procedure by typing the following
statement in the Immediate window and pressing Enter to execute:
AddToMultiValueList "Customers", "Literature Sent", "Sales Contract"
After you execute the function procedure, the Immediate window should
display the original value of the RowSource property and the new updated
value:
"Product Brochure";"Product Flyer A";"Product Flyer B";"Product Flyer C";"Sales Agreement";"Company Portfolio"
"Product Brochure";"Product Flyer A";"Product Flyer B";"Product Flyer C";"Sales Agreement";"Company Portfolio";"Sales Contract"
3. Run the AddToMultiValueList function procedure again by typing the fol-
lowing statement in the Immediate window and pressing Enter to execute:
AddToMultiValueList "Customers", "Literature Sent", "Dinner Invitation"
You should now see in the Immediate window the following two strings:
"Product Brochure";"Product Flyer A";"Product Flyer B";"Product Flyer C";"Sales Agreement";"Company Portfolio";"Sales Contract"
"Product Brochure";"Product Flyer A";"Product Flyer B";"Product Flyer C";"Sales Agreement";"Company Portfolio";"Sales Contract";"Dinner Invitation"
4. Press Alt+F11 to switch to the Microsoft Access window and double-click
the Customers table in the Navigation pane.
5. Open the Literature Sent drop-down list in any record and notice the two
new entries that were added by the VBA code in this hands-on exercise:
Sales Contract and Dinner Invitation.
6. Close the Customers table.
Tables, Forms, and Reports | 867
Working with New Features in Access 2007
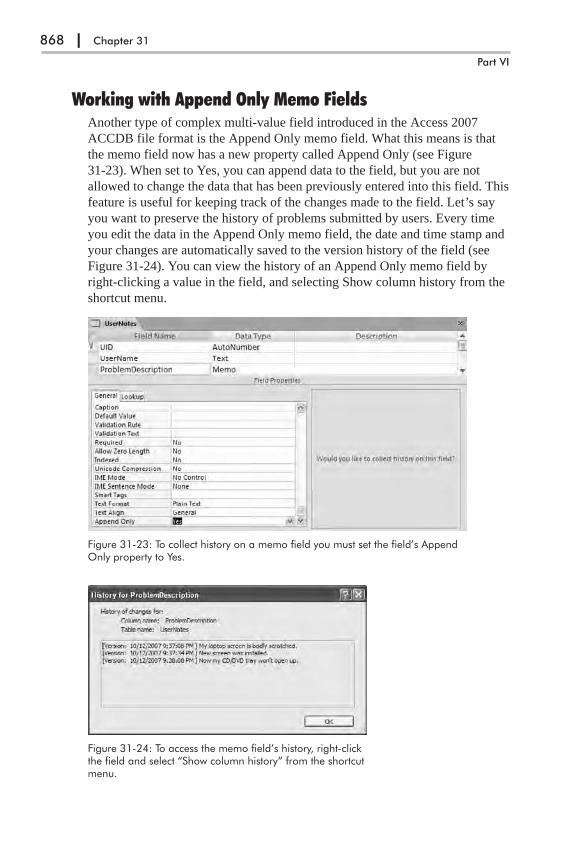
Working with Append Only Memo FieldsAnother type of complex multi-value field introduced in the Access 2007
ACCDB file format is the Append Only memo field. What this means is that
the memo field now has a new property called Append Only (see Figure
31-23). When set to Yes, you can append data to the field, but you are not
allowed to change the data that has been previously entered into this field. This
feature is useful for keeping track of the changes made to the field. Let’s say
you want to preserve the history of problems submitted by users. Every time
you edit the data in the Append Only memo field, the date and time stamp and
your changes are automatically saved to the version history of the field (see
Figure 31-24). You can view the history of an Append Only memo field by
right-clicking a value in the field, and selecting Show column history from the
shortcut menu.
868 | Chapter 31
Part VI
Figure 31-23: To collect history on a memo field you must set the field’s AppendOnly property to Yes.
Figure 31-24: To access the memo field’s history, right-clickthe field and select “Show column history” from the shortcutmenu.

� Important Note: The Append Only feature comes with a warning fromMicrosoft. If you are tracking the history of changes in the memo field and thenfor some reason you or someone else decides to change the Append Only prop-erty to No, Access will erase the field value’s history without asking you toconfirm.
Working with Append Only Memo Fields Using VBA
You can get the history of values that have been stored in a memo field by
using the ColumnHistory method of the Application object. For example, the
following statement:
Debug.Print Application.ColumnHistory(“UserNotes”, “ProblemDescription”,“UID=1”)
will print to the Immediate window the Problem Description history of a user
whose UID equals 1 (see Figure 31-25).
Notice that the ColumnHistory method requires three parameters: the name of
the table that contains the Append Only memo field, the name of the memo
field, and a string used to locate a record in the table.
Let’s begin by creating a new table with an Append Only memo field. After
entering some sample data in this table, we will run a procedure that retrieves
the history data into three separate items: MemoDate, MemoTime, and
MemoText.
�Custom Project 31-1: Working with Append Only Fields
While this project does not depend on the data in the Northwind 2007 data-
base, we will use this database since it’s already open.
Part 1: Writing a VBA Procedure to Create a Table with an AppendOnly Memo Field
1. In the Northwind 2007 database, switch to the Visual Basic Editor window
and choose Insert | New Module.
2. In the module’s Code window, enter the CreateTblUserNotes procedure
as shown below, or copy the procedure code from the C:\Acc07_
HandsOn\Chap31.txt file.
Sub CreateTblUserNotes()Dim db As DAO.DatabaseDim tdf As DAO.TableDefDim fld As DAO.Field2
Tables, Forms, and Reports | 869
Working with New Features in Access 2007
Figure 31-25: Retrieving the history of values stored in a memo field.
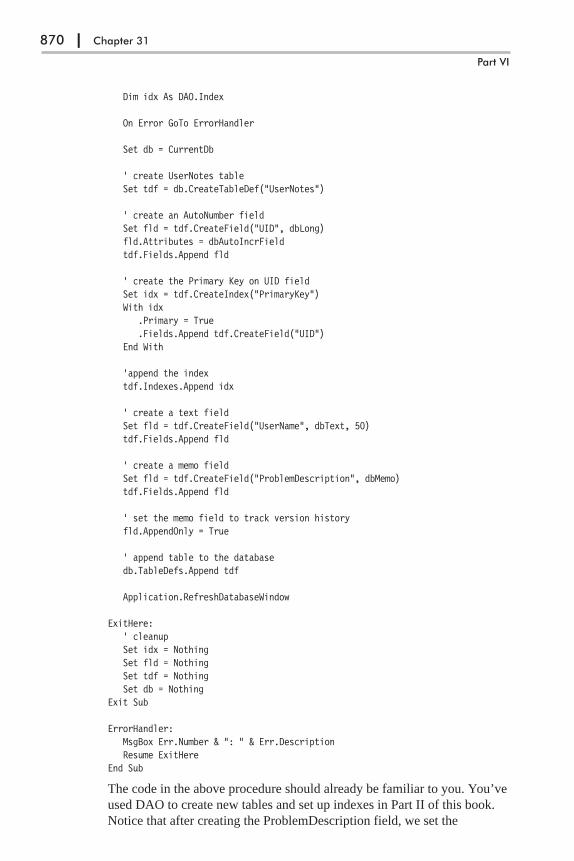
Dim idx As DAO.Index
On Error GoTo ErrorHandler
Set db = CurrentDb
' create UserNotes tableSet tdf = db.CreateTableDef("UserNotes")
' create an AutoNumber fieldSet fld = tdf.CreateField("UID", dbLong)fld.Attributes = dbAutoIncrFieldtdf.Fields.Append fld
' create the Primary Key on UID fieldSet idx = tdf.CreateIndex("PrimaryKey")With idx
.Primary = True
.Fields.Append tdf.CreateField("UID")End With
'append the indextdf.Indexes.Append idx
' create a text fieldSet fld = tdf.CreateField("UserName", dbText, 50)tdf.Fields.Append fld
' create a memo fieldSet fld = tdf.CreateField("ProblemDescription", dbMemo)tdf.Fields.Append fld
' set the memo field to track version historyfld.AppendOnly = True
' append table to the databasedb.TableDefs.Append tdf
Application.RefreshDatabaseWindow
ExitHere:' cleanupSet idx = NothingSet fld = NothingSet tdf = NothingSet db = Nothing
Exit Sub
ErrorHandler:MsgBox Err.Number & ": " & Err.DescriptionResume ExitHere
End Sub
The code in the above procedure should already be familiar to you. You’ve
used DAO to create new tables and set up indexes in Part II of this book.
Notice that after creating the ProblemDescription field, we set the
870 | Chapter 31
Part VI
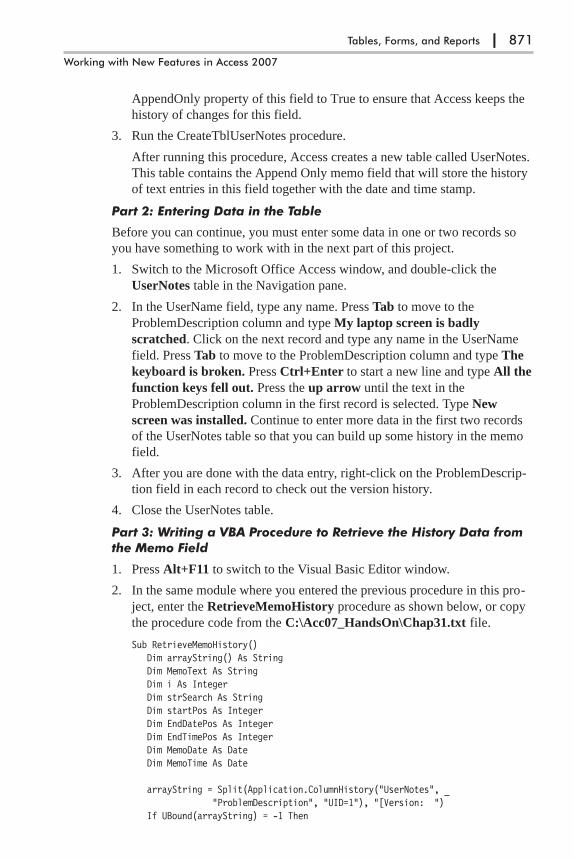
AppendOnly property of this field to True to ensure that Access keeps the
history of changes for this field.
3. Run the CreateTblUserNotes procedure.
After running this procedure, Access creates a new table called UserNotes.
This table contains the Append Only memo field that will store the history
of text entries in this field together with the date and time stamp.
Part 2: Entering Data in the Table
Before you can continue, you must enter some data in one or two records so
you have something to work with in the next part of this project.
1. Switch to the Microsoft Office Access window, and double-click the
UserNotes table in the Navigation pane.
2. In the UserName field, type any name. Press Tab to move to the
ProblemDescription column and type My laptop screen is badly
scratched. Click on the next record and type any name in the UserName
field. Press Tab to move to the ProblemDescription column and type The
keyboard is broken. Press Ctrl+Enter to start a new line and type All the
function keys fell out. Press the up arrow until the text in the
ProblemDescription column in the first record is selected. Type New
screen was installed. Continue to enter more data in the first two records
of the UserNotes table so that you can build up some history in the memo
field.
3. After you are done with the data entry, right-click on the ProblemDescrip-
tion field in each record to check out the version history.
4. Close the UserNotes table.
Part 3: Writing a VBA Procedure to Retrieve the History Data from
the Memo Field
1. Press Alt+F11 to switch to the Visual Basic Editor window.
2. In the same module where you entered the previous procedure in this pro-
ject, enter the RetrieveMemoHistory procedure as shown below, or copy
the procedure code from the C:\Acc07_HandsOn\Chap31.txt file.
Sub RetrieveMemoHistory()Dim arrayString() As StringDim MemoText As StringDim i As IntegerDim strSearch As StringDim startPos As IntegerDim EndDatePos As IntegerDim EndTimePos As IntegerDim MemoDate As DateDim MemoTime As Date
arrayString = Split(Application.ColumnHistory("UserNotes", _"ProblemDescription", "UID=1"), "[Version: ")
If UBound(arrayString) = -1 Then
Tables, Forms, and Reports | 871
Working with New Features in Access 2007

MsgBox "There is no history data for this field."Exit Sub
End If
For i = 1 To UBound(arrayString)startPos = 1strSearch = arrayString(i)EndDatePos = InStr(startPos, strSearch, " ")MemoDate = CDate(Left(strSearch, EndDatePos - 1))
startPos = EndDatePos + 1EndTimePos = InStr(startPos, arrayString(i), "]") - 3MemoTime = CDate(Mid(strSearch, startPos, EndTimePos - startPos))
startPos = EndTimePos + 3strSearch = Trim(Replace(strSearch, vbCrLf, ""))MemoText = Right(strSearch, Len(strSearch) - startPos)Debug.Print MemoDate, MemoTime, MemoText
NextEnd Sub
As mentioned earlier, the Application object’s ColumnHistory method is
used in VBA to retrieve memo column history data. Because Access
returns this data in a single string and we want to have it as separate items,
we use the Split function. This function is ideal for breaking a long string
into an array of substrings based on a specified delimiter. The Split func-
tion returns a zero-based, one-dimensional array where each substring is an
element. To hold the result of this function, the above procedure defines an
array variable of the String data type named arrayString. The first argument
of the Split function specifies the string expression you want to split. The
string that will be returned by the ColumnHistory method of the Applica-
tion object is shown below.
arrayString = Split(Application.ColumnHistory("UserNotes", _"ProblemDescription", "UID=1"), "[Version: ")
The second argument of the Split function specifies a string that is used to
identify substring limits. You can split a string on a single character, a
space, or a group of characters. Because each history item is separated by a
line feed and a carriage return (vbCrLf), you might think that it’s a good
idea to break the Access-generated history string into separate lines by
using the vbCrLf delimiter. Well, it isn’t, simply because memo fields
allow carriage returns. A better delimiter is something that does not conflict
with anything the user may enter into the memo field. You should be able
to use the "[Version: " string that Access adds to each line of the history
string without having to worry about unexpected results. Notice that there
are two spaces after the colon that we also want to include in the delimiting
string.
Now that we have eliminated from the history string extraneous text
([Version: ), we need to iterate through the array elements using the
For…Next loop. However, there is no point of doing this if the arrayString
872 | Chapter 31
Part VI

variable does not contain any elements. To check this out we can use the
UBound function, which will return –1 when the array is empty.
While enumerating the history data, the procedure uses several vari-
ables to determine the character position where the date and time strings
end (EndDatePos, EndTimePos). We also use the startPos variable to spec-
ify at which position in the search string the search should begin. Before
extracting the date and time strings, we find the end character positions for
these strings using the InStr function, which was discussed earlier in this
chapter. We also use two other text functions (Right, Left) to extract a
specified number of characters from the string. Because we defined the
MemoDate and MemoTime variables as Date, after extracting the date and
time strings from the searched string, we use the CDate function to convert
them into the Date format.
3. Run the RetrieveMemoHistory procedure. The procedure prints to the
Immediate window the history string broken into three columns as shown
below:
10/12/2007 9:37:08 AM My laptop screen is badly scratched.10/12/2007 9:37:34 AM New screen was installed.10/12/2007 9:38:08 AM Now my CD/DVD tray won't open up.
While the text in your output might be different, the layout of the data
should match the above example.
It is a good idea to run this procedure again in Step mode (F8) to see
the values of variables during the procedure run. Use the debugging tools
you learned about in Chapter 9 to help you understand the parsing process.
� Note: As an additional exercise, you could now modify the RetrieveMemo-History procedure to write the date, time, and the memo text to a table insteadof to the Immediate window.
Rich Text Memo FieldsThe Access 2007 ACCDB file format introduces the Rich Text feature in
memo fields. In a datasheet, you can now format your memo fields with the
bold, italics, underline, and other formatting options that are available via the
new Ribbon. To enable the Rich Text feature, you need to open a table in
Design view and under the field properties for the selected memo field, set the
Text Format property to Rich Text (see Figure 31-26). When you use the Rich
Text feature in a memo field, Access stores the data in HTML format.
� Note: You cannot use rich text formatting in Append Only memo fields. Evenif you set the Text Format property of this field to Rich Text, Access will disregardit and use its Plain Text format. In other words, the text will be savedunformatted.
Tables, Forms, and Reports | 873
Working with New Features in Access 2007

New Features in FormsAccess 2007 brings many enhancements and a new set of features to the form
design area. For example, with the new Layout view you can see what you get.
The form interface is now a true WYSIWYG; you can see the live data as you
design your form without the need of constant switching between the Design
and Form views. The new form features include various methods of creating
forms, the split form, bound image controls, the Attachments control, new
styles and AutoFormats, and rich text support as well as new ways of grouping
controls by using the layouts. Some of the new form features also apply to
datasheets and were discussed earlier in this chapter. These include the Date
Picker, alternating row colors, the Totals row, truncated number displays, sort-
ing and filtering, and an easy way to add new list items to combo boxes.
874 | Chapter 31
Part VI
Figure 31-26: Enabling Rich Text for a memo field.
Figure 31-27: Memo text in a datasheet with rich text formatting.

Many Ways to Create Access FormsThe form buttons on the Ribbon’s Create tab enable users to create both simple
and more advanced forms (see Figure 31-28). The standard Access form can
be created by clicking the Form button. Access creates the form based on the
object selected in the Tables, Queries, or Reports sections of the Navigation
pane. Split Form is a new type of form introduced in Access 2007 that contains
a datasheet and a standard Access form (see Figure 31-29). The datasheet dis-
plays multiple records. Simply click on the record in the datasheet and the
form will change to show the details for this record. Access can create these
types of forms with ease without asking you a single question. The Multiple
Items form is a standard continuous form used in earlier versions of Access.
This form displays multiple records in a datasheet, with one record per row
(see Figure 31-30).
Tables, Forms, and Reports | 875
Working with New Features in Access 2007
Figure 31-28: The Createtab on the Ribbon providesmany ways of creatingforms in Access 2007.
Figure 31-29: Split Form is a new type of form available in Access 2007.
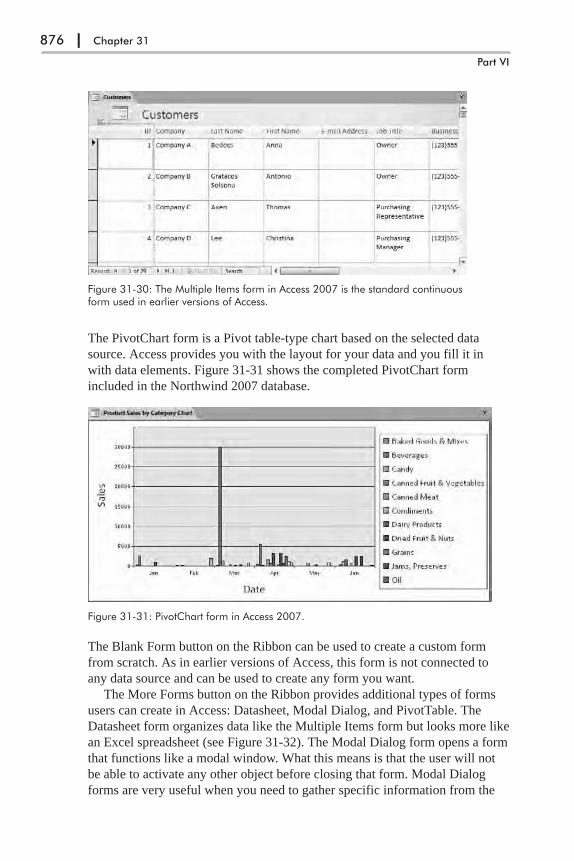
The PivotChart form is a Pivot table-type chart based on the selected data
source. Access provides you with the layout for your data and you fill it in
with data elements. Figure 31-31 shows the completed PivotChart form
included in the Northwind 2007 database.
The Blank Form button on the Ribbon can be used to create a custom form
from scratch. As in earlier versions of Access, this form is not connected to
any data source and can be used to create any form you want.
The More Forms button on the Ribbon provides additional types of forms
users can create in Access: Datasheet, Modal Dialog, and PivotTable. The
Datasheet form organizes data like the Multiple Items form but looks more like
an Excel spreadsheet (see Figure 31-32). The Modal Dialog form opens a form
that functions like a modal window. What this means is that the user will not
be able to activate any other object before closing that form. Modal Dialog
forms are very useful when you need to gather specific information from the
876 | Chapter 31
Part VI
Figure 31-30: The Multiple Items form in Access 2007 is the standard continuousform used in earlier versions of Access.
Figure 31-31: PivotChart form in Access 2007.

users before allowing them to perform other actions. There is also an option
for launching the Form Wizard used in earlier versions of Access. When you
use the Form Wizard, Access allows you to specify which fields to include
from which table or query and makes it easy to choose from a variety of
AutoFormats. Using the wizard you get only the fields you want. When using
other form buttons, Access creates forms that include all the fields, so you
need to spend extra time deleting the fields you don’t want and repositioning
the remaining fields.
Grouping Controls Using LayoutsAccess 2007 introduces a new way of grouping controls through a feature
known as Layouts. Layout view allows working with entire groups of controls.
You no longer need to guess if the controls are properly sized and positioned.
Take a look at Figure 31-33 and notice the Selector widget. When you click on
the widget, you will see which controls are included in that layout. Using the
Layout view you can easily move controls around in the form and resize them.
To control the layouts, use the buttons in the Control Layout section of the
Ribbon’s Arrange tab (see Figure 31-34).
Tables, Forms, and Reports | 877
Working with New Features in Access 2007
Figure 31-32: The Datasheet form in Access 2007 resembles an Excelspreadsheet.
Figure 31-33: A group of controls on the form can be moved easily byusing the anchor point (Selector widget).
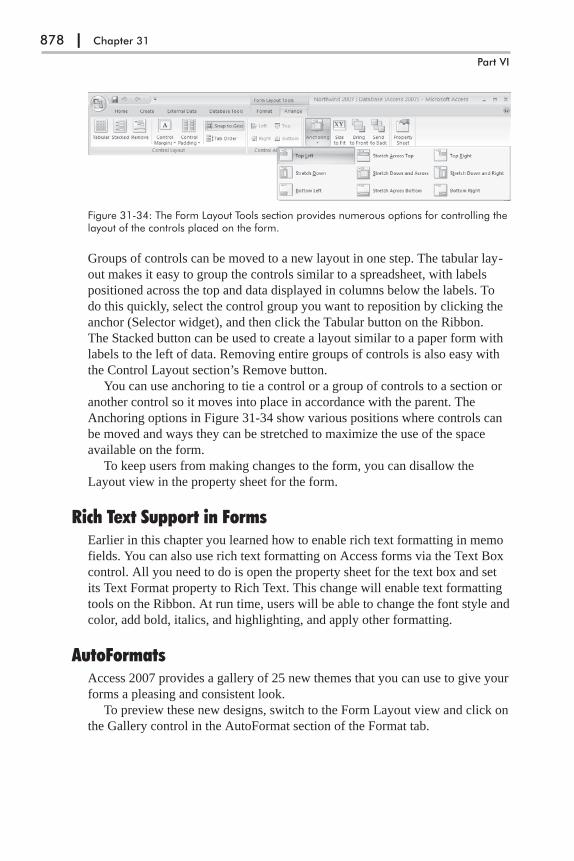
Groups of controls can be moved to a new layout in one step. The tabular lay-
out makes it easy to group the controls similar to a spreadsheet, with labels
positioned across the top and data displayed in columns below the labels. To
do this quickly, select the control group you want to reposition by clicking the
anchor (Selector widget), and then click the Tabular button on the Ribbon.
The Stacked button can be used to create a layout similar to a paper form with
labels to the left of data. Removing entire groups of controls is also easy with
the Control Layout section’s Remove button.
You can use anchoring to tie a control or a group of controls to a section or
another control so it moves into place in accordance with the parent. The
Anchoring options in Figure 31-34 show various positions where controls can
be moved and ways they can be stretched to maximize the use of the space
available on the form.
To keep users from making changes to the form, you can disallow the
Layout view in the property sheet for the form.
Rich Text Support in FormsEarlier in this chapter you learned how to enable rich text formatting in memo
fields. You can also use rich text formatting on Access forms via the Text Box
control. All you need to do is open the property sheet for the text box and set
its Text Format property to Rich Text. This change will enable text formatting
tools on the Ribbon. At run time, users will be able to change the font style and
color, add bold, italics, and highlighting, and apply other formatting.
AutoFormatsAccess 2007 provides a gallery of 25 new themes that you can use to give your
forms a pleasing and consistent look.
To preview these new designs, switch to the Form Layout view and click on
the Gallery control in the AutoFormat section of the Format tab.
878 | Chapter 31
Part VI
Figure 31-34: The Form Layout Tools section provides numerous options for controlling thelayout of the controls placed on the form.

Using Images in Access FormsAccess 2007 comes with better image support. Earlier versions of Access con-
verted the images from their native format and stored them as bitmaps (BMP).
This format caused a significant increase in the size of the database because
bitmap files are not compressed. Also, during the conversion process, if the
image had a transparency feature, this would also be lost. In Access 2007 if
you use the Image control and specify the image in the Picture property,
Access will store the image in its native format with no conversion. Images
with transparency work just fine. You can see examples of transparent buttons
and pictures in the Northwind 2007 database’s forms (see Figure 31-36).
Because some people are still using the older MDB databases that do not sup-
port saving images in the native format, there is a new database property that
lets you choose whether the images should be converted to DIB (device inde-
pendent bitmap) or stored in their native format. The default setting in Access
2007 is to store images in their native format and convert them to bitmaps for
MDB and ADP databases. If you want your images to be displayed in previous
versions of Access, choose the second option button under the Picture Property
Storage Format setting (see Figure 31-37).
Tables, Forms, and Reports | 879
Working with New Features in Access 2007
Figure 31-35: The Quick Format gallery inMicrosoft Access 2007.
Figure 31-36: Transparent images and buttons work very well with Access 2007.

Also new to Access 2007 is a bound Image control. Earlier versions of Access
needed lots of VBA code to display images on forms and reports when the
images were stored in the directories on disk. The Image control can now be
bound to the image path. To add an image to your form, place the form in
Design view and click the Image button in the Controls group of the Ribbon’s
Design tab. When you click the form grid, Access displays the Insert Picture
dialog box where you can browse to your picture location on disk. When you
click OK, the selected picture is placed in the Image control on the form. If
you activate the property sheet for the Image control, you will see that Access
has placed the filename in the Picture property. If you don’t like the picture
you’ve chosen, you can simply click the Browse button next to the Picture
property and choose another image.
880 | Chapter 31
Part VI
Figure 31-37: To tell Access how to store images in Access 2007 andearlier, use the options under the Picture Property Storage Format. TheAccess Options window can be accessed by clicking the MicrosoftOffice button and then selecting Access Options.
Figure 31-38: The picture is shown here using the Image control placed on an Access2007 form.
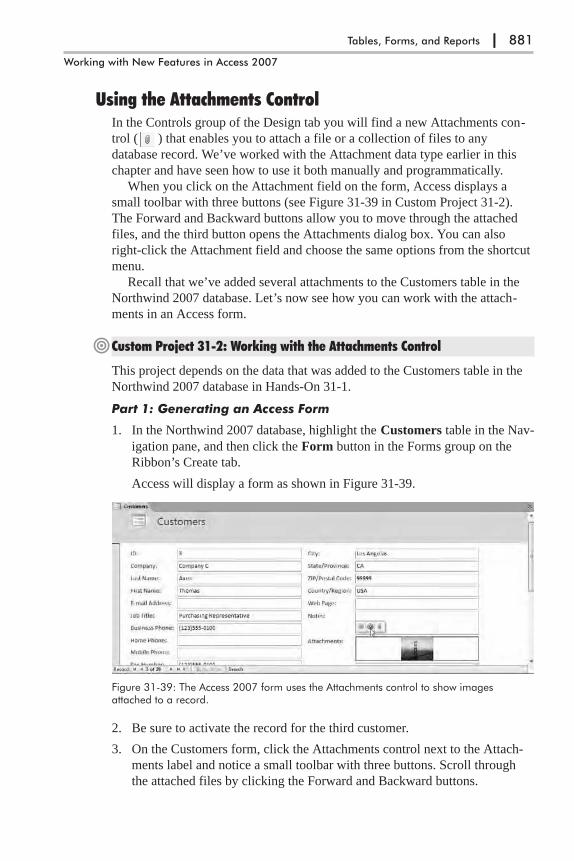
Using the Attachments ControlIn the Controls group of the Design tab you will find a new Attachments con-
trol ( ) that enables you to attach a file or a collection of files to any
database record. We’ve worked with the Attachment data type earlier in this
chapter and have seen how to use it both manually and programmatically.
When you click on the Attachment field on the form, Access displays a
small toolbar with three buttons (see Figure 31-39 in Custom Project 31-2).
The Forward and Backward buttons allow you to move through the attached
files, and the third button opens the Attachments dialog box. You can also
right-click the Attachment field and choose the same options from the shortcut
menu.
Recall that we’ve added several attachments to the Customers table in the
Northwind 2007 database. Let’s now see how you can work with the attach-
ments in an Access form.
�Custom Project 31-2: Working with the Attachments Control
This project depends on the data that was added to the Customers table in the
Northwind 2007 database in Hands-On 31-1.
Part 1: Generating an Access Form
1. In the Northwind 2007 database, highlight the Customers table in the Nav-
igation pane, and then click the Form button in the Forms group on the
Ribbon’s Create tab.
Access will display a form as shown in Figure 31-39.
2. Be sure to activate the record for the third customer.
3. On the Customers form, click the Attachments control next to the Attach-
ments label and notice a small toolbar with three buttons. Scroll through
the attached files by clicking the Forward and Backward buttons.
Tables, Forms, and Reports | 881
Working with New Features in Access 2007
Figure 31-39: The Access 2007 form uses the Attachments control to show imagesattached to a record.

Part 2: Modifying the Form to Display Additional Information aboutthe Attachments
1. Switch to the Design view of the Customers form and use the Text Box
control in the Controls group of the Design tab to add two text boxes to the
form as shown in Figure 31-40. Change the labels of the text boxes to
match the figure.
2. Click the first unbound text box next to the Number of Attached Files
label, and in the property sheet for this text box, click the All tab and type
txtNumOfFiles in the Name property. Click the Format tab and change
the Back Color property to any color you like.
3. Click the second unbound text box next to the Current File Name label,
and in the property sheet for this text box, click the All tab and type
txtCurrentFileName in the Name property. Click the Format tab and
change the Back Color property to any color you like.
Part 3: Writing an Event Procedure to Display Information aboutAttachments in the Text Boxes
1. In the form grid, click the Attachments control. In the property sheet for
this control, click the Event tab and click the Browse button next to the On
Attachment Current property. In the Choose Builder dialog box, select
Code Builder and click OK.
Access will write for you the stub of the Attachments_AttachmentCurrent
event procedure.
2. Complete the code of the Attachments_AttachmentCurrent procedure as
shown in Figure 31-41, or copy the procedure code from the C:\Acc07_
HandsOn\Chap31.txt file.
882 | Chapter 31
Part VI
Figure 31-40: Placing unbound text box controls on the form.
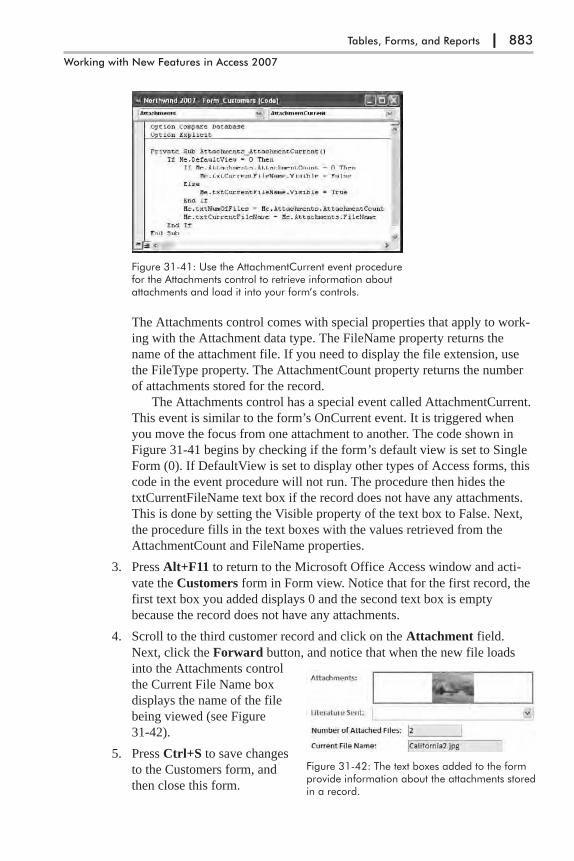
The Attachments control comes with special properties that apply to work-
ing with the Attachment data type. The FileName property returns the
name of the attachment file. If you need to display the file extension, use
the FileType property. The AttachmentCount property returns the number
of attachments stored for the record.
The Attachments control has a special event called AttachmentCurrent.
This event is similar to the form’s OnCurrent event. It is triggered when
you move the focus from one attachment to another. The code shown in
Figure 31-41 begins by checking if the form’s default view is set to Single
Form (0). If DefaultView is set to display other types of Access forms, this
code in the event procedure will not run. The procedure then hides the
txtCurrentFileName text box if the record does not have any attachments.
This is done by setting the Visible property of the text box to False. Next,
the procedure fills in the text boxes with the values retrieved from the
AttachmentCount and FileName properties.
3. Press Alt+F11 to return to the Microsoft Office Access window and acti-
vate the Customers form in Form view. Notice that for the first record, the
first text box you added displays 0 and the second text box is empty
because the record does not have any attachments.
4. Scroll to the third customer record and click on the Attachment field.
Next, click the Forward button, and notice that when the new file loads
into the Attachments control
the Current File Name box
displays the name of the file
being viewed (see Figure
31-42).
5. Press Ctrl+S to save changes
to the Customers form, and
then close this form.
Tables, Forms, and Reports | 883
Working with New Features in Access 2007
Figure 31-41: Use the AttachmentCurrent event procedurefor the Attachments control to retrieve information aboutattachments and load it into your form’s controls.
Figure 31-42: The text boxes added to the formprovide information about the attachments storedin a record.
New Features in ReportsMany of the new features that were introduced in Access 2007 forms are also
available for reports. For example, to make long tabular reports easier to read,
you can apply alternating row shading just by changing the Alternate Back
Color property in the report’s Detail section. Like forms, reports can utilize
bound Image controls, rich text formatting, and new filtering and sorting fea-
tures. The new Layout view makes it easier to design reports; since in Layout
view you are working with the live data, you no longer need to switch between
Design and Report views to see how the final report will look. The Layout
view allows formatting report sections and controls, adding new fields, apply-
ing AutoFormats, grouping and sorting data, and changing many of the
report’s properties. As with the Layouts feature in forms, layouts can be used
in reports for resizing and moving groups of controls together, or adding grid
lines that grow or shrink with the data. You no longer need to spend time creat-
ing lines the way you did in earlier versions of Access. In addition to the
Layout view, Access 2007 introduces a new view for reports called Report
view in which you can easily perform data searches, as well as sorting and fil-
tering. You can even copy the data. This is a big improvement over the Print
Preview that only displays the data image. Another big improvement for
reports is in the area of their distribution. You can now save your reports in
portable document format (PDF) or XML Paper Specification (XPS) format.
Using the Report ViewReports have a new interactive view called Report view. This is the default
view for all new reports created in Access 2007. In this view you can easily
copy data by selecting it and clicking the Copy button in the Clipboard group
of the Home tab, or simply press Ctrl+C. If you need to find particular data in
the report, use the Find button in the Find group of the Home tab or simply
press Ctrl+F. Access will pop up the standard Find dialog box in which you
can enter your search criteria. Filtering and sorting is also enabled for the
Report view via the buttons located in the Filter & Sort section of the Home
tab. The report open in the Report view isn’t divided into pages; it is one big
page. If you have any calculations that depend on the Page or Pages properties
of the report, they may not return the correct results. Certain report events,
such as Print and Format, will not be triggered when the report is displayed in
the Report view. The Report view has its own new event called Paint that is
used with sections in Report view. This event fires whenever a section needs to
be drawn on the screen. Use this event to conditionally format controls in that
view, as shown in Hands-On 31-11.
� Note: The Paint event fires multiple times for each section of the reportbecause Access paints various elements of the given section separately at differ-ent times. The calculated controls are painted separately, and so are the itemsthat require a change in background or foreground colors.
884 | Chapter 31
Part VI

�Hands-On 31-11: Conditionally Formatting a Control in the Report View
1. In the Northwind 2007 database, right-click the Customer Address Book
report in the Navigation pane and choose Design view.
2. Click the Detail section and activate the property sheet.
3. In the property sheet of the Detail section, click the Event tab, and then
click the Browse button next to the Paint property. In the Choose Builder
dialog box, select Code Builder and click OK.
Access will write for you the stub of the Detail_Paint event procedure.
4. Complete the code of the Detail_Paint procedure as shown below, or copy
the procedure code from the C:\Acc07_HandsOn\Chap31.txt file.
Private Sub Detail_Paint()If Me.City.Value = "Chicago" Then
Me.City.ForeColor = vbBlueElse
Me.City.ForeColor = vbBlackEnd If
End Sub
The above procedure will set the ForeColor property for a control called
City to blue when the City name is Chicago, and display the names of all
other cities in black. This procedure will be triggered when you open the
report in Report view.
5. Press Ctrl+S to save the changes in the Report module.
6. Press Ctrl+F11 to return to the Microsoft Office Access window.
7. Click the View button in the Views group of the Design tab.
8. Access displays the report in its default Report view. Press Ctrl+F to acti-
vate the Find dialog box. Enter Chicago and click Find Next. Access
locates the first customer who lives in Chicago. Click Find Next again to
Tables, Forms, and Reports | 885
Working with New Features in Access 2007
Figure 31-43: Access 2007 reports offer users four different views.

locate the next customer. Notice that all the Chicago names are shown in
blue.
9. Close the Customer Address Book report.
Sorting and Grouping DataAccess 2007 has a new interface for grouping data, adding totals, and filtering.
These features are now available from a separate Group, Sort, and Total pane
as shown in Figure 31-44. To work with this pane, open the report in the Lay-
out view, click the Format tab, and select the Group & Sort button in the
Grouping & Totals section. When you click on the Add a Group or Add a Sort
buttons in the pane at the bottom of the report, Access will walk you through
the steps required to create new report groups, add totals, or perform sorting.
Saving Reports in the PDF or XPS File FormatAccess 2007 reports can now be saved to the PDF or XPS format. The portable
document format (PDF) preserves document formatting and makes files easy
to distribute and print. Reports distributed as PDF files will retain their format
and can be protected so that the data may not be copied or changed. To view
and print PDF files you need to download a free Adobe Acrobat Reader from
the Adobe web site. Another format that you can use for your report distribu-
tion is the XML Paper Specification (XPS) format. This file format also retains
the format of the original document. Currently you need Windows Vista to
view XPS files. In order to save your Access reports in PDF or XPS file for-
mat, you need to download and install a free add-in from Microsoft. You will
886 | Chapter 31
Part VI
Figure 31-44: The new Group, Sort, and Total pane provides a quick way to addcalculations in Access 2007 reports.

find more information on this subject in the Access online help (see Figure
31-45).
Chapter SummaryThis chapter introduced you to the important new features in Access 2007
tables, forms, and reports. Some features were just highlighted, while others
were covered in more detail, showing you how to use the feature both manu-
ally and with VBA. After working through this chapter’s examples, you should
feel comfortable using the new complex data types in your Access 2007 data-
base and the many new tools provided by the user interface in the design of
your forms and reports. If you have used prior versions of Access, it may take
a while for you to get used to all the new features. It’s always easier to learn
something new than it is to unlearn the thing that we’ve been using for years.
In the next chapter, we will take a look at other important additions and
changes introduced in Access 2007 that apply to working with templates and
macros.
Tables, Forms, and Reports | 887
Working with New Features in Access 2007
Figure 31-45: See the online help for how to get the free add-in from Microsoft for savingyour reports to PDF and XPS file formats.

Chapter 32
Macros and Templates
While programming Access applications there are two other areas of Access
that you need to be acquainted with: macros and templates. Macros in Access
have been around longer than the Visual Basic for Applications language.
When Access 2 came out in 1992, it included a macro language called Access
Basic that contained a subset of Visual Basic 2.0’s core syntax. Access 95
replaced Access Basic with Visual Basic for Applications, but up until Access
97, macros were the most common means of automating database tasks. When
Access 2000 came out, many successful macro users had already moved to the
new programming platform to take advantage of the language model that
offered more control over Access. In fact, in versions 2000 through 2003,
Microsoft recommended VBA to automate Access applications, and macros
were supported mainly for backward compatibility.
The outlook on macros has changed again with the release of Access 2007.
After performing some extensive research, Microsoft found out that many
users are intimidated by the programming environment that Access provides
but are quite successful at creating macros. It seems that it is much simpler to
pick a macro action and set a couple of parameters than it is to write VBA
code. Since most of the Access applications created by end users are loaded
with macros, Microsoft decided to improve the “macro experience” in Access
2007 by adding event handling, temporary variables (TempVars), better error
handling, and a new type of macros called embedded macros. Another new
macro feature is a Macro sandbox, which is related to the new security model
introduced in the 2007 release.
This chapter focuses on the new macro features in Access 2007. After
we’ve looked at macros, we will take a look at the new ACCDT file format
used with Access templates.
New Features in MacrosYou can use both VBA and macros to automate your Microsoft Access appli-
cations. While macros in Access 2007 are more powerful than those in earlier
versions of Access, whether you use macros or VBA will depend on what you
want to do. Macros can perform just about any task you can do with the
Access user interface by using the keyboard or the mouse. They provide an
easy way of opening and closing various Access objects (tables, queries,
forms, and reports). You can also use them to automate repetitive tasks, exe-
cute commands on the Access Ribbons, set values for form and report controls,
888

import and export spreadsheet and text files, display informative messages, or
even sound a beep. These are just a few examples of what macros can do.
What macros cannot do is create and manipulate database objects the way
we did in VBA earlier in this book by using DAO or ADO, or step through the
records in a recordset and perform an operation on each record. You need to
write VBA code to perform these types of operations. You must also use VBA
when you need to pass parameters to your Visual Basic procedures, call
dynamic link libraries (DLLs), create custom functions, or find out if a file
exists on the system. Even if you don’t want to get started with macros now
that you know how to write code in VBA, you still need to understand how
macros are used in Access 2007 as Microsoft makes extensive use of macros in
their templates and the built-in Button Wizard creates embedded macros.
Access 2007 Macro SecurityIn Microsoft’s documentation, the term “macro security” applies to macros and
VBA, as well as other executable content that could be harmful when allowed
to run. In Chapter 1 of this book (see Hands-On 1-4) we specified that Access
should trust any database file opened from the C:\Acc07_ByExample folder.
This enabled you to work with this book’s examples without having to con-
stantly deal with the Access 2007 security warning (see Figure 32-1).
If, however, a file you are attempting to open contains macros and that file
does not reside in a trusted location, Access determines whether to display a
security alert by checking your macro settings (see Figure 32-2). You can
change your macro settings at any time by following these steps:
1. Click the Microsoft Office button, and then click Access Options.
2. In the Access Options dialog box, click the Trust Center tab, and then click
Trust Center Settings.
3. In the Trust Center dialog box, select Macro Settings.
Macros and Templates | 889
Working with New Features in Access 2007
Figure 32-1: Security Warning message bar in Access 2007.
Figure 32-2: The Macro Settings options allow you to specify whether themacros should be disabled or allowed to run and whether you shouldsee a notification when macros are disabled.

If the Disable all macros with notification option is selected, you may want to
leave it at that. This option allows you to enable the disabled content for this
session only by clicking the Options button in the Security Warning message
bar and clicking the Enable this content option in the Microsoft Office Security
Options dialog box (see Figure 32-3).
If you select the first option button in the above figure, Access will open the
database in disabled mode, meaning it will turn off all executable content, as
shown in Figure 32-4.
890 | Chapter 32
Part VI
Figure 32-3: The MicrosoftOffice Security Options dia-log box allows you to tem-porarily enable disabledprogramming content.
Figure 32-4: TheAccess online helplists the compo-nents that Access2007 disables.
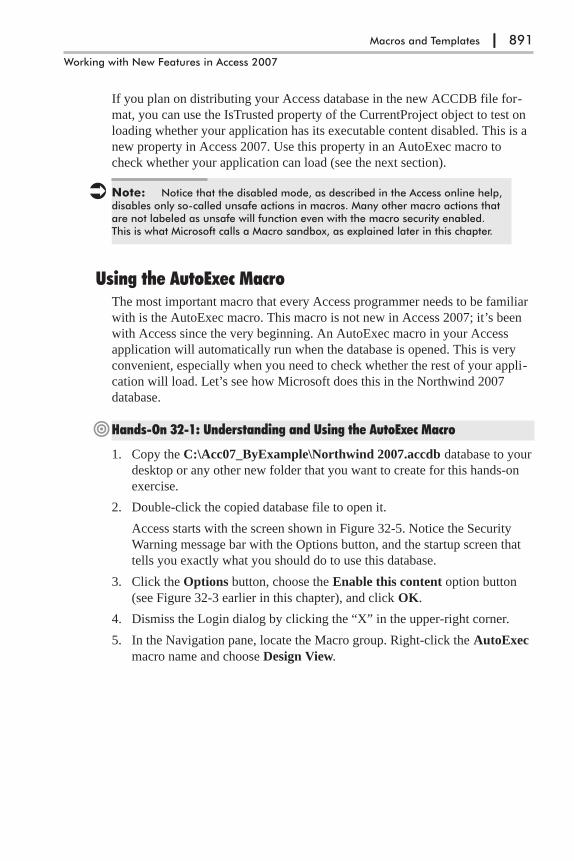
If you plan on distributing your Access database in the new ACCDB file for-
mat, you can use the IsTrusted property of the CurrentProject object to test on
loading whether your application has its executable content disabled. This is a
new property in Access 2007. Use this property in an AutoExec macro to
check whether your application can load (see the next section).
� Note: Notice that the disabled mode, as described in the Access online help,disables only so-called unsafe actions in macros. Many other macro actions thatare not labeled as unsafe will function even with the macro security enabled.This is what Microsoft calls a Macro sandbox, as explained later in this chapter.
Using the AutoExec MacroThe most important macro that every Access programmer needs to be familiar
with is the AutoExec macro. This macro is not new in Access 2007; it’s been
with Access since the very beginning. An AutoExec macro in your Access
application will automatically run when the database is opened. This is very
convenient, especially when you need to check whether the rest of your appli-
cation will load. Let’s see how Microsoft does this in the Northwind 2007
database.
�Hands-On 32-1: Understanding and Using the AutoExec Macro
1. Copy the C:\Acc07_ByExample\Northwind 2007.accdb database to your
desktop or any other new folder that you want to create for this hands-on
exercise.
2. Double-click the copied database file to open it.
Access starts with the screen shown in Figure 32-5. Notice the Security
Warning message bar with the Options button, and the startup screen that
tells you exactly what you should do to use this database.
3. Click the Options button, choose the Enable this content option button
(see Figure 32-3 earlier in this chapter), and click OK.
4. Dismiss the Login dialog by clicking the “X” in the upper-right corner.
5. In the Navigation pane, locate the Macro group. Right-click the AutoExec
macro name and choose Design View.
Macros and Templates | 891
Working with New Features in Access 2007

6. Close the AutoExec macro in the same way you close any other Access
window. You can click the “X” button in the window’s upper-right corner
or right-click the AutoExec tab and choose Close.
Understanding Macro Actions, Arguments, and ConditionsA macro can have one or more actions. The Action column is the only required
column when creating macros. However, if the task you are trying to perform
is based on a condition, then use the optional Condition column as well. Your
condition could test a value in a field or evaluate the result of a function. You
can use any expression that evaluates to True/False (Yes/No) in the Condition
892 | Chapter 32
Part VI
Figure 32-5: Startup screen in the Microsoft Northwind 2007 sample database.This screen tells the user what to do to run the application.
Figure 32-6: The contents of the AutoExec macro in the Northwind 2007 sample database.
column. If there is an expression in a macro’s Condition column, the action
specified in that row will execute if the condition is true. If the condition is not
true, the action will be skipped, and the macro control will move to the next
row. The actions that should not be executed when the condition is true are
preceded with Not. If the Condition column is not visible in the Macro Design
view, click the Conditions button in the Show/Hide group of the Design tab.
Macro actions can be picked from the drop-down list that appears when you
click in the Action column. Access 2007 includes 70 macro actions to pick
from. If the macro action requires arguments, you enter them in the Action
Arguments area at the bottom of the Macro Design screen. Your choices will
be automatically reflected by Access in the Arguments column. Arguments are
separated by commas, which are also used to indicate empty arguments. You
will find documentation on all macro actions and their arguments in the Access
online help. The AutoExec macro in the Northwind 2007 database uses the
following macro actions:
� SetDisplayedCategories — This action is used to specify which categories
are displayed under Navigate to Category in the title bar of the Navigation
pane. This action has two arguments. The Show argument can be set to Yes
to show the category name or No to hide it. The Category argument speci-
fies the name of the category you want to show or hide. The Northwind
2007 database contains a custom category named Northwind Traders, and
the first macro line simply says to display this category in the Navigation
pane.
� OpenForm — This action is used to open any form. The form can be
selected from a drop-down list when you click the Form Name box in the
Action Arguments section of the Macro Design view. All forms in the cur-
rent database will be shown. You can also specify the view in which the
form will open. The default view is Form; you can select the view from the
drop-down box once you click the View box in the Action Arguments sec-
tion. Not all arguments need to be filled in. You can easily look up argu-
ments that a particular action can take by clicking on any line in the Action
Arguments section and pressing the F1 key. The second macro action in the
AutoExec example shown in Figure 32-6 tells Access to open the startup
screen in Form view using the Normal window. Notice that the arguments
that were not provided are shown as commas in the Arguments column:
Startup Screen, Form, , , , Normal
The first comma after Form is an argument separator; the other three com-
mas are placeholders for the arguments that were not provided: Filter
Name, Where Condition, and Data Mode.
Whether a form opens can depend on a certain condition being met; in
this example, the Condition column has the following statement:
Not [CurrentProject].[IsTrusted]
This statement tells Access to show the startup screen only if the current
project (the database) is not trusted. Notice the use of the IsTrusted
Macros and Templates | 893
Working with New Features in Access 2007

property of the CurrentProject object to test whether your application has
its executable content disabled. You saw this line of macro code execute
when you opened the Northwind 2007 database, as shown in Figure 36-5.
The next line of macro code loads the login dialog if
[CurrentProject].[IsTrusted] is true. This line was executed when you told
Access to “Enable this content” in the Microsoft Office Security Options
dialog box (see steps 3-4 in the hands-on exercise).
A macro executes until it encounters a blank line. Therefore, never use
blank lines to separate your macro actions.
� Note: To open an Access database without running the AutoExec macro,hold down the Shift key while opening the database.
Creating Macros in Access 2007Access 2007 supports two types of macros: standalone macros used in earlier
versions of Access and embedded macros introduced in Access 2007.
Standalone macros are visible in the Navigation pane under Macros; embedded
macros are part of the object in which they are embedded (form, report, or con-
trol) and therefore are not visible in the Navigation pane.
Creating and Using Standalone Macros
The AutoExec macro we looked at in the previous section is a standalone
macro. Once created, this macro appears in the Navigation pane.
The general steps to create a standalone macro are as follows:
1. Click Macro in the Other group of the Create tab (Figure 32-7).
Note that a macro consists of macro actions that are carried out in the order
you list them in the Macro Design view.
2. To add an action to the macro, click the first empty cell in the Action col-
umn. Type the action name or select the action from the Action drop-down
list. The Action list displays all the available macro actions when the Show
All Actions button is selected. When this button is not selected, you will
see a shorter list of actions that are allowed to run even if the database is
not trusted.
894 | Chapter 32
Part VI
Figure 32-7: Creating a standalone macro.
3. In the Arguments column, specify arguments for the selected action, if
required. If you click in the text box next to the Argument name in the
Action Arguments section of the Macro Design view, you will see a short
description in the box to the right.
4. If the macro action should be conditionally executed, type an expression in
the Condition column. If this column is not visible, click the Conditions
button in the Show/Hide group of the Design tab.
If there is an expression in the Condition column of a macro, the action in
that row will execute if the condition is true. If the condition is not true, the
action will be skipped. Instead of repeating the same condition in line after
line, use an ellipsis (...) as shown in Figure 32-8. When a line has an ellip-
sis in the Condition column, the condition from the previous line continues
to apply. If the action on the ellipsis line is StopMacro, then the macro will
end without executing the next lines.
5. To make your macro actions easy to understand for yourself and others,
type a comment in the Comments column. Comments are optional.
6. To add another action to your macro, type or select an action in the next
row’s Action column, and repeat steps 3-5 above.
To add an action row in between the actions you’ve already entered, simply
right-click where you want to add a new row and select Insert Row from
the shortcut menu, or click the Insert Rows button in the Rows group of
the Design tab.
To delete a row, right-click the row and choose Delete Row from the
shortcut menu, or click the Delete Rows button in the Rows group of the
Design tab.
7. When you are done entering all actions for your macro, press Ctrl+S to
save your macro, or click the Save button on the Quick Access toolbar.
Enter the macro name in the Save As dialog box and click OK.
8. Close the Macro Design view.
Using Macro Groups
Instead of having a large number of standalone macros listed in the Navigation
pane, consider storing related macros together in a macro group. Figure 32-8
shows macros that can be attached to the Suppliers form in the Northwind.mdb
database. Notice how this single macro object named Suppliers stores all
related macros in a macro group. To create a macro group, you must give each
macro a unique name.
Macros and Templates | 895
Working with New Features in Access 2007
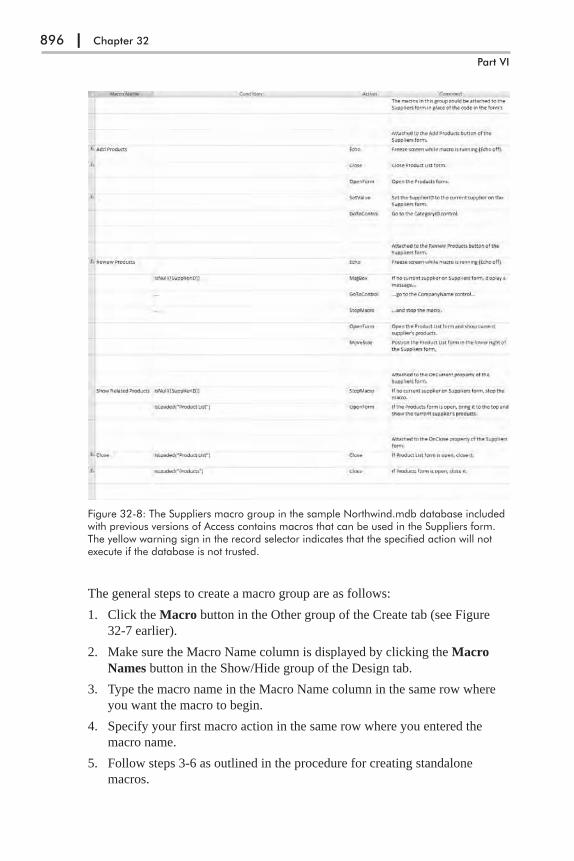
The general steps to create a macro group are as follows:
1. Click the Macro button in the Other group of the Create tab (see Figure
32-7 earlier).
2. Make sure the Macro Name column is displayed by clicking the Macro
Names button in the Show/Hide group of the Design tab.
3. Type the macro name in the Macro Name column in the same row where
you want the macro to begin.
4. Specify your first macro action in the same row where you entered the
macro name.
5. Follow steps 3-6 as outlined in the procedure for creating standalone
macros.
896 | Chapter 32
Part VI
Figure 32-8: The Suppliers macro group in the sample Northwind.mdb database includedwith previous versions of Access contains macros that can be used in the Suppliers form.The yellow warning sign in the record selector indicates that the specified action will notexecute if the database is not trusted.
6. Save the macro group by pressing Ctrl+S and typing the name for the
group. The name you specify is the name of the group of macros. This
name will appear in the Navigation pane under Macros.
7. Close the Macro Design view.
Macro groups work great for creating modular macros. Instead of a longer
macro with many conditions, simply create a small macro that calls other small
macros.
Running Standalone Macros
You can run standalone macros from the Design view, from the Navigation
pane, from another macro, from a VBA procedure, or in response to an event
on a form, report, or control.
� Run a macro from the Design view — If the standalone macro is open in
the Design view, you can click the Run button in the Tools group of the
Design tab to run the macro. To run a macro in the macro group, click the
macro name and then click the Run button.
� Note: You can also run your macro one action at a time by selecting the Sin-gle Step button and then clicking the Run button (see “Error Handling in Macros”later in this chapter).
� Run a macro from the Navigation pane — A standalone macro can also
be run directly from the Navigation pane. Simply right-click the macro
name and choose Run from the shortcut menu, but make sure you know
what the macro will do before you run it. A badly designed macro could
wipe out all the data in your database without asking you if you want to
proceed.
� Note: If the macro contains macro groups and you right-click the macro inthe Navigation pane and choose Run, only the first macro in the group will exe-cute.
� Run a macro from another macro — To run a macro from another
macro, you must create at a minimum two macros. The main macro should
include the RunMacro action. Set the Macro Name argument of this action
to the name of the macro you want to run. When you run the main macro,
both macros will execute.
� Run a macro from a VBA procedure — The RunMacro method of the
DoCmd object carries out the RunMacro action in VBA.
� To run a standalone macro, use the following statement:
DoCmd.RunMacro “YourMacroName”
Macros and Templates | 897
Working with New Features in Access 2007

Optionally, you may specify how many times the macro should be run:
DoCmd.RunMacro “YourMacroName”, 2
� To run a particular macro in a macro group, use the name of the group
followed by a period and the name of the macro:
DoCmd.RunMacro “Sales.AddProducts”
� Run a macro in response to an event on a form, report, or control — A
standalone macro can be bound to events for forms, reports, or controls.
For example, if your form contains a button that needs to open another
form and you have previously created a macro that performs this action,
you can specify the macro name in the OnClick property of the button, as
shown in Figure 32-9. To do this you must open the form in Design or Lay-
out view, click the Button control on the form, and open the property sheet.
On the property sheet for the button, click the Event tab, and then click the
event property for the event you want to trigger. The macro will run when
you return to Form view and click the button. Notice that Access lists all
the available macros when you open a drop-down list next to an event
property. Macros that appear in macro groups are listed in two parts — the
name of the standalone macro and the name of the macro in a macro group.
Creating and Using Embedded Macros
New to Access 2007 are macros that can be embedded in any of the events
provided by a form, report, or control. As mentioned earlier, these embedded
macros are not visible in the Navigation pane.
The general steps to create an embedded macro are as follows:
1. Open a form or report in Design or Layout view.
2. Select an object to which you want to assign an embedded macro (a form,
report, or control).
898 | Chapter 32
Part VI
Figure 32-9: Binding a standalone macro to an event property. Shown here is the Sup-pliers form in the sample Northwind.mdb database from an earlier version of Access.

3. Activate the property sheet. In Design view, the Property Sheet button is
located in the Tools group of the Design tab. In Layout view, you will find
this button in the Tools group of the Arrange tab.
4. In the property sheet, click the Event tab, and then click the Build button
(…) next to the desired property.
5. In the Choose Builder dialog box, select Macro Builder, and then click
OK. Access will open the same Macro Design view that you use for creat-
ing standalone macros.
6. Choose the actions for your macro, and specify the arguments and condi-
tions if required.
7. Press Ctrl+S to save your macro, and click the Close button in the Close
group of the Design tab. Access closes the Macro Design view and enters
[Embedded Macro] in the event property (see Figure 32-10).
� Note: To modify the embedded macro, click on the Build button (…) next tothe property with [Embedded Macro], and Access will open the Macro Builder(Design view) where you can make the required modifications.
Keep in mind that you cannot reference an embedded macro from other mac-
ros. To reference a macro from another macro, you must create a standalone
macro.
Copying Embedded Macros
Because embedded macros are part of the object in which they were created,
the macro behind the control is also copied when you copy the form, report, or
control.
You can also copy an embedded macro from one event property to another.
This is possible thanks to so-called “shadow properties.” What this means is
that for each event property of a control, form, or report there is a “shadow”
event property that contains the embedded macro for that property. For exam-
ple, if your form’s On Load event property is set to [Embedded Macro], then
the shadow property called On Load Macro contains its embedded macro. The
Macros and Templates | 899
Working with New Features in Access 2007
Figure 32-10: Assigning an embedded macro to the event property of a form’s commandbutton.
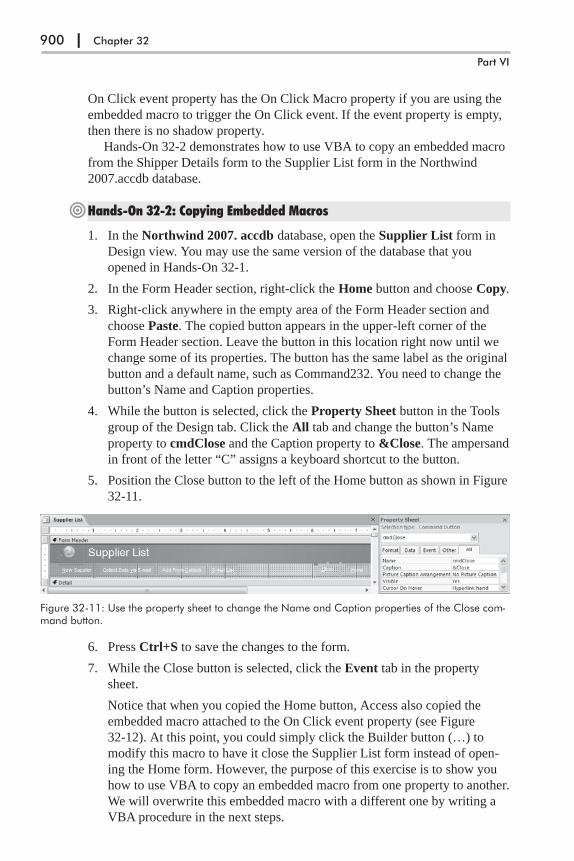
On Click event property has the On Click Macro property if you are using the
embedded macro to trigger the On Click event. If the event property is empty,
then there is no shadow property.
Hands-On 32-2 demonstrates how to use VBA to copy an embedded macro
from the Shipper Details form to the Supplier List form in the Northwind
2007.accdb database.
�Hands-On 32-2: Copying Embedded Macros
1. In the Northwind 2007. accdb database, open the Supplier List form in
Design view. You may use the same version of the database that you
opened in Hands-On 32-1.
2. In the Form Header section, right-click the Home button and choose Copy.
3. Right-click anywhere in the empty area of the Form Header section and
choose Paste. The copied button appears in the upper-left corner of the
Form Header section. Leave the button in this location right now until we
change some of its properties. The button has the same label as the original
button and a default name, such as Command232. You need to change the
button’s Name and Caption properties.
4. While the button is selected, click the Property Sheet button in the Tools
group of the Design tab. Click the All tab and change the button’s Name
property to cmdClose and the Caption property to &Close. The ampersand
in front of the letter “C” assigns a keyboard shortcut to the button.
5. Position the Close button to the left of the Home button as shown in Figure
32-11.
6. Press Ctrl+S to save the changes to the form.
7. While the Close button is selected, click the Event tab in the property
sheet.
Notice that when you copied the Home button, Access also copied the
embedded macro attached to the On Click event property (see Figure
32-12). At this point, you could simply click the Builder button (…) to
modify this macro to have it close the Supplier List form instead of open-
ing the Home form. However, the purpose of this exercise is to show you
how to use VBA to copy an embedded macro from one property to another.
We will overwrite this embedded macro with a different one by writing a
VBA procedure in the next steps.
900 | Chapter 32
Part VI
Figure 32-11: Use the property sheet to change the Name and Caption properties of the Close com-mand button.

8. Press Alt+F11 to activate the Visual Basic Editor window, and choose
Insert | Module.
9. In the module’s Code window, enter the following Copy_OnClickMacro
procedure as shown below, or copy the procedure code from C:\Acc07_
HandsOn\Chap32.txt.
Sub Copy_OnClickMacro()Dim ctl As Control
' open in the Design view the Supplier List formDoCmd.OpenForm "Supplier List", acDesign
' only run the code if the specified control' exists on the formFor Each ctl In Forms("Supplier List").Controls
If TypeOf ctl Is CommandButton ThenIf StrComp(ctl.Name, "cmdClose", vbTextCompare) = 0 Then
' open in the Design view the Shipper Details form' this form contains an embedded macro in the OnClick' event of cmdClose button
DoCmd.OpenForm "Shipper Details", acDesign
' copy macro from the OnClick event property of the' cmdClose button on the Shipper Details form' to the OnClick event property of the cmdClose button' on the Supplier List form
Forms("Supplier List").Controls("cmdClose").OnClickMacro = _Forms("Shipper Details").Controls("cmdClose").OnClickMacro
DoCmd.Save acForm, "Supplier List"DoCmd.Close acForm, "Shipper Details"MsgBox "The embedded macro was successfully copied."Exit Sub
End IfEnd If
Next
MsgBox "Operation could not be performed. " & vbCrLf & _"Ensure that the specified control exists."
End Sub
Macros and Templates | 901
Working with New Features in Access 2007
Figure 32-12: When you copied the Home button the new button, inherited the embedded macroassigned to the On Click event property.
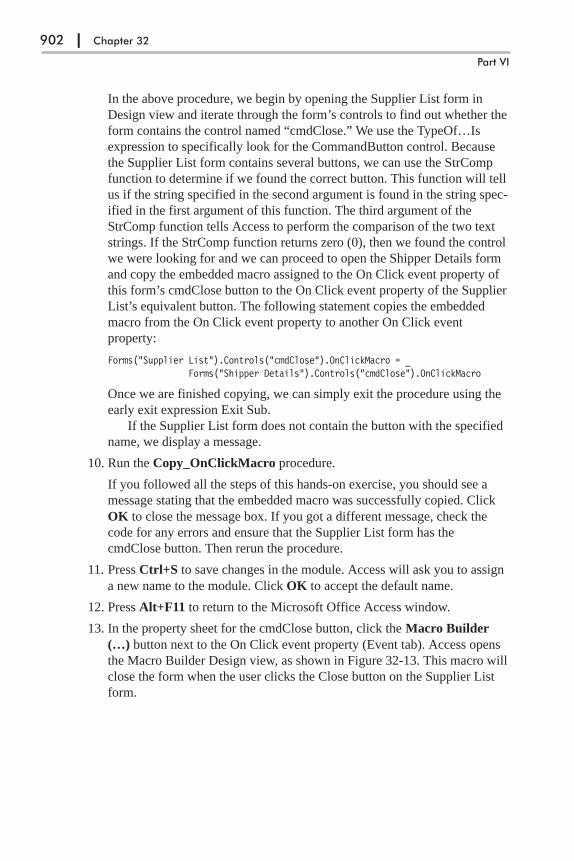
In the above procedure, we begin by opening the Supplier List form in
Design view and iterate through the form’s controls to find out whether the
form contains the control named “cmdClose.” We use the TypeOf…Is
expression to specifically look for the CommandButton control. Because
the Supplier List form contains several buttons, we can use the StrComp
function to determine if we found the correct button. This function will tell
us if the string specified in the second argument is found in the string spec-
ified in the first argument of this function. The third argument of the
StrComp function tells Access to perform the comparison of the two text
strings. If the StrComp function returns zero (0), then we found the control
we were looking for and we can proceed to open the Shipper Details form
and copy the embedded macro assigned to the On Click event property of
this form’s cmdClose button to the On Click event property of the Supplier
List’s equivalent button. The following statement copies the embedded
macro from the On Click event property to another On Click event
property:
Forms("Supplier List").Controls("cmdClose").OnClickMacro = _Forms("Shipper Details").Controls("cmdClose").OnClickMacro
Once we are finished copying, we can simply exit the procedure using the
early exit expression Exit Sub.
If the Supplier List form does not contain the button with the specified
name, we display a message.
10. Run the Copy_OnClickMacro procedure.
If you followed all the steps of this hands-on exercise, you should see a
message stating that the embedded macro was successfully copied. Click
OK to close the message box. If you got a different message, check the
code for any errors and ensure that the Supplier List form has the
cmdClose button. Then rerun the procedure.
11. Press Ctrl+S to save changes in the module. Access will ask you to assign
a new name to the module. Click OK to accept the default name.
12. Press Alt+F11 to return to the Microsoft Office Access window.
13. In the property sheet for the cmdClose button, click the Macro Builder
(…) button next to the On Click event property (Event tab). Access opens
the Macro Builder Design view, as shown in Figure 32-13. This macro will
close the form when the user clicks the Close button on the Supplier List
form.
902 | Chapter 32
Part VI

14. Click the Close button to close the Macro Builder Design view.
15. Right-click the Supplier List tab, and choose Form View.
16. Click the Close button in the Header section of the Supplier List form to
close this form.
You can see the contents of the OnClickMacro shadow property by typing the
following statement in the Immediate window and pressing Enter (the form
must be open for this to work):
?Forms("Supplier List").Controls("cmdClose").OnClickMacro
You should see the output as shown below:
Version =196611ColumnsShown =8Begin
Action ="Close"Argument ="-1"Argument =""Argument ="0"
End
Access has a large number of hidden properties that make it possible to get and
set embedded macros. The property name begins with the name of the event
property and ends with “EmMacro,” such as OnClickEmMacro, AfterUpdate-
EmMacro, and so on. Try out the following statement in the Immediate
window (the form must be open for this to work), and notice that it produces
the same output as the statement you tried earlier:
? Forms("Supplier List").Controls("cmdClose").Properties("OnClickEmMacro").Value
Version =196611ColumnsShown =8Begin
Action ="Close"
Macros and Templates | 903
Working with New Features in Access 2007
Figure 32-13: Examining an embedded macro after it’s been copiedfrom another event property.

Argument ="-1"Argument =""Argument ="0"
End
With this knowledge, it is easy to create a standalone macro from an embedded
macro. Here’s an example VBA procedure that does just that:
Sub SaveEmToStandalone()Dim strMacro As StringDim objFileSys As ObjectDim objFile As ObjectDim strFileName As String
' open in the Design view the form that contains' the embedded macroDoCmd.OpenForm "Login Dialog", acDesign
' to write an embedded macro to a file use the Value propertystrMacro = Forms("Login Dialog"). _
Controls("cboCurrentEmployee"). _Properties("AfterUpdateEmMacro").Value
' close the formDoCmd.Close acForm, "Login Dialog"
' Create a text filestrFileName = "C:\Acc07_ByExample\AfterUpdate for combo.txt"
Set objFileSys = CreateObject("Scripting.FileSystemObject")Set objFile = objFileSys.CreateTextFile(strFileName, True)
' Write strMacro to the text fileobjFile.Write strMacro' Close the fileobjFile.Close
' Use the undocumented LoadFromText method' of the Application object to create a standalone macro' from the text fileApplication.LoadFromText acMacro, "Cbo Employee After Update", _
strFileName
End Sub
The LoadFromText method of the Application object makes it possible to cre-
ate various Access database objects (including macros) from information that
was previously saved to a text file. The LoadFromText method requires that
you specify the object type, the object name, and the name of the text file.
After running the above procedure, you should see the Cbo Employee After
Update macro listed in the Navigation pane under Macros.
904 | Chapter 32
Part VI

Working in Sandbox ModeBy default Access 2007 runs in Sandbox mode, which means that the program
blocks all the expressions in field properties and controls that are considered
unsafe. A safe expression is one that does not use functions that could be used
to access drives or other resources on a user’s computer to damage data or
files. When Access is running in Sandbox mode, any expressions that use
unsafe macro actions are marked with a yellow warning sign, as shown earlier
in Figure 32-8.
Access allows you to disable Sandbox mode by setting the macro security
level to low; however, for security reasons this setting is not recommended. If
you trust the database and want to run unsafe expressions that the Sandbox
mode blocks without having to change your current macro security, you can
disable Sandbox mode by changing a Registry key. Modifying the Registry is
beyond the scope of this chapter.
Error Handling in MacrosAccess 2007 adds three new macro actions that give macros the capability to
handle errors: OnError, ClearMacroError, and SingleStep. There is also a new
MacroError object that you can use to obtain information about the error
received and create user-friendly error messages. The OnError action is similar
to the On Error statement in VBA. The OnError action specifies how errors
should be handled when a run-time error occurs. This action has two argu-
ments, as shown in the table below.
Table 32-1: OnError action arguments
Arguments Description
Go To
(This argument is required)
Specifies how macro should handle errors. The Go Toargument can be set to: Next, Macro Name, or Fail.
Next — The error is recorded in the MacroError objectand the execution of the macro moves to the next macroaction. This is similar to the On Error Resume Nextstatement in VBA.
Macro Name — The macro execution is passed to themacro that is named in the Macro Name argument. This
is similar to the On Error GoTo statement in VBA.
Fail — Access will stop the execution of the macro anddisplay an error. This is similar to On Error GoTo 0 inVBA.
Macro Name
(This argument is optional)
If the Go To argument is set to Macro Name, the nameof the macro in the current macro group will handle theerror.
The OnError action suppresses standard error messages displayed by Access
when an error occurs. If you use the OnError action in your macro, then you
should use the error information saved in the MacroError object to display a
user-friendly message about the error.
Macros and Templates | 905
Working with New Features in Access 2007
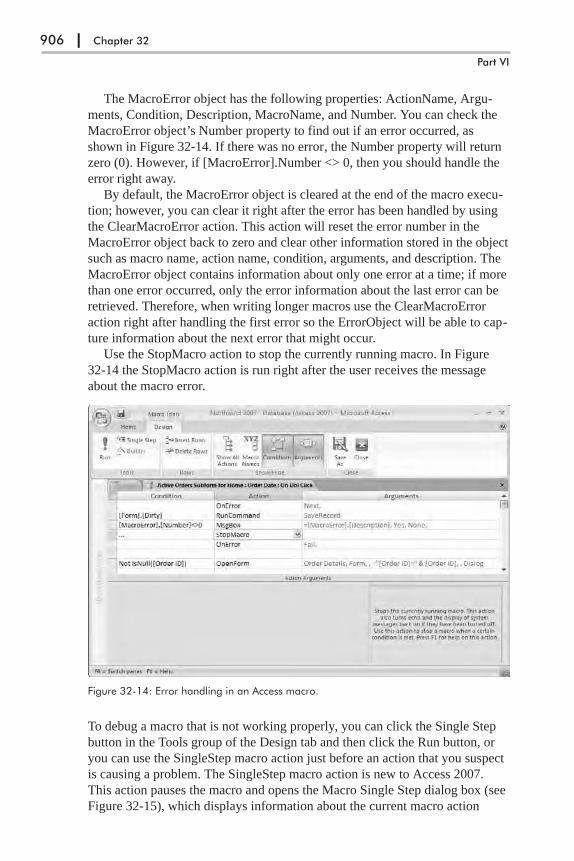
The MacroError object has the following properties: ActionName, Argu-
ments, Condition, Description, MacroName, and Number. You can check the
MacroError object’s Number property to find out if an error occurred, as
shown in Figure 32-14. If there was no error, the Number property will return
zero (0). However, if [MacroError].Number <> 0, then you should handle the
error right away.
By default, the MacroError object is cleared at the end of the macro execu-
tion; however, you can clear it right after the error has been handled by using
the ClearMacroError action. This action will reset the error number in the
MacroError object back to zero and clear other information stored in the object
such as macro name, action name, condition, arguments, and description. The
MacroError object contains information about only one error at a time; if more
than one error occurred, only the error information about the last error can be
retrieved. Therefore, when writing longer macros use the ClearMacroError
action right after handling the first error so the ErrorObject will be able to cap-
ture information about the next error that might occur.
Use the StopMacro action to stop the currently running macro. In Figure
32-14 the StopMacro action is run right after the user receives the message
about the macro error.
To debug a macro that is not working properly, you can click the Single Step
button in the Tools group of the Design tab and then click the Run button, or
you can use the SingleStep macro action just before an action that you suspect
is causing a problem. The SingleStep macro action is new to Access 2007.
This action pauses the macro and opens the Macro Single Step dialog box (see
Figure 32-15), which displays information about the current macro action
906 | Chapter 32
Part VI
Figure 32-14: Error handling in an Access macro.

(macro name, condition, action name, arguments, and error number). The
Macro Single Step dialog box contains the following three buttons:
Table 32-2: Macro Single Step dialog buttons
Button Name Description
Step Move to the next macro action.
Stop All Macros Stop the current macro and any other macros that may be running.
Continue Use this button to exit the Single Step mode and continue the normalexecution of the macro.
� Note: If you started the Macro Single Step dialog box using the Single Stepbutton on the Ribbon, you must click this button again when you are donedebugging your macro or the next macros that you run will also be run usingthe Single Step mode.
Using Temporary Variables in MacrosA new functionality in Access 2007 that applies both to VBA and macros is
temporary variables (TempVars). You’ve seen the VBA side of using the
TempVar object earlier in this book in Chapter 3. Recall that the TempVar
object of the TempVars collection allows you to get or set a value for a vari-
able. Each TempVar object has a name and value property. In macros, there are
three new macro actions that relate to TempVars:
� SetTempVar(name, expression) — This macro action is used to create a
new temporary variable. This variable can then be used as a condition or
argument in subsequent macro actions. Temporary variables are global;
therefore, you can use them in another macro, in an event procedure, or on
a form or report. The first argument of the SetTempVar macro action
assigns a name to the temporary variable. The second argument is the
expression that Access should use to set the value for this temporary vari-
able. You can define up to 255 temporary variables at one time.
Macros and Templates | 907
Working with New Features in Access 2007
Figure 32-15: Debug your macros using the Macro SingleStep dialog box.

� RemoveTempVar(name) — This macro action is used to remove the tem-
porary variable. Use the name argument to provide the name of the vari-
able to remove. It is recommended that you remove the temporary variable
once you’ve finished working with it. If you don’t remove your temporary
variables, they will be removed automatically when you close the database.
� RemoveAllTempVar — This macro action is used to remove all temporary
variables from the TempVars collection.
� Note: Because both macros and VBA use the same TempVars collection, it isnow easy to share data between your macros and VBA procedures.
Converting Macros to VBA CodeThe ability to convert standalone macros to VBA code has been available since
Access 97. With the introduction of embedded macros, Access 2007 also pro-
vides a button to convert to VBA code macros stored in an event property of a
form, report, or control (Figure 32-20).
Converting a Standalone Macro to VBA
To convert a standalone macro to VBA, select the macro in the Navigation
pane under Macros and click the Convert Macros to Visual Basic button in the
Macro group of the Database Tools tab (see Figure 32-17). Access will display
a dialog box asking whether you want to include error handling and comments
in the code (see Figure 32-18). To keep your code very simple, you can clear
both check boxes. Start the conversion process by clicking the Convert button.
908 | Chapter 32
Part VI
Figure 32-16: Using temporary variables in an Access macro.

Upon completion of the macro conversion process, Access displays a message
stating that the conversion is finished. Click OK to the message, and review
the Modules group in the Navigation pane. You should see a separate module
for the converted macro. The name of the module is Converted Macro fol-
lowed by a dash and the name of the macro you converted. For example, after
converting the Delete All Data macro, the name of the VBA module is Con-
verted Macro – Delete All Data. To view the converted macro, double-click the
converted module’s name. This will open the Visual Basic Editor window, as
shown in Figure 32-19.
Macros and Templates | 909
Working with New Features in Access 2007
Figure 32-17: Converting a standalone macro to VisualBasic for Applications code.
Figure 32-18: Access displays thisdialog box when you click the Con-vert Macros to Visual Basic button(see Figure 32-17).
Figure 32-19: This VBA code was generated by Access from astandalone macro.

� Note: You can modify the code generated by the macro conversion processto suit your needs.
Converting Embedded Macros to VBA
To convert embedded macros, open the form or report in Design view and
click the Database Tools tab. If you opened a form, you should see the button
named Convert Form’s Macros to Visual Basic in the Macro group, as shown
in Figure 32-20.
After clicking the Convert Form’s Macros to Visual Basic button, Access dis-
plays the same dialog box as was shown earlier in the conversion process for
standalone macros (see Figure 32-18). When you click the Convert button,
Access begins the conversion process, and when this process completes you
will see a message about the successful completion of the conversion. Click
OK to the message. Next, activate the property sheet, and notice that form and
control event properties that have previously been set to [Embedded Macro]
now display [Event Procedure]. You can click the Builder button (…) to view
the VBA code. The following VBA event procedures were generated for the
embedded macros found in the Shipper List form:
Option Compare Database
'------------------------------------------------------------' cmdNew_Contact_Click''------------------------------------------------------------Private Sub cmdNew_Contact_Click()On Error GoTo cmdNew_Contact_Click_Err
910 | Chapter 32
Part VI
Figure 32-20: Converting embedded macros to VBA code.
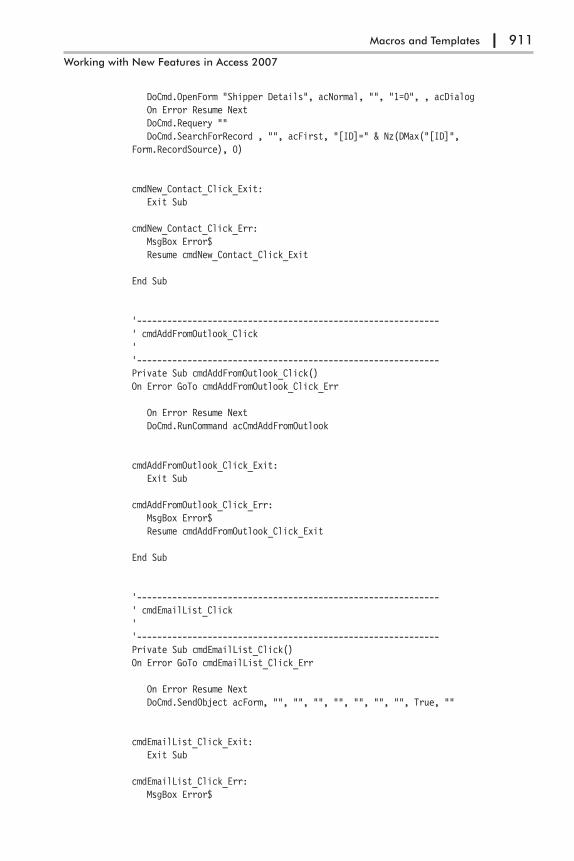
DoCmd.OpenForm "Shipper Details", acNormal, "", "1=0", , acDialogOn Error Resume NextDoCmd.Requery ""DoCmd.SearchForRecord , "", acFirst, "[ID]=" & Nz(DMax("[ID]",
Form.RecordSource), 0)
cmdNew_Contact_Click_Exit:Exit Sub
cmdNew_Contact_Click_Err:MsgBox Error$Resume cmdNew_Contact_Click_Exit
End Sub
'------------------------------------------------------------' cmdAddFromOutlook_Click''------------------------------------------------------------Private Sub cmdAddFromOutlook_Click()On Error GoTo cmdAddFromOutlook_Click_Err
On Error Resume NextDoCmd.RunCommand acCmdAddFromOutlook
cmdAddFromOutlook_Click_Exit:Exit Sub
cmdAddFromOutlook_Click_Err:MsgBox Error$Resume cmdAddFromOutlook_Click_Exit
End Sub
'------------------------------------------------------------' cmdEmailList_Click''------------------------------------------------------------Private Sub cmdEmailList_Click()On Error GoTo cmdEmailList_Click_Err
On Error Resume NextDoCmd.SendObject acForm, "", "", "", "", "", "", "", True, ""
cmdEmailList_Click_Exit:Exit Sub
cmdEmailList_Click_Err:MsgBox Error$
Macros and Templates | 911
Working with New Features in Access 2007

Resume cmdEmailList_Click_Exit
End Sub
'------------------------------------------------------------' cmdCollectDataviaEmail_Click''------------------------------------------------------------Private Sub cmdCollectDataviaEmail_Click()On Error GoTo cmdCollectDataviaEmail_Click_Err
DoCmd.OpenQuery "Shippers Extended", acViewNormal, acEditDoCmd.RunCommand acCmdCollectDataViaEmailDoCmd.Close acQuery, "Shippers Extended"
cmdCollectDataviaEmail_Click_Exit:Exit Sub
cmdCollectDataviaEmail_Click_Err:MsgBox Error$Resume cmdCollectDataviaEmail_Click_Exit
End Sub
'------------------------------------------------------------' cmdHome_Click''------------------------------------------------------------Private Sub cmdHome_Click()On Error GoTo cmdHome_Click_Err
DoCmd.OpenForm "Home", acNormal, "", ""
cmdHome_Click_Exit:Exit Sub
cmdHome_Click_Err:MsgBox Error$Resume cmdHome_Click_Exit
End Sub
'------------------------------------------------------------' Last_Name_DblClick''------------------------------------------------------------Private Sub Last_Name_DblClick(Cancel As Integer)On Error GoTo Last_Name_DblClick_Err
912 | Chapter 32
Part VI
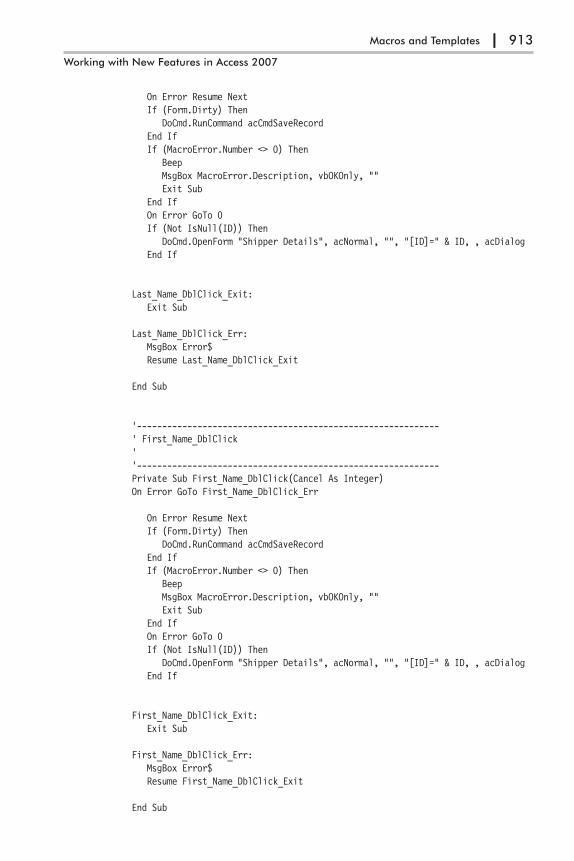
On Error Resume NextIf (Form.Dirty) Then
DoCmd.RunCommand acCmdSaveRecordEnd IfIf (MacroError.Number <> 0) Then
BeepMsgBox MacroError.Description, vbOKOnly, ""Exit Sub
End IfOn Error GoTo 0If (Not IsNull(ID)) Then
DoCmd.OpenForm "Shipper Details", acNormal, "", "[ID]=" & ID, , acDialogEnd If
Last_Name_DblClick_Exit:Exit Sub
Last_Name_DblClick_Err:MsgBox Error$Resume Last_Name_DblClick_Exit
End Sub
'------------------------------------------------------------' First_Name_DblClick''------------------------------------------------------------Private Sub First_Name_DblClick(Cancel As Integer)On Error GoTo First_Name_DblClick_Err
On Error Resume NextIf (Form.Dirty) Then
DoCmd.RunCommand acCmdSaveRecordEnd IfIf (MacroError.Number <> 0) Then
BeepMsgBox MacroError.Description, vbOKOnly, ""Exit Sub
End IfOn Error GoTo 0If (Not IsNull(ID)) Then
DoCmd.OpenForm "Shipper Details", acNormal, "", "[ID]=" & ID, , acDialogEnd If
First_Name_DblClick_Exit:Exit Sub
First_Name_DblClick_Err:MsgBox Error$Resume First_Name_DblClick_Exit
End Sub
Macros and Templates | 913
Working with New Features in Access 2007
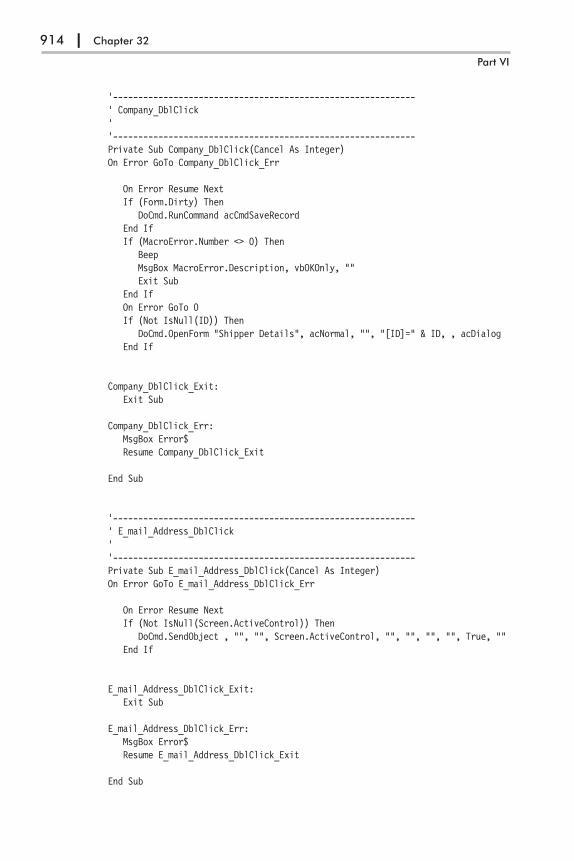
'------------------------------------------------------------' Company_DblClick''------------------------------------------------------------Private Sub Company_DblClick(Cancel As Integer)On Error GoTo Company_DblClick_Err
On Error Resume NextIf (Form.Dirty) Then
DoCmd.RunCommand acCmdSaveRecordEnd IfIf (MacroError.Number <> 0) Then
BeepMsgBox MacroError.Description, vbOKOnly, ""Exit Sub
End IfOn Error GoTo 0If (Not IsNull(ID)) Then
DoCmd.OpenForm "Shipper Details", acNormal, "", "[ID]=" & ID, , acDialogEnd If
Company_DblClick_Exit:Exit Sub
Company_DblClick_Err:MsgBox Error$Resume Company_DblClick_Exit
End Sub
'------------------------------------------------------------' E_mail_Address_DblClick''------------------------------------------------------------Private Sub E_mail_Address_DblClick(Cancel As Integer)On Error GoTo E_mail_Address_DblClick_Err
On Error Resume NextIf (Not IsNull(Screen.ActiveControl)) Then
DoCmd.SendObject , "", "", Screen.ActiveControl, "", "", "", "", True, ""End If
E_mail_Address_DblClick_Exit:Exit Sub
E_mail_Address_DblClick_Err:MsgBox Error$Resume E_mail_Address_DblClick_Exit
End Sub
914 | Chapter 32
Part VI
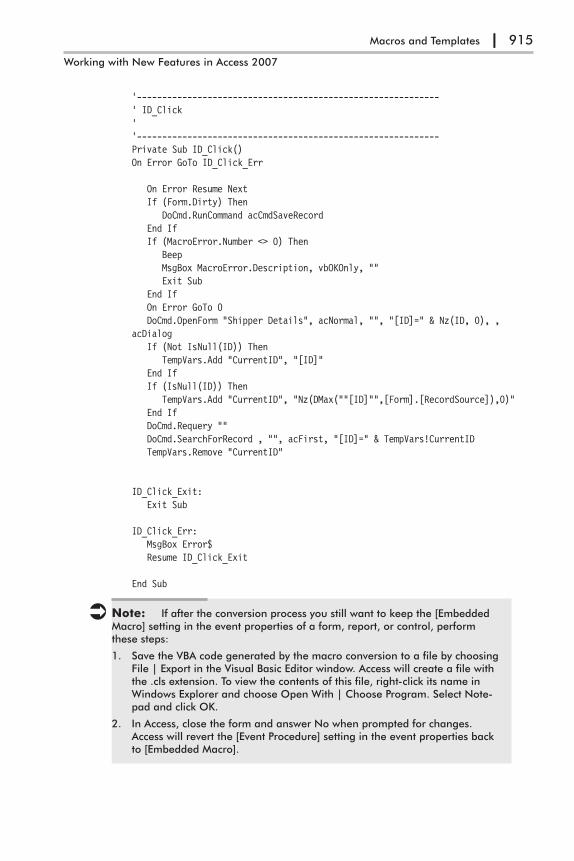
'------------------------------------------------------------' ID_Click''------------------------------------------------------------Private Sub ID_Click()On Error GoTo ID_Click_Err
On Error Resume NextIf (Form.Dirty) Then
DoCmd.RunCommand acCmdSaveRecordEnd IfIf (MacroError.Number <> 0) Then
BeepMsgBox MacroError.Description, vbOKOnly, ""Exit Sub
End IfOn Error GoTo 0DoCmd.OpenForm "Shipper Details", acNormal, "", "[ID]=" & Nz(ID, 0), ,
acDialogIf (Not IsNull(ID)) Then
TempVars.Add "CurrentID", "[ID]"End IfIf (IsNull(ID)) Then
TempVars.Add "CurrentID", "Nz(DMax(""[ID]"",[Form].[RecordSource]),0)"End IfDoCmd.Requery ""DoCmd.SearchForRecord , "", acFirst, "[ID]=" & TempVars!CurrentIDTempVars.Remove "CurrentID"
ID_Click_Exit:Exit Sub
ID_Click_Err:MsgBox Error$Resume ID_Click_Exit
End Sub
� Note: If after the conversion process you still want to keep the [EmbeddedMacro] setting in the event properties of a form, report, or control, performthese steps:
1. Save the VBA code generated by the macro conversion to a file by choosingFile | Export in the Visual Basic Editor window. Access will create a file withthe .cls extension. To view the contents of this file, right-click its name inWindows Explorer and choose Open With | Choose Program. Select Note-pad and click OK.
2. In Access, close the form and answer No when prompted for changes.Access will revert the [Event Procedure] setting in the event properties backto [Embedded Macro].
Macros and Templates | 915
Working with New Features in Access 2007

New Features in TemplatesAs stated in Chapter 30, Access 2007 comes with several prebuilt templates
that give users a head start with various types of Access database projects. The
template files can be easily recognized by their .accdt file extension. By
default, Access stores the prebuilt template files in the C:\Program Files\
Microsoft Office\Templates\1033\Access folder, as shown in Figure 32-21.
Access will also look for template files in the user’s application data directory,
which is hidden by default. On computers with Windows Vista, this folder is
named: C:\Users\<user name>\AppData\Roaming\Microsoft\Templates. On
computers with Windows XP and Windows 2000, the user’s template folder is:
C:\Documents and Settings\<user name>\Application Data\Microsoft\
Templates.
The remaining sections of this chapter focus on the new template format intro-
duced in Access 2007.
Creating a Custom Blank TemplateWhen you click the Blank Database button in the Getting Started screen (see
Chapter 30, Figure 30-1), Access provides you with an empty database that
you can customize to suit your specific needs. If you are like many users, you
start your next database project by again clicking the Blank Database button
and proceed to implement many of the same customizations that you applied to
916 | Chapter 32
Part VI
Figure 32-21: Template files included in Access 2007. The templatesthat are used to create an entire database use the .accdt file extension.The ACCFL and ACCTB files store information about field and tabletemplates that you can see in the Field Templates pane when you clickthe New Field button in the Fields & Columns group of the Datasheettab (see Chapter 31, Figure 31-2).

the previous database project. If you have been working like this, however,
you are not taking advantage of the startup template — Blank.accdb. Instead of
customizing each new blank database, simply create a new database called
Blank.accdb in the \Program Files\Microsoft Office\Templates\1033\Access
folder and customize it to include specific database properties, VBA references
and custom functions, Ribbon customizations, default forms and reports, and
customized controls, as well as any other special configuration settings that
you normally use in your database applications. The next time you click the
Blank Database button in the Getting Started screen, Access will make a copy
of your Blank.accdb database so you won’t need to start from scratch. Your
new database will already contain the common settings that you saved in the
Blank.accdb file. Moreover, if your database requirements have changed, you
can create a new Blank.accdb database with settings that conform to these new
requirements.
� Note: If you already have a database that you want to use as the startingpoint for your new Access databases, click the Microsoft Office button, andchoose Save As. Under Save the database in another format, click the file for-mat you want for the template. In the Save As dialog box, browse to the systemtemplate folder (C:\Program Files\Microsoft Office\Templates\1033\Access) orthe user template folder as discussed in the previous section. In the File namebox, type Blank.accdb or Blank.mdb, and click Save.
Understanding the ACCDT File FormatThe ACCDT file format that Access 2007 uses for its database templates is
based on the new Microsoft Office Open Packaging Convention (OPC) file
format. This file format is based on the XML and ZIP archive technologies.
The OPC file format is also used by the new .docx, .xlsx, and .pptx file formats
introduced for Word 2007, Excel 2007, and PowerPoint 2007. The OPC format
makes it possible to store a number of text, image, and .xml/.xsd files in a sin-
gle compressed file. The OPC files can be easily opened and examined. Before
you can open an Access template file (.accdt) and examine its structure, you
need to add the .zip extension at the end of the filename as shown in the fol-
lowing steps:
1. Locate the Northwind.accdt file in your Program Files\Microsoft Office\
Templates\1033\Access folder and rename it Northwind.accdt.zip.
2. When the Rename dialog box appears, click Yes to confirm that you want
to change the filename extension. The file format changes to the zip
archive.
3. To open the Northwind.accdt.zip file, right-click the filename and choose
Open With | Compressed (zipped) Folders. The folders that make up the
document are shown in Windows Explorer (see Figure 32-22).
If you are using Windows Vista, right-click the filename and choose
Extract All. In the Extract Compressed (Zipped) Folders dialog box,
Macros and Templates | 917
Working with New Features in Access 2007
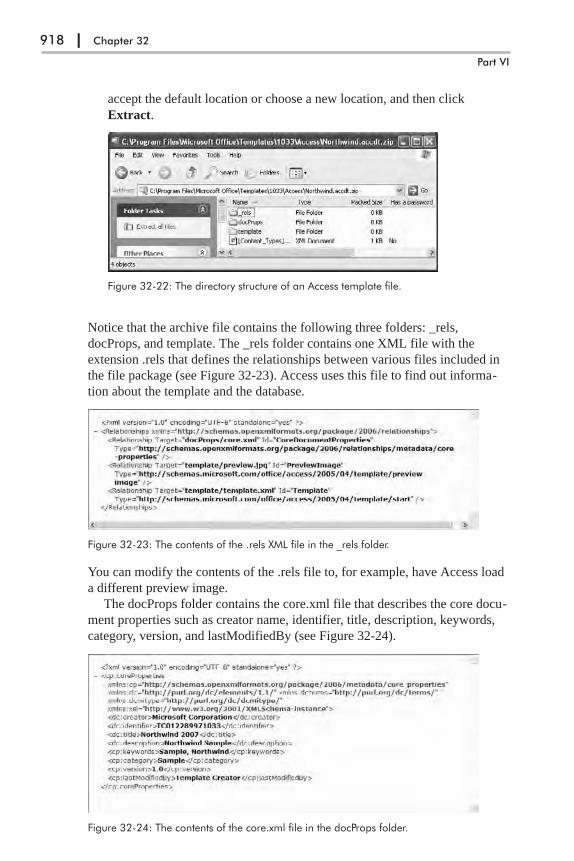
accept the default location or choose a new location, and then click
Extract.
Notice that the archive file contains the following three folders: _rels,
docProps, and template. The _rels folder contains one XML file with the
extension .rels that defines the relationships between various files included in
the file package (see Figure 32-23). Access uses this file to find out informa-
tion about the template and the database.
You can modify the contents of the .rels file to, for example, have Access load
a different preview image.
The docProps folder contains the core.xml file that describes the core docu-
ment properties such as creator name, identifier, title, description, keywords,
category, version, and lastModifiedBy (see Figure 32-24).
918 | Chapter 32
Part VI
Figure 32-22: The directory structure of an Access template file.
Figure 32-23: The contents of the .rels XML file in the _rels folder.
Figure 32-24: The contents of the core.xml file in the docProps folder.

When you double-click the template folder, you will see two subfolders named
_rels and database, as well as the preview.jpg file of the Northwind image and
a template.xml file (Figure 32-25).
The template.xml file contains information about the format of the template
file.
You can find out a lot of information about the contents and the structure of
the .accdt file by opening the database folder (Figure 32-26).
The databaseProperties.xml file in the database folder stores various database
settings and properties. You can modify this file to include additional proper-
ties that need to be set by adding new nodes to the file.
The navpane.xml file contains information about the structure of the Navi-
gation pane. It also contains the data for the Navigation pane system tables:
MSysNavPaneGroupCategories, MSysNavPaneGroups,
MSysNavPaneGroupToObjects, and MSysNavPaneObjectIDs.
The relationships.xml file contains the contents of the MSysRelationships
system table.
The vbaReferences.xml file contains all VBA project references that Access
needs to set.
If you take a look at the objects folder you will find a whole bunch of other
files that describe different database objects (Figure 32-27).
Macros and Templates | 919
Working with New Features in Access 2007
Figure 32-25: The contents of the template folder.
Figure 32-26: The contents of the database folder.

You can open any of the files listed in the above figure to find out what type of
information is stored. Since this chapter covered macros, take a look at the
SupplierList.txt file to find out how Access stores the embedded macros.
� Note: When you are done viewing the files, rename theNorthwind.accdb.zip file back to its original name — Northwind.accdb.
Chapter SummaryThis chapter introduced you to the new features in Access 2007 macros. We
took a detailed look at macro security, created standalone and embedded mac-
ros, saw examples of temporary variables (TempVars), and examined the new
error-handling actions in macros. We also learned how standalone and embed-
ded macros can be converted to Visual Basic code. Because Access 2007 uses
embedded macros extensively in its templates, we examined the structure and
contents of the new ACCDT file format. If you need to create template files
yourself, I recommend that you download from the Microsoft web site the
Access Developer Extensions (ADE) for Microsoft Access 2007. This tool is
absolutely free for you to use and explore.
920 | Chapter 32
Part VI
Figure 32-27: Files in the objects folder contain information about differentdatabase objects in the template file as well as information about sample dataand properties for each object included in the template.

921
Index
- wildcard character, 352
!, 331
! type declaration character, 47
! wildcard character, 352
# type declaration character, 47
# wildcard character, 352
#Const directive, 186
$ type declaration character, 47
% type declaration character, 47
% wildcard character, 352
& operator, 4
& type declaration character, 47
* wildcard character, 352
// (match attribute), 724
/WRKGRP switch, 447
?, 38, 677
? wildcard character, 352
@, 556
@ type declaration character, 47
@* (in XML), 772
[] wildcard character, 352
_ wildcard character, 352
< operator, 94
<% and %> directives, 665
<= operator, 94
<> operator, 94
= operator, 94
> operator, 94
>= operator, 94
A
AbsolutePosition property, 313
ACCDB file format, 198
ACCDB files, and security, 438
ACCDT file format, 917
ACCDT files, adding .zip extension to,
917-918
Access,
data types, 257
file formats in, 199-201
hiding elements of user interface, 796
macros in, 888
versions of, 198
Access 2007,
creating macros in, 894-895, 898-899
data types, 843
form types, 875-877
updates, 779, 840-845, 874, 884, 888-889,
916
Access Connectivity Engine, see ACE
accounts, see group accounts and user accounts
ACE, 198
Activate event, 574-575, 613-614
Active Server Pages, see ASP
ActiveX Data Object, see ADO
ActiveX Data Object Extension for DDL and
Security, see ADOX library
ADD COLUMN clause, 506
ADD CONSTRAINT clause, 509
ADD USER statement, 542
Add Watch dialog box, 176-177
AddNew method, 326, 328
ADO,
adding fields to table, 260
adding records to tables, 328-329
changing password, 469-471
checking object permissions, 464-466
components of, 205-206
copying records, 339-344
copying tables, 258-259
creating database, 240-241
creating disconnected recordset, 392-393
creating primary key, 275-278
creating queries, 356-358, 364-366,
378-380
creating recordset, 390-391
creating shaped recordset, 415-421
creating table, 254-256, 500-501, 503-504
creating transaction, 431-433
creating user and group accounts, 449-452
data providers, 212
data types, 257
deleting indexes, 282-283

deleting query, 385-386
deleting records, 335-336
deleting table, 259-260, 504-505
deleting user and group accounts, 452-453
executing queries, 358-361, 366-367,
370-372, 380-381
filling combo box with disconnected
recordset, 395-397
filtering records, 345-348
listing indexes in table, 281-282
listing queries, 383-384
listing user and group accounts, 453-455
listing users in groups, 455-456
modifying records, 331-332
modifying query, 361-362
opening database, 220-224, 226-228
opening Excel spreadsheet, 236-237
opening text file, 237-238
removing fields from table, 262
retrieving name of object owner, 457-458
setting user permissions, 460-464
sorting records, 348-349
updating records, 332-334
ADO Object Library, creating reference to,
206-207
ADO Recordsets, 298
converting to string, 315-317
counting records in, 324-325
determining position of record in, 313-314
filtering records in, 323-324
navigating, 312-313
opening, 305-312
retrieving values from fields with, 314-315
saving as XML files, 764-766
ADO.NET, 206
ADODB Object Model, 205, 255
ADOX library, 254
ADOX Object Model, 206, 255
AfterDelConfirm event, 573-574
AfterFinalRender event, 601-602
AfterInsert event, 566-567
AfterLayout event, 596-598
AfterRender event, 600
AfterUpdate event, 568-570, 628-629
alias, 670
ALL predicate, 353
ALTER COLUMN clause, 507, 508
ALTER DATABASE PASSWORD statement,
537
ALTER TABLE statement, 506, 515
ALTER USER statement, 541
AND operator, 94
ANSI SQL query mode, 497
setting, 498-499
APPEND command, 413
Append method, 390
Append Only memo fields, 868-869
working with, 869-873
Append query, 372
running, 372-374
ApplyFilter event, 585-587
arguments, 4, 72
optional, 75-77
passing, 74-75
vs. parameters, 93
Array function, 135-136
array variable, 126
arrays, 124
and data types in, 126
declaring, 126
default values of elements in, 129
dimensioning, 135
dynamic, 133-135
errors in, 138-140
finding bounds of, 137-138
fixed-dimension, 133
functions in, 135
lower bound of, 127
one-dimensional, 124-125
parameter, 140-141
passing between procedures, 131
range of, 127
removing data from, 137
static, 133
three-dimensional, 126
two-dimensional, 124, 125
upper bound of, 127
using, 127-135
As keyword, 47
ASP, 661-663
ASP Object Model, 668
ASP pages,
breaking into separate pages, 674-678
creating, 663-668
creating data entry form in, 694-697
creating user interface with, 707-711
loading from hyperlink, 679-681
requesting, 671-672
retrieving records with, 672-674, 682-684
updating, 698-702
using with delete operation, 702-706
ASP.NET, 663
922 | Index
Attachment data type, 843, 846-847
attachments,
adding, 848, 855-857
deleting from table records, 857-858
listing, 851-853
retrieving fields with, 853-854
saving, 854-855
using queries to return rows with, 849-850
using with VBA, 850-851
working with, 846-858
Attachments control, 881
working with, 881-883
Attachments dialog box, 848
attribute-centric XML, 766-767
transforming, 767-768, 770-773
AutoExec macro, 891
using, 891-892
AutoNumber, 273
changing seed and increment values of,
515-516
changing value of, 273-274
data type, 843
B
batch updates, 332
BeforeDelConfirm event, 572-573
BeforeInsert event, 565-566
BeforeQuery event, 593
BeforeRender event, 598-600
BeforeScreenTip event, 596
BeforeUpdate event, 567-568, 627-628
BEGIN TRANSACTION statement, 520
BeginTrans method, 431, 433
BETWEEN…AND operator, 352
bitmask, 459
BOF property, 310
Bookmark property, 321
bookmarks, 321
navigating with, 189
removing, 189
setting up, 188-189
using, 321-323
Boolean data type, 41
Boolean expressions, 94
bound controls, 56
bound Image control, 880
break mode, 174-175
breakpoints,
removing, 174
setting, 169
vs. watch expressions, 177
built-in constants, see intrinsic constants
built-in functions, 77
ByRef keyword, 75
Byte data type, 41
ByVal keyword, 75
using, 74-75
C
Calendar control, 843-844
Call Stack dialog box, 182
Call statement, 10
callback procedures, 797
CancelUpdate method, 331
Case clause,
specifying multiple conditions in, 110
specifying range of values in, 108-109
Case Else clause, 106
capturing errors with, 108
Case Is clause, 108
Catalog object, 357
executing query with, 360-361
change events, 602-605
ChangePassword method, 469-471
chapter column, 414
character encoding, in XML, 718
check boxes, creating, 826-827
CHECK constraint, 517
using, 518-521
child nodes, 428
child recordset, 413, 417
class methods, 152
class modules, 11-13, 142, 147
creating, 147
naming, 148
sinking events in standalone, 639-648
standalone, 11, 639
types of, 11
classes, 142, 147
creating instances of, 153
events in, 153-154
responding to control events in, 649-652
variables in, 148
Classes list box (Object Browser), 34
ClearMacroError macro action, 906
Click event, 576, 631-635
client-side cursor, 301
client-side scripts, 666
Clone method, 407
Close event, 613
code, skipping, 185
Code Builder, 15-16
code template area (Object Browser), 34-35
Index | 923
Code window, 16, 25-27
working with in break mode, 175
collections, 142-143
adding objects to, 144-145
creating, 145-146
declaring, 144
reindexing, 146
removing objects from, 146
working with, 143-144
column,
defining, 523
specifying conditions for, 518-519
Column object, 256
Columns collection, 256
combo boxes,
creating, 828-829
filling with disconnected recordset, 395-397
command events, 605-608
Command object, 356
using to execute query, 371-372
CommandBars object, 836-837
CommandBeforeExecute event, 607
CommandChecked event, 606-607
CommandEnabled event, 605-606
CommandExecute event, 608
Comment Block feature, 32-33
comments, 32-33
COMMIT TRANSACTION statement, 520
CommitTrans method, 431, 433
CompactDatabase method, 227-228, 241, 246,
466-467, 471
CompactRepair method, 246
comparisons, string, 8-9
compilation, conditional, 186-188
Complete Word feature, 31
concatenation, 45
conditional compilation, 186-187
using, 187-188
conditional expression, 94
conditions, evaluating multiple, 98-99
configuration, of Navigation pane, 788-790
conflict table, retrieving name of, 492-493
ConflictTables property, 491
Connection object, 211-212
connection strings, 207-208
creating via data link file, 215-218
ConnectionString property, 220
Const keyword, 64
constants, 30, 64
assigning title text to, 89
declaring, 64-65
grouping, 67-68
intrinsic, 65-67
CONSTRAINT clause, 523, 528
constraints, 505, 517
deleting, 522
Container object, 204
Container objects, 218-219
containers, setting user permissions for,
462-464
content, enabling, 19-20
control events, 625-637
responding to, 649-652
controls,
formatting in Report view, 885-886
grouping using Layouts, 877-878
CopyFile method, 242-243
CopyFromRecordset method, 336
counters, 117
CREATE GROUP statement, 542
CREATE INDEX statement, 529, 532
Create method, 240
CREATE PROC statement, 553-554
CREATE PROCEDURE statement, 553-554
CREATE TABLE statement, 499, 523, 528
using, 500-501, 503-504
CREATE USER statement, 539
CREATE VIEW statement, 549
CreateDatabase method, 239
CreateObject function, 338
CreateQueryDef method, 354-355
CreateReplica method, 477
criteria, opening ADO recordset based on, 311
Currency data type, 41, 843
Current event, 564-565
CurrentDb method, 230
CursorLocation parameter, 301-302
cursors, 298-299
client-side, 301
server-side, 301
types, 299-300
CursorType parameter, 299-300
D
DAO,
adding attachments, 855-857
adding fields to table, 261-262
adding records to tables, 327
adding values to multi-value fields, 865-867
copying database, 241-242
copying records, 341-342
creating database, 239-240
creating primary key, 278
924 | Index

creating queries, 354-356, 362-364,
368-370, 376-378
creating table, 249-251, 502
creating transaction, 433-436
deleting attachments, 857-858
deleting query, 384-385
deleting records, 334-335
determining if queries are updatable,
386-387
executing queries, 372-376
filtering records, 344-347
modifying records, 329-331
opening database, 218-220, 223-226
opening Excel spreadsheet, 234-235
removing fields from table, 262-263
retrieving list of attachments, 851-853
retrieving query properties, 382-383
retrieving values from multi-value fields,
864-865
saving attachments, 854-855
setting database password, 468-469
working with Append Only memo fields,
869-873
DAO database, accessing current, 230-231
DAO Recordsets,
finding records in, 293-298
moving between records in, 292-293
opening, 289-290
retrieving field contents in, 292
retrieving number of records in, 290-291
types of, 287-288
data,
exporting file, 715-716, 733-734
filtering in Access 2007, 844
grouping in Access 2007, 886
members, 148
providers, 205
reading from field, 314-315
searching in Access 2007, 844
sorting in Access 2007, 886
updating, 334
Data Access Object, see DAO
Data Definition Language, see DDL
Data Definition Query window, 522, 525-526
data entry form, creating, 694-697
data events, 564-574
Data Link Properties dialog box, 215, 217
Data Manipulation Language, see DML
data shaping, 413
working with, 414-415
data source events, 590-595
Data Source Name, see DSN
Data tab export options, 726-727
data types, 41-42
Access, 257
Access 2007, 843
ADO, 257
changing for field, 507
converting, 87-88
declaring for variables, 47
enumerated, 67-68
finding for variables, 63-64
in arrays, 126
listing, 272-273
specifying for function result, 72-73
specifying for variables, 46
SQL, 501-502
table design, 501-502
understanding, 46-47
database lookups, 684-693
Database object, 204
database password,
deleting, 538-539
setting, 537-538
database replication, 474
databases,
compacting, 246-247
copying, 241-243
creating, 239-241
creating table in, 500-504
deleting table in, 504-505
enabling components of, 19-20
encrypting with JRO, 471-473
opening in read/write mode, 218-223
opening in read-only mode, 223-224
opening password-protected, 224-228
opening with user-level security, 228-230
placing in trusted location, 20-21
securing, 441-449
setting user permissions for, 461-462
Databases collection, 204
DataChange event, 602-603
dataroot element, 719
DataSetChange event, 603
Datasheet view, 840
Date data type, 42
Date/Time data type, 843
dBASE file, reading, 210-211
dBASE table, linking, 267
DBEngine object, 204
DblClick event, 576, 609, 635-637
Index | 925

DDL, 497, 499
working with, 525-527
Deactivate event, 575, 614
debugging, 168
Decimal data type, 42
declaration section, 8
Delete event, 571-572
Delete method, 334
Delete query, 374
running, 375-376
DELETE statement, 374-375
Design Master, 475
creating, 476-477
DHTML, 662
dialog box launcher, creating, 830-832
Dim keyword, 5, 43, 53, 126, 135
directives, 186
Dirty event, 570-571
DISALLOW NULL option, 532
using, 533-534
disconnected recordset, 392
creating, 392-393
filling combo box with, 395-397
display events, 595-602
DISTINCT predicate, 353
DISTINCTROW predicate, 353
DLL, 198
DML, 499
Do…Until statement, 115-116
using, 115-117
Do…While statement, 112, 114
using, 113-115
Double data type, 41
DROP COLUMN clause, 509, 511
DROP CONSTRAINT clause, 511
drop-down list box, creating, 684-688
drop downs, creating, 828-829
DROP GROUP statement, 547
DROP INDEX statement, 535
DROP PROC statement, 559
DROP PROCEDURE statement, 559
DROP TABLE statement, 504
DROP USER statement, 543-544
DROP VIEW statement, 553
DSN, 209
DSN connection, 209
creating, 210-211
DSN-less connection, 209
creating, 213
DSN types, 209
dynamic array, 133
using, 134-135
Dynamic HTML, see DHTML
dynamic link library, see DLL
Dynamic-type recordset, 288
Dynaset-type recordset, 287
finding records in, 295-296
opening, 289-290
E
edit boxes, creating, 828
Edit toolbar, 28
element-centric XML, 766-767
transforming attribute-centric XML to,
767-768
element nodes, see nodes
Else clause, 99
ElseIf clause, 102
embedded macros, 894
converting to VBA, 910-915
copying, 899-904
creating, 898-899
encryption, database, 471-473
End Function keywords, 5
End Property keywords, 149
End Select clause, 106
End Sub keywords, 3
Enter event, 626-627
Enum keyword, 67
EOF property, 310
Erase function, 136-137
Err object, 191, 244
using, 245
Error event, 583-584, 616-617
error events, 583-584
error handler, 243
error handling, 189-192, 905-907
testing, 193
Error object, 244
error trapping, see error handling
errors, 167-168
capturing with Case Else clause, 108
generating, 193
handling, 189-192, 905-907
in arrays, 138-140
logic, 168
responding to, 189-190
run-time, 168
syntax, 167-168
vs. mistakes, 190
Errors collection, 204, 244
using, 245
926 | Index

event
property, 13-14, 563
sink, 638
source, 638
trapping, 14, 563
event-driven application, 13
event procedures, 6, 14, 142, 563
naming, 16
writing, 14-19, 156-163, 648
Event statement, 638, 652-653
event types
change, 602-605
class, 153-154
command, 605-608
control, 625-637
data, 564-574
data source, 590-595
display, 595-602
error, 583-584
filter, 584-587
focus, 574-575
form section, 609
keyboard, 579-583, 608
mouse, 576-578, 608
PivotChart, 588-589
PivotTable, 588-589
report, 611-617
report section, 617-623
timing, 587-588
events, 13, 142, 153, 563, 564
declaring, 652-656
raising, 653-656
reasons to use, 14
responding to in class, 649-652
sequence of, 563-564
sinking, 639
sourcing, 639
Excel file formats, 339
Excel spreadsheet,
copying records to, 336-339
linking, 268-269
opening, 233-237
Execute method, 370
using to open ADO Recordset, 306-307
Exit Do statement, 113, 121
Exit For statement, 121
Exit Function statement, 121
Exit Property keywords, 149
Exit Sub statement, 121
explicit variable declaration, 42
Export XML window, 726-729
ExportNavigationPane method, 788
ExportXML method, 740-743
using, 743-749
expression-based filters, 479
Extensible Markup Language, see XML
Extensible Stylesheet Language, see XSL
F
fetching, asynchronous, 304
Field object, 204
field templates, 841-842
fields,
adding to table, 260-262, 506-507
changing data type of, 507
changing size of, 508
creating for table, 251-252, 256-257
deleting, 509, 511-512
listing, 271-272
reading data from, 314-315
removing from table, 262-263
retrieving, 853-854
retrieving contents of, 292
retrieving properties of, 265
setting default value for, 513-514
setting properties for, 252-254
Fields collection, 204
File DSN, 209
file formats,
Access, 199-201
Excel, 339
FileSystemObject, 477
copying database with, 242-243
Filter event, 584-585
filter events, 584-587
Filter property, 320
using to filter records, 346-348
filters, 479
Find method, 317
Find methods, 295
fixed-dimension arrays, 133
focus events, 574-575
For Each…Next statement, 120
For…Next statement, 117-118
using, 118-119
foreign key, 284, 523
setting, 523
FOREIGN KEY constraint, 517, 523
form designs, 878-879
form modules, 12-13, 142
form section events, 609
Format event, 618-620
Index | 927
forms,
Access 2007 updates to, 874
creating, 875-877
rich text formatting in, 878
types in Access 2007, 875-877
using images in, 879-880
Forward-only-type recordset, 288
FROM keyword, 350
full replica, 475
creating, 477-478
Function keyword, 5
function procedures, see functions
functions, 5
built-in, 77
debugging, 170-173
executing, 9-11, 71-72
exiting, 121
passing arguments to, 74-75
specifying data type of result, 72-73
testing, 77
using Select Case statement in, 109-110
vs. subroutines, 74
writing, 70-71
G
GET method, 687-688
getImage callback, using to load images,
816-821
GetObject function, 338
GetObjectOwner method, 456-457
GetPermissions method, 464
GetRows method, 324
using to retrieve records, 681-684
GetString method, 315, 341
Getting Started with Microsoft Office Access
window, 779-781
global variables, 55-56
global variables form, 56
GotFocus event, 575
GRANT statement, 545
group accounts,
creating, 449-452, 542
deleting, 452-453, 547
listing, 453-455
Group, Sort, and Total pane, 886
groups,
adding to Navigation pane, 783-784
adding users to, 542-543
assigning objects to in Navigation pane,
784-785
displaying in Navigation pane, 788
granting permissions for tables to, 545-546
listing users in, 455-456
removing user from, 543-544
H
hierarchical recordsets, using, 422-430
HTML, 662
transforming attribute-centric XML to,
770-773
HTML file, exporting data to, 733-734
HTML form, using with delete operation,
702-706
HTML tags, 662, 666-667
<A>, 677
<B>, 677
<BASE>, 710
<BODY>, 667
<BR>, 677
<CENTER>, 680
<FORM>, 687
<FRAMESET>, 708
<HEAD>, 667
<HR>, 677
<HTML>, 667
<I>, 677
<IMG>, 709
<NOFRAMES>, 708
<OPTION>, 687
<PRE>, 691
<TABLE>, 667
<TD>, 667
<TH>, 667
<TITLE>, 667
<TR>, 667
Hyperlink data type, 843
hyperlink, loading ASP page from, 679-681
HyperText Markup Language, see HTML
I
If block,
indenting, 99
inner, 105
outer, 105
If…Then statement, 95
formatting, 97
multi-line, 96
using, 95-97, 102-105
If…Then…AND statement, 98-99
If…Then…Else statement, 99-100
using, 100-101
If…Then…ElseIf statement, 101-102
IGNORE NULL option, 532
using, 534-535
928 | Index
IIS, installing, 668-669
Image control, bound, 880
images,
loading, 812-816, 816-821
using, 879-880
Immediate window, 36-37
asking questions in, 38
using in break mode, 174-175
working with, 37
implicit variable declaration, 42-43
implicit variables, 42, 44
ImportNavigationPane method, 788
ImportXML method, 756-757
IN operator, 351
Indent/Outdent feature, 31-32
Index object, 279
indexes, 275, 528
adding multiple-field, 510-511
adding to table, 529-530
creating in tables, 528-529
creating primary key, 532-533
defining, 279
deleting, 282-283, 512-513, 535-536
deleting field from, 511-512
disallowing Null values in, 533-534
ignoring Null values in, 534-535
listing, 281-282
multiple-field, 280-281
placing restrictions on, 532-535
single-field, 279-280
Indexes collection, 281
infinite loop, 115
Initialize event, 153-154, 652
InputBox function, 72, 85-86
using, 86-87
INSERT INTO statement, 372, 555
instance, 142, 147
creating, 153
Integer data type, 41
IntelliSense technology, 28
Internet Information Services, see IIS
intrinsic constants, 65
accessing, 66
using, 66-67
IRibbonControl object, 801
IS NULL operator, 352
IsArray function, 136
IsMissing function, 77
J
JavaScript, 662
Jet, 197-198
Jet database table, linking, 266-267
Jet/ACE OLEDB:Database Password property,
538
JOIN statement, 370, 412
JRO,
encrypting database with, 471-473
filters, 479
library, 226
setting database password with, 467-468
JRO Object Model, 206
K
Key object, 275
keyboard events, 579-583, 608
KeyDown event, 579-580
KeyPress event, 580-581
KeyUp event, 582-583
keywords, 3, 16
L
Layout view, 877-878
LBound function, 137-138
libraries, 33, 201
missing, 202
referencing, 201-203
registering, 202
lifetime of variable, 52
LIKE operator, 351
wildcard characters, 352
list, see one-dimensional array
List Constants feature, 30
List Properties/Methods feature, 28-29
loadImage callback, using to load images,
812-816
local variables, 52-53
Locals window, 181
using, 182
lock types, 300-301
LockType parameter, 300-301
logic errors, 168
logical operators, 94
Long data type, 41
Loop statement, 112
looping, 112
loops, 113
exiting early, 121
infinite, 115
nested, 122-123
using variables in, 116
using with arrays, 129-132
LostFocus event, 575
Index | 929
M
macro actions, 892-893
macro groups, 895-896
creating, 896-897
macro security, 889-891
macro settings, changing, 889-891
MacroError object, 905-906
macros,
converting to VBA code, 908-915
copying embedded, 899-904
creating, 894-895, 898-899
embedded, 894
error handling in, 905-907
in Access, 888
running standalone, 897-898
standalone, 894
updates in Access 2007, 888-889
using temporary variables in, 907-908
using TempVars collection with, 59
working with, 892-893
MakeReplicable method, 475
Make-Table query, 367
creating, 368
MDB file format, 197
MDB files,
and replication, 474
and security, 438
Members list box (Object Browser), 34
Memo data type, 843
memo fields,
Append Only, 868-873
Rich Text, 873-874
message box, formatting, 78-80
methods, 147, 152
class, 152
Microsoft Access 12.0 Object Library, 203
Microsoft Access DAO 3.6 Object Library,
204-205
Microsoft ActiveX Data Objects 2.8 Library,
205-206
Microsoft Jet and Replication Objects Library,
see JRO
Microsoft Jet database engine, see Jet
Microsoft Office 12.0 Access database engine
Object Library, 203
Microsoft Office Web Components Object
Library, 589
referencing, 590
mistakes vs. errors, 190
module-level variables, 53-54
using, 54-55
modules, 6, 142
class, see class modules
naming, 12
standard, see standard modules
types of, 6
mouse events, 576-578, 608
MouseDown event, 577-578
MouseMove event, 577
MouseUp event, 577
MouseWheel event, 577
Move methods, 293
MsgBox function, 72, 78
buttons argument settings, 80-81
formatting message box with, 78-80
returning values from, 84-85
using parentheses with, 85
using with arguments, 82-84
MSXML Object Library, setting reference to,
757-758
multiple conditions, finding record based on,
320-321
multiple-field index,
adding to table, 510-511
creating, 280-281
multiple-selection list box, creating, 688-693
multi-value fields, 859
adding values to, 865-867
creating, 859-861
editing values in, 861-862
retrieving values from, 864-865
returning rows with, 862-864
using with VBA, 864-865
N
namespace, 719
NavigateTo method, 786
using to control display of database objects,
787-788
Navigation Options dialog, 783-784
Navigation pane,
adding group to, 783-784
assigning objects to groups in, 784-785
customizing with VBA, 782-790
displaying categories in, 788
displaying system objects in, 806
loading configuration of, 788-790
locking, 785
saving configuration of, 788-790
nested loops, 122-123
nested statements, 105
If…Then, 102-105
New keyword, 144, 153
930 | Index

NewPassword method, 468
NewPassword property, 224
NoData event, 614-615
Node objects, 428
nodes, 428, 720
creating, 428-430
retrieving information from, 761-764
using in XML, 760-761
NOT NULL constraint, 517
NOT operator, 94
NotInList event, 630-631
Null, using with passwords, 538
Null values, using in indexes, 533-535
Number data type, 843
numeric variables, 46
O
Object Browser, 33-35
Object data type, 42
Object drop-down (Code window), 16, 26
object instance, 147
object libraries,
Microsoft Access 12.0, 203
Microsoft Access DAO 3.6, 204-205
Microsoft ActiveX Data Objects 2.8,
205-206
Microsoft Office 12.0 Access database
engine, 203
Microsoft Office Web Components, 589
VBA, 35, 203
object models,
ADODB, 205
ADOX, 206, 255
ASP, 668
JRO, 206
object owner, 456
retrieving name of, 457-458
object variables, 61
using, 61-63
objects, 153
assigning to groups in Navigation pane,
784-785
checking for replicability of, 481-482
checking permissions for, 464-466
controlling display of, 787-788
creating, 153
granting permissions for, 545
preventing replication of, 483-484
replicating, 483
setting user permissions for, 458-461
ODBC connection, creating, 210-211, 213
ODBC connection strings, 207-208, 214
using, 209-214
ODBC Data Source Administrator, 209
Office button, 780-781
Office menu, 780
customizing, 837-838
OLE DB, 205
OLE DB connection strings, 207-208, 215
OLE Object data type, 843
ON DELETE statement, 523
On Error statement
options, 190
types, 244
ON UPDATE statement, 523
OnConnect event, 590-593
OnDisconnect event, 593
one-dimensional array, 124-125
using, 127-128
OnError macro action, 905
one-to-many relationship, creating, 284-286
OnUndo event, 571
OPC file format, 917
Open event, 611-612
Open method, 298
using to open ADO Recordset, 307-308
OpenDatabase method, 218, 223, 233
OpenForm macro action, 893-894
OpenRecordset method, 288-291
OpenSchema method, 271-272
operators,
logical, 94
relational, 94
SQL, 351-352
Option Base statement, 127
Option Compare statement, 8
Option Explicit statement, 50, 52
Option Private Module statement, 56
optional arguments, 75-76
using, 76-77
Optional keyword, 75
Options parameter, 302-305
OR operator, 94
ORDER BY clause, 354, 549, 552-553
P
Page event, 615-616
pages, breaking recordset into, 674-678
ParamArray keyword, 140
parameter arrays, 140-141
Parameter Info feature, 29-30
Parameter object, 204
Index | 931
Parameter query, 362
creating, 362-366
executing, 366-367
parameterized stored procedures,
creating, 555-557
executing, 557-559
parameters,
specifying names of, 225
vs. arguments, 93
Parameters collection, 204
parent-child relationship, 413
parent nodes, 428
parent recordset, 413
parser, 713
partial replica, 475, 478
creating, 479-481
Pass-Through query, 376
creating, 376-380
executing, 380-381
password,
changing, 469-471, 541
deleting, 538-539
setting, 224-228, 466-469, 537-538
using Null with, 538
PDF format, saving reports in, 886-887
PERCENT predicate, 354
permissions, 456
checking for objects, 464-466
granting for objects, 545
revoking, 546-547
setting, 458-464
persisted recordset, 394, 397
using, 397-407
PivotChart events, 588-589
PivotTable events, 588-589
PivotTableChange event, 603-604
PopulatePartial method, 479
POST method, 697
predefined constants, see intrinsic constants
predicates, SQL, 352-354
Presentation tab export options, 728-729
Preserve keyword, 134-135
primary key, 275, 531
adding to table, 509-510
creating, 275-278, 531-532
setting, 523
PRIMARY KEY constraint, 517
primary key index, creating, 532-533
PRIMARY KEY keywords, 509, 531
PRIMARY option, 532
using, 532-533
Print event, 620-623
Private keyword, 53, 148
Procedure drop-down (Code window), 16, 26
procedure-level variables, see local variables
procedure section, 9
procedures, 3
breaking up, 89-93
compiling, 19
creating, 150-151
event, see event procedures
executing, 9-11
function, see functions
passing arrays between, 131
property, see property procedures
resetting, 186
resuming execution of, 185-186
running to selected line, 185
stepping out of, 185
stepping over, 184-185
stepping through, 182-184
stopping, 168-169
subroutine, see subroutines
testing, 168, 192
types of, 3
watching execution of, 164-166
writing in standard modules, 6-9
programming assistance, 28-33
Project Explorer window, 22-23
Project/Library drop-down (Object Browser),
33
properties, 147
application-defined, 252-253
retrieving, 263-265, 382-383
setting for fields, 252-254
user-defined, 252-254
Properties collection, 204
Properties window, 23-24
using to view form properties, 24-25
Property Get procedures, 148
creating, 150
Property keyword, 6
Property Let procedures, 148
creating, 150-151
property procedures, 6
declaring, 149
exiting, 149
scope of, 151
syntax for, 149
types of, 6, 148-149
Property Set procedures, 149
property sheet, 13
932 | Index

Public keyword, 55
public variables, see global variables
Q
queries, 350
deleting, 384-386
determining if updatable, 386-387
listing, 383-384
non-row-returning, 372
opening ADO recordset based on, 308-309
retrieving properties for, 382-383
row-returning, 358, 366
saving tables as, 846
temporary, 356
using to return rows, 849-850, 862-864
Query event, 593-595
QueryDef object, 204, 354-355
Quick Access toolbar, 781
Quick Format gallery, 878-879
Quick Info feature, 31
Quick Watch dialog box, 180
using, 180-181
R
RaiseEvent statement, 639, 653
records,
adding to table, 327, 328-329
archiving, 433-436
cloning, 407-412
copying, 336-344
counting, 309, 324-325
deleting, 334-336, 702-706
determining position of, 313-314
discarding changes to, 332
fetching, 304
filtering, 323-324, 344-348
finding, 295-298, 317-321
inserting, 431-433
marking with bookmark, 322-323
modifying, 329-332, 698-702
moving between, 292-293
navigating, 312-313
retrieving, 672-674, 681-684
saving to disk, 394-395
sort order of, 354
sorting, 348-349
updating, 332-334
using stored procedures to modify, 560
Recordset object, 204, 212-213, 269, 287, 298
see also ADO Recordsets and DAO
Recordsets
recordsets,
breaking into multiple pages, 674-678
checking for records in, 310
child, 413, 417
creating, 389-392
determining if in other recordset, 418
disconnected, 392-393
hierarchical, 422-430
navigating, 288
opening, 288-289
parent, 413
persisted, 394, 397
shaped, 413, 415-417
working with shaped, 418-422
Recordsets collection, 204
ReDim statement, 133, 135
reference,
creating for ADO Object Library, 206-207
setting to MSXML Object Library, 757-758
REFERENCES clause, 523
References dialog box, 201-202
referential integrity, 523
RefreshDatabaseWindow method, 502
RELATE command, 413
Relation object, 204
relational operators, 94
relationship-based filters, 479
relationships, creating between tables, 523-525
RemoveAllTempVar macro action, 908
RemoveTempVar macro action, 908
Replica object, 475
replicas, 475
creating, 477-481
properties of, 486
retrieving properties of, 486-488
synchronizing, 485-486, 488-491
types of, 475
Replication Conflict Viewer window, 490-491
replication, database, 474
report events, 611-617
report modules, 12-13
report section events, 617-623
Report view, 884-885
formatting control in, 885-886
ReportML, 715
reports,
Access 2007 updates to, 884
assigning Ribbon customizations to,
808-812
saving in PDF format, 886-887
saving in XPS format, 886-887
Index | 933
reserved words, see keywords
Reset option, 186
Retreat event, 623
REVOKE statement, 546
RGB colors, 17
Ribbon, 790-793
hiding, 796
programming, 793-794
refreshing, 833-836
Ribbon controls, 822
creating, 823-832
disabling, 832-833
repurposing, 833
Ribbon customizations,
assigning to reports, 808-812
creating XML markup for, 794-797
embedding in VBA procedure, 804
loading, 797-803
storing, 804-808
using images in, 812-821
RibbonX, 793
rich text formatting, 878
Rich Text memo fields, 873-874
Rollback method, 431, 433
ROLLBACK TRANSACTION statement, 520
root nodes, 428
rows, shading, 845
Run To Cursor option, 185
run-time errors, 168
S
safe expression, 905
Sandbox mode, 905
Save method, 394
schema file, 750
importing, 735-740
Schema tab export options, 727-728
scope
of property procedures, 151
of variables, 52
scripts, 666
Search Results section (Object Browser), 34
Search Text box (Object Browser), 33-34
security,
Access, 437-438
features, 19
share-level, 224, 438
user-level, 228, 438
Security Wizard, 441-446
Seek method, 294, 318-319
Select Case statement, 106
using, 106-110
SELECT INTO statement, 367-368
SELECT keyword, 350
Select query, 350
creating, 354-358
executing, 358-361
modifying, 361-362
SelectionChange event, 604-605
server-side cursor, 301
server-side scripts, 666
SET DEFAULT clause, 513
Set Next Statement option, 185
SetDisplayedCategories macro action, 893
SetDisplayedCategories method, 788
SetObjectReplicability method, 481
SetPermissions method, 458-459
SetTempVar macro action, 907
shadow properties, 899-900
SHAPE command, 413
generating, 422
shaped recordset, 413
creating, 415-417
with grandchildren, 421-422
with multiple children, 418-421
share-level security, 224, 438
Show Next Statement option, 186
sibling nodes, 428
signature, 822
Single data type, 41
single-field index, creating, 279-280
SingleStep macro action, 906-907
Snapshot-type recordset, 287
finding records in, 297
opening, 289-290
retrieving number of records in, 290-291
sort order, 354
Sort property, 348
split button, creating, 824-826
SQL, 497
data types, 501-502
expression, 351
operators, 351-352
predicates, 352-354
versions, 497
SQL Server database, connecting to, 232-233
SQL statement, opening ADO recordset based
on, 310-311
SQLOLEDB provider, 208, 232
using to connect to SQL Server database,
232-233
standalone class modules, 11, 639
sinking events in, 640-648
934 | Index

standalone macros, 894
converting to VBA, 908-910
creating, 894-895
running, 897-898
standard modules, 6
working in, 6-9
Standard toolbar, 23
statements, 4
nesting, 105
static array, 133
Static keyword, 53, 59
static variables, 59
using, 59-60
Step Into option, 182
Step Out option, 185
Step Over option, 184
Stop Macro macro action, 906
Stop statement, 175-176
stored procedures, 549
creating, 553-554
deleting, 559-560
naming, 554
parameterized, 555-559
using to change records, 560
String data type, 42
string variables, 46
strings,
comparing, 8-9
concatenating, 4, 45
converting ADO recordset to, 315-317
Structured Query Language, see SQL
stylesheet,
applying, 733-734, 768-770
creating, 729-732
Sub keyword, 3
subprocedures, see subroutines
subroutine procedures, see subroutines
subroutines, 3-5
exiting, 121
passing arguments to, 74-75
using, 93
vs. functions, 74
Subscript out of range error, 136, 138-139
synchronization
conflicts, 488
of replicas, 484-486
types, 484
syntax assistance, 31
syntax errors, 167-168
System DSN, 209
system objects, displaying in Navigation pane,
806
System.mdw, 228, 438-439
T
table constraints, 517
table design data types, 501-502
Table object, 256
Table-type recordset, 287
finding records in, 293-295
opening, 289-290
TableDef object, 204, 249
tables, see also two-dimensional array
Access 2007 updates to, 840-845
adding fields to, 260-262, 506-507
adding index to, 279-281, 510-511, 529-530
adding primary key to, 509-510
adding records to, 327-329
copying, 258-259
creating, 249-251, 254-256, 499-504
creating fields for, 251-252, 256-257
creating index in, 528-529
creating relationships between, 284-286,
523-525
creating to store Ribbon customizations in,
804-808
creating validation rule for, 519-521
creating view based on, 551-552
deleting, 259-260, 504-505, 522
deleting field from, 509
deleting record from, 702-706
exporting to XML files, 716-717
granting permissions for, 545-546
linking, 266-267
listing, 270-271
modifying, 505-516
modifying records in, 329-331
opening ADO recordset based on, 308-309
removing fields from, 262-263
retrieving properties of, 263-265
saving as queries, 846
Tables collection, 256, 270
templates,
creating blank, 916-917
structure of, 918-920
updates in Access 2007, 916
temporary variables, 56
creating, 57
removing from TempVars collection, 58
retrieving properties of, 57-58
using, 57-58, 907-908
Index | 935
TempVar object, 907
retrieving properties of, 57-58
TempVars collection, 56
using, 57-59
Terminate event, 154, 652
Text data type, 843
text files,
copying records to, 342-344
opening, 237-238
three-dimensional array, 126
Timer event, 587-588
timing events, 587-588
toggle button, creating, 823
TOP predicate, 354
Totals row, 844-845
transactions, 430
creating, 431-436
TransformXML method, 749-750
using, 750-756
TreeView control, 426-427
Trusted Location dialog box, 21
two-dimensional array, 124-125
using, 132-133
type conversion functions, 60
type declaration characters, 47
using, 48
Type Mismatch error, 46, 139
avoiding, 89
Type property constants, 251-252
U
UBound function, 137-138
unbound controls, 56
Uniform Resource Identifier, see URI
UNIQUE constraint, 517
UNIQUE keyword, 510
universal data link file, 215
creating, 215-218
untyped variables, 46
Updatable property, 386
Update query, 369
creating, 369-370
executing, 370-372
UPDATE statement, 369
URI, 719
user accounts,
creating, 449-452, 539-541
deleting, 452-453, 544
listing, 453-455
User and Group Accounts window, 448
User and Group Permissions window, 448
User-defined data type, 42
User DSN, 209
user form, designing, 154-156
user interface,
Access 2007 updates to, 779
creating, 707-711
user-level security, 228, 438
opening database with, 228-230
user permissions, see permissions
users,
adding to groups, 542-543
listing in groups, 455-456
removing from group, 543-544
V
validation rule,
creating for table, 519-521
defining, 252
values, assigning to variables, 45, 48-50
variables, 5, 40
array, 126
assigning values to, 45, 48-50
creating, 42
declaring, 5, 43, 53, 148
declaring type of, 47
finding definition of, 63
finding type of, 45, 63-64
forcing declaration of, 50-52
global, 55-56
initializing, 49
lifetime of, 52
local, 52-53
module-level, 53-55
naming, 40-41
numeric, 46
object, 61-63
scope of, 52
specifying data type of, 46
static, 59-60
string, 46
temporary, 56-58
understanding data types of, 46-47
untyped, 46
using, 44-45, 116, 907-908
Variant data type, 41-42, 46
VarType function, 63-64
VBA, 3
customizing Navigation pane with, 785-790
using with Append Only memo fields,
869-873
using with attachments, 850-851
using with multi-value fields, 864-865
VBA code, converting macros to, 908-915
936 | Index

Index | 937
VBA Object Library, 35, 203
using, 35-36
VBA procedure, embedding Ribbon
customizations in, 804
VBE, see Visual Basic Editor window
VBScript, 662
ViewChange event, 605
views, 549
creating, 549-552
deleting, 553
generating list of, 552-553
naming, 549
virtual directory, creating, 669-671
Visual Basic development environment, 7-8
Visual Basic Editor window, 15-16, 22, 27
programming tools, 28-33
Visual Basic for Applications, see VBA
W
watch expressions,
adding, 176-177
removing, 179
vs. breakpoints, 177
Watches window, working with, 177-179
web interface, creating, 707-711
web page,
creating data entry form on, 694-697
creating drop-down list box on, 684-688
creating multiple-selection list box on,
688-693
WHERE clause, 351
using to filter records, 344-346
wildcard characters, with LIKE operator, 352
WithEvents keyword, 638-639
Word document, copying records to, 339-342
workgroup information file, 228, 438-440
Access versions, 439
Workspaces collection, 204
X
XML, 712-714
attribute-centric, 766-767
character encoding in, 718
data file, 717-720
element-centric, 766-767
elements, 719-720
export options, 726-729
in Access, 715
XML document, 714
applying stylesheet to, 768-770
creating for Ribbon customization, 794-797
loading, 774-775
loading Ribbon customization from,
797-803
storing in table, 804-808
viewing, 725
well-formed, 714
XML document nodes, using, 760-761
XML Document Object Model, see XML DOM
XML DOM, 748, 757-758
XML files,
exporting to, 715-717, 740-749
importing, 735-740, 756-757
loading contents of, 758-760
saving ADO recordsets as, 764-766
transforming, 749-756, 767-768
XML Schema Definition, see XSD
XML schema file, 720-722
XML tags, 714
<xsl:apply-templates>, 731
<xsl:output>, 730
<xsl:sort>, 754
<xsl:stylesheet>, 730
<xsl:template>, 723, 731
<xsl:value-of>, 731
XPath, 724
XPS format, saving reports in, 886-887
XSD, 720
XSD file, importing, 735-740
XSL, 722
XSL file, applying, 733-734
XSL stylesheets, 723
applying, 768-770
XSL transformation files, 722-724
creating, 729-732
XSL Transformations, see XSLT
XSLT, 722
Y
Yes/No data type, 843

Looking for more?Check out Wordware’s market-leading
Applications Library featuring the following titles.
Design Patterns1-59822-031-4 • $39.956 x 9 • 304 pp.
Camtasia Studio 5: TheDefinitive Guide1-59822-057-8 • $39.956 x 9 • 656 pp.
Advanced SQL Functions inOracle 10g
1-59822-021-7 • $36.956 x 9 • 416 pp.
FileMaker Web Publishing:A Complete Guide to Usingthe API for PHP
1-59822-041-1 • $49.956 x 9 • 472 pp.
Introduction to Game Pro-gramming with C++1-59822-032-2 • $44.956 x 9 • 392 pp.
Word 2003 Document Auto-mation with VBA, XML, XSLTand Smart Documents1-55622-086-3 • $36.956 x 9 • 464 pp.
Excel 2003 VBA Programmingwith XML and ASP1-55622-225-4 • $36.956 x 9 • 968 pp.
Managing Virtual Teams:Getting the Most From Wikis, Blogs,
and Other Collaborative Tools
1-59822-028-4 • $29.956 x 9 • 400 pp.
Visit us online at www.wordware.com for more information.
Use the following coupon code for online specials: access042x
Captivate 3.0: The Definitive Guide 1-59822-049-7
Excel 2007 VBA Programming with XML and ASP 1-59822-043-8
Word 2007 Document Automation with VBA and VSTO 1-59822-047-0
Advanced JavaScript (3rd Ed.)1-59822-033-0 • $39.956 x 9 • 616 pp.
Learn C#1-59822-035-7 • $39.956 x 9 • 424 pp.
Essential LightWave v91-59822-024-1 • $49.956 x 9 • 992 pp.
Microsoft Excel Functions &Formulas1-59822-011-X • $29.956 x 9 • 416 pp.
Access 2003 Programmingby Example with VBA, XML,and ASP1-55622-223-8 • $39.956 x 9 • 704 pp.
FileMaker Pro BusinessApplications1-59822-014-4 • $49.956 x 9 • 648 pp.
Learn FileMaker Pro 91-59822-046-2 • $39.956 x 9 • 592 pp.
Top Related
Copyright © 2022 FDOKUMEN

