


Bahasa
Halaman
Hukum

2. Event Tickets User GuideThank you for purchasing our extension. If you have any questions that are beyond the scope of this document, please feel free to contact us via [email protected]
Updated: 10/09/2020 | By: Magenest | Support Portal: http://servicedesk.izysync.com/servicedesk/customer/portal/7
IntroductionFeaturesSystem Requirements
ConfigurationConfigurations
Create a new event Edit Event Tickets
PDF TemplateReminder Email TemplatesManage eventsManage TicketsView Order
Store Front FunctionsSelect ticket options
UpdateSupport
Introduction
The Event Ticket extension for Magento 2 by Magenest is the ultimate extension for E-commerce websites that allows merchants to create and manage events and tickets. Merchants can create multiple custom ticket options such as VIP, adults, children,… each with a customized template to best fit the event's context. The extension can also send reminder emails so that your customer won't miss the event.
Features
For admin
Create product as the event ticket typeSupport multiple locations, multiple dates, multiple sessions/timeslot for the event. Add event to the menu barSpecify custom ticket type for each event (ticket options) and set name, price, quantity, and sequence of available tickets for each typeAutomatically generate Bar code and QR codeDrag-drop pdf template design with XY coordinates in the admin panelPreview and print the pdf ticket instantly in the admin panelAdd Google map to event detailsCreate unlimited email templatesAssign email template to each eventAllow customers to fill in attendee information at the checkout pageEasily track attendees, purchased tickets for each eventAdd terms and conditions for each eventSend ticket confirmation emails to event attendeesSend pdf tickets to all the attendees or to the purchaser onlyExport event attendees, event list, ticket list into CSV, XML files
For customers
Choose from multiple ticket options (location, date, time, and ticket type)View the location of each event with a pinpoint on Google map integrated on product page
System Requirements
Your store should be running on
Magento Open Source 2.2.x, 2.3.x, 2.4Magento Commerce 2.2.x,2.3.x, 2.4
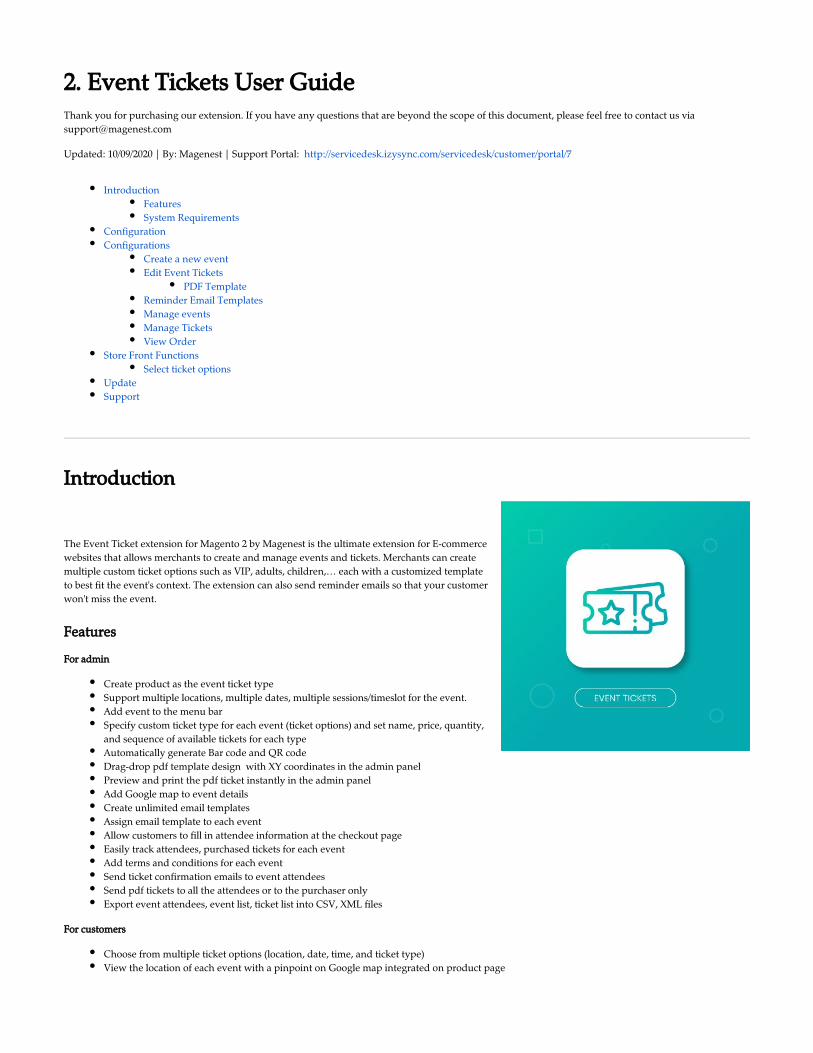
ConfigurationOn the Admin sidebar, go to Stores > Configuration > Magenest > Event Ticket.
General:
Pattern to generate code: The ticket code format. [A2] is to generate 2 random characters, [N4] is to generate 4 random numbers while "Magenest" is the hard codeChange quantity: You can choose to deduct the ticket stock after the order is placed or is invoicedDate format: You can choose from 16 available date formats for the eventAuto-hide expired dates: Select to hide the expired date from the calendarYesDisplay Google Maps for events: Choose Yes to display Google map for each event locationGoogle Map API Keys: Fill in your Google API Keys to integrate Google map. Learn more
Ticket
When ordered quantity X > 1: When the customer purchase more than 1 ticket, you can choose to whether or will be 1 ticket more than 1 ticket generated. All of the tickets will be sent to the customer's email address.
that if multiple tickets are generated, there will be multiple emails sent to the purchaser. Note
Email:
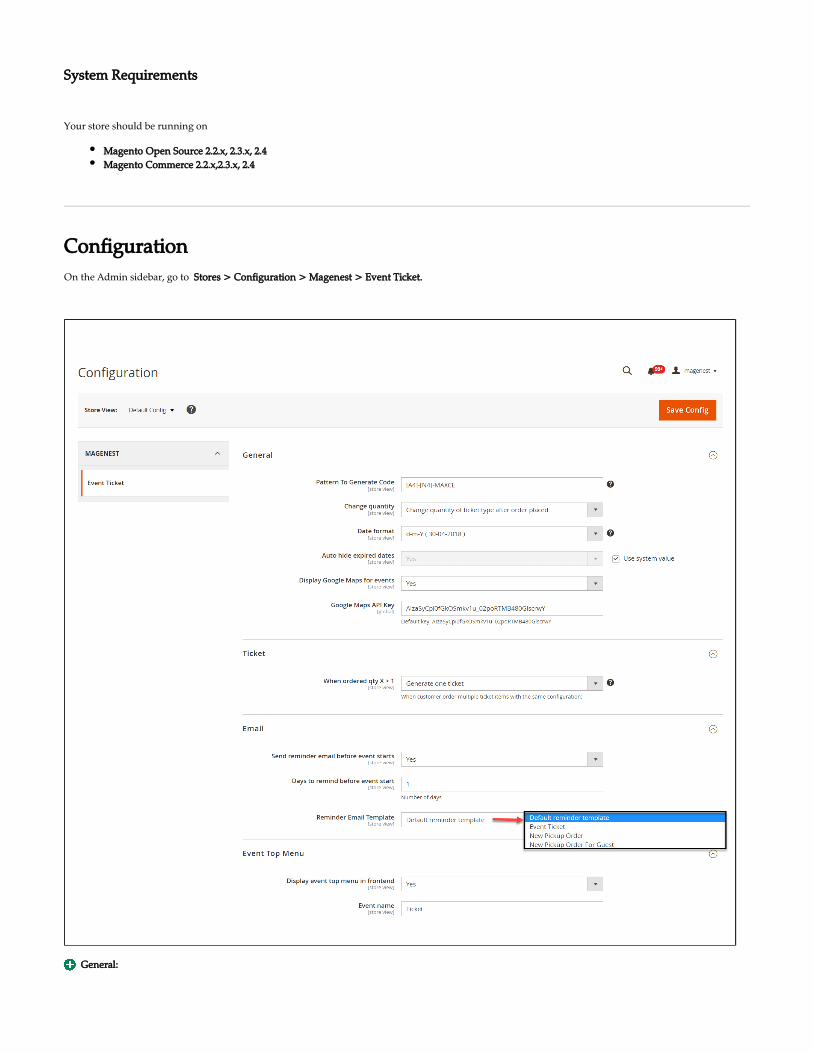
Send reminder email before event starts: Choose to send reminder email of the events to customersYesDays to remind before event starts: Enter the number days before the event in order to send reminder emailsReminder Email Templates: Assign the email template to send a reminder email. You can create an email template in Marketing > Email Templates
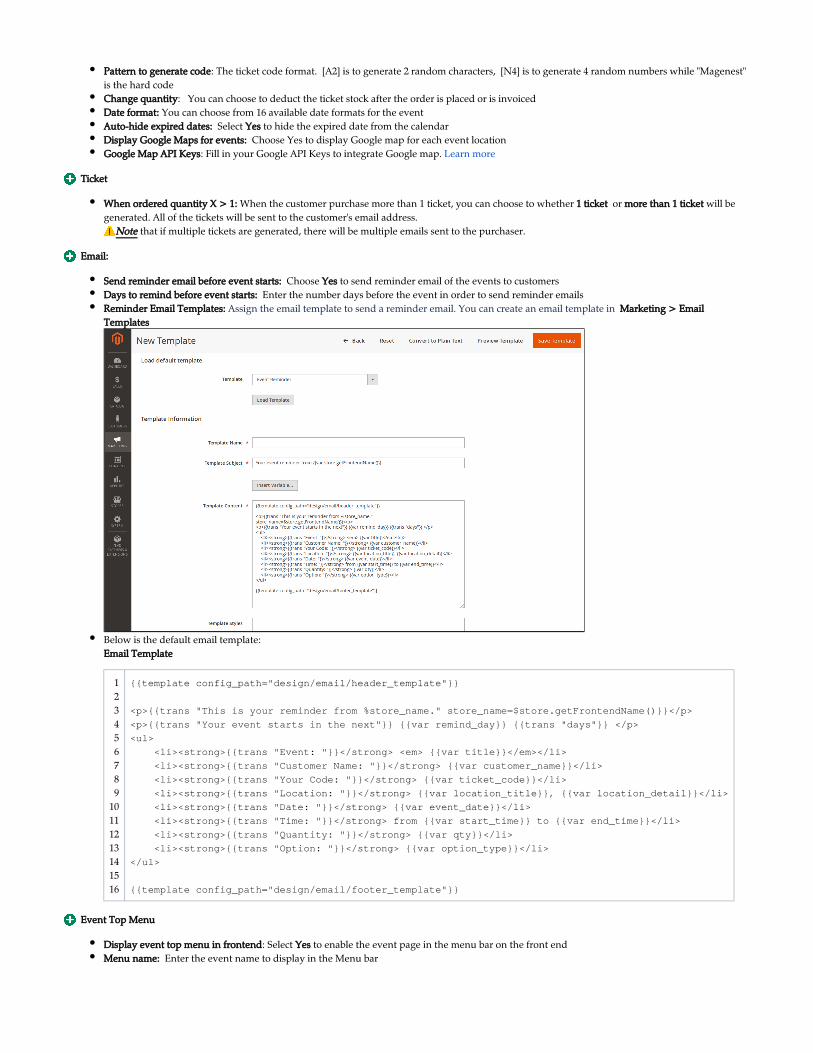
Below is the default email template: Email Template
123456789
10111213141516
{{template config_path="design/email/header_template"}}
<p>{{trans "This is your reminder from %store_name." store_name=$store.getFrontendName()}}</p>
<p>{{trans "Your event starts in the next"}} {{var remind_day}} {{trans "days"}} </p>
<ul>
<li><strong>{{trans "Event: "}}</strong> <em> {{var title}}</em></li>
<li><strong>{{trans "Customer Name: "}}</strong> {{var customer_name}}</li>
<li><strong>{{trans "Your Code: "}}</strong> {{var ticket_code}}</li>
<li><strong>{{trans "Location: "}}</strong> {{var location_title}}, {{var location_detail}}</li>
<li><strong>{{trans "Date: "}}</strong> {{var event_date}}</li>
<li><strong>{{trans "Time: "}}</strong> from {{var start_time}} to {{var end_time}}</li>
<li><strong>{{trans "Quantity: "}}</strong> {{var qty}}</li>
<li><strong>{{trans "Option: "}}</strong> {{var option_type}}</li>
</ul>
{{template config_path="design/email/footer_template"}}
Event Top Menu
Display event top menu in frontend: Select to enable the event page in the menu bar on the front endYes Enter the event name to display in the Menu barMenu name:

After saving the configurations, please clear the cache to apply the changes.
Configurations
Create a new event
In order to create a new event ticket, go to Catalog > Event Manager > Event
Edit Event Tickets
Tickets Setup
The ticket is a product on your site, so to set it up as an event ticket, please scroll down to see Event Ticket.
You can enable the .Apply the locations/schedules to all the ticket options
Locations/Schedules: You can add multiple locations, with multiple dates and sessions/timeslot. You can set the limited quantity for each session. that the total of limited quantities must be equal or less than the product quantity.Note
The active field will be checked by default, if this box is left unchecked, the session will not display on the Event Detail Page.
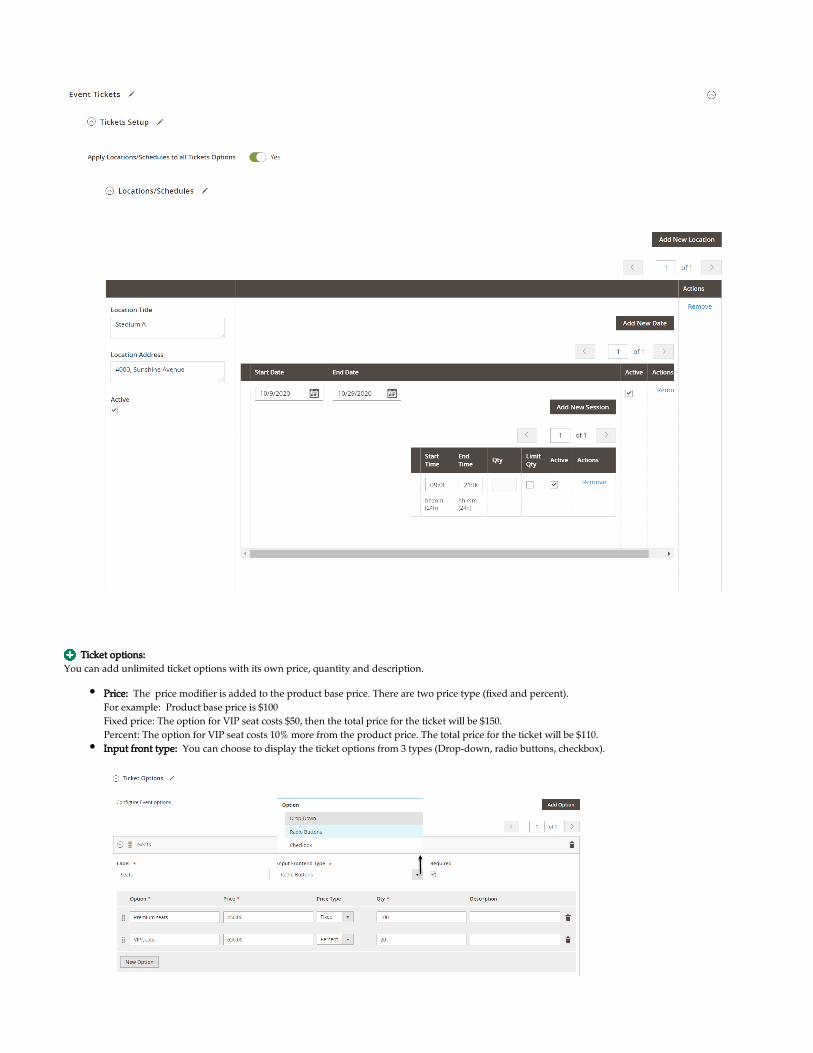
Ticket options: You can add unlimited ticket options with its own price, quantity and description.
Price: The price modifier is added to the product base price. There are two price type (fixed and percent).For example: Product base price is $100Fixed price: The option for VIP seat costs $50, then the total price for the ticket will be $150.Percent: The option for VIP seat costs 10% more from the product price. The total price for the ticket will be $110.
You can choose to display the ticket options from 3 types (Drop-down, radio buttons, checkbox).Input front type:

Template Settings:
Ticket Template:
You can use the PDF Template created in or a Custom Template. If you use the PDF Template, switch the Catalog > Event Management > PDF Template U to No.se Custom Template
PDF Template
You can create any manage PDF Template in Catalog > Event Management > PDF Template
You can select between 2 default ticket template designs. Default Template:

Template Type 1:
Template Type 2:

One thing with our new PDF template (Type 2) is that you can click on , you'll be able to use PDF Content > HTML Content > Show Editor Drag and Drop action to design the template,

Custom Template
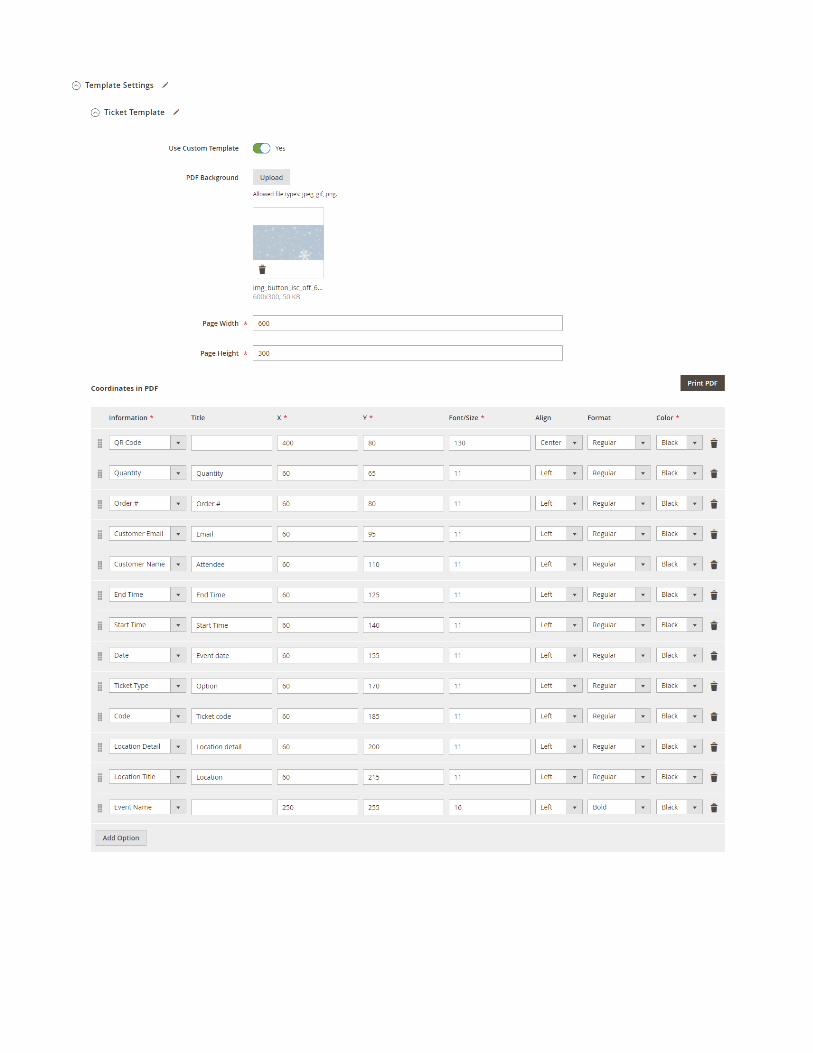
Or you can customize a ticket template right in the product settings by turning on the Use Custom Template.
Then you can upload the PDF background image (in jpeg, gif, png), adjust the page width, and page height.
In the PDF coordinates, you can choose the information fields, fill in the title, set the XY coordinates, and font/size, format, color and alignment for each information.
You can use to MB-Ruler software measure the XY coordinates on your ticket PDF, or watch the following tutorial video.
You can preview the template by clicking on the Print PDF button.
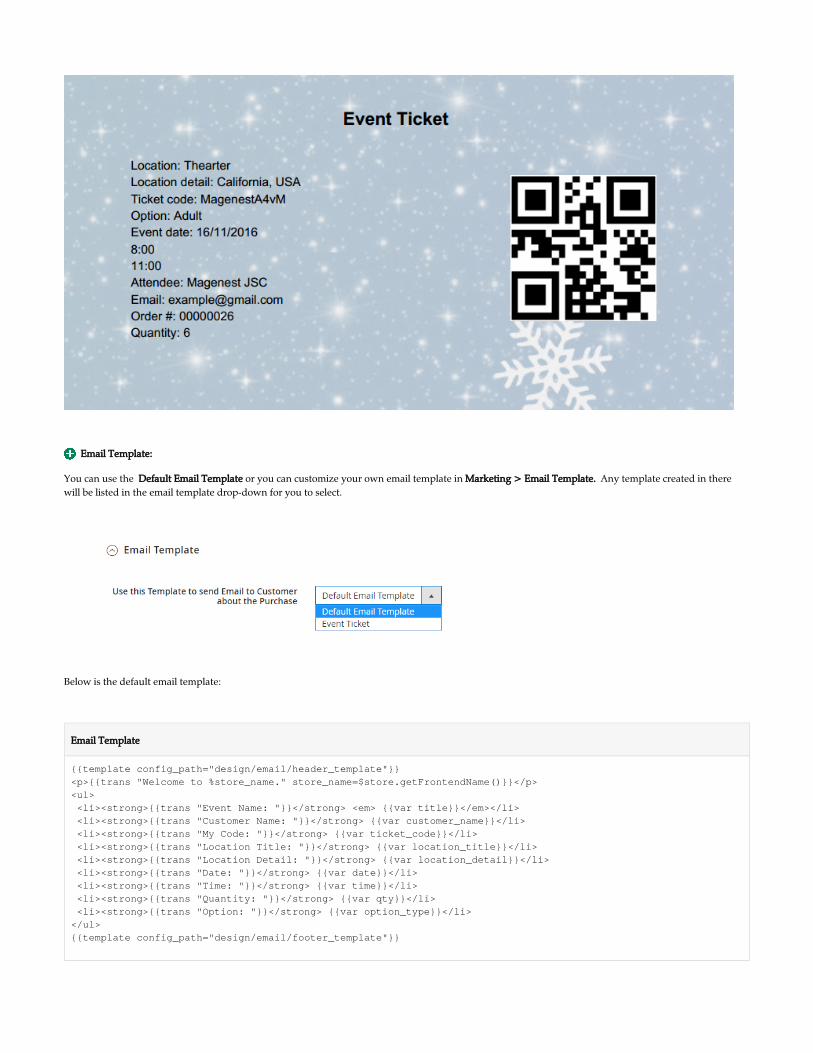
Email Template:
You can use the or you can customize your own email template in Any template created in there Default Email Template Marketing > Email Template. will be listed in the email template drop-down for you to select.
Below is the default email template:
Email Template
{{template config_path="design/email/header_template"}}<p>{{trans "Welcome to %store_name." store_name=$store.getFrontendName()}}</p><ul> <li><strong>{{trans "Event Name: "}}</strong> <em> {{var title}}</em></li> <li><strong>{{trans "Customer Name: "}}</strong> {{var customer_name}}</li> <li><strong>{{trans "My Code: "}}</strong> {{var ticket_code}}</li> <li><strong>{{trans "Location Title: "}}</strong> {{var location_title}}</li> <li><strong>{{trans "Location Detail: "}}</strong> {{var location_detail}}</li> <li><strong>{{trans "Date: "}}</strong> {{var date}}</li> <li><strong>{{trans "Time: "}}</strong> {{var time}}</li> <li><strong>{{trans "Quantity: "}}</strong> {{var qty}}</li> <li><strong>{{trans "Option: "}}</strong> {{var option_type}}</li></ul>{{template config_path="design/email/footer_template"}}

Personal Information
In this setting, you can enable the attendee information form and set it as required. If it is required, the customer will have to fill in the form before adding the tickets to the cart.
If you do not need this feature, you can turn it down by switching the 2 options to No.
Report
Summary: This grid table will show the sales statistics for each ticket option. You can see the available number of tickets, the purchased quantity and the revenue from each option.
Purchased Tickets: The information of each ticket sold in your store, with customer information for each order.
Terms and conditions
You can add the terms and conditions for each event in this setting.

Reminder Email Templates
Assign the email template to send a reminder email. You can create an email template in Marketing > Email Templates
Below is the default email template:
Email Template
{{template config_path="design/email/header_template"}}
<p>{{trans "This is your reminder from %store_name." store_name=$store.getFrontendName()}}</p><p>{{trans "Your event starts in the next"}} {{var remind_day}} {{trans "days"}} </p><ul> <li><strong>{{trans "Event: "}}</strong> <em> {{var title}}</em></li> <li><strong>{{trans "Customer Name: "}}</strong> {{var customer_name}}</li> <li><strong>{{trans "Your Code: "}}</strong> {{var ticket_code}}</li> <li><strong>{{trans "Location: "}}</strong> {{var location_title}}, {{var location_detail}}</li> <li><strong>{{trans "Date: "}}</strong> {{var event_date}}</li> <li><strong>{{trans "Time: "}}</strong> from {{var start_time}} to {{var end_time}}</li> <li><strong>{{trans "Quantity: "}}</strong> {{var qty}}</li> <li><strong>{{trans "Option: "}}</strong> {{var option_type}}</li></ul>
{{template config_path="design/email/footer_template"}}
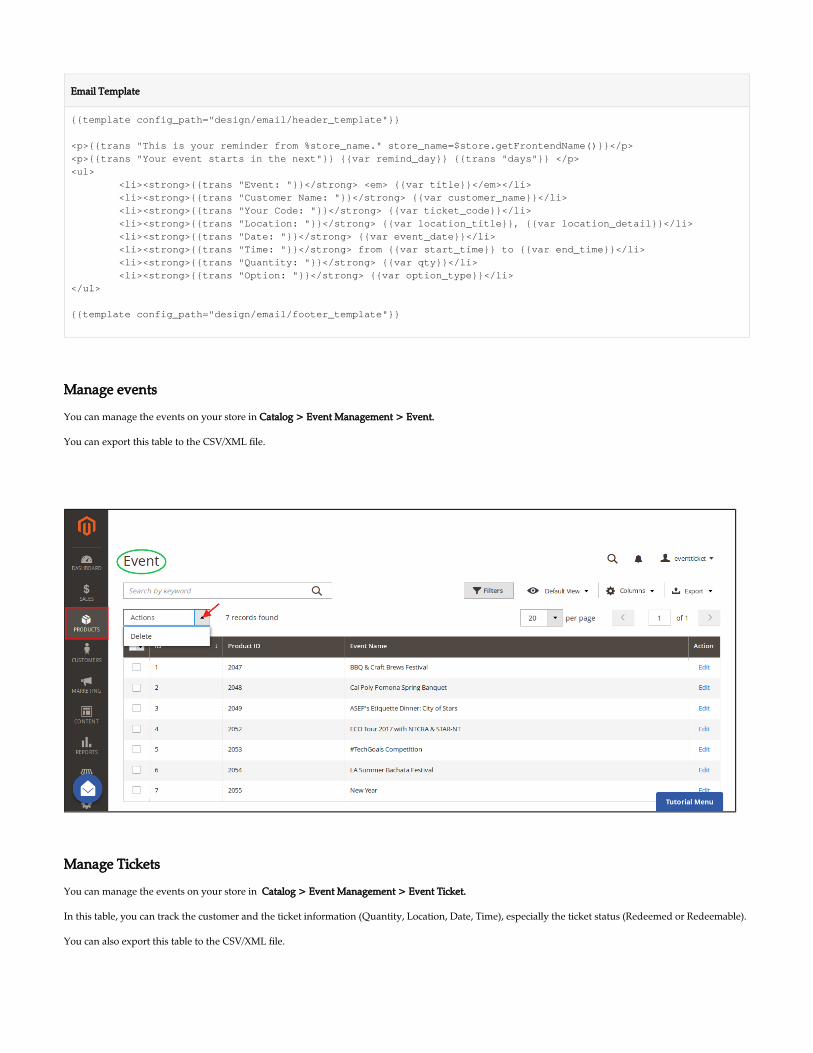
Manage events
You can manage the events on your store in Catalog > Event Management > Event.
You can export this table to the CSV/XML file.
Manage Tickets
You can manage the events on your store in Catalog > Event Management > Event Ticket.
In this table, you can track the customer and the ticket information (Quantity, Location, Date, Time), especially the ticket status (Redeemed or Redeemable).
You can also export this table to the CSV/XML file.
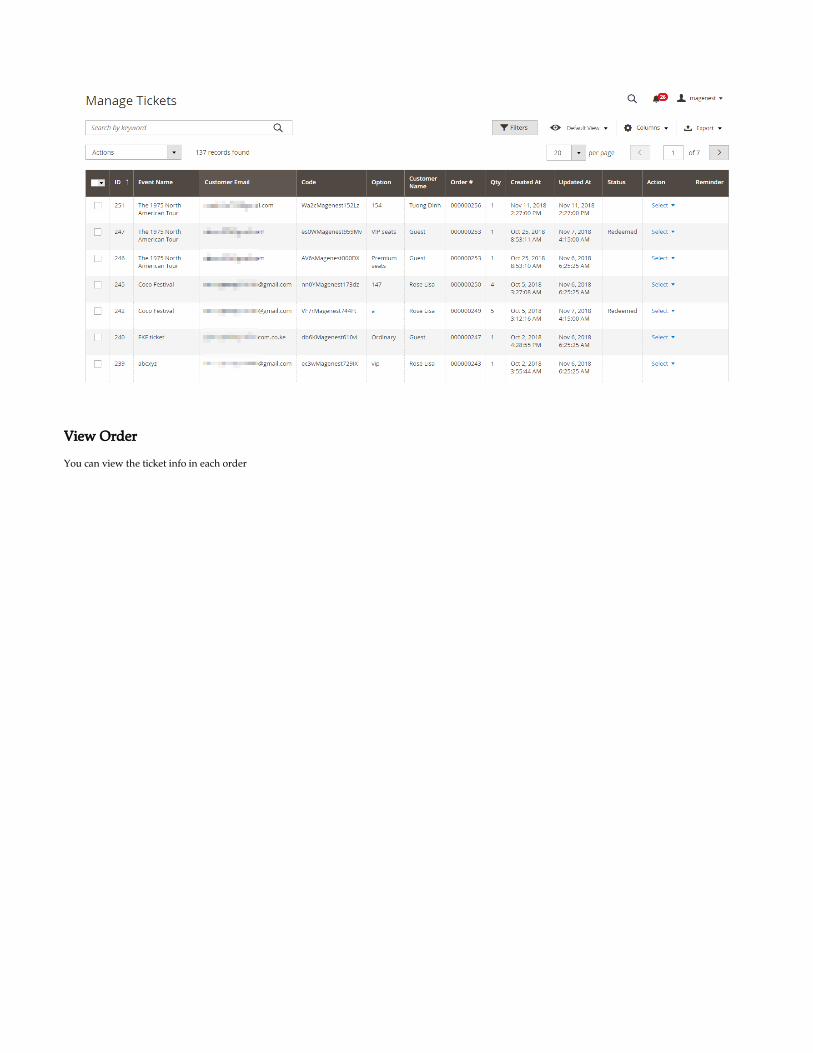
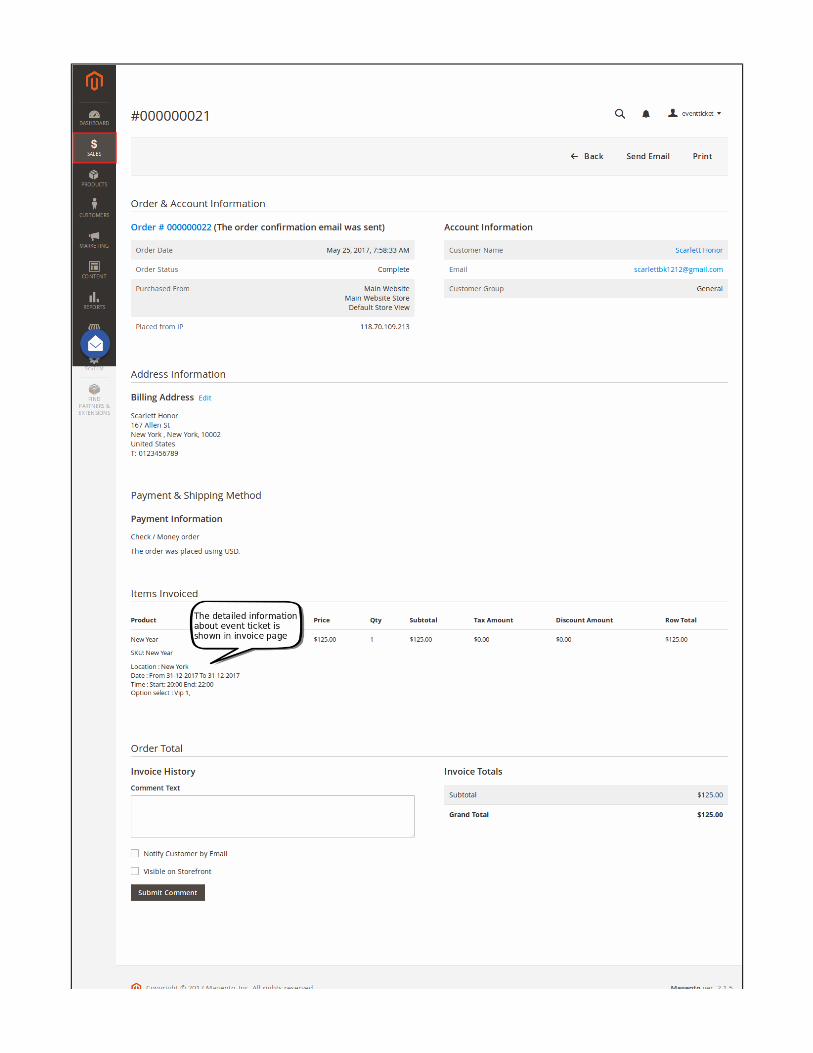
View Order
You can view the ticket info in each order


And Invoice:
Store Front Functions
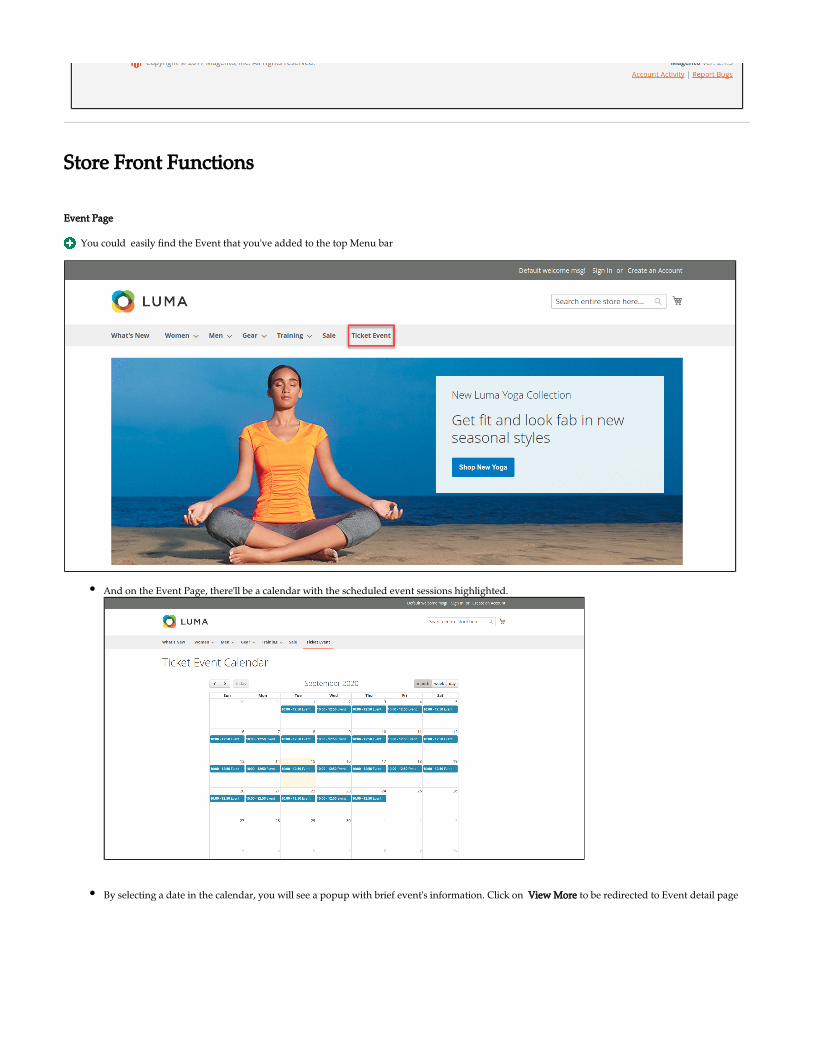
Event Page
You could easily find the Event that you've added to the top Menu bar
And on the Event Page, there'll be a calendar with the scheduled event sessions highlighted.
By selecting a date in the calendar, you will see a popup with brief event's information. Click on to be redirected to Event detail pageView More

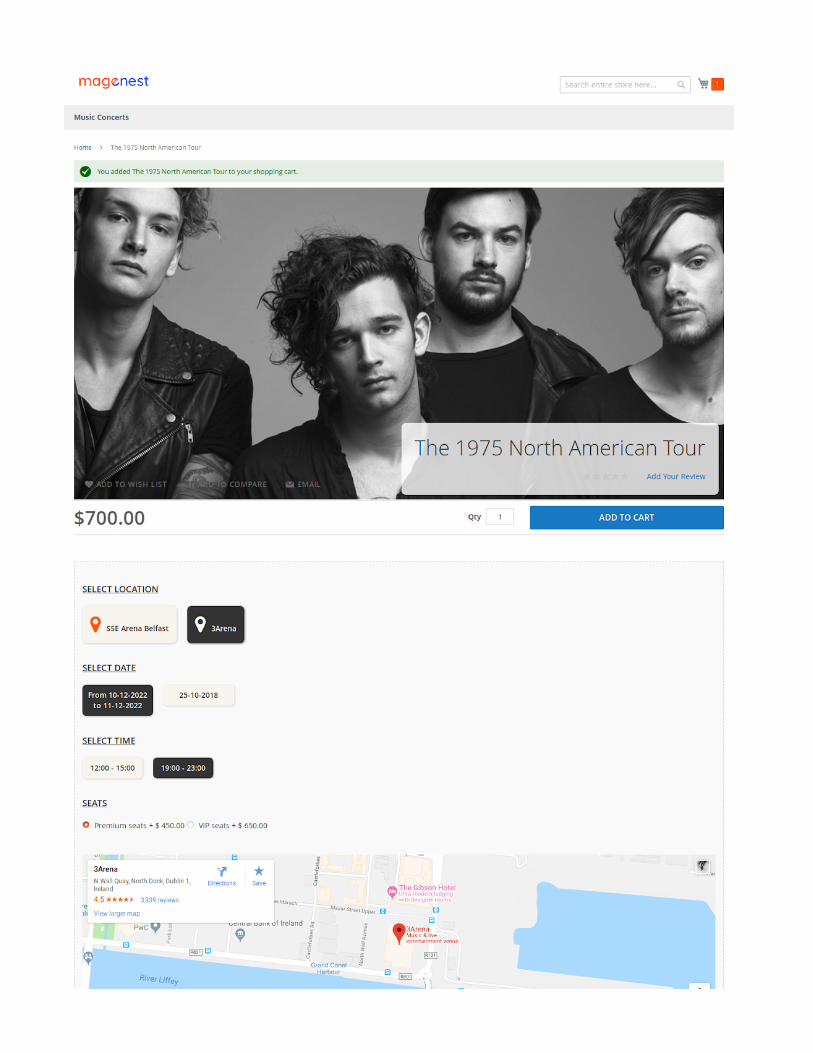
Select ticket options
Customers can choose the event location, date and time. They can also choose the ticket option and view the event location with the pinpoint on Google Map right on the product page.

If this event's ticket has been "Out of stock", customers will receive a message as in the image below
After buying the event ticket successfully , in My Account tab, click on , customers can view ticket price, status, and the order is invoiced My Ticketduration, and location as well as print PDF Ticket.

Update
When a bug fix or new feature is released, we will provide you with the module's new package.All you need to do is repeating the above installing steps and uploading the package onto your store. The code will automatically override.Flush the config cache. Your store and newly installed module should be working as expected.
SupportWe will reply to support requests within .2 business daysWe will offer . Support includes answering questions related to our lifetime free update and 6 months of free support for all of our paid productsproducts, bug/error fixing to make sure our products fit well in your site exactly like our demo.Support include other services such as customizing our products, installation, and uninstallation service.DOES NOT
Once again, thank you for purchasing our extension. If you have any questions relating to this extension, please do not hesitate to contact us for support.
Top Related
Copyright © 2022 FDOKUMEN

