XP-Remote - LS Electric
60
Right choice for ultimate yield LSIS strives to maximize customers' profit in gratitude of choosing us for your partner. Human Machine Interface XP-Remote User’s Manual Read this manual carefully before installing, wiring, operating, servicing or inspecting this equipment. Keep this manual within easy reach for quick reference. XGT Panel http://www.lsis.com
-
Upload
khangminh22 -
Category
Documents
-
view
0 -
download
0
Transcript of XP-Remote - LS Electric

Right choice for ultimate yield LSIS strives to maximize customers' profit in gratitude of choosing us for your partner.
Human Machine Interface
XP-RemoteUser’s Manual
Read this manual carefully beforeinstalling, wiring, operating, servicingor inspecting this equipment.
Keep this manual within easy reach
for quick reference.
XGT Panel
http://www.lsis.com

Before using the product…
To use the product safely and effectively, please read this instruction manual thoroughly before use.
► Please keep to the safety precaution, for it is to prevent accidents and potential danger from
occurring.
► Safety precaution is classified into ‘Warning’ and ‘Caution’ and their meanings are as follows.
Violating the instruction may result in serious personal injury or death.
Violating the instruction may result in slight personal injury or product
damage.
► The indicated illustrations on the product and in the manual have the following meanings.
Be cautious, for danger may be present.
Be cautious, for there is a possibility of an electric shock.
► After reading the instruction manual, keep it handy for quick reference.
Warning
Caution

2
Revision History
Version Date Main Changes Revision Page
V 1.0 ’11 10 1. The initial edition issued -
V 1.32 ’15 06 1. Add Fix Screen Size to XGT Panel Size 47
2. Add Adjust Screen Size to Frame Size 48
3. Add Full Screen 49
4. Add XP-VNC control caution 38
5. Revise Restriction 54, 55
※ The number of the User’s Manual is printed on the right side of the back cover of the User’s Manual.
Ⓒ LSIS Co., Ltd 2015 All Rights Reserved.

3
Thank you for purchasing LSIS’s HMI. Before using the product, please read this User’s Manual to understand the functions, performances and installation and programming method of the product you have purchased and ensure this User’s Manual is well distributed to the end user and the responsible person for maintenance . The following User’s Manual is the one regarding to this product. Also, visit our homepage http://www.lsis.com/ and download the manual in PDF file. List of Relevant Manuals
Manual Title Manual Contents Manual Number
XGT Panel Communication User’s Manual
User’s Manual on XGT Panel communication describing Circuit Diagram to connect XGT Panel products with control devices such as PLC and inverter and their communication setting
10310000758
XP-Builder User’s Manual
User’s Manual on XP-Builder software describing screen data, communication, environment setting, logging/recipe data backup, simulator and printing function needed to use XGT Panel products
10310000759
XGT Panel User’s Manual
It describes dimensions, special features and system configuration of XGT Panel series. 10310000757
XP-Manager User’s Manual
XP-Manger is software that can support XGT Panel’s various functions and perform data communication between XGT panels via XP Link.
10310001110

4
- Table of Contents –
Chapter1 Starting ....................................................................................................................... 6 ~ 13
1.1 Special Features of the XP-Remote ....................................................................................................... 6 1.2 System Requirements for Executing the XP-Remote ............................................................................ 8 1.3 Installation of the XP-Remote ............................................................................................................. 9
Chapter 2 Introduction and Demonstration of the XP-Remote ...................................... 14 ~ 18
2.1 Introduction of the XP-Remote ............................................................................................................... 14
2.1.1 What is the XP-Remote? .............................................................................................................. 14 2.1.2 Execution Condition of the XP-Remote ...................................................................................... 14
2.2 Demonstration ........................................................................................................................................ 15 2.2.1 Execution of the XGT Panel Monitor ........................................................................................... 15 2.2.2 Monitoring with the XP-Remote .................................................................................................... 15 2.2.3 Controlling the XGT Panel with the XP-Remote ........................................................................... 18
Chapter 3 The XP-Remote Configuration ............................................................................. 19 ~ 23
3.1 Screen Configuration .............................................................................................................................. 19 3.2 Menu Configuration ................................................................................................................................ 21 3.3 Toolbar Configuration.............................................................................................................................. 23
Chapter 4 Project ..................................................................................................................... 24 ~ 31
4.1 Reconnect .............................................................................................................................................. 24
4.1.1 Connect by Using the next Address .............................................................................................. 24 4.1.2 Connect After Finding and Opening a Project .............................................................................. 26 4.1.3 Connect After Opening Recent Projects ..................................................................................... 28
4.2 Close ...................................................................................................................................................... 30 4.3 End ......................................................................................................................................................... 31
Chapter 5 Online ...................................................................................................................... 32 ~ 40
5.1 Screen Sync Mode ................................................................................................................................. 32
5.1.1 Convert Screen by the XGT Panel ............................................................................................... 33 5.1.2 Convert Screen on the XP-Remote .............................................................................................. 34
5.2 Screen Non-Sync Mode ......................................................................................................................... 35 5.2.1 Convert Screen by the XGT Panel ............................................................................................... 36

5
5.2.2 Convert Screen on the XP-Remote ............................................................................................. 36 5.3 Obtain the Control Right ......................................................................................................................... 37 5.4 Return the Control Right ......................................................................................................................... 39 5.5 Obtain the Control Right From the XGT Panel ....................................................................................... 40
Chapter 6 Screen ..................................................................................................................... 41 ~ 49
6.1 Go to the XGT Panel’s Current Screen .................................................................................................. 41 6.2 Go to the Starting Screen ....................................................................................................................... 42 6.3 Go to the Previous Screen ..................................................................................................................... 43 6.4 Go to the 1 minus Screen ....................................................................................................................... 44 6.5 Go to the 1 plus Screen .......................................................................................................................... 45 6.6 Screen Conversion Combo Box............................................................................................................. 46 6.7 Fix Screen Size to XGT Panel Size ........................................................................................................ 47 6.8 Adjust Screen Size to Frame Size .......................................................................................................... 48 6.9 Full Screen ............................................................................................................................................. 49
Chapter 7 Tools ........................................................................................................................ 50 ~ 53
7.1 Screen Capture ...................................................................................................................................... 50 7.2 Options ................................................................................................................................................... 51
7.2.1 Online ............................................................................................................................................ 51 7.2.2 Control ........................................................................................................................................... 52 7.2.3 General ......................................................................................................................................... 53
Chapter 8 Restriction .............................................................................................................. 54 ~ 56
8.1 Restriction ............................................................................................................................................... 54 8.2 Difference in Movement Between XP-Remote and XGT Panel ............................................................ 55
Annex 1 Problem Solving ....................................................................................................... 57 ~ 58
Annex1.1 Communication Problems ........................................................................................................... 57 Annex1.2 Control Right Problems ................................................................................................................ 58

6
Chapter 1 Starting
1.1 Special Features of the XP-Remote XP-Remote is a tool to monitor and control the XGT Panel installed in the office or in the plant. The XGT Panel can be monitored by several people at the same time. (1) Remote monitoring of XGT Panel is available
(2) The XGT Panel can be controlled remotely in the same way as at the site.
(3) Fast monitoring and controlling is available even from a remote area.
(4) It consists of big icons to use its functions easily.
(5) It is easy to convert to a particular screen regardless of drawing contents.
(6) It can reduce uploading time when saving the project and re-starting monitoring. (7) Available to monitor the XGT Panel and other screens.
LAN

7
(8) Multiple users can monitor one XGT Panel.
LAN
LAN

8
1.2 System Requirements for Executing the XP-Remote (1) Personal Computer and Memory
A computer with memory of at least 512MB or higher in the CPU of Pentium 4 or higher (2) Communication Port
Ethernet ports (3) Hard Disc
XP-Remote installation file size is about 40MB, it needs available area of at least 100MB or above to install.
(4) Mouse Mouse that can be connected with the computer
(5) Monitor Resolution of 1024 X 768 or above
(6) Computer Operation System Execution is available on the version of Window XP or Window 7.

9
1.3 Installation of the XP-Remote
[Installation Sequence] (1) Execute installation files
(2) Select a language to be installed
(3) Prepare for installing the installation wizard as follows:

10
(4) Starting the XP-Remote Installation’ is displayed as seen in the following screen. Press the [Next] button to continue installation.
(5) After inputting the user information, press the Next button.

11
(6) Specify a folder location to install the XP-Remote. About 100MB installation space is needed for the XP-Remote. Check if there is sufficient space in the folder subject to installation. If the installation space is not sufficient, warning message will appear and proceeding to the next step is impossible. Press the [Next] button after selecting a folder.
(7) Preparing for installation is completed. Press the Installation button to start installing.

12
(8) Installation progress is displayed.
(9) Press the End button to end installation normally.

13
(10) Execute the XP-Remote from the [Start] Menu or execute ‘Go To Directly’ generated on the Desktop to start the task.
[Deleting Sequence] (1) To remove the XP-Remote, select [Remove XP-Remote] from the [Start] Menu or use the Control edition’s
[Add/Delete Program] function. (2) Select an Yes.
(3) Information on the installed programs is collected and those programs are deleted.

14
Chapter 2 Introduction and Demonstration of the XP-Remote
2.1 Introduction of the XP-Remote
2.1.1 What is the XP-Remote? The user can remote monitor and control the XGT Panel by using the XP-Remote. The user can perform the XGT Panel’s functions above with the office computer not with the site’s XGT Panel. The user does not perform works under poor site conditions any more.
2.1.2 Execution Condition of the XP-Remote
The XP-Remote shall be satisfied the following conditions to ensure remote monitoring and controlling:
(a) XP-Builder 1.30 or above (b) XGT Panel 1.30 or above (c) Environment under which LAN communication is available (d) Check the XGT Panel Setting [Settings]-[XP-Remote]-[XP-Remote]’s [Allow XP-Remote to connect]
options (e) XP-Remote version should be same or above version with XGT Panel.
LAN

15
2.2 Demonstration
The user can understand easily on overall methods to use the XP-Remote through the following demonstration processes.
2.2.1 Execution of the XGT Panel Monitor [Sequence] (a) Turn the XGT Panel on. (b) Send drawings by using the XP-Builder (1.30 version or above) (c) Check the XGT Panels button [Settings]-[XP-Remote]’s [Allow XP-Remote to connect] options.
(d) Press the XGT Panel button [Start] to start monitoring.
2.2.2 Monitoring with the XP-Remote The XP-Remote shall be executed to monitor the XGT Panel from any remote computer. [Sequence]
(a) Execute [XP-Remote 1.00] from the widows’ starting program (b) Select XP-Remote Menu [Tools]-[Options]-[Online] tap. (c) Select a network adopter with the same band with the XGT Panel’s IP band and close the dialog box
by pressing Confirm.

16
Note (1) ‘The same band with the XGT Panel’s IP band’ means that it is the same IP band if the XGT Panel’s IP
Address is “165.244.149.113 and the PC’s IP is “165.244.149.113 (In case of Subnet Mask is 255.255.255.0)
(d) Select XP-Remote Menu [Project]-[Reconnect] and input the XGT Panel’s IP Address.
(e) Press the [Connect] button to connect with the XGT Panel.
Note (1) The following message will appear in case that communication with the XGT Panel is failed. Check
communication errors and attempt again to make a Reconnect.
(2) For detailed solution when communication fails, refer to “Annex 1 Problem Solving”.

17
(f) The XGT Panel’s data connected with the XP-Remote will be synchronized.
(g) The XP-Remote monitor will start.

18
2.2.3 Controlling the XGT Panel with the XP-Remote For remote controlling with the XP-Remote, the following procedures are necessary. Basically, only connecting with the XP-Remote does not allow remote controlling.
[Sequence]
(a) Press and hold the empty space of the XGT Panel screen about 2 seconds. (b) Press the [Enable control by XP-Remote] button and allow the XP-Remote to control.
Note (1) When displaying the Status Bar by pressing the XGT Panel’s empty space once again, this button is displayed
in [Disable control by XP-Remote].
(c) Press the XP-Remote Menu [Online]-[Obtain the Control Right] to obtain a control right.
Note (1) If the control right is not obtained, the mouse cursor will have the following shape when it is moved on the
screen.
(2) If the control right is not obtained, the XP-Remote’s Status Bar will display the following icons:
(d) Press the mouse’s left button to control the XGT Panel.

19
Chapter 3 XP-Remote Configuration
3.1 Screen Configuration
The XP-Remote screen consists of the following components: (1) Screen
(a) (b)
(c) (d)
(e)

20
[Window Description] Item Description
Title Bar(a) Project name + XGT Panel Machine Type [XGT Panel’s IP Address] + XP-Remote is displayed. It appears on the window’s working window.
Menu Bar(b) Basic menu for programs. Tool Bar(c) Button to execute commands directly from the menu. Screen Window(d) XGT Panel’s screen. In case of non-sync mode, different screen will be seen.
Status Bar(e) Description or movement of the currently selected file is displayed. Obtain the Whether there is a control right or not and the entity who owns the control right are displayed.
Note (1) If a project is not saved, its project name is not displayed on the Title Bar.
(2) Status Bar
[Status Bar Description]
Item Description Description(a) The selected menu is described and displayed.
Display(b)
Possession status of the control right over the XP-Remote is displayed.
No control right
Possession of control right
Control Right information(c)
If there is no control right, information on other node that owns the control right is displayed. If other XP-Remote owns the control right, the IP Address of the computer in which the corresponding XP-Remote is executing is displayed. If the XGT Panel own this control right, “XGT Panel’ is displayed.

21
3.2 Menu Configuration
The XP-Remote menu is described. For the menus with short-cut keys, their commands are implemented through pressing short-cut keys only.
(1) Project
Command Description
Reconnect Close the opened project and connect with the XGT Panel again. Open a saved project and connect with the XGT Panel.
Close Close the opened project. Save Save the opened project. Save as Different Name Save the opened project under a different name Recent File List of the currently opened files is displayed End The XP-Remote ends.
(2) Online
Command Description Screen Sync Mode Always show the same screen with the XGT Panel. Screen Non-Sync Mode Show different screen from the XGT Panel. Obtain the Control Right Press the mouse’s left button and the XGT Panel’s switch to control.
Return the Control Right The control right is returned to the XGT Panel. Controlling is not available any more.

22
(3) Screen
Command Description
Go to Screen of XGT Panel In case of the screen in non-sync mode, convert to the XGT Panel’s current screen.
Go to the Starting Screen Convert to the starting project in the drawing
Go to the Previous Screen If converting to screen has been performed before, convert to the previous screen
Go to the Current Screen No -1 Convert to the screen that subtracts 1 from the current one Go to the Current Screen No +1 Convert to the screen that adds 1 to the current one. Fix Screen Size to XGT Panel Size Fix XP-Remote screen size to XGT Panel screen size. Adjust Screen Size to Frame Size Adjust XP-Remote screen size to frame Size. Full Screen Convert to full screen size of monitor.
(4) Tools
Command Description
Screen Capture The displayed screen on the XP-Remote is captured and saved in a bitmap file.
Options The XP-Remote’s environment settings can be changed.
(5) Help
Command Description
Help The XP-Remote Help File is executed.
XP-Remote information The XP-Remote’s version information and license are displayed .
+
-

23
3.3 Toolbar Configuration
Command Image Description
Reconnect
Close the opened project and connect with the XGT Panel again. Open a saved project and connect with the XGT Panel.
Save
Save the opened project.
Screen Sync Mode
Always show the same screen with the XGT Panel.
Screen Non-Sync Mode
Show different screen from the XGT Panel.
Obtain the Control Right
Press the mouse’s left button and the XGT Panel’s switch to control.
Return the Control Right
The control right is returned to the XGT Panel. Controlling is not available any more.
Convert to the Starting Screen
Convert to the starting project in the drawing
Convert to the Previous Screen
If converting to screen has been performed before, convert to the previous screen
Convert to the 1 minus Screen
Convert to the screen that subtracts 1 from the current one
Convert to the 1 plus Screen
Convert to the screen that adds 1 to the current one.
Screen Capture
The displayed screen on the XP-Remote is captured and saved in a bitmap file.
Screen Combo Box
The current screen number is displayed. If the Combo Box is unfolded, the screen number list can be seen.

24
Chapter 4 Project
4.1 Reconnect
The XP-Remote can move only when it is connected with the XGT Panel through Online. The following three methods can be used for reconnection.
4.1.1 Connect to the Next IP Address Connecting is available after directly inputting the XGT Panel’s IP Address. The XGT Panel’s IP Address to be connected shall be known in advance. Monitoring is possible by connecting with the XGT Panel with the inputted IP Address and synchronizing the project with it.
[Sequence] (1) Select Menu [Project]-[Reconnect] (2) Select Option [Connect to Next IP Address] (3) Input IP Address or press the [Search] button to search and select the XGT Panel on the network.
(4) Press the [Connect] button to connect with the XGT Panel.
(a) (c)
(d)
(b)

25
[Dialog Box Description]
Item Description Connect to following IP Address(a)
The inputted IP Address’s XGT Panel is connected. Input an accurate IP Address.
Request control authority after connection(b)
Obtaining the control right is attempted automatically after connecting with the XGT Panel. If the XGT Panel does not allow the control right, that attempt might be turned into failure.
Scan(c) XGT Panels are searched and selected on the network. Connect (d) A project is generated after connecting with the XGT Panel
Scan XGT Panel(e) A list of XGT Panels that respond on the network is displayed. IP Address and status information are displayed.
Note
(1) In case that communication with the XGT Panel is failed, the following message will appear. Check communication errors and attempt reconnection.
(2) For detailed solutions in case of communication failure, refer to “Annex 1 Problem Solving”
(e)

26
4.1.2 Connect After Finding and Opening a Project [Sequence] (1) Select Menu [Project]-[Reconnect]. (2) Select Option [Connect After Finding and Opening a Project]. (3) Press the [Connect] button. (4) A dialog box to find a file appears. After finding a file, press the [Open] button.
(a)
(b)
(c)
(d)

27
(5) After opening the selected file by pressing the [Open] button, connect with the XGT Panel with the saved IP Address.
[Dialog Box Description] Item Description
Connect After Finding and Opening a Project(a)
Find and open a XP-Remote file among the saved files. Find a XRT file. XRT files are XP-Remote project files.
Connect (b) Call a dialog box to find a file.
File List(c) A XRT file list is seen in the selected folder. If there is no XRT file, no list is displayed.
Open(d) A selected XRT file is opened. After opening, the XGT Panel is connected with the saved IP Address.
Note (1) For detailed solutions in case of communication failure, refer to “Annex 1 Problem Solving” (2) Basically, the file list shows only XRT files and folders. When changing the file type into “All” type, all of files in
the folder can be seen.

28
4.1.3 Connect After Opening Recent Projects [Sequence] (1) Select Menu [Project]-[Reconnect] (2) Select option [Connect After Opening Recent Projects] (3) Select a file from the list. (4) Press the [Connect] button and connect with the XGT Panel.
[Dialog Box Description]
Item Description Connect After Opening Recent Projects (a)
After opening a selected file among the list that has been opened before on the XP-Remote, connect it with the XGT Panel.
Project List(b) Display the Project List that has been opened before. View All Paths(c) Show the entire path on which files are located.
Connect (d) After opening a selected file, connect it with the XGT Panel with the saved IP Address.
(a)
(b)
(c)
(d)

29
Note (1)For detailed solutions in case of communication failure, refer to “Annex 1 Problem Solving.” (2) If there is no selected project, the following error message will appear.
(3) The same list with the Menu [Project]’s latest Project List is displayed.

30
4.2 Close Close the opened project.
[Sequence] (1) Select Menu [Project]-[Close]’
(2) In case that any opened project is closed without being saved or the connected XGT Panel’s drawing is
revised, it checks whether to save changes or not.

31
4.3 End
Close the opened project and end the XP-Remote. [Sequence] (1) Select Menu [Project]-[End].
(2) In case that any opened project is closed without being saved or the connected XGT Panel’s drawing is revised, it checks whether to save changes or not.
(3) The XP-Remote will be ended.

32
Chapter 5 Online
5.1 Screen Sync Mode
After the XP-Remote is connected with the XGT Panel, always the same screen is displayed. The same screen is displayed with the basic screen, Window1 and Window2. In case that a screen is converted from the XGT Panel, the XP-Remote also converts the screen. In case that a screen is converted from the XGT Panel after the control right is obtained, the XP-Remote also converts the screen. [Sequence]
(1) Select Menu [Online]-[Screen Sync Mode].
(2) The same screen with the XGT Panel is displayed.
Note (1) If the current mode is the Screen Sync Mode, Menu [Screen Sync Mode] has been already checked. (2) In case that it is in the Screen Non-Sync Mode and a different screen from the XGT Panel is displayed, it
converts into the same screen with the XGT Panel if the Screen Sync Mode is selected. (3) The Screen Sync Mode can be implemented regardless of owning the control right. (4) Any window generated upon pressing any window switch or the pressure keypad screen is not synchronized. (5) Device values are always synchronized regardless of the Screen Sync Mode.

33
5.1.1 Convert Screen by the XGT Panel
When a screen is converted by the XGT Panel, a screen is converted also on the XP-Remote.
LAN
Convert screen by the channel number 2.
Screen sync
Screen sync complementation

34
5.1.2 Convert Screen on the XP-Remote
When the XP-Remote owns the control right, a screen is converted also on the XGT Panel as a screen is converted on the XP-Remote.
LAN
Screen sync
Screen sync complementation
Convert screen by the channel number 2.

35
5.2 Screen Non-Sync Mode Different screen from the XGT Panel can be monitored on the XP-Remote. The basic screen, Window1 and Window2 can be seen differently. Even a screen is converted on the XGT Panel, the current screen is continuously displayed on the XP-Remote. In contrary, in case that a screen is converted on the XP-Remote, the XGT Panel continuously displays the current screen.
[Sequence] (1) Select Menu [Online]-[Screen Async Mode].
Note (1) If the current screen is the Screen Non-Sync Mode, Menu [Screen Non-Sync Mode] has been already
checked. (2) The Screen Sync Mode can be implemented regardless of owning the control right. (3) Device values are always synchronized regardless of the Screen Async Mode. (4) In case that the XP-Remote does not have any control right, a screen can be converted by using the screen
conversion menu. For details, refer to “”Chapter 6 Screen” in the User’s Manual.

36
5.2.1 Convert Screen by the XGT Panel
Even though a screen is converted by the XGT Panel, any screen is not converted on the XP-Remote.
5.2.2 Convert Screen on the XP-Remote
Even though a screen is converted on the XGT Remote, any screen is not converted on the XP-Panel.
LAN
Convert screen by the channel number 2.
Convert

37
5.3 Obtain the Control Right At the first implementation, the XP-Remote does not own the control right. Therefore, the XGT Panel’s switches cannot be controller. Only after a control right is obtained from the XGT Panel, they can be controlled.
[Sequence] (1) Press non-screen of the XGT Panel’s screen about 2 seconds.
(2) Press the [Enable control by XP-Remote] button in the dialog box at the bottom of the screen.

38
Note (1) If Option [Allow XP-Remote to connect]is not checked in the XGT Panel’s Menu [Settings]-[XP-Remote]
Setting dialog box, the [Enable control by XP-Remote] button cannot be seen.
(2) The [Enable control by XP-Remote] button will be changed into the [Disable control by XP-Remote]one.
(3) Select XP-Remote Menu [Online]-[Obtain the Control Right].
(4) When the XP-Remote obtains the control right, the XGT Panel can be controlled by pressing switches.
Note (1) If the XP-Remote obtains the control right, [Online]-[Obtain the Control Right] Menu will be inactive. (2) If Obtain the Control Right] is activated, XP-VNC will lose control.
(3) The XGT Panel’s [Enable control by XP-Remote] button is changed into the [Disable control by XP-Remote].
If the XP-Remote obtains the control right, Control Right icon is displayed on the Status Bar

39
5.4 Return the Control Right In case that controlling is not needed any more on the XP-Remote or other XP-Remote needs the control right, the control right shall be returned to the XGT Panel. After the control right is returned, switches cannot be controlled from XP-Remote.
[Sequence] (1) Select XP-Remote Menu [Online]-[Return the Control Right]
(2) The control right is returned to the XGT Panel.
Note (1) If the XP-Remote returns the control right, [Online]-[Return the Control Right] Menu will be inactive.
(2) If the XP-Remote returns the control right, the Status Bar will show No Control Right icon.

40
5.5 Obtain the Control Right From the XGT Panel When the XGT Panel does not have the control right and it is urgently needed for the XGT Panel to control, the XP-Remote’s control right can be forcefully taken. Since then, the XP-Remote loses the control right.
[Sequence] (1) Press non-screen of the XGT Panel’s screen about 2 seconds.
(2) Press the [Disable control by XP-Remote] button in the dialog box at the bottom of the screen.

41
Chapter 6 Screen Since the XP-Remote provides the Screen Conversion Tool Bar, screen conversion movement in a drawing or converting to other screen is possible. The screen is convertible under the following conditions:
XP-Remote Control Right Possession
Screen Mode Available to Convert Screen
No Control Right Screen Non-Sync Mode Available No Control Right Screen Sync Mode Not available
Control Right Screen Non-Sync Mode Available Control Right Screen Sync Mode Available
If the XP-Remote has the control right and it is in the sync mode, the XGT Panel screen is also convertible on the XT Panel when the screen is converted.
6.1 Go to Screen of XGT Panel If the XP-Remote is in the Screen Non-Sync Mode, it is an available function when a different screen is displayed from the XGT Panel’s screen. It converts to the screen that the XGT Panel is currently displaying. [Sequence] (1) Select XP-Remote Menu [Screen]-[Convert to the XGT Panel’s Current Screen] (2) It converts to the same screen with the XGT Panel’s current screen.
Note (1) If the screen displays the same screen with the XGT Panel, the screen won’t be converted even [Convert to
the XGT Panel’s Current Screen] Menu is selected.

42
6.2 Go to Start Screen A designated screen in a drawing file of the XGT Panel is converted to the starting screen
Note (1) Starting screen: The basic screen in bold font in the XP-Builder project window is the starting screen.
The starting screen is No. 1 screen in the following figure.
[Sequence] (1) Select XP-Remote Menu [Screen]-[Convert to the Starting Screen].
(2) The starting screen is converted.
Note (2) If the current screen is the starting screen, the screen won’t be converted even [Convert to the Starting
Screen] Menu is selected.

43
6.3 Go to Previous Screen This function is available if the XP-Remote has converted screens before. It converts to the previous screen.
Note (1) Example of Converting to the Previous Screen.
a. The current screen is NO. 10. b. Convert to No. 5 screen. c. Select the [Convert to Previous Screen] Menu. d. Convert to No.10 screen.
[Sequence] (1) Select XP-Remote Menu [Screen]-[Convert to the Previous Screen]. (2) Converting to the previous screen is performed.
Note (1) If the connected XGT Panel upon the start of the XP-Remote has converted screens before, it is possible to
convert to the previous screen.

44
6.4 Go to Current Screen No -1 The current screen is converted to the screen that subtracts 1 from the current one.
[Sequence] (1) Select XP-Remote Menu [Screen]-[Convert to the 1 minus Screen].
(2) Convert to the screen that subtracts 1 from the current one.
Note (1) No. 0 screen is not converted. (2) If the screen that subtracts 1 from the current one does not have any drawing, the screen is not converted.
+
-

45
6.5 Go to Current Screen No +1 The current screen is converted to the screen that adds 1 to the current one.
[Sequence] (1) Select XP-Remote Menu [Screen]-[Convert to the 1 plus Screen].
(2) Convert to the screen that adds 1 to the current one.
Note (1) No. 0 screen is not converted. (2) If the screen that adds 1 to the current one does not have any drawing, the screen is not converted.
+
-

46
6.6 Screen Conversion Combo Box Screen Conversion Combo Box exists on the XP-Remote Tool Bar. Immediate converting to a particular screen number is possible.
[Sequence] (1) Select an arrow of screen number combo box to unfold the combo.
A screen number list is displayed in the drawing.
(2) Select a screen number you want to move from the list.
(3) Convert to the selected screen.
Note (1) Input a number directly in the combo box and press the Enter button to make the applicable screen
converted. (2) If the inputted screen number does not exist in the drawing, converting is not performed. “screen number –
NG” is displayed as follows:

47
6.7 Fix Screen Size to XGT Panel Size
Screen of XP-Remote is fixed as same size of XGT Panel.
[Sequence]
(1) Select menu [Screen] - [ Fix Screen Size to XGT Panel Size].
(2) It is not possible to resize the frame of XP-Remote.

48
6.8 Adjust Screen Size to Frame Size Screen of XP-Remote can be resized automatically as the frame.
[Sequence] (1) Select menu [Screen] - [ Adjust Screen Size to Frame Size].

49
6.9 Full Screen Screen of XP-Remote is expanded to monitor size. [Sequence]
(1) Select menu [Screen] - [ Full screen].
(2) Screen of XP-Remote will be returned to the original size if push the button [Close full Screen] or ESC.

50
Chapter 7 Tools
7.1 Screen Capture A screen displayed on the XP-Remote is saved in a bitmap file.
[Sequence] (1) Select XP-Remote Menu [Tools]-[Screen Capture].
(2) A dialog box of saving as other name appears.
(3) Input a file name and press the Save button to save the file.

51
7.2 Options
7.2.1 Online Settings related to online can be changed.
[Sequence]
(1) Select XP-Remote Menu [Tools]-[Options]-[Online] tap.
(2) Revise items and press the Confirm button. [Dialog Box Description]
Item Description OK(a) Save the changed contents and close the dialog box. Cancel(b) Close the dialog box without saving the changes. Apply(c) Apply the changes.
Timeout(d) Waiting time for response during the communication with the XGT Panel. (1second ~ 10seconds)
Communication interval(e)
Interval to collect device values on the screen. (0.1second ~ 1.0 second)
1:1 connect when connecting with the XGT Panel (f)
If the selected adopter’s IP band is different from that of the XGT Panel, add a virtual IP Address to the computer and attempt communication. But, on Windows Vista and Windows 7, it is not supported.
Select network adapter for communication(g)
Select a network adopter mounted on the computer. Data are sent or received via the selected network adopter to the XGT Panel.
Note (1) Select a network adopter whose IP band adopter is the same with that of the XGT Panel to reduce
communication error.
(g)
(f)
(e)
(d)
(a) (b) (c)

52
7.2.2 Control Settings regarding to control can be changed.
[Sequence]
(1) Select XP-Remote Menu [Tools]-[Options]-[Control] tap.
(2) Revise items and press the Confirm button.
[Dialog Box Description]
Item Description Request control authority after connection (a)
After connecting with the XGT Panel, automatically attempt to obtain the control right. For details on the control right, refer to “Chapter 5 Online” of the User’s Manual.
Execute screen script when Asynchronous screen mode (b)
On the XP-Remote, screen script is not implemented. When this option is selected, screen script will be implemented upon converting to the screen synchronized with Screen Script.
XP-Remote automatically disconnect when not in use (c)
After setting time, XP-Remote automatically disconnect when not in use.
Note (1) PLC Control might be malfunctioning when any different screen script from that of the XGT Panel and that of
the XP-Remote is implemented in non-sync mode. That is why Screen Script is not used.
(a)
(c) (b)

53
7.2.3 General The XP-Remote’s general settings can be changed.
[Sequence] (1) Select XP-Remote Menu [Tools]-[Options]-[General] tap.
(2) Modify items and press the Confirm button.
[Dialog Box Description]
Item Description Default project storage path (a)
Specify a path to save a project for the first time.
Number of Recent Projects to display(b)
Specify the number of displayed recent project list.
Display new connection dialog box when starting(c)
Set up whether to display a dialog box of reconnection when the XP-Remote starts.
Fit frame to screen size after connection(d)
After the XP-Remote is connected with the XGT Panel, screen size is automatically adjusted.
(a)
(b)
(c)
(d)

54
Chapter 8 Restriction
8.1 Restriction The following functions are not available on the XP-Remote even though they are available on XGT Panel while using the XP-Remote.
function Description Global Script Global script in the drawing does not move.
Screen Script Screen script in the drawing does not move. But, it moves if [Options]-[Control] [Implement Screen Script in the Screen Non-Sync Mode] option is selected.
Script Function
The following Script Functions do not move. Ex) It will not occur beep sound, if ‘Buzzer’ switch is on.
- Buzzer - Backlight On - SetBuzzerEnable - ShowStatusbar - HMIExit - SetTime - WriteToIO - ReadFromIO - PrintAlarm - PrintScreen - Reset USB
Special Switch
The following Special Switches do not move. - [History Alarm Viewer] - [Print History Alarm] - [History Alarm Viewer] - [Delete Recovered alarm Data] - [History Alarm Viewer] - [Delete All Occurrence No.] - [History Alarm Viewer] - [Delete Recovered all alarm Data] - [Manager and Editor] - [Data List Editor] - [Manager and Editor] - [File Explorer] - [Manager and Editor] - [File Recipe and Transfer] - [Manager and Editor] - [File Recipe Editor] - [Manager and Editor] - [General Recipe] - [Memo Pad] - [Save] - [Memo Pad] - [Delete Memo] - [Memo Pad] - [Delete All Saved Memos] - [Running Completed] - [Execute External Program] - [Program Monitoring] - [Print Screen]
Object
The following objects are not displayed on the screen. - Motion image player - File Recipe Editor - Datalist - Datalist Editor
55
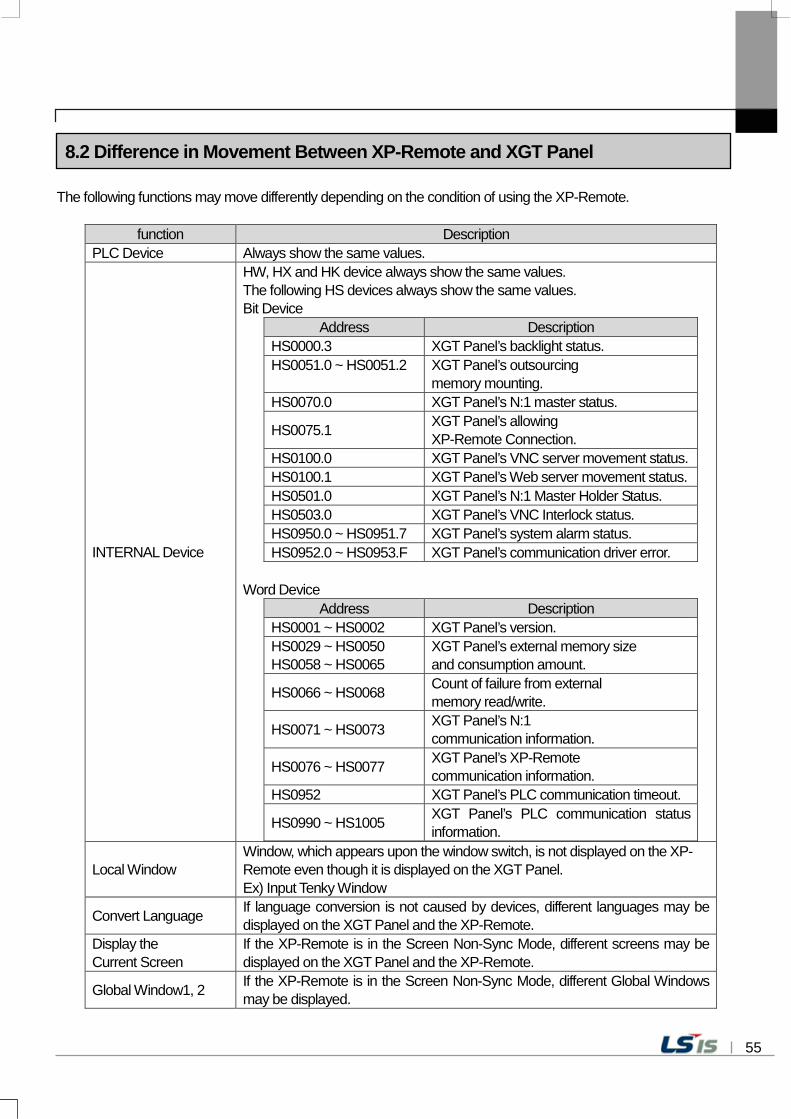
8.2 Difference in Movement Between XP-Remote and XGT Panel The following functions may move differently depending on the condition of using the XP-Remote.
function Description PLC Device Always show the same values.
INTERNAL Device
HW, HX and HK device always show the same values. The following HS devices always show the same values. Bit Device
Address Description HS0000.3 XGT Panel’s backlight status. HS0051.0 ~ HS0051.2 XGT Panel’s outsourcing
memory mounting. HS0070.0 XGT Panel’s N:1 master status.
HS0075.1 XGT Panel’s allowing XP-Remote Connection.
HS0100.0 XGT Panel’s VNC server movement status. HS0100.1 XGT Panel’s Web server movement status. HS0501.0 XGT Panel’s N:1 Master Holder Status. HS0503.0 XGT Panel’s VNC Interlock status. HS0950.0 ~ HS0951.7 XGT Panel’s system alarm status. HS0952.0 ~ HS0953.F XGT Panel’s communication driver error.
Word Device
Address Description HS0001 ~ HS0002 XGT Panel’s version. HS0029 ~ HS0050 HS0058 ~ HS0065
XGT Panel’s external memory size and consumption amount.
HS0066 ~ HS0068 Count of failure from external memory read/write.
HS0071 ~ HS0073 XGT Panel’s N:1 communication information.
HS0076 ~ HS0077 XGT Panel’s XP-Remote communication information.
HS0952 XGT Panel’s PLC communication timeout.
HS0990 ~ HS1005 XGT Panel’s PLC communication status information.
Local Window Window, which appears upon the window switch, is not displayed on the XP-Remote even though it is displayed on the XGT Panel. Ex) Input Tenky Window
Convert Language If language conversion is not caused by devices, different languages may be displayed on the XGT Panel and the XP-Remote.
Display the Current Screen
If the XP-Remote is in the Screen Non-Sync Mode, different screens may be displayed on the XGT Panel and the XP-Remote.
Global Window1, 2 If the XP-Remote is in the Screen Non-Sync Mode, different Global Windows may be displayed.

56
Clock Object Clock Object on the XP-Remote displays computer clock. Memo Pad Memo pad contents on the XP-Panel are not displayed on the XP-Remote. Logging Trend Graph Logging that is old and deleted may be displayed in a different figure. Logging Distribution Graph For logging that is old and deleted, it may be displayed in a different figure.
Trend Graph Since the time of data collection is different, it can be displayed in a different graph.
Real-Time Distribution Graph
Since the time of data collection is different, it can be displayed in a different graph.
Special Switch
Special switches of below list do not operate with XGT Panel. - [History Alarm Viewer] Function - [History Alarm Row Scroll] Function - [Logging Viewer] Function - [Logging Row Scroll] Function - [Alarm Navigator] Function - [Logging Trend] Function - [Memo] Function - [Manager and Editor] Function - [ETC] - [Key Switch] - [ETC] - [Next Cursor] - [ETC] - [Previous Cursor]

57
Annex 1. Problem Solving
1.1 Communication Problems 1.1.1 The XGT Panel communication connection does not work well on the XP-Remote.
Phenomenon Record When communicating, the following error messages appear:
<Cause> More than one of the following examples is the cause of the problem. 1) The XGT Panel with an applicable IP address of the object node does not exist on the network. 2) No ethernet cable is connected with the XGT Panel. 3) The ethernet cable is not correct. It might be short cut or disconnected. 4) The network administrator blocks UDP/IP connection. 5) The object XGT Panel’s IP band is not equal to the gateway band set up on the PC. 6) The XGT Panel is not in the monitor mode. 7) The computer’s Window firewall blocks the XP-Remote communication. 8) The XGT Panel’s version is less than 1.30. <Solution> 1) Connect the ethernet cable with the object node’s XGT Panel to join it in the network. 2) Connect the XGT Panel’s ethernet cable. 3) Check the wiring status of the ethernet cable and check its movement. In case that the XGT Panel and
the PC are directly connected and they use cross cable hub, use direct cables. 4) Contact the network administrator. 5) Change the XGT Panel’s IP. Since IP Address can conflict, contact the network administrator. 6) Convert to the XGT Panel’s monitor mode. 7) Change the computer’s Window [Control edition] firewall settings to cancel the blocked items related to
the XP-Remote. 8) The XP-Remote connection is supported from the XGT Panel version 1.30 or higher. Upgrade the XGT
Panel. Note (1) Most of communication connection problems occur under the conditions above. If the same problem occurs
even after taking the actions above, contact LSIS customer center.

58
1.2 Control Right Problems
1.2.1 Switches on the screen are not pressed. Phenomenon Record Switches or number input on the drawing screen do not pressed down.
<Cause> 1) The control right is not obtained. <Solution> 1) Obtain the control right. For details, refer to “Chapter 5 Online” of the User’s Manual.
1.2.2 Even though the control right is obtained, it is not controlled from a certain moment. 1.2.3 Phenomenon Record After the control right is obtained, it is not controlled any more from a certain
moment. The following messages appear.
<Cause> 1) The control right is forcefully taken from the XGT Panel by pressing the [Disable control by XP-Remote]
button by somebody. <Solution> 1) After checking if there is the control right by asking the site operator who is near the XGT Panel, and if not,
obtain it again.

※ LS Industrial Systems constantly endeavors to improve its product so that information in this manual is subject to change without notice.
ⓒ LSIS Co., Ltd 2015 All Rights Reserved.
10310001431
2015. 06
LS values every single customers.
Quality and service come first at LSIS.
Always at your service, standing for our customers.
www.lsis.com
■ HEAD OFFICE
LS Tower, 127, LS-ro, Dongan-gu, Anyang-si, Gyeonggi-Do, 431-848, Korea
http://www.lsis.com ■Southeast Asia +82-2-2034-4888 [email protected] (Charles Hwang) ■Europe +82-2-2034-4676 [email protected] (Brian Choi) ■Turkey/Israel/CIS +82-2-2034-4879 [email protected] (Daniel Kim) ■Oceania +82-2-2034-4394 [email protected] (Kendra Cho) ■North/Latin America +82-2-2034-4286 [email protected] (Hank Raul Chung) ■Southwest Asia/Africa +82-2-2034-4467 [email protected] (Henry Lee) ■Middle East +971-4-886-5360 [email protected] (Lambert Choi) ■ LSIS(Dalian) Co., Ltd. /CHINA
No. 15, Liaohexi 3-Road, Economic and Technical Development zone, Dalian, P.R. China Tel : 86-411-8731-7542 Fax : 86-411-8730-7560 E-Mail : [email protected] ■ LSIS(Wuxi) Co., Ltd./CHINA
102-A, National High & New Tech Industrial Development Area,
Wuxi, Jiangsu, P.R. China Tel : 86-510-8534-6666 Fax : 86-510-8534-4078 E-Mail : [email protected] ■ LS Hukai Electric(Hubei) Co., Ltd./CHINA
No. 100, Tanjiahe Road, Dianjun District, Yichang City, Hubei Province, P.R. China Tel : 86-717-667-7536 Fax : 86-717-667-7222 E-Mail : [email protected]
■ LS-VINA Industrial Systems Co., Ltd./VIETNAM
Room 1311, 13th, M3-M4 Building 91 Nguyen Chi Thanh street, Hanoi, Vietnam Tel : 84-4-6275-8055 Fax : 86-21-5237-7189 ■ LSIS(ME) FZE/U.A.E.
LOB 19-205, JAFZA View Tower, Jebel Ali Free Zone, Dubai, United Arab Emirates Tel : 971-4-886-5360 Fax : 971-4-886-5361 E-Mail : [email protected] ■ LSIS Europe B.V./NETHERLANDS
1st. Floor, Tupolevlaan 48, 1119NZ,Schiphol-Rijk, The Netherlands Tel : 31-20-654-1420 Fax : 31-20-654-1429 E-Mail : [email protected]
■ LSIS Japan Co., Ltd./JAPAN
16th,Higashi-Kan, Akasaka Twin Tower, 2-17-22, Akasaka, Minato-ku, Tokyo, Japan Tel : 847-941-8240 Fax : 847-941-8259 E-Mail : [email protected] ■ LSIS USA Inc./U.S.A.
2000 Millbrook Drive, Lincolnshire, Chicago, IL 60069, United States of America Tel : 86-510-8534-6666/Fax : 86-510-8534-4078 e-mail : [email protected]
■ LSIS Gurgaon Office/INDIA
109 First Floor, Park Central, Sector-30, Gurgaon- 122 002, Haryana, India Tel : +0091-124-493-0070 Fax : 91-1244-930-066 E-Mail : [email protected]