
Workflow Service Administration Guide - Micro Focus
180
Workflow Service Administration Guide January 2022
-
Upload
khangminh22 -
Category
Documents
-
view
2 -
download
0
Transcript of Workflow Service Administration Guide - Micro Focus

Workflow ServiceAdministration Guide
January 2022

Legal NoticeFor information about NetIQ legal notices, disclaimers, warranties, export and other use restrictions, U.S. Government restricted rights, patent policy, and FIPS compliance, see https://www.netiq.com/company/legal/.
Copyright (C) 2022 NetIQ Corporation. All rights reserved.
2

Contents
About this Book and the Library 9
Part I Introduction to Workflow Service 11
1 Introduction to the Workflow Service Components 13Workflow Administration Console. . . . . . . . . . . . . . . . . . . . . . . . . . . . . . . . . . . . . . . . . . . . . . . . . . . . . . . . . . . 13
Form Builder. . . . . . . . . . . . . . . . . . . . . . . . . . . . . . . . . . . . . . . . . . . . . . . . . . . . . . . . . . . . . . . . . . . . . . . 13Workflow Builder . . . . . . . . . . . . . . . . . . . . . . . . . . . . . . . . . . . . . . . . . . . . . . . . . . . . . . . . . . . . . . . . . . . 14
Workflow Engine. . . . . . . . . . . . . . . . . . . . . . . . . . . . . . . . . . . . . . . . . . . . . . . . . . . . . . . . . . . . . . . . . . . . . . . . . 14Workflow Database. . . . . . . . . . . . . . . . . . . . . . . . . . . . . . . . . . . . . . . . . . . . . . . . . . . . . . . . . . . . . . . . . . . . . . . 15
2 Understanding Authorizations in Workflow Service 17
Part II Getting Started with Workflow Administration Console 19
3 Exploring the Dashboard 21Understanding Dashboard Tiles. . . . . . . . . . . . . . . . . . . . . . . . . . . . . . . . . . . . . . . . . . . . . . . . . . . . . . . . . . . . . 21
4 Configuring Default Settings for Workflow Administration Console 23Manage User Access . . . . . . . . . . . . . . . . . . . . . . . . . . . . . . . . . . . . . . . . . . . . . . . . . . . . . . . . . . . . . . . . . . . . . . 23
Assigning Trustees . . . . . . . . . . . . . . . . . . . . . . . . . . . . . . . . . . . . . . . . . . . . . . . . . . . . . . . . . . . . . . . . . . 23Configure Advanced Settings . . . . . . . . . . . . . . . . . . . . . . . . . . . . . . . . . . . . . . . . . . . . . . . . . . . . . . . . . . . . . . . 24
Add a New Configuration Property . . . . . . . . . . . . . . . . . . . . . . . . . . . . . . . . . . . . . . . . . . . . . . . . . . . . 24Edit Existing Configuration Properties . . . . . . . . . . . . . . . . . . . . . . . . . . . . . . . . . . . . . . . . . . . . . . . . . . 25
Add Category and Process Type to the Workflow Catalog. . . . . . . . . . . . . . . . . . . . . . . . . . . . . . . . . . . . . . . . 25Add a Category or Process Type . . . . . . . . . . . . . . . . . . . . . . . . . . . . . . . . . . . . . . . . . . . . . . . . . . . . . . . 25Delete a Category . . . . . . . . . . . . . . . . . . . . . . . . . . . . . . . . . . . . . . . . . . . . . . . . . . . . . . . . . . . . . . . . . . 26
Customize the User Interface Display Settings . . . . . . . . . . . . . . . . . . . . . . . . . . . . . . . . . . . . . . . . . . . . . . . . . 26General Settings. . . . . . . . . . . . . . . . . . . . . . . . . . . . . . . . . . . . . . . . . . . . . . . . . . . . . . . . . . . . . . . . . . . . 26Dashboard Settings . . . . . . . . . . . . . . . . . . . . . . . . . . . . . . . . . . . . . . . . . . . . . . . . . . . . . . . . . . . . . . . . . 26Column Customization Settings . . . . . . . . . . . . . . . . . . . . . . . . . . . . . . . . . . . . . . . . . . . . . . . . . . . . . . . 27
Part III Working with Forms Catalog 29
5 Forms Catalog Overview 31About Forms . . . . . . . . . . . . . . . . . . . . . . . . . . . . . . . . . . . . . . . . . . . . . . . . . . . . . . . . . . . . . . . . . . . . . . . . . . . . 31
About Request Forms . . . . . . . . . . . . . . . . . . . . . . . . . . . . . . . . . . . . . . . . . . . . . . . . . . . . . . . . . . . . . . . 31About Approval Forms. . . . . . . . . . . . . . . . . . . . . . . . . . . . . . . . . . . . . . . . . . . . . . . . . . . . . . . . . . . . . . . 31About Template Forms . . . . . . . . . . . . . . . . . . . . . . . . . . . . . . . . . . . . . . . . . . . . . . . . . . . . . . . . . . . . . . 32
About Form Builder. . . . . . . . . . . . . . . . . . . . . . . . . . . . . . . . . . . . . . . . . . . . . . . . . . . . . . . . . . . . . . . . . . . . . . . 32
Contents 3

4 Con
6 Managing Forms in Forms Catalog 33Listing Forms . . . . . . . . . . . . . . . . . . . . . . . . . . . . . . . . . . . . . . . . . . . . . . . . . . . . . . . . . . . . . . . . . . . . . . . . . . . . 33
Finding a Form . . . . . . . . . . . . . . . . . . . . . . . . . . . . . . . . . . . . . . . . . . . . . . . . . . . . . . . . . . . . . . . . . . . . . 33Sorting the List by Columns . . . . . . . . . . . . . . . . . . . . . . . . . . . . . . . . . . . . . . . . . . . . . . . . . . . . . . . . . . 34Customizing the Columns . . . . . . . . . . . . . . . . . . . . . . . . . . . . . . . . . . . . . . . . . . . . . . . . . . . . . . . . . . . . 34Form Legends. . . . . . . . . . . . . . . . . . . . . . . . . . . . . . . . . . . . . . . . . . . . . . . . . . . . . . . . . . . . . . . . . . . . . . 34
Creating New Forms . . . . . . . . . . . . . . . . . . . . . . . . . . . . . . . . . . . . . . . . . . . . . . . . . . . . . . . . . . . . . . . . . . . . . . 35Creating New Request, Approval, or Template Form . . . . . . . . . . . . . . . . . . . . . . . . . . . . . . . . . . . . . . 35Creating a New Form by Copying an Existing Form . . . . . . . . . . . . . . . . . . . . . . . . . . . . . . . . . . . . . . . 36Creating a New Form from Template Forms . . . . . . . . . . . . . . . . . . . . . . . . . . . . . . . . . . . . . . . . . . . . . 36
Form Actions . . . . . . . . . . . . . . . . . . . . . . . . . . . . . . . . . . . . . . . . . . . . . . . . . . . . . . . . . . . . . . . . . . . . . . . . . . . . 37Restoring Previous Version of a Form . . . . . . . . . . . . . . . . . . . . . . . . . . . . . . . . . . . . . . . . . . . . . . . . . . 37
Modifying a Published Form . . . . . . . . . . . . . . . . . . . . . . . . . . . . . . . . . . . . . . . . . . . . . . . . . . . . . . . . . . . . . . . 38Deleting Forms . . . . . . . . . . . . . . . . . . . . . . . . . . . . . . . . . . . . . . . . . . . . . . . . . . . . . . . . . . . . . . . . . . . . . . . . . . 38
Part IV Working with Workflow Catalog 39
7 Workflow Catalog Overview 41
8 Managing Workflows in a Catalog 43Creating a Workflow . . . . . . . . . . . . . . . . . . . . . . . . . . . . . . . . . . . . . . . . . . . . . . . . . . . . . . . . . . . . . . . . . . . . . . 43
Copying a Workflow . . . . . . . . . . . . . . . . . . . . . . . . . . . . . . . . . . . . . . . . . . . . . . . . . . . . . . . . . . . . . . . . 44Editing a Workflow . . . . . . . . . . . . . . . . . . . . . . . . . . . . . . . . . . . . . . . . . . . . . . . . . . . . . . . . . . . . . . . . . . . . . . . 44
Editing Properties on the Overview Tab . . . . . . . . . . . . . . . . . . . . . . . . . . . . . . . . . . . . . . . . . . . . . . . . 44Deleting a Workflow . . . . . . . . . . . . . . . . . . . . . . . . . . . . . . . . . . . . . . . . . . . . . . . . . . . . . . . . . . . . . . . . . . . . . . 46Restoring a Workflow . . . . . . . . . . . . . . . . . . . . . . . . . . . . . . . . . . . . . . . . . . . . . . . . . . . . . . . . . . . . . . . . . . . . . 46Publishing a Workflow . . . . . . . . . . . . . . . . . . . . . . . . . . . . . . . . . . . . . . . . . . . . . . . . . . . . . . . . . . . . . . . . . . . . 46Viewing Workflow Association . . . . . . . . . . . . . . . . . . . . . . . . . . . . . . . . . . . . . . . . . . . . . . . . . . . . . . . . . . . . . 46Listing Workflows . . . . . . . . . . . . . . . . . . . . . . . . . . . . . . . . . . . . . . . . . . . . . . . . . . . . . . . . . . . . . . . . . . . . . . . . 46
Sorting Workflows . . . . . . . . . . . . . . . . . . . . . . . . . . . . . . . . . . . . . . . . . . . . . . . . . . . . . . . . . . . . . . . . . . 46Searching for a Workflow . . . . . . . . . . . . . . . . . . . . . . . . . . . . . . . . . . . . . . . . . . . . . . . . . . . . . . . . . . . . 47Customizing Columns . . . . . . . . . . . . . . . . . . . . . . . . . . . . . . . . . . . . . . . . . . . . . . . . . . . . . . . . . . . . . . . 47
Using System-Defined Workflows . . . . . . . . . . . . . . . . . . . . . . . . . . . . . . . . . . . . . . . . . . . . . . . . . . . . . . . . . . . 48Applying System-Defined Workflows . . . . . . . . . . . . . . . . . . . . . . . . . . . . . . . . . . . . . . . . . . . . . . . . . . . 49
Part V Workflow Builder Overview 51
9 Using Workflow Builder to Create Workflows 53About Workflow Builder. . . . . . . . . . . . . . . . . . . . . . . . . . . . . . . . . . . . . . . . . . . . . . . . . . . . . . . . . . . . . . . . . . . 53
Canvas. . . . . . . . . . . . . . . . . . . . . . . . . . . . . . . . . . . . . . . . . . . . . . . . . . . . . . . . . . . . . . . . . . . . . . . . . . . . 53Palette. . . . . . . . . . . . . . . . . . . . . . . . . . . . . . . . . . . . . . . . . . . . . . . . . . . . . . . . . . . . . . . . . . . . . . . . . . . . 54Associated Views . . . . . . . . . . . . . . . . . . . . . . . . . . . . . . . . . . . . . . . . . . . . . . . . . . . . . . . . . . . . . . . . . . . 54
Adding Activities to a Workflow. . . . . . . . . . . . . . . . . . . . . . . . . . . . . . . . . . . . . . . . . . . . . . . . . . . . . . . . . . . . . 55Setting the General Properties of an Activity . . . . . . . . . . . . . . . . . . . . . . . . . . . . . . . . . . . . . . . . . . . . 56Defining the Data Items for an Activity . . . . . . . . . . . . . . . . . . . . . . . . . . . . . . . . . . . . . . . . . . . . . . . . . 56Defining the Email Template Settings . . . . . . . . . . . . . . . . . . . . . . . . . . . . . . . . . . . . . . . . . . . . . . . . . . 57Validating a Workflow . . . . . . . . . . . . . . . . . . . . . . . . . . . . . . . . . . . . . . . . . . . . . . . . . . . . . . . . . . . . . . . 58
Adding Flow Paths. . . . . . . . . . . . . . . . . . . . . . . . . . . . . . . . . . . . . . . . . . . . . . . . . . . . . . . . . . . . . . . . . . . . . . . . 58Configuring Flow Paths . . . . . . . . . . . . . . . . . . . . . . . . . . . . . . . . . . . . . . . . . . . . . . . . . . . . . . . . . . . . . . . . . . . . 58
tents

Guidelines for Creating Workflows . . . . . . . . . . . . . . . . . . . . . . . . . . . . . . . . . . . . . . . . . . . . . . . . . . . . . . . . . . 60Rules for Activities . . . . . . . . . . . . . . . . . . . . . . . . . . . . . . . . . . . . . . . . . . . . . . . . . . . . . . . . . . . . . . . . . . 60Rules for Flow Paths . . . . . . . . . . . . . . . . . . . . . . . . . . . . . . . . . . . . . . . . . . . . . . . . . . . . . . . . . . . . . . . . 60Understanding Workflow Data . . . . . . . . . . . . . . . . . . . . . . . . . . . . . . . . . . . . . . . . . . . . . . . . . . . . . . . . 62
Debugging a Workflow . . . . . . . . . . . . . . . . . . . . . . . . . . . . . . . . . . . . . . . . . . . . . . . . . . . . . . . . . . . . . . . . . . . . 65Using the Log Activity . . . . . . . . . . . . . . . . . . . . . . . . . . . . . . . . . . . . . . . . . . . . . . . . . . . . . . . . . . . . . . . 65Changing Log Levels. . . . . . . . . . . . . . . . . . . . . . . . . . . . . . . . . . . . . . . . . . . . . . . . . . . . . . . . . . . . . . . . . 65
10 Workflow Activity Reference 67Start Activity . . . . . . . . . . . . . . . . . . . . . . . . . . . . . . . . . . . . . . . . . . . . . . . . . . . . . . . . . . . . . . . . . . . . . . . . . . . . 67
Properties . . . . . . . . . . . . . . . . . . . . . . . . . . . . . . . . . . . . . . . . . . . . . . . . . . . . . . . . . . . . . . . . . . . . . . . . . 67Data Items . . . . . . . . . . . . . . . . . . . . . . . . . . . . . . . . . . . . . . . . . . . . . . . . . . . . . . . . . . . . . . . . . . . . . . . . 68Email Template. . . . . . . . . . . . . . . . . . . . . . . . . . . . . . . . . . . . . . . . . . . . . . . . . . . . . . . . . . . . . . . . . . . . . 69Problems. . . . . . . . . . . . . . . . . . . . . . . . . . . . . . . . . . . . . . . . . . . . . . . . . . . . . . . . . . . . . . . . . . . . . . . . . . 69
Finish Activity . . . . . . . . . . . . . . . . . . . . . . . . . . . . . . . . . . . . . . . . . . . . . . . . . . . . . . . . . . . . . . . . . . . . . . . . . . . 69Properties . . . . . . . . . . . . . . . . . . . . . . . . . . . . . . . . . . . . . . . . . . . . . . . . . . . . . . . . . . . . . . . . . . . . . . . . . 69Data Items . . . . . . . . . . . . . . . . . . . . . . . . . . . . . . . . . . . . . . . . . . . . . . . . . . . . . . . . . . . . . . . . . . . . . . . . 70Email Template. . . . . . . . . . . . . . . . . . . . . . . . . . . . . . . . . . . . . . . . . . . . . . . . . . . . . . . . . . . . . . . . . . . . . 70Problems. . . . . . . . . . . . . . . . . . . . . . . . . . . . . . . . . . . . . . . . . . . . . . . . . . . . . . . . . . . . . . . . . . . . . . . . . . 72
Approval Activity . . . . . . . . . . . . . . . . . . . . . . . . . . . . . . . . . . . . . . . . . . . . . . . . . . . . . . . . . . . . . . . . . . . . . . . . . 72Properties . . . . . . . . . . . . . . . . . . . . . . . . . . . . . . . . . . . . . . . . . . . . . . . . . . . . . . . . . . . . . . . . . . . . . . . . . 72Data Items . . . . . . . . . . . . . . . . . . . . . . . . . . . . . . . . . . . . . . . . . . . . . . . . . . . . . . . . . . . . . . . . . . . . . . . . 77Available ECMAScript Methods . . . . . . . . . . . . . . . . . . . . . . . . . . . . . . . . . . . . . . . . . . . . . . . . . . . . . . . 78Email Template. . . . . . . . . . . . . . . . . . . . . . . . . . . . . . . . . . . . . . . . . . . . . . . . . . . . . . . . . . . . . . . . . . . . . 79Specifying the Addressee Property . . . . . . . . . . . . . . . . . . . . . . . . . . . . . . . . . . . . . . . . . . . . . . . . . . . . 81Problems. . . . . . . . . . . . . . . . . . . . . . . . . . . . . . . . . . . . . . . . . . . . . . . . . . . . . . . . . . . . . . . . . . . . . . . . . . 86
Log Activity . . . . . . . . . . . . . . . . . . . . . . . . . . . . . . . . . . . . . . . . . . . . . . . . . . . . . . . . . . . . . . . . . . . . . . . . . . . . . 87Properties . . . . . . . . . . . . . . . . . . . . . . . . . . . . . . . . . . . . . . . . . . . . . . . . . . . . . . . . . . . . . . . . . . . . . . . . . 87Data Items . . . . . . . . . . . . . . . . . . . . . . . . . . . . . . . . . . . . . . . . . . . . . . . . . . . . . . . . . . . . . . . . . . . . . . . . 88Email Template. . . . . . . . . . . . . . . . . . . . . . . . . . . . . . . . . . . . . . . . . . . . . . . . . . . . . . . . . . . . . . . . . . . . . 88Problems. . . . . . . . . . . . . . . . . . . . . . . . . . . . . . . . . . . . . . . . . . . . . . . . . . . . . . . . . . . . . . . . . . . . . . . . . . 88
Condition Activity . . . . . . . . . . . . . . . . . . . . . . . . . . . . . . . . . . . . . . . . . . . . . . . . . . . . . . . . . . . . . . . . . . . . . . . . 88Properties . . . . . . . . . . . . . . . . . . . . . . . . . . . . . . . . . . . . . . . . . . . . . . . . . . . . . . . . . . . . . . . . . . . . . . . . . 88Data Items . . . . . . . . . . . . . . . . . . . . . . . . . . . . . . . . . . . . . . . . . . . . . . . . . . . . . . . . . . . . . . . . . . . . . . . . 89Email Template. . . . . . . . . . . . . . . . . . . . . . . . . . . . . . . . . . . . . . . . . . . . . . . . . . . . . . . . . . . . . . . . . . . . . 89Problems. . . . . . . . . . . . . . . . . . . . . . . . . . . . . . . . . . . . . . . . . . . . . . . . . . . . . . . . . . . . . . . . . . . . . . . . . . 89
Mapping Activity . . . . . . . . . . . . . . . . . . . . . . . . . . . . . . . . . . . . . . . . . . . . . . . . . . . . . . . . . . . . . . . . . . . . . . . . . 90Properties . . . . . . . . . . . . . . . . . . . . . . . . . . . . . . . . . . . . . . . . . . . . . . . . . . . . . . . . . . . . . . . . . . . . . . . . . 90Data Items . . . . . . . . . . . . . . . . . . . . . . . . . . . . . . . . . . . . . . . . . . . . . . . . . . . . . . . . . . . . . . . . . . . . . . . . 90Email Template. . . . . . . . . . . . . . . . . . . . . . . . . . . . . . . . . . . . . . . . . . . . . . . . . . . . . . . . . . . . . . . . . . . . . 91Problems. . . . . . . . . . . . . . . . . . . . . . . . . . . . . . . . . . . . . . . . . . . . . . . . . . . . . . . . . . . . . . . . . . . . . . . . . . 91
Workflow Status . . . . . . . . . . . . . . . . . . . . . . . . . . . . . . . . . . . . . . . . . . . . . . . . . . . . . . . . . . . . . . . . . . . . . . . . . 91Properties . . . . . . . . . . . . . . . . . . . . . . . . . . . . . . . . . . . . . . . . . . . . . . . . . . . . . . . . . . . . . . . . . . . . . . . . . 91Data Items . . . . . . . . . . . . . . . . . . . . . . . . . . . . . . . . . . . . . . . . . . . . . . . . . . . . . . . . . . . . . . . . . . . . . . . . 92Email Template. . . . . . . . . . . . . . . . . . . . . . . . . . . . . . . . . . . . . . . . . . . . . . . . . . . . . . . . . . . . . . . . . . . . . 92Problems. . . . . . . . . . . . . . . . . . . . . . . . . . . . . . . . . . . . . . . . . . . . . . . . . . . . . . . . . . . . . . . . . . . . . . . . . . 92
Email Activity. . . . . . . . . . . . . . . . . . . . . . . . . . . . . . . . . . . . . . . . . . . . . . . . . . . . . . . . . . . . . . . . . . . . . . . . . . . . 92Properties . . . . . . . . . . . . . . . . . . . . . . . . . . . . . . . . . . . . . . . . . . . . . . . . . . . . . . . . . . . . . . . . . . . . . . . . . 92Data Items . . . . . . . . . . . . . . . . . . . . . . . . . . . . . . . . . . . . . . . . . . . . . . . . . . . . . . . . . . . . . . . . . . . . . . . . 93Email Template. . . . . . . . . . . . . . . . . . . . . . . . . . . . . . . . . . . . . . . . . . . . . . . . . . . . . . . . . . . . . . . . . . . . . 93Problems. . . . . . . . . . . . . . . . . . . . . . . . . . . . . . . . . . . . . . . . . . . . . . . . . . . . . . . . . . . . . . . . . . . . . . . . . . 94
Rest Activity. . . . . . . . . . . . . . . . . . . . . . . . . . . . . . . . . . . . . . . . . . . . . . . . . . . . . . . . . . . . . . . . . . . . . . . . . . . . . 95Properties . . . . . . . . . . . . . . . . . . . . . . . . . . . . . . . . . . . . . . . . . . . . . . . . . . . . . . . . . . . . . . . . . . . . . . . . . 95
Contents 5

6 Con
Data Items . . . . . . . . . . . . . . . . . . . . . . . . . . . . . . . . . . . . . . . . . . . . . . . . . . . . . . . . . . . . . . . . . . . . . . . . 99Email Template. . . . . . . . . . . . . . . . . . . . . . . . . . . . . . . . . . . . . . . . . . . . . . . . . . . . . . . . . . . . . . . . . . . . . 99Problems. . . . . . . . . . . . . . . . . . . . . . . . . . . . . . . . . . . . . . . . . . . . . . . . . . . . . . . . . . . . . . . . . . . . . . . . . . 99
Notify Activity . . . . . . . . . . . . . . . . . . . . . . . . . . . . . . . . . . . . . . . . . . . . . . . . . . . . . . . . . . . . . . . . . . . . . . . . . . . 99Properties . . . . . . . . . . . . . . . . . . . . . . . . . . . . . . . . . . . . . . . . . . . . . . . . . . . . . . . . . . . . . . . . . . . . . . . .100Data Items . . . . . . . . . . . . . . . . . . . . . . . . . . . . . . . . . . . . . . . . . . . . . . . . . . . . . . . . . . . . . . . . . . . . . . .100Email Template. . . . . . . . . . . . . . . . . . . . . . . . . . . . . . . . . . . . . . . . . . . . . . . . . . . . . . . . . . . . . . . . . . . .100Problems. . . . . . . . . . . . . . . . . . . . . . . . . . . . . . . . . . . . . . . . . . . . . . . . . . . . . . . . . . . . . . . . . . . . . . . . .101
Integration Activity . . . . . . . . . . . . . . . . . . . . . . . . . . . . . . . . . . . . . . . . . . . . . . . . . . . . . . . . . . . . . . . . . . . . . .101Properties . . . . . . . . . . . . . . . . . . . . . . . . . . . . . . . . . . . . . . . . . . . . . . . . . . . . . . . . . . . . . . . . . . . . . . . .101Data Items . . . . . . . . . . . . . . . . . . . . . . . . . . . . . . . . . . . . . . . . . . . . . . . . . . . . . . . . . . . . . . . . . . . . . . .102Email Template. . . . . . . . . . . . . . . . . . . . . . . . . . . . . . . . . . . . . . . . . . . . . . . . . . . . . . . . . . . . . . . . . . . .103Problems. . . . . . . . . . . . . . . . . . . . . . . . . . . . . . . . . . . . . . . . . . . . . . . . . . . . . . . . . . . . . . . . . . . . . . . . .103
Working with Integration Activities . . . . . . . . . . . . . . . . . . . . . . . . . . . . . . . . . . . . . . . . . . . . . . . . . . . . . . . . .103Adding an Integration Activity . . . . . . . . . . . . . . . . . . . . . . . . . . . . . . . . . . . . . . . . . . . . . . . . . . . . . . .104Moving Data to and from the Integration Activity . . . . . . . . . . . . . . . . . . . . . . . . . . . . . . . . . . . . . . .105Adding a Web Service Authentication Certificate to Workflow Service . . . . . . . . . . . . . . . . . . . . . .106Troubleshooting Issues with Integration Activity . . . . . . . . . . . . . . . . . . . . . . . . . . . . . . . . . . . . . . . .107
Subprocess Activity . . . . . . . . . . . . . . . . . . . . . . . . . . . . . . . . . . . . . . . . . . . . . . . . . . . . . . . . . . . . . . . . . . . . . .108Branch Activity . . . . . . . . . . . . . . . . . . . . . . . . . . . . . . . . . . . . . . . . . . . . . . . . . . . . . . . . . . . . . . . . . . . .109Merge Activity . . . . . . . . . . . . . . . . . . . . . . . . . . . . . . . . . . . . . . . . . . . . . . . . . . . . . . . . . . . . . . . . . . . .110
11 Working with ECMA Expressions 111About the ECMA Expression Builder . . . . . . . . . . . . . . . . . . . . . . . . . . . . . . . . . . . . . . . . . . . . . . . . . . . . . . . .111
About ECMAScript . . . . . . . . . . . . . . . . . . . . . . . . . . . . . . . . . . . . . . . . . . . . . . . . . . . . . . . . . . . . . . . . .111Using the ECMA Expression Builder . . . . . . . . . . . . . . . . . . . . . . . . . . . . . . . . . . . . . . . . . . . . . . . . . . .112About Global Configuration Values Integration . . . . . . . . . . . . . . . . . . . . . . . . . . . . . . . . . . . . . . . . .112
Part VI Working with Email Notification Templates 113
12 Email Notification Template Overview 115
13 Setting Up Email Notification Templates 117Creating Templates . . . . . . . . . . . . . . . . . . . . . . . . . . . . . . . . . . . . . . . . . . . . . . . . . . . . . . . . . . . . . . . . . . . . . .117
Creating a New Notification Template . . . . . . . . . . . . . . . . . . . . . . . . . . . . . . . . . . . . . . . . . . . . . . . . .117Inserting a Token . . . . . . . . . . . . . . . . . . . . . . . . . . . . . . . . . . . . . . . . . . . . . . . . . . . . . . . . . . . . . . . . . .118
Editing a Notification Template . . . . . . . . . . . . . . . . . . . . . . . . . . . . . . . . . . . . . . . . . . . . . . . . . . . . . . . . . . . .119Deleting Notification Templates . . . . . . . . . . . . . . . . . . . . . . . . . . . . . . . . . . . . . . . . . . . . . . . . . . . . . . . . . . .119Managing Notification Templates . . . . . . . . . . . . . . . . . . . . . . . . . . . . . . . . . . . . . . . . . . . . . . . . . . . . . . . . . .119
Sorting Templates . . . . . . . . . . . . . . . . . . . . . . . . . . . . . . . . . . . . . . . . . . . . . . . . . . . . . . . . . . . . . . . . .119Searching for a Template. . . . . . . . . . . . . . . . . . . . . . . . . . . . . . . . . . . . . . . . . . . . . . . . . . . . . . . . . . . .119Customizing Columns . . . . . . . . . . . . . . . . . . . . . . . . . . . . . . . . . . . . . . . . . . . . . . . . . . . . . . . . . . . . . .120Importing and Exporting Templates . . . . . . . . . . . . . . . . . . . . . . . . . . . . . . . . . . . . . . . . . . . . . . . . . .120Using System-Defined Templates . . . . . . . . . . . . . . . . . . . . . . . . . . . . . . . . . . . . . . . . . . . . . . . . . . . . .121
Exporting and Importing Templates for Localization . . . . . . . . . . . . . . . . . . . . . . . . . . . . . . . . . . . . . . . . . . .121Deleting Localized Templates . . . . . . . . . . . . . . . . . . . . . . . . . . . . . . . . . . . . . . . . . . . . . . . . . . . . . . . .122
Publishing Templates . . . . . . . . . . . . . . . . . . . . . . . . . . . . . . . . . . . . . . . . . . . . . . . . . . . . . . . . . . . . . . . . . . . .123
tents

Part VII Working with Email Based Approval 125
14 Email-Based Approval Overview 127
15 Managing Approvals by Email 129Checklist to Setup Email-Based Approval . . . . . . . . . . . . . . . . . . . . . . . . . . . . . . . . . . . . . . . . . . . . . . . . . . . .129
Choosing Email-Based Approval Templates for Workflow . . . . . . . . . . . . . . . . . . . . . . . . . . . . . . . . .130Enabling Email-Based Approval on Cluster Environment . . . . . . . . . . . . . . . . . . . . . . . . . . . . . . . . . .130
Configuring Outgoing Email Settings . . . . . . . . . . . . . . . . . . . . . . . . . . . . . . . . . . . . . . . . . . . . . . . . . . . . .131Enabling Email Approval and Configuring Incoming Mail Server Properties . . . . . . . . . . . . . . . . . . . . . . .133Troubleshooting Email-Based Approval Issues . . . . . . . . . . . . . . . . . . . . . . . . . . . . . . . . . . . . . . . . . . . . . . . .135
Part VIII Workflow Engine and Cluster: Configuration and Monitoring 139How Clustering Works?. . . . . . . . . . . . . . . . . . . . . . . . . . . . . . . . . . . . . . . . . . . . . . . . . . . . . . . . . . . . . . . . . . .139
16 Configuring Workflow Engine and Cluster Settings 141Configuring the Workflow Engine Settings . . . . . . . . . . . . . . . . . . . . . . . . . . . . . . . . . . . . . . . . . . . . . . . . . . .141Configuring the Workflow Cluster Settings. . . . . . . . . . . . . . . . . . . . . . . . . . . . . . . . . . . . . . . . . . . . . . . . . . .142Reviewing the Status of Workflow Engines. . . . . . . . . . . . . . . . . . . . . . . . . . . . . . . . . . . . . . . . . . . . . . . . . . .143Deleting an Instance of Workflow Engine . . . . . . . . . . . . . . . . . . . . . . . . . . . . . . . . . . . . . . . . . . . . . . . . . . . .143
17 Monitoring Workflow Processes 145Finding Workflow Processes That Match Search Criteria . . . . . . . . . . . . . . . . . . . . . . . . . . . . . . . . . . . . . . .145
Sorting Workflow Processes by Recipient, Requester, or Request Date . . . . . . . . . . . . . . . . . . . . . .146Customizing the Columns . . . . . . . . . . . . . . . . . . . . . . . . . . . . . . . . . . . . . . . . . . . . . . . . . . . . . . . . . . .146
Viewing the Status of a Workflow Process . . . . . . . . . . . . . . . . . . . . . . . . . . . . . . . . . . . . . . . . . . . . . . . . . . .146Viewing the Approval Status of a Workflow Process . . . . . . . . . . . . . . . . . . . . . . . . . . . . . . . . . . . . . . . . . . .147Actions You Can Perform On The Page . . . . . . . . . . . . . . . . . . . . . . . . . . . . . . . . . . . . . . . . . . . . . . . . . . . . . .147
Terminating a Workflow Process . . . . . . . . . . . . . . . . . . . . . . . . . . . . . . . . . . . . . . . . . . . . . . . . . . . . .148Reassigning a Workflow Process . . . . . . . . . . . . . . . . . . . . . . . . . . . . . . . . . . . . . . . . . . . . . . . . . . . . .148Viewing Workflow Process Comments . . . . . . . . . . . . . . . . . . . . . . . . . . . . . . . . . . . . . . . . . . . . . . . .149
Part IX Understanding and Setting Up Event Logging 151
18 Understanding the Basics of Logging 153About Logging Services . . . . . . . . . . . . . . . . . . . . . . . . . . . . . . . . . . . . . . . . . . . . . . . . . . . . . . . . . . . . . . . . . .153What Can Be Logged. . . . . . . . . . . . . . . . . . . . . . . . . . . . . . . . . . . . . . . . . . . . . . . . . . . . . . . . . . . . . . . . . . . . .158The Workflow Logging Environment and Process . . . . . . . . . . . . . . . . . . . . . . . . . . . . . . . . . . . . . . . . . . . . .158
Terminology . . . . . . . . . . . . . . . . . . . . . . . . . . . . . . . . . . . . . . . . . . . . . . . . . . . . . . . . . . . . . . . . . . . . . .158Components for Logging . . . . . . . . . . . . . . . . . . . . . . . . . . . . . . . . . . . . . . . . . . . . . . . . . . . . . . . . . . . .159How Logging Works . . . . . . . . . . . . . . . . . . . . . . . . . . . . . . . . . . . . . . . . . . . . . . . . . . . . . . . . . . . . . . . .159
Types of Log Files . . . . . . . . . . . . . . . . . . . . . . . . . . . . . . . . . . . . . . . . . . . . . . . . . . . . . . . . . . . . . . . . . . . . . . .160Catalina Log . . . . . . . . . . . . . . . . . . . . . . . . . . . . . . . . . . . . . . . . . . . . . . . . . . . . . . . . . . . . . . . . . . . . . .160Localhost Log . . . . . . . . . . . . . . . . . . . . . . . . . . . . . . . . . . . . . . . . . . . . . . . . . . . . . . . . . . . . . . . . . . . . .160Application Log . . . . . . . . . . . . . . . . . . . . . . . . . . . . . . . . . . . . . . . . . . . . . . . . . . . . . . . . . . . . . . . . . . .160Additional Log Files . . . . . . . . . . . . . . . . . . . . . . . . . . . . . . . . . . . . . . . . . . . . . . . . . . . . . . . . . . . . . . . .161
Understanding the Log Format . . . . . . . . . . . . . . . . . . . . . . . . . . . . . . . . . . . . . . . . . . . . . . . . . . . . . . . . . . . .161
Contents 7

8 Con
Message Fields. . . . . . . . . . . . . . . . . . . . . . . . . . . . . . . . . . . . . . . . . . . . . . . . . . . . . . . . . . . . . . . . . . . .162Message Severity . . . . . . . . . . . . . . . . . . . . . . . . . . . . . . . . . . . . . . . . . . . . . . . . . . . . . . . . . . . . . . . . . .163
19 Configuring Logging 165Configuring Logging . . . . . . . . . . . . . . . . . . . . . . . . . . . . . . . . . . . . . . . . . . . . . . . . . . . . . . . . . . . . . . . . . . . . .165
Understanding Logging Configuration . . . . . . . . . . . . . . . . . . . . . . . . . . . . . . . . . . . . . . . . . . . . . . . . .165Understanding the Log Level Settings . . . . . . . . . . . . . . . . . . . . . . . . . . . . . . . . . . . . . . . . . . . . . . . . .166Specifying the Severity Level for Commons Logging API Loggers . . . . . . . . . . . . . . . . . . . . . . . . . . .166Editing the Logging Configuration File . . . . . . . . . . . . . . . . . . . . . . . . . . . . . . . . . . . . . . . . . . . . . . . . .167Managing Log File Size . . . . . . . . . . . . . . . . . . . . . . . . . . . . . . . . . . . . . . . . . . . . . . . . . . . . . . . . . . . . .167
Changing the Log Levels for Features . . . . . . . . . . . . . . . . . . . . . . . . . . . . . . . . . . . . . . . . . . . . . . . . . . . . . . .168Adding a Package . . . . . . . . . . . . . . . . . . . . . . . . . . . . . . . . . . . . . . . . . . . . . . . . . . . . . . . . . . . . . . . . . .168
20 Configuring Logging in a Cluster 171Tomcat Logging . . . . . . . . . . . . . . . . . . . . . . . . . . . . . . . . . . . . . . . . . . . . . . . . . . . . . . . . . . . . . . . . . . . . . . . . .171Workflow Logging . . . . . . . . . . . . . . . . . . . . . . . . . . . . . . . . . . . . . . . . . . . . . . . . . . . . . . . . . . . . . . . . . . . . . . .172
Part X Understanding Audit Configuration 173
21 Configure Audit Events Overview 175
22 Configuring Audit Events 177Enabling and Disabling the Audit Configuration. . . . . . . . . . . . . . . . . . . . . . . . . . . . . . . . . . . . . . . . . . . . . . .177Audit Log Events . . . . . . . . . . . . . . . . . . . . . . . . . . . . . . . . . . . . . . . . . . . . . . . . . . . . . . . . . . . . . . . . . . . . . . . .178
tents

About this Book and the Library
The Administration Guide describes how an administrator can utilize the Workflow Administration Console to manage, design, and monitor different workflows used for provisioning and fulfillment of resources.
Intended AudienceThis book provides information for administrators who are responsible for designing, managing, and monitoring workflows.
About this Book and the Library 9

10 About this Book and the Library

I IIntroduction to Workflow Service
Workflow Service is a web-based service for creating workflows. It allows you to create, execute, and manage workflows, ranging from simple approval processes to custom workflows that exchange data with REST services. As a result, workflows created using Workflow Service can integrate with other systems both inside and outside the organization. For example, Identity Governance employs Workflow Service to build custom approval processes. The approval process is then associated with the permissions. When a user requests for permission, the Workflow Service initiates and executes the approval process.
Workflow Service provides a wide range of capabilities, including:
Designing Workflows Design workflows using custom request and approval forms.
Monitoring and Managing Workflow Processes Initiate a workflow and monitor the running workflow process.
Email Based Approval Request reviewers to approve or deny a request using email.
Email Notification Service Notify approvers of tasks in their queues, inform the initiator that the workflow is done, or update if there is any change in the workflow status.
Logging Debug the configurations for various features provided in the applications.
Auditing Log events occurring in the Workflow Administration Console to provide evidence that you are complying with regulations.
Introduction to Workflow Service 11

12 Introduction to Workflow Service

1 1Introduction to the Workflow Service Components
The Workflow Service rely on a number of components acting together:
“Workflow Administration Console” on page 13 “Workflow Engine” on page 14 “Workflow Database” on page 15
Workflow Administration ConsoleWorkflow Administration Console integrates the Workflow Builder and Form Builder, which add workflow and form-building capabilities to the application, respectively.
Form BuilderForm Builder is a web-based service used for designing forms. It is a platform for application developers and administrators to build their own complex forms. It combines JavaScript forms with REST API Data Management platforms to set up form-based progressive web applications.
Form Builder provides the following features and benefits:
Drag and drop feature that enables you to quickly create modern and responsive forms Multiple components (widgets) with modern look and feel Simplify connections between the forms and the REST APIs Integrated with the JavaScript Editor to provide a consolidated view of all the JavaScript
methods in the form Integrated with the JSON Editor to edit JSON forms directly Support for inbuilt localization for forms Allows you to search and read the REST API description and invoke the REST API in JS methods
with a single click. Automatically populates the code in JavaScript Editor to call the API
For more information about the Form Builder, see Administrator’s Guide to the Form Builder.
Introduction to the Workflow Service Components 13

About Form Control Data BindingEvery field that you add in a form using Form Builder is automatically available for data binding when you associate that form with a workflow. The Data Binding includes the following types of binding or mapping for a field:
A pre-activity mapping to initialize or pre-load a form field with data A post-activity mapping to move modified form data into the workflow document. This process
is called flowdata
The Data Items tab in the workflow builder displays this mapping property sheet. The data item mappings, along with any script expressions that are used, are executed in the Workflow Engine before the form is displayed to the end user. Common uses for pre-activity data-item mappings and their expressions that operate against the flow-data document are for moving previous approval data into the current approval or for setting default values for fields. For more information on data item mappings, see “Defining the Data Items for an Activity” on page 56.
Workflow BuilderWorkflow Builder is a component of the Workflow Administration Console that allows you to build workflows. It provides an array of activities that you can use to create workflow diagrams based on the consumer application business requirement. Forms created in Form Builder are available for associating with the workflow activities in Workflow Builder.
Workflow Builder user interface is intuitive and easy to use. To create a simple workflow diagram, drag-and-drop activities to the canvas, attach request and approval forms to the activities, connect with the global connect tool. For more information on how to use Workflow Builder, see Chapter 9, “Using Workflow Builder to Create Workflows,” on page 53.
The workflow database maintains workflows in XML format. Until the workflow is published, the XML is saved in an intermediate state. After publishing, it is ready for use in the consumer application. Workflow Builder communicates with the workflow runtime database via REST API that enables you to create, read, update, and delete workflows.
Workflow Builder is built on BPMN.iO, an open-source project for the modeling framework and toolkits. Refer to the bpmn.io License for details that governs the usage of this toolkit.
Workflow EngineThe Workflow Engine is responsible for managing and executing steps in an administrator-defined workflow and keeping track of state information. The Workflow Engine persists the information in the workflow runtime database.
The Workflow Engine supports features such as email based approval and email notification. During the course of workflow execution, the Workflow Engine can send one or more email messages to notify users of changes in the state of the workflow. You can edit an email template and use this
14 Introduction to the Workflow Service Components

template for email notifications. At runtime, the Workflow Engine retrieves the template from the database and replaces tags with dynamic text suitable for the notification. For more information, see Chapter 13, “Setting Up Email Notification Templates,” on page 117.
In addition, the Workflow Engine also provides functionalities such as logging, generating reminder and escalation notifications, retrying failed processes, and heartbeat monitoring. The Workflow Engine gathers workflow metrics and lets you monitor an approval flow process. The Workflow Engine can also be clustered in your deployment to overcome the fail-over scenario and to manage the workload.
Workflow DatabaseWorkflow Service uses the workflow runtime database to store the following information:
Configuration data for the application, such as Web page definitions and preference values Workflow definitions, forms, and email templates The state information of active and completed workflow processes Global configurations and page access settings
Introduction to the Workflow Service Components 15

16 Introduction to the Workflow Service Components

2 2Understanding Authorizations in Workflow Service
Workflow Service relies on predefined authorizations (set of permissions) to provide access to users or groups. The authorizations for administrators are defined in the application that integrates with Workflow Service. For example, users or groups with Identity Governance Global, Customer, or Access Request authorization will be the Workflow Administrator when Workflow Service is integrated with Identity Governance. For more information about Identity Governance authorizations, see Identity Governance User and Administration Guide.
You must be assigned one of the following authorizations to perform operations on the Workflow Administration Console:
Permissions For SaaS Deployment For On-premises Deployment
Grant or revoke access to the Workflow Administration Console pages
Bootstrap Administrator Workflow Administrator
Bootstrap Administrator Workflow Administrator
Customize the Dashboard and other user interface display properties
Bootstrap Administrator Workflow Administrator Customer Administrator*
Bootstrap Administrator Workflow Administrator
Create and manage forms using the Form Builder
Bootstrap Administrator Workflow Administrator
Bootstrap Administrator Workflow Administrator
Create and manage workflows using the Workflow Builder
Bootstrap Administrator Workflow Administrator
Bootstrap Administrator Workflow Administrator
Create and manage templates used for email notifications
Bootstrap Administrator Workflow Administrator
Bootstrap Administrator Workflow Administrator
Monitor the status and comments for workflow processes
Bootstrap Administrator Workflow Administrator
Bootstrap Administrator Workflow Administrator
Reassign tasks to other users using the email-based approval feature
Bootstrap Administrator Workflow Administrator
Bootstrap Administrator Workflow Administrator
Add new or modify existing configuration properties in the workflow runtime database
SaaS Operations Administrator Bootstrap Administrator Workflow Administrator
Configure the incoming and outgoing email server settings to notify users of tasks that are triggered when a workflow is executed
SaaS Operations Administrator Bootstrap Administrator Workflow Administrator
Customize the Workflow Engine's default settings and cluster configurations to meet an organization's needs
SaaS Operations Administrator Bootstrap Administrator Workflow Administrator
Understanding Authorizations in Workflow Service 17

IMPORTANT: The above authorizations and their associated permissions cannot be modified in the Workflow Administration Console. You can, however, assign users or groups as trustees and enable them to perform operations such as editing workflows. For more information about trustees, see “Manage User Access” on page 23.
Change the log levels to support application debugging. This helps to identify and isolate problems caused by configuration errors, invalid user data, or issues related to workflow execution
SaaS Operations Administrator Bootstrap Administrator Workflow Administrator
Enable or disable event logging to the preferred auditing services
SaaS Operations Administrator Bootstrap Administrator Workflow Administrator
*A customer administrator oversees the configuration of a single tenant, such as assigning authorizations or roles to specific users within that company
Permissions For SaaS Deployment For On-premises Deployment
18 Understanding Authorizations in Workflow Service

II IIGetting Started with Workflow Administration Console
This section tells you how to begin using the Workflow Administration Console. Topics include:
Chapter 3, “Exploring the Dashboard,” on page 21 Chapter 4, “Configuring Default Settings for Workflow Administration Console,” on page 23
Getting Started with Workflow Administration Console 19

20 Getting Started with Workflow Administration Console

3 3Exploring the Dashboard
With an increasing number of workflows, being able to generate an easy-to-understand summary is crucial, especially if you are in the role of an administrator. The Dashboard provides easy-to-read, easy access, real-time information that you need to know about the approval flow process and make informed decisions without having to install a separate web service for gathering workflow metrics.
The Dashboard is the default landing page that displays when you log in to the Workflow Administration Console for the first time. The Dashboard provides you a summary of all workflow processes in the database derived using simple metrics for analyzing the workflow performance. Each metric is represented on the Dashboard in form of a tile. You can monitor these tiles to keep track of how the workflow processes are performing. For example, you can monitor the number of workflow processes that are pending approval or the number of workflow processes retracted or reassigned to another user. It helps you to prioritize the workflows based on the need of your organization.
Understanding Dashboard TilesYou will find six different tiles pinned to the Dashboard. Each tile provides you a consolidated summary of workflow processes and the associated activities.
PENDING APPROVALS This tile gives you the number of activities that are pending approval. The activities are listed in reverse chronological order, which means the most recent activity that was sent (and pending) for approval is listed at the top. For each activity, the tile also displays the time passed since it got assigned to the recipient. These activities have the status “Processing” in the database, indicating that they are awaiting approval from the approver.
CURRENT REASSIGNMENTS This tile gives you the number of activities reassigned from the original approver to a new approver. The activities are listed in reverse chronological order, which means the most recently reassigned activity is listed at the top. The tile also displays the names of the original and new approvers of the activity. These activities have the status “Processing” in the database, indicating that they are awaiting approval from the new approver.
RETRACTION REQUESTED This tile gives you the number of workflow processes that were retracted by the requester before the workflow completion. The activities are listed in reverse chronological order, which means the most recently retracted request is listed at the top. For each workflow process, the tile also displays the time passed since the request got retracted. These processes are marked as “Terminated” in the database.
Exploring the Dashboard 21

LONG WAITING APPROVAL This tile gives you the number of activities that are pending approval for a long duration. The duration is determined by the value you provide on the Dashboard Settings page. By default, the value is set to 3 days. For more information, see “Dashboard Settings” on page 26. The activities are listed in reverse chronological order, which means the longest pending approval activity in the database is listed at the top. For each activity, the tile also displays the time passed since the activity got assigned to the recipient.
LONG EXECUTED PROCESSES This tile gives you the number of workflow processes that took the longest duration for completion. The duration is determined by the value you provide on the Dashboard Settings page. By default, the value is set to 3 days. For more information, see “Dashboard Settings” on page 26. The processes are listed in reverse chronological order, which means the process that took the longest time for completion is listed at the top. For each process, the tile also displays the time passed since the process got completed.
NOTE: Only workflow processes that have been completed are counted.
LONG COMPLETED APPROVALS This tile gives you the number of activities in the database approved after a long duration. The duration is determined by the value you provide on the Dashboard Settings page. By default, the value is set to 3 days. For more information, see “Dashboard Settings” on page 26. The activities are listed in reverse chronological order, which means the activity that took the longest time for completion is listed at the top. For each activity, the tile also displays the time passed since the activity got approved or denied.
NOTE: Only activities in approved and denied states are counted.
22 Exploring the Dashboard

4 4Configuring Default Settings for Workflow Administration Console
If you are a Workflow or Bootstrap Administrator, the Workflow Administration Console by default provides you an access to the Settings page. You have complete control over all configuration operations provided on this page. You can set trustees for each navigation item (including the Settings page), add or modify global configuration settings, and also customize the user interface display settings. For a detailed information on how to perform each of these operations, refer to the following sections:
“Manage User Access” on page 23 “Configure Advanced Settings” on page 24 “Add Category and Process Type to the Workflow Catalog” on page 25 “Customize the User Interface Display Settings” on page 26
IMPORTANT: If you are a user other than the Workflow or Bootstrap Administrator with access permission to the Settings page, you still may not be able to view or perform all operations available on this page. This happens when you are not added as trustee for all operations listed under the Settings navigation item. For more information, see “Manage User Access” on page 23.
Manage User AccessThe Settings page in the Workflow Administration Console allows you to control the accessibility and visibility of the pages for a user. You can add users and groups as trustees, which provides them access to different pages within the console. Trustees can view only the pages to which they have access.
Based on the policies of your organization, you can click Access > Settings to assign permissions to users, who in turn can act as administrators.
NOTE: A trustee who has access permission to the Settings page, cannot view the page unless he has permissions to one or more page items under Access > Settings.
The trustees can perform operations on the pages for which they have permission. However, if a trustee tries to access a page that is not provisioned, they are redirected to the dashboard.
Each Navigation item has a set of default trustees. If no default trustee is assigned, the Add Trustee link is displayed.
Assigning TrusteesYou can assign access permissions to perform tasks such as create, edit, delete, reassign, restore.
Configuring Default Settings for Workflow Administration Console 23

To configure a trustee for a page:
1 In the Workflow Administration Console, select Settings > Access.2 Expand the required Navigation item for which you want to provision access.
NOTE: When you provide access to a page item, you must provide access for the Navigation item of that page.
3 Click the link under the Trustees column. 4 Click the Select User, Group box, and select the relevant tab. 5 Use the search field to search for users or groups.6 Specify one or more trustees for the selected page item.7 Click Ok.8 Click Save.
Configure Advanced SettingsThe Advanced settings enables you to make application level changes in the Workflow Administration Console. You can add new configuration properties or modify the existing properties directly to the workflow runtime database. The configuration property key and its values are stored in a central location so that multiple workflow engines can use the same setting values.
Add a New Configuration PropertyTo add a new configuration property to the workflow runtime database, perform the following actions:
1 Click the Advanced drop-down menu on the Settings page.2 Click the Add new configuration option.3 In the NEW CONFIGURATION modal window, enter the Key for the configuration property that
you want to add. Characters allowed includes A-Z, a-z, slash (/), hyphen (-), period (.), and underscore (_).
4 (Conditional) To enable encryption for the Value text box, select the Encrypt check box.5 Enter a Value for the configuration property. Characters allowed includes A-Z, a-z, 0-9, and
special characters. The input value will get encrypted if you have enabled encryption in Step 4, else it will display in clear-text.
NOTE: The application does not consider any whitespace provided at the beginning or end of a value and saves the input without these characters. However, it does not apply if the value field is encrypted.
6 Click Add.
24 Configuring Default Settings for Workflow Administration Console

Edit Existing Configuration PropertiesTo modify any configuration property that is already present in the workflow runtime database, perform the following actions:
1 Click the Advanced drop-down menu on the Settings page.2 You can search for the property by its key or value. The search finds every key or value that
begins with the text you type. It is not case sensitive. You can optionally use the asterisk (*) as a wildcard in your text to represent zero or more of any character that you want to search.
3 Identify the property that you want to modify. Click the Edit icon corresponding to that property.
4 Change the value in the Value field as desired. Characters allowed includes A-Z, a-z, 0-9, and special characters.
NOTE: If the value is non-encrypted, the application does not consider any whitespace provided at the beginning or end of the value and saves the input without these characters.
5 (Optional) If you want to revert the field to its previous value, click the Reset icon.6 Click the Save icon.
Add Category and Process Type to the Workflow CatalogCategory and process type are attributes that are used to organize workflows in the workflow catalog. They are used for filtering and sorting the workflow list on the Workflows page. By default, there are two categories namely Accounts and System Templates defined under the main category and one process type, that is Normal.
You can define any number of categories and process type that your organization might need using the Add Category and Add Process Type options provided under the Settings > Workflow Catalog option. For an example, you can add a category named Roles to contain all workflows related to role requests and a process type named Role Approval to define the workflow type as role approval.
When a user selects a workflow for editing on the Workflows page (Catalog > Workflow), these categories and process types are displayed in the Category and Process Type drop-down list in the Overview tab. The user can select the category under which they want put their workflow. For more information, see “Editing a Workflow” on page 44.
Add a Category or Process TypeTo add a category or process type, perform the following actions:
1 Click the Workflow Catalog drop-down menu on the Settings page.2 (Conditional) If you want to add a new category, perform the following actions:
2a Click the Add Category option next to the Category attribute.2b Enter a unique identifier in the Key field.2c Specify a name. The string is displayed in the Category drop-down list in the Overview tab
when editing a workflow.
Configuring Default Settings for Workflow Administration Console 25

3 (Conditional) If you want to add a new process type, perform the following actions:3a Click the Add Process Type option next to the Process Type attribute.3b Enter a unique identifier in the Key field.3c Specify a name. The string is displayed in the Process Type drop-down list in the Overview
tab when editing a workflow.4 Click Save.
Delete a CategoryTo delete a category, select that category from the list, click the trash icon, then click Confirm.
Similarly, select the process type that you want to delete, click the trash icon, then click Confirm.
NOTE: You cannot delete a category or process type when they are associated with a workflow.
Customize the User Interface Display SettingsThe following options under the UI Display Settings helps you to customize the display properties of the Workflow Administration Console:
“General Settings” on page 26 “Dashboard Settings” on page 26 “Column Customization Settings” on page 27
General SettingsThe parameters in the General tab enables you to configure the default settings that applies to all pages in the Workflow Administration Console.
Specify the number of results to be displayed per page Select a number from the list that you want to set in the pagination on all pages. It determines the maximum number of results that a page can display. Default value is 5, however you can set the value to 50 at maximum.
Feedback Message Span Specifies the time span (in milliseconds) for which a feedback message will appear on a page. Default value is 10000 milliseconds (10 seconds).
Dashboard SettingsYou can use the parameters in the Dashboard tab to change the default behavior of some tiles on the Dashboard page. This can be particularly useful in tracking workflow processes. For example, if you want to prioritize the workflow processes that are pending approval for more than 10 days, change the value for the Number of days to consider for marking pending workflows as long-waiting approval
26 Configuring Default Settings for Workflow Administration Console

parameter to 10. You can now monitor the processes pending approval in the LONG WAITING APPROVAL tile on the Dashboard page. For more information on such functionalities, review the following dashboard parameters and customize them as required:
Maximum number of workflows allowed to display on each tile Applies to all tiles on the Dashboard page.Specify how many workflow processes or activities are allowed to display on each tile at maximum. The valid range is between 5 and 10. If you specify the value as 5, the Dashboard displays the details of five most recent workflow process or activity.
Number of days to consider for marking pending workflows as long-waiting approval Applies only to the LONG WAITING APPROVAL tile on the Dashboard.Specify after how many days workflow activities in the processing state can be marked as long-waiting approval.
Number of days to consider for marking workflow processes as long-executed process Applies only to the LONG EXECUTED PROCESSES tile on the Dashboard.Specify how many days must be considered at minimum to mark workflow processes (in completed state) as long-executed processes.
Number of days to consider for marking approval activities as long-completed approvals Applies only to the LONG COMPLETED APPROVALS tile on the Dashboard.Specify how many days must be considered at minimum to mark approval activities (in approved state) as long-executed approvals.
Column Customization SettingsThe Column Customization option allows you to select the default columns that you want to show or hide on each page of the Workflow Administration Console. This option is available for the Forms Catalog, Notification Template, Workflow Catalog, and Workflow Monitoring pages.
For each page, you will find few columns listed in the Selected Columns by default. Out of those, one or more columns cannot be hidden. This ensures that the page is not blank, it shows some details to the user on loading.
For example, if you want to customize the columns on the Forms page, perform the following actions:
1 Expand the UI Display Settings drop-down option on the Settings page.2 Click the Column Customization tab.3 Choose Forms Catalog from the drop-down list.
By default, Form Name, Form Type, Created By, Created On, and Actions are displayed under the Selected Columns list. Out of these columns, Form Name and Actions columns cannot be hidden.
4 Drag and drop the columns that you want to show from the Available Columns list to Selected Columns or vice versa to hide any column. In the Selected Columns list, you can also arrange the sequence in which you want the columns to display.
5 Click Save to apply the changes.
Configuring Default Settings for Workflow Administration Console 27

NOTE: A user can also select the columns that they want to show or hide using the Column Customization icon provided on each page. However, those selection are not saved. Next time when they navigate to that page, default columns that are configured from the Column Customization tab in Settings will be shown.
28 Configuring Default Settings for Workflow Administration Console
III IIIWorking with Forms Catalog
This section provides an overview of the forms catalog and its usage in the Workflow Administration Console.
Chapter 5, “Forms Catalog Overview,” on page 31 Chapter 6, “Managing Forms in Forms Catalog,” on page 33
Working with Forms Catalog 29

30 Working with Forms Catalog
5 5Forms Catalog Overview
The forms catalog is a component of the Workflow Administration Console that contains all forms used by the workflows. The forms catalog allows you to create, read, update, and delete workflow forms. It also provides the basic and advanced search functionality that enables you to search for forms based on attributes, such as form name, identifier, form type, created or updated by, created or updated on, and publishing state.
To view all forms in the forms catalog, navigate to Catalog > Forms.
About FormsForms are an integral part of any application that involves workflows. In a workflow, you use forms for different activities. For example, if you want to include an approval activity in a workflow, you must associate an approval form with that activity. The application makes use of this form to coordinate the approvals for granting a permission access.
Workflow Administration Console segregates the workflow forms into three main categories, namely Request, Approval, and Template, and provides a set of default request and approval forms under the forms catalog. It is recommended that you do not edit the default forms. However, you can use these forms to create new forms. For more information, see “Creating New Forms” on page 35.
About Request FormsWorkflow Administration Console provides a default Request Form with a set of predefined fields. In a workflow, you can associate this form with the Start Activity. If you want to use a different request form, create a custom request form using Form Builder and associate that form with the workflow.
NOTE: Request forms are used only for start activities. Only one request form can be associated per workflow.
About Approval FormsWorkflow Administration Console provides a default Approval Form with a set of predefined fields. In a workflow, you can associate this form with the Approval Activity. If you want to use a different approval form, create a custom approval form using Form Builder and associate that form with the workflow.
NOTE: Approval forms are only used for approval activities. You can define multiple approval forms for a workflow, but associate only one approval form per approval activity.
Forms Catalog Overview 31
About Template FormsThe third category of forms is the template forms. Similar to the default request and approval forms, template forms can be copied and used for creating custom request and approval forms specific to a workflow. But first, you must design a template form. A helpdesk form is a good example in this case. Selecting the form type as Template while creating a new form, you can design a helpdesk template form with predefined fields that are common across all permissions, such as name, organization, and department of an employee. When there is a specific requirement, for example to create custom request and approval forms for requesting permission access to printers in your organization, you can easily create a copy of this helpdesk template form and add custom fields specific to the printer permission access.
For more information on how to create template forms, see “Creating a New Form from Template Forms” on page 36.
About Form BuilderForm Builder is a web-based service used for designing forms. Workflow Administration Console integrates Form Builder with the forms catalog to enable you to create and manage forms for your workflows.
Form Builder allows you to create new request and approval forms. These forms can be associated with the Workflow activities in Workflow Builder. In addition to form building capabilities, Forms Builder enables you to edit the forms in JS Editor, add macros, and seamlessly pass the user and approver submissions to the associated workflows. For more information on Form Builder and the capabilities it offers, see “Form Builder” on page 13. For detailed information on using Form Builder, see the Administrator’s Guide to the Form Builder.
32 Forms Catalog Overview

6 6Managing Forms in Forms Catalog
You can perform the following operations on the Forms page:
“Listing Forms” on page 33 “Creating New Forms” on page 35 “Form Actions” on page 37 “Modifying a Published Form” on page 38 “Deleting Forms” on page 38
Listing FormsAll forms in the workflow database are listed on the Forms page. This includes a set of default request and approval forms provided by the application. You can use the pagination option to navigate through this list and specify the number of entries that can be displayed at a time. You can also search and filter the list to find specific forms.
Finding a FormTo find a specific form, you can use any of the following options:
Simple Search Enter any form name or identifier in the search bar.
Filtered Search To filter the search for forms, click the Filter icon and specify any of the following criteria: Type of form: request, approval, or template Person who created or updated the form Date when the form was created or last updated State of form: published or not published
You can add two or more criteria on this window to see a more refined list. To add a new filter, click the Add new filter icon, then choose from any of the available criteria and specify a value for it.
Combined Search You can also combine simple search with one or more filters to obtain a more refined search result. For example, suppose that you are searching for a specific form to request for a laptop. To find this form, type “laptop” in the search field, then click the Filter icon. Select Form Type from the drop-down list, specify the value as Request, then click Filter.
Managing Forms in Forms Catalog 33

Sorting the List by ColumnsBy default, all forms on the Forms page are sorted based on their creation time, displaying the most recently created form on top of the list. You can reorder the sequence of listing based on the column of your choice. For example, click the sort icon next to the Form Name to sort the forms in an alphabetical order. Subsequently, you can shuffle this list in ascending or descending order by clicking the same sort icon.
Sorting is supported for the following columns:
Form Name Form Type Created By Updated By Created On Updated On
Customizing the ColumnsWhen you navigate to the Forms page, you see the columns that are selected to display by default. However, you can choose the columns to display as desired by using the Column Customization option.
To customize the columns:
1 Click the Column Customization icon.2 Select the check box next to the desired column that you want to display. The selected columns
are added simultaneously to the Forms page.
TIP: To choose all columns, select the check box provided near the search field.
3 Click the close sign (x) on the Column Customization window.
NOTE: Workflow Administration does not save your customization. Next time when you navigate to the Forms page, columns that are configured to display by default will be shown. Alternatively, if you have appropriate permissions, you can set your preferences as default from the Settings page. For more information, see “Column Customization Settings” on page 27.
Form LegendsWorkflow Administration Console uses certain legends to indicate the publishing state of a form, whether it is unpublished, published, or in editing state. The following table helps you to interpret the form legends and take required actions:
Legend Used Form State Indicates that...
Form is published The form is in published state and can be associated with any workflow.
34 Managing Forms in Forms Catalog

Creating New FormsThe application provides you a set of default request and approval forms that can be used with any workflow. While creating a workflow, you can associate these default forms with the workflow’s Start and Approval activities. However, for some workflows, you may require to create new request and approval forms. Workflow Administration Console enables you to create new forms using Form Builder.
The following sections provide procedures on how to create new forms in the forms catalog.
“Creating New Request, Approval, or Template Form” on page 35 “Creating a New Form by Copying an Existing Form” on page 36 “Creating a New Form from Template Forms” on page 36
Creating New Request, Approval, or Template FormThe Forms page provides you option to create new request and approval forms for specific workflows. To save time, you can also design template forms with common fields and use them to create new forms.
To create a new request, approval, or template form:
1 Click the Create icon on the Forms page.2 In the FORM BASIC DETAILS window, specify a name and unique identifier for the form. Allowed
characters are A-Z, a-z, 0-9, and special characters.
IMPORTANT: Only few special characters are allowed in the Form Identifier field. This includes period (.), underscore (_), hyphen (-), at sign (@), and colon (:).
3 Do one of the following: If you want to create a new request or approval form, select the Form Type as:
Request: These forms are used for request activity in a workflow. Approval: These forms are used for approval activity in a workflow.
If you want to create a template form, select the Form Type as Template from the drop-down list. This form can be used as templates for creating other forms. For more information on how to create new forms from a template form, see “Creating a New Form from Template Forms” on page 36.
Form not published The form is saved in the database but is not in a published state. It cannot be associated with any workflow.
Form has unpublished changes A published version of the form is present in the database, but there are additional changes which have not been published yet. Forms in this state can be associated with a workflow, however, the new changes will not reflect in the attached form.
Legend Used Form State Indicates that...
Managing Forms in Forms Catalog 35

4 Click Create. Form Builder is launched in a new browser tab.5 Drag and drop form components, configure related settings, and save the form. For help on how
to use Form Builder, see Administrator’s Guide to Form Builder.6 Select the Workflow Administration Console browser tab to return to the Forms page.7 Click the Refresh icon to update the Forms page manually.8 In the Actions column, click the Publish icon to publish the form.
Creating a New Form by Copying an Existing FormThe easiest way to create a new form is to copy an existing form in the forms catalog.
To create new form from an existing form:
1 On the Forms page, identify the form that you want to copy.2 In the Actions tab, click the Create as a copy icon.
The application creates a duplicate form by copying the basic details from the original form and adds “Copy of <original_form_name>” to the Form Name and Form Identifier attributes. You can choose either to retain those values or modify them as required.
3 Click Create. Form Builder is launched in a new browser tab.All form components are also duplicated which can be customized using Form Builder.
4 Modify the existing form fields as required. To add new fields, drag and drop form components, configure related settings, and save the form. For help on how to use Form Builder, see Administrator’s Guide to Form Builder.
5 Select the Workflow Administration Console browser tab to return to the Forms page.6 Click the Refresh icon to update the Forms page manually.7 In the Actions column, click the Publish icon to publish the form.
Creating a New Form from Template FormsTo create a new form from a template form:
1 On the Forms page, identify the form template that you want to use.2 In the Actions tab, click the Create as a copy icon.3 In the FORM BASIC DETAILS window, the basic form details that was selected in the template
form are auto-populated into the new form. You can choose either to retain those values or modify them as required.
4 Click Create. Form Builder is launched in a new browser tab.5 Modify the existing form fields as required. To add new fields, drag and drop form components,
configure related settings, and save the form. For help on how to use Form Builder, see Administrator’s Guide to Form Builder.
6 Select the Workflow Administration Console browser tab to return to the Forms page.7 Click the Refresh icon to update the Forms page manually.8 In the Actions column, click the Publish icon to publish the form.
36 Managing Forms in Forms Catalog

Form ActionsYou can perform the following actions on the Forms page:
Publish Allows you to publish a form so that it can be associated with a workflow. The Publish icon is enabled only in two conditions: when you create a form for the first time, and when a form has unpublished changes
You can identify a published form by a tick sign next to the form name. For more information on form legends, see “Form Legends” on page 34.
Workflows Displays a list of workflows that are using the selected form. You can also view details such as name, ID, description, and status of the workflows using the given form.
NOTE: A form can be associated with one or more workflows, which can be either in published or unpublished state. Nonetheless, Workflow Administration Console displays only those workflows that are in published state.
Restore Allows you to restore the selected form to its previous published version. The Restore icon is enabled only for forms with unpublished changes. For more information on how to use the restore action, see Restoring Previous Version of a Form.
Create as a copy Allows you to create a new form by duplicating an existing form. For more information, see “Creating a New Form by Copying an Existing Form” on page 36.
Restoring Previous Version of a FormThe restore option enables you to undo the saved changes on a form and restore the previous published version. This applies only if the saved changes are not published yet. The restore action is useful when you encounter an issue with the edited version of a form and want to recover the previous published version.
Consider the following points when performing the restore action:
When you restore a form to its previous published version, all changes present in the edited version will be lost. You cannot undo this action.
The Restore icon is disabled for forms which have not been published even once.
To restore a form, identify the form first, click the Restore icon, then click Confirm to submit.
Managing Forms in Forms Catalog 37

Modifying a Published FormAfter publishing a form, you might require to add additional fields or change the properties of existing fields. In Workflow Administration Console, you can easily modify a form using Form Builder. Every time a form is modified, the Forms page updates the user name and time stamp of this event in the Updated By and Updated On columns respectively. This information can be useful for tracking and determining when the most recent update was, and who made it.
To modify a form:
1 Click the form name link to launch Form Builder in a new browser tab.2 Modify the form as required and save the changes. For help on how to use Form Builder, see
Administrator’s Guide to Form Builder.3 Select the Workflow Administration Console browser tab to return to the Forms page.4 Click the Refresh icon to update the Forms page manually.5 In the Actions tab, click the Publish icon to publish the form.
NOTE
We recommend you to create and modify a copy of the default request and approval form, rather than modifying the original. For more information on how to create copy of a form, see “Creating a New Form by Copying an Existing Form” on page 36.
If you modify a form that is already associated with a workflow, the changes will not update in the attached form until you publish it. After you publish the form, the workflow is automatically updated with the latest version of that form.
Deleting FormsTo delete a form, select the check box next to the form name and click the Delete icon. You can also select multiple forms for deletion at one time.
IMPORTANT: You cannot delete a form associated with a workflow. The check box is disabled until you remove that form from all the associated workflows.
38 Managing Forms in Forms Catalog

IV IVWorking with Workflow Catalog
This section provides an overview of the workflow catalog and its usage in the Workflow Administration Console.
Chapter 7, “Workflow Catalog Overview,” on page 41 Chapter 8, “Managing Workflows in a Catalog,” on page 43
Working with Workflow Catalog 39

40 Working with Workflow Catalog

7 7Workflow Catalog Overview
Workflows are used to initiate workflow processes to manage the approval and removal of user access in the secure system of an organization. Requests that require approval from more than one individual, starts one or more workflows.
Workflows help to reduce the administrative burden of entering, updating, and deleting user information across all systems in the enterprise. These workflows provide a web-based interface for users to manipulate distributed identity data that triggers workflows as necessary.
The workflow catalog in Workflow Administration Console lists all the workflows created using the Workflow Builder. The workflow catalog can search based on workflow name, description, or category, and it provides the option to edit the workflow definition by launching the workflow builder.
The Workflow Administration Console includes two system-defined workflows that can be used directly for approval request or copied to create new workflows.
Workflow Catalog Overview 41

42 Workflow Catalog Overview

8 8Managing Workflows in a Catalog
The workflow catalog allows you to launch Workflow Builder, and manage all the workflows that you create, edit, or publish. You can drag the components from the palette, and drop them on the canvas to create the workflow. For more information, see Chapter 9, “Using Workflow Builder to Create Workflows,” on page 53.
NOTE: You must have the appropriate permissions to access the workflow catalog and perform tasks on the Workflows page. To determine your access permissions, contact your administrator.
To access the Workflows page, click Catalog > Workflow. For information regarding tasks that you can perform on the Workflows page, see the following sections:
“Creating a Workflow” on page 43 “Editing a Workflow” on page 44 “Deleting a Workflow” on page 46 “Restoring a Workflow” on page 46 “Publishing a Workflow” on page 46 “Viewing Workflow Association” on page 46 “Listing Workflows” on page 46 “Using System-Defined Workflows” on page 48
Creating a WorkflowIf you have appropriate permissions you can use Workflow Builder to create workflows. Workflows you create and publish, are stored in the database and used for approvals of user requests.
To create a workflow:
1 Select Catalog > Workflow.2 Click the plus sign (+).
NOTE You can copy the system-defined workflows to create new workflows. For more
information, see “Using System-Defined Workflows” on page 48. For associating a system-defined or a custom workflow to an Identity Governance approval
policy, ensure that you select the Identity Governance request form for the Start Activity.
3 Enter a unique identifier, and a name for the workflow.
NOTE: The Identifier field supports the special character, underscore (_). However, after you save a workflow, you cannot change a unique identifier.
Managing Workflows in a Catalog 43

4 Type a description, then click CREATE WORKFLOW.5 Use Workflow Builder to create the workflow.6 Save or publish the workflow.7 Close the window to return to the Workflows page.
Copying a WorkflowYou can use the copy function to create a new workflow from an existing workflow.
To copy a workflow:
1 Click Catalog > Workflow.2 Click Create as a copy for the workflow you want to copy. 3 Enter a new unique identifier, workflow name, and description for the workflow.
If you do not provide new details, the application uses details such as identifier, name, and description from the original workflow.
4 Click CREATE WORKFLOW.5 Use Workflow Builder to make any change.6 Save or publish the workflow.7 Close the window to return to the Workflows page.
Editing a WorkflowYou can edit a workflow that is in the published, unpublished, or in the edit state.
To edit a workflow:
1 Click Catalog > Workflow.2 Click the workflow name listed on the Workflows page.3 (Optional) If you want to edit the workflow, click the Workflow Builder tab.4 (Optional) If you want to edit details such as name, description, or category of the workflow,
click Overview tab. For more information, see “Editing Properties on the Overview Tab” on page 44.
5 Save or publish the workflow.6 Close the window to return to the Workflows page.
Editing Properties on the Overview TabThe Overview tab allows you to edit basic information about the workflow, such as the name and description of the workflow, the category to which it belongs, and its status.
The following list defines some of the fields on the Overview tab:
44 Managing Workflows in a Catalog

Field Description
Status Specifies the status of the workflows.
Active: The workflow is available for use in the application.
Inactive: The workflow is temporarily unavailable for use in the application.
Template: The workflow can be used as the basis for other workflows. Templates are not available for use in the application.
Flow Strategy Select one of the following options:
Single Flow: One workflow is used with one recipient.
Flow Per Member: The recipient can be a group DN. When you select this strategy, the application starts a workflow instance for each member of the group, and each workflow can be approved or denied separately.
Single Flow Provision Members: The recipient can be a group DN. When you select this strategy, the application starts a single workflow instance for the group. The workflow spawns multiple provisioning steps (one for each member) within the single workflow. The workflow is approved or denied to the group as a whole, not for each individual member.
Category Specifies the category in which the workflow belongs. Used for filtering workflows. You can add categories based on the requirement. To add categories, access Settings > Workflow Catalog > Category. For more information, see “Add a Category or Process Type” on page 25.
Process Type Specifies the workflow type. Normal is selected by default. To add process type, access Settings > Workflow Catalog > Process Type. For more information, see “Add a Category or Process Type” on page 25.
Notify Participants By Email If you enable this option, approvers are notified about pending approval tasks, and initiators are notified of workflow completion. For information on selecting an email template and customizing email template parameters, see “Finish Activity” on page 69.
Generate Comments If you enable this option, the workflow engine generates comments as the workflow progresses. These comments are displayed under Monitoring > Actions.
Managing Workflows in a Catalog 45
Deleting a WorkflowTo delete a workflow, select the check box next to the workflow that you want to delete and click Delete. You can select multiple workflows for bulk deletion.
Restoring a WorkflowYou can restore workflows that are in the state, “Workflow has unpublished changes”. The restore function helps you to return to the previous version of the workflow if needed. However, you will lose your latest edit.
To restore a workflow, click Restore, and Confirm.
Publishing a WorkflowTo Publish a workflow, click the workflow name on the Workflows page. When the Workflow Builder opens, click Publish.
Viewing Workflow Association Workflows can be associated with one or more access request policies and the permissions, and applications included in the policies. To view the list of all the policies a workflow is associated with, click Associations. Click Details to drill down and see the permissions and applications associated with the policy.
Listing WorkflowsAccess to the Workflows page allows you to perform certain activities such as listing, searching, sorting, and customizing columns.
Sorting WorkflowsThe workflows are listed by creation date, with the latest template listed first. You can click the sort arrows next to the workflow Name column and sort the columns based on the following:
Name, description, and the category Alphabetical order Ascending or descending order
Default Completion Status As Approval If you enable this option, the default completion status of the provisioning request is considered “approved”.
Field Description
46 Managing Workflows in a Catalog

The Workflow Administration Console uses certain symbols to show the state of listed workflows. This table lists the states, and their corresponding symbols:
Searching for a WorkflowYou can search and filter specific workflows. To find a specific workflow, you can use any one of the following options:
Simple Enter the workflow name or description in the search box. Workflows with matching name and description are displayed.
Filtered Click Filter, and select the workflow category. The drop-down list displays the default categories, Accounts, and System Templates and any categories you added. For more information about adding categories, see “Configure Advanced Settings” on page 24.After you select the category, select a workflow status from the drop-down list: Active Inactive Template
Combined You can combine the simple search with the filter option to obtain more refined search results. For example, if you are searching for an active workflow that contains “approval” in the title, type approval in the search box, and click Filter. On the pop-up window, specify the status as Active, then click FILTER.
Customizing ColumnsOn the Workflows page, you can see the default columns. However, you can use the Column Customization option to choose the columns for display as desired.
Workflow symbols Workflow states Description
Workflow is published Available in the database, and you can use it in an approval request.
Workflow is not published Available in the database, but you cannot use it in an approval request.
Workflow has unpublished changes
Available in the database, but the workflow is edited and those edits are not published. If you use the workflow in an approval request, changes will not appear until you publish the workflow.
Managing Workflows in a Catalog 47

To customize columns:
1 Click Catalog > Workflow.2 Click Column Customization.3 Select the check box next to the desired columns that you want to display. The selected columns
are added to the Workflows page.
TIP: To choose all columns, select the check box provided near the search field.
4 Click the close icon (X).
NOTE: The Workflow Administration Console does not retain the customization. The next time you navigate to the Workflows page, the default columns appear. However, you can use the Settings page to choose which columns display by default. For more information, see “Column Customization Settings” on page 27.
Using System-Defined WorkflowsThe Workflow Administration Console includes a set of pre-built workflows that you can use for approval request. You can copy these workflow and create new workflows. The workflows contain values for fields you can modify as required. The modified workflows appear on the Workflows page.
The system-defined workflows are available when you install Workflow Administration Console. You cannot delete the system-defined workflows.
NOTE: You must have the appropriate permissions to the access workflow catalog, and perform tasks on the Workflows page. To determine your access permissions, contact your administrator.
The Workflow Administration Console includes the following workflows:
One Step Approval Requires single approval for the workflow request to be fulfilled.
Two Step Approval Requires two approvals for the workflow request to be fulfilled. This workflow supports sequential processing.
To create a copy of the system-defined workflow, see “Copying a Workflow” on page 44.
NOTE
For associating a system-defined or a custom workflow to an Identity Governance approval policy, ensure that you select the Identity Governance request form for the Start Activity.
While using the Notify Activity for a system-defined or a custom workflow, ensure that you use custom scripts for source expressions. To use custom scripts for source expressions, refer Identity Governance workflows.
48 Managing Workflows in a Catalog

Applying System-Defined WorkflowsTo edit a system-defined workflow:
1 Click Catalog > Workflow.2 Click One Step Approval or Two Step Approval link under the Name column. 3 (Optional) If you want to edit the workflow, click the Workflow Builder tab.4 (Optional) If you want to edit details such as name, description, or category of the workflow,
click the Overview tab. For more information, see “Editing Properties on the Overview Tab” on page 44.
5 Save or publish the workflow. 6 Close the window to return to the Workflows page.
Managing Workflows in a Catalog 49

50 Managing Workflows in a Catalog

V VWorkflow Builder Overview
This section will guide you on how to use Workflow Builder and its activities to create and modify workflows for your organization.
Chapter 9, “Using Workflow Builder to Create Workflows,” on page 53 Chapter 10, “Workflow Activity Reference,” on page 67 Chapter 11, “Working with ECMA Expressions,” on page 111
Workflow Builder Overview 51

52 Workflow Builder Overview

9 9Using Workflow Builder to Create Workflows
The following sections provide all information you need to know about Workflow Builder and how to use it to build workflows for your application:
“About Workflow Builder” on page 53 “Adding Activities to a Workflow” on page 55 “Adding Flow Paths” on page 58 “Configuring Flow Paths” on page 58 “Guidelines for Creating Workflows” on page 60 “Debugging a Workflow” on page 65
About Workflow BuilderThe Workflow Builder interface consists of a Canvas, Palette, and Associated Views.
To create a workflow diagram, drag the required activities from the palette, drop them in the canvas area, then configure their properties in the right-side properties window. Connect one activity to another using the connection tool. Use the associated views to define the data item mapping, email template settings and to view the problems associated with a workflow.
CanvasThe canvas is a space where you design and work on the workflow diagram. It provides a graphical view of the activities that build up an entire workflow. To move around and view different parts of your workflow, click any empty space in the canvas and drag the screen to your desired view. The canvas also provides the following options to make workflow viewing easier:
Zoom out and Zoom in Click the Zoom out and Zoom in icons to decrease and increase the magnification of the workflow display. You can maximize the workflow to display a detailed view, or minimize the workflow for a compact view.Click the Resize icon to return to the default size of the canvas.
MiniMap View Click the MiniMap icon to see the whole workflow diagram in the MiniMap window. MiniMap provides a minimized view of the entire workflow in a small window. You can also click and drag the highlighted rectangle to view a specific area of the workflow diagram on the main canvas.
Using Workflow Builder to Create Workflows 53

You will also notice an Errors and Warnings banner on the canvas. A green banner with 0 errors and 0 warnings indicates that a workflow has passed the validation check. However, the banner turns red if your workflow fails the validation check. For more information on validation rules, see “Validating a Workflow” on page 58. Click the Problems icon to display the errors and warnings reported on a workflow. You must resolve the reported errors and warnings before publishing.
NOTE: When you create a new workflow without using a template, the canvas is blank except for 2 errors which indicates that the workflow is missing a Start activity and a Finish activity. For general guidelines that must be followed before creating any workflow, see “Guidelines for Creating Workflows” on page 60.
PaletteThe palette contains an array of activities that you can drag onto the canvas to create a workflow. In addition, the palette also provides two basic tools, one for selecting and the other for creating connections in a workflow.
The following table gives you a detailed description of all tools available in the palette:
Table 9-1 Workflow Builder Palette
Associated ViewsFor each selected item on the canvas, Workflow Builder includes the following associated views:
Properties Data Items Problems Email Template
Tool Description
Global connect tool Creates flow paths between activities. Flow paths provide connection logic for linking two activities. For more information about connecting activities, see “Adding Flow Paths” on page 58.
Lasso tool Selects multiple activities or flow paths. Use this tool to move items as a group. To select multiple items, click the Activate the lasso tool icon, then hold down the mouse button in an area outside of the items that you want to select and drag over the items, then release the mouse button.
When you select multiple items, the properties window displays properties for the first item selected (see “Associated Views” on page 54 for more information).
Activities (for example, Start, Approval, Log)
Inserts the selected activity into the workflow. For more information about adding activities, see “Adding Activities to a Workflow” on page 55. For detailed descriptions of the activities, see Chapter 10, “Workflow Activity Reference,” on page 67.
54 Using Workflow Builder to Create Workflows

Not all activities utilize all views. The following table identifies the views and the activities that use them:
Table 9-2 Associated Views for Activities
Adding Activities to a WorkflowActivities are the building blocks of your workflow. Each activity has a predefined purpose in the workflow. Workflow Builder provides you multiple activities to choose from to build custom workflows.
While creating a new workflow diagram, you must always start with a Start activity and end the workflow with a Finish activity, then connect both these activities together with a flow path. You can insert an activity between two activities by dropping it onto the flow path.
The following procedure shows you how to add a Start activity and Finish activity to an existing workflow. It assumes that only the basic parameters have been defined for this workflow.
1 In the Workflow Administration Console, go to Catalog > Workflow and select the workflow to which you want to add the activities. The workflow opens in the Workflow Builder tab.
2 Drag the Create Start Activity icon from the palette and place it in the canvas at desired location.
Activity Properties Data Items Problems Email Template
Create Start Activity Create Finish Activity Create Approval Activity Create Log Activity Create Condition Activity Create Mapping Activity Create WorkflowStatus Activity Create Email Activity Create Rest Activity Create Notify Activity Create Integration Activity Create Subprocess Activity
Using Workflow Builder to Create Workflows 55

Set the properties of this activity (see “Setting the General Properties of an Activity” on page 56). For detailed information about configuring the Start activity, see Chapter 10, “Workflow Activity Reference,” on page 67.
3 To add a Finish activity, drag the Create Finish Activity icon from the palette and place it in the canvas below the Start activity.Next add a forward flow path in between the two activities. For more information, see “Adding Flow Paths” on page 58.
Setting the General Properties of an ActivityThe name and identifier are common to all activities. Workflow Builder auto-generates an identifier in the <Activity>_<N> format, where <Activity> represents the name of an activity and <N> represents an alphanumeric value consisting of 7 characters. It is unique and non-editable for each activity.
An activity has a common name that you can change. We recommend that you replace the common name of an activity with a descriptive string that describes the specific purpose of that activity in the workflow. This makes it easier to understand the workflow when you look at the workflow diagram.
You can either set the properties of an activity just after adding it to a workflow diagram, or later select that activity on canvas and define its properties. If any required property is found empty, the Errors and Warnings banner on the canvas will turn red, indicating the number of errors and warnings in that workflow. To know more about these errors, click the Problems tab located below the canvas.
Defining the Data Items for an ActivityYou can use the Data Items tab to map data from the data flow into the fields in a form (pre-activity mapping) and to map data from the form back to the data flow (post-activity mapping).
To define data items for an activity:
1 On the canvas, click the activity icon for which you want to set data items.You can also view the Data Items tab by simply dragging the window located below the palette. Data Item tab is selected by default.
2 For pre-activity mapping, click in the Source Expression field for the item that you want to map, then specify an expression.Pre-activity maps can be used for: Initializing form control values. Setting default values for form controls. Populating complex form controls with data lists derived from LDAP queries. Passing data from form controls of a previous activity to a form control in the current
activity. Calling external Java classes to process data.
56 Using Workflow Builder to Create Workflows

Leave the Source Expression blank in pre-activity maps for form fields that the user is expected to fill in. Alternatively, create a source expression to supply a default value for form fields that the user is expected to fill in. In either case the form field needs to be defined as editable while creating the form in Form Builder. See Administrator’s Guide to the Form Builder for information about setting the properties of form fields.
3 For post-activity mapping, go to the Post Activity tab and click in the Target Expression field for the item that you want to map, then specify an expression. You can use the MAP ALL button to automatically generate the target expression for all source form fields.Post-activity maps can be used for: Creating new data items in flowdata. Moving form control data from an activity into flowdata. Calling external Java classes to process data.
For detailed information about data item mapping for the different types of activities, see Chapter 10, “Workflow Activity Reference,” on page 67.
The Start Activity can have hard-coded strings, system variables like process locale and recipient, and Identity Vault expressions (created using the ECMA Script Builder Modal window) in pre-activity maps.
Defining the Email Template SettingsYou can use the Email Template tab to select an email template, and to specify expressions to provide values for named parameters included in the email template. Emails are sent when a new Approval activity starts (to notify approvers that they have work to do) and when the Finish activity completes (to notify the initiator that the workflow is done).
To define the email template settings:
1 On the canvas, click the activity icon for which you want to configure the email template settings.
2 Go to the Email Template tab, select an email template from a list of defined templates.Localized email templates: By default, the Email Template tab displays email notification templates that are in default language. When you select a template from the list, the email is in the user’s default language (if the default is a supported language). So, while notifying a user, the Workflow Engine sends the email in the user’s default language using the selected notification template. If the selected template is not available in required language, the Workflow Engine sends the email in the default language.Editing an email template: You can edit an email template from the Notification Templates page in the Workflow Administration Console. For more information, see “Editing a Notification Template” on page 119.
3 Click the Source field for a Target token and specify an ECMAScript expression that assigns a value to the token.See Chapter 10, “Workflow Activity Reference,” on page 67 for information about email notification settings.
Using Workflow Builder to Create Workflows 57

Validating a WorkflowValidating a workflow is an important step in creating a workflow, even though it does not guarantee that every process will be completed successfully. Validation helps to limit the possibility for errors during the deployment.
While you are creating a workflow, you must follow guidelines for adding activities and connecting them. Workflow Builder performs a set of predefined validation check on the workflow. Any violation, if detected, is displayed in the Problems tab with an error or warning message against an ID. You can click the ID to locate the activity on the canvas and resolve the reported errors and warnings before publishing.
A workflow can display a validation error even though it showed 0 errors and 0 warnings in the banner. At the time of publishing, Workflow Engine checks the workflow on the server and displays a validation failure message if your workflow violates the guidelines of workflow creation. For more information, see “Guidelines for Creating Workflows” on page 60.
Workflow Administration Console also uses XML Schema Definition (XSD) to validate the workflow XML. This schema document contains a set of rules to which a workflow XML document must conform to be considered “valid” according to that schema. These additional validations help reduce potential issues that might develop when deploying a workflow. The XSD validation is enabled by default.
Adding Flow PathsFlow Paths are the logical connections between any two activities. There are different types flow paths depending on the activities that they connect (see Table 9-3, “Different types of Flow Paths and its description,” on page 59).
To connect two activities with a flow path:
1 Click the Activate the global connect tool icon in the palette.2 Click the activity from which you want the flow path to begin, then click the activity on which
you want the flow path to end. The activities are connected.3 To configure the flow path, click the Activate the lasso tool icon in the palette, click the flow
path, then select values for the required parameters in the SEQUENCE FLOW ACTIVITY window. For information about configuring flow paths, see Configuring Flow Paths.
Configuring Flow PathsAfter adding a flow path to a workflow diagram, you can specify the path type. Flow paths are color-coded. Different colors indicate different flow path type.
To configure a flow path:
1 Click the flow path in the workflow diagram.2 In the SEQUENCE FLOW ACTIVITY window, set the flow type by selecting one of the options in
the Type drop-down list.The following table gives you a brief description of the flow path types and the colors that they use:
58 Using Workflow Builder to Create Workflows

Table 9-3 Different types of Flow Paths and its description
3 Click the Save icon to save the flow path configuration changes.
Flow Path Type Description
forward Forwards control to the next activity in a workflow. The forward flow path is available after all activities except:
Approval Condition Finish
Displayed in blue color.
approved Determines what happens when a user approves a request. The approved flow path is valid only after the Approval activity. Displayed in green color
denied Determines what happens when a user denies a request. The denied flow path is valid only after the Approval activity. Displayed in red color.
refused Determines what happens when a user refuses a request. The refused flow path is valid only after the Approval activity. Displayed in red color.
timeout Determines what happens when an Approval activity times out because the user did not respond.
The timeout flow path is valid only after the Approval activity. Displayed in red color.
error Determines what happens when an Approval or Condition activity terminates with an error.
The error flow path is valid only after the Approval and Condition activities. Displayed in red color.
true Determines what happens when a conditional expression evaluates to True.
The True flow path is valid only after the Condition activity. Displayed in green color.
false Determines what happens when a conditional expression evaluates to False.
The False flow path is valid only after the Condition activity. Displayed in red color.
Using Workflow Builder to Create Workflows 59

Guidelines for Creating WorkflowsTo create well-formed workflows, you need to understand the rules for adding activities and connecting them. In addition, you need to understand how to manipulate workflow data.
Rules for ActivitiesWhen adding activities to a workflow, follow these rules:
A workflow must have only one Start activity and one Finish activity. A workflow can have zero or more of the following activity types:
Approval activityLog activityBranch activityMerge activityCondition activityMapping activityWorkflow StatusEmail activityRest activityIntegration activity
Each Branch activity must have a corresponding Merge activity.
Rules for Flow PathsWhen adding flow paths to a workflow, follow these rules:
With the exception of the Start activity, all activities can have one or more incoming flow paths. The Start activity cannot have any incoming flow paths.
The Finish activity cannot have any outgoing flow paths. There can be only one flow path out of the Start activity. The flow path type must be forward. There can be between one and five flow paths out of the Approval activity. The valid flow path
types are approved, denied, refused, timedout, and error. At runtime, only one of the flow paths is executed.
There can be only one flow path out of the Log and Merge activities. The flow path type must be forward.
There can be two or three flow paths out of the Condition activity. The valid flow path types are true, false, and error. The true and false flow paths are required; the error flow path is optional.
There can be one or more flow paths out of the Branch activity. The flow path type must be forward for each path. At runtime, all the flow paths execute.
There can be between one and three flow paths out of the Rest activity. The valid flow path types are forward, error, and timedout.
The following table summarizes the rules for adding flow paths into and out of an activity:
60 Using Workflow Builder to Create Workflows
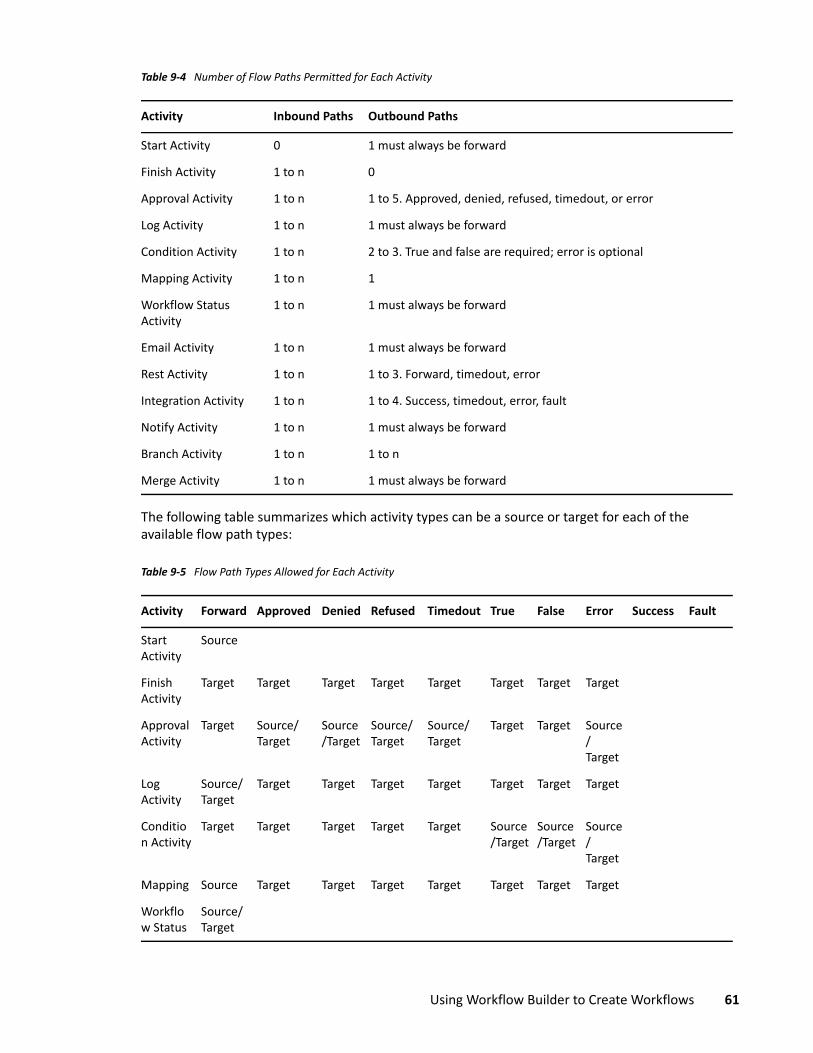
Table 9-4 Number of Flow Paths Permitted for Each Activity
The following table summarizes which activity types can be a source or target for each of the available flow path types:
Table 9-5 Flow Path Types Allowed for Each Activity
Activity Inbound Paths Outbound Paths
Start Activity 0 1 must always be forward
Finish Activity 1 to n 0
Approval Activity 1 to n 1 to 5. Approved, denied, refused, timedout, or error
Log Activity 1 to n 1 must always be forward
Condition Activity 1 to n 2 to 3. True and false are required; error is optional
Mapping Activity 1 to n 1
Workflow Status Activity
1 to n 1 must always be forward
Email Activity 1 to n 1 must always be forward
Rest Activity 1 to n 1 to 3. Forward, timedout, error
Integration Activity 1 to n 1 to 4. Success, timedout, error, fault
Notify Activity 1 to n 1 must always be forward
Branch Activity 1 to n 1 to n
Merge Activity 1 to n 1 must always be forward
Activity Forward Approved Denied Refused Timedout True False Error Success Fault
Start Activity
Source
Finish Activity
Target Target Target Target Target Target Target Target
Approval Activity
Target Source/Target
Source/Target
Source/Target
Source/Target
Target Target Source/Target
Log Activity
Source/Target
Target Target Target Target Target Target Target
Condition Activity
Target Target Target Target Target Source/Target
Source/Target
Source/Target
Mapping Source Target Target Target Target Target Target Target
Workflow Status
Source/Target
Using Workflow Builder to Create Workflows 61

Understanding Workflow DataWhen you are creating a workflow, you can manipulate workflow data to suit the needs of your provisioning application.
“Data Objects and Variables” on page 62 “Creating New Data Items” on page 63 “Modifying Data Items” on page 63 “Working with Complex Data Item Mappings” on page 64 “Moving Form Control Data to Flowdata” on page 64 “Moving Flowdata to Form Controls” on page 64 “About Mapping Activity Operations” on page 65
Data Objects and VariablesThe workflow uses a single process object to manage information about the process. A separate activity object is created for each activity in the workflow and form data is maintained for each activity that provides user interaction.
The data objects associated with each user interface control on a form (text field, drop-down list, and so forth) can be modified immediately prior to the execution of the corresponding activity (Start activity or Approval activity). In addition, this data can be retrieved immediately after execution of the activity. After control has been passed to the next activity, the form control data is no longer available. For this reason, the workflow provides a special object called flowdata that allows you to define your own data items. You can add your own variables to this object to keep track of information that is important to your workflow, including form data that would otherwise be lost.
The following table summarizes the categories of workflow data:
Email Activity
Source/Target
Rest Activity
Source/Target
Target Target Target Source/Target
Target Target Source/Target
Target Target
Notify Activity
Source/Target
Integration Activity
Source/Target
Target Target Target Source/Target
Target Target Source/Target
Source Source
Branch Activity
Source/Target
Target Target Target Target Target Target Target
Merge Activity
Source/Target
Target Target Target Target Target Target Target
Activity Forward Approved Denied Refused Timedout True False Error Success Fault
62 Using Workflow Builder to Create Workflows

Table 9-6 Categories of Workflow Data
NOTE: The workflow administrator is the person who creates workflow in Workflow Builder.
You can reference these objects in ECMAScript expressions. Script expressions in a workflow can at any time refer to data items that are bound upstream in the flow. However, workflow expressions cannot refer to data items that are created downstream (because these data items do not exist yet) or to data bound on other branches in a flow that supports parallel processing (because these branches could be executing concurrently with the current activity).
Creating New Data ItemsYou can create a new data item on the flowdata object by specifying a post-activity target expression on the Data Items tab for the Start or Approval activities. If you specify a name for a new data item in the Target Expression column, this automatically creates the variable. Any activity executed after this activity can then access the data item.
For example, you might want to map the form field called reason to the target expression flowdata.myReason. The variable myReason then becomes a new data item that is available to all activities executed later in the workflow.
Modifying Data ItemsYou can modify a data item by specifying a pre-activity expression on the Data Items tab for the Start or Approval activities. For example, to prepend a dollar sign to a price, you might map the following source expression to a target form field called Price:
"$" + flowdata.get('cost')When the form displays to the user, the Price data appears as follows:
$xx.xxAnother example might be computing the total cost by adding the tax to the base cost. To do this, you could map the following source expression to a target form field called TotalCost:
Number(flowdata.get('cost')) + Number(flowdata.get('tax'))
Data Object Lifetime Editable Creator
process Workflow No System
activities Workflow No System
activity forms Activity Yes System and workflow administrator
flowdata Workflow Yes Workflow administrator
Using Workflow Builder to Create Workflows 63

Working with Complex Data Item MappingsAll data in the flowdata object is maintained in XML, so you can create data items in a hierarchical fashion as well. For example, suppose you have a workflow form that allows a user to ask for access to two internal systems, one for accounts payable and one for receivables. Suppose the form has (among other fields) two Yes/No fields named Acct_Pay and Acct_Rec. In the post-activity data item mappings, you might create two mappings as follows:
Table 9-7 Complex Data Item Mapping Examples
This would create an XML element named SystemAccess with two child elements named AcctPay and AcctRec. One reason to structure data in this way is for clearer organization and management of data in complex workflows containing many forms and data items. To retrieve data from these hierarchies, the following syntax would be used:
flowdata.get('SystemAccess/AcctPay')For complete details on building ECMAScript expressions, see Chapter 11, “Working with ECMA Expressions,” on page 111.
Moving Form Control Data to FlowdataAll form controls you create are automatically made available for use in pre-activity and post-activity expressions on the Data Items tab for the activity that uses the form. For example, suppose you want to make a user’s entry data in control ACONTROL on form AFORM in AACTIVITY available for use in a subsequent activity. To do this, you would select AACTIVITY in the workflow, select the Data Items tab, and click the Post Activity tab. Next to the source form field ACONTROL, you would then enter a target expression in the following format:
flowdata.my_ACONTROLAny subsequent activity in the workflow would then be able to access this data by using pre-activity source expressions such as these:
flowdata.get('my_ACONTROL')flowdata.getObject('my_ACONTROL')
Moving Flowdata to Form ControlsYou can also move flowdata values into form controls. The simplest case is moving a single text value into a form control. In the example above, suppose ACONTROL is a simple text entry field. In this case, to move it into another text entry field in an activity called ZACTIVITY, you would select ZACTIVITY in the workflow, select Data Items > Pre Activity. Next to the target form field, you would then enter this source expression:
flowdata.my_ACONTROL
Source Form Field Target Expression
Acct_Pay flowdata.SystemAccess/AcctPay
Acct_Rec flowdata.SystemAccess/AcctRec
64 Using Workflow Builder to Create Workflows

To move data into a form control, you need to be aware of type constraints. For example, you should not try to move text-based data into a numeric control.
About Mapping Activity OperationsIn the mapping activity, the source expressions are evaluated before they are assigned to the target expression. If the source expression does not exist prior to the mapping activity, no value is assigned to the target expression.
For example, if flowdata.get(“textfield”) maps to flowdata.copyoftextfield and flowdata.get("copyoftextfield") maps to flowdata.copyoftextfield2, the value of flowdata.copyoftextfield2 is empty at the end of the mapping activity because the value of the flowdata.copyoftextfield is assigned only after the mapping activity.
To assign values to the target expression, you can use either of these options:
Multiple mapping-activities. Single mapping-activity but repeat the source expression.
When you repeat the source expression, the flowdata.get(“textfield”) maps to flowdata.copyoftextfield and flowdata.get("textfield") maps to flowdata.copyoftextfield2.
Debugging a WorkflowWhen testing a workflow, you might need to see the values of the variables you are using in the flow. Some options include:
“Using the Log Activity” on page 65 “Changing Log Levels” on page 65
Using the Log ActivityUse the Log activity to display messages containing the variables you need to look at. After you have configured the Log activity, you can then see the messages in the console. In the Log activity, you can use scripting expressions in the Message property to retrieve the values you need. For example, you might use this expression to log a message containing the value of a variable defined on the flowdata object:
flowdata.get('my_variable')For details on using the Log activity, see “Log Activity” on page 87.
Changing Log LevelsDuring the debugging process, you can change the log levels associated with the workflow system. This approach might generate more information than you need, but sometimes it can be helpful. To change logging levels, go to the Logging Configuration page in the Configuration tab of the Workflow Administration Console.
Using Workflow Builder to Create Workflows 65

66 Using Workflow Builder to Create Workflows

10 10Workflow Activity Reference
The activities are the main components in a workflow process where each activity has a purpose. While creating a workflow, you must start the workflow with the “Start” activity and complete with the “Finish” activity and connect both these activities with a flow path. This section provides details on configuring the different types of workflow activities.
Start ActivityThe Start activity is the first activity of a workflow. This activity begins execution when the user makes a request to provision a resource. After the user makes the request, the Start activity displays the request form to the user. The request form asks the user can be asked to provide reason for the request.
You can customize the request form to suit your application requirements. For details on customizing forms, see Part III, “Working with Forms Catalog,” on page 29.
Before displaying the form to the user, the Start activity performs any pre-activity data mappings specified for the activity.
After the user submits the form, the Start activity performs any post-activity data mappings specified for the activity. These mappings typically include copying data from form fields into the flowdata object.
“Properties” on page 67 “Data Items” on page 68 “Email Template” on page 69 “Problems” on page 69
PropertiesThe Start activity includes the following properties:
Table 10-1 Start Activity Properties
Property Name Description
Identifier A unique string value that identifies the activity. Workflow Builder generates this value automatically in the <Activity>_<N> format, where <Activity> represents the name of the activity and <N> represents an alphanumeric value that contains seven characters.
Name Provides a name for the activity.
Workflow Activity Reference 67

Data ItemsTo bind the data items associated with the Start activity, you define pre-activity and post-activity mappings. The pre-activity mappings initialize data in the request form with constants or values retrieved from the flowdata object. The post-activity mappings move form data back into the flowdata object.
Table 10-2 Start Activity Data Item Mappings
Form Specifies the name of the request form to display at runtime. Select the name of the form you want to use, or create a new form. For information on how to create a new form using Form Builder, see “Creating New Forms” on page 35.
After you select the form, select the data items to include in the form from the listed data items.
You must associate a form with a Start activity. If you do not specify a form an error message appears at runtime.
Resource Name Override Type
Allows you to specify the resource name type. The name can be either an ECMA expression, or a constant value.
Define expressions using the ECMA expression builder. At runtime, the expression is evaluated and replaced with a meaningful value.
Type the constant value in the Resource Name Override field. The value is displayed exactly as entered in the field.
Resource Name Override
Allows you to change the name of the workflow at runtime. This name is displayed in the Workflow Monitoring page.
Setting Description
Pre Activity Allows you to specify one or more pre-activity mappings. When you select this option, you can click a cell in the Source Expression column to specify where the initial request form gets data for a particular target form field.
The pre-activity mapping expression is evaluated twice before the form is presented, once during the initial presentation of the form, and again before the post activity to ensure that all the values on the form have a valid type including those that were not initialized. As a result, any calls made to external systems are made twice. For example, a call that retrieves a unique counter for a value makes two calls that allocates two counters, with the last one requested being used.
NOTE: When you select the Pre Activity option, you cannot edit the cells in the Target Form Field column.
Property Name Description
68 Workflow Activity Reference
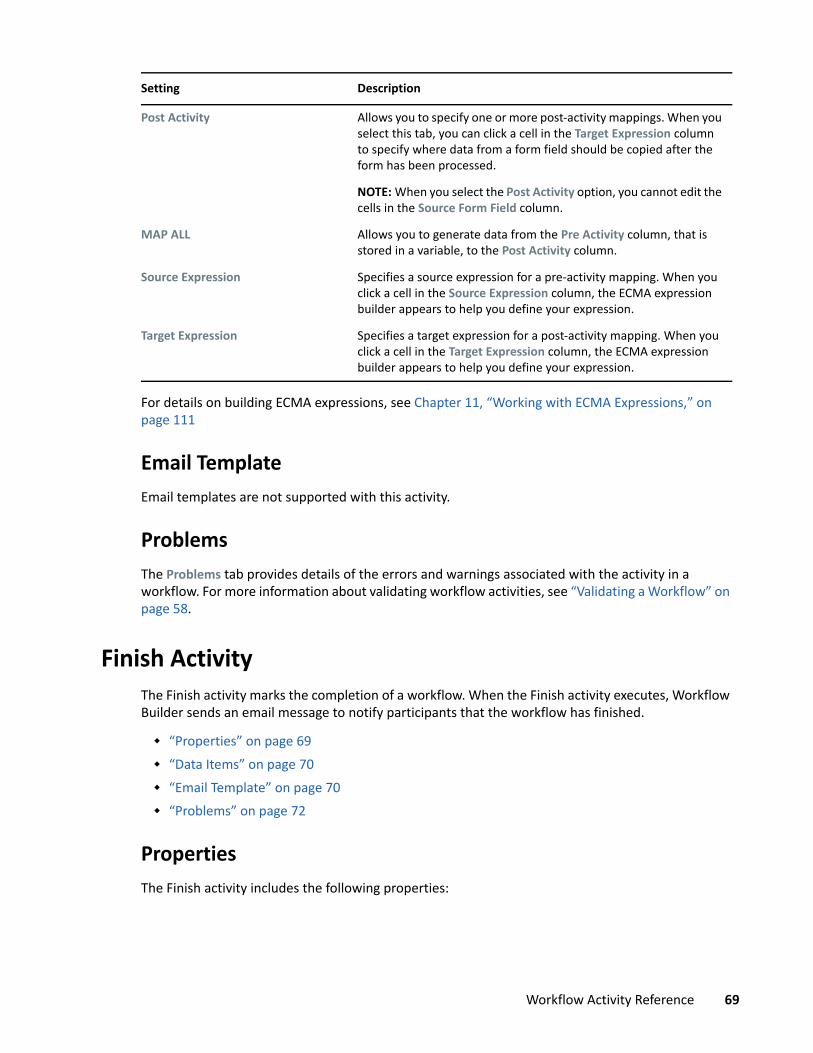
For details on building ECMA expressions, see Chapter 11, “Working with ECMA Expressions,” on page 111
Email TemplateEmail templates are not supported with this activity.
ProblemsThe Problems tab provides details of the errors and warnings associated with the activity in a workflow. For more information about validating workflow activities, see “Validating a Workflow” on page 58.
Finish ActivityThe Finish activity marks the completion of a workflow. When the Finish activity executes, Workflow Builder sends an email message to notify participants that the workflow has finished.
“Properties” on page 69 “Data Items” on page 70 “Email Template” on page 70 “Problems” on page 72
PropertiesThe Finish activity includes the following properties:
Post Activity Allows you to specify one or more post-activity mappings. When you select this tab, you can click a cell in the Target Expression column to specify where data from a form field should be copied after the form has been processed.
NOTE: When you select the Post Activity option, you cannot edit the cells in the Source Form Field column.
MAP ALL Allows you to generate data from the Pre Activity column, that is stored in a variable, to the Post Activity column.
Source Expression Specifies a source expression for a pre-activity mapping. When you click a cell in the Source Expression column, the ECMA expression builder appears to help you define your expression.
Target Expression Specifies a target expression for a post-activity mapping. When you click a cell in the Target Expression column, the ECMA expression builder appears to help you define your expression.
Setting Description
Workflow Activity Reference 69

Table 10-3 Finish Activity Properties
Data ItemsData items are not supported with this activity.
Email TemplateTo enable email notification for the Finish activity, you must specify the email template to use, as well as source expressions for target tokens in the email body.
Table 10-4 E-Mail Notification Settings for the Finish Activity
Property Description
Identifier A unique string value that identifies the activity. Workflow Builder generates this value automatically in the <Activity>_<N> format, where <Activity> represents the name of the activity and <N> represents an alphanumeric value that contains seven characters.
Name Provides a name for the activity.
Notify by E-Mail Provides a method of triggering an email notification when you execute the Finish activity. Set the property to “True”, to send email notifications.
See “Email Template” on page 70 for information about setting up the email notification.
Setting Description
E-Mail Template Specifies the name of the email template to use. By default, the Finish activity uses the “Provisioning Approval Completed Notification” template.
You can edit an email template from the console. See “Editing an email template:” on page 57 for more information.
Notify Specifies that this email message is a notification email.
Show Default Tokens Displays the following default tokens:
TO CC BCC REPLYTO TO_DN CC_DN BCC_DN
Source Specifies the source expressions for target tokens in the email body.
70 Workflow Activity Reference

NOTE
Email notification is supported only when the Notify participants by E-Mail check box is selected on the Overview tab, and the Notify by E-Mail property for the Approval activity is set to “True”.
If you create an activity using any of the target tokens TO_DN, CC_DN, or BCC_DN, you must specify a user’s DN or an expression that resolves to a user’s DN as the source expression for the token.
If you create an activity using both the target tokens TO and TO_DN, the workflow sends duplicate notification emails to the target users.
Target The list of target tokens is determined by the selected email template. You cannot add new tokens, but you can assign values to the predefined tokens by building your own source expressions. At runtime, the source expressions are evaluated to determine the value of each token.
The available target tokens for the “Provisioning Approval Completed Notification” email template are listed below:
TO CC BCC REPLYTO TO_DN CC_DN BCC_DN requestStatus requestSubmissionTime requestID recipientFullName initiatorFullName requestTitle
If you use a provisioning request definition template to create your workflow, each token has a default source expression. The default expressions retrieve values from the workflow process (the process object). You can modify these expressions to suit your application requirements.
For details on building ECMA expressions, see Chapter 11, “Working with ECMA Expressions,” on page 111.
Setting Description
Workflow Activity Reference 71

ProblemsThe Problems tab provides details of the errors and warnings associated with the activity in a workflow. For more information about validating workflow activities, see “Validating a Workflow” on page 58.
Approval ActivityThe Approval activity is a user-facing activity that displays an approval form that allows users to approve, deny, or refuse a provisioning request. The Approval activity can have multiple outgoing flow paths, but only one of the paths is executed at runtime.
You can customize the approval form to suit your application requirements. For details on customizing forms, see Part III, “Working with Forms Catalog,” on page 29.
Before displaying the form to the user, the Approval activity performs any pre-activity data mappings specified for the activity.
After the user submits the form, the Approval activity performs any post-activity mappings specified for the activity. These mappings typically include copying data from form fields into the flowdata object.
“Properties” on page 72 “Data Items” on page 77 “Available ECMAScript Methods” on page 78 “Email Template” on page 79 “Specifying the Addressee Property” on page 81 “Problems” on page 86
PropertiesThe Approval activity includes the following properties:
Table 10-5 Approval Activity Properties
Property Name Description
Identifier A unique string value that identifies the activity. Workflow Builder generates this value automatically in the <Activity>_<N> format, where <Activity> represents the name of the activity and <N> represents an alphanumeric value that contains seven characters.
Name Provides a name for the activity.
72 Workflow Activity Reference

Form Specifies the name of the approval form to display at runtime. Select the name of the form you want to use, or create a new form. For information on how to create new form using Form Builder, see “Creating New Forms” on page 35.
After you select the form, map the data items to include in the form from the listed data items.
You must associate a form with a Approval activity. If you do not specify a form an error message appears at runtime.
Approver Type Specifies the number of addresses that are allowed and the approval pattern that is enforced for this activity. The choices are:
Normal: Action by the addressee is required to complete the approval.
Group: Action by one addressee in the group is required to complete the approval.
Multiple: Action by all of the addressees is required to complete the approval.You cannot use post-activity data item mapping with this approver Type.
Quorum: Action by a percentage of addressees or an absolute number of addressees is required to complete the approval.You cannot use post-activity data item mapping with this approver Type.
For information about how the Approver Type property interacts with the Addressee property, see “Specifying the Addressee Property” on page 81.
Property Name Description
Workflow Activity Reference 73

Addressee Specifies a dynamic expression that identifies the addressee for the activity. The addressee is the approver of the workflow.
The addressee is determined at runtime, based on the evaluation of the expression. The Workflow Administration Console validates that the expression is a valid ECMA expression. It cannot validate whether the expression resolves to a valid object (such as a role) or whether that object will exist at runtime.
For information on specifying addressees, see “Specifying the Addressee Property” on page 81.
For more information about developing valid addressee expressions, and about how the Addressee property interacts with the Approver Type property, see “Specifying the Addressee Property” on page 81.
TIP: To simplify the process of testing a new workflow, you can set the addressee to be the recipient. Doing so removes the need to log out of the application and log in again as a manager each time you want to test your forms. This technique is useful when the workflow involves multiple levels of approval. After the testing phase is complete, you can change the addressee to the correct value.
For details on building ECMA expressions, see “Using the ECMA Expression Builder” on page 112. For descriptions of the system variables available in a workflow, see “Understanding Workflow Data” on page 62.
Reminder Start Specifies a dynamic expression that defines, in milliseconds, the time to send the first reminder email. The start value is an offset from the time of the first assignment associated with the activity. You can pick predefined expressions that represent common intervals (for example, hour, day, week) in the ECMAScript Objects pane of the ECMA expression builder.
This property is part of the reminder email function. If this activity is considered important and needs to be acted on quickly, you can configure the activity to send a reminder email to the activity addressee. For example, you can configure the reminder settings to send a reminder email five days before the activity times out, and on a daily basis until the activity times out. To do so, specify a Reminder Start time, a Reminder Interval, and the email to be sent (see “Email Template” on page 79).
For details on building ECMA expressions, see “Using the ECMA Expression Builder” on page 112. For descriptions of the system variables available in a workflow, see “Understanding Workflow Data” on page 62.
Reminder Interval Specifies a dynamic expression that defines the interval between sending reminder emails. You can select predefined expressions that represent common intervals (for example, hour, day, week) in the ECMAScript Objects pane of the ECMA expression builder.
Property Name Description
74 Workflow Activity Reference

Escalation Addressee Not available when the approver type is “Multiple” or “Quorum”.
Specifies a dynamic expression that identifies the user who should get this task if the timeout limit has been reached.
The escalation addressee is determined at runtime, based on how the expression is evaluated.
For details on building ECMA expressions, see “Using the ECMA Expression Builder” on page 112. For descriptions of the system variables available in a workflow, see “Understanding Workflow Data” on page 62.
Escalation Count Not available when the approver type is “Multiple” or “Quorum”.
Specifies the number of times to retry the activity in the event of a timeout.
When an activity times out, the workflow process can try to complete the activity again, depending on the escalation count specified for the activity. With each retry, the workflow process can escalate the activity to another user. In this case, the activity is reassigned to another user to give this user an opportunity to finish the work of the activity. If the last attempt times out, the activity can be marked as approved, denied, refused, timed out, or in error, depending on the final timeout action specified for the activity.
Escalation Interval Not available when the approver type is “Multiple” or “Quorum”.
Specifies a dynamic expression that defines the period of time allotted for the addressee to complete the task. The escalation interval applies each time the addressee executes the activity.
The timeout interval (see Timeout in this table) takes precedence over the escalation interval. For example, if you set the Timeout to 10 minutes, and also specify an Escalation Count of 3 minutes and Escalation Interval of 5 minutes, the activity will finish after 10 minutes without attempting all of the retries. In this example, the second retry would be canceled, and the workflow would finish processing for the activity. When the activity completes, the workflow engine follows the link defined by the final timeout action.
For details on building ECMA expressions, see Chapter 11, “Working with ECMA Expressions,” on page 111. For descriptions of the system variables available in a workflow, see “Understanding Workflow Data” on page 62.
Escalation Reminder Start Not available when the approver type is “Multiple” or “Quorum”.
Specifies a dynamic expression that defines the time at which the first reminder email (see Reminder Start in this table) should be sent to the escalation addressee. The start value is an offset from the time of the escalation assignment. You can pick predefined expressions that represent common intervals (for example, hour, day, week) in the ECMAScript Objects pane of the ECMA expression builder.
Property Name Description
Workflow Activity Reference 75
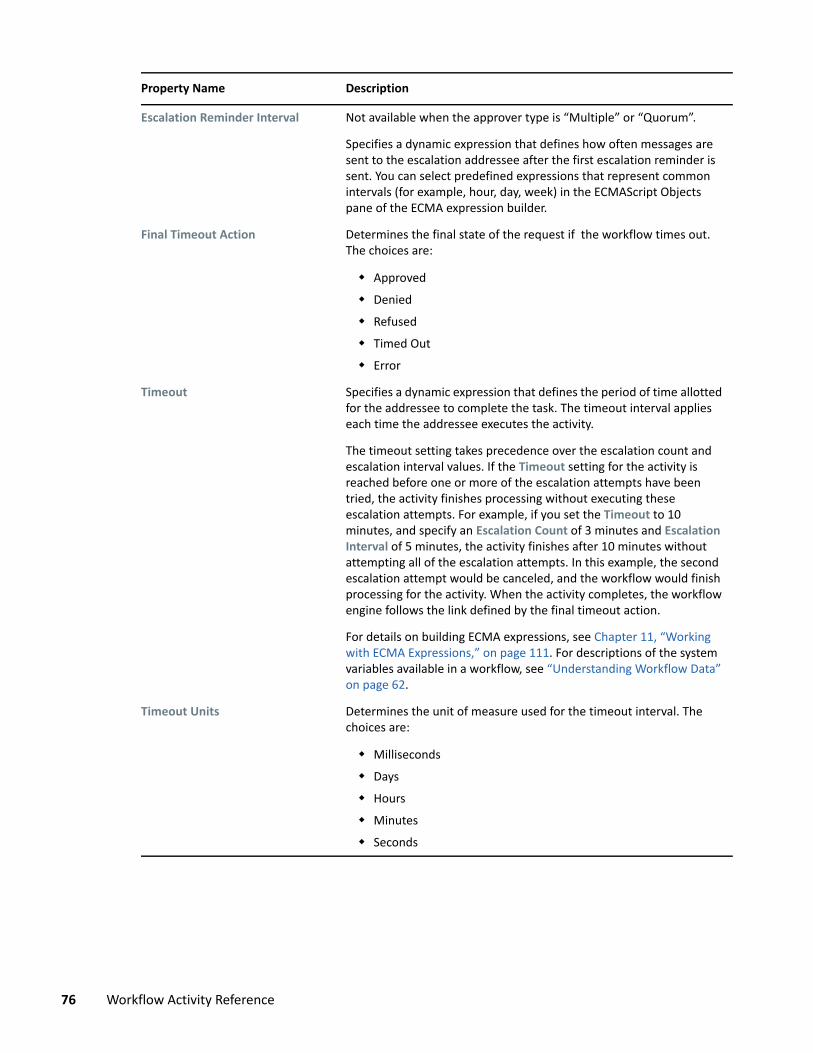
Escalation Reminder Interval Not available when the approver type is “Multiple” or “Quorum”.
Specifies a dynamic expression that defines how often messages are sent to the escalation addressee after the first escalation reminder is sent. You can select predefined expressions that represent common intervals (for example, hour, day, week) in the ECMAScript Objects pane of the ECMA expression builder.
Final Timeout Action Determines the final state of the request if the workflow times out. The choices are:
Approved Denied Refused Timed Out Error
Timeout Specifies a dynamic expression that defines the period of time allotted for the addressee to complete the task. The timeout interval applies each time the addressee executes the activity.
The timeout setting takes precedence over the escalation count and escalation interval values. If the Timeout setting for the activity is reached before one or more of the escalation attempts have been tried, the activity finishes processing without executing these escalation attempts. For example, if you set the Timeout to 10 minutes, and specify an Escalation Count of 3 minutes and Escalation Interval of 5 minutes, the activity finishes after 10 minutes without attempting all of the escalation attempts. In this example, the second escalation attempt would be canceled, and the workflow would finish processing for the activity. When the activity completes, the workflow engine follows the link defined by the final timeout action.
For details on building ECMA expressions, see Chapter 11, “Working with ECMA Expressions,” on page 111. For descriptions of the system variables available in a workflow, see “Understanding Workflow Data” on page 62.
Timeout Units Determines the unit of measure used for the timeout interval. The choices are:
Milliseconds Days Hours Minutes Seconds
Property Name Description
76 Workflow Activity Reference

NOTE: To enable delegation to a group DN, you can have an approver type of Group or Normal, but the addressee value must be an expression that returns the user DNs for each member of that group For example, Entity.get('/api/entity', 'group', {groupIdHere}, ['members']).
Data ItemsTo bind the data items associated with the Approval activity, define pre-activity and post-activity mappings. The pre-activity mappings initialize data in the approval form with constants, values retrieved from the flowdata object, system process variables, system activity variables, and data retrieved through expression calls to the directory abstraction layer. The post-activity mappings move form data back into the flowdata object.
Exclude Requester Specifies whether requestors can approve their own provisioning requests.
True: The requestor is not allowed to approve their own provisioning requests.
False: The requestor is allowed to approve their own provisioning requests.
Notify by E-Mail Specifies whether this activity should send email notifications. Set to “True” to notify by email; otherwise, set to False.
Specifies the email to send using the Email Template tab (see “Email Template” on page 79).
To use this feature, the Notify participants by Email parameter for the provisioning request definition must be set to “True”.
Priority Specifies a dynamic expression that defines the priority of the approval activity. Valid priority values are 1, 2, or 3. You can also define an expression to determine the priority from workflow data. For example, flowdata.get("Priority").
Property Name Description
Workflow Activity Reference 77

Table 10-6 Approval Activity Data Item Mappings
For details on building ECMA expressions, see Chapter 11, “Working with ECMA Expressions,” on page 111.
Available ECMAScript MethodsThe Approval activity provides several default methods to use in ECMAScript expressions. Some methods are displayed in the ECMAScript Objects pane of the ECMA expression builder, while others must be entered manually into the text area provided in the ECMA expression builder.
Setting Description
Pre Activity Allows you to specify one or more pre-activity mappings. When you select this option, you can click a cell in the Source Expression column to specify where the approval form gets data for a particular target form field.
The pre-activity mapping expression is evaluated twice before the form is presented, once during the initial presentation of the form and again before the post activity, to ensure that all the values on the form have a valid type including those that were not initialized. As a result, any calls made to external systems are made twice. For example, a call that retrieves a unique counter for a value makes two calls that allocates two counters, with the last one requested being used.
NOTE: When you select the Pre Activity option, you cannot edit the cells in the Target Form Field column.
Post Activity Allows you to specify one or more post-activity mappings. When you select this option, you can click a cell in the Target Expression column to specify where data from a form field should be copied after the form has been processed.
You cannot use post-activity mappings with the Multiple and Quorum approver types, see “Properties” on page 72.
The form for an Approval activity includes a special internal control called apwaComment. This control causes user comments to be written to the workflow database. It should not have a post-activity mapping.
NOTE: When you select the Post Activity option, you cannot edit the cells in the Source Form Field column.
MAP ALL Allows you to generate data from the Pre Activity column, that is stored in a variable, to the Post Activity column.
Source Expression Specifies a source expression for a pre-activity mapping. When you click a cell in the Source Expression column, the ECMA expression builder appears to help you define your expression.
Target Expression Specifies a target expression for a post-activity mapping. When you click a cell in the Target Expression column, the ECMA expression builder appears to help you define your expression.
78 Workflow Activity Reference

Table 10-7 Available ECMAScript Methods for Approval Activities
Email TemplateTo enable email notification for the Approval activity, you must specify the email template to use, as well as source expressions for target tokens in the email body.
Table 10-8 E-mail Notification Settings for the Approval Activity
Object Method Description
Action Activity-ID.getAction() Returns the approval action taken by the activity. Possible options are:
Approved Denied Refused Timed Out Error
Addressee Activity-ID.getAddressee() Returns the DN of the user who needs to approve or deny the requested action.
Name Activity-ID.getName(locale) Returns the name of the approval activity for the specified locale.
Timestamp Activity-ID.getTimestamp() Returns the date and time of any approval action taken by the user or system, including approved, denied, refused, timed out, or error.
User Activity-ID.getUser() Returns the approver’s DN of the work task for the activity.
WorkId Activity-ID.getWorkId() Returns the work item ID for the activity.
Addressee List Activity-ID.getAddresseeList() Returns a list of DNs of all users who need to approve or deny the requested action.
Notify Addressee Activity-ID.getNotifyAddressee()
Returns the full name of the user who needs to approve or deny the requested action.
Setting Description
Notify Specifies that this email notification is a notification email.
Reminder Specifies that this email notification is a reminder email.
Escalation Reminder Specifies that this email notification is a retry reminder email.
Workflow Activity Reference 79

NOTE
Email notification is supported only when the Notify participants by E-Mail check box is selected on the Overview tab, and the Notify by E-Mail property for the Approval activity is set to “True”.
When you create a workflow for use with the Resource Request portlet, and you use the “_default_” as the expression for the TO token, the addressee expression must be an ECMA expression.
Show Default Tokens Displays default tokens (for example, TO, CC, BCC, REPLYTO, TO_DN, CC_DN, and BCC_DN) in the Target column.
E-Mail Template Specifies the name of the email template to use. By default, the Approval activity uses the “Provisioning Notification template”.
You can edit an email template in the console. For more information, see “Editing an email template:” on page 57.
Source/Target Specifies the source expressions for target tokens in the email body.
The list of target tokens is determined by the selected email template. You cannot add new tokens, but you can assign values to the tokens by building your own source expressions. At runtime, the source expressions are evaluated to determine the value of each token.
The available target tokens are listed below:
TO CC BCC REPLYTO TO_DN CC_DN BCC_DN recipientFullName initiatorFullName requestTitle userFirstName
If you use a provisioning request definition template to create your workflow, each token has a default source expression. The default expressions retrieve values from the workflow process (the process object). You can modify these expressions to suit your application requirements.
For details on building ECMA expressions, see Chapter 11, “Working with ECMA Expressions,” on page 111.
Setting Description
80 Workflow Activity Reference

If you create an activity using any of the target tokens TO_DN, CC_DN, or BCC_DN, you must specify a user’s DN or an expression that resolves to a user’s DN as the source expression for the token.
If you create an activity using both the target tokens TO and TO_DN, the workflow sends duplicate notification emails to the target users.
Specifying the Addressee PropertyTo address an Approval activity, you must enter a valid expression for the Addressee property. The addressee is the approver for the activity. The number of approvals that are required to approve the activity is determined by the relationship between the Addressee property and the Approver Type property, as described in “Relationship Between Addressee and Approver Type” on page 82.
To build the addressee expression:
1 Click the plus sign (+) next to Addressee. (Available only for Group, Multiple or Quorum )2 Enter a value in the Addressee field, then click OK.
NOTE: For each addressee, you must add a separate entry, then enter the name separately.
3 (Optional) To add a new addressee by using the expression builder, click the icon next to the Addressee field.
4 (Optional) Choose one of the ECMAScript Objects to build the addressee expression. For example, if you do not know the name of the addressee, but you know the user ID, you can use User ID from Source to build the expression, Entity.get('/api/entity', 'user', { userIdHere }, ['userId']). Then replace 'userIdHere’ with the user ID of the addressee. At runtime, the user ID is evaluated and the task is sent to the appropriate approver.
5 (Optional) Click OK.
NOTE: When the approver type is “Quorum”, you must specify the Quorum Type. At runtime, the Quorum Expression is evaluated and replaced with a meaningful value, whereas for Quorum Constant the value is displayed exactly as entered in the field.
Valid Addressee ExpressionsAn Addressee expression must resolve to one of the following at runtime:
A valid individual addressee that can be a user DN, a group DN, or a role DN. A valid list of addressees (for example, created using a Java vector object) that can contain
multiple user DNs, multiple group DNs, or multiple role DNs, or a mixture of both.
Because the addressee is the approver, the maximum number of approvals possible equals the number of addressees (the number of user DNs plus the number of group DNs or role DNs) and does not include or count the individual members of a group or roles.
NOTE: A Group DN or a Role DN is always processed to contribute a single vote (that is, when one member of a group or role claims an activity, the rest of the members of the group or role can no longer see or claim the activity), regardless of the approver type.
Workflow Activity Reference 81

The following table provides examples of valid addressee expressions that you can create using the ECMA expression builder.
Table 10-9 Examples of Addressee Expressions
NOTE: Roles are specific to products.
Relationship Between Addressee and Approver TypeBecause the addressee is the approver, the behavior of the workflow and the total number of affirmative approvals needed varies, depending on the type of addressee that is specified by the Addressee expression, and the Approver Type that is selected.
“Normal Approver Type” on page 82 “Group Approver Type” on page 83 “Multiple Approver Type” on page 84 “Quorum Approver Type” on page 85
Normal Approver TypeThe following table describes the workflow behavior when different types of addressee are used with the Normal approver type.
Table 10-10 Workflow Behavior with the Normal Approver Type
Type of Expression Example
Individual user DN 'uniqueUserIdHere'
Individual group DN 'uniqueGroupIdHere'
Individual role DN 'uniqueRoleIdHere'
Addressee Value Description
Individual User DN Only the user can see the Approval activity in his or her task list. Only one approval is needed to complete the activity as “Approved”.
Individual Group DN All members of group can see the activity in their task list. When one member claims the activity, it is removed from the task lists of
others in the group. Only one approval is needed to complete the activity as “Approved”.
Individual Role DN Each member of the role can see the activity in the task list. When one role member claims the activity, it is removed from the task
lists of others in the role. Only one approval is needed to complete the activity as “Approved”.
Multiple User DNs Not allowed.
82 Workflow Activity Reference
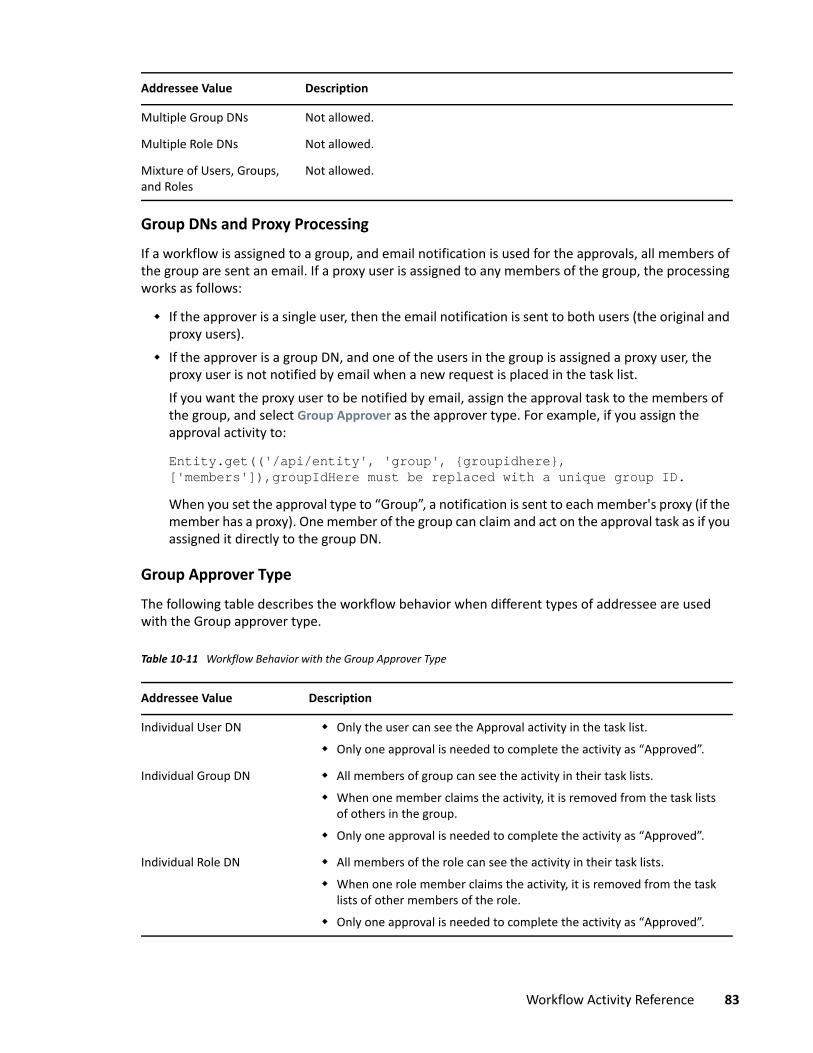
Group DNs and Proxy ProcessingIf a workflow is assigned to a group, and email notification is used for the approvals, all members of the group are sent an email. If a proxy user is assigned to any members of the group, the processing works as follows:
If the approver is a single user, then the email notification is sent to both users (the original and proxy users).
If the approver is a group DN, and one of the users in the group is assigned a proxy user, the proxy user is not notified by email when a new request is placed in the task list.If you want the proxy user to be notified by email, assign the approval task to the members of the group, and select Group Approver as the approver type. For example, if you assign the approval activity to:
Entity.get(('/api/entity', 'group', {groupidhere}, ['members']),groupIdHere must be replaced with a unique group ID.When you set the approval type to “Group”, a notification is sent to each member's proxy (if the member has a proxy). One member of the group can claim and act on the approval task as if you assigned it directly to the group DN.
Group Approver TypeThe following table describes the workflow behavior when different types of addressee are used with the Group approver type.
Table 10-11 Workflow Behavior with the Group Approver Type
Multiple Group DNs Not allowed.
Multiple Role DNs Not allowed.
Mixture of Users, Groups, and Roles
Not allowed.
Addressee Value Description
Individual User DN Only the user can see the Approval activity in the task list. Only one approval is needed to complete the activity as “Approved”.
Individual Group DN All members of group can see the activity in their task lists. When one member claims the activity, it is removed from the task lists
of others in the group. Only one approval is needed to complete the activity as “Approved”.
Individual Role DN All members of the role can see the activity in their task lists. When one role member claims the activity, it is removed from the task
lists of other members of the role. Only one approval is needed to complete the activity as “Approved”.
Addressee Value Description
Workflow Activity Reference 83

Multiple Approver TypeThe following table describes the workflow behavior when different types of addressees are used with the Multiple approver type.
Table 10-12 Workflow Behavior with the Multiple Approver Type
Multiple User DNs All users in the virtual group can see the activity in their task lists. When one user from the virtual group claims the activity, the activity is
removed from the task lists of other users in the group. Only one approval is needed to complete the activity as “Approved”.
Multiple Group DNs All members in each of the groups can see the activity in their task lists. When one user from the virtual group claims the activity, the activity is
removed from the task lists of others in all the groups. Only one approval is needed to complete the activity as “Approved”.
Multiple Role DNs Each member of each of the roles can see the activity in the task list. When one member of one of the roles claims the activity, the activity is
removed from the task lists of other members of all the other roles. Only one approval is needed to complete the activity as “Approved”.
Mixture of Users, Groups, and Roles
All users and members of each group or role can see the activity in their task lists.
When one of the approvers claims the activity, the activity is removed from the task lists of others.
Only one approval is needed to complete the activity as “Approved”.
Addressee Value Description
Individual User DN Only the user can see the activity in the task list. Only one approval is needed to complete the activity as “Approved”.
Individual Group DN All members of the group can see the activity in their task lists. When one member claims the activity, the activity is removed from the
task lists of others in the group. Only one approval is needed to complete the activity as “Approved”.
Individual Role DN All members of the role can see the activity in their task lists. When one role member claims the activity, the activity is removed from
the task lists of other members of the role. Only one approval is needed to complete the activity as “Approved”.
Multiple User DNs All users can see the activity in their task lists. All users can claim the activity. Approval of each user is needed to complete the activity as “Approved”. Any single denial completes the activity as “Denied”.
Addressee Value Description
84 Workflow Activity Reference

Quorum Approver TypeThe following table describes the workflow behavior when different types of addressee are used with the Quorum approver type.
Table 10-13 Workflow Behavior with the Quorum Approver Type
Multiple Group DNs All members of each of the groups can see the activity in their task lists. When one member of a group claims the activity, the activity is removed
from the task lists of others in that group. Each group must supply one approval to complete the activity as
“Approved”. Any single denial completes the activity as “Denied”.
Multiple Role DNs All members of each of the roles can see the activity in their task lists. When one member from a role claims the activity, the activity is
removed from the task lists of others in that role. Each role must supply one approval to complete the activity as
“Approved”. Any single denial completes the activity as “Denied”.
Mixture of Users, Groups, and Roles
Each user and all members of each group or role, can see the activity in their task lists.
Each user can claim the activity. One member of each group or role can claim the activity, after which others in the group or role do not see the task.
Each user and one member of each group or role must approve the activity to complete the activity as “Approved”.
Any single denial completes the activity as “Denied”.
Addressee Value Description
Individual User DN Only the user can see the activity in the task list. Only one approval is needed to complete the activity as “Approved”.
Individual Group DN All members of the group can see the activity in their task lists. When one member claims the activity, the activity is removed from the
task lists of others in the group. Only one approval is needed to complete the activity as “Approved”.
Individual Role DN All members of the role can see the activity in their task lists. When one member claims the activity, the activity is removed from the
task lists of other members of the role. Only one approval is needed to complete the activity as “Approved”.
Addressee Value Description
Workflow Activity Reference 85
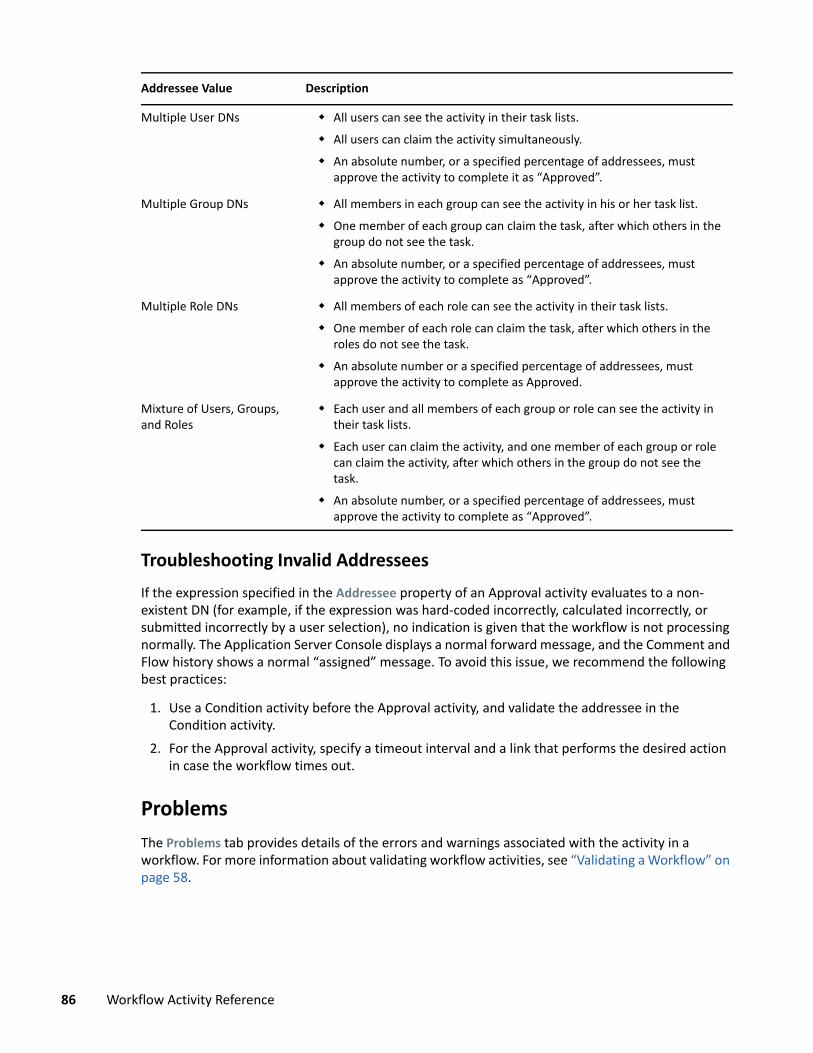
Troubleshooting Invalid AddresseesIf the expression specified in the Addressee property of an Approval activity evaluates to a non-existent DN (for example, if the expression was hard-coded incorrectly, calculated incorrectly, or submitted incorrectly by a user selection), no indication is given that the workflow is not processing normally. The Application Server Console displays a normal forward message, and the Comment and Flow history shows a normal “assigned” message. To avoid this issue, we recommend the following best practices:
1. Use a Condition activity before the Approval activity, and validate the addressee in the Condition activity.
2. For the Approval activity, specify a timeout interval and a link that performs the desired action in case the workflow times out.
ProblemsThe Problems tab provides details of the errors and warnings associated with the activity in a workflow. For more information about validating workflow activities, see “Validating a Workflow” on page 58.
Multiple User DNs All users can see the activity in their task lists. All users can claim the activity simultaneously. An absolute number, or a specified percentage of addressees, must
approve the activity to complete it as “Approved”.
Multiple Group DNs All members in each group can see the activity in his or her task list. One member of each group can claim the task, after which others in the
group do not see the task. An absolute number, or a specified percentage of addressees, must
approve the activity to complete as “Approved”.
Multiple Role DNs All members of each role can see the activity in their task lists. One member of each role can claim the task, after which others in the
roles do not see the task. An absolute number or a specified percentage of addressees, must
approve the activity to complete as Approved.
Mixture of Users, Groups, and Roles
Each user and all members of each group or role can see the activity in their task lists.
Each user can claim the activity, and one member of each group or role can claim the activity, after which others in the group do not see the task.
An absolute number, or a specified percentage of addressees, must approve the activity to complete as “Approved”.
Addressee Value Description
86 Workflow Activity Reference

Log ActivityThe Log activity is a system activity that writes messages to a log. The Workflow Administration Console uses CEF formatted events to log information about the state of a workflow process, and then publishes the log to the audit server.
During the course of its processing, a workflow can log information about various events that occurred. Users can then use the reporting tools to look at logged data.
Before you can use logging, you must enable logging in the user application. For more information, see “Configuring Logging” on page 165.
NOTE: During the course of workflow execution, many system events are logged that are not controlled by the Log activity. For example, the Workflow Administration Console writes a message to the log whenever a workflow starts or stops, or when it is approved, denied, or refused.
“Properties” on page 87 “Data Items” on page 88 “Email Template” on page 88 “Problems” on page 88
PropertiesThe Log activity includes the following properties:
Table 10-14 Log Activity Properties
Property Name Description
Identifier A unique string value that identifies the activity. Workflow Builder generates this value automatically in the <Activity>_<N> format, where <Activity> represents the name of the activity and <N> represents an alphanumeric value that contains seven characters.
Name Provides a name for the activity.
Audit Specifies whether log messages should be sent. When this property is set to “True”, messages are sent to all log4j channels. When this property is set to False, no log messages are sent.
Author Defines the author for the message. By default, the author is the initiator of the provisioning request. This field value may not exceed 255 characters.
Message Specifies an ECMA expression that defines text for the log message. Typically, this text indicates where within the process this Log activity is executed and provides other information that makes the log easy to understand.
For details on building ECMA expressions, see Chapter 11, “Working with ECMA Expressions,” on page 111. For descriptions of the system variables available in a workflow, see “Understanding Workflow Data” on page 62.
Workflow Activity Reference 87

Data ItemsData items are not supported with this activity.
Email TemplateEmail templates are not supported with this activity.
ProblemsThe Problems tab provides details of the errors and warnings associated with the activity in a workflow. For more information about validating workflow activities, see “Validating a Workflow” on page 58.
Condition ActivityThe Condition activity lets you add conditional logic to a workflow. This logic can be used to control what happens when the workflow executes. The Condition activity allows you to define logic as an ECMA expression that evaluates to a boolean value.
Each Condition activity must have two outgoing flow paths, one that handles conditions that evaluate to true and another that handles conditions that evaluate to “false”. Optionally, a third flow path can be added to handle error conditions that occur if the ECMA expression evaluation fails.
“Properties” on page 88 “Data Items” on page 89 “Email Template” on page 89 “Problems” on page 89
PropertiesThe Condition activity includes the following properties:
Comment Specifies an ECMA expression that defines text that can be displayed in the user comments. You can use the comment to record the reason for a request, or the completed approval status of request. Some examples include:
"Reason for request: "+ flowdata.get('reason')or
"Process has been " + flowdata.get(IDM_COMPLETED_APPROVAL_STATUS')
Property Name Description
88 Workflow Activity Reference
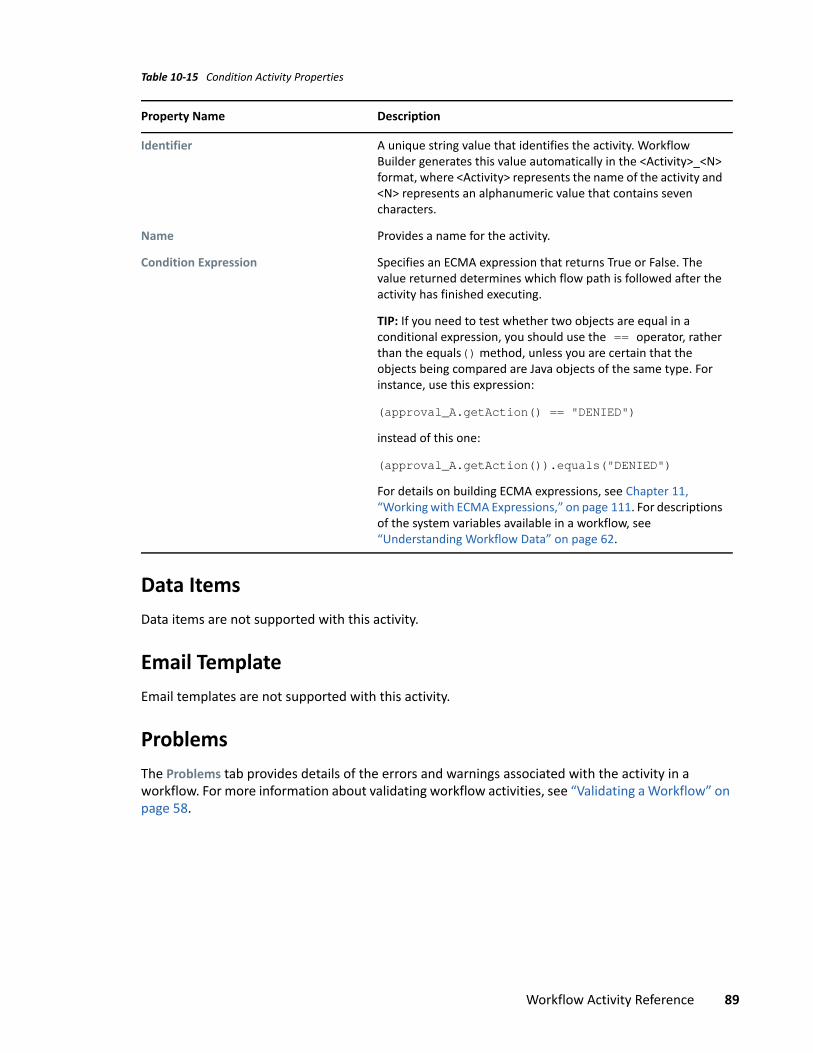
Table 10-15 Condition Activity Properties
Data ItemsData items are not supported with this activity.
Email TemplateEmail templates are not supported with this activity.
ProblemsThe Problems tab provides details of the errors and warnings associated with the activity in a workflow. For more information about validating workflow activities, see “Validating a Workflow” on page 58.
Property Name Description
Identifier A unique string value that identifies the activity. Workflow Builder generates this value automatically in the <Activity>_<N> format, where <Activity> represents the name of the activity and <N> represents an alphanumeric value that contains seven characters.
Name Provides a name for the activity.
Condition Expression Specifies an ECMA expression that returns True or False. The value returned determines which flow path is followed after the activity has finished executing.
TIP: If you need to test whether two objects are equal in a conditional expression, you should use the == operator, rather than the equals() method, unless you are certain that the objects being compared are Java objects of the same type. For instance, use this expression:
(approval_A.getAction() == "DENIED")instead of this one:
(approval_A.getAction()).equals("DENIED")For details on building ECMA expressions, see Chapter 11, “Working with ECMA Expressions,” on page 111. For descriptions of the system variables available in a workflow, see “Understanding Workflow Data” on page 62.
Workflow Activity Reference 89

Mapping ActivityThe Mapping activity allows you to add or manipulate data in a workflow. It evaluates the source expression and saves the result in the target expression of the associated data items. You can use it as a way to combine data from parallel-processed approval forms after their data is moved to flowdata.
For example, in a parallel approval context you might need to collect data from more than one approval form that is dependent on each other or needs to be calculated with each other. To accomplish this, place a Mapping activity after a Merge activity and before any activities that consume the results (for example, Condition, Entity, Provisioning or another Approval activity).
You can also use the Mapping activity to isolate calls to external Java routines that might manipulate data and be resource intensive, thereby not slowing down user-based Approval activities in either their pre-activity or post-activity mapping phase.
“Properties” on page 90 “Data Items” on page 90 “Email Template” on page 91 “Problems” on page 91
PropertiesThe Mapping activity includes the following properties:
Table 10-16 Mapping Activity Properties
Data ItemsTo bind the data items associated with the Mapping activity, define pre-activity and post-activity mappings. The pre-activity mappings initialize data in flowdata with constants, values retrieved from the flowdata object, system process variables, system activity variables, or data retrieved through expression calls to the directory abstraction layer. The post-activity mappings move data into the flowdata object.
Property Name Description
Identifier A unique string value that identifies the activity. Workflow Builder generates this value automatically in the <Activity>_<N> format, where <Activity> represents the name of the activity and <N> represents an alphanumeric value that contains seven characters.
Name Provides a name for the activity.
90 Workflow Activity Reference

Table 10-17 Mapping Activity Data Item Mappings
Email TemplateEmail templates are not supported with this activity.
ProblemsThe Problems tab provides details of the errors and warnings associated with the activity in a workflow. For more information about validating workflow activities, see “Validating a Workflow” on page 58.
Workflow StatusThe Workflow Status activity lets you specify the approval status for a workflow as either approved or denied upon completion. This method overrides the status set in the Default Completion Status As Approval parameter provided in the Overview tab. However, for workflows that do not contain a Workflow Status activity, the approval status is determined by the latter, that is the Default Completion Status As Approval parameter.
“Properties” on page 91 “Data Items” on page 92 “Email Template” on page 92 “Problems” on page 92
PropertiesThe Workflow Status activity has the following properties:
Setting Description
Source Expression Specifies a source expression. When you click a cell in the Source Expression column, the ECMA expression builder displays to help you define your expression. For example,
function list() { s=new java.lang.String(); if (wi.XPath('count(flow-data/groups)' ) > 0) s="There was a group selected"; return s;}; list();
Target Expression Specifies a target expression. When you click a cell in the Target Expression column, the ECMA expression builder displays to help you define your expressions or you can click the Map All button. An example of a target expression is:
flowdata.testexpression
Workflow Activity Reference 91

Table 10-18 Workflow Status Activity Properties
Data ItemsData items are not supported with this activity.
Email TemplateEmail templates are not supported with this activity.
ProblemsThe Problems tab provides details of the errors and warnings associated with the activity in a workflow. For more information about validating workflow activities, see “Validating a Workflow” on page 58.
Email ActivityThe Email activity provides a way to send an email to interested parties outside of an approval process.
“Properties” on page 92 “Data Items” on page 93 “Email Template” on page 93 “Problems” on page 94
PropertiesThe Email activity has the following properties:
Property Description
Identifier A unique string value that identifies the activity. Workflow Builder auto-generates this value in Mapping_<N> format, where <N> represents an alphanumeric value that contains 7 characters.
Name Specifies a name for the activity.
Workflow Status Specifies the approval status as Approved or Denied.
92 Workflow Activity Reference

Table 10-19 Email Activity Properties
Data ItemsData items are not supported with this activity.
Email TemplateTo enable email notification for this activity, you need to specify the email template to use, as well as source expressions for target tokens in the email body.
Table 10-20 Email Template Settings for the Email Activity
Property Name Description
Identifier A unique string value that identifies the activity. Workflow Builder auto-generates this value in E-Mail_<N> format, where <N> represents an alphanumeric value that contains 7 characters.
Name Specifies a name for the activity.
Notify by Email Specifies whether this activity should send email notifications. Set to True to notify by email; otherwise, set to False.
You must specify the email required to send in the Email Template tab (see Email Template).
To use this feature, you must enable the Notify Participants by EMail parameter in the Overview tab for a workflow (see “Editing a Workflow” on page 44).
Setting Description
Notify Specifies that this email template is a notification email.
Show Default Tokens Displays system tokens (for example, TO, CC, BCC, REPLYTO, TO_DN, CC_DN, and BCC_DN) provided by default in the Target column.
List of email templates By default, the Email Activity has no template selected. You must select the email template to use.
You can edit an email template on the Notification Templates page (Catalog > Notification Templates). For more information, see “Editing a Notification Template” on page 119.
Workflow Activity Reference 93

NOTE
Email notification is supported only when the Notify participants By EMail check box is selected in the Overview tab, and the Notify by Email property for the activity is set to True.
If you create an activity using any of the target tokens TO_DN, CC_DN, or BCC_DN, you must specify a user’s DN or an expression that resolves to a user’s DN as the source expression for the token.
If you create an activity using both the target tokens TO and TO_DN, the workflow sends out duplicate notification emails to the target users.
ProblemsThe Problems tab provides details of the errors and warnings associated with the activity in a workflow. For more information about validating workflow activities, see “Validating a Workflow” on page 58.
Source/Target Specifies the source expressions for target tokens in the email body.
The list of target tokens is determined by the selected email template. You cannot add new tokens, but you can assign values to the tokens by building your own source expressions. At runtime, source expressions are evaluated to determine the value of each token. For details on building ECMA expressions, see Chapter 11, “Working with ECMA Expressions,” on page 111.
The available default tokens are listed below:
TO
To specify multiple recipients, use the following syntax:
'[email protected]||[email protected]' CC BCC REPLYTO TO_DN CC_DN BCC_DN
Setting Description
94 Workflow Activity Reference

Rest ActivityThe Rest activity enables users to call REST endpoints or resources when processing workflow data. The activity allows workflows to exchange data with arbitrary REST services. Data sent to a REST service can integrate a workflow with other systems inside and outside the organization. Data received from a REST service can provide decision support information on approval forms. You create flowdata variables to move data between the workflow and the REST service.
“Properties” on page 95 “Data Items” on page 99 “Email Template” on page 99 “Problems” on page 99
PropertiesThe Rest activity has the following properties. Most of the Rest activity properties are ECMAScript expressions, so ensure that you configure each property by clicking the edit icon in the property field to open the expression builder modal window.
Table 10-21 Rest Activity Properties
Property Name Description
Input properties
Identifier A unique string value that identifies the activity. Workflow Builder auto-generates this value in Rest_<N> format, where <N> represents an alphanumeric value that contains 7 characters.
Name Specifies a name for the activity.
API url Specifies the encoded URL path that the activity uses when calling the REST server. If the path includes any reserved characters, you must URL encode the path. For example, you can use the following sample expression:
encodeURIComponent({api_url_path})For more information about URL encoding, see https://en.wikipedia.org/wiki/Percent-encoding.
HTTP method Specifies the method the activity uses to retrieve data from or modify data on the REST server. The choices are:
get put post delete
Workflow Activity Reference 95

Authentication type Specifies the authentication method used by the activity when calling the REST server. You can specify any one of the following:
Basic Authentication: Authenticates by providing the user ID and password within an HTTP header. Click the edit icon in the Username and Password properties to define the expressions for the header in the expression builder.
In many cases, the REST server expects the header to be in the “Basic Authentication” format. For more information about the “Basic Authentication” format, see https://en.wikipedia.org/wiki/Basic_authentication.
OAuth: The activity uses Oauth-based authentication to communicate with the REST server. In the Oauth authorization url property, specify the expression URL to the authorization server that issues the access token. The access token generated by the specified authorization server enables the activity to authenticate future requests.The OAuth protocol provides the following authorization Grant type to obtain the access tokens for accessing the OAuth protected REST endpoints or resources: Client credentials: The activity authenticates through
client credentials. Specify the Client Id and Client secret of the registered client.
Resource owner password: The activity authenticates through both client and user credentials. Specify the Client Id, Client secret, Username, and Password for authentication.
Accept Header Specifies the Accept header that the activity uses when receiving data from the REST server. The Accept header tells the REST server the format in which it should return data. You can specify an acceptable header, such as application/json and application/xml.
Content type When you use a PUT or POST request to call the REST service, you may need to specify the content type in the payload data. Click the edit icon to specify an expression. The value of this type of expression is normally either application/json or application/xml.
Request Content When you use a PUT or POST request to call the REST service, you may need to specify the content in the payload data. Click the edit icon to specify an expression for getting the data for a particular REST server input field.
Http Headers Specifies any additional HTTP headers the activity uses when calling the REST server. Specify both header name and value expressions, as necessary, using quotation marks around each expression.
Property Name Description
96 Workflow Activity Reference

Timeout Specifies a dynamic expression that defines the period of time, in milliseconds, allotted for the Rest activity to complete. The timeout interval applies each time the activity is executed by the addressee.
Trust Managers Specifies one or more trust managers used to authenticate the connection to the REST server. The property expression must evaluate to TrustManager, TrustManager[], or List<TrustManager>.
The default choices available in the ECMA expression builder are:
Trust All Certs Trust Certs in default keystore Trust Certs in specified keystore
Property Name Description
Workflow Activity Reference 97

Map Output If the REST service returns data you want to capture, you need to specify the mapping. This is normally the case for most requests.
Click Map Output and specify where the data from REST server output field should be copied after the form has been processed. In particular, you can set the expression for Status Code, Content Type, and Response Content, as follows:
Status code: The value of this expression is the HTTP status code from the REST call.
Content type: The value of this type of expression is normally either application/json or application/xml, depending on the format of the data the server returns. REST services typically return responses in a JSON format for the majority of requests.
Response content: This type of expression evaluates to a JSON- or XML-formatted string depending on the returned data. REST services typically return a JavaScript Object Notation (JSON) in response to the majority of requests.
The Auto map button in the REST activity can be used to map the Status code, Content type, and Response content fields into the flowdata automatically. You can then read these flowdata variables by extracting the fields in a subsequent activity using the Expression Builder’s utility functions with either get() or getObject() functions.
For example, in a workflow where you have mapped the response returned from the REST call to the flowdata.REST_<N>/content, you can use the get() function in the following expression to retrieve the values of the flowdata variable in a Log activity’s Author field:
function parseIt() {//get JSON valuevar parsedjson = JSON.parse(flowdata.get('Rest_<N>/content'));return parsedjson;}; parseIt();where, JSON.parse is a utility function in Expression Builder that parses a string into an JavaScript object.
Property Name Description
98 Workflow Activity Reference

Data ItemsData items are not supported with this activity.
Email TemplateEmail templates are not supported with this activity.
ProblemsThe Problems tab provides details of the errors and warnings associated with the activity in a workflow. For more information about validating workflow activities, see “Validating a Workflow” on page 58.
Notify ActivityThe Notify activity is added before the Finish activity in a workflow. The Notify activity allows workflows to send the workflow status information and approver’s comments to the consumer application via REST call.
Alternatively, you can use the getObject() function to retrieve a JavaScript object as above. See the following example for one such expression used to retrieve the values of the same flowdata variable in the Message field of a Log activity:
function parseIt() {var responseObject = flowdata.getObject('Rest_<N>/content');var childNodes = responseObject.get(0).getChildNodes();for ( var i=0; i<childNodes.getLength(); i ){try{var field = childNodes.item(i);var parsedJSON = JSON.parse(String(field.getTextContent()));return parsedJSON;} catch( e ){e.toString();}}};parseIt();
Property Name Description
Workflow Activity Reference 99

NOTE: While using the Notify Activity for a system-defined or a custom workflow, ensure that you use custom scripts for source expressions. To use custom scripts for source expressions, refer Identity Governance workflows.
“Properties” on page 100 “Data Items” on page 100 “Email Template” on page 100 “Problems” on page 101
PropertiesThe Notify activity has the following properties:
Table 10-22 Notify Activity Properties
Data ItemsTo pass the workflow status and comments information to a consumer application, you must specify data items for the notify activity. The source expressions specify how Workflow Builder maps values retrieved from the workflow database to the target attributes, namely workflow status and notify comment in the input message for the consumer application REST endpoint that will be accessed by the Notify activity.
Table 10-23 Notify Activity Data Item Mappings
Email TemplateEmail templates are not supported with this activity.
Property Name Description
Identifier A unique string value that identifies the activity. Workflow Builder auto-generates this value in Notify_<N> format, where <N> represents an alphanumeric value that contains 7 characters.
Name Specifies a name for the activity.
Setting Description
Source Expression An expression used to initialize the data items needed by the Notify activity. When you click the edit icon in the Source Expression column, the ECMA expression builder displays to help you define your expression.
Target Field A read-only field that specifies the target fields for the initialization data specified in the Source Expression.
Data Type The data type for this data item.
100 Workflow Activity Reference

ProblemsThe Problems tab provides details of the errors and warnings associated with the activity in a workflow. For more information about validating workflow activities, see “Validating a Workflow” on page 58.
Integration ActivityThe Integration activity provides a way to use a Web service to process workflow data. For detailed information about using the Integration activity, see “Working with Integration Activities” on page 103.
“Properties” on page 101 “Data Items” on page 102 “Email Template” on page 103 “Problems” on page 103
PropertiesThe Integration activity has the following properties.
Table 10-24 Integration Activity Properties
Property Name Description
Identifier A unique string value that identifies the activity. Workflow Builder auto-generates this value in Integration_<N> format, where <N> represents an alphanumeric value that contains 7 characters.
Name Specifies a name for the activity.
WSDL Resource Specifies a Web Services Description Language (WSDL) file for the Web service to be used in the Integration activity. After it is specified, the WSDL is incorporated into the workflow definition file.
When you select a WSDL file, a dialog box is displayed that allows you to select the Web service port type and operation that you want to use in the Integration activity.
You can also specify a SOAP endpoint for the Integration activity and configure authentication for the SOAP service. For more information about specifying a WSDL file and configuring the Integration activity, see “Adding an Integration Activity” on page 104.
Timeout Specifies a dynamic expression that defines the period of time allotted for the Integration activity to complete. The timeout interval applies each time the activity is executed by the addressee.
Workflow Activity Reference 101
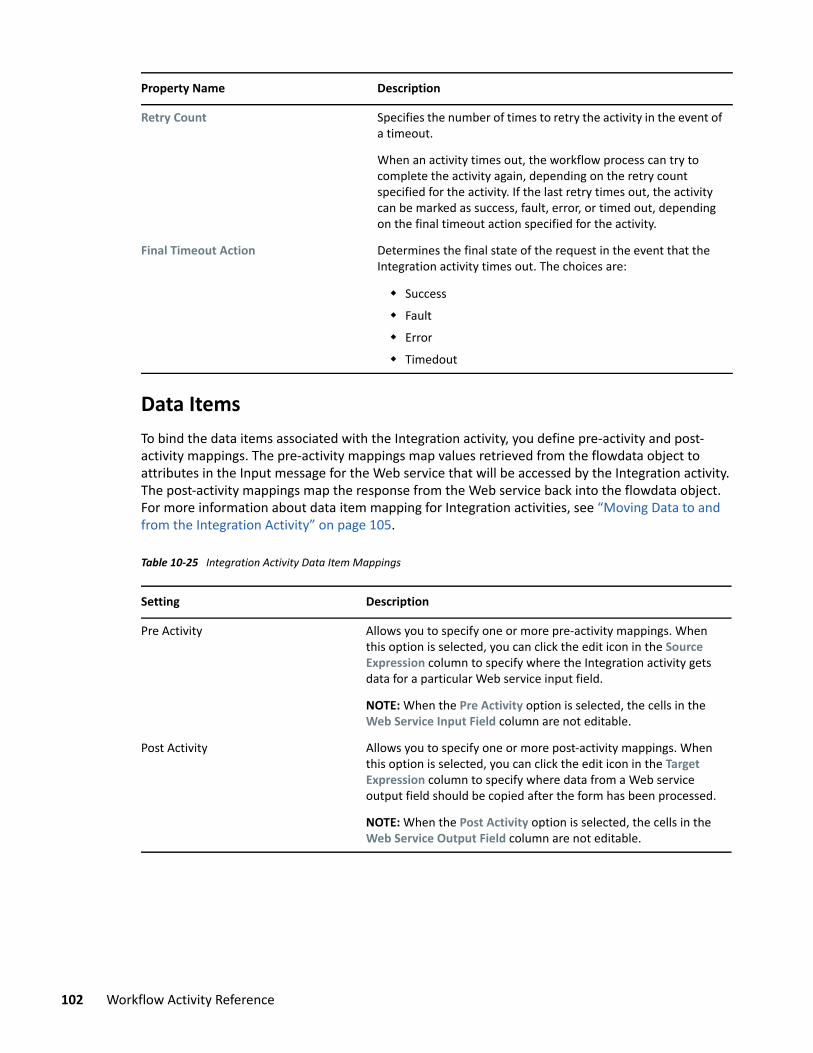
Data ItemsTo bind the data items associated with the Integration activity, you define pre-activity and post-activity mappings. The pre-activity mappings map values retrieved from the flowdata object to attributes in the Input message for the Web service that will be accessed by the Integration activity. The post-activity mappings map the response from the Web service back into the flowdata object. For more information about data item mapping for Integration activities, see “Moving Data to and from the Integration Activity” on page 105.
Table 10-25 Integration Activity Data Item Mappings
Retry Count Specifies the number of times to retry the activity in the event of a timeout.
When an activity times out, the workflow process can try to complete the activity again, depending on the retry count specified for the activity. If the last retry times out, the activity can be marked as success, fault, error, or timed out, depending on the final timeout action specified for the activity.
Final Timeout Action Determines the final state of the request in the event that the Integration activity times out. The choices are:
Success Fault Error Timedout
Setting Description
Pre Activity Allows you to specify one or more pre-activity mappings. When this option is selected, you can click the edit icon in the Source Expression column to specify where the Integration activity gets data for a particular Web service input field.
NOTE: When the Pre Activity option is selected, the cells in the Web Service Input Field column are not editable.
Post Activity Allows you to specify one or more post-activity mappings. When this option is selected, you can click the edit icon in the Target Expression column to specify where data from a Web service output field should be copied after the form has been processed.
NOTE: When the Post Activity option is selected, the cells in the Web Service Output Field column are not editable.
Property Name Description
102 Workflow Activity Reference

Email TemplateEmail templates are not supported with this activity.
ProblemsThe Problems tab provides details of the errors and warnings associated with the activity in a workflow. For more information about validating workflow activities, see “Validating a Workflow” on page 58.
Working with Integration ActivitiesThe Integration activity is an activity that allows workflows to exchange data with arbitrary Web services. Data sent to a Web service can integrate an individual workflow with other systems, inside and outside the organization. Data received from a Web service can provide decision support information on approval forms.
You create flowdata variables to move data from the workflow to the Web service for processing. The Integration activity automatically creates an action model for working with a Web service based on a WSDL document that you specify.
An action model is a visual representation of a set of instructions for processing XML documents and communicating with XML data sources. An action model performs all data mapping, data transformation, and data transfer within an Integration activity. You can edit the action model to manipulate data before and after the data is submitted to the Web service. You then map the data from the Integration activity back to flowdata variables for use in the workflow.
Source Expression Specifies a source expression. When you click the edit icon in the Source Expression column, the ECMA expression builder displays to help you define your expression. For example, flowdata.get('Start/RequestRate/Country1') for a Web service input, or flowdata.Start/RequestRate/Country1 for a Web service output field.
Web Service Input Field This column displays all of the input fields for the port type and operation specified when the WSDL file was selected. The fields in this column are automatically populated. If you want to remove an input field, click Mapping, expand the nodes of the sample document and deselect any input fields that you want to remove.
Web Service Output Field This column displays all of the output fields for the port type and operation specified when the WSDL file was selected. The fields in this column are automatically populated. If you want to remove an output field, click Mapping, expand the nodes of the sample document and deselect any output fields that you want to remove.
Mapping Displays a hierarchical view of the sample document for the inputs to or outputs from the Web service. You can use this feature to deselect input or output fields (by default, all Web service input and output fields are selected).
Setting Description
Workflow Activity Reference 103

Adding an Integration Activity
IMPORTANT: Make sure that you have the same certificate as the Web service from which the WSDL file was obtained. Workflow Service uses this certificate to authenticate the Web service and establish a connection when the workflow is initiated. For more information on how to import the certificate, see “Adding a Web Service Authentication Certificate to Workflow Service” on page 106.
To add an Integration activity to a workflow:
1 Log in to the Workflow Administration Console and navigate to Catalog > Workflow. 2 Create a new workflow. (see “Creating a Workflow” on page 43).3 Select the newly created workflow. The workflow opens into the Workflow Builder tab. 4 Drag an Integration activity from the palette and place it in the desired location in the workflow.5 In the INTEGRATION ACTIVITY properties view, type a name for the activity in the Name field.6 Click the edit icon for the WSDL Resource property to display a dialog box.7 Browse your file system to locate the WSDL file for the Web service that you want to use. Click
the name of the WSDL file, then click Open.A dialog box that allows you to select a port type and operation for the Web service is displayed.The Select Port Type list includes a set of port types supported by the Web service. Each port type supports operations that include the input and output messages of the operation.This window allows you to specify the SOAP endpoint, the user ID used to access the SOAP endpoint, and the password used to access the SOAP endpoint. These options are all ECMAScript expressions and can be GCV values. Use the ECMA expression builder to configure the expressions you want to use.
NOTE: The Use new WSDL Generation type option enables Workflow Builder to build the Integration activity using an XML Interchange action instead of a WS Interchange action. It is recommended that you leave this option selected, because the WSDL parsing is more robust, and the resulting Integration activity does not require the WSDL document be maintained as part of the provisioning request definition and is smaller in size.
8 Select a port type from the Select Port Type list.9 Select an operation from the Select Operation list.
10 If you want to specify a SOAP endpoint, specify a SOAP endpoint URL, either by selecting the URL from the Select Soap Service Endpoint Expression list or by clicking the edit icon and using the ECMA expression builder to configure an expression that resolves to the SOAP endpoint URL.
NOTE: Ensure that you specify the private key in DER format (PKCS8) and without a password. You can convert the private key from PKS12 to PKCS8 format by running an OpenSSL command. For example, openssl pkcs8 -topk8 -inform PEM -outform DER -in key.pem -nocrypt > key
104 Workflow Activity Reference

11 If you want to use basic authentication for a SOAP endpoint, complete the following steps:11a Select SOAP Service requires Basic Authentication.11b In the User ID Expression field, click the edit icon and use the ECMA expression builder to
specify an expression that resolves to the user ID used to access the SOAP endpoint.11c In the Password Expression field, click the edit icon and use the ECMA expression builder to
specify an expression that resolves to the password used to access the SOAP endpoint.12 Click OK.
The Integration activity creates an action model based on the WSDL document. You can use the action model at design time to test the input to the Web service, test the response from the Web service, and map and transform data, if necessary, before returning the data to the workflow.For many Web services, you don’t need to concern yourself with the action model. You simply create data item mappings for the Integration activity.
13 Specify the Timeout, Retry Count, and Final Timeout Action properties (see “Integration Activity” on page 101).
Moving Data to and from the Integration Activity1 Create form fields to allow users to provide input to the Web service accessed by the
Integration activity (see “Creating New Forms” on page 35). For example, if you are working with a Web service that provides stock quotes, you need a field for the user to specify a stock symbol.
2 To move user input from the form to the workflow, create a flowdata variable in an activity that precedes the Integration activity in the workflow. For example, if you have created a form field called “symbol” to accept a stock symbol for input to the Web service, you would go to the post-activity data item mapping for the activity associated with the form that contains the symbol field, then you would map the symbol field to a flowdata variable (for example, flowdata.symbol).
3 In the Workflow Builder tab, select the Integration activity icon, then select the Data Items tab.4 Select Pre Activity.
In the Web Service Input Field grid, you should see fields that match all of the input fields associated with the port type and operation specified in Step 8 and Step 9 on page 104.The integration activity automatically selects all of the input field associated with the port type and operation. You can remove the input fields by following this procedure:4a Click Mapping.
The Modal window is displayed.4b Expand the nodes and deselect any input fields that you want to remove.4c Click Ok to return to the Data Items tab.
IMPORTANT: The Integration activity does not support multivalued fields. As a result, the Web service response will contain only one value, even if you select an operation with input field that returns multiple values. For example, the getWorkEntries operation, which is used to query work entries (activities) and returns a list of WorkEntry objects, will only return the first work entity object in the logs.
Workflow Activity Reference 105

5 For each Web Service Input Field, click in the Source Expression field, then click the ECMA expression builder button.The ECMA expression builder is displayed.
6 Expand the flowdata node in the ECMAScript Objects pane of the ECMA expression builder, then double-click the flowdata variable for the user input to the Web service.
7 Click OK to return to the Data Item Mapping view.8 Select Post Activity.
In the Web Service Output Field grid, you should see fields that match all of the output fields associated with the port type and operation specified in Step 8 and Step 9 on page 104.
9 The Integration activity automatically selects all of the output fields associated with the port type and operation. If you want to remove some of the output fields, follow these steps:9a Click Mapping.
The Sample Document dialog box is displayed.9b Expand the nodes of the sample document and deselect any attributes that you want to
remove.9c Click OK to return to the Data Item Mapping view.
10 Click Map All to automatically create flowdata variables for each Web Service Output Field. Alternatively, for each Web Service Output Field, click in the Source Expression field, then click the ECMA expression builder button.
11 Expand the flowdata node in the ECMAScript Objects pane of the ECMA expression builder, then double-click the flowdata variable that will receive data from the Web service.
12 If you want to configure the Integration activity to provide more detailed information about any potential SOAP faults that might be encountered during the SOAP call of the activity, select Fault Maps in the Data Item Mapping view and click Map All. If Identity Manager encounters a SOAP fault, the Integration activity executes the fault maps to provide further details.
13 Click OK to close the ECMA expression builder.Now you can work in the Integration view to test and refine the interaction with the Web service.
Adding a Web Service Authentication Certificate to Workflow ServiceBefore adding a WSDL file to the Integration activity, export the certificate from the Web service, import it into the cacerts directory of Workflow Service, and restart Tomcat.
You can use the following keytool command to import the certificate file:
/opt/netiq/idm/apps/jdk/jre/bin/keytool -import -alias aliasName -file certFile -keystore /opt/netiq/idm/apps/jdk/jre/lib/security/cacerts Replace aliasName with a unique name of your choice for this certificate. Replace certFile with the name of your certificate file.
For example,
106 Workflow Activity Reference

/opt/netiq/idm/apps/jdk/jre/bin/keytool -import -alias idm -file certfile.cer -keystore /opt/netiq/idm/apps/jdk/jre/lib/security/cacerts
Troubleshooting Issues with Integration ActivityThe following table lists the issues you might encounter and the suggested actions for working on these issues.
Issue Suggested Actions
When a workflow with an Integration activity is initiated, Workflow Service tries and fails to authenticate the Web service. The following error is reported in the Catalina log file:
<m:Message>com.sssw.b2b.rt.GNVException: rt001801:Document I/O error: peer not authenticated;---> nested javax.net.ssl.SSLPeerUnverifiedException: peer not authenticated</m:Message></m:FaultInfo>
Ensure that you have the same certificate as the Web service from which the WSDL file was obtained. For instructions on how to import the certificate, see “Adding a Web Service Authentication Certificate to Workflow Service” on page 106.
Workflow Activity Reference 107

Subprocess ActivityThe Branch and Merge activities are grouped under the Subprocess activity.
The Subprocess activity has the following properties:
When using the flowdata.get() method, the Log activity is unable to retrieve data from an Integration activity. This behavior is only seen in a few SOAP endpoints, such as getEngineState, getProcess, and getVersion, as well as the majority of APIs in the roles WSDL file. This issue occurs when the WSDL parser eliminates SOAP return values that are contained in an attribute from the Web service response while copying them to the Integration activity’s Web service output fields. As a result, the log activity is unable to retrieve entire data using the flowdata.get() method.
To resolve this issue, you must ensure the following:
When defining expressions in the Log activity, use the flowdata.getObject() ECMAScript instead of flowdata.get() to retrieve data items from an Integration activity.
NOTE: The flowdata.getObject() returns a Java arraylist of DOM nodes.
For example, if you want to get the version of the Web service using the getVersion endpoint, you must specify the following ECMA expression in the Log activity’s Comment field: flowdata.getObject('Integration_<N>/Envelope/Body/getVersionResponse/Version').get(0).getAttribute('<name>')Where, <N> denotes the unique identifier for the Integration activity.
.get(0) is the first element for an array list, that is the Version DOM element.
<name> is the value of the attribute in the form of a string. For example, major, minor, and revision.
When mapping the Web service response back into the flowdata object (post-activity mapping) in the Integration activity, make sure that you select the parent fields and deselect all other output fields in the Mapping modal window.For example, for getEngineState endpoint, click Post Activity > Mapping in Data Items tab, and select the getEngineStateResponse and Envelope check boxes.
Issue Suggested Actions
108 Workflow Activity Reference

Table 10-26 Subprocess Activity Properties
Branch ActivityIn a workflow that supports parallel processing, the Branch activity allows multiple users to act on different areas of the work item in parallel. After the users have completed their work, the Merge activity synchronizes the incoming branches in the flow.
A workflow can have multiple Branch activities, but each Branch activity must have an associated Merge activity. All flow paths leading out of a Branch activity will execute.
The Branch activity does not support synchronization between the branches while they are executing. Each branch must not depend on data being updated in another branch. The data synchronization is enforced by the Merge activity. After the Merge activity completes, all of the data set in the branches is available.
PropertiesThe Branch activity has the following properties:
Table 10-27 Branch Activity Properties
Data ItemsData items are not supported with this activity.
Email TemplateEmail templates are not supported with this activity.
ProblemsThe Problems tab provides details of the errors and warnings associated with the activity in a workflow. For more information about validating workflow activities, see “Validating a Workflow” on page 58.
Property Name Description
Identifier A unique string value that identifies the activity. Workflow Builder auto-generates this value in Activity_<N> format, where <N> represents an alphanumeric value that contains 7 characters.
Name Specifies a name for the activity.
Property Name Description
Identifier A unique string value that identifies the activity. Workflow Builder auto-generates this value in Branch_<N> format, where <N> represents an alphanumeric value that contains 7 characters.
Name Specifies a name for the activity.
Workflow Activity Reference 109

Merge ActivityIn a workflow that supports parallel processing, the Merge activity synchronizes the incoming branches in the flow. The Merge activity is used in conjunction with the Branch activity, which allows two users to act on different areas of the work item in parallel. After the users have completed their work, the Merge activity synchronizes the incoming branches.
A workflow can have multiple Branch activities, but each Branch activity must have an associated Merge activity.
PropertiesThe Merge activity has the following properties:
Table 10-28 Merge Activity Properties
Data ItemsData items are not supported with this activity.
Email TemplateEmail templates are not supported with this activity.
ProblemsThe Problems tab provides details of the errors and warnings associated with the activity in a workflow. For more information about validating workflow activities, see “Validating a Workflow” on page 58.
Property Name Description
Identifier A unique string value that identifies the activity. Workflow Builder auto-generates this value in Merge_<N> format, where <N> represents an alphanumeric value that contains 7 characters.
Name Specifies a name for the activity.
110 Workflow Activity Reference

11 11Working with ECMA Expressions
This section provides details on using the ECMA expression builder.
About the ECMA Expression BuilderWorkflow Builder incorporates an ECMAScript interpreter and expression editor, which allows you create script expressions that refer to and modify workflow data. For example, you can use scripting to:
Create new data items needed in a workflow under the flowdata element. Perform basic string, date, math, relational, concatenation, and logical operations on data. Use expressions for runtime control to:
Modify or override form field labels. Initialize form field data. Customize email addresses and content. Evaluate any past activity data to conditionally follow a workflow path by using the
Condition activity. Write different log messages that are conditionally triggered by using a single Log activity.
NOTE: To define expressions for a workflow, you need to understand how workflow activities are configured. For details on configuring workflow activities, see Chapter 10, “Workflow Activity Reference,” on page 67.
About ECMAScriptECMAScript is an object-oriented scripting language for manipulating objects in a host environment (in this case, Workflow Builder). ECMAScript (ECMA-262 and ISO/IEC 16262) is the standards-based scripting language underpinning both JavaScript (Netscape) and JScript (Microsoft). It is designed to complement and extend existing functionality in a host environment such as Workflow Builder’s graphical user interface. As a host environment, Workflow Builder provides ECMAScript access to various objects for processing. ECMAScript in turn provides a Java-like language that can operate on those objects.
The extensibility of ECMAScript, and its powerful string-handling tools (including regular expressions), make it an ideal language to extend the functionality of Workflow Builder.
NOTE: You can find detailed information about ECMAScript at the European Computer Manufacturers Association (ECMA) Web site (http://www.ecma-international.org).
Working with ECMA Expressions 111

Using the ECMA Expression BuilderWorkflow Builder provides access to ECMAScript in various places. You can access the expression builder in the Properties view such as the Condition Expression property for a Condition activity or under the Data Items tab of an approval activity in the workflow. Click the edit icon to display the ECMA Expression Builder.
About Global Configuration Values Integration Global configuration values (GCVs) are integrated with the workflow process through the ECMA expression builder. You can add a GCV using the Advanced option in the Settings page. For more information, see “Configure Advanced Settings” on page 24.
To access a GCV through the ECMA expression builder, select any GCV from the GCV list. These GCVs are available to you in all activities on the workflow.
112 Working with ECMA Expressions

VI VIWorking with Email Notification Templates
This section provides an overview of the email notification templates and its usage in the Workflow Administration Console.
Chapter 12, “Email Notification Template Overview,” on page 115 Chapter 13, “Setting Up Email Notification Templates,” on page 117
Working with Email Notification Templates 113

114 Working with Email Notification Templates

12 12Email Notification Template Overview
In a workflow process, an email notification is sent at various points in the course of its execution. The email notification function included in the Workflow Administration Console allows you to send email notifications that notify users of changes in the state of a workflow, tasks that they need to perform, or when a user assigns a workflow activity to a new addressee. You can send an email notification to one or more users.
Workflow Administration Console allows you to create email templates for any user activity, finish activity, and the email activity. You can then associate these templates with the activities in the workflow builder.
When you create a template and include template tokens, you must specify the source expression for the tokens. When an email is sent, the tokens are replaced dynamically with the values defined under data item mapping in the workflow builder.
The Workflow Administration Console also includes eight default templates. You can use them as-is, or customize them for your environment.
Email Notification Template Overview 115

116 Email Notification Template Overview

13 13Setting Up Email Notification Templates
Email notification templates are used to notify approvers of tasks in their queues, inform the initiator that the workflow is done, or update if there is any change in the workflow status. Email notifications are triggered for approval activities, finish activity, and the email activity.
NOTE: You must have the appropriate permissions to perform any task on the Notification Templates page in the Workflow Administration Console. To determine your access permissions, contact your administrator.
To access the Notification Templates page, click Catalog > Notification Templates. For information regarding tasks that you can perform on the Notification Templates page, see the following sections:
“Creating Templates” on page 117 “Editing a Notification Template” on page 119 “Deleting Notification Templates” on page 119 “Managing Notification Templates” on page 119 “Exporting and Importing Templates for Localization” on page 121 “Publishing Templates” on page 123
Creating TemplatesYou can create notification templates to notify approvers, remind approvers, and escalate if there is any delay in approvals. You can then attach the template to the workflow activity that supports email notifications.
Creating a New Notification TemplateTo create a new notification template:
1 Select Catalog > Notification Templates.2 Click the plus sign (+).3 Provide a unique template ID and a template name.
NOTE: The Template ID field supports a few special characters. The characters are, underscore (_), “at” sign (@), hyphen (-), period (.), colon (:).
4 Select the format.5 In the Subject field, type the text for the email subject line.6 In the Message box, type the message you want to be displayed in the notification.
Setting Up Email Notification Templates 117

NOTE: You can insert tokens in the email subject line and in the message. To do so, click where you want to insert the token, select the token from the Tokens box, then click Insert Token. For more information, see “Inserting a Token” on page 118.
7 Click CREATE.
The template is always created in the default language. The default template is sent to recipients when their local language template is not available.
Inserting a TokenTokens are variables or replacement tags for text such as the user’s name. You can use the following tokens in the subject line and message body of the email:
Template tokens You can insert template tokens while creating a template. When the template is attached to an activity, you must define the source expression for the target tokens in the data item mapping section of Workflow Builder. For example, a template that is used to notify users of password expiry, you include the token $recipientname$, you can add the source expression or add a string value, such as ‘full name’. So, when the email is sent, the $recipientname$ token will be dynamically replaced with the full name of the person who is going to receive the notification.
Standard tokens You can insert standard tokens while creating a template. However, when you attach the template to an activity, the tokens are not displayed in the data item mapping section. The replacement values for these tokens are generated from the back-end. The following standard tokens are available for selection: $PORT$ $PROTOCOL$ $TASKLIST CONTEXT$ $SECURE_PROTOCOL$ $HOST$ $TASK DETAILS$ $SECURE PORTS$
System tokens The system tokens are included in all the templates. These tokens are standard, and once you attach a template to an activity, these tokens are added to the template from Workflow Builder. You must define the source expression for the target tokens in the data item mapping section of Workflow Builder. The following system tokens are available: TO CC BCC REPLYTO TO_DN
118 Setting Up Email Notification Templates

CC_DN BCC_DN
Editing a Notification TemplateYou can edit a template from its detail page.
1 In the Notification Templates page, click the template you want to edit.2 Click Edit.
NOTE: If you have localized versions of the template, then click Edit for the localized template you want to edit.
3 Make your changes, then click UPDATE.4 (Optional) If you want to publish the template, click Publish.
Deleting Notification TemplatesTo delete a notification template, on the Notification Templates page, select the check box next to the template that you want to delete, then click Delete. You can select multiple templates for bulk deletion. When you delete the default template, it is deleted from the database.
Managing Notification TemplatesWhen you have access to the Notification Templates page you can perform certain activities such as searching, sorting, and customizing columns.
Sorting TemplatesThe templates are listed by creation date, with the latest template listed first. You can click the sort arrows next to the template Name column and sort the columns based on the following:
Name and creation date Alphabetical order Ascending or descending order
You can also set the number of rows per page for display by clicking the drop-down list.
Searching for a TemplateYou can search and filter specific templates. To find a specific template, you can use any one of the following options:
Simple Enter any template name in the search box.
Setting Up Email Notification Templates 119

Filtered Click Filter and select the notification state from the drop-down list: Published templates: Displays templates that are published in the database Published templates with draft changes: Displays published templates but with additional
changes on the templates that are not published Not published: Displays templates that are not published
Combined You can combine the simple search with the filter option to obtain more refined search results. For example, if you are searching for a template that is published with the word “request” in the title, type request in the search box and click Filter. On the pop-up window, specify the state as Published, then click FILTER.
To search for a template specific to a language, click the Default drop-down list.
Customizing Columns To customize columns:
1 Click Catalog > Notification Templates.2 Click Column Customization.3 Select the check box next to the columns you want to display. The selected columns are added
to the Notification Templates page.
TIP: To choose all columns, select the check box provided near the search field.
4 Click the close icon (X).
NOTE: Workflow Administration Console does not retain the customization. The next time you navigate to the Notification Templates page, the default columns are displayed. However, you can choose the default columns from the Settings page. For more information, see “Column Customization Settings” on page 27
Importing and Exporting Templates The import option on the Notification Templates page allows you to import templates from a single file, and the export option allows to export templates to a single file. For example, when you want to use a set of templates from another system and do not want to create a new template, you can use the import function.
To import templates:
1 Click Catalog > Notification Templates.2 Click Import Templates.3 Choose the file you want to import.4 Click SAVE or PUBLISH to save the data in the database.
120 Setting Up Email Notification Templates

NOTE: When you publish, the templates are ready to be attached to an workflow activity.
If there are localized versions of the template available for import, then those templates are also imported with the default template.
To export templates:
1 Click Catalog > Notification Templates.2 Click the check boxes next to the templates you wish to export.3 Click Export Templates.4 On the dialogue box, type a file name.5 Click EXPORT.
If there are localized templates available for download, then those templates are also downloaded to a single JSON file.
Using System-Defined TemplatesThe Notification Templates page lists the eight system-defined templates. You can use them as-is, or edit them to change the content and format of the email messages. However, you cannot delete these templates.
The Workflow Administration Console includes the following templates:
Provisioning Reminder Provisioning Notification Provisioning Notification Activity Provisioning Approval Completed Notification Email Based Approval Success Notification Email Based Approval Failure Notification Email Based Approval Provisioning Notification Email Based Approval Reminder Notification
Exporting and Importing Templates for LocalizationThe notification template is, by default, created in the user’s default language. However, you can export the localized templates as a zipped file on your local system. After the files are translated you can import the translated files to the application. Use this option, for example, when you have to send the templates to individual localization teams for translation.
The following languages are supported for translation:
Danish German English Spanish
Setting Up Email Notification Templates 121

French Italian Japanese Norwegian Dutch Polish Portuguese Russian Swedish Chinese (China) Chinese (Taiwan)
To export the templates:
1 Click Catalog > Notification Templates.2 Click the template you want to export.3 Click Import/Export Localized Templates > Export Templates for Localization.4 Select the language or languages you wish to localize.5 Click EXPORT.
When the templates are exported, the content from the default template is copied to the exported files. However, if there is a template that is already localized, then the content from the localized template is copied to the exported files.
To import the templates:
1 Click Catalog > Notification Templates.2 Click the template you want to import.3 Click Import/Export Localized Templates > Import Localized Templates.4 Choose the translated files from your local system then click IMPORT.
You can save the imported files, discard them from your local system, or publish them for future use.
NOTE: Workflow Administration Console displays an error message during import if the file contains invalid data or if you try to upload files which are not part of the localized data.
Deleting Localized TemplatesTo delete a localization template, select the check box next to the template that you want to delete, then click Delete. You can select multiple templates for bulk deletion.
122 Setting Up Email Notification Templates

Publishing TemplatesYou can publish the localized template individually by clicking Publish, or you can select the check boxes, and click PUBLISH ALL.
Published templates are stored in the database and can be attached to the workflow activity from Workflow Builder. For more information, see “Choosing Email-Based Approval Templates for Workflow” on page 130.
Once the template is attached to the workflow, you can specify the email address and include the replacement values for the tokens. Before sending the email notification, ensure the following configurations are in place:
Outgoing mail server is configured. For more information, see “Configuring Outgoing Email Settings” on page 131.
The Notify Participants by E-Mail check box is selected on the Overview tab when Workflow Builder is launched
The value for the property Notify By E-Mail is set to true for the workflow activity where the template is attached
Setting Up Email Notification Templates 123

124 Setting Up Email Notification Templates

VII VIIWorking with Email Based Approval
This section provides an overview of email based approval, how to set up email based approval, and its usage in the Workflow Administration Console.
Chapter 14, “Email-Based Approval Overview,” on page 127 Chapter 15, “Managing Approvals by Email,” on page 129
Working with Email Based Approval 125

126 Working with Email Based Approval

14 14Email-Based Approval Overview
The Workflow Administration Console allows you to send an email notifying the request reviewer that they need to review a permission request. Each notification includes a message containing all the information a user needs, to make a decision. You can embed the message in the body, or attach it as a separate document. The reviewer can click the appropriate link on the email, or, they can modify the subject line of the email to approve or deny the request.
Email-based approvals also supports digital signatures to ensure authentication of the message content.
Email-Based Approval Overview 127

128 Email-Based Approval Overview

15 15Managing Approvals by Email
The Workflow Administration Console allows you to send an email notifying the request reviewers that they need to review a permission request. The email notification can include links that can be used for approving, rejecting, reassigning, or returning requests. You can either respond to the request, or assign the request to another approver without logging in to the application.
You can respond or reassign the notification email in the following ways:
By clicking the “Approve”, “Reject”, “Reassign”, or “Return” link in the email. When you click one of these links, the application composes a new email with the required subject and allows you to enter comments in the email and send it.
By modifying the subject line of the email. However, you must ensure that the keywords “Approve”, “Reject”, “Reassign”, or “Return” along with the alpha-numeric unique code is not changed.
NOTE: If you forward the email to another user, the link for approval, rejection, reassignment, or
return does not work. When you reassign a request, you can specify the approver’s email address to whom you
want to reassign. In the absence of an email address, the Workflow Administration Console sends the request to your supervisor.
You cannot reassign a request to a group for approval. To reply to the notification email, set the “From” address of the request reviewer mail
server as same as the incoming mail server.
This chapter includes the following sections on email based approval:
“Checklist to Setup Email-Based Approval” on page 129 “Configuring Outgoing Email Settings” on page 131 “Enabling Email Approval and Configuring Incoming Mail Server Properties” on page 133 “Troubleshooting Email-Based Approval Issues” on page 135
Checklist to Setup Email-Based ApprovalBefore setting up the email-based approval, review the following checklist:
Managing Approvals by Email 129

Choosing Email-Based Approval Templates for WorkflowYou can attach an email notification template for approval activities, the finish activity, and the email activity.
To attach a template to a workflow:
1 Select Catalog > Workflow.2 Click the workflow name to which you want to associate the template.3 In the Workflow Builder, click the Overview tab.4 Select the Notify Participants By Email toggle. 5 Click the Workflow Builder tab. 6 Click the workflow activity to which you want to attach the template.7 Select True for the option Notify By E-mail.8 Click Email Template to display the following email options:
Notify Reminder Escalation Reminder
9 Choose an email option, then select the template Email Based Approval Provisioning Notification.
10 Enter the source expressions for the required fields based on the selected template.11 Click Publish.
Enabling Email-Based Approval on Cluster EnvironmentEnsure that the outgoing mail server is configured.
Checklist Items
1. Ensure that outgoing mail server is configured, for more information, see “Configuring Outgoing Email Settings” on page 131.
2. Choose the Email-Based Approval templates for workflows. For more information, see “Choosing Email-Based Approval Templates for Workflow” on page 130.
3. To receive emails, set up an account on an email server that supports POP3 or IMAP protocol. If you are using a POP3 type of server, the received emails are not marked as ‘read’ in the incoming mailbox.
4. Enable email-based approval and configure incoming mail server properties from the Workflow Administration Console, for information, see “Enabling Email Approval and Configuring Incoming Mail Server Properties” on page 133.
5. (Conditional) If you want to enable email-based approval in a cluster environment, see “Enabling Email-Based Approval on Cluster Environment” on page 130.
130 Managing Approvals by Email
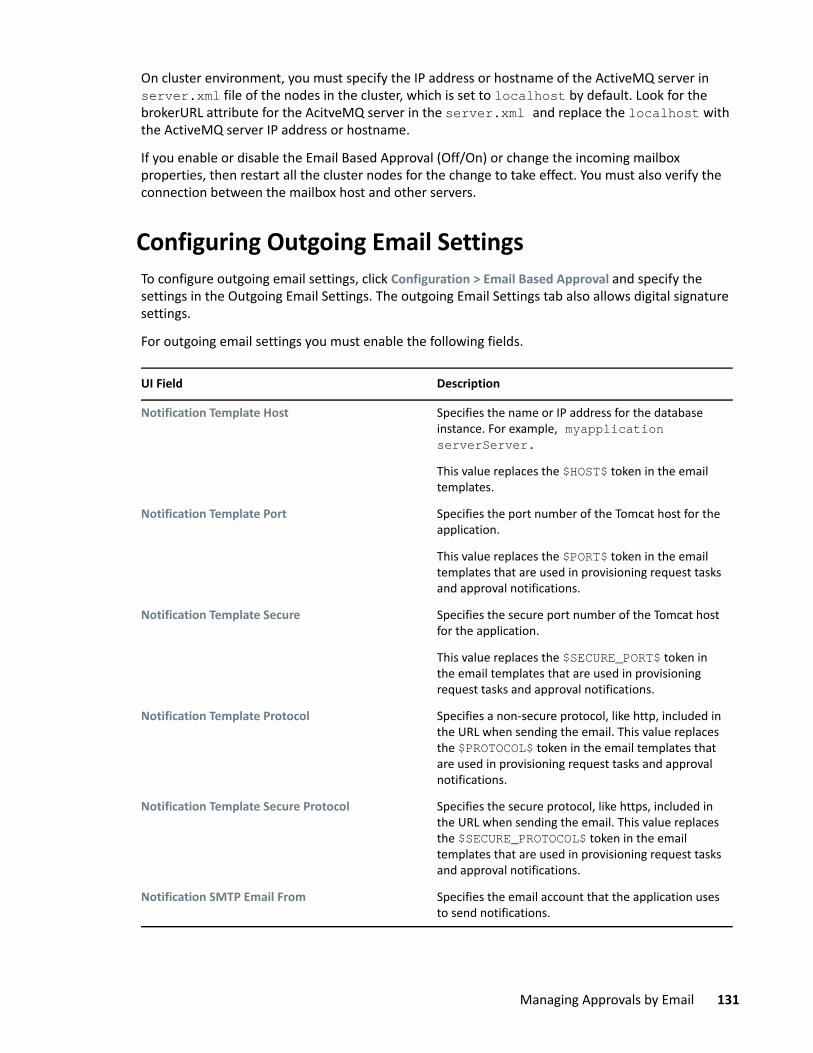
On cluster environment, you must specify the IP address or hostname of the ActiveMQ server in server.xml file of the nodes in the cluster, which is set to localhost by default. Look for the brokerURL attribute for the AcitveMQ server in the server.xml and replace the localhost with the ActiveMQ server IP address or hostname.
If you enable or disable the Email Based Approval (Off/On) or change the incoming mailbox properties, then restart all the cluster nodes for the change to take effect. You must also verify the connection between the mailbox host and other servers.
Configuring Outgoing Email SettingsTo configure outgoing email settings, click Configuration > Email Based Approval and specify the settings in the Outgoing Email Settings. The outgoing Email Settings tab also allows digital signature settings.
For outgoing email settings you must enable the following fields.
UI Field Description
Notification Template Host Specifies the name or IP address for the database instance. For example, myapplication serverServer.This value replaces the $HOST$ token in the email templates.
Notification Template Port Specifies the port number of the Tomcat host for the application.
This value replaces the $PORT$ token in the email templates that are used in provisioning request tasks and approval notifications.
Notification Template Secure Specifies the secure port number of the Tomcat host for the application.
This value replaces the $SECURE_PORT$ token in the email templates that are used in provisioning request tasks and approval notifications.
Notification Template Protocol Specifies a non-secure protocol, like http, included in the URL when sending the email. This value replaces the $PROTOCOL$ token in the email templates that are used in provisioning request tasks and approval notifications.
Notification Template Secure Protocol Specifies the secure protocol, like https, included in the URL when sending the email. This value replaces the $SECURE_PROTOCOL$ token in the email templates that are used in provisioning request tasks and approval notifications.
Notification SMTP Email From Specifies the email account that the application uses to send notifications.
Managing Approvals by Email 131

SMTP Server Name Specifies the IP address or DNS name of the SMTP email host appended with the port number that the application uses for provisioning emails. For example, smtp.gmail.com:587. Do not use localhost.
Server requires authentication Specifies whether you want the server to require authentication.
If you require authentication, you must also specify the following:
Username
Specifies the name of a login account for the email server.
PasswordSpecifies the password of an login account for the mail server.
Use SMTP TLS Specifies whether you want to secure the contents of email messages during transmission between the mail servers.
Email Notification Image Location Specifies the path to the image that you want to include in email notifications. For example, https://localhost:8543/IDMProv/images.
Sign email Specifies whether you want to add a digital signature to outgoing messages. If you enable this option, you must also specify the following:
Keystore Path
Specifies the full path to the keystore (cacerts) file that you want to use for digitally signing an email. You can manually enter the path or browse to the cacerts file. For example, /opt/netiq/idm/apps/jdk/jre/lib/security/cacerts.
Keystore PasswordSpecifies the password for the keystore file. For example, changeit.
Alias of signature keySpecifies the alias of the signing key in the keystore. For example, idmapptest.
Signature key passwordSpecifies the password that protects the file containing the signature key. For example, changeit.
UI Field Description
132 Managing Approvals by Email

Enabling Email Approval and Configuring Incoming Mail Server Properties
After the request reviewer approves, denies, reassigns, or returns a request, the reply is sent to the incoming mail server that is configured.
To configure incoming mail settings, select Configuration > Email Based Approval.
NOTE: Before enabling email-based approvals, ensure that you have configured the workflows to support notifications and (optional) digital signatures. For more information see, “Choosing Email-Based Approval Templates for Workflow” on page 130.
For incoming email settings you must configure the following fields.
UI Field Description
Server Type Specifies the type of server that you want to use for the incoming email notifications.
Host Specifies the name or IP address of the incoming mail server.
Email Specifies the email address that receives the reply messages from users responsible for reviewing permissions requests. For example, imap.gmail.com.
If the notification includes action links for approving, denying, reassigning, or returning a request, the Workflow Administration Console automatically populates the To field. Otherwise, users must specify valid email address in this field.
Authentication Required Specifies whether the incoming mail server requires authentication. If you enable this setting, you must also specify the following:
User ID
Specifies the account required for server authentication. The account for the incoming mail server should be unique and not a duplicate account that might receive the email notifications.
PasswordSpecifies the password for the account.
Folder If you select IMAP as the server type, specify the folder in the email system where you want to store the email notifications. The default folder is INBOX. For POP3 servers, you cannot change the folder name.
Enable SSL Specifies whether you want to use Secure Sockets Layer (SSL) protocol for authentication.
Managing Approvals by Email 133

Use default port Specifies whether the email process uses the default port for the mail server. Otherwise, specify the port number you want to use to connect to the incoming mail server.
Email Content Options Specifies the type of information that you want to include in the notification:
Exclude action links
The notification does not include the action links that users can select to approve or deny the request.
To act on the request, users can reply to the email, then add the appropriate keyword, such as “Approve” in the subject line. Alternatively, they can log in to the console to complete the task.
Include action links with digital signatureThe notification includes the action links that users can select to approve, deny, reassign, or return the request. It also requires a digital ID for authenticating the message content.
Include action links without digital signatureThe notification includes the action links that users can select to approve, deny, reassign, or return the request. The email does not require a digital ID for authenticating the message content.
Polling Interval Specifies how often you want to poll the incoming mail server for task notifications.
Token Expiration Specifies the amount of time that each email-based approval will remain in effect. After the token expires, you cannot use that notification to take any action on the task.
Cleanup Interval Specifies the interval after which the server can clear expired tokens from the database.
Approve, Reject, Reassign and Return Specifies the terminologies used to display as action links in the email. You can select these links to approve, deny, reassign, and return the request. You can modify these terms for all supported languages.
Success Mail Template and Failure Mail Template Specifies the email templates that you want to use to indicate the result of an action.
Success notifications occur after the user successfully approves, denies, reassigns or returns a task. The application sends a failure notification when one of these tasks are not accomplished.
UI Field Description
134 Managing Approvals by Email

Troubleshooting Email-Based Approval IssuesYou might encounter the following issues while working with email-based approval:
Empty email-based approval token in the request email
This issue can occur if email-based approval is not enabled. For example, the feature is disabled while using the new email templates in the workflows.
Check the configuration in Workflow Administration Console, and enable the feature. The application is not acting on emails
This issue can occur if the incoming mailbox is not connected from the server.Verify that the incoming mailbox is connected and reachable from the server where it is deployed.
“Approve”, “deny”, “reassign’, “return” links missing from email after configuring email-based approvalThis issue can occur when the email templates are not properly configured.
Domain Specifies the domain of the email. Allows you to configure more than one domain.
If you configure a domain, the email address that you specify for reassigning a request must match one of the configured domains, otherwise, the request is not reassigned. If the domain is not configured then the request is reassigned.
Enable Socks Proxy Specifies whether you want to use a proxy server to process the approval email messages. If you do not enable this setting the server connects directly to the specified inbox.
If you enable this setting, you must also specify values for the following parameters:
Proxy Host
Specifies the name or IP address of the proxy email server.
Proxy PortSpecifies the port that you want to use for incoming email to the proxy server.
Authentication RequiredSpecifies whether the proxy server requires authentication for incoming email.If you enable this setting, you must also specify a valid user ID and password for the proxy server.
UI Field Description
Managing Approvals by Email 135

Make sure the templates are configured correctly. For more information, see “Choosing Email-Based Approval Templates for Workflow” on page 130.
Reviewer cannot compose an email after clicking the “approve”, “deny”, “reassign” or “return” link. Links are not workingThis issue can occur when the default application is not selected to send emails.Verify that the default email client is configured. For example, Microsoft Outlook.
Email notification is not deliveredThis issue can occur when an error occurs in the connection between the client and the mail server.Check the logs and determine whether the connection is configured properly, and the mail server is running and accessible. Verify the authentication details, port, and if Transport Layer Security (TLS) is enabled or disabled.
Java Message Service (JMS) persistent email queue is not initialized properlyThis issue can occur when JMS in not configured correctly.Perform the following steps.
1. Navigate to the /opt/netiq/idm/apps/tomcat/conf folder.2. Open the server.xml file.3. Add the following resources:
<Resource auth="Container" brokerName="LocalActiveMQBroker" brokerURL="tcp://localhost:61716" description="JMS Connection Factory" factory="org.apache.activemq.jndi.JNDIReferenceFactory" name="jms/ConnectionFactory" type="org.apache.activemq.ActiveMQConnectionFactory" />
<Resource auth="Container" description="Topic for IdmApps" factory="org.apache.activemq.jndi.JNDIReferenceFactory" name="topic/IDMNotificationDurableTopic" physicalName="WFNotificationDurableTopic" type="org.apache.activemq.command.ActiveMQTopic" />
<Resource auth="Container" description="Topic for IdmApps email based approval" factory="org.apache.activemq.jndi.JNDIReferenceFactory" name="topic/EmailBasedApprovalTopic" physicalName="EmailBasedApprovalTopic" type="org.apache.activemq.command.ActiveMQTopic" />
NOTE: You have to replace localhost with the IP address or hostname where activemq is running.
4. Open the context.xml file and add the following:
136 Managing Approvals by Email

<ResourceLink global="topic/IDMNotificationDurableTopic" name="topic/WFNotificationDurableTopic" type="javax.jms.Topic" />
<ResourceLink global="topic/EmailBasedApprovalTopic" name="topic/EmailBasedApprovalTopic" type="javax.jms.Topic" />
<ResourceLink global="jms/ConnectionFactory" name="jms/ConnectionFactory" type="javax.jms.ConnectionFactory" />
5. Navigate to the /opt/netiq/idm/apps/activemq/conf folder.6. Open the activemq.xml file. 7. Change the TCP port to the one mentioned in server.xml, that is, 61716.
<transportConnector name="openwire" uri="tcp://0.0.0.0:61716?maximumConnections=1000&wireFormat.maxFrameSize=104857600"/>.
8. Stop and start ActiveMQ.9. Stop and start Tomcat.
Managing Approvals by Email 137

138 Managing Approvals by Email

VIII VIIIWorkflow Engine and Cluster: Configuration and Monitoring
Clustering any application is a critical part for handling the workload and failover scenarios. The Workflow Engine can be clustered in your deployment to overcome the failover scenario and to manage the workload. This can be achieved by running multiple instances of the Workflow Engine at the same time. Each instance is assigned a unique Engine ID whenever a new instance is initiated in the cluster. The Workflow Engine maintains a list of unique IDs and the status of all the clustered instances in the workflow database.
How Clustering Works?The workflow processes are distributed across all the instances of Workflow Engine to ensure that all instances have roughly the same workload. If one instance fails, all workflow processes running on that engine is automatically re-assigned to a different instance running on the same cluster. Depending on workload, a fresh Workflow Engine instance may also initiate (with a unique Engine ID) and all workflow processes from the failed instance will be re-assigned to the new instance. All these operations happen in the background seamlessly. This ensures that the Workflow Engines are highly available and do not have any downtime, in case of a failure.
The following sections describe how to change the Workflow Engine and cluster settings. It also includes procedures for monitoring, reassigning, and terminating workflow processes running on the Workflow Engine.
Chapter 16, “Configuring Workflow Engine and Cluster Settings,” on page 141 Chapter 17, “Monitoring Workflow Processes,” on page 145
Workflow Engine and Cluster: Configuration and Monitoring 139

140 Workflow Engine and Cluster: Configuration and Monitoring

16 16Configuring Workflow Engine and Cluster Settings
The settings for clustered Workflow Engine instances can be configured and customized to suit your organization's needs. There are default values assigned to each of these settings.
You can configure the settings for all instances of Workflow Engine through the Engine and Cluster Settings page on Workflow Administration Console. For more information, see the following topics:
“Configuring the Workflow Engine Settings” on page 141 “Configuring the Workflow Cluster Settings” on page 142 “Reviewing the Status of Workflow Engines” on page 143 “Deleting an Instance of Workflow Engine” on page 143
Configuring the Workflow Engine SettingsThe Workflow Engine settings apply to all the Workflow Engine instances in the cluster. When you modify any of these settings, all Workflow Engine instances that are part of the same cluster will use the modified values.
The following table describes the Workflow Engine settings that you can configure:
Engine Setting Description
Enable Email Notification Enables or disables email notifications for the Workflow Engine. Defaults to enabled.
Web Service Activity Timeout (minutes)
Specifies the default Web Service activity timeout. The default value is 50 minutes.
User Activity Timeout (hours, 0 for no timeout)
Specifies the default user activity timeout. The default value is 0 hours, which indicates no timeout.
Completed Process Timeout (day) Specifies the number of days that a completed process is kept in the workflow database system. The default value is 120 days.
Completed Process Cleanup Interval (hours)
Specifies the time interval at which the Workflow Engine checks for and removes the completed processes from the workflow database. This setting only applies to those processes that have reached the limit specified in the Completed Process Timeout parameter. The default value is 12 hours.
Pending Process Interval (seconds) User activities that are executed on an engine which the process is not bound to are put into a pending state. This interval specifies how often to check for pending activities in order to continue their execution. The default value is 30 seconds.
Configuring Workflow Engine and Cluster Settings 141

Configuring the Workflow Cluster SettingsThe following table describes the workflow cluster settings that you can configure:
Retry Queue Interval (minutes) Activities that fail because of suspected database connectivity issues are put on a retry queue. This interval specifies how often the engine attempts to retry these activities. The default value is 15 minutes.
Thread Keep Alive Time (seconds) If the pool is larger than the minimum size, excess threads that have been idle for more than the keep-alive time will be destroyed. The default value is 5 minutes.
Maximum Engine Shutdown Timeout (minutes)
The engine attempts to shutdown gracefully. When shutting down it stops queuing new activities for execution and attempts to complete any activities already queued. This timeout specifies the maximum time that the engine waits for all queued activities and threads executing activities to complete. If this time is exceeded, the engine halts processing of queued activities and attempts to stop all threads executing activities. The default value is 1 minute.
Maximum Thread Pool Size The maximum number of threads that the engine uses to execute activities. The default value is 20.
Minimum Thread Pool Size The minimum number of threads that the engine uses to execute activities. When a thread is requested and fewer than the minimum are in the pool, a new thread will be created even if there are idle threads in the pool. The default value is 10.
Initial Thread Pool Size Number of pre-started threads in the pool when it is created. The default is 5.
Process Cache Load Factor The load factor specifies how full the cache is allowed to get before increasing its capacity. If the number of entries in the cache exceeds the product of the load factor multiplied by the current capacity, then the capacity is increased. The default value is 0.75.
Process Cache Initial Capacity The process cache is backed by a hash map. The capacity is the number of buckets in the hash map. The initial capacity is the number of buckets at the time the cache is created. The default value is 700.
Process Cache Maximum Capacity Before adding a process to the cache, if the number of processes in the cache equals or exceeds the Process Cache Maximum Capacity, the cache attempts to remove the oldest inactive process from the cache. The maximum capacity is a soft limit, so the number of processes in the cache might exceed the Process Cache Maximum Capacity if there are no inactive processes (only active processes) in the cache. The default value is 500.
Notify Consumer Interval (seconds) Specifies how many seconds the Workflow Engine must wait before sending any pending approval status notification to a consumer application. This setting is applicable when consumer application such as Identity Governance is in maintenance mode or if it fails to receive the notification. The default value is 300 seconds.
Engine Setting Description
142 Configuring Workflow Engine and Cluster Settings

Reviewing the Status of Workflow EnginesThe Workflow Engines State lists all instances of Workflow Engine in the cluster with their engine IDs and current status. At any given time, a Workflow Engine instance will display one of the following statuses:
SHUTDOWN Indicates that the Workflow Engine has shut down gracefully. This state is determined using the Maximum Engine Shutdown Timeout parameter. For more information, see “Configuring the Workflow Engine Settings” on page 141.
TIMEDOUT Indicates that the Workflow Engine has timed-out. This state is determined by two parameters, namely the Heartbeat Interval and Heartbeat Factor. For more information, see “Configuring the Workflow Cluster Settings” on page 142.
STARTING Indicates that the Workflow Engine is starting.
RUNNING Indicates that the Workflow Engine is active.
Deleting an Instance of Workflow EngineReview the following guidelines before deleting any instance of a Workflow Engine:
You must have appropriate permission to delete a Workflow Engine from the Workflow Administration Console. If you are unable to locate the Delete icon under the Workflow Engines State, it indicates that you do not have the required permission. For more information, see “Manage User Access” on page 23.
You can delete a Workflow Engine only when it is in shutdown state. The Delete icon is disabled by default when a Workflow Engine is in starting, running, or timedout state.
Cluster Setting Description
Heartbeat Interval Specifies the time interval at which the Workflow Engine sends out a heartbeat signal to indicate that it is active and running in the cluster.
If a Workflow Engine crashes and is restarted, its last state in the database will indicate that it is still running. The Workflow Engine therefore uses a heartbeat timer, which sends heartbeats at the specified interval, to determine that it is still running in the cluster. The minimum value for the heartbeat interval is 60 seconds.
Heartbeat Factor Specifies the factor that is multiplied with the Heartbeat Interval to arrive at the heartbeat timeout. The minimum value for the Heartbeat Factor is 2.
The heartbeat timeout is the maximum elapsed time permitted between heartbeats before an engine will be considered timed out.
Configuring Workflow Engine and Cluster Settings 143

To delete an instance of Workflow Engine, expand the Workflow Engines State option on the Engine and Cluster Settings page, click the Delete icon next to the Engine ID that you want to delete, then click Confirm.
NOTE: In the back-end, the application continuously monitors the status of all Workflow Engines in the database. If an instance of Workflow Engine is in the shutdown state for more than 5 minutes, the application automatically deletes that instance from the database. The timer for this automatic engine deletion is set by default, and it cannot be configured.
144 Configuring Workflow Engine and Cluster Settings

17 17Monitoring Workflow Processes
Once a workflow is initiated, you can monitor its progress through the Workflow Administration Console. You can view the current status, reassign activities within the workflow, terminate a workflow process, and even view the comments logged during its execution.
The Workflow monitoring page lists all workflow processes initiated by the Workflow Engine. You can use the pagination option to navigate through the workflow process list. If required, you may also change the number of entries to display on each page.
Click the Refresh icon to get the latest workflow process list from the workflow runtime database. The status of all running workflow processes also gets refreshed.
You can perform the following operations on the Workflow monitoring page:
“Finding Workflow Processes That Match Search Criteria” on page 145 “Viewing the Status of a Workflow Process” on page 146 “Viewing the Approval Status of a Workflow Process” on page 147 “Actions You Can Perform On The Page” on page 147
Finding Workflow Processes That Match Search CriteriaTo find a specific workflow process, you can use any of the following options:
Simple Search Enter the name of the workflow process, recipient, or requester in the search bar.
NOTE: The name of a workflow process is determined by the workflow’s Start Activity and its two properties, namely Resource Name Override Type and Resource Name Override. When the Resource Name Override Type is a Constant, the name provided in the Resource Name Override is the process name. However, if the type is an expression, the Workflow Engine evaluates the expression defined in the Resource Name Override and generates a meaningful process name at runtime.
Filtered Search To filter the search for workflow processes, click the Filter icon and use one of the following options: Name of the requester who initiated the workflow process Name of the recipient Status of the workflow process Status of the approval activity Requested date. You can filter the workflow processes either before or after a particular
date
Monitoring Workflow Processes 145

NOTE: After selecting a date and time from the calendar, click any place outside the calendar to close it.
Sorting Workflow Processes by Recipient, Requester, or Request DateBy default, the workflow process list on the Workflow monitoring page is sorted based on the Request Date column, displaying the most recently requested process on top of the list. You can also sort the list based on the names of the requester or recipient. Click the sort icon next to these columns to arrange the list alphabetically. Subsequently, you can shuffle the list in ascending or descending order by clicking the sort icon.
Customizing the ColumnsYou can choose the columns to display on the Workflow monitoring page using the Column Customization option.
To customize the columns:
1 Click the Column Customization icon.2 Select the check box next to the desired column that you want to display. The selected columns
are added simultaneously to the Workflow monitoring page.
TIP: To choose all columns, select the check box provided near the search field.
3 Click the close sign (x) on the Column Customization window.
NOTE: Workflow Administration Console does not save your customization. Next time when you navigate to the Workflow monitoring page, columns that are configured to display by default will be shown. Alternatively, if you have appropriate permissions, you can set your preferences as default from the Settings page. For more information, see “Column Customization Settings” on page 27.
Viewing the Status of a Workflow ProcessAt any given time, a workflow process will display one of the following statuses in the Status column:
Running Indicates that a workflow process is in progress. One or more approval request activities is waiting for an action from the approver.
Completed Indicates that a workflow process is complete. You can view the approval status in the Approval Status column. To know more about the different states of approval, see Viewing the Approval Status of a Workflow Process.
146 Monitoring Workflow Processes

Stopped (Applies to a non-clustered Workflow Engine environment) Indicates that instance of the workflow engine is currently down and not reachable.
Terminated Indicates that a workflow process was terminated before completion.
Viewing the Approval Status of a Workflow ProcessThe Approval Status column reflects the current approval status of a workflow process. At any given time, a workflow process will display one of the following statuses:
Processing Indicates that one or more activities in the workflow process is waiting for an action from the approver. For example, if a workflow process has two approval activities defined, one is already approved, and the other is still waiting for approval. Technically, the workflow process is still running, so the workflow process displays the approval status as Processing.
Approved Indicates that all approval activities in the workflow process have been completed.
Denied Indicates that one or more approval activities in the workflow process was rejected by the approver.
Retracted Indicates that the request for permission access was retracted by the requester. In this case, the workflow process is terminated before completion.
Error Indicates that one or more approval activities in the workflow process is faulty. In this case, the entire workflow process is terminated before completion. The errors can occur due to many reasons, some of them are listed below: Error in calling the token end point. Error while initializing the scripting engine or scripting context. While forwarding a task, the Activity ID or Addressee details are missing or empty.
Actions You Can Perform On The PageWorkflow Administration Console allows you to manage workflow processes through the following actions:
Terminating a Workflow Process Reassigning a Workflow Process Viewing Workflow Process Comments
Monitoring Workflow Processes 147

IMPORTANT: You must have appropriate permission to reassign or terminate a workflow process. If you are unable to view or perform these actions, contact your administrator for assistance.
Terminating a Workflow ProcessYou can terminate a workflow process if you do not want to continue its processing. While terminating, you must provide a reason explaining why you want to terminate that workflow process. After termination, all activities associated with that workflow process will end, and the workflow status will change to Terminated.
NOTE: While initiating a workflow process, if the Workflow Engine detects an error in the workflow definition, it automatically terminates that workflow process.
You can terminate a running workflow process in the following scenarios:
When an activity that is open for a long duration, is preventing the completion of the workflow process.
When a user has retracted the request for permission access. When a workflow process has stopped and cannot be restarted.
To terminate a workflow process:
1 On the Workflow monitoring page, identify a workflow process that you want to terminate and select the check box next to its name. You can also select multiple check boxes for terminating more than one workflow process at a time.
NOTE: The check box is automatically disabled for a workflow process that is in terminated or completed state.
2 Click the Terminate workflows icon.3 Specify a reason for terminating the workflow process.4 Click Terminate.
Reassigning a Workflow ProcessSometimes, the activities that have been assigned to an individual may require to be reassigned to someone else. You can assign one or more activities associated with a workflow process to another addressee in the organization. While reassigning, you must also provide a reason explaining why you want to reassign that activity. When the activity is reassigned, the Workflow Engine notifies the recipient about the task through an e-mail.
You must review the following guidelines before reassigning a workflow process:
Reassign a workflow process only if an approval request activity has timed-out or is unattended for a long time. This might happen when either the recipient is unavailable or has left the organization.
You can reassign a workflow process that has stopped and cannot be restarted.
148 Monitoring Workflow Processes

To reassign a workflow process:
1 On the Workflow monitoring page, identify a workflow process that you want to reassign, then click the Reassign icon.
2 In the modal window, select the check box next to the workflow activity that you want to reassign.
NOTE You can reassign only one workflow process at a time. However, if a workflow process has
more than one activity, you can either select all activities or choose only those activities that you want to reassign.
Before re-assigning any activity, refer to its status in the Status column. For more information on the different types of status and its description, see “Viewing the Approval Status of a Workflow Process” on page 147.
3 Click the Reassign To drop-down menu and select the addressee that you want to reassign the task to.
4 Specify a reason for reassignment in the Comment text box.5 Click Reassign.
Viewing Workflow Process CommentsWhen a workflow process is executing, the Workflow Engine logs the key events in form of comments. This includes comments logged by the system and the user. System comments corresponds to the actions taken by the application to complete the workflow process. For example, assigning the approval activity to an individual who can approve the request. User comments, on the other hand, are the comments that a user adds with each action. For example, the reason provided by an administrator while terminating a workflow process.
You can review the comments using the View Comments option provided in the Actions tab on the Workflow monitoring page. The events are listed in reverse chronological order with the latest event on top. Each event includes a comment with a timestamp, a reference to the activity name, and indicates whether the comment was system-generated or user-defined. By default, the comments added by a user is displayed. To view both the system and user comments, click the View System Comments check box.
The View Comments feature provides visibility into workflow execution. If the Workflow Engine terminates a workflow process with an error, the administrator can easily trace the error details from the workflow comments window.
Monitoring Workflow Processes 149

150 Monitoring Workflow Processes

IX IXUnderstanding and Setting Up Event Logging
Logging is the main tool you use for debugging the Workflow Administration configuration. The logging service provides facilities for writing, viewing, filtering, and listening for log messages. The Tomcat application server instances and subsystems, and applications that run on Tomcat or in client JVMs generate these log messages.
This sections discusses the following topics:
Chapter 18, “Understanding the Basics of Logging,” on page 153 Chapter 19, “Configuring Logging,” on page 165 Chapter 20, “Configuring Logging in a Cluster,” on page 171
Understanding and Setting Up Event Logging 151

152 Understanding and Setting Up Event Logging

18 18Understanding the Basics of Logging
Logging is used to debug the configurations for the various features in the Workflow Administration Console. The logging service allows you to easily write, view, filter, and listen to log messages. Workflow Administration Console log levels are set for features, and each feature is mapped to a set of packages. Changing the log level for a feature resets the log levels for all the packages. These changes can then be persisted and saved in the database. The Workflow Administration Console also includes the option to add miscellaneous packages.
This sections discusses the following topics:
“About Logging Services” on page 153 “What Can Be Logged” on page 158 “The Workflow Logging Environment and Process” on page 158 “Types of Log Files” on page 160 “Understanding the Log Format” on page 161
About Logging Services A Tomcat server uses logging services to communicate its status and respond to specific events, including server startup and shutdown information, failures of one or more subsystems, errors, warning messages, access information on HTTP requests, and additional information. For example, you can use the logging services from Tomcat to report error conditions, or to listen for log messages from a specific subsystem.
All administrator and end-user actions and events are logged to the Tomat server console and to the Tomcat server log file which allows easy access to this information for security and operational purposes. Additionally, the audit log system provides the ability to monitor ongoing activities such as authentication activity and up time of the system. File logging is enabled by default.
The workflow functionalities are implemented in a layered architecture. Each feature uses one or more packages. Each package handles a specific area of a feature and has its own independent log level that obtains event messages from different parts of the application. The logs contain information about processing and interactions among components that occur while fulfilling user and administrative requests, and during general system processing. By enabling the correct log levels for various features, an administrator can monitor how the workflow service processes user and administrative requests. Package names are based on Java Development Kit (JDK) conventions. The event messages include these package names indicating the context of the message output. The logs include tags and values that allow the administrator to identify and correlate which package log entries pertain to a given transaction and user. Table 18-1 describes some of the features and the packages they use.
Understanding the Basics of Logging 153

Table 18-1 Workflow Administration Packages and Features
Feature Description Packages
Approval The approval packages are implemented for approving any permission or other user request.
com.netiq.idm.rest.access.util com.netiq.workflow.access.nodes com.novell.soa.af com.novell.soa.af.impl.worklist com.novell.soa.af.rest.controller com.novell.srvprv.apwa.util
Audit and Logging
Logging allows you to debug the configurations associated with the various features in the Workflow Administration Console. The logging service allows to write, view, filter, and listen to log messages. You can configure logging to troubleshoot errors, or to receive notification for specific events. These events are logged in CEF format.
com.microfocus.logging.controller com.microfocus.logging.dao com.microfocus.logging.serviceImpl com.netiq.idm.logging.cache com.netiq.idm.logging.syslog com.novell.soa.af.impl com.novell.soa.af.logging com.sssw.fw.event.impl
Authorization The Settings page in the Workflow Administration Console is used to assign trustees, configure the display settings, and categories, and process types for the workflow catalog.
com.microfocus.authorization.controller com.microfocus.authorization.persist com.microfocus.external.auth com.microfocus.workflow.store.auth com.microfocus.external.auth.oauth com.netiq.idm.auth.oauth com.microfocus.common.auth.filter com.novell.common.auth.sso
154 Understanding the Basics of Logging
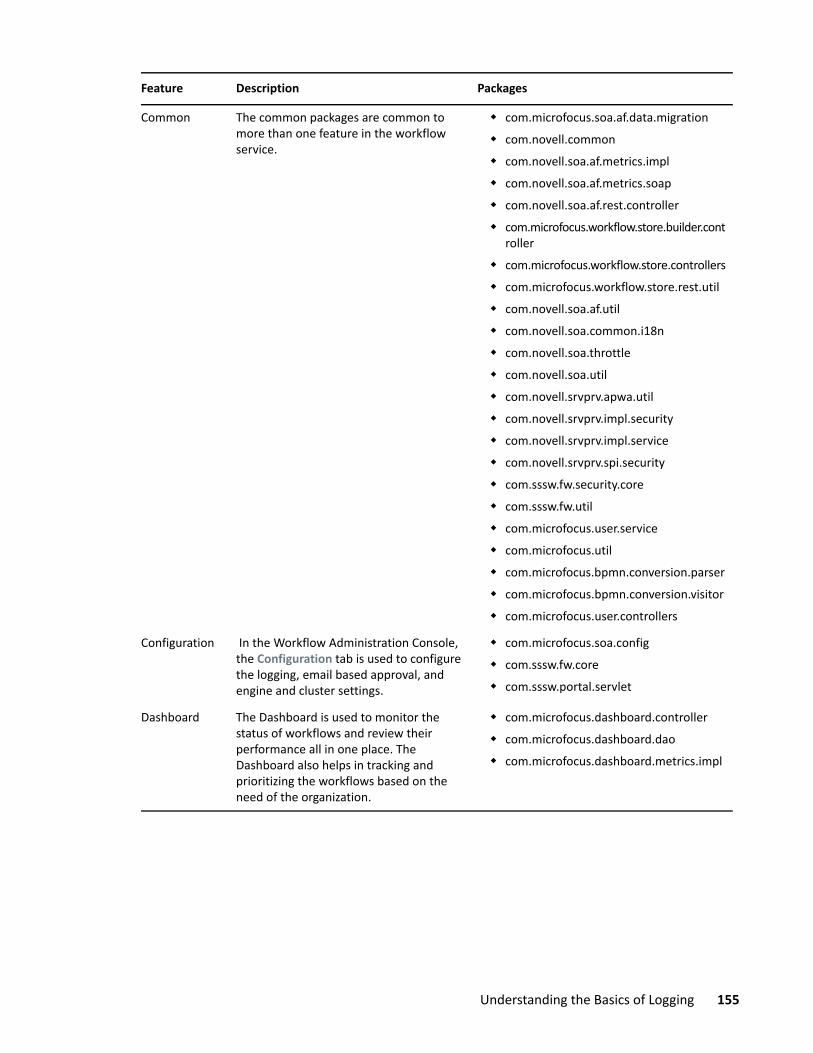
Common The common packages are common to more than one feature in the workflow service.
com.microfocus.soa.af.data.migration com.novell.common com.novell.soa.af.metrics.impl com.novell.soa.af.metrics.soap com.novell.soa.af.rest.controller com.microfocus.workflow.store.builder.cont
roller com.microfocus.workflow.store.controllers com.microfocus.workflow.store.rest.util com.novell.soa.af.util com.novell.soa.common.i18n com.novell.soa.throttle com.novell.soa.util com.novell.srvprv.apwa.util com.novell.srvprv.impl.security com.novell.srvprv.impl.service com.novell.srvprv.spi.security com.sssw.fw.security.core com.sssw.fw.util com.microfocus.user.service com.microfocus.util com.microfocus.bpmn.conversion.parser com.microfocus.bpmn.conversion.visitor com.microfocus.user.controllers
Configuration In the Workflow Administration Console, the Configuration tab is used to configure the logging, email based approval, and engine and cluster settings.
com.microfocus.soa.config com.sssw.fw.core com.sssw.portal.servlet
Dashboard The Dashboard is used to monitor the status of workflows and review their performance all in one place. The Dashboard also helps in tracking and prioritizing the workflows based on the need of the organization.
com.microfocus.dashboard.controller com.microfocus.dashboard.dao com.microfocus.dashboard.metrics.impl
Feature Description Packages
Understanding the Basics of Logging 155

Data Layer It is the layer that interacts with the persistent store, such as, the database to fetch any information.
com.microfocus.soa.af.data com.microfocus.soa.af.data.handler com.microfocus.soa.af.data.idm com.microfocus.soa.af.data.ig com.microfocus.soa.af.data.script com.microfocus.soa.identity.util com.novell.idm.nrf.persist com.novell.idm.nrf.service com.novell.idm.nrf.util com.novell.soa.af.impl.persist com.novell.soa.persist com.novell.srvprv.impl.servlet.service com.novell.srvprv.impl.vdata.definition com.novell.srvprv.impl.vdata.model com.novell.srvprv.impl.vdata.model.util com.novell.srvprv.spi.vdata.util com.sssw.fw.directory.api com.sssw.fw.directory.core com.sssw.fw.directory.persist com.sssw.fw.directory.realm.impl.jndildap com.sssw.fw.util.jndi
Email-based Approval
Email notifications in the Workflow Administration Console informs users of tasks and events in the system. For example, sending an email to approvers when an event or task requires an approval.
com.novell.srvprv.spi.email com.novell.soa.af.impl.emailapproval com.novell.soa.af.rest.controller com.novell.soa.notification.mailbox com.novell.soa.notification.mailbox.impl
Engine and Cluster
Provides information on engine and cluster. com.novell.soa.af.impl.core com.sssw.fw.cachemgr.cluster com.sssw.fw.cachemgr.core
Feature Description Packages
156 Understanding the Basics of Logging

The generated logs that are primarily intended for debugging the software. System administrators and support personnel can identify and isolate problems caused by configuration errors, invalid user data, or network problems. However, component file logging is typically the first step in identifying software bugs.
Package logging is more verbose than audit logging. It increases the processing load. On a day-to-day basis, you should enable only log levels of error conditions and system warnings. If a specific problem occurs, logging can be set to Info or Debug to gather extra information needed to isolate and resolve the detected problem. When the problem is resolved, logging should be reconfigured to log only error conditions and system warnings.
External Service Implements the client to connect to the external services, such as Identity Governance and Identity Manager.
com.microfocus.external.client com.microfocus.external.idm com.microfocus.external.ig com.microfocus.external.igaworkflow.impl com.microfocus.external.nodes com.microfocus.idm.nrf.persist com.microfocus.idm.nrf.service com.microfocus.idm.nrf.util
Locale Includes information on all default and supported locales.
com.microfocus.rest
Notification The notification function included in the Workflow Administration Console allows you to send email notifications that notify users of changes in the state of a workflow, tasks that they need to perform, or when a user assigns a workflow activity to a new addressee.
com.novell.soa.af.impl.core com.novell.soa.notification com.novell.soa.notification.impl com.novell.soa.notification.impl.jms com.novell.soa.notification.impl.vdx
Workflow Process
Includes information on workflow processes, such as start, approval, finish.
com.novell.soa.af.impl.activity com.novell.soa.af.impl.core com.novell.soa.af.impl.link com.novell.soa.af.impl.model com.novell.soa.af.impl.prvsrv com.novell.soa.af.impl.scripting com.novell.soa.af.impl.scripting.bridge.servi
ce com.novell.soa.af.impl.timers com.novell.soa.script.impl.dom.impl com.novell.soa.script.impl.lang.es.impl com.novell.srvprv.impl.servlet
Feature Description Packages
Understanding the Basics of Logging 157

What Can Be LoggedThe Workflow Administration Console allows you to log any workflow functionality, and actions, such as granting permissions and making external service calls. The log level for these features is controlled by configuring logging for the packages they use. You can change log levels from the Logging page.
The Workflow Administration Console functionality that executes on a client and does not directly execute in context of the web server cannot be logged in the same way. For example, most of the form processing that occurs in the client. The action scripts defined on the form control’s onLoad, onChange, or custom events execute in the browser of the user’s client computer and not in the workflow web server. Therefore, errors that occur while rendering the form or processing an action script, cannot be directly logged. However, workflow queries issued from a form or Start Activity can be logged to troubleshoot the workflow features. You can view the Workflow Administration Console errors and informational messages in the Client Browser Developer Tool. Click either the Console tab or the Network tab. It contains HTTP response codes for both successful and failed requests. The workflow application allow you to record the outcome of a user’s request and response.
The Workflow Administration Console allows you to log the state of a user’s request and response at the following locations in the data flow:
Between the browser and the application server Between the application server and the application database Between the application server and the external service
You can configure the log files to include entries for the following events:
Configuration Events processed by application components such as authentication, role assignment, and
resource access Error conditions
The log files help you determine the reason for a request failure. For example, if the browser did not send the required information.
The Workflow Logging Environment and ProcessThe following sections describes the workflow logging environment, and provides an overview of the logging process.
TerminologyThe logging framework comprises of three main components: loggers, appenders, and layouts. These components work together to accomplish the following tasks:
Record messages based on message type and level. Control how log messages are formatted and where they are reported at runtime.
158 Understanding the Basics of Logging
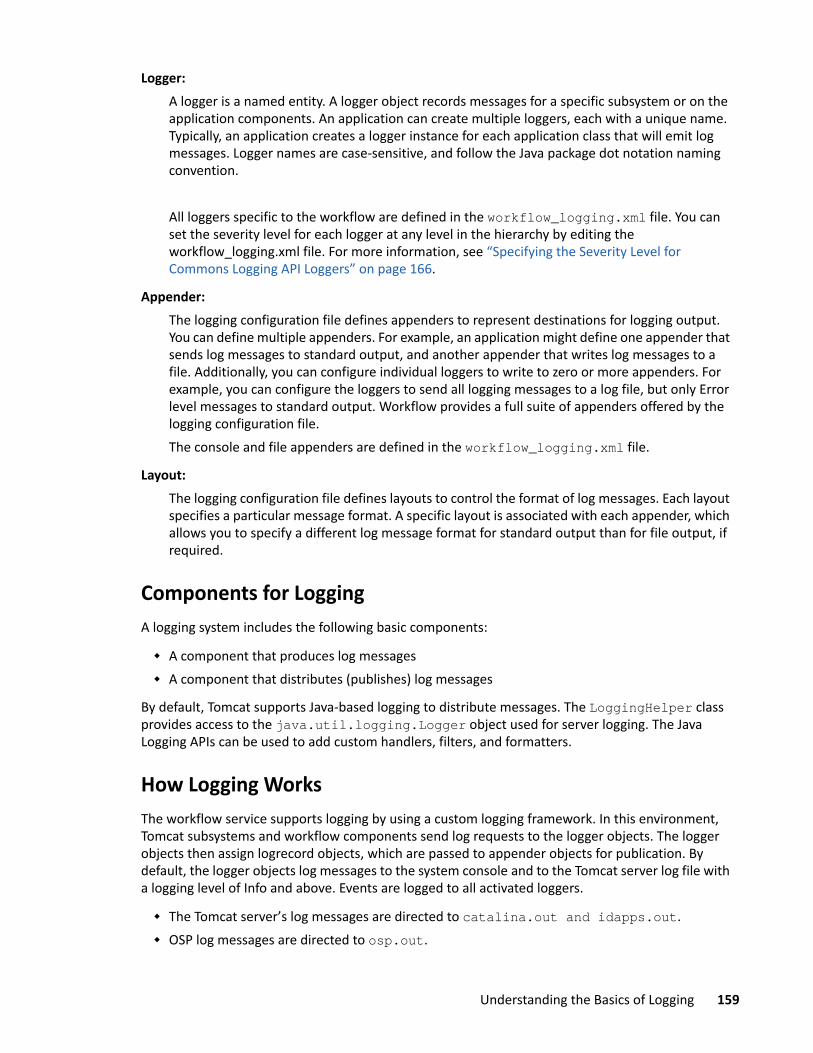
Logger: A logger is a named entity. A logger object records messages for a specific subsystem or on the application components. An application can create multiple loggers, each with a unique name. Typically, an application creates a logger instance for each application class that will emit log messages. Logger names are case-sensitive, and follow the Java package dot notation naming convention.
All loggers specific to the workflow are defined in the workflow_logging.xml file. You can set the severity level for each logger at any level in the hierarchy by editing the workflow_logging.xml file. For more information, see “Specifying the Severity Level for Commons Logging API Loggers” on page 166.
Appender: The logging configuration file defines appenders to represent destinations for logging output. You can define multiple appenders. For example, an application might define one appender that sends log messages to standard output, and another appender that writes log messages to a file. Additionally, you can configure individual loggers to write to zero or more appenders. For example, you can configure the loggers to send all logging messages to a log file, but only Error level messages to standard output. Workflow provides a full suite of appenders offered by the logging configuration file. The console and file appenders are defined in the workflow_logging.xml file.
Layout: The logging configuration file defines layouts to control the format of log messages. Each layout specifies a particular message format. A specific layout is associated with each appender, which allows you to specify a different log message format for standard output than for file output, if required.
Components for LoggingA logging system includes the following basic components:
A component that produces log messages A component that distributes (publishes) log messages
By default, Tomcat supports Java-based logging to distribute messages. The LoggingHelper class provides access to the java.util.logging.Logger object used for server logging. The Java Logging APIs can be used to add custom handlers, filters, and formatters.
How Logging WorksThe workflow service supports logging by using a custom logging framework. In this environment, Tomcat subsystems and workflow components send log requests to the logger objects. The logger objects then assign logrecord objects, which are passed to appender objects for publication. By default, the logger objects log messages to the system console and to the Tomcat server log file with a logging level of Info and above. Events are logged to all activated loggers.
The Tomcat server’s log messages are directed to catalina.out and idapps.out. OSP log messages are directed to osp.out.
Understanding the Basics of Logging 159

Custom appenders are created to handle log messages to convert the messages to a specific format, then send them to the configured auditing service.
To configure logging, see “Configuring Logging” on page 165.
Types of Log FilesThis section discusses the different log files that are generated and what each file contains.
Catalina Log The Catalina log is the global log. It records information about events such as the startup and shutdown of the Tomcat application server, the deployment of new applications, or the failure of one or more subsystems. The messages include information about the time and date of the event and the ID of the user who initiated the event.
The catalina.log file contains all log messages that are written to the Tomcat system.out and system.err streams. Tomcat internal log statements use the java.util.logging package (juli). The default destination for that log is standard.out.
The catalina.out file can include:
Uncaught exceptions printed by java.lang.ThreadGroup.uncaughtException(..)
Thread dumps, if you requested them through a system signal
The catalina.out file is located on the Tomcat server instance. Each server instance has its own catalina.out file. By default, the catalina.out file is located in the logs directory under the Tomcat root directory. For example, /opt/netiq/idm/apps/tomcat/logs/catalina.out.
It is recommended that you do not modify the log files manually. Modifying a file could result in the file no longer recording information from the Tomcat server.
By default, a server instance prints only messages of the Info severity level or higher to standard. out. You can modify the severity threshold as a logging configuration so that the server prints more or fewer messages to respective log files. For more information, see “Understanding Logging Configuration” on page 165.
Localhost Log The Localhost log (localhost_access_log.<date of log generation>.txt) contains HTTP transactions between the client and the application server. The default location and rotation policy for this log is the same as catalina.out file.
Application Log Each application component provides its own logging. Tomcat provides no support for application logs. Each component includes its own logging configuration that defines default log levels and appender configurations. These logging configuration files are placed in the \conf directory of the Tomcat server.
160 Understanding the Basics of Logging

Additional Log FilesThe catalina.out log messages and log files communicate events and conditions that affect Tomcat server operations. Logs for all application components are logged in the catalina.out file. This file also records the interactions between the Tomcat server and the client.
Some subsystems and components also maintain additional log files that help in auditing their individual interactions. The following list describes some of the additional configuration files:
Logging is turned off by default and must be enabled in the setenv.sh file in the /TOMCAT_INSTALLED_HOME/bin/ directory.
The HTTP subsystem keeps a log of all HTTP transactions between the client and the application server in the, localhost_access_log.<date of log generation>.txt file. The default location and rotation policy for this log is the same as the catalina.out file. You can set the attributes that define the behavior of HTTP access logs for your server.
Each server has a transaction log that stores information about committed transactions coordinated by the server that may not have been completed. Tomcat uses the transaction log when recovering from a system crash or a network failure. You cannot directly view the transaction log because the file is in a binary format.
The auditing service records information from a number of security requests, which are determined internally by the security framework. The service also records the event data associated with these security requests and the outcome of the requests. Each server writes auditing data to its own log file in the server directory.
The JDBC subsystem records various events related to JDBC connections, including registering JDBC drivers and SQL exceptions. The events related to JDBC are written to the server log, such as when connections are created or refreshed or when configuration changes are made to the JDBC objects.
The Java Message Service (JMS) logging is enabled by default when you create a JMS server with Apache ActiveMQ as a JMS provider. Logs can be found in the ActiveMQ installed path at data/activemq.log. The JMS persistent store helps to persist email messages. If JMS is not properly configured, any email message in the memory queue will be lost if the application server is shut down.
The hibernate framework writes log messages in different categories and log levels. For example, it logs messages for establishing connections with the database, executed SQL statements, or cache interactions. Hibernate logging is enabled by default at the Info level. The events related to JDBC subsystem are written to the server log. All hibernate related information is logged when the data is persisted in the application.
Understanding the Log FormatWorkflows use a specific format for file log entries. To improve log entry readability, the log entries in the catalina.out files use standard elements. Doing so facilitates the use of non-interactive, stream-oriented editors such as sgrep, sed, awk, and grep. The first part of each message begins with a locale-formatted timestamp followed by a data portion that contains information specific to the log entry. The data portion is the most flexible part of a log entry.
A log entry contains the following fields:
time-date-stamp [Severity] [Subsystem] [Message Text]
Understanding the Basics of Logging 161

The following entry is an example entry that is logged when a user requests a role:
[INFO] 2021/07/26 21:15:57 com.novell.soa.af.impl.LogEvent:191 [WORKFLOW] [Workflow_Started] Initiated by 88293b680a5440c0b9856ee4c2ab72a7, Process ID: {9}, Process Name: Sample_PRD, Activity: {8}, Recipient: 88293b680a5440c0b9856ee4c2ab72a7, Secondary User: {10}[INFO] 2021/07/26 21:15:57 com.novell.soa.af.impl.LogEvent:191 [WORKFLOW] [Workflow_Forwarded] Initiated by System, Process ID: {9}, Process Name: Sample_PRD, Activity: {8}, Recipient: 88293b680a5440c0b9856ee4c2ab72a7[INFO] 2021/07/26 21:15:57 com.novell.soa.af.impl.LogEvent:191 [WORKFLOW] [Workflow_Forwarded] Initiated by System, Process ID: {9}, Process Name: Sample_PRD, Activity: {8}, Recipient: 88293b680a5440c0b9856ee4c2ab72a7[INFO] 2021/07/26 21:15:57 com.novell.soa.af.impl.LogEvent:191 [WORKFLOW] [Workflow_Ended] Initiated by System, Process ID: {9}, Process Name: Sample_PRD, Activity: {8}, Recipient: 88293b680a5440c0b9856ee4c2ab72a7Most log entries do not use the optional line breaks ([\n]). The time-date-stamp, the severity, subsystem, and message text are on the same line to enable stream-oriented editors that use only one line (such as grep) can be used to locate related log entries.
If a message is logged within the context of a transaction, the message text contains the correlation ID assigned to the transaction.
The Tomcat server uses the default character encoding of the host computer for the messages it writes.
Message FieldsA Tomcat server message contains a consistent set of fields, as described in the following table. In addition, if your applications use Tomcat logging services to generate messages, those messages will contain these fields.
Table 18-2 Log Entry Fields
Field Description
Time-date-stamp Time and date message originated, in a format specific to the locale. The Java Virtual Machine (JVM) that runs a Tomcat server instance refers to the host computer operating system for information about the local time zone and format.
The date and time is specified in the W3C profile format of ISO 8061. It has the following fields: year-month-day-T-hour-minutes-seconds-time zone. The “Z” value for the time zone indicates that the time is specified in UTC.
Severity Indicates the degree of impact of the event reported by the message such as warning, informational, or debug.
In the example log entry, the level of severity is Info.
Subsystem Indicates the Tomcat subsystem or the type of the module that was the source of the message. For example, JMS.
162 Understanding the Basics of Logging
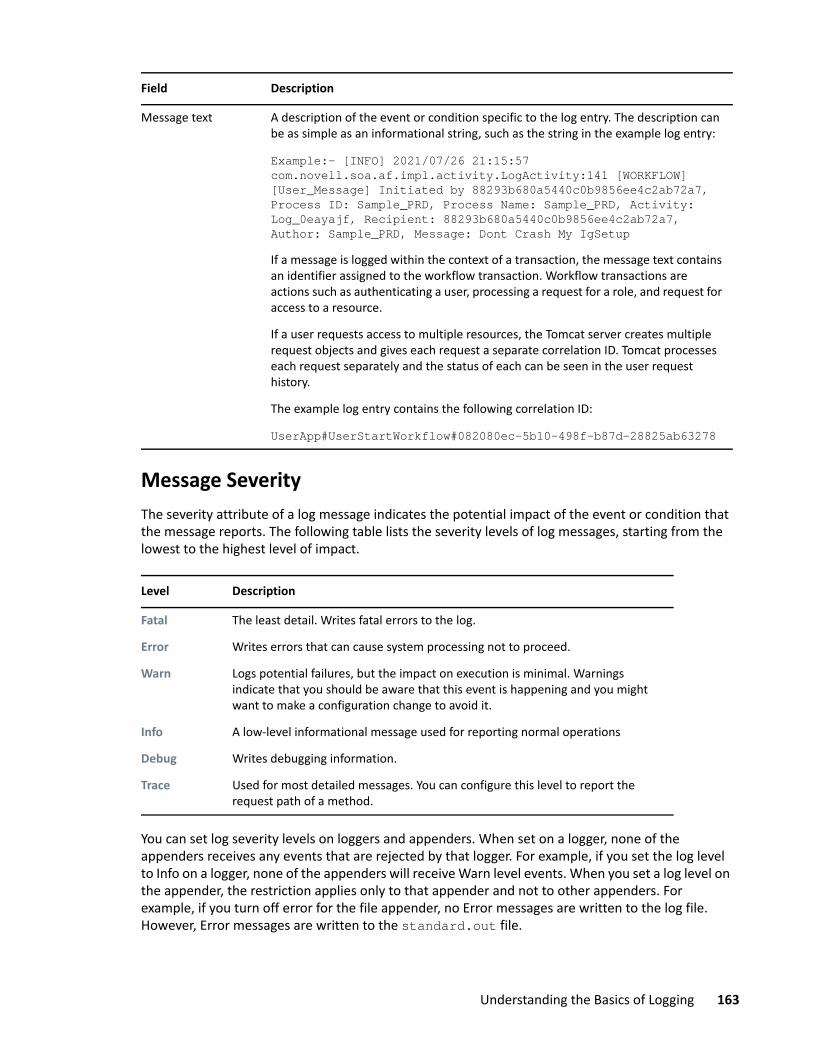
Message SeverityThe severity attribute of a log message indicates the potential impact of the event or condition that the message reports. The following table lists the severity levels of log messages, starting from the lowest to the highest level of impact.
You can set log severity levels on loggers and appenders. When set on a logger, none of the appenders receives any events that are rejected by that logger. For example, if you set the log level to Info on a logger, none of the appenders will receive Warn level events. When you set a log level on the appender, the restriction applies only to that appender and not to other appenders. For example, if you turn off error for the file appender, no Error messages are written to the log file. However, Error messages are written to the standard.out file.
Message text A description of the event or condition specific to the log entry. The description can be as simple as an informational string, such as the string in the example log entry:
Example:- [INFO] 2021/07/26 21:15:57 com.novell.soa.af.impl.activity.LogActivity:141 [WORKFLOW] [User_Message] Initiated by 88293b680a5440c0b9856ee4c2ab72a7, Process ID: Sample_PRD, Process Name: Sample_PRD, Activity: Log_0eayajf, Recipient: 88293b680a5440c0b9856ee4c2ab72a7, Author: Sample_PRD, Message: Dont Crash My IgSetupIf a message is logged within the context of a transaction, the message text contains an identifier assigned to the workflow transaction. Workflow transactions are actions such as authenticating a user, processing a request for a role, and request for access to a resource.
If a user requests access to multiple resources, the Tomcat server creates multiple request objects and gives each request a separate correlation ID. Tomcat processes each request separately and the status of each can be seen in the user request history.
The example log entry contains the following correlation ID:
UserApp#UserStartWorkflow#082080ec-5b10-498f-b87d-28825ab63278
Level Description
Fatal The least detail. Writes fatal errors to the log.
Error Writes errors that can cause system processing not to proceed.
Warn Logs potential failures, but the impact on execution is minimal. Warnings indicate that you should be aware that this event is happening and you might want to make a configuration change to avoid it.
Info A low-level informational message used for reporting normal operations
Debug Writes debugging information.
Trace Used for most detailed messages. You can configure this level to report the request path of a method.
Field Description
Understanding the Basics of Logging 163

<logger name="com.sssw" level="INFO" additivity="true"> <appender-ref ref="WFCEF"/> </logger><logger name="com.netiq" level="DEBUG" additivity="true"> <appender-ref ref="WFCEF"/> </logger>You can set log levels for loggers using the Logging page or the logging configuration file. You can also configure loggers through APIs. You can only enable or disable an appender.
The workflow modules generate many messages of lower severity and fewer messages of higher severity. For example, under normal circumstances, they generate many Info or Trace messages. Applications that use Tomcat logging services can use the severity level of Debug.
164 Understanding the Basics of Logging

19 19Configuring Logging
Logging allows you to debug the configurations associated with the various features in Workflow Administration Console. The logging service allows you to write, view, filter, and listen to log messages.
By default, the application saves the logging configuration in the workflow_logging.xml file is located in the following directories:
Linux: /opt/netiq/idm/apps/tomcat/conf/Windows: C:\netiq\idm\apps\tomcat\conf
Configuring LoggingYou can configure logging to troubleshoot errors, or to receive notification for specific events. You can also configure logging to perform the following activities:
Allow recording of Info level messages from the HTTP subsystem in the log file. Track log information for individual servers in a cluster. Configure an appender to publish messages only whose severity level is warning or higher. Stop recording of Debug and Info messages in the log file.
You may need to configure the logging.properties file in some cases.
The following sections describe the basic tasks involved in logging configuration:
“Understanding Logging Configuration” on page 165 “Understanding the Log Level Settings” on page 166 “Specifying the Severity Level for Commons Logging API Loggers” on page 166 “Editing the Logging Configuration File” on page 167 “Managing Log File Size” on page 167
Understanding Logging ConfigurationWhen you enable logging, the Workflow Administration Console sends a logging request to the subscribed appenders. Tomcat provides appenders for sending log messages to the standard.out file and the server log file (catalina.out). You can control logging for each type of handler by filtering log messages based on severity level and other criteria. For example, the Stdout handler has a notice threshold severity level by default. Therefore, Info and Debug level messages are not sent to the standard.out file.
By default, event messages are logged to the system console and to the Tomcat server log file at the Info logging level and above. Events are logged to all activated loggers.
Configuring Logging 165
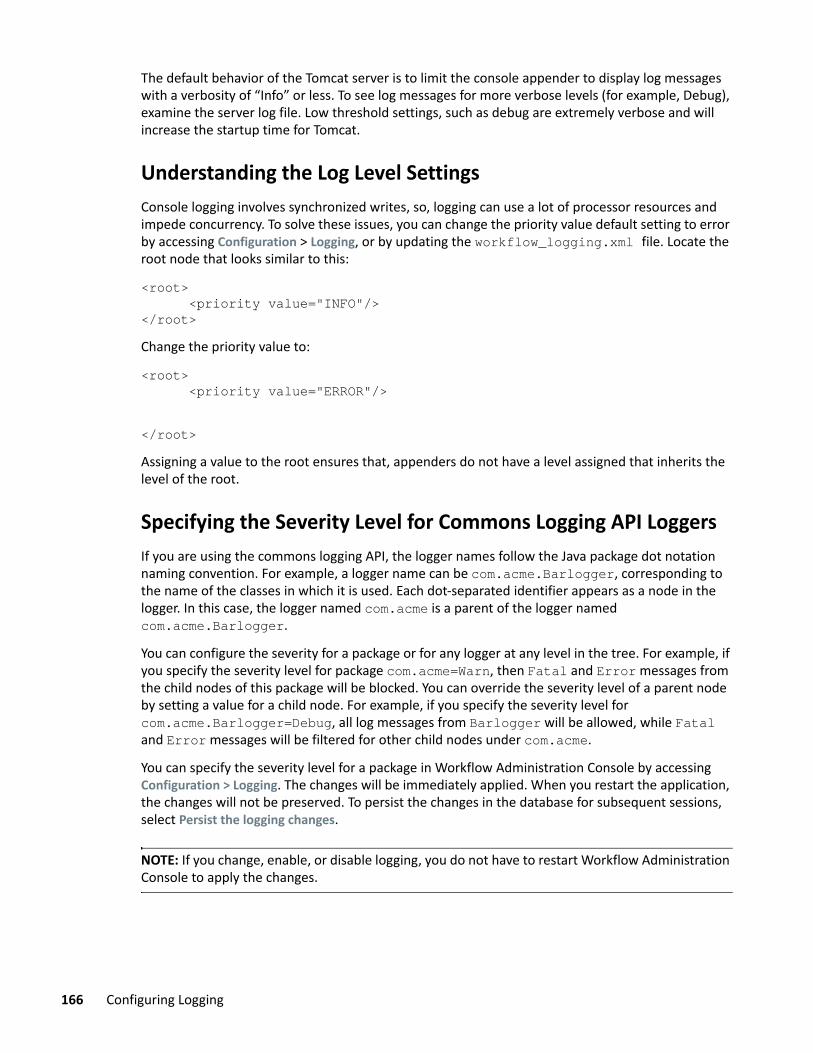
The default behavior of the Tomcat server is to limit the console appender to display log messages with a verbosity of “Info” or less. To see log messages for more verbose levels (for example, Debug), examine the server log file. Low threshold settings, such as debug are extremely verbose and will increase the startup time for Tomcat.
Understanding the Log Level SettingsConsole logging involves synchronized writes, so, logging can use a lot of processor resources and impede concurrency. To solve these issues, you can change the priority value default setting to error by accessing Configuration > Logging, or by updating the workflow_logging.xml file. Locate the root node that looks similar to this:
<root> <priority value="INFO"/></root>Change the priority value to:
<root> <priority value="ERROR"/> </root>Assigning a value to the root ensures that, appenders do not have a level assigned that inherits the level of the root.
Specifying the Severity Level for Commons Logging API LoggersIf you are using the commons logging API, the logger names follow the Java package dot notation naming convention. For example, a logger name can be com.acme.Barlogger, corresponding to the name of the classes in which it is used. Each dot-separated identifier appears as a node in the logger. In this case, the logger named com.acme is a parent of the logger named com.acme.Barlogger.
You can configure the severity for a package or for any logger at any level in the tree. For example, if you specify the severity level for package com.acme=Warn, then Fatal and Error messages from the child nodes of this package will be blocked. You can override the severity level of a parent node by setting a value for a child node. For example, if you specify the severity level for com.acme.Barlogger=Debug, all log messages from Barlogger will be allowed, while Fatal and Error messages will be filtered for other child nodes under com.acme.
You can specify the severity level for a package in Workflow Administration Console by accessing Configuration > Logging. The changes will be immediately applied. When you restart the application, the changes will not be preserved. To persist the changes in the database for subsequent sessions, select Persist the logging changes.
NOTE: If you change, enable, or disable logging, you do not have to restart Workflow Administration Console to apply the changes.
166 Configuring Logging

Editing the Logging Configuration FileThe configuration settings for the Workflow Administration Console logging are stored in the workflow_logging.xml file, located in the install directory on the Tomcat server. To configure the logging levels and other settings permanently, stop the Tomcat server and change the settings in these files.
NOTE: All loggers specific to the Workflow Administration Console are defined in workflow_logging.xml.
To change the log level in the workflow_logging.xml file, open the file in a text editor and locate the following entry at the end of the file:
<root><priority value="INFO" />
<appender-ref ref="CONSOLE" />
</root>Assigning a value to root ensures that any log appenders that do not have a level explicitly assigned will inherit the root level (in this case, Info). For example, the file appender does not have a default threshold level assigned. It assumes the root’s threshold level.
The log levels used are Debug, Info, Warn, Error, and Fatal. Inappropriate use of these settings can be costly in terms of performance.
A good rule of thumb is to use Info or Debug only when debugging a particular problem.
Any appender included in the root that does have a level threshold set, should have that threshold set to Error, Warn, or Fatal unless you are debugging something.
The performance issues associated with high log levels has less to do with verbosity of messages than with the fact that console and file logging involves synchronous writes.
The default log level of Info in the log configuration file for the Workflow Administration Console is suitable for many environments. However, for a performance intensive environment, you can change the entry as follows:
<root> <priority value="ERROR"/> </root>
NOTE: Enabling Info and console logging is not needed for a fully tested and debugged production setup.
Managing Log File SizeBy default, event messages are logged in the following places:
The system console of the application server where you deployed the Workflow Administration Console
Configuring Logging 167

A log file on that Tomcat server. For example: /opt/netiq/idm/apps/tomcat/logs/catalina.outThis is a rolling log file. By default, the server rotates the file every 24 hours. The server does not rotate the local server log file when you start the server.
To immediately rotate the log file, change the appender configuration in the logging configuration file. By default, the rotated files are stored in the same directory as the log file.
Changing the Log Levels for FeaturesThe logs contain information about processing, and interactions that occur while fulfilling users and administrative requests, and during general system processing in the Workflow Administration Console.
In Workflow Administration Console, the packages are grouped based on features, and under each feature includes one or more packages. Each package handles a specific area of a feature and has its own independent log level that obtains event messages from different parts of the application.
The package names are based on Java Development Kit (JDK) conventions. The event messages include these package names, indicating the context of the message output. The logs include tags and values that allow the administrator to identify and correlate the package with the log entries that pertain to a given transaction and user.
By enabling the correct log levels for the features, an administrator can monitor how the application process users and administrative requests.
To change the log level of the features:
1 Click Configuration > Logging. 2 Identify the features from the list for which you want to change the log level.3 Select the log level from the drop-down list.
NOTE: By default, the log level is set to Info for all the features. For more information on types of log levels, see “Message Severity” on page 163.
NOTE: To retain these changes in the database, you can select the check box for Persist the logging changes.
4 Click Apply.
Adding a PackageYou can use this option when you want to add a custom package, or if you want to add a new package that is not a part of a feature.
To add a package:
1 Click Configuration > Logging.2 Expand the Miscellaneous Logging section.3 Click the plus sign (+).
168 Configuring Logging

4 Enter the package name.5 Click Add.6 Set the log level for the package by clicking the drop-down list.
NOTE: To retain these changes in the database, you can select the check box for Persist the logging changes.
7 Click Apply.
Configuring Logging 169

170 Configuring Logging

20 20Configuring Logging in a Cluster
This section includes tips for configuring logging in a Tomcat cluster.
“Tomcat Logging” on page 171 “Workflow Logging” on page 172
Tomcat LoggingYou can configure Tomcat for logging in a cluster. To enable logging for clusters, you need to edit the workflow_logging.xml configuration file, located in the /conf directory for the Tomcat server configuration (for example, tomcat/conf folder), and uncomment the following section at the end of the file:
<!-- Workflow_logging.xml --> - <!-- Uncomment the following to redirect the org.jgroups and <appenders><!-- CEF appender -->
<appender class="com.netiq.idm.logging.syslog.CEFSyslogAppender" name="WFCEF"><param name="Threshold" value="INFO"/><param name="Facility" value="user"/><param name="SyslogHost" value="${com.netiq.ism.audit.cef.host:localhost}" /><param name="SyslogPort" value="${com.netiq.ism.audit.cef.port:1468}" /><param name="SyslogProtocol" value="${com.netiq.ism.audit.cef.protocol:tcp}" /><param name="SyslogSslKeystoreFile" value="${com.netiq.idm.audit.cef.tls-keystore:/opt/netiq/idm/apps/jre/lib/security/cacerts}" /><param name="SyslogSslKeystorePassword" value="${com.netiq.idm.audit.cef.tls-keystore-password:KeystorePassword}" /><param name="CacheDir" value="${com.netiq.ism.audit.cef.cache-file-dir:/opt/netiq/idm/apps}" /><param name="CacheRolloverSize" value="2"/><param name="ApplicationName" value="WORKFLOW"/><param name="EventPrefix" value="IDM:"/></appender></appenders>
<!--Logger definitions
Additivity of true means the loggers defined below will inherit the appenders.
Configuring Logging in a Cluster 171

--><loggers><logger name="workflow.log" level="INFO" additivity="true"><!-- remove this line to turn on CEF Audit<appender-ref ref="WFCEF"/>remove this line to turn on CEF Audit --></logger><logger name="com.novell" level="INFO" additivity="true"><!-- remove this line to turn on CEF Audit<appender-ref ref="WFCEF"/>remove this line to turn on CEF Audit --></logger><logger name="com.netiq" level="INFO" additivity="true"><!-- remove this line to turn on CEF Audit<appender-ref ref="WFCEF"/>remove this line to turn on CEF Audit --></logger><logger name="com.sssw" level="INFO" additivity="true"><!-- remove this line to turn on CEF Audit<appender-ref ref="WFCEF"/>remove this line to turn on CEF Audit --></logger><logger name="com.microfocus" level="INFO" additivity="true"><!-- remove this line to turn on CEF Audit<appender-ref ref="WFCEF"/>remove this line to turn on CEF Audit --></logger></loggers> --> You can find the cluster.log file in the log directory for the Tomcat server configuration (for example, tomcat/log).
Workflow LoggingThe logging configuration is not propagated to all servers in cluster. For example, if you use the Logging page on a server, in a cluster to set the logging level for Workflow Process to Trace, this setting is not propagated to the other servers in the cluster. You must individually configure the level of logging messages for each server in the cluster.
For more information, see Chapter 19, “Configuring Logging,” on page 165.
172 Configuring Logging in a Cluster

X XUnderstanding Audit Configuration
This section provides an overview of audit configuration in the Workflow Administration Console.
Chapter 21, “Configure Audit Events Overview,” on page 175 Chapter 22, “Configuring Audit Events,” on page 177
Understanding Audit Configuration 173

174 Understanding Audit Configuration

21 21Configure Audit Events Overview
In the Workflow Administration Console the audit events are saved either in the log files, syslog server, Tomcat server, or in the configured database such as, Postgres, MSSQL, Oracle, or Vertica. After you enable auditing, the Workflow Administration Console sends the configuration to the workflow server, and then to the workflow runtime database where all the audit configurations are stored. The Workflow Administration Console retrieves data from the workflow runtime database and populates it in the console when required.
Configure Audit Events Overview 175

176 Configure Audit Events Overview

22 22Configuring Audit Events
Audit event logs allow you to provide evidence that you are complying with regulations. The Workflow Administration Console logs the events in Common Event Format (CEF) that enables you to collect and aggregate the data for further analysis. Depending on your audit configuration, the Workflow Administration Console sends audit event information to one of these locations:
Tomcat Saves the audit events in the catalina.out file.
Syslog Saves the audit events in the syslog server. If the syslog server is not reachable the audit events are saved in the cache file that is configured.
File Saves the audit events in the file that is configured in the specified directory.
JDBC Saves the audit events in the configured database, such as, Postgres, MSSQL, Oracle, or Vertica.
“Enabling and Disabling the Audit Configuration” on page 177 “Audit Log Events” on page 178
Enabling and Disabling the Audit ConfigurationYou can enable one or all the audit configurations as per your requirements. If you enable all the audit configuration options, the Workflow Administration Console saves the audit events in all the locations.
To enable or disable the audit configuration:
1 Log in to the Workflow Administration Console, then select Configuration > Audit Configuration.2 Select the location where you want to save the audit events.
After you select, the Workflow Administration Console automatically saves your selection. The table below lists the properties which you can modify for audit configuration.
Properties Description
Truncate-to-cef Truncates the audit messages when they cross the specified word limit.
Host Specifies the IP of the auditing server.
Protocol Specifies the protocol the Workflow Administration Console uses to establish communication with the auditing server. You can use either TCP or UDP.
Configuring Audit Events 177

Audit Log EventsAfter you enable the audit configuration, the Workflow Administration Console saves the following workflow events.
Keystore password Specifies the password for the keystore type.
Keystore type Specifies the keystore type.
Check TLS certificate expiration Checks if the TLS (Transport Layer Security) certificate has expired or not. If the certificate has expired, then the Workflow Administration Console saves the audit events in the cache file. If not, it saves the audit events in the keystore file.
Keystore file Specifies where the Workflow Administration Console saves the certificates.
Port Specifies the port number of the auditing server.
Cache file The Workflow Administration Console saves the audit events in a cache file when the syslog server is unreachable. After the syslog server becomes available, the Workflow Administration Console rolls back the events saved in the cache file to the syslog server.
Cache dir Specifies the directory where the cache file is located.
Filename prefix Specifies the prefix of the filename.
Directory Specifies the directory where the file is located.
Filename suffix Specifies the suffix of the filename.
Connection URL Specifies the database connection URL where the audit events are stored.
Username Specifies the user name of the database.
Tablename Specifies the database table where the audit events are stored.
Driver Specifies the driver that is used to connect to the database.
Password Specifies the password used to access the database.
Properties Description
Event ID Description
31520 Workflow Error
31521 Workflow Started
31522 Workflow Forwarded
178 Configuring Audit Events

31523 Workflow Reassigned
31524 Workflow Approved
31525 Workflow Refused
31526 Workflow Ended
31527 Workflow Claimed
31529 Workflow Denied
3152B Workflow Timedout
31533 Workflow Retracted
31534 Workflow Escalated
31535 Workflow Reminder Sent
31537 Workflow ResetPriority
31544 Workflow Returned
Event ID Description
Configuring Audit Events 179

180 Configuring Audit Events