VMware Horizon Client for Linux User Guide
46
VMware Horizon Client for Linux User Guide VMware Horizon Client for Linux 2106
-
Upload
khangminh22 -
Category
Documents
-
view
4 -
download
0
Transcript of VMware Horizon Client for Linux User Guide

VMware Horizon Client for Linux User Guide
VMware Horizon Client for Linux 2106

You can find the most up-to-date technical documentation on the VMware website at:
https://docs.vmware.com/
VMware, Inc.3401 Hillview Ave.Palo Alto, CA 94304www.vmware.com
Copyright ©
2021 VMware, Inc. All rights reserved. Copyright and trademark information.
VMware Horizon Client for Linux User Guide
VMware, Inc. 2

Contents
VMware Horizon Client for Linux User Guide 5
1 How Do I Log In? 6
2 Connecting to Remote Desktops and Published Applications 7Setting the Certificate Checking Mode in Horizon Client 7
Connect to a Remote Desktop or Published Application 8
Connect to Published Applications Using Unauthenticated Access 10
Log Off or Disconnect 11
Disconnecting From a Server 12
3 Using Remote Desktops and Published Applications 13Share Local Folders and Drives 13
Supported Languages 16
Copying and Pasting Text 16
Logging Copy and Paste Activity 16
Saving Documents in a Published Application 17
Switch Remote Desktops or Published Applications 17
Using the Seamless Window Feature 17
Sharing Remote Desktop Sessions 18
Invite a User to Join a Remote Desktop Session 18
Manage a Shared Remote Desktop Session 20
Join a Remote Desktop Session 20
Use Multiple Sessions of a Published Application From Different Client Devices 21
Using the URL Content Redirection Feature 22
Configure Lock Key Synchronization 23
4 Using External Devices 24Keyboards and Monitors 24
Use Display Scaling 26
Using DPI Synchronization 27
Select Specific Monitors to Display Published Applications 27
Customize the Display Resolution and Display Scaling for a Remote Desktop 28
Configure Lock Key Synchronization 29
Use an Input Method Editor with Published Applications 30
Printing from a Remote Desktop 30
Set Printing Preferences for the VMware Integrated Printing Feature 30
Printing From a Remote Desktop to a Local USB Printer 31
VMware, Inc. 3

Use USB Redirection to Connect USB Devices 32
USB Redirection Limitations 34
Using Serial Port Redirection 35
Using Scanners 37
Using Webcams and Microphones 39
When You Can Use a Webcam with the Real-Time Audio-Video Feature 39
Select a Default Microphone on a Linux Client System 39
Improve Mouse Performance in a Remote Desktop 40
5 Troubleshooting Horizon Client 41Restart a Remote Desktop 41
Reset Remote Desktops or Published Applications 42
Uninstall Horizon Client for Linux 43
Collect Horizon Client Log Information 44
Problems with Keyboard Input 45
What to Do If Horizon Client Quits Unexpectedly 46
Connecting to a Server in Workspace ONE Mode 46
VMware Horizon Client for Linux User Guide
VMware, Inc. 4
VMware Horizon Client for Linux User Guide
This document, VMware Horizon Client for Linux User Guide, explains how to use VMware Horizon® Client™ for Linux to connect to and use remote desktops and published applications.
Horizon Client communicates with a server, which acts as a broker between the client device and remote desktops and published applications. You enter credentials into Horizon Client, the server authenticates your credentials, and then the server finds the remote desktops and published applications that you are entitled to use.
For information about the software installed on your remote desktops, contact your system administrator.
This document assumes that Horizon Client for Linux is already installed and configured on your client system. For information about installing and configuring Horizon Client for Linux, see the VMware Horizon Client for Linux Installation and Setup Guide document.
VMware, Inc. 5

How Do I Log In? 1Before you can log in and connect to a remote desktop or published application, a system administrator at your company must set up your user account. If Horizon Client prompts you for a server name and domain, your system administrator must tell you the server name to type and the domain to select.
If you do not know your user name or password, or how to reset your password, contact the system administrator at your company.
When you are ready to log in and get started, see Connect to a Remote Desktop or Published Application.
VMware, Inc. 6

Connecting to Remote Desktops and Published Applications 2Horizon Client communicates with a server, which acts as a broker between the client device and remote desktops and published applications. You enter credentials into Horizon Client, the server authenticates your credentials, and then the server finds the remote desktops and published applications that you are entitled to use.
This chapter includes the following topics:
n Setting the Certificate Checking Mode in Horizon Client
n Connect to a Remote Desktop or Published Application
n Connect to Published Applications Using Unauthenticated Access
n Log Off or Disconnect
n Disconnecting From a Server
Setting the Certificate Checking Mode in Horizon Client
Server certificate checking occurs for connections between Horizon Client and a server. A certificate is a digital form of identification, similar to a passport or a driver's license.
Your system administrator might ask you to set the certificate checking mode in Horizon Client to make sure that you can successfully connect to a server. At some companies, an administrator might set the certificate checking mode and prevent you from changing it in Horizon Client.
If a Horizon administrator has allowed it, you can set the certificate checking mode. To set the certificate checking mode, start Horizon Client and select File > Preferences from the menu bar. You can select one of the following options.
n Never connect to untrusted servers. This setting means that you cannot connect to the server if any of the certificate checks fail. An error message lists the checks that failed.
n Warn before connecting to untrusted servers. This setting means that you can click Continue to ignore the warning if a certificate check fails because the server uses a self-signed certificate. For self-signed certificates, the certificate name is not required to match the server name that you entered in Horizon Client. You can also receive a warning if the certificate has expired.
n Do not verify server identity certificates. This setting means that no certificate checking occurs.
VMware, Inc. 7

Using an SSL Proxy Server
If you use an SSL proxy server to inspect traffic sent from the client environment to the Internet, enable the Allow connection via an SSL Proxy setting. This setting allows certificate checking for secondary connections through an SSL proxy server and applies to both Blast Secure Gateway and secure tunnel connections. If you use an SSL proxy server and enable certificate checking, but you do not enable the Allow connection via an SSL Proxy setting, connections fail because of mismatched thumbprints. The Allow connection via an SSL Proxy setting is not available if you enable the Do not verify server identity certificates option. When the Do not verify server identity certificates option is enabled, Horizon Client does not verify the certificate or thumbprint and an SSL proxy is always allowed.
To allow VMware Blast connections through a proxy server, see "Configure VMware Blast Options" in the VMware Horizon Client for Linux Installation and Setup Guide document.
Connect to a Remote Desktop or Published Application
After logging in to a server, you can connect to the remote desktops and published applications that you are authorized to use.
If your administrator has allowed it, you can configure the certificate checking mode for the TLS/SSL certificate presented by Connection Server. To determine which mode to use, see Setting the Certificate Checking Mode in Horizon Client.
If you want to use an account configured with unauthenticated access to start published applications, see Connect to Published Applications Using Unauthenticated Access for information.
Prerequisites
Obtain the following information from your Horizon administrator:
n Instructions about whether to turn on a VPN (virtual private network) connection.
n Server name to use for connecting to the server.
n If the port is not 443, the port number to use for connecting to the server.
n Credentials for logging in, such as an Active Directory user name and password, RSA SecurID user name and passcode, RADIUS authentication credentials, or smart card personal identification number (PIN).
n Domain name for logging in.
Procedure
1 If a VPN connection is required, turn on the VPN.
2 Either open a terminal window and enter vmware-view or search the applications for VMware
Horizon Client, and double-click the icon.
VMware Horizon Client for Linux User Guide
VMware, Inc. 8

3 Connect to a server.
Option Action
Connect to a new server Double-click the + Add Server button, or click New Server on the menu bar, enter the name of a server as instructed by your system administrator, and click Connect.
Connect to an existing server Double-click the server icon, or right-click the server icon and select Connect.
Connections between Horizon Client and the server always use TLS. The default port for TLS connections is 443. If the server is not configured to use the default port, use the format servername:port, for example, view.company.com:1443.
You might see a message that you must confirm before the login dialog box appears.
4 If you are prompted for RSA SecurID credentials or RADIUS authentication credentials, enter the credentials and click Login.
5 If you are prompted for a user name and password, supply Active Directory credentials.
a Type the user name and password of a user who is entitled to use at least one desktop or application pool.
If the Domain drop-down menu is disabled, you must type the user name as domain\username or [email protected].
b (Optional) Select a domain value from the Domain drop-down menu.
c Click Login.
6 (Optional) To configure display settings for a remote desktop, right-click the remote desktop icon and select Settings.
Option Action
Select a display protocol If a Horizon administrator has allowed it, use the Connect Via drop-down menu to select the display protocol.
Select a display layout Use the Display drop-down menu to select a window size or to use multiple monitors.
7 (Optional) To mark the remote desktop or published application as a favorite, right-click the
remote desktop or published application icon and select Mark as Favorite from the context menu that appears.
A star icon appears in the upper-right corner of the remote desktop or published application name. The next time you log in, you can click the Show Favorites button to find this application or desktop quickly.
VMware Horizon Client for Linux User Guide
VMware, Inc. 9

8 Double-click a remote desktop or application to connect.
If you are connecting to a session-based remote desktop, which is hosted on a Microsoft RDS host, and if the desktop is already set to use a different display protocol, you cannot connect immediately. You are prompted to either use the protocol that is set or have the system log you off the remote operating system so that a connection can be made with the protocol you selected.
Results
After you are connected, the client window appears.
Connect to Published Applications Using Unauthenticated Access
You can connect to published applications using an unauthenticated access account with Horizon Client.
Prerequisites
Obtain the following information from your Horizon administrator:
n Instructions about whether to turn on a VPN (virtual private network) connection.
n Name of the server on which you have unauthenticated access to remote applications.
n If the port is not 443, the port number to use for connecting to the server.
n An Unauthenticated Access user account to use for logging in anonymously, if necessary.
n Instructions about whether to select Log in anonymously using Unauthenticated Access in Horizon Client.
If your system administrator instructs you to configure the certificate checking mode, see Setting the Certificate Checking Mode in Horizon Client.
Procedure
1 If a VPN connection is required, turn on the VPN.
2 Either open a terminal window and enter vmware-view or search the applications for VMware
Horizon Client, and double-click the icon.
3 In the Horizon Client home screen, select File > Log in anonymously using Unauthenticated Access from the menu bar, if it is not already selected.
4 Connect to the Connection Server that is configured for unauthenticated access.
n If the server that you need has not yet been added, double-click the + Add Server button, or click the New Server button in the menu bar. Then enter the name of the Connection Server and click Connect.
VMware Horizon Client for Linux User Guide
VMware, Inc. 10
n If the server that you need is displayed in the Horizon Client home screen, right-click the icon for the server and select Connect from the context menu.
You might see a message that you must confirm before the login dialog box appears.
5 In the Server Login dialog box, specify the unauthenticated access account to use.
a Select a user account from the drop-down menu of existing unauthenticated access accounts.
The default user account has (default) displayed next to it.
b (Optional) Click Always use this account if you want to bypass the Server Login dialog box the next time you connect to the server.
c Click OK.
The application selector window appears and displays the published applications that the unauthenticated access account is authorized to use.
Note If you selected the Always use this account option during a previous unauthenticated access login session, you are not prompted for the account to use for the current unauthenticated access session. To deselect this option, right-click the icon for the server in the Horizon Client home screen, and select Forget the saved Unauthenticated Access account from the context menu.
6 To start an application, double-click the application icon.
The application window appears.
7 Exit the application after you are done using it.
The Disconnect from Session dialog box appears asking if you want to disconnect from the server.
Results
If the session timeout specified by your Horizon administrator is reached, the session is automatically disconnected from the server.
Log Off or Disconnect
If you disconnect from a remote desktop without logging off, applications in the remote desktop might remain open. You can also disconnect from a server and leave published applications running.
You can log off from a remote desktop even if you do not have the remote desktop open. This feature has the same result as sending Ctrl+Alt+Del to the remote desktop and then clicking Log Off.
VMware Horizon Client for Linux User Guide
VMware, Inc. 11

Procedure
u Disconnect without logging off.
Option Action
Also quit Horizon Client Click the Close button in the corner of the window or select File > Quit from the menu bar.
Select a different remote desktop on the same server
Select Desktop > Disconnect from the menu bar.
Select a remote desktop on a different server
Select File > Disconnect from server from the menu bar.
Note A Horizon administrator can configure remote desktops to log off automatically when they are disconnected. In that case, any open applications in the remote desktop are stopped.
u Log off and disconnect from a remote desktop.
Option Action
From within the remote desktop Use the Windows Start menu to log off.
From the menu bar Select Desktop > Disconnect and Log off.
If you use this procedure, files that are open on the remote desktop are closed without being saved first.
u Log off when you do not have a remote desktop open.
a From the Home screen with desktop shortcuts, select the desktop and select Desktop > Log off from the menu bar.
b If prompted, supply credentials for accessing the remote desktop.
If you use this procedure, files that are open on the remote desktop are closed without being saved first.
Disconnecting From a Server
After you have finished using a remote desktop or published application, you can disconnect from the server.
To disconnect from a server, click the Disconnect from Server icon in the upper-left corner of the desktop and application selector window, or select File > Disconnect from Server in the Horizon Client menu bar, or press Ctrl+O.
VMware Horizon Client for Linux User Guide
VMware, Inc. 12

Using Remote Desktops and Published Applications 3Horizon Client includes additional features to help you use remote desktops and published applications on your local client device.
This chapter includes the following topics:
n Share Local Folders and Drives
n Supported Languages
n Copying and Pasting Text
n Saving Documents in a Published Application
n Switch Remote Desktops or Published Applications
n Using the Seamless Window Feature
n Sharing Remote Desktop Sessions
n Use Multiple Sessions of a Published Application From Different Client Devices
n Using the URL Content Redirection Feature
n Configure Lock Key Synchronization
Share Local Folders and Drives
With the client drive redirection feature, you can share folders and drives on the local client system with remote desktops and published applications.
Shared drives can include mapped drives and USB storage devices.
The client drive redirection feature does not support sharing Microsoft OneDrive, Google Drive, and enterprise file storage.
In a Windows remote desktop, shared folders and drives appear in the This PC folder or in the Computer folder, depending on the Windows operating system version. In a published application, such as Notepad, you can browse to and open a file in a shared folder or drive.
The client drive redirection feature requires that the following library files be installed. On some thin-client machines, these library files might not be installed by default.
n libsigc-2.0.so.0
VMware, Inc. 13

n libglibmm-2.4.so.1
The client drive redirection settings apply to all remote desktops and published applications.
Prerequisites
To share folders and drives with a remote desktop or published application, a Horizon administrator must enable the client drive redirection feature.
Procedure
1 Open the Settings dialog box with the Sharing panel displayed.
Option Description
From the desktop and application selector window
Right-click a remote desktop or published application icon, select Settings, and click Drive Sharing. Alternatively, select Connection > Settings from the menu bar and click Drive Sharing.
From the Sharing dialog box when you connect to a remote desktop or published application
Click Allow to share, or Deny to not share, your home directory.
From within a remote desktop Select Connection > Settings from the menu bar and click Drive Sharing.
2 Configure the client drive redirection settings.
Option Action
Share a specific folder or drive with remote desktops and published applications
Click the Add button, browse to and select the folder or drive to share, and click Open.
Note If a USB device is already connected to a remote desktop or published application with the USB redirection feature, you cannot share a folder on the USB device.
Stop sharing a specific folder or drive
Select the folder or drive in the Folder list and click the Remove button.
Give remote desktops and published applications access to files in your home directory
Select the Share your home folder: home-directory check box.
VMware Horizon Client for Linux User Guide
VMware, Inc. 14

Option Action
Share USB storage devices with remote desktops and published applications
Toggle the Allow auto access to removable storage option to on. The client drive redirection feature shares all USB storage devices inserted in your client system and all FireWire and Thunderbolt-connected external drives automatically. Selecting a specific device to share is not necessary.
Note USB storage devices already connected to a remote desktop or published application with the USB redirection feature are not shared.
If this option is toggled off, you can use the USB redirection feature to connect USB storage devices to remote desktops and published applications.
Do not show the Sharing dialog box when you connect to a remote desktop or published application
Select the Do not show dialog when connecting to a desktop or application check box.
If this check box is deselected, the Sharing dialog box appears the first time you connect to a remote desktop or published application. For example, if you log in to a server and connect to a remote desktop, you see the Sharing dialog box. If you then connect to another remote desktop or published application, you do not see the dialog box. To see the dialog box again, you must disconnect from the server and log in again.
3 Click Apply.
What to do next
Verify that you can see the shared folders from within the remote desktop or published application.
n In a Windows remote desktop, open File Explorer and look in the This PC folder, or open Windows Explorer and look in the Computer folder, depending on the Windows operating system version.
n In a published application, select File > Open or File > Save As and navigate to the folder or drive.
The folders and drives that you selected for sharing might use one (or more) of the following naming conventions.
Naming Convention Example
folder-name on desktop-name jsmith on JSMITH-W03
folder-name (drive-number:) jsmith (Z:)
folder-name on desktoptop-name (drive-number:) jsmith on JSMITH-W03 (Z:)
For some remote desktops, a redirected folder can have two entrances, such as under Devices and drives and Network locations in Windows 10, and both entrances can appear at the same time. If all the volume labels (from A: through Z:) are already in use, the redirected folder has only one entrance.
VMware Horizon Client for Linux User Guide
VMware, Inc. 15

Supported Languages
The user interface and documentation are available in English, Japanese, French, German, Simplified Chinese, Traditional Chinese, Korean, and Spanish.
Copying and Pasting Text
You can copy and paste text to and from remote desktops and published applications. A Horizon administrator can configure this feature so that copy and paste operations are allowed only from the client system to a remote desktop or published application, or only from a remote desktop or published application to the client system, or both, or neither.
Copying and pasting from the client system (where Horizon Client is installed) to a remote desktop or published application, and conversely, is the same as copying and pasting between applications on the same system. For example, you can press Ctrl+C to copy text and press Ctrl+V to paste text.
This feature is available if you use the VMware Blast or PCoIP display protocol.
You can copy text from Horizon Client to a remote desktop or published application, or the reverse, but the pasted text is plain text.
You cannot copy and paste graphics. You also cannot copy and paste files between a remote desktop and the file system on the client computer.
Logging Copy and Paste Activity
When you enable the clipboard audit feature, Horizon Agent records information about copy and paste activity in an event log on the agent machine. The clipboard audit feature is disabled by default.
To enable the clipboard audit feature, you must configure the Configure clipboard audit group policy setting.
You can optionally configure the Whether block clipboard redirection to client side when client doesn't support audit group policy setting to specify whether to block clipboard redirection to clients that do not support the clipboard audit feature.
For more information about the group policy settings for clipboard redirection, see the Configuring Remote Desktop Features in Horizon document.
This feature requires Horizon Agent 7.7 or later on the agent machine.
The event log where information about copy and paste activity is recorded is named VMware Horizon RX Audit. To view the event log on the agent machine, use the Windows event viewer. To view the event log from a centralized location, configure VMware Log Insight or Windows Event Collector. For information about Log Insight, go to https://docs.vmware.com/en/vRealize-Log-Insight/index.html. For information about Windows Event Collector, see the Microsoft documentation.
VMware Horizon Client for Linux User Guide
VMware, Inc. 16

Saving Documents in a Published Application
With certain published applications, such as Microsoft Word or WordPad, you can create and save documents. Where these documents are saved depends on your company's network environment. For example, your documents might be saved to a home share mounted on your local computer.
Contact your system administrator to find out where documents created in published applications are saved in your environment.
Switch Remote Desktops or Published Applications
If you are connected to a remote desktop, you can switch to another remote desktop. You can also connect to a published application while you are connected to a remote desktop.
Procedure
u Select a remote desktop or application from the same server or a different server.
Option Action
Choose a different desktop or application on the same server
Perform one of the following actions:
n If you are logged in to a remote desktop and you want to switch to another remote desktop or application that is already running on your client, select Connection > Running Items and select the desktop or application from the list.
n If you are logged in to a remote desktop and you want to switch to another desktop or application that is not running, select File > Return to Desktop and Application List from the menu bar and then launch the desktop or application from the selector window.
n From the desktop and application selector window, double-click the icon for the other desktop or application. That desktop or application opens in a new window so that you have multiple windows open, and you can switch between them.
Choose a different desktop or application on a different server
Perform either of the following actions:
n If you want to keep the current desktop or application open and also connect to a remote desktop or application on another server, start a new instance of Horizon Client and connect to the other desktop or application.
n If you want to close the current desktop and connect to a desktop on another server, go to the desktop selector window, click the Disconnect icon in the upper-left corner of the window, and confirm that you want to log off of the server. You will be disconnected from the current server and any open desktop or application sessions. You can then connect to a different server.
Using the Seamless Window Feature
With the Seamless Window feature, you can interact with an application that is running on a remote desktop as if it was a locally running application.
VMware Horizon Client for Linux User Guide
VMware, Inc. 17

The Seamless Window feature is enabled by default and available for all supported Linux systems.
Sharing Remote Desktop Sessions
With the Session Collaboration feature, you can invite other users to join an existing remote desktop session. A remote desktop session that is shared in this way is called a collaborative session. The user that shares a session with another user is called the session owner, and the user that joins a shared session is called a session collaborator.
A Horizon administrator must enable the Session Collaboration feature.
For information about how the Session Collaboration feature behaves at your company, contact your system administrator.
Invite a User to Join a Remote Desktop Session
With the Session Collaboration feature, you can invite users to join a remote desktop session by sending collaboration invitations by email, in an instant message (Windows remote desktops only), or by copying a link to the clipboard and forwarding the link to users.
You can invite only users that belong to a domain that the server allows for authentication. You can invite up to five users by default. A Horizon administrator can change the maximum number of users that you can invite.
The Session Collaboration feature has the following limitations.
n If you have multiple monitors, only the primary monitor is shown to session collaborators.
n You must select the VMware Blast display protocol when you create a remote desktop session to share. The Session Collaboration feature does not support PCoIP or RDP sessions.
n Anonymous collaboration is not supported. Session collaborators must be identifiable through Horizon-supported authentication mechanisms.
n Session collaborators must have Horizon Client for Windows, Mac, or Linux installed, or they must use HTML Access.
n If a session collaborator has an unsupported version of Horizon Client, an error message appears when the user clicks a collaboration link.
n You cannot use the Session Collaboration feature to share published application sessions.
Prerequisites
n The Session Collaboration feature must be enabled and configured.
n To use the email invitation method, an email application must be installed.
n To use the IM invitation method for a Windows remote desktop, Skype for Business must be installed and configured.
VMware Horizon Client for Linux User Guide
VMware, Inc. 18

Procedure
1 Connect to a remote desktop for which the Session Collaboration feature is enabled.
You must use the VMware Blast display protocol.
2 In the system tray in the remote desktop, click the VMware Horizon Collaboration icon, for
example, .
The collaboration icon might look different, depending on the operating system version.
3 When the VMware Horizon Collaboration dialog box opens, enter the user name (for example, testuser or domain\testuser) or the email address of the user that you want to join the
remote desktop session.
The first time you enter the user name or email address of a particular user, you must click Look up "user", enter a comma (,), or press the Enter key to validate the user. For Windows remote desktops, the Session Collaboration feature remembers the user the next time you enter the user's user name or email address.
4 Select an invitation method.
Not all invitation methods might be available.
Option Action
Email Copies the collaboration invitation to the clipboard and opens a new email message in the default email application. An email application must be installed to use this invitation method.
IM (Windows remote desktops only) Copies the collaboration invitation to the clipboard and opens a new window in Skype for Business. Press Ctrl+V to paste the link into the Skype for Business window. Skype for Business must be installed and configured to use this invitation method.
Copy Link Copies the collaboration invitation to the clipboard. You must manually open another application, such as Notepad, and press Ctrl+V to paste the invitation.
Results
After you send an invitation, the VMware Horizon Collaboration icon also appears on the desktop and the Session Collaboration user interface turns into a dashboard that shows the current state of the collaboration session and enables you to take certain actions.
When a session collaborator accepts your invitation to join a Windows remote desktop session, the Session Collaboration feature notifies you and a red dot appears on the VMware Horizon Collaboration icon in the system tray. When a session collaborator accepts your invitation to join a Linux remote desktop session, a notification appears in the primary session desktop.
What to do next
Manage the remote desktop session in the VMware Horizon Collaboration dialog box. See Manage a Shared Remote Desktop Session.
VMware Horizon Client for Linux User Guide
VMware, Inc. 19

Manage a Shared Remote Desktop Session
After you send a session collaboration invitation, the Session Collaboration user interface turns into a dashboard that shows the current state of the shared remote desktop session (collaborative session) and enables you to take certain actions.
A Horizon administrator can configure a remote desktop to prevent the hand off of control to a session collaborator.
Prerequisites
Start a collaborative session. See Invite a User to Join a Remote Desktop Session.
Procedure
1 In the remote desktop, click the VMware Horizon Collaboration icon in the system tray.
The names of all session collaborators appear in the Name column and their status appears in the Status column.
2 Use the VMware Horizon Session Collaboration dashboard to manage the collaborative session.
Option Action
Revoke an invitation or remove a collaborator
Click Remove in the Status column.
Hand off control to a session collaborator
After the session collaborator joins the session, toggle the switch in the Control column to On.
To resume control of the session, double-click or press any key. The session collaborator can also give back control by toggling the switch in the Control column to Off, or by clicking the Give Back Control button.
Add a collaborator Click Add Collaborators.
End the collaborative session Click End Collaboration. All active collaborators are disconnected.
In Windows remote desktops, you can also end the collaborative session by clicking the Stop button next to the VMware Horizon Session Collaboration icon. The Stop button is not available in Linux remote desktops.
Join a Remote Desktop Session
With the Session Collaboration feature, you can click the link in a collaboration invitation to join a remote desktop session. The link might be in an email or instant message, or in a document that the session owner forwards to you. Alternatively, you can log in to the server and double-click the icon for the session in the remote desktop and application selector window.
This procedure describes how to join a remote desktop session from a collaboration invitation.
When you join a remote desktop session with the Session Collaboration feature, you cannot use the following features in the remote desktop session.
n USB redirection
VMware Horizon Client for Linux User Guide
VMware, Inc. 20

n Real-Time Audio-Video (RTAV)
n Multimedia redirection
n Client drive redirection
n Smart card redirection
n Clipboard redirection
You also cannot change the remote desktop resolution in the remote desktop session.
Prerequisites
To join a remote desktop session with the Session Collaboration feature, you must have Horizon Client for Windows, Mac, or Linux installed on the client system, or you must use HTML Access.
Procedure
1 Click the link in the collaboration invitation.
Horizon Client opens on the client system.
2 Enter your credentials to log in to Horizon Client.
After you are successfully authenticated, the collaborative session begins and you can see the session owner's remote desktop. If the session owner transfers mouse and keyboard control to you, you can use the remote desktop.
3 To return mouse and keyboard control to the session owner, click the VMware Horizon Collaboration icon in the system tray and toggle the switch in the Control column to Off, or click the Give Back Control button.
4 To leave the collaborative session, click Options > Disconnect.
Use Multiple Sessions of a Published Application From Different Client Devices
When multi-session mode is enabled for a published application, you can use multiple sessions of the same published application when you log on to the server from different client devices.
For example, if you open a published application in multi-session mode on client A, and then open the same published application on client B, the published application remains open on client A and a new session of the published application opens on client B. By comparison, when multi-session mode is disabled (single-session mode), the published application session on client A disconnects and reconnects on client B.
The multi-session mode feature has the following limitations.
n Multi-session mode does not work for applications that do not support multiple instances, such as Skype for Business.
n If the application session is disconnected while you are using a published application in multi-session mode, you are logged off automatically and any unsaved data is lost.
VMware Horizon Client for Linux User Guide
VMware, Inc. 21

Prerequisites
A Horizon administrator must enable multi-session mode for the published application. You cannot enable or change the multi-session mode for a published application unless a Horizon administrator allows it.
Procedure
1 Connect to a server.
2 Click the Settings button (gear icon) in the upper-right corner of the desktop and application selector window and select Multi-Launch.
If no published applications are available to use in multi-session mode, the Multi-Launch setting does not appear.
3 Select the published applications that you want to use in multi-session mode and click OK.
If a Horizon administrator has enforced multi-session mode for a published application, you cannot change this setting.
Using the URL Content Redirection Feature
A Horizon administrator can configure URL links that you click inside a remote desktop or published application to open in the default browser on the local client system. The URL link might be to a web page, a phone number, an email address, or another type of link. This feature is called URL Content Redirection.
A Horizon administrator can also configure URL links that you click inside a browser or application on the local client system to open in a remote desktop or published application. If Horizon Client is not already open you click the URL link, it starts and prompts you to log in.
A Horizon administrator might set up the URL Content Redirection feature for security purposes. For example, if you are at work and click a link that points to a URL outside your company network, the link might be more safely opened in a published application. An administrator can configure which published application opens the link.
Each company configures its own URL Content Redirection policies. If you have questions about how the URL Content Redirection feature behaves at your company, contact your system administrator.
Using URL Content Redirection with Firefox
The first time a URL is redirected from the Firefox browser on the client system, you are prompted to open the URL in Horizon Client. If you select the option to remember this choice and always allow links to be opened with Horizon Client (recommended) and then click Open Link, this prompt does not appear again.
VMware Horizon Client for Linux User Guide
VMware, Inc. 22
Using URL Content Redirection with Chrome
If the Chrome browser prompts you to enable the VMware Horizon URL Content Redirection Helper extension, choose the option to enable the extension so that you can use the URL Content Redirection feature with the Chrome browser. If you do not enable the extension, URLs clicked in Chrome are not redirected.
Configure Lock Key Synchronization
You can configure Horizon Client to synchronize the toggle states of the Num Lock, Scroll Lock, and Caps Lock keys from the client system to a remote desktop, and from a remote desktop to the client system. The configuration applies globally to all the remote desktops under a given server connection.
Procedure
1 Start Horizon Client and connect to a server.
2 Open the Settings dialog box for a remote desktop.
n Click the Settings (gear) icon in the upper-right corner of the desktop and application selection window and select any remote desktop in the left pane.
n Right-click any remote desktop in the desktop and application selection window and select Settings.
3 To enable the lock key synchronization feature, select the Automatically synchronize the keypad, scroll and caps lock keys check box and click Close.
Note If the remote desktop does not support the capability to synchronize the lock key state, the Automatically synchronize the keypad, scroll and caps lock keys check box appears dimmed and cannot be selected.
Results
The lock key synchronization feature is enabled for all the remote desktops under the server connection.
If you deselect the Automatically synchronize the keypad, scroll and caps lock keys check box, the lock key synchronization feature is disabled for all the remote desktops under the server connection.
VMware Horizon Client for Linux User Guide
VMware, Inc. 23

Using External Devices 4You can use keyboards, displays, microphones, and other external devices with remote desktops and published applications.
This chapter includes the following topics:
n Keyboards and Monitors
n Printing from a Remote Desktop
n Use USB Redirection to Connect USB Devices
n Using Serial Port Redirection
n Using Scanners
n Using Webcams and Microphones
n Improve Mouse Performance in a Remote Desktop
Keyboards and Monitors
You can use multiple monitors and all types of keyboards with a remote desktop. Certain settings ensure the best possible user experience.
Best Practices for Using Multiple Monitors
The following are recommendations for successfully using multiple monitors with a remote desktop:
n Define the primary monitor as the bottom-left-most monitor.
n Enable Xinerama. If you do not enable Xinerama, the primary display might be identified incorrectly.
n The menu bar appears on the top-left-most monitor. For example, if you have two monitors side by side and the top of the left monitor is lower than the top of the right monitor, the menu bar appears on the right monitor because the right monitor is still the top-left-most monitor.
n You can use up to four monitors if you have enough video RAM.
To use more than two monitors to display your remote desktop on an Ubuntu client system, you must configure the kernel.shmmax setting correctly. Use the following formula:
VMware, Inc. 24
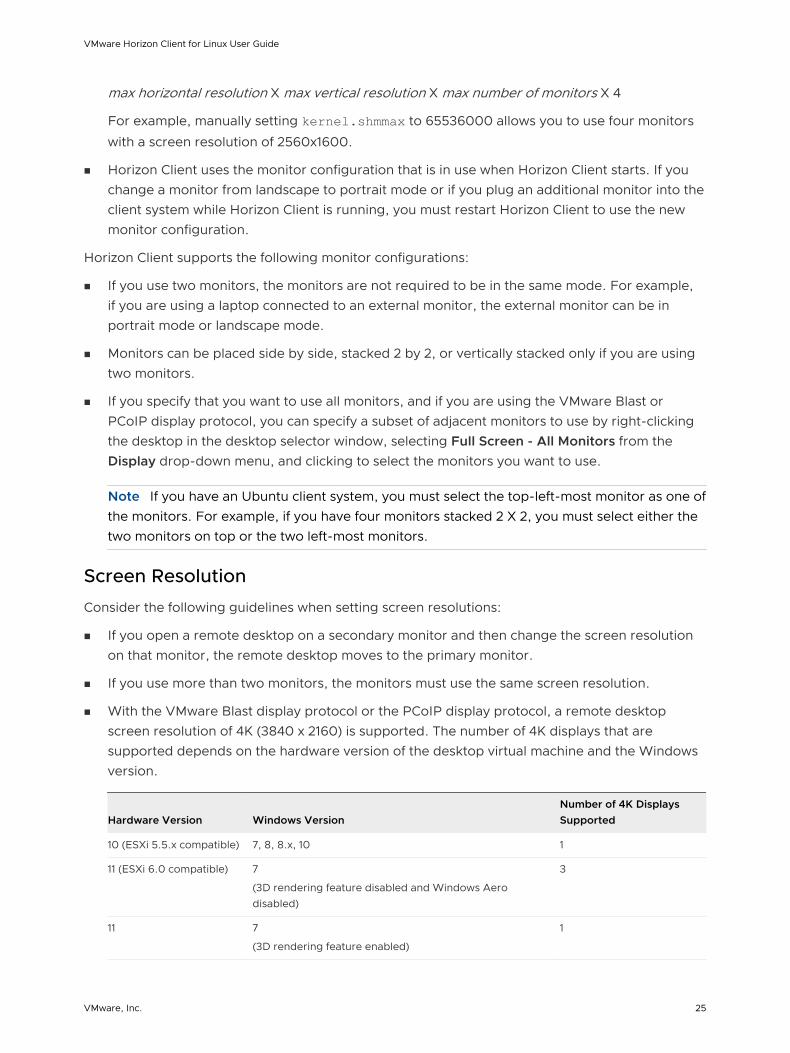
max horizontal resolution X max vertical resolution X max number of monitors X 4
For example, manually setting kernel.shmmax to 65536000 allows you to use four monitors
with a screen resolution of 2560x1600.
n Horizon Client uses the monitor configuration that is in use when Horizon Client starts. If you change a monitor from landscape to portrait mode or if you plug an additional monitor into the client system while Horizon Client is running, you must restart Horizon Client to use the new monitor configuration.
Horizon Client supports the following monitor configurations:
n If you use two monitors, the monitors are not required to be in the same mode. For example, if you are using a laptop connected to an external monitor, the external monitor can be in portrait mode or landscape mode.
n Monitors can be placed side by side, stacked 2 by 2, or vertically stacked only if you are using two monitors.
n If you specify that you want to use all monitors, and if you are using the VMware Blast or PCoIP display protocol, you can specify a subset of adjacent monitors to use by right-clicking the desktop in the desktop selector window, selecting Full Screen - All Monitors from the Display drop-down menu, and clicking to select the monitors you want to use.
Note If you have an Ubuntu client system, you must select the top-left-most monitor as one of the monitors. For example, if you have four monitors stacked 2 X 2, you must select either the two monitors on top or the two left-most monitors.
Screen Resolution
Consider the following guidelines when setting screen resolutions:
n If you open a remote desktop on a secondary monitor and then change the screen resolution on that monitor, the remote desktop moves to the primary monitor.
n If you use more than two monitors, the monitors must use the same screen resolution.
n With the VMware Blast display protocol or the PCoIP display protocol, a remote desktop screen resolution of 4K (3840 x 2160) is supported. The number of 4K displays that are supported depends on the hardware version of the desktop virtual machine and the Windows version.
Hardware Version Windows VersionNumber of 4K Displays Supported
10 (ESXi 5.5.x compatible) 7, 8, 8.x, 10 1
11 (ESXi 6.0 compatible) 7
(3D rendering feature disabled and Windows Aero disabled)
3
11 7
(3D rendering feature enabled)
1
VMware Horizon Client for Linux User Guide
VMware, Inc. 25
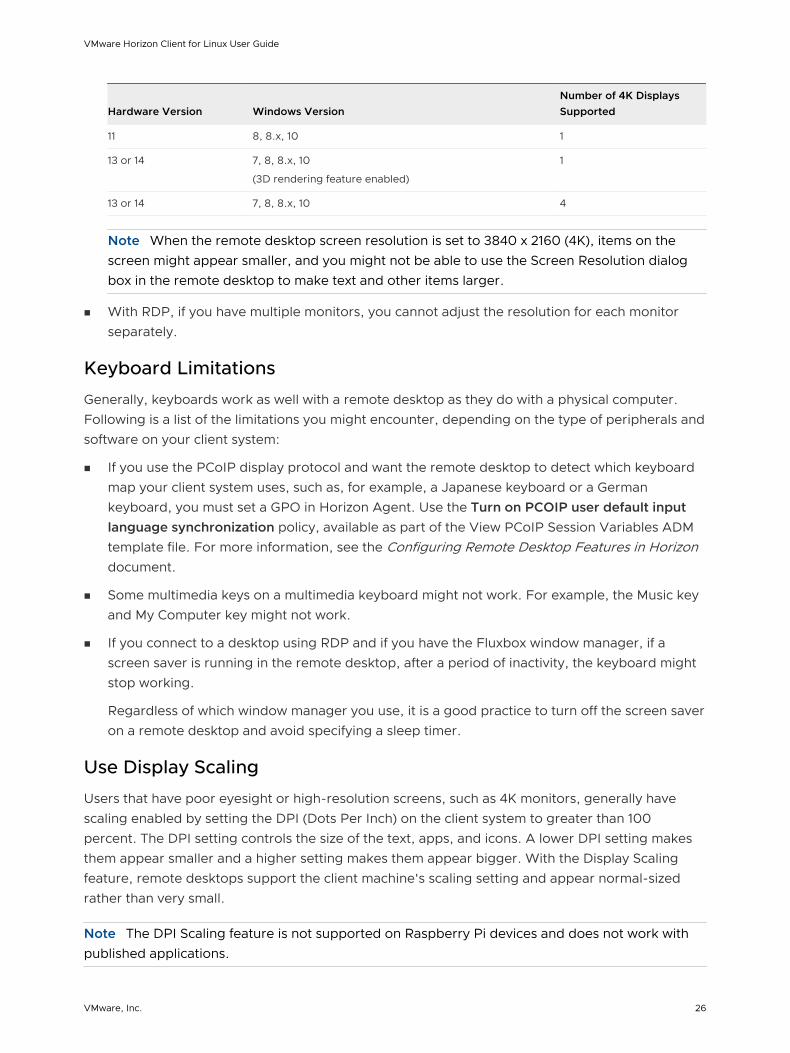
Hardware Version Windows VersionNumber of 4K Displays Supported
11 8, 8.x, 10 1
13 or 14 7, 8, 8.x, 10
(3D rendering feature enabled)
1
13 or 14 7, 8, 8.x, 10 4
Note When the remote desktop screen resolution is set to 3840 x 2160 (4K), items on the screen might appear smaller, and you might not be able to use the Screen Resolution dialog box in the remote desktop to make text and other items larger.
n With RDP, if you have multiple monitors, you cannot adjust the resolution for each monitor separately.
Keyboard Limitations
Generally, keyboards work as well with a remote desktop as they do with a physical computer. Following is a list of the limitations you might encounter, depending on the type of peripherals and software on your client system:
n If you use the PCoIP display protocol and want the remote desktop to detect which keyboard map your client system uses, such as, for example, a Japanese keyboard or a German keyboard, you must set a GPO in Horizon Agent. Use the Turn on PCOIP user default input language synchronization policy, available as part of the View PCoIP Session Variables ADM template file. For more information, see the Configuring Remote Desktop Features in Horizon document.
n Some multimedia keys on a multimedia keyboard might not work. For example, the Music key and My Computer key might not work.
n If you connect to a desktop using RDP and if you have the Fluxbox window manager, if a screen saver is running in the remote desktop, after a period of inactivity, the keyboard might stop working.
Regardless of which window manager you use, it is a good practice to turn off the screen saver on a remote desktop and avoid specifying a sleep timer.
Use Display Scaling
Users that have poor eyesight or high-resolution screens, such as 4K monitors, generally have scaling enabled by setting the DPI (Dots Per Inch) on the client system to greater than 100 percent. The DPI setting controls the size of the text, apps, and icons. A lower DPI setting makes them appear smaller and a higher setting makes them appear bigger. With the Display Scaling feature, remote desktops support the client machine's scaling setting and appear normal-sized rather than very small.
Note The DPI Scaling feature is not supported on Raspberry Pi devices and does not work with published applications.
VMware Horizon Client for Linux User Guide
VMware, Inc. 26

In a multiple-monitor setup, using display scaling does not affect the number of monitors and the maximum resolutions that Horizon Client supports. When display scaling is allowed and is in effect, scaling is based on the DPI setting of the system.
Using DPI Synchronization
The DPI Synchronization feature ensures that the DPI value in a remote session changes to match the DPI value of the client system when you connect to a remote desktop or published application.
Note The DPI synchronization feature is not supported on Raspberry Pi devices.
When the DPI Synchronization feature and the Display Scaling feature are both enabled, only one feature takes effect at any given time. Display scaling occurs only when DPI synchronization has not yet taken effect (that is, before the DPI setting on the remote desktop matches the DPI setting on the client system), and display scaling stops working after the DPI settings match.
The DPI synchronization feature is enabled by default, but a Horizon administrator can deactivate it.
Tips for Using DPI Synchronization
Use the following guidelines when working with DPI Synchronization.
n If you change the DPI setting on the client system, but the DPI setting does not change in the remote desktop, you might need to log out and log in again to make Horizon Client aware of the new DPI setting on the client system.
n If you start a remote session on a client system that has a DPI setting of more than 100 percent, and then use the same session on another client system that has a different DPI setting of more than 100 percent, you might need to log out and log back in to the remote session on the second client system to make DPI synchronization work on the second client system.
Select Specific Monitors to Display Published Applications
If you have two or more monitors, you can select the monitors on which to display published application windows. For example, if you have three monitors, you can specify that published application windows appear on only two of those monitors.
You can select up to four adjacent monitors. The monitors can be side by side, or stacked vertically. For example, you might configure two rows of two monitors each.
Note For 4K displays, the following restrictions apply:
n For an application published on an RDS host, you can select up to four adjacent monitors.
n For an application published on a Windows 10-hosted desktop, you can select up to three adjacent monitors.
VMware Horizon Client for Linux User Guide
VMware, Inc. 27

Prerequisites
You must have two or more monitors.
Procedure
1 Start Horizon Client and connect to a server.
2 Click the Settings button (gear icon) in the upper-right corner of the desktop and application selection window.
3 Select Applications in the left pane of the Settings dialog box.
Thumbnails of the monitors that are currently connected to the client system appear under Display settings. The display topology matches the display settings on the client system.
4 To select or deselect a monitor on which to display published applications, click a thumbnail.
When you select a monitor, its thumbnail changes color. If you violate a display selection rule, a warning message appears.
Customize the Display Resolution and Display Scaling for a Remote Desktop
If an administrator has enabled this capability, you can use Horizon Client to customize the display resolution and display scaling for a remote desktop. The display resolution determines the clarity of the text and images. At higher resolutions, such as 1600 x 1200 pixels, items appear sharper. Display scaling, which is represented as a percentage, increases or decreases the size of text, icons, and navigation elements.
Custom display resolution and display scaling settings are stored only on the local client system. If you log in to the remote desktop from a different system, the settings are not applied.
This feature has the following limitations and considerations.
n Customizing the display resolution and scaling for a remote desktop is not supported in multiple-monitor mode.
n If you select a custom resolution that is higher than the client resolution, Horizon Client resizes the remote desktop window to fit the client window. If you select a custom resolution that is lower than the client resolution, black bars appear in the remote desktop window.
n If you customize the display resolution during a remote desktop session, your changes take effect immediately. If you customize display scaling during a remote desktop session, you must log out and log back in to make your changes take effect.
Procedure
1 Start Horizon Client and connect to a server.
2 In the desktop and application selector window, right-click the remote desktop and select Settings.
3 From the Connect Via menu, select VMware Blast or PCoIP.
VMware Horizon Client for Linux User Guide
VMware, Inc. 28

4 From the Display drop-down menu, select Full Screen - This Monitor, Large Screen, Small Screen, or Custom.
Note If you select the Full Screen - All Monitors option, the Resolution and Scaling drop-down menus are hidden, and you cannot customize the display resolution or scaling of remote desktops.
5 To customize the display resolution, select a resolution from the Resolution drop-down menu.
If you select Automatic (the default setting), Horizon Client fits the remote desktop to the client window size. If the remote desktop does not support the display resolution that you select, it uses the default setting.
6 To customize display scaling, select a scaling size from the Scaling drop-down menu.
If you select Automatic (the default setting), Horizon Client sets the display scaling percentage based on the display resolution that you select.
Configure Lock Key Synchronization
You can configure Horizon Client to synchronize the toggle states of the Num Lock, Scroll Lock, and Caps Lock keys from the client system to a remote desktop, and from a remote desktop to the client system. The configuration applies globally to all the remote desktops under a given server connection.
Procedure
1 Start Horizon Client and connect to a server.
2 Open the Settings dialog box for a remote desktop.
n Click the Settings (gear) icon in the upper-right corner of the desktop and application selection window and select any remote desktop in the left pane.
n Right-click any remote desktop in the desktop and application selection window and select Settings.
3 To enable the lock key synchronization feature, select the Automatically synchronize the keypad, scroll and caps lock keys check box and click Close.
Note If the remote desktop does not support the capability to synchronize the lock key state, the Automatically synchronize the keypad, scroll and caps lock keys check box appears dimmed and cannot be selected.
Results
The lock key synchronization feature is enabled for all the remote desktops under the server connection.
If you deselect the Automatically synchronize the keypad, scroll and caps lock keys check box, the lock key synchronization feature is disabled for all the remote desktops under the server connection.
VMware Horizon Client for Linux User Guide
VMware, Inc. 29

Use an Input Method Editor with Published Applications
This topic explains how to use an input method editor (IME) on your client system to enter text in a published application session from Horizon Client for Linux. You can configure a setting to have published applications accept text in a language that you input using an IME.
Procedure
1 Start Horizon Client and connect to a server.
2 Click the Settings (gear) icon in the upper-right corner of the desktop and application selection window.
3 In the left pane of the Settings dialog box, select Applications.
4 Select the Extend the local IME to hosted applications checkbox.
Printing from a Remote Desktop
You can print from a remote desktop to a local or network printer. The VMware Integrated Printing feature allows you to print to a local or network printer without having to install additional printer drivers in the remote desktop. The USB redirection feature provides another way to print from a remote desktop to a USB printer to the local client computer.
Set Printing Preferences for the VMware Integrated Printing Feature
You can set printing preferences in a remote desktop for the VMware Integrated Printing feature. With the VMware Integrated Printing feature, you can use local or network printers from a remote desktop without having to install additional printer drivers in the Windows remote desktop. For each printer available through this feature, you can set preferences for data compression, print quality, double-sided printing, color, and other settings.
In a single-user virtual machine desktop, each virtual printer appears as <printer_name>(vdi) by default. In a published desktop or published application, each virtual printer appears as <printer_name>(v<session_ID>) by default.
A Horizon administrator can change the printer naming convention for client printers that are redirected to remote desktops and published applications.
Prerequisites
To use VMware Integrated Printing, a Horizon administrator must enable the VMware Integrated Printing feature for the remote desktop.
To determine whether the VMware Integrated Printing feature is installed in a remote desktop, verify that the C:\Program Files\Common Files\VMware\Remote Experience\x64\vmware-print-redir-server.exe and C:\Program Files\Common Files\VMware\Remote Experience\x64\vmware-print-redir-service.exe files exist in the remote desktop file
system.
VMware Horizon Client for Linux User Guide
VMware, Inc. 30

Procedure
1 In the Windows remote desktop, go to Control Panel > Hardware and Sound > Devices and Printers.
2 In the Devices and Printers window, right-click the virtual printer and select Printer properties from the context menu.
3 On the General tab, click Preferences.
4 In the Printing Preferences dialog box, select the different tabs and specify which settings to use.
5 To save your changes, click OK.
Printing From a Remote Desktop to a Local USB Printer
A USB printer is a printer that is attached to a USB port on the local client system. You can send print jobs to a USB printer attached to the local client system from a remote desktop.
You can use either the USB redirection feature or the VMware Integrated Printing feature to print to a USB printer from a remote desktop. Redirected USB printers and virtual printers can work together without conflict.
Using the USB Redirection Feature
To use the USB redirection feature to attach a USB printer to a virtual USB port in a remote desktop, the required printer drivers must be installed in the remote desktop as well as on the client system.
When you use the USB redirection feature to redirect a USB printer, the USB printer is no longer logically attached to the physical USB port on the local client system and it does not appear in the list of local printers on the local client system. You can print to the USB printer from the remote desktop, but you can no longer print to the USB printer from the local client system.
In a remote desktop, redirected USB printers appear as <printer_name>.
For more information, see Use USB Redirection to Connect USB Devices.
Using the VMware Integrated Printing Feature
When you use the VMware Integrated Printing feature to send print jobs to a USB printer, you can print to the USB printer from both the remote desktop and the local client system and you do not need to install printer drivers in the remote desktop.
To use the VMware Integrated Printing feature with a remote desktop or published application, a Horizon administrator must enable the feature.
For more information, see Set Printing Preferences for the VMware Integrated Printing Feature.
VMware Horizon Client for Linux User Guide
VMware, Inc. 31

Use USB Redirection to Connect USB Devices
With the USB redirection feature, you can use locally attached USB devices, such as thumb flash drives, in a remote desktop or published application.
When you use the USB redirection feature, most USB devices that are attached to the local client system become available from menus in Horizon Client. You can use the menus to connect and disconnect the devices.
You can redirect locally connected USB thumb flash drives and hard disks for use in published desktops and applications. Published desktops and applications can also support more generic USB devices, including TOPAZ Signature Pad, Olympus Dictation Foot pedal, and Wacom signature pad. Other types of USB devices, including security storage drives and USB CD-ROM drives, are not supported in published desktops and applications.
You can connect USB devices to a remote desktop or published application either manually or automatically.
Prerequisites
n To use USB devices with a remote desktop or published application, a Horizon administrator must enable the USB feature.
n The USB Redirection component must be installed in Horizon Client. If you did not include this component in the installation, uninstall the client and run the installer again to include the USB Redirection component.
n Become familiar with USB Redirection Limitations.
Procedure
u Connect a USB device to a remote desktop.
a Connect the USB device to your local client system.
b From the Horizon Client menu bar, click Connect USB Device.
c Select the USB device.
The device is redirected from the local system to the remote desktop.
u Connect a USB device to a published application.
a Connect the USB device to the local client system.
b In the desktop and application selector window, open the published application.
The name of the application is the name that your administrator has configured for the application.
c In the desktop and application selector window, right-click the application icon and select Settings.
d In the left pane, select USB Devices.
VMware Horizon Client for Linux User Guide
VMware, Inc. 32

e In the right pane, select the USB device and click Connect.
f Select the application, and click OK.
Note The name of the application in the list comes from the application itself and might not match the application name that your administrator configured to appear in the desktop and application selector window.
Horizon Client connects the USB device to the published application that you selected. The USB device is also available to other applications in the same farm as the application that you selected. After you close the application, the USB device is not released right away.
g (Optional) To configure Horizon Client to connect the USB device automatically to the published application when the application is started, select the Auto-connect at Startup check box and click Apply.
This setting is not selected by default.
This setting also applies to all other applications in the same farm as the application that you selected.
h (Optional) To configure Horizon Client to connect the USB device automatically to the published application when you plug the device into the local system, select the Auto-connect when inserted check box and click Apply.
This setting is not selected by default.
The published application must be activated and in the foreground for this behavior to take effect. This setting also applies to all other applications in the same farm as the application that you selected.
i To close the Settings window, click Close.
j When you are finished using the application, release the USB device so that you can access it from your local system. In the desktop and application selector window, open the Settings window again, select USB Devices, and select Disconnect.
u Configure Horizon Client to connect USB devices automatically to a remote desktop when Horizon Client starts.
This option is not selected by default.
a Before you plug in the USB device, start Horizon Client and connect to a remote desktop.
b From the Horizon Client menu bar, click Connect USB Device.
c Select Automatically Connect at Startup.
d Plug in the USB device and restart Horizon Client.
USB devices that you connect to your local system after you start Horizon Client are redirected to the remote desktop.
VMware Horizon Client for Linux User Guide
VMware, Inc. 33

u Configure Horizon Client to connect USB devices automatically to a remote desktop when you plug them in to the local system.
The remote desktop must be activated and in the foreground for this behavior to take effect.
Enable this option if you plan to connect devices that use MTP drivers, such as Android-based Samsung smart phones and tablets. This option is not selected by default.
a Before you plug in the USB device, start Horizon Client and connect to a remote desktop.
b From the Horizon Client menu bar, click Connect USB Device.
c Select Automatically Connect when Inserted.
d Plug in the USB device.
USB devices that you connect to your local system after you start Horizon Client are redirected to the remote desktop.
Results
If the USB device does not appear in the remote desktop or published application after several minutes, disconnect and reconnect the device to the client system.
USB Redirection Limitations
The USB redirection feature has certain limitations.
n When you access a USB device from a menu in Horizon Client and use the device in a remote desktop or published application, you cannot access the USB device on the local device.
n USB devices that do not appear in the menu, but are available in a remote desktop or published application, include human interface devices such as keyboards and pointing devices. The remote desktop or published application, and the local device, use these devices at the same time. Interaction with these USB devices can sometimes be slow because of network latency.
n Large USB disk drives can take several minutes to appear in the remote desktop or published application.
n Some USB devices require specific drivers. If a required driver is not already installed, you might be prompted to install it when you connect the USB device to the remote desktop or published application.
n If you plan to attach USB devices that use MTP drivers, such as Android-based Samsung smart phones and tablets, configure Horizon Client so that it connects USB devices to the remote desktop or published application automatically. Otherwise, if you try to manually redirect the USB device by using a menu item, the device is not redirected unless you unplug the device and then plug it in again.
n Do not connect to scanners by using the Connect USB Device menu. To use a scanner device, use the scanner redirection feature, if available. See Using Scanners.
VMware Horizon Client for Linux User Guide
VMware, Inc. 34

n The redirection of USB audio devices depends on the state of the network and is not reliable. Some devices require a high data throughput even when they are idle. Audio input and output devices work well with the Real-Time Audio-Video feature. You do not need to use USB redirection for those devices.
n You cannot format a redirected USB drive in a published desktop unless you connect as an administrator user.
Note Do not redirect USB devices such as USB Ethernet devices and touch screen devices to a remote desktop or published application. If you redirect a USB Ethernet device, your client system loses network connectivity. If you redirect a touch screen device, the remote desktop or published application receives touch input but not keyboard input. If you have set the remote desktop or published application to autoconnect USB devices, you can configure a policy to exclude specific devices. See "Configuring Filter Policy Settings for USB Devices" in the Configuring Remote Desktop Features in Horizon document.
Using Serial Port Redirection
With serial port redirection, you can redirect locally connected serial (/dev/ttyS) ports, such as built-in RS232 ports and USB-to-serial adapters. Devices such as printers, bar code readers, and other serial devices can be connected to these ports and used in virtual desktops and RDS-hosted desktops.
If a Horizon administrator has configured the serial port redirection feature, and if you use the VMware Blast or PCoIP display protocol, serial port redirection works in the virtual desktop or RDS-hosted desktop without further configuration. For example, /dev/ttyS0 on the local client system is redirected as COM1 on the remote desktop. Serial port /dev/ttyS1 is redirected as COM2. If the /dev/ttyS port is already in use, it is mapped to avoid conflicts. For example, if COM1 and COM2 exist on the remote desktop, /dev/ttyS0 on the client system is mapped to COM3 by default.
You must have any required device drivers installed on the local client system, but you do not need to install the device drivers on the remote desktop. For example, if you use a USB-to-serial adapter that requires specific device drivers to work on your local client system, you must install those drivers, but only on the client system.
Important If you are using a device that plugs in to a USB-to-serial adapter, do not connect the device from the Connect USB Device menu in Horizon Client. Doing so routes the device through USB redirection and bypasses the serial port redirection feature.
Tips for Using the Serial Port Redirection Feature
n Click the serial port icon ( ) in the system tray or notification area of the remote desktop to connect, disconnect, or customize the mapped /dev/ttyS ports.
VMware Horizon Client for Linux User Guide
VMware, Inc. 35

When you click the serial port icon, the Serial COM Redirection for VMware Horizon context menu appears. If an administrator has locked the configuration, the items in the context menu are dimmed. The icon appears only if a Horizon administrator has configured the serial port redirection feature and all requirements are met. For more information, see the "System Requirements for Serial Port Redirection" topic in the VMware Horizon Client for Linux Installation and Setup Guide document.
n In the context menu, the port items are listed as port mapped to port, for example, /dev/ttyS0 mapped to COM1. The first port, which is /dev/ttyS0 in this example, is the physical port or the USB-to-serial adapter on the local client system. The second port, which is COM1 in this example, is the port used in the remote desktop.
n To select the Port Properties command, right-click a /dev/ttyS port.
In the COM Properties dialog box, you can configure a port to connect automatically when a remote desktop session is started, or you can ignore DSR (data-set-ready signal), which is required for some modems and other devices.
You can also change the port number that the remote desktop uses. For example, if the /dev/ttyS0 port on the client system is mapped to COM3 in the remote desktop, you can change the port number to COM1. If COM1 exists in the remote desktop, you might see COM1 (Overlapped). You can still use this overlapped port. The remote desktop can receive serial data through the port from the server and also from the client system.
n Connect to a mapped COM port by selecting Connect to use the port in the remote desktop.
When a redirected COM port is opened and in use on a remote desktop, you cannot access the port on the local computer. Conversely, when a /dev/ttyS port is in use on the local computer, you cannot access the port on the remote desktop.
n You can then select the Disconnect command to disconnect and make the physical COM port available for use on the client computer.
Viewing Information About Redirected Serial Ports
For remote desktops that have Horizon Agent 2106 or later installed, you can view details about redirected serial ports by running the vmwsprrdctl.exe console utility on the desktop. The utility is supported on both remote desktop sessions and nested mode sessions.
The utility is located on the remote desktop in C:\Program Files\Common Files\VMware\SerialPortRedirection\Agent\vmwsprrdctl.exe.
To get help with command-line usage for the utility:
1 Start a remote desktop session and open a console window on the desktop.
2 Change to the directory location of the utility and run the following command.
vmwsprrdctl.exe -h
VMware Horizon Client for Linux User Guide
VMware, Inc. 36

The utility provides the following information.
n Hardware ID information:
n USB device VID (Vendor ID)
n USB device PID (Product ID)
n USB device Rev (Product Revision)
n COM port device description as it appears in Device Manager
n Source COM port number on the client
n COM port redirection status
Note The utility does not provide the source COM port number on the client or the COM port redirection status for any virtual COM port on the agent redirected from a client port that uses a USB-to-serial adapter.
Using Scanners
With the scanner redirection feature, you can scan information into remote desktops with scanners that are connected to the local client system. You can control scanner settings by selecting options in the remote desktop interface. This feature redirects scanning data with a significantly lower bandwidth than can be achieved by using USB redirection.
Scanner redirection supports scanning devices that are compatible with the SANE interface standard. You must install the SANE scanner device drivers on the local client system. You do not need to install the scanner device drivers on a remote desktop.
The scanner redirection feature does not support webcam devices. VMware recommends that you use the Real-Time Audio-Video feature to redirect webcams.
Note Scanner redirection to the remote desktop does not work when you scan from an application that supports the WIA (Windows Image Acquisition) standard. To use scanner redirection, scan from an application that supports the TWAIN standard instead.
If a Horizon administrator has configured the scanner redirection feature, and if you use the VMware Blast display protocol or the PCoIP display protocol, a scanner connected to your local client system can be used in a remote desktop.
Important Do not connect a scanner from the Connect USB Device menu in Horizon Client. The performance will be unusable.
When scanning data is redirected to a remote desktop, you cannot access the scanner on the local client computer. Conversely, when a scanner is in use on the local client computer, you cannot access it on the remote desktop.
VMware Horizon Client for Linux User Guide
VMware, Inc. 37

A Horizon administrator can configure group policy settings to control the options that available in the VMware Horizon Scanner Redirection Preferences dialog box.
Note If a Horizon administrator configures scanner redirection to use a specific scanner and that scanner is not available, scanner redirection does not work.
Tips for Using the Scanner Redirection Feature
n To change scanner redirection settings, click the scanner icon ( ) in the system tray or notification area of the remote desktop.
If the scanner or serial port service does not start, restart the local client system.
Note You do not need to use the menu that appears when you click the scanner icon. Scanner redirection works without any further configuration. If the menu that appears does not list any scanners, an incompatible scanner is connected to the local client system. If the scanner icon is not present, the scanner redirection feature is either disabled or not installed on the remote desktop. The scanner icon also does not appear on local client systems that do not support this feature.
n If you want the TWAIN Scanning Properties dialog box to appear even if a scanning application does not display the scanning dialog box, click the Preferences option in the scanner icon menu and select the Force the TWAIN Scanning Properties dialog check box.
n To display the actual scanner names rather than VMware Virtual nnn scanner, click the Preferences option in the scanner icon menu and select the Use vendor defined names for TWAIN scanners check box.
n To select options to control image compression or determine how to select the default scanner, click the Preferences option in the scanner icon menu and select the Compression or Defaults tab.
n Most scanners display a scanner settings dialog box by default, but some do not. For those scanners that do not display settings options, you can use the Preferences option in the scanner icon menu and select the Force the TWAIN Scanning Properties dialog option.
n To display the TWAIN Scanner Properties dialog box on the remote desktop, click the Preferences option in the scanner icon menu and select the Agent (VMware Scanning Properties dialog) check box. Horizon Client for Linux does not support the Client (Native Scanning Properties dialog, if supported) option.
n Scanning too large an image or scanning at too high a resolution might not work. In this case, you might see the scanning progress indicator freeze, or the scanner application might exit unexpectedly. If you minimize the remote desktop, an error message might appear on the local client system, notifying you that the resolution is set too high. To resolve this issue, reduce the resolution or crop the image to a smaller size and scan again.
VMware Horizon Client for Linux User Guide
VMware, Inc. 38
Using Webcams and Microphones
With the Real-Time Audio-Video feature, you can use the local client system's webcam or microphone in a remote desktop or published application. Real-Time Audio-Video is compatible with standard conferencing applications and browser-based video applications. It supports standard webcams, audio USB devices, and analog audio input.
Note This feature is available only with the version of Horizon Client for Linux provided by third-party vendors or with the Horizon Client software available from the VMware Product Downloads website.
When You Can Use a Webcam with the Real-Time Audio-Video Feature
If a Horizon administrator has configured the Real-Time Audio-Video feature, you can use a webcam that is built in or connected to the client computer in a remote desktop or published application. You can use the webcam in conferencing applications such as Skype, Webex, or Google Hangouts.
During the setup of an application such as Skype, Webex, or Google Hangouts on a remote desktop, you can select input and output devices from menus in the application.
For remote desktops and published applications, a redirected webcam is named VMware Virtual Webcam in the application.
For many applications, you do not need to select an input device.
When the client computer uses the webcam, the remote session cannot use it at the same time. Also, when the remote session uses the webcam, the client computer cannot use it at the same time.
If more than one webcam is connected to the local client computer, you can configure a preferred webcam to use in remote sessions.
Select a Default Microphone on a Linux Client System
If you have multiple microphones on your client system, only one of them is used on your remote desktop. To specify which microphone is the default, you can use the Sound control on your client system.
With the Real-Time Audio-Video feature, audio input devices and audio output devices work without requiring the use of USB redirection, and the amount of network bandwidth required is greatly reduced. Analog audio input devices are also supported.
Prerequisites
n Verify that you have a USB microphone or another type of microphone installed and operational on your client system.
VMware Horizon Client for Linux User Guide
VMware, Inc. 39

n Verify that you are using the VMware Blast display protocol or the PCoIP display protocol for your remote desktop.
Procedure
1 In the Ubuntu graphical user interface, select System > Preferences > Sound.
You can alternatively click the Sound icon on the right side of the toolbar at the top of the screen.
2 Click the Input tab in the Sound Preferences dialog box.
3 Select the preferred device and click Close.
Improve Mouse Performance in a Remote Desktop
If you use the VMware Blast display protocol or the PCoIP display protocol when using 3D applications in a remote desktop, mouse performance improves when you enable the relative mouse feature.
In most circumstances, if you are using applications that do not require 3D rendering, Horizon Client transmits information about mouse pointer movements by using absolute coordinates. Using absolute coordinates, the client renders the mouse movements locally, which improves performance, especially if you are outside the corporate network.
For work that requires using graphics-intensive applications, such as AutoCAD, or for playing 3D video games, you can improve mouse performance by enabling the relative mouse feature, which uses relative, rather than absolute, coordinates.
When the relative mouse feature is enabled, performance might be slow if you are outside the corporate network, on a WAN.
Prerequisites
A Horizon administrator must turn on 3D rendering for the remote desktop.
Procedure
1 Start Horizon Client and log in to the server.
2 Right-click the remote desktop and select VMware Blast or PCoIP.
3 Connect to the remote desktop.
4 Select Connection > Enable Relative Mouse from the Horizon Client menu bar.
The option is a toggle. To disable the relative mouse feature, select Connection > Enable Relative Mouse again.
Note If you use Horizon Client in windowed mode rather than full-screen mode and the relative mouse feature is enabled, you might not be able to move the mouse pointer to the Horizon Client menu options or move the pointer outside of the Horizon Client window. To resolve this situation, press Ctrl+Alt.
VMware Horizon Client for Linux User Guide
VMware, Inc. 40

Troubleshooting Horizon Client 5You can solve most problems with Horizon Client by restarting or resetting remote desktops or published applications, or by reinstalling Horizon Client.
This chapter includes the following topics:
n Restart a Remote Desktop
n Reset Remote Desktops or Published Applications
n Uninstall Horizon Client for Linux
n Collect Horizon Client Log Information
n Problems with Keyboard Input
n What to Do If Horizon Client Quits Unexpectedly
n Connecting to a Server in Workspace ONE Mode
Restart a Remote Desktop
If the remote desktop operating system stops responding, you might need to restart a remote desktop. Restarting a remote desktop is similar to using the Windows operating system restart command. The remote desktop operating system usually prompts you to save any unsaved data before it restarts.
You can restart a remote desktop only if a Horizon administrator has enabled the restart feature for the remote desktop.
VMware, Inc. 41

Procedure
u Use the Restart command.
Option Action
Restart a remote desktop from within the desktop
Select Connection > Restart Desktop from the menu bar.
Restart a remote desktop from the desktop and application selection window
Do one of the following:
n Right-click the remote desktop icon and select Restart Desktop.
n Select the remote desktop icon and select Connection > Restart Desktop from the menu bar.
Horizon Client prompts you to confirm the restart action.
Results
The operating system in the remote desktop restarts and the client disconnects and logs off from the remote desktop.
What to do next
Wait an appropriate amount of time for the system to restart before you attempt to reconnect to the remote desktop.
If restarting the remote desktop does not solve the problem, you might need to reset the remote desktop. See Reset Remote Desktops or Published Applications.
Reset Remote Desktops or Published Applications
You might need to reset a remote desktop if the desktop operating system stops responding and restarting the remote desktop does not solve the problem.
Resetting a remote desktop is the same as pressing the Reset button on a physical PC to force the PC to restart. Any files that are open on the remote desktop are closed and are not saved.
Resetting published applications quits all open applications.
Resetting published applications quits the applications without saving any unsaved data. All open published applications are closed.
You can reset a remote desktop only if a Horizon administrator has enabled the reset feature for the remote desktop.
VMware Horizon Client for Linux User Guide
VMware, Inc. 42

Procedure
u Use the Reset command.
Option Action
Reset a remote desktop from within the desktop
Select Connection > Reset from the menu bar.
Reset a remote desktop from the desktop and application selection window
Do one of the following:
n Right-click the remote desktop icon and select Reset Desktop.
n Select the remote desktop icon and select Connection > Reset from the menu bar.
Reset published applications from the desktop and application selection window
Do one of the following:
n Right-click any published application icon and select Settings. Click Reset, and then click Reset again to confirm the operation.
n Select any published application icon and click the Settings button (gear icon) in the upper-right corner of the window. Click Reset, and then click Reset again to confirm the operation.
Results
When you reset a remote desktop, the operating system in the remote desktop restarts and the client disconnects and logs off from the remote desktop. When you reset published applications, the published applications quit.
What to do next
Wait an appropriate amount of time for system to restart before attempting to reconnect to the remote desktop or published application.
Uninstall Horizon Client for Linux
You can sometimes resolve problems with Horizon Client by uninstalling and reinstalling the Horizon Client application.
Prerequisites
Verify that you have root access on the Linux client system.
VMware Horizon Client for Linux User Guide
VMware, Inc. 43

Procedure
u In a Terminal window, change to the directory that contains the installer file, and run the installer command with the -u option.
Option Command
For uninstallation, if you have set executable permissions
sudo env VMWARE_KEEP_CONFIG=yes \
./VMware-Horizon-Client-YYMM-x.x.x-yyyyyyy.arch.bundle -u vmware-horizon-client
For uninstallation, if you have not set executable permissions
sudo env VMWARE_KEEP_CONFIG=yes \
sh ./VMware-Horizon-Client-YYMM-x.x.x-yyyyyyy.arch.bundle -u vmware-horizon-client
In the installer filename, YYMM represents the marketing version number, x.x.x represents the internal version number, and yyyyyyy represents the build number. arch represents the CPU instruction set architecture.
Note If you are uninstalling version 5.5 or earlier of Horizon Client, the installer filename does not contain the marketing version number YYMM.
Using the VMWARE_KEEP_CONFIG=yes setting means retain the configuration settings when the
client is uninstalled. If this environment variable is not set, you are prompted to specify whether to save the configuration settings.
Collect Horizon Client Log Information
You can use the Horizon Client log collection script to gather client logs from various locations and package them into a single log file for troubleshooting. To run the log collection script from the command-line terminal, you must have "execute" permission on the Linux client system.
Most Linux-based thin clients typically store Horizon Client logs in one or more of the following locations:
n /tmp/vmware-
n /tmp/teradici-
n /tmp/vmware-root
The log collection script compiles the client logs into a package file named horizon-log.tar.gz by default.
VMware Horizon Client for Linux User Guide
VMware, Inc. 44

Procedure
1 Ensure that you have "execute" permission to the log collection script on the Linux client system. In the command-line terminal, run the following command:
# sudo chmod +x /usr/bin/vmware-view-log-collector
2 To start the log collection script, run the following command:
# sudo /usr/bin/vmware-view-log-collector
By default, the script finds the latest log files generated by Horizon Client and compiles them into a package file named horizon-log.tar.gz, located in the folder from which you ran the
script.
To customize the name and location of the package file, you can run a command that resembles one of the following examples:
# sudo /usr/bin/vmware-view-log-collector abc.tar.gz
# sudo /usr/bin/vmware-view-log-collector /home/user/Downloads/abc.tar.gz
n The first example compiles client logs into a package file named abc.tar.gz in the folder
from which you ran the script.
n The second example compiles client logs into a package file named abc.tar.gz in the /home/user/Downloads/ folder.
Problems with Keyboard Input
When you type in a remote desktop or published application, none of the keystrokes seem to work.
Problem
When you are connected to a remote desktop or published application, no characters appear when you type. Another symptom might be that a single key keeps repeating itself.
Cause
Some security software, such as Norton 360 Total Security, includes a feature that detects keystroke logging software and blocks keystroke logging. This security feature is meant to protect the system against spyware that steals passwords and credit card numbers. This security software might block Horizon Client from sending keystrokes to the remote desktop or published application.
Solution
u On the client system, turn off the keystroke logging detection feature of your antivirus or security software.
VMware Horizon Client for Linux User Guide
VMware, Inc. 45

What to Do If Horizon Client Quits Unexpectedly
Horizon Client quits even if you do not close it.
Problem
Horizon Client quits unexpectedly. Depending on the server configuration, you might see a message such as There is no secure connection to the View Connection Server.
Sometimes a message does not appear.
Cause
This problem occurs when the connection to the server is lost.
Solution
u Restart Horizon Client. You can connect successfully when the server is running again. If you continue to have connection problems, contact your system administrator or VMware Support.
Connecting to a Server in Workspace ONE Mode
You cannot connect to a server directly through Horizon Client, or your remote desktop and published application entitlements are not visible in Horizon Client.
Problem
n When you try to connect to the server directly through Horizon Client, Horizon Client redirects you to the Workspace ONE portal.
n When you open a remote desktop or published application through a URI or command, the request redirects you to the Workspace ONE portal for authentication.
n After you open a remote desktop or published application through Workspace ONE and Horizon Client starts, you cannot see or open other entitled remote desktops or published applications in Horizon Client.
Cause
A Horizon administrator can enable Workspace ONE mode on a Connection Server instance. This behavior is normal when Workspace ONE mode is enabled on a Connection Server instance.
Solution
Use Workspace ONE to connect to a Workspace ONE enabled server and access your remote desktops and published applications.
VMware Horizon Client for Linux User Guide
VMware, Inc. 46