veracrypt - Edinburgh Napier Staff Intranet
26
VERACRYPT VeraCrypt is an open-source encryption tool that you can use to create an encrypted area on your hard drive or a USB stick. This document is aimed at Edinburgh Napier University staff installing VeraCrypt on their Windows PC(s) and/or laptop(s). Contents SUPPORTED OPERATING SYSTEMS ............................................................................................ 2 ACCESSING VERACRYPT............................................................................................................... 2 HOW TO SET UP AN ENCRYPTED VOLUME ON A HARD DISK USING VERACRYPT................ 3 SET UP A VERACRYPT VOLUME ................................................................................................ 3 MOUNT THE ENCRYPTED VOLUME........................................................................................... 9 HOW TO DISMOUNT THE ENCRYPTED DRIVE ....................................................................... 11 HOW TO ENCRYPT A USB DRIVE USING VERACRYPT ............................................................. 12 FORMAT THE USB DRIVE IN WINDOWS 7 ............................................................................... 12 CONFIGURE TRAVELER (PORTABLE) DISK SETTINGS ......................................................... 14 CREATE AN ENCRYPTED VOLUME ......................................................................................... 17 MOUNT THE ENCRYPTED VOLUME......................................................................................... 23 DISMOUNT THE ENCRYPTED VOLUME................................................................................... 25 SHUTDOWN THE USB ............................................................................................................... 26
-
Upload
khangminh22 -
Category
Documents
-
view
4 -
download
0
Transcript of veracrypt - Edinburgh Napier Staff Intranet

VERACRYPT VeraCrypt is an open-source encryption tool that you can use to create an encrypted area on your hard drive or a USB stick. This document is aimed at Edinburgh Napier University staff installing VeraCrypt on their Windows PC(s) and/or laptop(s).
Contents SUPPORTED OPERATING SYSTEMS ............................................................................................ 2
ACCESSING VERACRYPT ............................................................................................................... 2
HOW TO SET UP AN ENCRYPTED VOLUME ON A HARD DISK USING VERACRYPT................ 3
SET UP A VERACRYPT VOLUME ................................................................................................ 3
MOUNT THE ENCRYPTED VOLUME ........................................................................................... 9
HOW TO DISMOUNT THE ENCRYPTED DRIVE ....................................................................... 11
HOW TO ENCRYPT A USB DRIVE USING VERACRYPT ............................................................. 12
FORMAT THE USB DRIVE IN WINDOWS 7 ............................................................................... 12
CONFIGURE TRAVELER (PORTABLE) DISK SETTINGS ......................................................... 14
CREATE AN ENCRYPTED VOLUME ......................................................................................... 17
MOUNT THE ENCRYPTED VOLUME ......................................................................................... 23
DISMOUNT THE ENCRYPTED VOLUME ................................................................................... 25
SHUTDOWN THE USB ............................................................................................................... 26

SUPPORTED OPERATING SYSTEMS VeraCrypt runs on Windows, macOS, Linux and FreeBSD. This document will demonstrate VeraCrypt using a Windows OS. Throughout this document there will be an option to “Never Save History”. This is your choice but we would recommend that you check this box and never save the history. This gives enhanced security encryption as no history of your file is saved on your PC. ACCESSING VERACRYPT VeraCrypt can be found in the Edinburgh Napier University Application Window.
Alternatively, by clicking on the START menu and choosing APPLICATIONS/CORE from the menu.
Double click on the VeraCrypt icon and follow next stage of this procedure.

HOW TO SET UP AN ENCRYPTED VOLUME ON A HARD DISK USING VERACRYPT
Any data that is moved from Edinburgh Napier University premises and is of a sensitive or confidential nature must be encrypted as stated in the Information Security Policy - User Policy. This document explains how Edinburgh Napier University staff can set up an encrypted volume on a hard disk using the free encryption tool VeraCrypt.
SET UP A VERACRYPT VOLUME
1. Start VeraCrypt from the Start menu or from the desktop icon.
2. Select Create Volume:
Select Create an encrypted file container and click Next:
3. Select Standard VeraCrypt volume and click Next:

4. You will now be asked to select a Volume location. Specify a path and filename for the VeraCrypt volume.
Click on the option “Never save history” and then click Next.
5. Select the Encryption Algorithm (in this example AES) and click Next:

6. On the Volume Size dialog, enter the size in MB that you want the encrypted partition to be (in this example 100 MB). Check the properties of the files you are encrypting to give a size estimate and give yourself some “wiggle” room and for a few unencrypted files on the drive if required. Click Next:
7. Create a password for the encrypted volume. You will be prompted to enter it twice. If you

use a password of less than 20 characters, the wizard will inform you that you are using a weak password.
Remember: A shorter password is easier to crack so Information Services recommend you create a password of 20 characters however it is not a requirement. For advice on creating a strong password refer to the Information Security section of the Information Services intranet pages.
Warning: There is NO password recovery facility within VeraCrypt. If a password is forgotten or lost it will NOT be possible to unencrypt the data.
Click Next.
8. If you intend to store files larger than 4gb in size, select YES from the next window. If not, then select NO. Click on Next

9. The Volume Format screen will be displayed. Depending on which option you choose in the previous screen, the “filesystem” will be automatically selected for you.
Now move your mouse as randomly as possible for several seconds to increase the cryptographic strength of the encryption keys. Once the status bar goes green, you have a good strength of the encryption key
10. Click the Format button. The formatting will take between 10 minutes and an hour or so, depending on the size of the volume and your machine type.
The following screen will be visible during the formatting process:

11. When the format is complete click OK:
12. An encrypted volume has now been created, click Exit:

MOUNT THE ENCRYPTED VOLUME Access VeraCrypt as you did previously (if not already open). To now use the volume you have just created, you need to mount it from the main VeraCrypt window.
1. The program will automatically select free drive letters that are on your computer.
Highlight a drive letter of your choice from the list and click Select File.
Again, click on the box “Never save history”.
2. In the “Select a VeraCrypt Volume” window browse to the path and filename you
specified when initially setting up the volume. Click Open:
This will populate the “Select File” field. Now click on the button “Mount”.
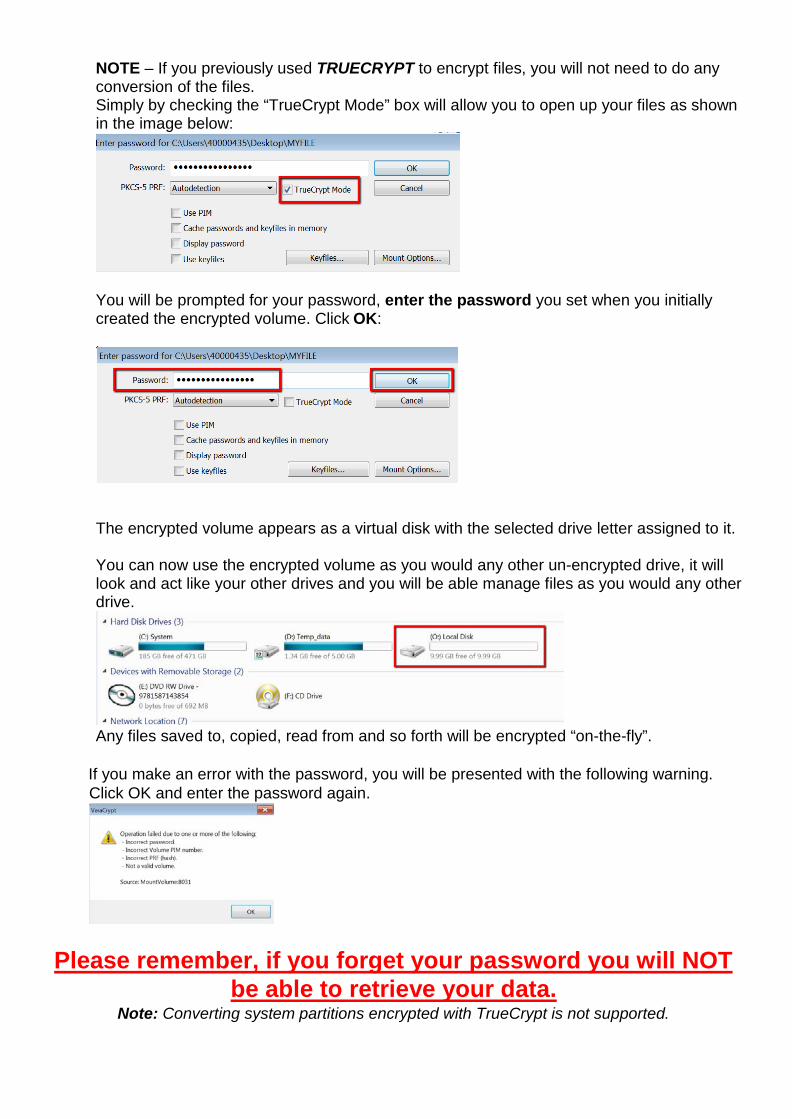
NOTE – If you previously used TRUECRYPT to encrypt files, you will not need to do any conversion of the files. Simply by checking the “TrueCrypt Mode” box will allow you to open up your files as shown in the image below:
You will be prompted for your password, enter the password you set when you initially created the encrypted volume. Click OK:
The encrypted volume appears as a virtual disk with the selected drive letter assigned to it. You can now use the encrypted volume as you would any other un-encrypted drive, it will look and act like your other drives and you will be able manage files as you would any other drive.
Any files saved to, copied, read from and so forth will be encrypted “on-the-fly”.
If you make an error with the password, you will be presented with the following warning. Click OK and enter the password again.
Please remember, if you forget your password you will NOT be able to retrieve your data.
Note: Converting system partitions encrypted with TrueCrypt is not supported.

HOW TO DISMOUNT THE ENCRYPTED DRIVE Once you are finished your file management and wish to dismount the drive, highlight the drive that you have been using for your encrypted files:
1. Select Dismount from the main VeraCrypt window.
2. Select Exit to close VeraCrypt.
HOW TO ENCRYPT A USB DRIVE USING VERACRYPT
Any data that is moved from Edinburgh Napier University premises and is of a sensitive or confidential nature must be encrypted as stated in the Information Security Policy - User Policy. This document explains how Edinburgh Napier University staff can encrypt a USB drive using the free encryption tool VeraCrypt.
FORMAT THE USB DRIVE IN WINDOWS 7 If you intend to create an encrypted volume that is larger than 4 GB, you will can format the drive with the NTFS or exFAT file system.
Warning: Once you format the drive with the file system, you must shut down the USB drive before removing it to avoid corrupting the drive, instructions on how to do this are here.
To format the drive:
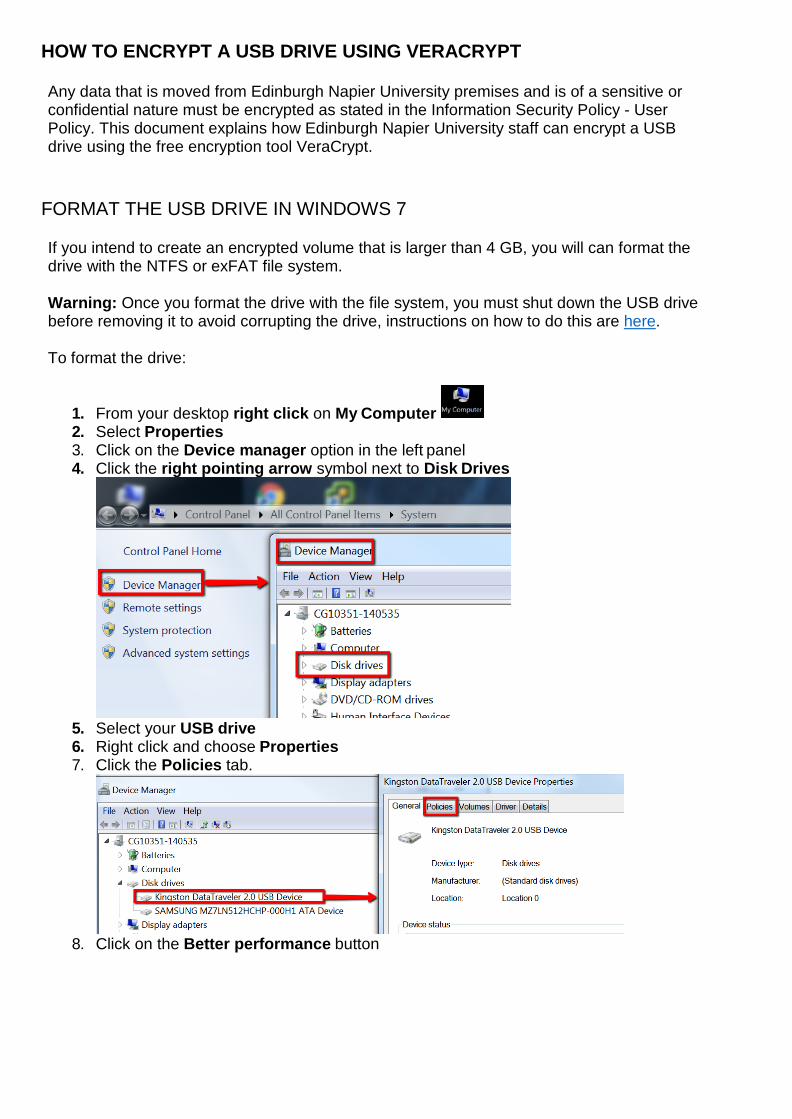
1. From your desktop right click on My Computer 2. Select Properties 3. Click on the Device manager option in the left panel 4. Click the right pointing arrow symbol next to Disk Drives
5. Select your USB drive 6. Right click and choose Properties 7. Click the Policies tab.
8. Click on the Better performance button

9. Click OK and close the Device Manager window 10. Click OK on the System Properties window.
Now format the USB drive WARNING: Formatting the USB drive will destroy any data on it:
To format the USB drive:
1. From the desktop double click My Computer 2. Select your USB drive 3. Right click and choose Format 4. In the dropdown box under File System, choose NTFS/exFAT/FAT32 5. Under Format Options, click the Quick Format checkbox 6. Click the Start button 7. Click OK on the warning dialog 8. Click OK on the Format Complete dialog 9. Click Close on the Format window.

CONFIGURE TRAVELER (PORTABLE) DISK SETTINGS VeraCrypt can run in traveler mode, which means a portable copy of VeraCrypt is placed in an unencrypted portion of the USB drive so that the encrypted volume can be accessed on systems that do not have VeraCrypt installed. However, keep in mind: After examining the registry file, it may be possible to tell that VeraCrypt was run (and that a VeraCrypt volume was mounted) on a Windows system even if it is run in traveler mode.
To configure the USB drive as a Traveler Disk:
1. Start VeraCrypt from the Edinburgh Napier University Application Window as shown in the
previous stages.
2. In the Tools menu, select Traveller Disk Setup. The following screen will appear:
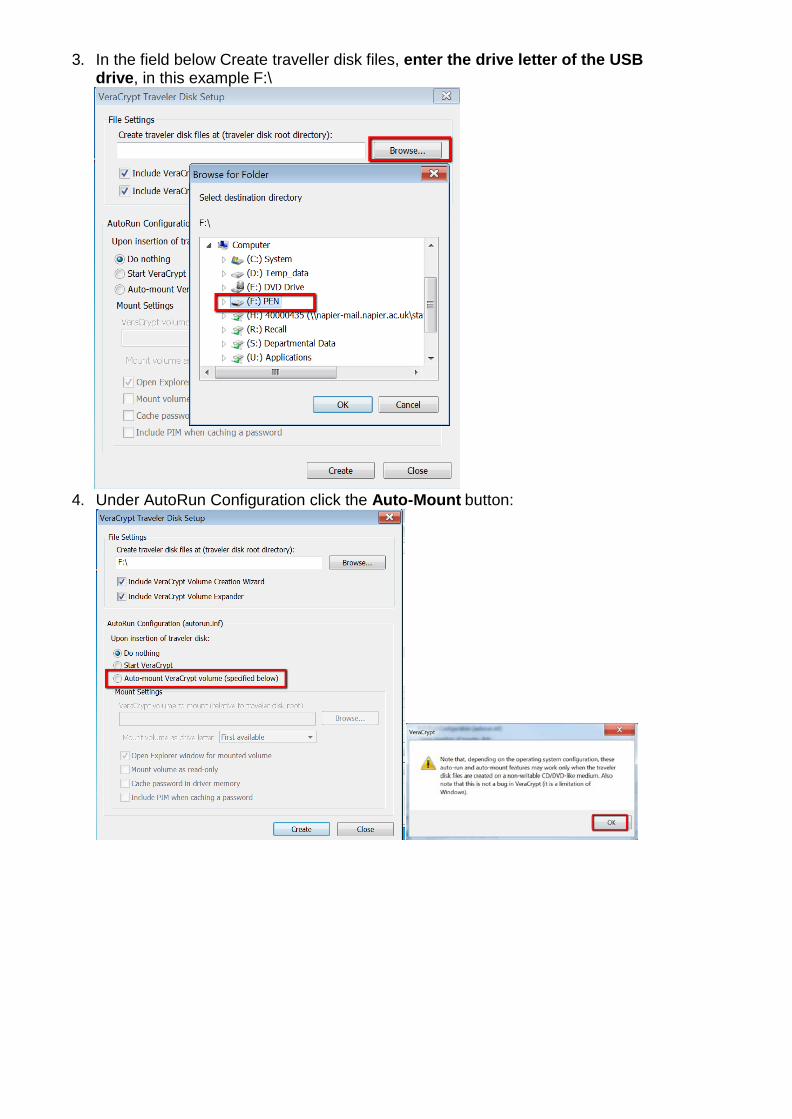
3. In the field below Create traveller disk files, enter the drive letter of the USB drive, in this example F:\
4. Under AutoRun Configuration click the Auto-Mount button:
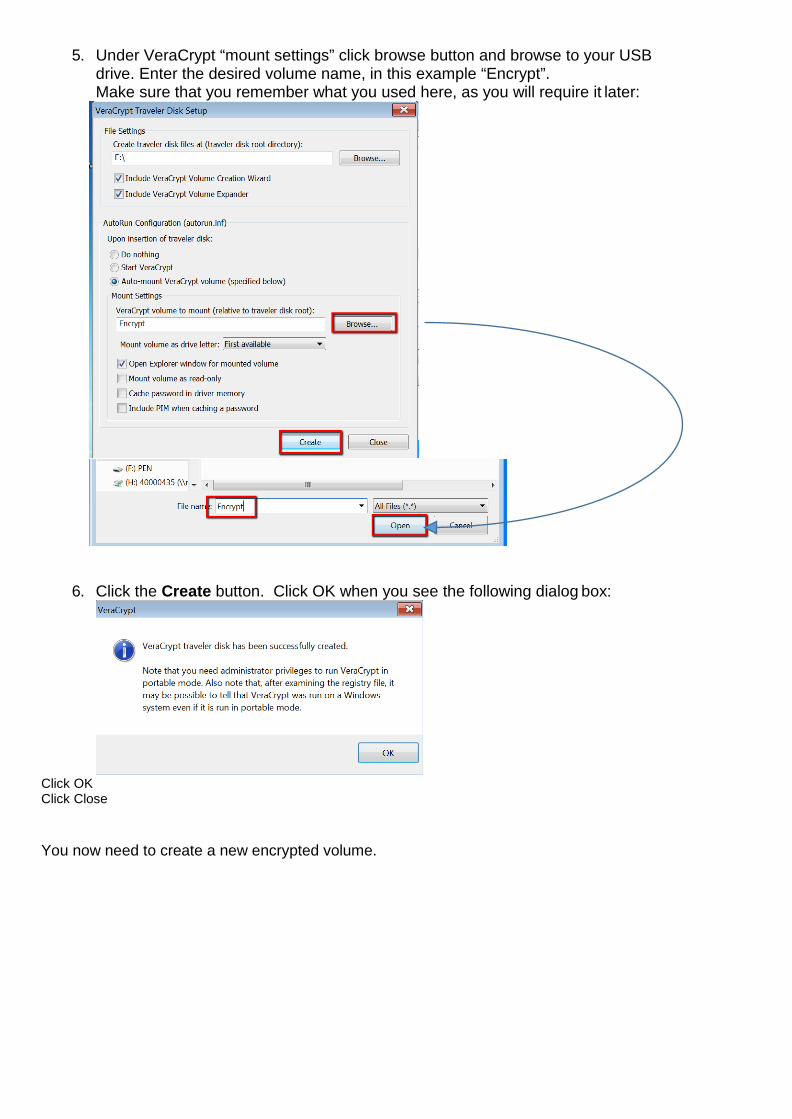
5. Under VeraCrypt “mount settings” click browse button and browse to your USB drive. Enter the desired volume name, in this example “Encrypt”. Make sure that you remember what you used here, as you will require it later:
6. Click the Create button. Click OK when you see the following dialog box:
Click OK Click Close You now need to create a new encrypted volume.

CREATE AN ENCRYPTED VOLUME To create the encrypted volume:
1. Click Tools, then select Volume Creation Wizard.
2. Click the Create an encrypted file container button and then click Next:
3. Click the Standard VeraCrypt volume button and then click Next:

4. Click Select File:
5. Browse to the USB drive. You should see the VeraCrypt folder that was created in the previous step.
6. In the File Name field, enter the same volume name that you used when
configuring the Traveler settings earlier (in this example “Encrypt”), then click the Save button:
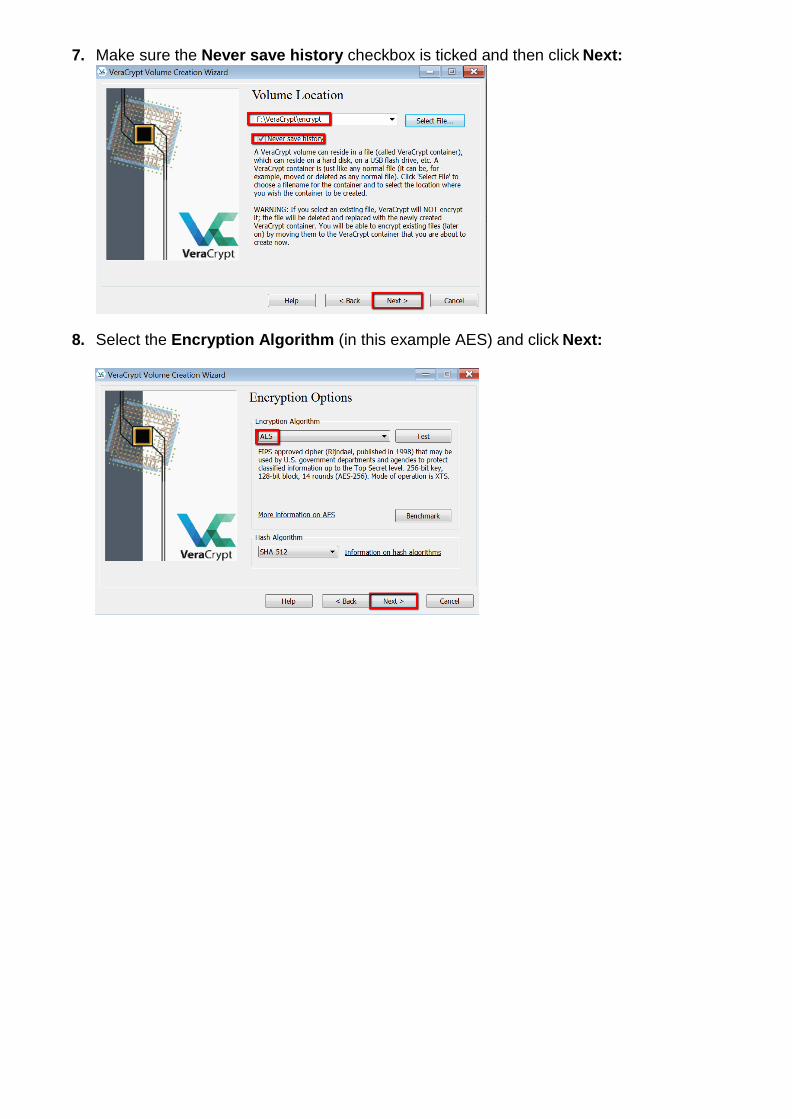
7. Make sure the Never save history checkbox is ticked and then click Next:
8. Select the Encryption Algorithm (in this example AES) and click Next:

9. On the Volume Size dialog, enter the size in MB that you want the encrypted partition to be (in this example 100 MB*). Leave a little extra space so that there is space for a few unencrypted files on the drive if required. Click Next:
*This size will be dependent on the files that you are encrypting. If your total files size is 1 GB, then set the volume size accordingly.
10. Create a password for the encrypted volume. You will be prompted to enter it twice. If you use a password of less than 20 characters, the installer will inform you that you are using a weak password.
Remember: A shorter password is easier to crack so Information Services recommend you create a password of at least 20 characters however it is not a requirement.
For advice on creating a strong password refer to the Information Security section of the Information Services intranet pages.
Warning:
There is NO password recovery facility within VeraCrypt. If a password is forgotten or lost it will NOT be possible to unencrypt the
data.
Click Next.

10. Choose the Yes or No option dependant on the file sizes that you are going to
encrypt. VeraCrypt will choose the best option for you in the next stage.
Move your mouse randomly for several seconds to increase the cryptographic strength of the encryption keys. Wait till the bar goes from RED to GREEN to ensure you have a good strength of encryption.

11. Click the Format button. The formatting will take between 10 minutes and an
hour or so, depending on the size of the volume and your machine type.
The following screen will be visible during the formatting process:
When the format is complete click OK:

12. An encrypted volume has now been created, click Exit:
MOUNT THE ENCRYPTED VOLUME Once you have mounted the encrypted volume you will see the volume show up as the first available drive letter.
To manually mount an encrypted volume:
1. Start VeraCrypt, and then click the Select File button:
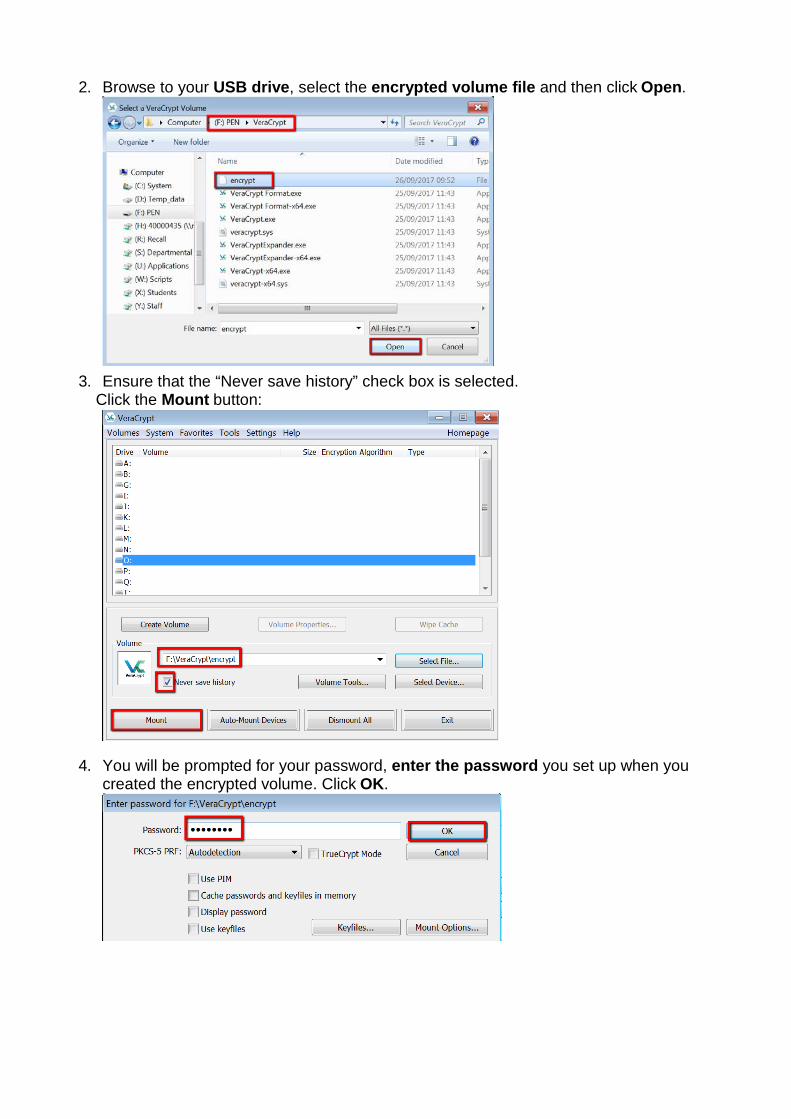
2. Browse to your USB drive, select the encrypted volume file and then click Open.
3. Ensure that the “Never save history” check box is selected.
Click the Mount button:
4. You will be prompted for your password, enter the password you set up when you created the encrypted volume. Click OK.

You can now use the encrypted volume as you would any other un-encrypted drive - it will look and act like your other drives and you will be able manage files as you would any other drive.
DISMOUNT THE ENCRYPTED VOLUME
1. If VeraCrypt is still open, select your drive letter that your USB is mapped to and click on the DISMOUNT button.
Alternatively, right click on the VeraCrypt icon which can be found on the bottom right of your desktop, in the tray next to the clock.
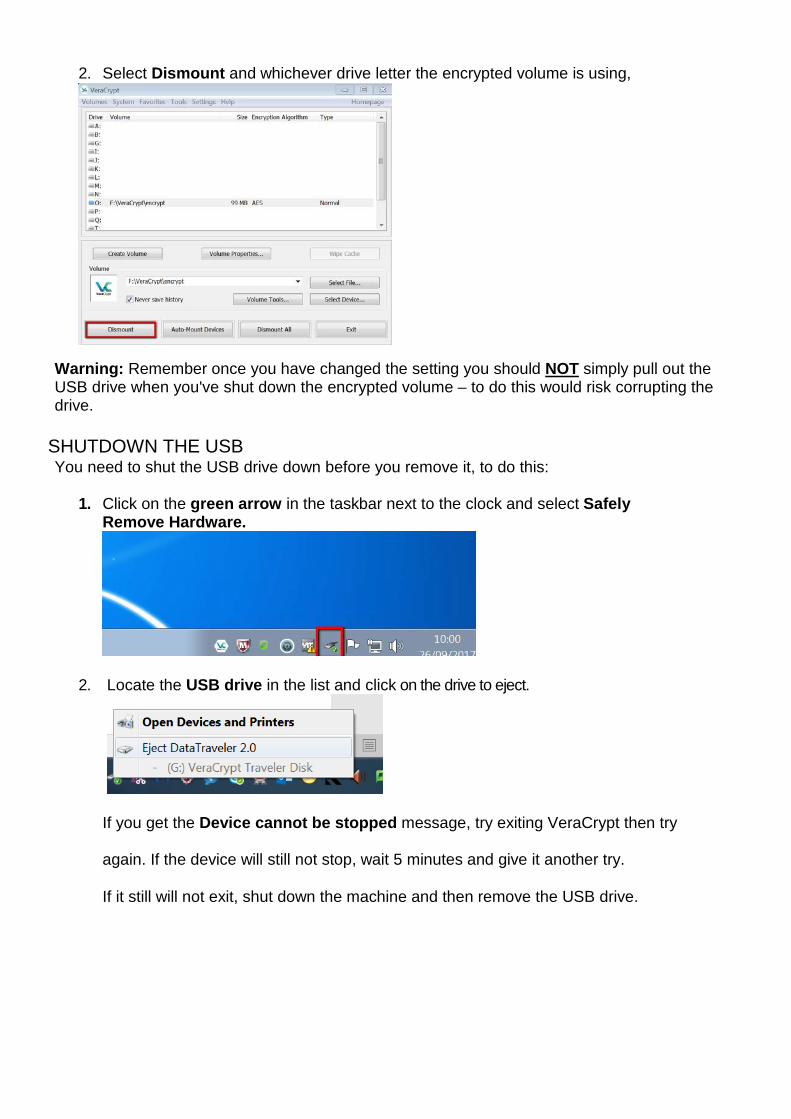
2. Select Dismount and whichever drive letter the encrypted volume is using,
Warning: Remember once you have changed the setting you should NOT simply pull out the USB drive when you've shut down the encrypted volume – to do this would risk corrupting the drive.
SHUTDOWN THE USB You need to shut the USB drive down before you remove it, to do this:
1. Click on the green arrow in the taskbar next to the clock and select Safely
Remove Hardware.
2. Locate the USB drive in the list and click on the drive to eject.
If you get the Device cannot be stopped message, try exiting VeraCrypt then try
again. If the device will still not stop, wait 5 minutes and give it another try.
If it still will not exit, shut down the machine and then remove the USB drive.