Utility Billing Software Manual - Avitar Associates
49
Utility Billing Software Manual
-
Upload
khangminh22 -
Category
Documents
-
view
3 -
download
0
Transcript of Utility Billing Software Manual - Avitar Associates

Utility Billing Software Manual

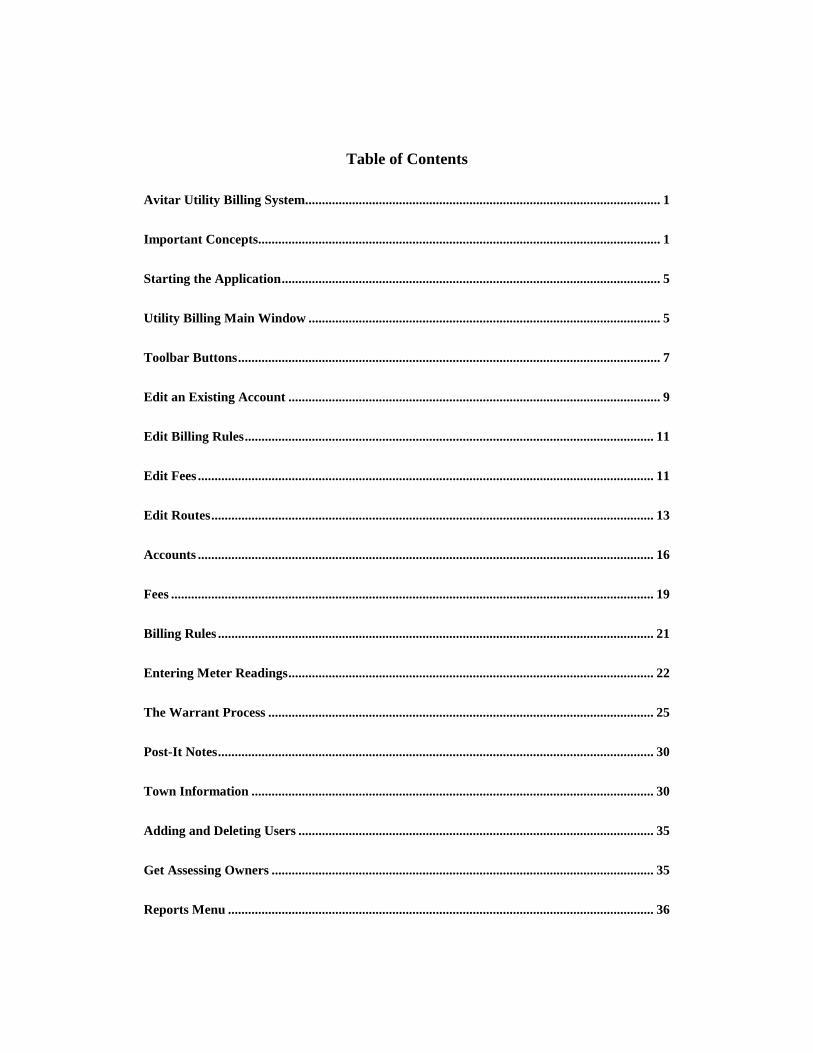
Table of Contents
Avitar Utility Billing System .......................................................................................................... 1
Important Concepts........................................................................................................................ 1
Starting the Application ................................................................................................................. 5
Utility Billing Main Window ......................................................................................................... 5
Toolbar Buttons .............................................................................................................................. 7
Edit an Existing Account ............................................................................................................... 9
Edit Billing Rules .......................................................................................................................... 11
Edit Fees ........................................................................................................................................ 11
Edit Routes .................................................................................................................................... 13
Accounts ........................................................................................................................................ 16
Fees ................................................................................................................................................ 19
Billing Rules .................................................................................................................................. 21
Entering Meter Readings ............................................................................................................. 22
The Warrant Process ................................................................................................................... 25
Post-It Notes .................................................................................................................................. 30
Town Information ........................................................................................................................ 30
Adding and Deleting Users .......................................................................................................... 35
Get Assessing Owners .................................................................................................................. 35
Reports Menu ............................................................................................................................... 36

File Menu ...................................................................................................................................... 39

1
Avitar Utility Billing System
Important Concepts Before examining the details of how to use the Avitar Utility Billing program, it is
necessary to explore important definitions and concepts used throughout this
manual:
Relationship between Utility Billing, Assessing, and Tax Collect
The Assessing program maintains owner and parcel information for the purpose of
calculating property tax warrants. The tax collect program imports owner and
parcel information, and the finalized property tax warrants from assessing for the
purpose of billing and collection.
The Utility Billing program calculates water/sewer warrants based on owner and
parcel information imported from assessing and meter information that is
maintained in and specific to the utility billing program. Once finalized, the
warrant is imported into tax collect for billing and collection.
Importing owner and parcel information from assessing reduces the amount of
duplicate information and for the ability to easily integrate utility balances for the
process of tax collect notices, liening, and deeding.
Parcel Identifier, PID, or Map/Lot/Sub Lot
Both Avitar Assessing and Avitar Utility Billing maintain assessment and other
parcel data based on a unique parcel identifier assigned to each parcel. This
identifier, often referred to as the PID, is generated from the map, lot, and sub lot
assigned to each parcel on your tax maps. The PID is an eighteen character code,
consisting of six characters each for the map, lot, and sub lot. For example, the
PID of the first parcel shown on tax map number seven would appear as follows:
000007 000001 000000
If this parcel was later subdivided in to three lots, the resulting PIDs might appear
as follows, depending on the nomenclature used in your community:
000007 000001 000000
000007 000001 00000A
000007 000001 00000B
In this example, PID 000007 000001 000000 would typically remain with the
original “mother lot”, and the new sub lots carved out of the original parcel would
be numbered 000007 000001 00000A and 000007 000001 00000B. Throughout
2
this document, the terms record, parcel identifier, PID, and map/lot/sub lot will be
used interchangeably.
Custom PID Format
It is possibile to configure your system to display PIDs in a manner different from
the standard six character map, six character lot, and six character sublot. This is
in response to the growing number of communities (predominantly towns that
have had a remapping/renumbering project by Cartographic Associates) that have
PIDs that do not conform to this standard. Previously, this could be
accommodated within the existing 18 character PID framework but it was not
always clean.
The Custom PID function allows you to configure a PID mask that divides the 18
available characters up into as many as six distinct sections of any length (e.g. six
sections of three characters or one section of ten characters and another of eight
characters). Additionally, you can choose to indicate a character that will separate
each section and/or you can choose to suppress leading zeros from each section.
Note that this function should only be enabled in consultation with Avitar
Software Support and in conjunction with your Assessing department. However,
review the description below and please contact us if you and your assessors are
interested in implementing a Custom PID format.
By using the Custom PID Format option, you can choose to change the system
format to an eighteen character PID in a manner different from the standard six
character map, six character lot, and six character sublot format. For example, you
could elect to choose six characters for the map, three for the lot, three for the
sublot, three for a building number, and three for a unit number.
Custom PID Mask -- You must use the # symbol to indicate the placement
of the individual PID characters within the mask. Then use another
character (for example a space or a dash or a slash) to indicate the
character you wish to use to separate the component sections of the PID.
However, you can only use one character as the separator character.
Custom PID Description -- Enter a brief description of the entire PID (e.g.
"Map/Lot/Sub/Bld/Unit"). This is the label that will appear on reports. It
is best to use a capital letter for the first letter of each component and then
lower-case letters for the rest. This will match the format of the rest of the
program and the report heading will look consistent.

3
Custom PID Section Names -- You can choose to enter a description for
each component of the PID (e.g. "Map", "Lot", etc.). The Custom PID
Section names are only visible when you hover over the individual boxes
throughout the program used to enter PID values on which to search.
Suppress Leading Zeros -- Check this box to suppress the leading zeros in
each section of the customized PID (e.g. "1/2/3" instead of
"000001/000002/000003").
Pad Separators with Spaces -- Check this option to add a space before
and after each separator, making it easier to read in some instances (e.g. "1
/ 2 / 3" instead of "1/2/3").
Account
An Account in Avitar Utility Billing represents a single bill. There can be more
than one Account on a PID. The account screen is divided into two sections. The
top portion contains the owner and parcel information, and the bottom portion
holds the meter information.
4
Route
The Utility Billing system enables you to manage your accounts by categorizing
them into specific routes. You can then produce reports or process readings based
on your routes.
Flat and Metered Rates
Water/sewer bills can be calculated using either flat or metered billing rates. There
can be multiple configured flat or metered billing rules. Both flat rate and metered
rate can have a minimum bill amounts.
Flat rates do not require updated usage information each billing period. You can
assign a units amount to each account, even though two accounts are billed on the
same flat rate, they receive different bill amounts.
Metered rates require updated usage information for each billing period. Within
each metered rate, you may have graduated rates. The first 15,000 gallons will be
billed at one rate, the next 15,000 gallons billed at a different rate. A Metered
billing rule can also incorporate a Flat billing rate, in addition to a minimum bill
amount.
Fees
In addition to the standard billing rates associated with each account, you can
create standard fees that can be assigned to accounts. You can create temporary or
permanent fees. Temporary fees are one-time fees that only last through the next
bill calculation and are automatically removed when the next warrant is exported.
A few examples include new owner set-up, re-connect service, final readings,
meter repair. Permanent fees remain assigned to an account until you remove
them. Examples would include multi-housing rate, commercial fees, hydrants.
Record Sets
A record set simply indicates a group of accounts that match your search criteria
and were therefore selected from the database. The number of possible records in
your record set ranges from zero to all of the accounts in your database. There can
be multiple accounts on a PID. If you select a single owner, your record set may
consist of several accounts if the selected owner owns many parcels in town.
When you create a record set by selecting particular parcels for access, Avitar
Utility Billing will display the first record (generally based on the first PID). If
there are several records in your record set, you can navigate among them using
the Previous and Next buttons on the Toolbar. At all times, the record counter on
the Data Display Banner will indicate which record of your current record set is
now displayed. Most of the time, the record counter will say “Account 1 of 1",
indicating you only have one account in your record set and it is currently
5
displayed.
Starting the Application
Click on the Avitar Utility Billing desktop Icon or select Utility Billing from the
Avitar program group on your Windows Start Menu. You will see what is referred
to as the splash screen, visible while the program initially connects to the
database. You are then greeted with the main Avitar Utility Billing window. The
program opens in public access mode in which you will be able to view, but not
edit, data.
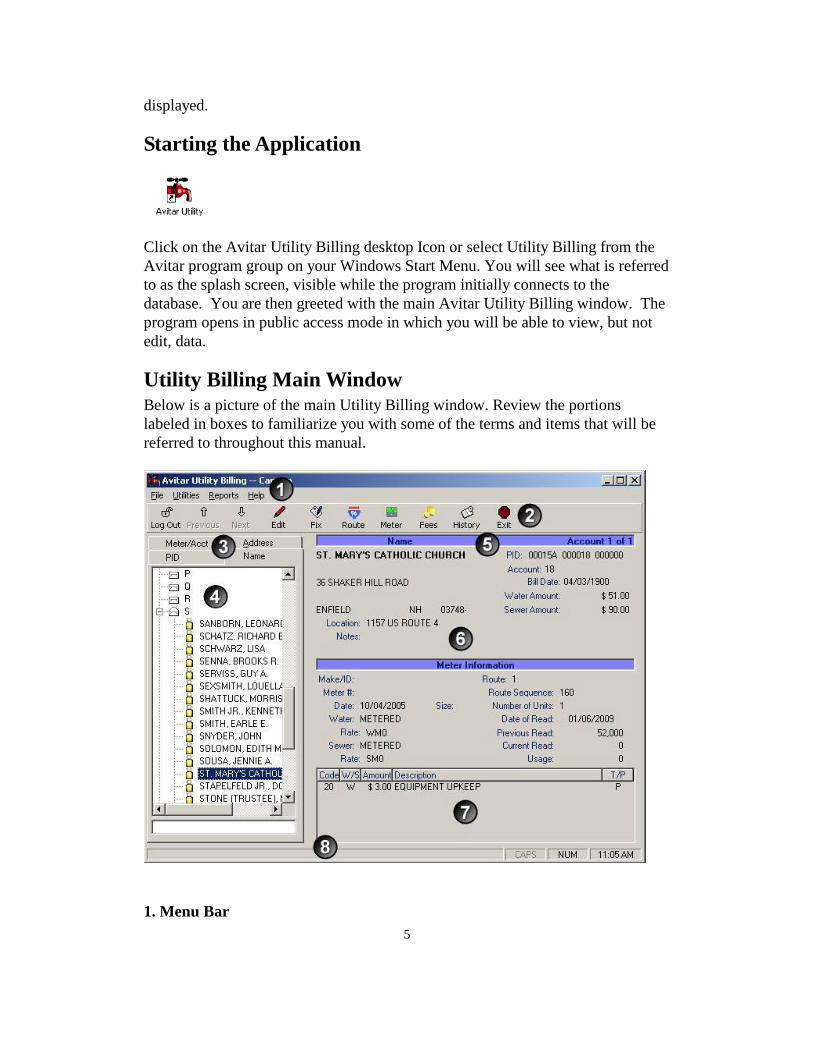
Utility Billing Main Window Below is a picture of the main Utility Billing window. Review the portions
labeled in boxes to familiarize you with some of the terms and items that will be
referred to throughout this manual.
1. Menu Bar

6
2. Toolbar
3. Data Access Tabs
4. Tree View
5. Record Counter
6. Account Display
7. Fee Display
8. Status Bar
Logging In
In order to browse most account information, you do not need to log in. However,
to edit accounts and to perform most tasks, such as printing reports or calculating
taxes, you will need to log in using the username and password you were given.
Until you log in, most of the items on the toolbar and drop down menus will be
disabled.
To Log In, press the Log In button located on the toolbar across the top of the
main window. You will be prompted to enter your username and password. Keep
in mind that passwords are case-sensitive, such that “ABCDE” is not the same as
“abcde”. After successfully logging in, you will notice many of the toolbar buttons
and the items from the drop down menus will be enabled, depending on the access
level associated with your username. Also, notice that the Log In toolbar button
now says Log Out. When you are done editing records or printing reports, you can
press the Log Out button to prevent further changes to the accounts, and
unauthorized use in you absence. Alternatively, you can exit the system using the
Exit toolbar button, which will log you out and exit the program.
Locating and Viewing Records
You can access existing accounts through any of the categories listed on the Data
Access Tabs. The basic methods are by account name, by PID (Parcel
Identification, usually Map-Lot-Sublot numbers), or by parcel address. All of
these categories are displayed within Tree View. To navigate the Tree View,
simply click on the appropriate top level to display the corresponding subcategory.
For example, the PID Tree View might show a top level grouping of “000001"
corresponding to Tax Map #1. With a click, this then expands to show all lots on
Map #1.
Note: Map, Lot and Sublot are maintained with six characters for each value, such
that Map 15A Lot 3 Sublot 0 would appear as “00015A 000003 000000" as
shown below:
7
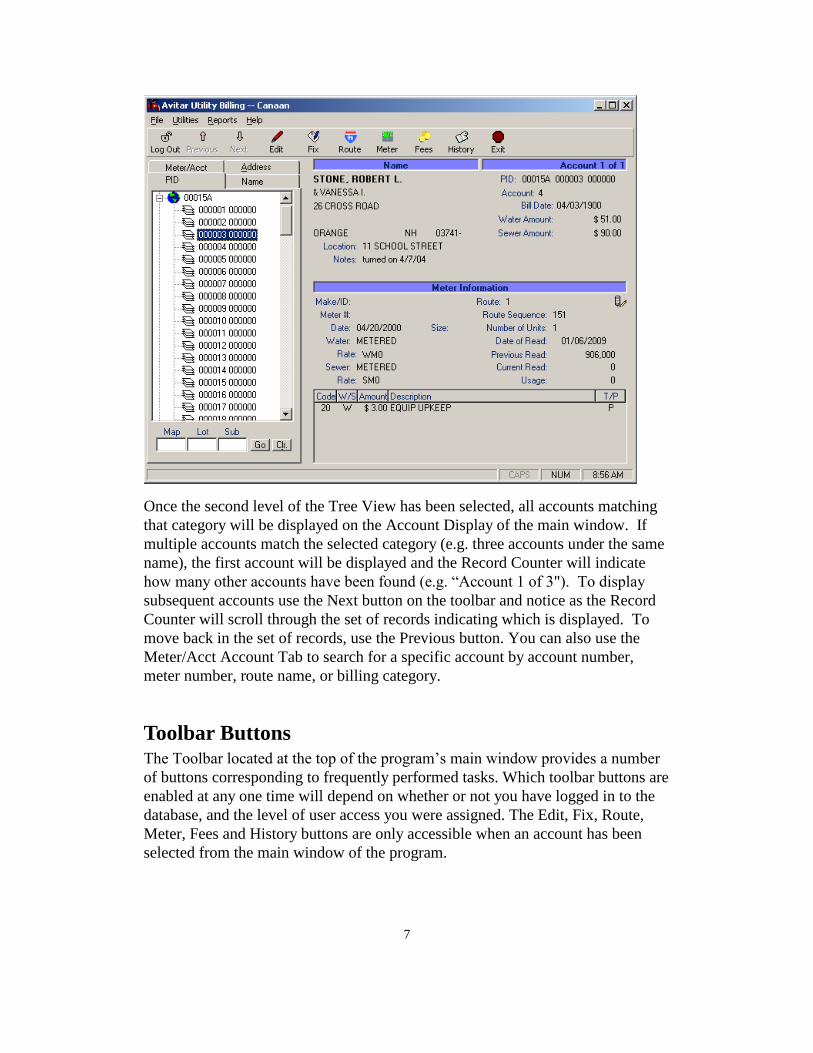
Once the second level of the Tree View has been selected, all accounts matching
that category will be displayed on the Account Display of the main window. If
multiple accounts match the selected category (e.g. three accounts under the same
name), the first account will be displayed and the Record Counter will indicate
how many other accounts have been found (e.g. “Account 1 of 3"). To display
subsequent accounts use the Next button on the toolbar and notice as the Record
Counter will scroll through the set of records indicating which is displayed. To
move back in the set of records, use the Previous button. You can also use the
Meter/Acct Account Tab to search for a specific account by account number,
meter number, route name, or billing category.
Toolbar Buttons The Toolbar located at the top of the program’s main window provides a number
of buttons corresponding to frequently performed tasks. Which toolbar buttons are
enabled at any one time will depend on whether or not you have logged in to the
database, and the level of user access you were assigned. The Edit, Fix, Route,
Meter, Fees and History buttons are only accessible when an account has been
selected from the main window of the program.

8
Log In/Log Out Button
The Avitar Utility Billing system does not require you to log in to the database
when you start the program. In this public access mode you are able to view most
data, but the majority of the system’s functions are not accessible. To print reports
you will need to log in.
To log in press the Log In button on the program’s main toolbar. On the Login
dialog box, enter your user name and password in the appropriate text boxes.
Keep in mind that passwords are case sensitive. Your user level determines what
functions you are able to access. User levels are explained in detail under the
Maintain Users section.
You can press the Log Off button to end your user session without closing the
Avitar Utility Billing system. Logging off is recommended when you are away
from your computer. Alternatively, you can simply exit the program.
Previous/Next Button Toolbar Buttons
The Previous and Next buttons on the program’s main toolbar allow you to move
back and forth between records within the currently displayed recordset.
Edit Button
The Edit button allows you to make changes to currently displayed invoice. You
are also able to change the meter information.
Fix Button
The Fix function makes it easy for you to update previous and current meter
reading amounts as well as the meter reading date in a single place when your
meter reader comes back with readings that don't match what you had on file.
Typically this happens when, unbeknownst to you, they've swapped out or reset a
meter in the field.
Route Button
The Route button allows you to edit an existing route. For detailed information on
editing routes refer to the Editing Routes section of this manual.
9
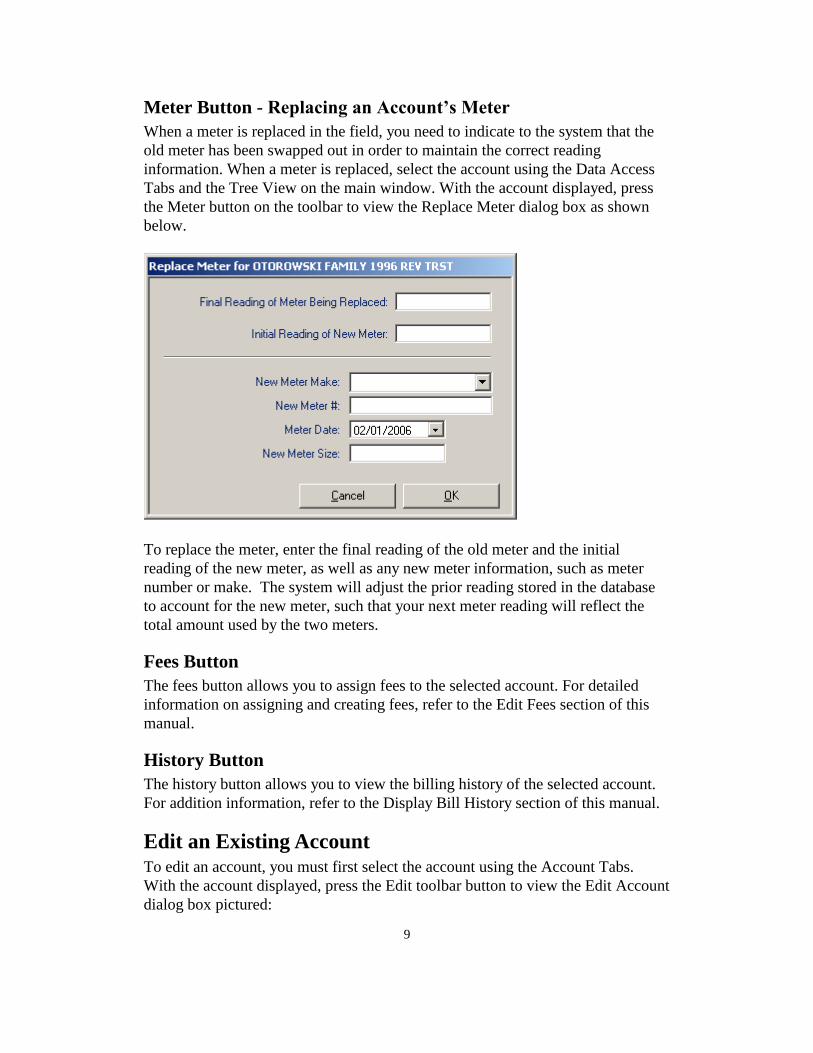
Meter Button - Replacing an Account’s Meter
When a meter is replaced in the field, you need to indicate to the system that the
old meter has been swapped out in order to maintain the correct reading
information. When a meter is replaced, select the account using the Data Access
Tabs and the Tree View on the main window. With the account displayed, press
the Meter button on the toolbar to view the Replace Meter dialog box as shown
below.
To replace the meter, enter the final reading of the old meter and the initial
reading of the new meter, as well as any new meter information, such as meter
number or make. The system will adjust the prior reading stored in the database
to account for the new meter, such that your next meter reading will reflect the
total amount used by the two meters.
Fees Button
The fees button allows you to assign fees to the selected account. For detailed
information on assigning and creating fees, refer to the Edit Fees section of this
manual.
History Button
The history button allows you to view the billing history of the selected account.
For addition information, refer to the Display Bill History section of this manual.
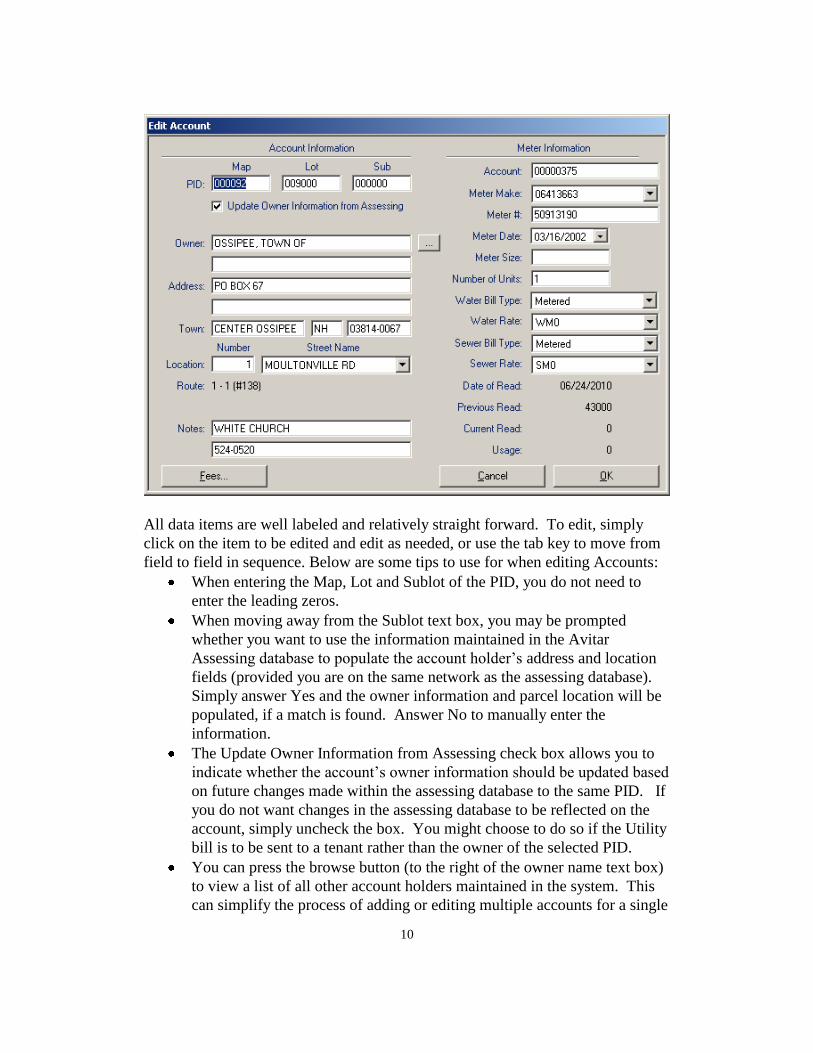
Edit an Existing Account To edit an account, you must first select the account using the Account Tabs.
With the account displayed, press the Edit toolbar button to view the Edit Account
dialog box pictured:
10
All data items are well labeled and relatively straight forward. To edit, simply
click on the item to be edited and edit as needed, or use the tab key to move from
field to field in sequence. Below are some tips to use for when editing Accounts:
When entering the Map, Lot and Sublot of the PID, you do not need to
enter the leading zeros.
When moving away from the Sublot text box, you may be prompted
whether you want to use the information maintained in the Avitar
Assessing database to populate the account holder’s address and location
fields (provided you are on the same network as the assessing database).
Simply answer Yes and the owner information and parcel location will be
populated, if a match is found. Answer No to manually enter the
information.
The Update Owner Information from Assessing check box allows you to
indicate whether the account’s owner information should be updated based
on future changes made within the assessing database to the same PID. If
you do not want changes in the assessing database to be reflected on the
account, simply uncheck the box. You might choose to do so if the Utility
bill is to be sent to a tenant rather than the owner of the selected PID.
You can press the browse button (to the right of the owner name text box)
to view a list of all other account holders maintained in the system. This
can simplify the process of adding or editing multiple accounts for a single
11
owner by copying owner and address information from existing accounts.
Location Street Names can either be typed in or selected from the drop
down list of existing street name. By selecting names from the existing
list, you can help standardize street names which will make the Address
Tree View on the main window easier to navigate.
If you select a Water or Sewer Bill Type other than “Unconnected” or “No
Charge” you will need to select one of the corresponding Rates for the
selected Type.
You can also edit Fee information for the selected account by pressing the
Fees button. Refer the section Assigning Fees to an Account for more
information on fees.
You can add a billing note to your account which will print on the bill that
is printed. See the Town Information section of this manual to see how to
enable this feature.
To save your changes and exit the dialog box press the OK button. To exit
without saving your changes press the Cancel button.
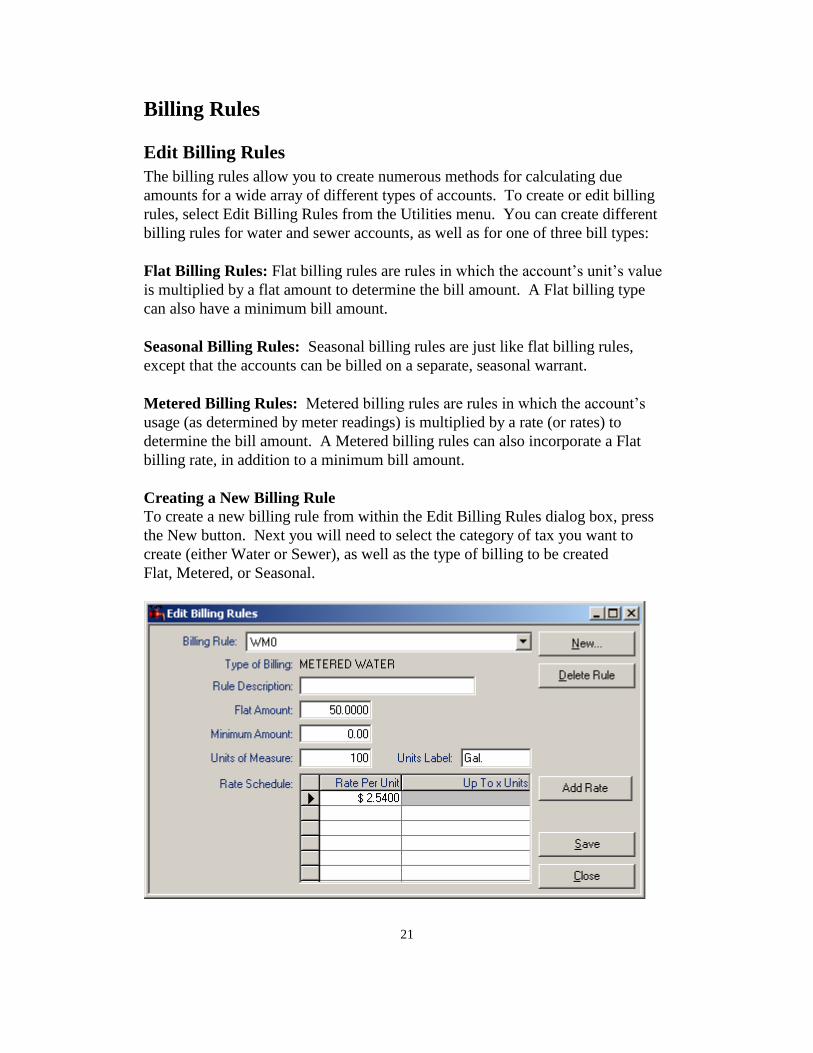
Edit Billing Rules To edit an existing billing rule, first select the rule from the Billing Rule drop
down list. The rules attributes will be displayed below, depending upon the type
of rule selected. All billing rules have a Rule Description used to refer to the rule,
as well as a Flat Amount and a Minimum Amount. Metered rules have several
additional attributes. These include a Units of Measure value, which refers to the
units in which the rates are entered, for example $0.625 per 1000 gallons. Also
included is a units label that will appear on the bill. Units label values might be
“gal” or “cu ft” depending upon your meters. Finally, all Metered rates require you
to enter the Rate per Unit, as well as a range of units for the given rate, for
example $0.625 per 1000, up to the maximum billable amount. Your Metered
rules can have multiple rates associated with different ranges of usage.
Edit Fees In addition to the standard billing rates associated with each account, you can
create standard fees that can be assigned to accounts. Before assigning a fee to an
individual account, you should create the fee by selecting Utilities | Edit Fees. The
edit Standard Fees dialog box is shown below:
12
To create a new standard fee that can then be assigned to individual accounts,
press the New Fee button. You will be prompted to enter a unique two letter code
for the new fee. After entering the fees code, you will be able to edit the attributes
of the new fee. The W/S value refers to whether it is a Water Fee (W), a Sewer
Fee (S), or a Seasonal Fee (X), and thereby which types of accounts and bills to
which the fee can be assigned. The T/P value refers to whether the fee is
Temporary (T) or Permanent (P). Temporary fees are one-time fees that only last
through the next bill calculation and are automatically removed when the next
warrant is exported. Permanent fees remain assigned to an account until you
remove them.
To edit an existing fee, simply make any changes in the displayed list of fees.
You will be prompted if any of the values you enter are not acceptable. Once you
have made changes to the fees, whether it is a change in the fee amount or fee
description, you can press the OK button to save your changes. If the fees you
have modified are currently assigned to any accounts, you will be prompted
whether you want to update the existing assigned fees to reflect the changes you
have just made. Therefore, if the Debt Service fee changed to $38.75 for the next
warrant, the change could be made once here and then automatically applied to all
accounts that receive the Debt Service fee.
To delete an existing standard fee, first select the fee by clicking on the fees
corresponding record selector within the grid (the gray box down the left-most
column pictured above). Then press the Delete Fee button. If the fee you have
selected for deletion is currently assigned to any accounts, you will be prompted
13
by the system whether you want to cancel the deletion process or continue by
having the system remove the fees from the affected accounts. However, you
cannot delete a standard fee without at the same time removing that fee from any
accounts.
Edit Routes The Utility Billing system enables you to manage your accounts by categorizing
them into specific routes. You can then produce reports or process readings based
on your routes.
To create a new route, select Utilities | Edit Routes and the following screen
appears:
Then click the New Route button and the screen below will appear:
Select a route number from the drop down menu; this will display only numbers

14
not previously used for a route. Enter a route name or description by which you
will refer to your new route. Click the OK button to add the route. You will now
be able to add accounts to your new route.
You have now returned to the “Routes” screen. Select the Route Name drop down
window and choose the new route you just created or any route in the list to edit.
In either case, you can then open the Available Streets drop down menu and select
a street to add to the route.
Once selected, click the Add to Route button and you will see the Accounts
display in the box below:
In the picture displayed above, the route selected “TOWN CENTER” and the
Street selected “MAIN STREET” and the accounts on Main Street added to your
route. From here, you can select a record and move it up or down in the listing to
place it in the appropriate location, or Remove the record from the list by selecting
the account and clicking the appropriate button. Once you have sequenced the
accounts to your liking, you can add more streets to the beginning, the end or
anywhere in between. First select the account in the route where you want to
insert another street and then from the Available Streets drop down list select a
new street and click the Add to Route button. You will then be asked if you wish
to insert the street prior to the selected account or append to the end of the route.
15
Using this procedure you will be able to create any possible route configuration
and once completed, click the Save Route button to save your work or the Close
button to cancel your changes and close the window.
If you want to reorder multiple sequential accounts at one time, highlight the first
record to be moved, then hold down the Shift key on your keyboard and click on
the record selector button to the left of the final record in the group to be moved.
All the records will be highlighted and will move as a group up or down as you
click the appropriate buttons or be removed from the route by clicking on the
Remove button.
In addition to using the buttons, you can reposition accounts by dragging and
dropping them within the list using the standard windows drag and drop actions
with your mouse.
Editing a Single Account’s Route Assignment or Order
By selecting Utilities | Edit Routes, you are able to edit any account on any route.
However, if you reposition a single record within an existing route or add a new
account to an existing route, you can use the Route button on the main window
toolbar. To do so, first use the Data Access Tabs to find and display the desired
account, then click the Route button on the toolbar. If the account has already
been assigned to a route, you will see the route displayed. If the account is not
assigned to a route, you can choose a route from the available list and then click
the Add to Route button. Once displayed in the displayed route list, you can then
reposition it as needed.
16
Accounts
Add Account
The process of adding new Accounts to the system begins by selecting
Utilities | Add Account. Use the corresponding text boxes to enter the Map, Lot,
and Sub Lot for the new Account. The tab button will walk you through the entry
in order or click with the mouse to skip fields not needed. Select the Fees button if
you need to assign any fees to the Account. For more information about assigning
fees, refer to the Assigning Fees to an Account section of this manual.
Once you have completed the process of entering the owner and meter
information and added any necessary fees, press the Add button. You are
prompted whether you wish to add this Account to a Route. You have completed
the process of adding a new Account.
Close Account
NOTE: If you just need to update the account holder information without issuing
an interim closing bill then you should use the Edit button on the main screen to
make the changes; you do not need to go through the Close Account process.
The Close Account function is designed to help you with the process of issuing a
final bill to an account when the account holder changes prior to your next
scheduled billing process. To use the function, first select the account on the main
screen and then select Utilities | Close Account.
The first screen of the Close Account process displays the current account holder
information on the account and allows you to enter the name and address of the
new account holder. You can also update or add any notes on the account and
indicate whether you wish for the billing information to be updated in the future
based on information maintained for that PID in the Avitar Assessing database. If
you chose to update the information automatically you should make sure that the
new account holder's information is to be updated in the Assessing database or
else the information will revert back to the previous account holder the next time
you import owner information from Assessing. After entering the information for
the new account holder press Next.
The second screen allows you to determine the bill amount for the final bill to the
previous account holder. This is separated into two sections: Fee Billing and Rate
17
Billing (i.e. the normal flat and/or metered bill amounts). If the account does not
have any fees, the Fee Billing section will be disabled.
If there are fees attached to the account you can choose under the Fee Billing
section how the fees should be apportioned between the previous and the new
account holders. You can elect to 1) bill all of the fees to the previous account
holder, 2) bill all of the fees to the new account holder, or 3) enter a percentage of
the fees that should be billed to the previous account holder. For example, if the
change of account happens two months into a quarterly billing cycle, you might
choose to bill 67% of the fees to the previous account holder. The remaining 33%
will be reflected on the new account holder's bill during your next standard billing
cycle. Note that if the account has multiple fees assigned, all of the fees will be
treated the same, based on your choice.
The Rate Billing section will offer different options as determined by the type of
water and/or sewer billing rules assigned to the account. If the account has either
metered water or a metered sewer billing type you will be able to enter the final
reading for the account at the time of the close. If the account has either flat water
or a flat sewer billing type you again will be able to enter a percentage of the total
amount for a normal billing cycle that should be billed to the previous account
holder. Again, using the scenario listed above, if the change of account happens
two months into a quarterly billing cycle, you might choose to bill 67% of the
standard flat rate to the previous account holder. The remaining 33% of the
standard flat rate will be reflected on the new account holder's bill during your
next standard billing cycle. Note that if the account has a metered water billing
type and a flat sewer billing type (or vice versa) you will need to enter both a final
reading and a percentage. Once you have entered all information press Next.
The final screen of the Close Account process shows you the final bill amount for
the previous account holder and allows you to enter the additional billing
information that will appear on the final bill. Verify that the bill amounts are
correct and then enter the bill setup information. The bill setup information is
virtually identical to the bill setup screen for producing bills for a standard billing
cycle. You need to enter dates for the billing period for the final closing bill, a due
date for the closing bill, and whether you wish the bill to include an interest rate or
a flat penalty for late payments. You can use the two message lines to include any
extra information to appear on the bill, and you should confirm the return address
and tax collector office hour’s information. Once you have verified all of the
required bill information press Print Closing Bill to produce the actual final bill to
be sent to the previous account holder. After printing the bill press Print Tax
Collector Supplement to produce a one page supplement sheet that provides all of
the information necessary for your tax collector to supplement the final bill into
the tax collections system. The printed supplement includes a copy of the final
closing bill in addition to instructions for the tax collector for supplementing the
18
final bill amount.
After you have printed the final bill for the previous account holder and the tax
collector supplement press Finish to complete the process. The new account
holder information and any fee or billing changes are not actually saved to the
database until you press Finish. If you press Close instead of Finish you will be
prompted that none of your changes have been saved and you should discard any
printed final bill or tax collector supplement.
If the account is based strictly on metered water and/or sewer billing types and
does not have any fees that were billed in part or in total to the previous account
holder, then the only changes made to the account going forward will be the new
account holder information and a new Previous Read value (equal to the Final
Meter Reading value you provided during the Close Account process). The
revised Previous Read value will be used in conjunction with the Final Read to be
entered at the time of the next standard billing cycle to calculate the bill for the
new account holder. If, however, the account had either a flat water billing type, a
flat sewer billing type, or fees that were billed either in part or in total to the
previous account holder you should notice a temporary fee that was added to the
account by the Close Account process. The "fee" will appear as "Acct. Change
Credit" and will actually be for a negative amount. This is necessary to credit the
new account holder's upcoming bill to reflect the portion of the fees and/or flat
rate billing amounts that were billed to the previous account holder. The credit is
added as a temporary fee that will automatically be removed after the next bill is
calculated and finalized. The temporary credit should never produce a negative
total bill amount for the new account holder's next bill unless you manually
remove Permanent fees that were on the account at the time of the issuance of the
final bill or reduce the rate for that account's flat billing types.
Delete Account
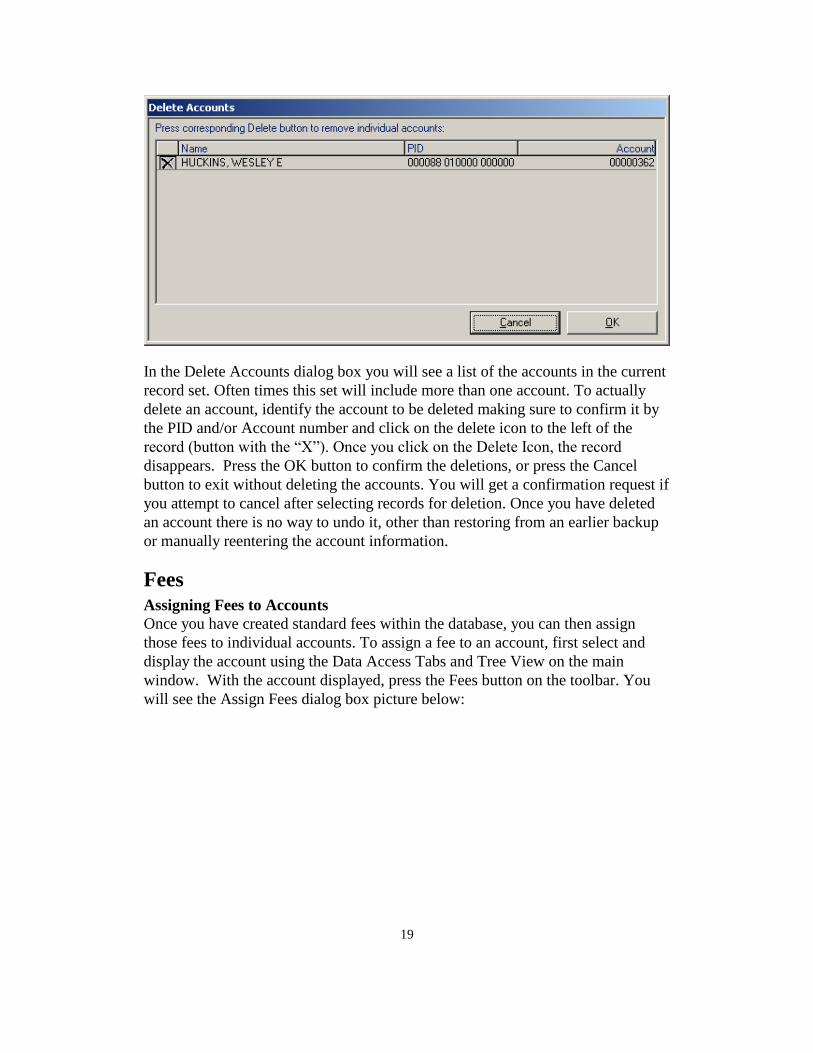
To delete an account, first locate and display the accounts on the main window
using the Data Access Tabs and Tree View. With the account(s) displayed, select
Utilities | Delete Account. The Delete Account dialog box is pictured below:
19
In the Delete Accounts dialog box you will see a list of the accounts in the current
record set. Often times this set will include more than one account. To actually
delete an account, identify the account to be deleted making sure to confirm it by
the PID and/or Account number and click on the delete icon to the left of the
record (button with the “X”). Once you click on the Delete Icon, the record
disappears. Press the OK button to confirm the deletions, or press the Cancel
button to exit without deleting the accounts. You will get a confirmation request if
you attempt to cancel after selecting records for deletion. Once you have deleted
an account there is no way to undo it, other than restoring from an earlier backup
or manually reentering the account information.
Fees
Assigning Fees to Accounts
Once you have created standard fees within the database, you can then assign
those fees to individual accounts. To assign a fee to an account, first select and
display the account using the Data Access Tabs and Tree View on the main
window. With the account displayed, press the Fees button on the toolbar. You
will see the Assign Fees dialog box picture below:
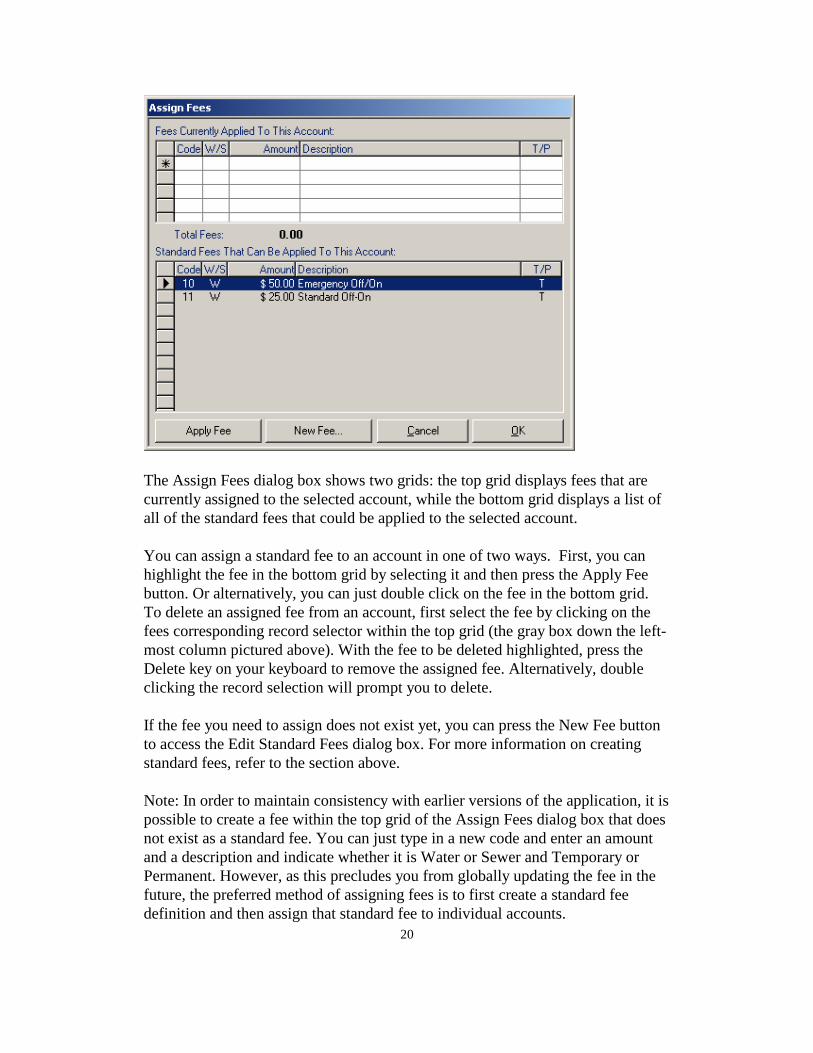
20
The Assign Fees dialog box shows two grids: the top grid displays fees that are
currently assigned to the selected account, while the bottom grid displays a list of
all of the standard fees that could be applied to the selected account.
You can assign a standard fee to an account in one of two ways. First, you can
highlight the fee in the bottom grid by selecting it and then press the Apply Fee
button. Or alternatively, you can just double click on the fee in the bottom grid.
To delete an assigned fee from an account, first select the fee by clicking on the
fees corresponding record selector within the top grid (the gray box down the left-
most column pictured above). With the fee to be deleted highlighted, press the
Delete key on your keyboard to remove the assigned fee. Alternatively, double
clicking the record selection will prompt you to delete.
If the fee you need to assign does not exist yet, you can press the New Fee button
to access the Edit Standard Fees dialog box. For more information on creating
standard fees, refer to the section above.
Note: In order to maintain consistency with earlier versions of the application, it is
possible to create a fee within the top grid of the Assign Fees dialog box that does
not exist as a standard fee. You can just type in a new code and enter an amount
and a description and indicate whether it is Water or Sewer and Temporary or
Permanent. However, as this precludes you from globally updating the fee in the
future, the preferred method of assigning fees is to first create a standard fee
definition and then assign that standard fee to individual accounts.
21
Billing Rules
Edit Billing Rules
The billing rules allow you to create numerous methods for calculating due
amounts for a wide array of different types of accounts. To create or edit billing
rules, select Edit Billing Rules from the Utilities menu. You can create different
billing rules for water and sewer accounts, as well as for one of three bill types:
Flat Billing Rules: Flat billing rules are rules in which the account’s unit’s value
is multiplied by a flat amount to determine the bill amount. A Flat billing type
can also have a minimum bill amount.
Seasonal Billing Rules: Seasonal billing rules are just like flat billing rules,
except that the accounts can be billed on a separate, seasonal warrant.
Metered Billing Rules: Metered billing rules are rules in which the account’s
usage (as determined by meter readings) is multiplied by a rate (or rates) to
determine the bill amount. A Metered billing rules can also incorporate a Flat
billing rate, in addition to a minimum bill amount.
Creating a New Billing Rule
To create a new billing rule from within the Edit Billing Rules dialog box, press
the New button. Next you will need to select the category of tax you want to
create (either Water or Sewer), as well as the type of billing to be created
Flat, Metered, or Seasonal.
22
Finally, you can enter a rule description and press the Save button to add the rule.
Once the new rule is added, you can edit it just as you would an existing rule. For
more information, please refer to the Edit Billing Rules section of this manual.
Deleting a Billing Rule
If you wish to delete a rule, first select the rule from the Billing Rule drop down
list. Then press Delete Rule. The system will check all accounts to verify that the
rule is no longer assigned to any accounts. If the rule is not in use, you will be
asked to confirm the deletion, and once confirmed the rule will be deleted.
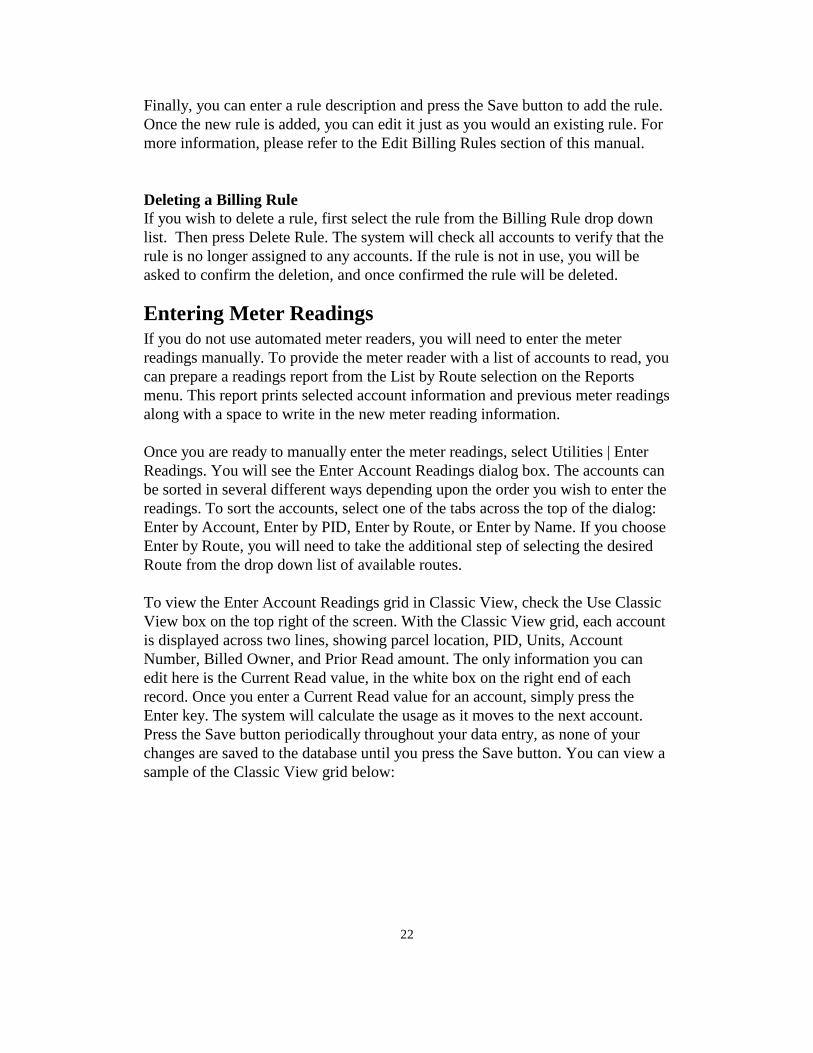
Entering Meter Readings
If you do not use automated meter readers, you will need to enter the meter
readings manually. To provide the meter reader with a list of accounts to read, you
can prepare a readings report from the List by Route selection on the Reports
menu. This report prints selected account information and previous meter readings
along with a space to write in the new meter reading information.
Once you are ready to manually enter the meter readings, select Utilities | Enter
Readings. You will see the Enter Account Readings dialog box. The accounts can
be sorted in several different ways depending upon the order you wish to enter the
readings. To sort the accounts, select one of the tabs across the top of the dialog:
Enter by Account, Enter by PID, Enter by Route, or Enter by Name. If you choose
Enter by Route, you will need to take the additional step of selecting the desired
Route from the drop down list of available routes.
To view the Enter Account Readings grid in Classic View, check the Use Classic
View box on the top right of the screen. With the Classic View grid, each account
is displayed across two lines, showing parcel location, PID, Units, Account
Number, Billed Owner, and Prior Read amount. The only information you can
edit here is the Current Read value, in the white box on the right end of each
record. Once you enter a Current Read value for an account, simply press the
Enter key. The system will calculate the usage as it moves to the next account.
Press the Save button periodically throughout your data entry, as none of your
changes are saved to the database until you press the Save button. You can view a
sample of the Classic View grid below:
23
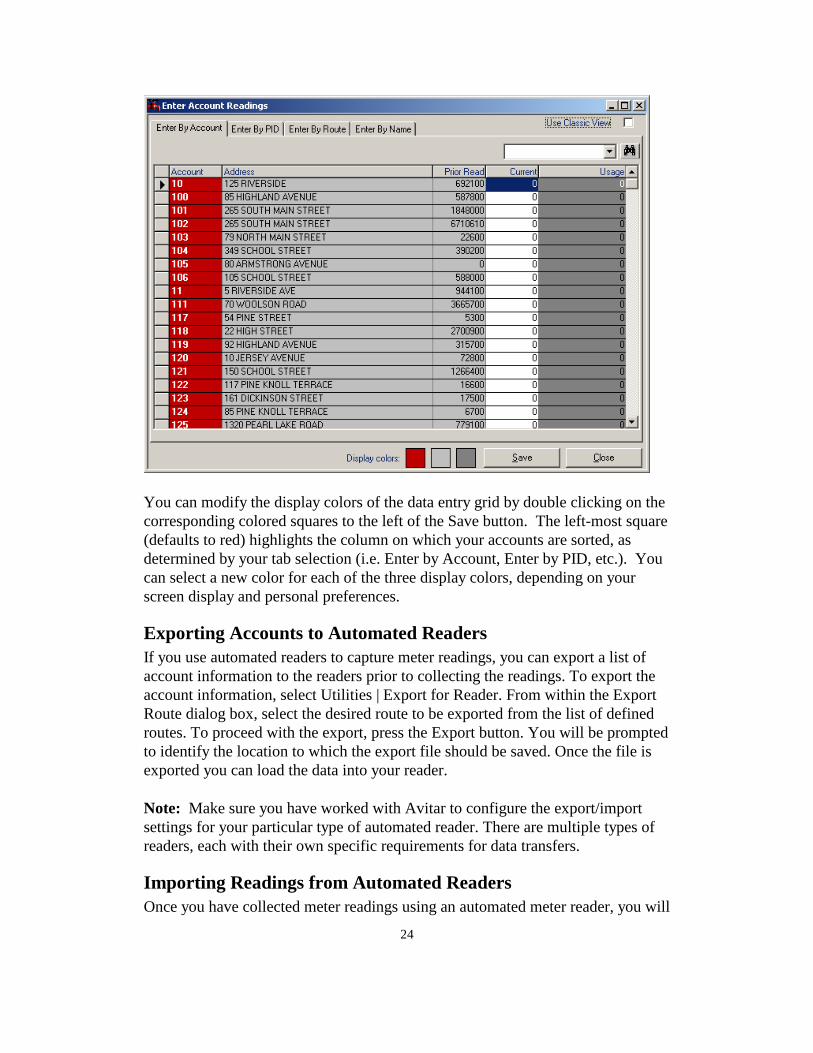
To view the Enter Account Readings grid in the default Update Dialog Box,
uncheck the Use Classic View on the top right of the screen. The Update Dialog
Box displays the information in columns. Depending on which tab you have
selected, is how the data will be sorted. The column in red indicates how the data
is currently sorted. The only information you can edit here is the Current Read
value, in the column labeled Current. Once you enter a Current Read value for an
account, simply press the Enter key. The system will calculate the usage as it
moves to the next account. Press the Save button periodically throughout your
data entry, as none of your changes are saved to the database until you press the
Save button. You can view a sample of the Update Dialog box grid below:
24
You can modify the display colors of the data entry grid by double clicking on the
corresponding colored squares to the left of the Save button. The left-most square
(defaults to red) highlights the column on which your accounts are sorted, as
determined by your tab selection (i.e. Enter by Account, Enter by PID, etc.). You
can select a new color for each of the three display colors, depending on your
screen display and personal preferences.
Exporting Accounts to Automated Readers
If you use automated readers to capture meter readings, you can export a list of
account information to the readers prior to collecting the readings. To export the
account information, select Utilities | Export for Reader. From within the Export
Route dialog box, select the desired route to be exported from the list of defined
routes. To proceed with the export, press the Export button. You will be prompted
to identify the location to which the export file should be saved. Once the file is
exported you can load the data into your reader.
Note: Make sure you have worked with Avitar to configure the export/import
settings for your particular type of automated reader. There are multiple types of
readers, each with their own specific requirements for data transfers.
Importing Readings from Automated Readers
Once you have collected meter readings using an automated meter reader, you will
25
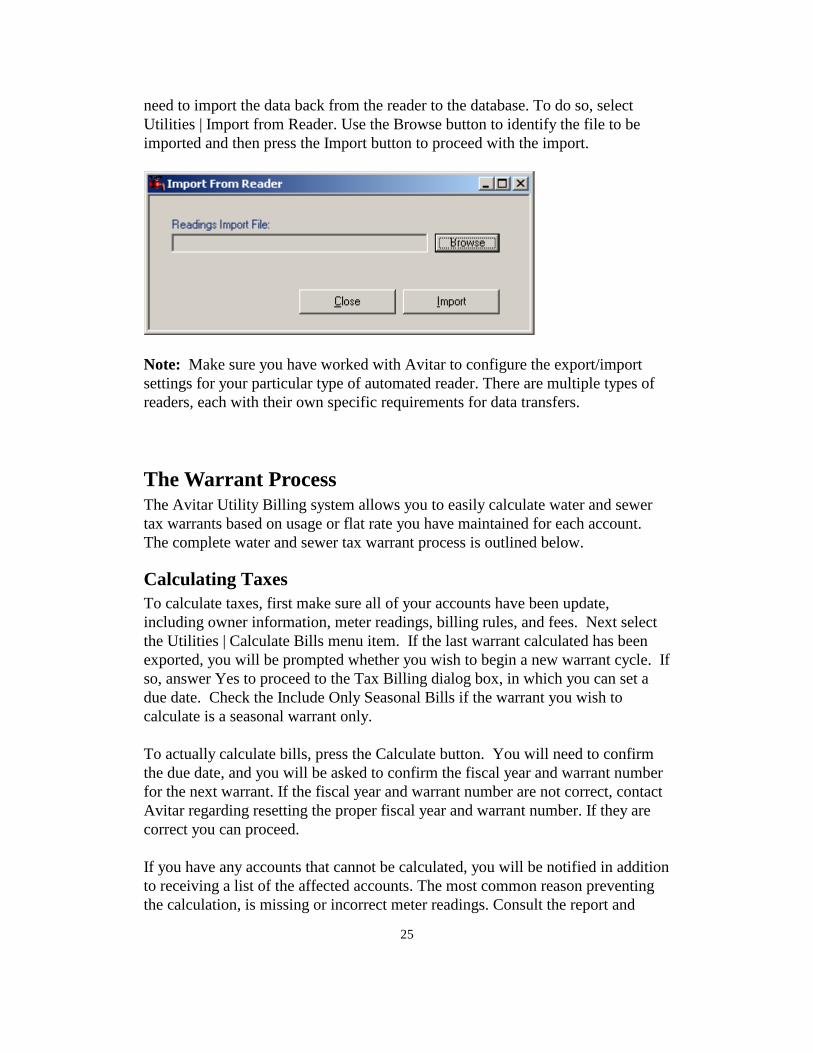
need to import the data back from the reader to the database. To do so, select
Utilities | Import from Reader. Use the Browse button to identify the file to be
imported and then press the Import button to proceed with the import.
Note: Make sure you have worked with Avitar to configure the export/import
settings for your particular type of automated reader. There are multiple types of
readers, each with their own specific requirements for data transfers.
The Warrant Process The Avitar Utility Billing system allows you to easily calculate water and sewer
tax warrants based on usage or flat rate you have maintained for each account.
The complete water and sewer tax warrant process is outlined below.
Calculating Taxes
To calculate taxes, first make sure all of your accounts have been update,
including owner information, meter readings, billing rules, and fees. Next select
the Utilities | Calculate Bills menu item. If the last warrant calculated has been
exported, you will be prompted whether you wish to begin a new warrant cycle. If
so, answer Yes to proceed to the Tax Billing dialog box, in which you can set a
due date. Check the Include Only Seasonal Bills if the warrant you wish to
calculate is a seasonal warrant only.
To actually calculate bills, press the Calculate button. You will need to confirm
the due date, and you will be asked to confirm the fiscal year and warrant number
for the next warrant. If the fiscal year and warrant number are not correct, contact
Avitar regarding resetting the proper fiscal year and warrant number. If they are
correct you can proceed.
If you have any accounts that cannot be calculated, you will be notified in addition
to receiving a list of the affected accounts. The most common reason preventing
the calculation, is missing or incorrect meter readings. Consult the report and

26
make any changes to the accounts necessary prior to recalculating the taxes. You
can continue to calculate and commit a particular warrant as many times as you
wish, until such time as you finalize the warrant. It is important to note that you
will need to recalculate taxes in order to make any changes effective for the given
warrant. So, if for example, you calculate the warrant and print a commitment
report and then realize that you don’t have the most recent address information for
a given account, you should first update the account and then you must recalculate
the tax warrant, in order for those changes to appear on the tax bill. Once you
have successfully calculated taxes, you can proceed to creating the Commitment
Report.
Creating the Commitment Report
The Commitment Report shows a summary of a particular tax warrant, as well as
a detail of each account’s bill amounts. You must calculate taxes prior to printing
the Commitment Report. To view the Commitment Report, select Utilities |
Commitment Report. You will see a summary of the most recently calculated
warrant. Verify that this information is correct, and then press Print Commitment
Report to print the report. If the information contained on the Commitment
Report is correct, you can finalize the tax warrant. If the information is not
correct, you can make any changes to accounts and then calculate the tax warrant
again.
Finalizing the Tax Warrant
Once you have calculated a warrant, printed the Commitment Report, and are
satisfied that the warrant is complete you must finalize the warrant. A warrant
cannot be recalculated once it has been finalized, and billing information cannot
be exported until the warrant has been finalized.
To finalize the warrant, select Utilities | Finalize Warrant menu item. Verify that
the warrant and totals are correct and read the messages to make sure you are
aware of what the process is doing. By finalizing the warrant, you will be
resetting meter readings in preparation for the next set of readings, in addition to
removing any temporary fees, as well as making the data available to the tax
collector.
Note: meter readings will not be reset when exporting Seasonal Warrants.
To proceed with the finalizing of the warrant process, you will be asked to
confirm the interest rates assigned to the tax bills. If the rates are not correct, you
will need to cancel and reset the interest rates within the Town Information dialog
box. Upon Okaying the interest rates, you will be asked whether the warrant is
the final warrant of the current fiscal year. If you answer Yes, the system will
27
reset your fiscal year and warrant ID, such that you will no longer be able to
calculate warrants for the current fiscal year.
Exporting Water/Sewer Tax Warrant
In addition to finalizing the warrant within the Utility Billing database, the
warrant will need to be exported from the Utility Billing program and imported
into the Tax Collect Program. Select Utilities | Export Warrant. The Export Tax
Bills screen will open displaying the current warrant information. If the
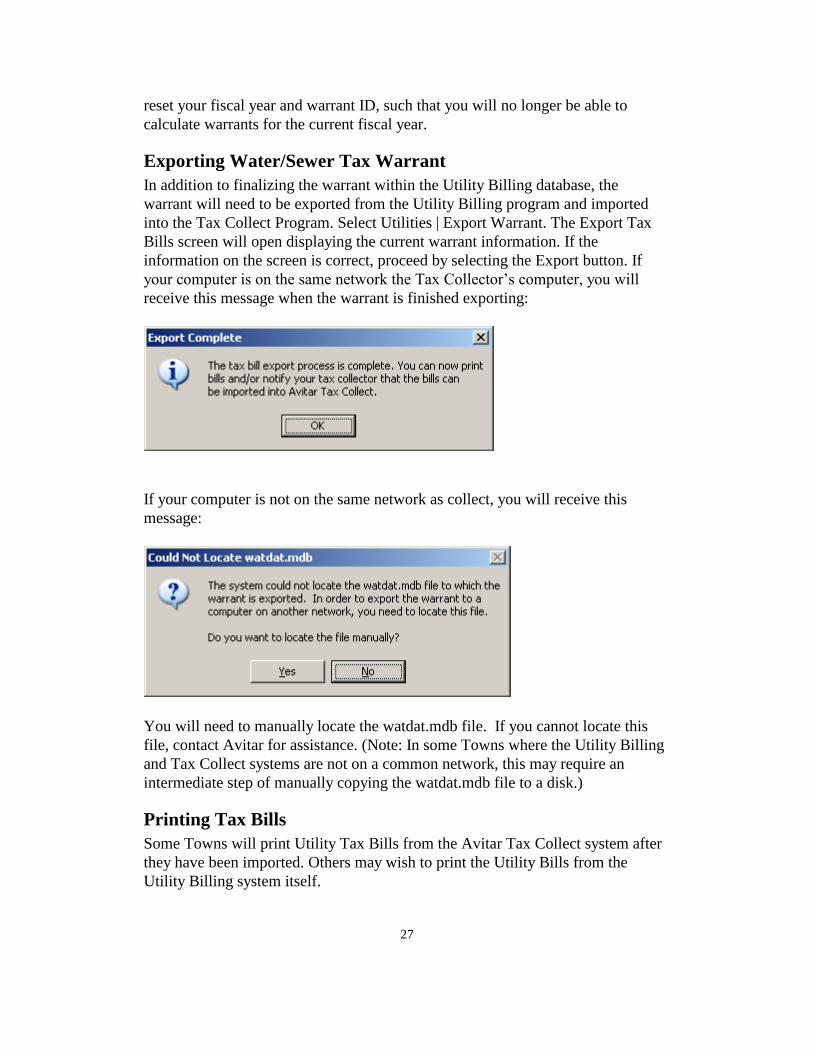
information on the screen is correct, proceed by selecting the Export button. If
your computer is on the same network the Tax Collector’s computer, you will
receive this message when the warrant is finished exporting:
If your computer is not on the same network as collect, you will receive this
message:
You will need to manually locate the watdat.mdb file. If you cannot locate this
file, contact Avitar for assistance. (Note: In some Towns where the Utility Billing
and Tax Collect systems are not on a common network, this may require an
intermediate step of manually copying the watdat.mdb file to a disk.)
Printing Tax Bills
Some Towns will print Utility Tax Bills from the Avitar Tax Collect system after
they have been imported. Others may wish to print the Utility Bills from the
Utility Billing system itself.

28
To print bills from the Utility Billing system, first make sure you have calculated,
committed, and finalized the warrant and then select Utilities | Tax Bills menu
item. In the Tax Bill Setup dialog box, you can enter any messages to be printed
on the bills, as well as return address, office hours and billing period information.
Once the input is correct, press the Print button to actually print the bills.
Display Bill History
The system allows you to review an Account’s billing information for any prior
warrants. There are two ways to display Bill History.
First, you can select Utilities | Display Bill History. Within the Billing History
dialog box you can search for bills either by PID or by Owner Name. In either
case, enter the search criteria and then press the corresponding “Find” button.
The alternate method for displaying Bill History is to first display a selected
account on the main window. Then using the Data Access Tabs and Tree View
with the record displayed, press the “History” button on the toolbar. With this
method, you do not need to enter the search criteria -- it defaults to searching for
29
bills with the same PID. If however, you wish to search on the owner name of the
selected account rather than PID, just select the History for Owner radio button
once the dialog is displayed.
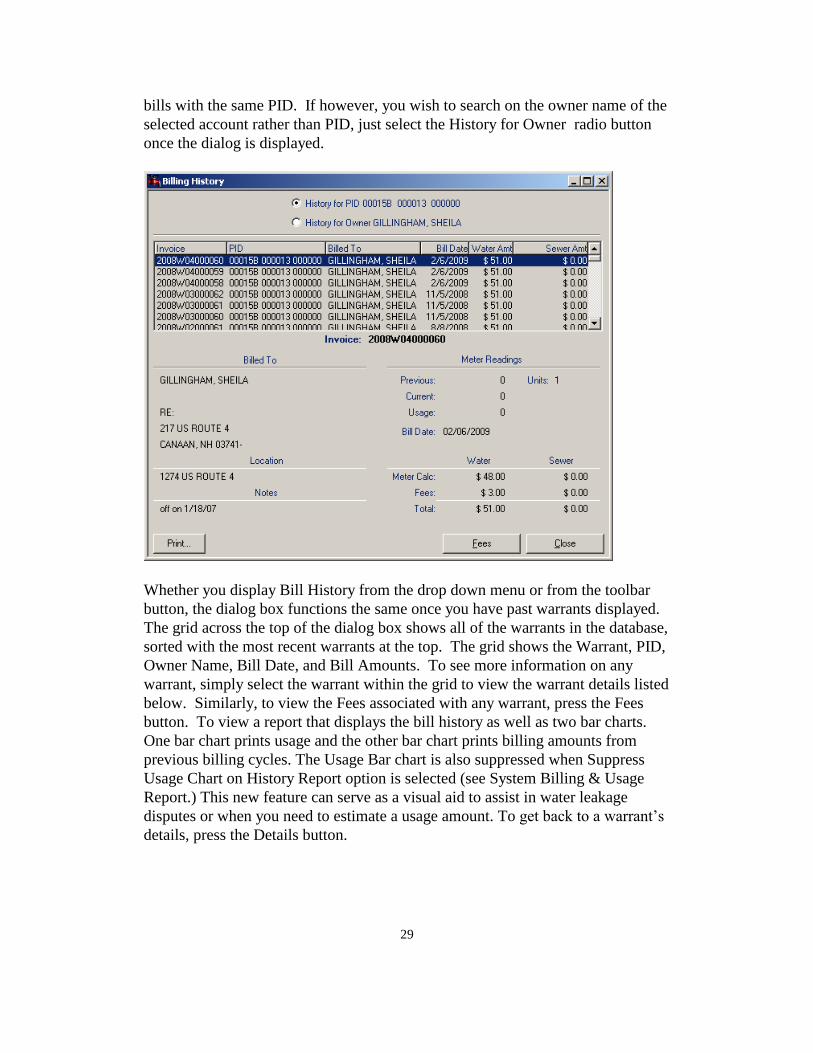
Whether you display Bill History from the drop down menu or from the toolbar
button, the dialog box functions the same once you have past warrants displayed.
The grid across the top of the dialog box shows all of the warrants in the database,
sorted with the most recent warrants at the top. The grid shows the Warrant, PID,
Owner Name, Bill Date, and Bill Amounts. To see more information on any
warrant, simply select the warrant within the grid to view the warrant details listed
below. Similarly, to view the Fees associated with any warrant, press the Fees
button. To view a report that displays the bill history as well as two bar charts.
One bar chart prints usage and the other bar chart prints billing amounts from
previous billing cycles. The Usage Bar chart is also suppressed when Suppress
Usage Chart on History Report option is selected (see System Billing & Usage
Report.) This new feature can serve as a visual aid to assist in water leakage
disputes or when you need to estimate a usage amount. To get back to a warrant’s
details, press the Details button.
30
Post-It Notes The system provides Post-It functionality whereby you can add notes or reminders
to specific accounts.
To create a Post-It, display the appropriate account in the main screen and select
Utilities | Add Post-It. The Post-It dialog box allows you to view, add, edit, delete
or enter reminder dates on Post-It Notes. Within the Post-It dialog box you have
several options. Use the yellow text box to enter the actual information. If you
wish to be reminded by the system about the Post-It at a specific point of time in
the future, check the Set Reminder check box and then use the Reminder Date to
indicate the date. For example, you might use the Reminder option to alert you of
an upcoming meter change for an account. Additionally, if you wish to be
explicitly reminded of the Post-It whenever the account is displayed on the screen
check the Flash This Message check box. For example, you might use the Flash
option to add a Post-It to remind you that the customer was confrontational the
last time they were in your office. You can add multiple Post-Its to a single
account by pressing the New button.
If a Post-It exists for a displayed account, the Post-It icon will appear as a small
yellow piece of paper. To access an existing Post-It, simply press the Post-It icon.
The system will automatically display Post-Its that were created with the Flash
This Message option. When a Flash Post-It is displayed you can press the Don't
Remind Me button once you have acknowledged the Post-It. Note that this only
lasts through the remainder of your current login session. It will continue to Flash
in subsequent sessions until you either delete the Post-It or remove the Flash
option. To delete a Post-It, simply press the Delete button within the Post-It dialog
box.
If you have Post-Its for which the Reminder option has been set for a specific
date, you will be prompted to review them after login.
Town Information The Town Information section is used to maintain all of your local information
such as; Tax Collector’s name and address, fiscal year, rates and fees, billing
districts. There are four tabs, each with their own information and function. The
information contained in the tabs is configured by Avitar when your system is
installed. For information on each tab, see the tab heading for assistance.
To access Town Information choose Utilities | Town Information. The Town
Maintenance dialog box will display.

31
Town Information Tab
The Town Information tab maintains the tax collector, address, hours, and phone
number. To view and/or update the information choose Utilities | Town
Information and select the Tax Information tab. Update the information if needed
and press Apply Changes.
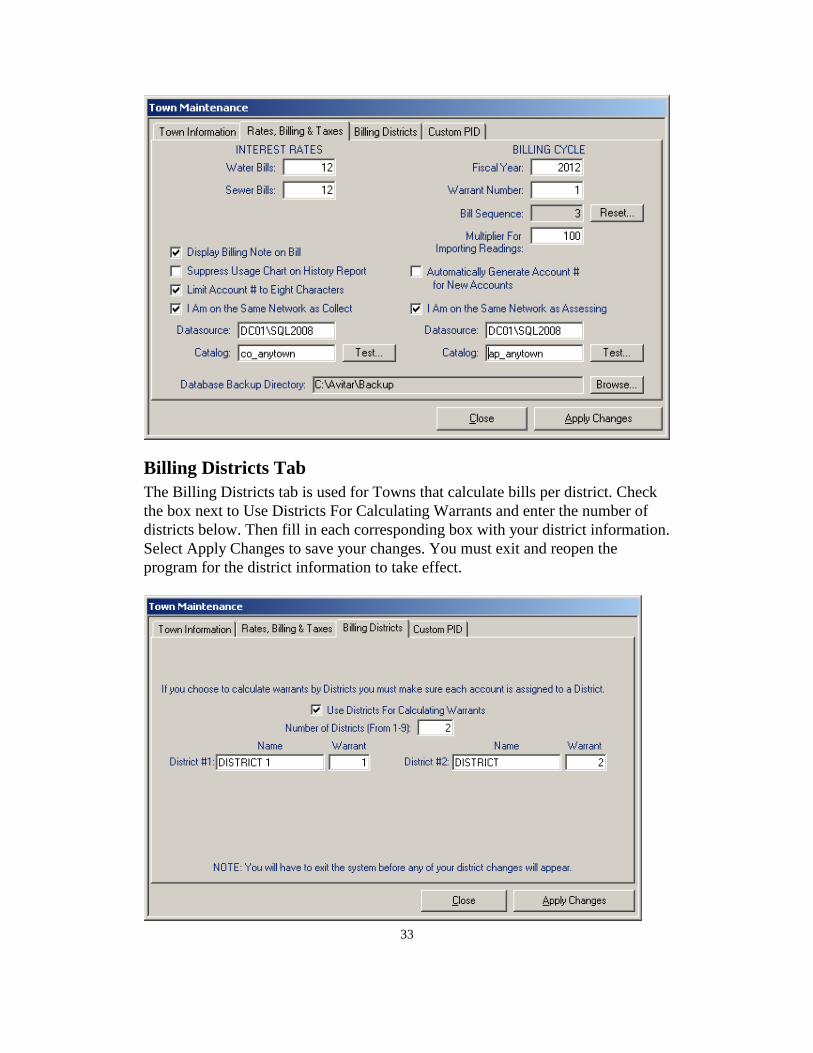
Rates, Billing & Taxes Tab
The Rates, Billing & Taxes tab is used to maintain fiscal year information, interest
rates, backup directory, network connection to other Avitar applications, and
various other settings. The items on this tab are highlighted below:
Interest Rates: These are the interest rates for water and sewer bills that will print
on the bill and be exported to Tax Collect as part of the warrant.
Billing Cycle: This is used to preset the Fiscal Year and warrant number. Once
they have been preset, the system, based on your input, will take care of
incrementing the warrants and fiscal years, so you should not need to reset these
items except in the case of an error.
Multiplier for Importing Readings: When importing meter readings from
automated readers, some readers require that the input be multiplied to obtain the
actual reading. For example: the reader might output “1" when the reading is
“1000". In such a case, the value here would obviously be “1000".
32
Display Billing Note on Bill: This allows you to add a billing note to display for
an account on the utility bill. This option must be enabled for the Bill Note section
to be available within the Edit Account dialog box.
Suppress Usage Chart on History Report: If checked, this will disable the
usage chart from displaying on the Billing History Report.
Limit Account # To Eight Characters: The Utility Billing database will allow
account numbers of up to 20 characters in length. However, the import formats
for several of the automated readers will only accept an eight character account
number. In these instances, this setting can be checked to keep you from
inadvertently entering an account number that would not be compatible.
Automatically Generate Account # For New Accounts: The system requires
that account numbers be unique for each account. For Towns in which the
account number does not correlate to any other values, you can choose to have the
system automatically generate a new, unique account number for each new
account.
I Am On The Same Network As Assessing: This is to indicate to the system that
you share a common computer network with the Avitar Assessing system and is
used in the importing of owner, address, and parcel location information. If you
do share a common network with Assessing, you also need to indicate the
Assessing Datasource and Catalog to which Utility Billing should connect. These
values will be set by Avitar on installation. Call Avitar if you think these values
need to be modified.
I Am On The Same Network As Collect: This is to indicate to the system that
you share a common computer network with the Avitar Tax Collect system and is
used in the exporting of water/sewer warrants. If you do share a common network
with Tax Collect, you also need to indicate the Tax Collect Datasource and
Catalog to which Utility Billing should connect. These values will be set by
Avitar on installation. Call Avitar if you think these values need to be modified.
Database Backup Directory: This identifies a shared directory on your file
server to which your application should look when performing a remote backup as
detailed in the section on “Backing up Your Data”. This will initially be set by
Avitar during the install and conversion and should not need to be changed unless
settings on your network change. Call Avitar for assistance if you think these
needs to be changed, as it will need to be reflected on the file server as well.
33
Billing Districts Tab
The Billing Districts tab is used for Towns that calculate bills per district. Check
the box next to Use Districts For Calculating Warrants and enter the number of
districts below. Then fill in each corresponding box with your district information.
Select Apply Changes to save your changes. You must exit and reopen the
program for the district information to take effect.
34
Custom PID Tab
Note that this function should only be enabled in consultation with Avitar
Software Support and in conjunction with your Assessing department. However,
review the description below and please contact us if you and your assessors are
interested in implementing a Custom PID format.
By using the Custom PID Format option, you can choose to change the system
format to an eighteen character PID in a manner different from the standard six
character map, six character lot, and six character sublot format. For example, you
could elect to choose six characters for the map, three for the lot, three for the
sublot, three for a building number, and three for a unit number.
To set the Custom PID format, navigate to Utilities | Town Settings | Custom PID.
Check the box that says Use Custom PID Format. Below is a description of the
corresponding fields that need to be completed in order to user the Custom PID
format.
Custom PID Mask -- You must use the # symbol to indicate the placement
of the individual PID characters within the mask. Then use another
character (for example a space or a dash or a slash) to indicate the
character you wish to use to separate the component sections of the PID.
However, you can only use one character as the separator character.
Custom PID Description -- Enter a brief description of the entire PID (e.g.
"Map/Lot/Sub/Bld/Unit"). This is the label that will appear on reports. It
is best to use a capital letter for the first letter of each component and then
lower-case letters for the rest. This will match the format of the rest of the
program and the report heading will look consistent.
Custom PID Section Names -- You can choose to enter a description for
each component of the PID (e.g. "Map", "Lot", etc.). The Custom PID
Section names are only visible when you hover over the individual boxes
throughout the program used to enter PID values on which to search.
Suppress Leading Zeros -- Check this box to suppress the leading zeros in
each section of the customized PID (e.g. "1/2/3" instead of
"000001/000002/000003").
Pad Separators with Spaces -- Check this option to add a space before and
after each separator, making it easier to read in some instances (e.g. "1 / 2 /
3" instead of "1/2/3").

35
Adding and Deleting Users To add additional users to the system, select Utilities | Add User. Enter a
username, type a password, and then confirm the password. Select a user access
level for the new user from the choices listed. Note that each access level
includes all of the privileges granted to lower access levels and each level is
described within the Add User dialog box.
Get Assessing Owners If your system is configured to import PID, name, address, and parcel location

36
information from the Avitar Assessing application, you can obtain an updated
record set of this information by selecting Utilities | Get Assessing Owners. In
addition to getting a fresh list of PIDs and owners to be used when adding new
accounts, this function will update name and address information for existing
accounts in the Utility Billing system that can be matched to the assessing
database on PID. Any accounts which you have unchecked the Update Owner
Information from Assessing box in the Edit Account dialog box; will not be
updated during this process.
Once the import process is complete you will be prompted if you wish to generate
a report listing accounts for which owner/address information was changed
following the Get Assessing Owners function. If you wish to see this report, you
must print it when prompted as the list of accounts that were updated is discarded
after the process is complete.
Reports Menu
Reports Preview Toolbar
Every report in Avitar Utility Billing will preview to the screen in the report
viewer. At the top of the report viewer window you will find the report preview
toolbar.
The report preview toolbar enables you to view and print the current report. The
forward and back arrow icons allow you to sequentially move through the pages
of the report in preview mode. The first and last arrow icons enable you to
immediately jump to the first or last page of the current report in preview mode.
The counter will indicate the number of the currently displayed report page.
If you decide you wish to print the report, click the Print Report icon. You will be
able to see which printer the report will be sent to and you can indicate the pages
you wish to print. If you want to select a different printer, you need to cancel the
Print dialog box and then select a new printer using the File | Print Setup menu
item on the main Avitar Utility Billing window. Avitar Utility Billing will always
print to your current default Windows printer.
Depending upon your screen’s resolution, the report may or may not be legible
when it is first displayed in the preview mode. You can zoom in or out on the
current report by selecting a new zoom factor from the dropdown list of
percentages. The report will always appear at 100% initially, however, it may be
necessary to set the zoom factor to 150% or higher to actually read the report in
preview mode. Note that the zoom factor has no effect on the final print of the
37
report, only on the way in which it is displayed in preview mode. Also note that
depending upon your resolution and system fonts, some labels or values may
appear truncated in preview mode at higher zoom factors. However, the report
should be fine when printed – this is only a display issue with some screen
resolutions.
If you need to locate a specific record within the report, type the name or value for
which you are searching in the find text box on the preview toolbar. To begin the
search, click on the Search Text icon (pictured with the binoculars) and Avitar
Utility Billing will search the report for the string entered in the text box. Any
matches will be highlighted with a red rectangle in the preview window. To keep
searching, just continue pressing the Search Text button. If the text is not found,
you will receive a message indicating no results were found.
Once you have previewed or printed a report, you can close the report preview
window by clicking on the standard close button (pictured with an “X”) in the
control box in the upper right corner of the report form.
Exporting Reports
In addition to printing reports, you have the ability of exporting most all of the
reports in Avitar Utility Billing to a number of standard file formats. Your
options range from distributable report formats like Adobe PDF files and HTML
files, to formats like Microsoft Excel or delimited text files that allow you to share
data with other applications. To export a report select the envelope icon on the
toolbar and you will see all of the aforementioned options. Please note that some
reports may produce unexpected results when exported to certain formats and it
may take a bit of trial and error with different export types to get just the type of
format that is most useful to you.
List By Route
The Reports | List By Route item produces a report by selected route number
displaying parcel location, owner information, account number, previous reading,
and current reading. After selecting which route you would like to display, you
have the option to include the meter number.
Check Readings
The Reports | Check Readings menu item allows you to generate a report of
accounts that are either missing current reading amounts or have questionable
current reading amounts.
Water File List
The Reports | Water File List menu item generates a report listing owner
information and meter information. You have the ability to sort and filter accounts
38
that appear on the Water File List report. You can sort the report by Owner, PID,
Street, Usage, Meter Number, District, Route, and Meter Reading. You can also
limit the scope of the report to display the current record set or the prior bill.
The default scope is "All Records". This option returns all the records in the
database that match the selection criteria. We have added the ability to filter the
report by Route, Meter Make, Meter Size, Water Bill Type, Water Rate, Sewer
Bill Type, Sewer Rate, and the Assessing Update Option. (The Assessing Update
Option allows the account's owner information to be updated based on future
changes made within the assessing database. Typically this option should be
checked unless you have a situation, such as a landlord/tenant scenarion, in which
the utility bill is to be sent to someone other than the parcel's owner.)
You can also choose from three report formats:
* The "Standard" report format just displays Owner Name, PID, and Location.
* The "Expanded" report format adds Owner Address as well as detailed account,
meter, and billing information.
* If you are using the Custom Meter option, the "Expanded With Custom Meter
Information" report format displays the values exported to an automated meter
reader.
System Billing & Usage
The System Billing & Usage report is for utility departments wish to track system-
wide usage and billing amounts from previous billing cycles. The report presents
the information in bar chart format. The System Billing & Usage report can be
found by selecting Reports | System Billing & Usage. If you bill customers using
only flat fees, the display of the Usage Bar Chart can be suppressed. To suppress
this option, select Utilities | Town Information. Under the Rates, Billing & Taxes
heading, click the check box labeled Suppress Usage Chart on History Report and
click Apply Changes.
Post-Its
The Post-It Note report can be found by selecting Reports | Post-Its. Here you can
sort the report by PID/Account, Creator, Creation Date, and Reminder Date. You
can also limit the report to display only Post-Its by creator. The report will display
on the screen for you to view and/or print.
Labels
The Labels report will generate a list of owners and addresses in laser label
format.
39
File Menu
Refresh Lists
The Tree View on the Data Access Tabs of the main window, display lists of
every record in the database within the selected category. (For example: PIDs on
Tax Map “000001" or Owners beginning with “A”). As you add and delete
accounts, the system will automatically refresh the lists to reflect changes to the
database. If however, you cannot find an account that you know exists or
conversely see names or PIDs listed for accounts that have been deleted, you can
select Refresh Lists from the File menu to force the system to re-query the
database for a list of accounts.
Backing Up Your Data
In most towns, your data will be configured to back up automatically each night.
However, sometimes it’s useful to be able to backup your data to send to Avitar or
keep on your workstation without having to go to your file server. You can create
a backup of your data by selecting Backup Database from the File menu.
When you select File | Backup Database you will be prompted to identify a
location where you want to save the backup file. Press the button with the three
dots to browse to the folder in which you want to backup the data. Once you have
selected the proper folder press the Backup Data button.
In the event you need to restore the data from your backup, call Avitar for
assistance, but before doing so, make a new backup of your current data. This is a
precaution in the event your backup file you wish to restore from is an older one
then you thought. In which case, you can restore from the one you just did, in
order to get back where you were prior to attempting to restore.
FTP Data to Avitar
The FTP Data to Avitar function allows you to transfer data to Avitar’s FTP
server when your computer is connected to the Internet. The acronym FTP stands
for File Transfer Protocol and it is a method by which you can transfer data from
your computer up to Avitar’s web server utilizing the connectivity of the Internet.
In order for this function to work, your computer’s configuration must satisfy
several conditions:
Your remote backup must be configured such that you can use the File |
Backup Database menu item to successfully backup your data to your local
computer. If this function is not configured, call Avitar.
Your machine must have a connection to the Internet. If your connection
40
is a dial-up connection that you must manually start, you will need to start
the connection before selecting the FTP Data to Avitar menu item. If your
database is large and your connection to the Internet utilizes dial-up, then
the FTP function may be impractical due to the size of the database. In
such cases, you will need to find an alternative for transferring the data.
Any firewall application on your network must allow Avitar’s
avwatsew.exe application to access the Internet. Firewalls exist in part to
prevent malicious applications that may somehow get installed on your
computer from being able to connect to other computers on the Internet to
exploit your machine. In most all cases, however, these firewalls can be
configured to allow certain trusted applications to access the Internet. As
with the steps outlined above, you may need to contact your local
hardware or networking specialist in order to help configure your system.
If your system meets these criteria, select File | FTP Data to Avitar and then press
the FTP Data button. The progress bars will indicate the time remaining in the
total process.
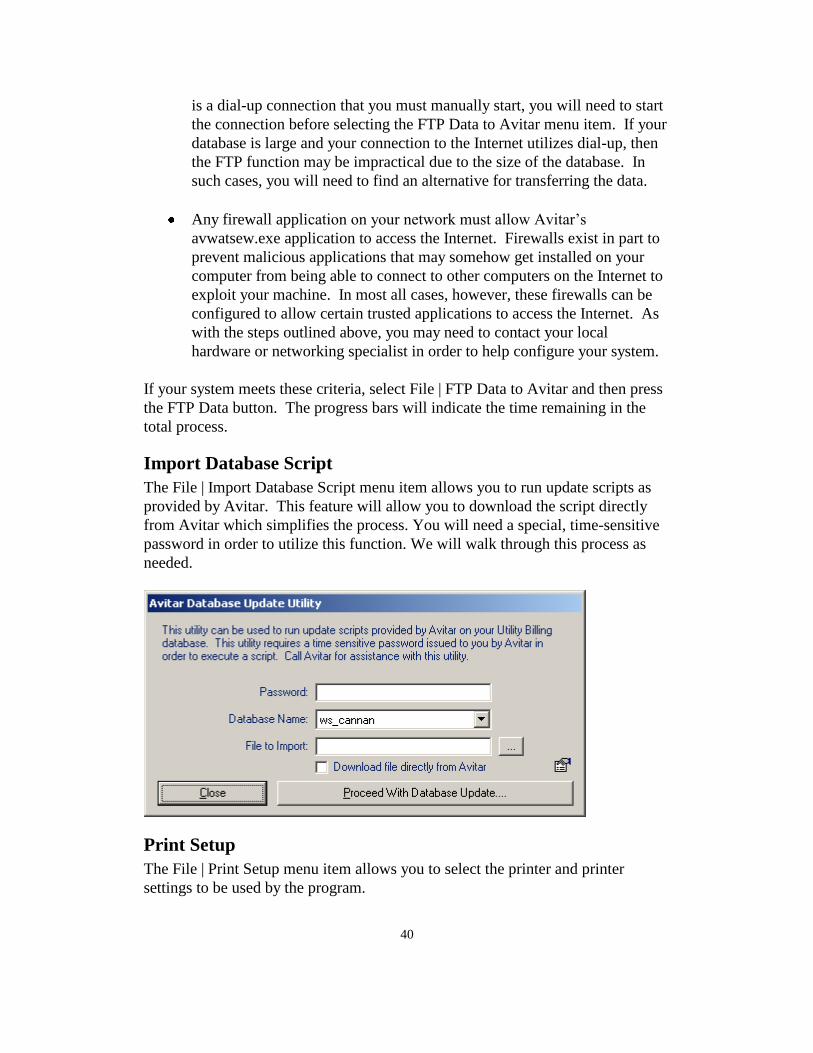
Import Database Script
The File | Import Database Script menu item allows you to run update scripts as
provided by Avitar. This feature will allow you to download the script directly
from Avitar which simplifies the process. You will need a special, time-sensitive
password in order to utilize this function. We will walk through this process as
needed.
Print Setup
The File | Print Setup menu item allows you to select the printer and printer
settings to be used by the program.

41

42
Index
Avitar Utility Billing System .......................................................................................................... 1
Important Concepts........................................................................................................................ 1
Relationship between Utility Billing, Assessing, and Tax Collect ................................................ 1
Parcel Identifier, PID, or Map/Lot/Sub Lot ................................................................................. 1
Account ......................................................................................................................................... 3
Route ............................................................................................................................................ 4
Flat and Metered Rates ................................................................................................................ 4
Fees .............................................................................................................................................. 4
Record Sets ................................................................................................................................... 4
Starting the Application ................................................................................................................. 5
Utility Billing Main Window ......................................................................................................... 5
Logging In .................................................................................................................................... 6
Locating and Viewing Records ..................................................................................................... 6
Toolbar Buttons .............................................................................................................................. 7
Log In/Log Out Button ................................................................................................................. 8
Previous/Next Button Toolbar Buttons ......................................................................................... 8
Edit Button ................................................................................................................................... 8
Fix Button ..................................................................................................................................... 8
Route Button ................................................................................................................................. 8
Meter Button - Replacing an Account’s Meter ............................................................................. 9
Fees Button ................................................................................................................................... 9
History Button .............................................................................................................................. 9
Edit an Existing Account ............................................................................................................... 9
Edit Billing Rules .......................................................................................................................... 11
Edit Fees ........................................................................................................................................ 11
Edit Routes .................................................................................................................................... 13
Editing a Single Account’s Route Assignment or Order ............................................................ 15
43
Accounts ........................................................................................................................................ 16
Add Account ............................................................................................................................... 16
Close Account ............................................................................................................................. 16
Delete Account ........................................................................................................................... 18
Fees ................................................................................................................................................ 19
Assigning Fees to Accounts ........................................................................................................ 19
Billing Rules .................................................................................................................................. 21
Edit Billing Rules ....................................................................................................................... 21 Creating a New Billing Rule ....................................................................................................... 21 Deleting a Billing Rule ............................................................................................................... 22
Entering Meter Readings ............................................................................................................. 22
Exporting Accounts to Automated Readers ................................................................................ 24
Importing Readings from Automated Readers ........................................................................... 24
The Warrant Process ................................................................................................................... 25
Calculating Taxes ....................................................................................................................... 25
Creating the Commitment Report ............................................................................................... 26
Finalizing the Tax Warrant ........................................................................................................ 26
Exporting Water/Sewer Tax Warrant ......................................................................................... 27
Printing Tax Bills ....................................................................................................................... 27
Display Bill History .................................................................................................................... 28
Post-It Notes .................................................................................................................................. 30
Town Information ........................................................................................................................ 30
Town Information Tab ................................................................................................................ 31
Rates, Billing & Taxes Tab ......................................................................................................... 31
Billing Districts Tab ................................................................................................................... 33
Custom PID Tab ......................................................................................................................... 34
Adding and Deleting Users .......................................................................................................... 35
Get Assessing Owners .................................................................................................................. 35
Reports Menu ............................................................................................................................... 36
Reports Preview Toolbar ............................................................................................................ 36
44
Exporting Reports ...................................................................................................................... 37
List By Route .............................................................................................................................. 37
Check Readings .......................................................................................................................... 37
Water File List ............................................................................................................................ 37
Post-Its ....................................................................................................................................... 38
Labels ......................................................................................................................................... 38
File Menu ...................................................................................................................................... 39
Refresh Lists ............................................................................................................................... 39
Backing Up Your Data ............................................................................................................... 39
FTP Data to Avitar ..................................................................................................................... 39
Import Database Script .............................................................................................................. 40
Print Setup .................................................................................................................................. 40
Avitar Utility Billing Manual 4.2.5
Avitar Associates of New England
150 Suncook Valley Highway
Chichester, NH 03258
Ph: 603-798-4419
Fax: 603-798-4263
www.avitarasociates.com